Posted on — Leave a comment

Red Velvet Cake Recipe: Moist, Tender & Easy with Cream Cheese Frosting

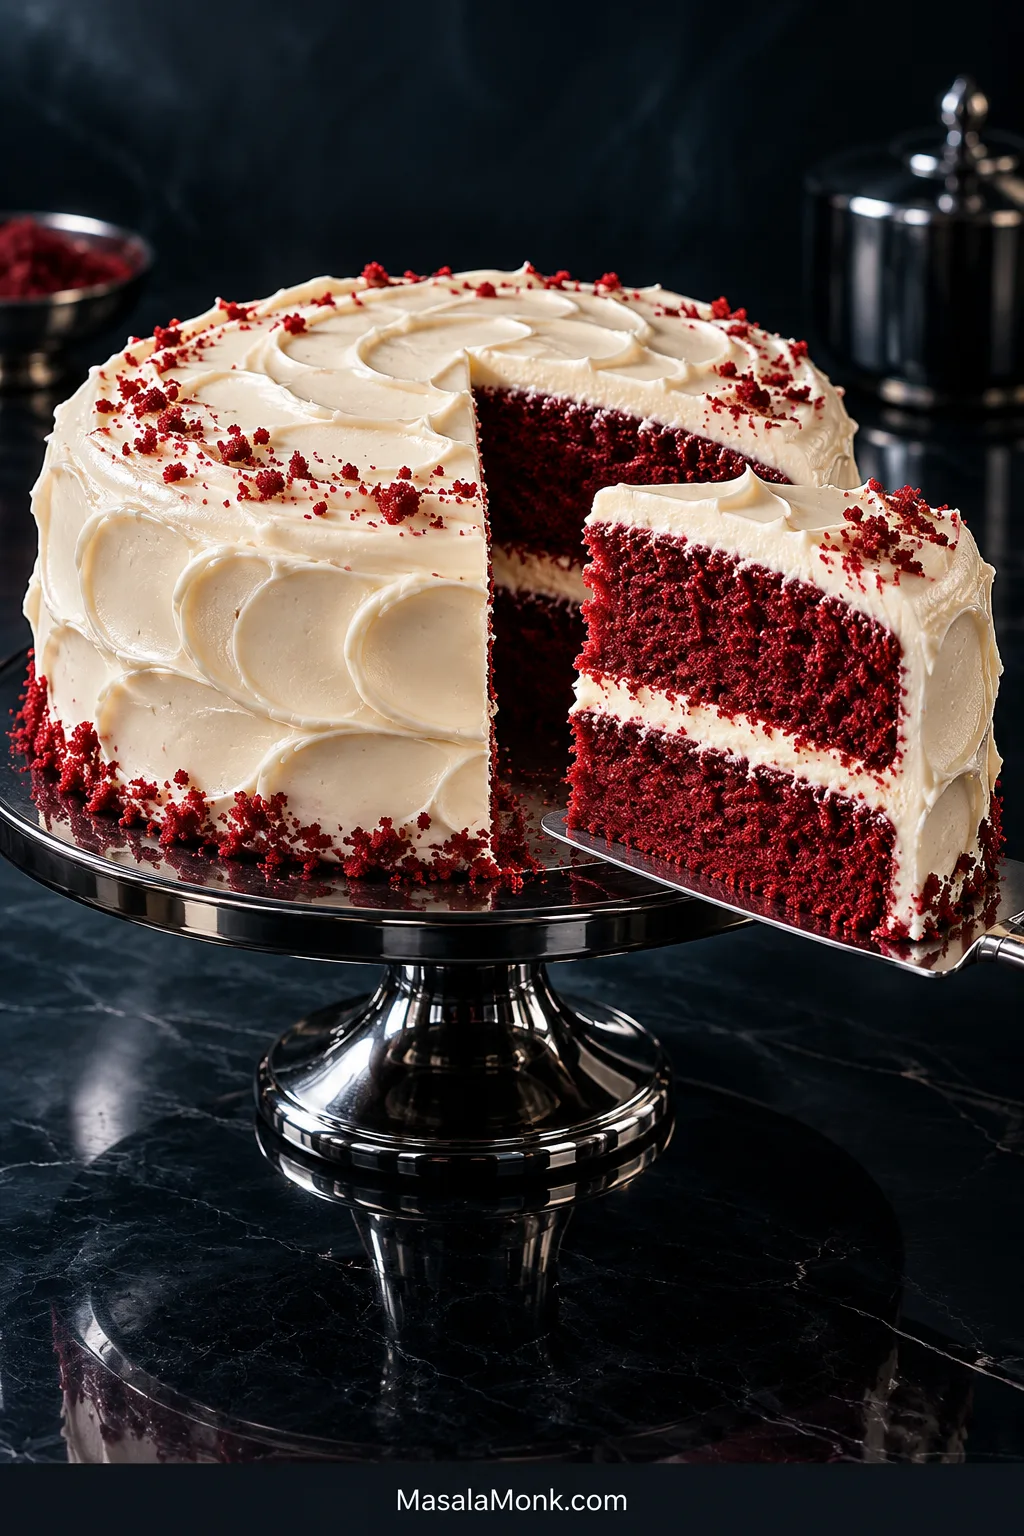
Two-layer red velvet cake with white cream cheese frosting and a cut slice showing deep crimson cake layers.

The first cut tells you almost everything about a good red velvet cake. A knife should pass through creamy white frosting into a deep crimson cake with a fine, tender crumb. Once plated, the slice should stand neatly while the cake itself stays soft under the fork.

This red velvet cake recipe gets there without turning a from-scratch layer cake into a project. There are no separately whipped egg whites, and the decoration can be as simple as soft frosting swirls. Butter brings the richness, while a little neutral oil keeps the crumb soft after chilling. Cultured buttermilk supplies the familiar tang, and the cocoa stays deliberately mild so vanilla and buttermilk remain just as important to the flavor.

The cream cheese frosting is tangy and creamy, with plenty for filling and finishing the cake. Keep the cream cheese cool and add it late in the mixing. Kept cool—and briefly chilled if needed—it has enough body to stay between the layers and give you clean slices.

What you are looking for

  • Crumb: fine, tender and moist, with no glossy or gummy middle.
  • Color: crimson to burgundy inside; the exposed crust may look considerably darker.
  • Flavor: butter and vanilla first, mild cocoa underneath, followed by a gentle cultured tang.
  • Frosting: creamy and distinctly tangy, with enough body when cool to stay between the layers.

Red Velvet Cake with Cream Cheese Frosting

A moist two-layer red velvet cake with mild cocoa, cultured-buttermilk tang and a generous cream cheese frosting.

Yield
1 two-layer 9-inch / 23-cm cake

Serves
12–14

Difficulty
Approachable layer cake

Oven
350°F / 175°C

Active time
55–60 minutes

Bake
27–31 minutes

Total
About 3½ hours including cooling and chilling

Equipment

  • Two light-colored 9 × 2-inch (23 × 5-cm) round metal cake pans
  • Parchment-paper rounds
  • Large and medium mixing bowls
  • Electric hand mixer or stand mixer
  • Whisk and silicone spatula
  • Wire cooling racks
  • Digital kitchen scale, strongly recommended
  • Offset spatula for frosting

Ingredients

For the red velvet cake

  • 2½ cups (300 g) all-purpose flour, spooned and leveled if not weighing
  • 2 tablespoons (12 g) natural unsweetened cocoa powder
  • 1 teaspoon baking soda (about 5–6 g)
  • ½ teaspoon (about 2 g) baking powder
  • 1 teaspoon (about 5 g) fine salt
  • ½ cup / 1 stick (4 oz / 113 g) unsalted butter, softened but not greasy
  • 1¾ cups (350 g) granulated sugar
  • ½ cup (120 ml) neutral oil, such as canola, vegetable or grapeseed oil
  • 2 large eggs, room temperature
  • 1 large egg yolk, room temperature
  • 1 cup (240 ml) cultured buttermilk, room temperature
  • 2 teaspoons (10 ml) pure vanilla extract
  • 1 teaspoon (5 ml) white distilled vinegar
  • 1 teaspoon (5 ml) concentrated red gel food coloring, plus more as needed, up to 2 teaspoons (10 ml) depending on brand strength

For the cream cheese frosting — about 5 cups

  • 1 cup / 2 sticks (8 oz / 226 g) unsalted butter, softened but still cool
  • 4½ cups (500 g) powdered sugar, sifted if lumpy
  • 2 teaspoons (10 ml) pure vanilla extract
  • ¼ teaspoon fine salt
  • 16 oz (454 g) full-fat brick-style cream cheese, kept refrigerated until frosting time

Before you start, bring the butter for the cake, eggs and buttermilk toward cool room temperature. Keep the cream cheese refrigerated while the cake cools. When you begin the frosting, cut it into pieces and let it lose just enough refrigerator chill to become firm but pliable while you beat the butter and sugar.

For tiny amounts such as baking soda and baking powder, use the spoon measure as the practical reference unless your scale reads very small weights accurately.

Why this cake uses baking soda, baking powder and vinegar: Baking soda reacts with the acidic buttermilk and vinegar. The small amount of baking powder adds extra lift without relying on more baking soda, which would also shift the batter’s alkalinity. At this amount, the vinegar should not be noticeable in the finished cake.

Make the red velvet batter

  1. Prepare the oven and pans. Heat the oven to 350°F / 175°C with a rack in the center. Lightly grease two light-colored 9 × 2-inch (23 × 5-cm) metal cake pans, line the bottoms with parchment rounds, then lightly grease the parchment.
  2. Combine the dry ingredients. Whisk the flour, natural cocoa, baking soda, baking powder and salt until the cocoa is evenly dispersed and no obvious lumps remain.
  3. Mix the buttermilk and color. Whisk together the cultured buttermilk, vanilla, vinegar and 1 teaspoon red gel coloring. Look for an even, vivid red with no dark streaks. If your gel is weaker and the mixture still looks muted, add a little more, up to 2 teaspoons total.

Color checkpoint before the flour
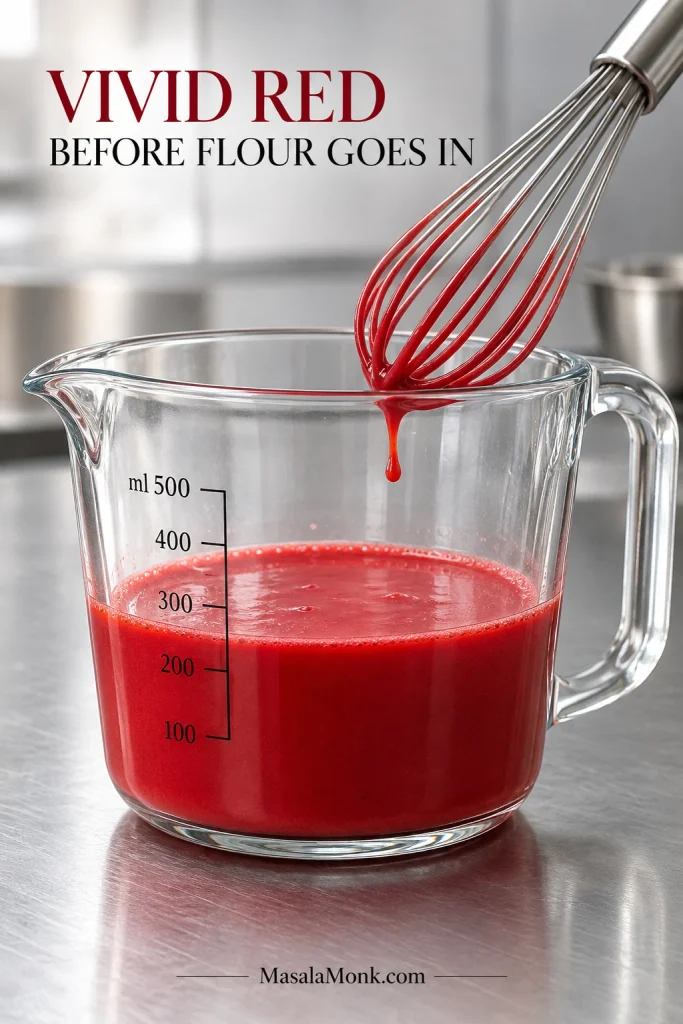
Clear measuring jug holding a smooth vivid-red buttermilk mixture with a whisk above it.
Because gel colors vary in strength, treat the wet mixture as your color checkpoint rather than relying on the teaspoon count alone. It should still move like buttermilk—the gel changes the color, not the consistency.
  1. Build the butter base. Beat the butter and sugar on medium-high for 2–3 minutes, scraping down the bowl once or twice, until the mixture looks noticeably paler and fluffier. Slowly mix in the oil. Add the eggs one at a time, followed by the yolk, stopping once each has disappeared into the mixture.
  2. Finish the batter. Turn the mixer to low. Add about one-third of the dry ingredients, then half of the red buttermilk. Repeat, then finish with the remaining dry ingredients. Stop when the final flour streaks disappear. One or two folds with a spatula are enough to catch anything hiding at the bottom of the bowl.

The finished batter should be smooth, moderately thick and evenly crimson.
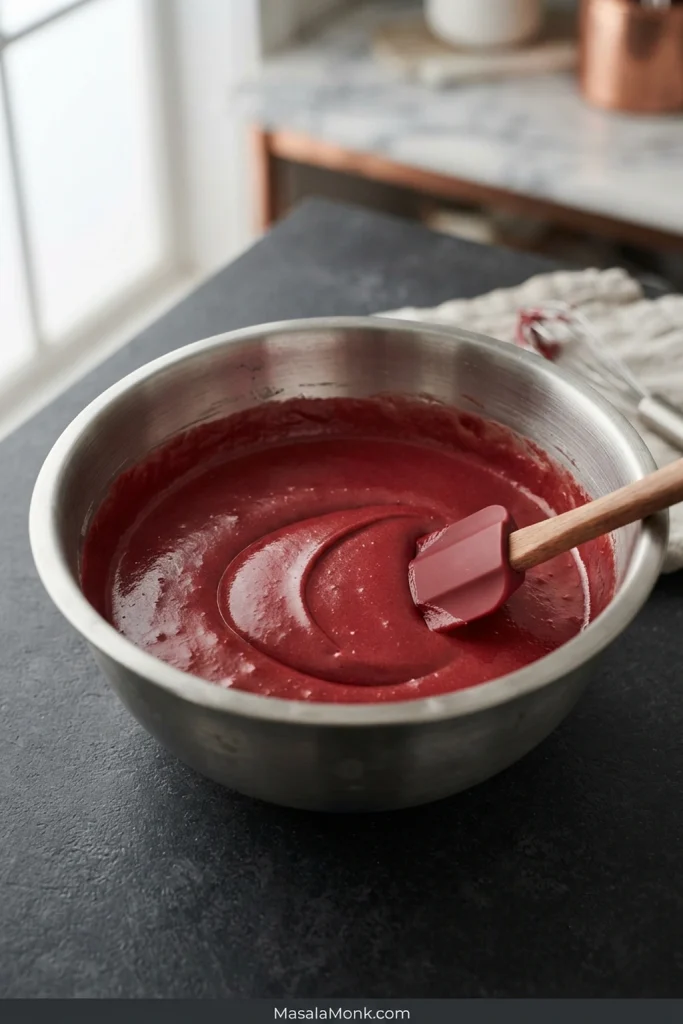
Smooth crimson red velvet cake batter in a stainless-steel bowl with a spatula leaving a soft fold in the surface.
Tip the bowl slightly and the finished red velvet cake batter should move and settle on its own. If it behaves more like frosting and needs to be spread firmly into the pan, it is stiffer than the texture pictured here.

Bake and cool the layers

  1. Divide the batter. Expect 1,250–1,300 g total, or 625–650 g per pan. If your cake layers never seem to come out the same height, weighing the batter removes the guesswork.
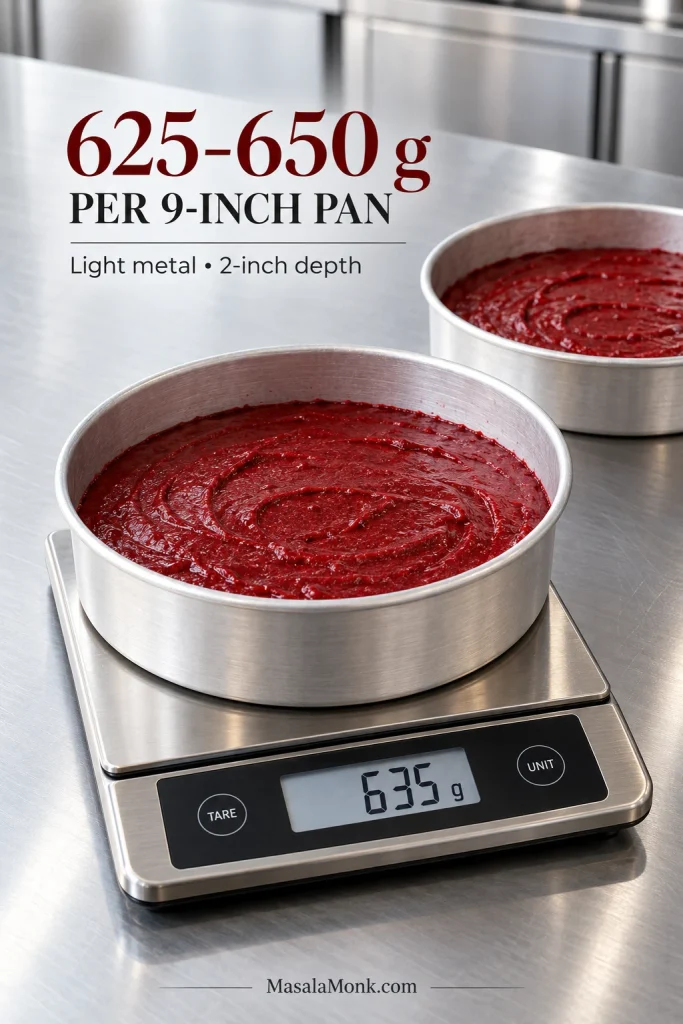
Red velvet cake batter in a light metal round pan on a digital scale reading about 635 grams, with a second filled pan nearby.
Equal batter weight is really equal batter depth. Keeping each 9-inch pan around 625–650 g makes it easier for both red velvet cake layers to rise and set at a similar rate.
  1. Bake for 27–31 minutes. Start checking at 27 minutes. As the layers near done, the kitchen should smell more buttery and vanilla-rich than intensely chocolatey. The centers should look set and spring back lightly under a fingertip. A toothpick should carry a few moist crumbs, with no liquid batter. A bone-dry tester is not the goal.
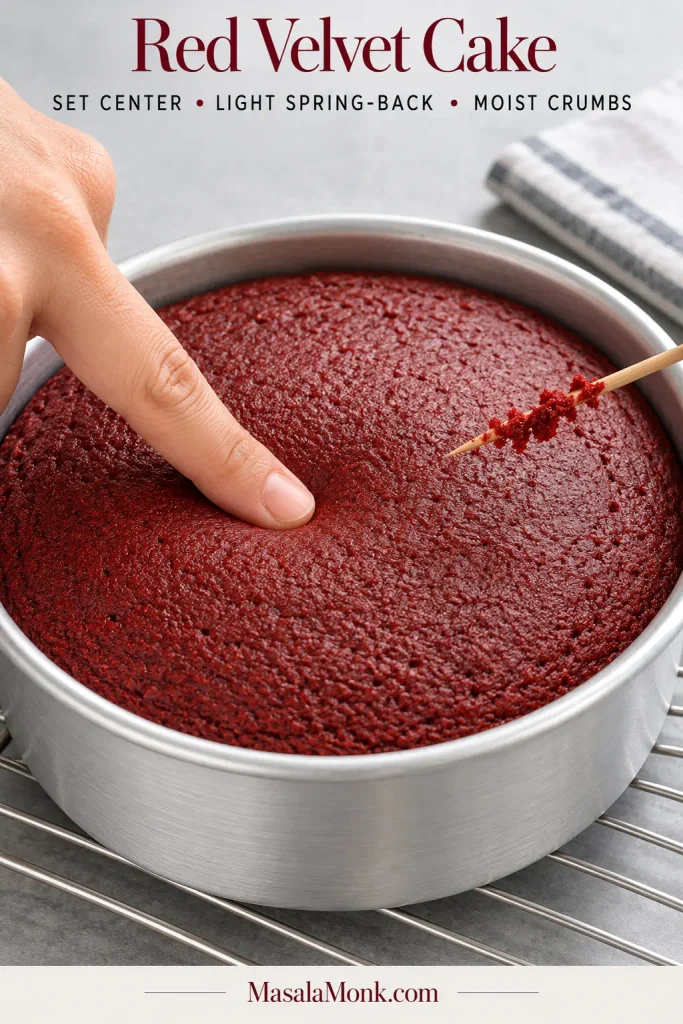
Baked red velvet cake layer in a round pan being pressed in the center, with a tester showing moist cake crumbs.
Check the middle of the layer, not the darker perimeter. The edge sets first, so a deeply colored rim can look finished while the center still needs another few minutes.
  1. Cool for 15 minutes in the pans, then turn the layers onto wire racks and peel away the parchment. Run a thin knife around the edge first only if the cake needs help releasing.
  2. Let the layers cool all the way through. Warm cake softens cream cheese frosting surprisingly quickly, even when the outside already feels cool.

Make the cream cheese frosting

  1. Start with the butter. Take the cream cheese from the refrigerator, cut it into pieces and set it aside. Beat the butter on medium for about 1 minute until creamy. It should dent easily under a fingertip without looking shiny or greasy.
  2. Add the powdered sugar. Work in three additions, beginning on low speed each time. Once incorporated, beat for about 2 minutes, then mix in the vanilla and salt.
  3. Add the cream cheese last. It should now feel firm but pliable rather than refrigerator-hard. With the mixer on low, add it a few pieces at a time. Stop as soon as the frosting is smooth and uniform. Scrape the bowl once and mix again only if you find an unmixed patch.

Drag a spatula through the bowl. The trail should remain visible, and a lifted spoonful should make a soft peak. Frosting that quickly levels itself needs chilling before it goes onto the cake.
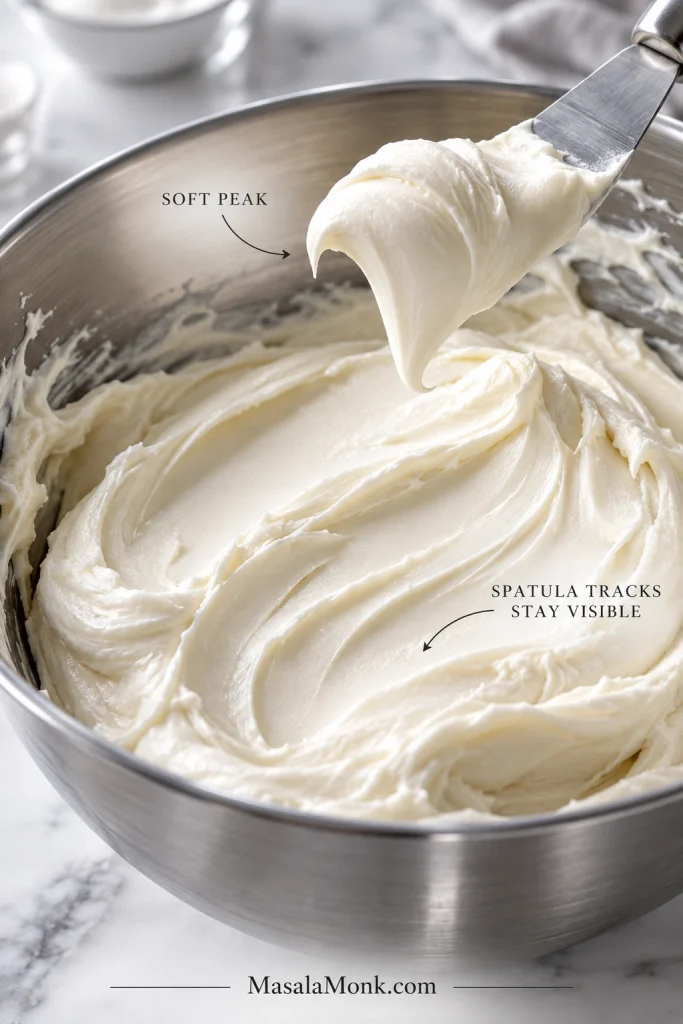
White cream cheese frosting in a stainless-steel bowl with a visible spatula trail and a soft peak on the spatula.
For cake assembly, track retention matters more than a tall frosting peak. The cream cheese frosting should hold the groove from a spatula long enough to support the filling while still spreading without pulling at the cake.

Fill, crumb-coat and finish

  1. Level only if needed. A slight dome is fine. Trim only enough to give the second layer a stable seat.
  2. Add the filling. Spread roughly 1 to 1¼ cups frosting over the first layer, then set the second layer on top.
  3. Crumb-coat and chill. Cover the cake with a very thin layer of frosting to catch the red crumbs. It will probably look messy. That’s exactly what this coat is for. Refrigerate for 20–30 minutes, until the surface feels firm rather than tacky.
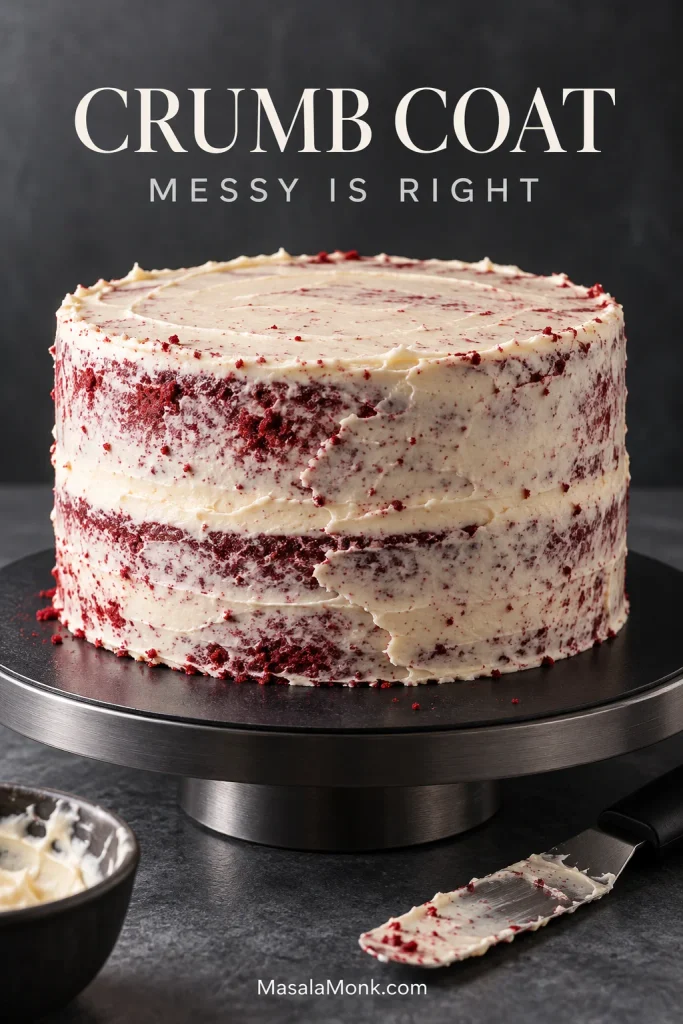
Two-layer red velvet cake covered with a thin, streaky cream cheese crumb coat with red crumbs showing through.
Think of the crumb coat as an adhesive layer rather than the first half of the final frosting. Use just enough to trap the loose red crumbs; extra thickness here only makes the cake softer to handle.
  1. Finish with the remaining frosting. Once the clean white layer goes on, the cake suddenly looks finished. Soft swirls suit red velvet beautifully, although you can smooth the sides with an offset spatula if you prefer. Cake trimmings can be crumbled over the top for the familiar red-and-white finish.
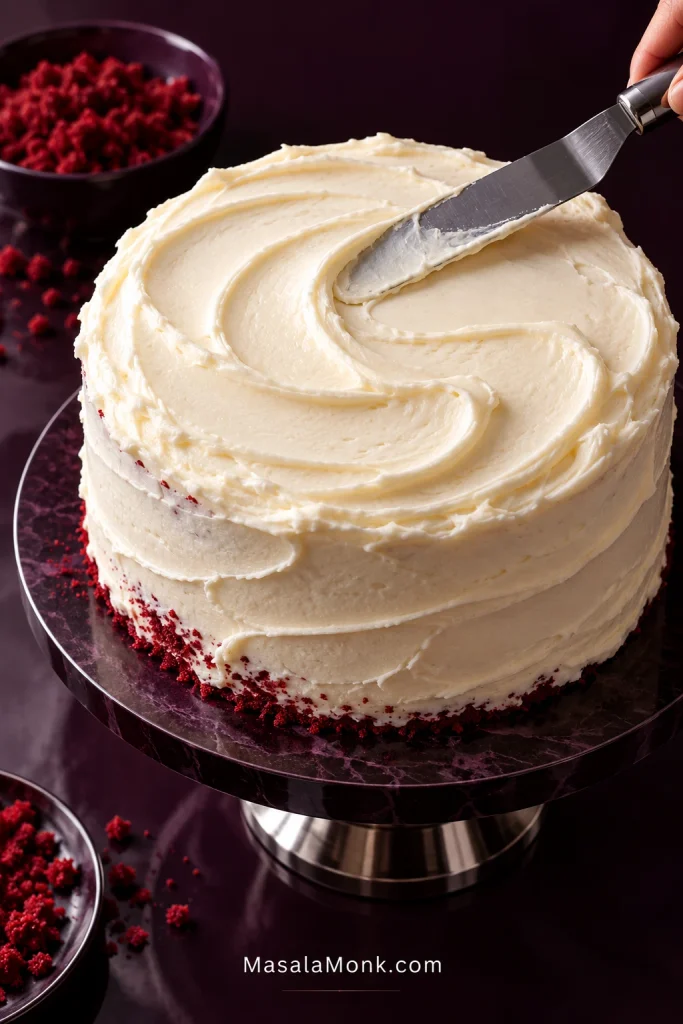
Two-layer red velvet cake being finished with smooth white cream cheese frosting using an offset spatula.
Cream cheese frosting becomes softer as it warms during handling, so fewer confident finishing passes usually give a cleaner result. Once the chilled cake is covered and the swirls hold their shape, stop working the surface.

Once the cake is chilled and cut, the slice gives you one last set of clues. The crumb, color and frosting should all tell the same story. If something looks wetter, darker or softer than expected, the guide below will help you work out why.

Read the Slice: what good red velvet should tell you

A cut slice often tells you more than the timer did. Start with the middle. A well-baked crumb is fine and tender, with enough moisture that it feels soft under the fork and still breaks into recognizable cake crumbs.
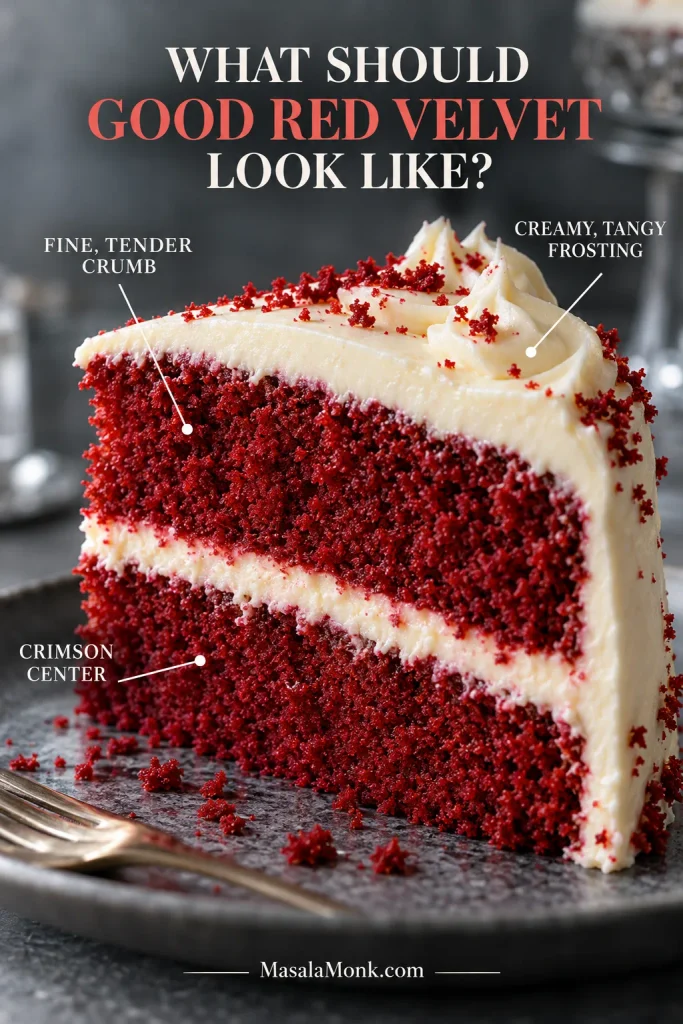
Annotated red velvet cake slice showing fine crimson crumb, cream cheese filling and white outer frosting.
Look for fine, evenly colored crumb in both layers, with a clear boundary between the cake and frosting. A moist slice should hold together under the knife without a compressed or gummy band through the middle.

A glossy center is different. So is a compressed wet band through the middle or batter smearing onto the knife. Those signs usually mean the cake needed longer in the oven. Softness is welcome; a gummy center is not.
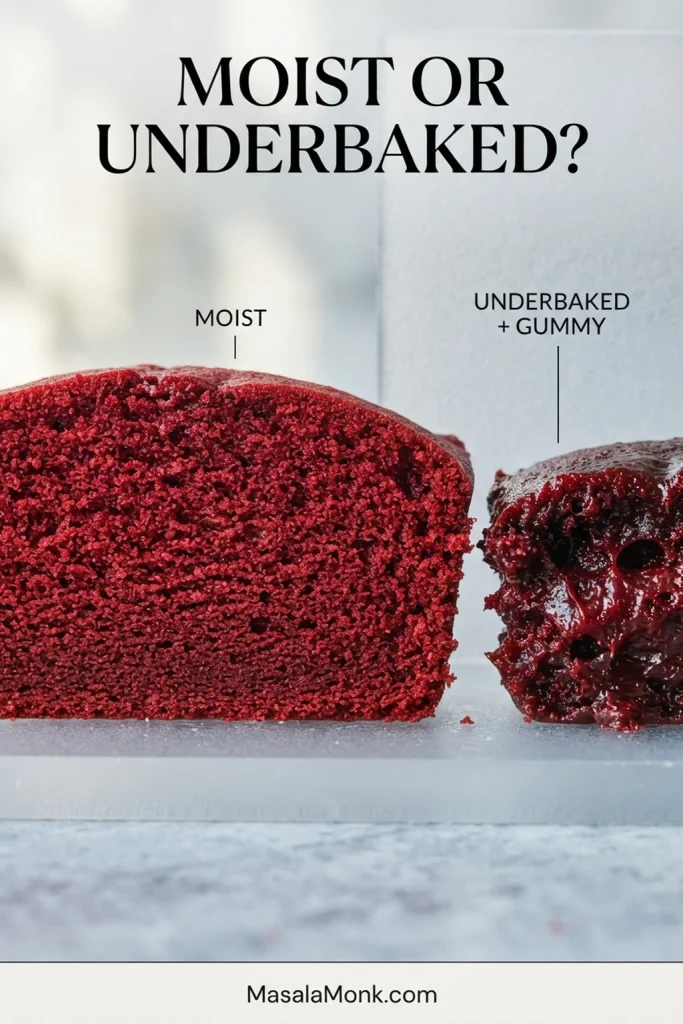
Comparison of a properly baked red velvet cake crumb and a glossy, compressed underbaked gummy center.
The knife can help distinguish moist from underbaked: a tender red velvet crumb leaves recognizable crumbs, while a gummy center is more likely to compress or smear along the cut.

The outside may surprise you too. Red velvet darkens where the batter gets the most oven heat, so the top and edges can look reddish-brown while the cut center remains crimson or burgundy. Let the layer cool before deciding that the color failed.
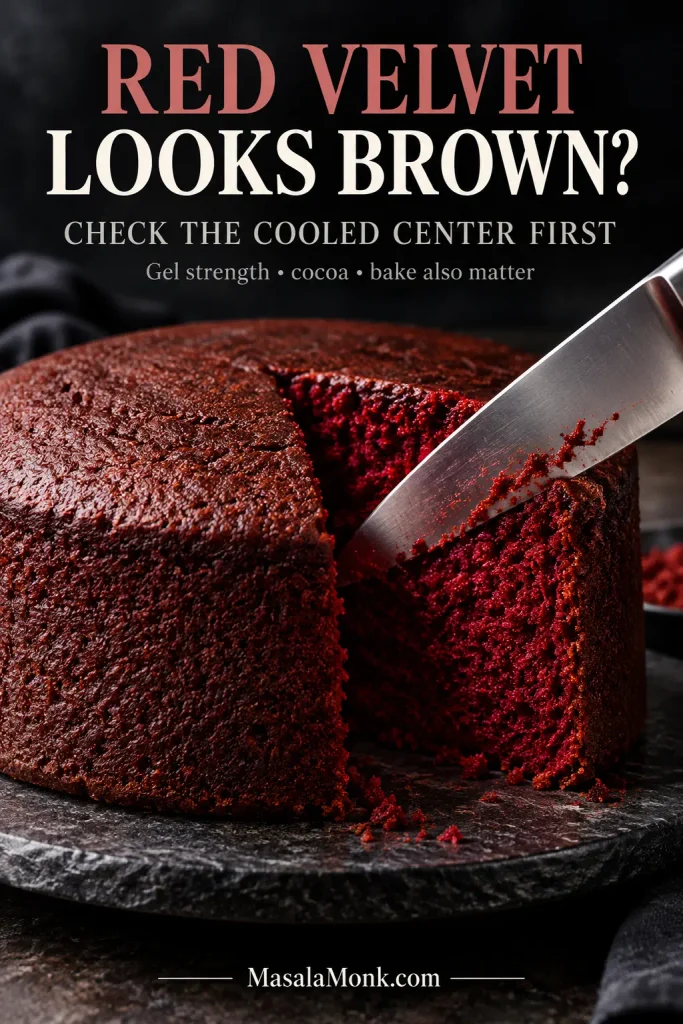
Red velvet cake being cut to reveal a deep crimson interior beneath a darker reddish-brown baked crust.
Use the cooled cut interior as your color reference before deciding to add more red gel next time. Direct oven heat naturally darkens the exposed crust more than the protected center.

What does red velvet cake taste like?

Red velvet cake tastes buttery and vanilla-forward, with mild cocoa, a gentle buttermilk tang and sweet-tangy cream cheese frosting. The cocoa sits underneath rather than dominating, and food coloring should not have a detectable taste.

Red velvet is not simply chocolate cake colored red. It contains much less cocoa than a chocolate cake, so vanilla, cultured buttermilk and the tangy frosting remain just as important to the finished flavor. The “velvet” matters as much as the red: the crumb should be fine, soft and tender rather than coarse. The cocoa stays restrained too, giving the cake depth without making chocolate the dominant flavor.

For a stronger chocolate finish, increasing the cocoa in the layers changes more than flavor. A chocolate cream cheese frosting is an easier way to push the finished cake toward chocolate while leaving the red velvet crumb alone.

Getting red velvet red without chasing the dye bottle

Seeing brown in red velvet can make it tempting to keep squeezing in more color. Before you do, look at the cocoa, the strength of the gel and which part of the cake you are judging.

Why did my red velvet cake turn brown?

  • Coloring: weak gel or too little pigment can leave the baked crumb muted.
  • Cocoa: darker cocoa pushes the batter and finished cake further toward brown.
  • Bake: excess heat or too much oven time darkens the cake, especially around the edges.
  • Check before changing anything: cut a cooled layer. The exposed crust naturally looks darker than the center.

Natural and Dutch-process cocoa differ in acidity and color. Other red velvet cakes can be formulated with Dutch cocoa, but these layers use natural unsweetened cocoa. Its lighter color also makes it easier to get a vivid red crumb without piling in unnecessary coloring.
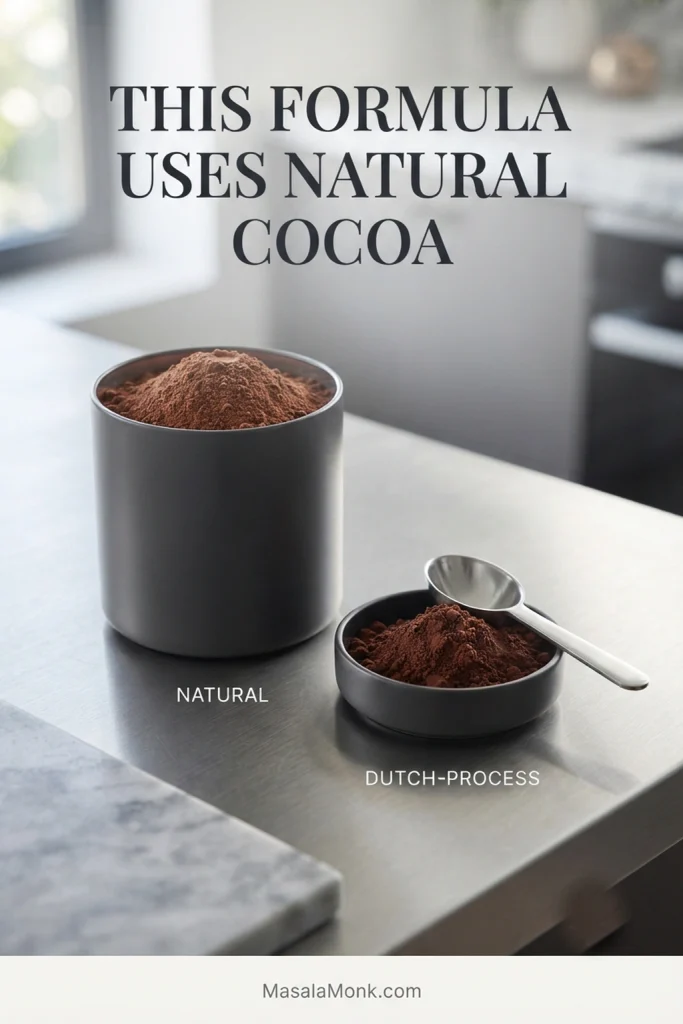
Natural unsweetened cocoa powder shown beside a smaller amount of darker Dutch-process cocoa on a metal surface.
Check the cocoa package as well as the color: wording such as “alkalized” or “processed with alkali” identifies Dutch-process cocoa. This red velvet cake formula calls for natural unsweetened cocoa instead.

Concentrated gel is useful because a small amount gives strong color without adding much extra liquid. Brand strength varies, so start with 1 teaspoon. Once whisked into the buttermilk, the mixture should look evenly and unmistakably red. Add a little more at that stage if your particular gel is weak.

Can I leave out the food coloring?

Yes. The vanilla, cocoa and buttermilk flavor will still be there. Without added color, expect a muted mahogany or cocoa-red cake instead of modern scarlet.
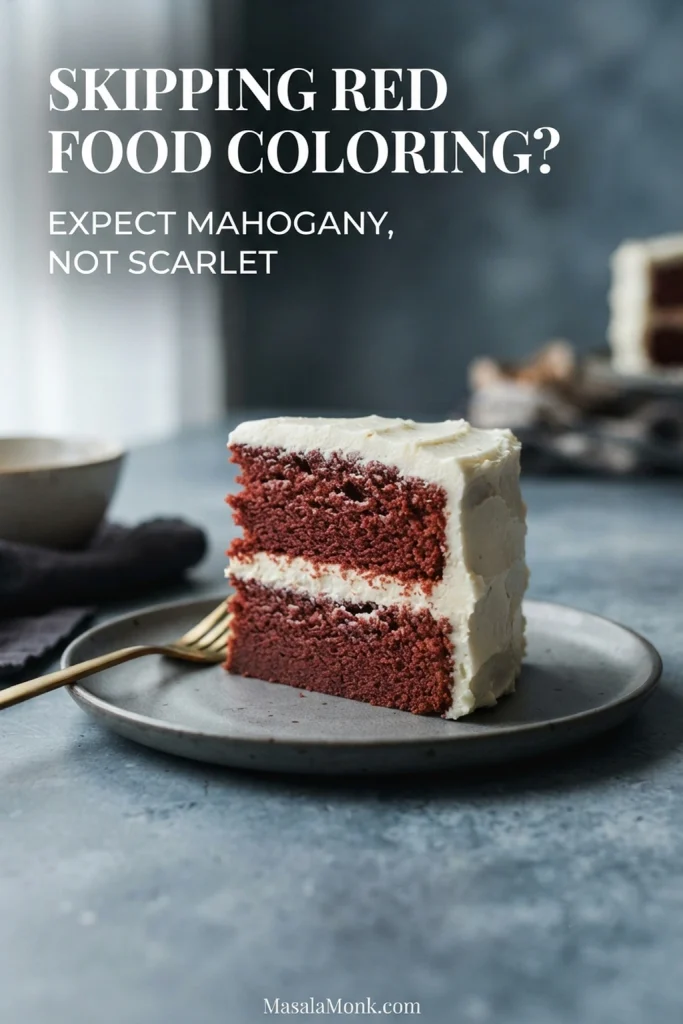
Two-layer red velvet cake slice with white cream cheese frosting and a muted mahogany-brown crumb made without vivid red coloring.
If you skip red food coloring, do not compensate by adding extra cocoa just to deepen the shade. More cocoa pushes the cake browner and more chocolate-forward rather than recreating the red that gel provides.

Beet puree and large quantities of beet powder are a different project. They bring their own moisture, flavor and acidity, so they need a cake balanced around them rather than a straight swap for gel.

Why this red velvet cake stays moist and tender

Butter carries much of the flavor, while neutral oil stays fluid when chilled and helps the crumb remain soft. Cultured buttermilk adds moisture and acidity, and the restrained amount of cocoa gives the cake its mild chocolate character without taking over the batter.

Mixing matters just as much. Once the flour goes in, beat only until the batter comes together. Continued mixing develops more gluten and works against the fine, tender crumb you want in the finished layers.

Together, those choices help a chilled slice soften back under the fork instead of staying firm and crumbly.

↑ Back to Recipe

Cream cheese frosting that stays put between the layers

This frosting has a pronounced cream-cheese tang and a soft finish. Chilling gives it the body needed for a two-layer cake, but it is not meant to behave like stiff piping buttercream.

Use firm full-fat cream cheese

Brick-style cream cheese is the most reliable choice here. Whipped and spreadable tub products usually carry more moisture, which becomes a problem once sugar is mixed in.

Cream cheese texture varies by country and package style too. A product that is loose and easily spreadable while refrigerator-cold will usually produce a softer frosting.
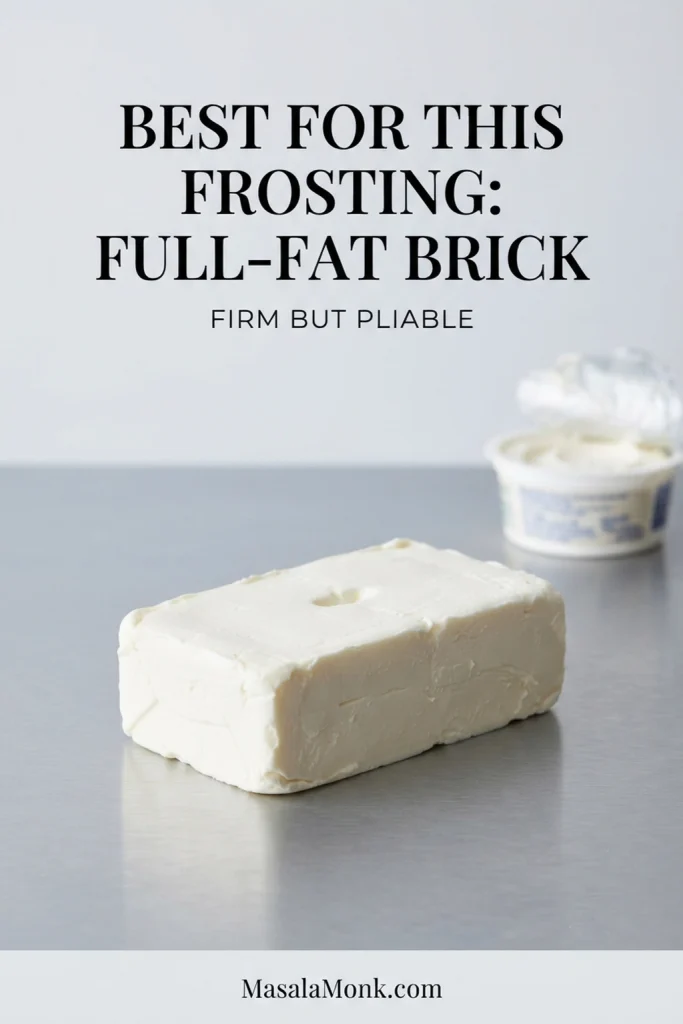
Block of full-fat cream cheese with a slight indentation showing a firm but pliable texture, with a softer tub-style cream cheese nearby.
A useful cream cheese check is how the block behaves before mixing: it should cut cleanly and hold its shape, yet yield slightly when pressed. Spreadable tubs change the moisture balance, not merely the package shape.

Keep it smooth without making it loose

The butter should dent easily without looking greasy. The cream cheese should remain cooler—firm enough to hold its shape, but pliable enough to blend without prolonged beating.

Beat the butter and powdered sugar first, then bring in the cream cheese near the end. Cream cheese contains considerably more water than butter, and prolonged mixing—especially once sugar is involved—can loosen the frosting. Stop as soon as it is smooth.

How to fix cream cheese frosting that’s too soft

  • Ready: a soft peak stands up and spatula tracks remain visible.
  • Too soft: the surface quickly levels itself or the frosting slides from the spatula.
  • Too cold: it drags over the cake and lifts crumbs.

Frosting that is too soft should go into the refrigerator for 15–20 minutes before you change the recipe. Check it again once cold. Chilling is a better first move than adding cup after cup of powdered sugar and burying the cream-cheese tang.
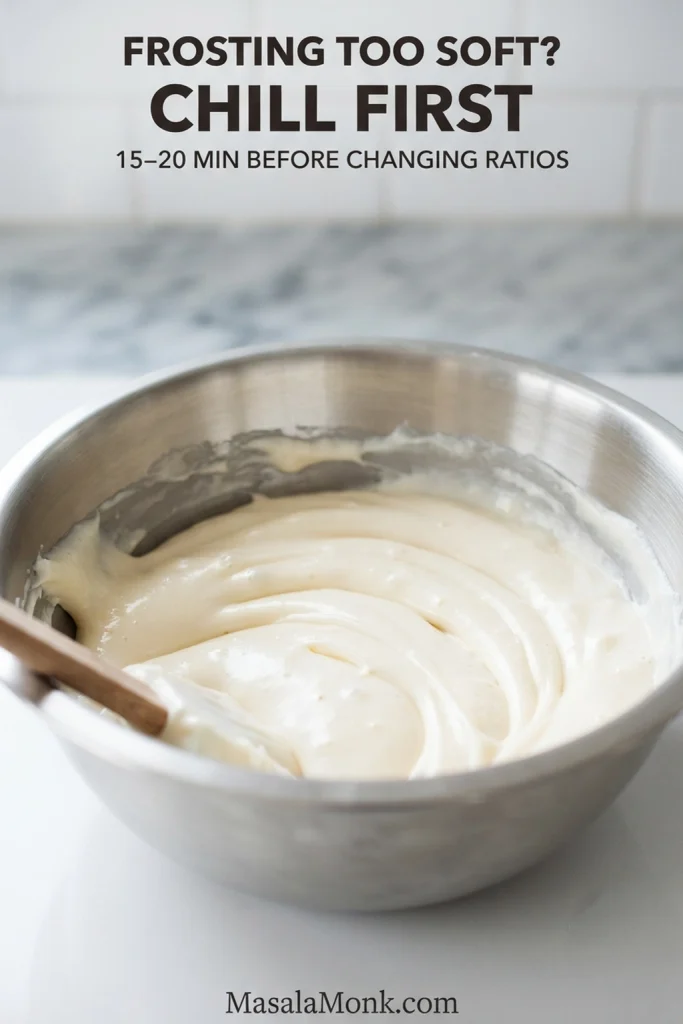
Soft cream cheese frosting in a bowl visibly slumping and losing the ridges left by a spatula.
Smooth frosting is not necessarily stable frosting. If a spoonful or spatula ridge quickly spreads into a flatter puddle, chill the cream cheese frosting before deciding that the recipe needs more sugar.

If it is still almost pourable after chilling and you started with tub-style cream cheese, more sugar probably will not turn it into the frosting described here. Use it as a softer finish, or start again with firmer block cream cheese.

Cream cheese or ermine frosting?

Cream cheese frosting is the modern pairing most people expect with red velvet, but it is not the cake’s only traditional partner. Ermine frosting has longstanding ties to mahogany cake, an early version of red velvet.

Ermine starts with cooked milk and flour, then gets whipped with butter and sugar into a lighter, less tangy frosting. It makes sense if you want something soft and not overly sweet. For sharper piping and firmer decorative details, a classic buttercream frosting is easier to control.

Return to the cream cheese frosting method · Back to Recipe

Same batter, different pan? Watch the depth

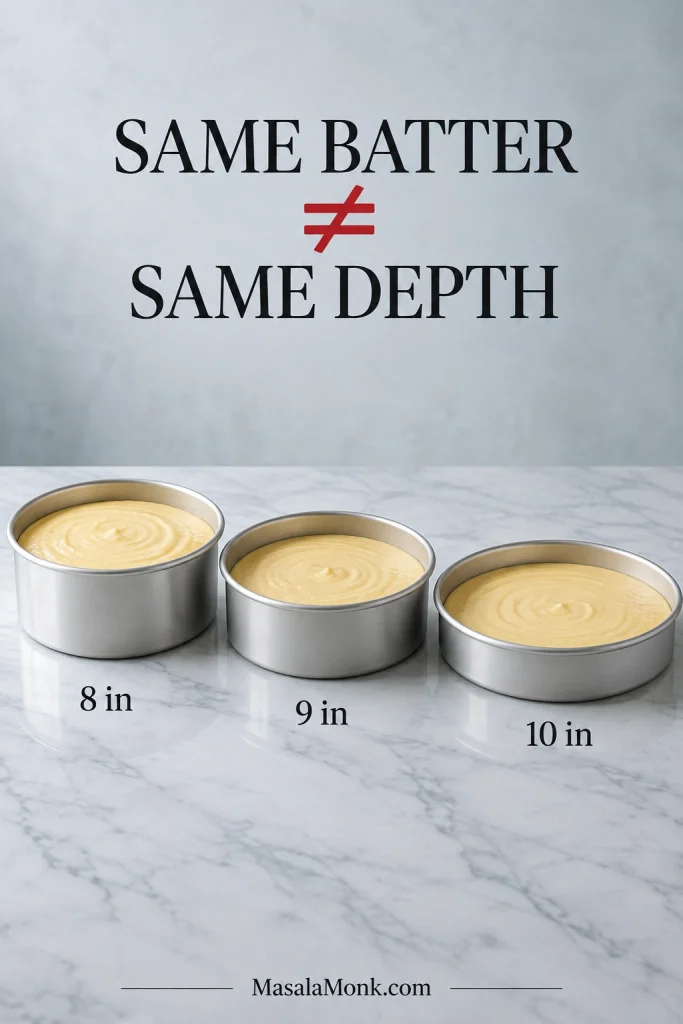
Diameter isn’t the whole story: pan depth and material matter too. For the most predictable result here, use two light-colored 9 × 2-inch (23 × 5-cm) metal round pans. A pan that’s too shallow can overflow, while a deeper batter fill needs longer to set through the middle.

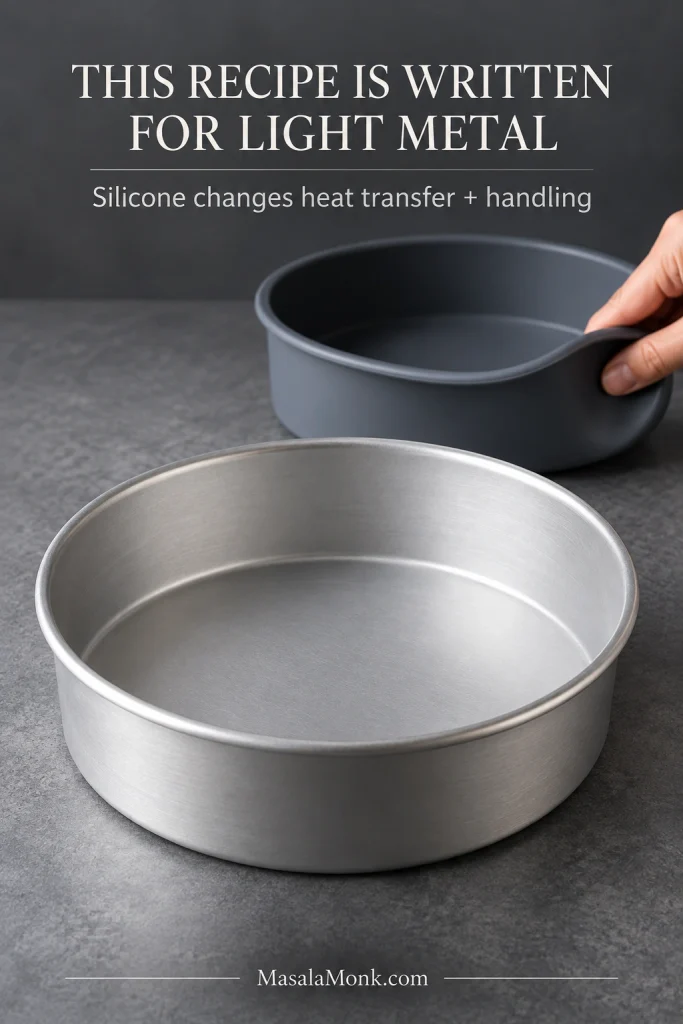
The times below assume light-colored metal. Dark pans absorb heat more aggressively, so the crust and edges may brown sooner; begin checking several minutes early if yours are very dark.
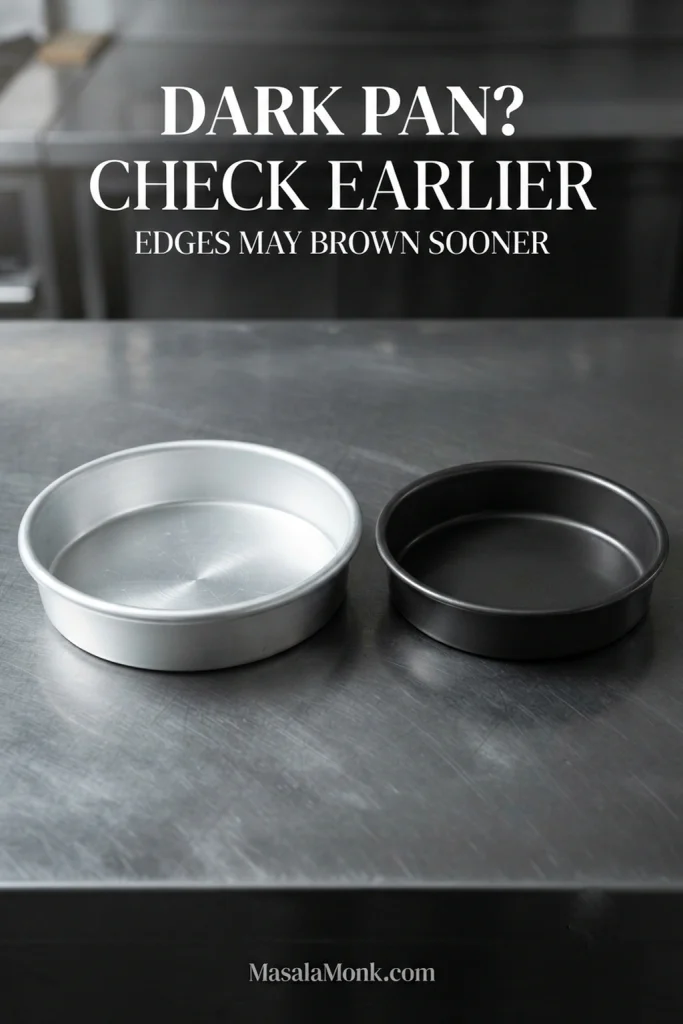
Light aluminum round cake pan beside a dark metal round cake pan on a cool grey surface.
Dark metal absorbs more radiant heat at the pan surface, which can widen the doneness gap between the edge and center. If the rim is racing ahead, start checking sooner rather than assuming the batter is the problem.
PanBatter + first check
Two 9 × 2-inch (23 × 5-cm) rounds625–650 g per pan; begin checking at 27 minutes.
Three 8 × 2-inch (20 × 5-cm) rounds415–430 g per pan; begin checking around 20 minutes.
One 9 × 13-inch (23 × 33-cm) panUse all the batter; begin checking around 30 minutes.

The alternate times are first-check estimates. Your oven and pan still decide the real finish. Check the middle, not just the clock.
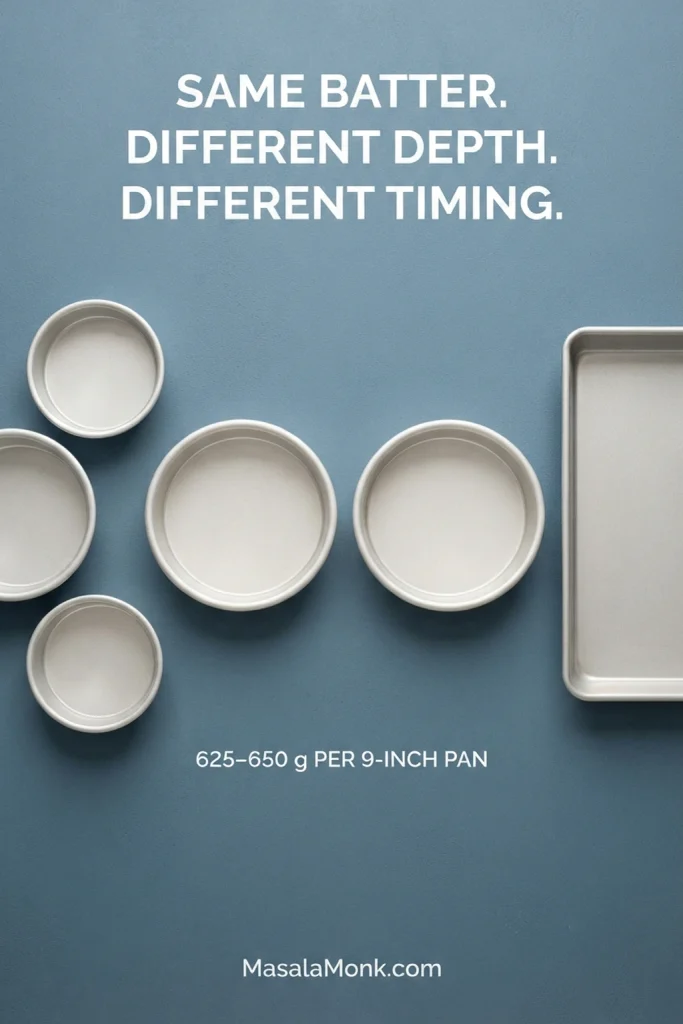
Light metal cake pans arranged to show two 9-inch rounds, three 8-inch rounds and one 9-by-13-inch pan.
Pan conversions change the geometry of the bake, not just its shape. Spreading the same batter across more surface area creates shallower layers that set sooner, while deeper batter takes longer for heat to reach the center.

Cupcakes and Bundt cakes deserve their own baking directions. Their depth and exposed surface area change enough that this table should not be treated as a shortcut for either one.

Red velvet cake troubleshooting

Start with what you can actually see. Treat the crumb, color and frosting as separate clues.

ProblemLikely cause + what to do
Dry crumbToo much flour, overbaking or a hot oven. Weigh the flour, begin checking early and stop when moist crumbs remain but wet batter is gone.
Dense cakeOvermixing after the flour, measurement error or weak leavener. Mix only until the flour disappears and measure the baking soda and powder carefully.
Wet or gummy middleThe center was underbaked. If you notice a glossy, unset middle while the cake is still baking, give it more time. If you discover it after cooling, use the cue to adjust the next bake.
Sunken centerThe center may not have fully set, the pan may be overfilled or the pan depth may differ. Use the stated pan size and wait for the center to spring back lightly before removing it.
Brown-looking cakeThe crust may have darkened normally, the coloring may be weak, the cocoa may be darker, the pan may be dark or the cake may be overbaked. Check the cut interior first.
Hard or very dark edgesThe oven may be running hot or the pan may be dark and transferring heat aggressively. Use light-colored metal pans for the stated timing and check the oven with an independent thermometer if the problem continues.
Runny frostingSpreadable cream cheese, warm ingredients, prolonged mixing or wetter cream cheese are common causes. Use block cream cheese, keep it cool and chill the frosting before changing the ratios.
Layers slidingThe cake may still be warm, the frosting too soft, the filling layer too deep or the crumb-coat chill too short. Cool the layers completely, use a controlled amount of filling and chill before the final coat.

Why red velvet cake layers slide

If the upper layer starts shifting as soon as you set it down, pause before adding the outer coat. Warm cake, a generous filling layer or soft frosting can make the stack move; remove excess filling if needed and chill the assembled cake until it is stable.
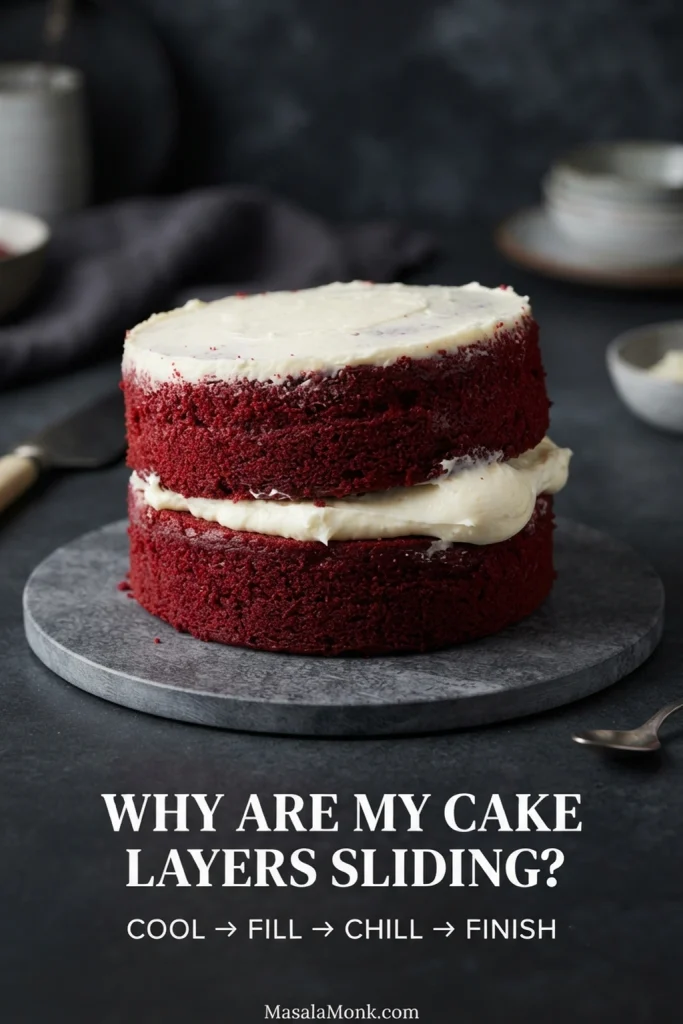
Two-layer red velvet cake with the upper layer shifted slightly sideways and cream cheese filling bulging at one edge.
Catch a sliding cake early: if the filling begins bulging as soon as the top red velvet cake layer goes on, remove a little excess before chilling instead of repeatedly pushing the layer back into position.

↑ Back to Recipe · Cream Cheese Frosting

Useful substitutions—and the ones best left alone

No cultured buttermilk?

In a pinch, add 1 tablespoon (15 ml) white vinegar or lemon juice to a measuring cup, then add enough whole milk to reach 1 cup (240 ml). Stir and leave it for 5–10 minutes before using.

This substitutes for the cultured buttermilk only; still add the separate 1 teaspoon (5 ml) white vinegar listed in the cake ingredients. Cultured buttermilk is still the better choice when you have it: it is thicker and gives the cake a fuller cultured flavor.
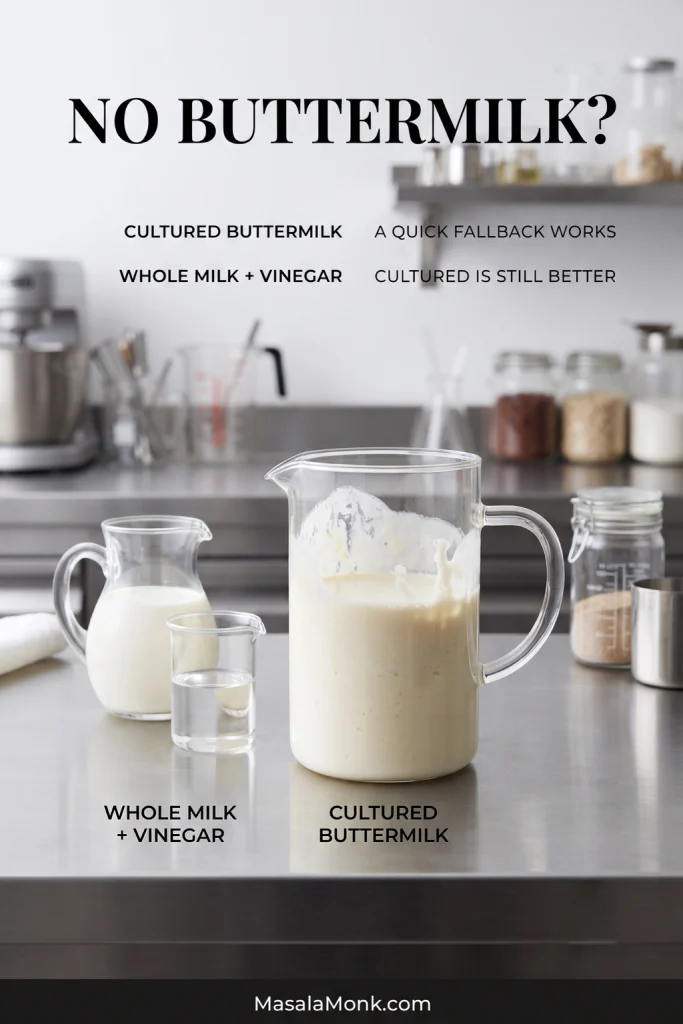
Large jug of cultured buttermilk beside whole milk and a small glass of white vinegar on a stainless-steel counter.
Acidulated whole milk is a functional buttermilk substitute, not a visual texture match. It stays thinner than cultured buttermilk, so do not wait for the milk-and-vinegar mixture to become equally thick before using it.

Can I use Dutch-process cocoa?

Not in this formula. Use natural unsweetened cocoa; this formula’s acidity, color and leavening are balanced around it.

Red food coloring: Liquid coloring made for baking can work, but concentrated gel is easier to control because it delivers more pigment with less extra liquid.

Neutral oil: Canola, vegetable and grapeseed oil all work well. Choose something mild enough to disappear behind the butter, vanilla and cocoa.

Eggless, vegan or gluten-free: these changes affect the cake’s structure, so a purpose-built formula is more reliable than treating them as one-for-one substitutions.

Make ahead, store, freeze and transport

Make the cake a day ahead

You can bake the layers, make the frosting, or assemble the entire cake 1 day ahead. Cool baked layers completely before wrapping them tightly and refrigerating them. A fully frosted cake can also be covered and refrigerated overnight.

If you make the frosting ahead, keep it covered in the refrigerator overnight. Let it soften only until spreadable, then stir it or mix on the lowest speed just long enough to restore an even texture.

Refrigerator storage

Store the finished cake covered in the refrigerator for up to 3 days for best quality. This cream cheese frosting has not been formulated or tested as a shelf-stable frosting, so keep it chilled. Kansas State’s food-safety guidance for frostings and fillings explains why room-temperature safety depends on the specific formulation rather than on the frosting’s name alone.

Straight from the refrigerator, the crumb and frosting will both taste firmer. Give an individual slice 15–20 minutes at a cool room temperature. The crumb relaxes, and the butter, vanilla and cocoa come through much more clearly.

Freezing red velvet cake

Well-wrapped unfrosted layers can be frozen for up to 2 months for best quality. Thaw them while still wrapped so most condensation collects on the wrapping rather than directly on the cake.

Individual frosted slices can also be frozen in airtight containers. Thaw them in the refrigerator first, then let the serving piece soften briefly before eating.

Transport red velvet cake

For transport, chill the assembled cake until the frosting feels firm, keep it level and keep it cool. Cream cheese frosting is not a good match for hours in strong summer heat or direct sun.
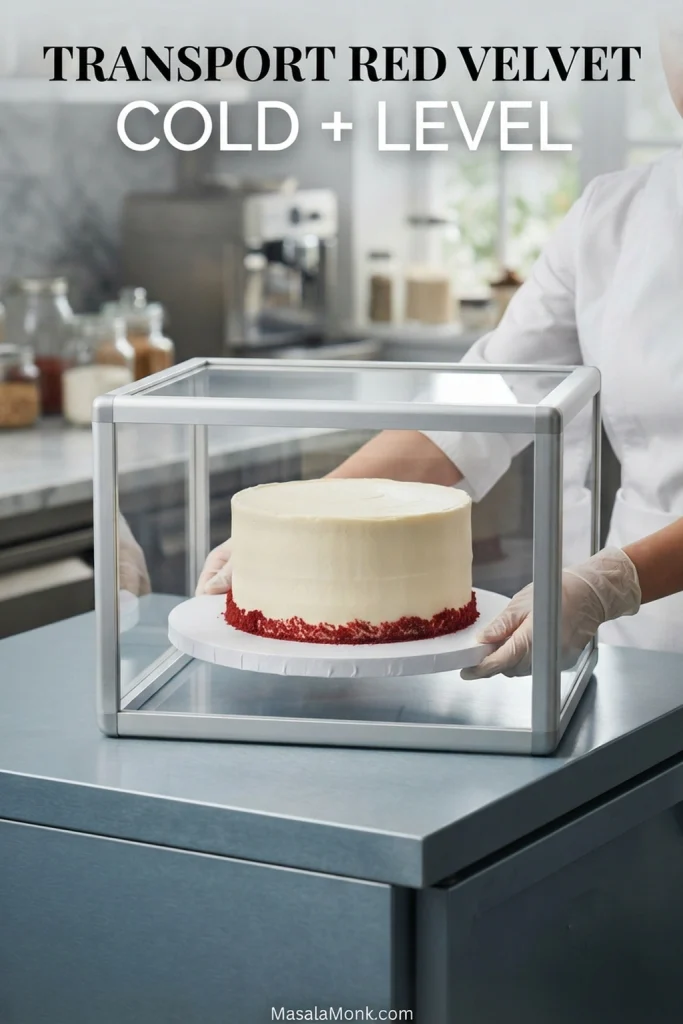
Finished frosted red velvet cake sitting level on a rigid board inside a clear cake carrier.
Chilling firms the cream cheese frosting, but cold alone cannot stop sideways movement. A rigid cake board, non-slip base and adequate lid clearance each solve a different transport problem.

Cut and serve red velvet cake

For clean red-and-white layers, use a sharp knife and wipe the blade between slices. Let each serving sit on the plate for a few minutes so the refrigerator chill begins to lift and the crumb softens.
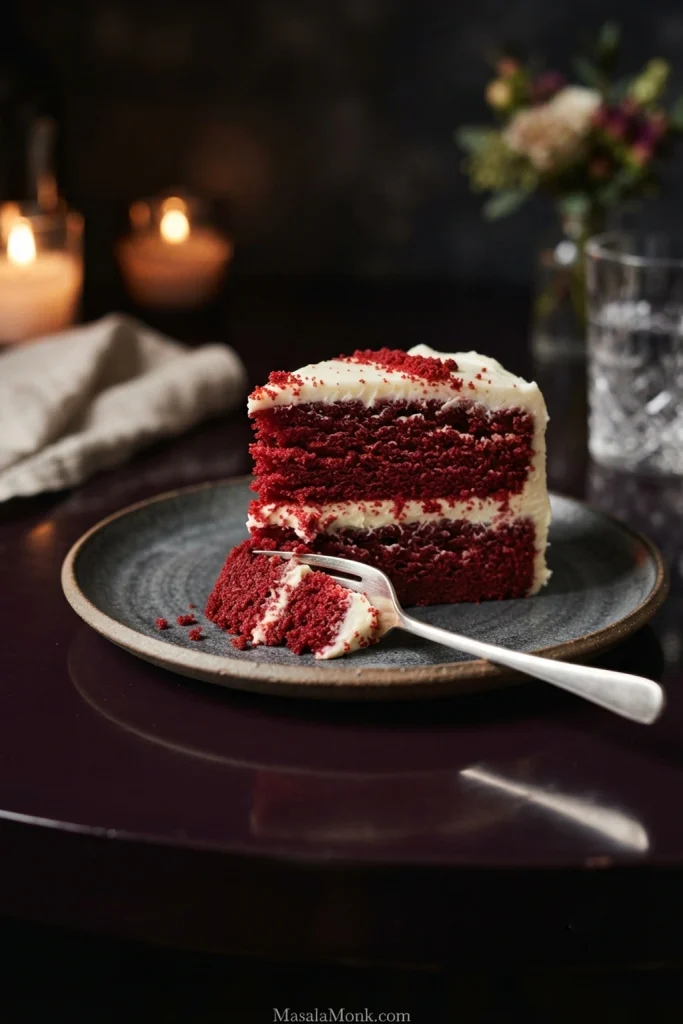
Fork pressing into a two-layer red velvet cake slice with deep crimson crumb and white cream cheese frosting on a dark plate.
Cold red velvet cake gives you the neatest red-and-white slices; slightly warmer cake gives you the softer eating texture. Cut while chilled, then let only the serving piece lose some refrigerator chill.
Posted on — Leave a comment

Irish Soda Bread Recipe: Easy, Crusty & Tender

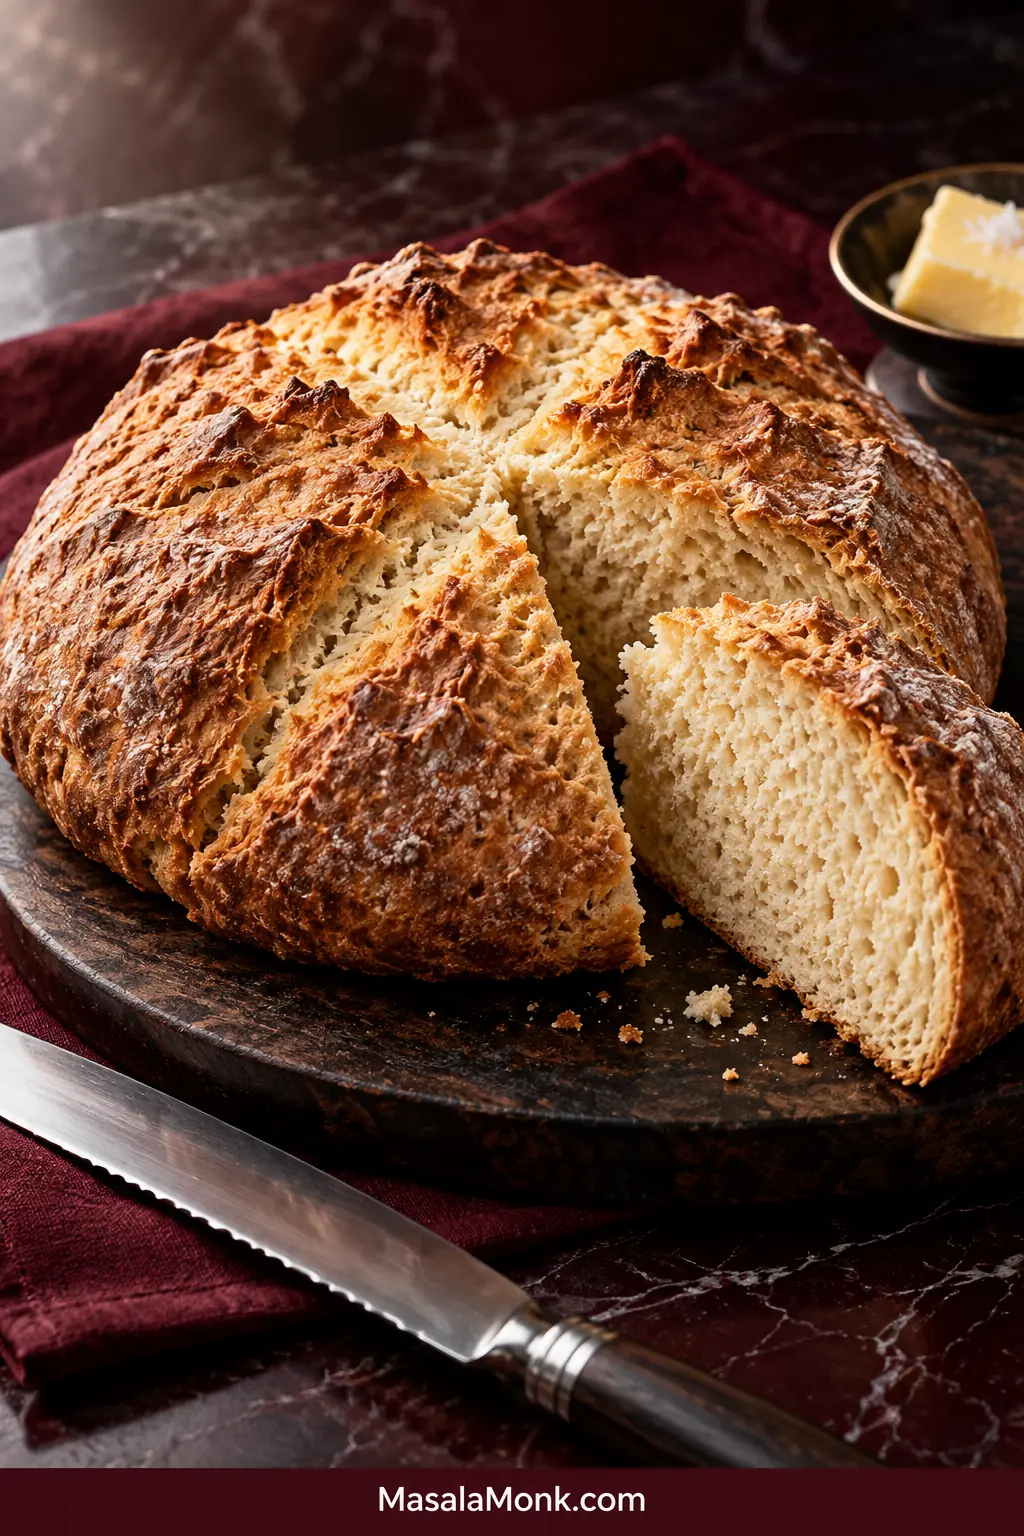
Low, round Irish soda bread on a dark red surface, deeply scored with an X and cut open to show a pale, close-grained crumb, with butter and a bread knife nearby.

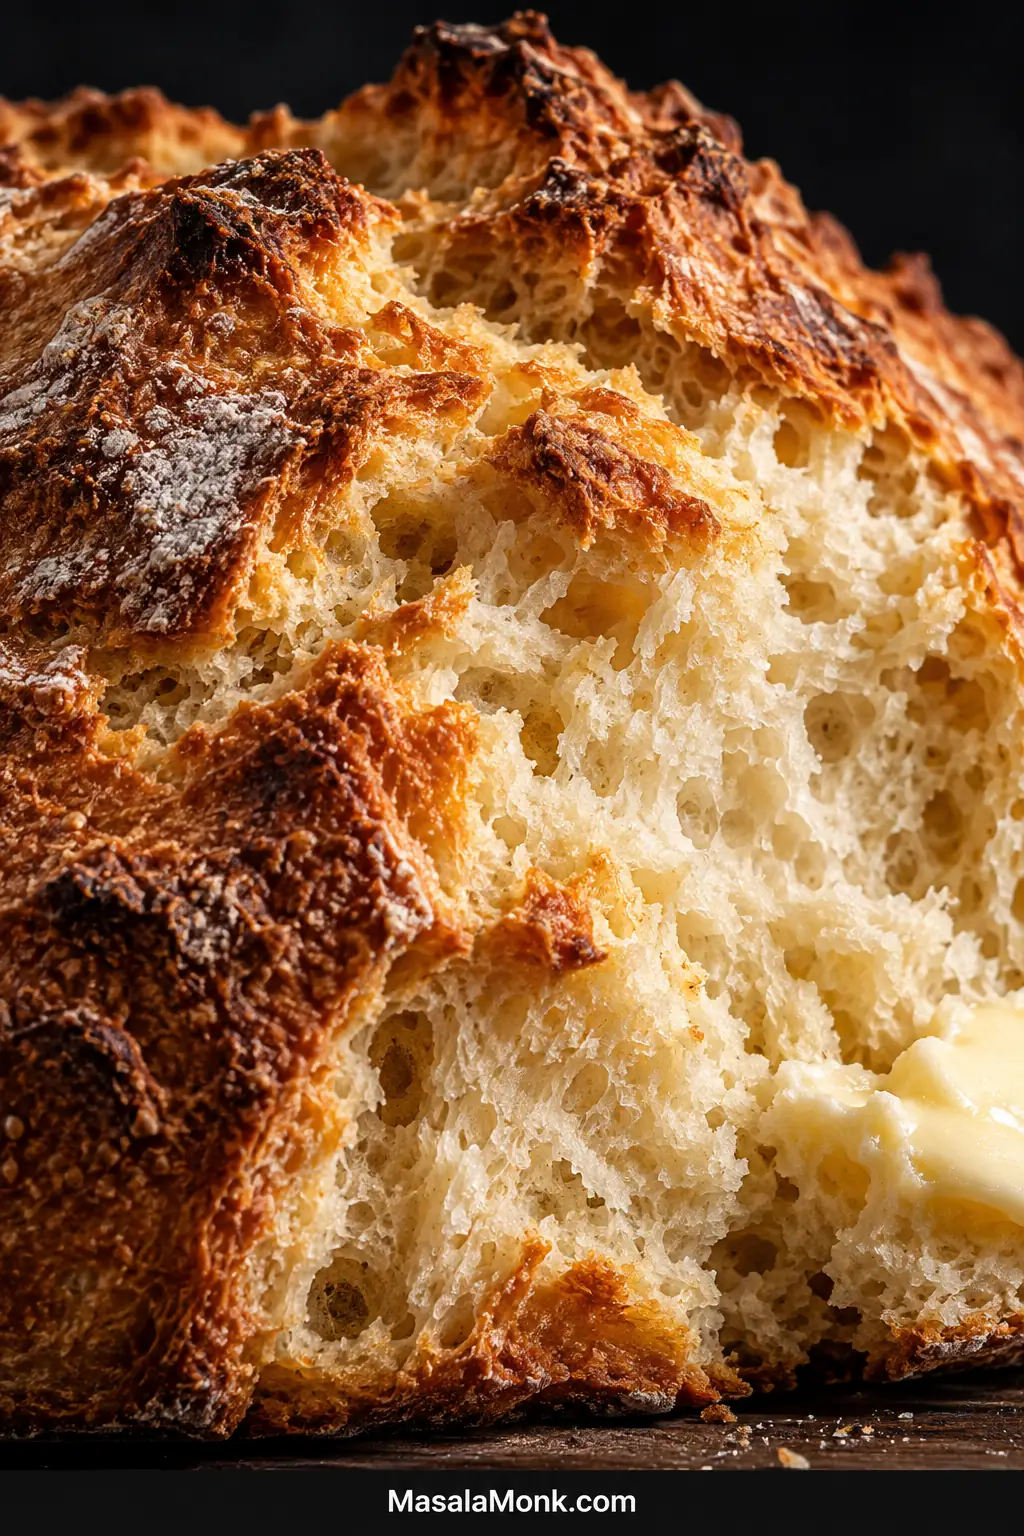
This Irish soda bread recipe gives you a craggy, deeply golden crust around a tender, close-grained buttermilk crumb. Once the loaf has rested, the crust should give a little crackle under the knife.

Extreme close-up of a craggy golden soda bread crust and pale, close-grained crumb with softened butter at the edge.
A close crumb can still be tender. The useful cue is separation: once cooled, the cut face should look set and moist enough for butter, not smeared or cotton-dry.

You only need four ingredients: flour, baking soda, salt and buttermilk. There is no yeast or proofing, and the dough only needs a few quick folds—not kneading until smooth and elastic. Once the oven is hot, mixing and shaping takes about 10 minutes and the loaf bakes for another 40–45 minutes.

The few places that need judgment are the buttermilk, loaf shape, depth of the cross and final doneness. Once you know what to look for, none of them is difficult.

Before you start: keep a little buttermilk back, expect a shaggy dough, flatten the loaf instead of making a tall ball, and plan to check the middle rather than trusting the crust alone.

Irish Soda Bread Recipe

Easy, Crusty & Tender Irish Soda Bread

A lean four-ingredient white soda bread with no yeast or proofing, a craggy crust and a gently tangy, close crumb.

Yield
1 round loaf, about 10 slices

Hands-On
About 10 minutes

Bake
About 40–45 minutes

Cooling
About 1 hour

Prep + Bake + Cool
About 1 hr 50–1 hr 55 min

Loaf Size
7½–8 in / 19–20 cm wide

Equipment

You need a large mixing bowl, light-colored baking sheet, sharp knife and cooling rack. A kitchen scale and instant-read thermometer are useful if you have them. If lining the sheet, use parchment rated for 450°F / 230°C.

Ingredients

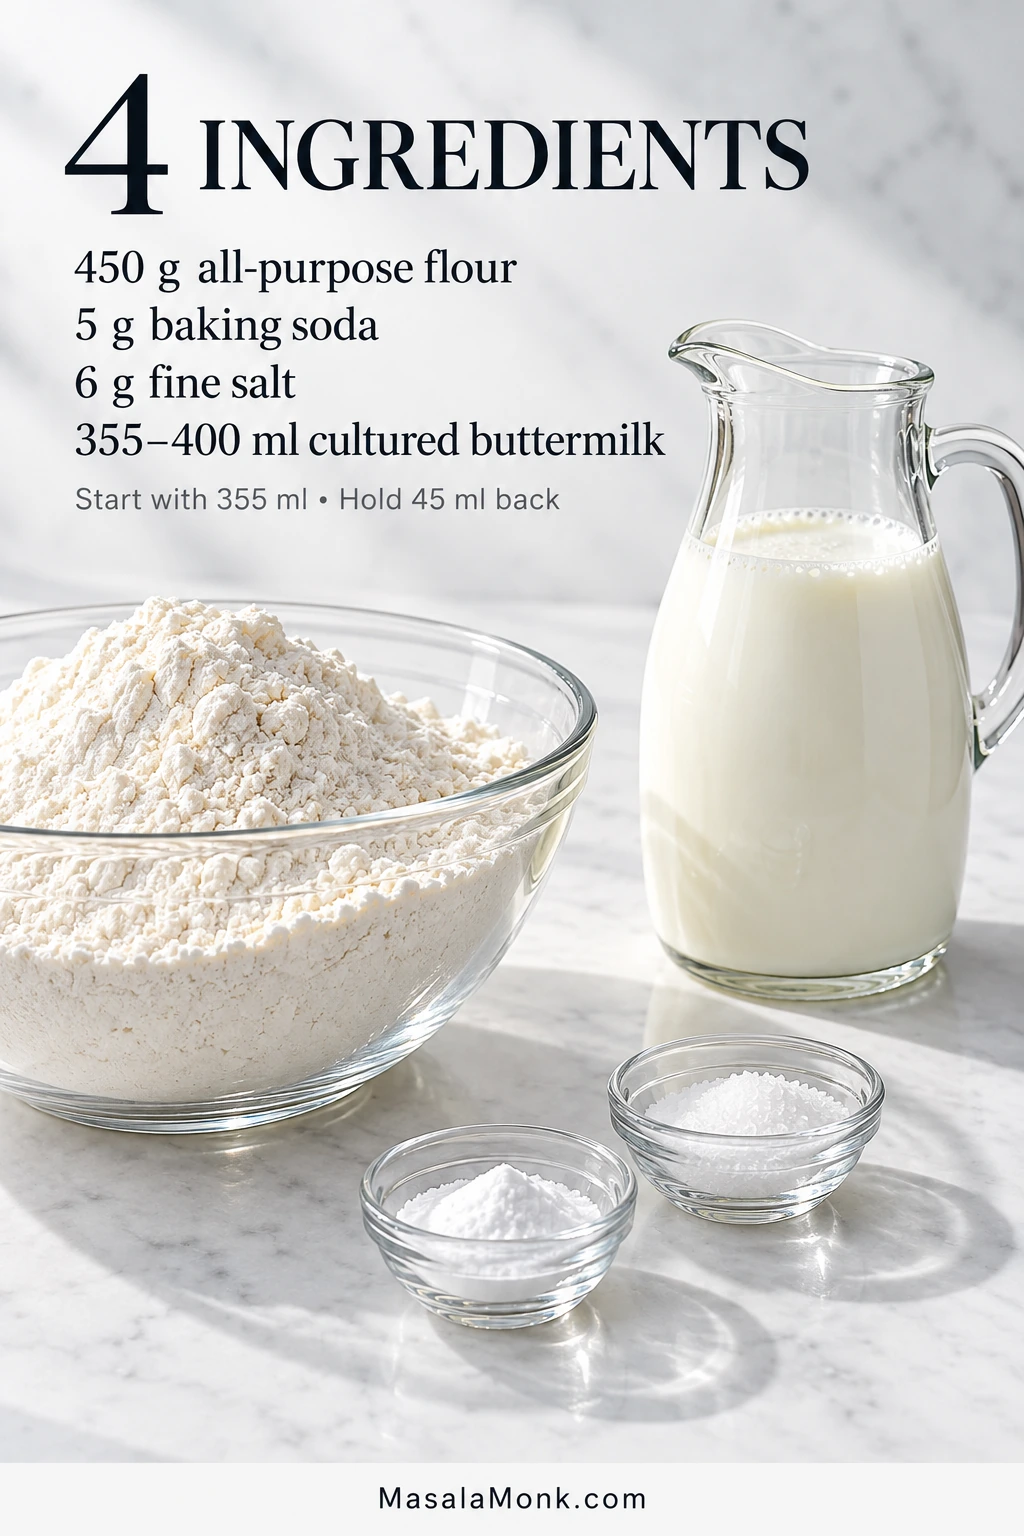
  • 3¾ cups / 450 g all-purpose flour, spooned and leveled if using cups
  • 1 level teaspoon baking soda / bread soda / bicarbonate of soda, about 5 g
  • 1 teaspoon fine sea salt / about 6 g
  • Up to 1⅔ cups / 400 ml cultured buttermilk, divided
Flour, baking soda, salt and a glass jug of cultured buttermilk arranged with printed ingredient amounts for Irish soda bread.
The flour, soda and salt are fixed; the buttermilk is the variable. Because flour absorption and dairy thickness change from brand to brand, think of 400 ml as the upper limit rather than an amount to force in.

Start with 1½ cups / 355 ml buttermilk. Keep about 3 tablespoons / 45 ml in reserve. You may not need all of it.

Baking soda and baking powder are not interchangeable here. Buttermilk supplies the acid the baking soda needs, so a 1:1 swap changes how the loaf rises.

No buttermilk? See the buttermilk substitutes below.

Dough still looks too dry or too loose? Jump to the dough guide before adding more liquid or flour.

Method

Mix the Dough

  1. Heat the oven and prepare the sheet. Set the oven to 450°F / 230°C conventional or 410°F / 210°C fan/convection. Use parchment rated for this heat or bake on a clean, unlined light-colored sheet. If your sheet is dark, check the underside a little earlier because it may brown faster.
  2. Mix the dry ingredients. Put the flour, baking soda and salt in a large bowl and whisk thoroughly. Even mixing helps prevent bitter pockets of soda.
  3. Add the buttermilk gradually and keep moving. Pour in 1½ cups / 355 ml and quickly draw the flour into the liquid. Once wet meets dry, the soda is already reacting. If dry flour remains, add reserved buttermilk 1 tablespoon / 15 ml at a time. Stop when the dough clings lightly to your fingers but can still hold its shape.

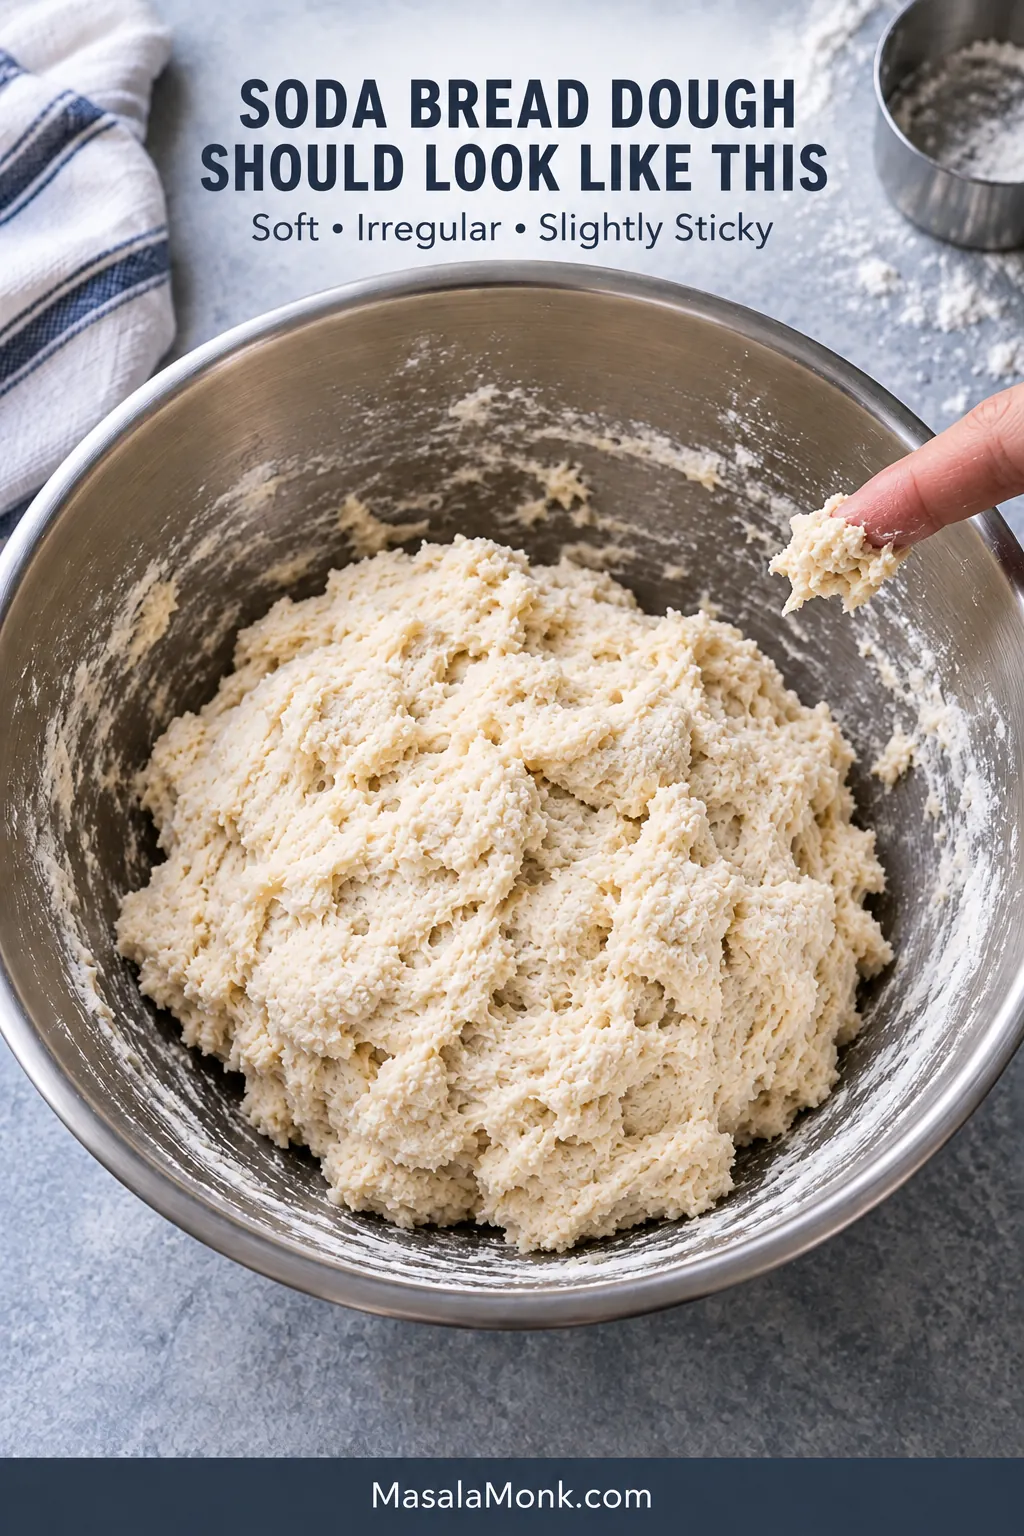
Before shaping, pause here and compare the dough with the visual below. It should move as one shaggy mass and feel lightly tacky, without looking polished or elastic like kneaded yeast dough.

Shaggy, slightly sticky soda bread dough in a stainless-steel bowl, with a small piece of dough clinging to a fingertip.
Roughness is a stopping cue, not a flaw. Once Irish soda bread dough holds together with a little tack, extra mixing only makes it neater—not better.

Shape, Score and Bake

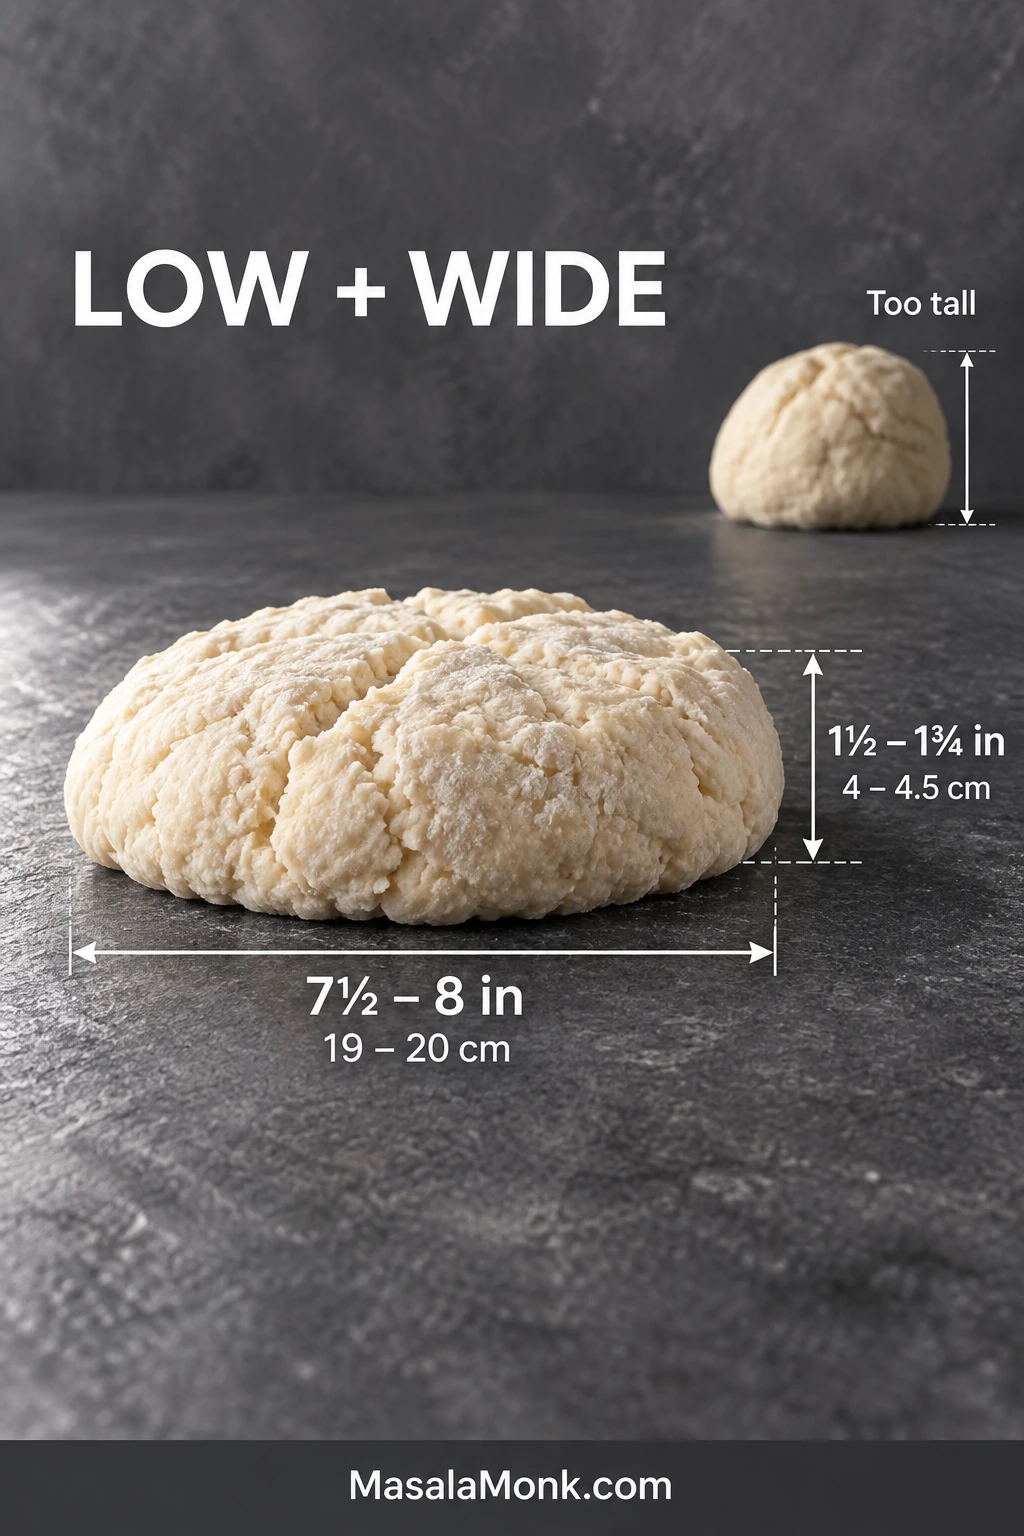
  1. Gather and shape. Turn the dough onto a very lightly floured surface. One or two gentle folds are enough if it needs tidying. Shape it about 7½–8 inches / 19–20 cm across and 1½–1¾ inches / 4–4.5 cm high. Don’t spend time making it perfect; a few creases and rough edges belong on soda bread.
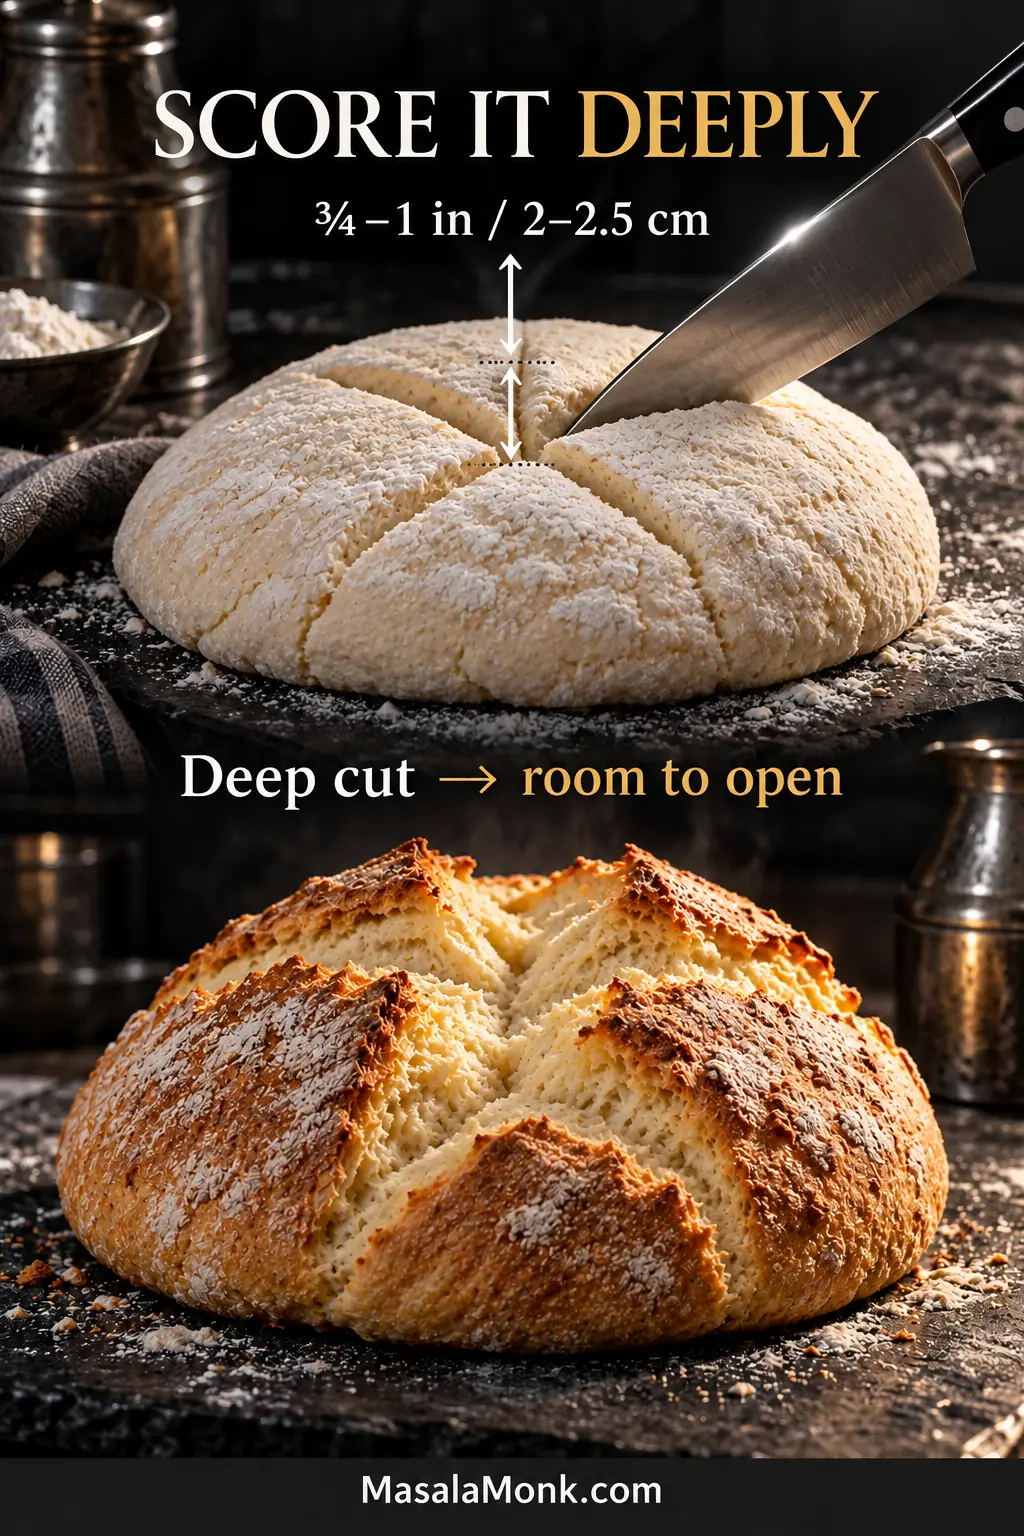
  2. Give it a deep cross. Slash an X about halfway to two-thirds through the loaf—roughly ¾–1 inch / 2–2.5 cm deep at this thickness—and carry the cuts nearly to the edges.
  3. Bake hot, then lower the heat. Start with 15 minutes at 450°F / 230°C conventional or 410°F / 210°C fan/convection. Reduce the oven to 400°F / 200°C conventional or about 355°F / 180°C fan/convection and continue for another 25–30 minutes.
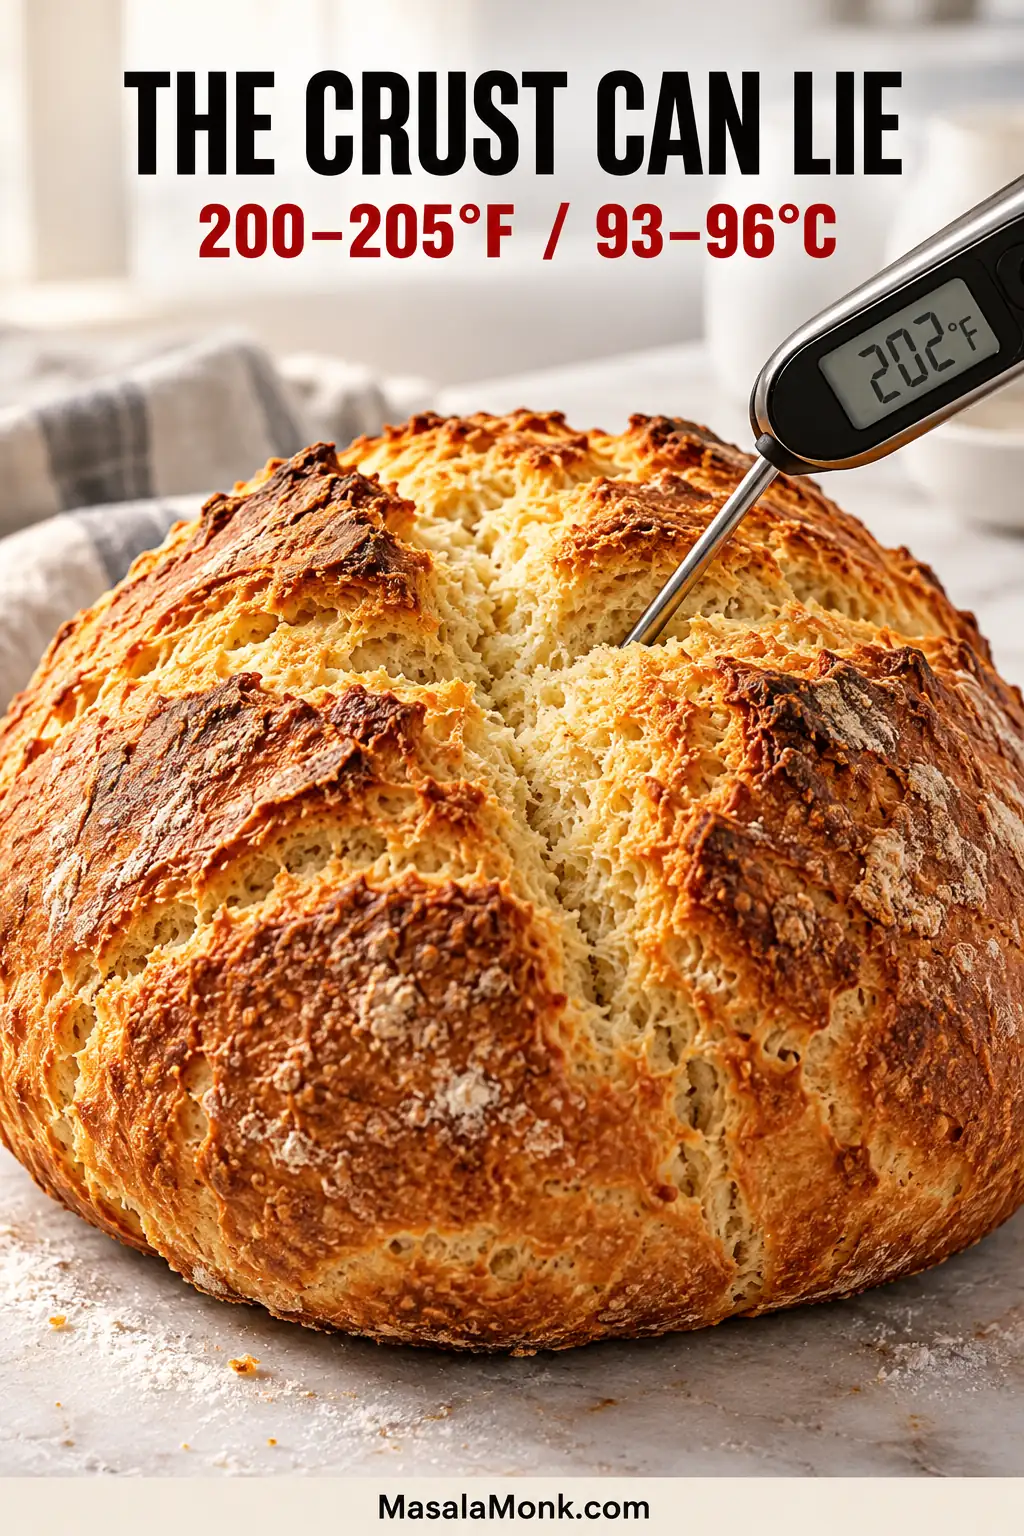
  4. Check for doneness. Look for a deeply golden crust, a set-looking cross and a hollow sound underneath. If you have a thermometer, the thickest part should be around 200–205°F / 93–96°C. When the crust is ready before the middle, tent it loosely with foil and keep baking.
  5. Cool before slicing. Move the loaf to a rack and leave it for about 1 hour for the cleanest crumb. If you want warm bread, 30–45 minutes is workable, but expect a softer slice.

Recipe Notes

  • Use conventional heat if your oven offers both. Fan/convection temperatures are included for ovens that need them.
  • If you’re unsure about an older box of baking soda, test it or replace it rather than guessing.
  • For a softer crust, loosely drape a clean tea towel over the loaf while it cools. Leave it uncovered for a crisper crust.

If everything above makes sense, you can stop there and bake. The rest is for the moments when the dough feels odd, the crust gets ahead of the middle, or you need to change an ingredient.

Read the Dough, Not the Measuring Jug

This is not a smooth, polished bread dough. It should look irregular and feel soft enough to be slightly sticky while still holding itself together.

Flour does not absorb liquid identically from one bag, brand or country to another, and buttermilk can be thick or surprisingly fluid. Darina Allen’s soda bread masterclass likewise gives a liquid range rather than one compulsory amount.

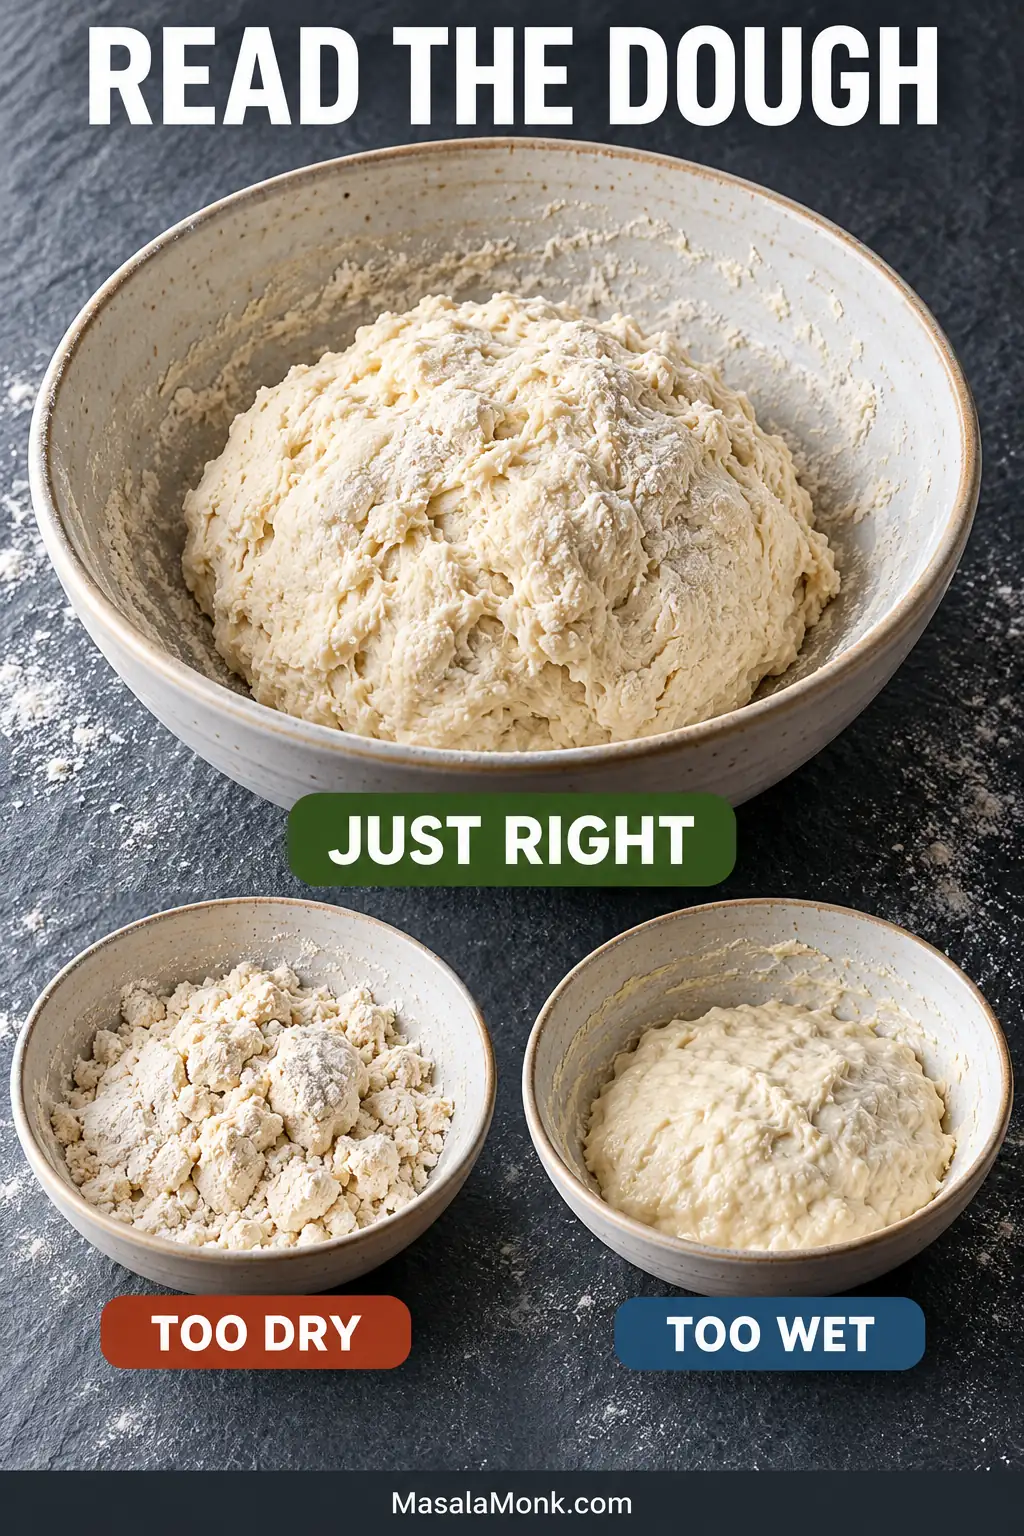
Comparison of three soda bread dough states labeled Too Dry, Just Right and Too Wet; the correct dough forms a soft, shaggy mound.
Watch what the dough does when you stop touching it: dry dough fractures, correctly hydrated dough holds a shaggy mound, and overly wet dough keeps slumping.

Too dry

Loose flour remains, cracks fall apart, and a gentle squeeze will not make the dough hold together. Add reserved buttermilk 1 tablespoon / 15 ml at a time.

Just right: the dough clings lightly to your fingers but stays where you put it. Sticky is not automatically too wet. Once you reach this stage, leave it alone.

Too wet

The dough flows, puddles or slumps badly instead of keeping its shape. First make sure all the flour has been incorporated. If it still cannot hold itself, add a small amount of flour cautiously.

Weighing the flour makes this easier. A heavily packed measuring cup followed by extra bench flour can push the loaf toward dry before it reaches the oven.

Keep It Rough, Low and Deeply Scored

Once the dough comes together, the less fussing, the better.

Rough: stop early

One or two gentle folds may help the dough come together. Beyond that, there is little to gain from working it. A few creases and rough edges are exactly at home on this bread.

Low: give the middle a chance

Keeping the loaf squat gives heat less distance to travel before the middle sets. Think roughly 8 inches / 20 cm wide and under 2 inches / 5 cm high, rather than a tall compact ball.

Side view of raw soda bread dough shaped into a low round, with arrows marking 7½–8 inches wide and 1½–1¾ inches high.
Judge the side profile before you score. If the raw loaf still resembles a compact ball, press it flatter now; deep scoring will not fully compensate for an overly tall center.

Score it deeply

The cross gives the expanding dough room to open and lets heat reach farther into the thickest part. Give it a proper cut—roughly halfway to two-thirds through—instead of scratching the surface.

Irish tradition gives the cross another job too: letting the fairies out. The practical reason is still handy when dinner is waiting.

Raw soda bread being cut with a deep X beside the baked loaf opened along the score, with a ¾–1 inch depth guide.
A useful X is both deep and long. Carry the cuts nearly to the edges so the loaf can open across its whole top instead of splitting wherever pressure finds a weak spot.

The Crust Can Lie About the Center

Don’t let color make the decision by itself. Use several cues together.

Golden soda bread with a probe thermometer inserted into the center, showing a 202°F reading and a target range of 200–205°F, or 93–96°C.
Probe the thickest solid section, not the open cross. That gives a more representative reading of the center when checking for roughly 200–205°F (93–96°C).
CheckWhat You Want
CrustDeeply golden and firm.
UndersideA hollow sound when tapped.
Opened crossThe exposed crumb looks set rather than wet or paste-like.
ThermometerThe thickest part around 200–205°F / 93–96°C.

If the crust is ready first, tent the loaf loosely with foil and keep baking. When the underside still feels damp, take the loaf off the baking sheet and return it directly to the oven rack for a few minutes.

Give the crumb time to settle. About an hour on the rack lets the interior set properly. Cut sooner if you want warm bread, but expect a softer slice.

If Your Soda Bread Didn’t Behave

Most soda-bread problems are small and fixable. Find the symptom that matches your loaf and change one thing on the next one; that’s usually enough.

Dough and Shape Problems

What Happened?Why It Happens & What to Change
Why is my dough sticky?If it still holds its shape, it may be completely fine. Extra flour is usually unnecessary.
Why does the dough spread like batter?There is too much liquid for the flour. Hold some buttermilk back and add the last of it gradually.
Why does the dough crumble apart?It needs more moisture or started with too much flour. Add reserved buttermilk 1 tbsp / 15 ml at a time.
Why is the loaf heavy and tough?Too much flour, too little liquid and excessive handling are the main causes.
Why did the loaf burst or mushroom?The score may have been too shallow. Give the expanding dough a deeper path through the top.

Baking, Crumb and Crust Problems

What Happened?Why It Happens & What to Change
Why is the middle raw or gummy?A truly raw middle usually points to a loaf that was too tall, too wet or underbaked. If the crumb is baked through but seems gummy, slicing before it had time to cool can be the reason.
Why is the crust dark before the center is done?The outside is cooking faster than the middle. Shape the next loaf flatter; once the crust is dark enough, tent with foil.
Why is it dry and crumbly?Too much flour or too much oven time are common causes. Weigh the flour and use the interior to decide when the loaf is finished.
Why does it taste bitter or soapy?Too much baking soda, too little acidity or unevenly mixed soda can leave an alkaline flavor.
Why did it barely rise?Old soda, weak acidity or dough left sitting after mixing can contribute. Soda bread will still rise less dramatically than yeast bread.
Why is the crust so hard?Loosely drape the well-baked loaf with a clean tea towel while it cools. The trapped steam softens the crust.

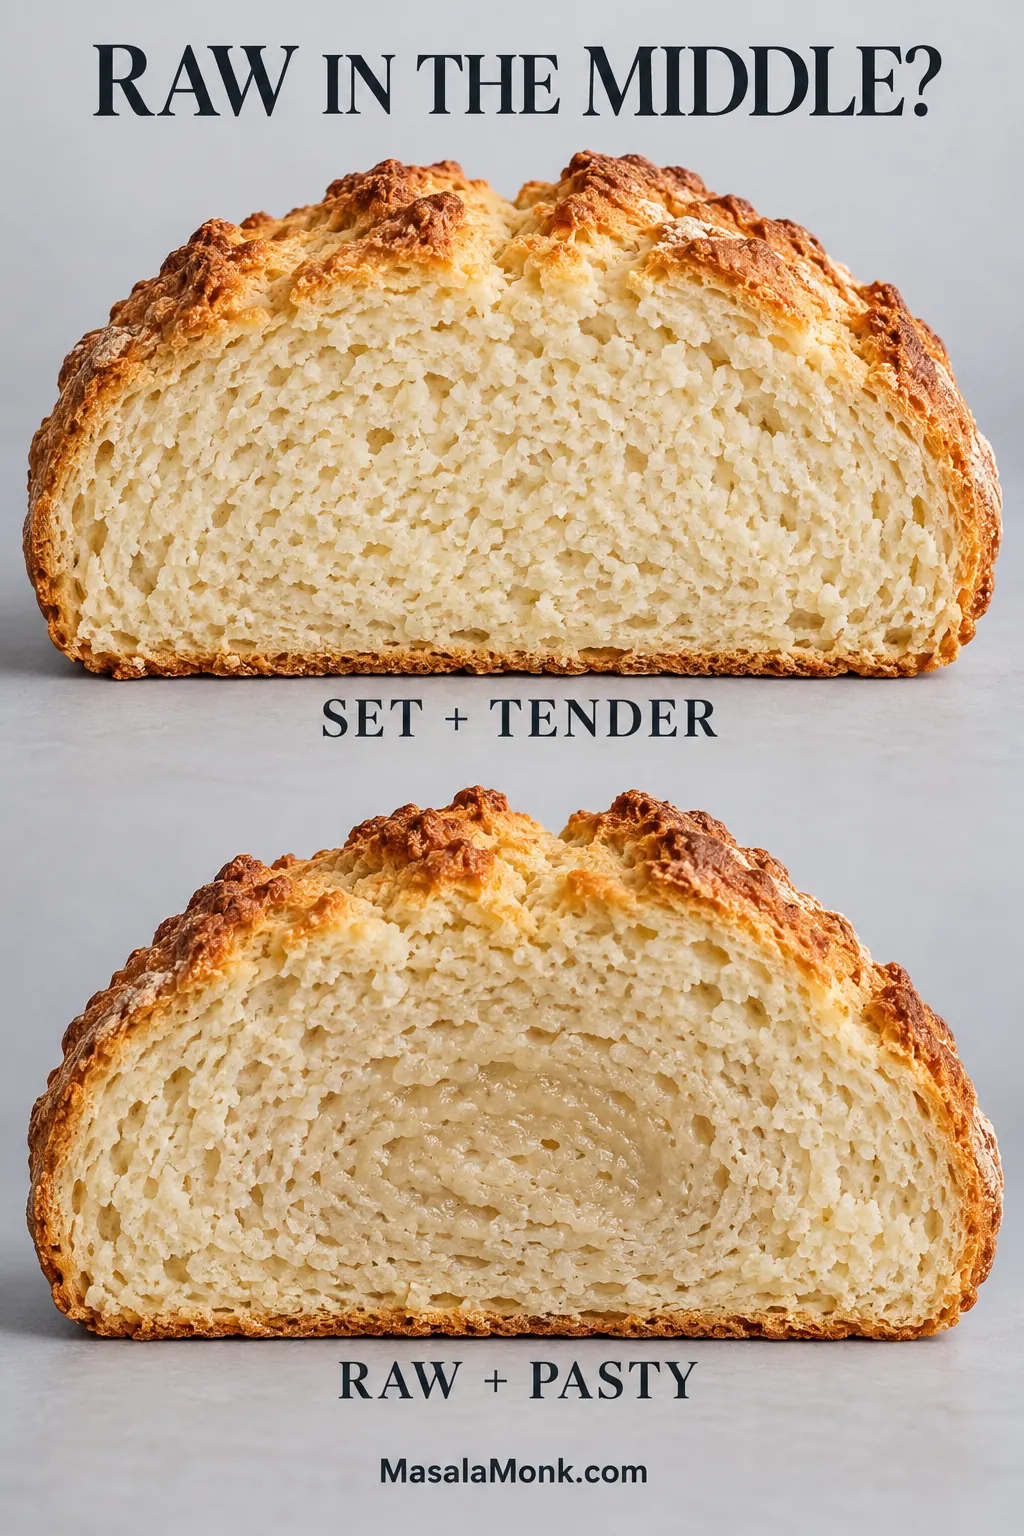
Raw Center vs Soft Crumb

A soft slice is not automatically underbaked. Use the comparison below to separate a genuinely raw center from a tender crumb that is simply still warm.

Two cut soda bread loaves labeled Set + Tender and Raw + Pasty; the underbaked loaf has a damp, compressed center.
A raw center loses normal crumb definition: the cells compress into a darker, paste-like band instead of separating cleanly. After cooling, a baked-through center should still look close-grained, but it should cut and tear like bread.

If the center is fully set but simply close-grained, see what normal Irish soda bread texture looks like before changing the recipe.

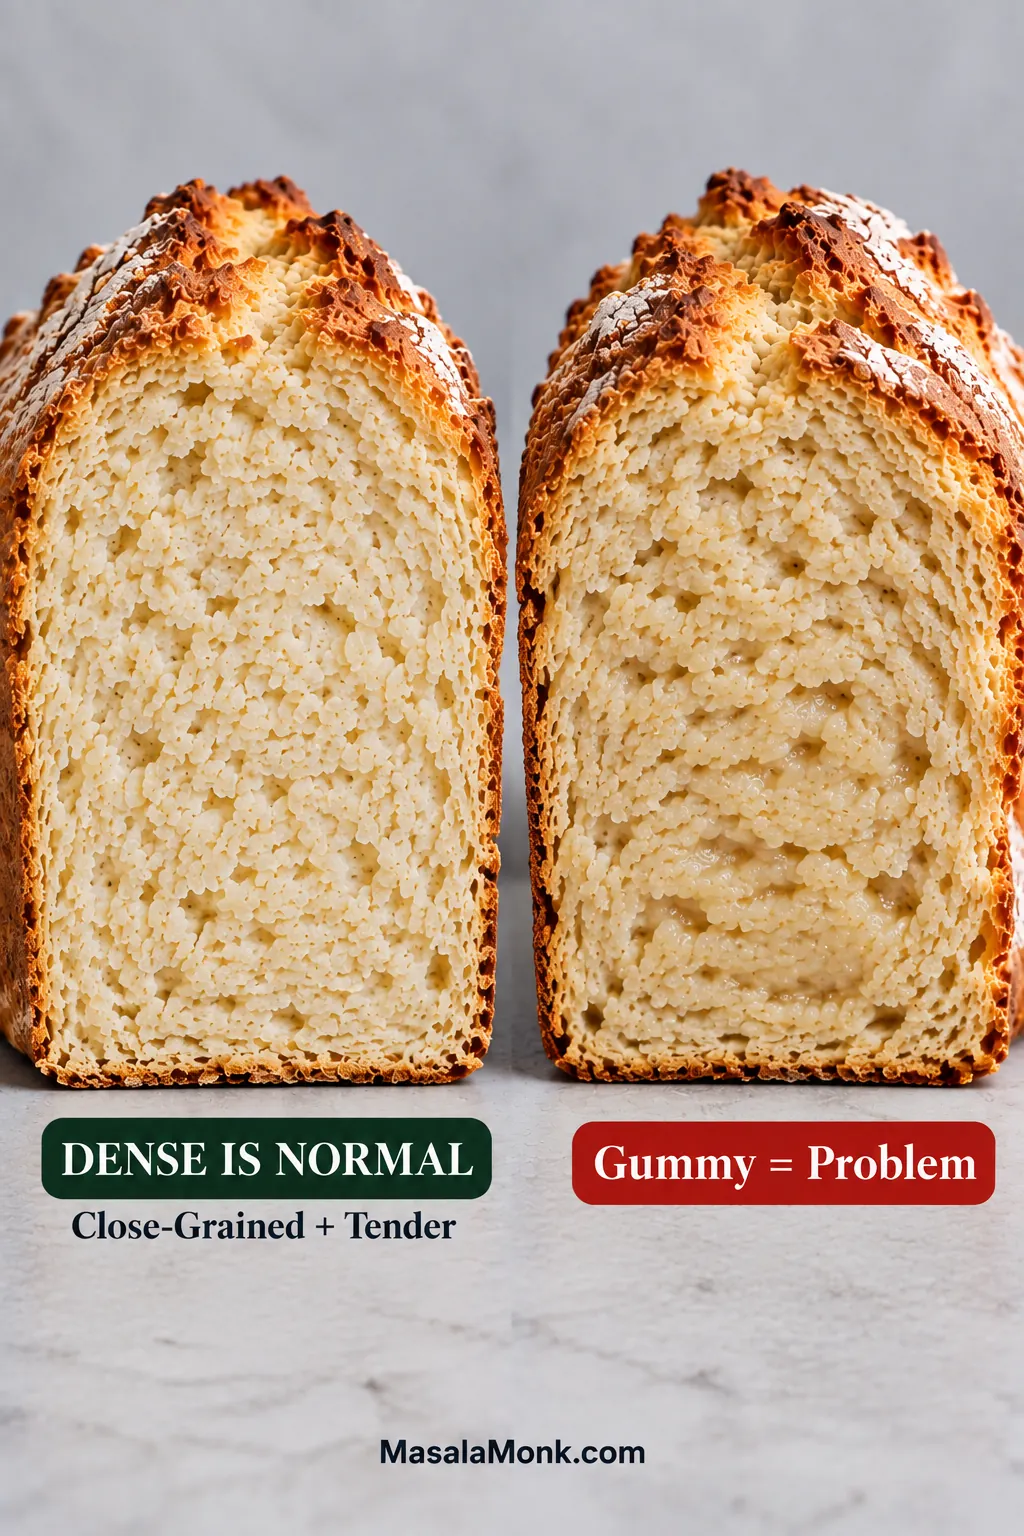
Is Irish Soda Bread Supposed to Be Dense?

A good soda bread is close-grained and substantial while still feeling tender. Dense is normal; gummy or leaden is not.

Two soda bread halves comparing a close-grained tender crumb with a darker, compressed gummy crumb labeled Gummy = Problem.
Look for definition rather than airiness: a properly baked close crumb still shows distinct cells and a clean cut face, whereas gummy crumb looks tacky, compressed and smeared.

If what you see is actually wet or paste-like in the middle, go back to the raw-center comparison; that is a different problem from ordinary density.

When it is right, a slice feels sturdy in your hand but gives easily under the teeth. The edge has some crackle, while the crumb stays tender enough for butter to sink into it.

That close crumb is one reason soda bread works so well beside Guinness beef stew. A thick slice can catch the stout gravy without immediately collapsing into the bowl.

The flavor should be wheaty, lightly salty and gently tangy. A strong baking-soda taste is a warning sign. Because the acidic dairy helps keep that balance right, substitutions deserve a little care.

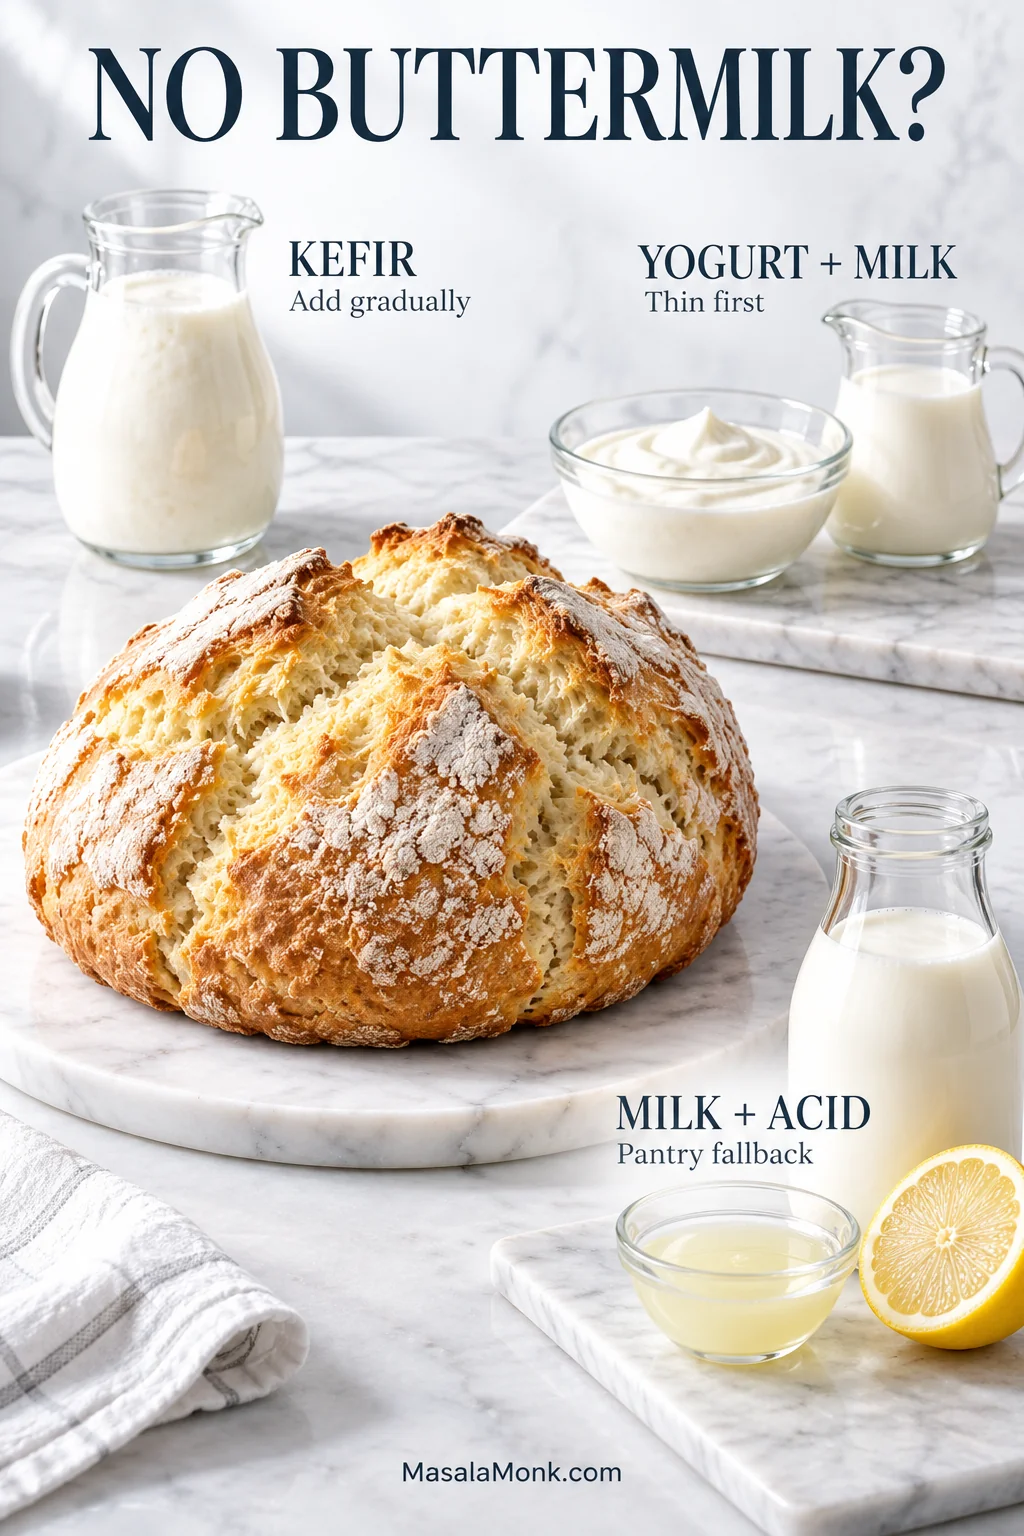
Can You Make Irish Soda Bread Without Buttermilk?

Yes, but keep two things intact: enough acidity for the baking soda and roughly the right consistency for the dough.

Kefir, thinned yogurt with milk, and milk with lemon shown as three buttermilk substitutes for Irish soda bread.
When a substitute pours thinner than cultured buttermilk, be more conservative with the last splash. In practice, kefir is usually closest in body, while acidified milk usually requires the most restraint with the final liquid addition.
SubstituteHow to Use It
KefirWorks very well here. Pour it in gradually because some brands are noticeably thicker than others.
Plain full-fat yogurtThin it with milk until it pours roughly like cultured buttermilk or heavy cream. Greek yogurt will need more milk than ordinary plain yogurt.
Whole milk + lemon or vinegarPantry fallback: for 400 ml total, add 25 ml / 1 tbsp + 2 tsp lemon juice or white vinegar to the jug, then fill with whole milk to 400 ml. Rest 5–10 minutes and add gradually because the mixture is thinner than cultured buttermilk.
Plain milkToo low in acidity for this baking-soda recipe.

Whichever substitute you use, let the dough decide the final amount. If it looks crumbly or too loose, revisit the dough guide before correcting it.

Bought a whole carton of buttermilk? Use the rest in our fluffy buttermilk pancakes the next morning.

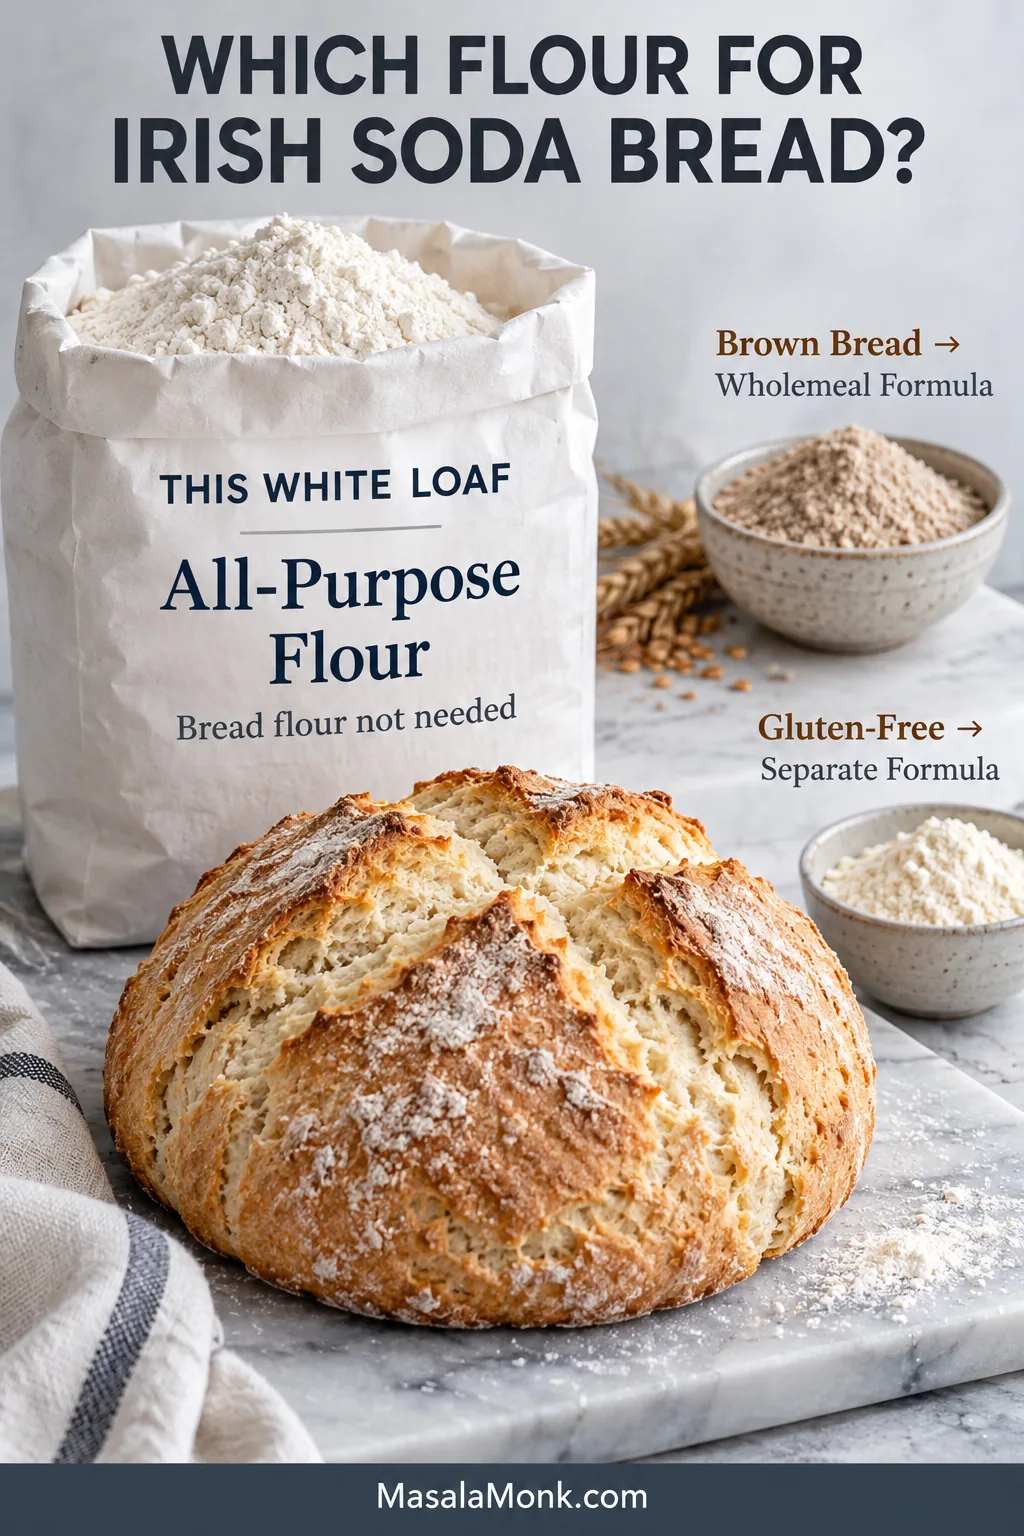
Do You Need Irish Flour for Soda Bread?

For this white soda bread, ordinary U.S. all-purpose flour works well. Bread flour is unnecessary, and you do not need to hunt down specialty Irish flour.

All-purpose flour and a white soda bread loaf shown as the main choice, with smaller wholemeal and gluten-free flour references.
Two bags of all-purpose flour can absorb buttermilk differently. That is why the recipe holds 45 ml back and adjusts by feel instead of prescribing one compulsory final volume.

For brown soda bread, wholemeal flour changes both the texture and how much liquid the dough needs. Irish-style wholemeal flour can be an excellent choice there. Gluten-free soda bread likewise needs a formula built around gluten-free flour rather than a straight swap into this loaf.

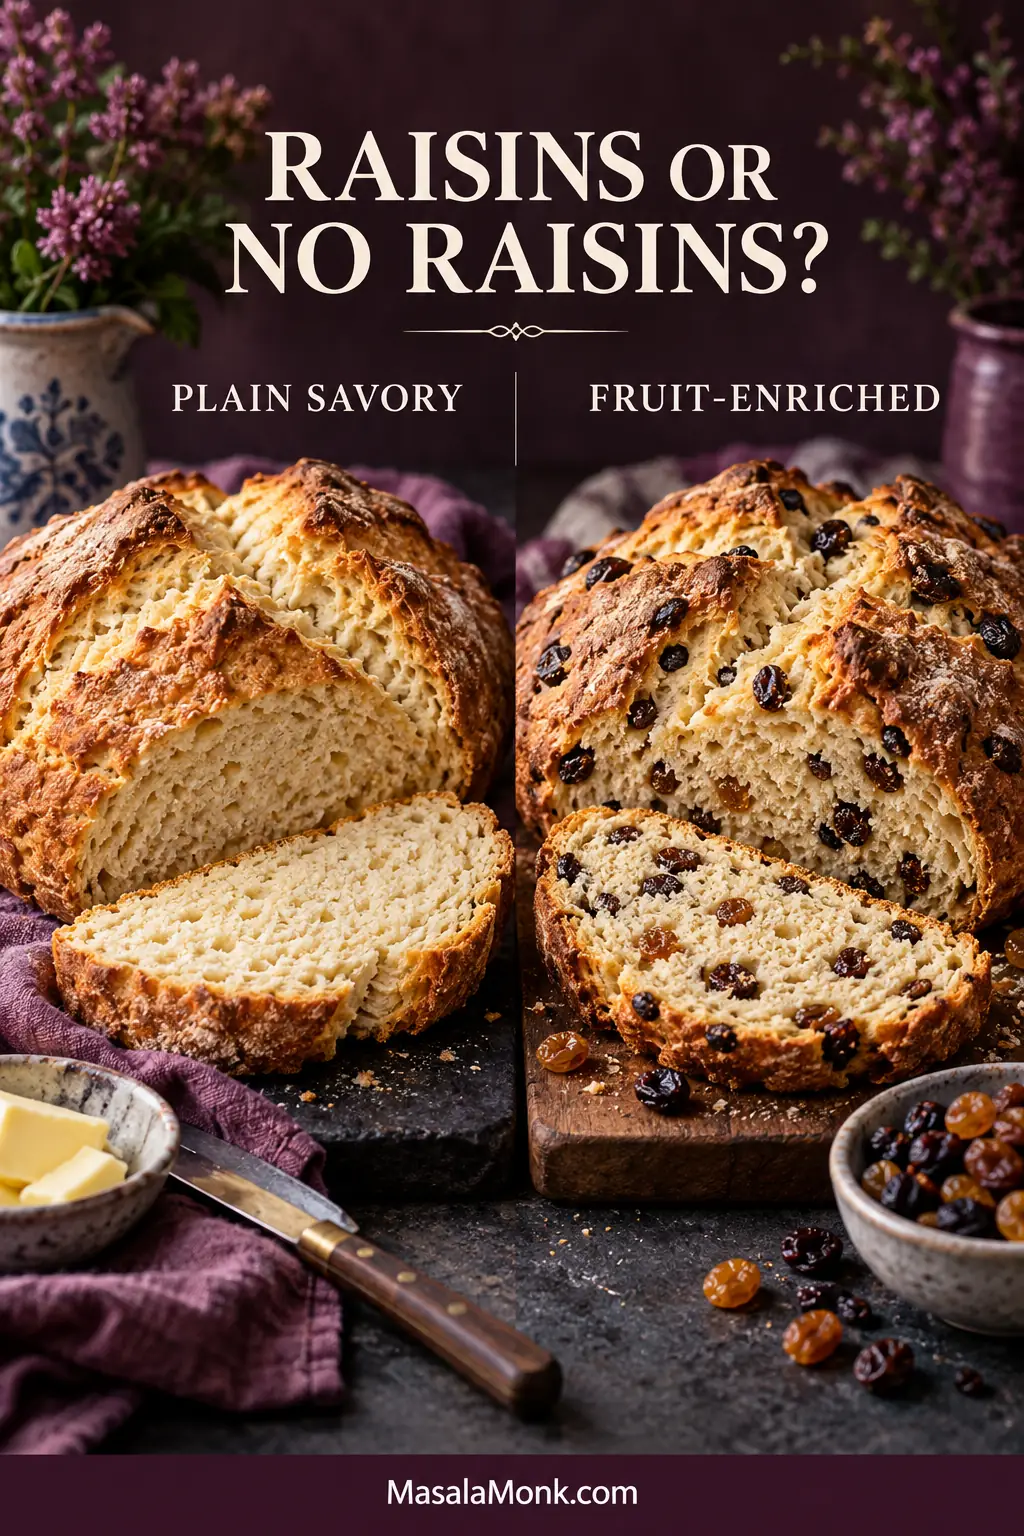
Raisins or No Raisins?

Plain savory soda bread is a traditional everyday Irish form; dried fruit belongs to enriched relatives such as Spotted Dog and to many Irish-American soda breads. If you grew up with raisins and caraway, your family version is not imaginary—and neither is the plain loaf someone else remembers.

Plain white soda bread beside a fruit-enriched loaf dotted with raisins or currants.
For the simple fruit version here, keep the same low, deeply scored shape and distribute the dried fruit through the crumb rather than letting it cluster.

Irish household recipes still vary. Bord Bia’s traditional white soda bread, for example, includes butter and egg and lists cream of tartar as optional.

The main loaf here stays lean and savory. Cultured buttermilk already supplies the acidity needed for the baking soda, so cream of tartar is unnecessary.

A simple fruit version

Toss 3.5 oz / 100 g dried fruit—roughly ⅔ cup, depending on whether you use currants, raisins or sultanas—through the dry ingredients before adding the buttermilk. Then add the liquid gradually as usual.

That gives you a straightforward fruit soda bread. A fully enriched Spotted Dog changes more than the fruit.

Spotted Dog and Irish-American soda bread

Spotted Dog—also known regionally by names including Railway Cake—is an enriched relative of soda bread, made with dried fruit and often egg or sugar.

Irish-American versions commonly add butter, egg, sugar and dried fruit, and some family recipes use caraway. If egg goes into the dough, count it as part of the wet ingredients instead of adding it on top of the full amount of buttermilk.

White, Brown, Wheaten and Farls

  • White soda bread: primarily white flour; this is the style used here.
  • Brown soda bread / Irish brown bread: substantial wholemeal flour and a different amount of liquid.
  • Wheaten bread: a closely related Northern Irish wholemeal bread tradition.
  • Soda farls: flatter soda-bread dough divided into quarters and commonly cooked on a griddle.
  • Potato farls: a separate potato-based griddle bread, often served alongside soda farls.

What to Eat With Irish Soda Bread

The first slice barely needs a plan. Let the loaf cool enough for the crumb to set, cut through the crust and spread it generously with salted butter while there is still a little warmth inside.

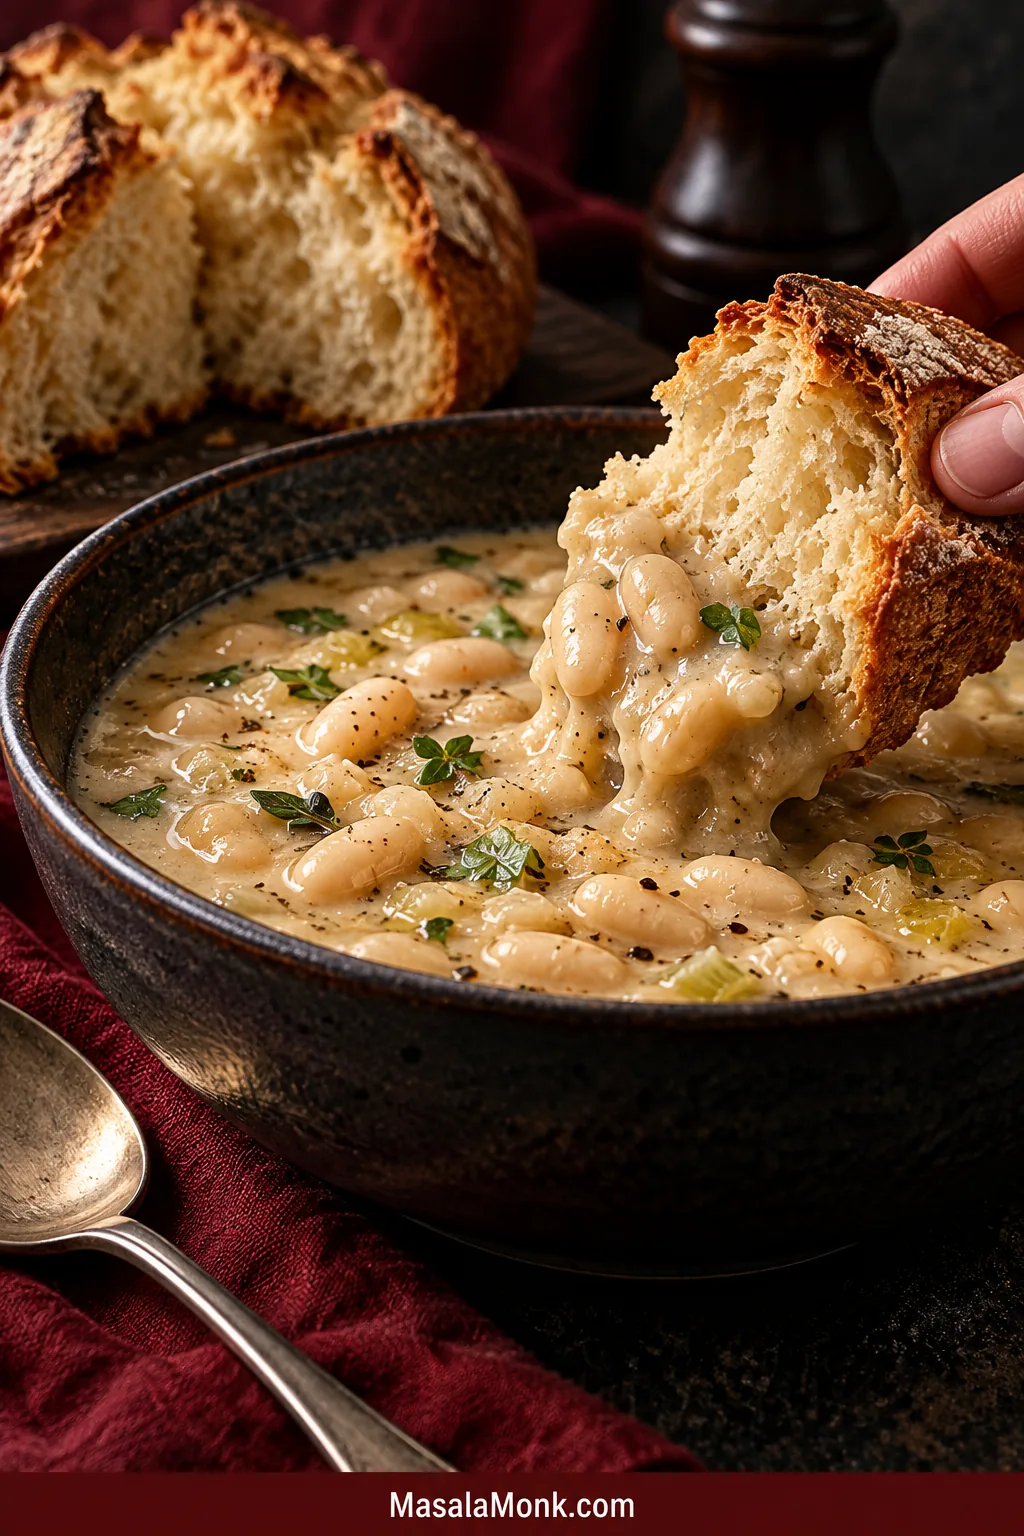
For lunch or dinner, thick slices are particularly good beside creamy white bean soup. The crisp crust brings contrast to the soft beans while the crumb picks up the broth.

A hand dips a thick piece of Irish soda bread into creamy white bean soup with whole beans visible in a dark bowl.
For dipping, cut a thick piece with crust along one edge. The crust works like a firm handle while the exposed crumb takes on broth, making the last few bites easier to scoop rather than fish from the bowl.

Eggs, mature cheddar and smoked salmon are natural savory partners too.

For something sweeter, salted butter and homemade orange marmalade are excellent against the mild buttermilk tang. Jam and honey work beautifully as well.

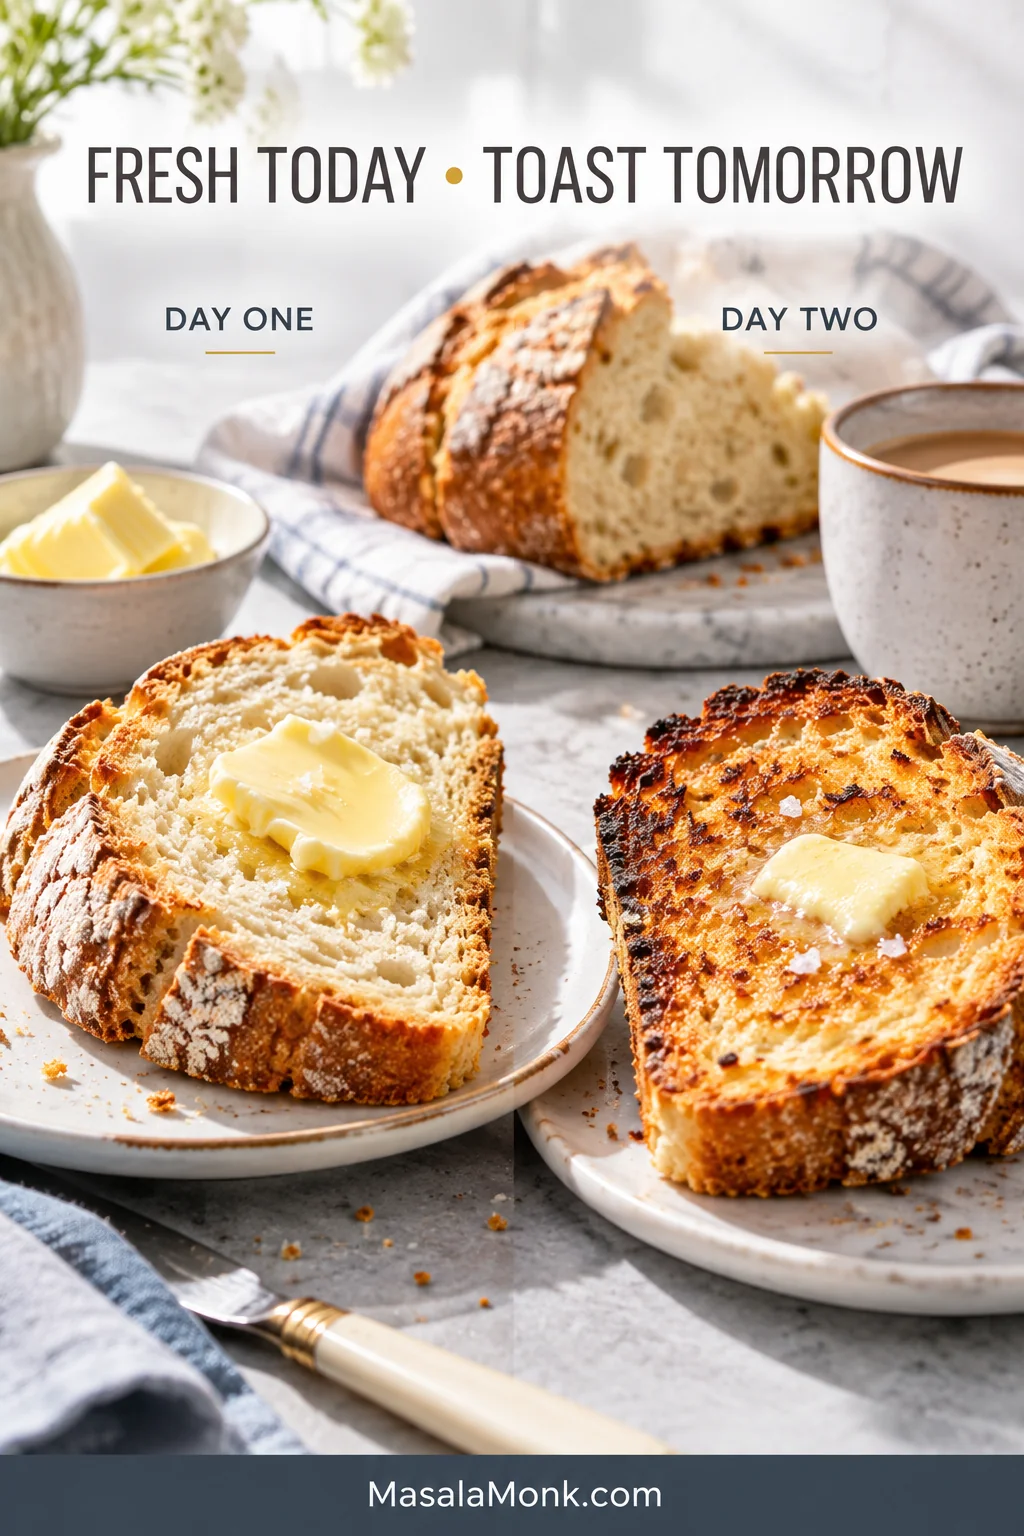
Fresh Today, Toast Tomorrow

Soda bread is best on day one, excellent toasted on day two, and better frozen than left to dry out after that.

Fresh buttered Irish soda bread beside a deeply toasted buttered slice, labeled Day One and Day Two.
Day-two soda bread benefits from real browning, not just warming. Toast a reasonably thick slice until the cut face crisps while the middle keeps some tenderness.

Day one: enjoy it once the crumb has set. Cool completely before wrapping whatever is left.

Day two: keep it well wrapped at room temperature and toast it. A thick slice makes a sturdy base for avocado toast, or use one to scoop up shakshuka and its tomato-pepper sauce and soft yolk.

For longer storage: freeze the cooled loaf or individual slices for up to about 3 months for best quality. Slices can go straight into the toaster from frozen; larger pieces can thaw before reheating. If the bread becomes properly stale, toast it hard, serve it under eggs, or use larger leftovers in bread pudding where the drier crumb becomes useful.

A Few Useful Questions

Why doesn’t Irish soda bread need yeast?

Buttermilk’s acidity reacts with baking soda to make the gas that lifts the loaf, so there is no yeast or proofing stage. Once wet and dry meet, shape and bake the dough without leaving it sitting around.

Can I make the dough ahead?

Better not. Have the baking sheet ready and the oven hot before you mix, then shape and bake the dough straight away.

Can I bake it in a loaf pan?

Yes, but don’t transfer the round-loaf timing blindly to a loaf pan. A deeper pan changes how quickly heat reaches the middle, so rely on the same doneness cues and expect the bake to take longer.

Can I make this gluten-free?

Not reliably with a one-for-one flour swap. Use a soda bread recipe built around gluten-free flour instead.

Is Irish soda bread healthy?

This particular loaf has no added sugar or butter, but it is still made primarily with white flour. Wholemeal soda breads generally provide more fiber, while enriched versions may add butter, egg, sugar and dried fruit. How it fits into your diet depends on the portion and what you eat with it.

After about an hour on the rack, cut through the opened cross. The crumb should be set but still tender. A thick slice with salted butter is enough.

Posted on — Leave a comment

Blueberry Pie Recipe: Juicy, Jammy & Sliceable with Fresh or Frozen Blueberries

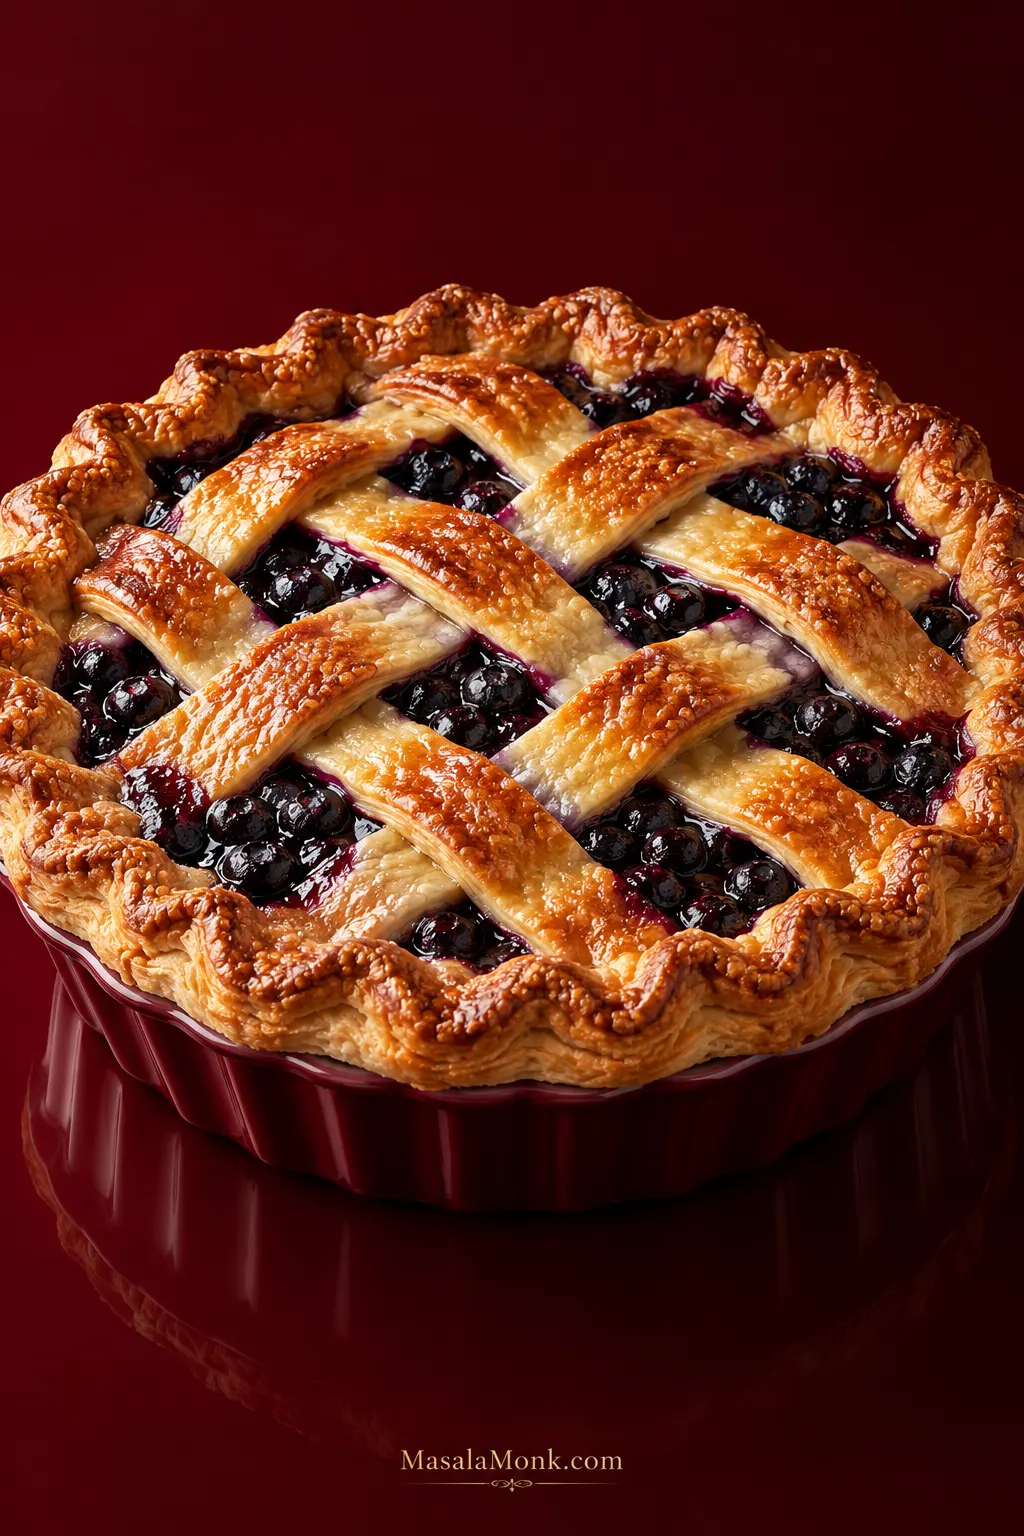
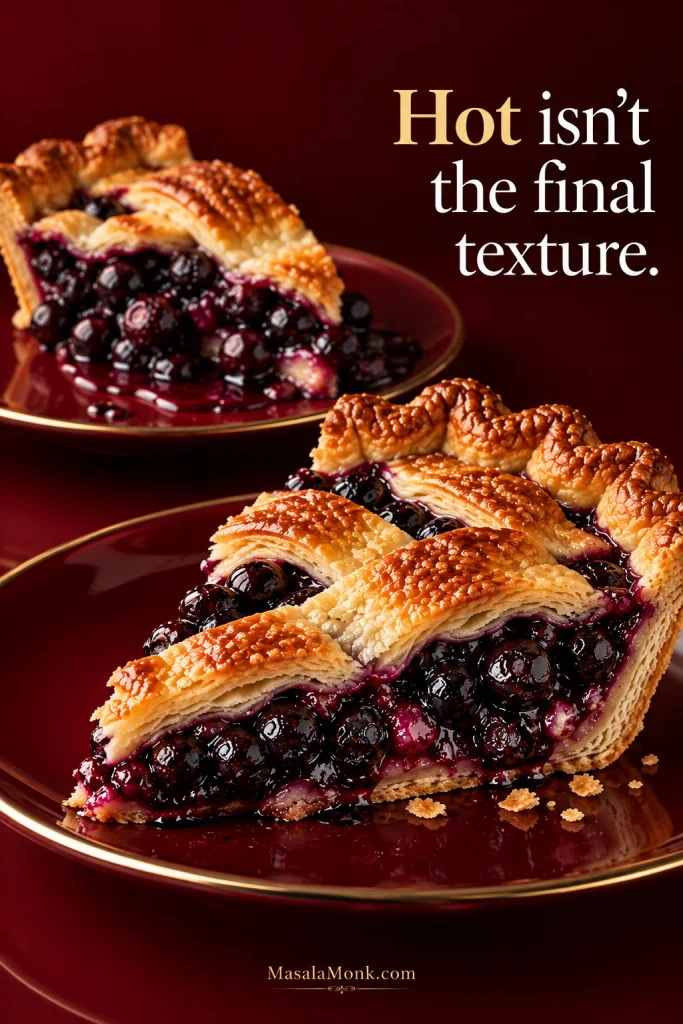
Deep-dish blueberry pie with a deeply golden lattice crust and dark blueberry filling visible between the pastry strips.

The best blueberry pie has a buttery, crisp crust, soft berries you can still recognize, and dark, glossy juices that stay tucked around the fruit when you lift a slice.

Getting there is a balancing act. Blueberries release plenty of juice as they cook, so the center can stay loose even after the crust begins to brown. Too much thickener solves that problem at the expense of the fruit, turning those juices stiff and pasty.

This blueberry pie recipe handles the fruit in two stages. Half the blueberries are cooked first to build a concentrated base; the rest are folded in afterward, leaving plenty of berries plump and recognizable in the finished pie.

Fresh blueberries are the simplest choice, although frozen berries work too with slightly different handling. Either way, the goal is the same: plenty of recognizable fruit held together by blueberry juices that stay with the slice.

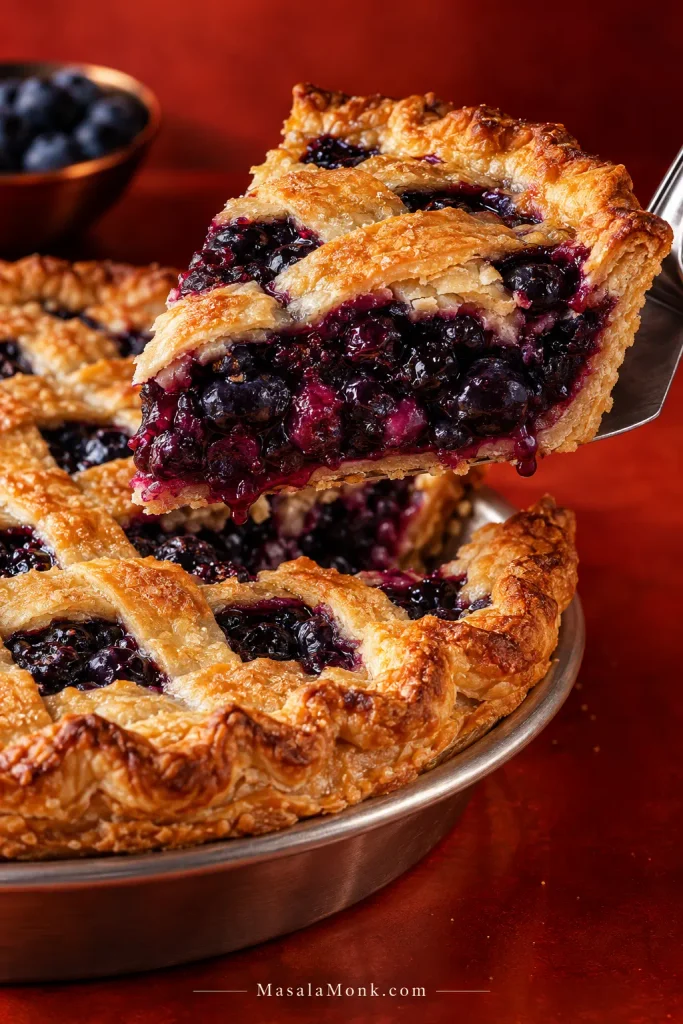
Blueberry pie slice lifted from the whole pie, showing flaky golden crust, recognizable blueberries and thick purple filling that holds together.
A clean slice does not need to be dry. Instead, look for berries held in a soft, jammy filling with just enough purple juice to stay around the fruit rather than running freely across the plate.

Why Half the Blueberries Are Cooked

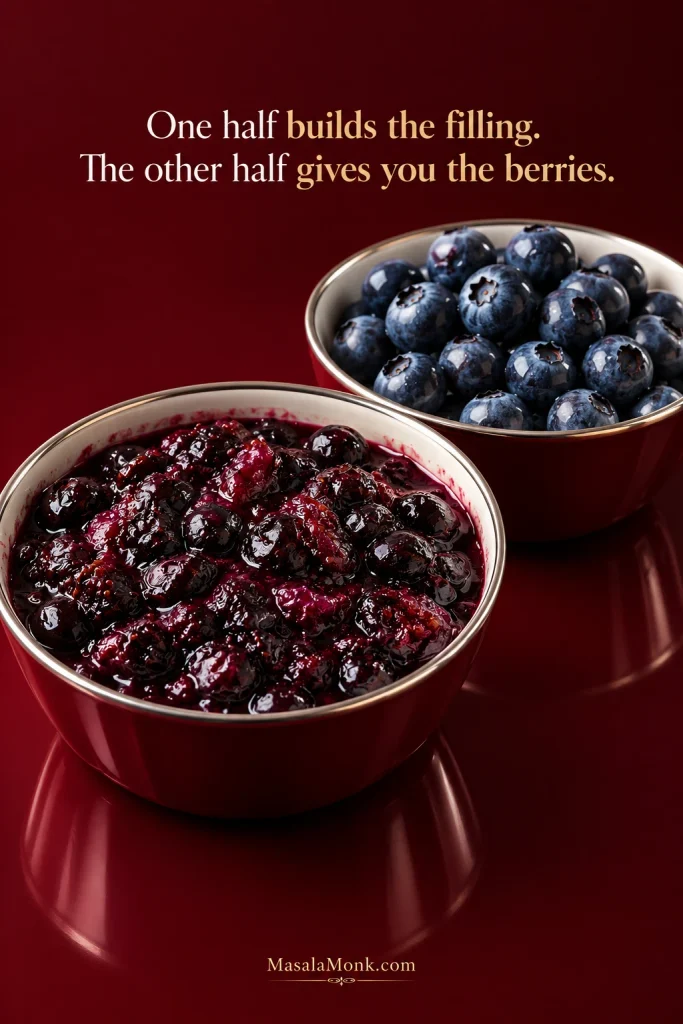
One half builds the filling. The other half gives you the berries.

First, one portion softens in a saucepan and releases its juice, which becomes the base for the pie once the cornstarch thickens it. The reserved portion goes in afterward, keeping much more of its shape.

Cooked, collapsed blueberries beside whole blueberries, showing the two stages used to make the pie filling.
Partial cooking gives each half of the blueberries a different job: softened fruit builds the thickened base, while the second batch preserves more berry shape and texture in the finished pie.

Cooking part of the fruit also gives you a chance to taste the blueberries before they reach the crust. Some batches are naturally sweeter than others, while especially tart fruit may need a little extra sugar.

The finished texture should still belong to the berries. Their juices need enough body to cling around the fruit and hold a wedge together. They should still be soft; this is blueberry pie, not fruit gel.

Can You Make Blueberry Pie with Frozen Blueberries?

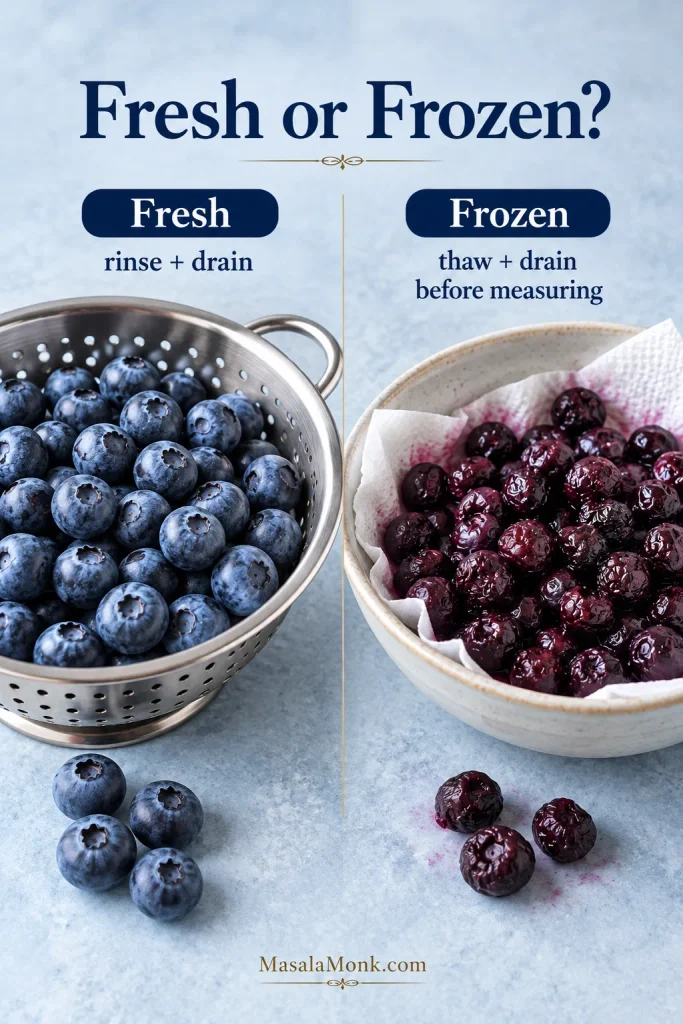
Yes. Fresh berries need little more than a gentle rinse and a thorough drain. Frozen blueberries are thawed and drained before measuring in this version because they release additional liquid as they thaw.

Fresh blueberries in a metal colander beside darker, softened thawed and drained frozen blueberries.
Thawed blueberries should look darker and softer than fresh ones; that is normal. Let gravity do the draining rather than pressing the fruit, which can crush berries and change how much usable fruit you end up measuring.

For this pie, the important checkpoint comes in the saucepan: the cooked portion needs enough body to support the berries folded in afterward.

The same principle—adjusting the preparation to the fruit you’re starting with—also matters in our peach cobbler with fresh, frozen or canned peaches.

Blueberry Pie Recipe

A deep-dish blueberry pie with a flaky all-butter crust, juicy berries and enough structure to cut into generous wedges without making the fruit stiff.

Yield1 × 9-inch deep-dish pie
Servings8 slices
PrepAbout 55 minutes, plus chilling
BakeAbout 55–70 minutes
CoolAt least 3 hours
TotalAbout 5 hours 20 minutes–5 hours 35 minutes, including minimum chilling and cooling
Pan9-inch pie dish, roughly 1½–2 inches deep
Oven425°F / 220°C, then 350°F / 175°C

Equipment

  • 9-inch deep-dish pie plate
  • Rimmed baking sheet
  • Medium saucepan
  • Large heatproof bowl
  • Rolling pin
  • Pastry cutter or fingertips
  • Pastry brush
  • Sharp knife or pastry wheel
  • Cooling rack
  • Pie shield or aluminum foil, optional

Ingredients

All-Butter Crust

  • 2¾ cups / 330 g all-purpose flour, plus more for rolling
  • 1 tablespoon / 12 g granulated sugar
  • 1¼ teaspoons fine salt
  • 1 cup / 226 g unsalted butter, very cold and cut into ½-inch / 1.25 cm pieces
  • 6 tablespoons / 90 ml ice water, plus up to 2 tablespoons / 30 ml more if needed

Blueberry Filling

  • 7 cups (about 36 oz / 1,020 g) blueberries, divided; if using frozen berries, thaw and drain as directed before measuring
  • ¾ cup / 150 g granulated sugar, plus a little more if the berries are especially tart
  • 6 tablespoons / 42 g cornstarch
  • ½ teaspoon fine salt
  • ¼ teaspoon ground cinnamon, optional
  • 2 tablespoons / 30 ml water, for fresh blueberries only
  • 1 tablespoon / 14 g unsalted butter
  • 1–2 teaspoons finely grated lemon zest
  • 1 tablespoon / 15 ml fresh lemon juice

For Finishing

  • 1 large egg
  • 1 tablespoon / 15 ml water or milk
  • 1–2 tablespoons coarse sparkling, turbinado or demerara sugar, optional

Method

1. Make and Chill the Dough

Whisk the flour, sugar and salt together. Add the cold butter and work it into the flour until you have a mixture of pea-sized pieces and thinner flakes.

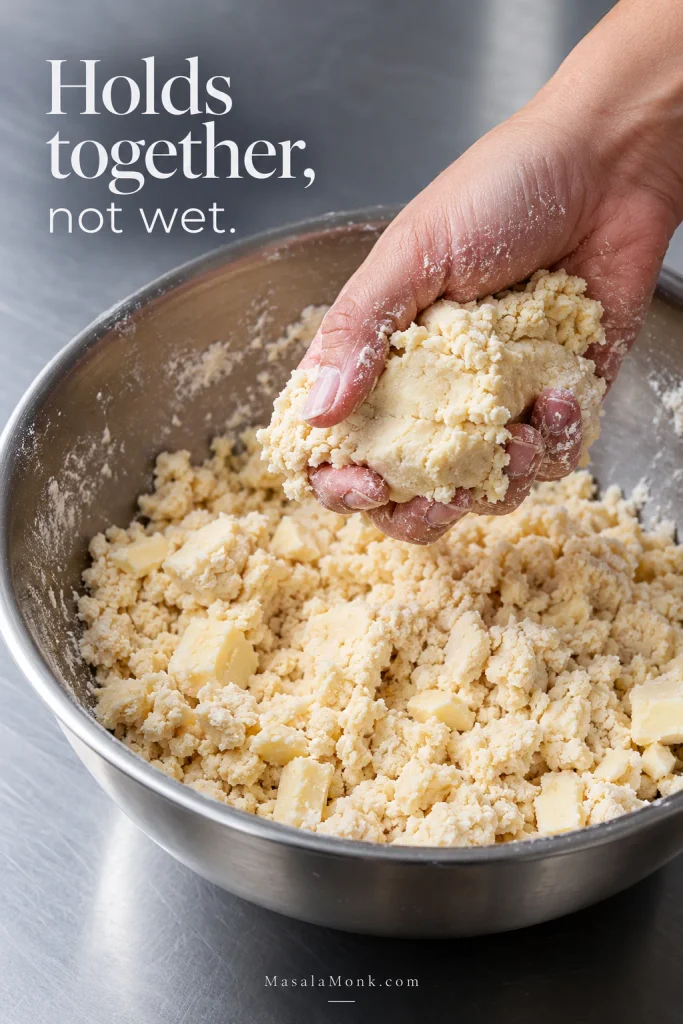
Drizzle in 6 tablespoons / 90 ml ice water while tossing with a fork. Squeeze a handful of dough. When it holds together without feeling wet, there’s enough water. Add more ice water a tablespoon at a time only if it still falls apart.

Hand squeezing shaggy pie dough that holds together while loose crumbs remain around it, showing proper dough hydration.
Flour can take up water differently from batch to batch, so the squeeze test outranks the measuring spoon. Stop adding water once the crumbs hold as a clump; chasing a smooth dough here can make the crust tougher.

Bring the dough together without kneading. Divide it into two disks, making the bottom-crust disk slightly larger. Wrap and refrigerate for at least 30 minutes.

If pie pastry is the part you find trickiest, our easy homemade pie crust guide goes deeper into butter temperature, hydration, rolling and chilling.

2. Prepare and Divide the Blueberries

Rinse fresh berries gently and drain them well. For frozen blueberries, thaw completely and drain before measuring, leaving the collected thawing liquid out of the filling.

Divide the prepared fruit into two equal portions: 3½ cups (about 510 g) for the cooked base and 3½ cups (about 510 g) to fold in later.

3. Cook the First Half

Put the first portion of blueberries in a medium saucepan over medium heat. Add the 2 tablespoons / 30 ml water only for fresh fruit.

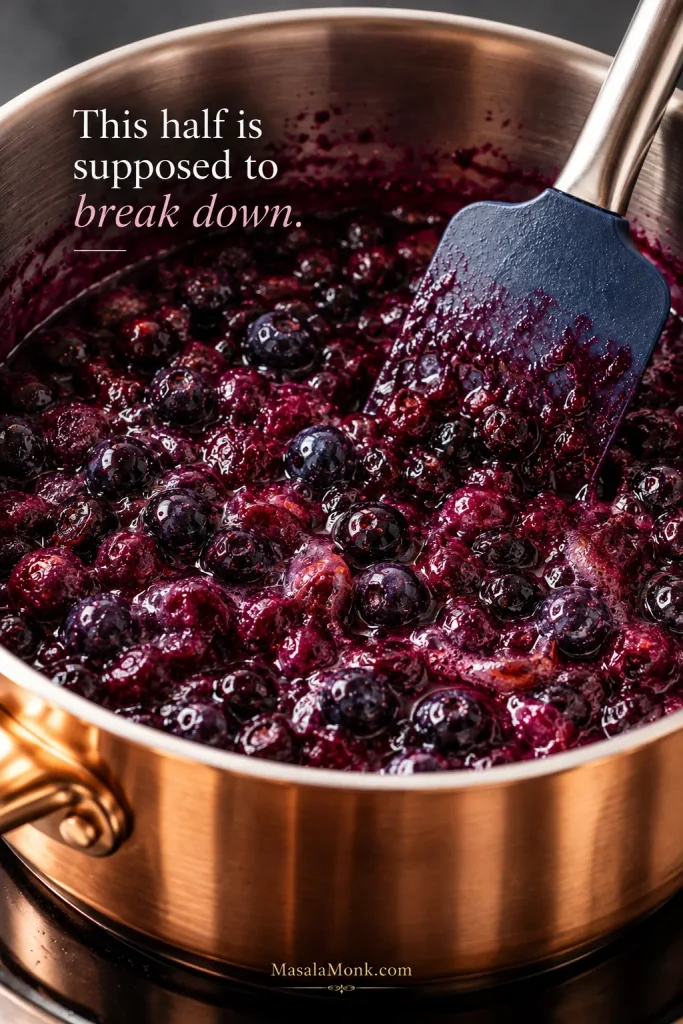
Cook for about 5–7 minutes, stirring occasionally. The berries will soften and begin to collapse as their purple juices come to a gentle simmer. That’s what you want from this half; these berries are building the base.

Blueberries cooking in a saucepan, with split and collapsed berries releasing dark purple juice while some berries remain recognizable.
Do not wait for every berry to disappear. Some fruit can remain recognizable while enough berries collapse to release the purple juice that forms the concentrated filling base.

4. Thicken the Blueberry Base

Whisk the sugar, cornstarch, salt and optional cinnamon together, then stir them into the simmering berries.

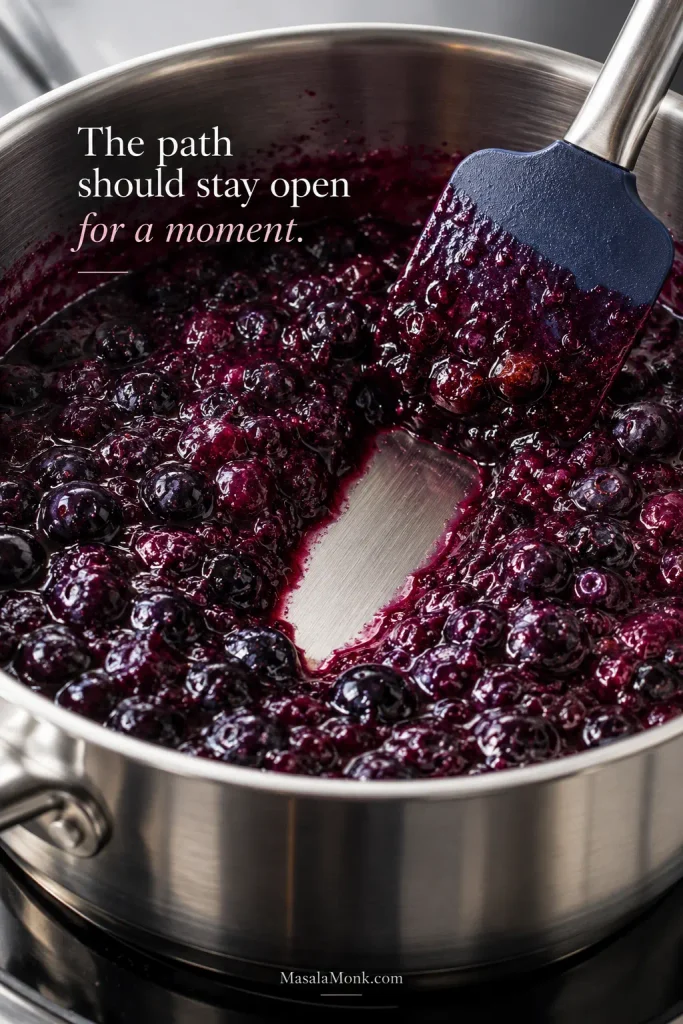
Keep stirring over medium heat as the mixture thickens and returns to a gentle bubble. Drag a spatula across the bottom of the saucepan. It should leave a clear path for a moment before the fruit closes over it again.

Spatula drawn through thickened blueberry filling in a saucepan, leaving a temporary clear path across the bottom.
Use the trail as a calibration check: if it vanishes instantly, keep cooking; if the mixture sits in a rigid trench, it has gone too far. The useful middle ground closes slowly behind the spatula.

5. Add the Lemon and Butter

Remove the saucepan from the heat and stir in the butter, lemon zest and lemon juice.

Let a small spoonful cool before tasting. Especially tart berries may need a little more sugar; stir it in while the mixture is still warm enough to dissolve. The lemon should brighten the blueberries without making the pie taste distinctly lemony.

6. Fold in the Remaining Blueberries

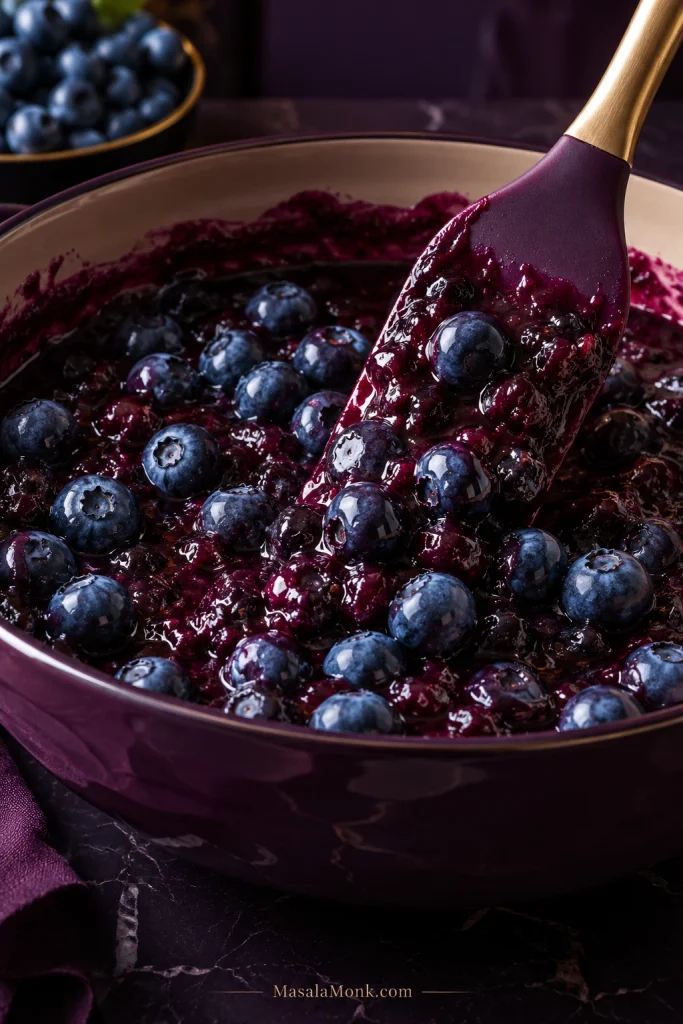
Put the reserved berries in a large heatproof bowl. Pour the cooked blueberry base over them and fold gently until the berries are evenly coated.

Now you can see why the fruit was divided: the cooked berries have become the sauce around a second batch that still looks like blueberries.

Whole blueberries being gently folded into a thick cooked blueberry base with a spatula.
Fold rather than stir aggressively here. The goal is to coat the second batch in the cooked blueberry base without crushing away the berry texture this two-stage method is designed to preserve.

Set the mixture aside while you roll the crust.

7. Roll the Bottom Crust

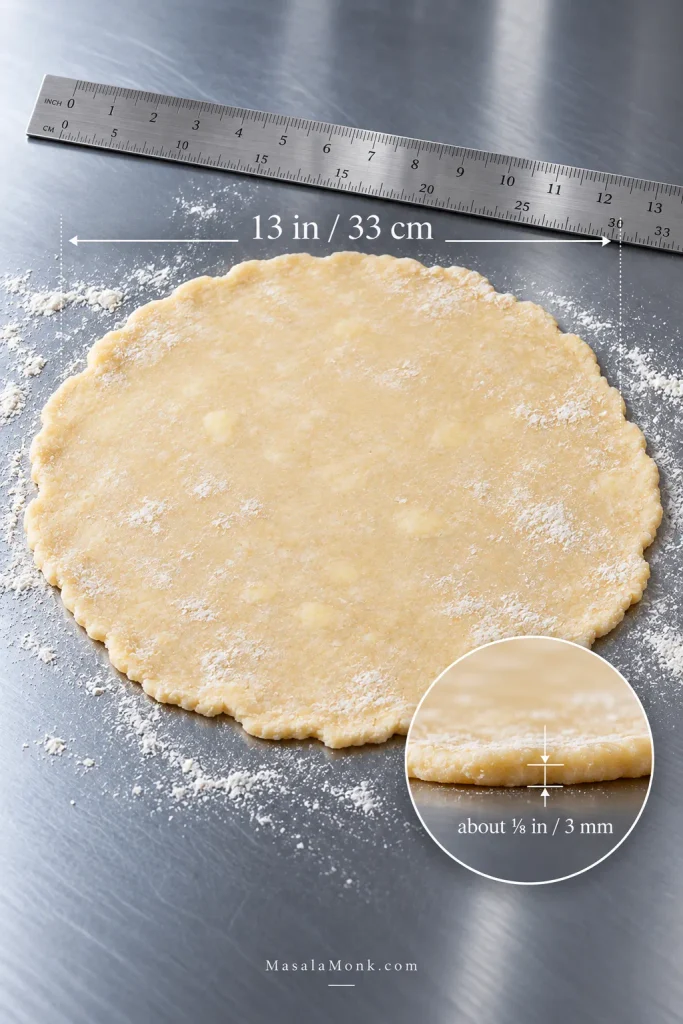
Roll the larger dough disk into roughly a 13-inch / 33 cm circle, about ⅛ inch / 3 mm thick. Lower it gently into the pie plate and let the pastry settle into the corners without stretching it.

Rolled pie dough on a stainless-steel surface measured to about 13 inches wide, with an inset showing roughly ⅛-inch thickness.
Use the ruler to avoid undersizing, but do not stretch dough that comes up short. Re-roll it slightly wider instead; stretched pastry is more likely to pull back as it bakes.

Dough that starts feeling soft or greasy needs another short chill before you continue.

8. Fill and Top the Pie

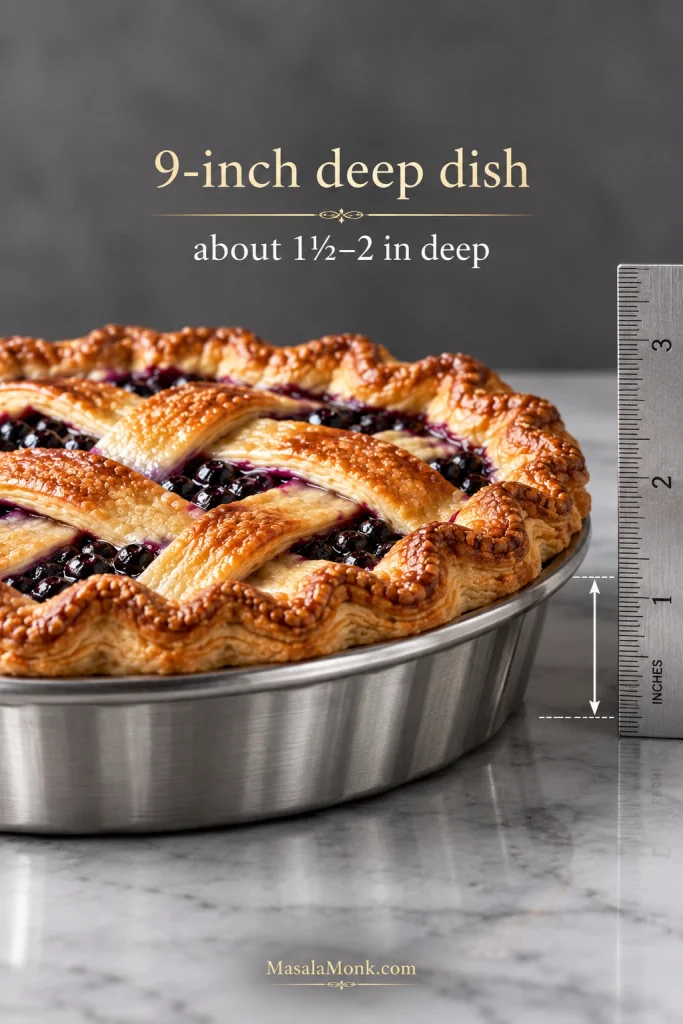
Spoon the blueberry mixture into the crust and spread it evenly, keeping the filling below the top edge of the pie plate. In a 9-inch deep-dish pan, that headroom gives the bubbling fruit somewhere to expand without crowding the crust.

Side view of a blueberry pie in a metal deep-dish pan beside a ruler showing approximately 1½ to 2 inches of depth.
Measure the usable inside depth rather than judging the pan by its outer rim. Enough headroom lets a generous blueberry filling bubble without crowding the crust or spilling over.

Roll the second dough disk to about ⅛ inch / 3 mm. Cut it into strips for a lattice, or lay it over the pie whole and cut several generous steam vents. Trim the excess pastry, fold the edges together and crimp firmly.

Beat the egg with the water or milk. Brush the top lightly and sprinkle with coarse sugar if using.

For a shortcut, a refrigerated store-bought double crust can replace the homemade pastry. Keep it cold and make sure there’s enough dough for a 9-inch deep-dish pie.

9. Chill While the Oven Heats

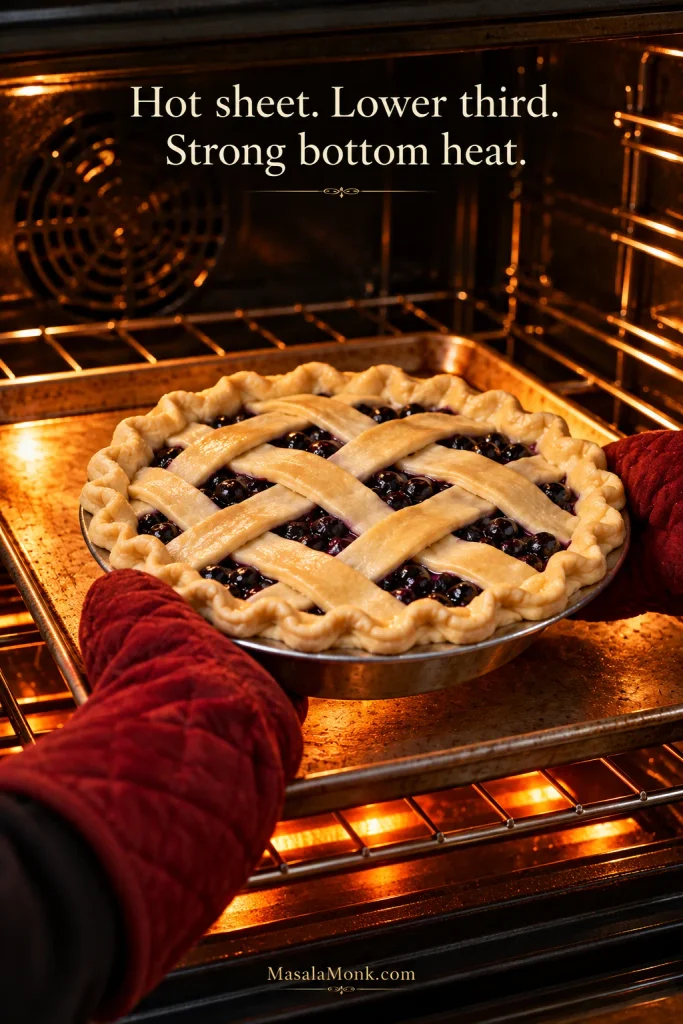
Refrigerate the assembled pie while the oven heats to 425°F / 220°C. Put a rimmed baking sheet in the oven as it preheats and position a rack in the lower third.

Raw lattice blueberry pie in a metal pie plate being placed with oven mitts onto a hot baking sheet on a lower oven rack.
A preheated sheet shortens the time the bottom pastry spends waiting for strong heat. That early boost is especially useful beneath a heavy, moisture-rich fruit filling.

The pastry should feel cold and firm before it goes into the oven. Leave it in the refrigerator a little longer if assembly has softened it noticeably.

10. Bake

Set the chilled pie on the hot baking sheet and bake for 15 minutes at 425°F / 220°C.

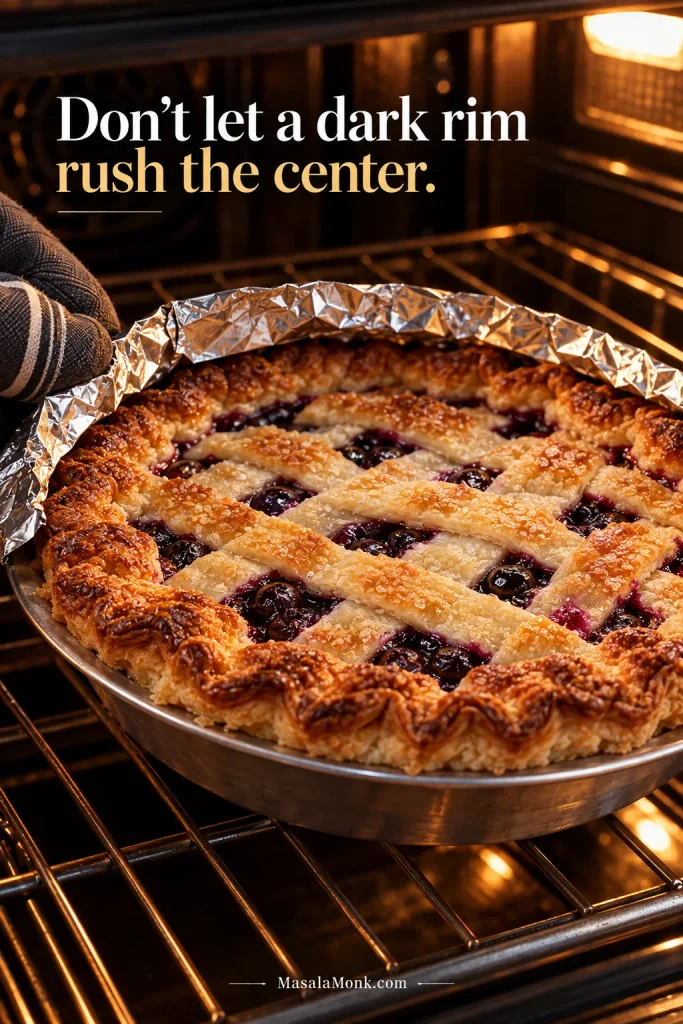
Reduce the oven to 350°F / 175°C and continue baking for about 40–55 minutes. The rim can darken well before the middle is finished. Once the pastry has enough color, cover the edge loosely with foil or a pie shield.

Blueberry lattice pie baking in an oven with the browned outer crust protected by foil while the center continues cooking.
Think of the foil shield as a brake on browning, not a signal that the pie is done. Protect the rim once it has enough color, then let the center keep catching up.

Don’t let a darkening rim rush the center.

11. Wait for the Center to Bubble

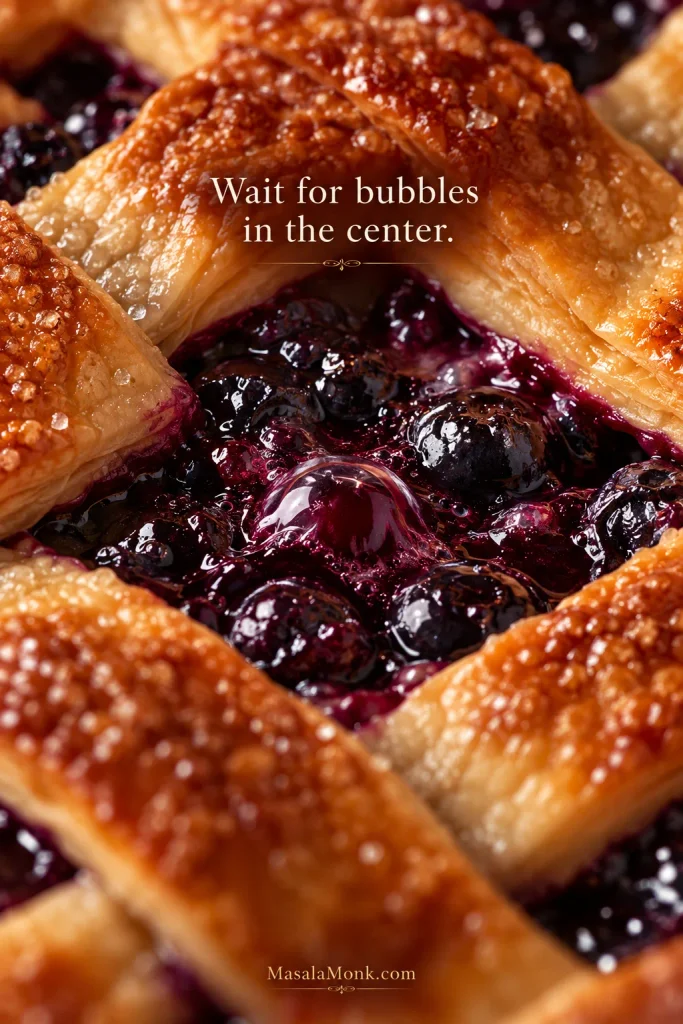
Watch through the lattice or steam vents. The pie is ready to come out when the crust is deeply golden and blueberry juice is actively bubbling through the center, not only around the edge.

Close-up through the center of a golden lattice crust showing thick blueberry filling actively bubbling between the pastry strips.
Edge bubbling happens sooner because the outside heats first. Consequently, activity through the lattice near the middle is a much more useful sign that the deepest part of the blueberry filling has caught up.

12. Cool Before Cutting

Transfer the pie to a cooling rack and leave it undisturbed for at least 3 hours before slicing. A longer rest gives the juices more time to settle and makes the wedges easier to cut cleanly.

Help the Bottom Crust Stay Crisp

The preheated baking sheet puts strong heat beneath the cold pie as soon as it enters the oven. A metal pie plate gives especially direct bottom heat and is the most straightforward choice for this method.

No separate blind bake is used here. The chilled assembled pie starts at high heat on the preheated sheet, giving the bottom crust a head start while the fruit cooks above it.

For a deeper look at bottom-crust browning and heat, see King Arthur Baking’s guide to preventing soggy pie bottoms.

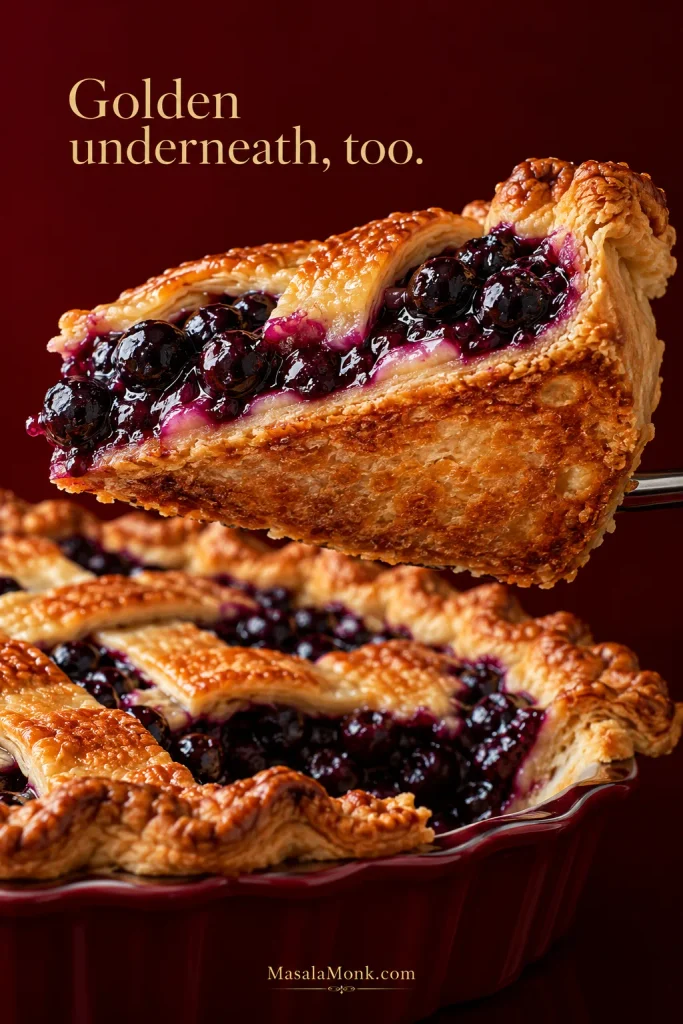
The bottom crust is easiest to judge on a lifted slice, where you can see whether the base browned along with the top instead of staying pale and damp.

Lifted blueberry pie slice tilted to reveal a dry, evenly golden-brown bottom crust beneath the berry filling.
Top-crust color does not prove the base is finished. Check the underside too: a dry, golden bottom points toward adequate heat, whereas a pale soft base is primarily a crust-and-baking problem.

A well-browned crust matters, but color alone doesn’t tell you whether the fruit in the middle is finished.

How Do You Know When Blueberry Pie Is Done?

The outside of a blueberry pie can look finished surprisingly early. Around the rim, browning and bubbling begin before the middle catches up. That’s why the center matters.

Once the edge has enough color, shield it and keep baking. Wait for visible bubbling through the openings near the middle as well.

The clock gets you into the right window, but the pie in front of you gets the final say. Berry temperature, pan material and individual ovens can all shift the exact baking time.

Once the center is bubbling and the pastry is baked through, the oven has finished its job. Even then, the fruit still needs time to settle.

Let the Pie Set Before You Slice It

The filling smells ready long before it is ready to slice.

Straight from the oven, the blueberry juices are still loose. As the pie cools, the thickened liquid settles around the fruit and the whole filling becomes easier to cut cleanly. A slice taken too early doesn’t show you what the finished pie will be like.

Two blueberry pie slices comparing a hot, loose slice with a cooled slice that holds its shape more cleanly.
Use the rested slice as the real texture test. Heat temporarily loosens thickened fruit juices, while cooling reveals whether the filling can hold a wedge and still remain soft.

That’s a long wait when the pie is sitting right there. It pays off. For a warm dessert, let the whole pie set first and gently reheat individual slices later.

What Your Slice Is Telling You

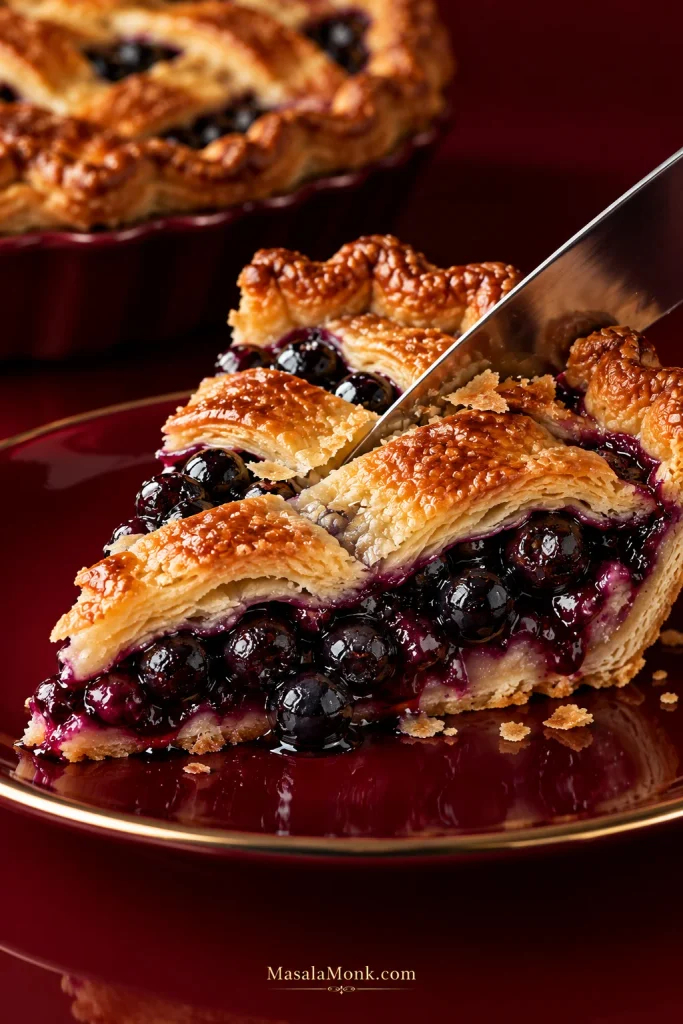
Once the pie has cooled, the first slice tells you quite a lot. The knife should meet a little crisp resistance from the crust before moving into soft berries and thickened blueberry juices.

Knife cutting through a blueberry pie slice with flaky golden crust, recognizable berries and cohesive dark purple filling.
For cleaner wedges, use a sharp knife and wipe the blade between cuts. That tidy cut exposes the real texture of the blueberry filling instead of dragging juice and crumbs through the slice.

A good wedge holds its shape without looking stiff. You can still see individual blueberries, with purple juice settled around them. A little juice on the plate is welcome; blueberry pie should still feel like fruit.

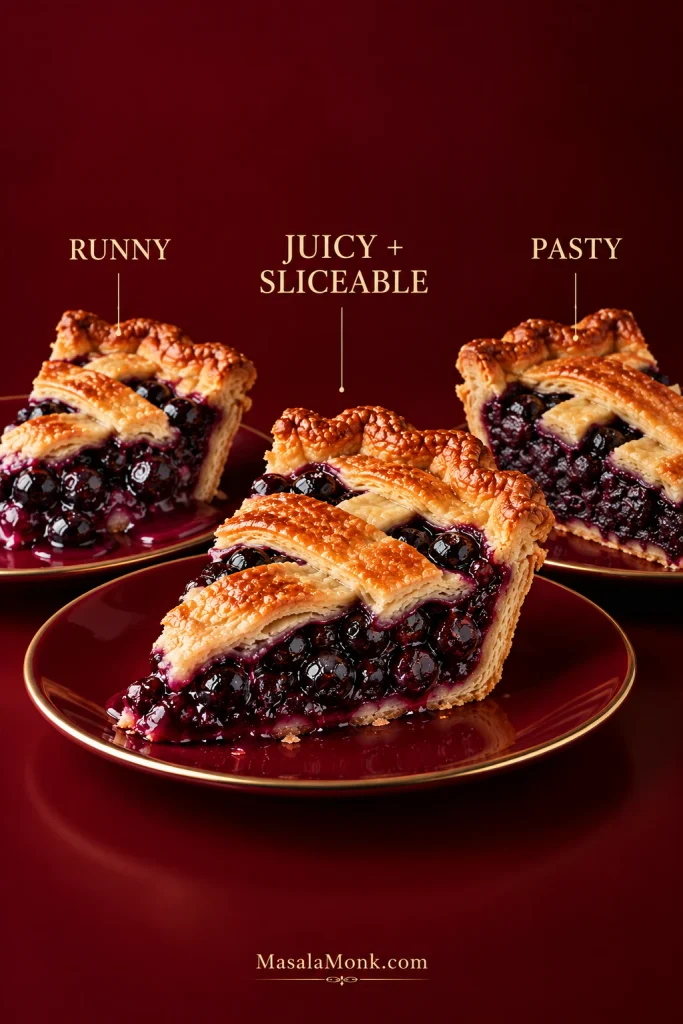
Thin liquid running freely from a fully cooled slice points toward excess fruit moisture or a berry base that didn’t cook long enough. A dense, pasty slice points in the opposite direction: the base may have cooked down too far, or the fruit may have more thickener than it needs.

Runny filling can come from several different places. Extra starch solves only one of them. Judge the filling only after it has cooled, then compare how freely the juice moves around the berries.

Three blueberry pie slices comparing loose runny filling, a juicy sliceable filling and an overly thick pasty filling.
Compare the liquid around the berries, not only whether the wedge stands up. Free-flowing juice points toward runny; a dull, rigid mass points toward pasty; the middle should still glisten and hold.

When the fruit looks right but the underside is soft, leave the cornstarch alone. That’s a crust-and-heat problem.

If your slice doesn’t look like that, the pattern usually gives you a clue about what happened.

Blueberry Pie Troubleshooting

ProblemWhat to check first
Pie is runny but still warmLet it cool completely before judging the final texture. Hot berry filling is naturally much looser than cooled filling.
Dark crust, quiet centerShield the rim and continue baking until the middle is visibly bubbling.
Watery pie after using frozen berriesCheck whether the thawed fruit was drained before measuring and whether the berry base cooked until properly thickened.
Stovetop base stayed thinIt needed more cooking before the second half of the berries went in.
Filling is gummy or pastyThe base may have cooked down too far, or the fruit may have more thickener than it needs.
Bottom crust is softCheck pastry temperature, bottom heat and overall baking time before changing the filling.
Pie overflowedCheck the depth of the pie dish and keep the fruit below the rim during assembly.
Berries taste too tartTaste the cooked base before assembly and adjust the sweetness while it’s still warm enough for additional sugar to dissolve.

Storage & Make-Ahead

Let the pie cool completely before covering it. The USDA Food Safety and Inspection Service guidance for pie storage says fruit pies can be kept at room temperature for 1–2 days or refrigerated for up to 7 days.

For eating quality, sooner is better. The crust is at its crispest on baking day; refrigeration buys more holding time, but the pastry gradually softens as it sits against the fruit filling.

Can You Make Blueberry Pie Ahead?

Yes. The dough can be made 2–3 days ahead, wrapped well and refrigerated. You can also bake the whole pie the day before serving; cool it completely before covering so trapped steam does not soften the crust.

Can You Freeze Blueberry Pie?

Yes. Cool the baked pie completely, freeze it until firm, then wrap it well. For best quality, use it within about 3 months. Thaw the wrapped pie in the refrigerator.

If you want it warm, reheat the thawed pie at about 350°F / 175°C until heated through; a whole pie may take around 30 minutes. For only one or two servings, warming individual slices is quicker and protects the rest of the crust from another full heating cycle.

Serving Blueberry Pie

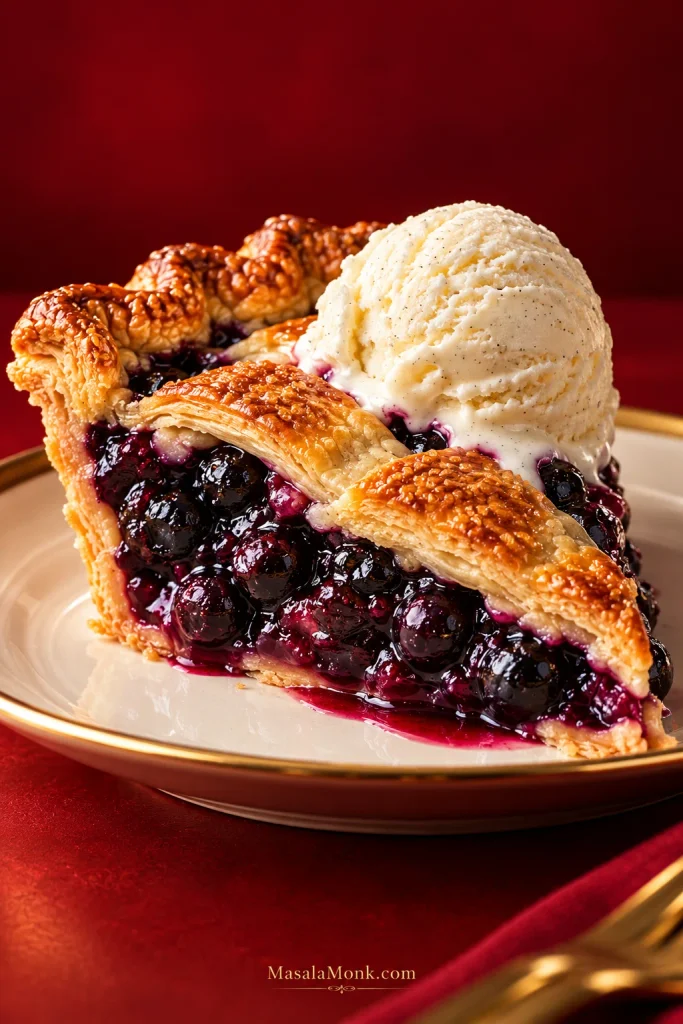
Serve the pie as it is, or add something cool and creamy alongside. A scoop of homemade vanilla ice cream gives you the classic creamy contrast, while softly whipped cream is lighter and lets the blueberries stay in front.

Slice of blueberry lattice pie topped with melting vanilla ice cream, showing flaky golden crust and dark blueberry filling on a plate.
Let the whole pie set first; then warm individual slices if you want the classic contrast of warm blueberry pie and cold vanilla ice cream without loosening the entire filling again.

Then comes the reward for waiting: the knife gives a little through the golden crust, the blueberries stay tucked into the dark filling, and a small amount of purple juice settles around the slice instead of running away from it.

Posted on — Leave a comment

Lemon Bars Recipe: Easy, Tangy Bars with Buttery Shortbread Crust

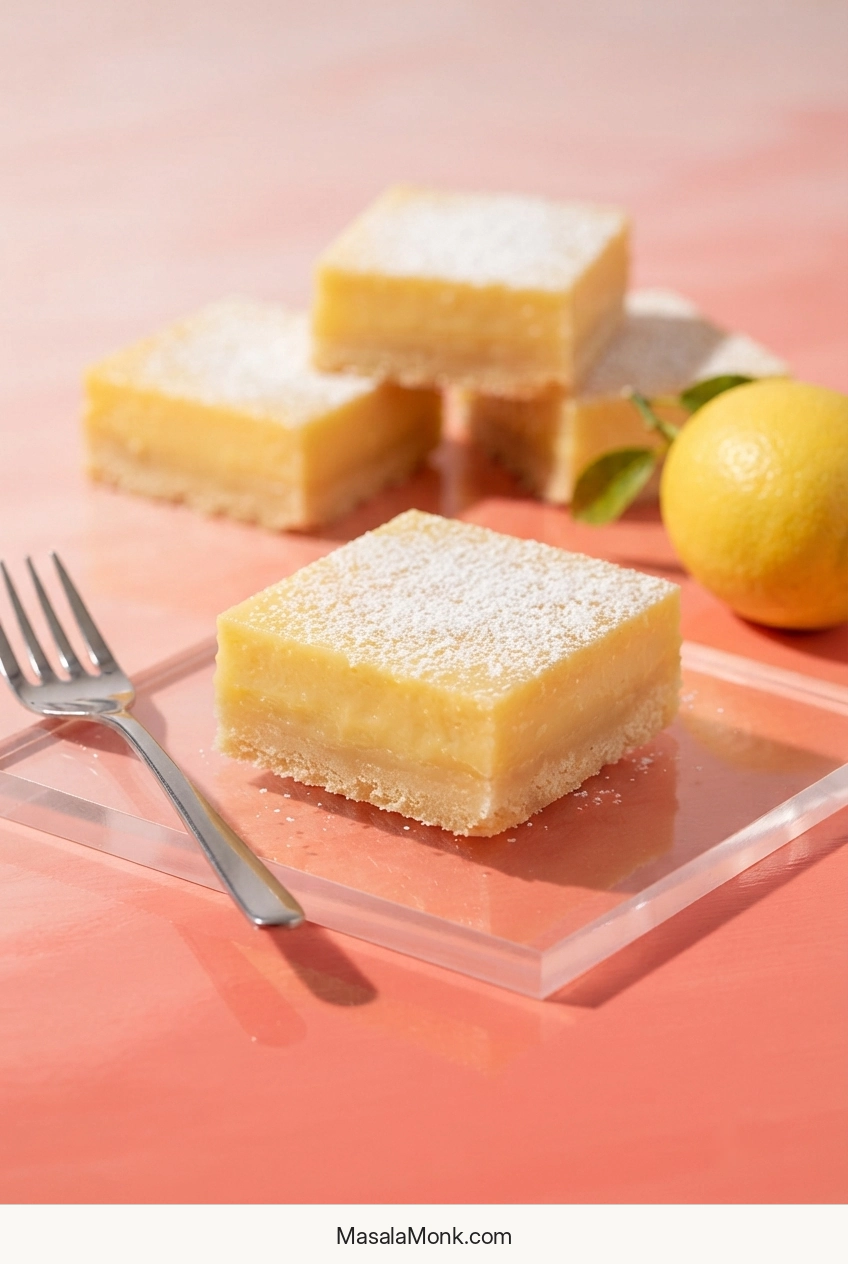
Finished lemon bars with smooth pale-yellow lemon filling over thin golden shortbread crusts, lightly dusted with powdered sugar.

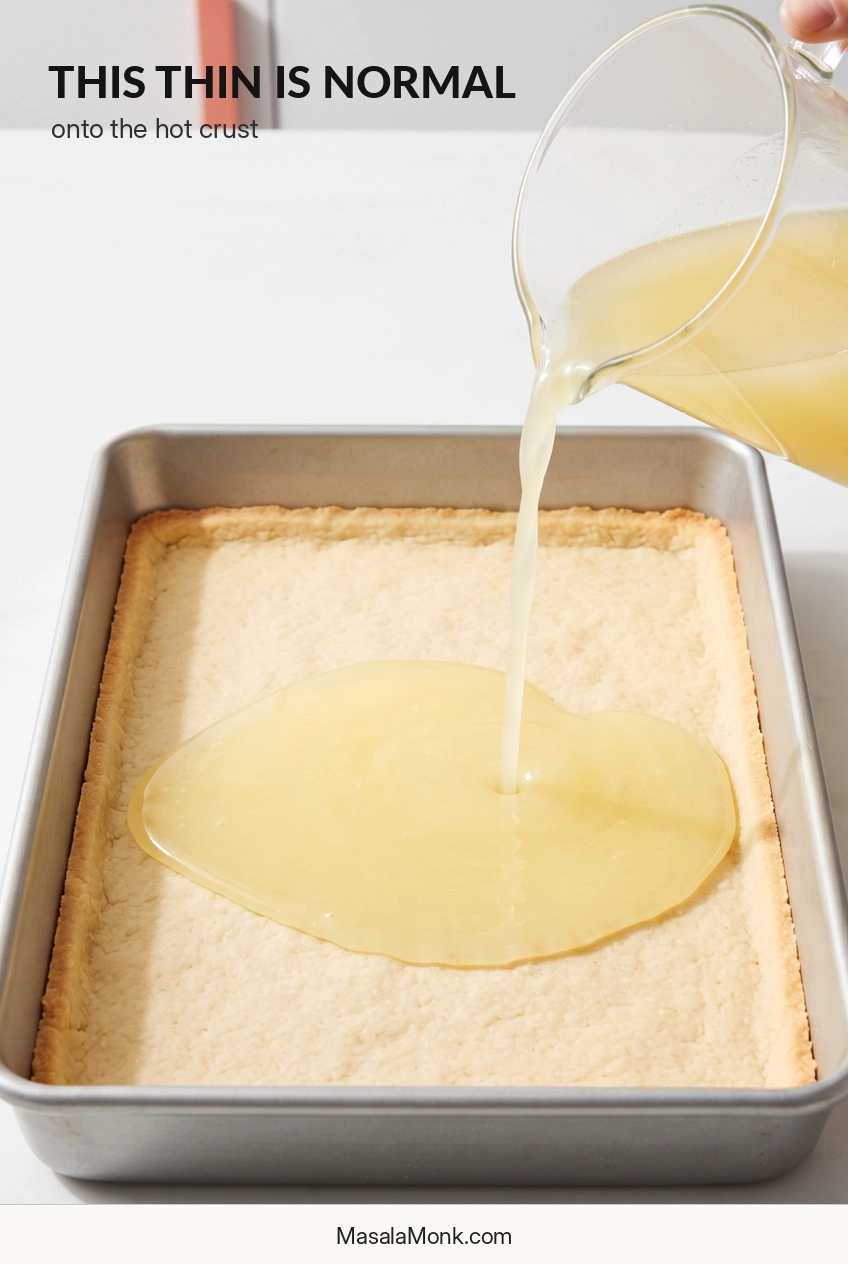
Homemade lemon bars—also called lemon squares—ask you to trust a filling that looks far too thin when it first goes into the oven. It sits over freshly baked shortbread, pours almost like cream, and is still surprisingly soft when the pan comes back out.

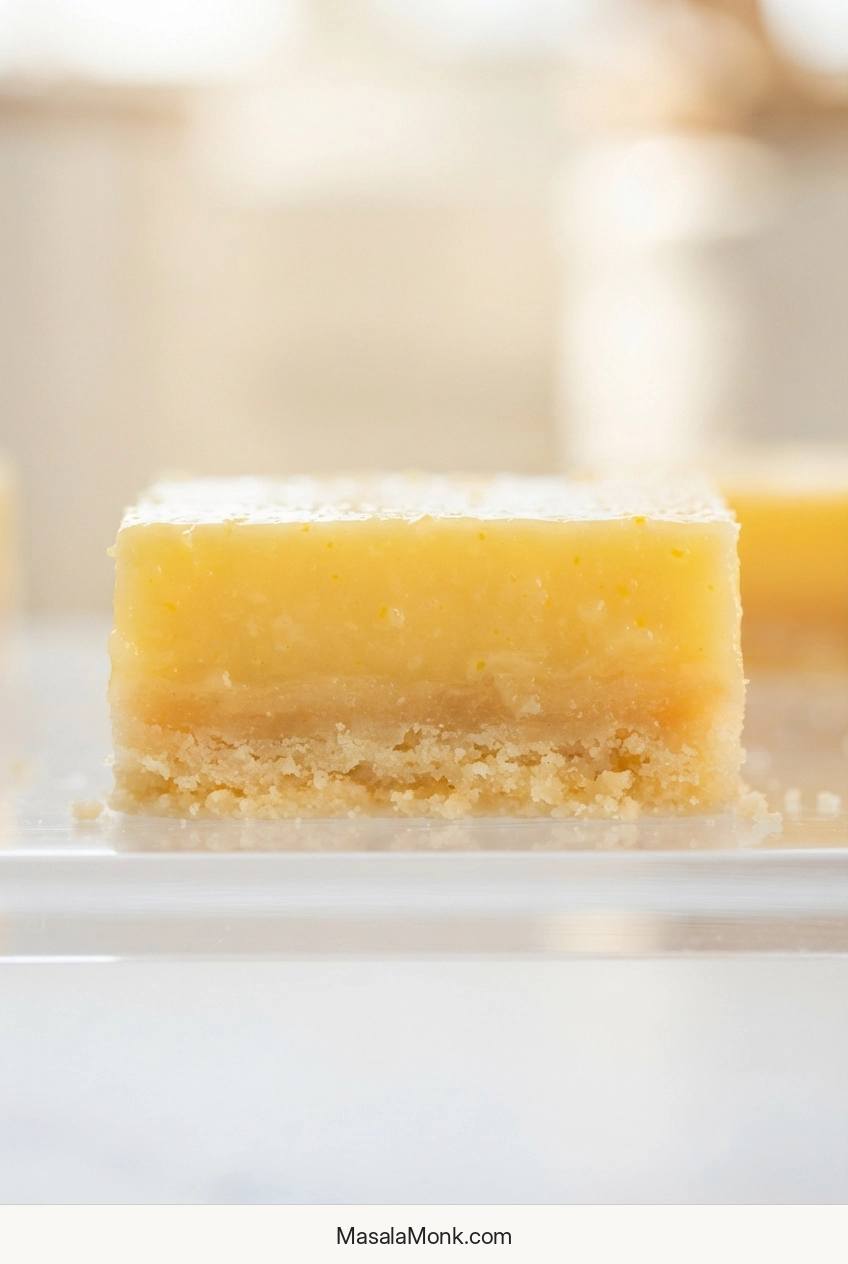
After cooling and chilling, that loose mixture becomes a smooth, bright lemon layer that holds its shape when cut. Underneath, the shortbread stays buttery and crisp-tender, substantial enough to support the filling without taking over the bite.

Classic Lemon Bars Recipe

Bright lemon custard over tender shortbread, baked only until the center moves softly and then chilled until fully set. Have the filling ready before the crust comes out so the two layers can go straight back into the oven.

Pan
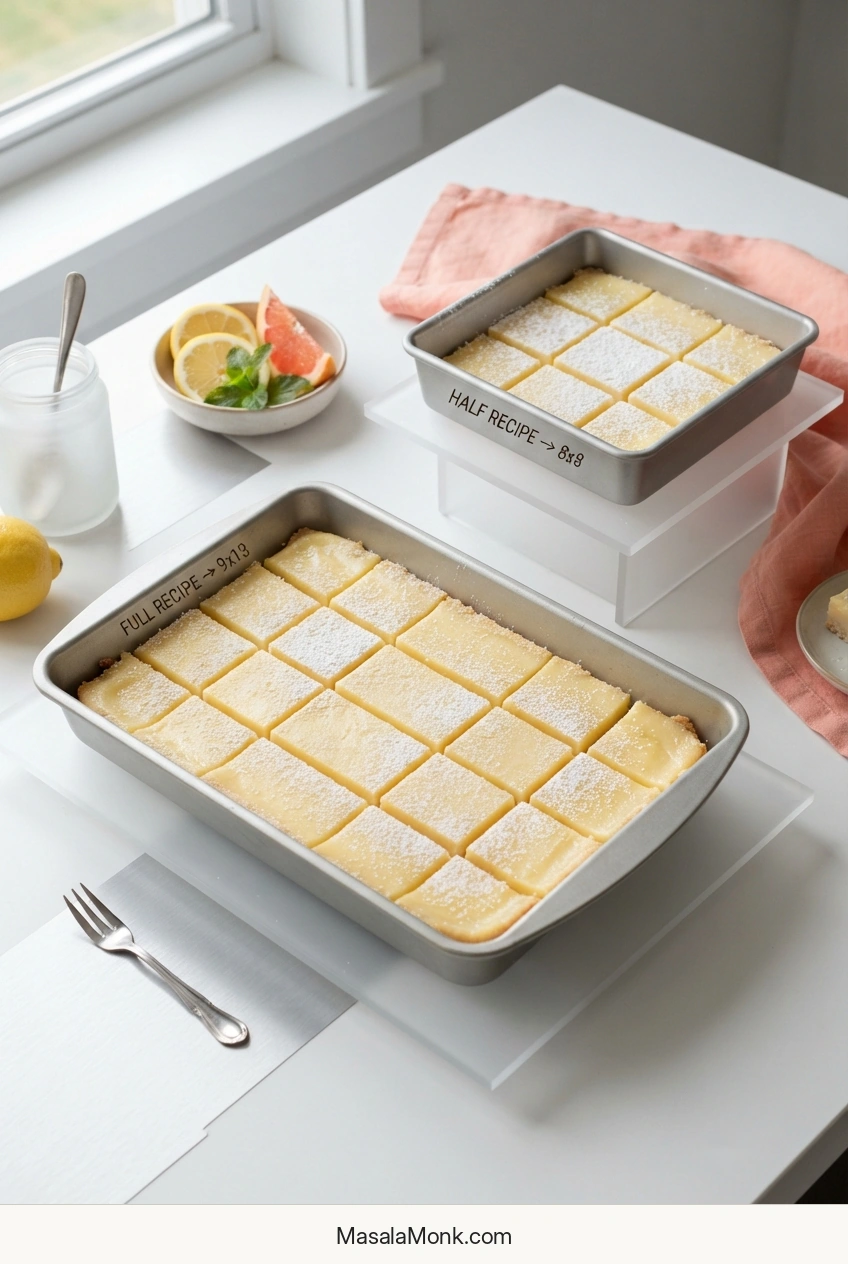
9 × 13 in / 23 × 33 cm

Yield
20 standard bars

Hands-On
About 20 min

Crust Bake
20–24 min

Filling Bake
About 22–27 min

Cool
About 1–1½ hr

Chill
At least 3 hr

Total
About 5½ hr

Equipment

  • 9 × 13-inch / 23 × 33 cm light-colored metal baking pan
  • Parchment paper
  • Two mixing bowls, whisk and silicone spatula
  • Fine grater or Microplane and citrus juicer
  • Flat-bottomed measuring cup or glass for pressing the crust
  • Kitchen scale, recommended
  • Long sharp knife for cutting

Pan note: A light-colored metal pan gives the most predictable bake for these timings. If your bare aluminum pan has previously given acidic foods a metallic taste, use glass instead and follow the visual cues rather than trying to match the timing exactly.

Shortbread Crust

  • 1 cup / 226 g unsalted butter, melted and cooled for a few minutes
  • 1¾ cups plus 2 tablespoons / 225 g all-purpose flour
  • ⅓ cup / 40 g cornstarch
  • ¾ cup / 90 g powdered sugar
  • ½ teaspoon fine salt
  • 1 teaspoon vanilla extract, optional

Using cups? Spoon the flour into the measuring cup and level the top instead of scooping straight from the bag. Packed flour can make the chilled crust much harder than intended.

Lemon Filling

  • 2 cups / 400 g granulated sugar
  • 2 tablespoons finely grated lemon zest, from 2–4 of the lemons
  • 6 tablespoons / 46 g all-purpose flour
  • ¼ teaspoon fine salt
  • 6 large eggs
  • 1 cup / 240 ml freshly squeezed lemon juice, usually from 5–7 lemons total
  • Powdered sugar, for finishing

Zest before you juice. Grate only the yellow outer peel and stop before you reach the bitter white pith. Then squeeze the same lemons and measure the juice. Once you have 1 cup / 240 ml, stop.

Method

Prepare the Crust and Lemon Filling

  1. Heat the oven. Set a rack in the center and heat the oven to 350°F / 175°C conventional. For a fan oven, use 160°C and start watching the crust a little early. Line the pan with a parchment sling, leaving overhang on two opposite sides so the chilled slab can be lifted out later.
  2. Mix the shortbread. Stir together the flour, cornstarch, powdered sugar and salt. Add the melted butter and optional vanilla. Mix until no dry flour remains. The mixture will look crumbly but hold easily when squeezed.
  3. Press an even base. Scatter the mixture over the whole pan before pressing it down. Use the bottom of a measuring cup or glass to level it, paying particular attention to the corners and perimeter. Close visible cracks or thin spots, then leave it alone.
  4. Par-bake the crust. Bake for 20–24 minutes. The surface will look dry and set, with light-golden color beginning around the edges. Make the filling while the crust is in the oven.
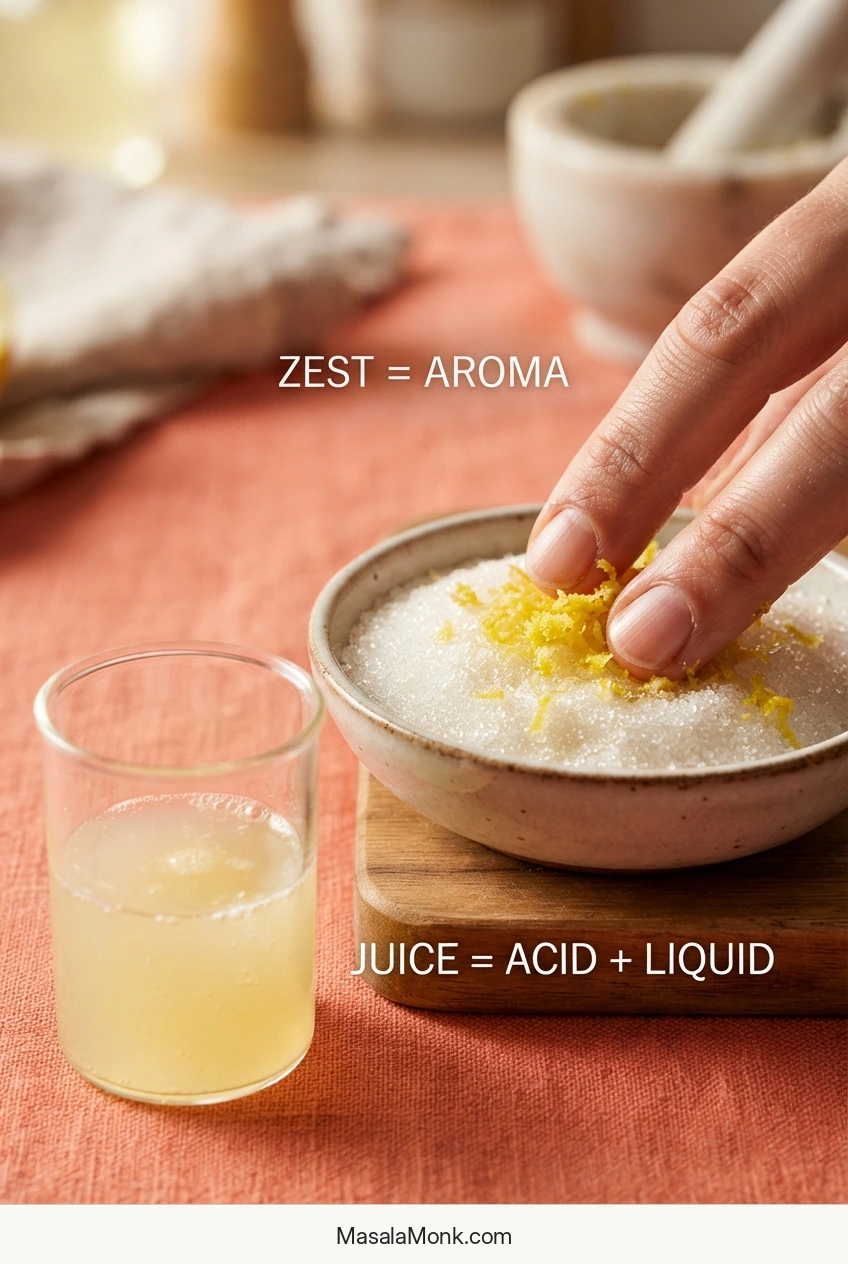
  5. Make the lemon sugar. Put the granulated sugar and zest in a large bowl. Rub them together with your fingertips for 30–60 seconds. The sugar will become damp, and the bowl should smell much more strongly of fresh lemon. Whisk in the flour and salt.
  6. Mix the lemon filling. Whisk in the eggs until evenly combined, then add the measured lemon juice and whisk just until smooth. The mixture will be very thin and easy to pour. If this is your first batch, this is often the point that looks wrong. It isn’t.

Bake, Chill and Finish

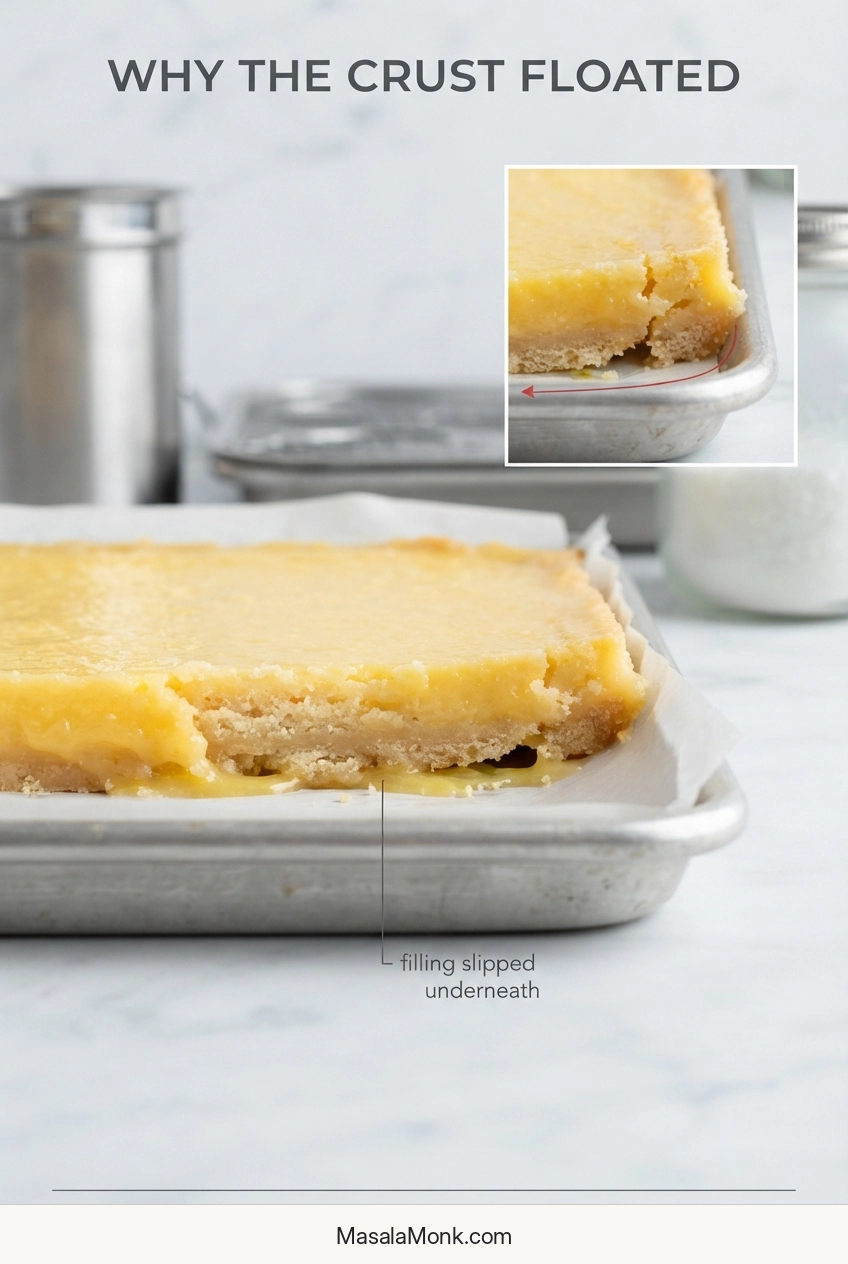
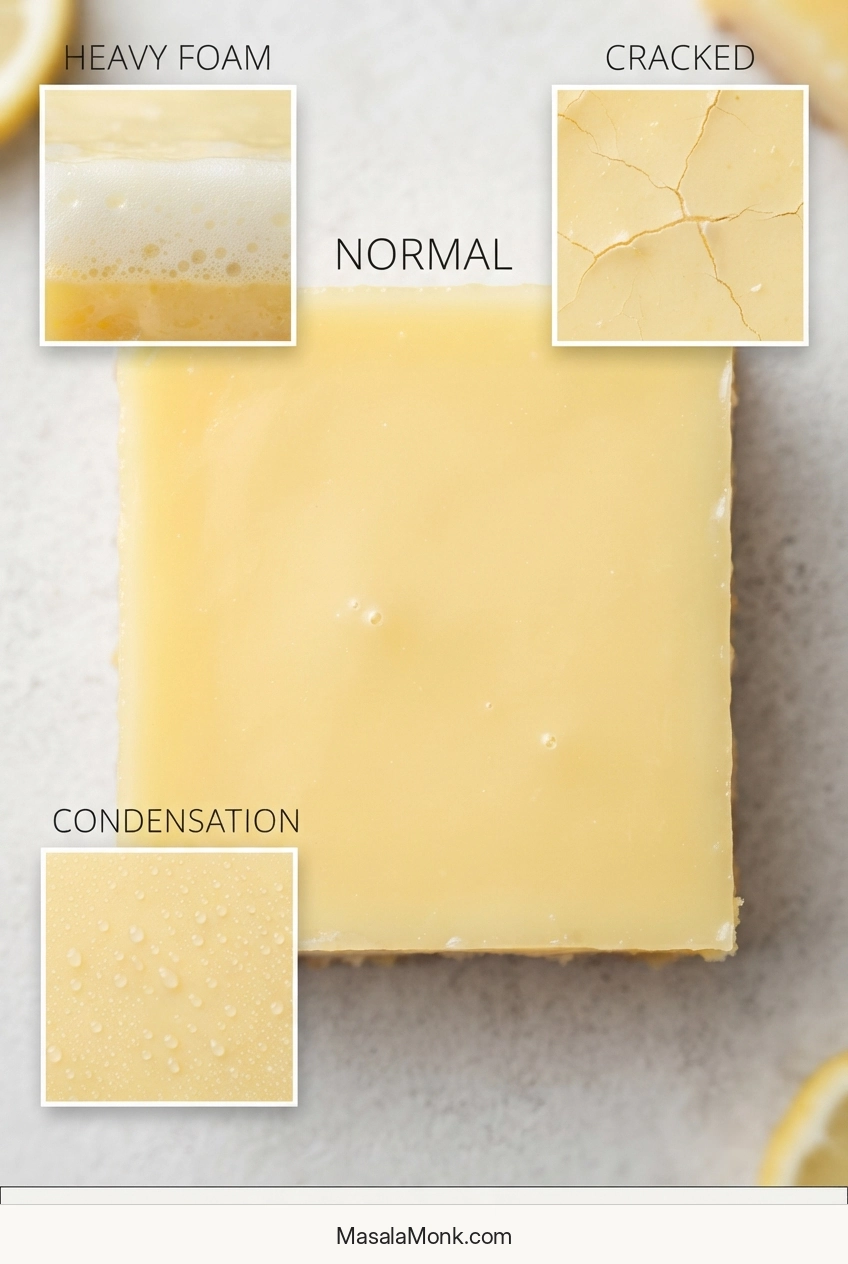
  1. Pour onto the hot crust. Take the crust from the oven and reduce the temperature to 325°F / 165°C conventional; for a fan oven, use 150°C. If you see an obvious crack or edge gap, gently nudge the surrounding shortbread closed with the back of a spoon before pouring in the filling. If a thick layer of foam has collected on top, let it settle briefly and give it one gentle stir. Pour the filling onto the hot crust and return the pan straight to the oven.
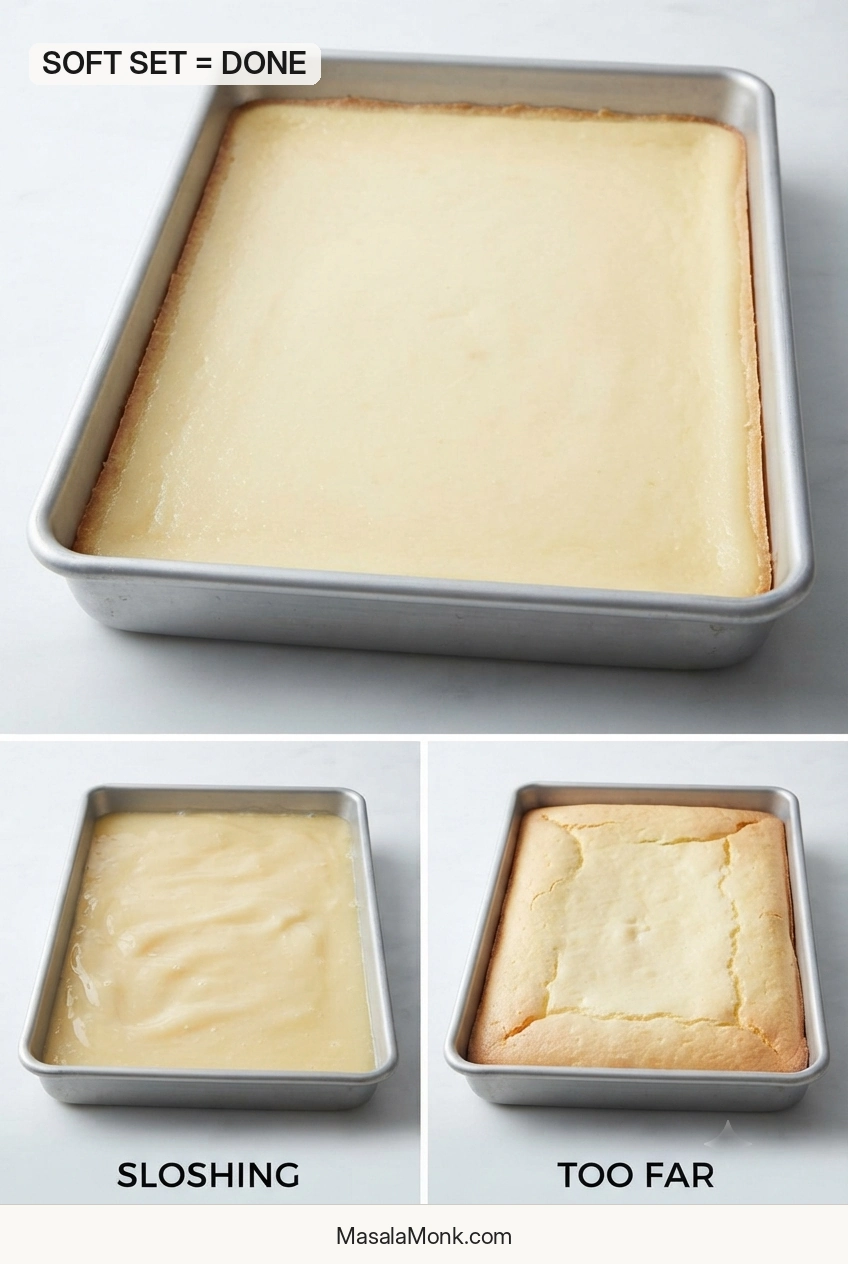
  2. Bake until the center moves as one layer. Begin checking at about 22 minutes. The edges will be set while the center moves softly when the pan is nudged. If liquid visibly ripples or sloshes underneath, give it a few more minutes. Most pans will finish in roughly 22–27 minutes.
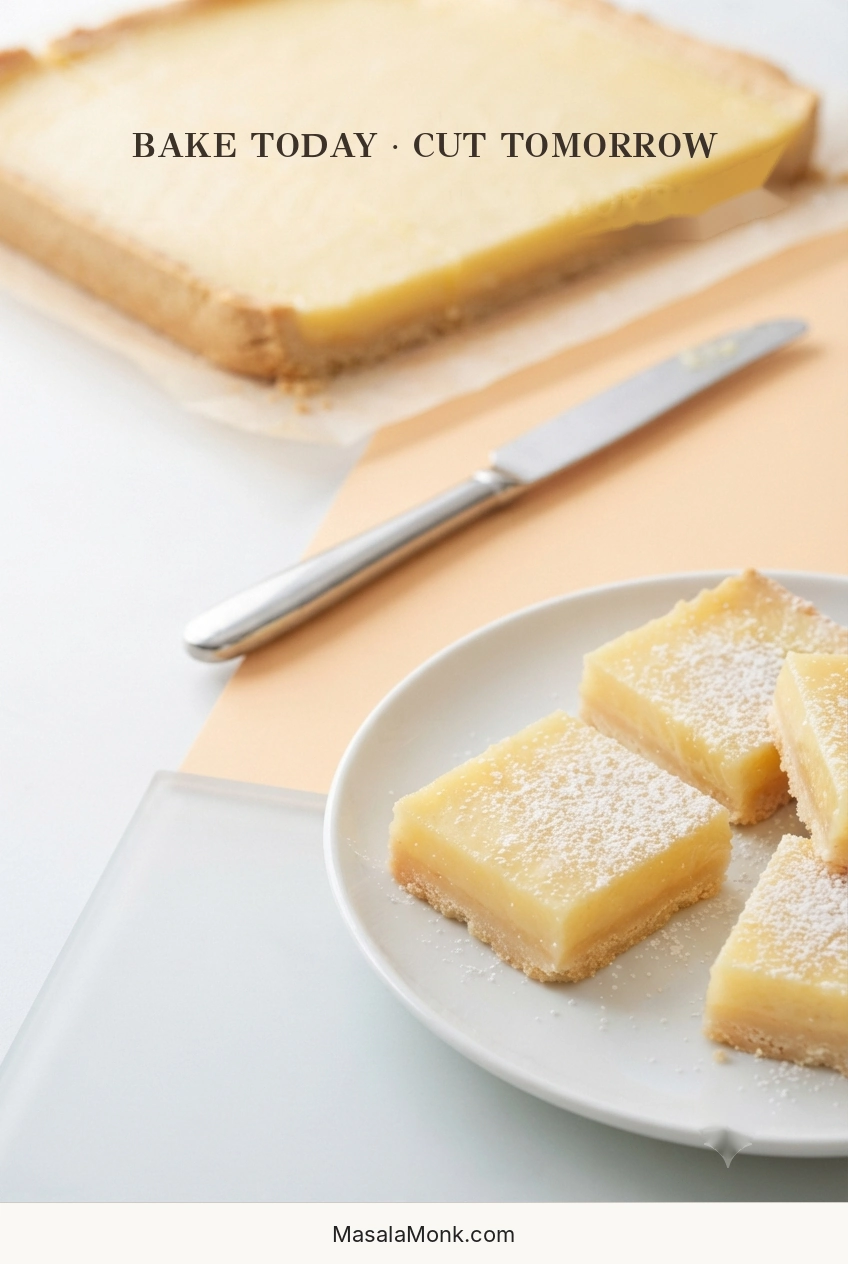
  3. Cool, then chill. Set the pan on a rack until the filling and pan are no longer warm, usually 1–1½ hours. Refrigerate for at least 3 hours. Cutting while the custard is warm or only partly chilled turns defined layers into a much messier job. Overnight chilling is excellent when neat slices matter.
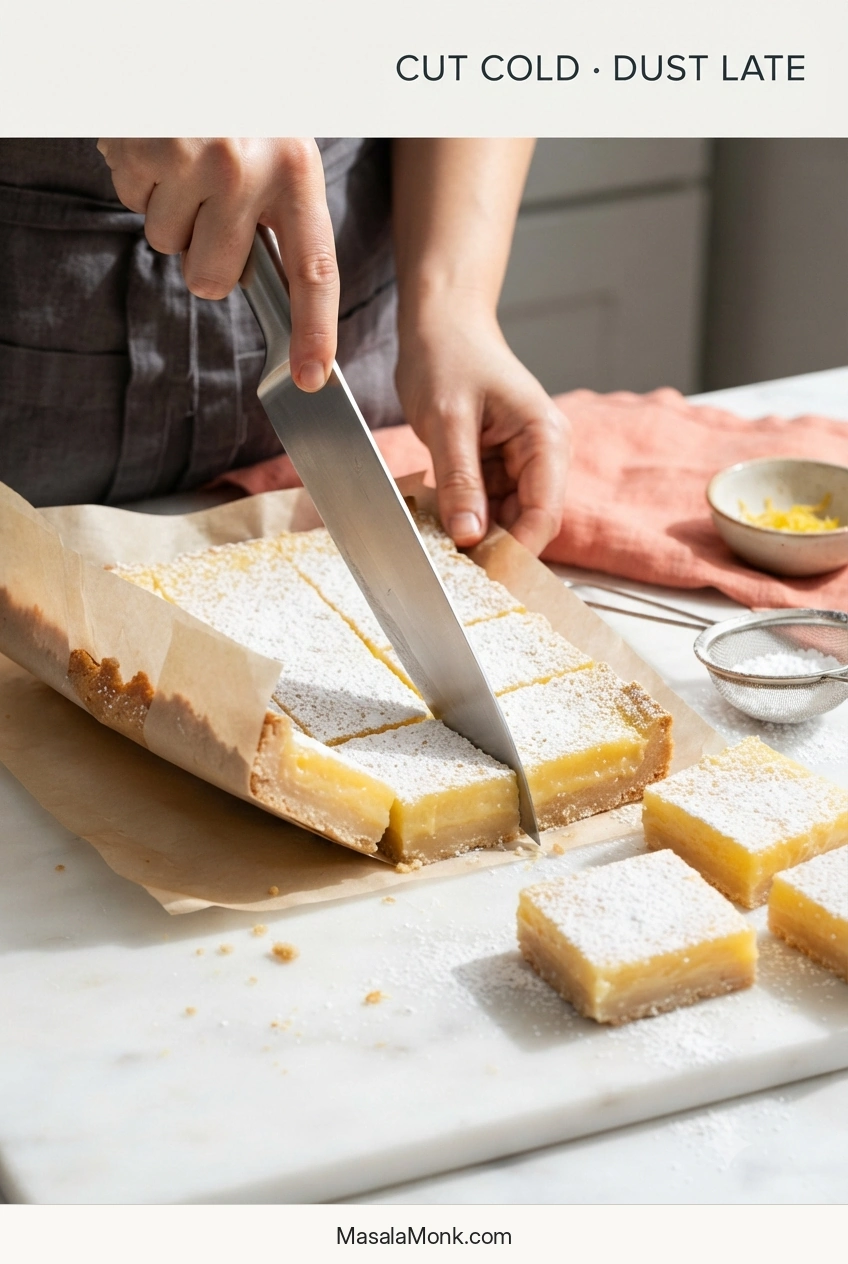
  4. Cut and finish. Lift the cold slab out by the parchment. Use a long sharp knife and wipe the blade after each cut. Dust with powdered sugar shortly before serving.

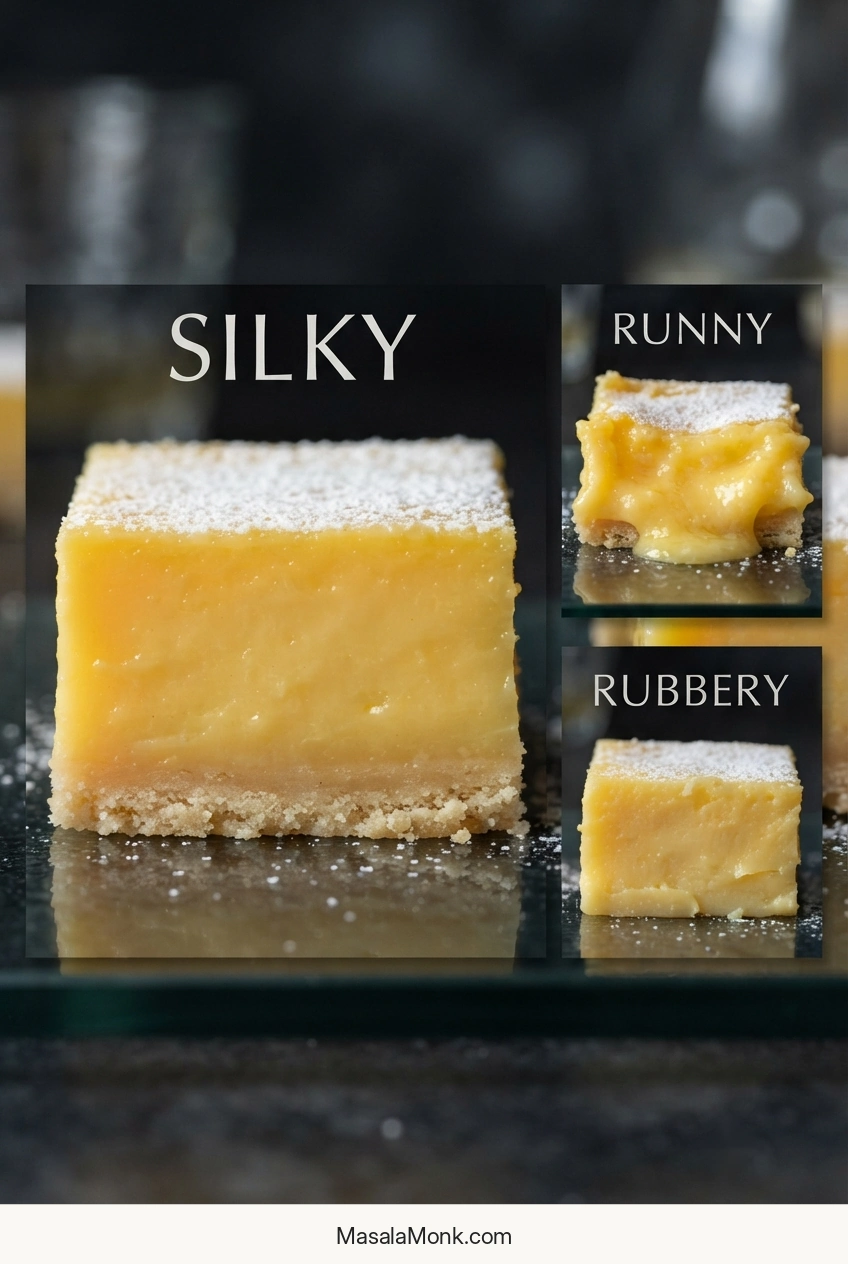
Cold from the refrigerator, the lemon filling is silky and firm enough to hold its shape, with lemon arriving before the butter and shortbread. As the chill comes off, both layers soften slightly and the citrus aroma comes forward.

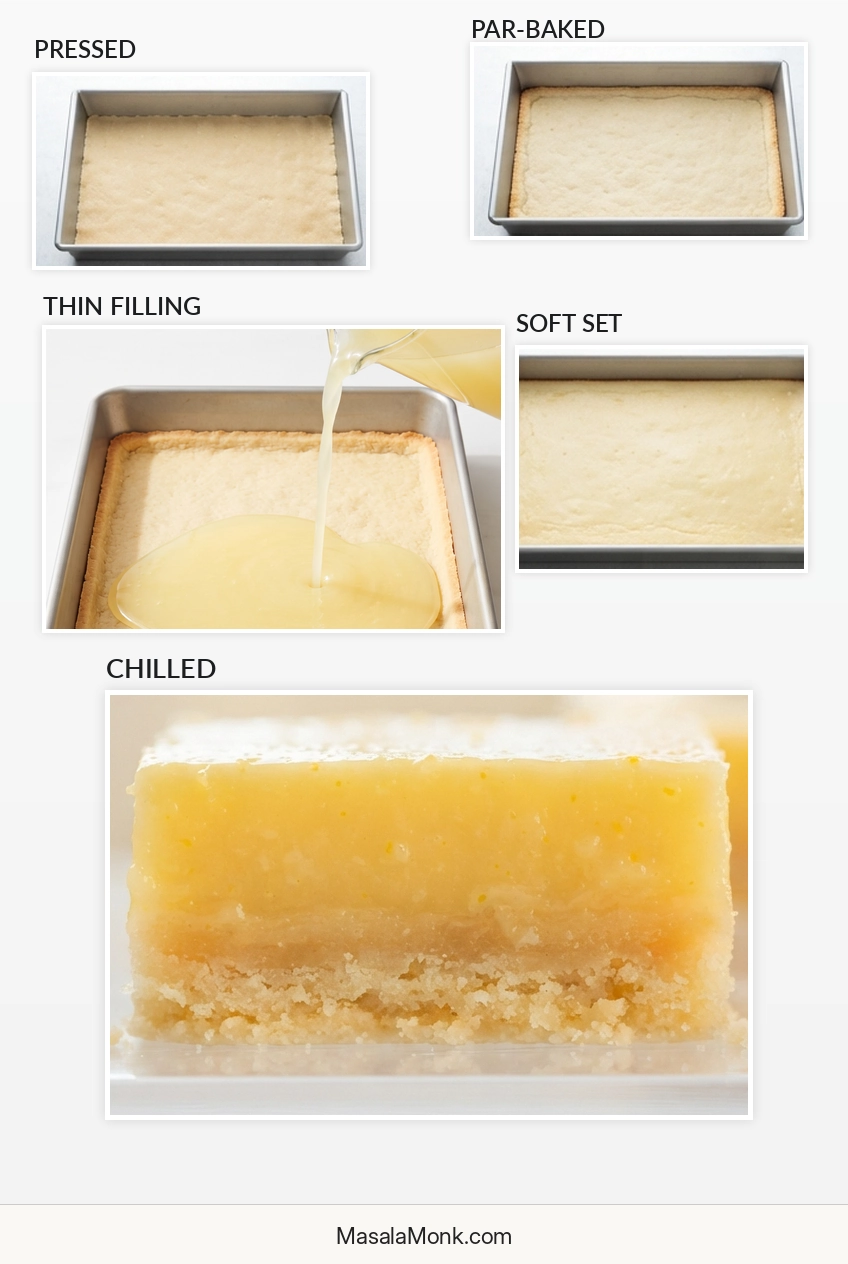
What the Pan Should Look Like

The crust, raw filling and finished custard look quite different from one another. These are the checkpoints worth remembering.

StageLook for
Pressed crustAn even layer reaching the corners and perimeter, without obvious cracks or thin channels.
Par-baked crustA dry, set surface with the first light-golden color around the edges.
Raw fillingThin, smooth and easily pourable. A few small bubbles are normal.
Finished bakeSet edges and a center that moves gently as one soft layer, with no liquid sloshing underneath.
Fully chilledFirm enough to lift and slice neatly, but still silky when you bite into it.
Five-stage visual showing pressed shortbread, lightly par-baked crust, thin raw lemon filling, a soft-set baked lemon layer, and a chilled finished bar.
The important changes happen in texture and structure, not just color: the flat crust sets first, the very thin filling follows, and chilling finally turns the soft baked center into a clean-cut bar.

The Shortbread Has Two Jobs

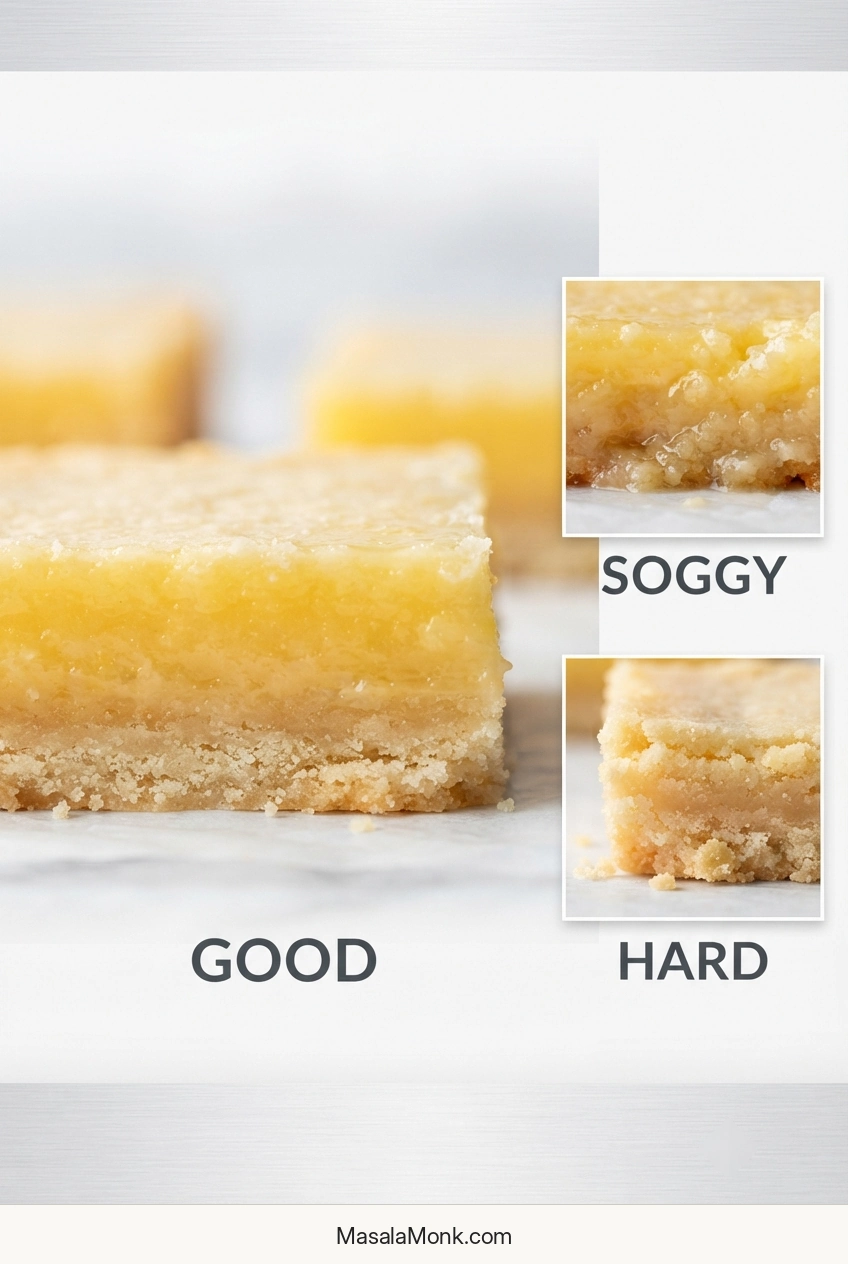
It needs to taste like shortbread, and it has to support a bowlful of liquid filling. A very thick base may feel safer under all that liquid, but too much shortbread leaves you with a bar that tastes mostly of crust.

A little cornstarch takes the place of some flour and helps the shortbread stay tender once the bars are cold. Spread the crumbs throughout the pan before pressing them down. Even thickness matters more than brute force.

Firmly packed is enough. Once the crust is level and the obvious gaps are gone, leave it alone. Butter-rich shortbread is naturally firmer when cold.

Gluten-free: For gluten-free lemon bars, use a recipe developed for the particular flour blend you plan to use instead of making a straight 1:1 substitution in this shortbread. Different blends absorb butter differently.

Lemon Juice and Zest

Lemon juice provides most of the acidity and the bulk of the liquid; zest adds concentrated aromatic citrus oils. For stronger lemon aroma, add more zest. Extra juice changes the amount of liquid the custard has to set. Lemons vary widely in size and juiciness, so measure the juice rather than relying on the number of lemons.

Hands rubbing finely grated lemon zest into granulated sugar beside a clear glass of fresh lemon juice.
Fresh zest and lemon juice do different jobs in the filling: rubbing the zest into sugar releases aromatic oils first, while the juice brings the sharp acidity that makes the bars taste distinctly lemony.

Fresh juice is the better default when lemon is the main flavor. Serious Eats’ fresh-versus-bottled testing found the difference mattered most in lemon-forward recipes, while fresh zest narrowed the gap. If you don’t have enough lemons for a full cup, bottled juice plus fresh zest is the better fallback.

Meyer lemons work at the same measured juice volume and give a sweeter, more floral result with less sharp acidity.

Can you use prepared lemon curd instead? Not as a direct swap. Lemon curd has already been cooked and balanced differently, so it will not behave like the raw egg-lemon filling used here.

When to Add the Filling

Pour the filling onto the crust while it is still hot. The residual heat begins setting the custard where it meets the shortbread, helping the two layers stay where they belong.

Keep the handoff short. Lower the oven temperature, pour in the filling and send the pan straight back in.

Thin pale-yellow lemon filling pouring from a clear pitcher onto a flat par-baked shortbread base in a rectangular metal baking pan.
The raw lemon mixture should look almost unexpectedly loose; when it lands on the hot shortbread, it levels into a shallow layer rather than sitting on top as a thick mound.

How to Tell When Lemon Bars Are Done

Begin checking around 22 minutes. Lemon bars are ready when the edges are set and the center moves softly as one layer when you gently nudge the pan. If liquid visibly ripples or sloshes underneath, keep baking.

Rectangular baking pan showing the desired soft-set lemon-bar center alongside smaller examples of a liquid underbaked center and a firmer overbaked center.
Don’t wait for the center to look completely firm in the oven; a gentle, unified movement is the useful checkpoint, whereas obvious liquid sloshing means the filling is not there yet.
What you seeWhat to do
Liquid ripples or sloshingKeep baking and check again after a few minutes.
Set edges; center moves softly as one layerTake the pan out. Cooling and chilling will firm it substantially.
Heavy puffing, strong browning or a rigid hot centerThe custard is heading toward a firmer, more rubbery texture.

Glass, dark nonstick and light metal pans heat differently, and home ovens are rarely perfectly calibrated. Use the timing as a guide, then watch the center. Chilling finishes the texture; it does not finish the cooking.

If the texture already looks wrong, jump to troubleshooting.

Cooling and Cutting

Let the pan cool until it is no longer warm before covering and refrigerating it. Cover too early and trapped steam can settle back onto the lemon layer as condensation.

What the Chilled Layers Should Look Like

The long chill is worth it. Once the slab lifts out in one piece, the layers are easy to see: lemon on top, shortbread underneath, without the two smearing together as you cut.

Close side view of a chilled lemon bar showing a smooth pale-yellow filling above a thin compact golden shortbread crust.
The clean boundary between the two layers is the useful clue here: the chilled lemon custard should cut as one tender layer while the shortbread stays compact underneath.

How to Cut Clean Lemon Bar Squares

Use a long sharp knife and wipe it after each cut. That is mostly about presentation—the bars taste just as good if the edges are less tidy. Cut the slab into 15 generous bars, 20 standard squares or 24 smaller pieces, depending on how you plan to serve them.

Chilled lemon-bar slab being lifted with parchment while a knife makes clean cuts and finished pieces receive powdered sugar.
The long chill does more than cool the bars: it gives the lemon layer enough structure for the knife to reveal two clean layers instead of dragging the filling through the shortbread.

Dust with powdered sugar after cutting and preferably shortly before serving. It gradually absorbs moisture from the surface and disappears, which is normal.

For a softer bite and stronger lemon aroma, let the bars sit out for about 10–15 minutes before eating.

Troubleshooting Lemon Bars

The crust floated or the filling baked underneath it

A lemon-bar crust floats when thin filling finds a crack, thin spot or edge gap, gets underneath the shortbread and pushes it upward as it bakes.

Cross-section of a lemon bar with the shortbread lifted above the lemon filling, with a smaller detail showing filling beneath an edge gap.
An upside-down-looking crust is actually a useful diagnostic clue; when lemon filling appears beneath the shortbread, check the edge for the path it took underneath.

Next time, press the base evenly to the perimeter so the thin filling has no easy route underneath. If the slab is fully set and intact despite the layers ending up upside down, you may be able to chill it thoroughly, invert it and cut it.

The filling is still runny

If the center was actually sloshing instead of moving softly as one layer, the bars were underbaked. If you catch that as soon as the pan comes out, return it to the oven and check again after a few minutes.

Three close-up lemon-bar textures comparing a loose runny filling, a smooth silky filling, and a firm rubbery filling.
Once chilled, the center reveals the bake more clearly: the ideal lemon custard stays smooth and tender, without collapsing on the knife or bouncing back like a firm gel.

A smaller pan, extra lemon juice or an oven running cool can all lengthen the bake.

The filling tastes eggy or feels rubbery

If the filling is firm and rubbery as well as eggy, overbaking is the likely cause. If the texture is good but the flavor seems egg-forward, use more zest next time—not extra juice. Zest strengthens the lemon aroma without adding more liquid.

There are white bubbles or foam on top

A few white bubbles are cosmetic. Ignore them. Heavy foam usually means the filling was whisked harder than necessary; next time, let it settle briefly before pouring.

The filling has flour lumps

If you see flour lumps before pouring, press the filling through a fine-mesh sieve. Scrape any zest caught in the sieve back into the bowl. Next time, whisk the flour into the lemon sugar before adding the eggs and juice.

The crust is soggy or very hard

For a soggy base, first look back at the par-bake. The surface needed to be dry and set before the lemon mixture went on. Filling that slipped underneath the crust can cause a similar texture, and several days in the refrigerator will soften even a well-baked base.

A very hard crust points toward too much flour, excessive par-baking, an unusually thick layer or heavy compaction. Let one bar lose some refrigerator chill before deciding; butter-rich shortbread is much firmer when cold.

Comparison of lemon-bar shortbread showing a tender crust, a moisture-softened soggy crust, and a dense hard crust beneath lemon filling.
The best shortbread should break cleanly without fighting the bite: it stays tender enough to chew, yet firm enough to carry the lemon layer without turning wet or dense.

The top looks pale, cracked or wet

Pale yellow is normal. It says very little about how lemony the bars will taste. Cracks can come with excess air or too much oven time. If a properly set surface looks wet after chilling, condensation is a likely cause, especially if the pan was covered while warm.

Lemon-bar surface close-ups showing a normal pale top with small bubbles, heavy foam, cracking, and condensation.
Start with the ordinary-looking surface: a pale top and a few tiny bubbles can be perfectly fine, so appearance alone is not a reason to call the batch a failure.

The bars taste metallic

If lemon or other acidic foods have picked up a metallic taste from your pan before, use glass next time and avoid letting aluminum foil touch the filling. Stainless-steel bowls, whisks and utensils are fine.

Ugly does not always mean ruined. Surface bubbles are cosmetic. A set slab with inverted layers may still be usable. And if the bars break while cutting but taste good, spoon the pieces into glasses with whipped cream or yogurt and berries.

Using an 8×8 Pan

For an 8×8-inch / 20×20 cm pan, make half the recipe. That gives you almost the same layer depth as the full batch in a 9×13, so begin checking around the normal time. It may finish a little earlier.

If you want the math, a 9×13 pan has about 117 square inches of surface area; half of that is 58.5 square inches. An 8×8 pan has 64 square inches, so a half batch is about 9% shallower. Putting the entire recipe into an 8×8 would make the layers more than 80% deeper and require a substantially different bake.

Two lemon-bar pans comparing a full batch in a 9-by-13-inch pan with a half batch in an 8-by-8-inch pan at similar finished depth.
The useful thing to compare is the finished depth, not simply the pan dimensions: using half the mixture in an 8×8 keeps the lemon-bar layer close to the thickness of a full batch in a 9×13.

Make Ahead, Storage and Freezing

Make the Bars a Day Ahead

Lemon bars are particularly easy to make a day ahead because the long chill is already part of the recipe. Bake and cool the slab, refrigerate it overnight, then lift, cut and dust the bars the next day. Besides taking work off your serving day, the overnight chill makes especially neat slices easier.

Whole uncut lemon-bar slab in the background with clean powdered-sugar-dusted lemon-bar squares in the foreground, illustrating make-ahead preparation.
Overnight chilling turns the bars into an easier make-ahead dessert: tomorrow’s slab is firmer, steadier and much easier to portion neatly than one that is still warm from the oven.

Yes, lemon bars should be refrigerated. Keep them covered and plan to finish them within about 4 days. Their texture is best during the first 2–3 days, while the shortbread still contrasts clearly with the creamy lemon layer. That four-day limit also lines up with FDA guidance for cooked egg dishes, which gives a 3–4 day refrigerator window.

For a party or bake sale, put out smaller batches and replenish them from the refrigerator. Don’t leave the bars unrefrigerated for more than 2 hours, or more than 1 hour when the temperature is above 90°F / 32°C.

For longer storage, chill and cut the bars first but leave off the powdered sugar. Freeze the pieces until firm, then wrap them well or stack them with parchment between layers in a freezer-safe container. For best quality, use them within about 3 months. Thaw overnight in the refrigerator, then dust shortly before serving.

If oven space is the real constraint, No-Bake Lemon Bars take a different route, setting in the refrigerator instead of relying on eggs and oven heat.

Posted on — Leave a comment

Pineapple Upside Down Cake Recipe: Moist, Caramelized & Easy to Flip

Hands lift a round metal pan straight above a freshly inverted pineapple upside-down cake topped with glossy pineapple rings and red cherries.

Pineapple upside down cake spends almost its entire bake hiding the best part. Turn it out, lift the pan, and the brown sugar, pineapple rings and cherries suddenly become the top.

The flip looks like the risky part. Usually, the bigger trouble started much earlier—with fruit that went into the pan too wet or a center that came out of the oven too soon.

This pineapple upside down cake from scratch keeps both in check. The rings are drained and blotted, some of their juice flavors the butter cake, and the cake stays in the oven until the center is properly set. The reward is sticky brown-sugar pineapple over a soft, moist crumb with enough structure to hold a clean slice.

Pineapple Upside Down Cake in One Minute

For a 9-inch pineapple upside down cake, arrange well-blotted pineapple rings over butter and brown sugar, then cover them with thick cake batter. Bake at 350°F / 180°C until the center is set, then invert while the caramel is still warm.

Seven pineapple rings with red cherries are arranged in a round metal pan, with one ring in the center and six around it.
Leave a little space between the pineapple rings instead of forcing overlaps. After the flip, those gaps become visible channels where the brown-sugar caramel can settle around the fruit.

Use pineapple packed in juice and reserve ¼ cup / 60 ml for the batter.

Pineapple Upside Down Cake Recipe

A butter cake flavored with pineapple juice, topped with tender fruit and sticky brown-sugar caramel that settles into the crumb underneath.

Prep
About 25 minutes

Bake
Begin checking at 40 minutes; continue until the center is set

Rest Before Flipping
About 10 minutes

Cool for Neat Slices
At least 20 minutes more

Yield
8–10 slices

Oven: 350°F / 180°C conventional, or 160°C fan
Pan: 9-inch / 23 cm light-colored metal cake pan, at least 2 inches / 5 cm deep

Equipment

  • 9-inch / 23 cm light-colored metal cake pan, at least 2 inches / 5 cm deep
  • Rimmed baking sheet
  • Electric hand mixer or stand mixer
  • Kitchen scale, especially useful for the flour
  • Thin blunt knife or small offset spatula
  • Heat-safe serving platter wider than the pan
  • Two dry oven mitts

Ingredients

For the Topping

  • 4 tablespoons / 57 g unsalted butter, melted, plus a little extra for the sides of the pan
  • ½ cup packed / 110 g light brown sugar
  • 1 (20 oz / 567 g) can pineapple rings in 100% juice, drained, juice reserved and rings blotted dry
  • 6–7 maraschino cherries, blotted dry, optional

For the Cake

  • 1½ cups / 180 g all-purpose flour
  • 1 teaspoon / 4 g baking powder
  • ¼ teaspoon / 1 g baking soda
  • ½ teaspoon / 3 g fine salt
  • ½ cup / 113 g unsalted butter, softened but still cool
  • ¾ cup / 150 g granulated sugar
  • 2 large eggs, room temperature
  • ⅓ cup / 80 g full-fat sour cream, room temperature
  • ¼ cup / 60 ml reserved pineapple juice, room temperature
  • 1 teaspoon / 5 ml vanilla extract

Instructions

Prepare the Pan & Fruit

  1. Heat the oven and prepare the pan. Set the oven to 350°F / 180°C conventional, or 160°C fan, with a rack in the center. Lightly butter the sides of the pan and set it on a rimmed baking sheet.
  2. Drain and blot the pineapple. Drain the rings over a measuring jug and save at least ¼ cup / 60 ml juice. Lay the fruit on clean towels or paper towels and blot both sides. Do the same with the cherries. Don’t squeeze the pineapple. Blotting is enough.
  3. Make the topping. Spread the 57 g melted butter over the bottom of the pan. Sprinkle over the 110 g brown sugar and break up any firm lumps. Leave the butter and sugar as layers.
  4. Arrange the fruit. Put one pineapple ring in the center and fit about six more around it. You’ll usually have a few rings left; save them, or use a couple of half-rings around the edge if your pan has room. Add cherries if using.

Mix & Add the Batter

  1. Mix the dry ingredients. Whisk the flour, baking powder, baking soda and salt together.
  2. Cream the butter and sugar. Beat the softened butter and granulated sugar until lighter in color and fluffy, usually about 2–4 minutes. Scrape down the bowl once or twice.
  3. Add the eggs. Beat them in one at a time, letting the first mix in before adding the second.
  4. Add the sour cream and juice. Mix in the sour cream, pineapple juice and vanilla until combined. The mixture may look slightly uneven or curdled at this stage; that’s fine. There’s no need to keep beating it smooth.
  5. Add the flour. Mix on low until most of the flour disappears, then finish with a spatula. The batter should feel more like something you place over the pineapple than something you pour over it.
  6. Cover the fruit. Spoon the batter into several places around the pan, then gently spread the dollops together. This keeps the pineapple where you put it.

Bake, Check & Flip

  1. Bake. Begin checking at about 40 minutes. If the surface is already nicely golden but the center still needs time, lay a loose sheet of foil over the top without pressing it onto the cake.
  2. Check the center. It should look set and spring back lightly when touched. Test two or three spots of cake crumb close to the center, avoiding the pineapple. Damp crumbs are fine; shiny wet batter is not. Keep baking until those wet streaks are gone.
  3. Rest before flipping. Leave the cake in the pan for about 10 minutes. The caramel around the edge should still look glossy. Do not let the cake cool completely in the pan.
  4. Flip. Run a thin blunt knife around the edge. Put the serving platter face-down over the pan, hold both firmly together and turn them over in one smooth movement.
  5. Lift the pan. Set the platter down, then lift the pan straight upward. If a ring or cherry stays behind, put it back where it came from while the caramel is still warm.
  6. Cool and slice. You can serve the cake warm, but the slices will be softer. Give it another 20 minutes or more if you want cleaner wedges.

Pineapple Upside Down Cake Guide

These are the moments worth a closer look, from choosing the pineapple to knowing when the cake is ready to turn out.

Choosing the Pineapple

For the classic cake, use canned pineapple rings packed in 100% juice. They’re evenly cut, already tender and predictable in the oven, and you can use the juice left in the can in the batter.

Open can of pineapple rings in juice beside drained rings and a clear measuring jug containing reserved pineapple juice.
Treat the reserved juice as a measured batter ingredient, not extra topping liquid: the pineapple supplies flavor twice, but the loose moisture still needs to stay controlled.

Rings packed in syrup work too, but they make a sweeter cake. Light brown sugar already brings plenty of caramel flavor, so juice-packed fruit lets the pineapple come through more clearly. Maraschino cherries are traditional but optional; leave them out with no other changes.

Fresh pineapple

Fresh pineapple works too. Cut it into ¼-inch / 6 mm slices, core them, then arrange the pieces in a single layer, trimming or halving them as needed to fit without heavy overlap. Blot the pieces before they go into the pan. Because fresh fruit varies in ripeness and juiciness, let the center tell you when the cake is done.

Crushed pineapple

Crushed pineapple changes the moisture distribution and gives a softer, less defined topping. This recipe is built around rings, so it is not a direct swap without adjusting and testing the topping separately.

For a fresh-fruit version, try MasalaMonk’s peach upside down cake.

Moist Cake Starts With Dry Pineapple

Draining the can is only the first step. Pineapple rings can still carry plenty of juice on the surface, and that liquid goes straight into the butter and sugar underneath.

Blot both sides until there are no obvious beads of juice. Don’t try to dry the fruit all the way through. It should still be juicy when you eat it; the surface just shouldn’t be wet when it goes into the pan.

A hand presses a paper towel against a pineapple ring to remove visible beads of surface juice.
Use the shine as your cue: once obvious beads of juice disappear, stop blotting. The pineapple should still look juicy, just no longer wet enough to drip into the sugar layer.

Blot the cherries too. Their syrup is concentrated, and a few wet cherries can add more liquid than you’d think.

The Batter Should Sit Over the Pineapple, Not Run Through It

You’re looking for a thick, spoonable batter. It should fall slowly from the spatula and spread without much effort.

Pineapple juice gives the crumb its fruit flavor, while sour cream helps keep it tender. After they go in, the mixture may look slightly grainy or curdled; if it still looks cohesive, that is fine. Once the flour is added, the finished batter should remain thick enough to sit over the fruit instead of flooding beneath it.

Pale yellow cake mixture in a glass bowl looks slightly grainy and curdled but remains cohesive.
Small grainy flecks are different from a fully separated mixture: if the batter still looks cohesive like this, move on rather than beating it endlessly in search of perfect smoothness.

Spoon the batter around the pan in several places, then spread it gently. The rings are less likely to move when the batter is distributed instead of dropped heavily in one spot.

Thick pale cake batter sits in soft dollops over pineapple rings and cherries in a round metal pan.
Look for soft mounds that hold briefly, then relax under gentle pressure. That texture lets you join the dollops without having to drag the spatula hard enough to move the fruit.

Moist, Soggy or Underbaked?

A thin moist seam under the pineapple is normal; a broad gummy band or glossy loose center is not.

A properly baked slice should be tender. Directly beneath the pineapple, the crumb will usually look a little darker and feel more saturated than it does farther down.

Close-up of a cake slice with pineapple on top, a thin darker moist seam directly beneath it and open golden crumb below.
Judge the darker seam by how far it travels, not by color alone. Normal moisture hugs the fruit and quickly fades into open crumb; a gummy layer stays thick much farther down.

If that damp layer extends much farther into the cake, the fruit may have gone in too wet, the center may have needed longer, or both. If the center is glossy, custardy or actually flows when the cake is cut, it is underbaked. A golden top doesn’t change that.

Cake tester pulled from the center of a golden cake in a metal pan with shiny wet batter clinging to its tip.
Think of the first bake check as a decision point, not a finish time: even a deeply golden surface loses the argument when the center tester still comes out coated in shiny batter.

If the top is already golden while the center still needs longer, tent the cake loosely with foil and keep baking. The timer tells you when to start looking; the center tells you when to stop baking.

Loose aluminum foil arches over the plain golden top of a cake still inside its round metal baking pan.
Keep a little space between the foil and the cake surface; the cover only needs to shield the top while the slower center continues baking.

The Flip: Warm Cake, Warm Caramel, One Steady Turn

Flip the cake while it is warm enough for the caramel to remain glossy but rested long enough for the crumb to hold together.

The flip looks more dramatic than it feels. Get everything in place before the 10-minute rest is up.

  • Use a sturdy serving platter wider than the pan.
  • A shallow lip helps if a little caramel moves toward the edge.
  • Keep two dry oven mitts within reach.
  • Clear a place for the hot pan afterward.

After about 10 minutes, the caramel around the edge should still look glossy. That’s your window.

Run a thin knife around the perimeter, place the platter face-down over the pan, and grip both firmly. Turn the pan and platter over together in one smooth motion.

Two oven-mitted hands hold a round metal cake pan tightly against a flat serving platter while turning them together.
Keep the platter flush against the pan throughout the turn. If a gap opens mid-flip, the warm cake can drop before the platter is underneath to support it.

Set the platter down, then lift the pan straight up.

If one ring stays behind, put it back where it came from while the caramel is warm.

A spatula carries one caramelized pineapple ring toward the single empty ring-shaped space on an inverted cake.
The caramel imprint shows exactly where a stuck ring belongs. While the glaze is still warm, set the fruit back into that spot gently instead of pressing it into the crumb.

After the Flip

The pineapple should look glossy, almost lacquered, with sticky brown-sugar caramel settled into the spaces between the rings. A little caramel reaching the edge of the platter is fine. It shouldn’t run off like thin syrup.

Whole pineapple upside-down cake with seven glossy pineapple rings, red cherries and amber caramel between the fruit.
Look at the edge as well as the glossy top: a successful pineapple upside down cake can shine heavily while the cake itself remains defined instead of sitting in a puddle of loose syrup.

Cut into the cake and you should get sticky pineapple and caramel on top, a thin syrup-soaked seam underneath, then tender butter cake below. The slice should still hold together.

Slice of pineapple upside-down cake showing caramelized pineapple, a narrow darker seam and structured golden cake crumb.
A properly baked pineapple upside down cake slice should stay cake-like beneath the fruit: tender enough for a fork, yet structured enough that the wedge does not sag into a custardy layer.

Why Isn’t the Topping Crunchy?

Because it shouldn’t be. Pineapple gives off juice as it bakes, so the butter and brown sugar stay glossy, sticky and soft instead of forming a hard caramel shell.

Close-up of a spoon pressing through glossy amber caramel between pineapple rings and red cherries.
A spoon should leave a soft groove and pick up clingy caramel. That visible give is the practical difference between this soft-set topping and a brittle caramel shell.

Pineapple Upside Down Cake Troubleshooting

ProblemLikely Cause / What to Do Next
Top browned before the center was doneCover loosely with foil and keep baking until the center tests done.
Gummy layer under the pineappleThe fruit may have gone in too wet, the cake may need more baking, or both. If you’ve already cut the cake, note the texture for next time; otherwise, keep baking until the center is fully set.
Cake won’t release / caramel feels glued to the panThe caramel may have cooled too far or the edge may still be attached. Loosen the perimeter and turn the cake out while the topping is warm.
Caramel is wateryToo much loose fruit liquid reached the topping. Next time, blot the pineapple and cherries more thoroughly before they go into the pan.
Cake is dry, dense or rubberyCheck the flour measurement, bake time and mixing after the flour goes in. Weighing the flour helps avoid an overly dry batter.
Fruit moved while adding batterThe batter landed too heavily in one place. Distribute it in several dollops, then spread gently.

The toothpick was clean, but the center was still raw

One tester can hit a baked pocket and miss a wetter one nearby. Check two or three places close to the center, making sure you’re testing cake crumb and not pineapple or caramel.

A hand inserts a cake tester into several nearby spots around the center of a plain golden cake in a metal pan.
Keep the test spots close to the center so you are judging the same critical zone rather than comparing a faster-baking edge with the slower middle of the cake.

The cake split around a pineapple ring

The fruit creates natural weak points in the crumb. A cake that is still a little underdone, unusually wet or turned over roughly is more likely to split there. Bake the center fully and keep the pan and platter together during the flip.

Close-up of a baked cake slice with a small crack starting beneath the edge of a pineapple ring.
A crack that begins directly beneath a pineapple-ring edge is different from a broad collapse through the center; the narrow strip of crumb there simply carries more structural stress.

What Changes With a Different Pan

Changing the pan changes more than the shape. Batter depth, browning, headroom and bake time can all shift.

  • 9×13-inch pan: has much more surface area than a 9-inch round, so this recipe needs scaling rather than a simple pan swap.
  • Cast-iron skillet: retains more heat and can give stronger browning and caramelization. Treat it as a distinct version rather than carrying over this timing unchanged.
  • Bundt pan: better treated as its own recipe because the fruit arrangement, batter depth and release all change.
  • Springform pan: avoid it here because the butter-sugar layer can leak through the seam.

An 8-inch round makes the batter substantially deeper and can risk overflow unless the pan is deep enough. A 10-inch round gives a shallower cake and will usually finish sooner. Neither should inherit the 9-inch bake time unchanged.

Three round metal pans labeled 8, 9 and 10 inches show the same batter at progressively shallower depths.
The key difference is the center-to-surface distance: the same batter sits deepest in the 8-inch pan and shallowest in the 10-inch, so the three cakes cannot share identical bake behavior.

For the most predictable bake, use the light-colored metal pan this recipe is written for. Silicone transfers heat more slowly and flexes during handling; glass, ceramic and dark metal can also change browning and timing.

Rigid light-colored metal cake pan beside a dark silicone pan whose rim bends inward under a person's hand.
Light metal gives you a rigid rim to fill, move and later grip during inversion; silicone, by contrast, flexes at exactly the moments when a stable pan is useful.

Can I use cake mix?

A full prepared cake mix may be too much batter for this 9-inch pan. Use a pineapple upside down cake recipe designed for the cake mix and pan size you’re using instead of treating a whole box as a direct replacement for this scratch batter.

Make Ahead, Storage & Transport

Yes, you can bake this cake a day ahead. Flip it as directed, cool it completely on the serving platter, cover it well and refrigerate it. Let it come closer to room temperature before serving.

The cake is at its best on the day it is baked. By the next day, the fruit and caramel will have softened the crumb beneath them further.

Taking it to a birthday or potluck

Turn the cake out at home, then cool and transport it on the serving platter. Leaving it in the baking pan for several hours and trying to release it at your destination gives the caramel plenty of time to stick.

Finished pineapple upside-down cake sits level inside a clear locking cake carrier with a raised lid and handle.
For transport, keep the cake level and choose enough lid clearance that nothing touches the sticky pineapple topping. A secured flat base protects the reveal you already worked for.

Storing leftovers

For longer storage, cool the cake completely, cover it and refrigerate it for about 3–4 days. That matches USDA’s general guidance for refrigerated leftovers. Let refrigerated slices warm slightly at room temperature before serving, or rewarm them gently.

How to Serve It

The fruit decorates the cake for you, so it doesn’t need frosting. It is one of those cakes that looks finished the second the pan comes off.

Serve it at room temperature for the neatest wedges or slightly warm for softer caramel. A spoonful of homemade whipped cream is plenty if you want something cool alongside it. Vanilla ice cream works too, especially with a warm slice.

Warm slice of pineapple upside-down cake beside a scoop of vanilla ice cream beginning to soften where it touches the cake.
Warm pineapple upside down cake loosens the caramel just enough to soften vanilla ice cream at the contact edge, giving you hot-cold contrast without needing another sauce or frosting.

The best part is still lifting the pan. If the pineapple comes up glossy, the cake cuts cleanly into a tender wedge and one cherry needs nudging back into place, that’s still a successful cake.