Posted on — Leave a comment

Pineapple Upside Down Cake Recipe: Moist, Caramelized & Easy to Flip

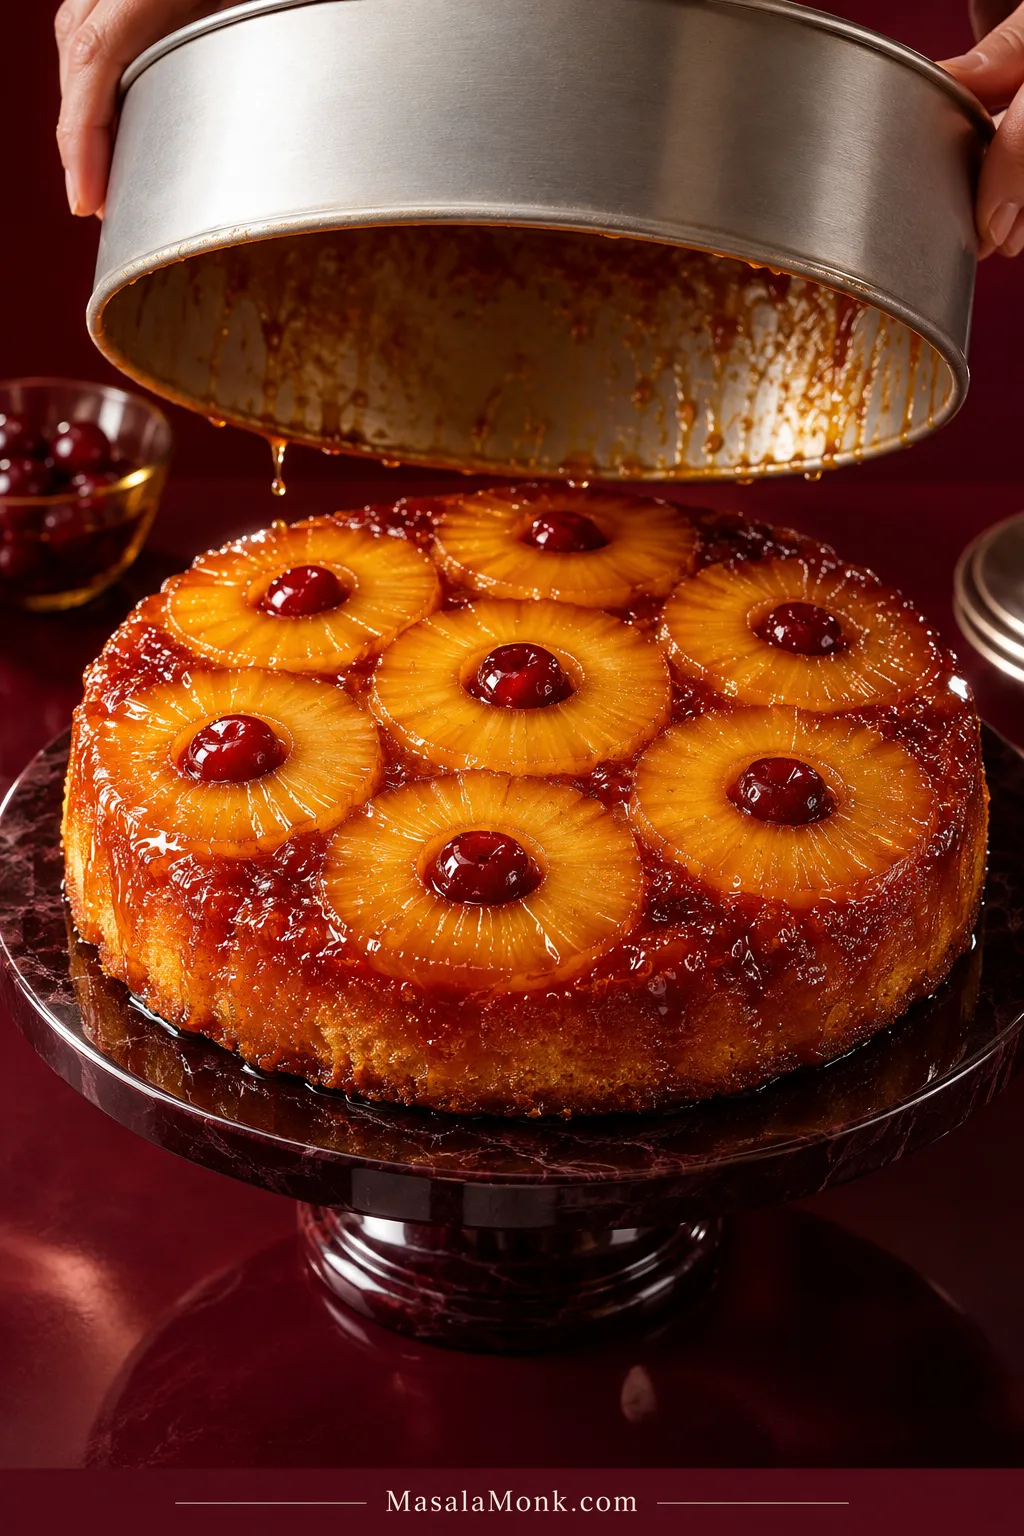
Hands lift a round metal pan straight above a freshly inverted pineapple upside-down cake topped with glossy pineapple rings and red cherries.

Pineapple upside down cake spends almost its entire bake hiding the best part. Turn it out, lift the pan, and the brown sugar, pineapple rings and cherries suddenly become the top.

The flip looks like the risky part. Usually, the bigger trouble started much earlier—with fruit that went into the pan too wet or a center that came out of the oven too soon.

This pineapple upside down cake from scratch keeps both in check. The rings are drained and blotted, some of their juice flavors the butter cake, and the cake stays in the oven until the center is properly set. The reward is sticky brown-sugar pineapple over a soft, moist crumb with enough structure to hold a clean slice.

Pineapple Upside Down Cake in One Minute

For a 9-inch pineapple upside down cake, arrange well-blotted pineapple rings over butter and brown sugar, then cover them with thick cake batter. Bake at 350°F / 180°C until the center is set, then invert while the caramel is still warm.
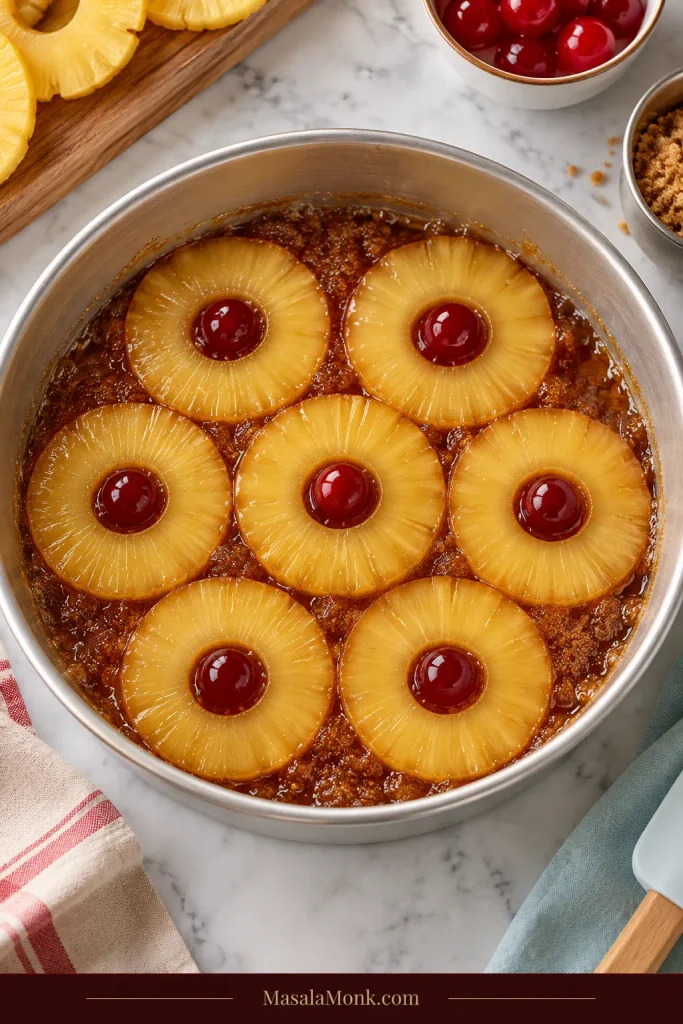
Seven pineapple rings with red cherries are arranged in a round metal pan, with one ring in the center and six around it.
Leave a little space between the pineapple rings instead of forcing overlaps. After the flip, those gaps become visible channels where the brown-sugar caramel can settle around the fruit.

Use pineapple packed in juice and reserve ¼ cup / 60 ml for the batter.

Pineapple Upside Down Cake Recipe

A butter cake flavored with pineapple juice, topped with tender fruit and sticky brown-sugar caramel that settles into the crumb underneath.

Prep
About 25 minutes

Bake
Begin checking at 40 minutes; continue until the center is set

Rest Before Flipping
About 10 minutes

Cool for Neat Slices
At least 20 minutes more

Yield
8–10 slices

Oven: 350°F / 180°C conventional, or 160°C fan
Pan: 9-inch / 23 cm light-colored metal cake pan, at least 2 inches / 5 cm deep

Equipment

  • 9-inch / 23 cm light-colored metal cake pan, at least 2 inches / 5 cm deep
  • Rimmed baking sheet
  • Electric hand mixer or stand mixer
  • Kitchen scale, especially useful for the flour
  • Thin blunt knife or small offset spatula
  • Heat-safe serving platter wider than the pan
  • Two dry oven mitts

Ingredients

For the Topping

  • 4 tablespoons / 57 g unsalted butter, melted, plus a little extra for the sides of the pan
  • ½ cup packed / 110 g light brown sugar
  • 1 (20 oz / 567 g) can pineapple rings in 100% juice, drained, juice reserved and rings blotted dry
  • 6–7 maraschino cherries, blotted dry, optional

For the Cake

  • 1½ cups / 180 g all-purpose flour
  • 1 teaspoon / 4 g baking powder
  • ¼ teaspoon / 1 g baking soda
  • ½ teaspoon / 3 g fine salt
  • ½ cup / 113 g unsalted butter, softened but still cool
  • ¾ cup / 150 g granulated sugar
  • 2 large eggs, room temperature
  • ⅓ cup / 80 g full-fat sour cream, room temperature
  • ¼ cup / 60 ml reserved pineapple juice, room temperature
  • 1 teaspoon / 5 ml vanilla extract

Instructions

Prepare the Pan & Fruit

  1. Heat the oven and prepare the pan. Set the oven to 350°F / 180°C conventional, or 160°C fan, with a rack in the center. Lightly butter the sides of the pan and set it on a rimmed baking sheet.
  2. Drain and blot the pineapple. Drain the rings over a measuring jug and save at least ¼ cup / 60 ml juice. Lay the fruit on clean towels or paper towels and blot both sides. Do the same with the cherries. Don’t squeeze the pineapple. Blotting is enough.
  3. Make the topping. Spread the 57 g melted butter over the bottom of the pan. Sprinkle over the 110 g brown sugar and break up any firm lumps. Leave the butter and sugar as layers.
  4. Arrange the fruit. Put one pineapple ring in the center and fit about six more around it. You’ll usually have a few rings left; save them, or use a couple of half-rings around the edge if your pan has room. Add cherries if using.

Mix & Add the Batter

  1. Mix the dry ingredients. Whisk the flour, baking powder, baking soda and salt together.
  2. Cream the butter and sugar. Beat the softened butter and granulated sugar until lighter in color and fluffy, usually about 2–4 minutes. Scrape down the bowl once or twice.
  3. Add the eggs. Beat them in one at a time, letting the first mix in before adding the second.
  4. Add the sour cream and juice. Mix in the sour cream, pineapple juice and vanilla until combined. The mixture may look slightly uneven or curdled at this stage; that’s fine. There’s no need to keep beating it smooth.
  5. Add the flour. Mix on low until most of the flour disappears, then finish with a spatula. The batter should feel more like something you place over the pineapple than something you pour over it.
  6. Cover the fruit. Spoon the batter into several places around the pan, then gently spread the dollops together. This keeps the pineapple where you put it.

Bake, Check & Flip

  1. Bake. Begin checking at about 40 minutes. If the surface is already nicely golden but the center still needs time, lay a loose sheet of foil over the top without pressing it onto the cake.
  2. Check the center. It should look set and spring back lightly when touched. Test two or three spots of cake crumb close to the center, avoiding the pineapple. Damp crumbs are fine; shiny wet batter is not. Keep baking until those wet streaks are gone.
  3. Rest before flipping. Leave the cake in the pan for about 10 minutes. The caramel around the edge should still look glossy. Do not let the cake cool completely in the pan.
  4. Flip. Run a thin blunt knife around the edge. Put the serving platter face-down over the pan, hold both firmly together and turn them over in one smooth movement.
  5. Lift the pan. Set the platter down, then lift the pan straight upward. If a ring or cherry stays behind, put it back where it came from while the caramel is still warm.
  6. Cool and slice. You can serve the cake warm, but the slices will be softer. Give it another 20 minutes or more if you want cleaner wedges.

Pineapple Upside Down Cake Guide

These are the moments worth a closer look, from choosing the pineapple to knowing when the cake is ready to turn out.

Choosing the Pineapple

For the classic cake, use canned pineapple rings packed in 100% juice. They’re evenly cut, already tender and predictable in the oven, and you can use the juice left in the can in the batter.
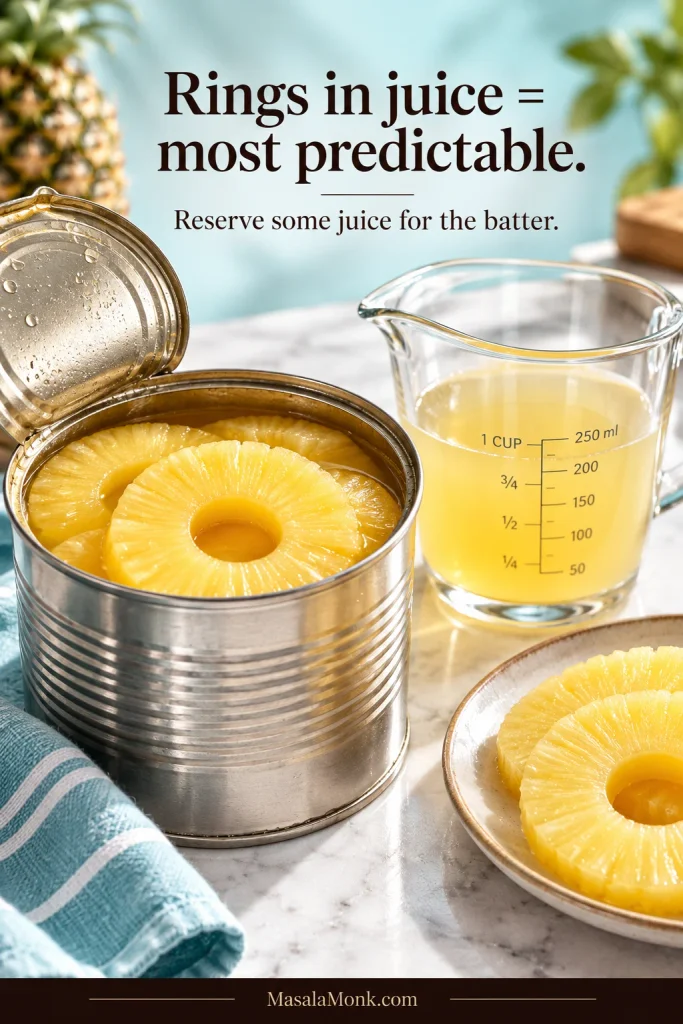
Open can of pineapple rings in juice beside drained rings and a clear measuring jug containing reserved pineapple juice.
Treat the reserved juice as a measured batter ingredient, not extra topping liquid: the pineapple supplies flavor twice, but the loose moisture still needs to stay controlled.

Rings packed in syrup work too, but they make a sweeter cake. Light brown sugar already brings plenty of caramel flavor, so juice-packed fruit lets the pineapple come through more clearly. Maraschino cherries are traditional but optional; leave them out with no other changes.

Fresh pineapple

Fresh pineapple works too. Cut it into ¼-inch / 6 mm slices, core them, then arrange the pieces in a single layer, trimming or halving them as needed to fit without heavy overlap. Blot the pieces before they go into the pan. Because fresh fruit varies in ripeness and juiciness, let the center tell you when the cake is done.

Crushed pineapple

Crushed pineapple changes the moisture distribution and gives a softer, less defined topping. This recipe is built around rings, so it is not a direct swap without adjusting and testing the topping separately.

For a fresh-fruit version, try MasalaMonk’s peach upside down cake.

Moist Cake Starts With Dry Pineapple

Draining the can is only the first step. Pineapple rings can still carry plenty of juice on the surface, and that liquid goes straight into the butter and sugar underneath.

Blot both sides until there are no obvious beads of juice. Don’t try to dry the fruit all the way through. It should still be juicy when you eat it; the surface just shouldn’t be wet when it goes into the pan.
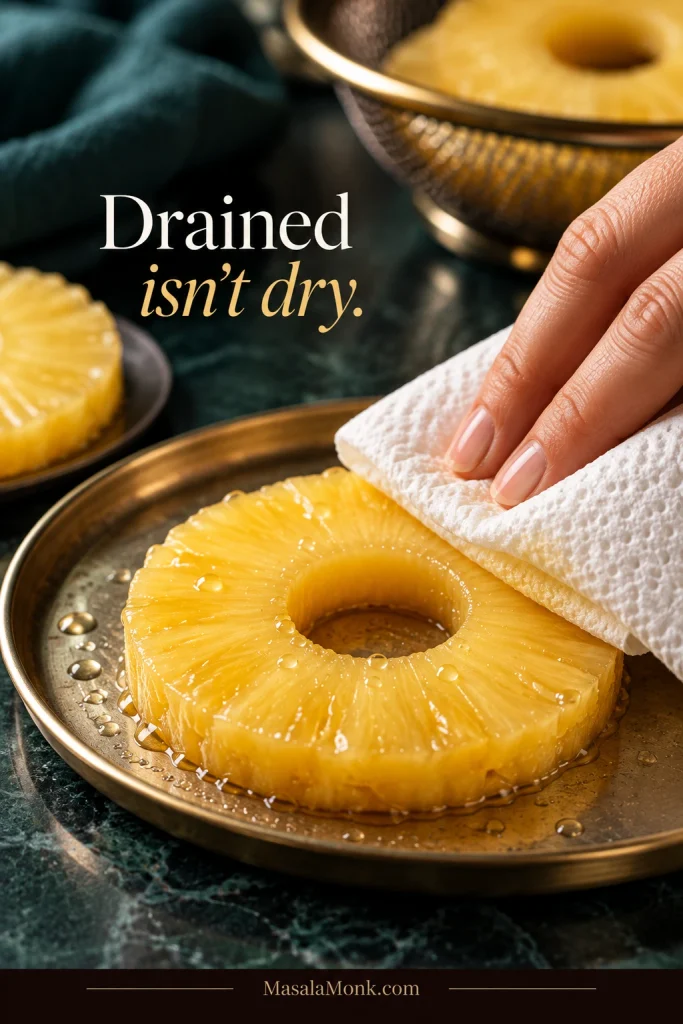
A hand presses a paper towel against a pineapple ring to remove visible beads of surface juice.
Use the shine as your cue: once obvious beads of juice disappear, stop blotting. The pineapple should still look juicy, just no longer wet enough to drip into the sugar layer.

Blot the cherries too. Their syrup is concentrated, and a few wet cherries can add more liquid than you’d think.

The Batter Should Sit Over the Pineapple, Not Run Through It

You’re looking for a thick, spoonable batter. It should fall slowly from the spatula and spread without much effort.

Pineapple juice gives the crumb its fruit flavor, while sour cream helps keep it tender. After they go in, the mixture may look slightly grainy or curdled; if it still looks cohesive, that is fine. Once the flour is added, the finished batter should remain thick enough to sit over the fruit instead of flooding beneath it.
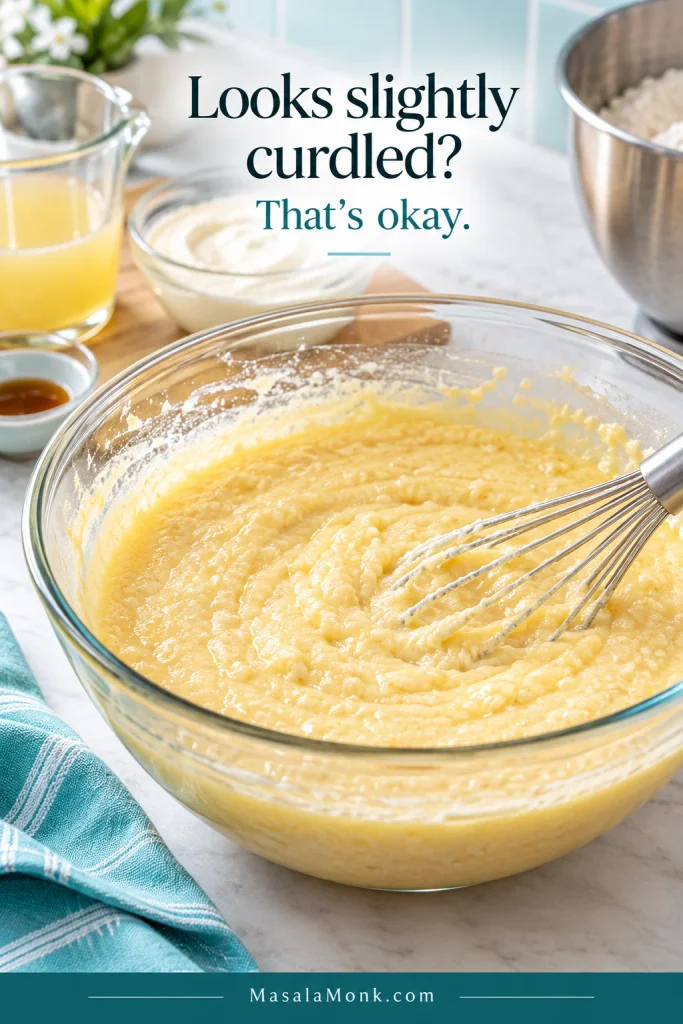
Pale yellow cake mixture in a glass bowl looks slightly grainy and curdled but remains cohesive.
Small grainy flecks are different from a fully separated mixture: if the batter still looks cohesive like this, move on rather than beating it endlessly in search of perfect smoothness.

Spoon the batter around the pan in several places, then spread it gently. The rings are less likely to move when the batter is distributed instead of dropped heavily in one spot.
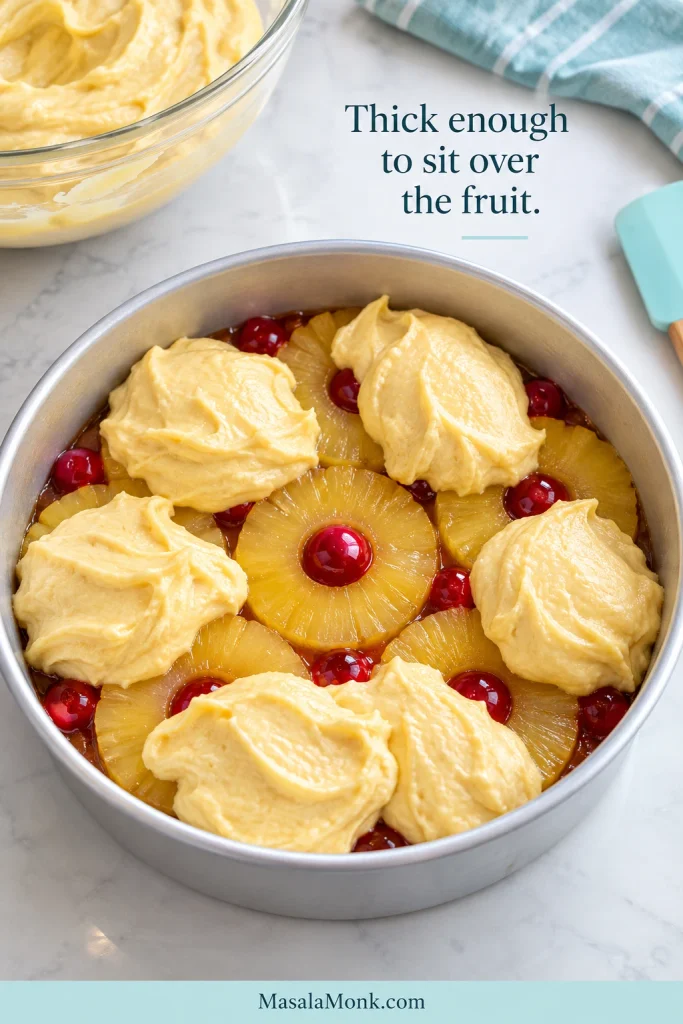
Thick pale cake batter sits in soft dollops over pineapple rings and cherries in a round metal pan.
Look for soft mounds that hold briefly, then relax under gentle pressure. That texture lets you join the dollops without having to drag the spatula hard enough to move the fruit.

Moist, Soggy or Underbaked?

A thin moist seam under the pineapple is normal; a broad gummy band or glossy loose center is not.

A properly baked slice should be tender. Directly beneath the pineapple, the crumb will usually look a little darker and feel more saturated than it does farther down.
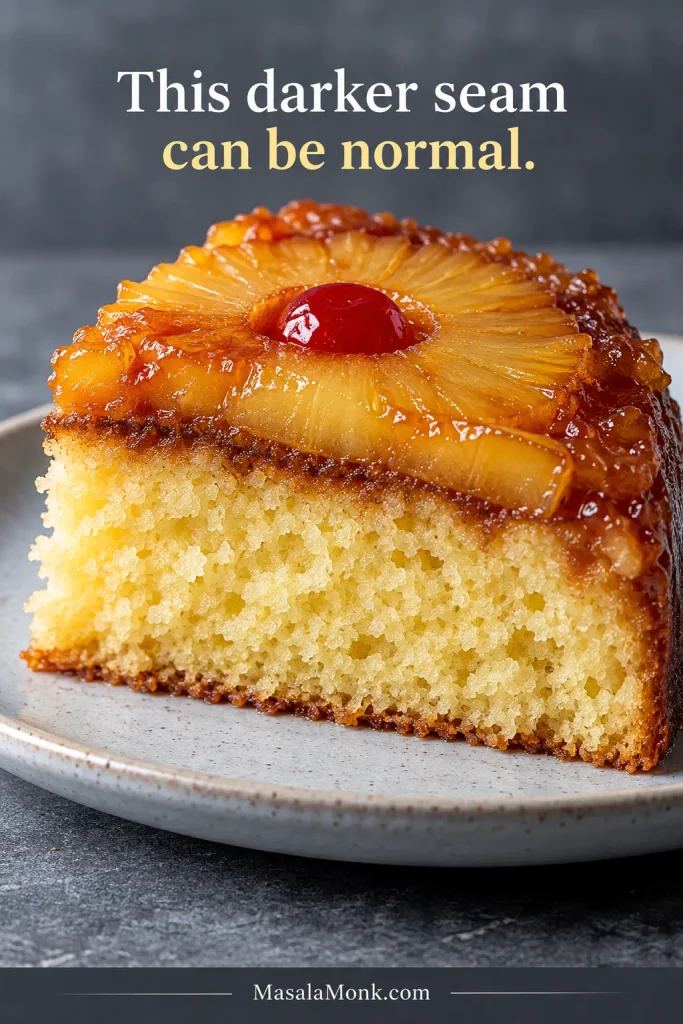
Close-up of a cake slice with pineapple on top, a thin darker moist seam directly beneath it and open golden crumb below.
Judge the darker seam by how far it travels, not by color alone. Normal moisture hugs the fruit and quickly fades into open crumb; a gummy layer stays thick much farther down.

If that damp layer extends much farther into the cake, the fruit may have gone in too wet, the center may have needed longer, or both. If the center is glossy, custardy or actually flows when the cake is cut, it is underbaked. A golden top doesn’t change that.
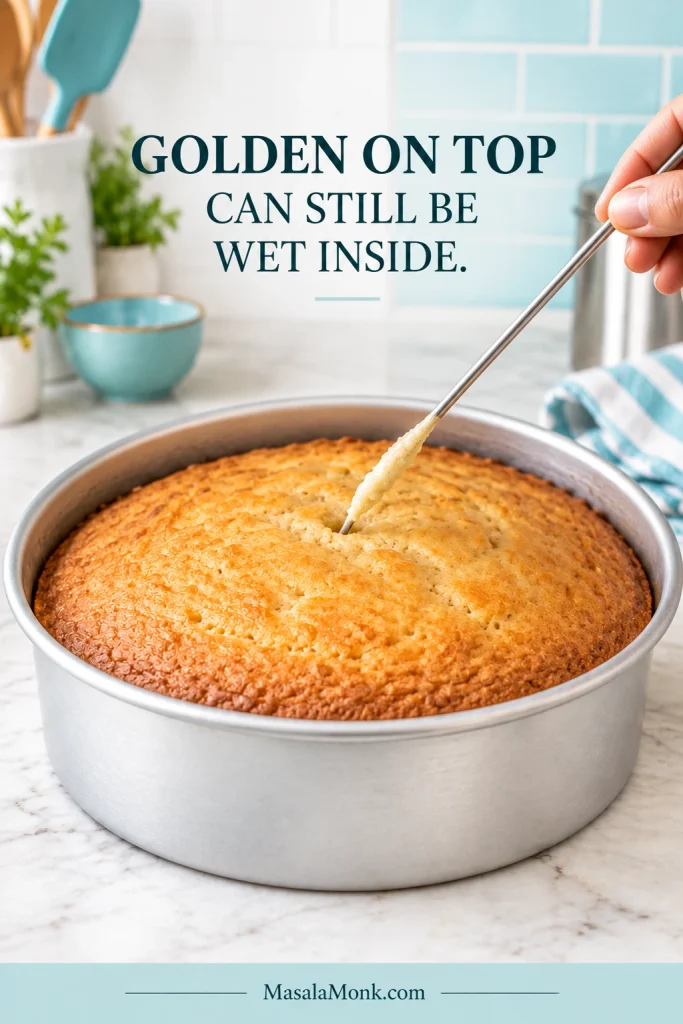
Cake tester pulled from the center of a golden cake in a metal pan with shiny wet batter clinging to its tip.
Think of the first bake check as a decision point, not a finish time: even a deeply golden surface loses the argument when the center tester still comes out coated in shiny batter.

If the top is already golden while the center still needs longer, tent the cake loosely with foil and keep baking. The timer tells you when to start looking; the center tells you when to stop baking.
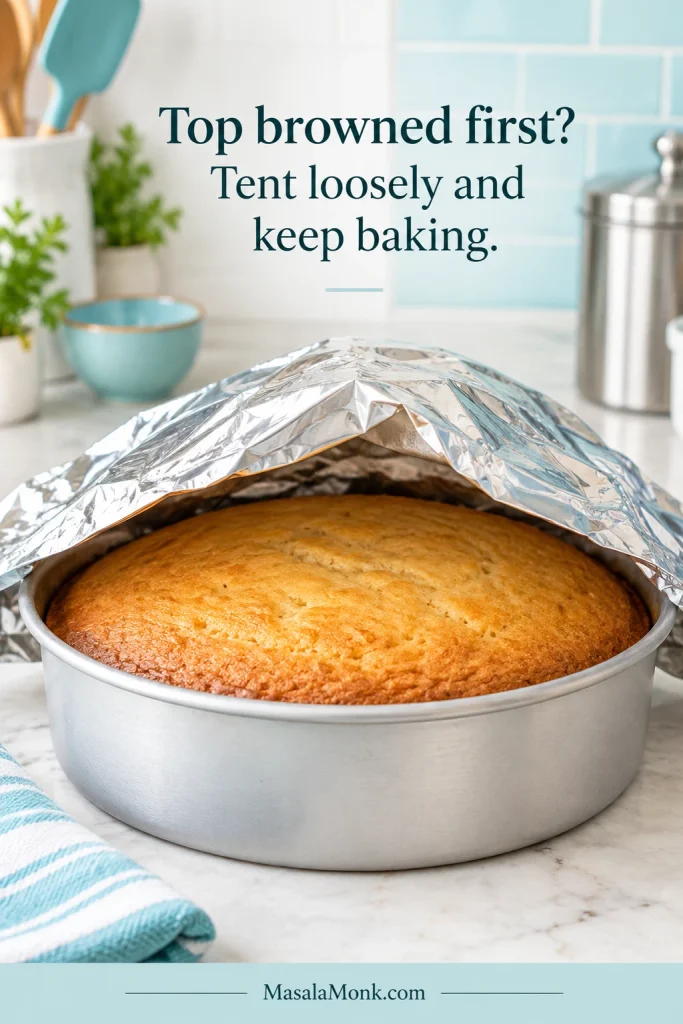
Loose aluminum foil arches over the plain golden top of a cake still inside its round metal baking pan.
Keep a little space between the foil and the cake surface; the cover only needs to shield the top while the slower center continues baking.

The Flip: Warm Cake, Warm Caramel, One Steady Turn

Flip the cake while it is warm enough for the caramel to remain glossy but rested long enough for the crumb to hold together.

The flip looks more dramatic than it feels. Get everything in place before the 10-minute rest is up.

  • Use a sturdy serving platter wider than the pan.
  • A shallow lip helps if a little caramel moves toward the edge.
  • Keep two dry oven mitts within reach.
  • Clear a place for the hot pan afterward.

After about 10 minutes, the caramel around the edge should still look glossy. That’s your window.

Run a thin knife around the perimeter, place the platter face-down over the pan, and grip both firmly. Turn the pan and platter over together in one smooth motion.
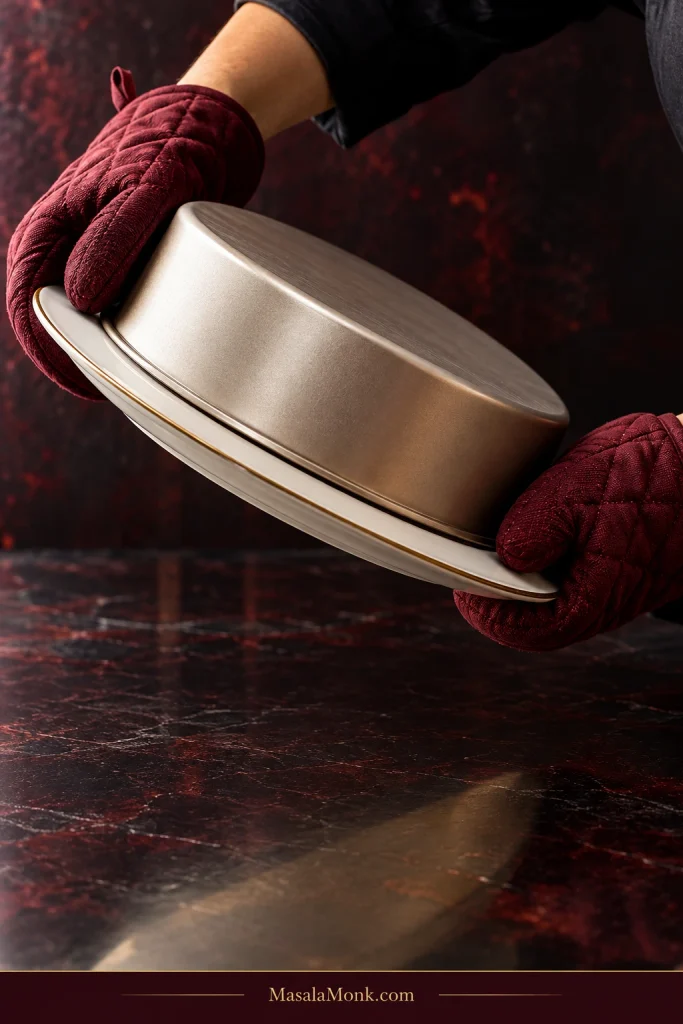
Two oven-mitted hands hold a round metal cake pan tightly against a flat serving platter while turning them together.
Keep the platter flush against the pan throughout the turn. If a gap opens mid-flip, the warm cake can drop before the platter is underneath to support it.

Set the platter down, then lift the pan straight up.

If one ring stays behind, put it back where it came from while the caramel is warm.
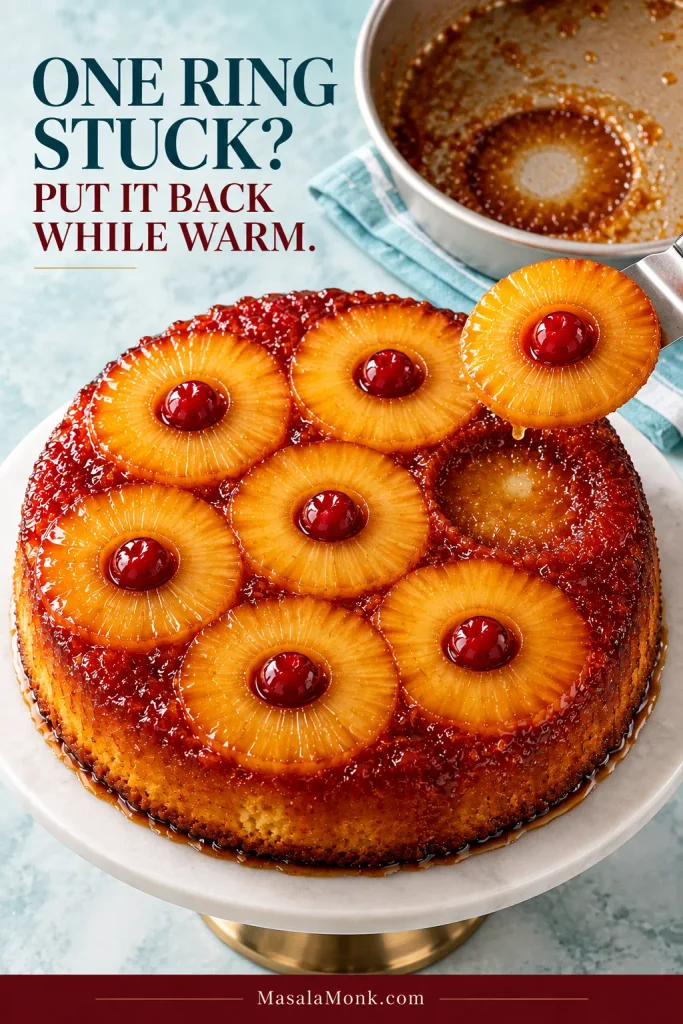
A spatula carries one caramelized pineapple ring toward the single empty ring-shaped space on an inverted cake.
The caramel imprint shows exactly where a stuck ring belongs. While the glaze is still warm, set the fruit back into that spot gently instead of pressing it into the crumb.

After the Flip

The pineapple should look glossy, almost lacquered, with sticky brown-sugar caramel settled into the spaces between the rings. A little caramel reaching the edge of the platter is fine. It shouldn’t run off like thin syrup.
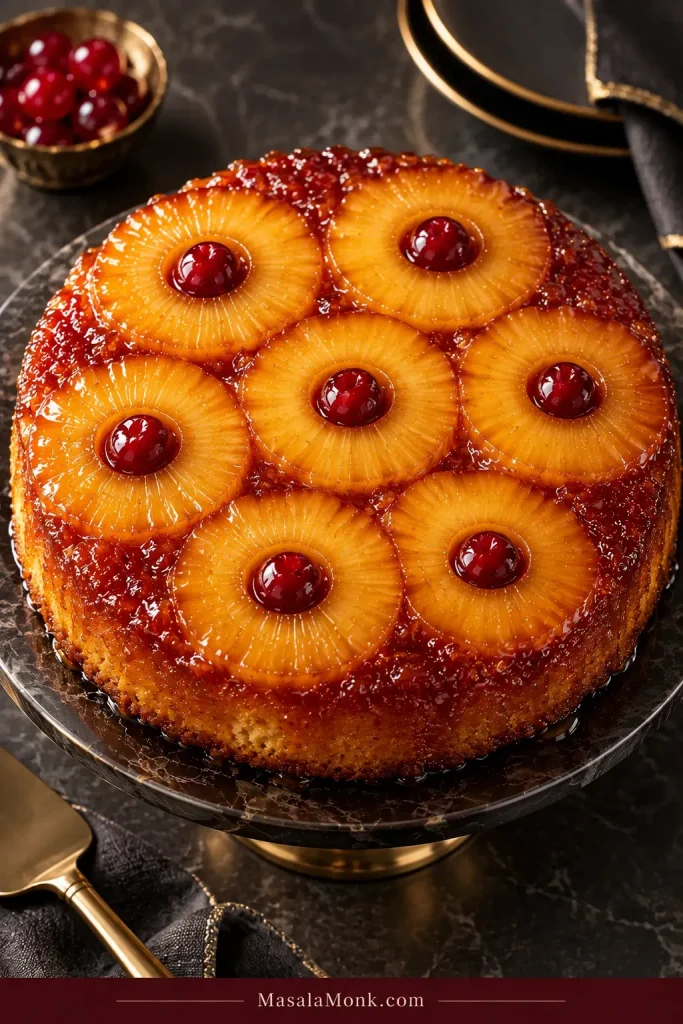
Whole pineapple upside-down cake with seven glossy pineapple rings, red cherries and amber caramel between the fruit.
Look at the edge as well as the glossy top: a successful pineapple upside down cake can shine heavily while the cake itself remains defined instead of sitting in a puddle of loose syrup.

Cut into the cake and you should get sticky pineapple and caramel on top, a thin syrup-soaked seam underneath, then tender butter cake below. The slice should still hold together.
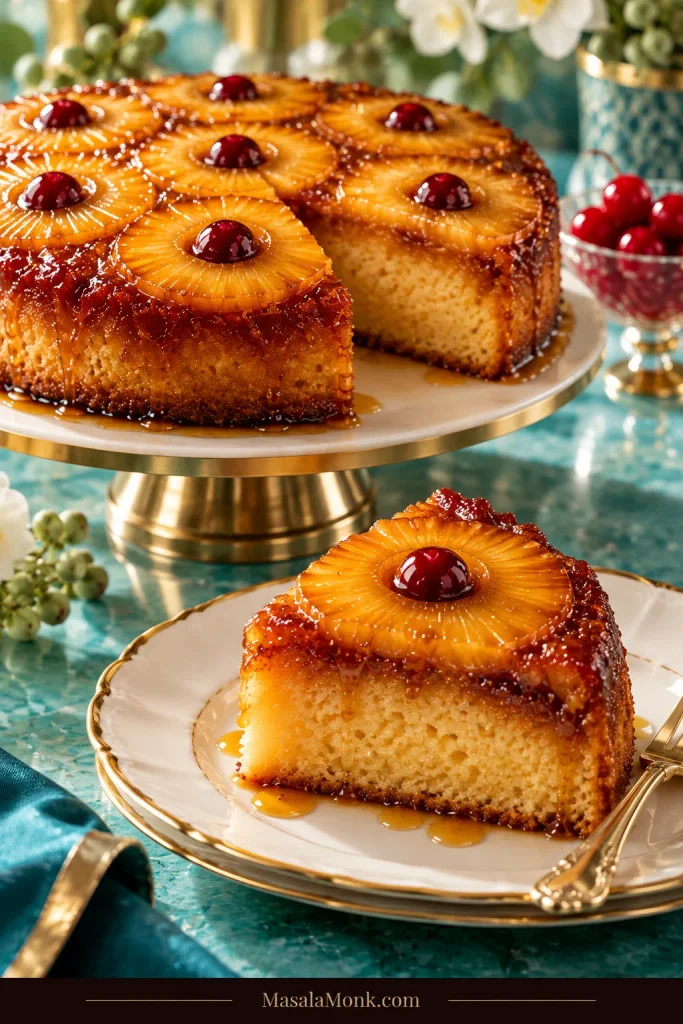
Slice of pineapple upside-down cake showing caramelized pineapple, a narrow darker seam and structured golden cake crumb.
A properly baked pineapple upside down cake slice should stay cake-like beneath the fruit: tender enough for a fork, yet structured enough that the wedge does not sag into a custardy layer.

Why Isn’t the Topping Crunchy?

Because it shouldn’t be. Pineapple gives off juice as it bakes, so the butter and brown sugar stay glossy, sticky and soft instead of forming a hard caramel shell.

Close-up of a spoon pressing through glossy amber caramel between pineapple rings and red cherries.
A spoon should leave a soft groove and pick up clingy caramel. That visible give is the practical difference between this soft-set topping and a brittle caramel shell.

Pineapple Upside Down Cake Troubleshooting

ProblemLikely Cause / What to Do Next
Top browned before the center was doneCover loosely with foil and keep baking until the center tests done.
Gummy layer under the pineappleThe fruit may have gone in too wet, the cake may need more baking, or both. If you’ve already cut the cake, note the texture for next time; otherwise, keep baking until the center is fully set.
Cake won’t release / caramel feels glued to the panThe caramel may have cooled too far or the edge may still be attached. Loosen the perimeter and turn the cake out while the topping is warm.
Caramel is wateryToo much loose fruit liquid reached the topping. Next time, blot the pineapple and cherries more thoroughly before they go into the pan.
Cake is dry, dense or rubberyCheck the flour measurement, bake time and mixing after the flour goes in. Weighing the flour helps avoid an overly dry batter.
Fruit moved while adding batterThe batter landed too heavily in one place. Distribute it in several dollops, then spread gently.

The toothpick was clean, but the center was still raw

One tester can hit a baked pocket and miss a wetter one nearby. Check two or three places close to the center, making sure you’re testing cake crumb and not pineapple or caramel.
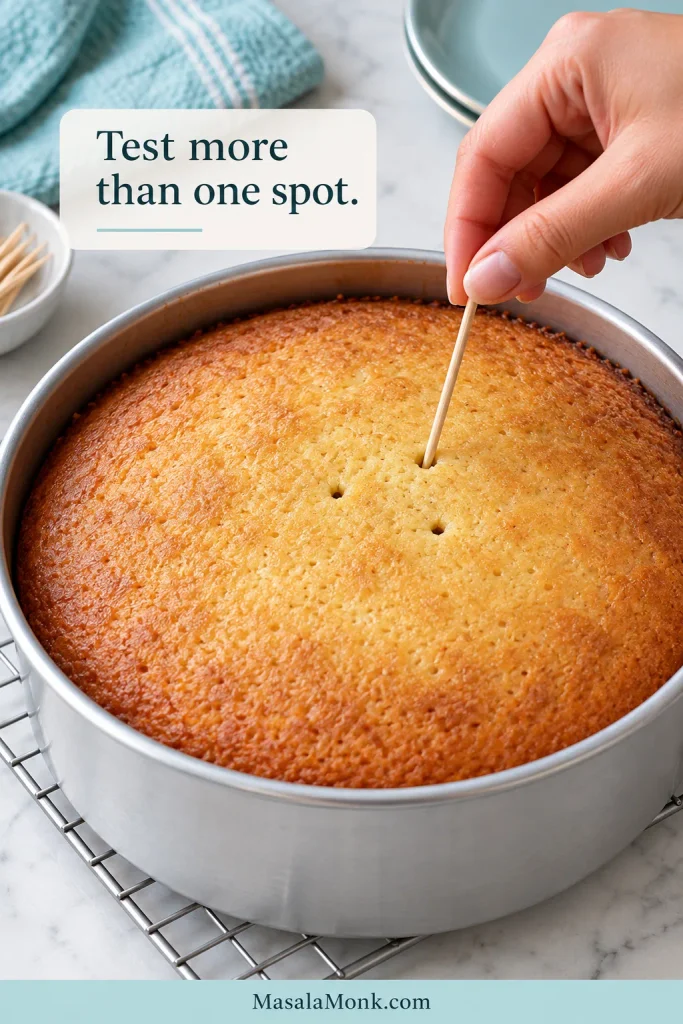
A hand inserts a cake tester into several nearby spots around the center of a plain golden cake in a metal pan.
Keep the test spots close to the center so you are judging the same critical zone rather than comparing a faster-baking edge with the slower middle of the cake.

The cake split around a pineapple ring

The fruit creates natural weak points in the crumb. A cake that is still a little underdone, unusually wet or turned over roughly is more likely to split there. Bake the center fully and keep the pan and platter together during the flip.
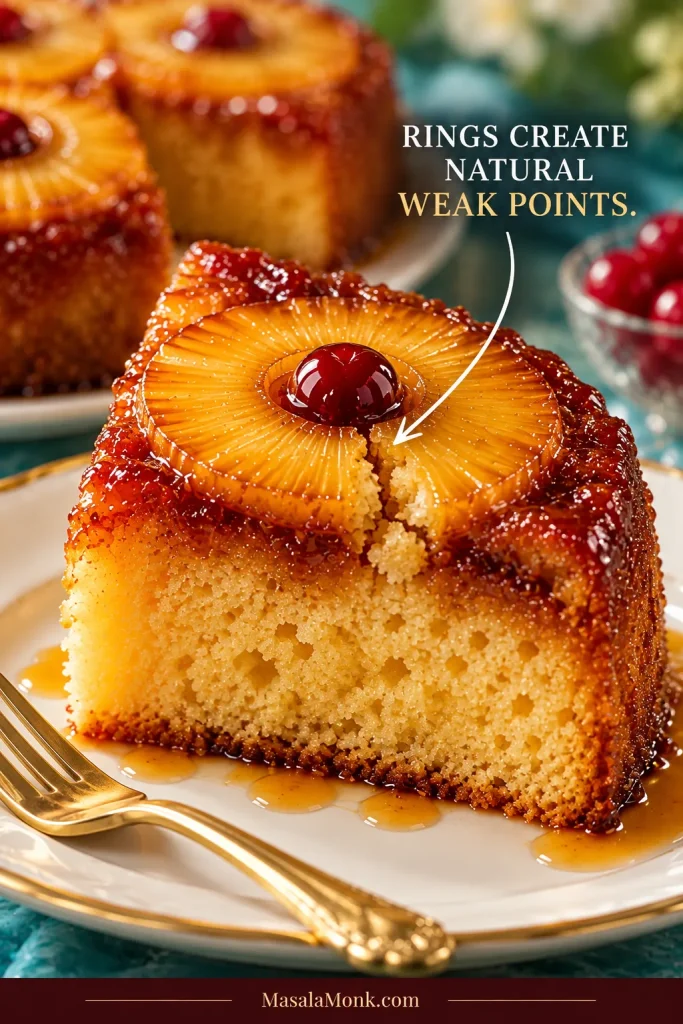
Close-up of a baked cake slice with a small crack starting beneath the edge of a pineapple ring.
A crack that begins directly beneath a pineapple-ring edge is different from a broad collapse through the center; the narrow strip of crumb there simply carries more structural stress.

What Changes With a Different Pan

Changing the pan changes more than the shape. Batter depth, browning, headroom and bake time can all shift.

  • 9×13-inch pan: has much more surface area than a 9-inch round, so this recipe needs scaling rather than a simple pan swap.
  • Cast-iron skillet: retains more heat and can give stronger browning and caramelization. Treat it as a distinct version rather than carrying over this timing unchanged.
  • Bundt pan: better treated as its own recipe because the fruit arrangement, batter depth and release all change.
  • Springform pan: avoid it here because the butter-sugar layer can leak through the seam.

An 8-inch round makes the batter substantially deeper and can risk overflow unless the pan is deep enough. A 10-inch round gives a shallower cake and will usually finish sooner. Neither should inherit the 9-inch bake time unchanged.
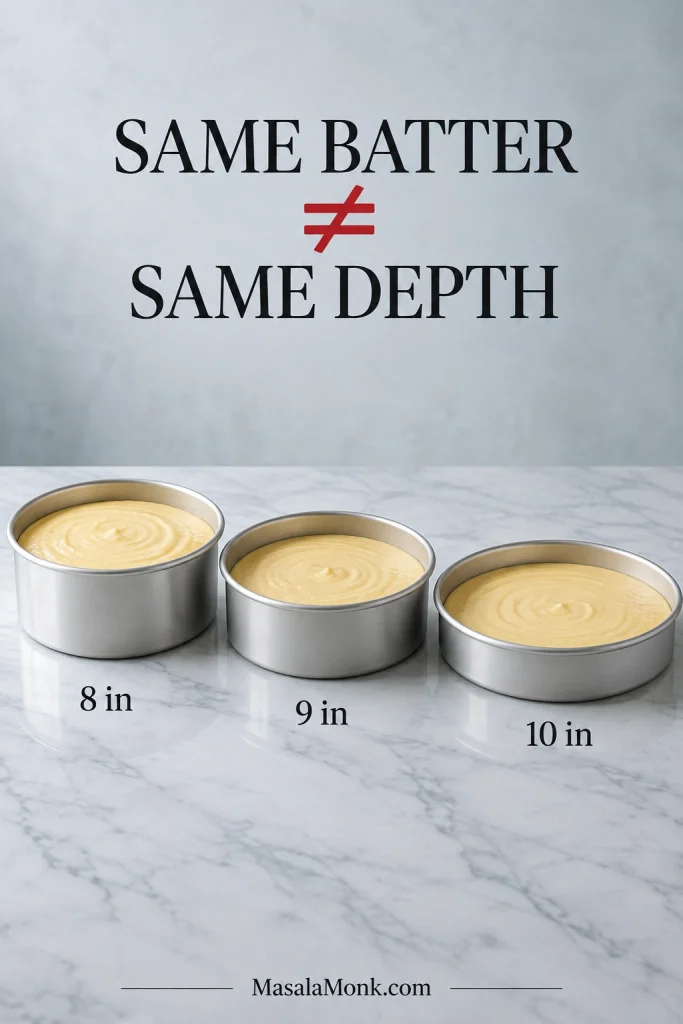
Three round metal pans labeled 8, 9 and 10 inches show the same batter at progressively shallower depths.
The key difference is the center-to-surface distance: the same batter sits deepest in the 8-inch pan and shallowest in the 10-inch, so the three cakes cannot share identical bake behavior.

For the most predictable bake, use the light-colored metal pan this recipe is written for. Silicone transfers heat more slowly and flexes during handling; glass, ceramic and dark metal can also change browning and timing.
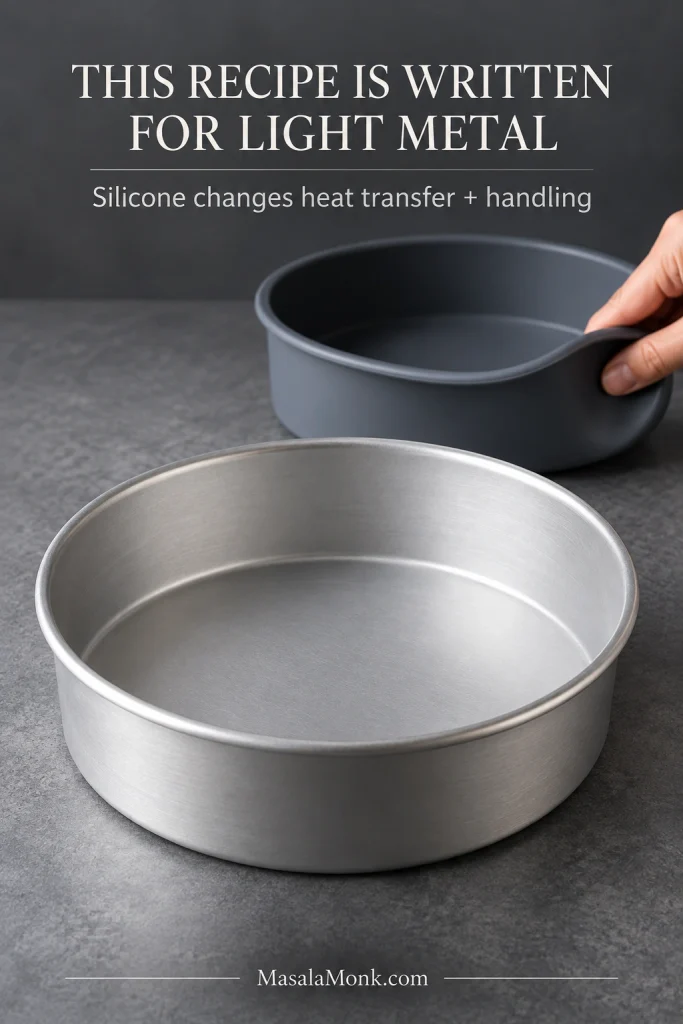
Rigid light-colored metal cake pan beside a dark silicone pan whose rim bends inward under a person's hand.
Light metal gives you a rigid rim to fill, move and later grip during inversion; silicone, by contrast, flexes at exactly the moments when a stable pan is useful.

Can I use cake mix?

A full prepared cake mix may be too much batter for this 9-inch pan. Use a pineapple upside down cake recipe designed for the cake mix and pan size you’re using instead of treating a whole box as a direct replacement for this scratch batter.

Make Ahead, Storage & Transport

Yes, you can bake this cake a day ahead. Flip it as directed, cool it completely on the serving platter, cover it well and refrigerate it. Let it come closer to room temperature before serving.

The cake is at its best on the day it is baked. By the next day, the fruit and caramel will have softened the crumb beneath them further.

Taking it to a birthday or potluck

Turn the cake out at home, then cool and transport it on the serving platter. Leaving it in the baking pan for several hours and trying to release it at your destination gives the caramel plenty of time to stick.
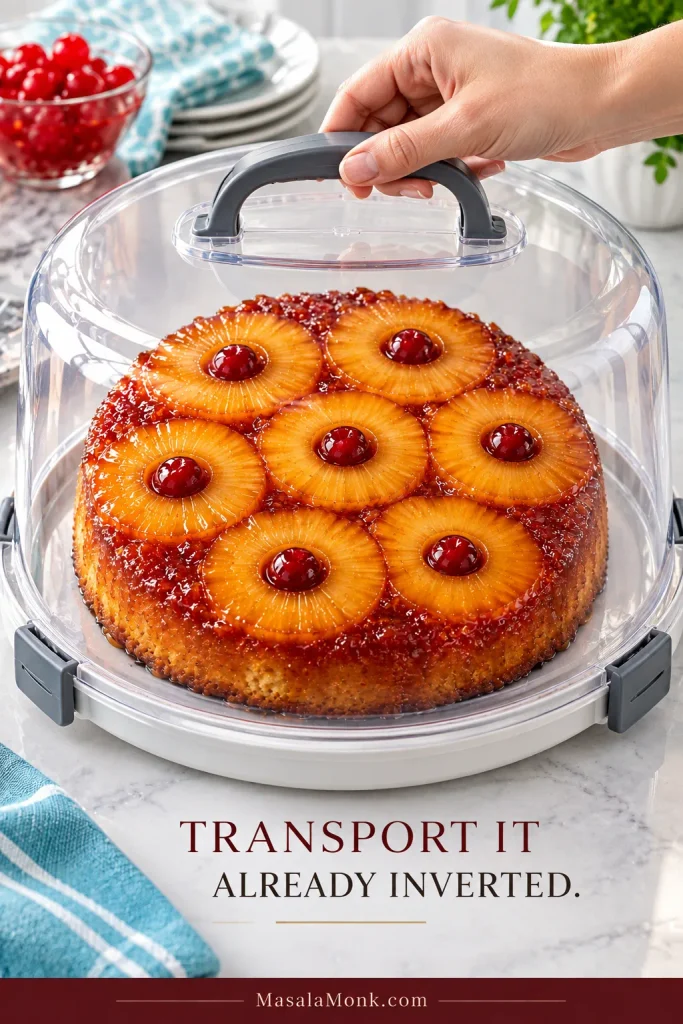
Finished pineapple upside-down cake sits level inside a clear locking cake carrier with a raised lid and handle.
For transport, keep the cake level and choose enough lid clearance that nothing touches the sticky pineapple topping. A secured flat base protects the reveal you already worked for.

Storing leftovers

For longer storage, cool the cake completely, cover it and refrigerate it for about 3–4 days. That matches USDA’s general guidance for refrigerated leftovers. Let refrigerated slices warm slightly at room temperature before serving, or rewarm them gently.

How to Serve It

The fruit decorates the cake for you, so it doesn’t need frosting. It is one of those cakes that looks finished the second the pan comes off.

Serve it at room temperature for the neatest wedges or slightly warm for softer caramel. A spoonful of homemade whipped cream is plenty if you want something cool alongside it. Vanilla ice cream works too, especially with a warm slice.
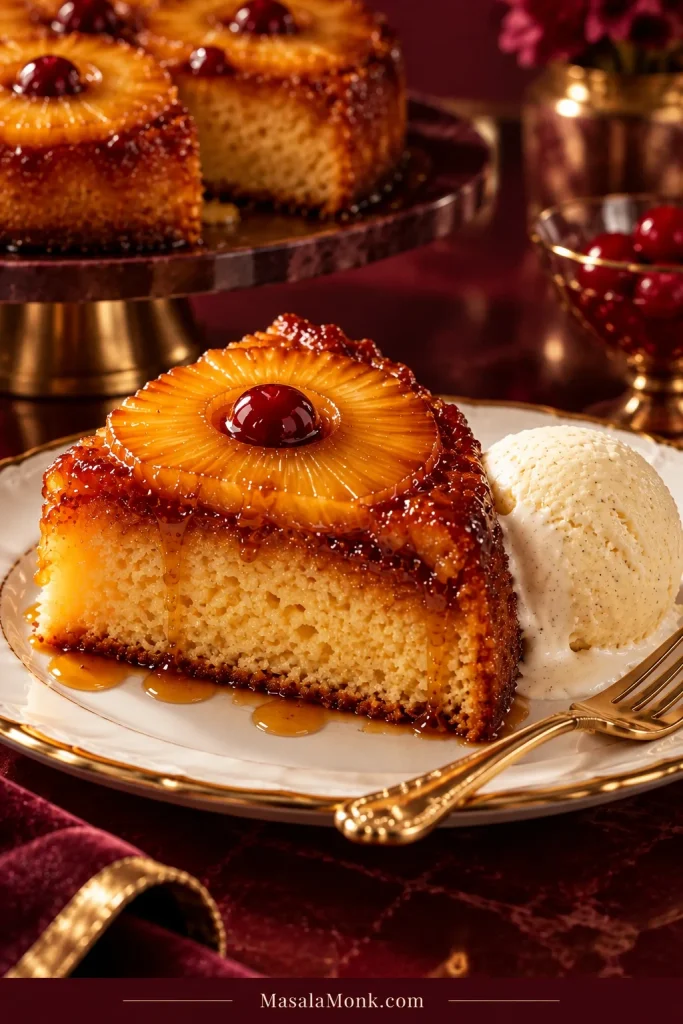
Warm slice of pineapple upside-down cake beside a scoop of vanilla ice cream beginning to soften where it touches the cake.
Warm pineapple upside down cake loosens the caramel just enough to soften vanilla ice cream at the contact edge, giving you hot-cold contrast without needing another sauce or frosting.

The best part is still lifting the pan. If the pineapple comes up glossy, the cake cuts cleanly into a tender wedge and one cherry needs nudging back into place, that’s still a successful cake.
Posted on — Leave a comment

Peach Upside Down Cake Recipe: Caramelized, Moist and Easy to Flip

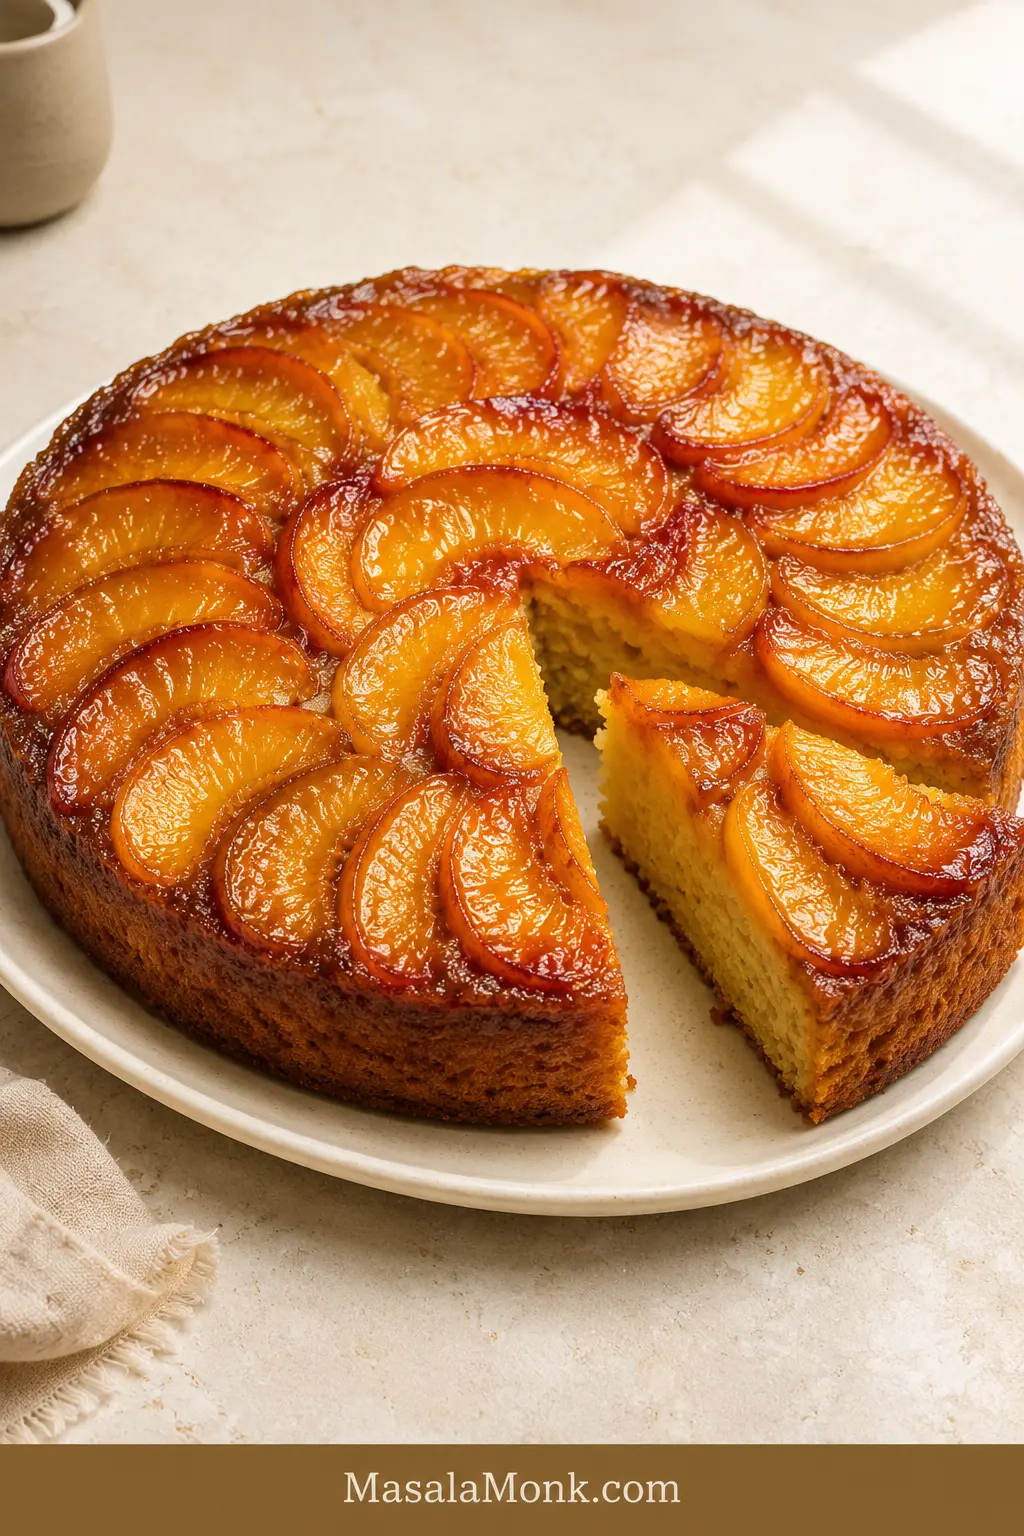
Round peach upside down cake on an ivory platter with glossy caramelized peach slices arranged across the top and one wedge removed to show the pale golden cake crumb.

The best moment in a peach upside down cake happens before the first slice. The pan lifts away, the caramel lets go, and the peaches appear on top—glossy, golden and arranged closely enough to look as though the cake planned it all along.

That reveal is also why this cake can feel more intimidating than an ordinary fruit bake. The peaches may release too much juice. The surface may brown before the middle is ready. Then, after all that, the whole cake has to be turned over without leaving its prettiest part inside the pan.

The cake itself is simpler than the reveal makes it look. This is a from-scratch butter cake: peaches go over butter and brown sugar, a soft sour cream batter goes on top, and the oven does the caramelizing for you. There is no boxed mix and no separate caramel to cook.

The MasalaMonk rule is simple: keep the peaches juicy, bake the center through and turn the cake out while the topping is still warm.

Start here

Peach Upside Down Cake in One Minute

Arrange 1 pound / 450 g prepared peach slices over melted butter and light brown sugar in a solid-bottom 9-inch / 23 cm light metal cake pan. Cover them with a thick sour cream butter-cake batter.

The topping caramelizes in the oven, so there is no saucepan of hot sugar to judge or pour.

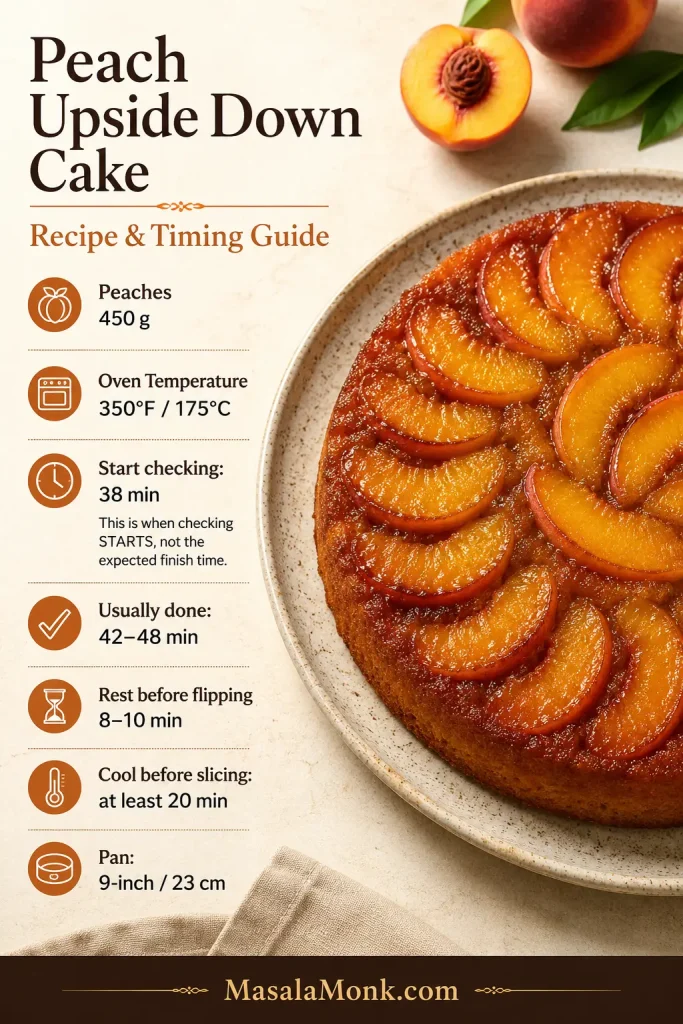
Bake at 350°F / 175°C and begin checking at 38 minutes. Look for a center that no longer ripples, springs back slowly and leaves moist crumbs—but no shiny batter—on a tester.

Rest the cake for 8–10 minutes, loosen the edge and turn it out in one steady movement. Let it cool for at least 20 minutes before slicing.

Peach upside down cake timing guide showing 450 g peaches, 350°F / 175°C, first doneness check at 38 minutes, usual bake time of 42–48 minutes, an 8–10 minute rest before flipping, at least 20 minutes of cooling and a 9-inch pan.
Treat the timeline as checkpoints, not deadlines: the first-check mark starts observation, while the later window shows where many cakes actually finish.

Fresh, Canned or Frozen Peaches?

For the brightest peach flavor and clearest pattern, start with firm-ripe yellow peaches. Canned and frozen fruit are useful alternatives when fresh peaches are not available.

On a phone, swipe sideways to compare the options.

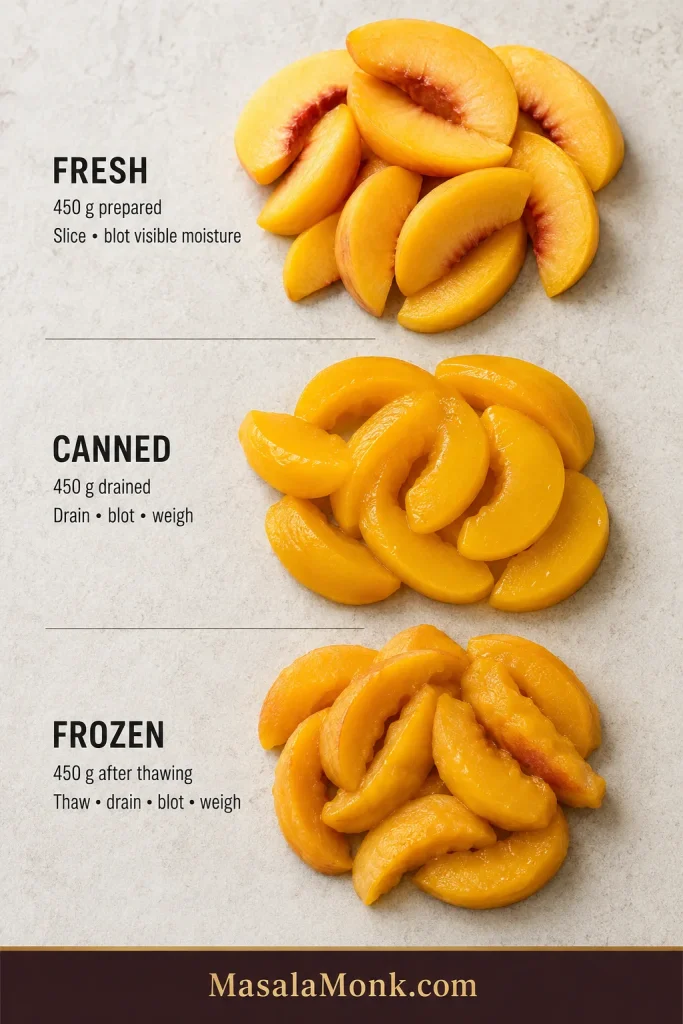
PeachesAmountBefore they go in the pan
Fresh, firm-ripe1 lb / 450 g prepared slicesPit and slice; peel only if the skin is tough; blot visibly wet surfaces
Canned in juice1 lb / 450 g drained slicesDrain thoroughly and blot before weighing
Canned in syrup1 lb / 450 g drained slicesDrain very well; rinse briefly only if heavily syrup-coated, then blot
Frozen1 lb / 450 g after thawingThaw completely, drain, blot and then weigh
Three groups of peach slices labeled fresh, canned and frozen, with fresh peaches shown firm, canned peaches drained and glossy, and frozen peaches thawed and softer.
Fresh peaches usually keep sharper edges, canned slices are more uniform, and frozen fruit softens after thawing; each can work, but the finished texture will not be identical.

The fresh-peach version

Caramelized Peach Upside Down Cake

A close layer of peaches bakes beneath a tender sour cream butter cake, then becomes the glossy caramelized top after the flip. Brown sugar and butter form a light caramel glaze around the fruit.

It looks dressed up, but the basic method is simple: arrange the peaches, mix the batter, bake, rest and flip.

Prep
About 25 minutes

Bake
42–48 minutes

Rest before flipping
8–10 minutes

Cool before slicing
At least 20 minutes

Total time
About 1 hour 40 minutes

Yield
8 generous or 10 smaller slices

Oven and pan
350°F / 175°C; 9-inch / 23 cm solid-bottom light metal cake pan, at least 2 inches / 5 cm deep

Equipment

  • 9-inch / 23 cm solid-bottom light metal cake pan
  • Parchment paper
  • Rimmed baking sheet
  • Kitchen scale
  • Mixing bowls
  • Hand mixer or stand mixer
  • Flexible spatula
  • Thin blunt knife or small offset spatula
  • Heat-safe serving platter wider than the cake pan

Ingredients

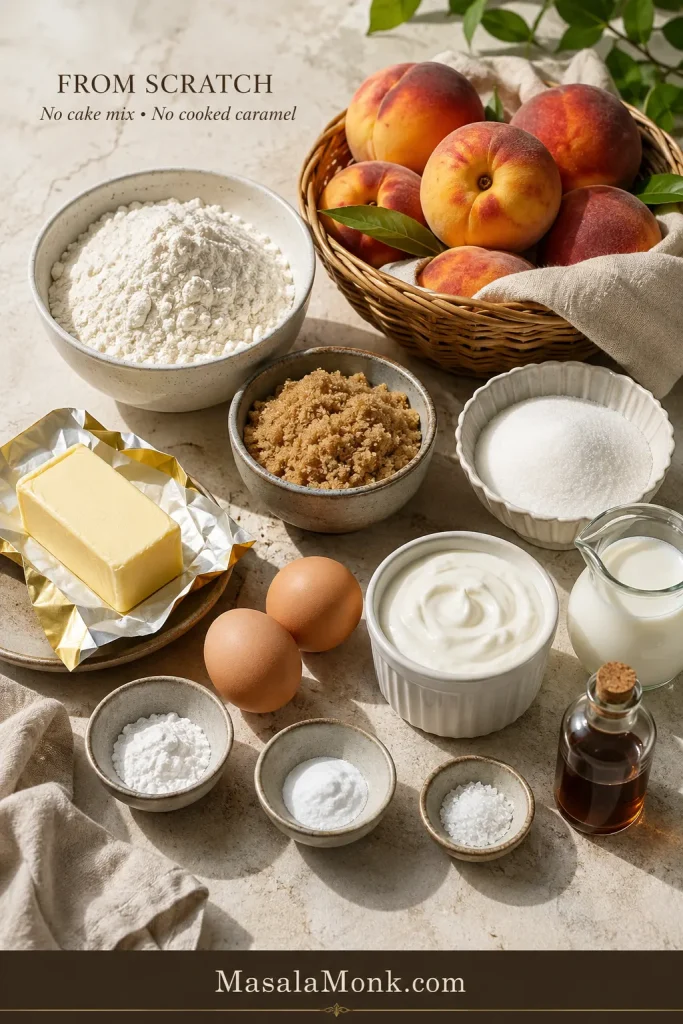
Fresh peaches, butter, brown sugar, granulated sugar, flour, two eggs, sour cream, milk and vanilla arranged on a light work surface for peach upside down cake.

Peaches, brown sugar and butter make the glossy top; the simple sour cream batter underneath is what turns it into a tender, sliceable cake.

Peach topping

  • 4 tablespoons / 56 g unsalted butter
  • ½ cup packed / 100 g light brown sugar
  • ¼ teaspoon fine salt
  • 1 pound / 450 g prepared peach slices, cut about ¼ inch / 6–8 mm thick

Sour cream cake

  • 190 g all-purpose flour, about 1½ cups when spooned and leveled
  • 1½ teaspoons baking powder
  • ¼ teaspoon baking soda
  • ½ teaspoon fine salt
  • ½ cup / 113 g unsalted butter, softened but still cool
  • ¾ cup / 150 g granulated sugar
  • 2 large eggs, at room temperature
  • 2 teaspoons vanilla extract
  • ½ cup / 120 g full-fat sour cream, at room temperature
  • ¼ cup / 60 ml whole milk, at room temperature

Instructions

Prepare the pan and peach base

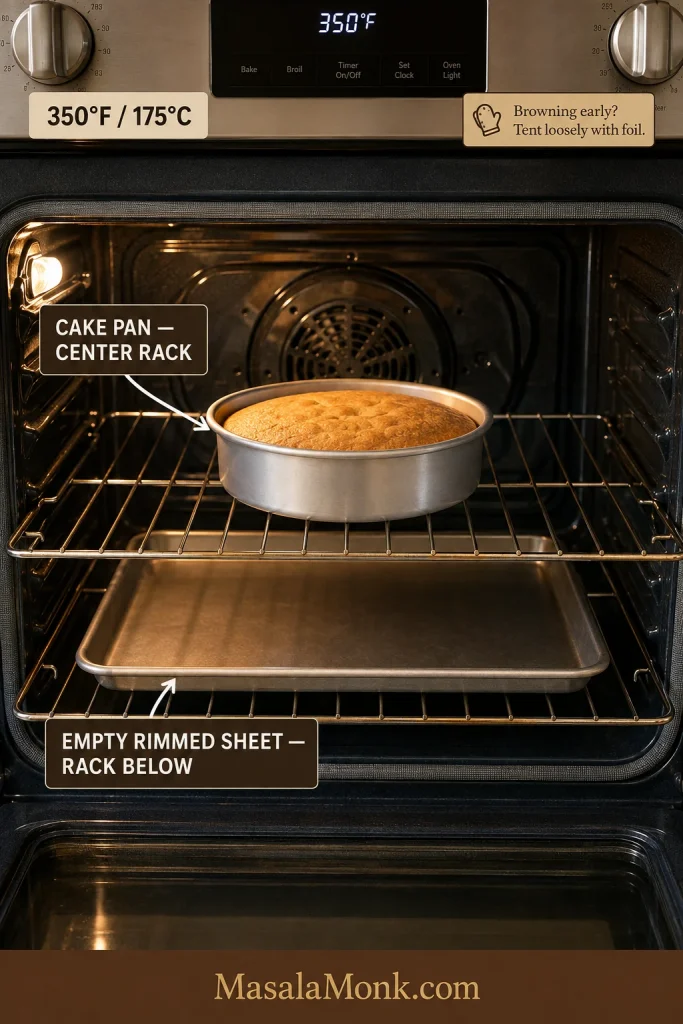
  1. Heat the oven and prepare the pan. Set a rack in the center and heat the oven to 350°F / 175°C. Lightly grease the base and sides of the cake pan. Press a fitted parchment round onto the base and grease it lightly. Place an empty rimmed baking sheet on the rack below to catch drips.
Open home oven with a round light-metal cake pan containing a plain golden cake on the center rack and an empty rimmed baking sheet on the rack below at 350°F / 175°C.
The lower baking sheet is insurance, not part of the cake’s baking stack. Keeping an air gap between sheet and pan leaves the cake directly exposed to the intended oven heat.
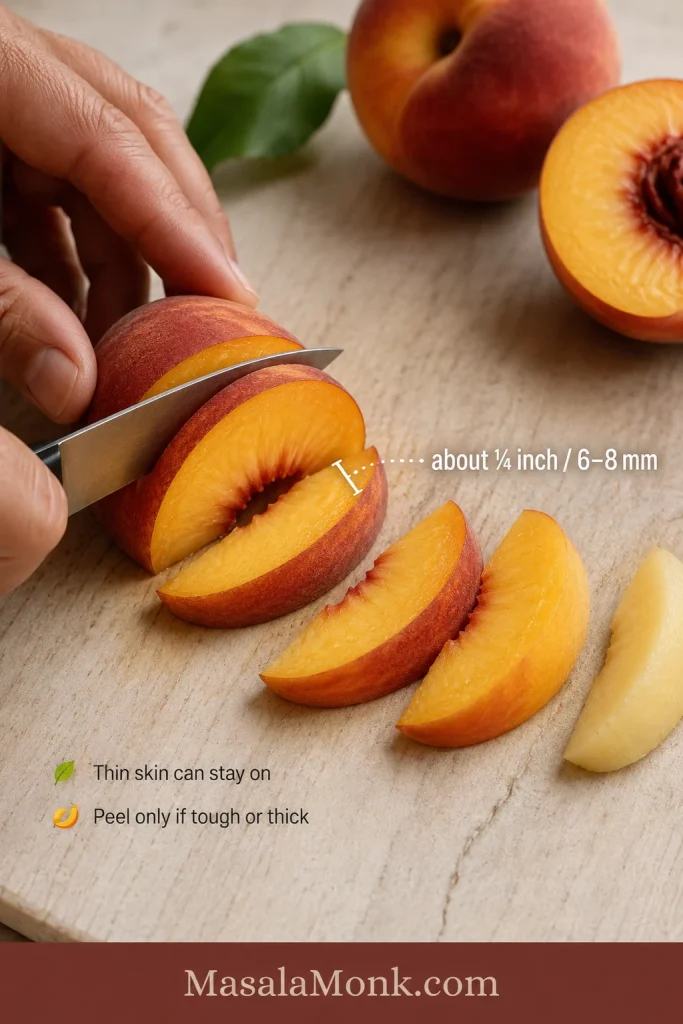
  1. Prepare the peaches. Halve and pit the fruit. Peel only if the skin is thick or tough. Cut into slices about ¼ inch / 6–8 mm thick, then weigh 1 pound / 450 g. Blot surfaces that are visibly wet.
  2. Add the butter and brown sugar. Melt the 4 tablespoons / 56 g butter and pour it into the pan. Tilt to coat the base. Mix the brown sugar with ¼ teaspoon salt and scatter it evenly over the butter.
  3. Arrange the peaches. Start near the outside edge and make one close overlapping layer, working toward the center. Use smaller pieces to fill the last gaps and save anything that does not fit comfortably.

Mix, bake and turn out the cake

  1. Whisk the dry ingredients. Combine the flour, baking powder, baking soda and ½ teaspoon salt.
  2. Cream the butter and sugar. Beat the softened butter and granulated sugar for about 3 minutes, scraping the bowl once or twice, until lighter and slightly fluffy.
  3. Add the eggs and dairy. Beat in the eggs one at a time. Mix in the vanilla and sour cream.
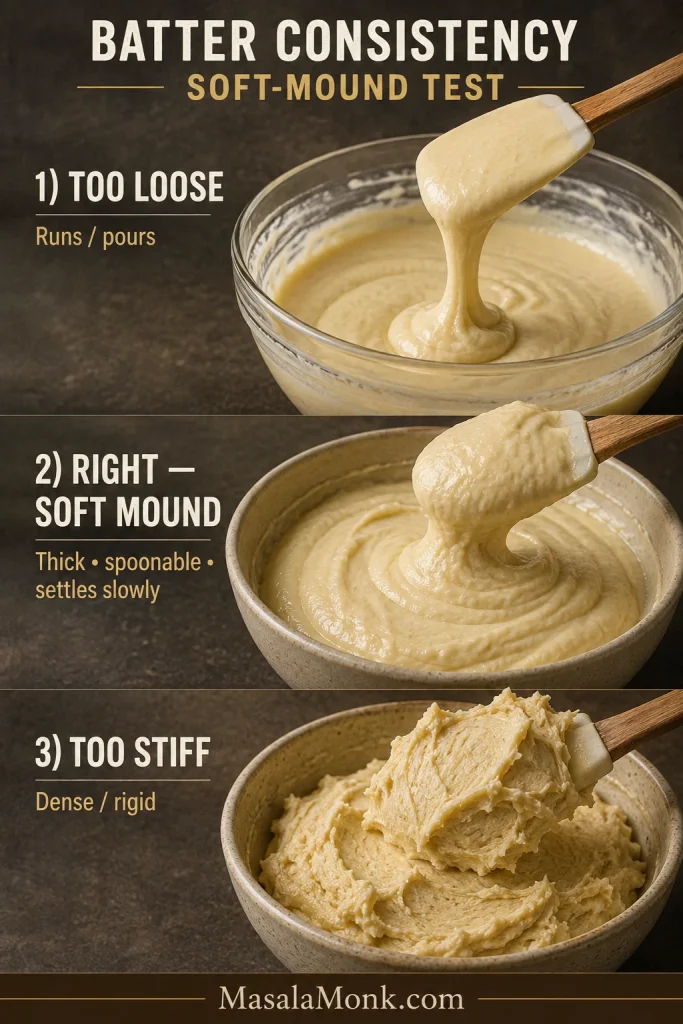
  4. Finish the batter. Mix in half of the flour mixture on low speed. Add the milk, then the remaining flour. Stop when the dry streaks disappear. The batter should form a soft mound rather than pour freely.
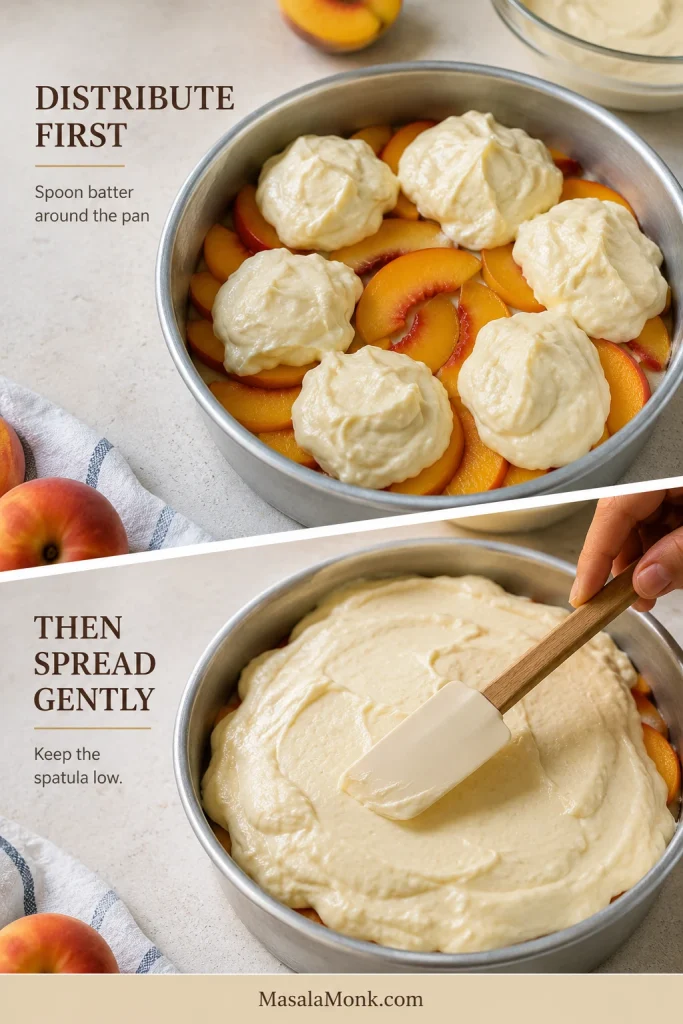
  5. Spread over the peaches. Spoon the batter around the pan and gently spread it to the edge, keeping the spatula low so the fruit stays in place.
  6. Bake and check the center. Put the cake pan directly on the center rack and bake for 42–48 minutes, beginning the first check at 38 minutes. The center should no longer ripple, should spring back slowly and should leave moist crumbs but no shiny batter on a tester. Tent loosely with foil if the surface darkens first.
  7. Rest, loosen and flip. Set the pan on a heatproof surface and immediately start an 8–10 minute timer. Run a thin blunt knife around the edge, place the heat-safe platter face-down over the pan and turn both over together in one smooth movement.
  8. Lift, repair and cool. Leave the inverted pan in place for about 30 seconds, then lift it straight up and peel away the parchment. Put back any peach that stayed behind while the topping is warm. Cool for at least 20 minutes before slicing.

Recipe Notes

  • Canned peaches: Drain and blot thoroughly before weighing. Juice-packed peaches give the most balanced result.
  • Frozen peaches: Thaw completely, drain, blot and weigh after thawing.
  • Dark metal pan: Begin checking several minutes earlier because the edge may brown faster.
  • Springform pan: Butter, sugar and peach juice may leak through the removable base, so a solid pan is safer.
  • Cleanest slices: Cool to room temperature and wipe the knife between cuts.

If your peaches are softer than expected, your oven browns quickly or the flip is the part making you nervous, the details below cover those exact moments.

Choose and Prepare the Peaches

Look for peaches that smell sweet before the knife touches them and yield slightly near the stem, yet remain firm enough to slice cleanly.

Judge ripeness by the yellow or cream background color rather than the red blush alone. For more help choosing and ripening peaches, see this peach selection and storage guide from Utah State University Extension.

Freestone peaches are easiest to prepare because the pit releases cleanly. Clingstone peaches still work; cut the flesh away from the pit instead of pulling hard enough to tear the fruit.

Buy about 1¼–1½ pounds / 570–680 g whole peaches to allow for pits, bruised spots and any skin you remove. Fruit count varies, so weigh the prepared slices.

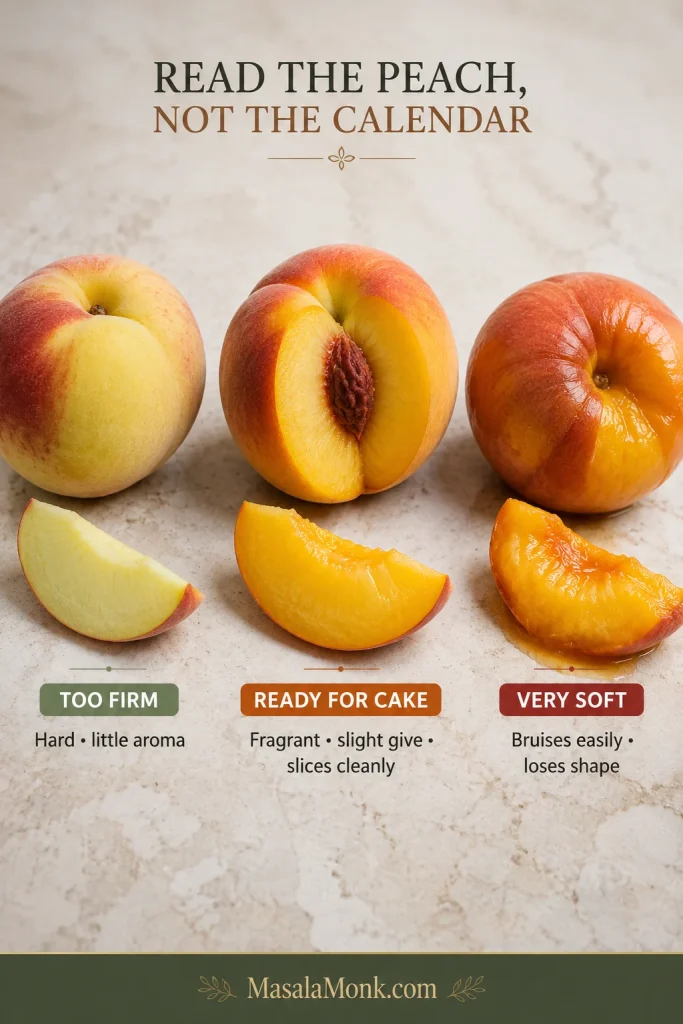
Read the peach, not the calendar

Too firm: Little aroma and hard around the stem. Let it ripen at room temperature in a loosely closed paper bag and check daily.

Ready: Fragrant, slightly yielding near the stem and easy to slice cleanly.

Very soft: Bruises under light pressure and releases juice as soon as it is cut. Handle gently, slice a little thicker and consider cobbler if the fruit will not hold its shape.

Three peaches showing different ripeness levels: a firm peach with pale flesh, a ripe peach with juicy orange-yellow flesh that slices cleanly, and a very soft peach with softer edges and more visible juice.
The cut edge is a useful ripeness clue: ready peaches look juicy yet hold a neat wedge, whereas very soft fruit begins slumping before it reaches the pan.

Thin peach skin softens in the oven and gives the finished slices a little more definition. Peel only when the skin is thick, tough or fuzzy enough to bother you.

A peach being cut into wedges about one-quarter inch thick beside several peach slices, including slices with the natural skin left on.
Uniformity matters as much as thickness. Similar-size slices soften at roughly the same pace, while a thin strip of peach skin can help preserve their outline after baking.

Using canned or frozen peaches

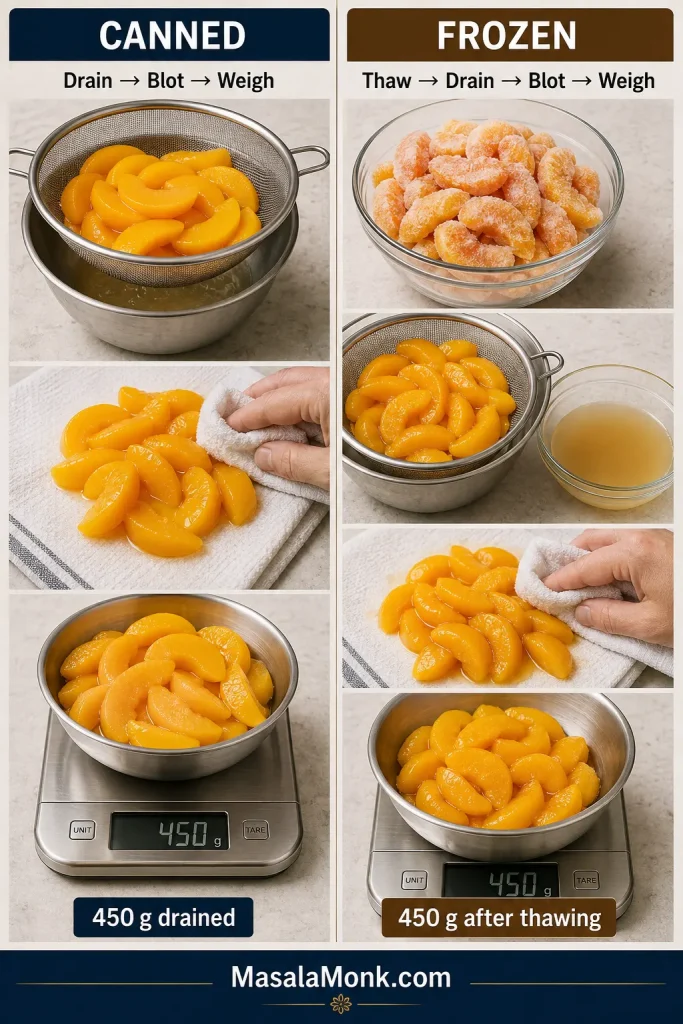
For canned peaches, fruit packed in juice is the easiest option to balance with the brown sugar topping. Drain the slices thoroughly, spread them over a clean towel and blot the exposed surfaces before weighing. A large 29-ounce / 820 g can is a sensible place to start, but drained yield varies by brand.

Syrup-packed peaches are sweeter and softer. Drain them especially well. If thick syrup coats the slices, give them a quick rinse under cool water and blot them dry.

If you would rather skip the flip altogether, this peach cobbler with canned peaches turns the same pantry fruit into a warm, scoopable dessert.

For frozen peaches, thaw the slices completely, drain away the released liquid, blot them and then weigh the fruit. Buy slightly more frozen fruit than the finished amount you need because some weight is lost with the liquid.

Icy peaches chill the bottom of the pan and release water into the caramel just as the cake is trying to set, so thawing first matters here.

Two peach preparation workflows showing canned peaches being drained, blotted and weighed, and frozen peaches being thawed, drained, blotted and weighed after thawing.
The important endpoint is the same: weigh the peaches after excess liquid is removed. Otherwise, part of that measured weight may be syrup or thaw water rather than fruit.

Keep them juicy, not watery

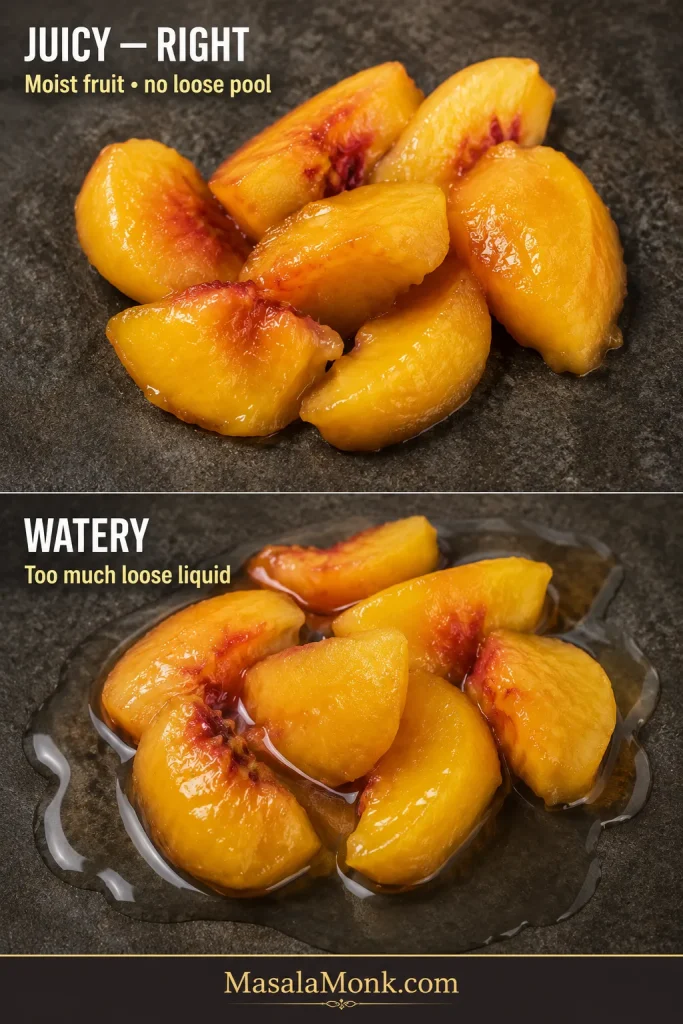
A ripe peach is supposed to contain juice. The aim is simply to keep loose liquid from pooling beneath the batter.

Close comparison of juicy peach slices with a moist sheen but no liquid pooling beside peach slices sitting in visible loose juice.
Look beneath the fruit: moisture clinging to the peach surface is desirable juice, whereas liquid collecting underneath is excess water headed for the caramel.

Cut the slices about ¼ inch / 6–8 mm thick. Blot surfaces that are visibly dripping, but do not squeeze the fruit dry. Slice close to assembly time too; sugar draws juice from cut peaches surprisingly quickly.

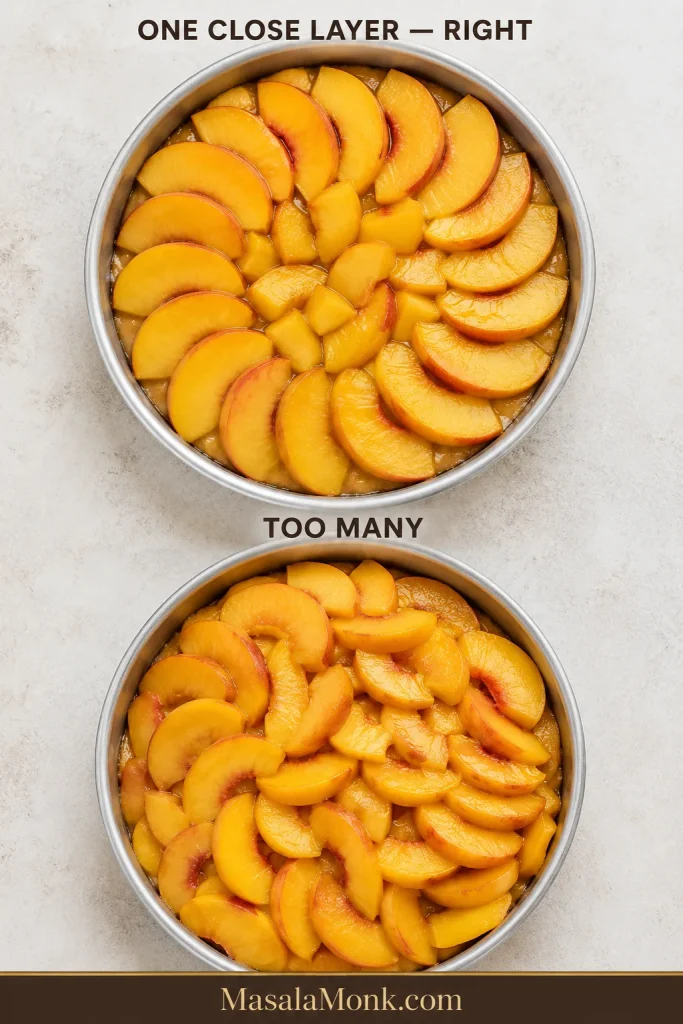
Build one close overlapping layer. Start around the outside and work toward the center. Once the last gap is filled, the pan should already hint at the pattern you are hoping to reveal later.

There is no prize for forcing every remaining peach slice into a full pan. Save the extras for yogurt, oatmeal or serving beside the cake.

Two round cake pans viewed from above: one filled with a single close layer of overlapping peach slices and another overloaded with peaches stacked in multiple layers.
From above, a full pan should still read as one peach layer. Once slices start hiding whole slices underneath, generous has become overloaded.

Peaches ready? Mix the batter·Return to the recipe

Mix a Tender Batter That Stays in Place

With the peaches settled in the pan, the batter needs enough body to cover them without pushing the pattern apart.

Softened butter should accept a fingertip impression without looking shiny or partly melted. Beat it with the sugar until lighter and a little fluffy, then add the eggs one at a time.

Once the flour goes in, slow the mixer down. Stop as soon as the last dry streaks disappear. The finished batter forms a soft mound; it does not pour like pancake batter or sit like cookie dough.

Three bowls showing cake batter that is too loose and runny, correctly thick and spoonable in a soft mound, and too stiff with rigid peaks.
Watch what happens after the spoon lifts: correct sour cream batter holds briefly, then relaxes at the edges instead of flowing flat or standing rigid.

Spoon the peach-cake batter around the pan before spreading it. A single heavy mound can push the fruit outward. Keep the spatula low and move gently toward the edge.

Two-step view of thick cake batter first spooned in several mounds over peaches in a round pan and then gently spread across the surface with a spatula.
Several smaller batter deposits shorten every spatula stroke, so less sideways force reaches the peach pattern hidden underneath.

Prefer fruit folded through the crumb instead? Try this fresh apple cake, which holds plenty of fruit in a thick, tender batter.

Know When the Center Is Fully Baked

A beautifully browned surface can hide a soft center. Peach juice also makes a tester harder to read than it would be in a plain butter cake.

When butter, vanilla and peach fill the kitchen, you are getting close. The center—not the smell or the clock—decides when the cake comes out.

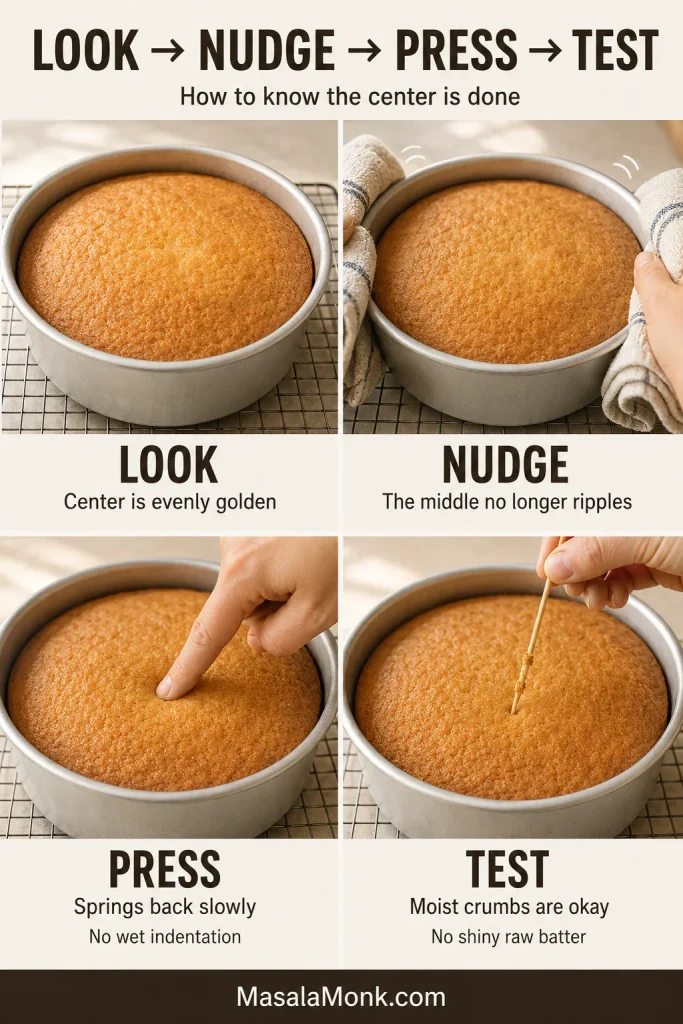
  1. Look: The exposed surface is evenly golden, including the center.
  2. Nudge: The middle no longer ripples when the pan moves gently.
  3. Press: A light touch in the center springs back slowly instead of leaving a wet indentation.
  4. Test: A skewer inserted into central cake crumb may carry moist crumbs but shows no shiny raw batter.
Four-step doneness guide showing a golden cake surface, a pan being gently nudged with heat protection, a fingertip lightly pressing the center and a tester carrying moist crumbs but no raw batter.
No single doneness cue has to carry the whole decision. When appearance, movement, touch and tester all agree, the center becomes much easier to judge confidently.

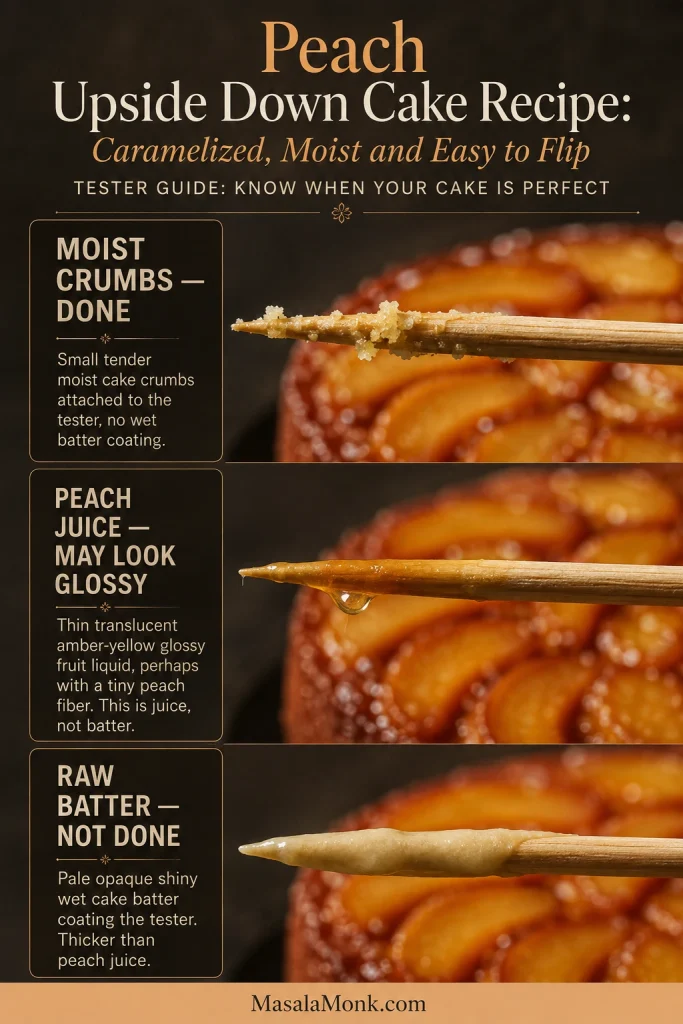
A tester that passes through a peach may come back glossy even when the cake is done. Angle it toward an area of central crumb when necessary.

Three cake testers showing small moist baked crumbs, thin translucent peach juice and thick pale shiny raw cake batter for comparison.
Opacity is the easiest visual distinction: peach juice looks translucent, baked crumbs look granular, while raw batter appears smooth, pale and opaque.

Begin checking at 38 minutes. Most cakes finish around 42–48 minutes, but every oven behaves a little differently. Trust what the center is doing more than the final minute on the clock.

Remember this

The clock tells you when to start checking. The center tells you when the cake is done. The warm topping tells you when to flip.

Center ready? Go straight to the flip·Something looks off?·Return to the recipe

How to Flip the Cake Cleanly

When the center is fully baked, it is time for the part everyone thinks about: the flip.

The cake needs a short rest first. Turn it out too soon and the crumb may split under the fruit. Leave it until cold and the caramel begins holding more firmly to the pan.

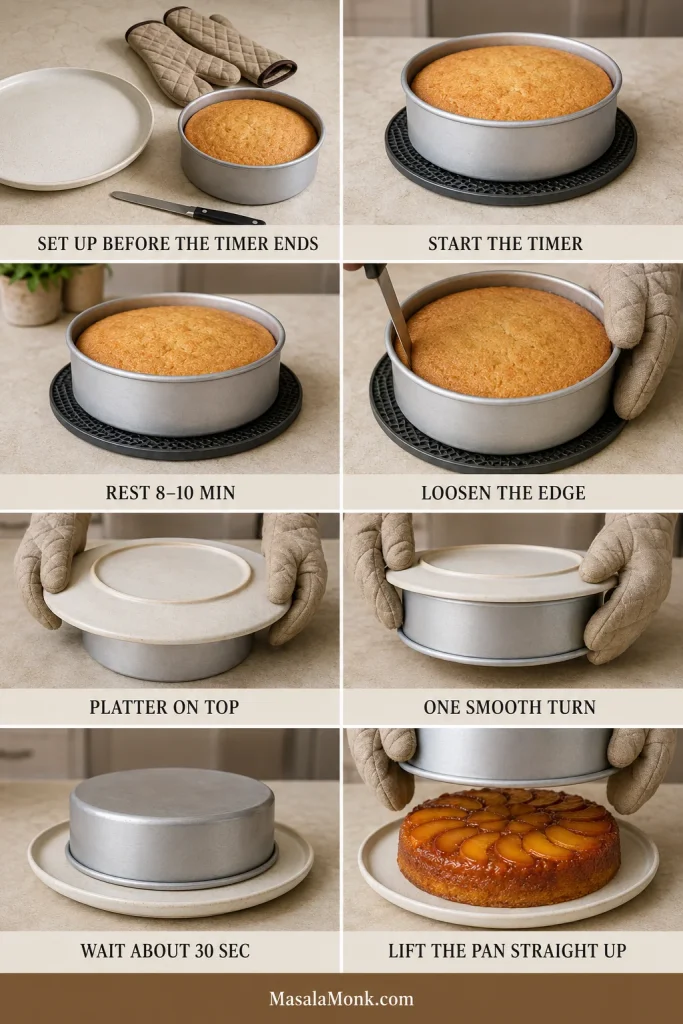
Set up the landing place before the timer ends. Clear the counter and set out a heat-safe platter wider than the cake pan, a thin knife and dry oven mitts. One calm turn is much easier when everything already fits.

Rest the cake for 8–10 minutes. Start the timer as soon as the pan leaves the oven. The short rest steadies the crumb before the caramel firms against the pan.

Step-by-step peach upside down cake flipping guide showing setup with platter and oven mitts, an 8–10 minute rest, loosening the edge, placing the platter over the pan, turning them together, waiting about 30 seconds and lifting the pan.
Each step controls a different risk: resting steadies the crumb, loosening frees the edge, the brief inverted pause lets gravity help, and the final lift protects the reveal.

Make one steady turn

  1. Run a thin blunt knife around the edge.
  2. Place the heat-safe serving platter face-down over the pan.
  3. Grip the platter and pan firmly together.
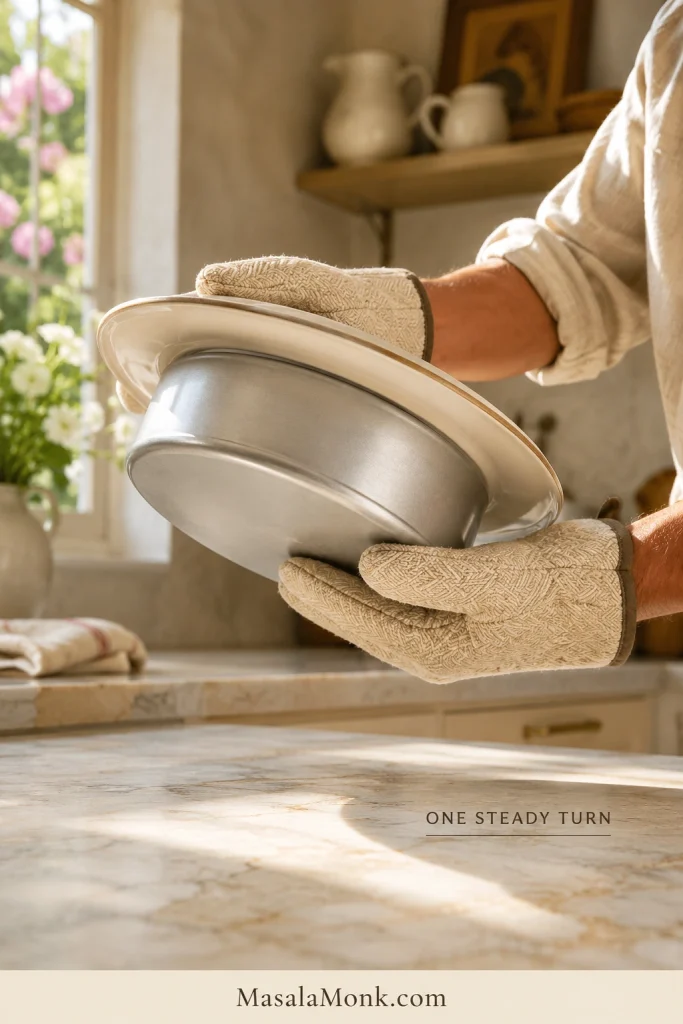
  4. Turn them over in one smooth movement and set the platter down.
  5. Leave the pan in place for about 30 seconds.
  6. Lift the pan straight up and peel away the parchment carefully.
Hands in oven mitts holding a round metal cake pan tightly against an ivory serving platter while turning them together to invert the cake.
During inversion, the pan and platter are safest when they behave like one object. Any gap between them gives the hot cake room to slide.

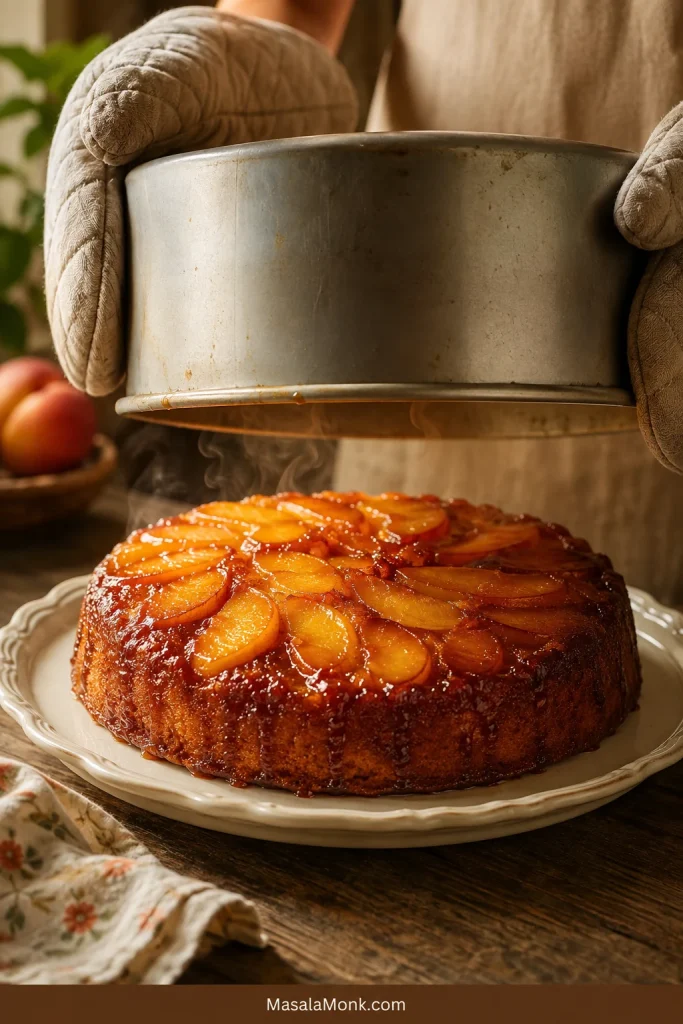
A little steam may rise from the peaches and the caramel may still move around the edge. Give it a moment before touching the pattern.

Two hands wearing oven mitts lifting a round metal cake pan straight upward to reveal a glossy caramelized peach upside down cake on an ivory platter.
A clean reveal does not need a perfect pattern—glossy peaches, intact cake edges and a cake that stays centered on the platter are enough.

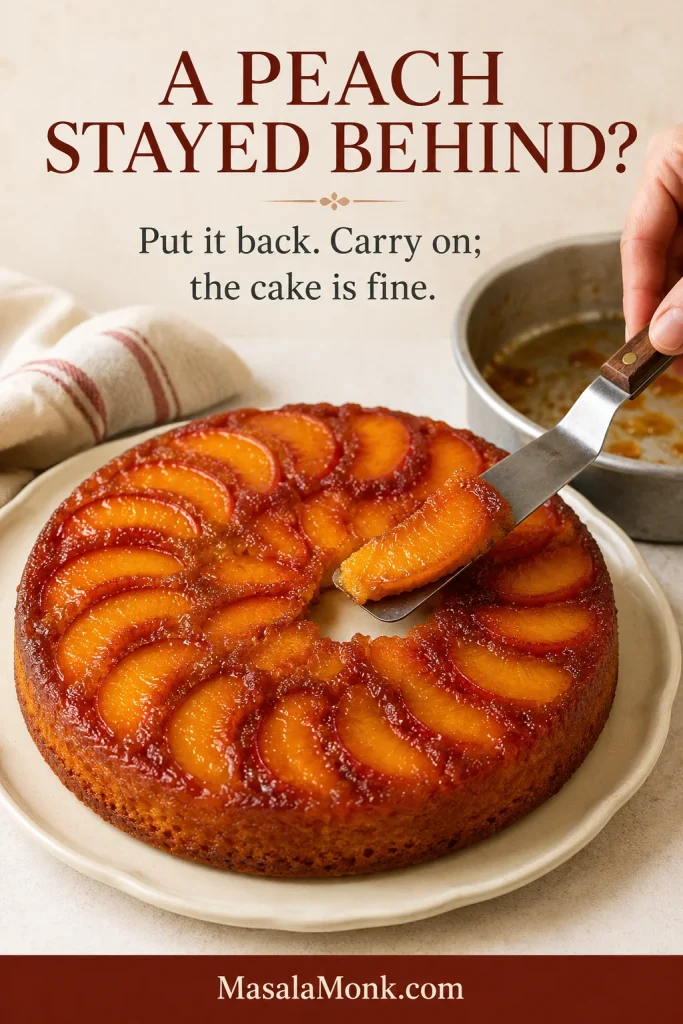
If a peach stays behind, lift it gently with a small spatula, return it to the visible gap and spoon over any glaze left in the pan. Carry on; the cake is fine.

Finished peach upside down cake with one peach-shaped gap while a single caramelized peach slice is returned to the gap with a small offset spatula.
Use the empty shape on the cake as your map. Returning the peach to its original gap usually disguises the repair better than rearranging the topping.

Now give the cake at least 20 minutes before cutting. The topping needs warmth for the flip; the crumb needs a little more time before the knife goes through it.

What Success Looks Like

The peaches should look glossy rather than flooded, with individual slices visible. Their edges soften into the caramel, and the pattern can remain a little irregular.

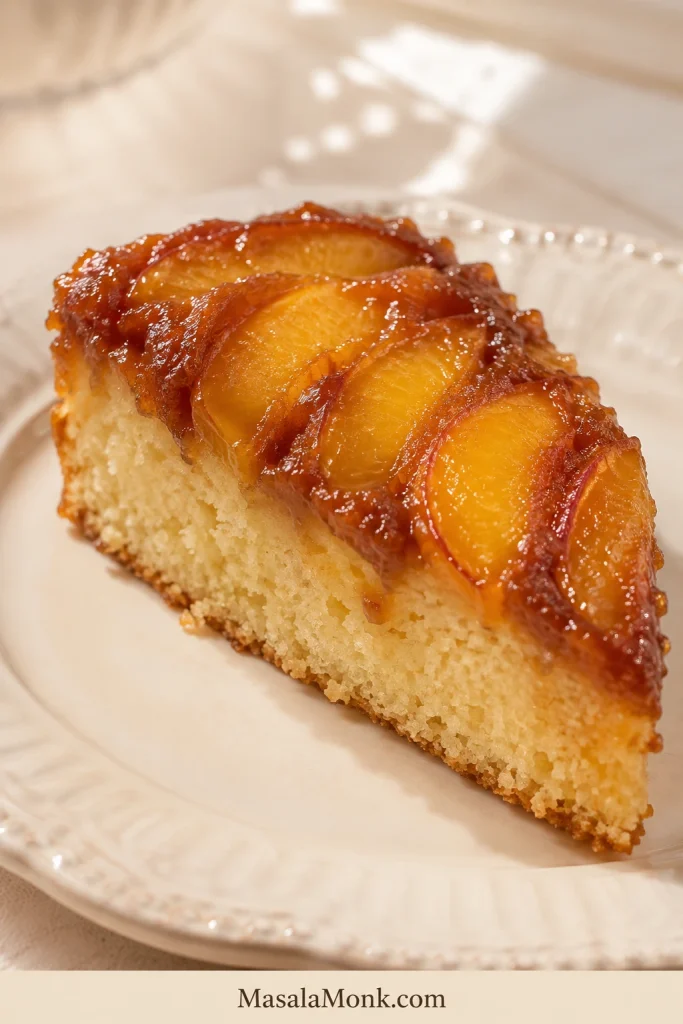
Close-up wedge of peach upside down cake showing glossy caramelized peaches, a thin moist layer beneath the fruit and a fully baked pale golden cake crumb.
A good slice stays tender and moist but still stands cleanly beneath the peaches instead of slumping on the plate.

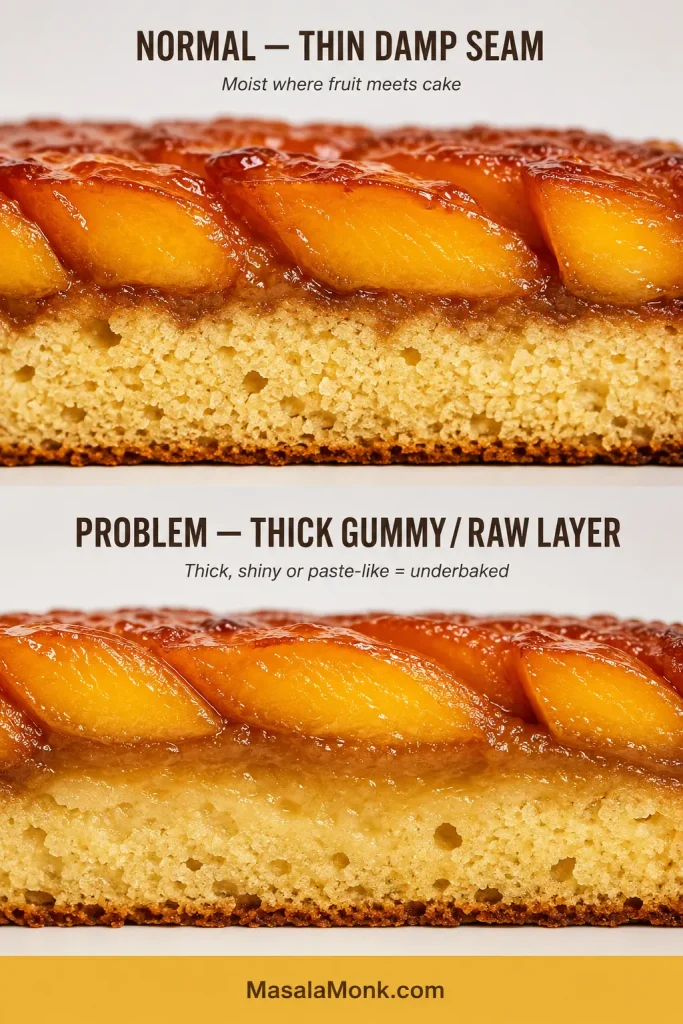
Beneath the fruit, the cake should feel soft and moist yet hold a clean wedge. A thin damp seam where peach, glaze and crumb meet is normal. A thick gummy layer or shiny raw center is not.

Two cake cross-sections comparing a thin moist seam directly beneath caramelized peaches with a much thicker shiny gummy layer in an underbaked cake.
The key distinction is depth, not moisture alone: normal peach moisture stays close to the topping, whereas underbaking affects a much thicker band of the interior.

Slight overlaps and darker caramel around the edge belong on a homemade upside-down cake. They are not signs that anything went wrong.

Checking the result? Troubleshoot a problem·See why it works·Return to the recipe

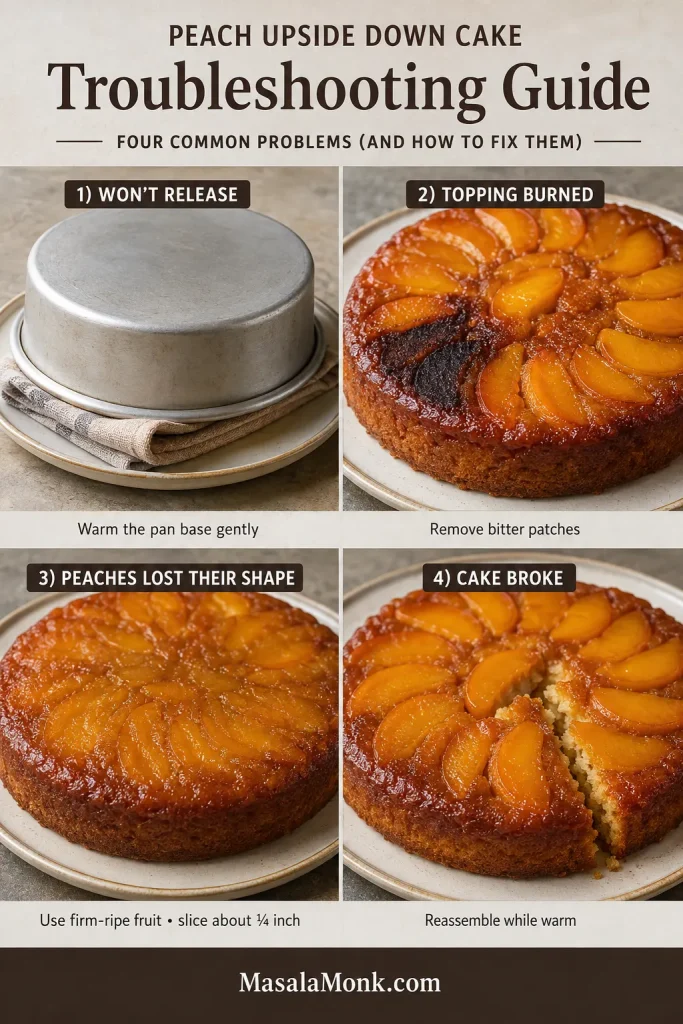
Troubleshooting: If Something Looks Off

An uneven pattern or one stuck peach is mostly cosmetic. Pay closer attention to the things that change how the cake eats: a raw center, a pool of loose juice, a dry crumb or caramel that has genuinely burned.

Four-panel peach upside down cake troubleshooting guide showing a cake stuck beneath an inverted pan, a localized burned caramel patch, peach slices that have lost their shape and a cake with an accidental crack after flipping.
Peach upside down cake troubleshooting becomes simpler when you identify the system that failed first: release, caramel, fruit structure or cake structure.

On a phone, swipe sideways to see each cause and fix.

Release and topping problems

ProblemWhy it happenedFix now and next time
Cake will not come outThe caramel cooled too far or the edge is still attachedNow: Warm the pan base briefly with a hot towel and loosen the edge again.
Next time: Turn it out while the topping is still warm.
Peaches stayed in the panOne area held more firmly than the restNow: Put the slices back while warm.
Next time: Spread the butter and brown sugar evenly.
Topping looks wateryThe peaches carried too much loose juice into the panNow: Spoon away only obvious pools.
Next time: Drain and blot canned or frozen fruit before weighing.
Caramel hardened in the panThe cake rested too long before the flipNow: Warm the base gently before trying again.
Next time: Start the timer as soon as the cake leaves the oven.
Topping burnedThe pan was very dark, the rack was low or the cake baked too longNow: Remove bitter patches before serving.
Next time: Use a light pan on the center rack and check sooner.

Center, crumb and fruit problems

ProblemWhy it happenedFix now and next time
Center is rawThe cake came out by time or color aloneNow: If it has not been flipped, tent the top and return it to the oven.
Next time: Use the look, nudge, press and test cues together.
Dense or dry crumbToo much flour, overmixing or too much oven timeNow: Serve slightly warm with cream or ice cream.
Next time: Measure the flour carefully, mix gently and begin checking early.
Peach slices disappearedThe fruit was very soft or sliced too thinlyNow: Serve it as it is; the flavor may still be lovely.
Next time: Use firm-ripe peaches cut about ¼ inch / 6–8 mm thick.
Peach flavor seems faintThe fruit was underripe or heavy seasoning covered itNow: Serve with fresh peach slices and keep the accompaniments simple.
Next time: Choose fragrant fruit and season lightly.
Cake broke during the flipThe center was underbaked or the cake was turned too soonNow: Reassemble it while warm and serve in portions.
Next time: Confirm the center is baked and allow the full rest.

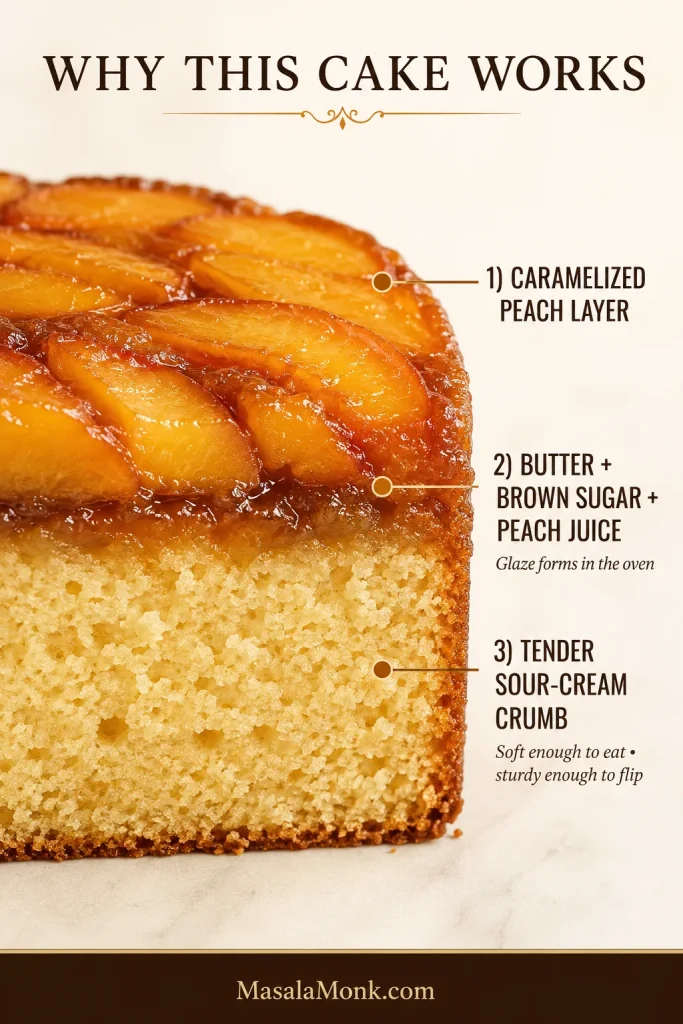
Why This Peach Upside Down Cake Works

One close layer gives the cake a generous peach top. The peach layer looks full after the flip while leaving the crumb room to bake through.

Butter, light brown sugar and peach juice make the glaze in the oven. The sugar adds gentle caramel depth, and the fruit supplies the juice that gathers into a soft glaze around the edges.

Sour cream gives the batter the body to stay over the fruit, then bakes into a tender crumb. Whole milk loosens the batter slightly, and the eggs help the cake hold together when it is turned out.

Annotated cross-section of peach upside down cake showing the caramelized peach layer, a thin butter-brown-sugar-and-peach-juice glaze, and the tender sour cream cake crumb beneath.
The cutaway shows why the cake can survive inversion: the wettest, softest zone stays near the peach topping, while most of the crumb remains structured enough to support it.

All-purpose flour gives the cake the support it needs. Weigh it whenever possible; flour packed heavily into a measuring cup can make the crumb drier and firmer than intended.

Baking with almond flour instead? Try this almond flour cake; almond flour changes the way a cake absorbs moisture and sets, so it is not a straight swap here.

Choose the Right Pan

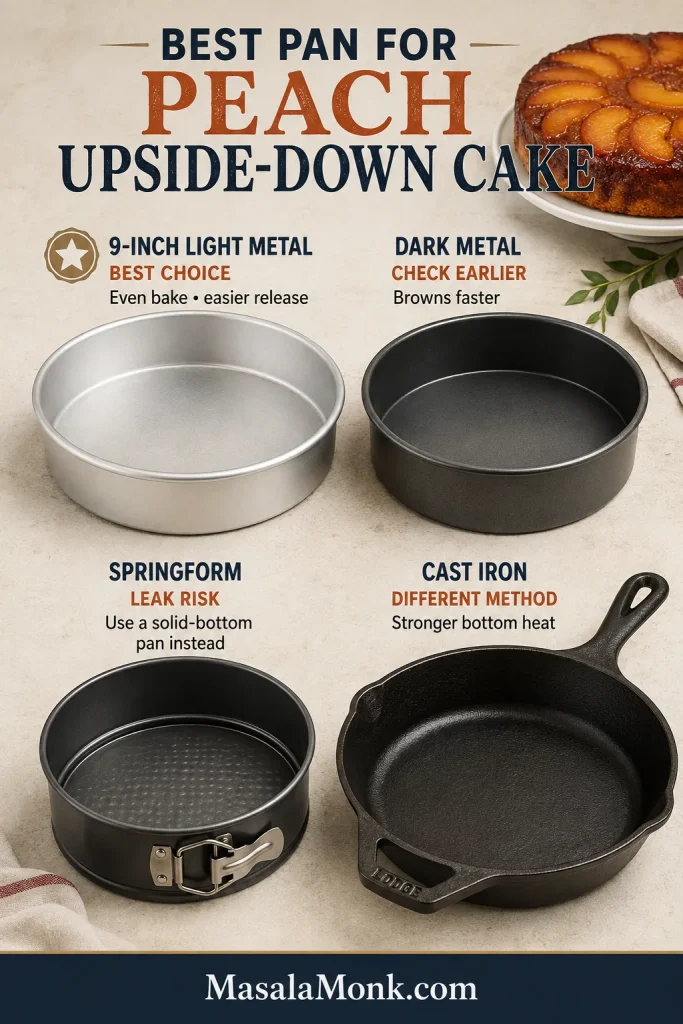
A solid-bottom 9-inch / 23 cm light metal cake pan is the easiest choice for this version. It gives the peaches enough room, bakes the center evenly and avoids the leakage risk of a removable base.

Four empty baking pans compared on a light surface: a 9-inch light-metal round pan marked as the best choice, a dark metal pan, a springform pan and a cast-iron skillet.
Notice the geometry as well as the material: straight sides and a solid base give peach upside down cake a simple release path, while seams and heavy cookware introduce extra variables.

On a phone, swipe sideways to compare the pan options.

PanBest approachWhat changes
9-inch light metalPreferredEven baking and the easiest shape to turn out cleanly
Dark nonstick metalCheck earlierThe edge and topping may brown faster
Cast-iron skilletUse a skillet-specific recipeStronger bottom heat and more carryover cooking
SpringformAvoid for this versionButter, sugar and peach juice may leak through the removable base
BundtUse a Bundt-specific recipeDeeper batter and a much larger surface to release
9×13-inchUse a recipe scaled for that panA shallower cake and a much more awkward flip

Small Variations

The best changes stay in the background and leave the peaches as the main flavor.

  • Almond peach: Add ⅛ teaspoon almond extract with the vanilla.
  • Lightly spiced: Mix ¼ teaspoon cinnamon or a small pinch of nutmeg into the brown sugar.
  • Lemon peach: Add 1 teaspoon finely grated lemon zest to the batter.
Peach upside down cake surrounded by three flavor variation cues: almond extract and almonds, cinnamon and nutmeg, and lemon with finely grated zest.
Almond, warm spice or lemon can nudge the flavor in a new direction without taking the peaches out of the spotlight.

Choose one direction and leave the rest alone. If cinnamon, ginger, nutmeg and deeper brown-sugar warmth are what you really want, this moist spice cake gives those flavors room to lead.

Cake mix, gluten-free or vegan substitutions, and substantially different pans such as a Bundt pan or cast-iron skillet need a recipe written for those changes.

How to Serve It

There is no frosting to make and nothing left to decorate. The peaches have already done that work in the oven.

Let the cake cool until it cuts cleanly, then serve once the fruit is faintly warm and fragrant. The caramel will be soft, the crumb settled and a plain slice already complete.

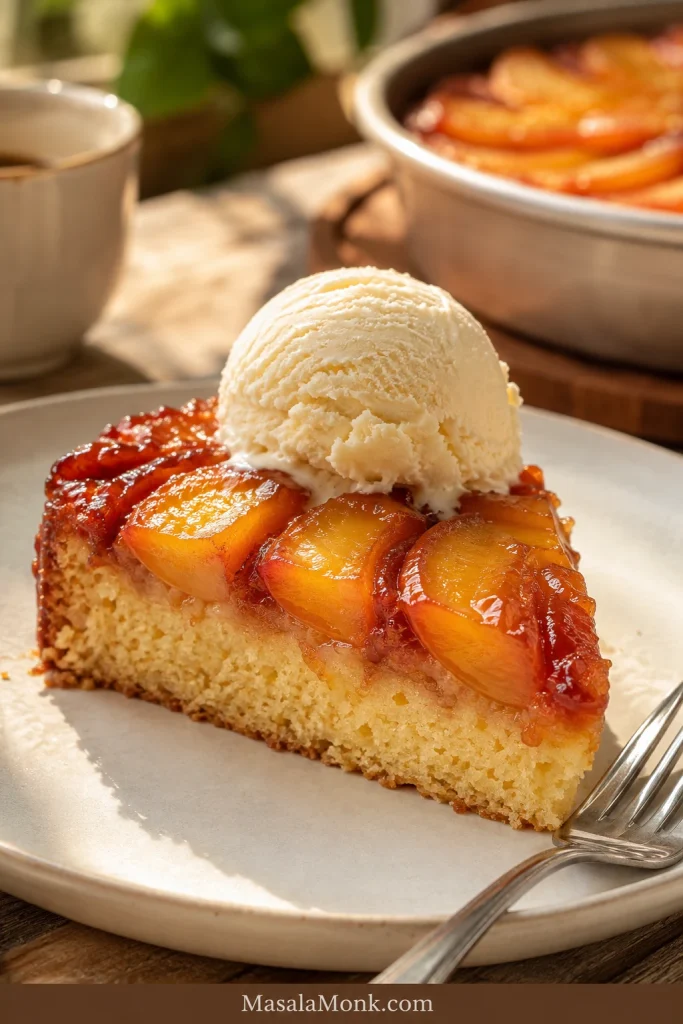
  • Classic: Add vanilla ice cream and let the cold scoop soften against the fruit.
  • Lighter: Add softly whipped cream with little or no extra sugar.
  • Tangy: Serve with crème fraîche or plain Greek yogurt.
  • Bright: Add fresh raspberries or a few extra peach slices.
  • Simple: Serve plain with coffee or black tea.
Slice of peach upside down cake on a cream plate topped with one scoop of vanilla ice cream beginning to soften over the glossy caramelized peaches.
Serve the cake faintly warm so vanilla ice cream softens into the caramel without disappearing into a puddle.

Making the vanilla ice cream too? This KitchenAid ice cream guide includes both eggless and custard-style vanilla bases.

Make Ahead, Store and Reheat

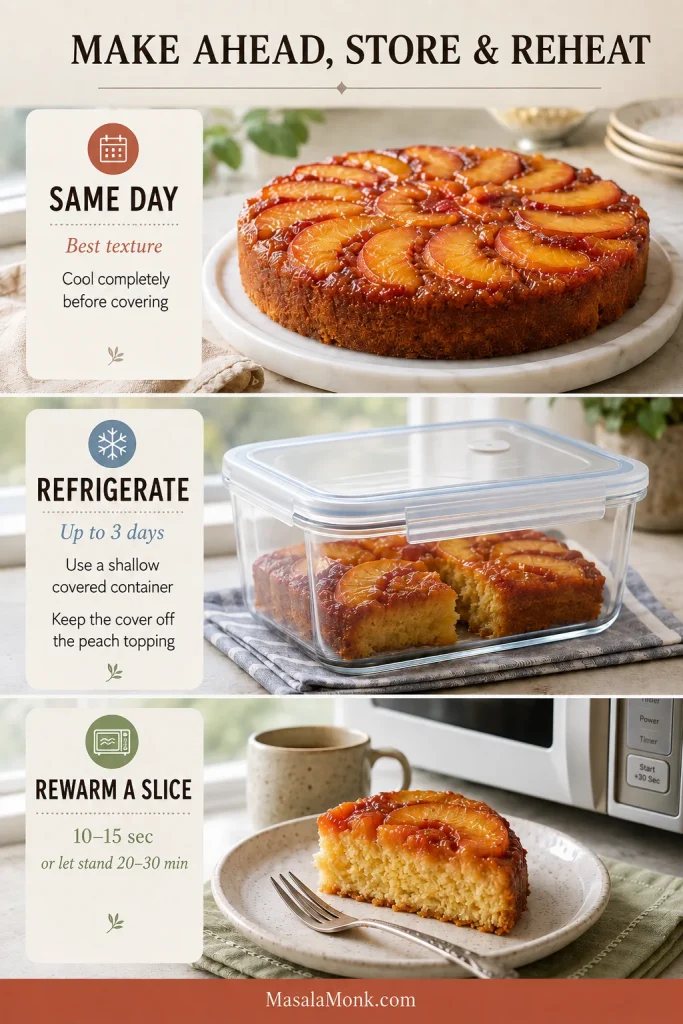
For the same day, bake the cake several hours ahead and cover it only after it has cooled completely. This is when the peaches are at their glossiest and the crumb beneath them is at its freshest.

For leftovers, place the fully cooled cake in a shallow covered container and refrigerate for up to three days. Avoid pressing plastic or foil against the peach topping. By the second and third day, the fruit softens further and more of its juice works into the cake beneath it.

To serve it again, let a refrigerated slice sit at room temperature for 20–30 minutes, or microwave it for about 10–15 seconds—just long enough to remove the chill.

Three-part storage guide showing a cooled whole peach upside down cake, leftover slices in a shallow covered container with space above the topping, and one plated slice beside a microwave for gentle reheating.
Good storage is visible in the spacing: the cover protects the cake without touching the peach topping. When reheating, restore softness rather than heating until the caramel bubbles.

Freezing is possible, but the peaches become softer and the topping may release more moisture after thawing. Refrigeration gives the better texture.

Where next? Serving ideas·Cake or cobbler?·Return to the recipe·Back to top

Cake or Cobbler?

Choose upside-down cake when the peaches can hold defined slices and you want a cake that cuts into wedges. Choose cobbler when the fruit is very soft, irregular or abundant and a spoonable dessert suits it better.

Side-by-side peach desserts showing a sliced peach upside down cake with defined caramelized fruit and a peach cobbler with soft peach filling and golden biscuit-style topping.
The visual difference is structural: upside-down cake asks peaches to hold a pattern, whereas cobbler lets the fruit relax into a spoonable filling. That makes the condition of the fruit a useful clue when choosing the dessert.

For that softer route, the MasalaMonk peach cobbler recipe explains how to work with fresh, frozen or canned peaches.

Frequently Asked Questions

Can I use canned or frozen peaches?

Yes. Drain canned peaches thoroughly before weighing. Thaw frozen peaches completely, drain the released liquid, blot the slices and then weigh them. The peach-preparation guide covers both options in more detail.

Why is the layer beneath the peaches soggy?

Very soft fruit, excess loose juice, too much fruit or an underbaked center are the usual causes. Check the troubleshooting table if the layer is thick or gummy rather than simply moist where fruit meets cake.

Can I use a different pan?

A dark 9-inch metal pan can work with an earlier check. For a cast-iron skillet, Bundt pan or 9×13-inch pan, use a method written for that shape and depth.

Can I use boxed cake mix?

This recipe is built around a from-scratch sour cream butter cake. A cake-mix version needs different liquid, fruit and pan quantities, especially when canned peach juice is involved, so use a recipe written specifically for boxed mix.

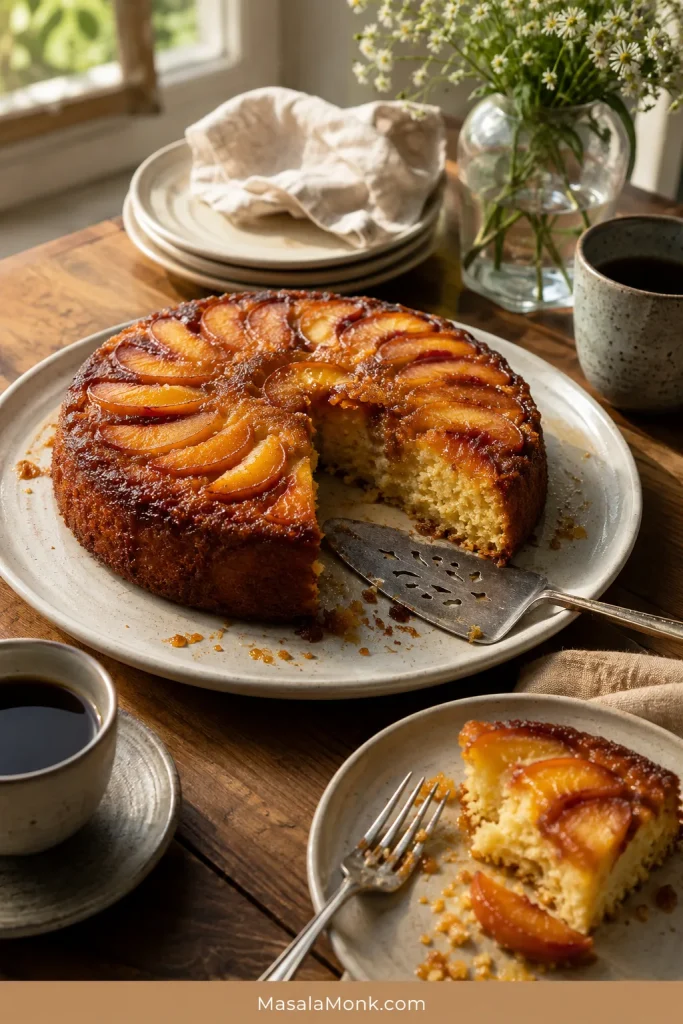
The reveal may be what everyone notices first, but the cake earns the second slice. Fragrant peaches, a soft caramelized top and a fully baked center matter more than a flawless pattern.

Partly served peach upside down cake on a platter with several wedges removed, a cake server, scattered crumbs, coffee and a partially eaten slice on a small plate with a fork.
Even after a few slices are gone, the cake should still hold neat wedges, a tender crumb and a glossy peach top.

Give the fruit enough room, trust the doneness cues and start the flip timer when the pan leaves the oven. When the pan finally lifts, the cake arrives at the table glossy, fragrant and worth the brief moment of suspense.

Back to top ↑