
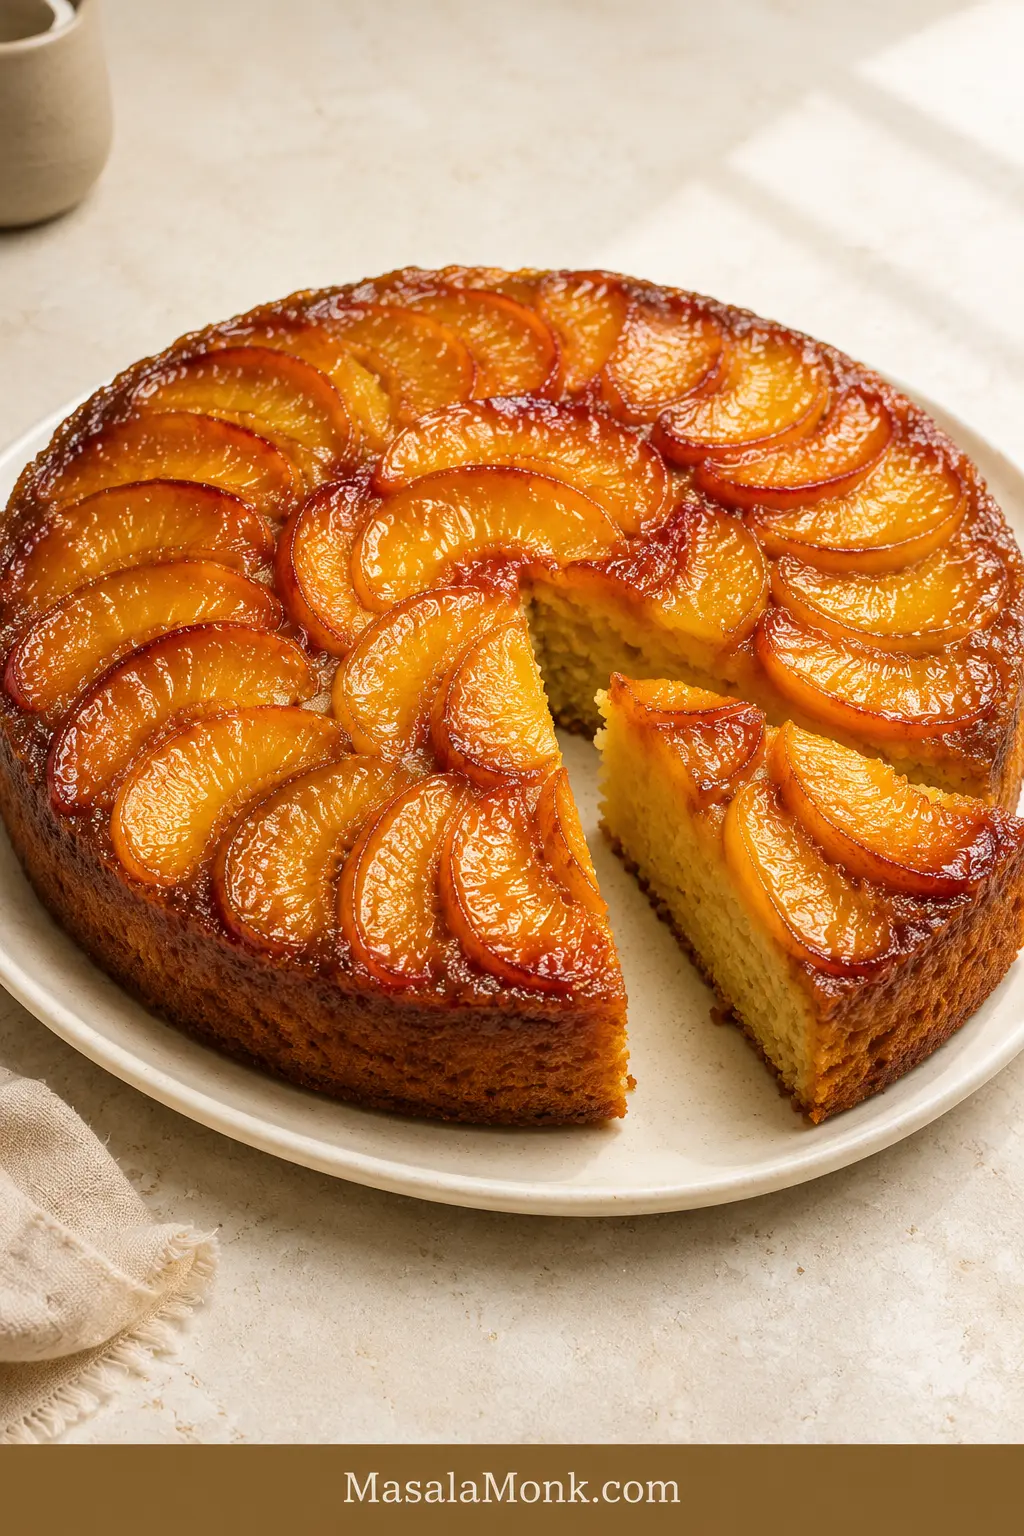
The best moment in a peach upside down cake happens before the first slice. The pan lifts away, the caramel lets go, and the peaches appear on top—glossy, golden and arranged closely enough to look as though the cake planned it all along.
That reveal is also why this cake can feel more intimidating than an ordinary fruit bake. The peaches may release too much juice. The surface may brown before the middle is ready. Then, after all that, the whole cake has to be turned over without leaving its prettiest part inside the pan.
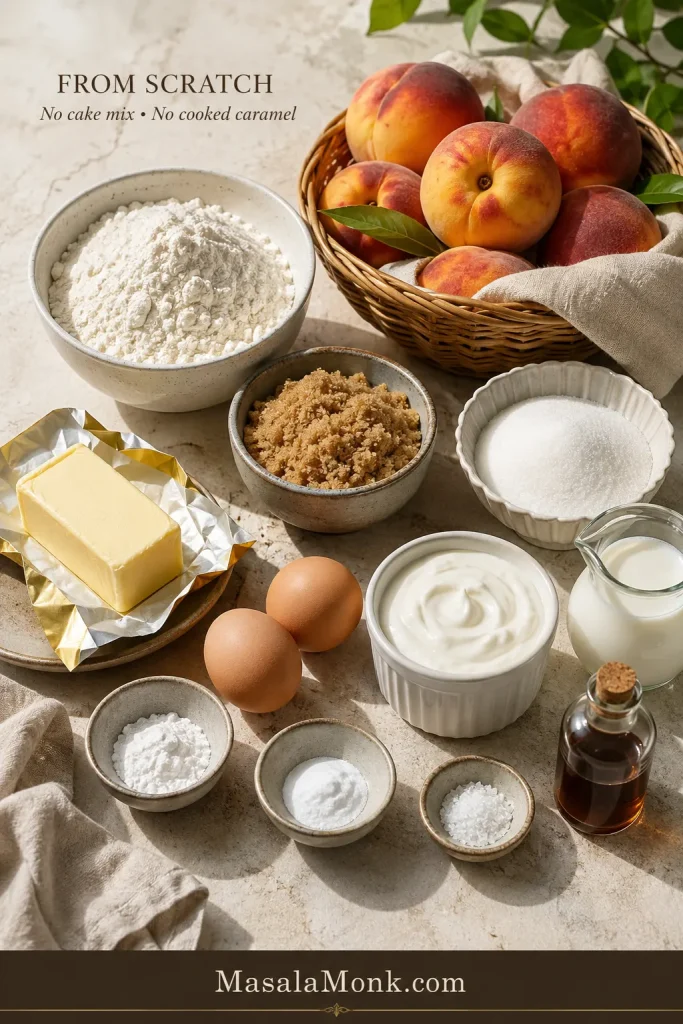
The cake itself is simpler than the reveal makes it look. This is a from-scratch butter cake: peaches go over butter and brown sugar, a soft sour cream batter goes on top, and the oven does the caramelizing for you. There is no boxed mix and no separate caramel to cook.
The MasalaMonk rule is simple: keep the peaches juicy, bake the center through and turn the cake out while the topping is still warm.
Start here
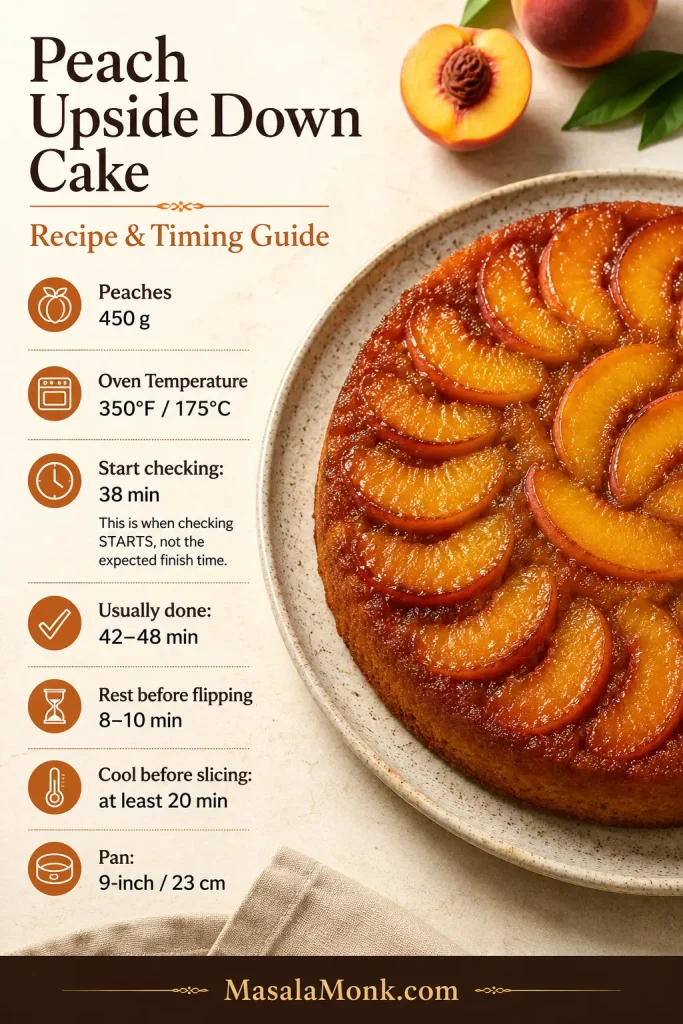
Peach Upside Down Cake in One Minute
Arrange 1 pound / 450 g prepared peach slices over melted butter and light brown sugar in a solid-bottom 9-inch / 23 cm light metal cake pan. Cover them with a thick sour cream butter-cake batter.
The topping caramelizes in the oven, so there is no saucepan of hot sugar to judge or pour.
Bake at 350°F / 175°C and begin checking at 38 minutes. Look for a center that no longer ripples, springs back slowly and leaves moist crumbs—but no shiny batter—on a tester.
Rest the cake for 8–10 minutes, loosen the edge and turn it out in one steady movement. Let it cool for at least 20 minutes before slicing.
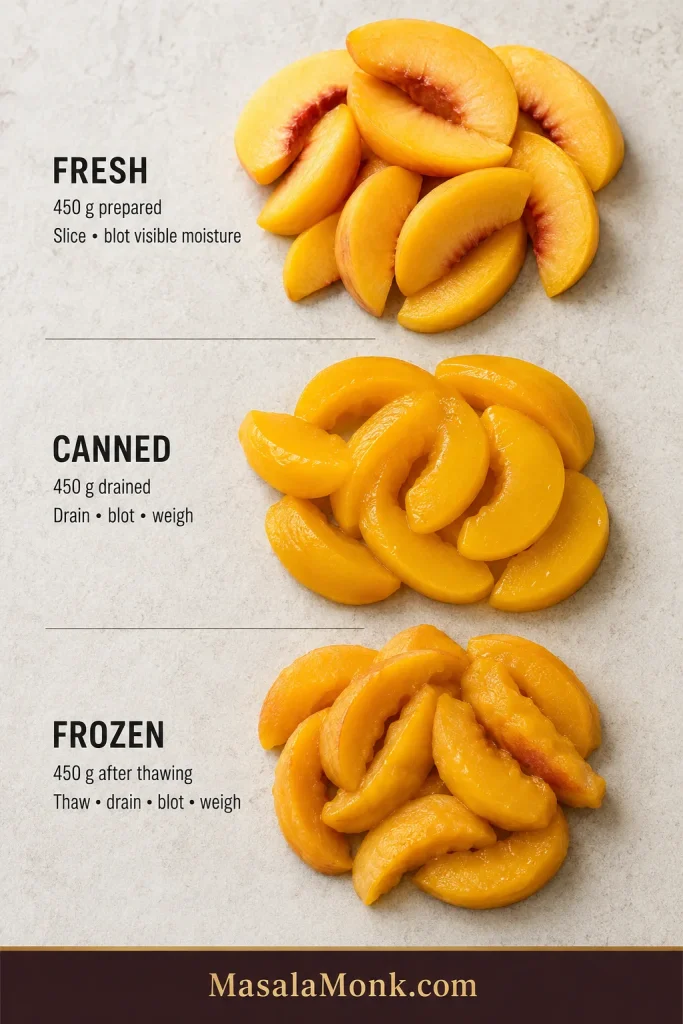
Fresh, Canned or Frozen Peaches?
For the brightest peach flavor and clearest pattern, start with firm-ripe yellow peaches. Canned and frozen fruit are useful alternatives when fresh peaches are not available.
On a phone, swipe sideways to compare the options.
| Peaches | Amount | Before they go in the pan |
|---|---|---|
| Fresh, firm-ripe | 1 lb / 450 g prepared slices | Pit and slice; peel only if the skin is tough; blot visibly wet surfaces |
| Canned in juice | 1 lb / 450 g drained slices | Drain thoroughly and blot before weighing |
| Canned in syrup | 1 lb / 450 g drained slices | Drain very well; rinse briefly only if heavily syrup-coated, then blot |
| Frozen | 1 lb / 450 g after thawing | Thaw completely, drain, blot and then weigh |
The fresh-peach version
Caramelized Peach Upside Down Cake
A close layer of peaches bakes beneath a tender sour cream butter cake, then becomes the glossy caramelized top after the flip. Brown sugar and butter form a light caramel glaze around the fruit.
It looks dressed up, but the basic method is simple: arrange the peaches, mix the batter, bake, rest and flip.
Equipment
- 9-inch / 23 cm solid-bottom light metal cake pan
- Parchment paper
- Rimmed baking sheet
- Kitchen scale
- Mixing bowls
- Hand mixer or stand mixer
- Flexible spatula
- Thin blunt knife or small offset spatula
- Heat-safe serving platter wider than the cake pan
Ingredients
Peach topping
- 4 tablespoons / 56 g unsalted butter
- ½ cup packed / 100 g light brown sugar
- ¼ teaspoon fine salt
- 1 pound / 450 g prepared peach slices, cut about ¼ inch / 6–8 mm thick
Sour cream cake
- 190 g all-purpose flour, about 1½ cups when spooned and leveled
- 1½ teaspoons baking powder
- ¼ teaspoon baking soda
- ½ teaspoon fine salt
- ½ cup / 113 g unsalted butter, softened but still cool
- ¾ cup / 150 g granulated sugar
- 2 large eggs, at room temperature
- 2 teaspoons vanilla extract
- ½ cup / 120 g full-fat sour cream, at room temperature
- ¼ cup / 60 ml whole milk, at room temperature
Instructions
Prepare the pan and peach base
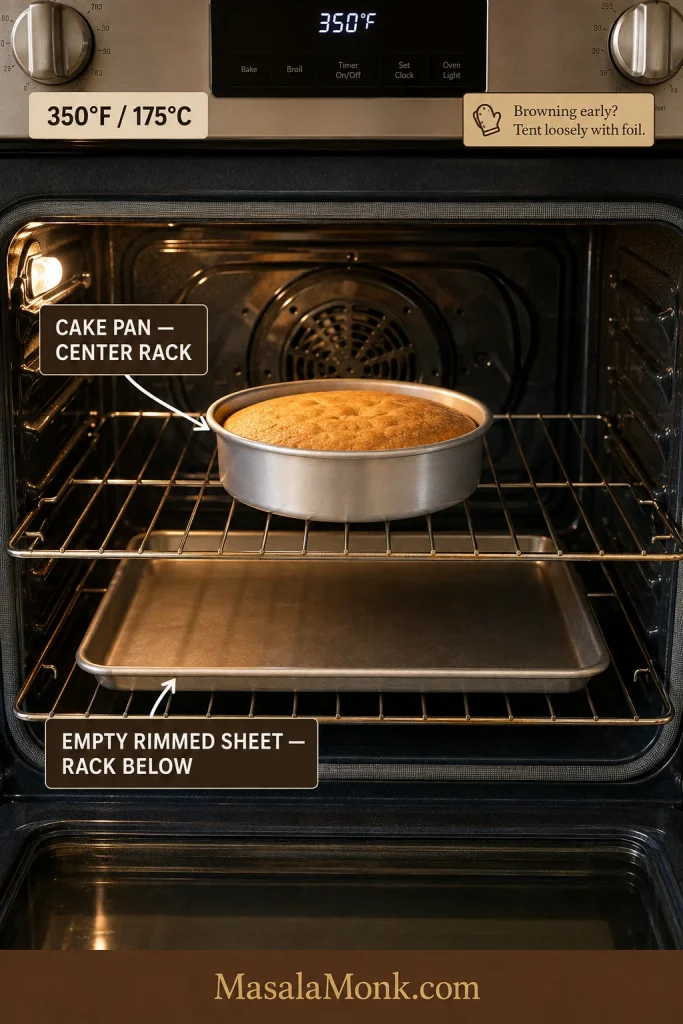
- Heat the oven and prepare the pan. Set a rack in the center and heat the oven to 350°F / 175°C. Lightly grease the base and sides of the cake pan. Press a fitted parchment round onto the base and grease it lightly. Place an empty rimmed baking sheet on the rack below to catch drips.
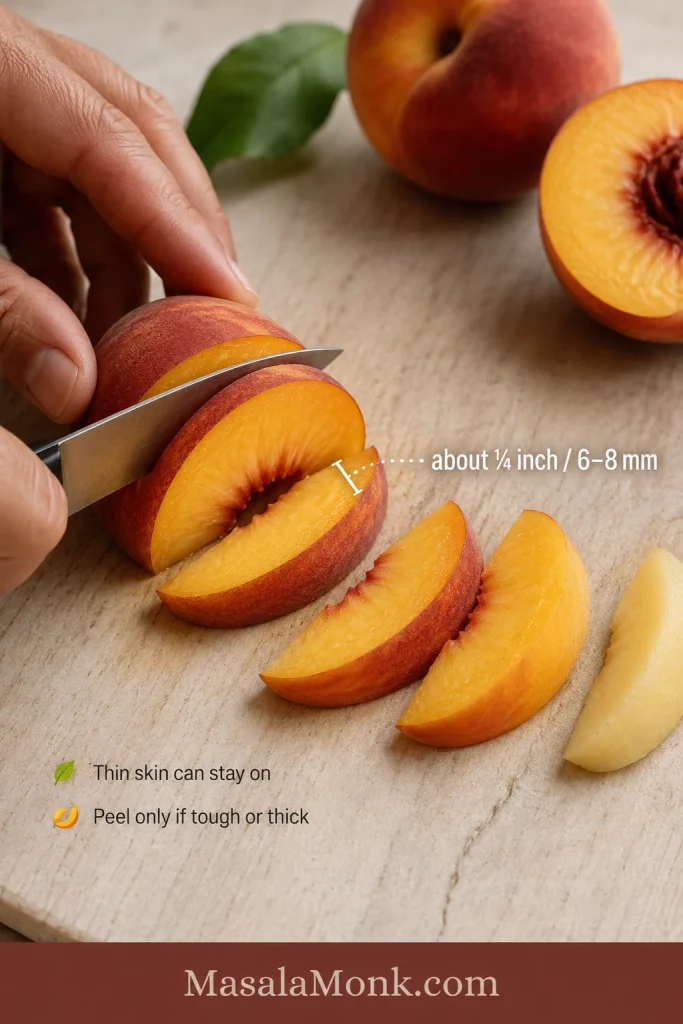
- Prepare the peaches. Halve and pit the fruit. Peel only if the skin is thick or tough. Cut into slices about ¼ inch / 6–8 mm thick, then weigh 1 pound / 450 g. Blot surfaces that are visibly wet.
- Add the butter and brown sugar. Melt the 4 tablespoons / 56 g butter and pour it into the pan. Tilt to coat the base. Mix the brown sugar with ¼ teaspoon salt and scatter it evenly over the butter.
- Arrange the peaches. Start near the outside edge and make one close overlapping layer, working toward the center. Use smaller pieces to fill the last gaps and save anything that does not fit comfortably.
Mix, bake and turn out the cake
- Whisk the dry ingredients. Combine the flour, baking powder, baking soda and ½ teaspoon salt.
- Cream the butter and sugar. Beat the softened butter and granulated sugar for about 3 minutes, scraping the bowl once or twice, until lighter and slightly fluffy.
- Add the eggs and dairy. Beat in the eggs one at a time. Mix in the vanilla and sour cream.
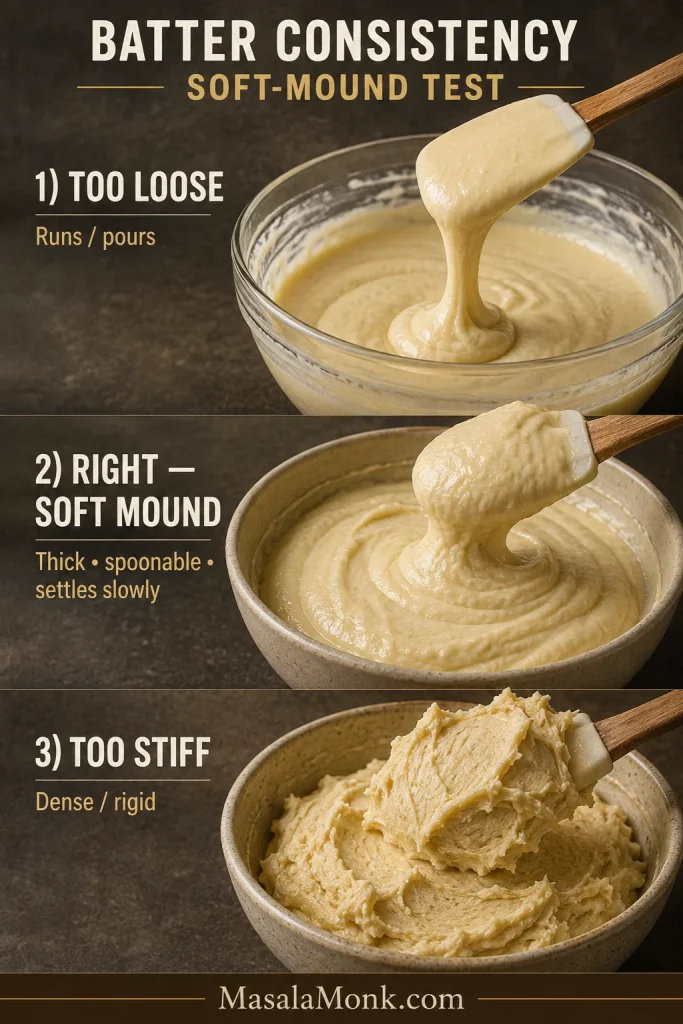
- Finish the batter. Mix in half of the flour mixture on low speed. Add the milk, then the remaining flour. Stop when the dry streaks disappear. The batter should form a soft mound rather than pour freely.
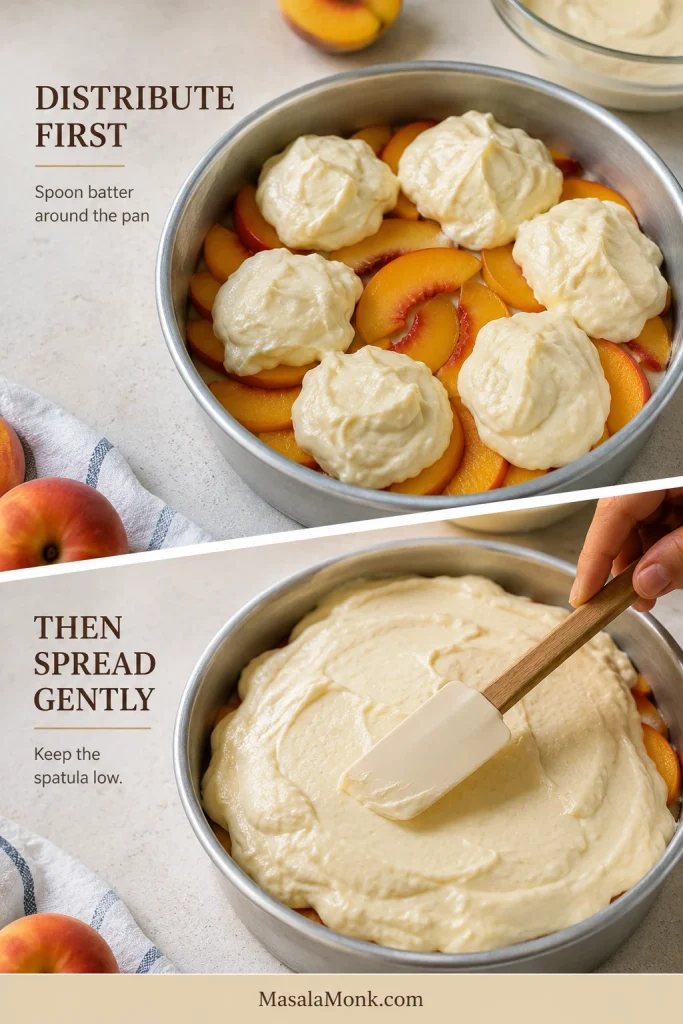
- Spread over the peaches. Spoon the batter around the pan and gently spread it to the edge, keeping the spatula low so the fruit stays in place.
- Bake and check the center. Put the cake pan directly on the center rack and bake for 42–48 minutes, beginning the first check at 38 minutes. The center should no longer ripple, should spring back slowly and should leave moist crumbs but no shiny batter on a tester. Tent loosely with foil if the surface darkens first.
- Rest, loosen and flip. Set the pan on a heatproof surface and immediately start an 8–10 minute timer. Run a thin blunt knife around the edge, place the heat-safe platter face-down over the pan and turn both over together in one smooth movement.
- Lift, repair and cool. Leave the inverted pan in place for about 30 seconds, then lift it straight up and peel away the parchment. Put back any peach that stayed behind while the topping is warm. Cool for at least 20 minutes before slicing.
Recipe Notes
- Canned peaches: Drain and blot thoroughly before weighing. Juice-packed peaches give the most balanced result.
- Frozen peaches: Thaw completely, drain, blot and weigh after thawing.
- Dark metal pan: Begin checking several minutes earlier because the edge may brown faster.
- Springform pan: Butter, sugar and peach juice may leak through the removable base, so a solid pan is safer.
- Cleanest slices: Cool to room temperature and wipe the knife between cuts.
If your peaches are softer than expected, your oven browns quickly or the flip is the part making you nervous, the details below cover those exact moments.
Choose and Prepare the Peaches
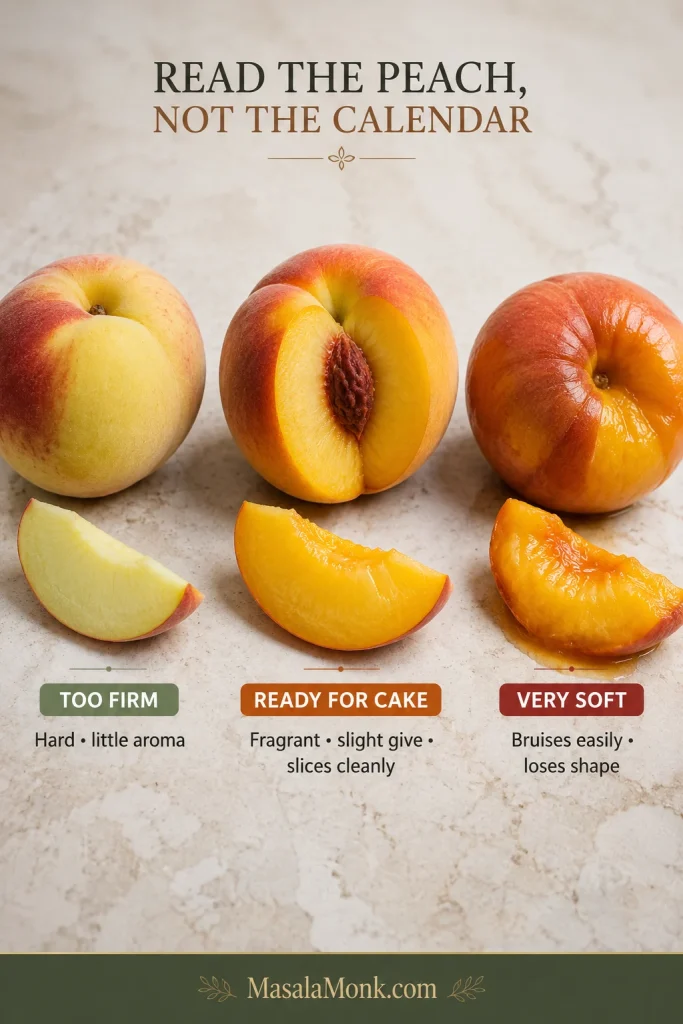
Look for peaches that smell sweet before the knife touches them and yield slightly near the stem, yet remain firm enough to slice cleanly.
Judge ripeness by the yellow or cream background color rather than the red blush alone. For more help choosing and ripening peaches, see this peach selection and storage guide from Utah State University Extension.
Freestone peaches are easiest to prepare because the pit releases cleanly. Clingstone peaches still work; cut the flesh away from the pit instead of pulling hard enough to tear the fruit.
Buy about 1¼–1½ pounds / 570–680 g whole peaches to allow for pits, bruised spots and any skin you remove. Fruit count varies, so weigh the prepared slices.
Read the peach, not the calendar
Too firm: Little aroma and hard around the stem. Let it ripen at room temperature in a loosely closed paper bag and check daily.
Ready: Fragrant, slightly yielding near the stem and easy to slice cleanly.
Very soft: Bruises under light pressure and releases juice as soon as it is cut. Handle gently, slice a little thicker and consider cobbler if the fruit will not hold its shape.
Thin peach skin softens in the oven and gives the finished slices a little more definition. Peel only when the skin is thick, tough or fuzzy enough to bother you.
Using canned or frozen peaches
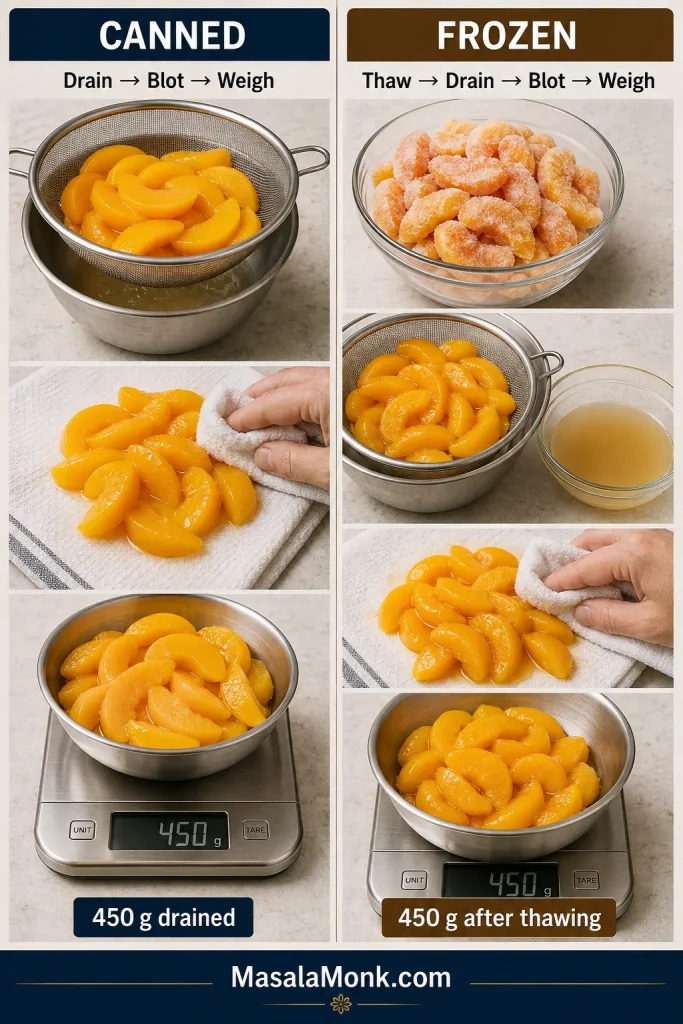
For canned peaches, fruit packed in juice is the easiest option to balance with the brown sugar topping. Drain the slices thoroughly, spread them over a clean towel and blot the exposed surfaces before weighing. A large 29-ounce / 820 g can is a sensible place to start, but drained yield varies by brand.
Syrup-packed peaches are sweeter and softer. Drain them especially well. If thick syrup coats the slices, give them a quick rinse under cool water and blot them dry.
If you would rather skip the flip altogether, this peach cobbler with canned peaches turns the same pantry fruit into a warm, scoopable dessert.
For frozen peaches, thaw the slices completely, drain away the released liquid, blot them and then weigh the fruit. Buy slightly more frozen fruit than the finished amount you need because some weight is lost with the liquid.
Icy peaches chill the bottom of the pan and release water into the caramel just as the cake is trying to set, so thawing first matters here.
Keep them juicy, not watery
A ripe peach is supposed to contain juice. The aim is simply to keep loose liquid from pooling beneath the batter.
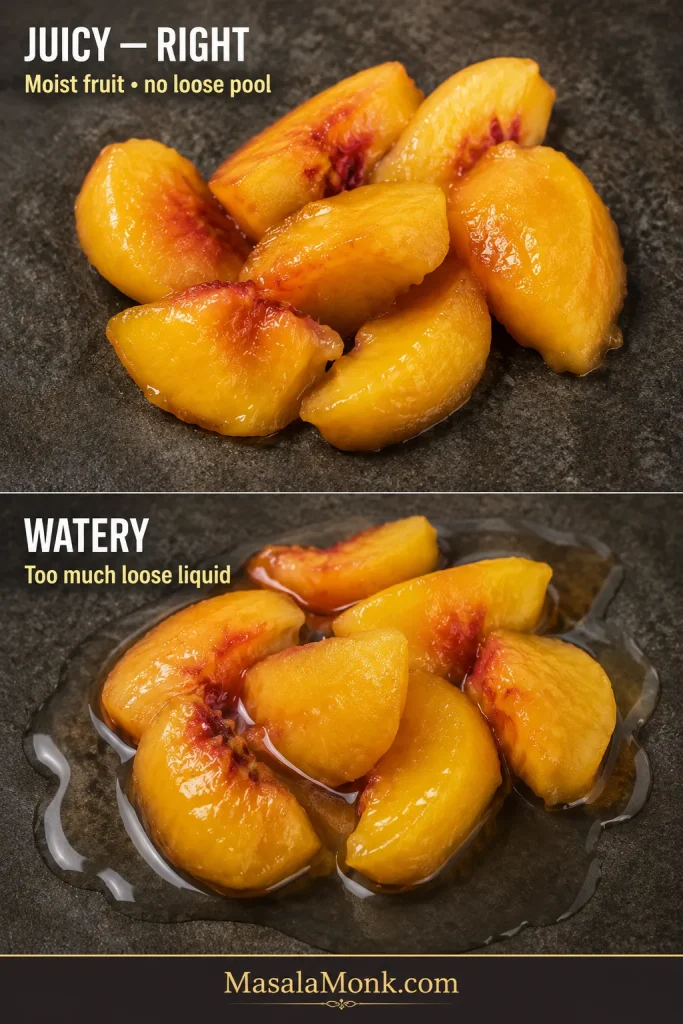
Cut the slices about ¼ inch / 6–8 mm thick. Blot surfaces that are visibly dripping, but do not squeeze the fruit dry. Slice close to assembly time too; sugar draws juice from cut peaches surprisingly quickly.
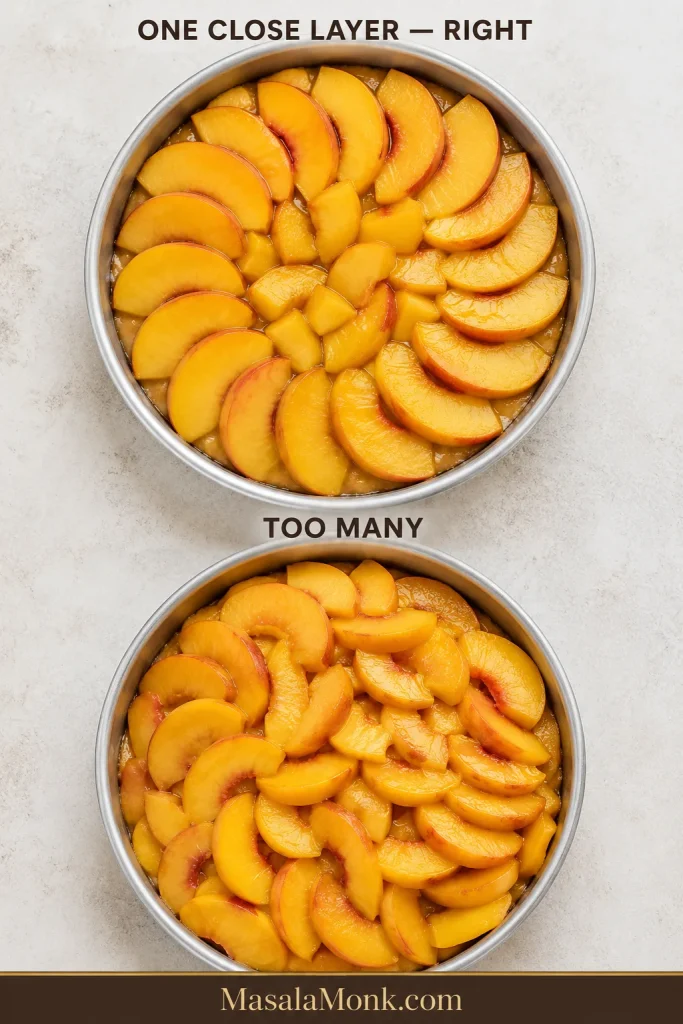
Build one close overlapping layer. Start around the outside and work toward the center. Once the last gap is filled, the pan should already hint at the pattern you are hoping to reveal later.
There is no prize for forcing every remaining peach slice into a full pan. Save the extras for yogurt, oatmeal or serving beside the cake.
Peaches ready? Mix the batter·Return to the recipe
Mix a Tender Batter That Stays in Place
With the peaches settled in the pan, the batter needs enough body to cover them without pushing the pattern apart.
Softened butter should accept a fingertip impression without looking shiny or partly melted. Beat it with the sugar until lighter and a little fluffy, then add the eggs one at a time.
Once the flour goes in, slow the mixer down. Stop as soon as the last dry streaks disappear. The finished batter forms a soft mound; it does not pour like pancake batter or sit like cookie dough.
Spoon the peach-cake batter around the pan before spreading it. A single heavy mound can push the fruit outward. Keep the spatula low and move gently toward the edge.
Prefer fruit folded through the crumb instead? Try this fresh apple cake, which holds plenty of fruit in a thick, tender batter.
Know When the Center Is Fully Baked
A beautifully browned surface can hide a soft center. Peach juice also makes a tester harder to read than it would be in a plain butter cake.
When butter, vanilla and peach fill the kitchen, you are getting close. The center—not the smell or the clock—decides when the cake comes out.
- Look: The exposed surface is evenly golden, including the center.
- Nudge: The middle no longer ripples when the pan moves gently.
- Press: A light touch in the center springs back slowly instead of leaving a wet indentation.
- Test: A skewer inserted into central cake crumb may carry moist crumbs but shows no shiny raw batter.
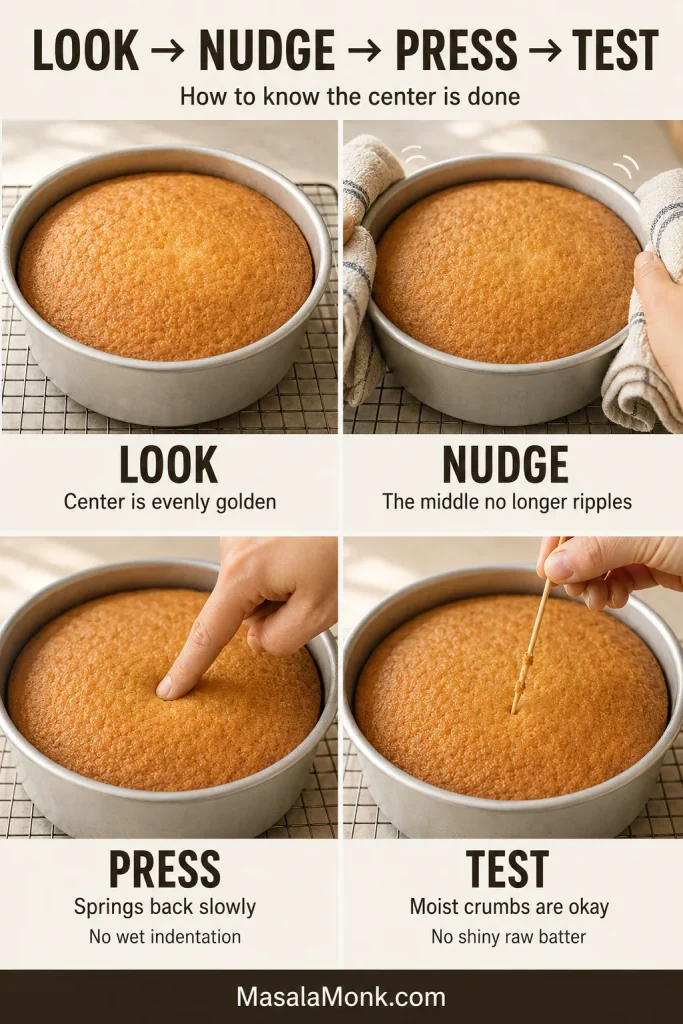
A tester that passes through a peach may come back glossy even when the cake is done. Angle it toward an area of central crumb when necessary.
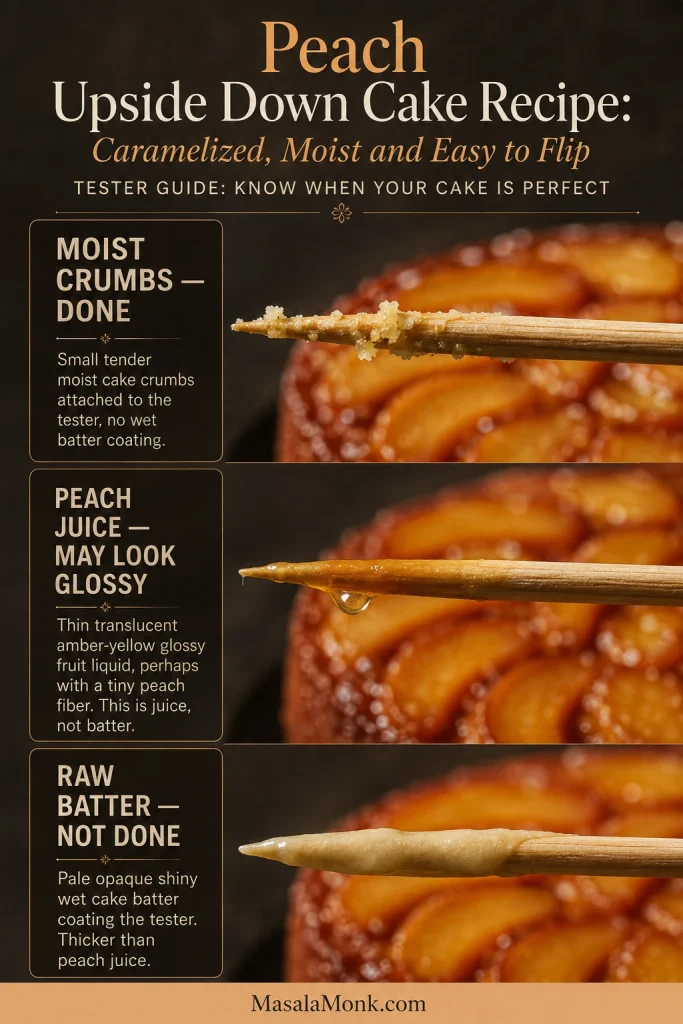
Begin checking at 38 minutes. Most cakes finish around 42–48 minutes, but every oven behaves a little differently. Trust what the center is doing more than the final minute on the clock.
Remember this
The clock tells you when to start checking. The center tells you when the cake is done. The warm topping tells you when to flip.
Center ready? Go straight to the flip·Something looks off?·Return to the recipe
How to Flip the Cake Cleanly
When the center is fully baked, it is time for the part everyone thinks about: the flip.
The cake needs a short rest first. Turn it out too soon and the crumb may split under the fruit. Leave it until cold and the caramel begins holding more firmly to the pan.
Set up the landing place before the timer ends. Clear the counter and set out a heat-safe platter wider than the cake pan, a thin knife and dry oven mitts. One calm turn is much easier when everything already fits.
Rest the cake for 8–10 minutes. Start the timer as soon as the pan leaves the oven. The short rest steadies the crumb before the caramel firms against the pan.
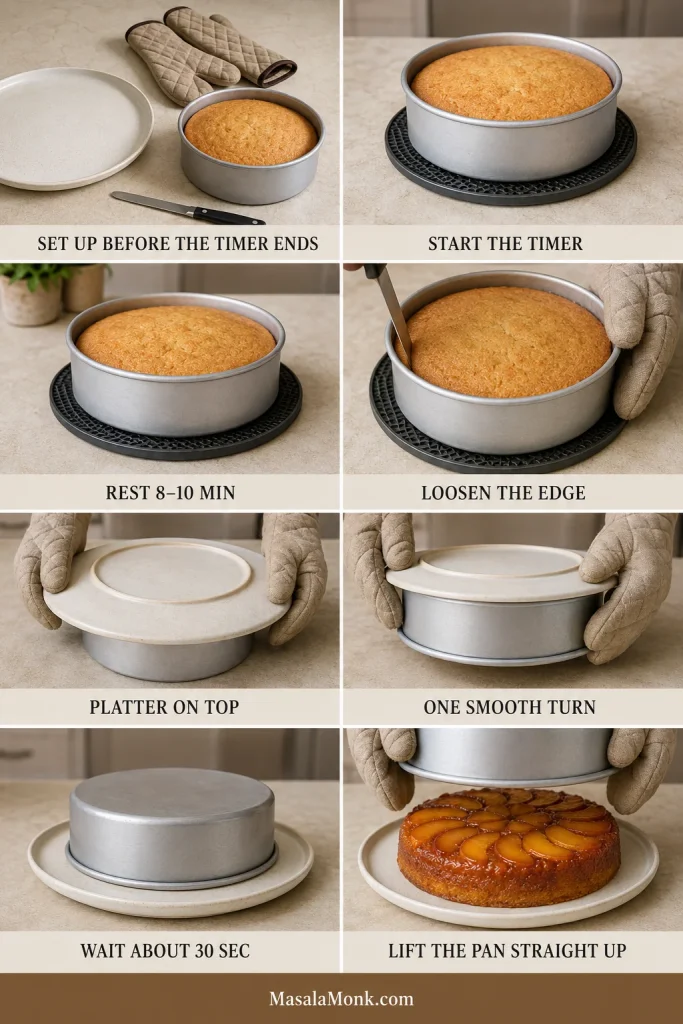
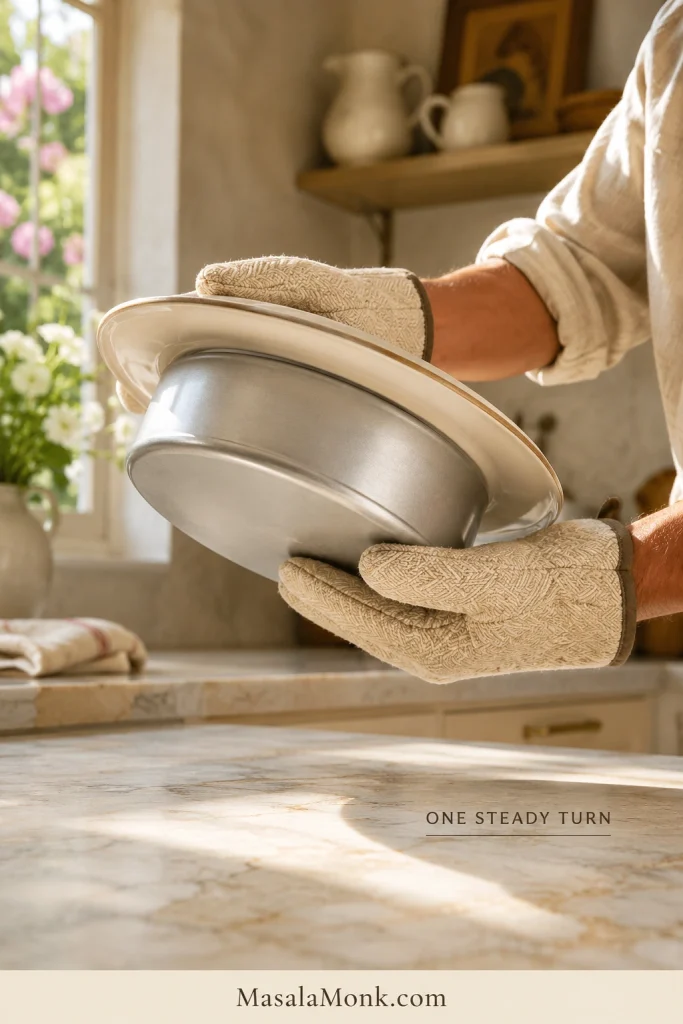
Make one steady turn
- Run a thin blunt knife around the edge.
- Place the heat-safe serving platter face-down over the pan.
- Grip the platter and pan firmly together.
- Turn them over in one smooth movement and set the platter down.
- Leave the pan in place for about 30 seconds.
- Lift the pan straight up and peel away the parchment carefully.
A little steam may rise from the peaches and the caramel may still move around the edge. Give it a moment before touching the pattern.
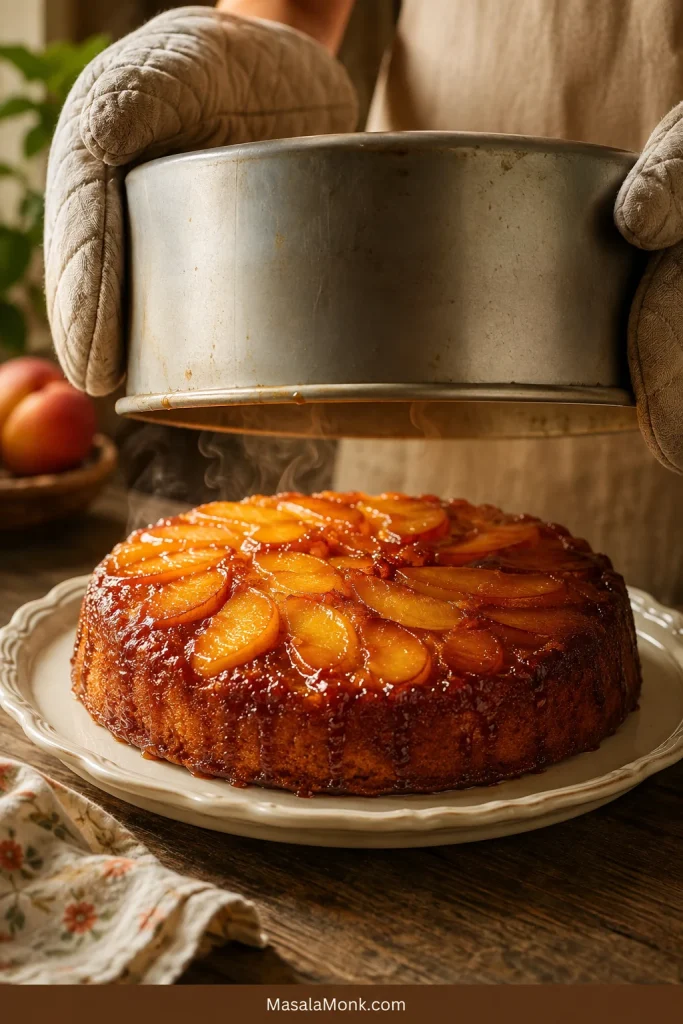
If a peach stays behind, lift it gently with a small spatula, return it to the visible gap and spoon over any glaze left in the pan. Carry on; the cake is fine.

Now give the cake at least 20 minutes before cutting. The topping needs warmth for the flip; the crumb needs a little more time before the knife goes through it.
What Success Looks Like
The peaches should look glossy rather than flooded, with individual slices visible. Their edges soften into the caramel, and the pattern can remain a little irregular.
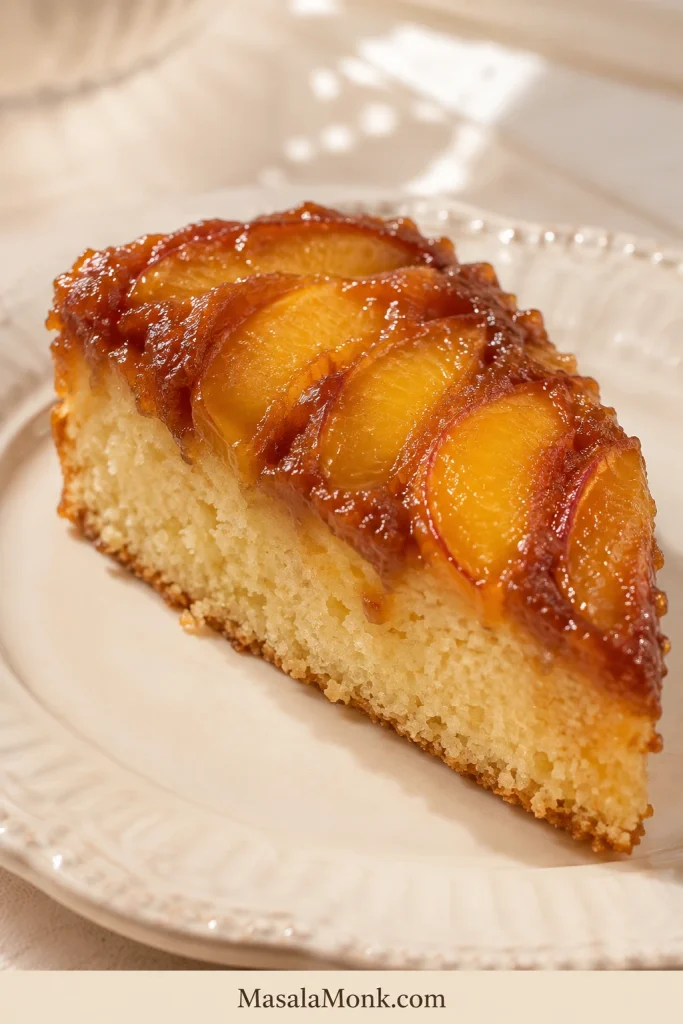
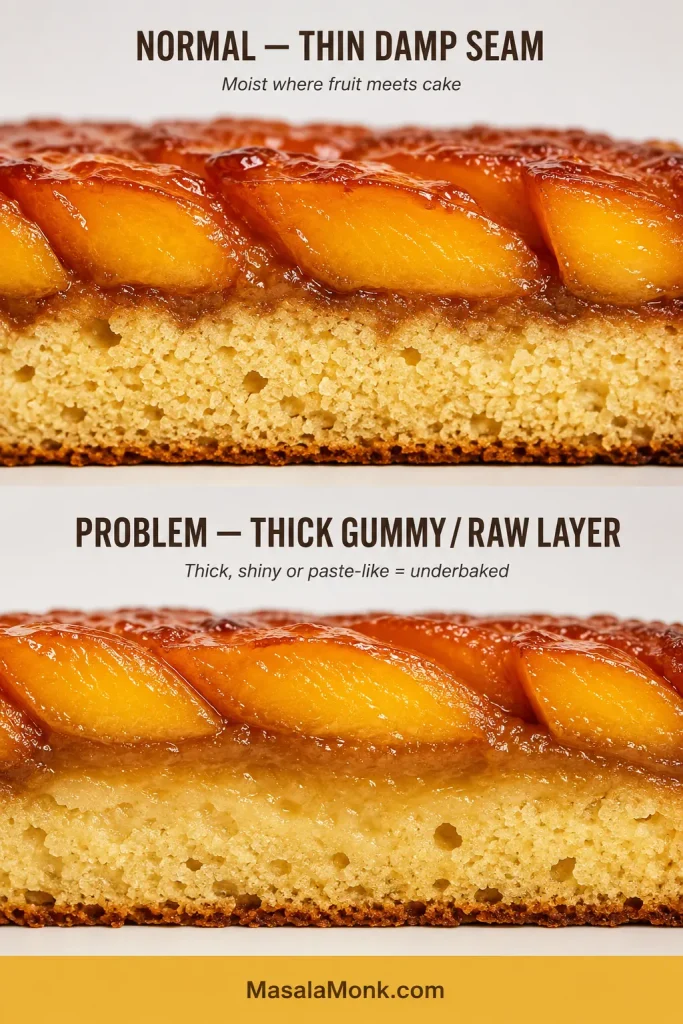
Beneath the fruit, the cake should feel soft and moist yet hold a clean wedge. A thin damp seam where peach, glaze and crumb meet is normal. A thick gummy layer or shiny raw center is not.
Slight overlaps and darker caramel around the edge belong on a homemade upside-down cake. They are not signs that anything went wrong.
Checking the result? Troubleshoot a problem·See why it works·Return to the recipe
Troubleshooting: If Something Looks Off
An uneven pattern or one stuck peach is mostly cosmetic. Pay closer attention to the things that change how the cake eats: a raw center, a pool of loose juice, a dry crumb or caramel that has genuinely burned.
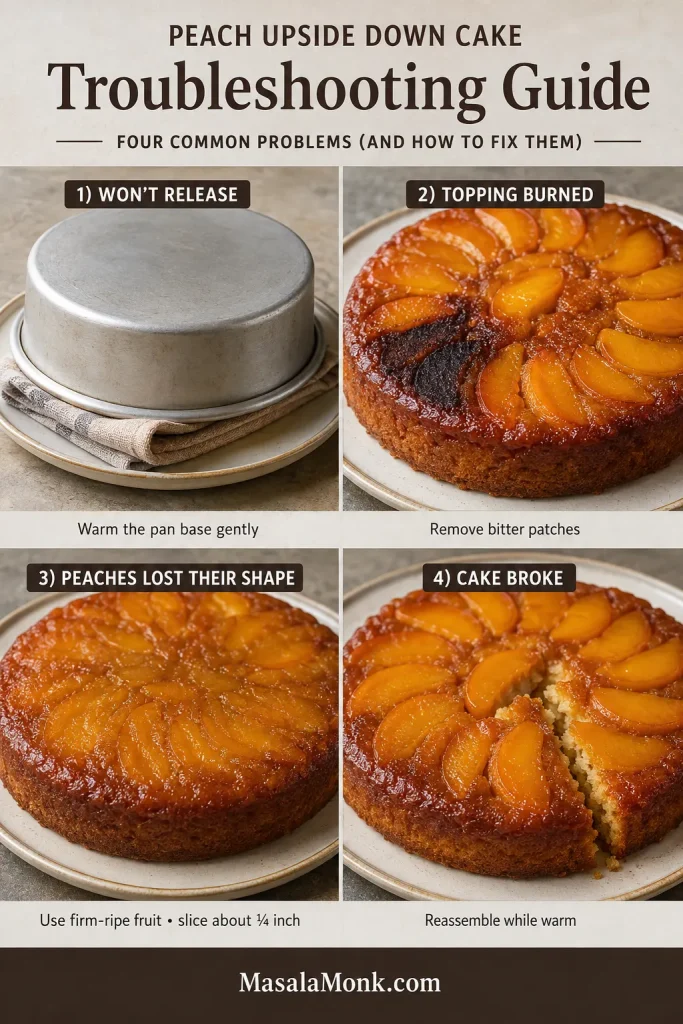
On a phone, swipe sideways to see each cause and fix.
Release and topping problems
| Problem | Why it happened | Fix now and next time |
|---|---|---|
| Cake will not come out | The caramel cooled too far or the edge is still attached | Now: Warm the pan base briefly with a hot towel and loosen the edge again. Next time: Turn it out while the topping is still warm. |
| Peaches stayed in the pan | One area held more firmly than the rest | Now: Put the slices back while warm. Next time: Spread the butter and brown sugar evenly. |
| Topping looks watery | The peaches carried too much loose juice into the pan | Now: Spoon away only obvious pools. Next time: Drain and blot canned or frozen fruit before weighing. |
| Caramel hardened in the pan | The cake rested too long before the flip | Now: Warm the base gently before trying again. Next time: Start the timer as soon as the cake leaves the oven. |
| Topping burned | The pan was very dark, the rack was low or the cake baked too long | Now: Remove bitter patches before serving. Next time: Use a light pan on the center rack and check sooner. |
Center, crumb and fruit problems
| Problem | Why it happened | Fix now and next time |
|---|---|---|
| Center is raw | The cake came out by time or color alone | Now: If it has not been flipped, tent the top and return it to the oven. Next time: Use the look, nudge, press and test cues together. |
| Dense or dry crumb | Too much flour, overmixing or too much oven time | Now: Serve slightly warm with cream or ice cream. Next time: Measure the flour carefully, mix gently and begin checking early. |
| Peach slices disappeared | The fruit was very soft or sliced too thinly | Now: Serve it as it is; the flavor may still be lovely. Next time: Use firm-ripe peaches cut about ¼ inch / 6–8 mm thick. |
| Peach flavor seems faint | The fruit was underripe or heavy seasoning covered it | Now: Serve with fresh peach slices and keep the accompaniments simple. Next time: Choose fragrant fruit and season lightly. |
| Cake broke during the flip | The center was underbaked or the cake was turned too soon | Now: Reassemble it while warm and serve in portions. Next time: Confirm the center is baked and allow the full rest. |
Why This Peach Upside Down Cake Works
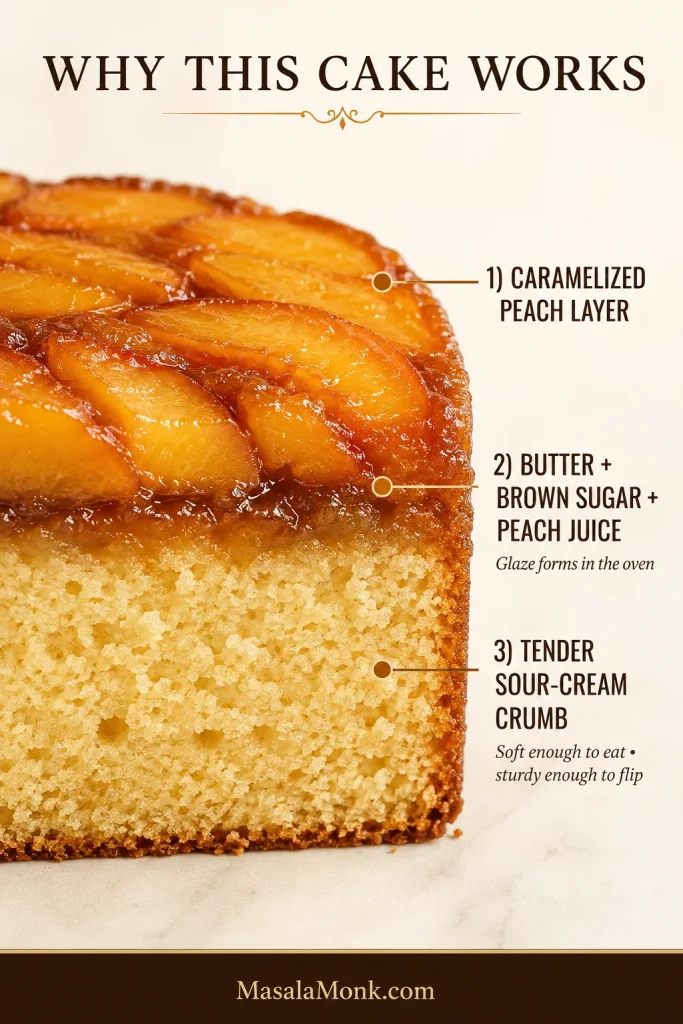
One close layer gives the cake a generous peach top. The peach layer looks full after the flip while leaving the crumb room to bake through.
Butter, light brown sugar and peach juice make the glaze in the oven. The sugar adds gentle caramel depth, and the fruit supplies the juice that gathers into a soft glaze around the edges.
Sour cream gives the batter the body to stay over the fruit, then bakes into a tender crumb. Whole milk loosens the batter slightly, and the eggs help the cake hold together when it is turned out.
All-purpose flour gives the cake the support it needs. Weigh it whenever possible; flour packed heavily into a measuring cup can make the crumb drier and firmer than intended.
Baking with almond flour instead? Try this almond flour cake; almond flour changes the way a cake absorbs moisture and sets, so it is not a straight swap here.
Choose the Right Pan
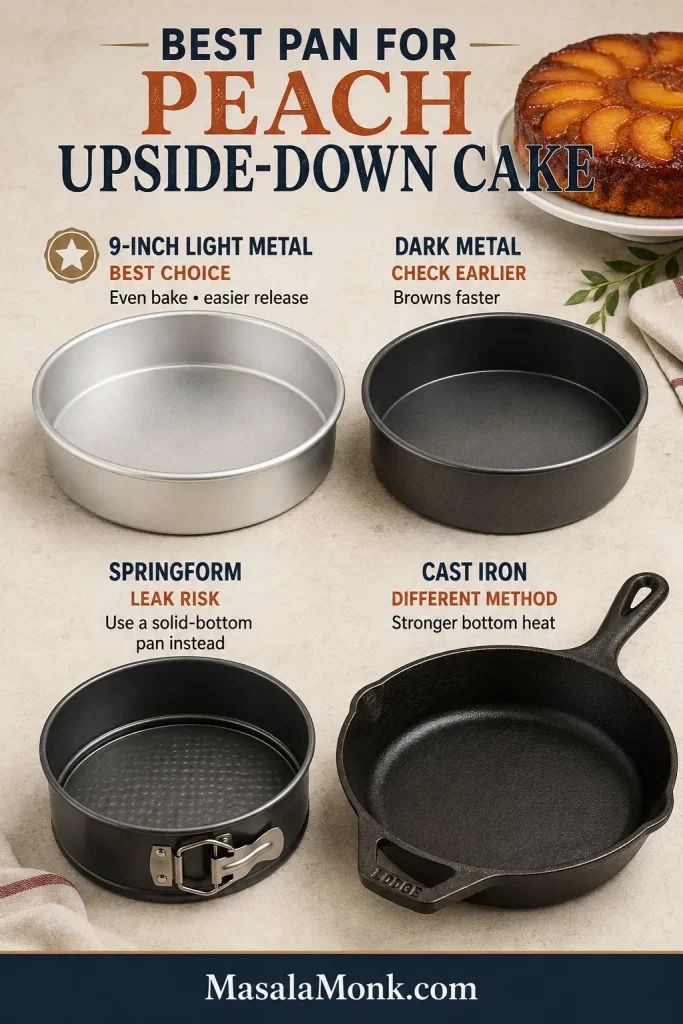
A solid-bottom 9-inch / 23 cm light metal cake pan is the easiest choice for this version. It gives the peaches enough room, bakes the center evenly and avoids the leakage risk of a removable base.
On a phone, swipe sideways to compare the pan options.
| Pan | Best approach | What changes |
|---|---|---|
| 9-inch light metal | Preferred | Even baking and the easiest shape to turn out cleanly |
| Dark nonstick metal | Check earlier | The edge and topping may brown faster |
| Cast-iron skillet | Use a skillet-specific recipe | Stronger bottom heat and more carryover cooking |
| Springform | Avoid for this version | Butter, sugar and peach juice may leak through the removable base |
| Bundt | Use a Bundt-specific recipe | Deeper batter and a much larger surface to release |
| 9×13-inch | Use a recipe scaled for that pan | A shallower cake and a much more awkward flip |
Small Variations
The best changes stay in the background and leave the peaches as the main flavor.
- Almond peach: Add ⅛ teaspoon almond extract with the vanilla.
- Lightly spiced: Mix ¼ teaspoon cinnamon or a small pinch of nutmeg into the brown sugar.
- Lemon peach: Add 1 teaspoon finely grated lemon zest to the batter.

Choose one direction and leave the rest alone. If cinnamon, ginger, nutmeg and deeper brown-sugar warmth are what you really want, this moist spice cake gives those flavors room to lead.
Cake mix, gluten-free or vegan substitutions, and substantially different pans such as a Bundt pan or cast-iron skillet need a recipe written for those changes.
How to Serve It
There is no frosting to make and nothing left to decorate. The peaches have already done that work in the oven.
Let the cake cool until it cuts cleanly, then serve once the fruit is faintly warm and fragrant. The caramel will be soft, the crumb settled and a plain slice already complete.
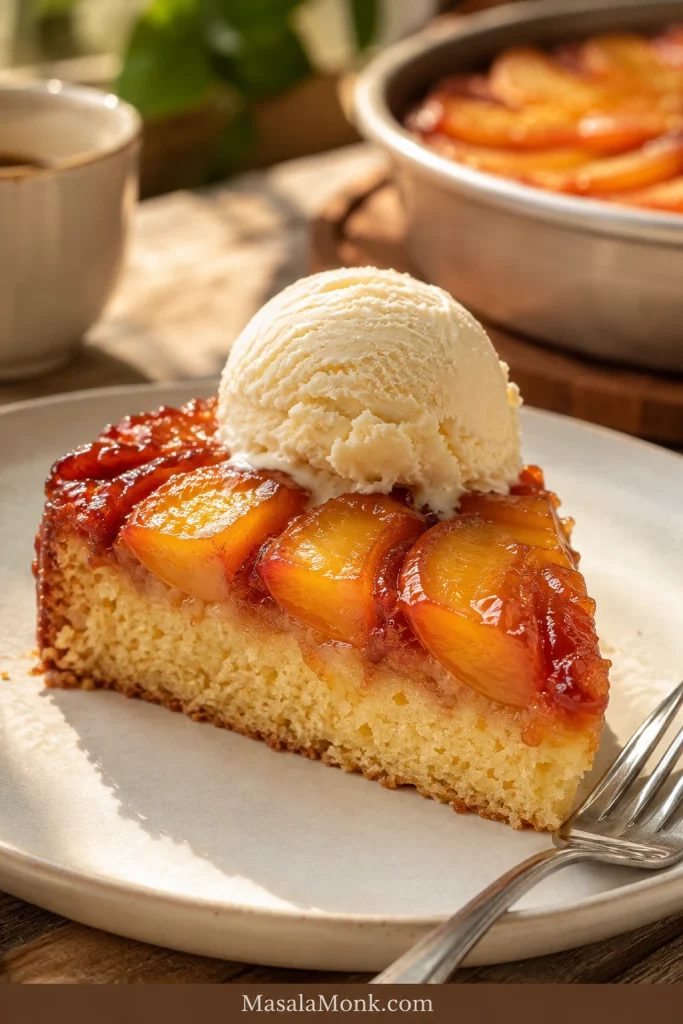
- Classic: Add vanilla ice cream and let the cold scoop soften against the fruit.
- Lighter: Add softly whipped cream with little or no extra sugar.
- Tangy: Serve with crème fraîche or plain Greek yogurt.
- Bright: Add fresh raspberries or a few extra peach slices.
- Simple: Serve plain with coffee or black tea.
Making the vanilla ice cream too? This KitchenAid ice cream guide includes both eggless and custard-style vanilla bases.
Make Ahead, Store and Reheat
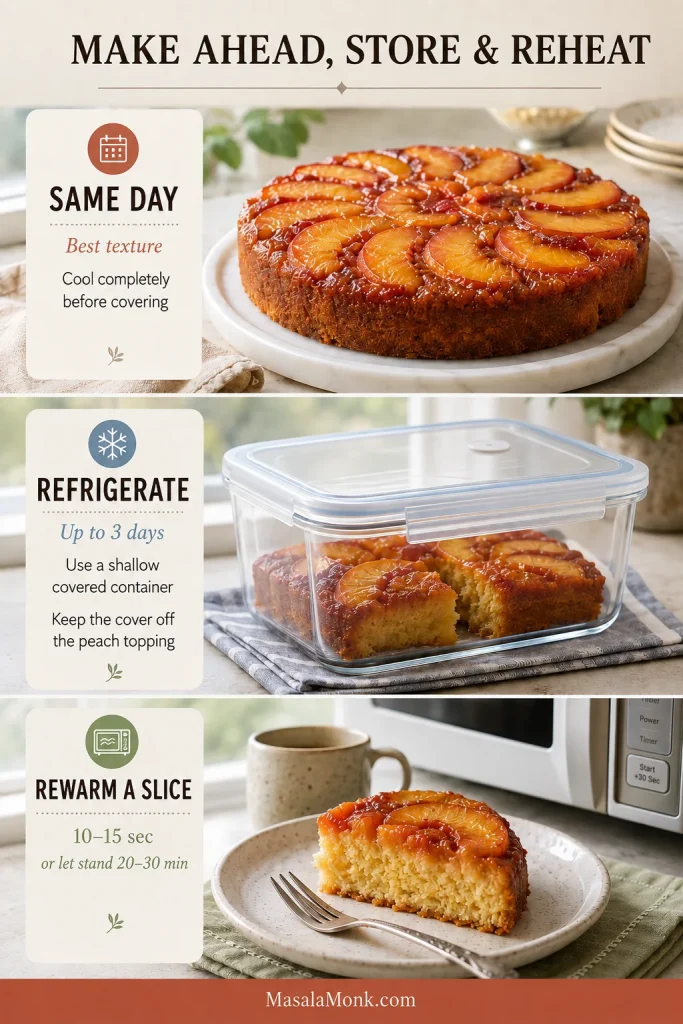
For the same day, bake the cake several hours ahead and cover it only after it has cooled completely. This is when the peaches are at their glossiest and the crumb beneath them is at its freshest.
For leftovers, place the fully cooled cake in a shallow covered container and refrigerate for up to three days. Avoid pressing plastic or foil against the peach topping. By the second and third day, the fruit softens further and more of its juice works into the cake beneath it.
To serve it again, let a refrigerated slice sit at room temperature for 20–30 minutes, or microwave it for about 10–15 seconds—just long enough to remove the chill.
Freezing is possible, but the peaches become softer and the topping may release more moisture after thawing. Refrigeration gives the better texture.
Where next? Serving ideas·Cake or cobbler?·Return to the recipe·Back to top
Cake or Cobbler?
Choose upside-down cake when the peaches can hold defined slices and you want a cake that cuts into wedges. Choose cobbler when the fruit is very soft, irregular or abundant and a spoonable dessert suits it better.

For that softer route, the MasalaMonk peach cobbler recipe explains how to work with fresh, frozen or canned peaches.
Frequently Asked Questions
Can I use canned or frozen peaches?
Yes. Drain canned peaches thoroughly before weighing. Thaw frozen peaches completely, drain the released liquid, blot the slices and then weigh them. The peach-preparation guide covers both options in more detail.
Why is the layer beneath the peaches soggy?
Very soft fruit, excess loose juice, too much fruit or an underbaked center are the usual causes. Check the troubleshooting table if the layer is thick or gummy rather than simply moist where fruit meets cake.
Can I use a different pan?
A dark 9-inch metal pan can work with an earlier check. For a cast-iron skillet, Bundt pan or 9×13-inch pan, use a method written for that shape and depth.
Can I use boxed cake mix?
This recipe is built around a from-scratch sour cream butter cake. A cake-mix version needs different liquid, fruit and pan quantities, especially when canned peach juice is involved, so use a recipe written specifically for boxed mix.
The reveal may be what everyone notices first, but the cake earns the second slice. Fragrant peaches, a soft caramelized top and a fully baked center matter more than a flawless pattern.
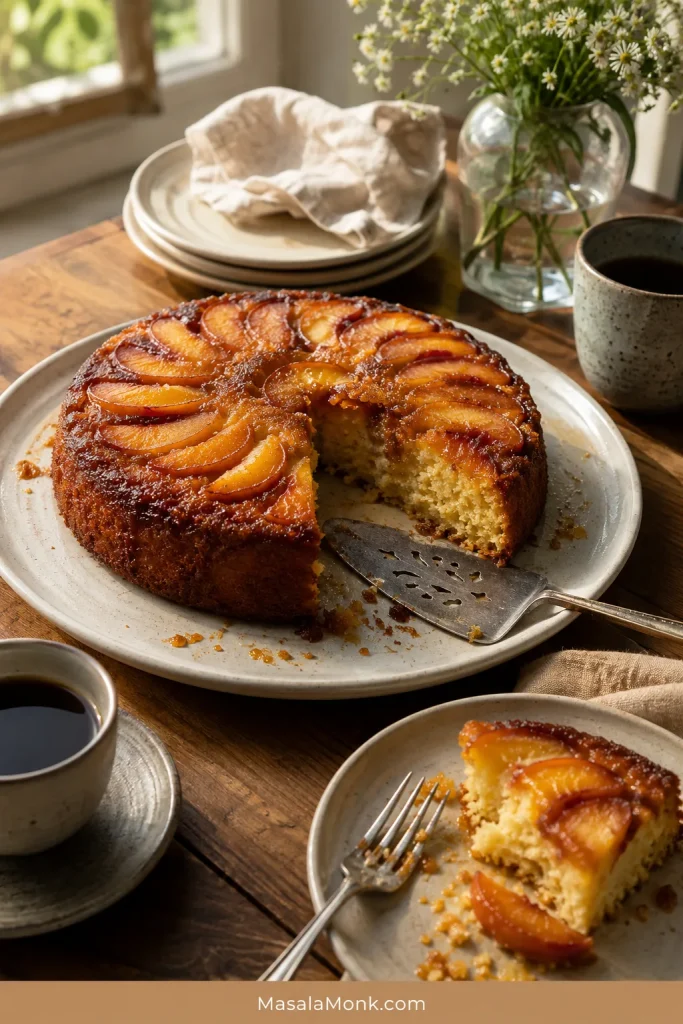
Give the fruit enough room, trust the doneness cues and start the flip timer when the pan leaves the oven. When the pan finally lifts, the cake arrives at the table glossy, fragrant and worth the brief moment of suspense.








