Posted on 2 Comments

Frittata Recipe: Easy Oven-Baked Egg Frittata

Finished oven-baked frittata in a skillet with a clean wedge lifted out, showing eggs, spinach, mushrooms, peppers, and cheese.

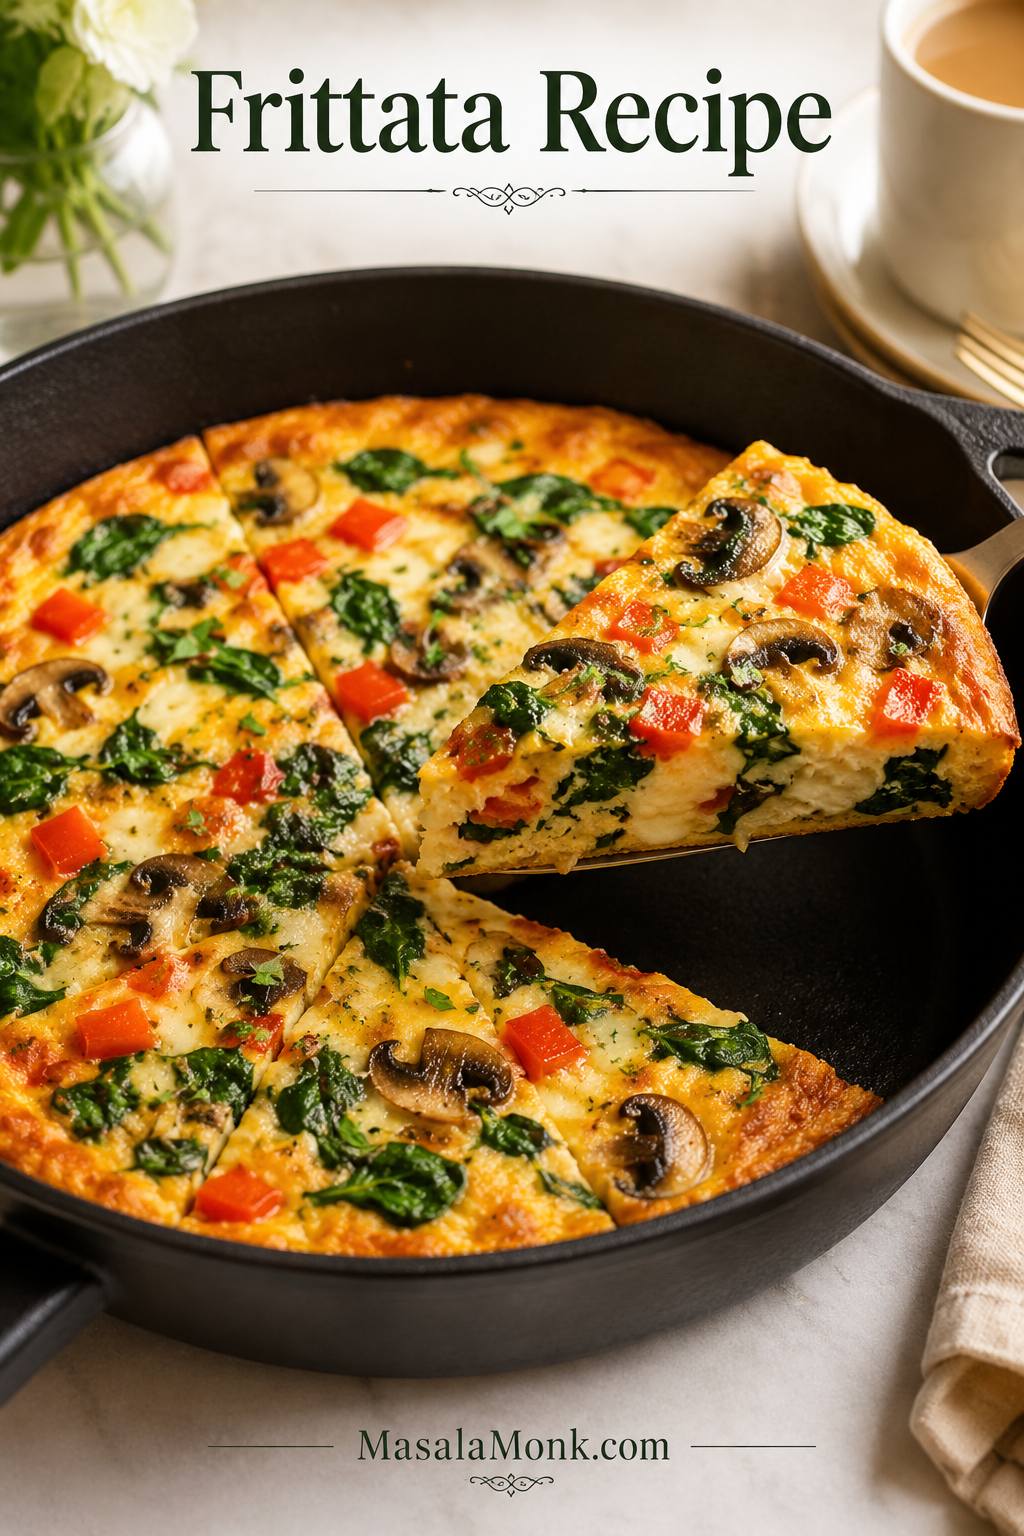
This frittata recipe is for the kind of breakfast that starts with a few eggs, a handful of cooked vegetables, and maybe a little cheese from the fridge. The goal is simple: a fluffy oven-baked egg frittata that slices cleanly, reheats well, and does not turn wet in the middle.

It works for brunch, meal prep, a quick dinner with salad, or a clean-out-the-fridge breakfast. Once you understand the egg-to-dairy ratio and how to handle the fillings, this frittata becomes one of those back-pocket meals you can repeat without measuring every single thing forever.

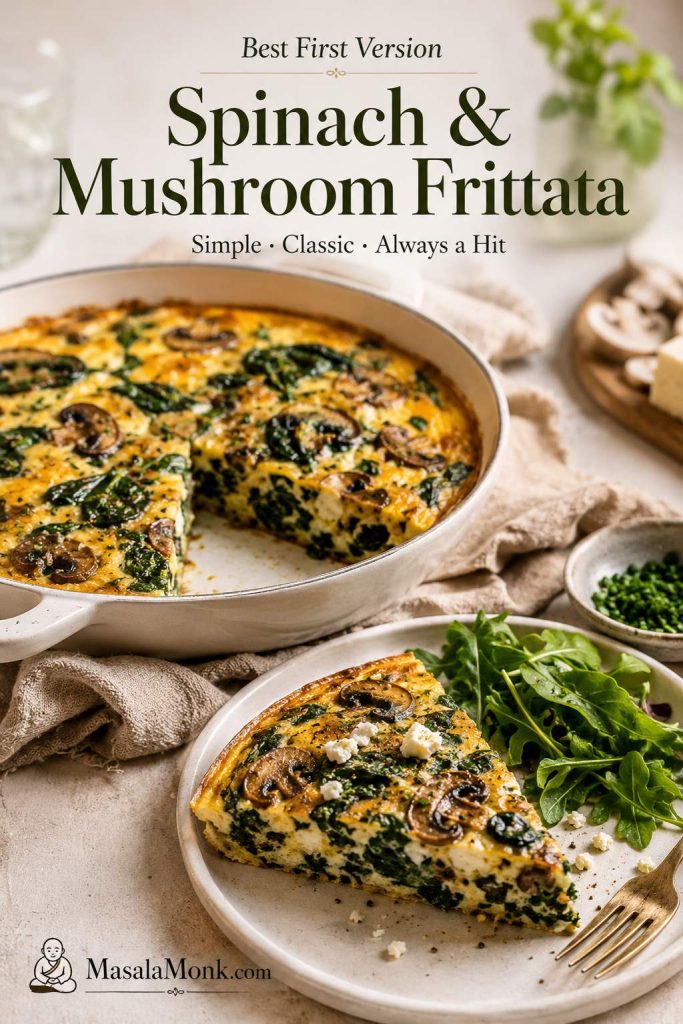
The best version feels generous without being heavy: tender eggs, sweet cooked vegetables, little pockets of cheese, and clean slices you can eat warm for brunch or chilled from the fridge the next morning.

Close-up slice of oven-baked egg frittata on a plate, showing a softly set center with vegetables and cheese.
A clean slice is the best texture clue: once the center sets and the frittata rests, the wedge should lift without wet egg pooling underneath.
At a glance: This frittata recipe uses 8 eggs, 1/3 cup dairy, 1 1/2–2 cups cooked fillings, and 3/4 cup cheese. Bake in a 10-inch oven-safe skillet at 375°F / 190°C for about 18–22 minutes, then rest 5–10 minutes before slicing.

Quick Answer: How to Make a Frittata

The easiest method is to cook your fillings first, pour the egg mixture into a greased oven-safe skillet, add cheese, and bake at 375°F / 190°C until the middle is just set. After a short rest, the frittata should slice cleanly without turning dry or rubbery.

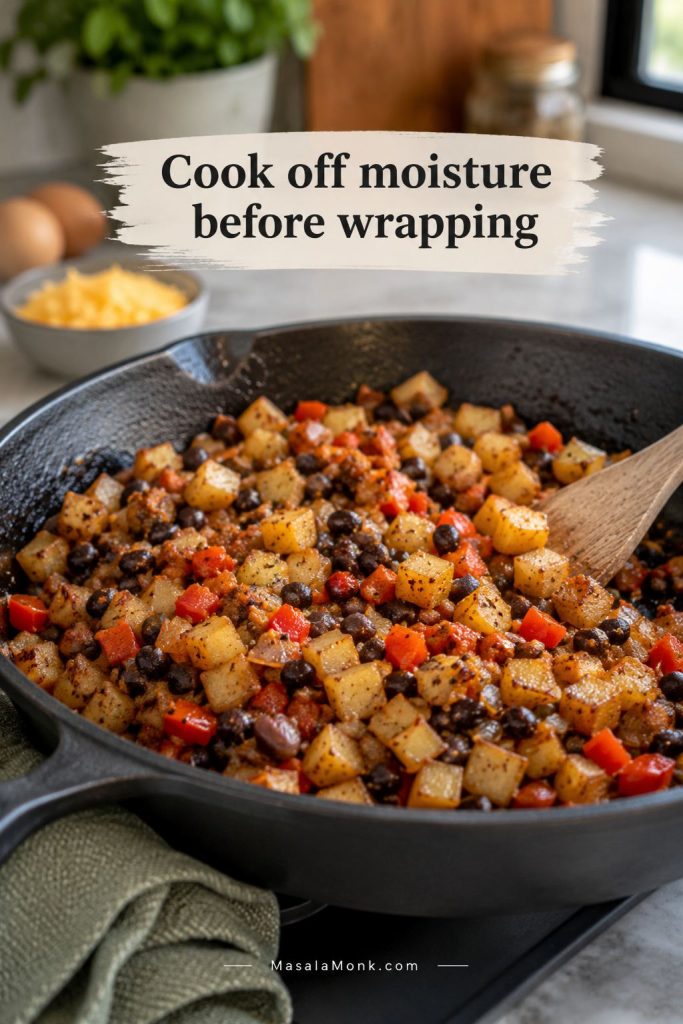
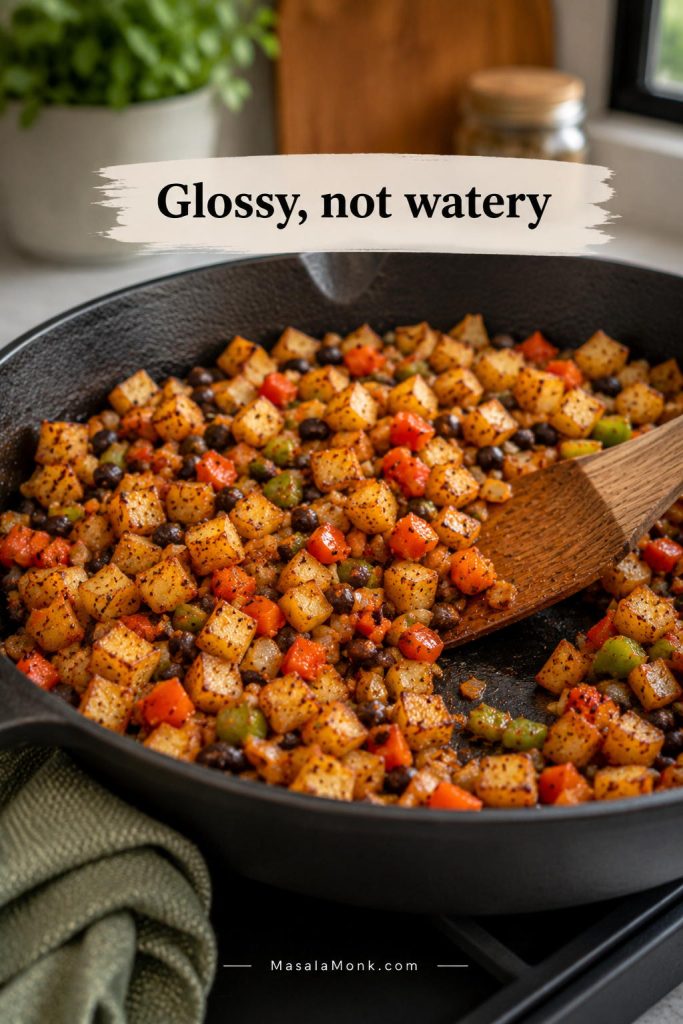
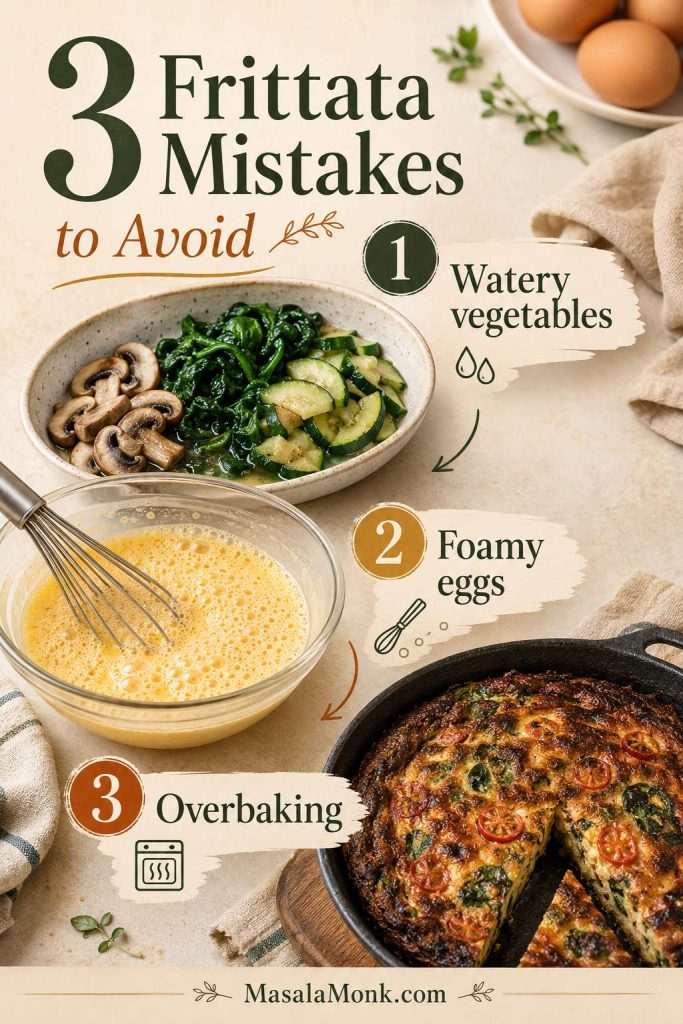
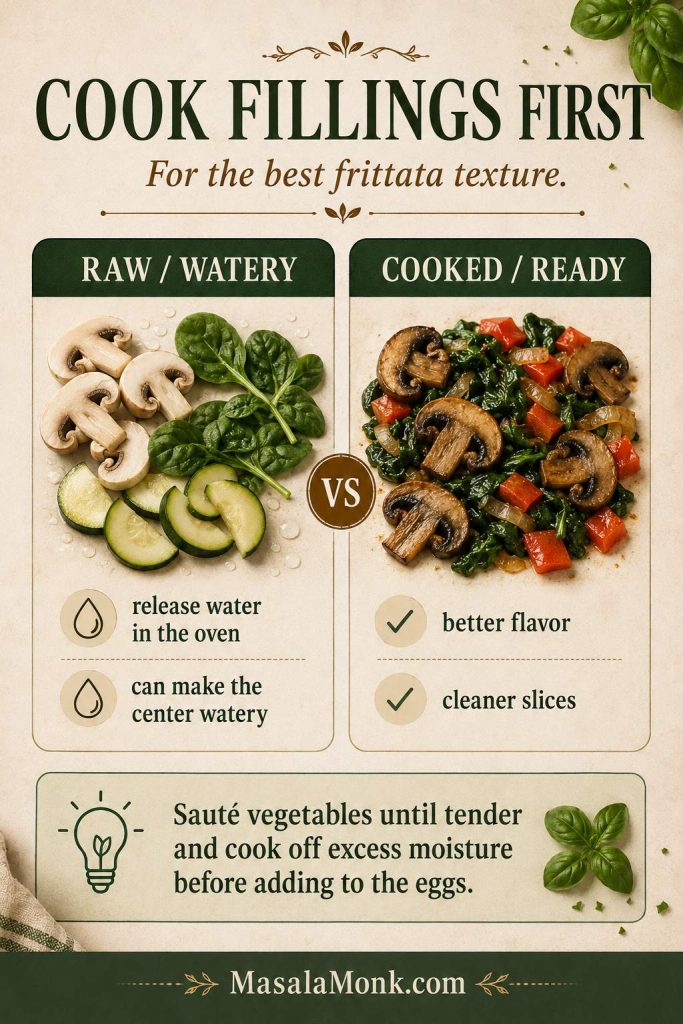
The shortcut that saves most frittatas is simple: deal with the fillings before the eggs ever hit the pan. Mushrooms give off liquid, spinach collapses as it cooks, zucchini softens quickly, and breakfast meats can release extra fat. Taking care of that first gives the finished frittata a cleaner texture and deeper flavor.

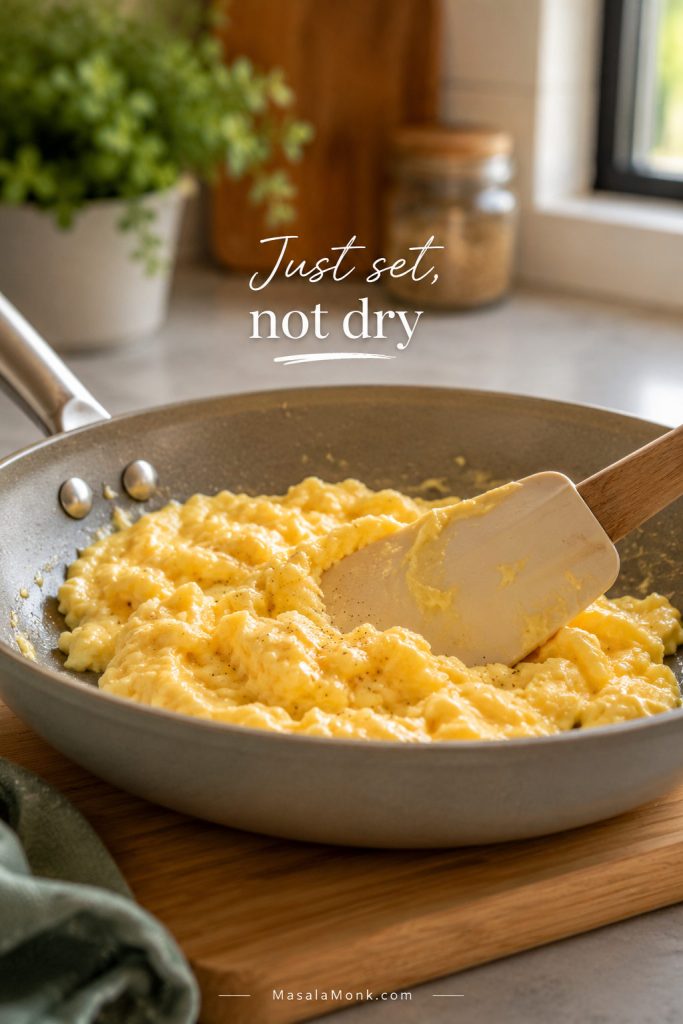
A finished frittata should look softly firm through the middle, with no wet egg pooling on top. A little wobble is not a problem; loose, sloshy egg is. The clock helps, but the center tells the truth.

At-a-glance frittata guide showing 8 eggs, 1/3 cup dairy, 1 1/2 to 2 cups cooked fillings, 3/4 cup cheese, and 375°F bake temperature.
Use this quick formula as your starting point; then, once the base feels familiar, swap the vegetables, cheese, or herbs to match what you have.

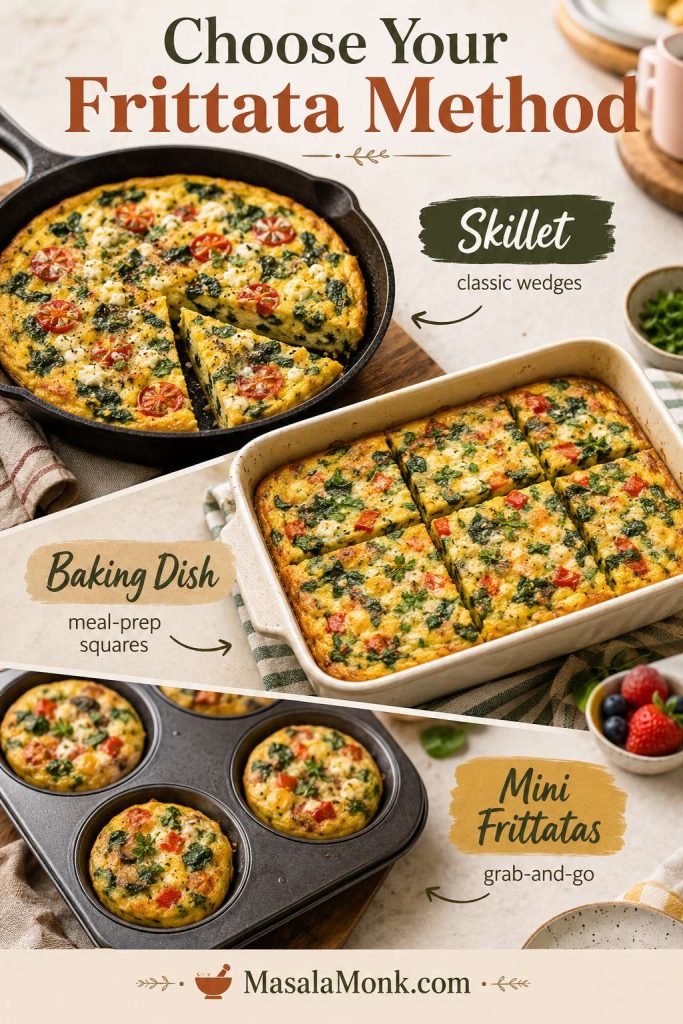
Choose Your Frittata Method

The best method depends on your pan and how you want to serve it. A skillet frittata gives you the most flavor, a baking-dish frittata is easiest for meal prep, and mini frittatas are best when you want individual portions.

MethodBest forHow to cook it
Skillet frittataClassic wedges and better browned fillingsCook fillings in a 10-inch oven-safe skillet, add eggs, and bake at 375°F / 190°C for 18–22 minutes.
Baking-dish frittataNo-skillet cooking and square meal-prep slicesCook fillings separately, add to a greased pie dish or 8×8 dish, and bake at 350°F / 175°C until set.
Mini frittatasGrab-and-go breakfasts and lunchboxesDivide the mixture into greased muffin cups and bake at 350°F / 175°C until just set.
Frittata method comparison showing skillet frittata, baking-dish frittata, and mini frittatas in a muffin tin.
Before choosing a pan, decide how you want to serve the frittata: wedges for brunch, squares for meal prep, or mini portions for busy mornings.
Three mistakes to avoid: Do not add watery vegetables raw, do not over-whisk the eggs into foam, and do not wait for a deeply browned top. Cook the fillings first, whisk just until blended, and pull the frittata when the center is softly set.
Guide showing three frittata mistakes to avoid: watery vegetables, over-whisked foamy eggs, and overbaking.
Most frittata problems are preventable: first remove moisture from fillings, then whisk gently, and finally pull the pan before the top gets too brown.

What Is a Frittata?

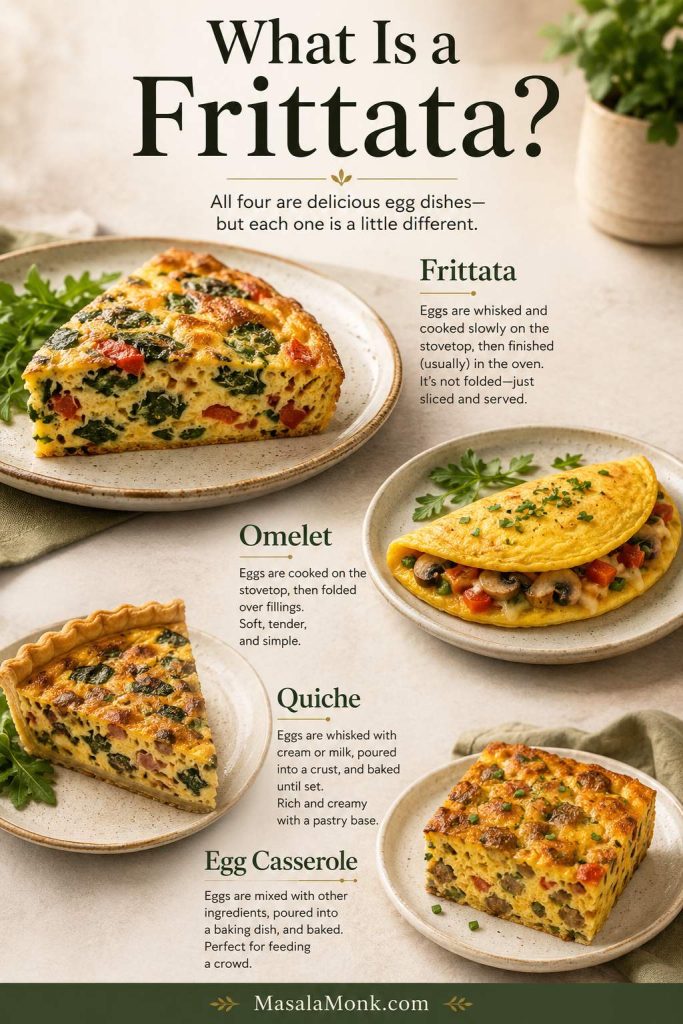
A frittata is an Italian-style egg dish where beaten eggs are mixed with vegetables, cheese, herbs, or cooked meat, then cooked until set. Unlike an omelet, the fillings are mixed into the eggs instead of folded inside. Unlike quiche, a frittata usually has no crust and uses less dairy, so it is firmer, faster, and easier to slice.

That is what makes it so useful: it feels nicer than scrambled eggs, takes less work than quiche, and turns leftovers into something that looks intentional.

At home, it can feel like a weekend brunch dish, but it is also practical enough for leftovers, cooked greens, roasted vegetables, bits of cheese, or breakfast meats you already have. Think of it as a flexible egg bake with a little more elegance and a lot less fuss.

Comparison of a frittata wedge, folded omelet, quiche slice, and egg casserole square.
A frittata is the practical middle ground between everyday eggs and brunch food: simpler than quiche, sturdier than an omelet, and easier to slice.

Why This Recipe Works

The egg-to-dairy ratio keeps it tender

Eggs set firmly when they bake, so a little dairy helps soften the texture. The balance matters, though. Too little dairy can make the frittata firm and rubbery, while too much can make it loose, wet, or closer to a crustless quiche. For this frittata recipe, 1/3 cup / 80 ml dairy for 8 large eggs gives a tender center that still slices well.

Cooked fillings help the eggs set cleanly

Vegetables can quietly sabotage a frittata if they go in raw. Mushrooms release liquid, spinach shrinks dramatically, zucchini softens fast, and tomatoes can make the middle look underbaked. Cooking those ingredients first concentrates their flavor and keeps the eggs from turning loose in the oven.

Oven baking gives even slices

A skillet frittata usually starts with cooked fillings on the stovetop, then finishes in the oven. That oven finish helps the middle set more evenly, especially once vegetables and cheese are spread through the eggs. If you do not have an oven-safe skillet, a pie dish or square baking dish works too.

Resting keeps the slices clean

Resting is not just a polite suggestion. Give the frittata 5 to 10 minutes after baking and the center firms slightly, the cheese settles, and the slices come out cleaner. Cut too soon and even a properly baked frittata can look softer than it really is.

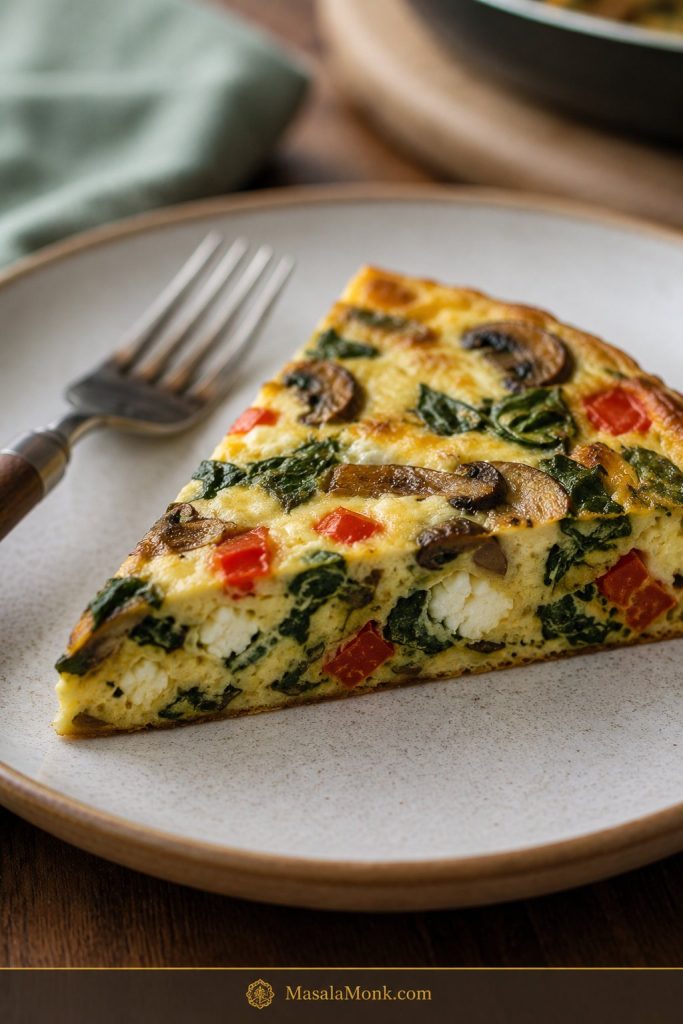
The finished frittata should be softly set, lightly creamy in the center, and sturdy enough to cut into wedges. It should not taste like dry scrambled eggs, and it should not leak liquid when sliced. When the fillings are cooked first and the eggs are pulled at the right time, the texture lands in that sweet spot between tender and sliceable.

This base version is intentionally simple: mushrooms, greens, onion, a little dairy, and cheese. Once you make it once, the ratio is easy to reuse with almost any cooked filling.

Saveable oven-baked frittata recipe card showing 8 eggs, 1/3 cup dairy, 1 1/2 to 2 cups cooked fillings, 3/4 cup cheese, 375°F, 18 to 22 minutes, and 5 to 10 minutes rest time.
Keep the ratio, bake time, and resting step together; those three details make this oven-baked frittata easier to repeat with different fillings.

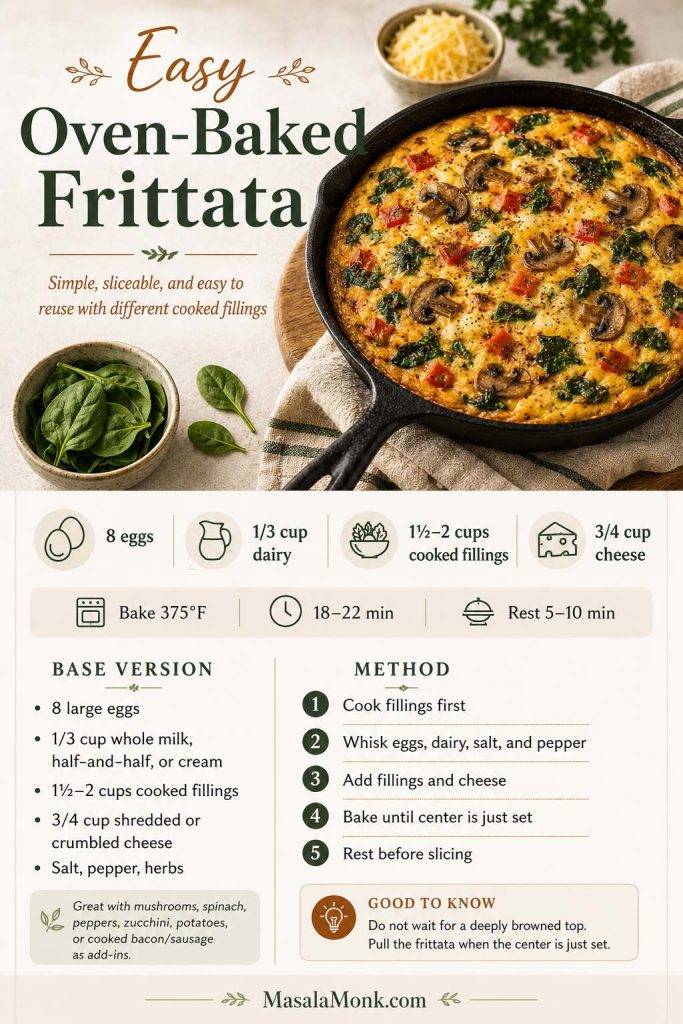
Easy Oven-Baked Frittata Recipe Card

Prep Time 10 minutes
Cook Time 25–30 minutes
Rest Time 5–10 minutes
Yield 4–6 servings

Recipe name: Easy Oven-Baked Egg Frittata

Course: Breakfast, brunch, meal prep

Best pan: 10-inch / 25 cm oven-safe skillet

Oven temperature: 375°F / 190°C
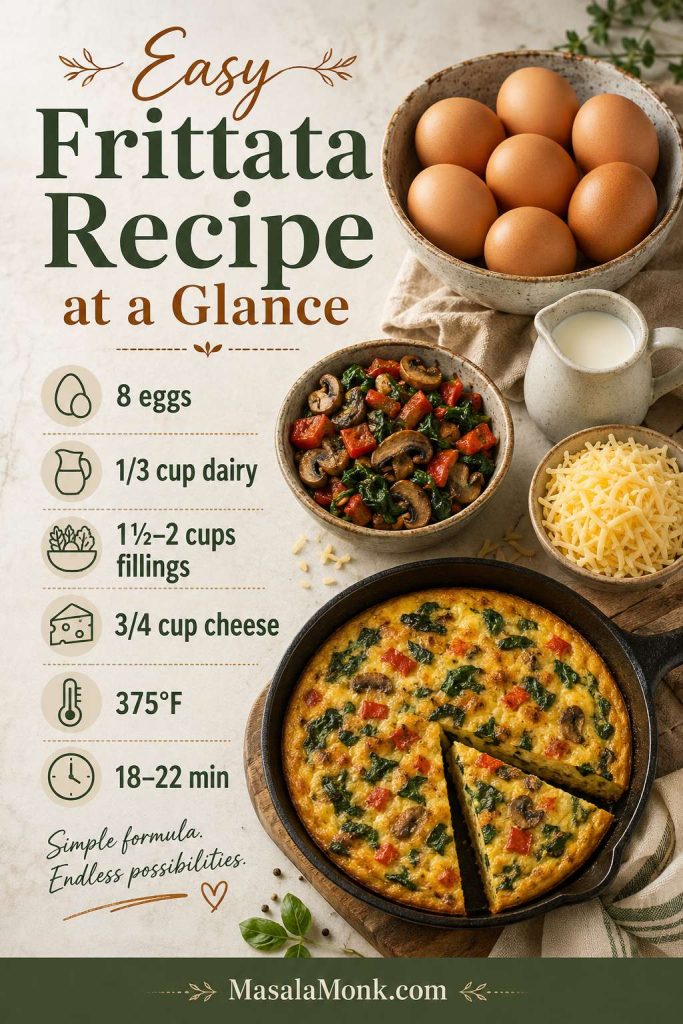
Ingredients

  • 8 large eggs
  • 1/3 cup / 80 ml whole milk, half-and-half, or heavy cream
  • 1 tbsp / 15 ml olive oil or butter, plus more for greasing if needed
  • 1 small onion or shallot, finely chopped
  • 1–2 garlic cloves, minced
  • 1 cup sliced mushrooms
  • 1/2 cup chopped bell pepper or zucchini
  • 2 packed cups baby spinach or chopped kale
  • 3/4 cup / 75–90 g shredded or crumbled cheese
  • 1/2 tsp fine salt, plus more for vegetables if needed
  • 1/4 tsp black pepper
  • 2 tbsp chopped fresh herbs, optional

Base vegetable filling

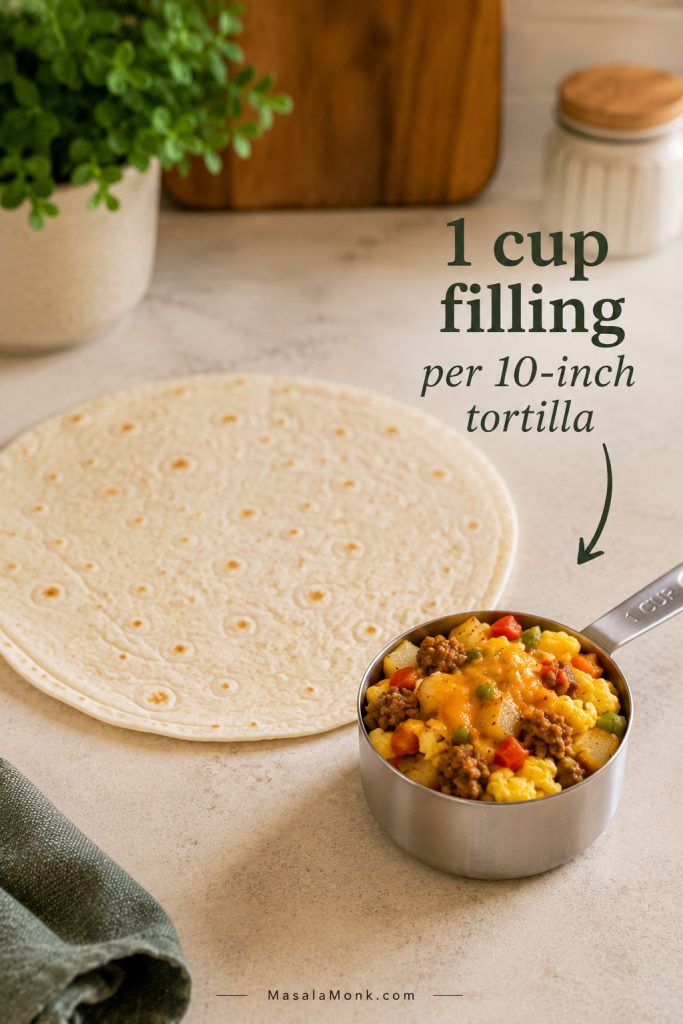
For the easiest first version, use the onion or shallot, mushrooms, bell pepper or zucchini, and spinach or kale listed above. After cooking, the filling should reduce to about 1 1/2–2 cups total.

You can swap this mix with the same amount of cooked asparagus, broccoli, roasted potatoes, leftover vegetables, cooked bacon, ham, or sausage. Just keep the finished filling amount close to 1 1/2–2 cups so the eggs still set cleanly.

Cook the onion first, then add the mushrooms and bell pepper or zucchini. Add the spinach or kale at the end and cook just until wilted. If the pan looks wet, keep cooking for another minute before adding the eggs.

Method

  1. Preheat the oven to 375°F / 190°C. Grease a 10-inch oven-safe skillet if needed.
  2. Warm the olive oil or butter in the skillet over medium heat. Add the onion or shallot and cook until softened.
  3. Add the garlic, mushrooms, and bell pepper or zucchini. Cook until the vegetables soften and excess moisture reduces. Add the spinach or kale and cook just until wilted.
  4. In a bowl, whisk the eggs, dairy, salt, and pepper just until combined. Do not whisk the eggs into a very foamy mixture.
  5. Spread the cooked fillings evenly in the skillet. Pour the egg mixture over them, then sprinkle the cheese over the top. You can also stir some of the cheese directly into the eggs and reserve a little for the surface.
  6. Bake for 18–22 minutes, until the center is just set and no wet egg pools on top.
  7. Rest for 5–10 minutes before slicing. Finish with fresh herbs, black pepper, or a little extra cheese if desired.

Doneness

The center should look set, with only a slight wobble. For the safest check, egg dishes should reach 160°F / 71°C in the center.
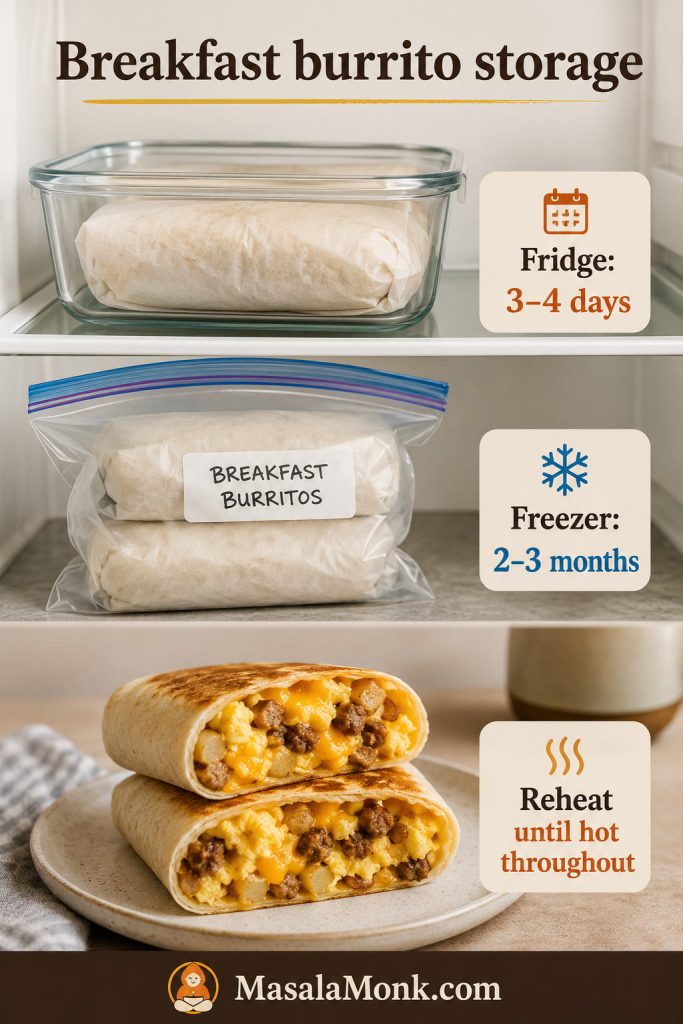
Storage

Refrigerate cooled slices in an airtight container for 3–4 days, or freeze well-wrapped portions for up to 2–3 months.

Need to adjust the pan or timing? Check the bake-time guide. Not sure when it is done? Use the doneness cues.

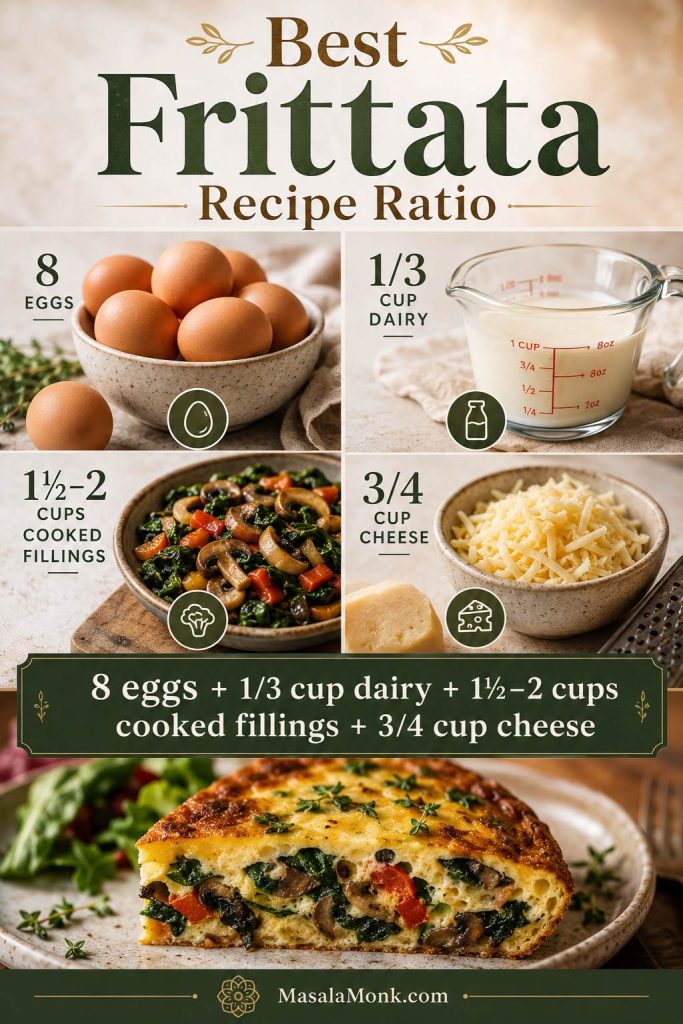
Best Frittata Recipe Ratio

The easiest way to stop guessing is to use a frittata ratio. This frittata recipe is flexible, but the base balance is what keeps it reliable: enough egg for structure, enough dairy for tenderness, enough cooked fillings for flavor, and enough cheese to make each bite satisfying without weighing the eggs down.

For most home cooks, the most useful starting point is 8 eggs + 1/3 cup dairy + 1 1/2 to 2 cups cooked fillings + 3/4 cup cheese. That makes a full 10-inch skillet frittata that serves 4 hungry people or 6 lighter portions with sides. Think of the ratio as guardrails, not handcuffs.

Frittata ratio board showing eggs, dairy, cooked fillings, cheese, and the formula 8 eggs, 1/3 cup dairy, 1 1/2 to 2 cups fillings, and 3/4 cup cheese.
The best frittata recipe ratio keeps the eggs structured, the dairy balanced, and the cooked fillings flavorful without making the center loose.

Frittata Ratio by Egg Count

EggsDairyCooked fillingsCheeseBest pan
4 eggs2–3 tbsp / 30–45 ml3/4–1 cup1/3 cupSmall skillet or small baking dish
6 eggs1/4 cup / 60 ml1–1 1/2 cups1/2 cup8- or 9-inch skillet
8 eggs1/3 cup / 80 ml1 1/2–2 cups3/4 cup10-inch skillet
12 eggs1/2 cup / 120 ml2 1/2–3 cups1 cup9×13 dish or 12-inch skillet
Frittata scaling chart showing ratios for 4 eggs, 6 eggs, 8 eggs, and 12 eggs with dairy, cooked fillings, cheese, and pan size.
When scaling the recipe, adjust the pan along with the eggs; otherwise, a thicker frittata may need more time while the edges cook faster.

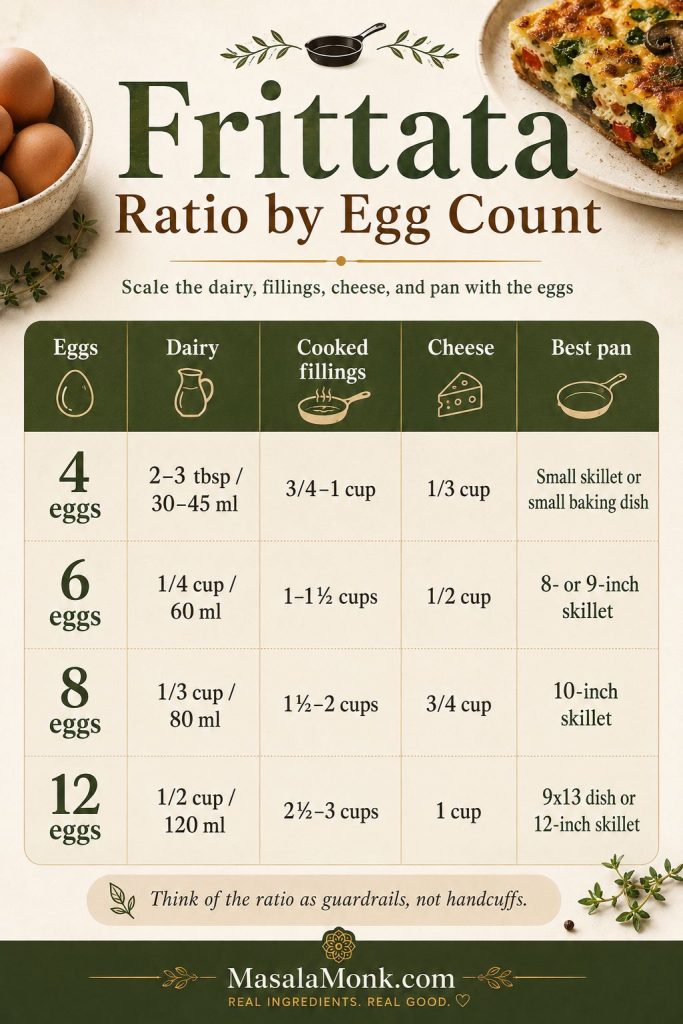
If you are cooking for one or only have a couple of eggs, this guide to 2-egg dishes has smaller breakfast ideas for days when you do not want a full pan.

A little more cheese is fine if you are using a salty, bold cheese in small amounts. A few extra vegetables are fine when they are already cooked and not watery. What you want to avoid is a pan overloaded with raw vegetables or a bowl of eggs thinned out with too much milk.

If you want a softer brunch-style frittata, use half-and-half or cream and a cheese with personality, like feta, goat cheese, Gruyère, or sharp cheddar. If you want cleaner meal-prep slices, stay closer to whole milk, cooked vegetables, and a moderate amount of cheese.

Ingredients for an Easy Egg Frittata

A frittata is forgiving, but it is not random. Each ingredient has a job: the eggs hold it together, the dairy softens it, the cheese adds depth, and the cooked fillings make it worth slicing into.
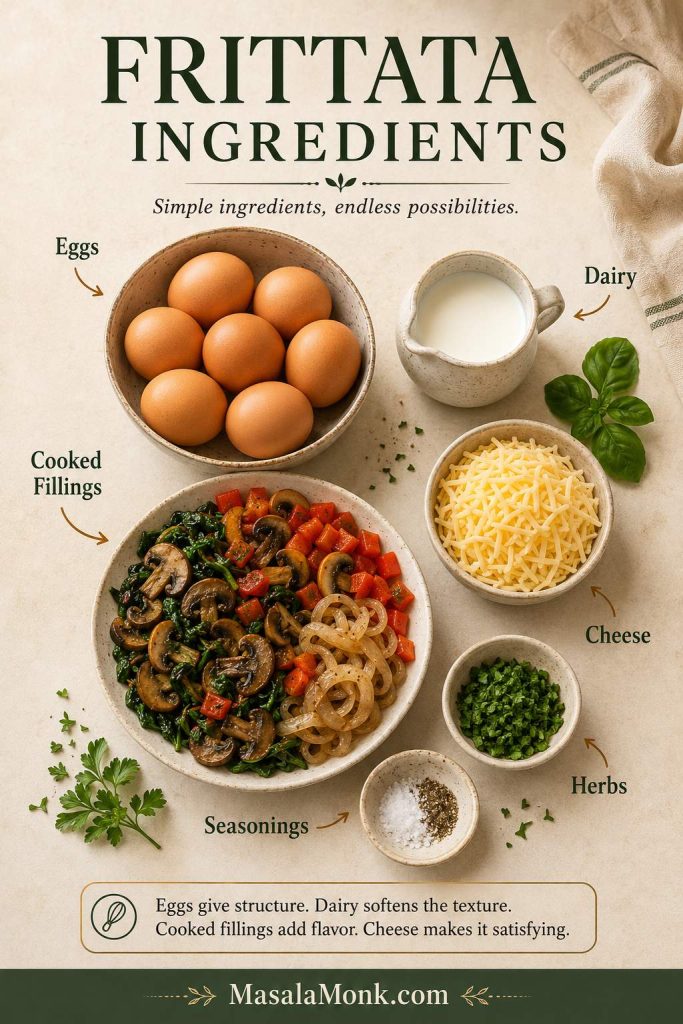
Overhead frittata ingredients including eggs, dairy, cooked vegetables, cheese, herbs, garlic, onion, salt, and pepper.
A flexible frittata still needs balance: eggs set the structure, dairy softens the texture, fillings add flavor, and cheese brings richness.

Eggs

Use large eggs for the most predictable result. If your eggs are very small, the frittata may have less structure. If they are extra-large, it may take a little longer to set. Either way, the visual cues matter more than the exact clock: the center should look set, not wet.

Dairy

Whole milk makes a lighter frittata, half-and-half gives a creamy but still sliceable texture, and heavy cream makes the richest version. Unsweetened dairy-free milk can work too, though the texture will usually be a little firmer and less custardy.
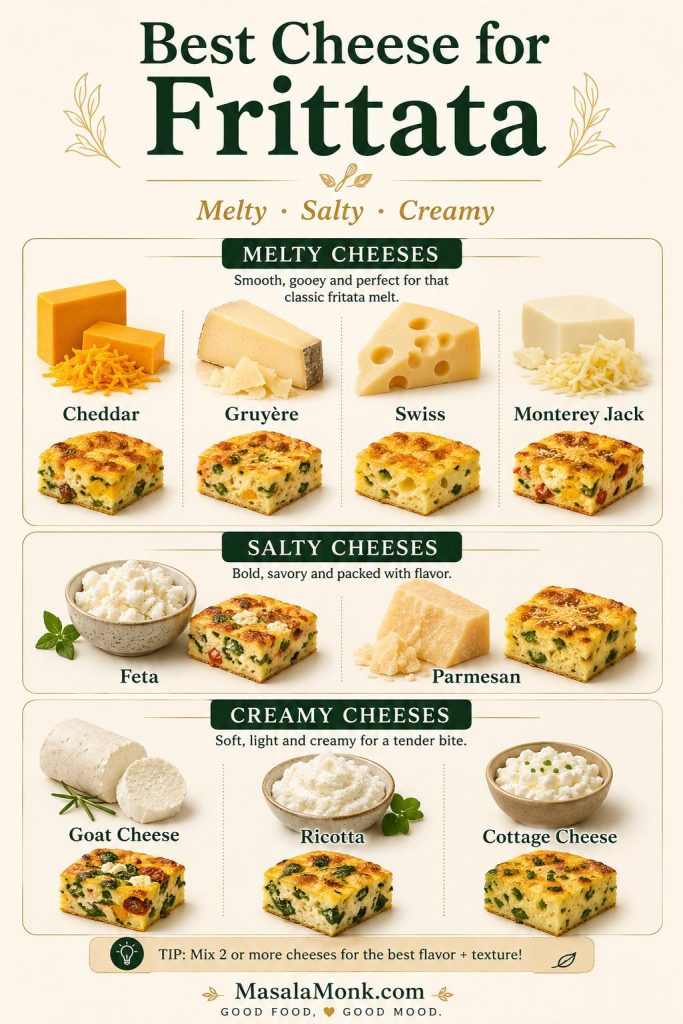
Cheese

Cheese is where the frittata starts to feel generous. Cheddar, Swiss, Gruyère, mozzarella, Monterey Jack, feta, goat cheese, Parmesan, ricotta, and cottage cheese can all work, but they do different jobs. Melting cheeses make the slices cozy and familiar, crumbly cheeses give salty pockets, and soft cheeses like ricotta or goat cheese are best dotted on top.

Vegetables and add-ins

The best vegetables have already done their messy work before they meet the eggs: mushrooms have given up their water, spinach has wilted down, potatoes are tender, and onions taste sweet instead of sharp. That gives the finished frittata better flavor and cleaner slices.

Side-by-side comparison of raw watery vegetables and cooked frittata fillings in a skillet.
Cook high-moisture fillings before they meet the eggs so mushrooms, greens, onions, and zucchini add flavor instead of leaking water.

Herbs and seasoning

Salt the eggs, but pay attention to salty fillings. Bacon, ham, feta, Parmesan, sausage, smoked salmon, and olives can all push the salt level up quickly. Fresh herbs like parsley, basil, dill, chives, cilantro, or green onion brighten the finished frittata, especially when added after baking.

Best Pan for Frittata

The best pan for a frittata depends on how you want to cook it. A 10-inch oven-safe skillet is the best all-purpose choice because you can cook the fillings in the same pan, pour in the eggs, and move it straight to the oven.

No oven-safe skillet? Use a greased pie dish, square baking dish, or casserole dish. The frittata will take longer because the egg mixture starts cold in the dish instead of warm from the skillet, but the method is simple and reliable.
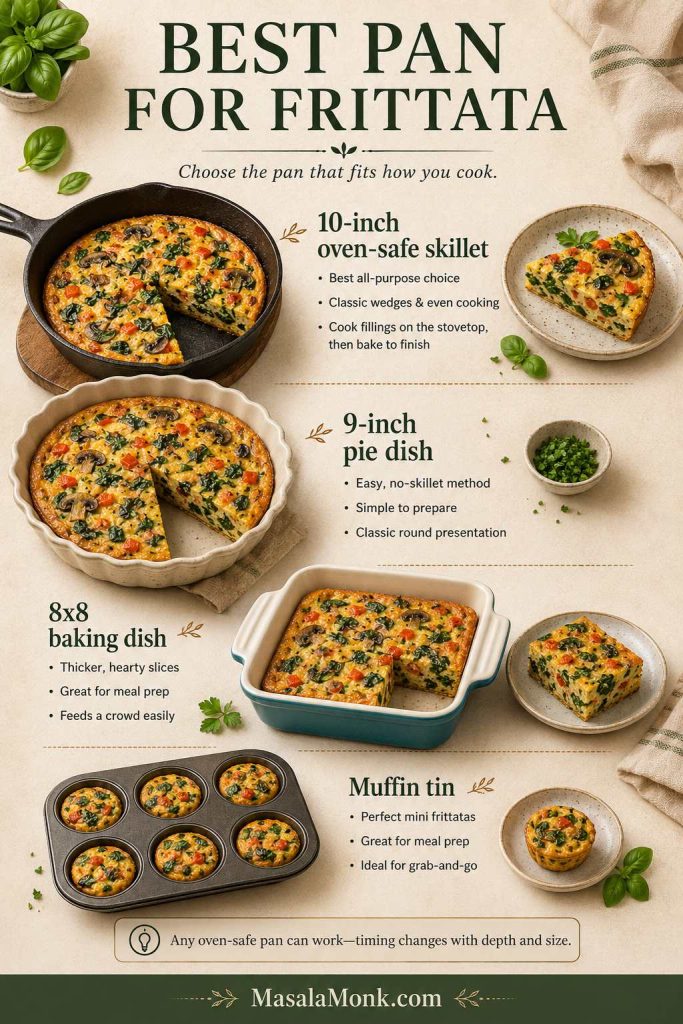
Frittata pan guide showing a 10-inch skillet, 9-inch pie dish, 8x8 baking dish, and muffin tin.
The pan shapes the final result: a skillet gives browned wedges, a baking dish gives neat squares, and a muffin tin gives individual portions.
PanBest useWhat to watch
10-inch oven-safe skilletBest default for an 8-egg frittataHandle must be oven-safe.
12-inch oven-safe skilletThinner frittata with quicker bakingCheck early so it does not dry out.
9-inch pie dishNo-skillet oven-baked frittataUsually needs a lower temperature and longer bake.
8×8 or 9×9 baking dishThicker meal-prep slicesThe middle needs more time than the edges.
9×13 baking dishLarger brunch or meal-prep batchUse more eggs or expect thinner slices.
Muffin tinMini frittatas and breakfast meal prepGrease well and check early.
Important: If using a skillet, make sure both the pan and handle are oven-safe. When in doubt, use a greased pie dish or baking dish instead.

Once you choose the pan, check the matching bake time so the center sets without drying the edges.

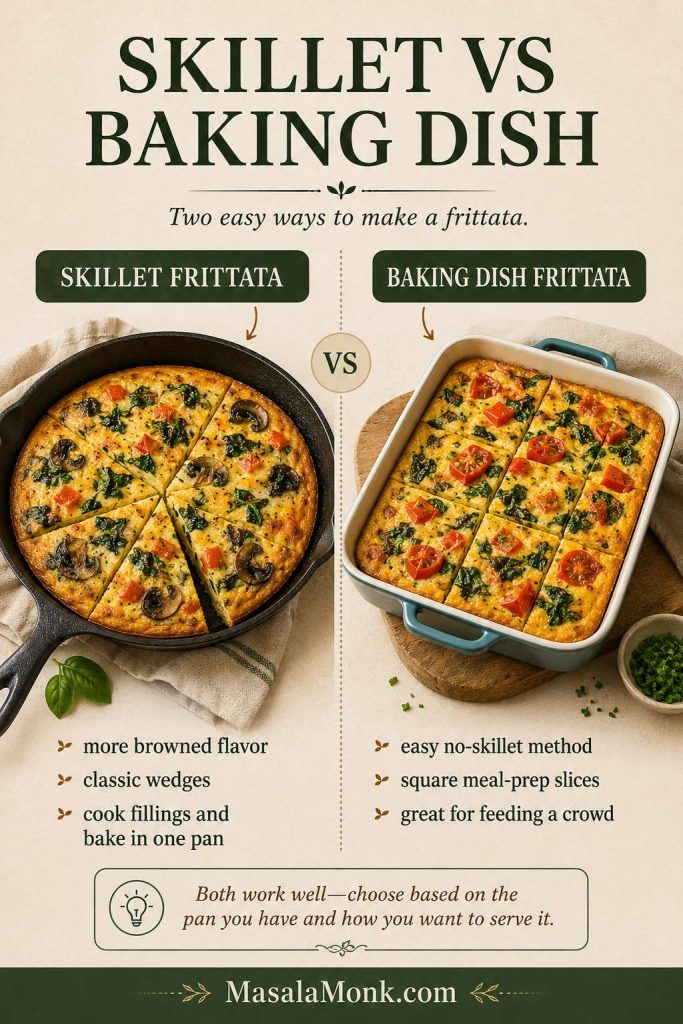
Skillet Method vs Fully Oven-Baked Method

The skillet method gives the best flavor because the fillings cook in the same pan before the eggs go in. Use it when you want deeper browning and a classic wedge-shaped frittata.

The fully oven-baked method is simpler if you do not have an oven-safe skillet. Cook the fillings separately, spread them in a greased 9-inch pie dish or 8×8 baking dish, pour the egg mixture over the top, and bake at 350°F / 175°C until the center is set. This method is especially helpful for meal prep because square slices fit neatly into containers.

Comparison of skillet frittata wedges and baking-dish frittata squares.
Use the skillet method for browned flavor and a classic brunch look; choose a baking dish when easy make-ahead slices matter more.

How to Make a Frittata in the Oven

The method is simple: cook the fillings, whisk the eggs gently, combine everything in a greased pan, bake until just set, and rest before slicing. The small details are what keep the frittata from turning soggy, rubbery, or bland.

Step-by-step frittata method showing cooked fillings, whisked eggs, combined ingredients, baking, and resting before slicing.
The steps are simple, but the order matters: cook, whisk, combine, bake, and rest so the final frittata stays tender and sliceable.

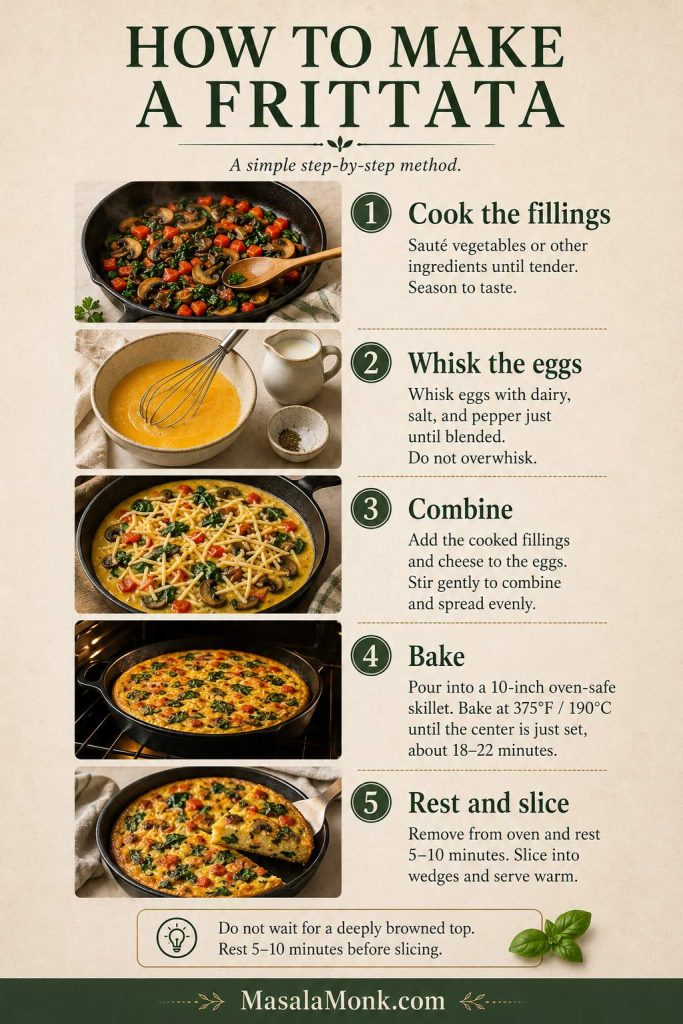
Step 1: Cook the vegetables first

Warm the oil or butter in your skillet, then cook the onion or shallot until soft. Add garlic for the last 30 seconds so it does not burn. From there, add the vegetables that need cooking. Mushrooms should release their moisture and start to brown. Spinach should wilt down. Zucchini should soften and reduce. Potatoes, sweet potatoes, broccoli, and asparagus should already be tender before the eggs are added.

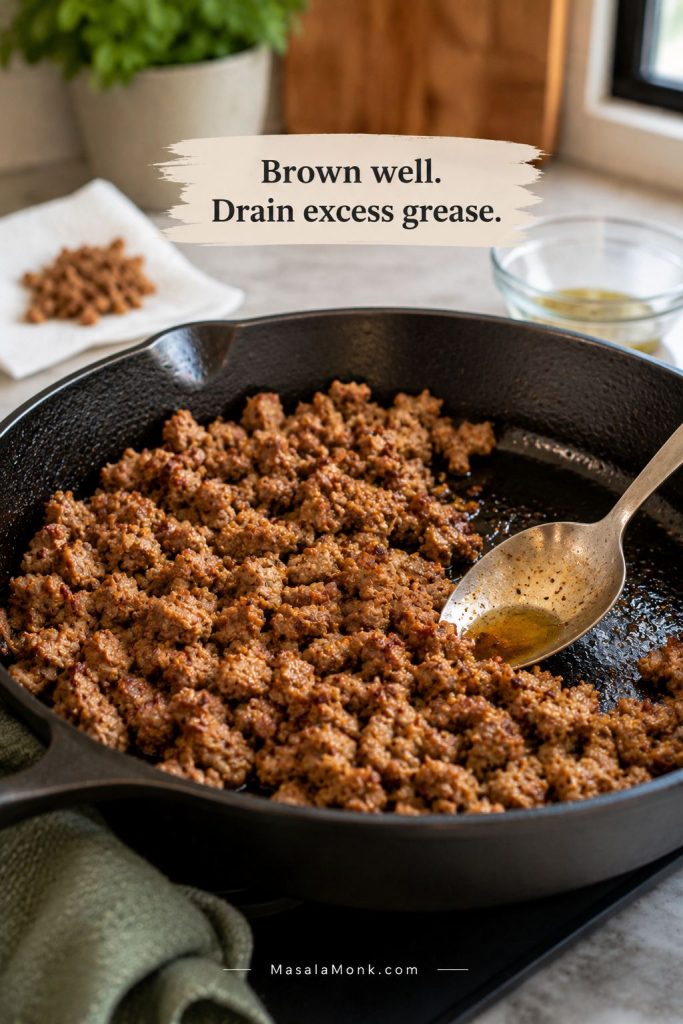
If you are using bacon, sausage, chicken, or another meat, cook it fully first. Drain excess fat if the pan looks greasy. A little fat is flavorful; too much can make the frittata heavy.

Step 2: Whisk the eggs gently

In a mixing bowl, whisk the eggs, dairy, salt, and pepper just until the yolks and whites are blended. You do not need to beat the eggs until they are foamy. Over-whisked eggs can puff dramatically in the oven, then collapse as they cool.

Step 3: Add the fillings and cheese

You can stir the cooked fillings and most of the cheese into the eggs, or you can spread the fillings evenly in the skillet and pour the egg mixture over the top. Both methods work. For the prettiest surface, reserve a little cheese and a few colorful vegetables to scatter on top before baking.

Step 4: Bake until just set

For the main recipe, bake in a 10-inch oven-safe skillet at 375°F / 190°C for 18–22 minutes. Start checking around 18 minutes. The edges may puff slightly and the center should no longer look wet. Instead of waiting for the top to turn deeply browned, pull the frittata when the middle is softly set.

Step 5: Rest before slicing

Finally, let the frittata rest for 5 to 10 minutes. This short pause gives the center time to finish settling and makes the slices cleaner. Add fresh herbs, cracked black pepper, or a little extra cheese just before serving.

How Long to Bake a Frittata

Frittata bake time changes with pan size, pan depth, oven temperature, and how much moisture is in the fillings. A shallow skillet frittata can finish quickly, while a thicker baking-dish frittata needs more time through the middle.
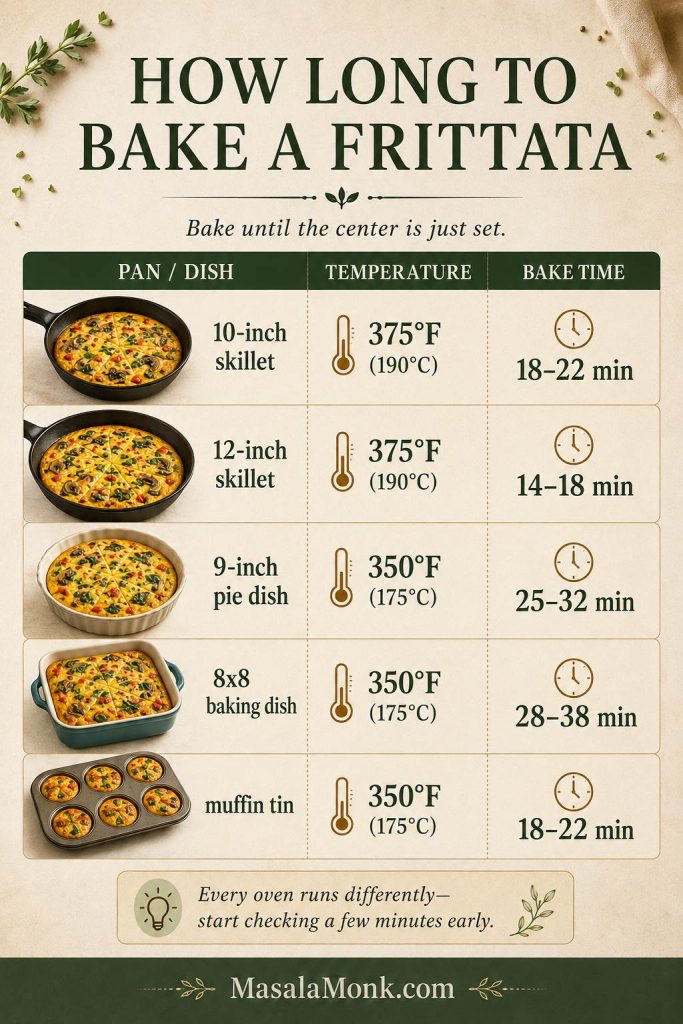
Frittata bake time guide showing different pans and approximate oven times for skillet, pie dish, baking dish, sheet pan, and muffin tin.
Because pan depth changes bake time, start checking early and trust the center more than the clock or the color of the top.
Pan or methodOven temperatureApproximate timeBest for
10-inch skillet375°F / 190°C18–22 minutesMain recipe
12-inch skillet375°F / 190°C14–18 minutesThinner frittata
10-inch skillet, fast finish400°F / 200°C8–15 minutesStovetop-start method
9-inch pie dish350°F / 175°C25–32 minutesNo-skillet method
8×8 baking dish350°F / 175°C28–38 minutesThicker meal-prep slices
9×13 baking dish350°F / 175°C25–35 minutesLarger batch
Sheet pan375°F / 190°C20–25 minutesBrunch or crowd servings
Standard muffin tin350°F / 175°C18–22 minutesMini frittatas
Mini muffin tin350–375°F / 175–190°C10–14 minutesBite-size egg cups

Use these times as a guide, then check the doneness cues before pulling the frittata from the oven.

For a sheet-pan frittata, use a well-greased or parchment-lined rimmed pan, spread the fillings evenly, and check early because the egg layer is usually thinner than a skillet or baking-dish frittata.

Every oven and pan behaves a little differently, so use the clock as a guide rather than the only test. A frittata with dry cooked vegetables may set faster than one with juicy tomatoes, zucchini, or extra cheese. Start checking a few minutes early, especially if your pan is wide or your oven runs hot.

350°F vs 375°F vs 400°F for Frittata

The oven temperature is not random. Different frittata recipes use different temperatures because they are usually using different pans and methods. Instead of treating one number as magic, choose the temperature based on the pan and texture you want.

TemperatureBest useWhat to watch
350°F / 175°CPie dishes, square baking dishes, muffin tins, and deeper frittatasGentler heat, but the middle takes longer.
375°F / 190°CBest default for a 10-inch skillet frittataBalanced speed and control.
400°F / 200°CFast stovetop-start skillet frittatasCheck early because edges can overcook.
Oven temperature guide for frittata comparing 350°F for deeper dishes, 375°F for skillet frittata, and 400°F for a fast finish.
Use 375°F for a classic skillet frittata. Deeper dishes usually need gentler heat so the middle sets before the edges dry out.

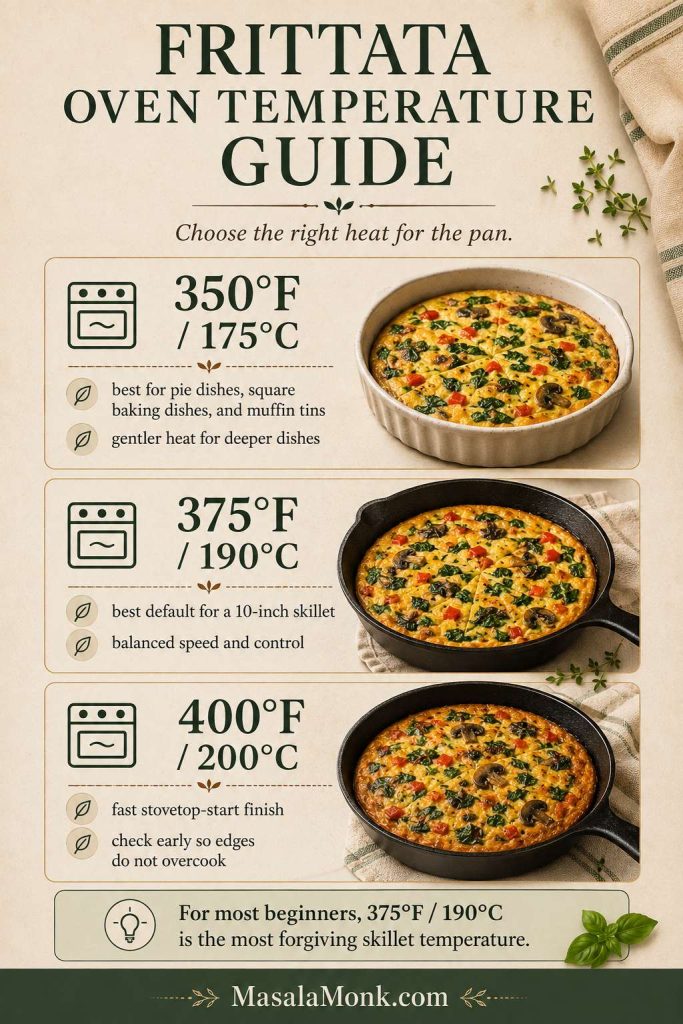
For most beginners, 375°F / 190°C is the most forgiving skillet temperature. Use 350°F / 175°C when the eggs are in a deeper dish, and use 400°F / 200°C only when you want a faster finish and are comfortable checking early.

Best Vegetables and Fillings for Frittata

The best frittata fillings are already cooked, seasoned, and not watery. That does not mean they need to be complicated. Leftover roasted vegetables, sautéed greens, cooked potatoes, bacon, ham, sausage, or bits of cheese can all turn into a good breakfast frittata.

Vegetable guide for frittata showing mushrooms, spinach, peppers, onions, potatoes, zucchini, tomatoes, and broccoli.
The best vegetables for frittata are not just tasty; they also cook down well and do not release too much water into the eggs.

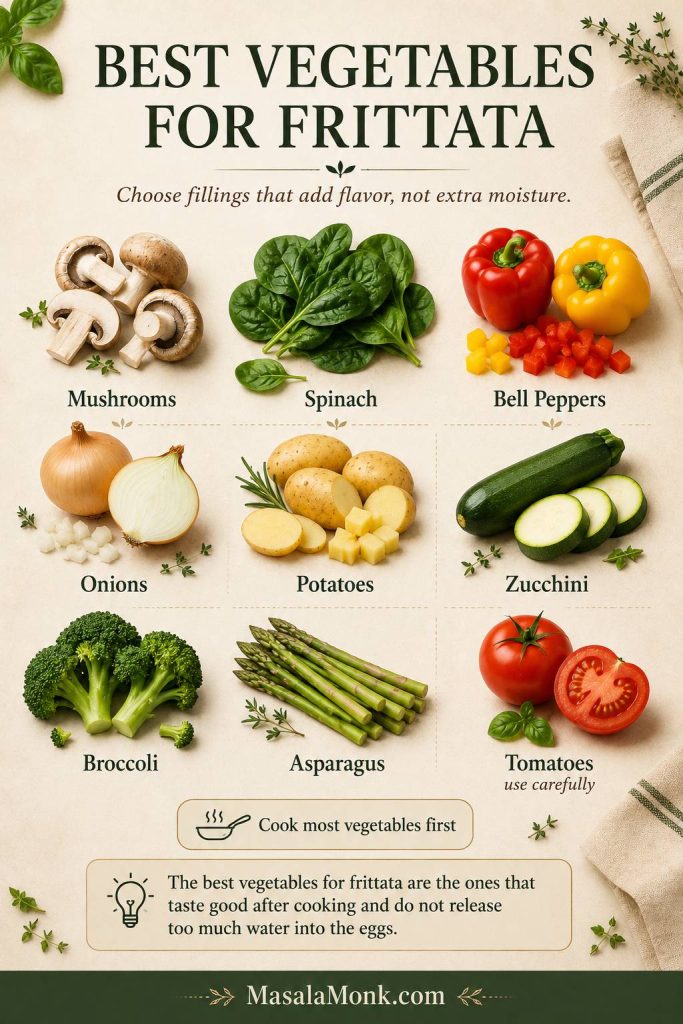
Best Filling Prep Before Baking

Use the table below as a prep guide before adding fillings to your eggs.

FillingUse raw or cooked?Best prep
MushroomsCook firstSauté until moisture releases and the mushrooms start browning.
Spinach or kaleCook firstWilt, then squeeze or cook off extra moisture.
ZucchiniCook firstSauté until the pieces soften and excess water reduces.
Bell peppers and onionsCook firstSauté until softened and lightly sweet.
Potatoes or sweet potatoesFully cook firstRoast, boil, microwave, or pan-cook until tender.
Broccoli or asparagusParcook firstSteam, roast, or sauté until just tender.
TomatoesUse carefullyUse cherry tomatoes or seeded tomatoes so the frittata does not turn watery.
Bacon, sausage, ham, or chickenCook firstCook fully and drain excess fat if needed.
Fresh herbsAdd lateStir into the eggs or sprinkle after baking for brighter flavor.

If your frittata usually turns watery, check the troubleshooting guide before adding more dairy or extra fillings.

Best Frittata Filling Combinations

A spinach frittata is best with wilted, squeezed spinach and feta, goat cheese, cheddar, or Parmesan. A potato frittata works best when the potatoes are already tender and lightly browned. A mushroom frittata needs mushrooms that have cooked long enough to lose their water. For a vegetable frittata, two or three vegetables usually taste better than a full fridge clean-out: spinach and mushrooms work, peppers and onions work, and zucchini with tomatoes and basil works. Seven vegetables in one pan usually taste less intentional.

Can you use frozen vegetables in a frittata?

Yes, but do not add them icy or wet. Thaw frozen spinach, broccoli, peppers, or mixed vegetables first, then squeeze or cook off as much moisture as you can. Frozen spinach especially needs a good squeeze before it goes into the eggs.

Milk vs Cream vs Half-and-Half in Frittata

Milk, cream, and half-and-half all work in a frittata, but they create different textures. The main rule is simple: use enough dairy to soften the eggs, not so much that the center turns loose.
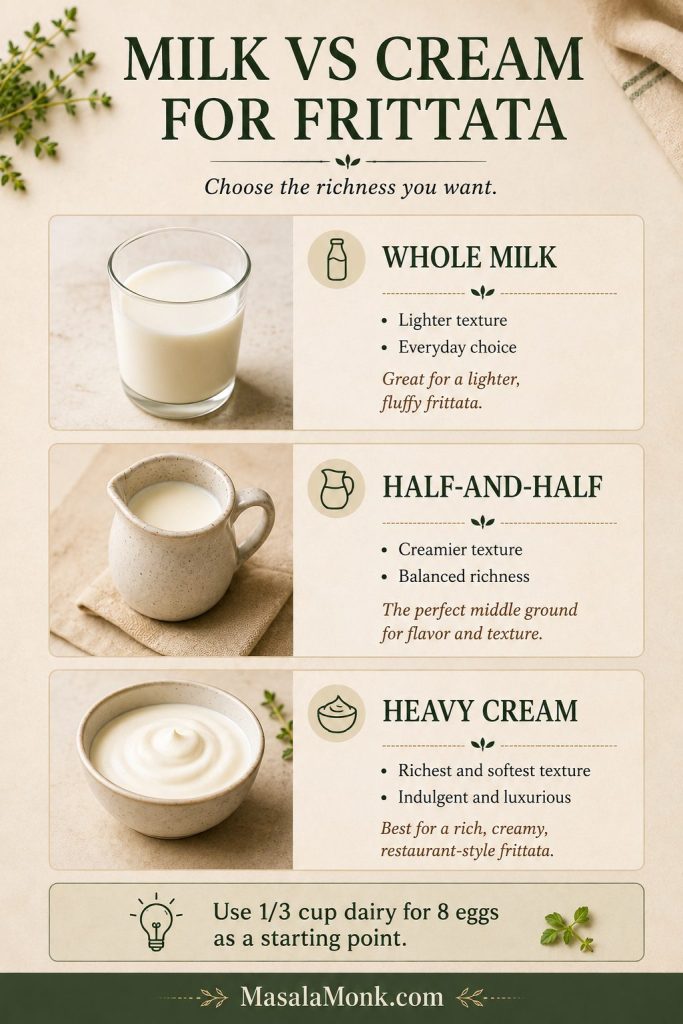
Comparison of milk, half-and-half, and cream for frittata texture.
Milk keeps the frittata lighter, cream makes it richer, and half-and-half sits in the middle with a creamy but still sliceable texture.
DairyTextureBest use
Whole milkLight and tenderEveryday frittata
Half-and-halfCreamier but still sliceableBest balanced choice
Heavy creamRich and softerBrunch-style frittata
Unsweetened dairy-free milkLighter and less richDairy-free variation
Cottage cheeseHigher protein, creamy pockets or blended textureHigh-protein frittata variation

Cheese has a second job beyond flavor: it helps make the frittata feel satisfying. Use a melting cheese when you want a classic breakfast texture, a salty cheese when you want punchier flavor, or a soft cheese when you want creamy pockets. If the cheese is bold, you do not need much. A little feta, Parmesan, or goat cheese can do more for the whole pan than a heavy layer of mild cheese.

Cheese guide for frittata showing melty cheeses like cheddar, Gruyère, Swiss, and Monterey Jack; salty cheeses like feta and Parmesan; and creamy cheeses like goat cheese, ricotta, and cottage cheese.
Cheese changes the whole character of a frittata: melty cheese feels cozy, salty cheese adds punch, and creamy cheese creates soft pockets.

How to Tell When a Frittata Is Done

A frittata is done when the center is set but not dried out. The mistake many people make is waiting for the top to brown deeply. By then, the edges may already be rubbery.
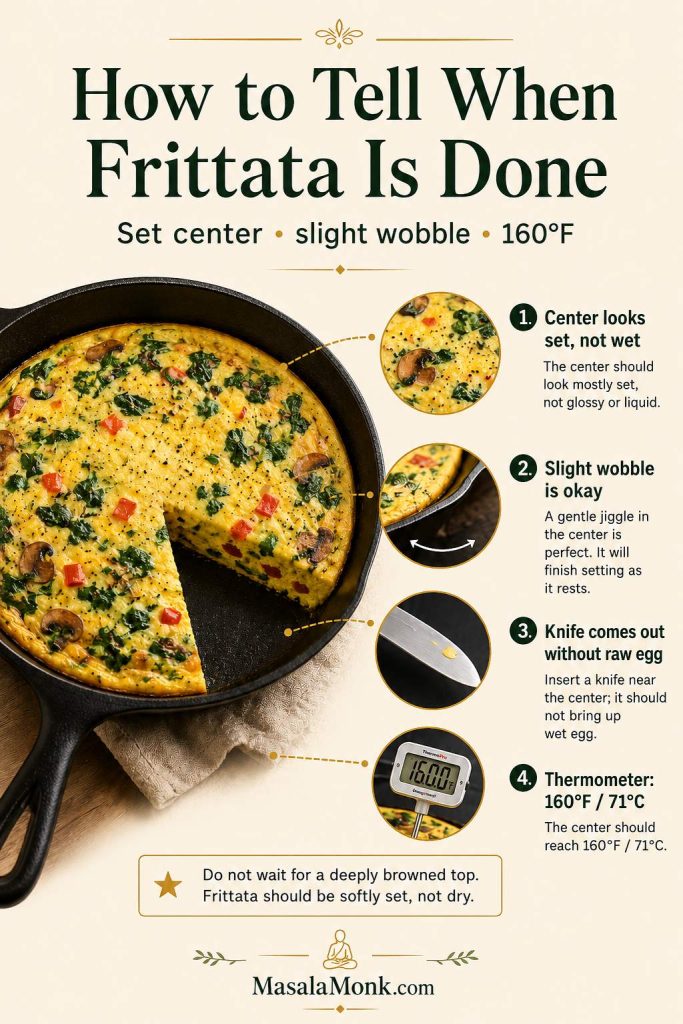
Do not wait for deep browning: A frittata is usually best when the center is just set. If you wait for a dark golden top, the edges may already be dry or rubbery.
Doneness guide for frittata showing a set center, slight wobble, knife test, and thermometer reading 160°F or 71°C.
Instead of waiting for a dark top, look for a set center, a slight wobble, and no wet egg when you test near the middle.
CheckWhat you want
VisualThe center looks set, not wet, shiny, or liquid.
JiggleA slight wobble is fine; loose sloshing egg is not.
TouchThe center feels lightly springy.
Knife testA knife inserted near the center should not bring up raw egg.
ThermometerThe center should reach 160°F / 71°C for egg dishes.

For food safety, egg dishes such as frittata and quiche should reach 160°F / 71°C in the center. You can check the current official chart at FoodSafety.gov.

Frittata Variations

Once the base ratio is comfortable, use this frittata recipe as a flexible starting point. Keep the same egg mixture, then change the vegetables, cheese, herbs, or cooked meat depending on what you have.

If you are making it for brunch, think creamy, herby, and a little richer. If you are making it for meal prep, think sturdy, sliceable, and easy to reheat. And if you are using leftovers, choose two or three good fillings instead of trying to fit the whole fridge into one pan.

For the safest first version, go with spinach, mushrooms, and cheddar or feta. The flavors are familiar, the vegetables are easy to manage, and the finished slices hold together well.

Spinach and mushroom frittata with a wedge served on a plate beside salad greens and crumbled cheese.
Spinach and mushroom is a smart first version because the flavors are familiar, the vegetables cook down well, and the slices hold together.

Not sure which version to make first? Start with one of these combinations, then adjust the vegetables and cheese based on what you have.
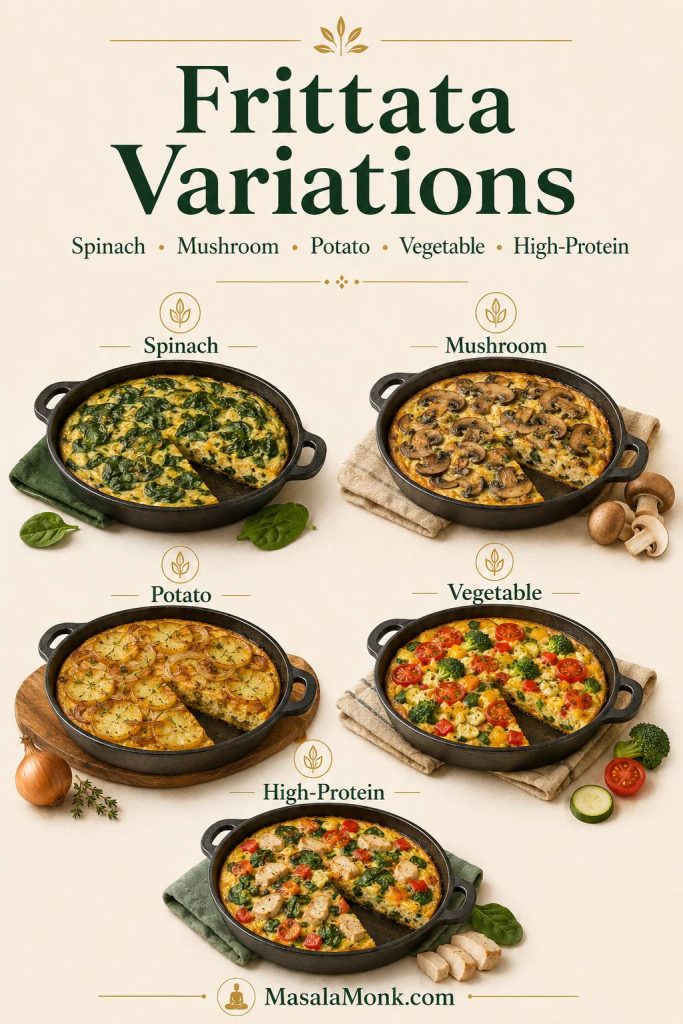
Frittata variations board showing spinach, mushroom, potato, vegetable, and high-protein frittatas.
Once the base method works, variations become easy: keep the egg mixture steady, then change the vegetables, cheese, herbs, or protein.
Frittata styleBest fillingsBest cheese
Spinach frittataWilted spinach, onion, herbsFeta, goat cheese, Parmesan, or cheddar
Mushroom frittataBrowned mushrooms, shallot, thymeGruyère, Swiss, goat cheese, or cheddar
Potato frittataCooked potatoes, onion, peppersCheddar, Monterey Jack, or Parmesan
Vegetable frittataPeppers, zucchini, broccoli, asparagus, or roasted vegetablesFeta, mozzarella, goat cheese, or cheddar
High-protein frittataSpinach, peppers, cooked turkey, herbsCottage cheese, cheddar, or Parmesan

Spinach frittata

For a spinach frittata that tastes bright instead of watery, wilt the spinach first, squeeze it well, then pair it with feta, goat cheese, dill, chives, or green onion.

Potato frittata

Potatoes should be fully cooked before the eggs go in. Roasted potatoes, boiled potatoes, leftover breakfast potatoes, or pan-fried cubes all work. For the best texture, let the potatoes brown lightly so they do not taste flat inside the eggs.

Vegetable frittata

Use a mix of cooked peppers, onions, mushrooms, zucchini, broccoli, asparagus, tomatoes, or leftover roasted vegetables. Two or three vegetables usually taste better than too many competing flavors in one pan.

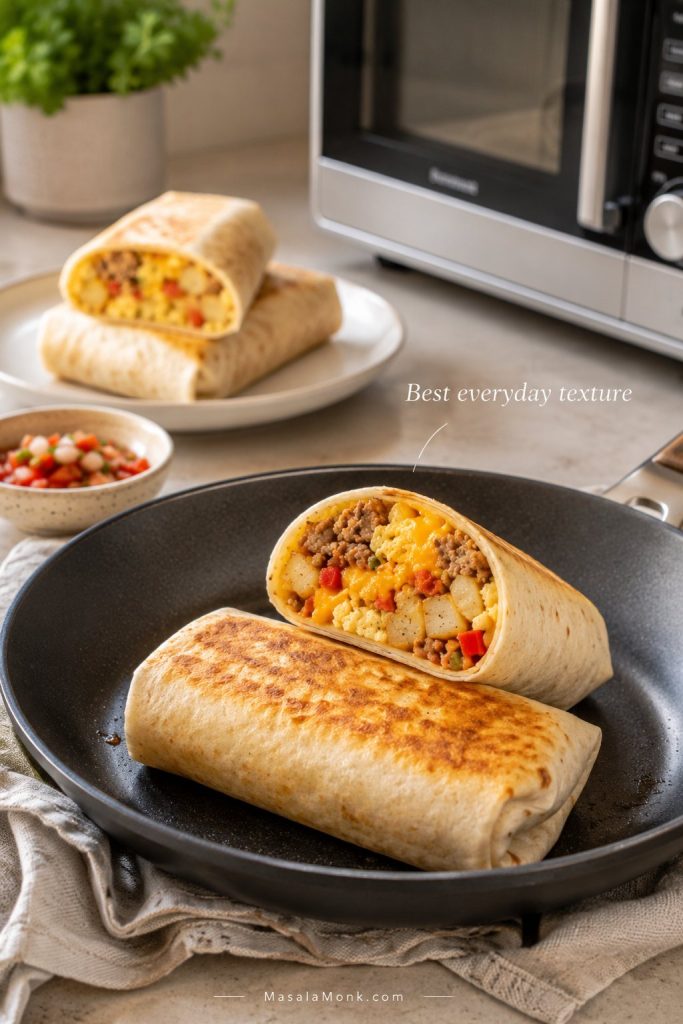
Bacon, ham, or sausage frittata

Cook bacon or sausage first and drain excess fat. Ham is already cooked, but browning it briefly can deepen the flavor. Since breakfast meats and many cheeses are salty, reduce the added salt if needed. For an easy brunch plate, serve slices with air fryer bacon, toast, and fruit.

Egg white frittata

An egg white frittata is leaner, but it can turn firm faster than a whole-egg frittata. Use cooked vegetables, enough seasoning, and a little cheese or cottage cheese for better texture. Check early so the egg whites do not overbake.

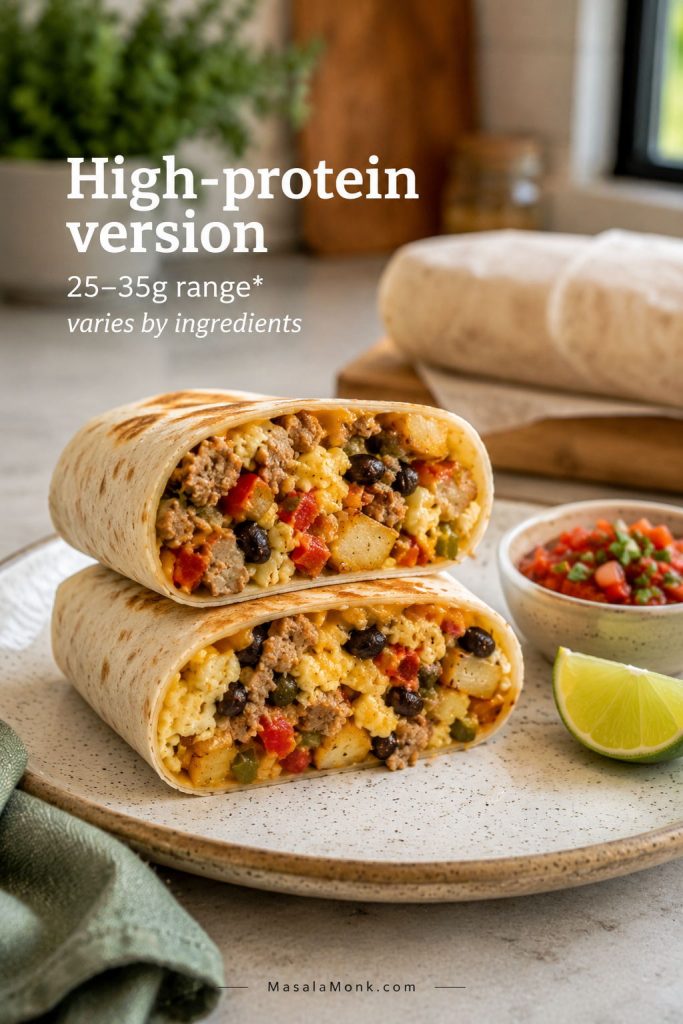
Cottage cheese or high-protein frittata

For a higher-protein frittata, use about 1/2 cup cottage cheese with 8 eggs and reduce the milk or cream to 2 tablespoons. Leave the cottage cheese as is for creamy pockets, or blend it with the eggs for a smoother texture.

Dairy-free frittata

Use unsweetened dairy-free milk or skip the dairy and rely on cooked vegetables, herbs, and olive oil for flavor. The texture may be a little firmer without dairy, so avoid overbaking.

Keto or low-carb frittata

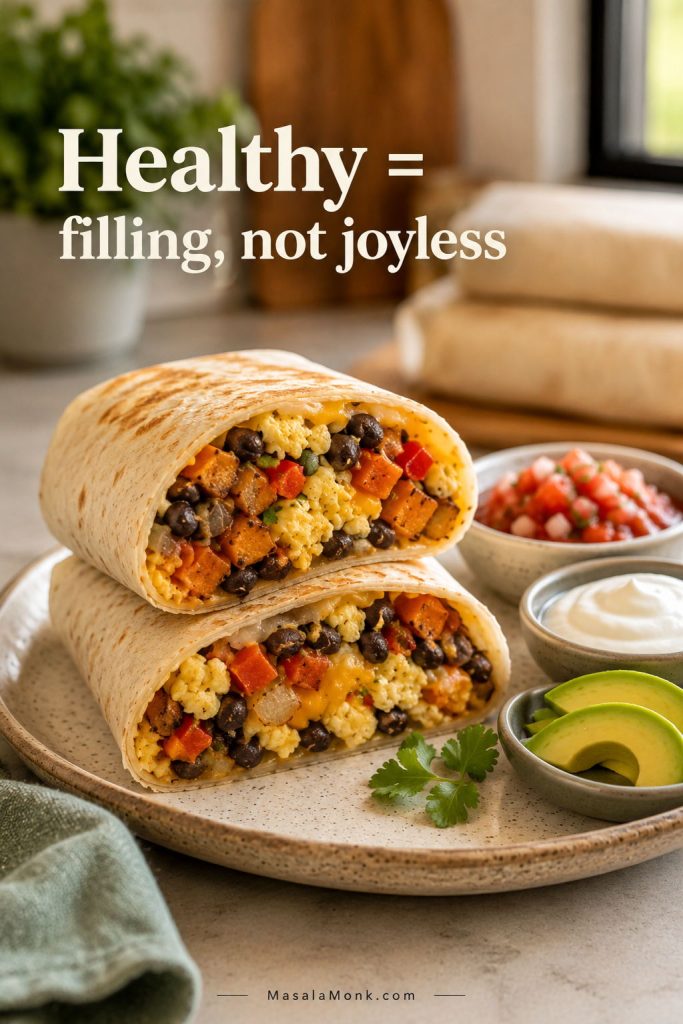
For a keto frittata, use eggs, cheese, cream or half-and-half, and low-carb vegetables such as spinach, mushrooms, zucchini, bell peppers, broccoli, asparagus, or cauliflower. Skip potatoes, sweet potatoes, and sweet vegetables if you are keeping carbs very low.

Mini frittatas or frittata muffins

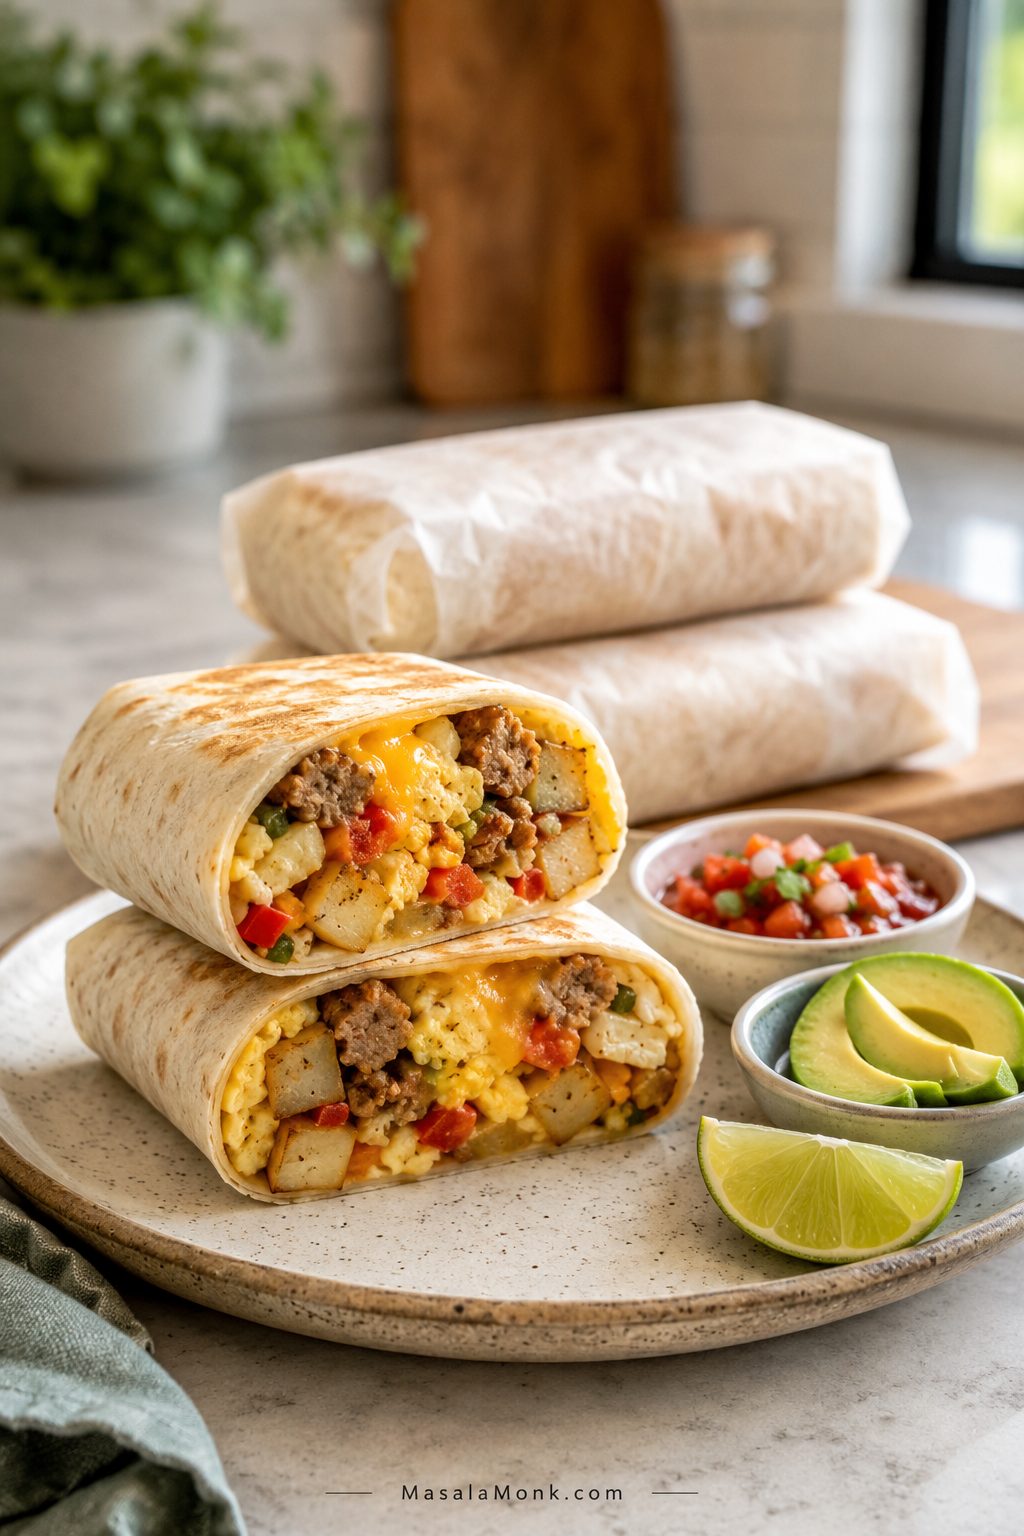
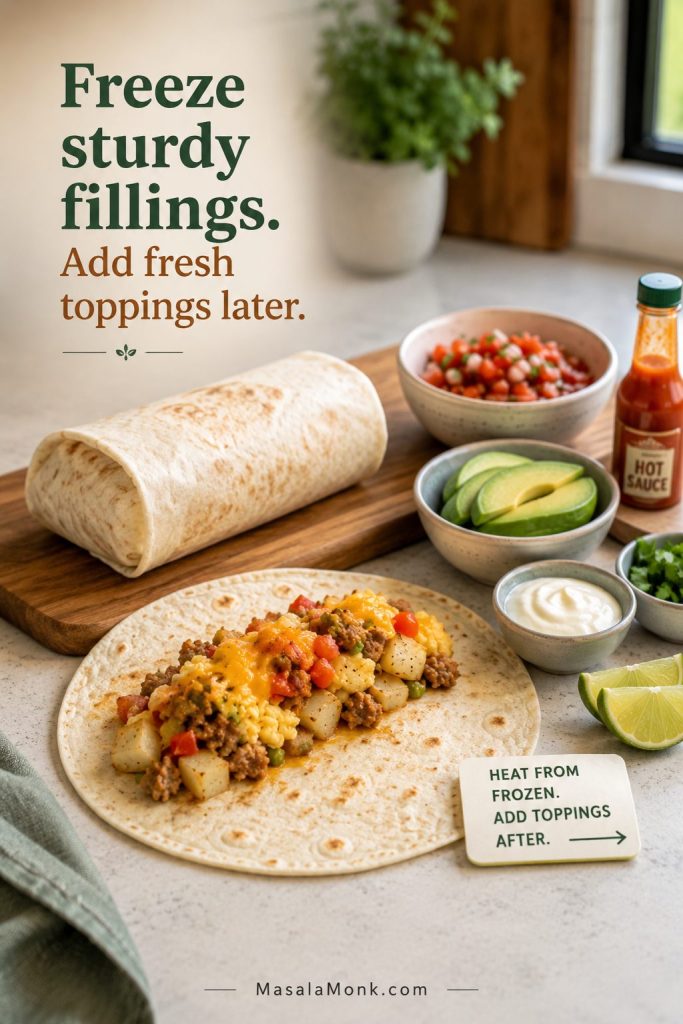
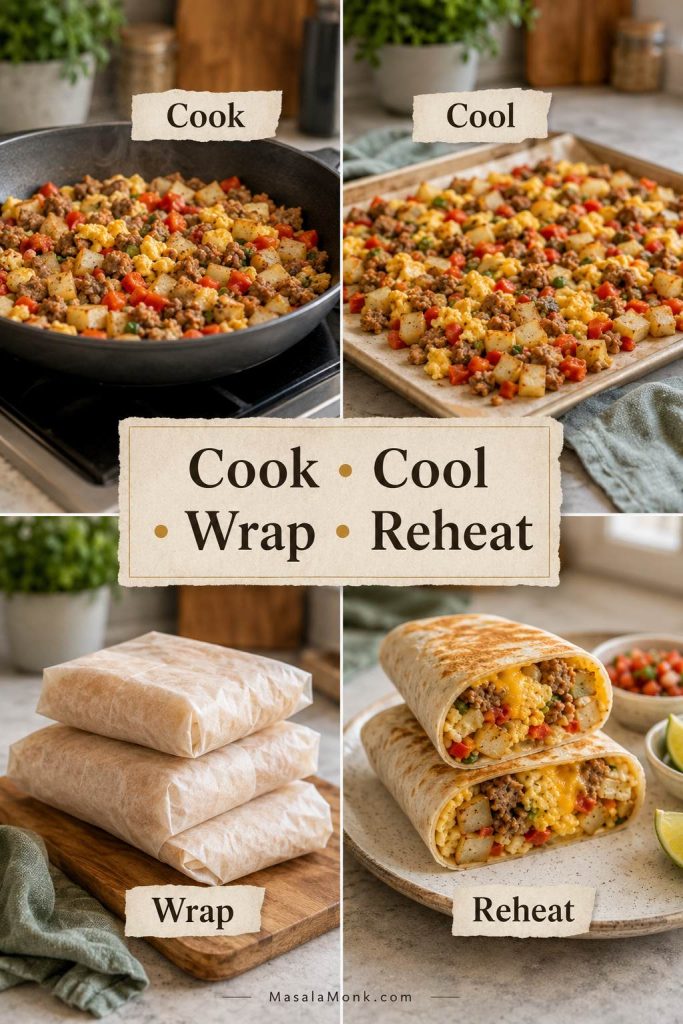
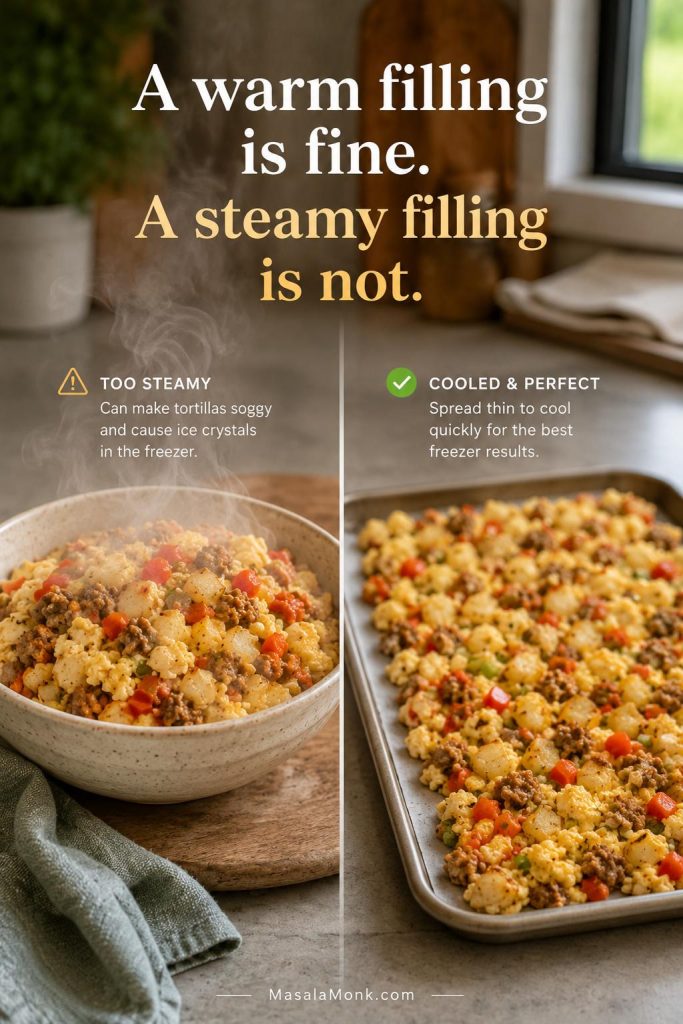
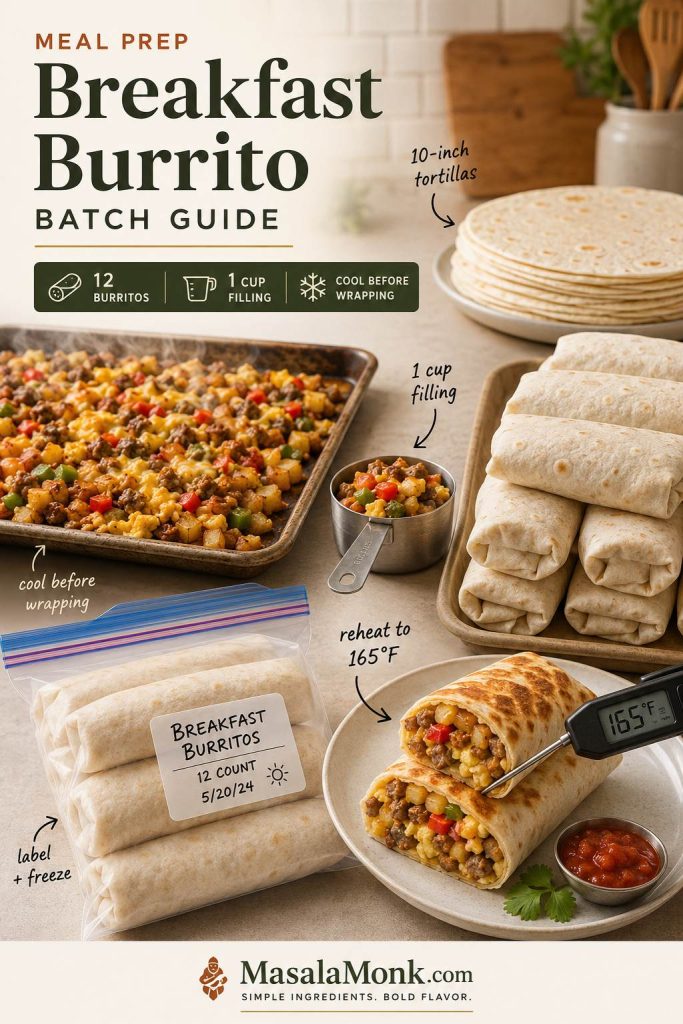
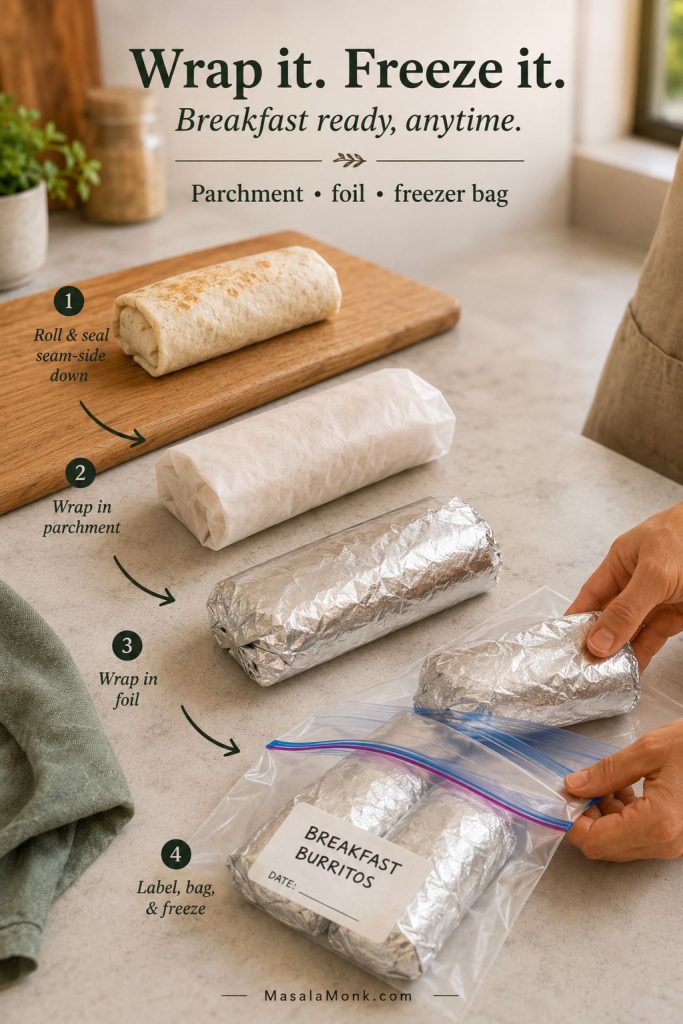
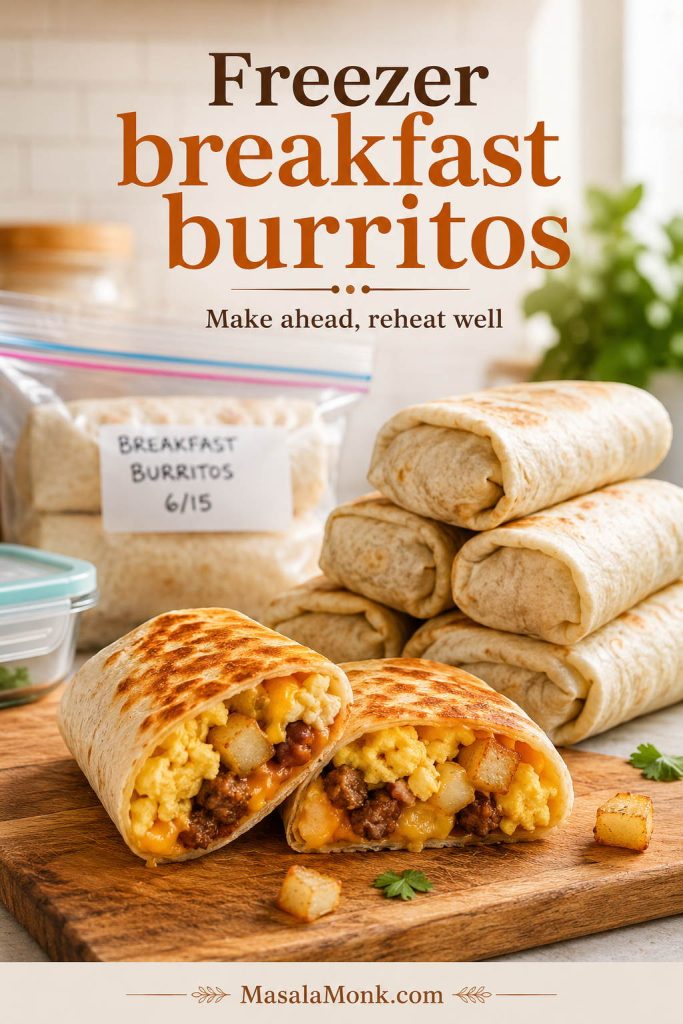
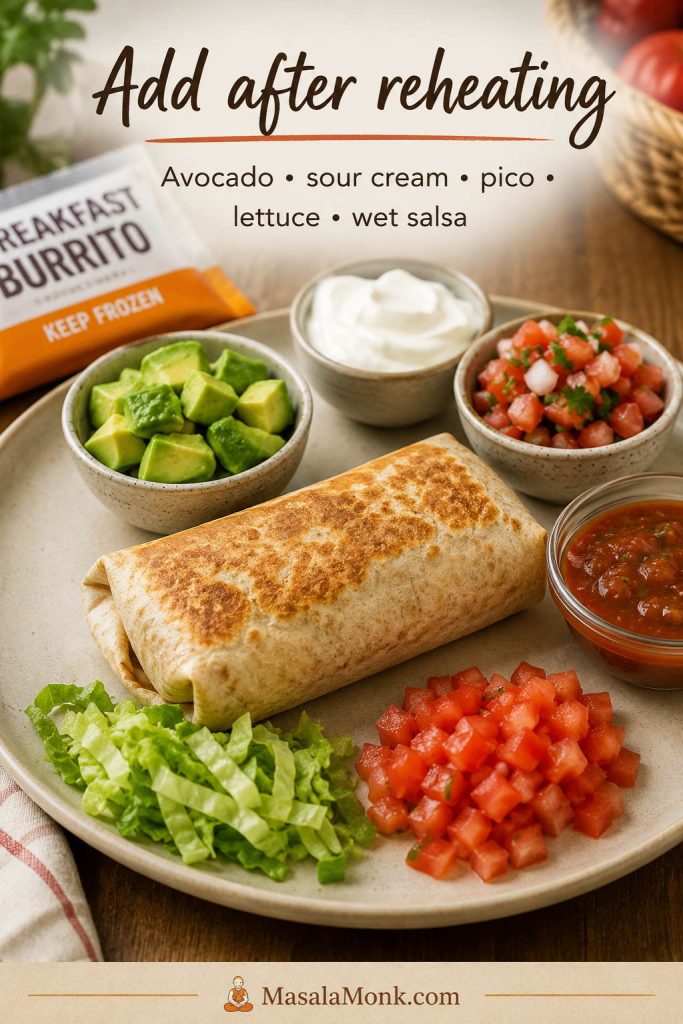
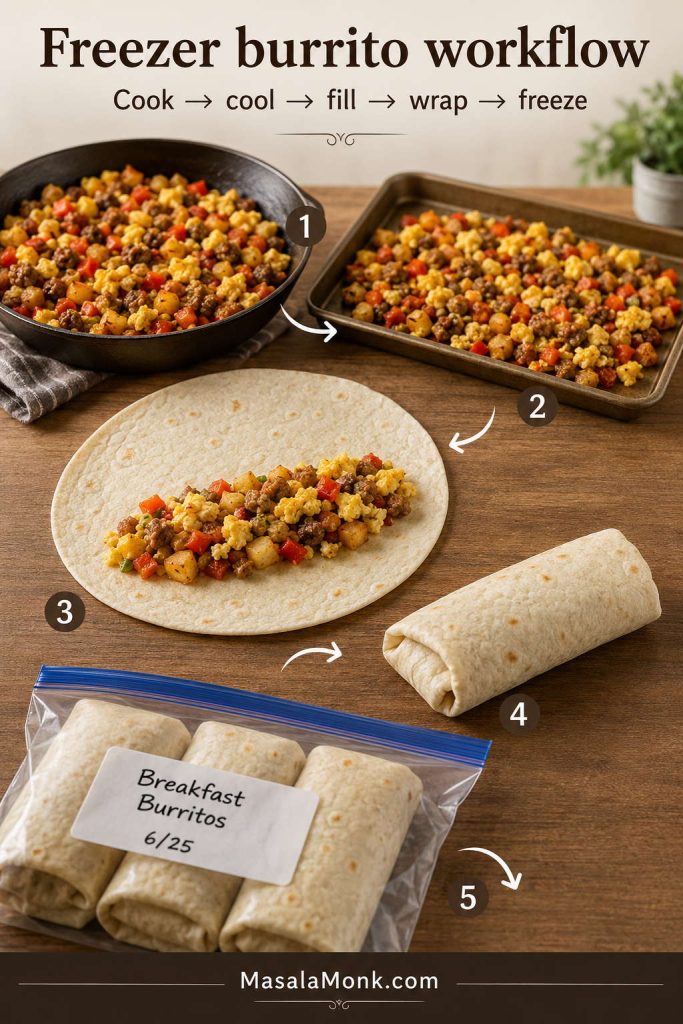
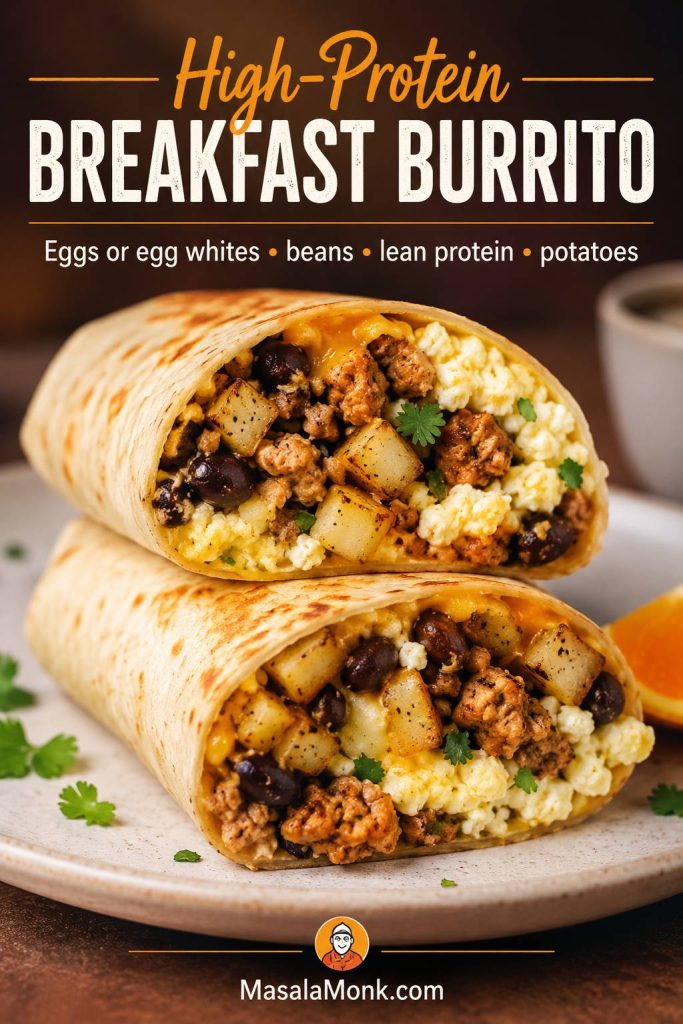
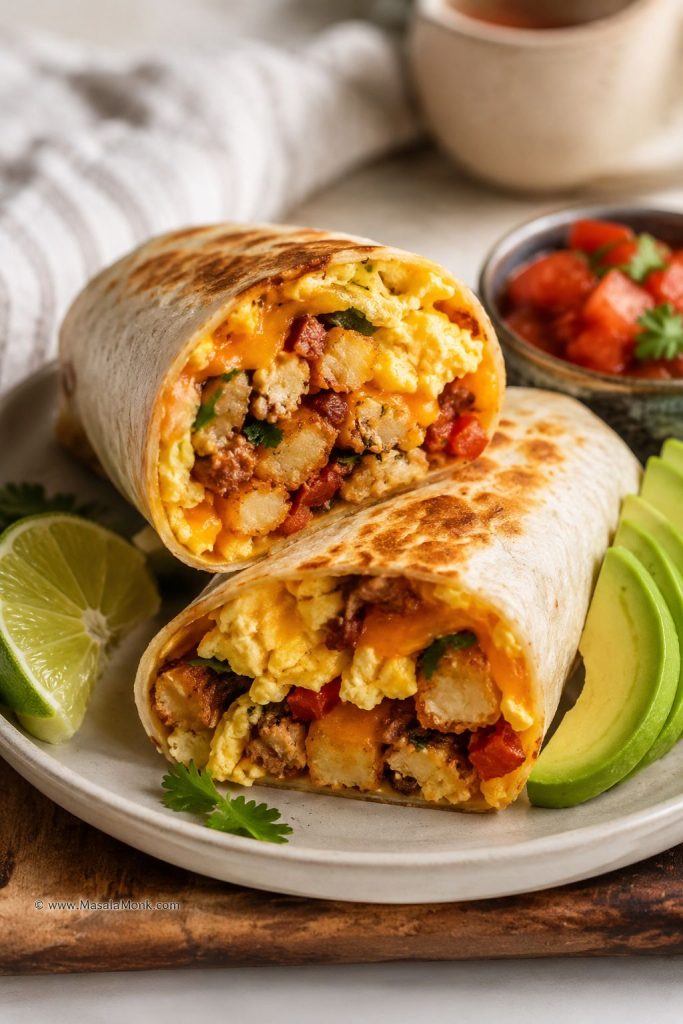
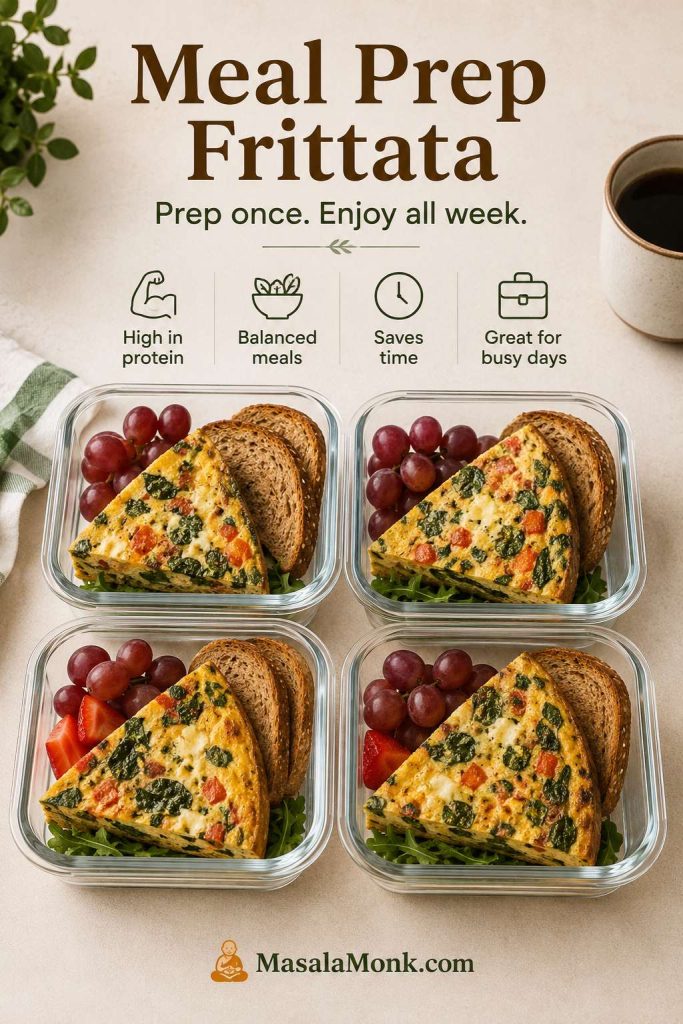
For mini frittatas, divide the egg mixture among well-greased muffin cups and bake at 350°F / 175°C until just set. They are useful for breakfast meal prep, lunchboxes, and grab-and-go mornings. If meal prep is the goal, you may also like this freezer-friendly breakfast burrito recipe.

Mini frittatas baked in a muffin tin with a few served on a plate and packed in a container for meal prep.
Mini frittatas turn the same base recipe into portable portions, which makes them useful for lunchboxes, freezer breakfasts, and quick mornings.

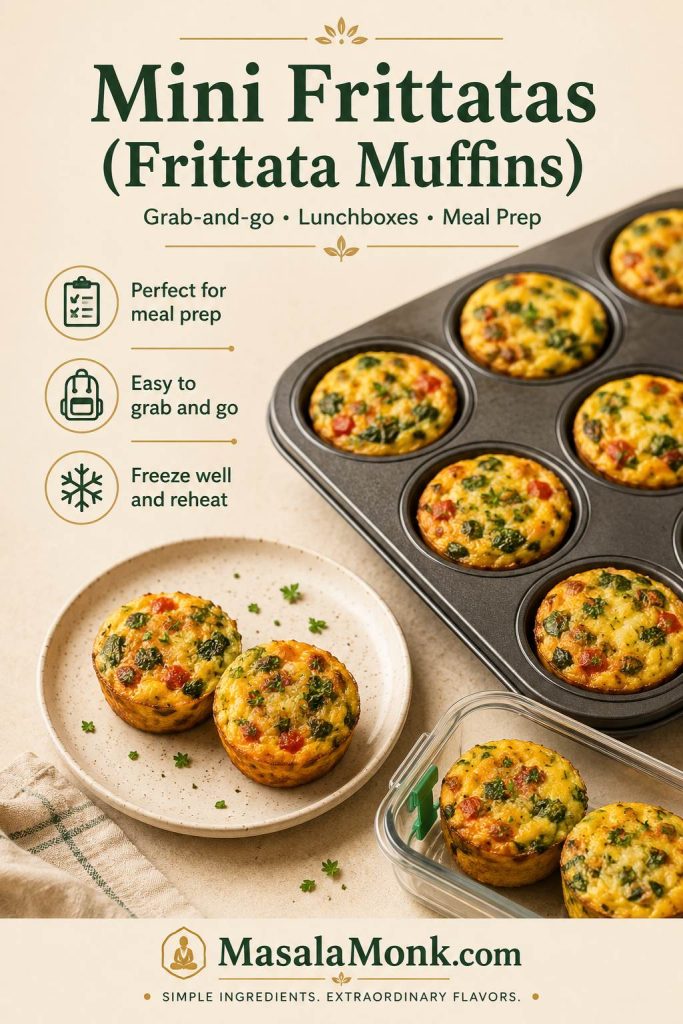
Making these ahead? Use the storage and reheating guide so the texture stays tender.

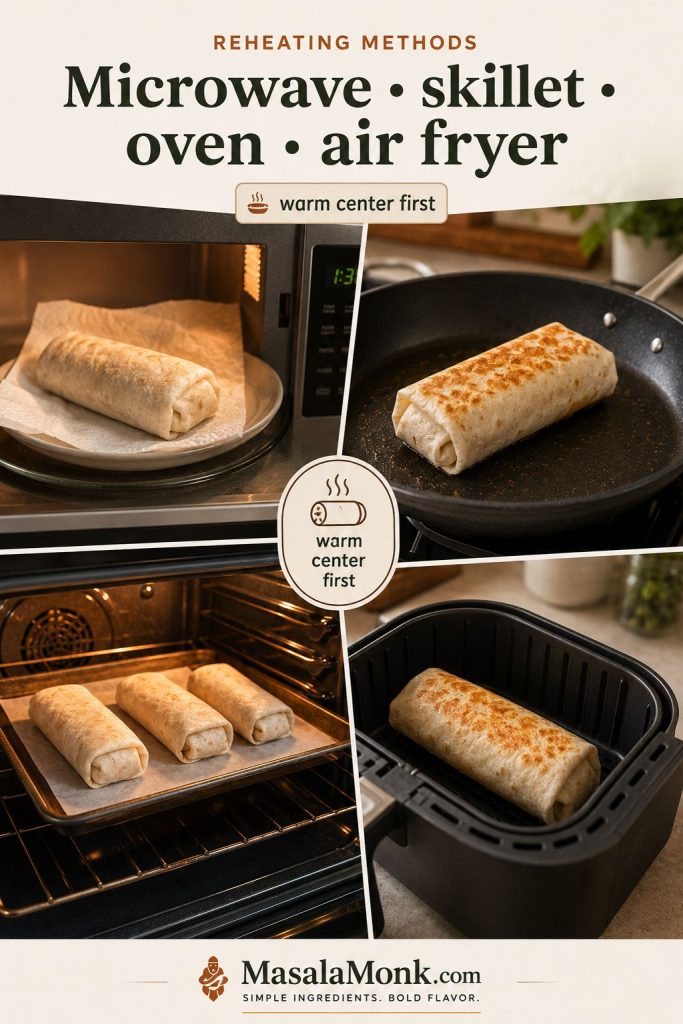
How to Store, Freeze, and Reheat Frittata

Cool and Pack the Slices First

Frittata is excellent for meal prep because it holds its shape, reheats quickly, and tastes good warm or chilled from the fridge. If you serve it at room temperature for brunch, keep the timing in mind and do not leave it out too long.

For the cleanest meal-prep slices, let the frittata cool on a rack or cutting board before packing it away. If it sits hot in the pan or a closed container, steam can soften the bottom and make the slices damp.

Fridge, Freezer, and Reheat Times
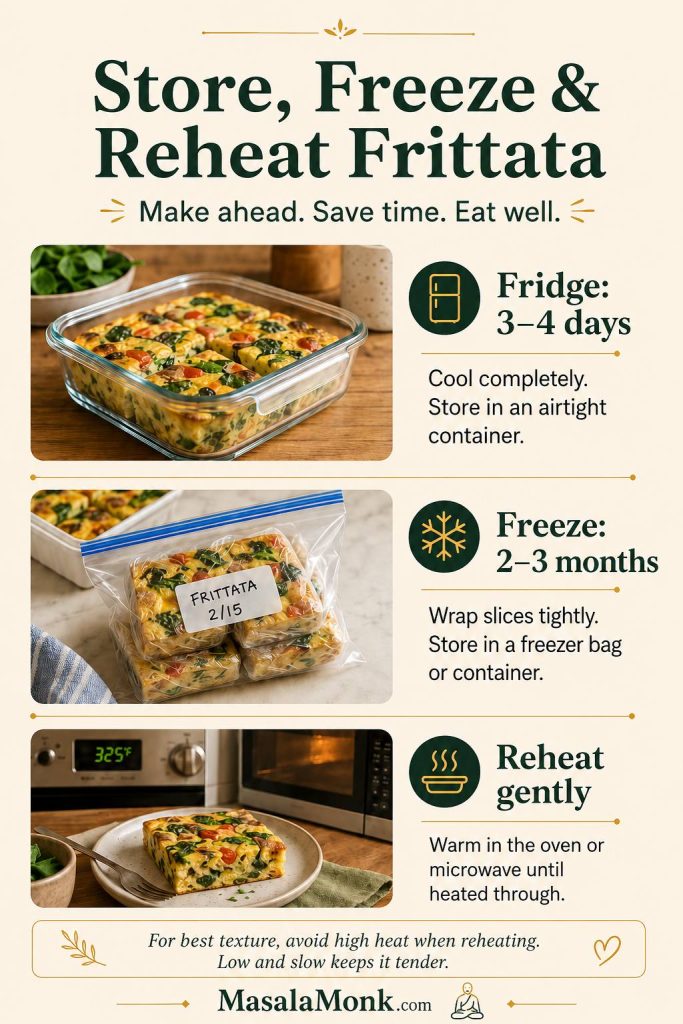
Storage guide showing frittata slices in a container, wrapped freezer portions, and a reheated slice on a plate.
Cool the frittata before storing; otherwise, trapped steam can soften the slices even when the eggs were baked correctly.
MethodHow longBest practice
Refrigerator3–4 daysCool completely, then store slices in an airtight container.
Freezer2–3 monthsWrap individual slices well, then place in a freezer-safe bag or container.
MicrowaveShort burstsCover lightly and heat gently so the eggs do not turn rubbery.
Oven300–350°F until warmBest for texture; for food safety, reheat leftovers to 165°F / 74°C.
Air fryerLow heat, short timeUseful for small portions, but avoid drying the edges.

Food Safety for Stored Frittata

The FDA recommends refrigerating cooked egg leftovers and using them within 3–4 days. You can read more on the FDA egg safety page.

If serving frittata at room temperature for brunch, do not leave it out for more than 2 hours, or more than 1 hour in very hot weather.

When reheating a slice in the microwave, use short bursts instead of one long blast. Eggs can turn rubbery when overheated, so warm them gently when texture matters. Leftovers should be reheated to 165°F / 74°C before serving.

Frittata Meal Prep Boxes

To build a bigger breakfast-prep spread, pair frittata slices with overnight oats, fruit, toast, or a smoothie.

Meal-prep containers filled with frittata slices, fruit, toast, and greens.
Make-ahead frittata slices pack neatly, reheat quickly, and still taste good chilled from the fridge.

Serving leftovers for breakfast or brunch? See what to serve with frittata for easy plate ideas.

Frittata Troubleshooting: Watery, Rubbery, or Undercooked

When a frittata goes wrong, the trouble usually starts before it ever reaches the plate: the fillings were too wet, the pan was too deep, the eggs were beaten too aggressively, or the bake went a few minutes too long. Fortunately, most of those problems are easy to fix the next time.
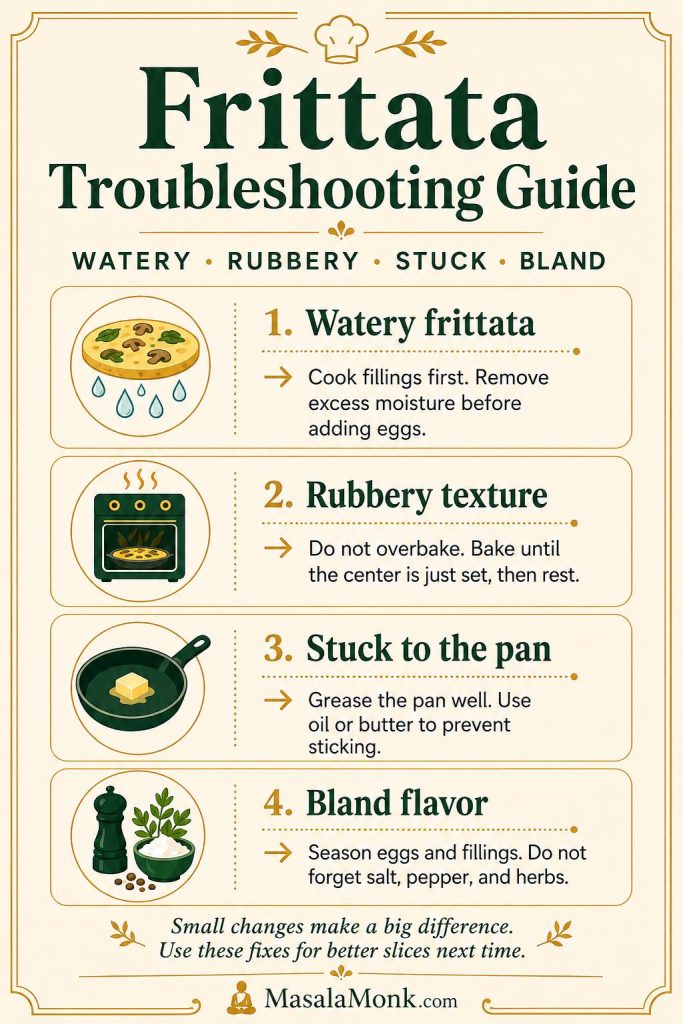
Troubleshooting guide for watery frittata, rubbery texture, stuck frittata, and bland flavor with short fixes.
When a frittata goes wrong, check four things first: moisture, heat, pan prep, and seasoning. Fixing those usually fixes the next batch.
ProblemLikely causeFix next time
Watery frittataRaw watery vegetables or too much dairySauté or roast high-moisture fillings before adding the eggs, and keep the dairy ratio in check.
Rubbery textureOverbaking, high heat, or too little dairyPull it when just set and rest before slicing.
Wet center, dry edgesPan is too small/deep or oven is too hotUse a wider pan or lower the temperature for deeper dishes.
Frittata stuck to panNot enough fat or unsuitable panGrease well, use an oven-safe nonstick pan, or use a pie dish.
Bland flavorEggs and vegetables were underseasonedSeason the eggs and the cooked fillings.
Puffed then collapsedEggs were over-whisked or overbakedWhisk gently and bake only until set.
Too saltySalty cheese, bacon, ham, or smoked salmonReduce added salt when using salty fillings.

If the frittata is already watery, give it a few more minutes in the oven if the center is underbaked. If the liquid came from vegetables, it may not become perfect, but it can still be served. Next time, let the vegetables cook longer before the eggs go in.

What to Serve with Frittata

At breakfast, frittata works well with toast, fruit, potatoes, or bacon. At lunch or dinner, it feels more complete with a crisp salad, roasted vegetables, or a slice of good bread.

  • Toast, sourdough, English muffins, or flatbread
  • Simple green salad or tomato salad
  • Roasted potatoes, breakfast potatoes, or crispy air fryer hash browns
  • Fresh fruit or fruit salad
  • Bacon for a brunch plate
  • Overnight oats, smoothies, or yogurt for a breakfast spread
Frittata serving board with toast, fruit, potatoes, salad, smoothie, and a plated frittata wedge.
Build the plate with contrast: something crisp, something fresh, and something filling will carry frittata from breakfast to brunch or dinner.

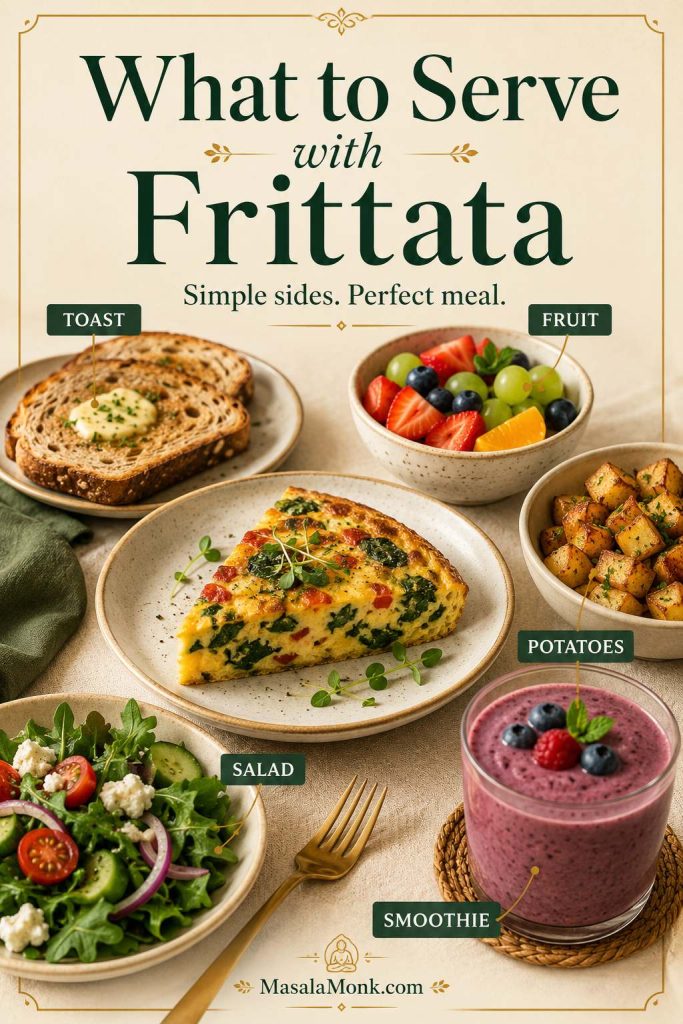
A simple brunch plate could be warm frittata wedges, crispy potatoes, fruit, toast, and something fresh like a tomato salad. Meal prep can stay much simpler: one slice of frittata, fruit, and oats or toast is enough for a balanced breakfast.

For a fresher brunch plate, pair frittata with fruit or a creamy kiwi smoothie instead of adding another heavy side.

For a different savory breakfast on another morning, this soft poha recipe is another quick, pantry-friendly option that works well for busy mornings.

Frittata FAQs

What is the best ratio for a frittata?

For an 8-egg frittata, use 1/3 cup dairy, 1 1/2 to 2 cups cooked fillings, and about 3/4 cup cheese. That gives you enough egg to hold the frittata together without making it plain or dry.

Is a frittata better with milk or cream?

Milk makes a lighter frittata, cream makes a richer one, and half-and-half gives the best middle ground. The bigger issue is quantity: too much dairy can make the frittata loose, while a moderate amount keeps it tender and sliceable.

Should vegetables be cooked before adding them to a frittata?

Usually, yes. Mushrooms, spinach, zucchini, onions, peppers, potatoes, broccoli, asparagus, and most dense or juicy vegetables do better after a quick sauté, roast, steam, or parcook. The flavor gets better, and the egg mixture sets more cleanly.

Can I use frozen vegetables in a frittata?

Yes, but thaw and squeeze or cook off extra moisture first. Frozen spinach, broccoli, peppers, and mixed vegetables can work well as long as they are not added icy or wet.

Why is my frittata watery?

A watery frittata usually comes from raw watery vegetables, too much dairy, underbaking, or slicing before it has rested. Cook high-moisture fillings first, use the ratio table, bake until the center is set, and rest for 5 to 10 minutes before cutting.

What oven temperature is best for frittata?

For a skillet frittata, 375°F / 190°C is the best default. For deeper baking dishes or muffin tins, 350°F / 175°C is gentler and gives the center more time to set. A 400°F / 200°C oven can work for a fast finish, but it is easier to overbake the edges.

Do I need a cast-iron skillet for frittata?

No. Cast iron works well, but any oven-safe skillet can work. If your skillet is not oven-safe, use a greased pie dish or baking dish instead.

How do you know when a frittata is done?

The center should look set, not wet or shiny. A slight wobble is fine, but loose liquid egg is not. A knife inserted near the center should not bring up raw egg, and an instant-read thermometer should register 160°F / 71°C for egg dishes.

Why did my frittata puff up and then collapse?

A little puffing is normal. A dramatic rise and collapse usually comes from over-whisking the eggs or baking too long. Whisk just until blended and pull the frittata when the center is set.

Can frittata be made ahead?

Yes. Cool the frittata completely, slice it, and refrigerate it in an airtight container for 3 to 4 days. Reheat gently in the microwave or oven so the eggs stay tender.

What is the difference between a frittata, omelet, quiche, and egg casserole?

A frittata mixes eggs with fillings and is usually finished or fully baked in the oven. An omelet is cooked quickly on the stovetop and folded around fillings. A quiche is more custard-like, usually richer in dairy, and often baked in a crust. An egg casserole is usually thicker and may include bread, potatoes, or more heavy add-ins.

Final Tips for a Better Frittata

A great frittata is less about one exact filling and more about a dependable method. Use this frittata recipe as your base, give the add-ins a little attention before they meet the eggs, bake gently, and let the finished frittata rest before slicing. Once those pieces are in place, breakfast leftovers, cooked vegetables, herbs, and small bits of cheese can turn into a meal that feels planned even when it started with whatever was in the fridge.

What went into yours: spinach and feta, potato and cheddar, mushrooms and herbs, or whatever needed using from the fridge?

Back to frittata guide

“recipeInstructions”: [ { “@type”: “HowToStep”, “name”: “Preheat the oven and prepare the pan”, “url”: “https://masalamonk.com/frittata-recipe/#best-pan”, “text”: “Preheat the oven to 375°F / 190°C. Grease a 10-inch oven-safe skillet if needed.”, “image”: “https://masalamonk.com/wp-content/uploads/2026/05/best-pan-for-frittata.jpg” }, { “@type”: “HowToStep”, “name”: “Cook the vegetables first”, “url”: “https://masalamonk.com/frittata-recipe/#cook-fillings-first”, “text”: “Warm the olive oil or butter in the skillet over medium heat. Add the onion or shallot and cook until softened. Add the garlic, mushrooms, and bell pepper or zucchini. Cook until the vegetables soften and excess moisture reduces. Add the spinach or kale and cook just until wilted.”, “image”: “https://masalamonk.com/wp-content/uploads/2026/05/cook-fillings-first-for-frittata.jpg” }, { “@type”: “HowToStep”, “name”: “Whisk the eggs gently”, “url”: “https://masalamonk.com/frittata-recipe/#ingredients”, “text”: “In a bowl, whisk the eggs, dairy, salt, and pepper just until combined. Do not whisk the eggs into a very foamy mixture.”, “image”: “https://masalamonk.com/wp-content/uploads/2026/05/frittata-ingredients.jpg” }, { “@type”: “HowToStep”, “name”: “Add the fillings and cheese”, “url”: “https://masalamonk.com/frittata-recipe/#how-to-make”, “text”: “Spread the cooked fillings evenly in the skillet. Pour the egg mixture over them, then sprinkle the cheese over the top. You can also stir some of the cheese directly into the eggs and reserve a little for the surface.”, “image”: “https://masalamonk.com/wp-content/uploads/2026/05/how-to-make-a-frittata-step-by-step.jpg” }, { “@type”: “HowToStep”, “name”: “Bake until just set”, “url”: “https://masalamonk.com/frittata-recipe/#oven-times”, “text”: “Bake for 18 to 22 minutes, until the center is just set and no wet egg pools on top. Do not wait for a deeply browned top.”, “image”: “https://masalamonk.com/wp-content/uploads/2026/05/how-long-to-bake-a-frittata.jpg” }, { “@type”: “HowToStep”, “name”: “Rest before slicing”, “url”: “https://masalamonk.com/frittata-recipe/#doneness”, “text”: “Rest the frittata for 5 to 10 minutes before slicing. Finish with fresh herbs, black pepper, or a little extra cheese if desired.”, “image”: “https://masalamonk.com/wp-content/uploads/2026/05/oven-baked-egg-frittata-slice.jpg” } ]
Posted on 3 Comments

Meal Prep Breakfast Burritos

Cut breakfast burrito filled with eggs, potatoes, cheese, peppers, and sausage, with wrapped freezer burritos and fresh toppings nearby.

These meal prep breakfast burritos are made for the freezer, the fridge, and the kind of morning when you want real breakfast without cooking from scratch.

The filling is hearty without being wet, the eggs stay tender, the tortillas roll tightly, and the reheating method helps the center get hot without turning the outside soggy or chewy.

Done right, they come out cheesy, savory, filling, and easy to eat with one hand — exactly the kind of breakfast you are happy to find waiting in the freezer.

The part that usually goes wrong with make-ahead burritos is not the flavor. It is the texture. Hot filling steams the tortilla, salsa leaks into the wrap, overfilled burritos reheat with cold centers, and rushed microwaving can make the outside tough before the inside is warm.

This recipe fixes those problems with a simple system: cook a sturdy filling, let it stop steaming, use the right amount per tortilla, keep fresh toppings out until serving, wrap each burrito well, and reheat it in a way that matches your morning.

What You’ll Find in This Guide

This guide walks through what to cook, how much filling to use, what to keep out, how to wrap, how to reheat, and how to adjust the batch for high-protein, healthy, vegetarian, or vegan versions.

Quick Answer: The Best Way to Make Meal Prep Breakfast Burritos

The best meal prep breakfast burritos are built like freezer food from the start. Use 10-inch flour tortillas, about 1 cup of cooled filling per burrito, and a sturdy mix of eggs, cooked protein, potatoes or beans, cheese, and cooked vegetables.

The real trick is moisture control. Keep salsa, avocado, sour cream, raw tomato, and lettuce out of the wrap until serving. Roll the burritos tightly, freeze them flat, then reheat gently before crisping the outside so the center gets hot without turning the tortilla tough.

Freezer breakfast burrito with cooked filling inside and salsa, avocado, yogurt, lime, and cilantro kept outside until serving.
Moisture control starts before freezing. Keep cooked eggs, potatoes, beans, cheese, and protein inside; then add salsa, avocado, and creamy toppings after reheating.

If you already have a batch ready, go straight to the reheating guide. If your main worry is texture, the no-soggy tips and freeze-inside vs add-after table will help most.

Four-step meal prep breakfast burrito process showing cooked filling, cooled filling, wrapped burritos, and a reheated cut burrito.
The easiest system is cook, cool, wrap, and reheat. Cooling before wrapping is the step that turns a regular breakfast burrito into a reliable freezer breakfast.
Best rule: do not wrap hot filling. Hot eggs, potatoes, and meat steam inside the tortilla. That steam turns into freezer ice, then reheats into a wet, heavy wrap.
Hot breakfast burrito filling in a deep bowl compared with cooled filling spread on a sheet pan before wrapping.
Cooling the filling on a tray gives steam a place to escape, which helps protect the tortilla before the burritos go into the freezer.

Meal Prep Breakfast Burritos at a Glance

Quick Batch Guide

Yield12 full-size burritos
Tortilla size10-inch flour tortillas
Filling amountAbout 1 cup per burrito
Cooling timeAt least 15–20 minutes, or until no longer hot
Freezer timeBest within 2–3 months
Reheat target165°F / 74°C in the center
Breakfast burrito batch guide showing twelve burritos, ten-inch tortillas, one cup of filling, cooling before wrapping, and reheating to 165°F.
For a consistent freezer batch, use 10-inch tortillas, portion about one cup of filling per burrito, cool before wrapping, and reheat until the center is hot.

The batch is big enough to make the prep worthwhile, but not so huge that your freezer turns into a burrito warehouse. Make 12 if you want a proper stash of grab-and-go breakfasts, or use the batch chart below for a smaller test run.

For exact amounts by batch size, use the batch size chart. For the full cooking method, jump to how to make the burritos.

Make-Ahead Breakfast Burritos vs Regular Breakfast Burritos

A regular breakfast burrito is made to eat right away. You can add salsa, avocado, sour cream, soft eggs, and juicy fillings because the tortilla only needs to hold up for a few minutes.

A make-ahead freezer burrito has a harder job. It has to survive cooling, wrapping, freezing, reheating, and maybe a rushed weekday morning. That means the structure matters more: less moisture, better rolling, controlled filling, and clear reheating instructions.

Regular breakfast burrito with fresh toppings compared with a make-ahead freezer breakfast burrito made with cooked fillings.
A fresh burrito can handle juicy toppings right away. However, a make-ahead breakfast burrito needs drier cooked filling so it can freeze and reheat cleanly.

For a fresh, made-now version, use this breakfast burrito recipe. The recipe below is the make-ahead version built for freezing and reheating.

Why These Freezer Breakfast Burritos Work

Freezer breakfast burritos work best when each ingredient has a job. Eggs give the burrito its breakfast base, potatoes or beans make it filling, cheese adds flavor and a little protection against moisture, and cooked vegetables bring flavor without leaking water into the tortilla.

Think of every ingredient by how it behaves after freezing: does it stay sturdy, leak water, dry out, or help the tortilla hold together?

  • Large tortillas roll better. A 10-inch tortilla gives you room to fold the sides and seal the filling.
  • The filling is cooked dry. Peppers, onions, spinach, potatoes, and protein should not be watery when they go into the wrap.
  • The eggs are just set. Overcooked eggs become dry after freezing and reheating.
  • The burritos are not overfilled. About 1 cup filling gives you a satisfying burrito that still reheats evenly.
  • Fresh toppings stay fresh. Salsa, avocado, sour cream, and lettuce are added after reheating, not frozen inside.

Ingredients for Meal Prep Breakfast Burritos

You can change the fillings, but the basic structure should stay the same: tortilla, eggs, protein, starch or beans, cheese, and cooked vegetables. That combination gives you burritos that are filling, flavorful, and easier to reheat.

Once you have your ingredients, the most important part is portioning. The 1-cup filling formula keeps the burritos easy to roll and easier to reheat.

Best Tortillas for Freezer Breakfast Burritos

For full-size make-ahead burritos, 10-inch flour tortillas are the safest choice. They give you enough room to fold the sides, tuck the filling in tightly, and still end up with a burrito that reheats evenly. If you use 8-inch tortillas, treat them as smaller breakfast wraps and reduce the filling.

Whole-wheat, high-fiber, low-carb, corn, and gluten-free tortillas can work, but warm them before rolling. Stiffer tortillas crack more easily when cold.

Hands folding a ten-inch tortilla around breakfast burrito filling with a smaller tortilla shown nearby as a wrap option.
A 10-inch tortilla gives you room to fold the sides, tuck the filling, and seal the burrito without forcing the wrap to stretch or split.

Eggs, Egg Whites, or Cottage Cheese Eggs

Whole eggs give the classic breakfast burrito texture. For extra protein, use a mix of eggs and egg whites, or blend cottage cheese into the eggs before cooking. The eggs should be cooked until just set, then cooled before wrapping.

If you use cottage cheese, blend it with the eggs until mostly smooth. Blending gives the smoothest texture; if you whisk cottage cheese in without blending, small curds may remain, which is fine but more noticeable. If you skip it, use the eggs as written and cook them gently; for a softer texture, whisk in 2 tablespoons water before cooking.

Cottage cheese and eggs being blended with soft scrambled eggs in a skillet for breakfast burritos.
Blending cottage cheese into the eggs helps create a softer, higher-protein filling that holds up better after freezing and reheating.

Best Proteins for Freezer Breakfast Burritos

For the base recipe, breakfast sausage, turkey sausage, lean ground turkey, or chicken sausage work especially well. Cook the protein fully, brown it well, and drain excess grease. You want seasoned protein, not a greasy or watery scoop that will soak the tortilla later.

Bacon and ham also work, but use them more lightly because they are saltier and can make the filling greasy if overused. Tofu scramble, black beans, and pinto beans are good meat-free options.

Cooked protein options for breakfast burritos, including sausage, turkey, chicken sausage, tofu, and beans.
Choose protein that is fully cooked, seasoned, and drained. That way, the burrito gets flavor and staying power without extra grease or moisture.

Potatoes, Beans, Cheese, and Vegetables

Potatoes, hash browns, sweet potatoes, and beans make the burritos more satisfying and help them feel like a real breakfast after reheating. For the easiest timing, use cooked diced potatoes, thawed hash browns, or cooked sweet potatoes. If starting with raw diced potatoes, cook them separately first until tender, then add them to the filling.

Cheese adds flavor and can act as a small moisture barrier. Bell peppers, onions, spinach, and mushrooms should be cooked until their extra moisture is gone. You should not see liquid pooling when you drag a spatula through the filling.

Breakfast burrito filling with potatoes, black beans, peppers, onions, and cooked vegetables in a skillet.
Potatoes, beans, and vegetables make the filling more satisfying. Meanwhile, cooking off extra moisture keeps the tortilla from turning wet in the freezer.

If hash browns are your favorite burrito filling, this air fryer hash browns guide is useful for getting the potatoes crisp and dry before they go into the tortilla.

Seasoning and Sauce

Eggs and potatoes need proper seasoning, especially after freezing. Use taco seasoning, chili powder, cumin, smoked paprika, garlic powder, onion powder, black pepper, or a simple breakfast burrito seasoning blend. Taste the filling before cooling. It should taste well-seasoned now, because tortillas, potatoes, and eggs can dull the flavor after freezing.

Keep wet sauces on the side until after reheating. Salsa, pico de gallo, crema, and avocado taste fresher that way, and the tortilla stays in better shape.

The 1-Cup Filling Formula for Freezer Breakfast Burritos

The easiest way to make burritos that roll cleanly and reheat evenly is to use about 1 cup total filling per 10-inch tortilla.

The 1-cup rule: for each 10-inch tortilla, use about 1 cup total filling, including eggs, protein, potatoes, beans, cheese, and vegetables.
One cup of breakfast burrito filling beside a large flour tortilla for portioning freezer breakfast burritos.
Portioning the filling before you roll keeps every burrito the same size, so the batch freezes neatly and reheats more predictably.

This is the rule that keeps the whole batch from falling apart. A slightly smaller burrito that reheats evenly is much better than an oversized one with a cold middle and torn tortilla.

More filling sounds better, but it usually causes problems. Overfilled burritos tear, freeze unevenly, take longer to heat through, and fall apart when you eat them. The best version is not the biggest burrito possible; it is the one you will actually enjoy when you are hungry and short on time.

Overfilled breakfast burrito splitting open beside a neatly rolled breakfast burrito with controlled filling.
More filling often creates more problems. Instead, keep the burrito slightly controlled so it seals well and reheats evenly.
Component Amount Per Burrito Why It Helps
Eggs About 1 large egg, or egg plus egg whites Gives the burrito its breakfast base and protein.
Protein 2–3 tablespoons cooked meat, beans, or tofu Adds flavor and keeps the burrito filling.
Potatoes or hash browns 3–4 tablespoons Adds body and improves reheated texture.
Cheese 1–2 tablespoons Adds flavor and helps protect the tortilla from moisture.
Cooked vegetables 1–2 tablespoons Adds flavor without making the burrito watery.

How to Make Meal Prep Breakfast Burritos

This main method uses a skillet because it is the easiest way to control moisture, seasoning, and egg texture. The goal is not just to cook the filling. The goal is to cook off extra water, cool everything properly, and roll burritos that will still taste good after freezing.

Before rolling, check the freeze-inside vs add-after table if you are tempted to add salsa, avocado, sour cream, or fresh toppings.

1. Cook the Protein

Heat a large skillet over medium heat. Add the sausage, turkey, chicken sausage, bacon, tofu, or other protein and cook until fully done and lightly browned. Break up ground meat as it cooks so it spreads evenly through the filling.

Drain off extra grease or liquid before moving on. A little fat adds flavor, but a greasy filling can soak through the tortilla once the burritos are wrapped.

Ground breakfast sausage or turkey browning in a skillet with excess grease being drained for burrito filling.
Browning builds flavor, but draining extra grease matters too. Otherwise, the filling can soak into the tortilla after wrapping.

2. Cook the Potatoes and Vegetables

Add the cooked potatoes, thawed hash browns, or cooked sweet potatoes and cook until lightly browned and dry around the edges. If you are starting with raw diced potatoes, cook them separately first until tender, then add them to the filling.

Add peppers and onions and cook until softened. If using spinach or mushrooms, keep cooking until the skillet looks glossy instead of watery. When you drag a spatula through the pan, there should not be liquid pooling behind it.

Potatoes, peppers, onions, and beans cooking in a skillet with a spatula showing no liquid pooling.
The skillet should look glossy, not watery. Once liquid stops pooling, the vegetables and potatoes are ready for freezer-friendly burrito filling.

3. Make the Eggs

Whisk or blend the eggs with cottage cheese, salt, pepper, and seasoning. Lower the heat to medium-low, then cook the eggs gently until just set. They should look soft and slightly glossy, not dry or browned.

If your skillet is crowded, cook the eggs separately and fold them into the filling afterward. That gives you better control and keeps the eggs from overcooking.

Soft scrambled eggs being folded in a skillet until just set for freezer breakfast burritos.
Eggs should be just set and still soft. If they are dry before freezing, they usually become even firmer after reheating.

4. Cool the Filling Until It Stops Steaming

This is the unglamorous step that makes the whole batch work. Filling that is still steaming will soften the tortilla now, create ice crystals in the freezer, and come back as wetness when you reheat the burrito later.

Spread the cooked filling out on a tray, sheet pan, or large plate so heat escapes faster. Do not leave the filling piled in a deep bowl to cool. Wait until it is no longer hot before adding it to the tortillas. It can be slightly warm, but it should not be steaming.

For a large batch, this usually takes at least 15–20 minutes. That little bit of patience is what gives you a burrito that reheats cleanly instead of steaming itself soggy.

Breakfast burrito filling spread thinly on a sheet pan to cool before wrapping, with a bowl of filling in the background.
Spreading the filling on a tray helps heat escape faster. As a result, less steam gets trapped inside the tortilla once the burritos are rolled.

5. Warm, Fill, and Roll the Burritos

Warm the tortillas for 10–20 seconds so they bend easily. Add a little cheese first, then about 1 cup cooled filling. Fold the sides in, roll tightly from the bottom, and place each burrito seam-side down.

Do not add salsa, avocado, sour cream, lettuce, raw tomato, or pico de gallo before freezing. Those taste better after reheating and keep the tortilla from getting wet.

Hands folding a tortilla around cheese and cooled breakfast burrito filling while rolling a freezer breakfast burrito tightly.
Start with cheese against the tortilla, then add cooled filling and fold firmly; this helps the wrap hold together without becoming overloaded.

Optional Sheet-Pan Egg Shortcut

If you prefer a sheet-pan egg layer, blend the eggs with cottage cheese and seasoning, pour into a greased 9×13-inch baking dish, and bake at 350°F / 175°C for 18–22 minutes, or until just set in the center. Cool, cut into 12 portions, and add one portion to each tortilla with the cooked potatoes, protein, vegetables, beans, and cheese.

Sheet-pan eggs cut into even portions for assembling meal prep breakfast burritos.
Sheet-pan eggs speed up batch prep and give each tortilla an even egg portion, which helps the burritos roll and reheat more consistently.

What to Freeze Inside vs Add After Reheating

Cooked, sturdy fillings handle the freezer best. Watery, creamy, and fresh toppings are better added after the burrito is hot. Think of the freezer as the final test: anything watery going in will feel even wetter coming out.

Open freezer breakfast burrito filled with cooked eggs, potatoes, sausage, beans, cheese, peppers, and onions.
Cooked eggs, potatoes, beans, cheese, protein, and softened vegetables are the best fillings to freeze because they stay sturdy inside the wrap.
Freeze Inside the Burrito Add After Reheating Why
Eggs, egg whites, or cottage cheese eggs Avocado or guacamole Avocado changes texture and can brown.
Cooked sausage, turkey, chicken sausage, bacon, ham, tofu, or beans Salsa, pico de gallo, or raw tomato Watery toppings soak the tortilla.
Hash browns, diced potatoes, or sweet potatoes Sour cream, Greek yogurt, crema, or extra sauce Creamy toppings are better cold and fresh.
Cooked peppers, onions, spinach, or mushrooms Lettuce or fresh greens Fresh greens wilt and turn unpleasant.
Cheddar, Monterey Jack, pepper jack, or Mexican-style cheese Fresh cilantro, lime, salsa, and extra hot sauce Fresh toppings brighten the burrito after reheating.

Best Toppings After Reheating

Once the burrito is hot, add the fresh things that do not belong in the freezer: salsa, avocado, pico de gallo, sour cream, Greek yogurt, hot sauce, cilantro, lime, or a spoonful of crema. This gives you the fresh flavor of a made-now burrito without sacrificing freezer texture.

Reheated breakfast burrito cut open and topped with salsa, avocado, cilantro, lime, and Greek yogurt after reheating.
Once the burrito is hot, fresh toppings can do their job properly: brighten the flavor, add creaminess, and keep the freezer wrap from turning wet.

How to Wrap and Freeze Breakfast Burritos

Wrapping matters because it protects the tortilla from drying out, prevents freezer burn, and makes reheating easier. The best setup is parchment around the burrito, foil outside that if needed, and a freezer bag or airtight container around the batch.

Wrapping sequence for freezer breakfast burritos showing a rolled burrito, parchment, foil, and a freezer bag.
A layered wrap protects the burritos from drying out, while individual wrapping makes it easier to reheat one breakfast at a time.
  1. Roll each burrito tightly and place it seam-side down.
  2. Let the rolled burritos finish cooling if they are still warm.
  3. Wrap each burrito in parchment paper.
  4. Add foil around the parchment if freezing longer than a couple of weeks.
  5. Place wrapped burritos in a freezer bag or airtight container.
  6. Press out as much air as possible.
  7. Label the bag with the date and reheating note.
  8. Freeze flat first, then stack once solid.
Wrapped breakfast burritos arranged flat on a freezer tray and stacked in a bag once solid.
Freeze the burritos flat first so they keep their shape. Then, once solid, stack them to save freezer space.

If you are making several flavors, label them before freezing. Once wrapped, turkey sausage, vegetarian, and spicy burritos all look exactly the same.

Wrapped breakfast burritos labeled turkey, vegetarian, and spicy before being stored in a freezer bag.
Label the flavor and date before freezing. Once wrapped, turkey, vegetarian, and spicy breakfast burritos can look almost identical.

Once the burritos are frozen, the next decision is how you want to reheat them. The morning workflow gives the easiest plan, and the reheating table gives exact times for microwave, oven, skillet, and air fryer.

Microwave safety note: remove foil before microwaving. Parchment can usually stay on, but foil should never go into the microwave.

How to Keep Breakfast Burritos from Getting Soggy

A soggy freezer burrito usually does not come from one big mistake. It comes from several small ones stacking up: filling that was still steaming, vegetables that held too much water, salsa trapped inside the wrap, or a microwave blast that made the tortilla tough before the center was hot.

Fix those small things, and the burritos suddenly feel much more like something you made on purpose, not something rescued from the freezer.

  • Cool everything first. A warm filling is fine; a steamy filling is not.
  • Cook vegetables until dry. Peppers, onions, mushrooms, and spinach should not leak water.
  • Keep salsa out. Salsa and pico de gallo are better after reheating.
  • Use cheese as a barrier. Add cheese against the tortilla before the filling.
  • Do not overfill. About 1 cup filling is enough for a 10-inch tortilla.
  • Warm the center gently first. Lower power helps the inside heat through before the tortilla overcooks.
No-soggy freezer breakfast burrito guide showing cooled filling, dry vegetables, toppings kept separate, and gentle reheating.
No-soggy burritos come from several small choices working together: dry filling, toppings on the side, tight wrapping, and gentle reheating.

If your burritos are already wrapped or frozen, skip ahead to the reheating methods. Gentle reheating can fix a lot, even if the filling was not perfect.

Do not freeze these inside the burrito: salsa, pico de gallo, avocado, guacamole, sour cream, Greek yogurt, lettuce, and raw tomato. Add them after reheating for better texture and flavor.

Best Morning Workflow for Make-Ahead Breakfast Burritos

The best morning version starts the night before. Move one burrito to the refrigerator before bed, and breakfast becomes much easier: faster reheating, a hotter center, and a tortilla that is easier to crisp instead of chew through.

This is the part that decides whether the burrito feels like a real breakfast or just something rushed from the freezer.

Situation Best Move Why It Works
You planned ahead Thaw overnight in the fridge, microwave 60–90 seconds, then skillet-crisp 1–2 minutes per side. Fastest good-texture method.
You forgot to thaw Microwave from frozen at 50% power first, then finish on high and crisp if you have time. Lower power warms the center before the tortilla overcooks.
You need several burritos Use the oven so they heat together instead of microwaving one by one. Best for family breakfasts or batch reheating.
You want the crispiest outside Thaw first, then use the air fryer or skillet. Crisps the tortilla without leaving the center cold.
Breakfast burrito reheating workflow showing thawing overnight in the refrigerator or warming from frozen before crisping.
Thawing overnight gives the most even reheat. Still, frozen burritos work well when you warm the center gently before crisping the tortilla.

How to Reheat Frozen Breakfast Burritos

The reheating goal is simple: warm the center before the tortilla gives up. That is why a fully frozen burrito needs gentler heat at first, while a thawed burrito can go faster and crisp more easily.

For food safety, reheat leftovers until the center reaches 165°F / 74°C. An instant-read thermometer is useful if your burritos are large or densely filled.

Method Best For From Frozen From Fridge or Thawed Texture
Microwave Fastest breakfast Remove foil. Wrap in a damp paper towel. Microwave at 50% power for 3–5 minutes, then high for 60–90 seconds. Rest 1 minute before eating. Microwave 60–90 seconds, then rest 1 minute. Soft tortilla, fastest method.
Microwave + Skillet Best everyday texture Microwave until hot in the center, then skillet-crisp 1–2 minutes per side. Microwave briefly if needed, then skillet-crisp 1–2 minutes per side. Hot center with a toasted outside.
Oven Heating several burritos Bake at 375°F / 190°C for 30–40 minutes, loosely covered for the first 20 minutes if the tortilla browns too quickly. Bake at 350°F / 175°C for 15–20 minutes. Good for batches, slower but steady.
Air Fryer Crispier outside Remove foil. Air fry at 300°F / 150°C for 12–15 minutes, then increase to 350°F / 175°C for 3–5 minutes to crisp. Turn once and check the center. Remove foil. Air fry at 350°F / 175°C for 8–12 minutes, turning once. Crisp outside, but frozen centers need gentle heat first.
Frozen breakfast burrito reheating methods showing microwave, skillet, oven, and air fryer options.
Microwave, skillet, oven, and air fryer methods can all work. The key is to heat the center first, then crisp the outside if you want better texture.

For most mornings, microwave plus skillet gives the best balance of speed and texture. The microwave warms the center quickly, and the skillet brings back the toasted tortilla finish that frozen burritos often lose.

Breakfast burrito crisping in a skillet after microwaving with a cut half showing eggs, potatoes, cheese, and sausage inside.
For busy mornings, this two-step method gives the best tradeoff: fast heat from the microwave and a toasted finish from the skillet.

High-Protein Meal Prep Breakfast Burritos

For a high-protein version, increase the protein without making the burrito dry. A good balance is eggs, egg whites, cottage cheese, lean cooked protein, beans, and enough cheese or potato to keep the filling satisfying.

High-protein meal prep breakfast burrito filled with eggs, turkey, black beans, cheese, potatoes, and peppers.
A high-protein meal prep breakfast burrito still needs to eat like a real burrito, so keep the filling flavorful, soft, and balanced.

High-Protein Breakfast Burrito Formula

For a direct high-protein batch, use 12 eggs, 1 cup cottage cheese, 1 lb turkey sausage or lean ground turkey, 1 can black beans, 1 cup shredded cheese, and the same tortillas, potatoes, peppers, and onions from the main recipe. If you want it even leaner, replace 4 of the whole eggs with 8 egg whites.

Depending on the tortilla, meat, beans, cottage cheese, and cheese you use, a high-protein version can often land around 25–35g protein per burrito. Treat that as a planning range, not a fixed nutrition label. For exact numbers, calculate with your specific brands.

If you are changing the protein, keep the same portioning rule from the 1-cup filling formula so the burritos still roll and reheat properly.

The best high-protein version still needs to eat like a burrito, not like a protein target wrapped in a tortilla. These swaps keep the filling satisfying while raising the protein:

  • Use eggs plus egg whites for more protein without too much heaviness.
  • Blend cottage cheese into the eggs for a tender, higher-protein egg layer.
  • Use turkey sausage, chicken sausage, lean ground turkey, tofu scramble, or beans.
  • Add black beans or pinto beans for fiber and plant protein.
  • Keep a little cheese, potato, or sauce after reheating so the burrito does not taste dry.

The mistake with high-protein burritos is removing everything that makes the burrito enjoyable. A better version still needs seasoning, texture, and a little softness.

For more breakfast protein ideas beyond burritos, MasalaMonk also has a practical guide to turning oatmeal into a high-protein meal with egg whites, yogurt, cottage cheese, tofu, and other add-ins.

Healthy Meal Prep Breakfast Burritos

A healthy freezer breakfast burrito should still taste like something you want to eat. Use better proportions, not punishment. Keep it flavorful, filling, and easy to reheat.

Healthy Breakfast Burrito Formula

A balanced healthy breakfast burrito usually works best with eggs or egg whites, beans or lean protein, cooked vegetables, a moderate amount of cheese, and salsa or Greek yogurt after reheating. The goal is not to make the burrito joyless. The goal is to make it filling enough that you do not need a second breakfast an hour later.

Healthy meal prep breakfast burrito with eggs, beans, vegetables, sweet potatoes, cheese, salsa, avocado, and Greek yogurt.
A healthy breakfast burrito should still be satisfying. Protein, fiber, cooked vegetables, and fresh toppings make it filling without making it dry.
Goal Best Adjustment
More protein Add egg whites, cottage cheese eggs, turkey, chicken sausage, tofu, or beans.
More fiber Use beans, cooked vegetables, sweet potatoes, or whole-wheat tortillas.
Lower grease Drain meat well and choose lean protein.
Lower calories Use less cheese, more vegetables, and sauce after reheating instead of inside the wrap.
Better fullness Keep some potato, beans, or cheese instead of making the burrito too lean.
  • Choose a tortilla that fits your goals but still rolls without cracking.
  • Use vegetables and lean protein to make the burrito lighter without making it dry.
  • Keep enough beans, potato, cheese, or sauce-after-reheating so the burrito still feels satisfying.

Balance matters more than making the burrito as lean as possible. A burrito with eggs, beans, vegetables, and a moderate amount of cheese will usually be more satisfying than a dry wrap that only looks healthy on paper.

Vegetarian and Vegan Meal Prep Breakfast Burritos

Vegetarian Freezer Breakfast Burritos

For vegetarian burritos, use eggs, cheese, potatoes, beans, cooked peppers, onions, and spinach. Black beans and pinto beans are especially helpful because they make the filling more substantial and add protein without meat.

Season the beans and potatoes well. Vegetarian freezer burritos can taste flat if the filling relies only on eggs and cheese, so use cumin, chili powder, smoked paprika, garlic powder, onion powder, black pepper, or a spoonful of taco seasoning.

Vegan Freezer Breakfast Burritos

For vegan burritos, use tofu scramble, beans, potatoes, cooked peppers and onions, and vegan cheese if you like it. Cook the tofu scramble until flavorful and not watery, then add avocado, salsa, or hot sauce after reheating.

Tofu holds up well in the freezer when it is seasoned and cooked until the extra moisture is gone. Crumble it into the skillet, season it generously, and let it cook long enough that it looks fluffy rather than wet.

For both vegetarian and vegan versions, the same freezer rule applies: cook off extra moisture before wrapping, then add avocado, salsa, lime, or hot sauce after reheating.

Vegetarian and vegan freezer breakfast burritos with eggs, tofu scramble, beans, potatoes, peppers, avocado, salsa, lime, and cilantro.
Vegetarian and vegan freezer burritos work best when beans, tofu, eggs, or vegetables are cooked dry and finished with fresh toppings after reheating.

If you are using tofu as the egg replacement, this guide to high-protein plant-based breakfast ideas has more tofu scramble and wrap-friendly breakfast inspiration.

For more meat-free batch-cooking ideas, you may also like these vegetarian high-protein meal prep ideas.

Breakfast Burritos vs Breakfast Wraps for Meal Prep

Breakfast burritos and breakfast wraps overlap, but they are not exactly the same for freezing. Burritos are usually larger, more tightly folded, and better for a full freezer meal. Breakfast wraps are often smaller and faster to reheat, but they need less filling or they split.

If you are using 8-inch tortillas, treat them as breakfast wraps. Use less filling, avoid bulky amounts of potato, and reheat for a shorter time. If you want a full freezer breakfast that keeps you full longer, use 10-inch tortillas and the 1-cup filling rule.

Large breakfast burrito compared with a smaller breakfast wrap, both cut open to show eggs, potatoes, cheese, peppers, and protein.
Use a 10-inch tortilla for a fuller meal prep breakfast burrito. Smaller tortillas work better as lighter breakfast wraps with less filling.

If you want another grab-and-go breakfast format, these breakfast sandwich ideas are useful for mornings when you want something quick but not wrapped like a burrito.

Meal Prep Breakfast Burrito Batch Size Chart

Use this chart to scale the recipe up or down. The amounts are flexible, but the filling should still land around 1 cup per 10-inch tortilla.

Burritos Eggs Protein Potatoes / Hash Browns Cheese Tortillas
4 4 large eggs ⅓ lb / 150g 1 cup / 150–170g ⅓–½ cup / 40–55g 4 large tortillas
6 6 large eggs ½ lb / 225g 1½ cups / 225–250g ½–¾ cup / 55–85g 6 large tortillas
8 8 large eggs ¾ lb / 340g 2 cups / 300–340g ¾–1 cup / 85–115g 8 large tortillas
10 10 large eggs 1 lb / 454g 2½ cups / 375–425g 1–1¼ cups / 115–140g 10 large tortillas
12 12 large eggs 1–1¼ lb / 454–565g 3 cups / 450–500g 1–1½ cups / 115–170g 12 large tortillas

How to Store Freezer Breakfast Burritos Safely

Store these burritos in the refrigerator for 3–4 days, or freeze them for the best texture within 2–3 months. Properly frozen food kept at 0°F / -18°C can stay safe longer, but tortillas, eggs, potatoes, and cheese lose quality over time.

For food safety, reheat leftovers until the center reaches 165°F / 74°C. You can read more from the USDA on leftovers and food safety and freezing and food safety.

Storage Method Best Timeframe Best Practice
Refrigerator 3–4 days Wrap well so the tortilla does not dry out.
Freezer Best within 2–3 months Wrap individually, press air from the freezer bag, and label with the date.
Thawed in refrigerator Use within 24 hours for best texture Thawed burritos reheat more evenly than fully frozen burritos.
Meal prep breakfast burrito storage guide showing burritos in the refrigerator, freezer bag storage, and reheating to 165°F.
Short-term burritos belong in the fridge, longer-term batches belong in the freezer, and every reheated burrito should be hot in the center before serving.

Troubleshooting Freezer Breakfast Burritos

Most freezer burrito problems are easy to fix once you know what caused them. If the issue is happening during reheating, also check the reheating table. If the problem starts before freezing, the fix is usually in the no-soggy tips or the wrapping method.

Troubleshooting guide for freezer breakfast burritos showing soggy tortillas, cold centers, cracked tortillas, dry eggs, and bland filling with fixes.
Most freezer breakfast burrito problems come from moisture, overfilling, rushed reheating, or under-seasoning. Fortunately, many can be improved in the current batch and prevented in the next one.

Texture and Reheating Problems

Problem Likely Cause Fix
Soggy tortilla Hot filling, wet toppings, or watery vegetables For this batch, unwrap slightly and reheat gently so steam can escape. Next time, cool the filling fully, keep salsa and avocado out, and cook vegetables until dry.
Cold center Too much filling or too much high heat too soon Microwave at lower power first, rest 1 minute, then crisp only after the center is hot. Next time, use about 1 cup filling per tortilla.
Dry eggs Eggs were overcooked before freezing Add salsa, Greek yogurt, or avocado after reheating for this batch. Next time, cook eggs just until set, blend in cottage cheese for softness, or add egg whites only if you want more protein.
Greasy wrap Protein was not drained before filling Blot the reheated burrito if needed. Next time, drain excess fat and let the filling cool before rolling.

Wrapping, Freezing, and Flavor Problems

Problem Likely Cause Fix
Tortilla cracks Cold tortilla or stiff wrap Warm tortillas for 10–20 seconds before rolling. If using low-carb or gluten-free tortillas, warm them extra carefully and avoid overfilling.
Burrito falls apart Overfilled or rolled loosely For this batch, reheat seam-side down and eat with a plate. Next time, use 10-inch tortillas, fold the sides tightly, and keep the filling closer to 1 cup.
Freezer burn Loose wrapping or too much air in the freezer bag Trim away any dry edges if needed. Next time, use parchment, foil, and a freezer bag with the air pressed out.
Bland filling Eggs and potatoes were under-seasoned Add hot sauce, salsa, lime, or a seasoned yogurt sauce after reheating. Next time, taste the filling before cooling and season it a little more boldly.

Equipment for Meal Prep Breakfast Burritos

  • Large skillet or rimmed sheet pan
  • Mixing bowl or blender for eggs and cottage cheese
  • Spatula
  • Measuring cup for portioning filling
  • Parchment paper
  • Aluminum foil
  • Freezer bags or airtight freezer containers
  • Marker for labeling
  • Optional instant-read thermometer
  • Microwave, oven, air fryer, or skillet for reheating

Meal Prep Breakfast Burritos Recipe Card

Meal Prep Breakfast Burritos

Freezer-friendly breakfast burritos with eggs, protein, potatoes, beans, cheese, and cooked vegetables. They are built to roll cleanly, freeze well, and reheat without turning soggy.

Serving size: 1 burrito

Yield12 burritos
Prep Time25 minutes
Cook Time30 minutes
Total TimeAbout 1 hour 10 minutes, including cooling

Breakfast Burrito Ingredients

  • 12 large 10-inch flour tortillas
  • 12 large eggs
  • 1 cup / about 225g cottage cheese, optional but recommended for softer high-protein eggs
  • 1–1¼ lb / 454–565g breakfast sausage, turkey sausage, lean ground turkey, or chicken sausage
  • 3 cups / about 450–500g cooked diced potatoes, thawed hash browns, or cooked sweet potatoes
  • 2 medium bell peppers, diced, about 250–300g
  • 1 medium onion, diced, about 150g
  • 1 can black beans, drained well, about 240–260g drained, optional or use in place of some of the potatoes
  • 1 to 1½ cups / 115–170g shredded cheddar, Monterey Jack, pepper jack, or Mexican-style cheese
  • 2 tablespoons / 30ml oil, divided as needed
  • 2–3 teaspoons taco seasoning, chili powder blend, or breakfast burrito seasoning
  • 1 to 1½ teaspoons salt, divided, or to taste
  • ½ teaspoon black pepper
  • Optional after reheating: salsa, avocado, Greek yogurt, sour cream, hot sauce, cilantro, lime

Cook the Breakfast Burrito Filling

  1. Cook the protein. Heat a large skillet over medium heat. Add the sausage, turkey, or chosen protein and cook until browned and fully cooked. Break up ground meat as it cooks. Drain excess grease or liquid.
  2. Cook the potatoes. Add oil if the skillet looks dry. Add the cooked potatoes, thawed hash browns, or cooked sweet potatoes and cook until lightly browned and dry around the edges. If starting with raw diced potatoes, cook them separately first until tender.
  3. Cook the vegetables. Add bell peppers and onion. Cook until softened and no longer watery. If using spinach or mushrooms, cook until their extra moisture has evaporated.
  4. Make the eggs. Blend or whisk eggs with cottage cheese, seasoning, salt, and pepper. Cook gently over medium-low heat until just set and still soft. If the skillet is crowded, cook the eggs separately.
  5. Combine the filling. Stir together the eggs, protein, potatoes, vegetables, and drained beans, if using. Taste while warm and adjust seasoning. The filling should taste well-seasoned before cooling.
  6. Cool until no longer steaming. Spread the filling on a tray, sheet pan, or large plate. Let it cool for at least 15–20 minutes, or until it is no longer hot or steaming. Do not leave the filling in a deep hot pile.

Fill, Wrap, Freeze, and Reheat

  1. Warm the tortillas. Warm tortillas for 10–20 seconds so they roll without cracking.
  2. Fill. Add a small layer of cheese first, then about 1 cup cooled filling per tortilla. Do not add salsa, avocado, sour cream, lettuce, pico de gallo, or raw tomato before freezing.
  3. Roll. Fold the sides in, roll tightly from the bottom, and place seam-side down.
  4. Wrap. Wrap each burrito in parchment paper, then foil if freezing longer than a couple of weeks. Place wrapped burritos in a freezer bag or airtight container and press out extra air.
  5. Freeze. Label the bag with the date and freeze flat until solid. Stack once frozen.
  6. Reheat. Remove foil before microwaving. From frozen, microwave at 50% power for 3–5 minutes, then high for 60–90 seconds. For better texture, crisp in a skillet for 1–2 minutes per side after microwaving.

Recipe Notes

  • Use about 1 cup total filling per 10-inch tortilla.
  • Cool the filling until it is no longer hot or steaming before wrapping.
  • Freeze wet toppings separately or add them after reheating.
  • For best quality, eat frozen burritos within 2–3 months.
  • Reheat until the center reaches 165°F / 74°C.
  • Total time assumes cooked potatoes, thawed hash browns, or cooked sweet potatoes. Raw diced potatoes need extra cooking time.
  • If skipping cottage cheese, use the eggs as written and cook gently. For softer eggs, whisk in 2 tablespoons water before cooking.
  • For a sheet-pan egg option, bake the egg mixture in a greased 9×13-inch dish at 350°F / 175°C for 18–22 minutes, or until just set.
  • Nutrition will vary depending on tortillas, protein, cheese, and whether you use cottage cheese or egg whites.

FAQs About Meal Prep Breakfast Burritos

Can you freeze breakfast burritos with eggs?

Yes. Eggs freeze well in breakfast burritos when they are cooked just until set and cooled before wrapping. The main thing to avoid is dry, browned eggs, because they become even firmer after freezing and reheating.

How do you keep frozen breakfast burritos from getting soggy?

The biggest fix is cooling the filling before wrapping. After that, keep salsa, avocado, raw tomato, sour cream, and lettuce out of the freezer burrito, and warm the center gently before crisping the tortilla.

How long do meal prep breakfast burritos last in the freezer?

They are best within 2–3 months for texture. Properly frozen food can stay safe longer, but tortillas, eggs, and potatoes lose quality over time.

Can you reheat a breakfast burrito from frozen?

Yes. Remove the foil, wrap the burrito in a damp paper towel, microwave at lower power first, then finish on high. For better texture, crisp it in a skillet or air fryer after the center is hot.

Are meal prep breakfast burritos healthy?

They can be. Use eggs or egg whites, lean protein, beans, cooked vegetables, a tortilla that fits your goals, and sauce after reheating. The healthiest version is still satisfying enough that you actually want to eat it.

Can I make vegetarian meal prep breakfast burritos?

Yes. Use eggs, cheese, beans, potatoes, cooked peppers, onions, and spinach. For a vegan version, use tofu scramble, beans, potatoes, cooked vegetables, and vegan cheese if desired.

Should I thaw frozen breakfast burritos before reheating?

You do not have to, but thawed burritos reheat more evenly. If you remember, move one to the refrigerator the night before. If reheating from frozen, use lower microwave power first so the center warms before the tortilla overcooks.

Can I put salsa inside freezer breakfast burritos?

It is better not to. Salsa, pico de gallo, and raw tomato can make the tortilla wet after freezing and reheating. Add salsa after the burrito is hot.

What is the best way to reheat a frozen breakfast burrito?

The best everyday method is microwave plus skillet. Microwave at lower power first so the center heats through, then crisp the tortilla in a skillet for 1–2 minutes per side.

Can I make breakfast burritos ahead without freezing?

Yes. Store wrapped burritos in the refrigerator for 3–4 days, then reheat until the center is hot. Refrigerated burritos usually reheat faster and more evenly than frozen ones.

Finished freezer breakfast burrito reheated and served with salsa, avocado, cilantro, lime, and wrapped burritos in the background.
After reheating and crisping, fresh toppings turn a freezer breakfast burrito back into a warm, satisfying breakfast that feels freshly made.

Back to top

Posted on 2 Comments

Breakfast Burrito Recipe

Toasted breakfast burrito cut open on a plate, showing scrambled eggs, browned potatoes, melted cheese, and sausage inside a flour tortilla.

This breakfast burrito recipe gives you the kind of burrito that actually feels worth waking up for: soft scrambled eggs, crisp-edged potatoes or hash browns, melted cheese, and a filling that stays inside the tortilla. Make them hot from the skillet this morning, or wrap a batch so tomorrow’s breakfast is already handled.

The goal is simple: a burrito that is full but still foldable, cheesy but not wet, freezer-friendly but not sad after reheating. That comes down to a few small choices: a large, flexible tortilla, cooked and seasoned fillings, browned potatoes, soft eggs, cheese in the right place, and sauce used smartly.

Below, you will get the main 6-burrito method, a simple per-burrito formula, folding tips, freezer instructions, reheating methods, filling ideas, sauce options, high-protein swaps, and fixes for cracked tortillas, rubbery eggs, cold centers, and filling that spills out.

Quick Answer: What Goes in a Breakfast Burrito?

A good breakfast burrito starts with a large flour tortilla, gently cooked eggs, crisp potatoes or hash browns, cheese, and a flavorful filling such as sausage, bacon, chorizo, black beans, peppers, onions, steak, chicken, or vegetables.

Ingredient guide showing a tortilla, eggs, potatoes, cheese, cooked filling, and sauce for making breakfast burritos
Think of a breakfast burrito as a simple build: tortilla for structure, eggs for softness, potatoes for bite, cheese for binding, filling for flavor, and sauce for brightness.

What the Finished Burrito Should Look Like

The finished burrito should be full enough to feel satisfying but not so packed that the tortilla tears. Look for a warm tortilla, soft eggs, browned potatoes, melted cheese, and a filling line that stays compact when sliced or reheated.

Close-up of a cut breakfast burrito with soft eggs, potatoes, melted cheese, and sausage visible inside
The inside should look generous but not overloaded. When the layers are balanced, the burrito slices cleanly and still holds up for reheating.

The Easy Breakfast Burrito Formula

For one large burrito, use 1 large tortilla, 1–2 eggs, about ½ cup cooked potatoes or hash browns, ¼–⅓ cup cheese, ¼–½ cup cooked meat, beans, or vegetables, and 1–2 tablespoons salsa or sauce. That formula is the easiest way to build a burrito that feels generous without fighting the tortilla.

Open flour tortilla with measured breakfast burrito fillings arranged to show eggs, potatoes, cheese, filling, and sauce amounts
This formula keeps the filling controlled before you roll. As a result, the burrito feels full without turning into a torn, bulky wrap.
For 1 Breakfast Burrito Best Amount Why It Matters
Large flour tortilla 1 tortilla, 10–12 inch / 25–30 cm Large tortillas fold better and hold more filling without tearing.
Eggs 1–2 large eggs Soft eggs give the burrito body without making it dry.
Potatoes or hash browns About ½ cup cooked A crisp potato layer makes the burrito hearty and breakfast-like.
Cheese ¼–⅓ cup shredded Cheese adds flavor, melts into the filling, and helps hold it together.
Protein, beans, or vegetables ¼–½ cup cooked Add sausage, bacon, chorizo, steak, chicken, beans, peppers, onions, or another cooked filling here.
Sauce or salsa 1–2 tablespoons Use lightly inside fresh burritos; serve on the side for freezer burritos.

Best First Version to Make

Best first version: Start with eggs, crisp hash browns or diced potatoes, cheddar or Monterey Jack, and breakfast sausage or black beans. Add salsa or hot sauce on the side. Once that base works, bacon, chorizo, steak, chicken, tofu scramble, and extra vegetables are easy swaps.

Breakfast burrito filled with eggs, crisp potatoes, cheddar, and sausage, served with salsa on the side
Start with the classic version first because it teaches the balance: eggs for softness, potatoes for texture, cheese for melt, and sausage or beans for flavor.

At a Glance

At a glance: This recipe makes 6 breakfast burritos in about 45–50 minutes. Use 10–12 inch flour tortillas, about ½ cup cooked potatoes or hash browns per burrito, and a skillet toast for the best texture. They keep 3–4 days in the fridge and freeze best without wet toppings inside.

Need the full method? Go to the recipe card. Meal-prepping? See freezer breakfast burritos. Want more flavor? Head to best sauces for breakfast burritos.

Why This Breakfast Burrito Recipe Works

The best breakfast burritos are not just full; they are balanced. You want enough egg to feel soft and breakfasty, enough potato to make it hearty, enough cheese to hold everything together, and just enough sauce to wake it up without soaking the tortilla.

Once the base is right, the filling is where the recipe becomes fun. Use breakfast sausage for a classic burrito, bacon for a smoky version, chorizo for heat, black beans for a vegetarian breakfast burrito, or a mix of eggs, egg whites, beans, and lean meat for a high-protein breakfast burrito.

Most importantly, the small details matter: warming the tortilla before folding, cooking the potato layer until browned, pulling eggs from the heat before they dry out, placing cheese down first, cooling fillings before freezing, and reheating gently so the eggs stay soft instead of rubbery.

Ready to cook? The full 6-burrito method is below. After the recipe card, you will find deeper notes on ingredients, folding, freezer storage, sauces, high-protein options, and troubleshooting.

Easy Breakfast Burrito Recipe

This breakfast burrito recipe makes 6 hearty burritos with soft eggs, browned potatoes or hash browns, cheese, and your choice of sausage, bacon, chorizo, beans, steak, chicken, or vegetables.

Yield6 burritos
Prep Time15–20 minutes
Cook Time25–30 minutes
Total Time45–50 minutes

Ingredients

  • 6 large flour tortillas, 10–12 inch / 25–30 cm
  • 8 large eggs, about 400 g without shells
  • 2 tablespoons milk, sour cream, or Greek yogurt, optional / 30 ml
  • 1–1¼ lb potatoes or frozen hash browns / 450–570 g
  • 10–12 oz breakfast sausage or chorizo before cooking / 280–340 g, or 8–10 oz cooked bacon, steak, or chicken / 225–280 g, or 1 drained 15 oz can black beans or pinto beans / about 240 g drained
  • For a vegetable version: 1½–2 cups cooked peppers, onions, mushrooms, spinach, or mixed vegetables / about 225–300 g cooked
  • 1½–2 cups shredded cheddar, Monterey Jack, or pepper jack / 170–225 g
  • 2–3 tablespoons oil or butter / 30–45 ml
  • ½ cup salsa, hot sauce, or burrito sauce, mostly for serving / 120 ml
  • ¾–1¼ teaspoons salt total, divided / 4–7 g
  • ½ teaspoon black pepper / 1–2 g
  • ½ teaspoon smoked paprika, ½ teaspoon cumin, ½ teaspoon chili powder, and ¼ teaspoon garlic powder, optional
  • ¼–½ cup chopped green onion or cilantro, optional / 10–20 g

Step-by-Step Method

  1. Cook the protein or vegetables. Brown raw sausage or chorizo in a large skillet, or warm cooked bacon, steak, chicken, beans, peppers, onions, or your chosen filling. Then, drain excess fat or liquid and transfer to a plate.
  2. Crisp the potatoes. Add 2 tablespoons oil or butter to the skillet. Cook diced potatoes for 12–15 minutes, stirring only occasionally, until tender inside and golden outside. Frozen shredded hash browns usually need 7–10 minutes in a thin layer. Season with salt, pepper, and optional smoked paprika, cumin, chili powder, or garlic powder.
  3. Scramble the eggs softly. Whisk eggs with milk, sour cream, or Greek yogurt if using. Cook over medium-low heat for 2–4 minutes, stirring slowly, until the eggs are just set but still glossy. Transfer them to a plate right away so they do not keep cooking in the hot pan.
  4. Warm the tortillas. Microwave tortillas under a damp paper towel for 15–30 seconds, or warm each one briefly in a dry skillet.
  5. Fill the burritos. Place a tortilla on a board. Add cheese first, then potatoes, eggs, protein or beans, and optional herbs. Keep the filling in a narrow strip slightly below the center.
  6. Fold tightly. Fold the left and right sides inward, pull the bottom flap over the filling, tuck it snugly, and roll forward into a tight burrito.
  7. Toast seam-side down. Place the burrito seam-side down in a dry skillet over medium heat. Toast for 1–2 minutes per side, until golden and sealed.
  8. Serve. Serve hot with salsa, chipotle crema, avocado crema, hot sauce, or green chile sauce on the side.

Recipe Notes

  • Start with ¾ teaspoon salt total if using bacon, chorizo, seasoned sausage, salty cheese, or canned beans. Add more only after tasting the cooked filling.
  • For freezer burritos, cool the eggs, potatoes, and filling before wrapping.
  • For freezer burritos, keep wet and fresh toppings for serving after reheating.
  • For a higher-protein version, use 10–12 eggs, egg whites, black beans, turkey sausage, chicken sausage, tofu scramble, or cottage cheese in the eggs.
  • For a vegetarian version, use eggs, black beans, crisp potatoes, peppers, onions, cheese, and salsa.
Saveable breakfast burrito recipe card with a burrito photo, ingredient formula, method steps, and freezer notes
This saveable recipe card keeps the main breakfast burrito method easy to scan, especially when you are batch-cooking or freezing burritos for later.

How to Scale the Recipe

The base recipe makes 6 burritos, which is a good size for one family breakfast or a few make-ahead meals. For a bigger freezer batch, double the filling and assemble 12 burritos while everything is already cooked and ready.

Batch Size Eggs Potatoes / Hash Browns Protein or Beans Cheese
6 burritos 8 eggs 1–1¼ lb / 450–570 g 10–12 oz raw sausage/chorizo, 8–10 oz cooked meat, or 1 drained can beans 1½–2 cups / 170–225 g
12 burritos 16 eggs 2–2½ lb / 900 g–1.1 kg 20–24 oz raw sausage/chorizo, 1–1¼ lb cooked meat, or 2 drained cans beans 3–4 cups / 340–450 g

For a larger batch, you can also roast the potatoes, peppers, and onions on a sheet pan, then cook the eggs separately while the vegetables finish. A full sheet-pan method deserves its own recipe, but this shortcut helps when you are making 12 burritos at once.

Breakfast Burrito Assembly Line

Before you start rolling, set up the tortillas, eggs, potatoes, cheese, and filling in one place. This keeps the portions more even, helps the tortillas stay warm, and makes it easier to build several breakfast burritos without overfilling the last few.

Breakfast burrito assembly station with warm tortillas, scrambled eggs, potatoes, cheese, sausage, and herbs arranged for filling
Set up the fillings before you roll. That way, the tortillas stay warm, the portions stay consistent, and each breakfast burrito is easier to fold tightly.
Want to make these easier to roll or prep ahead? See how to fold a breakfast burrito, toasting tips, or how to make freezer breakfast burritos.

Breakfast Burrito Ingredients: What Matters Most

This is a forgiving recipe, but the small choices matter. Once the tortilla is warm, the potatoes are browned, the eggs are soft, and the wet toppings are controlled, you can swap the meat, beans, cheese, vegetables, or sauce without losing the structure of the burrito.

Ingredient board showing tortillas, eggs, potatoes, cheese, sausage, beans, vegetables, sauce, and seasonings for breakfast burritos
The ingredient list is flexible, but each category has a job. Once you know what the tortilla, eggs, potatoes, cheese, filling, sauce, and seasoning do, swaps become easier.

Large Flour Tortillas

A large, flexible tortilla is the difference between a burrito that rolls cleanly and one that cracks before breakfast even starts. Aim for 10 inches for a standard burrito, or 12 inches if you like a generous filling or are still getting comfortable with folding.

Before filling, warm the tortillas. Stack them under a damp paper towel and microwave for 15–30 seconds, or warm each tortilla briefly in a dry skillet. That way, the tortilla bends around the filling instead of tearing.

Comparison of 10-inch and 12-inch flour tortillas for making breakfast burritos
A larger tortilla gives you more folding margin. Therefore, 12-inch tortillas are easier for generous burritos, while 10-inch tortillas work best with controlled filling.

Eggs

Scrambled eggs are the heart of the burrito. For 6 burritos, this recipe uses 8 large eggs, which gives enough egg to feel breakfast-forward without making every bite too heavy. For a bigger, higher-protein version, use 10–12 eggs or replace some whole eggs with egg whites.

Texture matters more than most people think. Cook the eggs over medium-low heat and stop while they are still soft and slightly glossy. Dry eggs become firm after folding, and they get even tougher if you reheat the burritos later.

Soft scrambled eggs cooking in a skillet with a spatula, showing a glossy texture
Pull the eggs before they look completely dry. They will continue to firm up after folding, and they need enough softness to survive reheating.

Potatoes or Hash Browns

Potatoes and hash browns give the burrito its hearty breakfast texture, but they need to be cooked properly before they go inside. The best choice depends on whether you want diced potatoes, shredded hash browns, patties, tots, or a roasted potato shortcut.

Guide showing diced potatoes, hash browns, hash brown patties, tater tots, roasted potatoes, and sweet potatoes for breakfast burritos
Diced potatoes, hash browns, patties, tots, roasted potatoes, and sweet potatoes can all work. However, they need browned edges before they go inside the burrito.

Why the Potato Layer Matters

The potatoes are what make this feel like a proper breakfast burrito instead of scrambled eggs wrapped in a tortilla. Get them browned first, and the whole burrito tastes more satisfying. Diced potatoes, frozen shredded hash browns, hash brown patties, tater tots, leftover roasted potatoes, and sweet potatoes can all work.

Do not rush the potato layer. Once the edges are browned, the filling has the texture that keeps the burrito from tasting soft all the way through. For each burrito, use about ½ cup cooked potatoes or hash browns.

Golden diced potatoes browned in a skillet for breakfast burrito filling
Crisp potatoes make the filling feel more complete. Without that browned layer, a breakfast burrito can taste soft from tortilla to center.

Fresh Grated Potatoes

If you grate fresh potatoes, squeeze them in a clean kitchen towel before cooking. Removing excess moisture helps the potatoes brown instead of steaming in the pan.

Roasted Potatoes for Breakfast Burritos

If you prefer roasting, spread diced potatoes on a sheet pan with oil, salt, pepper, and seasoning. Roast at 425°F / 220°C for 22–28 minutes, flipping once, until the centers are tender and the edges are browned.

Hash Browns and Shortcut Potatoes

If you are starting with frozen shredded potatoes, patties, or homemade grated potatoes, this MasalaMonk guide to crispy air fryer hash browns has useful timing and texture cues you can borrow before filling the burritos.

Potato Option Amount for 6 Burritos Best Method
Diced russet or yellow potatoes 1–1¼ lb / 450–570 g Dice small and pan-fry for 12–15 minutes, or roast at 425°F / 220°C for 22–28 minutes.
Frozen shredded hash browns 16–20 oz / 450–570 g Cook in a thin layer for 7–10 minutes until browned; press out excess moisture if needed.
Hash brown patties 6 patties Cook until crisp, then use one patty per burrito.
Tater tots About 20 oz / 570 g Bake or air-fry until crisp, then crush lightly before filling.
Leftover roasted potatoes About 3 cups Re-crisp in a skillet before adding to the burritos.
Sweet potatoes 1–1¼ lb / 450–570 g Roast with smoked paprika, cumin, chili powder, or pepper.

Cheese

Cheddar, Monterey Jack, pepper jack, mozzarella, or a Mexican-style cheese blend all work. Cheese adds flavor, but it also helps bind the filling and creates a light barrier between the tortilla and the warm eggs or potatoes.

For the best fold, add cheese to the tortilla first, then layer the warm filling over it. The heat from the eggs and potatoes softens the cheese while the burrito is folded and toasted.

Open flour tortilla with shredded cheese added first, followed by eggs and potatoes for a breakfast burrito
Cheese does more than add flavor. Placing it first helps catch the warm filling, melt into the layers, and reduce direct moisture against the tortilla.

Sausage, Bacon, Chorizo, Beans, or Vegetables

The main recipe works with many fillings. Breakfast sausage gives you the most classic version, bacon makes it smoky, chorizo adds heat, steak makes it hearty, chicken sausage keeps it lighter, and black beans with peppers make a filling vegetarian burrito.

Whatever you choose, cook and drain it before assembly. Otherwise, wet fillings make burritos harder to fold and easier to tear, especially if you plan to freeze them.

Simple Breakfast Burrito Seasoning

For a quick breakfast burrito seasoning, use ½ teaspoon smoked paprika, ½ teaspoon cumin, ½ teaspoon chili powder, ¼ teaspoon garlic powder, and a pinch of black pepper. Sprinkle it over the potatoes, sausage, beans, or vegetables rather than only adding seasoning to the eggs. Because each layer is seasoned, the burrito tastes better from end to end.

Salsa, Sauce, and Toppings

Sauce tastes better after reheating than it does trapped inside a freezer wrap. For fresh burritos, a small spoonful of salsa, hot sauce, chipotle crema, avocado crema, green chile sauce, or sour cream lime sauce can go inside. For freezer burritos, save sauce for the side and add it after warming.

Fresh avocado, pico de gallo, sour cream, lettuce, raw tomato, and watery salsa taste good, but they are not ideal inside freezer burritos. Instead, add them after reheating for better texture.

Helpful Equipment

You do not need special equipment for this method, but a few tools make the process easier: a large skillet or cast-iron pan for the filling, a flexible spatula for soft eggs, a sheet pan if you are cooling fillings for freezer burritos, foil or parchment for wrapping, and a freezer bag or airtight container for storage.

How to Fold a Breakfast Burrito

Folding is where many breakfast burritos go wrong. The filling may be good, but if the tortilla is cold, small, or overstuffed, the burrito cracks, unrolls, or spills from both ends.

If your burritos have cracked, leaked, or fallen apart before, it probably was not the filling idea that failed. It was usually the tortilla temperature, filling shape, or moisture level.

Start with a warm 10–12 inch flour tortilla. Next, place the filling in a narrow strip just below the center of the tortilla, not in a big mound. Fold the left and right sides inward first. Then, pull the bottom edge up and over the filling, tuck it tightly under the filling, and roll forward until closed.

Step-by-step folding guide showing a breakfast burrito being filled, sides folded in, tucked, and rolled closed
The fold works best when the filling starts narrow. Then the sides can tuck in cleanly, and the bottom flap can roll forward without pushing everything out.

How Much Filling Is Too Much?

As a rough limit, keep the total filling to about 1½ cups per 10–12 inch tortilla. More than that can make the burrito bulky, split the tortilla, or keep the ends from closing. If you want a bigger burrito, use a larger tortilla instead of forcing more filling into a smaller one.

Comparison showing an overfilled breakfast burrito tortilla beside a correctly filled tortilla with a narrow filling line
Overfilling is the fastest way to ruin the roll. Keep the filling line compact so the tortilla can close, seal, and toast properly.

Set the burrito seam-side down right away. If you are eating it fresh, toast it seam-side down in a skillet to seal the fold and give the outside a lightly crisp finish.

Folding rule: Warm tortilla, narrow filling line, sides in first, bottom flap over, tuck tightly, roll forward, then toast seam-side down.

If the tortilla cracks or the filling spills out, check the troubleshooting section for quick fixes.

Should You Toast a Breakfast Burrito?

Toasting is worth it if you are eating the burrito right away. It seals the seam, melts the cheese, warms the tortilla, and gives the outside a better texture. A soft wrapped burrito is fine for packed breakfasts, but a toasted breakfast burrito feels more finished.

Because this recipe uses warm fillings and shredded cheese, even a short skillet toast helps everything come together. It also makes the burrito easier to pick up without the seam opening.

Breakfast burrito toasting seam-side down in a skillet until the tortilla is golden
Toasting seam-side down first helps lock the fold. After that, the outside can brown evenly while the cheese finishes melting inside.
Finish Best For How to Do It
Skillet toast Best everyday texture Toast seam-side down for 1–2 minutes per side over medium heat.
Oven finish Several burritos at once Bake at 425°F / 220°C for 8–10 minutes, until hot and lightly crisp.
Broiler finish Fast browning Broil on low for 3–6 minutes, watching closely so tortillas do not burn.
Sandwich press Compact, crisp burritos Press gently until the outside is golden and the cheese melts.

How to Make Freezer Breakfast Burritos

Freezer breakfast burritos are brilliant when they work and disappointing when they do not. The difference is usually steam and sauce. Let the fillings cool, keep wet toppings out, wrap tightly, and reheat gently so the eggs stay soft and the tortilla does not turn limp.

The goal is to freeze a burrito that still tastes like breakfast after reheating, not a steamed tortilla with dry eggs inside.

Wrapped freezer breakfast burritos beside one cut-open burrito and a freezer bag
Freezer breakfast burritos need sturdy fillings and controlled moisture. Otherwise, they may freeze well but reheat into a soft, damp tortilla.

Cool the Filling First

Hot eggs, potatoes, and sausage release steam. If you wrap them immediately, that steam gets trapped inside the tortilla and softens it. For freezer burritos, spread the cooked fillings on a plate or sheet pan and let them cool until warm, not hot, before assembling.

Cooked eggs, potatoes, sausage, and peppers spread on a tray to cool before being wrapped into breakfast burritos
Letting the fillings cool gives steam a chance to escape. Because of that, the tortilla is less likely to soften before the burrito even reaches the freezer.

What Not to Put Inside Before Freezing

Some ingredients taste better added after reheating. Keep fresh avocado, guacamole, sour cream, watery salsa, pico de gallo, lettuce, raw tomato, and very wet sauces out of the burritos before freezing. Otherwise, they can turn watery, dull, or mushy after thawing.

Better freezer fillings include eggs, cheese, cooked sausage, bacon, chorizo, beans, potatoes, hash browns, cooked peppers, and cooked onions.

Avocado, sour cream, pico de gallo, lettuce, tomato, and salsa shown beside a breakfast burrito as toppings to add later
Avocado, sour cream, lettuce, pico, tomato, and watery salsa taste better after reheating. Keep them fresh on the side instead of freezing them inside.

Freezer Breakfast Burrito Workflow

  1. Cook the protein, potatoes, and eggs separately.
  2. Spread the hot fillings on a plate or sheet pan so steam can escape.
  3. Warm the tortillas so they fold without cracking.
  4. Add cheese first, then potatoes, eggs, and protein or beans.
  5. Fold tightly and place each burrito seam-side down.
  6. Wrap each burrito in parchment or foil.
  7. Place wrapped burritos in a freezer bag, label, and freeze flat.
  8. Reheat gently, then add salsa, crema, avocado, or fresh toppings after warming.
Workflow image showing cooked filling, cooled filling, burrito assembly, wrapping, and freezing steps
The freezer method is easier when you follow the order: cook, cool, fill, wrap, and freeze. Skipping the cooling step is where most texture problems begin.

How to Wrap Breakfast Burritos for the Freezer

Wrap each cooled burrito tightly in parchment or foil. Then, place the wrapped burritos in a freezer bag or airtight container. Foil helps protect the shape, but a freezer bag gives better protection from freezer air.

Label the bag with the filling and date. Breakfast burritos are best within 2–3 months for texture, depending on how well they are wrapped.

Hands wrapping breakfast burritos in parchment or foil with wrapped burritos and a freezer bag nearby
A tight wrap protects the tortilla and keeps the burrito compact. Then the freezer bag adds the second layer of protection against drying out.
Next: go straight to how to reheat breakfast burritos or jump down to storage, freezing, and reheating for the short version.

How to Reheat Breakfast Burritos

The best everyday method is microwave plus skillet: warm the center first, then crisp the outside. The microwave alone is fastest, but it can make the tortilla chewy. The oven or toaster oven gives better texture when reheating several burritos.

Reheating guide showing breakfast burritos in a microwave, skillet, oven, and air fryer
Reheating is not one-size-fits-all. The microwave is fastest, the skillet improves texture, the oven handles batches, and the air fryer adds crispness.
Situation Best Method Exact Guidance
Fresh burrito, eating now Skillet Toast seam-side down for 1–2 minutes per side.
Refrigerated burrito Microwave + skillet Microwave 45–90 seconds, then crisp in a skillet for 1–2 minutes per side.
Frozen burrito, fastest Microwave Remove foil, wrap in a paper towel, defrost at 50% power for 3–5 minutes, then heat on full power for 1–2 minutes more.
Frozen burrito, best oven texture Oven or toaster oven Heat foil-wrapped at 350°F / 175°C for 45–55 minutes, until hot in the center.
Thawed burrito, oven Oven or toaster oven Heat at 400°F / 200°C for 15–20 minutes.
Frozen burrito, air fryer Air fryer Remove foil or parchment. Heat at 350°F / 175°C for 15–20 minutes, checking the center.
Thawed burrito, air fryer Air fryer Heat at 350°F / 175°C for 8–12 minutes.
Crisp finish Skillet After warming, toast 1–2 minutes per side over medium heat.

Microwave and Skillet Reheating Method

For the best everyday texture, warm the burrito first so the center is hot, then finish it in a skillet so the tortilla gets lightly crisp again. This is especially helpful for refrigerated burritos and thawed freezer burritos because the microwave handles the center while the skillet fixes the outside.

Breakfast burrito first warmed in the microwave and then crisped in a skillet
This two-step method solves a common problem: the microwave warms the center, while the skillet brings back the toasted tortilla texture.

For food safety, reheat leftovers until hot throughout. If checking with a thermometer, the center should reach 165°F / 74°C. You can read more about safe leftover handling from the USDA leftover food safety guide.

Breakfast Burrito Filling Ideas

Once the basic breakfast burrito recipe formula is clear, the burritos become easy to customize. Keep the same structure: tortilla, cheese, eggs, potatoes or hash browns, a flavorful filling, and sauce on the side or added lightly inside.

Choose Your Breakfast Burrito Version

Quick chooser: Want classic? Use sausage, eggs, potatoes, and cheddar. Want smoky? Use bacon, hash browns, and chipotle crema. Want spicy? Use chorizo, potatoes, and salsa verde. Want meatless? Use eggs, black beans, peppers, onions, and cheese. Want high-protein? Use eggs or egg whites, beans, turkey sausage, cottage cheese, or tofu scramble.

Variation board showing classic, smoky, spicy, meatless, and high-protein breakfast burrito filling ideas
Once the base formula works, the filling can change with the mood: classic sausage, smoky bacon, spicy chorizo, meatless beans, or a higher-protein build.

Breakfast Burrito Variation Table

Variation Filling Best Sauce Notes
Sausage Breakfast Burrito Eggs, breakfast sausage, potatoes, cheddar Salsa or hot sauce The most classic version and a good first recipe.
Bacon Hash Brown Burrito Eggs, bacon, hash browns, cheddar Chipotle crema Smoky, crisp, and very brunch-friendly.
Chorizo Breakfast Burrito Eggs, chorizo, potatoes, Monterey Jack Salsa verde Spicy and rich; drain the chorizo well before filling.
Steak and Egg Breakfast Burrito Steak, eggs, potatoes, cheese Salsa roja or hot sauce Hearty and high-protein, especially good with leftover steak.
Chicken Breakfast Burrito Chicken sausage or shredded chicken, eggs, potatoes Avocado crema A lighter meat option that still feels filling.
Vegetarian Breakfast Burrito Eggs, black beans, potatoes, peppers, onions, cheese Salsa or avocado crema Meatless but still hearty because of beans and potatoes.
Vegan Breakfast Burrito Tofu scramble, beans, potatoes, salsa, vegan cheese Salsa or vegan crema Add avocado after reheating if freezing.
High-Protein Breakfast Burrito Eggs, egg whites, turkey sausage, beans, cottage cheese Salsa or Greek yogurt sauce Best for meal prep and macro-friendly breakfasts.
Freezer-Friendly Burrito Eggs, potatoes, cheese, sausage or beans Sauce on the side Avoid wet toppings inside before freezing.
Need matching sauce ideas? Head to best sauces for breakfast burritos. Want a lighter version? See how to make a healthy or high-protein breakfast burrito.

Sausage Breakfast Burrito

Use cooked breakfast sausage, soft eggs, golden potatoes, and cheddar or Monterey Jack. Before assembly, drain the sausage so the tortilla does not get greasy. This is the best classic version to make first.

Bacon Breakfast Burrito

Cook bacon until crisp, chop it, and pair it with eggs, hash browns, and cheddar. Bacon works especially well with chipotle crema, hot sauce, or a small spoonful of salsa.

Chorizo Breakfast Burrito

Chorizo brings spice and richness. Cook it fully, drain off extra fat, and balance it with eggs, potatoes, cheese, and salsa verde. Because chorizo is strongly seasoned, taste before adding extra salt.

Steak and Egg Breakfast Burrito

Use thinly sliced cooked steak or leftover steak with eggs, potatoes, cheese, and salsa roja. This version feels more filling and higher-protein, so it works well as a brunch or post-workout breakfast.

Chicken Breakfast Burrito

Use chicken sausage, shredded cooked chicken, or chopped grilled chicken with eggs, potatoes, cheese, and avocado crema. Since chicken has a milder flavor than bacon or chorizo, season the potatoes and sauce well.

Vegetarian Breakfast Burrito

Use eggs, black beans or pinto beans, crisp potatoes, peppers, onions, cheese, and salsa. The beans replace meat while adding protein, fiber, and a creamy texture against the browned potatoes.

Vegetarian breakfast burrito cut open with eggs, beans, potatoes, peppers, onions, and cheese
A vegetarian breakfast burrito should still feel hearty. Beans bring protein and creaminess, while potatoes, peppers, eggs, and cheese keep the texture satisfying.

Vegan Breakfast Burrito

Use tofu scramble instead of eggs, then add black beans, crisp potatoes, salsa, sautéed peppers, onions, and vegan cheese or cashew queso. If freezing, keep avocado and fresh greens out of the burrito and add them after reheating. For more savory plant-based breakfast ideas, MasalaMonk’s guide to using tofu instead of eggs is a natural companion.

Vegan breakfast burrito with tofu scramble, beans, potatoes, salsa, and vegetables
Tofu scramble works best when it is treated like a real filling, not an afterthought. Pair it with beans, potatoes, vegetables, and salsa for better balance.

High-Protein Breakfast Burrito

For a high-protein breakfast burrito, use extra eggs or egg whites, black beans, turkey sausage, chicken sausage, steak, tofu scramble, or cottage cheese-enriched eggs. Still, keep the potatoes if you want the burrito to taste like breakfast instead of a plain protein wrap.

High-protein breakfast burrito with eggs, egg whites, beans, lean meat, and potatoes
A high-protein breakfast burrito works better when protein is added around the classic structure. Keep enough potato, cheese, or sauce so it still tastes like breakfast.

Best Sauces for Breakfast Burritos

A dry breakfast burrito tastes like meal prep. A good sauce makes it feel like breakfast you actually wanted. The trick is using enough salsa, crema, or hot sauce to brighten the eggs and potatoes without making the tortilla wet.

This recipe works with several sauces, so choose based on the filling. For example, chorizo is great with salsa verde, bacon works beautifully with chipotle crema, and vegetarian burritos taste brighter with avocado crema or salsa.

Sauce guide showing salsa roja, salsa verde, hot sauce, chipotle crema, avocado crema, sour cream lime sauce, and green chile sauce with a breakfast burrito
Sauce changes the whole direction of the burrito. For example, salsa verde brightens spicy fillings, while chipotle crema makes bacon or hash browns feel richer.

Quick 3-Ingredient Breakfast Burrito Sauce

For the fastest sauce, stir together 3 tablespoons mayonnaise or Greek yogurt, 1 tablespoon lime juice, and 1–2 teaspoons taco seasoning or hot sauce. It is not as smoky as chipotle crema, but it gives the burrito a creamy, tangy finish in less than 2 minutes.

Creamy quick breakfast burrito sauce served beside a burrito with sauce ingredients nearby
A quick sauce can rescue a basic meal-prep burrito. Even a small creamy, tangy finish makes eggs, potatoes, and tortillas taste fresher.
Sauce Best With Use Inside or On the Side?
Salsa roja Sausage, bacon, steak, eggs Lightly inside fresh burritos; side for freezer burritos
Salsa verde Chorizo, potatoes, vegetarian burritos Best on the side or added after reheating
Hot sauce Almost any breakfast burrito Inside or on the side, but use lightly
Chipotle crema Bacon, hash browns, chicken, steak Side for freezer burritos
Avocado crema Vegetarian, chicken, spicy burritos Add after reheating for best texture
Sour cream lime sauce Classic egg and potato burritos Fresh serving only; not ideal inside freezer burritos
Green chile sauce Egg, potato, sausage, and cheese burritos Best spooned over or served on the side
Want to pair sauces with specific fillings? Jump back to breakfast burrito filling ideas or return to the main recipe.

For an egg-free creamy sauce, use thick yogurt, sour cream, or an egg-free mayo base. MasalaMonk’s eggless mayonnaise recipe is a useful starting point if you want a creamy breakfast burrito sauce without using eggs in the condiment.

Quick Chipotle Crema for Breakfast Burritos

For a smoky creamy sauce, mix 1 cup Greek yogurt, sour cream, or crema with 1 minced chipotle pepper in adobo, 1 tablespoon adobo sauce, 2 teaspoons lime juice, ¼ teaspoon garlic powder, and salt to taste. Blend for a smooth sauce or whisk if the chipotle is finely minced. If you like building sauces from a creamy base, MasalaMonk’s homemade mayo guide has more spicy mayo and garlic mayo ideas that can be adapted for burritos.

How to Make a Healthy or High-Protein Breakfast Burrito

A high-protein breakfast burrito should still taste like breakfast, not like a dry protein wrap. Keep the potatoes or hash browns for texture, then build more protein around them with eggs, egg whites, beans, turkey sausage, chicken sausage, steak, tofu scramble, or cottage cheese-enriched eggs.

For a lighter version, use whole eggs plus egg whites, add black beans or pinto beans, choose turkey sausage or chicken sausage, use a whole-wheat or high-fiber tortilla, and keep the sauce bright rather than heavy. A little sharp cheddar can also give more flavor than a lot of mild cheese.

High-protein formula: Use 1 whole egg + 2 egg whites, ¼–½ cup beans, 2–3 oz lean meat or tofu, ¼ cup cheese or cottage cheese, and ½ cup potatoes or vegetables per burrito.

Goal Best Move
More protein Add egg whites, black beans, turkey sausage, chicken sausage, steak, tofu scramble, or cottage cheese-enriched eggs.
Lower calories Use less cheese, lean protein, more peppers and onions, and sauce on the side.
More fiber Add black beans, pinto beans, a whole-wheat tortilla, spinach, peppers, or onions.
Still satisfying Keep about ½ cup potatoes or hash browns instead of removing the carb layer completely.

A higher-protein burrito works well with 2 eggs or 1 egg plus egg whites per burrito, ¼–½ cup beans, and turkey sausage, chicken sausage, steak, tofu scramble, or cottage cheese-enriched eggs. If you are building more protein-focused breakfasts across the week, this high-protein oatmeal guide gives another breakfast format using oats, yogurt, egg whites, cottage cheese, tofu, or protein powder.

Prefer a more classic version first? Go back to the main breakfast burrito recipe. Want filling inspiration? Browse the variation ideas.

Breakfast Burrito vs Breakfast Wrap

A breakfast burrito is usually larger, fuller, and folded closed on both ends. It often includes eggs, potatoes or hash browns, cheese, and a hearty filling. A breakfast wrap is usually lighter, flatter, and easier to toast, with fewer fillings or a more sandwich-like shape.

A lighter breakfast wrap works best with less potato, less cheese, a thinner layer of eggs, and a smaller amount of filling. A true breakfast burrito needs a large tortilla and enough filling so every bite has eggs, potatoes, cheese, and something flavorful. If you are deciding between a burrito, wrap, toast, or egg-and-cheese build, MasalaMonk’s breakfast sandwich ideas can help you choose a smaller, faster format for busy mornings.

Side-by-side comparison of a larger filled breakfast burrito and a lighter breakfast wrap
The difference is mostly structure. A breakfast burrito is fuller and folded closed, while a breakfast wrap is lighter, flatter, and easier to toast quickly.

Breakfast Burrito Troubleshooting

When breakfast burritos go wrong, it is usually not because the idea is bad. It is usually one of three things: too much moisture, a cold or small tortilla, or fillings that were overcooked before they ever went inside. Once you know which one caused the problem, the fix is usually simple.

Troubleshooting guide for breakfast burritos showing common problems such as cracked tortillas, soggy burritos, rubbery eggs, and cold centers
Most breakfast burrito problems are fixable. Check moisture, tortilla warmth, filling amount, egg texture, and reheating method before changing the whole recipe.
Problem Likely Cause Fix
Burrito falls apart Too much filling or tortilla too small Use a 10–12 inch tortilla and keep filling in a narrow strip.
Tortilla cracks Cold or dry tortilla Warm under a damp paper towel for 15–30 seconds before folding.
Burrito turns wet or limp Hot filling, watery salsa, or wet toppings inside Cool fillings first and keep sauce, sour cream, and avocado on the side.
Eggs turn rubbery Eggs overcooked before folding or overheated during reheating Cook eggs softly and reheat gently.
Potatoes are mushy Pan overcrowded or potatoes under-browned Cook in a thin layer until golden before adding to burritos.
Filling tastes bland Only the eggs were seasoned Season potatoes, eggs, and protein separately.
Cheese does not melt Cheese added too late or filling not warm enough Add cheese first, then warm fillings, and toast the burrito.
Frozen burrito is cold in the center Outside heated faster than the middle Defrost first, microwave at lower power, or oven-reheat longer.
Tortilla gets chewy in microwave Over-microwaved or uncovered Use a damp paper towel and finish in a skillet for better texture.
Burrito feels too bulky Too much potato or filling Use about ½ cup potatoes and ¼–½ cup protein or beans per tortilla.
Need the detailed fix? Revisit folding, freezer tips, reheating, or sauce ideas.

What to Serve with Breakfast Burritos

Breakfast burritos are filling enough on their own, but the right sides make them feel more complete. Serve them with salsa, hot sauce, avocado, fruit, roasted potatoes, a simple salad, or extra beans. For brunch, add lime wedges, pickled onions, sliced jalapeños, or a bowl of chipotle crema for dipping.

If you are serving a crowd, keep the burritos warm in a low oven, then set out sauces and toppings separately. This keeps the tortillas from softening too much and lets everyone choose their own heat level.

Storage, Freezing, and Reheating

Leftover breakfast burritos keep well in the refrigerator for 3–4 days. For longer storage, wrap them individually and freeze them for best quality within 2–3 months.

In the fridge, wrap each burrito in foil or parchment and keep it in an airtight container. For the freezer, wrap each cooled burrito tightly, then place the wrapped burritos in a freezer bag. After that, reheat until hot throughout and add sauce, avocado, sour cream, or fresh salsa only after warming.

Storage guide showing wrapped breakfast burritos for the refrigerator, wrapped burritos in a freezer bag, and a reheated cut burrito
Storage matters because eggs, cheese, potatoes, and tortillas all change texture over time. Refrigerate short-term batches and freeze longer meal prep portions.

This recipe is best when reheated gently rather than blasted on high heat from frozen. For a broader reference on refrigerator and freezer timing across eggs, cooked dishes, meats, and prepared foods, the FoodSafety.gov cold food storage chart is also useful.

Best make-ahead move: Freeze the burritos without wet toppings, then serve with salsa, crema, hot sauce, avocado, or pico de gallo after reheating.

Once you understand the formula, breakfast burritos become one of the easiest breakfasts to repeat: warm tortilla, soft eggs, crisp potatoes, melted cheese, a flavorful filling, and sauce used smartly. Make them fresh when you want a hot skillet breakfast, or wrap a batch for the freezer so a real breakfast is ready on busy mornings instead of another rushed compromise.

Final Breakfast Burrito Serving Idea

When you are ready to serve, keep the burrito warm and add the fresh toppings at the end. Salsa, avocado, crema, hot sauce, lime, or pico de gallo all taste better when they finish the burrito instead of sitting inside during storage.

Finished breakfast burrito served with avocado, salsa, and sauce on a plate
The payoff is a burrito that works fresh, reheated, or meal-prepped: warm tortilla, soft eggs, crisp potatoes, melted cheese, and fresh toppings added at the end.

FAQs

What goes in a breakfast burrito?

A classic breakfast burrito recipe usually includes a large flour tortilla, scrambled eggs, potatoes or hash browns, cheese, and a filling such as sausage, bacon, chorizo, beans, peppers, onions, steak, chicken, or vegetables. Salsa or sauce is usually served inside lightly or on the side.

What size tortilla is best for breakfast burritos?

For most home cooks, 10 inches is the smallest size I would use for a proper breakfast burrito. A 12-inch tortilla is easier if you like a generous filling or are still learning to fold tightly. Smaller tortillas usually crack, tear, or leave the ends open.

Do breakfast burritos need potatoes or hash browns?

Potatoes are not required, but they make breakfast burritos more filling and give the inside better texture. Diced potatoes, shredded hash browns, hash brown patties, tater tots, and leftover roasted potatoes all work.

How do you keep breakfast burritos from getting soggy?

The biggest fix is moisture control. Let hot fillings cool before wrapping, use cheese as the first layer, and keep watery salsa, sour cream, avocado, raw tomato, and wet sauces on the side if the burritos are going into the fridge or freezer.

Should salsa go inside a breakfast burrito?

A small spoonful of salsa can go inside a fresh burrito. For freezer burritos, keep salsa on the side and add it after reheating so the tortilla does not turn wet.

How do you fold a breakfast burrito?

Warm the tortilla first, place the filling in a narrow strip, fold the sides inward, pull the bottom flap over the filling, tuck it tightly, and roll forward. Then, toast seam-side down to help seal it.

Should you toast a breakfast burrito?

Toasting improves the texture and helps seal the fold. Place the burrito seam-side down in a skillet and cook for 1–2 minutes per side until the outside is lightly golden.

How long do breakfast burritos last in the fridge?

Breakfast burritos keep well in the refrigerator for 3–4 days when wrapped and stored in an airtight container. After reheating, add fresh toppings like avocado, sour cream, or salsa.

How do you freeze breakfast burritos?

Cool the fillings first, assemble the burritos without wet toppings, wrap each one tightly in parchment or foil, then place them in a freezer bag or airtight container. Label with the date and use within 2–3 months for best texture.

What should you leave out of freezer breakfast burritos?

Leave out fresh avocado, guacamole, sour cream, watery salsa, pico de gallo, lettuce, and raw tomato. These are better added after reheating because they can turn watery or mushy in the freezer.

How do you reheat frozen breakfast burritos?

The fastest method is to remove the foil, wrap the burrito in a paper towel, defrost it in the microwave at 50% power, and then heat until hot. For better texture, warm it first and then crisp it in a skillet. When reheating several burritos, the oven gives more even heat.

How do you make a high-protein breakfast burrito?

Use more eggs or egg whites, add black beans, choose turkey sausage, chicken sausage, steak, tofu scramble, or cottage cheese-enriched eggs, and use a higher-fiber tortilla. Keep the potatoes if you still want it to feel like a real breakfast burrito.

How do you make a vegetarian breakfast burrito?

Use scrambled eggs, black beans or pinto beans, crisp potatoes or hash browns, sautéed peppers and onions, cheese, and salsa. Together, beans and potatoes keep the burrito filling even without meat.

What sauce is best for breakfast burritos?

Salsa, hot sauce, chipotle crema, avocado crema, green chile sauce, and sour cream lime sauce all work well. For freezer burritos, serve sauce on the side or add it after reheating.

What is the difference between a breakfast burrito and a breakfast wrap?

A breakfast burrito is usually larger, fuller, and folded closed, often with eggs, potatoes, cheese, and a hearty filling. A breakfast wrap is often lighter, flatter, and easier to toast with fewer fillings.

Posted on Leave a comment

Protein Packed Millet Cutlets- Easy Vegetarian Recipe

Cutlets originally was derived from the French favourite cotelette, which evolved into ‘cutlet’ in English. It referred to a thin slice of meat, typically taken from the leg or rib section of the animal. This meat was often breaded and fried, creating a crispy and a flavorful dish. 

Cutlets have had quite a history. It came to English shores around 1700s. During those times, dishes with potatoes were considered a novelty. It was introduced in India by the Britishers around 1800s. Thanks to their love for French cooks. When the British came to Bengal, Lord William Amherst started cultivation of potatoes in India. Around those times, the colonial cooks mashed up boiled potatoes and mixed up minced meat to make the neat cutlet.

For the initial years, cutlet remained the privy of the British occupied spaces. Gradually, it made its way to commercial places which even included railway towns and mining colonies. It became so common that even leftover sabjis found its way into becoming a cutlet. 

Among several cutlet recipes, this is the one I enjoy the most because, first of all, it is a fuss free recipe, its healthy, gluten free, a flavor bomb and most importantly they are not deep fried. This can be served as an evening snack or in breakfast. Since it is not deep fried and are gluten free, they are also light on you stomach. These are especially great for all the picky little eaters. My little one gobbled them in no time. 🙂

These can also be stuffed inside toasted bread slices. Use your favourite dressing, top it with lettuce, tomato and onions and enjoy a wholesome meal.

Recipe: makes 6 cutlets

Ingredients 

  • 2, boiled Potatoes
  • 1/2 cup Indian Cottage Cheese or Paneer
  • 2 tbsps, finely chopped Onion
  • Handful of Mint Leaves and Coriander Leaves
  • 1 tbsp grated, Ginger
  • 3 tbsps, Millet flour (I used Finger Millet/Ragi Flour)
  • 1 tsp, Dhania or Coriander powder 
  • A pinch, Garam Masala
  • 1/4th tsp Red Chilli powder (optional)
  • 1/2 tsp, Jeera or Roasted Cumin powder
  • 1/2 tsp Amchoor or Raw Mango powder
  • Salt to taste
  • Oil/Ghee to cook

Instructions

  • Mash boiled potatoes in a bowl. To it add grated paneer/cottage cheese, onions, mint and coriander leaves and ginger. These herbs give an amazing flavor.
  • Now, add all the spices- coriander powder, cumin powder, red chilli powder, raw mango powder, garam masala and salt.
  • In a pan, add millet flour and roast on low flame till it is fragrant. It should take you roughly 2-3 minutes. Keep stirring continuously. Once the flour has roasted well, add it to the potato mixture.
  • Mix everything very well and form a soft dough. If it feels sticky, you can add more flour. Check for seasoning. Once ok, give it a desired shape. Keep aside
  • Heat a griddle or tawa on a medium heat. Add a tbsp of oil/ghee. When the oil is hot, gently place the cutlets on the griddle or tawa.
  • Fry them for 2-3 minutes each side till it gets golden brown on both sides. Do that on a low flame, so that it cooks well from inside.
  • Serve it with green chutney or ketchup.

Enjoy!!

Protein Content:

  • Paneer: 10 grams
  • Potatoes (Large): 5 grams
  • Millet (Ragi flour): 5 grams

Total Protein: 20 grams

Notes:

  • You can also use poha/flattened rice flour in place of millets. Just grind raw and dry poha to a powder and use it in place of ragi. Just make sure the poha powder is fine, otherwise the mixture will turn crumbly.
  • Quantity of flour may change depending on the kind of potatoes or the moisture level in your cooked potatoes.
  • You can also add vegetables of your choice here, like, shredded carrots, cabbage, boiled peas, spinach.
Posted on 5 Comments

Healthy Hung Curd Spinach Cheese Sandwich- Easy Vegetarian Protein Recipe

I normally avoid having commercial bread loaves on a regular basis. But once in every few days, we all crave for sandwiches. They are so versatile that everyone loves them. So, when that craving strikes, I try my best to add as much nutrition as I can.

I still remember when my child was 5 years old, he asked me before bedtime, if he can have cheese sandwich with 5 leaves of spinach for breakfast. 😄 The request was made so sweetly, I had to oblige. This was the time he tasted his first hung curd sandwich. He is 10 now and these are still his all time favourite.

This can be your easy peasy laid back weekend breakfast. Hung curd sandwiches are so easy to whip up. If you are looking for a veg sandwich recipe with high protein without mayonnaise, try these – a healthier take with the same creaminess level. These yogurt sandwiches are packed with probiotics from the curd & essential fiber, vitamins and minerals from spinach & herbs.

This recipe is very basic & is vegetarian but you can easily transform it to egg or chicken yogurt sandwich for more protein. 

Greek yogurt also known as Hung curd is nothing but strained yogurt. It is simply homemade yogurt that has been strained off the whey to get a thick and creamy product.

Hung curd can be a great healthy, low calorie substitute for mayonnaise, cream cheese or sour cream. 

I have made it using just spinach. You can use other finely chopped fresh vegetables like carrots, cabbage, onions, capsicum. Use herbs of your choice- mint, coriander, parsley, sweet basil. Sky is the limit! Customise this Yogurt Sandwich Recipe the way you want it.

Recipe

Prep time: 10 minutes Cook time: 5 minutes 
Serving: 5

Ingredients

  • 1 cup Hung curd
  • 1 cup tightly packed Spinach
  • 10 slices Bread (I used wholewheat bread)
  • 1 tbsp Butter 
  • 1 tsp Olive oil
  • Salt and pepper to taste
  • 5 cloves, chopped of garlic
  • 1/4th tsp Oregano 
  • Red Chilli flakes to taste
  • 3/4th cup Mozzarella cheese (optional)

Instructions

  • In a pan, heat butter & olive oil.  Add chopped garlic. Sauté till rawness goes. Now add roughly chopped spinach leaves. Sprinkle a pinch of salt and cook till spinach shrinks and water evaporates. 
  • Allow it to cool a little. Add spinach in hung curd and mix well. Add black pepper, oregano, salt & chilli flakes. Give a good mix. 
  • Take 2 bread slices. Spread hung curd mix generously on one slice. Add some mozzarella cheese on it and top it with another slice. 
  • You can either grill it in a griller or cook it in a pan using a little butter. If cooking in a pan/griddle, cook on a low flame so that the cheese melts. 
  • If using an air fryer, place the prepared sandwich in the air fryer basket or rack. Brush it with some butter. Air fry for 2 to 3 mins at 360 F or 180 C.

Notes:

If you do not have Greek Yogurt/ hung curd, add regular curd to a cheese/ muslin cloth and squeeze it gently to remove excess whey. You can do this the previous night and also hang it in the refrigerator.

Enjoy 😊