Posted on — 3 Comments

Indian Falafel: 6 Masala, Palak, Aloo, Paneer & Curry Leaf Twists

Six Indian falafel variations including Masala Chana, Methi-Palak, Aloo Tikki Chaat, Paneer Bhurji-Stuffed, Curry Leaf and Daal Bati Falafel.

At its most familiar, falafel starts with soaked chickpeas, herbs and spices, pulsed to a coarse crumb and cooked until the outside turns crisp while the middle stays tender. That basic idea fits surprisingly well into an Indian kitchen, where cumin, coriander, green chilli, ginger, amchur, chaat masala and chutneys already feel at home.

The recipes here take that starting point in six different directions. Masala Chana stays closest to classic falafel; Methi-Palak goes greener and softer; Aloo Tikki turns flat and chaat-ready; Paneer Bhurji becomes a filling rather than part of the shell; Curry Leaf brings mustard, ginger and coconut chutney into the picture; and Daal Bati deliberately leaves chickpea falafel furthest behind.

You do not need to cook them all the same way, either. Some want hot oil, one wants the broad crust of a frying pan, two sit happily in an appe/paniyaram pan, and the Daal Bati version belongs in the oven.

Table of Contents

Choose Your Indian Falafel

If you already know what sounds good, use the first column to jump straight to that recipe. If not, the texture and cooking method usually make the decision easier.

FalafelWhat it is likeBest methodBest with
Masala ChanaWarm, tangy and crisp, with a coarse chickpea centreFry or air-fryGreen chutney, cumin yogurt, pav or pita
Methi-PalakGreen, herbaceous and tender with a sesame crustAppe/paniyaram pan or air fryerCreamy dip, beet-carrot salad
Aloo TikkiCrisp outside, soft inside and built for chaatShallow-fryYogurt, green chutney, tamarind, sev
Paneer Bhurji-StuffedCrisp chickpea shell with a soft spiced paneer centreFryKachumber, pickled onion, roti
Curry LeafFragrant, peppery and coarse, with ginger and mustardFry or appe/paniyaram panCoconut-coriander chutney
Daal BatiEarthy, firm and rustic with a cracked bati-like crustBakeGreen chutney, onion, lemon, ghee

What Makes a Good Falafel Base?

For the Masala Chana, Methi-Palak, Paneer-Stuffed and Curry Leaf recipes, begin with dried chickpeas soaked in plenty of cold water for 8–12 hours or overnight in the refrigerator. Drain and rinse well before using. The Aloo Tikki version is different on purpose: cooked chickpeas suit the softer potato-based texture we want there.

Dry ingredients before adding more flour. Wet chickpeas or greens lead to more besan, and more besan can make falafel dense. This matters most with spinach: squeeze blanched palak until it feels almost surprisingly dry.

Pulse; do not purée. Falafel mixture should resemble coarse crumbs rather than hummus. A small handful may look loose in the bowl but should hold when firmly compressed.

Add besan cautiously. Start small and adjust only when the mixture genuinely needs help holding together.

For traditional falafel technique, classic serving ideas, baking and deeper air-fryer guidance, see our complete homemade falafel recipe.


1. Masala Chana Falafel

Masala Chana stays closest to familiar falafel: crisp outside, coarse within, but warmer with garam masala and cumin and a little sharper from amchur. Keep the garam masala measured so the chickpeas, coriander and garlic still come through.

Golden Masala Chana falafel balls with green chutney and cumin yogurt

Yield: about 14–16 falafel
Soaking: 8–12 hours or overnight in the refrigerator
Active prep: about 20 minutes
Chilling: 30 minutes
Cooking: about 15 minutes total, 4–5 minutes per fried batch

Ingredients

  • 1 cup (about 200 g) dried chickpeas
  • ½ medium onion, roughly chopped
  • 3 garlic cloves
  • ¾ cup loosely packed fresh coriander
  • 1 green chilli
  • 1 teaspoon ground cumin
  • 1 teaspoon ground coriander
  • ¾ teaspoon garam masala
  • ½ teaspoon amchur
  • ¼ teaspoon Kashmiri chilli powder, optional
  • 1 teaspoon fine salt, or to taste
  • 1 tablespoon besan, plus more only if needed
  • ½ teaspoon baking powder
  • Neutral oil, for frying

Method

  1. Soak the chickpeas as described above, then drain, rinse and pat away obvious surface moisture.
  2. Add chickpeas, onion, garlic, coriander and green chilli to a food processor. Pulse in short bursts until the mixture resembles coarse crumbs.
  3. Transfer to a bowl and mix in cumin, ground coriander, garam masala, amchur, chilli powder if using, salt and 1 tablespoon besan.
  4. Squeeze a spoonful firmly in your palm. It should hold together. If it is genuinely wet or still breaks after compression, add a little more besan.
  5. Cover and refrigerate for 30 minutes.
  6. Stir in the baking powder, then shape into 14–16 compact balls.
  7. Heat frying oil to about 170–175°C / 340–350°F. Fry one test falafel first. If it holds, cook the remaining falafel in small batches for about 4–5 minutes, until deeply golden and crisp.

Air-Fryer Option

Shape the falafel slightly flatter than perfect spheres, brush or spray the surfaces with oil and air-fry at 190°C / 375°F for about 12–15 minutes, turning halfway. Start checking early toward the end rather than relying only on the clock.

Serve with: coriander-mint green chutney and cumin yogurt. These also work beautifully in pav, pita or on a mezze plate with homemade hummus.


2. Methi-Palak Falafel with Mint & Coriander

Spinach turns these falafel unmistakably green, but methi is what gives them character. Mint and coriander keep the flavour fresh, while sesame adds nuttiness and a light crust around the outside.

The important step is simple: squeeze the spinach properly dry. Not casually dry. Not “I shook the colander twice” dry. Properly dry.

Green Methi-Palak falafel balls with sesame seeds, beetroot and carrot salad

Yield: about 14 small falafel
Soaking: 8–12 hours or overnight in the refrigerator
Active prep: about 25 minutes
Chilling: 30 minutes
Cooking: about 12 minutes

Ingredients

  • 1 cup (about 200 g) dried chickpeas
  • 60 g fresh spinach
  • ½ cup loosely packed fresh methi leaves
  • ½ cup fresh coriander
  • ¼ cup mint leaves
  • ¼ small onion
  • 2 garlic cloves
  • 1 green chilli
  • ¾ teaspoon ground cumin
  • ½ teaspoon ground coriander
  • ½ teaspoon amchur
  • Tiny pinch of nutmeg, optional
  • 1 teaspoon fine salt
  • 1 tablespoon besan, plus more only if required
  • ½ teaspoon baking powder
  • 2 tablespoons white sesame seeds
  • Oil, for cooking

Method

  1. Soak, drain and rinse the chickpeas as described above.
  2. Blanch the spinach for about 30–60 seconds, just until wilted. Cool immediately, then squeeze firmly until very little liquid comes out.
  3. Add chickpeas, squeezed spinach, methi, coriander, mint, onion, garlic and green chilli to a food processor. Pulse to a coarse green mixture rather than a paste.
  4. Mix in cumin, ground coriander, amchur, nutmeg if using, salt and 1 tablespoon besan.
  5. Chill for 30 minutes, then stir in the baking powder. Add a little more besan only if a firmly compressed portion will not hold.
  6. Shape into small round falafel and lightly roll or press each one in sesame seeds.

Appe/Paniyaram Pan Method

Brush the cavities lightly with oil. Add one falafel per cavity and cook over medium to medium-low heat, rotating as each surface firms. Cook until the falafel feels firm through the centre and no longer looks wet or pasty when one is broken open, usually around 10–12 minutes for small falafel.

Air-Fryer Option

Brush or mist lightly with oil and air-fry at 190°C / 375°F for about 12–14 minutes, turning once. Check early toward the end: small green falafel can dry out quickly.

Serve with: a creamy yogurt or coconut-yogurt dip, shredded beetroot, shredded carrot, coriander and lemon. That presentation also stays true to the vivid green falafel already shown in the article.


3. Aloo Tikki Falafel Chaat

Aloo tikki pulls this variation away from classic falafel in exactly the right direction. Cooked chickpeas keep the connection, potato gives the centre its softness, and ajwain, cumin, amchur and chaat masala take it straight toward North Indian street food.

Aloo Tikki falafel chaat with yogurt, green chutney, sev and pomegranate

Yield: 8 medium tikkis
Prep: about 25 minutes
Optional chilling: 20–30 minutes
Cooking: about 16 minutes total, around 8 minutes per batch

Ingredients for the Tikkis

  • 300 g boiled potatoes, cooled completely
  • 150 g cooked chickpeas, drained and dried well
  • 1 green chilli, finely chopped
  • 3 tablespoons chopped fresh coriander
  • ¾ teaspoon roasted cumin powder
  • ½ teaspoon ground coriander
  • ¾ teaspoon chaat masala
  • ½ teaspoon amchur
  • ¼ teaspoon ajwain, lightly crushed
  • ¼–½ teaspoon Kashmiri chilli powder, optional
  • ¾ teaspoon salt, or to taste
  • 2 tablespoons cornflour/cornstarch or rice flour
  • 1–2 tablespoons besan only if additional binding is needed
  • Oil, for shallow-frying

Method

  1. Use completely cooled potatoes. Coarsely crush the cooked chickpeas and mash the potatoes until mostly smooth but not gluey.
  2. Combine potatoes and chickpeas with green chilli, coriander, cumin, ground coriander, chaat masala, amchur, ajwain, chilli powder if using, salt and cornflour.
  3. Mix gently until the mixture holds together. Divide into eight portions and shape into broad patties about 1.5 cm thick.
  4. If the tikkis feel very soft, refrigerate for 20–30 minutes. If they are still too fragile after chilling, work a small amount of besan into the mixture.
  5. Heat a thin layer of oil in a heavy frying pan over medium heat.
  6. Cook the tikkis for about 3–4 minutes on the first side without constantly moving them. Flip once a proper crust has formed, then brown the second side.

Turn Them into Falafel Chaat

For all eight hot tikkis, have ready:

  • 1 cup plain yogurt, whisked smooth
  • 6 tablespoons green coriander-mint chutney
  • 4–6 tablespoons tamarind chutney
  • ½ small red onion, finely chopped
  • 4–6 tablespoons fine sev
  • 4 tablespoons pomegranate arils
  • Chaat masala
  • Chopped coriander

Arrange the hot tikkis on a plate, spoon over yogurt, then add green chutney and tamarind chutney. Finish with onion, sev, pomegranate, chaat masala and coriander. Serve immediately, while the tikki is still hot and crisp underneath the cool, tangy toppings.

Air-fryer option: brush both sides with oil and air-fry at 190°C / 375°F, turning once, until browned and firm. Start checking around 12 minutes. Shallow-frying still gives the more characteristic tikki crust.


4. Paneer Bhurji-Stuffed Falafel

Paneer works better here as a surprise in the centre than blended through the chickpea mixture. Keep the shell coarse and chickpea-heavy, then tuck a dry, fragrant paneer bhurji inside so the contrast is obvious when you cut one open.

Paneer bhurji-stuffed falafel cut open to show the spiced paneer filling

Yield: about 10–12 stuffed falafel
Soaking: 8–12 hours or overnight in the refrigerator
Active prep: about 30 minutes
Chilling: 30 minutes
Cooking: about 12 minutes total, 5–6 minutes per fried batch

For the Falafel Shell

  • 1 cup (about 200 g) dried chickpeas
  • ½ small onion
  • 3 garlic cloves
  • ½ cup fresh coriander
  • 1 green chilli
  • ¾ teaspoon ground cumin
  • ½ teaspoon ground coriander
  • ½ teaspoon garam masala
  • ¾ teaspoon fine salt
  • 1 tablespoon besan, plus more only if required
  • ½ teaspoon baking powder

For the Paneer Bhurji Filling

  • 100 g paneer, finely crumbled
  • 1 teaspoon oil or ghee
  • 1 teaspoon finely grated ginger
  • ½ green chilli, finely chopped
  • ¼ teaspoon turmeric
  • ½ teaspoon garam masala
  • ½ teaspoon kasuri methi, crushed
  • Small pinch of salt
  • 1 teaspoon lemon juice

Method

  1. Heat 1 teaspoon oil or ghee in a small pan. Add ginger and green chilli and cook briefly until aromatic.
  2. Add paneer, turmeric, garam masala, kasuri methi and salt. Cook for a few minutes until fragrant and deliberately fairly dry. Remove from the heat, stir in lemon juice and cool completely.
  3. Soak, drain and rinse the chickpeas as described above. Pulse them with onion, garlic, coriander and green chilli until coarse and crumbly.
  4. Mix in cumin, ground coriander, garam masala, salt and 1 tablespoon besan. Refrigerate for 30 minutes.
  5. Stir in the baking powder. If the shell mixture will not hold when firmly compressed, add a little more besan.
  6. Take roughly 2 tablespoons of falafel mixture and flatten it in your palm. Put about 1½–2 teaspoons of cooled paneer filling in the middle.
  7. Bring the chickpea mixture completely around the filling. Pinch any cracks closed and shape into a thick ball or slightly flattened oval. Keep the paneer completely enclosed.
  8. Fry at about 170–175°C / 340–350°F for roughly 5–6 minutes, until the shell is deeply golden and crisp.

Serve with: soft whole-wheat roti, kachumber, pickled red onion, coriander and lemony yogurt. If you want to make the filling from scratch, our guide to making paneer at home is useful here.


5. Curry Leaf Falafel with Mustard, Ginger & Green Chilli

Curry leaves change the aroma immediately. Ginger and green chilli bring a very different sort of heat from garam masala, while cumin, coriander and a small mustard tempering push the flavour toward South Indian pulse snacks without turning the recipe into a renamed vada.
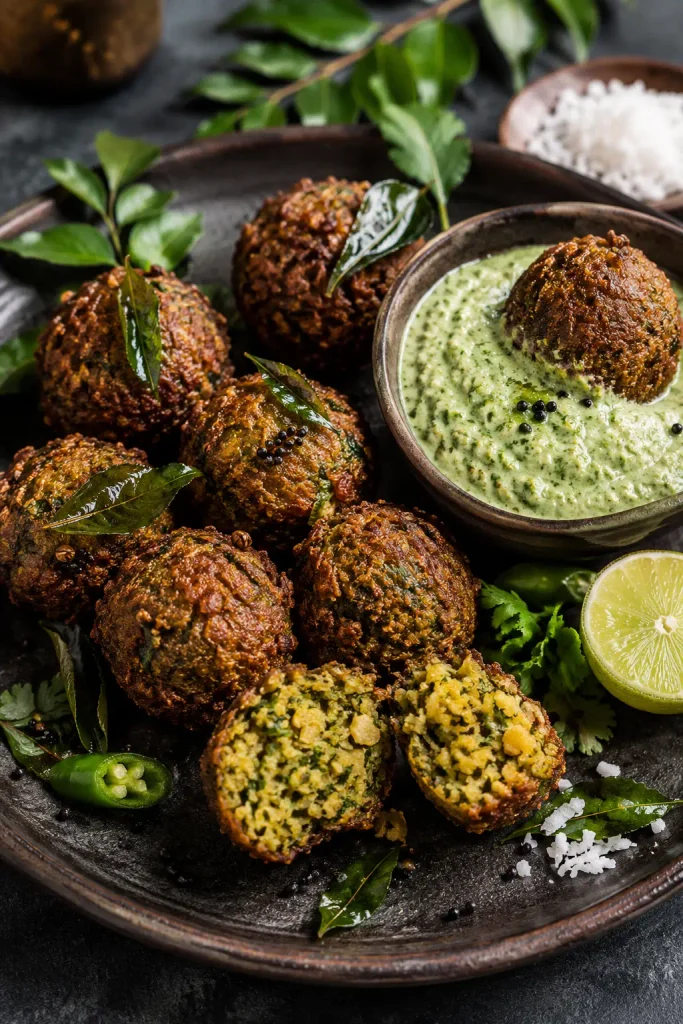
Curry leaf falafel with crisp curry leaves, mustard seeds and coconut-coriander chutney

Yield: about 14 falafel
Soaking: 8–12 hours or overnight in the refrigerator
Active prep: about 20 minutes
Chilling: 30 minutes
Cooking: about 10 minutes total, 4–5 minutes per fried batch

Ingredients

  • 1 cup (about 200 g) dried chickpeas
  • ½ small onion
  • 3 garlic cloves
  • 2.5 cm / 1 inch fresh ginger
  • 1–2 green chillies
  • 15 fresh curry leaves
  • ½ cup fresh coriander
  • ½ teaspoon cumin seeds
  • ½ teaspoon coriander seeds
  • ¼ teaspoon black mustard seeds
  • 1 teaspoon neutral oil, for tempering the mustard
  • ¼ teaspoon freshly ground black pepper
  • Small pinch of hing, optional
  • 1 teaspoon fine salt
  • 1 tablespoon besan, plus more only if needed
  • ½ teaspoon baking powder
  • 2 tablespoons desiccated coconut, optional
  • Neutral oil, for cooking

Method

  1. Soak, drain and rinse the chickpeas as described above.
  2. Toast the cumin and coriander seeds briefly in a dry pan until aromatic. Cool, then crush roughly.
  3. Heat 1 teaspoon neutral oil in the same small pan. Add the mustard seeds and let them crackle. Remove from the heat and cool.
  4. Add chickpeas, onion, garlic, ginger, green chilli, curry leaves and coriander to a food processor. Pulse until coarse.
  5. Mix through the toasted spices, cooled mustard tempering, black pepper, hing if using, salt, 1 tablespoon besan and desiccated coconut if using.
  6. Chill for 30 minutes, then stir in baking powder. Add a little more besan only if a compressed portion will not hold.
  7. Shape into about 14 compact falafel.
  8. Fry at 170–175°C / 340–350°F for about 4–5 minutes, until golden and crisp.

Appe/paniyaram pan option: oil the cavities lightly and cook over medium to medium-low heat, rotating the falafel as each side firms and browns.

Serve with: coconut-coriander chutney, lemon and a few crisp fried curry leaves. The creamy coconut softens the chilli and mustard without hiding the curry-leaf aroma.


6. Daal Bati Falafel

Daal Bati is the outlier of the six, and it should be. Instead of copying the coarse chickpea interior of classic falafel, it leans into lentils, atta, ajwain and ghee. The result is firmer and more rustic, with the cracked golden surface of a tiny bati.

Baked Daal Bati falafel with cracked golden crust, green chutney and onion salad

Yield: about 10–12 small bites
Prep: about 25 minutes
Resting: 15 minutes
Baking: about 25 minutes

Ingredients

  • ½ cup total dry dal, using roughly equal amounts moong dal, masoor dal and urad dal; cook and drain well, then measure 1 cup for the dough
  • 1 cup (about 120 g) whole-wheat flour, plus more if required
  • 2 tablespoons fine semolina/sooji
  • 2 tablespoons melted ghee or mustard oil
  • ½ teaspoon ajwain, lightly crushed
  • ¼ teaspoon cumin
  • Small pinch of hing
  • 1 green chilli, very finely chopped
  • ½ teaspoon grated ginger
  • ¼ teaspoon turmeric
  • ¾ teaspoon salt, or to taste
  • Water only if required
  • A little additional ghee for brushing, optional

Method

  1. Cook the ½ cup mixed dry dals until tender but not watery. Drain very thoroughly, then measure 1 cup of cooked dal for the dough. Reserve any extra.
  2. Mash the drained dal coarsely.
  3. Add whole-wheat flour, semolina, ghee or mustard oil, ajwain, cumin, hing, green chilli, ginger, turmeric and salt.
  4. Bring everything together into a firm dough. If sticky, add whole-wheat flour 1 tablespoon at a time. If too dry to hold, add water 1 tablespoon at a time.
  5. Rest for 15 minutes while the oven heats to 200°C / 400°F.
  6. Divide into 10–12 small balls. Leave a slightly rugged surface rather than smoothing every crack away.
  7. Arrange on a baking tray, brush lightly with ghee or oil and bake for 22–28 minutes, turning once, until browned and firm outside.
  8. If desired, brush the hot bites very lightly with ghee as soon as they leave the oven.

Serve with: green chutney, sliced onion, carrot or cucumber and lemon wedges. Because this recipe contains atta, it is not gluten-free. If finished with ghee, it is not vegan either; mustard oil keeps the bites themselves plant-based.


Which Cooking Method Works Best?

The best cooking method changes with the mixture. A chickpea ball wants something different from a soft potato tikki or an atta-and-dal bite.

MethodBest forWhat to expect
Deep-fryingMasala Chana, Paneer-Stuffed, Curry LeafDeepest colour and crispest falafel-style crust
Shallow-fryingAloo TikkiBroad golden crust with a soft potato-chickpea centre
Air fryerMasala Chana, Methi-Palak, Aloo TikkiGood browning with less oil; slightly drier than frying
Appe/paniyaram panMethi-Palak, Curry LeafSmall rounded bites with low oil and good support while cooking
OvenDaal BatiFirm, rustic, bati-like crust rather than a fried falafel shell

For the chickpea-heavy versions, frying gives the clearest contrast between crisp exterior and coarse interior. For Aloo Tikki, broad contact with a hot pan is the point. Methi-Palak benefits from the support of an appe/paniyaram pan, while Daal Bati belongs in the oven. Use the method that suits the texture of each variation rather than forcing every recipe into every appliance.

More Indian Ways to Serve Falafel

Falafel Chaat

Put several hot Masala Chana or Methi-Palak falafel on a plate and lightly crack them open. Add whisked yogurt, green chutney, tamarind chutney, finely chopped red onion, chaat masala, sev, pomegranate and coriander. Assemble just before eating so the base keeps some crunch.

Falafel Pav

Split and toast pav with a little butter or oil. Spread one side with green chutney and the other with tamarind chutney. Add a slightly flattened Masala Chana Falafel, sliced onion and something crisp such as cucumber or cabbage. A little chaat masala over the filling ties it together.

Paneer-Stuffed Falafel Roti Roll

Warm a soft roti and add sliced Paneer Bhurji-Stuffed Falafel, kachumber, pickled onion, coriander and lemony yogurt. Because the paneer is already inside, the wrap does not need another heavy filling.

Indian-Style Mezze Plate

Try Masala Chana Falafel with hummus, cucumber, kachumber, pickled onions, green chutney, lemon and warm flatbread. If you are making the bread too, use our homemade pita bread recipe. For a sharper mango-pickle note, a spoonful of amba sauce fits naturally beside falafel and hummus.

Falafel Bowl

Start with rice, millet, couscous or chopped salad. Add falafel, cucumber, tomato, onion and something creamy such as hummus or yogurt. Then choose one strong Indian accent—green chutney, tamarind, achar, chaat masala or coconut chutney—rather than using every condiment at once.

Fixing These Indian Falafel Variations

ProblemLikely causeFix
Masala or Curry Leaf falafel breaks in oilMixture too wet, too loose or oil too coolDrain thoroughly, compress firmly, fry one tester and add a little besan only if needed
Methi-Palak falafel is soggySpinach retained too much waterSqueeze blanched spinach much more thoroughly before processing
Paneer falafel cracks openWet filling, too much filling or paneer too close to the surfaceCook bhurji drier, cool completely and use a smaller amount
Aloo Tikki sticks or breaks when flippedTurned before the crust formedLeave it undisturbed longer and flip only when it releases more easily
Air-fried green falafel is dryToo little surface oil or too much cooking timeLightly oil and begin checking earlier
Daal Bati mixture is stickyCooked dal retained too much waterDrain longer and add atta gradually rather than dumping in a large amount

If the first chickpea falafel disintegrates, stop there. One tester is enough to tell you whether the mixture needs drying, firmer shaping or hotter oil.

Make Ahead, Store & Freeze

Masala Chana and Curry Leaf: the mixture can be prepared ahead and refrigerated, with baking powder stirred in shortly before shaping and cooking.

Methi-Palak: shorter holding is better because fresh greens continue releasing moisture as they sit.

Paneer-Stuffed: prepare the dry paneer bhurji and chickpea shell mixture separately, refrigerate them, then stuff closer to cooking.

Aloo Tikki: shape the patties, freeze in a single layer until firm, then transfer to a freezer-safe container with parchment between layers if stacking.

Daal Bati: bake, cool and refrigerate. Reheat in a hot oven or air fryer to restore the firmer exterior.

For broader freezing and reheating guidance for classic chickpea falafel, see the full falafel guide.

Indian Falafel FAQs

Can you put garam masala in falafel?

Yes. Classic falafel already uses spices such as cumin and coriander, so a restrained amount of garam masala fits naturally. In the Masala Chana version, it adds an Indian finish without masking the chickpeas and fresh herbs.

Which Indian chutney goes best with falafel?

Coriander-mint green chutney is the most versatile choice for Masala Chana, Methi-Palak and Paneer-Stuffed Falafel. Tamarind works particularly well with Aloo Tikki Falafel Chaat or falafel pav, while coconut chutney makes the most sense beside Curry Leaf Falafel.

Can I make falafel in an appe or paniyaram pan?

Yes. It is particularly useful for Methi-Palak and Curry Leaf Falafel because the cavities support the mixture while each surface cooks. Brush the cavities with a little oil and rotate the falafel as they firm and brown.

Why is my spinach falafel soggy?

Usually because the spinach contains too much water. After blanching, cool it and squeeze aggressively before adding it to the chickpeas. Removing moisture is preferable to compensating later with a large amount of besan.

Can falafel be made with moong dal?

Yes, but replacing chickpeas with another pulse changes both texture and technique. Whole or split moong can make excellent falafel-inspired fritters and patties, but it should be treated as its own formulation rather than a blind one-for-one substitution.

How do you make falafel chaat?

Put hot falafel or Aloo Tikki Falafel on a plate and add whisked yogurt, green chutney, tamarind chutney, onion, chaat masala, sev, pomegranate and coriander. Assemble just before serving so some of the crust stays crisp.

Can paneer be added to falafel?

Yes. Stuffing works particularly well because the paneer remains a distinct soft centre rather than changing the texture of the entire chickpea mixture. Keep the bhurji fairly dry and cool it completely before stuffing.

Which Indian falafel works best in an air fryer?

Masala Chana is the easiest starting point. Methi-Palak also works well, but check it early because small green falafel can dry out. Aloo Tikki can be air-fried, although shallow-frying gives the more characteristic crust. Daal Bati belongs in the oven, and frying remains the most reliable method for the stuffed paneer version.
Posted on — 5 Comments

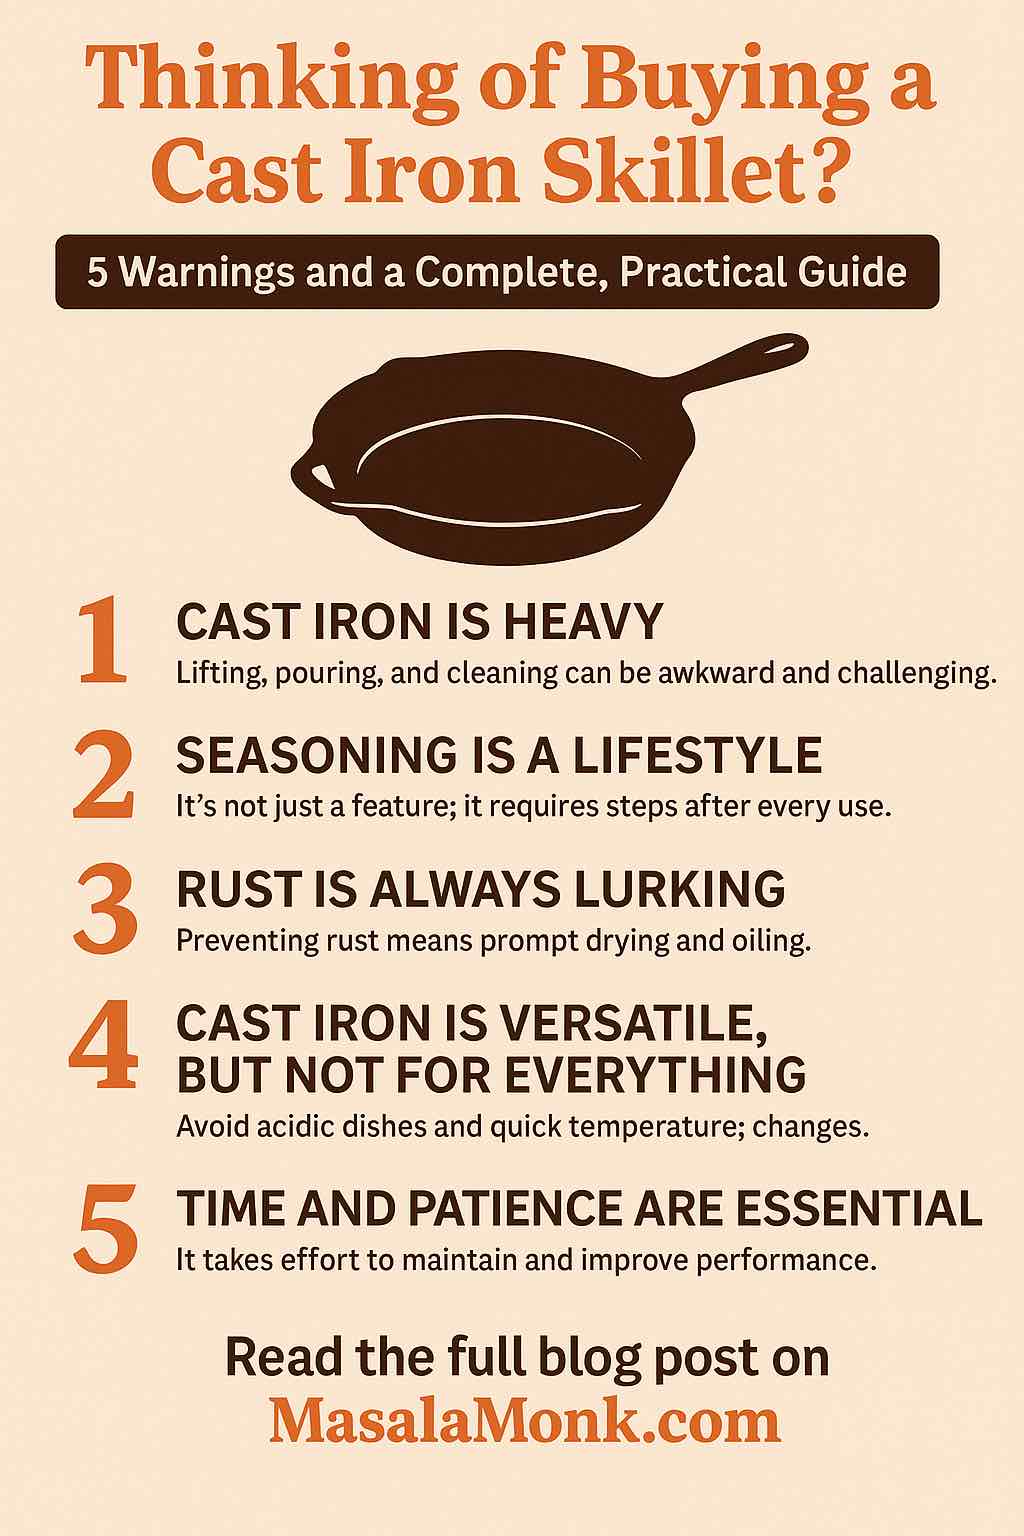
Buying a Cast Iron Skillet? 5 Warnings Before You Invest

Cast Iron Skillet - 5 Warnings

Cast iron skillets have an almost mythical status in the kitchen. People talk about them being “forever pans,” capable of making the best steak or cornbread of your life. But cast iron, for all its hype, isn’t for everyone—and even seasoned cooks sometimes get tripped up by classic mistakes.
If you’re considering buying your first (or next) cast iron skillet, read on. This post goes well beyond the marketing to give you real, practical advice—plus five honest warnings you need to know before making the commitment.


The Romance of Cast Iron—And the Reality

Owning a cast iron skillet feels like joining a secret club. The stories are true: with proper care, it can last generations, and it delivers incredible browning, searing, and oven-to-table versatility. But cast iron also requires a shift in habits. It’s not just a pan; it’s a relationship, and like all relationships, it comes with quirks you need to embrace—or at least understand.


1. Warning: Cast Iron Is Heavy—And That Matters More Than You Think

If you’re used to lightweight nonstick or stainless-steel pans, you may be surprised the first time you heft a cast iron skillet. These pans are solid metal, often weighing as much as a small bowling ball.
That heft is part of what makes cast iron great—it helps with heat retention and stability. But it can also make a difference in daily life:

  • Lifting and Pouring: Pouring off hot oil or moving a full skillet from stovetop to oven can be awkward or risky if you’re not prepared.
  • Cleaning: Scrubbing, rinsing, and drying a heavy, slippery pan isn’t trivial, especially if you have limited grip strength or wrist issues.
  • Storage: Cast iron pans take up space and can damage delicate surfaces if dropped or stacked carelessly.

Practical Tip:
Before you commit, try lifting a few pans in a store (if possible) or compare the weight to something you own. If you cook for just one or two people, consider a smaller skillet. Larger pans are great for volume but multiply the challenges.


2. Warning: Seasoning Isn’t One-and-Done—It’s a Lifestyle

One of the first things you’ll hear about cast iron is “seasoning.” This isn’t just a buzzword; it’s the heart of cast iron care.
Seasoning is a thin layer of polymerized oil that forms a protective, naturally nonstick coating on your skillet. While many pans are “pre-seasoned,” the reality is that maintaining and improving this seasoning is an ongoing responsibility.

What You’ll Actually Be Doing:

  • After Each Use: Rinse your pan promptly (avoid letting it soak), scrub away stuck-on bits (using coarse salt if needed), dry thoroughly, and rub on a very thin coat of cooking oil. Heat briefly to seal it in.
  • If Food Starts Sticking: It’s a sign your seasoning needs a boost. A few extra rounds of oiling and heating can help.
  • If Rust Appears: Don’t panic—rust can be scrubbed off and the pan re-seasoned.

Why This Matters:
Skipping these steps leads to rust, sticky food, or metallic flavors. Seasoning is a rhythm you get into—like making your bed or brushing your teeth.

Practical Tip:
Make seasoning a habit, not a chore. Keep a small bottle of oil near your stove and consider it part of the cooking process.


3. Warning: Cast Iron Isn’t for Everything—And That’s Okay

Cast iron is versatile, but it’s not a universal solution. There are foods and techniques that don’t play well with cast iron, especially with a newer or lightly-seasoned skillet:

  • Acidic Foods: Tomato sauce, vinegar, wine, and lemon juice can strip seasoning and cause off-flavors. Use another pan for these until your skillet is deeply seasoned.
  • Delicate Dishes: Eggs, fish, or pancakes may stick in a new pan until the seasoning is built up.
  • Quick-Change Cooking: Cast iron heats slowly and stays hot. If you’re making dishes that need fast temperature changes or precise control, another pan may be better.

Practical Tip:
Think of cast iron as a specialist—fantastic for searing, frying, baking, and roasting, but not the only pan you need. Let it excel at what it does best.


4. Warning: Rust Is Always Lurking—And It’s Your Job to Fight It

The flip side of cast iron’s durability is its vulnerability to moisture. Water is the enemy of cast iron.
Rust can show up overnight if a pan is left damp, air-dried, or stored in a humid environment. Even the most expensive or well-seasoned pan will rust if neglected.

How to Prevent Rust:

  • Always dry your skillet immediately after washing—ideally by heating it on the stove.
  • Store your pan in a dry place. If you live in a humid climate, consider placing a paper towel inside to absorb moisture.
  • Never put cast iron in the dishwasher or let it soak in the sink.

If Rust Appears:
Don’t panic. Scrub the rust with steel wool or a stiff brush, rinse, dry, and re-season. Rust is a setback, not a disaster.

Practical Tip:
Think of rust as feedback, not failure. If you see it, it just means the pan needs a little more attention. Fixing it is almost always possible.


5. Warning: Cast Iron Rewards the Patient—Not the Impulsive

The most beautiful thing about cast iron is how it gets better with time. Every meal, every oiling, every gentle scrub builds character and performance. But this is a long game.

  • Break-in Period: New pans are often a bit sticky, rough, or fussy. With regular use, they get smoother and slicker.
  • Appearance Changes: Don’t expect a glossy black patina immediately. Over months or years, your skillet will develop a deep, even finish and unique character.
  • Effort Up Front: The more you use and care for your skillet, the easier and better it gets.

Practical Tip:
Don’t be discouraged by imperfections or slow progress. Think of your skillet as something you grow with—it’s a tool and a project.


Beyond the Warnings: How to Get the Most Out of Your Cast Iron Skillet

Embrace Simplicity

Start with simple foods that help build seasoning and boost your confidence:

  • Fry bacon or sausages (the fat helps the pan).
  • Roast vegetables at high heat.
  • Try cornbread, biscuits, or skillet pizza.

Cleaning Simplified

  • Clean your skillet while it’s still warm—this makes removing residue easier.
  • Use hot water and a stiff brush. Avoid soap, or use it sparingly.
  • For stubborn spots, a paste of coarse salt and water works wonders.

Maintenance Routine

  • Oil lightly after every wash.
  • Heat briefly on the stove to finish drying and set the oil.
  • Store in a dry place, ideally with something between the pan and any lid to prevent moisture buildup.

Cooking Mastery

  • Preheat well: Allow the skillet to warm up for several minutes before adding food. This ensures even cooking and prevents sticking.
  • Don’t be afraid of high heat: Cast iron shines for searing and baking.
  • Let it cool gradually: Avoid shocking the pan with cold water or rapid temperature changes.

Mindset: It’s a Journey

  • The first months may include minor sticking, some uneven color, or a little rust. Don’t give up.
  • With use and patience, your skillet will become a prized tool, better than nonstick and longer lasting than stainless.

The Takeaway

Buying a cast iron skillet isn’t just about getting a new pan. It’s about adopting a time-tested way of cooking that values patience, care, and tradition. The rewards—superior flavor, deep browning, and a kitchen heirloom—are well worth the investment of time and a little effort.

Remember:

  • The weight is real—choose what you can handle.
  • Seasoning is a process, not a feature.
  • Use it for what it does best, and don’t force it for everything.
  • Rust is fixable—prevention is easier.
  • Cast iron is a journey, not a destination.

If you’re ready for a tool that grows with you, challenges you, and will one day be part of your family’s story, cast iron is a worthy investment. Treat it well, and it will repay you in unforgettable meals for decades to come.


Ready to begin? Let your cast iron journey start with knowledge, care, and confidence!

10 Cast Iron Skillet FAQs

1. Do I need to season my skillet if it says “pre-seasoned”?
Yes. Pre-seasoned skillets are ready to use, but regular seasoning after each use helps improve the nonstick surface and prevents rust. The more you cook (and oil it), the better it gets.

2. Why does food sometimes stick to my cast iron skillet?
Sticking can happen with new pans or if the seasoning is thin. Make sure the pan is well preheated, use enough oil, and keep building the seasoning layer over time. Acidic or watery foods may also loosen seasoning on newer skillets.

3. How do I clean my cast iron skillet after cooking?
Wipe out food residue while the pan is warm, rinse with hot water, scrub with a stiff brush (no soap or just a touch if needed), dry thoroughly, and lightly oil before storing.

4. What should I do if my cast iron skillet rusts?
Don’t worry! Scrub the rust off with steel wool or a stiff brush, rinse, dry completely, and re-season by applying a thin coat of oil and heating the pan.

5. Can I cook tomato sauce or other acidic foods in my cast iron?
Occasionally, yes—especially once the pan is well seasoned. Frequent or long cooking of acidic foods can strip seasoning, so use another pan for those until your skillet is well developed.

6. Is cast iron safe for all stovetops, including induction and glass?
Yes, but use care on glass or ceramic cooktops to avoid scratching or cracking the surface due to the pan’s weight and rough bottom.

7. How do I store my cast iron skillet to prevent rust?
Make sure it’s completely dry and lightly oiled. Store it in a dry place, with a paper towel or cloth inside to absorb moisture. Avoid putting the lid on tightly, which can trap humidity.

8. My skillet isn’t black and shiny yet—is that normal?
Absolutely. New or freshly re-seasoned pans often appear brown, gray, or matte. Over time, with regular use and oiling, it will darken and become glossy.

9. Can I use metal utensils with my cast iron skillet?
Yes. Metal spatulas, scrapers, and spoons won’t harm the seasoning. In fact, using them can help smooth out the surface over time.

10. Can I put my cast iron skillet in the dishwasher?
No. The dishwasher strips seasoning and encourages rust. Always wash by hand, dry right away, and re-oil before storing.

Posted on — 4 Comments

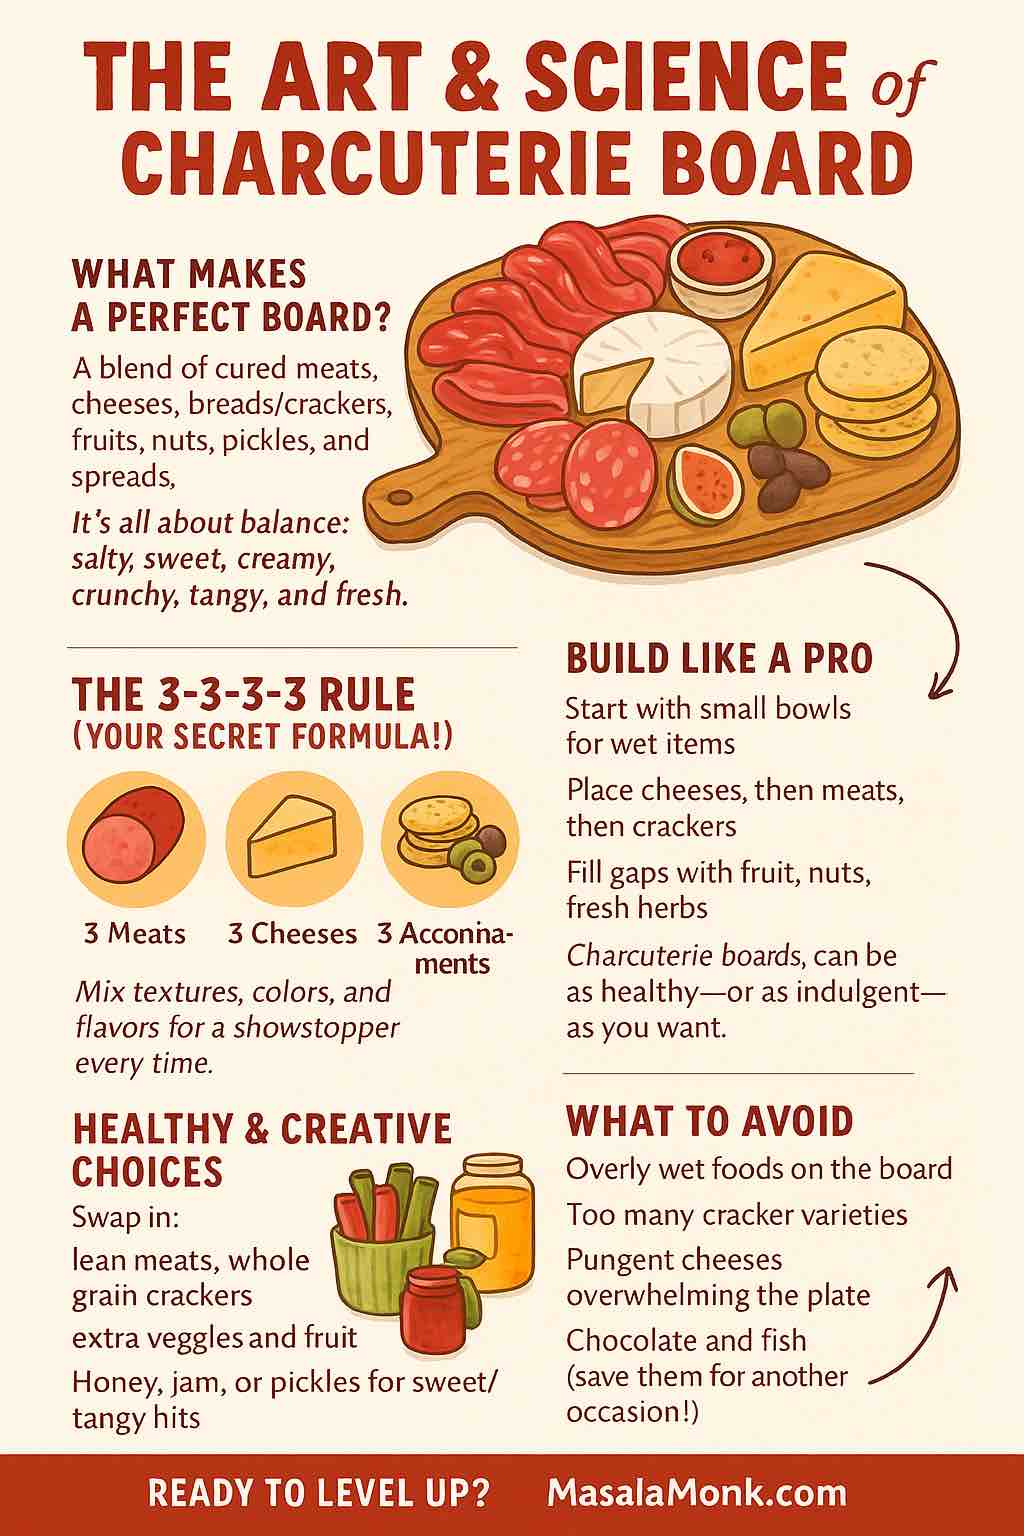
Charcuterie Boards: History, Assembly, Health, and the 3-3-3-3 Rule

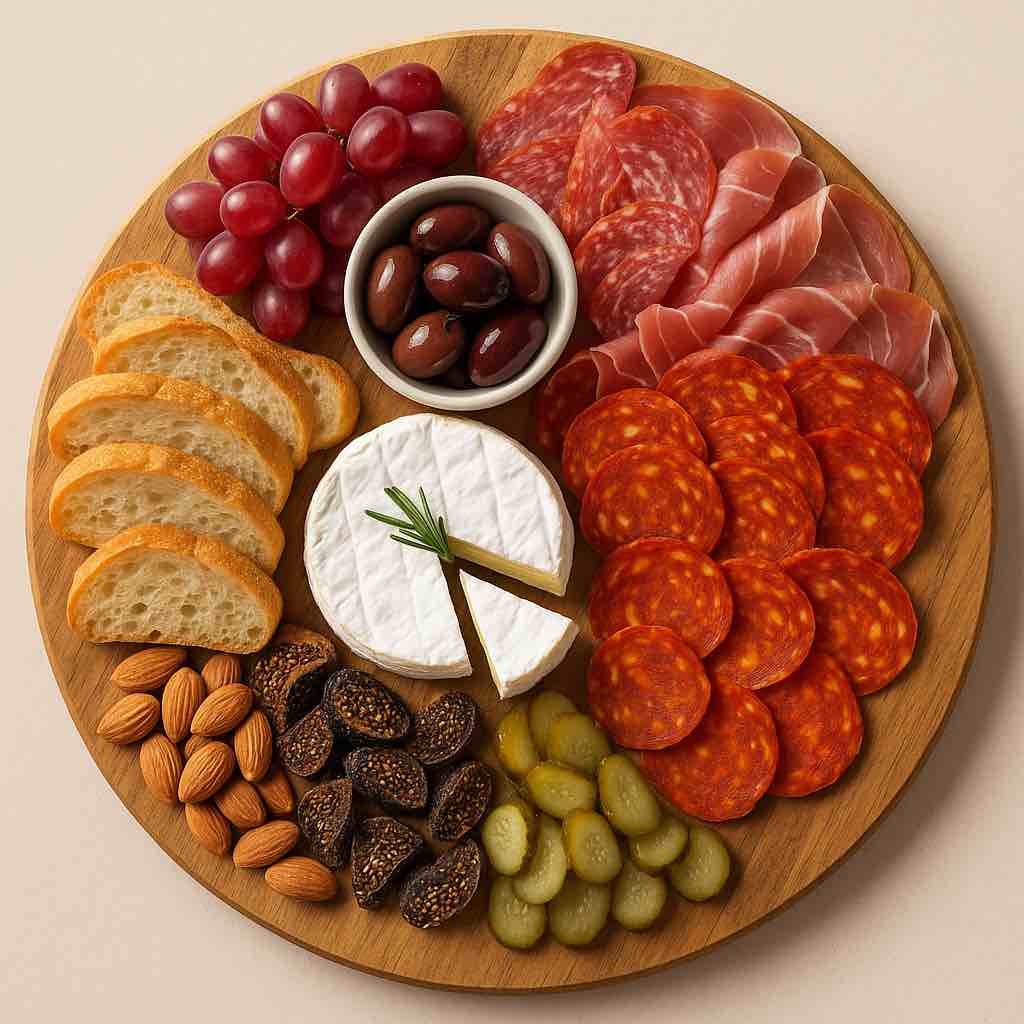
CHARCUTERIE BOARD

A well-crafted charcuterie board is more than just food—it’s a statement piece, a conversation starter, and a delicious way to bring people together. Whether for a cozy family gathering or a festive celebration, the art of arranging meats, cheeses, and their accompaniments is timeless and endlessly creative.

Let’s dive deep into the world of charcuterie boards—what they are, where they come from, how to make them healthy, and, most importantly, how to build a show-stopping spread at home.


What Is a Charcuterie Board?

At its core, a charcuterie board is an artful arrangement of cured meats (charcuterie), cheeses, bread, crackers, fruits, nuts, pickles, and spreads—all beautifully presented on a platter or wooden board. The word “charcuterie” is French, originally referring to shops that sold cured pork products. Today, charcuterie has expanded to encompass a much wider variety of meats, cheeses, and snacks.

Modern charcuterie boards are as diverse as their creators, often blending traditions from around the world. They’re now a mainstay at parties, wine nights, and even as a casual dinner option for families.


The History & Evolution of Charcuterie

  • European Roots: The tradition of curing meats began in France and Italy centuries ago as a way to preserve food before refrigeration. Meats were salted, air-dried, and sometimes smoked, then enjoyed with bread and local cheese.
  • Charcuterie Shops: In 15th-century France, “charcutiers” specialized in preparing and selling pork products—everything from pâté to sausage and rillettes.
  • The Modern Board: In recent decades, charcuterie boards have evolved, especially in the US, to include a wide array of cheeses, fruits, nuts, and even sweet elements like chocolate or honeycomb.

The Anatomy of a Charcuterie Board

A truly great charcuterie board offers balance, variety, and visual appeal. Here’s what usually makes the cut:

  • Cured Meats: Salami, prosciutto, coppa, soppressata, chorizo, turkey or chicken salami, pâté.
  • Cheeses: Soft (brie, camembert, goat), semi-hard (manchego, gouda), hard (aged cheddar, parmesan), blue cheese.
  • Bread & Crackers: Baguette slices, rustic bread, grissini (breadsticks), artisanal crackers, crostini.
  • Accompaniments: Fresh/dried fruits (grapes, figs, apricots), olives, pickles, nuts (almonds, walnuts, pistachios), jams, honey, mustards, and fresh herbs for garnish.

The secret: Mix flavors and textures—salty, sweet, tangy, creamy, crunchy.


The 3-3-3-3 Rule: Your Charcuterie Blueprint

Feeling overwhelmed by all the options? Use the 3-3-3-3 rule to guarantee a well-rounded, visually stunning board:

  • 3 Meats: (e.g., prosciutto, salami, chorizo)
  • 3 Cheeses: (e.g., brie, aged cheddar, blue cheese)
  • 3 Starches: (e.g., crackers, sliced baguette, breadsticks)
  • 3 Accompaniments: (e.g., olives, fruit, nuts)

This formula makes shopping simple and ensures a good mix without overloading the board.


How to Arrange Your Charcuterie Board Like a Pro

  1. Start Big: Place small bowls for olives, jams, and spreads on the board first.
  2. Add Cheese: Arrange cheese in different corners. Vary the shape—wedge, block, crumbled.
  3. Meats: Fold or fan out slices of meat for volume and easy grabbing. Group different meats together.
  4. Starches: Add stacks of crackers and bread in gaps, fanned or leaning for height.
  5. Fill Gaps: Tuck in fruits, nuts, and pickles to fill empty spaces and add pops of color.
  6. Finishing Touches: Garnish with fresh herbs (rosemary, thyme, basil) or edible flowers.

Tip: Serve at room temperature (let the board sit out for 15-30 minutes) to bring out the best flavors and textures.

CategoryClassic OptionVeg/Vegan OptionBudget-Friendly
MeatsProsciutto, SalamiRoasted Veggies, HummusTurkey slices
CheesesBrie, CheddarPlant-based cheeseLocal fresh cheese
StarchesBaguette, CrackersSeed crackers, PitaPopcorn, Breadsticks
AccompanimentsOlives, Grapes, NutsFruit, Pickles, NutsDried fruit
“Build-Your-Own Board” table for easy planning
CHARCUTERIE BOARD

5 Things to Avoid on a Charcuterie Board

  1. Overly Wet Foods: Juicy fruits or olives without bowls can make crackers soggy and messy.
  2. Super-Pungent Cheeses or Meats: Very strong flavors (like aged blue cheese or spicy sausage) can dominate—use sparingly and keep separate.
  3. Pre-Sliced Cheese: It dries out fast. Use blocks or wedges and slice just before serving.
  4. Too Many Crackers/Breads: Stick to 2-3 types so the board isn’t overwhelming.
  5. Chocolate or Fish: Chocolate can clash with savory items, and seafood flavors may overpower the board.

Are Charcuterie Boards Healthy?

Charcuterie boards can be healthy—or indulgent—depending on what you include. Tips for a more nutritious board:

  • Opt for lean, minimally processed meats (turkey, chicken, nitrate-free options).
  • Include fresh fruits and veggies for fiber, color, and vitamins.
  • Choose whole-grain crackers for more nutrients and fiber.
  • Add nuts for healthy fats and crunch.
  • Use cheese in moderation (watch out for high-fat, high-sodium varieties).

Remember: Processed meats, even those cured “naturally,” should be enjoyed in moderation. Pair with fresh foods and plenty of hydration.


Pro Tips & Pairing Ideas

  • Balance is Key: Always have something salty, something sweet, something creamy, and something crunchy.
  • Regional Pairings: Pair Italian meats with Italian cheeses and crackers; Spanish chorizo with Manchego and Marcona almonds.
  • Wine Pairings: White wines pair well with softer cheeses and lighter meats; bold reds with hard cheeses and spicy cured meats.

Charcuterie Board FAQ

1. What is a charcuterie board?
A charcuterie board is a platter featuring an assortment of cured meats, cheeses, breads or crackers, fruits, nuts, pickles, and spreads, arranged artfully for sharing.

2. How do I use the 3-3-3-3 rule for charcuterie boards?
Include 3 meats, 3 cheeses, 3 starches (crackers or breads), and 3 accompaniments (such as fruit, nuts, or pickles) for a well-balanced, visually pleasing board.

3. What should I avoid putting on a charcuterie board?
Avoid overly wet foods, very pungent cheeses or meats, pre-sliced cheese, too many types of crackers, and chocolate or fish, which can clash with other flavors.

4. How far in advance can I prepare a charcuterie board?
Prep ingredients a few hours in advance, but assemble the board just before serving to keep everything fresh and prevent drying out.

5. How much should I serve per person?
As an appetizer, plan for about 2 ounces of meat and 2 ounces of cheese per person.

6. Are charcuterie boards healthy?
They can be! Choose lean meats, lots of fruits and vegetables, whole grain crackers, and limit high-fat cheeses and processed meats for a more nutritious board.

7. What’s the best way to arrange a charcuterie board?
Start with bowls for spreads and olives, place cheeses and meats next, then fill in with breads, crackers, fruits, nuts, and garnishes for color and balance.

8. Can I include vegetarian or vegan options?
Yes! Add hummus, plant-based cheeses, marinated veggies, roasted nuts, and fruit for vegetarian or vegan guests.

9. What drinks pair best with a charcuterie board?
Wine is classic (red, white, or sparkling), but craft beers, ciders, and even mocktails pair well depending on the board’s flavors.

10. How do I keep the board looking fresh?
Keep wet foods in small bowls, use herbs for garnish, and avoid overcrowding—leave a little space so each item stands out.


Conclusion: The Joy of Sharing

Charcuterie boards celebrate abundance, flavor, and togetherness. With the right mix of elements—and a few pro tips—you can create a spread that delights the eyes as much as the tastebuds. Whether you’re a purist or a creative host, the charcuterie board is your canvas.

Want more tips, recipes, or printable guides?
Visit MasalaMonk.com for in-depth how-tos, shopping lists, and inspiration!


What’s your favorite element on a charcuterie board? Share your thoughts or questions below!

Posted on — 1 Comment

Homemade Chicken Salami Recipe

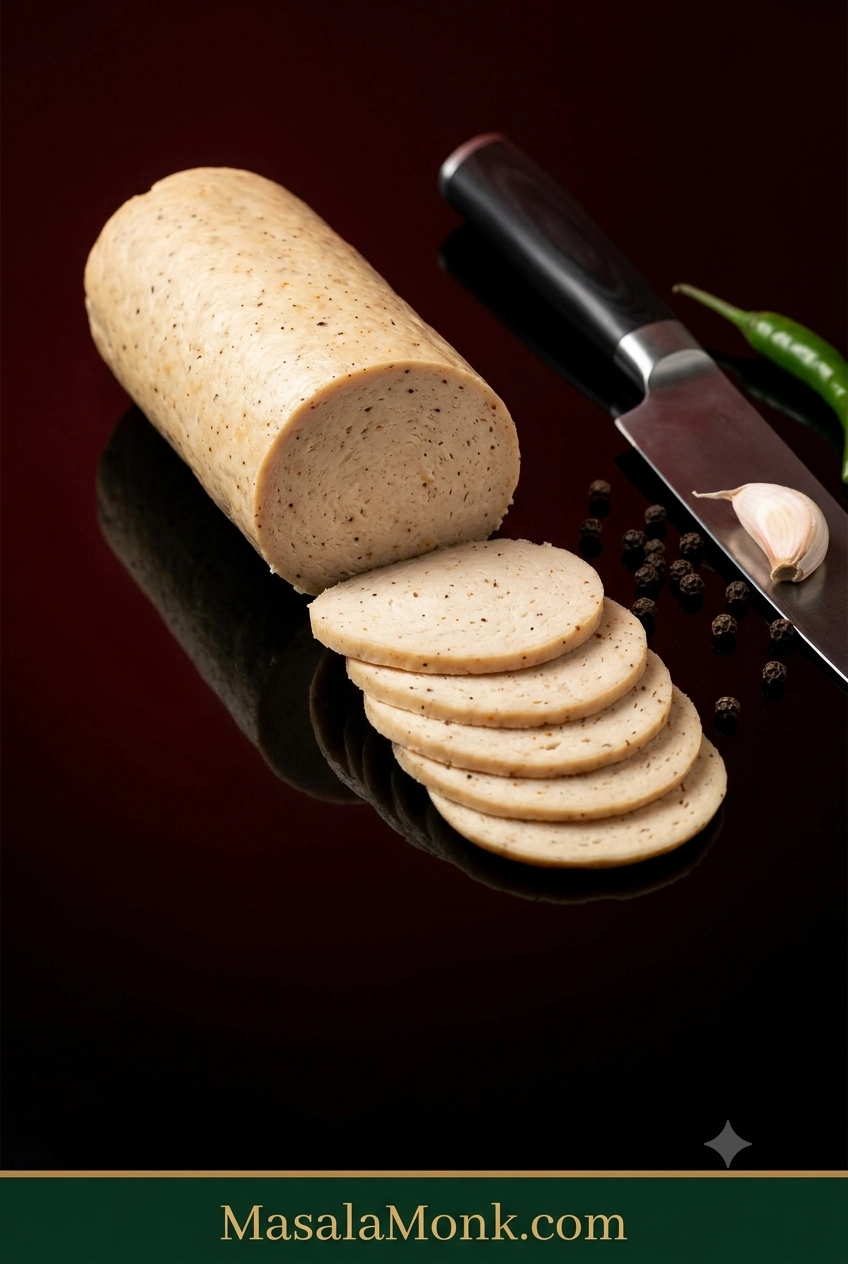
Sliced homemade chicken salami log on a dark oxblood set with a chef’s knife, showing a pale, fine-textured interior flecked with black pepper and paprika.

This post was last updated on:

Cold from the fridge, a good slice of homemade chicken salami should bend a little before it breaks: fine-textured, juicy without being wet, peppery and garlicky, firm enough for a sandwich but nowhere near rubbery.

Thin slices sit neatly in toast or a roti wrap without crumbling through the filling, and the rest of the log waits in the fridge for breakfast or lunch tomorrow. Because you season the batch yourself, you decide whether it leans garlicky, peppery, smoky or hot with green chilli.

The ingredients are the easy part. Texture is where homemade chicken salami can get frustrating. The chicken stays loose instead of turning sticky, an ultra-lean batch dries out, air gets trapped through the middle, or the log gets sliced while it is still warm and seems much softer than expected.

For this cooked deli-style version, a handful of details control almost everything: start with cold chicken, process it until sticky, pack the log tightly, cook it to temperature, and give it time to chill before slicing.

What we’re making: fully cooked, deli-style chicken salami—the soft sliced cold cut commonly used for sandwiches, breakfasts and wraps in India and across South Asia. It uses ordinary salt and spices, with no curing salt or separate preservative system, so it must stay refrigerated and has a short storage life. You won’t need a sausage casing, stuffer, grinder or curing chamber.

Quick Answer: Homemade Chicken Salami

For one batch, use 500 g / 17.6 oz / about 1.1 lb cold chicken. A combination of breast and thigh gives you the mild flavour of breast with enough natural fat to help the salami stay tender.

Process the chicken with 8 g salt, garlic, black pepper and spices. Start with 15 ml / 1 tbsp ice-cold water, adding more only if needed, until the chicken changes from mince into a fine, sticky paste that clings to itself.

Shape two compact logs around 5 cm / 2 inches in diameter, wrap the chicken in baking parchment and then foil, and steam until the centre reaches 165°F / 74°C. Chill for at least 4 hours; overnight gives the cleanest slices.

Homemade Chicken Salami Recipe

Make the simple version first. Fresh vegetables, sauces and other wet additions are much easier to judge once you’ve seen what the chicken should look and feel like when it is ready to shape.

PrepAbout 20 minutes
CookTypically 30–45 minutes for 5 cm / 2-inch logs; finish by temperature
Chill4 hours minimum; overnight best
TotalAbout 5 hours minimum, mostly chilling; overnight is easiest
Yield2 short logs; roughly 4–6 servings depending on use

Equipment

  • Food processor or powerful food chopper
  • Digital kitchen scale
  • Silicone or rubber spatula
  • Baking parchment / parchment paper
  • Aluminium foil for the outer wrapper
  • Steamer, or a large covered pot with a rack
  • Digital food thermometer
  • Sharp slicing knife

Ingredients

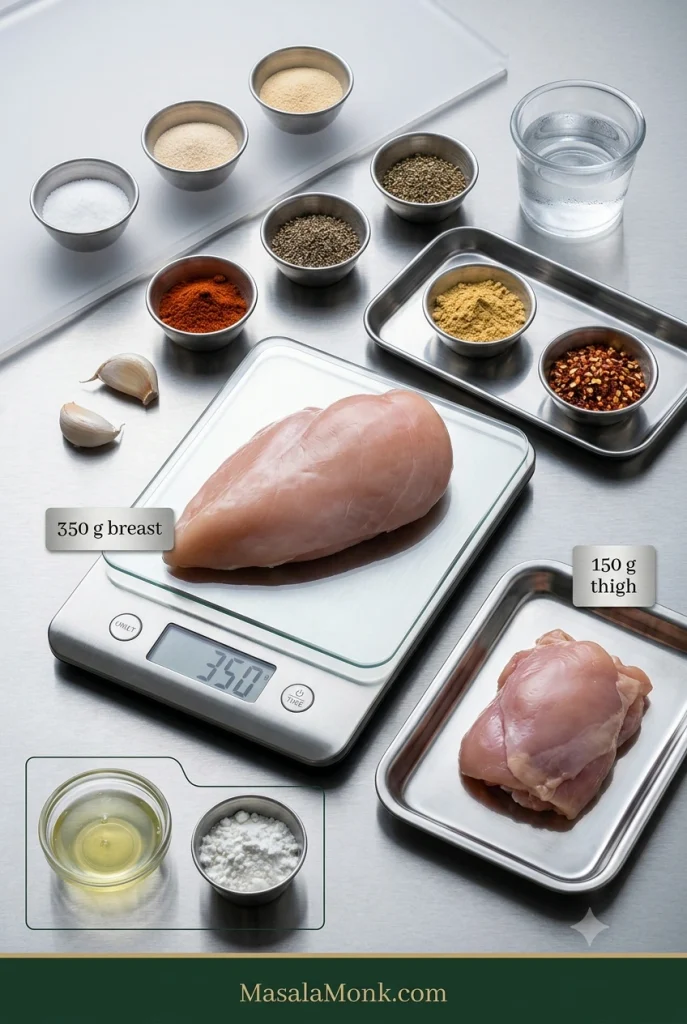
Chicken salami ingredients on stainless steel, including 350 g chicken breast on a digital scale, 150 g chicken thigh, garlic, spices, ice water, egg white and cornstarch.
Salt is 1.6% of the chicken by weight. Egg white and cornstarch are optional alternatives, not ingredients you need together.
  • 350 g / 12.3 oz boneless, skinless chicken breast, very cold
  • 150 g / 5.3 oz boneless, skinless chicken thigh, very cold
  • 8 g fine salt — about 1⅓ tsp fine table salt; weighing is strongly preferred because different salts fill a spoon differently
  • 6 g garlic, about 2 medium cloves, finely grated or crushed
  • Onion powder — 1 tsp
  • Freshly ground black pepper — 1 tsp
  • Sweet or smoked paprika — 1 tsp
  • Mustard powder — ½ tsp
  • Red chilli flakes — ¼–½ tsp, optional
  • 15–30 ml / 1–2 tbsp ice-cold water — start with 1 tbsp and add more only as needed

Optional binder

  • 8 g / about 1 tbsp cornstarch (often called cornflour in India and the UK), or
  • 1 large egg white

The base recipe works without either. Egg white gives a firmer, slightly springier slice; cornstarch adds a little extra structure without egg. If using egg white, begin without added water and add ice water a teaspoon at a time only if the processor needs it.

Raw-chicken note: there is no need to rinse chicken before processing it. Rinsing can splash raw poultry juices around the sink and nearby surfaces. Keep raw chicken and its utensils away from ready-to-eat foods, wash your hands well, and clean the processor parts, knife, board and work surface thoroughly afterwards.

Instructions

1. Get the chicken fridge-cold

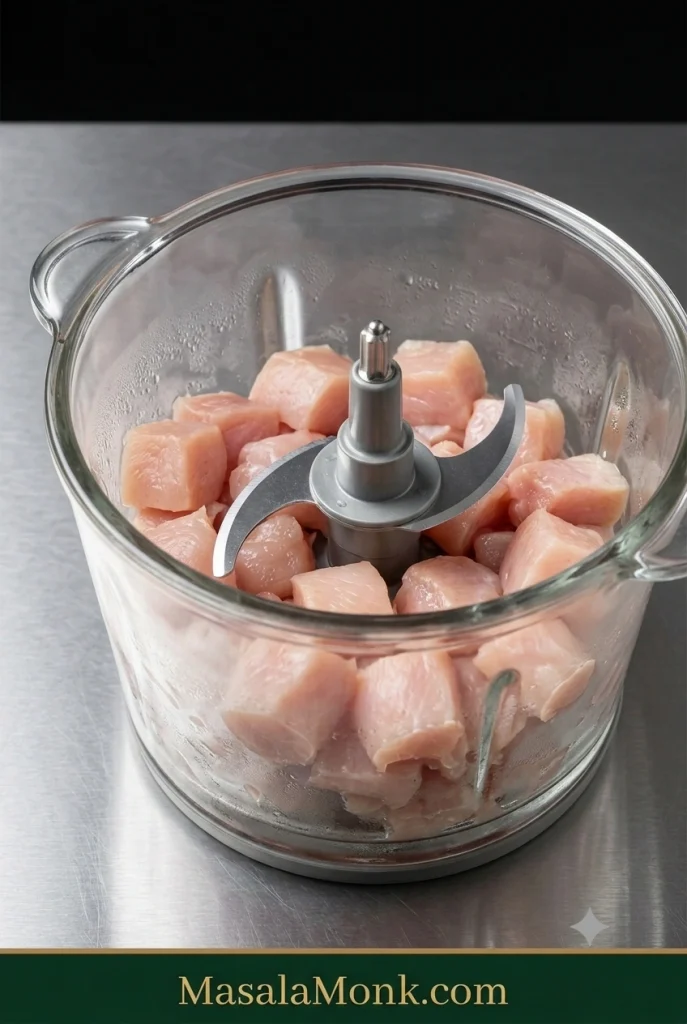
Cold 1-inch pieces of raw chicken breast and thigh in a clear food processor bowl with a steel blade on a stainless steel counter.
Start with visibly cold chicken pieces. If the bowl warms before the mixture turns tacky, pause and chill.

Cut the breast and thigh into roughly 2–3 cm / 1-inch pieces. Meat that has warmed while you gathered everything else can go back into the refrigerator for 15–20 minutes. In a hot kitchen, chilling the processor bowl and blade helps too.

A small processor is better handled in two batches. Keep the first batch chilled while you process the second, then combine them briefly at the end. Crowding the bowl makes the chicken process less evenly and gives it more time to warm up.

2. Start the sticky bind

Add the cold chicken and 8 g salt to the processor. Pulse until the larger pieces have broken down, then process briefly until the meat becomes finer.

Add the garlic, onion powder, black pepper, paprika, mustard and chilli flakes, along with the optional cornstarch or egg white if using.

3. Add the ice water gradually

Start with 1 tbsp / 15 ml ice-cold water and process in short bursts. A stiff mixture that the processor is struggling to move can take a little more, added a teaspoon at a time, up to another tablespoon.

The chicken should look moist and workable. A loose or runny paste has gone too far in the other direction.

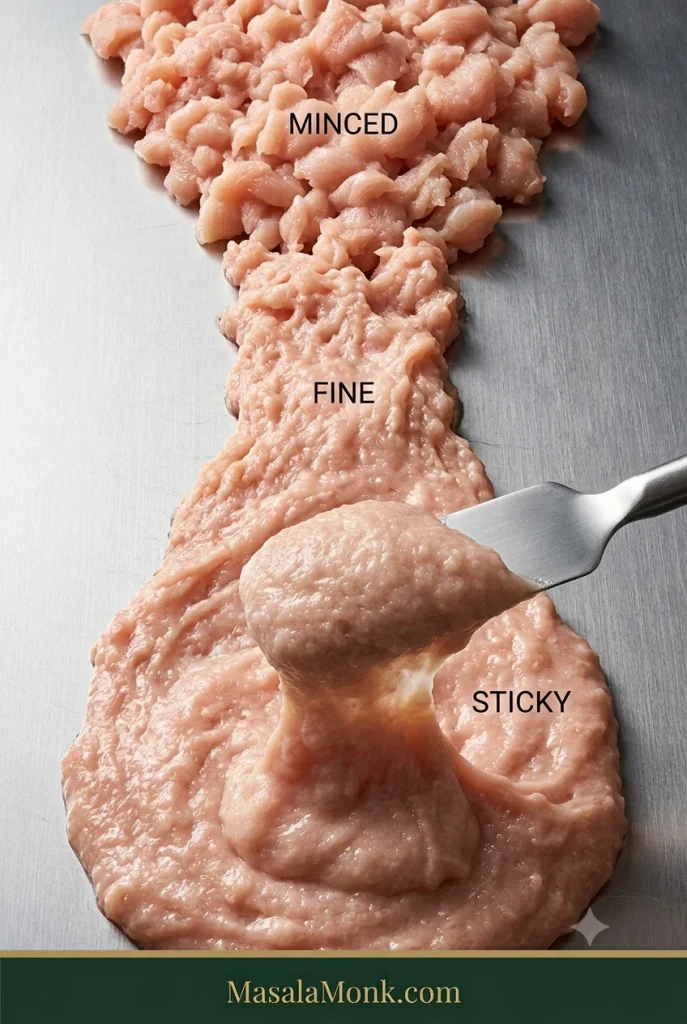
4. Let the texture tell you when to stop

Continuous chicken texture progression from loose minced chicken to fine chicken and finally sticky cohesive chicken paste lifting with a spatula.
Loose mince should become a fine, sticky paste that moves with the spatula as one mass.

At first you have chopped chicken, then fine mince. Keep going and the texture changes again: the meat begins pulling together into one tacky mass instead of behaving like hundreds of separate grains.

Press a little against a spoon or clean palm. It should cling. Lift some with the spatula and the rest of the meat paste should tug along with it.

Fine, sticky and holding together as one mass is the endpoint. If the bowl starts getting warm before you reach that stage, stop and refrigerate the chicken for 10–15 minutes. Once the mixture is already fine and tacky, stop processing and move on.

5. Cook a tiny seasoning test

Fry about a teaspoon of the mixture in a small pan until completely cooked, then taste it. The garlic, pepper, chilli and paprika should come through clearly. Cold food mutes aroma and spice a little, so the hot test piece can taste a touch bolder than you want the final chilled slice without becoming aggressively salty.

Adjust the seasoning now. Use this little patty for flavour rather than texture; a hot fried spoonful and an overnight-chilled steamed log will feel very different.

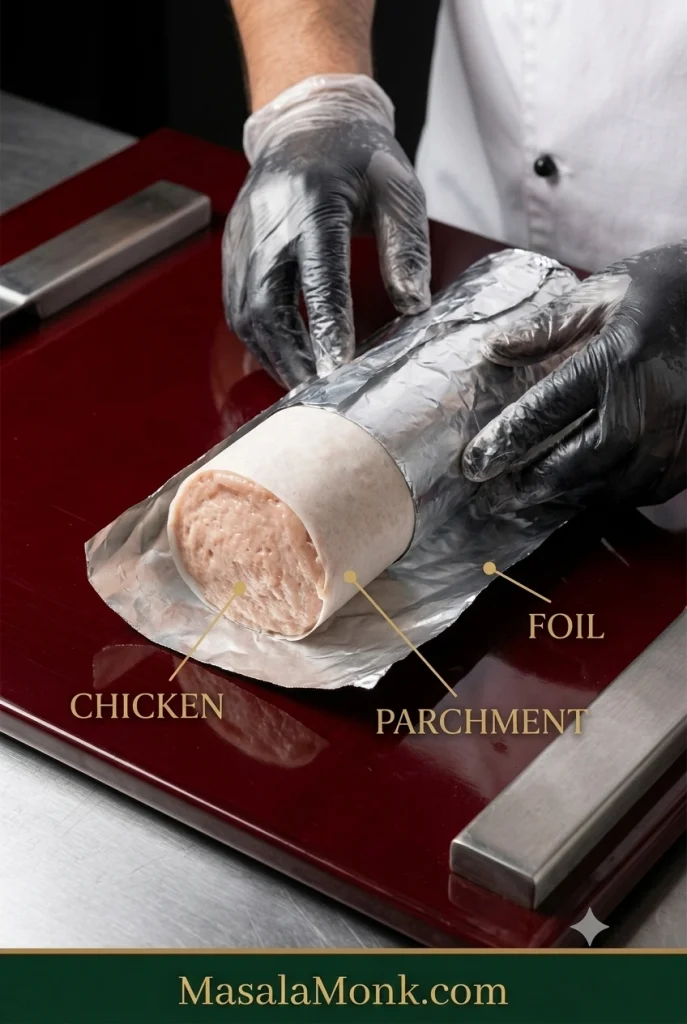
6. Shape two tight logs

Raw chicken salami log being wrapped first in white baking parchment and then in aluminium foil, with the three layers visible in order.
Chicken touches parchment first; foil stays outside as support while the log cooks.

Divide the chicken between two sheets of baking parchment and compact each portion into a cylinder around 5 cm / 2 inches in diameter. Press firmly as you shape and work obvious pockets of air toward the ends. A ruler-straight cylinder is unnecessary; reasonably even thickness and a snugly packed centre are enough.

Roll the parchment around the chicken and twist or fold the ends closed. Wrap each parchment-covered log in foil. The parchment stays between the meat and the aluminium.

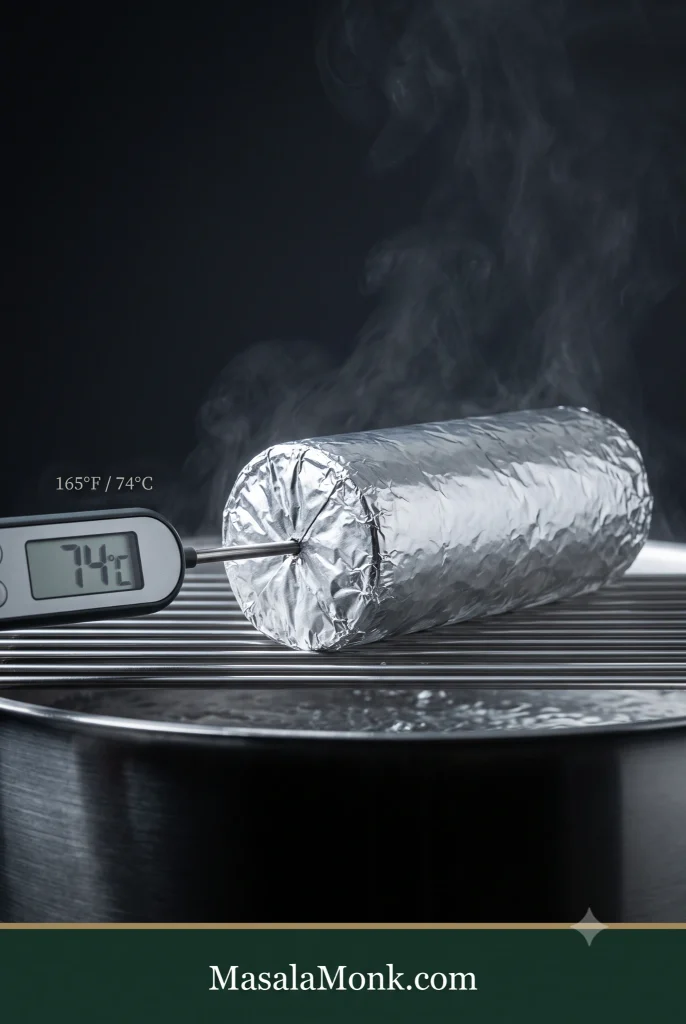
7. Steam to 165°F / 74°C

Foil-wrapped chicken salami steaming above water on a rack, with a connected digital thermometer probe entering through the centre of one wrapped end and reading 74°C.
Insert the probe through one end and aim for the centre: 165°F / 74°C.

Bring the water in a steamer or covered pot to a steady simmer. Place the logs above the water and cover.

For logs around 5 cm / 2 inches thick, begin checking at about 25–30 minutes. Many batches take roughly 30–45 minutes, but diameter, starting temperature and the steaming setup all affect the timing.

Slide the thermometer probe through one end of the log and aim for the centre. Ground poultry should reach 165°F / 74°C according to USDA safe-temperature guidance. Remove the log once the centre reaches that temperature.

8. Let the steam escape, then refrigerate

Leave the cooked logs for about 10–15 minutes, then carefully loosen the wrapper enough to release the heavy steam. Blot away obvious surface moisture.

Move the salami to the refrigerator promptly. Keep the total time at room temperature under 2 hours—or under 1 hour if the room is hotter than 90°F / 32°C.

9. Chill, unwrap and slice

Refrigerate the salami for at least 4 hours. Overnight gives the neatest texture. A freshly cooked log can feel surprisingly soft, so wait until it is completely cold before deciding how the final texture turned out.

Unwrap the chilled log. Pat the surface dry if needed, then cut with a sharp knife. Rewrap the unsliced portion or move it to an airtight container straight away.

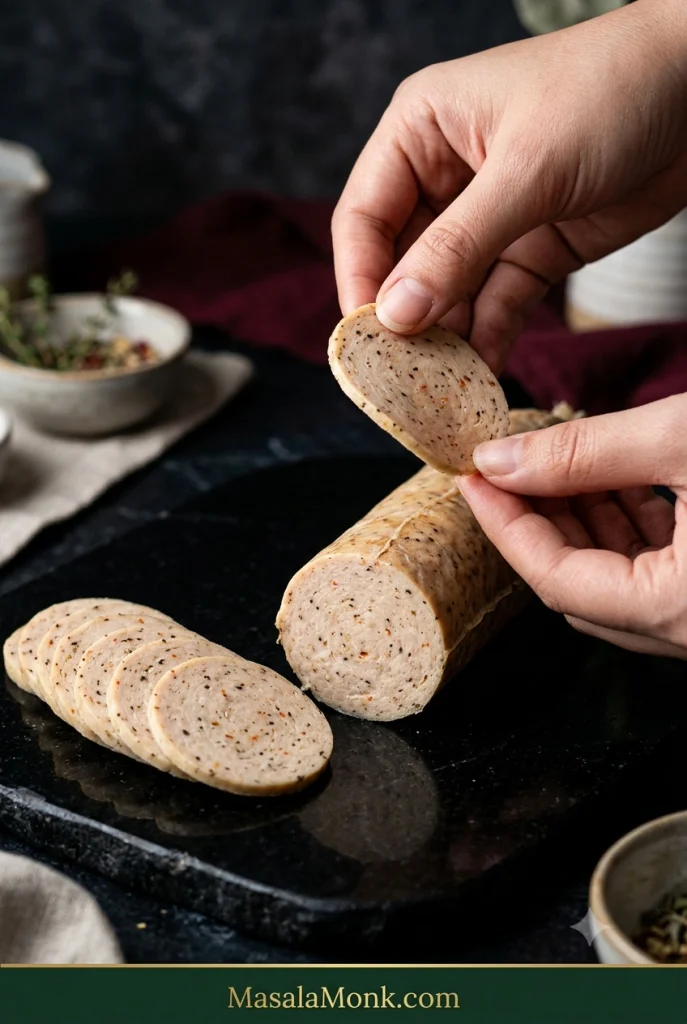
What Good Homemade Chicken Salami Looks Like

Thin chilled chicken salami slice bending slightly in a hand beside a sliced log with a fine, cohesive pale interior and small spice flecks.
Judge the texture only when cold: a good slice lifts cleanly, stays cohesive and still bends a little.

Before worrying about whether your salami looks exactly like a packet from the supermarket, cut one cold slice and look at what it actually does.

  • Texture: fine and even rather than visibly granular like a burger.
  • Slice: sturdy enough to pick up cold, with a little tenderness and bend.
  • Moisture: juicy without large watery or oily pockets.
  • Interior: fairly even, with no large tunnels from trapped air.
  • Colour: naturally beige, pale brown or faintly rosy depending on the chicken and spices.
  • Flavour: savoury and aromatic enough to remain interesting straight from the refrigerator.

Packet chicken salami can be exceptionally smooth and springy because commercial producers can control particle size, mixing and temperature very precisely and may also use starches, fibres or proteins to shape the texture. A home batch can feel a little more meat-like and still slice beautifully.

For straightforward chilled chicken without the fine salami texture, the simpler baked chicken breast recipe may suit you better.

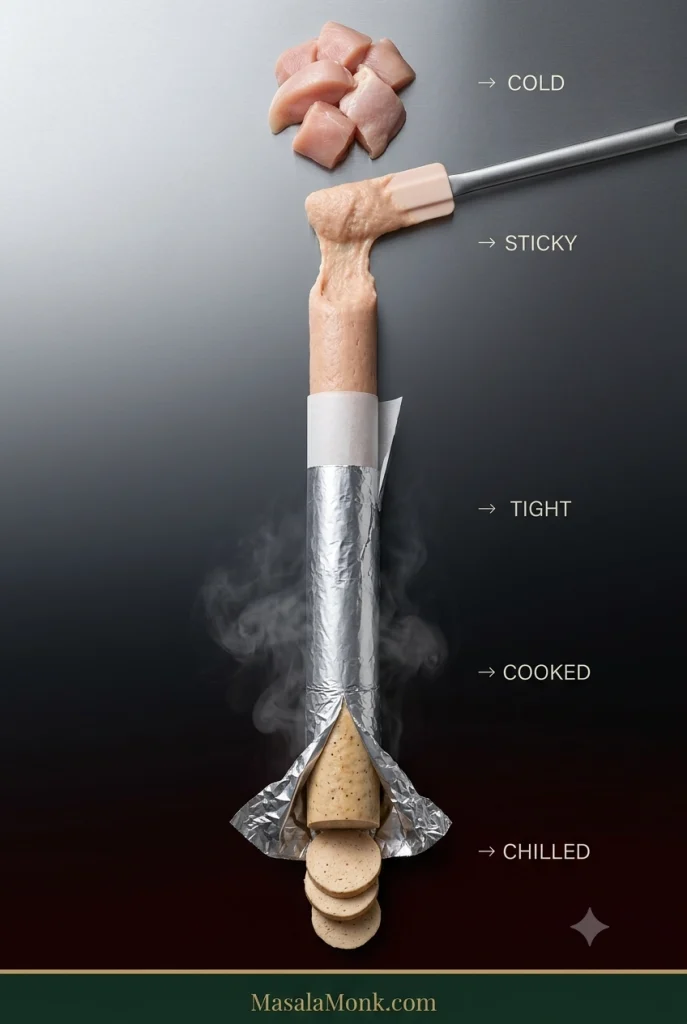
The Texture Rule: Cold → Sticky → Tight → Cooked → Chilled

Vertical transformation from cold chicken pieces to sticky paste, a tightly foil-wrapped log, a steaming cooked log and finally chilled sliced chicken salami.
Cold → sticky → tight → cooked → chilled. If a slice fails, work backward to find which stage went wrong.

The recipe tells you what to do. This is the bit that explains why it works.

Salt and mixing draw out muscle proteins that make the chicken tacky. That stickiness helps the meat hold moisture and natural fat more evenly as it cooks, which is why a properly processed paste slices so differently from simply seasoned mince.

This recipe also takes the chicken finer than you would for a coarse fresh sausage. Here the goal is a smooth deli-style slice, so visible chunks of mince aren’t what you’re aiming for. Advice to stop grinding early can make perfect sense for another sausage and still give you the wrong texture here.

What each stage controls

Cold. A food processor creates heat quickly. Fridge-cold chicken gives you more working time, and a bowl beginning to feel warm belongs back in the refrigerator for a few minutes.

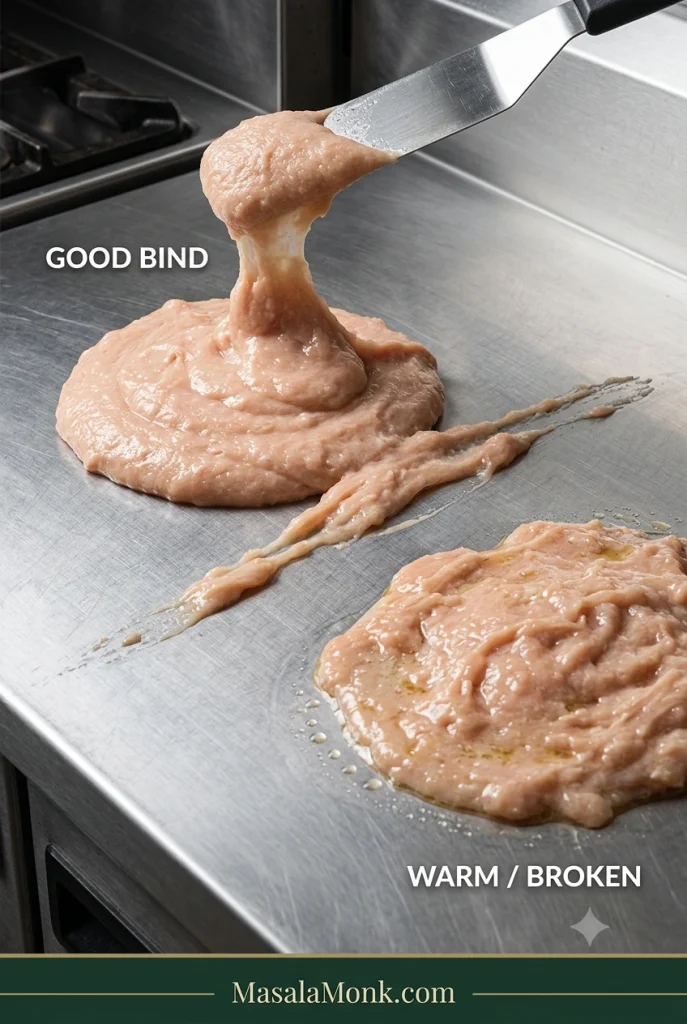
Sticky. Watch the bowl instead of the clock: loose mince → fine mixture → sticky paste that clings to itself. Stop at loose mince and the chilled salami may crumble. Once the meat is already tacky, extra processing mostly gives it more time to warm.

Correct pale pink sticky chicken paste lifting cohesively from a spatula beside warmer broken chicken paste with a looser, slightly oily texture.
Sticky paste should lift cohesively. A loose, greasy sheen means the mixture needs chilling before shaping.

Tight. Compact the paste firmly enough to push out obvious pockets of air. Tiny bubbles in an otherwise good slice aren’t worth worrying about; large tunnels mean the next log needs tighter packing.

Cooked. A thick log simply needs longer than a thin one. Keeping the diameter around 5 cm / 2 inches makes the timing more predictable, while the thermometer takes the guesswork out of the centre.

Chilled. Cooking sets the log; refrigeration firms it. The cold slice should stay in one piece when you lift it, even if it still bends a little between your fingers.

Breast or thigh?

ChickenWhat it gives youWatch for
Breast onlyLean, mild, paleDries out most easily if cooked too far
Thigh onlyJuicier and richerStronger chicken flavour and naturally more fat
Breast + thighBalanced flavour, juiciness and structureEasiest place to start
Ground chickenConvenient and already mincedResults depend on how lean the mince is

The 350 g breast + 150 g thigh mix gives a first batch some protection against dryness while keeping the flavour mild and chicken-forward. Fresh ground chicken works too; use 500 g as-is when it contains both light and dark meat.

Very lean breast mince needs closer temperature control and can benefit from the optional egg white or cornstarch. If an all-breast batch feels too lean, increasing the proportion of thigh is usually simpler than trying to rescue it with melted butter or oil. That little bit of dark meat is especially noticeable once the salami is cold, when dryness has nowhere to hide.

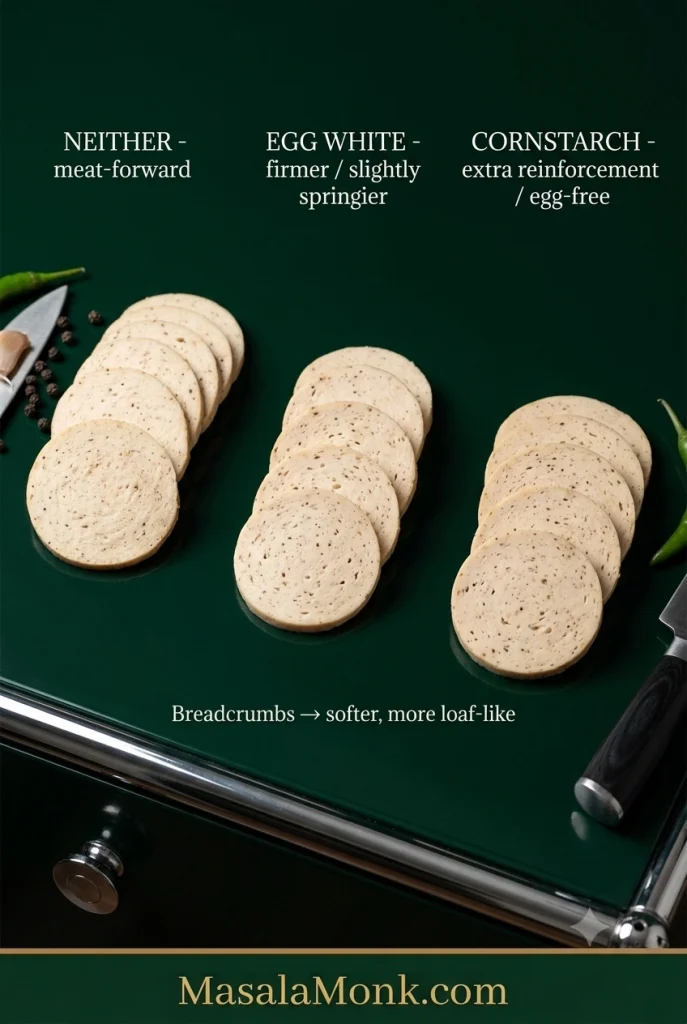
Egg, cornstarch—or neither?

Three chicken salami binder choices arranged on an emerald surface: no added binder, egg white and cornstarch, with breadcrumbs noted as producing a softer texture.
A strong sticky bind can work without extras; egg white and cornstarch make the slice firmer in different ways.

The chicken can hold together without an added binder. Cold meat, enough salt and enough mixing to reach the sticky stage matter more.

  • No added binder: the most meat-forward result and a good fit for the breast-thigh mixture once you’ve developed a strong sticky texture.
  • Egg white: gives a firmer, slightly springier slice and can be helpful with very lean chicken.
  • Cornstarch: adds a little extra reinforcement and is the obvious egg-free option.
  • Breadcrumbs: work, but move the texture toward a softer sausage loaf or meatloaf rather than a fine deli-style slice.

Egg or starch can help with firmness and moisture retention. If the mixture never became sticky, fix that before changing the recipe. Gelatin belongs to a different luncheon-meat method in which cooked meat and liquid are moulded and set as they chill.

Mixture still refusing to hold together? Jump to chicken salami troubleshooting →

Shaping the log

For familiar round slices, put parchment directly against the chicken and use foil on the outside to reinforce the cylinder. Twist or fold the parchment ends firmly. Reasonably even thickness and a tightly packed centre matter more than a machine-perfect shape.

Don’t want to roll a cylinder? Pack the chicken firmly into a lightly oiled or appropriately lined heatproof mould, cover it and cook to the same internal temperature. The slices will be square or rectangular, which happens to fit sandwich bread rather nicely.

Once the paste is cold, sticky and tightly packed, most of the texture work is already done. From here, the cooking method matters less than keeping the heat sensible and stopping when the centre reaches the right temperature.

Steamer, Covered Pot, Oven or Air Fryer?

Steaming is still the easiest first choice for the soft, even deli-style texture we’re after. A covered pot can do essentially the same job, while the oven and air fryer are useful when that’s what you already have.

MethodStarting pointWhat to expect
SteamBegin checking around 25–30 minSoft, even deli-style texture; best first method
Covered pot + rackSame general timing as steamingNearly the same result without a dedicated steamer
Oven330°F / 165°C; begin checking around 30 minSlightly firmer exterior
Air fryerAbout 330°F / 165°C to startMore dry heat around the outside; easier with smaller logs

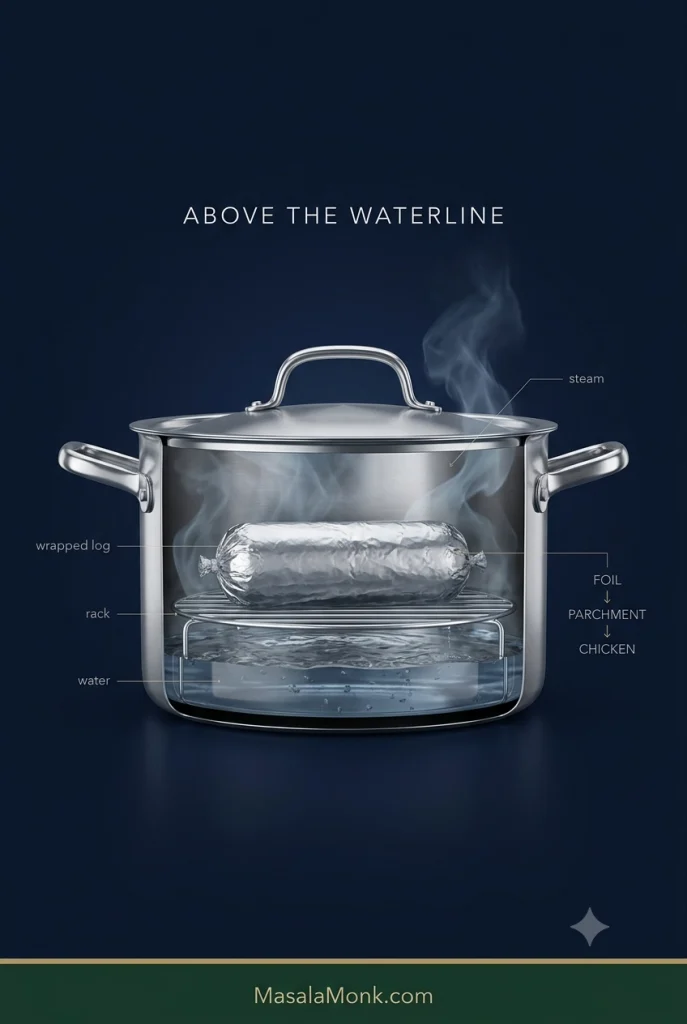
No steamer?

Cutaway of a covered pot showing water below a rack and a fully foil-wrapped chicken salami log steaming above the waterline.
Keep the wrapped log above the waterline on a stable rack or trivet; it should cook in steam, not water.

Add a few centimetres of water to a large pot and set a rack, trivet or sturdy heatproof inverted bowl above the waterline. Put the wrapped logs on top, cover tightly and keep the water at a steady simmer. The chicken should sit in steam rather than in the water.

Some home recipes simmer a tightly wrapped log directly in hot water. Keeping this version above the waterline reduces the chance of water finding its way into the parcel, so steaming is the baseline method here.

Oven method

Place the parchment-and-foil-wrapped logs on a baking tray and bake at 330°F / 165°C. Begin checking the centre around 30 minutes and remove the salami when it reaches 165°F / 74°C.

Air fryer method

Smaller logs are easier to manage in an air fryer. Start around 330°F / 165°C, follow your appliance guidance for foil or wrapped foods, and cook to the same internal temperature instead of relying on one universal time.

After Cooking: Colour, Chilling & Clean Slices

Three cooked chicken salami slices in pale beige, pale brown and faintly rosy tones beside a digital thermometer reading 74°C, showing that colour does not determine doneness.
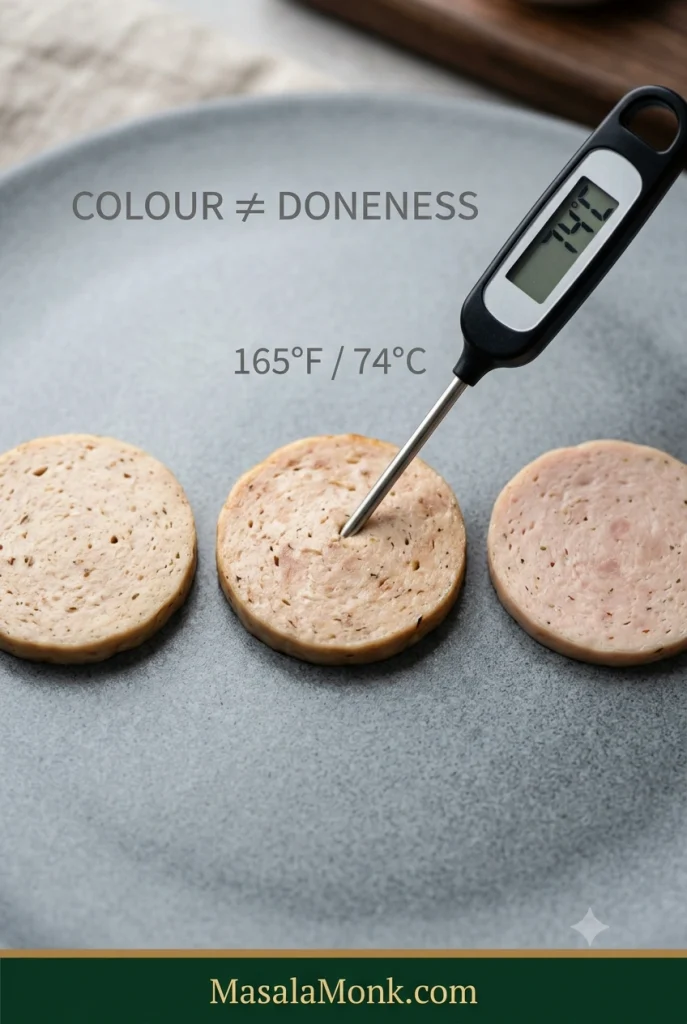
Beige, pale brown or faintly rosy can all be normal. Use 165°F / 74°C, not colour, to judge doneness.

Use the thermometer for doneness rather than trying to read the colour. This is uncured cooked chicken, so the inside may be beige, pale brown or faintly rosy. It does not need the even pink colour associated with many commercial cured cold cuts.

If you simply prefer a rosier appearance, a little beetroot juice can tint the meat. Replace some of the recipe’s ice water with the same amount of beet juice so the total liquid stays under control. It changes the colour and adds a faint earthy note; it does not change the cooking temperature or preserve the salami.

For thin deli-style slices, chill first

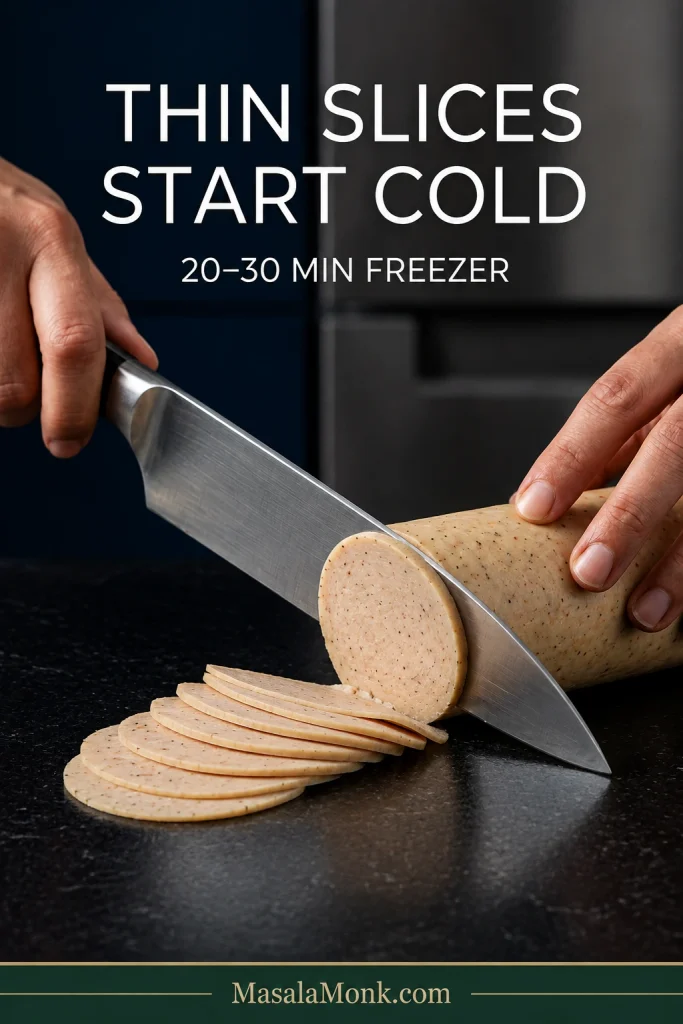
Chilled homemade chicken salami being cut with one chef’s knife into thin 2 to 3 millimetre slices on a dark cutting surface.
For thinner slices, chill until firm, then use a long clean knife stroke without pressing hard.

Start with completely cold salami and a sharp knife. Overnight refrigeration gives the easiest slicing. For finer rounds, put the chilled log in the freezer for 20–30 minutes so it firms up without freezing solid.

Don’t worry if the first few slices are thicker than deli-counter cuts. A clean slice that lifts intact matters more than getting it paper-thin.

Those thin slices are particularly good with egg and cheese; MasalaMonk’s breakfast sandwich guide has more ideas for breads, eggs, cheeses and sauces around them.

Chicken Salami Troubleshooting

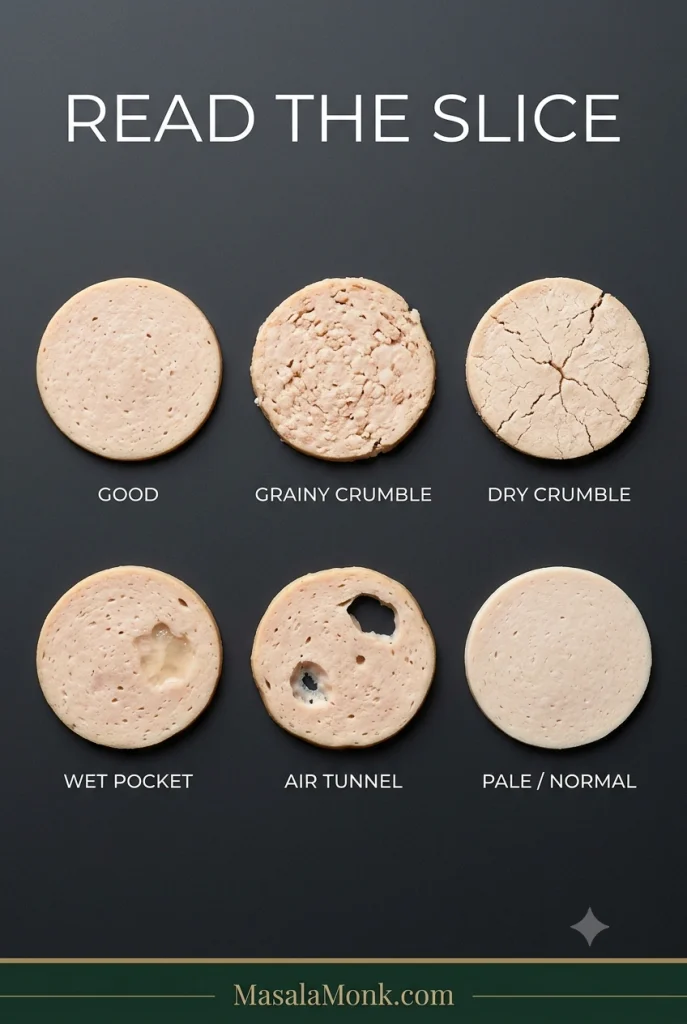
Six chicken salami cross-sections labeled good, grainy crumble, dry crumble, wet pocket, air tunnel and pale normal, showing different finished textures for troubleshooting.
Read the whole slice: graininess, dry fracture, wet pockets and large tunnels point to different problems.

“Crumbly” can mean several different things. Look at the cold slice first; it usually tells you more than automatically adding extra egg, starch or water to the next batch.

What you seeFirst thing to try
Cold slices crumble into meat grainsKeep the chicken colder and process until genuinely sticky
Dry, crumbly slicesUse some thigh and stop cooking at 165°F / 74°C
Greasy puddle around the logKeep the mixture colder and avoid large amounts of rendered fat
Wet or jelly-like pocketsReduce free liquid and squeeze wet aromatics
Large holes through the slicesPack the log more firmly
Pale or greyish interiorUsually normal for uncured chicken; check temperature, not colour

The cold slice crumbles into little pieces

Think back to the processor. Did the chicken ever reach the point where it clung to the spatula and pulled together as one mass? If it never did, start there rather than immediately increasing the binder.

Warm meat, very coarse processing, dramatically reduced salt or a generous amount of onion juice or sauce can all weaken the structure. Egg white or cornstarch can offer extra support, but they work best after the chicken itself has reached that sticky stage.

It is dry, mealy or strangely bouncy

All-breast chicken is easier to dry out, particularly when it cooks far beyond the safe endpoint. Thigh gives you more natural fat and moisture to work with.

A mealy or almost tofu-like bite can also turn up in a very lean, unstable mixture. At the opposite extreme, lots of processing and binder can push the texture toward an overly springy bounce. Think back to the earlier target: cold, cohesive and tacky—not warm and greasy.

There is grease, water or empty space inside

A teaspoon or two of cooking juice around the salami is ordinary. By contrast, a noticeable puddle of grease suggests that fat separated somewhere along the way, often because the chicken warmed up before its structure was properly developed.

Wet pockets point more toward excess free liquid. Start with less ice water next time and remember that fresh onion, sauces, yogurt and citrus juice all count toward the moisture in the bowl. Vinegar and generous amounts of lemon juice need care too: enough acid in the raw mixture can work against the sticky texture you’re trying to build. Add that sharpness later with chutney, mustard, pickles or a squeeze of citrus at the table.

Large air tunnels are simpler. Pack the next log more firmly. Tiny bubbles in an otherwise good slice aren’t worth worrying about.

← Back to the chicken salami recipe Back to the quick answer ↑

Three Easy Ways to Change the Flavour

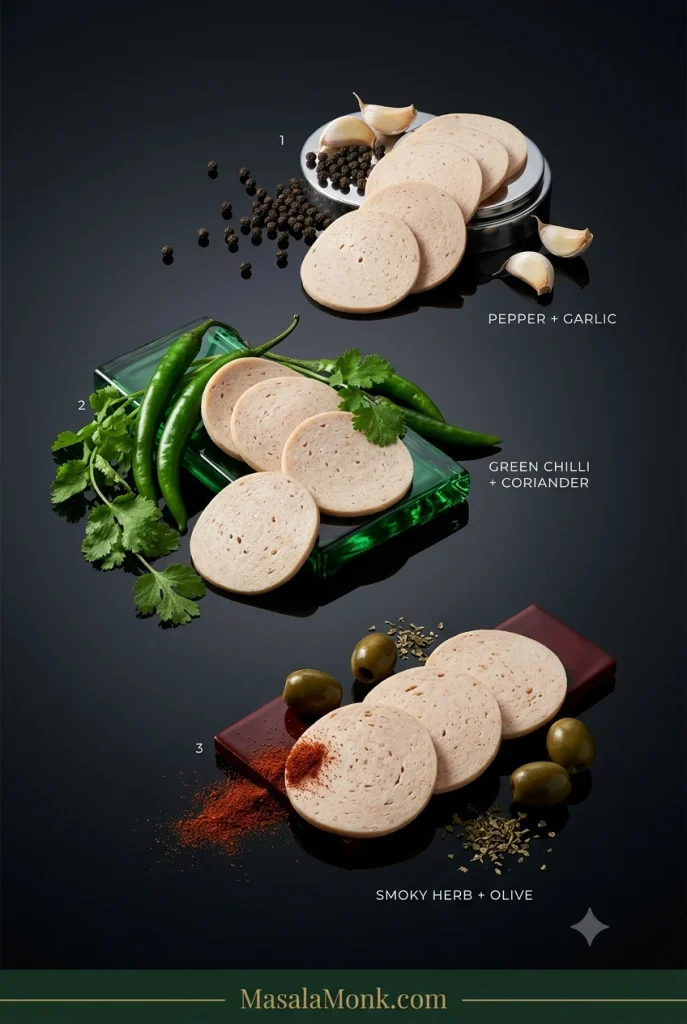
Three homemade chicken salami flavour variations styled with pepper and garlic, green chilli and coriander, and smoked herbs with green olives.
Change the aromatics, not the moisture balance: drain olives well and keep generous chutneys or citrus for serving.

Once you know what the basic chicken paste should feel like, keep the meat, salt and moisture balance steady and change the aromatics around them.

Pepper & Garlic

Keep the garlic from the base recipe, increase the black pepper to about 1½ tsp, keep the mustard and use sweet or smoked paprika. Leave out the chilli flakes for a gentler version.

It stays savoury and peppery even when cold, which makes it particularly good in sandwiches. A little honey mustard gives those flavours a sweet-sharp edge.

Ginger, Green Chilli & Coriander

Add 1 tsp finely grated ginger, 1 small green chilli and 2 tbsp finely chopped coriander. Keep the black pepper, and add chilli flakes only if you want another layer of heat.

The ginger and coriander keep the flavour fresh while the green chilli brings heat without flooding the chicken with sauce. Serve the slices with a thick green chutney for a brighter sandwich or roti wrap.

Smoky Herb & Olive

Use 1–1½ tsp smoked paprika, ½ tsp dried oregano, ¼ tsp dried thyme and 1–2 tbsp finely chopped, well-drained green olives. Add a small pinch of chilli flakes if you like.

Pat the olives dry before chopping. Their salty, briny flavour is welcome; a pocket of olive brine inside the salami isn’t.

Once There’s a Cold Log in the Fridge

Homemade chicken salami served three ways: with a fried egg for breakfast, layered in a toasted sandwich, and inside a roti wrap with green chutney, onion and cucumber.
Serve the slices cold in sandwiches and wraps, or brown them briefly for breakfast—the salami is already fully cooked.

It earns its fridge space quickly. Brown a couple of slices and add a fried egg for breakfast, or keep them cold with cucumber, lettuce, tomato, pickles, mustard and cheese. Shredded cabbage or crisp coleslaw is especially good against the softer salami.

For a quick roti wrap, add sliced onion, cucumber and green chutney, then squeeze over lime just before eating. When packing it for school or work, use an insulated lunch bag with a cold pack.

The salami is already cooked, so pizza, pasta and omelettes only need enough extra heat to warm or brown it. Add thin rounds toward the end of pizza baking, fold diced pieces into eggs, or colour thicker slices briefly in a pan before tossing them through pasta.

If both logs aren’t going to disappear into breakfasts, sandwiches and wraps within the next few days, freeze the second one while it’s still fresh.

How to Store and Freeze Homemade Chicken Salami

Treat this as cooked perishable chicken, not shelf-stable salami.

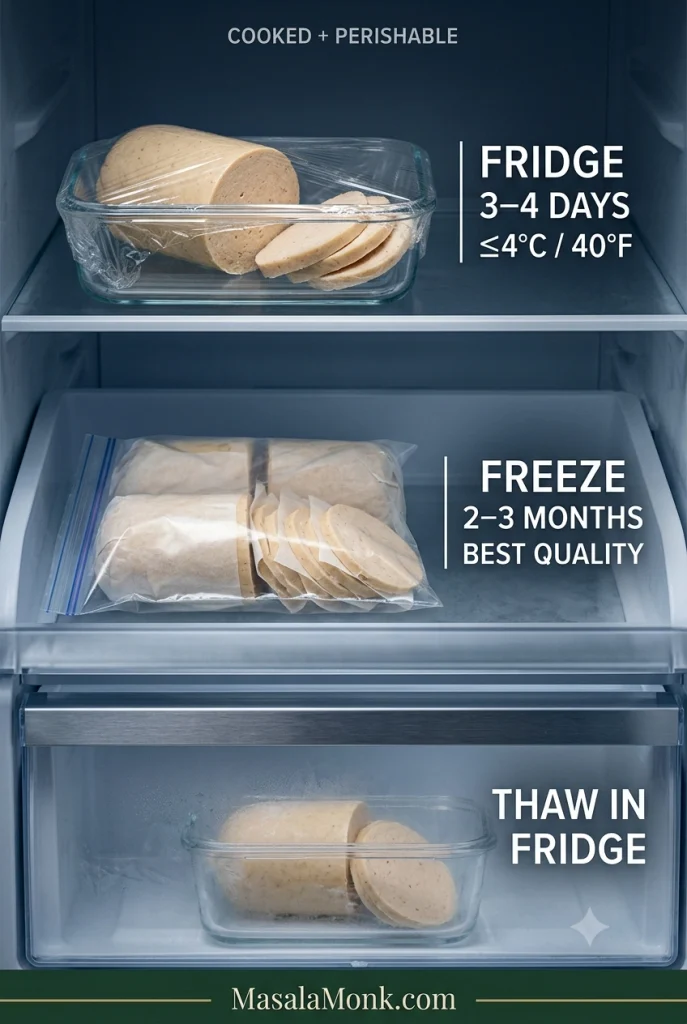
Chicken salami storage timeline showing pale cooked salami refrigerated for 3 to 4 days, frozen for 2 to 3 months for best quality, and thawed in the refrigerator.
Refrigerate for 3–4 days, or freeze meal-sized portions for 2–3 months for best quality.

Refrigerator

Wrap a completely cold log tightly or transfer it to an airtight container. Cover cut surfaces once you begin slicing so they don’t dry out.

Keep homemade chicken salami at 40°F / about 4°C or colder and use it within 3–4 days. This matches USDA storage guidance for fresh sausage cooked at home.

Freezer

Freeze half logs or meal-sized portions rather than one large block. For sliced salami, put small sheets of parchment between portions so they separate easily.

Two to three months is a useful freezer window for best quality. Food kept continuously frozen remains safe beyond that, but flavour and texture gradually decline.

Thawing

Thaw the salami in the refrigerator. A frozen-and-thawed slice may be a little softer than one cut from a freshly chilled log, particularly with very lean or wetter batches.

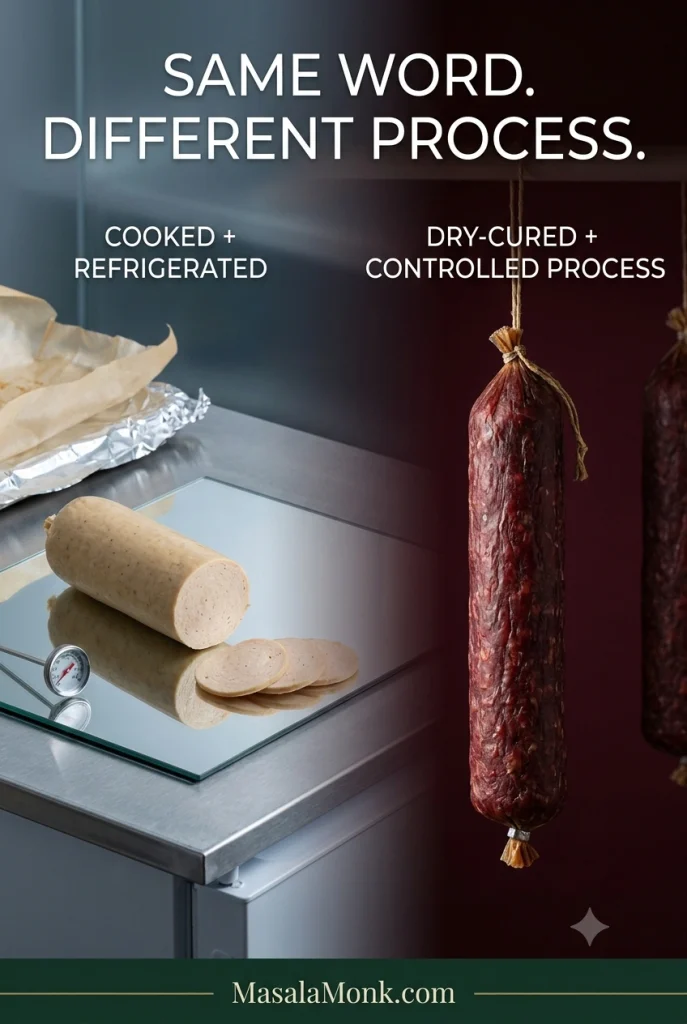
That short refrigerator life is also the clearest reminder that this recipe is a very different thing from traditional dry salami.

Cooked Chicken Salami vs Traditional Dry-Cured Salami

Comparison of pale casing-free cooked chicken salami with foil and thermometer cues beside dark red traditional dry-cured salami hanging in casings.
Fermentation, controlled humidity and weeks of drying belong to a different process from this fully cooked, refrigerated chicken salami.

Traditional dry salami is perfectly possible to make at home, but it is a different project. Depending on the style, it can involve precisely measured curing ingredients, starter cultures, fermentation, appropriate casings, controlled temperature and humidity, and weeks of drying.

That process deserves a validated recipe of its own. Smell and appearance alone cannot establish that raw cured meat is safe, and curing products with different formulations should not be swapped spoon-for-spoon because their names look similar.

For this cooked chicken version, the rule is much simpler: cook the ground poultry fully, chill it promptly and keep it refrigerated.

A Few Remaining Questions

Does this use curing salt or added preservatives?

No. This version uses ordinary salt, but no curing salt or separate preservative system. Keep it refrigerated and use it within 3–4 days, or freeze it.

Does the chicken have to touch aluminium foil?

No. Baking parchment sits directly against the chicken and the foil goes around the outside for support. A covered heatproof mould is another option if you prefer not to use a foil-wrapped log.

Can I make it without a food processor?

Very finely ground chicken can be mixed vigorously with salt until tacky to make a coarser cooked sausage. For the smooth deli-style texture in this recipe, a food processor or powerful chopper is strongly preferred.

Can I freeze the slices?

Yes. Chill the salami completely first, freeze meal-sized portions with parchment between the slices, and thaw what you need in the refrigerator.

Can I use turkey, pork or beef?

The general cooked-log idea can be adapted, but this recipe is formulated around chicken. Ground turkey should also reach 165°F / 74°C. For ground pork and ground beef, use at least 160°F / 71°C. Different meats have different fat levels, so expect some change in texture rather than treating them as exact one-for-one substitutions.

Is homemade chicken salami healthy?

Homemade does not automatically mean healthier. Making the salami yourself gives you control over the chicken, salt, seasonings and optional binder, while the nutritional picture still depends on those choices and on portion size. It is better thought of as a homemade cooked cold cut than as a health food.

The Best Part Comes the Next Morning

After a night in the refrigerator, the knife should pass through cleanly and the cold slice should lift in one piece.

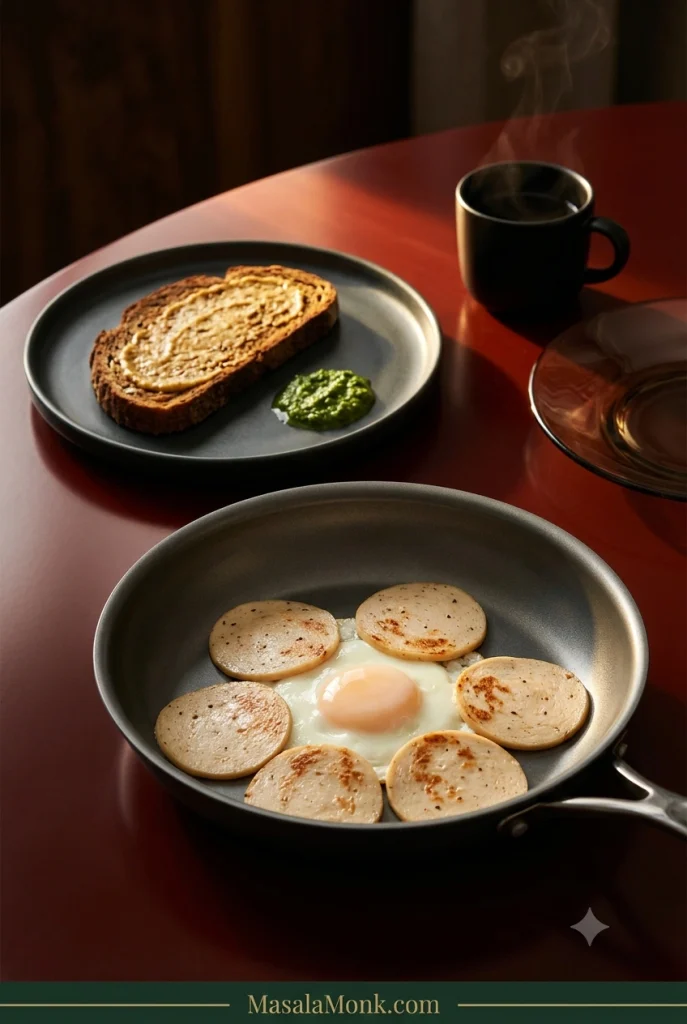
Thin homemade chicken salami slices lightly browned in a pan with a fried egg, toast, mustard and green chutney on a dark oxblood breakfast set.
Brief pan contact adds browned flavour to already-cooked slices while keeping the centres tender.

Eat it cold, or give a couple of slices a minute in a hot pan until the edges brown and the garlic wakes up again. Add an egg, toast and mustard—or a swipe of green chutney—and breakfast is done.

Back to the quick answer ↑ Back to the recipe ↑

Posted on — Leave a comment

Top 5 Air Fryers of 2024: AI & Web-Researched Guide

Introduction

In the bustling rhythm of modern kitchens, where convenience meets culinary creativity, air fryers have emerged as indispensable allies. These versatile appliances promise to transform the traditional frying process into a healthier, faster, and more efficient endeavor. As 2024 unfolds, the quest for the perfect air fryer has become more nuanced, with a plethora of models vying for the spotlight, each boasting unique features, capabilities, and innovations.

Amidst this landscape, the challenge for consumers is not just finding an air fryer but discovering the one that aligns with their culinary aspirations, lifestyle, and kitchen aesthetics. It’s a decision that transcends mere functionality, touching upon health considerations, environmental consciousness, and the sheer joy of cooking.

Why is this guide different? In a market saturated with biased reviews and overwhelming affiliate links, our mission is crystal clear: to provide you with the most unbiased, comprehensive, and meticulously researched guide to the top 10 air fryers of 2024. Leveraging advanced AI and in-depth web research, we’ve cut through the noise to bring you a selection based solely on performance, design, user feedback, and value—free from the influence of affiliate marketing.

This guide is not just about listing air fryers; it’s about empowering you with knowledge. From understanding the intricacies of air frying technology to navigating the subtle differences between models, we aim to equip you with the insights needed to make an informed choice. Whether you’re a busy parent seeking quick meal solutions, a health enthusiast aiming to reduce oil consumption, or a culinary explorer eager to experiment with new recipes, the perfect air fryer for your kitchen awaits.

Join us on this culinary journey as we unveil the Top 10 Air Fryers of 2024, analyzed and presented through the lens of unbiased AI and web research. It’s time to elevate your cooking experience, embrace healthier eating habits, and indulge in the simplicity and efficiency that only the best air fryers can offer.

To provide a clear and accurate explanation of how the information for the “Top 10 Air Fryers of 2024” list was compiled, here’s a straightforward summary of the process:

Methodology: Compiling the Top 5 Air Fryers of 2024

1. Web and Data Analysis:
The foundation of our list is built on extensive web research and data analysis. Utilizing advanced algorithms, we scoured the internet for product listings, customer reviews, and expert opinions from reputable culinary and consumer electronics websites.

2. Information Aggregation:
We aggregated information from various sources to ensure a diverse and comprehensive view. This included examining product specifications from manufacturers, reading through consumer reviews on major retail sites, and analyzing ratings and recommendations from trusted industry experts.

3. Feature and Specification Comparison:
Each air fryer was evaluated based on a set of key features and specifications. These included cooking capacity, temperature range, preset programs, ease of use, cleaning convenience, and any unique technologies or design elements that differentiate the product from its competitors.

4. Consumer Feedback Synthesis:
An essential part of our methodology was synthesizing consumer feedback. By analyzing reviews and ratings, we identified common themes regarding performance, reliability, user satisfaction, and potential drawbacks, providing a well-rounded perspective on each air fryer.

5. Editorial Review:
The final step involved a careful editorial review to ensure the accuracy and relevance of the information provided. Our team compiled the findings into coherent, detailed descriptions of each air fryer, highlighting their strengths and weaknesses without any commercial bias.

6. Transparency and Objectivity:
It’s important to clarify that this process does not involve hands-on testing by our team. Instead, it relies on publicly available data and the analytical capabilities of AI and manual editorial efforts to synthesize and present the most accurate, up-to-date information possible.

This methodology reflects our commitment to providing helpful, objective, and accurate information to assist consumers in making informed decisions when selecting air fryers.

Let’s proceed to the next section of the post, where we will introduce and review the top air fryers based on our research and analysis.


The Top 5 High-End Air Fryers of 2024: Elevating Your Culinary Experience

In the search for the ultimate kitchen companion, air fryers have become indispensable for their ability to offer healthier versions of our favorite fried foods. As 2024 sees a surge in innovative models, choosing the right one can be overwhelming. That’s where our exhaustive research and analysis come into play. After delving into the latest models, consumer feedback, and expert opinions, we’ve compiled an authoritative list of the top 5 air fryers of 2024.

Our selection criteria were stringent, focusing on performance, versatility, ease of use, durability, and, importantly, user satisfaction. We’ve sifted through the noise to bring you the crème de la crème of air fryers, ensuring that whether you’re a seasoned chef or a culinary novice, there’s something on this list that will meet your cooking needs and exceed your expectations.

From compact models perfect for small spaces to versatile multitaskers that can roast, bake, and grill, our top picks are about to make your meal prep easier, healthier, and more delicious. Without further ado, let’s dive into the reviews of the best air fryers of 2024, carefully curated to help you make an informed choice.

1. Ninja Foodi DualZone Air Fryer

Noteworthy Features:

  • DualZone Technology: Cook two foods, two ways, simultaneously.
  • Capacity: Generous 8-quart capacity, perfect for families or meal prepping.
  • Versatility: Offers air fry, roast, bake, and reheat options.

Why It Stands Out: The Ninja Foodi isn’t just an air fryer; it’s a culinary game-changer. With its DualZone Technology, preparing a complete meal, from crispy fries to succulent chicken, becomes effortless and fast. Its smart finish feature ensures that both zones are ready at the same time, maintaining the perfect serving temperature.

2. Instant Pot Vortex Plus 6-Quart Air Fryer

Key Specifications:

  • Smart Programs: Seven built-in programs for a variety of dishes.
  • EvenCrisp Technology: Guarantees a perfect crunch with 95% less oil.
  • Ease of Use: Intuitive touchscreen display for simple operation.

What Makes It Special: Beyond its sleek design, the Instant Pot Vortex Plus excels in delivering uniformly cooked, deliciously crispy dishes every time. Its 6-quart capacity is ideal for mid-sized households, ensuring no one misses out on their favorite fried foods, made healthier.

3. Cosori Pro LE Air Fryer

Highlights:

  • Design: Elegant, compact, and easy to fit on any countertop.
  • Preset Options: Wide variety of presets, tailored for different foods.
  • User-Friendly: Simple interface, easy to navigate even for beginners.

Distinctive Advantage: The Cosori Pro LE is celebrated for its optimal air circulation technology, ensuring food is cooked evenly and quickly. Its commitment to healthier cooking, without sacrificing taste or convenience, sets it apart in the air fryer market.

4. Instant Vortex Pro 10-Quart 9-in-1 Air Fryer

Features to Note:

  • 9-in-1 Functions: From air frying to rotisserie, it covers all cooking needs.
  • Large Capacity: 10-quart size is perfect for entertaining or large families.
  • Observation Window: ClearCook window and interior light for easy monitoring.

Why It’s a Top Pick: Its ability to simultaneously cook multiple meal components makes the Instant Vortex Pro a standout. Whether you’re dehydrating fruits or roasting a chicken, this air fryer ensures a gourmet cooking experience with minimal effort.

5. Breville Smart Oven Air Fryer Pro

Impressive Qualities:

  • Element iQ System: Smart heat distribution for perfect results.
  • Super Convection Technology: Faster cooking times and even heat.
  • Versatility: Functions as a full oven for baking, roasting, and more.

Unique Selling Point: The Breville Smart Oven Air Fryer Pro is not just for air frying; it’s an all-encompassing kitchen appliance. Its precision and wide range of cooking modes cater to all culinary aspirations, from quick snacks to elaborate dinners, making it a favorite among gourmet enthusiasts.

The 2024 lineup of high-end air fryers offers something for every home chef, from the simplicity and dual cooking options of the Ninja Foodi to the comprehensive cooking capabilities of the Breville Smart Oven. Each model on this list has been selected for its ability to transform your cooking experience, combining health, efficiency, and unparalleled taste. Dive into the world of advanced air frying and discover how these top 5 picks can elevate your culinary creations.


Features/ModelNinja Foodi DualZoneInstant Pot Vortex Plus 6-QtCosori Pro LEInstant Vortex Pro 10-QtBreville Smart Oven Air Fryer Pro
Capacity8 qt6 qt5 qt10 qt22 qt (approx.)
Cooking FunctionsAir fry, roast, bake, reheatAir fry, roast, bake, dehydrateAir fry, roast, bake, toastAir fry, roast, bake, dehydrate, rotisserieAir fry, bake, roast, dehydrate, toast
Control TypeDigital touchscreenDigital touchscreenDigital touchscreenDigital touchscreenDigital LCD display
Temperature Range105°F to 450°F95°F to 400°F170°F to 400°F95°F to 400°F80°F to 480°F
Unique FeaturesDualZone TechnologyEvenCrisp TechnologyCompact elegant designClearCook window, RotisserieElement iQ system, Super convection
Ease of UseEasy to clean, separate basketsSimple interface, easy cleanupUser-friendly, easy cleanupInterior light, easy cleanupIntuitive controls, easy cleanup
VersatilityHighMediumMediumHighVery High
Additional Notable FeaturesSync and match cook settingsDishwasher safe partsShake reminder, preheat functionDishwasher safe parts, 9 functions13 cooking functions, PID temperature control
Ideal ForLarge families/mealsMedium-sized householdsStyle-conscious cooksEntertaining, large familiesGourmet home cooking, versatility
Price Range$$$$$$$$$$$$$$

Key:

  • $$$ = Higher price point
  • $$ = Moderate price point
  • $$$$ = Premium price point

This table aims to provide a more detailed comparison across a broader set of features and specifications. It highlights not only the basic functionalities and capacity but also dives into the control mechanisms, temperature flexibility, and special features that set each air fryer apart. From the Ninja Foodi’s ability to cook two foods in two ways simultaneously to the Breville Smart Oven’s comprehensive cooking functions and advanced temperature control, each model caters to different culinary needs and preferences, offering something unique for every home chef.

How to Choose An Air Fryer?

When selecting an air fryer, especially from the top models of 2024, it’s essential to consider several key factors to ensure the appliance meets your cooking needs, preferences, and lifestyle. Here’s a guide on how to choose an air fryer, focusing on what to keep in mind while considering the top models discussed above:

1. Capacity and Size

Consider the size of your household and your cooking habits. A larger air fryer, like the Instant Vortex Pro 10-Quart or the Breville Smart Oven Air Fryer Pro, is ideal for large families or those who entertain often, providing ample space to cook meals in larger quantities. Smaller households might prefer the Cosori Pro LE, which offers a compact design without sacrificing cooking quality.

2. Cooking Functions

Evaluate the versatility you need. If you’re looking for an appliance that does more than just air fry, models like the Breville Smart Oven Air Fryer Pro and the Instant Vortex Pro 10-Quart come with multiple cooking functions, including baking, roasting, and even dehydrating. This versatility can save counter space and money by consolidating several appliances into one.

3. Ease of Use and Cleaning

Look for air fryers with intuitive controls and easy-to-clean designs. Touchscreen interfaces, such as those on the Ninja Foodi DualZone and Instant Pot Vortex Plus 6-Quart, offer straightforward operation. Additionally, models with dishwasher-safe parts or non-stick baskets, like the Instant Vortex Pro, significantly ease the cleaning process.

4. Temperature Range and Control

Consider the types of dishes you plan to cook. A broader temperature range, like the Breville Smart Oven Air Fryer Pro‘s 80°F to 480°F, offers more flexibility for various cooking methods, from gentle reheating to high-heat roasting. Precise temperature control, as seen with the Element iQ system in the Breville model, ensures perfect cooking results every time.

5. Unique Features and Technology

Each model comes with unique features that might appeal to different cooking styles and needs. For instance, the Ninja Foodi DualZone‘s ability to cook two dishes independently might be a game-changer for meal prep enthusiasts. Meanwhile, the Cosori Pro LE stands out for its stylish design and user-friendly interface, making it a great addition to a modern kitchen.

6. Price and Value

Finally, consider your budget and the value an air fryer brings. More expensive models like the Breville Smart Oven Air Fryer Pro offer extensive features and cooking capacity, which might justify the higher price for avid cooks looking for an all-in-one solution. In contrast, models like the Instant Pot Vortex Plus 6-Quart provide great functionality at a more moderate price, offering good value for most home cooking needs.

Choosing the right air fryer involves balancing your cooking requirements with the features, capacity, and price of the appliance. Whether you prioritize multifunctionality, ease of use, or specific cooking technologies, the top air fryers of 2024 cater to a wide range of culinary needs. By considering these factors, you can select an air fryer that not only fits your kitchen but also elevates your cooking experience.

As we wrap up our exploration of the top high-end air fryers of 2024, it’s clear that the advancements in kitchen technology continue to transform how we prepare our favorite meals. From the versatile and family-sized Ninja Foodi DualZone to the sophisticated and multifunctional Breville Smart Oven Air Fryer Pro, each model offers unique features that cater to different culinary desires and needs.

Embracing the Future of Cooking

The journey through the latest and greatest in air frying technology demonstrates not only the diversity in the market but also the commitment of brands to innovate and improve upon the convenience, health benefits, and versatility of cooking at home. Whether you are a seasoned chef looking to expand your culinary repertoire or a busy parent seeking quick and healthy meal options, there is an air fryer on this list that is sure to meet your cooking requirements.

Key Takeaways for the Aspiring Buyer

Remember, choosing the right air fryer goes beyond just picking the most advanced or expensive model; it’s about finding the perfect match for your kitchen, lifestyle, and culinary ambitions. Consider factors like capacity, functionality, ease of use, and, importantly, how a particular model can integrate into your daily routine to enhance your cooking experience.

Conclusion: A Culinary Revolution at Your Fingertips

In conclusion, the air fryers of 2024 are not just appliances; they are gateways to a healthier, more efficient, and more enjoyable cooking experience. They embody the culinary revolution that continues to evolve within our kitchens, offering a blend of technology and tradition that promises to delight your taste buds, nourish your body, and inspire your creativity.

As we move forward, the potential for what can be achieved with these remarkable tools is bound only by our imagination. So, whether you decide on the cutting-edge technology of the Instant Vortex Pro, the compact elegance of the Cosori Pro LE, or any other model from our top picks, you’re not just making a purchase—you’re investing in a lifestyle that values health, efficiency, and culinary excellence.

Happy cooking, and may your meals be as delightful and fulfilling as the journey you embark on with your new air fryer.

10 FAQs for High-End Air Fryers of 2024

  1. What size air fryer do I need for a family of four?
    • A 6 to 8-quart air fryer is ideal for a family of four, providing enough space to cook meals in sufficient quantities. Models like the Instant Pot Vortex Plus 6-Quart are perfect for medium-sized families.
  2. Can I bake, roast, and grill with these air fryers?
    • Yes, many high-end air fryers offer multiple cooking functions including baking, roasting, and grilling. The Breville Smart Oven Air Fryer Pro, for example, comes with specific settings for each cooking method.
  3. Are air fryers healthy?
    • Air fryers cook with significantly less oil than traditional frying methods, reducing fat content and calories in your meals. They are considered a healthier option for enjoying fried foods.
  4. How do I clean an air fryer?
    • Most air fryers have removable, non-stick baskets and trays that are dishwasher safe. For models like the Instant Vortex Pro 10-Quart, components can be easily detached and cleaned in a dishwasher or by hand.
  5. Can air fryers replace ovens and microwaves?
    • While air fryers can perform many of the same functions as ovens and microwaves, they might not fully replace them due to size limitations and specific cooking methods. However, they’re excellent for quick, efficient cooking with less energy.
  6. Is preheating necessary in an air fryer?
    • Some recipes and models, such as the Cosori Pro LE, benefit from preheating for optimal cooking results. It can lead to crispier textures and faster cooking times.
  7. What’s the benefit of having a dual-zone air fryer?
    • Dual-zone air fryers like the Ninja Foodi DualZone allow you to cook two different foods at two different settings simultaneously, making meal prep more efficient and versatile.
  8. Can I dehydrate food in an air fryer?
    • Certain models, such as the Instant Vortex Plus 6-Quart and the Instant Vortex Pro 10-Quart, come with a dehydrate function, allowing you to dry fruits, vegetables, and meats easily.
  9. How do I avoid food from sticking to the air fryer basket?
    • Even though most baskets are non-stick, a light spray of cooking oil can help prevent food from sticking. Ensure to clean the basket after each use to maintain its non-stick surface.
  10. Can I cook frozen foods in an air fryer?
    • Absolutely, air fryers excel at cooking frozen foods efficiently, requiring no thawing and offering quick, crispy results. Adjust cooking times accordingly to ensure even cooking.

Blog Tags for the Post

air fryers, healthy cooking, kitchen appliances, family meals, cooking technology, meal prep, quick recipes, home cooking, culinary innovation