Posted on 10 Comments

Guide to Oats: Types, Nutrition, and Differences Explained

OATS 101: YOUR ULTIMATE GUIDE

Oats are more than just a breakfast staple—they’re one of the most versatile, nutritious, and misunderstood whole grains you’ll find. Whether you call it oatmeal, porridge, or just “oats,” there’s a surprising amount of confusion around the types you see on supermarket shelves. Is there really a difference between rolled oats and old-fashioned oats? Are steel cut oats healthier than regular oats? What about quick oats, instant oats, or those porridge blends?

Let’s unravel the mystery, once and for all.


What Are Oats?

Oats are the edible seeds of the grass species Avena sativa. They’ve been a core part of traditional diets across the world for centuries—from hearty Scottish porridge to savory Indian oat upma and everything in between. At their core, all oat products start from the same whole oat “groat.”
Oats refers to the raw, unprocessed grain, while oatmeal is the name for a meal or porridge made from oats. However, in everyday use, the terms get mixed up—sometimes even on product labels.

Key Takeaway:

  • Oats = the grain in all forms (raw, steel cut, rolled, quick, etc.)
  • Oatmeal = any dish prepared from oats, typically boiled into a porridge.

Read more: Oats vs Oatmeal: What’s the Difference?


How Are Oats Processed? (From Field to Bowl)

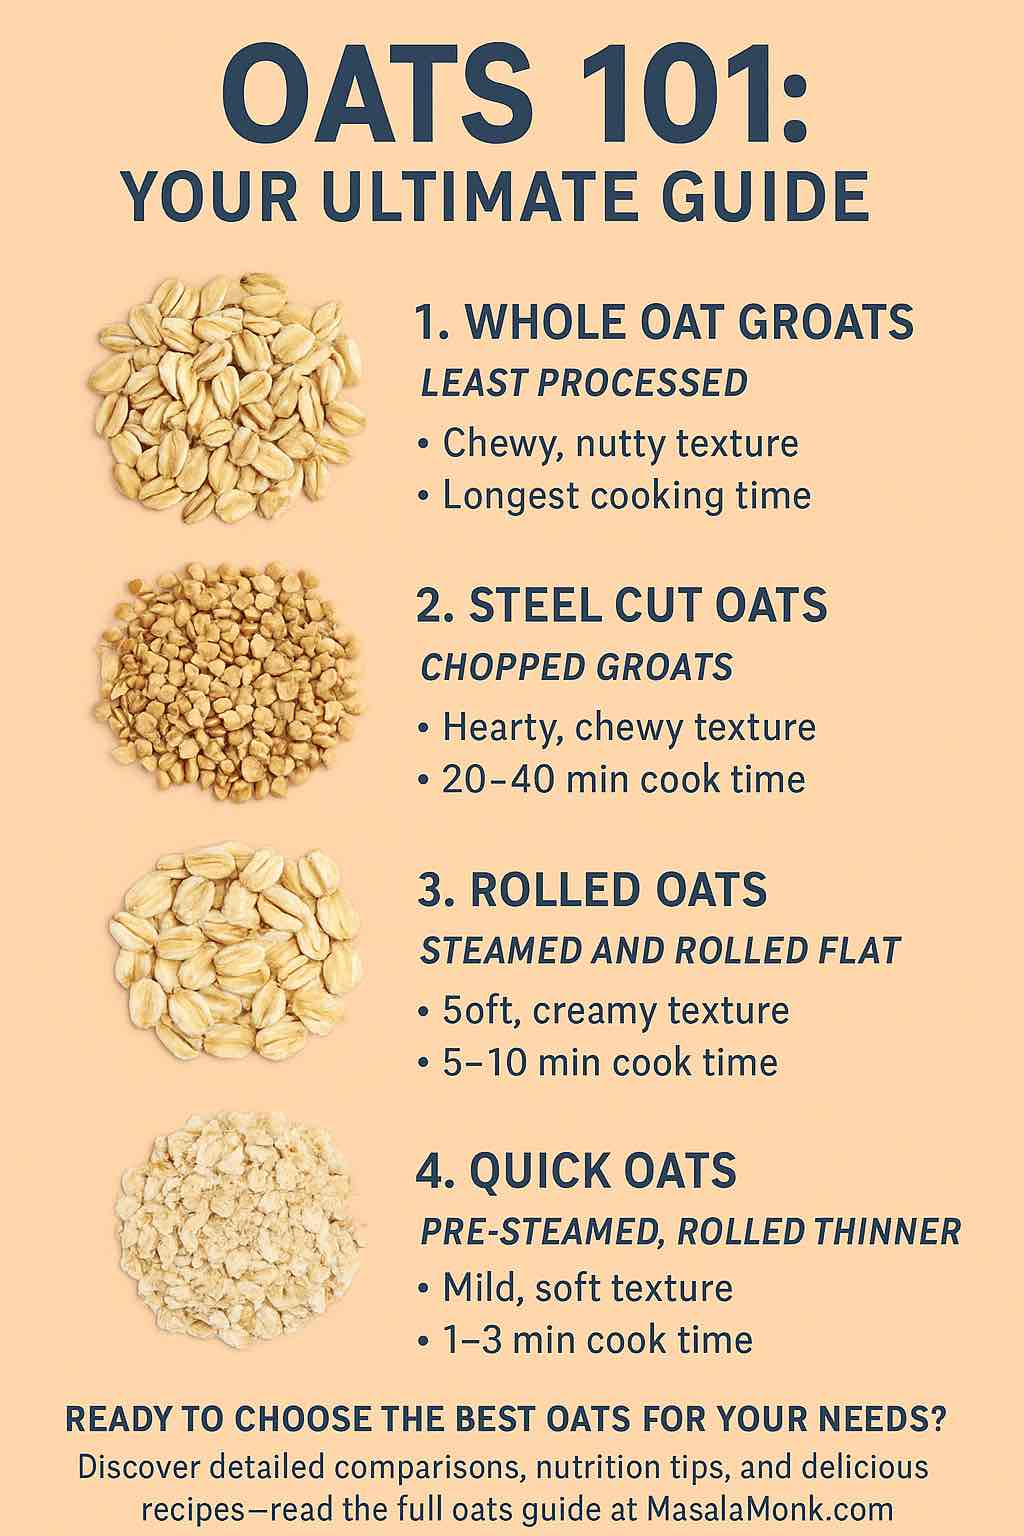
The journey from oat field to your breakfast bowl involves several stages. All oat products begin with whole oat groats—the de-husked, cleaned oat kernel. From there, the differences come down to how the oats are cut, steamed, and rolled:

  1. Steel Cut Oats (a.k.a. Irish oats, pinhead oats):
    • The groats are chopped into 2-4 pieces with steel blades.
    • No rolling or flattening.
    • Texture: Chunky, chewy, hearty.
  2. Rolled Oats (a.k.a. old-fashioned oats):
    • Groats are steamed and then pressed flat by large rollers.
    • Texture: Flaky, tender, with more bite than quick oats.
  3. Quick Oats:
    • Start as rolled oats, then cut into smaller pieces and rolled even thinner.
    • Texture: Soft, cook quickly, become mushy faster.
  4. Instant Oats:
    • The most processed. Pre-cooked, dried, then rolled ultra-thin. Often found in single-serve packets, usually with added flavors or sugar.
    • Texture: Creamiest, smoothest, “instant” porridge.

You might also see:

  • Sprouted Oats: Oats are soaked, allowed to sprout, then processed as above. Supposedly easier to digest, with a slightly nuttier flavor.
  • Porridge Oats: In the UK, this can refer to rolled oats or finely ground oats used for traditional porridge. Sometimes it’s a blend for extra creaminess.

Types of Oats: A Detailed Comparison

Let’s break down the differences and similarities in detail:

Steel Cut Oats

  • Also Known As: Irish oats, pinhead oats.
  • Processing: Whole oat groats chopped into pieces, not flattened.
  • Texture: Chewy, nubby, and hearty. Retains a bite even after cooking.
  • Flavor: Nutty and slightly sweet.
  • Cooking Time: 20-40 minutes on the stovetop; can be made in a pressure cooker or slow cooker.
  • Best For: Hearty porridge, overnight oats (with long soaking), savory oat bowls.

Fun Fact:
Steel cut oats are the closest to whole oat groats, meaning they take longest to digest and keep you full the longest.


Rolled Oats (Old-Fashioned Oats)

  • Also Known As: Old-fashioned oats (the terms are interchangeable!).
  • Processing: Groats are steamed to soften, then pressed flat into flakes.
  • Texture: Flaky, soft, with a pleasant chew; less firm than steel cut but not mushy.
  • Flavor: Mild and slightly sweet.
  • Cooking Time: 5-10 minutes on the stovetop; also popular for overnight oats and baking.
  • Best For: Classic oatmeal, overnight oats, cookies, muffins, granola, smoothies.

Tip:
If a recipe calls for “rolled oats” or “old-fashioned oats,” you can use either. They are exactly the same thing—just different names!


Quick Oats

  • Processing: Rolled oats cut into smaller pieces and rolled even thinner.
  • Texture: Cooks up soft, loses distinct flake structure, becomes mushy if overcooked.
  • Flavor: Neutral; takes on flavor of add-ins.
  • Cooking Time: 1-3 minutes—just add boiling water or microwave.
  • Best For: Quick breakfasts, mixing into batters, no-bake bars.

Note:
Quick oats and instant oats are not exactly the same, but many people (and brands) use the terms interchangeably. See the deep dive:
Are Quick Oats the Same as Instant Oats?


Instant Oats

  • Processing: Pre-cooked, dried, and rolled ultra-thin (often into a powdery texture).
  • Texture: Silky and creamy, almost pudding-like.
  • Flavor: Mild; often enhanced with added flavors, sugar, or salt in commercial packets.
  • Cooking Time: Instant! Just add hot water or microwave for 1 minute.
  • Best For: Emergency breakfasts, travel, kids, when you need food now.

Warning:
Check instant oat packets for added sugars and flavors. “Plain” versions are best if you want to avoid excess sugar.


Sprouted Oats

  • Processing: Groats are soaked, allowed to sprout (germinate), then dried and rolled or cut.
  • Texture/Flavor: Slightly nuttier, potentially easier to digest.
  • Use: As you would rolled oats or steel cut oats.

Porridge Oats / Pinhead Oats

  • Porridge Oats: In the UK and other countries, “porridge oats” might refer to rolled oats, sometimes ground for a creamier texture.
  • Pinhead Oats: Another name for steel cut oats.

Oats vs Oatmeal: Clearing Up the Confusion

  • Oats are the raw ingredient (groats, steel cut, rolled, quick, instant).
  • Oatmeal refers to the dish made from oats (porridge) or, in some places, any processed oat product.

If you’re buying oats for a recipe, always check if it calls for a specific type, because texture and cooking time can change the final result!

More details: Oats vs Oatmeal: What’s the Difference?


How Do Oat Types Compare Nutritionally?

Let’s be clear: All oats are nutritious!
But, the processing can slightly change how your body digests them:

TypeCaloriesFiberProteinGlycemic IndexCook Time
Steel Cut~150~4g~5g~5220–40 min
Rolled/Old-Fash~150~4g~5g~595–10 min
Quick Oats~150~4g~5g~661–3 min
Instant Oats~150~4g~5g75+1 min

Key points:

  • The macro nutrition (calories, protein, fiber) is nearly identical between all unsweetened oat types.
  • Steel cut oats are digested a bit more slowly, leading to a lower glycemic index and possibly longer-lasting energy.
  • Rolled oats strike a balance: faster to cook than steel cut, more texture than quick or instant.
  • Quick and instant oats digest faster, raising blood sugar more quickly—especially if sugar is added.

For people watching blood sugar:
Choose steel cut or rolled oats.
For convenience? Quick or instant is fine (just watch for extra sugar!).

Key Vitamins and Minerals in Oats (all types, per 40g dry serving):

While the macros (calories, protein, fiber) are very similar across all oat types, the micronutrient (vitamin and mineral) content is also quite consistent, because the different forms (steel cut, rolled, quick, instant) all start from the same whole grain. Minor losses in B-vitamins can occur with additional processing, but for most people, the differences are negligible.

  • Manganese: 70–90% Daily Value (DV)
  • Phosphorus: 20–30% DV
  • Magnesium: 15–20% DV
  • Iron: 8–10% DV
  • Zinc: 10–15% DV
  • Copper: 15–20% DV
  • Vitamin B1 (Thiamin): 10–15% DV
  • Folate: 5–8% DV
  • Selenium: 15–20% DV

Oats also contain:

  • Small amounts of potassium, calcium, and B5 (pantothenic acid)
  • The powerful antioxidant avenanthramides (unique to oats)

Does Processing Change the Mineral Content?

  • Steel cut, rolled, and quick oats:
    Very similar micronutrient profiles, as the oat bran and germ are retained.
  • Instant oats:
    Slightly lower levels of some B-vitamins due to extra steaming and pre-cooking, but still a rich source of minerals compared to most cereals.
    Main concern is usually added sugar/salt in flavored packets—not loss of minerals.

How Do Oats Support Health?

  • Manganese, phosphorus, and magnesium: For energy metabolism, bone health, and nerve function.
  • Iron and zinc: For immune support and oxygen transport.
  • Beta-glucan fiber: Supports cholesterol reduction, heart health, and gut microbiome.
  • Antioxidants (avenanthramides): Anti-inflammatory, may help lower blood pressure.

Bottom Line

  • Oats of all types are nutrient-dense, especially for minerals and certain B vitamins.
  • Choose plain, unsweetened varieties for maximum health benefit.
  • Processing for quick or instant oats may reduce B-vitamins slightly, but minerals remain high.

Cooking With Different Oat Types

Steel Cut Oats:

  • Use for a hearty, chewy porridge.
  • Great in savory oat “risottos” or grain bowls.
  • Overnight soak or pressure cook to save time.

Rolled/Old-Fashioned Oats:

  • Perfect for traditional oatmeal, overnight oats, and muesli.
  • Use in baking: cookies, muffins, breads, pancakes.
  • Make homemade granola or snack bars.

Quick Oats:

  • Great for instant breakfast or to thicken smoothies.
  • Use in batters (pancakes, muffins) for softer texture.
  • Not ideal for recipes where you want oat texture to stand out.

Instant Oats:

  • Best for emergencies, travel, or super-fast prep.
  • Often sweetened—use plain, then add your own toppings for a healthier bowl.

Can You Substitute One Oat for Another?

  • Rolled oats ↔ Old-fashioned oats: YES, always!
  • Rolled/old-fashioned ↔ Quick oats: Usually yes, but final texture will be softer/mushier.
  • Rolled/quick ↔ Steel cut: Not directly. Steel cut oats require more liquid, longer cooking, and have a totally different texture.
  • Instant oats ↔ Any other: Not a good swap for most recipes, as they dissolve or get mushy quickly.

Tip:
When baking, always use the type of oat called for in the recipe—especially for cookies or granola, where texture is key.


Why Choose One Oat Type Over Another?

  • Steel cut oats for chew, hearty texture, slow digestion.
  • Rolled oats for versatility, classic oatmeal, baking.
  • Quick oats for speed and convenience.
  • Instant oats for emergencies or travel.
  • Sprouted oats for those who want easier digestion or a slightly different flavor.

Final Thoughts: Which Oats Are Best?

There’s no single “best” oat for everyone. It depends on your:

  • Time: Steel cut for slow mornings, quick or instant for busy days.
  • Texture: Chewy (steel cut), soft but still textured (rolled), or creamy (quick/instant).
  • Nutrition: All are healthy, just be mindful of instant oat ingredients.

The bottom line? All oats are good oats.
Pick the type that fits your taste, recipe, and schedule best!


Ready to Go Deeper? Explore These Detailed Guides:


Do you have a favorite way to use oats? Share your tips and questions in the comments below!

10 FAQs About Oats

1. Are steel cut oats healthier than rolled oats?

Steel cut and rolled oats have almost identical nutrition—same calories, fiber, and protein. Steel cut oats have a slightly lower glycemic index and digest more slowly, which may help you feel full longer.


2. Can I substitute rolled oats for old-fashioned oats in recipes?

Yes! Rolled oats and old-fashioned oats are the same product, just two names. Use them interchangeably in any recipe.


3. Are quick oats and instant oats the same thing?

Not exactly. Quick oats are cut and rolled thinner to cook in 1–3 minutes. Instant oats are pre-cooked, dried, and rolled ultra-thin for “just add water” convenience. Instant oats often have added sugar or flavors.


4. Which type of oats is best for overnight oats?

Rolled (old-fashioned) oats work best for overnight oats, providing the right texture after soaking. Steel cut oats will be too chewy unless pre-cooked or soaked very long; quick oats become mushy.


5. Is there a big difference in calories or protein between oat types?

No. Steel cut, rolled, quick, and instant oats (plain, unsweetened) all have nearly the same calories, protein, and fiber per serving.


6. Why do steel cut oats take longer to cook?

Steel cut oats are just chopped, not rolled or steamed. Their thicker, denser shape takes more time and liquid to soften fully.


7. What are porridge oats?

In the UK and some other countries, “porridge oats” typically means rolled oats or a blend of rolled and ground oats for a creamy texture.


8. Can I use instant oats in baking recipes?

Not recommended. Instant oats tend to dissolve and make baked goods mushy. Use rolled or quick oats for better texture in cookies, muffins, and bars.


9. Are flavored instant oat packets healthy?

Many instant oat packets contain added sugars, salt, and artificial flavors. Choose plain instant oats and add your own healthy toppings for a better option.


10. Do oats contain gluten?

Oats are naturally gluten-free, but are often processed in facilities that also handle wheat. If you need gluten-free oats, look for oats specifically labeled “gluten-free.”

Posted on Leave a comment

5 Irresistible Keto Strawberry Low-Carb Desserts Ideas

KETO STRAWBERRY LOW-CARB DESSERTS

Strawberries on keto? Absolutely! While many people believe fruit is off-limits on a ketogenic diet, strawberries—in moderation—fit right into a low-carb lifestyle. Sweet, juicy, and bursting with flavor, strawberries can elevate your dessert game without tanking your carb count. In this blog post, I’m sharing five irresistible keto strawberry desserts that are practical for real life: they’re easy, delicious, and will satisfy your sweet tooth, all while keeping your macros on track.

Let’s dive into these guilt-free pleasures!


1. No-Bake Keto Strawberry Cheesecake Bites

Who doesn’t love a good cheesecake? Now, imagine all that creamy, tangy goodness transformed into adorable, bite-sized snacks that require no oven time. These cheesecake bites come together in minutes and are perfect for meal prep, after-dinner treats, or mid-day cravings.

Ingredients:

  • 8 oz cream cheese, softened
  • 1/3 cup powdered erythritol or monk fruit sweetener
  • 1/2 tsp vanilla extract
  • 1/2 cup diced strawberries or 1/4 cup freeze-dried strawberries (crushed)
  • 1/2 cup almond flour
  • Optional: unsweetened coconut flakes or sugar-free chocolate chips for rolling/dipping

Directions:

  1. Beat the softened cream cheese, sweetener, and vanilla until smooth.
  2. Fold in strawberries and almond flour until you have a thick, scoopable dough.
  3. Scoop out small portions and roll into balls.
  4. Chill on a parchment-lined tray for 20 minutes. If desired, roll in coconut or dip in melted sugar-free chocolate.

Practical Tips:

  • Use freeze-dried strawberries for a stronger flavor and firmer texture.
  • Store in an airtight container in the fridge for up to 5 days, or freeze for a cool summer snack.

2. Creamy Strawberry Keto Chia Pudding

Busy mornings? Need an easy make-ahead breakfast or dessert? Keto chia pudding is your friend! Chia seeds soak up the liquid and thicken overnight, while strawberries lend a pop of sweetness and color.

Ingredients:

  • 1 cup unsweetened almond or coconut milk
  • 1/4 cup chia seeds
  • 1/4 cup strawberries (fresh or frozen)
  • 2-3 tbsp erythritol or monk fruit sweetener
  • 1/2 tsp vanilla extract

Directions:

  1. In a blender, puree strawberries with milk, sweetener, and vanilla.
  2. Stir in chia seeds and pour into a mason jar or bowl.
  3. Refrigerate for at least 4 hours, ideally overnight.
  4. Stir before serving. Top with sliced strawberries, keto granola, or a dollop of whipped cream.

Practical Tips:

  • Double or triple the recipe for meal prep!
  • Layer with Greek yogurt or nut butter for a parfait-style treat.

3. Keto Strawberry Shortcake Mug Cake

Short on time but craving something special? This mug cake is a game-changer: you get all the nostalgia of strawberry shortcake, but it’s ready in under 5 minutes. Plus, it’s perfect for portion control.

Ingredients:

  • 1 egg
  • 3 tbsp almond flour
  • 1 tbsp coconut flour
  • 1 tbsp melted butter or coconut oil
  • 1 tbsp erythritol or monk fruit sweetener
  • 1/4 tsp baking powder
  • 1/2 tsp vanilla extract
  • 2-3 strawberries, diced

Directions:

  1. In a large mug, whisk together the egg, sweetener, and melted butter.
  2. Stir in almond flour, coconut flour, baking powder, and vanilla.
  3. Gently fold in the strawberries.
  4. Microwave for 90 seconds to 2 minutes, until set.
  5. Let cool briefly, then top with keto whipped cream or a few more fresh berries.

Practical Tips:

  • Every microwave is different, so start with 90 seconds and add more time as needed.
  • For extra decadence, add a square of sugar-free white chocolate in the center before microwaving.

4. Keto Strawberry Fat Bombs

Fat bombs are a keto staple—and for good reason. They’re convenient, customizable, and crush sugar cravings. Add strawberries and you get a naturally sweet, refreshing twist perfect for summer!

Ingredients:

  • 4 oz cream cheese, softened
  • 4 oz unsalted butter or coconut oil, softened
  • 1/4 cup strawberries, pureed or finely chopped
  • 2-3 tbsp powdered sweetener
  • 1/2 tsp vanilla or lemon zest (optional)

Directions:

  1. Beat cream cheese, butter/coconut oil, sweetener, and vanilla until fluffy.
  2. Fold in the strawberry puree.
  3. Scoop into silicone molds or mini muffin liners.
  4. Freeze for 1-2 hours, then pop out and store in a freezer bag or container.

Practical Tips:

  • For firmer fat bombs, use freeze-dried strawberries instead of fresh.
  • Experiment with flavor by adding a dash of lemon zest or swapping vanilla for almond extract.

5. Sugar-Free Strawberry Gelatin Parfaits

Craving a classic jello cup—but keto? These gelatin parfaits layer homemade sugar-free strawberry gelatin with whipped cream or mascarpone. They’re fun to eat, visually beautiful, and perfect for parties!

Ingredients:

  • 1 cup fresh strawberries, pureed
  • 1 cup water
  • 1-2 tbsp powdered erythritol or monk fruit sweetener
  • 1 tbsp grass-fed gelatin
  • 1 cup heavy cream or mascarpone, whipped with sweetener

Directions:

  1. Heat water and sweetener in a saucepan until steaming. Whisk in gelatin until dissolved.
  2. Remove from heat and blend with strawberry puree.
  3. Pour into small jars or cups and chill for 2-3 hours, until set.
  4. Top with a swirl of whipped cream or mascarpone, and garnish with a sliced strawberry.

Practical Tips:

  • Use silicone molds for fun shapes, or layer in wine glasses for an elegant presentation.
  • Add a splash of lemon juice to enhance the strawberry flavor.

Final Thoughts

Keto desserts don’t have to be complicated—or boring. With a handful of fresh strawberries, the right keto-friendly ingredients, and a bit of creativity, you can enjoy indulgent sweets without the guilt. Whether you crave creamy cheesecake, fluffy cake, or refreshing gelatin, there’s a keto strawberry dessert here for every craving and every cook.

Ready to get started?
Pick a recipe, share your creations with #KetoStrawberryDessert, and let me know your favorite in the comments. If you want even more keto dessert inspiration (or need help troubleshooting a recipe), just ask!


Pin this post for your next dessert craving, and happy low-carb baking! 🍓✨

10 Keto Strawberry Dessert FAQs

1. Can I use frozen strawberries in these recipes?
Yes, frozen strawberries work well for all these recipes. Thaw them first and drain excess liquid for best texture, especially in no-bake and fat bomb recipes.


2. What are the best sweeteners for keto desserts?
Erythritol, monk fruit, allulose, and stevia blends are excellent options. Powdered sweeteners dissolve more smoothly in no-bake recipes and fillings.


3. How do I calculate net carbs in these desserts?
Net carbs are calculated by subtracting fiber and sugar alcohols (from keto sweeteners) from total carbohydrates. Always check labels, especially for almond flour and sweeteners.


4. How long can I store these desserts?
Most no-bake and cheesecake-based desserts last 4–5 days refrigerated in airtight containers. Fat bombs and gelatin cups can be frozen for up to 1 month.


5. Can I make these recipes dairy-free?
Absolutely! Substitute coconut cream for heavy cream and vegan cream cheese for dairy cream cheese. Use coconut oil or vegan butter in place of regular butter.


6. What can I use instead of almond flour for nut allergies?
Sunflower seed flour or coconut flour can often be substituted. If using coconut flour, use only 1/3 the amount and add extra egg or liquid.


7. How do I keep my cheesecake bites from being too soft?
Chill them well before serving. Using freeze-dried strawberries instead of fresh prevents excess moisture. You can also add a little more almond flour.


8. Can I make these desserts ahead for a party?
Yes! All of these recipes can be prepared a day or two in advance. For best presentation, add whipped cream or garnishes just before serving.


9. Will these desserts raise my blood sugar?
When made with approved keto sweeteners and portioned correctly, these desserts have minimal impact on blood sugar for most people. Monitor your own response if you’re sensitive.


10. Can I double or triple the recipes for meal prep or gatherings?
Definitely. Most recipes scale easily. When increasing batch size, mix thoroughly for even distribution of ingredients, and adjust chill/bake times as needed.

Posted on 1 Comment

Homemade Salami: Minimal Processing, Maximum Flavor

low sodium salami spicy salami salami for charcuterie board dry cured salami uncured salami salami for charcuterie

A Complete Guide for Food Lovers, Health Seekers, and DIY Cooks


Salami—the word conjures up visions of rustic Italian kitchens, spicy aromas, and mouthwatering slices enjoyed with cheese or olives. But if you care about health, clean eating, or just want to avoid additives, the question is: Can you make healthy, minimally processed salami at home?

The answer is YES—and it’s easier than you might think.

This post covers the what, why, and how of homemade salami, along with several practical, delicious recipes for any kitchen. Let’s dive in!


What is Salami, Really?

Salami is a family of cured sausages made by fermenting and air-drying meat, usually pork or beef, with spices and salt. Traditionally, salami was made to preserve meat for long periods without refrigeration.

Why make it yourself?

  • Control every ingredient: Choose your own meat, salt, and spices.
  • Skip preservatives: No unnecessary nitrates, nitrites, or chemical flavors.
  • Customize for health: Go leaner, lower-sodium, or even plant-based!

The Basics: How is Salami Made?

  1. Meat Selection
    Start with fresh, high-quality meat—pork, beef, chicken, or even game. For classic salami, a bit of fat (about 20%) is ideal for flavor and texture.
  2. Seasoning
    Salt, black pepper, garlic, wine, fennel seeds, or chili are common. Use what you love.
  3. Curing or Cooking
    Traditional salami is cured—fermented and air-dried for weeks or months. But home cooks can make oven-baked, steamed, or even instant “semi-cured” versions for speed and safety.
  4. Casing
    Either use natural/edible casings (from the butcher), plastic wrap, or simply foil for no-casing versions.

Is Homemade Salami Healthier?

It can be—IF you control the process:

  • Use leaner meats, fresh spices, and skip artificial preservatives.
  • Control salt levels.
  • Choose oven-baked or steamed versions if you want to avoid nitrites or worry about curing at home.
  • Add extra flavor and nutrition with herbs, veggies, or even plant-based swaps.

4 Healthy, Easy Salami Recipes for Home

1. Simple Oven-Baked Beef Salami

Best for: Fast, fuss-free, high-protein snacking
No fermentation, no casing, no preservatives!

You’ll need:

  • 500g (1 lb) lean ground beef (or chicken/turkey)
  • 1.5 tsp salt
  • 1 tsp black pepper
  • 1 tsp garlic powder
  • 1 tsp mustard seeds
  • ½ tsp smoked paprika or a few drops liquid smoke (optional)
  • Pinch of sugar or honey (optional, helps flavor—not needed for keto)

Steps:

  1. Mix everything very well in a bowl (knead with hands for best texture).
  2. Shape into a thick log.
  3. Wrap tightly in plastic wrap, then foil.
  4. Chill in fridge 24 hours for flavors to meld.
  5. Remove wrap, place on rack in baking tray. Bake at 160°C (325°F) until internal temp is 70°C (160°F), about 45–60 mins.
  6. Cool fully before slicing thin.

Why it’s healthy:

  • No chemicals, minimal salt, your meat and your flavors!

2. Preservative-Free Chicken Salami

Best for: Lean protein, lower fat, quick lunchboxes

You’ll need:

  • 500g ground chicken
  • 1 tsp salt
  • 1 tsp black pepper
  • 1 tsp red chili flakes
  • 1 tsp garlic powder
  • ½ tsp ground coriander
  • 1 tbsp finely chopped bell pepper (optional for color)

Steps:

  1. Mix ingredients well.
  2. Shape into log, wrap tightly in baking paper and then foil.
  3. Steam for 25–30 mins or until cooked through, or bake at 160°C for 40 mins.
  4. Cool, unwrap, and chill before slicing.

Why it’s healthy:

  • No nitrites or additives, high in protein, lower in fat.

3. Traditional-Style “Milano” Semi-Cured Salami (Short Ferment)

Best for: Classic salami fans with some patience, probiotic benefits

You’ll need:

  • 400g pork shoulder (finely minced)
  • 100g pork fat
  • 2 tsp salt
  • 1 tsp black pepper
  • ½ tsp garlic powder
  • 1 tbsp red wine
  • Natural casing (from butcher)
  • Optional: 1/4 tsp starter culture (for safe fermentation, see butchers or online)

Steps:

  1. Mix meat, fat, salt, pepper, garlic, wine. Add starter culture if using.
  2. Stuff tightly into soaked casing.
  3. Hang in cool, humid place (15–20°C, 80–90% humidity) for 3 days to ferment.
  4. Move to cooler, less humid area to dry for 2–4 weeks until firm.
  5. Slice thin and enjoy.

Note: Always follow food safety for curing (see trusted online guides).

Why it’s healthy:

  • No commercial chemicals, natural fermentation for gut health, real ingredients.

4. Spicy Vegan “Salami” (No Meat, All Flavor)

Best for: Plant-based eaters, anyone avoiding meat or preservatives

You’ll need:

  • 1 cup vital wheat gluten
  • 1 tbsp chickpea flour
  • 2 tbsp tomato paste
  • 1 tbsp olive oil
  • 2 tbsp nutritional yeast
  • 1 tsp smoked paprika
  • ½ tsp garlic powder
  • ½ tsp onion powder
  • 1 tsp black pepper
  • 1 tbsp soy sauce or tamari
  • 1 tsp miso paste (optional)
  • ¾ cup water

Steps:

  1. Mix all dry ingredients.
  2. Whisk wet ingredients separately, then combine.
  3. Knead into a dough, shape into log, wrap tightly in foil.
  4. Steam for 40–50 mins.
  5. Cool and slice thin.

Why it’s healthy:

  • No nitrates, cholesterol, or processed meat—just plant power and fiber!

Tips for Success & Safety

  • Oven-baked/steamed salami is safest for beginners—no risk of unsafe fermentation.
  • If curing, use a starter culture for reliable results.
  • Cool and chill before slicing for best texture.
  • Experiment! Add herbs, seeds, or chopped nuts for variety.

Final Thoughts

Homemade salami gives you real control, flavor, and nutrition with minimal fuss. Whether you want classic beef or chicken, probiotic-rich “semi-cured,” or a plant-powered version, there’s a healthy salami for every kitchen.

Why settle for store-bought with additives when you can make your own—clean, tasty, and tailored to your health goals?


Hungry for More?

Want step-by-step photos, video tutorials, or a printable recipe card? Or are you ready for an in-depth guide to fermentation safety and flavor mastery?
Let us know in the comments or read more on MasalaMonk.com!


Ready to slice into your own homemade salami? Try a recipe and share your creations—tag us @MasalaMonk!

10 FAQs for Healthy Homemade Salami

1. Is it safe to make salami at home?
Yes, if you follow proper recipes, hygiene, and temperature guidelines. Oven-baked or steamed salami is safest for beginners, while fermentation or curing requires more care and experience.

2. Do I need curing salts (nitrates/nitrites) for homemade salami?
For oven-baked or steamed salami, you can skip curing salts. For dry-cured or fermented salami, curing salts are recommended to prevent harmful bacteria—unless you’re very experienced with safe fermentation.

3. What meats can I use for healthy homemade salami?
Lean beef, chicken, turkey, pork, and even wild game. For healthier versions, choose lean cuts and trim excess fat.

4. Can I make salami without any preservatives or additives?
Yes! Use only meat, salt, herbs, and spices for oven or steamed salami. For dry-cured types, the process itself preserves the meat with salt, but food safety is essential.

5. How long does homemade salami last?
Oven-baked or steamed salami lasts up to 7–10 days in the fridge. Dry-cured salami can last several weeks or even months if stored properly.

6. Is homemade salami healthier than store-bought?
Usually, yes. You control the meat quality, salt, and spices, and avoid commercial additives, preservatives, and excess sodium.

7. Are there plant-based or vegan salami options?
Absolutely! You can make vegan salami using vital wheat gluten, spices, tomato paste, and olive oil, steamed or baked for firm texture.

8. Can I customize the flavor of my homemade salami?
Definitely. Add any herbs, spices, seeds, chili flakes, or even chopped nuts to suit your taste preferences.

9. What’s the easiest salami to make at home for beginners?
Oven-baked or steamed chicken or beef salami—no casing, no fermentation, just mix, shape, cook, and slice.

10. Do I need special equipment to make salami at home?
No special tools are required for oven or steamed recipes. For traditional cured salami, you’ll need casings and a cool, humid place for drying.

Posted on 2 Comments

5 Sweet Potato Appetizers Ideas to Inspire the Chef in You

SWEET POTATO APPETIZERS

Sweet potatoes have officially moved beyond the Thanksgiving table and into the culinary spotlight as a versatile, healthful, and flavor-packed ingredient. Whether you’re a home chef or running a professional kitchen, the latest trends in sweet potato appetizers are all about global flavors, striking visuals, and creative textures.

In this post, we dive deep into five trending sweet potato appetizers for 2025, blending research from top food publications, chef menus, and recent product innovations. Each idea is presented with a chef’s rationale, practical how-to guidance, and tips for home and pro kitchens alike.


1. Grilled Purple Sweet Potato Salad Bites

Why It’s Trending:
Purple sweet potatoes are a visual knockout and rich in antioxidants. Recently featured by Bon Appétit (July 2025), grilling intensifies their natural sweetness while adding smokiness—a modern update for plant-forward appetizers.

How to Make It Practical:

  • Slice purple sweet potatoes into ½-inch rounds.
  • Toss with olive oil, salt, and pepper.
  • Grill on high heat until blistered and tender (about 4 minutes per side).
  • Dress with a creamy sesame-mayo or a lemony vinaigrette.
  • Top with scallions, toasted sesame seeds, and microgreens.

Pro Tip:
For parties, skewer grilled rounds and serve with the dressing on the side for dipping. The color and char will stand out on any appetizer tray.


2. Nashville-Spiced Sweet Potato Balls

The Inspiration:
A twist on classic croquettes, these crispy, spice-laden balls are inspired by the hot chicken craze, but made for vegetarians and flexitarians. Recent recipes (Cherry on My Sundae, June 2025) blend sweet potato with smoky paprika, cayenne, and a crunchy coating.

How to Make Them Practical:

  • Roast and mash sweet potatoes.
  • Mix with breadcrumbs, Nashville-style spices, finely diced green onions, and (optional) shredded cheese or bacon bits.
  • Form into balls; dredge in flour, egg, and panko.
  • Fry or bake until golden and crisp.
  • Serve with a creamy ranch or tangy comeback sauce.

Pro Kitchen Variation:
Pipe spiced sweet potato puree into mini choux pastry shells for an upscale passed hors d’oeuvre.


3. Roasted Sweet Potato “Crostini” with Guacamole & Corn

Why Chefs Love It:
Bread-free “crostini” are trending among gluten-free diners and those seeking lighter fare. Roasted sweet potato rounds are the perfect vehicle for colorful, bold toppings. This concept is popular with food bloggers and professional caterers alike (A Couple Cooks, Jan 2025).

How to Make at Home or Work:

  • Slice sweet potatoes into thick rounds (about ½ inch).
  • Roast with olive oil, cumin, and smoked paprika at 425°F until caramelized (20–25 minutes).
  • Top each round with a dollop of guacamole, roasted corn kernels, diced red onion, and chopped cilantro.
  • Finish with lime juice and a sprinkle of cotija cheese.

Chef’s Tip:
Try different toppings, such as whipped feta with pomegranate seeds or spicy black bean mash with pickled jalapeños.


4. Loaded Sweet Potato with Maple-Sriracha Yogurt & Crispy Chickpeas

On the Cutting Edge:
Loaded sweet potatoes are evolving, now being downsized into appetizer “boats” for maximum flavor and visual impact. The latest takes layer sweet, spicy, tangy, and crunchy elements for a full flavor experience (Good Mood Food, April 2025).

How to Make Them Practical:

  • Halve small sweet potatoes lengthwise; roast until just soft.
  • Scoop out a little center to make a well (save the scooped flesh for another use).
  • Fill with maple-sriracha Greek yogurt, crispy roasted chickpeas, crumbled feta, and pickled onions.
  • Drizzle with almond salsa verde (blend toasted almonds, parsley, lemon, olive oil, and a pinch of chili).

Meal Prep Friendly:
Both the yogurt sauce and chickpeas can be made days in advance, making this ideal for parties.


5. Tempura Sweet Potato Rounds with Flavored Salt

The Industry Insight:
Pre-cooked, tempura-battered sweet potato slices are gaining traction in restaurant and catering sectors for their crispness and convenience (US Foods Chef’s Line, 2025). This idea translates well to home kitchens using basic tempura batter.

How to Bring to Your Table:

  • Cut sweet potato into ½-inch thick rounds.
  • Dip in a simple tempura batter (flour, cornstarch, cold seltzer).
  • Fry in hot oil until golden and crispy.
  • Sprinkle immediately with flavored salt (smoked paprika, garlic powder, or furikake).
  • Serve with a dipping sauce—try spicy mayo, ponzu, or garlic aioli.

Entertaining Tip:
Offer a trio of dips and salts, and let guests mix and match.


Expert Tips for Sweet Potato Appetizer Success

  • Visual Appeal: Use a mix of purple, orange, and white sweet potatoes for color contrast.
  • Batch Prep: Many components (roasted rounds, sauces, toppings) can be made ahead for fast assembly.
  • Texture Matters: Combine creamy, crunchy, and chewy elements for memorable bites.
  • Global Flavors: Don’t be afraid to borrow from global cuisines—sriracha, gochujang, furikake, and curry powder all pair beautifully with sweet potatoes.

Final Thoughts

From smoky grilled salads to street-food-inspired croquettes, sweet potato appetizers are having a major moment in 2025. They’re healthy, photogenic, endlessly adaptable, and equally at home at a casual party or a fine-dining table. Whether you’re looking for a new plant-based favorite or a show-stopping party snack, these ideas bring the best of today’s trends straight to your kitchen.

Ready to experiment? Which idea will you try first? Let us know in the comments or share your own sweet potato creations!


FAQs

1. Can I use regular potatoes instead of sweet potatoes in these recipes?

Answer:
Yes, you can substitute regular potatoes for sweet potatoes in most appetizer recipes, but you’ll lose the characteristic sweetness and vibrant color. Adjust seasonings to balance flavors accordingly.


2. How do I keep sweet potato rounds from getting soggy when roasting or grilling?

Answer:
Slice rounds evenly (about ½ inch), don’t overcrowd the pan, and roast or grill at high heat (425°F/220°C) to encourage caramelization. Let them cool on a wire rack to preserve crispness.


3. Can I make sweet potato appetizers ahead of time?

Answer:
Yes! Many components (roasted rounds, dips, toppings) can be made a day ahead. Store separately and assemble just before serving for best texture and flavor.


4. What are some gluten-free options for breading or crisping sweet potatoes?

Answer:
Use gluten-free panko, crushed rice crackers, or cornmeal for coating. Tempura batter can be made with rice flour and cornstarch.


5. How do I make sweet potato appetizers vegan?

Answer:
Omit dairy (cheese, yogurt) and use plant-based alternatives like cashew cream, vegan cheese, or dairy-free yogurt. Use aquafaba or flaxseed “egg” for binding in fritters or balls.


6. What’s the best oil for frying sweet potato appetizers?

Answer:
Use oils with a high smoke point like canola, peanut, or avocado oil. For added flavor, try a touch of sesame oil in the batter or as a finishing drizzle.


7. Can I air-fry sweet potato appetizers instead of deep frying?

Answer:
Absolutely! Air frying is a healthier alternative and works well for rounds, wedges, and even “balls.” Toss lightly in oil, arrange in a single layer, and cook at 375°F/190°C, flipping halfway.


8. How do I add more flavor to plain sweet potato appetizers?

Answer:
Experiment with spice blends (cajun, za’atar, curry powder), citrus zest, fresh herbs, or flavored salts. Don’t be afraid to use bold, global-inspired dips.


9. Are these sweet potato appetizers suitable for kids?

Answer:
Yes! They’re naturally sweet and can be made mild by adjusting spices. Offer a range of dips and let kids assemble their own bites for fun.


10. How should I store leftovers, and can I reheat sweet potato appetizers?

Answer:
Store leftovers in an airtight container in the fridge for up to 3 days. Reheat in a hot oven or air fryer to restore crispness; avoid microwaving as it makes them soggy.

Posted on Leave a comment

Garlic Bread Reimagined: Elevating the Classic with a Keto Twist and Irresistible Variations!

KETO GARLIC BREAD

Few foods captivate the senses quite like garlic bread. The golden, crusty exterior, the rich aroma of garlic butter, the indulgent chew — it’s an iconic comfort food that’s universally loved.

But if you’re following a keto or low-carb lifestyle, traditional garlic bread is a problem: loaded with refined carbs and wheat flour, one slice can easily contain more carbs than your entire daily allowance.

Thankfully, the world of keto innovation has transformed garlic bread into something not only possible but better — deeply flavorful, indulgent, and entirely macro-friendly. This comprehensive guide walks you through everything you need to master keto garlic bread, offering multiple variations, practical recipes, expert techniques, ingredient science, and flavor innovations.


🌟 Why Reinvent Garlic Bread for Keto?

Let’s start with the problem.

Traditional garlic bread:

  • Made from French bread or Italian loaf
  • Typically 25-30g carbs per slice
  • Refined flour, no fiber, spikes blood sugar

The keto lifestyle requires:

  • 20-30g carbs total per day
  • Higher fat, moderate protein
  • Minimal sugars and refined starches

The goal: capture the same satisfying taste, texture, and mouthfeel of garlic bread while staying true to keto macros. This is absolutely achievable — once you understand the building blocks.


🧬 The Science of Keto Bread: Replacing Gluten & Carbs

Traditional bread owes its structure to gluten, which creates the elastic network that traps air bubbles, giving bread its signature chew.

Keto bread replaces gluten structure by manipulating:

  • Protein matrices (from cheese, eggs, or whey protein)
  • Fiber binders (psyllium husk, xanthan gum)
  • Fat emulsifiers (cream cheese, sour cream, ghee)

The result: chewy, satisfying bread analogs that hold together, brown beautifully, and offer complex flavor.


🍞 The Best Keto Garlic Bread Bases

Here’s a complete breakdown of your options — each with its strengths, trade-offs, and ideal use cases.


1️⃣ Fathead Dough (The Keto Classic Workhorse)

Core Ingredients:

  • Shredded mozzarella (protein matrix)
  • Cream cheese (fat and tenderness)
  • Almond flour (structure)
  • Egg (binding)
  • Baking powder (lift)
  • Psyllium husk (for elasticity and chew)

Why it’s fantastic:

  • Excellent bread-like chew
  • Flexible for loaves, rolls, sticks, or pull-apart bread
  • Freezes well for make-ahead batches

Pro Tip:
Use block mozzarella shredded at home for best melt and elasticity. Pre-shredded often contains anti-caking agents that affect dough texture.


2️⃣ Air Fryer Cheese Wrap Garlic Bread (The Ultra-Fast Version)

Core Ingredients:

  • Store-bought keto cheese wraps (e.g. egg-thin wraps, almond flour wraps)
  • Butter + garlic mixture
  • Parmesan or shredded mozzarella

Why it’s fantastic:

  • Lightning-fast — ready in under 10 minutes
  • Air fryer gives crispy edges and gooey centers
  • Great for quick snacks or appetizers

Method:

  • Brush wrap with garlic butter
  • Sprinkle cheese generously
  • Air fry at 375°F for 5-7 minutes

3️⃣ Cloud Bread (The Fluffy, Light Option)

Core Ingredients:

  • Egg whites (foaming structure)
  • Cream cheese or mascarpone
  • Cream of tartar (stabilizes meringue)
  • Garlic powder or fresh garlic

Why it’s fantastic:

  • Virtually zero carbs
  • Extremely light and airy — almost melts in your mouth
  • Perfect paired with lighter dishes like soups or salads

Limitation:
It lacks the chewiness of regular bread but delivers a wonderfully light texture that works for those preferring softer bites.


4️⃣ Almond Flour Loaf (The Sliceable, Bread-Like Classic)

Core Ingredients:

  • Almond flour (main structure)
  • Baking powder (leavening)
  • Eggs (binding)
  • Crème fraîche or sour cream (moisture, tenderness)
  • Mozzarella or Parmesan (depth of flavor)
  • Garlic and herbs

Why it’s fantastic:

  • Slices like traditional bread
  • Stores well, easy for batch baking
  • Holds up to slicing, spreading, and toasting

Pro Tip:
Use blanched almond flour for finer texture and less grittiness.


🧄 The Flavor Centerpiece: Keto Garlic Butter

No matter which base you choose, garlic butter is what transforms keto bread into garlic bread.

Essential Garlic Butter Formula:

  • ½ cup unsalted butter (softened)
  • 3-5 cloves minced or roasted garlic
  • 1 tbsp chopped fresh parsley
  • 1 tsp salt
  • 1 tsp lemon juice or apple cider vinegar (optional, balances richness)

Flavor Variations:

Add-OnFlavor Benefit
Truffle oilDeep, earthy luxury
Chili flakesSpicy heat
Smoked paprikaSubtle smoky depth
Bacon bitsSalty, meaty crunch
Pesto drizzleFresh herbal brightness
Fresh rosemaryMediterranean savory notes

Pro Tip:
Roasting your garlic beforehand makes it milder, sweeter, and more complex.


🔥 Cooking Techniques to Perfect Keto Garlic Bread

Both traditional ovens and air fryers can deliver exceptional results — depending on your base and goal.

MethodBest ForCook Time
Air FryerWraps, quick bakes, smaller portions5-7 minutes at 375°F
Oven BakeLoaves, pull-apart bread, rolls15-25 minutes at 350-375°F
Broiler/Blow TorchFinal blistering, golden finish1-2 minutes

Pro Tip:
For pull-apart bread, baste with garlic butter both before and after baking to lock in moisture and create rich layers of flavor.


🧮 Macronutrient Breakdown (Sample — Fathead Version)

NutrientPer Serving
Net Carbs2-3g
Fat16-20g
Protein8-10g
Calories200-250

Perfectly aligned with standard keto macros, allowing you to indulge without guilt.


🍳 Complete Keto Garlic Bread Recipe (Highly Practical Guide)

Ingredients (Makes 8 servings)

For the dough:

  • 1 ½ cups shredded mozzarella
  • 2 tbsp cream cheese
  • ¾ cup almond flour
  • 1 egg
  • 1 tbsp psyllium husk
  • 1 tsp baking powder

For the garlic butter:

  • ½ cup unsalted butter, softened
  • 4 cloves roasted garlic, mashed
  • 2 tbsp fresh parsley, chopped
  • 1 tbsp grated Parmesan
  • Salt, to taste

Directions

Step 1 — Make the Dough:

  1. Melt mozzarella and cream cheese together in microwave-safe bowl (90 seconds).
  2. Stir thoroughly until smooth.
  3. Add almond flour, psyllium husk, baking powder, and egg.
  4. Knead mixture until a uniform dough forms.

Step 2 — Shape the Bread:

  • Roll into loaf shape, pull-apart rolls, or flatbread depending on your preference.

Step 3 — Bake:

  • Preheat oven to 375°F.
  • Bake for 15-20 minutes until golden and set.

Step 4 — Prepare Garlic Butter:

  • Mix softened butter with roasted garlic, parsley, Parmesan, and salt.

Step 5 — Finish:

  • Brush garlic butter over hot bread.
  • Optional: broil for 1-2 minutes to achieve a gorgeous golden blister.

🍽 Serving Suggestions

  • Dipping Sauces: Low-sugar marinara, garlic aioli, pesto, or keto ranch.
  • Main Pairings: Keto pasta alternatives (zucchini noodles, shirataki), grilled meats, hearty stews.
  • Appetizers: Slice into sticks or knots for party platters.
  • Meal Prep: Make ahead, refrigerate for up to 3 days, reheat in air fryer for maximum crisp.

💡 Creative Variations to Explore

VariationHighlight
Pull-Apart Garlic Bread BitesEntertaining crowd-pleasers
Truffle Butter Garlic KnotsGourmet dinner parties
Air Fryer Garlic Bread ChipsKeto snacking
Bacon & Jalapeño Garlic BreadSmoky-spicy indulgence
Dairy-Free Almond Cheese VersionPlant-based option

🚀 Pro Tips for Success

  • Use parchment paper for easier handling of sticky dough.
  • Always cool slightly before slicing to maintain structure.
  • Don’t skip roasting garlic — it’s a game changer.
  • For ultra-soft texture, add 1 tbsp sour cream or crème fraîche to dough.

🔍 Why Keto Garlic Bread Is Worth Mastering

  • Satisfies intense bread cravings.
  • Customizable to every flavor preference.
  • Fits seamlessly into keto macros.
  • Impressive for entertaining — your guests may not realize it’s keto!
  • Easy to batch-cook and store for busy weeks.

Final Thought:
With the power of keto recipe science and a little creativity, you can enjoy garlic bread that’s not just “good for keto” — it’s outstanding, period.

You don’t need to compromise flavor, texture, or indulgence to stay on track. Mastering keto garlic bread might just become one of your most satisfying keto cooking achievements.


Ready to bake? Pick your base, prep your garlic butter, and elevate your keto comfort food game to delicious new heights.

🔎 10 FAQs and Answers for Keto Garlic Bread


1️⃣ Can I make keto garlic bread without almond flour?

Yes. You can substitute coconut flour (using about ¼ the amount of almond flour) or use fathead variations that rely more heavily on cheese. Cloud bread is also entirely almond flour-free. Each option gives a different texture, so choose based on your preference.


2️⃣ What’s the lowest-carb version of keto garlic bread?

The cloud bread version typically has less than 1g net carb per serving, making it the lowest-carb option. Air fryer cheese wraps are also extremely low-carb and fast to prepare.


3️⃣ Can I freeze keto garlic bread?

Absolutely. Fathead-based or almond flour loaves freeze very well. Cool completely, slice, and store in freezer bags for up to 3 months. Reheat directly from frozen in the oven or air fryer for best texture.


4️⃣ Is dairy-free keto garlic bread possible?

Yes, but more challenging. Substitute dairy-free mozzarella (almond or coconut-based) and use vegan cream cheese. The structure may be softer, but it’s achievable with some recipe adjustments.


5️⃣ Why does my fathead dough feel too sticky or oily?

This usually happens if:

  • The cheese wasn’t melted evenly.
  • The almond flour wasn’t fully incorporated.
  • The dough wasn’t allowed to cool slightly before kneading.

Knead with lightly oiled hands or chill for a few minutes to firm it up before shaping.


6️⃣ What’s the best type of mozzarella for fathead dough?

Use low-moisture, full-fat block mozzarella. Avoid pre-shredded varieties, as anti-caking agents prevent smooth melting and elasticity.


7️⃣ Can I make keto garlic bread in the air fryer?

Yes, very successfully! Cheese wraps, fathead dough mini-loaves, or garlic butter-topped chaffles work beautifully in the air fryer. Typical air frying time is 5–7 minutes at 375°F.


8️⃣ How do I make garlic bread more fluffy and less dense?

  • Add 1–2 tablespoons of sour cream or crème fraîche to the dough.
  • Do not overmix.
  • Use fresh baking powder for maximum lift.
  • Allow the dough to rest before baking.

9️⃣ Can I make pull-apart or party versions?

Definitely. Roll the fathead dough into small balls, arrange them close together, brush with garlic butter, and bake. This creates shareable pull-apart garlic bread that’s perfect for parties.


🔟 How do I prevent keto garlic bread from being too “eggy”?

Use only the required amount of egg — don’t add extra. For stronger garlic butter flavors, roast your garlic beforehand to help balance any remaining egg taste.