Posted on 2 Comments

Hashbrown Casserole Recipe

Golden hashbrown casserole in a baking dish with a scoop lifted to show the creamy shredded potato center.

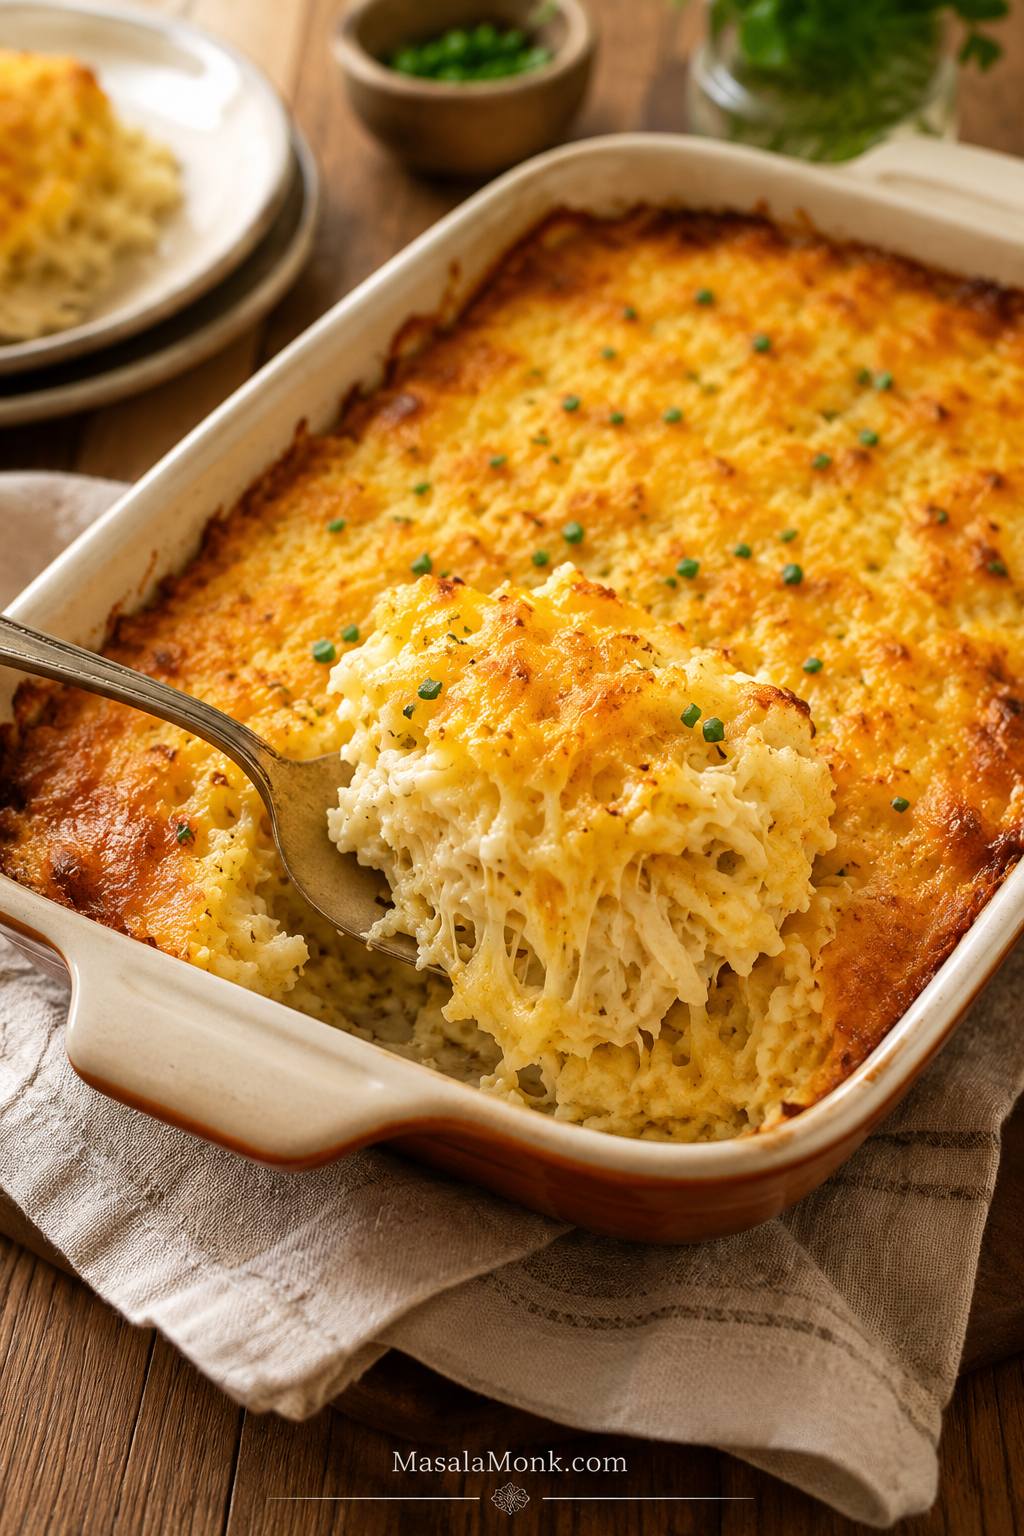
This hashbrown casserole recipe bakes up with bubbling edges, a soft cheesy potato center, and a golden top that feels right at home on a holiday table, potluck spread, or Sunday dinner plate. It starts with frozen shredded hash browns, so you get the comfort of a classic potato casserole without peeling, shredding, or squeezing potatoes from scratch.

Whether you call it hashbrown casserole or hash brown casserole, this is the creamy shredded-potato bake made with cheese, sour cream, and a golden topping. The filling is the cozy kind: hash browns folded into sour cream, cream soup or a quick homemade sauce, sharp cheddar, melted butter, onion, and seasoning.

This hashbrown casserole recipe is the cheesy potato side-dish style, rather than an egg-based breakfast bake. The goal is simple: creamy potatoes in the middle, bubbling edges at the sides, and a topping that still tastes like a topping when it reaches the table. Keep the top soft and melty with extra cheese, or add buttered cornflakes or crackers for the crunchy finish often associated with funeral potatoes.

If you were looking for the egg-and-potato breakfast lane instead, this breakfast burrito recipe uses eggs, potatoes or hash browns, cheese, and freezer-friendly filling ideas.

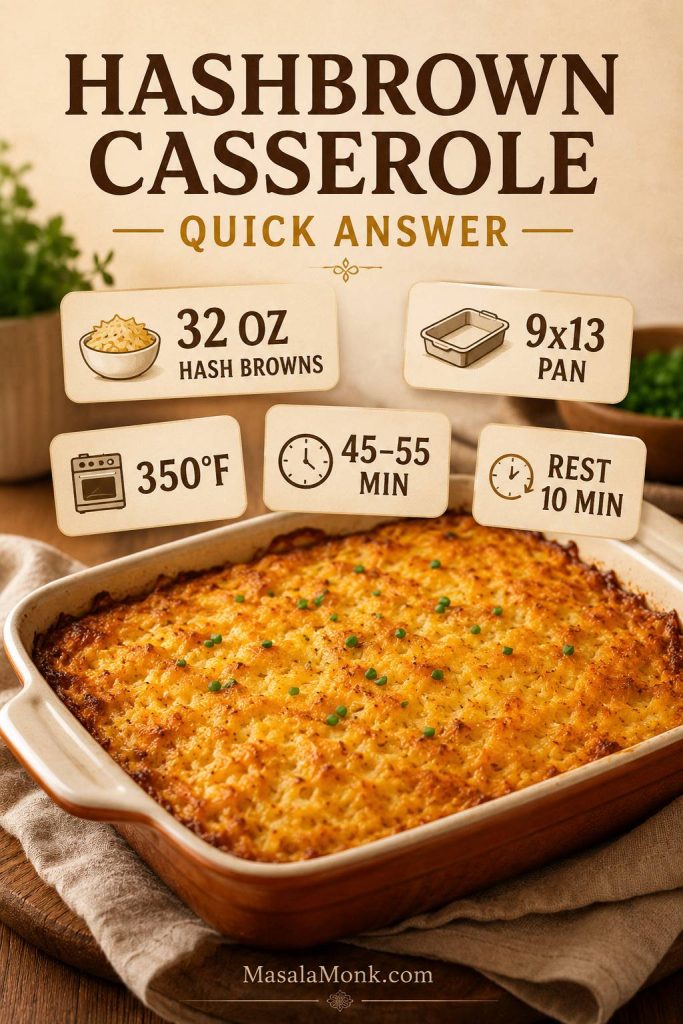
Quick Answer: Hashbrown Casserole Recipe Basics

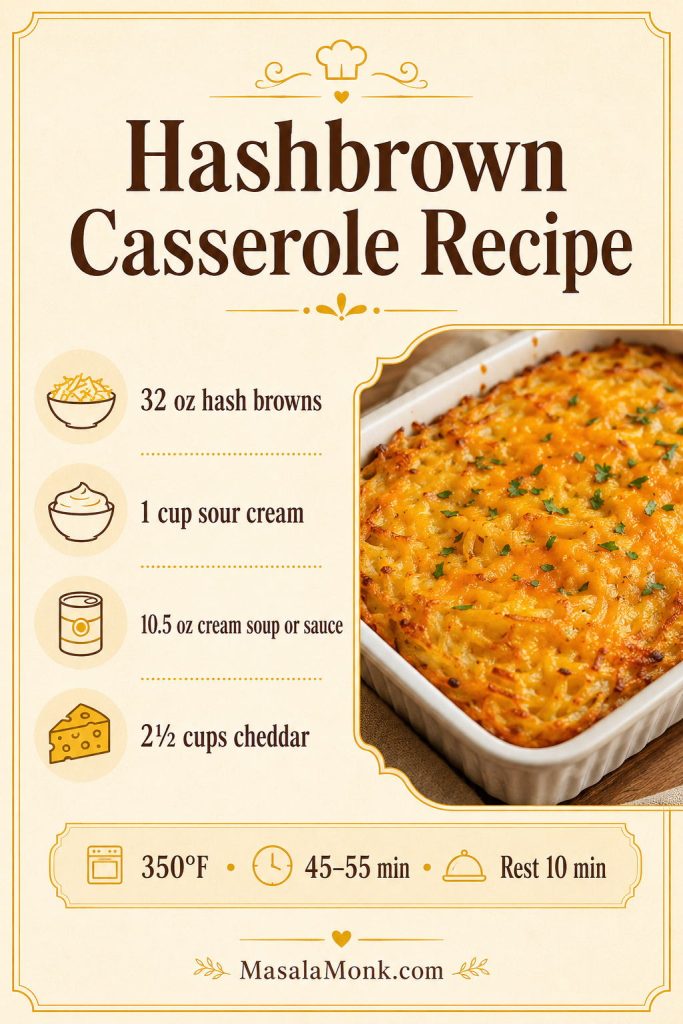
To make hashbrown casserole, thaw frozen shredded hash browns and remove excess moisture. After that, mix them with sour cream, cream of chicken or cream of mushroom soup, melted butter, sharp cheddar, onion, garlic powder, black pepper, and a small amount of salt. Spread the mixture in a greased 9×13-inch baking dish, add more cheese or a buttery cornflake topping, and bake at 350°F / 175°C for 45–55 minutes.

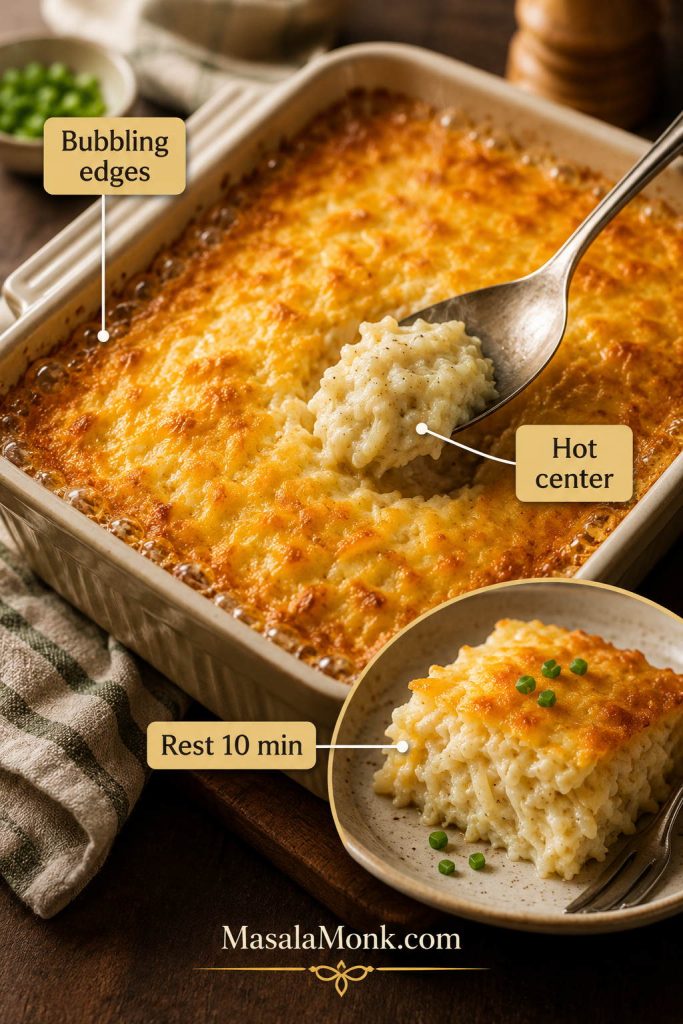
This hashbrown casserole recipe is done when the top is golden, but the edges matter more: they should be bubbling steadily, and the center should be hot and creamy when you spoon into it. Do not panic if the top looks done early; that is exactly when a loose tent of foil helps the middle finish without over-browning the topping.

Finally, let the pan rest for about 10 minutes so the filling settles into soft, scoopable squares. Serve it as a holiday potato side, potluck casserole, brunch side, or cozy dinner side with ham, chicken, pork, eggs, or simple vegetables.

Ready to cook now? Jump to the recipe card, or keep reading for the style choices, topping options, and make-ahead tips.

Quick answer board for hashbrown casserole showing 32 oz hash browns, 9x13 pan, 350°F bake time, and 10 minute rest.
Use this as the core formula: 32 oz hash browns, a 9×13 pan, 350°F oven, 45–55 minutes of baking, and 10 minutes to rest.

Hashbrown Casserole at a Glance

Recommended potatoes Frozen shredded hash browns, thawed and dried well
Pan 9×13-inch baking dish
Oven temperature 350°F / 175°C
Bake time 45–55 minutes
Rest time 10 minutes
Servings 10–12 side servings

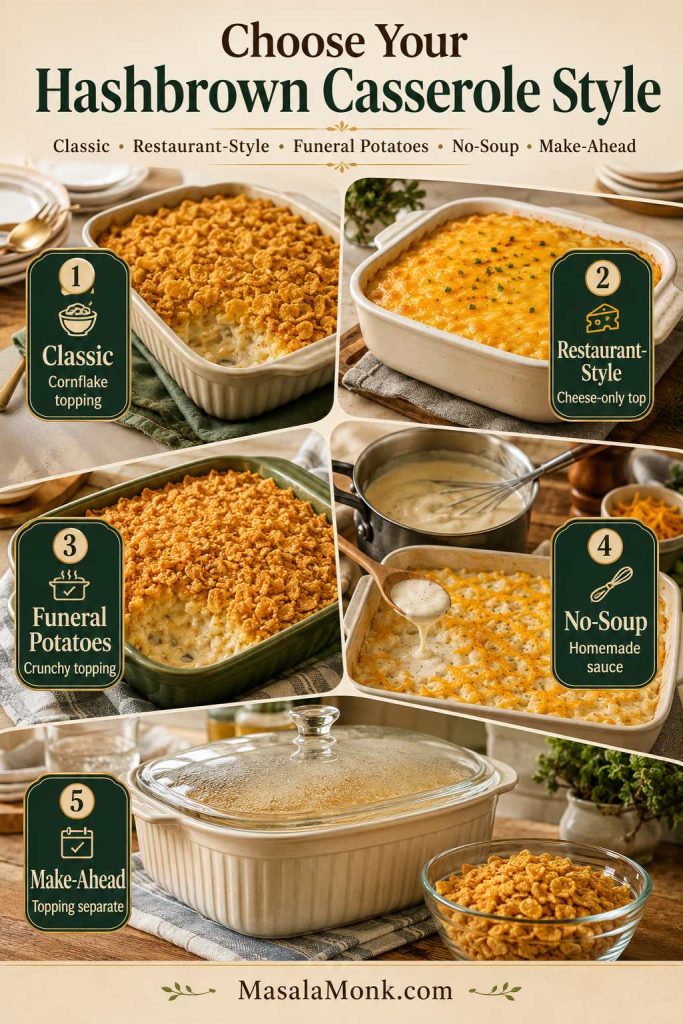
Choose Your Hashbrown Casserole Style

The base of this hashbrown casserole recipe is flexible, so you can steer the same pan toward a classic potluck side, funeral potatoes, a soft restaurant-style casserole, or a no-soup version. This is the fastest way to choose your topping before you start mixing.

Quick Style Guide

Classic potluck style Use cream of chicken soup, sour cream, cheddar, and a buttered cornflake topping.
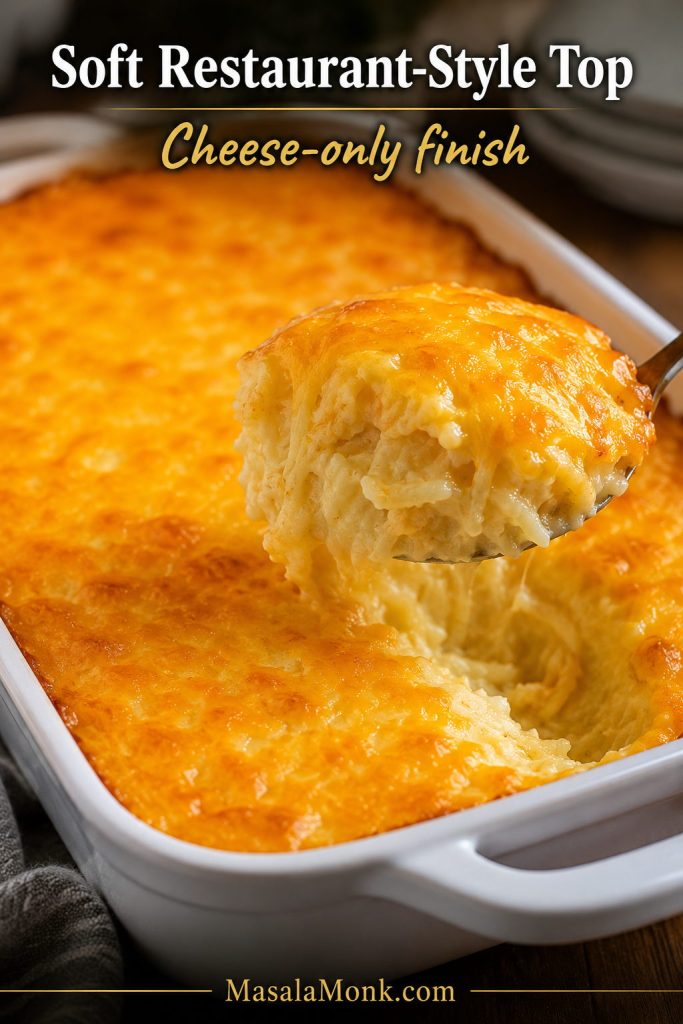
Soft restaurant-style top Keep the top cheese-only for a softer, melty finish instead of a crunchy cornflake layer.
Funeral potatoes style Add buttered cornflakes or crackers and bake until the edges are bubbling.
No canned soup Use the quick homemade butter-flour-broth-milk sauce below.
Best make-ahead version Assemble the filling ahead, but add the crunchy topping right before baking.

For the crunchy finish, go to topping options. For the homemade sauce version, jump to hashbrown casserole without canned soup.

Style guide showing classic, restaurant-style, funeral potatoes, no-soup, and make-ahead hashbrown casserole options.
Choose the version before you start: cornflakes for classic crunch, cheese-only for a soft restaurant-style top, or homemade sauce for a no-soup casserole.

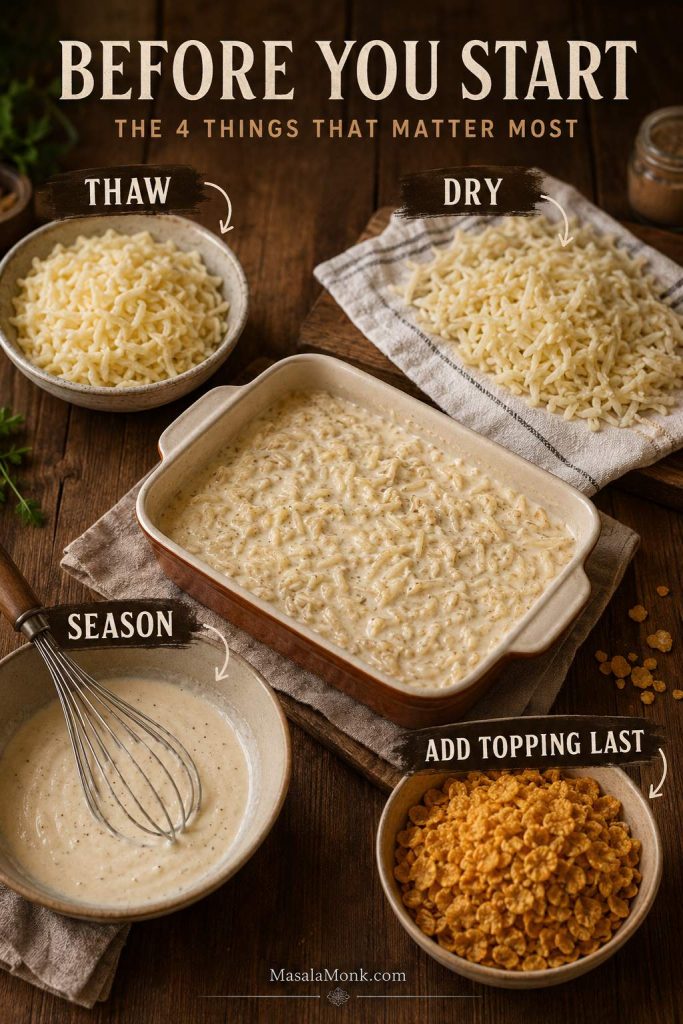
Before You Start: The 4 Things That Matter Most

If this casserole fails, it usually fails in one of four places: frozen potatoes, excess moisture, flat seasoning, or a topping that sat too long before baking. Check these before the pan goes into the oven.

  • Thaw the hash browns. Frozen clumps release water as they bake and make the timing less predictable.
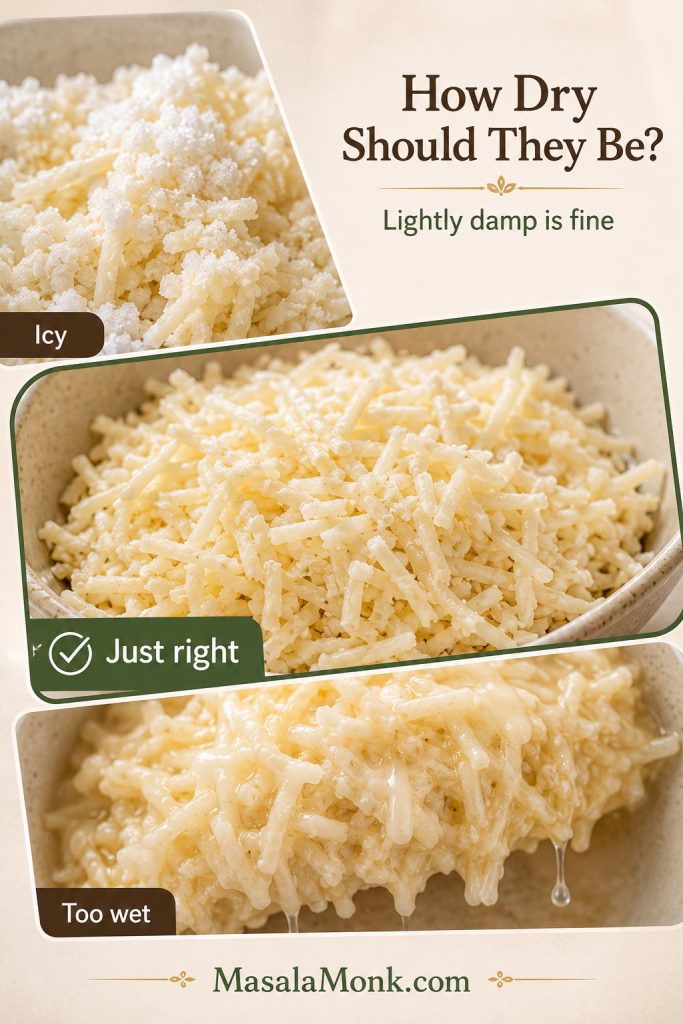
  • Dry off the extra moisture. The potatoes can feel lightly damp, but they should not be icy, soaked, or dripping.
  • Season the sauce before adding potatoes. Otherwise, the hash browns can mellow the flavor too much once everything is folded together.
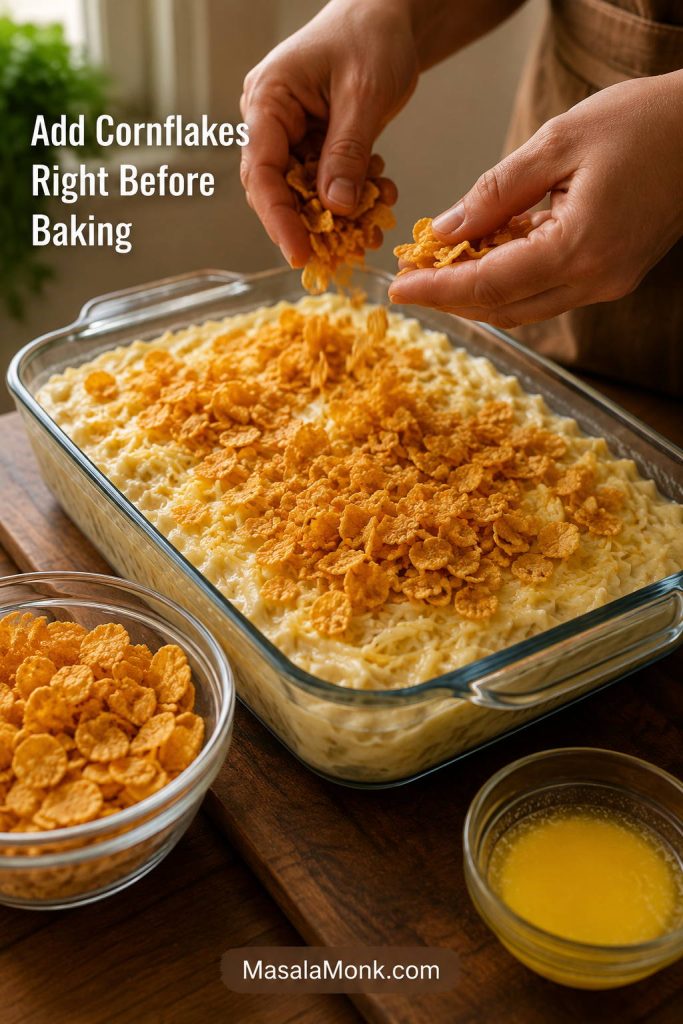
  • Add crunchy topping right before baking. For make-ahead prep, cornflakes, crackers, and panko stay crispest when they do not sit in the fridge overnight.

Not sure how dry the potatoes should be? The thawing section shows the texture cue before mixing.

Hashbrown casserole prep guide showing thawed potatoes, drying, seasoned sauce, and topping kept separate.
Before baking, solve the usual trouble spots first: frozen clumps, excess moisture, flat seasoning, and crunchy topping added too early.

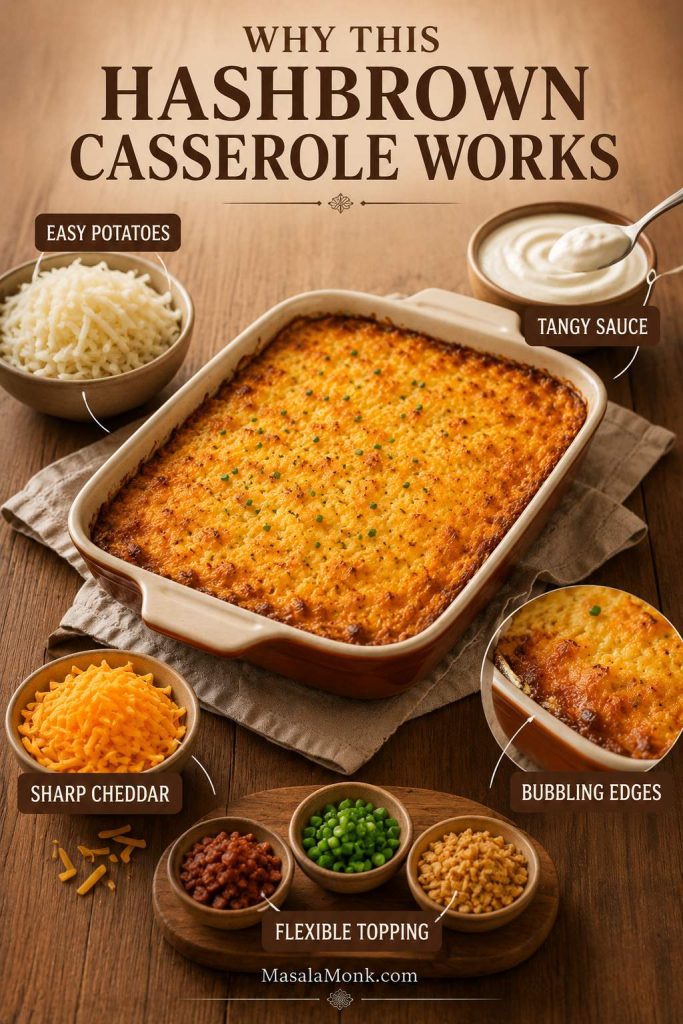
Why This Hashbrown Casserole Works

The recipe is simple, but it is not random. Each part is there to solve a common casserole problem: watery potatoes, flat sauce, a soft topping, or a middle that needs more time than the top.

  • Frozen shredded potatoes keep prep easy. You get a soft potato center without peeling, shredding, or par-cooking fresh potatoes.
  • Sour cream keeps the sauce from tasting flat. It adds tang against the cheese, butter, and cream soup.
  • Sharp cheddar gives more flavor than mild cheddar. That means the casserole tastes cheesy without needing an excessive amount of cheese.
  • Bubbling edges are a better doneness cue than color alone. The top can brown before the center is fully hot.
  • The topping is flexible. Cheese-only gives a soft, melty finish, while cornflakes or crackers give a crunchy funeral-potatoes-style top.
Explainer image showing frozen hash browns, sour cream, cheddar, bubbling edges, and topping choices for hashbrown casserole.
This recipe works because each part solves a problem: frozen potatoes save prep, sour cream adds tang, sharp cheddar adds flavor, and bubbling edges show doneness.

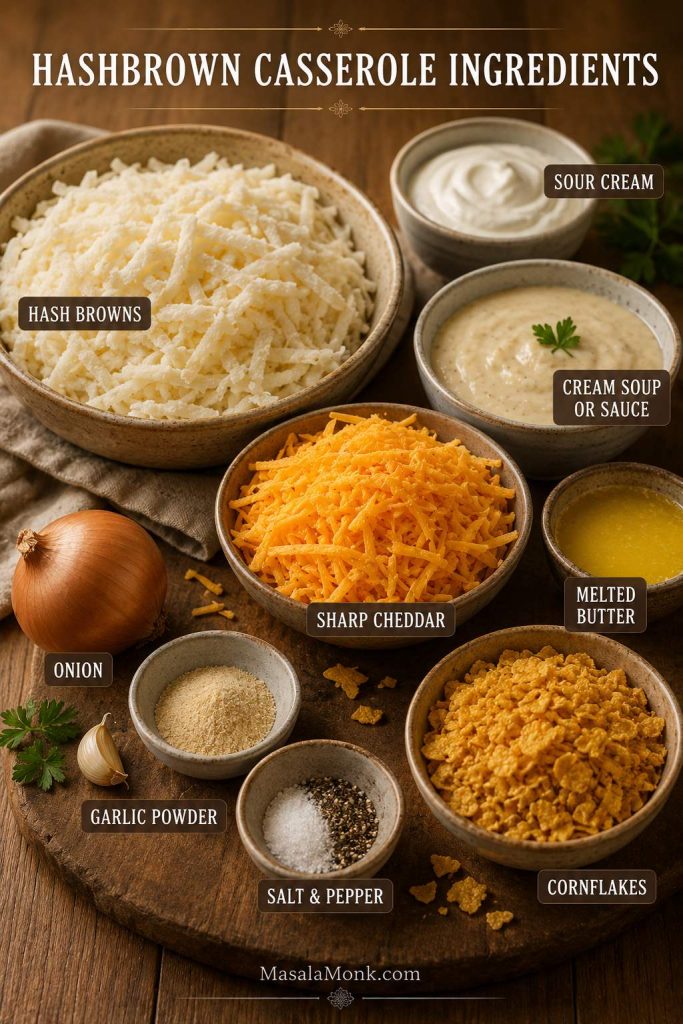
Ingredients and Why They Matter

The ingredient list is short, but each piece has a job. This is not the kind of casserole that needs fancy extras; it just needs the potatoes dry enough, the sauce thick enough, and the top added at the right time.

Ingredients for hashbrown casserole including hash browns, sour cream, cream soup or sauce, cheddar, butter, onion, and seasonings.
The ingredient list is short, but the balance matters: potatoes for body, sour cream for tang, cheddar for flavor, and topping for texture.

Frozen Shredded Hash Browns

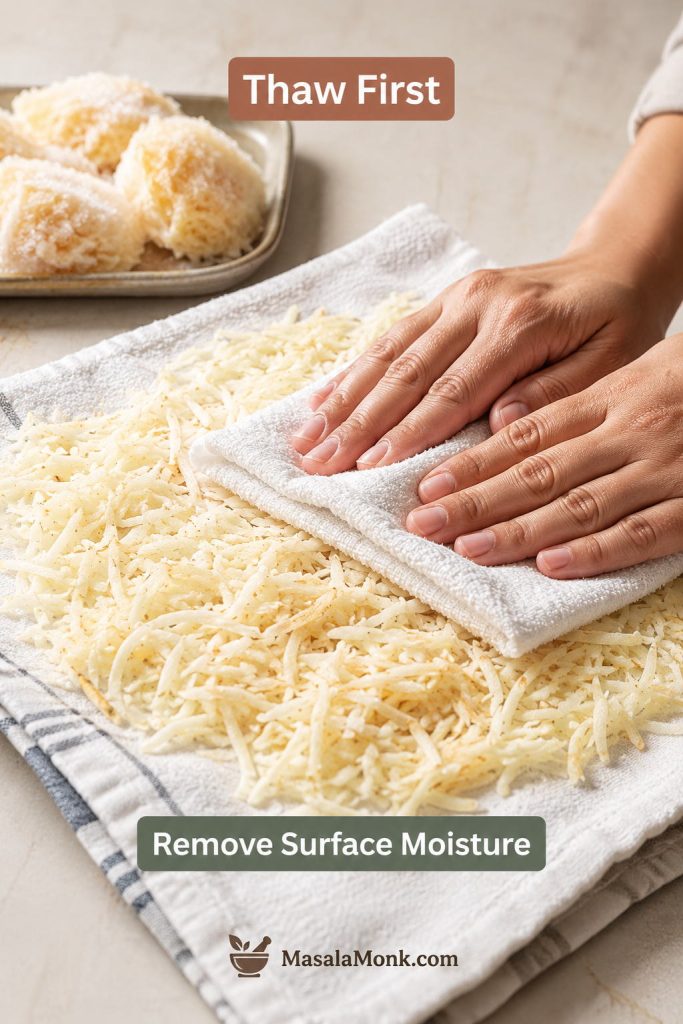
A 32 oz / 907 g bag of frozen shredded hash browns is the easiest starting point here. Let the potatoes thaw, then press away surface moisture with a clean towel before mixing. Shredded hash browns blend easily with the sauce and cheese, giving the casserole that soft, spoonable potato texture.

Diced hash browns also work, although they create a chunkier bite and may need a few extra minutes in the oven.

Sour Cream

Use 1 cup / about 240 g sour cream. Some old-school versions use a full 16 oz container; however, 1 cup gives enough tang and richness without making the casserole feel too heavy.

For a richer pan, you can add a little more. Need a substitute? See what to use instead of sour cream.

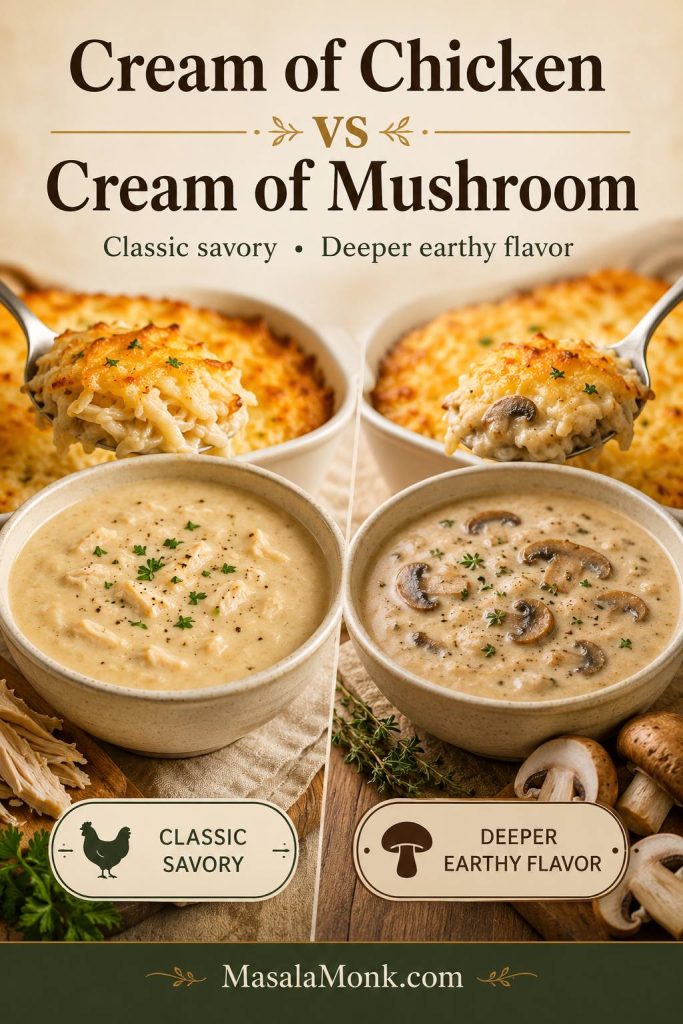
Cream of Chicken Soup or Cream of Mushroom Soup

Many traditional hashbrown casseroles use one 10.5 oz / 298 g can of condensed cream soup. For the most savory old-school flavor, use cream of chicken. If you want a deeper, earthier base or prefer to skip chicken-based soup, cream of mushroom is the better choice.

Cream of celery also works if you want a milder vegetable-style base. Prefer homemade sauce? Jump to the no-soup version, which replaces the can with butter, flour, broth, and milk.

Comparison of cream of chicken soup and cream of mushroom soup for hashbrown casserole.
Pick cream of chicken for the classic savory flavor, or use cream of mushroom when you want a deeper, earthier casserole base.

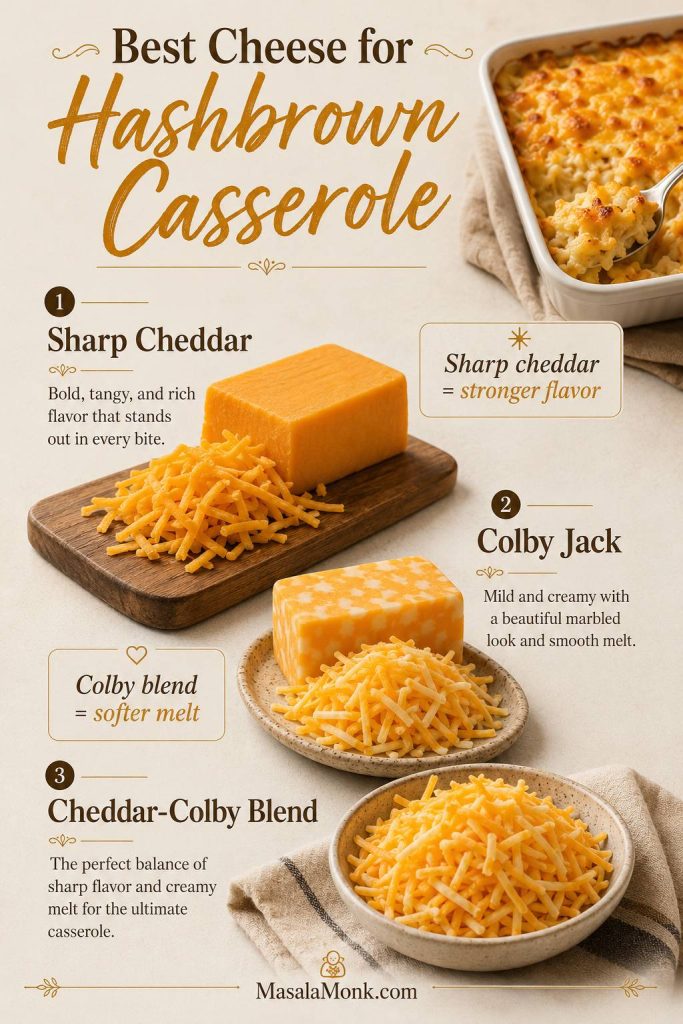
Sharp Cheddar Cheese

Use 2½ cups / about 280 g shredded sharp cheddar, divided between the filling and the top. Sharp cheddar gives the casserole more flavor than mild cheddar and helps every bite taste properly cheesy.

Freshly shredded cheese melts the smoothest. That said, bagged shredded cheddar is still fine for a practical casserole like this. For a softer restaurant-style direction, you can also use Colby, Colby Jack, or a cheddar-Colby blend.

Cheese options for hashbrown casserole including sharp cheddar, Colby Jack, and a cheddar-Colby blend.
Sharp cheddar gives the casserole stronger flavor, while Colby-style blends melt softer for a restaurant-style finish.

Butter

Use ½ cup / 113 g melted butter in the casserole base. It adds richness and helps the top brown. If you choose cornflakes, crackers, or panko, that topping gets its own smaller amount of melted butter.

Onion, Garlic Powder, Salt, and Pepper

Finely diced onion gives the strongest flavor, while onion powder is useful when you want a smoother filling. Garlic powder and black pepper round out the sauce.

Start with only ¼ teaspoon salt, then add more only if needed. Because condensed soup, cheese, and salted toppings can already bring plenty of salt, tasting the sauce before adding the potatoes is the safest move.

Optional Crunchy Topping

The topping is where this casserole changes personality. Extra cheese keeps it soft and gooey. Meanwhile, buttered cornflakes make it crisp and nostalgic, crushed crackers taste richer and a little softer, and panko gives a lighter crunch.

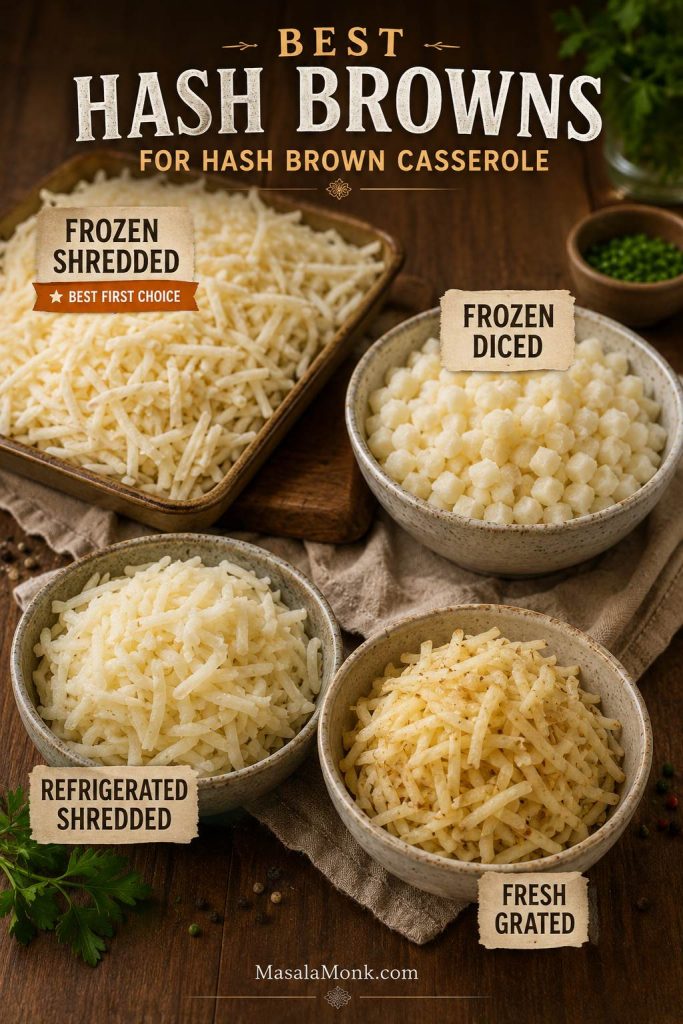
Best Hash Browns for Hash Brown Casserole: Shredded, Diced, Refrigerated, or Fresh?

Frozen shredded hash browns are the safest first choice for this recipe. They mix evenly into the creamy base, bake through reliably, and make the casserole easy to scoop. However, refrigerated shredded hash browns can also work well when you want a firmer, less icy starting point.

If you are comparing shredded hash browns, diced potatoes, and patties, this air fryer hash browns guide is useful for understanding the different frozen hash brown styles before you choose what to use.

Hash brown type Use it for What to know
Frozen shredded hash browns Soft, creamy casserole Most reliable choice for this recipe. Thaw and dry well before mixing.
Frozen diced hash browns Chunkier potato bite Works well, but may need 5–10 extra minutes in the oven.
Refrigerated shredded hash browns Firmer, less icy texture Useful for a soft restaurant-style hash brown casserole; still check for excess moisture before mixing.
Fresh grated potatoes From-scratch version Must be rinsed and squeezed very dry so the casserole does not turn thin or soupy.
Hash brown patties Layered casserole styles Better for a patty-style breakfast casserole than this creamy side-dish version.
Four hash brown options for hash brown casserole: frozen shredded, frozen diced, refrigerated shredded, and fresh grated potatoes.
Frozen shredded hash browns are the easiest first choice; however, diced, refrigerated, and fresh potatoes each change the bite and bake time.

Once you choose your potatoes, the next texture step is simple: thaw and dry the hash browns before mixing.

Do You Thaw Frozen Hash Browns First?

Thawing is the quiet step that saves the texture. Once the hash browns are thawed, press out surface moisture before mixing them into the creamy base. As a result, the casserole bakes more evenly and extra water is less likely to thin the sauce.

The potatoes do not need to be bone-dry, but they should not be icy, soaked, or dripping. Icy potatoes can stretch the bake time and leave the edges loose instead of creamy.

Hands pressing thawed shredded hash browns in a towel to remove surface moisture before making casserole.
Thawing first gives you a chance to remove surface moisture before the potatoes go into the sauce.

Easy Ways to Thaw Hash Browns

  • Overnight in the fridge: Place the bag in a bowl or on a tray in case condensation collects.
  • Microwave in short bursts: Use low or medium power, break up clumps, and stop before the potatoes begin to cook.
  • Spread on a tray: Spread the hash browns in a thin layer, let them soften, then dry off wet spots with a clean towel.

What Happens If You Use Frozen Hash Browns Without Thawing?

You can use them straight from frozen in a pinch, but it is not ideal for this hashbrown casserole recipe. Frozen hash browns release moisture as they bake, which can make the sauce thinner and the bake time less predictable. If you use them frozen, break up icy clumps, add extra baking time, and cover the dish loosely if the top browns before the center is hot.

If you already baked the casserole and it turned thin or watery, use the troubleshooting guide for fixes.

How Dry Should They Be?

They should feel thawed and lightly damp, not soaked. Press gently with a clean kitchen towel or paper towels. You are only removing the surface moisture that would thin the filling.

Moisture guide showing icy, lightly damp, and too-wet hash browns before mixing into casserole.
The hash browns do not need to be bone-dry; instead, aim for lightly damp potatoes with no icy clumps or dripping water.

How to Make It

This casserole is mostly mixing and baking, but the order matters. Start with dry potatoes, season the creamy base before adding the hash browns, and let the finished pan rest before serving.

Step-by-step hashbrown casserole method showing drying potatoes, mixing sauce, folding, spreading, topping, baking, and resting.
The order matters: dry the potatoes, season the creamy base, fold gently, spread evenly, top, bake until bubbly, and rest before serving.

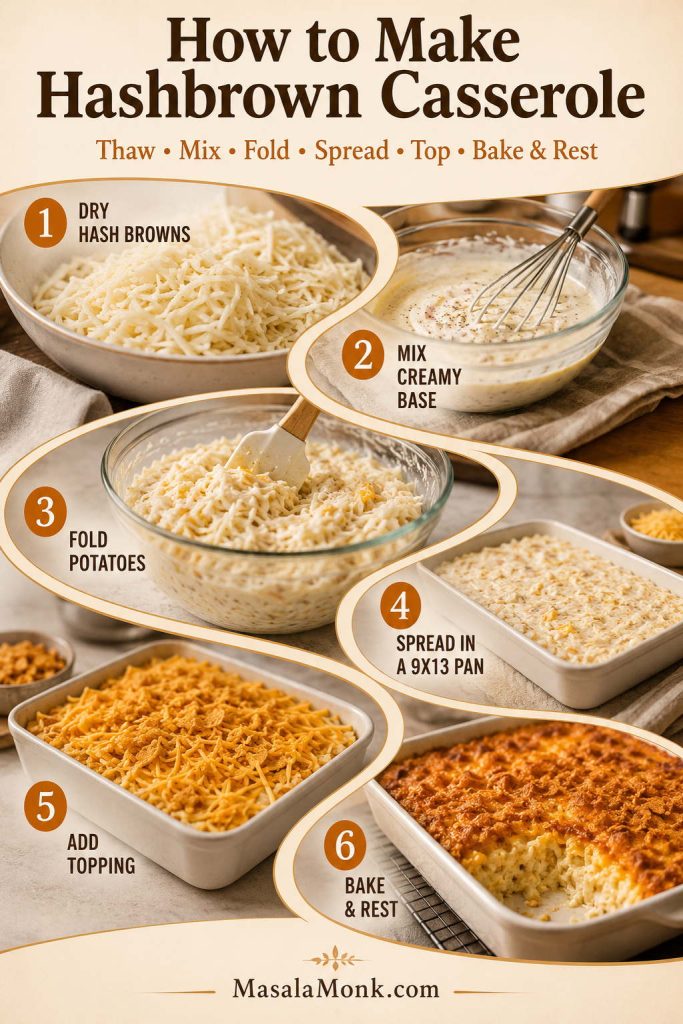
Step 1: Thaw and Dry the Hash Browns

Thaw the frozen shredded hash browns and remove surface moisture with a clean towel. Then, break up any clumps so the potatoes mix evenly with the sauce.

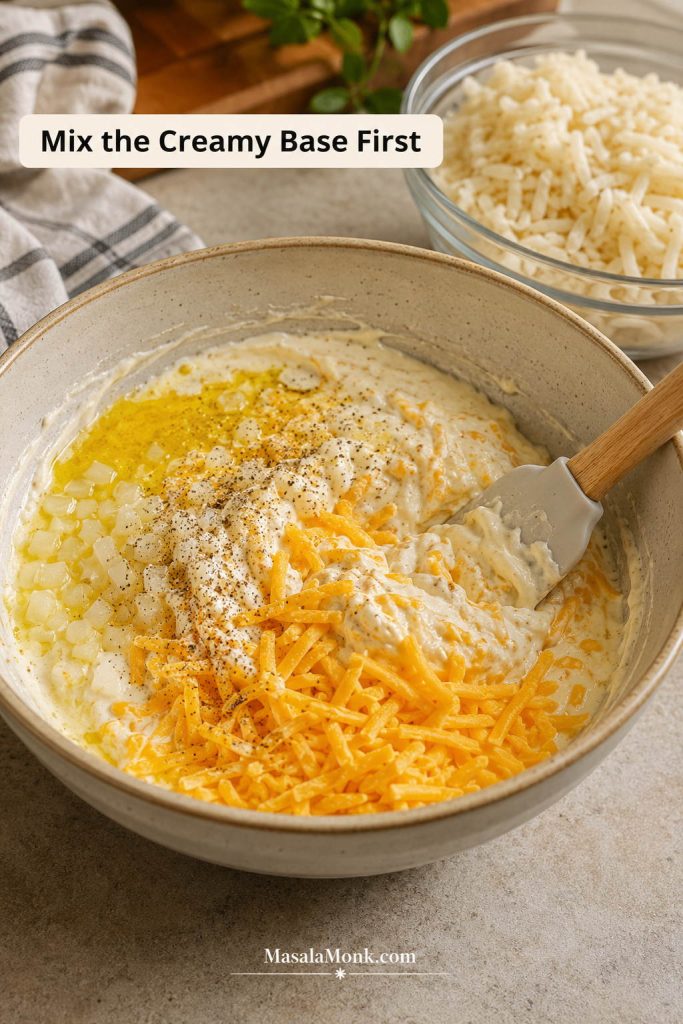
Step 2: Mix the Creamy Base

In a large bowl, stir together the cream soup, sour cream, melted butter, onion, garlic powder, black pepper, ¼ teaspoon salt, and most of the cheddar cheese.

This is the right time to check seasoning. The base should taste savory and cheesy because the potatoes will soften the flavor once everything is folded together.

Creamy hashbrown casserole base being mixed in a bowl before the potatoes are added.
Mix and season the creamy base before adding potatoes so the sauce tastes savory enough to carry the whole casserole.

Step 3: Fold in the Hash Browns

Add the thawed hash browns and fold gently until they are coated. Avoid mashing them; instead, keep the filling creamy but still textured.

Step 4: Spread in the Baking Dish

Grease a 9×13-inch baking dish, then spread the mixture into an even layer. A shallow, even layer helps the center heat through and the top brown properly.

Step 5: Add Cheese or Crunchy Topping

Sprinkle the remaining cheddar over the top. For a crunchy finish, mix crushed cornflakes, crackers, or panko with melted butter and scatter it over the casserole.

Step 6: Bake Until Bubbly and Golden

Bake at 350°F / 175°C for 45–55 minutes, until the center is hot, the edges are bubbling, and the top is golden. However, the topping may brown before the middle is fully hot, so use bubbling edges as your main doneness cue.

If the top is golden but the center still looks unsettled when nudged, cover the dish loosely with foil and keep baking until the edges bubble steadily.

Step 7: Rest Before Serving

Those 10 minutes matter. Straight from the oven, the filling is still loose; after a short rest, it scoops like a casserole instead of sliding across the plate.

Hashbrown casserole doneness cues showing bubbling edges, hot center, and a rested scoop.
A golden top is not enough by itself; look for bubbling edges, a hot center, and a short rest for cleaner scoops.

Texture Tips: Creamy Center, Not Watery Edges

The casserole should scoop softly, not slide apart in a puddle of sauce. Once the hash browns are thawed and dried well, the next details are baking time, pan depth, and when you add the topping.

Texture comparison showing watery hashbrown casserole beside a creamy, cohesive casserole scoop.
A watery hashbrown casserole usually needs one of four fixes: drier potatoes, a shallower pan, more bake time, or a longer rest.
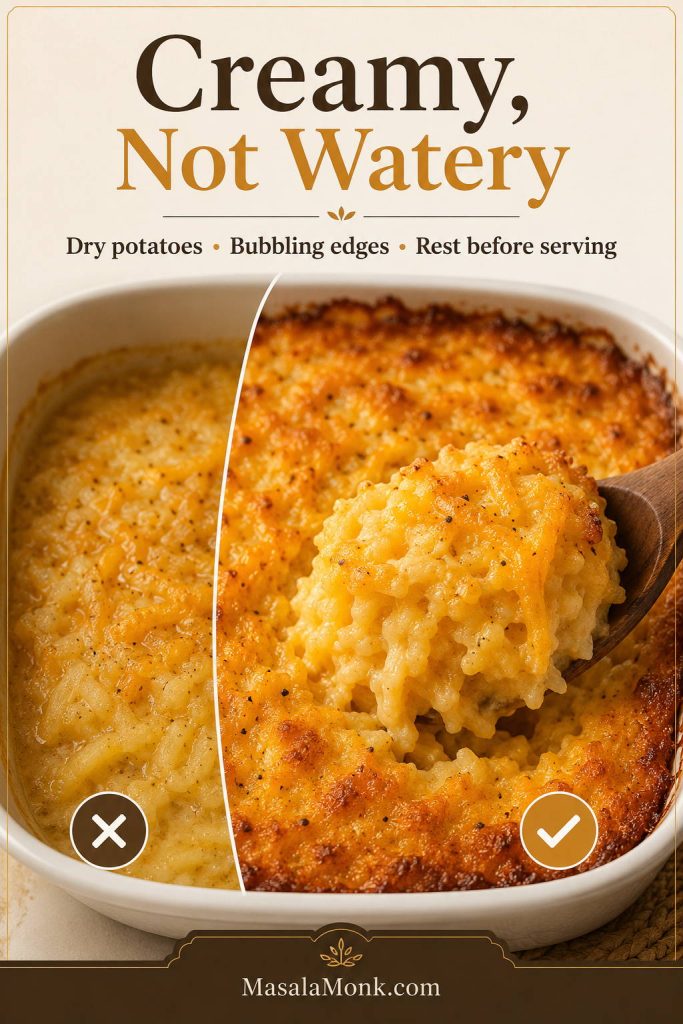
  • Use a 9×13-inch dish for the full recipe. A deeper dish can work, but the center may need more time to heat through.
  • Look for bubbling edges. A golden top is not enough; the edges should bubble steadily and the center should be hot.
  • Give diced hash browns extra time. They are thicker than shredded potatoes and may need 5–10 more minutes.
  • Cover only if the top browns too fast. Foil protects the topping while the center finishes baking.
  • Rest the pan before serving. Ten minutes helps the sauce settle into the potatoes instead of running across the plate.

Hashbrown Casserole Topping Options: Cornflakes, Crackers, or Cheese

The topping is where the casserole changes personality. Cheese-only keeps it soft and melty; cornflakes turn it into the crunchy holiday pan many people recognize as funeral potatoes. Crackers make the top buttery and softer, while panko gives a lighter finish.

Buttery round crackers, such as Ritz-style crackers, give a richer and softer topping than cornflakes.

If you are taking this to a potluck, choose cornflakes or crackers and add them just before baking. If you want the soft restaurant-style top, skip the crunchy layer and let the cheese do the work.
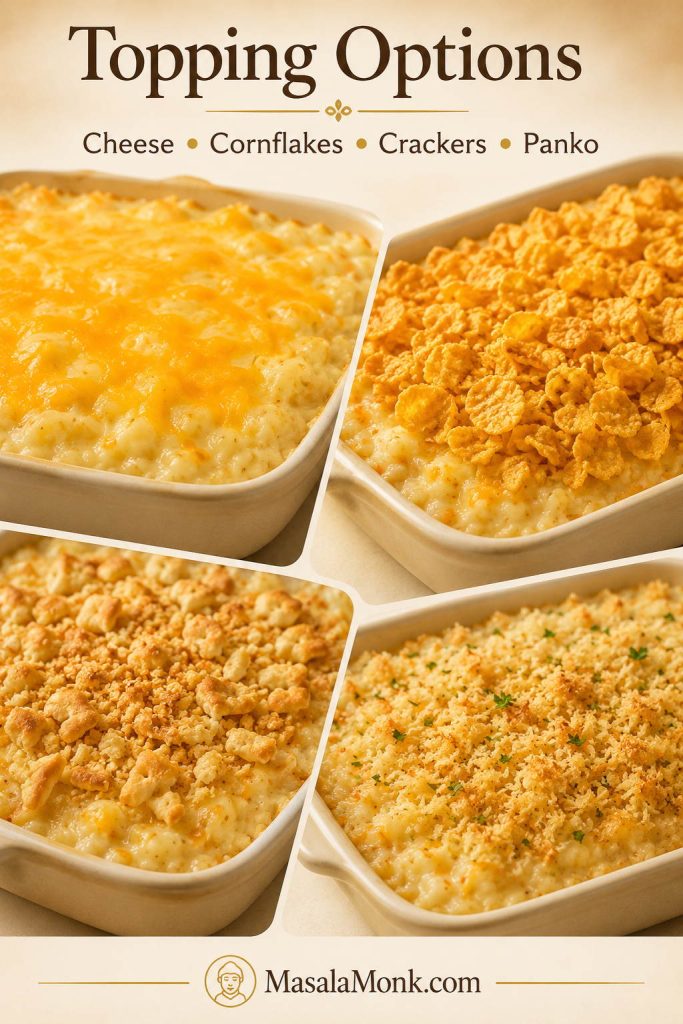
Topping options for hashbrown casserole showing cheese, cornflakes, crackers, and panko.
The topping changes the whole bite: cheese stays soft, cornflakes turn crunchy, crackers taste buttery, and panko keeps the finish lighter.
Topping Amount for 9×13 Texture Best for
Extra cheddar ½ cup reserved cheese Gooey and simple Soft cheesy top
Cornflakes 2 cups crushed + 3–4 tbsp melted butter Crisp and nostalgic Funeral-potatoes-style casserole, holidays, potlucks
Buttery crackers 1–1½ cups crushed + 2–3 tbsp melted butter Rich and softer than cornflakes Family dinners and comfort-food spreads
Panko 1 cup + 2–3 tbsp melted butter Light and crisp A less sweet topping

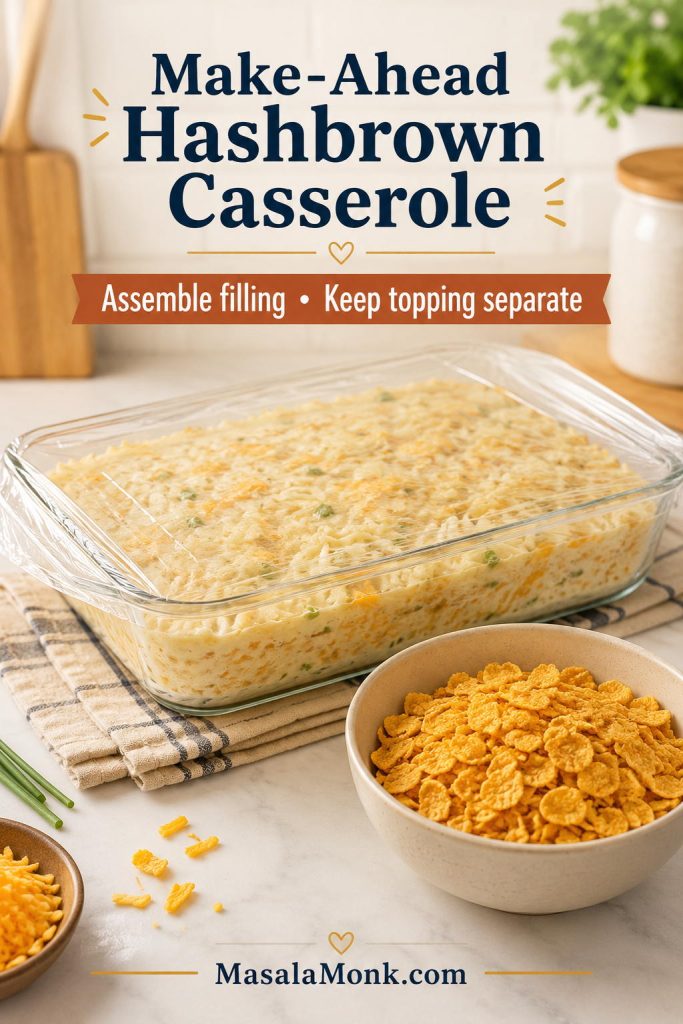
When to Add the Topping

For same-day baking, add the topping before the pan goes into the oven. For make-ahead prep, keep the topping separate and scatter it over the casserole just before baking.

Making the casserole ahead? The make-ahead section shows how to keep the topping crisp.

Buttered cornflakes being added to hashbrown casserole before baking.
Add cornflakes right before baking, especially for make-ahead hashbrown casserole, so the topping stays crisp instead of softening in the fridge.

What If the Topping Browns Too Fast?

Tent the dish loosely with foil if the top browns before the center is hot. Afterward, remove the foil near the end so the topping can crisp again.

Hashbrown Casserole Without Canned Soup

This is the version to use if you like the comfort of the original but do not want the canned-soup flavor. Condensed cream soup keeps the old-school style easy, thick, and familiar; however, this hashbrown casserole recipe also works with a quick white sauce made from butter, flour, broth, and milk.

Homemade white sauce for hashbrown casserole without canned soup, with butter, flour, broth, and milk.
For hashbrown casserole without canned soup, the homemade sauce needs enough body to coat the potatoes and hold the filling together.

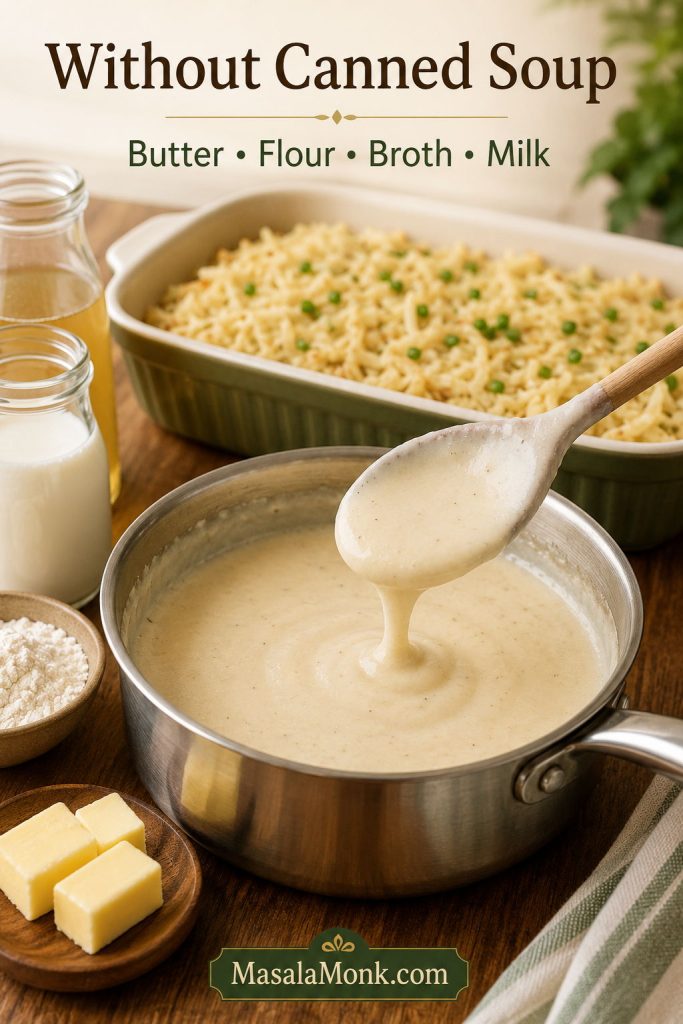
This swap works because condensed soup is mostly doing two jobs here: adding savory flavor and giving the casserole a thick sauce that can hold the potatoes together. Use this homemade sauce to replace one 10.5 oz can of condensed cream soup. It makes about 1 to 1¼ cups of thick sauce, close to the amount needed for this casserole.

Ingredient Amount
Butter 2 tbsp / 28 g
Flour 3 tbsp / about 24 g
Chicken broth or vegetable broth ½ cup / 120 ml
Milk ½ cup / 120 ml
Salt and pepper To taste

Melt the butter in a small saucepan. Next, whisk in the flour and cook for 1–2 minutes, stirring constantly. Slowly whisk in the broth and milk. Simmer until thick and creamy, then use it in place of the canned soup.

Homemade Sauce Thickness

Homemade sauce coating a spoon to show the correct thickness for hashbrown casserole without canned soup.
The no-soup sauce should coat a spoon before it goes into the casserole; if it pours like milk, simmer it a little longer.
Important: The homemade sauce should be thicker than gravy but looser than paste, and it should coat a spoon before it goes into the casserole. If it is thin and pourable like milk, simmer it a little longer or the casserole may bake up loose around the edges.

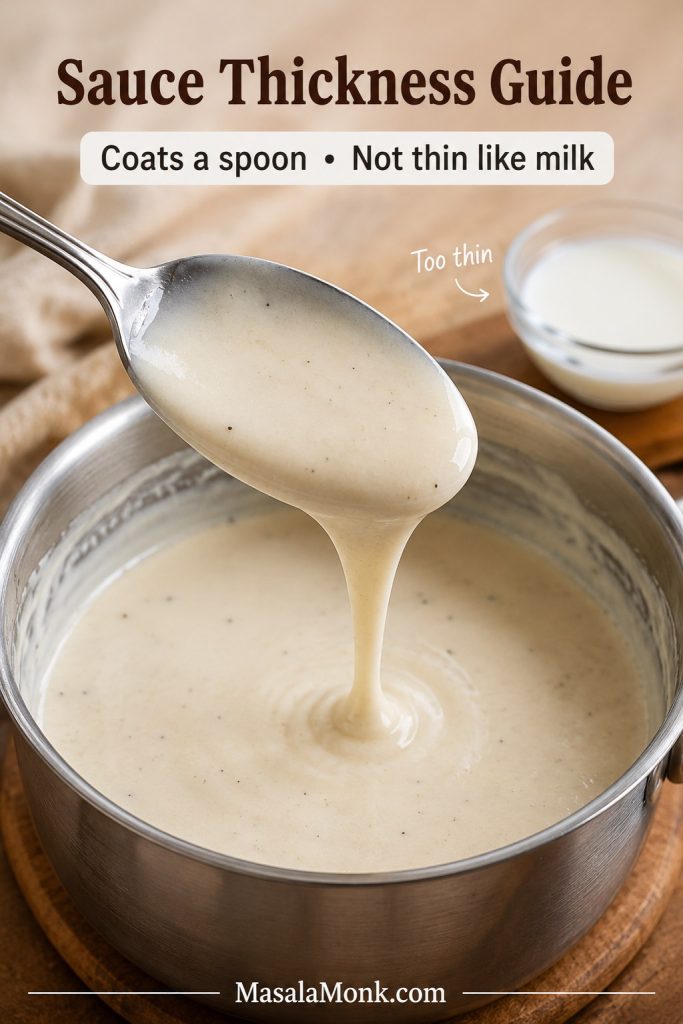
Chicken broth gives the most savory, traditional flavor. Vegetable broth works well if you are using cream of mushroom or building a more vegetarian-friendly pan.

What to Use Instead of Sour Cream

Sour cream gives the filling its tangy, creamy texture, but you still have options if you do not want to use it.

Substitute How to use it Result
Full-fat Greek yogurt Use as a 1:1 replacement Tangy and slightly lighter
Cream cheese + milk Use 4 oz softened cream cheese loosened with a little milk Richer and thicker
Extra homemade cream sauce Add ½–¾ cup more sauce Mild, smooth, and less tangy
Sour cream substitutes for hashbrown casserole including Greek yogurt, cream cheese with milk, and extra sauce.
Full-fat Greek yogurt is the easiest sour cream swap, while cream cheese with milk makes the filling richer and thicker.

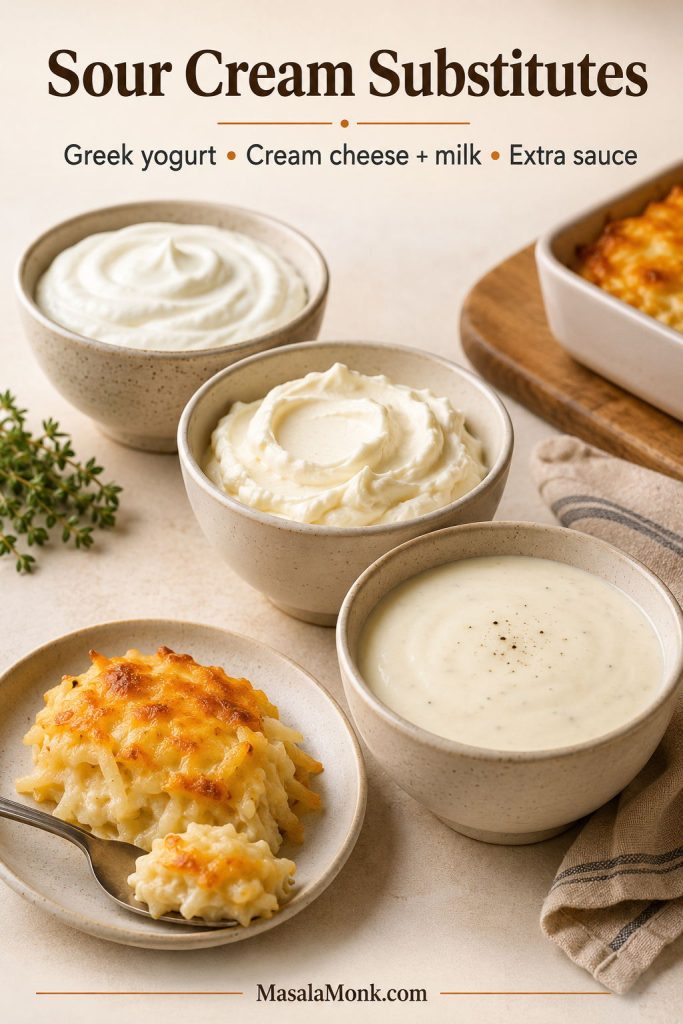
Full-fat plain Greek yogurt is the best sour cream swap. Fat-free yogurt is the one option to avoid here because it can bake up thin or grainy, especially in a casserole that stays in the oven for nearly an hour.

Can You Use Fresh Potatoes Instead of Frozen Hash Browns?

You can, but fresh potatoes are not a shortcut here. They are the from-scratch version, and they hold more moisture than frozen hash browns. For that reason, they need extra prep so the casserole does not turn thin, loose, or soupy.

Fresh grated potatoes being squeezed dry in a towel before using in hashbrown casserole.
Fresh potatoes work, but they are the from-scratch route, so rinse, squeeze, and dry them well before mixing.

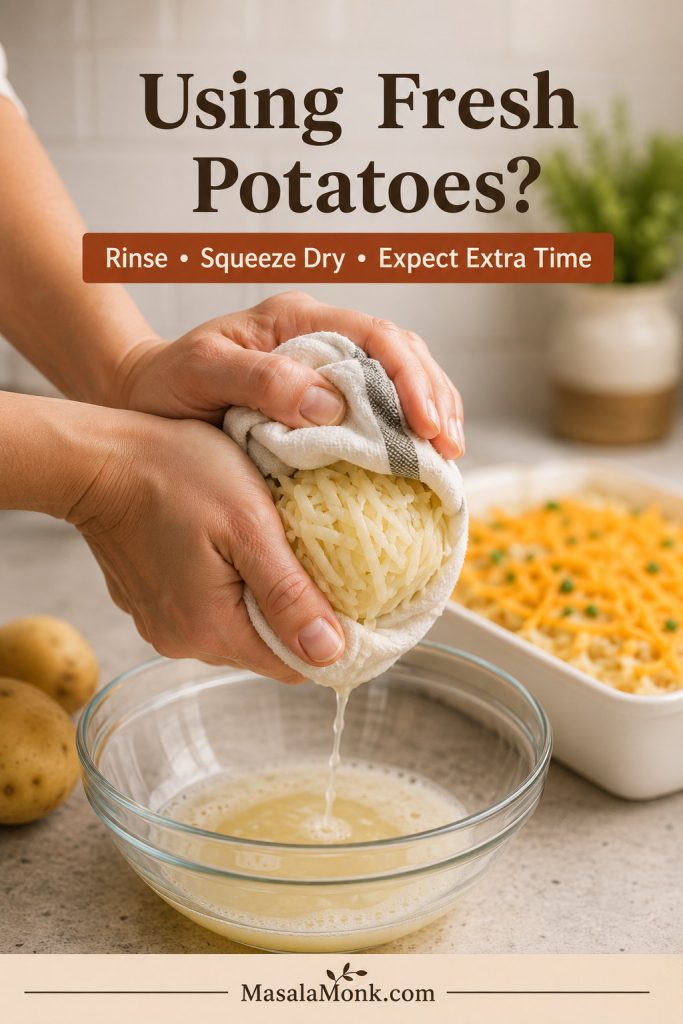
How to Use Fresh Potatoes

  • Use russet potatoes for the best texture.
  • Peel them if you want a smoother casserole.
  • Shred the potatoes on a box grater or in a food processor.
  • Rinse briefly to remove excess surface starch.
  • Squeeze very dry in a clean towel.
  • After that, expect the casserole to need a little extra baking time.

How Much Fresh Potato to Use

Use about 2 lb / 900 g fresh shredded potatoes to replace a 30–32 oz bag of frozen hash browns. The texture will be a little different, but the casserole can still bake up creamy and comforting if the potatoes are squeezed dry.

Make-Ahead Hashbrown Casserole: Storage, Freezing, and Reheating

This hashbrown casserole recipe works well as a make-ahead side dish, which is one reason it fits holidays, potlucks, and brunch. For the crispest topping, keep cornflakes, crackers, or panko separate until the pan is ready to bake.

Make-ahead hashbrown casserole with the filling covered and the crunchy topping kept separate.
For make-ahead hashbrown casserole, assemble the filling ahead, but keep cornflakes, crackers, or panko separate until baking.
Need What to do Important note
Make ahead Assemble the filling up to 24 hours ahead Add cornflake, cracker, or panko topping right before baking
Bake from fridge Bake as directed, adding 10–15 minutes if cold Cover loosely if the top browns too fast
Store leftovers Refrigerate in an airtight container for 3–4 days Cool and refrigerate promptly
Freeze Freeze baked or unbaked casserole for best quality up to 3 months Add crunchy topping after thawing if possible
Reheat Warm covered at 350°F / 175°C until hot Uncover near the end to re-crisp the top

Make Ahead

Mix the filling, spread it in the baking dish, cover, and refrigerate for up to 24 hours. When you are ready to bake, add the crunchy topping if using one.

Baking from the Fridge

A cold casserole usually needs 10–15 extra minutes in the oven. If the top starts browning before the center is hot, tent the dish loosely with foil.

Storing Leftovers

Store leftovers in an airtight container in the refrigerator for 3–4 days. For general leftover safety, the USDA recommends refrigerating cooked leftovers within 2 hours and using refrigerated leftovers within 3–4 days. USDA leftover safety guidance is useful if you are cooking for a holiday table or large gathering.
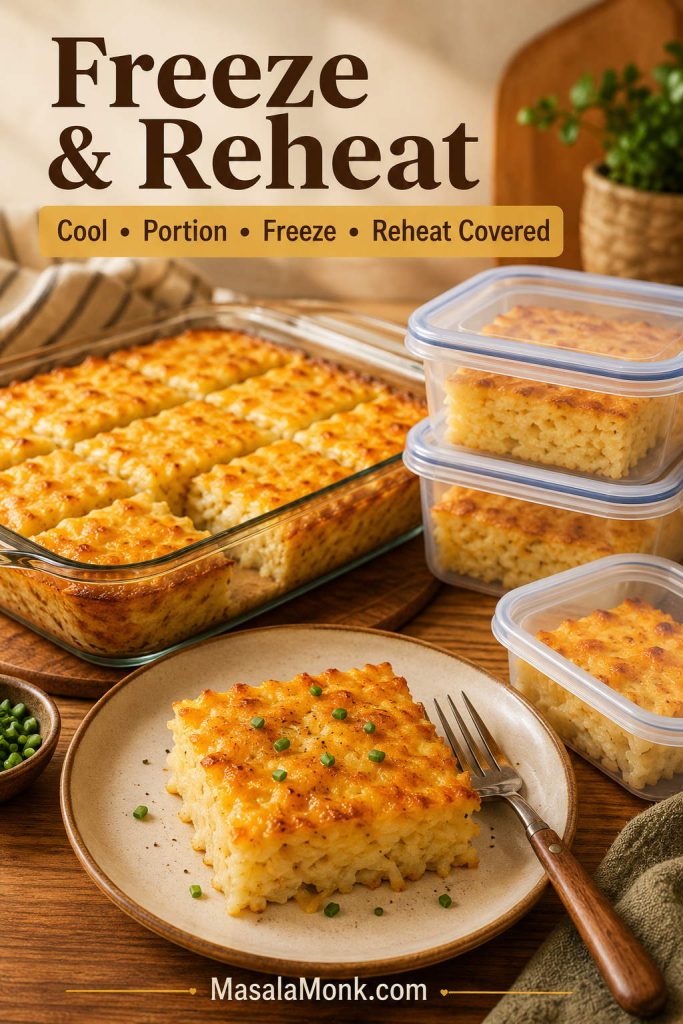
Freezing

You can freeze the casserole baked or unbaked for best quality up to 3 months. However, for a crisper topping, freeze it without cornflakes or crackers and add the topping before baking.

For the neatest frozen portions, bake first, cool completely, cut into squares, then freeze. No-soup or sour-cream-heavy versions can sometimes soften or separate slightly after thawing, so the freshest texture still comes from baking the casserole soon after assembly.

Reheating

For better texture, reheat covered at 350°F / 175°C until hot, then uncover for a few minutes to help the top crisp. The microwave works for single portions, but the topping will soften.

Hashbrown casserole portions in freezer-safe containers with a reheated serving on a plate.
For neat freezer portions, bake the casserole first, cool it completely, cut it into squares, and reheat covered until hot.

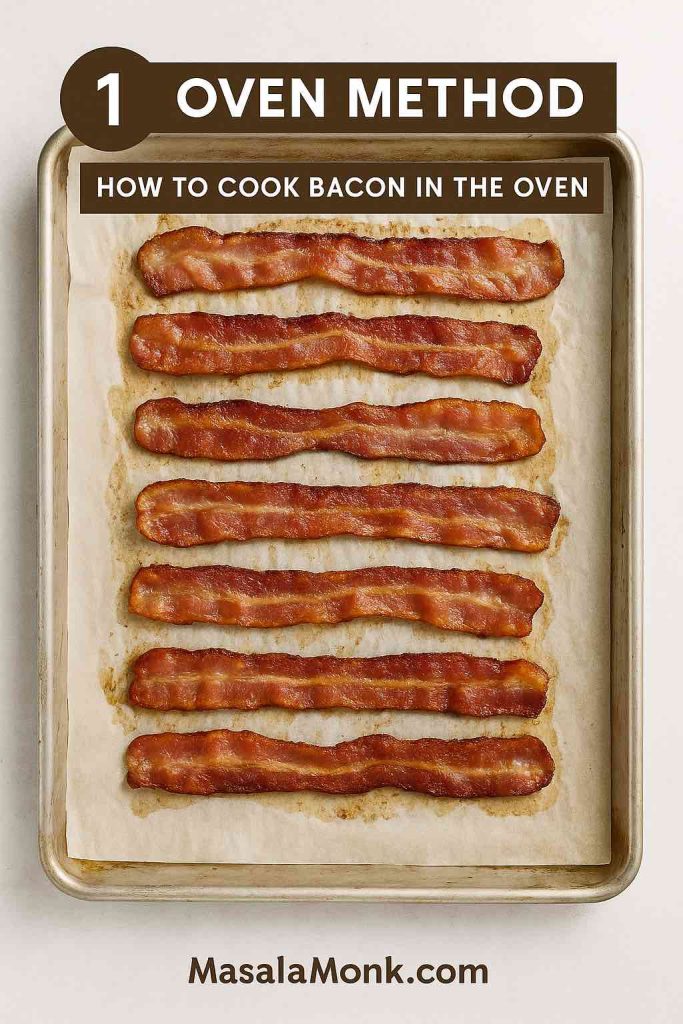
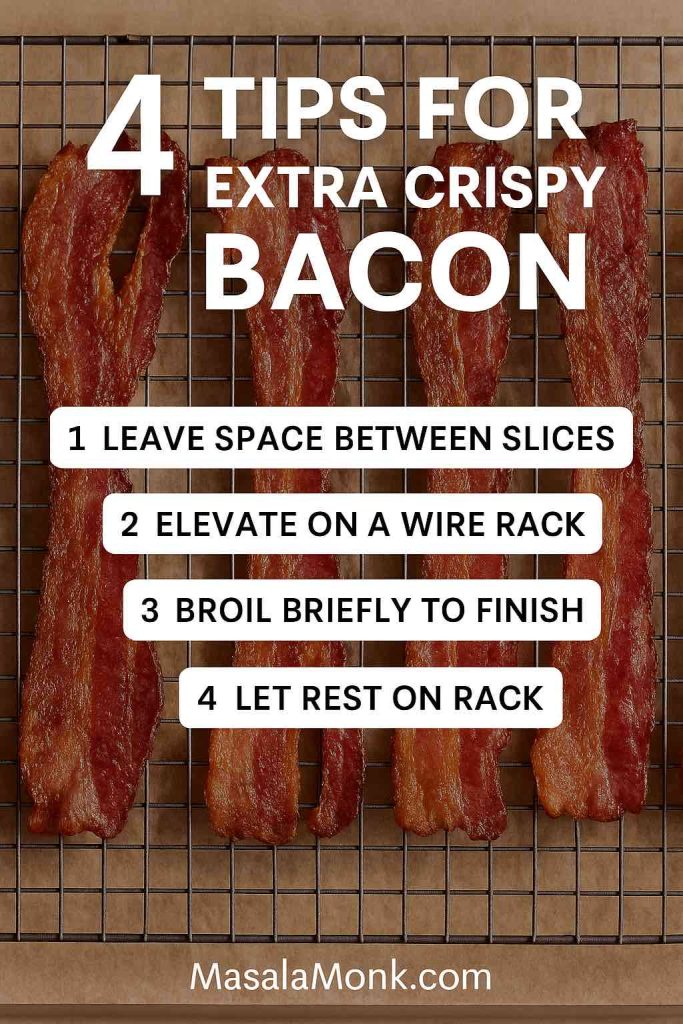
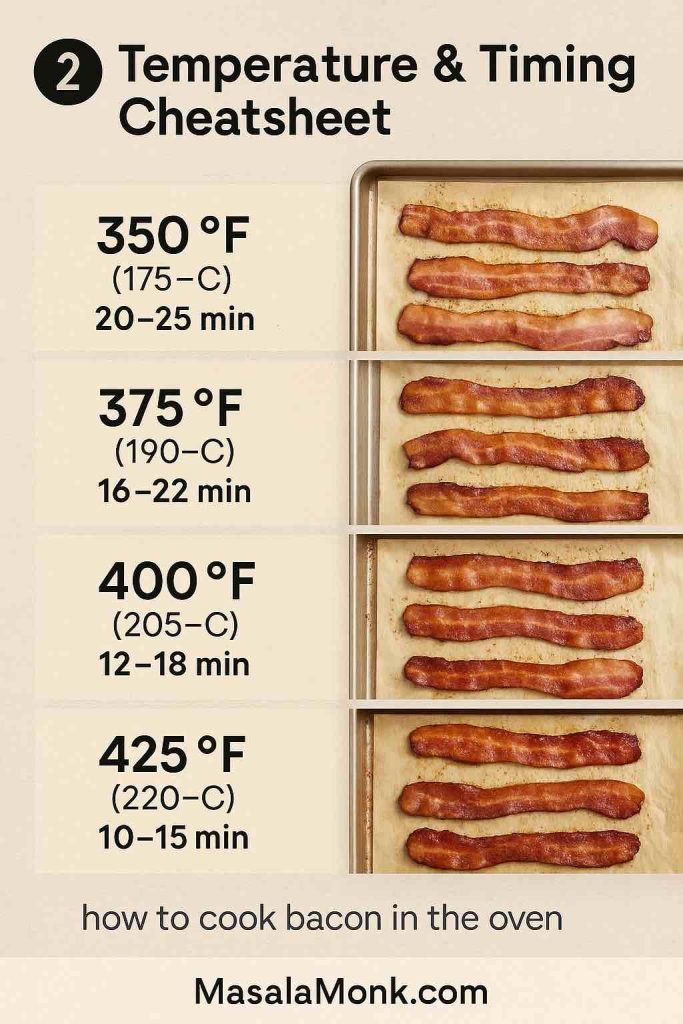
For a simple brunch plate, serve warm squares with eggs and air fryer bacon, especially if you want a crisp side without standing over a skillet.

Can You Make a Smaller Pan?

The full 9×13 casserole is ideal for holidays, potlucks, and family meals. However, a smaller pan works when you only need a few servings.

Pan size Hash browns Servings Approximate bake time
8×8 or 9×9-inch dish 15–16 oz 4–6 40–50 minutes
9×13-inch dish 30–32 oz 10–12 45–55 minutes
Deep 3-quart dish 30–32 oz 10–12 50–60 minutes

For an 8×8 or 9×9 pan, halve the remaining ingredients as closely as possible and start checking around 40 minutes.

For topping choices, see the cornflake, cracker, panko, and cheese topping guide.

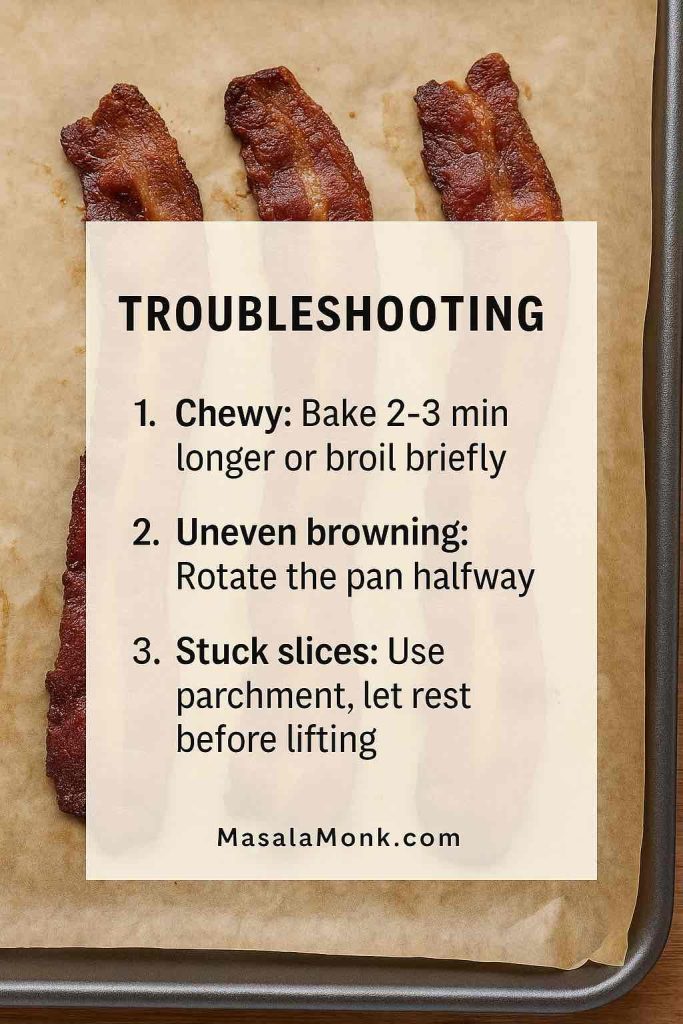
Troubleshooting Hashbrown Casserole: Watery, Bland, Greasy, or Soggy?

This is the section to use when a pan looks good on top but does not eat the way you wanted. Most problems come from moisture, seasoning, baking time, or topping timing.
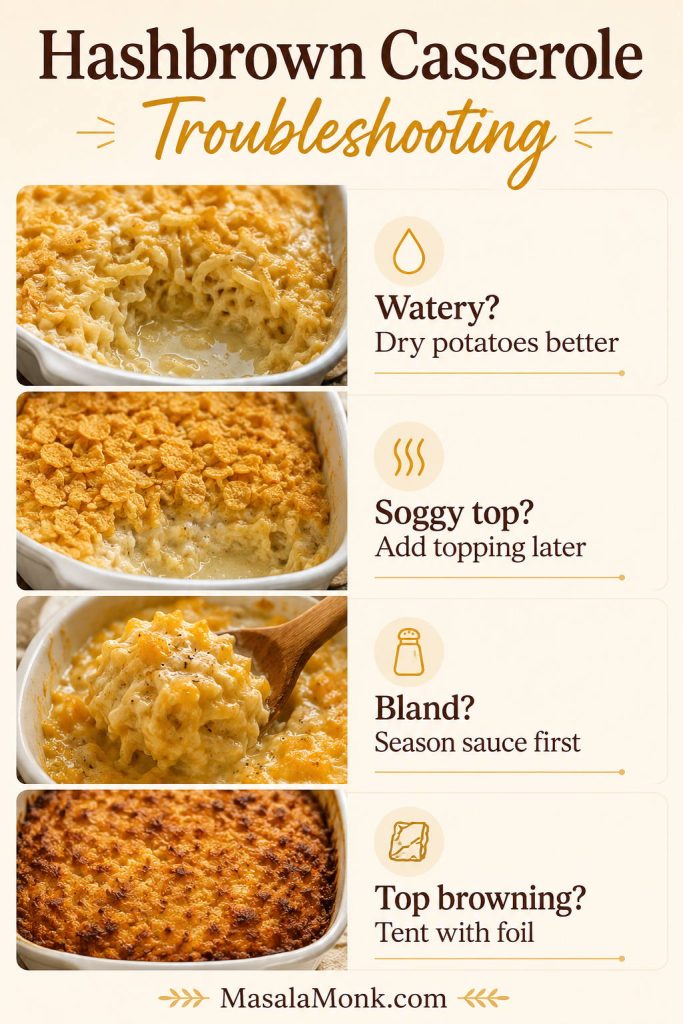
Troubleshooting guide for hashbrown casserole with fixes for watery filling, soggy topping, bland flavor, and top browning.
Most hashbrown casserole problems trace back to moisture, seasoning, topping timing, or the center needing more time in the oven.
Problem Likely cause Fix
Watery casserole Hash browns were not thawed or dried well If it is already baked, let it rest longer and serve with a slotted spoon. Next time, thaw, dry the potatoes well, and bake uncovered a little longer.
Soggy topping Topping was added before refrigeration Add cornflakes, crackers, or panko right before baking.
Bland casserole The creamy base was under-seasoned Use sharp cheddar, taste the sauce before adding potatoes, and make sure onion, pepper, and salt are balanced.
Greasy casserole Too much butter, oily add-ins, or mild cheese Use sharp cheddar, drain bacon or sausage well, and reduce topping butter slightly.
Potatoes taste undercooked Diced potatoes, cold casserole, or not enough bake time Bake 5–15 minutes longer, tenting with foil if needed.
Top browns before center is hot Topping is browning too quickly Tent loosely with foil and continue baking until the edges bubble.
Casserole seems dry Overbaked or not enough sauce Add a splash of milk when reheating.
It will not scoop cleanly Served straight from the oven Rest for 10 minutes before serving.

For prevention next time, revisit the thawing guide and topping timing tips.

Variations and Easy Swaps

The base recipe is intentionally simple, which makes it easy to steer in different directions. Keep the potato-to-sauce ratio steady, then change the cheese, soup, topping, or add-ins depending on the meal.

If you like creamy baked comfort-food dinners in general, this tuna noodle casserole recipe sits in the same cozy casserole family.

Restaurant-Style Hashbrown Casserole

For a softer restaurant-style pan, similar to a Cracker Barrel-style hashbrown casserole, keep the topping cheese-only instead of using cornflakes. Use frozen or refrigerated shredded hash browns, cream of chicken soup, sour cream, onion, butter, and cheddar or Colby-style cheese, then bake until the edges are bubbling and the top is melted and golden.

Restaurant-style hashbrown casserole with a cheese-only topping and creamy potato center.
A cheese-only top gives hashbrown casserole a soft restaurant-style finish, similar to the Cracker Barrel-style version, instead of a crunchy funeral-potatoes topping.

Extra Cheesy Hashbrown Casserole

Add another ½ cup cheddar or mix in Monterey Jack, Colby Jack, or a little Parmesan. Sharp cheddar is still the strongest base because it gives the deepest cheese flavor.

Cream of Mushroom Hashbrown Casserole

Swap cream of mushroom soup for cream of chicken soup. It gives the casserole a deeper, earthier flavor and keeps the dish free of chicken-based soup.

Loaded Hashbrown Casserole

Add cooked bacon, scallions, and a little extra cheese for a loaded-baked-potato feel. Just keep the bacon cooked and drained before adding it so the filling stays creamy instead of greasy.

Funeral Potatoes Style

Use the cornflake topping, keep the filling rich with sour cream and cheese, and serve it as a holiday or potluck potato side. In many kitchens, funeral potatoes, party potatoes, cheesy potatoes, and cornflake-topped hashbrown casserole all belong to the same comfort-food family.

Vegetarian Hashbrown Casserole

Use cream of mushroom soup instead of cream of chicken, or make the no-soup sauce with vegetable broth. Then, keep the topping cheese-only, cracker-based, panko-based, or cornflake-based depending on the texture you want.

Gluten-Free Hashbrown Casserole

Use gluten-free condensed soup or the homemade sauce with a gluten-free flour blend. Then, choose gluten-free cornflakes or crackers, or skip the crunchy topping and use cheese only.

Lighter Hashbrown Casserole

Use full-fat Greek yogurt instead of sour cream, reduce the butter slightly, and keep sharp cheddar so the casserole still tastes satisfying. Avoid fat-free yogurt because it does not bake as smoothly.

Breakfast Hashbrown Casserole with Eggs

An egg-based breakfast hashbrown casserole is a different style of recipe. This version is a cheesy potato side dish, but the same hash brown guidance helps if you later make a breakfast casserole with eggs, sausage, bacon, or ham.

Add Meat or Vegetables

For a heartier pan, fold in a small amount of cooked ham, bacon, sausage, chicken, or ground beef. Similarly, broccoli, green chiles, mushrooms, and scallions work well, but cook or drain moisture-heavy add-ins first so the filling stays thick.

What to Serve with Hashbrown Casserole

Hashbrown casserole is rich, creamy, and cheesy, so it pairs well with something fresh, savory, or simply cooked. Serve it with baked ham, roast chicken, turkey, green beans, eggs, bacon, fruit salad, or a crisp green salad.

For a cold potato side on the same table, this potato salad recipe guide gives you classic, German, Russian, vegan, and other make-ahead directions.

Hashbrown casserole served with brunch and dinner sides including eggs, bacon, fruit, ham, chicken, and green beans.
Hashbrown casserole works for brunch, potlucks, and holiday dinners because it can sit beside eggs and bacon as easily as ham, chicken, pork, or green beans.

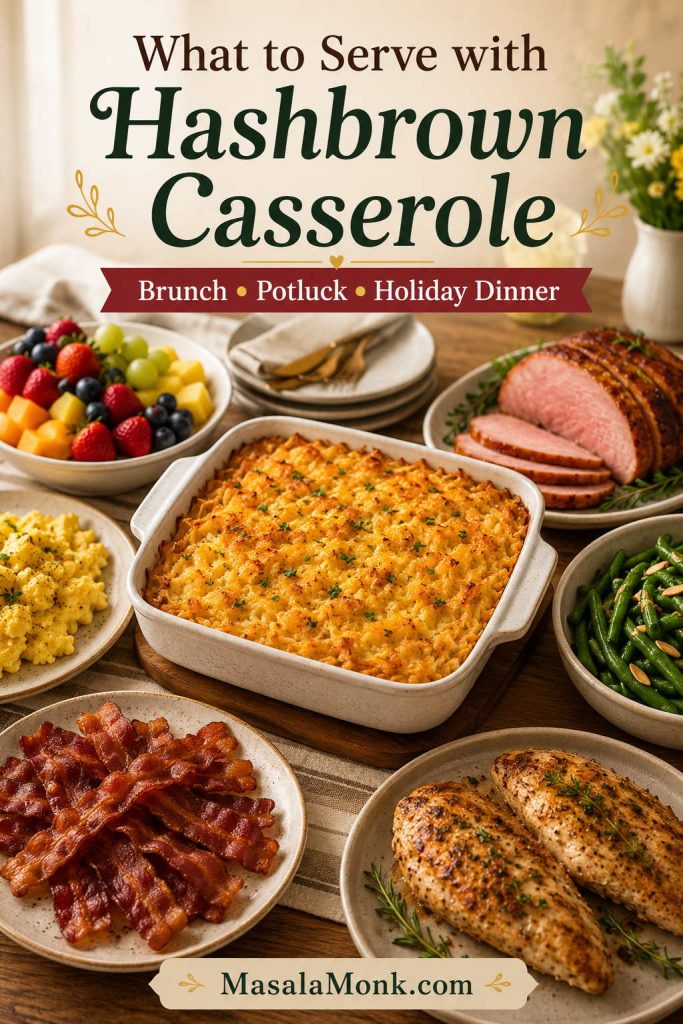
For brunch, pair it with fruit, crisp bacon, and air fryer hard-boiled eggs. For dinner, keep the plate simple with green beans, baked ham, roast chicken, or pork tenderloin in oven.

Hashbrown Casserole Recipe

Saveable hashbrown casserole recipe card with ingredients, oven temperature, bake time, and rest time.
Keep the core recipe simple: 32 oz hash browns, a 9×13 pan, 350°F oven, 45–55 minutes, and a 10-minute rest.

Description: This hashbrown casserole recipe makes a creamy, cheesy potato side dish with a soft center, golden edges, sharp cheddar, sour cream, and an optional buttery cornflake topping.

Prep Time15 minutes
Cook Time45–55 minutes
Rest Time10 minutes
Servings10–12 side servings

Equipment: 9×13-inch baking dish, large mixing bowl, spatula, measuring cups, measuring spoons, clean kitchen towel.

Ingredients

  • 32 oz / 907 g frozen shredded hash browns, thawed and dried well
  • 1 can / 10.5 oz / 298 g condensed cream of chicken soup or cream of mushroom soup
  • 1 cup / about 240 g sour cream
  • ½ cup / 113 g unsalted butter, melted
  • 2½ cups / about 280 g shredded sharp cheddar cheese, divided
  • ½ cup / 70–80 g finely diced onion, or 1 tsp onion powder
  • ½ tsp garlic powder
  • ½ tsp black pepper
  • ¼ tsp salt, plus more only if needed
  • Optional: 2 tbsp chopped chives or parsley

Optional Cornflake Topping

  • 2 cups / about 60 g crushed cornflakes
  • 3–4 tbsp / 42–57 g melted butter

Instructions

  1. Heat the oven to 350°F / 175°C. Grease a 9×13-inch baking dish.
  2. Thaw the hash browns and dry them well with a clean towel.
  3. In a large bowl, mix the cream soup, sour cream, melted butter, onion, garlic powder, black pepper, ¼ tsp salt, and 2 cups of the cheddar.
  4. Taste the sauce before adding the potatoes. Add more salt only if it tastes flat.
  5. Fold in the hash browns until evenly coated.
  6. Spread the mixture into the prepared baking dish.
  7. Sprinkle the remaining ½ cup cheddar over the top.
  8. For a crunchy topping, mix crushed cornflakes with melted butter and sprinkle over the casserole.
  9. Bake for 45–55 minutes, until hot in the center, bubbling around the edges, and golden on top.
  10. Rest for 10 minutes before serving.

Notes

  • For a no-soup version, use the homemade sauce in the section above.
  • If your soup, cheese, or butter is salty, start with ¼ tsp salt and add more only if the sauce tastes flat.
  • Add crunchy topping right before baking if making the casserole ahead.
  • Diced hash browns may need 5–10 extra minutes.
  • If baking cold from the fridge, add 10–15 minutes.
  • Store leftovers in the refrigerator for 3–4 days.

FAQs

Hashbrown casserole or hash brown casserole: which spelling is right?

Both spellings are common. “Hashbrown casserole” is often used as one word, while “hash brown casserole” is also widely used. Either way, the dish usually means a creamy shredded-potato casserole with cheese, sour cream, and a baked topping.

Do frozen hash browns need to be thawed first?

Thawing gives the most reliable texture. For the full cue, see how to thaw hash browns for casserole.

What happens if I use frozen hash browns without thawing?

It can work, but the bake time is less predictable because frozen potatoes release water as they heat. Thawing and drying gives a creamier, more reliable pan.

Shredded vs diced hash browns: which one works better?

Shredded hash browns are better for a soft, creamy casserole. Diced hash browns also work, although they give a chunkier texture and may need a little more time in the oven.

How far ahead can I assemble hashbrown casserole?

You can assemble the filling the night before, cover it, and refrigerate it. For the best crunch, add cornflakes, crackers, or panko right before baking.

What is the best way to freeze hashbrown casserole?

Freeze it baked or unbaked for best quality up to 3 months. However, the topping stays better if you freeze the casserole without cornflakes or crackers, then add them before baking or reheating.

Why did my hashbrown casserole turn watery?

The most common reason is hash browns that were still icy or carrying too much moisture. For fixes, see the troubleshooting guide.

What can replace cream of chicken soup?

Cream of mushroom soup is the easiest swap and gives the casserole a deeper, earthier flavor. For a no-canned-soup version, use the quick butter-flour-broth-milk sauce above.

Best sour cream substitutes for hashbrown casserole

Full-fat Greek yogurt is the easiest swap. For amounts and texture, see sour cream substitutes.

Is hashbrown casserole the same as funeral potatoes?

They are very similar. Funeral potatoes usually refer to a cheesy hash brown casserole made with sour cream, cream soup, cheddar, and a crunchy cornflake or cracker topping.

Is this like Cracker Barrel hashbrown casserole?

Yes, you can make it in that style. Use shredded hash browns, cream soup, sour cream, onion, butter, and cheese, then skip the cornflake topping so the top stays soft and melty.

Which meats or vegetables work well in hashbrown casserole?

Cooked bacon, ham, sausage, chicken, or ground beef can be added, but drain it well first. Similarly, vegetables like broccoli, green chiles, mushrooms, or scallions work best when cooked or drained so they do not water down the filling.

What are the doneness signs besides a golden top?

The edges should be bubbling, the center should be hot, and the top should be golden. Then, let it rest for 10 minutes before serving so the filling can settle.

With this hashbrown casserole recipe, the small details do the heavy lifting: dry the potatoes well, keep the sauce thick, choose the topping you like best, and rest the pan before serving. The result is simple, generous, and deeply comforting, with soft potatoes, a creamy cheese-coated center, and either a melty or crunchy golden top.

Posted on 3 Comments

Air Fryer Bacon Recipe: Crispy Bacon, Time, Temp, Thick-Cut & Turkey Bacon

Air fryer basket filled with crisp cooked bacon, with more bacon resting on a rack beside a breakfast plate.

This air fryer bacon recipe gives you crisp, evenly cooked strips without standing over a skillet or heating the oven for just a few slices. The trick is not simply dropping bacon into the basket and hoping for the best. Bacon is fatty, air fryers run differently, and the wrong temperature often means smoke, curled strips, burnt edges, or chewy centers. If smoke is your main problem, jump straight to the smoke prevention section.

For regular bacon, start at 350°F / 175°C for 7–10 minutes in a single layer. That temperature is hot enough to crisp the edges, but gentle enough to let the fat render before the bacon scorches or the air fryer starts smoking. Thick-cut slices need longer, turkey bacon needs a closer eye, and frozen bacon works best when you soften and separate the slices before crisping them.

Use this guide when you want a few slices for breakfast, sandwiches, salads, wraps, burgers, or meal prep. If you are cooking a full pack for a crowd, MasalaMonk’s oven bacon method is usually the better move because it gives you more space and less batch-by-batch grease management.

Air Fryer Bacon at a Glance

Best default

350°F / 175°C for 7–10 minutes for regular bacon in a single layer.

For thick-cut bacon

350°F / 175°C for 10–15 minutes, with a quick flip or rearrange if the strips brown unevenly.

For turkey bacon

350–360°F / 175–182°C for 5–10 minutes. It is leaner than pork bacon, so it dries faster.

For less smoke

Begin with moderate heat, keep the bacon in a loose single layer, drain grease between batches, and drop to 320–325°F if your machine smokes easily.

Quick Answer: How Long to Cook Bacon in the Air Fryer?

For this recipe, regular bacon in the air fryer usually lands in the 7–10 minute range at 350°F / 175°C. Thin bacon finishes faster, while thick-cut bacon needs more time for the fat to render. The time and temperature chart below helps when you are switching between regular, thick-cut, turkey, frozen, or candied bacon.

When in doubt, begin with the moderate 350°F method, then adjust by thickness and crispness on your next batch. A second batch cooking faster is normal; it does not mean the timing failed. It simply means the basket and drawer are already hot.

Air fryer basket with crisp bacon and a quick answer showing regular bacon cooked at 350°F for 7 to 10 minutes.
Start regular bacon at 350°F / 175°C for the most reliable air fryer bacon texture. It is hot enough to crisp the edges, yet gentle enough to render the fat before the strips darken too fast.

What Done Bacon Looks Like

Look for bubbling fat, browned or lightly ruffled edges, and centers that no longer look pale or raw. The bacon should look almost done, not cardboard-stiff, when it leaves the basket. Give it a minute on paper towels or a rack and it will firm into the crisp texture you actually want.

Close-up of air fryer bacon lifted with tongs showing browned edges, bubbled rendered fat, and a slightly flexible strip.
Rather than waiting for bacon to turn rigid in the basket, look for browned edges, bubbled fat, and a strip that still bends slightly. That is usually the sweet spot for crisp bacon after resting.

The Main Rule

Give the strips room. A little touching is fine, but stacked or heavily overlapped pieces trap steam and block airflow. Bacon needs moving air around the surface; when the strips overlap, the covered parts steam instead of crisping.

Air Fryer Bacon Time and Temperature Chart

Start with the chart below when the bacon in front of you does not match the “regular slice” timing. That is where most air fryer bacon mistakes begin: the slice is thinner, thicker, leaner, sweeter, or still frozen, but the timing is treated like it never needs to change.

Air fryer bacon time and temperature chart for thin, regular, thick-cut, turkey, frozen, and candied bacon.
Since bacon thickness changes cook time so much, this chart works best as a starting guide, not a rigid rule. Thin slices, thick-cut bacon, turkey bacon, frozen bacon, and candied bacon all need their own timing.
Bacon type Temperature Time Best for
Thin bacon 350°F / 175°C 5–7 minutes Fast strips, softer bacon, quick breakfast plates
Regular bacon 350°F / 175°C 7–10 minutes Best everyday method
Regular bacon, very crisp 350°F / 175°C 10–12 minutes Extra crisp edges without jumping straight to high heat
Thick-cut bacon 350°F / 175°C 10–15 minutes Better fat rendering and less scorching
Low-smoke bacon 320–325°F / 160–165°C 9–15 minutes Air fryers that smoke easily
Fast crisp method 375–400°F / 190–205°C 6–12 minutes Fast browning when your air fryer handles bacon well
Turkey bacon 350–360°F / 175–182°C 5–10 minutes Leaner strips that dry out quickly
Regular frozen bacon 350–360°F / 175–182°C 4–8 minutes to separate, then 6–10 minutes Stuck frozen slices; thick-cut frozen bacon may need longer
Candied bacon 325–350°F / 160–175°C 8–15 minutes Brown sugar, maple, or spicy-sweet bacon

Why the Timing Changes So Much

Bacon timing changes because strips vary in thickness, fat level, sugar content, moisture, and size. A thin supermarket slice may burn before a thick-cut slice has fully rendered. Turkey bacon has less fat, so it dries out faster. Candied bacon has sugar on the surface, which means it needs a gentler temperature. Your appliance also matters: a compact, powerful basket often cooks much faster than a larger air fryer oven.

Second Batch Warning

If you cook more than one batch, check the second batch 1–2 minutes earlier. The basket, drawer, and surrounding parts are already hot, so the next round often browns faster. That smoky second batch is usually a grease-management problem, not a failed recipe.

Ingredients and Equipment for Air Fryer Bacon

The ingredient list is short — just bacon — but the setup still matters. A good pair of tongs, a place to drain the strips, and the right liner choice make the difference between easy cleanup and a smoky mess. For liner and smoke-control questions, the foil, parchment, water, and bread section explains what actually helps.

Air fryer bacon setup with bacon, tongs, rack or paper towels, parchment, and a clean air fryer basket.
Although air fryer bacon needs only a few ingredients, the setup still matters. Tongs, a draining surface, and a clean basket make the cook easier, cleaner, and less likely to smoke.

Ingredients

  • 5 slices regular bacon, about 6 oz / 170 g
  • Or 4–5 slices thick-cut bacon, about 6–8 oz / 170–225 g
  • Optional for turkey bacon: a very light mist of oil
  • Optional for candied bacon: brown sugar, black pepper, cayenne, or maple
  • Optional smoke-control helpers: water, bread, foil, or parchment, explained later in the post

Equipment

  • Basket-style air fryer or air fryer oven
  • Silicone-tipped tongs
  • Paper towel-lined plate or cooling rack
  • Optional perforated parchment liner
  • Optional foil for the lower drawer or drip tray only, if your manual allows it
  • Optional instant-read thermometer for turkey bacon or thicker cured meats

Best Amount of Bacon to Air Fry at Once

The best amount depends on basket size, but the bacon should still sit mostly in one layer. If you force in a full pack, the slices steam, stick, cook unevenly, and release more grease than the drawer can comfortably handle.

Capacity guide showing small basket, large basket, and air fryer oven with different amounts of bacon.
Even a powerful air fryer cannot crisp bacon well when the basket is overcrowded. Keep the batch size realistic so hot air can move around the strips instead of steaming the covered spots.
Air fryer type Practical bacon amount Best note
Small basket air fryer 3–5 slices Cut strips in half if they fit better
Large basket air fryer 5–7 slices Keep the layer loose, not packed tight
Air fryer oven 6–9 slices, depending on tray size Use the drip tray correctly and watch upper racks
Small-batch tip: The air fryer is best for a few slices. If you need a full pack of bacon for a crowd, the oven usually gives the strips more space and saves you from draining grease between several small batches.

Should You Cut Bacon in Half?

Cutting bacon in half helps when long strips do not fit flat. Shorter pieces stay away from the basket sides, curl less dramatically, and are easier to flip or rearrange with tongs. A little curling is normal; you only need to intervene if the strips fold over themselves or block airflow.

Raw bacon strips being cut in half before being arranged in an air fryer basket.
When long strips do not fit flat, cut them in half before cooking. That simple step helps reduce curling, improves spacing, and makes the bacon easier to check halfway through.

Best Temperature for Air Fryer Bacon: 350°F vs 375°F vs 400°F

For this recipe, 350°F / 175°C is the sweet spot for bacon in the air fryer. It is hot enough to brown the edges, but not so aggressive that the grease starts smoking before the fat has properly rendered.

Temperature guide for air fryer bacon showing lower smoke, best default, faster crisping, and fast browning settings.
If smoke control matters most, stay lower. On the other hand, if you want faster crisping and already know your air fryer runs cleanly, you can move hotter with a closer eye on the bacon.
Goal Best setting Why it works
Least smoke 320–325°F / 160–165°C Gentler heat helps reduce grease smoke in sensitive machines
Best everyday bacon 350°F / 175°C Good balance of rendered fat, crisp edges, and control
Faster crisping 375°F / 190°C Useful once you know your air fryer handles bacon cleanly
Fastest browning 390–400°F / 200–205°C Works for some batches, but needs close watching and a clean drawer

350°F / 175°C — Best Default

This is the setting to trust first. It gives regular bacon enough heat to brown while still giving the fat time to soften, bubble, and render. It is not the fastest option, but it is the most forgiving one.

375°F / 190°C — Faster Crisping

Once your air fryer has proven it handles fatty foods without smoking, 375°F / 190°C becomes a useful faster setting. It crisps regular strips quickly, but the margin for error gets smaller. Thin bacon, sugary bacon, and second batches need extra attention at this temperature.

390–400°F / 200–205°C — Fast but Watch Closely

This is the tempting shortcut because the bacon browns quickly. The catch is that high heat gives you less time between crisp edges and burnt-smelling grease. Use this range only when you are nearby, the drawer is clean, and the basket is not crowded. If your machine smokes with fatty foods, use the low-smoke temperature or go to the smoke fixes.

Comparison of air fryer bacon cooked at 350°F versus 400°F, with the 350°F side showing more even rendering.
At 350°F, bacon fat has more time to render before the edges race ahead. By contrast, 400°F cooks faster, but the margin between crisp and overdone gets much smaller.

320–325°F / 160–165°C — Low-Smoke Mode

If your air fryer has ever smoked with bacon, wings, sausage, or anything fatty, do not start at 400°F. Drop to 320–325°F / 160–165°C and let the fat render more slowly. This lower setting is especially useful for thick-cut bacon, very fatty slices, or compact baskets where grease sits close to the heat source.

How to Cook Bacon in the Air Fryer

Once the air fryer is set, the method is mostly about giving the bacon enough room, letting the fat render, and remembering that the final crispness happens after the strips leave the basket.

Step-by-step air fryer bacon process showing arranging bacon, air frying, checking halfway, and draining on a rack.
First arrange the bacon so air can circulate, then cook, check, and let it rest. Those last two steps matter because curling, overlap, and post-cook crisping all affect the final texture.

Step 1 — Preheat or Start Cold

Preheating is optional. A cold start works, while a 2–3 minute preheat makes the timing chart more predictable. If you use parchment, add it only when the bacon is on top and weighing it down.

Step 2 — Arrange Bacon in a Single Layer

Lay the strips flat in the basket. A little touching is fine; heavy overlap is not. Cut long pieces in half if they fit better that way. This is the step that keeps the bacon from steaming underneath itself.

Bacon arranged in a loose single layer inside an air fryer basket with no heavy overlap.
A loose single layer is one of the biggest keys to crispy air fryer bacon. That way, the heat can circulate properly and the strips can brown instead of trapping steam underneath.

Step 3 — Cook, Check, Flip if Needed

Cook regular bacon at 350°F / 175°C for 7–10 minutes. Around the halfway point, check the basket instead of walking away completely: if the strips are folding over, touching too much, or browning unevenly, flip or rearrange them.

Tongs checking and rearranging bacon halfway through cooking in an air fryer basket.
Meanwhile, a quick halfway check helps you catch the small issues that change results most, such as folding strips, uneven browning, or pieces that started overlapping as the fat rendered.

Step 4 — Drain and Cool

Transfer the bacon to paper towels or a cooling rack. It may still bend slightly when it comes out, but it will firm as it cools. Before cooking another batch, carefully drain the lower drawer or drip tray. Do not pour hot bacon grease down the sink. Let it cool until it thickens, scrape it into the trash, or save clean rendered bacon fat in a heat-safe container if you cook with it.

Cooked air fryer bacon resting on a wire rack with an air fryer basket nearby.
Once the bacon leaves the basket, give it a minute on a rack or paper towels. As steam escapes, the texture firms up, which is why bacon often crisps more after cooking than during it.

Air fryer bacon grease disposal setup with cooled bacon fat in a heat-safe container, paper towels, and an empty air fryer basket.
After air frying bacon, let the grease cool before you move it. You can discard it safely or save clean bacon fat for cooking, but do not pour it down the sink.

If the strips are still soft, burnt, or uneven, the troubleshooting table will help you adjust the next batch.

How to Make Crispy Air Fryer Bacon

Crisp air fryer bacon comes from more than heat alone. It needs rendered fat, moving air, and a short rest after cooking so steam can escape. Too much heat may brown the edges before the center has had time to render properly, especially with thick-cut bacon.

Pull It When the Fat Looks Rendered

Look for browned edges, bubbling fat, and strips that no longer look raw or shiny in the center. The best air fryer bacon comes out slightly flexible, then crisps as the steam escapes. If you wait until it looks completely rigid in the basket, it may cool into hard, brittle strips.

Air fryer bacon doneness guide with three strips labeled pale center, just right, and too stiff.
If timing feels uncertain, let the bacon itself guide you. Pale centers usually need more time, while strips that look very dark and rigid have gone beyond the best crisp point.

Do Not Crowd the Basket

If your bacon is pale in the middle but dark at the edges, the basket may be too full. Cook fewer strips so hot air reaches the surface of each piece. Crowding is one of the easiest ways to turn bacon from crisp to limp.

Use a Rack or Paper Towels After Cooking

Move the bacon out of the hot basket and let it rest on paper towels or a rack. This keeps it from sitting in grease and gives steam somewhere to escape. For a crisp breakfast plate, pair it with air fryer hash browns, where the same airflow-and-spacing rule matters just as much.

Thick-Cut Bacon in the Air Fryer

Thick-cut bacon is where patience pays off. The outside browns fast, but the fat inside still needs time to soften, bubble, and render. Start at 350°F / 175°C and give the bacon a steadier cook.

Thick-cut bacon cooking in an air fryer basket with a 350°F and 10 to 15 minute timing cue.
For thick-cut bacon, a steadier cook matters more than aggressive heat. Give the fat time to soften and render at 350°F so the outside does not outpace the center.

Cook thick-cut bacon at 350°F / 175°C for 10–15 minutes, flipping or rearranging halfway if needed.

Thick-Cut Bacon Time Chart

Texture Temperature Time
Tender-crisp 350°F / 175°C 10–12 minutes
Crisp 350°F / 175°C 12–15 minutes
Low-smoke thick-cut bacon 320–325°F / 160–165°C 13–18 minutes

Why Thick-Cut Bacon Takes Longer

Thick bacon is not just regular bacon with a few extra minutes tacked on. It has more fat and more thickness to render through. Lower, steadier heat helps the bacon become crisp without leaving chewy centers.

Close-up of thick-cut bacon in an air fryer showing rendered fat and browned edges.
In other words, thick-cut bacon is not done just because the edges browned. The real goal is rendered fat through the strip, which is what gives thick bacon its best tender-crisp bite.

Turkey Bacon in the Air Fryer

Turkey bacon works well in the air fryer, but the timing is less forgiving. Without pork bacon’s fat cushion, turkey bacon goes from flexible to dry before you expect it. It still crisps nicely, especially with moderate heat and a very light mist of oil when needed.

Turkey bacon strips in an air fryer basket with a 350 to 360°F and 5 to 10 minute timing cue.
Because turkey bacon is leaner than pork bacon, it can go from flexible to dry much faster. Start moderate, check early, and use only a light oil mist if the surface needs help browning.

Air fry turkey bacon at 350–360°F / 175–182°C for 5–10 minutes, flipping once if needed. Thin turkey bacon may finish in 4–6 minutes, while thicker turkey bacon may need closer to 8–10 minutes.

Turkey Bacon Time Chart

Turkey bacon type Temperature Time Notes
Thin turkey bacon 350°F / 175°C 4–6 minutes Start checking before the low end of the range
Regular turkey bacon 350–360°F / 175–182°C 5–8 minutes Flip halfway for even browning
Extra crisp turkey bacon 360°F / 182°C 8–10 minutes Watch the edges closely

Should You Spray Turkey Bacon with Oil?

A very light mist of oil helps turkey bacon brown because it has less fat than pork bacon. Use a pump spray or brush if your air fryer manual warns against aerosol sprays. Do not soak the strips; a quick, even coating is enough.

How to Tell Turkey Bacon Is Done

Turkey bacon is done when the strips look set, the edges have browned, and the texture is no longer soft or floppy. Because turkey bacon products vary more than pork bacon, treat the package directions as the final authority for doneness and safe handling. For thicker pieces, an instant-read thermometer helps remove guesswork.

Turkey bacon doneness guide showing set texture, light browning, and a reminder not to overcook.
Even then, turkey bacon does not need to look deeply browned to be done. Once the strips look set and lightly colored, extra time often dries them out instead of making them better.

Frozen Bacon in the Air Fryer

Frozen bacon works best with a short softening stage before the strips are separated and crisped. Those first few minutes are not really about browning; they loosen the slices so you do not tear them into thin, uneven pieces that overcook.

Frozen bacon in the air fryer shown in three stages: frozen stack, separated strips, and crisp cooked bacon.
With frozen bacon, the smartest move is to soften first and crisp second. Separate the slices as soon as they loosen, then cook them in a single layer for the most even result.
  1. Place the frozen bacon block or stuck slices in the air fryer.
  2. Air fry at 350–360°F / 175–182°C for 4–8 minutes, just until the slices loosen.
  3. Use tongs to separate the strips carefully.
  4. Arrange the slices in a single layer.
  5. Cook for another 6–10 minutes, depending on thickness and crispness.

Do Not Force Apart Frozen Bacon

If the slices are frozen together, do not pry them apart while they are still rigid. Warm them briefly first, then separate them once the fat softens and the strips loosen naturally.

Frozen Bacon Timing by Thickness

Frozen bacon timing guide showing soften and crisp stages for thin, regular, and thick-cut bacon.
As thickness increases, the softening stage matters more. Thin frozen bacon separates quickly, whereas thick-cut frozen strips need extra time before the final crisping step begins.
Frozen bacon type Stage 1: Separate Stage 2: Crisp
Thin frozen bacon 350°F / 175°C for 3–5 minutes 5–7 minutes more
Regular frozen bacon 350–360°F / 175–182°C for 4–8 minutes 6–10 minutes more
Thick-cut frozen bacon 350–360°F / 175–182°C for 6–8 minutes 10–15 minutes more

Once the slices are separated, treat them like fresh bacon and use the main timing ranges above.

Candied Bacon in the Air Fryer

Candied air fryer bacon is easy, but sugar changes the rules. Brown sugar and maple darken faster than the bacon underneath cooks, so use gentler heat and look at the strips before they go from glossy to bitter.

Glossy candied bacon on a rack with brown sugar, pepper, and a 325 to 350°F temperature cue.
Meanwhile, candied bacon needs gentler heat because sugar colors faster than the meat cooks. Aim for a glossy amber finish, then pull it before the sweet coating turns bitter.

For 4–5 slices bacon, use 2–3 tablespoons brown sugar, a little black pepper, and optional cayenne. Cook at 325–350°F / 160–175°C for 8–15 minutes, depending on bacon thickness and how sticky-crisp you want it.

Brown Sugar Bacon

Pat the bacon dry, sprinkle lightly with brown sugar, and press the sugar onto the top side. Avoid heavy piles of sugar because they can melt into the basket before the bacon finishes.

Maple Bacon

Brush the bacon lightly with maple syrup during the last few minutes of cooking. Adding maple too early makes the surface darken before the bacon is crisp.

Spicy Candied Bacon

Add a pinch of cayenne or crushed red pepper to the brown sugar. Keep the temperature moderate so the spice blooms and the sugar caramelizes without turning bitter.

If you are making bacon for a snack tray instead of breakfast, MasalaMonk’s baked jalapeño poppers are a natural next recipe because they use bacon for that salty, crisp, party-style finish.

Other Bacon Types: Rashers, Back Bacon, Canadian Bacon and Beef Bacon

Bacon names and cuts vary by country. Use this section if your package does not look like standard streaky bacon strips; leaner cuts cook faster, thicker cuts need more time, and already-cooked products are usually closer to reheating than raw bacon cooking.

Guide to other bacon types for the air fryer including streaky rashers, back bacon, Canadian bacon, and beef bacon.
Not every bacon package behaves like standard streaky strips. Back bacon, Canadian bacon, beef bacon, and rashers can cook differently, so use the cut itself as your first clue.

Streaky Bacon and Rashers

Streaky bacon is closest to US-style strips. Cook it gently at 350°F / 175°C, or use 200°C / 400°F for a faster UK-style method if your machine does not smoke easily. Most streaky rashers take 6–10 minutes.

Back Bacon

Back bacon is leaner and usually cooks faster than streaky bacon. At 200°C / 400°F, many rashers finish in 4–8 minutes. Since it has less fat, check it a minute or two sooner than you would with streaky bacon.

Canadian Bacon

Canadian bacon is usually more of a reheating and light-crisping job than a raw fatty bacon job. Start at 350°F / 175°C and check after 2–4 minutes. Continue briefly if you want browned edges.

Beef Bacon

Beef bacon varies a lot by cut and fat level. Start around 350°F / 175°C and check after 6 minutes. Fattier beef bacon may need more time, while leaner pieces dry out quickly.

Basket Air Fryer vs Air Fryer Oven Bacon

A basket air fryer and an air fryer oven both cook with hot circulating air, but bacon behaves a little differently in each. This is why the same bacon timing can feel perfect in one air fryer and too fast in another. Basket models are compact and quick. Air fryer ovens give more surface area, but they need more attention to trays, racks, and grease drips.

Basket air fryer and air fryer oven comparison showing bacon cooked in a small basket and on a larger tray.
A basket air fryer usually cooks bacon faster in smaller batches. By contrast, an oven-style air fryer gives you more surface area, though rack position and tray layout can change browning.

Basket Air Fryer

Basket air fryers are best for small batches. Bacon may curl, overlap, or brown unevenly, so flipping or rearranging halfway helps. Grease collects below the basket, which is convenient, but the drawer should be drained before the next batch.

Air Fryer Oven

Air fryer ovens fit more bacon on trays or racks. Use the drip tray correctly, watch for hot spots, and check whether the top rack browns faster than the lower rack. Rotate trays if needed.

Dual-Rack Air Fryers

If you use two racks, the top rack may cook faster because it is closer to the heating element. Check the top layer first and remove strips as they finish instead of waiting for every piece to match exactly.

How to Stop Air Fryer Bacon from Smoking

Smoke is the reason many people try bacon in the air fryer once and never do it again. Usually, though, it is not the bacon’s fault. It is grease sitting too close to high heat, old residue burning off, or a second batch going into an already-hot drawer.

Air fryer bacon smoke prevention guide showing a 350°F setting, bacon in a basket, drained grease, and a clean drawer cue.
If bacon starts smoking in the air fryer, the cause is usually heat, grease buildup, or old residue. Start at 350°F, drain between batches, and keep the drawer clean before blaming the method.

For general air fryer safety, the USDA’s Food Safety and Inspection Service recommends following the manufacturer’s instructions for your appliance. That matters here because air fryer designs vary, especially around liners, trays, water, and grease handling. You can read their general guidance here: USDA FSIS air fryer food safety guidance.

Start at 350°F, Not 400°F

If your kitchen fills with smoke, start by lowering the heat rather than blaming the whole method. Begin at 350°F / 175°C. If that still smokes, move down to 320–325°F / 160–165°C and add a few minutes.

Drain Grease Between Batches

Grease from the first batch often smokes during the second batch. Let the air fryer cool slightly if needed, then carefully drain the lower drawer or drip tray before continuing.

Clean Old Grease Before Cooking Bacon

Old residue may smoke before the fresh bacon even starts rendering. If your air fryer smells burnt as soon as it heats, clean the basket, drawer, tray, and any reachable grease spots according to your manual.

Use Low-Smoke Mode for Sensitive Air Fryers

Low-smoke mode means 320–325°F / 160–165°C and a longer cook. It is especially useful for thick-cut bacon, very fatty slices, or air fryers that have smoked with wings, sausages, or other greasy foods.

Stop If Smoke Turns Heavy or Burnt-Smelling

A little steam or light haze is different from heavy smoke. If the air fryer is smoking heavily or smells burnt, stop the machine, let it cool, remove the food safely, and check for grease buildup or food touching the heating area. MasalaMonk’s guide to common air fryer mistakes is also useful here, especially for crowding, airflow, and cleanup problems.

Foil, Parchment, Water, or Bread: What Actually Helps?

This is where a lot of air fryer bacon advice gets messy. Foil, parchment, water, and bread all help in some situations, but none of them should block airflow or fight your air fryer’s manual.

Air fryer bacon safety guide showing perforated parchment, foil in the lower tray, a small amount of water in the drawer, and bread below the basket.
However, cleanup helpers only work when they do not interfere with airflow or safety. Use parchment, foil, water, or bread carefully, and always follow the air fryer manual first.
Option Use it? Best guidance
Perforated parchment Sometimes Useful for cleanup, but never preheat loose parchment. Add it only when bacon weighs it down.
Foil Cautiously Use only if your manual allows it. Keep it in the lower tray or drawer and do not block airflow.
Water Sometimes Helps some basket models reduce smoking, but only if your air fryer design safely allows water in the lower drawer.
Bread Sometimes A slice below the basket absorbs some grease, but it must not touch the heating element or block airflow.
Nothing Often best Single layer, 350°F, and draining grease between batches is enough for many air fryers.

The biggest mistake is treating liners like a full basket cover. Bacon still needs exposed airflow to crisp, so any foil or parchment should help with cleanup without blocking circulation.

Foil in the Air Fryer for Bacon

Only use foil if your manual allows it. Place it where it catches grease without covering air holes or interfering with circulation. Do not wrap the basket tightly in foil, and do not place loose foil where it might lift into the heating element.

Parchment Paper for Air Fryer Bacon

Perforated air fryer parchment helps with cleanup, but it should be weighed down by food. Never preheat the air fryer with loose parchment inside. For bacon, parchment may reduce sticking, but it also reduces some direct airflow under the strips.

Water Under Bacon in the Air Fryer

Some cooks add a small splash or thin layer of water to the lower drawer to reduce smoke from hot grease. This works in some basket-style models, but not universally. Use water only if your manual allows it and only if the water stays safely away from electrical parts and the heating element.

Bread Under Bacon in the Air Fryer

A slice of bread below the basket absorbs dripping grease in some models. It is a helper, not a requirement. Make sure it sits safely below the basket, away from the heating element, and does not block airflow.

What to Serve with Air Fryer Bacon

Once the bacon is cooked, it is more than a breakfast side. Use the crisp strips for eggs and toast, tuck them into sandwiches, crumble them over salads, add them to burgers, or chop them for meal prep.

Classic Breakfast Plate

Serve them with eggs, toast, fruit, avocado, or roasted tomatoes. If you want eggs without boiling water, MasalaMonk’s air fryer hard-boiled eggs guide gives timing for soft, jammy, and fully hard yolks.

Crispy Air Fryer Breakfast

For a crisp diner-style breakfast, pair bacon with air fryer hash browns. Cook the bacon first, drain the grease, wipe the basket if needed, then cook the potatoes so they do not pick up too much bacon residue.

Meal Prep Wraps, Burritos and Salads

Chopped bacon works well in breakfast wraps, egg bites, salads, sandwiches, and freezer-friendly burritos. If you are building a bigger make-ahead breakfast, the breakfast burrito recipe is a natural place to use crisp pieces with eggs, potatoes, cheese, and sauce.

How to Store and Reheat Air Fryer Bacon

Leftover bacon is useful, but it is easy to overdo during reheating. Store it cold, reheat it gently, and stop as soon as it is hot and crisp again. The goal is to bring back the crispness without cooking all the moisture out of the strip.

Fridge Storage

Let the bacon cool, then store it in an airtight container in the refrigerator for 3–4 days. For broader cold-storage guidance, refer to the FoodSafety.gov cold food storage chart.

Freezer Storage

To freeze cooked bacon, layer cooled strips between parchment, place them in a freezer bag, press out excess air, and freeze. For best quality, use frozen cooked bacon within about 1 month.

Reheating Bacon in the Air Fryer

Reheat cooked bacon at 325–350°F / 160–175°C for 2–5 minutes, depending on thickness. Thin bacon may only need a couple of minutes. Thick-cut slices may need longer.

Reheating Turkey Bacon

Reheat turkey bacon at 350°F / 175°C for 2–3 minutes. Because it is lean, avoid reheating it too long or it may become dry and leathery.

Air Fryer Bacon Troubleshooting

If your bacon did not come out right, do not give up on the method yet. The mistake is usually visible once you know what to look for: pale centers mean crowding or short timing, burnt edges point to heat, and smoke usually points to grease.

Air fryer bacon troubleshooting guide with fixes for soft bacon, burnt bacon, smoke, and curled strips.
If a batch goes wrong, the fix is often small: add space for soft bacon, lower the heat for burnt edges, drain grease to reduce smoke, and cut long strips shorter to limit curling.
Problem Likely cause Fix
Bacon is not crispy Basket is crowded, cook time is short, or bacon is steaming Cook in a single layer, add 1–2 minutes, and cool on a rack or paper towels
Bacon burns at the edges Temperature is too high or bacon is thin Use 325–350°F and check earlier
Air fryer smokes Grease buildup, old residue, or high heat Drain grease, clean the drawer, and lower the temperature
Bacon curls Long strips are hitting basket sides or shrinking unevenly Cut strips in half and flip or rearrange halfway
Bacon cooks unevenly Hot spots or overlapping pieces Rearrange halfway and avoid stacking
Second batch burns Air fryer is already hot Check the second batch 1–2 minutes earlier
Turkey bacon is dry Too lean or overcooked Use a light oil mist and shorter timing
Candied bacon burns Sugar cooked too hot Use 325–350°F and check early

Bacon Is Not Crispy

Add another 1–2 minutes, but also check the setup. If the strips are crowded or sitting in trapped steam, extra time alone may not fix it. Cook fewer pieces and let them rest on paper towels or a rack after air frying.

Bacon Is Burning

Lower the temperature. Thin bacon and sugary bacon burn quickly at high heat. Use 325–350°F and check the next batch sooner.

Bacon Is Smoking

Drain grease, clean old residue, and lower the heat. If the smoke is heavy or smells burnt, stop the machine and inspect it safely after it cools.

Bacon Is Chewy

Chewy bacon usually needs more rendering time, not more heat. Keep the temperature moderate and cook a little longer, especially for thick-cut slices.

Turkey Bacon Is Dry

Turkey bacon dries out when it is cooked too long or too hot. Use a light oil mist, check it sooner, and pull it when the edges are browned and the strips look set.

Air Fryer Bacon Recipe Card

Air Fryer Bacon Recipe

This method uses 350°F / 175°C as the default temperature for crisp, evenly cooked bacon with better smoke control than hotter methods.

Yield4–5 slices
Prep Time2 minutes
Cook Time7–15 minutes
Total Time9–17 minutes

Equipment

  • Air fryer
  • Silicone-tipped tongs
  • Paper towel-lined plate or cooling rack

Ingredients

  • 5 slices regular bacon, about 6 oz / 170 g
  • Or 4–5 slices thick-cut bacon, about 6–8 oz / 170–225 g

Instructions

  1. Preheat the air fryer to 350°F / 175°C for 2–3 minutes, if you want more consistent timing.
  2. Arrange the bacon in a single layer in the basket. Cut strips in half if needed so they fit flat.
  3. Air fry regular bacon for 7–10 minutes, checking thin slices near the lower end of the range.
  4. Air fry thick-cut bacon for 10–15 minutes, flipping or rearranging halfway if needed.
  5. Transfer the bacon to paper towels or a rack. It will crisp more as it cools.
  6. Carefully drain grease from the lower drawer or drip tray before cooking another batch.

Notes

  • For less smoke, use 350°F instead of starting at 400°F.
  • For very smoky air fryers, use 320–325°F / 160–165°C and add a few minutes. See the smoke prevention tips if needed.
  • Do not crowd the basket. Cook in batches if needed.
  • The second batch may cook faster because the basket is already hot.
  • For turkey bacon, use 350–360°F / 175–182°C for 5–10 minutes, or see the turkey bacon section above.
  • Let bacon grease cool before discarding it. Do not pour hot grease down the sink.

FAQs About Air Fryer Bacon

Does bacon cook well in an air fryer?

Bacon cooks well in an air fryer when it sits in a loose single layer and the grease has room to drip below. The main things to watch are smoke, crowding, and overcooking.

How long does bacon take in the air fryer?

Regular bacon usually takes 7–10 minutes at 350°F / 175°C. Thin bacon may take 5–7 minutes, while thick-cut bacon may take 10–15 minutes.

What temperature is best for air fryer bacon?

350°F / 175°C is the best default because it gives the fat time to render without pushing the air fryer into a hotter, smokier range. Use 375–400°F only when you want faster crisping and know your air fryer handles bacon well.

Do you preheat the air fryer for bacon?

Preheating is optional. A cold start works, while a 2–3 minute preheat makes the timing more predictable. If you use parchment, never preheat with loose parchment inside the basket.

Do you flip bacon in the air fryer?

Flipping is not always required, but it helps when the strips curl, overlap, or brown unevenly. Basket-style air fryers often benefit from a quick flip or rearrange.

How do you stop bacon from smoking in the air fryer?

Start at 350°F instead of 400°F, cook in a single layer, drain grease between batches, and clean old residue from the basket and drawer. If your machine still smokes easily, use 320–325°F and cook a little longer.

How do you cook turkey bacon in the air fryer?

Cook turkey bacon at 350–360°F / 175–182°C for 5–10 minutes. Since turkey bacon is leaner than pork bacon, check it early and consider a very light oil mist if it tends to dry out.

How do you cook frozen bacon in the air fryer?

Frozen bacon works best with a two-stage method. Warm the frozen slices at 350–360°F for 4–8 minutes until they separate, then arrange them in a single layer and cook another 6–10 minutes. Thick-cut frozen bacon may need longer.

Should foil go under bacon in the air fryer?

Only use foil if your air fryer manual allows it. Keep it in the lower drawer or drip tray, do not block airflow, and do not place loose foil where it might lift toward the heating element.

Should you use parchment paper for air fryer bacon?

Use only air-fryer-safe perforated parchment, and make sure it is weighed down by bacon. Do not preheat with loose parchment inside the basket.

Why is my air fryer bacon not crispy?

Air fryer bacon usually stays soft when the basket is crowded, the strips overlap, or the cook time is too short for the bacon’s thickness. Cook in a loose single layer, add 1–2 minutes, and let the bacon rest on paper towels or a rack so steam can escape.

Is air fryer bacon better than oven bacon?

Air fryer bacon is better for small batches because it is fast and convenient. Oven bacon is better when you want to cook a full pack or feed a group because there is more space and less batch-by-batch grease management.

Back to top ↑

Posted on 8 Comments

Simple Bloody Mary Recipe – Classic, Bloody Maria, Virgin & More

Hand holding a garnished Bloody Mary cocktail in a dark bar setting with the text Bloody Mary Recipes – Classic, Virgin, Bloody Maria by MasalaMonk

There are cocktails you sip and forget, and then there’s the Bloody Mary. One good Bloody Mary recipe can carry an entire weekend: it wakes you up, feeds you a little, and hangs out happily next to eggs, toast, or full-on brunch feasts. It’s breakfast, lunch, snack, and hangover cure, all in one tall glass.

At its simplest, the drink is just vodka and tomato juice with a few pantry friends. Yet the moment you start playing, it blooms into a whole family of drinks: Virgin Mary mocktails, tequila-based Bloody Marias, bourbon brunch riffs, fizzy beer hybrids, and briny clam-laced Caesars. This post pulls all of that into one place so you can mix a classic Bloody Mary recipe from scratch, then confidently branch out into seven main variations and a bunch of quick twists.

Along the way, you’ll see nods to bar-standard recipes from places like Liquor.com’s classic Bloody Mary and the Virgin Mary mocktail from The Spruce Eats, but everything here is written for a home kitchen, not a fancy bar.


What Makes a Great Bloody Mary Recipe?

Before we get into exact measurements, it helps to understand the bones of a Bloody Mary recipe. Once you see the structure, every variant becomes easier to improvise.

Underneath all the garnish and drama, you’ll almost always find:

  • Base spirit – usually vodka, sometimes tequila, gin, rum, or whiskey
  • Tomato base – tomato juice, sometimes mixed with clam juice or vegetable juice
  • Citrus – lemon or lime for brightness
  • Umami – Worcestershire sauce, sometimes soy or Maggi, occasionally clam or beef broth
  • Heat – hot sauce, horseradish, chilli flakes or chilli salt
  • Salt – table salt, celery salt, or salted rims
  • Aromatic spices – black pepper, smoked paprika, celery seed, Old Bay, etc.

Once you understand that framework, everything else is customisation: change the spirit, switch lemon for lime, swap tomato juice for V8, or dial the heat up and down. At the same time, because the Bloody Mary recipe is so forgiving, you can tweak gently, taste, and correct as you go.

With that in mind, let’s start with a classic.

Also Read: Tres Leches – Mexican 3 Milk Cake Recipe


Classic Bloody Mary Recipe (Single Serving)

We’ll begin with a glass-by-glass Bloody Mary recipe that’s easy to memorise and adapt. It’s close to what you’ll find on Liquor.com and in other classic cocktail references, but stripped back just enough for a typical home bar.

Ingredients (1 drink)

  • 60 ml (2 oz) vodka
  • 120–150 ml (4–5 oz) tomato juice
  • 15 ml (½ oz) fresh lemon juice
  • 2–3 dashes Worcestershire sauce
  • 2–4 dashes hot sauce (Tabasco, Cholula, etc.)
  • 1 pinch celery salt
  • 1 pinch smoked paprika (optional, but lovely)
  • Freshly ground black pepper

To serve

  • Ice cubes
  • Tall glass (highball / Collins)

Garnish options

  • Celery stalk
  • Lemon wedge
  • Green olives
  • Pickled gherkins or onions
  • Cherry tomatoes on a skewer

You don’t need all the garnishes at once, although it’s fun to treat the glass like a little edible bouquet.

Classic Bloody Mary recipe card showing a tall vodka and tomato cocktail with celery, lemon and olives, styled on a brunch table, MasalaMonk.com
Classic Bloody Mary recipe in one glance – a vodka and tomato brunch cocktail served tall over ice with celery, lemon and olives, perfect to pin, print or save for your next MasalaMonk-style brunch.

Method

  1. Rim the glass
    First, run a lemon wedge around the rim of your glass. Dip it into a shallow plate of salt mixed with a little celery salt and chilli powder. This takes ten seconds, yet suddenly your Bloody Mary feels like it came from a bar menu.
  2. Build the flavour base
    Next, add vodka, tomato juice, lemon juice, Worcestershire, hot sauce, celery salt, smoked paprika and a good grind of black pepper to a mixing glass or shaker.
  3. Roll instead of hard shaking
    Then, add ice and “roll” the drink: pour it gently back and forth between two tins or glasses a few times. Rolling chills and aerates the mix without beating it into a foamy tomato smoothie. Classic bartenders swear by this technique, and once you try it, you’ll see why.
  4. Serve over fresh ice
    After that, fill your serving glass with fresh ice and strain (or simply pour) the drink over. Fresh ice keeps the Bloody Mary cold without making it watery.
  5. Garnish and taste
    Finally, add your chosen garnishes and take a sip. Want more heat? Add another dash of hot sauce. Need extra brightness? Squeeze in a little more lemon.

Once you’re happy with this basic Bloody Mary recipe, you can start multiplying it.

Also Read: Homemade Hot Chocolate with Cocoa Powder Recipe


Bloody Mary Recipe for a Crowd (Pitcher Brunch Version)

As soon as you make one good Bloody Mary, somebody will ask for another. Rather than building each glass individually, it’s much easier to mix a big jug and let people pour their own. At a brunch party, this approach saves you from being stuck shaking drinks while everyone else eats.

This pitcher version scales our Bloody Mary recipe up to about six servings and pairs beautifully with a table full of breakfast food. If you’re already thinking about what to serve alongside, recipes like 10 Most Popular Mediterranean Breakfasts are full of ideas for toast, eggs, beans and salads that sit perfectly next to a savoury drink.

Batch Ingredients (about 6 drinks)

  • 360 ml (1½ cups) vodka
  • 720–900 ml (3–3¾ cups) tomato juice
  • 90 ml (6 tbsp) lemon juice
  • 2 tbsp Worcestershire sauce
  • 2–3 tsp hot sauce (start mild; you can always add more)
  • 1½–2 tsp celery salt
  • 1 tsp freshly ground black pepper
  • 2–3 tsp prepared horseradish (optional, for serious spice fans)
Bloody Mary pitcher recipe card with a large jug and glasses of vodka and tomato cocktail for a brunch crowd, MasalaMonk.com
Bloody Mary recipe for a crowd – a big-batch vodka and tomato brunch pitcher you can mix ahead, chill and serve over ice so guests can customise with their own garnishes and heat levels.

Method

  1. Stir everything together
    Pour all the ingredients into a large jug or pitcher and stir thoroughly. Make sure the spices dissolve evenly, so no one gets a surprise spoonful of paprika.
  2. Let the flavours settle
    Cover and chill for at least an hour. Given a little time, the seasoning sinks into the tomato juice and the sharp edges smooth out.
  3. Prepare a garnish tray
    Meanwhile, set up a small station with celery sticks, lemon wedges, olives, pickles and maybe even crispy bacon strips. Treat this like a Bloody Mary salad bar.
  4. Serve over ice
    When guests arrive, fill their glasses with ice and pour the chilled mix three-quarters of the way up. Keep hot sauce and lemon wedges nearby for anyone who wants to doctor their own drink.

To round out the brunch, you could set a plate of French Toast Sticks (Air Fryer + Oven) in the centre of the table, or go for an eggless French Toast bake so there’s something sweet as well as savoury. A generous pitcher of this Bloody Mary recipe plus warm toast soldiers is hard to beat.


Homemade Bloody Mary Mix (Vodka-Free Base)

Instead of building from scratch every single time, you can take things one step further and treat the Bloody Mary recipe as a two-part system:

  1. A seasoned, vodka-free Bloody Mary mix
  2. A splash of whichever spirit you like at serving time

Home canning enthusiasts love this approach. Some even pressure-can large batches of tomato mix using tested recipes like the Bloody Mary mix directions from The Domestic Wildflower or other canning-safe formulas, then store them in the pantry for months. For everyday use, though, a simple fridge mix is more than enough.

Ingredients (makes about 8 drinks)

  • 1 litre tomato juice
  • 120 ml (½ cup) fresh lemon juice
  • 3 tbsp Worcestershire sauce
  • 1–2 tbsp hot sauce (adjust to taste)
  • 2 tsp celery salt
  • 1½ tsp freshly ground black pepper
  • 1 tsp smoked paprika
  • 1–2 tsp prepared horseradish (optional but highly recommended)
  • Optional: a tiny pinch of ground cumin for extra warmth
Homemade Bloody Mary mix recipe card with a glass bottle of tomato cocktail base, measuring jug and ingredients on a kitchen counter, MasalaMonk.com
Homemade Bloody Mary mix – a vodka-free tomato base you can batch in minutes, chill in the fridge and pour 90–120 ml at a time for instant Bloody Marys, Virgin Marys or Bloody Marias on busy brunch days.

Method

  1. Combine in a jug or bottle
    Pour all the ingredients into a large jug or, even better, a glass bottle with a tight lid. Shake or stir until everything is fully mixed.
  2. Taste and balance
    At this stage, the mix should taste slightly over-seasoned and zesty; remember, you’ll be diluting it with vodka and ice later. If it seems flat, nudge up the salt and lemon. If it feels sharp or too spicy, add a splash of extra tomato juice.
  3. Chill and let it mature
    Place the mix in the fridge and forget about it for at least 2–4 hours, preferably overnight. During this time, the ingredients meld, and the tomato base picks up the smoky, spicy notes beautifully.
  4. Use as a base
    When you’re ready to serve, pour 90–120 ml (3–4 oz) of mix over ice, add 45–60 ml (1½–2 oz) vodka (or another spirit), stir, and garnish. That’s it.

This vodka-free mix is brilliant for flexibility. One guest can have a full-strength Bloody Mary, another can have a light version, and a third can skip the alcohol entirely and enjoy the same mix as a Virgin Mary.

If you ever decide to preserve Bloody Mary mix in jars, it’s worth using a reputable, tested canning recipe such as this pressure-canning guide.

Also Read: Peanut Butter Cookies (Classic Recipe & 3 Variations)


Virgin Bloody Mary Recipe (Virgin Mary Mocktail)

Not everyone at the table will be drinking, yet almost everyone appreciates a drink that feels grown-up. That’s where a good Virgin Bloody Mary recipe comes in. It offers all the savoury, spicy satisfaction of a classic Bloody Mary, just without the vodka.

Mocktail round-ups regularly include this drink for good reason, and the Virgin Mary drink recipe from The Spruce Eats is a great example: tomato, lemon, Worcestershire, hot sauce, celery salt, black pepper, and plenty of crunch from garnishes. The version below follows the same spirit with a touch more tomato to make up for the missing alcohol.

Ingredients (1 drink)

  • 180 ml (6 oz) tomato juice
  • 15 ml (½ oz) fresh lemon juice
  • 1–2 dashes Worcestershire sauce (vegan if you need it)
  • 1–3 dashes hot sauce
  • 1 pinch celery salt
  • Freshly ground black pepper
  • Ice

Garnish

  • Celery stalk
  • Pickle spear
  • Lemon wedge
  • Olives or cherry tomatoes
Virgin Bloody Mary mocktail recipe card with a tall tomato juice drink over ice, garnished with celery, olives and lemon on a wooden table, MasalaMonk.com
Virgin Bloody Mary (Virgin Mary) – a zero-proof, spicy tomato brunch drink served tall over ice with celery, olives and lemon, giving non-drinkers the same full Bloody Mary experience without the alcohol.

Method

  1. Add everything to the glass
    Pour tomato juice, lemon juice, Worcestershire sauce, hot sauce, celery salt and pepper into a tall glass.
  2. Fill with ice and stir
    Add ice cubes until the glass is almost full, then stir for 10–15 seconds until chilled.
  3. Taste and tweak
    If it tastes too simple, drop in another dash of Worcestershire or hot sauce and stir again. If you overshoot with spice, add more tomato juice.
  4. Load up the garnish
    Slide in the celery, tuck a pickle or two along the side, and add a lemon wedge on the rim.

If you’re building a non-alcoholic menu, you can place this Virgin Mary beside other zero-proof ideas. For instance, colourful fruit drinks from MasalaMonk like apple juice mocktail recipes or tropical pineapple mojito mocktails give guests more than one option, while broader guides such as Mocktails with Grenadine cover even more playful combinations.


Bloody Maria (Tequila Bloody Mary Recipe)

Once you’re comfortable with the classic Bloody Mary recipe, changing the base spirit is the easiest way to explore new territory. Swapping vodka for tequila gives you the Bloody Maria: a drink that’s brighter, a little earthier, and a natural partner for Mexican-style brunch plates.

The Bloody Maria cocktail on Liquor.com keeps almost all the classic elements, simply trading lemon for lime and vodka for tequila. That’s exactly the direction we’ll take here.

Ingredients (1 drink)

  • 60 ml (2 oz) tequila (blanco for freshness, reposado for more oak)
  • 120–150 ml (4–5 oz) tomato juice
  • 15 ml (½ oz) fresh lime juice
  • 2–4 dashes Worcestershire sauce
  • 2–4 dashes hot sauce
  • 1 pinch celery salt
  • Freshly ground black pepper
  • Ice

Garnish

  • Lime wedge
  • Cucumber spear
  • Pickled jalapeños
  • Chilli-salt rim (Tajín works beautifully)
Bloody Maria tequila cocktail recipe card showing a chilli-salt rimmed tomato drink in a highball glass, garnished with lime, jalapeños and cucumber, MasalaMonk.com
Bloody Maria recipe – a tequila-based Bloody Mary with lime, chilli-salt rim and pickled jalapeños that shifts your brunch cocktail from classic to Mexican-inspired in a single pour.

Method

  1. Prepare the glass
    Run a lime wedge around the rim and dip it into chilli-salt. Fill the glass with ice.
  2. Combine the ingredients
    In a separate mixing glass or shaker, add tequila, tomato juice, lime juice, Worcestershire, hot sauce, celery salt and black pepper with ice.
  3. Roll or stir
    Roll the mixture gently between two tins, or stir until cold.
  4. Serve and garnish
    Strain or pour into the prepared glass, then garnish with lime, jalapeños and cucumber.

From here, you can slide easily into other tequila-centric brunch cocktails. If you love a bit of sparkle, a tequila twist on a French 75 (sometimes called a Mexican 75) is a fun follow-up—MasalaMonk’s French 75 cocktail recipe walks through the classic and several variations you can adapt.


Whiskey & Bourbon Bloody Mary Recipe

Changing gears again, let’s move from agave to grain. A Bloody Mary recipe made with bourbon or Irish whiskey lands somewhere between a savoury cocktail and a gentle smoke-kissed soup. It’s especially good in colder weather, or whenever there’s bacon on the table.

Ingredients (1 drink)

  • 60 ml (2 oz) bourbon or Irish whiskey
  • 120–150 ml (4–5 oz) tomato juice
  • 15 ml (½ oz) fresh lemon juice
  • 2–3 dashes Worcestershire sauce
  • 2–3 dashes hot sauce
  • 1 pinch celery salt
  • Freshly ground black pepper
  • Ice

Garnish

  • Crispy bacon strip
  • Grilled cherry tomatoes
  • Pickled onion or gherkin
Whiskey and bourbon Bloody Mary recipe card with a tall tomato cocktail garnished with crispy bacon, grilled cherry tomatoes and a pickle on a dark rustic table, MasalaMonk.com
Whiskey & Bourbon Bloody Mary – a rich, smoky take on the classic Bloody Mary, spiked with bourbon or Irish whiskey and finished with crispy bacon and grilled cherry tomatoes for a cosy, cold-weather brunch cocktail.

Method

  1. Mix as usual
    Add whiskey, tomato juice, lemon juice, Worcestershire, hot sauce, celery salt and pepper to a mixing glass with ice.
  2. Chill and dilute
    Roll or stir the drink until cold. Check the balance: whiskey brings sweetness, so you may want slightly more lemon to keep the Bloody Mary recipe bright.
  3. Serve over fresh ice
    Pour into a tall glass filled with ice.
  4. Lean into the smoke
    Finish with a piece of bacon or grilled vegetables so the garnish speaks the same language as the spirit.

When brunch is over, you can keep the whiskey story going with more classic sour-style drinks. MasalaMonk’s recipe archives often feature whiskey and bourbon in different contexts, so your bottle will definitely not go to waste once the Bloody Marys are finished.

Also Read: Cottage Cheese Lasagna Recipe | Chicken, Spinach, & Ricotta


Beer Bloody Mary Recipe (Michelada-Style Twist)

So far, every Bloody Mary recipe in this post has been spirit-based. However, the tomato-and-spice core also plays nicely with beer. A tomato-beer hybrid sits somewhere between a Bloody Mary and a Michelada: fizzy, lighter, and incredibly refreshing when it’s hot outside.

There are two main ways to bring beer into the picture:

  • A classic Bloody Mary served with a beer chaser
  • A tomato mix topped by beer in the same glass

The second feels like the bigger departure, so let’s build that.

Ingredients (1 drink)

  • 90 ml (3 oz) Bloody Mary mix (homemade or store-bought)
  • 15–20 ml (½–⅔ oz) lime juice
  • 1–2 dashes hot sauce
  • Pinch of salt or celery salt
  • 120–180 ml (4–6 oz) light lager or Mexican beer, well chilled
  • Ice

Garnish

  • Lime wedge
  • Cucumber spear
  • Chilli-salt rim
Beer Bloody Mary Michelada-style recipe card with a tall tomato and lager cocktail in a chilli-salt rimmed glass, garnished with lime and cucumber, MasalaMonk.com
Beer Bloody Mary (Michelada-style) – a light, fizzy twist on the classic Bloody Mary made with cold lager, Bloody Mary mix and fresh lime, perfect for hot-weather brunches, game days or anytime you want something less boozy but still full of flavour.

Method

  1. Salt and chill the glass
    Run a wedge of lime around the rim of the glass, then dip into chilli-salt. Drop in a few cubes of ice.
  2. Layer the base
    Add Bloody Mary mix, lime juice, hot sauce and a pinch of salt directly into the glass. Stir briefly.
  3. Top with beer
    Pour the beer slowly over the back of a spoon or down the side of the glass to preserve the fizz. Watch as the tomato base and beer swirl together.
  4. Adjust and garnish
    Taste. If it feels too thick, add a little more beer; if it’s thin, add a splash more mix. Garnish with lime and cucumber.

This version is especially handy when you have leftover mix and a few extra beers in the fridge. Once the tomato glasses are empty, you can pivot into other refreshing drinks such as the long, easy sippers in MasalaMonk’s coconut water cocktails collection or straightforward highballs.


More Bloody Mary Recipe Twists: Caesar, Bull, Green & V8

By now you’ve covered the major branches: classic, pitcher, mix, Virgin Mary, Bloody Maria, whiskey and beer. Even so, the Bloody Mary recipe tree still has more interesting little offshoots worth mentioning. These don’t need full recipes to themselves; a few notes are enough to get you playing.

Bloody Caesar (Clam-Tomato Cousin)

In Canada, you’re more likely to see a Caesar on brunch menus than a straight Bloody Mary. The main twist is clam-tomato juice instead of plain tomato juice. According to cocktail histories and the Bloody Mary article on Wikipedia, this variation evolved into its own national favourite.

Bloody Caesar cocktail recipe card with a clam-tomato Bloody Mary in a glass rimmed with celery salt, garnished with celery and lime, MasalaMonk.com
Bloody Caesar – a Canadian-style twist on the Bloody Mary made with clam-tomato juice, vodka, Worcestershire and hot sauce, served over ice with a celery stalk and lime wedge for a briny, savoury brunch cocktail.

To try it:

  • Use the classic Bloody Mary recipe as your base.
  • Replace some or all of the tomato juice with clam-tomato juice.
  • Garnish with celery, a lime wedge, and perhaps even a prawn or two.

The result is brinier and more ocean-y—like having a seafood bar in a glass.

Bloody Bull (Beef-Boosted Mary)

A Bloody Bull adds beef broth (or bouillon) to the equation. It shows up in lists of “Bloody Mary twists” alongside versions with rum, mezcal, or jerk seasoning, but this one is particularly cosy.

Bloody Bull cocktail recipe card with a short glass of tomato and beef-broth Bloody Mary, garnished with celery, lemon wedge and cherry tomato on a dark wooden surface, MasalaMonk.com
Bloody Bull – a deeply savoury twist on the Bloody Mary made with vodka, tomato juice and cooled beef broth, stirred over ice and finished with celery, lemon and cherry tomato for a rich, soup-like brunch cocktail.

To make one:

  • Add 30–45 ml (1–1½ oz) cooled beef broth to your classic Bloody Mary base.
  • Reduce the tomato juice slightly so your drink doesn’t thin out.
  • Taste; beef can dull acidity, so you may want extra lemon or hot sauce.

If you enjoy deep savoury flavours, this twist lands somewhere between a cocktail and a light, sip-able soup.

Green Bloody Mary

A Green Bloody Mary keeps the bones of the original Bloody Mary recipe but swaps out the red. Instead of tomato juice, you make a green vegetable blend and use that as your base.

Green Bloody Mary cocktail recipe card with a tall green tomatillo and cucumber drink garnished with lime, cucumber spear and green chilli on a brown background, MasalaMonk.com
Green Bloody Mary – a fresh, herb-packed twist on the classic, made with a blended tomatillo and cucumber base, lime and hot sauce, then spiked with vodka or tequila for a bright, modern brunch cocktail.

Rough guide:

  • Blend tomatillos (or green tomatoes), cucumber, coriander, green chilli, lime juice, and a bit of water.
  • Strain if you prefer, or leave slightly chunky.
  • Season with salt and pepper, then treat it exactly like tomato juice: add vodka (or tequila), Worcestershire, hot sauce and celery salt, then roll with ice.

On the table, a Green Bloody Mary looks dramatic alongside traditional red ones. It also fits beautifully with Mediterranean-leaning brunch spreads and fresh vegetable dishes like those in What is the Mediterranean Diet? and 10 Plant-Based Meal Prep Ideas.

Spicy V8 Bloody Mary

Finally, there’s the vegetable-juice shortcut. Instead of pure tomato juice, you use a blend like V8. Because it already contains carrot, celery, beet and spices, it gives you a more complex Bloody Mary recipe without extra work.

Spicy V8 Bloody Mary recipe card with a tall tomato and vegetable juice cocktail over ice, garnished with celery, lemon and olives on a warm brown background, MasalaMonk.com
Spicy V8 Bloody Mary – a quick, shortcut Bloody Mary made with spicy vegetable juice, vodka and a splash of citrus, stirred over ice and garnished with celery, lemon and olives when you want full flavour with minimal prep.

To build it:

  • Swap tomato juice for spicy vegetable juice in the classic recipe.
  • Reduce the added salt at first and adjust only after tasting.
  • Keep lemon or lime for freshness and hot sauce for extra kick if needed.

Home cooks who like to can and preserve sometimes choose veg juice mixes as a base, then follow pressure-canning advice from resources like Make a Bloody Mary mix safely so they can store jars on the shelf.

Also read: Air Fryer Hard-Boiled Eggs (No Water, Easy Peel Recipe)


Building Your Own Bloody Mary Bar

Once you have several versions of a Bloody Mary recipe under your belt, the natural next step is to turn them into a full “Bloody Mary bar” experience. Instead of one person quietly drinking at the kitchen counter, you get an interactive, help-yourself station that can anchor a whole brunch.

Here’s one way to organise it.

Step 1: Pick Your Bases

Choose two or three jugs to start with:

  • A classic vodka Bloody Mary
  • A Virgin Mary for non-drinkers
  • A Bloody Maria for tequila lovers

Optionally, keep a bottle of your homemade Bloody Mary mix in the fridge so you can pour fresh, super-cold drinks on demand and spike them glass by glass.

Label each jug so guests know which is which, or use coloured tags tied around the handles.

Step 2: Set Up Garnishes and Seasonings

Next, turn a corner of the table into a garnish playground. Place small bowls of:

  • Lemon and lime wedges
  • Celery sticks
  • Cherry tomatoes
  • Mixed olives
  • Pickled vegetables (onions, gherkins, jalapeños)
  • Crispy bacon strips for meat-eaters

Beside those, add little jars or bottles of:

  • Hot sauces (different brands and heat levels)
  • Worcestershire sauce
  • Celery salt, chilli salt, and regular salt
  • Black pepper
  • Prepared horseradish

Now each person can dress their own Bloody Mary recipe to match their mood: mild and bright, or thick and fiery, or salty and snack-like.

Step 3: Add Brunch Food That Loves Tomato

A Bloody Mary feels better when there’s food nearby. You don’t need a complicated menu, yet a couple of thoughtful dishes go a long way.

You might, for instance:

With even a few of those on the table, the drink stops being a gimmick and becomes part of a complete meal.

Step 4: Offer a “Second Round” That Isn’t Tomato

Eventually, even the biggest Bloody Mary fan might want to move on to something different. Rather than ending the party there, you can segue into another style of drink.

A few options that pair nicely:

That way, your Bloody Mary bar becomes the starting act of a longer, more relaxed gathering.

Also Read: French 75 Cocktail Recipe: 7 Easy Variations


One Bloody Mary Recipe, Many Possibilities

It’s amazing how much variety hides inside one simple Bloody Mary recipe. Begin with vodka and tomato juice; add lemon, Worcestershire, hot sauce, salt and pepper; then adjust and taste. From that tiny foundation, you can:

  • Stir up a classic single-serving drink
  • Scale it into a crowd-pleasing pitcher
  • Bottle a vodka-free mix for the week
  • Serve a Virgin Mary that feels just as grown-up
  • Swap tequila for a Bloody Maria
  • Pour in bourbon for a smoky, bacon-friendly twist
  • Blend it with beer for a lighter, fizzy version
  • Wander into Caesar, Bull, Green and V8 territory

However you decide to pour it, the fun comes from understanding the framework and then playing. Once you’ve made one good Bloody Mary recipe, the rest are just small, deliberate changes—and each of those changes can turn the same basic idea into a completely new drink.

Also Read: Green Bean Casserole Recipe Ideas (Classic, Cheesy, Dairy-Free & More)

FAQs

1. What is a Bloody Mary cocktail?

A Bloody Mary is a savoury cocktail made from vodka and tomato juice, seasoned with citrus, Worcestershire sauce, hot sauce, salt, and pepper. A classic Bloody Mary recipe is usually served over ice in a tall glass and finished with bold garnishes like celery, olives, pickles, or even bacon.


2. What are the basic ingredients in a classic Bloody Mary recipe?

The basic Bloody Mary ingredients are vodka, tomato juice, lemon or lime juice, Worcestershire sauce, hot sauce, celery salt, and black pepper. After that, you can add extras like horseradish, smoked paprika, or Old Bay seasoning to personalise the recipe.


3. What is the simplest Bloody Mary recipe I can make at home?

For a very simple Bloody Mary recipe, combine 60 ml vodka, 120–150 ml tomato juice, 15 ml lemon juice, 2–3 dashes Worcestershire sauce, 2–3 dashes hot sauce, a pinch of celery salt, and black pepper over ice. Stir well, taste, and then adjust salt, heat, or citrus until it tastes balanced to you.


4. What is the usual vodka to tomato juice ratio in a Bloody Mary?

Most basic Bloody Mary recipes use roughly 1 part vodka to 2 or 2½ parts tomato juice. If you like a stronger drink, use more vodka; if you prefer a longer, lighter Bloody Mary drink, add extra tomato juice or even a splash of water or ice melt.


5. What is a Bloody Maria and how is it different from a Bloody Mary?

A Bloody Maria is a Bloody Mary recipe made with tequila instead of vodka. Typically it also uses lime instead of lemon and often leans into Mexican-style flavours with chilli-salt rims, jalapeños, and coriander, but the tomato base and savoury seasonings stay similar.


6. What do you call a vodka and tomato juice drink?

Most of the time, a vodka and tomato juice cocktail is simply called a Bloody Mary. If it is very plain—just vodka and tomato juice without spice—some people might just describe it as a “vodka tomato juice drink”, but once you add citrus, salt, and hot sauce, you’re essentially in Bloody Mary recipe territory.


7. How do I make a Virgin Bloody Mary or Virgin Mary drink?

To make a Virgin Bloody Mary (also called a Virgin Mary), skip the vodka and increase the tomato juice. Mix about 180 ml tomato juice with 15 ml lemon juice, a couple of dashes of Worcestershire sauce, a few drops of hot sauce, celery salt, and pepper over ice, then garnish just like the alcoholic version.


8. Can I use other spirits instead of vodka in a Bloody Mary recipe?

Yes, you can. Tequila gives you a Bloody Maria, gin creates a herbal gin and tomato juice twist, bourbon or Irish whiskey brings a smoky, sweet note, and even rum or mezcal can work for adventurous versions. The key is to keep the tomato, citrus, and savoury seasoning structure the same while changing only the base alcohol.


9. Can I make a Bloody Mary with beer?

You can absolutely make a beer Bloody Mary recipe. Either serve a classic Bloody Mary with a beer chaser, or build a Michelada-style drink by mixing tomato-based Bloody Mary mix with lime juice, hot sauce, salt, and topping it with chilled lager.


10. Can I make a Bloody Mary without alcohol but still keep it spicy?

Definitely. For a non-alcoholic Bloody Mary mocktail, use tomato juice, lemon or lime juice, Worcestershire sauce (or a vegan equivalent), hot sauce, celery salt, and pepper over ice. You can add horseradish or extra chilli to keep it as fiery as a full-strength cocktail, even though it’s alcohol-free.


11. How do I make Bloody Mary mix from scratch?

To make a homemade Bloody Mary mix recipe, stir together tomato juice, lemon juice, Worcestershire sauce, hot sauce, celery salt, black pepper, and optional horseradish or smoked paprika in a jug or bottle. Chill it for a few hours so the flavours meld, then pour over ice and add vodka (or another spirit) whenever you’re ready for a drink.


12. How long does homemade Bloody Mary mix last in the fridge?

As a general rule, a fresh Bloody Mary mix without alcohol keeps well in the fridge for about 3–5 days in a sealed container. Before using it, shake or stir, taste, and adjust lemon, salt, or hot sauce so the final Bloody Mary recipe still tastes bright and balanced.


13. Can I can or bottle Bloody Mary mix for long-term storage?

You can, but only if you follow a tested canning recipe with proper acidity and pressure-canning times. For most home cooks, it’s safer and easier to make smaller fridge batches of Bloody Mary mix recipe and use them within a few days rather than trying to invent a shelf-stable version.


14. What are the best garnishes and toppings for a Bloody Mary?

Classic Bloody Mary toppings include celery stalks, lemon or lime wedges, olives, pickles, and cherry tomatoes. Beyond that, many people enjoy bacon strips, prawns, cheese cubes, pickled jalapeños, or even mini sliders for over-the-top “crazy Bloody Mary drinks” that double as food.


15. What’s the best vodka or tequila for a Bloody Mary or Bloody Maria?

For a Bloody Mary recipe, a clean, mid-range vodka that you like the taste of is ideal; it doesn’t have to be the most expensive bottle, but it shouldn’t taste harsh. For a Bloody Maria, a smooth blanco or lightly aged reposado tequila works well, because it adds character without overpowering the tomato and spice.


16. Can I use Clamato, V8 or other juices instead of plain tomato juice?

Yes, you can swap the base liquid. Plain tomato juice gives you a classic Bloody Mary, clam-tomato juice produces a Caesar-style drink, and vegetable blends like V8 create a richer, spicier version. Whenever you change the juice, just taste before adding extra salt or hot sauce, because some blends are already seasoned.


17. How do I make a low-sodium or low-sugar Bloody Mary?

For a lower-sodium Bloody Mary recipe, choose low-salt tomato or vegetable juice, limit celery salt, and go easy on Worcestershire sauce, adding just enough for flavour. To keep sugar down, avoid sweet mixers, don’t add syrups, and rely on citrus, spice, and savoury notes instead of sweetness for balance.


18. Is a Bloody Mary gluten-free and vegan?

A basic vodka and tomato juice Bloody Mary can be gluten-free and vegan, but only if you check the labels. Some Worcestershire sauces contain anchovies (not vegan) and certain mixes or spice blends may include gluten or malt-based ingredients, so you’ll want to choose vegan Worcestershire and certified gluten-free mixes for a fully vegan, gluten-free Bloody Mary recipe.


19. How do I scale a Bloody Mary recipe for a crowd?

To scale up, multiply your favourite single-serve Bloody Mary recipe by the number of guests and mix everything except the ice in a large jug or dispenser. Chill the batch, then let everyone pour over ice and customise with extra hot sauce, lemon, or garnishes so one big mix can satisfy different tastes.


20. Is a Bloody Mary really a hangover cure?

A Bloody Mary drink feels like a hangover cure because it’s cold, salty, spicy, and hydrating, and sometimes includes a bit of “hair of the dog” alcohol. However, it doesn’t actually fix dehydration or fatigue by itself; water, rest, and food do that, while the Bloody Mary recipe mostly just makes the morning more tolerable and a lot tastier.


21. Why does my Bloody Mary taste bland, too salty, or too thick?

If your Bloody Mary tastes bland, increase lemon or lime, a pinch of salt, and a dash or two of hot sauce. When it’s too salty, add more tomato juice and citrus, and skip a salted rim next time; if it’s too thick, thin it with a splash of water, extra citrus, or a bit more ice so the texture feels drinkable instead of soupy.


22. What’s the difference between a classic Bloody Mary recipe and a spicy Bloody Mary recipe?

A classic Bloody Mary has gentle heat from a small amount of hot sauce and pepper, while a spicy Bloody Mary recipe increases that heat with extra hot sauce, horseradish, chilli-salt rims, or spicy vegetable juice. The core structure stays the same; you simply push the spice element higher for people who enjoy more burn.

Posted on 19 Comments

How to Cook Bacon in the Oven (Crispy, No-Mess, Crowd-Ready Recipe)

Hand holding a parchment-lined tray of crispy oven-baked bacon with warm, moody styling; headline ‘How to Cook Bacon in the Oven’ and timing 400°F 12–18 min (thick 18–25); jalapeño poppers and thermometer props.

There’s a reason so many pros and savvy home cooks quietly migrate from the skillet to the sheet pan: once you learn how to cook bacon in the oven, you get even browning, less fuss, almost no splatter, and—most importantly—perfectly crisp slices that finish at the same time. Instead of babysitting over popping fat, you slide a tray into a preheated oven, rotate once, and pour yourself coffee while the heat does the work. Independent tests routinely rank oven on parchment among the most reliable approaches for consistent texture and easy cleanup, and large-batch cooking becomes trivial. If you’re planning brunch, feeding a crowd, or just prefer your kitchen to smell like breakfast (and not like a grease fire), this is the method you’ll return to again and again. See the side-by-side from The Kitchn that named parchment-lined baking the winner in a multi-method showdown: baking on parchment paper is best and, for further mechanics, Serious Eats’ explanation of why bacon “fries in its own fat” on a flat, lined sheet helps lock in uniform browning: the best way to cook bacon.

Before we light the oven, let’s set the payoff: oven bacon frees your hands for everything else. With one tray working, you can mash yolks for a platter of classic deviled eggs or toss together a spread of potato appetizers—both pairings that vanish quickly when crisp bacon hits the table.

Parchment-lined sheet pan with evenly browned bacon strips—step 1 oven method for cooking bacon at 400°F
Even browning, minimal mess: line a rimmed sheet with parchment, bake on the middle rack, rotate once, then rest to crisp.

The Straightforward Way: How to Bake Bacon in the Oven

To master how to cook bacon in the oven, start simple. Preheat to 400°F (205°C). Line a rimmed sheet with parchment; fold the paper’s edges up slightly so they catch the drips. Arrange the strips in one layer with a sliver of space between each piece. Slide the tray onto the middle rack and bake until the edges are deeply rendered and the centers no longer look shiny: for regular slices, 12–18 minutes; for thick cut, 18–25 minutes. Rotate the pan once halfway to even out hot-spot differences. If you crave a touch more mahogany, finish under the broiler for 60–90 seconds, watching constantly. Transfer the bacon to a wire rack (or paper towels) and rest 1–2 minutes; it crisps further as it cools.

Although foil works, parchment typically releases better and wipes up faster—exactly what The Kitchn’s 8-method test concluded when it crowned the parchment-lined oven method the overall winner. If you enjoy method-nerd deep dives, bookmark that side-by-side here: We tried 8 methods; baking on parchment won.

And because brunch is a whole mood, tuck a few supporting bites alongside: creamy deviled eggs and a tray of crisp-tender potato bites build out the board with minimal extra effort.

Also Read: 10 Best Chicken Sandwich Recipes (BBQ, Parm, Buffalo & More)


Why Oven Bacon Beats the Skillet When It Matters

First, capacity. A full sheet pan fits far more slices than a skillet; everything finishes together instead of in waves. Second, predictability. With a steady 400°F and a lined pan, you aren’t fighting hot spots or flare-ups, and you can place the bacon exactly where you want it. Third, tranquility. No hovering with tongs, no fat popping onto your forearms, and no chaos near the stovetop when you’re scrambling eggs.

Moreover, this isn’t just opinion. Food & Wine tested seven methods and landed where many of us do: the oven delivers the most consistent, low-effort crisp while still accommodating big batches. Have a look at their summary here: We tested 7 ways; oven won. Serious Eats also lays out why convection and even heat promote browning more evenly than a crowded skillet can manage: how to cook bacon.

Meanwhile, if you’re outfitting your kitchen for long-term wins, give this a skim before you impulse-buy more heavy cookware: Buying a Cast Iron Skillet? 5 Warnings Before You Invest. Cast iron is brilliant for searing and oven finishes, but caring for it properly protects your sanity (and your bacon).

Also Read: 10 Best Espresso Martini Recipe Variations (Bar-Tested)


How to Make Bacon Extra Crispy in the Oven—Every Time

Now that you know how to cook bacon in the oven, let’s push for that shattery edge without overcooking.

Space matters. Overlap creates steam, and steam softens. Leave small gaps so fat can render cleanly and the edges can dry.

Airflow wins. For the crispiest possible texture, elevate the slices on a wire rack set over the sheet pan. Air moving under the bacon tightens the texture and flattens the wave. Add 1–3 minutes to the timing when using a rack.

Finish fast. The broiler is a torch, not a strategy. Use it briefly—no more than 60–90 seconds—to burnish color at the end, not as the primary heat source.

Rest to set. Two minutes on a rack is the difference between “hot and floppy” and “cooled and crisp.”

Four tips overlay on bacon on a cooling rack: space slices, elevate on rack, brief broil, rest to set
Space the strips, lift on a rack, finish with a brief broil, then rest 1–2 minutes—hello shattery edges.

Curious why a flat, lined surface equals uniform browning? Because bacon essentially fries in its own fat on the sheet; parchment lets it baste, release, and crisp without sticking, which is exactly what Serious Eats describes in its method comparison: the best way to cook bacon. If you need ultra-flat slices for BLTs or breakfast sandwiches, try the pro trick of gently pressing the bacon beneath a second pan (with parchment between) as it bakes; Kenji López-Alt uses this in his “bacon for a crowd” method: baked bacon for a crowd.

Also Read: Macaroni & Cheese Recipe: Creamy Stovetop, Baked & Southern


Thickness, Temperatures, and Timelines

Because readers arrive with different ovens and cuts, it helps to position the timing windows clearly.

Oven bacon time and temperature chart for 350°F, 375°F, 400°F, and 425°F with doneness photos
Use this quick chart to hit your desired texture with bacon—400°F is the sweet spot for speed and crisp, while 350–375°F adds forgiveness.

How to Cook Bacon in the Oven at 400°F (the Sweet Spot)

Most kitchens get the best balance of speed and crisp at 400°F (205°C). Expect 12–18 minutes for standard slices and 18–25 for thick-cut, rotating the tray once. The Kitchn’s step-by-step lays out the same range with a straightforward setup: how to cook bacon in the oven at 400°F.

How to Cook Bacon in the Oven at 375°F (Even Browning)

Prefer a slightly gentler march toward crisp? At 375°F (190°C), you often see 16–22 minutes as the window. This is a sweet setting for big brunch trays where you’d rather have a touch more forgiveness.

How to Cook Bacon in the Oven at 350°F (Calmer, Fewer Pops)

At 350°F (175°C), you trade time for calm: 20–25 minutes for standard slices. If you’re new to your oven or worried about splatter, this conservative setting keeps things tidy.

How to Cook Bacon in the Oven at 425°F (Fast—Eyes on It)

When you’re sprinting, 425°F (220°C) can land 10–15 minutes, but it demands vigilance. The last three minutes determine whether you nail glossy, crisp mahogany or overshoot into brittle. Rotate, then watch like a hawk.

Also Read: French Toast Sticks (Air Fryer + Oven) — Crispy Outside, Custardy Inside


Thick-Cut Bacon: How to Cook Bacon in the Oven for Big Slices

Thick-cut strips reward patience. They hold more fat and need a breath more time to render. Set 400°F, lift the slices on a rack if you have one, and start checking at 18 minutes. Most batches pull somewhere between 20–25 minutes. If the centers are right but the color wants another shade, broil briefly—truly, a minute can be plenty.

Thick-cut bacon baked on parchment with timing note to check at 18 minutes and finish by 25
Thick-cut needs patience—start checking at 18 minutes at 400°F; pull when centers lose shine and edges are deeply rendered.

If you like food gear insights while we’re here, this piece offers real-world cautions before you add more iron to your cabinet: cast-iron skillet warnings. Cast iron excels for many tasks, but it’s fine to keep oven bacon on parchment; you don’t need a heavy pan to nail it.

Also Read: Lemon Drop Martini Recipe (Classic, 3-Ingredient, & More)


Parchment vs Foil vs Rack: Choosing the Best Setup

It’s tempting to chase hacks, yet the basics outperform gimmicks.

Side-by-side comparison of bacon baked on parchment, foil, and wire rack showing release and crispness differences
Parchment = easiest cleanup, Rack = crispiest (with more scrubbing), Foil = workable but can stick with sugary cures.

Parchment on a rimmed sheet is the dependable default: it releases cleanly, encourages even browning, and makes cleanup nearly effortless. The Kitchn’s comparison crowned this exact configuration: parchment-lined baking wins.

A rack over the sheet yields the crispiest texture with flatter slices and more airflow. Add a minute or two to timing and budget a moment to scrub the rack; the result is worth it for “glass-snappy” edges.

Foil-lined sheets also work and are easy to toss, though certain sugar-cured bacons can adhere slightly more to foil than to parchment. If you go foil, fold the edges up into a shallow tray to corral drips for mess-free disposal (Food & Wine even shows a DIY “ridge” rack with folded foil here: oven bacon trick).

For completeness, a few outlets promote cold-start tricks or twist techniques. If you enjoy experimenting, go for it. The fundamentals above, though, remain the most repeatable for week-to-week cooking.

Also Read: Classic vs. Authentic Alfredo: 5 Essential Recipes


Convection, Toaster Oven, and a Word on Microwaves

Because ovens vary, it’s smart to adapt. Convection fans accelerate browning by moving hot air constantly over the surface. As a rule, reduce by 25°F (≈15°C) and start checking 3–4 minutes earlier.

Bacon on a rack in a toaster oven with guidance to reduce temperature by ~25°F and check earlier
Convection speeds browning—drop temp by ~25°F and begin peeking 3–4 minutes early to avoid overshooting.

Toaster ovens are mini-ovens. The same guidance applies; just use a smaller tray and peek 2–3 minutes earlier because the elements sit closer to the food.

As for microwaves, they excel for 1–4 slices when you’re racing out the door: layer bacon between paper towels on a microwave-safe plate, cook about 1 minute per slice to start, then add 15–20 second bursts to finish. However, controlled tests still favor baked bacon for texture and consistency—especially with thick-cut. Food & Wine’s multi-method comparison places microwave near the bottom for taste and mouthfeel: 7 ways to make bacon—oven wins.

Also Read: Air Fryer Chicken Wings (Super Crispy, No Baking Powder)


How to Cook Bacon in the Oven—Without a Mess

If you’ve ever cleaned splatter from a stovetop, the oven already feels calmer; nevertheless, a few habits make it virtually mess-free.

  • Use a rimmed sheet so fat can’t cascade into the oven floor.
  • Middle rack positioning keeps hot coils above and below at safe distances.
  • Do not broil the entire time. Broiling drives popping; instead, broil only to finish for color.
  • Don’t crowd. Overlapping strips steam each other and spatter more.
  • Line with parchment and fold the edges up; this turns the paper into a drip tray you can lift and discard.
  • Start with a clean oven. Residual grease on the floor smokes before bacon does. A quick wipe pays dividends.

If you enjoy flavor-building extras across the rest of your brunch plan, take a peek at MasalaMonk’s seasoning ideas for eggs, which dovetail nicely with a bacon tray: egg-cellent seasoning options.


Turkey Bacon: How to Cook Bacon in the Oven When It Isn’t Pork

Turkey bacon behaves differently: less fat, quicker edges. Bake at 400°F (205°C) for 10–15 minutes. Flip at 8–10 minutes if the edges curl; pull once the surface looks uniformly crisp, because a minute too long dries it out.

Turkey bacon on a rack with steps: bake at 400°F 10–15 min, flip at 8–10 if edges curl, pull when surface looks crisp
Leaner strips cook faster—trust visual cues; flip if curling, then pull as soon as the surface crisps to prevent drying.

Because brand moisture and slice thickness vary, one must trust visual cues as much as the clock. If there’s ever a product advisory (they do happen), always check the official guidance—USDA FSIS maintains an updated recall hub and safety pages. For example, here’s the FSIS bacon safety backgrounder: Bacon and Food Safety.


Bacon Grease: Strain, Save, and Store

Once your tray cools a bit, pour the drippings through a fine sieve or a coffee filter into a clean jar. That liquid gold perfumes roasted potatoes, fried eggs, cornbread, even sautéed greens.

Jar of strained bacon grease with tips to refrigerate for about 3 months or freeze longer
Strain through a fine sieve or coffee filter; refrigerate up to ~3 months or freeze for longer—perfect for potatoes, eggs, and cornbread.

For storage, the simplest, most practical guidance is: refrigerate up to ~3 months and freeze for longer (6+ months), always discarding if the fat smells off or looks milky after warming. For broader food-safety context, tap FSIS’ comprehensive basics and temperature resources: Food safety basics and the safe internal temperature chart.


From Oven to Plate: What to Serve With Bacon (and How to Keep It Hot)

Because oven bacon scales so well, you can build the rest of the menu without anxiety. As mentioned earlier, classic pairings make you look like a catering pro with almost no extra labor: silky deviled eggs and crispy-creamy potato appetizers round out the plate. Or, pivot toward a slightly different vibe with sweet-potato starters—the salty-sweet play loves bacon.

Bacon slices on a wire rack with text: hold and reheat at 200°F (95°C) for 30–40 minutes
Keep bacon crisp for service: rest cooked strips on a rack in a 200°F oven for 30–40 minutes—airflow prevents soggy edges.

To hold bacon for the table, set your oven to 200°F (95°C) and rest the strips on a rack set over a sheet; this keeps them crisp for 30–40 minutes. Avoid covering tightly with foil, which traps steam and softens the edges you worked to get.

Also Read: Punch with Pineapple Juice: Guide & 9 Party-Perfect Recipes


A Note on Food Safety (Because You’re the Grown-Up in the Room)

While bacon itself is fully cooked when crisp to your liking, many brunch menus combine it with proteins that do require strict temperature targets—bacon-wrapped chicken breasts for instance.

Bacon on cooling rack with food safety notes: poultry 165°F, pork 145°F plus rest, refrigerate grease, check FSIS recalls
Pair bacon with safe temps: poultry to 165°F, pork to 145°F + rest. Strain and refrigerate grease, and scan FSIS recalls for advisories.

Whenever you include cross-links to recipes with poultry or seafood, keep your stance clear and cite the USDA’s numbers: poultry to 165°F / 74°C, pork whole cuts to 145°F / 63°C plus a short rest. For a one-page refresher, the FSIS chart is here: safe temperature chart. And as for bacon storage and handling, FSIS’ backgrounder is again the anchor: Bacon and Food Safety.


Variations Worth Knowing (Without Straying From the Core)

Once you’re have learned enough from above about how to cook bacon in the oven, you can go through a few optional flourishes.

Maple-pepper glazed bacon. In the final 5 minutes, brush a whisper of maple syrup on top and dust with black pepper. Return to the oven just long enough to set the glaze. Watch closely—sugar accelerates browning.

“Pressed” bacon for sandwiches. As mentioned earlier, slide a second tray gently over a parchment-covered layer of bacon so it bakes flat; Kenji showcases this for ultra-uniform slices: baked bacon for a crowd.

Convection for snappier edges. If your oven offers it, cut the temperature by 25°F (≈15°C) and begin checking 3–4 minutes early.

Toaster-oven micro-batches. For two people, a quarter sheet pan in a toaster oven works beautifully at the same temperatures, with a slightly earlier check. Food & Wine’s tip for a DIY foil “ridge” can keep slices out of pooled fat if you don’t own a rack: make bacon on foil ridges.

Also Read: What to Mix with Jim Beam: Best Mixers & Easy Cocktails


Troubleshooting Without Tears

Troubleshooting overlay on baked bacon: bake longer or brief broil, rotate pan halfway, use parchment and let rest
Chewy? Add 2–3 minutes or a quick broil. Uneven color? Rotate the pan. Sticking? Switch to parchment and lift after a brief rest.

Even with a method this forgiving, a few hiccups are common. Fortunately, each has a simple fix:

Chewy, not crisp. Either the oven ran a little cool or the slices were crowded. Add 2–3 minutes, or finish with a 1-minute broil to nudge color without overcooking the lean.

Uneven browning. Ovens have hot spots. Rotate the pan halfway, and consider a rack for better airflow if your bacon warps.

Stuck slices. Switch to parchment and let the bacon rest on the tray 30–60 seconds before lifting; rendered fat re-absorbs slightly and helps release.

Smoky oven. The usual culprit is old oil on the floor or walls, not the bacon itself. A quick wipe before you bake prevents most smoke. Keep the tray centered; upper racks sit closer to hot elements.

Also Read: 10 Creative Chia Pudding Recipes for Every Taste


The Case for Oven Bacon, Restated—For Anyone Still on the Fence

To recap with crisp clarity: how to cook bacon in the oven boils down to a preheated 400°F oven, a parchment-lined rimmed sheet, and a single layer of strips baked 12–18 minutes (or 18–25 for thick-cut), rotated once. The method scales to crowds, leaves your stovetop spotless, and delivers evenly rendered slices that finish together. It’s also the approach most publications reach for when they test multiple methods head-to-head: We tested 7 ways; oven was the clear winner, and The Kitchn’s parchment method remains a go-to reference for a reason.

Also Read: Coconut Water Cocktails: 10 Easy, Refreshing Drinks


FAQs

1) How long do I bake bacon at 400°F?

At 400°F (205°C), most regular slices turn perfectly crisp in about 12–18 minutes, while thick-cut usually needs 18–25. Moreover, rotate the pan once to even out hot spots, then let the strips rest briefly so they firm up.

2) How to cook bacon in the oven at 375°F?

Set the oven to 375°F (190°C) and plan for roughly 16–22 minutes. Additionally, this gentler temperature delivers very even browning, which helps when you’re baking multiple trays at once.

3) How to cook bacon in the oven at 350°F?

At 350°F (175°C), expect a calmer bake that typically takes 20–25 minutes for standard-cut slices. Consequently, if your oven runs hot or you prefer fewer pops, this setting keeps things tidy while still producing crisp edges.

4) How to cook bacon in the oven at 425°F?

With the dial at 425°F (220°C), bacon cooks fast—about 10–15 minutes—so watch closely near the end. Subsequently, pull the tray as soon as the color deepens; residual heat will finish the job.

5) What’s the best temperature to cook bacon in the oven?

Generally, 400°F strikes the ideal balance of speed and crispness. Likewise, it’s the sweet spot most readers land on once they learn how to cook bacon in the oven consistently.

6) Do I need to flip bacon while baking?

Not necessarily. Nevertheless, turning the pan once midway promotes uniform rendering without the mess of flipping each slice.

7) How do I make bacon extra crispy in the oven?

Space the slices so steam can escape, then consider a wire rack over the sheet for airflow. Finally, if you want deeper color, finish with a very brief broil—think 60 to 90 seconds—while watching constantly.

8) Should I use parchment, foil, or a rack?

Parchment is the easiest for release and cleanup, whereas foil is fine if that’s what you have. Alternatively, a rack yields the crispiest texture, though you may need an extra minute or two and a touch more cleanup.

9) How to cook thick-cut bacon in the oven without chewy centers?

Bake at 400°F and start checking around 18 minutes; most thick-cut slices finish between 20 and 25. Importantly, a rack helps render the middle while keeping the edges snappy.

10) Can I use convection for oven bacon?

Yes—reduce the temperature by about 25°F (≈15°C) and begin checking 3–4 minutes earlier. Subsequently, the moving air speeds browning, so rely on visual cues as much as the clock.

11) How do I keep the kitchen clean when baking bacon?

Use a rimmed sheet lined with parchment, place it on the middle rack, and avoid broiling for the entire cook. Moreover, a quick wipe of old grease from the oven floor before you start prevents smoky surprises.

12) What’s the timing for turkey bacon in the oven?

Turkey bacon generally finishes faster: estimate 10–15 minutes at 400°F. Ultimately, pull it when the surface looks crisp, because an extra minute can push it from perfect to dry.

13) How long will bacon grease last once saved?

After straining through a fine sieve or coffee filter, refrigerate for up to a few months or freeze for longer. Specifically, discard it if the aroma turns off or the texture looks milky after warming.

14) Is microwave bacon worth it if I’m in a rush?

For one to four slices, the microwave is speedy—about a minute per slice to start with brief bursts to finish. Still, if you’re chasing the best texture or serving a crowd, learning how to cook bacon in the oven remains the more consistent approach.

15) How do I reheat baked bacon so it stays crisp?

Warm it on a rack at 350°F for 3–5 minutes, just until the fat re-liquefies and edges revive. Likewise, avoid covering tightly, since trapped steam softens the crunch you worked for.