Posted on Leave a comment

How Long to Cook a Turkey: Cooking Time Chart by Weight & Oven Temperature

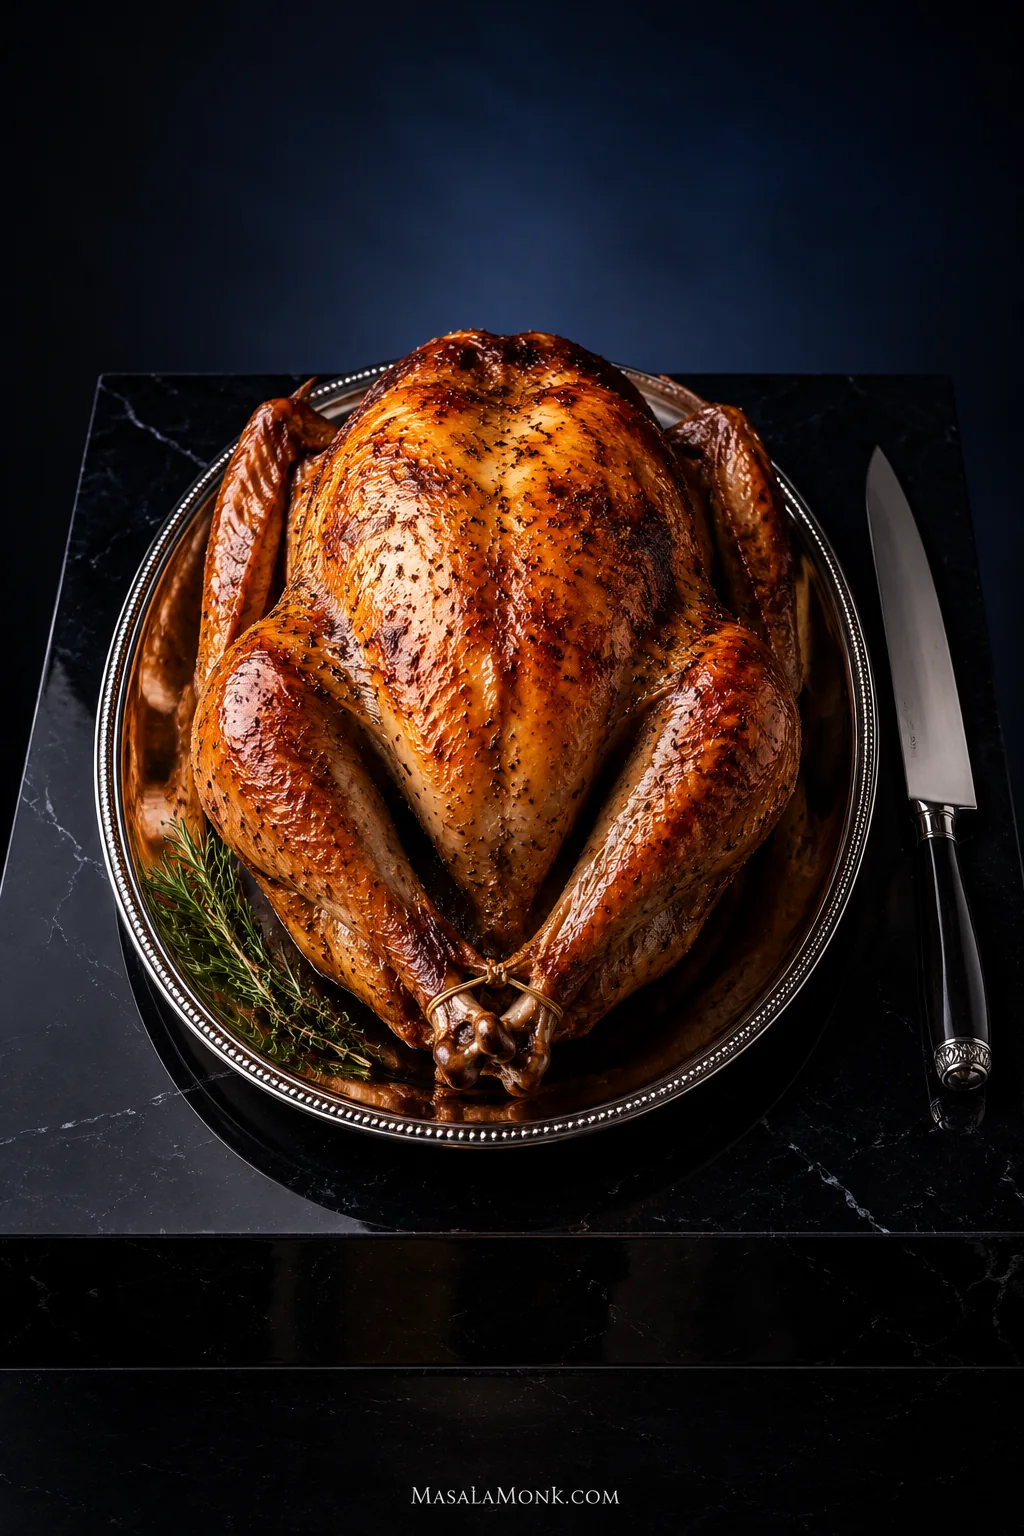
Whole roasted turkey with deep golden-brown skin on a silver platter beside a carving knife against a dark blue-black background.

How long to cook a turkey depends mostly on its weight, whether it is stuffed, how completely it is thawed, and the oven temperature. At 325°F / 163°C, a fully thawed, unstuffed 8–24 lb turkey generally takes about 2¾ to 5 hours. Stuffing adds time.

Seeing 325°F in one recipe, 350°F in another, and different times for the same 14-pound bird? That does not necessarily mean one chart is wrong. Different recipes use different temperatures, methods and assumptions. First make sure you’re comparing the same cooking method.

A useful schedule should leave you with browned skin, juicy breast meat, properly cooked dark meat and enough breathing room to finish the rest of dinner—not force the turkey to hit one magic minute.

Start taking temperatures toward the early end of the appropriate range. That gives you the chance to stop when the turkey is safely cooked instead of giving an already-finished breast another half hour just because the clock says so. Check the thickest part of the breast, the innermost part of the thigh, and the innermost part of the wing; each should reach at least 165°F / 74°C.

The chart tells you when to check. The thermometer tells you when dinner is cooked.

This guide covers an intact turkey roasted in the oven. Turkey breast, tenderloin, legs and wings have different cooking times. Convection ovens, oven bags, electric roasters, smokers and spatchcocked birds have their own timing too; those routes are covered farther down.

Updated September 2026. Timing and food-safety details were checked against current USDA/FSIS and FoodSafety.gov guidance.

Turkey Cooking Time Chart at 325°F

For a fully thawed turkey in a conventional oven, start here.

Turkey weightUnstuffed at 325°FStuffed at 325°FUnstuffed: first check
8–12 lb / 3.6–5.4 kg2¾–3 hours3–3½ hoursFrom 2¾ hr
12–14 lb / 5.4–6.4 kg3–3¾ hours3½–4 hoursFrom 3 hr
14–18 lb / 6.4–8.2 kg3¾–4¼ hours4–4¼ hoursFrom 3¾ hr
18–20 lb / 8.2–9.1 kg4¼–4½ hours4¼–4¾ hoursFrom 4¼ hr
20–24 lb / 9.1–10.9 kg4½–5 hours4¾–5¼ hoursFrom 4½ hr

These ranges follow the FoodSafety.gov turkey roasting chart. For a stuffed turkey, begin checking near the early end of the stuffed range rather than using the unstuffed first-check column.
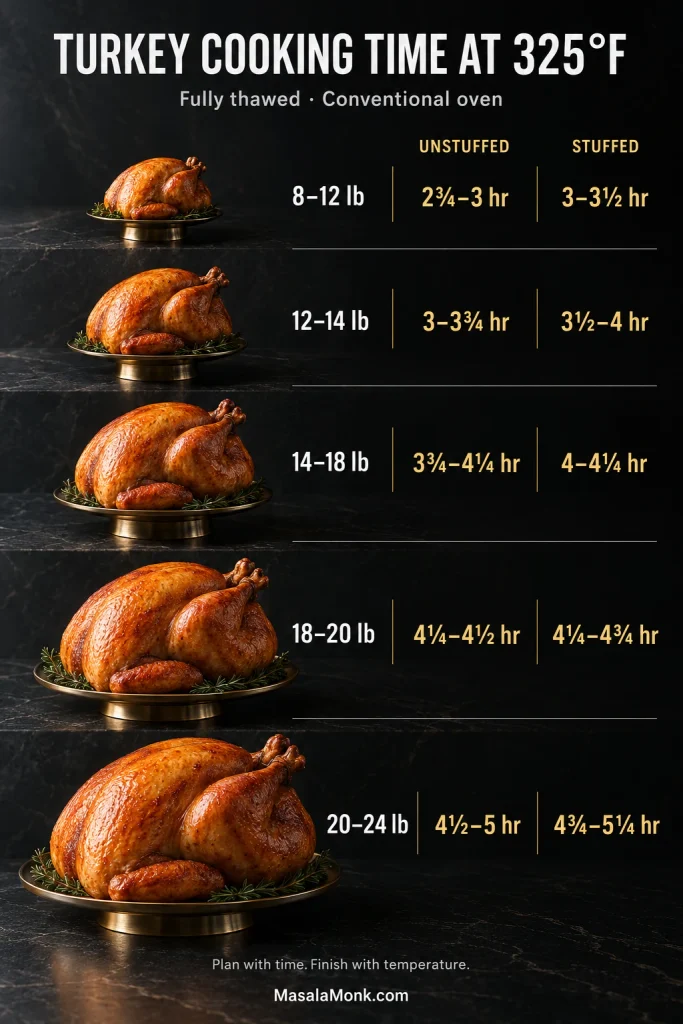
Infographic comparing 325°F cooking times for stuffed and unstuffed turkeys from 8 to 24 pounds, with progressively larger roasted turkeys.
Turkey cooking time by weight works in bands rather than exact promises. Find the row containing your bird, then use the early edge as the point where active checking begins.

The times are approximate. Two birds with the same label weight can still finish differently. And 12, 14, 18 and 20 pounds sit where two published rows touch, which is why those exact weights can produce different-looking answers on reliable charts.

Already at 165°F earlier than expected? Recheck the breast, thigh and wing. All three safely there? Take the turkey out. More oven time is not automatically better.

How Long to Cook Your Exact Turkey Weight

Your turkey has an exact weight, while the official chart uses ranges. The table below turns those ranges into two useful planning points for an unstuffed turkey at 325°F: when to take the first temperature reading and how long to keep the cooking window open.

First Check and Planning Window by Weight

Your turkeyApprox. metricFirst checkPlanning window
8 lb3.6 kg2¾ hrThrough 3 hr
9 lb4.1 kg2¾ hrThrough 3 hr
10 lb4.5 kg2¾ hrThrough 3 hr
11 lb5.0 kg2¾ hrThrough 3 hr
12 lb5.4 kg2¾ hrThrough 3¾ hr
13 lb5.9 kg3 hrThrough 3¾ hr
14 lb6.4 kg3 hrThrough 4¼ hr
15 lb6.8 kg3¾ hrThrough 4¼ hr
16 lb7.3 kg3¾ hrThrough 4¼ hr
17 lb7.7 kg3¾ hrThrough 4¼ hr
18 lb8.2 kg3¾ hrThrough 4½ hr
19 lb8.6 kg4¼ hrThrough 4½ hr
20 lb9.1 kg4¼ hrThrough 5 hr
21 lb9.5 kg4½ hrThrough 5 hr
22 lb10.0 kg4½ hrThrough 5 hr
23 lb10.4 kg4½ hrThrough 5 hr
24 lb10.9 kg4½ hrThrough 5 hr

The planning window is time you leave available, not a guaranteed finish time or a maximum. At the boundary weights—12, 14, 18 and 20 lb—it deliberately uses the longer adjoining official range so dinner is not built around the most optimistic possibility.
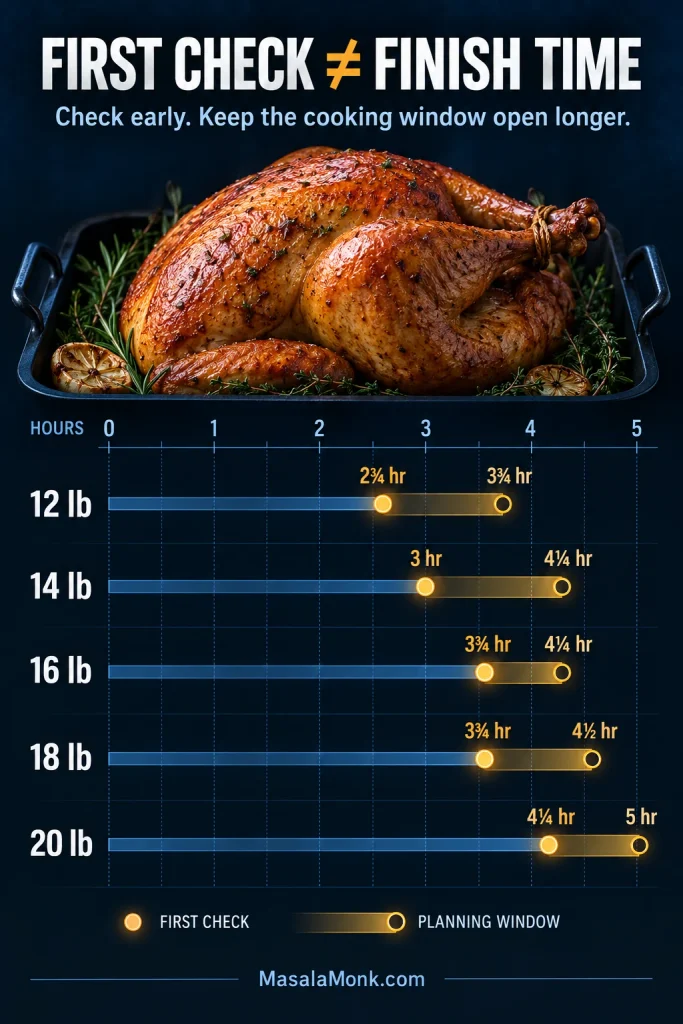
Infographic with timelines for 12, 14, 16, 18 and 20 pound turkeys, marking an earlier first temperature check and a longer planning window.
These two times solve different problems: the first-check marker helps prevent overcooking, while the wider planning window keeps a late-running turkey from throwing off dinner.

How Long to Cook a 12 lb Turkey

Begin checking a 12 lb / 5.4 kg unstuffed turkey around 2¾ hours, but keep the planning window open through about 3¾ hours. Twelve pounds sits where two official weight ranges overlap.

How Long to Cook a 14 lb Turkey

Start checking a 14 lb / 6.4 kg unstuffed turkey around 3 hours and keep the planning window open through roughly 4¼ hours. Fourteen pounds is shared by two published rows, which is why reliable charts can appear to give different answers.
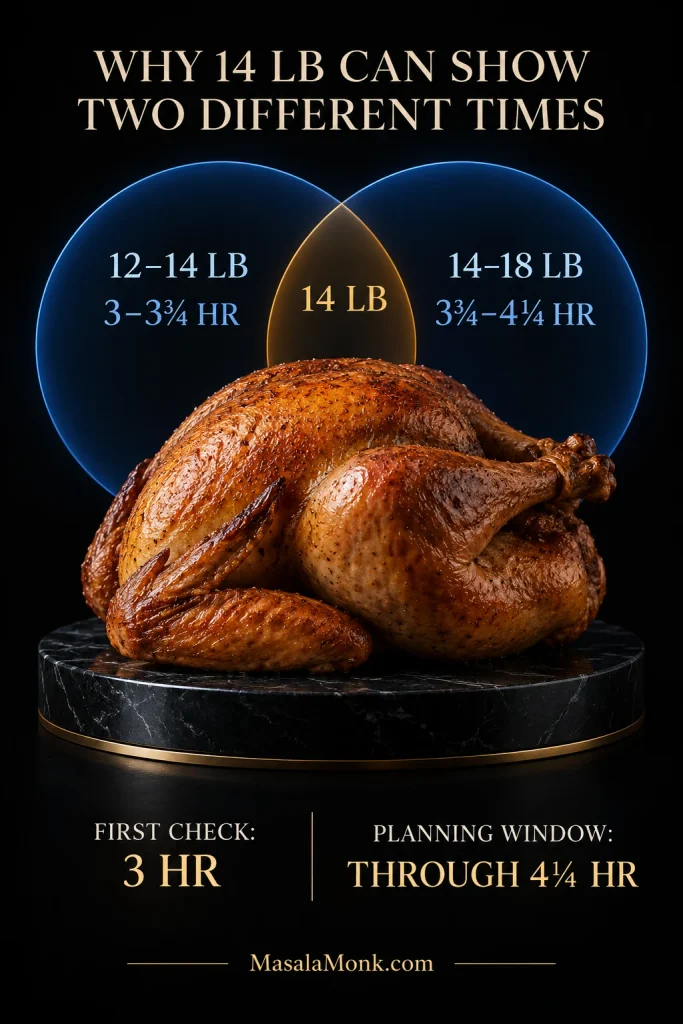
Roasted 14 pound turkey beneath two intersecting timing bands for 12–14 lb and 14–18 lb, with first-check and planning-window times.
A 14 lb turkey sits exactly where two published weight bands meet. So check from the earlier range, but keep enough schedule room for the later one instead of treating either number as a promise.

How Long to Cook a 16 lb Turkey

Allow about 3¾–4¼ hours at 325°F for a 16 lb / 7.3 kg unstuffed turkey. Once rest and carving are included, a 6 PM dinner usually means getting this bird into the oven around early afternoon.

How Long to Cook an 18 lb Turkey

Start checking an 18 lb / 8.2 kg turkey around 3¾ hours and keep the planning window open through about 4½ hours. Eighteen pounds is another overlap between two published rows.

How Long to Cook a 20 lb Turkey

Begin checking a 20 lb / 9.1 kg turkey around 4¼ hours and keep the planning window open through about 5 hours. On a bird this large, check several locations before calling it done.

Already have a 25–30 lb turkey? The National Turkey Federation’s 24–30 lb range is roughly 5–5¼ hours unstuffed or 5¼–6¼ hours stuffed at 325°F. Still shopping? Two smaller birds are usually easier to cook evenly, time and carve than one enormous turkey.

Planning dinner? → Work backward from serving time

Turkey Cooking Time Per Pound: Why One Number Does Not Fit Every Bird

At 325°F, don’t use one fixed minutes-per-pound number. The USDA ranges work out to roughly 21–23 minutes per pound for an 8 lb turkey, 14–16 minutes per pound at 16 lb, and about 11–13 minutes per pound at 24 lb. Use the weight chart for the actual schedule.

A bigger turkey does not simply take the same number of minutes multiplied by more pounds. Stuffing, ice remaining in the cavity, oven accuracy, bird shape, pan depth and repeated door opening can move the finish further.
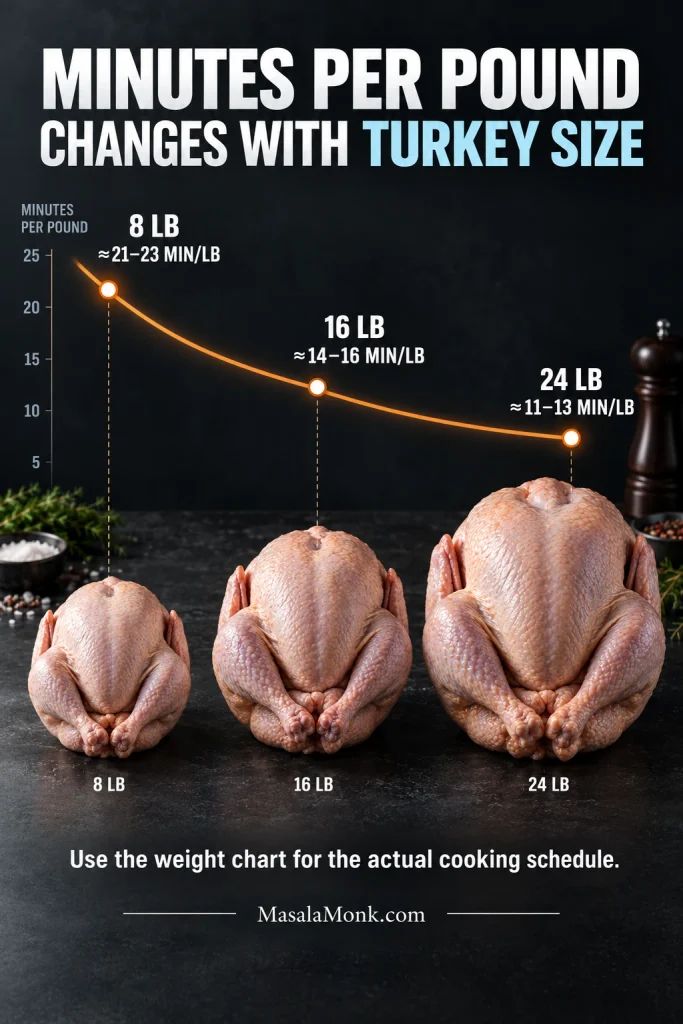
Graph with 8, 16 and 24 pound raw turkeys increasing in size while approximate cooking minutes per pound decrease.
Turkey cooking time per pound is not linear. Applying one fixed rate across every size can make a small bird seem faster—or a large bird much slower—than the weight-based ranges suggest.

Can You Cook Turkey at 350°F or 375°F?

Using 350°F or 375°F? Don’t convert the 325°F chart. Follow a complete turkey method written for that temperature. Higher-temperature recipes have their own timing, browning and foil decisions.
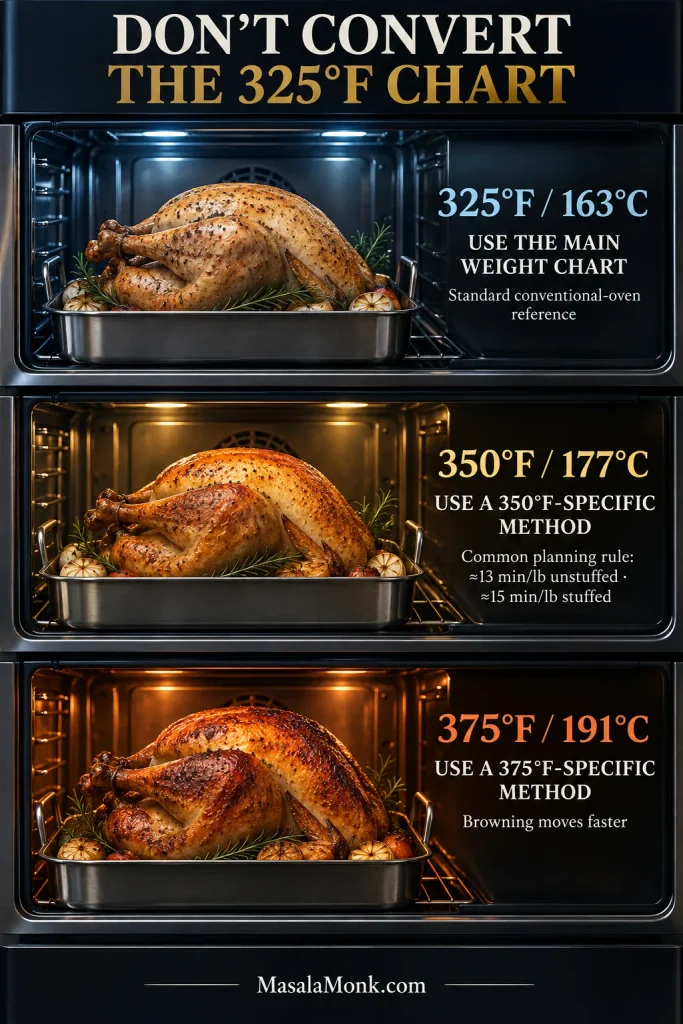
Three oven scenes showing turkeys at 325°F, 350°F and 375°F with progressively warmer lighting and method-specific guidance.
A 325°F chart cannot simply be recalculated for 350°F or 375°F. Once oven temperature changes, timing and browning behavior change together, so the method and its timetable need to stay paired.
Oven approachHow to use itWhat changes
325°F / 163°CUse the main chart on this pageStandard conventional-oven reference
350°F / 177°CUse timing written for that recipeUsually a shorter cook
375°F / 191°CUse a 375°F-specific methodCooking and browning move faster
High-heat startFollow the complete recipeFast initial browning before heat is usually reduced

Why 325°F Is the Main Chart

The 325°F / 163°C table gives us one authoritative conventional-oven reference across multiple weights and both stuffed and unstuffed birds. USDA guidance says a conventional oven should be set no lower than 325°F.

Turkey at 350°F

A common 350°F planning rule is about 13 minutes per pound for an unstuffed turkey and 15 minutes per pound for a stuffed one. That belongs to recipes designed around 350°F; it is not a mathematical conversion of the USDA 325°F table.

Published 350°F schedules vary. Once you’ve chosen one of those recipes, keep its approximate timing and cooking instructions together.

Turkey at 375°F

There is no universal 375°F timetable to substitute for the 325°F chart. Use the schedule supplied with the 375°F method. Faster browning is the predictable part: honey, maple syrup and sugary rubs need earlier watching, and foil can protect skin that reaches a deep golden color before the meat is ready.

Temperature-scale check: 180°C is about 356°F, not 180°F. Check the scale when moving between recipes, ovens or countries; that mistake can turn a normal roast into an all-day wait.

Using convection, an oven bag, roaster or smoker? → See the method-specific timetable

Stuffed vs Unstuffed Turkey: How Much Longer Does Stuffing Take?

Stuffing makes a turkey take longer and adds another doneness checkpoint: the center of the stuffing must reach 165°F / 74°C. For the easiest holiday schedule and better browning, bake the dressing separately.
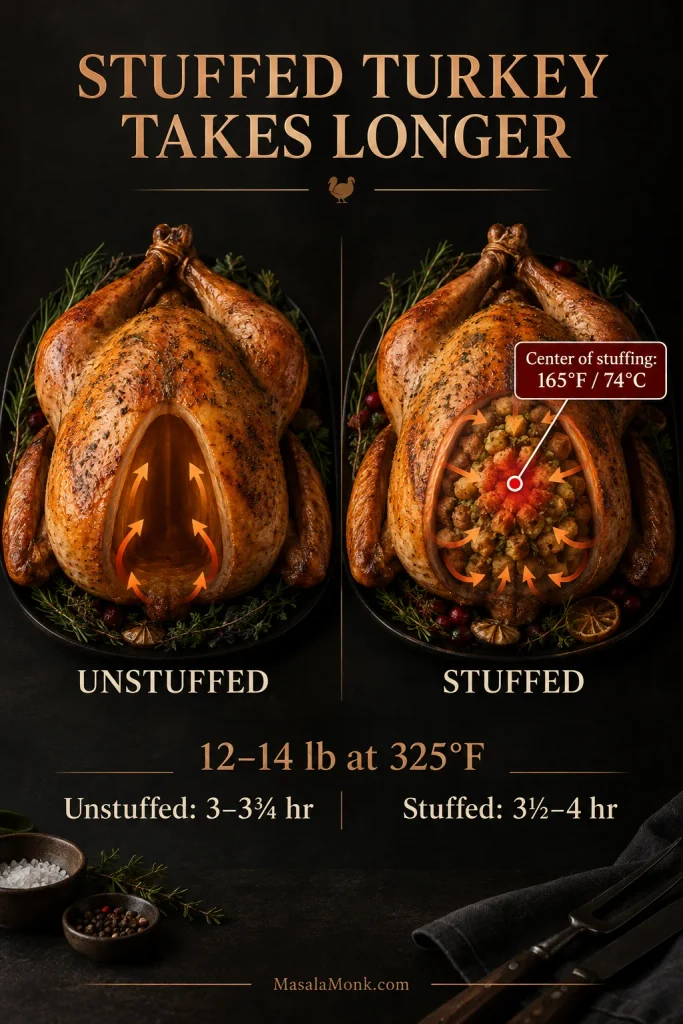
Split infographic comparing an unstuffed turkey cavity with a stuffed turkey cavity, with heat-flow arrows and a 165°F stuffing-center marker.
Stuffing sits deep inside the bird, so its center can lag behind the hotter outer meat. That slow-heating center is why stuffed turkey cooking time needs its own schedule.

At 325°F, a 12–14 lb turkey takes roughly 3–3¾ hours unstuffed versus 3½–4 hours stuffed. At 20–24 lb, the ranges are about 4½–5 hours and 4¾–5¼ hours.

Stuffing the bird? Add it immediately before roasting and keep it loose rather than packing the cavity tightly.

Baked in its own dish, the dressing gets the chance to develop a browned top instead of steaming inside the turkey. Our Southern cornbread dressing is built for that separate-pan approach.

Turkey Still Frozen? Here Is the Safe Path

No time left to thaw? A plain, unstuffed frozen turkey can go directly into a conventional oven. Plan on at least 50% more cooking time than for a thawed bird. Dinner may move later, but the turkey can still be cooked safely.

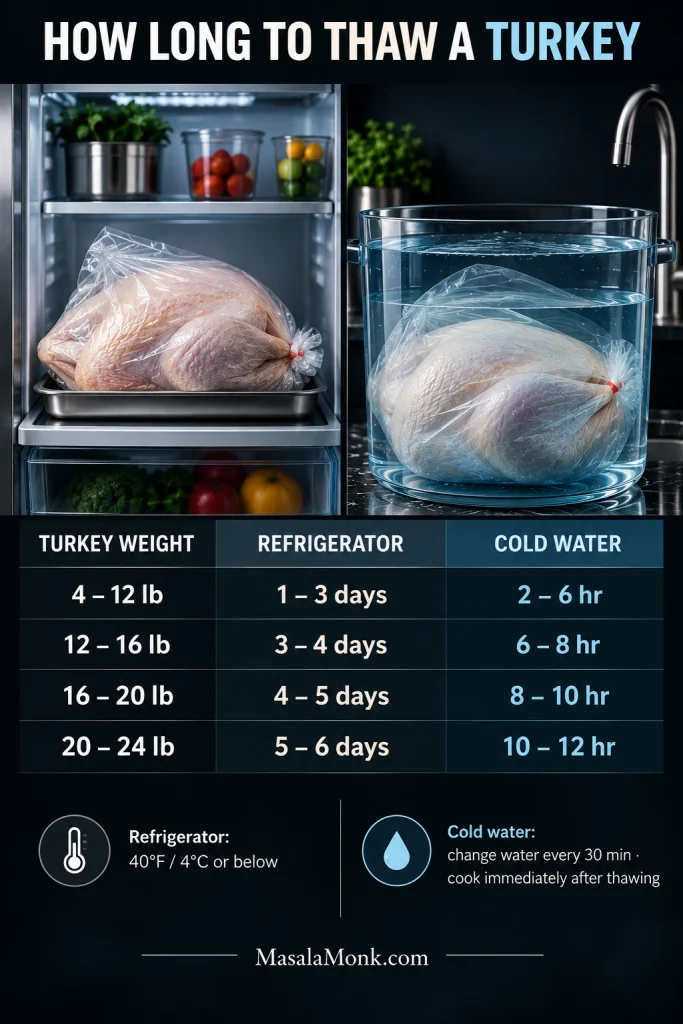
Turkey Thawing Times

Turkey weightRefrigerator at 40°F / 4°C or belowCold-water thawing
4–12 lb / 1.8–5.4 kg1–3 days2–6 hours
12–16 lb / 5.4–7.3 kg3–4 days6–8 hours
16–20 lb / 7.3–9.1 kg4–5 days8–10 hours
20–24 lb / 9.1–10.9 kg5–6 days10–12 hours
Infographic showing refrigerator and cold-water turkey thawing times for 4–12, 12–16, 16–20 and 20–24 pound birds.
Turkey thawing times are really a planning choice between days and hands-on hours. Refrigerator thawing is easier to schedule ahead; cold-water thawing is faster but demands repeated attention.

Exactly 12, 16 or 20 lb? Those weights sit where the published refrigerator-thaw rows overlap too. For holiday planning, give yourself the longer window rather than making dinner depend on the shortest possible thaw.

In the refrigerator, the broader rule is about 24 hours for every 4–5 pounds. A turkey thawed there can remain refrigerated for another 1–2 days before cooking.

For cold-water thawing, keep the turkey in leak-proof packaging or a food-safe leak-proof bag, submerge it in cold tap water, allow roughly 30 minutes per pound, and replace the water every 30 minutes. Cook immediately after thawing.
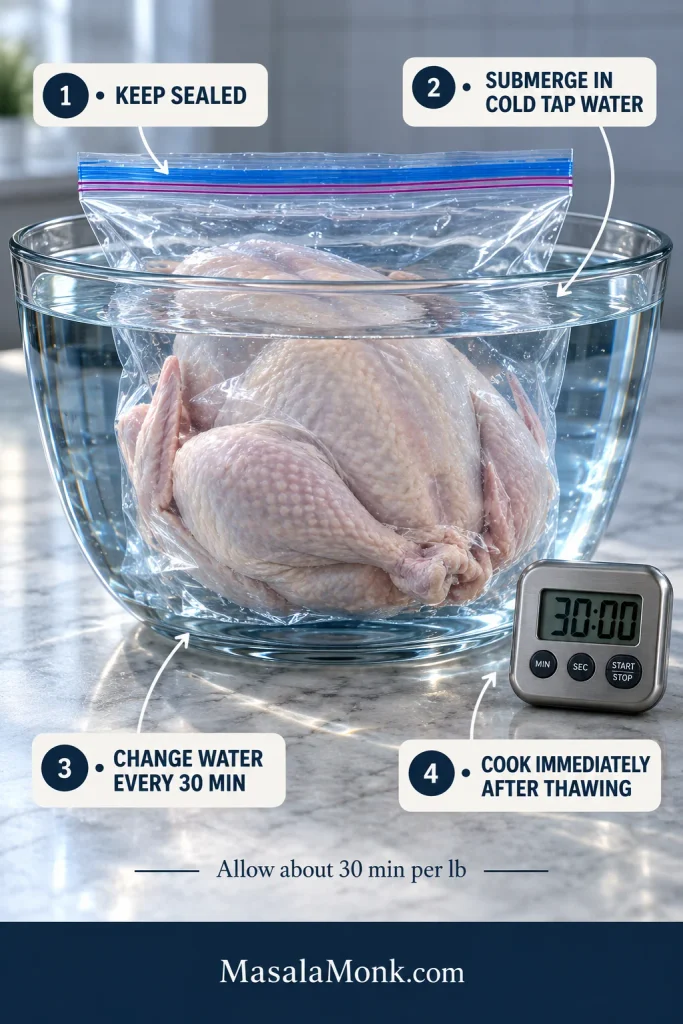
Sealed raw turkey fully submerged in clear cold water in a large glass container beside a 30-minute timer and thawing-step labels.
The 30-minutes-per-pound estimate is only the clock. Cold-water turkey thawing also depends on keeping the package leak-proof, the bird submerged and the water cold throughout.

The Outside Is Soft but the Cavity Is Still Icy

A soft breast doesn’t prove the whole bird is thawed. Check the cavity. The neck and giblet packet should come free, and the joints should no longer feel locked by ice.

Ice still inside means the fully thawed timetable no longer fits neatly. The outside warms first, so a reassuring shallow reading can coexist with much colder meat deeper in the bird. Give the turkey extra time and check more than one location as it cooks.
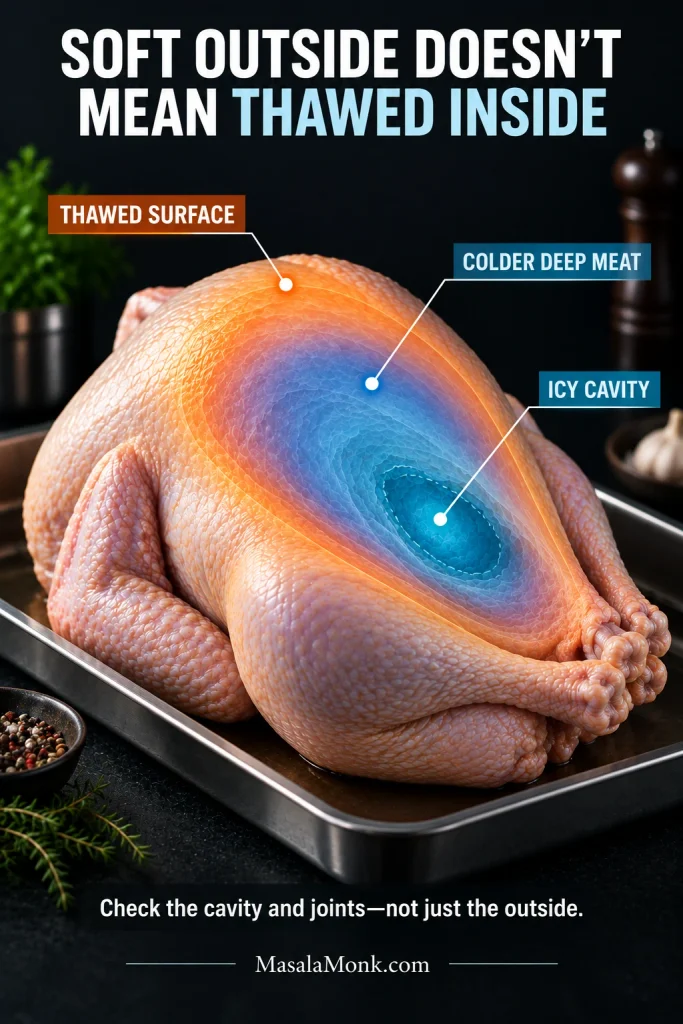
Raw whole turkey on a roasting tray with a thermal-style overlay changing from warm orange at the surface to blue in deeper meat and the cavity.
Touching the breast only tells you about the surface. On a large turkey, flexible outer flesh can coexist with ice around the cavity and joints much deeper inside.

A microwave can also thaw a turkey that fits, provided you follow the appliance’s defrost instructions and cook it immediately afterward. Hot water, warm water and the kitchen counter are not safe thawing methods.

Cooking a Turkey From Frozen

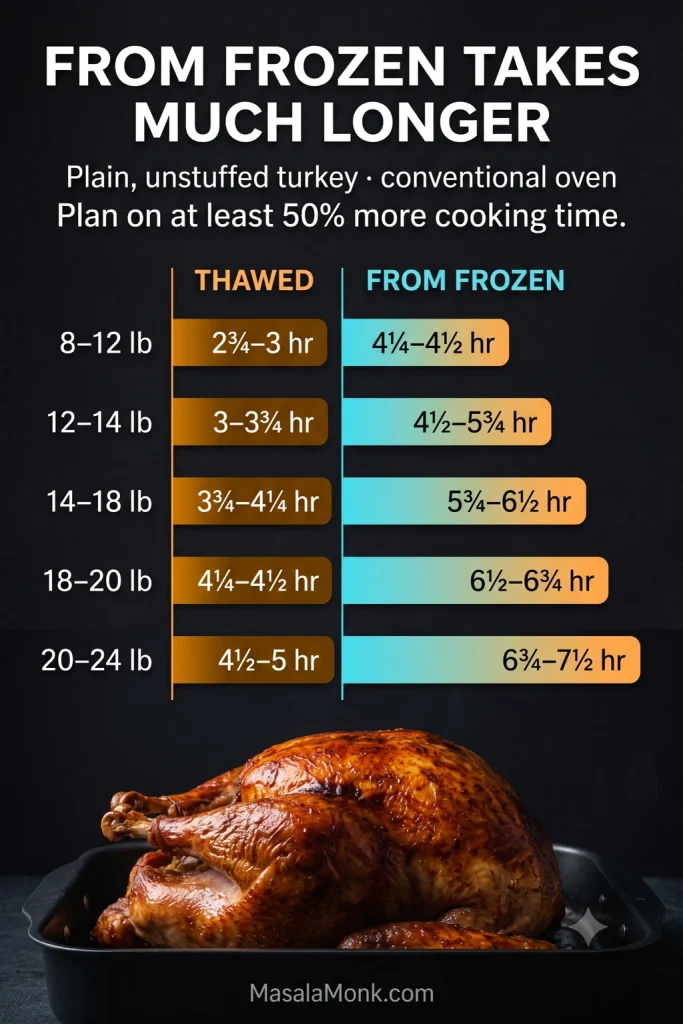
FoodSafety.gov gives these approximate conventional-oven times for a turkey that starts frozen:

Frozen turkeyApproximate oven time
8–12 lb / 3.6–5.4 kg4¼–4½ hours
12–14 lb / 5.4–6.4 kg4½–5¾ hours
14–18 lb / 6.4–8.2 kg5¾–6½ hours
18–20 lb / 8.2–9.1 kg6½–6¾ hours
20–24 lb / 9.1–10.9 kg6¾–7½ hours
Comparison infographic with thawed and from-frozen cooking-time ranges for unstuffed turkeys from 8 to 24 pounds.
Frozen turkey cooking time can add several hours, not another few minutes. For the largest birds on this chart, that difference is big enough to reshape the entire dinner schedule.

The giblet packet may still be frozen in place when the bird goes into the oven. Once the cavity loosens enough, remove it carefully with tongs or a fork and continue roasting.

From-frozen rescue means the conventional oven. Don’t cook a still-frozen turkey in an oven bag, smoker, grill or deep fryer. Microwave thawing is different: thaw according to the appliance instructions and cook immediately afterward.

Commercially frozen pre-stuffed turkey: do not thaw it. Keep it frozen and cook it according to the package cooking directions. The turkey and center of the stuffing must both reach 165°F / 74°C.

Turkey ready for the oven? → Build the dinner schedule

What Time Should You Put the Turkey in the Oven?

Once you know the weight, oven method, stuffing situation and thaw state, work backward from dinner. Doing the math earlier than that can give you a beautifully precise schedule for the wrong turkey.

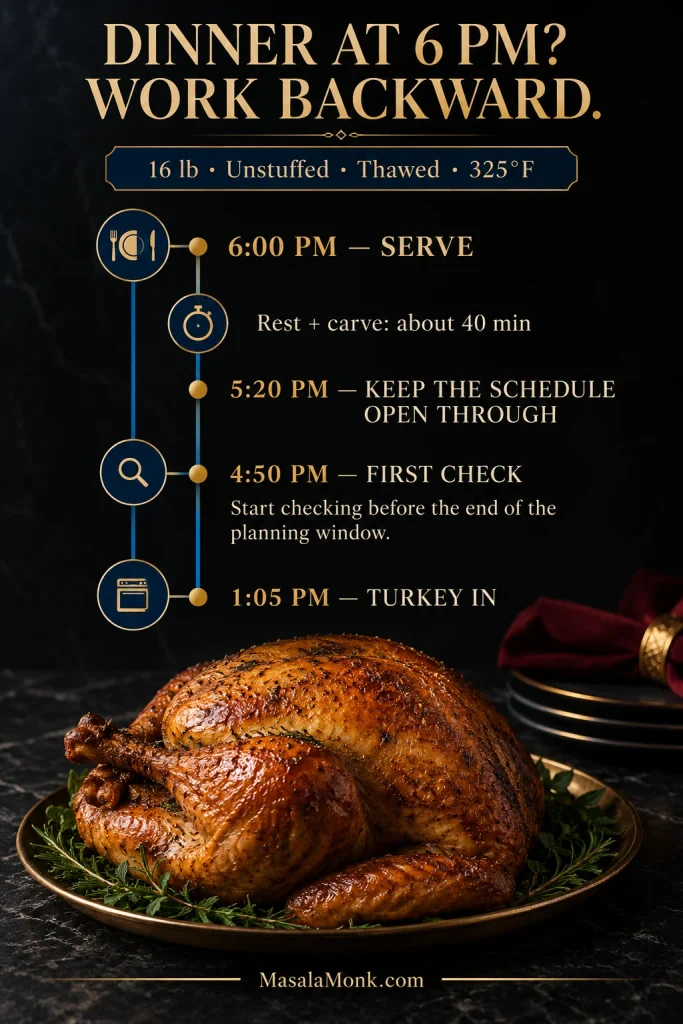
Quick formula: serving time − carving time − resting time − the longer realistic cooking estimate = when the turkey should go into the oven.

Turkey Start-Time Examples

The examples below leave about 40 minutes between the planned oven-out time and dinner for resting, carving and getting the platter to the table.

TurkeyServePut it in byFirst check
12 lb unstuffed5 PMAbout 12:35 PMAbout 3:20 PM
14 lb unstuffed5 PMAbout 12:05 PMAbout 3:05 PM
16 lb unstuffed6 PMAbout 1:05 PMAbout 4:50 PM
20 lb unstuffed6 PMAbout 12:20 PMAbout 4:35 PM
Vertical dinner-planning timeline for a 16 pound unstuffed turkey, showing oven-in time, first check, planning window and 6 PM serving.
Working backward from dinner protects the rest of the meal from an uncertain finish time. An early temperature check gives you room for a slower bird without sacrificing the resting-and-carving buffer.

The 12-, 14- and 20-pound examples deliberately use the longer adjoining range for their oven-in time. Their first checks come from the earlier range.

Schedule from the longer end and check from the shorter end. An early turkey gives you options. An underdone turkey when every side dish is hot gives you fewer.

First whole turkey? Don’t try to memorize the page. Get the bird into the oven on schedule, set an alarm for the first temperature check, and keep the thermometer nearby.

The rest period is useful kitchen time. Assemble or partly cook oven-heavy sides earlier, then use the freed oven to reheat, brown or finish them. A green bean casserole, for example, can make its final trip through the oven while the turkey rests.
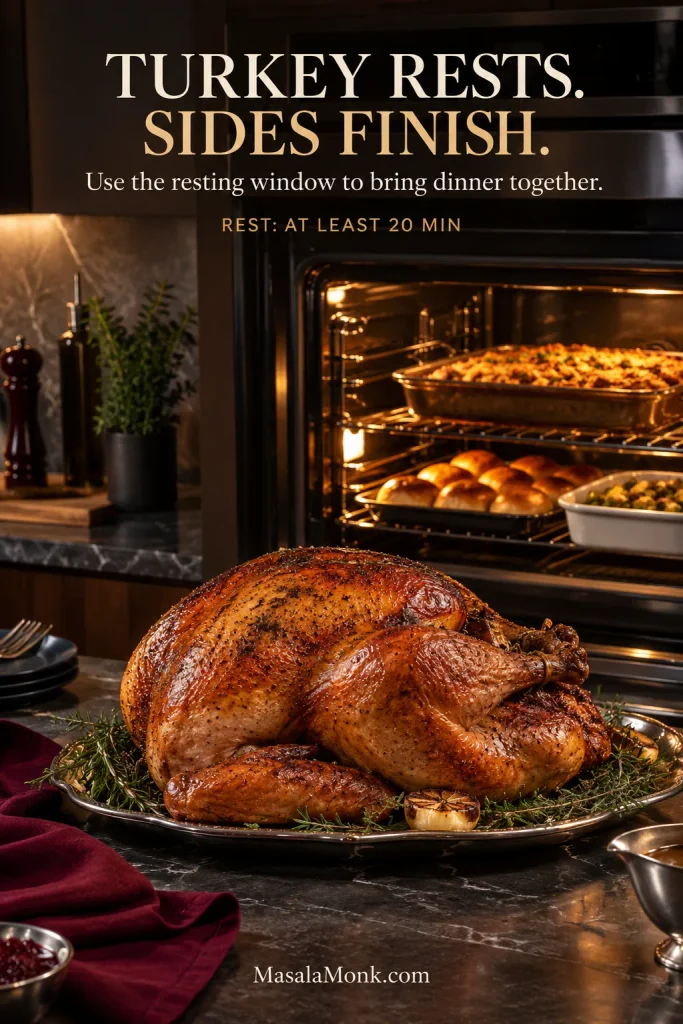
Roasted turkey resting on a platter in front of an open oven containing dinner rolls and casseroles in a dark modern kitchen.
Use turkey resting time for jobs that need reheating, browning or a quick final bake. Long-cooking sides should already be well underway before the turkey leaves the oven.

Already cooking? → Go to the doneness check

How to Cook a Turkey at 325°F: The Short Version

Got your timing sorted? Here’s the whole 325°F method in five steps.

  1. Check the label before adding salt. Remove the neck and giblets, pat the turkey dry and season it appropriately.
  2. Set the bird breast side up in a shallow roasting pan, preferably on a rack.
  3. Roast at 325°F / 163°C using the weight chart as your approximate time range.
  4. Begin checking near the early end and continue until the breast, thigh and wing each reach at least 165°F / 74°C. If the turkey is stuffed, check that the center of the stuffing reaches 165°F / 74°C too.
  5. Rest the turkey for at least 20 minutes, then carve.
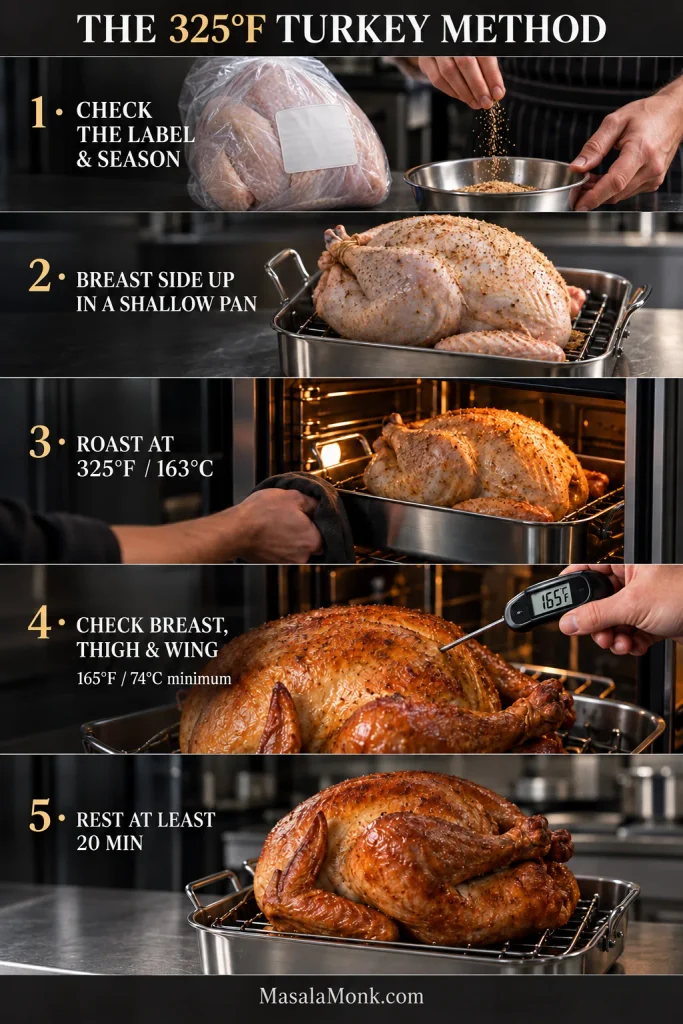
Five-panel infographic showing turkey preparation, breast-side-up roasting at 325°F, thermometer checking, and a final 20-minute rest.
The value of this five-step 325°F turkey method is the order: check the label before salting, set up the pan before roasting, and verify doneness before beginning the rest.

Cooking for a much smaller table? The oven-baked Turkey Tenderloin Recipe gives you a smaller cut with a much shorter cook.

Set Up the Turkey for an Easier Roast

Check the Label, Cavities and Seasoning

Enhanced, self-basting, basted, pre-brined, or “contains up to a stated percentage of solution” on the label? The turkey already contains added seasoned liquid. That percentage is not simply the salt percentage, but it is a reason to go easy before stacking a dry brine, salted butter, salty seasoning and bouillon onto the same bird.
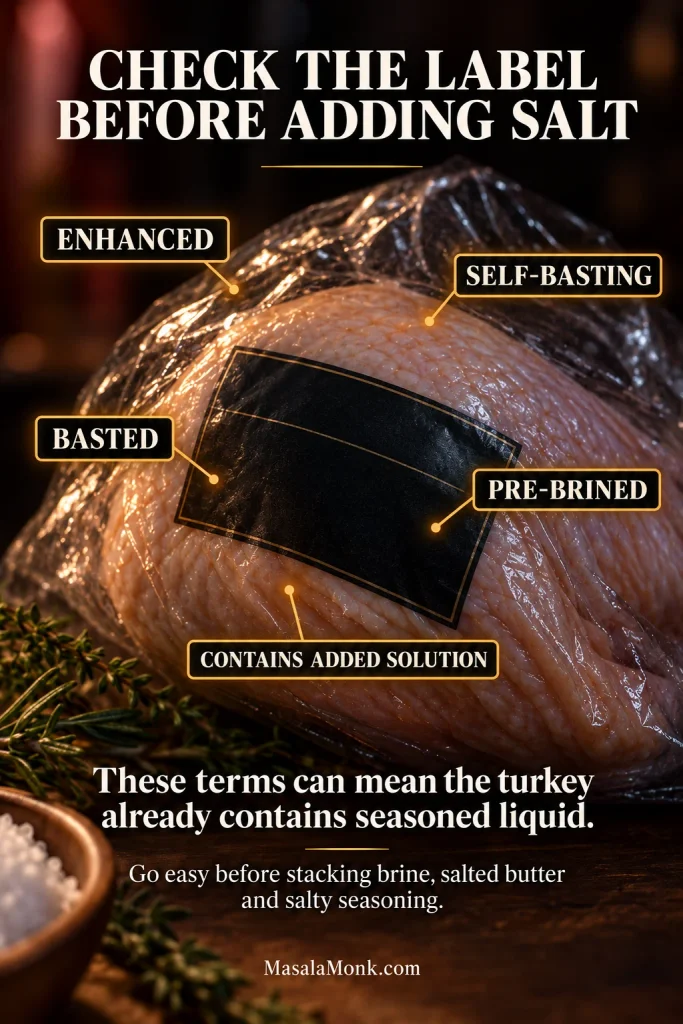
Close-up of packaged raw turkey with callouts highlighting enhanced, self-basting, basted, pre-brined and contains added solution.
These label terms can change how aggressively you season. If the turkey already contains seasoned solution, stacking brine, salted butter and a salty rub can push both the bird and the drippings too far.

Check both cavities for the neck and giblet package. Pat the turkey dry instead of rinsing it; splashing raw-poultry juices around the sink can spread contamination. After handling the bird, wash your hands with soap and water for at least 20 seconds and clean the countertop, sink, utensils and anything else the raw turkey touched.

Pre-seasoned birds can leave salty drippings too. Taste before concentrating them into gravy. Our Turkey Gravy Recipe From Drippings shows how to balance the pan juices with stock.

Set Up the Pan

A roasting rack is helpful, not mandatory. It lifts the turkey above pooled drippings and improves airflow around the lower bird. No rack? A bed of sturdy vegetables or another food-safe support can keep the turkey off the bottom.

Very deep roasting pans can reduce airflow around the bird and push the cook later, another reason the timetable is only approximate.

Keep the bird breast side up for this method. The skin gets direct heat for browning, and you don’t have to wrestle a large, hot turkey halfway through the cook.
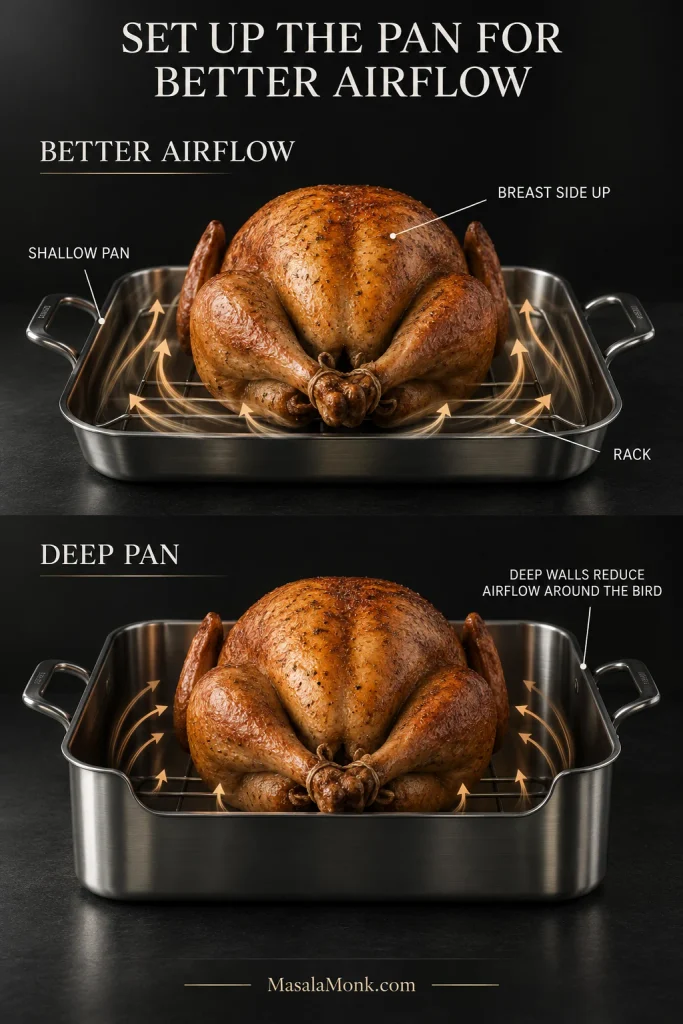
Comparison of a turkey in a shallow roasting pan with rack and airflow arrows versus the same turkey in a deep-sided pan with reduced airflow.
Pan shape is one reason equally weighted turkeys can finish at different times. A shallow roasting pan exposes more of the bird to circulating heat, while deep walls surround more of the lower turkey.

Manage the Browning Without Babysitting the Oven

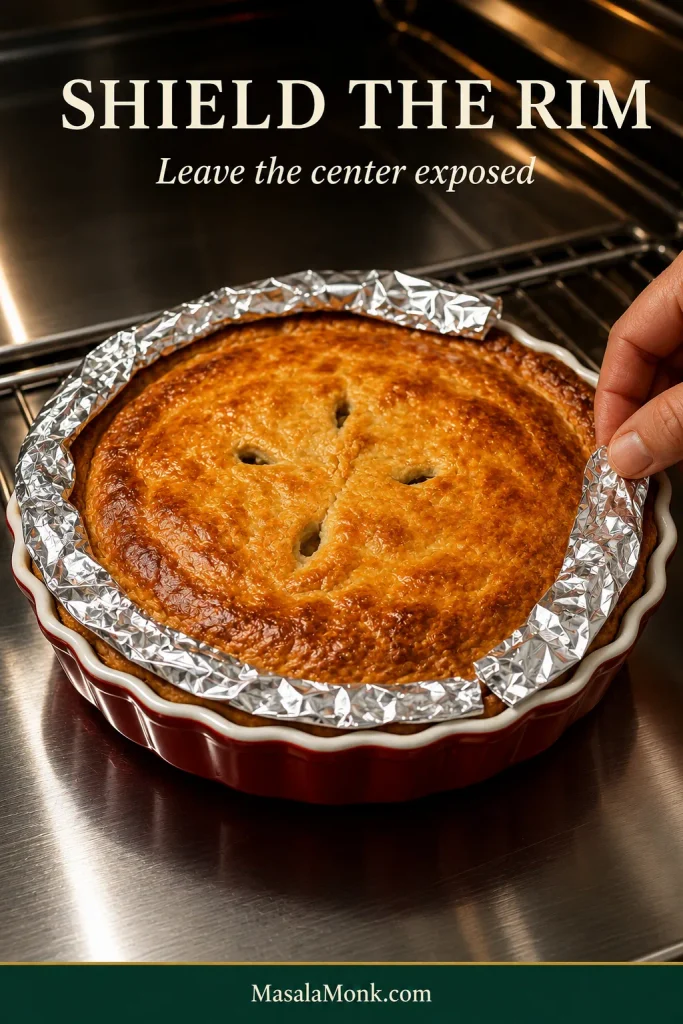
Once the skin is as deeply golden as you’d be happy to put on the table, foil can protect the darkening areas while the meat finishes. Sweet rubs and glazes may get there sooner.

Basting is optional. It can add surface flavor and color, but it doesn’t replace temperature control for keeping the breast juicy. Opening the oven every 20 minutes also dumps heat; occasional basting is plenty when a recipe calls for it.
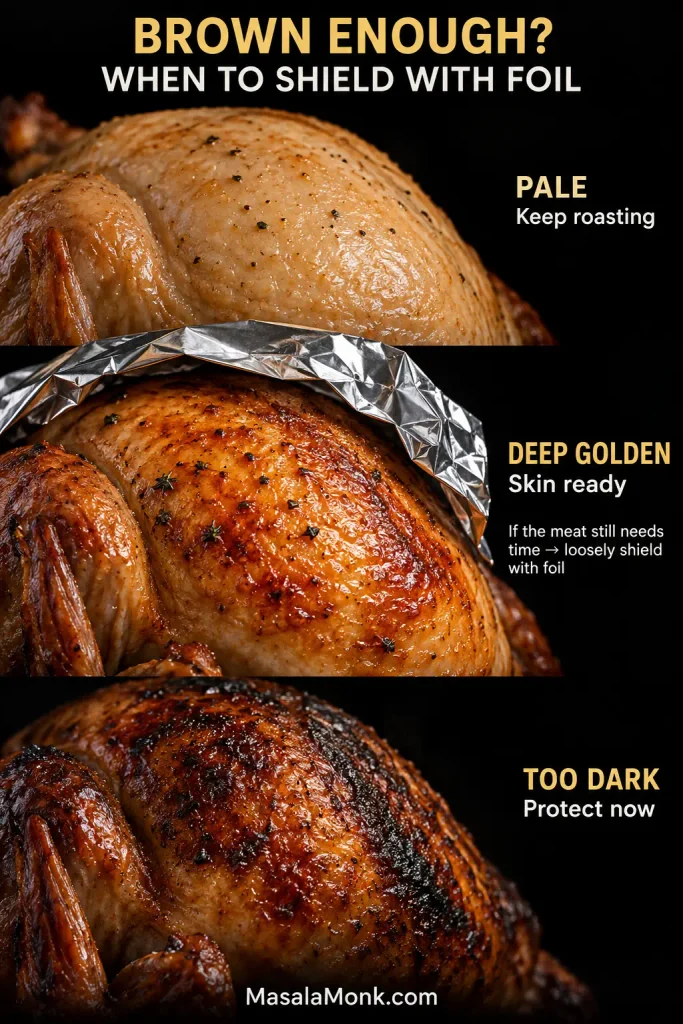
Three close-up turkey-skin stages labeled pale, deep golden and too dark, with loose aluminum foil shown at the deep-golden stage.
Once the skin reaches the color you want on the table, protect it if the meat still needs time. Foil manages browning; it does not turn a low internal temperature into a finished turkey.

Ready to check the turkey? → See where and how to take the temperature

How to Know When Turkey Is Done

This is the moment that matters: can the turkey come out now?

Turkey is done when the thickest breast, innermost thigh and innermost wing each reach at least 165°F / 74°C. If the bird is stuffed, the center of the stuffing must reach 165°F too.

Where to checkWhere the probe goesSafety-first target
BreastCenter of the thickest breast meat, away from bone and cavity165°F / 74°C
ThighInnermost thick thigh where the leg meets the body, away from bone165°F / 74°C minimum
WingInnermost wing area, away from bone165°F / 74°C
StuffingCenter of the stuffing, if used165°F / 74°C

This follows current USDA turkey roasting guidance.

Whole roast turkey with three thermometer probes marking the thickest breast, innermost thigh and innermost wing, plus a 165°F minimum label.
One hot spot cannot speak for the whole bird. A three-point turkey temperature check keeps a ready breast from being mistaken for a ready turkey when another area still needs heat.

Dark meat can benefit from additional heat, while pushing the breast unnecessarily high can turn juicy slices dry and chalky. Some advanced methods deliberately use controlled carryover cooking below 165°F; this guide uses the simpler 165°F-before-serving rule for the breast, thigh and wing.

Put the Probe in Thick Meat, Away From Bone

A strange reading deserves a second check nearby. The sensor should be in thick meat—not against bone, just beneath the skin, or hanging into the hollow cavity.

A leave-in probe is useful for watching one spot during the roast. An instant-read thermometer is better for checking the other breast, thighs and wing areas once you’re close.
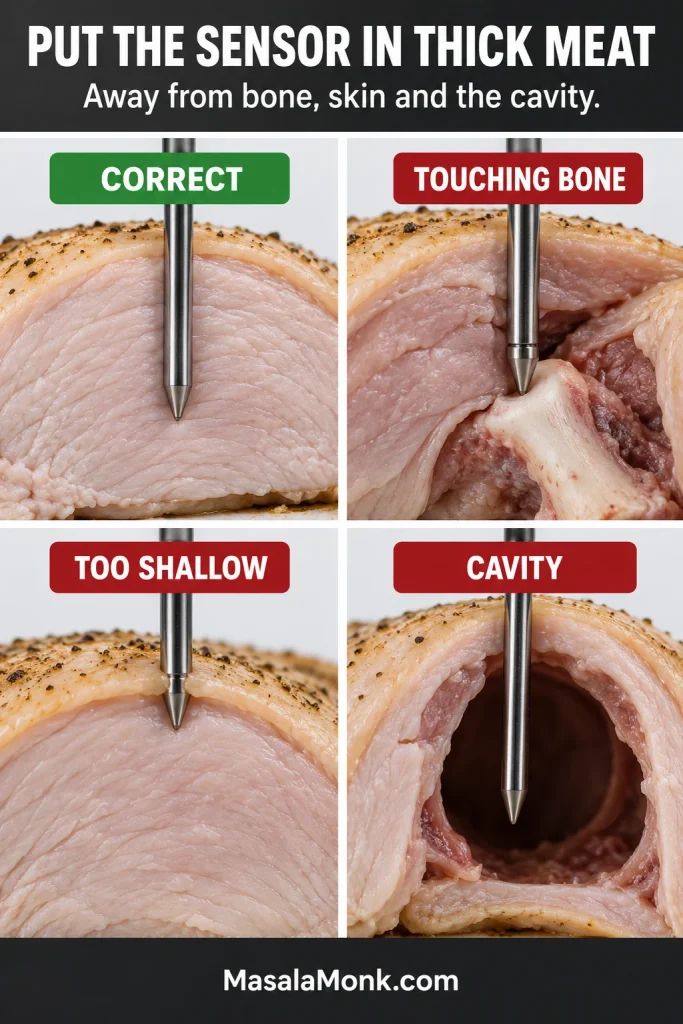
Four-panel close-up showing correct turkey thermometer placement, a probe touching bone, a probe too shallow under the skin, and a probe ending in the cavity.
A thermometer only answers the question you ask it. If the sensor touches bone, sits just under the skin or slips into the cavity, reposition it before changing the cooking plan.

Start Checking Before You Expect It to Be Done

Set your timer for the first check, not for when the turkey is supposed to be done.

Pink Meat and Pop-Up Timers

Safely cooked turkey can retain some pink, especially around joints or after smoking. Color alone is not a dependable doneness test. Breast, thigh and wing safely at temperature? Slight pinkness by itself is not a reason to keep roasting.
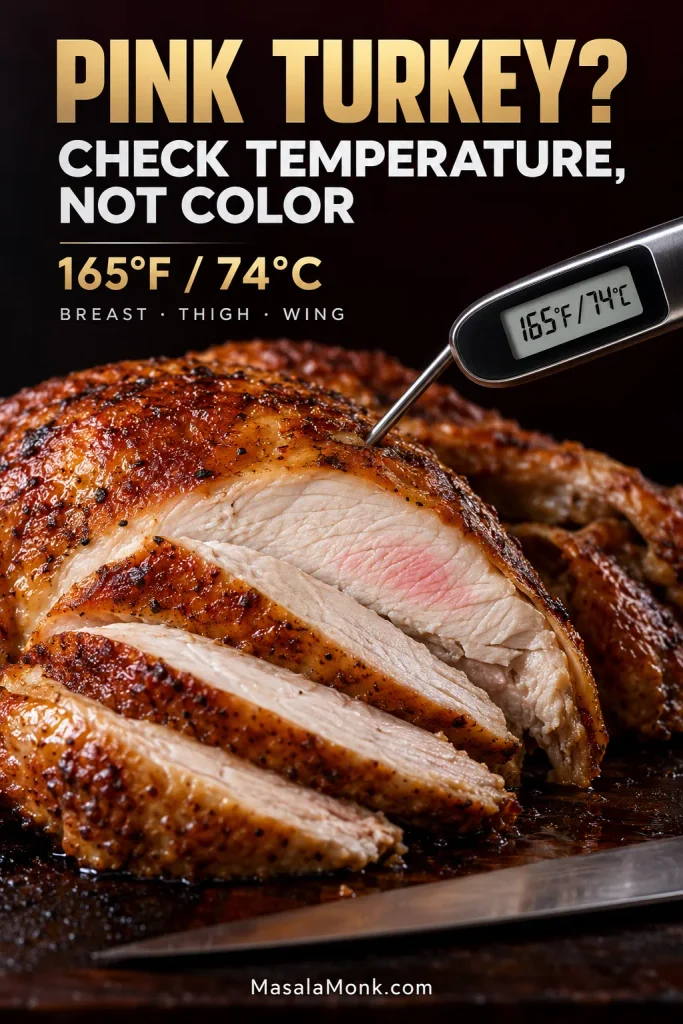
Close-up of carved roast turkey with a small pink area in the breast beside a digital thermometer reading 165°F / 74°C, under the message “Check temperature, not color.”
A pink tint can survive even when turkey is safely cooked, so color is a weak final judge. When appearance and temperature disagree, trust a valid thermometer reading over the shade of the meat.

A pop-up timer is another clue, not the final answer. It measures one location. When it pops, check the turkey with your thermometer.

Give the Turkey Time to Rest

Rest the turkey for at least 20 minutes before carving. Twenty to thirty minutes is comfortable for many birds: carving is less rushed, and the last dishes can make it to the table.

Those minutes are also enough time to warm or bake soft dinner rolls without making them compete with the turkey earlier in the day.

An hour-long delay is different. That’s holding cooked food, not simply resting it.
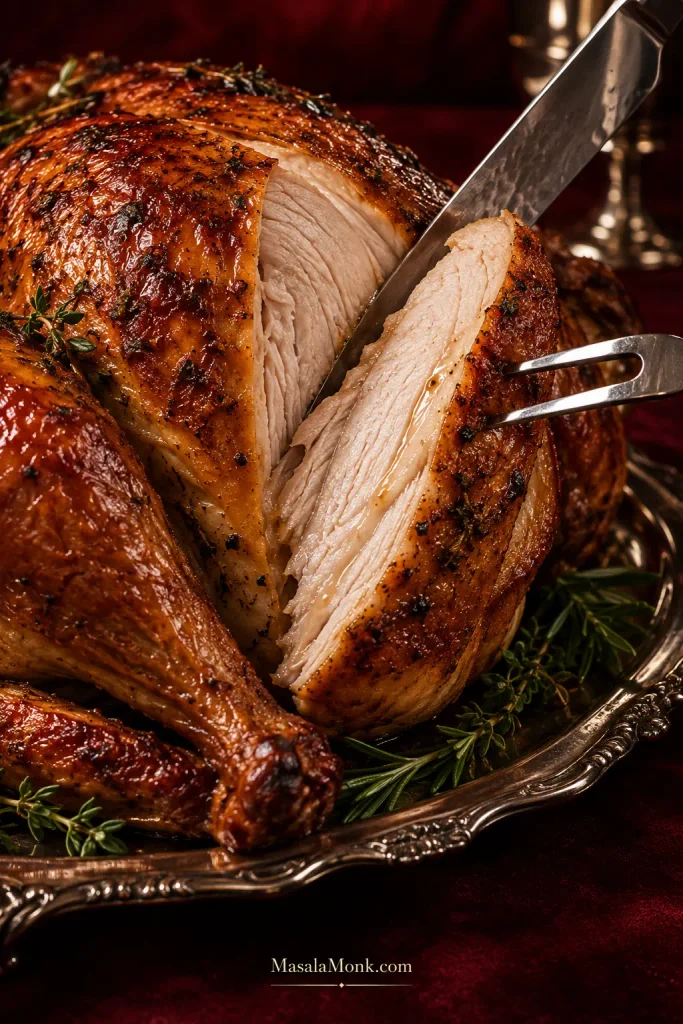
Close-up of a thick slice being carved from a roasted turkey breast, showing moist pale meat beneath deeply browned skin with a carving knife and fork.
Proper timing shows up here: moist breast meat beneath deeply browned skin, after enough rest to carve cleanly.

Turkey not behaving as expected? → Troubleshoot it

What Is Your Turkey Doing Right Now?

Most turkey trouble begins when two signals disagree: the clock says one thing and the thermometer another; the breast is ready while the thigh lags; or the skin looks finished while the center still needs time.
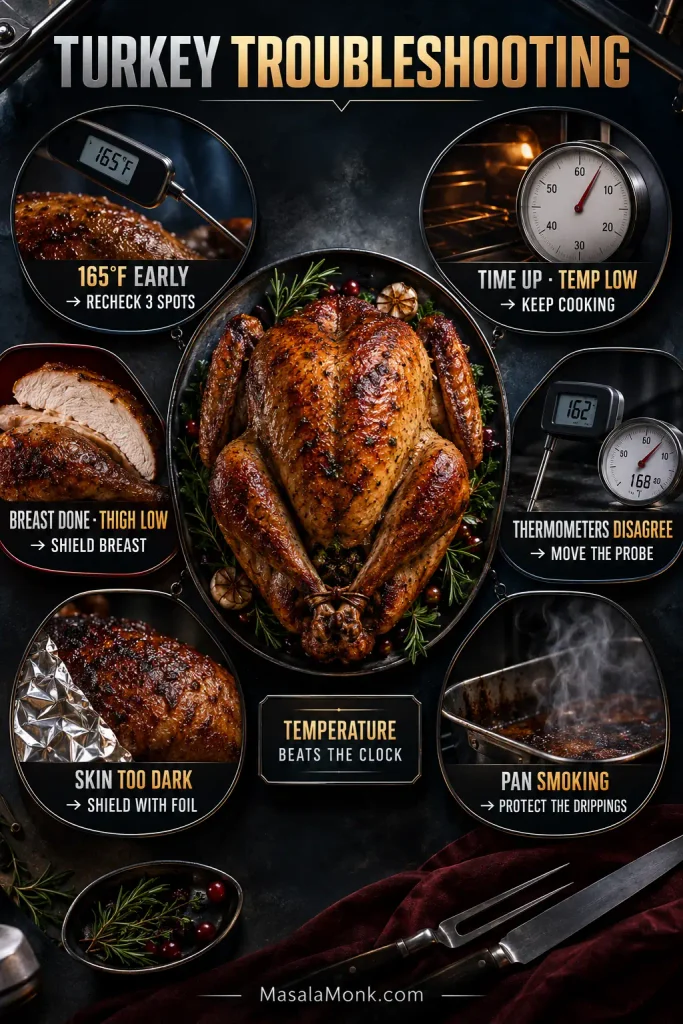
Turkey troubleshooting infographic with a whole roasted turkey in the center and six surrounding problem-and-fix panels for early temperature, low temperature, breast-thigh mismatch, thermometer disagreement, dark skin and smoking pan.
When the turkey stops matching the timetable, diagnose the signal before changing course. Temperature, browning, timing and pan problems may look equally urgent, but they do not need the same fix.
What you seeWhat to do first
165°F much earlier than expectedRecheck breast, thigh and wing; remove if all are ready
Time is up, temperature is lowKeep cooking; check thawing, oven and probe placement
Breast done, thigh lowShield breast and keep checking the thigh
Thigh hot, breast lowRecheck the breast in more than one spot
Thermometers disagreeMove probes away from bone and cavity; verify accuracy if needed
Skin too darkLoosely shield the dark area with foil
Turkey is pinkCheck breast, thigh and wing for 165°F
Finished earlyRest, then move to safe holding if needed
Dinner ready, turkey notKeep roasting the underdone area until it reaches 165°F
Pan is smokingProtect the drippings without shocking hot cookware
Forgot the giblet packageCheck the package material and condition
Turkey is dryNext time begin temperature checks sooner

It Reached 165°F Much Earlier Than Expected

Take another set of readings before assuming the thermometer is wrong. Breast, thigh and wing all safely at temperature? The turkey is finished. Oven calibration, airflow, bird shape and ordinary variation can all move the finish forward.

The Time Is Up but the Turkey Is Still Below Temperature

Keep cooking it.

Then find out why it is behind. Common reasons include ice in the cavity, stuffing, an oven running cool, repeated door opening, an unusually deep pan, a different appliance, or a thermometer sitting against bone instead of in thick meat.

When the readings are valid and still low, the schedule has to move; the safe-temperature target does not.

The Breast and Thigh Are Finishing at Different Times

Breast done but thigh low? Loosely shield the breast and keep roasting. Take a second thigh reading nearby before adding a long stretch of oven time, just in case the first probe touched bone. Dark meat can handle—and often benefits from—more heat, so don’t drag the breast upward just because the thigh needs longer.
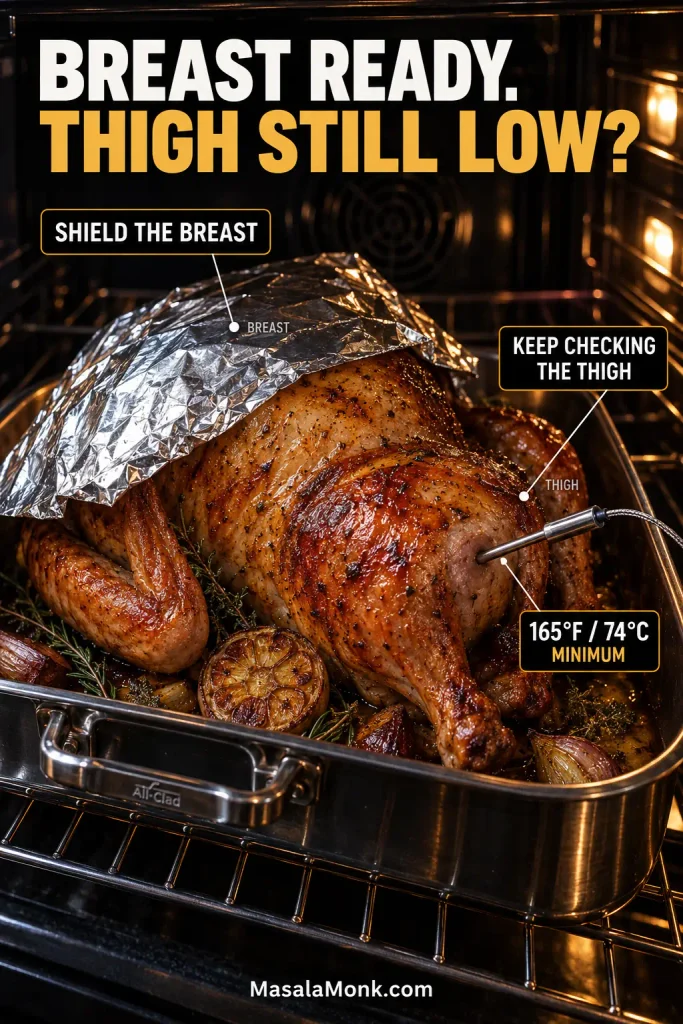
Roast turkey in an oven with the breast loosely covered in foil and a thermometer probe in the thigh, labeled to shield the breast and keep checking the thigh.
If the breast is already safe while the thigh still runs low, protect what is finished instead of driving the breast hotter. Shield the breast loosely, then keep checking the inner thigh.

A hot thigh with a low breast needs the opposite response: check the breast in more than one spot and continue until it is safe. Turkey shape and oven hot spots do not guarantee that the thighs always finish last.

The Thermometers Disagree

Move the probe first. Keep it away from bone and the cavity and give the reading a moment to settle.

Not sure which thermometer to trust? Check it in well-stirred ice water. The sensing area should read about 32°F / 0°C without touching the sides or bottom of the container; follow the manufacturer’s calibration instructions if it does not.
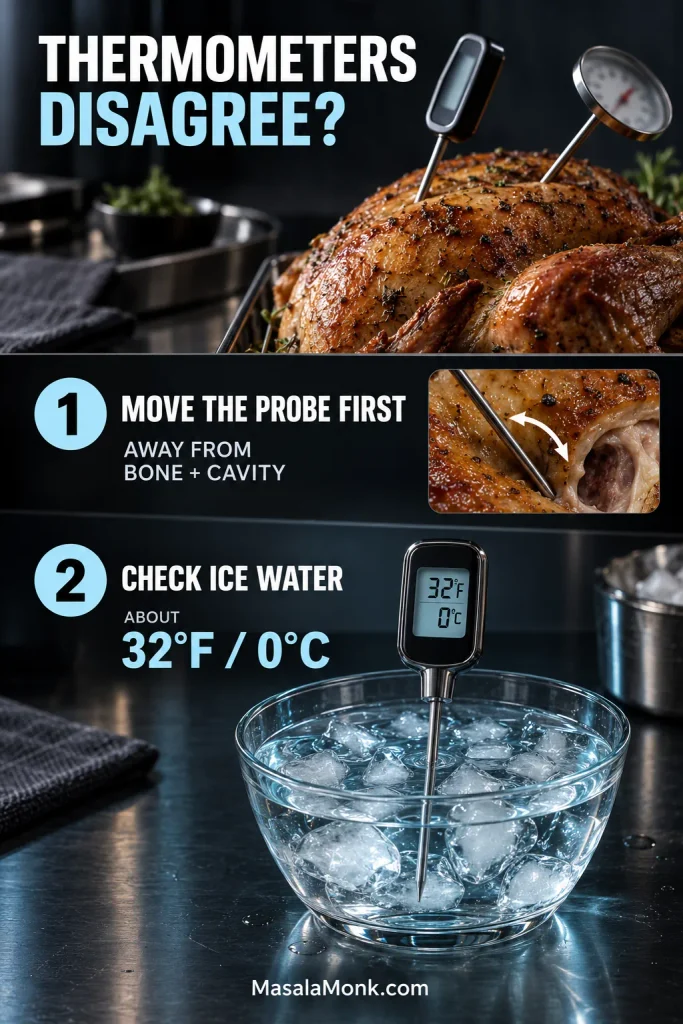
Two-step thermometer troubleshooting graphic showing probes in a roast turkey, then a probe moved away from bone and the cavity, followed by an ice-water check reading about 32°F / 0°C.
An ice-water test checks the thermometer, not the turkey. First rule out bad probe placement; if the readings still seem wrong, about 32°F / 0°C gives you a known reference point.

An oven thermometer is also worth checking when every turkey seems to finish implausibly early or late.

The Skin Is Getting Too Dark

Loosely cover the darkening area with foil and keep cooking. Sweet rubs and glazes can brown especially quickly at higher temperatures.

The Turkey Finished an Hour Early

Twenty or thirty minutes early is useful; that’s largely the rest the turkey needed anyway. Let it sit while you finish gravy, warm serving dishes or bring the mashed potatoes to the table.

A much longer wait becomes a holding problem. Keep hot-held turkey at 140°F / 60°C or above. Without safe hot holding, cooked turkey should not sit at room temperature for more than 2 hours.

Several hours to wait? Carve and refrigerate the meat promptly in shallow containers, then reheat it to 165°F / 74°C. Holding the whole bird hot indefinitely is hard on both the meat and the skin.
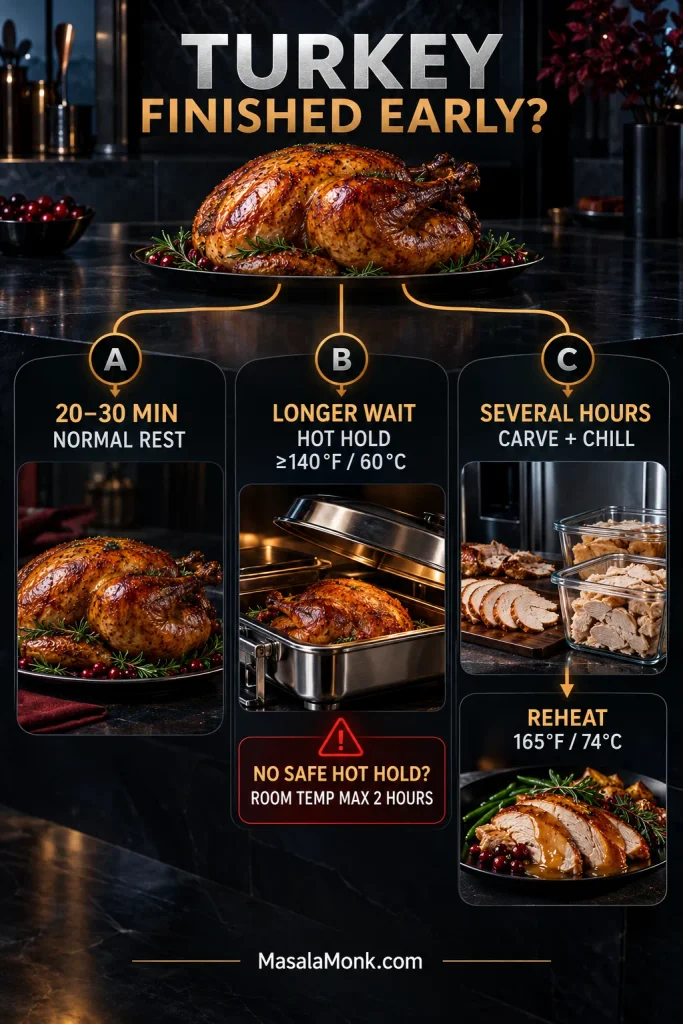
Three-path decision graphic for an early-finished turkey: a 20–30 minute rest, hot holding at 140°F / 60°C or above, or carving, chilling and reheating to 165°F / 74°C for a several-hour delay.
Finishing early is manageable once the delay is classified correctly. A short gap can be a normal rest, a longer wait needs safe hot holding, and a several-hour delay calls for chilling and reheating.

Dinner Is Ready and the Turkey Is Not

Underdone meat needs more cooking. A safely cooked breast with a lagging thigh or leg can be loosely shielded with foil while the underdone area continues toward 165°F.

The Pan Is Smoking

Drippings can scorch before the turkey is finished, particularly with high heat, a dry pan or sugary seasoning. With a metal roasting pan, a small amount of hot water or unsalted stock can help protect the drippings when your roasting setup allows it.

Glass and ceramic cookware need more caution: avoid sudden temperature changes and follow the cookware manufacturer’s guidance rather than pouring liquid blindly into a screaming-hot dish. Once the pan juices are bitter and black, don’t build gravy around them.

Roast turkey in a metal pan with smoking drippings as a small amount of hot liquid is added, beside a glass-or-ceramic cookware warning about sudden temperature change.
Darkening drippings can be rescued before they turn bitter, but the pan material changes what is safe to do next. Metal tolerates a little hot liquid; glass or ceramic needs protection from sudden temperature shock.

You Forgot the Giblet Bag

A paper-wrapped giblet packet cooking inside the turkey is not, by itself, a reason to discard a safely cooked bird.

Plastic is different. A packet that remained intact and unchanged does not automatically ruin the turkey. Melted, warped or broken-down plastic is a different situation: do not use the turkey.

The Turkey Came Out Dry

Dry breast meat usually points back to excessive internal temperature, not too little basting. Once the breast has overshot its finish, spooning pan juices over the surface cannot put that moisture back inside.

Next time, start checking sooner.
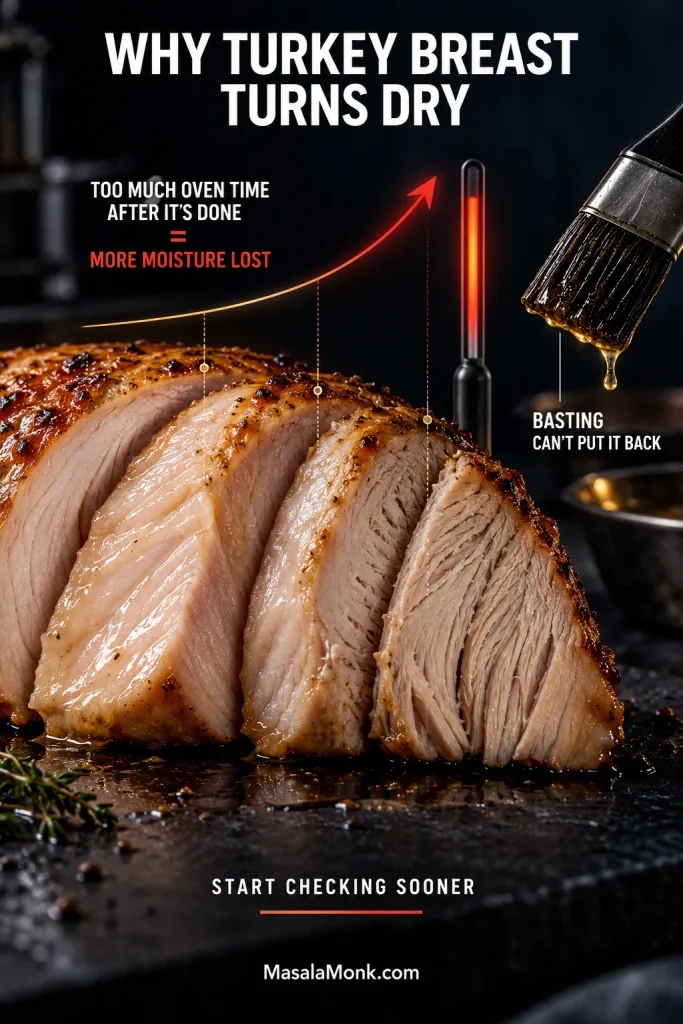
Close-up turkey breast slices progressing from moist to dry beside a rising heat-and-time line and a basting brush, illustrating moisture loss from extra oven time.
Basting can make the surface glossy and flavorful, but it cannot undo an overcooked center. Dry turkey breast is mainly a temperature-management problem, which is why earlier checking matters more than another spoonful of pan juices.

Need the core timing numbers again? ↑ Back to the main 325°F chart

Using a Different Cooking Method? Follow Its Own Timetable

Not using the standard oven method? Treat this section as a routing guide. Its job is to keep you from applying the main 325°F chart to a cooking method that behaves differently.
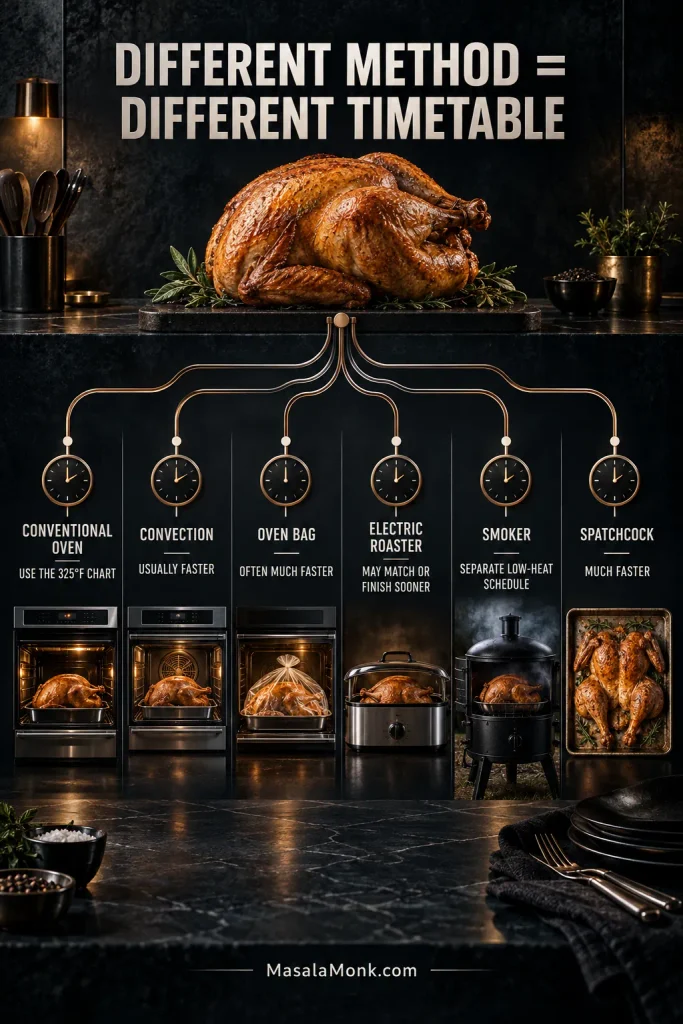
Routing infographic comparing six turkey cooking methods—conventional oven, convection, oven bag, electric roaster, smoker and spatchcock—with separate clocks showing that each method uses its own timetable.
Use this as a routing map: identify the equipment or turkey shape first, then follow that method’s timetable below. Conventional-oven numbers are not portable across convection, bags, roasters, smokers and spatchcocked birds.
MethodTiming differenceMain tradeoff
Conventional ovenUse the main 325°F chartStandard reference method
Convection ovenUsually fasterBegin checking earlier
Oven cooking bagOften much fasterMoist cooking, softer skin
Electric roasterMay match conventional timing or finish soonerFrees oven space, usually less browning
SmokerSeparate low-heat scheduleSmoke flavor; skin can soften
SpatchcockMuch fasterFlatter, more even roasting

Convection Oven

Convection can shorten the cook. USDA guidance says you may reduce the oven temperature by 25°F, but a convection oven should be set no lower than 300°F / 149°C.

Convection turkeyApproximate time
14–18 lb unstuffed2½–3¼ hours
18–22 lb unstuffed3¼–3½ hours
14–18 lb stuffed3–3¼ hours
18–22 lb stuffed3¼–3¾ hours

Check the oven manufacturer’s guidance too, then verify doneness in the breast, thigh and wing.

Oven Cooking Bag

A cooking bag traps steam and heat around the turkey, so it can roast much faster than in an open pan. USDA gives these approximate times for an unstuffed turkey at 350°F / 177°C:

Turkey in oven bagApproximate time
8–12 lb1½–2 hours
12–16 lb2–2½ hours
16–20 lb2½–3 hours
20–24 lb3–3½ hours

Add about 30 minutes for a stuffed bird and follow the bag manufacturer’s directions. Trapped steam contains splatter and helps retain moisture, but deeply crisp skin is harder to achieve.

Electric Roaster

Electric roasters vary, and some finish considerably sooner than a conventional oven. Follow the appliance manual and begin checking early.

The practical win is oven space. The main oven stays available for candied yams, casseroles and rolls; covered roasters often give you paler, softer skin in return.

Smoked or Spatchcocked Turkey

For a thawed, unstuffed 8–12 lb turkey, USDA’s alternate-method guidance uses roughly 20–30 minutes per pound as a smoker planning estimate. Weather, smoker temperature and airflow can move that number substantially, so use a dedicated smoking method.

Spatchcocking needs its own timetable too. Flattening the bird exposes more of it to heat and shortens the cook dramatically.

Using the standard oven method? ↑ Back to the main 325°F chart

Turkey Cooking Time FAQs

1. Can You Cook Two Turkeys at the Same Time?

Cooking two turkeys does not mean doubling the cook time or adding their weights together. If the oven can hold two similarly sized birds in separate shallow pans with enough space for hot air to circulate, plan each turkey by its own weight. Leave a little extra scheduling room for airflow and oven recovery, and temperature-check each bird separately.
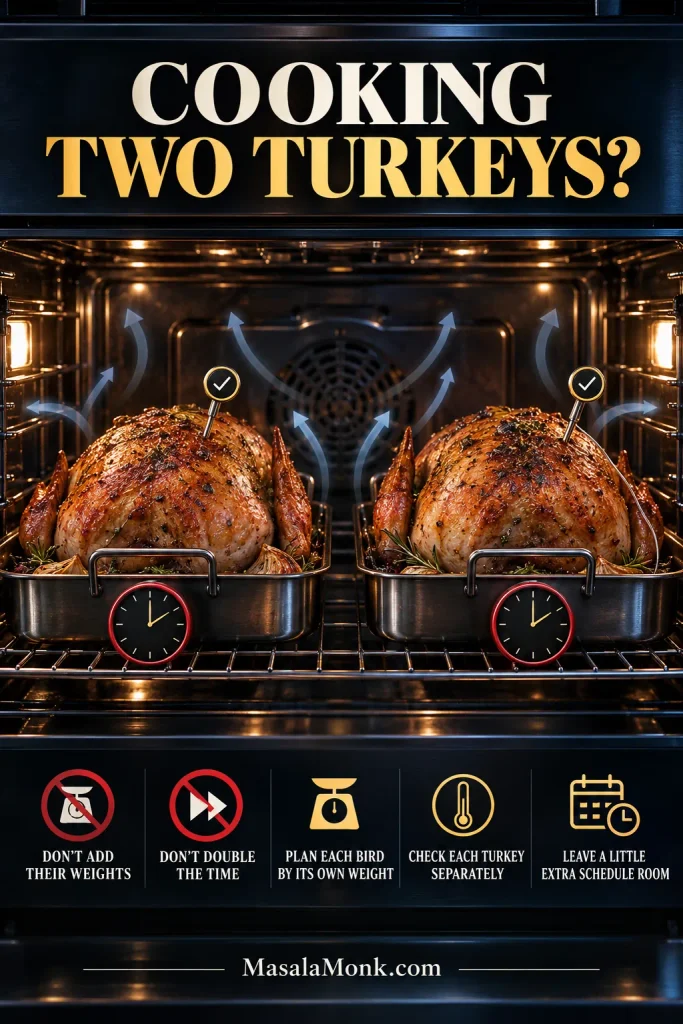
Two similarly sized turkeys roasting in separate shallow pans inside one oven with airflow arrows, separate clocks and check markers showing that each bird is timed and checked independently.
A fuller oven may recover heat more slowly after the door opens, so leave a little extra schedule room. Still, each turkey keeps its own weight-based clock and its own temperature checks.

2. Does a Turkey Cook Faster Covered or Uncovered?

Don’t use covering as a shortcut for the cook time in this guide. Roast the turkey uncovered, then use foil once the skin is brown enough. Fully covered methods and oven bags have different heat and moisture conditions and need their own timetable.

3. Can You Cook a Turkey the Day Before?

Yes. Cook it fully, carve or portion it, refrigerate promptly in shallow containers, then reheat the meat to 165°F / 74°C before serving.

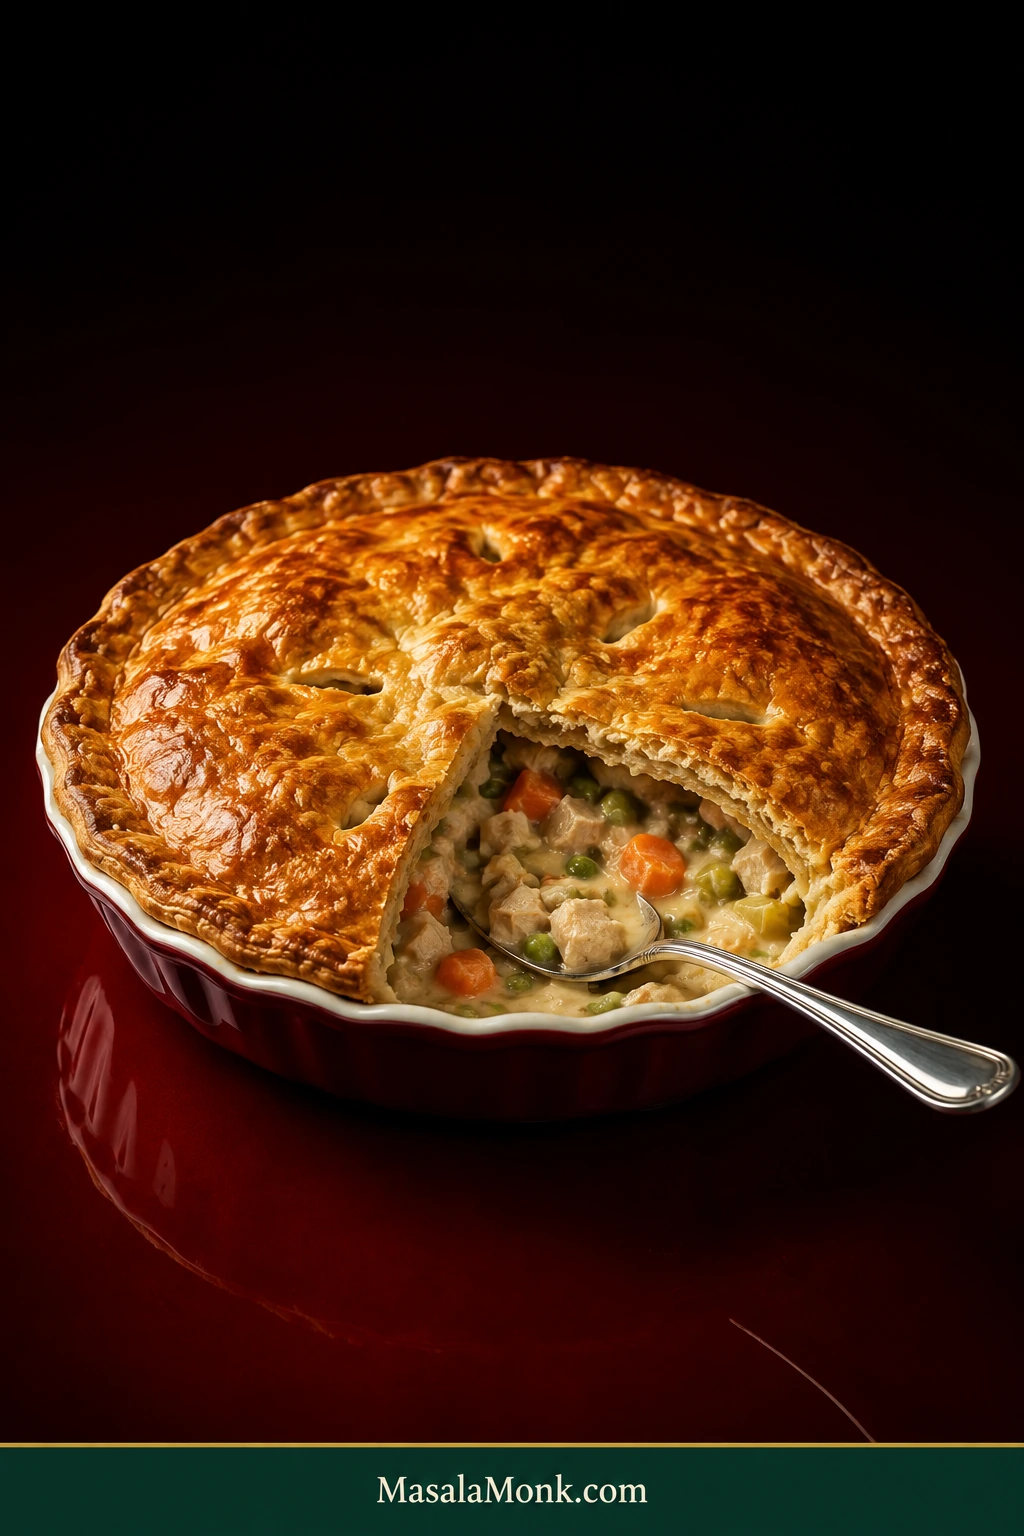
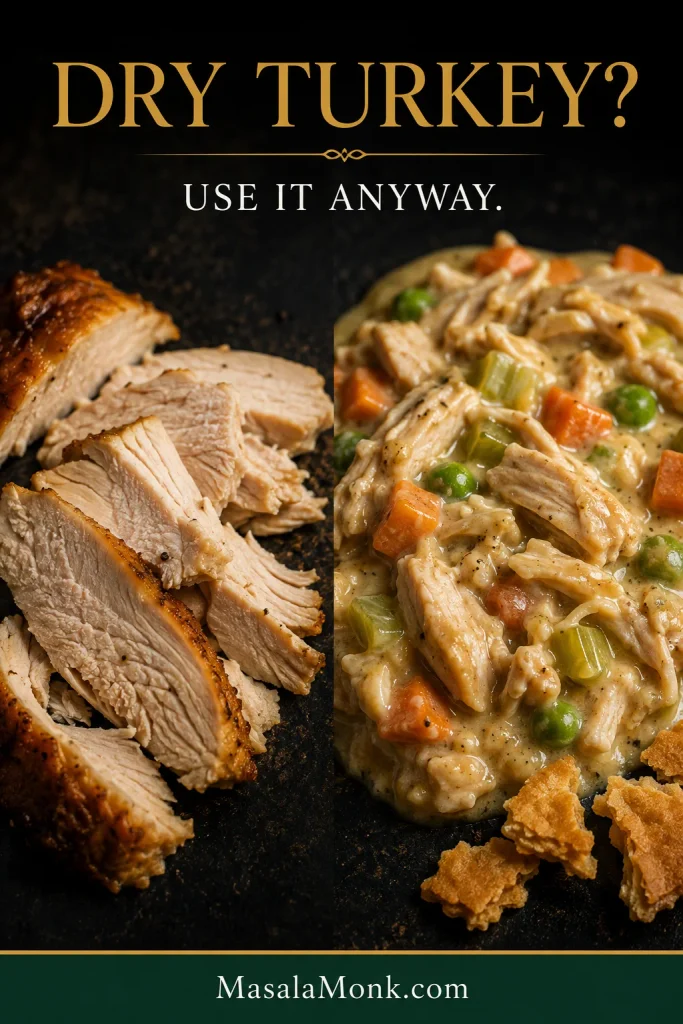
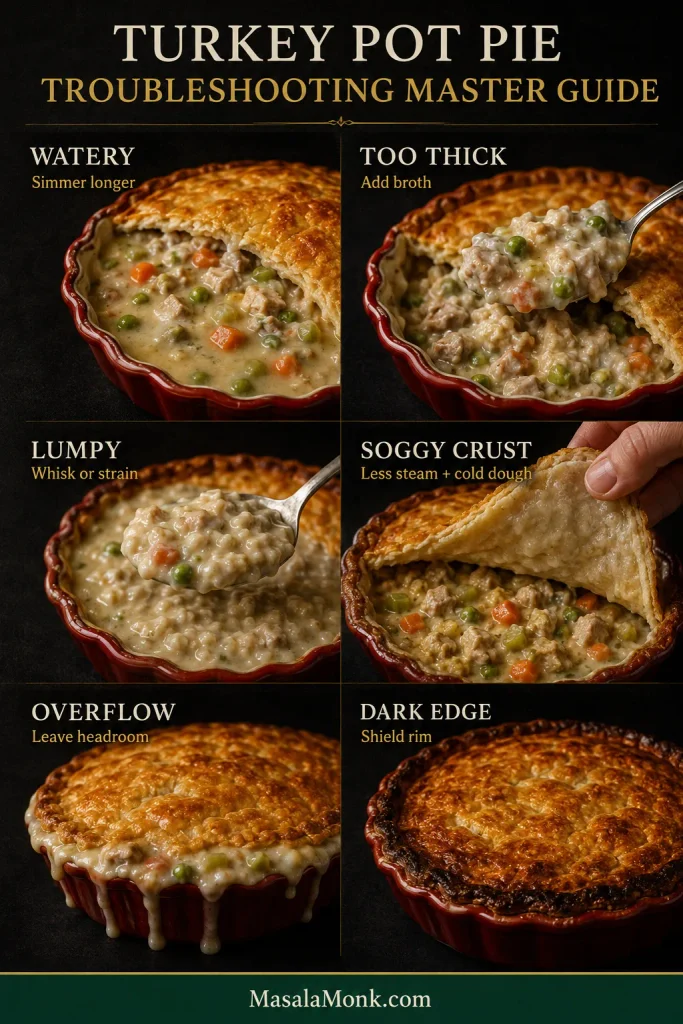
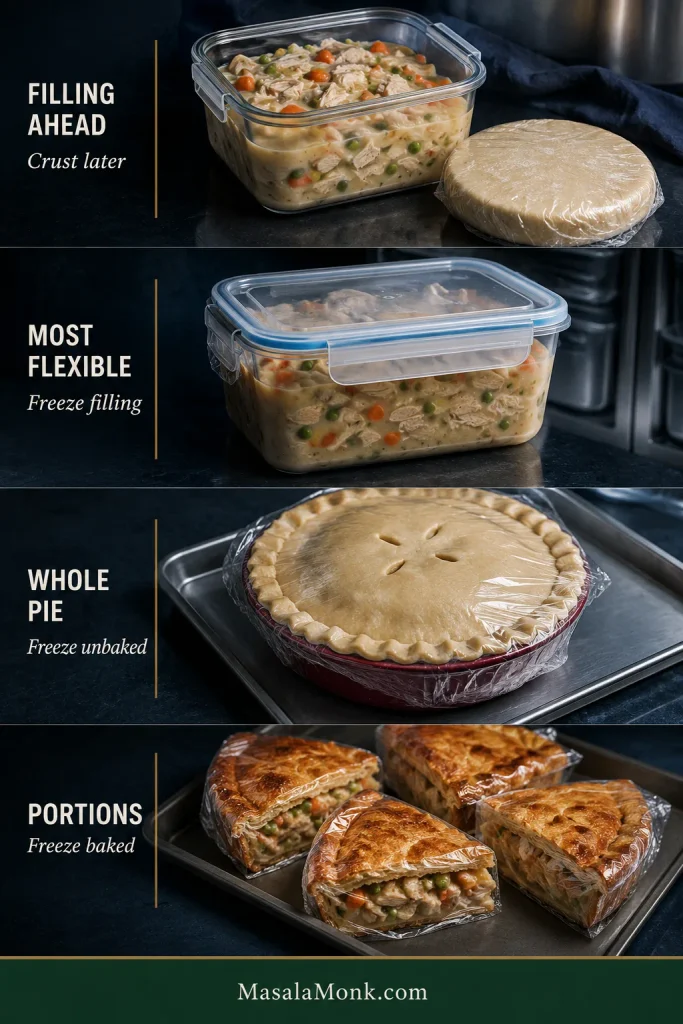
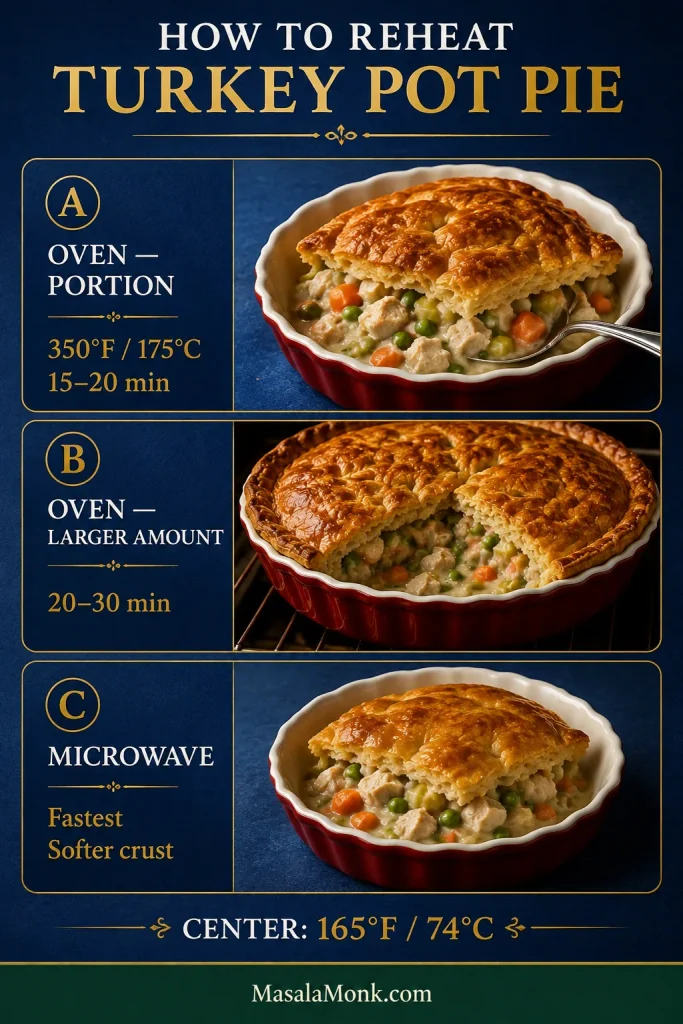
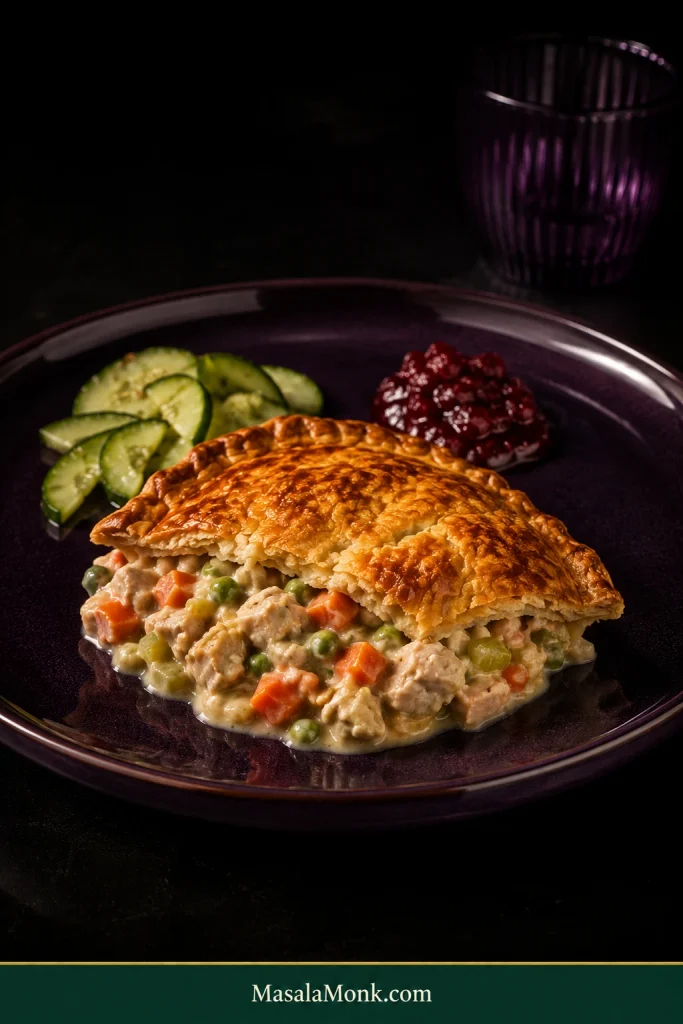
Extra cooked meat can become turkey pot pie the next day rather than disappearing into a week of identical sandwiches.

4. Can You Cook a Turkey Overnight?

Don’t improvise a very-low overnight roasting temperature just so the turkey can cook unattended. For the conventional method in this guide, use 325°F / 163°C or above and monitor the cook. Cooking ahead and reheating safely is a more predictable way to free the oven.


Once the first temperature check is on your schedule, most of the uncertainty is gone. Give the finished turkey its rest, use that window to bring the sides together, then carve and get it to the table. A bird that finishes a little earlier or later than the planning window suggested is normal; it doesn’t have to throw the rest of dinner off course.
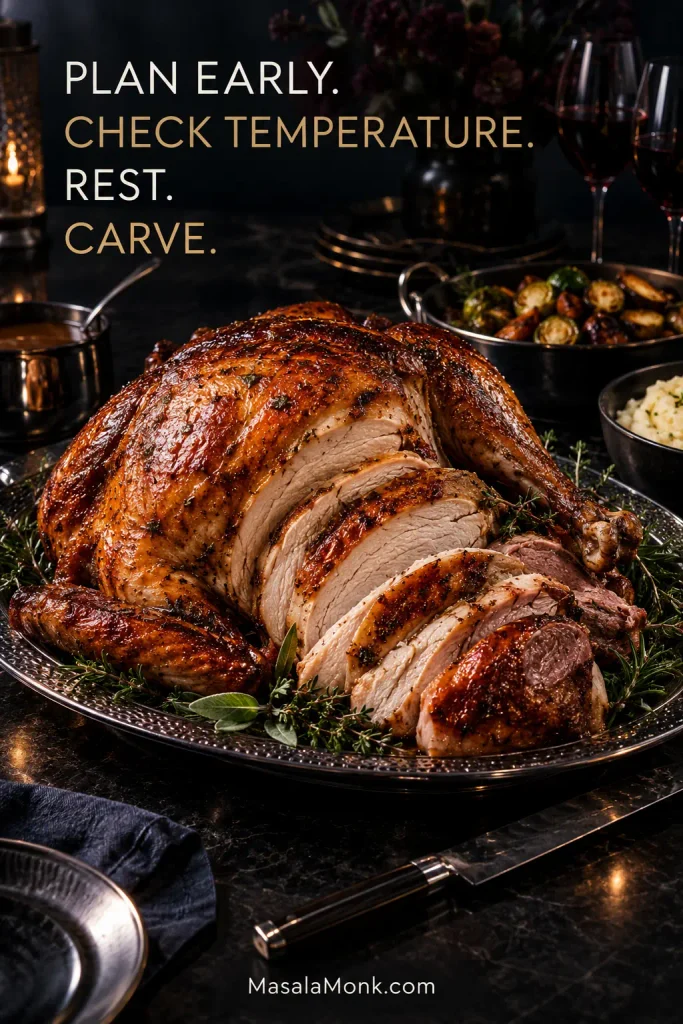
Partially carved golden-brown roast turkey on a silver platter with juicy breast slices and dark meat, beside serving dishes on a dark dinner table.
Crisp skin and juicy slices are the payoff for planning early, checking temperature and giving the turkey time to rest.
Posted on Leave a comment

Stuffed Acorn Squash Recipe – Sausage, Apple, Wild Rice & More

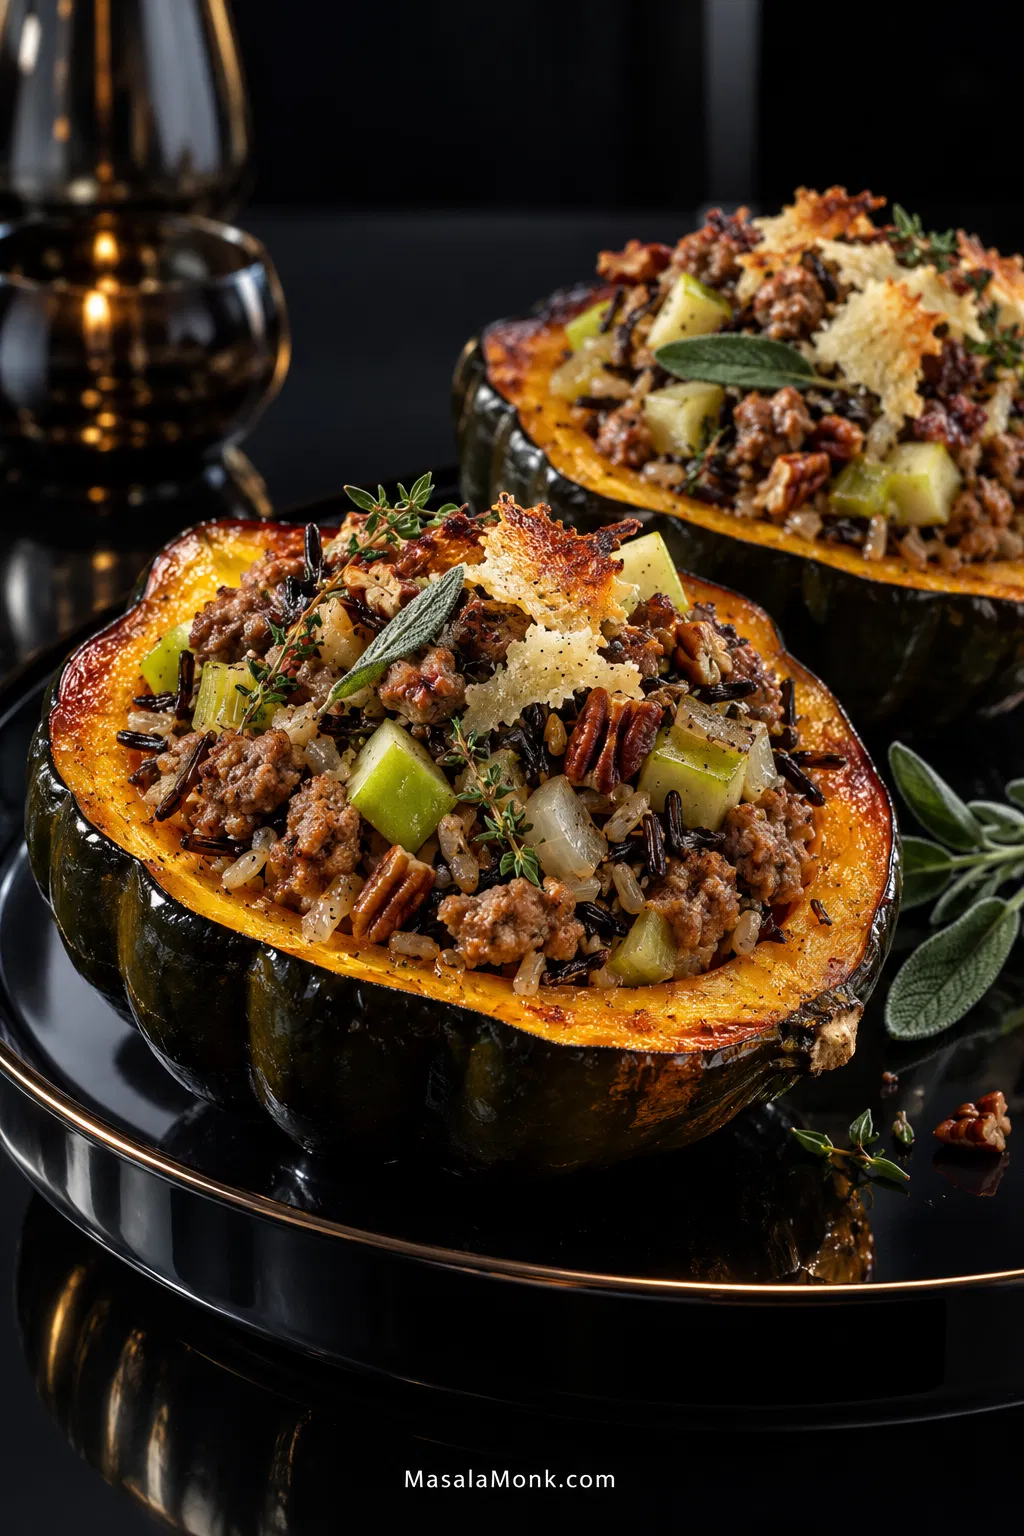
Two roasted acorn squash halves filled with browned sausage, wild rice, green Granny Smith apple, toasted pecans, herbs and Parmesan on a dark serving surface.

Acorn squash is slow; the filling isn’t. The trick with a good stuffed acorn squash recipe is getting those two timelines to meet. A half can look beautifully browned from above while the flesh underneath is still stubbornly firm. Leave everything in long enough for the squash to catch up and the sausage cooks twice, exposed rice dries around the edges, and the apple slowly disappears into the stuffing.

So most of the cooking happens before anything gets stuffed. The squash gets a head start in the oven while the sausage browns in the skillet. Wild rice goes in already tender, and the apple waits until near the end.

This version fills the roasted halves with mild Italian sausage, wild rice, Granny Smith apple, onion, celery, sage, thyme, toasted pecans and Parmesan. Wild rice has enough chew to stand up to the soft squash, the tart apple cuts through the sausage, and pecans keep a bit of crunch. Parmesan catches on exposed rice and sausage and browns in salty little patches.

Maple syrup and brown sugar aren’t required. This version stays savory, with cider vinegar, black pepper and herbs keeping the naturally sweet squash in balance. With a sharp salad or something green alongside, one stuffed half is plenty for dinner.

Jump to: Recipe · Filling ideas · Thanksgiving · Make ahead · Troubleshooting


Sausage, Apple & Wild Rice Stuffed Acorn Squash Recipe

The squash should give easily under a fork without collapsing. The filling should be moist and loose enough to mound, with browned sausage, tender rice and pieces of apple you can still pick out.

Yield4 main-course servings or 6–8 smaller holiday-side portions
Active time25–30 minutes
Elapsed totalAbout 70–85 minutes; much of the filling work overlaps the first roast
Initial roast30–45 minutes
Final bake12–15 minutes
Oven400°F / 205°C conventional / about 185°C fan
Squash size2 similar squash, ideally around 1¼ lb / 570 g each
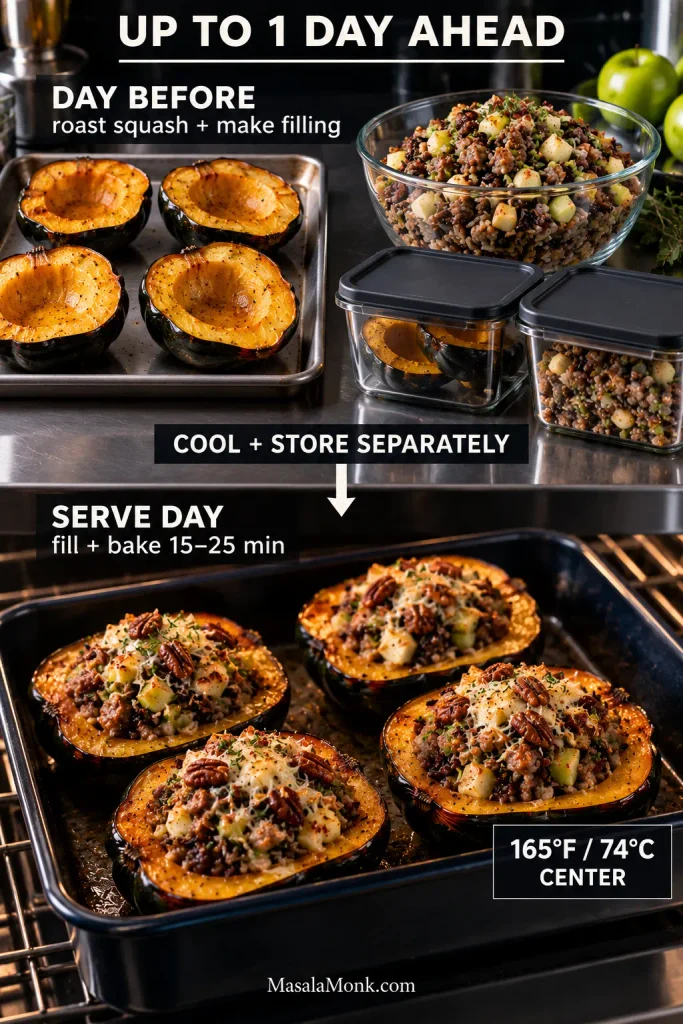
Make aheadUp to 1 day

Starting with dry wild rice? Put it on before prepping the squash; package timings vary, and you need 1½ cups cooked. Much of that cooking time overlaps the first roast. For ordinary rice, this guide to cooking rice covers several varieties and methods.

Ingredients

  • 2 medium-large acorn squash, ideally about 1¼ lb / 570 g each; 1–1½ lb / 450–680 g each works
  • 1 tablespoon / 15 ml olive oil for the squash, plus extra if the skillet looks dry
  • ½ teaspoon fine salt for the squash, plus more after tasting
  • Freshly ground black pepper, to taste
  • 12 oz / 340 g mild pork Italian sausage, bulk or casings removed
  • 1 small yellow onion, cut into ¼-inch / 6-mm dice
  • 2 celery ribs, finely diced
  • 2 garlic cloves, minced
  • 1 teaspoon dried sage
  • ½ teaspoon dried thyme
  • 1 medium Granny Smith apple, cored and cut into ¼–⅜-inch / 6–10-mm dice; peel it for a softer filling
  • 1½ cups cooked wild rice or cooked wild-rice blend
  • ⅓ cup / about 40 g toasted pecans, roughly chopped
  • 2 teaspoons / 10 ml apple cider vinegar, plus more as needed
  • ½ cup / about 55 g finely grated Parmesan, divided
  • ⅓ cup / about 40 g dried cranberries, optional
  • Fresh parsley, sage or thyme for finishing, optional

Wait before adding extra salt. Italian sausage and Parmesan vary quite a bit, and rice cooked in broth may already bring salt of its own.

Equipment: a stable cutting board, sharp chef’s knife, sturdy spoon, large rimmed baking sheet, parchment, wide spatula or turner, large skillet, and a saucepan if you’re starting with dry rice.

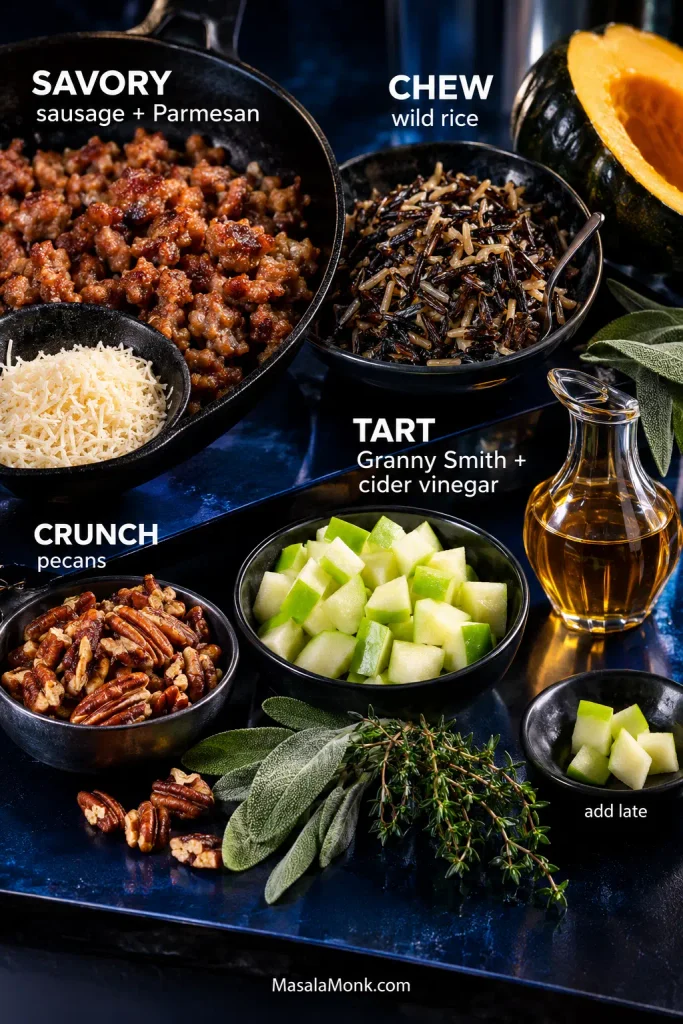
Ingredient arrangement with browned sausage, wild rice, Granny Smith apple, cider vinegar, pecans, Parmesan and herbs for stuffed acorn squash filling.
In an acorn squash filling, sequence matters as much as the ingredient list. Aromatics need time to soften, apple needs much less, and pecans only need warming; treating them alike is how distinct textures disappear.

How Long to Roast Acorn Squash at 400°F

For acorn squash around 1¼ lb / 570 g each, start checking after 30 minutes at 400°F / 205°C. Most need 30–45 minutes before stuffing. A fork should slip easily into the thickest flesh while the shell remains sturdy enough to hold the filling.

How to Make Stuffed Acorn Squash

Start the Rice and Roast the Squash

  1. Cook the wild rice if needed. Follow the package until the grains are tender all the way through, then measure 1½ cups cooked. There shouldn’t be a hard center left in the grain.
  2. Heat the oven. Preheat to 400°F / 205°C conventional / about 185°C fan. Line a large rimmed baking sheet with parchment.
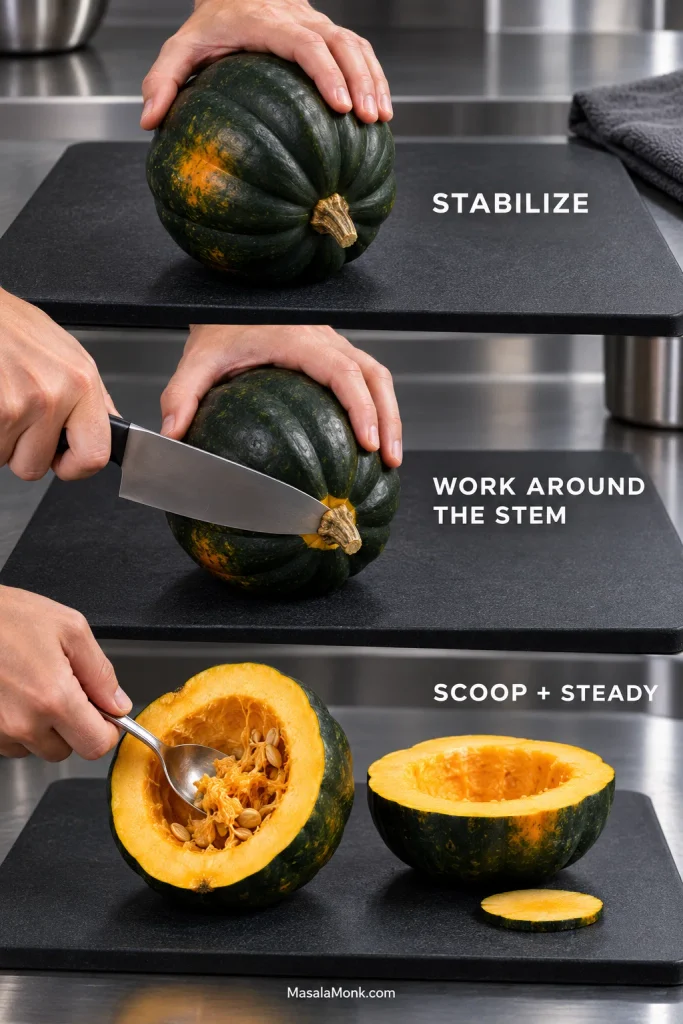
  3. Cut, scoop and steady the squash. Set one dry squash on a board that will not slide and cut it lengthwise with a sharp chef’s knife. Work around the woody stem when it resists, then scoop out the seeds and stringy center.

    For a particularly hard rind, pierce the squash several times and microwave it for 1–2 minutes. Let it cool enough to handle before cutting. If a half rocks when placed cut-side up, shave a very thin piece from the rounded base so it sits securely.
Acorn squash being stabilized, carefully cut around the hard stem, opened, seeded and steadied on a cutting surface.
A stable base helps twice: it makes the squash easier to control under the knife and later keeps the filled half level, so the filling stays where you mound it.
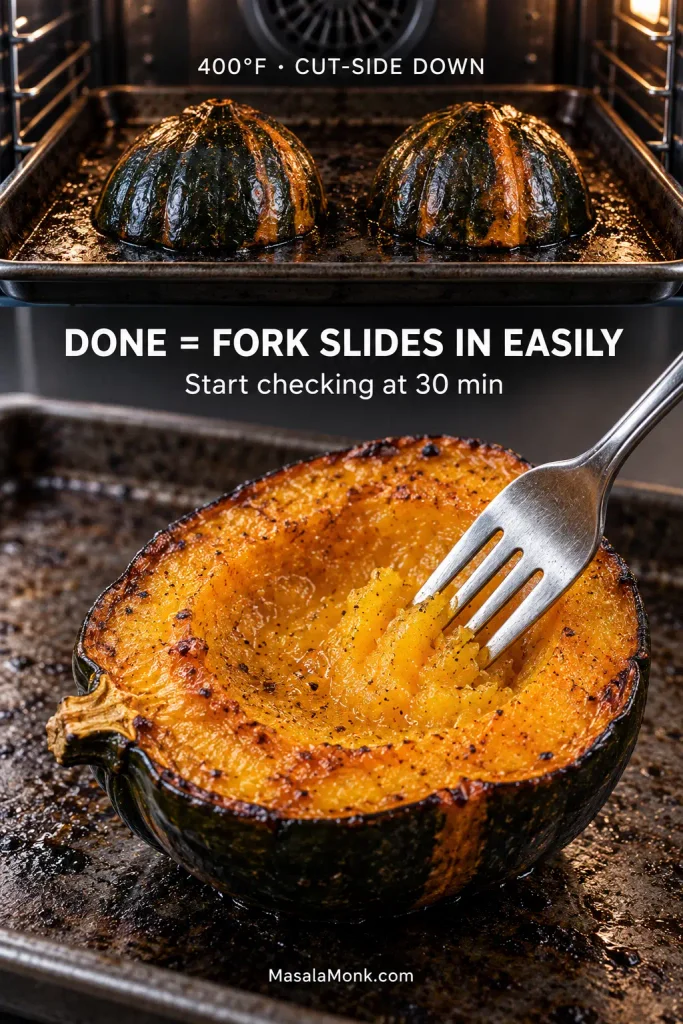
  1. Season and roast cut-side down. Brush the flesh with the olive oil and season with the ½ teaspoon salt and black pepper. Set the halves cut-side down on the parchment-lined tray.

    Begin checking at 30 minutes. A fork should slip easily into the thickest part of the flesh. Take out any half that finishes ahead of the others; similar-looking squash don’t always cook at the same speed.

    Thirty minutes tells you when to pick up the fork. The fork tells you when the squash is ready.
Roasted acorn squash shown cut-side down, then turned over as a fork tests the thick orange flesh for tenderness.
Check the thick shoulder, not only the thin rim. If a fork slips easily near the cavity but still meets resistance farther out, the squash can look ready while its densest flesh remains underdone.

Brown and Balance the Filling

  1. Brown the sausage while the squash roasts. Heat a large skillet over medium heat. Add the sausage, break it into small crumbles and leave it alone for short stretches so the edges brown. Cook pork sausage to 160°F / 71°C, in line with USDA safe-temperature guidance.

    Spoon off any standing pool of fat, leaving enough to lightly coat the skillet. If the pan looks dry—especially with a leaner sausage—add about 1 teaspoon olive oil before the vegetables.
  2. Add the onion, celery, herbs and apple. Cook the onion and celery with the sausage for 5–7 minutes, until softened and beginning to color. Add the garlic, sage and thyme and cook for 30–60 seconds. By now the skillet should smell unmistakably of browned sausage, onion and sage.

    Add the apple and cook for another 2–3 minutes. Its edges should soften while the pieces remain distinct.
  3. Finish the filling. Fold in the cooked wild rice, pecans, cider vinegar, about three-quarters of the Parmesan and the cranberries, if using. Let everything heat through.

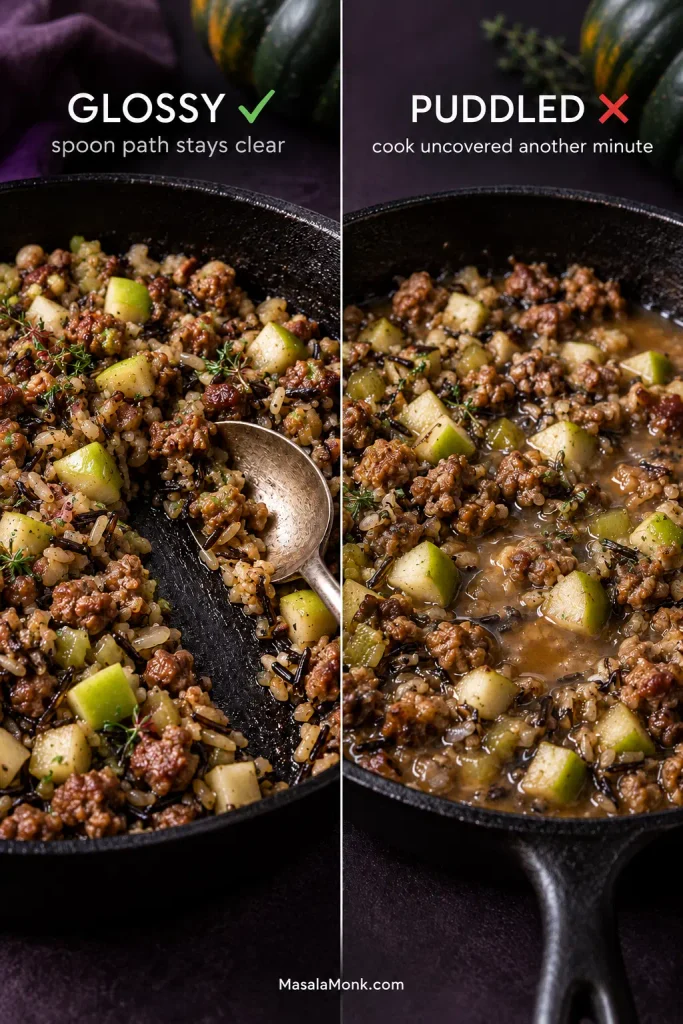
    Glossy is good; puddled is not. Drag a spoon across the skillet. The filling should look moist without liquid immediately flooding the cleared path. Cook another minute uncovered if it is wet; add a small splash of broth or olive oil if it looks dry.

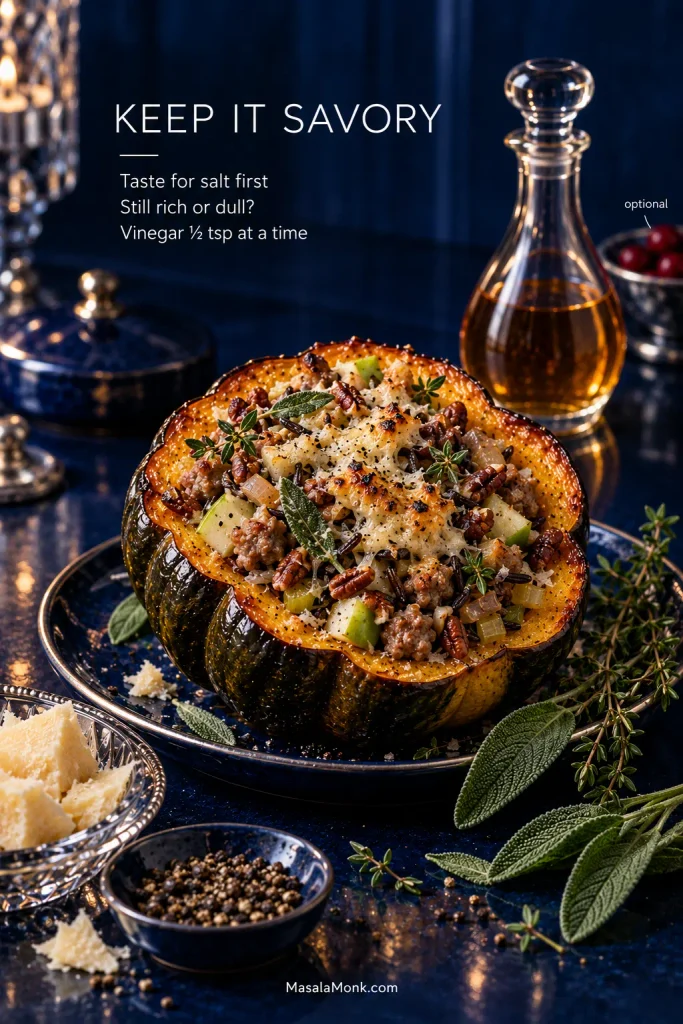
    Taste for salt first. If the sausage and rice still taste heavy or dull, add cider vinegar about ½ teaspoon at a time. Stop when the filling tastes brighter; the vinegar itself shouldn’t stand out. Finish with black pepper as needed.
Side-by-side comparison of glossy sausage, wild-rice and green-apple filling with controlled moisture versus watery filling with visible liquid pooling.
Excess liquid is easiest to fix in the skillet. Reduce it before stuffing; otherwise the filling steams instead of browning, and the exposed grains lose definition.

Fill, Bake and Rest

  1. Check the squash. Turn the roasted halves cut-side up with a wide spatula or turner. A fork should pass easily through the thickest flesh. Give a firmer half another five minutes if it needs it. Taste a little warm squash and season it again if the flesh seems flat.
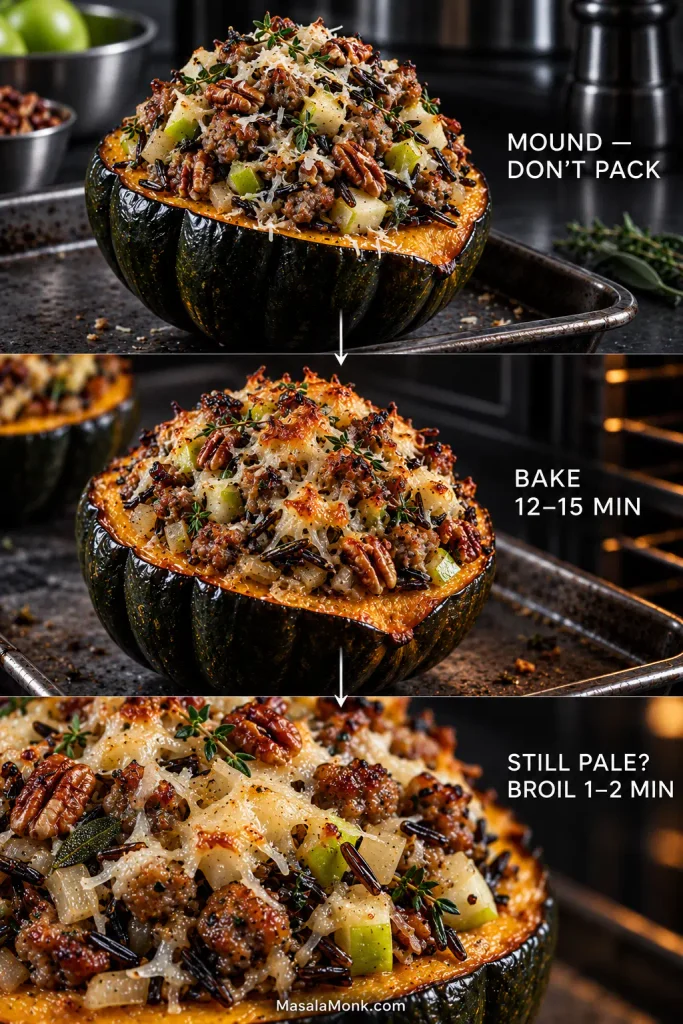
  2. Fill the halves. Spoon the filling into the cavities and mound it generously above the rim. A medium-large half takes around 1–1½ cups, though the space inside each squash will vary. Save any extra filling for another meal.

    For an unusually tight cavity, scoop out 1–2 tablespoons of cooked squash and fold it into the filling.
  3. Bake for another 12–15 minutes. Sprinkle over the remaining Parmesan, concentrating some on the exposed rice and sausage. Return the squash to the oven until the center is hot, the cheese has browned in spots and a few grains around the top are starting to crisp. If the top is still pale once the middle is hot, broil for 1–2 minutes.
Three-stage view of filling loosely mounded into roasted acorn squash, baked until hot, then briefly broiled for browned exposed edges.
Keep the mound irregular rather than smoothing it flat. Those peaks catch more heat, so rice, sausage and Parmesan brown at different rates and give the top a mix of crisp and tender.
  1. Rest for 5 minutes. Scatter over fresh parsley, sage or thyme if using. Push the fork through the sausage and rice into the squash underneath. The best bite has chewy grain, tart apple, browned sausage and soft squash together.
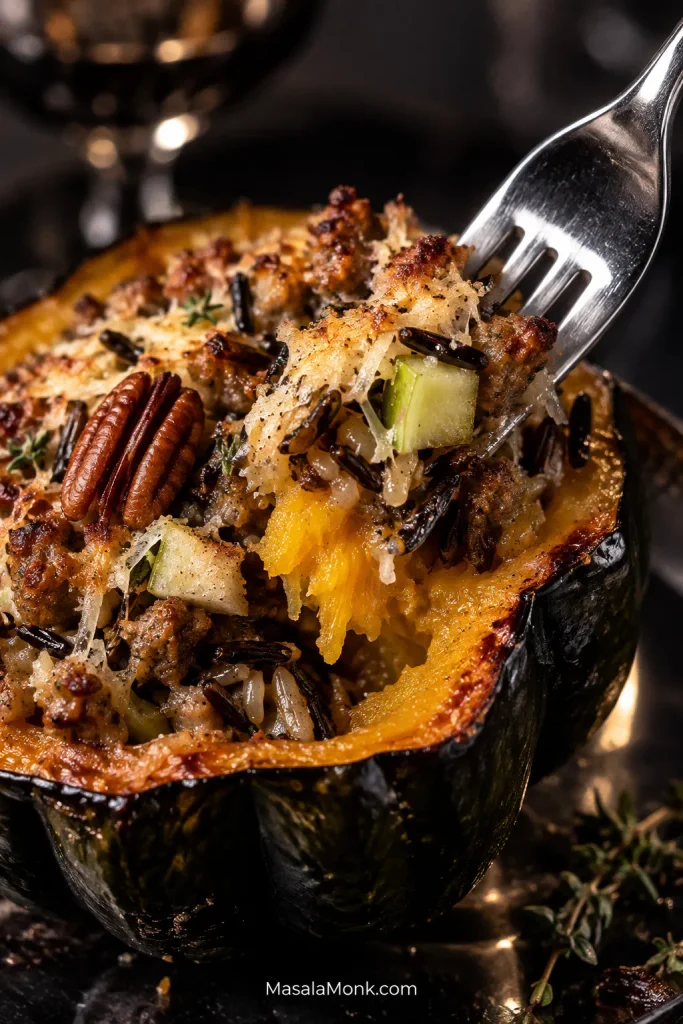
Close-up forkful containing orange acorn squash flesh, browned sausage, wild rice, green apple, pecan and Parmesan.
A five-minute rest lets the filling settle and the Parmesan firm slightly, so a forkful holds together more easily with the squash underneath.

Cooking for two? Use 1 squash and halve the remaining ingredients. The roasting time for that squash stays the same.

Want to adapt it? Filling ideas · Thanksgiving version · Make it ahead


Build the Filling

Plan on 2–3 cups of filling per medium squash—around 1–1½ cups per half. Some squash simply have more room than others.

When you change the filling, keep the contrasts that make the original work: something hearty, a cooked grain, aromatics, a tart note and some crunch. You don’t need to copy every ingredient exactly.

RoleGood choices
Hearty elementPork sausage, turkey/chicken sausage, seasoned ground poultry, or mushrooms + lentils/chickpeas
GrainWild rice, ordinary rice, farro, quinoa, barley or prepared stuffing
AromaticsOnion, celery, garlic and herbs
Acid or tartnessGranny Smith apple, cider vinegar, lemon or cranberries
CrunchPecans, walnuts or pepitas
Savory depthParmesan-style cheese, feta, tamari or nutritional yeast

How to Keep It Savory

The easiest way to stop the squash drifting too sweet is to balance its natural sweetness. Parmesan adds salt and savoriness; sage, thyme and black pepper push the filling further toward the savory side. Cider vinegar is especially helpful when sausage and rice taste rich but dull: add a little until the flavor lifts without tasting distinctly of vinegar.

Savory stuffed acorn squash with sausage, wild rice, green apple, pecans and herbs beside cider vinegar used for seasoning balance.
Salt and acid solve different problems. If the filling tastes muted, check the salt first. If it is already seasoned but still feels heavy, a little cider vinegar is the smarter adjustment.

Dried cranberries are optional. If the rest of dinner already includes something sweet—such as honey- or maple-roasted carrots—leave them out and keep maple syrup for anyone who wants a drizzle at the table.

Best Grains for the Filling

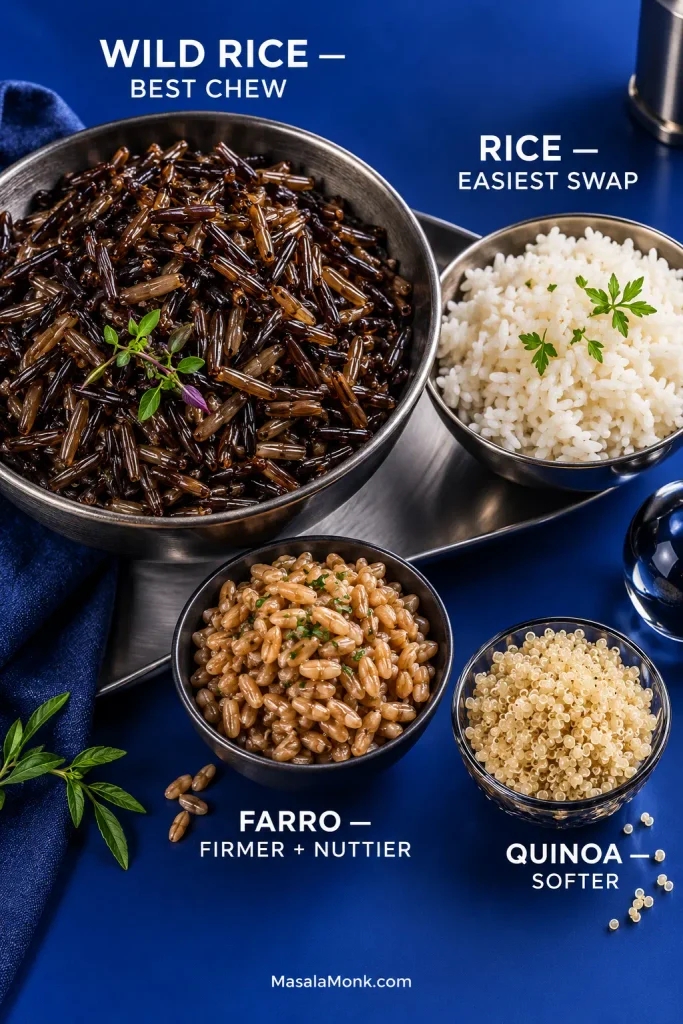
Wild rice remains the first choice for this filling. The easiest substitution is 1½ cups cooked brown or white rice, particularly when you already have some left over.

Farro is worth using when you want a firmer, nuttier bite. Quinoa makes the filling noticeably softer, so keep the pecans or pepitas. Barley gives it more of the cohesive feel of traditional stuffing. Whatever grain you choose, cook it before it goes into the squash.

Cooked wild rice, regular rice, farro and quinoa displayed separately to compare grain textures for stuffed acorn squash.
Wild rice and farro stay more distinct after the final bake, while quinoa blends into the soft squash. With softer grains, pecans or pepitas matter more for contrast.

Vegetable, Meat, Cheese & Crunch Swaps

Mushrooms are the vegetable addition that contributes the most savory flavor here. Give them enough skillet time for their water to cook away and the edges to brown. Kale can cook with the onion and celery; baby spinach only needs a quick wilt near the end. For a vegetable-heavy filling, reduce the cooked rice from 1½ cups to around 1 cup, or expect some filling left over.

The closest meat substitution is 12 oz / 340 g turkey or chicken Italian sausage. Very lean sausage may need a teaspoon or two of olive oil in the skillet. Cook poultry sausage to 165°F / 74°C.

Plain ground turkey or chicken works in the same quantity, but it needs the seasoning the sausage would have supplied. Add the sage and thyme as written, a pinch of fennel seed, black pepper and about ½ teaspoon fine salt. Wait until the rice and cheese are mixed in before deciding whether it needs more salt. A little olive oil helps very lean poultry brown without drying out.

Parmesan is still the best fit for the main recipe because it browns on the exposed grains without making the filling overly cheesy. Gruyère melts more deeply into the rice, while feta gives a meatless version a sharper edge. Walnuts can replace pecans, and toasted pepitas are the simplest nut-free option.

Vegetarian and Vegan Variations

For a meatless version, brown 8–10 oz / 225–285 g mushrooms well and add 1 cup cooked lentils or chickpeas. Choose cheese explicitly labelled suitable for vegetarians, whether that’s a hard Parmesan-style cheese or feta.

For a vegan version, keep the mushrooms and legumes, skip the cheese and start with 1 tablespoon low-sodium tamari plus 2 tablespoons nutritional yeast. Taste once the rice is mixed in. Add 1 tablespoon olive oil if the filling seems dry, and adjust the tamari only after tasting because it is already salty.


Stuffed Acorn Squash for Thanksgiving

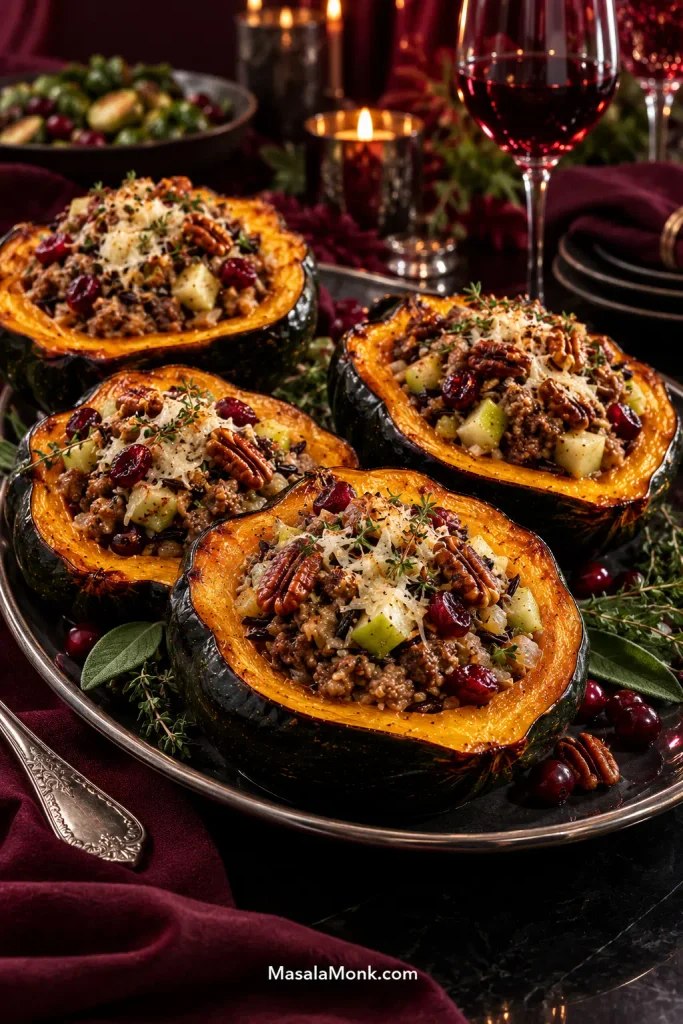
This stuffed acorn squash recipe is especially useful at Thanksgiving because the long roast can happen the day before, leaving only the short finishing bake when the oven is busiest.

Several browned stuffed acorn squash halves with sausage, wild rice, green apple, pecans, Parmesan and a restrained amount of cranberries on a holiday platter.
A restrained amount of cranberry gives the Thanksgiving version bright color and occasional tart-sweet bites without pushing the whole filling toward sweetness.

Keep the cranberries and pecans if you want more tart fruit and crunch on the holiday table, or replace some or all of the wild rice with prepared savory stuffing. Cornbread dressing fits especially well with the sage, onion and celery.

If you’re using leftover turkey, soften the onion and celery first, then add chopped cooked turkey near the end so it only needs to warm through. Expect to need a little more olive oil, sage, black pepper and salt because cooked turkey brings less fat and seasoning than Italian sausage.

Serve cranberry sauce alongside. A spoonful of cranberry sauce with orange juice gives the plate tart-sweet contrast without loosening the rice filling.

Once browned, the filled halves look at home among the rest of a holiday spread. A whole half is substantial enough for a main; when the squash is one of several side dishes, four large halves can be divided into 6–8 smaller portions. Spoon filling together with the squash underneath so each serving gets both.

Planning the rest of the meal? Make it ahead · What to serve with it · Storage & reheating


Make Ahead, Serving & Leftovers

Can You Make Stuffed Acorn Squash Ahead?

Yes. You can make this stuffed acorn squash recipe up to one day ahead. For the best texture, cool the roasted squash and filling separately, then cover and refrigerate them.

When you’re ready to serve, fill the chilled halves and bake at 400°F / 205°C for 15–25 minutes, until the center reaches 165°F / 74°C. Cover the top loosely with foil if it browns before the middle is hot.

Make-ahead workflow showing roasted squash and cooked filling stored separately, then assembled the next day and baked until the center reaches 165°F or 74°C.
Cold filling needs longer to heat through than a same-day filling. Keep the mound loose and cover the top if it browns early, giving the center time to catch up.

What to Serve With Stuffed Acorn Squash

Bright, crisp sides keep a sausage-stuffed half from feeling too heavy. Try a lemony salad or cabbage slaw for acidity; roasted Brussels sprouts or green beans add a firmer green contrast; sautéed kale, chard or spinach keeps a weeknight plate lighter.

Meanwhile, a sharp vinaigrette makes the next forkful of sweet squash, sausage and browned Parmesan taste brighter.

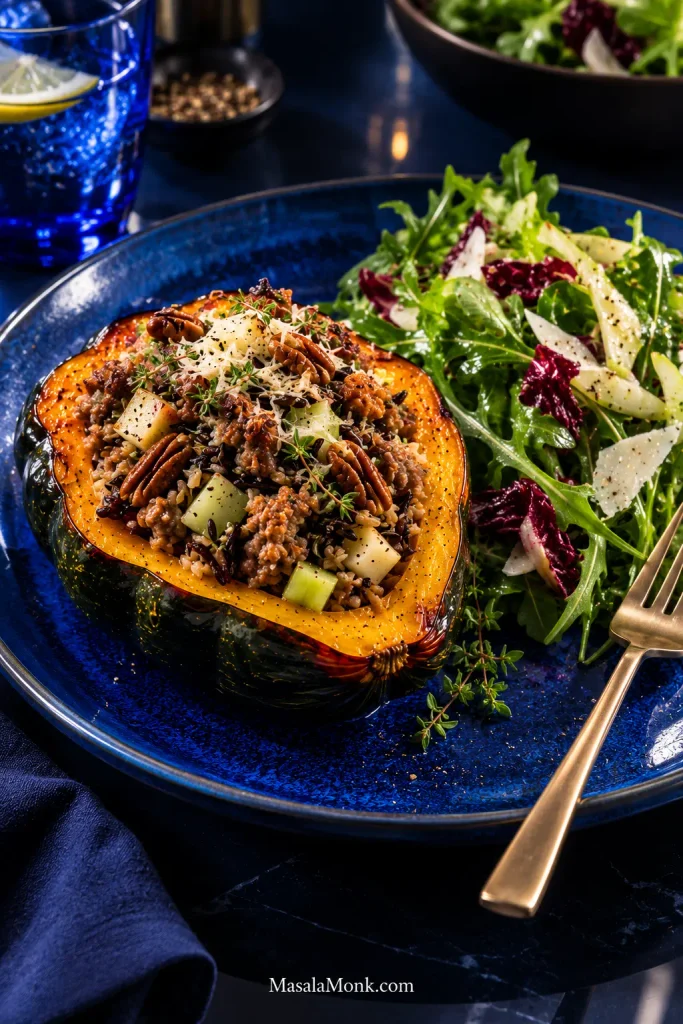
One sausage-and-wild-rice stuffed acorn squash half on a deep blue plate beside a fresh, crisp green salad with vinaigrette.
A sharp salad works best as contrast on the side. Dress the greens just before serving so their crispness and acidity stay intact beside the soft squash and rich filling.

If another side is going into the oven at the same time, something that cooks comfortably around 400°F keeps the meal simpler. At Thanksgiving, the squash also sits naturally beside green bean casserole, dressing and potatoes.

Storage, Reheating & Freezing

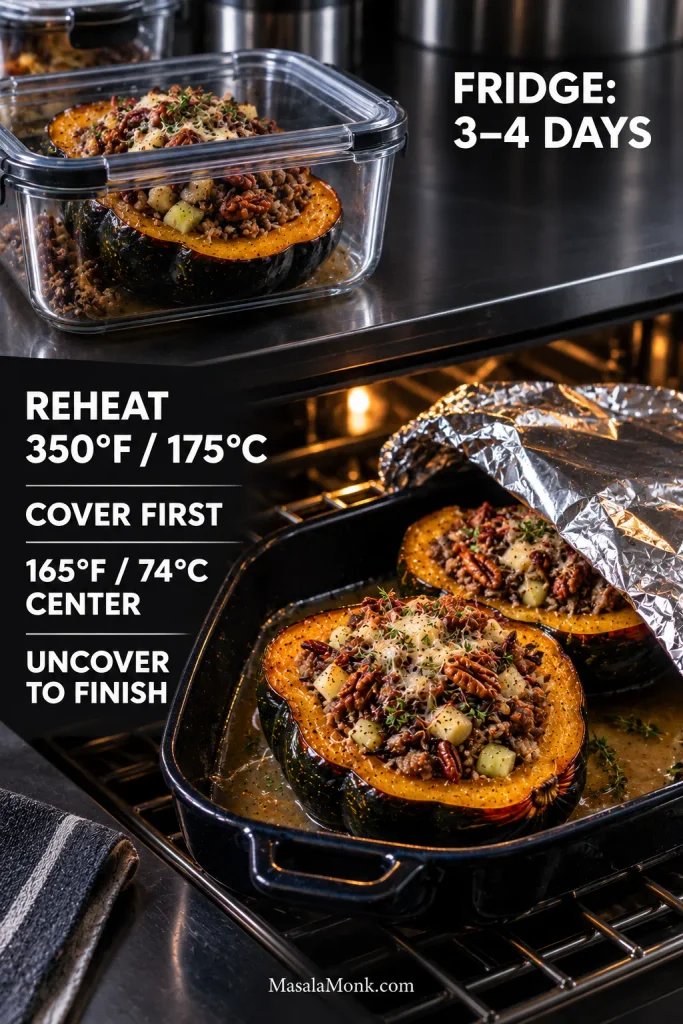
Refrigerate: get leftovers into the refrigerator within 2 hours and keep them covered for 3–4 days. These timings follow USDA leftovers guidance.

Reheat in the oven: place the squash in a baking dish, add a small splash of water or broth to the dish around the squash if the filling looks dry, and cover loosely with foil. Warm at 350°F / 175°C until the center reaches 165°F / 74°C. Uncover near the end if you want the top to dry and brown again.

Stuffed acorn squash stored in a covered container, then reheated under foil at 350°F or 175°C until the center reaches 165°F or 74°C before uncovering.
When reheating stuffed acorn squash, add broth or water around the base rather than pouring it over the filling. Cover first so the moisture circulates; then uncover briefly to revive the browned surface.

Microwave: place one portion in a microwave-safe dish, add a teaspoon or two of water if the filling looks dry, and cover loosely. Heat in 60–90 second bursts, turning or repositioning the squash between bursts, until the center reaches 165°F / 74°C. The squash will be softer than oven-reheated leftovers.

Freeze: assembled halves can be frozen, but cooked squash loses some firmness after thawing. Aim to use them within 2–3 months. For better texture, freeze extra filling on its own and roast fresh squash when you need it.


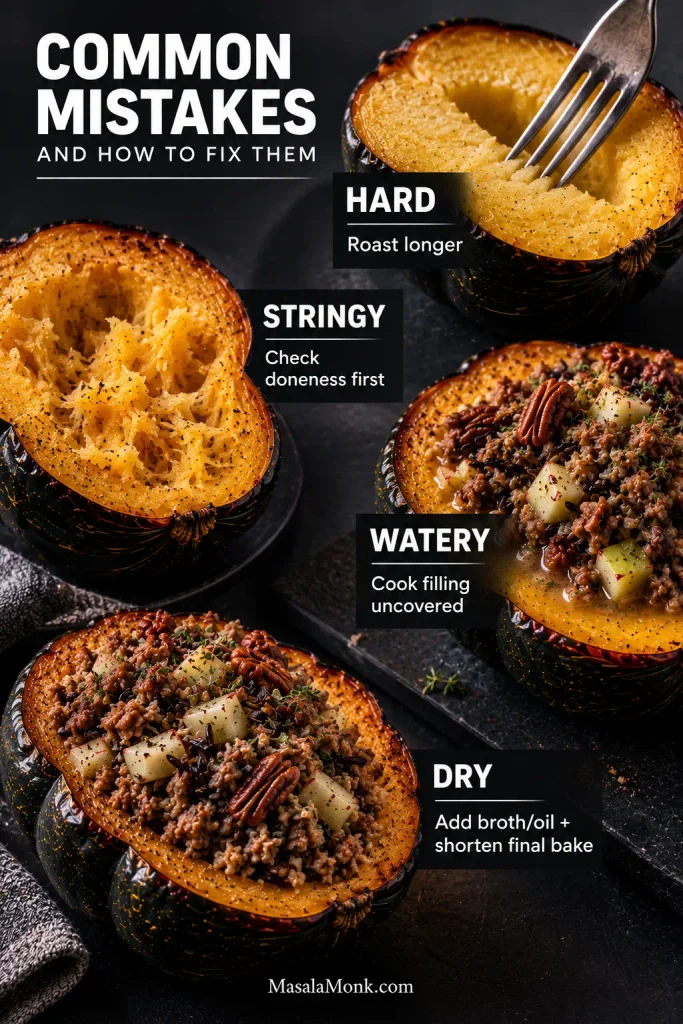
Stuffed Acorn Squash Troubleshooting

Most problems come back to one of three things: the squash needed more time, the skillet held too much or too little moisture, or the stuffed halves stayed in the oven too long.

Troubleshooting graphic showing hard squash flesh, coarse stringy flesh, watery filling and dry filling, with a corrective action for each problem.
Hard flesh points first to under-roasting; coarse stringiness can mean undercooking or an older squash; pooled liquid belongs back in the skillet; dry filling usually needs moisture or a shorter final bake.

Squash and Filling Problems

ProblemWhat to do
Squash is still hardCover the filling loosely with foil and keep roasting until a fork slips into the flesh. Next time, let the squash reach that point before filling.
Squash collapsedIt went too far during the first roast. Pull the halves once the flesh is soft but the rind can still support them.
Filling tastes good, squash tastes blandThe flesh underneath needed more seasoning. Salt it before roasting, then taste a little warm squash before filling.
Filling is greasySpoon excess sausage fat from the skillet after browning. Leave enough to coat the vegetables, but no standing pool.
Filling is dryAdd a splash of broth or olive oil. Lean meat, too much grain or a long final bake can all pull moisture from the filling.
Filling is wateryKeep cooking it uncovered. Apple, vegetables and sausage can all release liquid. The spoon-path test should leave a glossy skillet without liquid flooding the gap.
Dish tastes too sweetLeave out the cranberries and bring the filling back with black pepper, Parmesan, herbs and a little more cider vinegar.
Filling tastes flatCheck the salt first. If it is seasoned but still feels heavy or dull, add cider vinegar in small amounts until the flavors brighten.
Apple disappearedThe flavor will still be fine. Next time, give the apple only 2–3 minutes in the skillet.

Grain, Browning and Leftover Problems

ProblemWhat to do
Rice is hardIt went in undercooked. Wild rice, ordinary rice, quinoa, farro and barley should be tender before assembly.
Exposed grains are dry or crunchyThe stuffed squash baked too long, or the grain was already firm. Once the center is hot and the top has browned, take it out.
Top will not brownOnce the middle is hot, finish it for 1–2 minutes under the broiler.
Frozen leftovers are soft or wateryThat is a normal texture change from freezing cooked squash. Freeze the filling separately next time if texture matters most.

Why Is the Squash Stringy?

Check the doneness first. Undercooked squash can feel fibrous because the flesh still resists the fork. If it is fully tender yet unusually dry, coarse and stringy throughout, the squash itself may be older or lower quality. Firm squash that feel heavy for their size are a better starting point.

What if It Tastes Extremely Bitter?

Stop eating it. An intensely, abnormally bitter squash isn’t something to fix with maple syrup or seasoning. Poison Control advises spitting out very bitter squash and discarding the rest because elevated cucurbitacins can be responsible. Cooking does not make that problem safe.

Stuffed Acorn Squash FAQs

1. Can You Eat Acorn Squash Skin?

Yes. Cooked acorn squash skin is edible, but you don’t have to eat it. Some skins soften nicely; others remain fairly chewy. Eat it if you like the texture, or scoop the soft flesh away from the rind as you would with a baked potato.

2. Can I Use Butternut, Carnival or Kabocha Squash?

Yes. Carnival squash is the closest substitute. Butternut and kabocha vary more in shape, thickness and density, so use tenderness as your guide. The flesh should be nearly tender before the filling goes in.

3. Can I Use Prepared Stuffing Instead of Wild Rice?

Yes. Start with 1½ cups prepared, already-moistened stuffing in place of the 1½ cups cooked wild rice. Add more only if the filling needs it and your squash have room. Don’t add dry stuffing mix and expect it to hydrate during the short final bake. Taste before adding more salt because prepared stuffing may already be well seasoned. Savory herb stuffing or cornbread dressing both work naturally with the sausage, apple and sage.

If the squash is tender and the filling tastes right before assembly, the final bake only needs to heat everything through and brown the top.

Cook it now: Back to the recipe · Back to the top

Posted on Leave a comment

Turkey Gravy Recipe: Easy Homemade Gravy From Turkey Drippings

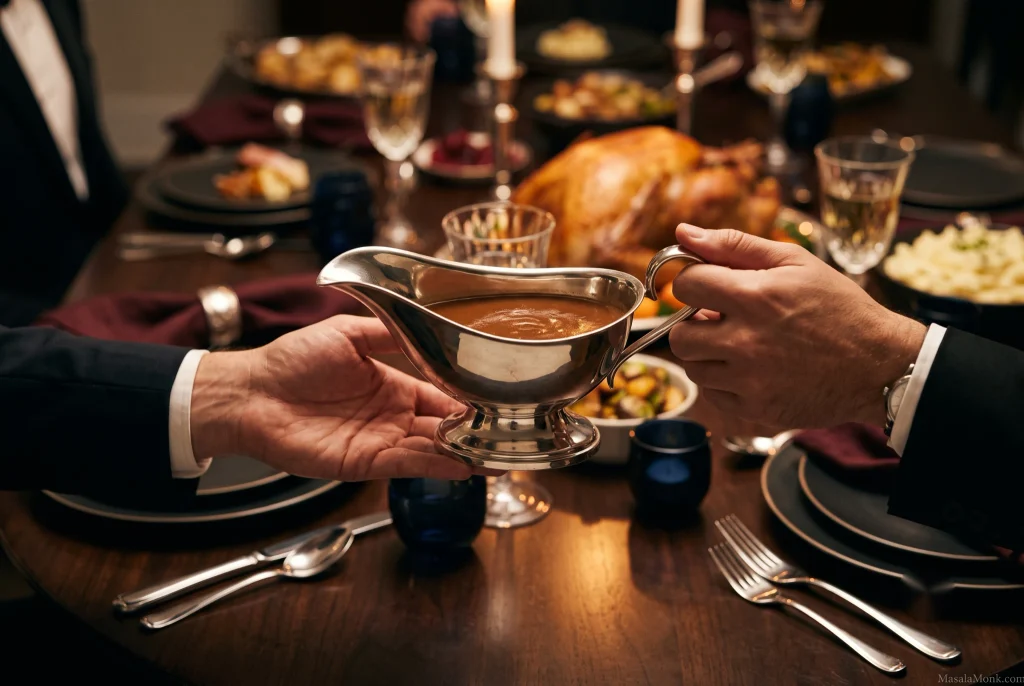
Silver gravy boat pouring glossy brown gravy over carved roast turkey on a dark Thanksgiving table.

The turkey is out, it needs to rest, and the roasting pan is still holding the beginnings of excellent gravy: browned bits, dark pan juices, and rendered turkey fat. Before anyone cleans that pan, give yourself about 20–30 minutes.

No two turkeys leave behind the same amount. A big bird may give you plenty of fat and juice; a turkey breast may leave surprisingly little. Your measuring cup does not need to look like the recipe photo. Separate the fat from the pan juices, measure what you have, and use butter or stock to fill the gaps.

The finished gravy should taste deeply of turkey, coat a spoon in a thin, smooth layer, and still pour easily over the bird, dressing, and mashed potatoes. Keep it slightly loose. It will thicken while it waits.
Quick Answer: Turkey Gravy From Drippings

For roughly 2 cups / 475 ml gravy, start with ¼ cup / 60 ml fat + ¼ cup / about 30 g all-purpose flour + 2 cups / 475 ml total liquid.

Total liquid means the pan juices you choose to use, any stock or water used to deglaze the roasting pan, and enough unsalted or low-sodium stock to reach 2 cups.

If the turkey was brined, injected, heavily seasoned, or smoked, let a spoonful of pan juice cool enough to taste before counting it toward those 2 cups. Use less if it is very salty or smoky, leave bitter or acrid liquid out, and let low-sodium stock make up the rest.

Cook the roux until lightly golden and no longer raw-smelling, add the liquid gradually, then simmer until the gravy lightly coats a spoon but still pours.

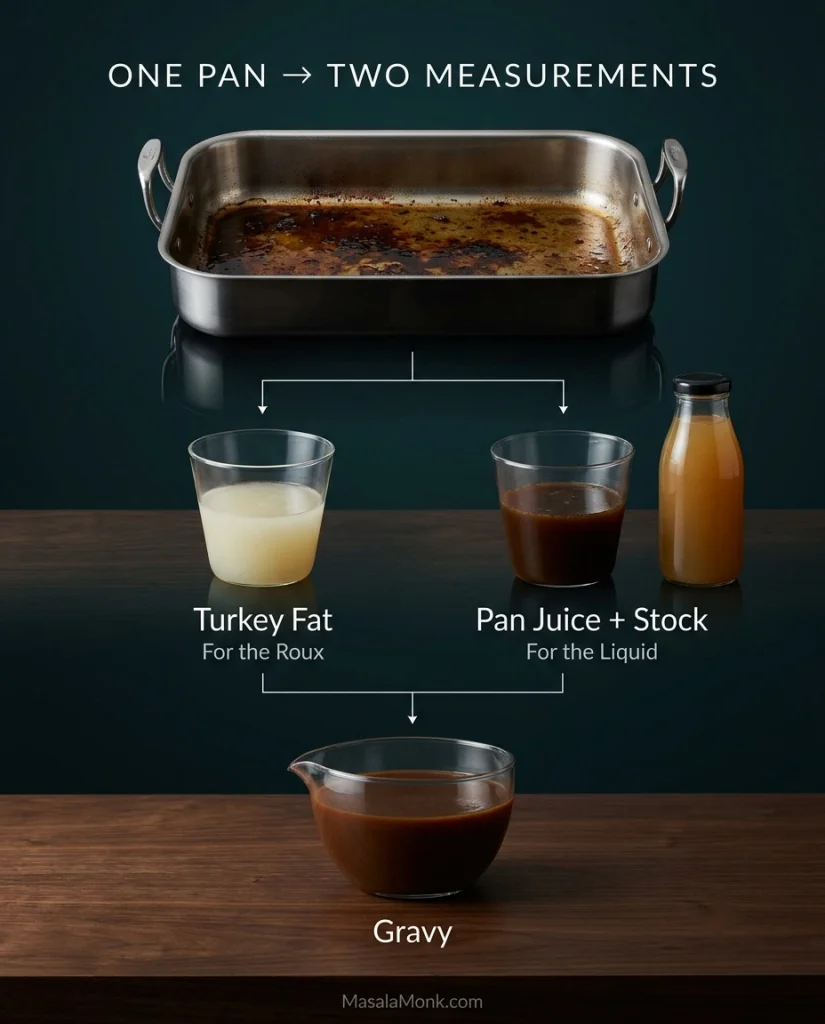
Roasting pan with turkey drippings separated into fat for roux and pan juice with stock for gravy liquid, leading to finished gravy.
Measure the fat and liquid separately; they control different parts of the gravy.

Make It Now: Turkey Gravy While the Bird Rests

Recipe at a Glance

Yield
Roughly 2 cups / 475 ml

Enough for
6 gravy-loving or 8 modest servings

Active time
15–20 minutes

Total time
20–30 minutes

Ingredients

  • Rendered turkey fat, up to ¼ cup / 60 ml
  • Unsalted butter, as needed to bring the total fat to ¼ cup / 60 ml
  • ¼ cup / about 30 g all-purpose flour
  • Defatted turkey pan juices, as available
  • Unsalted or low-sodium turkey or chicken stock, as needed to bring the total liquid to 2 cups / 475 ml; chicken broth works too
  • Freshly ground black pepper, to taste
  • Salt, only if needed at the end

Optional: 1 teaspoon finely chopped fresh thyme or ½ teaspoon finely chopped fresh sage. If using dried thyme or sage, start with ¼ teaspoon. Have ½–1 teaspoon Worcestershire sauce available if you want extra savory depth.
Useful equipment: medium saucepan, whisk, clear heatproof measuring jug, and preferably a fine-mesh strainer. A fat separator is handy, not essential.

1. Save the juices inside the turkey

Before moving the turkey to a board or platter, carefully tilt it over the roasting pan. Hot juices often collect inside the cavity and are easy to lose when the bird is lifted away. Move the turkey to its resting place, then turn back to the pan.

Roast turkey being carefully tilted over its roasting pan so juices drain from the cavity into the pan.
Those cavity juices belong in the pan-juice pool—save them before moving the turkey.

2. Deglaze the well-browned fond

Golden to deep-brown patches stuck to the roasting pan are fond, and they’re where a lot of the gravy’s roasted flavor comes from. Add a few tablespoons of stock or water if the pan needs loosening and scrape the browned patches free. A very dry pan may need a little more liquid.

Pour the deglazing liquid in with the pan juices; it will count toward the final gravy liquid. Leave behind anything black or acrid-smelling.

Liquid being added to a roasting pan as brown fond loosens, with a separate black scorched area left behind.
Deglaze only until the browned fond releases; leave black, acrid residue behind.

If you’re reading ahead before roasting: keep an eye on a pan that is becoming completely dry. Where the turkey recipe allows it, a splash of water can protect the fond before those useful brown deposits scorch.

3. Strain and separate the drippings

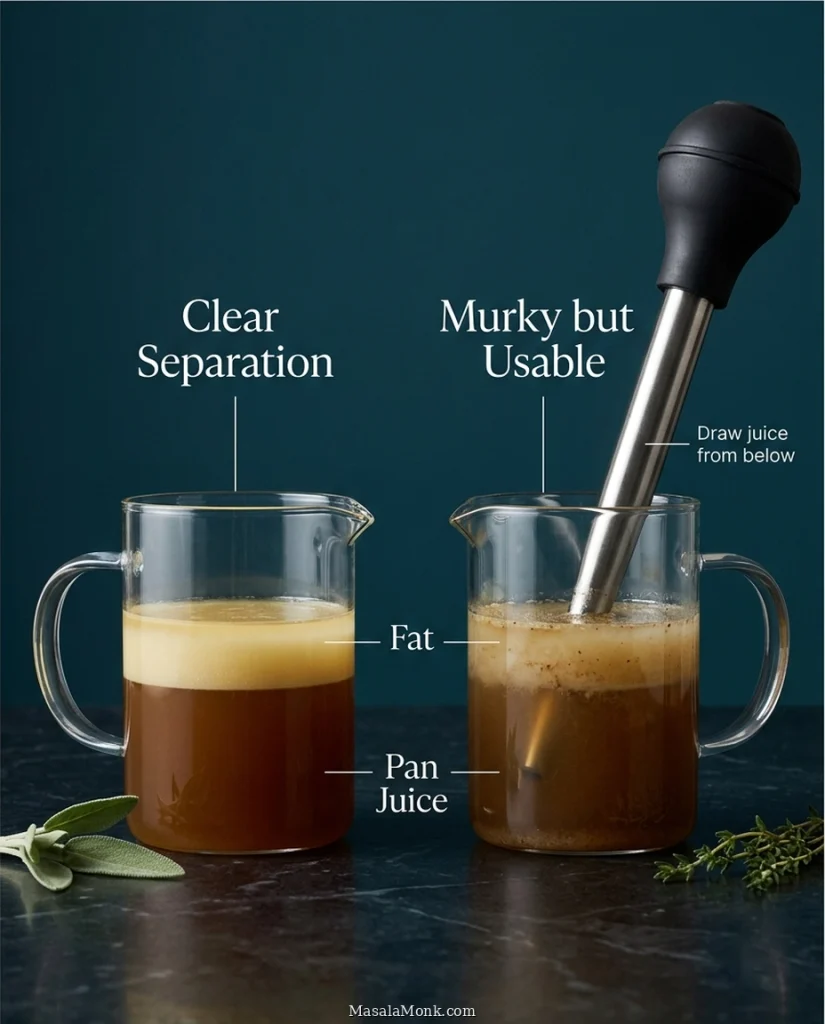
Pour everything through a fine-mesh strainer into a fat separator or clear heatproof measuring jug and let it stand for 5–10 minutes. The fat usually looks paler, clearer, and oily as it rises; underneath is the darker, thinner pan juice.

Some birds leave beautifully distinct layers. Others leave a murky jug that takes a few minutes to make sense of. Either is fine. You only need enough separation to measure the two parts.

No fat separator? Spoon the fat from the top of a clear jug, or use a turkey baster to draw the darker juice from underneath the fat layer.

Two clear containers compare well-separated and cloudy turkey drippings, with pale fat above darker pan juice and a baster drawing juice from below.
Cloudy drippings are fine. You only need to distinguish the oily fat from the darker pan juice.

4. Taste first, then measure what your turkey gave you

Measure up to ¼ cup / 60 ml turkey fat. A lean bird may leave only a spoonful. Keep it, then add unsalted butter until you have ¼ cup total fat. Save any excess turkey fat for another use.

Let a teaspoon of the darker pan juice cool enough to taste. If it tastes concentrated but pleasantly turkey-rich, use it. Very salty or smoky juice is better added gradually, and genuinely bitter or acrid liquid should stay out. Measure however much pan juice you choose to use, including the deglazing liquid you want to keep, then add enough unsalted or low-sodium stock to reach 2 cups / 475 ml total liquid.

For example, if the pan gives you 3 tablespoons turkey fat and ¾ cup / 180 ml pleasantly seasoned pan juice, add 1 tablespoon butter to complete the fat and about 1¼ cups / 295 ml stock to complete the liquid. If that same ¾ cup tastes aggressively salty, use less of it and let unsalted stock make up more of the 2-cup total.

Dark turkey pan juice, tasting spoon, low-sodium stock and a final liquid mixture arranged to show tasting before completing the gravy liquid.
Treat pan juice like a concentrate: taste it first, then decide how much belongs in the gravy.

Using a brined, injected or smoked bird? See the turkey-specific gravy notes ↓

5. Cook a light-golden roux

Put the measured turkey fat and any needed butter in a medium saucepan over medium heat. Whisk in ¼ cup / about 30 g flour. The fat and flour form the roux, the paste that will thicken the gravy.

Cook for 2–4 minutes, whisking regularly. The roux should come together into a wet paste. As it cooks, the raw-flour smell will fade, the mixture will bubble, and the color will move toward pale gold.

If there is an obvious puddle of oil around the roux because too much fat went into the pan, spoon off the excess. Keep the roux light golden: you’ll get some toasted flavor without losing much thickening power.

Three saucepans show just-combined, light-golden and darker roux, with a small example of excess oil being spooned away.
Light golden is enough; darker roux brings more toastiness but less thickening power.

6. Add the liquid gradually

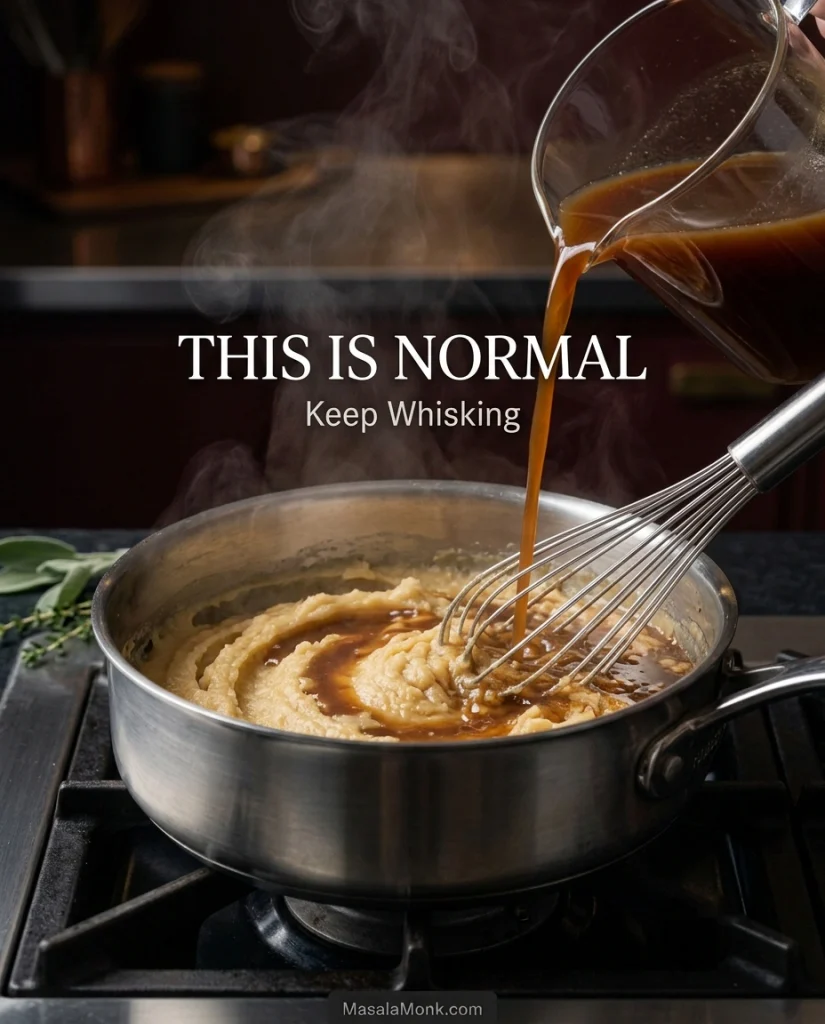
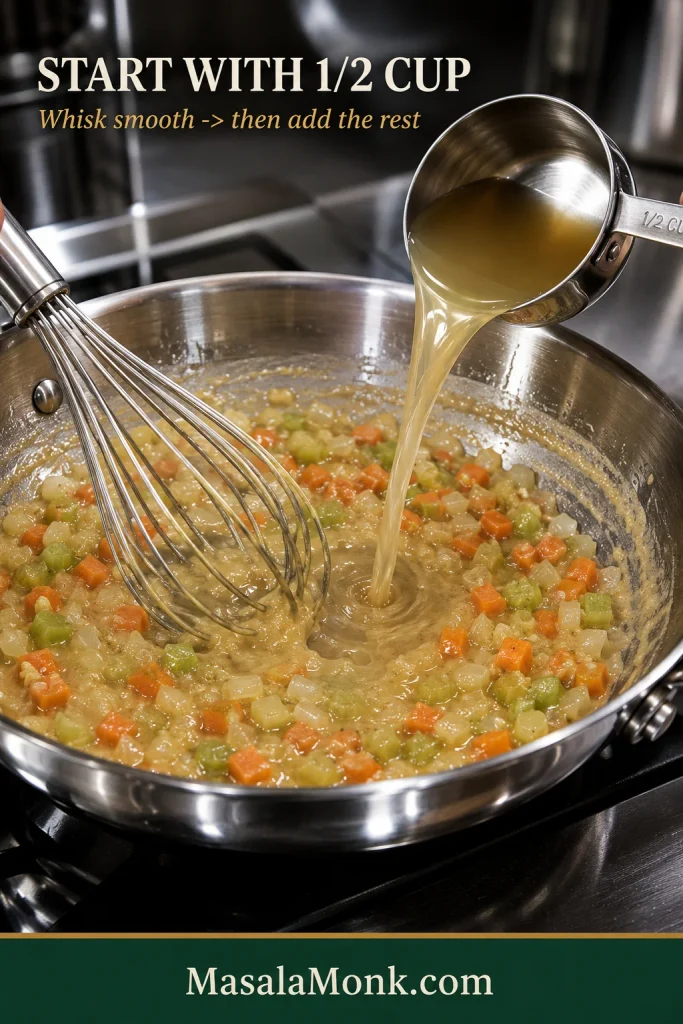
Whisk in a small splash of the measured liquid. The roux may suddenly tighten into something that looks almost like mashed potatoes. That’s normal.

Whisk it completely smooth, add another small portion, and repeat. Once the roux has loosened into a sauce, pour in the rest more steadily. Cold stock works; warming a large batch simply gets it back to a simmer faster.

Liquid being poured into roux while a whisk works through the very thick paste formed after the first addition.
The first splash can turn roux into a thick paste. Whisk it smooth before adding more.

7. Simmer until the gravy tells you it is ready

Bring the gravy briefly to a strong bubble, then lower the heat to a steady gentle simmer. Cook for 5–10 minutes, whisking now and then.

If you’re using dried thyme or sage, add it during this simmer. Give the flour time to work before judging the thickness. As the gravy cooks, the raw-flour smell should disappear and the pan should begin smelling much more like the turkey.

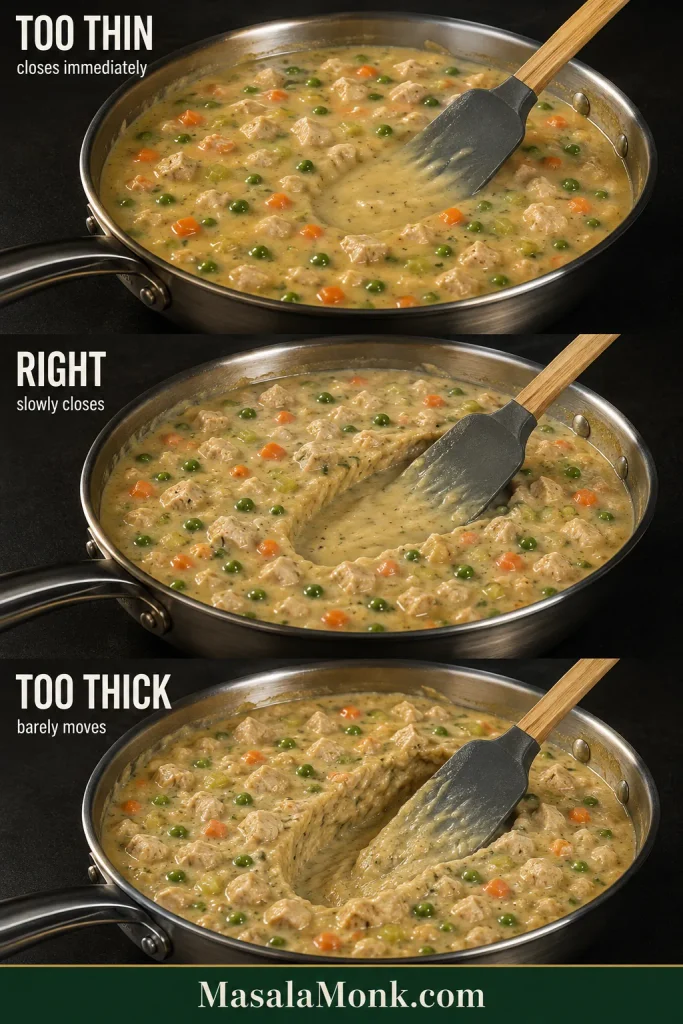
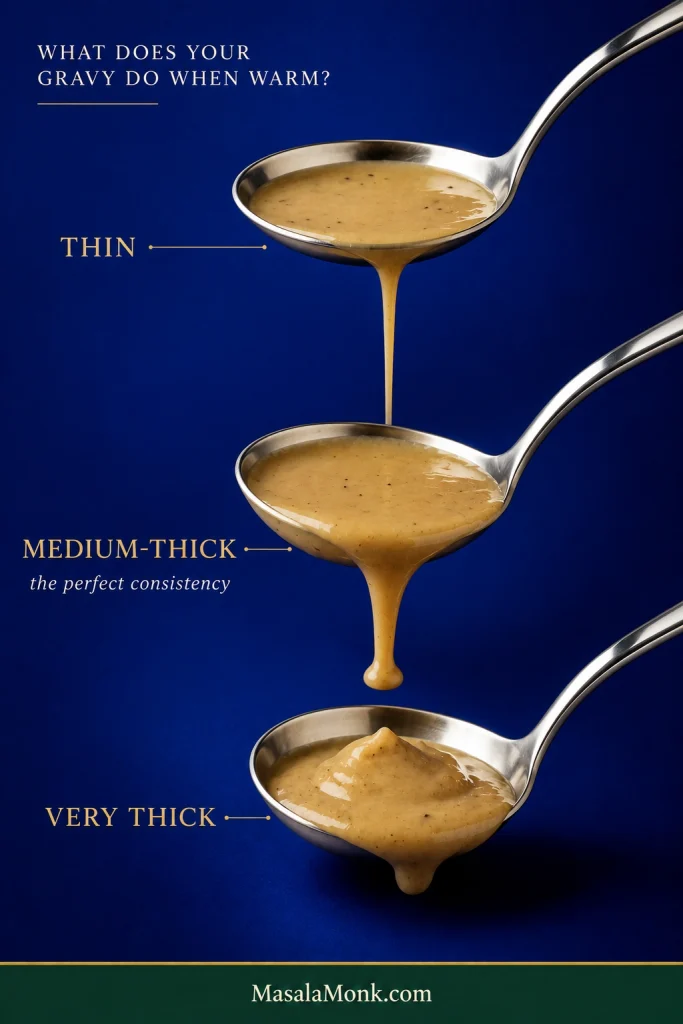
The Spoon Test

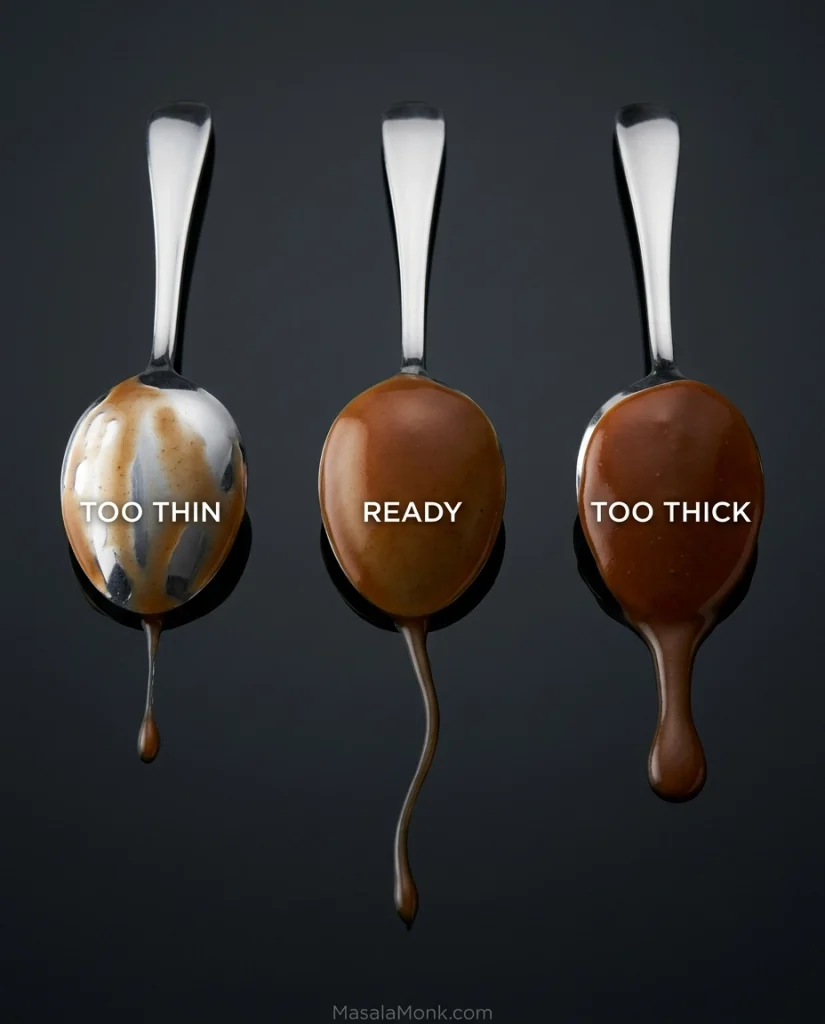
Dip in a spoon. The gravy should leave a thin, even film on the back while still running easily when the spoon is tilted.

  • Too thin: it runs off almost like broth.
  • Ready: it coats the spoon but still flows.
  • Too thick: it sits heavily and barely moves.

The finished gravy should be silky and easy to pour, without an oily film. Stop slightly loose; it will thicken further on its way to the table.

Three identical spoon backs compare gravy that is too thin, ready and too thick based on how heavily it coats and drips.
Judge consistency while hot: ready gravy coats the spoon lightly and still flows.

Taste the finished gravy. Add black pepper, then salt only if it needs it. Stir in fresh thyme or sage, or add Worcestershire gradually and taste.

If a piece of turkey is handy, taste the gravy with the meat before making the final seasoning call. Turkey is mild, and a gravy that seems slightly assertive on the spoon can land perfectly once the two meet.

If the gravy is smooth, savory, and pouring nicely, you’re done. When the pan was unusual—or the saucepan still isn’t quite right—go straight to Gravy ER troubleshooting.

Thanksgiving dinner plate with sliced turkey, mashed potatoes, stuffing, vegetables and glossy brown gravy.

More Help With Your Turkey Gravy

What Turkey Drippings Actually Contain

“Drippings” are really two liquids plus the browned material left in the pan. The pale oily layer is rendered turkey fat, which you use for the roux. Beneath it is the darker pan juice, carrying concentrated turkey flavor and the seasonings from the bird. Fond is the well-browned material stuck to the roasting pan; deglazing pulls it into the liquid. Stock makes up whatever liquid is missing.

Need to separate yours? Go to Step 3: Separate the drippings ↑

Not Enough Turkey Drippings? Here’s How to Adjust

A turkey breast, smaller bird, or lean roasting setup may leave very little behind. You can still make full-flavored gravy.

Suppose you have only 1 tablespoon turkey fat and ½ cup / 120 ml pan juices. Add enough unsalted butter to bring the fat to ¼ cup, then enough stock to bring the liquid to 2 cups.

The same adjustment works with smaller cuts such as turkey tenderloin. Use what the pan gave you, then let butter and stock provide the missing volume.

No usable drippings at all? Make the roux with butter. Use a flavorful low-sodium turkey stock for the liquid—especially one made with the neck or wings—or a good low-sodium chicken stock.

Photographic equations show turkey fat completed with butter and pan juice completed with low-sodium stock for making gravy.
Short on drippings? Keep the ratio and complete the missing fat with butter and liquid with stock.

Got the missing fat and liquid covered? Back to the recipe ↑

How Much Turkey Gravy Should You Make?

Plan on at least ¼ cup / 60 ml per person. For a holiday table where gravy is going over turkey, potatoes, and cornbread dressing, closer to ⅓ cup / about 80 ml per person is more comfortable.

Three increasingly large silver gravy boats represent gravy quantities for tables of about 6, 12 and 18 people.
When gravy serves turkey, potatoes and dressing, rounding up is usually safer than cutting it close.
Approximate batchFatFlourTotal liquid*
1 cup / 240 ml2 tbsp / 30 ml2 tbsp / about 15 g1 cup / 240 ml
2 cups / 475 ml¼ cup / 60 ml¼ cup / about 30 g2 cups / 475 ml
3 cups / 710 ml6 tbsp / 90 ml6 tbsp / about 45 g3 cups / 710 ml
4 cups / 950 ml½ cup / 120 ml½ cup / about 60 g4 cups / 950 ml
6 cups / 1.4 L¾ cup / 180 ml¾ cup / about 90 g6 cups / 1.4 L
*Total liquid includes the pan juices you choose to use, deglazing liquid, and enough stock to reach the listed amount. Finished volume varies somewhat with reduction.

A 4-cup batch may finish slightly above or below 4 cups because simmering changes the volume. Stocks vary too. Use the table to get close, then let the spoon decide.

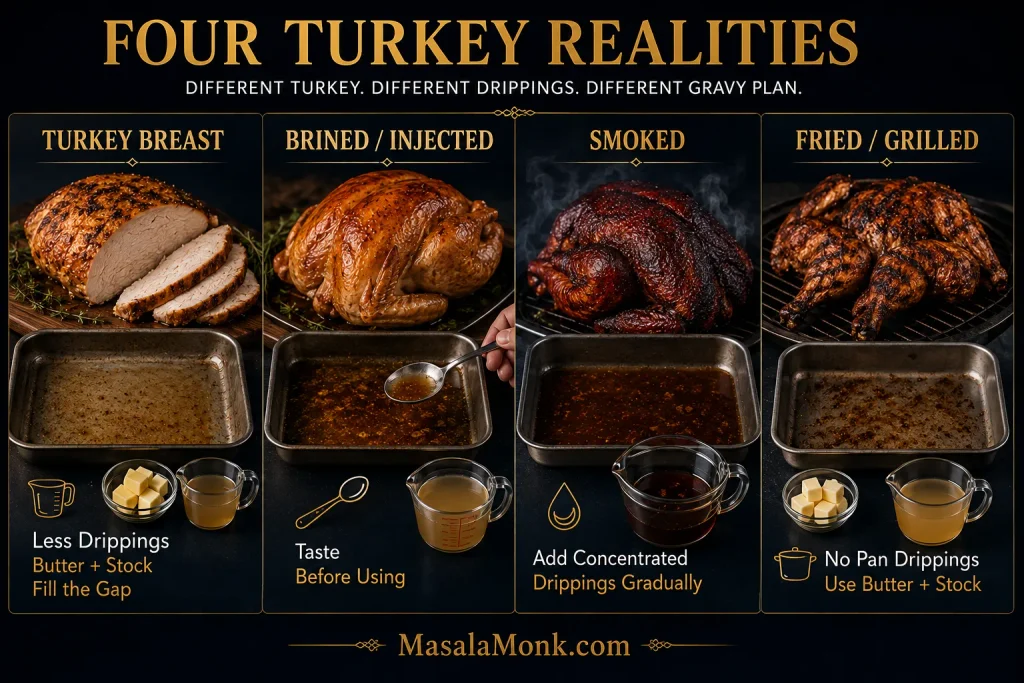
Turkey Breast, Brined Turkey and Smoked Turkey

The basic method holds up across most kinds of turkey; the drippings are what change.

A turkey breast often leaves less fat and liquid, so butter and stock do more of the work. Brined, injected, and heavily pre-seasoned birds may leave plenty of juice, but it can be much saltier than expected. Taste it first and add the pan juices gradually.

With smoked turkey, add the drippings gradually. Smoke and salt become more concentrated as the pan cooks down. When a seasoned smoker pan has lost a lot of moisture, plain water can sometimes be more useful than another pour of broth. Water evaporates; salt does not.

A spatchcocked bird needs no special gravy treatment, and its removed backbone is useful for stock. Fried or grilled turkey usually leaves no roasting-pan drippings, so start with butter and a flavorful stock instead.

Four-panel comparison of gravy approaches for turkey breast, brined or injected turkey, smoked turkey, and fried or grilled turkey.
Turkey breast changes quantity; brining changes salt; smoking changes concentration; frying or grilling may remove drippings entirely.

Ready to use those drippings? Return to Step 4: Taste first, then measure ↑

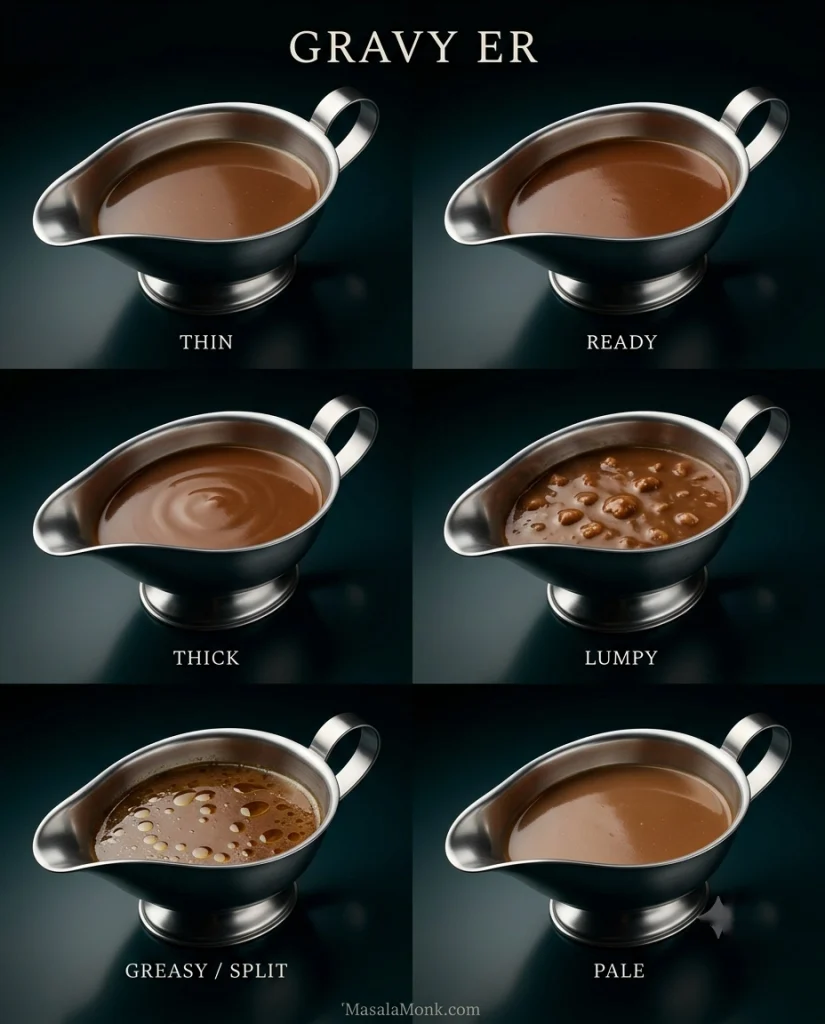
Turkey Gravy Troubleshooting: Gravy ER

This is the point where it is tempting to throw in more flour and hope for the best. Don’t. First work out what is wrong with the gravy in front of you.

Six matching pans compare gravy that is thin, ready, thick, lumpy, greasy or split, and pale.
The graphic compares six visible gravy states: thin, ready, thick, lumpy, greasy or split, and pale.
ProblemDo this now
Too thinSimmer first. If it is still thin, reduce when the salt level allows or use a small cornstarch slurry (cornstarch mixed with cold water).
Too thickHeat it fully before judging, especially after refrigeration. Then whisk in warm unsalted stock 1–2 tablespoons at a time.
LumpyWhisk vigorously. Strain through a fine-mesh sieve if needed; stubborn lumps can be smoothed with a brief pass of an immersion blender.
Greasy or splitSkim visible oil, return the gravy to gentle heat, and whisk. If it still looks separated, a brief pass with an immersion blender can help.
Raw or flouryThe roux was probably undercooked. Continue gentle cooking if the gravy can tolerate it.
Bitter or burntStart again with clean fat and flour, leaving burnt pan residue and bitter liquid behind. Strongly acrid gravy rarely improves with extra seasoning.
Too saltyStop reducing. Add unsalted stock or water; a badly oversalted batch may need to be combined with some plain unsalted gravy.
Bland but thickThe problem is flavor, not starch. Improve the pan juices, stock, or seasoning instead of adding more flour.
Too smoky or herbyDilute with unsalted stock and taste again.
PaleIf it tastes good and the texture is right, leave the color alone.

If the gravy is still too thin

Give flour-thickened gravy a real chance to simmer before reaching for more starch. It can look loose immediately after the stock goes in and change considerably over the next several minutes.

Still thin and not too salty? Let it reduce. If the gravy is already salty, stir together 1 teaspoon cornstarch with 1 tablespoon cold water, whisk in part of that slurry, bring the gravy back to a bubble, and check again before adding more.

A tiny correction is easy to repeat. Turning the saucepan into wallpaper paste is harder to undo.

If the gravy is too salty

Stop reducing. A mild problem may need only unsalted stock or some water. For a badly oversalted batch, make a small amount of plain unsalted gravy and whisk the two together. You usually need only enough neutral gravy to bring the first batch back into balance.

Adjust the thickness after the seasoning is where you want it. Skip the old potato trick; a potato does not selectively remove enough salt from gravy to solve the problem.

Back to the recipe ↑

How to Make Turkey Gravy Taste Better

If the gravy is thick enough but still tastes flat, leave the flour alone. It needs stronger turkey flavor or better seasoning.

More Turkey Flavor

Start with concentrated pan juices and properly deglazed fond. Turkey stock adds more depth than chicken stock when you have it. If you’re planning ahead, the neck or roasted wings can strengthen ordinary stock while the bird cooks.

A concentrated turkey or chicken base can strengthen weak stock too. These concentrates are salty, so start with a small amount and taste before adding more.

Best Seasonings for Turkey Gravy

Black pepper is the easiest finishing seasoning. For a 2-cup batch, try 1 teaspoon finely chopped fresh thyme or ½ teaspoon finely chopped fresh sage. Dried herbs are stronger; start with ¼ teaspoon and give them a few minutes in the simmering gravy.

Worcestershire adds another layer of savoriness. Start with ½ teaspoon; 1 teaspoon total is usually plenty for this size batch. The pan juices may already carry herbs, garlic, citrus, or pepper from the turkey, so taste before adding more seasoning.

Wine, Brightness and Color

For white-wine gravy, add ¼ cup / 60 ml dry white wine or dry sherry after the roux is cooked. Cook until most of the wine has evaporated and the sharp alcoholic aroma has softened, then add the full measured pan-juice-and-stock mixture. Treat the wine as an extra flavoring rather than part of the 2 cups of gravy liquid.

A rich gravy that tastes flat may need only a few drops of sherry vinegar or lemon juice. Add some, taste, and stop as soon as the savory flavors seem brighter. If the gravy starts tasting lemony or vinegary, you’ve added too much.

When the flavor and texture are right, leave a pale gravy alone. Well-browned fond and a light-golden roux will give it natural color.

Flour vs. Cornstarch for Turkey Gravy

For classic turkey gravy, flour is the better default. A flour roux uses the rendered turkey fat and gives the sauce its familiar opaque, velvety body. It also reheats reliably, which matters on a holiday table.

Cornstarch is quicker and produces a glossier sauce. It is useful for small last-minute corrections and also gives you a straightforward gluten-free thickening method.

For roughly 2 cups / 475 ml gluten-free gravy, mix 2 tablespoons cornstarch with 2 tablespoons cold water until completely smooth. Bring the 2 cups of pan-juice-and-stock mixture to a simmer, whisk in most of the slurry, and bring the gravy to a gentle boil for about 1 minute while whisking. Judge the thickness before adding the rest. Cornstarch does not require a roux.

Cornstarch and cold water being combined into a milky slurry before the slurry is whisked into simmering brown gravy.
Mix cornstarch with cold water first so the starch disperses before it meets hot gravy.

To make a smaller correction to flour gravy, use the 1-teaspoon-cornstarch slurry described in Gravy ER above. When the whole gravy must be gluten-free, check labels on stock, bouillon, Worcestershire, and other packaged seasonings as well.

Making Ahead, Storing, Reheating and Keeping Turkey Gravy Warm

Make Turkey Gravy Ahead

For Thanksgiving, the most practical make-ahead option is a concentrated gravy base that leaves room for fresh drippings. Up to 3 days ahead, melt ¼ cup / 60 ml butter, whisk in ¼ cup / about 30 g flour, and cook the roux until light golden. Gradually whisk in about 1½ cups / 355 ml unsalted or low-sodium stock, simmer until smooth, then transfer the base to a shallow container and refrigerate promptly. The base will be thicker than finished gravy; that’s intentional because the fresh pan juice will loosen it on Thanksgiving.

On Thanksgiving, reheat the base while whisking. Let the fresh pan juice cool enough to taste, then whisk in up to about ½ cup / 120 ml of the defatted pan juice you actually want to use. If the turkey gives you less than that—or the juice is too salty or smoky to use freely—add less and use low-sodium stock for the rest. Simmer until the gravy reaches the spoon-test consistency.

Three stages show a thick make-ahead gravy base, defatted turkey pan juice being whisked in, and smooth pourable finished gravy.
Build the stock base ahead; add fresh pan juice on Thanksgiving for the turkey’s final flavor.

If you already have cooked turkey drippings available, fully finished gravy can also be made up to 3 days ahead, refrigerated promptly, and reheated before serving.

Refrigerating and Freezing Turkey Gravy

Transfer leftover gravy to a shallow container and refrigerate promptly; don’t leave it sitting out to cool completely. Use refrigerated gravy within 3–4 days. USDA leftovers guidance recommends refrigerating perishable leftovers within two hours.

For longer storage, freeze the gravy. USDA guidance for gravy gives a freezer window of about 4–6 months. For best quality, use it within that window.

Reheating and Keeping Gravy Warm

Flour-thickened gravy naturally firms as it chills, and gelatin-rich drippings or stock can make it set even more. Reheat it before deciding that it is too thick.

Warm refrigerated gravy gently in a saucepan while whisking. Add stock or water a tablespoon or two at a time if it has tightened in the fridge.

Side-by-side view of the same gravy set and gelatinous when cold, then smooth, glossy and fluid after reheating.
Cold gravy can look much thicker than it really is. Reheat before deciding whether it needs thinning.

Before serving, bring reheated gravy to a rolling boil. Reheated leftovers should reach at least 165°F / 74°C.

The microwave works too when every burner is occupied. Heat in short intervals, stirring or whisking between them so there are no cold pockets, until the gravy is bubbling throughout and reaches 165°F / 74°C.

Gravy often seems to thicken just when everything else needs your attention. If it has to wait, keep it at 140°F / 60°C or above, as recommended in USDA hot-holding guidance, and keep some stock nearby for loosening before serving.

While the gravy waits, finish anything that needs last-minute attention, including a pan of soft dinner rolls. Warming the gravy boat with hot water, then emptying and drying it before filling, also buys you a bit more time.

Left with turkey and gravy the next day? They are already most of the way toward a turkey pot pie, where leftover gravy can become part of the creamy filling.

Turkey Gravy FAQs

Can I use chicken broth instead of turkey stock?

Yes. Unsalted or low-sodium chicken broth or chicken stock works well. The pan juices and fond still give the gravy most of its turkey character.

How much flour do I use per cup of turkey gravy?

Use about 2 tablespoons flour + 2 tablespoons fat for each 1 cup / 240 ml total liquid. The scaling table above follows that same starting ratio.

Can I make turkey gravy directly in the roasting pan?

Yes, provided the roasting pan is safe for stovetop use. You capture the fond directly, but a saucepan usually gives more even heat and easier whisking, especially when a large roasting pan sits awkwardly across two burners.

Can I use the turkey neck and giblets without putting pieces in the gravy?

Yes. Simmer the neck, heart, and gizzard in the stock while the turkey roasts, then strain them out before making the gravy. Leave the liver out unless you specifically want its stronger flavor. This gives you a deeper turkey stock without pieces of giblet in the finished sauce.

For traditional giblet gravy, keep the cooked giblets, chop them, and stir them into the finished gravy.


By the time the gravy boat reaches the table, nobody can tell whether you started with a beautiful cup of drippings or a murky half cup that needed butter and stock.

The uneven fat layer and too-small puddle of juice have disappeared into silky gravy that tastes deeply of the turkey. Then everyone starts passing the gravy boat, and suddenly it doesn’t look quite so large.

Two diners pass a silver gravy boat filled with brown gravy across an elegant Thanksgiving table with roast turkey in the background.

If your pan came from an unusually salty brined bird, a tiny turkey breast, or a smoker that seemed to leave you almost nothing to work with, tell us what happened in the comments. Those odd roasting pans often produce the most useful gravy questions.

↑ Back to top · Recipe Card · Quick Answer

Posted on Leave a comment

Turkey Pot Pie Recipe: Easy, Creamy & Perfect for Leftover Turkey

Deep burgundy pie dish holding a golden turkey pot pie with one serving removed, revealing creamy turkey, carrots, peas and celery beneath the top crust.

Leftover turkey is already halfway to becoming an excellent pot pie.

Maybe there is a container of roast turkey in the fridge, a little gravy, a few vegetables from Thanksgiving dinner—and very little enthusiasm for eating the same plate again. Maybe the breast meat is not as juicy as it was the first night. That is fine. Pot pie gives all of it a different job.

This version keeps the second round of cooking practical: one top crust, refrigerated pie dough if you want it, frozen vegetables if they make dinner easier, and a sauce that adjusts to however much leftover gravy you actually have. You already cooked Thanksgiving dinner; this doesn’t need to become another project. Get the vegetables nearly tender and the filling creamy before the crust goes on, and the payoff is a deeply golden top that cracks under the spoon with tender turkey and savory sauce underneath.

Quick Answer

For one easy 9-inch / 23-cm turkey pot pie, use 3 cups / 12–13 oz / 340–370 g cooked turkey. Cook the vegetables until nearly tender, make a creamy butter-and-flour sauce with broth and milk, then add the turkey after the sauce has thickened.

The creamy filling is made with a simple butter-and-flour roux, broth and milk, so no canned cream soup is needed. Leftover turkey gravy can replace part—or most—of that fresh sauce when you have it.

Transfer the filling to a deep pie dish, leaving 1/2 inch / 1.25 cm of headroom. Let it stand until it is still warm but no longer giving off strong clouds of steam, then cover with a cold top crust.

Bake at 400°F / 205°C for 30–35 minutes, until the pastry is deeply golden and you can see filling bubbling through the vents or around the edges. Rest the pie for 15 minutes before serving. Hands-on work is roughly 35–40 minutes; much of the remaining time is baking, cooling and resting.

Table of Contents


Turkey Pot Pie Recipe

Easy Creamy Leftover Turkey Pot Pie

Servings: 6 generous portions
Dish: Deep 9-inch / 23-cm pie dish
Oven: 400°F / 205°C
Hands-on time: 35–40 minutes
Bake time: 30–35 minutes
Rest time: 15 minutes
Total time: 1 hour 30 minutes to 1 hour 45 minutes

Using leftover gravy? Do not add it to the full standard sauce below. Use the leftover gravy adjustments instead. Omit the 1/4 teaspoon starting salt when using gravy and season only after the gravy and turkey are both in the filling.

Fastest vegetable shortcut: Keep the onion and garlic, but replace the carrot, celery and peas with 2 cups frozen mixed vegetables. Soften the onion first, add the frozen vegetables and cook until hot and any obvious excess water has evaporated, then add the garlic and continue with the flour.

Ingredients

Creamy Turkey Filling

  • 3 tablespoons / 42–43 g unsalted butter, divided
  • 3/4 cup / 115 g finely diced yellow onion
  • 3/4 cup / 95 g carrot, cut into 1/4- to 1/3-inch / 6- to 8-mm pieces
  • 1/2 cup / 60 g celery, finely diced
  • 2 garlic cloves, minced
  • 1/3 cup / 40 g all-purpose flour
  • 2 cups / 480 ml low-sodium turkey or chicken broth
  • 1/2 cup / 120 ml whole milk
  • 1 teaspoon dried thyme
  • 1/4 teaspoon celery seed
  • 1/2 teaspoon freshly ground black pepper
  • 1/4 teaspoon fine salt to start, plus more if needed (omit if using leftover gravy)
  • 3 cups / 12–13 oz / 340–370 g cooked turkey, chopped or loosely shredded into bite-size pieces
  • 3/4 cup / 100 g peas, frozen is fine
  • Up to 1 teaspoon Worcestershire sauce, optional

Crust

  • 1 refrigerated rolled pie-crust round, or 1 chilled homemade pie-dough disc rolled to 11–12 inches / 28–30 cm across
  • 1 large egg + 1 tablespoon milk or water for egg wash, optional but recommended for a deeper golden, glossy crust

Equipment

  • Large skillet or wide saucepan
  • Whisk
  • Silicone spatula or wooden spoon
  • Deep 9-inch / 23-cm pie dish
  • Rimmed baking sheet
  • Small sharp knife

Pie dishes vary in depth. Do not force every spoonful into a shallow dish. Stop when the filling sits about 1/2 inch / 1.25 cm below the rim and bake any extra separately in a small ramekin.

Method

Cook the Filling

  1. Heat the oven. Preheat to 400°F / 205°C and keep a rimmed baking sheet ready.
  2. Cook the vegetables. Melt 2 tablespoons butter in a large skillet over medium heat. Add the onion, carrot and celery and cook for 7–10 minutes, until the onion is soft and a piece of carrot can be pierced with only slight resistance. Add the garlic and cook for 30 seconds, just until fragrant.
Fork testing a small carrot piece in a stainless skillet with softened diced onion and celery. Text reads “Nearly tender — Slight resistance.”
Test a carrot rather than trusting the clock. Slight resistance means it can finish in the oven without a hard center.
  1. Make the roux. Add the remaining tablespoon butter. When it melts, stir in the flour, thyme, celery seed, black pepper and 1/4 teaspoon starting salt. Cook for 1 minute, stirring, until no dry flour remains. Skip the starting salt when using leftover gravy.
  2. Build the sauce gradually. Whisk in only 1/2 cup broth first. Get that small amount completely smooth before gradually whisking in the remaining broth, followed by the milk. This two-stage addition makes lumps much less likely.
Broth being poured from a half-cup metal measure into cooked carrot, onion and celery while a whisk mixes the thick roux in a stainless skillet.
The first small pour loosens the cooked roux into a smooth base before the rest of the broth goes in.
  1. Thicken the filling. Bring the sauce to a gentle simmer and cook for 4–7 minutes. Drag a spatula across the bottom of the skillet: the trail should remain open for a moment, then slowly close.
  2. Add the turkey and peas. Fold them in and heat only until warmed through. If you used the frozen-mixed-vegetable shortcut, add just the turkey here. Taste before adding more salt. When the salt is right but the flavor still seems muted, add 1/2 teaspoon Worcestershire sauce, taste, and add a little more only if it helps.

Assemble, Bake and Rest

  1. Fill the dish. Transfer the filling to the pie dish, stopping about 1/2 inch / 1.25 cm below the rim.
Burgundy pie dish filled with creamy turkey and vegetables to about half an inch below the rim, marked with a 1/2 inch or 1.25 cm bracket.
Leave the marked headroom so bubbling filling stays inside the dish instead of running over the rim.
  1. Let the filling stand. Give it 10–15 minutes, until it is still warm but no longer sending up strong clouds of steam.
  2. Add the crust. Lay the cold pastry over the filling without stretching it. Trim or tuck the edge, cut 3–5 steam vents and brush lightly with egg wash if using.
Two hands gently lowering a round of pie dough over creamy turkey pot pie filling in a deep burgundy pie dish.
Cold pastry should look relaxed over the filling rather than drum-tight. A little natural slack lets the dough settle around the rim as it bakes.
  1. Bake. Set the dish on the rimmed baking sheet and bake for 30–35 minutes, until the pastry is deeply golden and you can see filling bubbling through the vents or around the edges.
Freshly baked turkey pot pie with a glossy dark-golden crust, steam rising and creamy filling bubbling through several vents.
Think of the vents as windows into the filling. Steady bubbling there confirms that heat has reached beneath the browned pastry.
  1. Rest. Leave the pie for 15 minutes. That pause lets the creamy filling settle enough to spoon cleanly while the crust keeps its crisp edge.

Choose Your Leftover Route

Leftover cooking rarely starts with identical containers. For the sauce, pick the route closest to what is actually in your fridge.

What You HaveBest Route
Turkey, no gravyUse the standard broth-and-milk sauce in the recipe
Turkey + about 1/2 cup gravyReplace some broth and use a smaller fresh roux
Turkey + about 1 cup gravyLet the gravy provide more of the sauce and thickening
Turkey + 1 1/2–2 cups gravyLet the gravy become the sauce and loosen only as needed
Other saucy leftoversCount their liquid as part of the filling rather than adding it on top of the full sauce

Your leftovers do not need to match the recipe perfectly. You only need to know what moisture they are bringing with them.

Using gravy? Jump to the leftover turkey gravy guide →

Get the Filling Right

The Leftover Moisture Rule

A cup of leftover vegetables is not always just a cup of vegetables. When a leftover already contains gravy, cream sauce or noticeable cooking juices, reduce the pot-pie liquid to account for it.

Plain green beans and green bean casserole may take up similar room in a measuring cup, but the casserole also brings sauce. Mushrooms release water. Frozen vegetables can carry ice. Roasted vegetables may come with a spoonful of pan juices.

Two identical one-cup glass measures on a red background, one holding plain green beans and the other holding creamy green-bean casserole.
Same volume does not mean the same liquid contribution: saucy leftovers bring part of the pot pie sauce with them.
  • Mostly dry: chopped turkey, peas, drained corn, plain cooked carrots and drained green beans.
  • Moist: mushrooms, icy frozen vegetables, wet steamed vegetables and roasted vegetables stored with juices.
  • Saucy: gravy, turkey stored in gravy, green-bean casserole, creamed vegetables and similar leftovers carrying their own sauce.

The rule is simple: when something brings meaningful liquid, let it replace some of the recipe liquid instead of adding both.

How Thick Should Turkey Pot Pie Filling Be?

Turkey pot pie filling should coat the turkey and vegetables while still moving easily. Drag a spatula across the bottom of the skillet. The trail should stay open for a moment, then slowly close.

Three views of turkey pot pie filling in the same skillet showing too-thin filling that closes quickly, correct filling that slowly closes, and too-thick filling that barely moves.
Aim for the center state before the turkey goes in: the trail pauses, then slowly closes.
What You SeeWhat It MeansWhat to Do
The trail disappears immediately and the vegetables seem to swimToo thinKeep simmering gently
The trail stays open briefly, then slowly closesJust rightAdd the turkey and continue
The filling sits stiffly and barely flowsToo thickAdd broth 1–2 tablespoons at a time

Close enough is fine. Before the crust goes on, look for a filling that still moves but no longer leaves loose liquid pooling around the turkey and vegetables. A few extra minutes of simmering fixes most loose fillings; a splash of broth fixes one that has tightened too far.

Close-up of creamy turkey pot pie filling with irregular pieces of turkey, carrots, peas and celery coated in a glossy pale-golden sauce.
The target is creamy and cohesive—no watery moat around the vegetables and no stiff paste between them.

How to Use Leftover Turkey Gravy

Match the Sauce to the Gravy You Have

If you have about 1/2 cup gravy, replace part of the broth and make a smaller roux. Around 1 cup needs even less fresh flour. Once you have roughly 1 1/2–2 cups of medium-thick gravy, let the gravy become the sauce and add broth only as needed.

Think of gravy as part of the sauce, not an extra ingredient piled on top of it. Gravy replaces broth, while the amount of fresh flour drops as the gravy contributes more thickening of its own.

Gravy itself varies. One batch pours easily once warm; another stands almost like pudding before the heat loosens it. The guide below assumes a medium-thick gravy that coats a spoon once warm.

Three metal spoons against a blue background demonstrating thin flowing turkey gravy, medium-thick gravy that coats the spoon, and very thick gravy that holds a mound.
Warm gravy before judging it; thickness matters just as much as how much you have.
Gravy You HaveStart WithThen Check
About 1/2 cup / 120 ml1 1/2 cups broth + 1/2 cup milk + 2 Tbsp butter + 3 1/2–4 Tbsp / 25–30 g flourSimmer until it passes the spatula-trail test
About 1 cup / 240 ml1 cup broth + 1/2 cup milk + 2 Tbsp butter + 2–2 1/2 Tbsp / 15–20 g flourAdd more thickener only if the warm gravy is unusually thin
About 1 1/2–2 cups / 360–480 ml2 Tbsp butter for the vegetables; gravy plus broth only as needed to loosen; milk optionalStart without fresh flour and adjust after everything is hot

Build the Filling With Leftover Gravy

With 1/2–1 cup gravy: Cook the vegetables in the 2 tablespoons butter listed in the table. Add the garlic and cook for about 30 seconds. Stir in the reduced amount of flour with the thyme, celery seed and black pepper and cook for 1 minute. Whisk in the listed broth and milk, stir in the warm gravy, then simmer until the filling passes the spatula test. Add the turkey and peas and season to taste.

With 1 1/2–2 cups gravy: Cook the vegetables in 2 tablespoons butter. Add the garlic and cook for about 30 seconds, then stir in the thyme, celery seed and black pepper. Add the gravy and warm it through without adding fresh flour. Loosen with broth as needed; add a splash of milk only if you want a creamier filling. Add the turkey and peas, then judge the warm filling before making any further adjustment.

These are starting points, not laws. Very thick gravy may loosen enough on its own once heated, while thin gravy may simply need more simmering. Rich gravy can reduce the need for butter, and salty gravy calls for low-sodium or unsalted broth. Make the final decision from the filling in front of you.

Back to the recipe ↑  ·  Back to top ↑

Use What You Have

Turkey, Broth and Milk

Turkey. Breast meat, dark meat or a mixture all work. Slightly dry turkey is especially welcome here: once coated in creamy sauce and tucked beneath crisp pastry, the breast meat that felt disappointing on the first night stops feeling like the leftover everyone was avoiding. Cooked chicken or rotisserie chicken can replace the turkey in the same amount; taste before adding much salt because rotisserie meat may already be heavily seasoned.

Split food photograph showing slices of slightly dry roast turkey on one side and the same type of turkey coated in creamy pot pie filling with carrots, peas and celery on the other.
The goal is coating, not recooking. Irregular bite-size pieces give the creamy sauce plenty of surface to cling to without asking cooked turkey to become tender again.

Broth and milk. Use turkey broth if you have it; low-sodium chicken broth works very well too and gives you more control when gravy or seasoned leftovers are involved. For a milk-free pie, replace the milk with more broth or use an unsweetened neutral non-dairy milk. The filling will be a little less creamy but still savory.

Vegetables and Thanksgiving Leftovers

For vegetables and Thanksgiving extras, the main question is whether they need cooking, warming or moisture adjustment.

Red-background guide grouping raw carrots, potatoes and mushrooms under “Cook First,” cooked carrots, green beans, corn and potatoes under “Add Late,” and cranberry sauce under “Keep Beside.”
Instead of asking whether a vegetable belongs in pot pie, ask what cooking it still needs. Firm ingredients start early, cooked leftovers arrive late, and cranberry sauce stays beside the pie.
What You HaveBest Way to Use It
Frozen mixed vegetablesUse the 2-cup shortcut in the recipe card and cook off obvious excess water
Already-cooked carrots, green beans or cornFold in near the end; they only need warming
MushroomsCook until most released moisture evaporates
Raw potatoCut into 1/2-inch / 1.25-cm cubes and simmer until just fork-tender before adding
Cooked or canned diced potatoDrain well and fold in late
Green-bean casseroleUse modestly and count its creamy sauce toward the filling liquid
Mashed potatoesUse only a small amount inside; otherwise serve your creamy mashed potatoes alongside
StuffingBetter used as a topping for a different stuffing-topped pot pie than stirred into this creamy filling
Cranberry sauceKeep it for the plate; the tart sweetness works better beside the savory pie

Swap rather than endlessly add. Another cup of this and another cup of that eventually gives you more solids than sauce—or more filling than the dish can comfortably hold.

Back to the recipe method ↑

Keep the Crust Crisp

A single top crust is the easiest route here. You still get flaky pastry in every serving without asking a bottom crust to sit underneath a creamy filling.

Silver serving spoon breaking through the deeply browned top crust of a turkey pot pie, exposing creamy turkey and vegetable filling underneath.
That crisp first fracture is the payoff for getting the moisture right. Flaky top crust gives way to creamy turkey filling below without either texture compromising the other.

For a double-crust version, cool the filling more thoroughly, keep the bottom dough cold and make sure the sauce has already reached the correct thickness before assembly. Our flaky homemade pie crust guide covers the pastry itself.

Whatever crust you use, keep it cold and do not stretch it over the dish. Warm pastry softens before it has a chance to set, while stretched dough tends to pull back as it bakes.

If the rim becomes deeply browned before the center is ready, shield only the edge loosely with foil. By the time the filling is bubbling through the vents and the crust smells toasted and buttery, those refrigerator containers finally feel like dinner again.

Whole golden turkey pot pie in a burgundy dish with strips of aluminum foil wrapped around the outer crust rim while the center remains uncovered.
A narrow foil collar is enough. Covering the whole pie would also trap steam over the center you are still trying to brown and crisp.

Turkey Pot Pie Troubleshooting

Most pot-pie problems come down to moisture, heat or timing, and many are easy to correct before the crust ever goes on.

Six-part turkey pot pie troubleshooting guide showing watery filling, overly thick filling, lumpy sauce, soggy pastry, filling overflowing a pie dish and a darkened crust edge.
Troubleshooting starts with identifying the symptom correctly. Similar-looking pot pies can need opposite fixes, so diagnose what you see before reaching for more broth, flour or bake time.

My filling is watery

Keep it uncovered over a gentle simmer until it passes the spatula-trail test above. Frozen vegetables, mushrooms, roasting juices and gravy can all contribute more water than expected, so let that excess cook away before the pastry goes on.

My sauce looks oily or separated

Very rich gravy can supply more fat than the standard sauce expects, while a hard boil after the milk goes in can make a dairy-based sauce look grainy or separated. Keep the heat gentle and reduce the butter when your gravy already brings plenty of fat.

My leftover turkey is dry

Use it anyway. This is one of the better destinations for dry turkey: the sauce brings moisture to every bite, and adding the cooked meat only after the filling thickens keeps it from spending unnecessary time over the heat.

My filling tastes flat

Check the salt first. A properly salted filling can still taste washed out when the broth itself is weak, in which case a small amount of concentrated turkey or chicken base can deepen it quickly. Add cautiously because those products can be salty.

When the broth already tastes good, try a little more black pepper, a pinch of thyme or 1/2 teaspoon Worcestershire sauce, then taste again.

ProblemLikely CauseBest Fix
Filling too thickToo much reduction or very thick gravyAdd broth 1–2 tablespoons at a time
Lumpy sauceLiquid added to the roux too quicklyWhisk firmly and press small lumps against the pan; if lumping is severe, strain the sauce before adding the turkey
Hard carrots or potatoesPieces too large or not pre-cooked enoughCook firm vegetables until nearly tender before assembly
Soggy underside of top crustVery wet or strongly steaming filling, warm pastry or oven not fully preheatedThicken the filling first, let strong steam subside and use cold dough
Pie overflowedDish overfilledLeave headroom and always bake on a rimmed sheet
Crust edge too darkRim browned before center finishedShield only the edge loosely with foil
Filling runs when servedLoose filling or pie cut too soonUse the spatula test before baking and rest 15 minutes before serving

Back to the recipe method ↑  ·  Make ahead, freeze or reheat →  ·  Back to top ↑

Make Ahead, Freeze and Reheat

For the easiest make-ahead route, prepare the filling and keep the pastry separate. Freezing the filling by itself also gives you the most flexibility.

Four-part storage guide showing turkey pot pie filling with separate pastry, filling in a freezer container, a wrapped unbaked whole pie, and wrapped portions cut from a baked pie.
If crust quality matters most, stop the prep before assembly. If convenience matters more, freeze farther along the process.

Already cooked? Jump straight to reheating →

Make the filling ahead

Cook the filling, cool it promptly and refrigerate it covered. Keep the pastry separate and assemble the pie when you are ready to bake. That prevents raw dough from sitting against moist filling for hours.

Freeze the filling

Cool the filling promptly, chill it completely in the refrigerator, then freeze one pie’s worth in a freezer-safe container. Thaw overnight in the refrigerator, warm it enough to judge the texture again, then assemble with fresh cold pastry. A very thick thawed filling usually needs only a small splash of broth.

Freeze an assembled unbaked pie

Freeze the assembled pie in cookware suitable for both freezing and baking, following the manufacturer’s guidance for temperature changes. Wrap it well once firm. For the most predictable result, thaw it overnight in the refrigerator before baking.

A refrigerator-cold pie may need roughly 5–15 minutes beyond the usual 30–35 minute bake. Start checking at the normal time and continue until the crust is deeply golden and the filling is visibly bubbling through the vents and around the edges. Shield the crust if it browns before the filling is fully hot.

Baking from frozen: Thawing overnight is the more predictable route for this recipe. Direct-from-frozen timing can vary substantially with filling depth and cookware, so use a freezer-to-oven approach only when your baking dish is designed for it and follow the manufacturer’s temperature guidance.

Freeze baked portions

Baked pot pie can also be frozen in portions. It is convenient, although the pastry will normally be softer after thawing and reheating than it was on the first night.

Previously frozen cooked turkey

Previously frozen cooked turkey can still be used when it was thawed safely in the refrigerator. USDA guidance on freezing and refreezing says food thawed in the refrigerator can generally be refrozen, although repeated freezing and thawing may reduce quality.

Refrigerator storage

Older turkey does not become a fresh batch of leftovers simply because it has gone into a pie. When the turkey is already several days old, eat or freeze the finished pot pie promptly rather than treating it as a brand-new storage window.

FoodSafety.gov’s leftover guidance recommends using or freezing refrigerated leftovers within four days and reheating leftovers to 165°F / 74°C.

How to Reheat Turkey Pot Pie

Three-part reheating guide showing an oven-reheated portion, a larger amount of turkey pot pie and a microwave-reheated portion, with a center-temperature reminder of 165°F or 74°C.
Choose the reheating method by what matters most: the oven preserves a crisper top crust, while the microwave saves time. Either way, the center—not just the pastry—should reach 165°F / 74°C.

For the crispiest crust, use the oven. Reheat individual portions at 350°F / 175°C for roughly 15–20 minutes. A larger portion or much of the remaining pie may take 20–30 minutes. Loosely cover pastry that is already dark, then uncover for the final few minutes if it needs to crisp again. Heat the center to 165°F / 74°C.

For speed, use the microwave. Loosely cover an individual portion and heat until the center reaches 165°F / 74°C; around 2–3 minutes at reduced power is a useful starting point for many microwaves. The filling reheats well, but the pastry will be softer.

When exposed filling has become very thick in the refrigerator, stir a small splash of broth into the filling where you can reach it. Pouring liquid over the pastry only makes the crust soggy.

What to Serve With Turkey Pot Pie

Turkey pot pie already brings meat, vegetables, creamy sauce and pastry, so lighter, sharper sides usually balance it best.

A crisp cucumber salad with vinegar, dill and onion gives the rich filling a cool, acidic contrast. A simple green salad, steamed greens or roasted Brussels sprouts work for the same reason.

If cranberry sauce is still in the fridge, a spoonful of cranberry sauce with orange juice beside the pie gives each bite a bright sweet-tart edge.

Serving of creamy turkey pot pie topped with a large piece of golden crust on a dark plum plate, accompanied by sliced cucumber salad and cranberry sauce.
The plate gives one last consistency check. After resting, the filling should support a piece of top crust rather than spread underneath it.

Leftover Turkey, Completely Different Dinner

A container of leftover turkey, half a bowl of gravy and a few odds and ends from the holiday table do not look especially exciting in the refrigerator.

Put them under a crisp golden crust with enough creamy sauce, though, and they stop feeling like a repeat of yesterday’s meal.

Half-served turkey pot pie in a burgundy dish on a dark wooden table with a serving spoon, pastry crumbs, a partly eaten portion on a plate and a dark drinking glass.
By this point, the recipe has done more than clear a few containers from the refrigerator. Yesterday’s turkey and gravy have become a dinner people actually came back for.

If you make yours with leftover gravy or an unexpected Thanksgiving leftover, tell us what found its way into the pie.

Back to top ↑

Posted on Leave a comment

Southern Cornbread Dressing Recipe: Old-Fashioned, Moist & Easy

Southern cornbread dressing in a dark baking dish with a serving removed, showing a golden top and soft interior with onion, celery and herbs.

Southern cornbread dressing has a lightly golden top and a soft, moist center that gives easily to a serving spoon and holds together on the way to the plate.

It is also one of those dishes people may cook only once or twice a year, often for a table full of people who already know exactly how they think dressing should taste. That can make the bowl just before baking feel unusually important: Is it wet enough? Too wet? Did I add too much sage?

This one keeps things straightforward—savory homemade cornbread, a little plain bread, tender onion and celery, butter, broth, sage and eggs. Southern families disagree about plenty of the details; here, cornbread leads the flavor and the finished center stays soft, savory and spoonable.

Quick Answer

Cornbread dressing should look very moist before baking, with the broth soaked through the bread instead of pooling separately underneath it.

For the cornbread used in this recipe, start with 4 cups / 950 mL warm broth, fold gently and leave the bowl alone for 5 minutes. Dry crumbs or a stiff mound mean it needs more. When a spoonful slowly settles and the broth is absorbed throughout the bread, stop adding liquid. A persistent puddle beneath saturated crumbs means the bowl has gone too wet.

Taste and season before adding the raw eggs. Bake in a 9×13-inch / 23×33 cm dish at 375°F / 190°C until lightly golden, set through the middle and at least 165°F / 74°C.

Pan: 9×13 in / 23×33 cm   •   Serves: 10–12   •   Texture: soft, moist and spoonable

Three bowls compare cornbread dressing that is too dry, correctly moistened, and too wet with broth pooling around saturated crumbs.
After the five-minute rest, the middle bowl can move on to seasoning and eggs; the dry and pooled-liquid versions still need correction.

Southern Cornbread Dressing Recipe

Old-fashioned Southern cornbread dressing with tender onion and celery, sage and a soft, moist center with recognizable pieces of cornbread.

Active prep: about 25 minutes with prepared cornbread   •   Bake: 45–55 minutes   •   Rest: 10–15 minutes   •   Total with prepared cornbread: about 1 hour 20 minutes–1 hour 35 minutes

Starting with freshly baked cornbread? Allow extra time for it to cool and dry before the active prep begins.

Equipment

  • 9×13-inch / 23×33 cm baking dish
  • Large mixing bowl
  • Large skillet
  • Baking sheet if drying the breads the same day
  • Aluminum foil
  • Instant-read thermometer

Ingredients

Ingredients for Southern cornbread dressing arranged on a dark blue set: cornbread, white bread, onion, celery, butter, sage, seasoning, eggs and broth.
Cornbread leads; the smaller amount of white bread supports the soft center without turning this into ordinary bread stuffing.

Bread

  • 1 full 10-inch / 25 cm skillet savory Southern cornbread, completely cooled and slightly dried
  • 4 oz / 115 g plain white sandwich bread, about 4–5 standard slices, dried and torn

For the closest match to the method below, use the savory version of MasalaMonk’s Southern Cornbread Recipe. Other homemade and boxed cornbreads can differ in size, sweetness and absorption, so the broth may need to be handled a little differently.

Butter, Onion and Celery

  • 8 tablespoons / 4 oz / 113 g unsalted butter, plus more for the baking dish
  • About 1½ cups / 7 oz / 200 g yellow onion, finely diced
  • About 1½ cups / 6.3 oz / 180 g celery, finely diced

Seasoning

  • 2 teaspoons rubbed sage
  • 1 teaspoon poultry seasoning
  • 1 teaspoon freshly ground black pepper
  • Fine salt, to taste after the first broth soak; broth and cornbread can vary considerably in saltiness

Broth and Eggs

  • Starting broth: 4 cups / 950 mL low-sodium chicken or turkey broth, warmed
  • Reserve broth: up to 1 cup / 240 mL, warmed
  • 3 large eggs

Good homemade turkey broth can replace the chicken broth. Strained juices or drippings from a fully cooked turkey can replace part of it too; use concentrated or salty drippings sparingly.

Think of the last cup of broth as insurance, not a target. Very dry bread may want most of it. Fresher bread may need little or none.

Instructions

1. Dry and Crumble the Breads

If possible, bake the cornbread a day ahead and cool it completely. Breaking it into large pieces gives some of the fresh-baked moisture a chance to escape.

For same-day dressing, spread the cooled cornbread pieces on a baking sheet and dry them at 250°F / 120°C, turning occasionally and beginning to check around 20 minutes. Add the torn white bread too, watching the thinner pieces because they may dry sooner.

The surface feels dry and the pieces break easily when they are ready. The middle no longer feels steamy or cake-soft. There is no need to turn the bread into hard croutons.

Broken pieces of slightly dried cornbread with a matte exterior and porous, still-tender interior crumb.
Slightly dried cornbread gives you more control over broth without becoming hard or crouton-like.

Crumble the cornbread into a large bowl. Most pieces can be small, with a scattering of irregular ½–1 inch / 1–2.5 cm pieces. Uneven crumbs are fine.

Hands crumble cornbread over a bowl, leaving mostly small irregular crumbs with some larger half-inch to one-inch pieces.
Small crumbs absorb and bind; a few larger pieces keep the finished dressing recognizably cornbread.

Raise the oven to 375°F / 190°C when the bread is ready. If you dried it ahead, simply preheat the oven before assembly.

2. Cook the Onion, Celery and Seasonings

Melt the butter in a large skillet over medium heat. Add the onion and celery and cook for 8–10 minutes, stirring occasionally, until tender and translucent. A little color around the edges is welcome.

Add the rubbed sage, poultry seasoning and black pepper for the final 30–60 seconds. When the herbs hit the warm butter, the skillet should smell unmistakably like dressing. Scrape the vegetables and all of that seasoned butter over the bread.

Three pans show diced onion and celery raw, softened and translucent, then cooked with sage and poultry seasoning in butter.
Tender vegetables will not need to cook inside wet bread, while the brief herb bloom seasons the butter.

3. Add the First Broth

Using the linked cornbread or another similarly sized homemade batch, pour 4 cups / 950 mL warm broth around the bowl and fold gently from the bottom.

Using a noticeably smaller or very different batch of cornbread? Start with less broth and work upward instead of automatically pouring in all 4 cups.

As the broth spreads through the bowl, the crumbs become glossy and heavy with moisture while their cornbread texture remains visible. Fold only enough to distribute the liquid.

4. Leave It Alone for 5 Minutes

This is the point where dressing often looks wrong even when it isn’t. Give the bread time to drink before changing anything.

After 5 minutes, fold once or twice. Pale dry crumbs or a spoonful that sits in a stiff mound mean the bowl wants more broth. Add the reserve ¼ cup / 60 mL at a time.

Two bowls compare cornbread dressing immediately after broth is added and after five minutes, when the bread has absorbed more liquid and thickened.
Five minutes changes the picture: give the bread time to absorb the first broth before deciding whether it needs more.

Stop when the bread is moist all the way through and a spoonful slowly settles back into the bowl. Saturated crumbs with a persistent pool of broth underneath have gone too far.

Trust what the bread is doing more than the amount left in the measuring cup.

5. Taste, Season, Then Add the Eggs

Taste the dressing before the raw eggs go in. Add salt as needed, then taste for pepper or another small pinch of rubbed sage.

A hand tastes moistened cornbread dressing from a spoon while three whole eggs wait separately in the background.
After hydration, salt and sage register more clearly—making this the best moment for the final seasoning adjustment.

Go carefully with the sage. Adding another pinch is easy; softening an overwhelmingly herbal pan is not.

Whisk the 3 eggs, pour them over the dressing and fold gently until evenly distributed. Stop tasting once the raw eggs are in.

6. Fill the Baking Dish

Butter a 9×13-inch / 23×33 cm baking dish. Spoon in the dressing and spread it evenly without packing it down.

Making a double batch? Use two 9×13 pans. Keeping the layer close to the original depth helps both pans cook evenly.

Two dark baking dishes filled with moist unbaked cornbread dressing, illustrating the use of two pans for a double batch.
Two pans keep a double batch close to the original depth, so the bake behaves more like the single recipe.

7. Bake Covered, Then Uncovered

Cover loosely with foil and bake at 375°F / 190°C for 25 minutes. Remove the foil and bake another 20–30 minutes, beginning to look in on it around 20 minutes.

Foil being lifted from a steaming cornbread dressing casserole with instructions for 25 minutes covered, then 20 to 30 minutes uncovered until lightly golden.
Covered first protects the center; uncovering later shifts the oven’s job toward browning the surface.

The top turns lightly golden, with deeper toasted patches near some of the edges. Nudge the dish and the middle moves together gently instead of rippling or sloshing like loose batter. The center needs to reach at least 165°F / 74°C.

Take it out while the center still looks moist. The 10–15 minute rest will give it a little more structure.

8. Rest Before Serving

Leave the pan alone for 10–15 minutes. A serving spoon uncovers a moist interior beneath the lightly toasted surface, tender enough to yield and firm enough to reach the plate.

A silver serving spoon lifts rested Southern cornbread dressing from a dark casserole, revealing a soft moist interior beneath the browned top.
The 10–15 minute rest lets the moist center settle without baking away its tenderness.

Serve warm, while the top still has a little toastiness and the center is soft, savory and fragrant with sage and butter.

What Kind of Southern Cornbread Dressing Is This?

There isn’t one Southern dressing rulebook. One family may love a pan so soft it is almost spoon-pudding tender. Another may expect neat squares. Biscuits, white bread, chicken and condensed soup all appear in different family versions.

Three spoonfuls compare scoop-soft dressing, this recipe’s soft and spoonable texture, and a firmer sliceable style.
Two recipes can both be Southern cornbread dressing and land at very different points on this spectrum. Choose the texture you want before changing broth or bake time.

For a lot of cooks, the real reference point isn’t another written recipe at all. It is the pan they remember from Thanksgiving—the one somebody made largely by feel, adding broth until “it looked right.” The cues here are meant to make that judgment easier to recognize and repeat.

Here, cornbread leads the flavor. Onion and celery soften in butter first, sage stays clearly present, and raw eggs help the moist center set. Chicken, sausage and condensed soup can make excellent dressings too; they change the salt, fat and moisture enough to deserve their own balance.

Dressing vs Stuffing

The words overlap heavily in everyday use. A practical distinction is that dressing is commonly baked in its own casserole dish, while stuffing traditionally cooks inside poultry. This recipe is baked separately.

Which Cornbread Is Best for Dressing?

Slightly dried or day-old savory cornbread is easiest to work with because it has room to take on broth. Fresh cornbread works too; give it some time in the low oven first.

Good dressing bread feels dry at the surface and crumbles easily. It does not need to be brittle. Starting with a very moist, cake-soft pan simply makes the broth harder to control.

Three pieces of cornbread compare too-fresh cake-soft crumb, bread ready for dressing with a dry surface and tender crumb, and brittle over-dried bread.
The middle state gives you the most room to build moisture gradually without starting with cake-soft bread.

Why Add a Little White Bread?

The 4 oz / 115 g white bread is a small supporting part of the bowl. Cornbread supplies the flavor; the plain bread gives the tender center a little extra help holding together.

Some Southern dressings use biscuits for a similar reason. Plain sandwich bread stays deliberately quiet here.

Prefer all cornbread? Replace the white bread with 4 oz / 115 g additional dried cornbread. Let the first broth soak in before reaching for more, since an all-cornbread bowl may absorb differently.

Can I Use Jiffy or Another Corn Muffin Mix?

Yes, but expect a sweeter flavor and different absorption. Boxed mixes and other homemade recipes can also produce a smaller or larger amount of cornbread.

When the amount differs noticeably from the linked recipe, add the broth gradually. A smaller batch may need considerably less than 4 cups, while a larger or drier batch may take more.

Two bowls with different amounts of crumbled cornbread beside different starting amounts of broth, illustrating starting lower and adding broth as needed.
Batch size changes absorption capacity. A smaller boxed or homemade cornbread batch should not automatically receive the full broth amount.

How Much Sage—and What Do the Eggs Do?

Start with 2 teaspoons rubbed sage plus 1 teaspoon poultry seasoning. After the broth has soaked into the bread, taste and make any final adjustment before the eggs go in.

Rubbed Sage vs Ground Sage

Ground sage is much finer and packs more tightly into a measuring spoon than fluffy rubbed sage. A teaspoon-for-teaspoon swap can therefore taste considerably stronger.

Using ground sage? Begin cautiously. Poultry seasoning often contains sage as well, so check the label if you want a milder sage flavor or need to avoid it altogether.

Two measuring spoons compare fluffy leafy rubbed sage with fine, dense ground sage on a dark blue background.
Ground sage packs more densely than rubbed sage, so start conservatively and adjust after the broth soaks in.

Do You Put Eggs in Cornbread Dressing?

Raw eggs help the very moist dressing set as it bakes. Chopped hard-boiled eggs are a separate family-style addition.

Raw eggs in a glass bowl are labeled as helping dressing set, while chopped hard-boiled eggs are shown as an optional family-style texture addition.
Think structure versus texture: raw eggs help the dressing set; chopped boiled eggs change the bites you encounter.

Using eggs—or not using them—is a family and regional choice, not a test of whether dressing is “really Southern.” Plenty of long-standing versions exist on both sides.

If the dressing you grew up with had chopped boiled eggs, keep them if that’s the version you love. They bring their own flavor and texture; they do not replace the raw eggs used here for structure.

Leaving the raw eggs out entirely changes how this formula sets, so an intentionally eggless dressing is better balanced from the start as its own version.

How Wet Should Cornbread Dressing Be Before Baking?

Very moist and slowly settling is the goal. The bread is moist all the way through, from top to bottom. There are no dry pockets and no free liquid underneath.

This soft Southern dressing looks considerably wetter than cubed bread stuffing. Draw a serving spoon through the bowl and the path gradually relaxes instead of staying sharply open.

A spoon creates a shallow channel through very moist unbaked cornbread dressing; the soft sides of the trail begin to relax inward without pooled broth.
The groove should be temporary. Correctly moistened dressing slowly relaxes toward the spoon trail; a stiff trench points dry, while liquid collecting in it points too wet.
StateWhat It Looks LikeWhat to Do
Too dryDry crumbs remain and the mixture sits stifflyAdd warm broth ¼ cup / 60 mL at a time
Just rightThe bread is moist through, crumb texture remains, and a spoonful slowly settlesStop adding broth
Too wetThe crumbs are saturated but broth still gathers separately after restingFold in additional dried bread before adding the eggs

Freshly added broth can look alarmingly loose for a few minutes. Let it soak in. What matters is whether free liquid remains after the bread has had a chance to absorb it.

Soft Is the Goal; Paste Is Not

Soft dressing can be extremely tender and still show recognizable pieces of cornbread. Gummy dressing has lost that crumb and feels more like paste.

Very fresh bread, crumbs worked too fine, excess broth and aggressive mixing can all push the bowl in that direction. Extra oven time can remove moisture; it cannot rebuild crumb texture that has already broken down.

Bowl looks right? Back to the recipe. Still unsure? Go to troubleshooting.

Pan Size and Doneness for Cornbread Dressing

A standard 9×13-inch / 23×33 cm dish gives the dressing a comfortable depth for an even bake. Go deeper and the center needs more time; use a shallower dish and the surface browns and dries faster.

Look, Move, Measure

  • Look: the surface is lightly golden, with deeper toasted patches near some of the edges.
  • Move: the center shifts together gently when the dish is nudged; loose batter would ripple or slosh.
  • Measure: the middle reaches at least 165°F / 74°C.
Three-part doneness guide shows lightly golden cornbread dressing, a hand nudging the casserole, and a thermometer reading 165°F / 74°C in the center.
No single doneness cue is enough: browning can get ahead of the center, movement shows the set, and 165°F / 74°C confirms temperature.

Once the top looks right, the middle moves together and the thermometer says 165°F / 74°C, it is done. Don’t leave it in waiting for a firm center; the rest will take care of the final bit of setting.

For a moist dressing like this, gravy is an extra pleasure rather than the only thing keeping the serving from tasting dry.

Cornbread Dressing Troubleshooting

Your best rescue window is before the eggs. Broth, dry bread, salt and herbs are much easier to adjust then. Once the pan is baking, time and foil are your main tools.

Before Baking

Dry and stiff: Let the existing broth soak in first. If dry crumbs remain, add warm broth ¼ cup / 60 mL at a time.

Broth pooling underneath: Saturated bread plus persistent free liquid means the bowl is too wet. Fold in additional dried bread before adding the eggs.

Bland: Add salt, then reassess the pepper and herbs.

Too much sage: Dilute with unseasoned dried bread and enough broth to restore the soft, moist texture.

Crunchy onion or celery: Return the vegetables to the skillet and cook until tender before continuing.

During or After Baking

Center still wet or loose: Keep baking. If the top is already well browned, cover the dish loosely with foil. A deeper casserole may simply need longer through the middle.

A hand loosely covers browned cornbread dressing with foil because the center is still loose, with instructions to continue baking to 165°F / 74°C.
If the top browns first, loose foil protects it while the softer center finishes cooking.

Gummy or pasty: More baking may remove moisture, but it cannot fully restore crumb texture after the bread has been overworked or oversaturated.

Too firm or cakey: The bowl was probably too dry, or the pan stayed in the oven too long. Gravy helps at the table; next time leave the mixture wetter or pull it sooner.

Three spoonfuls compare ideal moist cornbread dressing, gummy pasty dressing with lost crumb structure, and firmer dry cakey dressing.
The crumb often reveals what went wrong: gummy dressing has lost its bread structure, while firm or cakey dressing usually points to a drier mixture or longer bake.

Falls apart: Give it the full 10–15 minute rest first. If it remains very crumbly, the mixture was likely too dry or the center needed more time.

Problem solved? Back to the recipe.

Simple Substitutions

A missing vegetable does not mean Thanksgiving is cancelled.

No celery or onion: Either can simply be left out. Omitting both gives you a plainer dressing, but the recipe still works.

No chicken broth: Turkey broth is the closest substitute. Vegetable broth works too, though it gives the dressing a different savory background.

All-cornbread dressing: Replace the 4 oz / 115 g white bread with the same amount of dried cornbread. Let the bread absorb the broth before adding more; an all-cornbread mixture may not need exactly the same amount.

How Much Cornbread Dressing Do You Need?

One 9×13 pan gives about 10–12 side servings. For a crowd, use more pans rather than building one unusually deep casserole.

Overhead serving guide shows a half batch for 5–6 people, one pan for 10–12, two pans for 20–24, and five pans for about 50 people.
Scale sideways rather than deeper: keeping similar pan depth preserves the recipe’s familiar center-to-edge bake.
PeopleAmountPan Setup
5–6½ batch8×8 in / 20×20 cm or similar; begin checking earlier
10–121 batchOne 9×13 pan
20–242 batchesTwo 9×13 pans
About 50About 5 batchesFive 9×13 pans when several other substantial sides are being served

For very generous servings or planned leftovers at a 50-person meal, make six pans.

Mix one or two batches at a time instead of wrestling with one giant bowl. It is easier to see how the bread is taking up the broth and easier to season evenly.

If you’re trying to match a particular family style before a big holiday, a half batch also gives you an easy way to dial in the moisture and seasoning for the version you remember.

Make-Ahead Southern Cornbread Dressing for Thanksgiving

Yes. Bake and dry the breads and cook the onion and celery ahead, then bring everything together close to baking.

Don’t fully assemble the dressing with broth and raw eggs the night before. Keep the dried breads separate from the refrigerated ingredients, then combine them on bake day.

Make-ahead cornbread dressing components kept separate: dried cornbread and white bread, cooked onion and celery, broth, and three whole eggs, labeled to combine on bake day.
Make-ahead dressing works best when prep does not lock in the final moisture level. Keep the liquid separate so absorption can be judged on bake day.

If you’re responsible for the dressing this year, getting the bread and vegetables out of the way ahead of time takes a lot of pressure off Thanksgiving morning.

WhenWhat to Do
1–2 days aheadBake the cornbread, cool it completely and begin drying it
Day beforeFinish drying both breads. Once completely cool, keep them covered and dry. Cook the onion and celery and refrigerate them. Keep broth and eggs refrigerated separately.
Bake dayCombine bread, vegetables and broth; adjust the moisture and seasoning; add the eggs; bake
Serving timeLet the finished dressing rest 10–15 minutes before serving

This also follows USDA stuffing food-safety guidance, which recommends preparing wet and dry ingredients ahead separately and combining them close to cooking.

If oven space is the bigger Thanksgiving problem, MasalaMonk’s Sweet Potato Casserole is another side that can be largely prepared ahead.

Keeping Dressing Warm Without Drying It Out

Holding it hot for a delayed meal? Keep the dressing at 140°F / 60°C or warmer. Otherwise, refrigerate it within 2 hours.

For a short delay, leave the pan covered so the surface holds onto more of its moisture. That also gives you a little breathing room to finish something best served fresh, such as soft dinner rolls.

Storage, Freezing and Reheating

Refrigerate: Transfer leftovers to reasonably shallow containers and refrigerate within 2 hours. Use refrigerated dressing within 3–4 days.

Freeze: Freeze cooked dressing in practical meal-size or family-size portions. For best quality, use it within about 2–3 months.

Reheat: Cover the dressing so it holds onto steam. A dry-looking portion can take a small splash of broth before reheating. Heat the center to 165°F / 74°C, uncovering near the end if you want a little texture back on top.

For the storage guidance behind those refrigerator and freezer times, see the FoodSafety.gov Cold Food Storage Chart.

The Dressing We Are After

The most important moment arrives before the oven door closes.

The bread is thoroughly moist. You can still see pieces of cornbread. The onion and celery are tender, and the sage smells warm and savory in the butter.

Then the oven takes over. The edges toast, the middle sets softly, and the bowl that looked almost suspiciously wet becomes dressing that gives easily under the spoon.

That is what the measurements and checkpoints are really for: turning “add broth until it looks right” into something you can recognize for yourself.

Hands serve steaming Southern cornbread dressing from a dark casserole onto a blue plate, showing a golden top and soft moist interior with onion and celery.
The payoff: a generous serving holds together on the way to the plate, then gives easily under the fork.

Once you can look at the bowl and know it is ready, Southern cornbread dressing stops feeling like a once-a-year gamble.

Back to top ↑