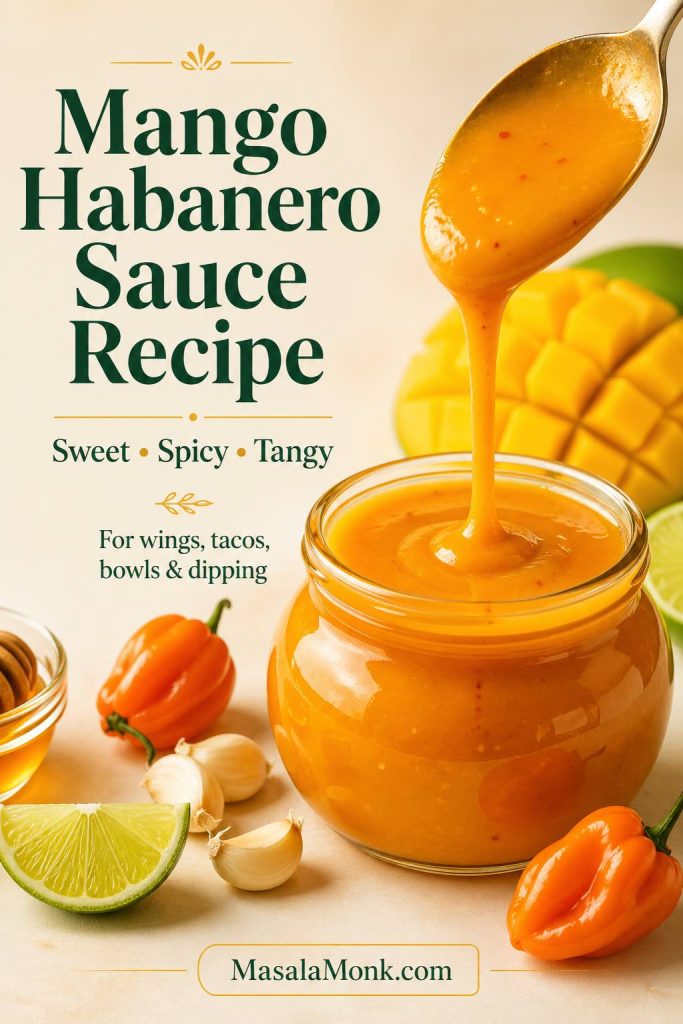
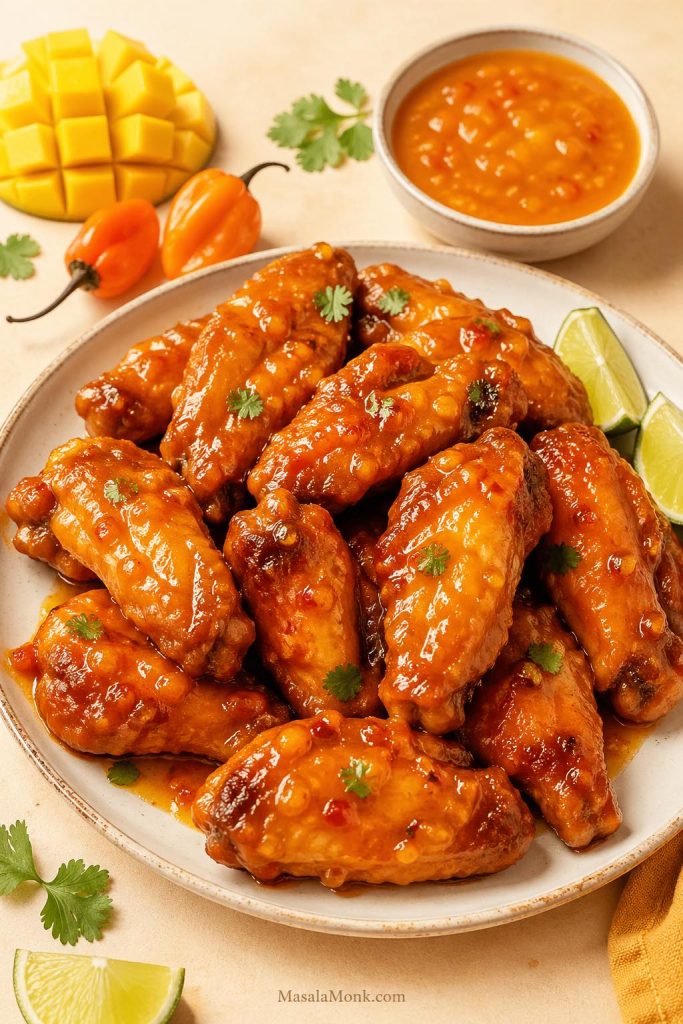
A good mango habanero sauce recipe should taste fruity, fiery, tangy, and balanced. The mango should come through clearly, the habanero should bring real heat, and the vinegar, lime, salt, garlic, and onion should keep the sauce sharp enough for wings, tacos, grilled chicken, shrimp, fish, paneer, tofu, burgers, wraps, fries, and rice bowls.
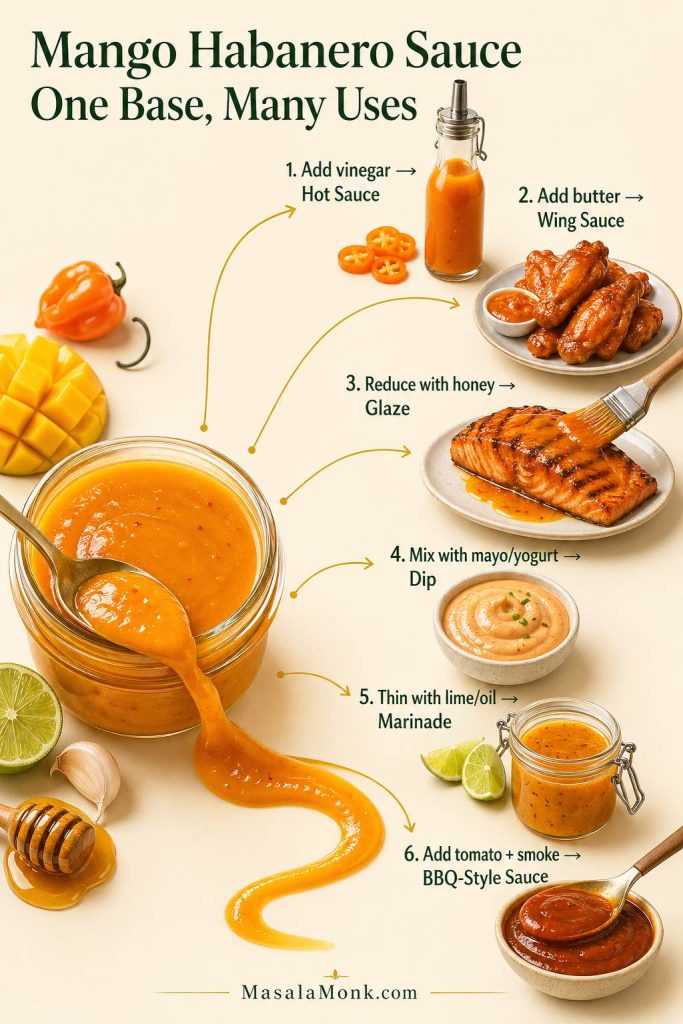
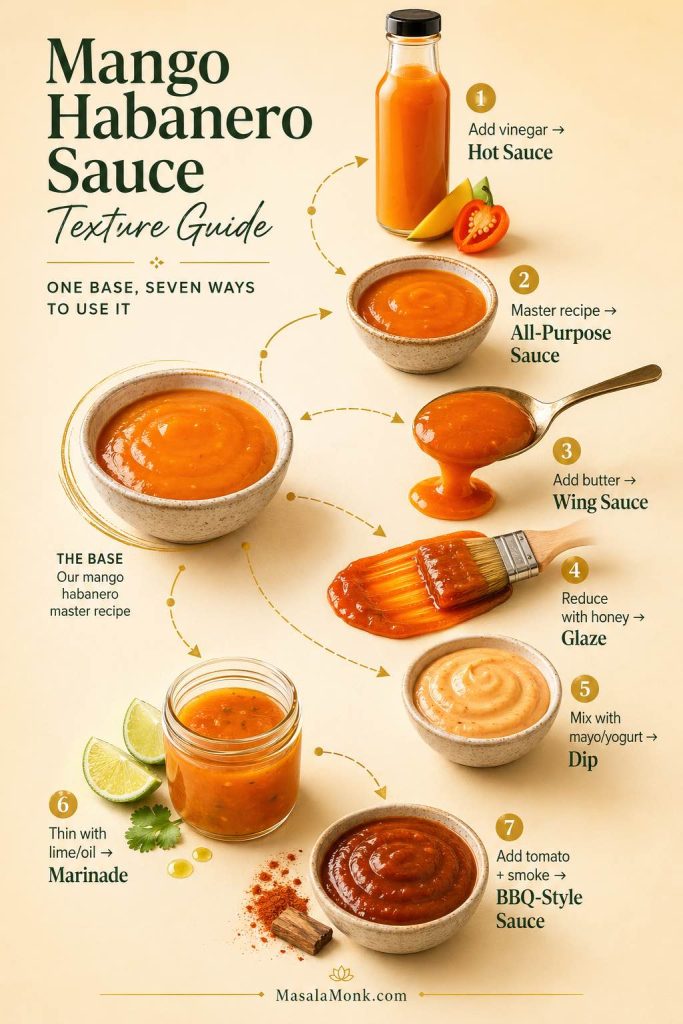
The useful part is that this homemade mango habanero sauce starts with one flexible base. From there, you can thin it into hot sauce, finish it with butter for wings, reduce it into a glaze, stir it into a creamy dip, or push it toward a BBQ-style sauce. Instead of locking you into one narrow version, it shows you how to control heat, texture, sweetness, acidity, and storage.
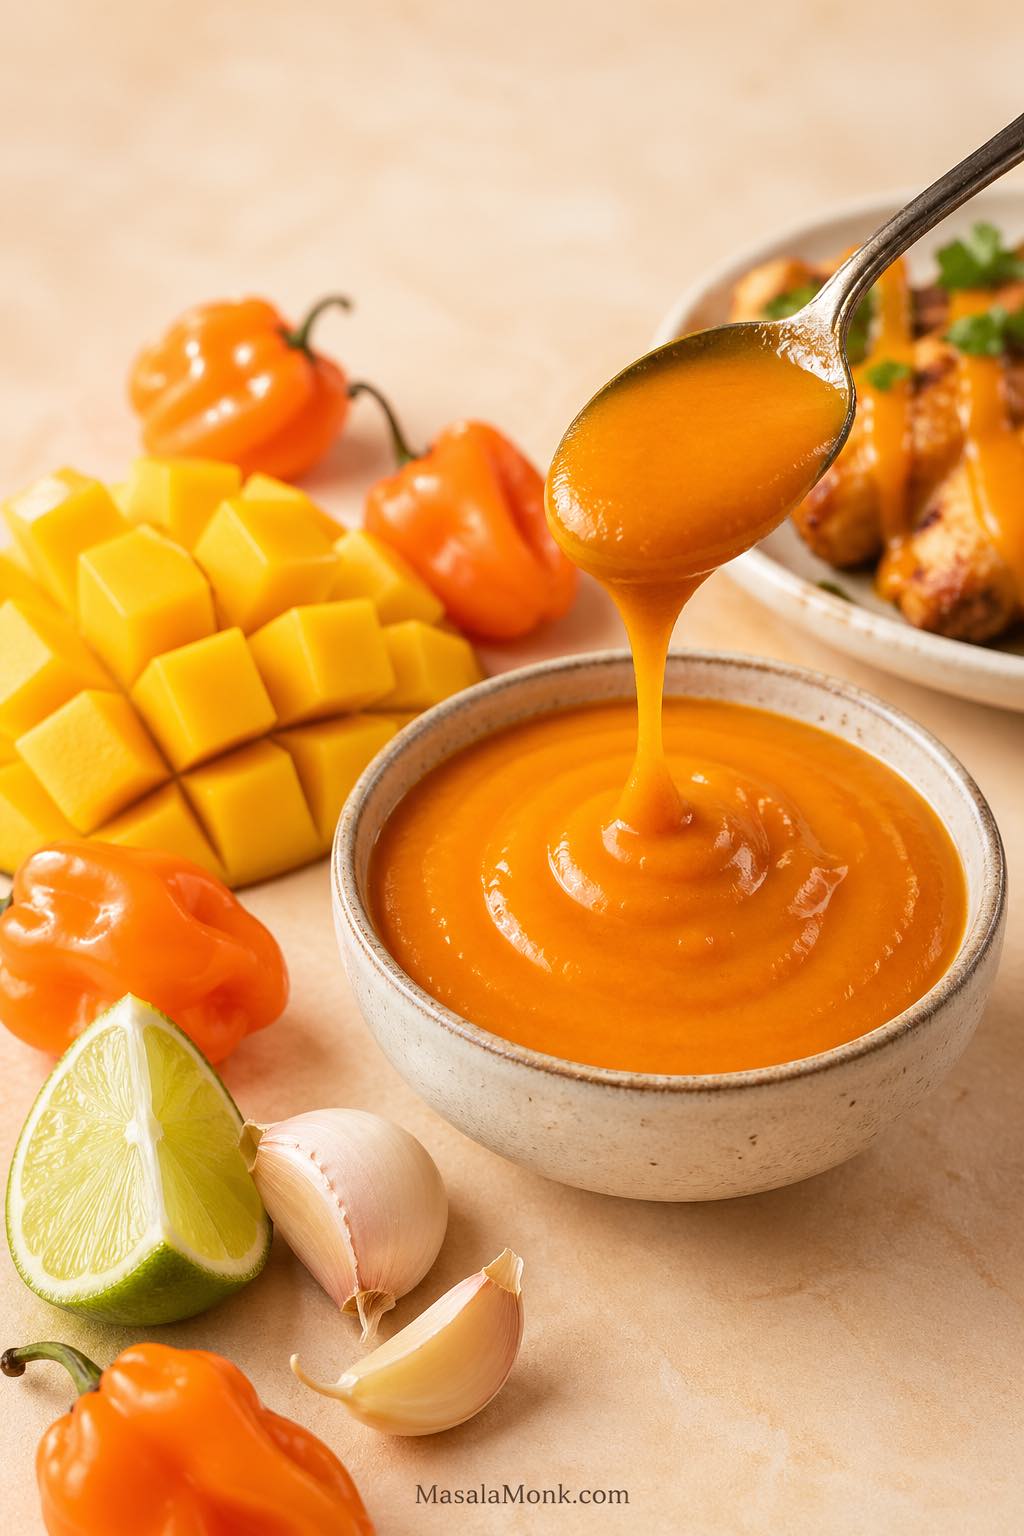
Here, the sauce starts as a cooked blender mango habanero sauce: mango, habanero, onion, garlic, vinegar, water, and salt simmer first, then everything is blended smooth and finished with lime juice and sweetener. As a result, the finished sauce tastes rounder than a raw blend, smoother than a salsa, and more useful than a plain vinegar hot sauce.
It is also easy to make. The base simmers in one pan, then blends into a smooth, pourable sauce without special hot sauce equipment. For that reason, you can make a bold homemade hot sauce at home without fermenting, canning, or buying specialty tools.
The one thing to respect is the habanero itself. It is seriously hot, so this recipe gives you a clear heat guide before you cook. Start with one pepper for a medium-hot mango habanero sauce, use two for a properly hot version, and only go beyond that if you already know you love very spicy sauces.
Table of Contents
Quick Answer: What Is Mango Habanero Sauce?
Mango habanero sauce is a sweet-spicy homemade sauce made with ripe mango, habanero peppers, vinegar, lime juice, garlic, onion, salt, and a little sweetener. In this recipe, the sauce is cooked and blended, so it becomes smooth, bright orange, fruity, tangy, and hot.
Unlike mango mustard sauce, this mango habanero sauce recipe is hotter and more chili-forward. Where mango salsa stays chunky and fresh, this sauce is cooked, blended, and pourable. Amba sauce, by contrast, leans more sour and pickle-like, while mango habanero sauce is sweeter, fruitier, and built around habanero heat.
Its biggest advantage is flexibility. For example, you can drizzle it over tacos and eggs, toss it with wings, brush it onto grilled shrimp or salmon, serve it with fries, or spread it inside burgers and wraps.
This version is best for readers who want a homemade mango habanero sauce that is hot but still usable, not a sauce so fiery that it only works a few drops at a time.
Why This Mango Habanero Sauce Recipe Works
The balance starts with the mango. It gives the sauce body, color, and natural sweetness. The habanero brings the heat, but it also adds a floral, fruity aroma. Meanwhile, vinegar and lime keep everything sharp, while salt makes the mango and chili taste complete.
Cooking the base first also matters. It softens the onion, garlic, mango, and habanero before blending, so the finished sauce tastes rounder instead of raw or harsh. As a result, the cooked base tastes smoother, while the lime added at the end keeps the sauce bright.
That balance makes the sauce flexible at home. For example, keep it medium-thick for dipping, thin it with extra vinegar for hot sauce, finish it with butter for wings, or reduce it into a glaze for grilled food.
What Does Mango Habanero Sauce Taste Like?
At first, mango habanero sauce should taste fruity and bright. After a few seconds, the habanero heat should build. The mango gives the recipe ripe tropical sweetness, the vinegar and lime keep the sauce tangy, and the habanero adds a floral heat that lingers.
A good batch should not taste like mango jam, and it should not taste like plain vinegar hot sauce either. Instead, the best version lands in that sweet and spicy middle ground: fruity enough for dipping, sharp enough for tacos, and bold enough for wings.
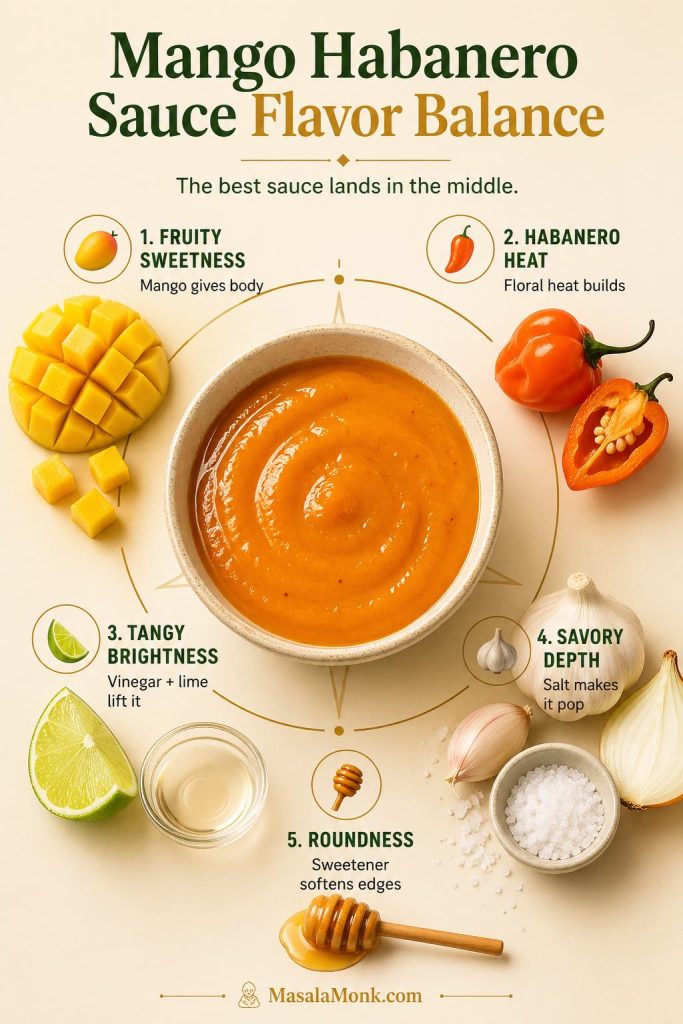
When one flavor takes over, adjust the sauce in stages. First, fix flatness with salt. Next, use lime or vinegar when the sauce tastes too sweet. Finally, when the habanero heat is running the show, bring the sauce back into balance with more mango or a little honey.
Ingredients for This Mango Habanero Sauce Recipe
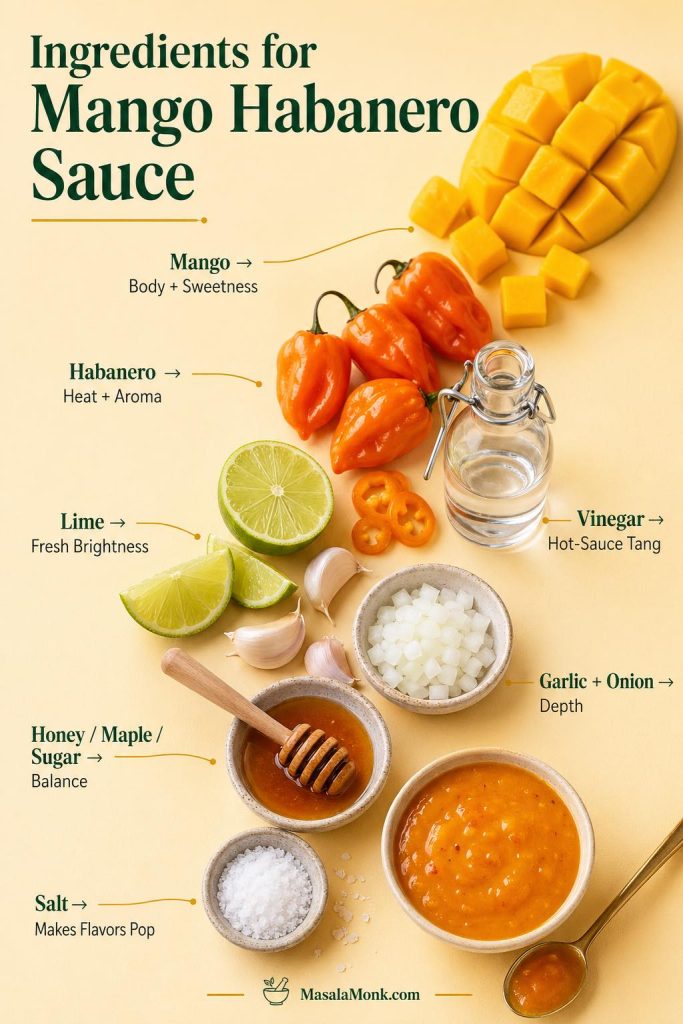
Think of the ingredients in roles, not just measurements. Mango gives body, sweetness, and color. Habanero gives heat and aroma. Vinegar gives sharpness, lime gives freshness, garlic and onion give depth, and sweetener rounds the edges.
The table below gives you a balanced starting point. Once the sauce is blended, you can adjust sweetness, heat, acid, salt, and thickness to match how you want to use it.
| Ingredient | US Amount | Metric Amount | Why It Matters |
|---|---|---|---|
| Ripe mango, diced | 1½ cups | 250 g / 8.8 oz | Sweetness, body, color, and fruit flavor |
| Fresh habanero peppers | 1–2 peppers | about 10–20 g / 0.35–0.7 oz | Heat and floral chili aroma |
| Onion, chopped | ¼ cup | 40 g / 1.4 oz | Savory body and depth |
| Garlic | 2 cloves | 6 g / 0.2 oz | Sharpness and backbone |
| Apple cider vinegar or white vinegar | ⅓ cup | 80 ml / 2.7 fl oz | Tang and hot-sauce character |
| Fresh lime juice | 2 tbsp | 30 ml / 1 fl oz | Fresh brightness |
| Water | ¼ cup | 60 ml / 2 fl oz | Helps the sauce simmer and blend |
| Honey, sugar, or maple syrup | 1–2 tbsp | 20–40 g honey/maple or 12–25 g sugar | Balances heat and acid |
| Fine sea salt | ¾ tsp | 4–5 g | Makes the sauce taste complete |
Optional flavor additions include ½–1 teaspoon grated ginger for tropical warmth, ¼ teaspoon cumin for earthiness, ¼ teaspoon smoked paprika for a BBQ-style direction, or a tiny pinch of allspice for a Caribbean-style note. However, for a first batch, keep the sauce simple before adding too many extra spices.
Best Mango to Use: Fresh, Frozen or Mango Pulp
For the brightest fresh mango flavor, use ripe mango that smells sweet before you cut it. Since mango is the body of this sauce recipe, the fruit should taste good before it goes into the pan.
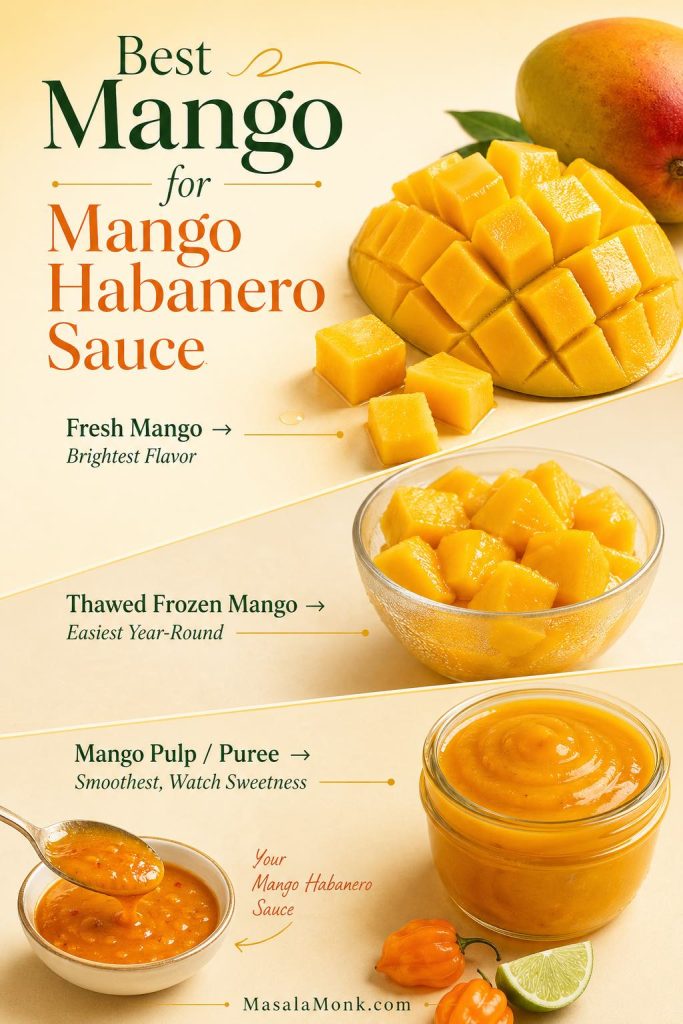
Meanwhile, mango habanero sauce with frozen mango can also taste excellent when fresh mango is out of season. Thaw frozen mango first, then use it like fresh diced mango. It often blends smoothly and gives the sauce a consistent color and texture.
Mango pulp or mango puree can also work, especially when you want a very smooth sauce. However, the one thing to watch is sweetness. Many mango pulps are already sweetened, so start with little or no honey or sugar and adjust after blending.
On the other hand, underripe mango will make the sauce sharper and less fruity. Very fibrous mango can also make the finished sauce harder to blend smooth, so strain it through a fine mesh sieve if needed.
Can You Use Mango Pulp or Mango Puree?
Yes, mango pulp or mango puree can work well in this mango habanero sauce recipe. Use about 1 cup / 250 g mango pulp in place of the diced mango. If the pulp is sweetened, skip the honey or sugar at first and adjust only after the sauce has simmered and blended.
Heat Guide for This Mango Habanero Sauce Recipe
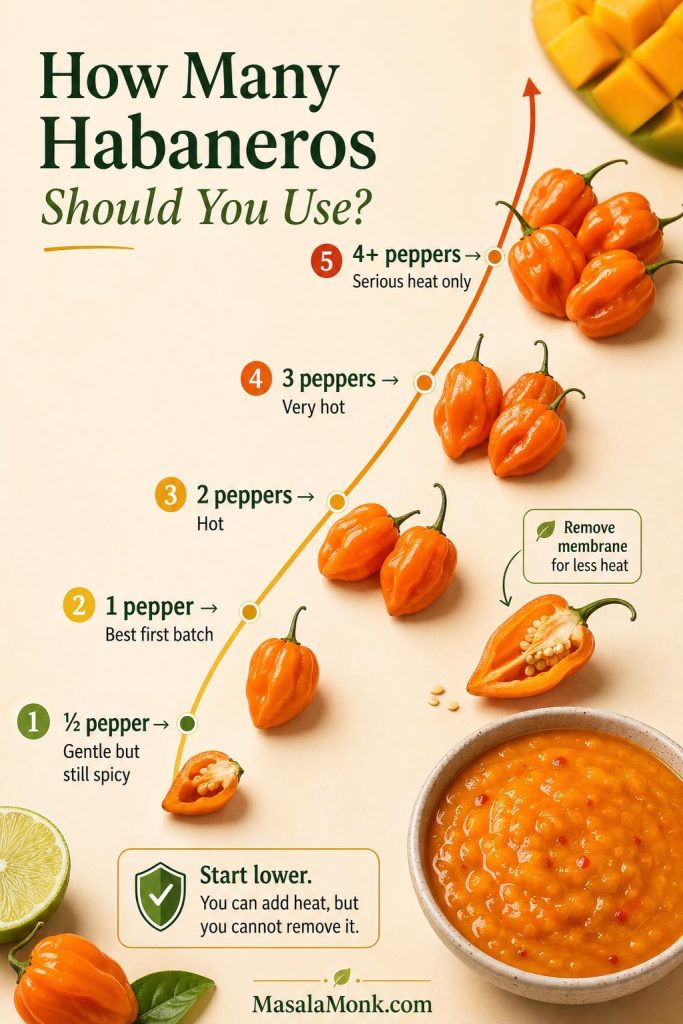
This is the section to read before cutting the peppers. Habaneros are much hotter than jalapeños; the Chile Pepper Institute lists orange habanero at around 250,000 Scoville Heat Units. That kind of habanero pepper heat can take over a mango sauce quickly.
For that reason, one seeded habanero is the best first batch for most people. After blending, you can always add more heat in small amounts. Once too much habanero is blended into the whole sauce, though, it is much harder to fix.
Use the table below to make a mild mango habanero sauce, medium-hot sauce, hot sauce, or extra hot mango habanero sauce without guessing.
| Heat Level | Habanero Amount | Prep Method | Best For |
|---|---|---|---|
| Gentle but still spicy | ½ pepper | Seeds and membrane removed | First-time habanero users |
| Medium-hot | 1 pepper | Mostly seeded | Best first batch |
| Hot | 2 peppers | Some membrane left | Wings, tacos, spicy bowls |
| Very hot | 3 peppers | Some seeds and membrane included | Hot sauce lovers |
| Extreme | 4+ peppers | Use with caution | Serious heat lovers only |
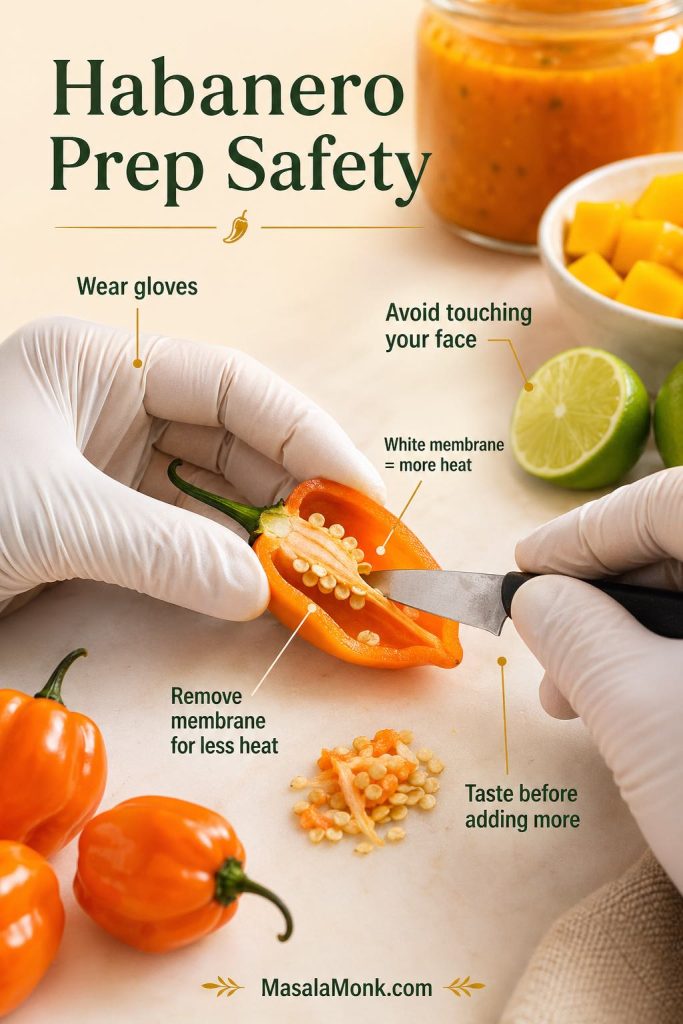
Before cutting the peppers, wear gloves. In addition, avoid touching your eyes, nose, lips, or face after handling habaneros. The white membrane inside the pepper carries a lot of the heat, so removing it gives this sauce recipe more control.
Equipment You Need
You need a small saucepan, a blender or immersion blender, gloves for handling habaneros, a spoon or spatula, and a clean jar or bottle for storing the finished sauce. A high-speed blender gives the smoothest mango habanero sauce, but an immersion blender works if you do not mind a slightly thicker texture. For a very smooth, bottle-friendly hot sauce, keep a fine mesh sieve nearby so you can strain the sauce after blending.
How to Make This Mango Habanero Sauce Recipe
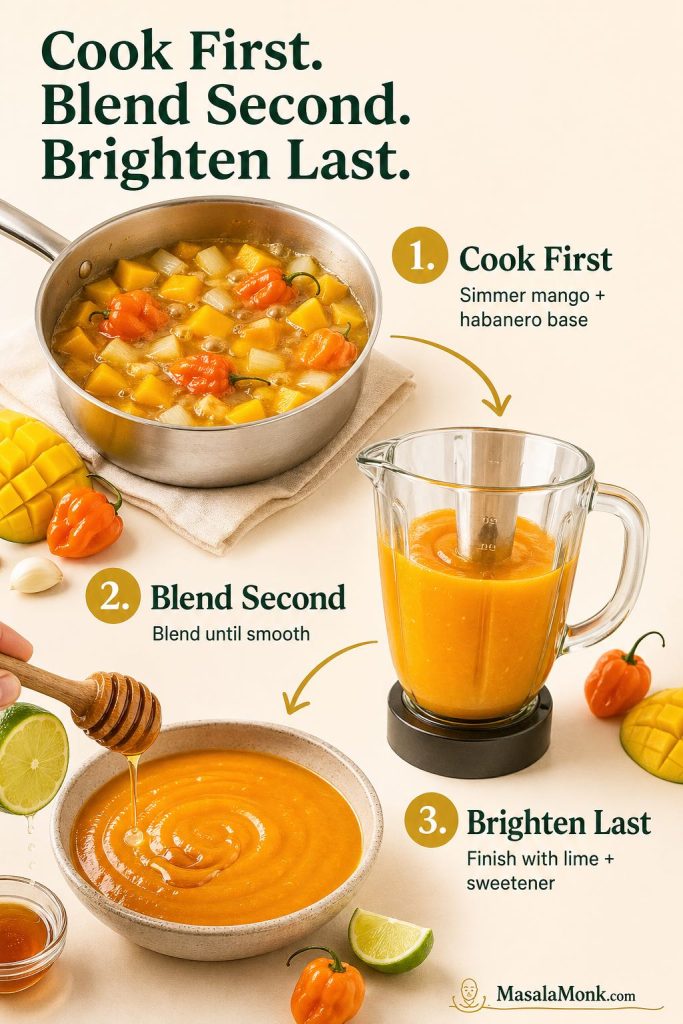
The method is simple, but the order matters: cook first, blend second, brighten last. First, simmering softens the mango, onion, garlic, and habanero. Next, blending turns them into a smooth sauce. Finally, lime juice and sweetener go in near the end so the finished sauce tastes bright instead of dull.
1. Prep the habaneros safely
First, put on gloves. Remove the stems from the habaneros. For less heat, cut the peppers open and scrape out most of the seeds and white membrane.
2. Simmer the mango and habanero base
Next, add the mango, habanero, onion, garlic, vinegar, water, and salt to a small saucepan. Bring the mixture to a visible boil over medium heat, then reduce it to a gentle simmer.
Simmer for 10–15 minutes, stirring often, until the mango and onion are soft. This cooking step rounds out the onion, garlic, and habanero, so the finished sauce tastes smoother and less raw.
3. Cool slightly and blend
After that, let the mixture cool for about 5 minutes. Blend until completely smooth. If using a blender, vent the lid slightly and cover it with a towel so steam does not build pressure.
4. Finish the sauce
At this point, return the sauce to the pan. Stir in lime juice, honey or sugar, and any optional spices. Then, simmer for another 2–5 minutes, until the mango habanero sauce looks glossy and unified.
5. Taste and adjust
Finally, taste carefully, using only a tiny spoon at first. Habanero heat builds as you eat, so the sauce may feel hotter after a few seconds.
- If the sauce tastes flat, add salt.
- If the mango habanero sauce tastes too sweet, add lime juice or vinegar.
- If the recipe tastes too sharp or too hot, add mango or honey.
- If the sauce is too thick, add water a spoonful at a time.
- If the sauce is too thin, simmer uncovered until it reduces.
Use the mango habanero sauce recipe below as the master version. From there, adjust the thickness and finish depending on whether you want hot sauce, wing sauce, glaze, dip, marinade, or BBQ-style sauce.
Mango Habanero Sauce Recipe
This homemade mango habanero sauce recipe makes a cooked blender sauce that is fruity, fiery, tangy, smooth, and flexible enough for wings, tacos, chicken, shrimp, fish, paneer, tofu, fries, burgers, wraps, and bowls.
Ingredients
- 1½ cups / 250 g ripe mango, diced
- 1–2 habanero peppers, stemmed
- ¼ cup / 40 g chopped onion
- 2 garlic cloves / 6 g, roughly chopped
- ⅓ cup / 80 ml apple cider vinegar or white vinegar, preferably 5% acidity
- ¼ cup / 60 ml water
- ¾ tsp / 4–5 g fine sea salt
- 2 tbsp / 30 ml fresh lime juice
- 1–2 tbsp honey, sugar, or maple syrup
- Optional: ½–1 tsp grated ginger
- Optional: ¼ tsp cumin
- Optional: ¼ tsp smoked paprika
- Optional: tiny pinch to ¼ tsp allspice
Instructions
- Wear gloves before handling the habaneros. Remove the stems. For less heat, remove seeds and most of the white membrane.
- Add mango, habanero, onion, garlic, vinegar, water, and salt to a small saucepan.
- Bring to a visible boil over medium heat, then reduce to a gentle simmer.
- Simmer for 10–15 minutes, stirring often, until the mango and onion are soft.
- Cool for 5 minutes, then blend until completely smooth.
- Return the sauce to the pan. Stir in lime juice, sweetener, and any optional spices.
- Simmer for 2–5 minutes more, until glossy and slightly thickened.
- Taste carefully. Adjust salt, lime/vinegar, sweetener, or water as needed.
- Cool the mango habanero sauce and store it in a clean jar or bottle in the refrigerator.
Recipe Notes
- Use 1 habanero for a medium-hot sauce and 2 habaneros for a hotter version.
- For a thinner homemade mango habanero hot sauce, increase the vinegar to ½ cup / 120 ml and strain after blending.
- For a thicker glaze, simmer uncovered for a few extra minutes.
- For wing sauce, use the butter-finished conversion below.
- This is a refrigerator sauce recipe, not a tested shelf-stable canning recipe.
Homemade Mango Habanero Hot Sauce Version
Choose this version when you want something bottle-friendly. More vinegar makes the sauce thinner, sharper, and easier to drizzle over tacos, eggs, grilled food, bowls, and roasted vegetables.
| Element | All-Purpose Sauce | Hot Sauce Version |
|---|---|---|
| Vinegar | ⅓ cup / 80 ml | ½ cup / 120 ml |
| Water | ¼ cup / 60 ml | ¼ cup / 60 ml, plus more if needed |
| Sweetener | 1–2 tbsp | 1 tbsp to start |
| Final simmer | 2–5 minutes | 5 minutes |
| Texture | Medium-thick | Thin and pourable |
| Optional step | Usually no strain | Strain for bottle-smooth sauce |
Compared with the all-purpose sauce, this hot sauce version tastes sharper, thinner, and more vinegar-forward. Therefore, use it when you want a real hot sauce texture rather than a thicker dipping sauce.

Mango Habanero Wing Sauce
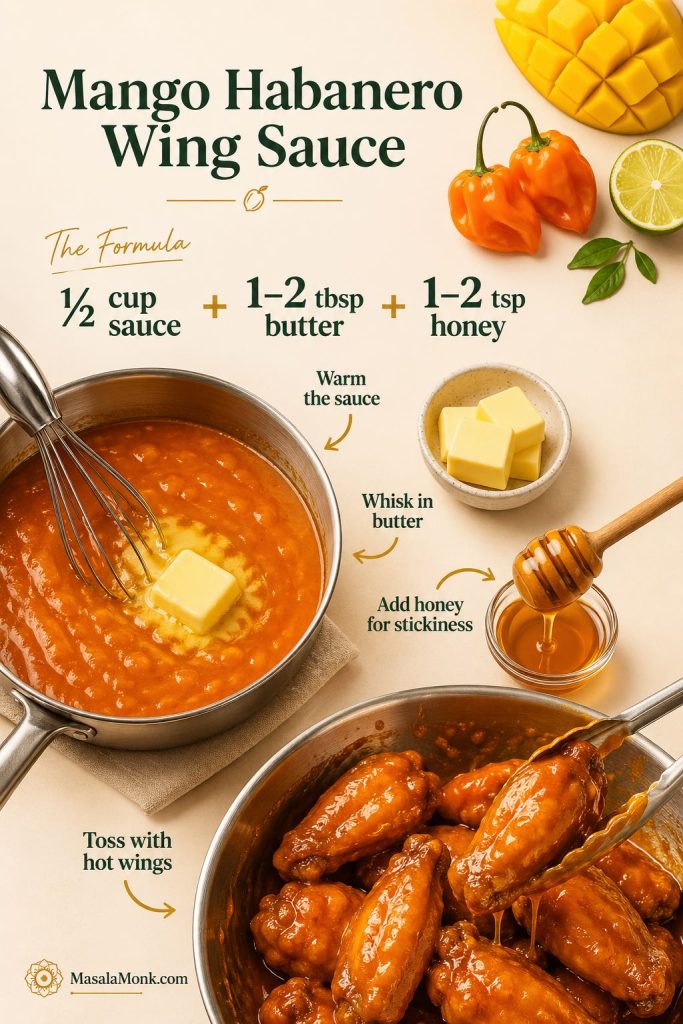
For wings, the sauce needs to cling. Butter gives it gloss, honey helps it stick, and gentle heat brings everything together. In other words, this is the sweet heat version to use when you want glossy mango habanero sauce for wings.
This wing version works for chicken wings, boneless wings, tenders, cauliflower wings, paneer bites, or crispy tofu. For best results, warm the sauce first, then toss it with hot cooked wings just before serving.
For 2 lb / 900 g Wings
| Ingredient | US Amount | Metric Amount |
|---|---|---|
| Mango habanero sauce | ½ cup | 120 ml / 4 fl oz |
| Butter | 1–2 tbsp | 14–28 g / 0.5–1 oz |
| Honey or brown sugar | 1–2 tsp | 7–14 g honey or 4–8 g sugar |
| Lime juice or vinegar, optional | 1 tsp | 5 ml |
| Salt | Pinch | To taste |
First, warm the mango habanero sauce in a small pan over low heat. Next, whisk in the butter until glossy. If you want a stickier wing sauce, add honey or brown sugar. Finally, if the sauce tastes too sweet, add lime juice or vinegar before tossing it with hot cooked wings.
Optional Baked Wings
For a simple oven version, use 2 lb / 900 g chicken wings, 1 tbsp / 10–12 g aluminum-free baking powder, ¾ tsp / 4 g kosher salt, ½ tsp garlic powder, and ½ tsp smoked paprika. First, pat the wings very dry. Then, toss them with the seasoning, arrange them on a rack, and bake at 425°F / 220°C for 45–50 minutes, flipping halfway.
After the wings are cooked, toss them with warm mango habanero wing sauce. For food safety, chicken wings should reach 165°F / 73.9°C internally, following USDA poultry temperature guidance.
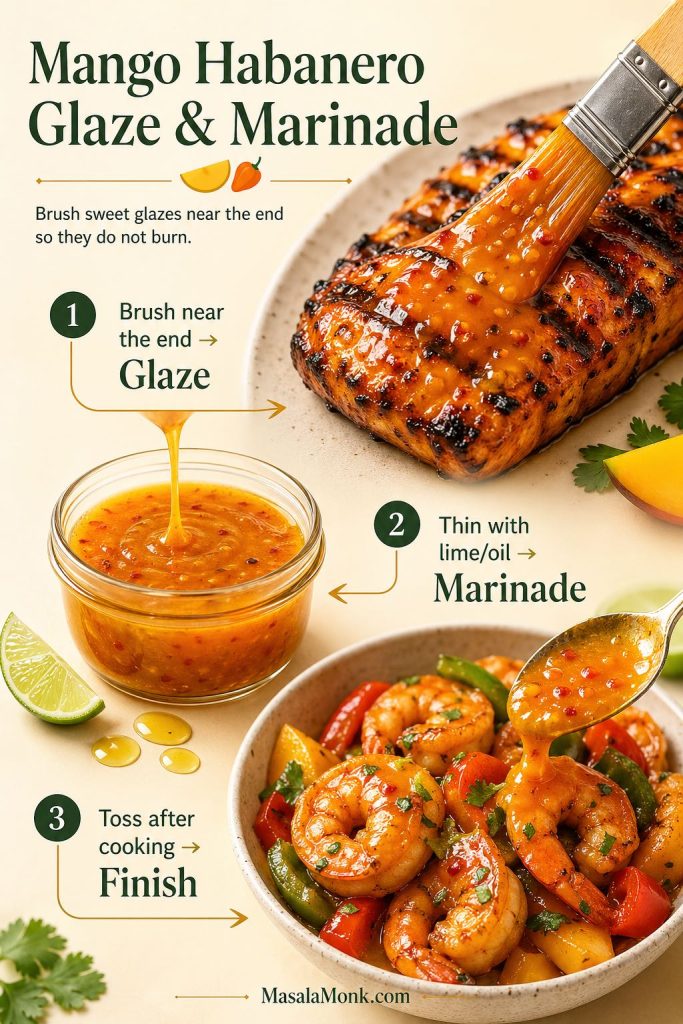
Mango Habanero Glaze
For a glaze, reduce the sauce instead of thinning it. A few extra minutes in the pan makes it thicker, shinier, and better for brushing onto grilled chicken, salmon, shrimp, pork, paneer, tofu, roasted vegetables, or skewers.
| Ingredient | Amount |
|---|---|
| Mango habanero sauce | ¾ cup / 180 ml |
| Honey | 1 tbsp / 20 g |
| Lime juice or vinegar | 1 tsp / 5 ml |
| Butter or oil, optional | 1 tbsp / 14 g butter or 1 tsp / 5 ml oil |
Simmer for 5–8 minutes, until the glaze lightly coats the back of a spoon. Then, brush it onto food near the end of cooking so the sugars do not burn.
Mango Habanero Sauce Variations
Once the master sauce is balanced, the variations are easy. In fact, you can keep the same mango-habanero base, then change the texture, sweetness, smokiness, or cooking method depending on how you want to serve it.
For your first batch, however, keep the sauce simple. It is easier to learn your preferred heat and acid level before adding extra spices or turning the sauce into BBQ sauce, salsa, aioli, or a fermented hot sauce.
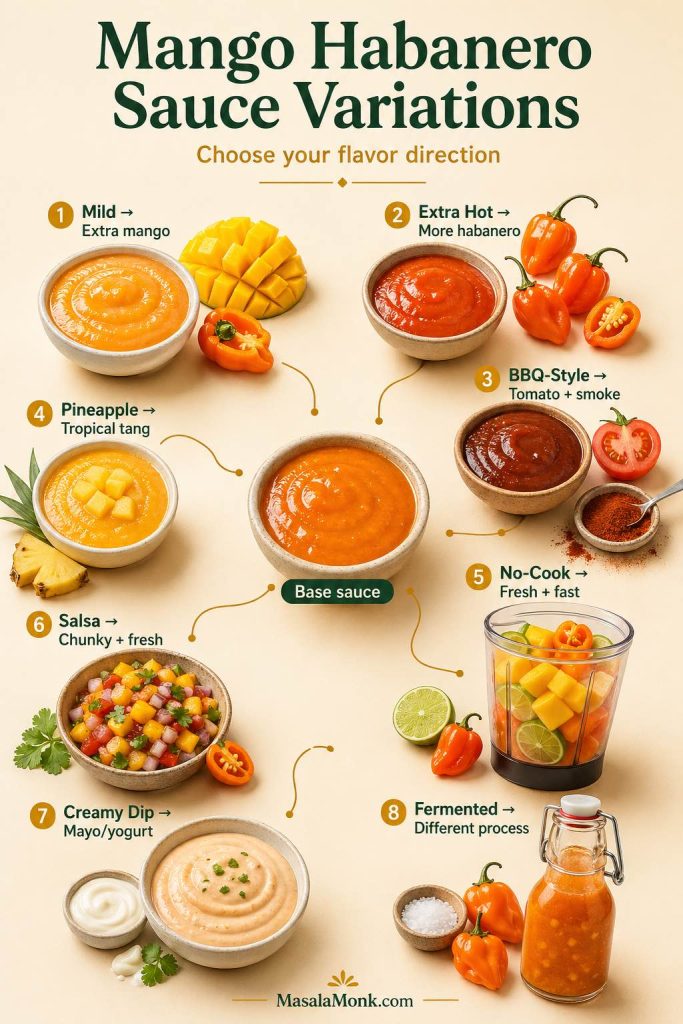
Mild Mango Habanero Sauce
For a milder sauce, use ½ seeded habanero and remove most of the white membrane. After blending, add extra mango if the heat still feels too sharp. You can also add a small amount of cooked orange bell pepper for body and color, but keep mango as the main flavor.
Extra Hot Mango Habanero Sauce
For an extra hot mango habanero sauce, use 3 or more habaneros only if you already enjoy very spicy sauces. Even then, add the extra pepper gradually so the sauce stays usable.
Mango Habanero BBQ Sauce
For a smoky, thicker version, simmer 1 cup / 240 ml mango habanero sauce with 2 tbsp / 30 g tomato paste, 1 tbsp / 12–14 g brown sugar, 1 tbsp / 15 ml apple cider vinegar, ½ tsp smoked paprika, ¼ tsp cumin, and 1 tsp / 5 ml Worcestershire sauce if you use it. As a result, the sauce becomes darker, thicker, and smoky-sweet after 8–10 minutes.
Pineapple Mango Habanero Sauce
For a brighter tropical variation, replace ½ cup / 80–90 g of the mango with pineapple. This version tastes sharper, juicier, and especially good with grilled shrimp, fish, chicken, tacos, and pork.
No-Cook Mango Habanero Sauce
For a faster, fresher version, blend the mango, habanero, vinegar, lime juice, garlic, salt, and sweetener without simmering. However, use less onion, or skip the onion, because raw onion can become sharp in a no-cook sauce.
This version tastes brighter and fruitier. However, it also tastes sharper and less rounded than the cooked sauce. Use the no-cook version within 2–3 days, and keep it refrigerated the whole time.
Mango Habanero Salsa
For a chunky salsa-style version, mix 1½ cups / 250 g diced mango with ½–1 very finely minced habanero, ¼ cup / 40 g red onion, 2 tbsp / 30 ml lime juice, 2 tbsp chopped cilantro, ½ tsp / 3 g salt, and optional tomato, cucumber, or pineapple. Then, rest the salsa for 10 minutes before serving.
For a chunkier mango topping with onion, cilantro, lime, and optional tomato or cucumber, see the full mango salsa recipe.
Mango Habanero Aioli or Creamy Dip
For a creamy dip, stir 1–2 tbsp cooled mango habanero sauce into ¼ cup mayonnaise, Greek yogurt, sour cream, or vegan mayo. Then, use it as a dip or sandwich spread for fries, burgers, wraps, tacos, nuggets, and roasted vegetables.
Fermented Mango Habanero Hot Sauce
Fermented mango habanero hot sauce is a different process from this quick cooked sauce. Instead of simmering first, the peppers, mango, onion, and garlic are usually fermented in a salt brine or mash before being blended with vinegar or lime.
Fermentation changes the safety and storage rules, so this quick cooked recipe should not be treated as a fermented sauce. If you want a fermented version, follow a dedicated fermented hot sauce method and pay attention to acidity, cleanliness, gas buildup, refrigeration, and pH if storing longer.
How to Use Mango Habanero Sauce
This is where the sauce earns its place in the fridge. For example, you can keep it medium-thick for dipping, thin it for drizzling, reduce it for glazing, or loosen it into a quick marinade.
Use this mango habanero sauce for chicken, shrimp, salmon, fish tacos, rice bowls, burgers, wraps, roasted vegetables, paneer, tofu, and fries. In other words, it works anywhere you want sweet heat with a bright mango finish.
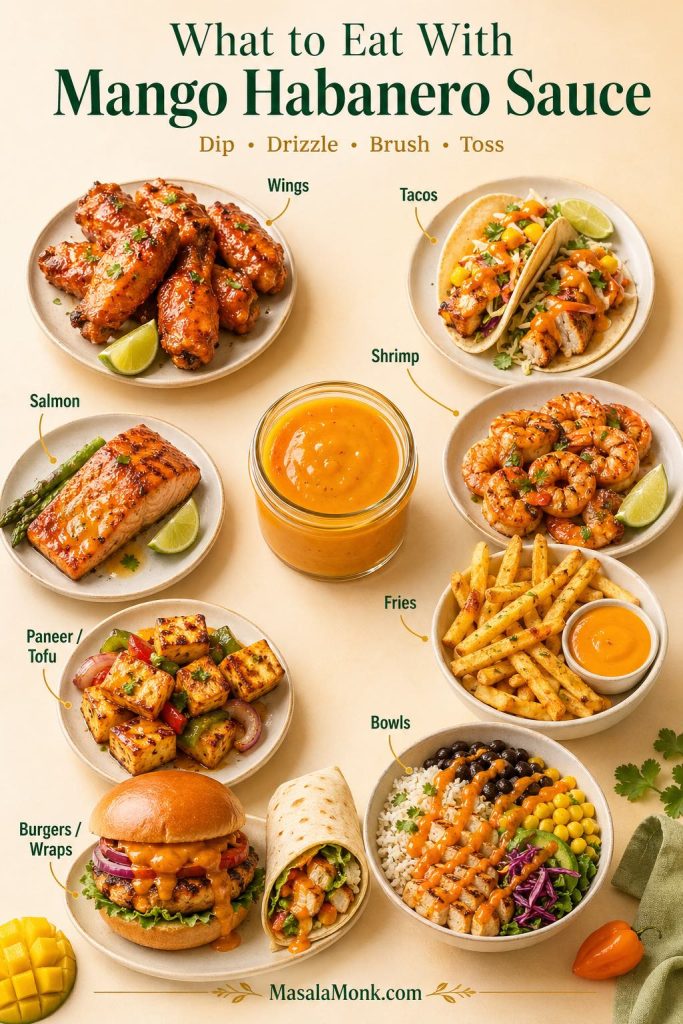
As a hot sauce
As a hot sauce, it works best when the texture is thin and pourable. Drizzle it on tacos, eggs, nachos, rice bowls, grilled vegetables, beans, burritos, wraps, and roasted potatoes. For a thinner hot sauce texture, use the extra-vinegar version above.
As a wing sauce
For wings, warm it first so it coats evenly. Toss it with chicken wings, boneless wings, tenders, nuggets, cauliflower wings, paneer bites, or crispy tofu just before serving.
As a glaze
When using it as a glaze, brush it on grilled chicken, shrimp, salmon, pork, paneer, tofu, roasted carrots, sweet potatoes, or skewers near the end of cooking. Otherwise, the sugars in the mango and honey can scorch if they cook too long.
As a marinade
For a quick mango habanero marinade, thin the sauce with a little extra lime juice, vinegar, or oil. Use it for chicken, shrimp, fish, paneer, tofu, or vegetables. However, avoid marinating delicate seafood for too long because the acid can change the texture.
As a dip
For dipping, keep the texture thicker. This works as a mango habanero dipping sauce for fries, potato wedges, onion rings, pakoras, chips, crackers, chicken tenders, nuggets, vegetable sticks, or roasted cauliflower. If the sauce feels too hot, mix a spoonful into mayo or yogurt.
As a sandwich sauce
Inside sandwiches and wraps, a little goes a long way. Use it on burgers, fried chicken sandwiches, grilled cheese, wraps, rolls, spicy mayo-style spreads, and grilled paneer sandwiches. The sweet, spicy, tangy flavor works especially well with rich or crispy fillings.
Mango Habanero Sauce vs Hot Sauce vs Wing Sauce vs Salsa
The names can get confusing because mango and habanero show up in several forms. However, the difference is mostly texture and use: hot sauce is thinner, wing sauce is buttery, glaze is reduced, salsa is chunky, marinade is looser, and BBQ sauce is smoky-sweet.
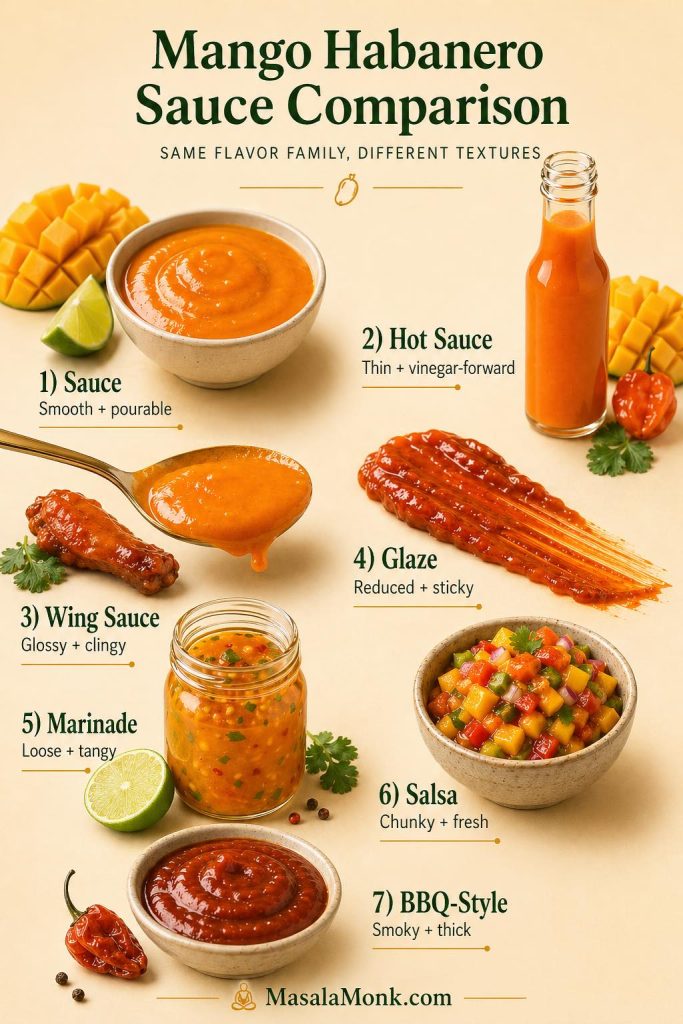
| Version | Texture | Main Flavor | Best Use |
|---|---|---|---|
| Mango habanero sauce | Smooth, medium-thick, pourable | Sweet, fruity, tangy, hot | Wings, tacos, chicken, shrimp, dipping |
| Mango habanero hot sauce | Thinner and more vinegar-forward | Sharper, brighter, hotter | Tacos, eggs, bowls, grilled food |
| Mango habanero wing sauce | Glossy, buttery, clingy | Sweet-hot and slightly sticky | Chicken wings, tenders, cauliflower wings |
| Mango habanero marinade | Loose, tangy, lightly sweet | Bright, spicy, acidic | Chicken, shrimp, fish, paneer, tofu |
| Mango habanero salsa | Chunky or roasted | Fresh, juicy, spicy | Chips, tacos, fish, bowls |
| Mango habanero BBQ sauce | Thicker, smoky, sticky | Sweet, smoky, spicy | Grilled chicken, ribs, burgers, sandwiches |
Sauce Texture Guide
After blending, texture is the easiest thing to change. For example, a spoonful of vinegar can turn the base into a hot sauce, while a few extra minutes of simmering can turn it into a glaze. Use this guide to adjust the sauce for the way you want to serve it.
| Version | Texture | Best Use | How to Adjust |
|---|---|---|---|
| Mango habanero hot sauce | Thin, pourable | Tacos, eggs, bowls, grilled food | Add more vinegar or water; strain if needed |
| All-purpose mango habanero sauce | Medium-thick, pourable | Chicken, tacos, fish, dipping | Use the master recipe |
| Mango habanero wing sauce | Glossy, clingy | Wings, tenders, cauliflower wings | Add butter and simmer briefly |
| Mango habanero glaze | Thick, lacquered | Grilled chicken, shrimp, salmon, paneer | Add honey and reduce |
| Mango habanero dipping sauce | Thick, spoonable | Fries, tenders, pakoras, nuggets, vegetables | Simmer slightly longer or stir into mayo/yogurt |
| Mango habanero marinade | Loose, pourable | Chicken, shrimp, fish, paneer, tofu | Thin with lime, vinegar, or oil |
| Mango habanero BBQ sauce | Thick, smoky-sweet | Grilling, ribs, burgers | Add tomato paste, brown sugar, and smoked paprika |
How to Fix Mango Habanero Sauce
Sauces are adjustable, especially before serving. Because mango sweetness, vinegar sharpness, and habanero heat can vary from batch to batch, taste the sauce after blending and fix it while it is still warm.
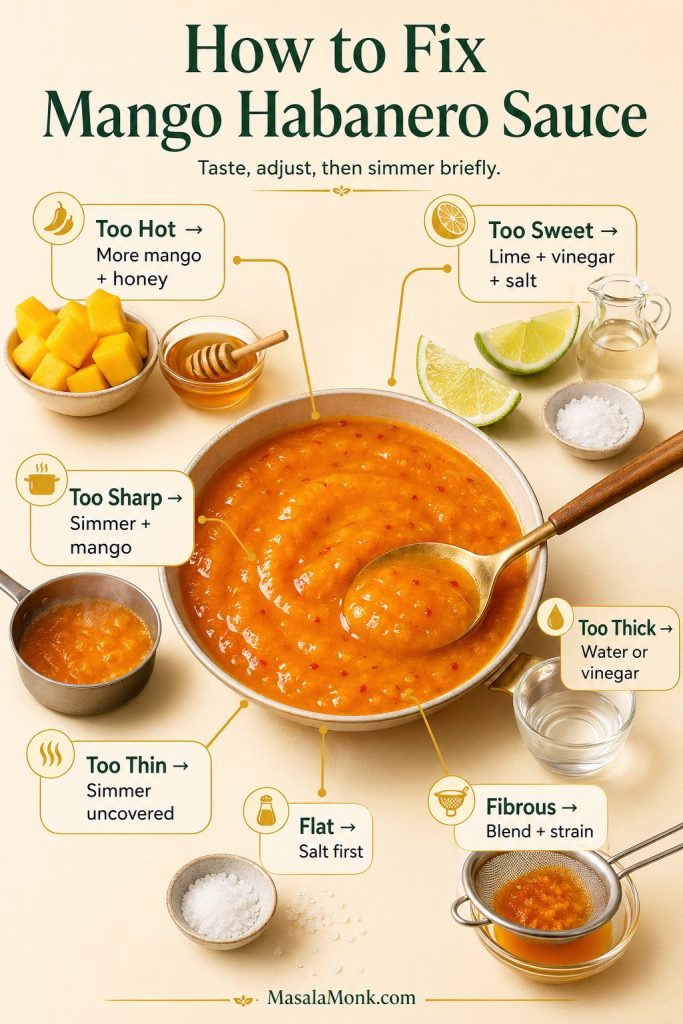
| Problem | Likely Cause | Fix |
|---|---|---|
| Too hot | Too much habanero or membrane | Add more mango first; then round it with honey, lime, or butter if making wing sauce |
| Too sweet | Very ripe mango plus too much sweetener | Add vinegar, lime, and salt |
| Too sharp | Too much acid or not enough simmering | Simmer 3–5 minutes more; add mango or honey |
| Too thin | Too much water or juicy mango | Simmer uncovered until reduced |
| Too thick | Dense mango or over-reduction | Add water, vinegar, or lime 1 tbsp / 15 ml at a time |
| Bitter | Burned garlic/onion or too much pepper pith | Add mango and sweetener; avoid browning garlic next time |
| Flat | Not enough salt or acid | Add salt first. If it still tastes dull, add lime or vinegar |
| Not mango-forward | Mango was bland or underripe | Add ripe mango, thawed frozen mango, or mango pulp |
| Grainy or fibrous | Fibrous mango or weak blender | Blend longer, strain, or use smoother mango/frozen mango |
Scaling the Recipe
Scaling is easy for mango, vinegar, lime, garlic, onion, sweetener, and salt. However, habaneros are the exception. Their size and heat vary so much that they should be scaled by taste, not strict multiplication.
If you double the mango and liquid, you can usually double the garlic, onion, vinegar, lime, sweetener, and salt. With habaneros, start lower, blend, taste carefully, and increase only if the sauce needs more heat.
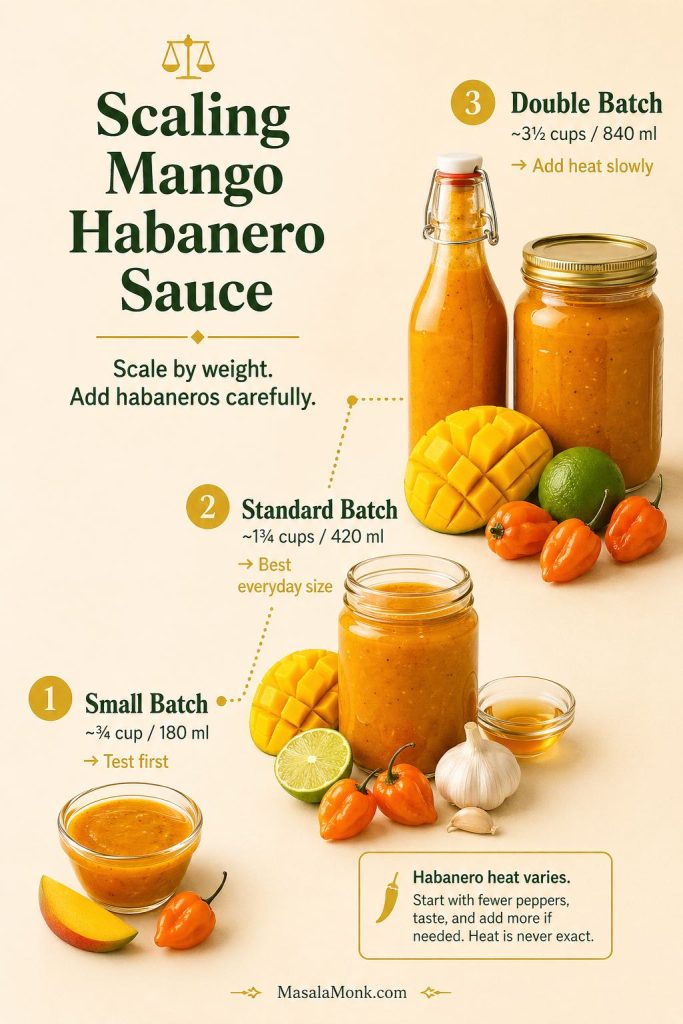
| Ingredient | Small Batch: ~¾ cup / 180 ml | Standard: ~1¾ cups / 420 ml | Double: ~3½ cups / 840 ml |
|---|---|---|---|
| Mango | 125 g / ¾ cup | 250 g / 1½ cups | 500 g / 3 cups |
| Habanero | ½–1 pepper | 1–2 peppers | 2–4 peppers, added carefully |
| Onion | 20 g / 2 tbsp | 40 g / ¼ cup | 80 g / ½ cup |
| Garlic | 1 clove / 3 g | 2 cloves / 6 g | 4 cloves / 12 g |
| Vinegar | 40 ml / 2 tbsp + 2 tsp | 80 ml / ⅓ cup | 160 ml / ⅔ cup |
| Lime juice | 15 ml / 1 tbsp | 30 ml / 2 tbsp | 60 ml / ¼ cup |
| Water | 30 ml / 2 tbsp | 60 ml / ¼ cup | 120 ml / ½ cup |
| Honey | 10–20 g | 20–40 g | 40–80 g |
| Salt | 2–2.5 g | 4–5 g | 8–10 g |
Storage, Freezing, and Canning Safety
Storage is the one place where homemade hot sauce should stay conservative. After the sauce cools, store it in a clean glass jar or bottle in the refrigerator. For best flavor and freshness, use it within 1–2 weeks. For longer storage, freeze small portions instead.
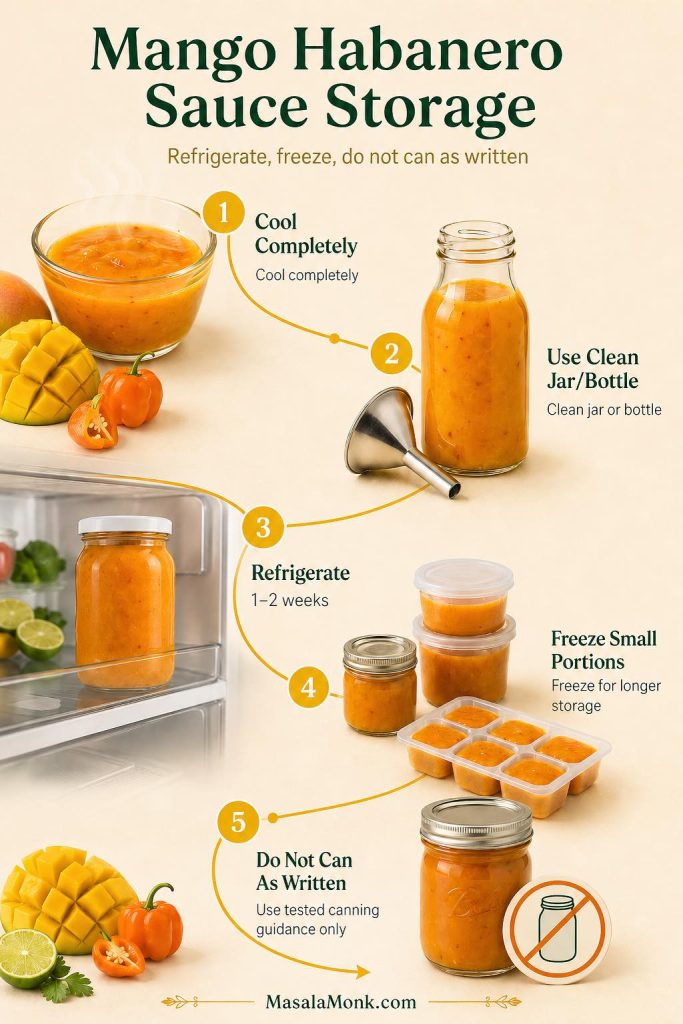
Even though the sauce contains vinegar and lime juice, it also contains mango, onion, garlic, and fresh peppers. Therefore, it should be treated as a refrigerator sauce, not a shelf-stable canned hot sauce, unless you are following tested preservation guidance.
For hot sauce safety, SDSU Extension explains that hot sauce should have a pH below 4.6 and include acid such as vinegar. For canning-style recipes, use vinegar labeled 5% acidity; Illinois Extension notes that tested USDA and National Center for Home Food Preservation recipes are built around that acidity level.
The National Center for Home Food Preservation has separate tested mango sauce canning guidance. In other words, do not treat this refrigerator mango habanero sauce recipe as a shelf-stable canning recipe.
FAQs
Is mango habanero sauce very spicy?
Yes, it can be. Because habaneros are very hot peppers, this mango habanero sauce recipe can become intense quickly. Use ½ to 1 seeded habanero for a more controlled first batch, or 2 habaneros for a properly hot sauce.
Can I make this mango habanero sauce recipe less spicy?
Yes. First, use fewer habaneros. Next, remove the seeds and membrane before cooking. If the finished sauce is still too hot, add more mango, honey, lime, or butter if you are turning it into wing sauce.
Is this mango habanero sauce easy to make?
Yes. This is an easy cooked blender sauce: simmer the mango, habanero, onion, garlic, vinegar, water, and salt, then blend and finish with lime juice and sweetener.
Can I make mango habanero sauce at home without special equipment?
Yes. You only need a saucepan, blender, gloves, spoon or spatula, and a clean jar or bottle. For a smoother homemade hot sauce, however, a high-speed blender and fine mesh sieve are helpful.
Can I use frozen mango?
Yes. Frozen mango works well in this sauce recipe. Thaw it before cooking so the mango simmers evenly and blends smoothly with the habanero, vinegar, garlic, and onion.
Can I use mango pulp or mango puree?
Yes. Use about 1 cup / 250 g mango pulp or mango puree instead of diced mango. If the pulp is sweetened, skip the honey or sugar at first, then adjust the sauce after blending.
Should mango habanero sauce be cooked?
For this style, yes. Cooking the mango, habanero, onion, and garlic before blending makes the sauce smoother, rounder, and more versatile. A raw blender version can taste fresher, but it will also taste sharper and less polished.
How do I make mango habanero hot sauce thinner?
Increase the vinegar to ½ cup / 120 ml, add water as needed, blend very smooth, and strain if you want a bottle-friendly texture. This gives the mango habanero sauce a thinner, sharper hot sauce consistency.
How do I make mango habanero wing sauce?
Warm ½ cup / 120 ml mango habanero sauce with 1–2 tbsp / 14–28 g butter, plus a little honey if you want it stickier. Then, toss hot cooked wings in the warm sauce just before serving.
Can I make mango habanero sauce without sugar?
Yes. If your mango is ripe and sweet, you can skip the honey, sugar, or maple syrup. However, the sauce will taste sharper and more hot-sauce-like, so adjust with extra mango or a little more salt if needed.
Can I make mango habanero sauce without vinegar?
You can reduce the vinegar and use more lime juice for a fresher flavor. However, the sauce will taste less like hot sauce and should still be refrigerated. For storage and hot-sauce character, vinegar is the better choice.
Is habanero mango sauce the same as mango habanero sauce?
Yes. Habanero mango sauce and mango habanero sauce usually mean the same thing: a sweet-hot sauce made with mango and habanero peppers. Mango habanero sauce is the more common way to describe it because the mango gives the sauce its body, color, and sweetness.
Is mango habanero sauce the same as mango habanero salsa?
No. Mango habanero sauce is usually smooth, cooked, and pourable. Mango habanero salsa is usually chunky, fresher, and made for chips, tacos, fish, shrimp, and bowls.
What vinegar is best for mango habanero sauce?
Apple cider vinegar gives the sauce a rounder, fruitier tang. White vinegar tastes sharper and more classic for hot sauce. Either works, but use vinegar labeled 5% acidity if you are following preservation-style guidance.
What can I use instead of habanero peppers?
Scotch bonnet peppers are the closest substitute because they have a similar fruity heat. Use the same cautious approach: start with ½ to 1 pepper, then increase only after tasting. For a milder sauce, use jalapeño, serrano, or Fresno peppers. The recipe will not have the same floral habanero punch, but it will still make a good spicy mango sauce.
Does mango habanero sauce need to be refrigerated?
Yes. This homemade mango habanero sauce should be refrigerated because it contains mango, onion, garlic, and fresh peppers. Store it in a clean jar or bottle and use it within 1–2 weeks for best flavor and freshness.
How long does mango habanero sauce last?
Store this mango habanero sauce recipe in the refrigerator and use it within 1–2 weeks for best flavor and freshness. For longer storage, freeze small portions instead of leaving the sauce at room temperature.
Can you freeze mango habanero sauce?
Yes. Freeze it in small portions, then thaw only what you need. The texture may loosen slightly after thawing, so shake, stir, or blend it again before serving.
Can I can mango habanero sauce?
Do not can this recipe as written. It is a refrigerator sauce, not a tested shelf-stable canning recipe. Use a tested canning recipe and proper pH controls if you want shelf-stable preservation.
Save this mango habanero sauce recipe for the next time you want a sweet, spicy, tangy sauce for wings, tacos, bowls, grilled food, or dipping.