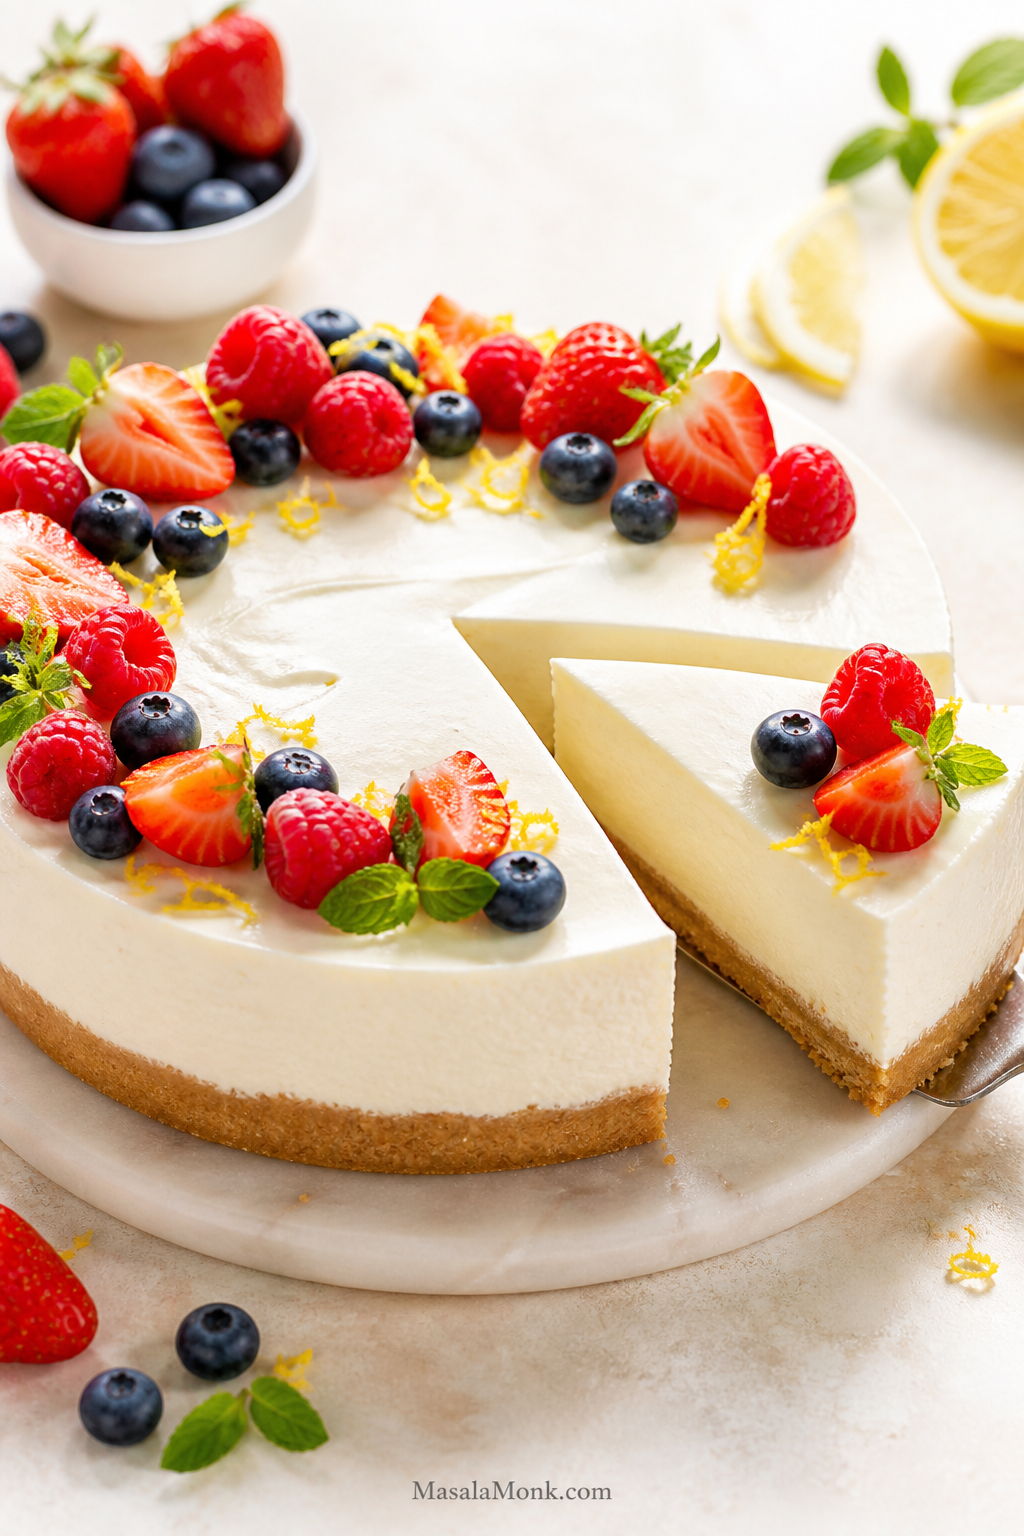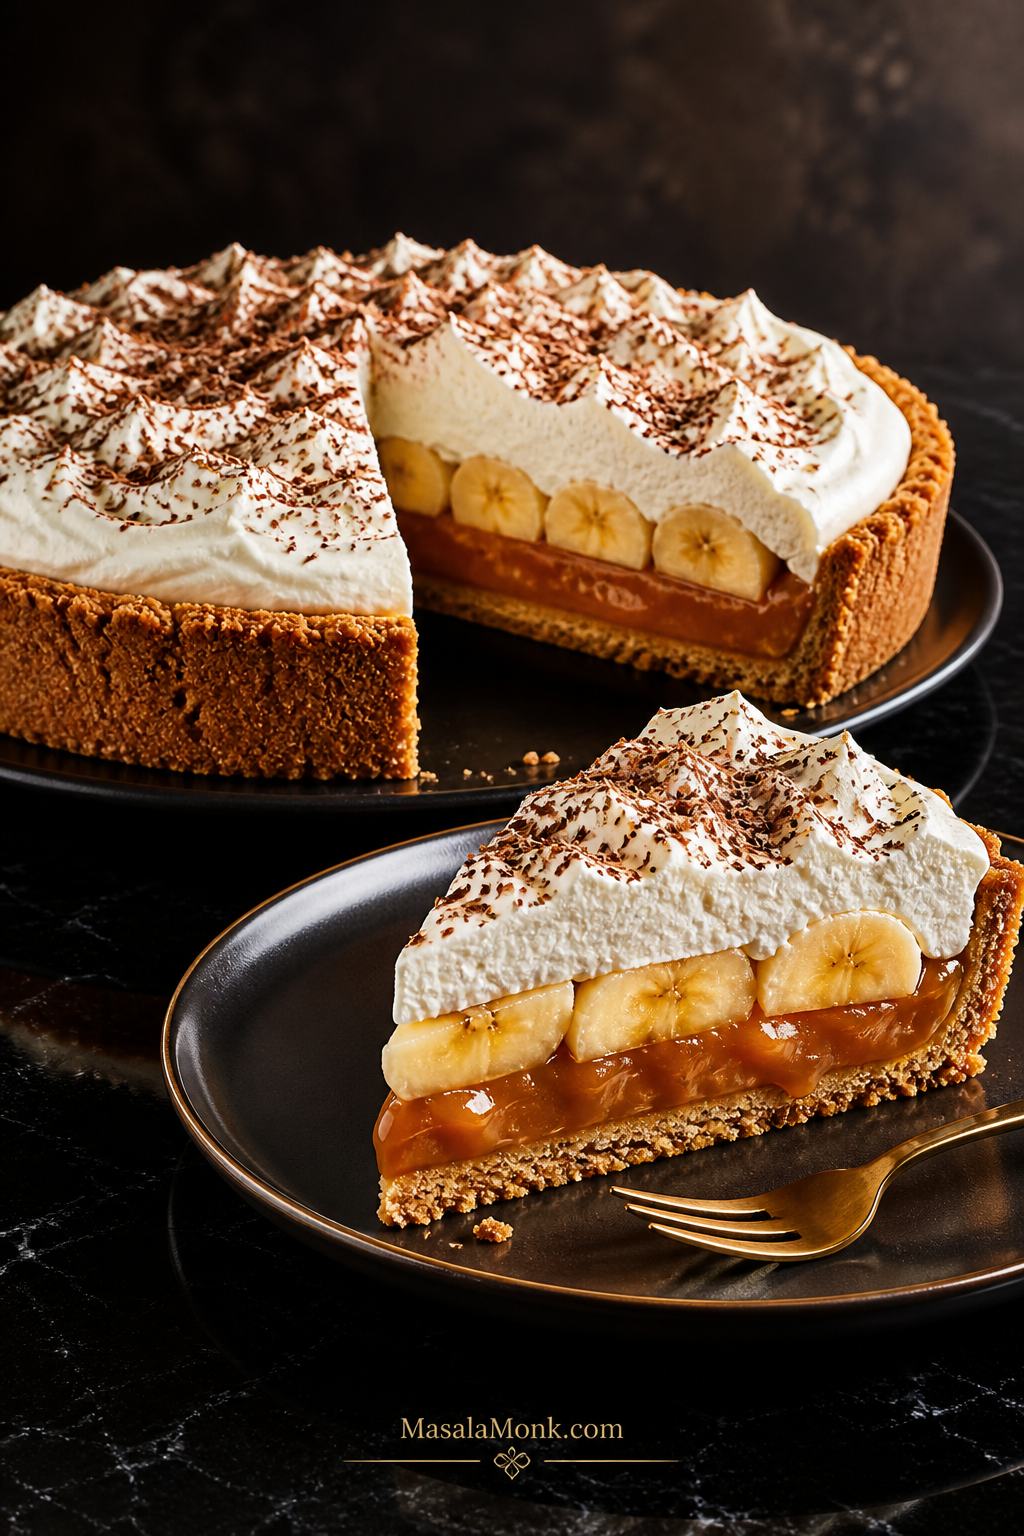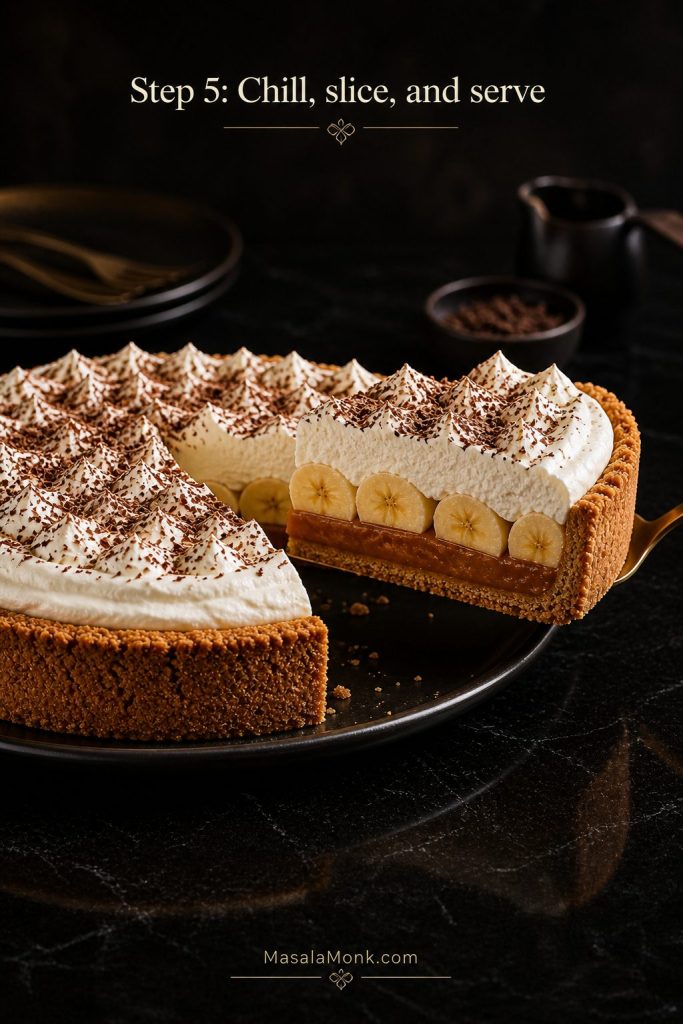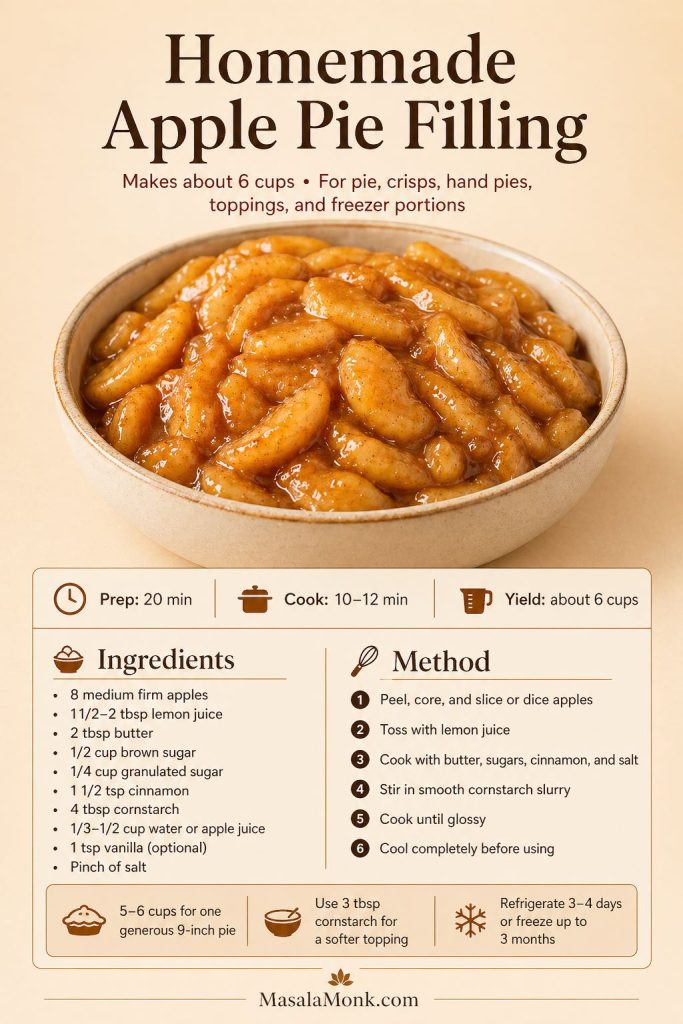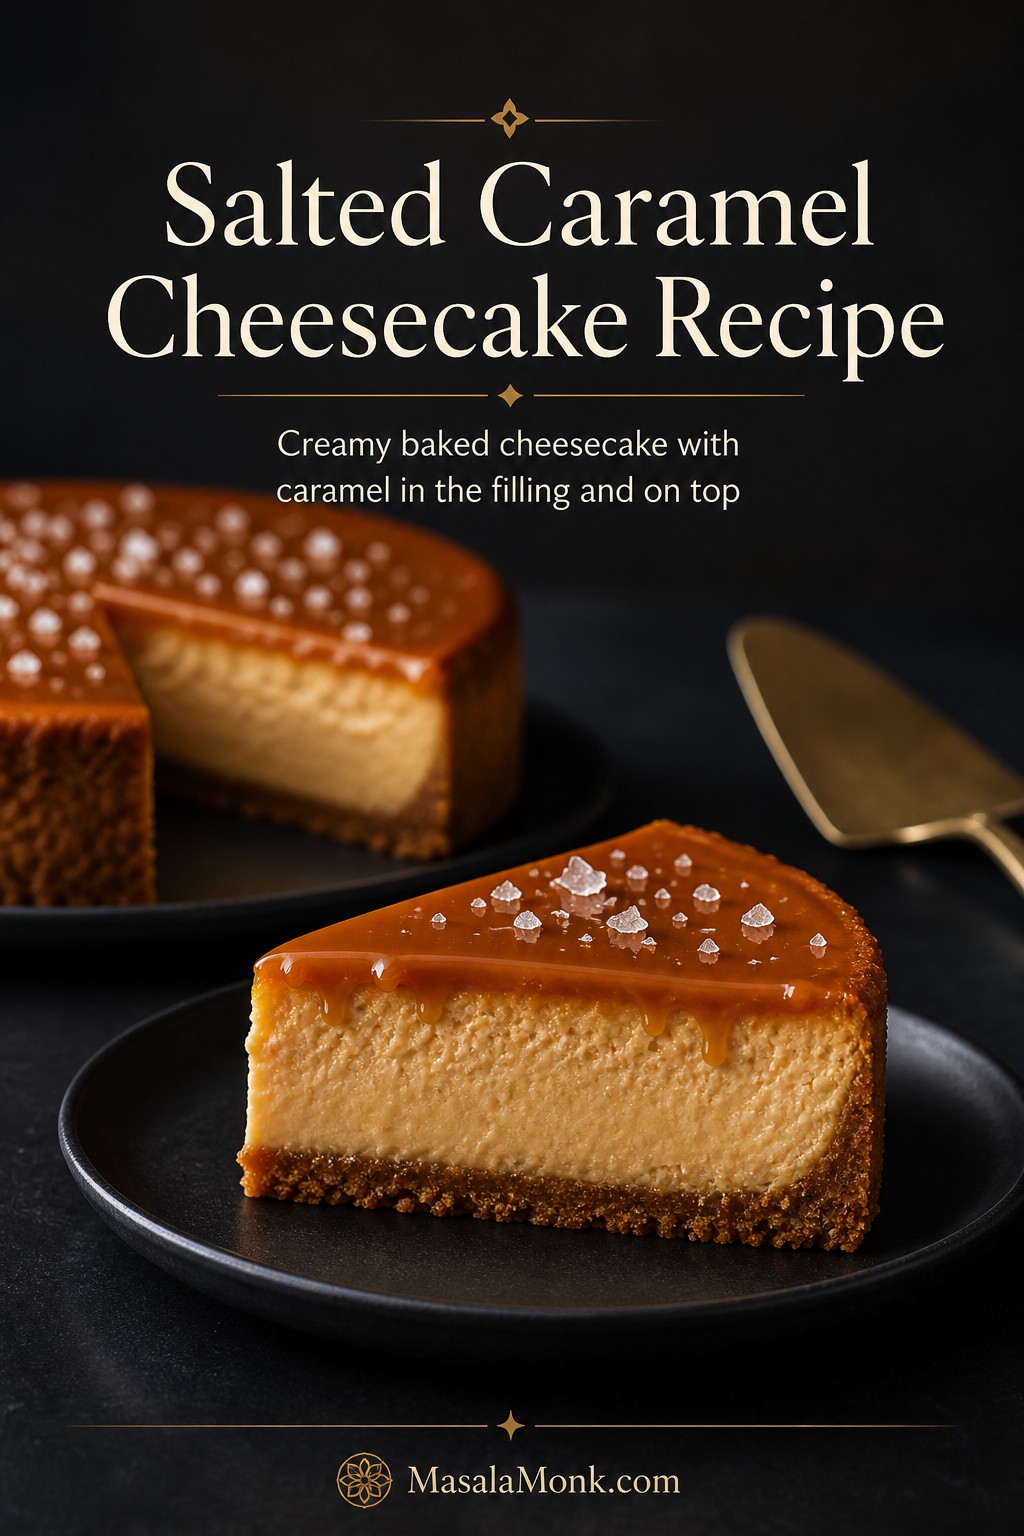
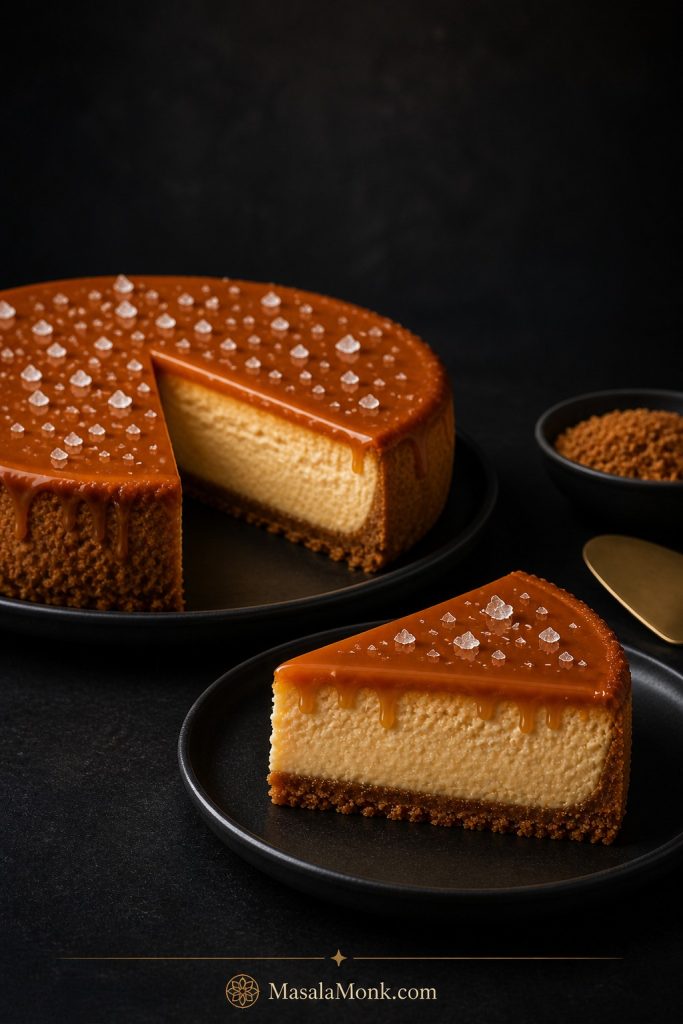
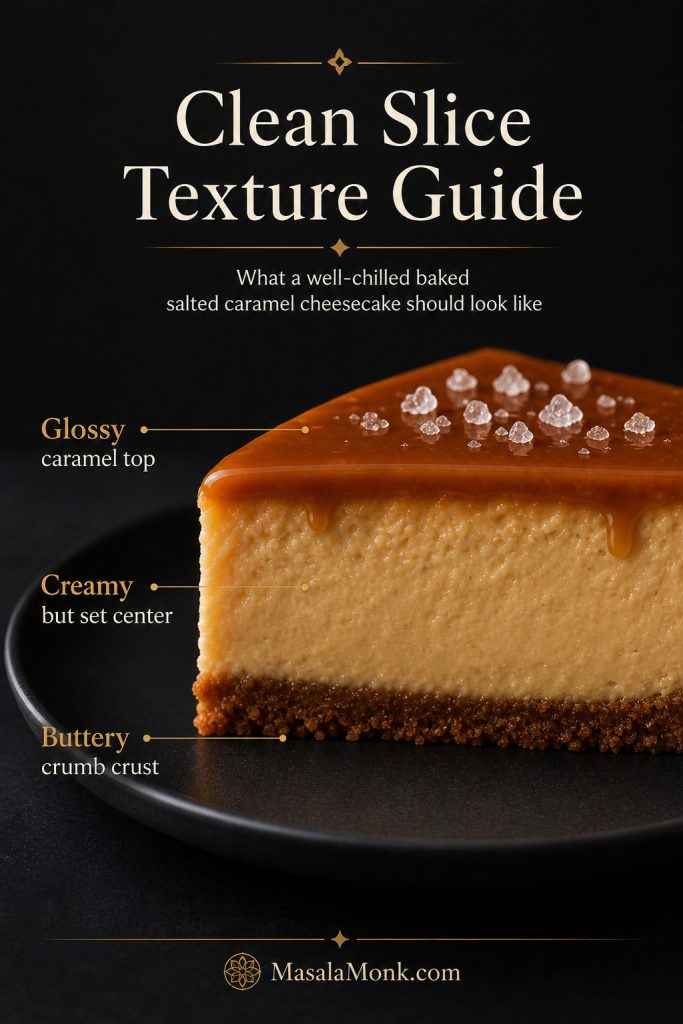
This salted caramel cheesecake recipe is for anyone who wants caramel in every bite, not just a sweet drizzle on top. The baked filling is creamy and caramel-flavored, the topping settles into a glossy layer, and the buttery crumb crust keeps each slice rich, balanced, and sturdy enough to cut cleanly.
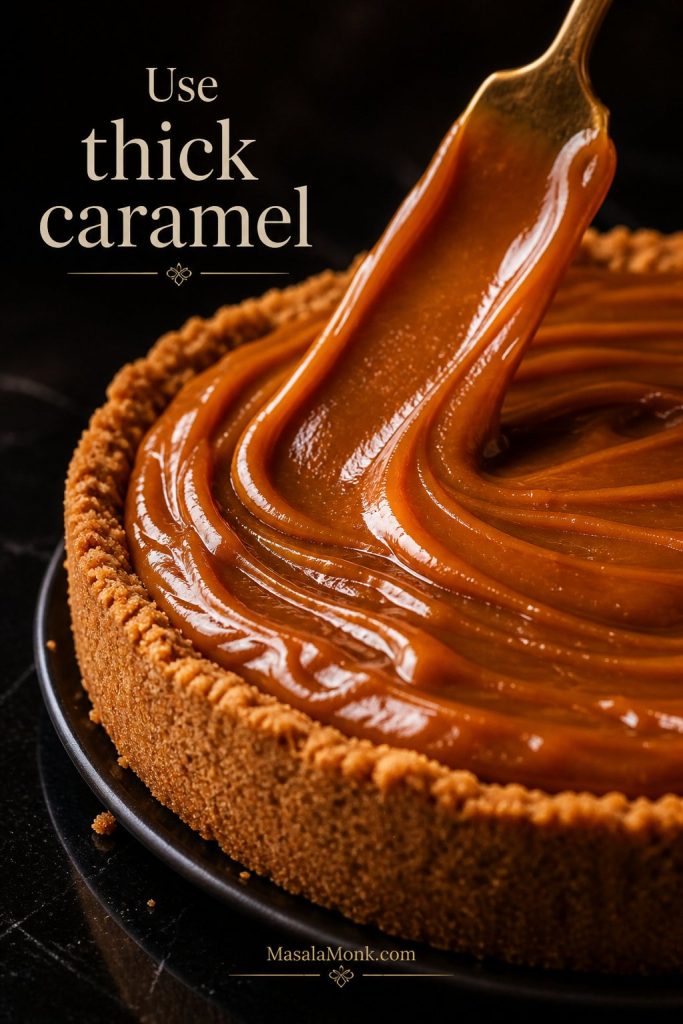
This is a baked salted caramel cheesecake, so the filling has the structure to hold caramel without turning loose in the middle. A measured amount of cooled caramel goes into the batter for flavor, then more caramel is spread over the chilled cheesecake for a glossy finish. That gives you real caramel depth, clean slices, and a top that looks polished instead of messy.
You’ll also learn how thick the caramel should be, when to add it, how to tell when the cheesecake is done, and why overnight chilling makes such a difference. Once those details are right, this is a deeply creamy, sliceable salted caramel cheesecake with a clean finish of flaky sea salt.
What’s in this guide
Make the Cheesecake
Recipe, Variations & Fixes
Quick Answer: Salted Caramel Cheesecake Recipe
To make salted caramel cheesecake, bake a buttery biscuit or graham cracker crust, fill it with a smooth cream cheese batter flavored with brown sugar and cooled salted caramel, then bake it gently at 300°F / 150°C until the edges are set and the center still wobbles slightly. Cool it slowly, chill it for at least 6 hours, then finish with a glossy caramel layer and flaky sea salt.
The trick is to use caramel in the right places. A controlled amount goes into the filling for flavor, while the topping is added after chilling so it stays visible and neat. That way, the cheesecake tastes caramel-forward without turning loose in the middle.
Want the exact measurements? Jump to the recipe card. Unsure about caramel thickness? Go to the caramel guide.
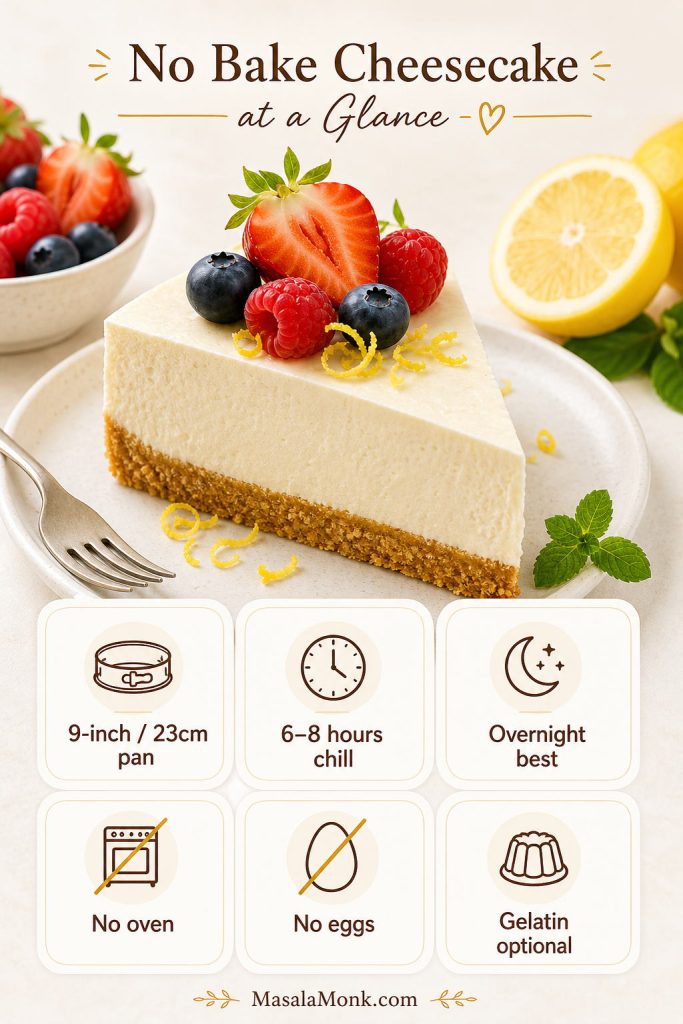
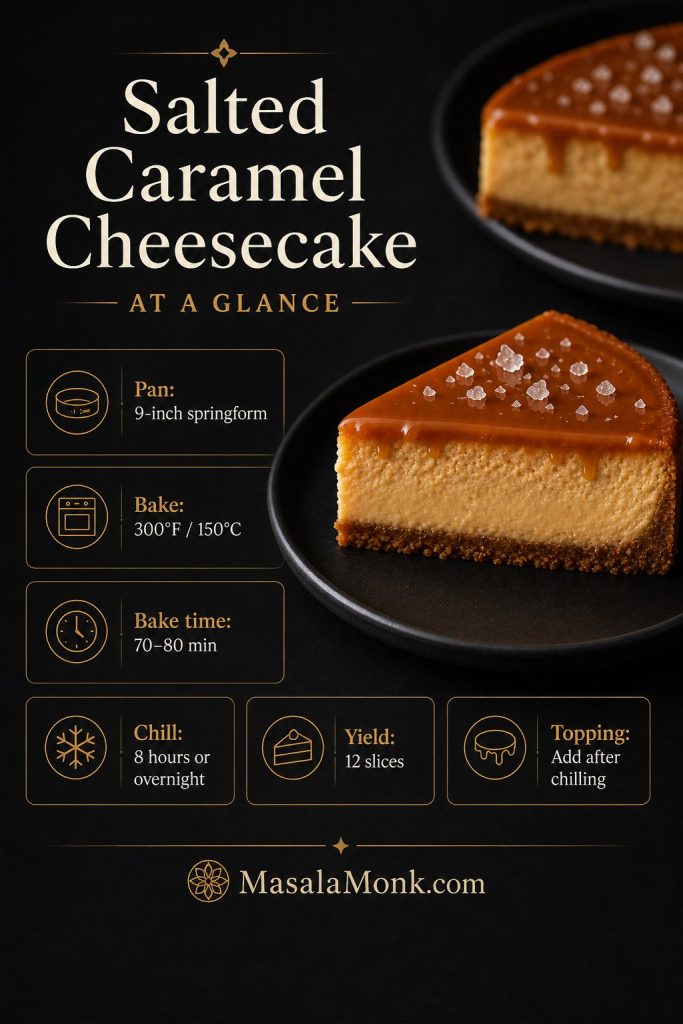
Salted Caramel Cheesecake at a Glance
| Style | Baked round salted caramel cheesecake |
|---|---|
| Pan | 9-inch / 23 cm springform pan |
| Yield | 12 slices |
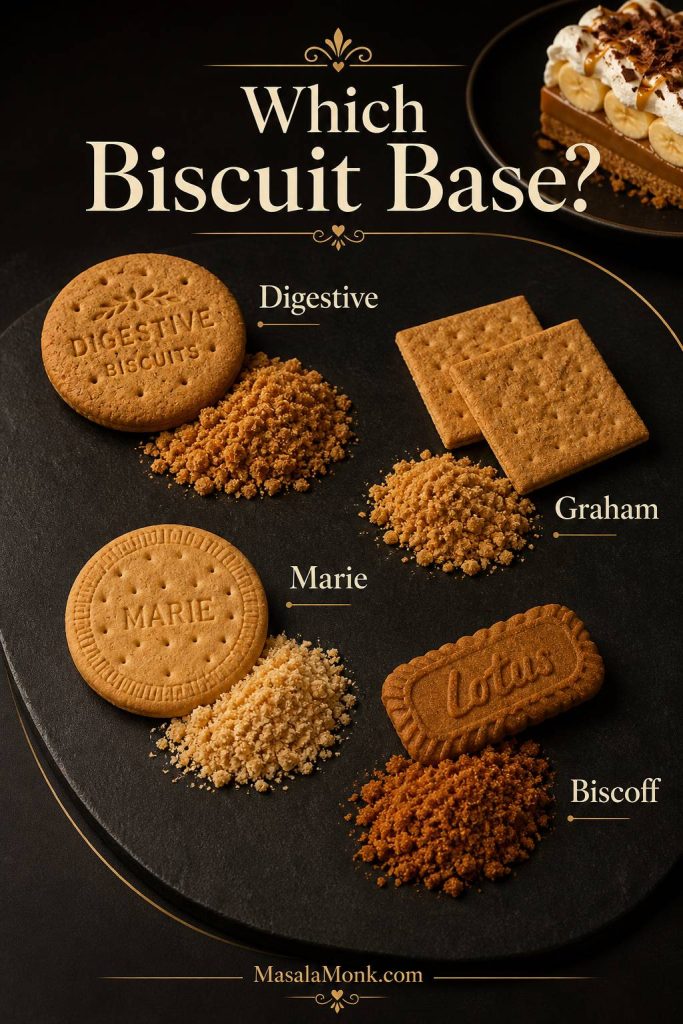
| Crust | Digestive biscuits, graham crackers, or Biscoff crumbs |
| Texture | Creamy, set, and sliceable after chilling |
| Caramel texture | Cooled and thick enough for the filling, glossy and slow-moving for the top |
| Bake temperature | 300°F / 150°C after the crust is baked |
| Fan oven | About 285°F / 140°C |
| Chill time | 8 hours or overnight for the cleanest slices; 6 hours is the bare minimum |
| Best finish | Caramel topping and flaky sea salt added after chilling |
Why This Salted Caramel Cheesecake Recipe Works
Balance is the tricky part of caramel cheesecake. With too little caramel, the dessert tastes like plain cheesecake with sauce. Add too much, and the filling can turn soft, overly sweet, or difficult to slice. This version keeps the flavor deep without overloading the batter.
- A controlled amount of caramel goes into the filling. It is enough to flavor the cheesecake, but not so much that the center turns loose.
- Brown sugar supports the caramel flavor. It gives the filling a warmer, rounder sweetness than white sugar alone.
- Sour cream balances the richness. That little tang keeps the cheesecake from tasting flat or cloying.
- The topping goes on after chilling. The caramel sits as a glossy layer instead of melting into a warm surface.
- A gentle bake protects the texture. The lower oven temperature gives the eggs time to set around the caramel-enriched filling.
- Overnight chilling gives the cleanest slices. The cheesecake firms as it rests, and the caramel flavor becomes smoother.
Ready to make it? Skip to the step-by-step method. Prefer the short version? Go straight to the recipe card.
Before You Start This Salted Caramel Cheesecake
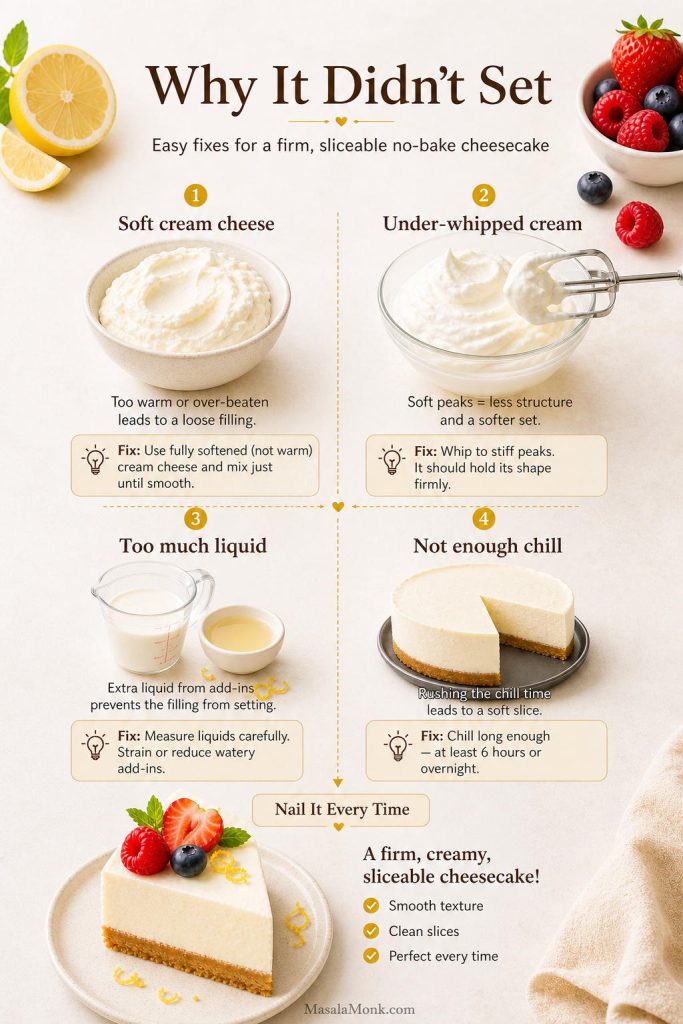
Cheesecake is not difficult, but it rewards patience. A few small details make the difference between a creamy slice and a soft, cracked, or lumpy one.
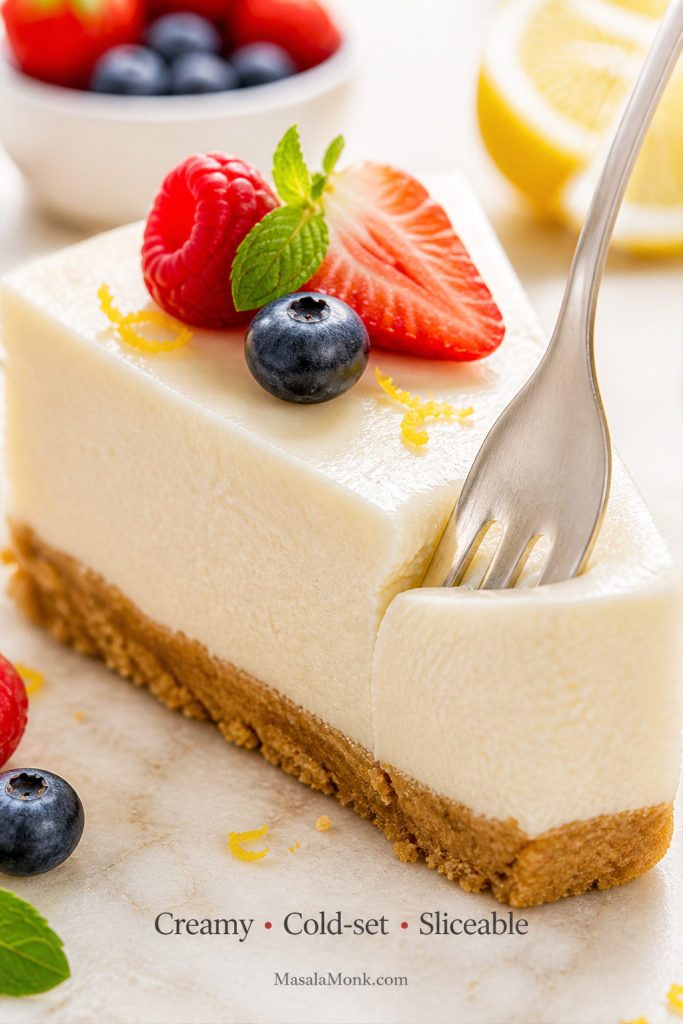
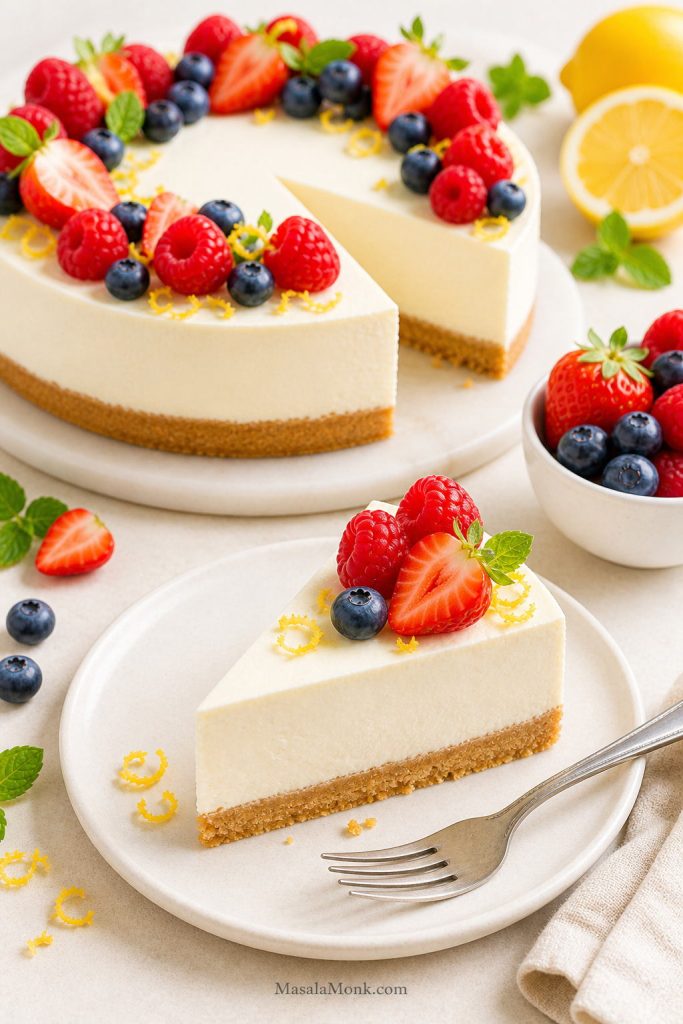
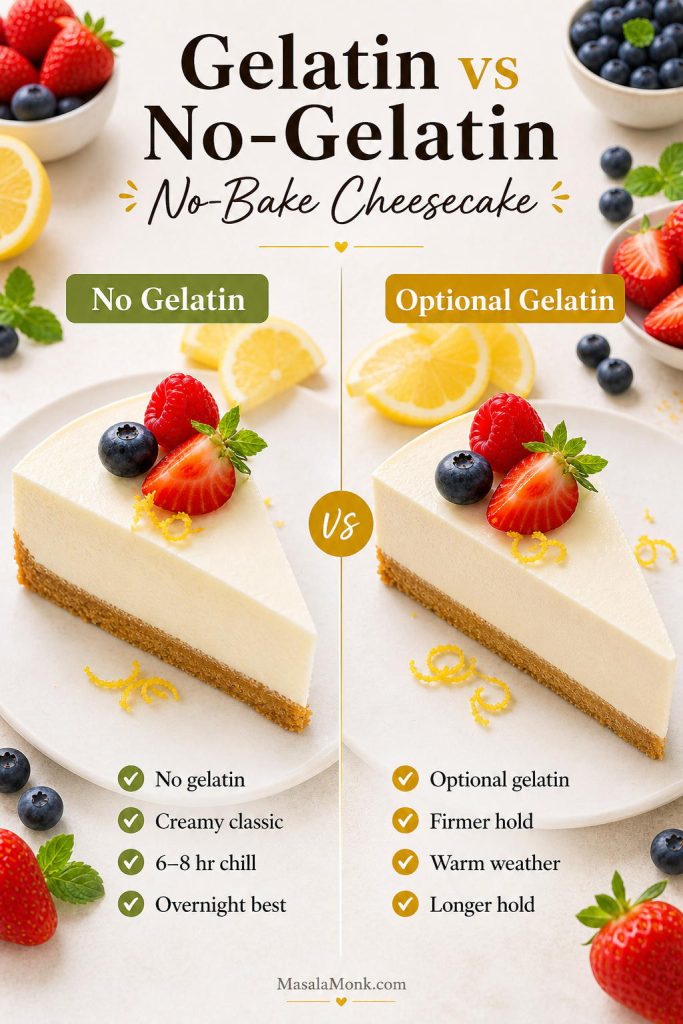
If you are still deciding between baked and chilled cheesecake styles, this no-bake cheesecake recipe explains the no-oven version in detail, including how cream cheese, whipped cream, and chill time create a sliceable texture.
Before you start: Bring the cream cheese, eggs, sour cream, and cream to room temperature. Use cooled caramel, not hot caramel. Mix gently after adding the eggs. Chill the cheesecake overnight if you want the neatest slices.
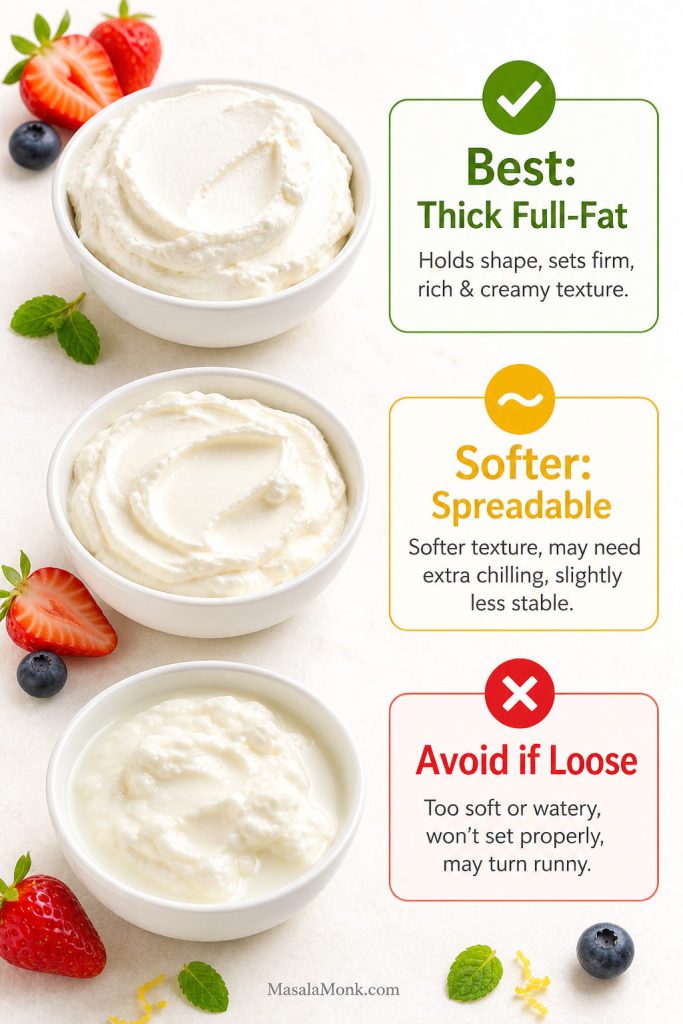
- Use full-fat block cream cheese. Spreadable tub-style cream cheese can be softer and may not set as firmly.
- Cool the caramel first. Warm caramel may seem easier to stir in, but it can soften the filling and make the cheesecake harder to bake evenly.
- Scrape the bowl often. Cream cheese lumps like to hide at the bottom and sides of the bowl.
- Mix on low after adding eggs. Too much air can make the cheesecake rise, fall, and crack.
- Do not rush the chill. A caramel cheesecake needs time to firm up fully.
Salted Caramel Cheesecake Ingredients
This ingredient list is simple, but texture matters. Choose full-fat dairy, a sturdy crumb base, and caramel that is thick enough for cheesecake rather than a thin dessert syrup.
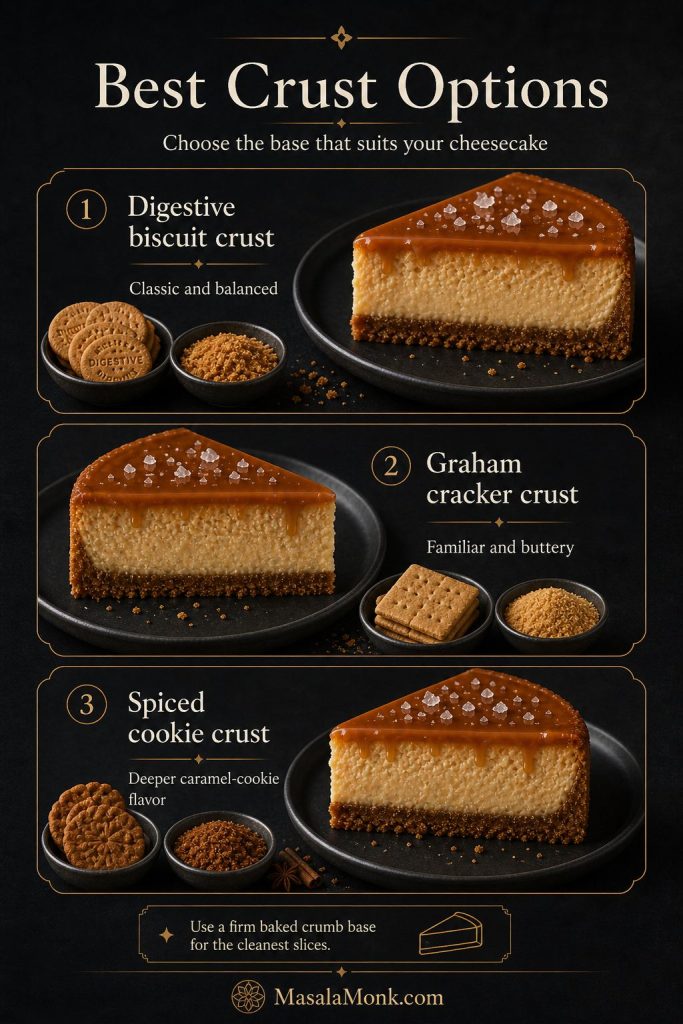
Buttery Crumb Crust
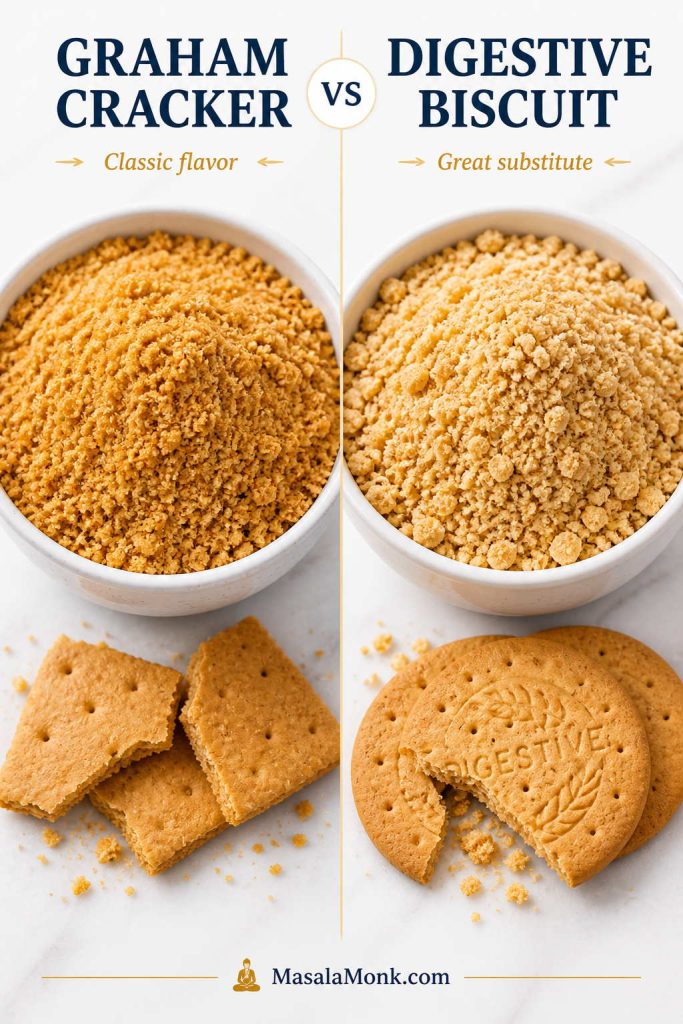
- Digestive biscuits, graham crackers, or Biscoff crumbs: Digestives and graham crackers give the cheesecake a classic base, while Biscoff adds a deeper caramel-cookie flavor.
- Melted butter: This binds the crumbs and helps the crust set firmly after baking.
- Light brown sugar: A small amount adds a gentle caramel note to the base.
- Fine salt: Salt keeps the crust from tasting flat underneath the sweet filling.
Salted Caramel Cheesecake Filling
- Full-fat block cream cheese: This gives the cheesecake its main structure. Let it come to room temperature before mixing so the batter turns smooth.
- Light brown sugar: Brown sugar tastes warmer and more caramel-like than white sugar.
- Sour cream: A little tang balances the caramel and keeps the filling from tasting too sweet.
- Heavy cream or double cream: Cream adds richness and helps the texture feel smooth.
- Eggs: These set the baked filling. Add them one at a time and mix gently.
- Cornstarch or all-purpose flour: Either one gives the filling a little extra stability, which helps when caramel is involved.
- Vanilla extract: Vanilla rounds out the dairy and caramel flavors.
- Fine salt: This balances the sweetness inside the cheesecake, not just on top.
- Cooled salted caramel sauce: Use caramel that is thick but stirrable, so it flavors the filling without making the batter too loose.
Salted Caramel Topping
- Salted caramel sauce: Look for a sauce that falls from a spoon in a slow ribbon. Runny caramel is better saved for drizzling over individual slices.
- Flaky sea salt: Sprinkle it on just before serving so it stays crisp and gives little salty pops against the caramel.
Need help with caramel texture before you start? See the caramel thickness guide. Ready to bake? Jump to the method.
Caramel for Cheesecake: Filling, Topping, and Drizzle
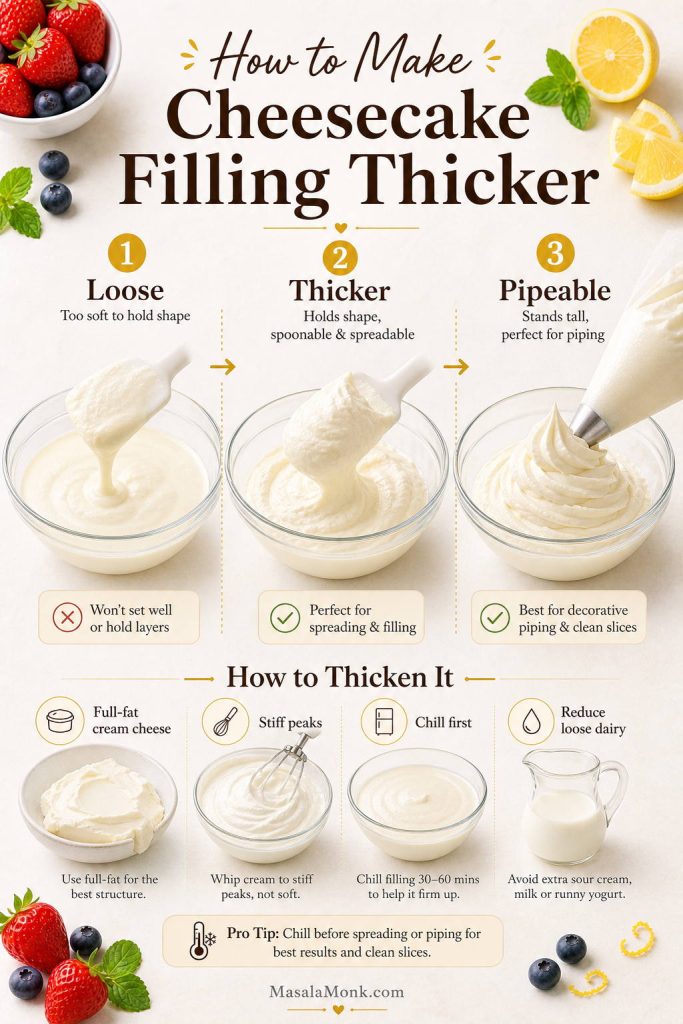
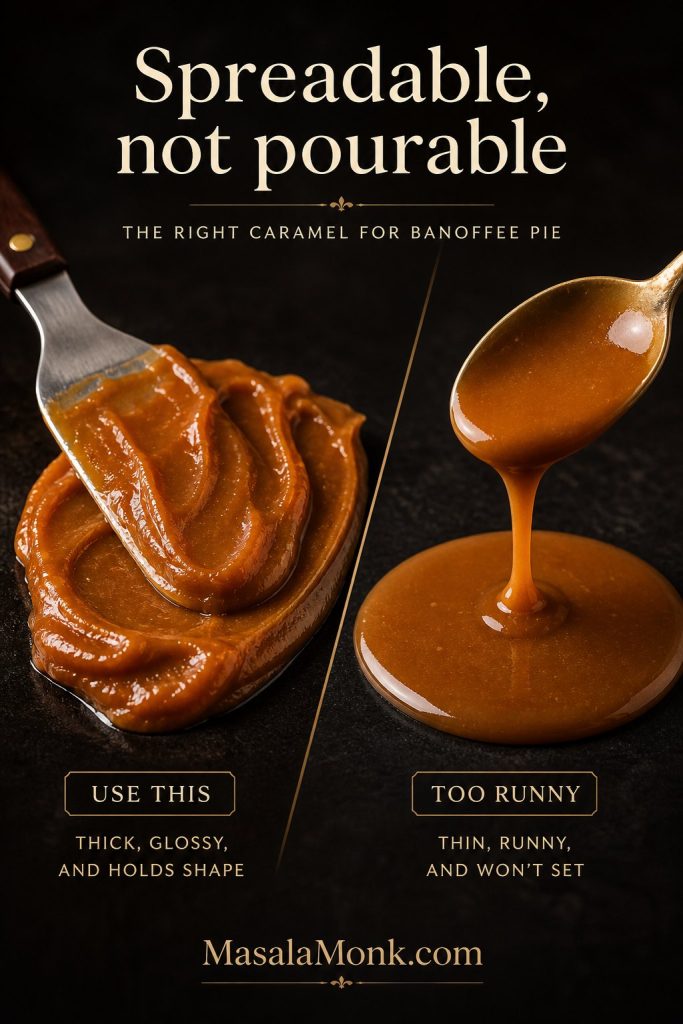
Caramel decides the texture here. A sauce that works beautifully over ice cream may be too thin for cheesecake. In this recipe, the caramel should be cool enough to protect the filling and thick enough to stay present in each slice.
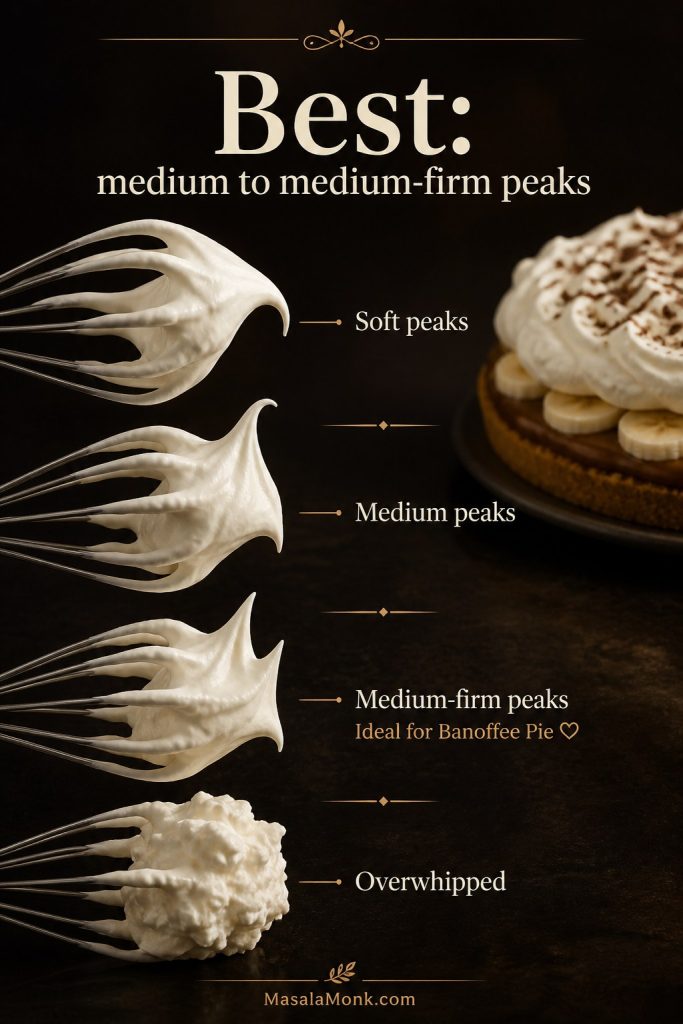
The Spoon Test for Caramel Cheesecake Topping
Before adding caramel to the filling or spreading it on top, test it with a spoon. This is easier than guessing by color alone.
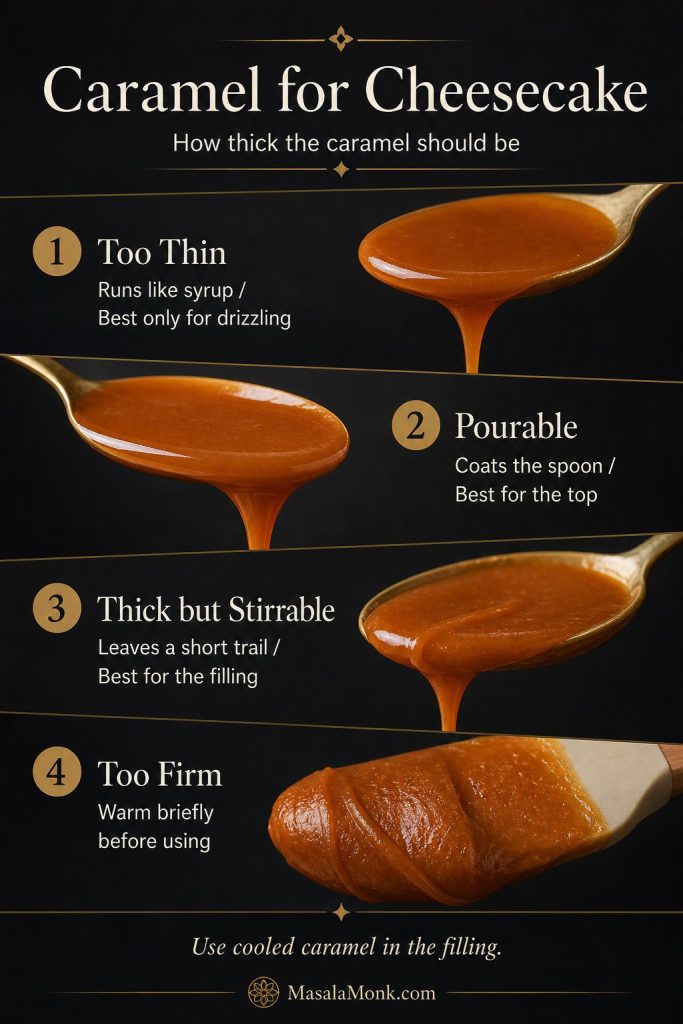
| Caramel texture | What it looks like | Best use |
|---|---|---|
| Too thin | Runs off the spoon like syrup | Use only as a serving drizzle |
| Pourable | Coats the spoon and falls in a slow ribbon | Best for the top of the chilled cheesecake |
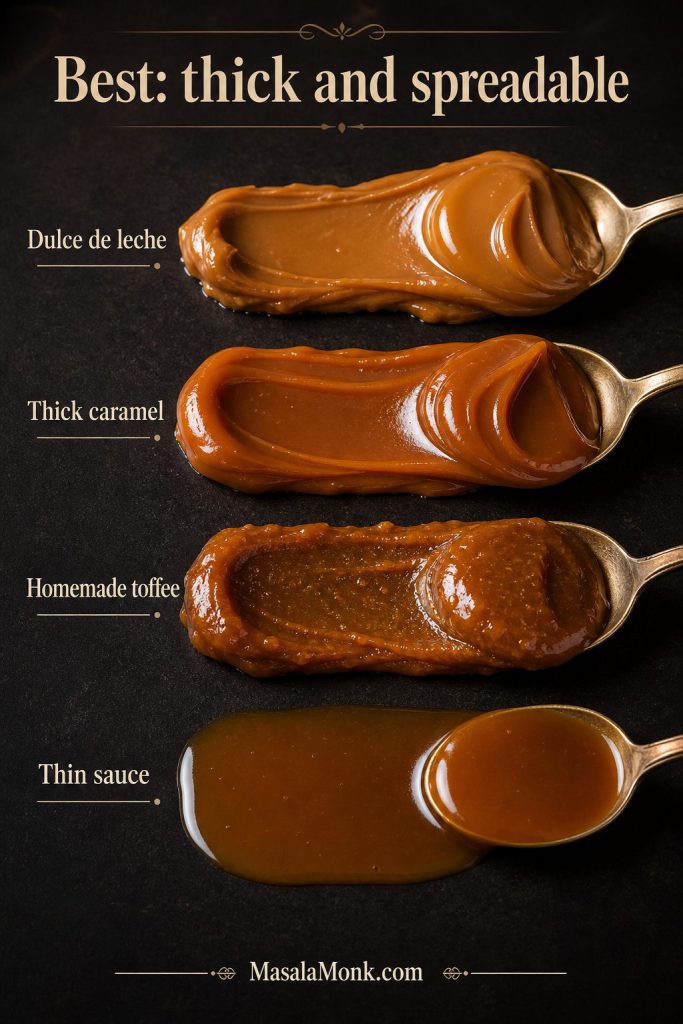
| Thick but stirrable | A spoon dragged through it leaves a trail for 2–3 seconds | Best for mixing into the filling or making a light swirl |
| Too firm | Clumps or spreads like cold fudge | Warm very briefly before using |
Best Caramel Sauce for Salted Caramel Cheesecake
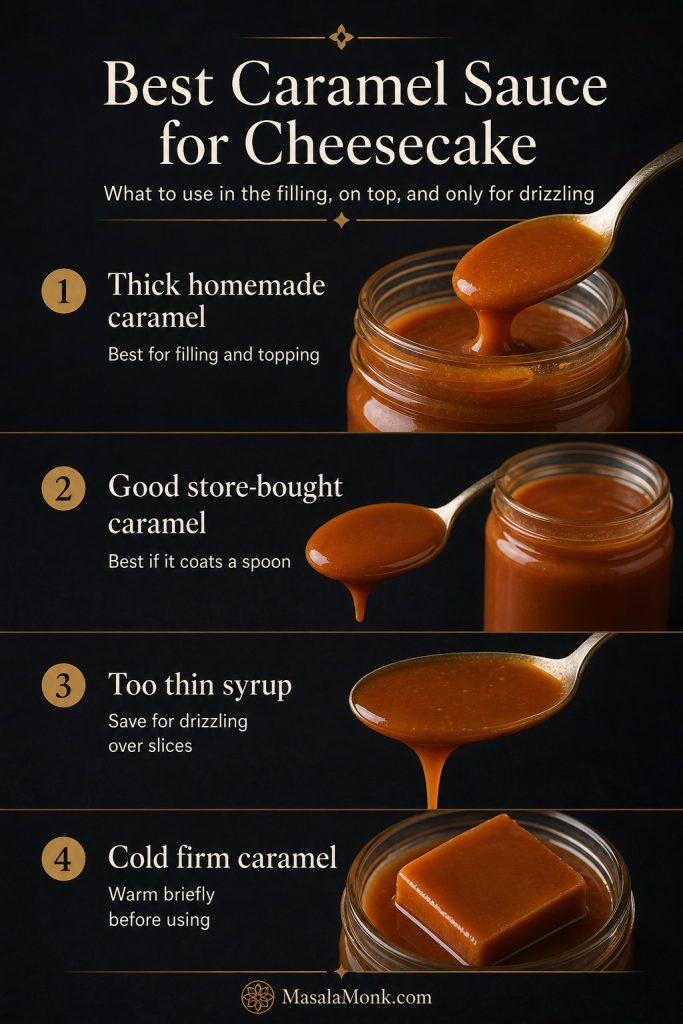
The best caramel sauce for salted caramel cheesecake is thick, glossy, and slow-moving. It should coat a spoon and fall in a ribbon rather than run like syrup. Homemade caramel gives you the most control, but store-bought salted caramel can work if it has enough body. Avoid thin ice cream-style caramel in the filling because it can make the cheesecake softer and harder to slice.
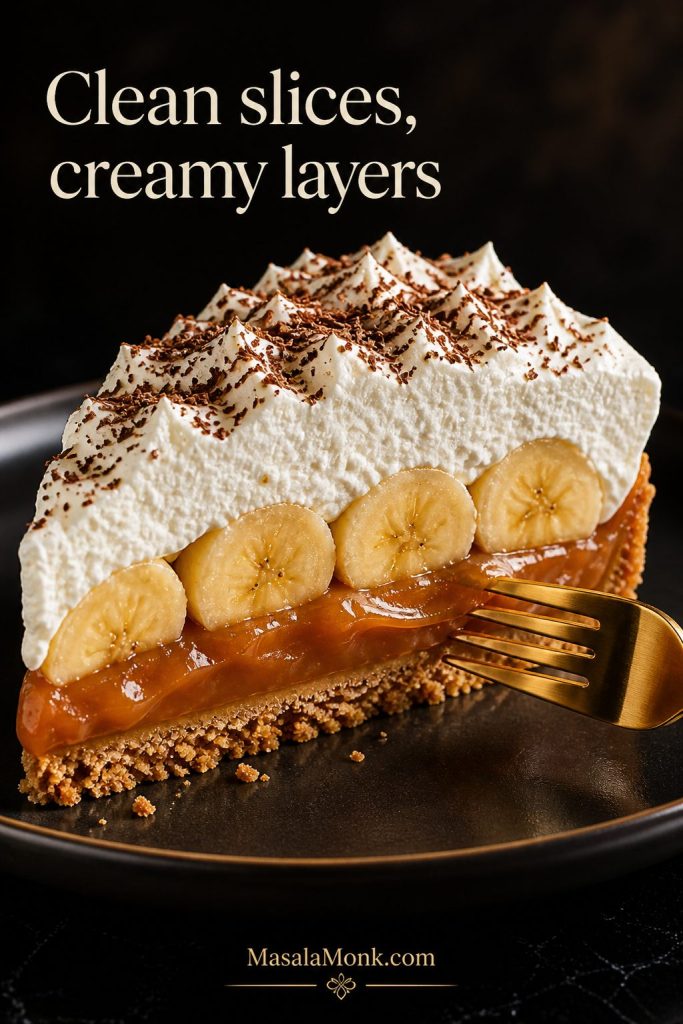
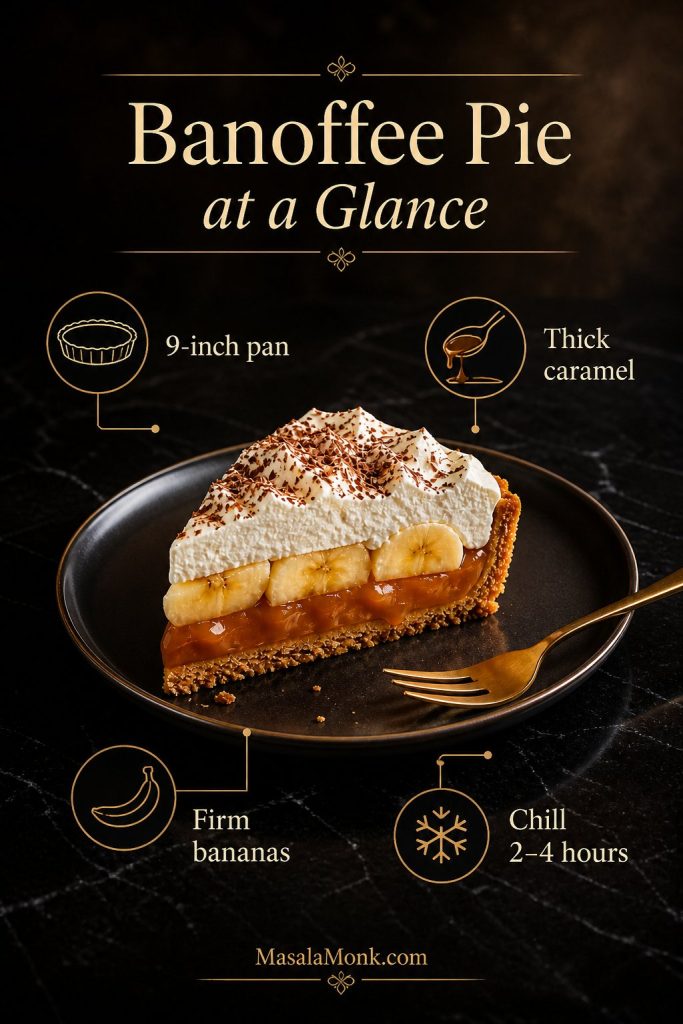
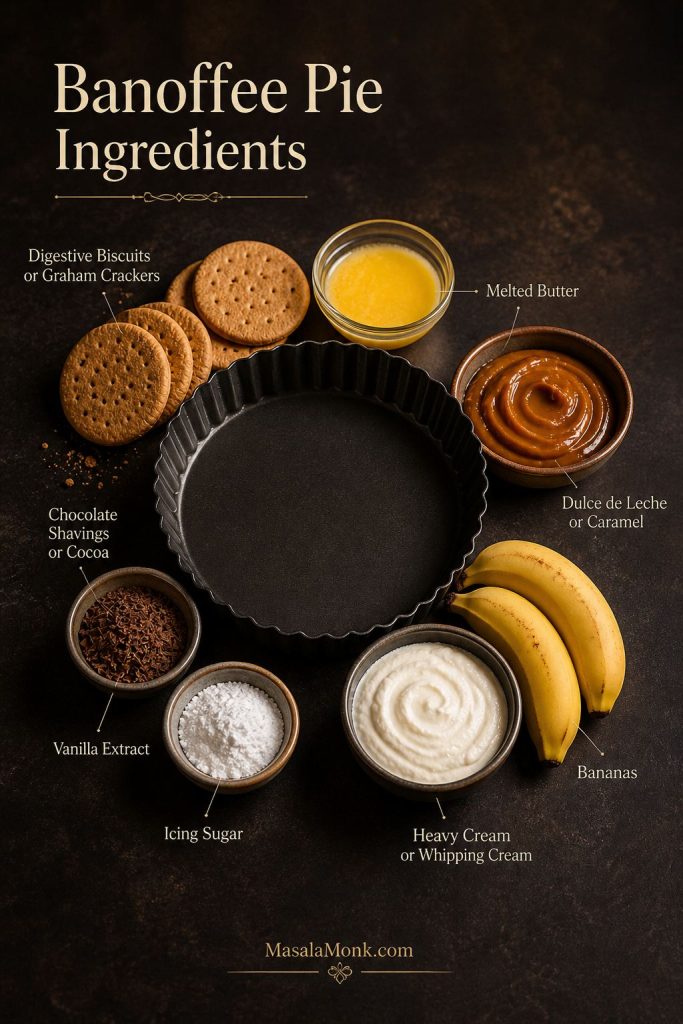
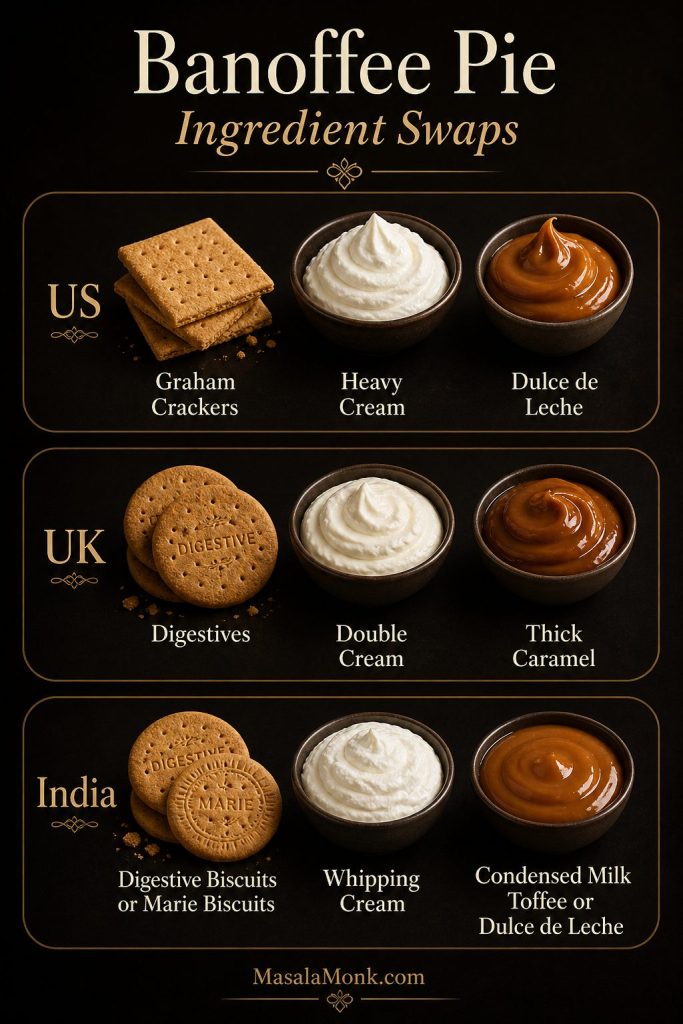
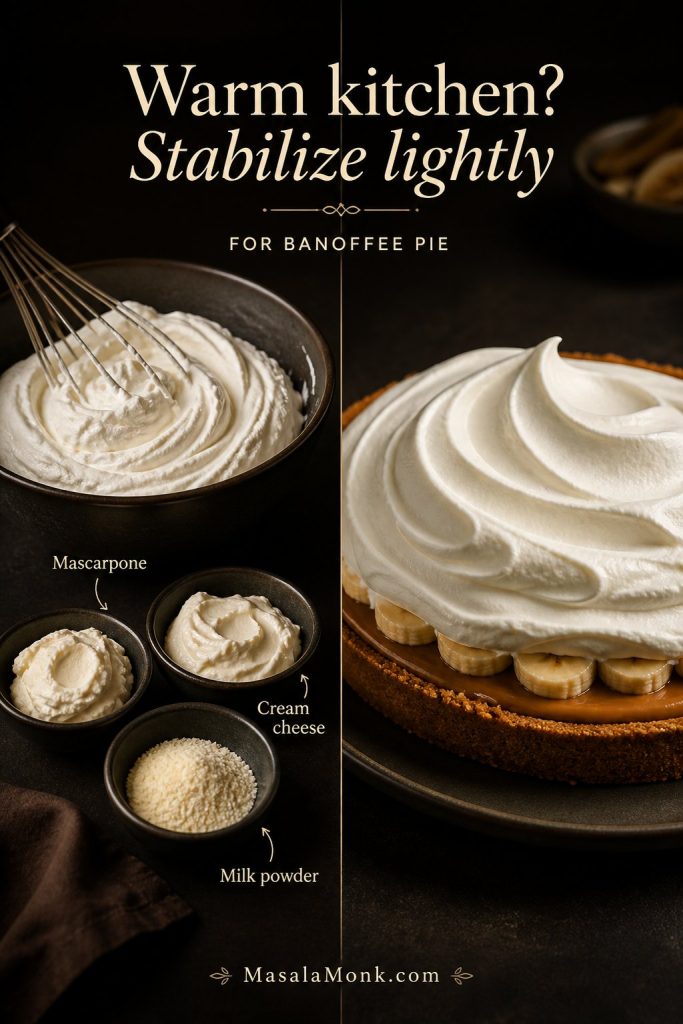
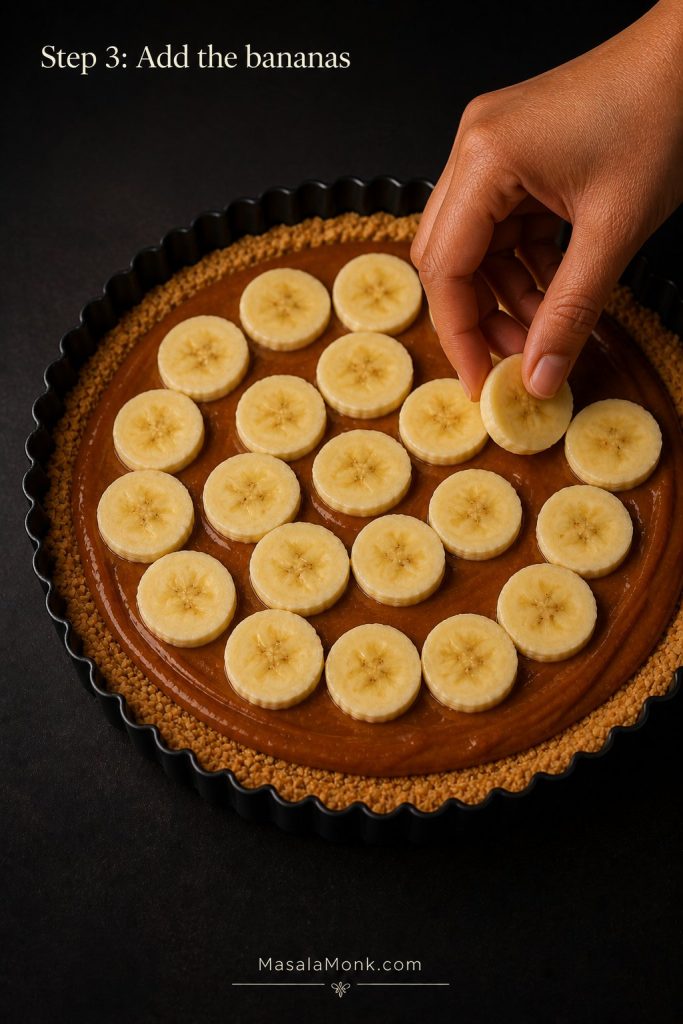
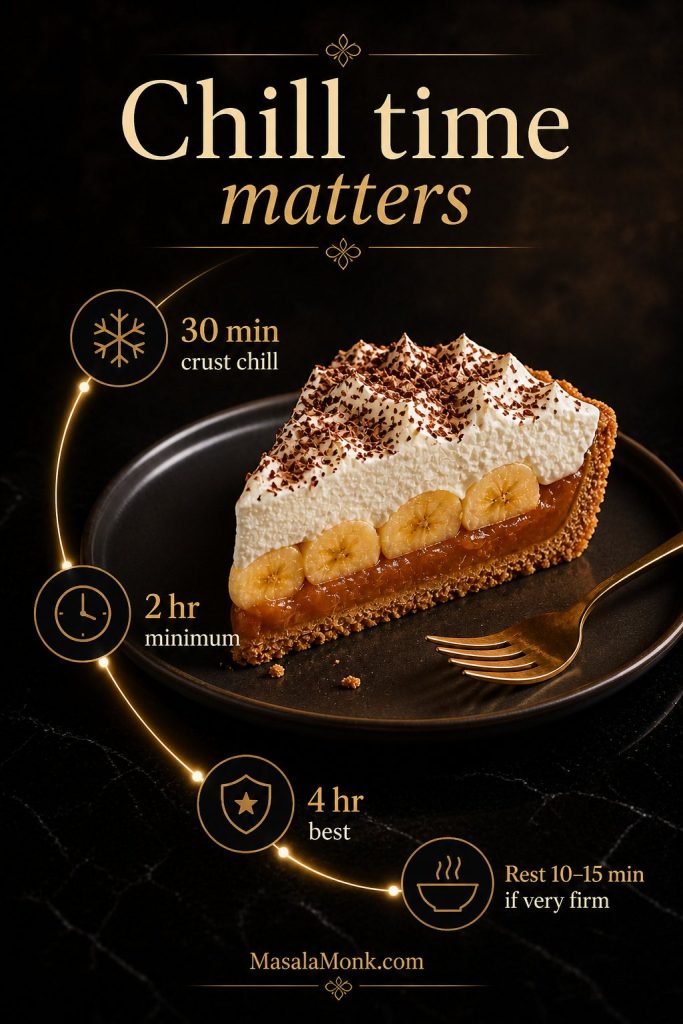
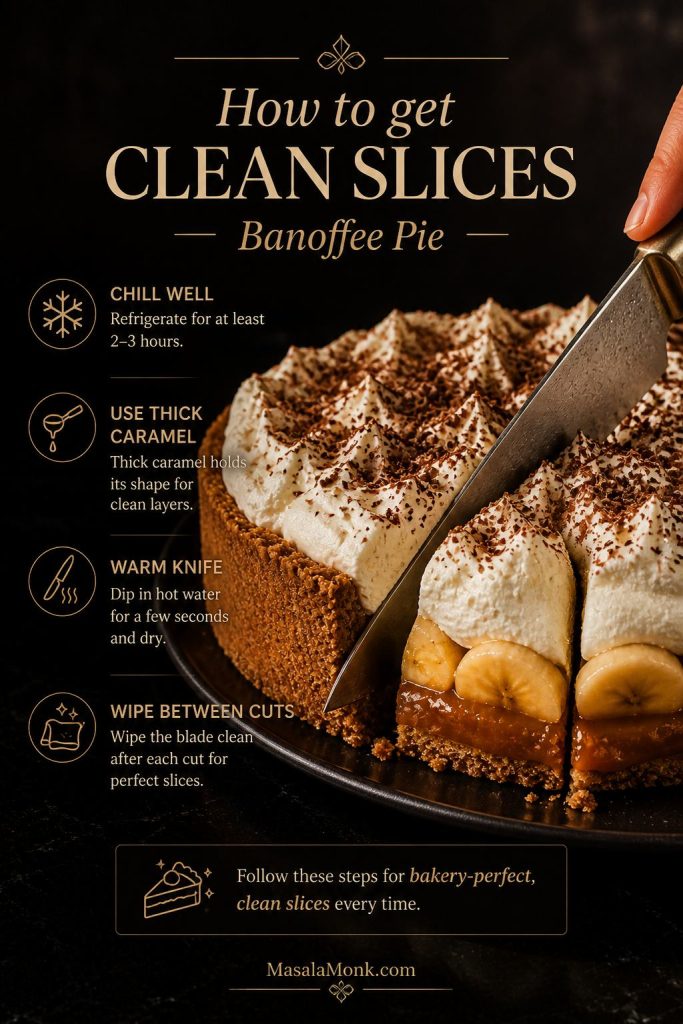
This same thick-caramel logic also matters in a banoffee pie recipe, where the caramel or dulce de leche needs enough body to sit under bananas and cream without turning the slices messy.
Homemade vs Store-Bought Caramel for Cheesecake
Homemade salted caramel gives you the most control because you can cook it to the right thickness. Store-bought caramel can still work, especially for the topping, as long as it is not watery. If your jarred caramel is thin and runny, keep it for a final drizzle instead of mixing it into the cheesecake batter.
For the filling, use caramel that has cooled completely. For the topping, choose a glossy sauce that moves slowly from the spoon. If it has been refrigerated and looks too firm, warm it for a few seconds at a time until it loosens, then let it cool slightly before spreading.
Quick Salted Caramel for This Cheesecake
If you do not already have caramel sauce, make a simple batch before you start the filling. It needs time to cool, so this is best done first.
- 200 g granulated sugar, about 1 cup
- 85 g unsalted butter, cubed, about 6 tbsp
- 120 ml heavy cream or double cream, 1/2 cup
- 1/2–1 tsp fine salt, to taste
- 1 tsp vanilla extract, optional
This makes enough caramel for the filling and topping, with a little extra for drizzling depending on how thick you cook it.
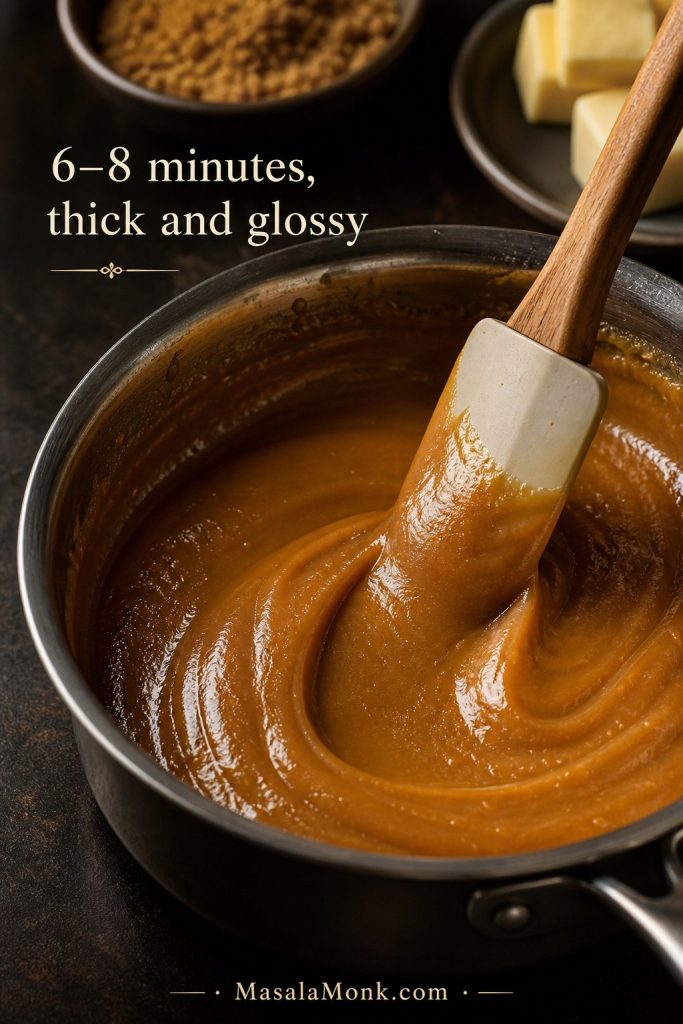
Place the sugar in a heavy-bottom saucepan over medium heat and let it melt, stirring gently only as needed until it becomes a deep amber caramel. The sugar may clump at first. Keep the heat moderate and continue stirring gently until the clumps melt. If it darkens too fast, lower the heat.
Carefully whisk in the butter; the mixture will bubble. Slowly add the cream while whisking, then simmer for 1–2 minutes until smooth. Remove from the heat, stir in salt and vanilla, and let it cool until thick but still spoonable.
Caramel safety note: Hot caramel is much hotter than boiling water and bubbles aggressively when butter or cream is added. Use a deep pan, pour the cream slowly, and keep your hands clear of the steam.
When to Add Caramel Topping to Cheesecake
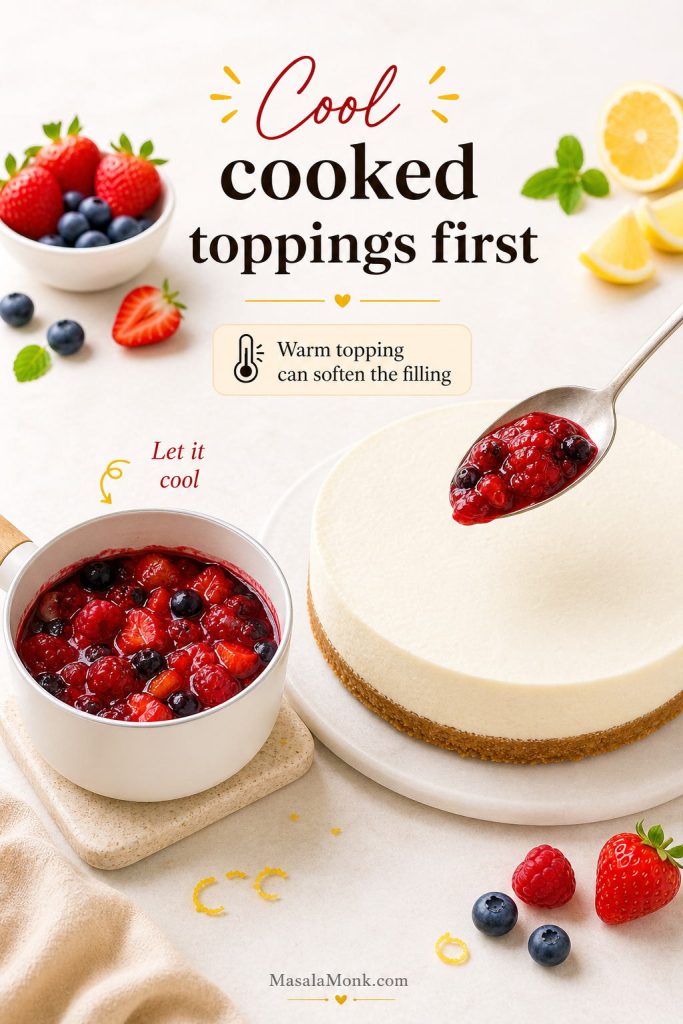
Add the topping after the cheesecake has chilled and set. If you add caramel while the cheesecake is warm, it can sink into the surface or slide toward the edges. If you are making the dessert ahead, bake and chill the cheesecake first, then add the caramel layer on the day you serve it.
Best result: Make the caramel first, bake the cheesecake the day before serving, chill it overnight, then add the caramel topping and flaky salt on the day you serve it.
If your caramel feels too thin or the topping keeps sliding, check the troubleshooting section. Want the full recipe in one place? Go to the recipe card.
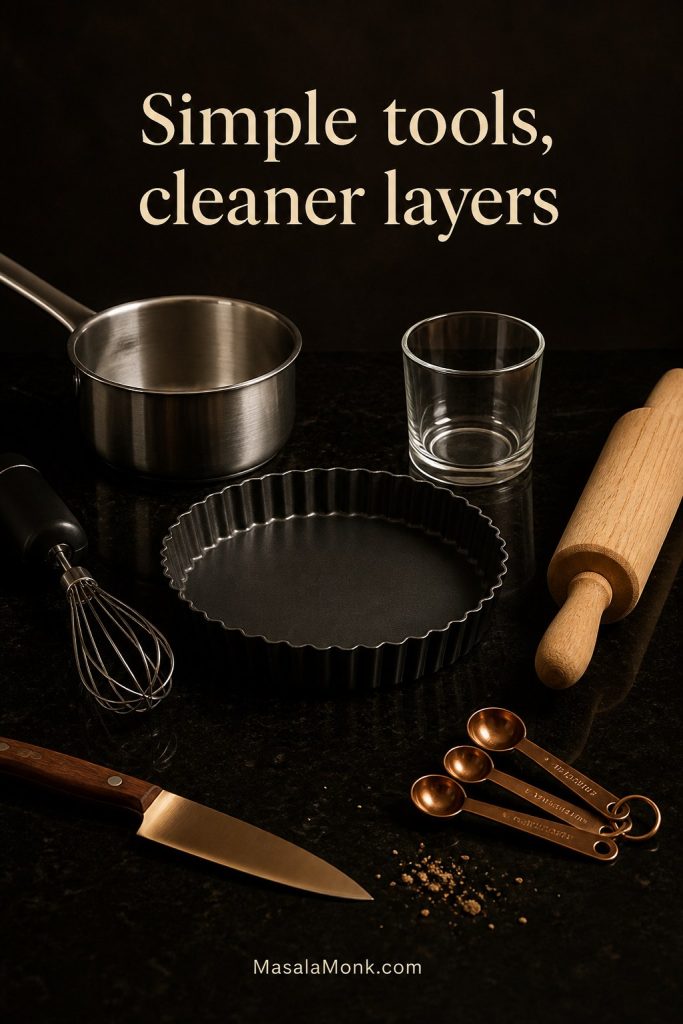
Equipment for Baked Salted Caramel Cheesecake
- 9-inch / 23 cm springform pan: A deeper pan is helpful because the filling rises slightly as it bakes.
- Parchment paper: Makes it easier to release the cheesecake from the base.
- Food processor or rolling pin: Use either one to make fine, even crumbs.
- Stand mixer with paddle or electric hand mixer: Keep the speed gentle, especially after adding the eggs.
- Roasting pan or deep baking tray: Helpful for a water bath or a steam-pan setup.
- Heavy-bottom saucepan: Needed if making caramel from scratch.
- Digital scale: Strongly recommended because small measurement changes affect cheesecake texture.
- Offset spatula: Helpful for smoothing the batter and caramel layer.
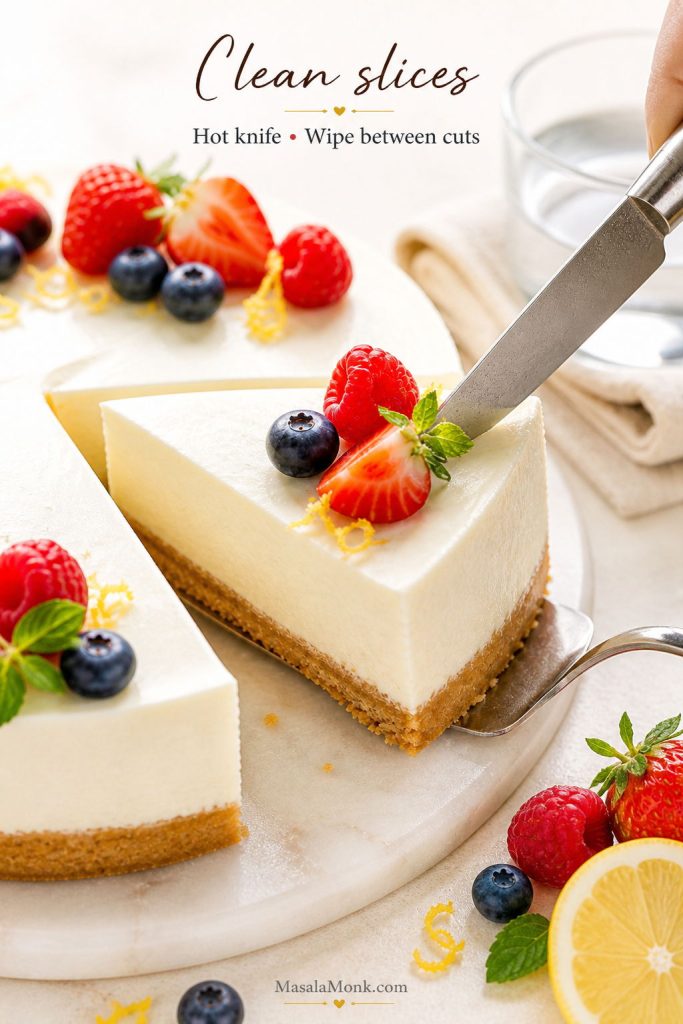
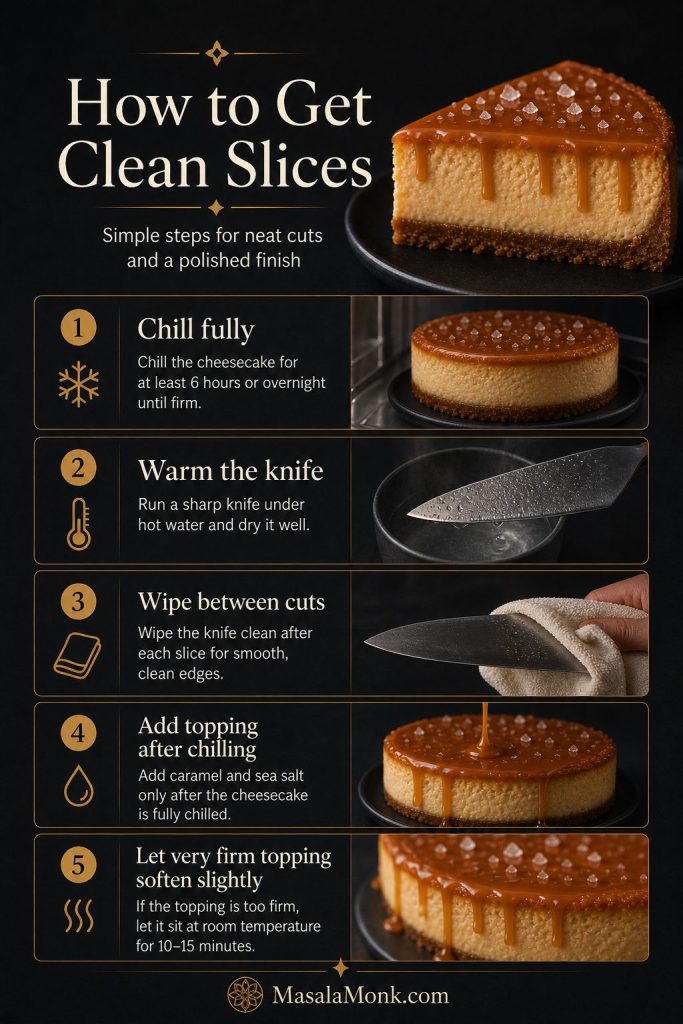
- Sharp knife: Warm and wipe it between cuts for neat slices.
- Instant-read thermometer, optional: Useful if you want a precise doneness check.
Common Mistakes to Avoid
- Do not add hot caramel to the filling. It can loosen the batter and make the cheesecake bake unevenly.
- Do not use thin caramel syrup in the batter. Save runny caramel for drizzling over individual slices.
- Do not overmix after adding eggs. Too much air can make the cheesecake rise, fall, and crack.
- Do not bake until the center looks fully firm. The middle should still wobble gently when the cheesecake leaves the oven.
- Do not add the caramel topping while the cheesecake is warm. Add it after chilling so the top stays glossy and neat.
How to Make Salted Caramel Cheesecake
The steps are straightforward, but the order makes a big difference. Bake the crust first, let the caramel cool, mix the filling gently, bake the cheesecake slowly, then give it enough time to chill before adding the topping.
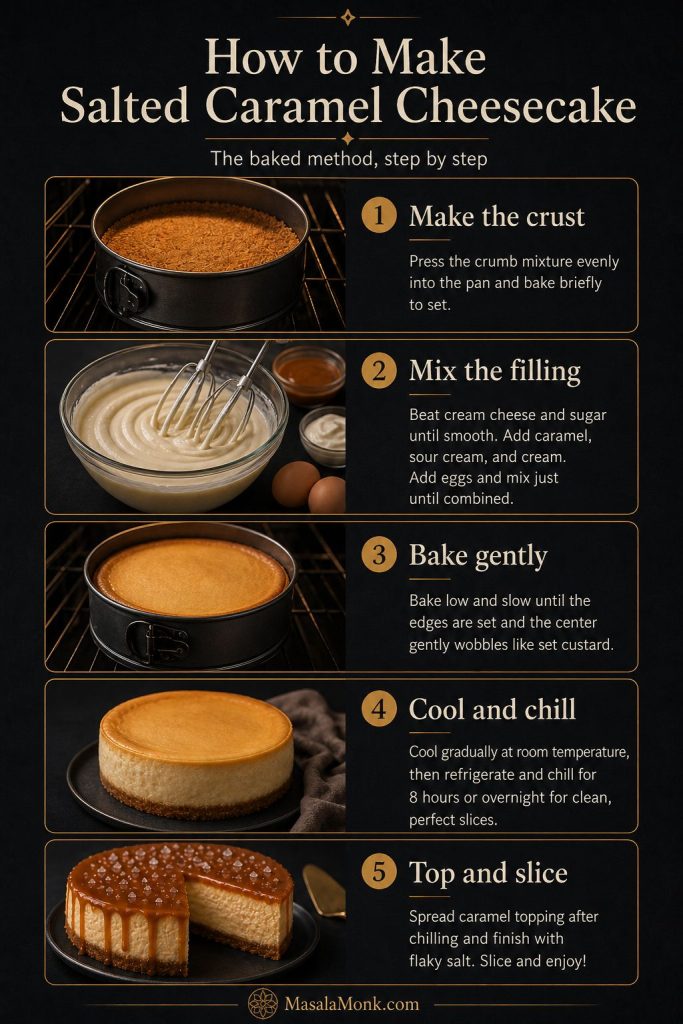
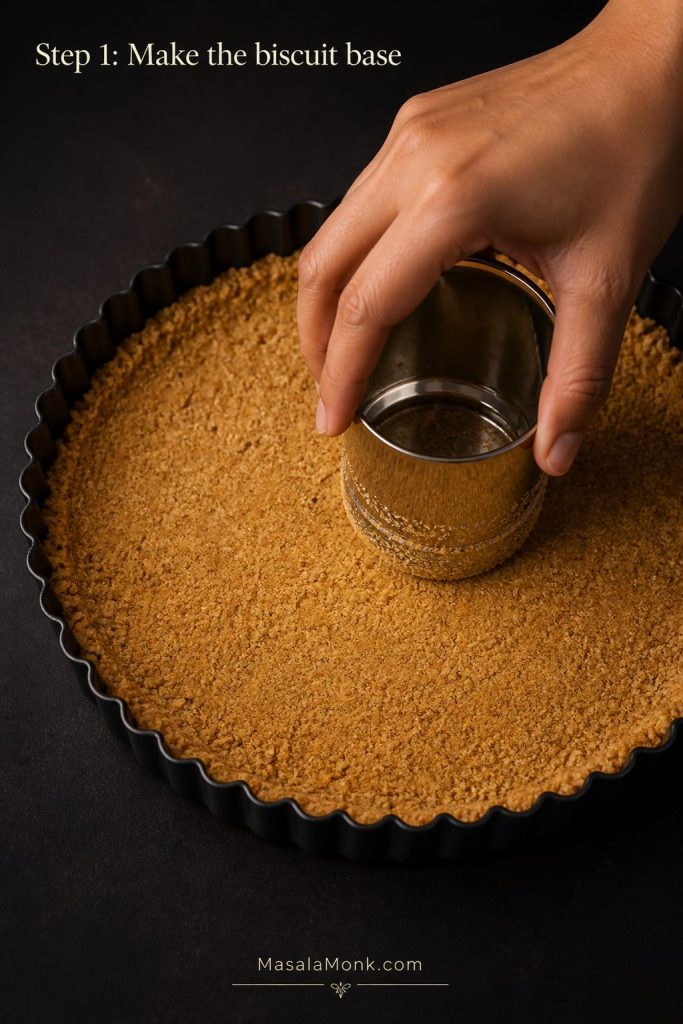
Step 1: Make the Crust
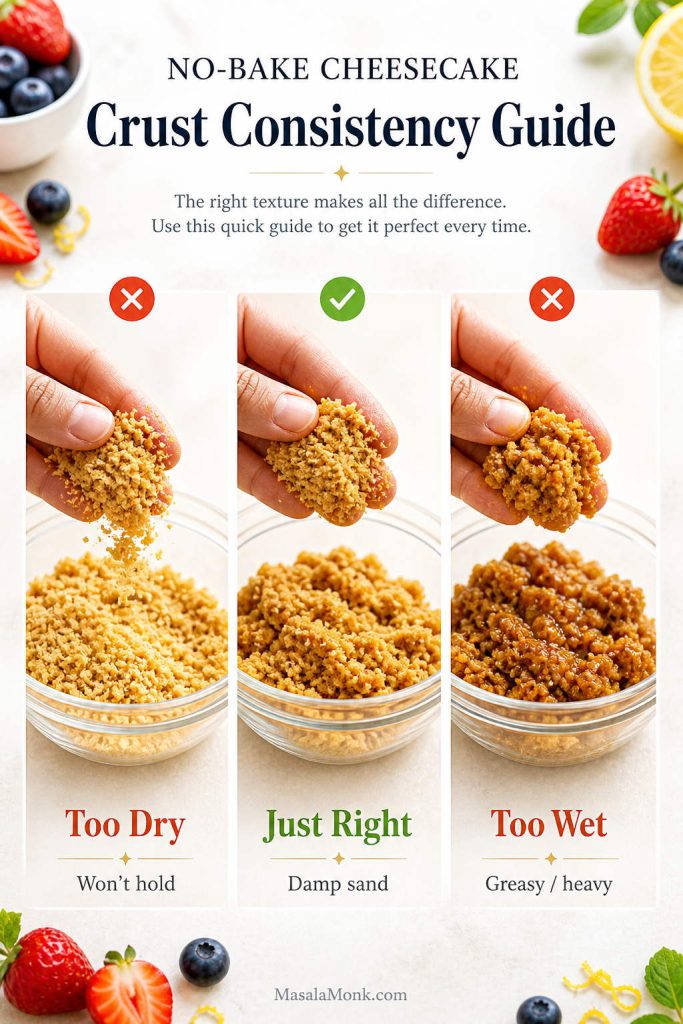
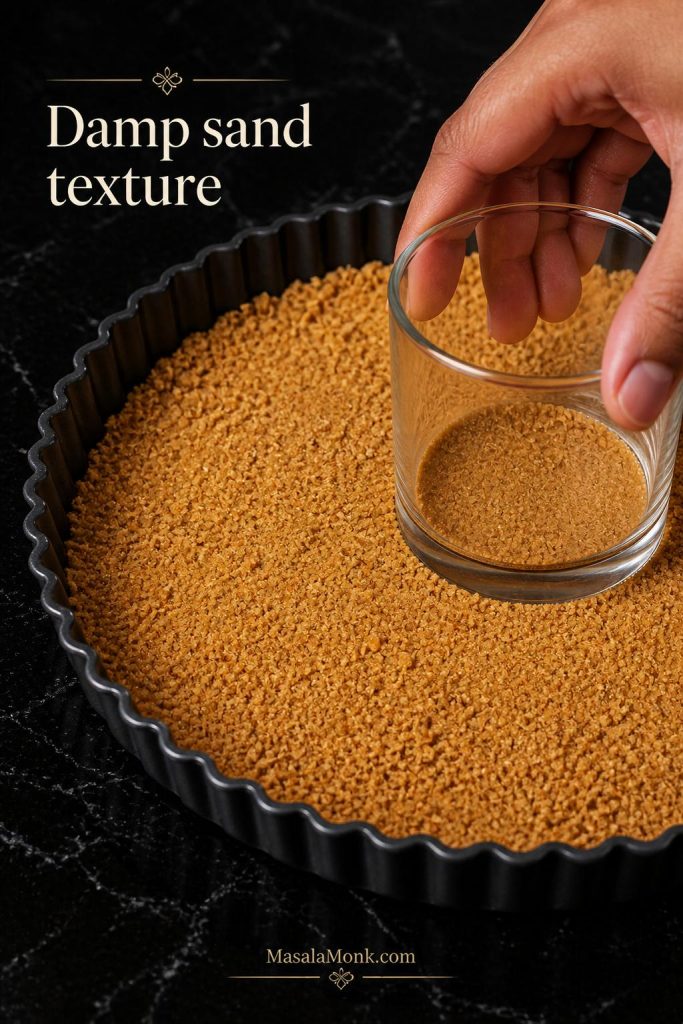
Heat the oven to 350°F / 175°C. Line the base of a 9-inch springform pan with parchment paper. Mix the biscuit crumbs, melted butter, brown sugar, and salt until the crumbs look evenly moistened, like damp sand.
Press the mixture firmly into the base of the pan. Bring the crumbs slightly up the sides to make a low edge, then bake for 8–10 minutes. Let the crust cool while you prepare the filling.
Step 2: Cool or Prepare the Caramel
If you are making caramel from scratch, make it now and let it cool. If you are using prepared caramel, check the texture with the spoon test. For the filling, the caramel should be cool and thick but still easy to stir.
Avoid adding hot caramel to the batter. It can soften the cream cheese mixture and make the cheesecake bake unevenly.
Step 3: Mix the Salted Caramel Cheesecake Filling
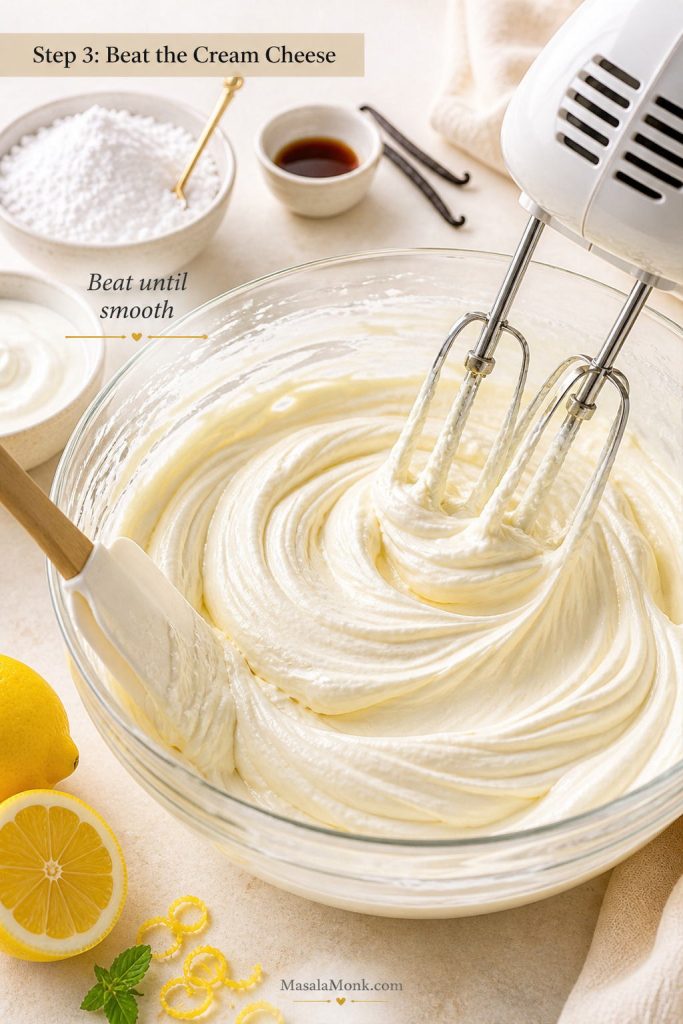
Lower the oven to 300°F / 150°C. If using a fan or convection oven, reduce the cheesecake baking temperature to about 285°F / 140°C. Beat the room-temperature cream cheese and brown sugar on low to medium speed until smooth. Stop and scrape the bowl a few times so no firm streaks of cream cheese remain.
Add the sour cream, heavy cream, vanilla, salt, cornstarch, and cooled caramel. Mix just until smooth. Add the eggs one at a time on low speed, mixing only until each egg disappears into the batter.
Mix gently once the eggs go in. Cheesecake batter should be smooth, not whipped. Too much air can make the cheesecake rise in the oven and crack as it cools.
Step 4: Bake the Salted Caramel Cheesecake Low and Slow
Pour the filling into the cooled crust and smooth the top. Bake at 300°F / 150°C for 70–80 minutes, using a water bath or steam pan if possible.
For a full water bath, wrap the outside of the springform pan well, place it in a roasting pan, and pour hot water around it until the water reaches about halfway up the sides. For the easier steam-pan method, place a tray of hot water on the lower rack and bake the cheesecake on the rack above.
The cheesecake is ready when the outer 2–3 inches look set and the center still has a soft wobble. It should move like set custard, not ripple like liquid. The top should look mostly matte rather than wet. If you are using a thermometer, the center should be around 145°F / 63°C; ThermoWorks uses the same internal temperature cue for cheesecake doneness.
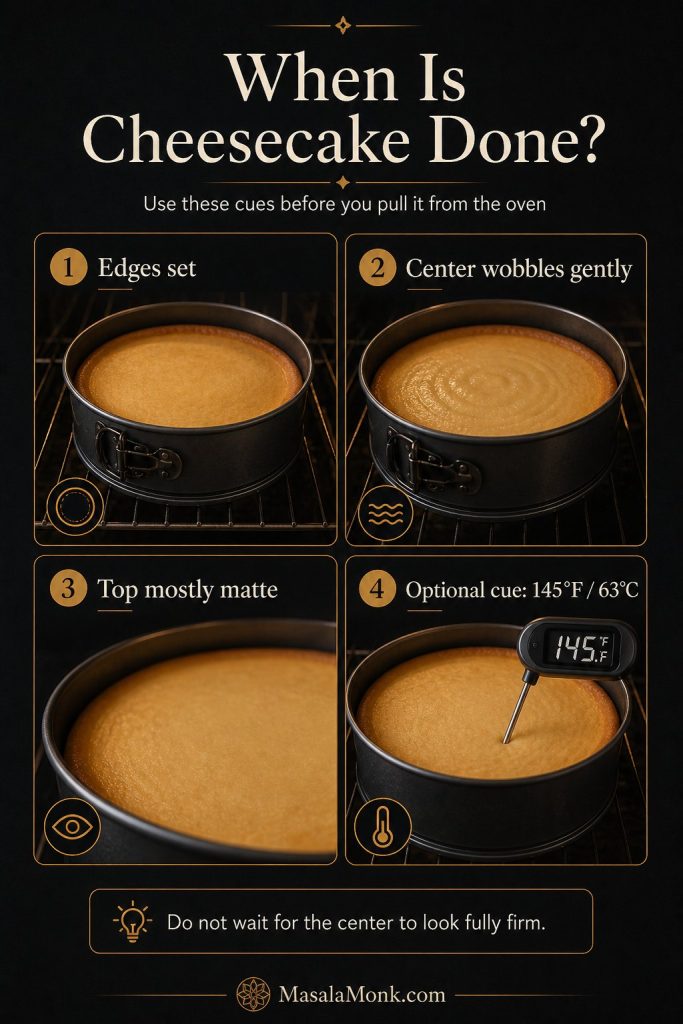
Do not wait for the center to look completely firm in the oven. By that point, the cheesecake may be overbaked. It will continue to set as it cools and chills.
Step 5: Cool Gradually
Turn the oven off, crack the door open, and leave the cheesecake inside for 1 hour. After that, move it to the counter and cool for another 1 hour. This slow cooling helps prevent sudden sinking and cracking.
Step 6: Chill Until Fully Set
Refrigerate the cheesecake for at least 6 hours. Overnight is better, and 8 hours gives a more reliable set. The filling becomes smoother and firmer as it rests, and the caramel flavor settles into the cream cheese base.
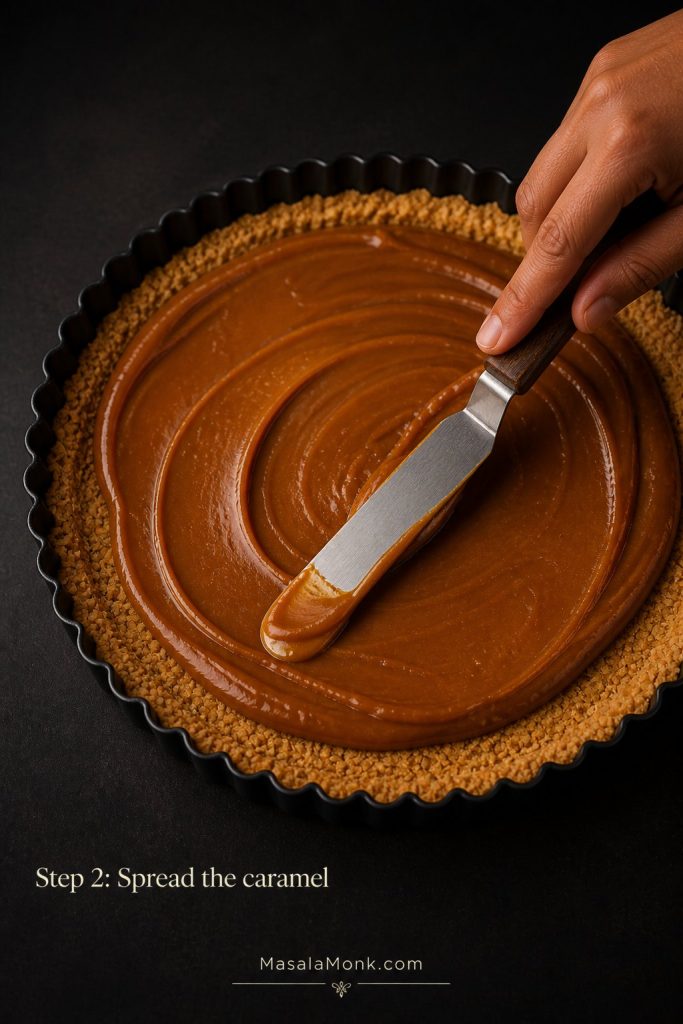
Step 7: Add the Salted Caramel Layer and Flaky Salt
Once the cheesecake is cold and set, spread the caramel over the top. Let it settle naturally, or guide it gently with an offset spatula. Finish with flaky sea salt just before serving.
For tidy slices, dip a sharp knife in hot water, wipe it dry, cut one slice, then wipe the blade before cutting again.
Need to store it or make it ahead? Jump to storage and freezing. Cheesecake not setting the way you expected? See troubleshooting.
Do You Need a Water Bath for Salted Caramel Cheesecake?
A water bath gives cheesecake the smoothest texture because it surrounds the pan with gentle, moist heat. That is especially helpful here because caramel adds sweetness and moisture to the filling.
If wrapping a springform pan makes you nervous, use a steam pan instead. Place a deep tray of hot water on the lower oven rack and bake the cheesecake on the rack above it. You still get extra moisture in the oven without risking water leaking into the crust.
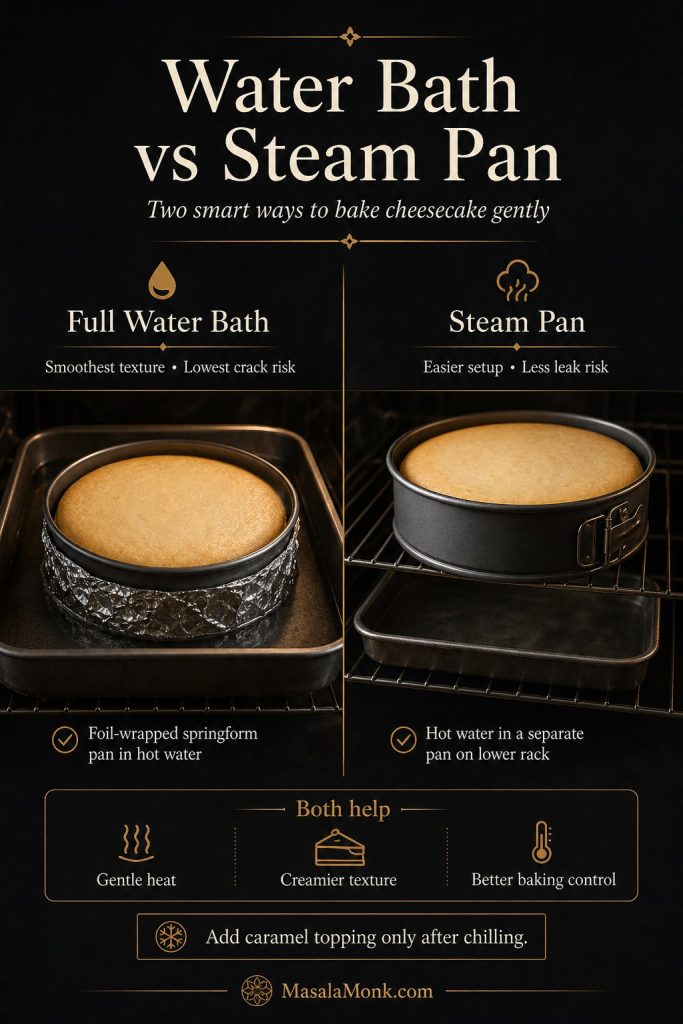
| Method | Best for | What to expect |
|---|---|---|
| Full water bath | Smoothest texture and lowest crack risk | Wrap the pan well and place it in hot water while baking. |
| Steam pan | Easier setup with less leak risk | Place hot water on the lower rack while the cheesecake bakes above it. |
| No water bath | Shortcut baking | The cheesecake can still work, but cracks and firmer edges are more likely. |
For another technical reference, Serious Eats also uses 145°F / 63°C as a cheesecake doneness target, which supports the thermometer cue in this recipe.
If you skip both the water bath and the steam pan, keep the oven temperature low and avoid overbaking. Any cracks can be covered with caramel, but the texture will be creamier if the cheesecake bakes gently.
Salted Caramel Cheesecake Recipe Card
This salted caramel cheesecake recipe makes a creamy baked cheesecake with caramel in the filling, a glossy caramel layer on top, buttery crumb crust, and a clean sliceable texture after chilling.
Total Time: About 10 hours minimum including cooling and chilling; overnight chilling is best.
Pan: 9-inch / 23 cm springform pan
Before You Start
- Bring cream cheese, eggs, sour cream, and cream to room temperature.
- Use cooled caramel in the filling, not hot caramel.
- Mix gently after adding eggs.
- Chill overnight for the neatest slices.
- Add the caramel topping after chilling.
Ingredients
Crust
- 225 g digestive biscuits, graham crackers, or Biscoff crumbs, about 2 1/4 cups
- 100 g unsalted butter, melted, about 7 tbsp
- 25 g light brown sugar, about 2 tbsp
- 1/4 tsp fine salt
Salted Caramel Filling
- 680 g full-fat block cream cheese, room temperature, 24 oz
- 150 g light brown sugar, about 3/4 cup packed
- 120 g sour cream, room temperature, 1/2 cup
- 60 ml heavy cream or double cream, 1/4 cup
- 120 g cooled salted caramel sauce, about 1/3–1/2 cup
- 1 tbsp cornstarch or all-purpose flour
- 2 tsp vanilla extract
- 1/4 tsp fine salt
- 3 large eggs, room temperature
Topping
- 160–200 g salted caramel sauce, slow-moving and pourable, about 1/2–2/3 cup
- 1/2–1 tsp flaky sea salt, to finish
Optional Quick Caramel Sauce
- 200 g granulated sugar, about 1 cup
- 85 g unsalted butter, cubed, about 6 tbsp
- 120 ml heavy cream or double cream, 1/2 cup
- 1/2–1 tsp fine salt, to taste
- 1 tsp vanilla extract, optional
Instructions
Make the Caramel and Crust
- If making the caramel sauce, melt the sugar in a heavy-bottom saucepan over medium heat until deep amber. Carefully whisk in butter, then slowly whisk in cream. Simmer for 1–2 minutes, remove from the heat, add salt and vanilla, and cool until thick but spoonable.
- Heat the oven to 350°F / 175°C. Line the base of a 9-inch springform pan with parchment paper.
- Mix the biscuit crumbs, melted butter, brown sugar, and salt until evenly moistened.
- Press the crumbs firmly into the base of the pan, bringing them slightly up the sides to make a low edge. Bake for 8–10 minutes, then cool.
Mix the Cheesecake Filling
- Lower the oven to 300°F / 150°C, or about 285°F / 140°C for a fan oven.
- Beat the cream cheese and brown sugar on low to medium speed until smooth, scraping the bowl as needed.
- Mix in sour cream, heavy cream, cooled caramel, cornstarch, vanilla, and salt.
- Add the eggs one at a time on low speed, mixing only until combined.
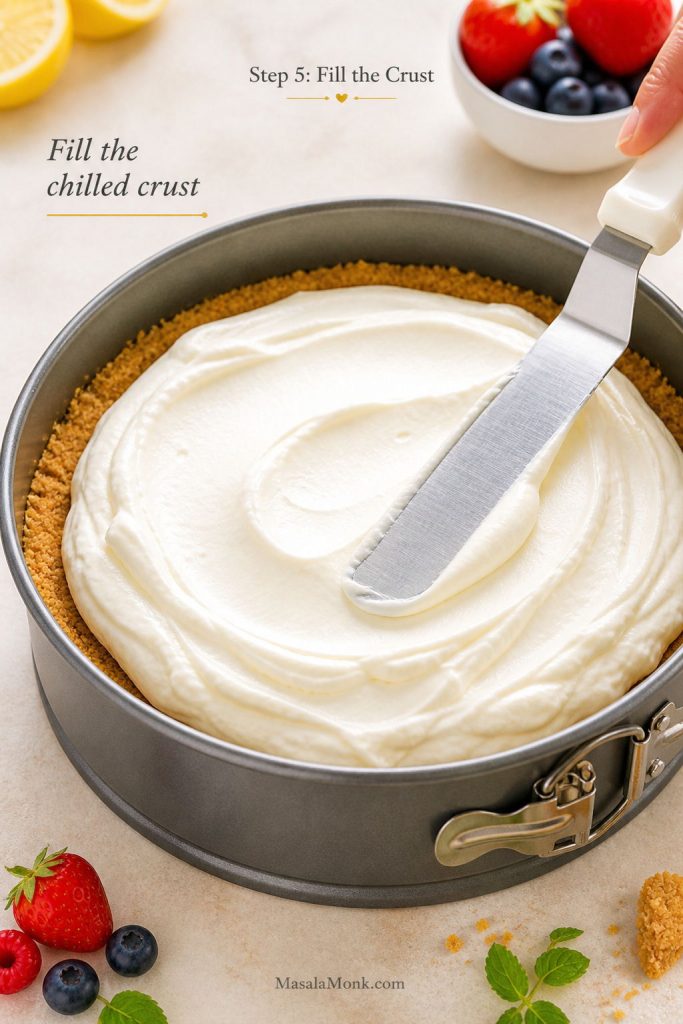
- Pour the filling into the cooled crust and smooth the top.
Bake, Cool, and Chill
- For a water bath, place the wrapped springform pan in a roasting pan and pour hot water around it until it reaches about halfway up the sides. For an easier steam-pan method, place a tray of hot water on the lower rack and bake the cheesecake on the rack above.
- Bake for 70–80 minutes, until the outer edges are set and the center wobbles gently like set custard.
- Turn off the oven, crack the door, and let the cheesecake cool inside for 1 hour.
- Move the cheesecake to the counter and cool for another 1 hour.
- Refrigerate for at least 6 hours, preferably 8 hours or overnight.
Finish and Slice
- Spread the caramel topping over the chilled cheesecake.
- Finish with flaky sea salt just before serving.
- Slice with a warm, wiped knife for the cleanest cuts.
Notes
- If the caramel runs like syrup, use it as a serving drizzle instead of mixing it into the filling.
- The cheesecake should not look fully firm when it leaves the oven. It will finish setting as it cools.
- Do not add the caramel topping before baking.
- Biscoff crumbs make the crust taste deeper and more caramel-like.
- If using store-bought caramel, choose a thick sauce rather than a thin ice cream syrup.
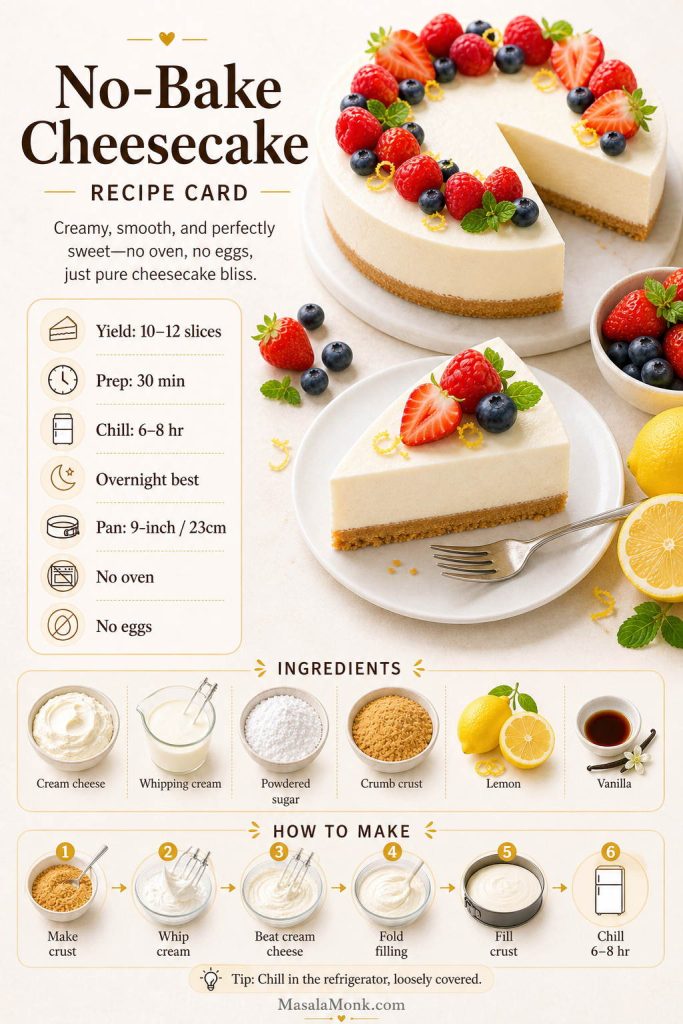
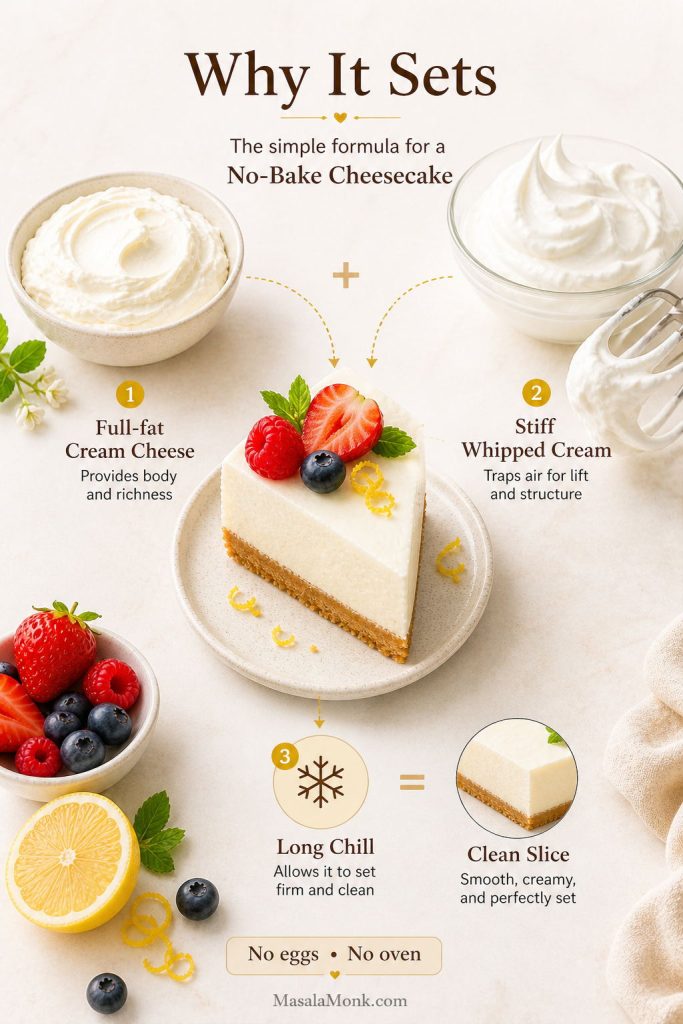
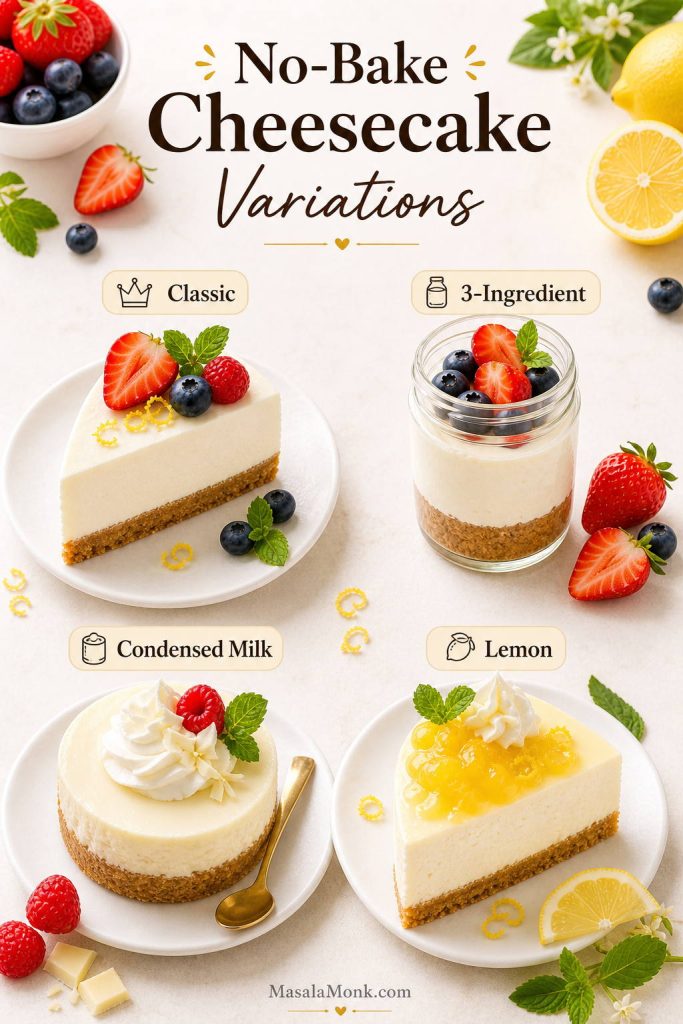
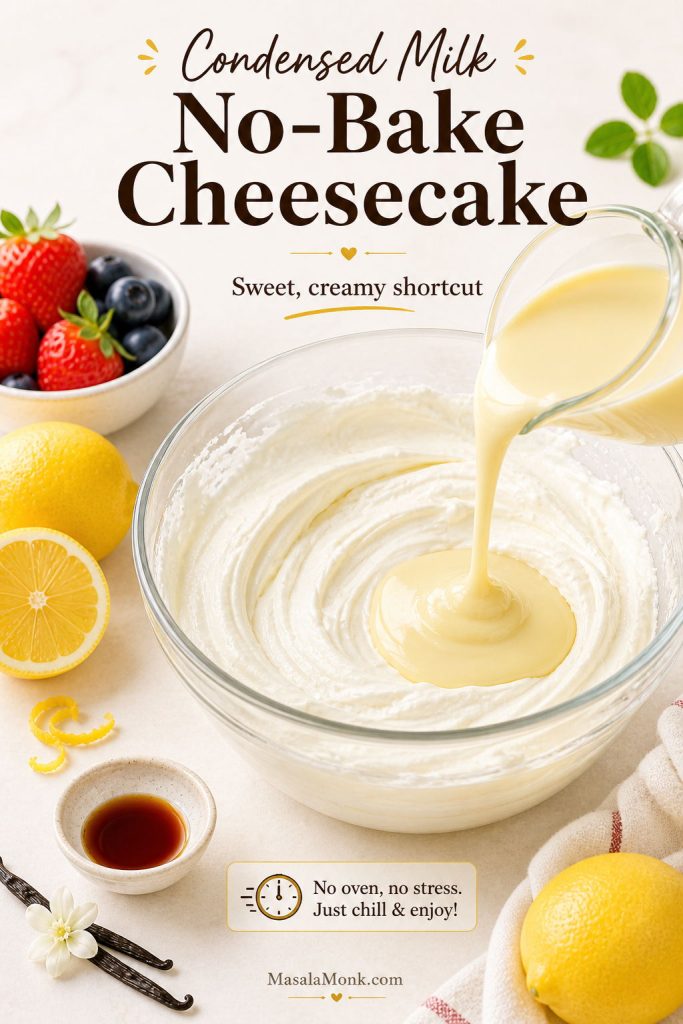
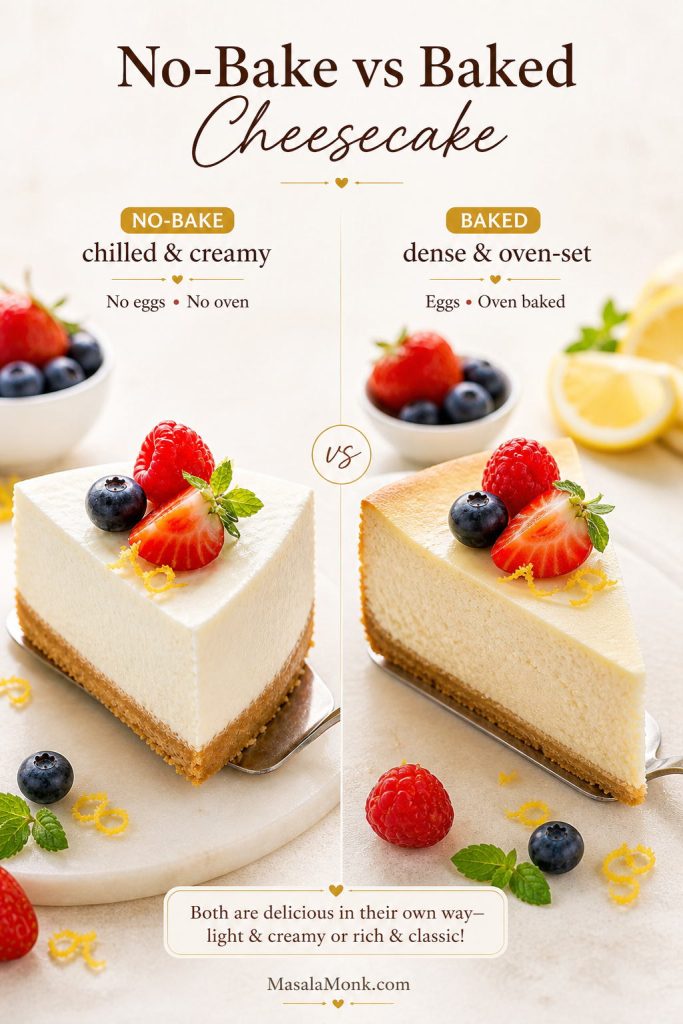
Can You Make This as a No-Bake Salted Caramel Cheesecake?
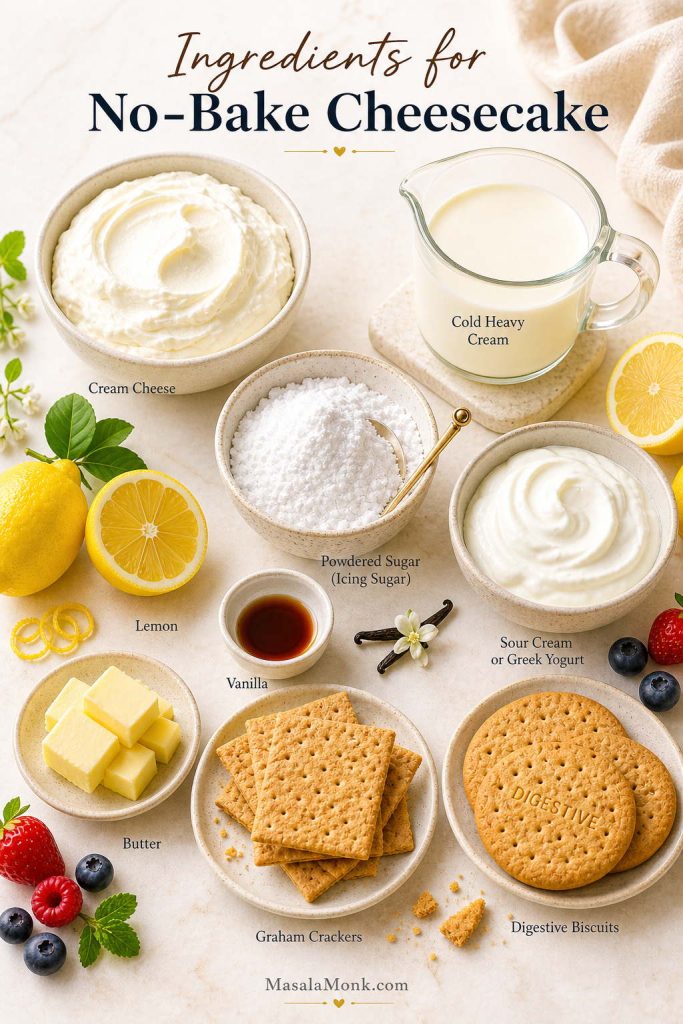
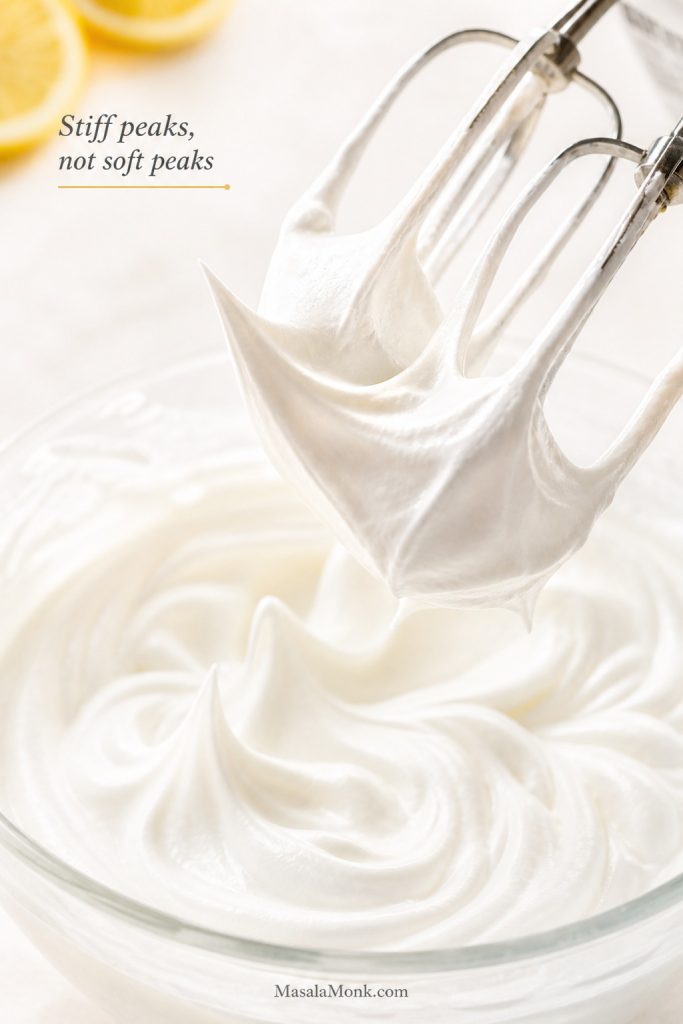
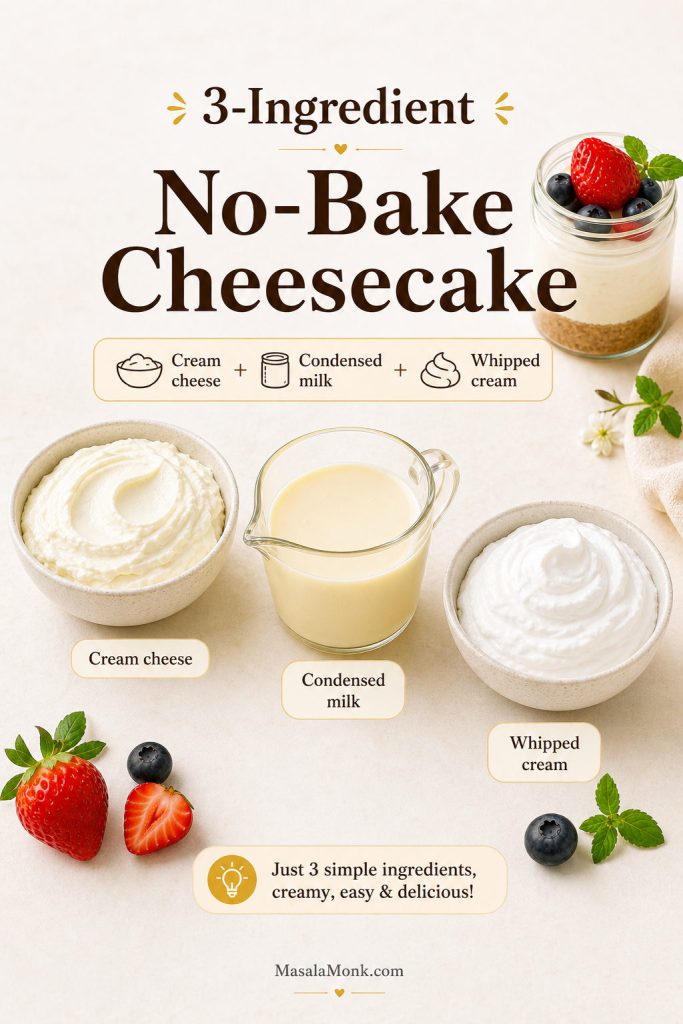
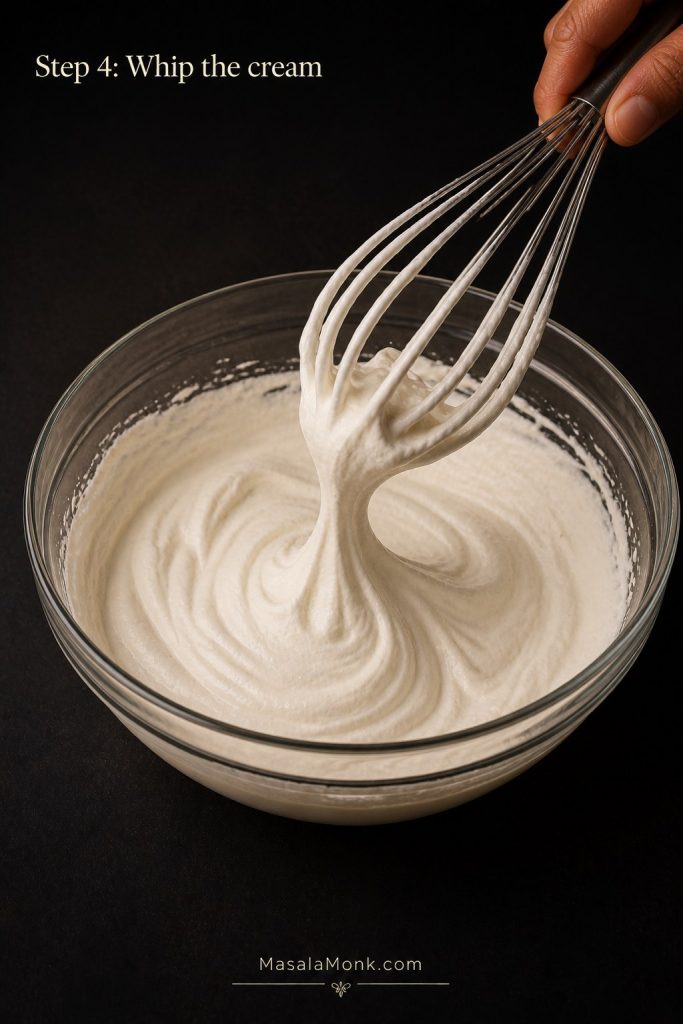
Yes, but a no-bake salted caramel cheesecake needs a different filling. You cannot simply remove the eggs from the baked recipe and chill it. A no-bake version needs whipped cream or double cream for structure, and the caramel must be thick enough that it does not loosen the filling.
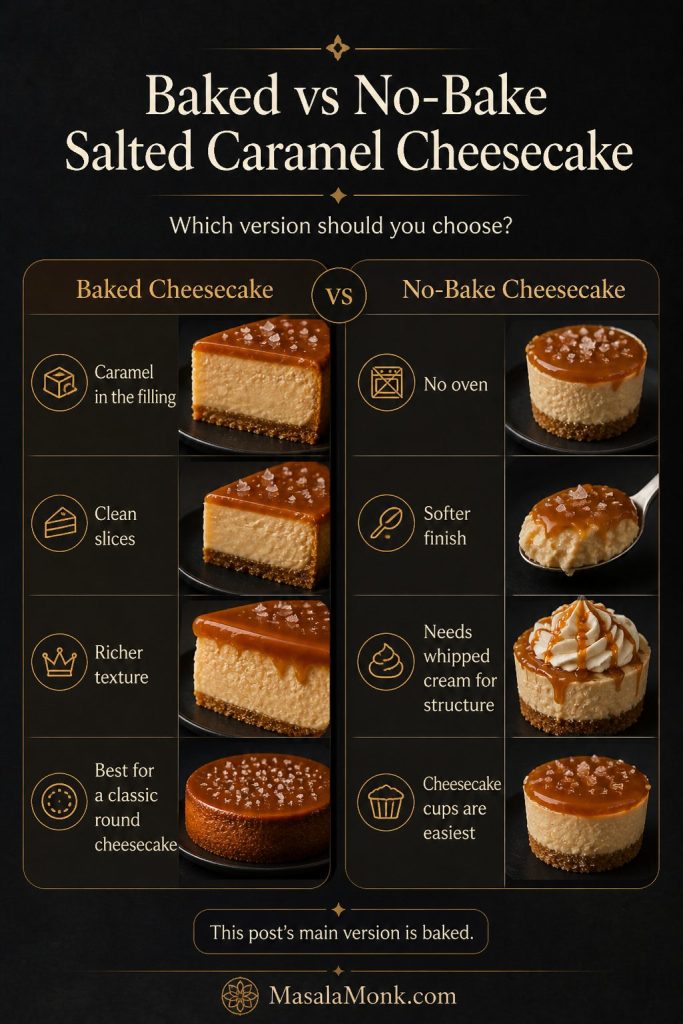
Baked vs No-Bake: Which Version Should You Choose?
| Version | Best for | Texture |
|---|---|---|
| Baked salted caramel cheesecake | Clean slices, richer texture, caramel in the filling | Creamy, set, and sliceable |
| No-bake salted caramel cheesecake | Easy chilled dessert, no oven, softer finish | Lighter and softer; best with full-fat dairy |
| Salted caramel cheesecake cups | Most forgiving no-bake option | Spoonable, neat, and party-friendly |
No-Bake Salted Caramel Cheesecake Starting Formula
For a 9-inch no-bake version, use this as a starting point:
- 250 g digestive biscuit or graham cracker crumbs
- 100 g melted butter
- 500 g full-fat cream cheese
- 100–120 g powdered sugar or icing sugar
- 1 tsp vanilla extract
- 150 g thick salted caramel sauce
- 300 ml cold heavy cream or double cream, whipped to soft peaks
- Extra caramel and flaky salt for topping
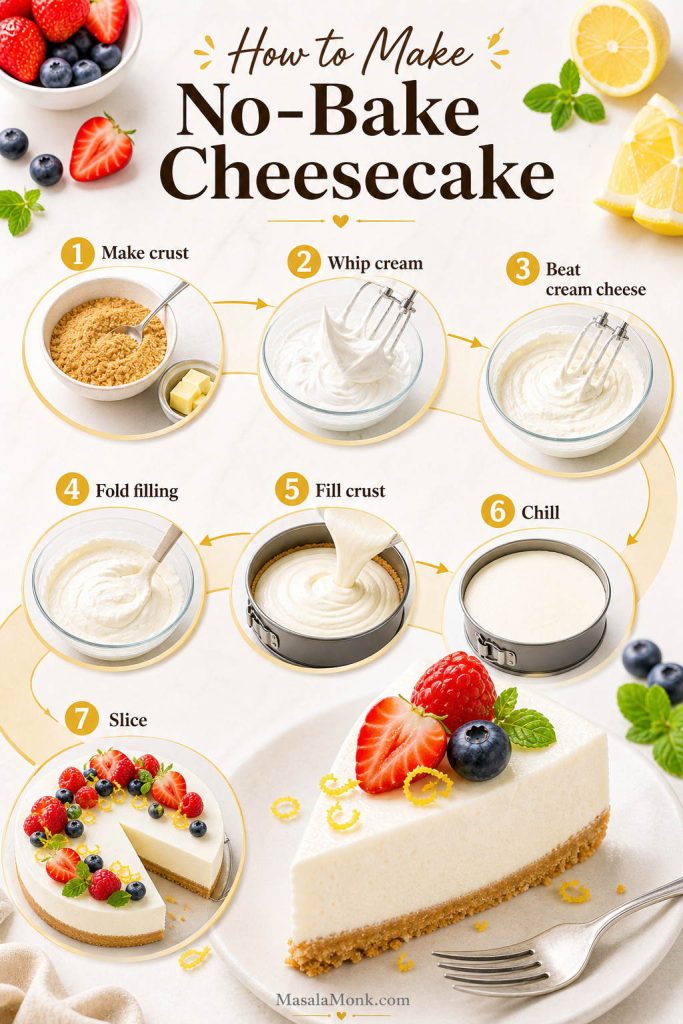
How to Assemble the No-Bake Version
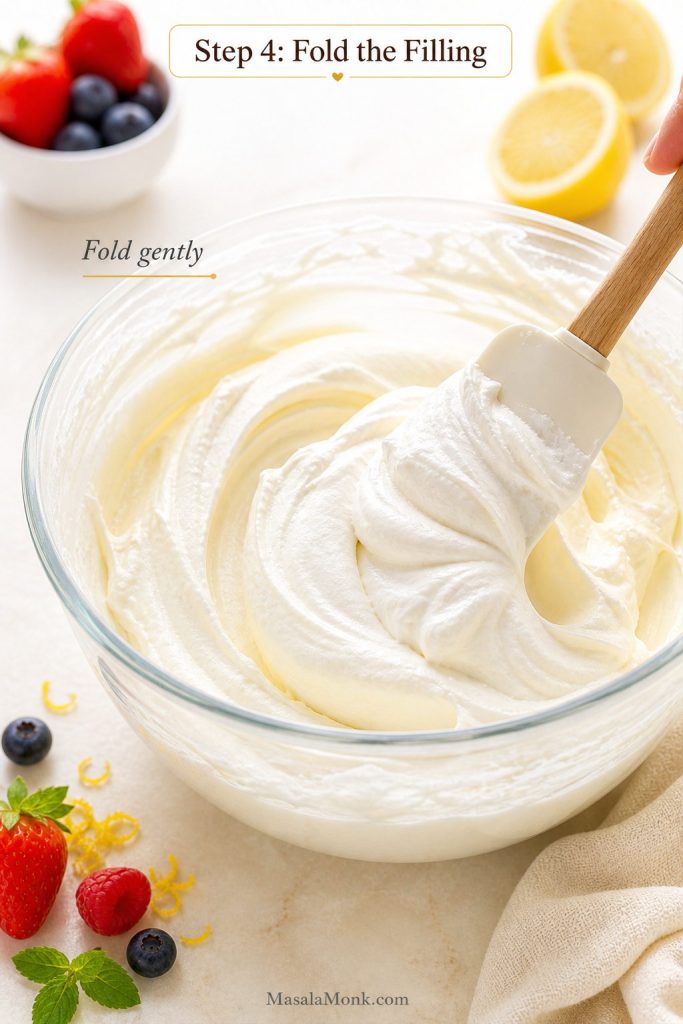
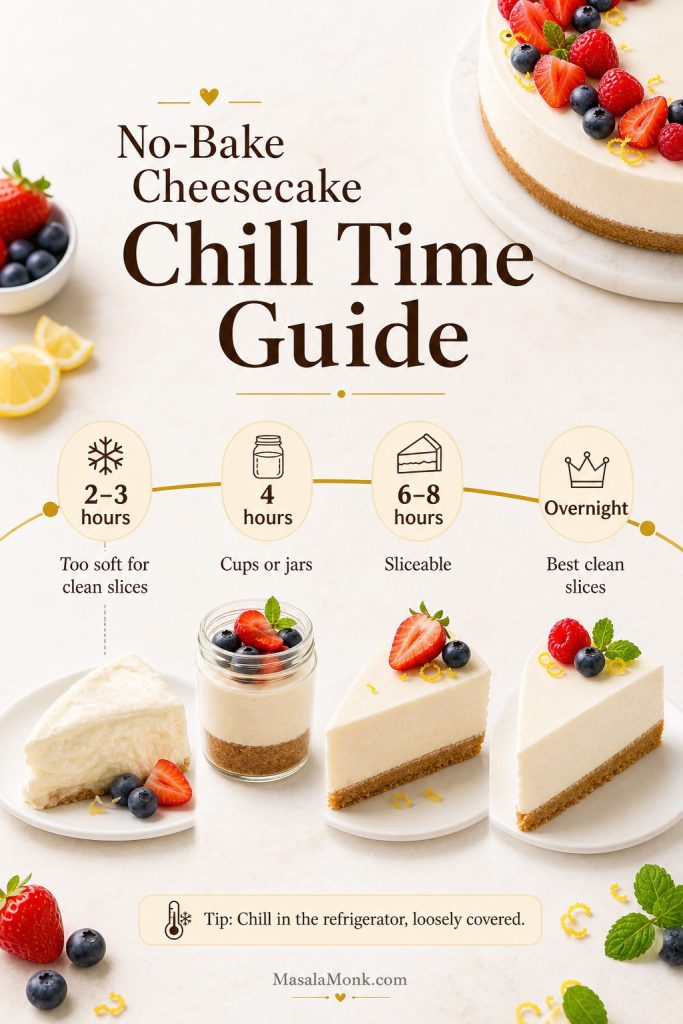
Press the crumb base into the pan and chill it while you make the filling. Beat the cream cheese, sugar, vanilla, and caramel until smooth, then fold in the whipped cream. Spoon the filling over the base and chill for at least 6 hours, preferably overnight. Add the caramel topping only after the filling has set.
If you want more detail on chilled cheesecake structure, the setting notes in this no-bake mango cheesecake recipe are helpful because they show how full-fat dairy, filling thickness, and chill time affect whether a no-bake cheesecake slices cleanly or works better in cups.
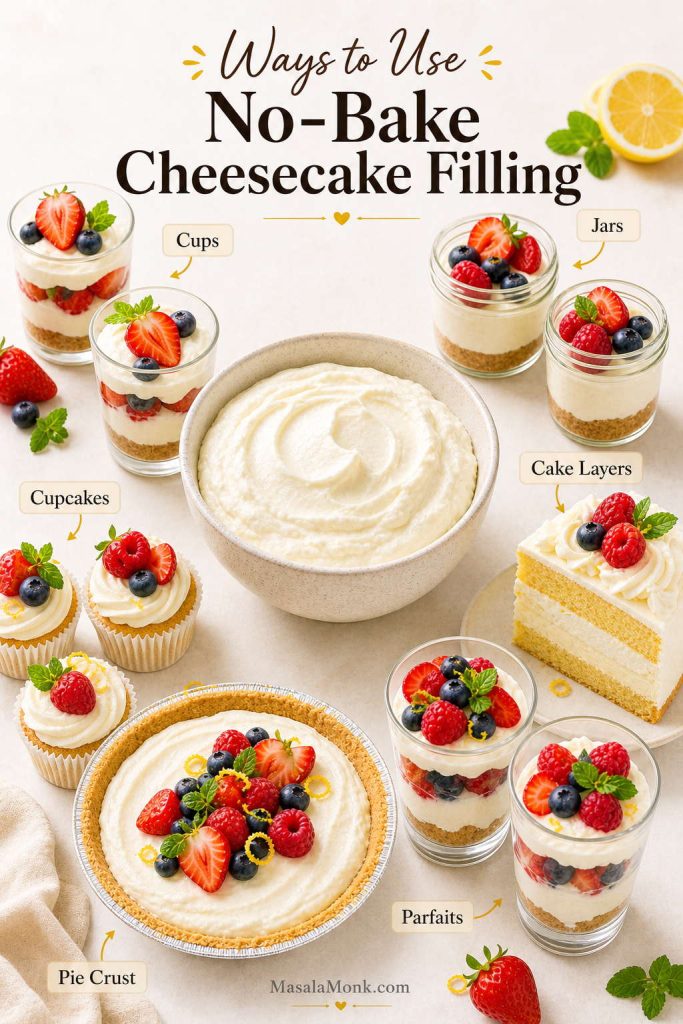
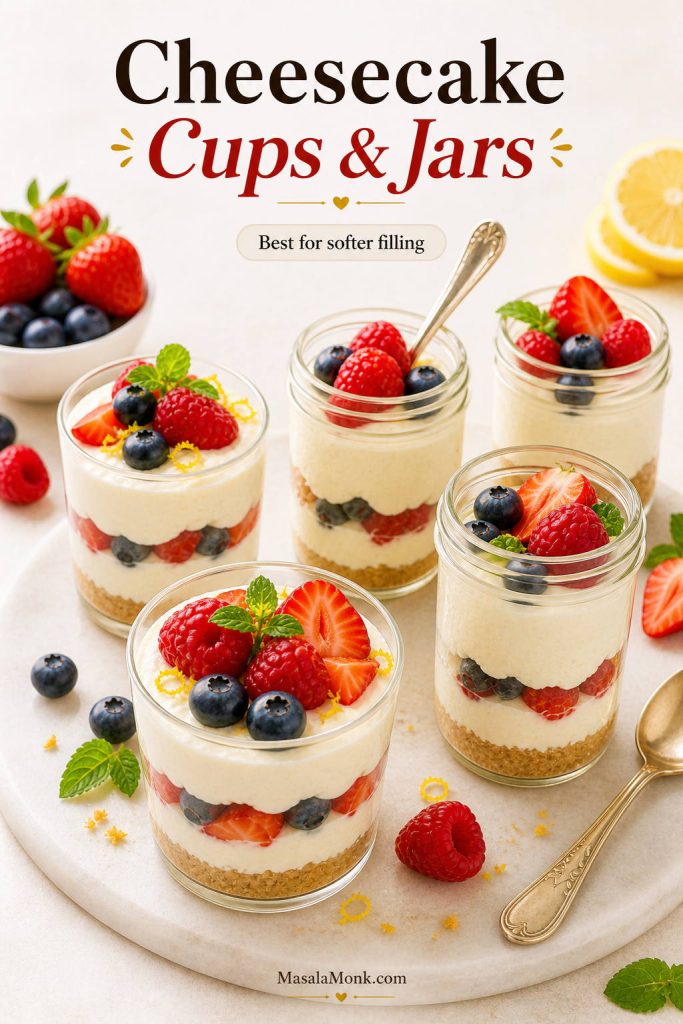
Why Cheesecake Cups Are Easier
If you want a more forgiving no-bake dessert, make salted caramel cheesecake cups instead of one large cheesecake. Cups set faster, serve neatly, and are less sensitive to a slightly softer filling.
Still deciding? See the baked method or jump to the main recipe card.
Salted Caramel Cheesecake Variations
The baked round cheesecake should stay the main version, but these variations are easy to adapt once you understand the caramel texture and chill time.
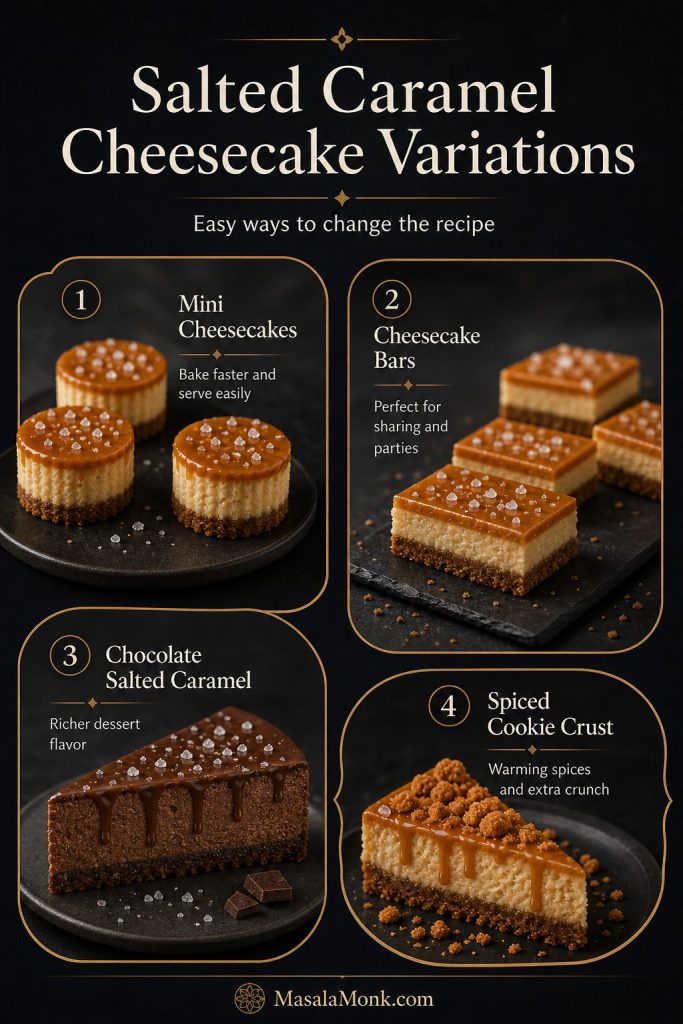
Mini Salted Caramel Cheesecakes
Use a muffin tin lined with paper liners. Press a spoonful of crumb base into each cup, add filling, and bake until the centers are just set. Mini cheesecakes bake much faster than a full cheesecake, so start checking early. Add caramel after chilling.
Salted Caramel Cheesecake Bars
For bars, use a parchment-lined square or rectangular pan. Bars are easier to chill, transport, and cut for parties. Keep the caramel layer thin and add it after the cheesecake has set.
Chocolate Salted Caramel Cheesecake
Use chocolate biscuit crumbs for the crust and add a thin chocolate ganache layer before the caramel topping. Keep the filling caramel-forward rather than adding too much cocoa to the base.
Salted Caramel Pecan Cheesecake
Add toasted chopped pecans to the crust or scatter them over the caramel before serving. Pecans add crunch and a slight bitterness that works beautifully with the sweet caramel.
Biscoff Salted Caramel Cheesecake
Use Biscoff crumbs for the crust and keep the filling the same. This gives the cheesecake a spiced caramel-cookie base without needing extra flavorings. If you like thick, baked, sliceable desserts with cookie-style richness, this cookie pie recipe is another good dessert to explore.
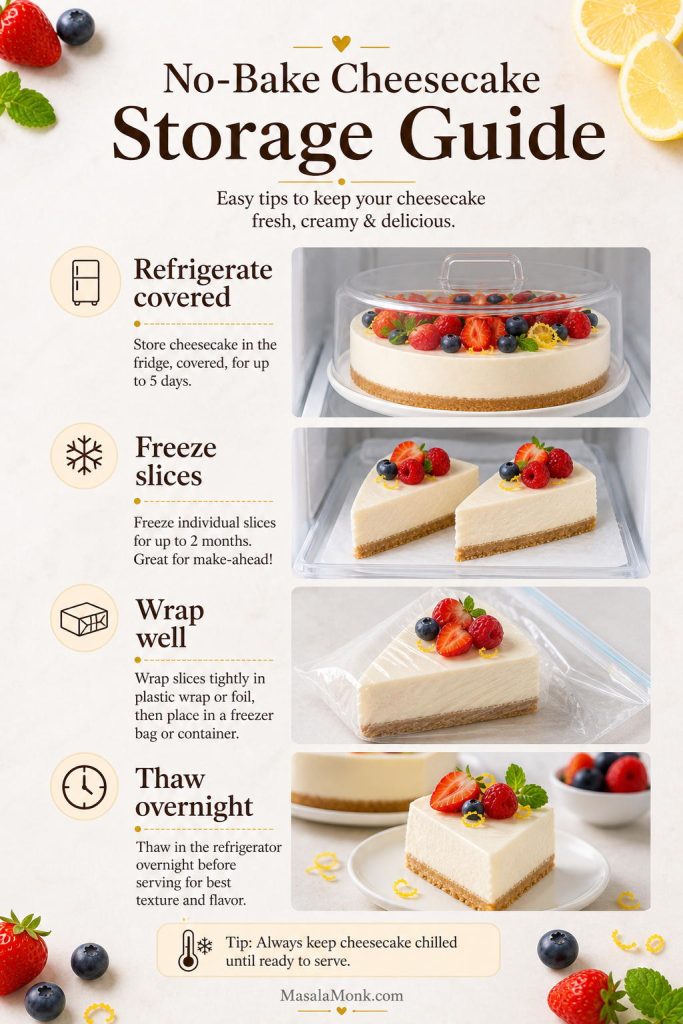
Make Ahead, Storage, and Freezing Salted Caramel Cheesecake
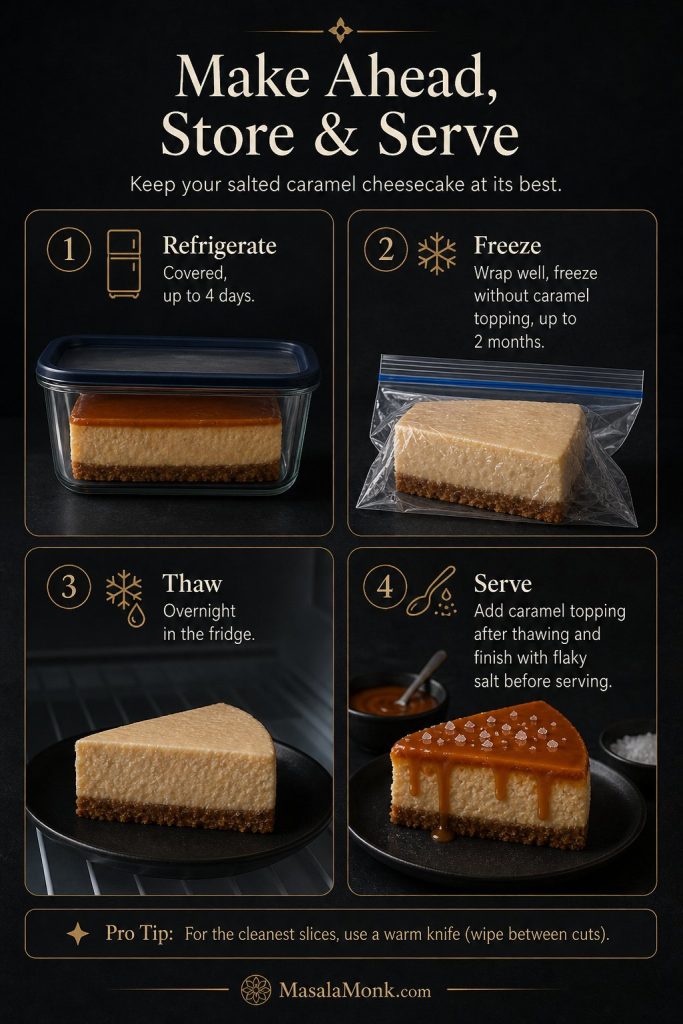
Make Ahead
This is an ideal make-ahead dessert. Bake the cheesecake one day before serving, cool it gradually, and chill it overnight. Add the caramel topping the next day so it looks fresh and glossy.
Refrigerator Storage
Store the cheesecake covered in the refrigerator for up to 4 days. If possible, add flaky salt just before serving rather than before storing.
Freezing
You can freeze salted caramel cheesecake, but it is best to freeze it without the caramel topping. Wrap the fully chilled cheesecake tightly, freeze for up to 2 months, then thaw overnight in the refrigerator. Add caramel after thawing.
Serving After Chilling
Serve the cheesecake cold from the refrigerator for the neatest slices. If the caramel topping is very firm, let the cheesecake sit at room temperature for 10–15 minutes before cutting.
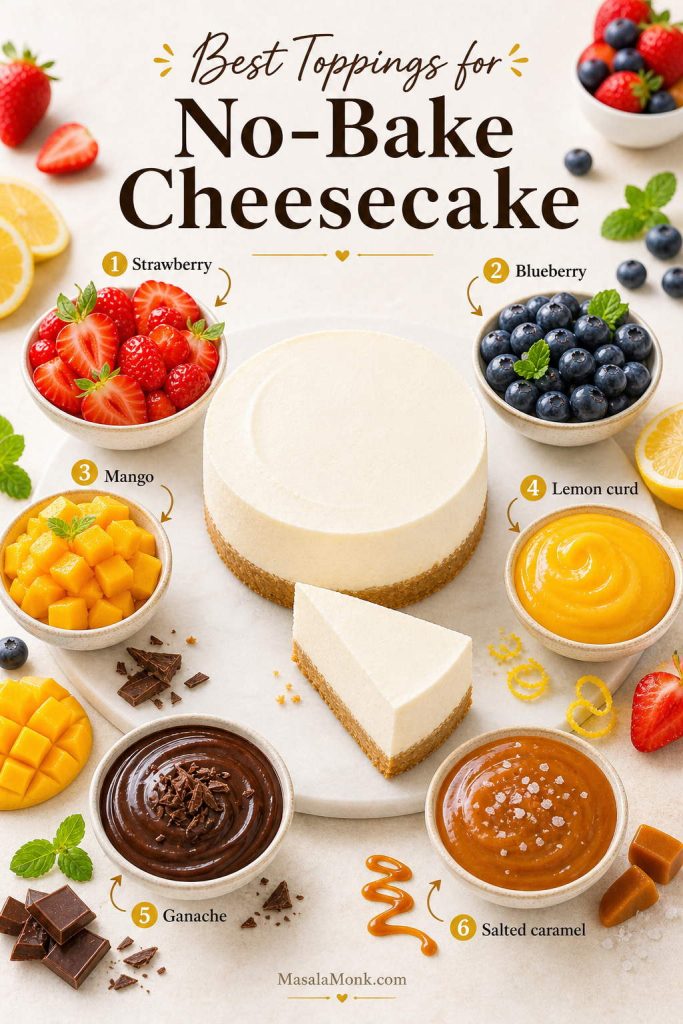
What to Do With Extra Caramel
Extra salted caramel keeps well in the refrigerator and can be warmed gently for serving. Spoon it over homemade ice cream, drizzle it into coffee, or use it as a dip for crisp desserts like homemade churros.
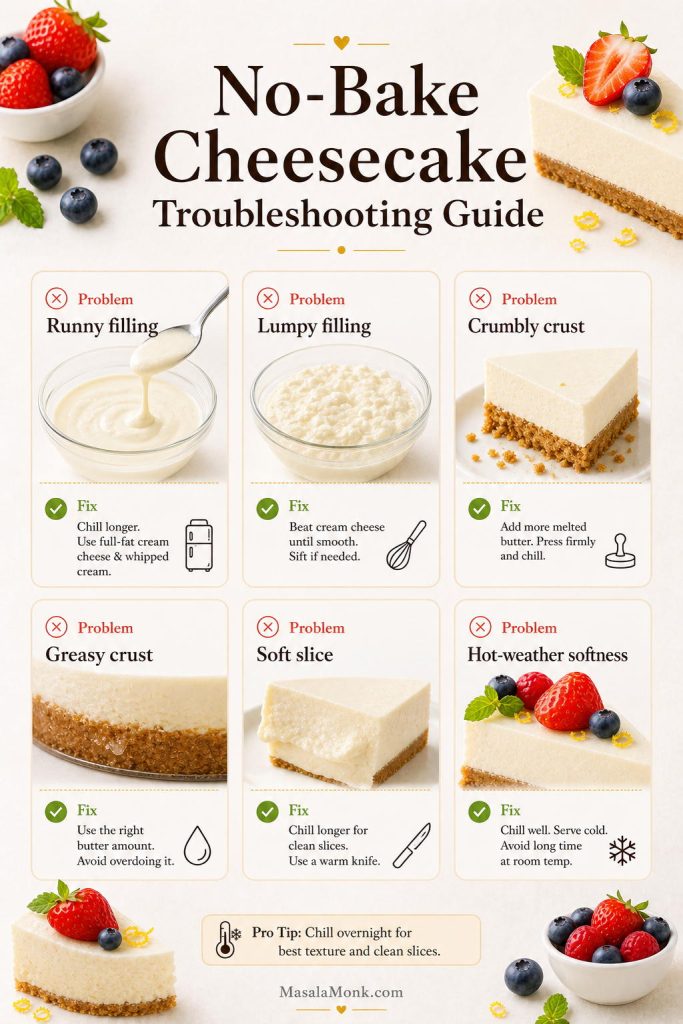
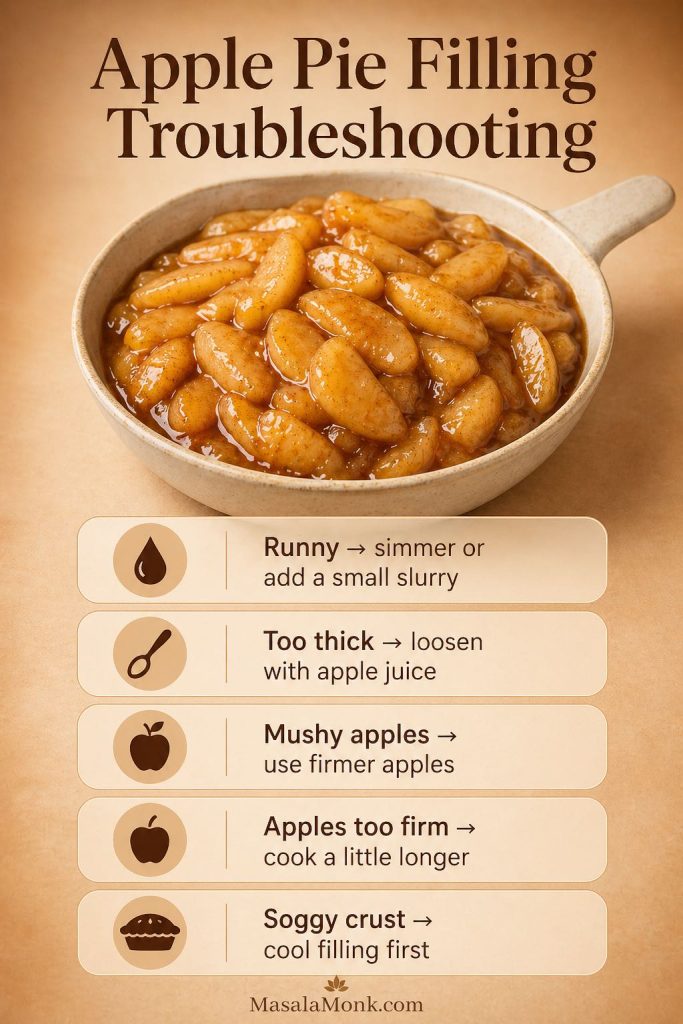
Troubleshooting Salted Caramel Cheesecake
Most problems come from three places: caramel that is too thin, filling that was mixed too aggressively, or a cheesecake that was not chilled long enough. Here is how to fix or avoid the common issues.
Need to compare with the main method? Go back to the step-by-step instructions. Want the full measurements again? Open the recipe card.
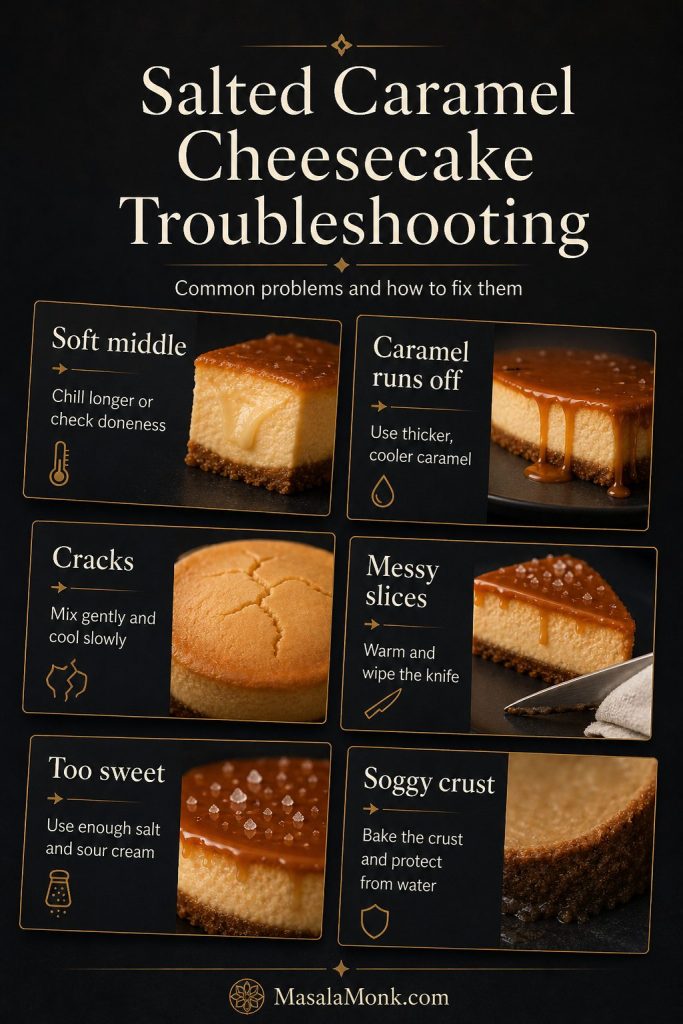
Why Is My Cheesecake Soft in the Middle?
It may be underbaked, under-chilled, or made with too much thin caramel. The center should wobble gently when it leaves the oven, but it should not look liquid. Chill for at least 6 hours, and overnight if possible.
Why Did My Caramel Run Off the Cheesecake?
The caramel was probably too thin, too warm, or added before the cheesecake had set. Use a slow-moving sauce for the top and add it only after the cheesecake is cold.
Why Did My Cheesecake Crack?
Cracks usually come from overmixing, overbaking, baking too hot, or cooling too quickly. Mix gently after the eggs go in, bake at a lower temperature, and let the cheesecake cool gradually in the turned-off oven.
Why Are My Slices Messy?
The cheesecake likely needs more chill time, or the knife is dragging through the caramel. Chill overnight, use a warm sharp knife, and wipe the blade between cuts.
Why Does My Cheesecake Taste Too Sweet?
Salted caramel is naturally sweet, so balance matters. Sour cream, fine salt in the filling, and flaky salt on top all help. A Biscoff crust will make the cheesecake taste sweeter, while a plain digestive or graham crust keeps it more balanced.
Why Is My Caramel Grainy?
Grainy caramel usually comes from sugar crystals forming while the caramel cooks. Use a clean heavy pan, melt the sugar evenly, and avoid splashing sugar crystals up the sides. If the caramel is already grainy, it is better mixed into the filling than used as the visible topping.
Why Did the Crust Get Soggy?
The crust may not have been baked long enough, or water may have leaked into the pan during a water bath. Bake the crust until it smells toasty, wrap the springform pan well if using a water bath, or use the steam-pan method instead.
Salted Caramel Cheesecake FAQs
What Makes This Salted Caramel Cheesecake Recipe Different?
This salted caramel cheesecake recipe uses caramel in the filling and on top, but keeps the amount controlled so the baked cheesecake still sets, chills, and slices cleanly.
Is Store-Bought Caramel Sauce Okay?
Yes, especially for the topping. Choose a thick caramel sauce that coats a spoon. Very thin caramel syrup is better for drizzling over slices than mixing into the cheesecake filling.
How Thick Should Caramel Be for Cheesecake?
For the filling, caramel should be thick but stirrable. For the topping, it should be glossy and slow-moving. If it runs off a spoon like water or syrup, it is too thin for the filling and better used as a serving drizzle.
Is a Water Bath Necessary?
No, but it helps. A water bath gives the smoothest texture, while a steam pan is an easier option. If you bake without either, keep the oven temperature low and avoid overbaking.
How Long Should Salted Caramel Cheesecake Chill?
Chill it for at least 6 hours. Overnight is best, and 8 hours gives more reliable clean slices because the caramel-enriched filling needs time to firm up fully.
Can This Cheesecake Be Made Ahead?
Yes. Bake and chill the cheesecake one day ahead, then add the caramel layer and flaky salt before serving. This gives the best texture and the freshest-looking topping.
Does Salted Caramel Cheesecake Freeze Well?
Yes, but freeze it before adding the topping if possible. Wrap the chilled cheesecake tightly, freeze for up to 2 months, and thaw overnight in the refrigerator. Add the caramel after thawing.
How Do You Make Mini Salted Caramel Cheesecakes?
Use a lined muffin tin and bake until the centers are just set. Mini cheesecakes bake much faster than a full cheesecake, so check them early and add caramel only after chilling.
How Do You Turn This Into Salted Caramel Cheesecake Bars?
Use a parchment-lined square or rectangular pan, bake until just set, chill well, then add caramel and cut into bars with a warm wiped knife.
What Is the Best Crust for Salted Caramel Cheesecake?
Digestive biscuits or graham crackers are the most classic choice. Biscoff crumbs make the crust taste more caramel-like, while a pretzel crust gives a saltier contrast.
Should Caramel Be Added Before or After Baking?
Add a controlled amount of cooled caramel to the filling before baking. Add the visible topping after the cheesecake has chilled. This gives flavor inside the cheesecake while keeping the top glossy and neat.