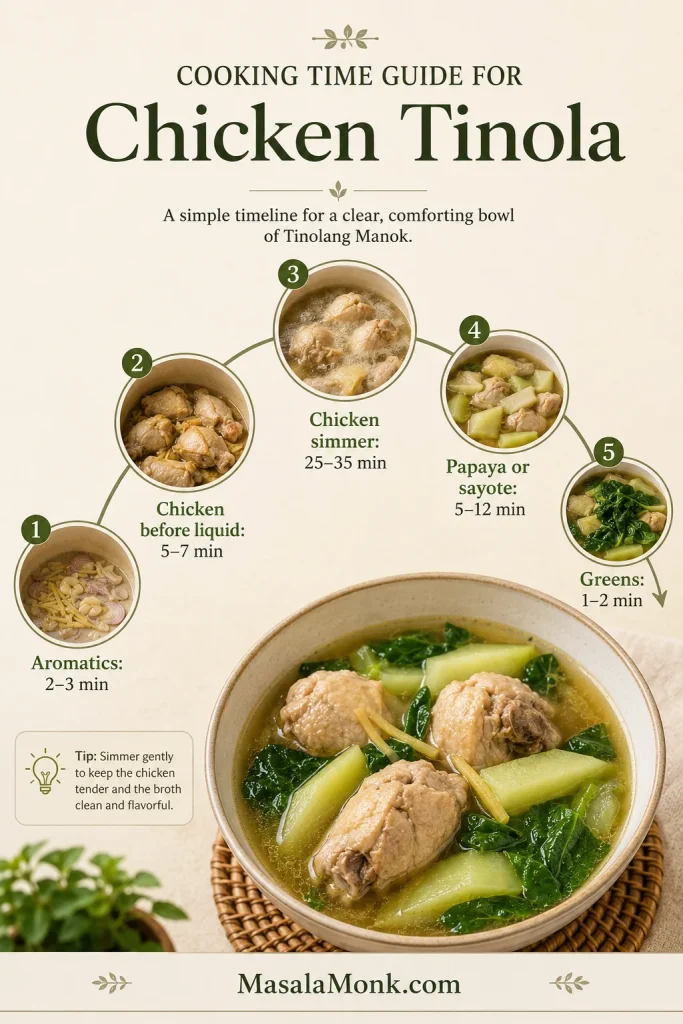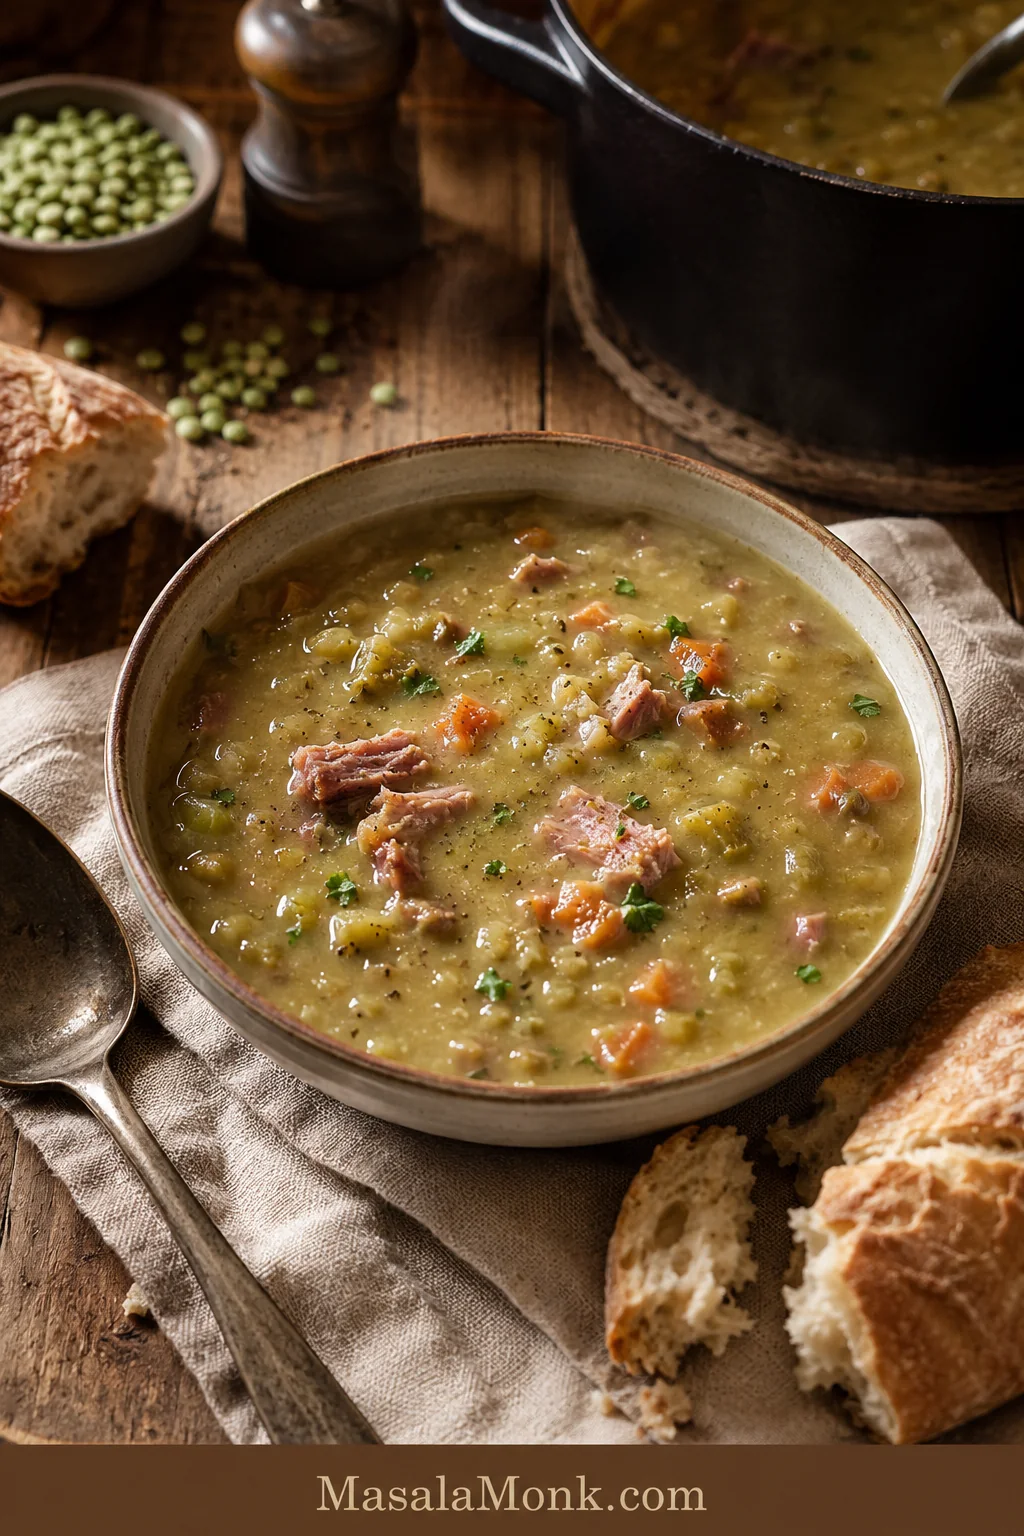
This crockpot chili recipe is for the night you want dinner to smell like it has been simmering all day, without standing over the stove all afternoon. It is thick, beefy, tomato-rich, and built to avoid the usual slow-cooker chili problems: watery sauce, greasy beef, bland seasoning, and beans that go too soft.
You brown and drain the beef first, build a quick tomato-spice base, add beans and tomatoes, then cook everything on Low for 6 to 8 hours or High for 3 to 4 hours. The result is cozy, spoonable chili that can hold cheese, sour cream, onions, and chips without turning into soup.
This is the kind of chili that tastes right with a spoon, a handful of chips, or a pile of toppings. It is not fancy. Instead, it is dependable: rich enough for adults, familiar enough for kids, and sturdy enough for leftovers.
The secret to thick crockpot chili is starting with a pot that looks almost too thick, because the slow cooker gives moisture back. Slow cookers trap steam instead of reducing liquid like a stovetop pot, so this recipe uses less added liquid, tomato paste for body, browned beef for flavor, and a short uncovered rest at the end.
This version stays with the familiar tomato-based beef-and-bean style. White chicken chili, turkey chili, vegetarian chili, and no-bean chili all need their own balance of ingredients, so they are treated here as simple variations rather than the main recipe.
Quick Answer: How to Make Crockpot Chili
To make crockpot chili, brown ground beef in a skillet, drain the grease, then cook onion, bell pepper, garlic, tomato paste, and chili spices for a minute to build flavor. Transfer everything to a slow cooker with beans, diced tomatoes, tomato sauce, a small amount of broth or beer, and Worcestershire sauce.
Cook on Low for 6 to 8 hours for the best flavor, or on High for 3 to 4 hours when you need chili sooner. Let the chili rest uncovered for 10 to 15 minutes before serving so it thickens just enough to hold a spoonful of cheese, sour cream, onions, and chips without turning soupy.
The mistake-proof chili rule: the pot should look thick and saucy before cooking, not loose. As the tomatoes release moisture, this recipe starts with only 1/2 cup added liquid and lets tomato paste, drained beans, and resting time do the thickening work.
Once the beef is browned, the recipe becomes very hands-off. The slow cooker handles the long simmer while the base stays sturdy enough for toppings, chili dogs, baked potatoes, nachos, or tomorrow’s lunch.
Need the next step? Go to the recipe card, compare Low vs High cook time, or jump straight to thickening fixes.
Crockpot Chili Recipe Card
Easy Crockpot Chili With Ground Beef and Beans
A hearty, family-style slow cooker chili made with browned ground beef, beans, tomatoes, tomato paste, chili spices, and a 6-quart crockpot. It is easy enough for a weeknight, sturdy enough for game day, and perfect for leftovers.
| Prep time | 20 minutes |
| Cook time | 6 to 8 hours on Low, or 3 to 4 hours on High |
| Total time | About 3 hours 20 minutes to 8 hours 20 minutes, depending on setting |
| Servings | 8 to 10 servings |
| Yield | About 10 to 12 cups chili |
| Recommended slow cooker size | 6-quart slow cooker |
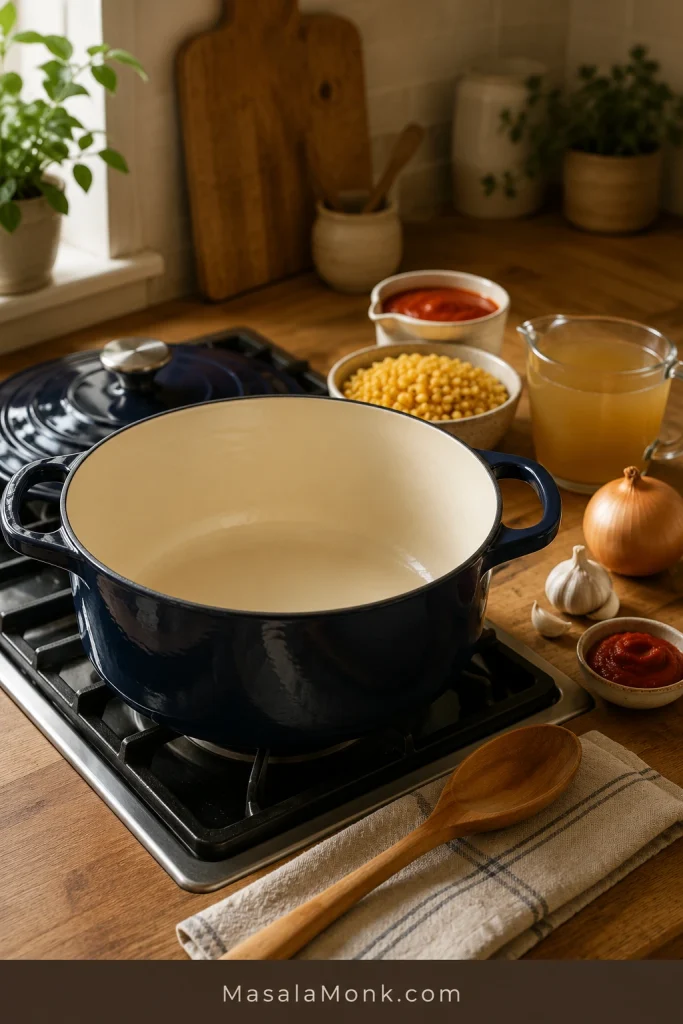
Equipment
- 6-quart slow cooker
- Large skillet or frying pan
- Wooden spoon or spatula for breaking up the beef
- Colander or strainer for draining and rinsing beans
- Ladle for serving
- Airtight containers or freezer bags for leftovers
- Optional instant-read thermometer, especially if using a dump-and-go raw beef method
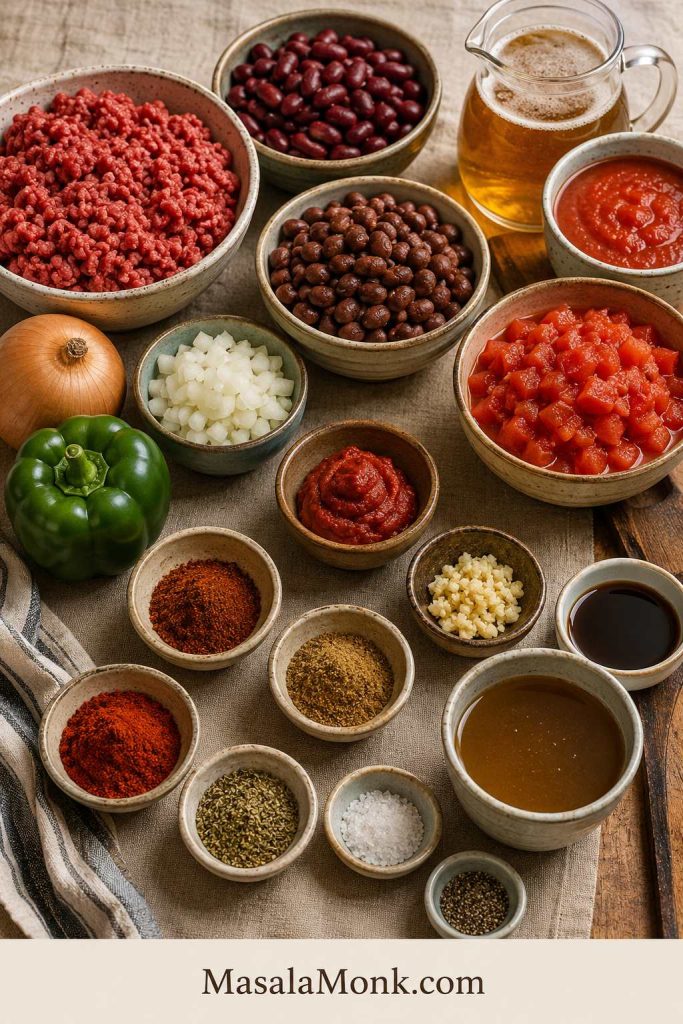
Ingredients
- 2 lb / 900 g ground beef, preferably 85/15 for richer chili or 90/10 for leaner chili
- 1 large yellow onion, diced, about 150 to 180 g
- 1 medium green bell pepper, diced, about 120 to 150 g
- 4 garlic cloves, minced, about 12 to 16 g
- 2 to 3 tablespoons / 30 to 45 g tomato paste
- 2 1/2 to 3 tablespoons chili powder blend
- 2 teaspoons ground cumin
- 1 teaspoon smoked paprika
- 1 teaspoon dried oregano
- 1 1/2 teaspoons salt, plus more to taste
- 1/2 teaspoon black pepper
- 1 can kidney beans, 15 oz / 425 g, drained and rinsed
- 1 can black beans or pinto beans, 15 oz / 425 g, drained and rinsed
- 1 can diced tomatoes, 28 oz / 794 g, undrained
- 1 can plain canned tomato sauce, 15 oz / 425 g
- 1/2 cup / 120 ml beef broth or beer
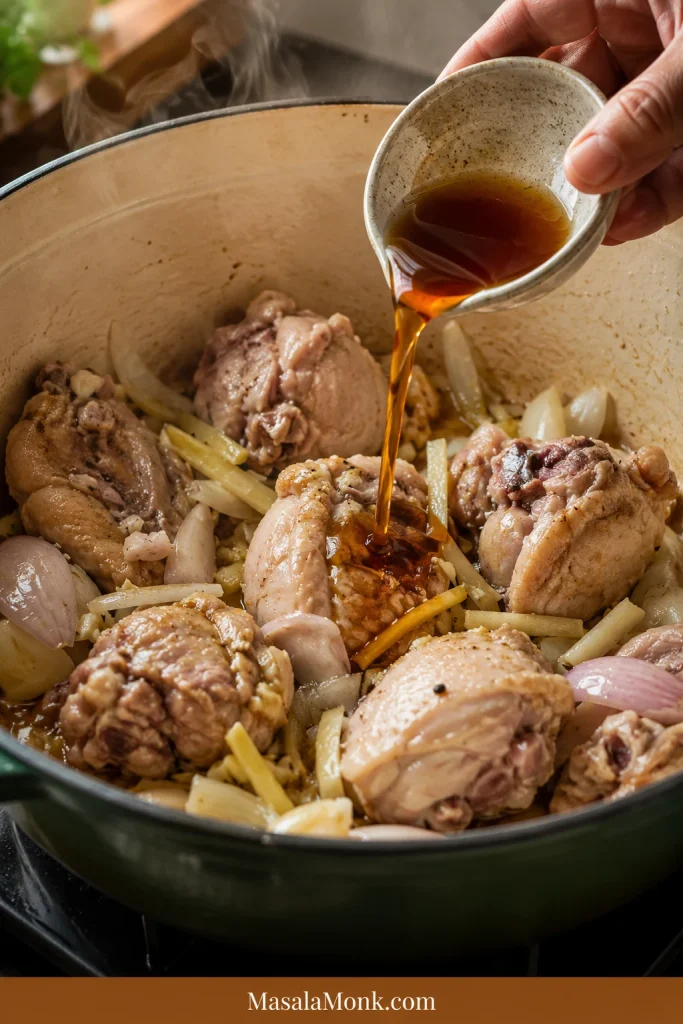
- 1 tablespoon / 15 ml Worcestershire sauce
Instructions
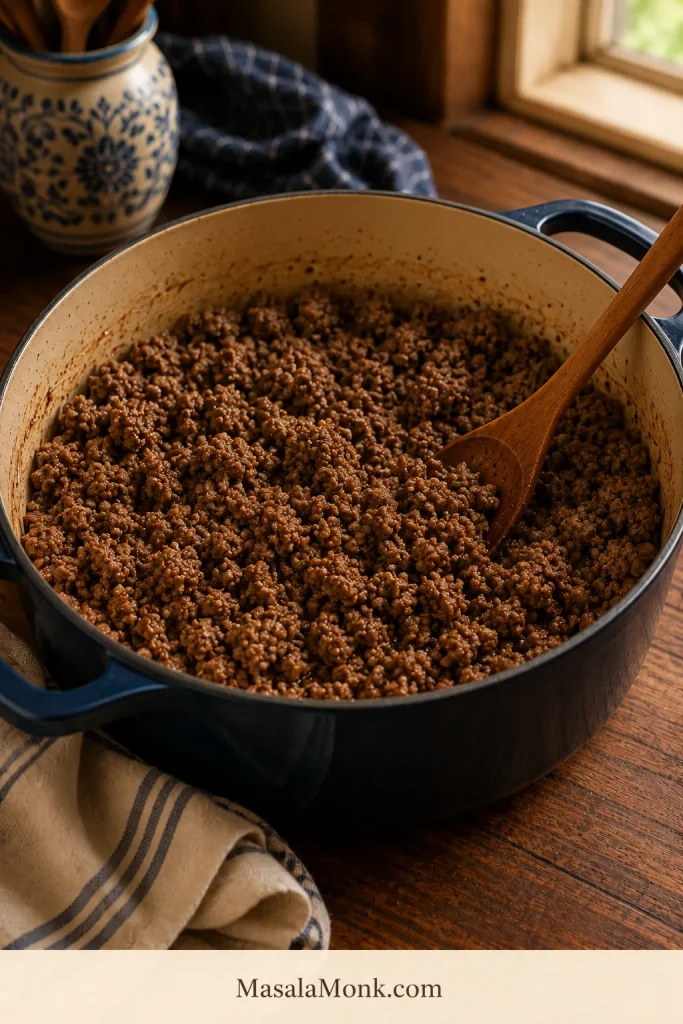
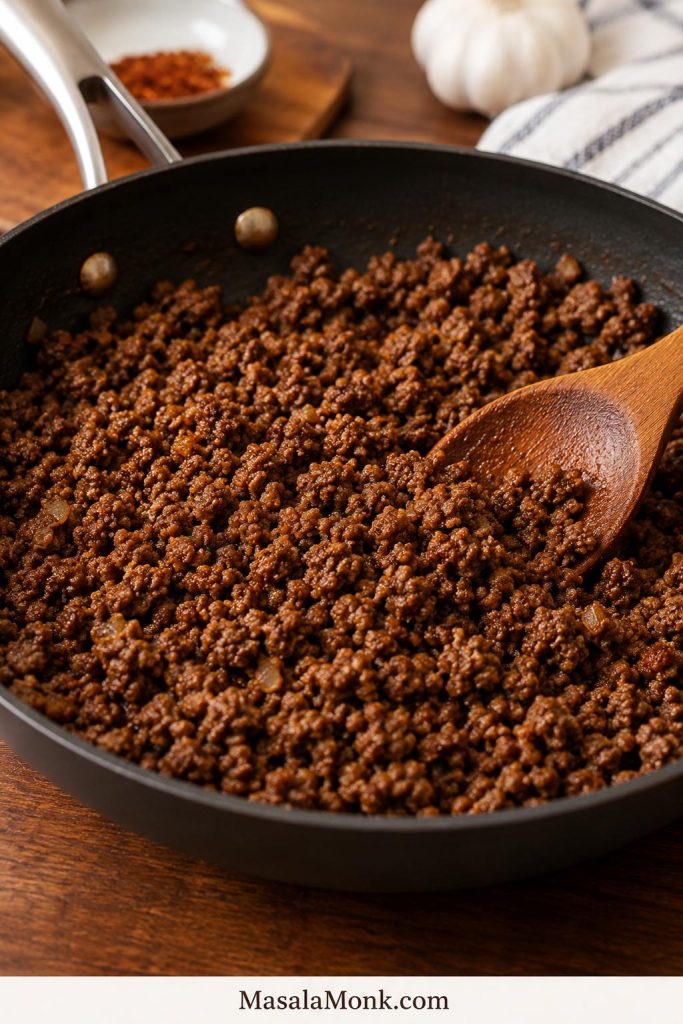
- Heat a large skillet over medium-high heat. Add the ground beef and cook for 6 to 8 minutes, breaking it into small pieces, until browned.
- Drain the excess grease. A little fat is fine, but too much will make the finished chili oily.
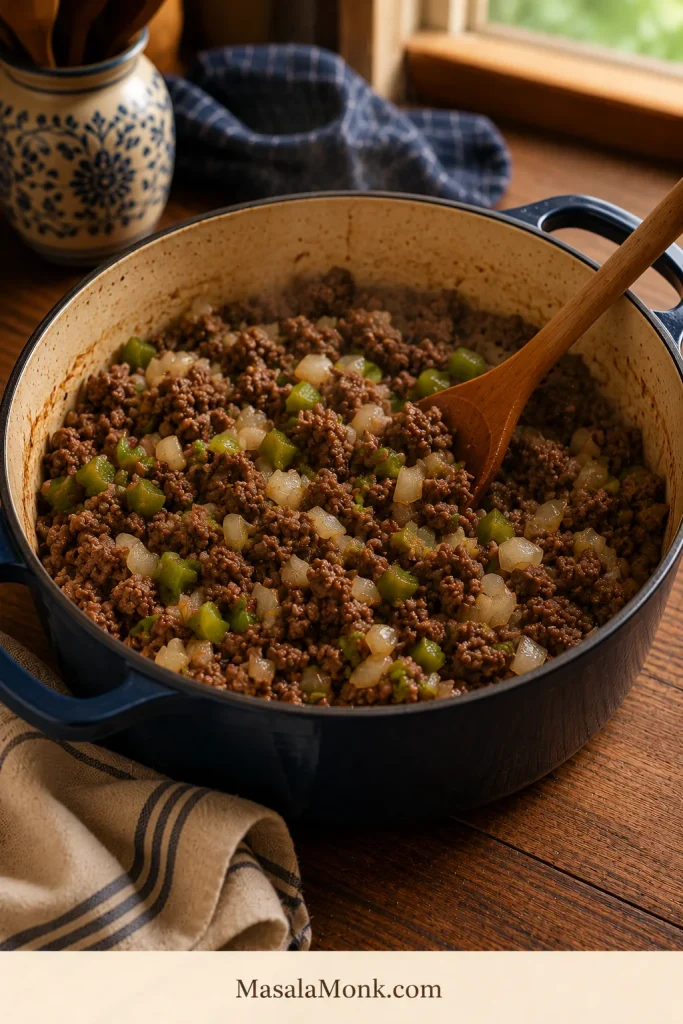
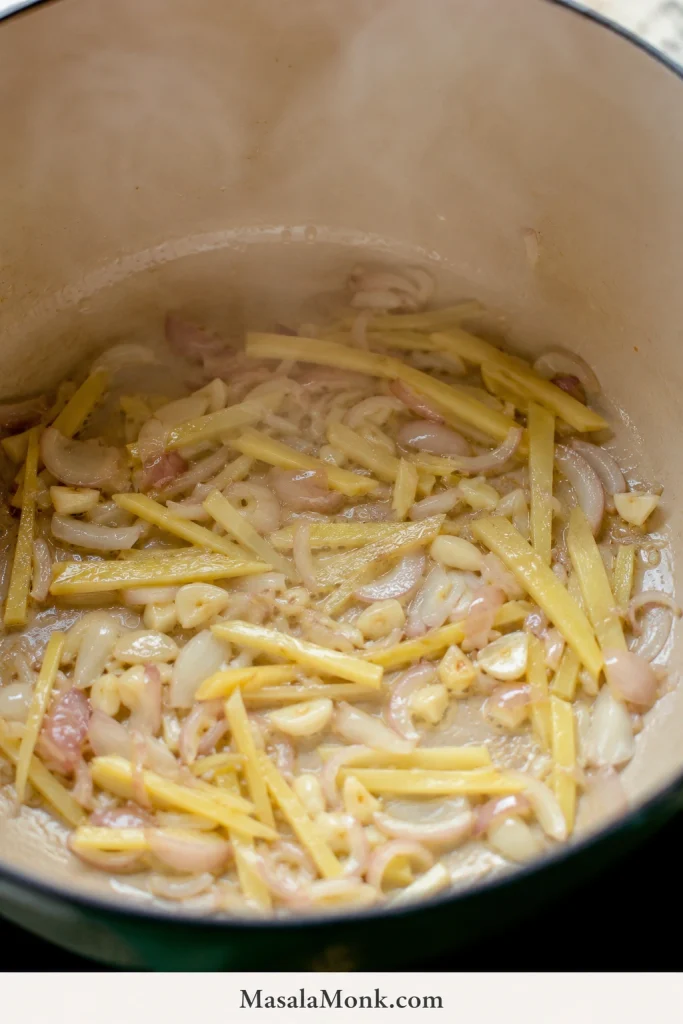
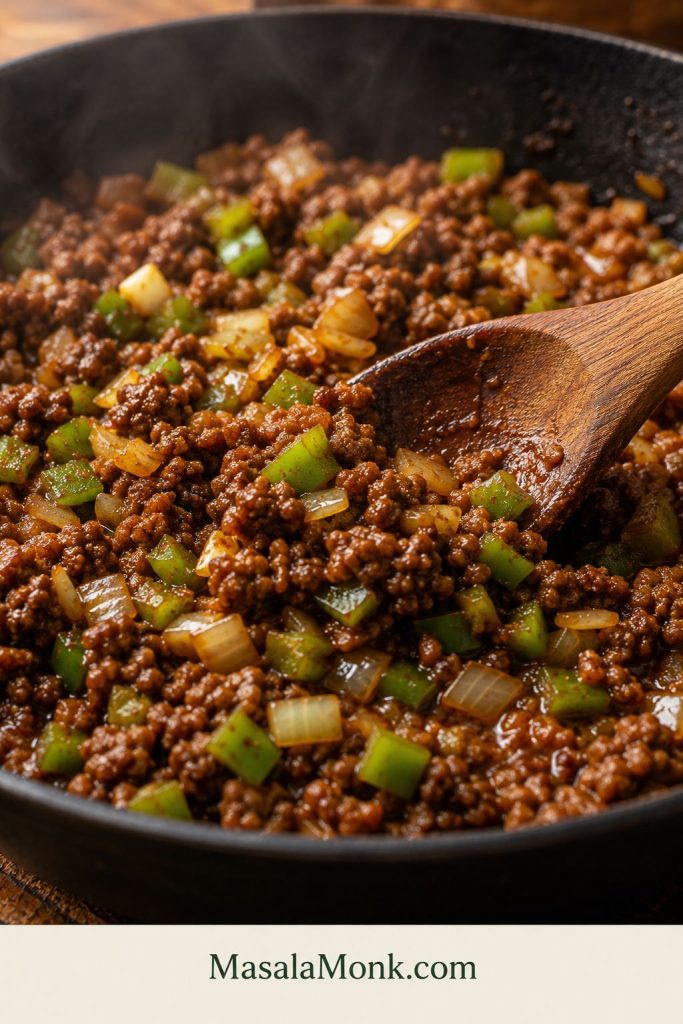
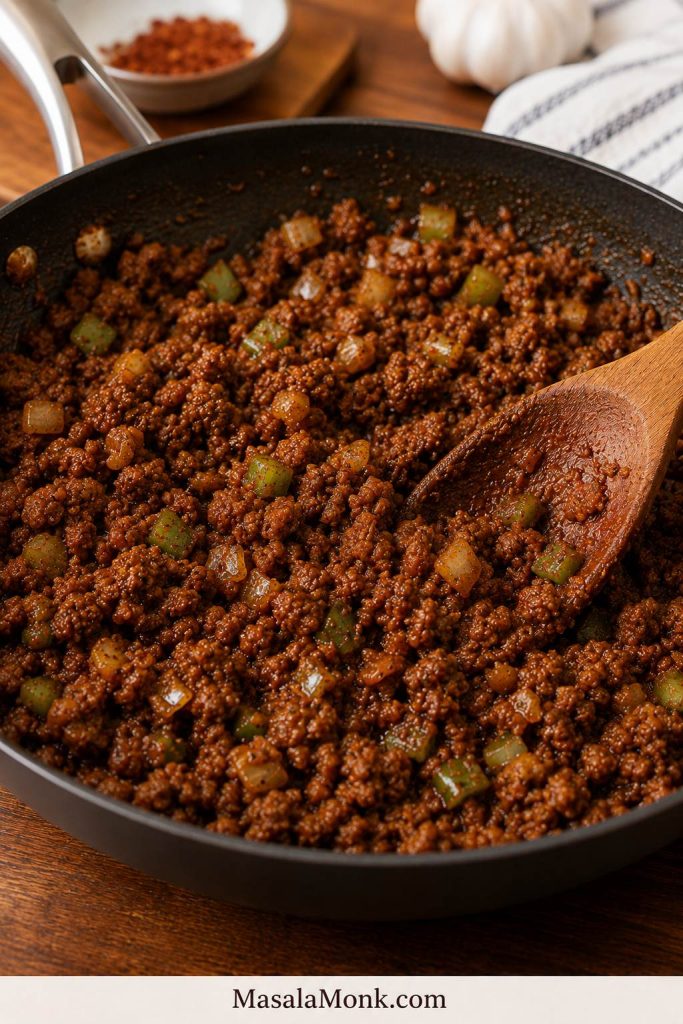
- Add the onion and bell pepper to the skillet. Cook for 4 to 5 minutes, until they begin to soften.
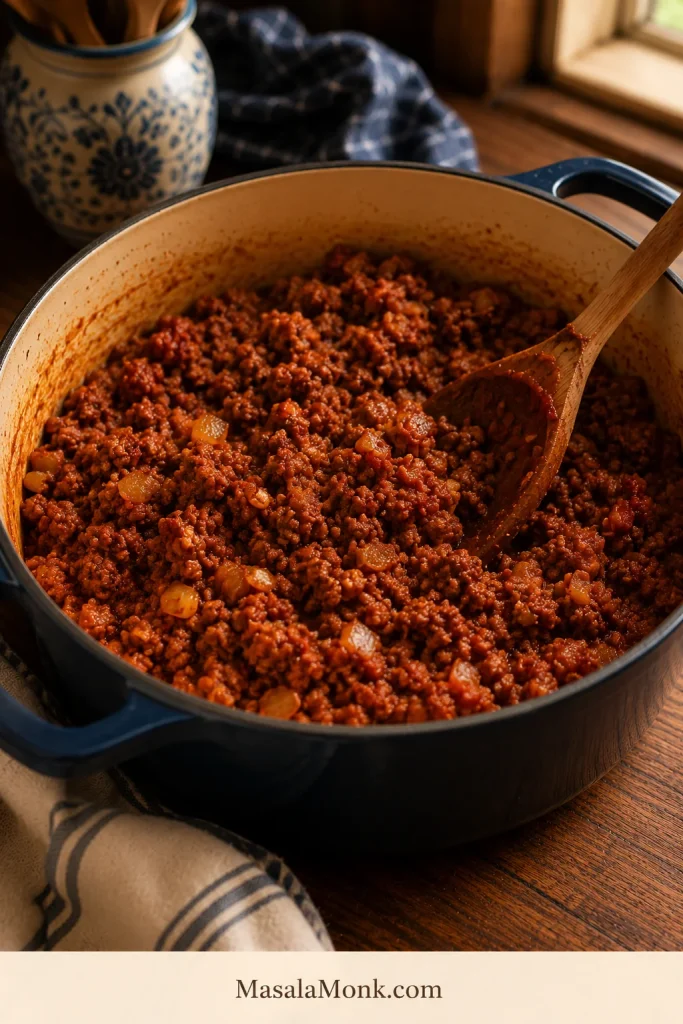
- Stir in the garlic, tomato paste, chili powder blend, cumin, smoked paprika, oregano, salt, and black pepper. Cook for 30 to 60 seconds, until the tomato paste darkens slightly and the spices smell warm.
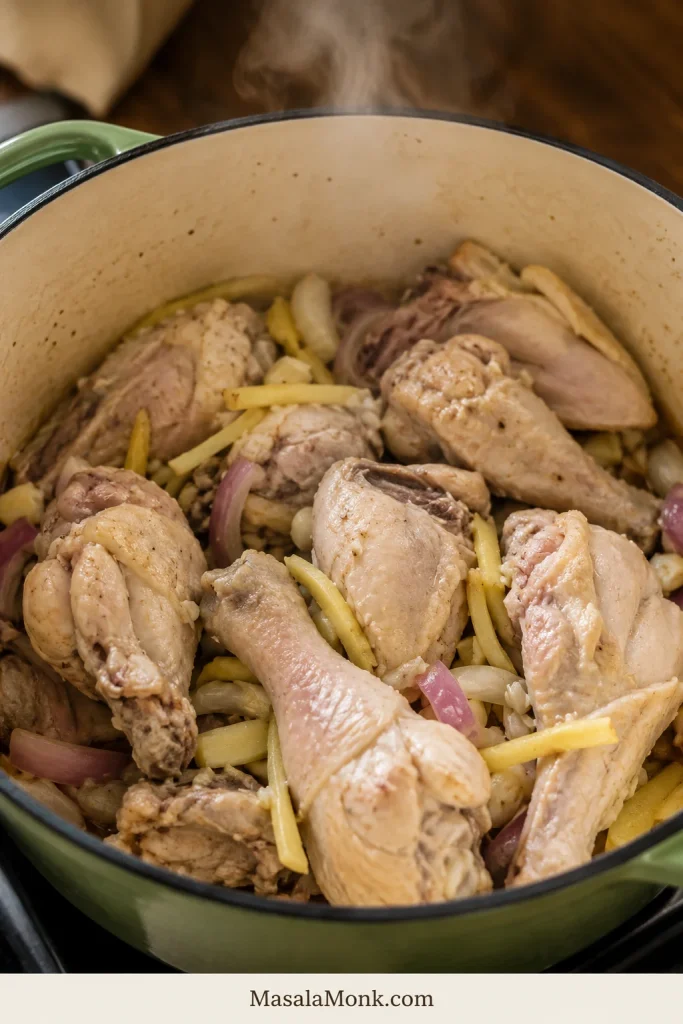
- Transfer the beef mixture to a 6-quart slow cooker.
- Add the drained beans, undrained diced tomatoes, plain canned tomato sauce, Worcestershire sauce, and about half the broth or beer. Stir well.
- Check the texture before the lid goes on. It should look saucy and sturdy, not loose. If it looks tight and dense, add the remaining broth or beer; if it already looks loose, hold it back.
- Cover and cook on Low for 6 to 8 hours or High for 3 to 4 hours. At the end, the chili should bubble gently around the edges and look thicker than it did when you started.
- Taste near the end. Add more salt, chili powder, Worcestershire sauce, or a small splash of apple cider vinegar if the chili tastes flat.
- Let the chili rest uncovered for 10 to 15 minutes before serving so the sauce tightens slightly.
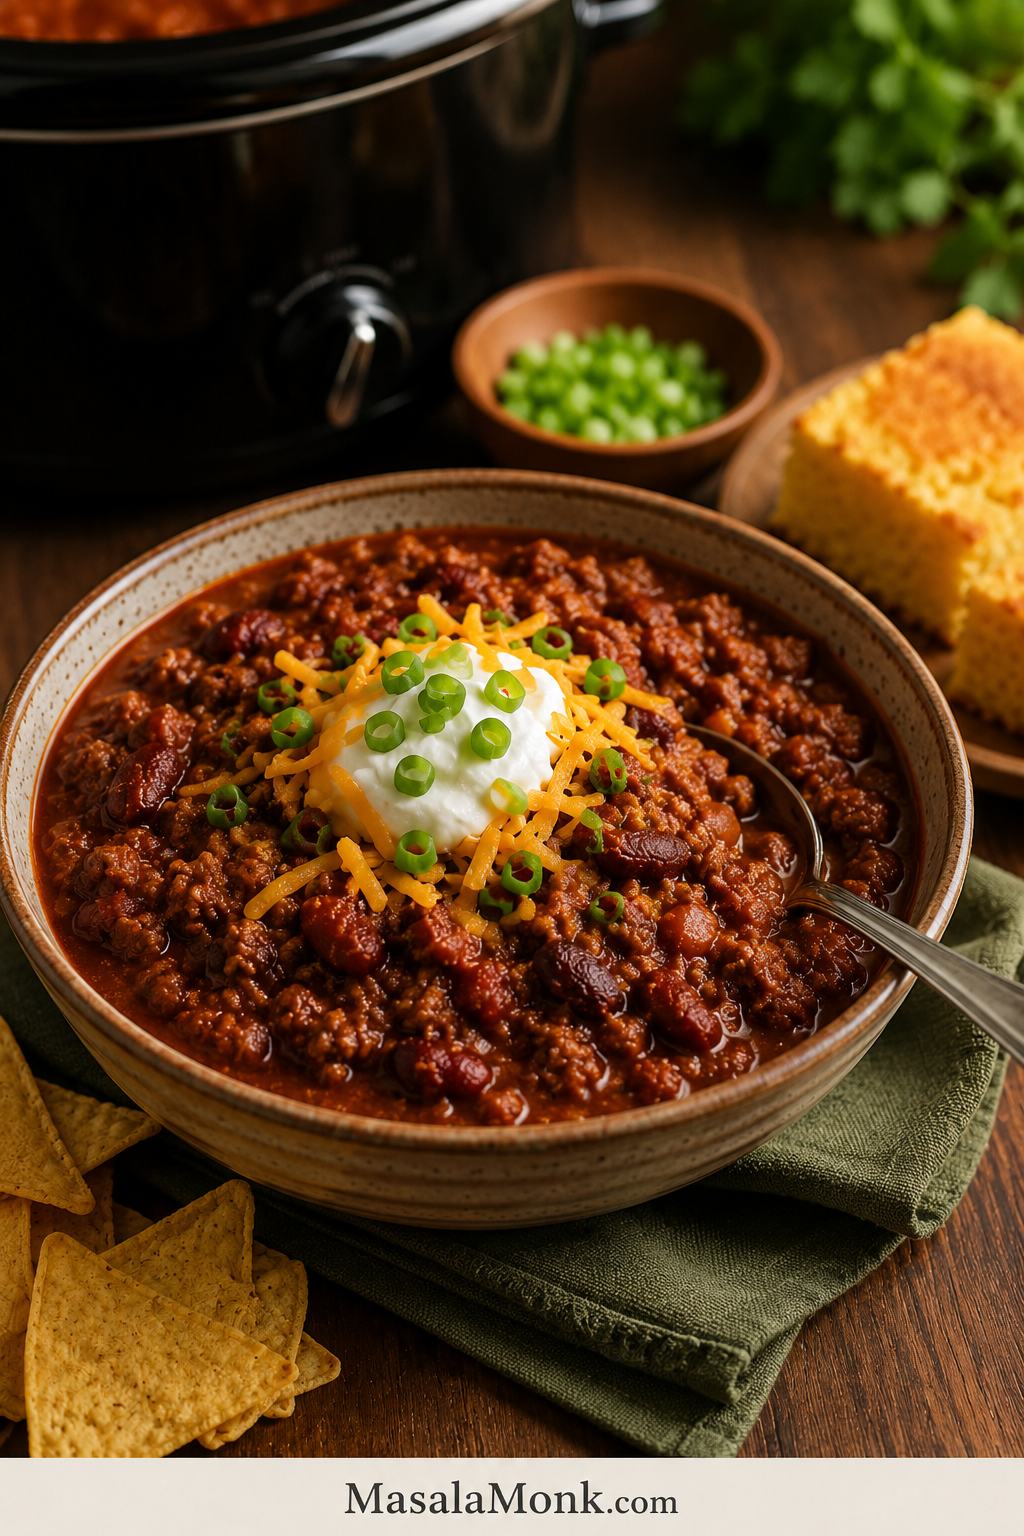
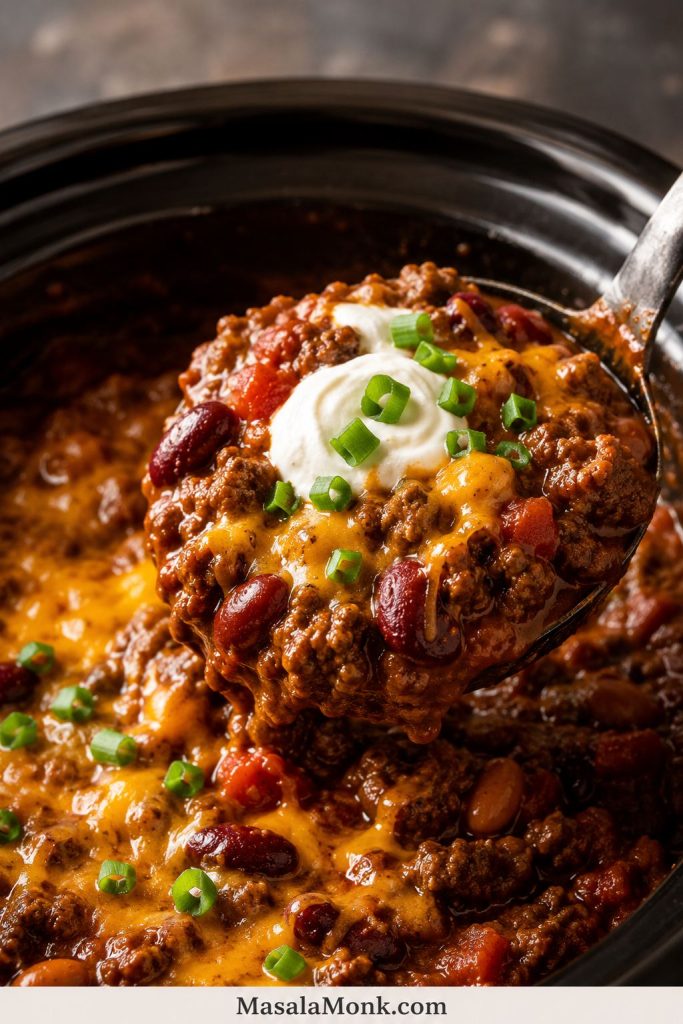
- Serve with shredded cheese, sour cream, green onions, jalapeños, tortilla chips, cornbread, or your favorite chili toppings.
Success Notes
- Need more body? Use the full 3 tablespoons tomato paste, keep broth to 1/2 cup, and rest the chili uncovered before serving.
- To round out the flavor: add 1 teaspoon cocoa powder for depth, 1 teaspoon brown sugar to soften acidity, or 1 teaspoon apple cider vinegar to brighten a flat pot.
- For more smoke: try smoked paprika, chipotle powder, cooked bacon, or a tiny splash of liquid smoke.
- To raise the heat: add jalapeño, cayenne, hot sauce, or diced tomatoes with green chiles.
- Keeping it mild? Use mild chili powder and plain diced tomatoes.
- Using a packet? Replace most dried spices with one chili seasoning packet, then taste before adding extra salt.
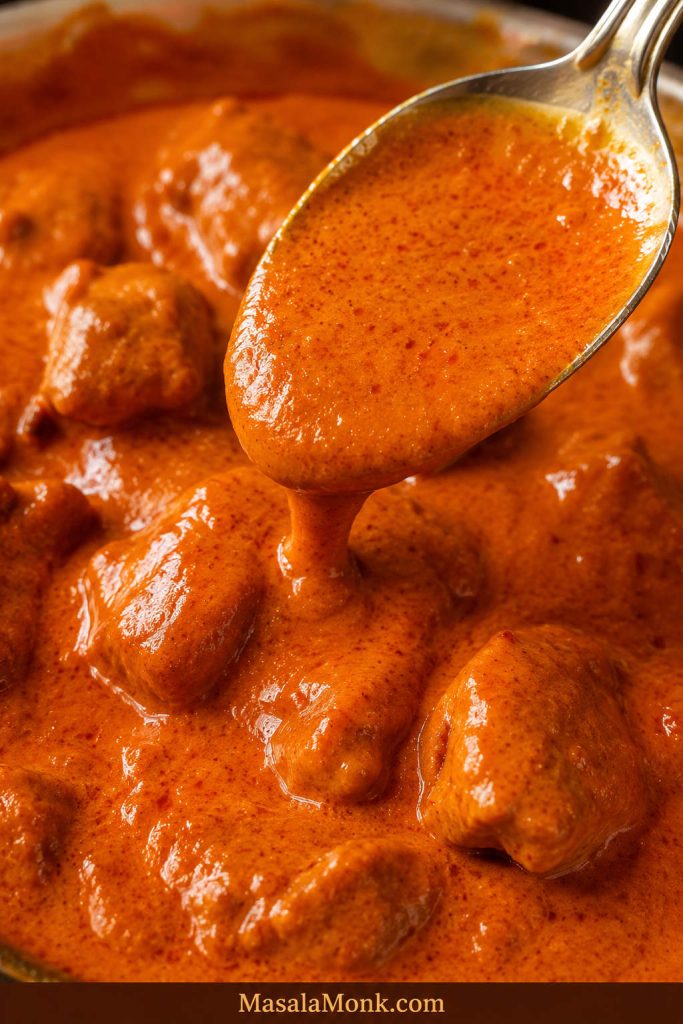
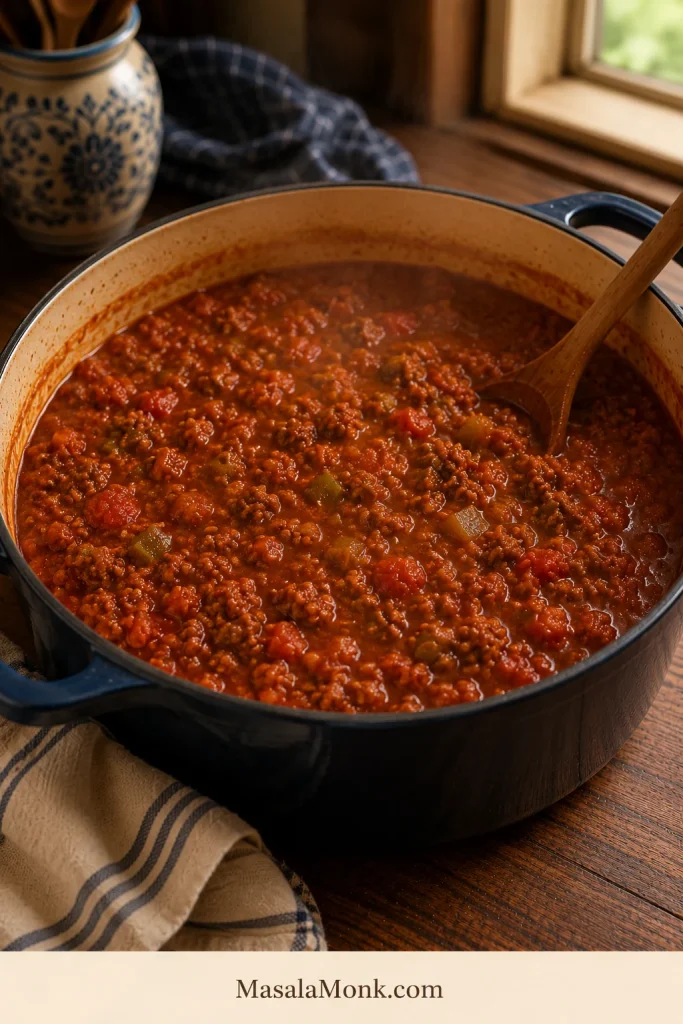
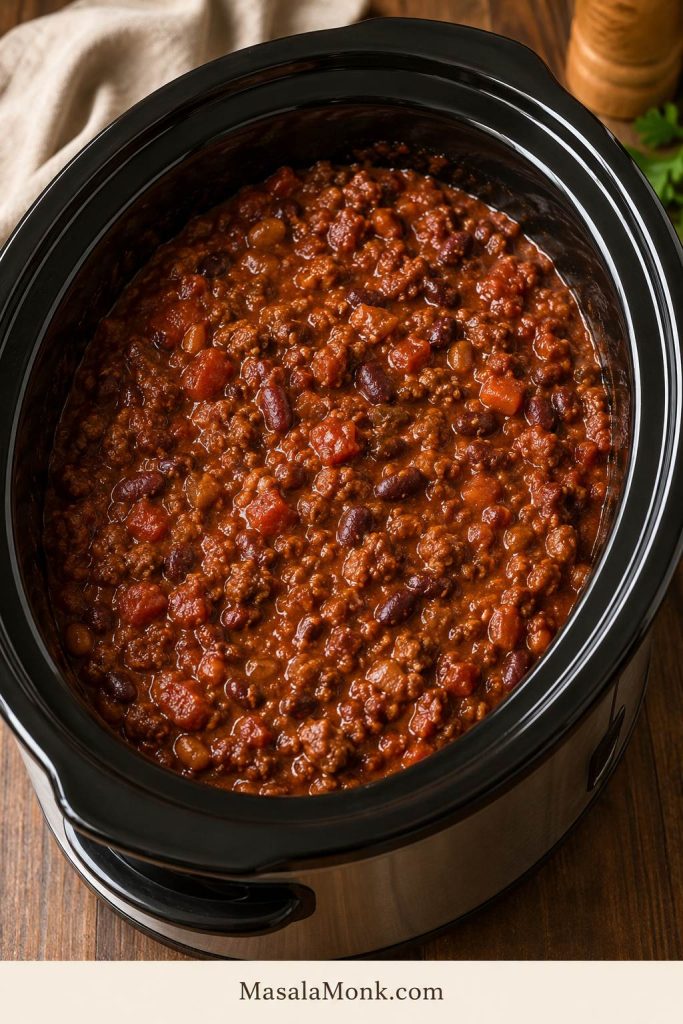
Serve when the chili looks thick, smells savory, and holds softly on a spoon after resting.
Before the deeper notes, here is the finished texture you are aiming for.
What Thick Crockpot Chili Should Look Like

Timing and Make-Ahead Notes
Timing at a Glance
Low is the setting to choose when the day allows it. The chili has time to settle, the tomato base tastes rounder, and the beef and beans feel like one pot instead of separate ingredients. High works for a faster batch in 3 to 4 hours. Use Warm only after the chili is fully cooked, when you are holding it for serving.
This is the chili for the day when dinner needs to take care of itself after the first 20 minutes. The pot does not need much attention, but the early browning step is what makes it taste like someone paid attention.
Can You Prep Crockpot Chili the Night Before?
Yes. Brown the beef, cook the onion, bell pepper, garlic, tomato paste, and spices, then cool the mixture and refrigerate it in an airtight container. The next day, add it to the slow cooker with the beans, tomatoes, tomato sauce, Worcestershire sauce, and broth or beer.
If you refrigerate ingredients in a removable slow cooker insert, check your manufacturer’s guidance before placing a very cold insert into the heating base. When in doubt, refrigerate the cooked beef mixture separately and load the slow cooker fresh the next day.
Make This Crockpot Chili When
- Dinner needs to be started before the busy part of the day hits.
- A short skillet step is fine, but the rest of the meal needs to be hands-off.
- Classic beef-and-bean chili sounds better than white chicken chili or vegetarian chili.
- The pot needs to hold cheese, sour cream, onions, and chips without turning soupy.
- Game day needs something easy that still tastes homemade.
- Leftovers should become chili dogs, nachos, baked potatoes, rice bowls, or chili mac.
- A bigger spread is planned with other slow-cooker snacks like grape jelly meatballs.
The flavor also settles well overnight, which makes this a good make-ahead chili for parties, meal prep, and second-day leftovers.
Texture Notes for Crockpot Chili
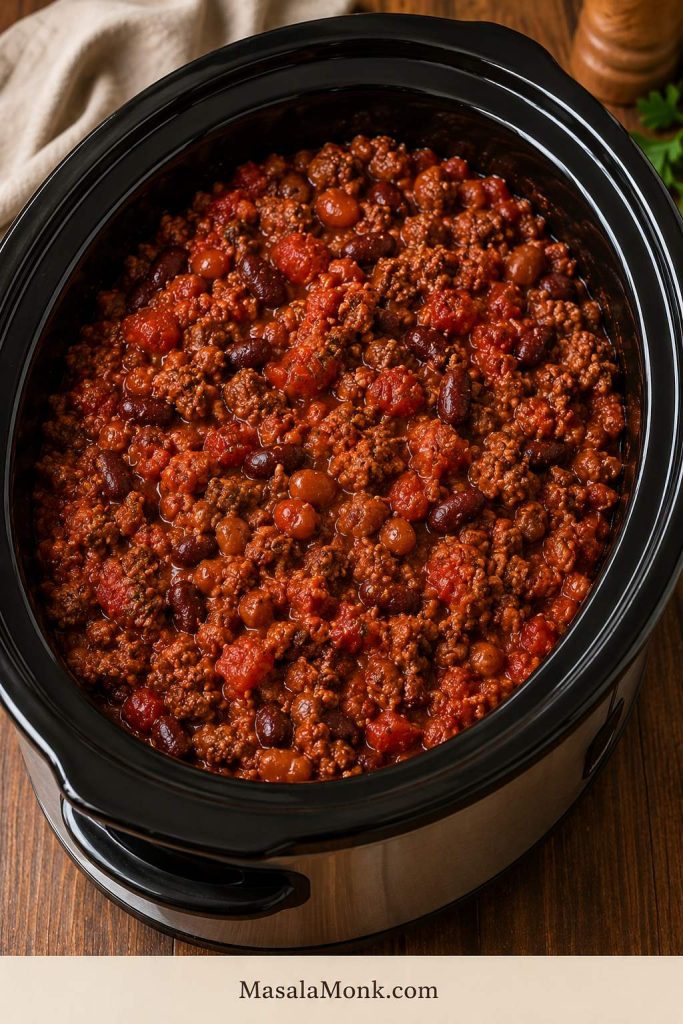
This is a thick beef-and-bean chili, not a loose tomato soup. The balance is simple: 2 lb beef, 2 cans beans, 28 oz undrained diced tomatoes, 15 oz plain canned tomato sauce, 2 to 3 tablespoons tomato paste, and only 1/2 cup added liquid.
Texture note: the best balance for this style of crockpot chili is 2 lb beef, 2 cans beans, 28 oz diced tomatoes, 15 oz tomato sauce, 2 to 3 tablespoons tomato paste, and only 1/2 cup added liquid. More liquid can make the chili looser after several hours because the slow cooker holds onto steam instead of reducing like a stovetop pot.
The pot may look denser than you expect before cooking. That is a good sign. If your slow cooker runs hot or the mixture looks too tight, add the remaining broth or beer a splash at a time.
What the Chili Should Look Like
| Stage | Texture cue |
|---|---|
| Before cooking | Thick and saucy, with visible beef and beans, not swimming in liquid |
| Halfway through | Juicier around the edges as the tomatoes release moisture |
| Finished | Darker chili bubbling gently around the sides |
| After resting | Spoonable chili that holds toppings on top instead of swallowing them |
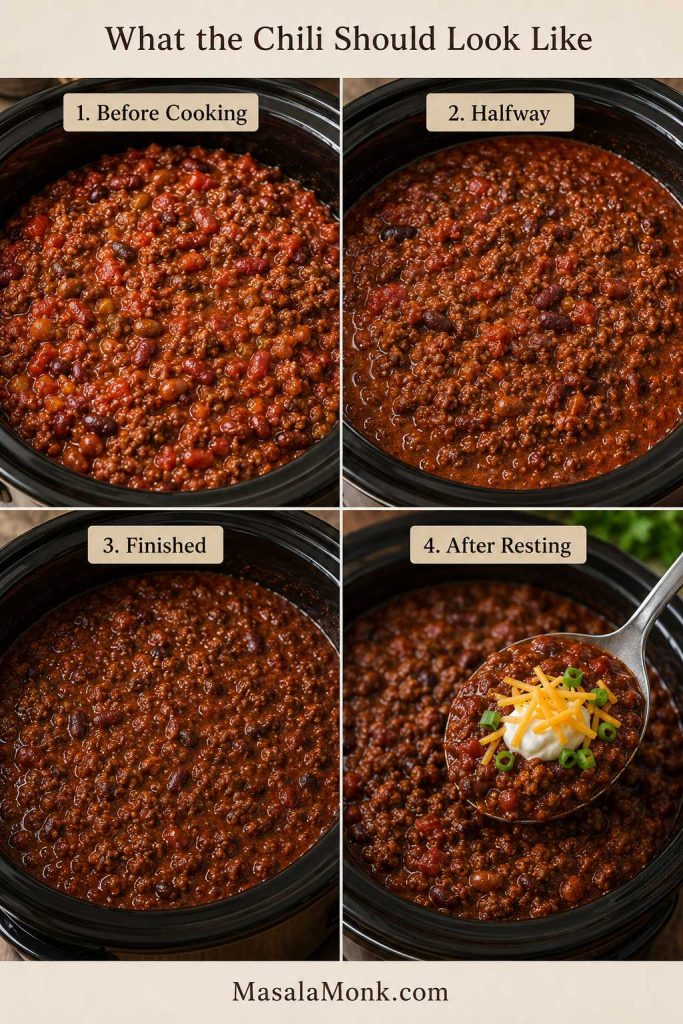
If the texture looks off: use how to thicken crockpot chili for loose sauce, or best beans for chili if the bowl feels too soft.
What It Tastes Like: Flavor and Heat Level
This is a classic tomato-based beef chili with a mild-to-medium heat level, depending on your chili powder. Use mild chili powder and skip jalapeños or cayenne for a kid-friendly pot. Beer adds a subtle malty depth, not a boozy flavor, and broth works perfectly if you want the chili classic and alcohol-free.
The finished chili tastes savory, gently smoky, and beefy, with enough tomato to feel rich but not so much that it tastes like plain canned tomatoes. It is sturdy enough for bowls, nachos, chili dogs, baked potatoes, and leftovers.
Why This Slow Cooker Chili Works
This slow cooker chili works because it does not rely on time alone. Time helps, but the real flavor comes from building the base correctly before the lid goes on.
Browning the beef gives the chili better flavor and better texture. It also lets you drain off excess grease so the finished bowl tastes rich instead of oily. This is the step that keeps the chili from tasting like ground beef floating in tomatoes.
Tomato paste gives the chili body. It deepens the tomato flavor and helps the sauce cling to the beef and beans instead of sitting loose in the bottom of the bowl.
Two kinds of beans make the chili feel hearty without becoming heavy. Kidney beans give the familiar chili bite. Pinto or black beans add softness, body, and a slightly different texture.
A small amount of broth or beer helps everything cook evenly without thinning the chili too much. Extra liquid feels safe at the beginning, but it is usually what makes slow cooker chili soupy at the end. Start small; you can always loosen a tight pot later.
The final rest matters. Chili thickens as it sits. Ten minutes uncovered can make the difference between a loose pot and a bowl that holds nicely under cheese, sour cream, onions, and chips.
Ingredients for Crockpot Chili
The ingredient list is simple, but nothing is just filler. Each piece helps the chili taste fuller, thicker, warmer, or more balanced.
Ground Beef
Choose 2 lb / 900 g ground beef. An 85/15 blend gives a richer chili, while 90/10 makes a leaner pot. Both work well as long as you brown and drain the beef before adding it to the crockpot.
If you use very lean beef, taste the chili near the end. Lean meat can taste milder, so it may need a little more salt, Worcestershire sauce, chili powder, or tomato paste to feel full and savory.
Onion, Bell Pepper, and Garlic
Onion, bell pepper, and garlic are what make the chili smell like dinner before the tomatoes even go in. Green bell pepper tastes familiar and old-school. Red bell pepper makes the pot slightly sweeter. Jalapeño can be added here if you want more heat.
Cooking the vegetables briefly with the beef helps them lose their raw edge and melt into the base instead of tasting like separate pieces floating in tomato sauce.
Beans
This version uses one can of kidney beans and one can of black or pinto beans. Kidney gives the classic chili bite, while the second can brings a softer texture and more body. Drain and rinse both for better control over salt and texture.
If you use chili beans in sauce, you can add the sauce too, but remember that they are already seasoned. Taste before adding extra salt or chili powder.
Tomatoes
Diced tomatoes bring the chunks, tomato sauce fills in the base, and tomato paste gives the chili that deeper, thicker body you want from a slow-cooked pot. Use plain canned tomato sauce here, not ketchup or sweet table sauce.
To make the chili spicier, replace some of the diced tomatoes with diced tomatoes and green chiles. For a smoother pot, use crushed tomatoes instead of diced tomatoes.
Broth or Beer
Keep the broth or beer to 1/2 cup / 120 ml. A broth version tastes familiar and straightforward. Beer leans the pot a little deeper, with a malty background that works especially well for game day. Choose broth if you want to keep everything alcohol-free.
Extra liquid feels helpful at the start, but the slow cooker gives moisture back as the tomatoes, beef, and beans cook together. Begin with less; a thick pot is easier to loosen than a watery pot is to fix.
Chili Seasoning
Chili powder blend, cumin, smoked paprika, oregano, salt, and black pepper give this recipe its main flavor. Use a chili powder blend, not pure hot red chile powder. When your chili powder is mostly ground hot chiles, use much less and build the heat slowly.
With salted broth, chili beans, or a seasoning packet, start with a little less salt and adjust near the end. When the first spoonful tastes almost right but a little dull, it probably needs brightness, not more cooking time. A little salt, Worcestershire sauce, tomato paste, chili powder, or apple cider vinegar can wake the whole pot up.
What Size Slow Cooker to Use for Chili
A 6-quart slow cooker is the best size for this full batch of crockpot chili. It gives the beef, beans, tomatoes, and sauce enough room to heat evenly without bubbling over.
- Half batch: use a 4-quart slow cooker.
- Full recipe: choose a 6-quart slow cooker.
- Larger batch or chili bar: move up to a 7- to 8-quart slow cooker.
For a half batch, use half the ingredients and keep the same cooking cues. A smaller pot can run hotter or finish a little sooner, so check the texture near the early end of the time range.
Keep the slow cooker no more than about three-quarters full so the chili has room to bubble gently and heat evenly. For a double batch, a very large cooker or two separate batches is safer than one overloaded pot.
How to Make Crockpot Chili
1. Brown the Beef
Brown the ground beef in a large skillet over medium-high heat, breaking it into small pieces as it cooks. You want browned, crumbly beef, not large soft clumps.
Drain the excess grease before adding the beef to the slow cooker. That one small step keeps the bowl cozy instead of greasy.
2. Soften the Vegetables
Add the onion and bell pepper to the skillet. Cook for a few minutes until they begin to soften, then add the garlic. From there, the base already starts smelling like chili before the slow cooker even takes over.
3. Bloom the Tomato Paste and Spices
Stir in tomato paste, chili powder blend, cumin, smoked paprika, oregano, salt, and pepper. Cook for 30 to 60 seconds. The mixture should smell warm and savory, not raw or dusty.
This small step makes the chili taste more developed. It also helps the tomato paste blend into the sauce instead of sitting in sharp little pockets.
4. Load the Slow Cooker
Transfer the beef mixture to the slow cooker. Add the beans, undrained diced tomatoes, plain canned tomato sauce, Worcestershire sauce, and about half the broth or beer. Stir until everything is evenly combined.
The mixture should look saucy but not loose before the lid goes on. Add the remaining broth or beer only if it looks thick and tight. Hold the rest back when the pot already looks loose.
5. Cook Low or High
Cook on Low for 6 to 8 hours or High for 3 to 4 hours. Low gives the best flavor, but High works when you need chili ready sooner.
Try not to keep lifting the lid. Each time the lid opens, heat escapes and the cooking time stretches. At the end, the chili should bubble gently around the edges and look darker and thicker than it did when you started.
6. Taste and Finish
Taste the chili near the end. When it tastes flat, add more salt, a small splash of Worcestershire sauce, or 1 teaspoon apple cider vinegar. If it tastes too acidic, add a tiny pinch of sugar or a little extra tomato sauce.
Let the chili rest uncovered for 10 to 15 minutes before serving. As it sits, the sauce thickens slightly and the flavors taste more complete.
The finished chili should taste savory, gently smoky, and tomato-rich, with beans that still hold their shape and a sauce thick enough to cling to the spoon. If it tastes sharp, flat, or thin, the fix is usually seasoning, acid, or a short uncovered rest.
Once the basic method is clear, the details below help you adjust the chili for thickness, timing, beans, toppings, leftovers, and a crowd.
Adjust the pot from here: choose a chili path, fix thin chili, or build the bowl with toppings.
Choose Your Chili Path
Once the base is right, you do not need a new recipe every time. Change the heat, toppings, beans, or shortcut ingredients around the same thick tomato-beef base.
| If you want… | Do this |
|---|---|
| Family-style chili | Use the recipe as written with kidney and pinto or black beans. |
| More spoonable chili | Use 3 tablespoons tomato paste, mash some beans, and rest uncovered. |
| Game-day chili | Keep it warm in the slow cooker and set toppings out separately. |
| Spicy chili | Add jalapeño, chipotle, cayenne, hot sauce, or diced tomatoes with green chiles. |
| Mild chili | Use mild chili powder, plain diced tomatoes, and no cayenne. |
| No-bean chili | Replace beans with extra beef, peppers, mushrooms, or tomatoes and reduce liquid. |
| Leaner chili | Use 90/10 beef or ground turkey, then season a little more boldly. |
| Shortcut chili | Use a chili seasoning packet and keep the tomato, bean, and liquid balance the same. |
Do You Have to Brown Ground Beef Before Crockpot Chili?
You do not absolutely have to brown ground beef before crockpot chili, but for the best chili, you should. Browning gives the beef better flavor, improves the texture, and lets you drain grease before it goes into the slow cooker.
If raw ground beef goes straight into the crockpot, it can cook through, but the finished chili is usually softer, greasier, and less flavorful. The beef may also clump together instead of staying in small, even pieces.
Can You Make Dump-and-Go Crockpot Chili?
You can make a dump-and-go version, but it is a compromise. Use thawed lean ground beef, break it up very well, and make sure it cooks through fully. The chili will usually be softer and a little greasier than the browned-beef version.
For the best balance of easy and flavorful, brown the beef first. It adds a few minutes, but it makes the whole pot taste better.
A Quick Safety Note
Before you change the beef, beans, or prep method, these few safety details are worth keeping in mind.
For the best texture and flavor, this recipe browns the ground beef before slow cooking. If you use a dump-and-go raw beef method, use thawed beef, break it up well, and make sure it cooks through fully. Ground beef should reach 160°F / 71°C.
Do not start with frozen ground beef in the slow cooker; it may heat unevenly. Canned beans are the easiest, most reliable choice here. Dried kidney beans need proper soaking and boiling before they go into the slow cooker.
For broader slow-cooker handling, the USDA slow cooker safety guide is a useful reference. To handle leftovers safely, cool the chili in shallow containers and refrigerate it within 2 hours rather than leaving the pot out for hours.
Crockpot Chili Cook Time: Low vs High
Crockpot chili is forgiving, but the setting changes the final texture and flavor. Low is best when you have time. High is useful when the beef is already browned and you need dinner sooner.
| Cooking method | Time | Result |
|---|---|---|
| Low | 6 to 8 hours | Best flavor, thicker texture, more developed chili |
| High | 3 to 4 hours | Good for same-day cooking |
| Longer than 8 to 10 hours | Not ideal | Beans can soften too much and flavor can turn dull |
| Warm setting | 1 to 2 hours after cooking | Good for serving, not endless holding |
Can Chili Cook Too Long in a Crockpot?
Yes. Chili can handle slow cooking, but it is not impossible to overcook. After too many hours, canned beans can get mushy, the beef can lose texture, and the flavor can become muddy instead of bright and hearty.
Can You Leave Chili on Warm?
You can leave chili on Warm for serving, especially for a party or game day, but it should stay hot, be stirred occasionally, and not drift into lukewarm territory. If the chili is sitting out for a crowd, a food thermometer is useful. Keep it around 140°F / 60°C or above so it stays safely hot, not just warm to the touch.
For the best texture, do not treat the Warm setting as an all-day extension of cooking time. It is for serving, not for endlessly stretching the batch.
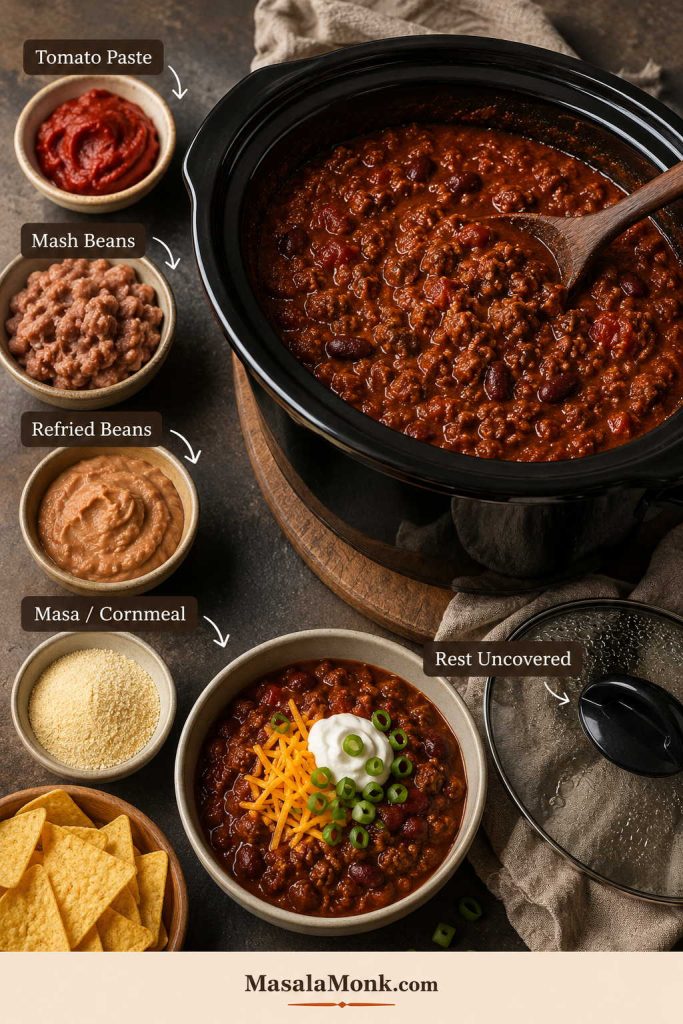
How to Thicken Crockpot Chili
If you have ever lifted the slow cooker lid and found chili that looks more like soup, this is the section that saves the pot.
The slow cooker is good at simmering; it is not good at evaporating. That is why thick chili starts with less liquid, not with a rescue mission at the end.
Do not judge the texture straight from under the lid. Slow cookers trap steam, so let the chili rest uncovered for 10 to 15 minutes before adding thickeners. If it still looks loose after resting, use one of the fixes below.
Once the chili coats the spoon and leaves a soft trail when you stir, it is thick enough.
Best Ways to Give a Loose Pot More Body
| Thickening method | How to use it |
|---|---|
| Tomato paste | Add 2 to 3 tablespoons at the start |
| Cook uncovered | Remove the lid for the last 20 to 30 minutes |
| Mash beans | Mash 1/2 to 1 cup beans into the chili before serving |
| Refried beans | Stir in 1/2 cup for a creamier, fuller base |
| Masa harina or cornmeal | Add 1 tablespoon at a time and let it cook in |
| Rest before serving | Let chili sit uncovered for 10 to 15 minutes |
Easy thick chili trick: mash some of the beans directly into the pot before serving. It gives the sauce body naturally without making the chili taste starchy. Refried beans work the same way if you want an even creamier base.
For the next batch, start with less broth, drain the beans, and keep tomato paste in the recipe. The chili should look almost too dense before cooking, because the slow cooker will give moisture back.
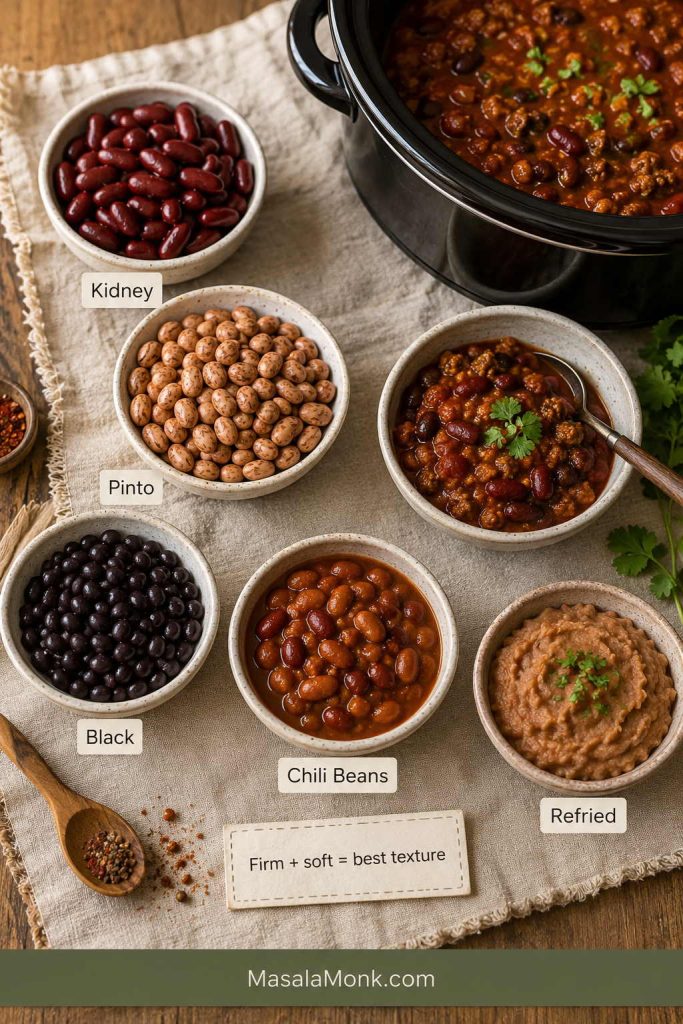
Best Beans for Crockpot Chili
Beans make chili hearty, but the mix decides whether the bowl feels firm, creamy, or too soft. The easiest rule is to use one firm bean and one softer bean so the chili has both bite and body.
- Kidney beans: classic chili bite, sturdy texture, and a familiar look.
- Pinto beans: softer and creamier, especially if you like a slightly thicker-feeling bowl.
- Black beans: darker, earthier, and a little firmer than pinto beans.
- Chili beans: useful as a shortcut because they are already seasoned, but taste before adding more salt.
- Refried beans: not a main bean here, but useful if you want to thicken the sauce naturally.
Kidney plus pinto gives the most classic texture. Pairing kidney with black beans makes the chili a little darker and heartier. If your family does not love kidney beans, use pinto and black beans instead.
Should You Drain Canned Beans for Chili?
For this recipe, yes. Draining and rinsing gives you better control over salt and keeps the chili base cleaner. If you use chili beans in sauce, you can include the sauce, but reduce other seasoning until you taste the finished pot.
Can You Use Dried Beans in Crockpot Chili?
Canned beans are the easiest, most reliable choice for this slow cooker chili. They are already cooked and ready for the crockpot.
Dried kidney beans need proper soaking and boiling before they go into a slow cooker recipe. If you want to use dried beans, cook them safely first, then add them to the chili.
Flavor Upgrades for Better Crockpot Chili
Once the base tastes right, upgrades should make the chili deeper, not busier. Choose one or two, not the whole table.
| Upgrade | What it does | How much to use |
|---|---|---|
| Bacon | Adds smoky richness | 4 to 6 cooked slices, chopped |
| Italian sausage | Adds savory depth | Replace 1/2 to 1 lb beef |
| Beer | Adds a deeper, malty base | Use 1/2 cup instead of broth |
| Worcestershire sauce | Adds umami | 1 tablespoon |
| Cocoa powder | Adds dark depth, not sweetness | 1 teaspoon |
| Brown sugar | Balances tomato acidity | 1 to 2 teaspoons |
| Apple cider vinegar | Brightens flat chili | 1 teaspoon at the end |
| Chipotle or smoked paprika | Adds smoky heat | Start with 1/2 to 1 teaspoon |
| Jalapeño or cayenne | Makes chili spicier | Add to taste |
| Beef bouillon | Boosts beefy flavor | 1 cube or 1 teaspoon paste |
For a familiar family-style chili, tomato paste and Worcestershire sauce are enough. A richer game-day pot can take bacon, beer, cocoa powder, or a little chipotle. To brighten chili that tastes dull, add a small splash of vinegar at the end instead of adding more spice.
If bacon is your upgrade, making a tray of oven-cooked bacon first is easier than frying strips while the chili is coming together.
Crockpot Chili Variations
The base method is built for beef-and-bean chili, but it can still flex without turning into a completely different dinner.
No-Bean Crockpot Chili
Skip the two cans of beans and add extra ground beef, diced bell peppers, mushrooms, or more tomatoes. Reduce the broth slightly so the chili does not turn soupy. A true no-bean chili needs a meatier balance, so build the pot around beef, peppers, tomatoes, and seasoning instead of simply removing the beans.
Turkey Chili
Use ground turkey in place of the beef. Because turkey is leaner and milder, add a little extra tomato paste, Worcestershire sauce, chili powder, or smoked paprika.
Spicy Crockpot Chili
Add jalapeño, cayenne, chipotle powder, hot sauce, or diced tomatoes with green chiles. Start small because the heat spreads through the whole pot as the chili cooks.
Mild Crockpot Chili
Use mild chili powder, plain diced tomatoes, no cayenne, and only a small amount of smoked paprika. If everyone at the table likes a different heat level, keep the base mild and let toppings do the arguing with jalapeños, hot sauce, chipotle, or mango habanero sauce.
5-Ingredient Shortcut Chili
For the fastest version, use ground beef, beans, diced tomatoes, tomato sauce, and a chili seasoning packet. It will not have the same depth as the full recipe, but it works when dinner needs to be simple.
Chili Seasoning Packet Version
Use one chili seasoning packet in place of the chili powder blend, cumin, smoked paprika, oregano, salt, and pepper. Taste near the end before adding more salt because packets vary.
Vegetarian Chili
For vegetarian crockpot chili, skip the beef and add extra beans, lentils, bell peppers, corn, zucchini, mushrooms, or sweet potato. Because the beef is no longer carrying the base, vegetarian chili needs extra body from beans, lentils, mushrooms, or vegetables.
White Chicken Chili
White chicken chili follows a different path. It usually uses chicken, white beans, green chiles, broth, and often cream cheese or cream. This recipe is the tomato-based beef chili version.
Ready to serve it? Move to chili toppings, what to serve with chili, or storage and leftovers.
Toppings for Crockpot Chili
Toppings are where the bowl gets fun: cold sour cream against hot chili, sharp cheddar melting into the top, onions for crunch, and chips for scooping.
- Shredded cheddar cheese
- Sour cream or Greek yogurt
- Green onions
- Diced red onion
- Pickled jalapeños
- Fresh jalapeños
- Cilantro
- Avocado
- Tortilla chips
- Corn chips
- Lime wedges
- Hot sauce
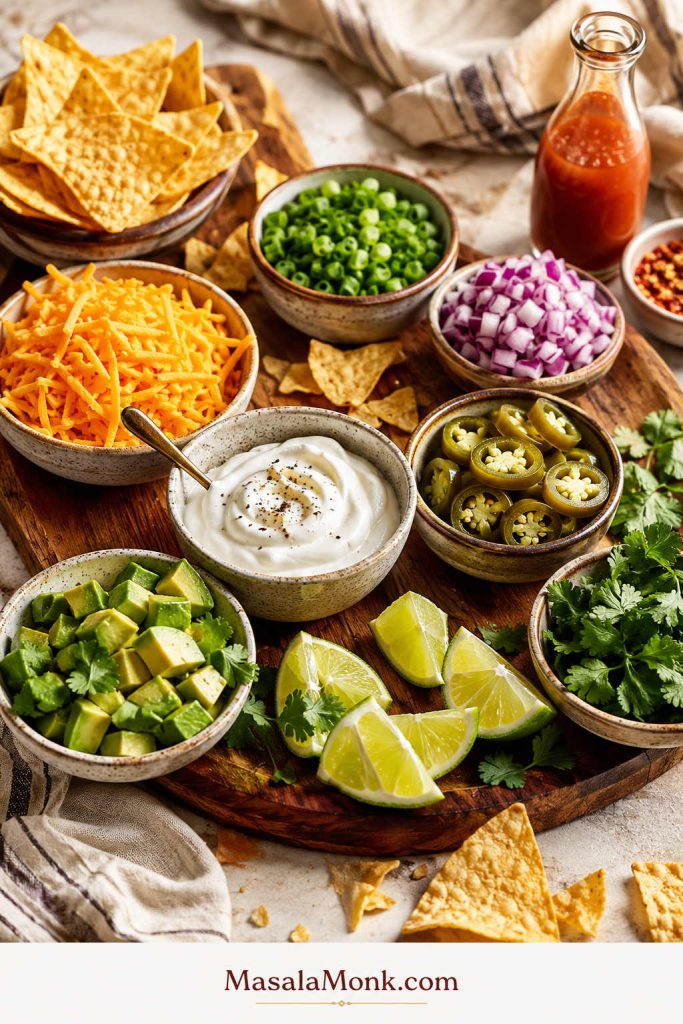
On game day, the easiest move is to keep the chili warm and let the toppings do the work. A rich, balanced pot makes every topping taste better.
If you are turning chili into nachos or chili cheese fries, a spoonable cheese sauce gives a smoother finish than shredded cheese alone.
What to Serve With Crockpot Chili
A bowl of chili can stand on its own, but the right side makes it feel like a full table instead of just a full bowl.
- Cornbread
- Rice
- Baked potatoes
- Tortilla chips
- Nachos
- Hot dogs
- French fries
- Garlic bread
- Simple green salad
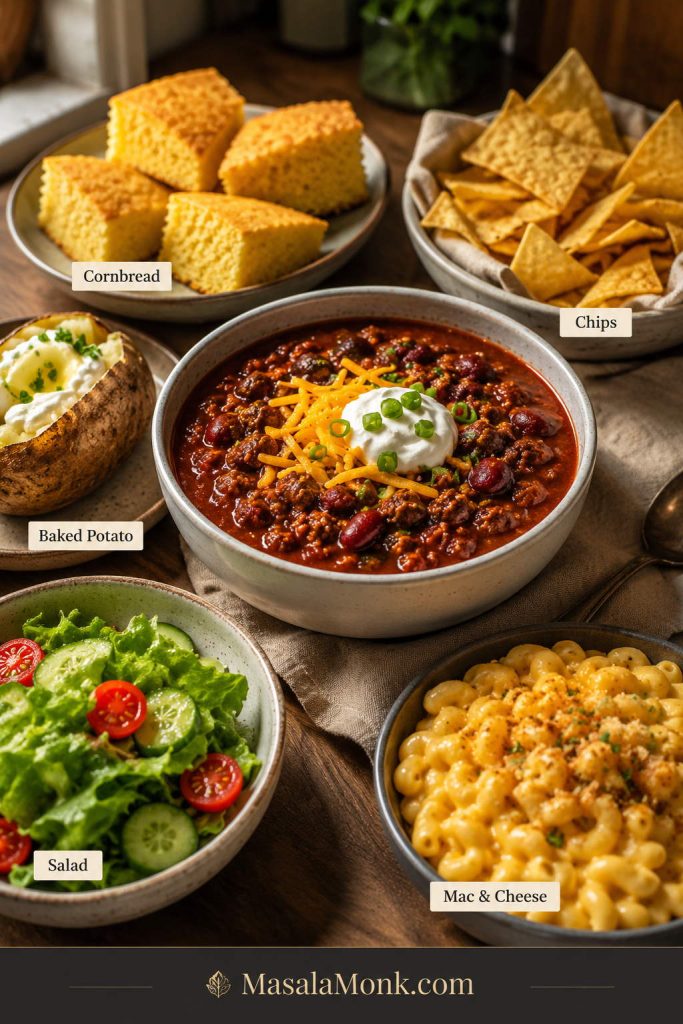
For a bigger comfort-food table, chili pairs well with creamy sides like macaroni and cheese. Keep the chili bold and the side creamy, and the plate feels balanced instead of heavy in one note.
If the chili spread is already rich, a cold wedge salad gives the table something crisp, creamy, and fresh without competing with the chili.
Leftover Chili Ideas
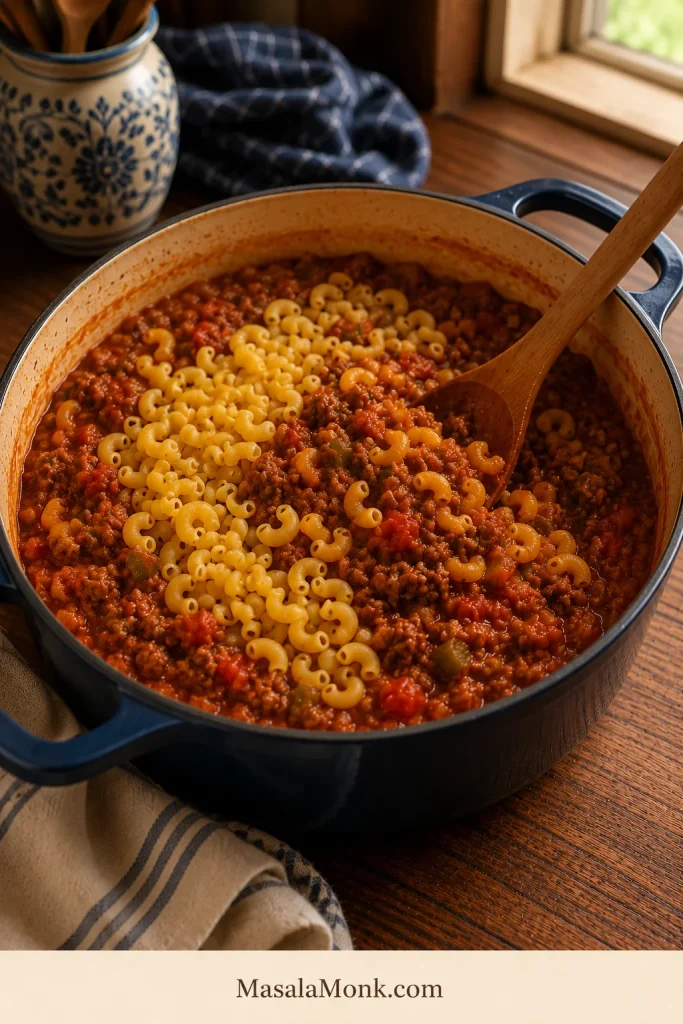
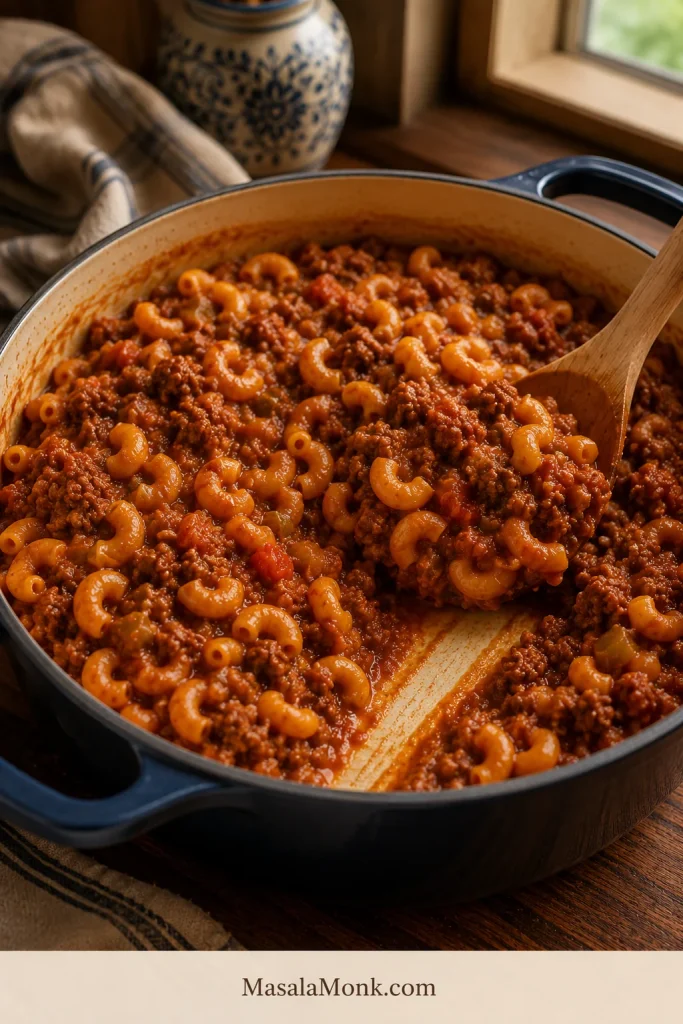
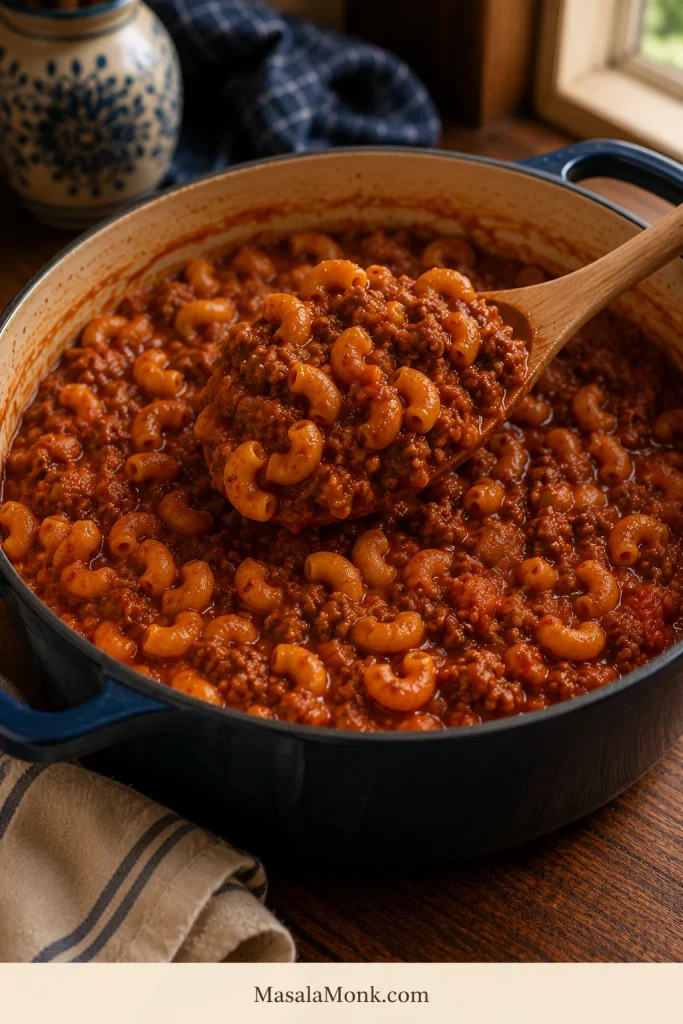
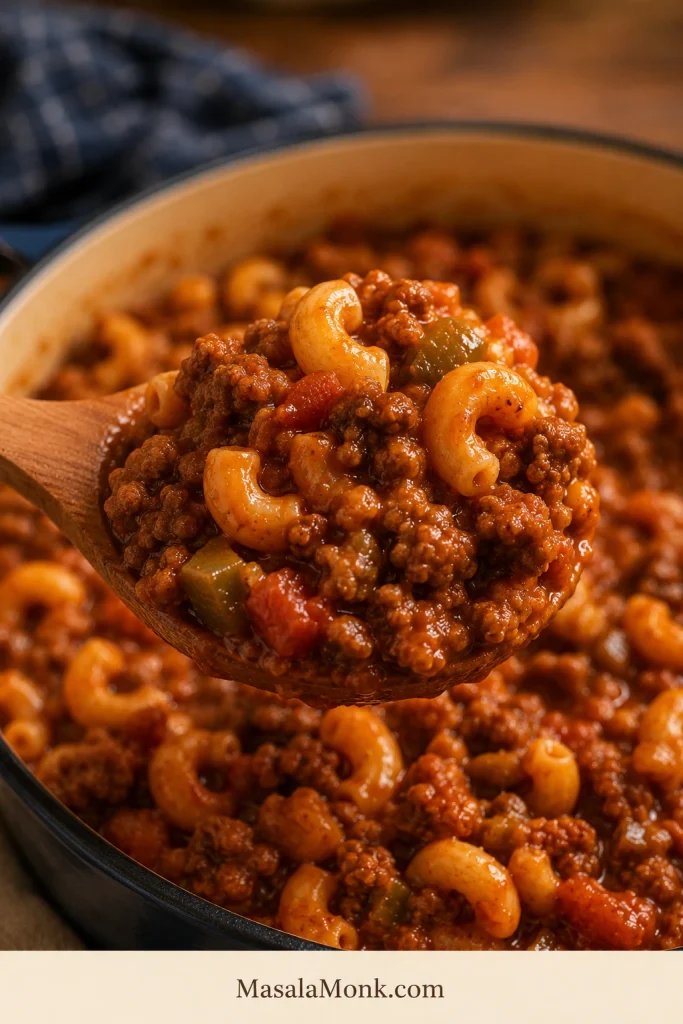
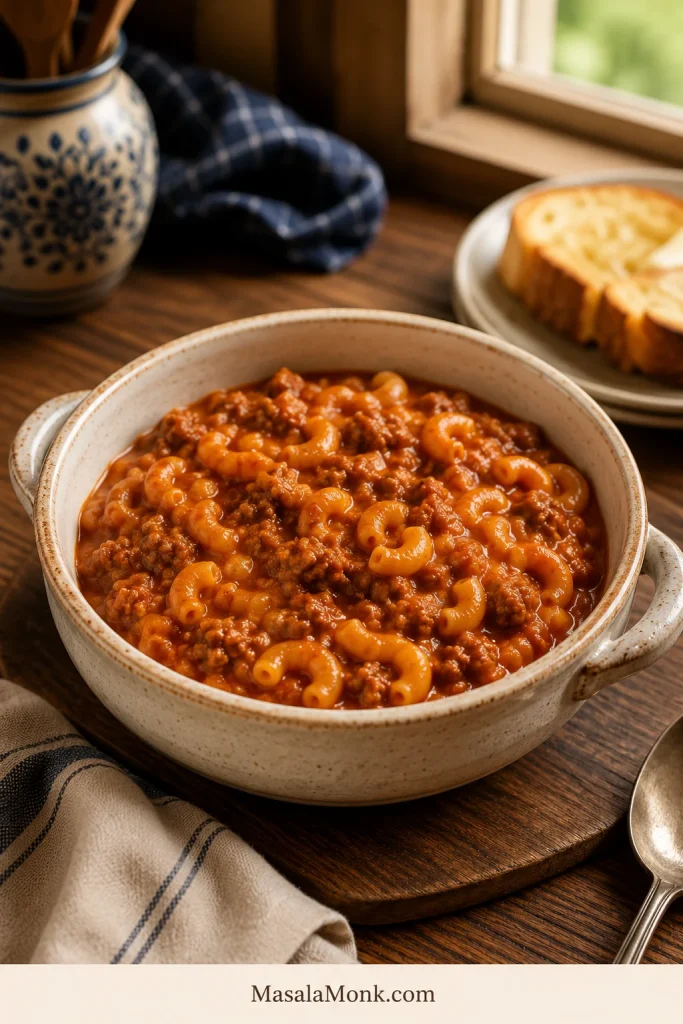
Leftovers are not a compromise here. They are part of the plan. Spoon chili over baked potatoes, use it for chili dogs, turn it into chili nachos, serve it over rice, or stir it into cooked macaroni for chili mac. For another ground-beef pasta night, homemade cheeseburger macaroni keeps the same cozy skillet-dinner feeling without repeating chili.
How Much Chili Per Person?
This recipe makes about 10 to 12 cups of chili, which is enough for 8 to 10 servings. The exact amount depends on whether chili is the main meal, part of a chili bar, or a topping for potatoes, hot dogs, nachos, or fries.
| Serving style | Plan for |
|---|---|
| Main meal | 1 to 1 1/2 cups per person |
| Chili bar with toppings | About 1 cup per person |
| Side dish | 1/2 to 3/4 cup per person |
| Topping for potatoes, nachos, or hot dogs | 1/2 cup per person |
How to Set Up a Crockpot Chili Bar
For a chili bar, keep the pot hot, set toppings out separately, and plan for people to come back for a little more. Chili has a way of turning one bowl into “just one more spoonful.”
If you are feeding a crowd, keep the slow cooker no more than about three-quarters full. Make two batches if needed, or use a larger 7- to 8-quart slow cooker so the chili has room to heat evenly.
Storage, Freezing, and Reheating
How Long Does Crockpot Chili Last in the Fridge?
Store leftover chili in shallow airtight containers in the refrigerator for 3 to 4 days. Let the steam settle briefly, then refrigerate it within 2 hours rather than leaving the pot out for hours.
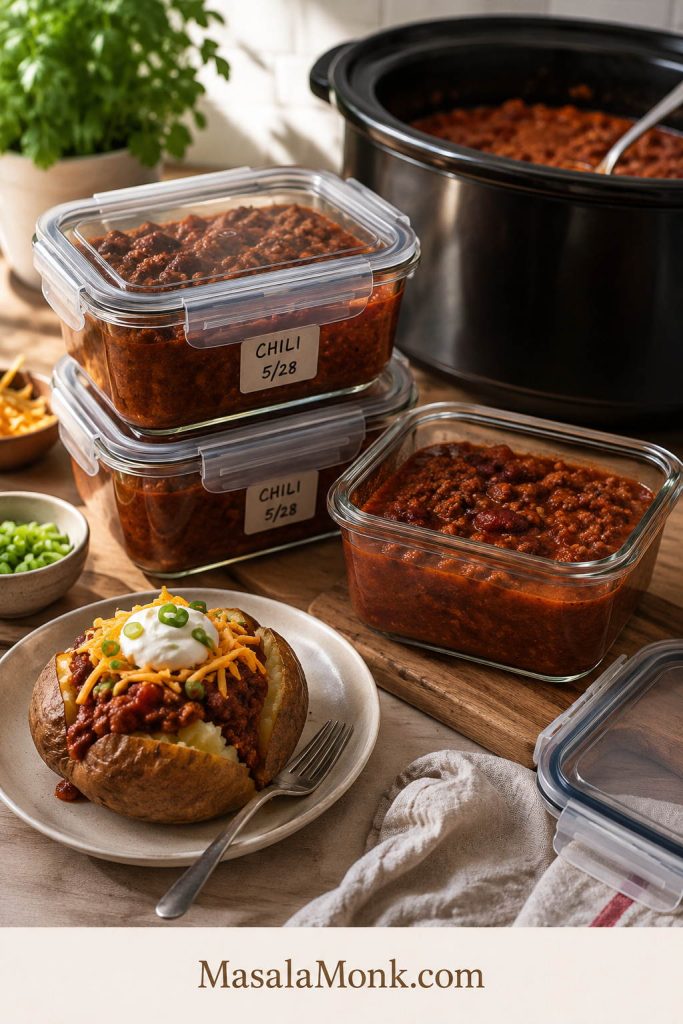
Can You Freeze Crockpot Chili?
Yes. Crockpot chili freezes well for up to 3 months for best quality. Freeze it in meal-size containers or freezer bags, leaving a little space at the top because chili expands as it freezes.
How to Reheat Chili
Reheat chili on the stovetop over medium-low heat or in the microwave, stirring occasionally. Add a splash of broth or water when it is too thick after chilling or freezing. When it is too thin, simmer uncovered until it tightens back up.
Is Chili Better the Next Day?
Yes, chili often tastes better the next day. The spices settle, the tomato base mellows, and the beef and beans absorb more flavor. Tomorrow’s bowl tastes like a plan, not a leftover.
Common Crockpot Chili Mistakes and Fixes
If the chili does not taste right at the end, do not panic. Most problems need a small adjustment, not a new pot. The final 15 minutes should be for toppings, not rescue work, but this table will still save a pot that needs help.
| Problem | Fix |
|---|---|
| Chili is watery | Rest uncovered first, then cook uncovered, add tomato paste, or mash beans |
| Chili is greasy | Brown and drain the beef before slow cooking |
| Chili tastes bland | Add salt, Worcestershire sauce, chili powder, or a splash of vinegar |
| Chili is too spicy | Add beans, tomato sauce, sour cream, or a tiny pinch of sugar |
| Beans are mushy | Add canned beans later next time if you prefer firmer beans |
| Chili is too firm | Add broth or water in small splashes |
| Beef is clumpy | Break it up well while browning before adding it to the slow cooker |
| Chili tastes acidic | Add a small pinch of sugar, more beans, or a little extra tomato sauce |
The easiest way to avoid most of these problems is to brown and drain the beef, use tomato paste, avoid too much liquid, and taste the chili near the end instead of assuming it is finished. If the pot tastes flat, it usually needs salt or brightness, not more hours.
Quick return: back to the recipe card, method, thickening section, or top.
FAQ
How long does chili cook in a crockpot?
Cook crockpot chili for 6 to 8 hours on Low or 3 to 4 hours on High. Low gives deeper flavor and a more settled, spoonable texture.
Best setting for crockpot chili: Low or High?
Choose Low when you have time. High works when the beef is already browned and you need the chili ready sooner.
Do you have to brown ground beef before crockpot chili?
Yes, for the best result. Browning gives the beef better texture, adds deeper flavor, and lets you drain grease before it goes into the slow cooker.
Can raw ground beef go in the slow cooker?
Technically yes, if it is thawed, broken up well, and cooked through fully to 160°F / 71°C. Browning first gives better texture, deeper flavor, and less grease.
Night-before prep: can you start crockpot chili ahead?
Yes. Brown the beef and cook the aromatics and spices, then cool and refrigerate that mixture. Add it to the slow cooker with the canned ingredients the next day.
Is this chili spicy?
It is mild to medium, depending on your chili powder. For kid-friendly chili, use mild chili powder and skip cayenne, jalapeños, and hot sauce.
How do you thicken crockpot chili?
Rest it uncovered for 10 to 15 minutes first. If it still looks loose, add tomato paste, mash some beans, stir in refried beans, or cook uncovered briefly.
What beans are best for crockpot chili?
Kidney beans give classic bite, pinto beans make the bowl softer and creamier, and black beans add a darker, earthier flavor. A mix of one firm bean and one softer bean works well.
Should canned beans be drained for chili?
Yes. Draining and rinsing canned beans gives you better control over salt and texture. If you use chili beans in sauce, add the sauce but season carefully.
Dried beans in crockpot chili: are they safe?
No, especially not dried kidney beans. Use canned beans here, or soak and boil dried beans properly before slow cooking.
How do you make crockpot chili without beans?
Replace the beans with extra ground beef, peppers, mushrooms, or more tomatoes, and reduce the added liquid. No-bean chili needs a meatier balance.
Does beer work in crockpot chili?
Yes. Beer adds a subtle malty depth, but broth works just as well if you want a classic or alcohol-free chili.
What size slow cooker do I need for chili?
A 6-quart slow cooker is best for this full recipe. Use a 4-quart slow cooker for a half batch, or a 7- to 8-quart slow cooker for a larger batch.
Doubling crockpot chili: what should change?
You can double it only if your slow cooker is large enough. Keep it no more than about three-quarters full, or make two separate batches.
Using a chili seasoning packet: does it work?
One chili seasoning packet can replace the dried spices. Taste near the end before adding more salt because packets vary.
Why does my chili taste bland?
Bland chili usually needs salt, acidity, or deeper savory flavor. Add salt, Worcestershire sauce, tomato paste, chili powder, or a small splash of apple cider vinegar near the end.
Freezing crockpot chili: does it work?
Crockpot chili freezes well. Cool it, portion it into freezer-safe containers or bags, and freeze for up to 3 months for best quality. Thaw overnight in the fridge and reheat gently.
Is chili better the next day?
Chili often tastes better the next day because the spices, beef, beans, and tomatoes have more time to settle. That makes it ideal for parties, meal prep, and leftovers.
Final Notes for Thick Crockpot Chili
Save this one for the days when you want dinner handled early and a pot of chili waiting when everyone is hungry. Make it once as written, then adjust the heat, beans, and toppings the way your table likes it.
The base is the part that matters: browned beef, tomato paste, low liquid, and enough time for the slow cooker to turn everything thick, savory, and scoopable. When that base is right, the chili smells good before anyone asks what is for dinner and lands on the table ready for cheese, sour cream, onions, chips, or a second bowl.