Posted on — 11 Comments

Buffalo Chicken Dip | Healthy, Crockpot & Veg Recipes

Hand dipping a celery stick into a bubbling buffalo chicken dip in a cast iron skillet on a wooden table

There are some recipes people like, and then there are recipes people hover around. This creamy buffalo chicken wing dip definitely belongs in the second group. It has everything you love about hot wings—heat, tang, salty richness—folded into a scoopable, shareable spread that works for game days, house parties, holiday evenings or the most low-key movie night.

Once you understand the basic structure of this hot wing chicken dip, you can twist it into a baked version, a crockpot buffalo-style chicken dip, a quick skillet batch, high-protein or low-carb options, and even vegetarian or vegan “buffalo chicken” style dips. You can then build a whole menu around it, with wings, jalapeño poppers, creamy side dishes, and even a couple of cocktails to cut through all that glorious richness.


Why This Creamy Wing Dip Works So Well

Every good buffalo-style chicken dip—no matter how fancy it looks in the photo—comes down to a few simple ideas:

  1. Shredded chicken for texture and savoriness
    Tender chicken brings the “wing” part of the flavor. When you shred it finely, each bite of dip feels meaty without being chunky or awkward to scoop.
  2. A smooth, tangy base
    Cream cheese, sour cream or yogurt and a little creamy dressing (usually ranch or blue cheese) give the dip its body. This mixture softens the heat, spreads the flavor and makes the whole thing feel luxurious.
  3. Buffalo-style hot sauce for fire and acidity
    A generous amount of hot sauce delivers that familiar wing flavor. The trick is balancing it with the creamy base so the dip stays bold but still pleasant to eat by the spoonful.
  4. Melty cheese for comfort
    A handful of shredded cheese melts through the mixture, giving the wing dip extra body and those stretchy strings everyone secretly chases with their chips.

When you keep these four pillars in mind—chicken, creamy base, buffalo-style sauce, and cheese—you can replace individual components and still end up with something delicious. That’s why one basic buffalo chicken wing dip recipe can morph into dozens of variations without ever feeling repetitive.

Also Read: Simple Bloody Mary Recipe – Classic, Bloody Maria, Virgin & More


Core Ingredients for Buffalo Chicken Dip

To give you a solid starting point, here’s a flexible list you can reuse across several methods: baked, slow cooker, stovetop, and more.

Choosing the chicken

You can use almost any cooked chicken:

  • Leftover roast or grilled chicken
  • Poached chicken breasts or thighs
  • Rotisserie chicken from the store
  • Even canned chicken in a pinch

For a party-sized batch of buffalo style chicken dip, aim for 2 cups (250–300 g) of shredded chicken. Finely shredded meat blends into the creamy base much more easily than large chunks, so it is worth taking an extra minute with your forks.

Building the creamy base

A reliable base ratio looks like this:

  • 225 g cream cheese, softened
  • ½ cup thick plain yogurt or sour cream
  • ½ cup ranch or blue cheese dressing

This gives you a mixture that’s rich, tangy and thick enough to feel substantial, yet still soft enough to scoop. Yogurt brings a little extra protein and a more pronounced tang, while sour cream gives a slightly silkier feel.

If you like to keep an eye on nutrition, it helps to know that plain Greek yogurt tends to be lower in fat and calories but higher in protein than sour cream, as shown in comparisons that use USDA data.(foodess.com) That makes it a handy ingredient when you want your hot chicken dip to be a bit lighter but still creamy.

Hot sauce and cheese

For that signature buffalo wing taste:

  • ½ cup buffalo-style hot sauce, or to taste
  • 1 cup shredded cheese (cheddar, mozzarella, Colby Jack or a blend)

The hot sauce brings heat and acidity; the cheese melts through and anchors everything. A small pinch of garlic powder and onion powder (about ¼ teaspoon each) rounds out the flavor and pushes the dip closer to what you’d get at a pub or sports bar.

Also Read: Tres Leches – Mexican 3 Milk Cake Recipe


Oven-Baked Buffalo Style Chicken Dip

The most straightforward way to make this dish is in the oven. Baked buffalo style chicken dip comes out bubbling around the edges with a lightly bronzed top, and it feels slightly more special than a dip made in the microwave.

Hand dipping toasted bread into classic baked buffalo chicken dip with golden cheese crust, served with wings and veggie sticks
Classic baked buffalo chicken dip with a bubbling cheesy top—ready in about 30 minutes and perfect as the base recipe for every variation in this guide.

Step-by-step baked buffalo chicken wing dip

Ingredients

  • 2 cups cooked shredded chicken
  • 225 g cream cheese, softened
  • ½ cup plain yogurt or sour cream
  • ½ cup ranch or blue cheese dressing
  • ½ cup buffalo-style hot sauce
  • 1 cup shredded cheese (plus extra for topping)
  • 2 tbsp chopped spring onion or chives (optional)
  • ¼ tsp garlic powder
  • ¼ tsp onion powder
  • Salt and pepper

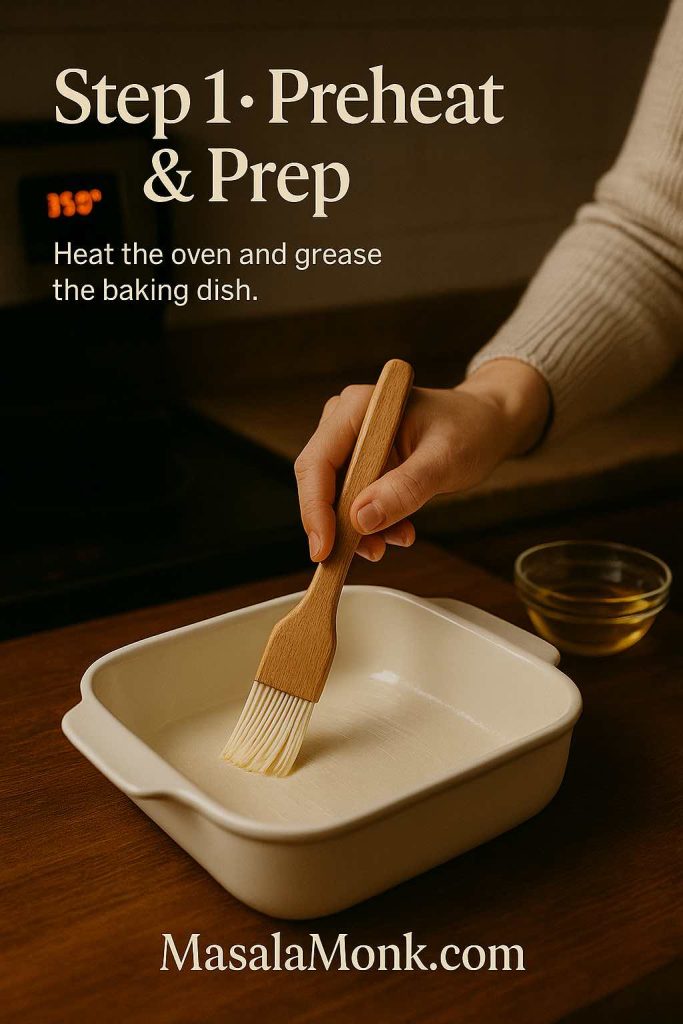
1. Preheat and prep

First, preheat your oven to 180°C / 350°F. Lightly grease an 8×8 inch (20×20 cm) baking dish or a similar small casserole. A shallow dish gives you more golden top; a deeper one gives you a softer center.
Hand brushing oil inside a square baking dish for buffalo chicken dip with a preheated oven and bowl of oil in the background
Step 1 – Preheat the oven to 180°C / 350°F and lightly grease your baking dish so the buffalo chicken dip bakes evenly and releases cleanly.

2. Mix the creamy buffalo base

Next, combine the softened cream cheese, yogurt or sour cream, ranch or blue cheese dressing, hot sauce, garlic powder and onion powder in a bowl. Whisk until the mixture is completely smooth.

At this stage, take a little taste:

  • If it feels too mellow, add another splash of hot sauce.
  • If it tastes sharper than you’d like, stir in a spoonful of cream cheese or yogurt.
  • If it seems flat, a pinch of salt helps other flavors pop.

Recipes like the oven-baked buffalo chicken dip at Taste of Home follow almost exactly this pattern: a short list of creamy ingredients plus hot sauce, chicken and cheese, baked until hot and bubbly.
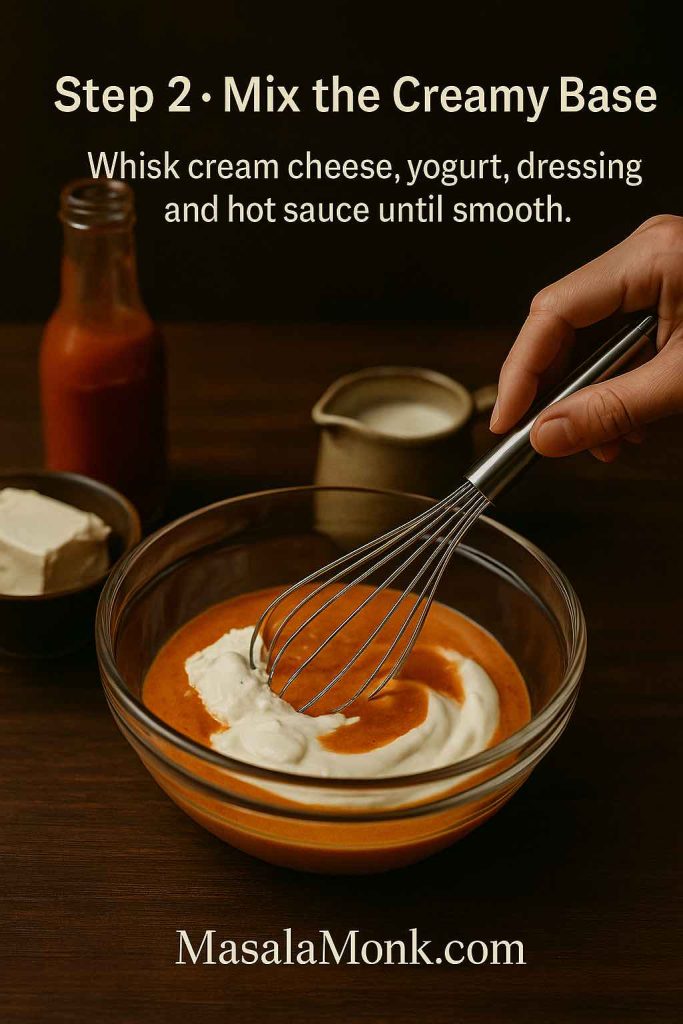
Hand whisking cream cheese, yogurt, dressing and buffalo-style hot sauce in a mixing bowl to make the creamy base for buffalo chicken dip.
Step 2 – Mix the creamy base by whisking softened cream cheese, yogurt or sour cream, ranch or blue cheese dressing, and buffalo-style hot sauce until completely smooth and well seasoned.

3. Fold in chicken and cheese

Then, add the shredded chicken, ¾ of your shredded cheese and the chopped herbs. Stir until the chicken is fully coated and you don’t see any dry pockets.

The mixture should be thick but spreadable. If it feels overly stiff, another spoonful of dressing or yogurt will loosen it.
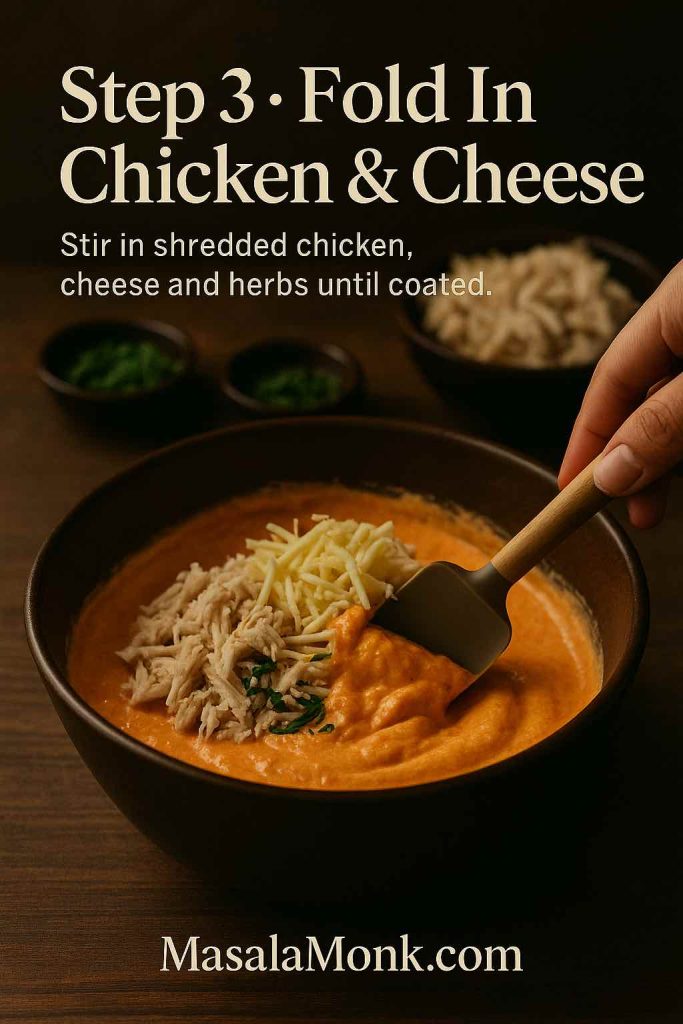
Hand folding shredded chicken, shredded cheese and chopped herbs into a creamy orange buffalo sauce in a mixing bowl.
Step 3 – Fold in shredded chicken, cheese and herbs until every piece is coated in the creamy buffalo sauce and the dip looks thick and spreadable.

4. Bake until bubbling

Spread the mixture evenly in your prepared baking dish. Sprinkle the remaining cheese over the top.

Bake for 20–25 minutes, or until:

  • The edges are bubbling
  • The cheese topping has melted and turned golden in places

If you love a browned crust, you can finish the dish under a hot grill or broiler for 2–3 minutes, keeping a close eye so the cheese doesn’t burn.

Hand wearing an oven mitt sliding a baking dish of buffalo chicken dip with melted cheese into a hot oven
Step 4 – Bake the buffalo chicken dip for 20–25 minutes until the cheese on top is melted, bubbling around the edges and lightly golden.

5. Rest and serve

Finally, let the baked chicken wing dip rest for about 5–10 minutes. During this pause, it thickens slightly and becomes easier to scoop.

Scatter extra herbs or a handful of crumbled blue cheese over the top if you like. Then carry it straight to the table with vegetables, crackers and bread.

A second, milder dip—perhaps one from the spinach dip recipes collection—looks beautiful next to this fiery, cheesy dish and gives your guests another flavor to explore.

Hand dipping a celery stick into baked buffalo chicken dip with a golden cheese crust, surrounded by baguette slices and veggie sticks on a wooden table
Step 5 – Let the buffalo chicken dip rest for a few minutes, garnish with herbs, then serve with crunchy veggie sticks and toasted bread for dipping.

Make-ahead tips for baked buffalo chicken wing dip

You can assemble this oven-baked buffalo chicken wing dip a day ahead:

  • Mix the base, chicken and cheese.
  • Spread it in the dish, cover tightly and refrigerate.
  • When you’re ready to serve, uncover, add the final layer of cheese and bake.

Because the mixture starts cold, it may need an extra 5–10 minutes in the oven. Check that the center is hot and the edges are bubbling before you bring it out.

Also Read: How to Cook Perfect Rice Every Time (Recipe)


Slow Cooker Buffalo Chicken Wing Dip for Parties

When you’re planning a game day or a long evening with friends, a slow cooker version—often called buffalo wing dip or buffalo style chicken dip in the slow cooker—is incredibly practical. You can prep everything earlier, then simply let the crockpot keep it warm while people graze.

There are two main approaches:

  1. Using chicken that is already cooked and shredded.
  2. Starting with raw chicken breasts, which cook in the slow cooker before becoming dip.

Crockpot buffalo wing dip with cooked chicken

For this crockpot method, use the same ingredient list as the baked version.

1. Load the slow cooker

Place the cream cheese (cut into cubes), yogurt or sour cream, ranch or blue cheese dressing, hot sauce, chicken, shredded cheese and seasonings into the slow cooker. Stir them together roughly.

2. Cook on LOW

Cover the crockpot and cook on LOW for about 2–3 hours, stirring once or twice. The aim is to gently melt the cheese and cream cheese until you have a smooth, hot wing dip.

3. Keep warm

Once the mixture is fully melted and bubbling around the edges, switch the slow cooker to WARM. This keeps the dip scoopable for hours without scorching it.

Hand ladling slow cooker buffalo chicken wing dip from a black crockpot, with veggie sticks, wings and dip bowls on a wooden table
Slow cooker buffalo chicken wing dip simmering in a crockpot—a hands-off, crowd-sized party batch you can keep warm for hours on game day.

Many popular recipes follow this rhythm almost exactly, such as slow cooker buffalo chicken dips from Allrecipes and Taste of Home that layer chicken, hot sauce, cheese and dressing, then cook on LOW before switching to WARM for serving.

Slow cooker method with raw chicken

If you prefer to start with raw chicken, you can do that as well:

  1. Place 2 small chicken breasts into the bottom of the slow cooker.
  2. Pour over your hot sauce, dressing and a splash of water or stock.
  3. Cook on LOW for 3–4 hours, until the chicken is tender.
  4. Shred the chicken directly in the pot using two forks or a hand mixer.
  5. Add cream cheese, yogurt or sour cream and shredded cheese. Stir to combine.
  6. Cook on LOW for another 30–45 minutes, then switch to WARM.

This approach is especially handy if you’re starting from frozen or raw meat and don’t want to dirty any extra pans.

Also Read: Crock Pot Lasagna Soup (Easy Base + Cozy Slow-Cooker Recipes)


Quick Stovetop and Skillet Buffalo Chicken Wing Dip

Sometimes turning on the oven or hauling out the slow cooker feels like too much. On a hot afternoon or in a tiny kitchen, a stovetop buffalo-style chicken dip is just easier.

Hand dipping a celery stick into skillet buffalo chicken dip with melted cheese in a cast iron pan on a wooden table
Skillet buffalo chicken dip made on the stovetop in one pan—quick hot wing–style flavor with a gooey cheese pull, ready fast for last-minute cravings.

Simple skillet method

  1. In a large skillet, gently heat the cream cheese, yogurt or sour cream, hot sauce and dressing over low to medium-low heat.
  2. Stir constantly until the mixture becomes smooth and creamy.
  3. Add the shredded chicken, cheese and seasonings.
  4. Continue to cook, stirring, until the cheese melts and the dip is piping hot.
  5. If your skillet is oven-safe, you can sprinkle extra cheese on top and slide it under the grill or broiler for a couple of minutes for a lightly browned finish.

Skillet versions often show up in slow-cooker recipes too; for instance, some Allrecipes methods start with a creamy mixture on the stove before moving to the slow cooker.(Allrecipes) In everyday life, though, you can simply stop once the dip is melted and serve it straight from the pan.

Also Read: High Protein Overnight Oats | 5 Recipes (Low Calorie, Vegan, Bulking & More)


Using Canned or Rotisserie Chicken

Realistically, you won’t always have perfectly poached or roasted chicken waiting in the fridge. Fortunately, this spicy chicken dip is very forgiving.

Canned chicken for speed

Canned chicken makes a surprisingly good base for buffalo style chicken dip when you’re short on time:

  • Use two 170 g (6 oz) cans, drained well.
  • Flake the meat with a fork to remove clumps.
  • Stir it into your creamy buffalo base just as you would fresh chicken.

Because canned chicken is lean and a bit drier, you might want to:

  • Add a spoonful or two of extra yogurt or dressing.
  • Increase the cheese slightly for more richness.

Recipes like Allrecipes’ baked buffalo dip with canned chicken use exactly this trick to turn pantry items into a party-ready hot dip with minimal effort.

Rotisserie chicken for extra flavor

Rotisserie chicken is ideal when you want the wing dip to feel extra luxurious with minimal extra work:

  • Pull the meat off the bones while it is still slightly warm.
  • Shred it finely, chopping any very large pieces.
  • Avoid large skin or cartilage pieces, though a little chopped crispy skin can add delicious flavor.

With rotisserie chicken, the rest of the recipe stays exactly the same, but the taste becomes deeper and more complex. That makes this approach wonderful for holidays or any time you want your buffalo style chicken dip to feel a notch above the usual.

Also Read: Homemade Hot Chocolate with Cocoa Powder Recipe


Lighter, High-Protein and Low-Carb Variations

A classic buffalo chicken wing dip is undeniably indulgent. Even so, you can nudge it toward healthier territory without sacrificing the flavors you love.

Greek yogurt hot wing dip

For a lighter yet creamy chicken wing dip, Greek yogurt is a star:

  • Use ½ block cream cheese instead of a full block.
  • Increase Greek yogurt to ¾–1 cup.
  • Keep hot sauce and cheese the same.
Hand dipping a carrot stick into high-protein buffalo chicken dip made with Greek yogurt, served with veggie sticks and toasted bread.
High-protein buffalo chicken dip made with Greek yogurt—lighter than the classic version, still extra creamy and perfect with crunchy veggie dippers.

Because Greek yogurt is typically lower in fat and higher in protein than sour cream, according to nutrition comparisons based on USDA data, it turns this into more of a high-protein buffalo chicken dip without feeling “diet” in the slightest.(foodess.com)

When you taste the mixture, you may find it a little tangier than the original. In that case, an extra tablespoon of cream cheese or a tiny drizzle of honey can round out the flavor.

Cottage cheese for a protein boost

For a really protein-dense spicy chicken dip:

  1. Blend 1 cup cottage cheese until completely smooth.
  2. Use that in place of half the cream cheese and half the yogurt or sour cream.
  3. Season generously with salt, pepper, garlic powder and extra hot sauce to keep the flavor bold.

This style of hot chicken dip is ideal when you want something that feels like a treat but works within a higher-protein eating plan.

Hand dipping a wholegrain cracker into protein buffalo chicken dip made with cottage cheese, with extra crackers, cottage cheese, and veggie sticks on a wooden board.
Protein buffalo chicken dip made with cottage cheese for a macro-friendly twist—extra creamy, high in protein, and still perfect with crackers or veggie sticks.

Lower-carb, keto-friendly chicken wing dip

Because the base ingredients are mostly meat, cheese and dairy, this hot wing chicken dip is already relatively low in carbohydrates. To keep it firmly in low-carb or keto territory:

  • Choose full-fat cream cheese, yogurt or sour cream and cheese.
  • Avoid any sweet sauces or sugary dressings.
  • Serve with low-carb dippers such as:
    • Celery sticks
    • Cucumber slices
    • Bell pepper strips
    • Lightly steamed broccoli florets
Hand dipping an orange bell pepper strip into keto buffalo chicken dip topped with golden cheese, surrounded by fresh veggie sticks on a wooden table.
Keto buffalo chicken dip with a golden, bubbly cheese crust—low-carb, high-fat, and perfect served with crunchy veggie sticks instead of chips or bread.

Meanwhile, guests who aren’t counting carbs can happily spoon their portion next to something extra cosy, like a bowl of creamy macaroni and cheese that covers stovetop, baked and Southern-style versions.


Vegetarian and Vegan Buffalo-Style Dip

Not everyone at the table eats meat or dairy, but that doesn’t mean they should miss the fun. You can borrow the same buffalo wing flavors and package them into vegetarian and vegan versions.

Meat-free buffalo ranch dip

For a vegetarian take:

  • Replace shredded chicken with roasted cauliflower florets, chopped into bite-sized pieces.
  • Or sauté a mix of white beans and finely chopped mushrooms until golden and fold them into the creamy base.

Hand dipping crusty bread into vegetarian buffalo cauliflower dip with roasted cauliflower and veggie sticks on a wooden table.
Vegetarian buffalo cauliflower dip made with roasted florets and a creamy, cheesy base—all the heat and comfort of classic buffalo dip, just without the chicken.

The result is a hearty, buffalo ranch dip that’s full of texture and spice but completely meat-free. It also sits nicely alongside actual wings, so vegetarians and omnivores can share the table without anyone feeling left out.

Dairy-free and vegan version

To go fully plant-based:

  • Swap cream cheese for a thick vegan cream cheese or blended cashew cream.
  • Use unsweetened plant yogurt instead of dairy yogurt or sour cream.
  • Choose a vegan cheese that melts well.
  • Stir in roasted cauliflower or soy-based “chicken” strips.
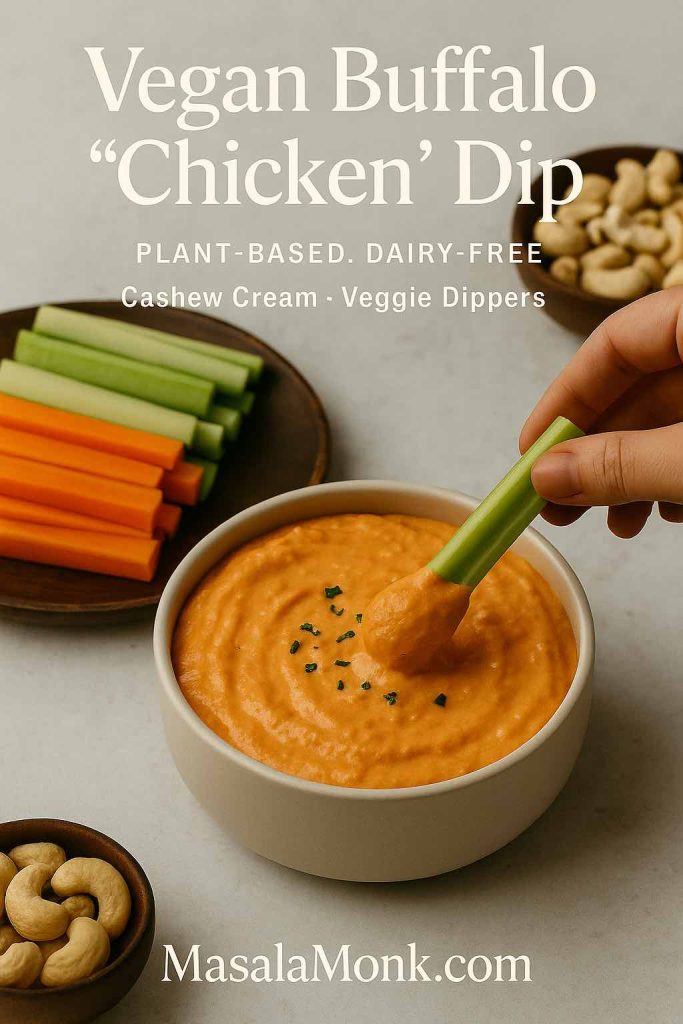
Hand dipping a celery stick into vegan buffalo “chicken” dip made with cashew cream, served with veggie sticks on a light surface.
Vegan buffalo “chicken” dip made with cashew cream and plenty of heat—fully plant-based, dairy-free, and perfect with crunchy veggie dippers.

Bake it just as you would the classic buffalo-style chicken dip, keeping an eye on how your plant-based cheese behaves. After one or two tries, you’ll know exactly how long it needs for a perfectly melty texture.

Also Read: Peanut Butter Cookies (Classic Recipe & 3 Variations)


What to Serve with Spicy Chicken Dip

A good hot wing chicken dip needs the right cast of supporting characters. With a few well-chosen sides and dippers, you can turn one bubbling dish into a whole buffet.

Classic dippers and fresh crunch

Start with a mix of crisp and neutral options:

  • Celery and carrot sticks
  • Cucumber rounds
  • Simple crackers
  • Pita triangles or toasted baguette slices
  • Soft bread cubes

The vegetables bring freshness and crunch, while the breads and crackers offer a mild base for that bold buffalo flavor.

Wings, poppers and creamy sides

To lean fully into a game-day vibe, build a spread around the dip:

  • Crispy chicken wings
    A batch of air fryer chicken wings gives you crunchy, shatteringly crisp wings without deep-frying, which pair naturally with any buffalo-inspired dish.
  • Baked jalapeño poppers
    A tray of baked jalapeño poppers echoes the spicy, cheesy theme and disappears just as fast as the dip itself.
  • A second creamy dip
    For guests who prefer milder flavors, something from the spinach dip recipes collection works beautifully—especially a cool spinach artichoke dip or yogurt-based variation.
  • Comforting vegetable side
    During the holidays, green bean casserole recipe ideas make a cosy partner for this spicy, cheesy dish.
  • Potato bites and other nibbles
    Air-fried potatoes are a natural match. Chilli garlic potato bites bring crunch, spice and a bit of smoky flavor without deep-frying, and they’re perfect for scooping up the dip.

Cool dips and drinks to tame the heat

Rich, spicy food almost always tastes better with something bright or cooling alongside it:

  • A big bowl of blue cheese dip from the blue cheese dip for wings guide gives people a way to mix tangy and spicy flavors.
  • A chilled platter of chopped vegetables with a simple yogurt ranch dressing offers a refreshing break from all the cheese.

For drinks, bubbles and citrus cut through the richness beautifully:

  • A batch of cocktails from the French 75 cocktail recipe post—gin, lemon and sparkling wine—feel festive but still sharp and refreshing.
  • Meanwhile, the creative gin cocktail recipes guide offers pineapple, lychee, coffee and other twists that hold up well against strong savory flavors.

Naturally, you can offer non-alcoholic options alongside these: sparkling water with lemon, iced tea or citrusy sodas all make sense next to a tray of hot wings and dips.


Storing, Reheating and Food Safety

Whenever you make a creamy buffalo-style chicken dip, it helps to treat it like any other dish containing cooked meat and dairy.

How long can spicy chicken dip sit out?

Food safety guidance from organizations such as the USDA and FoodSafety.gov generally recommends that perishable foods, including leftovers with meat and dairy, should not sit at room temperature for more than about two hours, or just one hour if the room is very hot.(Food Safety and Inspection Service) After that, bacteria can multiply quickly.

Practically speaking, that means:

  • If your dip is in a slow cooker on WARM, you can leave it out for the duration of a normal gathering.
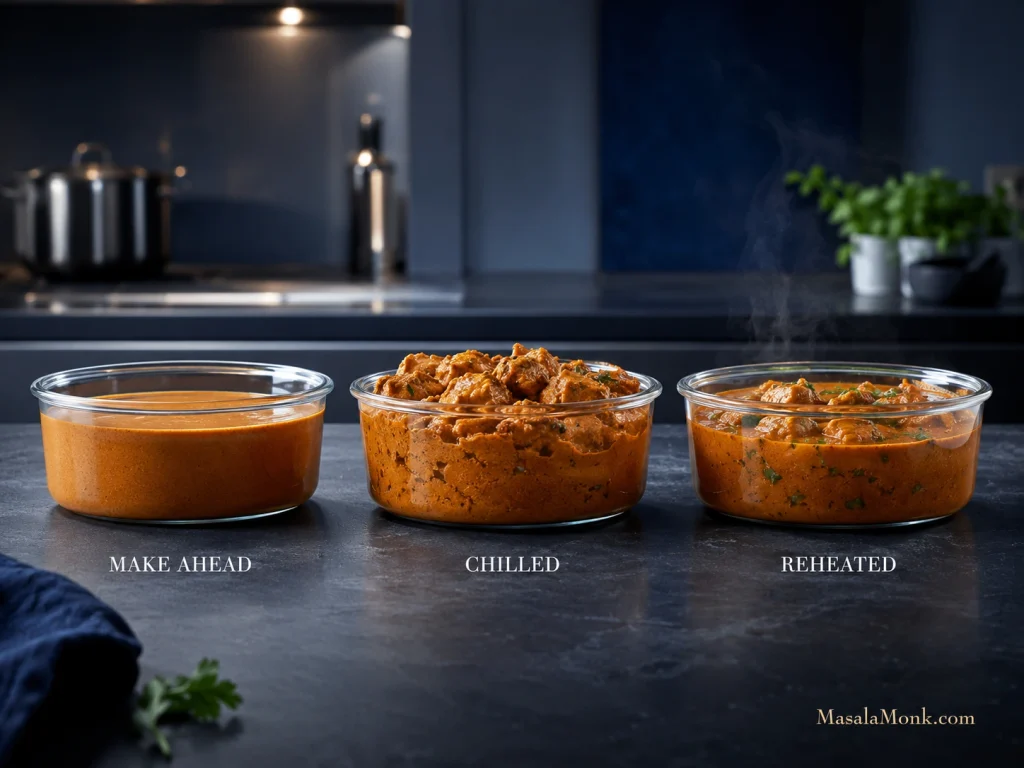
  • If it is in a regular dish and has cooled down on the table for a couple of hours, it’s better to wrap it, chill it promptly, and then reheat portions later rather than letting it sit all evening.

Storing and reheating leftovers

To store leftovers:

  1. Transfer any remaining dip to shallow, airtight containers.
  2. Allow it to cool slightly on the counter, but move it to the fridge within that 2-hour window.
  3. Keep it chilled and aim to eat it within 3–4 days, as suggested in general leftover guidelines.(Food Safety and Inspection Service)

To reheat, you can:

  • Warm small portions in the microwave, stirring between bursts.
  • Reheat larger amounts in a small baking dish at 160–175°C / 325–350°F until hot and bubbling.
  • Gently melt it in a saucepan over low heat, adding a spoonful of yogurt or milk if it seems too thick.

Once leftovers have been reheated, it is safest to eat them right away and avoid reheating the same portion multiple times.

Also Read: How to Make Churros (Authentic + Easy Recipe)


Leftover Ideas: Sandwiches, Stuffed Potatoes and More

When you’ve made a generous batch, leftovers of this buffalo style chicken dip turn into a secret stash of ready-to-go, seasoned chicken filling. Instead of spooning it back into a bowl, you can transform it into new dishes with very little extra work.

Buffalo chicken dip leftovers turned into four easy meals including a sandwich, stuffed potato, quesadilla wedge and mac and cheese, arranged on a wooden board.
Buffalo chicken dip leftovers turned into four easy meals—sandwiches, stuffed potatoes, quesadillas and mac and cheese—so one batch of dip stretches far beyond game day.

Spicy chicken sandwiches and sliders

Warm the leftover dip until soft and spreadable, then pile it onto toasted buns:

  • Add crisp lettuce and slices of tomato for freshness.
  • Layer in pickles, sliced onion or shredded cabbage for crunch.
  • Drizzle a little extra ranch or blue cheese dressing if you’d like things saucier.

For more ideas on toppings, breads and flavor combinations, you can borrow structures from the chicken sandwich recipes guide, which includes buffalo, BBQ and other styles.

Loaded baked potatoes

A few spoonfuls of leftover spicy chicken ranch dip are fantastic in baked potatoes:

  1. Bake potatoes until tender inside and crisp outside.
  2. Split and fluff the insides with a fork.
  3. Stir in warm dip and a little extra cheese.
  4. Return them to the oven or under the grill until the tops bubble and brown.

Top with chopped spring onions, jalapeño slices or even a dollop of yogurt for a complete meal.

Quesadillas and wraps

Spread leftover wing dip across a tortilla, sprinkle with a bit more cheese and top with another tortilla. Toast it in a skillet until crisp on both sides and slice into wedges. Serve with carrot sticks, celery and extra hot sauce.

Alternatively, spoon the heated dip into soft tortillas with shredded lettuce, cucumber and tomatoes, then roll into wraps for an easy lunch.

Buffalo mac and cheese mash-up

For the ultimate comfort combo, swirl warm dip through a bowl of creamy macaroni and cheese. The result is a mash-up that tastes like pub food in the best way—rich, cheesy pasta with pockets of spicy chicken running through it.


Build a Full Game-Day Spread Around Wing Dip

Once you’ve cooked this creamy wing dip a couple of times, it starts to feel natural to build entire menus around it. A simple, satisfying spread might look like this:

With a layout like that, people can move around the table, build plates that suit their mood and come back to the creamy wing dip whenever they like. It becomes the friendly constant in the middle of everything else.


A Simple Hot Wing Dip Formula You Can Adapt Forever

Underneath all the variations—baked, slow cooker, skillet, high-protein, keto, vegetarian or extra-rich—the structure of this buffalo style chicken dip stays the same:

Cooked chicken + creamy base + buffalo-style hot sauce + cheese

Once you remember that formula, you’re free to improvise:

  • Swap canned chicken, rotisserie chicken or leftover roast.
  • Adjust the base with more Greek yogurt, a little cottage cheese or extra cream cheese.
  • Choose cheddar for a sharper bite, mozzarella for extra stretch or a blend for balance.
  • Dial the heat up or down according to the crowd.
  • Fold the dip into sandwiches, wraps, potatoes and pasta when you have leftovers.

After a few rounds, you won’t really need to check measurements anymore. You’ll glance into your fridge, see chicken, hot sauce, a block of cream cheese and some shredded cheese, and know exactly what to do.

That’s when this creamy buffalo chicken wing dip—whatever version you land on—stops being just another recipe and quietly becomes your signature party dish.

Also Read: Béchamel Sauce for Lasagna: Classic, Vegan & Ricotta Sauce Recipe

FAQs about Buffalo Chicken Dip

1. Can I make buffalo chicken dip ahead of time?

Absolutely. Firstly, you can assemble the entire spicy chicken dip up to a day in advance. Mix the cooked chicken, creamy base, hot sauce, and cheese, then spread it in your baking dish, cover tightly, and refrigerate. When you’re ready to serve, uncover it, add the final layer of cheese, and bake until hot and bubbling. As a result, you get the ease of a make-ahead recipe with the taste and texture of a freshly baked buffalo wing dip. Just remember it may need a few extra minutes in the oven because it starts cold from the fridge.


2. Can I use canned chicken in this chicken wing dip?

Yes, you can. To begin with, canned chicken is a brilliant shortcut when you want a quick buffalo chicken dip recipe with minimal prep. Drain the cans very well, then flake the meat with a fork so there are no large clumps. After that, stir it into your creamy buffalo mixture just as you would shredded roast or rotisserie chicken. The flavor will still be rich and tangy, especially once it bakes with hot sauce and cheese. If it seems a bit dry, simply add a spoonful of extra yogurt, sour cream, or dressing to loosen the dip.


3. How do I make buffalo chicken dip with rotisserie chicken?

Rotisserie chicken works beautifully here. First, strip the meat from the bones while it’s still slightly warm; this makes shredding easier. Next, chop or shred the meat into small pieces so it blends evenly into the buffalo ranch chicken dip. You can use a mix of breast and thigh for the best flavor. Then, fold the shredded chicken into your creamy base and cook using your favorite method—baked, slow cooker, or stovetop. Because rotisserie meat already has plenty of seasoning, the final chicken wing dip tends to taste extra savory and satisfying.


4. What’s the best way to make buffalo chicken wing dip in a slow cooker?

For a crock pot version, start by adding cream cheese, yogurt or sour cream, ranch or blue cheese dressing, hot sauce, shredded chicken, and cheese to the slow cooker. Then, stir everything roughly to combine. Cook the dip on LOW for about 2–3 hours, stirring once or twice, until it’s smooth and melted. Afterwards, switch the setting to WARM so your buffalo style chicken dip stays hot and scoopable for the whole party. If you’re starting with raw chicken breasts, cook them first with the sauce on LOW until tender, shred the meat in the pot, and then add the remaining ingredients.


5. Can I make Instant Pot buffalo chicken dip?

Definitely. Initially, place chicken breasts, hot sauce, a splash of water or stock, and a bit of dressing in the Instant Pot. Pressure cook on HIGH for a short cycle (often around 10 minutes, depending on thickness) and allow a brief natural release. Once you open the pot, shred the chicken directly inside using forks or a mixer. After that, stir in cream cheese, yogurt or sour cream, dressing, and shredded cheese. Finally, use the sauté function on LOW to melt everything together into a creamy, spicy chicken dip. Keep stirring so the bottom doesn’t scorch.


6. How can I make this spicy chicken dip healthier or higher in protein?

There are several easy tweaks. For one thing, you can replace part of the cream cheese and sour cream with thick Greek yogurt, which usually has more protein and less fat. In addition, blending cottage cheese until smooth and using it for a portion of the base gives you an ultra-creamy, high-protein chicken ranch dip. You might also choose leaner chicken breast instead of darker meat, and use reduced-fat cheese if you prefer. Even with these adjustments, the hot chicken dip stays satisfying thanks to the spices and buffalo-style sauce.


7. Is buffalo chicken dip okay for low-carb or keto diets?

Generally, yes. The main ingredients—chicken, cream cheese, full-fat yogurt or sour cream, cheese, and hot sauce—are naturally low in carbohydrates. Nevertheless, you’ll want to check your dressing and sauces for hidden sugars if you’re strict about carbs. To keep this buffalo wing dip recipe keto-friendly, use full-fat dairy and serve it with low-carb dippers such as celery sticks, cucumber rounds, bell pepper strips, and broccoli florets. As long as you skip bread and crackers, this cheesy chicken dip fits neatly into many low-carb meal plans.


8. Can I make buffalo chicken dip without cream cheese?

You can, although the texture changes a little. Instead of cream cheese, you may use a combination of thick Greek yogurt, sour cream, and a bit of grated cheese to help the dip set as it bakes. Alternatively, blending cottage cheese until velvety creates a surprisingly rich base. Moreover, you can add a small amount of mayonnaise or extra shredded cheese for body. The result is still a creamy, hot wing dip recipe, just with a slightly lighter and less dense mouthfeel than the classic cream cheese version.


9. How do I make a dairy-free or vegan buffalo-style dip?

To create a dairy-free version, swap each creamy element for a plant-based counterpart. Use vegan cream cheese or cashew cream for the base, then add unsweetened plant yogurt instead of sour cream. Furthermore, choose a vegan cheese that melts well to mimic the gooey texture. For the “chicken,” roasted cauliflower florets or a soy-based chicken alternative work well. Season everything with hot sauce, garlic and onion powder, then bake or warm on the stove until thick and bubbly. This way, you get a vegan buffalo-style dip that still hits those familiar wing flavors.


10. Can I make a vegetarian buffalo cauliflower dip instead of chicken?

Yes, and it’s delicious. First roast bite-sized cauliflower florets with a drizzle of oil, a pinch of salt and a little hot sauce until they’re tender and lightly browned. Once they cool slightly, chop them into small pieces and fold them into your creamy base just as you would shredded chicken. Additionally, you can mix in a handful of white beans for extra protein. When you bake this vegetarian buffalo cauliflower dip, it delivers the same spicy, tangy flavor but with a completely meat-free twist that even non-vegetarians tend to enjoy.


11. How long should I bake chicken wing dip in the oven?

For a basic baked buffalo wing dip recipe, a good guideline is 20–25 minutes at 180°C / 350°F in a small baking dish. Usually, you’ll know it’s ready when the edges are bubbling enthusiastically and the cheese on top has melted and begun to brown in spots. However, if your dish is deeper or the mixture was very cold from the fridge, it might need an extra 5–10 minutes. On the other hand, if you’re using a wide, shallow skillet, the dip may heat through more quickly, so keep an eye on it.


12. How long can buffalo-style chicken dip sit out, and how should I store it?

Because this hot chicken dip contains cooked meat and dairy, it’s considered perishable. Generally, it’s wiser not to leave it out at room temperature for more than about two hours. After that, transfer leftovers to shallow, airtight containers, allow them to cool slightly, then refrigerate. As a rule of thumb, try to eat refrigerated leftovers within three to four days. When reheating, warm the dip until piping hot and bubbling—whether in the oven, on the stove, or in short bursts in the microwave—so the texture recovers and the flavor stays vibrant.


13. Can I freeze buffalo chicken dip?

Freezing is possible, though the texture changes a little. Cream cheese and yogurt or sour cream can turn slightly grainy after thawing. Even so, many people are happy with the result for casual gatherings. To freeze, cool the cooked dip completely, then pack it into a freezer-safe container, leaving a little room at the top. Later, thaw it overnight in the fridge. Then, reheat it gently in the oven or on the stove, stirring in a splash of fresh cream, milk, or yogurt if it seems thick. Although not perfect, it’s a convenient way to avoid wasting leftovers.


14. What can I serve with this spicy chicken dip besides chips?

There are countless options. Besides tortilla chips, crackers and bread, you can offer crisp vegetables such as celery, carrots, cucumbers, bell peppers and cherry tomatoes. In addition, toasted baguette slices, pita wedges, soft pretzels and breadsticks all pair nicely with a creamy buffalo ranch chicken dip. For a more substantial spread, you might add wings, jalapeño poppers, potato bites, or even simple roasted vegetables. That way, guests who want something lighter can focus on fresh dippers, while others indulge in the more decadent bites alongside the hot wing chicken dip.


15. How can I adjust the heat level in my buffalo wing dip recipe?

Tuning the spice is easy. To make a milder chicken wing dip, reduce the amount of hot sauce and increase the creamy components slightly—more yogurt, sour cream or dressing will soften the heat. Conversely, to make the dip hotter, you can add extra buffalo-style sauce, a pinch of cayenne or some finely chopped fresh chili. Additionally, stirring in more blue cheese or ranch dressing often balances a mixture that feels too fiery. Taste the dip before baking when it’s still in the mixing bowl; tweaking the seasoning at that stage is much simpler.


16. What should I do with leftover chicken wing dip?

Leftovers are extremely versatile. You can turn them into fillings for sandwiches, sliders or wraps by gently reheating the dip and spooning it into buns or tortillas with fresh lettuce and crunchy vegetables. Moreover, you can stuff baked potatoes with the warm mixture and a little extra cheese, then grill or broil until golden. Another fun idea is to spread the leftover spicy chicken dip between tortillas and toast them into quesadillas. Finally, stirring a spoonful into hot mac and cheese creates a richly flavored pasta dish that tastes like pub food in the best possible way.
Posted on — 6 Comments

Air Fryer Chicken Wings (Super Crispy, No Baking Powder)

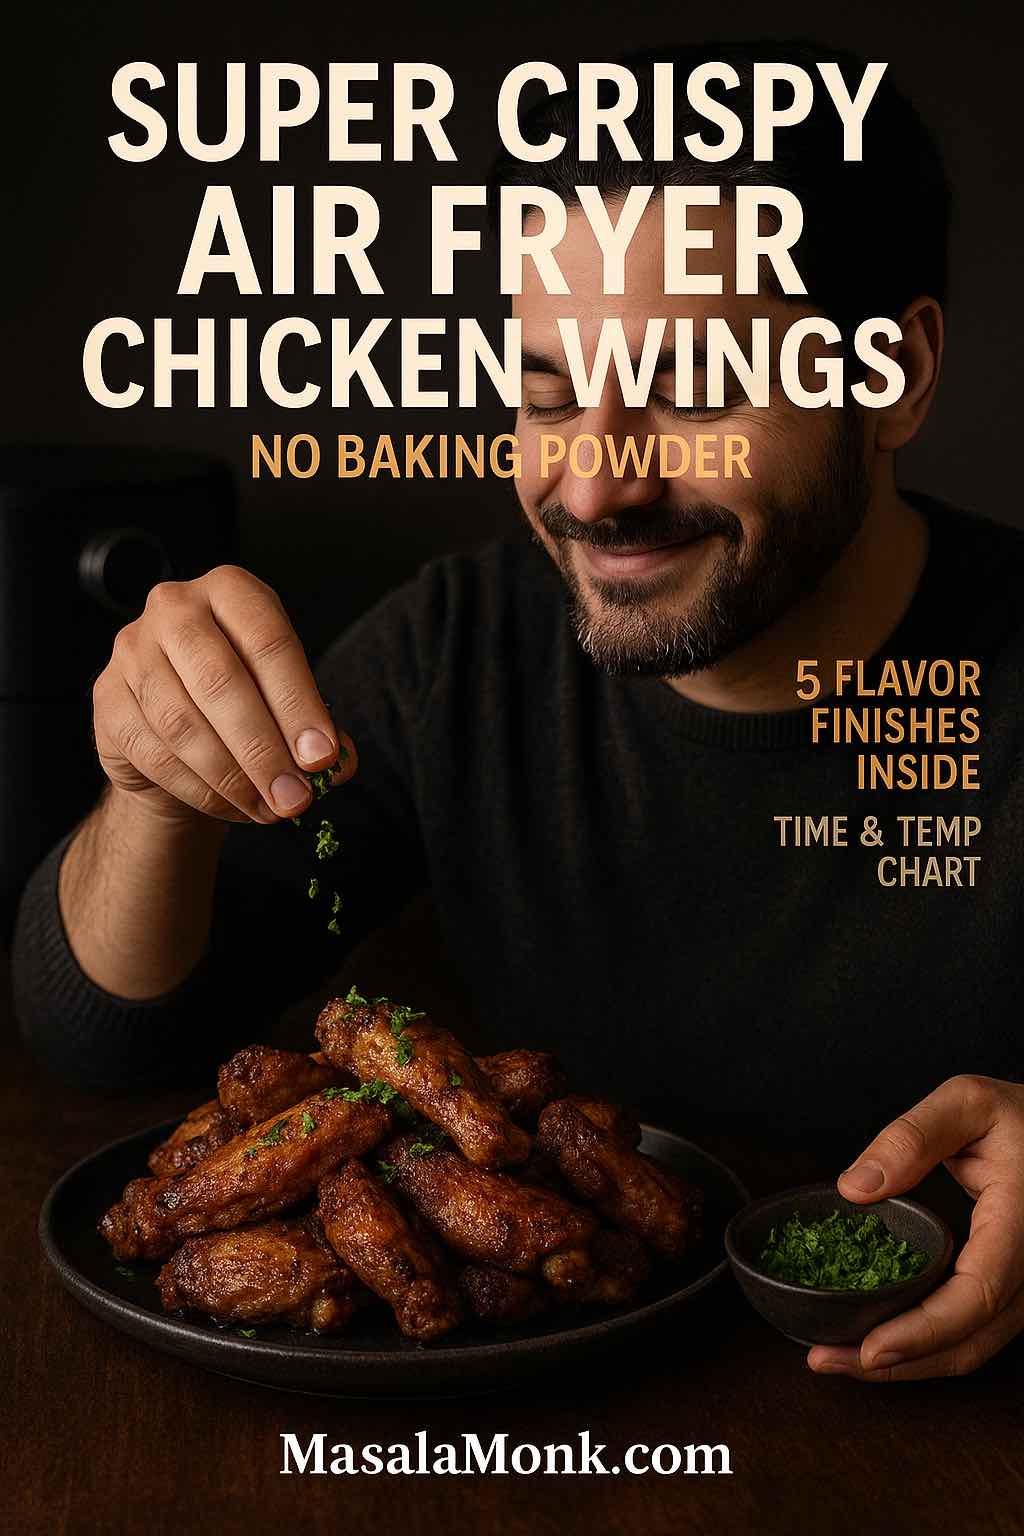
Magazine-style portrait of super crispy air fryer chicken wings with a cook’s hand sprinkling parsley; dip bowl and air fryer in background; no baking powder.

Crispy air fryer chicken wings don’t need a vat of oil or a dusting of baking powder. This method relies on a simple dry brine, generous airflow, and a two-stage cook that renders fat first and crisps the skin second. The result: shatteringly crisp wings with juicy meat—and a base technique that welcomes multiple finishes without sacrificing crunch. For serving, a tangy blue cheese dip for wings is the classic counterpoint that cools the heat and amplifies the texture (blue cheese dip for wings).

Before we dive in, a quick safety note: wings are ready when the thickest part reaches 165°F / 73.9°C. Use an instant-read thermometer and let them rest briefly before saucing (source: USDA safe minimum internal temperatures).

Ingredients For Air Fryer Chicken Wings (Base)

  • 2 lb (900 g) chicken wings, whole or separated into flats and drumettes
  • 1¼ tsp fine kosher salt (or ¾ tsp table salt)
  • 1 tsp garlic powder
  • 1 tsp paprika (sweet or smoked)
  • ½ tsp black pepper
  • 1 tsp onion powder (optional)
  • 1–1½ tbsp neutral oil (avocado, canola, or light olive)

Keep the base seasoning restrained; the fireworks happen after crisping when you finish with a sauce or dry rub so the skin stays glassy.

Method: Two-Stage Air Fryer Chicken Wings (Crisp Without Baking Powder)

  1. Dry Brine (Optional But Powerful). Pat wings very dry, toss with only the salt, and refrigerate uncovered for 8–24 hours. This lightly dehydrates the skin and seasons the meat end-to-end.
  2. Season And Oil. Blot any surface moisture, then add oil, garlic, paprika, pepper, and onion powder if you like.
  3. Preheat. Warm the air fryer to 190°C / 375°F for 3–5 minutes.
  4. Stage 1 — Render. Cook 190°C / 375°F for 16–18 minutes, flipping halfway; keep a single layer with air gaps so steam never softens the skin.
  5. Stage 2 — Finish. Increase to 205–210°C / 400–410°F and cook 6–10 minutes more, flipping once, until deep golden and blistered.
  6. Safety Check And Rest. Confirm 165°F / 73.9°C, then rest 2 minutes before saucing (see USDA poultry temperature).

Why This “No Baking Powder” Approach Still Crisps

Some recipes raise skin pH with baking powder; if readers want the science, this explainer clarifies how alkalinity affects browning (why baking powder crisps poultry skin). Here, a truly dry surface plus high, moving heat renders subcutaneous fat and blisters the skin—clean flavor, stellar texture, zero metallic notes.

Doneness & Texture Guide

  • Golden but not fully crisp: add 3–5 mins at 205°C/400°F.
  • Uneven browning: rotate basket or swap tray positions in tray-style models.
  • Skin blistering but meat drying: reduce finishing temp to 200°C/392°F and extend 2–4 mins.

Time & Temperature Chart (Reference)

Wings TypeStarting StateStage 1Stage 2Total Time
Flats & Drumettes (standard, 2–2.5 lb)Raw, patted dry190°C/375°F × 16–18 min (flip at 8–9)205–210°C/400–410°F × 6–10 min (flip once)22–28 min
Whole wings (tips on)Raw, patted dry190°C/375°F × 18–20 min205–210°C/400–410°F × 8–12 min26–32 min
Wingettes (small)Raw, patted dry190°C/375°F × 14–16 min205–210°C/400–410°F × 5–8 min19–24 min

Frozen method: Times differ and require an initial thaw-render stage.

Flavor Finishes: Five Ways To Sauce Or Season Air Fryer Chicken Wings

Start with the base method above; then finish after crisping so the coating clings without softening the crust.

Buffalo (Hot)

Toss wings with ¼ cup hot sauce + 2 tbsp melted butter + ½ tsp garlic powder. Serve immediately with crisp celery and a cooling dip. If you want a parallel take to reference, this tested guide to air-fryer Buffalo wings offers a useful comparison while you keep the core technique intact (air-fryer Buffalo wings). For pairing, put a creamy blue cheese dip for wings front and center (blue cheese dip for wings).

Lemon Pepper

Stir 1 tbsp melted butter with 1–1½ tsp lemon pepper seasoning, then add a squeeze of fresh lemon; a little zest adds bright lift without extra salt. Toss, plate, and sprinkle with chopped parsley.

Garlic Parmesan

Bloom 2 minced garlic cloves in 1 tbsp butter + 1 tbsp olive oil for 30–45 seconds over low heat. Toss the wings in that garlicky fat, then finish with 2–3 tbsp finely grated Parmesan and parsley. Finely grated cheese clings better than coarse shreds, preserving the crackly shell.

Honey BBQ

Warm ⅓ cup BBQ sauce with 1–1½ tbsp honey. If the sauce is thick, whisk in 1–2 teaspoons of water so it coats evenly; for a tackier set, return the sauced wings to the basket for 1 minute.

All-Purpose Dry Rub

Mix 1 tsp paprika, ½ tsp garlic powder, ½ tsp onion powder, ½ tsp brown sugar, ¼ tsp cayenne, ½ tsp kosher salt, ¼ tsp black pepper. Dust immediately after cooking so the residual surface fat grabs the spices.

Pro Tips That Keep Air Fryer Chicken Wings Ultra-Crispy

  • Don’t Crowd. Airflow is everything; cook in batches if necessary. For quick fixes to pale skin, smoke, or uneven browning, read this practical guide to common air fryer mistakes (common air fryer mistakes).
  • Flip And Rotate. Basket models often brown harder on the bottom; tray-style machines benefit from a mid-cook tray swap.
  • Mind Your Model. Capacity, wattage, and basket shape influence timing.
  • Sauce Late. Toss after the high-heat finish to protect the glassy crust. If someone prefers an oven method, here’s a respected oven-fried wings approach for context (oven-fried wings).

What “Air Fryer” Really Means (And Why Airflow Matters For Wings)

An air fryer is essentially a compact convection oven: a heating element and a powerful fan drive hot air across food in a tight chamber. That setup excels at blasting moisture from skin while rendering fat—a perfect match for air fryer chicken wings. For readers new to the appliance, this primer explains basket versus oven-style designs in plain English (what is an air fryer).

Because airflow is central, basket shape and chamber width affect results. Wide, shallow baskets often brown more evenly and handle wings without stacking, which means fewer batches and better texture. Narrow, tall baskets can work well too, but they demand stricter spacing and more flipping for even color.

Gear Notes: Choosing The Best Air Fryer For Wings (Capacity, Basket Shape, Airflow)

When readers are shopping, steer them toward capacity and shape before bells and whistles. A broad, shallow basket encourages airflow; sufficient wattage helps the unit recover heat after you add cold wings. For current, test-driven picks, here’s an expert shortlist of the best air fryers. And for airflow-focused designs that cook faster and more evenly, this in-depth review showcases why a wide, shallow basket can be a game-changer (Typhur Dome 2 review).

Multi-rack countertop ovens can get close to basket-style results—just rotate trays halfway and keep wings in a single layer on each rack to maintain airflow.

Serve And Pair

Classic Buffalo begs for contrast—so put that blue cheese dip for wings front and center and add crunchy celery and carrot sticks for texture (blue cheese dip for wings). If you’re making Lemon Pepper or Garlic Parmesan, a squeeze of lemon at the table adds a bright top note without dampening the crust. Keep sauces warm—not scorching—so they don’t tighten the skin when they hit it. For a simple appetizer board, pair the wings with pickled peppers, crisp radishes, and a crunchy salad.

Troubleshooting In Real Kitchens

If a batch smokes, fat likely pooled under the basket or residue baked on from a previous cook; add a small splash of water to the drawer and clean between rounds. Then if the wings look pale, extend the finishing phase or rotate the basket/tray to expose different sides to the hottest zones. And if some pieces crisp while others lag, you may have mixed sizes—separate wingettes and drumettes so smaller pieces don’t overcook while larger ones catch up. For a quick refresher on pitfalls and fixes, this guide to common air fryer mistakes is a solid reference (common air fryer mistakes).

From Base Technique To Brand-Specific Tweaks

Different machines run hot or gentle, and presets can mislead. We encourage readers to watch color and texture—not only the timer—on the first run. Owners of compact units like the Philips HD9252/90 will benefit from stricter spacing; larger baskets such as the Inalsa 5.5L or Sous Chef 6.5L can spread wings wider and finish faster at the same settings.

Scaling Air Fryer Chicken Wings For A Crowd

Cooking for a party? Rather than cramming more into one batch, repeat the process in batches. Hold finished wings on a rack over a sheet pan in a low oven (95–115°C / 200–240°F) to keep them crisp while you cook the next round; then toss everything with warm sauce right before serving. Larger machines with wide baskets naturally reduce the number of rounds, which makes entertaining easier and keeps the wings crisp.

Also, spice blends with sugar can darken early during the finishing phase. If you’re running sweet rubs, drop the finishing temperature by about 5–10°C (10–15°F) and extend the time slightly to avoid scorching. Conversely, salt-forward rubs thrive at the higher finish: the surface dries faster, fat renders more completely, and the bite stays delicate.

Storing And Reheating Leftover Air Fryer Chicken Wings

Wings reheat beautifully if you protect the surface. Refrigerate in a shallow layer, leave uncovered for 30 minutes to off-gas steam, then cover. Reheat at 180°C / 356°F for 5–7 minutes, shaking once; if the skin needs a boost, go 1–2 minutes at 200°C / 392°F to refresh the crust. Avoid microwaving unless you immediately re-crisp in the air fryer.

Quick Recap for Air Fryer Chicken Wings Recipe

  • Dry brine if you can; otherwise, pat very dry.
  • Cook in two stages: render at 190°C / 375°F, then finish at 205–210°C / 400–410°F.
  • Hit 165°F / 73.9°C internal; rest briefly. (USDA temperature)
  • Sauce or season after crisping.
  • Keep airflow sacred: space pieces, flip, and rotate as needed. For fast fixes, see common air fryer mistakes (common air fryer mistakes).

FAQs

1) How long do air fryer chicken wings take to cook?

Generally, 22–28 minutes total. Start at 190°C/375°F for 16–18 minutes (flip once), then finish at 205–210°C/400–410°F for 6–10 minutes until the skin is deeply golden and crackly.

2) What internal temperature should air fryer chicken wings reach?

Aim for 165°F/73.9°C in the thickest part of the meat (not touching bone). Let the wings rest a couple of minutes before saucing so the crust stays crisp.

3) Can I make air fryer chicken wings from frozen?

Yes. Cook longer and in stages: begin at a lower temp to thaw/render, separate any stuck pieces, then increase the heat to crisp. Expect roughly 28–35 minutes depending on size and model.

4) Do I need baking powder for crispy air fryer chicken wings?

No. A dry brine, thorough surface drying, proper spacing, and a hot finish deliver shatteringly crisp skin without baking powder or a metallic aftertaste.

5) How much oil should I use on air fryer chicken wings?

Use about 1–1½ tablespoons per 2 lb (900 g)—enough to help browning without greasiness. Too much oil can inhibit crisping and cause smoke.

6) Should I preheat the air fryer for wings?

Yes. A 3–5 minute preheat helps jump-start browning and keeps timing consistent across batches.

7) Do I flip air fryer chicken wings while cooking?

Absolutely. Flip halfway through Stage 1, and once during the hot finish. Also rotate trays in oven-style units to even out hot spots.

8) Can I stack wings to save time?

Avoid stacking during the main cook. Overlap traps steam and softens skin. If you must, separate pieces after a few minutes and finish in a single layer.

9) What’s the best seasoning base for air fryer chicken wings?

Keep it simple: salt, garlic powder, paprika, pepper. Then, after crisping, finish with Buffalo, Lemon Pepper, Garlic Parmesan, Honey BBQ, or a Dry Rub so the crust stays crunchy.

10) How do I stop smoke when cooking wings?

Clean the drawer/basket between batches and avoid excess oil. If needed, add a small splash of water beneath the basket to catch drips and minimize smoking.

11) Why aren’t my air fryer chicken wings crispy?

Common culprits: crowded basket, damp skin, no preheat, or skipping the high-heat finish. Spread wings out, pat dry thoroughly, and finish hotter for blistered skin.

12) Whole wings or flats & drumettes—which is better?

Either works. Separated pieces (flats/drumettes) generally cook more evenly and crisp faster; whole wings may need a few extra minutes.

13) Can I marinate wings before air frying?

Yes, though pat very dry before cooking. For sticky marinades, cook first, then toss in sauce to prevent soft skin and burnt sugars.

14) Is parchment or foil okay under air fryer chicken wings?

Only if your manufacturer allows it and never during preheat. Perforated liners are better for airflow; solid liners can block circulation and reduce crispness.

15) What’s the best way to reheat leftover wings?

Air fry at 180°C/356°F for 5–7 minutes until hot, then 200°C/392°F for 1–2 minutes to re-crisp. Avoid microwaving unless you finish in the air fryer.

16) How many wings can I cook at once?

As many as fit in a single layer with gaps. For parties, cook in batches and hold finished wings on a rack in a low oven so they stay crisp.

17) Do different air fryers change timing?

Yes. Basket size, wattage, and chamber shape matter. Start with the suggested ranges, then watch color and texture and adjust a minute or two as needed.

18) Can I use flour or cornstarch on air fryer chicken wings?

You can, sparingly. However, the dry-brine + hot finish method already crisps beautifully; extra starch may dull the clean, glassy texture.

19) When should I sauce air fryer chicken wings?

After they’re fully crisp. Toss quickly and serve right away so the skin stays snappy.

20) What side dishes pair best with air fryer chicken wings?

Celery sticks, carrot sticks, and a creamy dip are classics. Additionally, light salads, pickled vegetables, or coleslaw cut through richness without softening the crust.

Posted on — 1 Comment

Homemade Chicken Salami Recipe

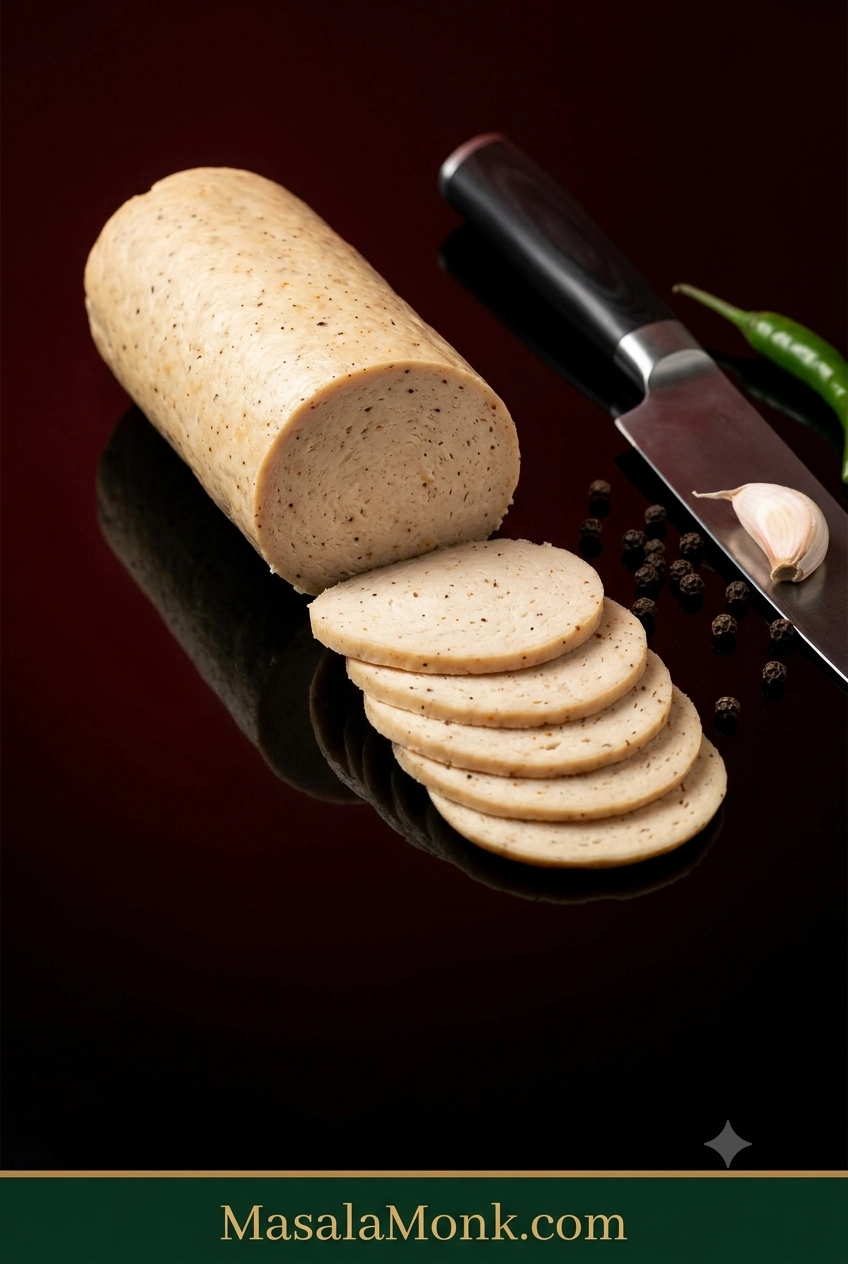
Sliced homemade chicken salami log on a dark oxblood set with a chef’s knife, showing a pale, fine-textured interior flecked with black pepper and paprika.

This post was last updated on:

Cold from the fridge, a good slice of homemade chicken salami should bend a little before it breaks: fine-textured, juicy without being wet, peppery and garlicky, firm enough for a sandwich but nowhere near rubbery.

Thin slices sit neatly in toast or a roti wrap without crumbling through the filling, and the rest of the log waits in the fridge for breakfast or lunch tomorrow. Because you season the batch yourself, you decide whether it leans garlicky, peppery, smoky or hot with green chilli.

The ingredients are the easy part. Texture is where homemade chicken salami can get frustrating. The chicken stays loose instead of turning sticky, an ultra-lean batch dries out, air gets trapped through the middle, or the log gets sliced while it is still warm and seems much softer than expected.

For this cooked deli-style version, a handful of details control almost everything: start with cold chicken, process it until sticky, pack the log tightly, cook it to temperature, and give it time to chill before slicing.

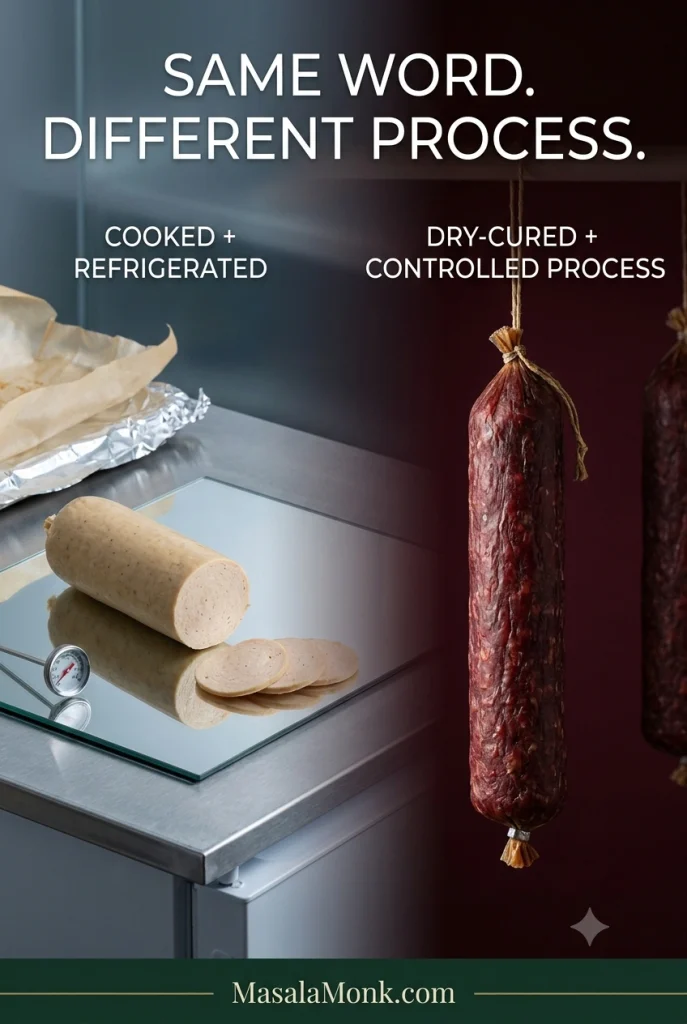
What we’re making: fully cooked, deli-style chicken salami—the soft sliced cold cut commonly used for sandwiches, breakfasts and wraps in India and across South Asia. It uses ordinary salt and spices, with no curing salt or separate preservative system, so it must stay refrigerated and has a short storage life. You won’t need a sausage casing, stuffer, grinder or curing chamber.

Quick Answer: Homemade Chicken Salami

For one batch, use 500 g / 17.6 oz / about 1.1 lb cold chicken. A combination of breast and thigh gives you the mild flavour of breast with enough natural fat to help the salami stay tender.

Process the chicken with 8 g salt, garlic, black pepper and spices. Start with 15 ml / 1 tbsp ice-cold water, adding more only if needed, until the chicken changes from mince into a fine, sticky paste that clings to itself.

Shape two compact logs around 5 cm / 2 inches in diameter, wrap the chicken in baking parchment and then foil, and steam until the centre reaches 165°F / 74°C. Chill for at least 4 hours; overnight gives the cleanest slices.

Homemade Chicken Salami Recipe

Make the simple version first. Fresh vegetables, sauces and other wet additions are much easier to judge once you’ve seen what the chicken should look and feel like when it is ready to shape.

PrepAbout 20 minutes
CookTypically 30–45 minutes for 5 cm / 2-inch logs; finish by temperature
Chill4 hours minimum; overnight best
TotalAbout 5 hours minimum, mostly chilling; overnight is easiest
Yield2 short logs; roughly 4–6 servings depending on use

Equipment

  • Food processor or powerful food chopper
  • Digital kitchen scale
  • Silicone or rubber spatula
  • Baking parchment / parchment paper
  • Aluminium foil for the outer wrapper
  • Steamer, or a large covered pot with a rack
  • Digital food thermometer
  • Sharp slicing knife

Ingredients

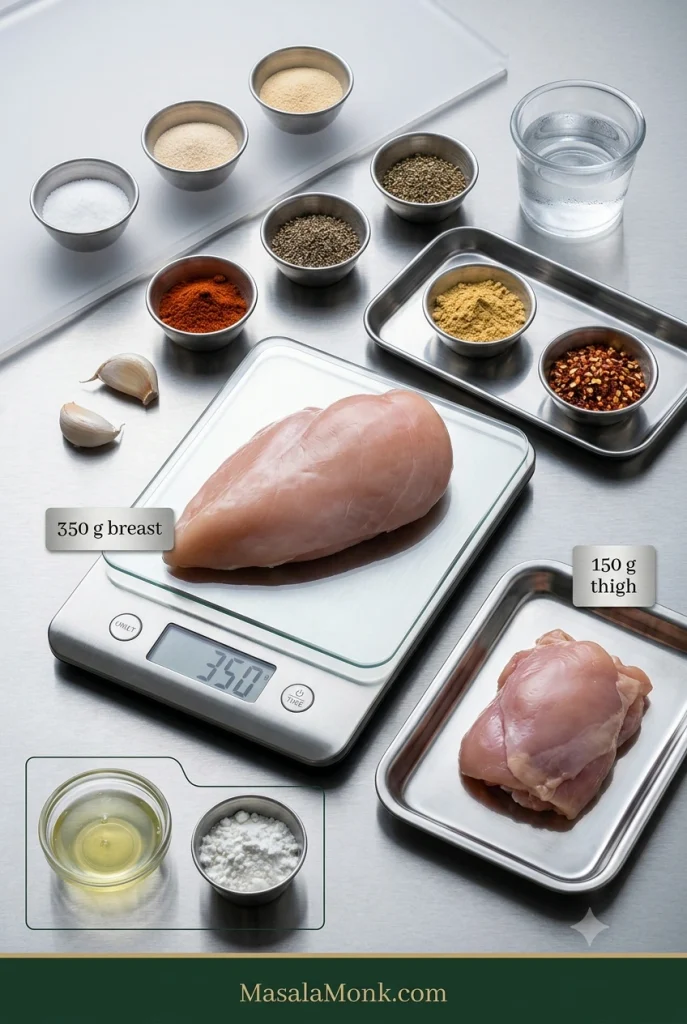
Chicken salami ingredients on stainless steel, including 350 g chicken breast on a digital scale, 150 g chicken thigh, garlic, spices, ice water, egg white and cornstarch.
Salt is 1.6% of the chicken by weight. Egg white and cornstarch are optional alternatives, not ingredients you need together.
  • 350 g / 12.3 oz boneless, skinless chicken breast, very cold
  • 150 g / 5.3 oz boneless, skinless chicken thigh, very cold
  • 8 g fine salt — about 1⅓ tsp fine table salt; weighing is strongly preferred because different salts fill a spoon differently
  • 6 g garlic, about 2 medium cloves, finely grated or crushed
  • Onion powder — 1 tsp
  • Freshly ground black pepper — 1 tsp
  • Sweet or smoked paprika — 1 tsp
  • Mustard powder — ½ tsp
  • Red chilli flakes — ¼–½ tsp, optional
  • 15–30 ml / 1–2 tbsp ice-cold water — start with 1 tbsp and add more only as needed

Optional binder

  • 8 g / about 1 tbsp cornstarch (often called cornflour in India and the UK), or
  • 1 large egg white

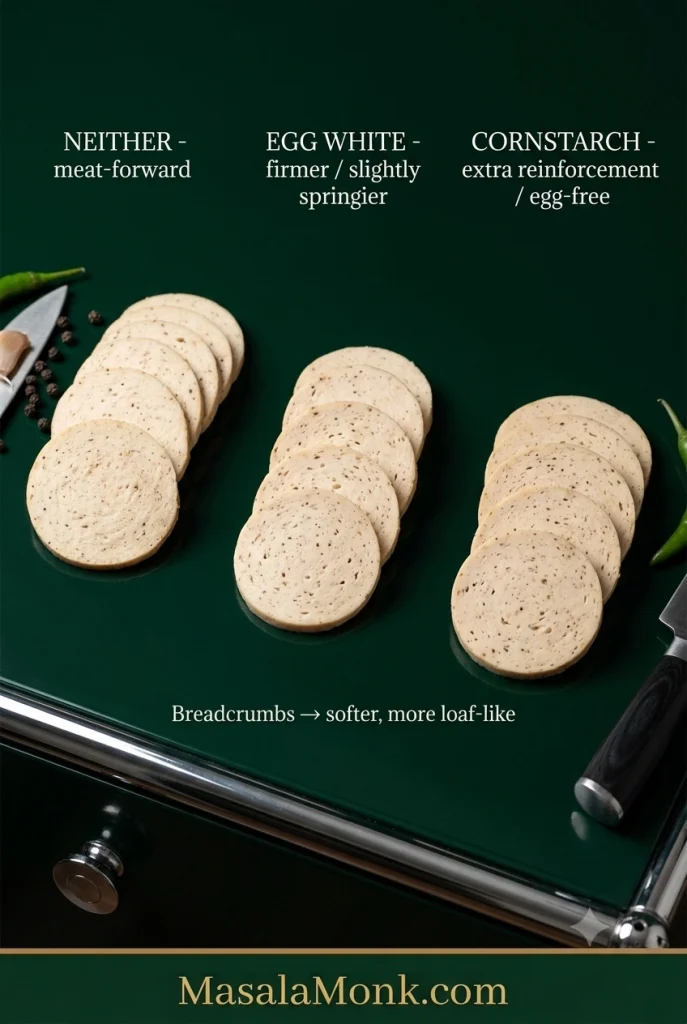
The base recipe works without either. Egg white gives a firmer, slightly springier slice; cornstarch adds a little extra structure without egg. If using egg white, begin without added water and add ice water a teaspoon at a time only if the processor needs it.

Raw-chicken note: there is no need to rinse chicken before processing it. Rinsing can splash raw poultry juices around the sink and nearby surfaces. Keep raw chicken and its utensils away from ready-to-eat foods, wash your hands well, and clean the processor parts, knife, board and work surface thoroughly afterwards.

Instructions

1. Get the chicken fridge-cold

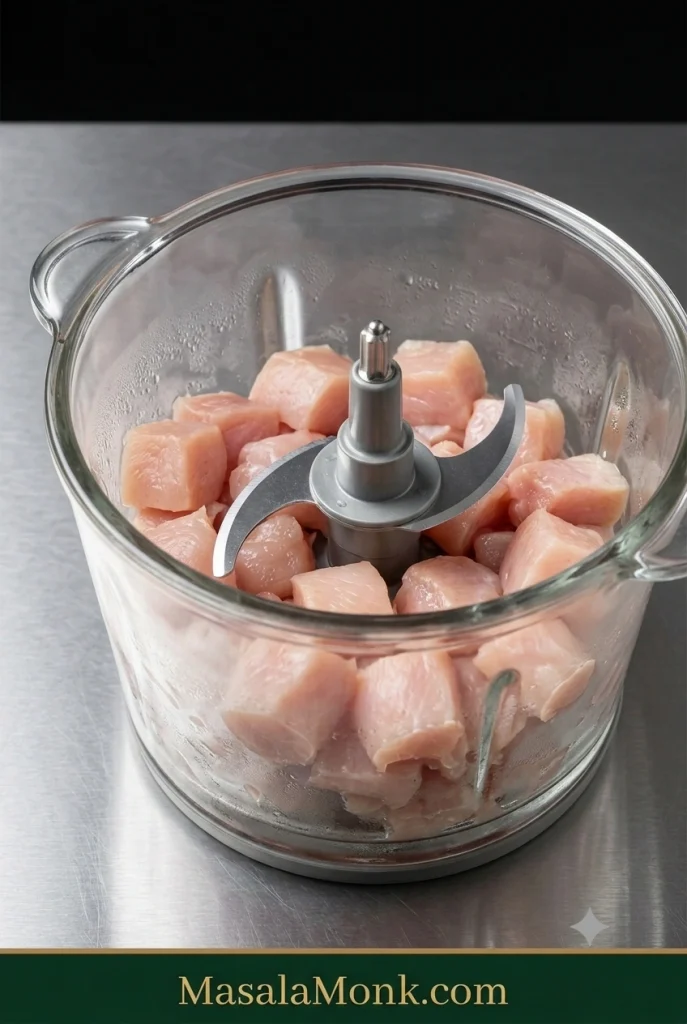
Cold 1-inch pieces of raw chicken breast and thigh in a clear food processor bowl with a steel blade on a stainless steel counter.
Start with visibly cold chicken pieces. If the bowl warms before the mixture turns tacky, pause and chill.

Cut the breast and thigh into roughly 2–3 cm / 1-inch pieces. Meat that has warmed while you gathered everything else can go back into the refrigerator for 15–20 minutes. In a hot kitchen, chilling the processor bowl and blade helps too.

A small processor is better handled in two batches. Keep the first batch chilled while you process the second, then combine them briefly at the end. Crowding the bowl makes the chicken process less evenly and gives it more time to warm up.

2. Start the sticky bind

Add the cold chicken and 8 g salt to the processor. Pulse until the larger pieces have broken down, then process briefly until the meat becomes finer.

Add the garlic, onion powder, black pepper, paprika, mustard and chilli flakes, along with the optional cornstarch or egg white if using.

3. Add the ice water gradually

Start with 1 tbsp / 15 ml ice-cold water and process in short bursts. A stiff mixture that the processor is struggling to move can take a little more, added a teaspoon at a time, up to another tablespoon.

The chicken should look moist and workable. A loose or runny paste has gone too far in the other direction.

4. Let the texture tell you when to stop

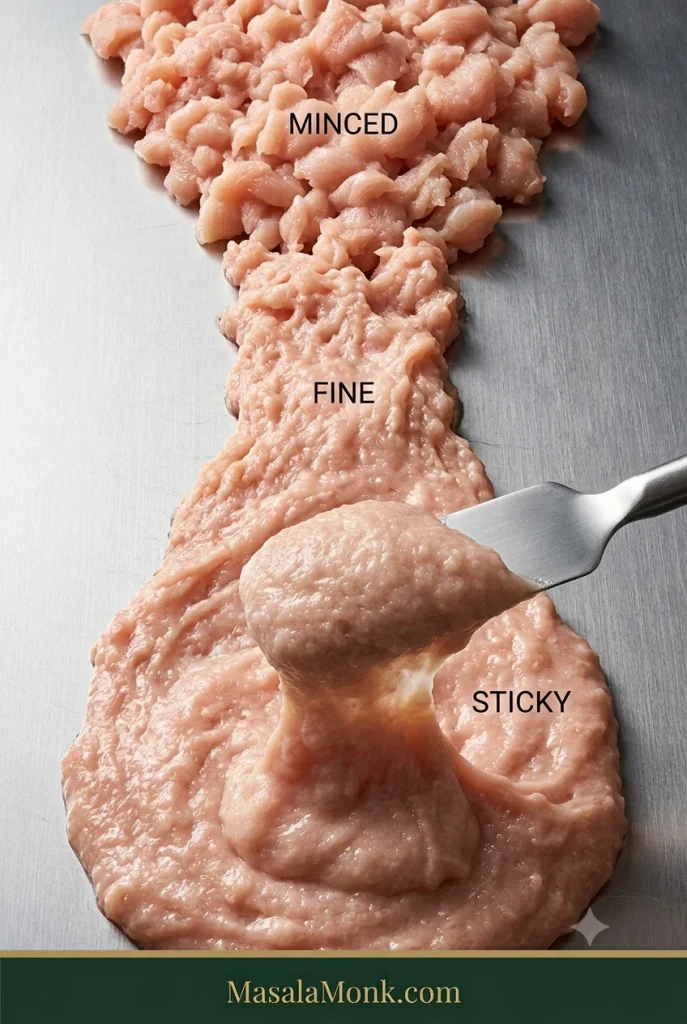
Continuous chicken texture progression from loose minced chicken to fine chicken and finally sticky cohesive chicken paste lifting with a spatula.
Loose mince should become a fine, sticky paste that moves with the spatula as one mass.

At first you have chopped chicken, then fine mince. Keep going and the texture changes again: the meat begins pulling together into one tacky mass instead of behaving like hundreds of separate grains.

Press a little against a spoon or clean palm. It should cling. Lift some with the spatula and the rest of the meat paste should tug along with it.

Fine, sticky and holding together as one mass is the endpoint. If the bowl starts getting warm before you reach that stage, stop and refrigerate the chicken for 10–15 minutes. Once the mixture is already fine and tacky, stop processing and move on.

5. Cook a tiny seasoning test

Fry about a teaspoon of the mixture in a small pan until completely cooked, then taste it. The garlic, pepper, chilli and paprika should come through clearly. Cold food mutes aroma and spice a little, so the hot test piece can taste a touch bolder than you want the final chilled slice without becoming aggressively salty.

Adjust the seasoning now. Use this little patty for flavour rather than texture; a hot fried spoonful and an overnight-chilled steamed log will feel very different.

6. Shape two tight logs

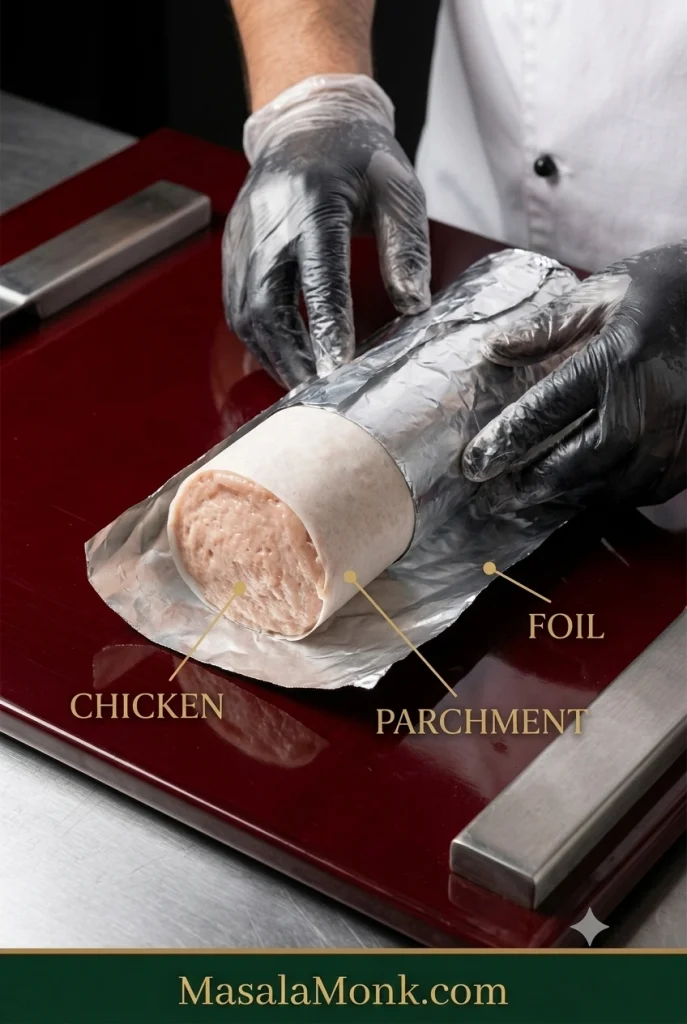
Raw chicken salami log being wrapped first in white baking parchment and then in aluminium foil, with the three layers visible in order.
Chicken touches parchment first; foil stays outside as support while the log cooks.

Divide the chicken between two sheets of baking parchment and compact each portion into a cylinder around 5 cm / 2 inches in diameter. Press firmly as you shape and work obvious pockets of air toward the ends. A ruler-straight cylinder is unnecessary; reasonably even thickness and a snugly packed centre are enough.

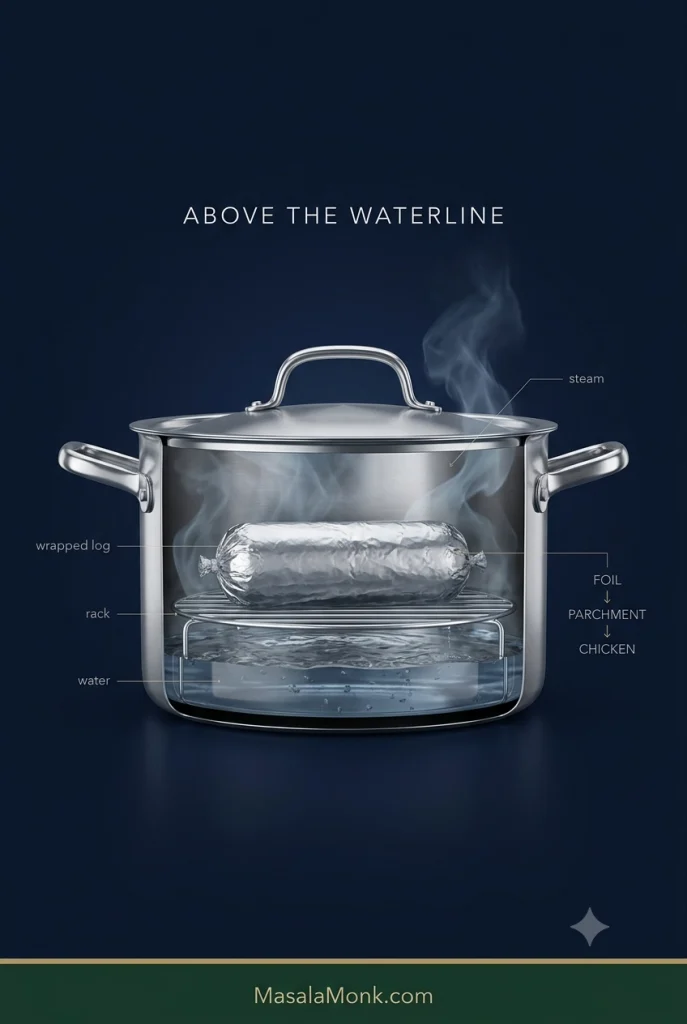
Roll the parchment around the chicken and twist or fold the ends closed. Wrap each parchment-covered log in foil. The parchment stays between the meat and the aluminium.

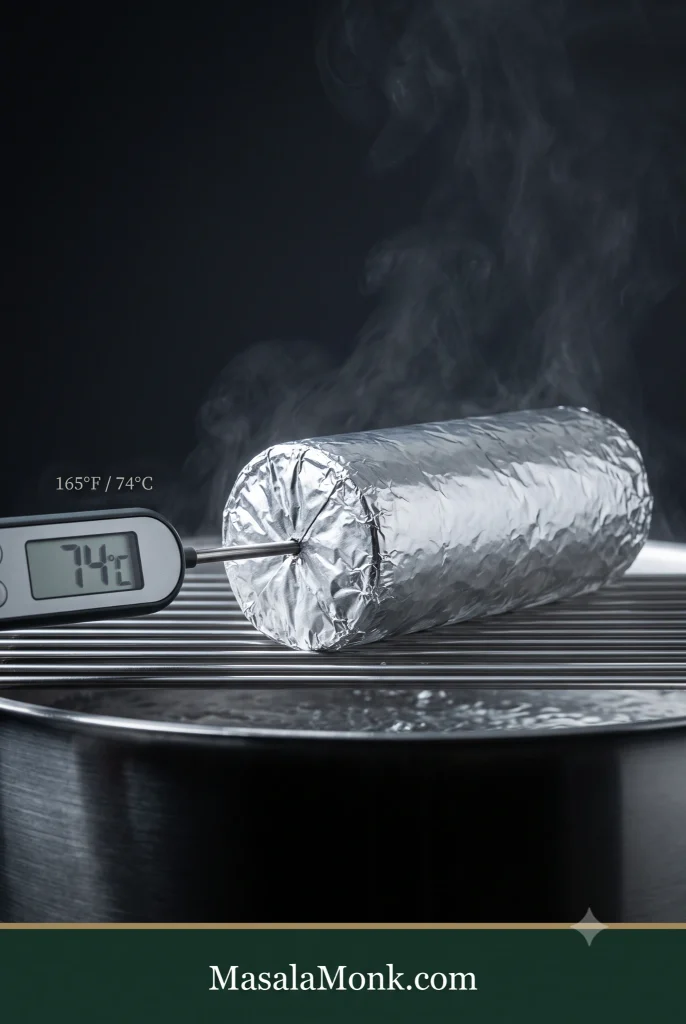
7. Steam to 165°F / 74°C

Foil-wrapped chicken salami steaming above water on a rack, with a connected digital thermometer probe entering through the centre of one wrapped end and reading 74°C.
Insert the probe through one end and aim for the centre: 165°F / 74°C.

Bring the water in a steamer or covered pot to a steady simmer. Place the logs above the water and cover.

For logs around 5 cm / 2 inches thick, begin checking at about 25–30 minutes. Many batches take roughly 30–45 minutes, but diameter, starting temperature and the steaming setup all affect the timing.

Slide the thermometer probe through one end of the log and aim for the centre. Ground poultry should reach 165°F / 74°C according to USDA safe-temperature guidance. Remove the log once the centre reaches that temperature.

8. Let the steam escape, then refrigerate

Leave the cooked logs for about 10–15 minutes, then carefully loosen the wrapper enough to release the heavy steam. Blot away obvious surface moisture.

Move the salami to the refrigerator promptly. Keep the total time at room temperature under 2 hours—or under 1 hour if the room is hotter than 90°F / 32°C.

9. Chill, unwrap and slice

Refrigerate the salami for at least 4 hours. Overnight gives the neatest texture. A freshly cooked log can feel surprisingly soft, so wait until it is completely cold before deciding how the final texture turned out.

Unwrap the chilled log. Pat the surface dry if needed, then cut with a sharp knife. Rewrap the unsliced portion or move it to an airtight container straight away.
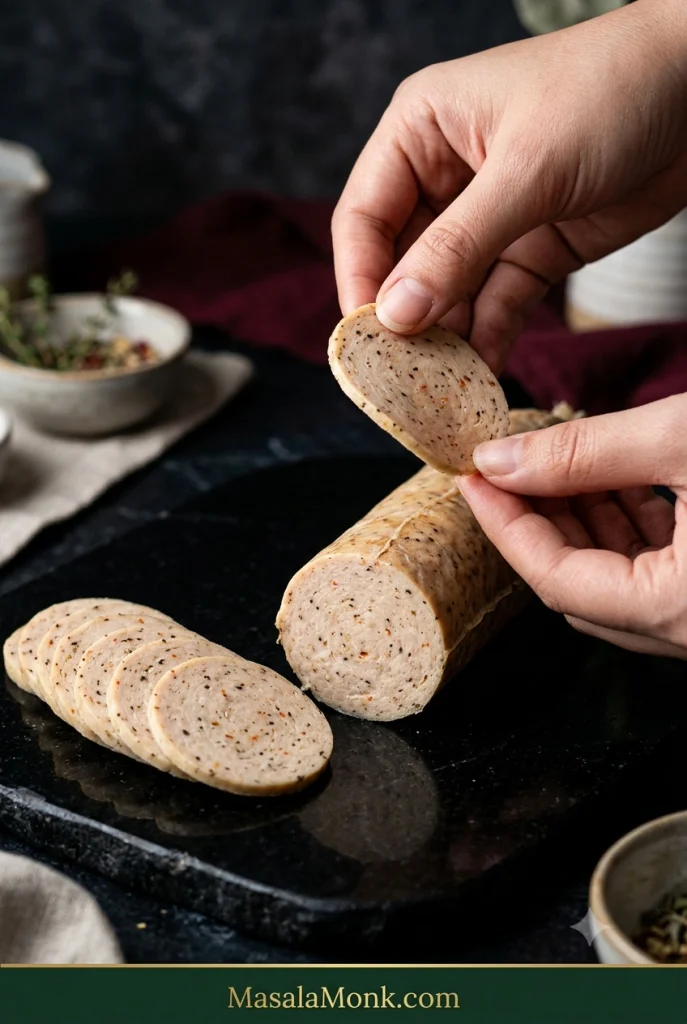
What Good Homemade Chicken Salami Looks Like

Thin chilled chicken salami slice bending slightly in a hand beside a sliced log with a fine, cohesive pale interior and small spice flecks.
Judge the texture only when cold: a good slice lifts cleanly, stays cohesive and still bends a little.

Before worrying about whether your salami looks exactly like a packet from the supermarket, cut one cold slice and look at what it actually does.

  • Texture: fine and even rather than visibly granular like a burger.
  • Slice: sturdy enough to pick up cold, with a little tenderness and bend.
  • Moisture: juicy without large watery or oily pockets.
  • Interior: fairly even, with no large tunnels from trapped air.
  • Colour: naturally beige, pale brown or faintly rosy depending on the chicken and spices.
  • Flavour: savoury and aromatic enough to remain interesting straight from the refrigerator.

Packet chicken salami can be exceptionally smooth and springy because commercial producers can control particle size, mixing and temperature very precisely and may also use starches, fibres or proteins to shape the texture. A home batch can feel a little more meat-like and still slice beautifully.

For straightforward chilled chicken without the fine salami texture, the simpler baked chicken breast recipe may suit you better.

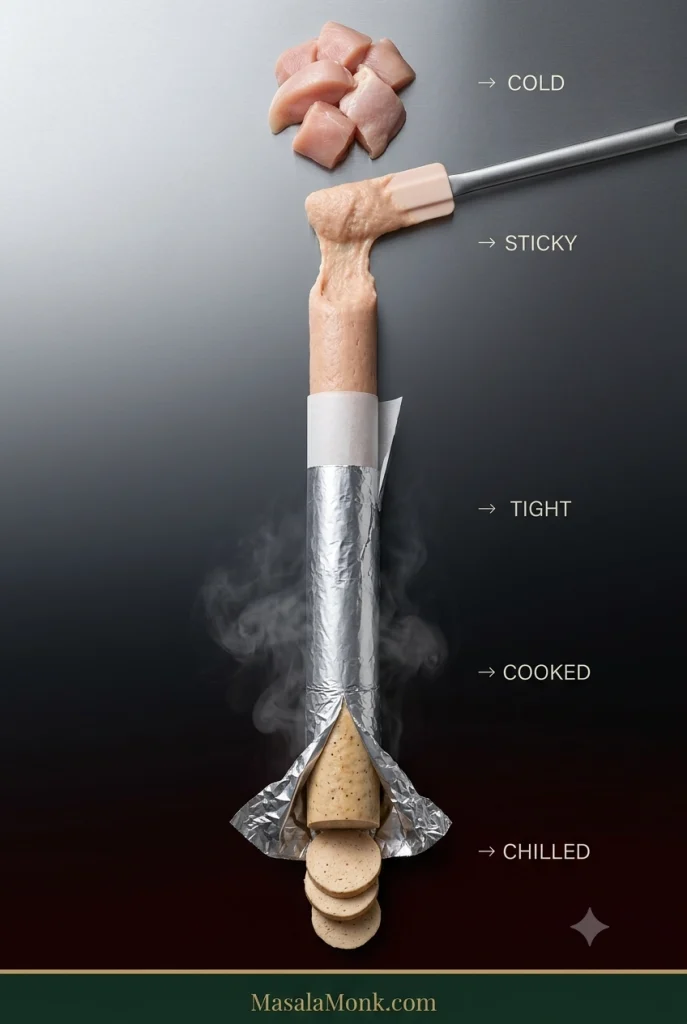
The Texture Rule: Cold → Sticky → Tight → Cooked → Chilled

Vertical transformation from cold chicken pieces to sticky paste, a tightly foil-wrapped log, a steaming cooked log and finally chilled sliced chicken salami.
Cold → sticky → tight → cooked → chilled. If a slice fails, work backward to find which stage went wrong.

The recipe tells you what to do. This is the bit that explains why it works.

Salt and mixing draw out muscle proteins that make the chicken tacky. That stickiness helps the meat hold moisture and natural fat more evenly as it cooks, which is why a properly processed paste slices so differently from simply seasoned mince.

This recipe also takes the chicken finer than you would for a coarse fresh sausage. Here the goal is a smooth deli-style slice, so visible chunks of mince aren’t what you’re aiming for. Advice to stop grinding early can make perfect sense for another sausage and still give you the wrong texture here.

What each stage controls

Cold. A food processor creates heat quickly. Fridge-cold chicken gives you more working time, and a bowl beginning to feel warm belongs back in the refrigerator for a few minutes.

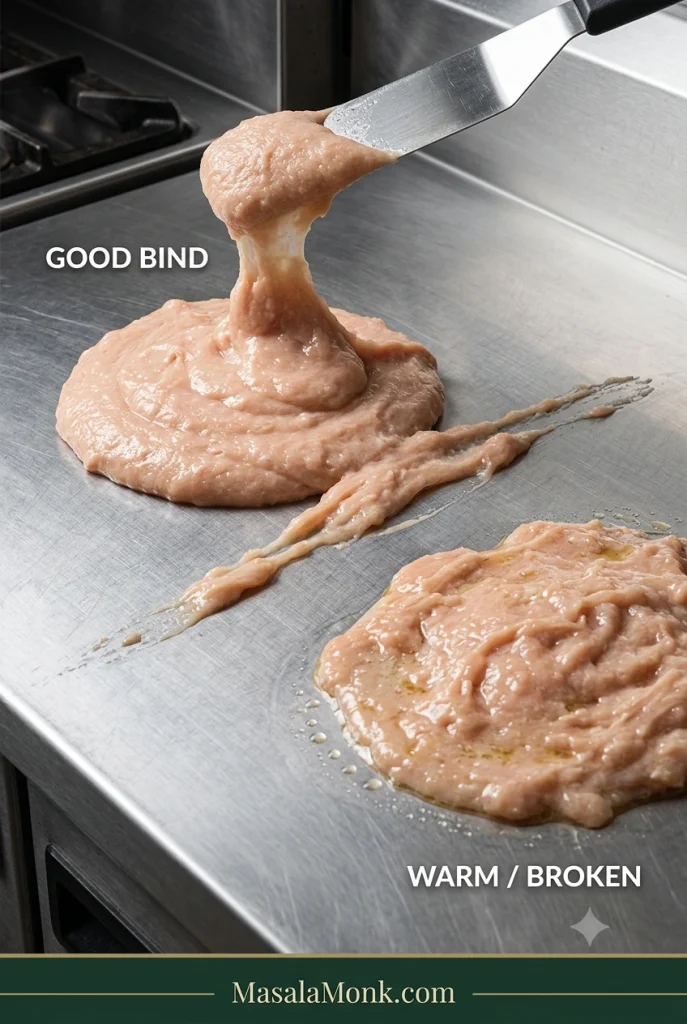
Sticky. Watch the bowl instead of the clock: loose mince → fine mixture → sticky paste that clings to itself. Stop at loose mince and the chilled salami may crumble. Once the meat is already tacky, extra processing mostly gives it more time to warm.

Correct pale pink sticky chicken paste lifting cohesively from a spatula beside warmer broken chicken paste with a looser, slightly oily texture.
Sticky paste should lift cohesively. A loose, greasy sheen means the mixture needs chilling before shaping.

Tight. Compact the paste firmly enough to push out obvious pockets of air. Tiny bubbles in an otherwise good slice aren’t worth worrying about; large tunnels mean the next log needs tighter packing.

Cooked. A thick log simply needs longer than a thin one. Keeping the diameter around 5 cm / 2 inches makes the timing more predictable, while the thermometer takes the guesswork out of the centre.

Chilled. Cooking sets the log; refrigeration firms it. The cold slice should stay in one piece when you lift it, even if it still bends a little between your fingers.

Breast or thigh?

ChickenWhat it gives youWatch for
Breast onlyLean, mild, paleDries out most easily if cooked too far
Thigh onlyJuicier and richerStronger chicken flavour and naturally more fat
Breast + thighBalanced flavour, juiciness and structureEasiest place to start
Ground chickenConvenient and already mincedResults depend on how lean the mince is

The 350 g breast + 150 g thigh mix gives a first batch some protection against dryness while keeping the flavour mild and chicken-forward. Fresh ground chicken works too; use 500 g as-is when it contains both light and dark meat.

Very lean breast mince needs closer temperature control and can benefit from the optional egg white or cornstarch. If an all-breast batch feels too lean, increasing the proportion of thigh is usually simpler than trying to rescue it with melted butter or oil. That little bit of dark meat is especially noticeable once the salami is cold, when dryness has nowhere to hide.

Egg, cornstarch—or neither?

Three chicken salami binder choices arranged on an emerald surface: no added binder, egg white and cornstarch, with breadcrumbs noted as producing a softer texture.
A strong sticky bind can work without extras; egg white and cornstarch make the slice firmer in different ways.

The chicken can hold together without an added binder. Cold meat, enough salt and enough mixing to reach the sticky stage matter more.

  • No added binder: the most meat-forward result and a good fit for the breast-thigh mixture once you’ve developed a strong sticky texture.
  • Egg white: gives a firmer, slightly springier slice and can be helpful with very lean chicken.
  • Cornstarch: adds a little extra reinforcement and is the obvious egg-free option.
  • Breadcrumbs: work, but move the texture toward a softer sausage loaf or meatloaf rather than a fine deli-style slice.

Egg or starch can help with firmness and moisture retention. If the mixture never became sticky, fix that before changing the recipe. Gelatin belongs to a different luncheon-meat method in which cooked meat and liquid are moulded and set as they chill.

Mixture still refusing to hold together? Jump to chicken salami troubleshooting →

Shaping the log

For familiar round slices, put parchment directly against the chicken and use foil on the outside to reinforce the cylinder. Twist or fold the parchment ends firmly. Reasonably even thickness and a tightly packed centre matter more than a machine-perfect shape.

Don’t want to roll a cylinder? Pack the chicken firmly into a lightly oiled or appropriately lined heatproof mould, cover it and cook to the same internal temperature. The slices will be square or rectangular, which happens to fit sandwich bread rather nicely.

Once the paste is cold, sticky and tightly packed, most of the texture work is already done. From here, the cooking method matters less than keeping the heat sensible and stopping when the centre reaches the right temperature.

Steamer, Covered Pot, Oven or Air Fryer?

Steaming is still the easiest first choice for the soft, even deli-style texture we’re after. A covered pot can do essentially the same job, while the oven and air fryer are useful when that’s what you already have.

MethodStarting pointWhat to expect
SteamBegin checking around 25–30 minSoft, even deli-style texture; best first method
Covered pot + rackSame general timing as steamingNearly the same result without a dedicated steamer
Oven330°F / 165°C; begin checking around 30 minSlightly firmer exterior
Air fryerAbout 330°F / 165°C to startMore dry heat around the outside; easier with smaller logs

No steamer?

Cutaway of a covered pot showing water below a rack and a fully foil-wrapped chicken salami log steaming above the waterline.
Keep the wrapped log above the waterline on a stable rack or trivet; it should cook in steam, not water.

Add a few centimetres of water to a large pot and set a rack, trivet or sturdy heatproof inverted bowl above the waterline. Put the wrapped logs on top, cover tightly and keep the water at a steady simmer. The chicken should sit in steam rather than in the water.

Some home recipes simmer a tightly wrapped log directly in hot water. Keeping this version above the waterline reduces the chance of water finding its way into the parcel, so steaming is the baseline method here.

Oven method

Place the parchment-and-foil-wrapped logs on a baking tray and bake at 330°F / 165°C. Begin checking the centre around 30 minutes and remove the salami when it reaches 165°F / 74°C.

Air fryer method

Smaller logs are easier to manage in an air fryer. Start around 330°F / 165°C, follow your appliance guidance for foil or wrapped foods, and cook to the same internal temperature instead of relying on one universal time.

After Cooking: Colour, Chilling & Clean Slices

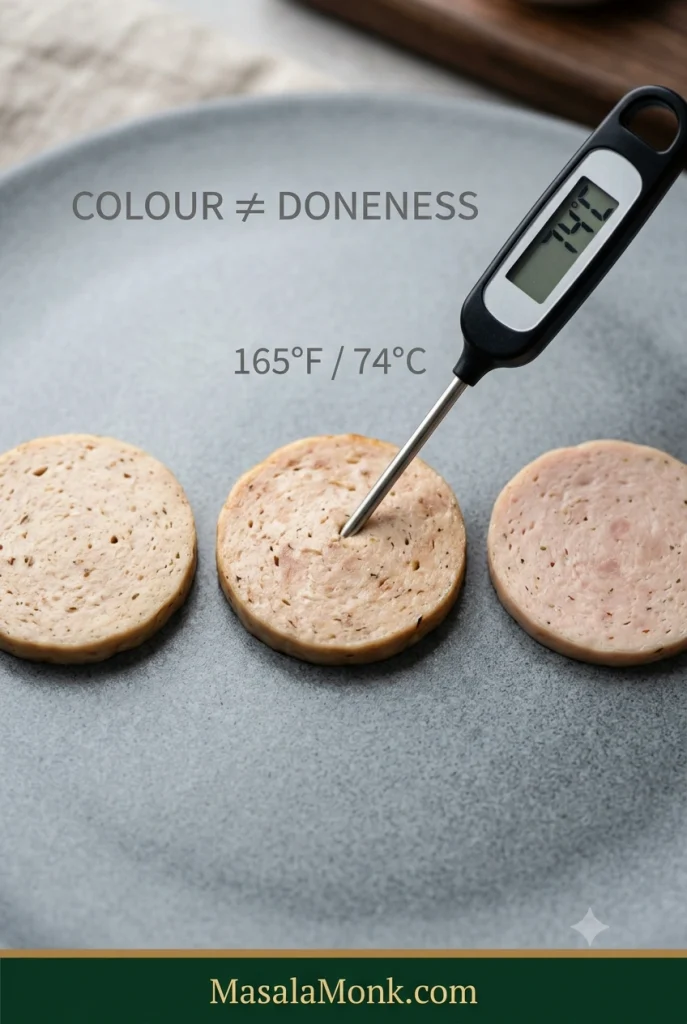
Three cooked chicken salami slices in pale beige, pale brown and faintly rosy tones beside a digital thermometer reading 74°C, showing that colour does not determine doneness.
Beige, pale brown or faintly rosy can all be normal. Use 165°F / 74°C, not colour, to judge doneness.

Use the thermometer for doneness rather than trying to read the colour. This is uncured cooked chicken, so the inside may be beige, pale brown or faintly rosy. It does not need the even pink colour associated with many commercial cured cold cuts.

If you simply prefer a rosier appearance, a little beetroot juice can tint the meat. Replace some of the recipe’s ice water with the same amount of beet juice so the total liquid stays under control. It changes the colour and adds a faint earthy note; it does not change the cooking temperature or preserve the salami.

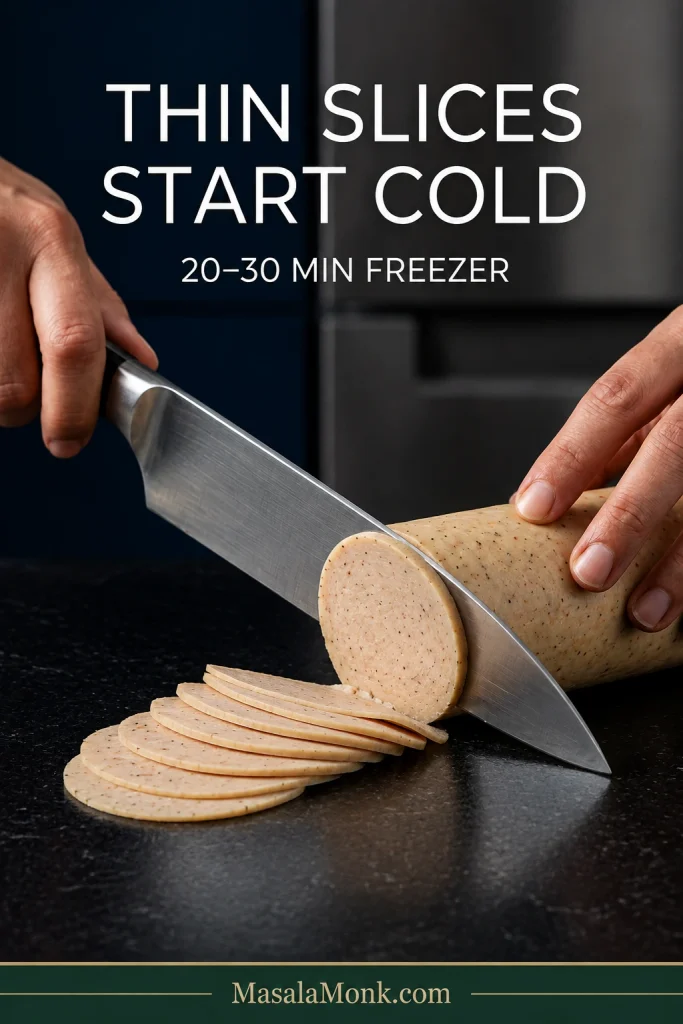
For thin deli-style slices, chill first

Chilled homemade chicken salami being cut with one chef’s knife into thin 2 to 3 millimetre slices on a dark cutting surface.
For thinner slices, chill until firm, then use a long clean knife stroke without pressing hard.

Start with completely cold salami and a sharp knife. Overnight refrigeration gives the easiest slicing. For finer rounds, put the chilled log in the freezer for 20–30 minutes so it firms up without freezing solid.

Don’t worry if the first few slices are thicker than deli-counter cuts. A clean slice that lifts intact matters more than getting it paper-thin.

Those thin slices are particularly good with egg and cheese; MasalaMonk’s breakfast sandwich guide has more ideas for breads, eggs, cheeses and sauces around them.

Chicken Salami Troubleshooting

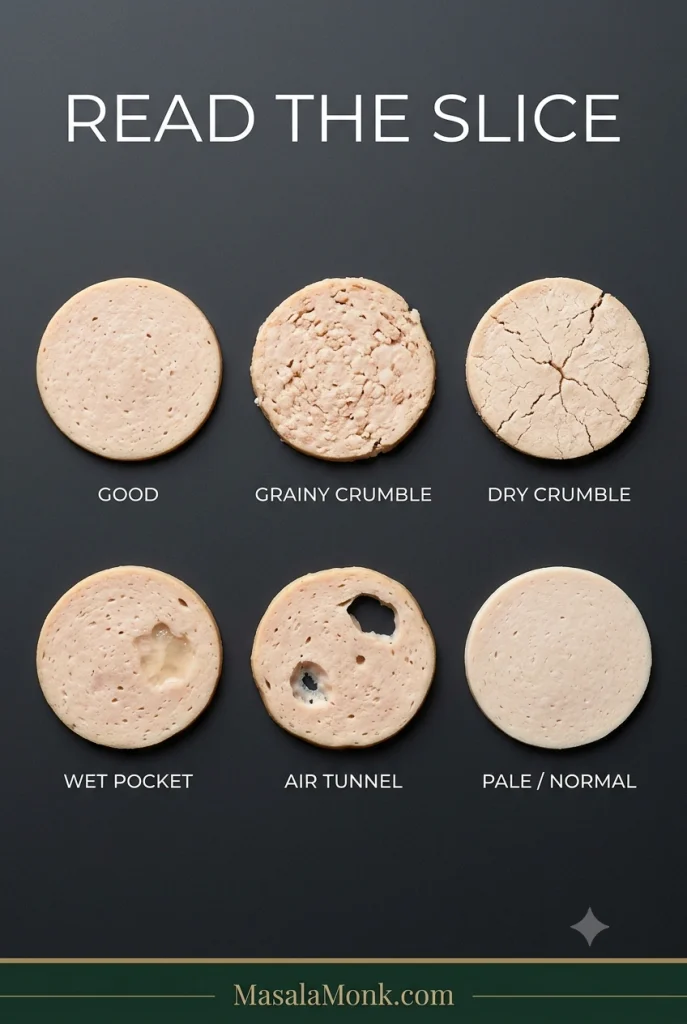
Six chicken salami cross-sections labeled good, grainy crumble, dry crumble, wet pocket, air tunnel and pale normal, showing different finished textures for troubleshooting.
Read the whole slice: graininess, dry fracture, wet pockets and large tunnels point to different problems.

“Crumbly” can mean several different things. Look at the cold slice first; it usually tells you more than automatically adding extra egg, starch or water to the next batch.

What you seeFirst thing to try
Cold slices crumble into meat grainsKeep the chicken colder and process until genuinely sticky
Dry, crumbly slicesUse some thigh and stop cooking at 165°F / 74°C
Greasy puddle around the logKeep the mixture colder and avoid large amounts of rendered fat
Wet or jelly-like pocketsReduce free liquid and squeeze wet aromatics
Large holes through the slicesPack the log more firmly
Pale or greyish interiorUsually normal for uncured chicken; check temperature, not colour

The cold slice crumbles into little pieces

Think back to the processor. Did the chicken ever reach the point where it clung to the spatula and pulled together as one mass? If it never did, start there rather than immediately increasing the binder.

Warm meat, very coarse processing, dramatically reduced salt or a generous amount of onion juice or sauce can all weaken the structure. Egg white or cornstarch can offer extra support, but they work best after the chicken itself has reached that sticky stage.

It is dry, mealy or strangely bouncy

All-breast chicken is easier to dry out, particularly when it cooks far beyond the safe endpoint. Thigh gives you more natural fat and moisture to work with.

A mealy or almost tofu-like bite can also turn up in a very lean, unstable mixture. At the opposite extreme, lots of processing and binder can push the texture toward an overly springy bounce. Think back to the earlier target: cold, cohesive and tacky—not warm and greasy.

There is grease, water or empty space inside

A teaspoon or two of cooking juice around the salami is ordinary. By contrast, a noticeable puddle of grease suggests that fat separated somewhere along the way, often because the chicken warmed up before its structure was properly developed.

Wet pockets point more toward excess free liquid. Start with less ice water next time and remember that fresh onion, sauces, yogurt and citrus juice all count toward the moisture in the bowl. Vinegar and generous amounts of lemon juice need care too: enough acid in the raw mixture can work against the sticky texture you’re trying to build. Add that sharpness later with chutney, mustard, pickles or a squeeze of citrus at the table.

Large air tunnels are simpler. Pack the next log more firmly. Tiny bubbles in an otherwise good slice aren’t worth worrying about.

← Back to the chicken salami recipe Back to the quick answer ↑

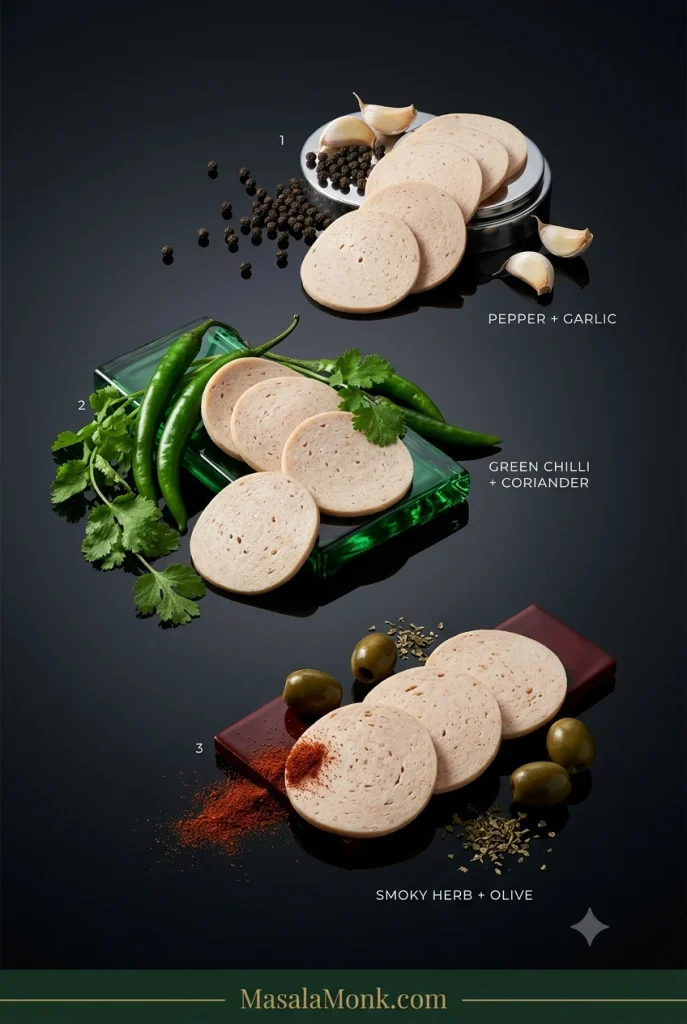
Three Easy Ways to Change the Flavour

Three homemade chicken salami flavour variations styled with pepper and garlic, green chilli and coriander, and smoked herbs with green olives.
Change the aromatics, not the moisture balance: drain olives well and keep generous chutneys or citrus for serving.

Once you know what the basic chicken paste should feel like, keep the meat, salt and moisture balance steady and change the aromatics around them.

Pepper & Garlic

Keep the garlic from the base recipe, increase the black pepper to about 1½ tsp, keep the mustard and use sweet or smoked paprika. Leave out the chilli flakes for a gentler version.

It stays savoury and peppery even when cold, which makes it particularly good in sandwiches. A little honey mustard gives those flavours a sweet-sharp edge.

Ginger, Green Chilli & Coriander

Add 1 tsp finely grated ginger, 1 small green chilli and 2 tbsp finely chopped coriander. Keep the black pepper, and add chilli flakes only if you want another layer of heat.

The ginger and coriander keep the flavour fresh while the green chilli brings heat without flooding the chicken with sauce. Serve the slices with a thick green chutney for a brighter sandwich or roti wrap.

Smoky Herb & Olive

Use 1–1½ tsp smoked paprika, ½ tsp dried oregano, ¼ tsp dried thyme and 1–2 tbsp finely chopped, well-drained green olives. Add a small pinch of chilli flakes if you like.

Pat the olives dry before chopping. Their salty, briny flavour is welcome; a pocket of olive brine inside the salami isn’t.

Once There’s a Cold Log in the Fridge

Homemade chicken salami served three ways: with a fried egg for breakfast, layered in a toasted sandwich, and inside a roti wrap with green chutney, onion and cucumber.
Serve the slices cold in sandwiches and wraps, or brown them briefly for breakfast—the salami is already fully cooked.

It earns its fridge space quickly. Brown a couple of slices and add a fried egg for breakfast, or keep them cold with cucumber, lettuce, tomato, pickles, mustard and cheese. Shredded cabbage or crisp coleslaw is especially good against the softer salami.

For a quick roti wrap, add sliced onion, cucumber and green chutney, then squeeze over lime just before eating. When packing it for school or work, use an insulated lunch bag with a cold pack.

The salami is already cooked, so pizza, pasta and omelettes only need enough extra heat to warm or brown it. Add thin rounds toward the end of pizza baking, fold diced pieces into eggs, or colour thicker slices briefly in a pan before tossing them through pasta.

If both logs aren’t going to disappear into breakfasts, sandwiches and wraps within the next few days, freeze the second one while it’s still fresh.

How to Store and Freeze Homemade Chicken Salami

Treat this as cooked perishable chicken, not shelf-stable salami.

Chicken salami storage timeline showing pale cooked salami refrigerated for 3 to 4 days, frozen for 2 to 3 months for best quality, and thawed in the refrigerator.
Refrigerate for 3–4 days, or freeze meal-sized portions for 2–3 months for best quality.

Refrigerator

Wrap a completely cold log tightly or transfer it to an airtight container. Cover cut surfaces once you begin slicing so they don’t dry out.

Keep homemade chicken salami at 40°F / about 4°C or colder and use it within 3–4 days. This matches USDA storage guidance for fresh sausage cooked at home.

Freezer

Freeze half logs or meal-sized portions rather than one large block. For sliced salami, put small sheets of parchment between portions so they separate easily.

Two to three months is a useful freezer window for best quality. Food kept continuously frozen remains safe beyond that, but flavour and texture gradually decline.

Thawing

Thaw the salami in the refrigerator. A frozen-and-thawed slice may be a little softer than one cut from a freshly chilled log, particularly with very lean or wetter batches.

That short refrigerator life is also the clearest reminder that this recipe is a very different thing from traditional dry salami.

Cooked Chicken Salami vs Traditional Dry-Cured Salami

Comparison of pale casing-free cooked chicken salami with foil and thermometer cues beside dark red traditional dry-cured salami hanging in casings.
Fermentation, controlled humidity and weeks of drying belong to a different process from this fully cooked, refrigerated chicken salami.

Traditional dry salami is perfectly possible to make at home, but it is a different project. Depending on the style, it can involve precisely measured curing ingredients, starter cultures, fermentation, appropriate casings, controlled temperature and humidity, and weeks of drying.

That process deserves a validated recipe of its own. Smell and appearance alone cannot establish that raw cured meat is safe, and curing products with different formulations should not be swapped spoon-for-spoon because their names look similar.

For this cooked chicken version, the rule is much simpler: cook the ground poultry fully, chill it promptly and keep it refrigerated.

A Few Remaining Questions

Does this use curing salt or added preservatives?

No. This version uses ordinary salt, but no curing salt or separate preservative system. Keep it refrigerated and use it within 3–4 days, or freeze it.

Does the chicken have to touch aluminium foil?

No. Baking parchment sits directly against the chicken and the foil goes around the outside for support. A covered heatproof mould is another option if you prefer not to use a foil-wrapped log.

Can I make it without a food processor?

Very finely ground chicken can be mixed vigorously with salt until tacky to make a coarser cooked sausage. For the smooth deli-style texture in this recipe, a food processor or powerful chopper is strongly preferred.

Can I freeze the slices?

Yes. Chill the salami completely first, freeze meal-sized portions with parchment between the slices, and thaw what you need in the refrigerator.

Can I use turkey, pork or beef?

The general cooked-log idea can be adapted, but this recipe is formulated around chicken. Ground turkey should also reach 165°F / 74°C. For ground pork and ground beef, use at least 160°F / 71°C. Different meats have different fat levels, so expect some change in texture rather than treating them as exact one-for-one substitutions.

Is homemade chicken salami healthy?

Homemade does not automatically mean healthier. Making the salami yourself gives you control over the chicken, salt, seasonings and optional binder, while the nutritional picture still depends on those choices and on portion size. It is better thought of as a homemade cooked cold cut than as a health food.

The Best Part Comes the Next Morning

After a night in the refrigerator, the knife should pass through cleanly and the cold slice should lift in one piece.

Thin homemade chicken salami slices lightly browned in a pan with a fried egg, toast, mustard and green chutney on a dark oxblood breakfast set.
Brief pan contact adds browned flavour to already-cooked slices while keeping the centres tender.

Eat it cold, or give a couple of slices a minute in a hot pan until the edges brown and the garlic wakes up again. Add an egg, toast and mustard—or a swipe of green chutney—and breakfast is done.

Back to the quick answer ↑ Back to the recipe ↑

Posted on — Leave a comment

Keto Butter Chicken Recipe: Rich, Silky Murgh Makhani

Bowl of keto butter chicken with browned boneless chicken pieces in glossy orange-red makhani gravy, finished with a little kasuri methi.

This post was last updated on:

A good butter chicken has contrast, and keto doesn’t change that.

The chicken should have browned, sometimes lightly charred edges. The gravy should cling to those pieces and still move around them, with a soft butter sheen. Tomato gives the sauce its backbone, cream smooths the acidity, and crushed kasuri methi leaves the aroma that makes the finished curry recognizably butter chicken.

If butter chicken is one of the dinners you’ve been missing since cutting back on carbs, most of what makes it worth eating can stay. Or maybe you’ve already tried a low-carb version and ended up with perfectly decent creamy tomato chicken that somehow never quite became butter chicken. This recipe is meant to solve both problems.

This version is savory and tomato-deep, with browned chicken, a smooth orange-red gravy, moderate cream and kasuri methi still noticeable after the bite. A favourite takeaway may be much sweeter or richer. If yours is, this will taste different—and nothing has gone wrong.

Butter chicken—murgh makhani—already starts with plenty of ingredients that fit naturally into a lower-carb meal. Most of the carb difference comes from added sugar, how much tomato and onion go into the gravy, cashews or starches, prepared sauces and, very often, the rice and naan served with it.

Keep the butter chicken. Change the carbs that matter.

Jump to: Recipe · The 5 Changes · Troubleshooting · Low-Carb Sides · Nutrition · Restaurant Butter Chicken

Quick Answer: Is Butter Chicken Keto-Friendly?

Yes. Homemade butter chicken can be keto-friendly. This version comes to roughly 7g net carbs per serving, with no added sugar, cashews or flour-based thickener.


Chicken, butter, ghee, cream and spices contribute relatively little carbohydrate in the amounts used here. Tomato, onion and plain yogurt contribute some. Restaurant and packaged gravies may add sugar, ketchup, flour, cornstarch, cashews or simply a much larger amount of sauce.

Homemade is easier to calculate because you know what went into the pan. Whether roughly 7g net carbs fits your day depends on the carbohydrate target you’re following.

Ready to cook? Jump to the keto butter chicken recipe →

The 5 Changes That Matter

  1. Skip the added sugar. Give the tomato enough time to lose its raw, sharp edge before deciding the sauce needs sweetness.
  2. Keep the yogurt-and-lemon marinade. Leave only a light coating on the chicken before browning so the spices stay with the meat without flooding the pan.
  3. Let the gravy thicken through cooking. Tomato reduction and blending give this sauce plenty of body. Flour and specialty keto thickeners are unnecessary.
  4. Measure the onion; skip the cashews in this version. A modest amount of onion still gives the gravy body and sweetness, while the tomato, butter and cream supply enough richness.
  5. Look at the whole plate. Jeera cauliflower rice, greens and something crisp can save more carbohydrates than stripping character out of the curry itself.

That’s most of the keto work. From here, cook it like butter chicken.

Butter chicken surrounded by visual cues for no added sugar, a light yogurt marinade, reduced tomato gravy, measured onion and cauliflower rice.
No specialty keto thickeners are needed here: reduction, measured gravy ingredients and the plate do the work.

Keto Butter Chicken Recipe

The ingredient list looks long, but the cooking itself is straightforward. Most of the work is measuring, browning the chicken and giving the tomato enough time.

If other people at the table aren’t eating low-carb, you do not need a second curry. Put rice or naan on their side of the table and cauliflower rice or vegetables on yours.

At a Glance

DetailWhat to expect
Serves4 generous main-course portions
Chicken700g / 1½ lb boneless skinless thighs
PrepAbout 15 minutes
Marinating30 minutes minimum; 2–4 hours is better
CookAbout 30–40 minutes
Minimum elapsed timeAbout 1¼–1½ hours
Pan11–12in / 28–30cm wide, reasonably deep skillet or sauté pan
Heat levelMild to medium
Estimated net carbsAbout 7g per serving, before sides

Equipment

  • 11–12in / 28–30cm wide, reasonably deep skillet or sauté pan
  • mixing bowl
  • knife and cutting board
  • instant-read thermometer
  • immersion blender, recommended for a smoother gravy
  • digital kitchen scale, useful but not essential

A countertop blender works too. If the gravy is too shallow for an immersion blender to stay submerged, transfer it to a tall heatproof jug. Let very hot gravy settle briefly and follow your blender manufacturer’s guidance for hot liquids. A fine-mesh strainer is optional.

Overhead arrangement of chicken thighs, yogurt, passata, onion, cream, butter, ghee, ginger-garlic paste and spices for keto butter chicken.
For carb tracking, weigh the tomato and onion first; tiny spice differences matter far less.

Chicken and Marinade

  • 700g / 1½ lb boneless, skinless chicken thighs, cut into roughly 3cm / 1¼-inch pieces
  • 80g / ⅓ cup thick plain full-fat yogurt or dahi; mild full-fat Greek yogurt also works
  • 15ml / 1 tbsp lemon juice
  • 15g / 1 tbsp ginger-garlic paste
  • 1 tsp Kashmiri red chilli powder
  • 1 tsp garam masala
  • ½ tsp ground cumin
  • 4g / about ¾ tsp fine sea salt

Makhani Gravy

  • 14g / 1 tbsp ghee, for browning the chicken
  • 14g / 1 tbsp ghee or butter, for the gravy
  • 50g / roughly ½ small onion, finely chopped
  • 15g / 1 tbsp ginger-garlic paste
  • 1 tsp ground coriander
  • ½ tsp ground cumin
  • ½ tsp garam masala
  • ¼ tsp ground turmeric
  • ¼–½ tsp Kashmiri red chilli powder
  • 225g / 8oz / scant 1 cup plain passata or strained tomatoes, with no added sugar
  • 60ml / ¼ cup hot water or unsalted/lightly salted chicken stock, plus more if needed
  • 3g / about ½ tsp fine sea salt

To Finish

  • 120ml / ½ cup heavy or whipping cream
  • 14g / 1 tbsp butter
  • 1 tsp dried kasuri methi
  • fresh coriander/cilantro, optional

A fresh cream around 25% milk fat works too. The gravy will be slightly lighter and looser and may need another minute of gentle reduction. The nutrition estimate later in the post assumes heavier cream in roughly the 30–36% range.

Kashmiri chilli is being used mainly for colour and gentle warmth. Add cayenne or a hotter Indian chilli powder separately when you want more heat. For a mixed table, keeping the main pan mild and sharpening individual portions at the end is usually easier.

1. Marinate the Chicken

Mix the yogurt, lemon juice, ginger-garlic paste, Kashmiri chilli, garam masala, cumin and salt. Add the chicken and turn until every piece carries a light coating.

Cover and refrigerate for at least 30 minutes. Two to four hours works particularly well, and overnight is fine when that suits your schedule.

Before cooking, lift the chicken from the bowl and scrape or shake away the heavy excess marinade. Discard what remains after contact with the raw chicken. A little yogurt-spice coating should stay on the meat, but there should not be enough to form a puddle in the pan.

2. Brown the Chicken

Heat the pan over medium-high heat and add the ghee. If you’re cooking in two batches, divide that tablespoon between them. Arrange the chicken in a single layer with some room around the pieces.

At first you’ll hear a damp hiss as moisture leaves the surface. As the pan dries, the sound becomes sharper and the yogurt-spice coating begins catching and darkening around the edges. Give the first side roughly 2–3 minutes before checking it. Chicken that still grips the pan usually needs another few moments; once the surface has browned properly, it releases more easily.

Turn and colour the second side briefly, then transfer the chicken to a plate while the centre is still underdone. A few uneven dark patches are exactly what you want. The pieces do not need to look identical.

Pan filling with water? Stop adding chicken. Remove the pieces if necessary, let the excess liquid evaporate, add a touch of ghee once the pan is dry again and continue in smaller batches.

Step-by-step comparison showing lightly marinated chicken becoming damp, drying and browned, plus an overcrowded pan filled with excess moisture.
Between batches, let the pan get hot and dry again before adding more yogurt-marinated chicken. Otherwise, the next batch inherits the moisture from the last one.

For stronger tandoori-style edges, the marinated chicken can go under a very hot broiler/grill until a few spots blister, then finish cooking in the gravy.

3. Build the Makhani Base

Lower the heat to medium and add the second tablespoon of ghee or butter. Add the onion and measured salt and cook for about 4–6 minutes, until the onion softens and loses its sharp raw smell. A little gold around the edges is welcome.

Add the ginger-garlic paste and cook for roughly 30 seconds, until its raw aroma mellows. Stir in the coriander, cumin, garam masala, turmeric and Kashmiri chilli for another 20–30 seconds. Lower the heat if the spices begin sticking or darkening quickly.

4. Give the Tomato Enough Time

Pour in the passata and scrape the bottom of the pan to release the browned chicken and spice residue. Cook uncovered over medium to medium-low heat, stirring regularly.

Expect roughly 8–15 minutes, sometimes longer. Tomato products vary, and so do burners and pans. If yours needs 18 minutes, nothing has gone wrong.

The sauce starts bright and loose. As water cooks away, the colour deepens, the texture tightens and the obvious bottled-tomato smell fades. Draw a spoon through the pan: the trail should remain visible briefly before the sauce flows back. Small beads or streaks of fat may appear near the edges; you do not need a dramatic oil layer.

Taste a little. A sharp, raw tomato flavour means it needs more cooking. Extra tomato paste makes the colour stronger, but it can push the gravy towards a concentrated pasta-sauce flavour. Use it only when the tomato product itself is unusually pale or weak.

Four stages of tomato gravy labeled raw, reducing, developed and ready, ending with thick orange-red sauce that holds a spoon trail.
A wide pan speeds evaporation, concentrating passata without flour, cornstarch or another gravy thickener.

5. Blend the Gravy, Then Finish the Chicken

Pour in 60ml / ¼ cup hot water or stock and remove the pan briefly from the heat. Blend until smooth. For an especially silky gravy, strain it before returning it to the pan. Leaving it a little rustic is fine too.

Return the blended gravy to medium-low heat for 2–3 minutes, stirring as it comes back together and thickens slightly. Tiny beads of fat may appear around the edge.

Add the browned chicken and the juices collected on the plate. Simmer gently until the largest piece reaches 165°F / 74°C, generally another 4–7 minutes at this size. The USDA recommends 165°F as the safe minimum internal temperature for poultry.

If the gravy tightens before the chicken is ready, add hot water or stock 1 tbsp / 15ml at a time.

6. Finish With Cream, Butter and Kasuri Methi

Reduce the heat to low and let hard bubbling settle. Stir in the cream, then crush 1 teaspoon kasuri methi between your palms over the pan and add it with the finishing butter. Warm everything gently for another minute.

Cream being poured into butter chicken as butter melts and dried kasuri methi is crushed over the pan.
Once the cream is in, keep the heat gentle. A hard boil can split the dairy, while prolonged cooking also softens the fresh aroma of butter and kasuri methi.

Taste and check the salt first. After that, make only the adjustment the gravy needs: another ¼ teaspoon methi, a touch more heat, a small finishing pinch of garam masala, a spoonful of water or perhaps one more spoonful of cream.

If the tomato is still sharply acidic after it has cooked fully and the salt, butter and cream are in place, a very small amount of your preferred low-carb sweetener can help. Add it only at the end and only if the sauce genuinely needs it.

Turn off the heat and let the curry rest for about 5 minutes.

The Finished Butter Chicken

Some of the yogurt-spice coating should have darkened around the chicken while the centre stays juicy. The gravy should settle naturally around the pieces, with no watery pool underneath. The raw tomato edge should be gone, but you should still taste tomato, ginger, chilli and spice after the cream goes in.

Kasuri methi should be easy to notice when you lean over the pan. Drag a spoon through the gravy; the line should stay open for a moment and then slowly close. Lift the spoon and the sauce should cling before falling back in a slow ribbon.

Too thick? Stir in 1 tbsp / 15ml hot water. Too loose? Give it another minute or two uncovered.

Spoon lifting a browned piece of butter chicken with thick glossy sauce clinging and dripping back into the pan in a slow ribbon.
Perfect texture can still mean too much sauce. Fix the ratio, not the chicken.

Then stop adjusting.

Spoon it over hot jeera cauliflower rice and get some browned chicken and gravy in the first bite. At that point, nobody needs to be thinking about what was removed.


If dinner is already on the table, stop here and eat. Everything below is for the question that comes next: why another recipe claims fewer carbs, why a gravy tastes wrong, what changes at a restaurant or how to make the next batch easier.

Need something specific? Troubleshoot the gravy · Build the low-carb plate · Order butter chicken at a restaurant

What Makes Butter Chicken Taste Like Butter Chicken?

The hardest butter chicken to diagnose is the one that isn’t bad. The chicken is tender, the sauce is creamy and the seasoning seems reasonable, yet the first bite still tastes like generic tomato curry.

Usually there isn’t one secret ingredient missing. Tomato that has cooked far enough, properly browned chicken, enough salt and a sensible amount of cream all matter. Kasuri methi adds one of the most recognizable aromas in the finished gravy, and even a small amount can change the character of the sauce.

If the curry tastes seasoned but still smells anonymous, smell the kasuri methi before reaching for another spoonful of spice.

Butter chicken shown with developed tomato gravy, browned chicken, dried kasuri methi and a small bowl of cream as key flavour elements.
When butter chicken tastes almost right, change one variable at a time: check salt first, then char and kasuri methi before adding more cream or another spoonful of spice.

Where the Carbs in Butter Chicken Come From

Two bowls of butter chicken can look nearly identical and still produce very different nutrition numbers. Much of that variation comes from the gravy and from what somebody has decided counts as one serving.

VariableLower-carb directionHigher-carb direction
TomatoMeasured tomato baseLarge tomato-heavy gravy
OnionSmall measured amountOnion-heavy base
Added sweetnessNoneSugar, honey or ketchup
CashewsNone or a littleCashew-rich gravy
YogurtPlain and measuredSweetened or larger amounts
ThickeningReductionFlour or cornstarch
Prepared saucePlain/no-added-sugarSweetened commercial gravy
Serving sizeClearly definedTiny or vague
The plateVegetables or cauliflower riceRice plus naan

For this recipe, one serving means one-quarter of the finished curry.

The 225g / 8oz tomato gives the gravy enough acidity and fruitiness without making tomato the whole story. Once properly cooked, it tastes much less dominant than it does straight from the bottle.

Some butter chicken is sweet and some isn’t. This version starts without added sugar because cooked tomato, salt, butter and cream usually provide enough balance.

The 50g onion contributes body and natural sweetness while keeping the quantity predictable. Cashew paste can make a lovely rich butter chicken gravy, but this sauce does not need it.

Two butter chicken meals compared side by side, one with basmati rice and naan and the other with cauliflower rice, greens and cucumber.
Same curry, different plate: hold the portion steady and let the sides change the carb load.

Ingredient Notes That Change the Result

Thick yogurt helps the seasoning cling to the chicken, and lemon adds brightness. Moisture is the part to watch during browning: a heavy yogurt coating cools the pan, releases water and can leave pale coagulated clumps. Plain unsweetened yogurt or dahi works well. A particularly tangy Greek yogurt can make the finished curry noticeably more sour.

Chicken thighs are more forgiving through browning and the final simmer. Breast works too; keep the pieces evenly sized and avoid cooking them through during the first sear. MasalaMonk’s baked chicken breast recipe goes deeper into thickness, temperature and keeping lean breast meat juicy.

For the tomato, smooth plain passata is the easiest choice. Finely crushed tomatoes can be used too and may need more cooking and blending. Sweet pasta sauce, ketchup and seasoned marinara change the flavour substantially. Tomato paste is far more concentrated, so save it for the rare batch where the tomato itself seems unusually pale or weak.

Spices, Kasuri Methi and Cream

Kashmiri chilli gives deep colour with moderate heat. Paprika can provide much of that colour when Kashmiri chilli is unavailable, with stronger chilli added separately. Garam masala varies considerably from brand to brand, so a small finishing pinch can help when its aroma seems muted.

Kasuri methi is dried fenugreek leaf. Fenugreek seed and ground fenugreek are much stronger and should not replace it measure-for-measure. Start with 1 teaspoon of the leaves and increase in ¼-teaspoon steps only after tasting. If you cannot find kasuri methi, leaving it out is safer than substituting the same quantity of seed or powder.

Spice guide showing Kashmiri chilli, garam masala and kasuri methi, with dried fenugreek leaves compared with fenugreek seeds and powder.
At the shop, look for “kasuri methi” or “dried fenugreek leaves” on the packet. Then crush the leaves just before finishing the gravy to release more of their aroma.

The 120ml / ½ cup cream used here softens the tomato and carries the spices through the gravy. Add much more and the curry can turn pale while the ginger, chilli and methi recede into the background.

Want a Smoother, More Restaurant-Style Finish?

Restaurant butter chicken is not one fixed flavour. Some gravies are sweeter, some tangier and some substantially richer with cream or cashew. You can reproduce much of the char, silkiness and aroma at home, but a particular restaurant may still taste quite different.

A very hot broiler or grill gives the chicken darker blistered edges than most home pans can manage when they are full. A few charred spots are enough.

For the gravy, thorough blending makes the biggest difference. Straining takes the texture one step further when you specifically want the very smooth finish found in many restaurant versions.

Keep the butter and kasuri methi for the end so their aroma stays fresh. A brief dhungar smoke can add another layer when that is a technique you already use comfortably. Good chicken char gets you a long way without it.

Three identical bowls of orange butter chicken gravy labeled rustic, blended and strained, showing progressively smoother texture.
Blending gets you most of the silkiness; straining is optional polish.

Fix Your Butter Chicken

Butter chicken problems often sound alike. “Too tomatoey,” “bland” and “thin” can each describe more than one failure, and throwing more cream or spice at a confused gravy rarely helps. Work out what is actually wrong first.

ProblemLikely causeFirst move
Raw or harsh tomatoTomato base undercookedKeep reducing
Tastes like pasta sauceToo much concentrate or underdeveloped gravyCook the base further
BlandSalt, char or finishing aroma lackingCheck salt first
Too sourAcidic or undercooked tomatoCook, then balance
Too sweetToo much sweetenerRestore salt and spice balance
Generic creamy curryWeak char, little methi or rushed tomatoCorrect those elements
WateryToo much liquidRemove chicken and reduce
PastyOver-reducedAdd hot water 15ml at a time
Too much gravySauce volume drifted upwardRemove some sauce
Chicken released lots of waterWet coating, cool pan, crowding or high-water chickenDry the pan and brown smaller batches
White yogurt clumpsWet marinade or crowded/cool panLess coating, more heat, smaller batches
Greasy or splitExcess fat or hard boiling after dairyLower the heat
Dry chickenOvercooked during both stagesBrown first; finish only to 165°F / 74°C
Bitter methiToo much kasuri methiDilute if possible
Too spicyExcess hot chilliAdd a little cream
Too paleToo much creamUse less next time
Four butter chicken problems shown side by side: watery gravy, split greasy sauce, pale over-creamed curry and chicken with wet yogurt clumps.
Read the pan before changing the seasoning. Pooling liquid, separated fat, pale gravy and yogurt clumps describe four different failures—and therefore four different fixes.

Too Tomatoey or Too Sour

Bright, raw tomato needs more cooking. A heavy concentrated-tomato flavour is different and often comes from too much tomato paste. For sourness, make sure the tomato is fully cooked and then check the salt. Butter or a little more cream can soften what remains; sweetener comes last.

Bland—or Just Not Tasting Like Butter Chicken?

Flat flavour usually calls for salt first. A curry that is already seasoned but still tastes generic needs a different diagnosis: check the chicken browning, tomato development and kasuri methi. Smell the garam masala and methi straight from their containers too. Old spices can be present in the recipe and almost absent in the bowl.

Watery Sauce

Once the chicken reaches temperature, take it out. Reduce the gravy uncovered and return the chicken only long enough to coat and warm through.

Great Sauce, Wrong Ratio?

Sometimes the gravy is perfectly thick and there is simply too much of it. An oversized onion, extra tomato or accidentally scaled-up sauce can do that. Remove some and save it for another meal instead of continuing to cook the chicken.

White Yogurt Clumps

The pan was probably too cool, too crowded or carrying too much wet marinade. The curry is still edible. Next time, leave only a light coating on the chicken and give the pieces more space.

Bitter Kasuri Methi

Once too much methi is in the sauce, there is no clean way to remove it. Extra unsweetened gravy or a little cream can dilute the bitterness. Starting with the first teaspoon and increasing slowly is much easier than rescuing an over-methi’d pan.

← Back to the recipe · Build the low-carb dinner →

Build a Low-Carb Butter Chicken Dinner

A lower-carb butter chicken dinner does not need to look like curry surrounded by substitutes you’re merely tolerating. Give the gravy something warm to sit on, something green to cut through the richness and something cold and crisp beside it.

Jeera Cauliflower Rice

Cumin makes cauliflower rice feel like part of dinner.

Serves 4

Ingredients: 600g / about 6 cups cauliflower rice, 1 tbsp ghee or butter, 1 tsp cumin seeds, ½–¾ tsp salt, plus coriander and a small squeeze of lemon if you like.

Heat a wide pan over medium heat and add the ghee. Let the cumin seeds sizzle for 20–30 seconds, until fragrant, then add the cauliflower rice and salt. Increase the heat to medium-high and cook uncovered for about 5–7 minutes.

There will be plenty of steam at first. As it eases, the cauliflower should become tender while the small grains remain separate. Stop before it turns soft and wet.

For more ways to use it, MasalaMonk’s guide to using cauliflower on keto goes beyond cauliflower rice.

Something Green

Garlic spinach is especially good here because its slight bitterness cuts through the buttery gravy. Roasted cauliflower, cabbage, broccoli and green beans are easy alternatives.

Something Cold and Crisp

Cucumber, coriander, mint and lemon bring crunch and acidity. MasalaMonk’s cucumber salad recipe gives you several ways to build that fresh side.

If You Miss Naan

A low-carb naan or roti can make the meal feel much closer to the dinner you were craving. With packaged low-carb breads, check the actual carbohydrate amount and serving size on the label.

Cauliflower rice, one green vegetable and something cold already make a generous plate.

Low-carb butter chicken dinner with jeera cauliflower rice, dark green spinach and cucumber salad on a jewel-toned table.
Put the hot jeera cauliflower rice under the curry so it catches the makhani gravy; keep cucumber alongside it so the crunch, acidity and temperature contrast stay intact.

Is Restaurant Butter Chicken Keto?

Restaurant butter chicken is harder to calculate because the gravy has usually made most of its decisions before you sit down.

It may contain sugar or honey, ketchup, more onion, cashew paste, flour or cornstarch, sweetened tomato products or a premade curry base. Because that gravy is often prepared in a large batch, asking for “no sugar” may not change what is already in the pot.

The most useful question is simple: Does the butter chicken gravy contain added sugar or flour/cornstarch?

Can’t get a clear answer? Simpler grilled dishes are easier to judge when you’re keeping carbohydrates particularly low: tandoori chicken, chicken tikka, kebabs, grilled fish and some dry-style meat preparations. MasalaMonk’s green chutney recipe is a natural partner for those dishes.

Then look at the rest of the order. Rice, naan and sweet chutneys can change the meal far more than a measured amount of tomato in the curry.

Your favourite takeaway may taste quite different from this recipe even when both are good butter chicken. Some house gravies are much sweeter, saltier or richer. If that is exactly the butter chicken you love, a different result at home does not mean the recipe failed; you’re simply aiming at another style.

Butter chicken on a restaurant table beside a menu, with prompts asking about added sugar, flour or cornstarch, and side dishes.
Batch gravy may already contain sugar or starch; when it does, a simpler grilled dish is easier to estimate.

← Back to the recipe · Make ahead and reheat →

Shortcuts and Appliance Notes

A jarred butter chicken sauce can make dinner much faster. Check the total carbohydrates, added sugars, flour or starch, stated serving size and how much sauce you will actually use. A sauce that fits your numbers but tastes flat can often be improved with a little butter, cream and crushed kasuri methi.

The full recipe takes roughly 45–55 minutes of active work plus at least a short marinade. For a quicker weeknight, marinate the chicken first and use those 20–30 minutes to chop and measure everything else. Smooth passata and skipping the optional straining save time without giving up the chicken browning or tomato reduction.

For nights when fifteen minutes really is the limit, MasalaMonk’s 15-minute sesame ground chicken works well over cauliflower rice, sautéed cabbage or lettuce.

Instant Pot

Pressure cooking traps moisture, so the finished gravy tends to be thinner. Use Sauté for the aromatics, deglaze the pot thoroughly and follow the minimum-liquid requirement for your cooker. Once the chicken is cooked, remove it and reduce a loose sauce with Sauté uncovered before adding the chicken back with the cream, butter and kasuri methi.

Slow Cooker

Slow cooking gives tenderness but very little browning, so sear the marinated chicken first when you can. For boneless pieces, 2–3 hours on High or 4–6 hours on Low is a reasonable starting range; the chicken still needs to reach 165°F / 74°C. Add the cream and finishing butter near the end, and reduce a thin gravy separately.

Make Ahead, Store and Reheat

The chicken can be marinated the day before. The blended tomato gravy can also be cooked ahead. If dinner is for tomorrow, refrigerate the gravy before adding the final cream, butter and kasuri methi, then add those as you reheat it.

Cool leftovers promptly and refrigerate them in a covered container. Use them within 3–4 days, in line with USDA leftover-storage guidance.

Cold butter chicken will look much thicker after a night in the refrigerator. That is normal. Warm it gently and add a splash of water or stock as the gravy loosens. Bring reheated leftovers back to 165°F / 74°C.

Butter chicken freezes well too. Portion it before freezing and aim to use it within about 3 months for best quality.

Three stages labeled make ahead, chilled and reheated, showing butter chicken gravy becoming thick when cold and looser again after reheating.
Reheat first, then thin only if needed; melted fats loosen chilled gravy naturally.

Keto Butter Chicken Nutrition

Based on typical nutrition values for the ingredients listed, one-quarter of the finished curry is approximately:

Per servingEstimated amount
CaloriesAbout 500 kcal
ProteinAbout 36g
FatAbout 36g
Total carbohydratesAbout 9g
FiberAbout 2g
Estimated net carbohydratesAbout 7g

Here, net carbs means total carbohydrate minus fiber. The estimate assumes full-fat plain yogurt and heavy/whipping cream in roughly the 30–36% fat range; a lighter fresh cream will lower the fat and calorie numbers somewhat.

The calculation includes the chicken, yogurt, lemon, onion, tomato, ginger, garlic, ghee, butter, cream and measured spices. It does not include cauliflower rice, bread, optional sweetener, extra cream at serving or other sides.

1 serving = ¼ of the finished curry. If you track carbohydrates closely, the labels on the ingredients in your own kitchen are the most relevant numbers.

Frequently Asked Questions

Does Butter Chicken Usually Contain Sugar?

Sometimes. Some home and restaurant versions add sugar or honey to soften tomato acidity; many others don’t. It isn’t required here. Cook the tomato fully and balance the gravy before deciding it needs sweetness.

Do I Really Need Kasuri Methi?

You can make good creamy tomato chicken without it, but kasuri methi contributes an aroma closely associated with butter chicken. Use dried fenugreek leaves, not the same quantity of fenugreek seed or powder. If the leaves are unavailable, omission is safer than an equal substitution.

Can I Make This Dairy-Free?

Yes, although the flavour will shift. Use plain unsweetened dairy-free yogurt in the marinade and full-fat coconut cream in the gravy, along with a suitable non-dairy cooking fat. The finished sauce becomes more coconut-forward and moves away from classic murgh makhani.

If you’re avoiding dairy because of a milk allergy, don’t assume ghee is automatically suitable.

Is This Butter Chicken Gluten-Free?

The recipe itself doesn’t use wheat flour. Stocks, packaged spice blends and prepared sauces can vary, so check labels when avoiding gluten strictly.

Can I Make It Without a Blender?

Absolutely. Use smooth passata, chop the onion finely and leave the gravy a little more rustic. You lose some silkiness, not dinner.

Keep the Butter Chicken

Once the bowl reaches the table, “keto” shouldn’t be the first thing you notice.

There should be a browned edge on the chicken and enough gravy to drag through whatever is underneath it. The tomato should taste deep and fully cooked, the cream should leave the spices easy to taste, and the butter should give the sauce a soft sheen.

The kasuri methi lingers after the bite.

Close-up spoonful of browned butter chicken, glossy orange-red gravy, cumin-speckled cauliflower rice and a small piece of spinach.
Cauliflower rice does not need to impersonate basmati. Here its job is simpler: catch the silky makhani gravy and bring toasted cumin into the same bite as the charred chicken.

Keep the butter chicken. Change the carbs that matter.

← Back to the recipe · ↑ Back to top

Posted on — Leave a comment

5 Folate-Focused Snacks for Pregnancy Nutrition: Chicken and Spinach Delights

Introduction

Embarking on the journey of pregnancy brings with it the joy of nurturing a new life and the responsibility of mindful nutrition. Folate, a critical nutrient for the baby’s neural tube development, becomes a key focus. This blog post introduces you to five delectable snacks combining folate-rich spinach and protein-packed chicken, offering not just nutritional benefits but also an invitation to experiment and share your culinary creations.

The Crucial Role of Folate in Pregnancy

Folate, a vital B vitamin, is essential for the healthy development of the fetus, particularly in preventing neural tube defects. Spinach is an excellent natural source of folate, while chicken provides necessary protein and other B vitamins, making them a perfect duo for pregnancy snacks.

1. Spinach and Chicken Mini Quiches

  • Ingredients: 2 cups chopped cooked chicken, 2 cups chopped spinach, 4 eggs, 1 cup milk, 1 cup grated cheese, whole-wheat pastry crust.
  • Preparation: Combine chicken, spinach, beaten eggs, and milk. Pour into pastry-lined muffin tins, sprinkle with cheese, and bake at 375°F until set.
  • Benefits and Experimentation: These mini quiches are a delightful blend of essential nutrients. Try adding different herbs or a bit of bell pepper for extra flavor and nutrition. Share your version on social media with the hashtag #PregnancyMiniQuiches!

2. Chicken Spinach Roll-Ups

  • Ingredients: Whole grain tortillas, cooked chicken slices, fresh spinach leaves, low-fat cream cheese, assorted herbs.
  • Preparation: Spread cream cheese on tortillas, layer with chicken and spinach, add a sprinkle of herbs, roll up and slice.
  • Engagement: Get creative with your fillings – maybe some sliced avocado or a dash of paprika? Share your unique roll-up ideas online!

3. Spinach Chicken Salad

  • Ingredients: 3 cups baby spinach, 1 cup diced cooked chicken, ½ cup cherry tomatoes, ½ cucumber, light vinaigrette dressing.
  • Preparation: Mix spinach, chicken, tomatoes, and cucumber. Drizzle with dressing and toss.
  • Benefits and Sharing: A perfect combination of taste and health. Experiment with dressings – a squeeze of orange or a sprinkle of nuts, perhaps? Don’t forget to share your salad masterpiece!

4. Creamy Spinach and Chicken Dip

  • Ingredients: 2 cups steamed chopped spinach, 1 cup shredded cooked chicken, 1 cup Greek yogurt, ½ cup grated Parmesan, minced garlic, spices.
  • Preparation: Mix all ingredients. Serve with whole grain crackers or vegetable sticks.
  • Interactive Element: Why not try adding a hint of lemon zest or roasted red peppers for a twist? Share your personalized dip creations and inspire others.

5. Spinach and Chicken Stuffed Mushrooms

  • Ingredients: Large mushrooms, finely chopped cooked chicken and spinach, cream cheese, minced garlic, breadcrumbs, and grated cheese.
  • Preparation: Stuff mushrooms with the chicken-spinach mixture, top with breadcrumbs and cheese, and bake until golden.
  • Engagement: We encourage readers to try different stuffings like quinoa or feta. Inviting them to post photos of their stuffed mushrooms can create a vibrant community experience.

Conclusion and Call to Action

These five folate-focused snacks are more than just recipes; they’re a canvas for your culinary creativity during pregnancy. As you nourish yourself and your growing baby, we invite you to experiment with these recipes, add your personal touch, and share your delicious creations with a community of fellow expectant mothers. Let’s celebrate nutrition and taste together!

10 FAQs for “5 Folate-Focused Snacks for Pregnancy Nutrition: Chicken and Spinach Delights”

  1. Can I use frozen spinach instead of fresh in these recipes? Yes, frozen spinach works well and is often more convenient. Just thaw and drain it before use to remove excess moisture.
  2. Is it safe to eat chicken during pregnancy? Absolutely, as long as it’s fully cooked to a safe temperature to avoid any risk of foodborne illness.
  3. How much folate do these snacks provide? While the exact amount varies, each recipe is designed to provide a significant portion of the daily recommended folate intake for pregnant women.
  4. Can I make these snacks in advance? Yes, most of these snacks can be prepared ahead of time. The mini quiches and roll-ups, for instance, store well in the refrigerator.
  5. Are these snacks suitable for vegetarians? These recipes focus on chicken, but you can substitute with vegetarian protein sources like tofu or tempeh, which are also good folate sources.
  6. Can I add other vegetables to these snacks? Definitely! Feel free to include other vegetables like bell peppers or carrots to enhance the nutrient content and flavor.
  7. What can I use as a substitute for cream cheese in the dip? You can use Greek yogurt or a plant-based cream cheese alternative if you prefer a lighter or dairy-free option.
  8. Are these snacks diabetic-friendly? These snacks are generally healthy, but it’s always best to monitor your overall carbohydrate intake and consult with a healthcare provider.
  9. How can I increase the protein content in these snacks? Adding extra chicken, Greek yogurt, or even nuts and seeds can boost the protein content of these snacks.
  10. Can these recipes be modified for gluten-free diets? Yes, all these recipes can be easily modified to be gluten-free. For instance, use gluten-free pastry for the mini quiches or gluten-free crackers for the dip.

Blog Tags

Pregnancy Nutrition, Folate-Rich Snacks, Healthy Pregnancy Diet, Chicken Recipes, Spinach Snacks, Maternal Health, Nutrient-Dense Foods, Easy Pregnancy Meals, Balanced Diet for Pregnancy, Protein-Rich Snacks