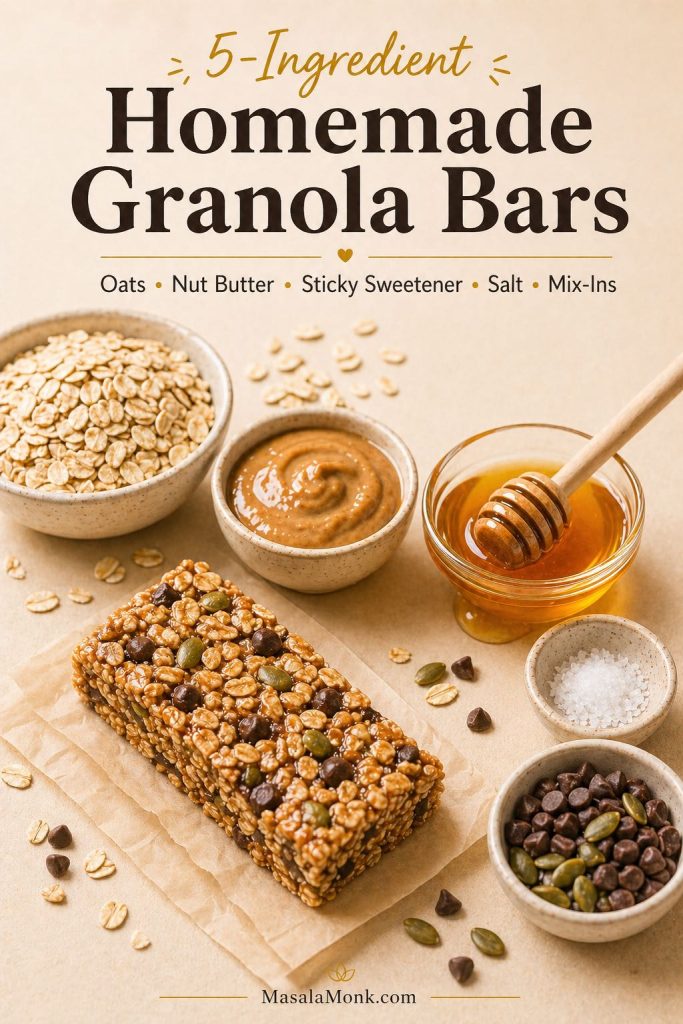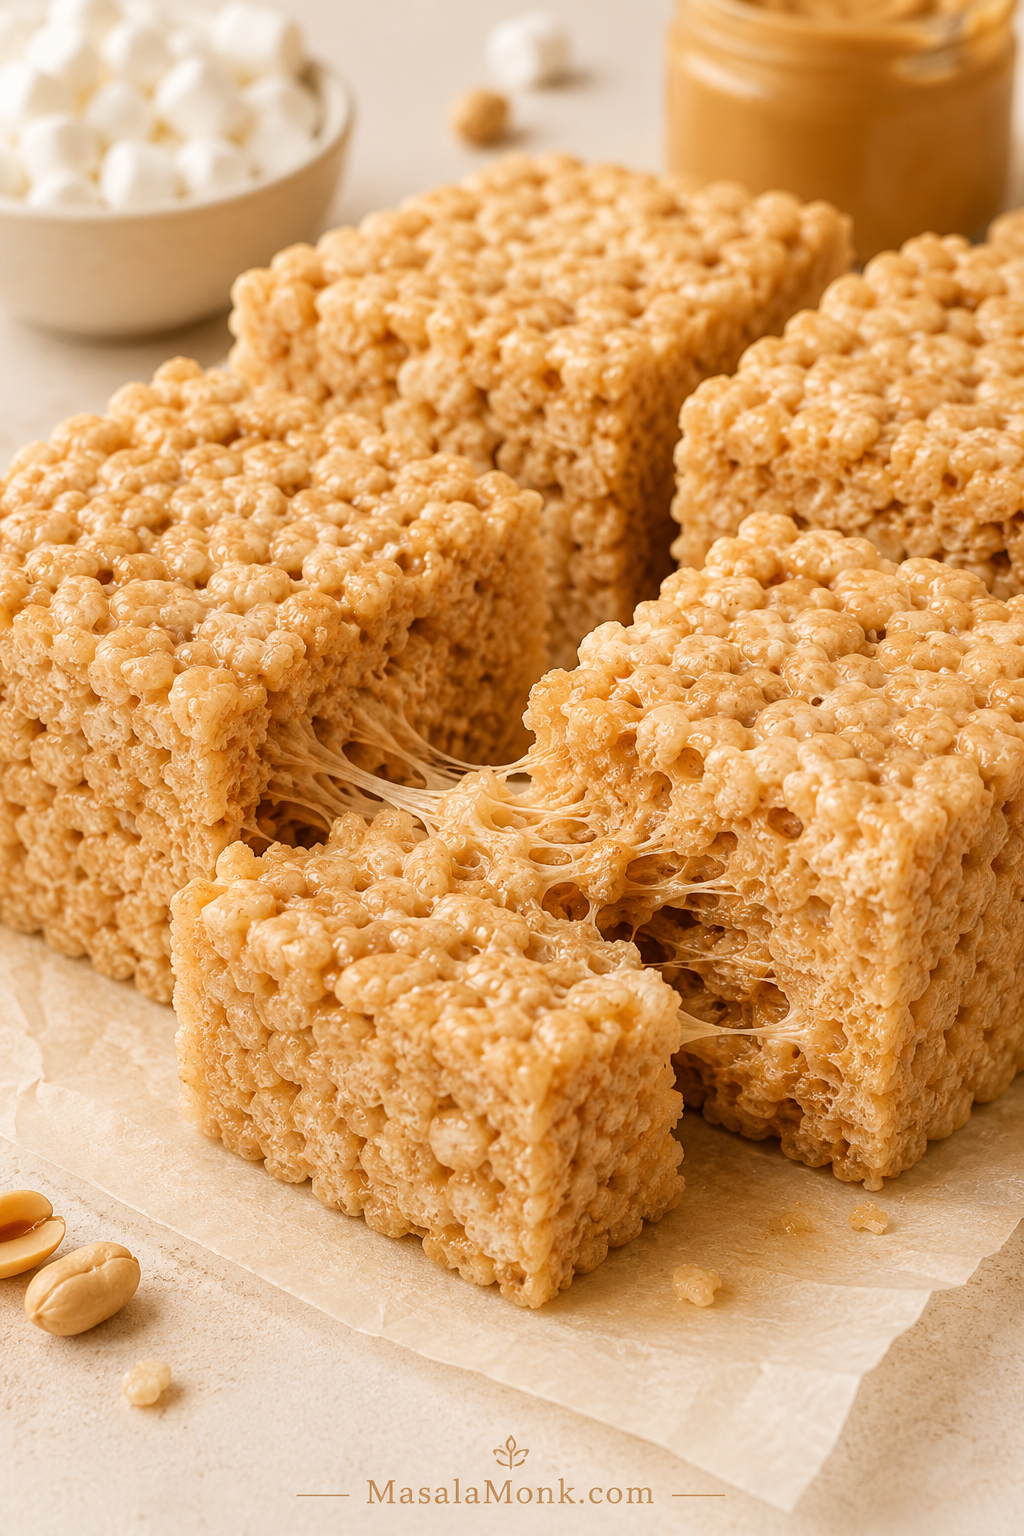
These peanut butter rice crispy treats are soft, chewy, salty-sweet no-bake bars with creamy peanut butter melted into the marshmallow mixture and a crisp cereal bite in every square. They taste nostalgic, but the peanut butter makes them richer and more satisfying than the plain version.
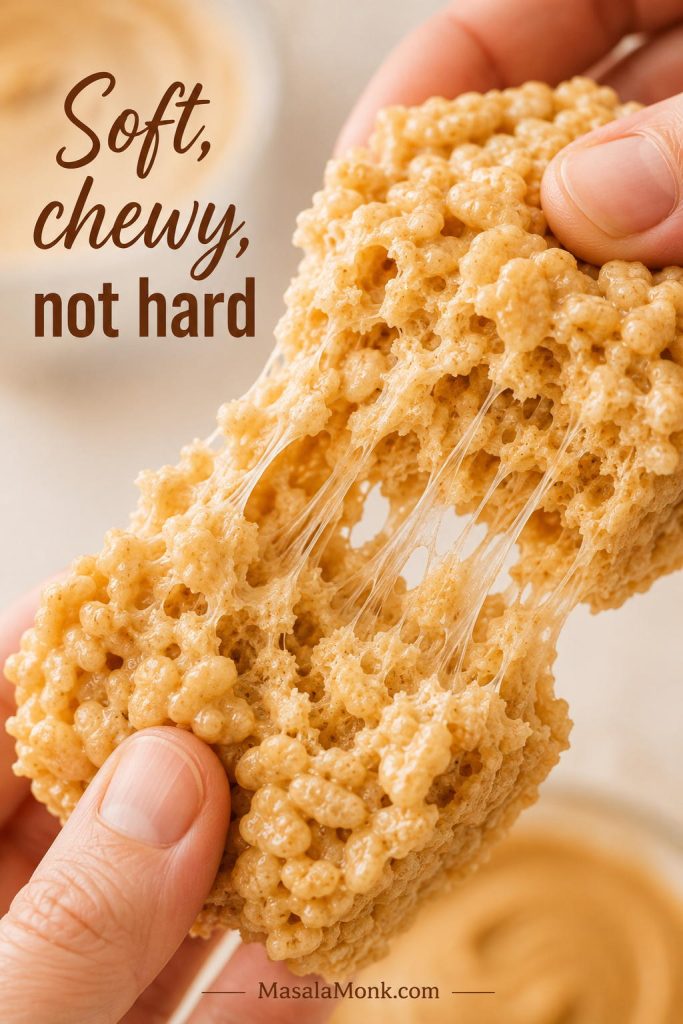
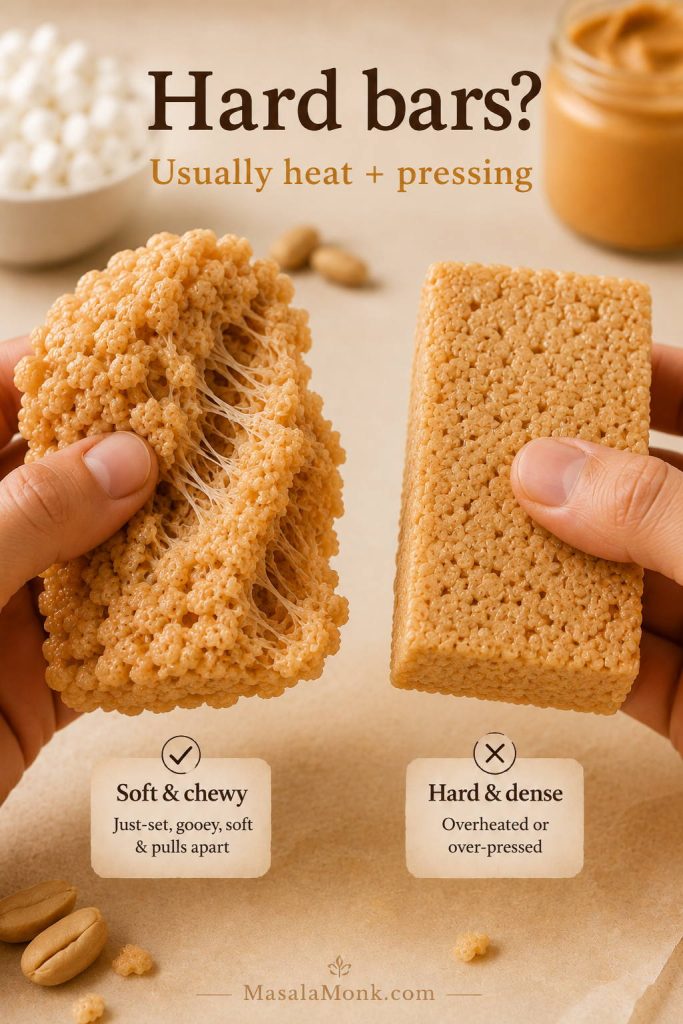
The best ones pull apart with soft marshmallow threads, hold their shape when you pick them up, and still have that little crackly bite from the cereal. They should feel homemade and tender, not hard, dry, greasy, or packed down like a brick.
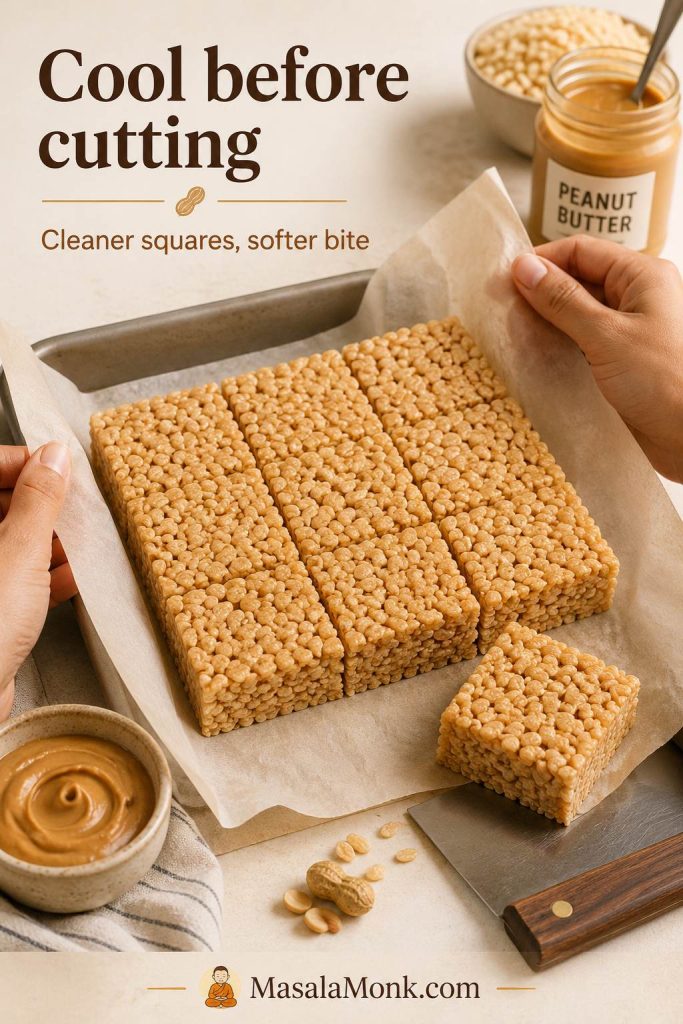
This is the kind of pan that disappears in uneven little cuts: one square for a lunchbox, one for the potluck tray, one warm corner piece while the bars are still setting, and then “just one more sliver” later in the afternoon.
You may know these as peanut butter Rice Krispie treats, but Rice Krispies cereal is not the only option. Any fresh crisp rice cereal works as long as the marshmallow mixture stays gentle, glossy, and well balanced.
This version is built around one goal: peanut butter rice crispy treats that stay soft instead of turning stiff. The details are small but important: low heat, fresh marshmallows, the right cereal range, and a light hand when pressing the mixture into the pan.
Peanut Butter Rice Crispy Treats Guide
Start Here
Quick Answer: How to Make Soft Peanut Butter Rice Crispy Treats
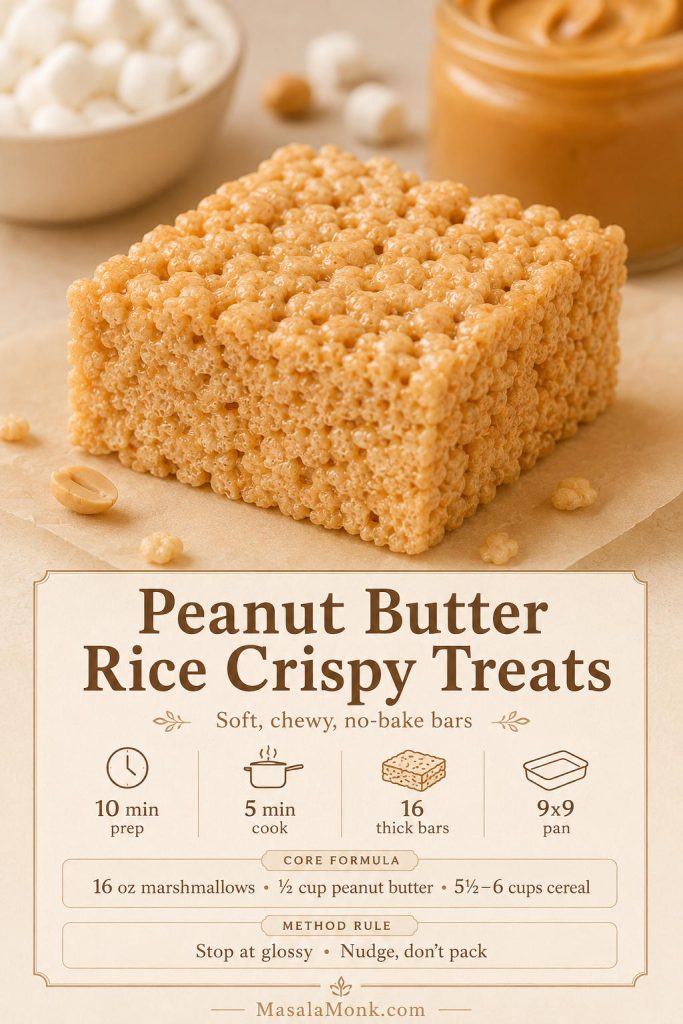
For soft peanut butter rice crispy treats, melt 5 tablespoons butter over low heat, add most of a 16-ounce bag of mini marshmallows, then stir in ½ cup creamy peanut butter, vanilla, and salt. Fold in 5½ to 6 cups crisp rice cereal, press the mixture lightly into a lined 9×9-inch pan, and cool before slicing.
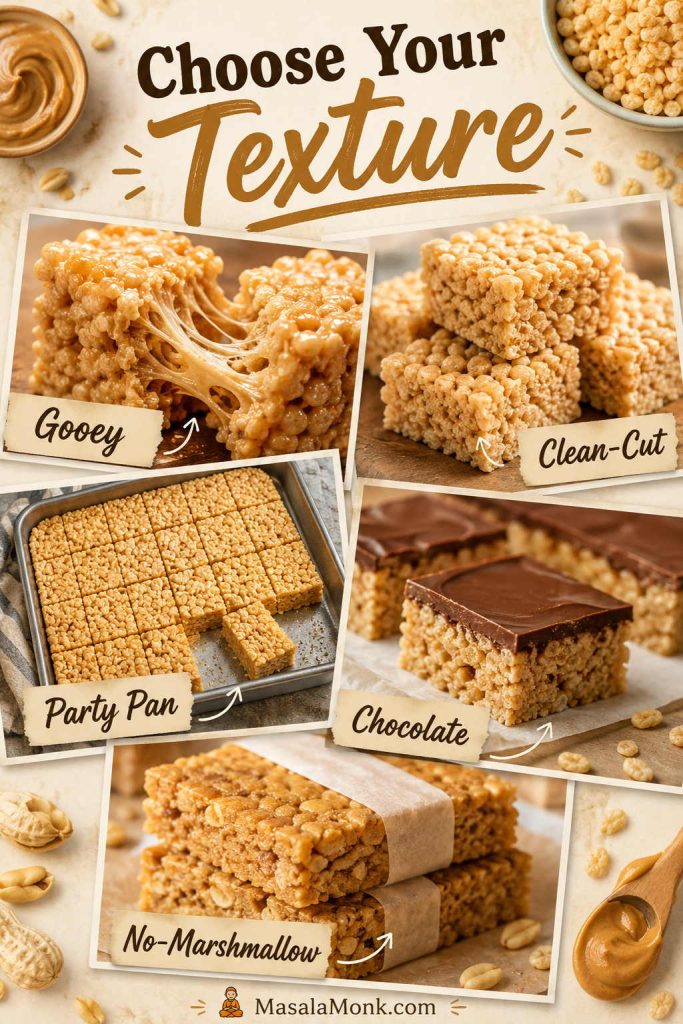
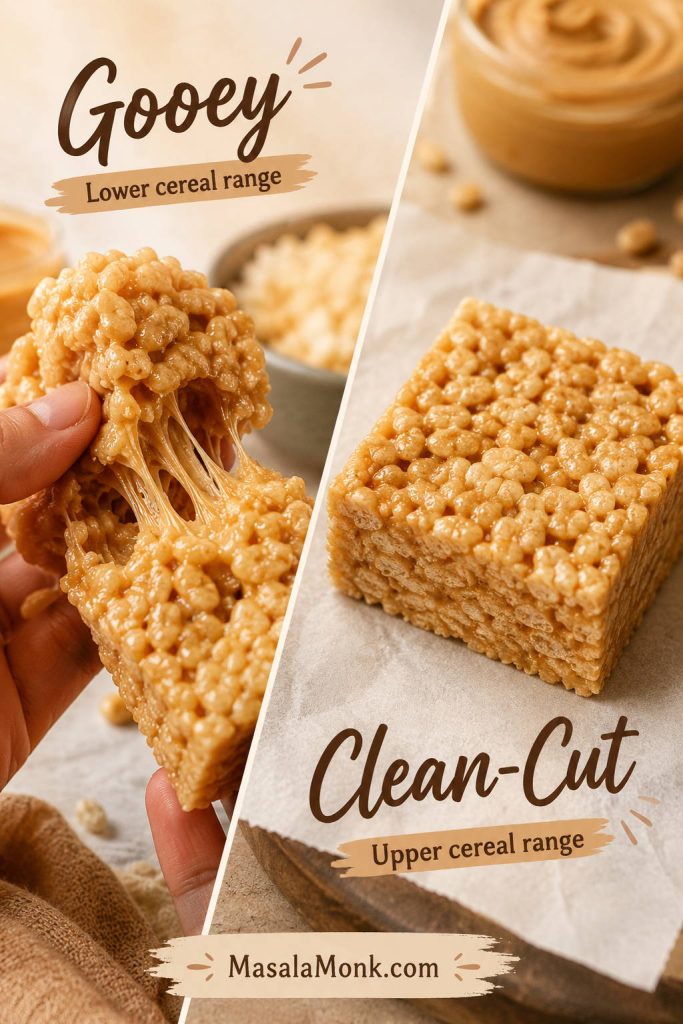
For softer, gooier bars, use 5½ cups cereal and fold in reserved mini marshmallows at the end. For cleaner-cut squares, use the full 6 cups cereal and let the pan cool completely. Not sure which texture you want? Use the texture chooser before you start.
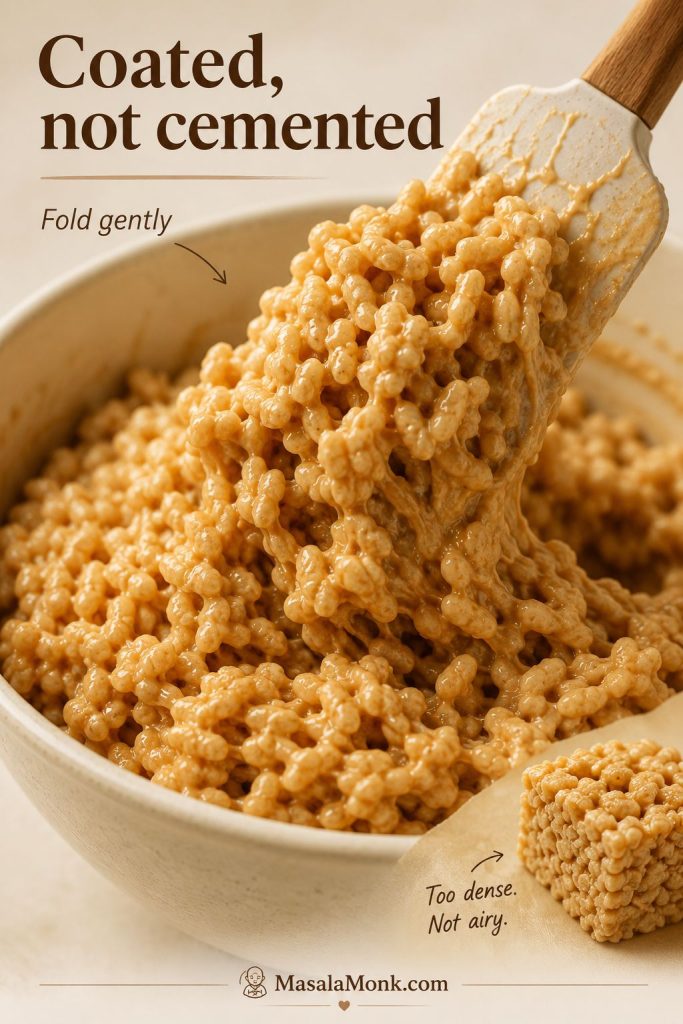
The key is gentle heat and light pressing. Stop when the marshmallow mixture is glossy, not bubbling hard, and nudge the cereal mixture into the pan instead of packing it down. That is what keeps the bars soft instead of brick-like.
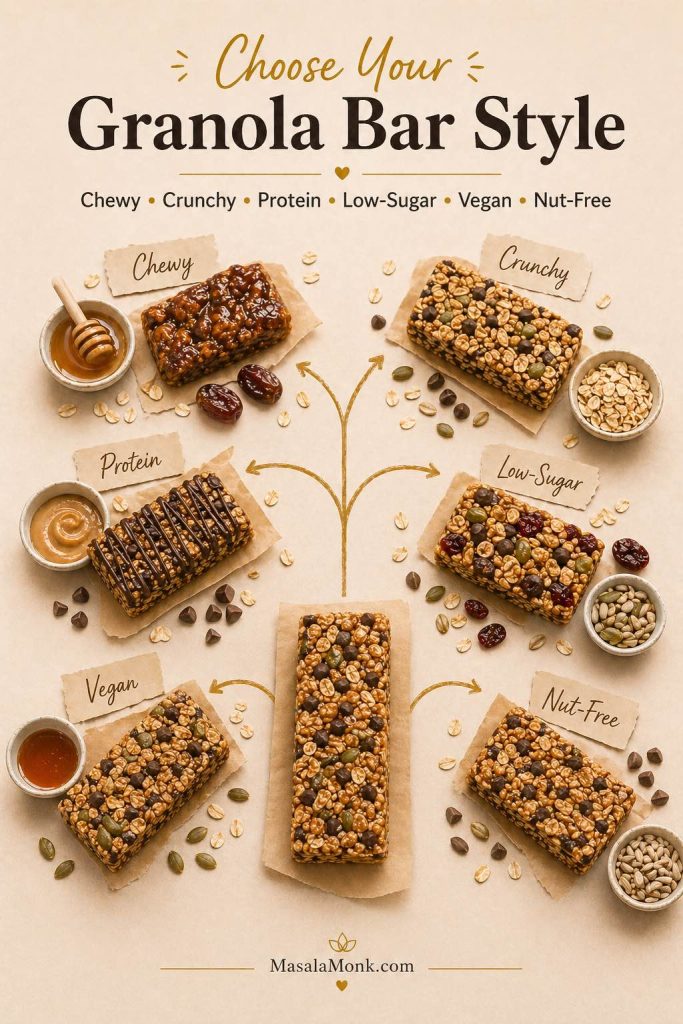
Choose Your Peanut Butter Rice Crispy Treats Texture
Before you start, decide what kind of treat you want from the pan. The same base recipe can turn soft and gooey for home, cleaner-cut for lunchboxes, chocolate-topped for dessert, party-ready in a 9×13 pan, or firmer and snack-bar-like without marshmallows.
| What you want | Best move | Where to go |
|---|---|---|
| Softest, gooey bars | Use 5½ cups cereal and fold in reserved mini marshmallows | See the Ratio |
| Cleaner lunchbox squares | Use 6 cups cereal and cool completely before cutting | See the Ratio |
| Party tray | Use the larger 9×13 pan scale instead of stretching the 9×9 batch | Choose a Pan |
| Dessert-bar version | Add the soft chocolate-peanut butter topping after the bars cool | Add Chocolate |
| Firmer snack-bar style | Use the peanut butter and honey or maple syrup version without marshmallows | Skip Marshmallows |
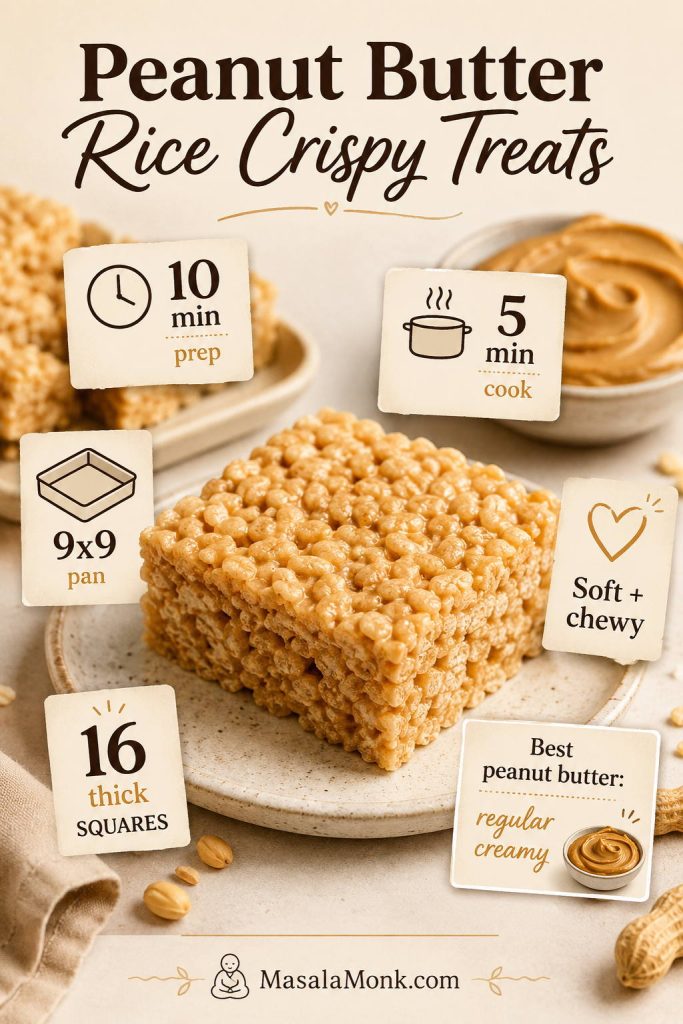
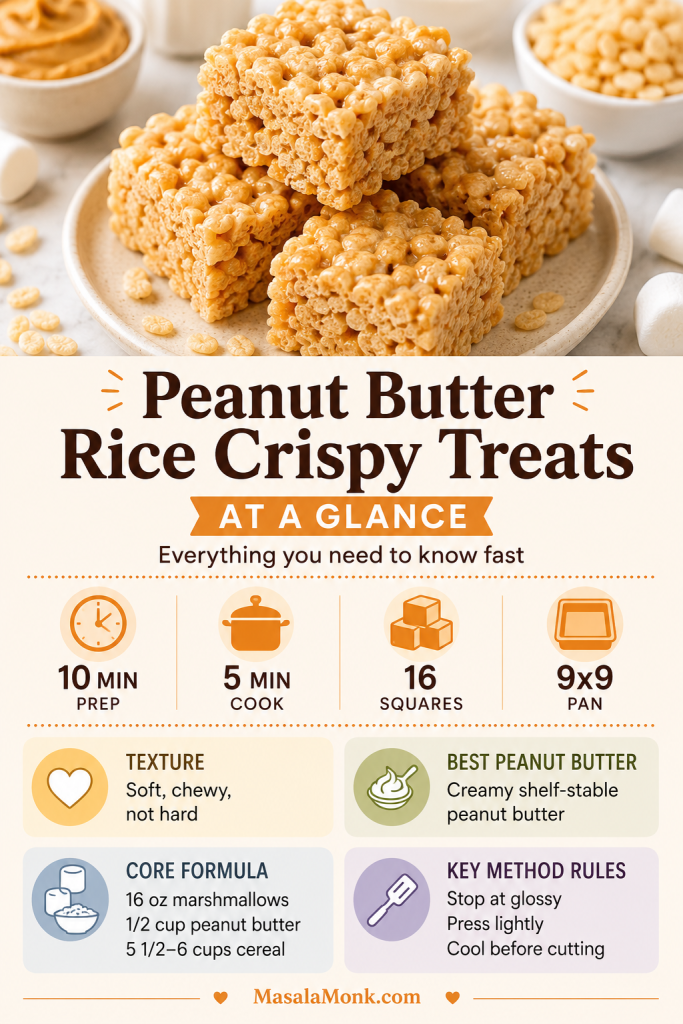
Peanut Butter Rice Crispy Treats at a Glance
| Prep time | 10 minutes |
|---|---|
| Cook time | 5 minutes |
| Cooling time | 30–45 minutes |
| Main pan | 9×9-inch pan for thick bars |
| Party pan | 9×13-inch pan for thinner squares |
| Yield | 16 thick 9×9 squares, or about 24 thinner 9×13 party pieces |
| Texture | Soft, chewy, lightly gooey, crisp around the cereal |
| Flavor | Sweet-salty, peanut-buttery, marshmallowy |
| Best for | Lunchboxes, bake sales, potlucks, parties, after-school snacks |
| Best peanut butter | Regular creamy peanut butter |
Why These Peanut Butter Rice Crispy Treats Work
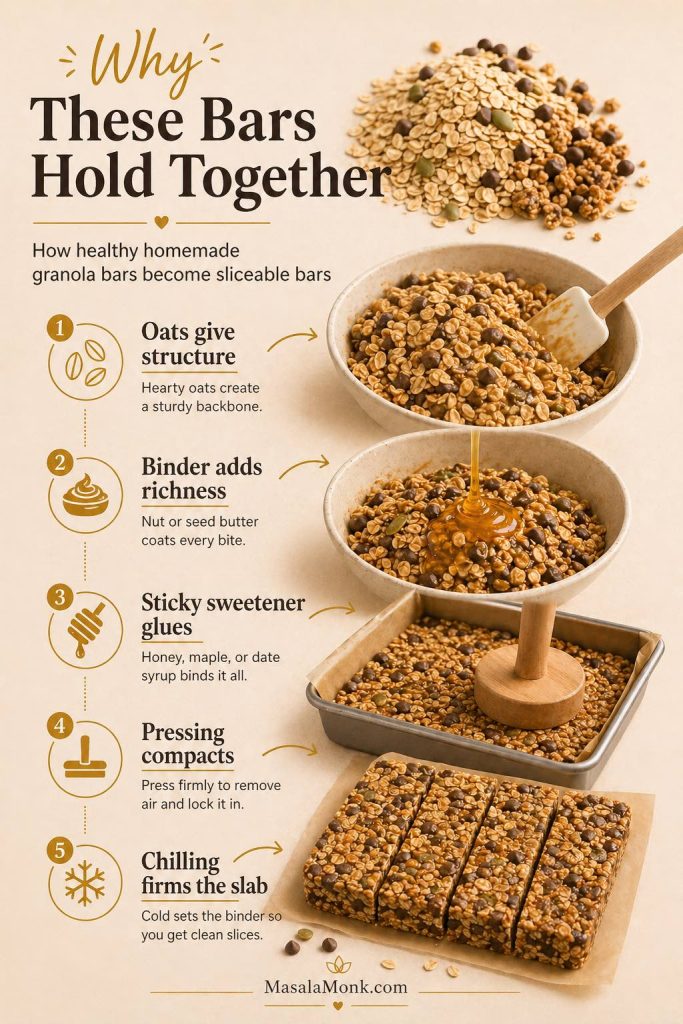
Peanut butter changes more than the flavor. It adds richness, saltiness, and body, so the bars taste fuller than plain marshmallow cereal treats. The tradeoff is that peanut butter also adds fat, which means the ratio matters: too much can make the bars greasy or heavy, while too little lets the peanut flavor fade into the marshmallow.
The balance is simple: enough marshmallow for pull, enough peanut butter for flavor, and just enough cereal to hold the bars together without making them stiff. You want a square that lifts cleanly from the pan but still bends a little when you bite it.
The peanut butter also keeps the sweetness from tasting one-note. Instead of plain marshmallow sweetness, you get a salty-sweet bar with deeper roasted peanut flavor, soft marshmallow pockets, and a crisp cereal bite.
The method matters too. Melt gently, stir the peanut butter in off the heat, fold without crushing the cereal, and press the mixture just enough to settle it into the pan. Think nudge, not pack.
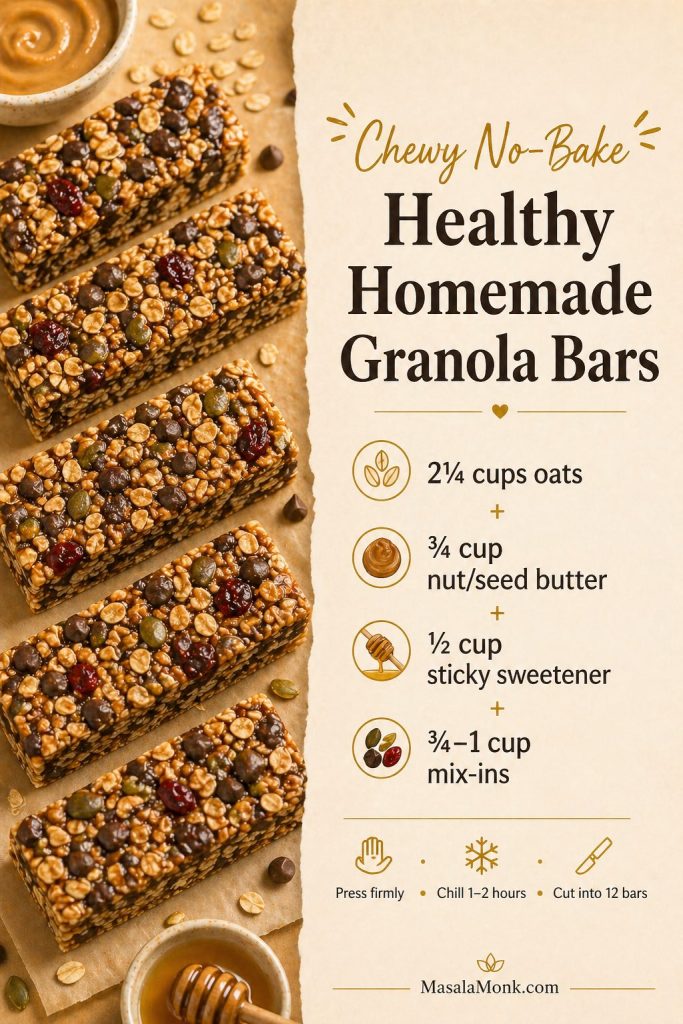
Ingredients for Peanut Butter Cereal Bars
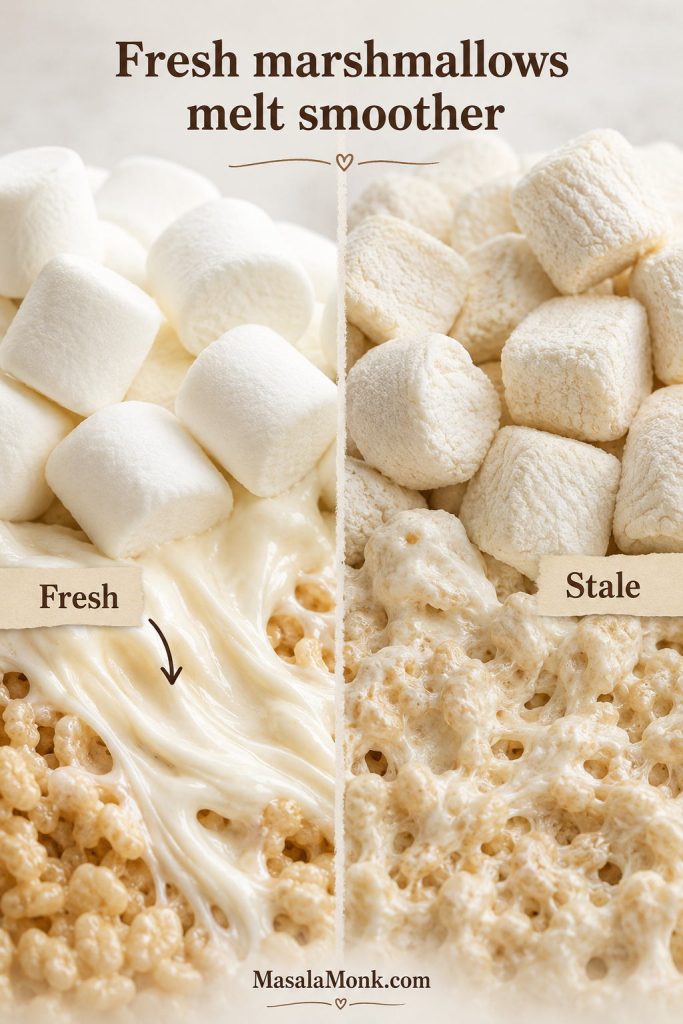
The ingredient list is short, so freshness matters. Soft marshmallows melt smoother, regular creamy peanut butter blends more reliably, and crisp cereal gives the bars that little crackle against the chewy marshmallow base.
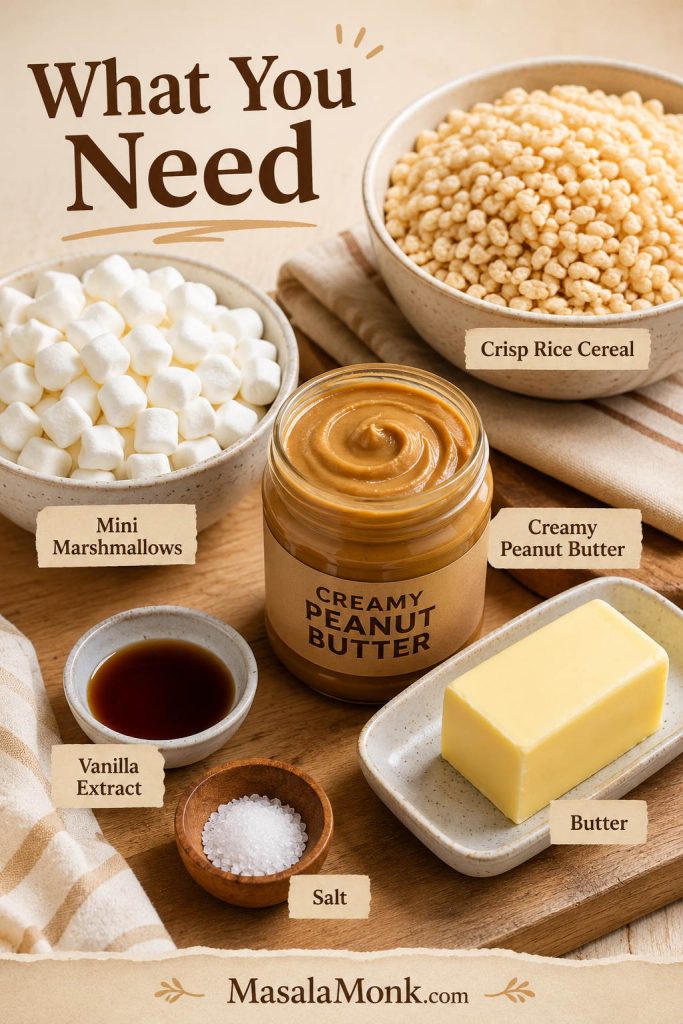
Crisp rice cereal
Any fresh crisp rice cereal will work here. Rice Krispies cereal is the branded classic, and the official peanut butter treats formula also uses butter, marshmallows, peanut butter, and crisp rice cereal; however, this version is built for thicker 9×9 bars with more softness and troubleshooting. See the official Rice Krispies peanut butter treats baseline.
Freshness matters: if the cereal tastes stale from the box, the finished bars will taste flat too, no matter how good the peanut butter mixture is.
Cereal volume can vary by brand and by how you scoop it, so the recipe gives a small range. Stay at the lower end for a softer pan, or use the upper end when you want neater squares.
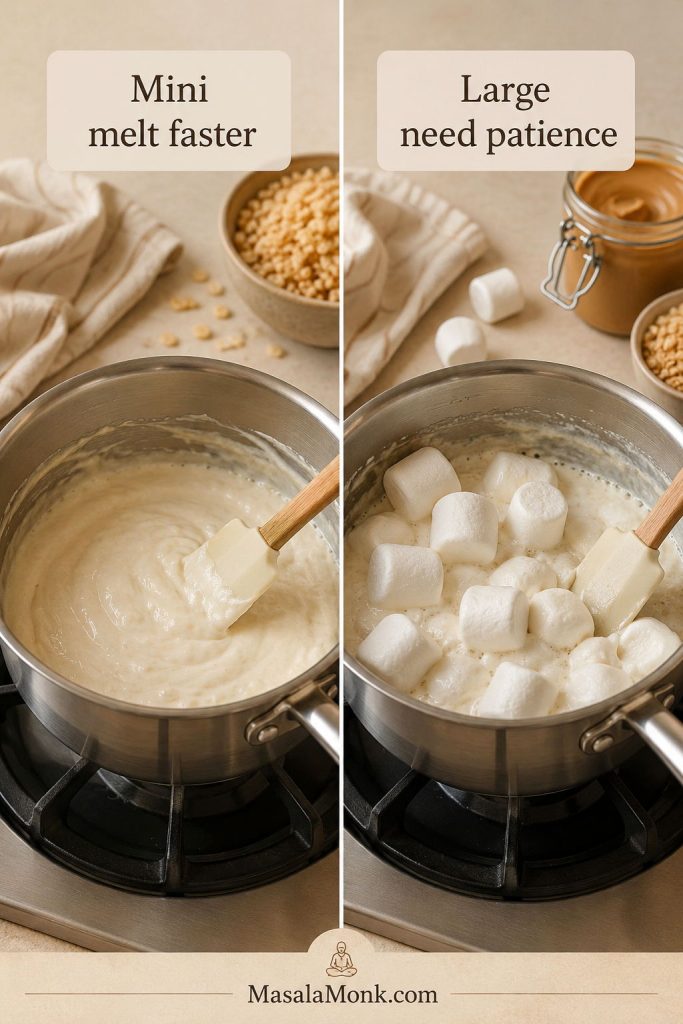
Mini marshmallows
Mini marshmallows melt faster and more evenly than large marshmallows. If they feel dry, firm, or stale in the bag, save them for something else. Fresh marshmallows melt smoother and give you softer, stretchier bars.
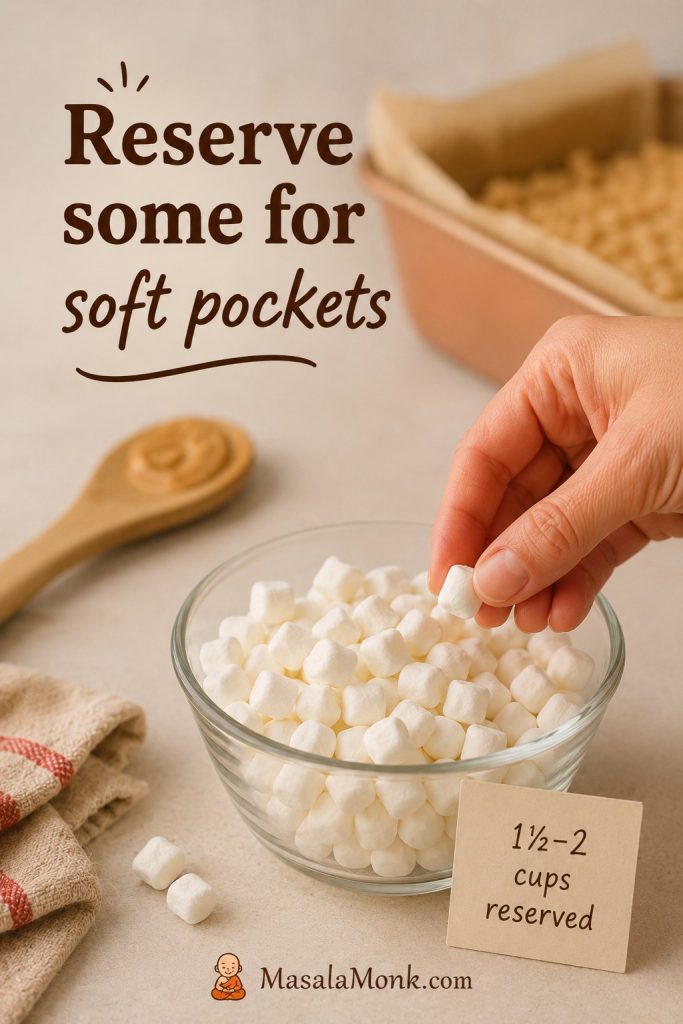
For the softest texture, reserve 1½ to 2 cups of mini marshmallows from the bag and fold them into the warm cereal mixture at the end. They will stay partly intact and create little marshmallow pockets throughout the bars.
Large marshmallows
Large marshmallows work, but weight is more reliable than counting pieces. This recipe needs 16 ounces / 454 g marshmallows total. Large marshmallows melt more slowly than minis, so keep the heat low and stir patiently instead of increasing the heat.
Creamy peanut butter
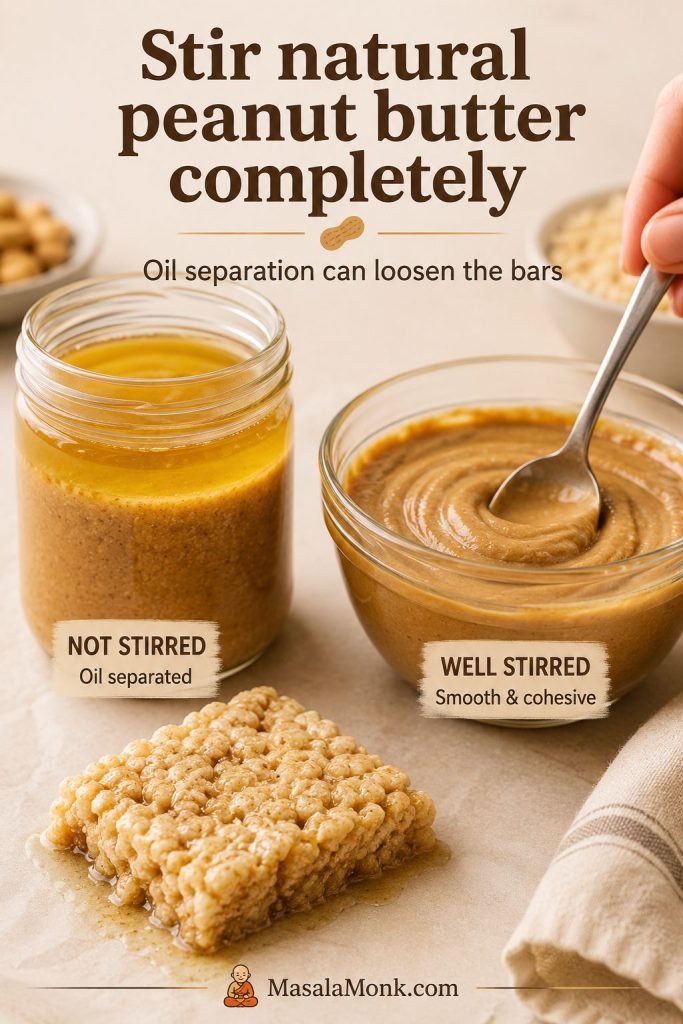
Regular creamy peanut butter is the safest choice because it blends smoothly into the melted marshmallows and gives the bars a consistent texture. Natural peanut butter can work, but it is more likely to separate, which can make the bars oily, loose, or crumbly.
Butter, vanilla, and salt
Butter helps the marshmallows melt smoothly and gives the bars a rounder flavor. Salted butter works well because peanut butter loves salt. If you use unsalted butter, add fine salt to the mixture.
Vanilla is optional in the strictest sense, but it makes the bars taste more finished. It softens the marshmallow sweetness and brings the peanut butter flavor forward.
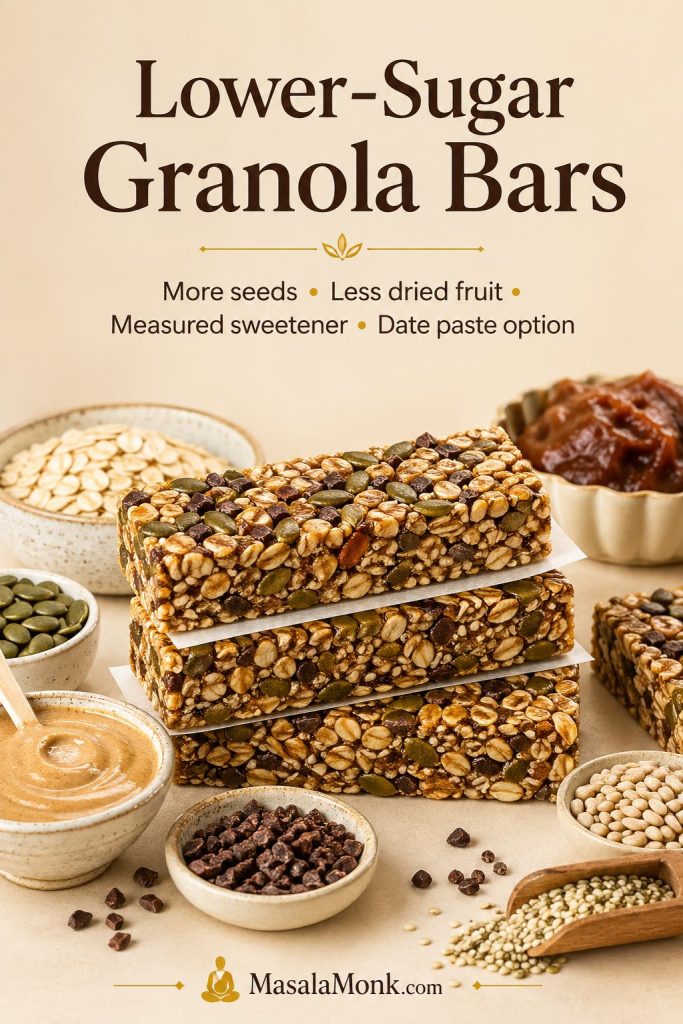
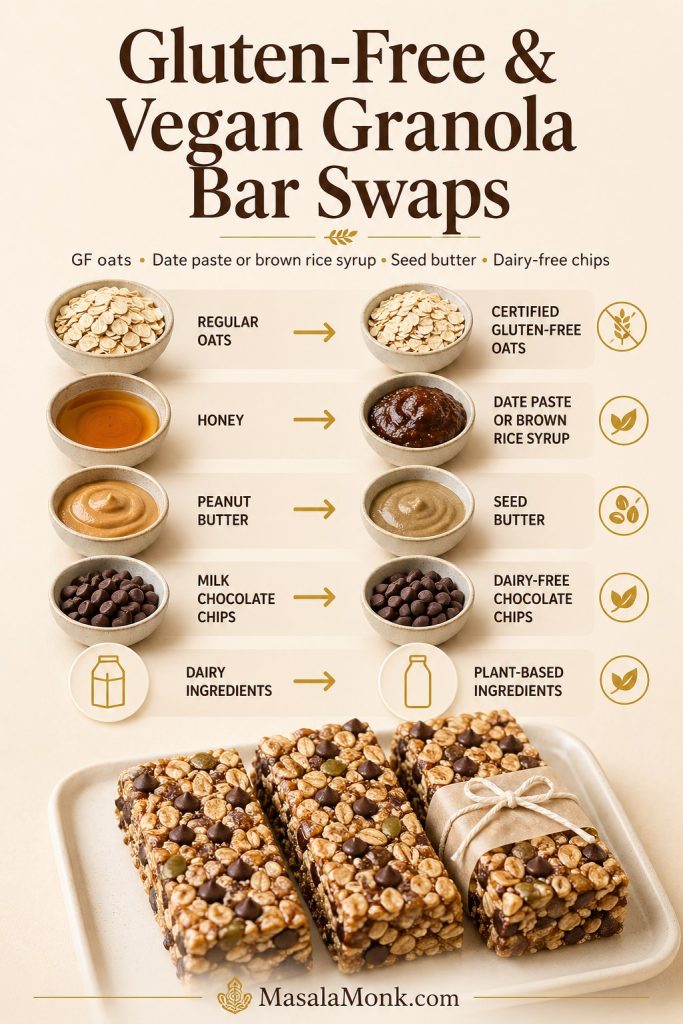
Gluten-free and dairy-free notes
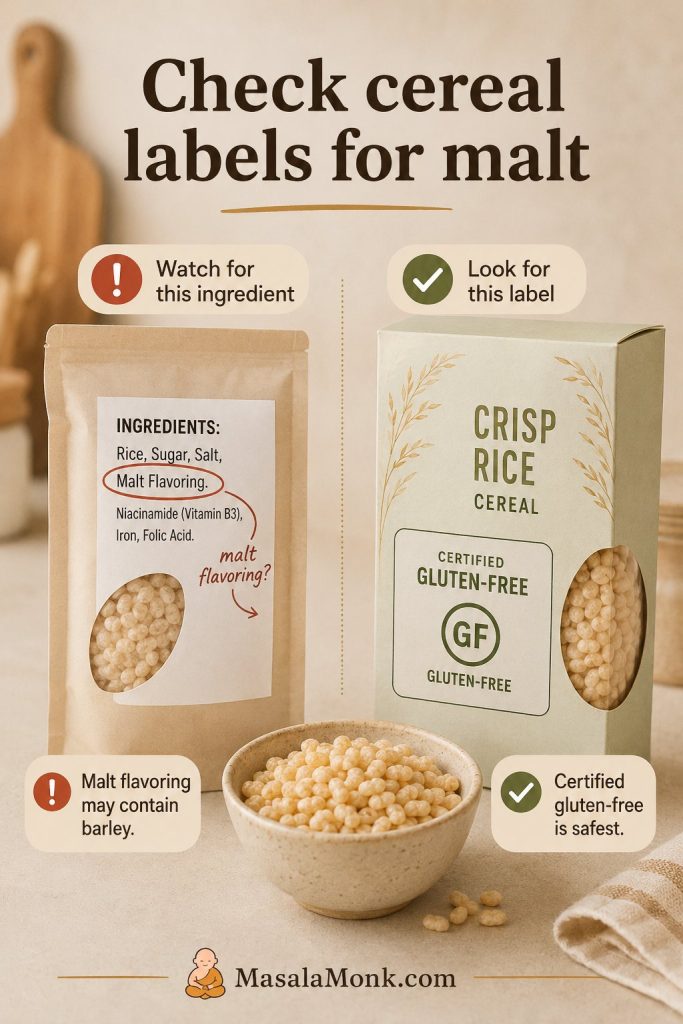
Making these gluten-free mostly comes down to the cereal label. Some crisp rice cereals contain malt flavoring, and malt is often made from barley, so use a certified gluten-free crisp rice cereal if gluten matters in your kitchen. The Celiac Disease Foundation explains why many crispy rice treats are not automatically gluten-free.
Dairy-free bars need a dairy-free butter substitute and dairy-free chocolate if you are adding the topping. Vegan bars also need vegan marshmallows, or you can use the no-marshmallow peanut butter and maple syrup version below.
Best Peanut Butter to Use
Peanut butter is doing two jobs here: flavor and structure. A smooth, no-stir creamy peanut butter melts into the marshmallow base instead of fighting it, which is why it gives the most reliable bars.
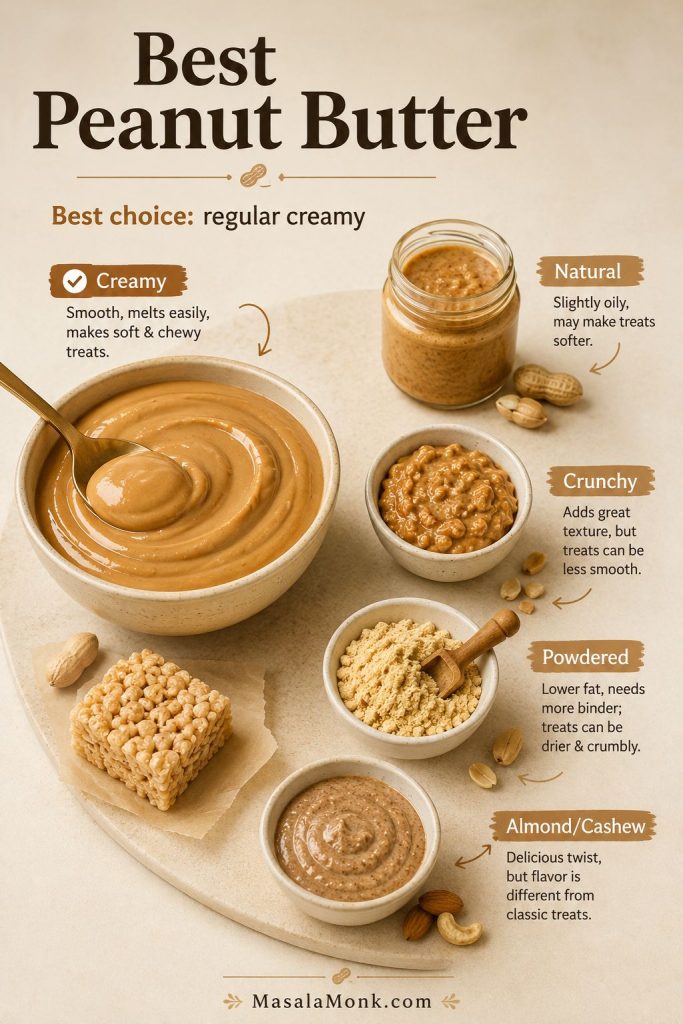
| Peanut butter type | Does it work? | What to expect |
|---|---|---|
| Regular creamy peanut butter | Best choice | Melts smoothly into the base and gives the cleanest, softest set |
| Natural peanut butter | Possible, but riskier | Can separate and make the bars greasy, loose, or crumbly |
| Crunchy peanut butter | Yes | Adds peanut crunch, but the finished bars will not feel as soft and uniform |
| Powdered peanut butter | Not recommended | Can make the mixture dry unless the recipe is heavily adjusted |
| Almond or cashew butter | Yes, as a variation | Works as a variation, but the flavor and set will be different |
If you only have natural peanut butter, stir it extremely well before measuring. If oil is sitting on top of the jar, the bars are more likely to turn greasy. For extra structure, use the full 6 cups of cereal instead of 5½ cups. If your bars already turned oily or loose, jump to the fixes.
If peanut butter is the flavor you are here for, these peanut butter cookies are the baked, cookie-style route for the same salty-sweet craving.
For a denser old-school peanut butter candy texture, this peanut butter fudge guide is the better next stop.
Best Ratio for Soft, Chewy Bars
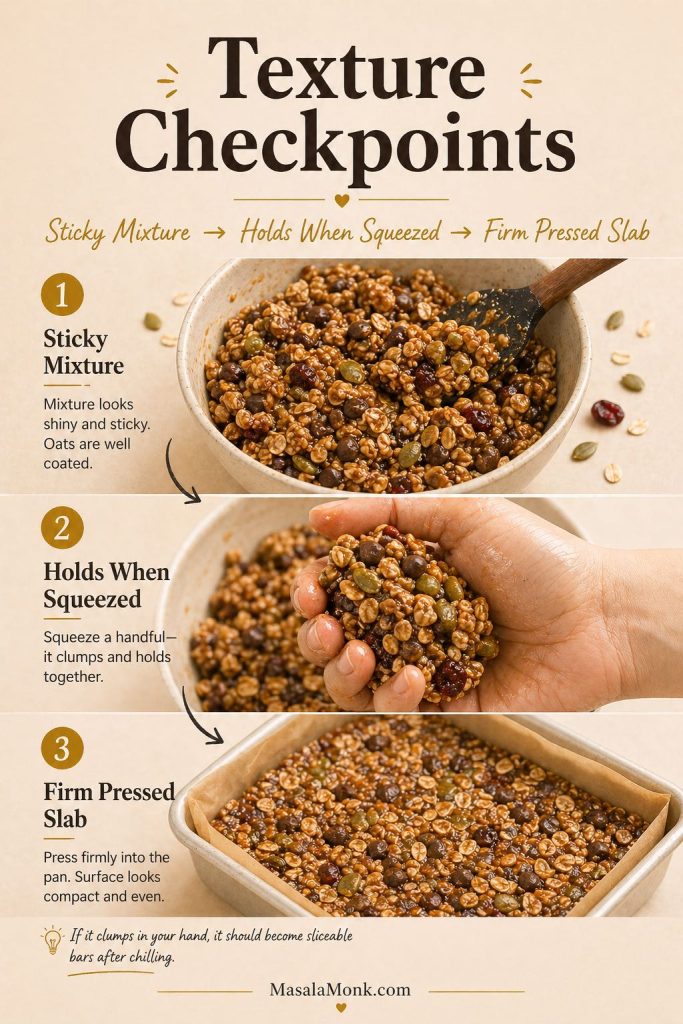
Most hard, dry cereal bars are not really a cereal-brand problem. They happen when the binder gets stretched too far, the marshmallows get too hot, or the warm mixture gets packed down too firmly.
The goal is not just a sweet square. It is a bar that bends slightly when you bite it, tastes deeply peanut-buttery, and still has enough cereal crackle to keep it from feeling heavy.
This recipe uses a 9×9-inch pan as the main version because it gives thick, soft bars without making them too tall to bite. For thinner party bars, use the 9×13 scale below.
Main 9×9 ratio
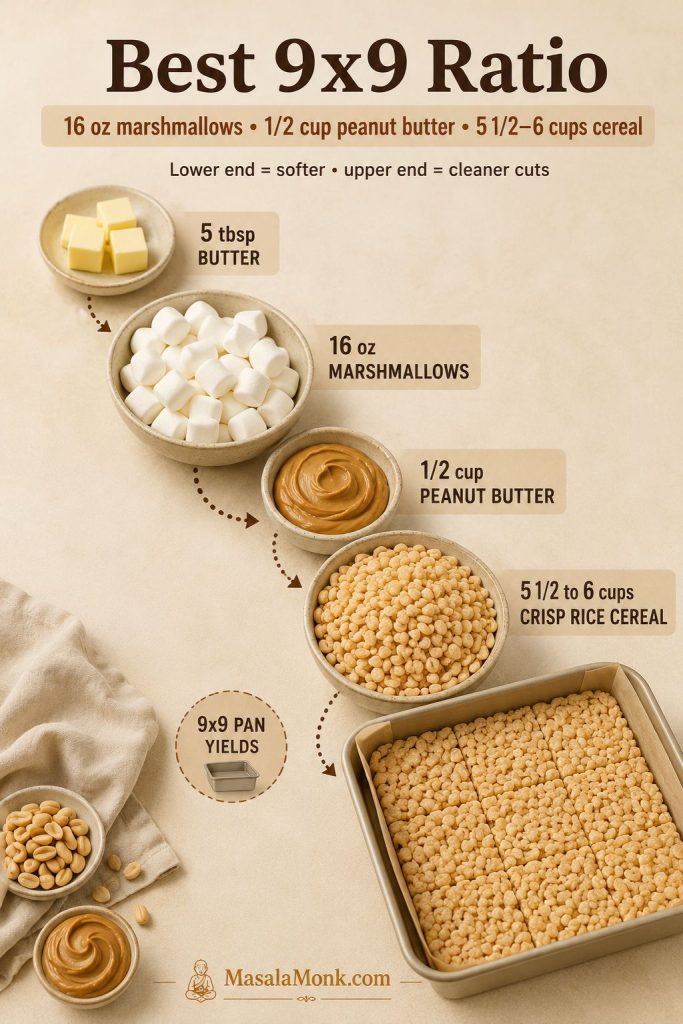
| Ingredient | US amount | Metric amount | Why it matters |
|---|---|---|---|
| Salted butter | 5 tbsp | 70 g | Helps marshmallows melt smoothly and adds richness |
| Mini marshmallows | 16 oz bag | 454 g | Creates the soft, chewy binder |
| Creamy peanut butter | ½ cup | 125–130 g | Adds peanut flavor without making the bars greasy |
| Crisp rice cereal | 5½–6 cups | 155–170 g | Use less for gooey bars, more for cleaner cuts |
| Vanilla extract | 1 tsp | 5 ml | Rounds out the flavor |
| Fine salt, if using unsalted butter | ¼ tsp | 1–1.5 g | Balances the sweetness |
If you only make one version first, make the 9×9 pan with the softer cereal amount. It gives you the most classic pull-apart texture while still cutting cleanly enough for sharing.
Softer, gooier bars
For softer, gooier bars, go with 5½ cups cereal and reserve 1½ to 2 cups of mini marshmallows to fold in at the end. The bars will be a little stickier, but the texture is plush and marshmallowy.
Cleaner-cut squares
For cleaner-cut squares, use the full 6 cups cereal and let the pan cool completely before slicing. This version still tastes chewy, but it holds up better for lunchboxes, parties, and bake sales.
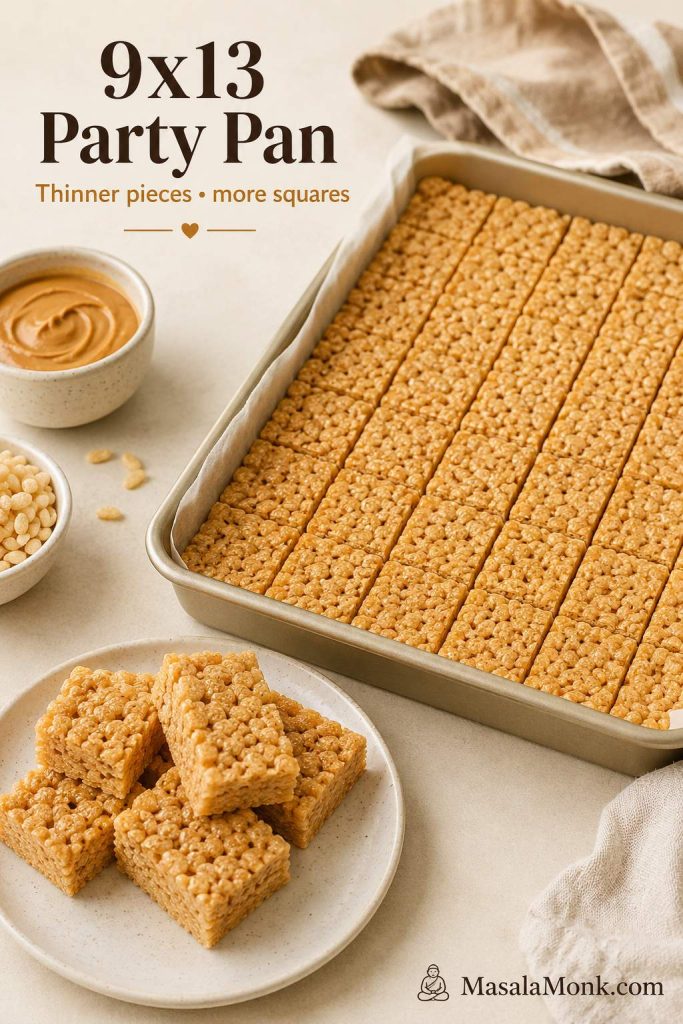
9×13 Party-Pan Scale for Peanut Butter Rice Crispy Treats
For potlucks, bake sales, and larger gatherings, use this 9×13-inch pan scale. It makes about 24 thinner squares, or more if you cut small party pieces. The full printable-style amounts are also included in the recipe card.
Do not simply spread the 9×9 recipe into a 9×13 pan unless you intentionally want very thin bars. The larger pan needs a larger batch.
| Ingredient | US amount | Metric amount |
|---|---|---|
| Salted butter | ½ cup / 8 tbsp | 113 g |
| Mini marshmallows | 20 oz | 567 g |
| Creamy peanut butter | 1 cup | 250–260 g |
| Crisp rice cereal | 8–8½ cups | 225–240 g |
| Vanilla extract | 1½–2 tsp | 7.5–10 ml |
| Fine salt, if using unsalted butter | ½ tsp | 2–3 g |
Equipment You Need
You only need a 9×9-inch pan, parchment paper, a heavy-bottomed pot, and a silicone spatula for the main recipe. A kitchen scale helps with marshmallows and cereal, especially if you are using large marshmallows or a different cereal brand.
For the larger batch, use a 9×13-inch pan. For cleaner cuts, lightly grease your knife before slicing, especially if you added the chocolate topping.
How to Make Peanut Butter Rice Crispy Treats
This is a quick recipe, but it rewards a gentle hand. A few calm minutes over low heat are what keep the bars soft, stretchy, and easy to bite instead of stiff.
Once your ingredients are measured, the process moves quickly. Have the pan ready before you melt the marshmallows so the warm mixture can go straight in while it is still easy to shape.
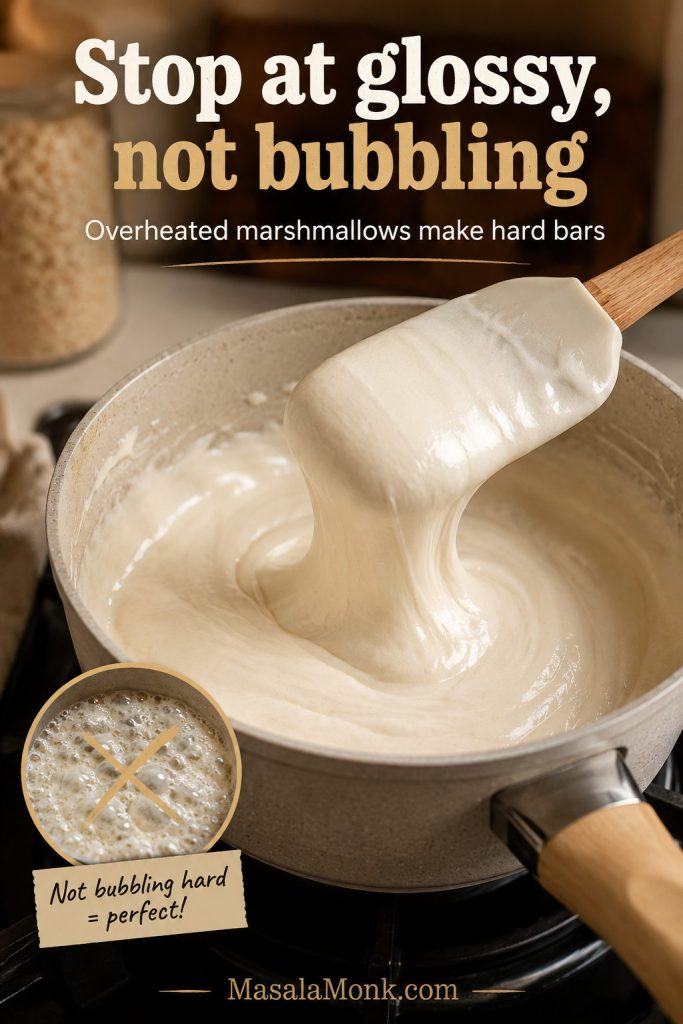
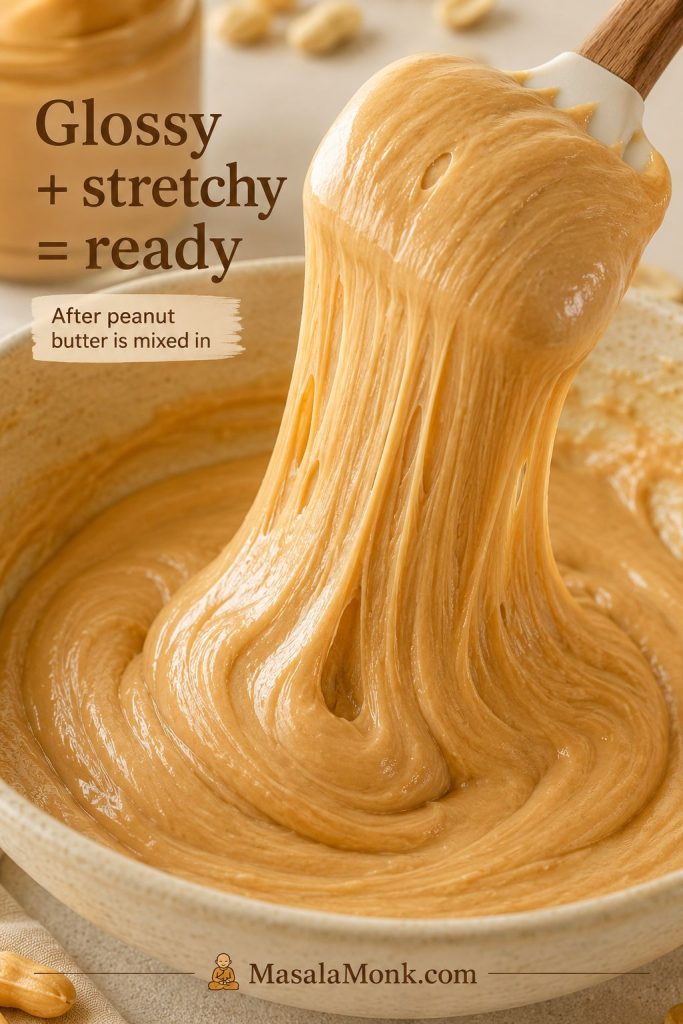
The mixture will look messy at first, then suddenly turn glossy, stretchy, and smooth. That glossy stage is the signal to stop cooking, stir in the peanut butter, and move quickly before the cereal mixture cools and stiffens.
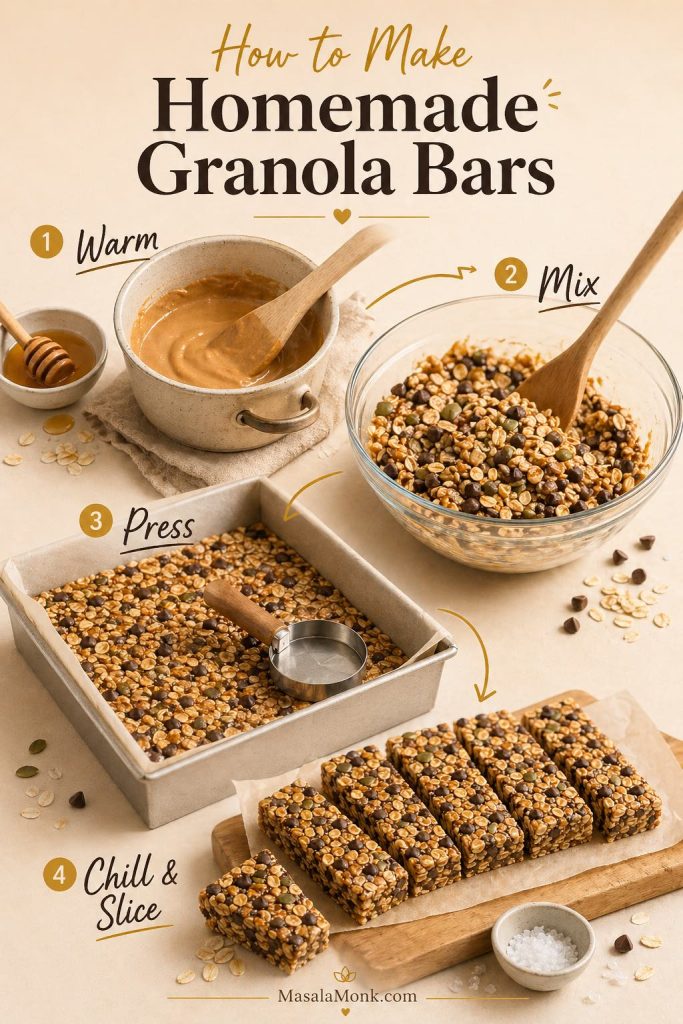
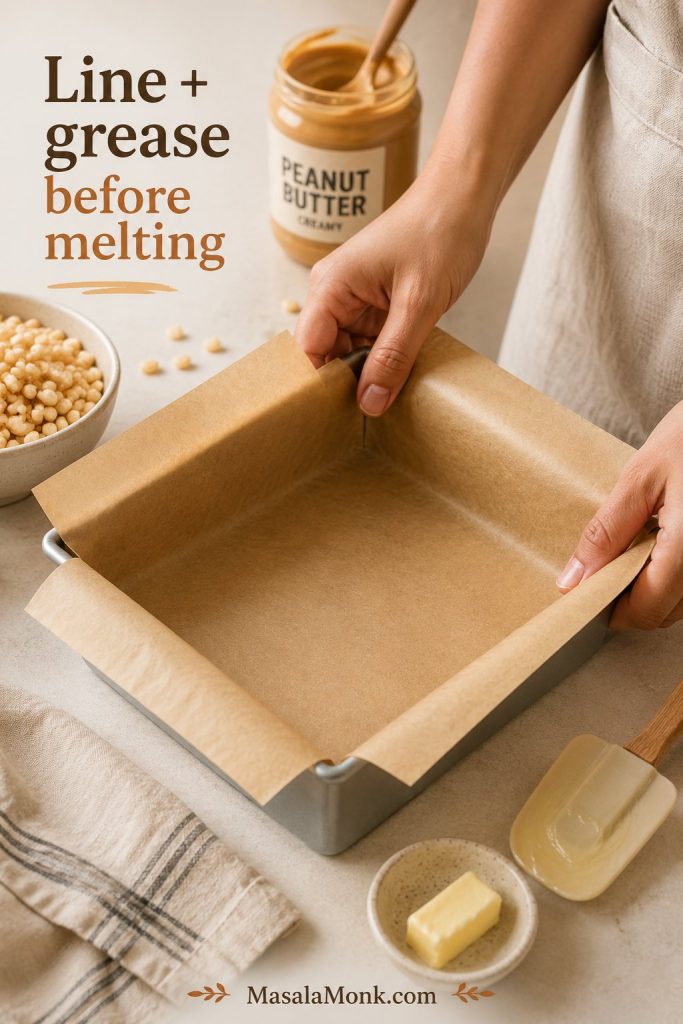
Step 1: Line and grease the pan
Line a 9×9-inch pan with parchment paper, leaving a little overhang so you can lift the bars out later. Then lightly grease the parchment, your spatula, and your hands before the marshmallow mixture starts getting sticky.
Step 2: Reserve mini marshmallows for soft pockets
Set aside 1½ to 2 cups of mini marshmallows from the 16-ounce bag before the pot goes on the heat. Because they are folded in at the end, they soften without disappearing completely.
Step 3: Melt the base until glossy
Melt the butter in a large heavy-bottomed pot over low to medium-low heat. Add the remaining marshmallows and stir until they are mostly melted, glossy, and stretchy. A few small lumps are fine, but stop before the mixture bubbles hard.
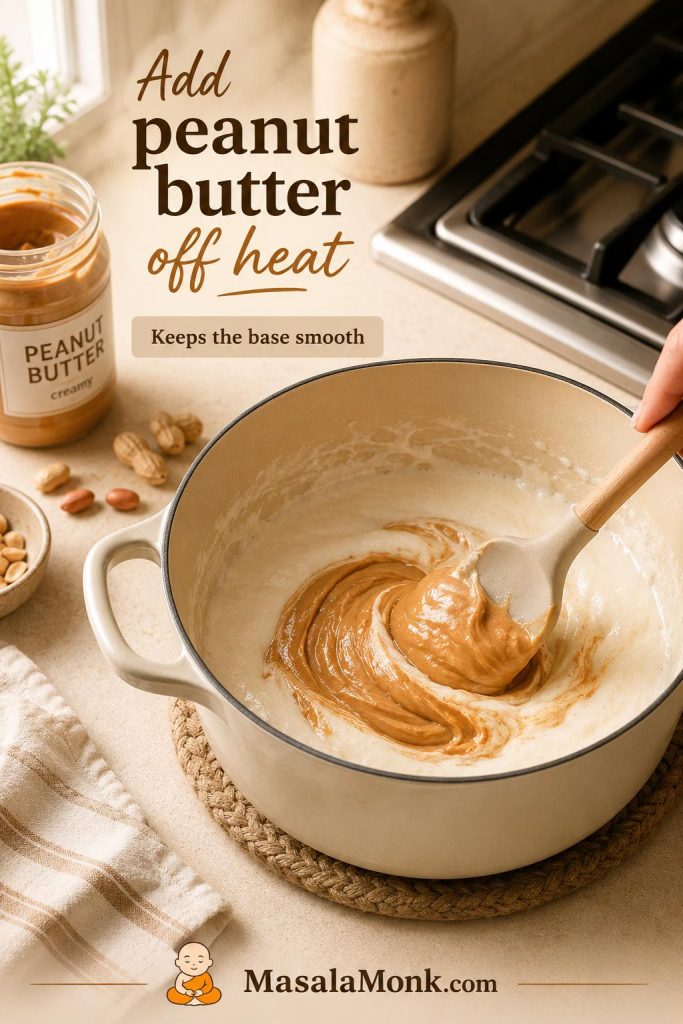
Remove the pot from the burner, then stir in the peanut butter, vanilla, and salt until the base looks creamy and smooth rather than oily or separated.
Step 4: Add peanut butter off heat
This off-heat moment is important because peanut butter needs gentle residual warmth, not direct heat. Stir it into the marshmallow base after the pot comes off the burner so the mixture stays smooth.
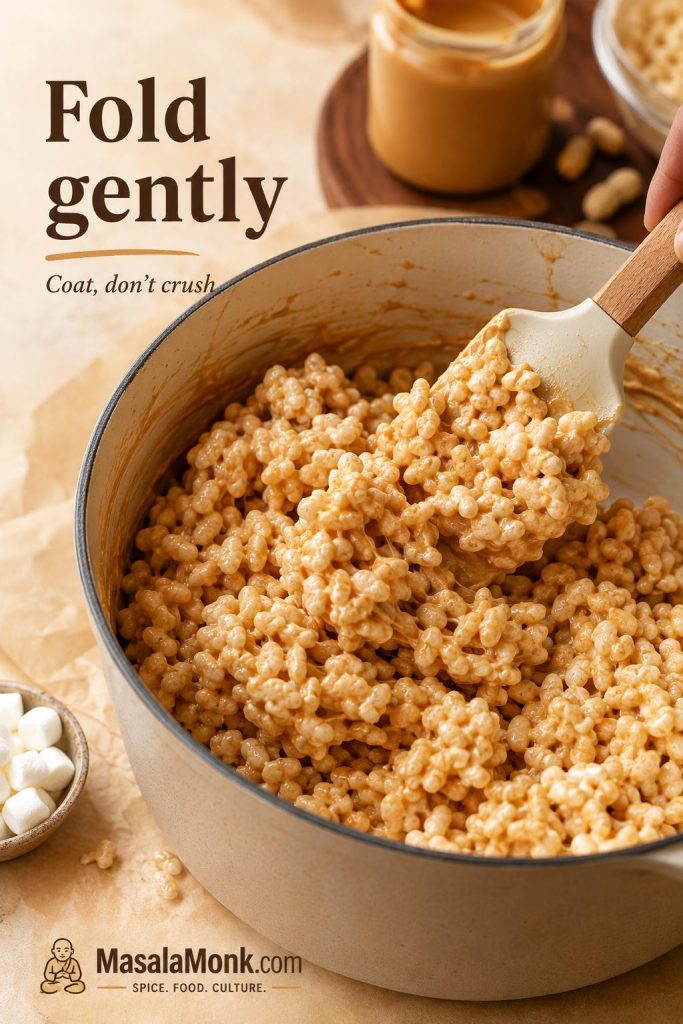
Step 5: Fold the cereal gently
Add the crisp rice cereal and fold with a silicone spatula until the pieces are coated but still airy. Stop once you no longer see dry pockets of cereal, then fold in the reserved mini marshmallows while the mixture is still warm.
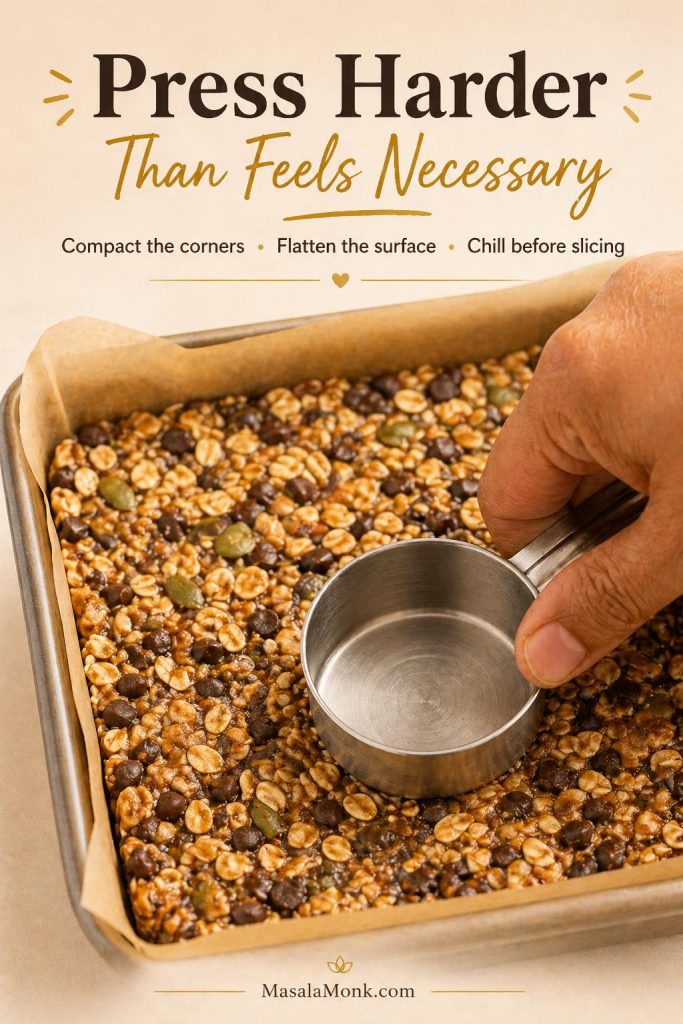
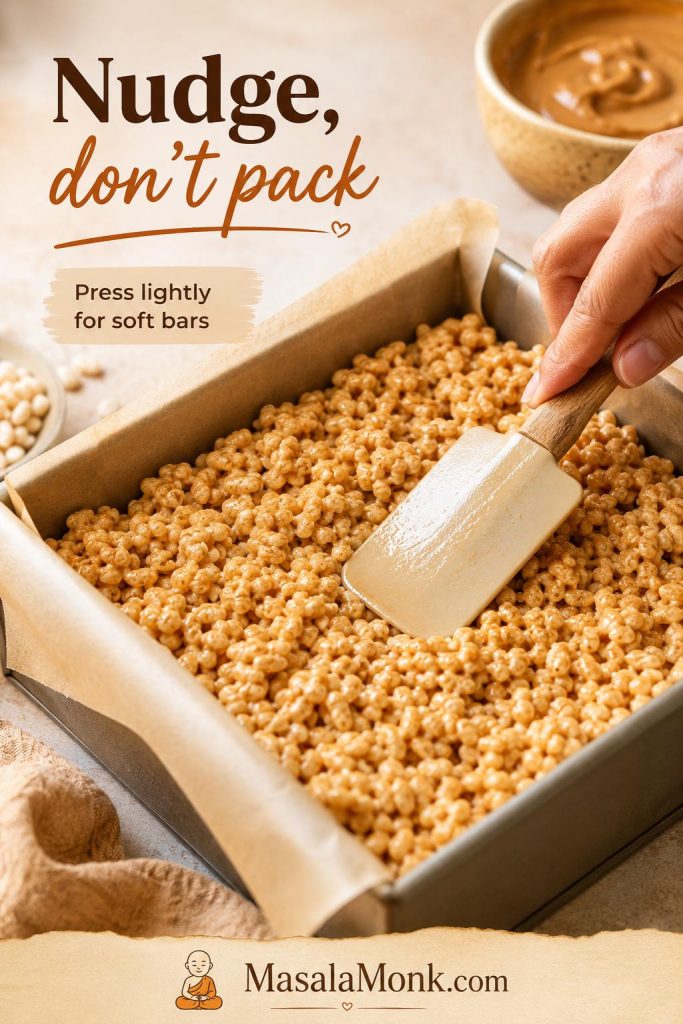
Step 6: Press the mixture lightly
Transfer the mixture to the prepared pan and nudge it into the corners with a greased spatula or lightly buttered hands. Shape it while it is still warm, but do not pack it down or flatten the top hard.
Step 7: Cool before cutting
Let the bars cool at room temperature for 30–45 minutes, or until the top no longer feels warm and the slab lifts cleanly from the pan. Cooling helps the squares hold their shape without losing tenderness.
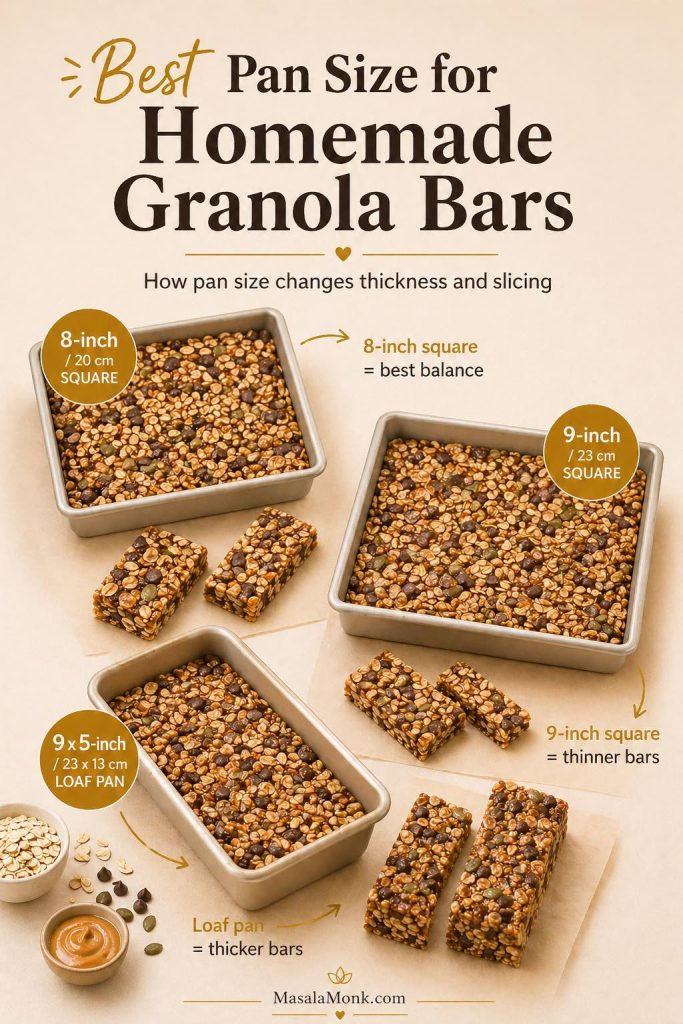
8×8 vs 9×9 vs 9×13 Pan
Pan size changes the whole eating experience. The same mixture can feel tall and gooey in one pan, thinner and firmer in another. Choose the pan based on whether you want thick home-style squares or neat party pieces.
| Pan size | Best for | Result |
|---|---|---|
| 8×8 inch | Very thick dessert bars | Tall, gooey, slower to cool, best for small batches |
| 9×9 inch | Main recipe | Thick but manageable, soft center, clean enough cuts |
| 9×13 inch | Parties, lunchboxes, bake sales | Thinner bars, more squares, faster cooling |
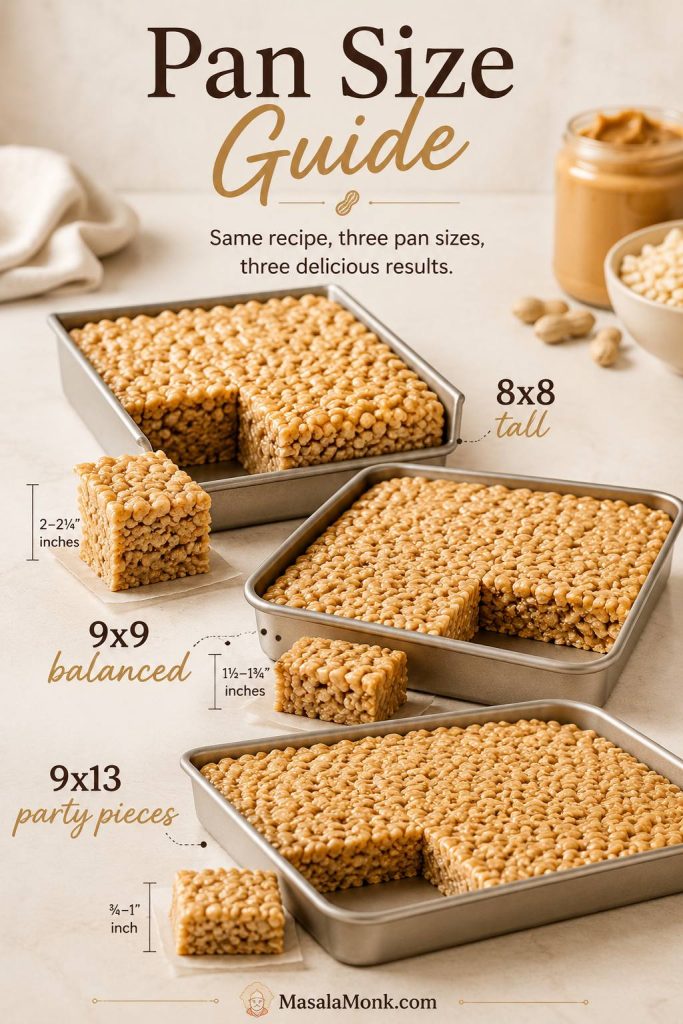
If you spread the 9×9 recipe into a 9×13 pan, the bars will be thin, firmer, and less gooey. Use the larger scale if you want a true party pan.
Microwave Method
The microwave is faster, but it needs short bursts and frequent stirring. Marshmallows can go from glossy to stiff quickly, so stop as soon as they are mostly melted.
- Use a large microwave-safe bowl with plenty of room for the marshmallows to puff.
- Add butter and most of the marshmallows.
- Microwave in 30–40 second bursts, stirring after each burst.
- Stop when the marshmallows are mostly melted and stir until smooth.
- Stir in peanut butter, vanilla, and salt.
- Fold in cereal and reserved marshmallows.
- Press lightly into a lined pan and cool before slicing.
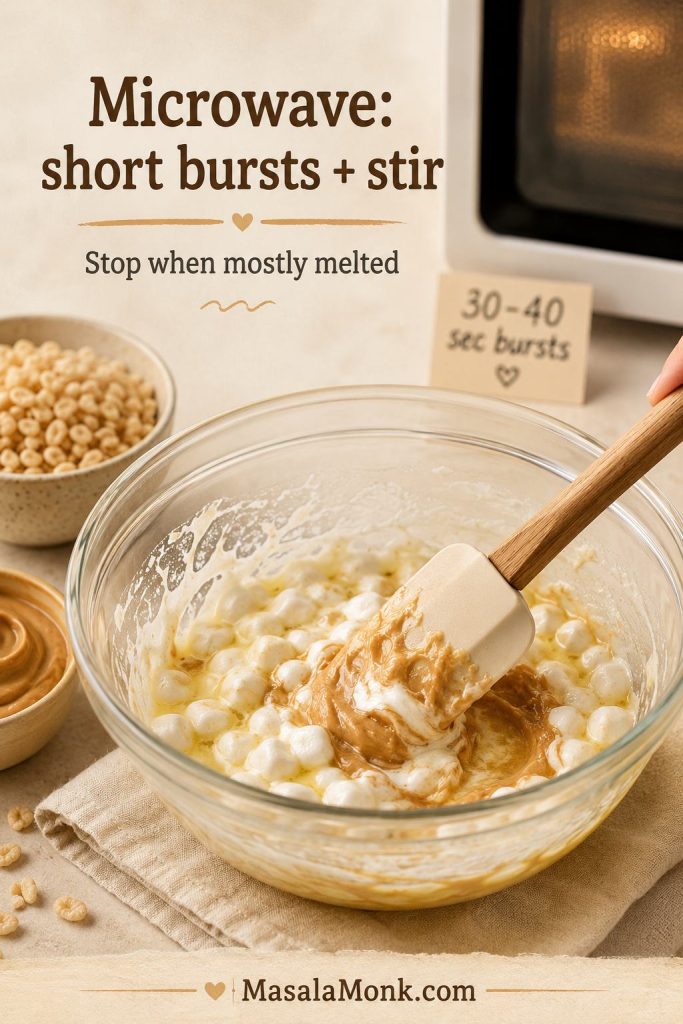
If the marshmallow mixture looks dry, stringy, or stiff after microwaving, it was likely overheated. Start again if you can; adding more peanut butter will not fully fix overheated marshmallows.
The stovetop gives you more control. If you are making these bars for the first time, it is the safer choice.
Chocolate Topping
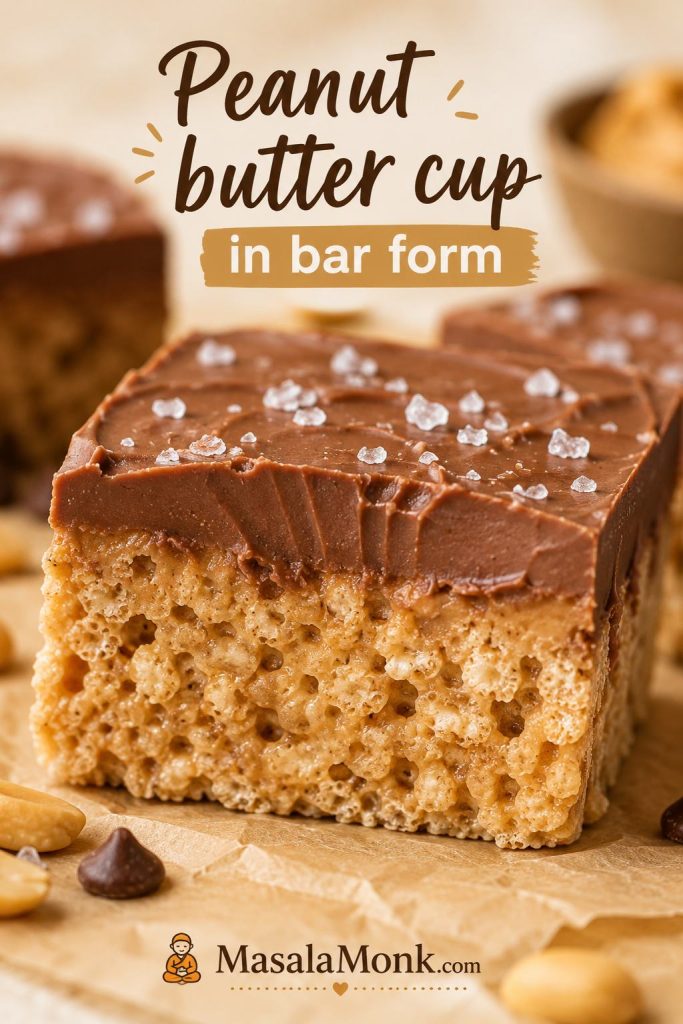
Add the chocolate topping when you want these to feel less like lunchbox squares and more like a peanut butter cup in bar form. The topping sets into a soft chocolate-peanut butter layer while the cereal base stays chewy, crisp, and marshmallowy underneath.
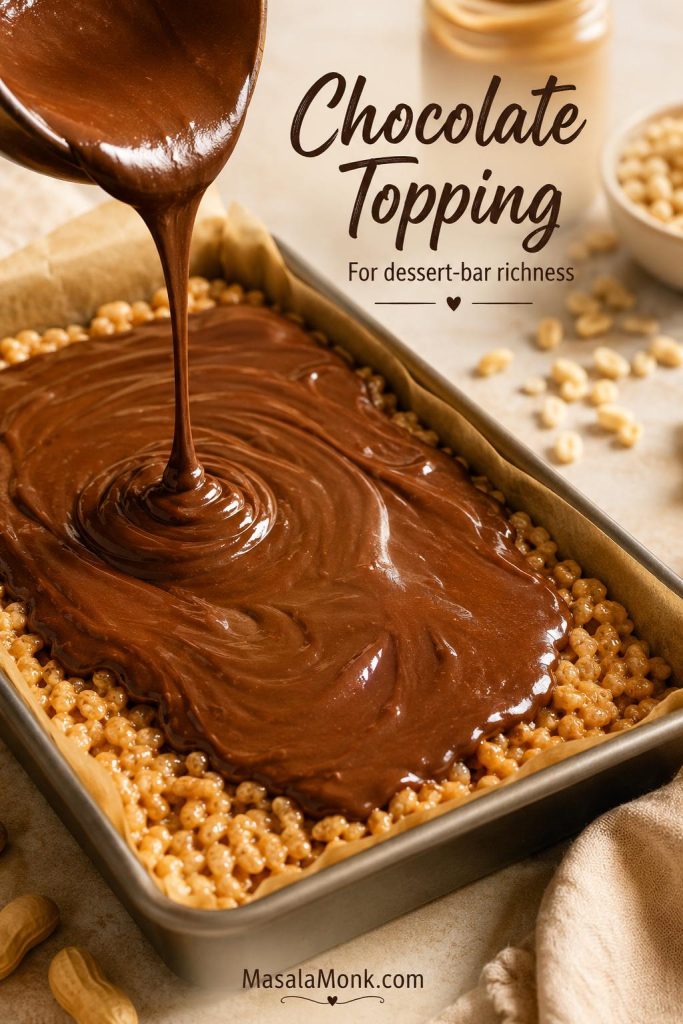
A drizzle is enough for a lighter snack. However, a full layer turns the pan into something closer to a no-bake chocolate peanut butter bar.
For another rich no-bake chocolate dessert, this avocado chocolate mousse keeps the chocolate flavor deep while staying creamy and spoonable.
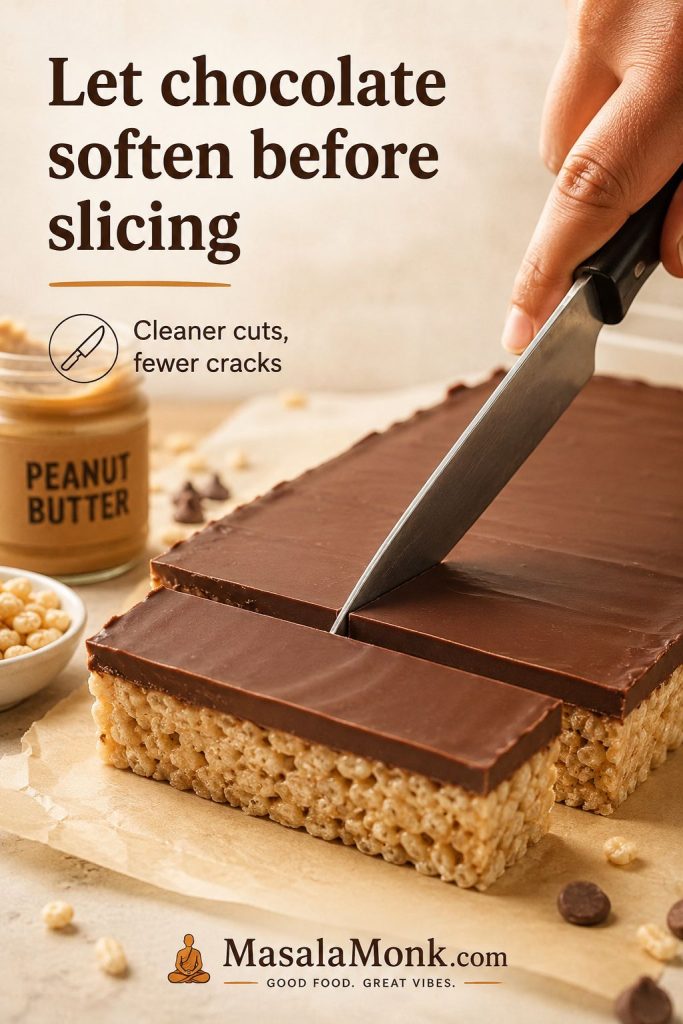
Let the bars cool before adding chocolate. If the base is still warm, the topping can sink into the cereal instead of sitting neatly on top. That gives the topping a cleaner surface and helps it set evenly.
Balanced chocolate topping
| Ingredient | US amount | Metric amount |
|---|---|---|
| Semi-sweet chocolate chips | 1½ cups | 255 g |
| Creamy peanut butter | 2 tbsp | 30–35 g |
| Flaky salt | Optional | Optional |
Melt the chocolate chips with the peanut butter until smooth, then spread over the cooled bars. Add flaky salt if you like a sweet-salty finish. Let the chocolate set before slicing.
For a lighter version, use half the chocolate mixture and drizzle it over the top instead of spreading a full layer. For a thicker candy-bar finish, increase the chocolate chips to 2 cups.
If you are building a no-bake dessert table, these bars sit naturally beside something creamy and chilled, like this no bake cheesecake recipe.
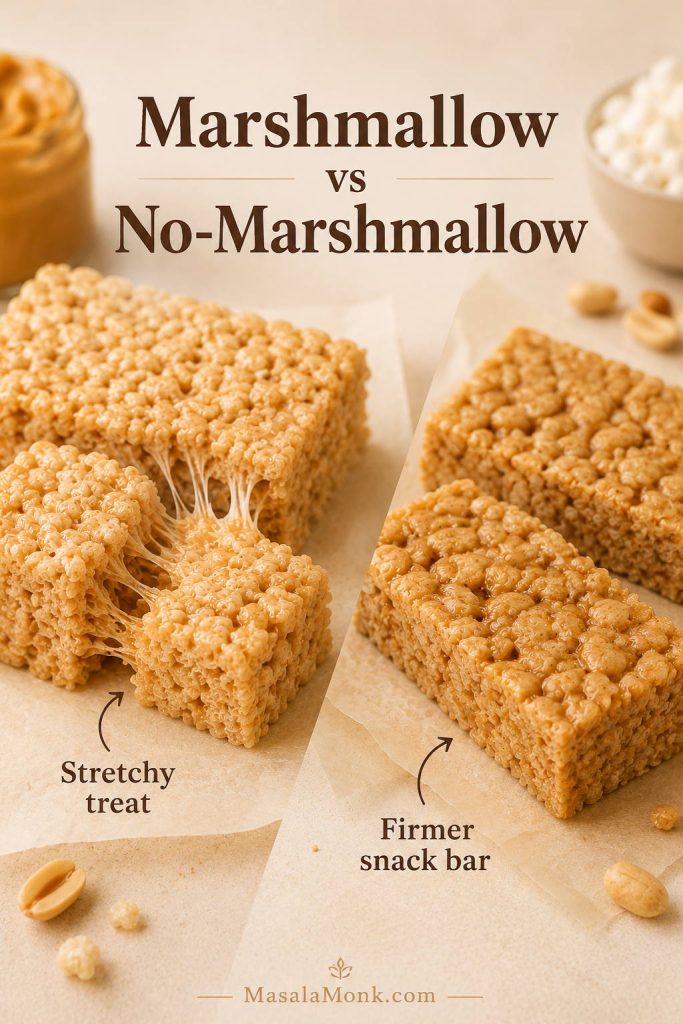
No-Marshmallow Version
No marshmallows means a different kind of bar. Instead of stretchy, gooey peanut butter rice crispy treats, you get a firmer peanut butter snack bar held together with honey or maple syrup.
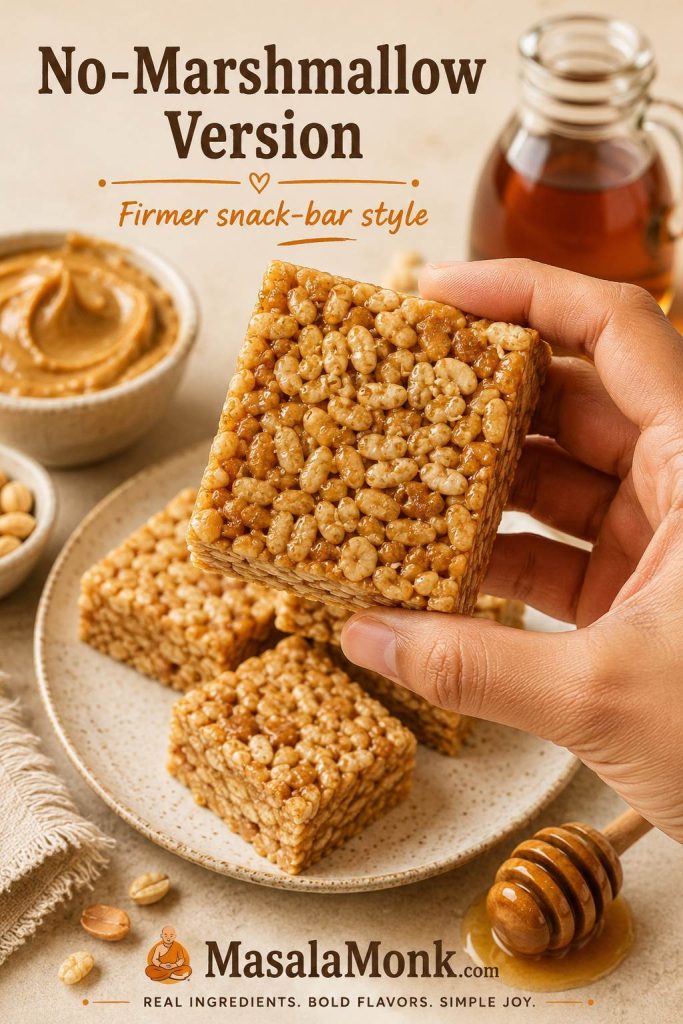
Choose the marshmallow version when you want classic pull-apart cereal treats. Choose this version when you want something firmer, less candy-like, easier to chill, and more lunchbox-snack than dessert-bar.
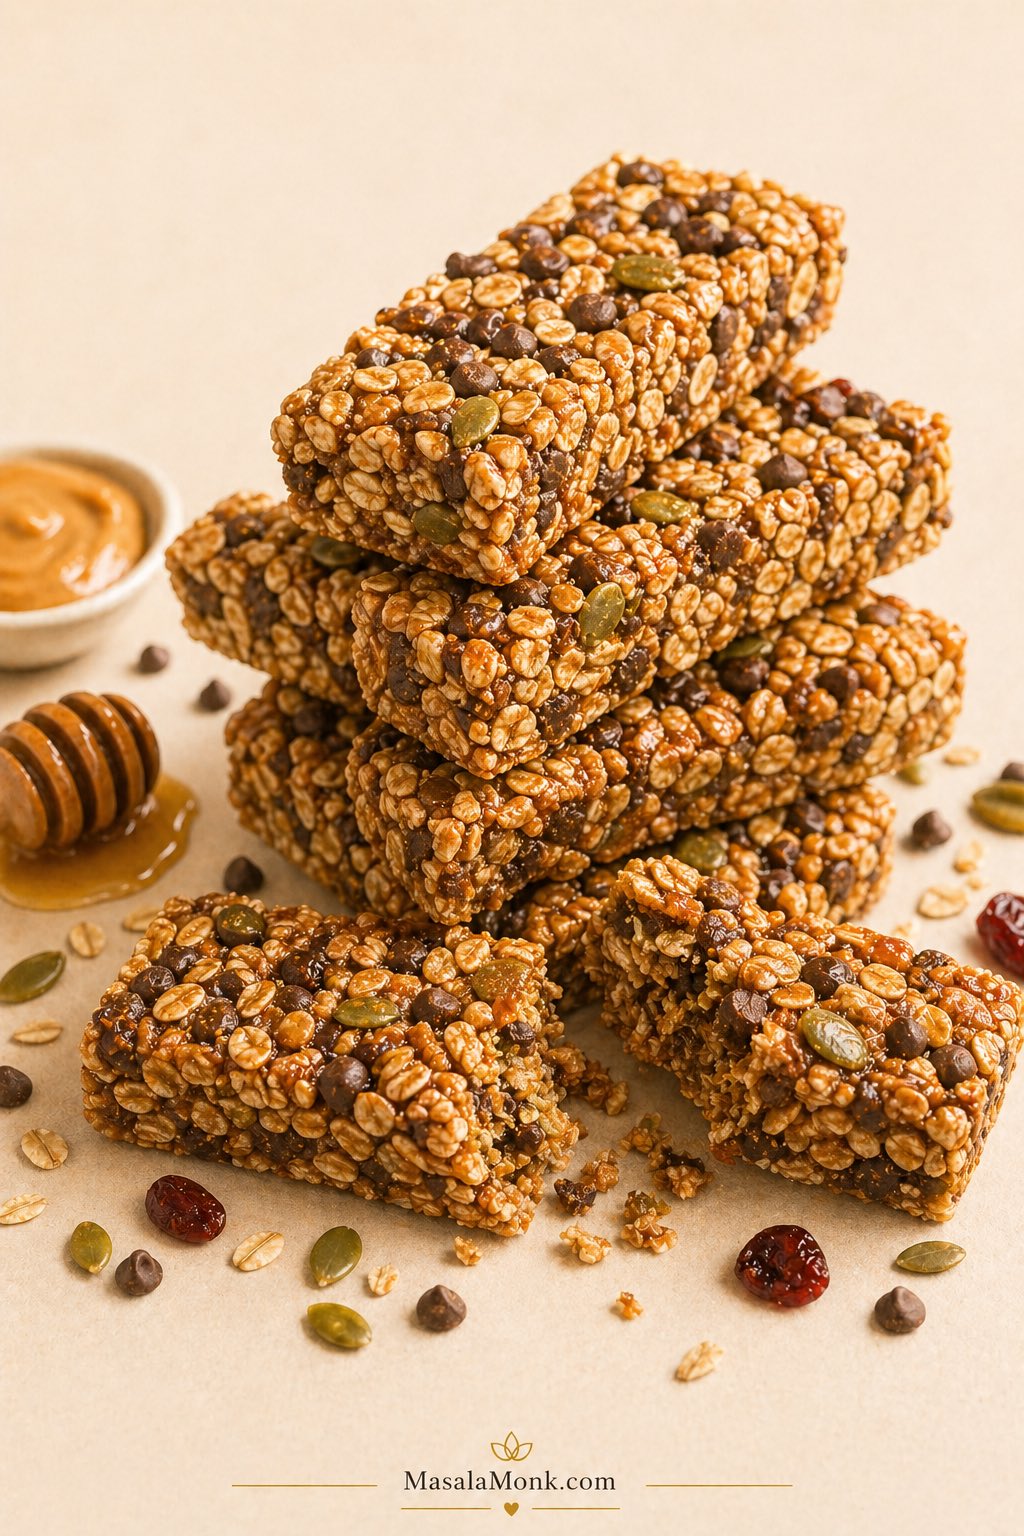
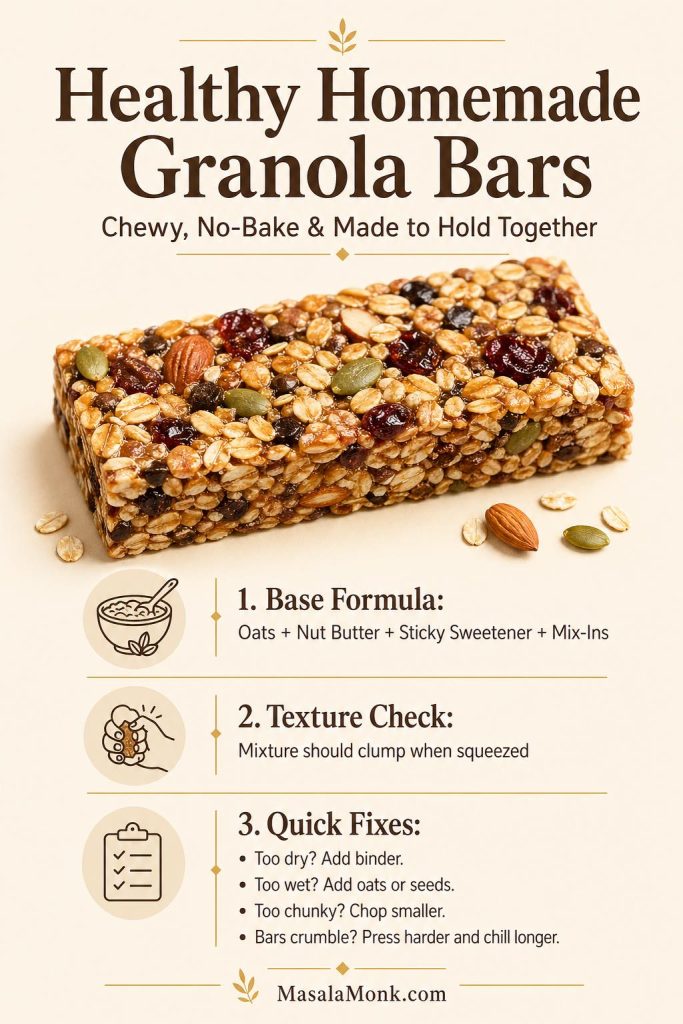
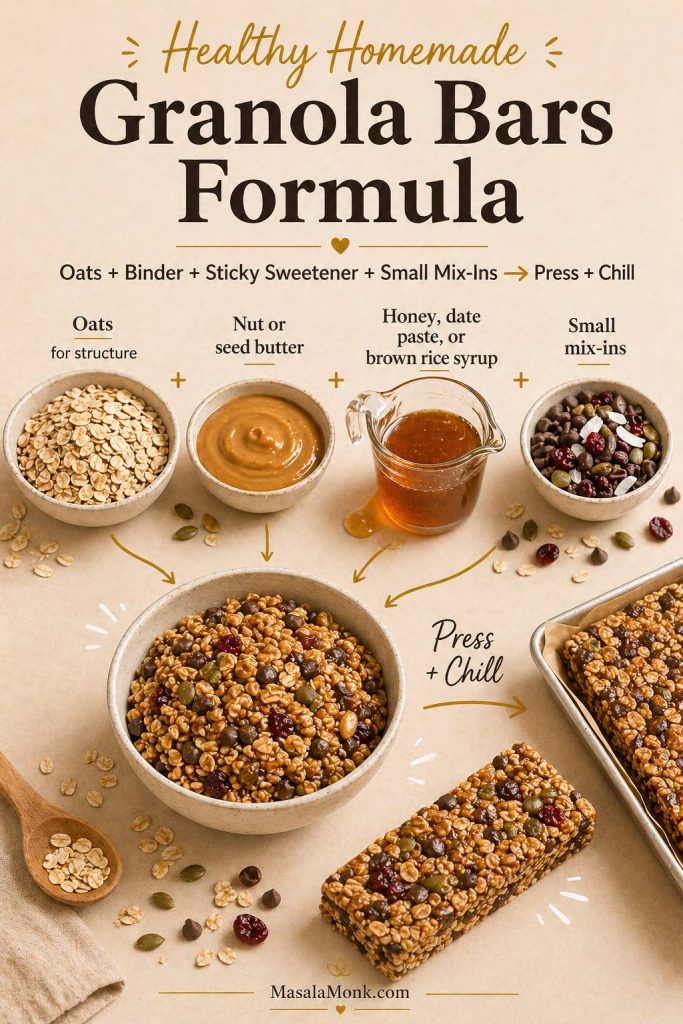
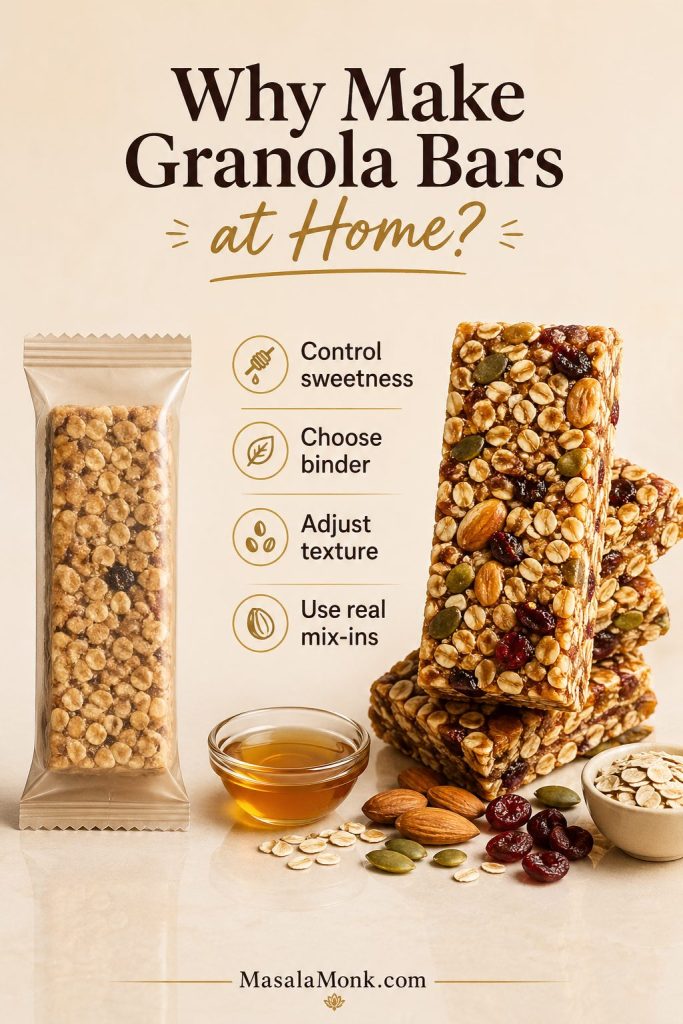
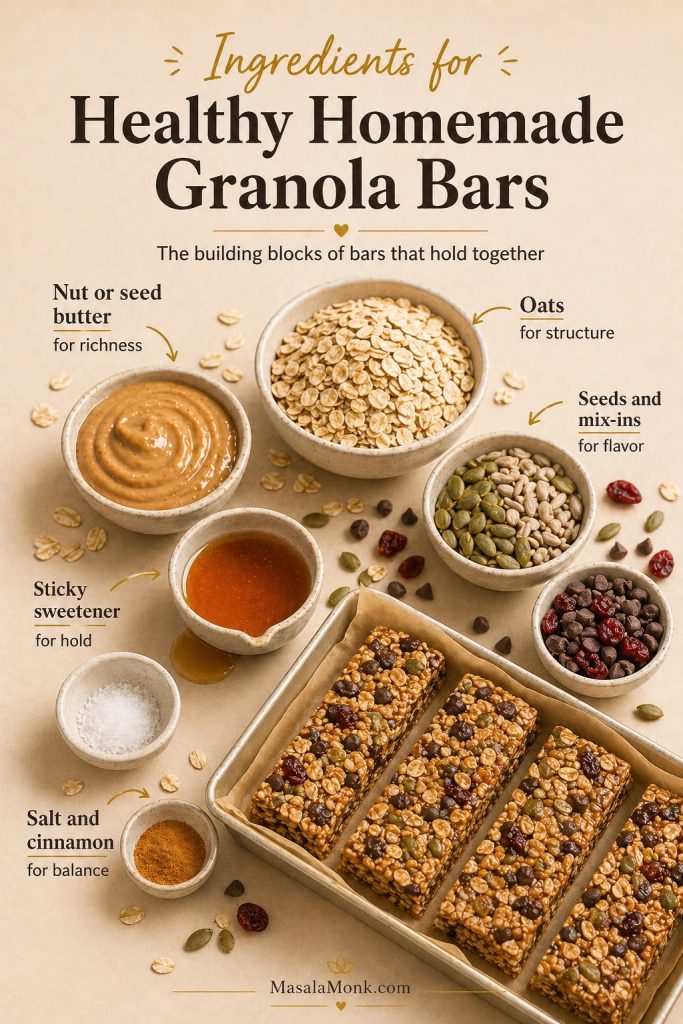
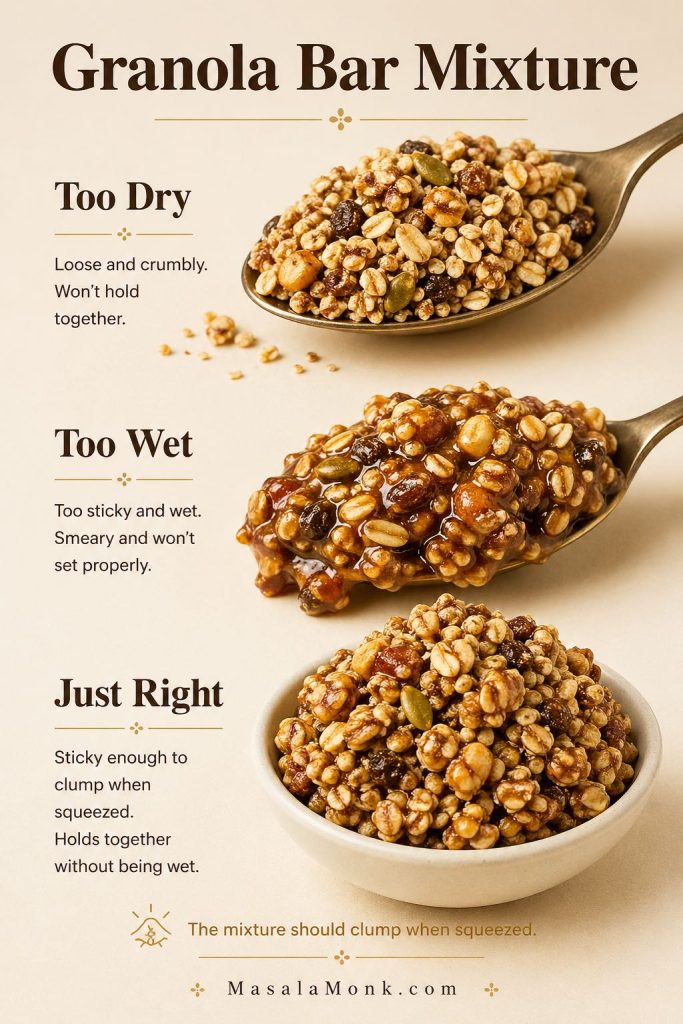
If that firmer snack-bar direction is what you want, this homemade granola bars recipe goes deeper into no-bake bar binders, texture, and lunchbox-style snacks.
| Ingredient | US amount | Metric amount |
|---|---|---|
| Creamy peanut butter | ¾ cup | 190 g |
| Honey or maple syrup | 6 tbsp | 90 ml |
| Crisp rice cereal | 3 cups | 80–85 g |
| Fine salt | Pinch | Pinch |
Warm the peanut butter and honey or maple syrup together just until smooth, then stir in the salt and cereal. Press the mixture firmly into a lined 8×8-inch pan and chill until set. This version needs firmer pressing and colder setting than the main recipe.
Can I Use Marshmallow Fluff?
Marshmallow fluff or marshmallow creme can work, but it behaves differently from regular marshmallows. It makes the bars softer, stickier, and harder to cut cleanly, so do not replace all 16 ounces of marshmallows with fluff unless you are using a fluff-specific recipe.
The safer move is to use fluff as a swirl. Fold ⅓ to ½ cup through the warm cereal mixture before pressing it into the pan, or swirl it over the top with a little melted peanut butter.
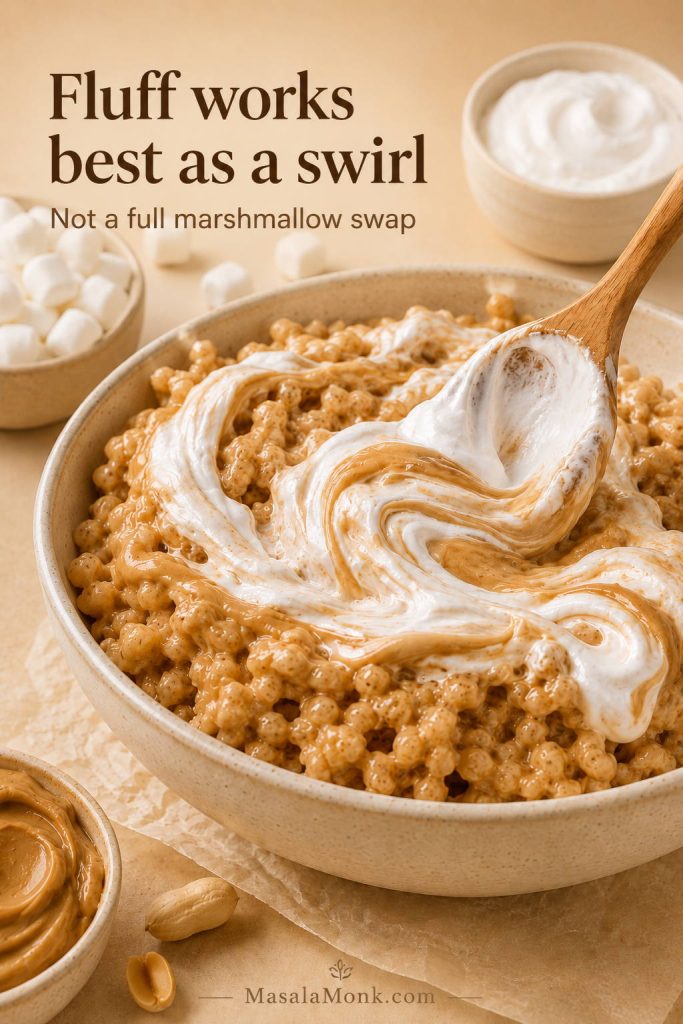
If you are adapting a thinner 9×13 cereal-treat formula, a 7-ounce jar of marshmallow creme is often used as a substitute for a 10-ounce bag of marshmallows. Even then, the finished bars will be softer and stickier than bars made with regular marshmallows.
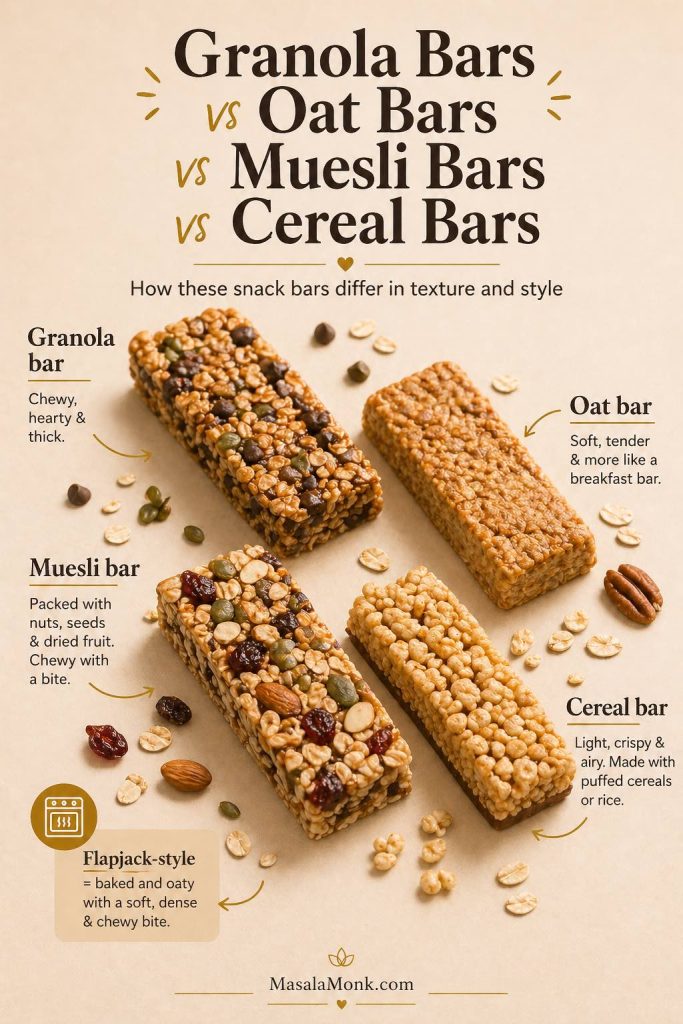
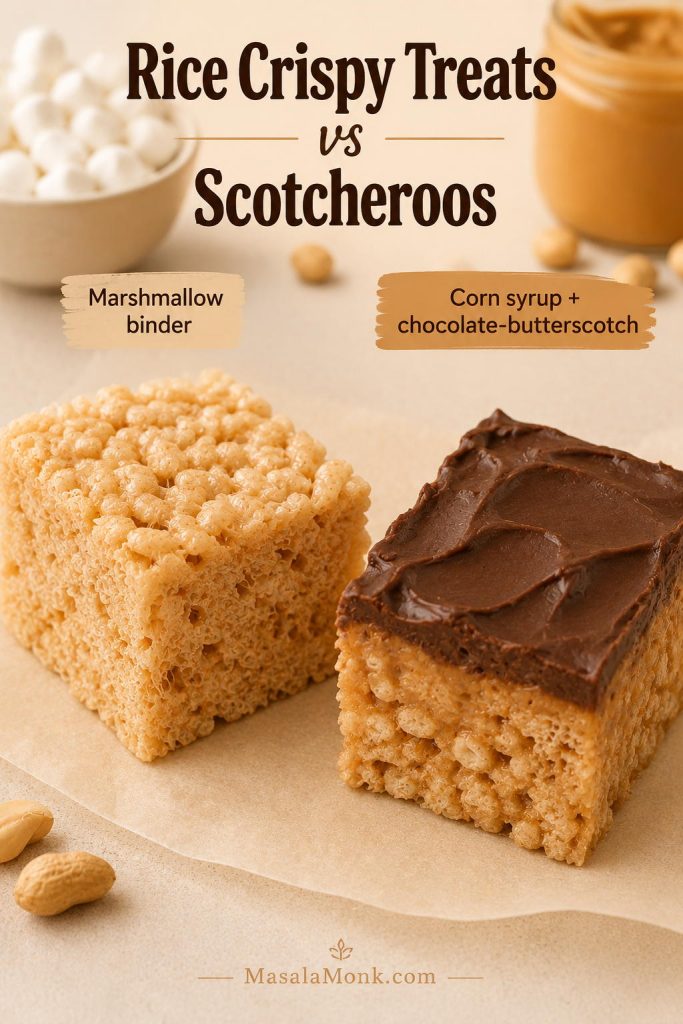
Peanut Butter Rice Crispy Treats vs Scotcheroos
These two bars are related, but the binder is different.
Peanut butter rice crispy treats usually rely on marshmallows, so they are softer, stretchier, and more classic cereal-treat-like. By contrast, Scotcheroos usually use peanut butter with corn syrup and sugar, then get a chocolate-butterscotch topping, so they are denser, sweeter, and more candy-like.
A quick clue: if the bar you remember had a glossy chocolate-butterscotch top and a firmer candy-like bite, you are probably thinking of Scotcheroos. If it was soft, marshmallowy, and stretchy when pulled apart, this is the recipe you want.
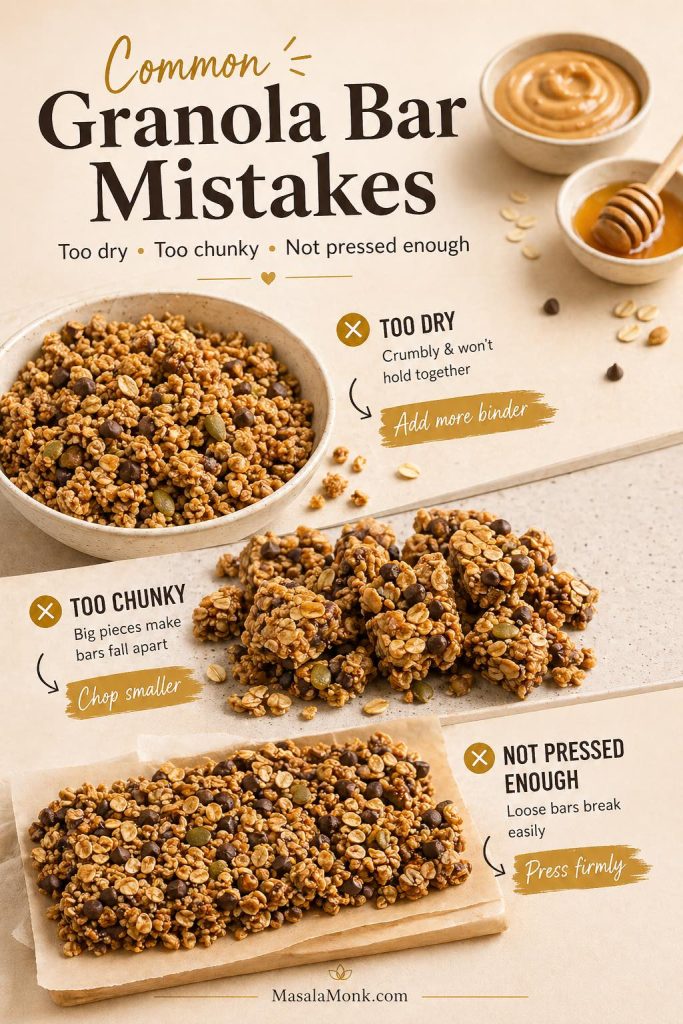
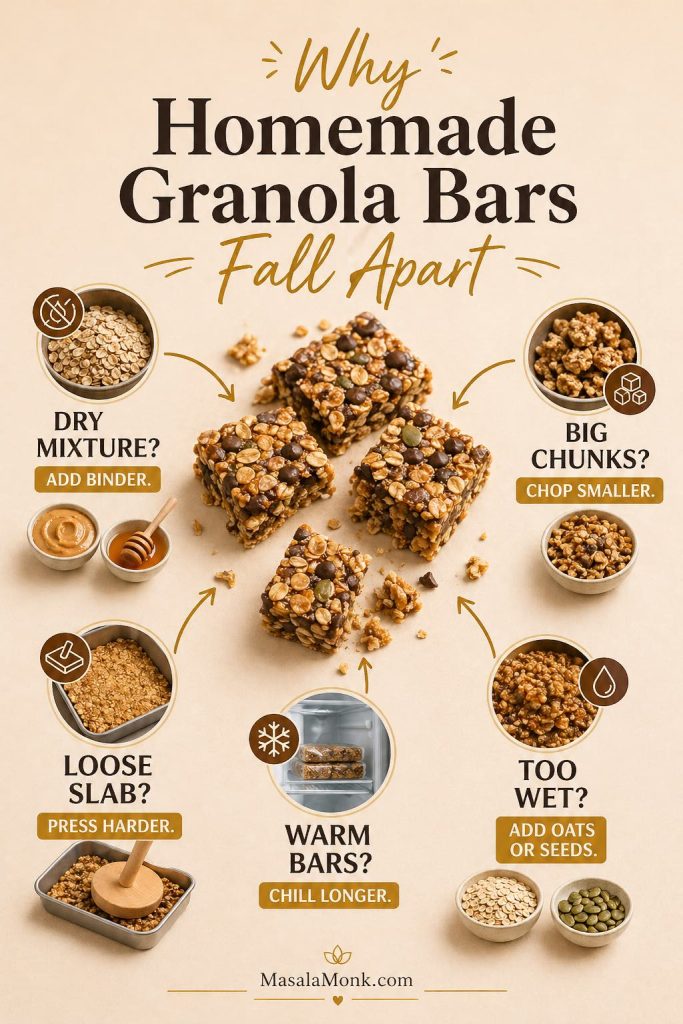
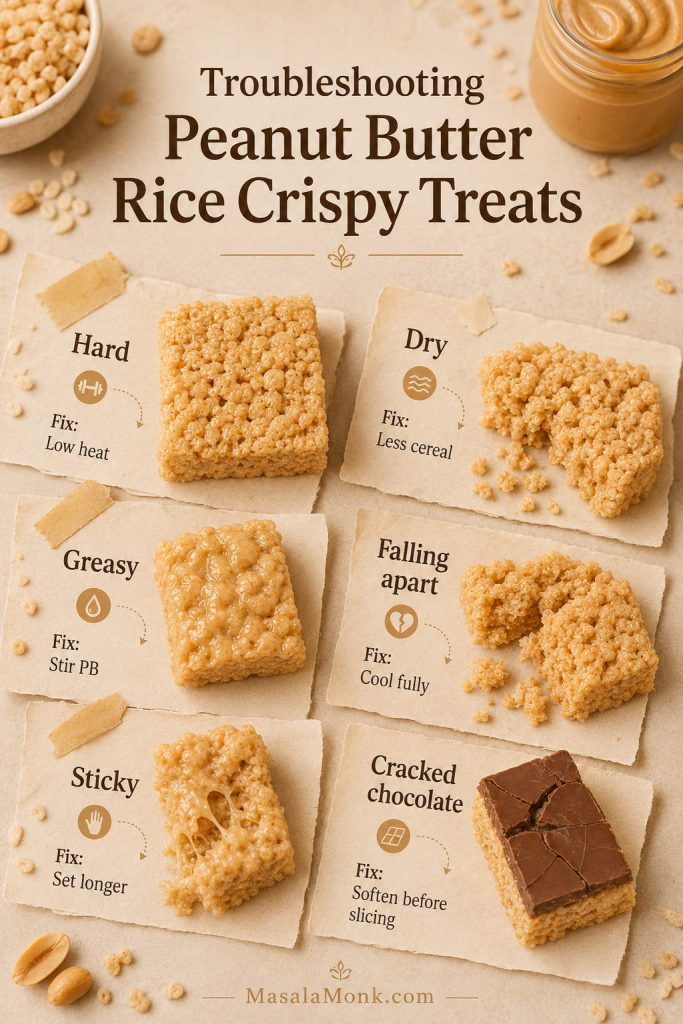
Troubleshooting
Even with a simple recipe, small changes can affect the final texture. If a batch turns hard, dry, greasy, or too sticky, the fix is usually one of four things: heat, ratio, peanut butter type, or how firmly the mixture was pressed into the pan. If your bars turned out well and you just need to keep them fresh, jump to storage.
| Problem | Likely cause | Quick fix next time |
|---|---|---|
| Hard bars | Overheated marshmallows or packed-down mixture | Use low heat, stop at glossy, and press lightly |
| Dry bars | Too much cereal | Use less cereal and fold more gently |
| Greasy bars | Separated natural peanut butter | Use regular creamy peanut butter |
| Bars falling apart | Not enough binder or cut too early | Cool fully before slicing |
| Sticky bars | Too many marshmallows or not cooled | Let them set longer |
| Cracked chocolate | Chocolate layer too cold or too thick | Let it soften slightly before slicing |
Why did my bars get hard?
The marshmallow mixture was probably overheated, the marshmallows were stale, too much cereal was added, or the mixture was pressed too firmly into the pan. Next time, use low heat, fresh marshmallows, and a gentler hand. Instead of packing the mixture down, nudge it into the pan just until it reaches the corners.
Why are they dry?
Dry bars usually mean there is too much cereal for the amount of marshmallow mixture. Next time, stay closer to the lower end of the cereal range, or add an extra handful of marshmallows to the melted mixture.
Why are they greasy?
Greasy bars often happen with natural peanut butter that has not been stirred well, or when too much peanut butter or butter is added. Regular creamy peanut butter gives the most reliable result.
Why are they falling apart?
The mixture may not have enough binder, the cereal amount may be too high, or the bars may have been cut before cooling. For the no-marshmallow version, the bars also need chilling time to firm up.
Why are they too sticky?
Sticky bars usually need more cooling time or slightly more cereal. If you folded in extra marshmallows, the bars may also be intentionally gooier. Let them sit longer before slicing.
Why did the chocolate topping crack?
The chocolate may have been too cold or too thick when sliced. Let the bars sit at room temperature for a few minutes before cutting, and use a sharp knife. Adding a little peanut butter to the melted chocolate also keeps the topping softer.
How to Store Them
These bars stay best when they are covered at room temperature: soft enough to bite, but still crisp around the cereal. Open air dries them out faster than time does.
They taste best the day they are made, when the cereal still has its crackle and the marshmallow base is soft. They stay good for about 2 days in an airtight container at room temperature. A third day is usually fine, but the bars will taste less fresh.
If stacking them, place parchment or wax paper between layers so the tops do not stick together. Otherwise, the soft marshmallow surface can cling to the layer above it.
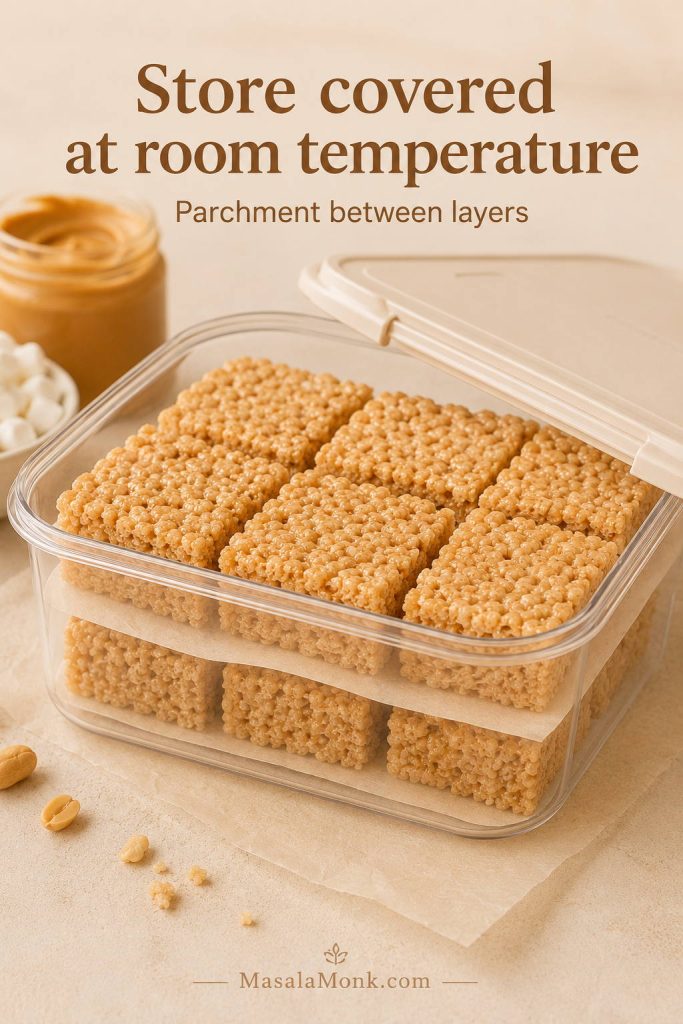
Avoid refrigerating plain bars because cold air can make them firm and dry. If you add a chocolate topping, you can chill the pan briefly just to set the chocolate, then move the sliced bars back to room temperature storage.
To freeze, place the bars in layers separated by parchment or wax paper inside an airtight freezer-safe container. Freeze for up to 6 weeks. Let them stand at room temperature before serving so the texture softens again. For the full batch formula, return to the recipe card.
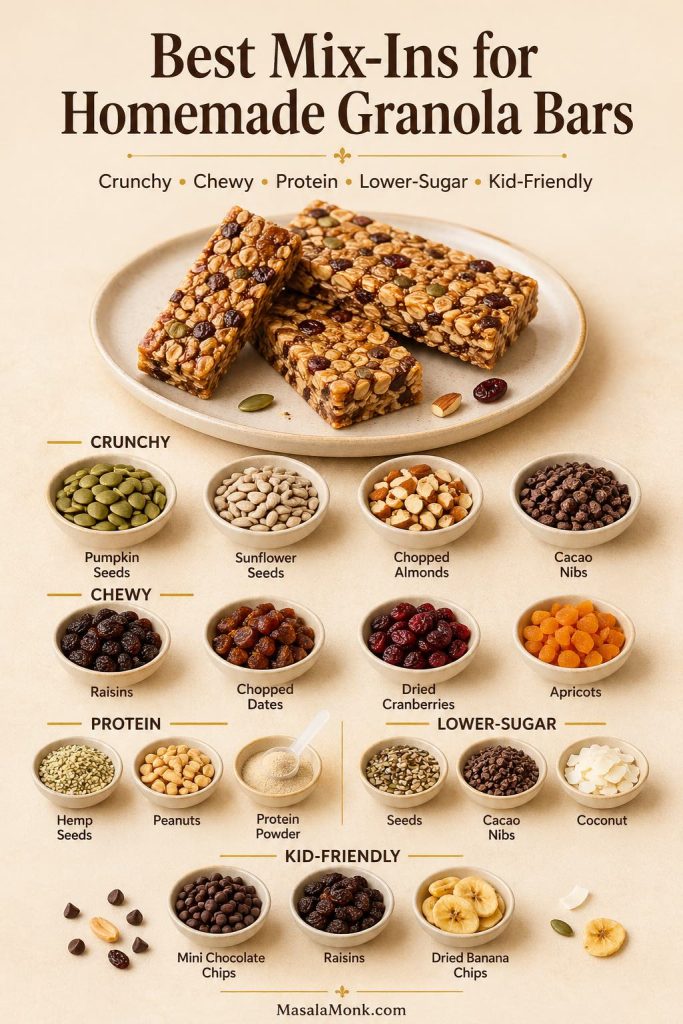
Variations
Once the base is soft and reliable, the fun part is choosing what kind of pan you want: lunchbox-simple, candy-bar rich, salty-sweet, extra gooey, or full peanut butter cup.
Keep the base ratio steady, then change the personality of the pan with chocolate, crunch, salt, jam, or a thicker dessert-bar finish.
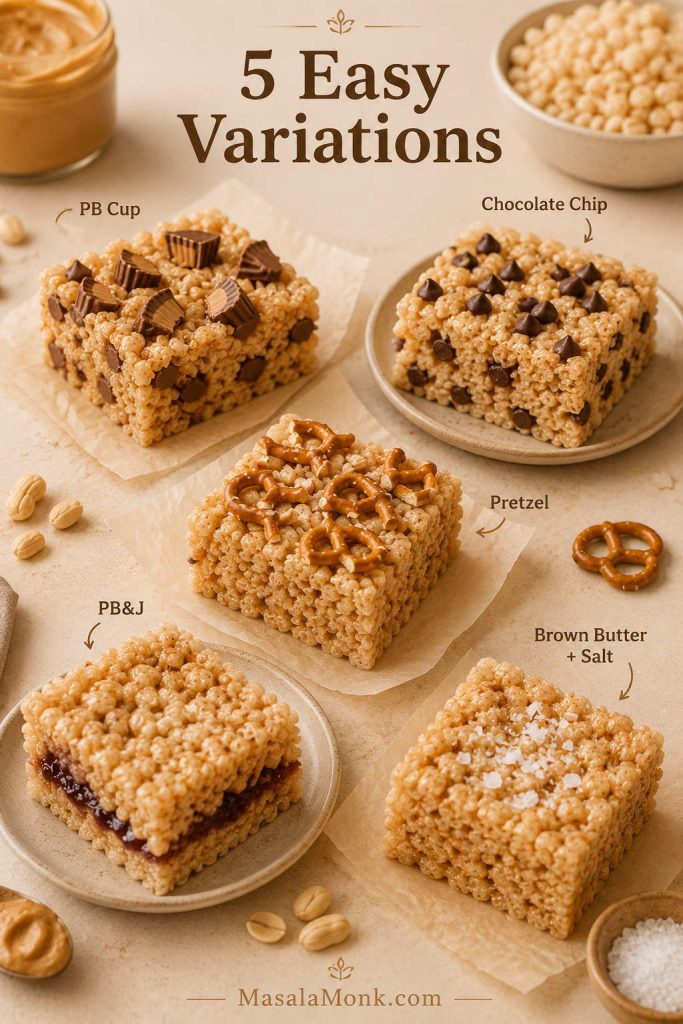
Chocolate and candy variations
- Peanut butter cup bars: Fold in chopped peanut butter cups after the cereal is coated, or press them on top before the bars cool.
- Chocolate chip bars: Sprinkle mini chocolate chips over the warm bars and press gently so they stick.
- Cookie dough-style bars: Add mini chocolate chips and a little extra vanilla for a cookie-dough feel. If you want the actual spoonable version, make this edible cookie dough recipe instead.
- Salted chocolate bars: Add the chocolate topping and finish with flaky salt.
Crunchy and salty variations
- Pretzel bars: Replace ½ cup cereal with lightly crushed pretzels for a salty crunch.
- Roasted peanut bars: Add ½ cup chopped roasted peanuts for extra texture.
- Flaky salt finish: Sprinkle a little flaky salt over the top before the bars fully set.
Softer or richer variations
- Brown butter bars: Brown the butter before adding marshmallows for a deeper, toasted flavor.
- Extra marshmallow pocket bars: Fold in 2 cups reserved mini marshmallows at the end for a gooier bite.
- Thicker dessert bars: Use an 8×8 pan and let the bars cool fully before slicing.
Lunchbox and snack-bar variations
- Lunchbox squares: Use the full 6 cups cereal and cut smaller squares after the bars cool completely.
- PB&J bars: Swirl a few teaspoons of jam over the top before the bars set, or sandwich a thin jam layer between two thinner layers of the peanut butter cereal mixture. Grape or strawberry keeps the classic lunchbox feel.
- Protein-style bars: Use the no-marshmallow version as the base and add a small amount of protein powder only if the mixture still feels moist enough. For a no-bake protein dessert that is already built around protein powder, this protein cookie dough recipe is a safer next recipe.
- Vegan-style bars: Use the no-marshmallow peanut butter and maple syrup version with a vegan crisp rice cereal.
Peanut Butter Rice Crispy Treats Recipe
Peanut Butter Rice Crispy Treats
Soft, chewy peanut butter cereal bars with a glossy marshmallow-peanut butter base, crisp rice cereal, and optional soft marshmallow pockets. Use 5½ cups cereal for gooier bars or 6 cups for cleaner-cut squares.
Ingredients
- 5 tbsp (70 g) salted butter, plus more for greasing
- 16 oz (454 g) mini marshmallows, divided
- ½ cup (125–130 g) regular creamy peanut butter
- 1 tsp (5 ml) vanilla extract
- ¼ tsp fine salt, only if using unsalted butter
- 5½–6 cups (155–170 g) crisp rice cereal
Optional chocolate topping
- 1½ cups (255 g) semi-sweet chocolate chips
- 2 tbsp (30–35 g) creamy peanut butter
- Flaky salt, optional
Instructions
- Line a 9×9-inch pan with parchment paper and lightly grease the parchment.
- Reserve 1½ to 2 cups of the mini marshmallows from the 16-ounce bag for folding in at the end.
- Melt the butter in a large heavy-bottomed pot over low to medium-low heat.
- Add the remaining marshmallows and stir until mostly melted, glossy, and stretchy. Stop before the mixture bubbles hard.
- Remove the pot from the heat. Stir in the peanut butter, vanilla, and salt until smooth.
- Add the crisp rice cereal and fold gently until evenly coated.
- Fold in the reserved mini marshmallows while the mixture is still warm.
- Transfer to the prepared pan and press lightly into an even layer. Do not compact firmly.
- Cool at room temperature for 30–45 minutes, then lift from the pan and cut into bars.
- For chocolate topping, melt chocolate chips with peanut butter, spread over cooled bars, sprinkle with flaky salt if using, and let set before slicing.
9×13 party-pan scale
- Salted butter: ½ cup / 8 tbsp (113 g)
- Mini marshmallows: 20 oz (567 g)
- Creamy peanut butter: 1 cup (250–260 g)
- Crisp rice cereal: 8–8½ cups (225–240 g)
- Vanilla extract: 1½–2 tsp (7.5–10 ml)
- Fine salt, if using unsalted butter: ½ tsp
Notes
- For the softest bars, stay closer to 5½ cups cereal and press very lightly.
- For cleaner-cut lunchbox or party squares, use 6 cups cereal and cool fully before slicing.
- Regular creamy peanut butter gives the most reliable texture.
- Natural peanut butter must be stirred completely smooth before measuring.
- Measure marshmallows by weight if using large marshmallows or a different brand.
- Store covered at room temperature so the bars stay soft and the cereal keeps some crackle.
Once you have the low heat, fresh marshmallows, and light pressing down, this becomes the kind of no-bake recipe you can adjust from memory. Make it gooey for home, cleaner-cut for a party tray, or chocolate-topped when you want the pan to disappear faster.
FAQs
Are these the same as peanut butter Rice Krispie treats?
Yes. Rice Krispies is the branded cereal many people associate with classic crispy cereal bars, while crisp rice cereal is the generic ingredient. This recipe works with Rice Krispies cereal or another fresh crisp rice cereal.
What peanut butter works best?
Regular creamy peanut butter works best because it melts smoothly into the marshmallow base and stays stable. Natural peanut butter can work, but it must be stirred very well and may still make the bars softer or greasier.
Why did my treats get hard?
Hard treats usually come from overheated marshmallows, stale marshmallows, too much cereal, or pressing the mixture too firmly into the pan. Keep the heat low and nudge the mixture into the pan instead of packing it down.
How do I make them extra gooey?
Use 5½ cups cereal, keep the heat low, fold in 1½ to 2 cups reserved mini marshmallows at the end, and press the mixture lightly into the pan.
Can I use large marshmallows?
Yes. Use 16 ounces / 454 g marshmallows total, and give them more time to melt. Large marshmallows melt more slowly than minis, so keep the heat low instead of turning up the burner.
What if I do not have marshmallows?
Use the no-marshmallow version with peanut butter and honey or maple syrup. The texture will be firmer and more snack-bar-like, not stretchy and gooey.
Should I use an 8×8, 9×9, or 9×13 pan?
Use an 8×8 pan for very thick bars, a 9×9 pan for the best balance of thickness and easy cutting, or a 9×13 pan for thinner party squares. The main recipe is written for a 9×9 pan.
Do these need to be refrigerated?
No. They stay softer at room temperature in an airtight container. Refrigeration can make the cereal treats firm, so only chill briefly if you need to set a chocolate topping.
How far ahead can I make them?
They taste best the day they are made, but they keep well for about 2 days in an airtight container. For parties, making them the night before is a good compromise between freshness and convenience.
Can I add chocolate on top?
Yes. Spread melted semi-sweet chocolate chips with a little peanut butter over the cooled bars. Finish with flaky salt if you want a stronger sweet-salty balance.
Are these gluten-free?
They can be, but only if every ingredient is gluten-free. The cereal is the main thing to check because some crisp rice cereals contain malt flavoring. If gluten matters, use certified gluten-free crisp rice cereal.
What is the difference between these and Scotcheroos?
These bars usually use marshmallows as the binder, so they are softer and stretchier. Scotcheroos usually use peanut butter with corn syrup and sugar, then get topped with chocolate and butterscotch, so they are denser and more candy-like.