Posted on — Leave a comment

Birria Tacos Recipe: Crispy Beef Quesabirria with Consommé

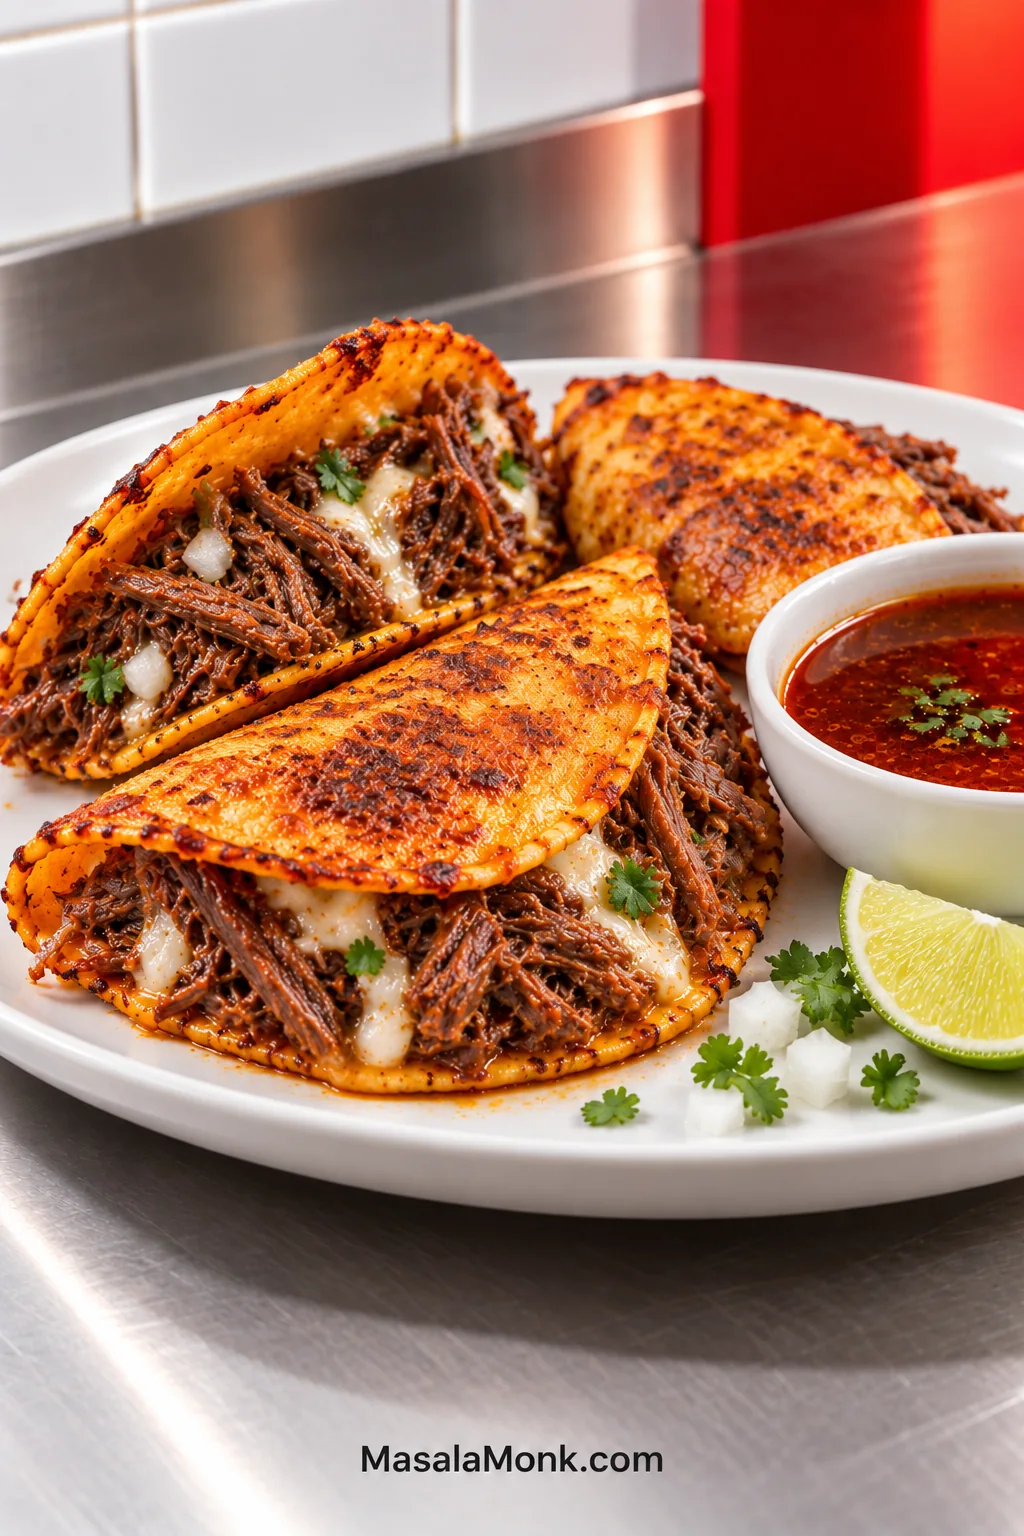
Three crisp beef quesabirria tacos filled with shredded beef and melted white cheese beside a bowl of dark red-brown consommé, onion, cilantro and lime.

Pull a good birria taco apart and several things happen at once. The corn tortilla cracks at the crisp edge, melted cheese stretches away from the fold, and the shredded beef underneath stays juicy without pouring broth down your hand. Then the whole thing gets dipped into hot, deeply savoury consommé with white onion, cilantro and lime.

They look like a restaurant project, and there is a long braise involved. At home, though, most of that time is waiting. The real work happens before the beef goes into the oven and after it comes out tender.

Birria tacos are corn tortillas filled with slow-braised, chile-seasoned meat; quesabirria adds melting cheese. In this version, the tortillas are crisped with the red fat from the beef braise and served with the finished consommé for dipping.

A finished braise gives you three useful things: seasoned beef, consommé and chile-stained red fat. The beef needs to stay succulent without soaking the tortilla. The consommé should taste concentrated while still pouring like broth. The red fat gets saved for the skillet, where a thin film helps the tortilla turn crisp and deeply coloured.
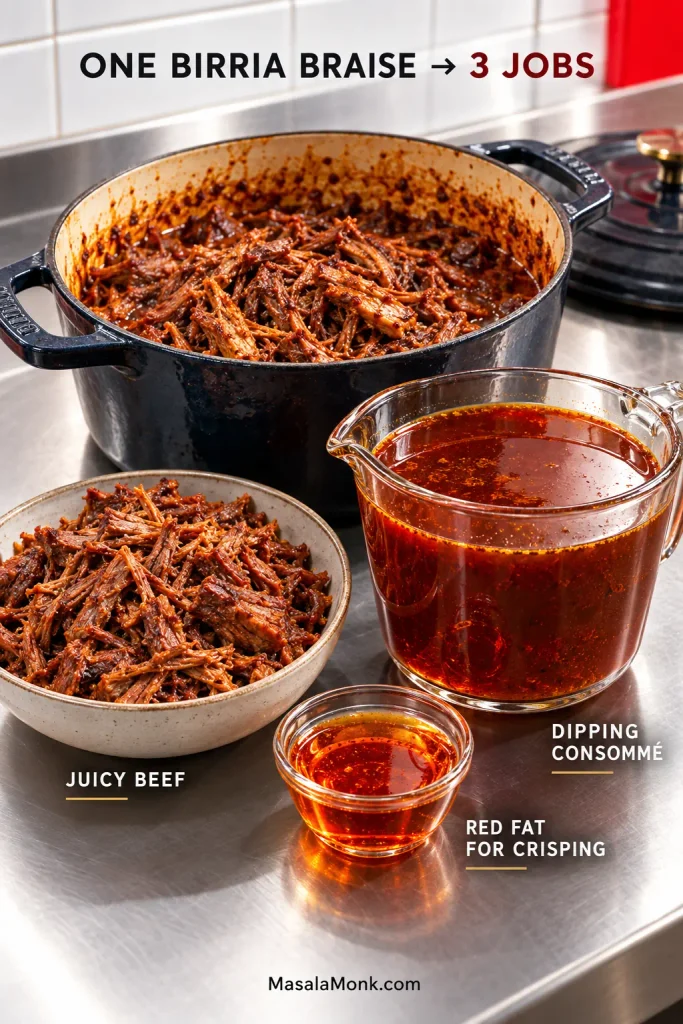
Shredded birria beef, dark consommé and a small bowl of translucent orange-red birria fat arranged separately beside a Dutch oven.
Once the beef leaves the pot, treat beef, consommé and red fat as three working ingredients. Keeping them separate gives you control over moisture, concentration and crisping.

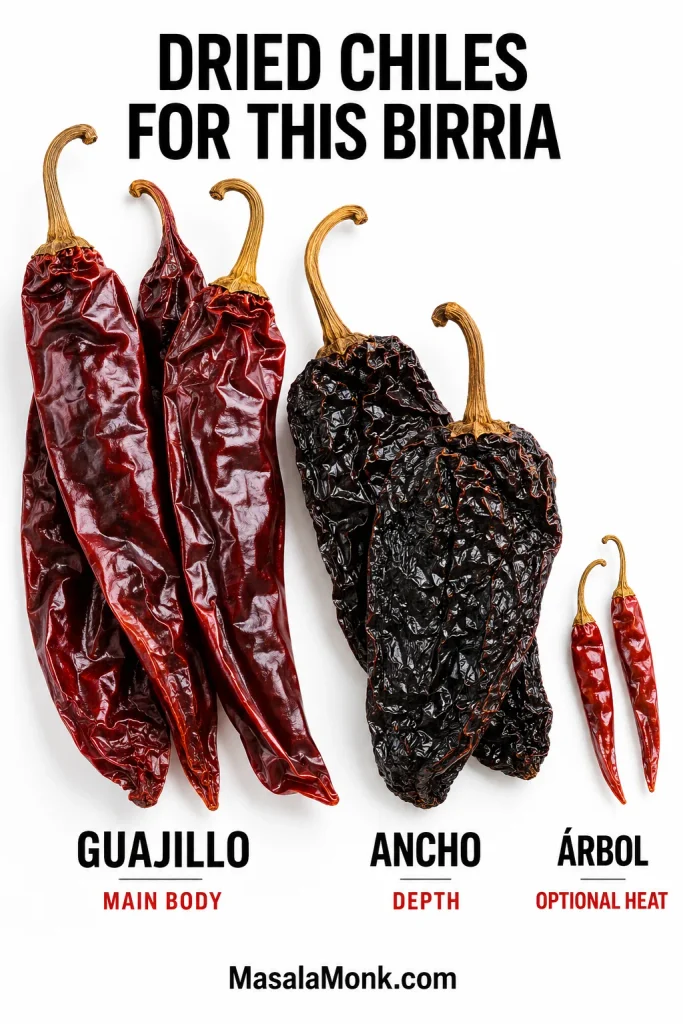
For this birria tacos recipe, chuck roast supplies most of the shreddable beef, while a smaller bone-in cut adds gelatin and rendered fat. Guajillo and ancho build the dried-chile flavour; chile de árbol is there only when you want more heat.

Allow about 5–6 hours from start to finish. The beef spends 3½–4 hours quietly braising, while total hands-on work comes to roughly 1½ hours.

How the Pot Becomes Birria Tacos

Once you see the pot as beef, consommé and red fat, the rest becomes much easier to follow.

  1. Build the birria sauce. Soften the dried chiles, blend them with tomatoes, aromatics and spices, then taste before the beef goes in.
  2. Braise the beef. Cook until the chuck is genuinely tender. The timer tells you when to start checking; the meat tells you when to stop.
  3. Finish the shredded beef. Return some concentrated birria liquid, then cook away the loose moisture until the meat is moist, not wet.
  4. Adjust the consommé. Reduce it if weak, loosen it if overly concentrated, then season once the flavour is right.
  5. Save the red fat. The chile-stained surface fat is what you want for the tortillas.
  6. Fry the quesabirria. Warm tortilla, thin film of fat, cheese, beef, hot griddle, plate.

Birria Tacos Recipe with Beef, Cheese and Consommé

This batch makes about 18 generously filled small quesabirria tacos and serves roughly six people at three tacos each. Short ribs and shank vary in how much edible meat they carry, so you may finish with some extra birria beef.

Recipe at a Glance

Yield
About 18 small tacos

Serves
About 6 people

Total time
About 5–6 hours

Hands-on
About 1½ hours

Same-day rhythm: sauce and browning → 3½–4 hour braise → finish the beef and consommé → fry the tacos in batches.

Primary method: covered Dutch-oven braise at 300°F / 150°C.

Ingredients

For the Beef

  • 3 lb / 1.36 kg boneless beef chuck roast, cut into roughly 3-inch / 7.5-cm pieces
  • 1 lb / 454 g bone-in beef short ribs or beef shank
  • 1½ teaspoons / about 9 g fine sea salt, plus more for finishing
  • 1 teaspoon freshly ground black pepper
  • 1 tablespoon / 15 ml neutral cooking oil

For the Birria Sauce

  • 8 guajillo chiles (dried), about 60 g / 2.1 oz before stemming and seeding
  • 4 ancho chiles (dried), about 45 g / 1.6 oz before stemming and seeding
  • 1–2 chiles de árbol (dried), about 1–2 g, optional for heat
  • 3 medium Roma tomatoes, about 300 g / 10.5 oz, quartered
  • 1 large white onion, about 250 g / 8.8 oz, quartered
  • 8 garlic cloves, about 30 g / 1 oz, peeled
  • 2 teaspoons Mexican oregano; regular oregano can work in a pinch, using slightly less
  • 1½ teaspoons ground cumin
  • ½ teaspoon ground cinnamon
  • ¼ teaspoon ground cloves
  • 2 tablespoons / 30 ml apple cider vinegar or distilled white vinegar
  • 5 cups / 1.18 litres low-sodium beef broth, divided, plus extra as needed
  • 2 bay leaves

Use the chile weights when you can. Dried peppers vary enormously in size. If eight guajillos or four anchos do not come close to the weights above, let the gram/ounce measurements guide the batch.

For the Quesabirria

  • 20 small fresh corn tortillas, 5–6 inches / 13–15 cm across, giving you two spares
  • 16 oz / 454 g Oaxaca (quesillo), Chihuahua, Asadero or Monterey Jack cheese
  • About 6 tablespoons / 90 ml reserved red birria fat
  • 1 small white onion, about 100 g / 3.5 oz, finely diced
  • ½ cup / about 15–20 g chopped fresh cilantro, plus more if wanted
  • 3 limes, cut into wedges

Oaxaca (quesillo) is the first choice when you can get it: mild, stretchy and excellent for melting. Chihuahua and Asadero work beautifully too; Monterey Jack is the easiest widely available substitute. Whichever you use, shred it finely so the cheese melts before the tortilla gets too dark.
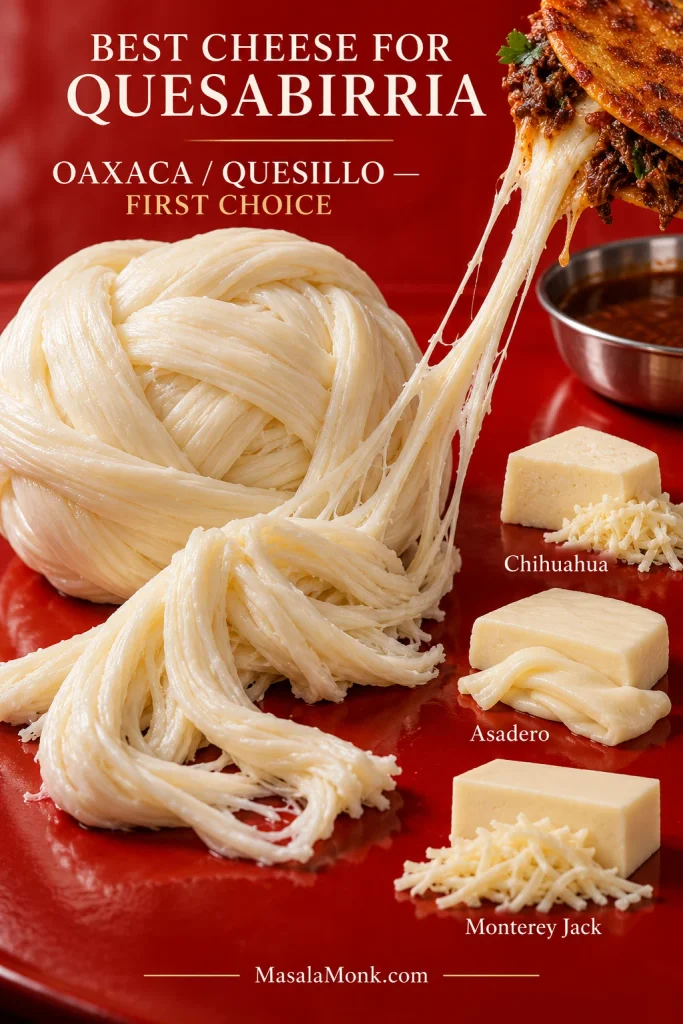
Oaxaca quesillo shown as the dominant cheese choice with smaller portions of Chihuahua, Asadero and Monterey Jack.
Cheese works best here as an adhesive, not the main filling: fast-melting Oaxaca or quesillo helps the beef stay put while the small corn tortilla develops its crisp shell.

Equipment

  • 6- to 7-quart / 5.7- to 6.6-litre Dutch oven or another heavy oven-safe pot with a lid
  • Medium saucepan
  • Blender
  • Fine-mesh strainer
  • Large bowl or tray for the cooked beef
  • Wide skillet, cast-iron pan or griddle
  • Tongs, ladle and heatproof spoon
  • Small heatproof bowl or jug for the red fat
  • Instant-read or probe thermometer for checking the beef, optional
  • Infrared thermometer for checking the griddle surface, optional

Phase 1: Make the Birria Sauce

1. Warm and Soften the Dried Chiles

Wipe the dried chiles clean, remove the stems and shake or scrape out most of the seeds.

Set a dry skillet over medium-low heat. Warm the guajillo and ancho chiles briefly, 10–15 seconds per side, until their aroma strengthens and the skins become more flexible. Chile de árbol needs even less time.

Pull them as soon as they smell fuller and fruitier. Smoke, an acrid smell or black scorched patches mean the heat has gone too far.

Cover the warmed chiles with very hot water and leave them for 15 minutes. They are ready when the skins bend easily and the softened flesh no longer feels brittle. Drain and discard the soaking water.
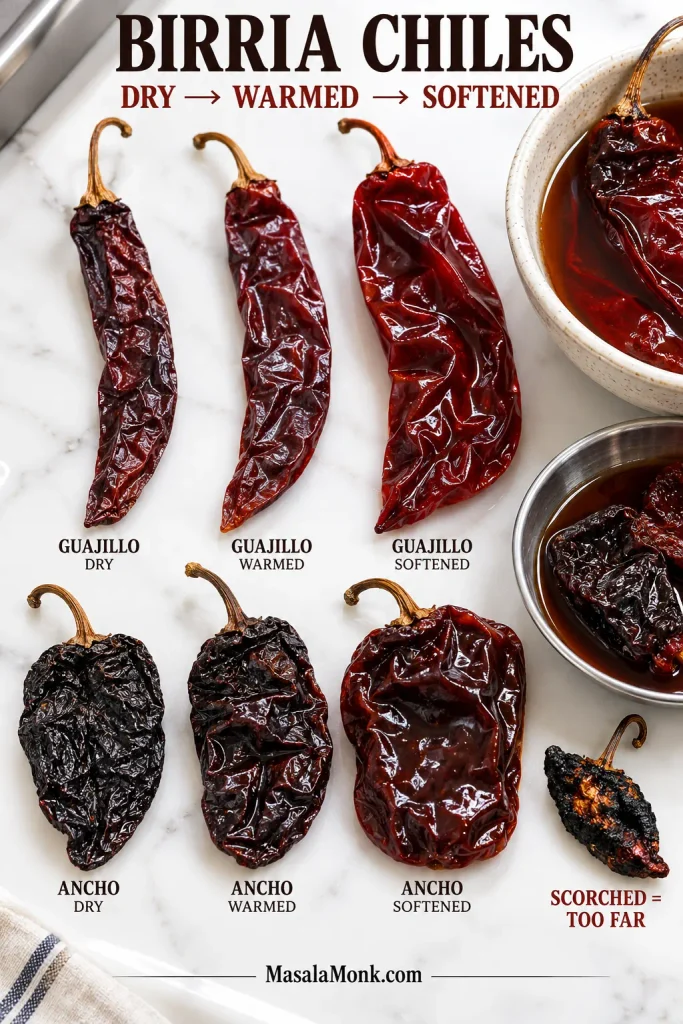
Guajillo and ancho chiles shown dry, gently warmed and softened after soaking, with a small blackened scorched chile for comparison.
The useful checkpoint is flexibility, not darkness. Warm dried chiles only until slightly pliable, then soak until fully bendable; brittle pieces blend poorly, while scorched ones can make the whole birria sauce bitter.

2. Soften the Tomatoes and Aromatics

Put the tomatoes, onion, garlic and 2 cups / 475 ml of the beef broth into a medium saucepan. Bring to a gentle simmer and cook for 10 minutes, until the tomato and onion have softened.

Let the mixture cool for several minutes before blending. If your blender is not designed for hot liquids, cool it further. Otherwise, follow the manufacturer’s instructions for venting steam safely and begin at low speed.

3. Blend, Strain and Taste

Transfer the softened chiles to the blender with the tomatoes, onion, garlic and their cooking broth. Add the Mexican oregano, cumin, cinnamon, cloves and vinegar. Blend until smooth.

As the mixture smooths out, it should turn a deep red-brown and smell distinctly of dried chile and warm spice rather than raw onion or garlic.

In this recipe, the birria sauce is the blended dried-chile, tomato, onion, garlic and spice base in which the beef braises. It is different from the finished consommé served beside the tacos.

Pour the sauce through a fine-mesh strainer, pressing with a flexible spatula. Once what remains is mostly fibrous chile skin and pulp, discard or compost the residue. A powerful blender may leave very little behind.

The strained sauce should pour in a steady stream. If yours sits like paste, loosen it with extra low-sodium broth.
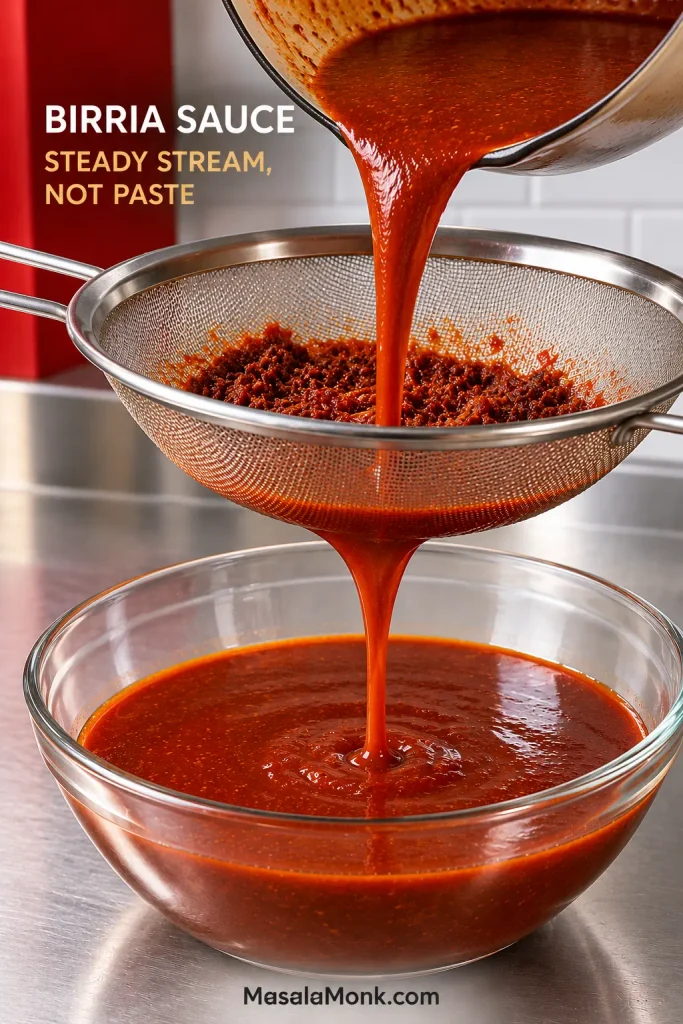
Smooth red-brown birria sauce flowing through a fine-mesh metal strainer into a glass bowl while coarse chile pulp remains in the sieve.
After straining, watch how the sauce settles in the bowl: it should level into a smooth surface instead of holding ridges. That flow helps the birria sauce move evenly around large pieces of beef.

Taste it now. It should be intense, fruity, earthy and savoury. A clearly scorched or acrid sauce is worth remaking before several pounds of beef go into it.

Phase 2: Braise the Beef

4. Brown the Beef

Heat the oven to 300°F / 150°C.

Pat the chuck and short ribs or shank reasonably dry. Season with the measured salt and black pepper.

Heat 1 tablespoon / 15 ml neutral oil in the Dutch oven over medium-high heat. Brown the meat in batches so the pieces have room to make contact with the pot.

A few properly browned surfaces are enough. The next few hours will do far more for the beef than chasing a perfect crust on every side.

5. Cover the Pot and Let the Beef Get Tender

Return all the beef to the Dutch oven. Pour in the birria sauce, the remaining 3 cups / 710 ml broth and the bay leaves.

Once everything settles, the liquid should reach about halfway to two-thirds of the way up the larger pieces. A particularly wide pot may need extra low-sodium broth.
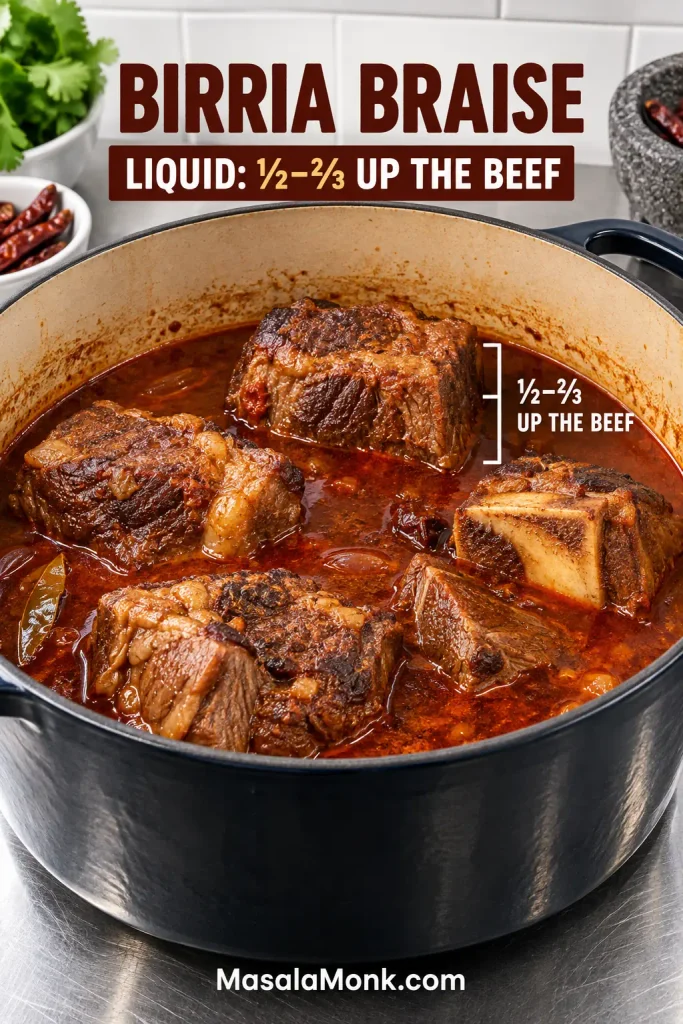
Large browned beef chunks in a Dutch oven with red birria braising liquid reaching roughly halfway to two-thirds up their sides.
Use the beef as the ruler. A wider Dutch oven may need a little extra broth to reach the same halfway-to-two-thirds depth.

Bring the liquid just to a simmer on the stovetop, cover the pot and put it in the oven.

Now there is not much to do. Start checking at 3 hours; most batches need 3½–4 hours.

The beef is done when a fork, skewer or probe slides into the chuck with almost no resistance and the meat pulls apart easily. Beef in this kind of braise often reaches the low 200s°F / mid-90s°C around the time it becomes tender, but the probe test decides when it is ready.

When the probe finally slips in without a fight, the long part is done. If the beef is still stubborn, close the pot and give it more time.
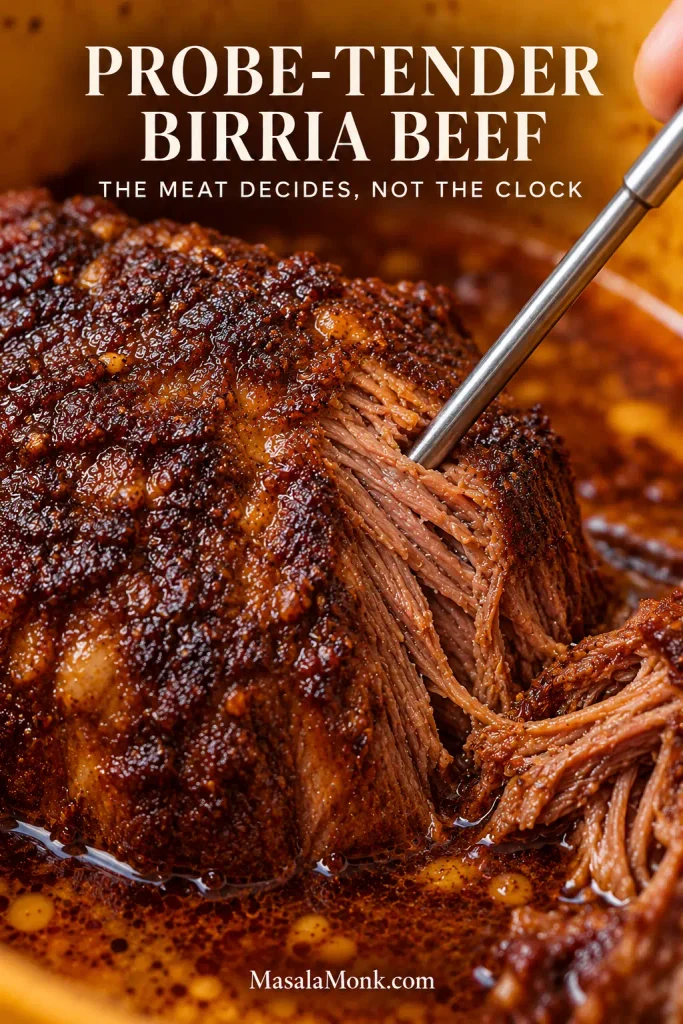
Metal probe entering a fully braised piece of chuck as softened beef fibres separate while the chunk remains intact.
Probe the thickest piece of chuck you can reach. Smaller or fattier pieces may soften sooner, so one tender edge is not enough to call the entire birria braise done.

Phase 3: Finish the Beef, Consommé and Red Fat

Use about 1 cup / 240 ml of the cooking liquid to finish the shredded beef. After that, aim to have roughly 3½–4½ cups / 830 ml–1.06 litres of consommé left for serving, plus about 6 tablespoons / 90 ml red fat for the 18 tacos.

Exact yield varies with the beef, pot and amount of reduction, so let flavour and texture guide the final adjustment.

6. Lift Out the Beef and Skim the Fat

Transfer the tender meat to a large bowl or tray and remove the bay leaves. Once the bone-in pieces are cool enough to handle, discard the bones and any tough pieces of gristle.

Let the pot sit for several minutes. Orange-red fat will gather over the darker consommé. Carefully skim about 6 tablespoons / 90 ml into a small heatproof bowl or jug.
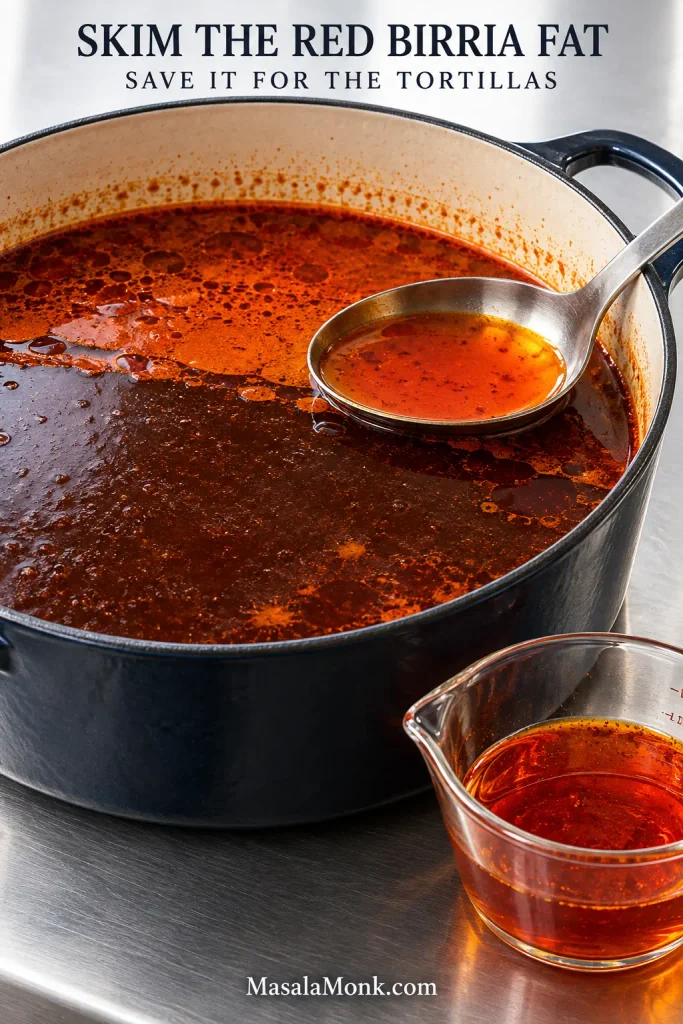
Ladle skimming a translucent orange-red fat layer from the surface of darker birria consommé in a Dutch oven.
Let the pot rest before skimming, then keep the spoon shallow. Clear orange-red fat is the target; if the ladle comes up dark and watery, you have dipped into the consommé.

That little bowl of red fat is worth protecting. It is what turns pale corn tortillas into the crisp red shells you are after.

A leaner batch may give you less. Save what you have and supplement it with enough beef tallow or neutral oil to coat the tortillas lightly.

7. Shred and Season the Beef

Shred the chuck and the usable meat from the short ribs or shank.

Transfer it to a wide skillet or saucepan with about 1 cup / 240 ml of the birria cooking liquid. Cook over medium heat for 5–8 minutes, tossing occasionally.

At first, broth will move around the bottom of the pan. Keep going until that puddle disappears and the beef looks glossy. Push some meat aside with your tongs: the surface underneath should be damp, not flooded.
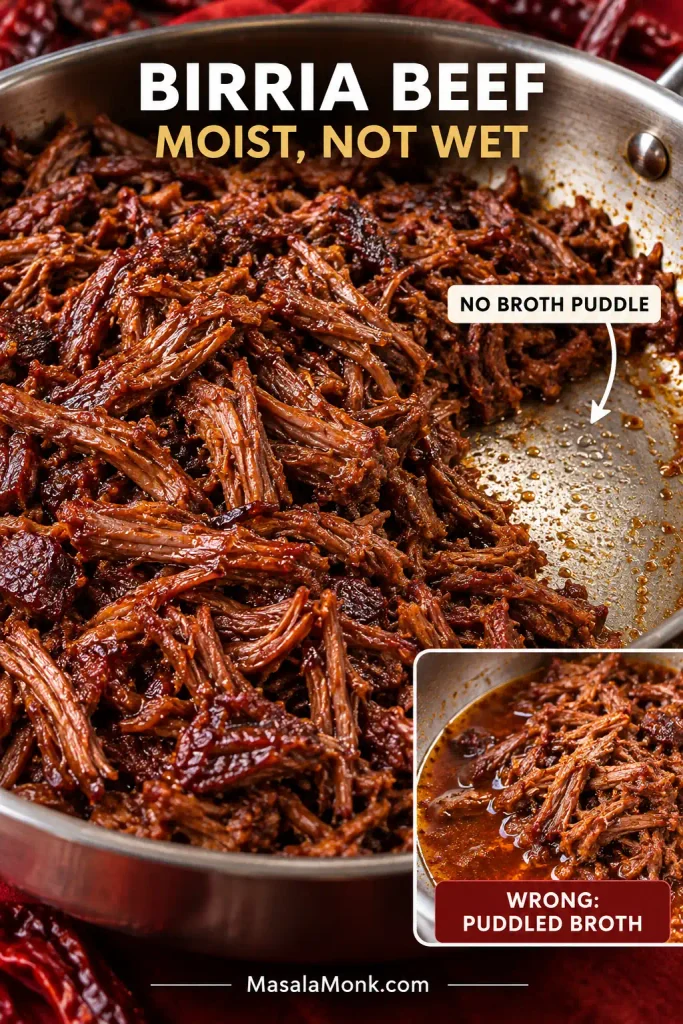
Glossy shredded birria beef with no standing broth beneath it beside a smaller comparison showing overly wet beef sitting in liquid.
Stopping at glossy-but-not-puddled protects two things at once: crisp tortillas and juicy birria beef. Reducing until the meat is completely dry would solve one problem by creating another.

Taste a strand. It should already be good enough to steal from the pan. If the beef itself tastes flat, add a small pinch of salt.

8. Taste and Adjust the Consommé

Good birria consommé should taste concentrated and beefy while remaining thin enough to drink like broth.

A light-looking broth is not automatically weak. If the beef, chile and spice flavours are already pronounced, leave it alone. If it tastes diluted, simmer uncovered until the flavour deepens.

A broth that has gone too far can be loosened gradually with unsalted broth or water. Once the strength is right, make the final salt adjustment.

Gelatin may make the consommé firm when cold; while hot, it should still pour easily from a ladle.

9. Check the Reserved Fat

Heat a small spoonful in the skillet. Normal sizzling is fine. Violent sputtering usually means watery consommé came along with the fat; warm it gently until that water cooks away.
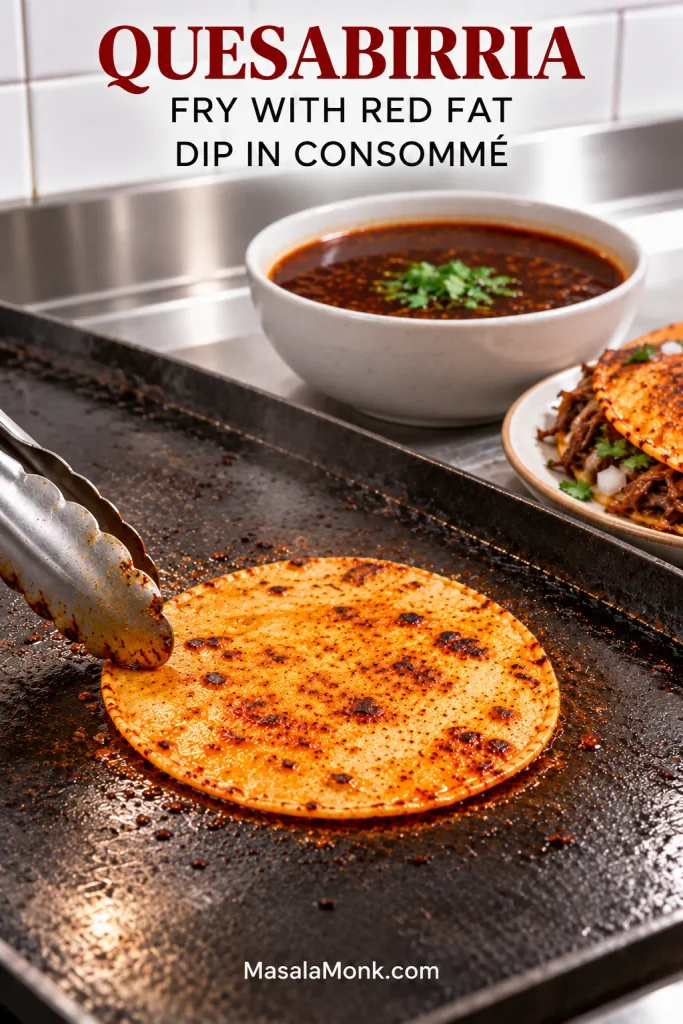
Corn tortilla crisping on a griddle in a thin film of orange-red birria fat beside a separate bowl of darker consommé.
Use the clear orange-red fat to crisp the tortilla; keep the darker consommé for dipping. If the fat spits violently, it probably carried some watery broth with it.

Phase 4: Fry the Quesabirria

This is the fast part. Have the beef hot, cheese shredded, tortillas ready and consommé waiting before you begin.

10. Warm the Tortillas

Warm the corn tortillas briefly on a dry skillet or griddle until pliable, 10–20 seconds per side. Refrigerated tortillas especially need this head start before they are folded.
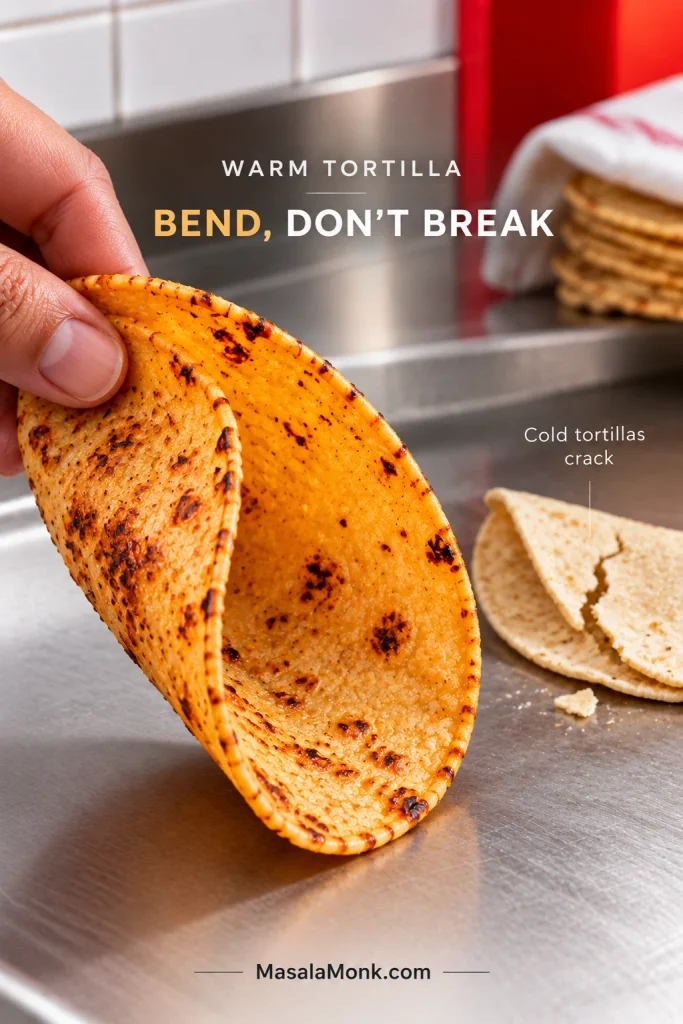
Warm corn tortilla bending smoothly in a hand beside a colder tortilla cracked along the fold.
Warm corn tortillas only until they fold without resistance; early browning steals griddle time from the final quesabirria, where you actually want the crisp crust to develop.

11. Portion the Filling

For each 5- to 6-inch / 13- to 15-cm tortilla, start with:

  • 1 teaspoon / 5 ml red birria fat
  • 25 g / a scant 1 oz finely shredded cheese
  • 1¾ oz / 50 g shredded birria beef

That gives you a generous taco without turning it into a stuffed pouch that barely touches the skillet.
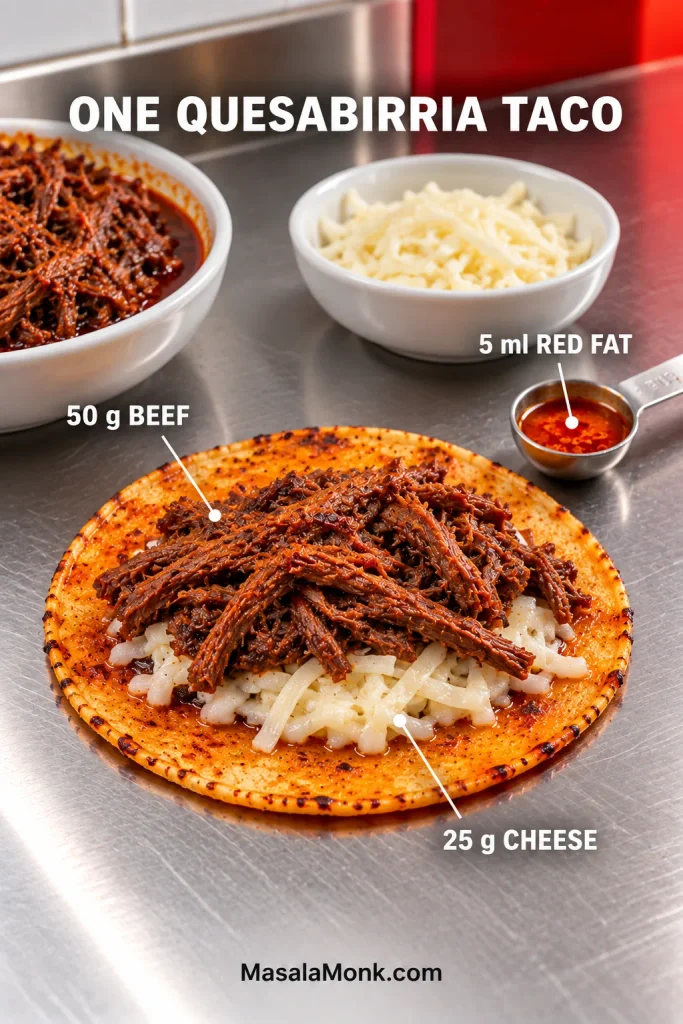
Small corn tortilla with 50 g shredded birria beef and 25 g cheese beside 5 ml of measured red birria fat.
Keep the filling slightly back from the tortilla edge. That bare border gives the folded quesabirria cleaner griddle contact and reduces beef and cheese squeezing out during the flip.

12. Coat, Fill and Crisp

Heat a large skillet or griddle over medium to medium-high heat. A surface around 350–375°F / 177–191°C is a useful working range if you use an infrared thermometer.

Work two or three tacos at a time unless you are using a large flat-top. Crowding makes them awkward to flip and can cool the cooking surface.

Add about 1 teaspoon / 5 ml red fat, then swipe a warm tortilla through it so the side against the pan gets a thin chile-red film.

Give it 15–30 seconds. Cheese over one half. Beef on top. Fold.

Then leave it alone long enough for the first side to turn red-golden and begin releasing from the pan, usually around 1½–2 minutes. Flip and crisp the second side until firm and browned.

The cheese should be melted and the shell should feel firm rather than floppy. A pale, damp tortilla simply needs more time against the heat.

The first taco tells you whether the pan is right: crisp edge, melted centre, and no stream of broth running out when you lift it.
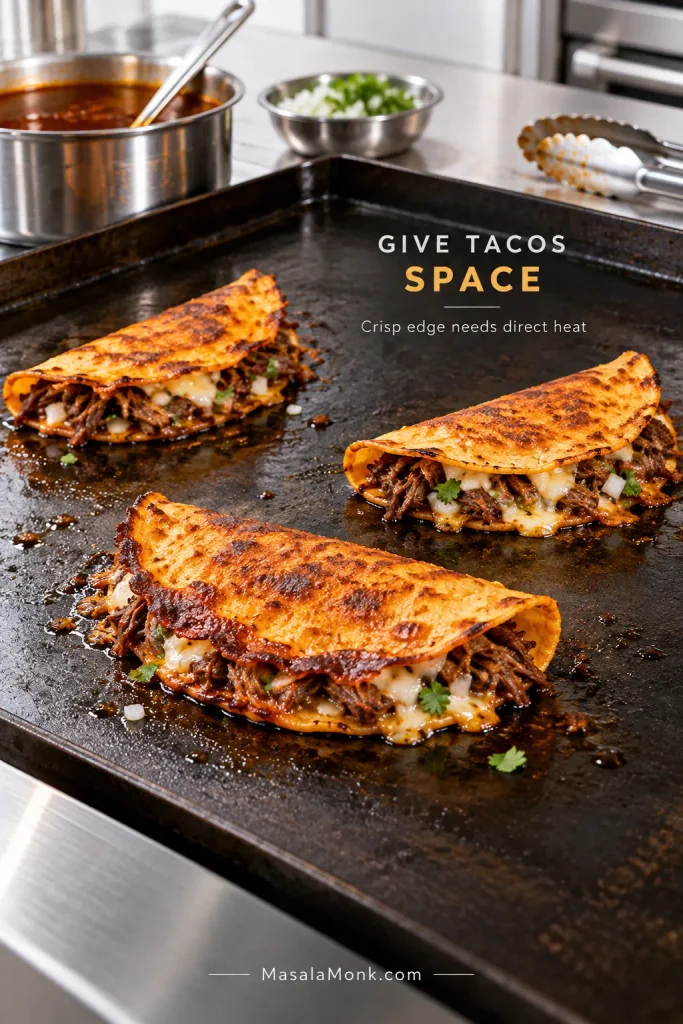
Three quesabirria tacos cooking with clear space between them on a hot griddle, with browned and blistered corn tortilla surfaces.
Use the first taco as a heat test: if browning is sluggish, let the griddle recover before loading the next batch. Empty hot metal between tacos matters as much as total pan size.

13. Serve Them Hot

Start with about ½–⅔ cup / 120–160 ml consommé per person and keep the rest hot for refills. Add diced white onion, cilantro and lime to taste.

Dip each taco just before you bite rather than letting it sit in the consommé; you get the hot broth without giving the crisp shell time to turn soggy.
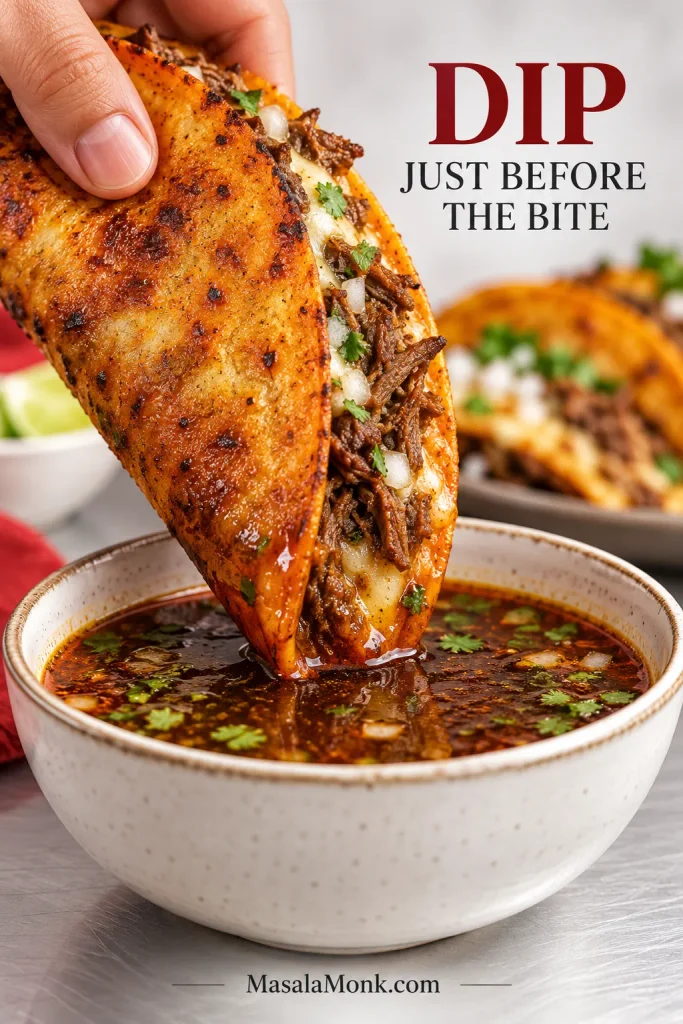
Hand dipping the pointed edge of a crisp beef quesabirria taco into dark birria consommé while most of the shell remains above the broth.
Dip the next bite, not the whole taco. A brief edge dip adds hot consommé and aroma; then a quick pause over the bowl keeps excess broth from softening the remaining shell.

Send the tacos straight from the griddle to the table. Steam and meat juices start softening the shell almost immediately, so this is not a meal that improves while waiting under foil.

If dinner is already underway, you can stop here. The guide below is for the questions that only matter when you are choosing a different cut, planning tomorrow’s batch or staring at a pot that is doing something you did not expect.

Choosing the Beef and Chiles

For this beef birria tacos recipe, chuck roast is the most practical main cut for most home cooks. It is widely available, gives a good yield of actual meat and contains enough connective tissue to become succulent after several hours of gentle cooking.

The smaller bone-in cut has a different job. Short ribs contribute fat and gelatin; shank brings connective tissue and bone. Oxtail gives you plenty of richness too, though comparatively little meat for the price.
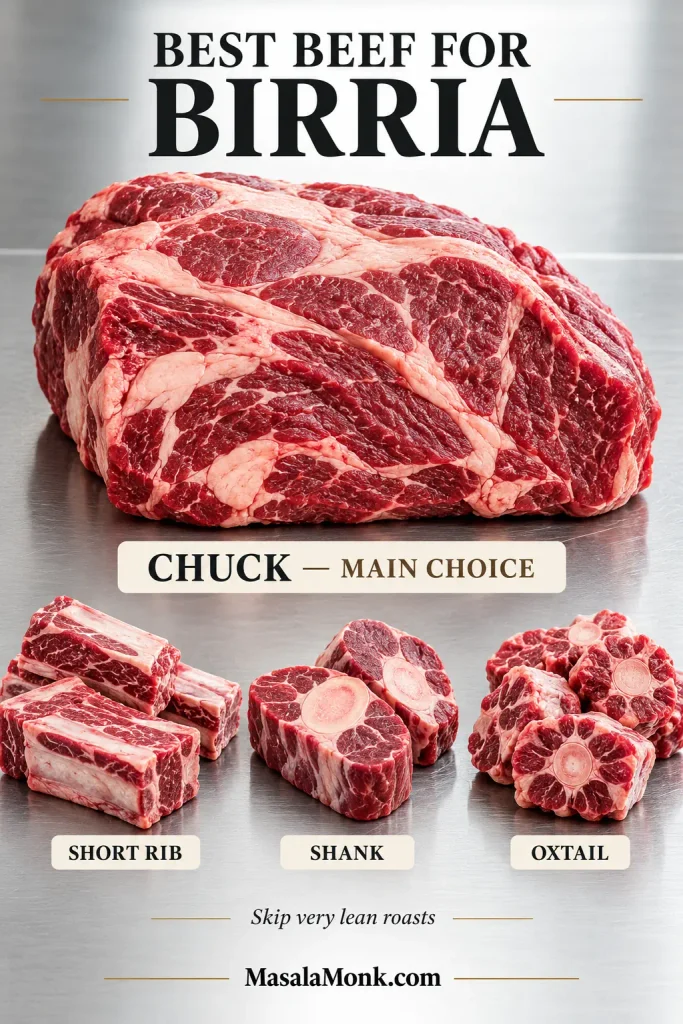
Raw beef chuck shown as the main birria cut with smaller portions of short ribs, beef shank and oxtail on a stainless surface.
Chuck supplies most of the meat; a smaller collagen-rich bone-in cut deepens the broth.
Cut What it contributes How to use it here
Chuck roast High meat yield, beef flavour, shreddable texture Main cut
Bone-in short rib Fat, gelatin and bone Rich secondary cut
Beef shank Gelatin, connective tissue and bone Excellent short-rib alternative
Oxtail Rich gelatin and fat Useful when cost and lower meat yield are acceptable
Brisket Beef flavour and shreddable texture Works, though chuck is simpler here

Avoid very lean steak or roasting cuts; they lack the connective tissue and fat that help this long braise produce succulent shredded beef and a fuller consommé.

Chuck alone works too. Choose a well-marbled roast; the consommé will generally be a little less gelatin-rich than when a bone-in cut joins the pot.

Whichever cut you choose, don’t use temperature alone to decide when it is done. Collagen-rich beef needs enough time at temperature to become tender, so the fork or probe test still matters; the ThermoWorks guide to birria temperatures has a useful deeper explanation of that relationship.

Guajillo and Ancho Build the Base; Árbol Controls the Heat

Chile What it brings Heat
Guajillo Red colour, fruity and earthy dried-chile character Mild
Ancho Darker fruitiness, sweetness and depth Mild
Árbol Sharper chile heat Hotter
Large group of long red guajillo chiles, smaller group of broad dark ancho chiles and two small chiles de árbol showing their relative amounts.
For dried chiles, trust weight more than count: one guajillo or ancho can be much larger than another. The gram ratio keeps the birria flavour steadier from batch to batch.

A pile of dried peppers makes birria look much fiercer than it has to be. Most of the weight here comes from guajillo and ancho. Leave the árbol out for a mild batch, use one for gentle warmth, or two when you want the heat to show up more clearly.

Look for dried chiles that still bend slightly and smell fruity and earthy. Very brittle, dusty-smelling peppers usually bring less character to the pot.

Birria, Tacos de Birria and Quesabirria

Birria is the chile-seasoned meat dish; tacos de birria put that meat into tortillas, while quesabirria—sometimes written quesa birria—adds melting cheese. The version here is beef quesabirria served with consommé.
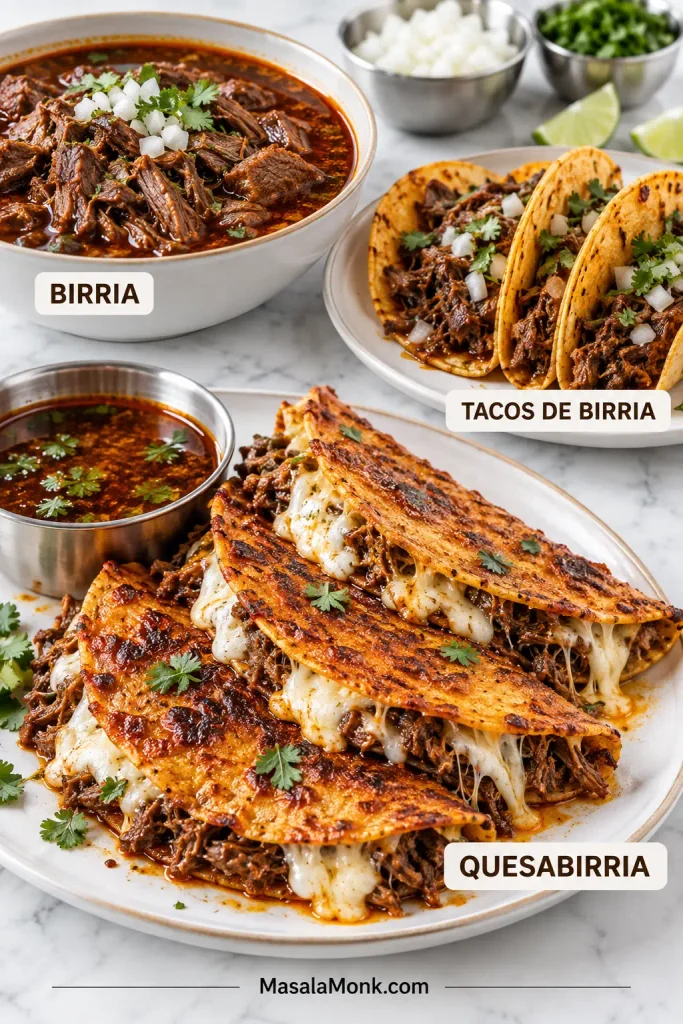
Bowl of birria with broth, soft tacos de birria filled with shredded beef and crisp cheese-filled quesabirria shown together.
Same birria, three serving formats: birria with broth, tacos de birria, and cheese-filled crisp quesabirria.

Birria has especially deep roots in Jalisco, where goat is strongly associated with older regional preparations. Beef birria, or birria de res, developed its own traditions too, and Tijuana became especially known for beef birria tacos and eventually the cheese-filled quesabirria style. Food writer Bill Esparza’s history of birria tacos in Tijuana and the United States traces some of the people and migrations behind that evolution.

So the tacos in this recipe belong to the modern beef-and-cheese quesabirria style rather than representing every older regional form of birria.

Keeping Quesabirria Crisp

Birria tacos usually turn soggy for three reasons: the beef is too wet, watery consommé ends up on the tortilla, or the pan is not hot enough. Overfilling and holding finished tacos too long make those problems worse.
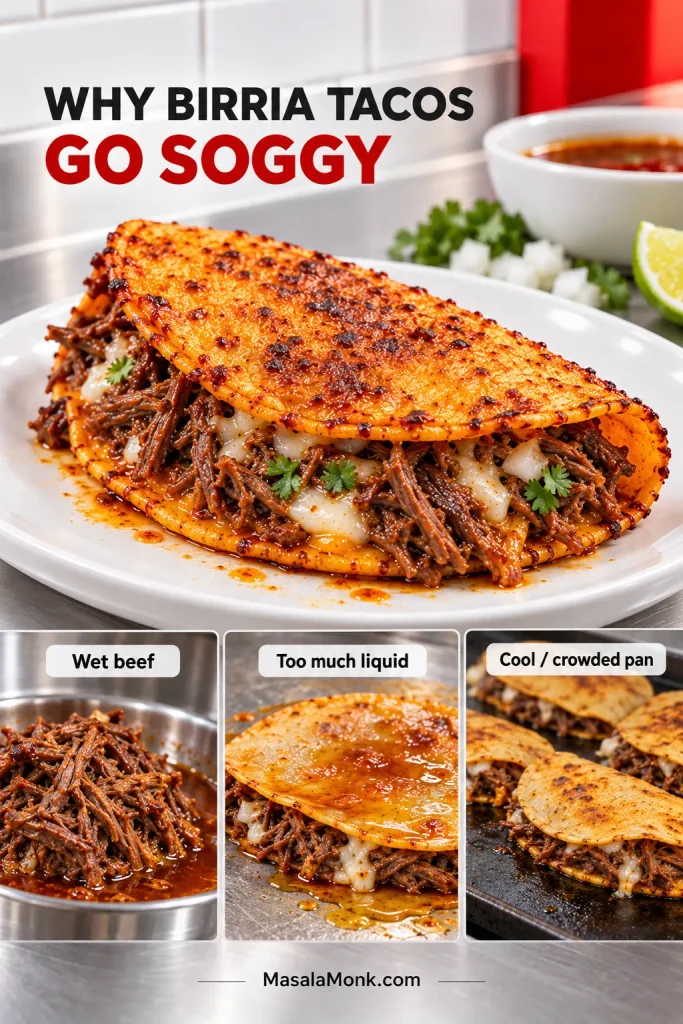
Crisp birria taco above smaller examples of wet shredded beef, a tortilla coated with excess liquid and tacos crowded on a griddle.
Diagnose soggy birria tacos in order: check the beef for loose moisture, then the tortilla coating, then the griddle heat. Turning up the pan will not rescue wet filling.

Warm cold corn tortillas until they bend easily before the fat and filling go on. If you make your own, our homemade corn tortilla recipe goes deeper into the hydration and resting cues that keep masa tortillas flexible.

Then resist the urge to pile them high. Around 50 g beef and 25 g cheese is enough for a small tortilla. Heavier filling means less tortilla against the pan and more steam trapped in the middle.

Fresh corn tortillas are easiest to work with. Very dry tortillas are more likely to split even after warming. Flour tortillas work too, though they give you a softer, chewier taco rather than the firmer corn shell used here.

Most importantly, fry in small waves. A taco can leave the skillet crisp and still soften ten minutes later as steam from the meat and cheese works into the shell.

Birria Is Often Easier the Next Day

Yes—birria is an excellent make-ahead meal. Braise and chill the beef and consommé a day or two ahead, then reheat the components and crisp the tacos just before serving.

Overnight chilling also firms the rendered fat at the surface, where you can lift it away cleanly instead of chasing it around a hot pot with a spoon.

Day 1

  • Make the sauce and braise the beef until tender.
  • Remove the beef, bay leaves and bones.
  • Shred the beef while it is still warm and toss it with just enough consommé to keep the meat juicy.
  • Transfer the beef and remaining consommé to separate shallow containers.
  • Refrigerate the cooked food within 2 hours.

If convenient, leave most of the rendered fat with the consommé overnight. It will firm into an easy-to-remove layer once chilled.

Day 2

The next day is the easy part. The beef is already shredded, the fat is firm on top and dinner is mostly reheating, seasoning and crisping.
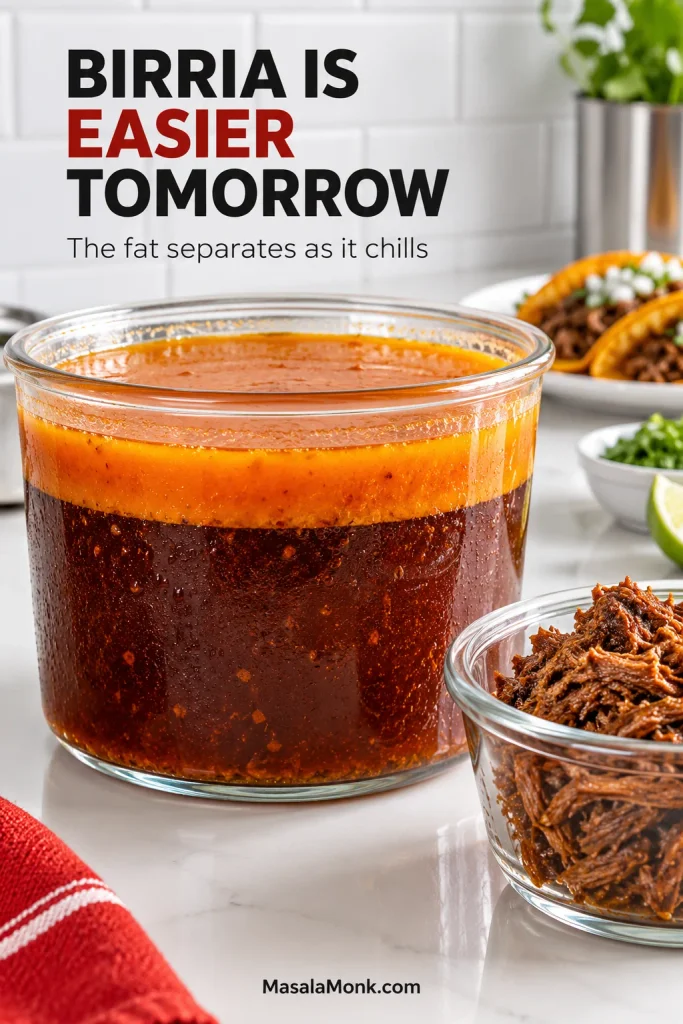
Chilled birria consommé in a clear container with a firm orange-red fat layer on top and shredded birria beef stored separately beside it.
Chilling makes the fat easy to lift and portion, while beef and consommé can be reheated and adjusted separately.

Lift off enough fat for the tortillas. Reheat the beef gently, adding consommé if it needs moisture, then let any loose liquid cook away. Warm the remaining consommé separately and melt the red fat gently before the tortillas hit the skillet.

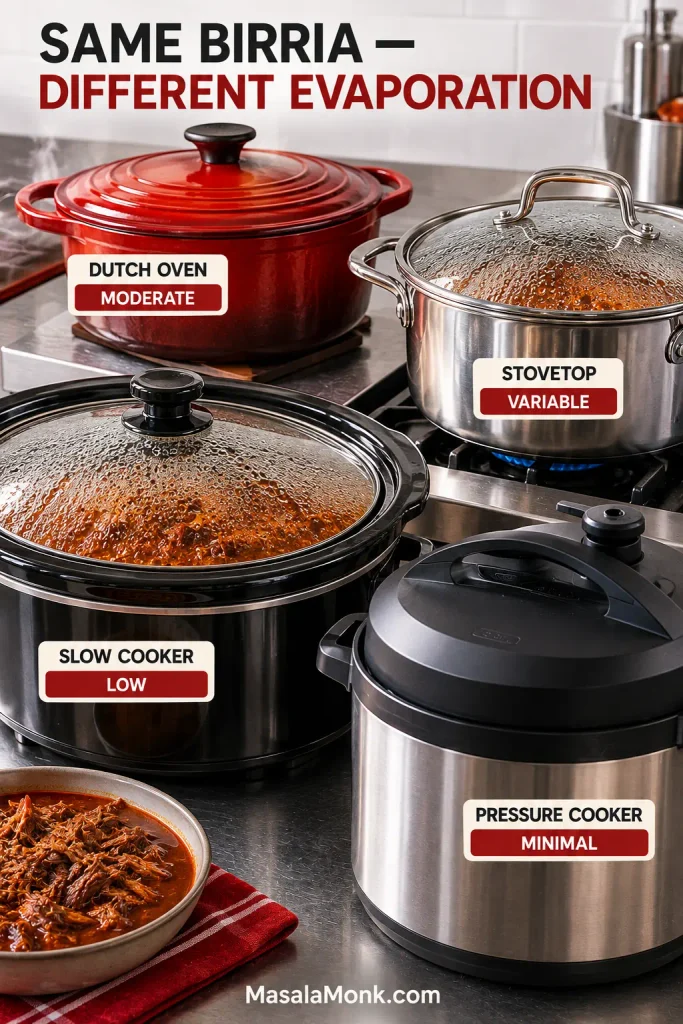
Slow Cooker, Stovetop and Instant Pot Birria

Make the sauce and brown the beef as written. What changes from here is the cooking time and how much water each cooker lets escape.

Method Timing and main difference
Dutch oven 300°F / 150°C for 3½–4 hours; moderate evaporation
Stovetop Gentle covered simmer for 3–3½ hours; check the liquid periodically
Slow cooker LOW for 7–8 hours; very little evaporation
Instant Pot / pressure cooker HIGH for 55 minutes + about 15 minutes natural release; very little evaporation
Covered Dutch oven marked moderate evaporation, lidded stovetop pot marked variable, closed slow cooker marked low and locked pressure cooker marked minimal evaporation.
Evaporation changes concentration as well as volume. Slow cookers and pressure cookers often need a post-cook reduction, so taste and salt the consommé after its final strength is set.

Slow Cooker

Prepare the sauce as written, using 2 cups / 475 ml broth in the sauce. Transfer it to the slow cooker with the browned beef, then add only 2 more cups / 475 ml broth. That gives you 4 cups / 950 ml total broth for the slow-cooker batch.

Cook on LOW for 7–8 hours. Once the beef is tender, take it out and taste the broth. Slow cookers lose little water, so a short uncovered reduction on the stove may make the consommé much better.

Instant Pot or Other Pressure Cooker

Use 2 cups / 475 ml broth while making the sauce, then add another 2 cups / 475 ml with the beef for 4 cups / 950 ml total.

This is a large pressure-cooker batch. Do not exceed your appliance’s maximum pressure-cooking fill line; divide the batch if necessary.

Cook at HIGH pressure for 55 minutes, followed by about 15 minutes of natural release. After 15 minutes, release any remaining pressure according to your cooker’s instructions before opening the lid.

Probe the chuck. Tight meat gets another 10–15 minutes at high pressure. Because almost no water has escaped, the consommé may still need reducing after the beef comes out.

Stovetop

Keep the covered pot at the gentlest steady simmer you can manage. Begin checking the beef at three hours, and add hot low-sodium broth if the pot gets too dry before the meat softens.

On nights when a four-hour braise is unrealistic, ground beef tacos get a taco dinner onto the table in about 20 minutes.

What to Serve with Birria Tacos and How to Feed a Crowd

Good sides for birria tacos either cut through the rich beef and cheese or make the meal more substantial without overwhelming the consommé. Keep diced onion, cilantro and lime on the table; a bowl of roasted salsa verde gives the tacos a tart green contrast, while creamy refried beans round out the meal without competing with the main event.

For a party, make the birria ahead and save your attention for the griddle. Keep the beef hot in one pan, consommé hot in another, tortillas wrapped and warm, cheese within reach and the red fat beside the cooking surface.

A standard skillet usually handles two or three tacos comfortably; a wide griddle handles more. Serve in waves and let people start eating. The tacos are better fresh from the skillet than waiting for the whole batch to finish.
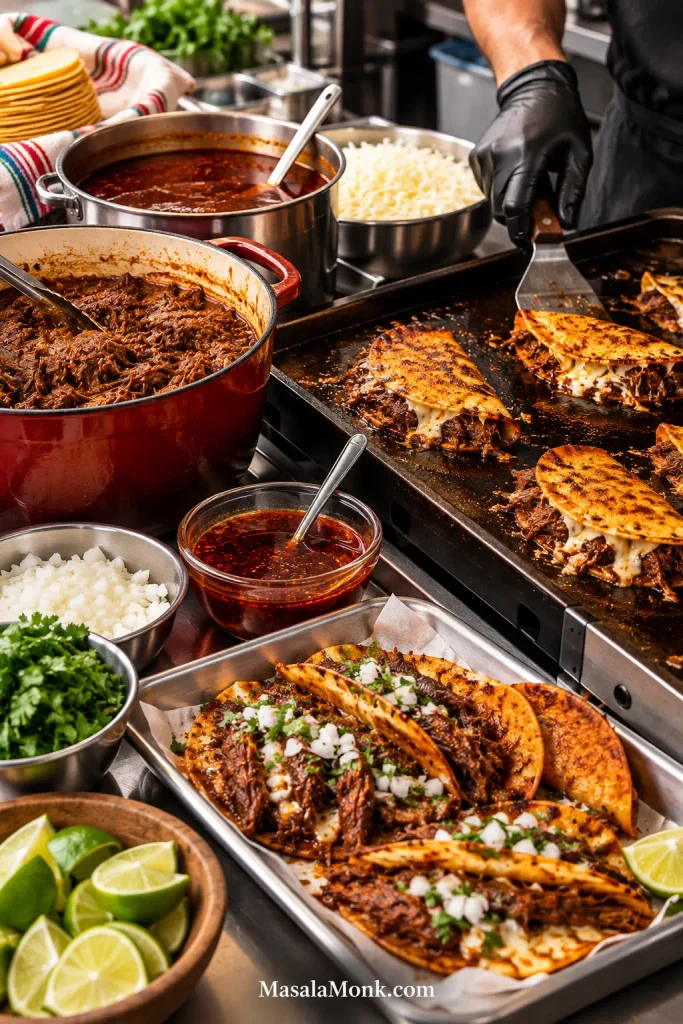
Active birria taco station with hot beef, consommé, tortillas, cheese, red fat and garnishes surrounding a griddle where quesabirria tacos are cooking.
For a crowd, the griddle is the bottleneck: keep the components hot and send tacos out as they crisp.

If people are grazing before the first tacos come off the pan, a cold 7 layer dip can already be on the table without tying up the stove.

When the Birria Doesn’t Behave

Start with the stage you are standing in. A scorched chile sauce needs a different fix from tough beef, and neither has much to do with a tortilla that refuses to crisp.

Before the Braise

The birria sauce tastes bitter or burnt: birria usually turns bitter when dried chiles, garlic or spices scorch. If the flavour is clearly burnt rather than simply intense, remake the sauce before adding the beef.

The sauce is too thick: dried chiles vary in size and dryness. Add low-sodium broth gradually until the sauce pours easily.

The heat got away from you: chile de árbol is usually responsible for the sharpest burn. Before the beef goes in, extra tomato and broth can spread that heat through a larger volume. Next time, reduce or omit the árbol.

After the Braise

The beef is still tough: it usually needs more cooking time. As long as it has enough braising liquid, keep going until the fibres loosen and a probe slides in easily.

The consommé tastes weak: remove the tender meat and reduce the broth uncovered. Finished beef does not need another twenty minutes in the pot just because the liquid needs concentration.

The consommé is too salty: add unsalted broth or water gradually until the balance returns.

There is hardly any red fat: some cuts simply render less. Save whatever chile-stained fat you have and extend it with beef tallow or neutral oil.

The skimmed fat spits violently: water probably came with it. Heat the fat gently until that water evaporates and the aggressive sputtering settles.

At the Griddle

What you see Likely cause What to do
Tortilla tears Cold, dry or brittle tortilla Warm until pliable before coating and folding
Birria taco is soggy or won’t crisp Wet beef, watery tortilla coating or cool pan Dry the filling further, use red fat rather than broth and let the skillet heat properly
Shell feels greasy Too much fat Use a thinner film; about 1 teaspoon / 5 ml is enough for a small tortilla
Cheese is slow to melt Thick shreds, cold filling or overloaded taco Finely shred the cheese and lighten the filling
First tacos were crisp; platter is soft Trapped steam Serve smaller waves and avoid stacking or sealing under foil

Storing, Freezing and Reheating Birria

Birria stores best when the beef, consommé and red fat are kept separately. Those components reheat well; an assembled crisp taco does not.
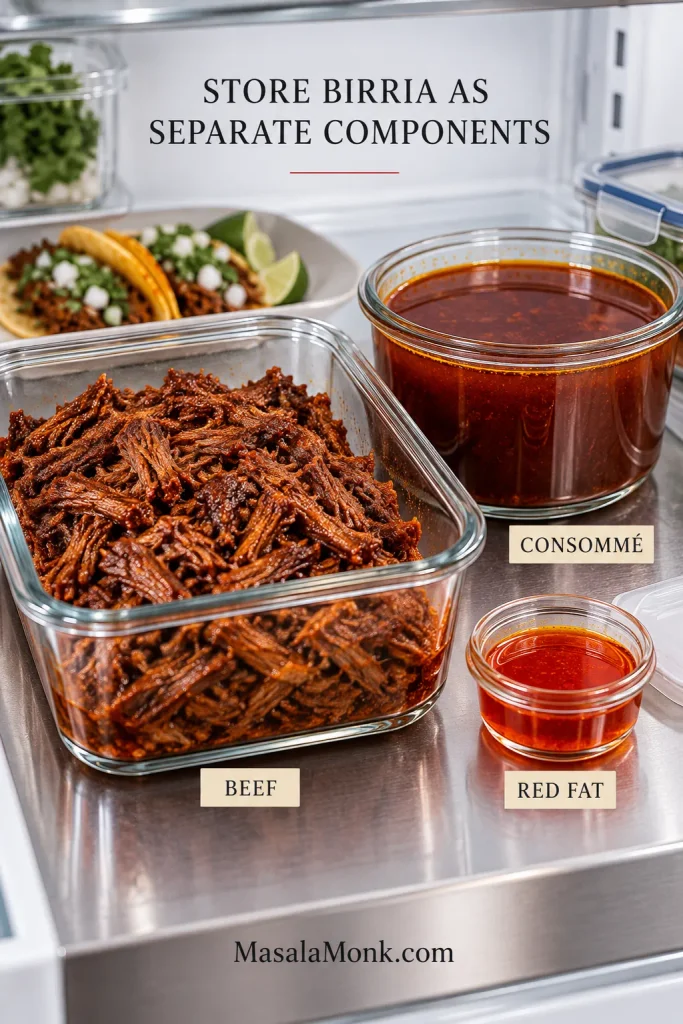
Separate glass containers holding shredded birria beef, dark consommé and a much smaller portion of red birria fat on a stainless shelf.
Store beef, consommé and red fat separately so each can be reheated and adjusted independently.

Divide the beef and consommé into shallow containers and refrigerate within 2 hours. Keep the refrigerator at 40°F / about 4°C or colder and use refrigerated cooked birria within 3–4 days. The USDA leftovers guidance has more detail on cooling and storing cooked food safely.

For longer storage, freeze the shredded beef and consommé rather than assembled tacos. Using them within 2–3 months gives the best quality.

Reheat leftover beef to 165°F / 74°C. Bring the consommé to a rolling boil, then lower the heat and keep it hot for serving. If the meat needs moisture, warm it with some consommé and let any loose liquid cook away before filling the tortillas.

An already cooked taco is best reheated in a dry skillet or air fryer rather than the microwave.

A Long Braise, Then a Very Fast Taco

The slow work happens in the pot; once the beef is tender, everything moves quickly.

Eat the tacos while the cheese is still melted, the red edges are crisp and the bowl of consommé beside you is still steaming.
Posted on — Leave a comment

Ground Beef Tacos Recipe: Juicy Taco Meat, Homemade Seasoning & Easy 20-Minute Dinner

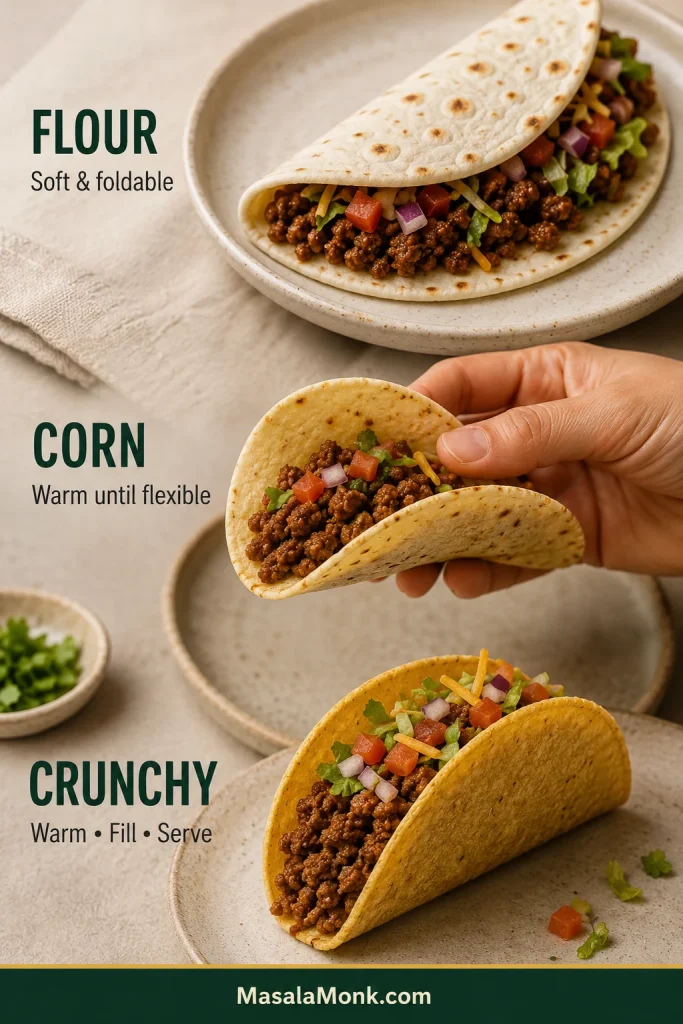
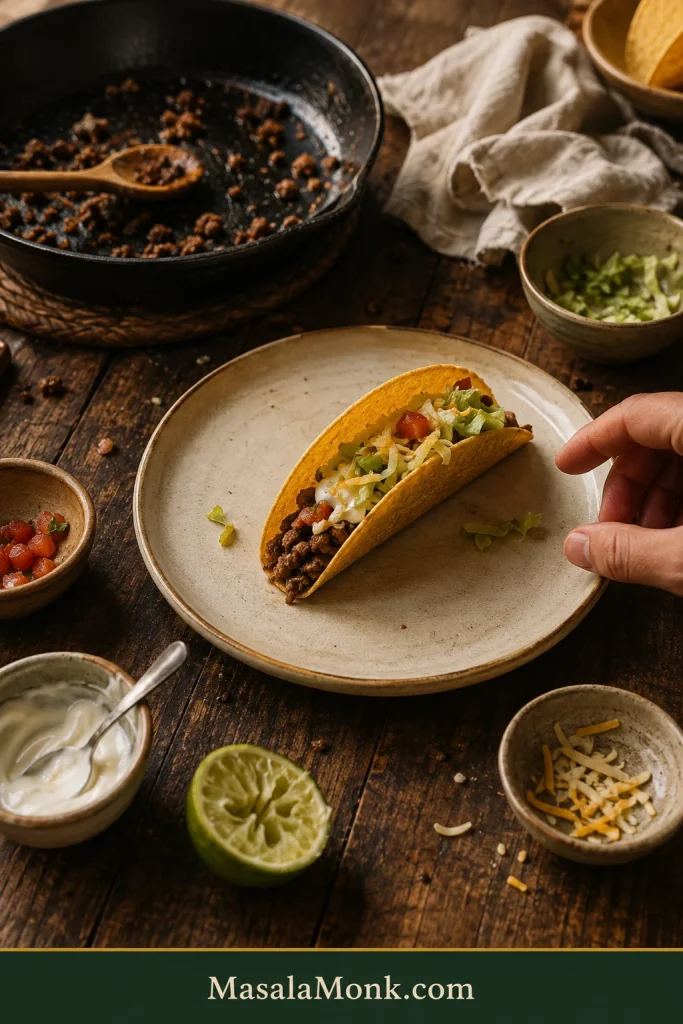
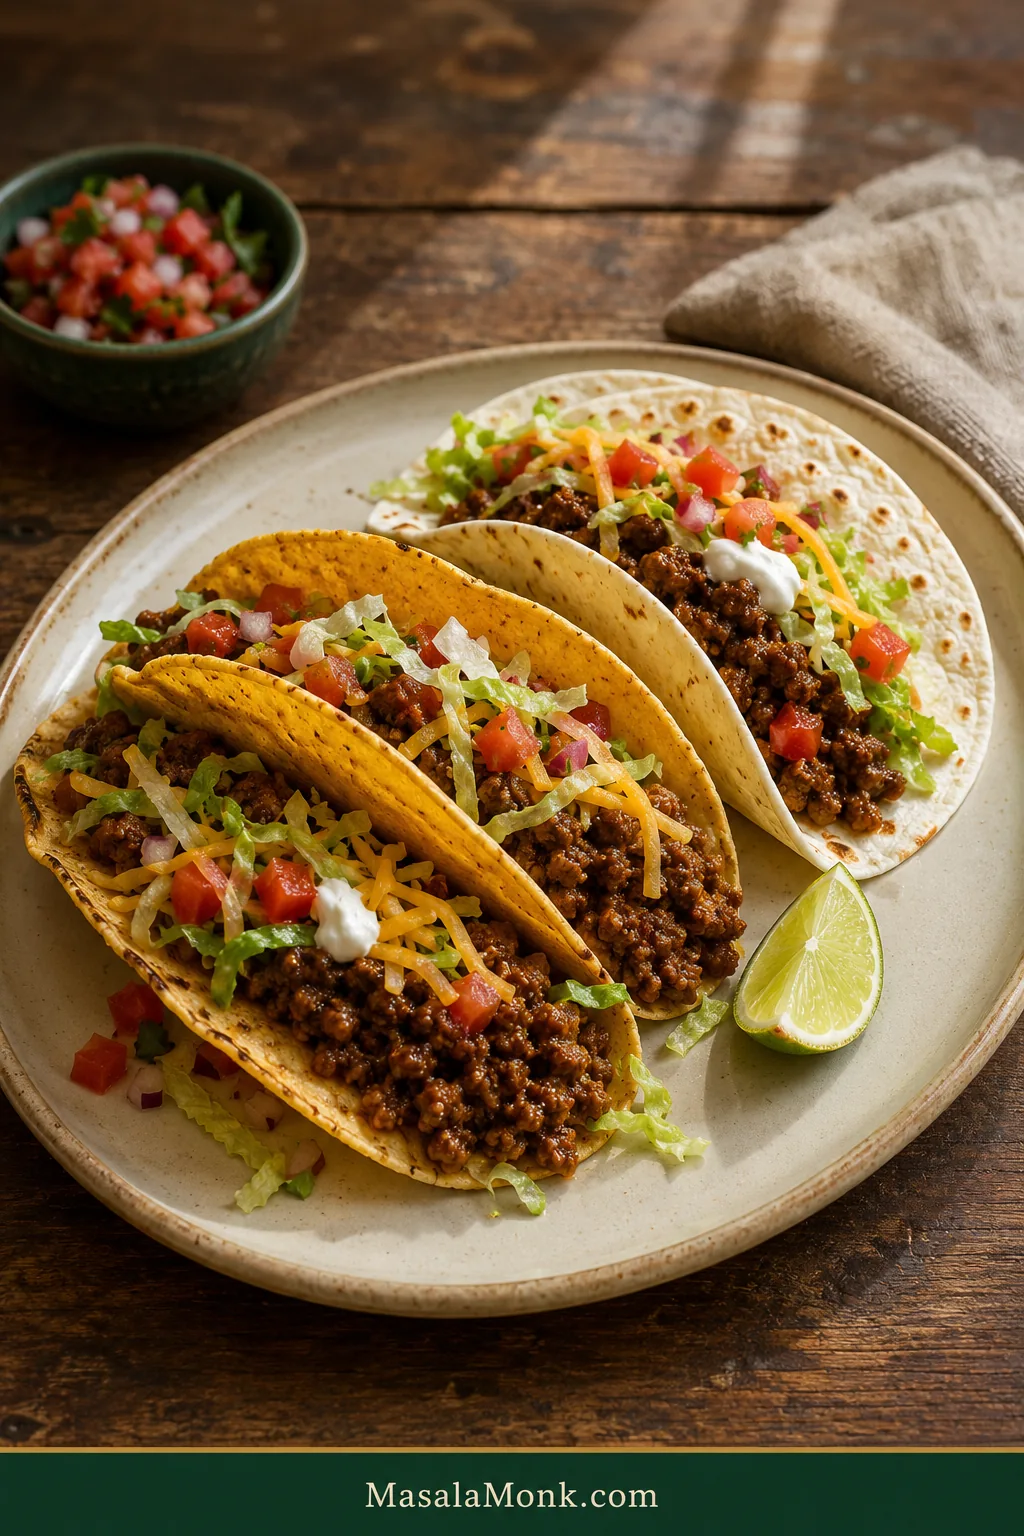
Three ground beef tacos on a ceramic plate: two golden crunchy shells and one soft flour tortilla filled with browned ground beef, shredded cheese, lettuce, diced tomato, onion and sour cream, with a lime wedge alongside.

Ground beef tacos are supposed to be the dinner you make when you don’t want dinner to become a project. A hot skillet, a pound of beef, warm tortillas or crunchy shells, a few bowls of toppings—and everyone builds the taco they actually want.

The disappointing versions usually go wrong in small ways. Sometimes the beef steams instead of catching browned color. Other times, the seasoning tastes dusty or flat. Tiny crumbles stay on the heat until they dry out, or loose sauce reaches a crunchy shell before you do.

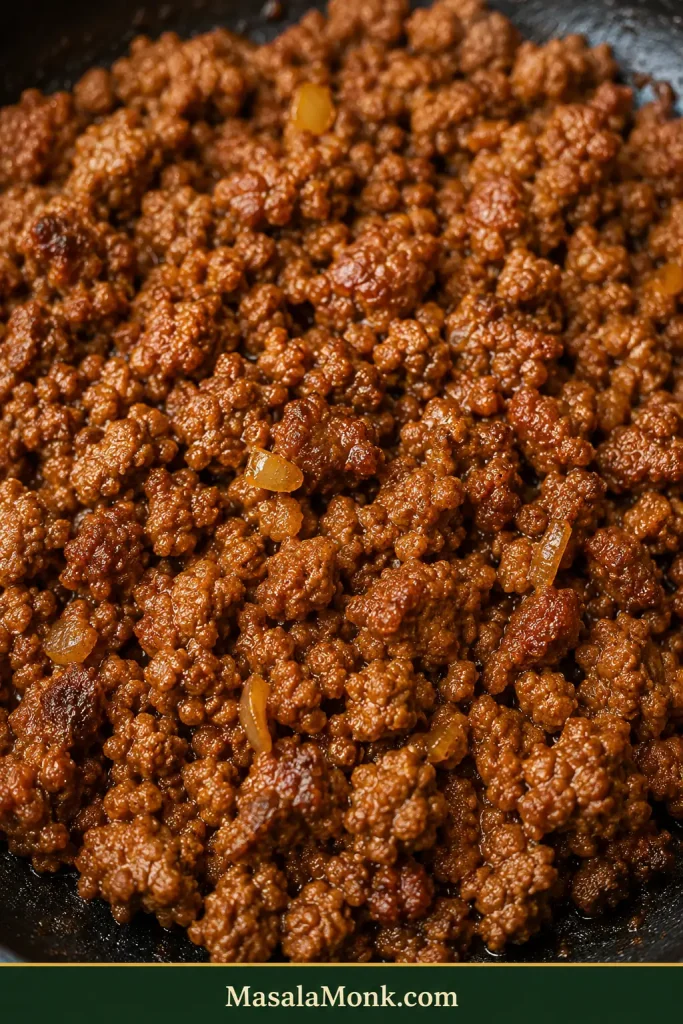
The difference is mostly in the skillet. Give the beef a brief chance to brown before crumbling it, then let the seasoning turn fragrant with the meat. Add tomato paste and just enough liquid to coat the crumbles, then reduce until the sauce clings.

You end up with hot, savory beef with browned edges and juicy crumbles—good inside a crisp shell or a warm tortilla, with as few or as many toppings as you like.

Quick Answer: How to Make Juicy Ground Beef Tacos

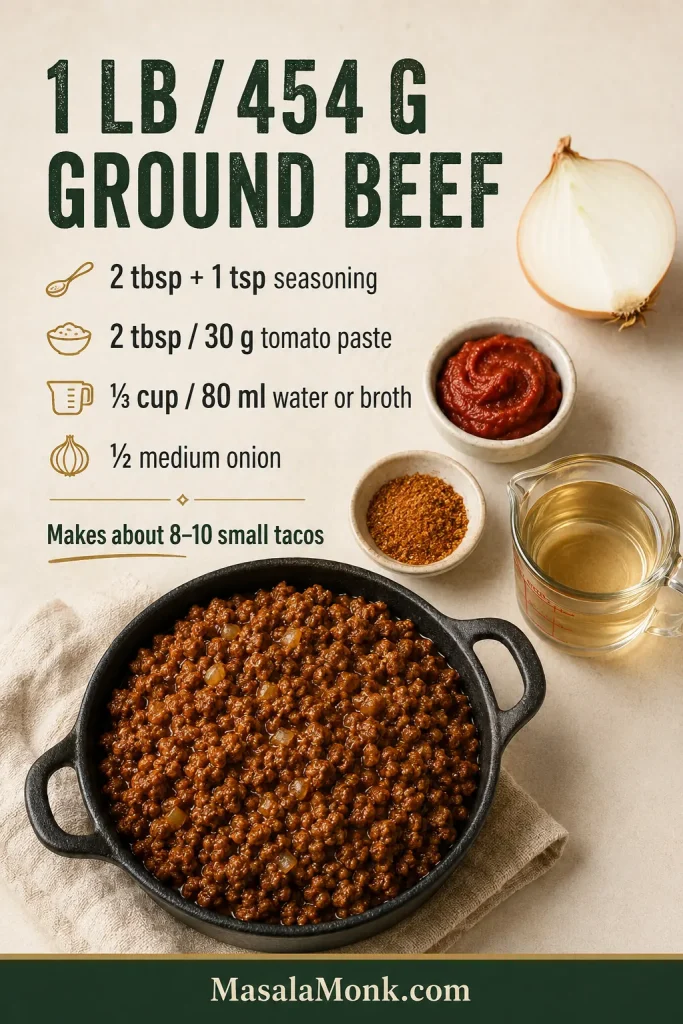
For 1 lb / 454 g ground beef, use 2 tablespoons + 1 teaspoon homemade seasoning and 2 tablespoons / 30 g tomato paste. Add ⅓ cup / 80 ml water or low-sodium broth, plus optional cayenne if you want more heat.

Give the beef a short head start on browning, then add the onion, seasoning and tomato paste. Pour in the liquid and simmer until the sauce clings and a spatula trail no longer floods with thin liquid.

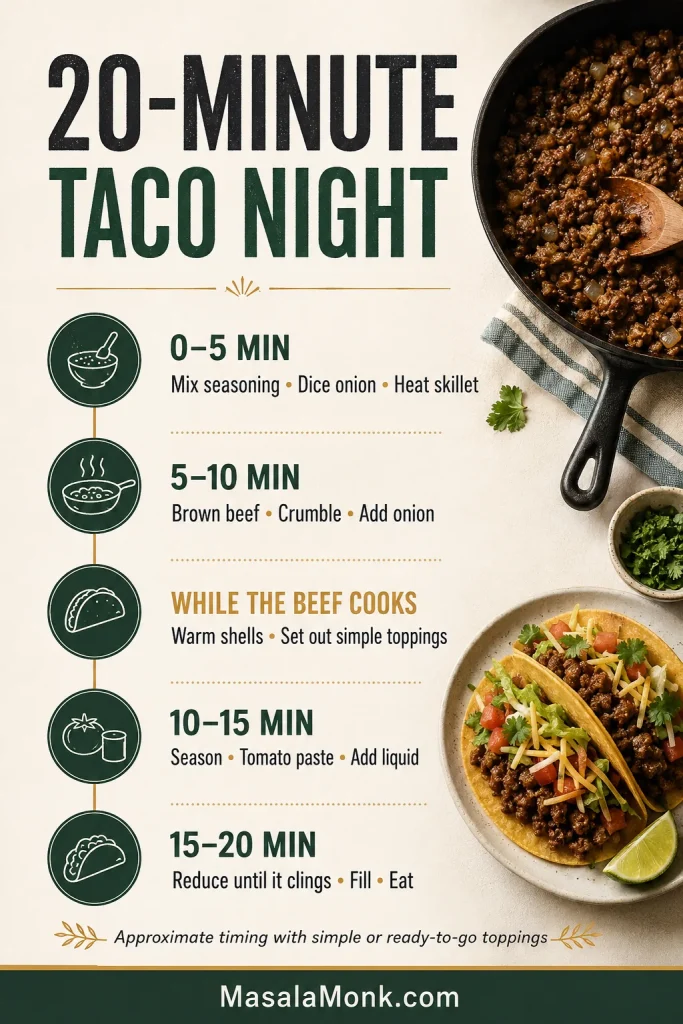
These are familiar American/Tex-Mex-style ground beef tacos with warm tortillas or crunchy shells and build-your-own toppings. Warm the tortillas or shells and set out simple toppings while the beef cooks, and dinner can stay close to 20 minutes.

Recipe reference showing 1 pound or 454 grams ground beef with half an onion, homemade taco seasoning, 2 tablespoons tomato paste, one-third cup water or broth, and a yield of about 8 to 10 small tacos.
Tomato paste gives the beef body; the measured liquid spreads seasoning and loosens browned flavor, then cooks back down.

Ground Beef Tacos Recipe

Recipe at a Glance

Prep5 minutes for the taco meat, plus topping prep as needed
Cook15 minutes
TotalAbout 20 minutes with simple or ready-to-go toppings
Skillet12 inch / 30 cm preferred
Yield8–10 small tacos; serves about 3–4
Look forJuicy crumbles with no loose watery liquid underneath
Vertical 20-minute taco-night timeline showing ingredient prep, browning and crumbling ground beef, warming taco shells and preparing toppings, then seasoning, adding tomato paste and liquid, reducing the meat and assembling tacos.
Toppings are the wildcard in a 20-minute taco dinner. Prep fresh salsa or guacamole first; otherwise, keep the lineup simple while the beef cooks.

Equipment

  • 12-inch / 30 cm skillet preferred; a 10-inch / 25 cm skillet works but may need a little longer for moisture to cook away
  • Sturdy spatula or wooden spoon
  • Instant-read thermometer, useful for checking the beef

A wide skillet matters more than the material. Stainless steel and cast iron brown especially well, but nonstick is fine too. The extra surface area lets released moisture evaporate instead of pooling around the beef.

Ingredients

For the taco meat

  • 1 lb / 454 g ground beef (also sold as beef mince or minced beef), preferably around 85/15
  • ½ medium yellow or white onion, finely diced, about 2½ oz / 70–75 g
  • 2 tablespoons / about 30 g tomato paste
  • ⅓ cup / 80 ml water or low-sodium beef broth
  • 1 teaspoon neutral oil, only if the beef is very lean or the skillet looks dry

Homemade taco seasoning

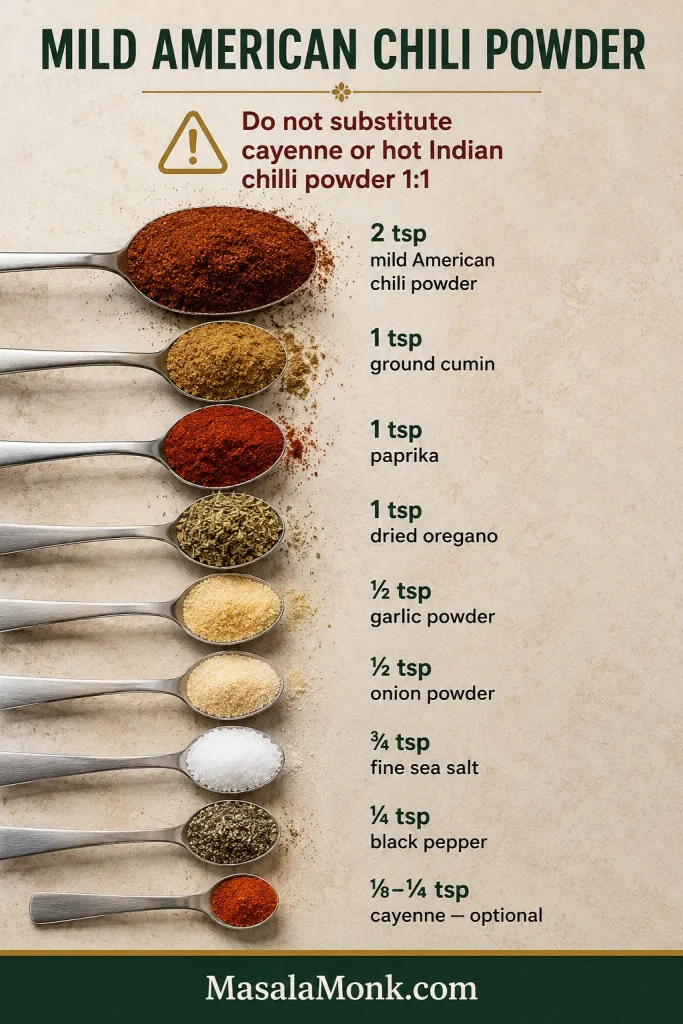
  • 2 teaspoons mild American-style chili powder, about 5 g
  • 1 teaspoon ground cumin, about 2 g
  • 1 teaspoon sweet or regular paprika, about 2 g
  • ½ teaspoon garlic powder, about 1.5 g
  • ½ teaspoon onion powder, about 1 g
  • 1 teaspoon dried oregano, about 1 g
  • ¾ teaspoon fine sea salt, about 4 g, plus more if needed
  • ¼ teaspoon freshly ground black pepper
  • ⅛–¼ teaspoon cayenne, optional

The seasoning blend measures 2 tablespoons + 1 teaspoon before the optional cayenne. Here, “chili powder” means the mild American-style seasoning blend. Cayenne, pure hot ground chile and Indian red chilli powder are much hotter and should not be substituted in the same amount.

Measured taco-seasoning ingredients including mild American chili powder, cumin, paprika, oregano, garlic powder, onion powder, fine sea salt, black pepper and optional cayenne, with a warning not to substitute very hot chilli powder or cayenne one-for-one for American chili powder.
Mild chili powder brings broad chile flavor, cumin adds earthiness, and the smaller spices keep the blend balanced rather than simply hotter.

Using a seasoning packet? That’s fine. Packet blends vary in salt, strength and thickeners, so use the packet’s own seasoning and liquid amounts.

For serving

  • 8–10 small flour or corn tortillas, roughly 6 inches / 15 cm, or similar-size crunchy taco shells
  • 1 cup / about 4 oz / 115 g shredded cheddar, Monterey Jack or a Mexican-style cheese blend
  • 2 cups shredded lettuce
  • 1 cup diced tomato or pico de gallo
  • ½ cup / 120 g sour cream
  • Avocado or fresh guacamole, chopped onion, cilantro, jalapeño, salsa, lime wedges and hot sauce, as desired

You don’t need a full taco bar for this to work. Mix the seasoning ahead if you like, and use pre-shredded lettuce or cheese when that makes dinner easier. Save avocado or guacamole for closer to serving.

If you want a side that can cook alongside dinner, air fryer corn on the cob can run while the taco meat is on the stove.

How to Make Ground Beef Tacos

Start with the Seasoning and Browning

  1. Mix the seasoning. Stir together the chili powder, cumin, paprika, garlic powder, onion powder, oregano, salt, black pepper and optional cayenne.
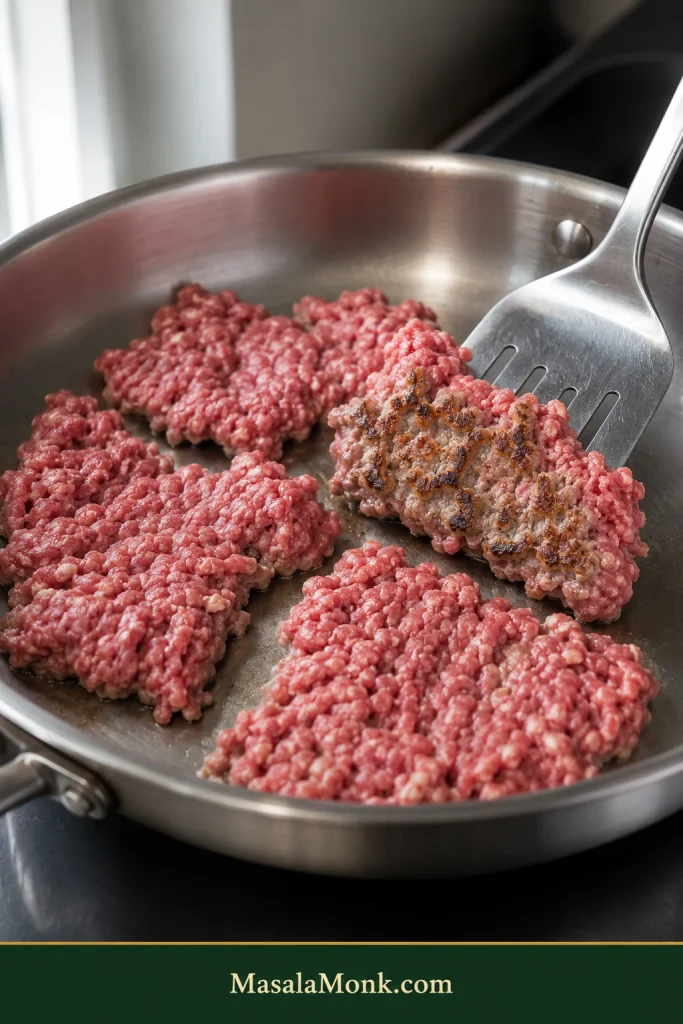
  1. Give the beef a head start on browning. Heat a wide skillet over medium to medium-high heat for 1–2 minutes, adjusting the heat as needed for your pan. Add the oil if the beef is very lean or the skillet looks dry. Add the beef in several large pieces and spread them loosely. Leave it mostly alone for about 2 minutes. You’re only looking for a few browned patches underneath, not a crust on every piece.
Loose sections of ground beef spaced across a stainless-steel skillet while a spatula lifts one section to reveal browned patches underneath.
Brown patches can form while the top still looks pink. Once you see a few underneath, turn the beef and start crumbling.
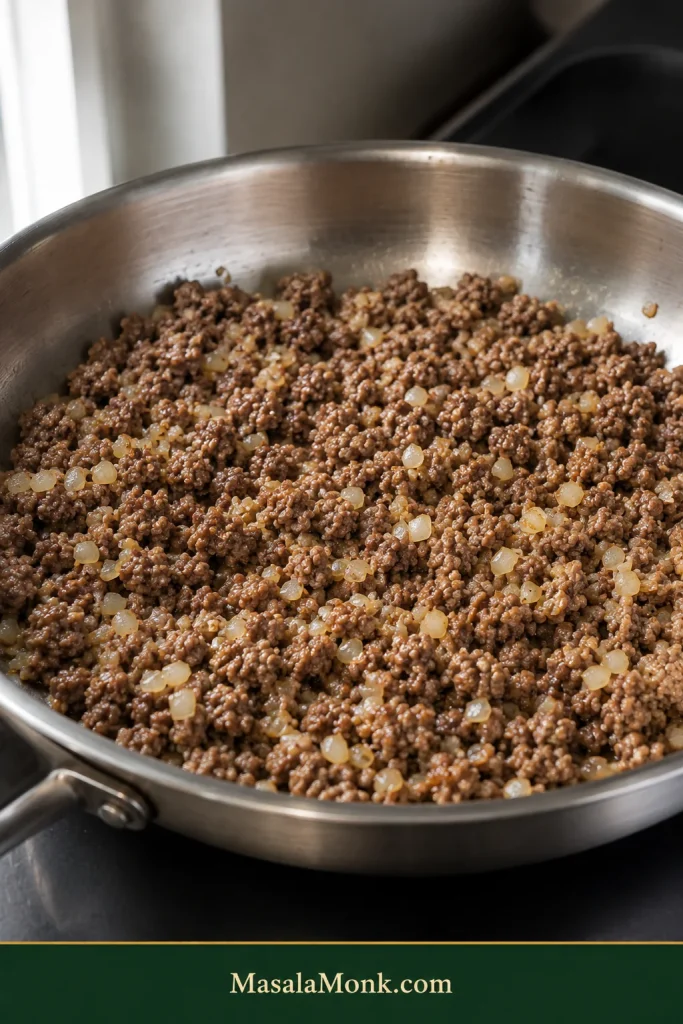
  1. Break it into small crumbles. Turn the beef and break it apart. Add the onion and cook for another 2–3 minutes, stirring occasionally. The onion should start softening around the edges and the beef should be nearly cooked through. Warm the tortillas or shells and get the toppings out while this happens.
Ground beef cooked into small irregular crumbles with finely diced softened onion distributed throughout a stainless-steel skillet.
Break up the largest pieces, then stop fussing. Irregular crumbles keep more browned texture while still fitting neatly into small tacos.

Drain, Season and Deglaze the Taco Meat

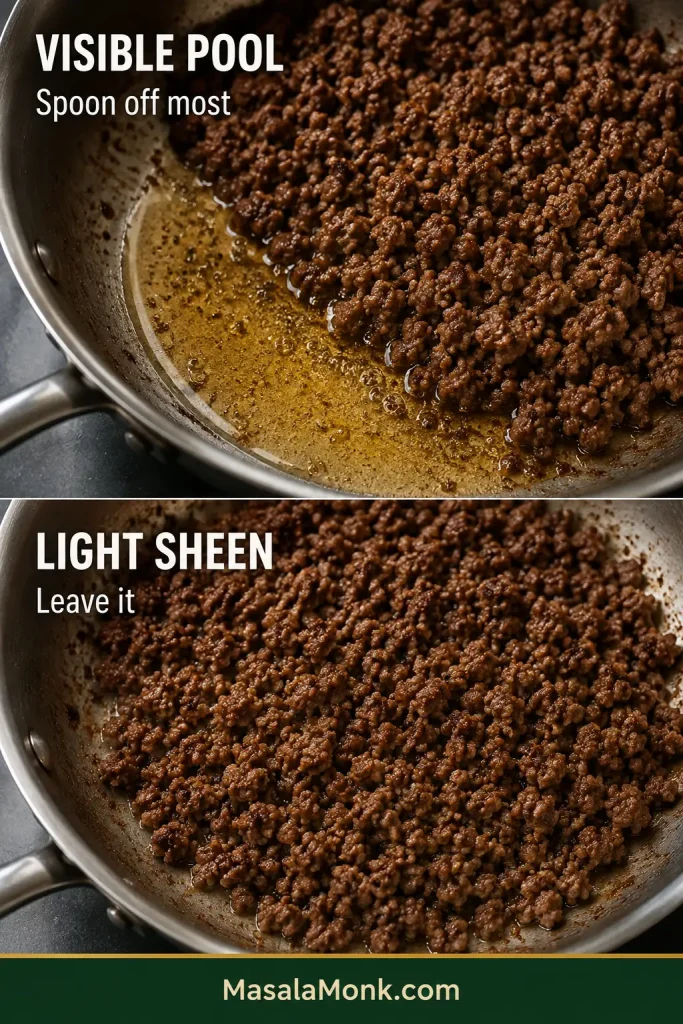
  1. Remove excess fat if needed. Tilt the skillet. If a noticeable pool runs to one side, spoon most of it off. If all you see is a light sheen around the crumbles, leave it alone. Lean meat may need no draining at all.
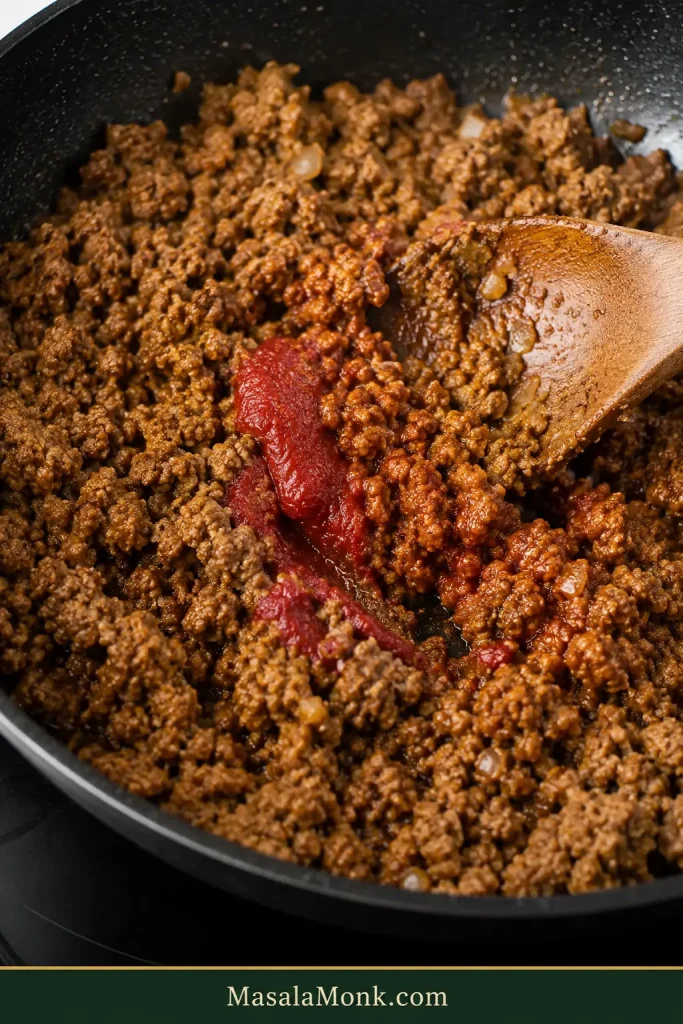
  1. Add the seasoning and tomato paste. Reduce the heat to medium. Stir the seasoning through the lightly coated beef for about 30 seconds, just until fragrant. Add the tomato paste and cook for another 30–60 seconds; its color should deepen slightly and the raw tomato smell should fade.
Seasoned ground beef in a skillet with tomato paste being stirred through the crumbles, showing both visible red streaks and darker paste already incorporated into the meat.
Move on once bright-red tomato paste darkens toward brick red and stops smelling raw; it does not need to disappear completely.
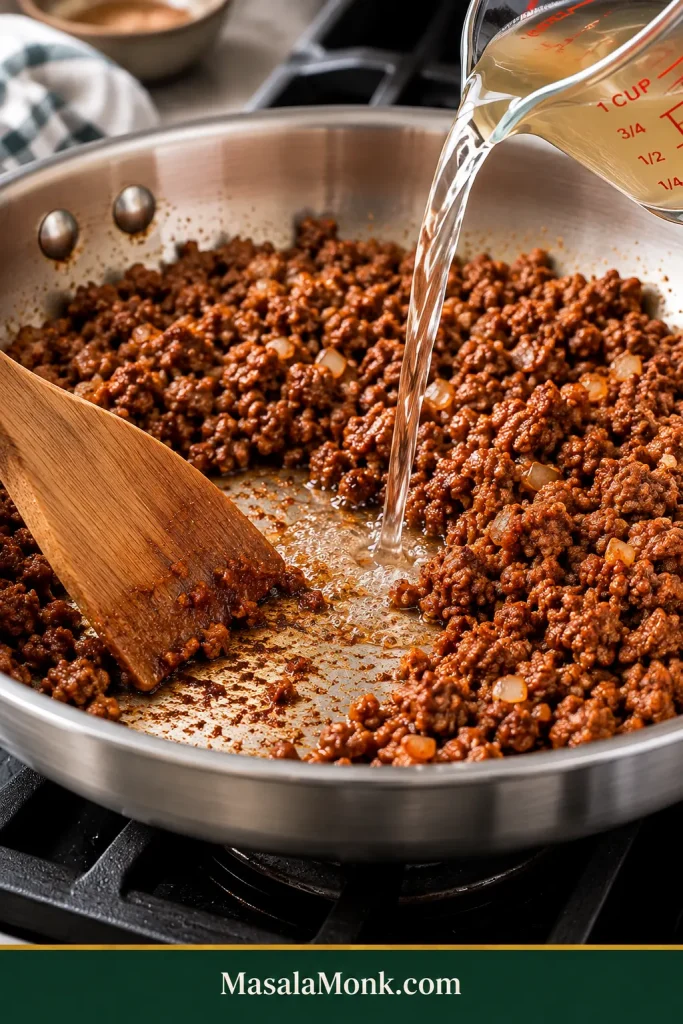
  1. Add the liquid. Pour in the ⅓ cup / 80 ml water or broth and scrape up the browned bits from the skillet. Stir until the seasoning and tomato paste are distributed through the beef.
Clear liquid being added to seasoned ground beef while a spatula scrapes browned residue from the exposed surface of a stainless-steel skillet.
Scrape the exposed metal as the liquid hits. Those browned bits are concentrated flavor that belongs back on the taco meat.

Reduce the Taco Meat

  1. Let the liquid cook down. Simmer uncovered for about 2–4 minutes. Pull a spatula through the center; if watery liquid rushes back into the trail, give it another minute. Stop while the crumbles look juicy and the sauce clings to them.
Close-up of finished ground beef taco meat with small browned crumbles, softened onion pieces and a glossy seasoned coating, with no loose liquid pooling underneath.
Finished taco meat should be scoopable, not pourable: moist, glossy crumbles that travel together without leaving loose liquid behind.

Taste and Assemble the Tacos

  1. Check the temperature, then taste. Ground beef should reach 160°F / 71°C. If the cooked meat tastes flat, try a small pinch of salt first. If the salt is right but the taco flavor is weak, add a little more seasoning. For more heat, let everyone add jalapeño or hot sauce at the table.
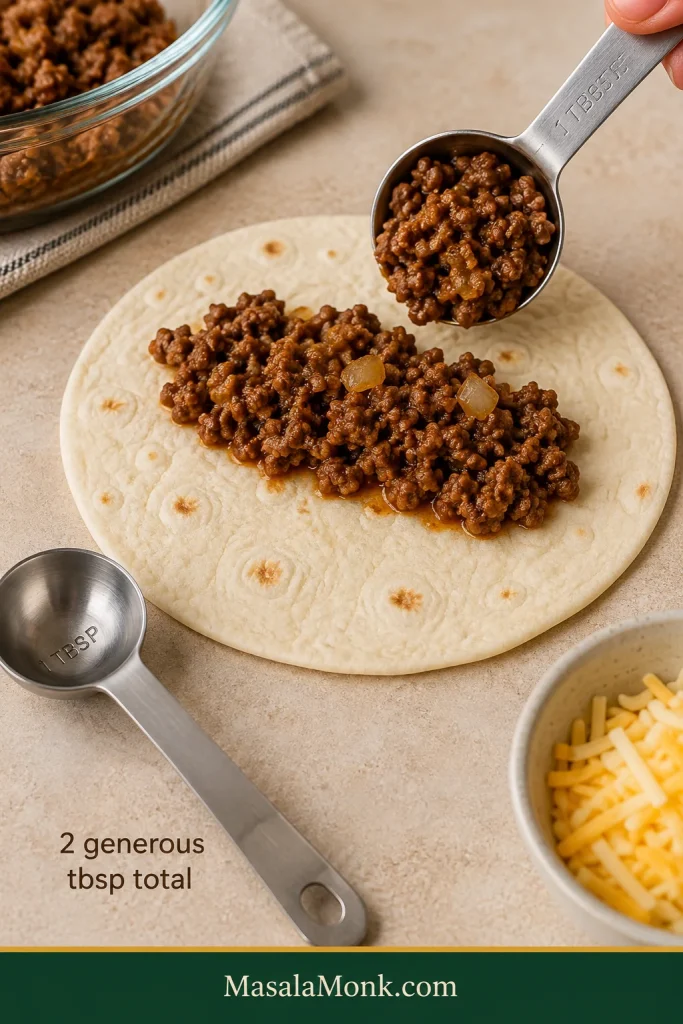
  1. Build the tacos while everything is warm. Spoon about 2 generous tablespoons of beef into each small tortilla or shell. Add the cheese while the beef is hot, then finish with whichever toppings sound good.
Small flour tortilla receiving browned ground beef from a tablespoon measure, with the graphic indicating two generous tablespoons of taco meat.
Leave bare tortilla around the filling. That space helps soft tortillas fold and keeps crunchy shells from being forced apart.

A good taco gets its contrast in a few bites: hot savory beef, cheese softening against it, something crisp, and something fresh or cool. You don’t need a dozen toppings to get there.

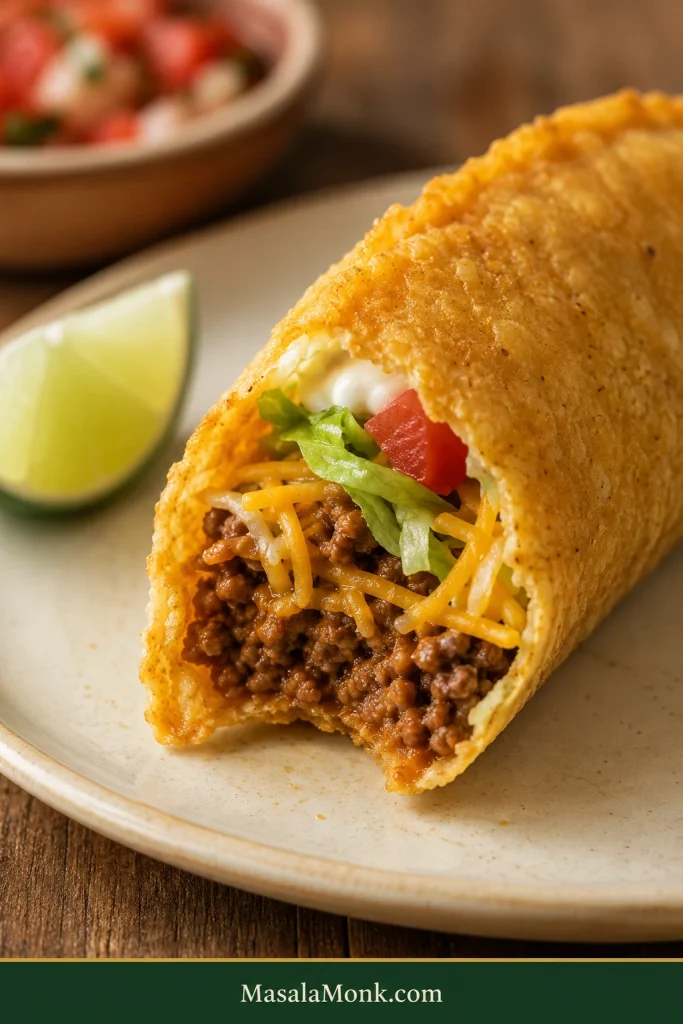
Close-up of a bitten crunchy taco showing browned ground beef, softened shredded cheese, lettuce, diced tomato and sour cream inside a golden crisp shell.
A clean cross-section shows the taco wasn’t overfilled: distinct layers stay put instead of spilling out with the first bite.

Best Ground Beef for Tacos: 80/20 vs 85/15 vs 90/10

85/15 is easy to work with, but 80/20 and 90/10 both make good tacos. Use the beef you already have. The numbers describe the lean-to-fat ratio: 85/15 means roughly 85% lean meat and 15% fat.

Ground BeefWhat to ExpectHow to Handle It
80/20Richest and usually the fattiestSpoon off most of any obvious pool before seasoning
85/15Beefy and juicy with manageable greaseA straightforward all-around choice; drain only if needed
90/10Lean with very little fat to removeKeep the measured liquid and watch the final minutes closely

You don’t need to chase an exact fat percentage. A little rendered fat helps the seasoning coat the meat; a large pool gets in the way.

Should You Drain Ground Beef for Tacos?

Only when a noticeable pool of fat collects. Spoon off most of the excess before adding the seasoning, but leave the light coating around the beef. With leaner ground beef, there may be nothing worth draining.

Side-by-side skillets of cooked ground beef: one has a visible pool of rendered fat labeled to spoon off most of it, while the other shows only a light sheen around the beef labeled to leave it.
Tilt the skillet. Excess fat gathers into a moving pool; a light sheen stays attached to the crumbles and can remain.

How Much Taco Seasoning and Water for 1 lb Ground Beef?

For 1 lb / 454 g ground beef, use 2 tablespoons + 1 teaspoon homemade seasoning and ⅓ cup / 80 ml water or broth. Add the optional cayenne separately if you want more heat.

Using a packet? Follow its seasoning and liquid directions instead. Packet blends vary in salt, strength and thickeners, so use the packet’s own amounts.

If the Taco Meat Tastes Flat, Check Salt Before Heat

Chili powder, cumin, paprika, oregano, garlic and onion create the taco flavor, but salt is what often brings it into focus. More cayenne only makes the meat hotter.

If the beef is spicy enough but tastes dull, try a pinch of salt before adding more seasoning. At the table, everyone can use lime, roasted salsa verde, jalapeño or hot sauce to add brightness or heat to their own taco.

How to Scale Taco Meat for ½, 1, 1½ or 2 lb Ground Beef

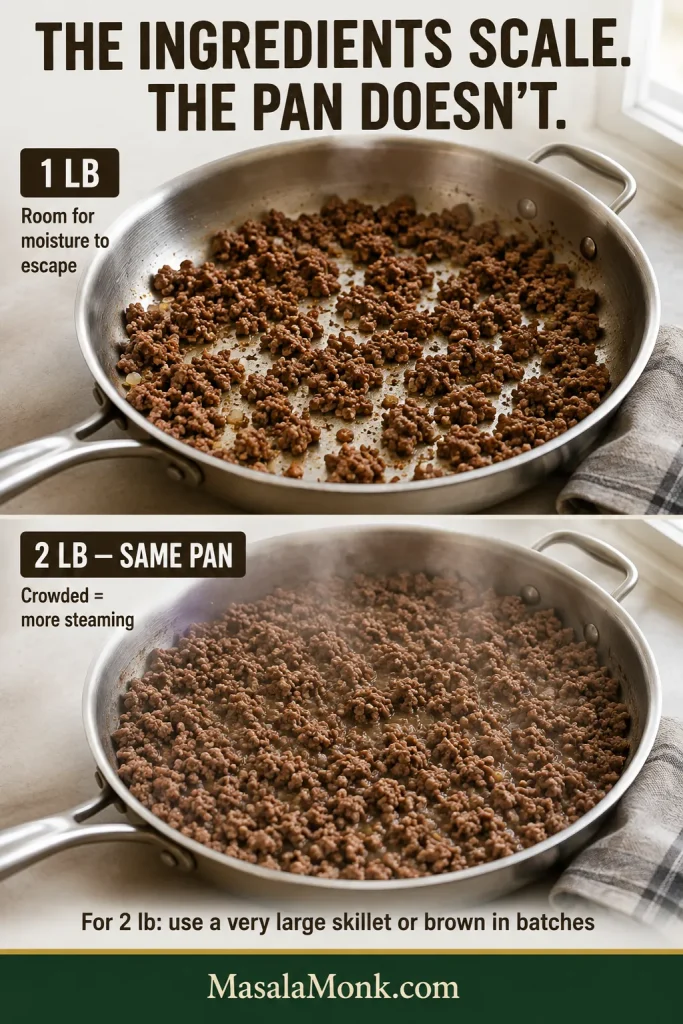
The ingredients scale. The pan doesn’t.

Ground Beef Homemade Seasoning Tomato Paste + Liquid Approx. Tacos
½ lb / 227 g 1 tbsp + ½ tsp 1 tbsp tomato paste
2 tbsp + 2 tsp / 40 ml liquid
4–5
1 lb / 454 g 2 tbsp + 1 tsp 2 tbsp tomato paste
⅓ cup / 80 ml liquid
8–10
1½ lb / 680 g 3 tbsp + 1½ tsp 3 tbsp tomato paste
½ cup / 120 ml liquid
12–15
2 lb / 907 g 4 tbsp + 2 tsp 4 tbsp tomato paste
⅔ cup / 160 ml liquid
16–20

Seasoning amounts in the table refer to the mixed blend before optional cayenne. If you’re mixing each amount from the individual spices, scale every spice by the same ½, 1½ or 2 multiplier.

Scale the onion roughly too: about ¼ medium for ½ lb, ½ medium for 1 lb, ¾ medium for 1½ lb and 1 medium for 2 lb. Oil is different—use only what the beef and skillet need.

Pan Size and Serving Yield for Larger Batches

For 2 lb / 907 g, use a very large skillet or brown the meat in two batches. Crowding twice as much beef into the same small pan traps moisture faster than it can evaporate.

Comparison of one pound of ground beef cooking with exposed skillet space and browned areas versus two pounds crowded into the same-size pan with more moisture and steam.
If 2 pounds crowd your skillet, brown the beef in portions, then recombine it before seasoning so the pan still has room to reduce.

For dinner planning, figure on about 2–3 small tacos per adult. One pound of raw ground beef makes roughly 8–10 small tacos and usually feeds 3–4 people, depending on appetite and sides.

The 3 Controls of Better Taco Meat

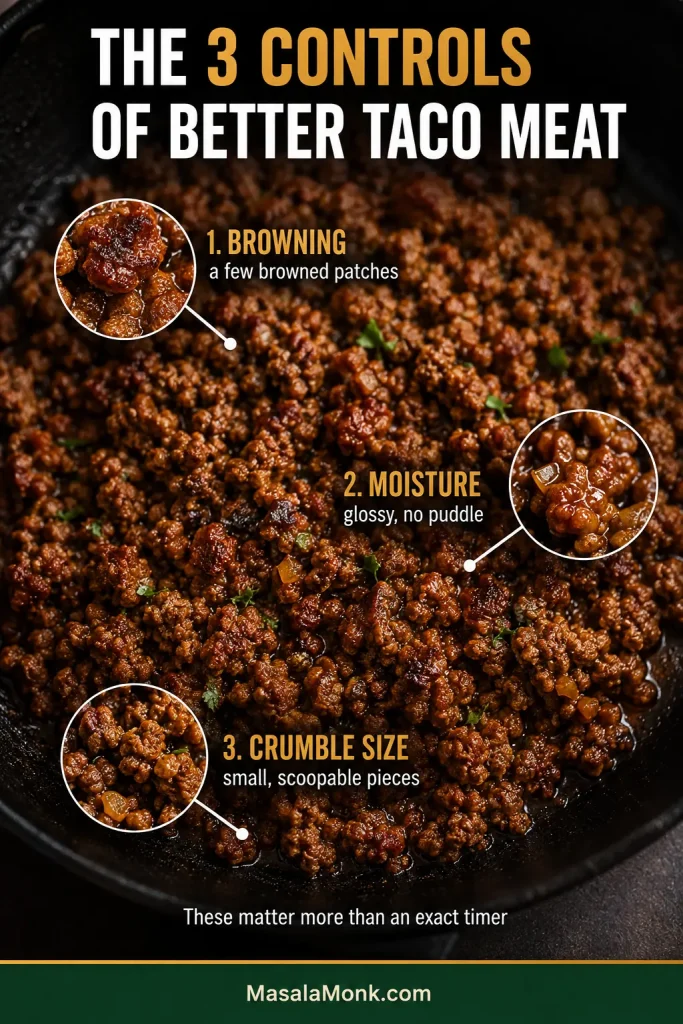
Most taco-meat problems come down to browning, moisture and crumble size. Once you can read those three things in the skillet, the exact timer matters a lot less.

Ground beef taco meat with three magnified callouts highlighting browned areas, glossy moisture without loose liquid, and the size of the cooked beef crumbles.
Fix the control that’s wrong: give pale beef better pan contact, reduce excess moisture, and stop breaking up crumbles once they’re small enough.

1. Browning: Let the Beef Touch the Pan

The first couple of minutes matter because beef can’t brown well while it is surrounded by its own released moisture. Give it some quiet contact with the hot skillet before breaking it apart.

Once you see browned patches underneath, start crumbling. Small pieces cook quickly, so there is no prize for forcing every crumb to turn dark.

Think browned edges, not browned gravel.

2. Moisture: Reduce Until the Sauce Clings

The biggest difference between juicy taco meat and watery taco meat often happens in the final few minutes. You want enough moisture to keep the crumbles glossy, but not enough to run into the bottom of the shell.

That small amount of liquid loosens the browned bits and helps the seasoning and tomato paste coat the beef before the excess cooks away.

As it reduces, the tomato paste gives the filling enough body that you don’t need cornstarch or another thickener.

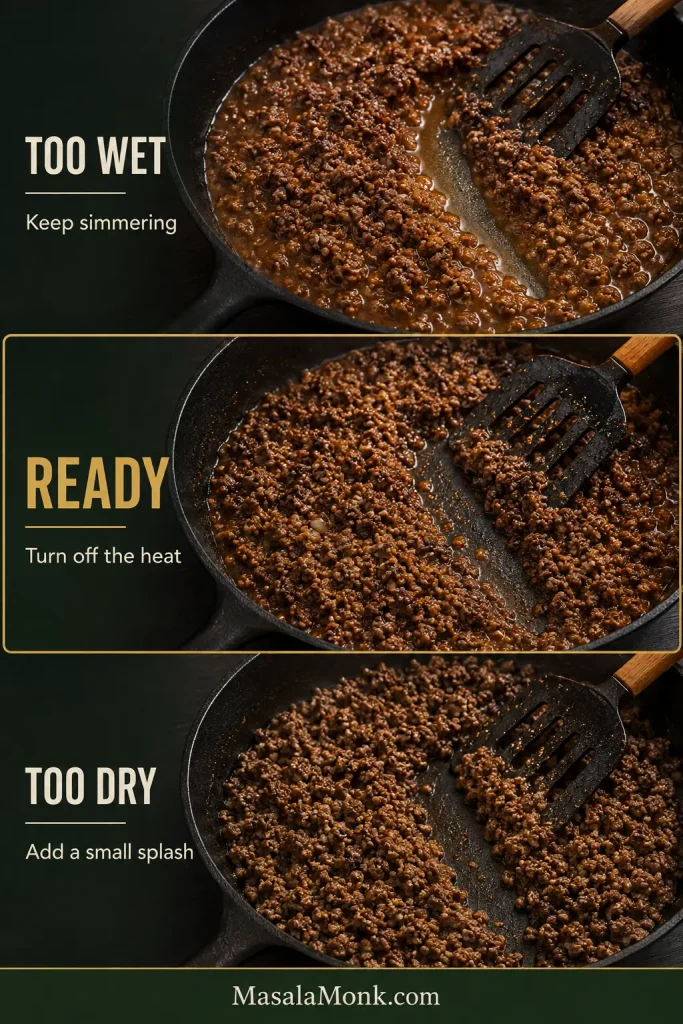
The Spatula Test

Pull a spatula through the middle of the skillet when you think the filling is close.

  • Watery liquid immediately fills the trail: keep simmering.
  • The pan is nearly dry and the beef looks matte: you’ve reduced it too far; stir in a small splash of water or broth.
  • The crumbles have a light sheen and the trail stays mostly clear: turn off the heat.
Three taco-meat states labeled Too Wet, Ready and Too Dry: loose liquid fills the spatula path in the wet version, the ready meat is glossy with a mostly clear trail, and the dry version appears matte.
Reduction speeds up near the finish. Once the trail stops flooding, check often so glossy taco meat doesn’t tip into dry.

After you’ve seen that stage a couple of times, it becomes much easier to trust the pan instead of the timer.

3. Crumble Size: Aim for Small Pieces

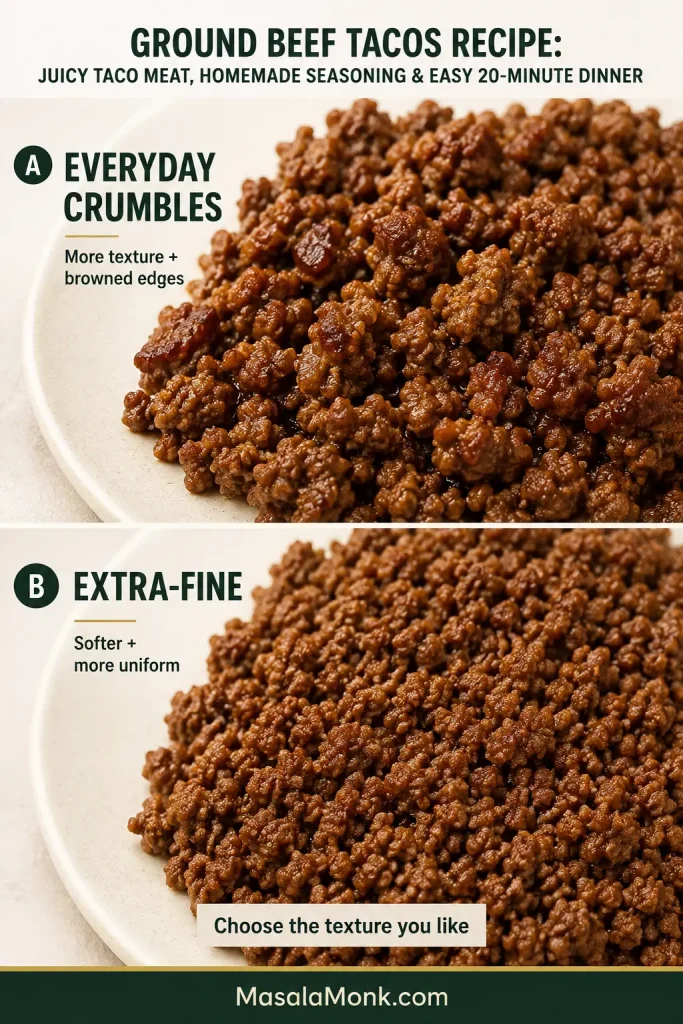
Large chunks tumble out of a small taco on the first bite. Very fine crumbles cook quickly and can dry out before you notice. For this recipe, aim for small pieces that scoop easily but still look and feel like beef.

If you prefer the softer, extra-fine taco-shop texture, break the beef down more aggressively while moisture remains in the pan. A pan-safe meat chopper or potato masher can help. You’ll trade some browned texture for a finer, more uniform filling—and that’s perfectly fine if that is the taco you want.

Side-by-side comparison of taco meat textures, with larger irregular browned crumbles in the everyday version and smaller, softer, more uniform crumbles in the extra-fine version.
For extra-fine taco meat, break it down while moisture remains. Waiting until the pan is dry only makes smaller, drier crumbles.

Soft Tortillas or Crunchy Taco Shells?

Use…How to Warm ItReady When…
Small flour tortillasWarm briefly in a dry skillet, turning onceSoft, warm and easy to fold
Small corn tortillasWarm roughly 20–30 seconds per side in a dry skilletThe center bends without cracking
Boxed crunchy shellsFollow the package directionsCrisp and warmed through

Crunchy-shell thickness varies by brand; you’re simply looking for shells that are crisp and warmed through.

Stack flour or corn tortillas under a clean towel as you warm them. When it’s warm enough, a corn tortilla should bend through the center instead of splitting.

Crunchy shells are less forgiving. Loose liquid softens them and a cold, brittle shell breaks easily, so warm them first and fill them just before serving.

Three taco-shell options: a folded flour tortilla, a warm corn tortilla bending in a hand without cracking, and a crisp golden hard taco shell filled with ground beef and toppings.
Keep soft tortillas wrapped to hold steam; keep crunchy shells dry and uncovered, then fill them only when people are ready to eat.

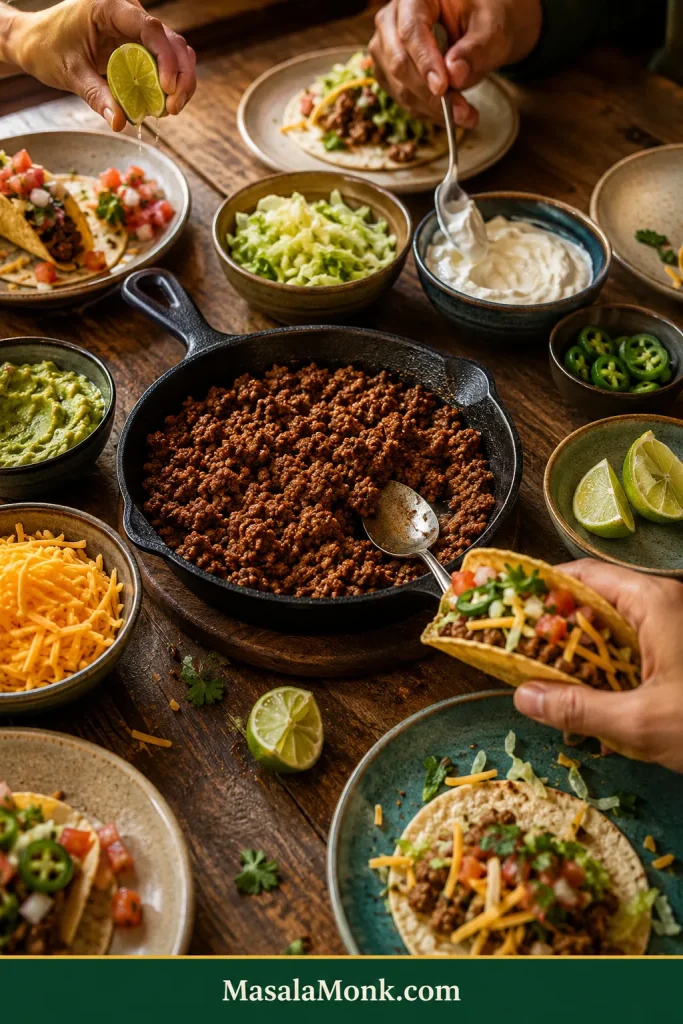
What to Put on Ground Beef Tacos

Lettuce or chopped onion adds crunch. Tomato, pico de gallo, salsa or a squeeze of lime brings freshness. Sour cream, avocado or guacamole cools the spice, while jalapeño and hot sauce can stay on the table so everyone controls their own heat.

Taco table with a skillet of ground beef and bowls of shredded cheese, lettuce, sour cream, guacamole, lime and jalapeño while several hands assemble individual tacos.
Keeping hot meat and cold toppings separate preserves contrast and choice. Let everyone build one taco at a time.

Two or three toppings are plenty. If you want something brighter and sweeter, fresh mango salsa works especially well with the savory beef.

Ground Beef Taco Troubleshooting

Most problems show themselves while the skillet is still in front of you, which means dinner usually isn’t lost. Start with what the pan is doing now.

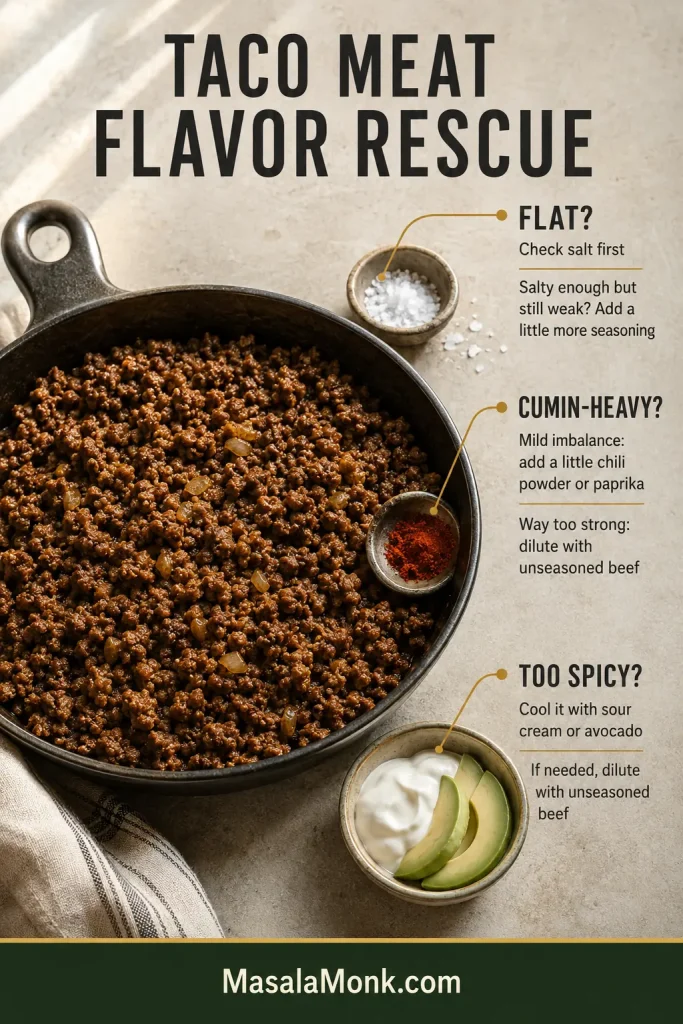
Fix Flavor Problems: Bland, Too Spicy or Cumin-Heavy Taco Meat

ProblemWhat to Do
Taco meat tastes bland Once the beef is safely cooked, try a small pinch of salt first. If the salt is right but the taco flavor is weak, add a little more seasoning.
It is far too spicy If practical, dilute the skillet with more unseasoned beef. Sour cream, avocado and other cooling toppings can soften the heat at the table. If pure hot chile or chilli powder was used in place of mild American chili powder, that may be the cause.
It tastes mostly of cumin If the imbalance is mild, add a little chili powder or paprika and check the salt. If cumin has completely taken over, diluting the batch with more unseasoned beef is the cleanest rescue.
Taco-meat flavor guide showing finished ground beef with three callouts: flat flavor paired with salt, cumin-heavy flavor paired with balancing spices or unseasoned beef, and overly spicy meat paired with sour cream, avocado or dilution.
Salt, taco flavor and chile heat are separate controls. Fix the specific imbalance instead of adding more of everything.

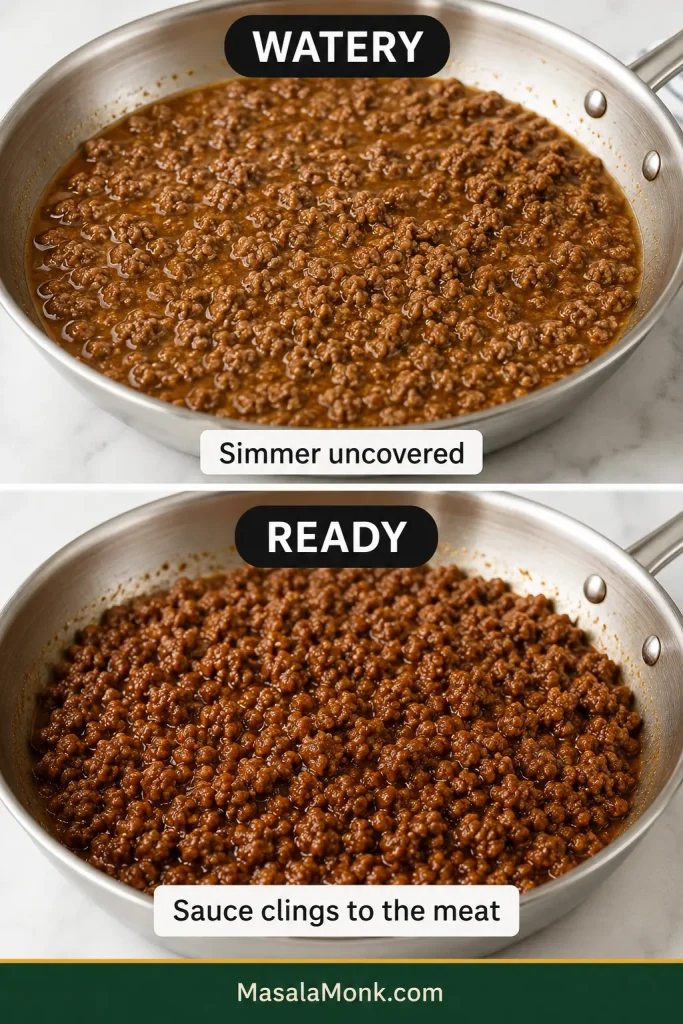
Fix Texture and Moisture Problems in Taco Meat

Before-and-after skillet comparison with thin liquid surrounding the ground beef in the Watery example and glossy coated taco meat with no loose pool in the Ready example.
Check the skillet edges as well as the center. If thin liquid runs when you tilt the pan, the taco meat needs more reduction.

Match What You See to the Fix

ProblemWhat to Do
The meat is dry Add 1–2 tablespoons water or broth and warm gently until the crumbles loosen and look moist again. Next time, stop the reduction a little sooner.
The meat is watery Keep simmering uncovered. Stir only occasionally and let the loose liquid evaporate until it coats the meat instead of collecting underneath it.
The meat is greasy Tilt the skillet and spoon off the obvious pool of rendered fat. Leave the light coating around the beef.
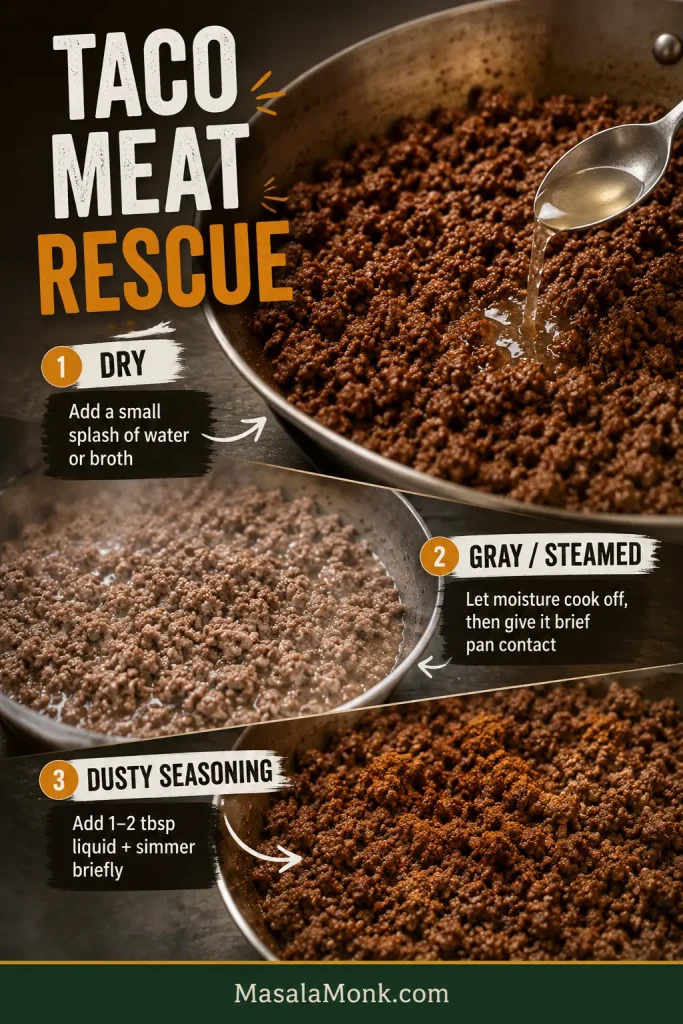
The beef is gray instead of browned If liquid is pooling, let it cook off before stirring again. Once the pan is drier, give the beef a short stretch of uninterrupted contact with the skillet. Don’t keep cooking indefinitely just to force more color; next time, a wider pan will help.
The crumbles are the wrong size For pieces that are too large, break them down while a little moisture remains. If the beef is already very fine and drying out, stop breaking it up and take the pan off the heat sooner.
The seasoning tastes dusty It’s still fixable. Add 1–2 tablespoons water, stir well and simmer briefly so the spices hydrate and spread through the meat. Next time, give the seasoning a short turn in the hot pan before adding the liquid.
Taco-meat troubleshooting graphic showing dry browned beef receiving a small splash of liquid, pale gray beef with excess moisture, and cooked ground beef with visible dry seasoning on the surface.
Read the surface first: matte means dry, pale meat in liquid means steaming, and visible powder means the seasoning needs hydration.

Fix Soggy Shells and Cracking Tortillas

ProblemWhat to Do
Crunchy shells turn soggy Let any loose liquid cook away and fill the shells only when people are ready to eat.
A crunchy shell shatters immediately Warm the shells before filling and don’t pack them to the rim. Cold, brittle shells break much more easily.
Corn tortillas crack when folded Warm both sides until the center feels flexible. Stack them under a towel so they stay soft while you finish the batch.

Back to cooking: Recipe · Spatula Test · Shells · Back to top

Make Ahead, Store and Reheat Taco Meat

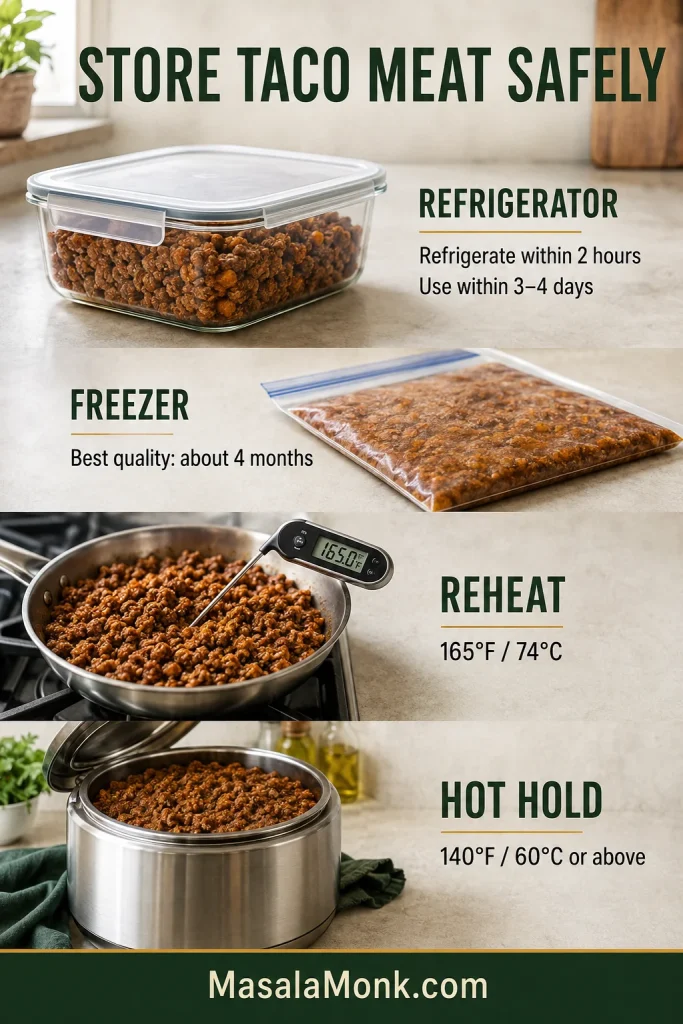
How to Refrigerate and Freeze Taco Meat

Refrigerator: Refrigerate cooked taco meat within 2 hours, keeping it separate from shells and fresh toppings. Store it covered and use it within about 3–4 days.

Freezer: Freeze cooled taco meat in portions you are likely to use. A flat freezer bag freezes and thaws quickly; for best quality, use it within about 4 months.

Food-storage guide showing cooked taco meat in a covered refrigerator container and freezer bag, a skillet with a thermometer reading 165°F, and a hot-holding vessel, alongside refrigerator, freezer, reheating and hot-holding guidance.
Label portions with the date and amount. The storage windows are easier to use when you don’t have to rely on memory.

How to Reheat Ground Beef Taco Meat

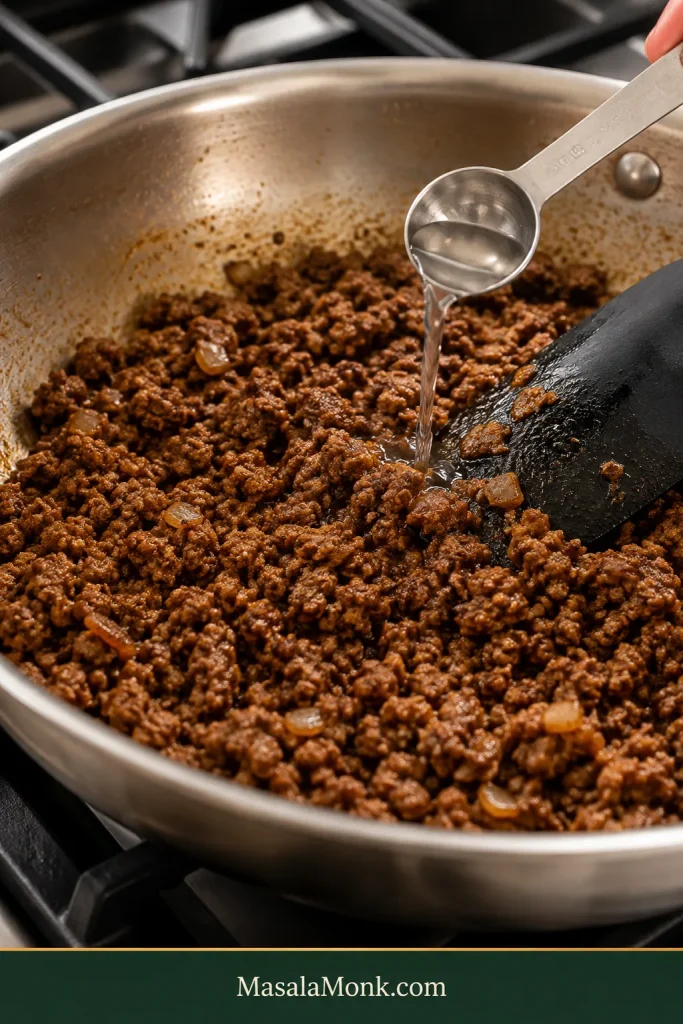
Reheating: Warm the beef over medium-low heat with a splash of water or broth—about 1 tablespoon per cup of taco meat is a useful starting point. For an individual microwave portion, add a teaspoon or two of water, cover and heat in short intervals. Reheated leftovers should reach 165°F / 74°C.

Cooked ground beef taco meat reheating in a stainless-steel skillet while a tablespoon measure adds a small amount of clear liquid beside a spatula.
Stop adding liquid once the crumbles loosen and regain a light sheen. Pooling liquid means the pan already has enough.

Larger batches: Thaw in the refrigerator when possible, then reheat on the stovetop, in the microwave or in a conventional oven until the meat reaches 165°F / 74°C. Add a little water or broth if the coating has tightened during storage.

Holding for a party: Once the taco meat is already hot, transfer it to a slow cooker and hold it at 140°F / 60°C or above.

Leftover Taco Meat Ideas

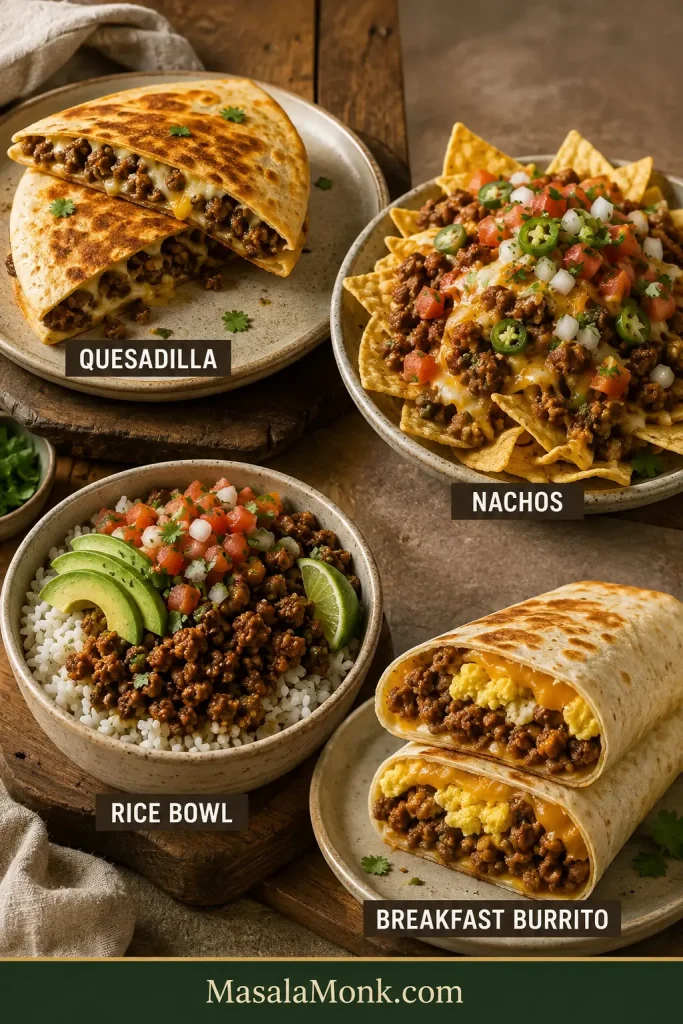
Leftover taco meat is useful well beyond another round of tacos. Spoon it into quesadillas, nachos, taco salad, rice bowls or baked potatoes, or fold it into breakfast burritos the next morning.

Four meals made with leftover taco meat: a browned beef-and-cheese quesadilla, ground beef nachos, a rice bowl topped with taco meat and avocado, and a breakfast burrito cut open to show beef, egg and cheese.
Keep reheated meat drier for quesadillas and nachos; rice bowls and breakfast burritos are more forgiving of a small splash.

Taco Night Should Still Feel Easy

You can spend a surprising amount of time thinking about ground beef—fat percentages, pan width, browning, moisture and exactly how small a crumble ought to be.

The reward for understanding those details is that you stop having to think about them very much.

Then the skillet lands in the middle of the table. Cheese starts softening as soon as it touches the hot beef. Lettuce and pico move from bowl to bowl. Someone reaches for lime; somebody else decides their taco needs considerably more hot sauce.

Everyone builds the taco they wanted, dinner gets eaten while it is still warm, and eventually somebody looks into the serving dish and asks the only difficult question left: who gets the last taco?

End-of-meal taco table with one crunchy ground beef taco remaining on a plate, an almost empty skillet with a few beef crumbles, nearly empty topping bowls, a squeezed lime half and a hand reaching toward the final taco.
One taco left, an almost-empty skillet and the toppings picked over. At this point, the recipe has done its job.
Posted on — Leave a comment

Beyond Chicken: 5 Flavorful Tempeh Taco Dinner Meal Prep Ideas, Plant-Based and Protein-Packed

vegan tacos on plate in close up view

Step up your taco game with these mouthwatering tempeh taco dinner meal prep ideas. Tempeh, a versatile and protein-rich plant-based protein source, takes center stage in these flavorful taco creations. Say goodbye to chicken and hello to the bold and satisfying flavors of tempeh. Get ready to indulge in these plant-powered tacos that will impress your taste buds and nourish your body.🌿🌮🌱


🌮 Smoky Chipotle Tempeh Tacos: Kick up the heat with smoky chipotle tempeh tacos that are sure to spice up your dinner table. Marinate tempeh slices in a mixture of adobo sauce, chipotle peppers, lime juice, and a touch of maple syrup for a perfect balance of smokiness and sweetness. Pan-fry the marinated tempeh until golden and crispy. Load soft tortillas with the smoky tempeh slices, and top with crunchy slaw, diced onions, and a drizzle of tangy vegan mayo. Garnish with fresh cilantro and a squeeze of lime for an extra burst of flavor. These smoky chipotle tempeh tacos are a fiery and satisfying choice for taco night.


🌮 Teriyaki Tempeh Tacos: Take your taste buds on an Asian-inspired adventure with teriyaki tempeh tacos. Marinate tempeh cubes in a homemade teriyaki sauce made from soy sauce, ginger, garlic, and a touch of sweetness. Sauté the marinated tempeh until caramelized and tender. Fill soft tortillas with the teriyaki tempeh, and top with a colorful medley of sliced bell peppers, shredded carrots, and sliced cucumbers. Drizzle with extra teriyaki sauce and sprinkle with sesame seeds. Garnish with chopped green onions for an added touch of freshness. These teriyaki tempeh tacos offer a delightful fusion of flavors and textures.


🌮 BBQ Tempeh Tacos: Get ready for a BBQ fiesta with these finger-licking BBQ tempeh tacos. Coat tempeh strips in your favorite BBQ sauce and let them marinate for maximum flavor. Grill or pan-fry the BBQ tempeh until caramelized and smoky. Load soft tortillas with the BBQ tempeh, and top with tangy coleslaw, pickled onions, and a drizzle of creamy vegan ranch dressing. Garnish with fresh cilantro and a squeeze of lime for a burst of freshness. These BBQ tempeh tacos are a crowd-pleasing option for summer cookouts or any time you’re craving that classic BBQ flavor.


🌮 Spicy Buffalo Tempeh Tacos: Heat things up with spicy buffalo tempeh tacos that will satisfy your cravings for bold and tangy flavors. Coat tempeh slices in buffalo sauce and bake or pan-fry until crispy and slightly charred. Fill soft tortillas with the buffalo tempeh, and top with crunchy lettuce, diced tomatoes, and creamy vegan ranch dressing. Add a sprinkle of chopped celery for an extra crunch and a squeeze of fresh lemon juice for a zesty kick. These spicy buffalo tempeh tacos are a fiery delight for those who love a little heat.


🌮 Mango Lime Tempeh Tacos: Experience a tropical twist with mango lime tempeh tacos that are both refreshing and vibrant. Marinate tempeh slices in a mixture of mango puree, lime juice, and a touch of agave or honey for a perfect balance of sweet and tangy flavors. Grill or pan-fry the marinated tempeh until golden and caramelized. Fill soft tortillas with the mango lime tempeh, and top with diced mango, sliced avocado, and a sprinkle of chopped fresh cilantro. Drizzle with a squeeze of lime juice for an extra burst of citrusy freshness. These mango lime tempeh tacos are a delicious and summery option that will transport you to a tropical paradise.


Embrace the flavors and versatility of tempeh with these tempeh taco dinner meal prep ideas. Incorporate tempeh into your tacos for a plant-powered protein boost and a burst of deliciousness. Don’t forget to capture your creations and share them with us! 📸 Tag your tempeh taco dishes with #MasalaMonk and @Masala.Monk on Instagram or Pinterest to join our community of food enthusiasts.

Save this post for future meal prep inspiration and embark on your own culinary adventure with these tempeh taco ideas.

Posted on — Leave a comment

Taco Tuesdays: Breakfast to Dinner, 25 Plant-Based High Protein Meal Prep Recipes and Ideas

cooked food on blue plate

Tacos, the delightful little parcels of flavor, have always been a party on our plates. But here’s the deal: we can now take that fiesta to a whole new level with plant-based, high-protein tacos! Who said healthy eating had to be boring? It’s time to unleash your inner foodie and dive headfirst into this guilt-free extravaganza that’ll have your taste buds doing the salsa!

The Plant-Powered Revolution:

Picture this: a world where tacos can be both scrumptious and nutritious! Plant-based eating is taking the world by storm and for all the right reasons. No more sad, wilted salads and flavorless tofu chunks—these tacos are here to prove that healthy can be hip and delicious! Say adios to the guilt, my friend, because we’re about to embark on a taste adventure that’ll leave you craving more and sharing with everyone you know.

Protein: No Longer a Meaty Dilemma!

Okay, let’s address the elephant (or should we say cow?) in the room: protein. We’ve been conditioned to think it’s only found in animal-based foods, but oh boy, have we got news for you! These plant-based tacos are protein powerhouses in disguise. We’re talking beans and legumes, tofu and tempeh, quinoa, nuts, and seeds—these magical ingredients are bursting with protein, fiber, and all kinds of good stuff. It’s like a secret superhero squad that’ll keep you full and fueled!

Health and Hilarity: A Perfect Match!

But wait, there’s more! By diving into these plant-based high-protein tacos, you’re not just treating yourself to a flavor fiesta—you’re also doing your health and the planet a huge favor. You’ll be slashing the saturated fats, cholesterol, and environmental impact associated with meat while boosting your intake of fiber and essential nutrients. It’s a win-win situation, my friend! Plus, think of the bragging rights you’ll have when you proudly share your taco creations with your friends and family. They’ll be begging you for the recipes and admiring your newfound culinary prowess!

So, Let’s Taco ’bout It:

Are you ready to take the plunge into the world of plant-based high-protein tacos? It’s time to don your chef’s hat, crank up the music, and get those tortillas sizzling. Join the party and show your taste buds some love without compromising on flavor or your health goals. Let’s share the taco love far and wide—because good food should always be celebrated and enjoyed!

Recipes That Will Make Your Taste Buds Cha-Cha:

Now, let’s get to the good stuff—the recipes that’ll make your mouth water and your tummy do a happy dance. We’ve got flavor combinations that’ll knock your socks off and leave you reaching for the maracas! From spicy black bean tacos that’ll make your taste buds tango to grilled tofu tacos that’ll sizzle with tanginess, we’ve got you covered. And let’s not forget the lentil and quinoa tacos, a protein-packed duo that’ll have you shimmying with joy. Add some crunchy veggies, zesty salsas, and a dollop of creamy goodness, and you’ve got a fiesta on a tortilla!

Remember: life’s too short for bland meals and food regrets. Embrace the plant-powered taco revolution, and let the tasty, protein-packed madness begin! So grab a friend, share this article, and get ready for a fiesta your taste buds won’t soon forget! Ole!

[ez-toc]

Tacos for Breakfast: 5 Plant-Based High Protein Meal Prep Ideas Replacing Eggs as a Source of Protein

Breakfast is the most important meal of the day, and what better way to start your morning than with a delicious, protein-packed breakfast taco? If you’re looking to replace eggs as a source of protein, we’ve got you covered! These breakfast taco recipes will make your taste buds sing and your tummy satisfied. So grab your tortillas and let’s dive into some exciting and egg-free breakfast taco ideas that will make you excited to jump out of bed!

  1. Tofu Fiesta:

Who needs eggs when you have tofu? Crumble firm tofu in a skillet and sauté it with onions, bell peppers, and a blend of turmeric and cumin. These spices not only add a vibrant yellow color but also provide a hint of that classic eggy flavor. Season the mixture with salt and pepper to taste, allowing the flavors to meld together.

Warm up your tortillas and generously spoon the flavorful tofu scramble onto them. Finally, top it all off with creamy avocado slices, zesty salsa, and a sprinkle of fresh cilantro. Get ready for a fiesta of flavors that will have you saying, “Adios, eggs!”

  1. Chickpea Sensation:

Chickpeas are a protein powerhouse that can easily be transformed into a delicious breakfast taco filling. Start by mashing cooked chickpeas with a drizzle of olive oil, diced onions, and a blend of ground cumin, paprika, and garlic powder. Season the mixture with salt and pepper to taste, ensuring it’s well seasoned.

Warm up your tortillas and generously spread the chickpea mixture onto them. Now, it’s time to add the finishing touches. Top it all off with juicy diced tomatoes, fresh chopped spinach for a pop of vibrant green, and a kick of hot sauce if you like things spicy. Brace yourself for an explosion of flavors that will leave you energized and ready to conquer the day.

  1. Hearty Lentil Delight:

Lentils are not just reserved for savory lunches and dinners—they can also make a fantastic breakfast taco filling. Start by cooking lentils until they’re tender and then season them with your favorite taco spices, like chili powder, cumin, and garlic powder. Season with salt and pepper to taste, ensuring the lentils are well seasoned.

Warm up your tortillas and spoon the lentil mixture onto them. Add a dollop of dairy-free yogurt for creaminess, sliced radishes for a refreshing crunch, and a sprinkle of chopped green onions for an added burst of flavor. This hearty and fiber-rich breakfast taco will keep you fueled and satisfied all morning long.

  1. Mushroom Magic:

If you’re a fan of savory breakfasts, mushrooms are here to save the day! Sauté sliced mushrooms in a drizzle of olive oil, minced garlic, and a pinch of thyme until they’re beautifully caramelized. Season with salt and pepper to taste, ensuring the mushrooms are well seasoned.

Warm up your tortillas and generously pile the mushroom medley onto them. Don’t forget to add a handful of fresh baby spinach leaves for a vibrant green touch. With every bite, you’ll experience a symphony of flavors that will have you forgetting all about those egg-filled mornings.

  1. Smoky Black Bean Fiesta:

Black beans are a versatile and protein-packed option that will turn your breakfast tacos into a smoky and satisfying delight. Heat cooked black beans in a skillet with a dash of olive oil, smoked paprika, cumin, and a squeeze of lime juice. Season with salt and pepper to taste, allowing the flavors to meld together.

Fill your tortillas with this flavorful bean mixture, creating a generous base. Now, it’s time to add the finishing touches. Top your tacos with diced ripe tomatoes for a burst of freshness, tangy pickled onions for a delightful zing, and a sprinkle of fresh cilantro to elevate the flavors. Get ready for a fiesta of flavors that will make you wonder why you ever relied on eggs in the first place.

Conclusion:

There you have it—five egg-free and protein-packed breakfast taco ideas that will revolutionize your mornings. Experiment with different fillings, spices, and toppings to create your own signature breakfast taco masterpiece. Whether you choose tofu, chickpeas, lentils, mushrooms, or black beans, these breakfast tacos will not only provide a satisfying start to your day but also showcase the endless possibilities of delicious and nutritious plant-based breakfasts. So why wait? Rise and shine to a breakfast taco adventure that will fuel your body and delight your taste buds!

[ez-toc]

Vegan Taco Creations for a Satisfying Lunch: 5 Plant-Based High Protein Meal Prep Ideas

Tacos are not just reserved for breakfast or dinner—they make a fantastic choice for a flavorful and satisfying lunch! If you’re looking to swap out the popular meat protein options for vegan alternatives, you’re in for a treat. These vegan taco recipes will prove that plant-based lunches can be just as delicious, if not more so, than their meaty counterparts. So, get ready to elevate your lunchtime experience with these tantalizing vegan taco creations!

  1. Pulled Jackfruit Tacos:

Jackfruit, the versatile tropical fruit, has gained recognition as a remarkable meat substitute due to its fibrous texture. To create a mouthwatering pulled jackfruit filling, cook canned young green jackfruit with a blend of smoky spices like paprika, cumin, and chili powder. As the jackfruit simmers, it absorbs the flavors, giving it a deliciously savory taste. Shred the jackfruit with a fork to achieve a pulled meat-like texture, and then pile it onto warmed tortillas. Top with your favorite taco toppings, such as crunchy cabbage slaw, tangy lime crema, and fresh cilantro, for a sensational lunch experience.

  1. Tempeh Taco Crunch:

Tempeh, made from fermented soybeans, is a protein-packed superstar that can be transformed into a delectable taco filling. Start by marinating thinly sliced tempeh in a flavorful blend of soy sauce, lime juice, garlic, and spices like cumin and smoked paprika. Pan-fry the tempeh until golden and crispy on the outside. Place the crispy tempeh slices onto warm tortillas and add a refreshing touch with sliced avocado, crunchy lettuce, and a drizzle of zesty vegan chipotle mayo. Every bite will be a delightful combination of textures and flavors.

  1. Cauliflower Baja Tacos:

Cauliflower takes center stage in these zesty Baja-style tacos, offering a delightful alternative to the usual fish or shrimp fillings. Begin by coating cauliflower florets in a seasoned batter made from a mixture of flour, spices, and plant-based milk. Bake the cauliflower until crispy and golden, giving it a satisfying crunch. Assemble the tacos by placing the crispy cauliflower on warm tortillas, then top with tangy lime-cilantro slaw, creamy avocado slices, and a drizzle of spicy vegan mayo. These vibrant and flavorful tacos will transport you straight to the sunny shores of Baja California.

  1. Walnut Meat Tacos:

If you’re craving a taco with a hearty, meaty texture, look no further than walnut meat. Pulse walnuts, along with a combination of spices like cumin, chili powder, and garlic powder, in a food processor until crumbly and resembling ground meat. Sauté the walnut mixture in a skillet with a little olive oil to enhance the flavors and create a savory filling. Spoon the walnut meat onto warm tortillas and add your favorite toppings, such as diced tomatoes, shredded lettuce, and a dollop of creamy vegan sour cream. Prepare to be amazed by the satisfying texture and rich flavors of these walnut meat tacos.

  1. Spicy Black Bean and Quinoa Tacos:

Black beans and quinoa make a dynamic duo in these protein-packed tacos. Cook quinoa and black beans separately, then combine them in a skillet with a medley of spices like cumin, paprika, and chili powder. Stir in some diced onions and minced garlic for extra flavor. Spoon the flavorful black bean and quinoa mixture onto warm tortillas and top with fresh salsa, sliced jalapeños, and a sprinkle of chopped fresh cilantro. These tacos offer a hearty and satisfying lunch option that will keep you energized throughout the day.

Conclusion:

Who says lunch has to be dull and predictable? These vegan taco creations are proof that plant-based alternatives can be just as exciting and delicious as traditional meat fillings. Whether you’re indulging in the pulled jackfruit tacos, savoring the crispy tempeh, enjoying the zesty cauliflower Baja tacos, relishing the walnut meat texture, or diving into the protein-packed black bean and quinoa tacos, your taste buds will be treated to a sensational lunch experience. So, let your lunch break be a moment of culinary delight with these tantalizing vegan taco recipes!

[ez-toc]

Elevate Your Dinner Game with Exquisite Plant-Based Dinner Tacos: 5 Vegan Recipe Ideas

Dinner time calls for something special, and what better way to satisfy your cravings than with a scrumptious plant-based dinner taco feast? Tacos have evolved from a simple street food staple to a gourmet delight, and these vegan dinner taco recipes will take your taste buds on a flavorful journey. Get ready to impress your family and friends with these exquisite plant-based taco creations that are perfect for a memorable dinner.

  1. Grilled Portobello Steak Tacos:

Give your taste buds a treat with these hearty and smoky grilled portobello steak tacos. Marinate thickly sliced portobello mushrooms in a mixture of balsamic vinegar, soy sauce, garlic, and herbs. Grill the marinated mushrooms until they become tender and develop those coveted grill marks. Slice the portobello steaks into thin strips and assemble them on warm tortillas. Enhance the flavors with caramelized onions, tangy pickled jalapeños, and a drizzle of creamy vegan chipotle sauce. These steak-inspired tacos are sure to satisfy even the most discerning palates.

  1. Spicy Lentil and Sweet Potato Tacos:

Combining the earthy flavors of lentils and the natural sweetness of sweet potatoes, these tacos are a symphony of flavors. Cook red lentils with aromatic spices like cumin, coriander, and smoked paprika until they are tender and infused with rich flavors. Roast diced sweet potatoes until they become caramelized and golden. Warm up your tortillas, and fill them with the flavorful lentils and sweet potatoes. Top it all off with a tangy lime-cilantro slaw, creamy avocado slices, and a sprinkle of toasted pepitas for an added crunch. These tacos offer a satisfying balance of textures and flavors that will leave you craving more.

  1. Mediterranean Chickpea Tacos:

Transport your taste buds to the sunny shores of the Mediterranean with these delightful chickpea tacos. Sauté chickpeas with garlic, olive oil, and a blend of Mediterranean herbs and spices like oregano, thyme, and paprika. Create a creamy and tangy tzatziki sauce using dairy-free yogurt, cucumber, lemon juice, and dill. Warm your tortillas and spoon the flavorful chickpea mixture onto them. Add a generous dollop of tzatziki sauce, sliced cherry tomatoes, diced cucumbers, and a sprinkle of fresh parsley. These Mediterranean-inspired tacos are a burst of fresh and vibrant flavors.

  1. Teriyaki Tempeh Tacos:

Take your taste buds on an Asian-inspired journey with these irresistible teriyaki tempeh tacos. Marinate sliced tempeh in a homemade teriyaki sauce made from soy sauce, ginger, garlic, and a touch of sweetness. Pan-fry the marinated tempeh until it caramelizes and becomes beautifully glazed. Fill your tortillas with the teriyaki tempeh and complement it with crunchy cabbage, sliced scallions, and a drizzle of spicy sriracha mayo. Each bite is a harmony of savory, sweet, and spicy flavors that will leave you wanting more.

  1. Roasted Cauliflower and Chickpea Tacos with Chipotle Crema:

Roasted cauliflower and chickpeas come together to create a taco filling that’s packed with flavor and texture. Toss cauliflower florets and chickpeas in a mixture of olive oil, cumin, smoked paprika, and chili powder, then roast them until they’re golden and crispy. Warm up your tortillas and load them with the roasted cauliflower and chickpea mixture. Drizzle with a smoky and creamy chipotle crema, and top with sliced radishes, chopped cilantro, and a squeeze of fresh lime juice. These tacos offer a delightful combination of smoky, spicy, and fresh flavors that will make your taste buds sing.

Conclusion:

With these exquisite plant-based dinner taco recipes, you can turn any ordinary evening into a culinary adventure. Whether you choose the grilled portobello steak tacos, spicy lentil and sweet potato tacos, Mediterranean chickpea tacos, teriyaki tempeh tacos, or roasted cauliflower and chickpea tacos, you’re in for a treat. Embrace the versatility and creativity that tacos allow, and let these plant-based dinner creations impress your family and friends with their remarkable flavors. Dinner just got a whole lot more exciting!

[ez-toc]

Indulgent Dessert Tacos: 5 Recipe Ideas to Satisfy Your Sweet Tooth

Who said tacos were only for savory dishes? Brace yourself for a delightful surprise as we embark on a journey to explore the world of dessert tacos. These sweet treats will revolutionize your dessert game and add a touch of whimsy to your culinary adventures. Get ready to satisfy your sweet tooth with these indulgent dessert taco recipes that will make your taste buds dance with joy.

  1. Chocolate-Strawberry Dream Tacos:

Experience pure bliss with these decadent chocolate-strawberry dream tacos. Start by coating small tortillas with melted dark chocolate and allow them to set. Once the chocolate shells are firm, fill them with a luscious strawberry compote or fresh sliced strawberries. For added texture and flavor, sprinkle crushed pistachios or toasted coconut on top. The combination of rich chocolate, sweet strawberries, and crunchy toppings will take your dessert experience to new heights.

  1. Cinnamon Sugar Churro Tacos:

Indulge in the irresistible flavors of churros with a delightful twist. Begin by frying small tortillas until golden and crispy. While still warm, toss the tortillas in a mixture of cinnamon and sugar, coating them generously. For an extra touch of sweetness, drizzle melted chocolate or caramel sauce inside the crispy churro shells. Serve your cinnamon sugar churro tacos with a side of creamy vanilla ice cream and a sprinkle of powdered sugar for a dessert that will transport you to the streets of a vibrant Mexican market.

  1. Tropical Paradise Tacos:

Escape to a tropical paradise with these refreshing and fruity dessert tacos. Fill small tortillas with a medley of tropical fruits like sliced mangoes, diced pineapples, and juicy kiwis. Drizzle a creamy coconut sauce made from coconut milk, a touch of honey or maple syrup, and a squeeze of lime juice over the fruit. For an added crunch, sprinkle toasted macadamia nuts or crushed graham crackers on top. The combination of vibrant tropical flavors and creamy coconut sauce will transport you to a sunny beachside getaway.

  1. Peanut Butter and Banana Tacos:

Channel your inner Elvis Presley with these nostalgic peanut butter and banana tacos. Spread a generous layer of creamy peanut butter inside small tortillas. Top it off with sliced bananas and a drizzle of honey for natural sweetness. For an extra indulgence, sprinkle crushed peanuts or dark chocolate shavings on top. These sweet and nutty tacos are sure to satisfy your cravings for a classic flavor combination.

  1. Lemon Berry Cheesecake Tacos:

Experience a burst of tangy and creamy flavors with these lemon berry cheesecake tacos. Whip together a velvety lemon-infused cream cheese filling and spoon it into small tortillas. Top the creamy filling with a medley of fresh mixed berries like strawberries, blueberries, and raspberries. For an elegant finishing touch, garnish with a sprinkle of lemon zest or a drizzle of berry coulis. These delightful dessert tacos offer a harmonious balance of sweet, tangy, and creamy flavors that will leave you craving another bite.

Conclusion:

Dessert tacos bring a playful and unexpected twist to traditional taco recipes, allowing you to satisfy your sweet tooth in the most delightful way possible. Whether you indulge in the chocolate-strawberry dream tacos, cinnamon sugar churro tacos, tropical paradise tacos, peanut butter, and banana tacos, or lemon berry cheesecake tacos, your taste buds will be treated to an explosion of flavors and textures. So, get creative in the kitchen and embrace the whimsy of dessert tacos to add a touch of sweetness to your culinary adventures. Who knew tacos could be so deliciously sweet?

[ez-toc]

Indian-inspired Delights: Fusion Dessert Tacos with a Spicy Twist:

Get ready for a flavor explosion as we dive into the world of Indian-inspired fusion dessert tacos! By combining the vibrant and bold flavors of Indian cuisine with the playful and versatile nature of tacos, we’re about to embark on a culinary adventure that will tantalize your taste buds. Get ready to savor these unique and mouthwatering dessert taco creations with a spicy twist.

  1. Mango Lassi Tacos:

Indulge in the classic Indian beverage with a twist. Start by filling small tortillas with a creamy mango lassi filling made from pureed mangoes, yogurt, honey, and a dash of cardamom. Top the lassi filling with a sprinkle of crushed pistachios and a drizzle of rose syrup for an added touch of elegance. The combination of the smooth and tangy mango lassi, crunchy pistachios, and floral rose syrup will transport you to the streets of India in every bite.

  1. Gulab Jamun Tacos:

Experience the rich and indulgent flavors of the beloved Indian sweet, gulab jamun, in a unique taco form. Fill small tortillas with pieces of gulab jamun, a soft and syrup-soaked doughnut-like dessert. For added texture and sweetness, top the gulab jamun with a dollop of whipped cream or vanilla ice cream. Garnish with a sprinkle of chopped pistachios or a drizzle of warm saffron-infused syrup. These gulab jamun tacos will take your taste buds on a sweet and aromatic journey.

  1. Masala Chai Spiced Tacos:

Spice up your dessert tacos with the warm and comforting flavors of masala chai. Begin by infusing small tortillas with a blend of spices like cinnamon, cardamom, cloves, and ginger. Fill the spiced tortillas with a creamy and aromatic masala chai-infused whipped cream or custard. Top it all off with a sprinkle of crushed tea cookies or a drizzle of caramel sauce for a delightful crunch and added sweetness. These masala chai spiced tacos offer a unique and cozy dessert experience.

  1. Coconut Barfi Tacos:

Transform the traditional Indian sweet, coconut barfi, into a delightful taco treat. Start by making small coconut barfi squares using desiccated coconut, condensed milk, and a hint of rosewater or cardamom for flavor. Place the coconut barfi squares inside small tortillas and garnish with a generous drizzle of melted dark chocolate and a sprinkle of toasted coconut flakes. These coconut barfi tacos will satisfy your craving for a sweet and nutty Indian dessert.

  1. Pistachio Kulfi Tacos:

Take a creamy and fragrant Indian frozen treat, kulfi, and reimagine it in taco form. Fill small tortillas with slices of pistachio kulfi, a traditional Indian ice cream made with condensed milk, ground pistachios, and aromatic spices. Add a touch of decadence by drizzling the kulfi with a generous amount of saffron-infused syrup and garnish with crushed pistachios for added texture. These pistachio kulfi tacos offer a unique and refreshing dessert experience.

Conclusion:

Indian-inspired fusion dessert tacos bring together the vibrant flavors of Indian cuisine with the playful nature of tacos, creating a unique and unforgettable culinary experience. Whether you indulge in mango lassi tacos, gulab jamun tacos, masala chai spiced tacos, coconut barfi tacos, or pistachio kulfi tacos, your taste buds will be treated to a fusion of sweet, spicy, and aromatic flavors. So, get ready to embark on a delicious journey where Indian and Mexican cuisines come together in harmony.

[ez-toc]

Fusion Fiesta: Indian-Inspired Tacos with a Flavorful Twist

Prepare your taste buds for a culinary adventure as we bring together the vibrant flavors of Indian cuisine and the irresistible charm of tacos. By infusing traditional Indian ingredients and spices into taco fillings, we’ll take your taste buds on a delightful fusion journey. Get ready to experience the explosion of flavors with these Indian-inspired tacos that will add a unique twist to your taco repertoire.

  1. Masala Aloo Tacos:

Experience the comforting flavors of Indian spiced potatoes in a taco format. Start by sautéing diced potatoes with a medley of aromatic spices like cumin, coriander, turmeric, and garam masala. Let the potatoes become tender and beautifully coated with the spice blend. Warm up your tortillas and fill them with the flavorful masala potatoes. Add a refreshing touch with tangy tamarind chutney, cooling yogurt sauce, and a sprinkle of fresh cilantro. These masala aloo tacos will transport you straight to the streets of India.

  1. Tandoori Paneer Tacos:

Paneer, a versatile Indian cheese, takes center stage in these delectable tacos. Marinate cubes of paneer in a tangy tandoori spice blend infused with yogurt, ginger, garlic, and a squeeze of lemon juice. Grill or pan-fry the marinated paneer until it develops a smoky and charred exterior. Place the tandoori paneer cubes onto warm tortillas and garnish with crunchy onion slices, zesty mint chutney, and a sprinkle of chaat masala. These tacos offer a perfect balance of creamy, tangy, and spicy flavors.

  1. Chana Masala Tacos:

Chana masala, a classic Indian chickpea curry, brings its bold and aromatic flavors to the taco scene. Prepare a flavorful chana masala by cooking chickpeas with a blend of spices like cumin, coriander, turmeric, and garam masala, along with tomatoes and onions. Allow the flavors to meld together and create a rich and hearty filling. Warm up your tortillas and spoon the chana masala onto them. Add a tangy and refreshing twist with a dollop of tangy yogurt, crunchy diced red onions, and a squeeze of fresh lemon juice. These chana masala tacos will make you fall in love with the fusion of Indian and Mexican flavors.

  1. Tikka Cauliflower Tacos:

Cauliflower, when marinated and roasted to perfection, creates a fantastic taco filling that captures the essence of Indian tikka flavors. Marinate cauliflower florets in a yogurt-based tikka masala marinade infused with a blend of spices like paprika, cumin, coriander, and fenugreek. Roast the marinated cauliflower until it becomes golden and tender. Fill your tortillas with the tikka cauliflower and add a burst of freshness with sliced cucumbers, tangy tomato chutney, and a sprinkle of chopped mint. These tikka cauliflower tacos will leave you craving more with their bold and aromatic flavors.

  1. Coconut Curry Lentil Tacos:

Embrace the creamy and aromatic flavors of coconut curry lentils in a taco form. Cook red lentils in a luscious coconut curry sauce made with a blend of spices, ginger, garlic, and coconut milk. Let the lentils simmer until they become tender and infused with the rich flavors of the curry. Warm up your tortillas and spoon the coconut curry lentils onto them. Top it off with a vibrant and tangy mango salsa, crispy fried onions, and a drizzle of cilantro-lime crema. These coconut curry lentil tacos offer a delightful combination of creaminess, spiciness, and tropical sweetness.

Conclusion:

Experience the best of both worlds with these Indian-inspired tacos that fuse the vibrant flavors of Indian cuisine with the beloved taco format. Whether you choose the masala aloo tacos, tandoori paneer tacos, chana masala tacos, tikka cauliflower tacos, or coconut curry lentil tacos, you’ll embark on a flavor adventure that blends the richness of Indian spices with the versatility of tacos. Get ready to indulge in the delightful fusion fiesta that will tantalize your taste buds and showcase the beauty of culinary creativity.

[ez-toc]

Unleash Your Taco Creativity: Inspire, Experiment, and Share the Plant-Based High-Protein Taco Journey

You now have a treasure trove of diverse and mouthwatering taco recipes to explore and experiment with. Our goal with this master post was to inspire you to think outside the box, embrace new flavors, and create culinary masterpieces that reflect your unique taste preferences.

We encourage you to take these recipes as a starting point and let your creativity run wild. Feel free to modify the seasonings, play with different toppings, or even combine elements from various recipes to create your own signature taco creations. The possibilities are endless, and the kitchen is your playground.

But here’s the best part: we want to hear from you! We would love for you to come back and share your experiences with us and others. Did you add a special twist to one of the recipes? Did you discover a new flavor combination that blew your mind? Your feedback and insights can inspire others to embark on their own taco adventures.

So, grab your apron, fire up the stove, and let your taste buds be your guide. Explore the world of plant-based high-protein tacos, experiment with different ingredients, and create culinary magic that will leave you and your loved ones in awe.

Remember, cooking is an art form, and with tacos as your canvas, you have the freedom to express your culinary prowess. So go forth, create, and come back to share the joy and deliciousness that awaits you in the realm of plant-based high-protein tacos. Happy cooking and taco feasting!

[ez-toc]