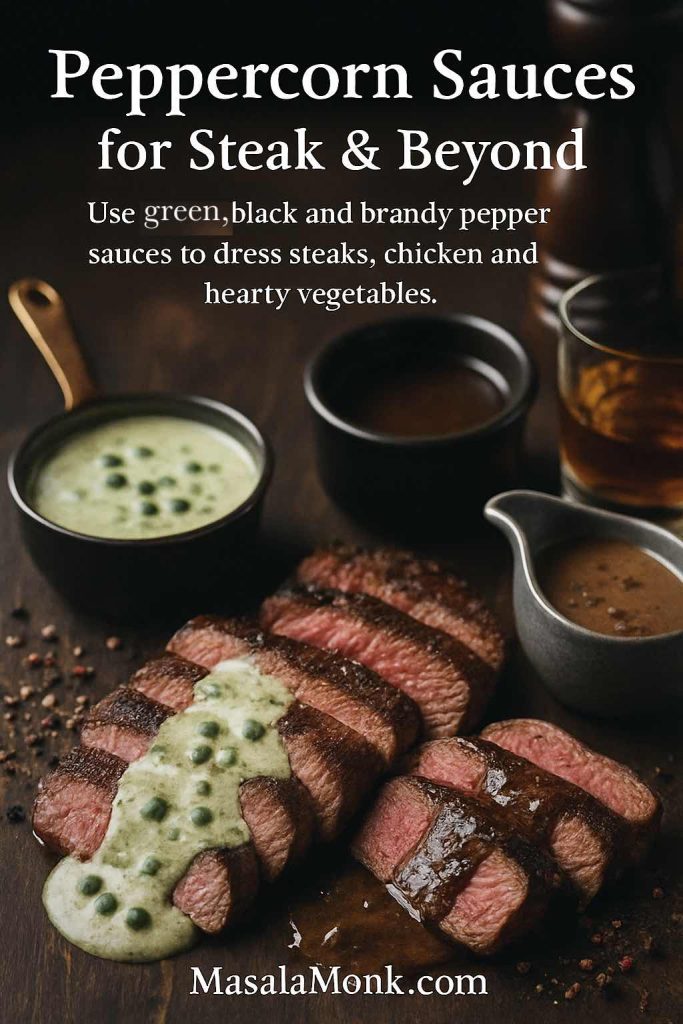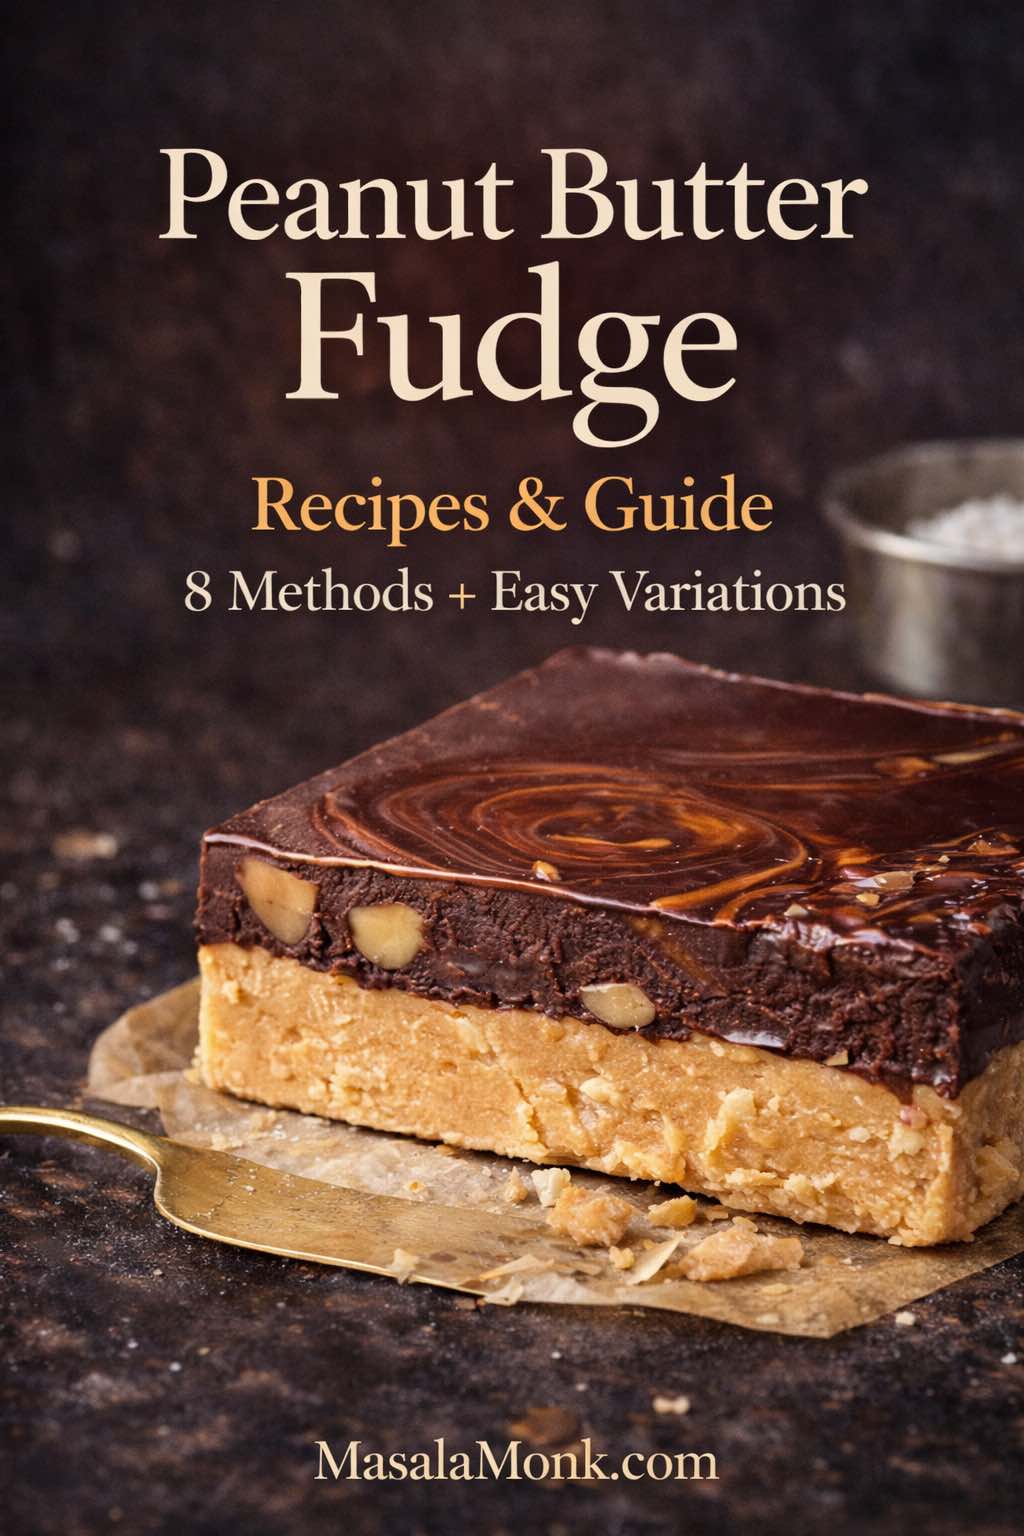
Some desserts feel like a project. This one, thankfully, doesn’t have to. A peanut butter fudge recipe can be a two-minute stir-and-chill treat, a creamy slice that tastes like it came from a candy counter, or an old-fashioned cooked confection with that unmistakable “holiday tray” vibe. Even better, it adapts: you can turn it into chocolate-and-peanut swirls, a buckeye-style slab with a glossy cap, a peanut-free version for allergy-friendly sharing, or a sugar-alternative batch that still scratches the same sweet itch.
Because there are so many ways to make it, the smartest approach is simple: pick the style that matches your mood, then follow the steps. Along the way, you’ll also learn how to troubleshoot grainy texture, fix a too-soft set, and store slices so they stay tender instead of drying out.
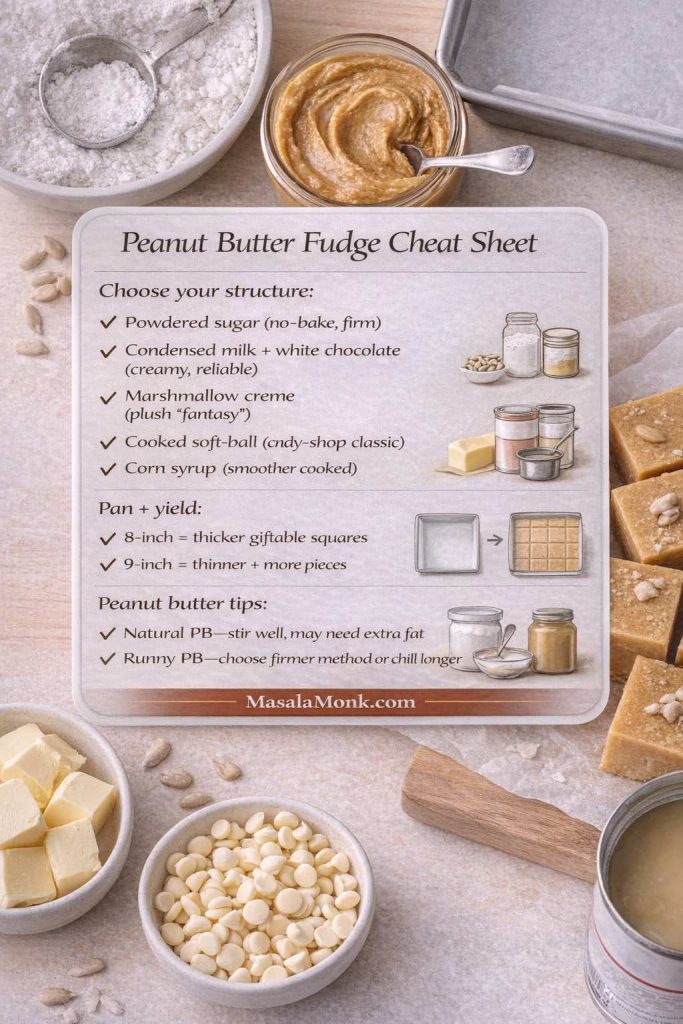
Choose your peanut butter fudge style
If you want the shortest path, start with the 2-ingredient version. If you prefer a creamier bite that rarely crumbles, go for the condensed milk method. Meanwhile, marshmallow creme delivers that plush, classic texture that many people associate with “fantasy” style fudge. On the other hand, if you’re craving a true candy-shop finish, the cooked soft-ball stage method is the one.
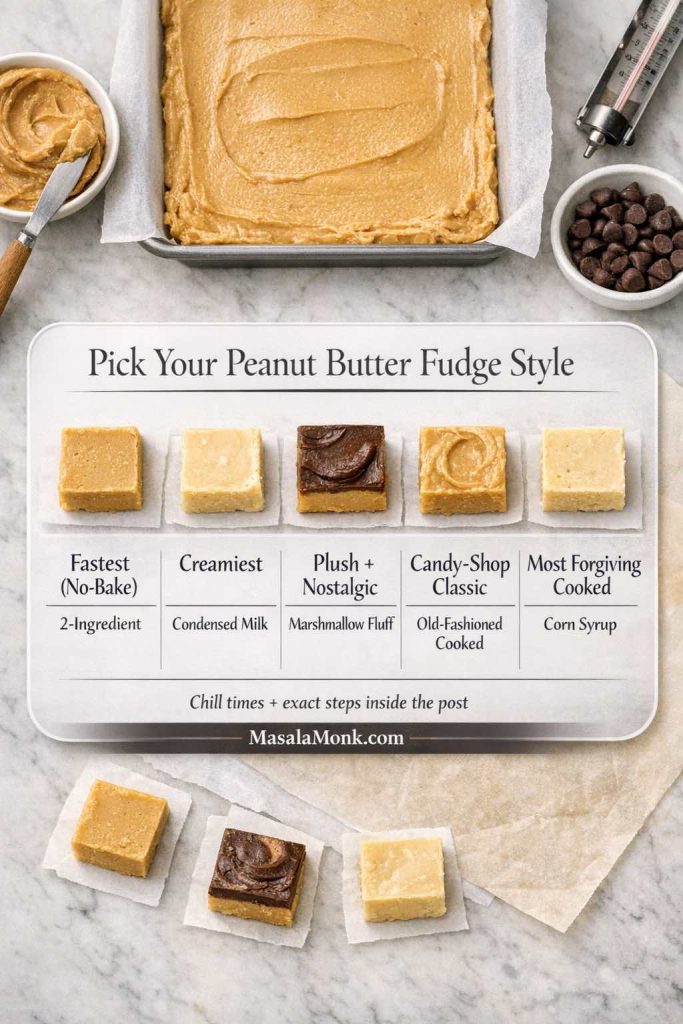
- Fastest: 2-ingredient easy peanut butter fudge
- Creamiest: peanut butter fudge with sweetened condensed milk
- Plush/nostalgic: marshmallow fluff peanut butter fudge
- Candy-shop: old fashioned peanut butter fudge (soft-ball stage)
- Most forgiving cooked: peanut butter fudge with corn syrup
- Shortcut: frosting and peanut butter fudge
- Low-sugar: keto peanut butter fudge / sugar free peanut butter fudge
- Allergy-friendly: peanut free fudge (seed butter swap)
No matter which route you take, great results begin with great peanut butter. If you like controlling the texture from the start—ultra smooth, slightly chunky, or deeply roasted—this guide on how to make peanut butter at home is a useful foundation.
Ingredients and tools that make everything easier
Before jumping into specific methods, it helps to set yourself up for a smooth run. Even when a recipe is “easy,” small choices can make the difference between creamy slices and a crumbly pan.
Pan size and lining
An 8-inch square pan is the sweet spot for thick, giftable squares. For thinner pieces (or if you want more servings), use a 9-inch square pan.
Line the pan with parchment paper, leaving overhang on two sides. That overhang becomes handles, so you can lift the slab out cleanly and slice without gouging the pan.
Peanut butter choice
You can use either stabilized peanut butter (the kind that doesn’t separate much) or natural peanut butter. However, natural versions vary a lot: some are oily and loose; others are stiff and dry.
- If your peanut butter is very stiff, you’ll often need a touch more fat (butter or coconut oil) to keep the mixture from crumbling.
- If it’s very runny, you may need a bit more structure (powdered sugar, a little extra chill time, or a firmer method like condensed milk).
Salt and vanilla in a peanut butter fudge recipe
Salt is the quiet hero here. Even salted peanut butter usually benefits from a pinch more. Vanilla is optional, yet it rounds the flavor and makes the final result taste more “finished.”
Optional tools
- A sturdy silicone spatula (best for thick mixtures)
- A heavy saucepan (for heated methods)
- A candy thermometer (strongly recommended for cooked styles)
Storage and food safety
Fudge lasts well when protected from air. Still, many versions include dairy (butter, milk, condensed milk). For safe handling basics, the USDA’s guidance on leftovers and food safety is a solid reference.
Also Read: 10 Vegan Chocolate Cake Recipes (Easy, Moist, & Dairy-Free)
Method 1: Two ingredient easy peanut butter fudge (fast, firm, classic recipe)
This is the “I need something sweet right now” method. It’s also the simplest way to get that peanut-butter-candy vibe without turning on the stove.
What this style of fudge with peanut butter is like
The texture is firm and sliceable, with a sweetness that hits quickly and then fades into roasted peanut flavor. Because it sets through dry structure rather than cooking, the bite feels a bit like old-fashioned peanut butter candy—dense and satisfying.
Ingredients (8-inch pan)
- 1 cup peanut butter (creamy works best)
- 2 to 2½ cups powdered sugar
- Optional: ½ teaspoon vanilla
- Optional: pinch of salt
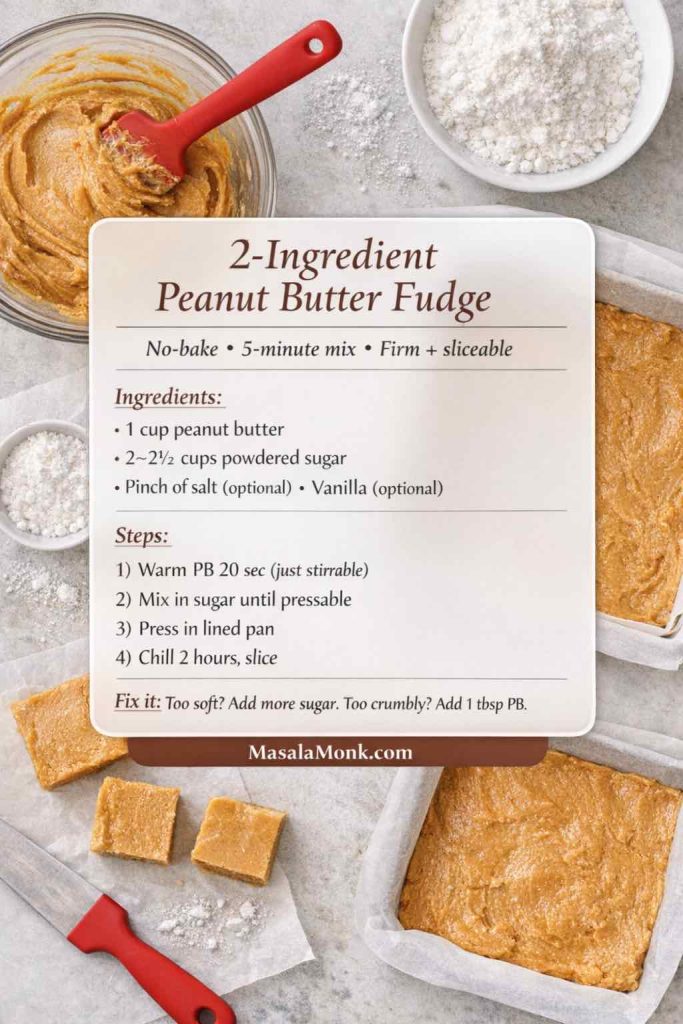
Step-by-step recipe
- Line the pan. Set it aside so it’s ready.
- Soften the peanut butter. Warm it gently—about 20 seconds in the microwave, or briefly in a small saucepan—just until it stirs easily. Avoid making it hot.
- Season it. Stir in vanilla and a pinch of salt if you’re using them.
- Add powdered sugar gradually. Start with 2 cups and stir until the mixture thickens into a soft dough.
Next, add more powdered sugar a few tablespoons at a time until it holds together and feels pressable. - Press into the pan. Use your spatula to compress it firmly. The tighter you press, the cleaner your slices will be.
- Chill until firm. Refrigerate at least 2 hours, then lift out and slice.
If it’s not perfect, fix it
- Crumbly or dry: Warm 1–2 tablespoons of peanut butter and knead it into the mixture. Alternatively, add 1 tablespoon melted butter and mix again.
- Too soft: Add a bit more powdered sugar and chill longer.
Also Read: Kahlua Drinks: 10 Easy Cocktail Recipes (Milk, Vodka, Coffee)
Method 2: Three ingredient peanut butter fudge (creamier and more forgiving)
This version keeps the no-bake ease, yet feels smoother and richer than the 2-ingredient batch. Because butter adds silkiness and helps binding, the texture often lands in that “creamy peanut butter fudge” zone.
Ingredients (8-inch pan)
- 1 cup peanut butter
- ¼ cup butter, melted
- 2 to 2½ cups powdered sugar
- Optional: ½ teaspoon vanilla
- Optional: pinch of salt
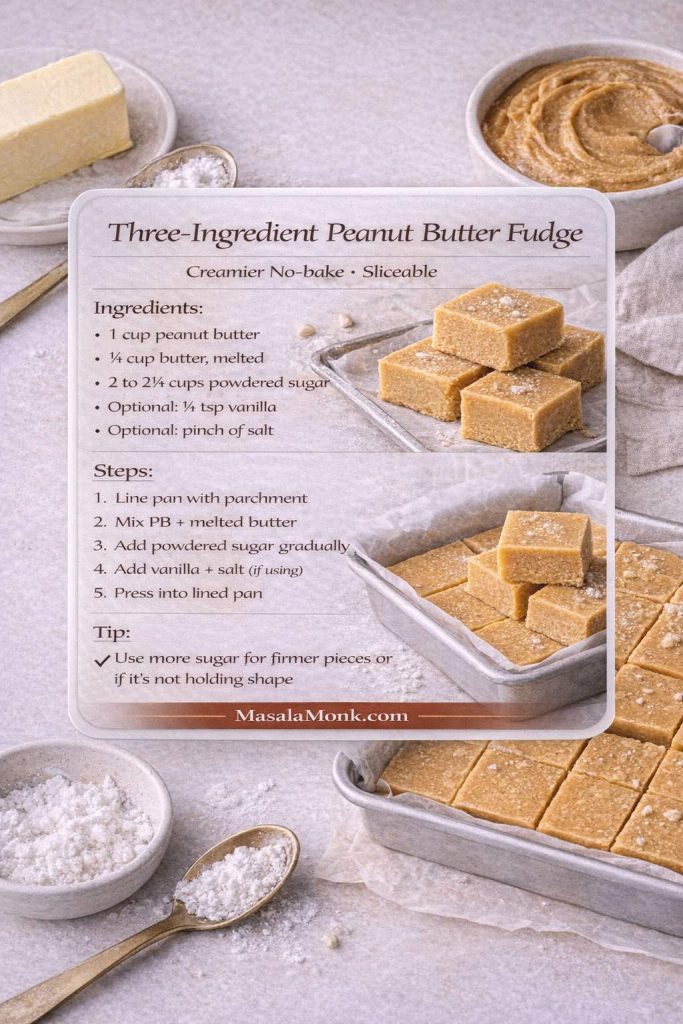
Step-by-step recipe
- Prepare your pan. Line it with parchment and set aside.
- Melt the butter. Let it cool for a minute so it’s warm, not scalding.
- Combine peanut butter and butter. Stir until glossy and unified.
- Add vanilla and salt if using.
- Stir in powdered sugar gradually. Begin with 2 cups, then adjust. The mixture should be thick but still spreadable.
- Press and smooth. Push it firmly into the pan and level the surface.
- Chill 2–3 hours until sliceable.
Flavor upgrades for 3 Ingredient peanut butter fudge
A slightly larger pinch of salt makes this taste more peanut-forward. Additionally, a spoonful of finely chopped roasted peanuts gives a satisfying crunch without making slicing difficult.
Also Read: Cranberry Moscow Mule Recipe: A Festive Holiday Cocktail With Easy Variations
Method 3: Four ingredient peanut butter fudge (balanced, “best-ever” flavor)
Four-ingredient versions are popular because that extra ingredient—often vanilla—makes the fudge taste more intentional. Moreover, the method is still just stir, press, chill.
Ingredients (8-inch pan)
- 1 cup peanut butter
- ¼ cup butter, melted
- 2 cups powdered sugar (plus extra only if needed)
- 1 teaspoon vanilla
- Pinch of salt (highly recommended)
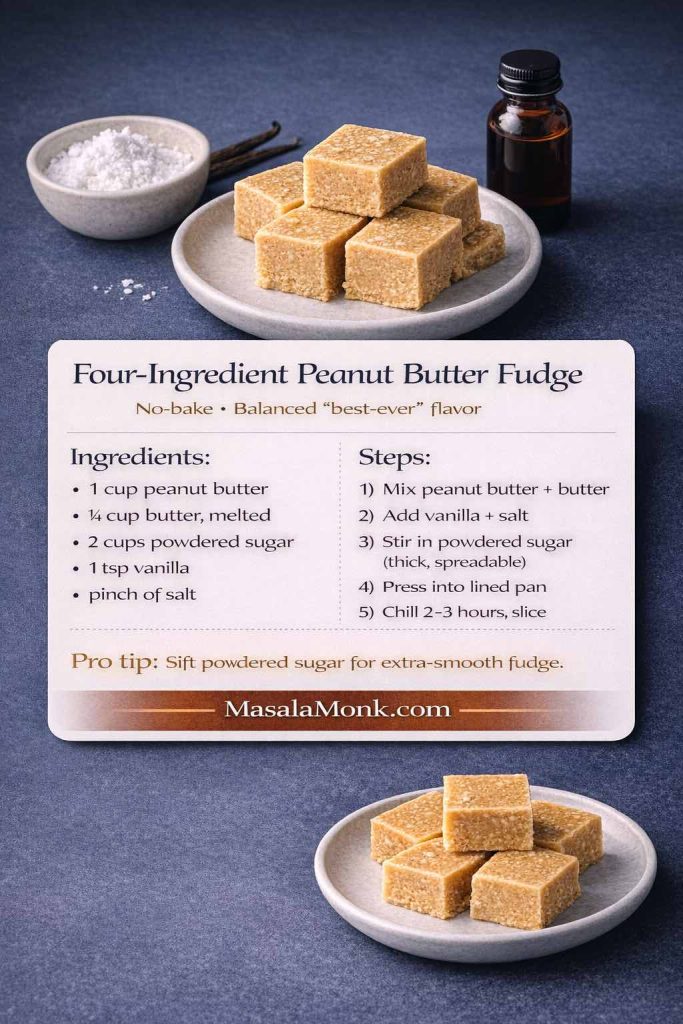
Step-by-step
- Line the pan and set it nearby.
- Stir peanut butter and melted butter until smooth.
- Add vanilla and salt. Mix thoroughly.
- Add powdered sugar and stir until thick and spreadable.
- Press into the pan firmly; smooth the top.
- Chill 2–3 hours, then slice.
A simple cocoa twist in 4 Ingredient peanut butter fudge
If you want a quick chocolate-peanut vibe without adding a full layer, stir 1–2 tablespoons cocoa into half the mixture and swirl it through before chilling. For an easy drizzle at serving time, this quick homemade chocolate syrup works beautifully on top of a slice.
Also Read: Iced Coffee: 15 Drink Recipes—Latte, Cold Brew, Frappe & More
Method 4: Peanut Butter Fudge with Sweetened Condensed Milk (extra creamy, very reliable)
This is the candy-counter style: smooth, rich, and easy to slice. To guarantee a firm set, this condensed milk version uses white chocolate chips for structure. Without a setting ingredient, the classic “condensed milk + peanut butter” combo can stay too soft—especially in warmer kitchens.
Ingredients (for an 8-inch pan)
- 1 can (14 oz / 396g) sweetened condensed milk
- 2½ cups white chocolate chips
- 1 cup peanut butter (creamy is easiest)
- 1 teaspoon vanilla
- Pinch of salt
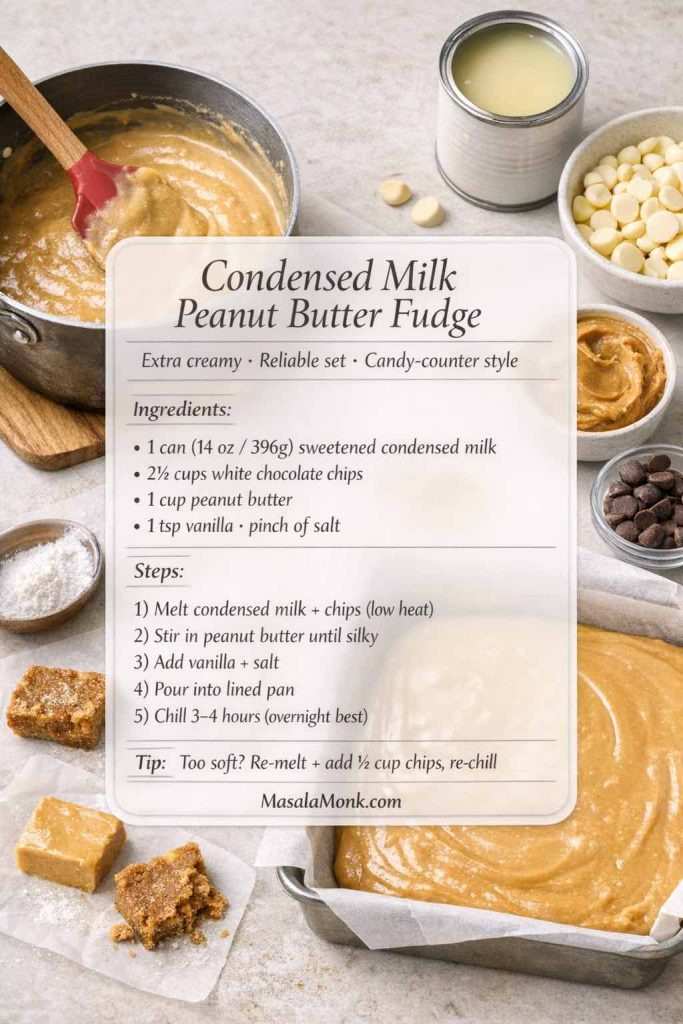
Step-by-step
- Prep the pan: Line an 8-inch square pan with parchment paper, leaving overhang.
- Melt gently: In a heavy saucepan over low heat, warm the condensed milk and white chocolate chips, stirring constantly until smooth and glossy (about 3–6 minutes). Keep the heat low to avoid scorching.
- Add peanut butter: Stir in the peanut butter until fully unified and silky.
- Finish the flavor: Remove from heat and stir in vanilla and salt.
- Pour and smooth: Scrape into the pan, level the top, and tap the pan lightly to settle it.
- Chill to set: Refrigerate 3–4 hours (overnight is best for super-clean slices). Lift out and slice.
If it’s not perfect, fix it
- Too soft: Chill longer first. If it still won’t set, re-melt gently and stir in ½ to 1 cup more white chocolate chips, then re-chill.
- Too firm: Let slices sit at room temperature for 5–10 minutes before serving.
Condensed milk peanut butter fudge without white chocolate (works, but a different texture)
If you’d rather skip the chips, you can still use condensed milk—just add dry structure so it sets sliceable:
- Warm 1 can condensed milk + 1 cup peanut butter over low heat until glossy.
- Remove from heat and stir in 2 to 2½ cups powdered sugar until thick and spreadable.
- Press into the pan and chill 3–4 hours.
This version is more “peanut butter candy” in texture than candy-shop fudge, but it’s still delicious and reliable when you want a no-chip option.
Also Read: Marinara Sauce Recipe: Classic Homemade Marinara
Method 5: Marshmallow Fluff Peanut Butter Fudge (plush, classic, nostalgic)
This is the classic “fantasy-style” approach: you cook the sugar base, then beat in marshmallow creme and peanut butter for that plush, sliceable, old-school texture. It’s much more reliable than simply mixing fluff and peanut butter and hoping it sets.
Ingredients (for an 8-inch pan)
- 2 cups sugar
- ½ cup evaporated milk (or whole milk)
- ½ cup butter
- 1 jar (7 oz / ~200g) marshmallow creme or marshmallow fluff
- ¾ to 1 cup peanut butter
- 1 teaspoon vanilla
- Pinch of salt
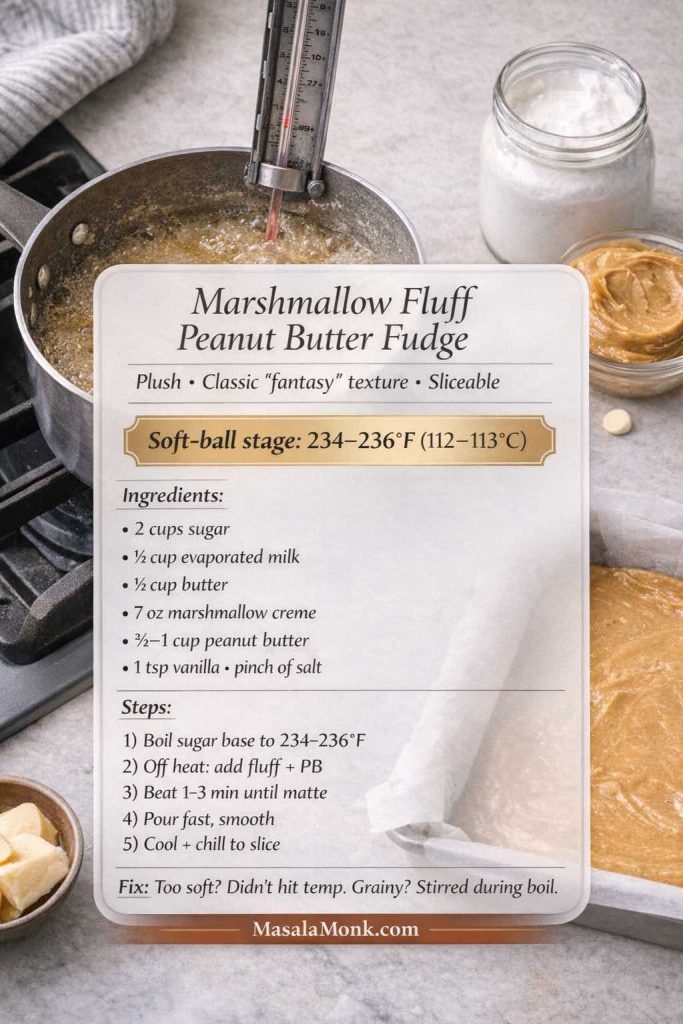
Step-by-step
- Line your pan with parchment and keep it close by. This mixture sets quickly once it’s beaten.
- Start the base: In a heavy saucepan, combine sugar, evaporated milk, and butter. Heat over medium, stirring until everything is dissolved and uniform.
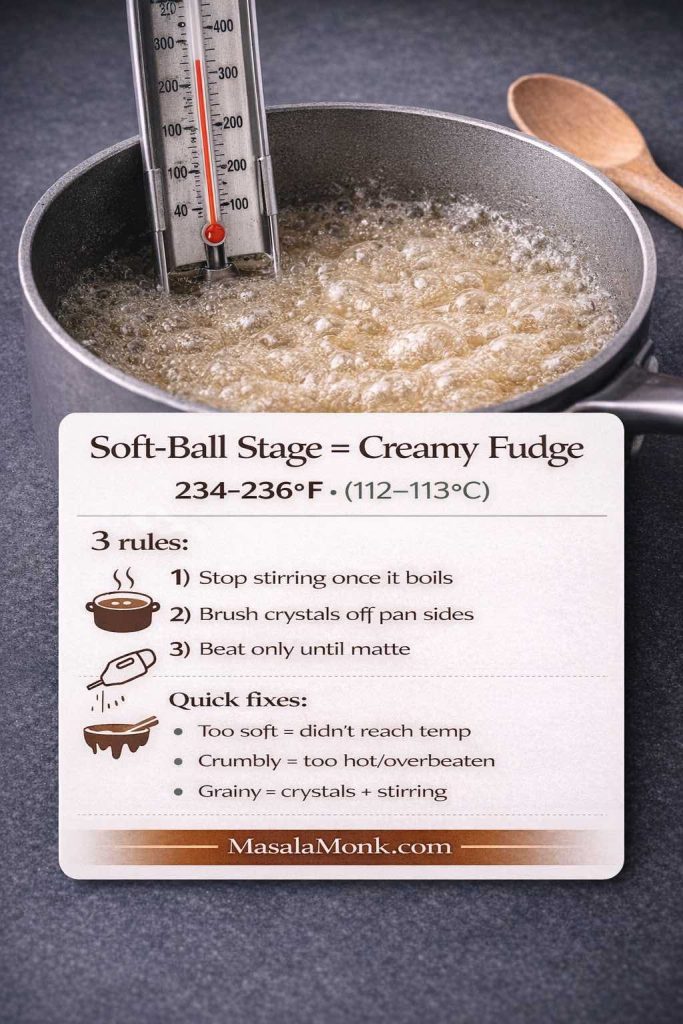
- Boil to soft-ball stage: Bring to a steady boil and cook until the mixture reaches 234–236°F (112–113°C). Once it’s boiling, avoid stirring—if needed, gently swirl the pan instead.
- Finish off-heat: Remove from heat. Immediately add the marshmallow creme, peanut butter, vanilla, and salt.
- Beat until it turns matte: Stir vigorously (with a wooden spoon or a mixer on low) until the mixture thickens, loses some shine, and starts holding soft shape—usually 1–3 minutes.
- Pour and smooth fast: Transfer to the pan right away and smooth the top. Let it cool until set, then refrigerate for cleaner slices.
If Marshmallow Fluff Peanut Butter Fudge is not perfect, fix it
- Grainy: Usually from sugar crystals or too much stirring while boiling. Next time, stop stirring once it boils and brush down the sides of the pan early with a little water.
- Too soft: It likely didn’t reach soft-ball temperature. You can re-melt the batch gently, bring it back to 234–236°F, then beat again and reset.
- Too firm/crumbly: It likely cooked a bit too hot or was beaten too long. Next time, stop beating as soon as it thickens and turns slightly matte.
Also Read: Hot Chocolate Coffee: 3 Easy Recipes (Cocoa, Mix, or Espresso)
Method 6: Frosting and peanut butter fudge (icing shortcut that actually works)
This method is almost unfairly easy. Because frosting already contains sugar and fat in a stable ratio, combining it with peanut butter creates a fudge-like base that sets in the fridge.
Ingredients (8-inch pan)
- 1 cup peanut butter
- 1 container frosting (about 16 oz / 450g), vanilla preferred
- Pinch of salt
- Optional: ½ teaspoon vanilla (if your frosting is bland)
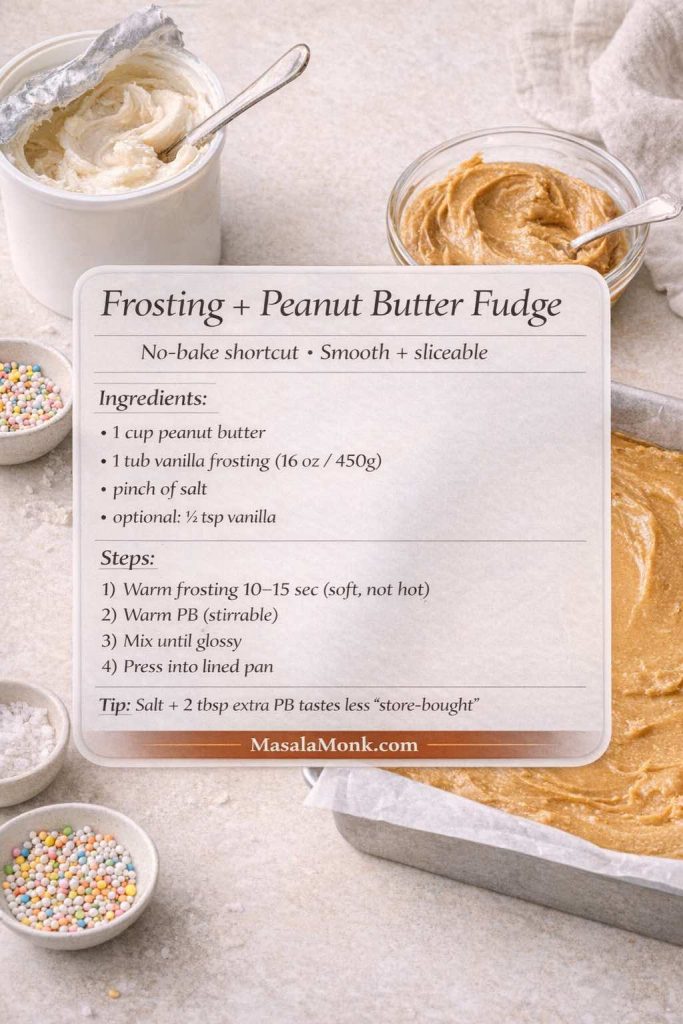
Step-by-step
- Line your pan with parchment.
- Warm the frosting briefly. Microwave 10–15 seconds to soften it.
- Soften the peanut butter the same way—just enough to stir.
- Combine frosting and peanut butter until completely smooth.
At first, it may resist; keep mixing and it will turn glossy. - Season with salt (and vanilla if using).
- Spread into the pan and smooth the top.
- Chill 2–3 hours until set.
Make it taste less “store-bought”
Salt is essential here. Also, a little extra peanut butter (2–3 tablespoons) pushes the flavor forward and keeps it from tasting like frosting with peanuts.
Also Read: Strawberry Smoothie Recipes (12 Easy Blends + Bowls & Protein Shakes)
Method 7: Corn Syrup Peanut Butter Fudge (smoother cooked texture, less grainy)
Corn syrup is the quiet helper in cooked fudge. It makes the batch more forgiving by lowering the chances of that gritty, grainy texture that can sneak into candy. If you want old-fashioned flavor with a smoother finish and a little extra insurance, this is the cooked method to start with.
Ingredients (for an 8-inch pan)
- 2 cups granulated sugar
- ½ cup milk or evaporated milk
- ½ cup light corn syrup
- ¼ cup butter
- 1 cup peanut butter (creamy is easiest)
- 1 teaspoon vanilla
- Pinch of salt
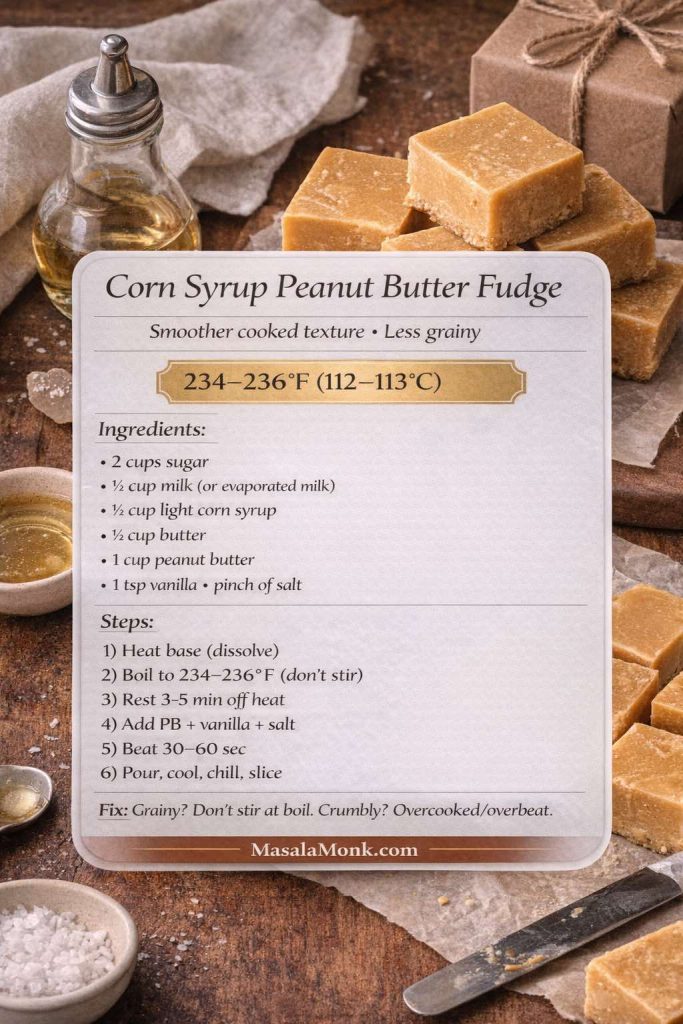
Step-by-step
- Prep the pan first. Line an 8-inch square pan with parchment paper and leave overhang so you can lift the fudge out later.
- Start the base. In a heavy saucepan, combine sugar, milk, corn syrup, and butter. Heat over medium, stirring until the mixture is fully uniform and the sugar looks mostly dissolved.
- Boil without stirring. Bring it to a steady boil. Once it’s boiling, stop stirring (stirring encourages crystals). If needed, gently swirl the pan instead.
- Cook to soft-ball stage. Continue boiling until the mixture reaches 234–236°F (112–113°C) on a candy thermometer. (This range is where you get creamy fudge—not syrupy-soft and not crumbly.)
- Rest briefly. Remove from heat and let the pan sit undisturbed for 3–5 minutes.
- Add the peanut butter and flavorings. Stir in peanut butter, vanilla, and salt until completely smooth.
- Beat just until it thickens. Keep stirring for about 30–60 seconds, until it looks slightly thicker and loses some shine. Don’t keep going once it starts to resist—overbeating can make it crumbly.
- Pour and smooth fast. Scrape into the prepared pan immediately and smooth the top.
- Set and slice. Let it cool until firm at room temperature, then refrigerate for cleaner slices.
What makes this Corn Syrup Peanut Butter Fudge different
It’s still real cooked fudge, but the corn syrup helps keep the texture smoother and reduces the “grainy surprise” factor.
If it’s not perfect, fix it
- Grainy: Next time, stop stirring once it boils, and brush down the sides of the pan early with a little water to remove sugar crystals.
- Too soft: It likely didn’t reach temperature. You can gently reheat, bring back to 234–236°F, then finish again.
- Crumbly: Usually cooked a touch too hot or beaten too long. Pull it off closer to 234°F next time and beat less.
Also Read: Sandwich for Breakfast: Breakfast Sandwich Recipe + 10 Variations
Method 8: Old-Fashioned Cooked Peanut Butter Fudge (classic soft-ball stage, candy-shop feel)
This is the true old-fashioned version—the one that smells like holidays and tastes like it came from a tiny candy shop. It’s a little more hands-on than the corn syrup method, but the payoff is big: a creamy, structured set and that classic “homemade fudge” character people remember.
Ingredients (for an 8-inch pan)
- 2 cups granulated sugar
- ½ cup milk or evaporated milk
- ¼ cup butter
- ¾ to 1 cup peanut butter (use 1 cup for bold peanut flavor)
- 1 teaspoon vanilla
- Pinch of salt
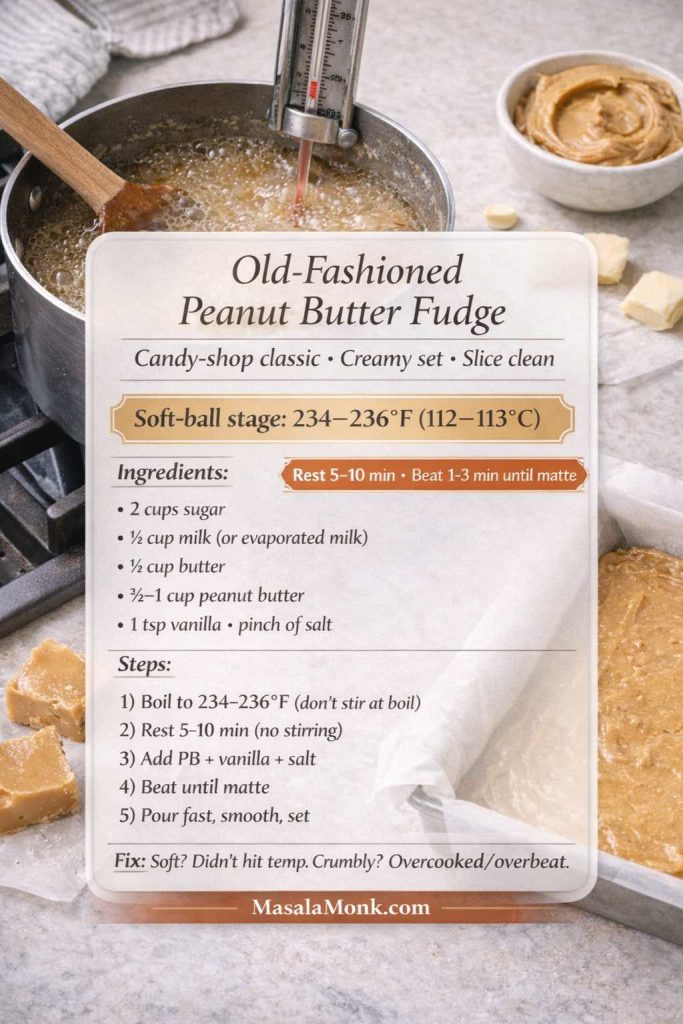
Step-by-step
- Prep the pan. Line an 8-inch pan with parchment and set it right beside the stove. Timing matters later.
- Dissolve the sugar. In a heavy saucepan, combine sugar, milk, and butter. Heat over medium, stirring until the mixture is smooth and the sugar is dissolved.
- Boil hands-off. Bring to a steady boil. Once boiling, stop stirring. If you see sugar crystals on the sides early on, brush them down with a little water.
- Cook to soft-ball stage. Cook until the mixture reaches 234–236°F (112–113°C).
- Cool undisturbed. Remove from heat and let it sit 5–10 minutes without stirring. This short rest helps you land on creamy instead of gritty.
- Add peanut butter + finishers. Add peanut butter, vanilla, and salt. Stir until smooth.
- Beat until it turns matte. Stir vigorously until it thickens, loses gloss, lightens slightly, and starts holding its shape. This usually takes 1–3 minutes. Stop as soon as it reaches a thick, pourable stage—overbeating can make it crumble.
- Pour immediately. Scrape into the pan right away and smooth the top quickly.
- Set and slice. Let it set at room temperature, then refrigerate if you want extra clean edges when slicing.
Why this Cooked Peanut Butter Fudge is “classic”
The cooling pause and the beating step create tiny crystals that make fudge taste creamy and slice cleanly. The timing is the whole game.
If it’s not perfect, fix it
- Too soft: It likely didn’t reach temperature. Reheat gently, bring back to 234–236°F, then finish again.
- Grainy: Usually caused by stirring while boiling or crystals on the pan sides. Next time: hands off once boiling + brush down sides early.
- Crumbly: Usually cooked too hot or beaten too long. Pull it off a touch earlier (closer to 234°F) and beat less.
Also Read: Paper Plane Cocktail Recipe + Best Amaro Substitutes & Tips
Chocolate peanut butter fudge and buckeye-style recipes
Chocolate turns a good batch into something that feels gift-worthy. Fortunately, you can add chocolate in several ways, depending on the mood.
If you want help choosing cocoa or chocolate types, MasalaMonk’s explainer on cacao vs chocolate vs dark chocolate is a handy read.
Variation A: Cocoa in the base (simple chocolate-peanut flavor)
Best for: a unified chocolate peanut fudge taste.
How to do it
- Make any base you like (no-bake, condensed milk, or marshmallow).
- Stir 2–4 tablespoons cocoa powder into the mixture.
If it thickens too much, add 1–2 tablespoons warm peanut butter to loosen. - Press, chill, slice.
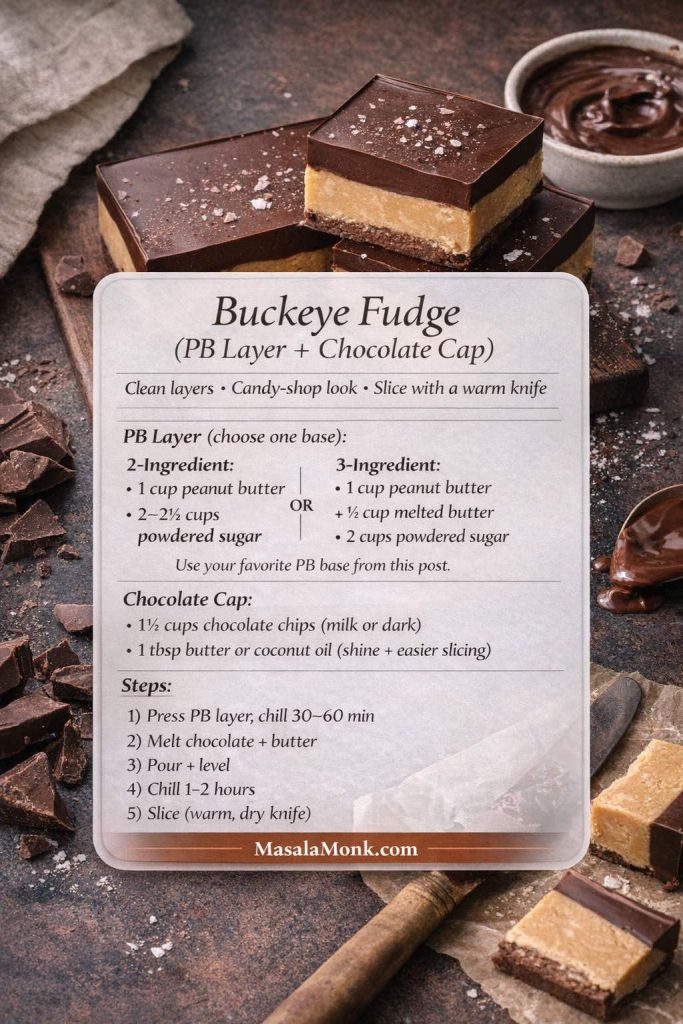
Variation B: Buckeye fudge (peanut layer + chocolate cap)
Best for: clean layers and candy-shop vibes.
Chocolate cap ingredients
- 1½ cups chocolate chips (milk or dark)
- 1 tablespoon butter or coconut oil (for shine and easier slicing)
Step-by-step
- Make and set your peanut butter base fully.
- Melt chocolate chips with butter until smooth.
- Pour over the set layer and tilt the pan to spread evenly.
- Chill until firm, then slice with a warm knife.
Variation C: Swirl (marbled look with minimal effort)
Best for: an impressive finish without extra work.
Step-by-step
- Prepare your peanut layer, then spread it into the pan.
- Melt chocolate separately (or use a thick chocolate syrup).
- Spoon chocolate over the top and drag a knife through for swirls.
- Chill until set.
For a fast drizzle that looks elegant on a serving plate, this 3-minute chocolate syrup is an easy option.
Also Read: Katsu Curry Rice (Japanese Recipe, with Chicken Cutlet)
Keto peanut butter fudge (low-sugar direction, still rich)
Keto-style batches depend on the sweetener you choose. Because sugar alternatives vary, the texture can shift—sometimes firmer, sometimes softer. Still, a good base formula delivers a sliceable, satisfying result.
For a helpful overview of sweetener types, the American Diabetes Association’s PDF guide to sugar substitutes provides useful context. If you’re deciding on monk fruit specifically, Cleveland Clinic’s overview of monk fruit sweetener is a clear introduction.
Ingredients (8-inch pan)
- 1 cup peanut butter (no added sugar)
- ½ cup coconut oil or butter, melted
- ¾ to 1 cup powdered-style keto sweetener blend
- ½ teaspoon vanilla
- Pinch of salt
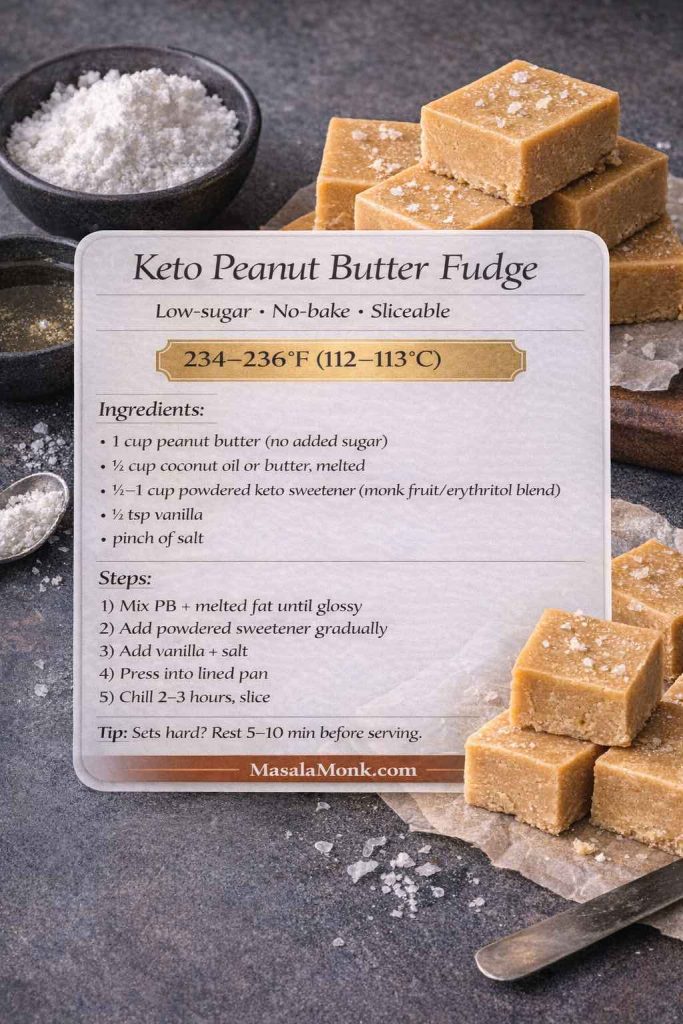
Step-by-step recipe
- Line your pan with parchment.
- Stir peanut butter and melted fat until glossy and smooth.
- Add sweetener gradually and mix until thickened.
Taste as you go; sweetness builds quickly with some blends. - Add vanilla and salt, mixing thoroughly.
- Press into the pan firmly and smooth the surface.
- Chill 2–3 hours until set.
Texture note for keto peanut butter fudge
If it sets very hard, let slices sit at room temperature for 5–10 minutes. Conversely, if it stays too soft, add a bit more powdered-style sweetener next time.
Also Read: Almond Flour Pancakes (Easy Recipes) Fluffy, High-Protein, Keto & More
Sugar-free peanut butter fudge and candy-style squares
Sugar-free versions often feel closer to “peanut butter candy” than traditional cooked fudge. That’s not a downside—rather, it’s a different texture expectation. The goal is a cohesive, sliceable slab with clean sweetness and strong peanut flavor.
For a grounded take on sweeteners, the NHS overview on whether sweeteners are safe is a practical read. If you prefer a research-focused summary, Harvard’s Nutrition Source page on low-calorie sweeteners adds nuance.
Ingredients (8-inch pan)
- 1 cup peanut butter
- ½ cup butter or coconut oil, melted
- ¾ to 1 cup powdered sugar-free sweetener blend
- ½ teaspoon vanilla
- Pinch of salt
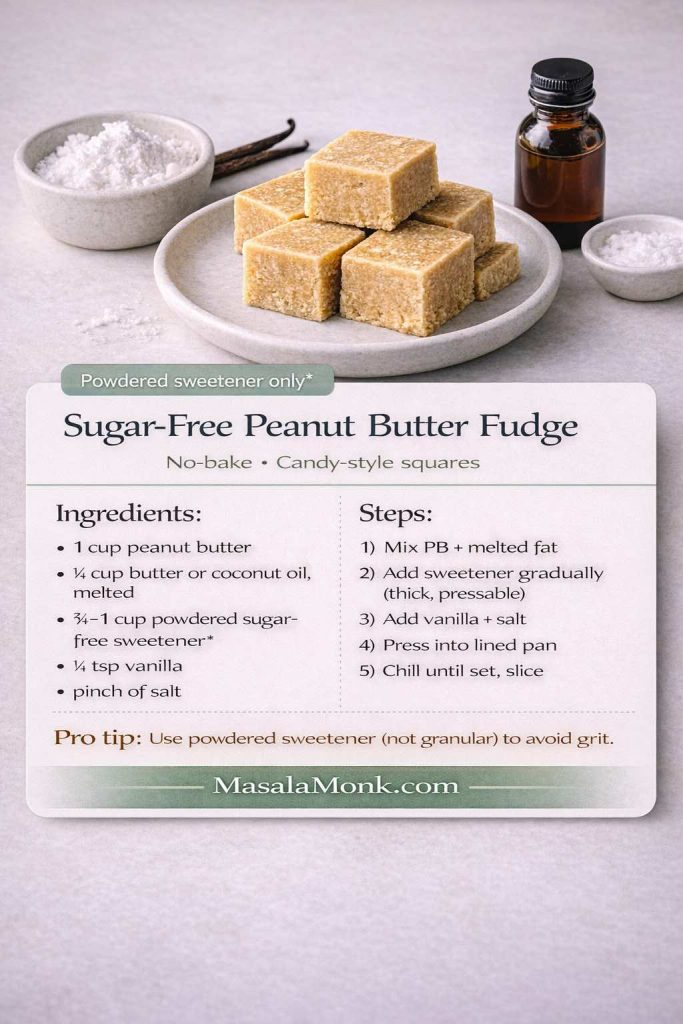
Step-by-step
- Line the pan with parchment.
- Combine peanut butter and melted fat until smooth.
- Add sweetener gradually until the mixture becomes thick and pressable.
- Stir in vanilla and salt to finish.
- Press into the pan firmly.
- Chill until set and slice.
Avoiding grit
Powdered-style sweeteners generally work better than granular ones in no-bake candy squares. Additionally, mixing thoroughly helps eliminate pockets of sweetness that can feel sharp.
Also Read: How to Cook Tortellini (Fresh, Frozen, Dried) + Easy Dinner Ideas
Peanut-free fudge (allergy-friendly recipe, still sliceable)
Peanut-free fudge is completely doable when you swap the spread. The method stays the same; the flavor shifts. For substitution ideas, Food Allergy Research & Education has a helpful list of peanut butter alternatives, including sunflower seed butter and soy nut butter.
Ingredients (8-inch pan, no-bake style)
- 1 cup sunflower seed butter (or another peanut-free alternative)
- ¼ cup melted butter (or coconut oil)
- 2 cups powdered sugar (or suitable alternative)
- ½ teaspoon vanilla
- Pinch of salt
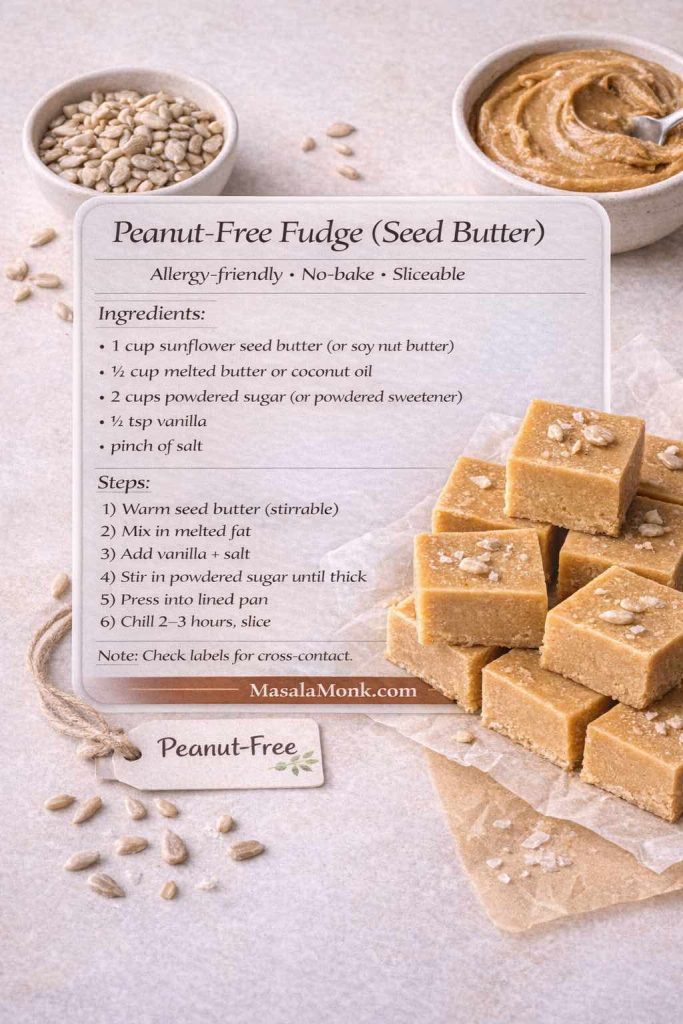
Step-by-step
- Line your pan with parchment.
- Warm the seed butter slightly so it stirs smoothly.
- Mix in melted butter until glossy.
- Add vanilla and salt.
- Stir in powdered sugar gradually until thick and spreadable.
- Press into the pan and chill until set.
Important reminder
Even when you use peanut-free ingredients, always check labels for cross-contact warnings if you’re cooking for someone with severe allergies.
Also Read: How to Cook Bacon in the Oven (Crispy, No-Mess, Crowd-Ready Recipe)
Troubleshooting: fix texture issues without panic
Even when you follow directions, fudge can surprise you. Fortunately, most problems have straightforward fixes.
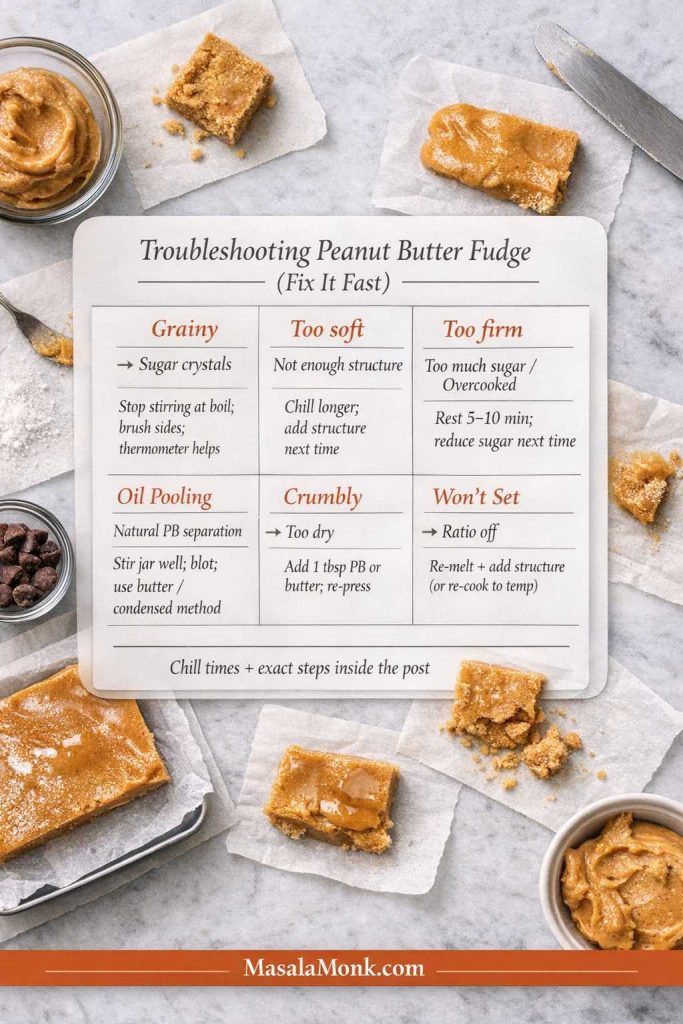
If it’s grainy
Graininess usually comes from sugar crystallization in cooked batches. To reduce the chance:
- Avoid stirring while the mixture boils.
- Use a clean pastry brush and water to wash sugar crystals from the sides early.
- Consider the corn syrup method if you want extra insurance. King Arthur’s explanation of corn syrup’s role is helpful for understanding why it works.
Your Peanut butter fudge is too soft
- Chill longer first; many slabs firm up with time.
- For no-bake versions, add a bit more powdered sugar (or powdered sweetener) next time.
- For condensed milk versions, slightly increase peanut butter or reduce condensed milk a touch.
If it’s too firm
- Let it sit at room temperature for several minutes before serving.
- In future batches, reduce powdered sugar slightly, or add a bit more fat (butter/coconut oil).
And If oil pools on top of your peanut butter fudge
This happens most often with natural peanut butter that separates easily.
- Stir the peanut butter extremely well before measuring.
- Chill the slab, then blot any surface oil gently with paper towel.
- Next time, use the 3-ingredient method or a condensed milk base for a more stable set.
If it crumbles when slicing
Crumbly no-bake fudge usually needs more binding:
- Add a spoonful of warmed peanut butter and mix again.
- Alternatively, add a tablespoon of melted butter and re-press.
Also Read: Benefits of Nuts and Seeds – Protein-Packed Superfoods
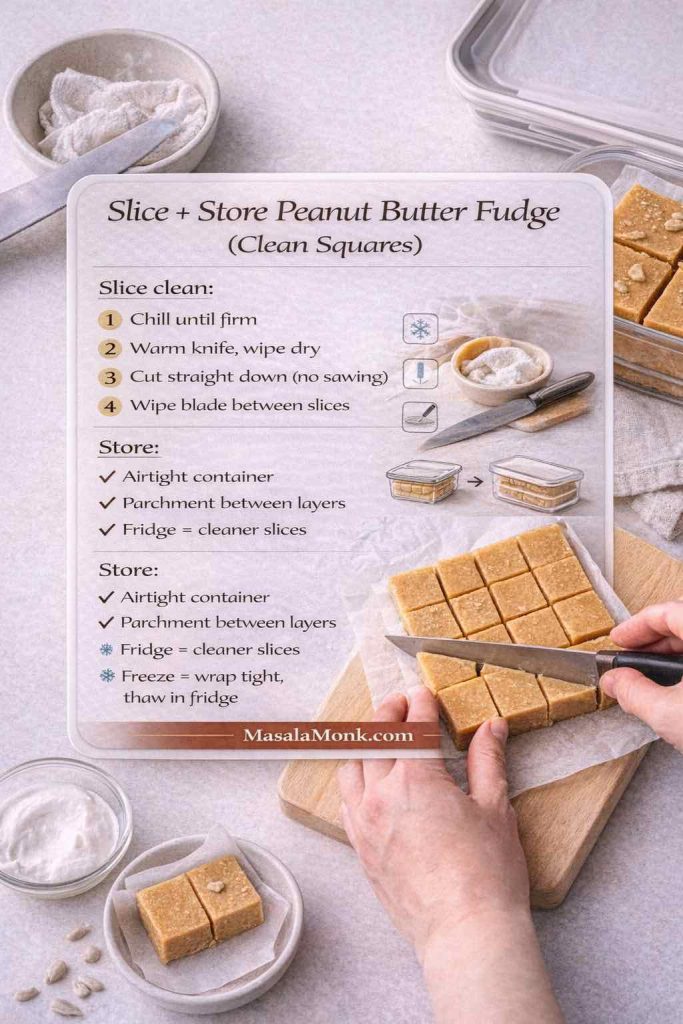
Slicing, serving, and pairing ideas
Slicing goes best when the slab is cold and firm. Use a long knife, warm it under hot water, wipe dry, and slice in decisive downward cuts. Then, wipe the blade between slices for clean edges.
For a peanut-butter-themed dessert plate, pairing squares with cookies makes everything feel intentional. MasalaMonk’s peanut butter cookies fit naturally alongside any of these methods. Meanwhile, if you want a lighter contrast, these healthy oat cookies balance rich fudge nicely. Finally, for something bright and fruity on the same spread, MasalaMonk’s mango dessert ideas bring a fresh counterpoint.
A closing thought (and a simple way to pick your winner)
If you’re short on time, start with the 2-ingredient batch. If you’re after creamy reliability, choose the condensed milk method. And if you want plush nostalgia, marshmallow creme is the move. When you want true candy-shop character, go cooked soft-ball stage. After that, chocolate turns any version into a showpiece—especially buckeye-style with a glossy cap.
Once you’ve made two or three styles, you’ll notice something: the “best” one changes depending on the day. Sometimes you want the easiest pan imaginable. Other times you want a softer melt, a deeper cooked flavor, or an allergy-friendly swap so everyone can share. Luckily, all of those are within reach—one method at a time.
Also Read: High Protein Overnight Oats | 5 Recipes (Low Calorie, Vegan, Bulking & More)
FAQs
1. What is the best peanut butter fudge recipe for beginners?
If you’re new to fudge, start with a no-bake peanut butter fudge that uses powdered sugar (the 2-, 3-, or 4-ingredient styles). It’s straightforward, doesn’t require a thermometer, and sets firmly in the fridge. After that, try the condensed milk or cooked soft-ball versions when you want a more candy-shop finish.
2. What are the ingredients in peanut butter fudge?
Peanut butter fudge usually needs peanut butter + a sweetener/structure. Depending on the method, that structure can be powdered sugar, sweetened condensed milk, marshmallow creme, or a cooked sugar base. In addition, many recipes include butter, vanilla, and salt to improve texture and flavor.
3. How do you make two ingredient peanut butter fudge?
Two-ingredient peanut butter fudge is typically peanut butter + powdered sugar. Warm the peanut butter just until stirrable, then mix in powdered sugar until the mixture becomes thick and pressable. Finally, press it into a lined pan and chill until firm.
4. How do you make three ingredient peanut butter fudge?
Three-ingredient versions usually add melted butter to peanut butter and powdered sugar. The butter makes the mixture creamier and easier to spread. Once combined, chill until sliceable.
5. What makes four ingredient peanut butter fudge taste “best ever”?
Four-ingredient peanut butter fudge often includes vanilla (plus peanut butter, butter, and powdered sugar). Vanilla and salt make the flavor taste more complete, while the butter keeps the bite smoother. As a result, it reads more like a finished candy than a quick mix.
6. Can I make peanut butter fudge with sweetened condensed milk?
Yes. For a reliable, creamy set, condensed milk versions usually need an additional “setting” ingredient (commonly white chocolate chips) or extra dry structure (like powdered sugar). Otherwise, condensed milk and peanut butter alone can stay too soft, especially in warmer kitchens.
7. What is marshmallow creme or fluff peanut butter fudge?
Marshmallow creme (or fluff) versions are often called fantasy-style peanut butter fudge. Typically, you cook a sugar base to the soft-ball stage, then beat in marshmallow creme and peanut butter. Consequently, the texture turns plush, cohesive, and sliceable for days.
8. How do you make old fashioned peanut butter fudge?
Old fashioned peanut butter fudge is a cooked method that usually requires reaching the soft-ball stage (about 234–236°F / 112–113°C). After cooking, you cool it briefly, then beat until it thickens and loses some shine before pouring into the pan. That timing is what creates the classic creamy bite.
9. What is corn syrup peanut butter fudge, and why use it?
Corn syrup versions are cooked fudge with an extra helper ingredient. Corn syrup helps reduce crystallization, which can lead to a smoother texture. In other words, it’s a more forgiving route when you want cooked fudge flavor without as much risk of graininess.
10. How do you make chocolate peanut butter fudge?
You can add chocolate in three easy ways: mix cocoa into the base, swirl melted chocolate through before chilling, or add a top layer for a buckeye-style finish. Meanwhile, using milk chocolate chips gives a softer, sweeter “candy bar” vibe, while dark chocolate makes the peanut flavor pop.
11. What is buckeye fudge?
Buckeye fudge is a peanut butter fudge base topped with a firm chocolate layer. Once the peanut butter layer is set, pour melted chocolate (often with a little butter or coconut oil for shine) over the top. Then chill again and slice with a warm knife for neat layers.
12. Can I make no bake peanut butter fudge?
Definitely. No-bake peanut butter fudge usually sets by using powdered sugar or a structured base like frosting. Because there’s no cooking stage, it’s faster and less fussy. Still, measuring and mixing thoroughly matters for a clean set.
13. Why is my peanut butter fudge grainy?
Graininess usually comes from sugar crystallization in cooked fudge, or from undissolved granules. To prevent it, avoid stirring once the mixture boils, keep crystals off the sides of the pan, and use a thermometer for accuracy. Conversely, if it’s a no-bake sweetener issue, switching to a powdered-style sweetener often helps.
14. Why is my peanut butter fudge too soft?
First, give it more chill time—many batches firm up as they cool fully. If it’s still soft, the mixture likely needs more structure: add a bit more powdered sugar (or powdered sweetener) next time. For cooked versions, it may not have reached soft-ball temperature, so a thermometer is the quickest fix.
15. Why is my peanut butter fudge crumbly or dry?
This usually means there’s too much dry structure or not enough fat. Add a spoonful of warmed peanut butter (or a little melted butter) and mix again, then press firmly into the pan. Next time, use slightly less powdered sugar or choose the condensed milk or marshmallow method for a creamier set.
16. Why did oil pool on top of my peanut butter fudge?
This happens most often with natural peanut butter that separates easily. Stir the jar extremely well before measuring, then chill and blot any surface oil if needed. Additionally, choosing a method with more stability (butter, condensed milk, or cooked fudge) can reduce pooling.
17. Can I make sugar free peanut butter fudge?
Yes, as long as you use a powdered-style sugar-free sweetener for the smoothest texture. Granular sweeteners can feel gritty in no-bake candy squares. Also, sweetness levels vary by brand, so taste as you go and adjust slowly.
18. Can I make keto peanut butter fudge?
Keto peanut butter fudge typically uses peanut butter with no added sugar, a fat like butter or coconut oil, and a powdered keto sweetener. If it sets very hard, let it sit at room temperature briefly before serving. On the other hand, if it stays too soft, add a little more powdered sweetener next time.
19. How do you make peanut free fudge?
To make peanut-free fudge, swap peanut butter for a safe alternative like sunflower seed butter or soy nut butter, then follow the same no-bake method. However, if you’re baking for allergies, always check labels and watch for cross-contact warnings.
20. How long does peanut butter fudge last and how should I store it?
For the best texture, store peanut butter fudge in an airtight container with parchment between layers. In a cool room, it can last several days; in the fridge, it lasts longer and slices cleaner. Furthermore, freezing works well—wrap tightly and thaw in the fridge so the surface doesn’t sweat.