Posted on Leave a comment

Crème Brûlée Recipe with Silky Custard and Crisp Sugar

Shallow white ramekin of crème brûlée with a spoon breaking the caramelized sugar crust to reveal smooth vanilla custard underneath.

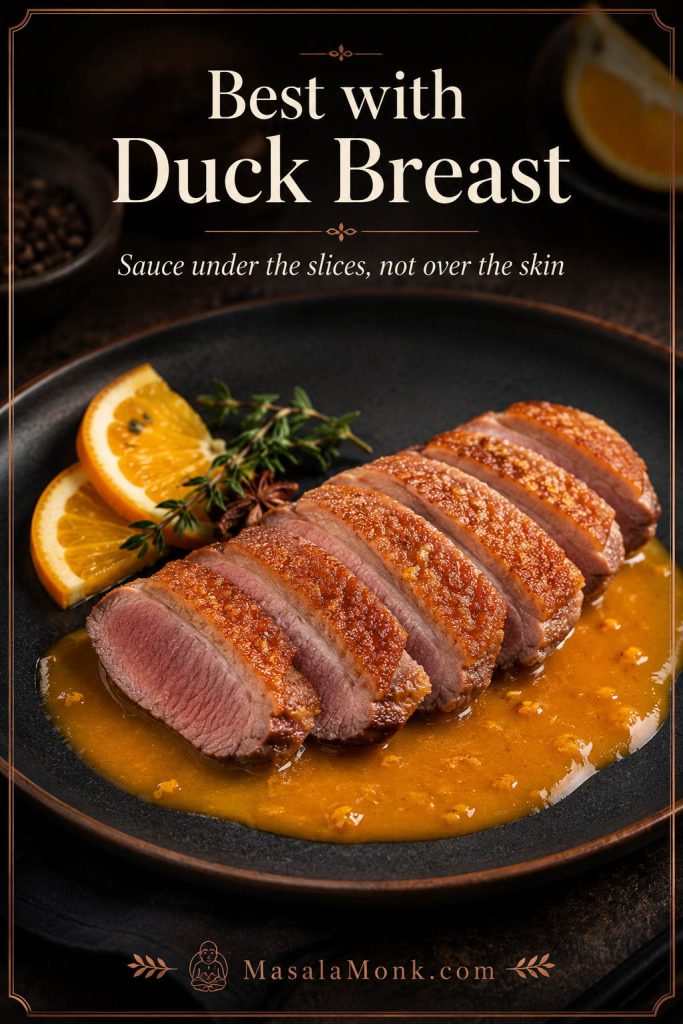
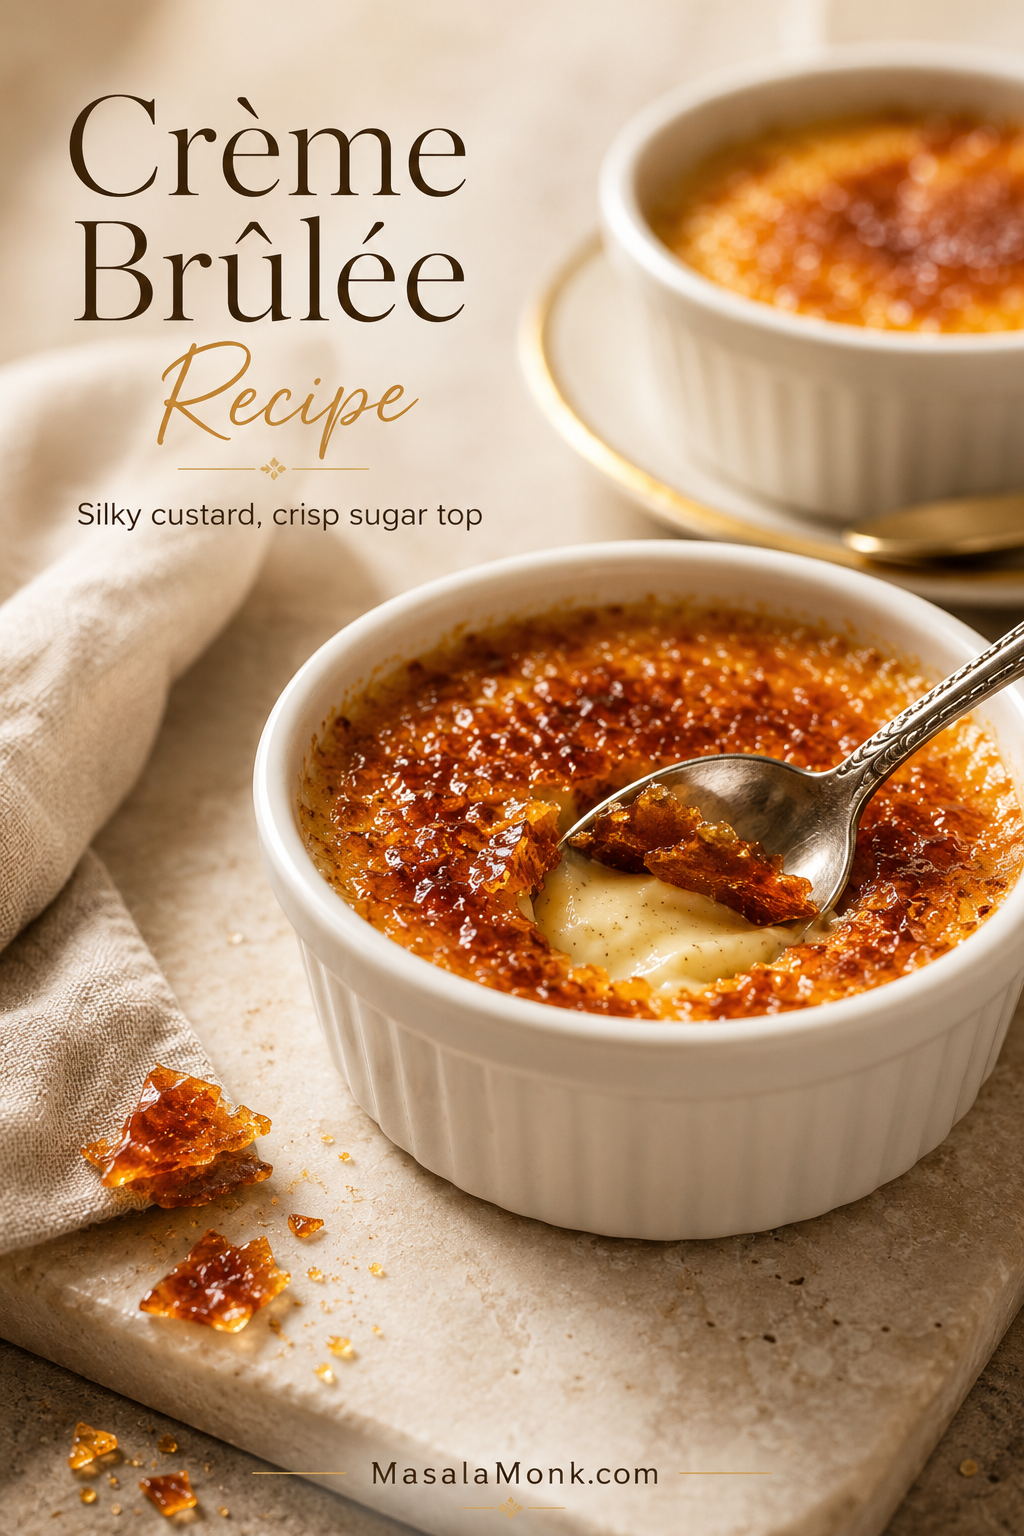
Crème brûlée looks like restaurant drama in a ramekin: a cold, silky vanilla custard hidden under a thin amber sheet of caramelized sugar. The first spoon tap is the whole point. The top cracks, the custard gives way, and a dessert made from cream, egg yolks, sugar, and vanilla suddenly feels far more luxurious than its ingredient list suggests.

It tastes like a restaurant dessert, but the base is simple: cream, egg yolks, sugar, vanilla, and salt. This is a restaurant-style crème brûlée recipe built around cues, not guesswork: warm the cream, whisk the custard, bake gently, chill fully, then torch.

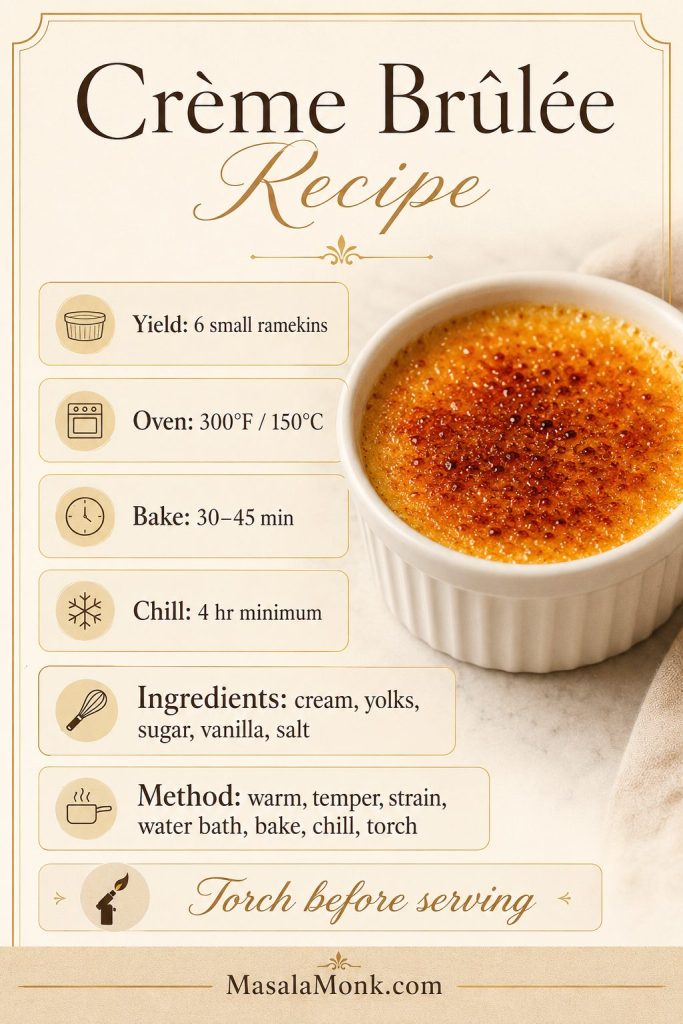
Whether you spell it crème brûlée or creme brulee, the promise is the same: cold vanilla custard under a crisp caramelized sugar shell. This version keeps that promise clear: rich cream, shallow ramekins, gentle baking, a proper chill, and a sugar top that cracks instead of burns.

Quick Answer: What Is Crème Brûlée?

Crème brûlée is a chilled baked custard finished with a thin caramelized sugar crust. The custard is usually made with heavy cream, egg yolks, sugar, vanilla, and a little salt. After baking and chilling, sugar is sprinkled over the top and melted with a kitchen torch until it forms a crisp amber shell.

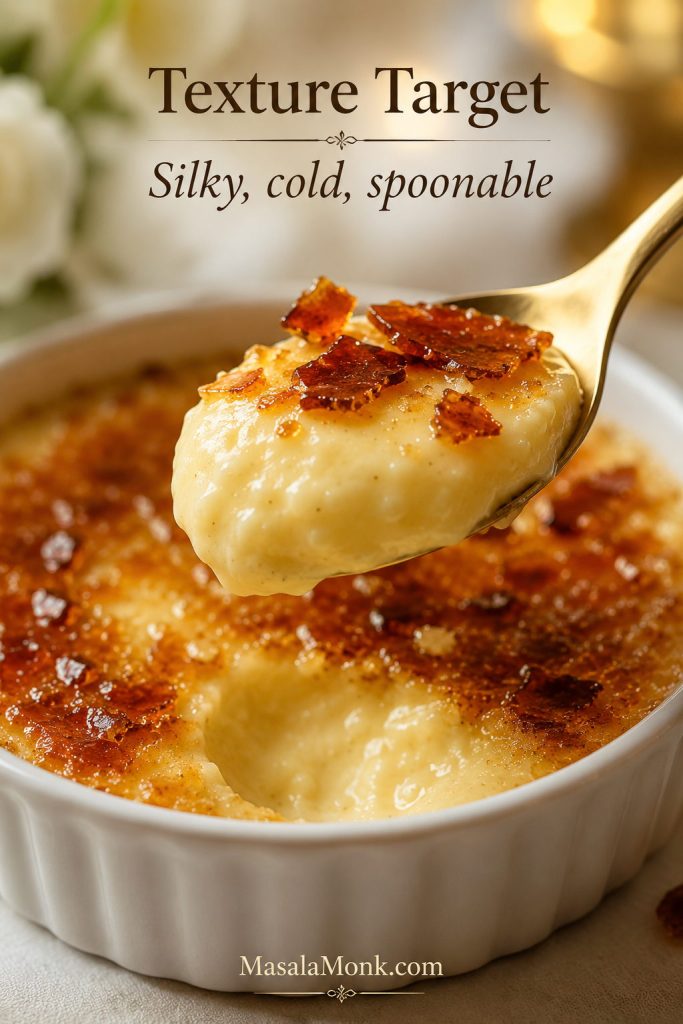
The name means “burnt cream,” but the best versions should not taste harsh or smoky. The sugar top should be caramelized, nutty, and bittersweet. Underneath, the custard should be cold, smooth, and spoonable — rich like vanilla cream, but not firm like flan or loose like pudding.

Spoon lifting silky vanilla custard through a broken amber sugar crust in a white crème brûlée ramekin.
The spoon lift shows the dessert’s structure: a thin caramel shell first, then cold vanilla custard underneath. That contrast is what makes crème brûlée feel special.

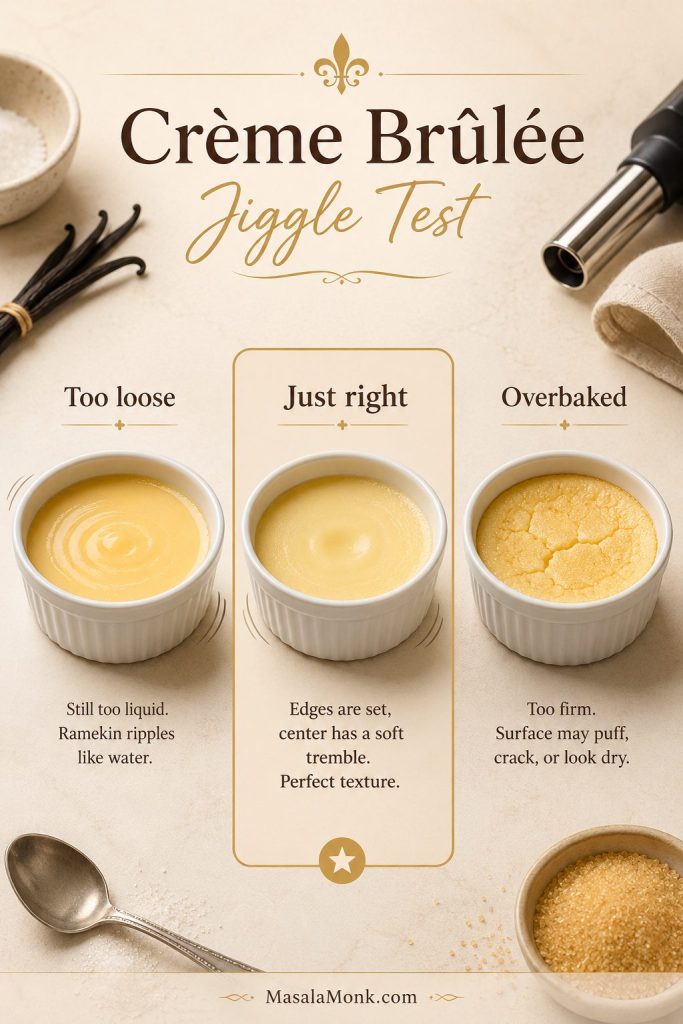
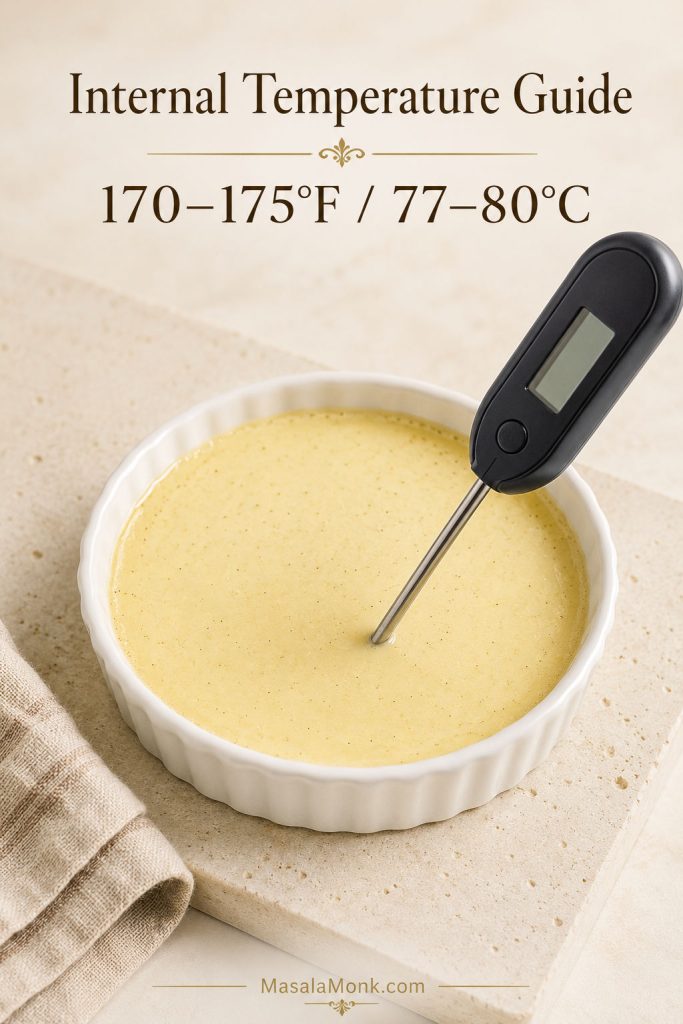
At a glance: crème brûlée is ready when the edges are set and the center still has a gentle jelly-like tremble. Chill the custards for at least 4 hours, preferably overnight, then caramelize the sugar just before serving. A thermometer is optional, but the center should be about 170–175°F / 77–80°C.

That slight tremble is not a mistake. Once you know the cues — warm cream, slow tempering, shallow dishes, and a full chill — crème brûlée becomes much easier to trust. If you want to compare the doneness cue later, see the bake-time and jiggle test.

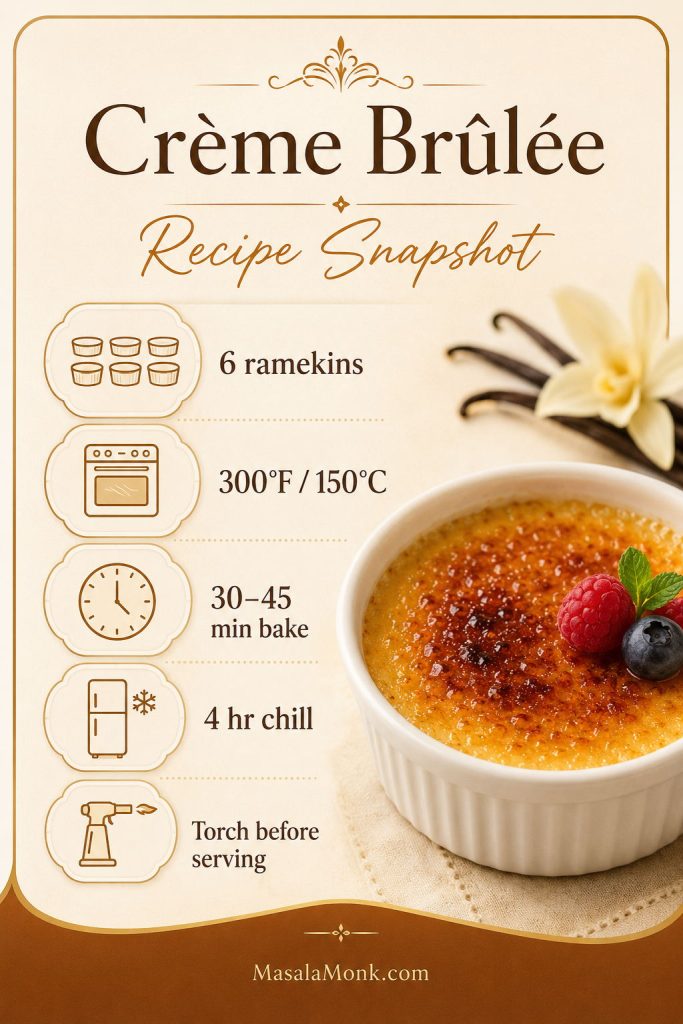
Crème Brûlée Recipe Snapshot

Here is the recipe at a glance before we get into the details. The classic torch method is the cleanest finish. Broiler and caramel-pour backups are included later only for no-torch situations, so check the no-torch options before choosing a backup finish.

Crème brûlée recipe snapshot board showing 6 ramekins, 300°F or 150°C oven temperature, 30 to 45 minute bake time, 4 hour chill time, and torch-before-serving note.
Keep these crème brûlée recipe numbers close: a low oven protects the custard, the full chill finishes the set, and torching at the end keeps the sugar top crisp.
DetailWhat to aim for
Yield6 modest 4 oz / 120 ml servings, filled below the rim
Best dishWide, shallow 4 oz / 120 ml ramekins
Oven temperature300°F / 150°C, middle rack
Bake time30–45 minutes, depending on ramekin depth and oven
Water bathHot water halfway to two-thirds up the ramekins
Doneness cueSet edges with a softly moving center
Internal temperature170–175°F / 77–80°C in the center
Chill time4 hours minimum; overnight is best
Sugar toppingLight, even coating, usually 1½–2 tsp per ramekin
Recommended finishKitchen torch

Choose your finish: use a kitchen torch if you have one. Use the broiler only with broiler-safe ramekins. Use the caramel-pour method only as a last-resort no-torch/no-broiler backup.

Do not panic if: the custard looks slightly soft when it leaves the oven, a few bubbles appear on top, or the vanilla seeds settle near the bottom. Those are manageable. Worry only if the center sloshes like liquid, the surface puffs and cracks, or the custard smells strongly eggy.

The reward is calm timing: most of the dessert is finished before anyone is waiting, and the only last-minute job is the crackly sugar top.

Why This Crème Brûlée Recipe Works

This recipe works because it keeps heat gentle at every stage: warm cream instead of boiled cream, yolks tempered slowly, shallow ramekins in a water bath, and a low oven so the edges do not tighten before the center sets. The custards should leave the oven slightly soft, then finish setting as they cool and chill. The sugar coating stays light so it caramelizes quickly without warming the custard too much.

Gentle heat gives the custard its silk; fast heat gives the sugar its crack.

The key: do not wait for the custards to look fully firm in the oven. A slight center tremble is part of the method.

Close-up spoonful of chilled crème brûlée custard with amber caramel shards, showing a smooth and spoonable texture.
The custard should look softly set, not stiff. Once chilled, crème brûlée should spoon cleanly while still feeling creamy and delicate.

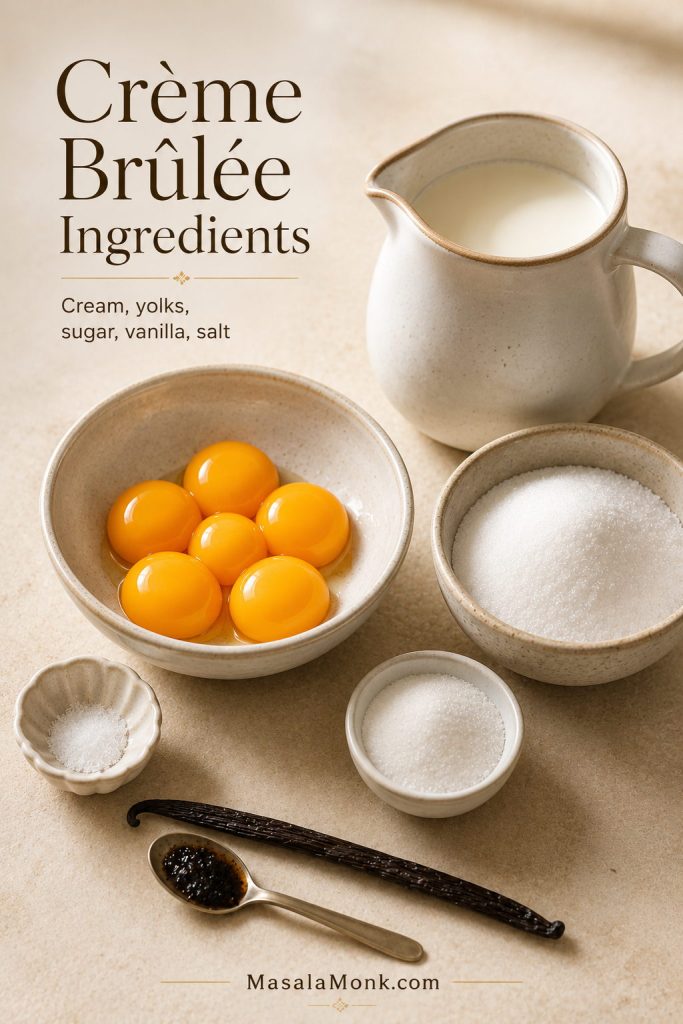
Crème Brûlée Ingredients

Crème brûlée is not a long-ingredient dessert, so the quality and role of each ingredient matter. This is a vanilla custard first. The sugar top is the contrast, not the whole dessert.

Crème brûlée ingredients arranged on a light surface, including heavy cream, egg yolks, white sugar, vanilla, and fine salt.
Because crème brûlée uses only cream, yolks, sugar, vanilla, and salt, each ingredient has a clear job: richness, structure, sweetness, aroma, and balance.
  • Heavy cream: This is where the custard gets its slow, silky richness. Use the richest plain dairy cream you can find.
  • Egg yolks: Yolks set the custard gently and make it smoother and richer than a whole-egg custard.
  • Granulated sugar: Sugar sweetens the base and softens the set. Too much can make the custard overly sweet and slower to set.
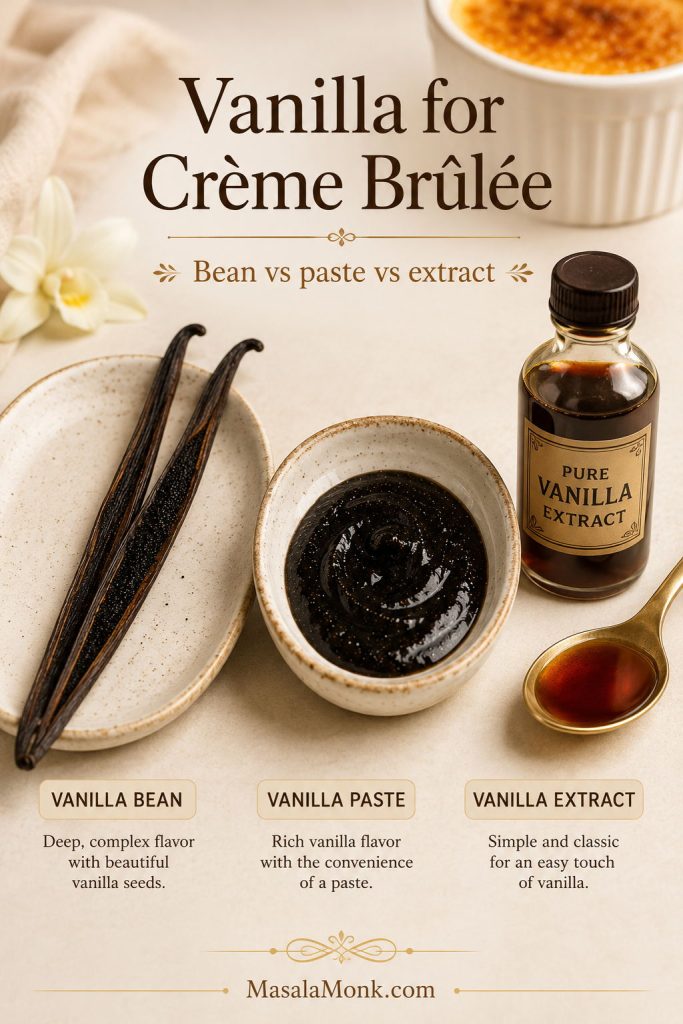
  • Vanilla: Because there are so few ingredients, vanilla is the flavor you notice as soon as the caramel cracks. Vanilla bean gives the deepest aroma and visible specks, vanilla bean paste is excellent, and good vanilla extract also works.
  • Fine salt: A small amount sharpens the vanilla and keeps the custard from tasting flat.
  • Sugar for topping: Superfine/caster sugar or white granulated sugar gives the most reliable crackly crust. For timing and amount, see the sugar-top guide.

Ingredient amounts for 6 small ramekins

  • 2 cups / 480 ml heavy cream
  • 5 large egg yolks
  • 1/3 cup / 65–70 g granulated sugar
  • 1 vanilla bean, or 1 tsp vanilla bean paste, or 1½ tsp vanilla extract
  • 1/8 tsp fine salt
  • 9–12 tsp superfine/caster sugar or white granulated sugar, for topping

Vanilla options for crème brûlée

Use this cue when choosing vanilla: bean gives the deepest aroma and specks, paste is convenient and strong, and extract works well when it is good quality.

Comparison of vanilla options for crème brûlée, showing vanilla bean, vanilla bean paste, and vanilla extract.
Vanilla bean gives the deepest aroma and visible specks; however, vanilla bean paste or good extract can still make a smooth, fragrant vanilla custard.

Small but important: once you whisk sugar into the egg yolks, temper soon after. If sugared yolks sit for too long, they can tighten and turn clumpy. Warm the cream first, then whisk the yolks and sugar when you are ready to combine. Save the leftover egg whites for meringues, pavlova, macarons, or an egg-white omelet.

Best Cream for Crème Brûlée

For the smoothest custard, use heavy cream or heavy whipping cream. A fat percentage around 35–36% gives the most reliable set and the most luxurious texture. That extra fat is what makes each spoonful feel rich, creamy, and plush instead of thin.

Cream comparison board for crème brûlée showing heavy cream as the richest option compared with lighter cream.
Heavy cream gives crème brûlée its plush texture and reliable set. Lighter cream can work, but the custard usually finishes softer and less luxurious.

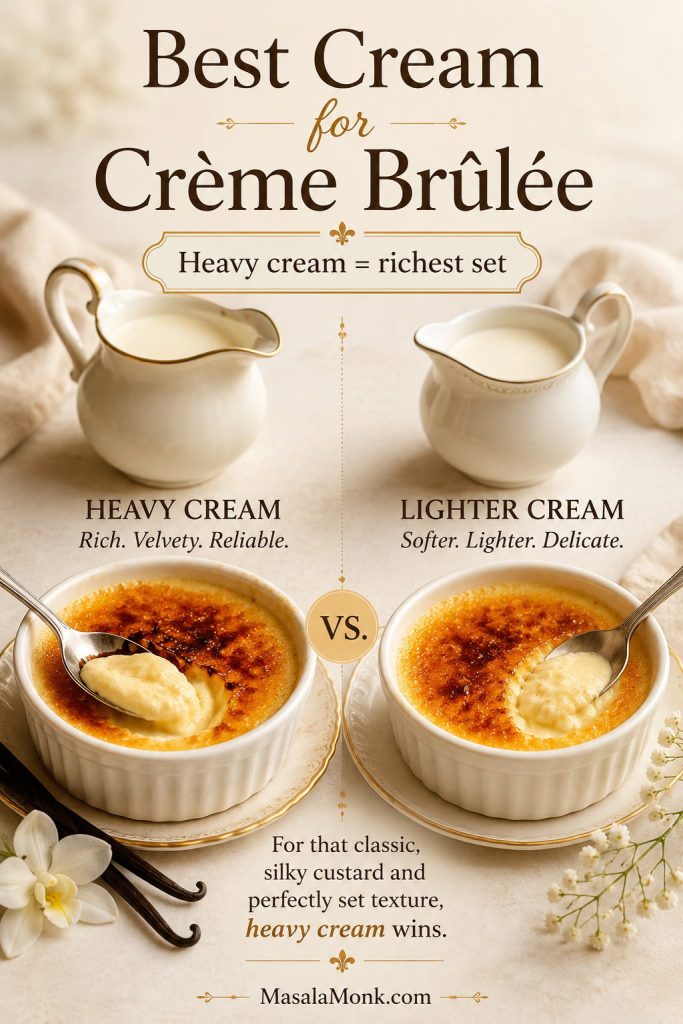
High-fat whipping cream can also work if it has enough fat. Lower-fat cream or light cream can still make a pleasant custard, especially in shallow ramekins with an overnight chill, but it will be softer and lighter than one made with heavy cream. Milk is not a direct swap here; a milk-heavy custard needs a different formula. If your custard turns loose, see the troubleshooting guide before changing the whole recipe.

Buying cream: choose the highest-fat plain dairy cream you can find. Avoid sweetened topping cream, non-dairy whipping topping, and very thin cooking cream. They are designed for different jobs and may not set like plain heavy cream in a baked custard.

Best Ramekins and Equipment for Crème Brûlée

Once the custard formula is right, the next big variable is the dish. The same custard behaves very differently in a shallow ramekin than it does in a deep bowl.

For the most even bake, choose wide, shallow 4 oz / 120 ml ramekins. They are not just traditional; they help the custard set before the edges turn firm and give you more crackly sugar per bite.

Ramekin size and fill depth

As a practical shopping cue, look for ramekins about 4–5 inches / 10–13 cm wide, with a filled custard depth of roughly 3/4–1 inch / 2–2.5 cm. A 5–6 oz dish can still work if you do not fill it deeply.

Side comparison of a shallow wide ramekin and a deeper ramekin for baking crème brûlée evenly.
A shallow 4 oz ramekin keeps the custard layer low, so the center can set before the edges overcook. Deeper dishes need more caution and closer checking.

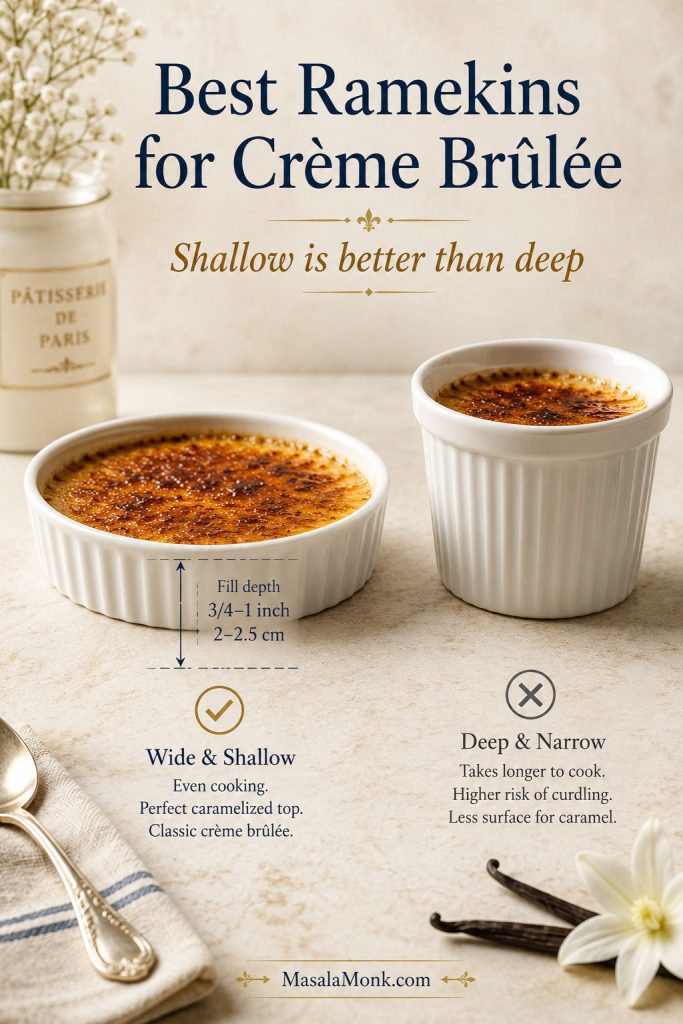
Narrow, deep bowls are riskier because the edges can overcook before the middle sets. Do not fill any ramekin to the brim; the custard should sit below the rim so you can move, chill, and sugar it cleanly. If you are using deeper dishes, see the bake-time and jiggle test before deciding they are done.

DishWorks?What changes
4 oz / 120 ml shallow ramekinsBestMost even bake; usually 30–40 minutes
5–6 oz ramekinsYesWorks best if filled shallowly
Deep ceramic bowlsPossible but riskyEdges can overcook before center sets; thermometer helps
One large shallow oven-safe dishPossible, not idealLonger bake, less sugar-top ratio, softer scooping
Oven-safe glass dishesPossibleAvoid thermal shock; do not broil unless specifically broiler-safe
Metal cupsNot idealConduct heat aggressively and can overcook the edges

A similar cooling-and-setting idea appears in a baked New York cheesecake recipe, where cooling and chilling protect the final texture as much as the bake itself.

Equipment you need

  • 6 shallow 4 oz / 120 ml ramekins
  • 9×13-inch baking dish or another deep oven-safe pan
  • Medium saucepan
  • Mixing bowl
  • Whisk
  • Fine-mesh sieve
  • Measuring jug with a spout
  • Kettle or saucepan for hot water
  • Thin kitchen towel for the water bath
  • Kitchen torch for the recommended finish
  • Broiler-safe ramekins if using the broiler backup
  • Small saucepan if using the caramel-pour backup
  • Instant-read thermometer, optional but helpful

How to Make Crème Brûlée Step by Step

Read through the method once before starting. Crème brûlée feels much easier if everything is ready: ramekins in the pan, cream warming, yolks ready, sieve nearby, and hot water prepared for the water bath.
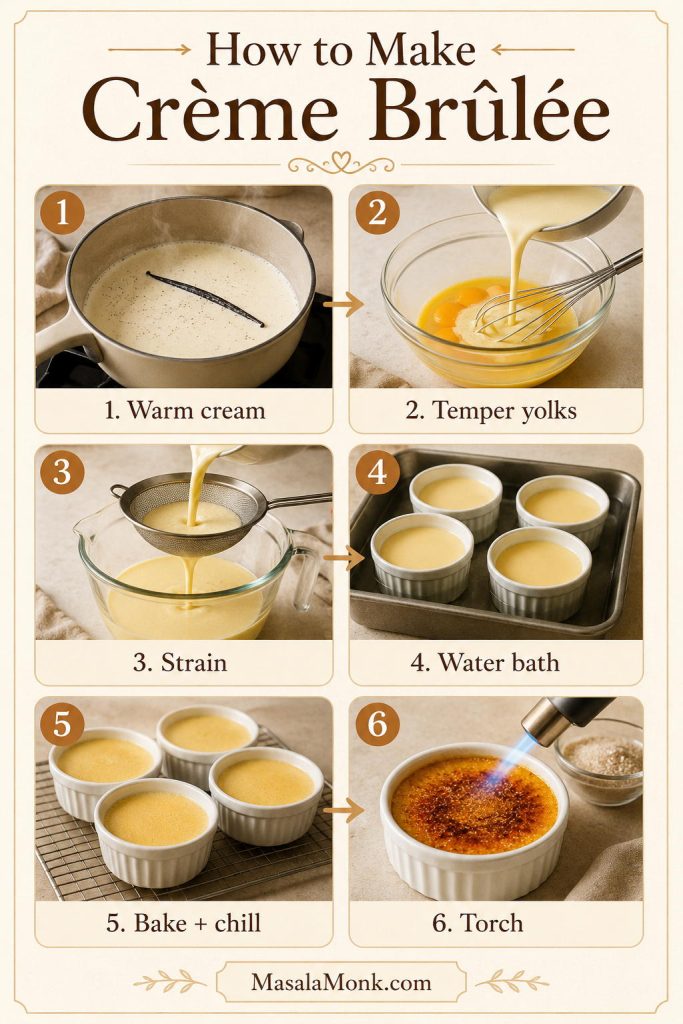
Step-by-step crème brûlée process board showing warm cream, temper yolks, strain, water bath, bake and chill, and torch.
The two places to slow down are tempering and baking. If the cream is added gradually and the water bath stays gentle, the custard has a much better chance of baking smooth.

1. Preheat the oven

Preheat the oven to 300°F / 150°C with a rack in the middle. Place the ramekins in a 9×13-inch baking dish. If they slide around, lay a folded thin kitchen towel in the bottom of the dish before adding them.

2. Warm the cream

Add the heavy cream to a saucepan. If using a vanilla bean, split it, scrape the seeds into the cream, and add the pod too. If using vanilla bean paste, whisk it into the cream while warming. Warm over medium-low heat until the cream is steaming and small bubbles appear around the edges. Steaming is enough; a hard boil makes tempering riskier.

For deeper vanilla-bean flavor, turn off the heat and let the vanilla steep in the warm cream for 10 minutes. Remove the pod before tempering. If the cream cools too much after steeping, rewarm it gently. If using vanilla extract, stir it in after the cream comes off the heat so the aroma stays cleaner.

3. Whisk yolks, sugar, and salt

In a mixing bowl, whisk the egg yolks, granulated sugar, and salt until smooth. You do not need to whip them until pale and fluffy. Too much air creates bubbles on the custard surface.

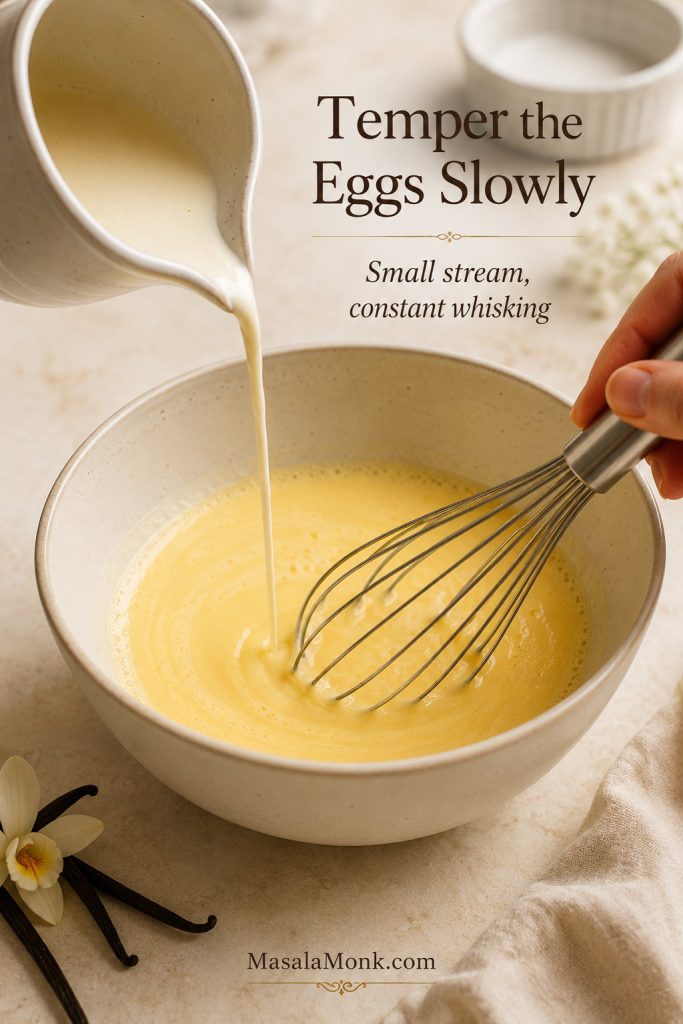
4. Temper the eggs slowly

Slowly pour a small stream of warm cream into the yolks while whisking constantly. Start with just a little cream. Once the bowl feels warm, the riskiest part is mostly over; add the rest more steadily and keep whisking.

Warm cream being poured in a thin stream into egg yolks while a whisk stirs the crème brûlée custard mixture.
Tempering warms the yolks gradually. Start with a small stream of cream and whisk constantly so the custard base stays smooth instead of scrambling.

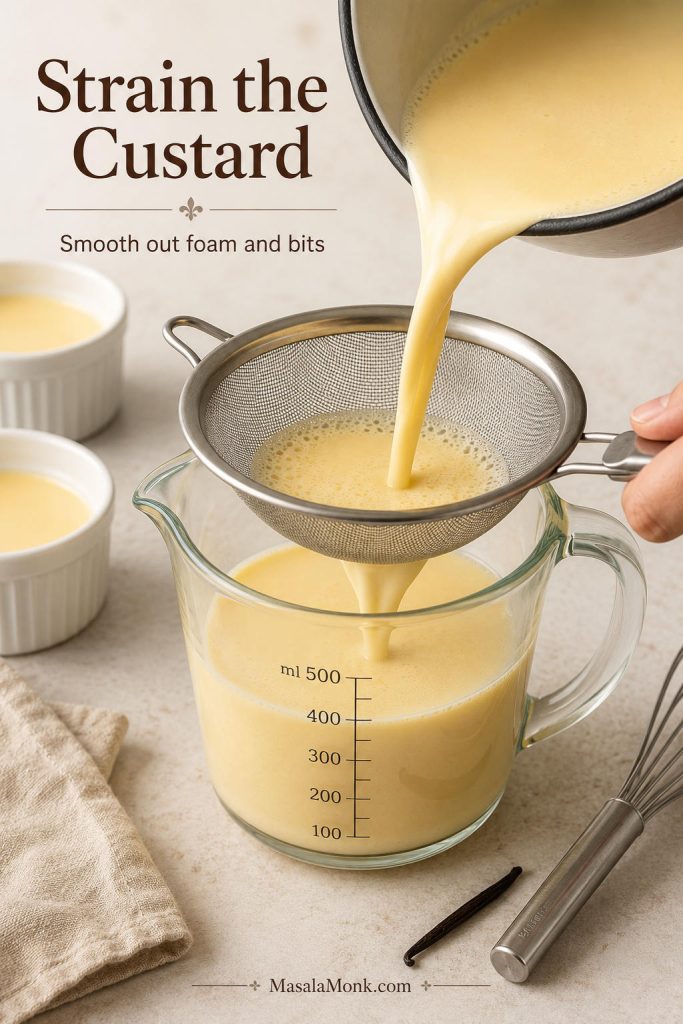
5. Strain and de-bubble the custard

Pour the custard through a fine-mesh sieve into a measuring jug. Straining catches vanilla pod pieces, foam, and any tiny cooked egg bits. If the surface is foamy, let the custard sit for 2 minutes, then skim off the foam with a spoon.

Pale crème brûlée custard being poured through a fine-mesh sieve into a measuring jug.
Straining catches foam, vanilla pod pieces, and tiny egg bits. As a result, the baked crème brûlée has a smoother, more polished texture.

6. Fill the ramekins

Divide the custard evenly among the ramekins. Fill below the rim so you can move the pan safely and later add the sugar topping. At this point, the custard should look thin and pourable. That is right; the oven and fridge do the setting later.

7. Add the hot water bath

Pour hot water into the baking dish until it reaches halfway to two-thirds up the sides of the ramekins. Pour slowly so water does not splash into the custard. If the pan feels heavy, place it on the oven rack first, then pour in the hot water.

8. Bake until just set

Bake for 30–40 minutes for shallow ramekins, longer for deeper dishes, until the edges are set and the center gives a soft, controlled wobble — not a liquid ripple. If using a thermometer, aim for 170–175°F / 77–80°C in the center without touching the bottom of the ramekin.

9. Remove from the water bath

Lift the ramekins out of the hot water bath after baking. Residual heat can keep cooking the custard, so move them to a rack or towel once they are done. They will firm as they cool and chill.

10. Cool and chill

Cool the custards uncovered just until warm, then cover loosely and refrigerate. Avoid covering hot ramekins tightly because condensation can drip onto the custard surface. Chill for at least 4 hours, preferably overnight.

At this point, the custard is finished; the torch is only there to create the crack.

11. Torch the sugar top

Just before serving, gently blot any surface moisture. Sprinkle each custard with 1½–2 teaspoons sugar in a light, even layer. Torch in small circles until the sugar melts, bubbles, and turns amber. Let it stand 1–2 minutes; the sugar needs that short pause to turn from melted caramel into a crisp shell.

Visual Cues to Check Your Crème Brûlée

Use this table as a check after reading the method. It keeps the texture cues in one place so you do not have to rely only on the clock.

StageWhat you should seeWhat to avoid
Warm creamSteam and tiny bubbles around the edgesA hard rolling boil
Tempered custardSmooth, pale mixture with no large curdsScrambled bits or thick cooked-egg streaks
Before bakingPourable custard with little foam on topA frothy surface full of bubbles
Done bakingSet edges with a soft center trembleLiquid ripples or a fully firm, puffed surface
After chillingCold, spoonable custard that holds its shapeWatery custard or a wet surface before sugaring
After torchingAmber, glassy sugar that hardens after 1–2 minutesBlack patches, grainy sugar, or a sticky refrigerated top

How to Temper Eggs Without Scrambling Them

Tempering simply means warming the egg yolks gradually. Hot cream can cook yolks on contact if it is added too quickly. A slow stream gives the yolks time to warm without curdling.

The first few splashes are the most important. Whisk constantly, add a little warm cream, whisk again, then add more. Once the yolk mixture is warm to the touch, you can pour in the rest more steadily. If you see one or two tiny bits, straining will usually catch them. If the mixture has large curds, the cream was too hot or added too fast.

Why Crème Brûlée Needs a Water Bath

The water bath acts like a heat cushion. The oven heats the water, and the water warms the ramekins gently, so the eggs set slowly instead of tightening too quickly around the edges. It is the simple step that gives you that spoon-smooth texture later.

White crème brûlée ramekins sitting in a baking dish with hot water reaching halfway up the sides.
The water bath should come halfway to two-thirds up the ramekins because gentle surrounding heat helps the custard set smoothly instead of turning grainy at the edges.
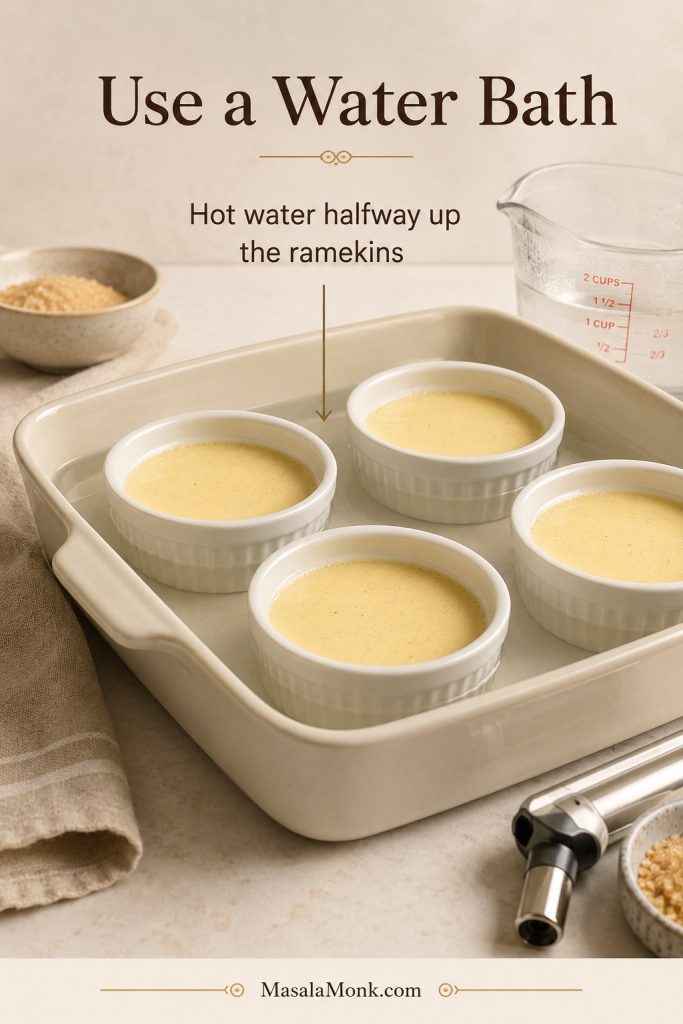
  • Start with hot water, not cold.
  • Fill halfway to two-thirds up the ramekins.
  • Pour carefully so water does not splash into the custard.
  • Remove ramekins from the water bath after baking.
  • Use a thin towel under the ramekins if they slide around.

Bake Time, Oven Temperature, and the Jiggle Test

This method uses 300°F / 150°C because a lower oven gives the custard more time to set gently. For shallow 4 oz ramekins, start checking at 30 minutes. Most batches finish between 30 and 40 minutes. Deeper dishes may need 40–45 minutes or more.

This recipe gives you three ways to judge doneness: time, wobble, and temperature. The timer gets you close, the wobble tells you texture, and the thermometer gives extra confidence.

The edges should look set, while the center should move softly, like gentle jelly. It should not ripple like liquid, puff dramatically, or crack. If using a thermometer, the center should read about 170–175°F / 77–80°C. This is the moment to trust softness, not fight it.

Crème brûlée jiggle test board comparing too loose, just right, and overbaked custard before torching.
Look for set edges and a soft center tremble. If the custard ripples like liquid, it needs more time; if it looks firm, it may be overbaked.

Crème brûlée temperature guide

A thermometer is optional, but it is useful if you are learning the custard’s doneness cue for the first time.

Instant-read thermometer inserted into the center of a pale baked crème brûlée custard with a target temperature of 170 to 175°F or 77 to 80°C.
A thermometer is not required, but it removes guesswork. For silky crème brûlée, the center should reach about 170–175°F / 77–80°C.

How Long to Chill Crème Brûlée

Crème brûlée needs at least 4 hours in the refrigerator after baking. Overnight chilling is better because the chill finishes the custard’s set and gives it the clean spoonable texture you want.

Untorched crème brûlée ramekins with smooth pale custard surfaces, ready to chill before adding sugar and torching.
A fully chilled custard gives you the classic contrast: cold vanilla cream underneath and a freshly caramelized sugar top above. Torch only after the custards are properly cold.

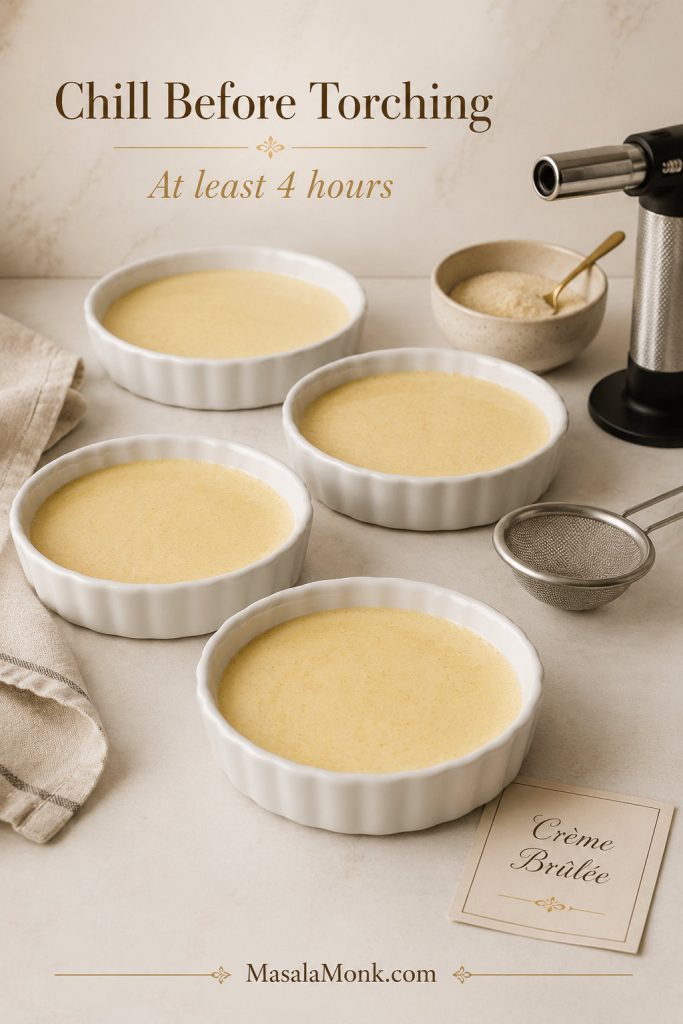
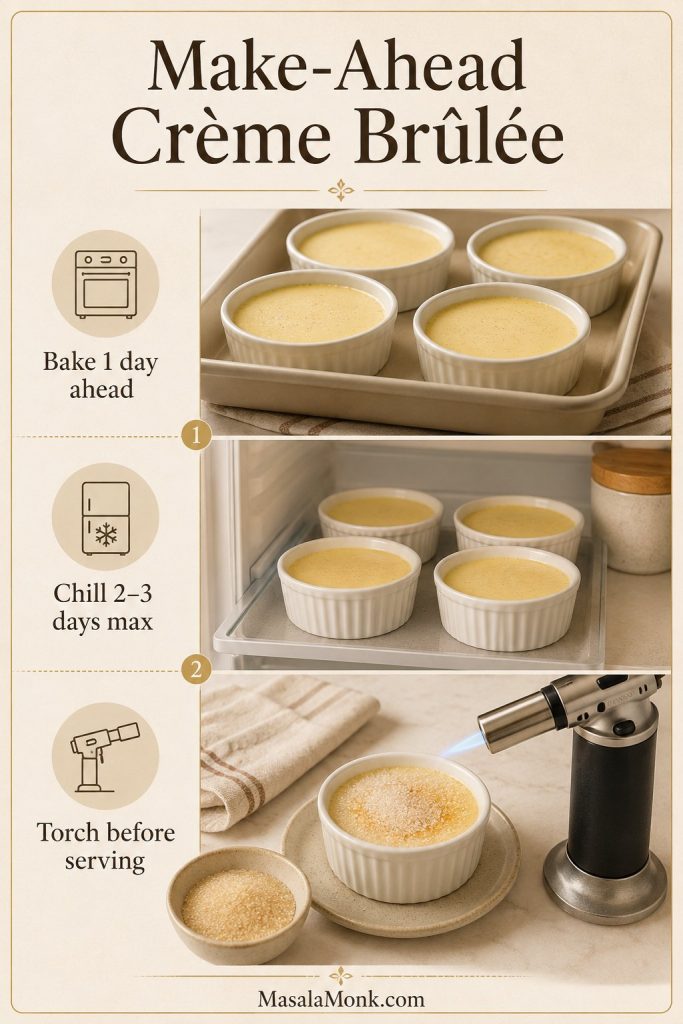
For best texture, bake the custards 1 day ahead. The baked, untorched custards can be refrigerated for 2–3 days, but the sugar top should be caramelized shortly before serving.

Make-ahead rule: bake early, chill fully, and caramelize late. The custard finishes in the fridge; the sugar top should happen close to serving.

The Sugar Top: Best Sugar, Amount, and Timing

The ideal top should crack under a spoon, not chew like thick candy or sink into the custard like syrup. You are looking for amber glass, not dark candy: delicate enough to shatter, caramelized enough to taste nutty.

Use enough sugar to make a light, even coating — usually 1½–2 teaspoons per 4 oz ramekin. A wider dish may need a little more than a narrow one.

Sugar comparison board for crème brûlée showing superfine or caster sugar and white granulated sugar as the best choices.
Superfine sugar melts fastest, while regular white granulated sugar is reliable and easy to find. Either way, use a light layer for the cleanest crack.
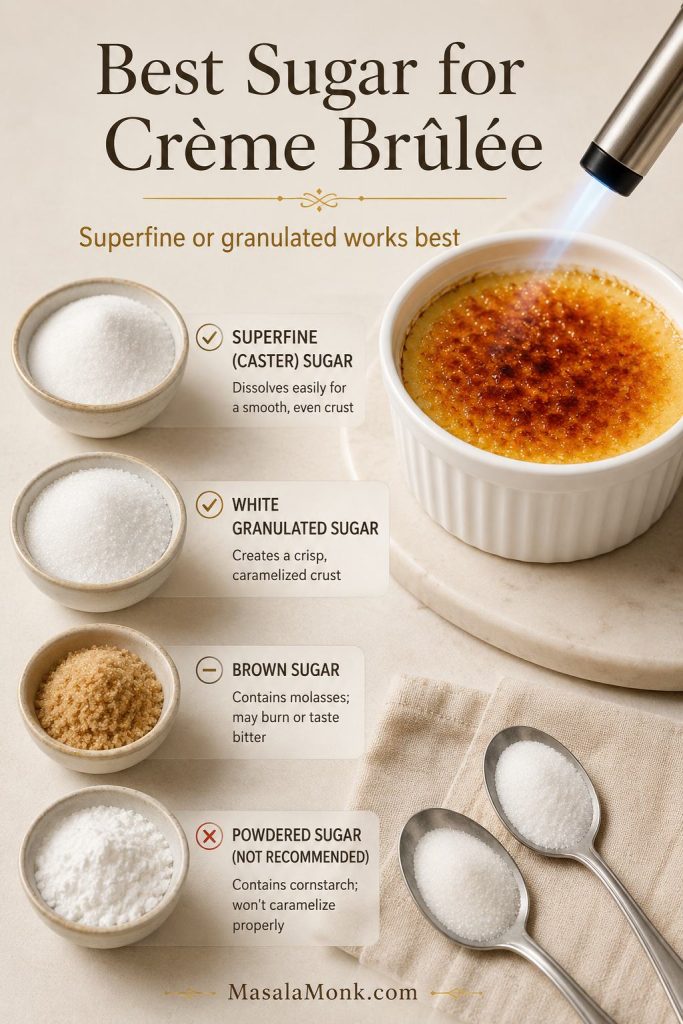
  • Superfine or caster sugar: Best if available because it melts quickly and evenly.
  • Regular white granulated sugar: Reliable and easy to find.
  • Raw sugar: Can work, but may need more careful torching.
  • Brown sugar: Less reliable because it can clump and burn unevenly.
  • Powdered sugar: Not recommended for the classic crackly crust.

One even coating is easiest. For a slightly sturdier crack, torch a very light coating until melted, sprinkle on a second light coating, and torch again. Heavy sugar burns before it melts evenly, so keep the layer light and move the flame constantly. If the top burns, sinks, or softens, see sugar-top troubleshooting.

How to Torch Crème Brûlée

A kitchen torch gives the best control because it melts the sugar quickly without warming the whole custard. Keep the flame moving in small circles. The sugar will melt, bubble, and then turn amber and glossy.

Kitchen torch caramelizing a light layer of sugar on top of a white crème brûlée ramekin.
Move the torch in small circles so the sugar melts evenly and turns amber. If the flame stays still, the crust can burn before the whole top caramelizes.

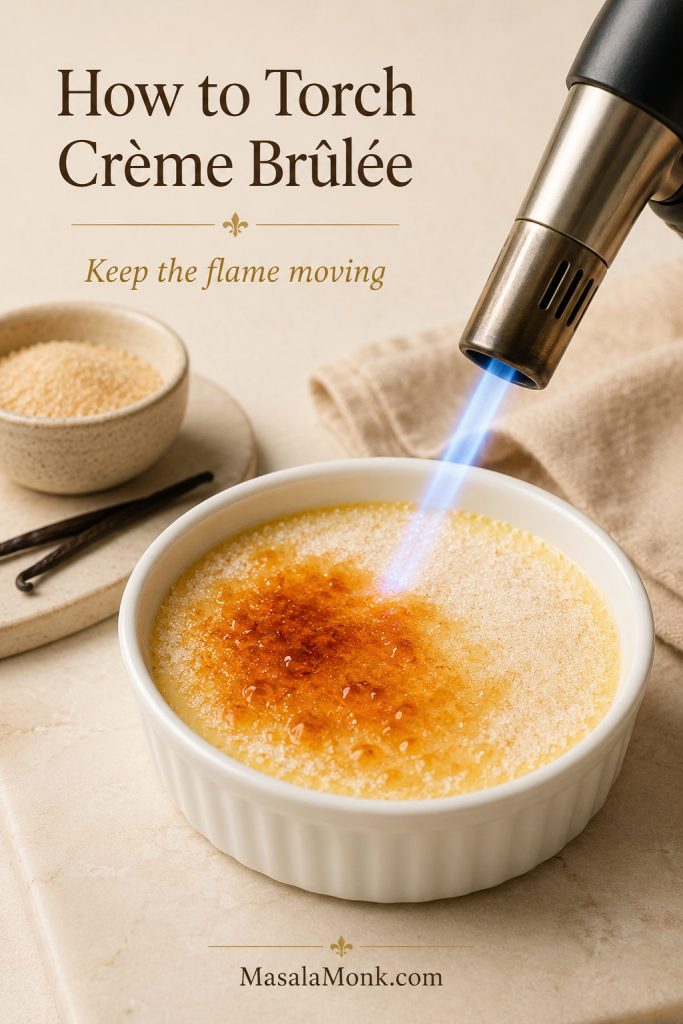
Stop before the sugar turns black or smoky. Let the ramekin sit for 1–2 minutes so the caramel hardens. The best spoonful gives you a brittle tap, a warm caramel aroma, and cold vanilla custard underneath.

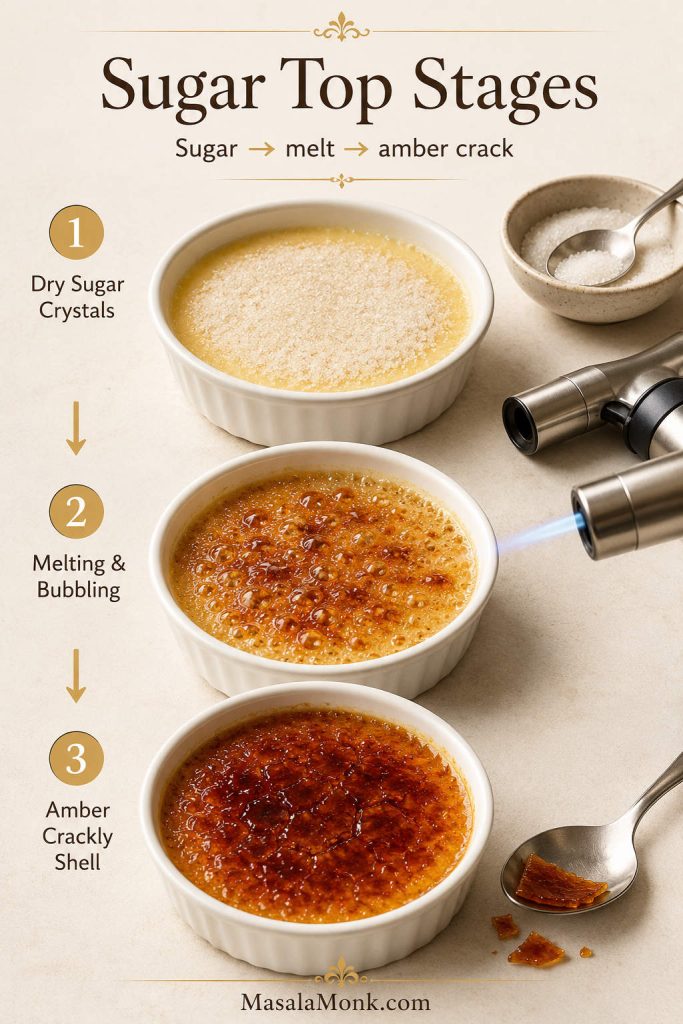
Crème brûlée sugar top stages

Use the stages below as a visual check: stop at amber and glossy, before the sugar turns black or smoky.

Three-stage crème brûlée sugar top board showing dry sugar, melting caramel, and a hardened amber crackly shell.
The sugar top changes quickly: dry crystals melt, bubble into caramel, then harden into a thin amber shell after a short rest.

How to Make Crème Brûlée Without a Torch

A kitchen torch is the recommended finish. If you do not have one, use the broiler only when your ramekins are broiler-safe. If you have neither a torch nor broiler-safe dishes, the caramel-pour method is a last-resort backup. No torch does not have to end the recipe, but it does change how carefully you need to finish the top.
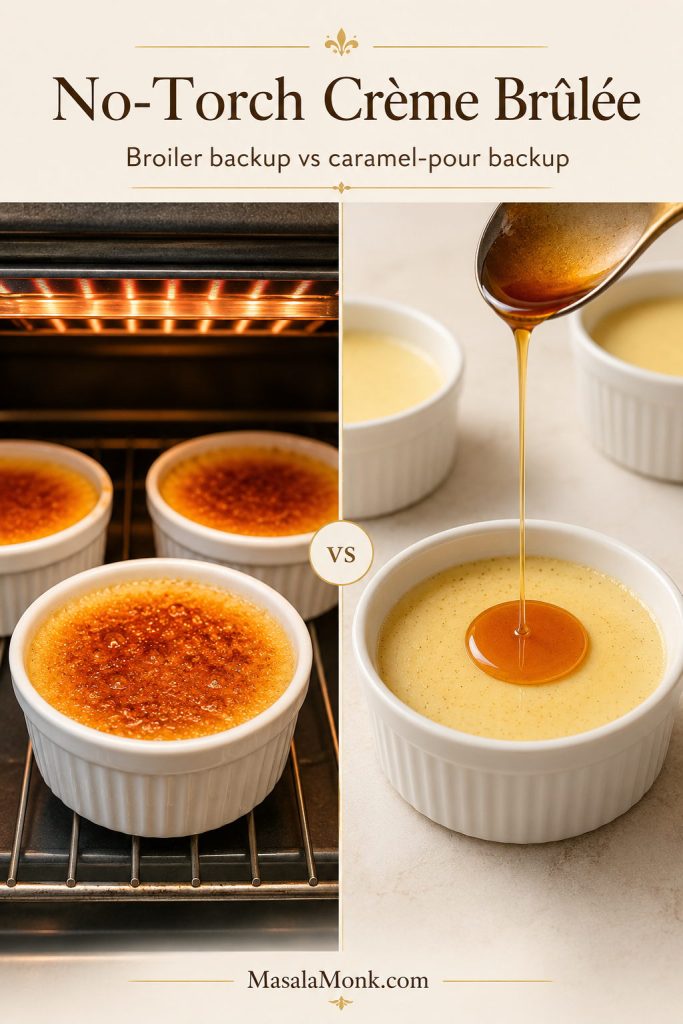
No-torch crème brûlée decision board comparing the broiler backup method with the caramel-pour backup method.
For no-torch crème brûlée, choose the backup by equipment. Use the broiler only with broiler-safe ramekins, or use a very thin caramel pour as a last resort.
No-torch optionBest forTradeoff
Broiler backupBroiler-safe shallow ramekinsFast, but can warm the custard and brown unevenly
Caramel-pour backupNo torch and no broiler-safe dishesNo broiler needed, but hot sugar is trickier and can set too thick

Broiler backup

Use this path only if the ramekins are specifically broiler-safe. The image below shows the goal: controlled top heat and amber sugar, not a scorched crust or warmed-through custard.

Broiler-safe crème brûlée ramekins on a tray with the sugar tops beginning to caramelize under broiler heat.
The broiler can caramelize sugar, but it heats the whole ramekin more than a torch. Therefore, start with very cold custards and watch closely.
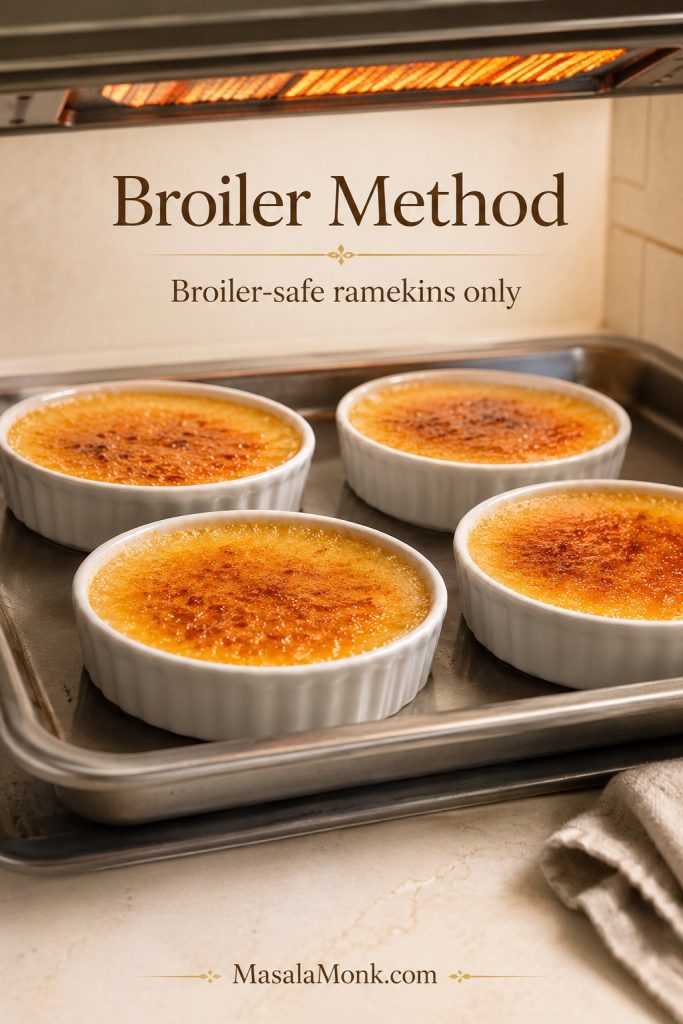
  1. Chill the baked custards thoroughly, preferably overnight.
  2. Use only shallow broiler-safe ramekins.
  3. Blot surface moisture, then add a light sugar coating.
  4. Preheat the broiler fully.
  5. Broil 2–4 inches below the heat for 1–3 minutes, watching constantly.
  6. Rotate the pan if some tops caramelize faster than others.
  7. Remove once amber; chill 10–20 minutes if the custard softens.

Broiler safety: only broil dishes that are specifically labeled broiler-safe. Oven-safe does not always mean broiler-safe, especially with glass or ceramic.

Last-resort caramel-pour backup

This is not a perfect torch replacement. It can give you a crisp caramel layer, but it is more advanced because hot sugar sets quickly and can become thick if you pour too much.

Thin amber caramel being poured from a spoon over cold vanilla custard in a shallow white crème brûlée ramekin.
The caramel-pour method is only a no-torch backup. Keep the caramel layer very thin so it cracks delicately instead of becoming a hard candy lid.

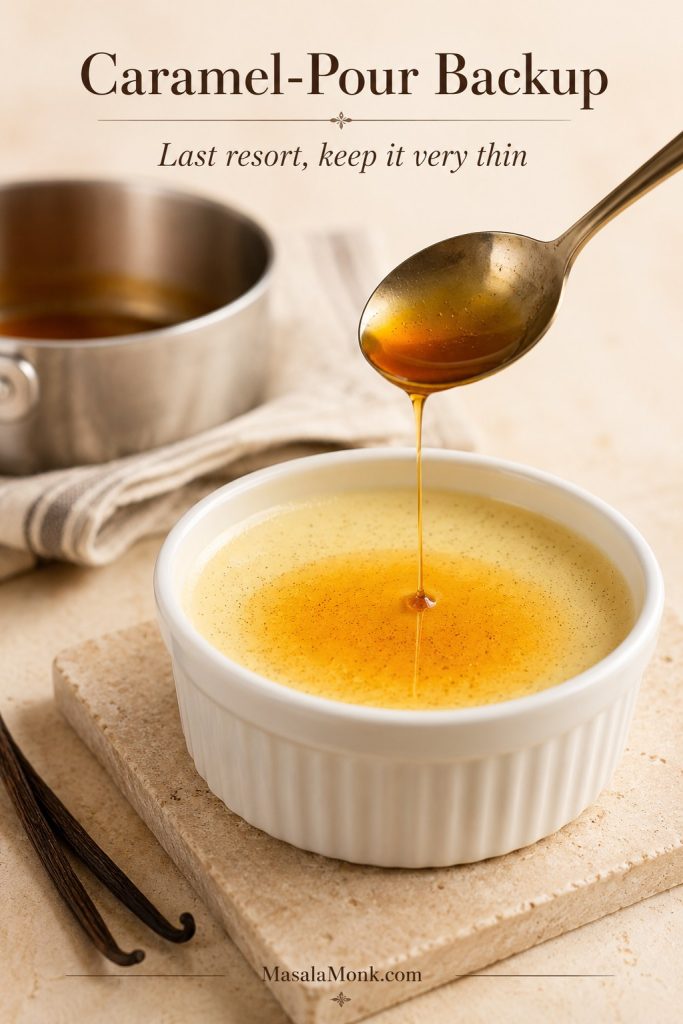
For 6 ramekins, start with about 1/3 cup / 65 g white sugar. You may not use every drop; the goal is the thinnest possible layer.

  1. Use very cold baked custards.
  2. Cook the sugar in a clean saucepan until it turns amber.
  3. Working quickly, pour a very thin layer over each custard.
  4. Tilt the ramekin gently so the caramel spreads before it hardens.
  5. Let the caramel set for 1–2 minutes before serving.

Caramel-pour caution: hot caramel can burn badly. Keep the layer very thin, keep children away from the pan, and do not touch the caramel while it is hot. If the layer is too thick, it will eat more like hard candy than a delicate crème brûlée crust.

When to Serve Crème Brûlée After Torching

Crème brûlée is best served shortly after the sugar is caramelized. Wait 1–2 minutes after torching so the sugar hardens, then serve within about 15–30 minutes for the crispest crack. For planning ahead, see the make-ahead timing.

For guests, this is the dessert you prepare earlier in the day and finish right before serving, when the sugar top becomes part of the moment. Keep the baked custards chilled, then caramelize them near the end of the meal. The custard should be cold, and the top should be freshly crisp.

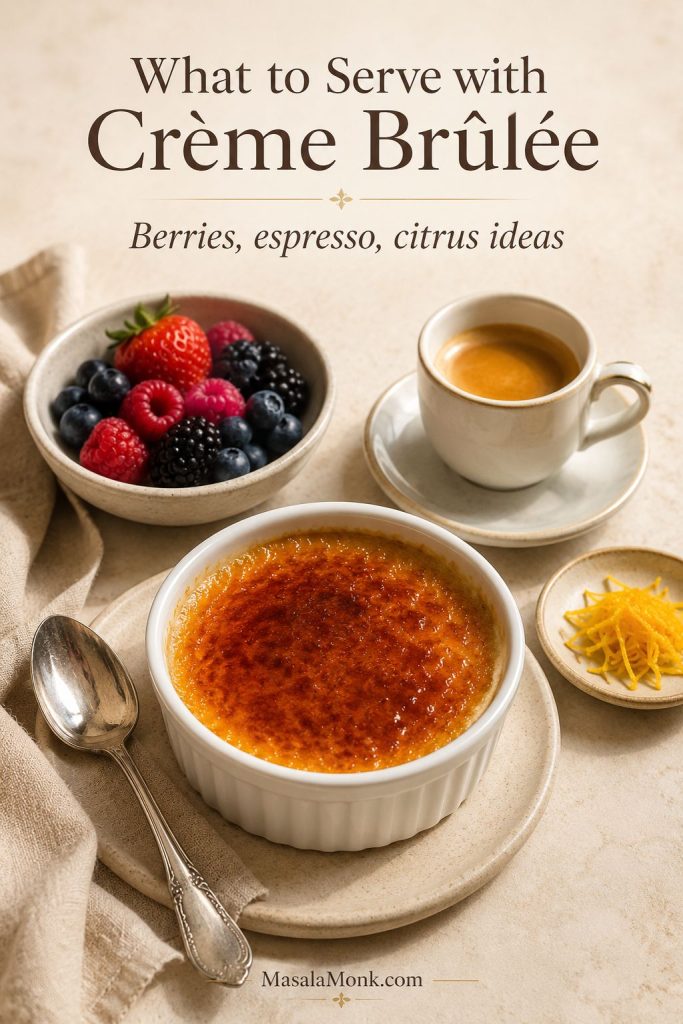
What to serve with crème brûlée

Classic crème brûlée is best served plain so the contrast stays clear: cold vanilla custard, crisp caramel, and that first spoon crack. If you want a little extra, serve berries on the side, add espresso after dinner, or use a citrus variation for a brighter meal. Avoid piling juicy fruit on the sugar top before serving because it softens the crust.

Crème brûlée served with berries on the side, an espresso cup, citrus zest, and a silver spoon.
Keep pairings on the side so the sugar crust stays crisp. Berries, espresso, and citrus brighten crème brûlée without covering the caramelized top.

Quick Guardrails Before You Bake

Most crème brûlée mistakes come from rushing heat, timing, or the sugar top. These quick guardrails keep the custard silky and the crust crisp.

Crème brûlée guardrails checklist showing not boiling the cream, not skipping the water bath, not overbaking, and not adding too much sugar.
Most crème brûlée problems start with heat or timing. Gentle cream, a proper water bath, a soft center, and a light sugar layer protect the final texture.
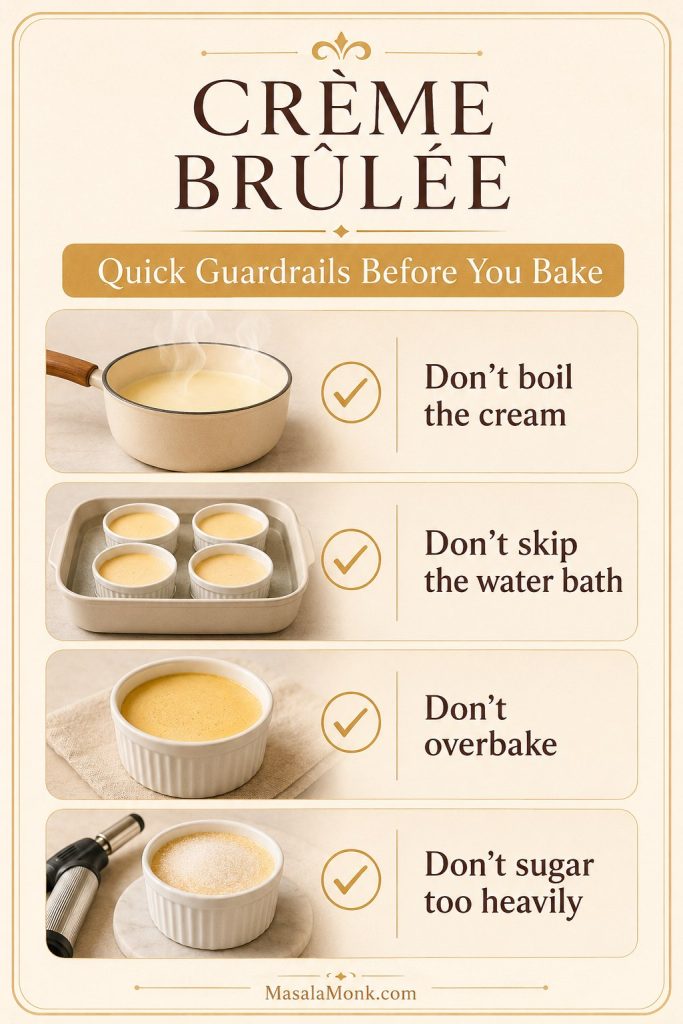
  • Hard-boiling the cream: steaming cream is enough and easier to temper.
  • Adding hot cream too quickly: start with a small stream so the yolks warm gradually.
  • Baking without a water bath: direct heat can make the custard grainy.
  • Waiting for a fully firm center: pull the custards before they look completely set.
  • Using too much sugar on top: a heavy coating burns in patches instead of forming a clean crack.
  • Caramelizing hours ahead: the crisp top softens as it sits.
  • Torching a wet surface: blot gently first so the sugar can melt instead of sinking.

Crème Brûlée Flavor Variations

The safest way to flavor crème brûlée is through the cream, not by adding watery ingredients to the finished custard. These are starting points for the base recipe; keep the mixture smooth, strain when needed, and avoid thinning the custard.
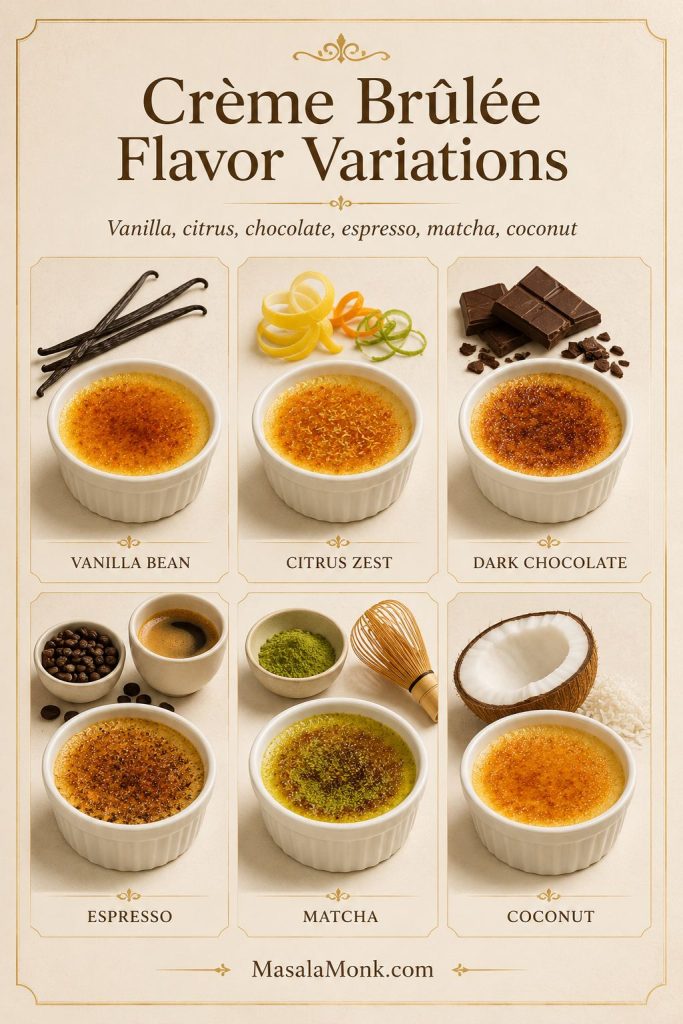
Crème brûlée flavor variation board showing vanilla bean, citrus zest, dark chocolate, espresso, matcha, and coconut options.
Flavor the cream rather than loading the top with extras. This keeps the custard smooth, the sugar crust crisp, and the variation balanced.
VariationHow to add itWhat it brings
Vanilla beanUse 1 vanilla bean or 1 tsp vanilla bean paste.Deeper vanilla flavor and visible specks.
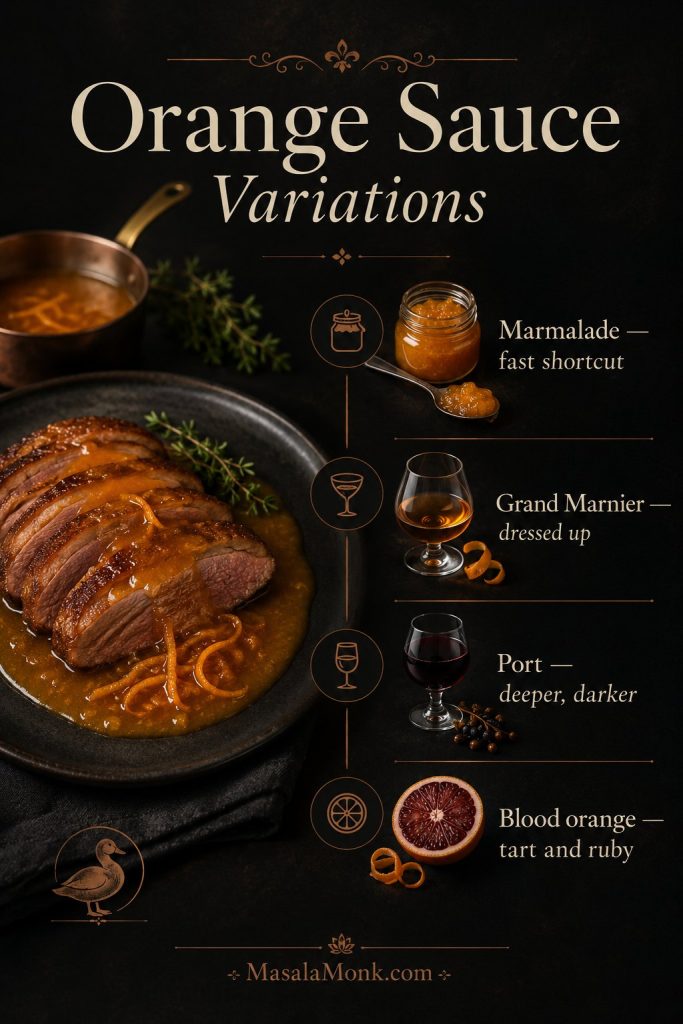
CitrusSteep the zest of 1 lemon or 1 orange in the warm cream, then strain.Brighter, fragrant custard.
ChocolateMelt 2 oz / 55 g finely chopped dark chocolate into the warm cream.Deeper, denser dessert flavor.
EspressoAdd 1–2 tsp instant espresso powder to the warm cream.More bittersweet, after-dinner flavor.
MatchaWhisk 1–2 tsp sifted matcha with a little warm cream first, then add it to the rest.Earthy, slightly bitter balance.
CoconutReplace 1/2 cup / 120 ml cream with thick coconut cream; expect a changed texture.Softer, lightly tropical custard.

Dairy-Free, Vegan, and Milk Substitution Notes

Cream and egg yolks are doing most of the structural work here. Dairy-free and vegan versions are possible, but they need different formulas.

  • Dairy-free but not vegan: use a separate tested coconut-cream-and-yolk formula rather than a direct cream swap.
  • Vegan: use a coconut, cashew, starch, or agar-based formula. Egg-free custard sets differently.
  • Lower-fat custard: use lower-fat cream only if you accept a softer, lighter result.
  • Milk-only custard: use a different baked custard formula. Milk is too lean for this version.

Make-Ahead and Storage

Crème brûlée is one of the best make-ahead desserts because the custards need time to chill. For best texture, bake the custards 1 day ahead. Baked, untorched custards can be refrigerated for 2–3 days, but caramelize the sugar topping shortly before serving.

Make-ahead crème brûlée guide showing baked custards, chilled ramekins, and torching before serving.
For entertaining, bake the custards ahead and save the dramatic step for last. The sugar crust is best when it is caramelized shortly before serving.

Because crème brûlée is an egg-and-dairy custard, refrigerate it promptly once it has cooled enough to cover, following standard two-hour food-safety guidance for perishable foods.

  • Best make-ahead timing: bake 1 day ahead, chill overnight, and torch before serving.
  • Before torching: keep baked custards covered in the fridge for 2–3 days.
  • After torching: serve within 15–30 minutes for the crispest top.
  • Leftovers: refrigerate, but expect the sugar top to soften.
  • Freezing: not recommended for best texture. The custard can become grainy or watery after thawing.
  • Covering: cover only once the custards are no longer hot, so condensation does not drip onto the surface.

Crème Brûlée Troubleshooting

If a batch goes wrong, it is usually not mysterious. Crème brûlée tells you where the problem happened: in the custard, in the water bath, or on the sugar top.

Most mistakes are fixable in the next batch, and many imperfect custards still taste good today. Use the clues below to decide whether to chill longer, serve it differently, or change the method next time. A failed crackly top or a loose center can feel disappointing, but it does not always mean dessert is lost.

Custard problems

Use this guide to read the custard first, then choose the fix. A loose center, watery surface, curdled texture, or cracked top points to a different part of the process.

Crème brûlée troubleshooting board showing runny, watery, curdled, rubbery, and cracked custard problems.
Custard texture is a clue. Runny usually means underbaked, watery can mean splashed water or low-fat cream, and curdled or rubbery custard points to too much heat.

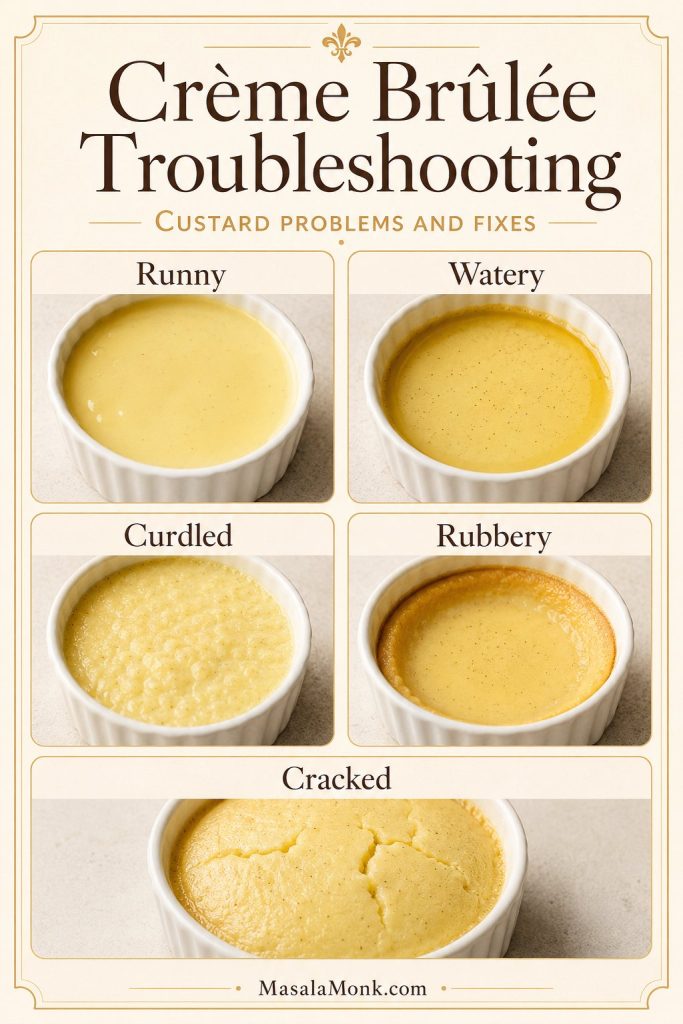
Runny or watery custard

ProblemLikely causeSave it todayFix next time
Custard is runnyUnderbaked, too deep a ramekin, low-fat cream, or short chillChill longer if slightly loose. If it sloshes, skip the torch and serve it as soft vanilla custard in small cups. It will not be classic crème brûlée, but it can still be dessert.Use shallow ramekins, bake until softly moving, and check 170–175°F / 77–80°C.
Custard is watery after chillingWater splashed in, custard underbaked, or cream too low in fatBlot minor surface water. If watery throughout, serve cold in small glasses with berries or whipped cream.Pour water carefully and use heavy cream for the richest set.

Curdled, eggy, or rubbery custard

ProblemLikely causeSave it todayFix next time
Custard curdledYolks overheated, oven too hot, no water bath, or overbakingChill and serve with berries or whipped cream. The texture will not become silky again, but a mild curdle can still taste good cold.Temper slowly, strain, and bake gently.
Custard tastes eggyOverbaked, overheated yolks, or too little vanilla/salt balanceServe very cold with a fresh caramelized top. Cold temperature and caramel help soften the eggy impression.Use good vanilla, add salt, and avoid overheating the custard.
Edges are rubberyOven too hot, dishes too deep, or custards left in hot waterThe edges may be firm, but the center can still be worth serving.Use shallow ramekins and remove promptly from the water bath.

Surface cracks, bubbles, and vanilla specks

ProblemLikely causeSave it todayFix next time
Surface crackedOverbaked or too much heatThe sugar topping will hide small cracks.Start checking earlier and pull before the custard looks firm.
Custard has bubblesWhisked too aggressively, skipped straining, or left foam on topMostly cosmetic. Once the sugar top is on, small bubbles matter less.Whisk gently, strain, and skim foam before baking.
Vanilla seeds sankCustard was thin or not stirred gently before pouringNo real fix needed; flavor is still fine.Stir gently before dividing into ramekins.

Sugar-top, water-bath, and equipment problems

Use this second troubleshooting guide for problems that happen after the custard is baked, especially the sugar crust, water bath, and no-torch finishing methods.

Crème brûlée sugar-top troubleshooting board showing burnt, grainy, sunken, and soft caramelized sugar problems.
Sugar-top issues usually come from moisture, uneven sugar, or excess heat. Blot the custard, spread a light coating, and caramelize close to serving.

Caramelized sugar-top issues

ProblemLikely causeSave it todayFix next time
Sugar top burnedSugar too thick, flame too close, or broiler too strongScrape off badly burnt patches if needed. A slightly bitter edge is manageable; a black smoky crust is worth removing.Use a lighter coating and keep the flame moving.
Sugar stayed grainyUneven sugar layer or not enough heatTorch pale or grainy patches a little longer.Use superfine or regular white sugar and spread evenly.
Sugar sank into custardSurface was wet or sugar layer was too thinBlot gently, chill uncovered briefly, then add fresh sugar. Do not torch a wet surface.Blot surface moisture before sugaring.
Top turned softTorched too early or refrigerated after torchingRe-torch lightly if the custard is still cold.Caramelize close to serving.

Water-bath and equipment issues

ProblemLikely causeSave it todayFix next time
Water got into ramekinsWater splashed while pouring or moving the panBlot lightly if it is only a little water. If the custard is diluted, serve cold instead of torching.Pour water after the pan is on the oven rack and move slowly.
Broiler melted the custardCustard was not cold enough or stayed too long under heatChill again before serving. The top may not be perfect, but the custard can still recover some firmness.Chill overnight and broil briefly, watching constantly.
No kitchen torchEquipment limitationUse the broiler only with broiler-safe dishes, or use the caramel-pour backup as a last resort.Use a torch for the most controlled finish.

Crème Brûlée FAQs

Crème brûlée basics

Is crème brûlée served cold?

Crème brûlée is meant to be served cold. The freshly caramelized top gives you the warm, crisp contrast.

What sugar is best for crème brûlée?

Superfine or caster sugar melts most evenly. Regular white granulated sugar also works well. Brown sugar and powdered sugar are less reliable for a crisp, even crust.

Why is my crème brûlée runny?

Runny crème brûlée is usually underbaked, under-chilled, baked in dishes that are too deep, or made with cream that is too low in fat. If the custard is only slightly loose, chill it longer. If it sloshes like liquid, serve it as soft custard and bake the next batch longer.

How do I know when crème brûlée is done?

The edges should be set, while the middle should still look delicate rather than firm. If using a thermometer, aim for 170–175°F / 77–80°C in the center without touching the bottom of the ramekin.

Is crème brûlée supposed to be jiggly after baking?

A gentle jiggle is exactly what you want. The center should tremble when hot; it should not slosh like liquid, but it should not look fully firm either. A custard that looks perfectly firm in the oven often becomes too firm after chilling.

How do I halve this crème brûlée recipe?

For 3 ramekins, halve the cream, sugar, salt, and vanilla. Use 2 yolks for a slightly lighter set or 3 yolks for a richer, firmer set. For a true crème brûlée for two, use a dedicated small-batch formula because yolks do not divide perfectly.

Equipment and method questions

No kitchen torch? Use these backups

A broiler can work if your dishes are broiler-safe, and the caramel-pour method can help when they are not. A kitchen torch is still the most controlled method because it caramelizes the sugar without warming the whole custard.

Is a regular lighter safe for the sugar top?

A regular lighter is the wrong tool for this job. It is usually uneven, slow, and not designed for caramelizing food. Use a kitchen torch, the broiler method with broiler-safe dishes, or the caramel-pour backup.

Does this method work without an oven?

This baked version needs an oven because the custard sets gently in a water bath. No-oven or stovetop versions are usually pudding-style shortcuts, so the texture is different.

Do I really need a water bath?

Not for this classic method. The water bath keeps the heat gentle so the edges do not overcook before the center sets. No-water-bath methods exist, but they use different timing, dish depth, or oven technique. For this recipe, the water bath is the safest path to a silky custard.

What changes if I use one large dish?

A large shallow dish can work, but it is less beginner-friendly. It takes longer to bake, is harder to judge, and gives less crisp sugar top per spoonful. Individual shallow ramekins are more reliable.

What about countertop or convection ovens?

A countertop or convection oven can work if it holds a gentle, steady temperature. Start checking early if using convection. Air fryer and sous vide versions need separate methods, so they are not direct swaps.

Substitutions and comparisons

Why use only egg yolks?

Not for this texture. Egg whites make custard firmer and less silky. For classic crème brûlée, use yolks only and save the whites for another recipe.

Why milk is not a direct cream swap

Milk is not a direct swap in this recipe. It creates a lighter, thinner custard and needs a different formula. For rich crème brûlée texture, use heavy cream or heavy whipping cream.

What changes with lighter cream?

Lighter cream can work, but the custard will be softer and less rich. Use shallow ramekins, bake gently, and chill overnight for the best chance of a clean set.

Vanilla extract versus vanilla bean

Vanilla extract works well. Vanilla bean gives the deepest flavor and visible specks, but vanilla bean paste or good vanilla extract is enough for a smooth, fragrant custard. If using extract, stir it into the warm cream after taking the cream off the heat.

What is the difference between crème brûlée, flan, and panna cotta?

Crème brûlée is a baked egg-yolk custard served in its dish with a hard caramelized sugar top. Flan is usually unmolded and served with a softer caramel sauce. Panna cotta is typically cream set with gelatin rather than eggs.

Make-ahead and storage questions

How far ahead can I make crème brûlée?

For a party, bake the custards 1 day ahead and keep them chilled. Add and caramelize the sugar shortly before serving so the top stays crisp.

Should I cover crème brûlée while chilling?

Let the custards cool first, then cover them. Covering hot ramekins tightly can create condensation, which drips onto the custard and makes the surface wet.

Why did my caramel top taste bitter?

Bitter caramel usually means the sugar was taken too far. Stop when the top is amber and glossy, before it turns black or smoky. A thin sugar layer is easier to control than a heavy one.

What happens if water gets into the custard?

A few drops on the surface can usually be blotted away. If water mixes into the custard, the texture may turn loose or watery. Serve it cold if it tastes good, and pour the water bath more slowly next time.

Does crème brûlée freeze well?

Freezing is not recommended for the best texture. The custard can become grainy or watery after thawing. It is better to make the custards ahead and keep them refrigerated for 2–3 days before torching.

Once you know what the wobble should look like, crème brûlée stops feeling like a restaurant secret. The custards wait in the fridge, the sugar cracks at the end, and you can bring the dessert to the table already knowing it worked.

Crème Brûlée Recipe

This crème brûlée recipe makes cold, silky vanilla custard with a crisp caramelized sugar top that cracks under a spoon. The kitchen torch method is the cleanest finish; broiler and caramel-pour backups are included below for no-torch situations.

Yield
6 small ramekins
Prep Time
15 minutes
Bake Time
30–45 minutes
Chill Time
4 hours minimum
Total Time
About 5 hours, including chill
Make Ahead
Bake 1 day ahead; torch before serving

Equipment

  • 6 shallow 4 oz / 120 ml ramekins
  • 9×13-inch baking dish
  • Medium saucepan
  • Mixing bowl
  • Whisk
  • Fine-mesh sieve
  • Measuring jug
  • Thin kitchen towel
  • Kitchen torch for the recommended finish
  • Broiler-safe ramekins if using the broiler backup
  • Small saucepan if using the caramel-pour backup
  • Instant-read thermometer, optional

Ingredients

  • 2 cups / 480 ml heavy cream
  • 5 large egg yolks
  • 1/3 cup / 65–70 g granulated sugar
  • 1 vanilla bean, or 1 tsp vanilla bean paste, or 1½ tsp vanilla extract
  • 1/8 tsp fine salt
  • 9–12 tsp superfine/caster sugar or white granulated sugar, for topping

Instructions

  1. Preheat the oven to 300°F / 150°C with a rack in the middle.
  2. Place 6 shallow ramekins in a 9×13-inch baking dish. Add a folded thin kitchen towel underneath if the ramekins slide around.
  3. Warm the cream over medium-low heat until steaming. If using vanilla bean, scrape in the seeds, add the pod, steep off heat for 10 minutes, then remove the pod. If using vanilla bean paste, whisk it into the warm cream. If using vanilla extract, add it off heat.
  4. In a mixing bowl, whisk egg yolks, granulated sugar, and salt until smooth.
  5. Slowly stream warm cream into the yolks while whisking constantly, starting with a small amount and adding more as the bowl warms.
  6. Strain the custard through a fine-mesh sieve into a measuring jug. Skim off foam if needed.
  7. Divide the custard among the ramekins, filling below the rim.
  8. Pour hot water into the baking dish until it reaches halfway to two-thirds up the ramekins, taking care not to splash the custard.
  9. Bake for 30–45 minutes, or until the edges are set and the centers move softly.
  10. If using a thermometer, aim for 170–175°F / 77–80°C in the center without touching the bottom of the ramekin.
  11. Remove the ramekins from the water bath. Cool uncovered just until warm, then cover loosely and refrigerate for at least 4 hours, preferably overnight.
  12. Just before serving, gently blot any surface moisture. Sprinkle each custard with 1½–2 tsp sugar in a light, even layer.
  13. Torch the sugar in small circles until melted, bubbling, and amber. Let stand 1–2 minutes so the top hardens.

No-Torch Options

  • Broiler backup: Use only broiler-safe ramekins. Broil very cold custards 2–4 inches below the heat for 1–3 minutes, watching constantly. Chill briefly if the custard softens.
  • Caramel-pour backup: Use only as a last resort. Cook about 1/3 cup / 65 g white sugar until amber, then pour a very thin layer over very cold custards. You may not need all of it. Hot caramel burns badly.

Recipe Notes

  • Use shallow ramekins and fill below the rim for the most even bake and cleanest sugar top.
  • Use the timer as a guide, but judge doneness by texture: set edges, soft center movement.
  • Low-fat cream can set softer and may not give the same rich texture.
  • For best make-ahead texture, bake 1 day ahead; untorched custards can be refrigerated for 2–3 days.
  • For the crispest top, torch shortly before serving and serve within 15–30 minutes.
  • A custard that puffs, cracks, or looks fully firm has likely baked too long.
  • Cover ramekins only after they cool so condensation does not drip onto the surface.
  • Save leftover egg whites for meringues, pavlova, macarons, or omelets.
Saveable crème brûlée recipe card showing yield, oven temperature, bake time, chill time, ingredients, method steps, and torch-before-serving note.
Use the recipe card as a final check before baking: shallow ramekins, low heat, full chill, and a sugar layer that is torched only at the end.

Back to top ↑

Posted on Leave a comment

Orange Sauce for Duck Recipe

Sliced duck breast with crisp skin served over glossy orange sauce on a dark plate.

Duck already feels like the kind of dinner you do not want to waste: crisp skin, rich meat, maybe guests at the table. This orange sauce for duck gives you the classic sweet-sharp citrus lift without turning the plate sticky, syrupy, or restaurant-complicated.

Use it with pan-seared duck breast, roast duck, duck legs, leftover duck, or a simple duck à l’orange-style dinner. It comes together on the stovetop in about 25 minutes and should taste bright, savory, lightly sweet, and clean enough to wake up the duck rather than cover it.

You may also see this called orange gravy for duck, although the texture here is closer to a polished pan sauce than a flour-thickened gravy. It should be glossy and pourable, not gloppy, with enough body to sit beside the meat without soaking the crisp skin.

Quick Answer

For about 1 cup / 240 ml sauce, simmer 1 cup / 240 ml orange juice, 1 cup / 240 ml duck or chicken stock, 1 1/2 tablespoons vinegar, 1 tablespoon honey or sugar, and 2 teaspoons orange zest until lightly reduced. Finish with 2 tablespoons / 28 g cold butter for a smooth citrus sauce that coats the spoon without turning sticky.

Base ratio for orange sauce for duck showing orange juice, stock, vinegar, zest, sweetener, and butter
Use this base ratio for orange sauce for duck as your starting point. Once it reduces, small adjustments with vinegar, stock, or butter can shift the flavor quickly.

Before serving, taste and adjust. Too sweet? Add a splash of vinegar. Too sharp? Add a little honey or butter. Too thin? Simmer it a few minutes longer before using cornstarch.

The target: glossy, pourable, orange-forward, and sharp enough to taste like dinner, not marmalade.

The point is not to make the sweetest orange sauce. The point is to make a sauce that feels right with duck: clean citrus edge, savory depth, gentle sweetness, and a finish that makes the plate feel special.

You can also make the base ahead, then warm it gently and whisk in the butter before serving. That takes pressure off the final minutes, especially when the duck itself already needs your attention.

Need the full measurements in one place? Jump to the recipe card. If your sauce is already too sweet, too sharp, or too thin, go straight to the fix guide.

Three rules for better duck sauce: reduce before thickening, taste before butter, and sauce the plate instead of the crisp skin.

What Is Orange Sauce for Duck?

Orange sauce for duck is a warm citrus sauce served with rich duck meat. It usually combines orange juice or zest with stock, vinegar, a little sweetness, and butter. Some versions are simple and quick, while classic French versions use a sweet-sour base with rich duck or veal stock.

Sauce boat with orange sauce, oranges, stock, vinegar, butter, and duck on a dark surface
Orange sauce for duck is a warm savory citrus sauce, not a sweet dipping sauce. Stock and vinegar are what make the orange taste dinner-ready instead of syrupy.

For home cooking, the goal is simpler: make a sauce that brightens the duck without turning the plate sweet. Orange brings freshness, vinegar keeps the richness in check, and stock gives the sauce enough body to feel like part of the dish rather than a sweet topping.

This recipe is designed as an all-purpose duck sauce. It works with duck breast, roast duck, duck legs, leftover duck, and a simplified duck à l’orange plate. If you like bright sauces for rich holiday mains, MasalaMonk’s cranberry sauce with orange juice follows a similar sweet-tart logic, but this one is warmer and more savory.

Comparing it with the French classic? See the duck à l’orange section before choosing a variation.

Why This Sauce Works with Duck

A good duck sauce has to do two things at once: cut through the richness and still taste like dinner. Orange brings the lift, vinegar keeps it from turning candied, stock gives it a savory backbone, and cold butter makes it feel polished on the plate.

  • Orange brightens rich meat: citrus gives the duck a clean edge instead of letting each bite feel heavy.
  • Vinegar controls the sweetness: it keeps the sauce sweet-sharp, not jammy.
  • Stock gives it backbone: it turns orange juice into a real pan sauce instead of a topping.
  • Cold butter finishes the texture: it softens the acidity and gives the sauce that silky, spoon-coating finish.
Board showing orange, vinegar, stock, and butter as the key parts of sauce for duck
The sauce works because it does more than add orange flavor. It cuts the richness, adds savory depth, and finishes smooth enough to belong on a dinner plate.

The good news is that this is not a one-shot sauce. Before the butter goes in, you can still pull it brighter, softer, saltier, thinner, or thicker.

Is This the Same as Duck à l’Orange Sauce?

This is a simplified duck à l’orange-style sauce. Classic duck à l’orange often starts with a more formal sweet-sour base, sometimes called a gastrique, then builds flavor with orange, stock, and sometimes orange liqueur. It is beautiful, but it can feel like one more moving part when the duck itself already needs care.

This recipe keeps the part home cooks usually want most: citrus lift, controlled sweetness, savory depth, and a smooth finish. It skips the restaurant-style steps unless you want to dress it up with Grand Marnier, port, marmalade, or blood orange. For a more traditional, fully developed version, Serious Eats has a detailed guide to duck à l’orange.

Think of this as the calmer sauce-first version: familiar enough for duck à l’orange cravings, but simple enough to make while dinner is still moving.

Comparison board showing classic duck à l’orange and a simpler orange sauce for duck
Duck à l’orange is the more classical route, while this sauce-first version keeps the same sweet-sharp idea simpler. Both work best when citrus is balanced with a savory base.

Ingredients You Need

Ingredients for orange sauce for duck including orange juice, zest, stock, vinegar, honey, butter, shallot, salt, and pepper
This sauce is short on ingredients, but each one matters. Orange brings aroma, stock makes it savory, vinegar keeps it bright, and cold butter smooths the finish.

Orange Juice and Zest

Fresh orange juice gives the sauce its main flavor. Orange zest is just as important because it adds concentrated citrus aroma without making the sauce watery. You will usually need 2 to 3 medium oranges for 1 cup / 240 ml juice, depending on size and juiciness, plus zest. Zest one orange before juicing it, and avoid the bitter white pith underneath the peel.

Bottled orange juice can work in a pinch, but fresh juice gives a cleaner, brighter sauce. If your oranges are very sweet, start with less honey or sugar and adjust after the sauce reduces.

Navel, Cara Cara, blood orange, and mandarin oranges for making orange sauce for duck
The orange you choose changes the finished sauce. Navel is balanced, Cara Cara is sweeter, blood orange is deeper and tarter, and mandarin gives a softer citrus note.

Duck Stock or Chicken Stock

Stock is the quiet ingredient that makes the sauce taste like dinner, not dessert. Duck stock is ideal if you have it, but low-sodium chicken stock is easier to find and works well. Low-sodium stock is especially helpful because the sauce reduces as it cooks.

If you are cooking duck breast in a pan, you can also add a spoonful of the rendered duck juices or pan drippings. Skim or pour off excess fat first so the sauce tastes rich, not greasy.

Duck stock and chicken stock comparison for orange sauce
Duck stock gives the deepest flavor, but low-sodium chicken stock is easier to find and still works well. Since the sauce reduces, starting with low-sodium stock gives you more control.

Vinegar for Balance

Duck needs acidity. Sherry vinegar and red wine vinegar are both excellent because they bring a rounded sharpness. White wine vinegar also works. Lemon juice can help in a pinch, although vinegar gives a more classic sweet-sour profile.

Use 1 1/2 tablespoons for a balanced base. Use closer to 2 tablespoons if your oranges are very sweet, if you are serving fatty roast duck, or if the finished sauce tastes too round and heavy.

Vinegar choices for orange sauce for duck including sherry vinegar, red wine vinegar, white wine vinegar, and lemon juice
Vinegar is the quiet fix that keeps orange duck sauce from tasting like marmalade. Sherry vinegar and red wine vinegar give rounded acidity, while lemon juice works when that is what you have.

Honey, Sugar, or Marmalade

You only need a little sweetness. Honey gives a rounded flavor, while sugar keeps the sauce cleaner. Start with 1 tablespoon, then add more only after the sauce has reduced and you have tasted it.

Orange marmalade can be used for a shortcut variation, but it should support the duck sauce rather than take over. Too much can push the flavor toward sticky glaze, so keep the base savory with stock and vinegar.

Honey and sugar comparison for sweetening orange sauce for duck
Sweetness should support the orange, not lead the plate. Honey tastes rounder, sugar tastes cleaner, and both should be added lightly until the sauce is reduced and tasted.

Butter for a Smooth Finish

Cold butter goes in at the end. It softens the acidity, gives the sauce a polished finish, and helps it feel complete. Add it off the heat or over very low heat and whisk until smooth.

Once the butter is added, avoid hard boiling. Butter should make the sauce silky, not oily. If the pan starts bubbling hard after the butter goes in, lower the heat immediately.

Equipment You Need

You only need a small saucepan, whisk, citrus zester, and juicer for the basic sauce. A fine-mesh sieve helps if you want a restaurant-smooth finish. A skillet only matters if you are making the orange pan sauce from duck drippings.

  • Small saucepan or saucier
  • Whisk
  • Fine grater or Microplane
  • Citrus juicer
  • Fine-mesh sieve, optional
  • Small bowl for cornstarch slurry, if using

Once the ingredients and basic tools are ready, start the step-by-step method.

How to Make Orange Sauce for Duck

The sauce is most flexible before the butter goes in. Taste there, adjust there, and the finish becomes much easier.

Step-by-step board showing orange sauce simmering, stock being added, sauce being tasted, thickened, and finished with butter
Think of the method as a sequence of control points. Build the citrus base, add savory body, correct the flavor, and only then decide whether the sauce needs help thickening.

1. Reduce the Orange Base

Add the orange juice, orange zest, vinegar, and honey or sugar to a small saucepan. If you are using shallot, add it here too. Bring to a simmer over medium heat, then cook for 5 to 7 minutes, until the mixture smells bright and citrusy and has reduced slightly.

You are not trying to make caramel or a thick syrup at this stage. You just want to concentrate the orange flavor and soften the sharp edge of the vinegar.

Orange sauce gently reducing in a saucepan
The sauce should simmer gently until the orange flavor concentrates. If it boils hard, it can turn sticky before the stock and butter have a chance to round it out.

2. Add Stock and Simmer

Add the duck stock or chicken stock. Simmer for 8 to 12 minutes, stirring occasionally, until the sauce tastes savory and leaves a thin coating on the spoon.

If the sauce still feels thin, keep simmering. Reduction gives better flavor than thickening too early.

3. Balance Sweetness, Acidity, and Salt

Taste before adding butter. This is the moment where the sauce becomes yours: a little sharper for fatty roast duck, a little softer for leaner duck breast, or a touch sweeter if the oranges are tart.

  • Too sweet? Add a small splash of vinegar or lemon juice.
  • Too sharp? Add a little more honey or sugar.
  • Flat? Add a pinch of salt and a little more orange zest.
  • Thin? Simmer longer before using slurry.

4. Thicken Only If Needed

If the sauce is still too thin after reducing, mix 1 teaspoon cornstarch or cornflour with 1 tablespoon cold water. Whisk a small amount of this slurry into the simmering sauce and cook for 30 to 60 seconds.

Do not add dry cornstarch directly to the pan. It can clump and make the texture uneven. Use only enough slurry to help the sauce coat the spoon lightly.

Thickening guide showing reduced sauce, cornstarch slurry, and a warning not to add dry cornstarch
Reduction gives better flavor than rushing to thicken. However, if the sauce still feels thin, mix cornstarch with cold water first so it blends smoothly instead of clumping.

If the sauce has already gone too thin, too thick, bitter, greasy, or broken, use the troubleshooting guide before adding more ingredients.

5. Finish with Butter

Lower the heat or remove the pan from the heat. Whisk in the cold butter, one small piece at a time, until the sauce is smooth. Taste again and adjust salt, pepper, vinegar, or sweetness as needed.

For a very smooth finish, strain it through a fine-mesh sieve before serving. For a more rustic sauce, leave the shallot and zest in.

Glossy orange sauce lightly coating the back of a spoon
The right texture is glossy and pourable, not thick like glaze. When the sauce lightly coats a spoon, it is ready to finish or serve.
Do not worry if the sauce is not perfect on the first taste. As long as you taste before adding the butter, you can pull it back from too sweet, too sharp, too thin, or too flat without starting over.

Orange Sauce for Duck Recipe

Orange Sauce for Duck Recipe

This citrus sauce gives duck the classic sweet-sharp orange lift without turning the plate syrupy. It is smooth enough for duck breast, savory enough for roast duck, and simple enough for a duck à l’orange-style dinner at home.

Prep Time
10 minutes
Cook Time
15–20 minutes
Total Time
25–30 minutes
Yield
About 1 cup / 240 ml

Servings: 4, with about 1/4 cup sauce each

Category: Sauce

Method: Stovetop reduction

Cuisine: French-inspired

Ingredients

  • 1 cup / 240 ml fresh orange juice, from about 2–3 medium oranges, depending on size and juiciness
  • 2 teaspoons finely grated orange zest
  • 1 cup / 240 ml duck stock or low-sodium chicken stock
  • 1 1/2 tablespoons sherry vinegar or red wine vinegar, plus more to taste
  • 1 tablespoon honey or 12 g sugar, plus more only after tasting
  • 1 small shallot, finely chopped, optional, about 2 tablespoons
  • 2 tablespoons / 28 g cold unsalted butter, cut into small pieces
  • 1/4 teaspoon fine salt, plus more to taste
  • Freshly ground black pepper or white pepper, to taste

Optional Thickener

  • 1 teaspoon cornstarch / cornflour
  • 1 tablespoon cold water

Optional Upgrades

  • 1–2 tablespoons / 15–30 ml Grand Marnier, Cointreau, or another orange liqueur
  • 2–4 tablespoons / 30–60 ml port for a richer sauce
  • 1 tablespoon / about 20 g orange marmalade for a sweeter shortcut version

Instructions

  1. Start the orange base. Add orange juice, orange zest, vinegar, honey or sugar, and the optional shallot to a small saucepan. Bring to a simmer over medium heat.
  2. Reduce slightly. Simmer for 5 to 7 minutes, until the orange mixture smells bright and has reduced a little. Do not reduce it to a thick syrup yet.
  3. Add stock. Pour in the duck stock or chicken stock. Simmer for 8 to 12 minutes, stirring occasionally, until the sauce tastes savory and leaves a thin coating on the spoon.
  4. Balance the sauce. Taste before adding butter. Add a little more vinegar if it tastes too sweet, more honey or sugar if it tastes too sharp, or a pinch of salt if it tastes flat.
  5. Thicken only if needed. If the sauce is still too thin after reducing, stir cornstarch with cold water in a small bowl. Whisk a little slurry into the simmering sauce and cook for 30 to 60 seconds. Do not add dry cornstarch directly to the sauce.
  6. Finish with butter. Lower the heat or remove the pan from the heat. Whisk in the cold butter until the sauce is smooth. Do not hard-boil after adding butter.
  7. Strain and serve. Strain through a fine-mesh sieve for a smooth sauce, or leave the shallot and zest in for a more rustic sauce. Serve warm with duck.

Notes

  • Yield: About 1/4 cup sauce per person for 4 servings. Double it if you like extra sauce at the table or are serving roast duck.
  • Texture: Aim for glossy and pourable, with enough body to coat a spoon lightly.
  • Best adjustment point: Taste before adding butter, while the sauce is still easy to correct.
  • Optional upgrades: Choose one at a time. Add marmalade or port with the stock, or orange liqueur after the sauce has reduced.
  • Serving: For crisp duck breast, sauce the plate or spoon around the slices. For roast duck, serve the sauce warm on the side.
Saveable orange sauce for duck recipe card with yield, time, ingredients, and method cues
This saveable card keeps the sauce method simple at the stove. The important moment is tasting before the butter, while the sauce is still easy to adjust.

Making sauce for cooked duck? Use the quick 10-minute version. Cooking duck breast in the pan? Use the duck drippings version.

Quick 10-Minute Version

Use this when the duck is already cooked and you need a fast, warm citrus finish, not a full restaurant-style reduction. It is brighter and lighter than the main recipe, but it still gives the meat the orange lift it needs.

Quick version: Simmer 3/4 cup / 180 ml orange juice, 1/2 cup / 120 ml stock, 1 tablespoon vinegar, 1 tablespoon marmalade or 1 to 2 teaspoons honey, and 1 teaspoon orange zest for 8 to 10 minutes. Finish with 1 tablespoon cold butter and adjust with salt, vinegar, or honey.
Quick orange sauce for duck in a saucepan with sliced cooked duck nearby
The quick version is best when the duck is already cooked and you need a warm citrus finish. Keep the sauce in the pan or spoon, then add it lightly to the plate.

If you are cooking duck breast from scratch, the pan-sauce version below gives better flavor because it uses the browned bits and juices left in the skillet.

Orange Pan Sauce from Duck Drippings

If you are cooking duck breast, this is where the skillet gives you flavor you cannot get from orange juice alone. After cooking the duck, transfer the breast to a board to rest. Pour off most of the rendered duck fat, leaving the browned bits and about 1 teaspoon of fat in the pan.

Add the shallot, if using, and cook for 30 to 60 seconds over medium-low heat, just until softened. Pour in the orange juice, then scrape up the browned bits from the bottom of the pan. Add the zest, vinegar, honey or sugar, and stock, then simmer until the sauce tastes savory and lightly coats a spoon. Lower the heat, whisk in the cold butter, and strain if you want a smoother finish.

This route is especially good for duck breast because it captures the savory flavor left in the skillet. Just avoid leaving too much duck fat in the pan, or the sauce can taste greasy.

Orange pan sauce being made in a skillet with duck drippings, shallots, and browned bits
Duck drippings add savory depth that orange juice alone cannot give. Pour off excess fat first, then use the browned bits to build a richer orange pan sauce.

Once the sauce is ready, see how to serve it with duck breast without soaking the crisp skin.

How to Serve the Sauce with Duck Breast

Duck breast is one of the best uses for this sauce because the contrast is so good: crisp skin, tender meat, and citrus sauce underneath. The skin is the prize. Once it is soaked, the plate loses its best texture.

Spoon the sauce onto the plate first, then lay the sliced duck breast over it. You can also spoon a little sauce around the slices and serve extra on the side. That way the first bite still has that crisp edge.

Sliced duck breast served over orange sauce with crisp skin kept dry
Duck breast needs contrast: crisp skin, tender meat, and citrus sauce below. Serving the sauce underneath gives flavor without softening the best texture.

If you are cooking duck breast from scratch, score the skin in a shallow crosshatch pattern without cutting into the meat. Start the breast skin-side down in a cold pan, then render the fat slowly over low to medium-low heat. This gives the fat time to melt and the skin time to crisp before the meat overcooks.

For the full meat-cooking method, use this duck breast recipe with crispy skin and orange sauce as the companion guide. This page focuses on the sauce, while that guide walks through the duck itself in more detail.

If you are only making the sauce for already-cooked duck, you can skip the temperature notes. If you are cooking duck breast at the same time, this section helps you time the meat before saucing the plate.

Duck Breast Temperature Guide

In restaurants and many home kitchens, duck breast is often served pink, but official U.S. poultry guidance is 165°F / 74°C. These lower temperatures are common doneness preferences, not official safety recommendations. If you choose a lower doneness target, use your own judgment and consider who you are serving, especially if cooking for children, pregnant guests, older adults, or anyone immunocompromised. You can also refer to the USDA’s safe minimum internal temperature chart for official guidance.

Duck breast temperature guide showing medium-rare, medium, and official United States poultry safety guidance
Duck breast is often served pink, but official U.S. poultry safety guidance is 165°F / 74°C. Use an instant-read thermometer and choose the doneness that suits your table.
Duck Breast Doneness Common Restaurant/Home Target Texture
Medium-rare 130–135°F / 54–57°C Pink, tender, steak-like
Medium 140°F / 60°C Lightly pink, firmer
Well done 155°F+ / 68°C+ Much firmer, less pink
Official U.S. poultry safety temperature 165°F / 74°C Fully cooked by official guidance

How to Keep the Duck Skin Crisp

  • Render the skin slowly instead of blasting it with high heat.
  • Rest the duck breast before slicing so juices settle.
  • Spoon sauce under or around the duck, not heavily over the skin.
  • Serve extra citrus sauce on the side so each person can add more.
  • If reheating leftovers, re-crisp the duck skin separately from the sauce.
Do and don’t comparison showing orange sauce under duck versus sauce poured over duck skin
The skin is the prize. Sauce the plate first, then set the duck on top so the meat gets the citrus lift and the skin keeps its crackle.

How to Use It with Roast Duck or Duck Legs

Roast duck can take a little more sauce than duck breast, especially once it is carved at the table. Still, crisp skin deserves respect. Keep the sauce warm and serve it beside the meat so people can add enough citrus lift without softening every piece.

If you have pan juices from roasting duck, add a spoonful to the sauce for deeper flavor. Skim off excess fat first; a little duck fat tastes luxurious, but too much can turn the sauce greasy.

Duck legs are more forgiving. Because the meat is darker and richer, you can spoon the sauce a little more generously, especially with roasted, braised, or confit-style legs.

Orange sauce served with sliced roast duck and duck legs on dark plates
This citrus sauce works beyond duck breast. With roast duck or duck legs, serve it warm on the side so guests can add more without softening all the skin.

For a bigger holiday table, keep the duck rich and the sides familiar: one citrus sauce, one potato dish, and one green side usually feel complete. If you want a classic make-ahead green side, MasalaMonk’s green bean casserole recipe ideas work better than adding another fussy main-style dish.

Orange Sauce Variations: Marmalade, Grand Marnier, Port, and Blood Orange

Orange sauce variation guide with marmalade, Grand Marnier, port, and blood orange options
Choose the variation by the dinner you want: marmalade for speed, Grand Marnier for elegance, port for depth, and blood orange for a sharper seasonal finish.

Marmalade Shortcut

Marmalade is the fast shortcut, not the whole personality of the sauce. Add 1 tablespoon with the stock for body, sweetness, and a slight orange-peel bitterness.

Too much marmalade pushes the sauce toward sticky glaze. Start small, keep the vinegar close, and remember: if it tastes good on toast, it is probably too sweet for duck.

Orange marmalade sauce for duck with marmalade, a saucepan, and sliced duck
Marmalade can make a fast orange sauce, but it is powerful. Start small, then use vinegar or stock if the flavor begins leaning more like jam than dinner.

Grand Marnier or Cointreau

This is the dinner-party version: still bright and pourable, but with a warmer orange aroma that feels more dressed up. Add 1 to 2 tablespoons of Grand Marnier, Cointreau, or another orange liqueur after the sauce has reduced.

Simmer briefly to mellow the alcohol, then finish with butter. The result should feel fragrant, not perfumey, and richer without becoming heavy.

Grand Marnier orange sauce for duck with plated duck, glossy sauce, and a subtle liqueur glass
Grand Marnier or Cointreau gives the sauce a warmer orange aroma. Simmer briefly before finishing with butter so it tastes elegant rather than sharp.

Port and Orange

Port moves the sauce into a deeper, darker lane. Add 2 to 4 tablespoons with the stock, then taste before serving because port can make the orange feel rounder and sweeter.

This version suits roast duck especially well. If the sauce starts leaning too soft or sweet, a few extra drops of vinegar will wake it back up.

Port and orange sauce served with sliced duck and a darker glossy sauce
Port moves the sauce into a deeper dinner-party lane. Because it can add sweetness, taste before serving and sharpen with a few drops of vinegar if needed.

Blood Orange

Blood orange gives the sauce a ruby-orange color and a slightly berry-like citrus note. Use it exactly as you would regular orange juice, then taste carefully because some blood oranges are less sweet and more tart.

If the finish tastes too sharp, soften it with a little honey or an extra piece of cold butter.

Blood orange sauce for duck with ruby-orange sauce, sliced duck, and cut blood oranges
Blood orange gives duck sauce a deeper color and a tarter citrus edge. If the finish tastes too sharp, soften it with honey or an extra piece of cold butter.

Use the table below as a quick chooser, then follow the same core method: reduce first, taste before butter, and keep the finish pourable rather than sticky.

Version Best For Flavor What to Adjust
Classic base Duck breast, roast duck, duck legs Bright, savory, balanced Taste vinegar and sweetness before butter
Marmalade Fast shortcut Sweeter, peel-like, slightly bitter Add extra vinegar if it tastes jammy
Grand Marnier or Cointreau Dinner-party plates Fragrant, festive, orange-forward Simmer briefly before butter
Port Roast duck or richer plates Darker, rounder, deeper Add acid if it becomes too sweet
Blood orange Seasonal dinners Tart, ruby-colored, berry-citrus Add honey if too sharp

If a variation tastes too sweet, too sharp, or too heavy after reducing, check the sauce fixes before serving.

Common Mistakes to Avoid

These are the small moves that usually separate a polished orange duck sauce from one that tastes too sweet, too heavy, or slightly clumsy on the plate.

  • Adding too much sweetness early: reduce the sauce first, then decide if it needs more honey, sugar, or marmalade.
  • Boiling after butter: once the butter goes in, use gentle heat so the sauce stays smooth.
  • Covering crisp duck skin: spoon the sauce under or around duck breast instead of soaking the skin.
  • Thickening too soon: simmer first, then use cornstarch only if reduction is not enough.
  • Zesting too deeply: use only the colored orange peel, not the bitter white pith.
Common mistakes board for orange sauce for duck showing over-sweetening, boiling butter, over-saucing skin, thickening early, and zesting too deeply
Most orange sauce mistakes start small: too much sweetener, too much heat, or sauce poured over crisp skin. Add gently, taste often, and keep the crisp parts dry.

How to Fix Orange Sauce for Duck

Most problems with this sauce are balance problems, not failures. A splash of acid, a little sweetness, more reduction, or gentler heat can usually bring it back.

Use the table as a quick rescue guide rather than a second recipe. Find the problem, make the smallest adjustment, then taste again before adding more.

Troubleshooting board for orange sauce for duck with sweet, sharp, thin, thick, bitter, greasy, and broken sauce problems
Troubleshooting works best one fix at a time. Adjust sweetness, acidity, thickness, or fat gently, then taste again before changing anything else.
Problem Why It Happened How to Fix It
Too sweet Too much honey, sugar, marmalade, or very sweet orange juice Add a splash of vinegar or lemon juice, then loosen with a little stock if needed.
Too sharp Too much vinegar or very tart oranges Add a little honey or sugar, then finish with butter to round the edges.
Too thin Not reduced enough, or stock was very light Simmer longer. If still thin, whisk in a small amount of cornstarch slurry.
Too thick or sticky Over-reduced or too much marmalade/sugar Whisk in warm stock, water, or orange juice a tablespoon at a time.
Bitter Too much white pith from the orange peel, or over-reduced citrus Strain the sauce, add a little honey, and finish with butter.
Flat Not enough salt, zest, or acid Add a pinch of salt, more orange zest, and a few drops of vinegar.
Greasy Too much duck fat in the pan sauce Skim excess fat or whisk in a splash of warm stock to loosen the sauce.
Broken after butter The sauce boiled hard after the butter was added Take the pan off the heat and whisk in warm stock 1 teaspoon at a time until the sauce looks smoother.

Make-Ahead, Storage, and Reheating

You can make the citrus base ahead of time. Cook the sauce through the reduction stage, then cool and refrigerate it. For the best texture, add the butter when reheating, not before storing.

  • Fridge: Store in an airtight container for 3 to 4 days.
  • Freezer: Freeze before adding butter, and preferably before adding cornstarch slurry, for up to 2 months.
  • Reheating: Warm gently in a small saucepan. Add a splash of stock or water if it has thickened too much.
  • Butter finish: Whisk in cold butter after reheating for the smoothest sauce.
Make-ahead and storage board for orange sauce with container, saucepan, butter, and storage times
For a calmer dinner, make the sauce base ahead and finish it with butter after reheating. Gentle heat protects the texture better than boiling it hard.

When the sauce is ready, build the plate with sides that catch, freshen, or round out the duck.

If the sauce looks slightly separated after chilling, warm it gently and whisk well. A small splash of stock can help bring it back together.

Avoid boiling the sauce hard when reheating, especially after the butter has been added. Gentle heat keeps the finish smoother.

What to Serve with Duck and Orange Sauce

For duck breast, the best plate is usually simple: crisp skin, sliced meat, a spoonful of orange sauce, something potato-based, and one green side. That lets the sauce feel polished without making the plate busy.

Because duck and citrus sauce already bring richness, sweetness, and acidity, choose sides by the job they do on the plate.

Side Job Best Choices Why It Works
Catch the sauce Mashed potatoes, potato gratin, wild rice, rice pilaf Soft or starchy sides hold the orange pan sauce without competing with it.
Freshen the plate Green beans, bitter salad leaves, orange-fennel salad, wilted greens Green or bitter sides keep the duck from feeling too heavy.
Match a holiday table Roasted carrots, Brussels sprouts, hashbrown casserole, green bean casserole These make the meal feel generous without adding another complicated main.

MasalaMonk’s garlic mashed potatoes are especially useful when you want a soft, buttery side that can hold sauce without feeling dry. For a holiday table where you want one rich, make-ahead side, this hashbrown casserole recipe can sit beside roast duck without stealing attention.

Duck with orange sauce served with potatoes, green beans, roasted vegetables, and holiday side dishes
Build the plate by function: something starchy to catch the sauce, something green to freshen the richness, and a warm side if the meal is more festive.

Duck can feel like a high-stakes dinner, but the sauce does not have to be fragile. Reduce it, taste it before the butter, adjust the sweet-sharp balance, and keep it warm. Once the skin is crisp and the sauce is glossy, let the orange lift the duck instead of covering it.

FAQs

What is orange sauce for duck made of?

It is usually made with orange juice, orange zest, stock, vinegar, a small amount of sweetness, and butter. Some versions also include shallot, port, marmalade, wine, or orange liqueur.

Why does orange work so well with duck?

Orange cuts through duck’s richness. The sauce still needs stock and vinegar, though, so it tastes like a savory dinner sauce instead of a sweet glaze.

Should the sauce be sweet?

Lightly sweet, yes. Syrupy, no. The best version is bright, rounded, and savory, with enough acidity to keep the orange from tasting like candy.

What can I use instead of duck stock?

Low-sodium chicken stock is the easiest substitute. It gives the sauce savory depth without overpowering the orange.

Does bottled orange juice work?

It works in a pinch, but fresh juice and fresh zest give a cleaner flavor. If using bottled juice, add fresh zest if possible and taste before adding extra sugar.

How do I thicken orange sauce for duck?

Reduce it first. If it is still too thin, mix 1 teaspoon cornstarch with 1 tablespoon cold water, then whisk in a little slurry and simmer briefly.

Why does my orange duck sauce taste bitter?

Bitterness usually comes from white pith or over-reduced citrus. Use only the colored zest, strain if needed, then soften the sauce with a little honey and butter.

Do I need alcohol?

No. Grand Marnier, Cointreau, and port are optional upgrades. The base sauce gets its balance from orange, stock, vinegar, sweetness, and butter.

How do I scale it for more people?

Double all the ingredients and use a wider saucepan if possible. The sauce may take a few extra minutes to reduce to the same spoon-coating texture.

Is this the same as Chinese duck sauce?

No. This is a warm savory citrus sauce for cooked duck breast, roast duck, or duck à l’orange-style dishes. Chinese-American duck sauce is usually a sweet condiment or dipping sauce.

Comparison of savory orange sauce for duck and Chinese duck sauce as a sweet dipping condiment
Orange sauce for duck is a warm savory citrus sauce for cooked duck. Chinese duck sauce is usually a sweet dipping condiment, so the two are not interchangeable.

How far ahead can I make it?

Make it 3 to 4 days ahead and refrigerate it. For the smoothest finish, reheat gently and whisk in the cold butter just before serving.

What duck dishes work with this citrus sauce?

Use it with pan-seared duck breast, roast duck, duck legs, duck à l’orange, leftover duck, or sliced duck served with potatoes and greens.

Should I pour it over crispy duck skin?

Use a light hand. Spoon the sauce under or around sliced duck breast so the skin stays crisp, then serve extra sauce on the side.

Back to Quick Answer

Posted on 12 Comments

Pepper Sauce Recipe Guide: Classic Vinegar Heat to Chipotle, Ají & Peppercorn

Overhead view of four colorful pepper sauces in bowls on a wooden board with chilies, garlic and lime, as a hand dips a fry into the red sauce for the Ultimate Pepper Sauce Recipe Guide on MasalaMonk

There are sauces that politely sit on the side of the plate, and then there are sauces that run the whole show. A good pepper sauce recipe belongs to that second group. A spoonful can rescue a flat stir-fry, wake up yesterday’s leftovers, or turn plain grilled vegetables into something you make on purpose.

Because “pepper sauce” is such a broad phrase, it can mean anything from a thin Louisiana-style hot pepper sauce recipe to smoky chipotle peppers in adobo sauce, fruity mango and habanero sauce, bright Peruvian aji amarillo sauce, or even a silky green peppercorn sauce for steak. This guide walks through the main families of pepper sauce, shows you how they’re related, and gives you practical recipes and variations you can actually cook in a home kitchen.

Along the way, you’ll meet jalapeno pepper sauce, habanero chili sauce, guajillo sauce, romesco sauce, ajvar, Szechuan chili oil, creamy peppercorn sauce, lemon pepper sauce, and a lot more. You’ll also see how to bend one base pepper sauce recipe into several versions: jalapeno salsa, jalapeno mayo, pineapple habanero salsa, ancho chipotle sauce, roasted red pepper pasta sauce, and even ghost pepper ranch.

Whenever the heat gets intense and you feel like balancing it with something cooling and creamy, it’s worth having a look at high-protein yogurt-based sauces like a good tzatziki with multiple variations or other dairy-based favorites such as creamy Alfredo and béchamel for lasagna. These sit on the other side of the sauce spectrum and pair beautifully with punchy pepper sauces.

Before we dive into specific recipes, let’s quickly look at the building blocks that almost every pepper sauce has in common.


What Makes a Great Pepper Sauce Recipe?

Although the flavor profiles are wildly different, most hot pepper sauce recipes are built from the same elements:

Flat lay of ingredients for a pepper sauce recipe showing fresh chilies, dried chilies, vinegar, lime, garlic, onion, salt and honey arranged in a circle with a build-your-own pepper sauce formula.
Use this 6-move formula to design any pepper sauce recipe: choose your chilies (fresh or dried), add acid, salt, a touch of sweetness and aromatics, then decide whether you want a thin vinegar hot sauce, chunky salsa or creamy peppercorn-style sauce.

Pepper

To start, everything begins with the pepper itself. You might reach for fresh chilies (jalapeño, habanero, scotch bonnet, serrano, datil), dried chilies (guajillo, ancho, aji panca, chipotle, arbol), or peppercorns (black or green). Each choice shifts both heat and personality—ranging from smoky or earthy to grassy, fruity, citrusy, or even floral.

Acid

Next, you need something sharp to brighten the sauce. This usually comes from vinegar or citrus (lime, lemon, orange), and occasionally from a gentle fermented tang. For instance, Louisiana-style hot sauces lean hard into vinegar, whereas Peruvian aji sauces often pair lime with dairy for a rounder, creamier acidity.

Salt

From there, salt steps in as more than just seasoning. It sharpens flavor, but in fermented hot sauces it also controls preservation and microbial balance. Because of that, getting the salt percentage right is essential for both safety and proper flavor development. If fermentation is the goal, it’s wise to consult a focused fermented hot sauce guide that covers brine strength and safe procedures in detail.

Vertical row of fresh peppers ranging from mild green jalapeno to superhot red Carolina Reaper on a neutral background, illustrating the heat ladder for pepper sauce recipes.
Use this pepper heat ladder to match chilies to each sauce: jalapeno and serrano for easy jalapeno pepper sauce, cayenne for classic vinegar hot pepper sauce, habanero and scotch bonnet for fruity Caribbean hot pepper sauce, and superhots like ghost pepper or Carolina Reaper for tiny-batch ‘world’s hottest’ style blends.

Sweetness (optional)

After you’ve set the heat and acid, a touch of sweetness can smooth the edges. Sugar, jaggery, honey, or fruits like mango, pineapple, peach, or even blueberry can soften aggressive heat. They’re the reason mango habanero wing sauce, pineapple habanero jelly, and habanero peach BBQ sauce end up craveable instead of just punishing.

Aromatics

Once the core flavors are in place, aromatics bring depth. Garlic, onion, herbs, and spices (such as cumin, oregano, or paprika) create complexity, while additions like nuts—as in romesco or ajvar—lend richness and a subtle, toasty backbone.

Texture

Finally, the way the sauce feels matters as much as how it tastes. It can be thin and pourable (like Louisiana hot sauce or cayenne pepper sauce), chunky (as in jalapeño relish or pineapple habanero salsa), thick and spreadable (ajvar or sweet pepper paste), or lush and creamy (habanero cream sauce, jalapeño ranch, peppercorn gravy). The chosen texture should match how you plan to use the sauce—whether splashed, spooned, spread, or drizzled.

Four bowls of pepper sauce in a vertical row showing different textures from thin red vinegar hot sauce to smooth green jalapeno sauce, chunky pineapple habanero salsa and thick creamy peppercorn sauce.
Texture is another lever in any pepper sauce recipe – splash thin vinegar hot sauce, drizzle smooth jalapeno pepper sauce, scoop chunky pineapple habanero salsa, or coat steaks and pasta with a thick creamy peppercorn-style sauce.

Once you see these levers, it becomes much easier to understand how different pepper sauce recipe versions relate to one another. So let’s start with the most familiar: classic vinegar-based hot pepper sauce.

Also Read: Healthy Tuna Salad – 10 Easy Recipes (Avocado, Mediterranean, No Mayo & More)


Classic Vinegar Hot Pepper Sauce

Thin, sharp, vinegary and bright red: this style of pepper sauce recipe is what many people associate with the word “hot sauce”. It covers Louisiana hot sauce, simple cayenne hot pepper sauce, Southern hot pepper vinegar, and a whole family of Caribbean hot sauces built around habanero and scotch bonnet chili.

Bottle of bright red vinegar hot pepper sauce on a wooden board with fresh red chilies, vinegar and salt, representing classic Louisiana-style hot sauce.
This simple base of red chilies, vinegar and salt can stand in for Louisiana hot sauce, homemade cayenne hot pepper sauce or a sharp Southern pepper vinegar to splash over beans, greens and fried food.

Simple Louisiana-Style Hot Pepper Sauce Recipe

This recipe gives you a classic hot pepper sauce that works with cayenne or any thin-skinned hot chili. It rivals bottled favorites like Tabasco-style chili sauce and Frank’s-style cayenne red pepper sauce, yet it’s easy enough for a beginner.

Overhead view of ingredients for Louisiana-style hot pepper sauce including red chilies, garlic cloves, white vinegar, salt, brown sugar, an empty glass bottle and a small funnel on a dark background.
Everything you need for a classic vinegar hot pepper sauce recipe in one frame: fresh red chilies, white vinegar, garlic, salt and a little sugar, ready to be simmered, blended and bottled as your own house Louisiana-style hot sauce.

Ingredients

  • 300 g fresh red chilies (cayenne, tabasco-type or mixed hot peppers)
  • 250 ml white vinegar (you can swap part for apple cider vinegar)
  • 3 cloves garlic
  • 1 tsp salt
  • ½ tsp sugar (optional, but balances the tang)

Method or Recipe

  1. Rinse the chilies, trim the stems and, if you want a slightly milder hot pepper sauce, slit them to remove some seeds.
  2. Combine chilies, garlic, vinegar, salt and sugar in a saucepan. Simmer gently for 8–10 minutes, just until softened.
  3. Cool for a few minutes, then blend everything until very smooth.
  4. If you prefer a very silky Louisiana-style pepper sauce, strain through a fine sieve; otherwise keep the pulp.
  5. Bottle while still slightly warm in a clean glass bottle or jar. Let your pepper sauce rest in the fridge for at least a day before using; it improves dramatically after a week.
Vertical photo showing the process of homemade vinegar hot pepper sauce with a pan of chilies in vinegar, a blender jug of red sauce and a glass bottle being filled using a funnel.
The full journey of a classic vinegar hot pepper sauce recipe in one frame – soften chilies and garlic in vinegar, blitz until smooth, then bottle your own Louisiana-style house hot sauce.

You’ve now got a base that can play many roles. With a few tweaks it becomes:

  • Cayenne hot pepper sauce: use only cayenne and keep it unstrained.
  • Southern pepper vinegar sauce: pour hot vinegar and salt over whole slit chilies in a bottle and let it steep instead of blending – that’s the classic pepper vinegar for greens and beans.
  • Scotch bonnet hot sauce or Jamaican hot pepper sauce: replace some or all of the chilies with scotch bonnet chili or habanero, add carrot and onion, and blend less vinegar for a thicker Caribbean hot pepper sauce.

If you love a bit of science in your kitchen, you can also move into fermented hot sauce territory by packing chopped chilies and garlic in salted brine, letting them ferment for a week or two, then blending with vinegar. For precise salinity and safety tips, it’s worth cross-checking against a detailed fermented hot sauce tutorial.

Also Read: Potato Salad Recipe: Classic, Russian, German, Vegan & More


Recipe for Jalapeno Pepper Sauce, Salsas, Mayo and Relish

Next, it helps to shift to something greener and friendlier. Jalapeno pepper sauce is a perfect “gateway” hot sauce: moderate heat, bright flavor, and endless variations like jalapeno salsa, jalapeno cream sauce, jalapeno mayo and even jalapeno pepper jam.

Board with a bottle of green jalapeno pepper sauce, a bowl of jalapeno salsa, creamy jalapeno mayo and a jar of jalapeno relish or hot pepper jelly surrounded by fresh jalapenos, lime wedges and coriander.
Start with one green jalapeno pepper sauce, then branch out: keep some as a pourable jalapeno hot sauce, pulse part into chunky jalapeno salsa, whisk a few spoons into jalapeno mayo or ranch, and cook the rest down into jalapeno relish or hot pepper jelly for burgers and cheese boards.

Fresh Green Jalapeno Pepper Sauce Recipe

This jalapeno hot sauce recipe gives you a grassy, tangy green chili sauce that works on tacos, eggs, burgers and grain bowls.

Flatlay of fresh green jalapeno hot sauce ingredients including sliced jalapenos, chopped onion, garlic, white vinegar, lime, coriander and salt arranged neatly on a light background.
These seven fresh ingredients form the backbone of a bright green jalapeño pepper sauce — a versatile base that can turn into jalapeño salsa, jalapeño mayo, or even a jalapeño relish with just a few easy tweaks.

Ingredients

  • 10–12 fresh jalapeños
  • ½ small onion
  • 3 cloves garlic
  • 120 ml white vinegar
  • Juice of 1 lime
  • 1 tsp salt
  • Small handful coriander (optional)
Vertical food photo showing the process of making green jalapeno hot sauce with sautéed jalapenos and onions in a skillet, a jug of blended green sauce and a small bottle of finished jalapeno pepper sauce with lime and coriander.”
Soften sliced jalapeños, onion and garlic in a pan, blitz with vinegar, lime and coriander, then bottle the smooth sauce – this simple flow turns basic chili prep into a bright, pourable jalapeño pepper hot sauce you can use on tacos, eggs, bowls and more.

Method

  1. Slice jalapeños and onion; peel the garlic. If you want a very mild pepper sauce, remove the seeds from some of the jalapeños.
  2. Add jalapeños, onion and garlic to a small pan with a splash of water. Cover and simmer 5–6 minutes, just to soften.
  3. Tip everything into a blender, add vinegar, lime juice, coriander and salt, then blend until perfectly smooth.
  4. Taste and adjust. More vinegar makes it sharper; a pinch of sugar softens the edges. If it’s too thick, thin with a little water.
  5. Bottle and refrigerate. The color may mellow over time but the flavor deepens.

Within a few minutes, you’ve created a green jalapeno pepper hot sauce that sits somewhere between salsa verde and a pourable chili pepper sauce.

Smoked Jalapeno and Lime Hot Sauce

If you enjoy deeper flavor, you can double down on the smokiness:

  • Replace some jalapeños with smoked jalapeno (chipotle) or stir in a spoonful of chipotle chili in adobo sauce at blending time.
  • Boost the lime juice for a bright jalapeno lime hot sauce that tastes fantastic on grilled fish or paneer tikka.
Bottle of smoky jalapeno and lime hot sauce on a wooden board with fresh jalapenos, dried chipotle chili, lime wedges and a plate of grilled paneer in the background.
To deepen the flavor of your jalapeño pepper sauce, swap in smoked jalapeños or chipotle in adobo and finish with extra lime juice – this smoky jalapeño and lime hot sauce is made for grilled fish, paneer tikka, tacos and fajita-style vegetables.

This is a great place to mention chipotle early, because it links this jalapeno family to the chipotle and adobo section later.

Jalapeno Mayo, Ranch and Cream Sauce

Once you have a basic jalapeno sauce, it becomes surprisingly easy to turn it into creamy jalapeno sauce variations:

  • Stir a spoon or two into mayonnaise, yogurt or sour cream for jalapeno mayo, jalapeno aioli or jalapeno ranch dipping sauce.
  • Add chopped coriander, lime and garlic for extra lift.
Three creamy green jalapeno sauces in white bowls, served with fries, tortilla chips and fresh jalapenos on a light background.
Once you’ve blended a bright green jalapeño pepper sauce, whisk it into mayo, yogurt or cream to get jalapeño mayo, jalapeño ranch and silky jalapeño cream sauce – the kind of dips that make fries, tacos and wings disappear fast.

A creamy jalapeno ranch sits nicely beside rich foods like fried chicken, wedges or nachos, just as yogurt-based dips like tzatziki balance grilled meats and vegetables.

Jalapeno Relish and Hot Pepper Jelly

Not every jalapeno sauce has to be smooth. Relishes and jellies give you texture and concentrated flavor:

  • Jalapeno relish or candied jalapeno relish uses chopped jalapeno, vinegar, sugar and spices simmered until sticky.
  • A jalapeno pepper jam recipe often combines jalapeno with fruit like pineapple, raspberry or apple and sets it with pectin to create a glossy hot pepper jelly.
Jar of chunky jalapeno relish and a bowl of glossy pepper jelly on a wooden board with crackers, cheese and fresh jalapenos, with text explaining how to make relish and jelly.
Jalapeño relish starts by chopping chilies and simmering them with vinegar and sugar until thick and sticky, while hot pepper jelly blends jalapeños with fruit, sugar and pectin before setting in jars – two sweet-heat preserves that turn cheese boards, burgers and sandwiches into something special.

These are magic on cheese boards, sandwiches and burgers, especially when served alongside other tangy, fruity spreads like cranberry sauce with orange juice variations.


Habanero Sauce, Scotch Bonnet Hot Sauce and Fruity Variants

As you step up from jalapeno toward habanero and scotch bonnet chili, the heat increases dramatically; however, so does the fruitiness. Habanero hot sauce, scotch bonnet hot sauce and Caribbean hot pepper sauce all share this bright, tropical character.

Board with bowls of habanero hot sauce, mango habanero sauce, pineapple habanero salsa and dark berry habanero sauce surrounded by fresh habanero peppers and diced mango, pineapple and peach.
Pairing habanero or scotch bonnet chili with fruit turns brutal heat into craveable sauce: blend it straight for classic habanero hot sauce, fold in mango or pineapple for wing sauce and salsa, or cook it down with peaches or berries for a richer, chutney-like hot sauce to serve with grills and cheeseboards.

Basic Habanero Hot Pepper Sauce

This habanero pepper sauce uses carrot to round out the heat and make a more balanced hot pepper sauce recipe.

Overhead view of ingredients for a carrot-softened habanero hot pepper sauce including whole orange habanero peppers, sliced carrot, onion, garlic, vinegar, lime and salt on a dark background.
Carrot, onion and lime soften the sharp heat of habanero in this base hot pepper sauce – a starting point you can keep plain, turn into Jamaican-style scotch bonnet hot sauce or sweeten into mango and habanero sauce.

Ingredients

  • 8–10 orange habanero chilies
  • 1 carrot, sliced
  • ½ onion, chopped
  • 3 cloves garlic
  • 250 ml white vinegar
  • Juice of 1 lime
  • 1–1½ tsp salt

Method

  1. In a saucepan, combine carrot, onion, garlic, habaneros and vinegar. Simmer until the vegetables are tender and the habanero flesh has softened.
  2. Cool slightly, then blend until very smooth, adding lime juice and a splash of water if needed.
  3. Taste for salt and acidity. Adjust until it feels punchy but not harsh.
  4. Bottle and refrigerate. After a couple of days, the flavors meld into a rounded habanero chili sauce.
Vertical food photo showing a pan of habaneros, carrot and aromatics simmering in liquid, a jug of blended orange habanero sauce and a glass bottle being filled with the finished hot pepper sauce, with fresh habaneros and a lime on the table.
Simmer habaneros with carrot, onion and garlic, blend the mixture silky smooth with vinegar and lime, then bottle it – this carrot-softened habanero base becomes Jamaican-style hot pepper sauce on its own or the backbone of mango, pineapple and peach habanero hot sauces.

By swapping habanero for scotch bonnet chili, you immediately slide into scotch bonnet hot sauce territory, a style widely used in Jamaican hot pepper sauce and other Caribbean hot sauces.

Mango and Habanero Sauce

Because habanero has such a fragrant, fruity note, it pairs naturally with mango. That’s why mango habanero wing sauce turns up on so many menus. You can build your own mango and habanero sauce from the classic base:

  • Blend 1 cup ripe mango chunks into the hot sauce.
  • Add 1–2 tablespoons honey or brown sugar if you want a stickier glaze.
  • Simmer briefly after blending to tighten the texture.
Plate of crispy chicken wings coated in glossy mango habanero sauce with a bowl of bright orange mango and habanero wing sauce, fresh habanero peppers, mango cubes and lime wedges on a dark wooden table.
Blend your basic habanero pepper sauce with ripe mango, a little honey or brown sugar and extra lime, then simmer until glossy – you’ve got a sticky mango habanero wing sauce that doubles as a fiery glaze for cauliflower, tofu or grilled chicken.

Brushed onto grilled chicken, cauliflower or wings, this mango habanero hot sauce gives you sticky, spicy, sweet flavors in one quick move. If you prefer less sweetness and more zing, lemon pepper sauce or hot lemon pepper sauce made with butter, lemon zest and cracked pepper is a great contrast to sticky mango habanero wing sauce.

Pineapple Habanero, Peach Habanero and More

The same pattern works with other fruits:

  • Pineapple and habanero sauce or pineapple habanero salsa (with red onion and coriander) is brilliant with tacos, grilled seafood, or paneer skewers.
  • Peach habanero salsa is ideal for pork chops or roast chicken.
  • Blueberry habanero hot sauce, darker and almost chutney-like, does wonders on cheeseboards or with rich sausages.
Tiny glass jar of dark red superhot chili sauce beside a bowl of creamy ranch dip, fresh superhot peppers and potato wedges on a dark wooden table with text warning to handle superhot peppers with care.
When you’re working with ghost pepper, Trinidad scorpion or Carolina Reaper, make a tiny ultra-hot concentrate and then tame it in mayo, ranch or cream. You still get that ‘world’s hottest sauce’ kick, but in a ghost pepper ranch–style dip that’s intense, edible and much easier to control.

If you’re tempted by phrases like “world hottest sauce”, it’s worth remembering how concentrated superhot peppers are. Carolina Reaper, Trinidad scorpion pepper and ghost chili hot sauce are best treated like seasonings rather than regular condiments – a small spoonful of superhot pepper mash stirred into mayo, yogurt or ranch makes a safer ghost pepper ranch or habanero trinidad scorpion pepper sauce than pouring it straight onto your food.

Also Read: Upma Recipe: 10+ Easy Variations (Rava, Millet, Oats, Semiya & More)


Chipotle Pepper in Adobo Sauce and Chipotle Hot Sauce

Chipotle peppers – essentially smoked, dried jalapenos – become incredibly versatile once they are cooked in an adobo sauce made of tomato, vinegar, sugar and spices. When chipotle goes in adobo sauce it becomes the smoky backbone of many Tex-Mex and Mexican-inspired recipes, from chipotle hot sauce to creamy chipotle mayo.

Cast-iron skillet of chipotle peppers in thick red adobo sauce with a bottle of chipotle hot sauce, a bowl of chipotle mayo, dried chipotle chilies, garlic and tomato paste on a dark wooden table.
Simmering dried chipotle chilies in a tomato-and-vinegar adobo sauce gives you a smoky base you can blend into chipotle hot sauce, whisk into chipotle mayo or stir into ketchup and soda for an easy chipotle BBQ or Dr Pepper barbecue sauce.

Homemade Chipotle in Adobo Sauce

Instead of always reaching for canned chipotle peppers in adobo, you can make your own. A homemade pan of chipotle peppers in adobo sauce feels deeply smoky and is surprisingly simple recipe.

Ingredients

  • 8–10 dried chipotle chilies
  • 1 small onion, finely chopped
  • 3 cloves garlic, minced
  • 2 tablespoons tomato paste
  • 250 ml water or light stock
  • 60 ml apple cider vinegar
  • 1–2 tablespoons brown sugar
  • 1 teaspoon salt
  • ½ teaspoon ground cumin
  • ½ teaspoon oregano
Overhead flatlay of ingredients for homemade chipotle in adobo sauce including dried chipotle chilies, tomato paste, chopped onion, minced garlic, apple cider vinegar, water, brown sugar, salt, cumin and oregano on a dark background.
Dried chipotle chilies, tomato, vinegar, brown sugar, cumin and oregano are all you need to build a smoky chipotle in adobo sauce that stands in for canned chipotle peppers in adobo in hot sauces, marinades, mayo and BBQ recipes.

Recipe for Homemade Chipotle

  1. Toast the dried chipotle peppers briefly in a dry pan until fragrant, then cover with hot water and soak for 20–30 minutes.
  2. In a saucepan, sauté onion and garlic in a little oil until they soften. Stir in tomato paste, cumin and oregano; fry for a minute.
  3. Add the softened chipotles, 250 ml of the soaking liquid or stock, vinegar, sugar and salt. Simmer gently for about 20 minutes until the chilies are glossy and the adobo sauce is thick and rich.
  4. Adjust seasoning. Some people like more sugar for a sweeter adobo chipotle; others increase vinegar for a sharper chili pepper adobo sauce.
Chipotle in adobo sauce process image showing dried chipotle chilies, rehydrated chilies in soaking liquid and chipotles simmered in rich red adobo sauce with the words Toast, Soak and Simmer.
To build deep flavor in chipotle in adobo sauce, lightly toast the dried chilies first, soak them until soft, then simmer with tomato, vinegar, sugar and spices until the chipotles are glossy and the adobo is thick and brick red.

You can leave the chipotles whole, creating classic chipotle chiles en adobo, or blend part of the batch for a smoother chile chipotle sauce. The process is similar to many detailed guides such as this homemade chipotles in adobo recipe, which walks through soaking, simmering and seasoning in depth.

Quick Chipotle Hot Pepper Sauce

Once you have chipotle and adobo sauce ready, it takes almost no effort to create a smoky, pourable chipotle pepper hot sauce:

Bottle of dark smoky chipotle hot sauce on a wooden board with a bowl of sauce, dried chipotle chilies and lime wedges, with tacos blurred in the background.
Once your chipotles are soft and simmered in adobo, blend them with extra vinegar and water into a pourable smoky chipotle pepper hot sauce you can splash over eggs, tacos, roasted vegetables and grain bowls.
  • Blend several chipotles and some adobo sauce with extra vinegar and a splash of water until you reach your preferred thickness.
  • Taste and balance with more sugar, salt or vinegar.

This chipotle pepper sauce is wonderful on eggs, roasted vegetables, grilled tofu and burritos.

Chipotle Mayo, Cream Sauce and BBQ

Chipotle and adobo also form the base of many creamy sauces:

  • Blend adobo sauce with mayonnaise and yogurt for a smoky chipotle mayo or chipotle sauce that works on burgers, tacos, bowls and sandwiches.
  • Fold chipotle in adobo into a simple mix of ketchup, vinegar, brown sugar and spices to make chipotle BBQ sauce or even a spicy Dr Pepper barbecue sauce if you add a splash of soda.
Bowl of creamy chipotle mayo and a ramekin of dark smoky chipotle BBQ sauce on a wooden board with a burger, glazed wings, dried chipotle chilies and a spoonful of adobo.
The same chipotle in adobo base can go creamy or sticky – whisk a spoonful into mayo or yogurt for an all-purpose chipotle mayo, or cook it with ketchup, brown sugar and a splash of soda for an easy smoky chipotle BBQ glaze for burgers, wings and grilled veggies.

When you’re using canned chipotle in adobo and wondering what to do with the rest of the tin, you might enjoy browsing idea lists like this collection of recipes that use up a can of chipotles in adobo.

Between your homemade adobo chipotle peppers and quick chipotle sauce recipes, you cover a huge chunk of that keyword universe: chili in adobo sauce, peppers in adobo sauce, chipotle chili adobo, chili adobo chipotle, sauce chipotle, adobo sauce chipotle and more, all with genuinely useful recipes.

Also Read: Double Chocolate Chip Cookies – Easy Recipe with 7 Variations


Guajillo Sauce, Ancho Chili Paste and Poblano Pepper Sauce

Moving from aggressive heat to deeper, warmer flavors, it helps to look at the family of Mexican red pepper sauces built on guajillo, ancho and poblano. These sauces often sit between a hot sauce and a stew base, but with a little extra vinegar they slide neatly into pepper sauce territory.

Three bowls of Mexican pepper sauces on a wooden board: brick-red guajillo sauce, dark ancho chili paste and creamy green poblano pepper sauce, surrounded by dried chilies, roasted poblano, lime wedge and coriander with text describing deep, warm heat.
Guajillo sauce brings a smooth brick-red base for tacos and enchiladas, ancho chili paste adds deeper raisiny heat for marinades and glazes, while creamy poblano pepper sauce gives you a mild green capsicum sauce for pasta, grilled chicken or chile poblano spaghetti.

Guajillo Sauce (Chile Guajillo Sauce)

When we talk about Guajillo chilies, they are medium heat, fruity and slightly smoky. A classic guajillo sauce (sometimes called sauce guajillo or chile guajillo sauce) is brick-red and velvety.

Ingredients

  • 6 dried guajillo chilies, stems and seeds removed
  • 2 dried ancho chilies (optional, for deeper flavor)
  • 2 cloves garlic
  • ¼ onion
  • 1 tomato, roasted or canned
  • 500 ml water or stock
  • Salt, vinegar to taste
Overhead photo of ingredients for guajillo sauce including dried guajillo and ancho chilies, tomatoes, onion, garlic, stock, oil and bowls of salt on a dark background.
Dried guajillo and a touch of ancho blended with tomato, onion, garlic, stock and a little salt become a smooth chile guajillo sauce you can use on tacos, enchiladas, rice bowls or even as a smoky red pepper pasta sauce.

Method

  1. Lightly toast the guajillo and ancho chilies in a dry pan until fragrant, then soak in just-boiled water for around 20 minutes.
  2. Blend the softened chilies with garlic, onion, tomato and about 250 ml of soaking liquid until smooth.
  3. Strain if needed, then simmer the sauce for 15–20 minutes, adding more water if it thickens too much.
  4. Season with salt and, if you want a sharper edge, a spoon or two of vinegar.
Vertical photo showing dried chilies soaking in a bowl, a jug of blended brick-red guajillo sauce and a small pan of guajillo sauce simmering on a dark wooden table with tortillas, tomato, garlic and onion around them.
Guajillo sauce follows a simple flow: soak dried guajillo and ancho chilies until soft, blend them with tomato, garlic and onion, then simmer the puree into a smooth brick-red sauce for tacos, enchiladas, rice bowls or even red pepper pasta.

Thickened, this sauce becomes a base for enchiladas, tacos, chili in adobo-style stews and even hatch chili sauce variations. Thinned slightly, it can be used as a red pepper pasta sauce, especially over robust shapes like rigatoni or penne.

Ancho Chile Paste and Ancho Chipotle Sauce

To make ancho chili paste, simply increase the proportion of ancho chilies, cook the blended sauce down further until it’s very thick, then cool and store in a jar. This ancho chile paste can:

  • Be whisked with vinegar and a little oil to become ancho sauce for grilled meats.
  • Combine with adobo chipotle for a dark, smoky ancho chipotle sauce that works on tacos, roasted vegetables and even pizza.
Small jar of thick dark-red ancho chili paste with a spoon on a wooden board, surrounded by dried ancho chilies and a blurred plate of roasted vegetables in the background.
Cooking a guajillo-style sauce down until it’s very thick gives you a spoonable ancho chili paste that adds instant depth to marinades, glazes and smoky ancho chipotle sauce for tacos and roasted vegetables.

Creamy Poblano Pepper Sauce

For something greener and milder, roasted poblano pepper sauce is an excellent choice.

Ingredients

  • 3–4 poblano peppers
  • ½ onion
  • 2 cloves garlic
  • 120 ml cream or cashew cream
  • Juice of ½ lime
  • Small handful coriander
  • Salt
Bowl of rigatoni pasta coated in creamy green poblano pepper sauce, topped with roasted poblano strips and coriander, with a small jug of extra poblano sauce and a roasted pepper on a wooden table.
Roast poblano peppers until blistered, then blend them with onion, garlic, cream, lime and coriander for a silky poblano pepper sauce that clings beautifully to pasta and doubles as a mild green capsicum sauce for grilled chicken, mushrooms or chile poblano spaghetti.

Method

  1. Roast poblano peppers over an open flame, under the grill or in a very hot oven until blistered. Place them in a covered bowl to steam, then peel and remove seeds.
  2. Blend the roasted poblanos with onion, garlic, cream, lime and coriander.
  3. Season with salt and adjust lime juice until it tastes vibrant.

This poblano sauce makes a rich, green capsicum sauce for pasta (think chile poblano spaghetti), grilled chicken or roasted mushrooms.

Also Read: One-Pot Chicken Bacon Ranch Pasta (Easy & Creamy Recipe)


Ají Amarillo Sauce, Ají Verde and Ají Panca

Shifting south, Peruvian aji sauces introduce another dimension to the pepper sauce world. Aji amarillo, aji panca and related peppers bring fruitiness, medium heat and gorgeous color.

Three bowls of Peruvian aji sauces on a wooden board: creamy yellow aji amarillo sauce, bright green aji verde and dark red aji panca paste, surrounded by yellow chilies, herbs, lime and roast potatoes with text describing the Peruvian aji trio.
Peruvian cooking leans on a colourful ají trio: creamy yellow ají amarillo sauce for fries and rice, herb-packed ají verde for drizzling over grilled meats and vegetables, and mellow red ají panca paste for marinades, stews and gentler red pepper sauce.

Ají amarillo, often described as the “sunshine chili”, is medium hot and vividly fruity. It appears in many Peruvian sauces and stews. Guides like this one on aji amarillo explain how central it is to Peruvian cooking and why its flavor is so distinctive.

Ají Amarillo Sauce (Peruvian Yellow Sauce)

This aji amarillo sauce, sometimes called Peruvian yellow sauce or peru yellow sauce, is a creamy, tangy dressing for fries, roast potatoes, roast chicken or veggies.

Overhead view of ingredients for creamy aji amarillo sauce including a spoonful of yellow aji amarillo paste, a bowl of mayonnaise or yogurt, a small jug of milk, lime halves, crumbled cheese, a garlic clove and a pinch bowl of salt on a light background with text about seven ingredients.
With just seven ingredients – ají amarillo paste, mayo or yogurt, a splash of milk, crumbled cheese, garlic, lime and salt – you can blend Peru’s favourite yellow ají amarillo sauce for dunking fries, roast potatoes, chicken and veggies.

Ingredients

  • 3–4 tablespoons aji amarillo paste
  • 120 ml mayonnaise or thick yogurt
  • 60 ml milk or evaporated milk
  • 50 g queso fresco or feta
  • 1 clove garlic
  • Juice of ½–1 lime
  • Salt
Plate of golden fries and roasted chicken pieces drizzled with creamy yellow aji amarillo sauce, with extra dipping sauce in small bowls, lime wedge and coriander on a wooden table, plus text about Peruvian yellow sauce for fries and chicken.
Peruvian ají amarillo sauce shines on anything crisp and salty – drizzle it over fries and roast potatoes, then serve more on the side as a tangy, creamy dip for roast chicken, grilled veggies or rice bowls.

Method

  1. Add ají amarillo paste, mayo, milk, cheese, garlic and lime juice to a blender.
  2. Blend until completely smooth and pale yellow.
  3. Adjust thickness with extra milk and season with salt.

The result is a bright, creamy aji pepper sauce that hits different notes from jalapeno ranch or habanero cream sauce yet plays a similar role: drizzled over bowls, fries, roasted vegetables and grilled meats.

Ají Verde (Green Ají Pepper Sauce)

Ají verde is the herb-forward cousin of yellow aji sauce. To make it, you can:

  • Blend ají amarillo paste with coriander, spring onion, lime juice, garlic, oil, a little mayo or yogurt and salt.
Plate of grilled chicken slices and roasted potato wedges drizzled with bright green aji verde sauce, with a bowl of the Peruvian green sauce, lime wedges, coriander and spring onions on a wooden table and recipe text overlay.
Ají verde takes the same ají heat in a fresher direction – blend ají paste with coriander, spring onions, lime, oil and a little mayo or yogurt for a herb-loaded green sauce to drizzle over grilled chicken, roast potatoes and veggies.

The result is a vibrant green aji chili sauce that pairs beautifully with grilled meats, bread or roast potatoes, in the same way a bright chimichurri does for steak.

Ají Panca Paste and Sauce

Ají panca is milder, deep red and slightly raisin-like. Turning it into aji panca paste is as simple as simmering aji panca, garlic and onion with a splash of vinegar, then blending until smooth.

Jar of deep red aji panca paste with a spoon on a wooden board, surrounded by dried red chilies, garlic, onion slices and a small jug of vinegar, with a dish of food coated in the sauce in the background.
Ají panca is milder and slightly raisiny; simmer it with garlic, onion and a splash of vinegar to make a mellow red aji panca paste that you can thin into a gentle red pepper sauce or use straight as a base for Peruvian-style marinades and stews.

This paste can be used:

  • As a marinade base for grilled vegetables or meats.
  • As a softer, less fiery red aji pepper sauce when thinned with stock and a little lime juice.

Together, ají amarillo sauce, ají verde and ají panca paste give you an entire Peruvian pepper sauce family that’s distinct from Mexican or Caribbean styles but equally addictive.

Also Read: Authentic Louisiana Red Beans and Rice Recipe (Best Ever)


Roasted Red Pepper Sauces: Romesco, Ajvar and Sweet Capsicum

Not all pepper sauces are about heat. Some focus on sweetness, smokiness and richness while still being robustly pepper-forward. This family includes romesco sauce, ajvar, roasted red pepper pesto and a variety of bell pepper pasta sauces.

Three roasted red pepper sauces on a wooden board: chunky romesco with almonds, smooth ajvar spread and a silky roasted red capsicum sauce in a jug, surrounded by roasted red peppers, grilled eggplant, nuts, bread and olive oil with text about roasted red pepper sauces.
Roasting red peppers opens the door to a whole family of sweet, smoky sauces – nutty romesco for bread and grilled fish, silky ajvar with eggplant for spreading and a smooth roasted capsicum sauce that can become red pepper pesto or a simple bell pepper pasta sauce.

Romesco Sauce Recipe

Romesco comes from Catalonia and brings together roasted red peppers, tomato, nuts, bread and olive oil. It’s thick, rust-colored and amazing with grilled vegetables, fish, eggs or crusty bread.

Overhead photo of ingredients for romesco sauce on a wooden background, including roasted red peppers, a tomato, almonds, garlic cloves, toasted bread, olive oil, vinegar and smoked paprika with text explaining the sauce.
Classic romesco starts simple – roasted red peppers and tomato blended with toasted nuts, bread, garlic, olive oil, vinegar and smoked paprika to make Spain’s favourite red pepper sauce for grilled vegetables, fish, eggs and crusty bread.

Ingredients

  • 2 large roasted red bell peppers (or 1 cup from a jar)
  • 1 tomato, roasted or canned
  • 30 g toasted almonds or hazelnuts
  • 1 slice stale bread, toasted
  • 1–2 cloves garlic
  • 2–3 tablespoons olive oil
  • 1–2 teaspoons sherry vinegar or red wine vinegar
  • Smoked paprika, salt and pepper

Method

  1. Combine peppers, tomato, nuts, bread and garlic in a food processor.
  2. Add olive oil and vinegar, then pulse until thick and slightly coarse.
  3. Season with smoked paprika, salt and pepper. Adjust vinegar until it tastes bright.
Plate with a bowl of thick romesco sauce, grilled asparagus and peppers, and toasted bread topped with the nutty roasted red pepper sauce, on a wooden table with the text ‘Romesco loves grill marks’.
Thick romesco – made from roasted red peppers, tomato, nuts and bread – is perfect for spooning over grilled vegetables, charred bread and even simple pan-fried fish whenever you want sweet smoke and crunch in one bite.

For a deeper dive into traditional methods, including the use of specific Spanish dried peppers, there are detailed guides such as this romesco sauce recipe.

Ajvar: Balkan Roasted Red Pepper Spread

Ajvar sauce is a Balkan favorite made from roasted red peppers and often eggplant. It’s smoother than romesco, typically without nuts or bread, and is used as a spread or dip.

Overhead view of ingredients for ajvar roasted red pepper spread, including charred red peppers, a roasted eggplant, garlic cloves, olive oil, vinegar, salt, chili flakes and a slice of rustic bread on a dark background.
Ajvar starts with slow-roasted peppers and eggplant; once they’re soft and smoky you blitz them with garlic, olive oil, vinegar, salt and a pinch of chili into a smooth Balkan sweet pepper spread for bread, grilled meats and mezze boards.

To make a simple ajvar red pepper spread:

  • Roast red peppers and eggplant until very soft.
  • Peel, drain excess liquid, then blend with garlic, a little vinegar, olive oil and salt.
  • Cook it down in a pan until thick and glossy.

This sweet pepper paste works as a sandwich spread, mezze dish or pasta toss.

Bowl of glossy ajvar roasted red pepper and eggplant spread on a wooden board with toasted bread topped with ajvar, grilled vegetables, olives and cheese cubes, with text describing it as a sweet smoky pepper spread.
Once the peppers and eggplant are roasted and blended smooth, ajvar becomes a sweet, smoky roasted red pepper spread that’s perfect on toasted bread, alongside grilled vegetables, cheeses and olives, or served with grilled meats on a mezze-style platter.

Roasted Red Pepper Pasta Sauce and Bell Pepper Coulis

Roasted bell peppers can easily become:

  • A smooth bell pepper pasta sauce blended with cream or cashew cream, garlic and Parmesan, echoing some of the comforting notes from sauces like Alfredo and béchamel.
  • A red pepper pesto (with nuts, cheese, olive oil) for tossing with pasta, much like the basil-based versions in pesto recipe collections.
  • A simple bell pepper coulis: a thin, silky puree splashed around grilled fish or vegetables.
Bowl of pasta coated in creamy roasted red pepper sauce with herbs and cheese in the foreground, and a plate of grilled fish or vegetables on a smooth bell pepper coulis swirl in the background, with extra red pepper sauce and roasted peppers on a wooden table.
The same roasted capsicum base can go rustic or refined – blend it rich for a creamy roasted red pepper pasta sauce, or strain it into a silky bell pepper coulis to plate grilled fish and vegetables restaurant-style.

These roasted red pepper sauces give you a way to highlight capsicum flavor when you don’t want too much heat, while still playing nicely alongside hotter sauces like habanero or chipotle.


Asian Chili Oil and Chili Pepper Sauce Recipes

When you move eastward, chili takes on new shapes. Instead of vinegar-heavy hot sauce, you often find chili oil, chili pastes and complex stir-fry sauces. These still count as pepper sauces in the broad sense, and they’re essential in many kitchens.

Jar of Sichuan chili oil with red oil, chili flakes and sesame seeds on a wooden table, surrounded by dried chilies, Sichuan peppercorns, garlic and a bowl of noodles in the background, with text describing ‘Sichuan Chili Oil: Heat in a Spoonful’.
Sichuan chili oil is made by pouring hot oil over chili flakes, sesame and Sichuan peppercorns to create a fragrant base you can drizzle over noodles, dumplings, rice bowls or whisk into Chinese hot pepper dipping sauces.

Sichuan Chili Oil

Szechuan chili oil – or Sichuan chili oil – is essentially a hot pepper sauce built in oil rather than vinegar. It carries crunchy chili flakes, sesame seeds and the numbing tingle of Sichuan peppercorns.

Basic idea

  1. Warm neutral oil with ginger, garlic, scallions, star anise and Sichuan peppercorn until fragrant.
  2. Strain the hot oil over a bowl of chili flakes, sesame seeds and a pinch of salt and sugar.
  3. Stir and let cool.
Process of making Sichuan chili oil showing a pan of oil with ginger, garlic and spring onions infusing, hot oil being strained through a sieve and a bowl of bright red chili oil with flakes and sesame seeds on a wooden table.
Good Sichuan chili oil is built in three calm steps: gently infuse aromatics in neutral oil, strain them out, then pour the hot oil over chili flakes and sesame so they toast and bloom without burning.

A very detailed walkthrough, including specific temperatures and variations, can be found in this chili oil guide.

From this one condiment, you can make:

  • Chinese hot pepper sauce by mixing chili oil with soy sauce, black vinegar, garlic and sugar as a dipping sauce for dumplings.
  • Japanese-style chili oil, lighter and often more sesame-forward, for ramen and gyoza.
  • Asian hot chili oil variations with dried shrimp, fermented black beans or peanuts.
Top-down view of a wooden tray with small bowls of soy sauce, black vinegar, Sichuan chili oil and a mixed chili dumpling dipping sauce beside pan-fried dumplings, with text reading ‘Easy Chili Oil Dumpling Sauce’ and MasalaMonk.com.
For an instant Chinese hot pepper dipping sauce, just stir Sichuan chili oil into soy sauce and black vinegar with a little garlic, then serve it alongside steamed or pan-fried dumplings.

In Indian kitchens, similarly punchy condiments appear in forms like thecha – a coarse, fiery mixture of green chilies, garlic and oil – which you can explore in recipes such as MasalaMonk’s tempting thecha.

These different takes on chili pepper sauce show how versatile the basic combination of pepper, fat, salt and aromatics can be.

Also Read: Sheet Pan Chicken Fajitas Recipe (Easy One-Pan Oven Fajitas)

Bowl of noodles coated in glossy red chili oil, topped with scallions and sesame seeds, with a jar of Sichuan chili oil and spoon beside it on a dark wooden table and text describing a quick chili oil noodle recipe.
Once you’ve got a jar of Sichuan chili oil, a fast weeknight dinner is as simple as tossing hot noodles with a spoonful of oil, a splash of soy and vinegar plus scallions and sesame for an instant chili pepper sauce bowl.

Peppercorn Sauce: Green, Black and Brandy Variations

Finally, pepper sauce doesn’t always mean chilies. Black and green peppercorns form the backbone of beloved steak sauces, gravies and dressings. These sauces are milder in heat but intense in aroma, and they round out the larger pepper sauce family.

Sliced medium-rare steak on a dark wooden table drizzled with creamy green peppercorn sauce and dark black pepper steak sauce, with three small sauce jugs and scattered peppercorns in a moody restaurant-style scene.
Between creamy green peppercorn sauce, darker black pepper steak sauce and brandy-laced gravy, you can dress everything from pan-seared steak to roasted chicken and hearty vegetables with a warm peppery kick instead of chili heat.

Classic Green Peppercorn Sauce

Green peppercorn sauce is a restaurant favorite, usually served with steak or grilled chicken. It’s creamy, slightly tangy and warmly peppery rather than searing.

Ingredients

  • 2 tablespoons butter
  • 1 small shallot, finely chopped
  • 2 tablespoons green peppercorns in brine, lightly crushed
  • 60 ml brandy (optional but traditional)
  • 120 ml stock
  • 120 ml cream
  • Salt
Vertical photo showing a small pan of creamy green peppercorn sauce on a dark wooden table surrounded by bowls of butter, chopped shallots, green peppercorns, brandy, stock, cream and salt, with text reading ‘Green Peppercorn Sauce in One Pan’ and MasalaMonk.com.
Butter, shallots, green peppercorns, a splash of brandy, stock and cream all come together in one pan to make the classic green peppercorn steakhouse sauce you can pour over steak, chicken or roasted vegetables.

Method

  1. In a pan, melt butter and gently cook the shallot until translucent.
  2. Stir in the green peppercorns and cook for another minute.
  3. Pour in brandy, let it bubble for a minute, then add stock. Simmer to reduce slightly.
  4. Add cream and simmer until the sauce thickens enough to coat the back of a spoon.
  5. Season with salt.

This green peppercorn sauce is perfect over beef steak with black pepper sauce-style rubs, grilled tofu or roasted vegetables.

Black Pepper Steak Sauce and Peppercorn Gravy Recipe

For a black peppercorn sauce recipe, you can:

  • Swap green peppercorns for coarsely crushed black peppercorns.
  • Add a splash of soy sauce and perhaps oyster sauce to push it toward an Asian black pepper Chinese sauce for stir-fried beef black pepper or beef steak pepper sauce.
Cast-iron pan filled with glossy black pepper steak sauce on a dark wooden table, with sliced steak in the background plus bowls of cracked pepper, stock and butter, and text reading ‘Black Pepper Steak Sauce, Restaurant Style’ with a cooking tip and MasalaMonk.com.
A classic black pepper steak sauce starts right in the pan – deglaze the meat drippings with stock or wine, whisk in butter and plenty of cracked pepper, then spoon the glossy sauce back over sliced steak or beef stir-fries.

Meanwhile, if you extend the stock and thicken with a little flour or cornstarch instead of cream, you get peppercorn gravy, ideal for mashed potatoes, roasts and pies.

Creamy Pepper Sauce Recipe and Peppercorn Dressing

A simple creamy pepper sauce recipe can be mashed together as follows:

  • Deglaze a pan with stock or wine after searing steak or chicken.
  • Add cream, cracked black pepper and a small spoon of mustard, then simmer until thickened.
Plate of green salad topped with grilled chicken drizzled in creamy Parmesan peppercorn dressing, with a jar of the dressing, grated cheese and cracked pepper on a wooden table and text explaining how to make the sauce.
Parmesan peppercorn dressing is just mayo or yogurt shaken with grated Parmesan, cracked black pepper, vinegar and herbs, giving you a cool, creamy pepper sauce for salads, wraps, roasted vegetables or as a dip next to spicy wings and pepper sauces.

For cold dishes and salads, a Parmesan peppercorn dressing mixes mayonnaise or yogurt with grated Parmesan, cracked pepper, vinegar and herbs. It makes a great foil for spicy fried chicken, buffalo cauliflower, and all the other places you might normally use ranch, just as Greek tzatziki variations offer a refreshing, protein-rich alternative.

Also Read: Whole Chicken in Crock Pot Recipe (Slow Cooker “Roast” Chicken with Veggies)


Bringing It All Together

Once you have a few of these pepper sauce recipes under your belt, it becomes easier to improvise your own. The logic that makes jalapeno pepper sauce work is not so different from the logic behind aji amarillo sauce or a simple chili pepper sauce for noodles.

You can:

  • Grab a handful of fresh chilies and make a quick hot pepper sauce with vinegar, garlic and salt.
  • Use dried guajillo, ancho or arbol chile for smoother, earthier guajillo sauce or ancho chili paste.
  • Blend roasted bell peppers and nuts into romesco, or roasted peppers and eggplant into ajvar.
  • Turn mango, pineapple or peach into sweet hot pepper sauce with habanero or scotch bonnet.
  • Switch to oil-based chili pepper sauce with Szechuan chili oil.
  • Move beyond chili entirely and make silky peppercorn gravy or brandy peppercorn sauce.

Alongside these, you may want non-pepper sauces in your repertoire as well. Creamy white sauces like béchamel for lasagna, rich meat sauces like bolognese, herb-forward green sauces like pesto and bright, tangy chutneys such as sautéed green chillies or peanut chutney all give you ways to match any dish and mood.

However you combine them, pepper sauces bring intensity, color and contrast to the table. Once you start keeping a couple of bottles or jars – maybe a jalapeno pepper sauce, a mango habanero hot sauce, a smoky chipotle in adobo and a romesco sauce – you’ll notice how often you reach for them. In the end, that’s the real power of a good pepper sauce recipe: it turns ordinary food into something you remember, again and again.

Also Read: Cheesy Chicken Broccoli Rice – 4 Ways Recipe (One Pot, Casserole, Crockpot & Instant Pot)

FAQs

1. What is a pepper sauce recipe?

It’s any sauce where peppers are the main flavor, usually blended with acid (vinegar or citrus), salt and sometimes a bit of sweetness. It can be a thin hot pepper sauce recipe, a chunky jalapeno salsa, a smooth aji pepper sauce or even a creamy peppercorn sauce for steak.


2. How is pepper sauce different from hot sauce?

Generally, “hot sauce” means a thin, vinegar-heavy chili sauce like cayenne hot pepper sauce or Louisiana hot sauce. “Pepper sauce” is a bigger family that also includes creamy pepper sauce, romesco sauce, guajillo sauce, ajvar, aji amarillo sauce and peppercorn gravy.


3. Which pepper is best for a basic hot pepper sauce?

For a classic vinegar hot pepper sauce, medium-hot, thin-walled peppers like cayenne, serrano or generic “red chilies” work best because they blend smoothly and deliver clean heat without overwhelming flavor.


4. What’s the difference between jalapeno pepper sauce and habanero hot sauce?

Jalapeno hot sauce is usually milder and greener in flavor, ideal for everyday use. Habanero hot sauce and habanero chili sauce are much hotter and more fruity, so they’re often used in smaller amounts or combined with mango, pineapple or cream.


5. How spicy is scotch bonnet hot sauce compared to habanero?

Scotch bonnet chili usually has a similar heat level to habanero, but it tastes a bit more tropical and floral. Therefore, scotch bonnet hot sauce and Jamaican hot pepper sauce feel fiery like habanero sauce but with a distinct island-style character.


6. How can I make my pepper sauce milder?

First, remove seeds and membranes before blending. Also, choose gentler peppers like bell pepper, banana pepper or jalapeno instead of habanero or ghost pepper. Finally, add more acid, sweetness or cream to soften the burn in any pepper sauce recipe.


7. How do I make a thicker, creamier pepper sauce?

Cook the sauce down to reduce liquid, or blend in creamy ingredients like yogurt, cream, cheese or mayo. That’s how you move from a thin jalapeno pepper sauce to a cheesy jalapeno sauce, creamy habanero sauce or rich brandy peppercorn sauce.


8. How long does homemade pepper sauce last in the fridge?

A very acidic hot pepper sauce recipe made with lots of vinegar and salt can last several months refrigerated in clean bottles. In contrast, creamy sauces, fruit-heavy mixes like mango and habanero sauce or pineapple habanero salsa are best used within a week or two.


9. Do I need to cook my pepper sauce or can it be raw?

You can do both. Raw sauces like fresh jalapeno salsa or a raw aji verde taste bright and grassy. Cooked sauces such as guajillo sauce, chili in adobo sauce or roasted red pepper sauce taste deeper and sweeter, with softer heat.


10. What is chipotle pepper in adobo sauce, exactly?

It’s smoked, dried jalapeno (chipotle) simmered in a tomato, vinegar, garlic, sugar and spice mixture called adobo sauce. The result is soft chilies in a rich, smoky, tangy sauce used for chipotle hot sauce, chipotle mayo and smoky stews.


11. What can I do with leftover chipotle in adobo?

Chop it into chili, taco fillings, scrambled eggs, soups or pepper steak sauce. Alternatively, blend with mayo or yogurt for chipotle sauce, stir into BBQ sauce, or add a spoon to guajillo sauce and ancho chili paste for extra smokiness.


12. What is aji amarillo, and why is it popular in sauces?

Aji amarillo is a Peruvian chili with medium heat and bright, fruity flavor. It’s used as aji amarillo chili paste and blended into aji amarillo sauce or Peruvian yellow aji sauce, which are creamy, tangy and perfect for fries, rice and grilled meats.


13. How is aji verde different from aji amarillo sauce?

Aji amarillo sauce is yellow, creamy and cheese-based, while aji verde is greener and herbier. Aji verde usually combines aji paste with coriander, spring onions, lime and oil, creating a fresher, sharper aji chili sauce.


14. What is guajillo sauce used for?

Guajillo sauce, or chile guajillo sauce, is a smooth red pepper sauce made from dried guajillo chilies. It’s commonly used on enchiladas, tacos, rice bowls and stews, and it can even double as a smoky red pepper pasta sauce when thinned.


15. How does ancho chili paste differ from guajillo sauce?

Ancho chili paste is thicker and deeper, with raisiny sweetness, while guajillo sauce is usually lighter and more tomato-forward. Ancho sauce or ancho chipotle sauce often ends up as a marinade or glaze, whereas guajillo sauce is more pourable.


16. What is romesco sauce, and is it really a pepper sauce?

Romesco sauce recipe combines roasted red pepper, tomato, nuts, bread, garlic and olive oil. It’s more of a thick dip than a hot sauce, yet it’s still a pepper sauce because roasted capsicum is the star flavor and the base for the whole mixture.


17. What is ajvar, and how is it different from romesco?

Ajvar is a Balkan roasted red pepper spread usually made from red peppers and eggplant, blended with oil and garlic. It is smoother and simpler than romesco, with no nuts or bread, and it leans more toward sweet pepper sauce than chili heat.


18. What is Szechuan chili oil, and how is it used?

Szechuan chili oil (Sichuan chili oil) is hot oil poured over chili flakes, garlic, sesame and Sichuan peppercorn. You use it to top noodles, dumplings, stir-fries and rice bowls, or to form the base of Chinese hot pepper sauce for dipping.


19. How is sweet chili pepper sauce different from regular hot sauce?

Sweet chili pepper sauce usually combines chilies with sugar or honey and often a little starch for gloss. It’s sticky, sweet and gently hot, unlike sharp vinegar hot sauce. It also glazes fried foods and wings beautifully.


20. What’s the difference between green pepper sauce and red pepper sauce?

Green pepper sauces often use jalapeno, serrano, green habanero or green peppercorns, giving fresh, grassy or zesty flavors. Red pepper sauces usually rely on ripe red chilies, guajillo, ancho or roasted red bell pepper, bringing deeper sweetness and smokier notes.


21. Can I make pepper sauce without vinegar?

Certainly. Instead of vinegar, you can use citrus juice, tomato, yogurt, cream or stock. Aji amarillo sauce, creamy jalapeno sauce, lemon pepper sauce, green peppercorn sauce and many romesco and ajvar variations skip vinegar or keep it minimal.


22. What is pepper vinegar sauce, and when should I use it?

Pepper vinegar sauce is simply whole or sliced chilies steeped in vinegar with salt, sometimes garlic. You splash it over beans, greens, rice and fried foods, much like a very thin hot pepper sauce, but with whole chilies still visible in the bottle.


23. Which pepper sauces recipes are best for wings?

Mango habanero wing sauce, classic cayenne hot pepper sauce with butter, garlic chili pepper sauce, sweet chili pepper sauce and smoky chipotle pepper sauce all work brilliantly on wings. Creamy options like ghost pepper ranch or jalapeno ranch dipping sauce also pair well on the side.


24. Which pepper sauces work best with pasta?

Romesco sauce, roasted red pepper pasta sauce, capsicum pasta sauce, bell pepper pasta sauce, ancho chipotle sauce and creamy poblano pepper sauce all cling nicely to pasta. For a peppercorn twist, creamy pepper sauce or peppercorn gravy can double as a rich pasta coating.


25. Can pepper sauce be vegetarian or vegan?

Yes, easily. Most vinegar-based hot sauces are naturally vegan. Romesco sauce, guajillo sauce, ajvar, chili oil homemade, African chilli sauce, basic aji pepper paste and many roasted capsicum sauces are also plant-based unless you add cheese or cream.


26. How do I safely handle very hot peppers like Carolina Reaper or ghost pepper?

Wear gloves, avoid touching your face, and use good ventilation. Work with tiny amounts in your pepper sauce recipes, and consider diluting them with fruit or dairy, as in ghost chili hot sauce with mango or ghost pepper wing sauce cut with butter and honey.


27. What’s the benefit of fermenting pepper sauce instead of just cooking it?

Ferments develop a more complex, tangy flavor and natural umami. Fermented hot pepper mash or fermented jalapeno hot sauce often tastes deeper and less harsh than a quick-boiled sauce, though it takes more time and requires careful salt levels.


28. How can I fix a pepper sauce recipe that tastes too salty or too acidic?

To rescue it, blend in more neutral base ingredients: extra peppers, tomato, fruit, roasted red pepper or even a little water or stock. To tame acidity, you can also add a pinch of sugar or honey. For salty sauces, using them as a marinade or glaze rather than a straight dip helps, too.


29. Which pepper sauces are kid-friendlier or good for spice beginners?

Milder options include bellpepper sauce, sweet pepper sauce, banana pepper sauce, roasted red pepper sauce, capsicum sauce, orange-tinted aji amarillo sauce with extra dairy, and jalapeno pepper sauce made from de-seeded chilies. Sweet chili pepper sauce also tends to be more approachable.


30. How do I choose which pepper sauce to serve with which dish?

As a rule of thumb, use sharp vinegar hot sauce on fried foods and eggs; fruity habanero hot sauce or mango and habanero sauce on grilled meats; smoky chipotle chili in adobo or guajillo sauce on tacos and burritos; romesco sauce or ajvar on roasted vegetables and bread; chili oil on noodles and dumplings; and green or black peppercorn sauce on steak, chicken or hearty vegetables. Over time, you’ll match each pepper sauce recipe naturally to the foods you cook most.

Posted on 2 Comments

Easy Festive Irish Rum Truffles- The Best Truffles

Irish Rum Truffles are a classic holiday treat. Chocolatey and rich. It is a French confectionery traditionally made with chocolate ganache centre and coated with cocoa powder, coconut or chopped nuts. It’s sweet, slightly bitter, fudgy and of course intensely boozy. These are my favourite indulgent sweets. I am absolutely certain that after trying this recipe, you will ditch the boxed truffles which doesn’t even come close to the homemade ones.

Irish Rum Truffles are quite easy to make. They are perfect when you are craving a treat but don’t want to turn on the oven. 

One of the qualities I find most important in food is the taste it leaves in my mouth. It should leave a memory on my taste buds that makes me want the next one. And, these truffles do exactly that.

My husband and I cut a small cake together at midnight on our anniversary each year. This is our moment together before we celebrate the day with our family and friends. 

So for our 5th anniversary I wanted to treat my husband with something different and not the usual midnight cake. That’s when I thought of making Irish rum truffles. I sat down and scrolled through many recipes, adding and omitting what I like and don’t like and finally came up with this recipe. I had my fingers crossed. 

When the clock struck midnight, I surprised him with these. He had a confused expression on his face because it was not the usual stuff. Skeptically, he took the first bite and the wide eyed expression said it all. 😄

They turned out to be so good. It has been 6 years now since I have been making this. I didn’t realise how good these were until one year I didn’t make them.

Not only are these holiday classics or a perfect gifting treats but you can make them whenever you like. It will lift your mood when you are sad. When you are happy, it will just make you happier. 😊

Although if rum or bailey’s isn’t your favourite liquor, you could try making them with bourbon, cointreau, cognac or kahlúa instead.

The taste will depend on the chocolate you are using. I used a total of 100 grams chocolate. 60 grams was Green & Black Dark Chocolate (70%) and 40 grams was a mix of Lindors and Lindt Milk chocolate. 

Pro Tips:

  • Do not use Chocolate chips or cheap bars because they will not melt in truffle consistency leaving you with grainy bits. Chocolate chips are great for recipes like cookies and tea cakes. 
  • Do not use half-and-half or any other liquid because the truffles won’t set properly.
  • Pure vanilla extract adds exceptional flavor to your chocolate truffles.
  • Coffee will accentuate the taste of the chocolate, so do not skip it. 

Truffles are too firm with less liquid. So stick to this recipe for truffle success!

Recipe: makes 12-13 truffles

Ingredients

Chocolate: 100 gms

Fresh cream: 60 ml (25% fat)

Coconut oil/Unsalted butter: 3 tbsps

Rum: 10 ml

Bailey’s Irish cream: 30 ml

Instant coffee: 1/2 tsp mixed in 1 tbsp water

Vanilla extract: 1/2th tsp

Sieved unsweetened Cocoa powder

Some coarsely crushed nuts. I went with Pistachios. 

Method:

  • Finely chop chocolate and keep aside in a big glass bowl. 
  • Heat cream. DO NOT BOIL IT. Remove from heat just when you see bubbles forming on the edges. Add coconut oil or butter. 
  • Pour the hot cream over the chocolate in batches, mixing well each time so that the chocolate doesn’t split. Use a wire whisk. If the chocolate splits, just add a splash of boiling water. 
  • Now, in goes the rum, bailey’s, instant coffee and vanilla extract.
  • Whisk it well for couple of minutes to incorporate some air and till everything mixes well.
  • Cover it with a cling and put it in the refrigerator for 3 hours to set. 
  • Once set, line a plate with butter paper. 
  • Take one tbsp scoop and scoop out to make small balls. You will have to shape really quickly because the heat from your hand might melt the chocolate. 
  • Keep the topping handy in a plate. 
  • Roll the truffle in the topping of your choice and place it one by one on the butter paper. 
  • Refrigerate for one hour or till it is set. It will last you about 2 weeks in a refrigerator. 

Troubleshooting

  • The chocolate is separating: This is one of the biggest concerns while making truffles. If your chocolate splits then your cream was too hot. So make sure you don’t boil it. 
  • The chocolate doesn’t melt: There can be two issues here, either your cream is too cold or you didn’t chop the chocolate into very small pieces. The finer the chocolate chunks, the quicker it will melt. If the chocolate doesn’t melt, craft a double boiler setting and heat the mixture in a heat proof bowl for a few seconds. 
  • Trying to scoop too-warm ganache: Once the cream and chocolate are whisked together, you will have a thick, smooth mixture known as ganache. You might think that it’s scoopable right out of the bowl, but you’ll need to cool it properly before scooping and rolling. Refrigerate it before scooping. 
Posted on Leave a comment

Top 7 Gourmet Gifts for Christmas & New Year 2018

Christmas is around the corner and like every festival the spirit is best celebrated by sharing & gifting food and goodies with your loved ones. 

So we thought we would put together a list of 7 gourmet products that you can gift to people you love cherish and appreciate. These products have been trending and super popular since their launch earlier this year and have received amazing feedback for their taste and ingenuity.

7. Pina Colada Jamalade

Its always great to start the list with some sunshine and little bit of tipple to keep the things right. Made from real pineapple, coconut and infused with rum this one is really going to keep your friends in right spirits. 

http:///64.227.165.57/product/pina-colada-rum-jamalade

6. Chunky Peanut Butter

Friends who diet together, stay tight together. Ok.. cheesy line maybe, but hey our 100% Natural Peanut Butter is absolute gorgeous gift this X-mas and new year.. 😎🤩

http:///64.227.165.57/product/chunky-peanut-butter/

5. Himalayan Honey & Garlic Murabba

A jar of honey & garlic Murabba would be appreciated by those who treat their bodies as temples. A clove of garlic and spoonful of this natural honey every morning is said to do wonders to the human body.. 🙂

http:///64.227.165.57/product/himalayan-honey-and-garlic/

4. Sweet Chilli Jam

This one is for a friend who is not afraid to experiment & play with flavors, because it takes a crazy mind to unleash our sweet chilli jam to its full potential.. 😉

http:///64.227.165.57/product/sweet-chilli-jam

3. Intensity – Chocolate & Rhum Spread

That intense poet and philosopher friend you got? yes! she is going to love a jar of Intensity with some Chocolate and Rum to set the mood right.. .. 🙃😉

http:///64.227.165.57/product/chocolate-and-rhum-spread/

2. Ammiji’s Winter Comfort

Because nothing says you care better than some love straight from Ammiji. This concoction made with finest quality of herbs and spices is going to keep your loved ones warm when you are not around.

http:///64.227.165.57/product/winter-comfort-by-ammiji

Honorary Mention

Deserving of top honors in any list we compile, a special mention to Ammiji’s Chai Masala and its newly introduced variants. The classic one itself is something that can add lot of spice to a Christmas cake 🙂

http:///64.227.165.57/product/ammijis-chai-masala-100-gms/

1. Orange & Whiskey Marmalade

Our best selling table spread- Orange & Whiskey Marmalade is made for people who prefer life on ‘fun’ side..bet you got a friend or two are going to love this one .. 😚😁

http:///64.227.165.57/product/orange-whiskey-marmalade

Well that completes the list of gourmet & boutique products we feel that would be appreciated by your loved ones. Though we have tried to limit this to seven choices, however do explore our store which is full of wonderful the delicious goodies for yourselves and your loves ones.