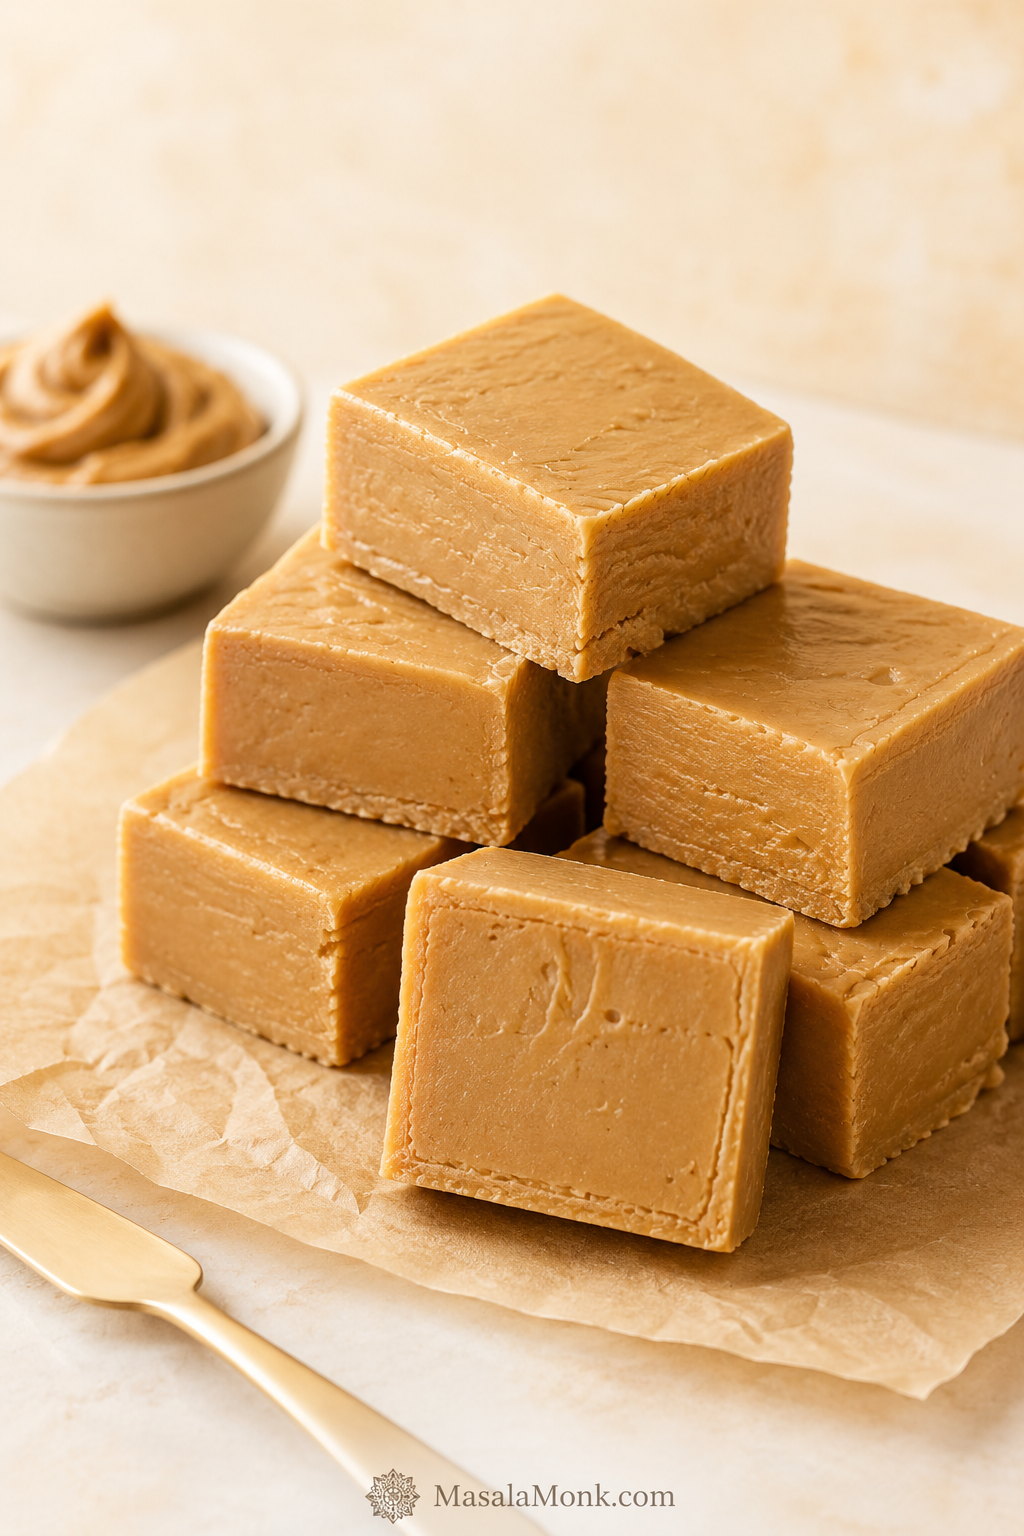
This easy peanut butter fudge recipe is built for creamy, sliceable squares without a candy thermometer, bubbling sugar syrup, or a long ingredient list. The goal is simple: rich peanut butter flavor, a smooth bite, and a slab that sets firmly without turning dry, greasy, or crumbly.
The result is deeply peanut-buttery, buttery, and sweet in that old-school homemade candy way, but still sturdy enough to cut into neat little pieces. You melt, stir, press, chill, and slice — no guessing at candy stages and no hovering over a bubbling pot.
The mixture thickens into a soft peanut butter dough before it goes into the pan, so you can see when it is ready instead of hoping it sets later.
It is the kind of fudge that works for holiday tins, bake-sale boxes, office trays, or the small after-dinner square that somehow disappears from the fridge. Cut it small, and it feels rich instead of heavy.
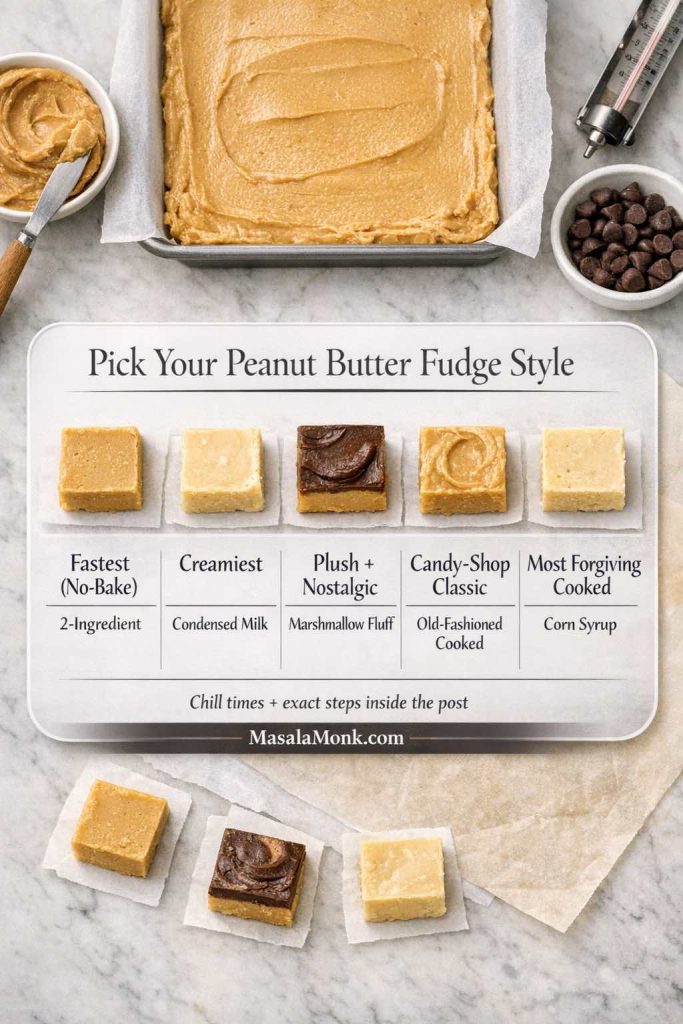
Start here if you want the simple version first. When you are ready to compare condensed milk, marshmallow fluff, old-fashioned, frosting, or keto versions, MasalaMonk’s full peanut butter fudge methods guide walks through those separately.
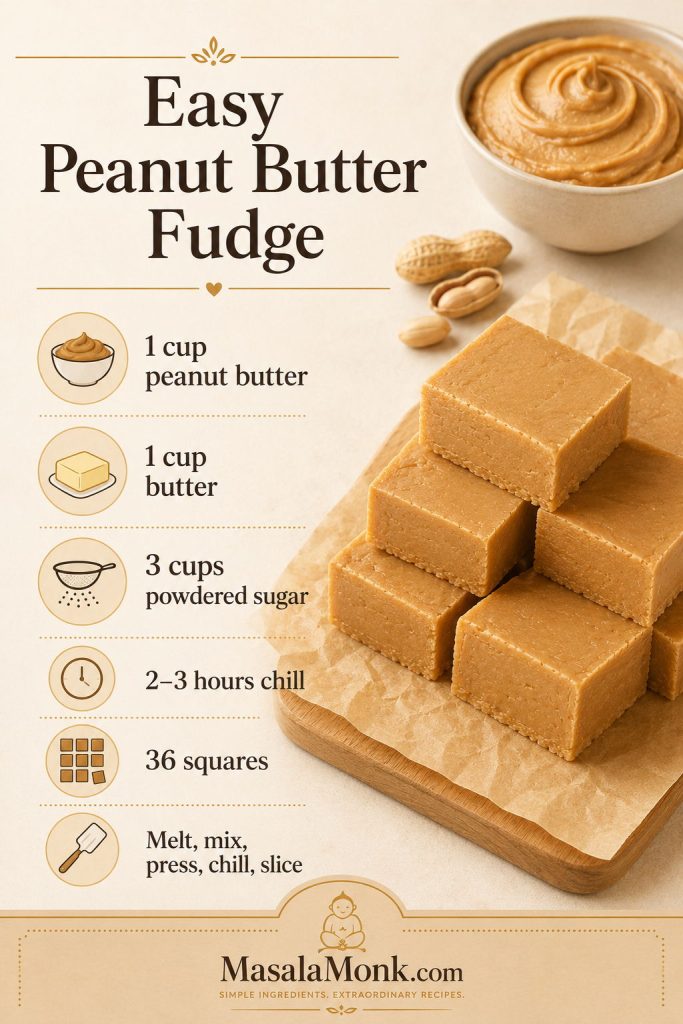
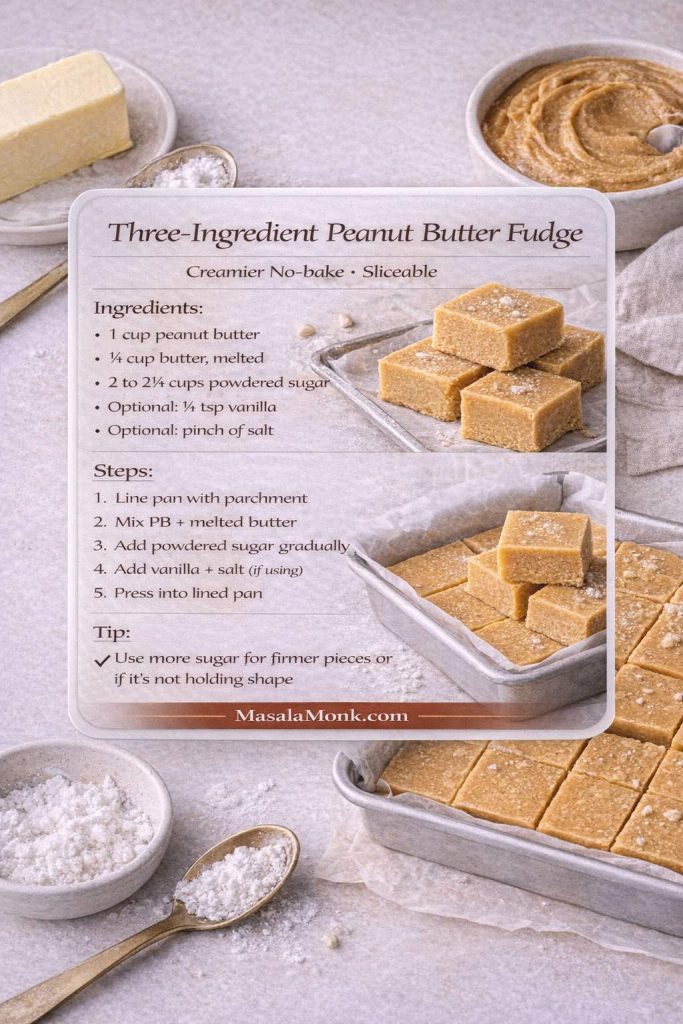
For easy peanut butter fudge, melt 1 cup creamy peanut butter with 1 cup butter, stir in 3 cups powdered sugar, press the thick mixture into a lined 8×8-inch pan, and refrigerate for 2–3 hours, until firm enough to cut. Vanilla and salt are optional, but they make the flavor rounder and less one-note.
Because this is a no-bake peanut butter fudge, the only heat you need is enough to melt the peanut butter and butter together. Powdered sugar gives the mixture body, butter keeps the bite smooth, and peanut butter brings the salty-sweet richness.
The best pieces should taste like the peanut butter center of a peanut butter cup: salty-sweet, dense, smooth, and rich enough that one small square feels satisfying.
Best first batch: Use regular creamy no-stir peanut butter, sift the powdered sugar if it is clumpy, and chill until the slab lifts cleanly from the pan before slicing.
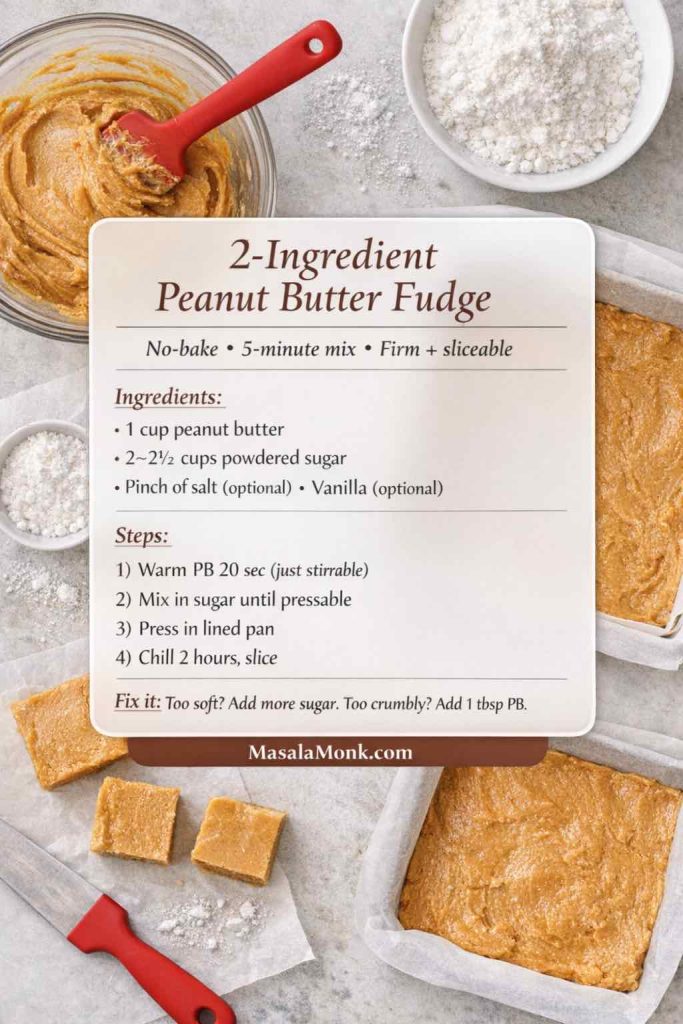
When you want the quick version, this is the whole easy peanut butter fudge formula: three core ingredients, an 8×8 pan, and a full chill before slicing.
9×9-inch / 23 cm works, but the pieces will be thinner
Texture
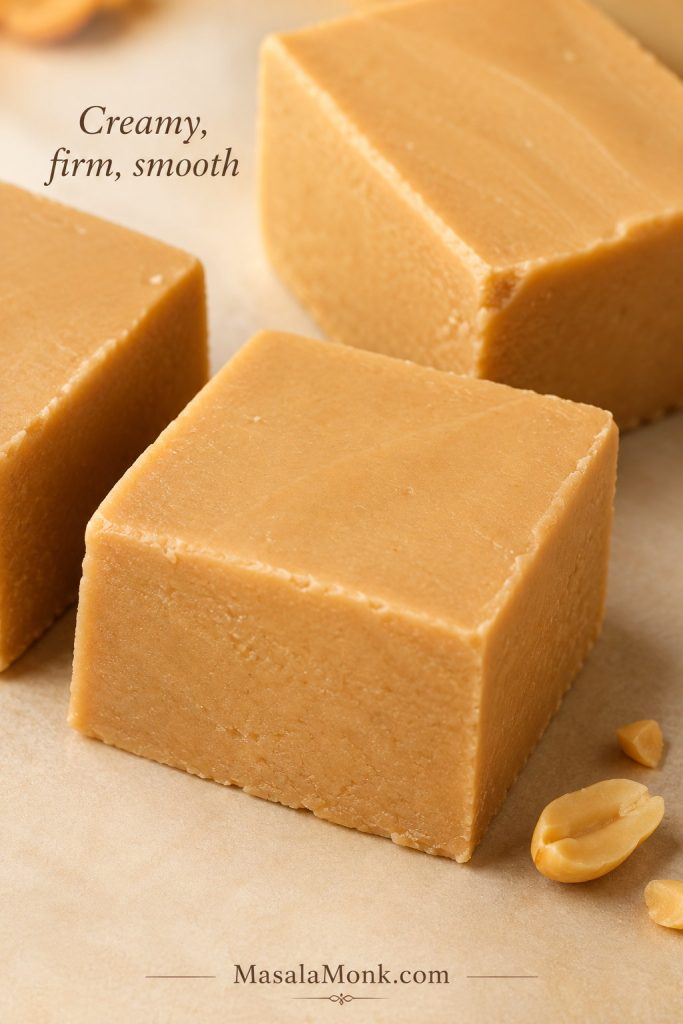
Creamy, firm, smooth, and sliceable
Chill time
2–3 hours in the refrigerator
Candy thermometer
Not needed
Yield
About 36 small squares
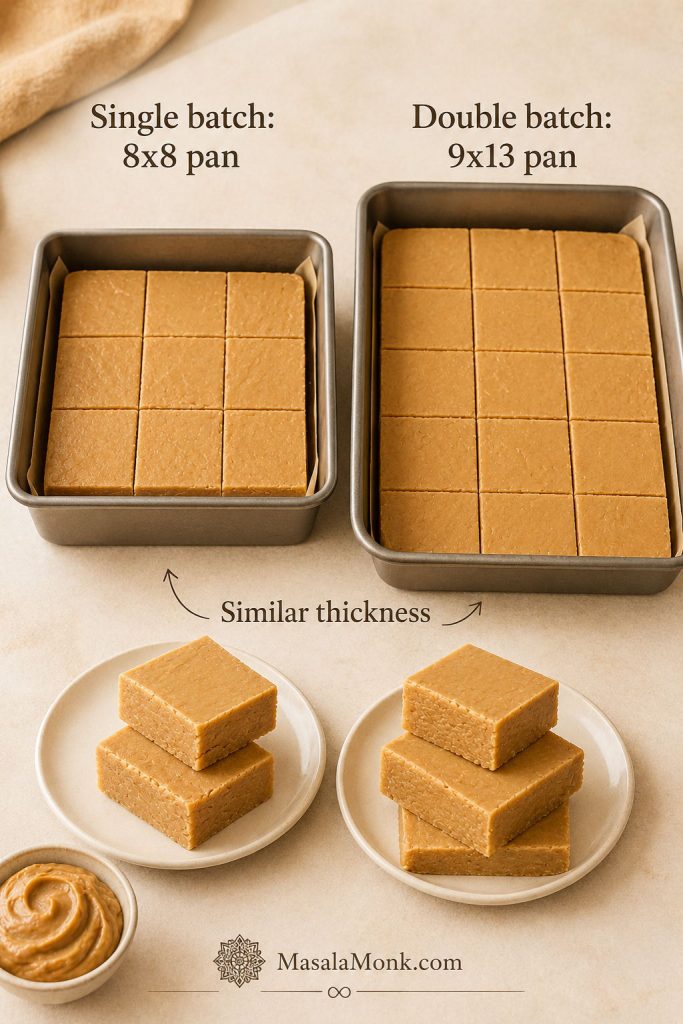
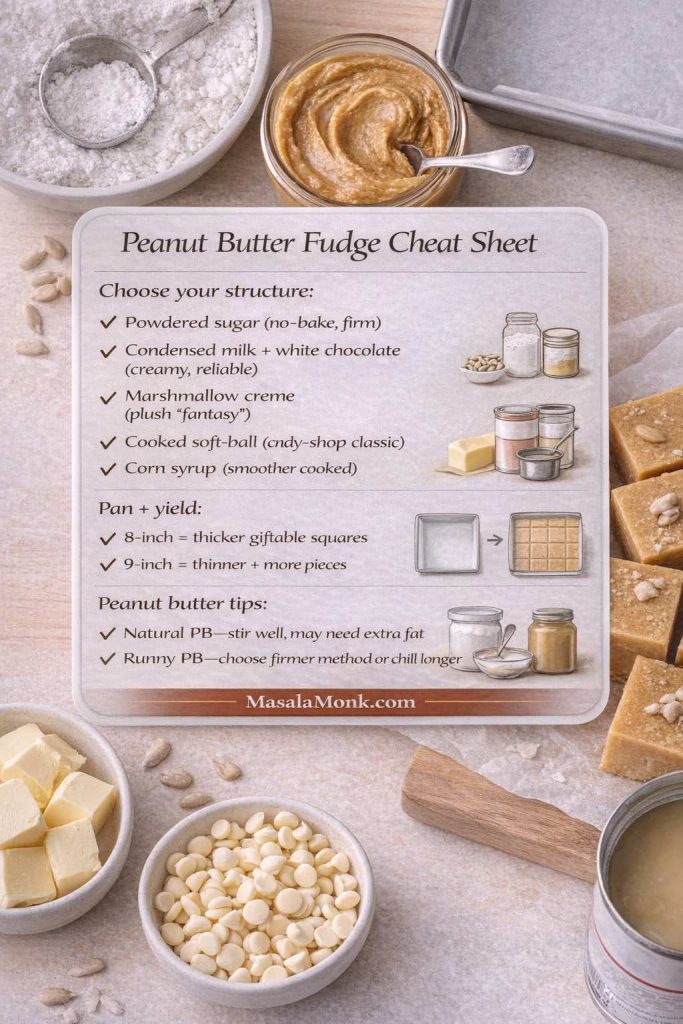
A 9×9-inch pan also works, but the pieces will be thinner and may firm up a little faster. For thicker, gift-style squares, use an 8×8-inch pan.
For party trays, 36 small squares is usually better than 16 large pieces. Peanut butter fudge is dense, so smaller pieces look neater and eat better.
What Good Peanut Butter Fudge Texture Looks Like
Use this texture cue before you start: the finished fudge should look smooth and dense inside, with clean edges that hold their shape once chilled.
Before you make a batch, notice the texture goal: dense and smooth in the center, firm at the edges, and never dry, greasy, or crumbly.
Why This Peanut Butter Fudge Works
This fudge sets because powdered sugar thickens the warm peanut butter-butter mixture while the refrigerator firms the slab enough to slice. You get a creamy bite without boiling sugar or trying to catch a candy stage at the exact right moment.
Powdered sugar helps the fudge hold together. It blends more smoothly than granulated sugar, especially when you add it while the mixture is still warm.
Butter gives the fudge richness and a softer bite. It makes the peanut butter base glossy and smooth before the powdered sugar goes in.
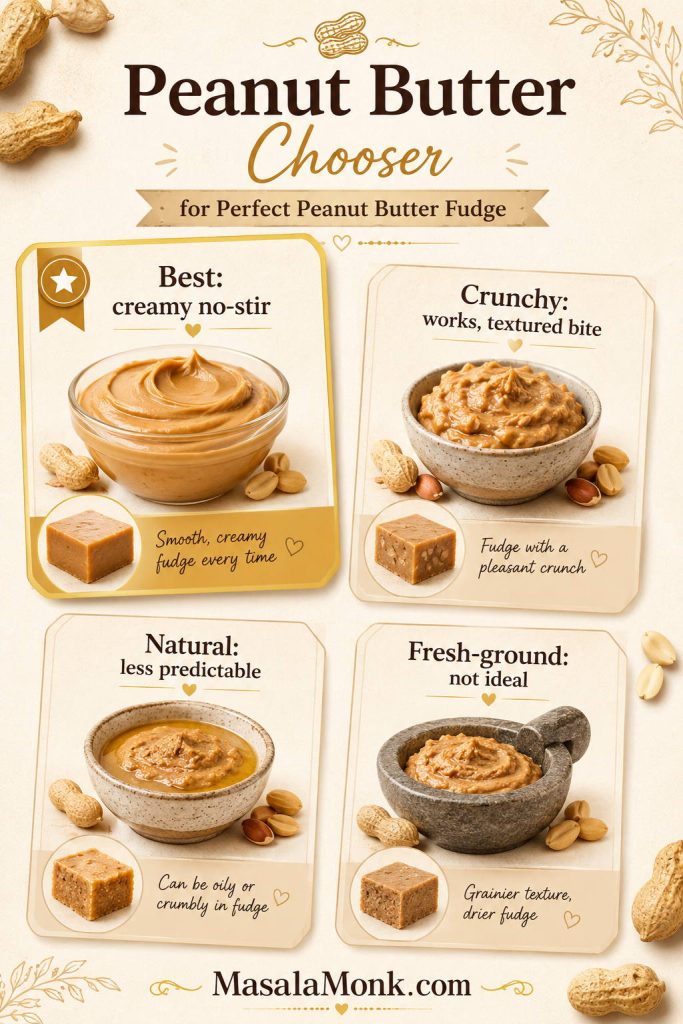
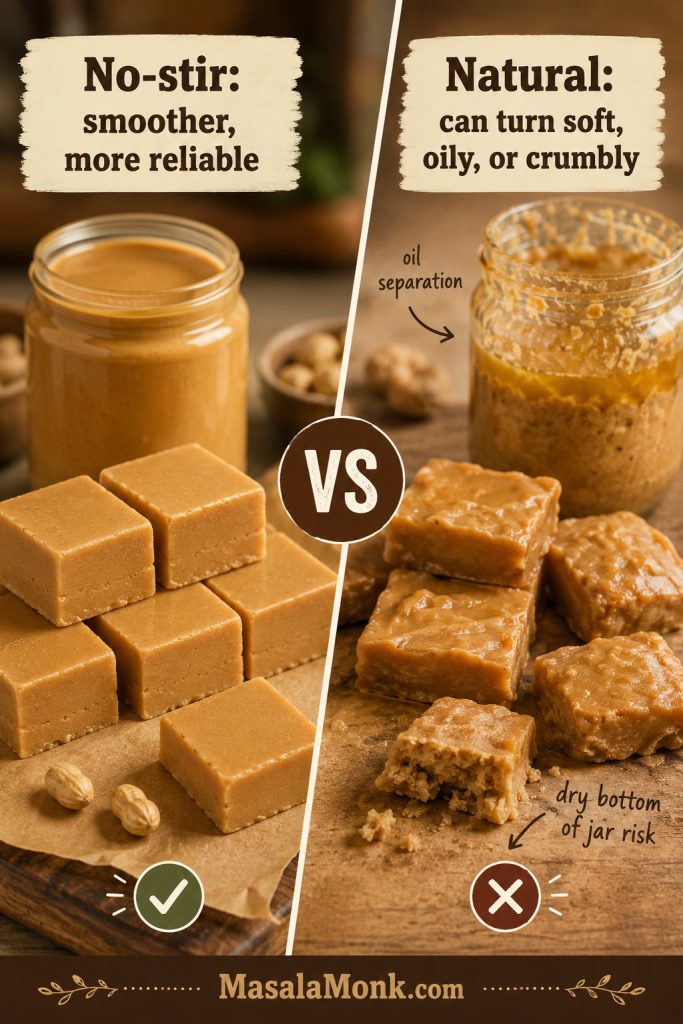
Creamy no-stir peanut butter gives the most predictable result. Natural peanut butter can work if it is thick and very well stirred, but it can change the set because some jars are oily, loose, or dry at the bottom.
The balance matters. Too little powdered sugar gives a soft slab, but too much pushes the texture toward dry candy instead of creamy fudge. This recipe gives a base amount first, then a small adjustment range if your mixture needs it.
Chilling finishes the texture. The mixture may look thick as soon as you press it into the pan, but it needs time in the refrigerator to hold its shape for tidy pieces.
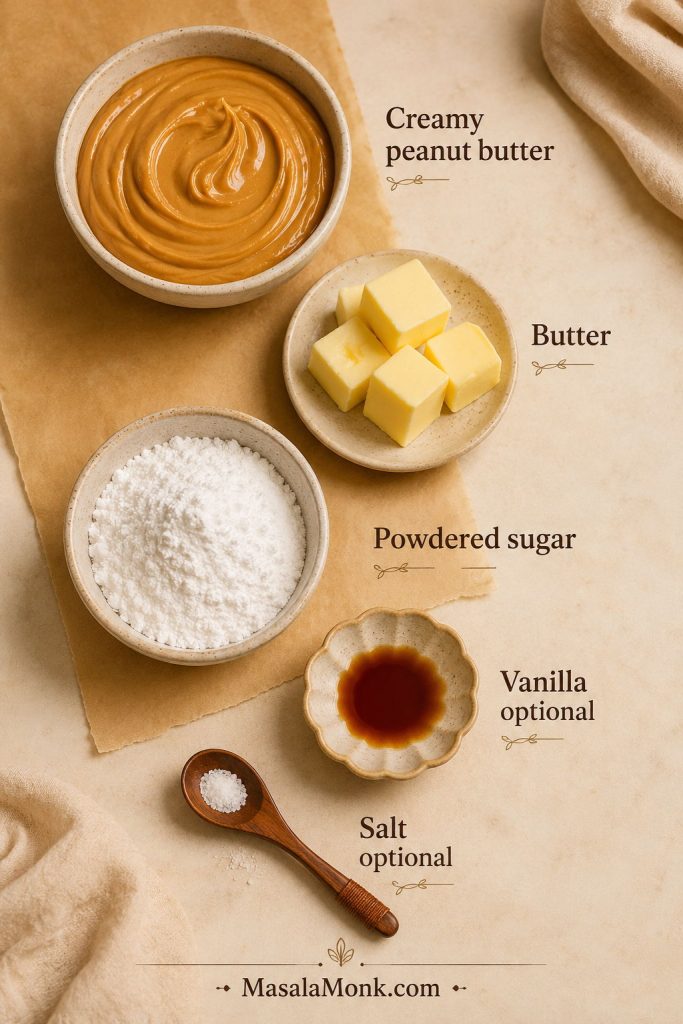
Ingredients You Need
This recipe has a short ingredient list, so the details matter. The image below shows the base ingredients and the two optional flavor helpers that make the fudge taste more balanced.
Because the ingredient list is short, there is not much room to hide mistakes; the peanut butter, butter, and powdered sugar each need to pull their weight.
Creamy Peanut Butter
Use creamy peanut butter for the smoothest fudge. A regular no-stir peanut butter gives the most reliable texture because it is already stable and well blended. If you like making pantry staples from scratch, MasalaMonk’s homemade peanut butter guide is useful, but for this recipe, make sure any homemade or natural peanut butter is thick, smooth, and extremely well stirred before measuring.
Butter
Unsalted butter gives you the most control. Salted butter also works; just skip or reduce the added salt. Cut the butter into pieces so it melts evenly with the peanut butter.
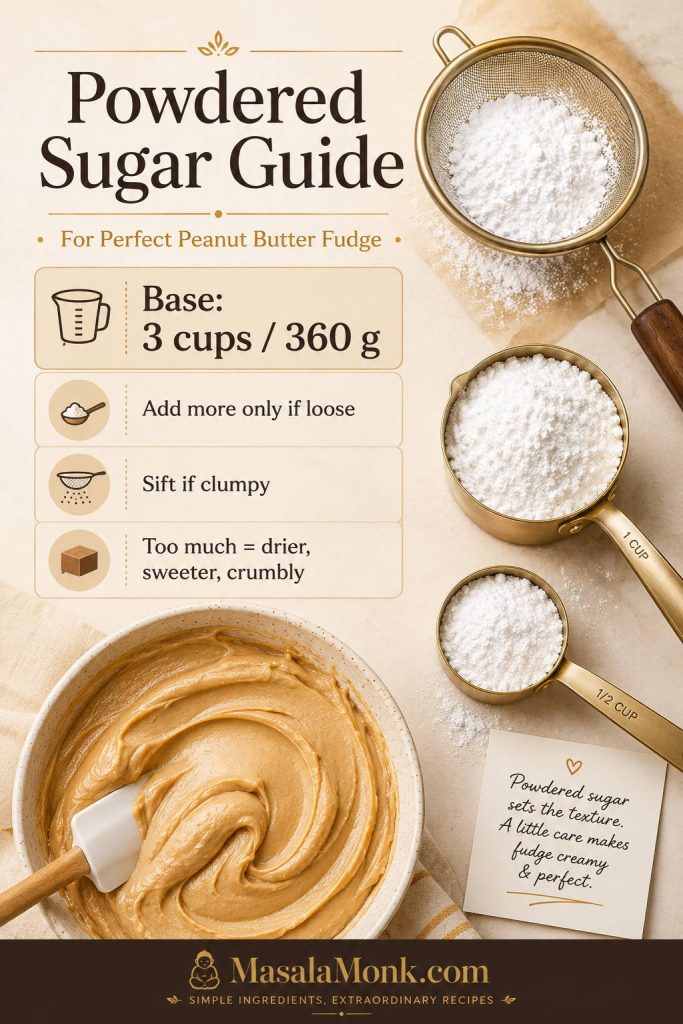
Why This Peanut Butter Fudge Uses Powdered Sugar
Powdered sugar is what turns the warm peanut butter mixture into fudge. If it is clumpy, sift it first so you do not get dry spots or grainy pockets in the finished candy.
Since powdered sugar gives this no-thermometer fudge its structure, start with 3 cups and add more only if the mixture still looks loose.
This version uses 3 cups / 360 g powdered sugar as the base because it keeps the fudge creamy while still giving the slab enough body to set. If the mixture still looks loose after resting for 2 minutes, increase the powdered sugar by 2 tablespoons at a time, up to 3 1/4 cups / about 390 g.
If you measure by cups, spoon the powdered sugar into the cup and level it instead of packing it down. This style is sweet by design because powdered sugar is part of the structure, not just the flavor; salt, vanilla, and smaller pieces make it taste more balanced without weakening the set.
If your fudge turns soft, crumbly, oily, or grainy, the troubleshooting section walks through the most common causes and fixes.
Vanilla and Salt
Vanilla and salt are optional, but they make the candy taste more complete. The vanilla rounds out the sweetness, while a small pinch of salt sharpens the peanut butter flavor. For a true 3 ingredient peanut butter fudge, leave both out; for the best-tasting version, use them.
Best Peanut Butter to Use for Fudge
The peanut butter you choose changes the bite more than almost anything else in this recipe. For a first batch, choose regular creamy no-stir peanut butter. It gives the best balance of smoothness, body, and neat cutting.
For the most reliable peanut butter fudge texture, creamy no-stir peanut butter is the safest first choice because it blends smoothly and sets predictably.
Natural peanut butter is not impossible, but it often explains those “same recipe, different result” batches. One jar may be thick and stable, while another may be oily, loose, or dry at the bottom.
Peanut Butter Type
Use It?
What to Expect
Regular creamy no-stir peanut butter
Best choice
Smooth, stable, creamy, and reliable for tidy squares.
Crunchy peanut butter
Yes
Works well, but the pieces will have a textured bite instead of a smooth finish.
Natural stir peanut butter
Use carefully
Can work if thick and fully stirred, but may turn oily, softer, or crumbly.
Fresh-ground peanut butter
Not ideal
Often too coarse or oily for the neatest fudge texture.
Salted peanut butter
Yes
Use it, but reduce or skip the added salt.
Peanut butter tip: For your first batch, avoid runny natural peanut butter, fresh-ground peanut butter, dry bottom-of-the-jar peanut paste, and very oily separated jars. If your peanut butter has visible oil, stir it completely smooth before measuring; do not pour off all the oil or scoop only the dry paste.
No-Stir vs Natural Peanut Butter for Fudge
Natural peanut butter can work, but the jar-to-jar variation is exactly why some batches turn soft, oily, or crumbly.
When two batches behave differently, the peanut butter is often the reason; natural jars can vary in oil, thickness, and bottom-of-jar dryness.
Once your peanut butter is chosen, use the success cues to check whether the mixture looks ready before chilling.
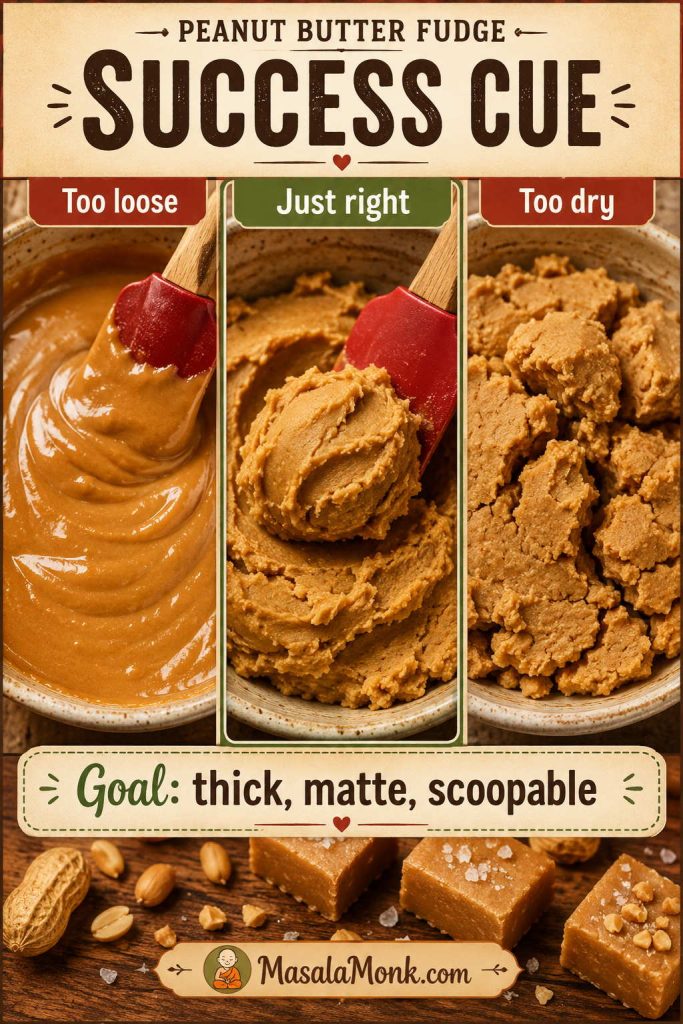
Success Cues: What Peanut Butter Fudge Should Look Like Before It Sets
Before chilling, the mixture should look thick, matte, and scoopable, almost like a soft peanut butter dough. It should not pour like sauce. After chilling, the slab should lift from the pan in one piece and cut without smearing through the center.
Before chilling, the mixture should look thick, matte, and scoopable; if it pours like sauce or cracks into dry clumps, adjust before pressing it into the pan.
Good sign: If the mixture gathers around the spatula and presses into the pan without spreading back out, you are on the right track.
How to Make Easy Peanut Butter Fudge
The method is simple, and the order is what keeps it easy. Measure the powdered sugar before you start so you can stir it in while the peanut butter mixture is still warm.
Once the peanut butter and butter are melted, work while the mixture is warm so the powdered sugar blends in smoothly before the fudge firms up.
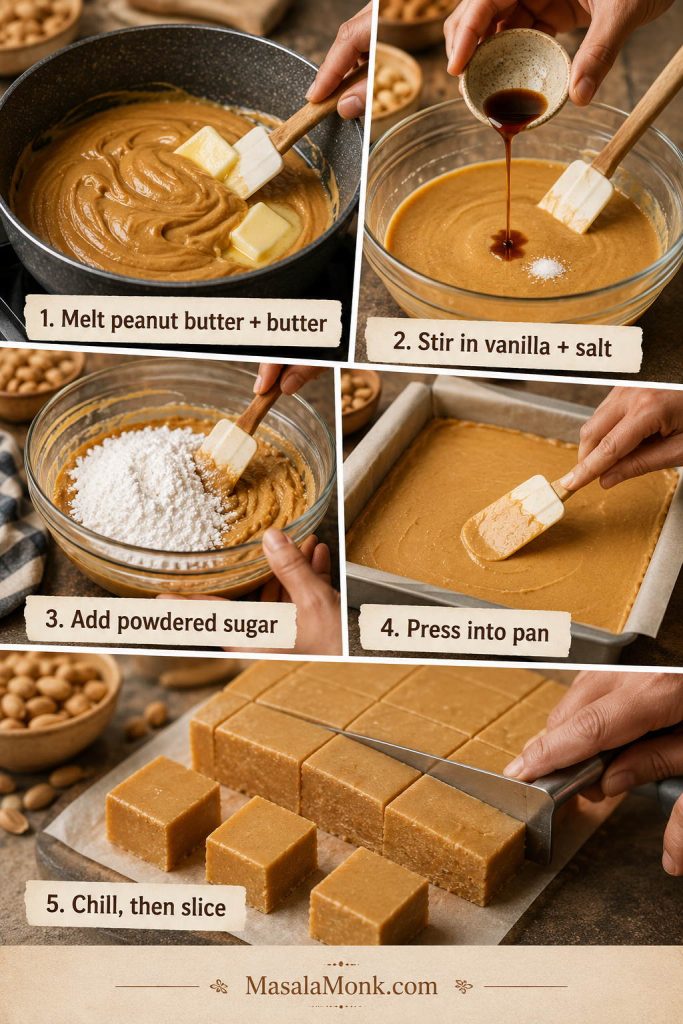
Step 1: Line the Pan
Line an 8×8-inch square pan with parchment paper, leaving overhang on two sides. This gives you a sling so you can lift the whole slab out later for cleaner cutting.
Step 2: Melt the Peanut Butter and Butter
Add the peanut butter and butter to a medium saucepan over low heat. Stir often until the butter melts and the mixture looks smooth and glossy. Do not boil it. You only want to melt and combine.
Step 3: Add Vanilla and Salt
Remove the pan from the heat. Stir in the vanilla and salt if using. The mixture should still be warm and fluid.
Step 4: Mix in the Powdered Sugar
Add the powdered sugar in batches, stirring after each addition. The mixture will thicken quickly. Keep stirring until no dry streaks remain. It should look like a thick, soft dough.
At this point, the mixture should no longer pour like a sauce. It should gather into a thick, matte, scoopable mass that can be pressed into the pan. If it still looks glossy and loose after all the sugar is mixed in, let it sit for 2 minutes and stir again before adding more sugar.
Step 5: Press Into the Pan
Transfer the fudge mixture to the lined pan. Press it firmly into the corners and smooth the top with a spatula. If it sticks, place a small piece of parchment over the top and press gently with your hands.
Do not worry if the top is not perfectly smooth yet. Once the slab chills, small spatula marks are much less noticeable, and you can always trim the edges before serving or gifting.
Step 6: Chill Until Firm
Refrigerate for 2–3 hours, or until the slab is sturdy enough to lift and slice. For faster setting, you can use the freezer for 45–60 minutes, but the refrigerator gives a more even texture.
Step 7: Slice
Lift the fudge out using the parchment overhang. Use a sharp knife to cut it into 36 small squares. For extra-neat edges, warm the knife under hot water, wipe it dry, cut, then wipe between cuts.
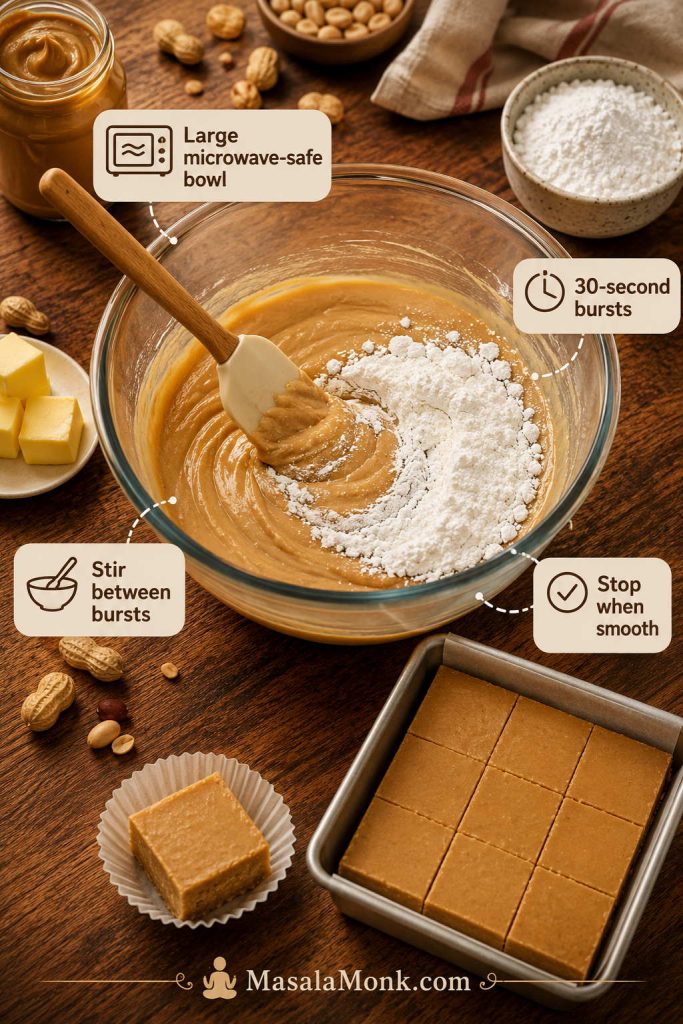
Microwave Peanut Butter Fudge Method
You can also make this peanut butter fudge in the microwave when you want the quickest no-stove version. Use a large microwave-safe bowl and short bursts instead of one long microwave time, because microwave strength varies and overheating can make the mixture oily.
Although the microwave method is fast, short bursts matter because overheating can make the peanut butter mixture oily before the powdered sugar goes in.
Add peanut butter and butter to a large microwave-safe bowl.
Microwave for 30 seconds, then stir.
Repeat in 30-second bursts until the butter is melted and the mixture is smooth.
Stir in vanilla and salt if using.
Add the powdered sugar in batches and mix until thick.
If the mixture looks loose, let it rest briefly and stir again before adding more powdered sugar.
Press into the lined pan and chill until firm.
Most common mistake: Judging the fudge while it is still warm. Let it cool briefly before adding extra sugar, and stop heating as soon as the peanut butter and butter are smooth.
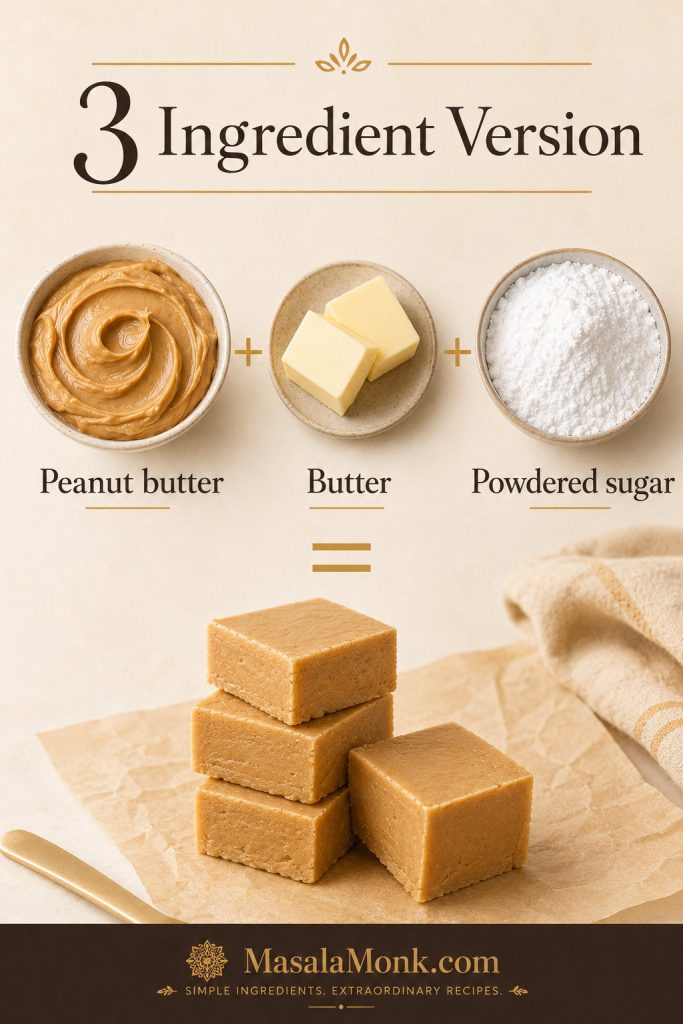
3 Ingredient Peanut Butter Fudge
To make this as a true 3 ingredient peanut butter fudge, use only:
1 cup creamy peanut butter
1 cup butter
3 cups powdered sugar
Even a true 3 ingredient peanut butter fudge depends on balance: peanut butter for flavor, butter for smoothness, and powdered sugar for structure.
Peanut butter brings the flavor, butter softens the bite, and powdered sugar helps the mixture hold together once it chills.
If you are not strictly trying to keep the ingredient count at three, add vanilla and salt. They do not change the method, but they make the fudge taste more balanced. Without them, the candy is still good, just simpler and sweeter.
If you like short ingredient-list peanut butter desserts, MasalaMonk’s peanut butter cookies are another easy option, with classic, 3-ingredient, chocolate chip, and oatmeal variations.
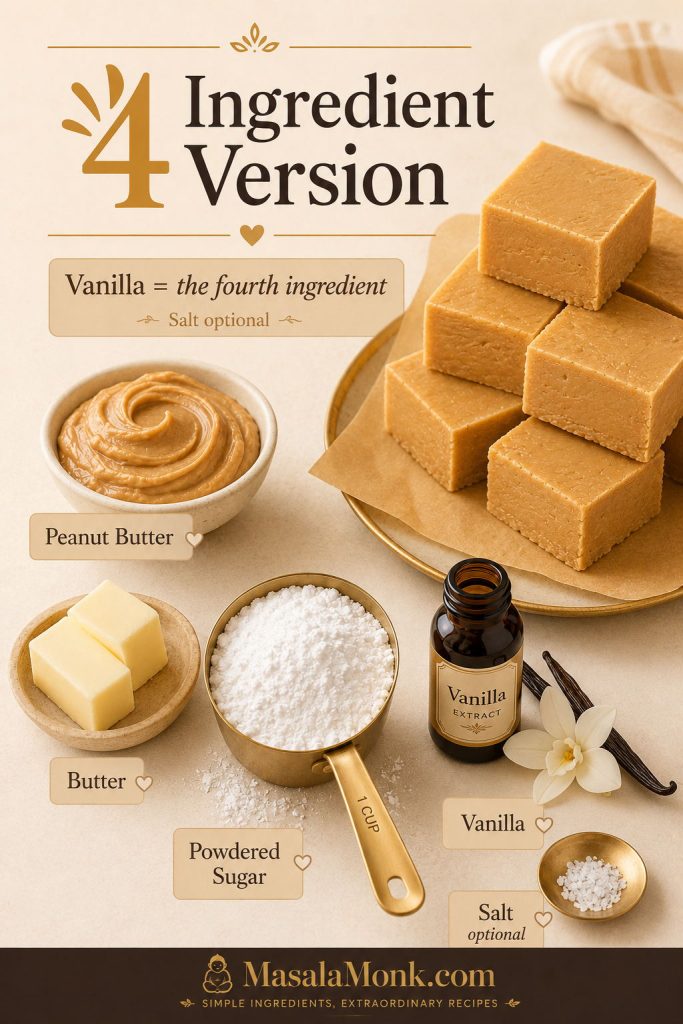
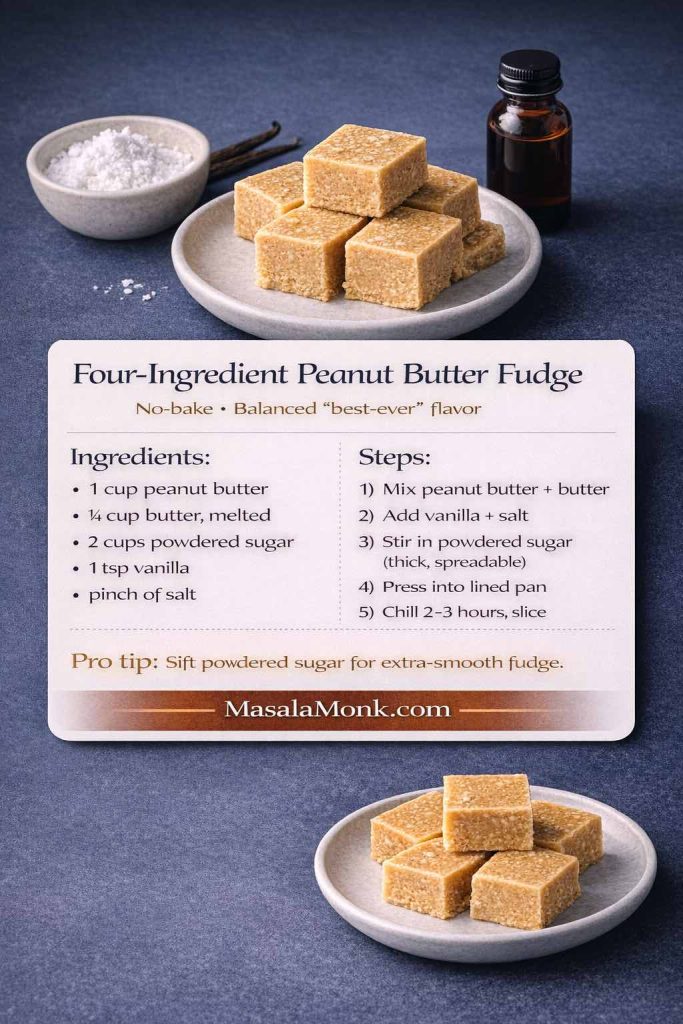
4 Ingredient Peanut Butter Fudge
For most readers, the best version is technically a 4 ingredient peanut butter fudge: peanut butter, butter, powdered sugar, and vanilla. Vanilla does not help the fudge set, but it makes the sweetness taste warmer and less flat.
With 4 ingredient peanut butter fudge, vanilla is the quiet upgrade that makes the sweetness taste warmer and less flat.
If you count salt as a fifth ingredient, use it as a flavor adjuster rather than a structural ingredient. Vanilla makes the fudge taste warmer; salt makes it taste more peanut-buttery. Neither one helps the fudge set, so the base ratio stays the same.
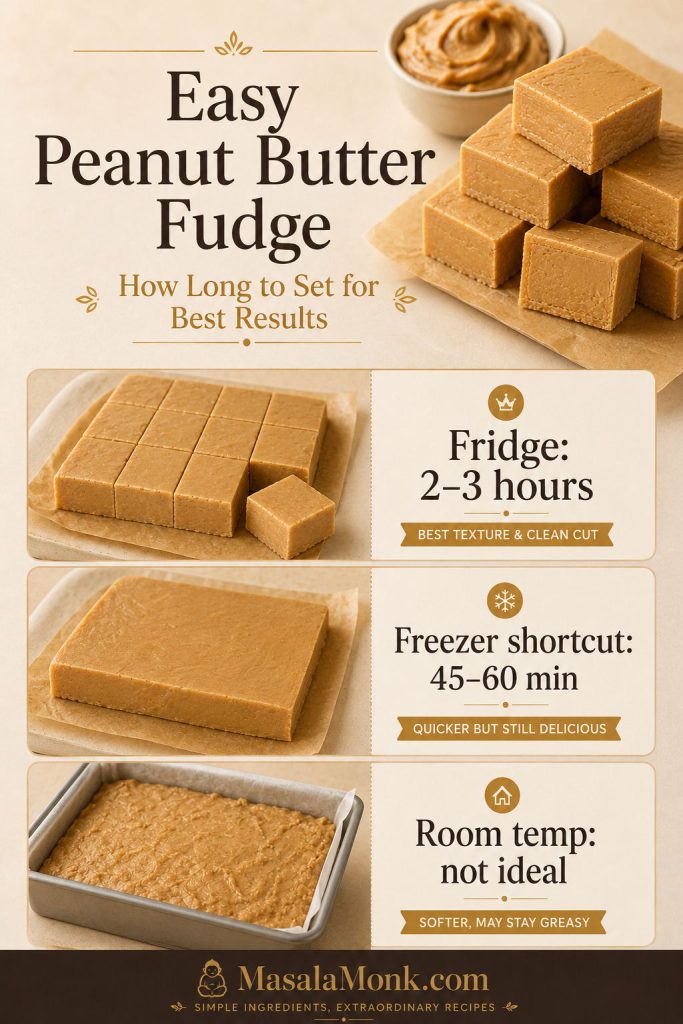
How Long Does Peanut Butter Fudge Take to Set?
The slab usually needs 2–3 hours in the refrigerator before it is ready to cut. It may look finished sooner, but slicing too early can make the edges smear and the center slump.
Although the top may look firm sooner, the center needs enough chill time for clean slices and a stable peanut butter fudge texture.
Setting Method
Approximate Time
Best Use
Refrigerator
2–3 hours
Best texture and neatest slices.
Freezer shortcut
45–60 minutes
Useful when you are in a hurry, but do not forget it there.
Room temperature
Several hours
Not ideal for a quick, firm set.
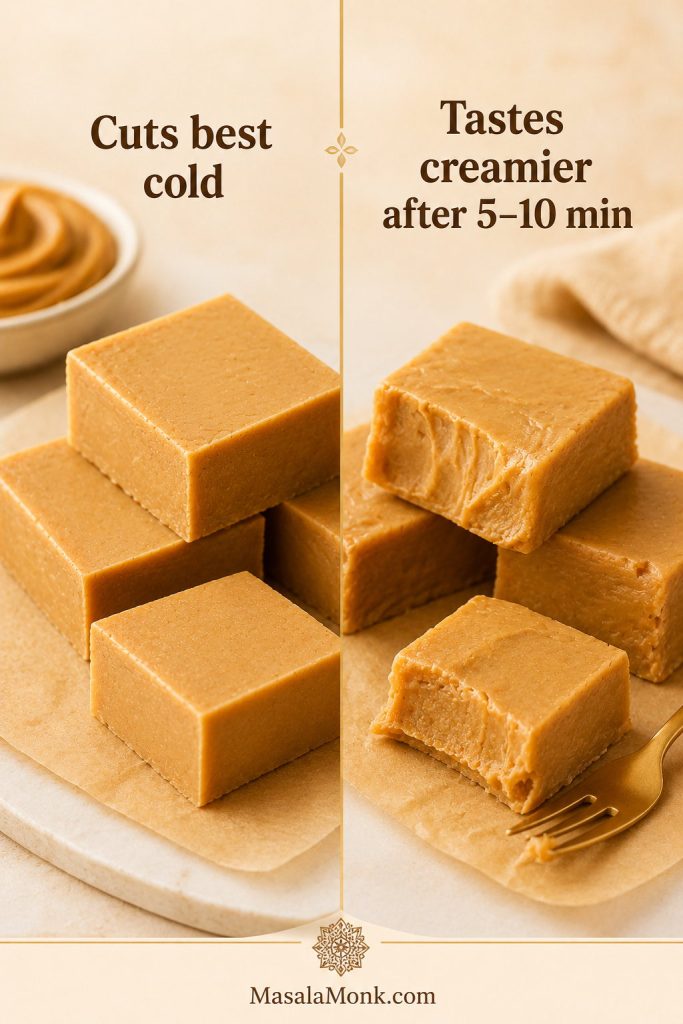
For the best pieces, chill the fudge until firm, slice it, then let the squares sit at room temperature for a few minutes before serving. That gives you sharp edges and a softer bite.
Serving tip: Cold fudge cuts neatly, but slightly softened fudge tastes creamier. Store it chilled, then let the squares sit out for 5–10 minutes before serving.
Best Serving Temperature for Peanut Butter Fudge
Cut the fudge while it is cold, then give the squares a few minutes at room temperature if you want the creamiest bite.
Cold fudge cuts cleanly; however, a few minutes at room temperature makes each square taste creamier and less stiff.
Once the slab is fully chilled, the clean-cutting tips will help you get neater squares for trays and gifts.
Why Didn’t My Peanut Butter Fudge Set?
If your peanut butter fudge is too soft, crumbly, grainy, or oily, the issue is usually one of four things: peanut butter type, powdered sugar amount, mixing temperature, or chill time.
Most problems are easier to fix than they look. If the fudge tastes good but feels too soft, start with more chill time before changing the recipe.
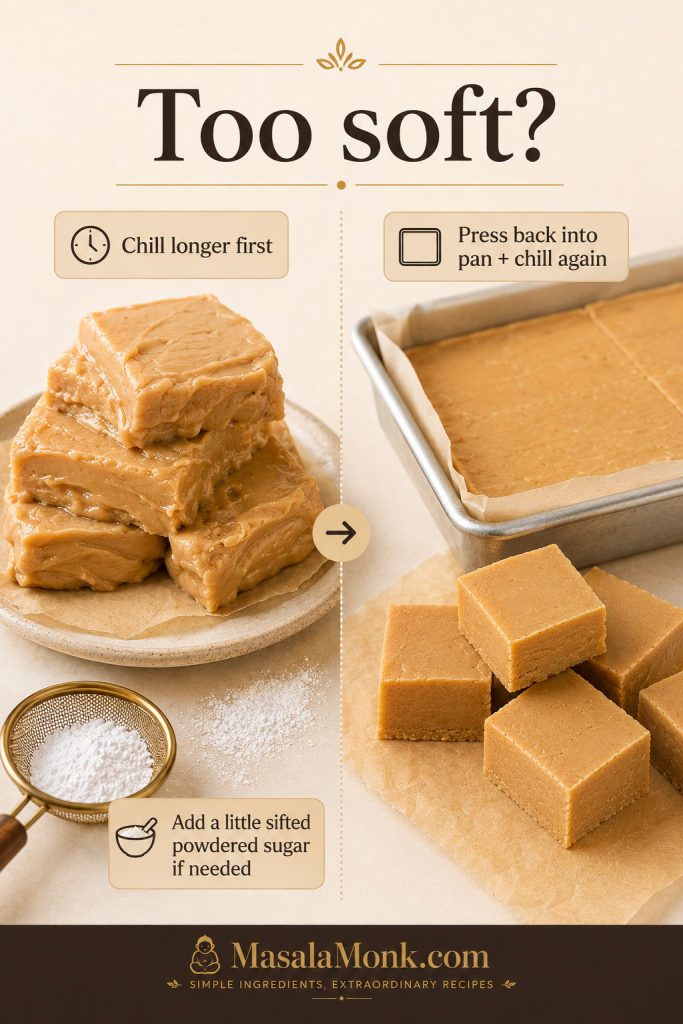
How to Fix Soft Peanut Butter Fudge
Start with the least disruptive fix first. Many soft batches only need more time in the refrigerator before you change the ratio.
If peanut butter fudge is too soft, chill it longer first; after that, use only a small amount of sifted powdered sugar if the slab still will not firm up.
Problem
Likely Cause
How to Fix It
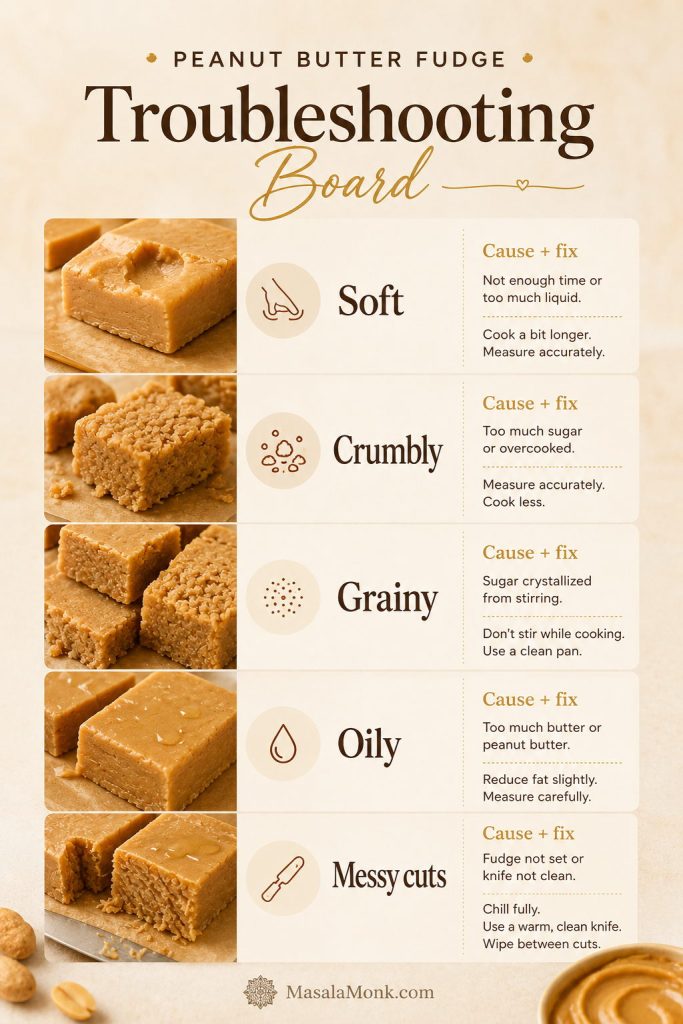
Fudge is too soft
Not enough powdered sugar, oily peanut butter, or not enough chill time.
Chill longer first. If it is still too soft after several hours, let it soften at room temperature, scrape it back into a bowl, and work in a little more sifted powdered sugar. Press it back into the pan and chill again.
Fudge is crumbly
Too much powdered sugar, dry peanut butter, or over-chilling.
Let it sit at room temperature for 10 minutes before cutting. Next time, reduce the powdered sugar slightly or use creamier peanut butter.
Fudge is grainy
Clumpy powdered sugar or sugar added after the mixture cooled too much.
Sift powdered sugar and add it while the peanut butter mixture is still warm.
Fudge looks oily
Natural peanut butter separated, or the mixture was overheated.
Use no-stir peanut butter for the most reliable batch. Melt gently and avoid boiling.
Fudge will not cut cleanly
Not chilled enough, or the knife is dragging through the fudge.
Chill longer. Use a warm, dry knife and wipe between cuts.
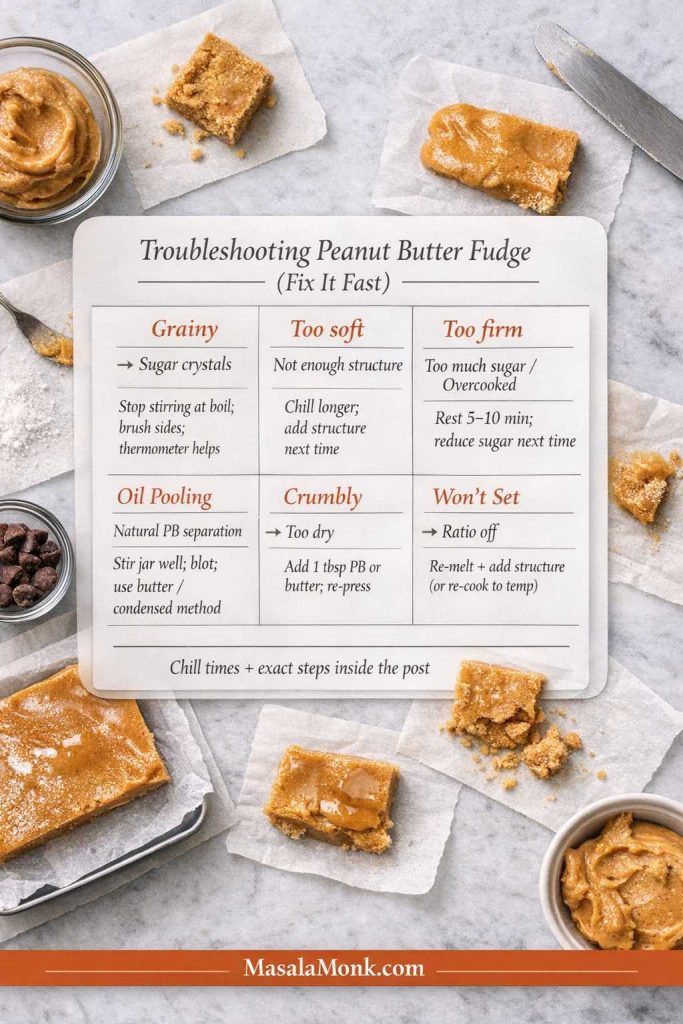
Peanut Butter Fudge Troubleshooting Guide
Use the visual guide below to match the texture problem to the most likely cause before making a bigger adjustment.
Rather than guessing, match the problem to the texture: soft, crumbly, grainy, oily, and messy-cut fudge each points to a different fix.
Most common fix: If the fudge is soft but tastes good, give it more fridge time before changing anything. Warm fudge often seems failed before it has actually finished setting.
If you are starting a fresh batch, the recipe card keeps the base ratio and method in one place.
How to Cut Clean Peanut Butter Fudge Squares
Neat squares make homemade fudge look more polished, especially if you are gifting it. The trick is to chill the slab fully, lift it from the pan, and cut with a warm, dry knife instead of dragging a dull blade through the fudge.
For clean peanut butter fudge squares, chill the slab fully, cut straight down, and wipe a warm dry knife between slices.
Chill the fudge until fully firm.
Lift the slab out of the pan using the parchment overhang.
Place it on a cutting board.
Use a long, sharp knife.
Warm the knife under hot water and wipe it dry.
Cut straight down instead of sawing back and forth.
Wipe the knife between cuts.
If the slab feels rock-hard straight from the refrigerator, let it sit for 5–10 minutes before cutting. Very cold fudge can crack at the edges, while slightly softened fudge cuts more neatly.
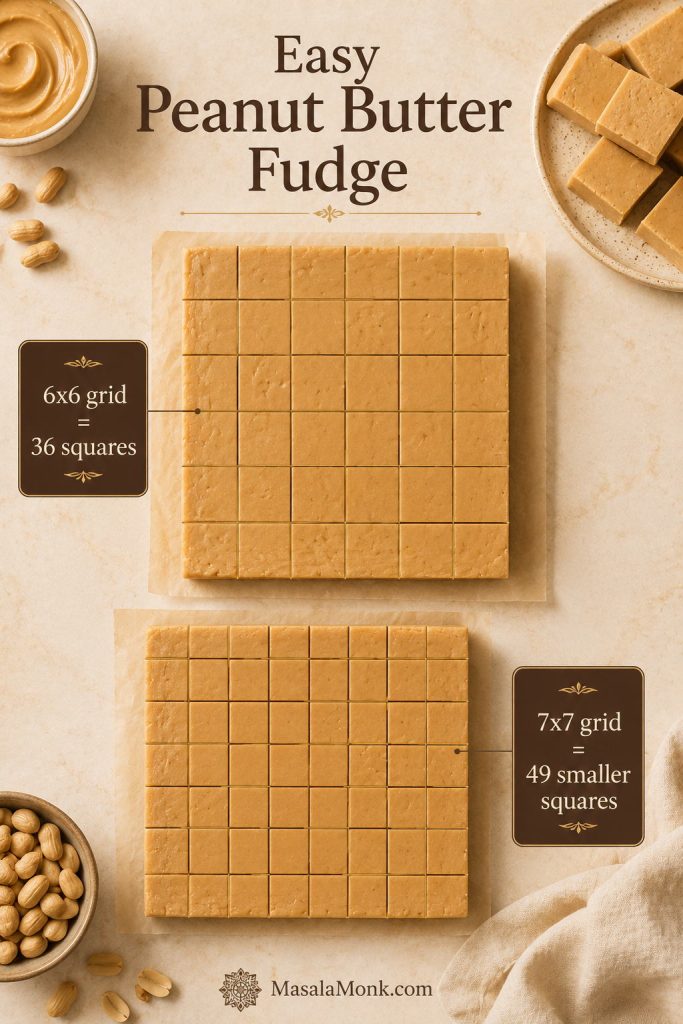
For 36 pieces, cut the slab into a 6×6 grid. For smaller holiday-box pieces, cut it into a 7×7 grid for 49 smaller squares.
Best Cutting Grid for Peanut Butter Fudge
Use the cutting grid based on how you plan to serve the fudge: slightly larger pieces for dessert plates, smaller pieces for tins, trays, and gifts.
Because peanut butter fudge is rich, smaller squares usually look better on trays, fit better in tins, and feel easier to serve.
Gifting tip: The center pieces are the prettiest for tins and boxes. Save the trimmed edges for snacking.
Easy Peanut Butter Fudge Recipe
A creamy, no-thermometer peanut butter fudge made with peanut butter, butter, and powdered sugar. Use regular creamy no-stir peanut butter for the smoothest, most reliable texture.
Use this recipe card as the quick memory version: melt gently, mix while warm, press firmly, chill fully, and slice once the slab holds.
Prep Time10 minutes
Melt Time3–5 minutes
Chill Time2–3 hours
Yield36 squares
Total Time: About 2 hours 15 minutes, including chill time.
Texture: Creamy, firm, smooth, and sliceable without smearing.
Equipment
8×8-inch / 20 cm square pan
Parchment paper
Medium saucepan or microwave-safe bowl
Heatproof spatula or wooden spoon
Fine-mesh sieve, optional but useful for clumpy powdered sugar
Sharp knife
Ingredients
1 cup creamy no-stir peanut butter, 250 g
1 cup unsalted butter, 226 g / 2 sticks
3 cups powdered sugar, sifted if clumpy, 360 g
1–2 teaspoons vanilla extract, optional, 5–10 ml
1/4 teaspoon fine salt, optional
Instructions
Line an 8×8-inch square pan with parchment paper, leaving overhang on two sides.
Add peanut butter and butter to a medium saucepan over low heat.
Stir until the butter is melted and the mixture is smooth. Do not boil.
Remove from the heat. Stir in vanilla and salt if using.
Add powdered sugar in batches, stirring until no dry streaks remain. The mixture will become thick.
If the mixture still looks loose, rest 2 minutes, stir again, then add 1–2 tablespoons more powdered sugar only if needed.
Transfer to the lined pan and press firmly into an even layer.
Refrigerate for 2–3 hours, or until sturdy enough to slice.
Lift from the pan, cut into 36 squares, and serve chilled or slightly softened at room temperature.
Microwave Method
Add peanut butter and butter to a large microwave-safe bowl. Microwave in 30-second bursts, stirring after each burst, until smooth. Stir in vanilla and salt, then mix in powdered sugar. Press into the lined pan and chill until firm.
Notes
Serving size is 1 small square when cut into 36 pieces.
A 9×9-inch / 23 cm pan works, but the pieces will be thinner and may chill faster.
To double the recipe, use a 9×13-inch pan. The pieces will be close to the same thickness as the 8×8-inch batch.
For true 3 ingredient peanut butter fudge, skip vanilla and salt.
For firmer gift-box squares, add powdered sugar 2 tablespoons at a time, up to 3 1/4 cups / about 390 g total.
If the fudge is too soft, chill it longer before adding more sugar.
For neat cuts, use a warm knife and wipe between slices.
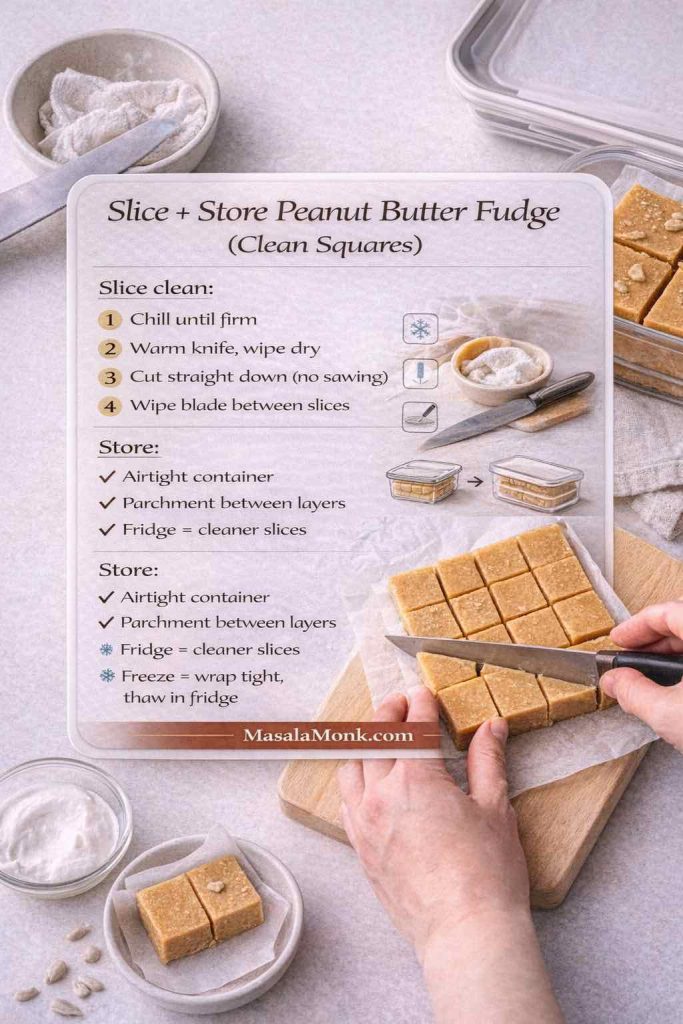
Storage
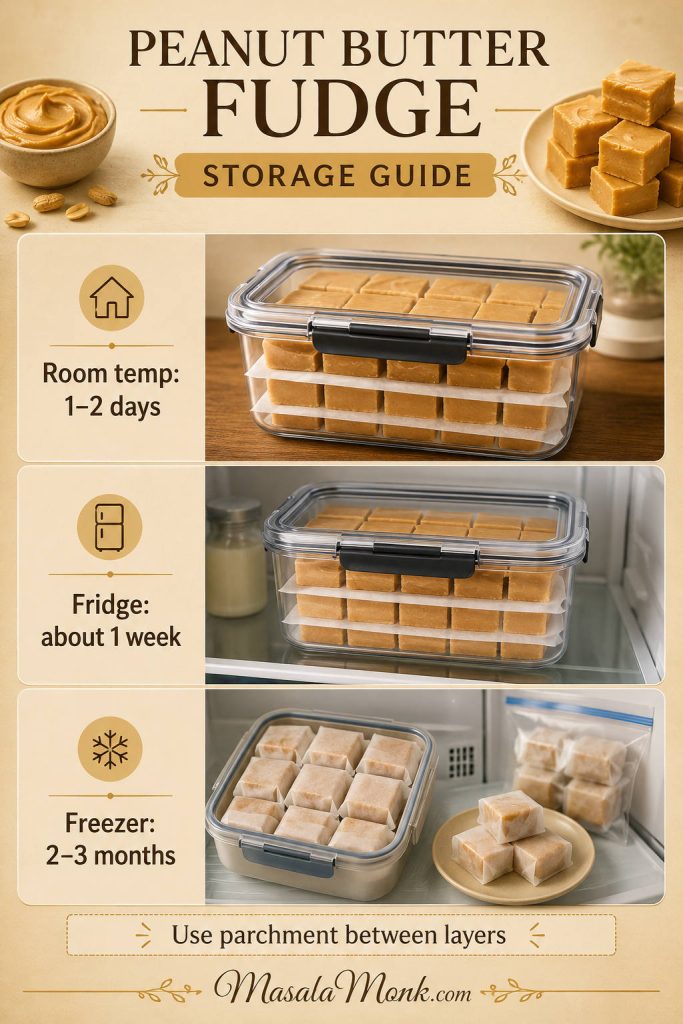
Store in an airtight container in the refrigerator for about 1 week, or freeze well-wrapped pieces for 2–3 months. Place parchment between layers if stacking.
How to Store Peanut Butter Fudge
Store peanut butter fudge in an airtight container. Place parchment between layers if stacking. The refrigerator is the best everyday storage choice because it keeps the squares firm and tidy.
In storage, parchment between layers is the small step that keeps peanut butter fudge squares from sticking, smearing, or losing their clean edges.
Storage Method
How Long
Notes
Room temperature
1–2 days in a cool room
Best only if your kitchen is not warm.
Refrigerator
About 1 week
Best everyday storage for a firmer texture.
Freezer
2–3 months
Wrap well, then thaw in the fridge before serving.
How to Gift Peanut Butter Fudge
This is one of the easiest homemade candies to gift because the pieces look polished without frosting, sprinkles, or extra decoration. Chill the slab well, cut it small, and it feels instantly giftable.
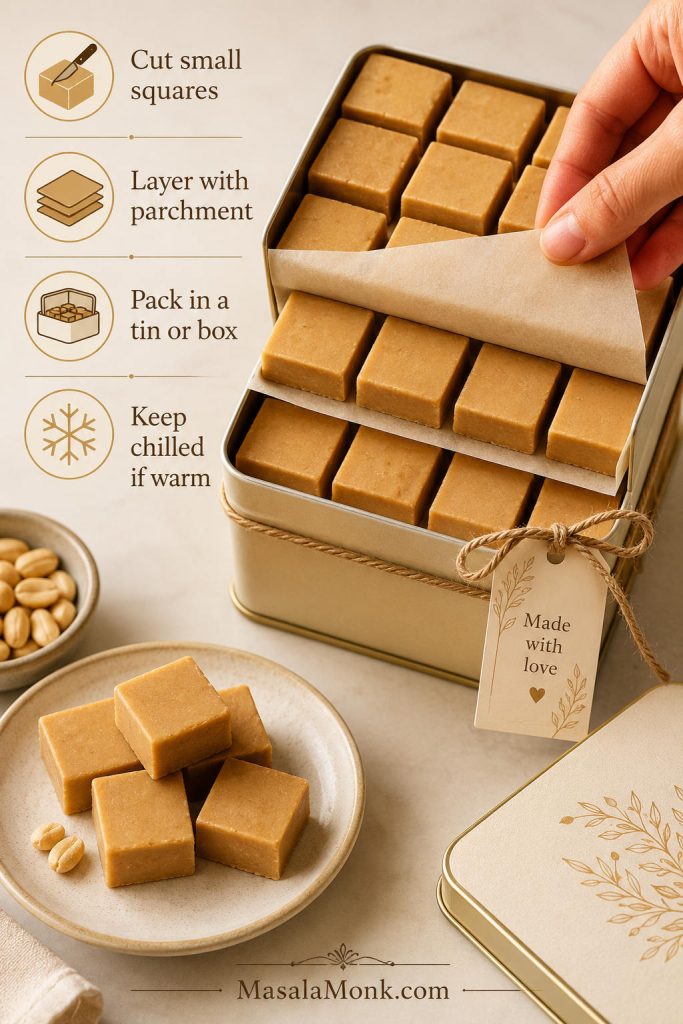
For gifting, small squares packed between parchment layers look tidier, travel better, and feel more polished than oversized blocks.
It is also the kind of treat that looks more impressive than the work it takes. Small, tidy pieces tucked between layers of parchment feel like a proper homemade gift without making the process fussy.
A small tin of peanut butter fudge feels personal without being fragile, which is why it works so well for neighbors, teachers, office trays, or a last-minute holiday sweet.
For a second make-ahead peanut butter sweet on the same dessert tray, these peanut butter rice crispy treats bring a softer, chewy contrast to the richer fudge squares.
Cut into small squares rather than large blocks.
Let the pieces firm fully before packing.
Use parchment between layers.
Pack in a tin, box, or airtight container.
Keep chilled if the weather is warm.
If you are packing the fudge ahead, check the storage guide first so the pieces stay firm and tidy.
For a cleaner gift box, trim the edges of the slab first and save the trimmings for snacking. The center pieces will look the neatest.
Which Peanut Butter Fudge Method Should You Choose?
Use this powdered sugar method when you want the easiest sliceable fudge without boiling sugar. Choose another method only if you want a different texture, a different sweetener, or a shortcut built around condensed milk, frosting, or marshmallow creme.
Once you know the difference between powdered sugar, condensed milk, old-fashioned, marshmallow fluff, and sugar-free fudge, choosing the right method gets easier.
Method
Best For
Tradeoff
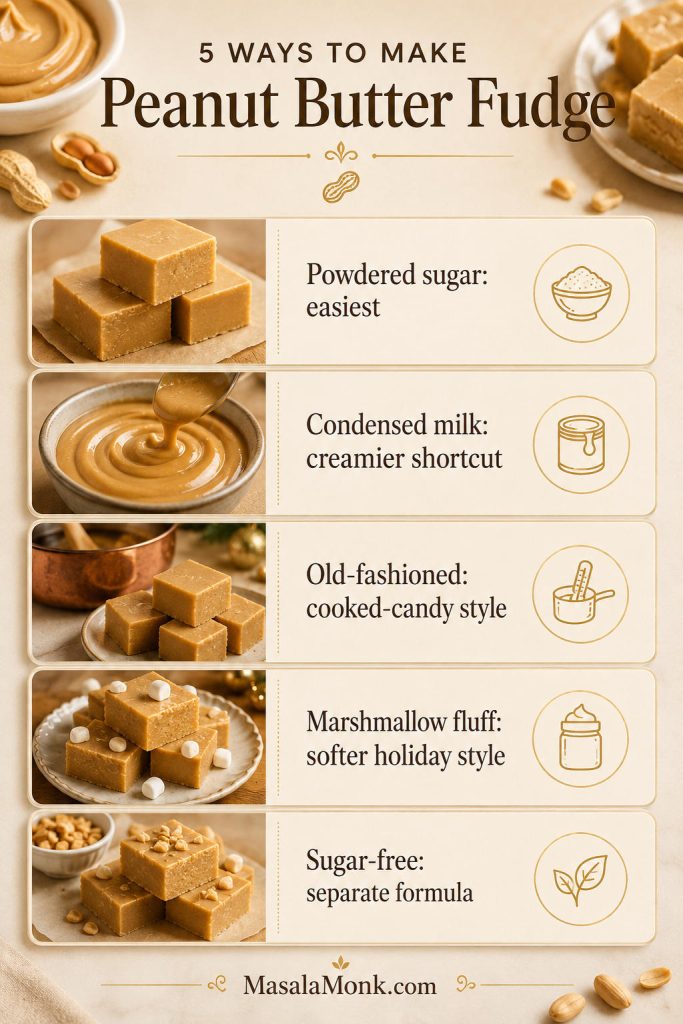
Powdered sugar peanut butter fudge
Easy, sliceable, no-thermometer fudge
Sweet and rich, so small pieces are best.
2 ingredient peanut butter fudge
The fastest shortcut version
Usually uses frosting or condensed milk, so the flavor is sweeter and less classic.
More temperature-sensitive because it depends on cooked sugar concentration and crystallization.
Marshmallow fluff peanut butter fudge
Softer, plush holiday-style fudge
Sweeter and made by a different method.
Chocolate peanut butter fudge
Peanut-butter-cup flavor
Best as a swirl or chocolate layer unless you are following a dedicated chocolate fudge formula.
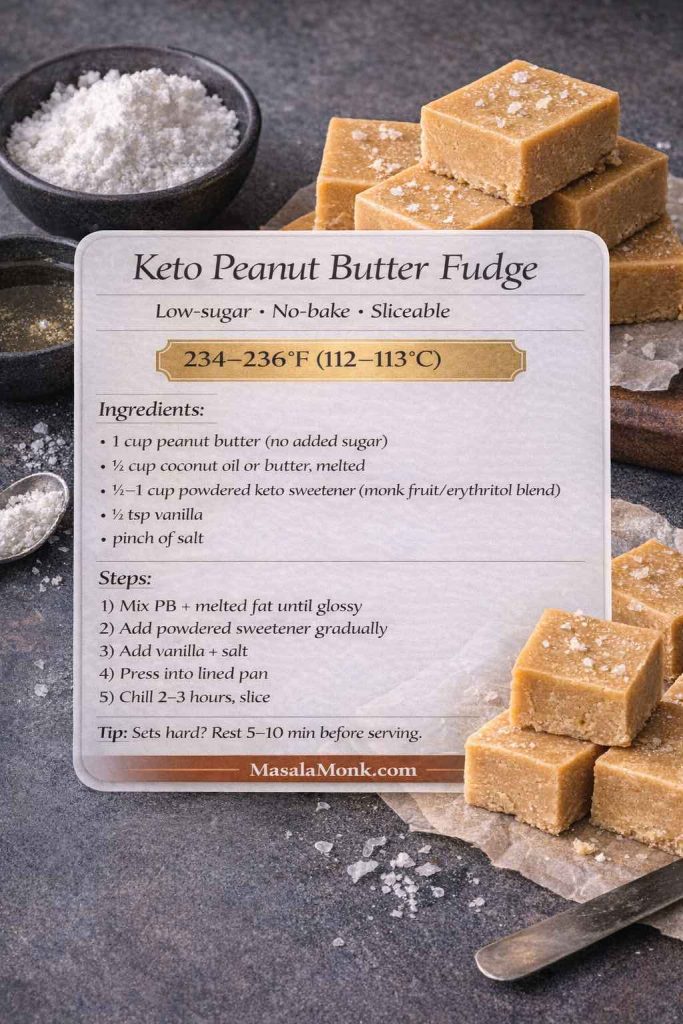
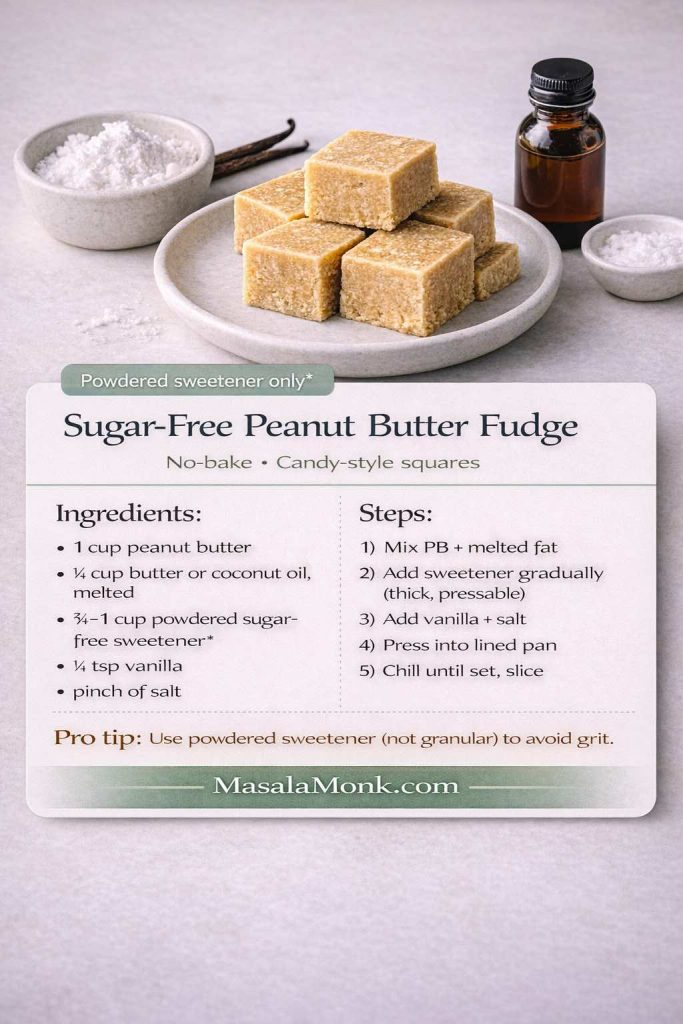
Sugar-free peanut butter fudge
Low-carb or keto needs
Requires a recipe built for sugar-free sweeteners; do not swap powdered sugar 1:1.
For keto, frosting, marshmallow creme, corn syrup, peanut-free, and other peanut butter fudge variations, MasalaMonk’s full peanut butter fudge methods guide is the better next step.
If you want to understand the cooked-candy difference behind old-fashioned fudge, the Exploratorium’s candy-making stages guide explains the soft-ball stage used for traditional fudge.
FAQs
Do you need a candy thermometer for peanut butter fudge?
No. This recipe does not use boiled sugar syrup, so there is no candy stage to measure. Powdered sugar helps the peanut butter mixture thicken and hold its shape once chilled.
What are the 3 ingredients in peanut butter fudge?
The three core ingredients are creamy peanut butter, butter, and powdered sugar. Vanilla and salt are optional flavor helpers.
Does natural peanut butter work in fudge?
It can, but it is less predictable. Natural peanut butter must be very well stirred before measuring. If it is oily, runny, coarse, or dry, the fudge may turn soft, oily, grainy, or crumbly.
Why is my peanut butter fudge soft?
It may need more chill time, or the mixture may not have enough powdered sugar. Oily peanut butter can also make fudge softer. Chill it longer first; if it still does not firm up, mix in a little more sifted powdered sugar.
Why did my peanut butter fudge turn crumbly?
Crumbly fudge usually has too much powdered sugar or peanut butter that is too dry. Let it sit at room temperature for 10 minutes before cutting. Next time, reduce the powdered sugar slightly or use creamier peanut butter.
Microwave or stovetop: which method is easier?
The microwave method is fastest, but the stovetop gives you more control. Either works as long as you heat gently, stop once the mixture is smooth, and avoid overheating.
Is condensed milk a direct swap for powdered sugar?
No. Condensed milk peanut butter fudge is a different method and usually needs chocolate, white chocolate, or peanut butter chips to help it set.
How do you double peanut butter fudge?
Double all ingredients and press the mixture into a 9×13-inch pan. The slab will be close to the same thickness as the 8×8-inch version, which makes it useful for holiday trays, parties, or gifting.
When you double the recipe, a 9×13 pan keeps the fudge close to the same thickness as the original 8×8 batch.
Freezing peanut butter fudge: what works best?
Wrap the pieces well, place them in an airtight container, and freeze for 2–3 months. Thaw in the refrigerator before serving.
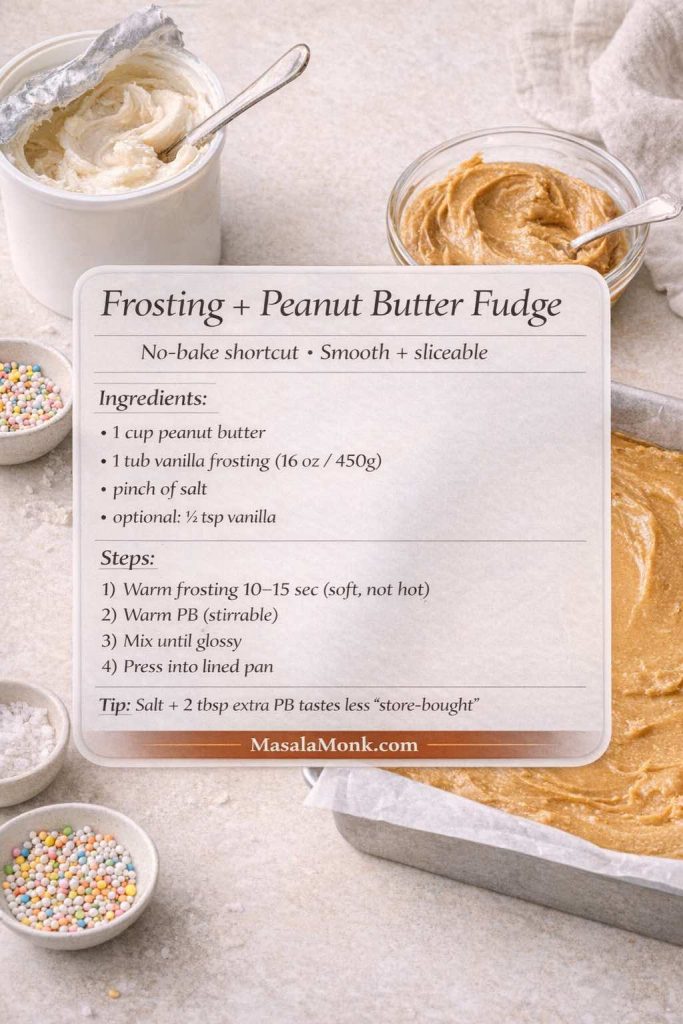
How do you make peanut butter fudge less sweet?
Use the optional salt, choose unsalted butter, and avoid frosting-based shortcut versions. This style will always be sweet because powdered sugar helps it hold together, but salt, vanilla, and smaller pieces make the richness feel more balanced.
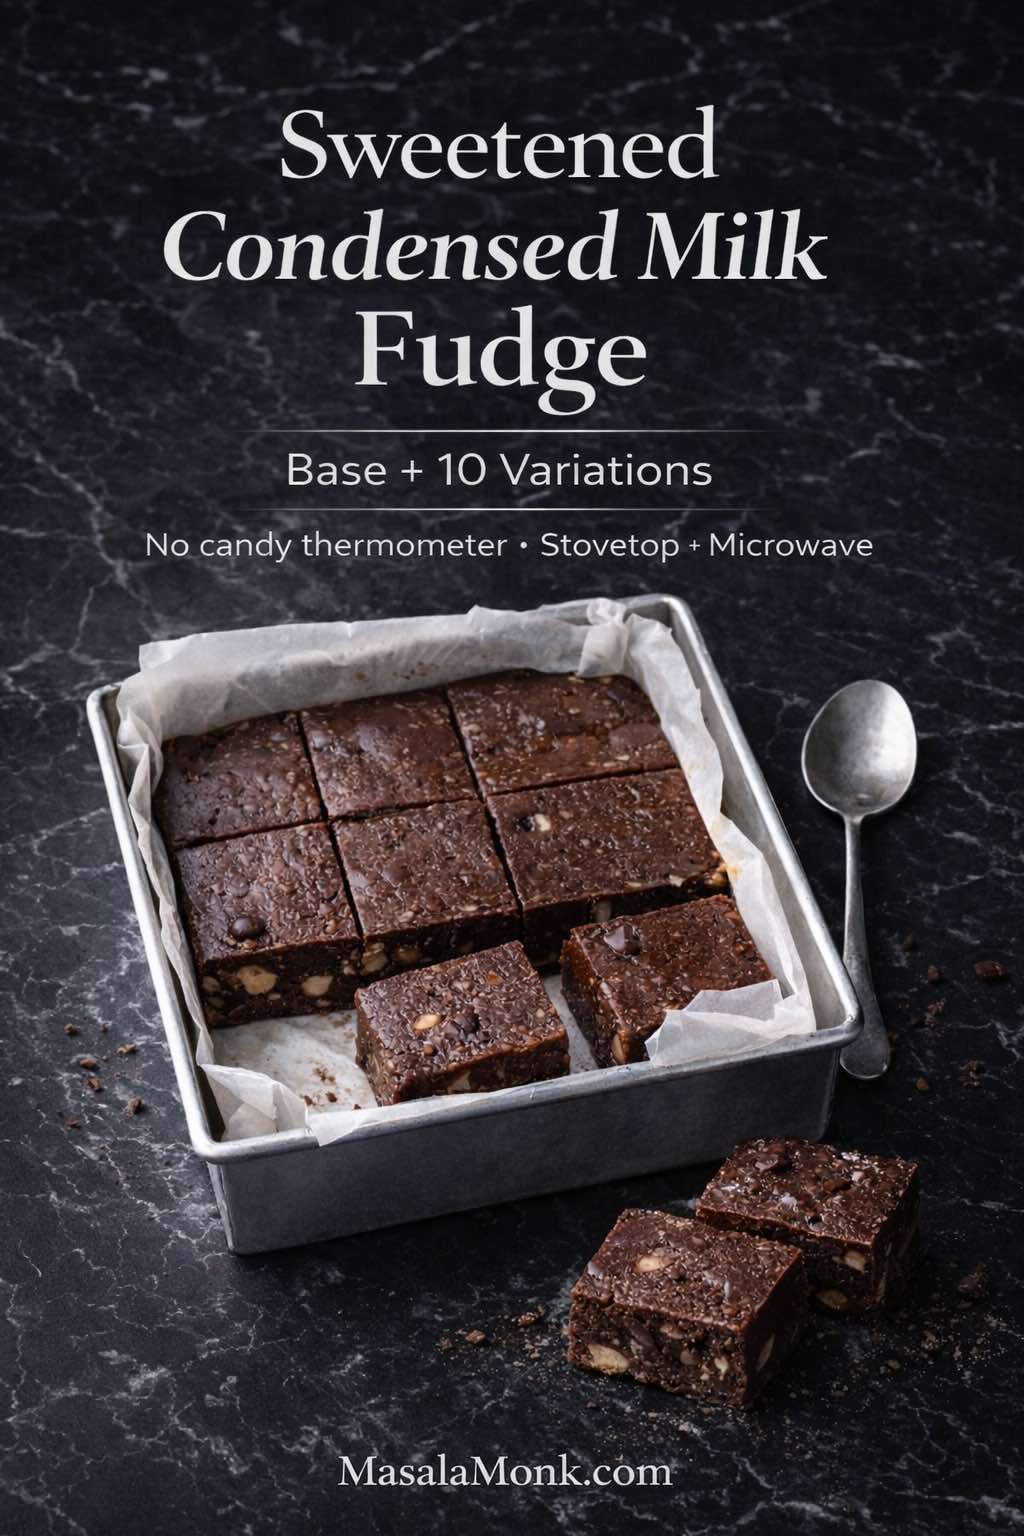
Some desserts are worth the effort. Fudge is worth it precisely because it doesn’t demand much effort at all—at least not in the versions you’ll make here. With fudge made from sweetened condensed milk, you get a shortcut that still tastes rich and finished: glossy, sliceable, and the kind of treat that looks at home on a festive platter or tucked into a small gift box.
Better yet, one dependable approach can branch into a whole set of flavors. That’s why this post is built like a guide you’ll actually use: a simple master method, then 10 full recipes that share the same rhythm. As you move through them, you’ll see the same ideas repeating in fresh ways—chocolate and sweetened condensed milk, peanut butter and condensed milk, cocoa powder structure, white chocolate as a firming backbone, and marshmallow crème for that plush “fantasy” bite.
Although the recipes vary, the goal stays the same: a smooth set, clean cuts, and a texture that feels creamy rather than crumbly or gritty. So, before we dive into the flavors, let’s set the stage properly—because a few small choices at the start make every pan easier to nail.
The simple rule that makes condensed milk fudge feel “no-fail”
Fudge is one of those candies where texture is everything. When it’s right, it’s firm but tender, dense yet smooth. When it’s off, it can turn sticky-soft, oddly greasy, or grainy in a way that makes you wish you’d just eaten a spoonful straight from the saucepan and called it a day.
In the condensed milk style, the easiest way to stay on the “right” side of that line is to remember one practical rule:
Sweetened condensed milk needs a strong setting partner.
Most often, that partner is melted chocolate (dark, milk, or white). Sometimes it’s a mix of cocoa powder and sugar for structure. In the marshmallow crème version, the fluff helps the mixture hold together while keeping the bite soft and cohesive. However it shows up, the setting partner is what turns a thick sauce into a sliceable square.
This is also why some “two ingredient” ideas—like condensed milk plus peanut butter—can feel unpredictable in warm kitchens. Peanut butter is rich, yes, but it doesn’t always firm up enough on its own. Once you add white chocolate (or another firming element), the entire batch becomes more stable, and the texture shifts from spoonable to sliceable.
If you’re curious about the classic condensed milk fudge baseline that inspired a lot of these modern shortcuts, you can glance at the traditional-style formula in Eagle Brand’s chocolate fudge recipe. It’s the same general idea you’ll use here—melt, stir, spread, chill—just translated into a full set of variations.
Your setup (and why it matters more than you think)
Tin size (keep it consistent)
Every recipe below is written for a 20 × 20 cm (8 × 8-inch) square tin. You can use a slightly larger pan for thinner pieces, but consistency makes life easier—especially when you’re moving between flavors and you want them to set similarly.
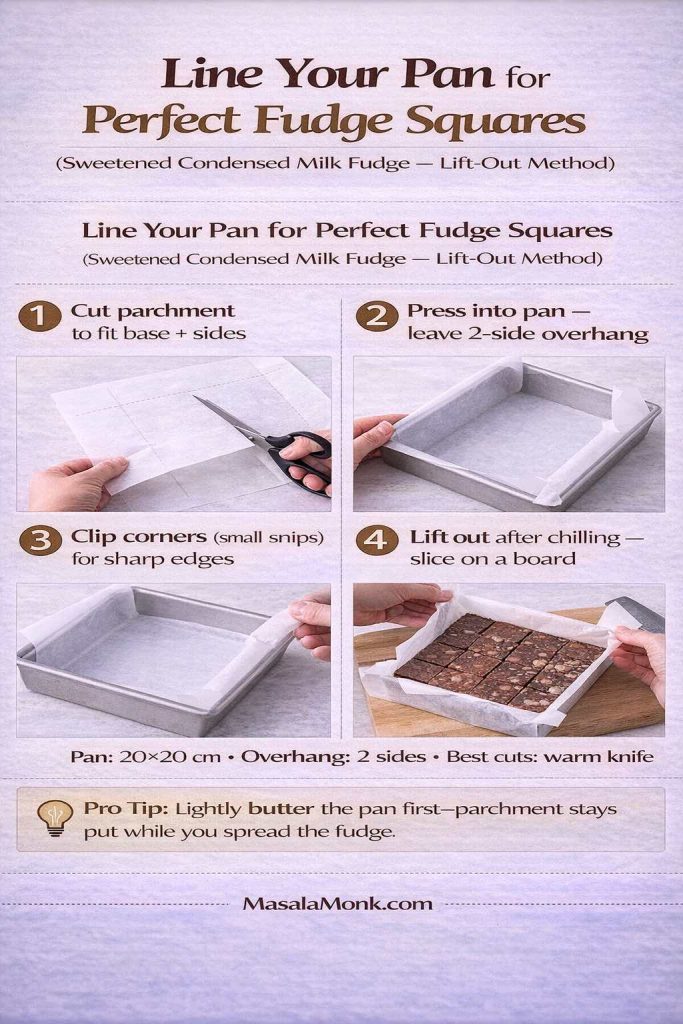
Lining the tin
Line the pan with baking paper so it overhangs on two sides. That overhang becomes your handle later. As a result, you can lift the whole slab out cleanly, then slice it neatly without scraping corners.
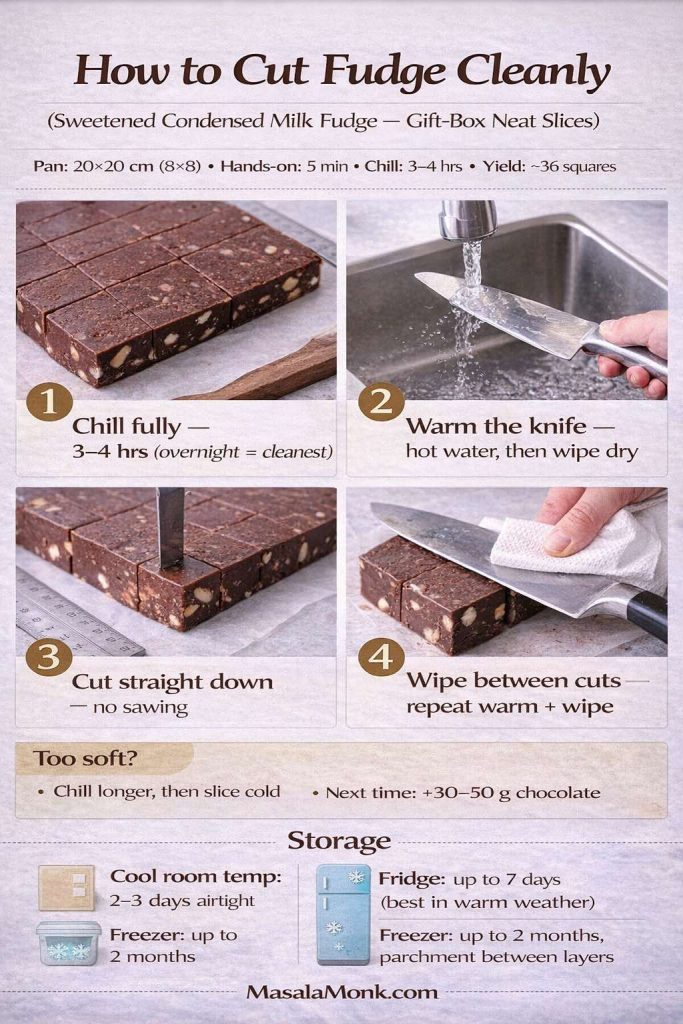
If you want clean, gift-box fudge squares, don’t skip the parchment overhang. This sweetened condensed milk fudge pan-lining guide shows the lift-out method that prevents stuck corners and broken edges: cut parchment, leave a two-side handle, snip corners for sharp sides, then lift and slice on a board. Save it once and you’ll use it for every condensed milk fudge batch—especially when you’re making multiple flavors for holiday trays.
Heat level
Low heat is your friend. Chocolate scorches quickly when pushed, and white chocolate is especially sensitive. So, even though it’s tempting to rush, keep the flame gentle and stir steadily.
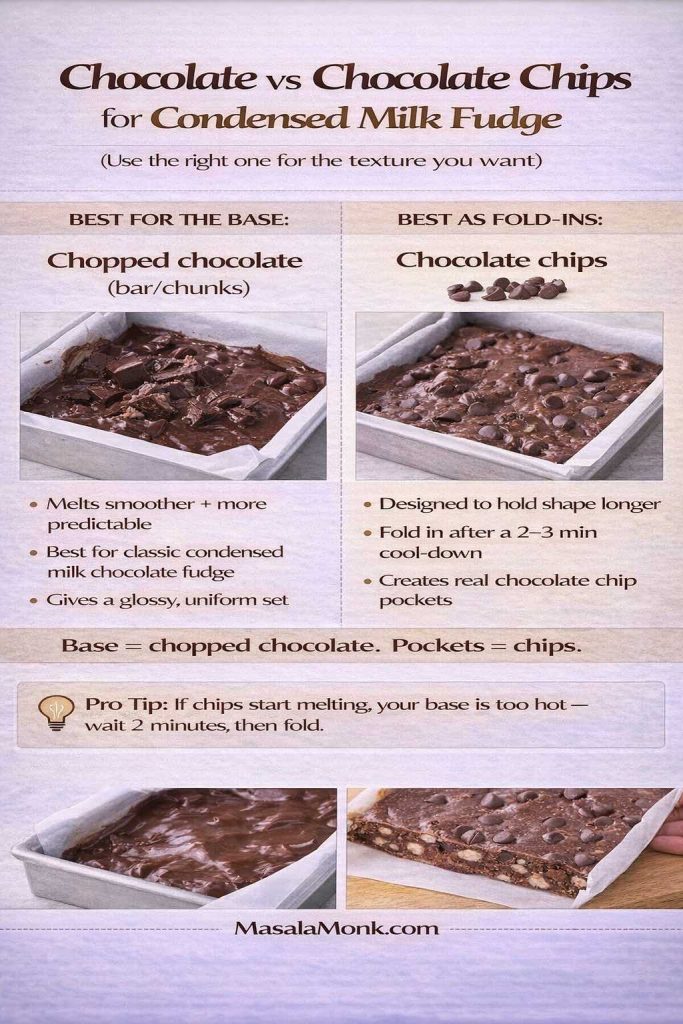
A note on “chips”
You’ll see two roles in these recipes: chopped chocolate is for a smoother, more reliable melt in the base, while chocolate chips are best used as fold-ins when you want real chocolate pockets in each bite. Also, chips can look stubborn in the microwave and then suddenly melt once stirred—that’s why short bursts and frequent stirring matter. If you’d like a dependable microwave reference for the rhythm, King Arthur Baking’s easy microwave fudge demonstrates the stop-and-stir approach that prevents scorching.
If you’re making fudge with sweetened condensed milk and chocolate chips, this quick guide prevents the most common mistake. Use chopped chocolate when you want a smooth, glossy base that sets cleanly—then use chocolate chips as fold-ins when you want real chip pockets in every bite. Save this card for any condensed milk fudge recipe so you get the texture you intended (uniform fudge vs chocolate-chip fudge) without scorching or melting your chips into streaks.
Cooling and slicing sweetened condensed milk fudge
Chill until firm—usually 2 to 4 hours—then slice with a warm knife. Warm doesn’t mean blazing hot; rather, run the knife under hot water, wipe it dry, and cut. Repeat as needed. Consequently, you get sharp edges instead of ragged cracks.
Want gift-box neat slices every time? Save this “warm knife” cutting guide for sweetened condensed milk fudge (and every other fudge, honestly). The difference between ragged edges and clean squares is simple: chill fully, warm the knife, cut straight down, wipe between cuts. It also includes the quick fix for warm kitchens—if fudge feels soft, slice it cold now, and next batch add 30–50 g extra chocolate for a firmer set. Keep this pinned for holiday trays, edible gifts, and Christmas fudge season.
The master method you’ll reuse (stovetop + microwave)
Most of the recipes below follow one of two paths:
Melted chocolate + sweetened condensed milk, then flavor and set
A structured cocoa base (cocoa + sugar + butter + condensed milk), then set
Because the steps repeat, you’ll get faster with every batch. In fact, after you make the first pan, the others feel almost effortless.
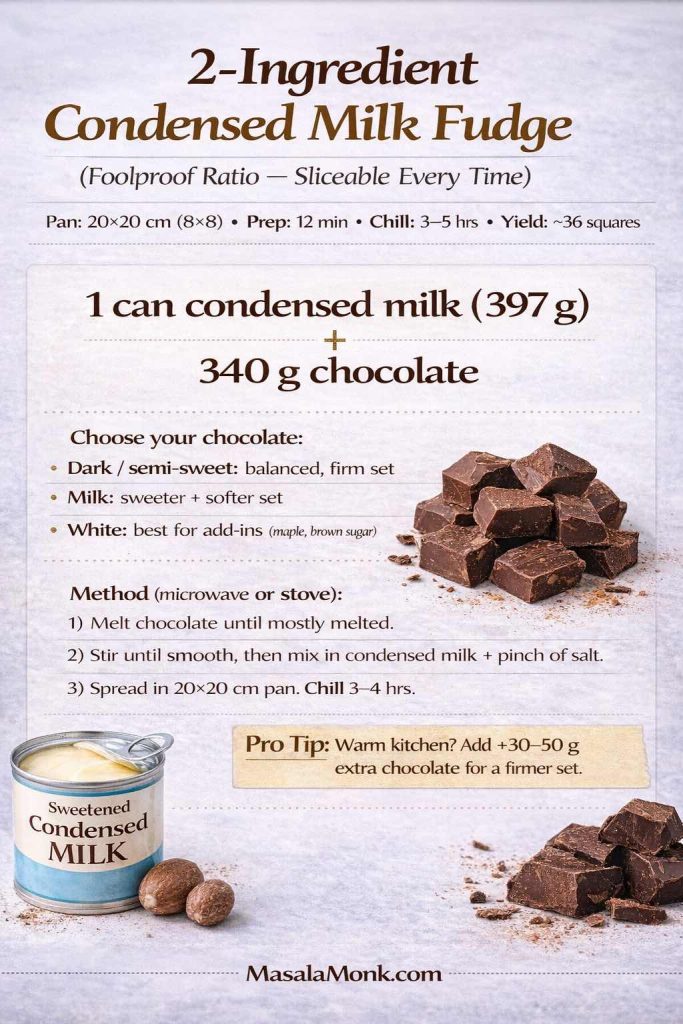
Save this 2 ingredient fudge with condensed milk ratio card for the moment you need an instant dessert that actually sets. The “foolproof” formula is simple: 1 can sweetened condensed milk + 340 g chocolate—then you can choose dark for a firmer, balanced bite, milk for a softer candy-bar vibe, or white as the base for flavors like maple and brown sugar. The pro tip is your safety net for warm kitchens: add a little extra chocolate for a clean, sliceable set every time.
Stovetop master method (best for control)
Line the tin and set it aside.
Add your chocolate (or white chocolate) plus sweetened condensed milk to a saucepan.
Place on low heat and stir slowly but consistently until glossy.
Remove from heat, then stir in salt, vanilla, and any flavor additions.
Spread into the tin and smooth the top.
Chill until firm.
Microwave master method (best for speed)
Put chopped chocolate in a large microwave-safe bowl.
Microwave in 20–30 second bursts, stirring very well each time, until the chocolate is mostly melted (a few soft lumps are fine).
Keep stirring until those last lumps disappear and the chocolate turns smooth and shiny.
Add sweetened condensed milk and mix until the mixture becomes thick and glossy.
Warm for 10–15 seconds only if needed, then stir again until fully smooth. Stir in flavor additions, spread, and chill.
One reminder worth repeating: in microwave batches, stirring finishes the melt. Stop when the chocolate is mostly melted, then stir until smooth. That’s how you get a glossy set without scorched edges or greasy separation.
If you’re looking for microwave fudge with condensed milk, the trick isn’t “longer cooking.” It’s short bursts + aggressive stirring. Chocolate keeps melting from residual heat, so stirring is what finishes the job without scorching the edges or splitting the mixture.
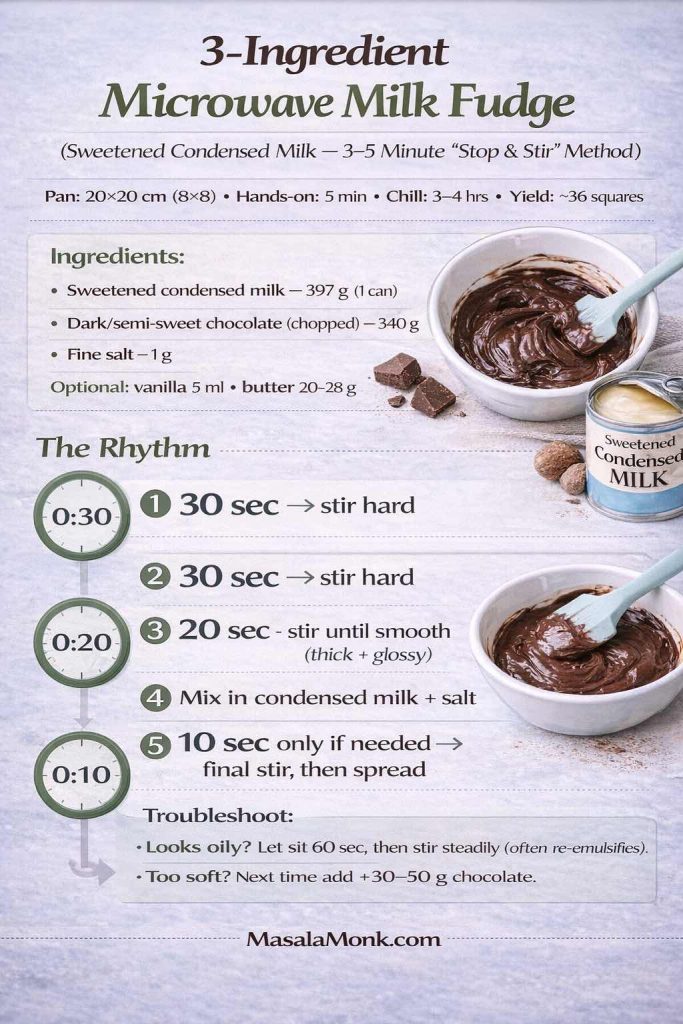
This 3 ingredient microwave fudge with sweetened condensed milk is the fast method that prevents scorching: short bursts + aggressive stirring. Save this “stop & stir” rhythm card for the days you want easy microwave fudge that sets cleanly—because the chocolate keeps melting from residual heat, and stirring is what makes it glossy (not grainy or oily). Bonus tip built in: if your kitchen runs warm, adding 30–50 g extra chocolate gives you a firmer, sliceable set without changing the flavor.
What you need (for a 20 × 20 cm tin)
Sweetened condensed milk: 397 g
Dark / semi-sweet chocolate, chopped: 340 g
Fine salt: 1 g
Optional (smoother bite): 20–28 g unsalted butter
Optional (rounds sweetness): 5 ml vanilla extract
Microwave method (the reliable rhythm)
Line the tin with baking paper (overhang on two sides).
Put the chopped chocolate in a large microwave-safe bowl.
Microwave in 20–30 second bursts, stirring very well each time, until the chocolate is mostly melted (it can look lumpy, but should feel soft).
Add the sweetened condensed milk + salt. Stir firmly until the mixture turns thick and glossy.
If it still looks streaky or stubborn, microwave 10–15 seconds, then stir again until fully smooth.
Stir in butter (if using) until melted, then vanilla.
Spread into the tin, smooth the top, and chill until firm.
How long does it take?
Total microwave time is usually 60–120 seconds (plus stirring).
The more important number is how many times you stir: 4–8 proper stirs beats “one long blast” every time.
Microwave troubleshooting (quick fixes)
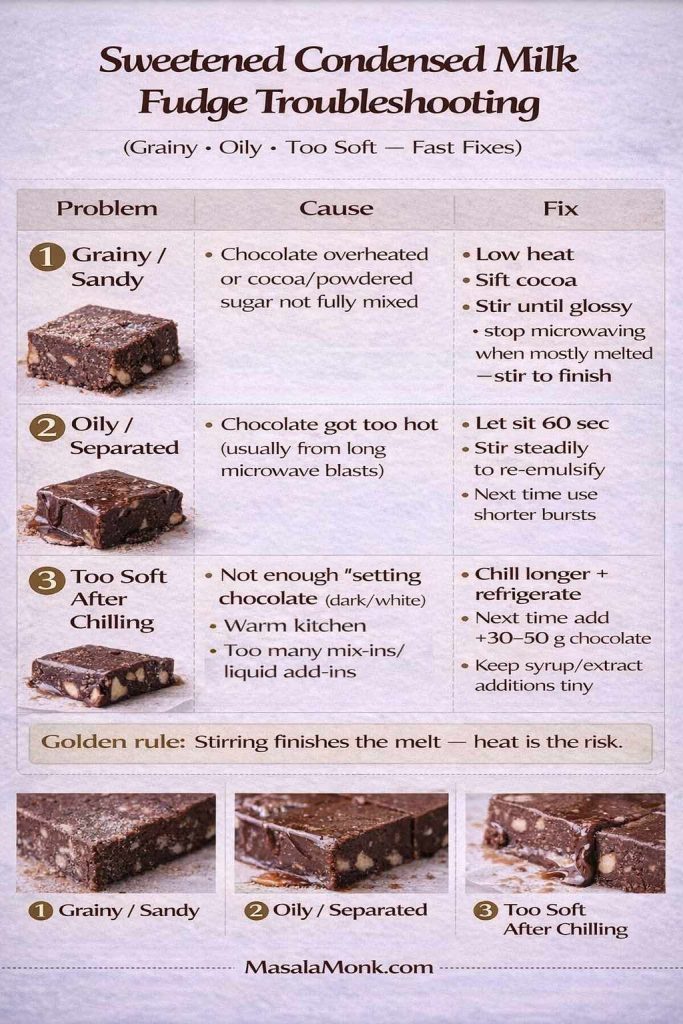
Grainy or oily look: the chocolate got too hot. Next time use shorter bursts. For now, let it sit 1 minute, then stir steadily; it often re-emulsifies as it cools slightly.
Too soft after chilling: you didn’t have enough “setting partner” (chocolate/white chocolate), or your add-ins softened the ratio. Chill longer, then store in the fridge. Next batch: increase chocolate by 30–50 g if your kitchen is warm.
Chocolate seized or clumped: Chocolate chips and some chocolates can clump before smoothing out because of stabilizers and uneven heating. Don’t blast it longer—let it sit 30–60 seconds, then stir steadily. Next time, use shorter bursts and a larger bowl for gentler heat.
Why fudge turns grainy (and how these recipes avoid it)
Graininess in fudge is almost always about sugar crystallization: you get crystals, but they’re too large to feel smooth. The interesting twist is that fudge actually wants crystals—just tiny ones that make the texture creamy rather than sandy. The science explanation in Exploratorium’s “What’s Special About Fudge?” is a surprisingly readable deep dive into that microcrystal sweet spot.
Save this sweetened condensed milk fudge troubleshooting card for the batch that goes sideways. It gives you fast fixes for the three most common problems—grainy fudge, oily/separated fudge, and fudge that’s too soft after chilling—plus the one rule that prevents most fails: stirring finishes the melt; too much heat is the risk. If you’re making holiday trays or gifting, this is the cheat sheet that helps every condensed milk fudge recipe set glossy and slice cleanly.
In condensed milk fudge, you usually sidestep the worst crystallization issues because you’re not boiling sugar syrup to a precise stage. Still, graininess can happen if:
the mixture overheats and separates,
you stir aggressively after it’s already thickening in a cooked style,
or dry ingredients clump and never fully dissolve.
That’s why these recipes emphasize gentle heat, steady stirring, and sifting cocoa where needed. In other words, the “no-fail” feeling isn’t magic—it’s good handling.
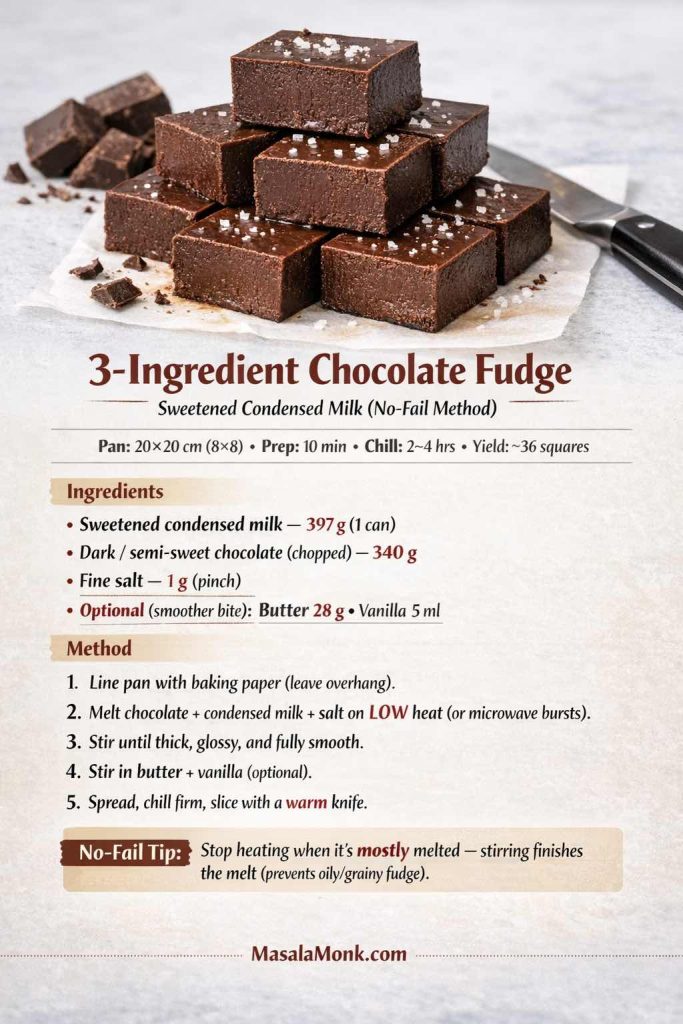
This is the one you’ll come back to when you want something simple and dependable. It’s the core condensed milk fudge recipe—smooth, glossy, and sliceable without drama. It also adapts easily: change your chocolate, add nuts, switch the aroma with vanilla, and you still end up with a finished candy.
Ingredients (20 × 20 cm tin)
Sweetened condensed milk: 397 g
Dark or semi-sweet chocolate, chopped: 340 g
Fine salt: 1 g
Optional, but genuinely worth it:
Unsalted butter: 28 g
Vanilla extract: 5 ml
This 3-ingredient chocolate fudge with sweetened condensed milk is the baseline “no-fail” recipe for the entire guide: one can of condensed milk + chopped dark/semi-sweet chocolate + a pinch of salt. Use the stovetop or microwave method, then chill until firm for clean slices. The key tip is simple but crucial—stop heating when the chocolate is mostly melted and let stirring finish the melt to avoid oily or grainy fudge. Save this card for quick holiday trays, edible gifts, or anytime you want dependable fudge without candy thermometers.
Method (stovetop)
Line the tin and set it aside.
Combine chocolate, sweetened condensed milk, and salt in a saucepan.
Warm on low heat, stirring until the mixture becomes glossy and uniform.
Remove from heat. Add butter (if using) and stir until fully melted. Then add vanilla.
Spread into the tin, smooth the top, and chill until firm.
Microwave version (fast and clean)
Use the microwave master method above: melt chopped chocolate in short bursts, stirring until it’s mostly melted, then stir until fully smooth. Add sweetened condensed milk and salt and mix until the mixture turns thick and glossy. If it looks streaky, warm it for 10–15 seconds and stir again. Finish with vanilla, spread, and chill.
How it tastes (so you can choose your chocolate)
Dark chocolate makes the sweetness feel balanced and grown-up.
Milk chocolate makes it softer and sweeter—more “candy bar.”
A blend lands in the middle, which is often the safest crowd-pleaser.
Save this best chocolate for sweetened condensed milk fudge guide before you swap ingredients. Dark/semi-sweet gives the firmest, cleanest slices with balanced sweetness, milk chocolate makes a softer candy-bar style fudge (especially in warm kitchens), and white chocolate is the best base for flavors like maple fudge, peanut butter fudge, and brown sugar fudge—just melt it gently. If you want a firmer set, the card includes the simplest adjustment: add 30–50 g extra chocolate.
A serving direction that feels intentional
Instead of just stacking squares, treat it like a dessert plate. A thin drizzle of cocoa syrup and a pinch of flaky salt makes each piece feel “finished.” If you want a quick drizzle that’s already designed to stay smooth, try MasalaMonk’s 3-minute homemade chocolate syrup. It pairs beautifully with condensed milk chocolate fudge, especially when the fudge is slightly chilled and the syrup is warm.
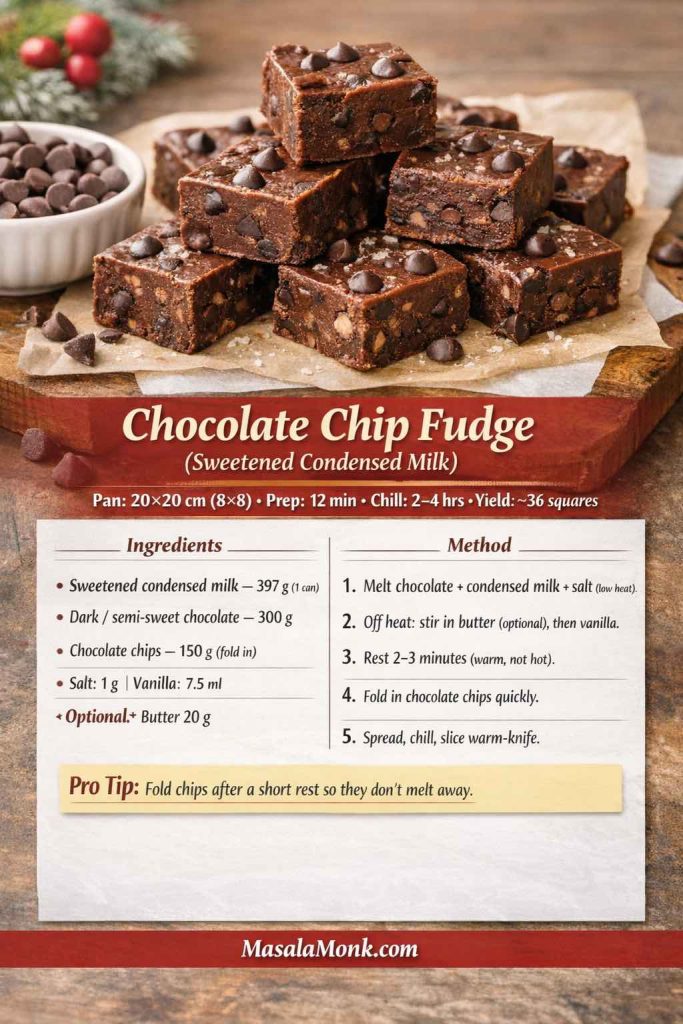
Sometimes you want that familiar holiday-tray vibe: a smooth chocolate fudge base with real chocolate chips baked right into the bite. This version delivers exactly that—rich, straightforward, and full of little chocolate pockets—because the chips are folded in at the end, not melted into the base.
Ingredients (20 × 20 cm tin)
Fudge base
Sweetened condensed milk: 397 g
Dark or semi-sweet chocolate, chopped: 300 g
Fine salt: 1 g
Vanilla extract: 7.5 ml (1½ tsp)
Fold-in chips (kept as chips)
Chocolate chips (semi-sweet or milk): 150 g
Optional (smoother bite)
Unsalted butter: 20 g
This chocolate chip fudge with sweetened condensed milk is the “holiday tray” version of the classic—smooth chocolate base, plus real chocolate chip pockets in every bite. The key move is simple: rest the warm fudge base for 2–3 minutes before folding in the chips, so they stay as chips instead of melting into streaks. Save this card when you want an easy, sliceable fudge that looks impressive and tastes like a familiar chocolate-chip dessert—without candy thermometers or complicated steps.
Method (stovetop)
Line the tin with baking paper and set it aside.
In a saucepan on low heat, melt the chopped chocolate with sweetened condensed milk and salt, stirring steadily until glossy and completely smooth.
Remove from heat. Stir in butter (if using), then vanilla.
Let the mixture sit 2–3 minutes so it’s still warm but not scorching hot.
Fold in the chocolate chips quickly so they stay intact rather than melting into streaks.
Spread into the tin, smooth the top, and chill until firm.
Method (microwave)
Melt the chopped chocolate in short bursts, stirring between bursts until smooth.
Stir in sweetened condensed milk and salt until thick and glossy (warm briefly only if needed).
Stir in butter (if using) and vanilla.
Rest 2–3 minutes, then fold in chips.
Spread and chill.
Why this stays a separate recipe from the chopped-chocolate classic
Even though the base is similar, the experience is different: instead of one uniform chocolate bite, you get bursts of chocolate from the chips. That “chip pop” is what people expect from chocolate chip fudge, and it’s the reason this version earns its own spot.
A small shift that makes it feel “new”
Add a handful of chopped walnuts or toasted pecans—about 60 g—and fold them in just before spreading. Then, once it’s set, slice and serve with hot coffee or iced coffee. If you’re building a “dessert and drink” pairing moment, the condensed milk angle flows naturally into MasalaMonk’s iced coffee recipes collection, which includes condensed milk-style coffee variations for that café feel.
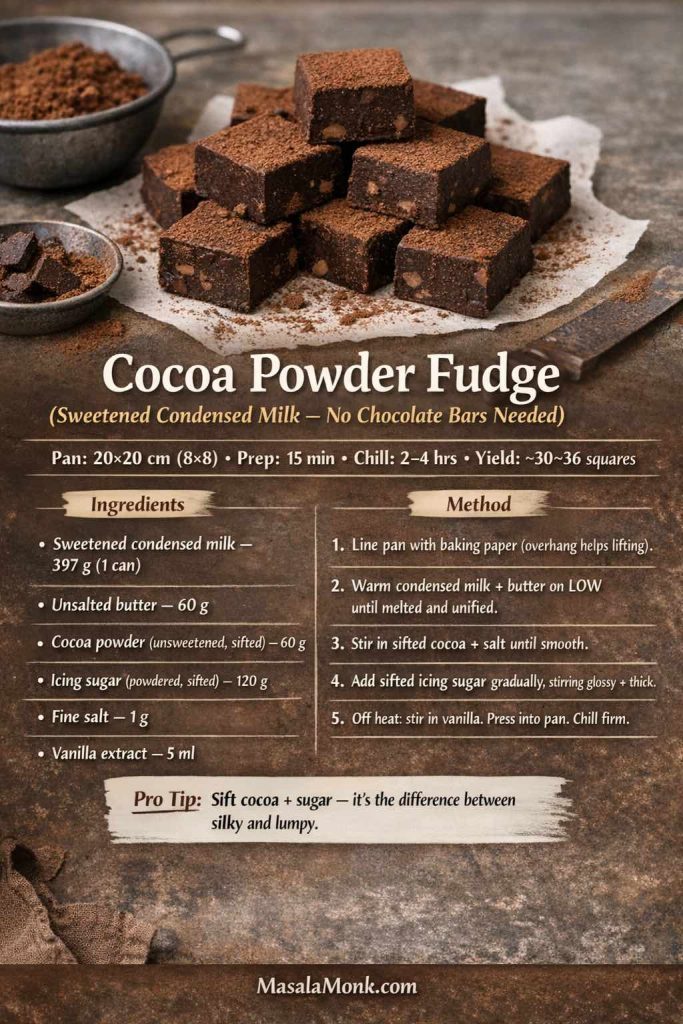
3) Cocoa powder fudge with sweetened condensed milk (deep chocolate, no melted chocolate required)
This one leans into cocoa powder and structure. It’s bold, dark, and intensely chocolatey without relying on a mountain of melted chocolate. The texture is slightly more “fudge-like” in a traditional way—dense and smooth, with a clean slice.
Ingredients
Sweetened condensed milk: 397 g
Unsalted butter: 60 g
Cocoa powder (unsweetened), sifted: 60 g
Icing sugar (powdered sugar), sifted: 120 g
Fine salt: 1 g
Vanilla extract: 5 ml
If you’re searching for a condensed milk cocoa powder fudge recipe, this is the reliable pantry version—no chocolate bars required. Sweetened condensed milk + butter builds a smooth base, while sifted cocoa powder and icing sugar give the fudge its structure and deep chocolate flavor. Save this card for those days when you want a bold, sliceable cocoa fudge fast—and remember the one detail that changes everything: sifting keeps the texture silky instead of lumpy.
Method
Line the tin and set it aside.
In a saucepan on low heat, warm condensed milk and butter until the butter melts and the mixture is unified.
Add sifted cocoa and salt. Stir until smooth.
Add sifted icing sugar gradually, stirring until the mixture thickens and becomes glossy.
Remove from heat, stir in vanilla, then press into the tin.
Chill until firm.
What to expect
This version sets quickly and tastes strongly of cocoa. Therefore, it’s a smart choice when you want the chocolate flavor to feel clear rather than candy-sweet.
A satisfying way to serve it
Cut into small squares and plate it with something crisp. Churros are especially good because they bring warmth, crunch, and cinnamon. If you want a full churros guide with sauces and variations, MasalaMonk’s churros recipe gives you plenty of options for turning fudge into a dip or a dessert board centerpiece.
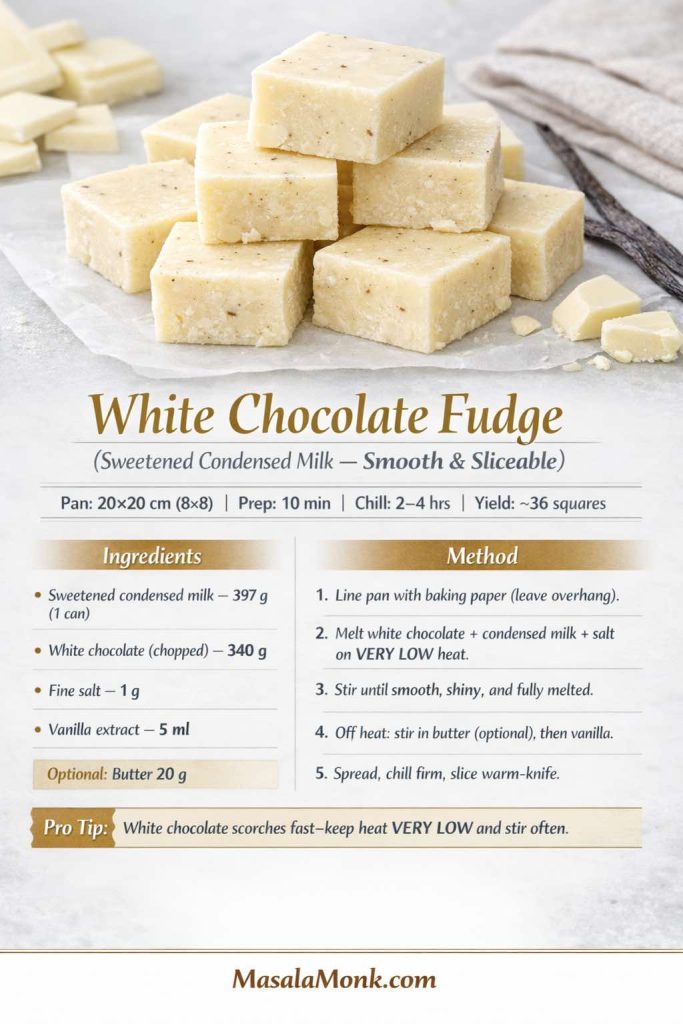
4) White chocolate fudge with sweetened condensed milk recipe (smooth, creamy, and versatile)
White chocolate condensed milk fudge is the quiet powerhouse of this collection. It’s creamy, sweet, and a perfect base for vanilla, maple, and “holiday tray” flavors. The key is gentle heat. White chocolate scorches faster than dark chocolate, so take your time.
Ingredients
Sweetened condensed milk: 397 g
White chocolate, chopped: 340 g
Fine salt: 1 g
Vanilla extract: 5 ml
Optional:
Unsalted butter: 20 g
This white chocolate fudge with sweetened condensed milk is the smooth, sliceable base that powers the “non-dark-chocolate” side of the guide—think vanilla, maple, brown sugar, and butterscotch-style variations. The only rule that matters here is heat control: white chocolate scorches fast, so keep the flame very low and stir until glossy. Save this card when you want a creamy, gift-box-friendly fudge that sets cleanly and cuts into neat squares every time.
Method
Line the tin and set it aside.
Melt white chocolate with condensed milk and salt on very low heat, stirring often.
Remove from heat and stir in butter (if using), then vanilla.
Spread, smooth, chill.
Why this base matters
White chocolate fudge is the bridge between candy and dessert. It also behaves beautifully with add-ins like nuts, dried fruit, or maple. So, even if you make only one “non-chocolate” fudge from this post, make it this one—because it becomes several other recipes with minor shifts.
A gentle, natural pairing link
If you like desserts that lean creamy and layered rather than purely chocolate, you’ll probably love MasalaMonk’s savoiardi chocolate vanilla pudding. It’s a different format, yet it hits the same comfort-dessert note, especially after a meal.
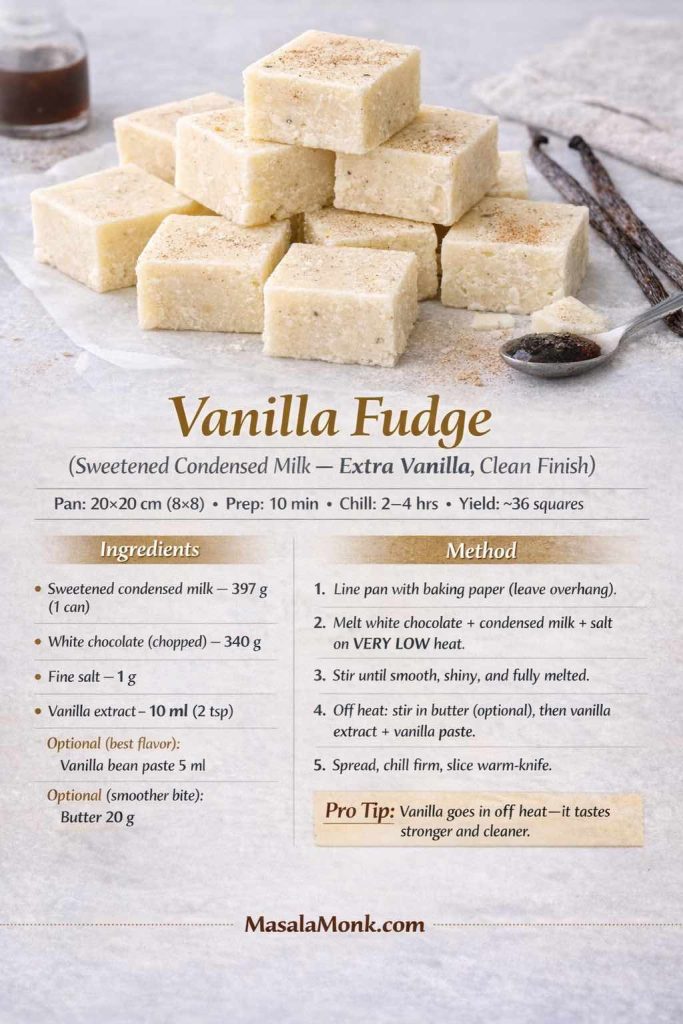
5) Vanilla fudge (sweetened condensed milk) recipe with a clean, classic finish
Vanilla fudge often gets dismissed as “just white chocolate,” but it doesn’t have to taste vague. The difference comes from how you build the flavor: more vanilla, a pinch of salt, and an option for vanilla bean paste if you want that speckled bakery look.
Ingredients
Sweetened condensed milk: 397 g
White chocolate, chopped: 340 g
Fine salt: 1 g
Vanilla extract: 10 ml (2 tsp)
Optional:
Vanilla bean paste: 5 ml
Unsalted butter: 20 g
This vanilla fudge recipe using sweetened condensed milk is the “clean finish” version of white chocolate fudge—same easy method, but with the flavor turned up so it tastes unmistakably vanilla, not just sweet. The trick is timing: add vanilla (and vanilla bean paste, if using) off the heat so the aroma stays bold and fresh. Save this card for gift boxes, holiday trays, and quick make-ahead desserts when you want a creamy, sliceable fudge that feels bakery-level without extra work.
Method
Melt white chocolate, condensed milk, and salt on very low heat.
Remove from heat. Stir in vanilla extract (and paste if using).
Spread into the tin. Chill until firm.
Make it feel special without making it complicated
Once set, sprinkle a light dusting of cinnamon or cardamom on top and press gently so it clings. It reads like a deliberate flavor choice rather than “plain.” Even more, it pairs beautifully with fruit-forward desserts, which makes it a nice companion to something like MasalaMonk’s no-bake blueberry cheesecake if you’re building a dessert table with variety.
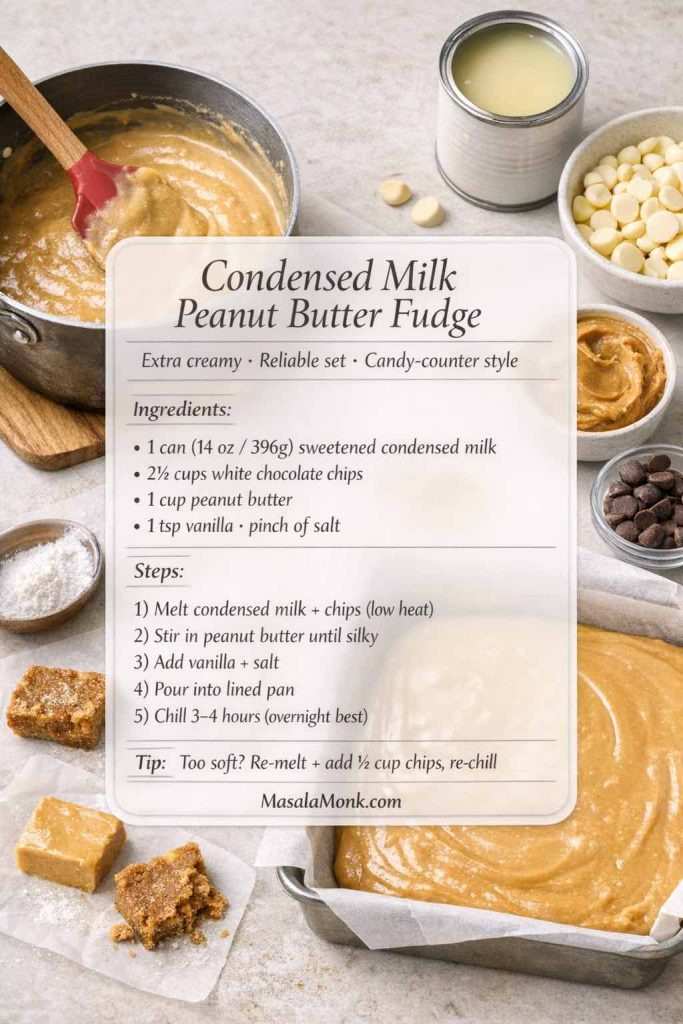
6) Peanut butter fudge using sweetened condensed milk (firm, creamy, and sliceable)
This is where a lot of people get disappointed when they improvise: peanut butter and condensed milk taste wonderful, but the set can be too soft. So, this recipe uses white chocolate as the structure. The result is creamy, stable, and easy to cut—even when your kitchen runs warm.
For a broader peanut butter fudge universe (including old fashioned cooked versions, marshmallow crème methods, and more), MasalaMonk’s peanut butter fudge guide is a great companion read.
Ingredients
Sweetened condensed milk: 397 g
White chocolate, chopped: 300 g
Peanut butter (creamy): 180 g
Fine salt: 1 g
Vanilla extract: 5 ml
Optional:
Roasted peanuts, chopped: 50–60 g
This peanut butter fudge with sweetened condensed milk is the sliceable, reliable version people are actually trying to get when they search “easy peanut butter fudge condensed milk.” The secret is structure: white chocolate acts as the setting partner, so the fudge firms up cleanly instead of staying soft—especially in warm kitchens. Save this card for quick batches, edible gifts, and dessert trays when you want that classic peanut-butter flavor with neat, gift-box cuts every time.
Method
Line the tin and set it aside.
Melt white chocolate with condensed milk on very low heat until smooth.
Remove from heat and stir in peanut butter until glossy.
Add salt and vanilla. Fold in peanuts if using.
Spread into the tin and chill.
What the texture should look like
When you stir in the peanut butter, the mixture should turn silky and cohesive, not greasy or separated. If it looks oily, keep stirring gently until it emulsifies. In most cases, it comes together with patience rather than extra heat.
A dessert-board idea
Peanut butter fudge is fantastic with crisp cookies, bananas, or even spooned onto toast. If you want a no-oven dessert that shares the same “layer and chill” ease, MasalaMonk’s banana pudding sits in the same comfort zone and pairs well on a dessert spread.
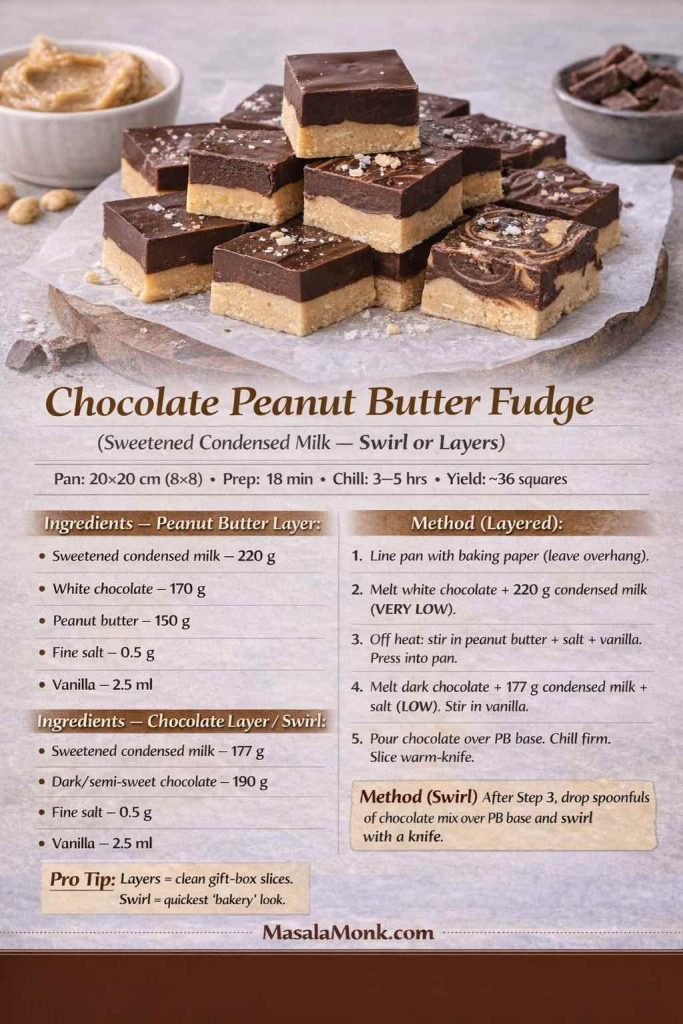
Chocolate and peanut butter together are always a win, yet you can choose the vibe: swirled for a casual look, layered for that clean “buckeye” feel. Either way, this version is built to set firmly and slice beautifully.
Ingredients (two mixtures)
Peanut butter base
Sweetened condensed milk: 220 g
White chocolate: 170 g
Peanut butter: 150 g
Fine salt: 0.5 g
Vanilla extract: 2.5 ml
Chocolate layer/swirl
Sweetened condensed milk: 177 g
Dark or semi-sweet chocolate: 190 g
Fine salt: 0.5 g
Vanilla extract: 2.5 ml
This chocolate peanut butter fudge with sweetened condensed milk is the showstopper version of the guide—choose clean layers for gift-box-perfect slices or a quick swirl for that bakery-style marbled top. The recipe is built to set firmly (thanks to the white-chocolate peanut-butter base) while still tasting rich and balanced. Save this card for holiday trays, edible gifts, or anytime you want a reliable “wow” fudge that cuts neatly and looks impressive with minimal effort.
Method (layered)
Make the peanut butter mixture: melt white chocolate with condensed milk, then stir in peanut butter, salt, and vanilla. Press it into the tin.
Make the chocolate mixture: melt dark chocolate with condensed milk and salt, then stir in vanilla.
Pour the chocolate layer over the peanut butter base.
Chill until firm, then slice with a warm knife.
Method (swirled)
Instead of pouring the chocolate as one layer, drop spoonfuls of chocolate mixture over the peanut butter base and swirl with a knife. Then chill.
Make it feel a bit more “dessert-like”
Serve a square with a spoonful of lightly sweetened cream, or drizzle with cocoa syrup. A warm cocoa drizzle (even a simple cocoa + sugar + hot water syrup) makes the swirl taste more ‘dessert’ than candy—especially when the fudge is chilled.
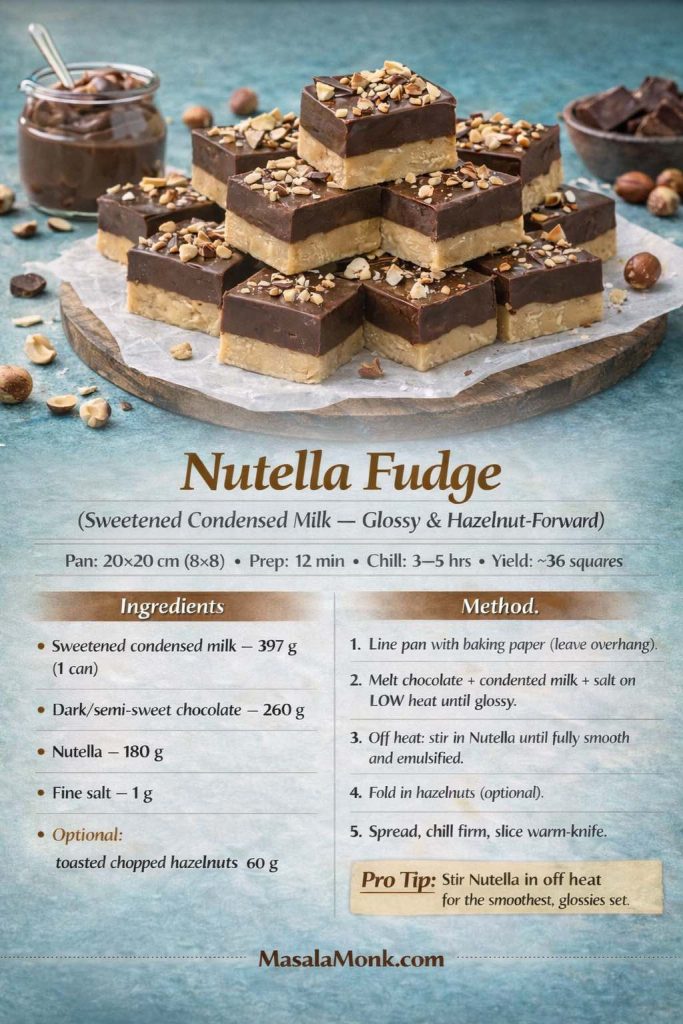
8) Nutella fudge with sweetened condensed milk (rich, glossy, and hazelnut-forward)
Nutella and condensed milk are an intuitive match: creamy, sweet, and deeply comforting. However, the best Nutella condensed milk fudge still benefits from real chocolate for structure and depth. This version keeps the hazelnut flavor clear without becoming overly sweet.
Ingredients
Sweetened condensed milk: 397 g
Dark or semi-sweet chocolate: 260 g
Nutella: 180 g
Fine salt: 1 g
Optional:
Toasted hazelnuts, chopped: 60 g
This Nutella fudge with sweetened condensed milk is the glossy, hazelnut-forward variation people look for when they want something richer than plain chocolate fudge. The method stays simple—melt chocolate with condensed milk, then stir Nutella in off the heat so it emulsifies smoothly and sets into neat, sliceable squares. Finish with toasted hazelnuts for crunch, and you’ve got a gift-box-ready fudge that feels special without extra effort. Save this card for holiday trays, edible gifts, or anytime you want a quick Nutella dessert that actually slices cleanly.
Method
Line the tin and set it aside.
Melt chocolate with condensed milk and salt on low heat until glossy.
Remove from heat and stir in Nutella until fully emulsified.
Fold in hazelnuts if using, then spread and chill.
A festive pairing suggestion
Nutella fudge sits beautifully next to truffles on a holiday tray. If you want a second bite-sized chocolate treat that doesn’t require baking, MasalaMonk’s Irish rum truffles add variety while staying in the same “rich and celebratory” mood.
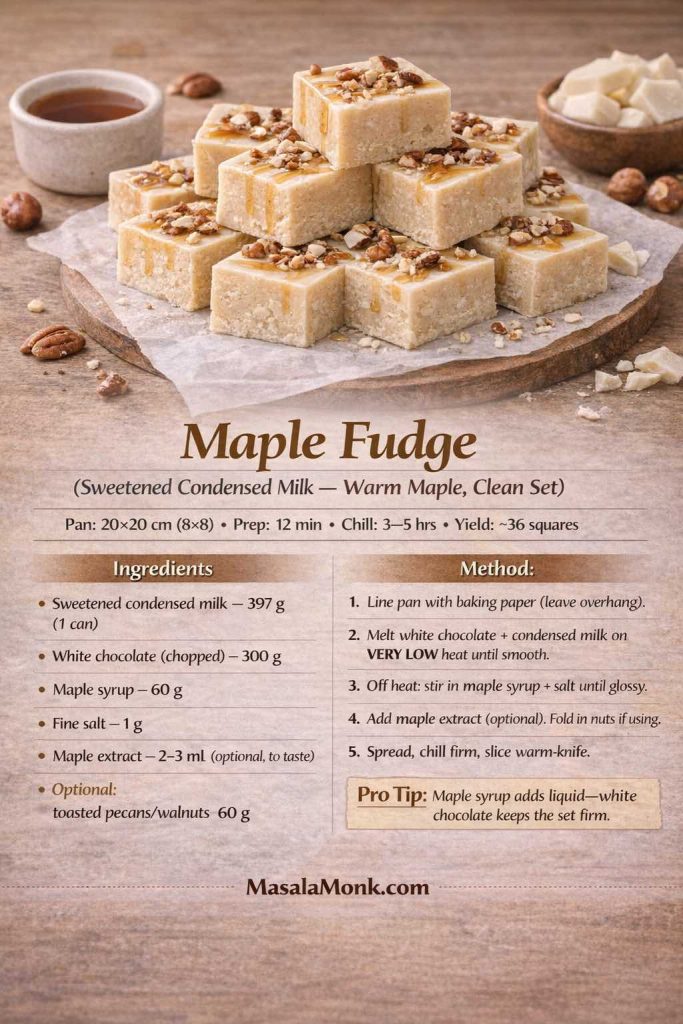
9) Maple fudge recipe (sweetened condensed milk) with a warm caramel edge
Maple fudge can be tricky if you rely on maple syrup alone—too much liquid can affect the set. So, this recipe uses white chocolate as the structure and a balanced amount of syrup for flavor, then finishes with maple extract (optional but helpful) for that unmistakable maple aroma.
Ingredients
Sweetened condensed milk: 397 g
White chocolate: 300 g
Maple syrup: 60 g
Fine salt: 1 g
Maple extract: 2–3 ml (optional, to taste)
Optional:
Toasted pecans or walnuts: 60 g
This maple fudge recipe with sweetened condensed milk is the cozy, sliceable version that actually sets cleanly—because maple syrup adds liquid, and white chocolate provides the structure. The result is creamy, warm-maple flavored fudge that looks gift-box ready with a simple pecan topping. Save this card for holidays, dessert trays, or anytime you want maple flavor without candy-thermometer stress—then use the pro tip as your “insurance” for neat squares.
Method
Line the tin and set it aside.
Melt white chocolate with condensed milk on very low heat.
Remove from heat and stir in maple syrup and salt.
Add maple extract gradually if using. Fold in nuts if you like.
Spread into the tin and chill.
Make it feel seasonal without forcing it
Maple fudge pairs beautifully with coffee. If you enjoy desserts that lean into creamy sweetness and milk flavors, it also connects naturally to a three-milks dessert like MasalaMonk’s tres leches cake guide, which uses sweetened condensed milk in a completely different (and equally comforting) way.
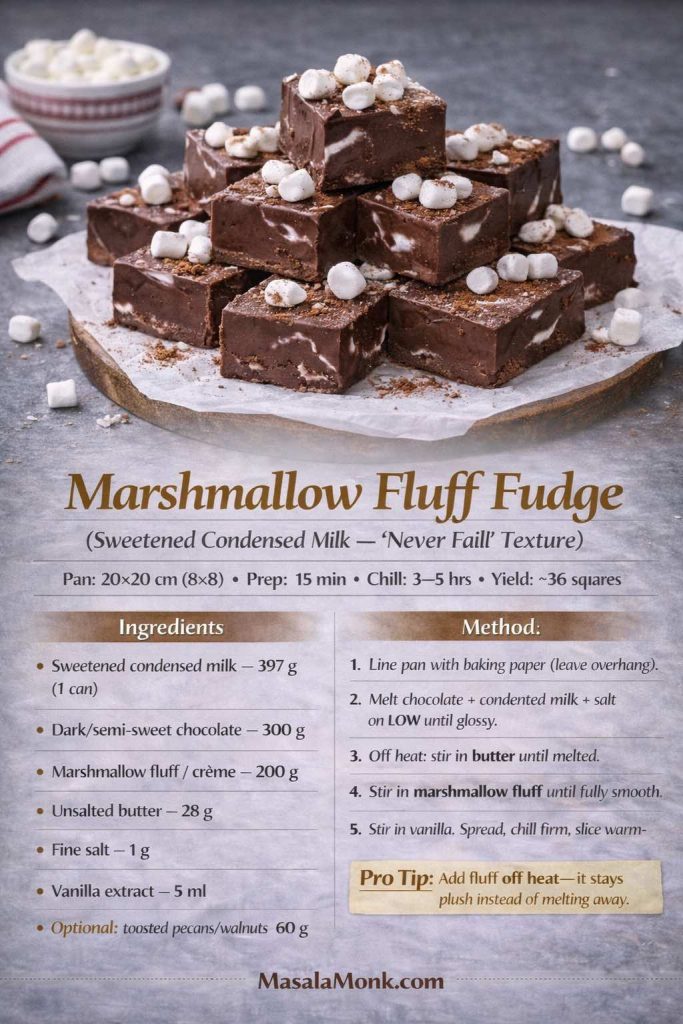
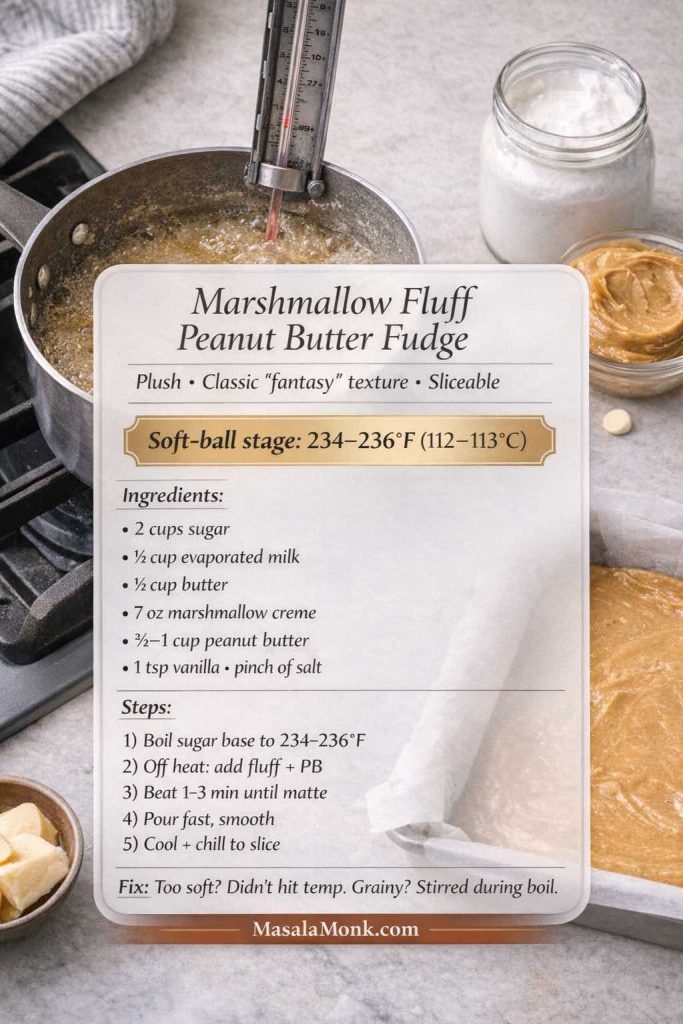
This is the soft, cohesive style that feels especially giftable because it stays tender and creamy. Marshmallow crème (or fluff) adds body and that signature “pull” to the bite. Meanwhile, chocolate provides structure so it still slices cleanly.
Ingredients
Sweetened condensed milk: 397 g
Dark or semi-sweet chocolate: 300 g
Marshmallow fluff/crème: 200 g
Unsalted butter: 28 g
Fine salt: 1 g
Vanilla extract: 5 ml
If you’re searching for “never fail fudge” with sweetened condensed milk, this is the one to save. Marshmallow fluff + butter gives the fudge that plush, creamy bite people expect from classic holiday-tray fudge, while chocolate keeps the set firm enough for clean squares. The most important step is timing: stir the fluff in off the heat so it stays fluffy and smooth instead of melting away. Keep this card for edible gifts, dessert boards, and quick make-ahead fudge that slices neatly every time.
Method
Line the tin and set it aside.
Melt chocolate with condensed milk and salt on low heat until glossy.
Remove from heat. Stir in butter until melted.
Add marshmallow fluff and stir until fully combined and smooth.
Stir in vanilla, spread into the tin, and chill.
How to make the slices look “clean”
Because this style is softer, it benefits even more from a warm knife. Chill thoroughly, warm the knife, wipe it dry, and cut with confident, straight pressure. If the edges smear, pause and rewarm the blade.
These are built on the same “strong setting partner” rule, so you don’t need a whole new method each time. Start with the base recipe that matches the flavor, then swap in the add-ins below.
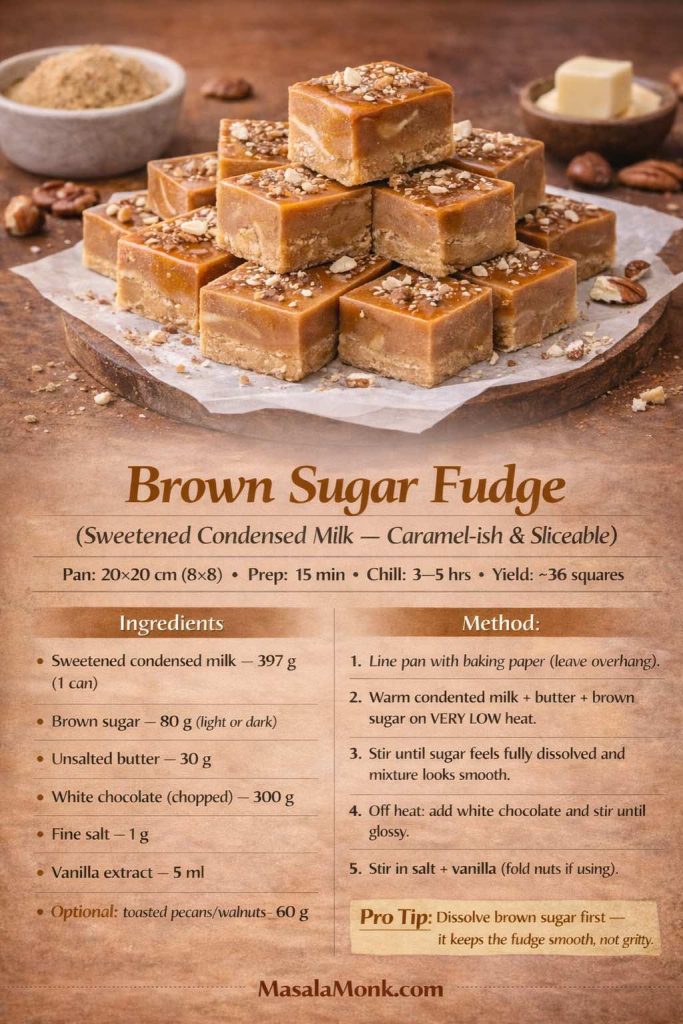
Unsalted butter: 30 g (use it here even if you skip it elsewhere)
Vanilla: 5 ml
Optional: toasted pecans/walnuts 60 g
This brown sugar condensed milk fudge is the caramel-ish, gift-box favorite—sweetened condensed milk makes it creamy, while white chocolate helps it set firm enough to slice cleanly. The key step is what most recipes skip: dissolve the brown sugar gently in condensed milk + butter first, then add white chocolate off the heat for a smooth, glossy finish (no gritty texture). Save this card for holiday trays, edible gifts, or whenever you want “butterscotch vibes” without candy thermometers.
How: Warm sweetened condensed milk + butter + brown sugar on very low heat, stirring until the sugar feels fully dissolved and the mixture looks uniform. Remove from heat, add white chocolate, and stir until completely melted and glossy. Add salt and vanilla, fold in nuts if using, then spread and chill.
Why this works: brown sugar brings moisture; the white chocolate keeps the set firm and sliceable.
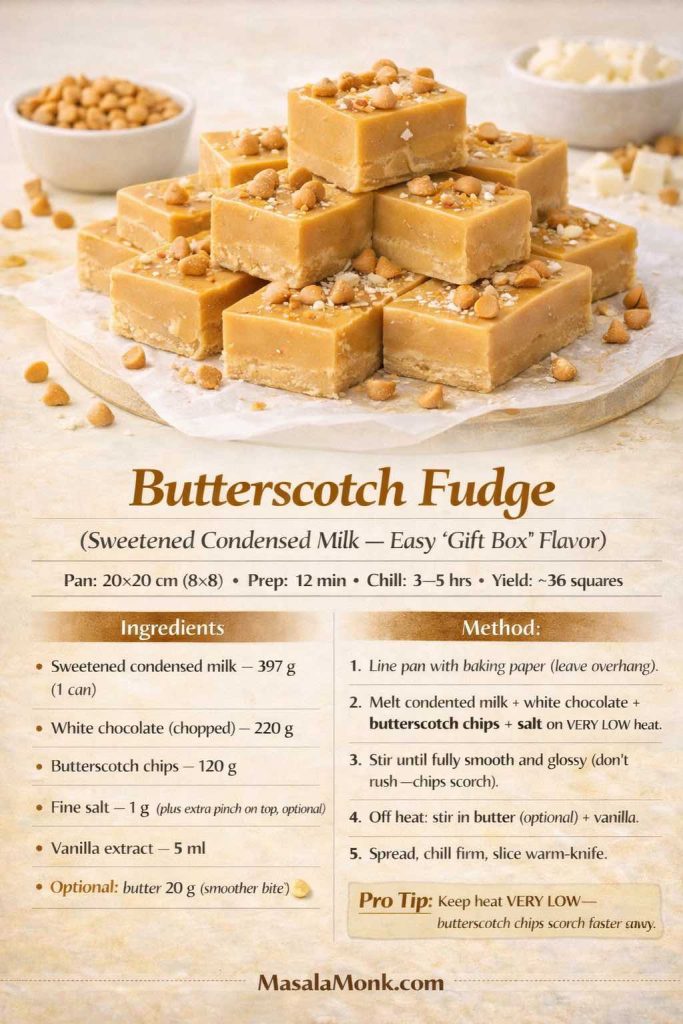
Replace 100–120 g of the white chocolate with butterscotch chips (or butterscotch pieces)
Optional salt bump: add an extra pinch (butterscotch loves salt)
This butterscotch fudge with sweetened condensed milk is the easiest “gift box” flavor—creamy, golden, and nostalgic, yet still firm enough to cut into neat squares. The success trick is temperature: butterscotch chips scorch faster than chocolate, so melt everything on very low heat and stir until glossy. Save this card for holiday trays, edible gifts, or quick make-ahead desserts when you want that classic butterscotch candy vibe without a thermometer.
How: Melt gently (butterscotch scorches easily). Stir until fully smooth, then chill as usual. Optional: top with flaky salt or crushed toasted nuts.
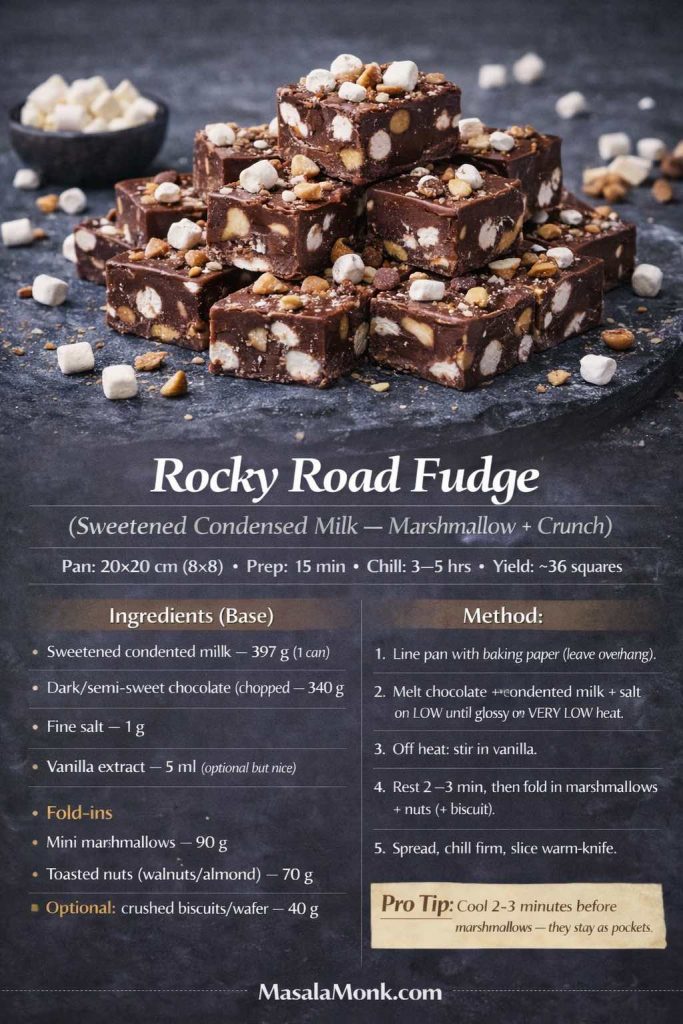
This rocky road fudge with sweetened condensed milk is the “texture contrast” superstar—rich chocolate base, chewy marshmallow pockets, and crunchy nuts in every bite. The make-or-break detail is simple: rest the melted fudge base for 2–3 minutes before folding in marshmallows, so they stay as soft pockets instead of melting into the chocolate. Save this card for dessert boards, edible gifts, and Christmas trays when you want a crowd-pleaser that looks chunky, festive, and bakery-style with almost zero effort.
How: Make the chocolate base. Let it cool 2–3 minutes so it’s thick but not scorching hot, then fold in marshmallows + nuts (+ biscuit). Spread, chill. Tip: if you fold marshmallows while the base is too hot, they’ll melt into the fudge instead of staying as pockets.
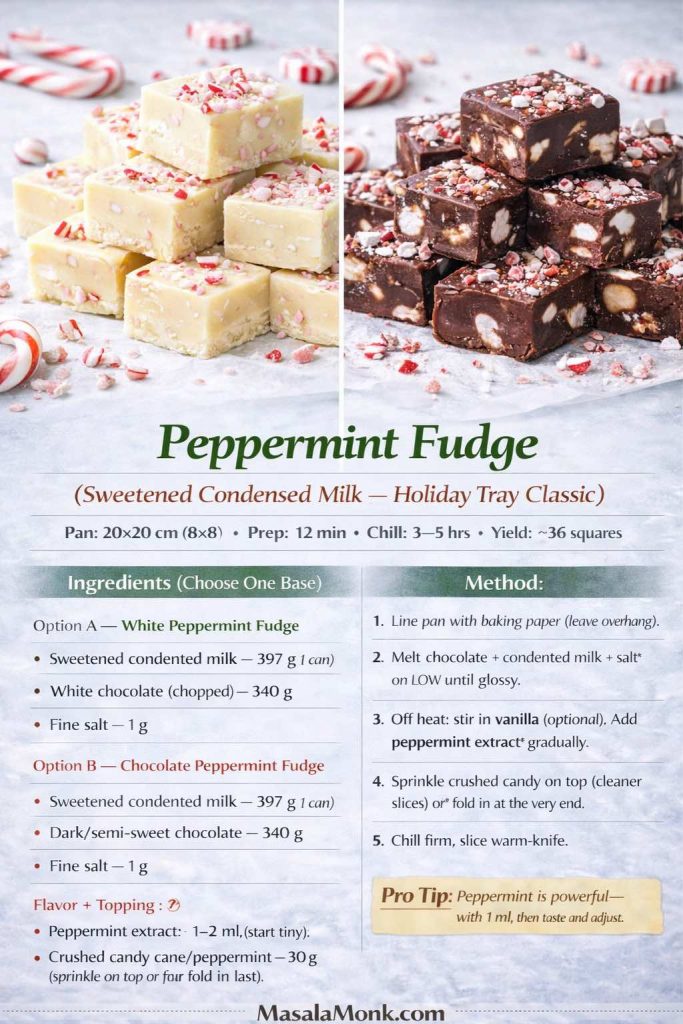
4) Peppermint fudge recipe condensed milk (clean, festive, not toothpaste-y)
Peppermint extract: 1–2 ml (start tiny, then adjust)
Crushed peppermint candy/candy cane: 25–40 g (sprinkle on top or fold in last)
This peppermint fudge recipe with sweetened condensed milk is the easiest way to get that classic Christmas candy vibe—cool, minty, and perfectly sliceable. The card gives you two options (white peppermint or chocolate peppermint) so you can match your tray, then nails the one detail that matters: peppermint extract is powerful, so start tiny and adjust. Save this for holiday trays, edible gifts, and last-minute Christmas desserts when you want festive flavor with a reliable condensed milk fudge set.
How: Stir extract in off heat. If using crushed candy, either press it on top (cleaner slices) or fold in at the very end (more candy bits inside).
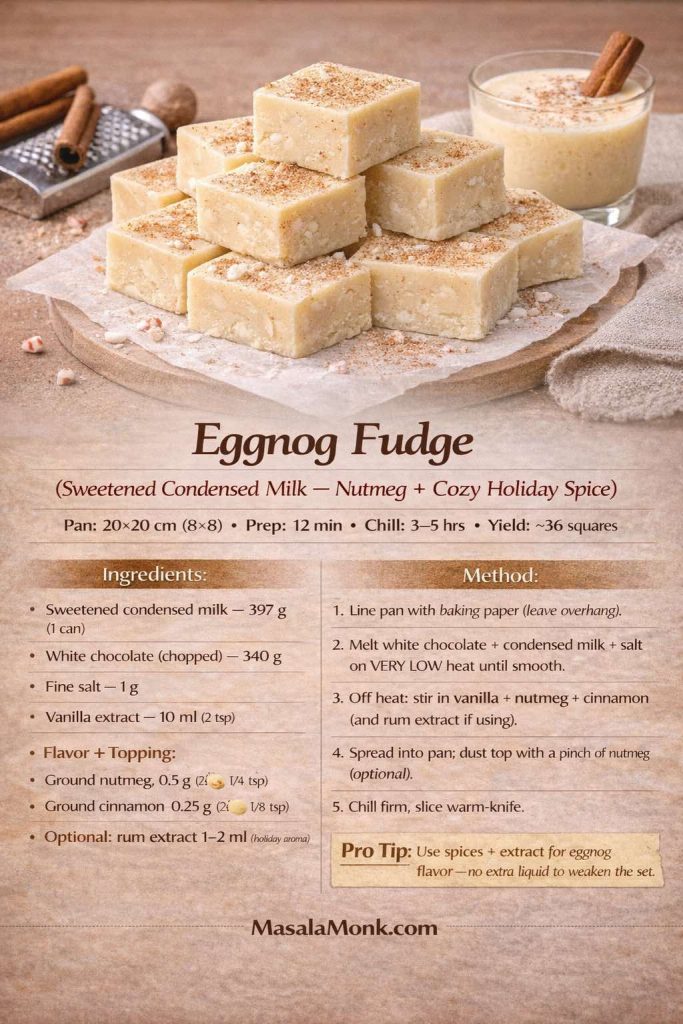
5) Eggnog fudge recipe condensed milk (holiday flavor without extra work)
Start with:Vanilla fudge (Recipe #5) Add:
Nutmeg: ¼ tsp
Cinnamon: ⅛ tsp
Vanilla: keep as written (don’t reduce)
Optional: rum extract 1–2 ml (only if you want that “eggnog” aroma)
This eggnog fudge with sweetened condensed milk is the cozy holiday flavor without the usual set problems—because it gets “eggnog” taste from nutmeg + cinnamon + vanilla (and optional rum extract), not extra liquid. The result is a creamy, sliceable white-chocolate fudge that looks gift-box ready with a simple nutmeg dusting. Save this card for Christmas trays and edible gifts when you want something festive that still behaves like a reliable condensed milk fudge.
How: Make vanilla fudge as written, then stir spices in off heat. Chill. Tip: spice blooms better if you stir it into the warm mixture, not after it’s cooling.
A few gentle dessert connections (so the fudge isn’t alone on the table)
Even though fudge can be the star, it also plays well with other easy, make-ahead sweets. So, if you’re building a spread—especially for holidays—these pairings keep the table interesting without adding stress:
Something fruity and chilled like no-bake blueberry cheesecake complements the richness of chocolate and peanut butter fudge.
Something crisp and warm like homemade churros turns fudge into a dipping moment, especially if you soften a spoonful gently.
Something creamy and layered like savoiardi chocolate vanilla pudding offers a different texture while staying in the same comfort-dessert family.
Something cake-like with the same pantry charm, such as peach condensed milk cake, keeps the condensed milk theme running without repeating the same bite.
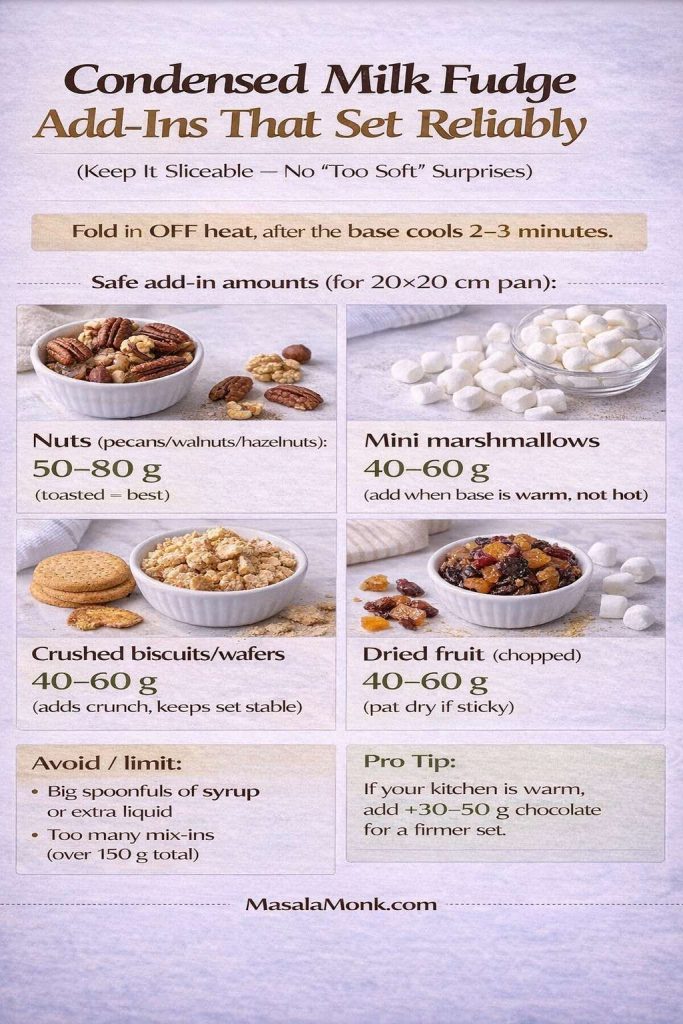
Sweetened condensed milk fudge add-ins that keep the set reliable
Once you’ve made one or two batches, it’s tempting to start improvising—and you should. Still, it helps to choose add-ins that don’t fight the texture.
Save this sweetened condensed milk fudge add-ins cheat sheet before you start “just throwing things in.” These are the mix-ins that keep fudge sliceable—with the exact gram ranges for nuts, mini marshmallows, crushed biscuits, and dried fruit (for a 20×20 cm pan). The biggest win is timing: fold add-ins off heat after a 2–3 minute cool-down so marshmallows stay as pockets and your base doesn’t loosen. If you’re making Christmas trays or gifting, this one card helps every condensed milk fudge variation set cleanly.
Mix-ins that work beautifully with sweetened condensed milk fudge
Toasted nuts (pecans, walnuts, hazelnuts): 50–80 g
Crushed biscuits or wafer pieces: 40–60 g
Mini marshmallows (best in chocolate bases): 40–60 g
Dried fruit (chopped): 40–60 g
Fold these in at the end, off the heat, right before spreading.
Flavor additions that lift sweetened condensed milk fudge without changing texture
Vanilla, of course (especially in white chocolate bases)
A small pinch of cinnamon or cardamom in vanilla fudge
Espresso powder (½ to 1 tsp) in chocolate fudge for deeper flavor
Orange zest in dark chocolate fudge for a bright edge
When you keep add-ins modest, the fudge still sets cleanly and slices neatly.
How to build a 10-flavor sweetened condensed milk fudge tray without chaos
Making one batch is easy. Making several batches in a row can still feel easy if you set up the flow.
Planning a Christmas fudge tray with sweetened condensed milk? Save this 10-flavor game plan. It shows the best batch order (clean-to-strong) so your vanilla/maple flavors don’t get “muddy,” plus a simple setup checklist for making multiple pans efficiently. You’ll also get a portion guide for gift boxes (9–12 pieces across 3–4 flavors), so you can build a tray that looks intentional—without turning your kitchen into a full-day project.
Start with the “clean pan” flavors
Begin with vanilla or white chocolate fudge, then move into peanut butter, then finish with dark chocolate. That order keeps flavors distinct and reduces lingering aromas.
Line multiple tins, even if you reuse them
If you only have one tin, line it, chill the slab until firm enough to lift, then transfer it to a board to finish chilling while you line the tin again. You don’t need perfection—just a steady rhythm.
Keep your slicing moment separate
Let everything chill fully first, then slice all slabs at once. This makes your pieces more uniform and reduces the “warm kitchen” effect that can soften edges.
Storage (so your fudge stays the right texture)
Fudge is forgiving, but storage still matters because temperature affects texture.
Room temperature (cool climate): keep in an airtight container for 2–3 days.
Refrigerator (best in warm kitchens): store in an airtight container up to a week. Let pieces sit for a few minutes before serving so the bite softens slightly.
Freezer: wrap the slab (or individual squares) tightly and freeze for up to 2 months. Thaw in the fridge overnight, then bring to cool room temperature before serving.
If you’re making several flavors at once, keep strong aromas (like peppermint or heavy extracts) sealed separately so the flavors stay distinct.
How to make this your “forever” Sweetened Condensed Milk Fudge guide
The best thing about sweetened condensed milk fudge is that it doesn’t ask for a special occasion—yet it still feels like one when you serve it. Once you’ve made a couple of these, you’ll notice something satisfying: you’re no longer “following a recipe,” you’re using a method. That method is what gives you freedom.
On a busy day, you can make condensed milk chocolate fudge and be done. Then on a festive week, you can stack your fridge with vanilla, peanut butter, Nutella, maple, and marshmallow crème slabs, then slice them into tidy squares that look like a gift. On a cozy weekend, you can build a dessert board with churros for dipping, a drizzle of chocolate syrup, and a few different fudge flavors so every bite feels slightly different.
If you’re in the mood to keep the condensed milk theme going beyond fudge, it’s worth pairing this with one creamy chilled dessert like no-bake blueberry cheesecake or a layered comfort dessert like banana pudding. That way, you get contrast in texture and style without adding stress.
Most importantly, don’t feel like you need to “save” these for holidays. Fudge is at its best when it’s part of real life—one square after dinner, a small box shared with someone you like, a sweet bite with coffee on an ordinary afternoon. Make one batch first, then choose the next flavor based on your mood. The guide will still be here when you’re ready to build the full ten. Whenever you want to expand beyond the core ten, use the white chocolate base for brown sugar and butterscotch, and the classic chocolate base for rocky road and peppermint.
Sweetened condensed milk fudge FAQ
1) What is sweetened condensed milk fudge, exactly?
Sweetened condensed milk fudge is a quick fudge method where sweetened condensed milk provides sweetness and creaminess, while chocolate (or other setting ingredients) helps the fudge firm up into sliceable squares. In other words, you get a rich, classic fudge texture without boiling sugar syrup to a specific temperature.
2) Is condensed milk fudge the same as sweetened condensed milk fudge?
Most of the time, yes. When recipes say “condensed milk fudge,” they usually mean sweetened condensed milk fudge. However, evaporated milk is sometimes confused with condensed milk, and it’s not the same product—so check the can before you start. Also, any brand of sweetened condensed milk works, but low-fat versions can set softer than expected.
3) Can I make fudge with condensed milk and chocolate chips?
Absolutely. Fudge with sweetened condensed milk and chocolate chips is one of the easiest versions: melt, stir, spread, and chill. That said, for a cleaner set, use enough chocolate so the mixture firms properly, especially if your kitchen is warm.
4) What’s the best condensed milk fudge recipe for beginners?
A simple sweetened condensed milk chocolate fudge with three ingredients—sweetened condensed milk, chocolate, and salt—is the most beginner-friendly. After that, peanut butter fudge with condensed milk or Nutella fudge with sweetened condensed milk are excellent next steps because they’re still straightforward.
5) Can I make two ingredient fudge with condensed milk?
You can, although “2 ingredient fudge condensed milk” often works best when one ingredient is chocolate (or white chocolate) and the other is sweetened condensed milk. On the other hand, condensed milk and peanut butter alone can turn out softer than expected, so many reliable versions include white chocolate for structure.
6) How do I make three ingredient fudge with condensed milk?
Three ingredient fudge with condensed milk typically uses sweetened condensed milk + chocolate + a pinch of salt (or vanilla). First, melt gently, then stir until glossy, and finally chill until firm. As a result, you get a no-fuss fudge that slices cleanly.
7) Can I make easy microwave fudge with sweetened condensed milk?
Yes—microwave sweetened condensed milk fudge is one of the fastest ways to make it. Still, the method works best with short bursts and frequent stirring so the chocolate melts evenly and doesn’t scorch.
8) Why is my sweetened condensed milk fudge too soft?
Usually it’s because there wasn’t enough setting ingredient (like chocolate or white chocolate), or the ratio shifted due to add-ins. Additionally, warm kitchens can keep fudge softer. To fix it next time, increase the chocolate slightly, chill longer, and store in the fridge if needed.
9) Why did my condensed milk fudge turn grainy?
Graininess typically comes from sugar crystallizing in larger grains or from dry ingredients not dissolving smoothly. Therefore, keep heat low, stir steadily, and sift cocoa or powdered sugar in cocoa-based versions so the mixture stays uniform.
10) Why is my fudge oily or separated?
Most often, the mixture got too hot or was heated too quickly. Instead of increasing heat, melt slowly and stir continuously. Also, when adding peanut butter or Nutella, stir them in off the heat so they emulsify smoothly.
11) Can I use cocoa powder and sweetened condensed milk instead of chocolate?
Yes. Cocoa powder condensed milk fudge is a popular option, yet it usually needs additional structure—commonly butter plus powdered sugar—so it sets properly and doesn’t taste dry. As long as cocoa is sifted and fully mixed, the texture can be smooth and dense.
12) Can I make chocolate fudge with condensed milk and marshmallows?
You can, and it’s a classic style. Marshmallow crème or fluff helps create a plush, creamy bite, which is why “marshmallow fudge recipe condensed milk” and “fluff fudge sweetened condensed milk” are so loved for gift trays.
13) What is “never fail” fudge with sweetened condensed milk?
“Never fail” usually refers to a very forgiving method—often a sweetened condensed milk fudge that uses chocolate plus marshmallow crème (or sometimes butter) to keep the texture creamy and stable. Consequently, it sets reliably and stays tender.
14) Can I make peanut butter fudge using sweetened condensed milk?
Yes, and it’s one of the most requested flavors. However, for a firm set, many peanut butter and condensed milk fudge recipes add white chocolate as the setting backbone. Otherwise, the fudge may stay too soft, especially in warm weather.
15) How do I make chocolate peanut butter fudge with sweetened condensed milk?
Use a chocolate condensed milk fudge mixture and a peanut butter condensed milk fudge mixture, then layer or swirl them before chilling. That way, you get distinct flavors in every bite and a clean slice once it’s firm.
16) Can I make Nutella fudge with sweetened condensed milk?
Yes—Nutella fudge condensed milk style is rich and glossy. Still, it works best with some real chocolate included for structure and depth, so the squares set cleanly and don’t become overly soft.
17) How do I make maple fudge with sweetened condensed milk?
Maple fudge condensed milk versions usually set best with white chocolate. Then, add maple syrup for flavor and, if you want a stronger aroma, a small amount of maple extract. As a result, you get a clear maple taste without a runny texture.
18) What about brown sugar fudge with sweetened condensed milk?
Brown sugar condensed milk fudge has a deeper, caramel-like sweetness. Typically, it works well as a variation of a white chocolate condensed milk fudge base, with brown sugar and butter helping create that butterscotch-style flavor.
19) Can I make white chocolate fudge with condensed milk?
Definitely. White chocolate and sweetened condensed milk fudge is one of the easiest non-dark-chocolate options. Even so, melt it gently—white chocolate can scorch faster—then chill until firm for clean squares.
20) Can I make vanilla fudge with sweetened condensed milk?
Yes. Vanilla condensed milk fudge is often based on white chocolate plus sweetened condensed milk, then boosted with extra vanilla (and a pinch of salt) so it tastes intentionally “vanilla” rather than just sweet.
21) Can I use evaporated milk instead of sweetened condensed milk?
Not in the same way. Evaporated milk fudge is a different method because evaporated milk isn’t sweetened and doesn’t have the same thickness. So, if a recipe calls for sweetened condensed milk, swapping evaporated milk usually won’t set correctly without other changes.
22) Can I make fudge without sweetened condensed milk?
Yes, but it becomes a different style of fudge—often old fashioned fudge made with sugar, milk (or evaporated milk), butter, and careful cooking. Therefore, if your goal is quick condensed milk fudge, it’s better to use the intended ingredient.
23) How long does sweetened condensed milk fudge take to set?
Most batches firm up in 2–4 hours in the refrigerator. Meanwhile, a thicker pan or a softer flavor (like peanut butter-heavy versions) may take longer. If you want the neatest cuts, chilling overnight is ideal.
24) Should I store condensed milk fudge in the fridge or at room temperature?
If your kitchen is cool, room temperature works for a couple of days in an airtight container. Otherwise, refrigeration keeps the texture firm and stable. For longer storage, freezing also works well once pieces are wrapped tightly.
25) Can I freeze sweetened condensed milk fudge?
Yes. Freeze it in layers with parchment between pieces, sealed well to prevent freezer smells. Then thaw in the fridge and let it sit a few minutes before serving so the texture softens slightly.
26) How do I scale a sweetened condensed milk fudge recipe up or down?
Start by scaling based on the sweetened condensed milk amount, then keep the chocolate ratio consistent. For example, doubling the batch usually means using two cans of sweetened condensed milk and roughly double the chocolate, then using a larger tin.
27) What’s the easiest way to cut fudge neatly?
First, chill until fully firm. Next, use a warm knife (run it under hot water, wipe dry). Then slice with steady pressure, wiping the blade between cuts. As a result, edges stay clean and the pieces look gift-box ready.
28) Why does my condensed milk fudge taste too sweet?
Milk chocolate and some white chocolates are very sweet on their own, and sweetened condensed milk adds more sugar. Instead, use darker chocolate, add a pinch more salt, or balance the flavor with nuts. Additionally, vanilla and espresso powder can make the sweetness feel more rounded.
29) Can I make a “creamy fudge recipe with condensed milk” on the stove without overcooking it?
Yes—low heat is the safest route. Stir constantly until the mixture is glossy and smooth, then remove it from heat promptly. Overheating is what most often causes separation or a dull, greasy texture.
30) What’s a good “Christmas fudge recipe condensed milk” approach without extra fuss?
Choose one dark chocolate batch, one white chocolate or vanilla batch, and one peanut butter batch for contrast. Then add simple mix-ins—nuts, crushed biscuits, or a peppermint sprinkle—so the tray feels festive while the method stays easy.
Some desserts feel like a project. This one, thankfully, doesn’t have to. A peanut butter fudge recipe can be a two-minute stir-and-chill treat, a creamy slice that tastes like it came from a candy counter, or an old-fashioned cooked confection with that unmistakable “holiday tray” vibe. Even better, it adapts: you can turn it into chocolate-and-peanut swirls, a buckeye-style slab with a glossy cap, a peanut-free version for allergy-friendly sharing, or a sugar-alternative batch that still scratches the same sweet itch.
Because there are so many ways to make it, the smartest approach is simple: pick the style that matches your mood, then follow the steps. Along the way, you’ll also learn how to troubleshoot grainy texture, fix a too-soft set, and store slices so they stay tender instead of drying out.
Choose your peanut butter fudge style
If you want the shortest path, start with the 2-ingredient version. If you prefer a creamier bite that rarely crumbles, go for the condensed milk method. Meanwhile, marshmallow creme delivers that plush, classic texture that many people associate with “fantasy” style fudge. On the other hand, if you’re craving a true candy-shop finish, the cooked soft-ball stage method is the one.
Not sure which peanut butter fudge recipe to make first? Use this quick chooser to match your mood to the right method—2-ingredient no-bake for speed, condensed milk for extra creaminess, marshmallow fluff for classic ‘fantasy’ texture, old-fashioned cooked for candy-shop flavor, or corn syrup for a smoother cooked set.
Fastest: 2-ingredient easy peanut butter fudge
Creamiest: peanut butter fudge with sweetened condensed milk
No matter which route you take, great results begin with great peanut butter. If you like controlling the texture from the start—ultra smooth, slightly chunky, or deeply roasted—this guide on how to make peanut butter at home is a useful foundation.
Ingredients and tools that make everything easier
Before jumping into specific methods, it helps to set yourself up for a smooth run. Even when a recipe is “easy,” small choices can make the difference between creamy slices and a crumbly pan.
Pan size and lining
An 8-inch square pan is the sweet spot for thick, giftable squares. For thinner pieces (or if you want more servings), use a 9-inch square pan.
Line the pan with parchment paper, leaving overhang on two sides. That overhang becomes handles, so you can lift the slab out cleanly and slice without gouging the pan.
Peanut butter choice
You can use either stabilized peanut butter (the kind that doesn’t separate much) or natural peanut butter. However, natural versions vary a lot: some are oily and loose; others are stiff and dry.
If your peanut butter is very stiff, you’ll often need a touch more fat (butter or coconut oil) to keep the mixture from crumbling.
If it’s very runny, you may need a bit more structure (powdered sugar, a little extra chill time, or a firmer method like condensed milk).
Save this peanut butter fudge cheat sheet to pick the right method fast—no-bake powdered sugar for speed, condensed milk + white chocolate for the creamiest reliable set, marshmallow creme for classic ‘fantasy’ texture, soft-ball cooked for candy-shop fudge, or corn syrup for a smoother cooked finish. It also shows the best pan size (8-inch vs 9-inch) and quick peanut butter tips so your batch sets the way you want.
Salt and vanilla in a peanut butter fudge recipe
Salt is the quiet hero here. Even salted peanut butter usually benefits from a pinch more. Vanilla is optional, yet it rounds the flavor and makes the final result taste more “finished.”
Optional tools
A sturdy silicone spatula (best for thick mixtures)
A heavy saucepan (for heated methods)
A candy thermometer (strongly recommended for cooked styles)
Storage and food safety
Fudge lasts well when protected from air. Still, many versions include dairy (butter, milk, condensed milk). For safe handling basics, the USDA’s guidance on leftovers and food safety is a solid reference.
This is the “I need something sweet right now” method. It’s also the simplest way to get that peanut-butter-candy vibe without turning on the stove.
What this style of fudge with peanut butter is like
The texture is firm and sliceable, with a sweetness that hits quickly and then fades into roasted peanut flavor. Because it sets through dry structure rather than cooking, the bite feels a bit like old-fashioned peanut butter candy—dense and satisfying.
Ingredients (8-inch pan)
1 cup peanut butter (creamy works best)
2 to 2½ cups powdered sugar
Optional: ½ teaspoon vanilla
Optional: pinch of salt
This 2-ingredient peanut butter fudge is the fastest no-bake method: warm the peanut butter just until stirrable, mix in powdered sugar until pressable, then chill and slice. Save this card for those ‘need something sweet now’ moments—and use the quick fix tips if your batch turns out too soft or a little crumbly.
Step-by-step recipe
Line the pan. Set it aside so it’s ready.
Soften the peanut butter. Warm it gently—about 20 seconds in the microwave, or briefly in a small saucepan—just until it stirs easily. Avoid making it hot.
Season it. Stir in vanilla and a pinch of salt if you’re using them.
Add powdered sugar gradually. Start with 2 cups and stir until the mixture thickens into a soft dough. Next, add more powdered sugar a few tablespoons at a time until it holds together and feels pressable.
Press into the pan. Use your spatula to compress it firmly. The tighter you press, the cleaner your slices will be.
Chill until firm. Refrigerate at least 2 hours, then lift out and slice.
If it’s not perfect, fix it
Crumbly or dry: Warm 1–2 tablespoons of peanut butter and knead it into the mixture. Alternatively, add 1 tablespoon melted butter and mix again.
Too soft: Add a bit more powdered sugar and chill longer.
Method 2: Three ingredient peanut butter fudge (creamier and more forgiving)
This version keeps the no-bake ease, yet feels smoother and richer than the 2-ingredient batch. Because butter adds silkiness and helps binding, the texture often lands in that “creamy peanut butter fudge” zone.
Ingredients (8-inch pan)
1 cup peanut butter
¼ cup butter, melted
2 to 2½ cups powdered sugar
Optional: ½ teaspoon vanilla
Optional: pinch of salt
This 3-ingredient peanut butter fudge is the creamier, more forgiving upgrade from the 2-ingredient version—melted butter adds silkiness so the texture stays smooth and sliceable. Save this card for a quick no-bake fudge that sets reliably in the fridge and tastes extra peanut-forward with a bigger pinch of salt.
Step-by-step recipe
Prepare your pan. Line it with parchment and set aside.
Melt the butter. Let it cool for a minute so it’s warm, not scalding.
Combine peanut butter and butter. Stir until glossy and unified.
Add vanilla and salt if using.
Stir in powdered sugar gradually. Begin with 2 cups, then adjust. The mixture should be thick but still spreadable.
Press and smooth. Push it firmly into the pan and level the surface.
Chill 2–3 hours until sliceable.
Flavor upgrades for 3 Ingredient peanut butter fudge
A slightly larger pinch of salt makes this taste more peanut-forward. Additionally, a spoonful of finely chopped roasted peanuts gives a satisfying crunch without making slicing difficult.
Method 3: Four ingredient peanut butter fudge (balanced, “best-ever” flavor)
Four-ingredient versions are popular because that extra ingredient—often vanilla—makes the fudge taste more intentional. Moreover, the method is still just stir, press, chill.
Ingredients (8-inch pan)
1 cup peanut butter
¼ cup butter, melted
2 cups powdered sugar (plus extra only if needed)
1 teaspoon vanilla
Pinch of salt (highly recommended)
Save this four-ingredient peanut butter fudge recipe card for a balanced, ‘best-ever’ no-bake batch that slices clean. The vanilla + salt make it taste more intentional, and the pro tip (sift the powdered sugar) helps keep the texture extra smooth instead of gritty.
Step-by-step
Line the pan and set it nearby.
Stir peanut butter and melted butter until smooth.
Add vanilla and salt. Mix thoroughly.
Add powdered sugar and stir until thick and spreadable.
Press into the pan firmly; smooth the top.
Chill 2–3 hours, then slice.
A simple cocoa twist in 4 Ingredient peanut butter fudge
If you want a quick chocolate-peanut vibe without adding a full layer, stir 1–2 tablespoons cocoa into half the mixture and swirl it through before chilling. For an easy drizzle at serving time, this quick homemade chocolate syrup works beautifully on top of a slice.
Method 4: Peanut Butter Fudge with Sweetened Condensed Milk (extra creamy, very reliable)
This is the candy-counter style: smooth, rich, and easy to slice. To guarantee a firm set, this condensed milk version uses white chocolate chips for structure. Without a setting ingredient, the classic “condensed milk + peanut butter” combo can stay too soft—especially in warmer kitchens.
Ingredients (for an 8-inch pan)
1 can (14 oz / 396g) sweetened condensed milk
2½ cups white chocolate chips
1 cup peanut butter (creamy is easiest)
1 teaspoon vanilla
Pinch of salt
This condensed milk peanut butter fudge is the ‘candy-counter’ version—extra creamy, smooth, and reliably sliceable thanks to white chocolate chips for structure. Save this card if you want a gift-worthy batch with minimal effort: melt, stir, pour, chill, then cut clean squares.
Step-by-step
Prep the pan: Line an 8-inch square pan with parchment paper, leaving overhang.
Melt gently: In a heavy saucepan over low heat, warm the condensed milk and white chocolate chips, stirring constantly until smooth and glossy (about 3–6 minutes). Keep the heat low to avoid scorching.
Add peanut butter: Stir in the peanut butter until fully unified and silky.
Finish the flavor: Remove from heat and stir in vanilla and salt.
Pour and smooth: Scrape into the pan, level the top, and tap the pan lightly to settle it.
Chill to set: Refrigerate 3–4 hours (overnight is best for super-clean slices). Lift out and slice.
If it’s not perfect, fix it
Too soft: Chill longer first. If it still won’t set, re-melt gently and stir in ½ to 1 cup more white chocolate chips, then re-chill.
Too firm: Let slices sit at room temperature for 5–10 minutes before serving.
Condensed milk peanut butter fudge without white chocolate (works, but a different texture)
If you’d rather skip the chips, you can still use condensed milk—just add dry structure so it sets sliceable:
Warm 1 can condensed milk + 1 cup peanut butter over low heat until glossy.
Remove from heat and stir in 2 to 2½ cups powdered sugar until thick and spreadable.
Press into the pan and chill 3–4 hours.
This version is more “peanut butter candy” in texture than candy-shop fudge, but it’s still delicious and reliable when you want a no-chip option.
This is the classic “fantasy-style” approach: you cook the sugar base, then beat in marshmallow creme and peanut butter for that plush, sliceable, old-school texture. It’s much more reliable than simply mixing fluff and peanut butter and hoping it sets.
Ingredients (for an 8-inch pan)
2 cups sugar
½ cup evaporated milk (or whole milk)
½ cup butter
1 jar (7 oz / ~200g) marshmallow creme or marshmallow fluff
¾ to 1 cup peanut butter
1 teaspoon vanilla
Pinch of salt
This marshmallow fluff peanut butter fudge is the classic ‘fantasy-style’ version—plush, nostalgic, and sliceable when you hit the soft-ball stage (234–236°F). Save this card if you want that old-school candy-shop texture, plus the quick fixes for batches that turn out too soft or grainy.
Step-by-step
Line your pan with parchment and keep it close by. This mixture sets quickly once it’s beaten.
Start the base: In a heavy saucepan, combine sugar, evaporated milk, and butter. Heat over medium, stirring until everything is dissolved and uniform.
Boil to soft-ball stage: Bring to a steady boil and cook until the mixture reaches 234–236°F (112–113°C). Once it’s boiling, avoid stirring—if needed, gently swirl the pan instead.
Finish off-heat: Remove from heat. Immediately add the marshmallow creme, peanut butter, vanilla, and salt.
Beat until it turns matte: Stir vigorously (with a wooden spoon or a mixer on low) until the mixture thickens, loses some shine, and starts holding soft shape—usually 1–3 minutes.
Pour and smooth fast: Transfer to the pan right away and smooth the top. Let it cool until set, then refrigerate for cleaner slices.
If Marshmallow Fluff Peanut Butter Fudge is not perfect, fix it
Grainy: Usually from sugar crystals or too much stirring while boiling. Next time, stop stirring once it boils and brush down the sides of the pan early with a little water.
Too soft: It likely didn’t reach soft-ball temperature. You can re-melt the batch gently, bring it back to 234–236°F, then beat again and reset.
Too firm/crumbly: It likely cooked a bit too hot or was beaten too long. Next time, stop beating as soon as it thickens and turns slightly matte.
Method 6: Frosting and peanut butter fudge (icing shortcut that actually works)
This method is almost unfairly easy. Because frosting already contains sugar and fat in a stable ratio, combining it with peanut butter creates a fudge-like base that sets in the fridge.
Ingredients (8-inch pan)
1 cup peanut butter
1 container frosting (about 16 oz / 450g), vanilla preferred
Pinch of salt
Optional: ½ teaspoon vanilla (if your frosting is bland)
This frosting and peanut butter fudge is the easiest no-bake shortcut—just warm, mix, press, and chill for smooth, sliceable squares. Save this card for last-minute dessert trays, and use the salt + extra peanut butter tip to make it taste less ‘store-bought.
Step-by-step
Line your pan with parchment.
Warm the frosting briefly. Microwave 10–15 seconds to soften it.
Soften the peanut butter the same way—just enough to stir.
Combine frosting and peanut butter until completely smooth. At first, it may resist; keep mixing and it will turn glossy.
Season with salt (and vanilla if using).
Spread into the pan and smooth the top.
Chill 2–3 hours until set.
Make it taste less “store-bought”
Salt is essential here. Also, a little extra peanut butter (2–3 tablespoons) pushes the flavor forward and keeps it from tasting like frosting with peanuts.
Corn syrup is the quiet helper in cooked fudge. It makes the batch more forgiving by lowering the chances of that gritty, grainy texture that can sneak into candy. If you want old-fashioned flavor with a smoother finish and a little extra insurance, this is the cooked method to start with.
Ingredients (for an 8-inch pan)
2 cups granulated sugar
½ cup milk or evaporated milk
½ cup light corn syrup
¼ cup butter
1 cup peanut butter (creamy is easiest)
1 teaspoon vanilla
Pinch of salt
This corn syrup peanut butter fudge is the most forgiving cooked method—corn syrup helps reduce sugar crystallization so the texture stays smoother and less grainy. Save this card for the key cues: boil to 234–236°F, don’t stir at the boil, rest briefly off heat, then beat just until it turns slightly matte for clean slices.
Step-by-step
Prep the pan first. Line an 8-inch square pan with parchment paper and leave overhang so you can lift the fudge out later.
Start the base. In a heavy saucepan, combine sugar, milk, corn syrup, and butter. Heat over medium, stirring until the mixture is fully uniform and the sugar looks mostly dissolved.
Boil without stirring. Bring it to a steady boil. Once it’s boiling, stop stirring (stirring encourages crystals). If needed, gently swirl the pan instead.
Cook to soft-ball stage. Continue boiling until the mixture reaches 234–236°F (112–113°C) on a candy thermometer. (This range is where you get creamy fudge—not syrupy-soft and not crumbly.)
Rest briefly. Remove from heat and let the pan sit undisturbed for 3–5 minutes.
Add the peanut butter and flavorings. Stir in peanut butter, vanilla, and salt until completely smooth.
Beat just until it thickens. Keep stirring for about 30–60 seconds, until it looks slightly thicker and loses some shine. Don’t keep going once it starts to resist—overbeating can make it crumbly.
Pour and smooth fast. Scrape into the prepared pan immediately and smooth the top.
Set and slice. Let it cool until firm at room temperature, then refrigerate for cleaner slices.
What makes this Corn Syrup Peanut Butter Fudge different
It’s still real cooked fudge, but the corn syrup helps keep the texture smoother and reduces the “grainy surprise” factor.
If it’s not perfect, fix it
Grainy: Next time, stop stirring once it boils, and brush down the sides of the pan early with a little water to remove sugar crystals.
Too soft: It likely didn’t reach temperature. You can gently reheat, bring back to 234–236°F, then finish again.
Crumbly: Usually cooked a touch too hot or beaten too long. Pull it off closer to 234°F next time and beat less.
Save this soft-ball stage fudge temperature guide if you’re making old fashioned peanut butter fudge or any cooked fudge. Hitting 234–236°F (112–113°C) is the difference between creamy slices and a batch that’s too soft, crumbly, or grainy—and the quick rules here show exactly when to stop stirring and when to beat.
This is the true old-fashioned version—the one that smells like holidays and tastes like it came from a tiny candy shop. It’s a little more hands-on than the corn syrup method, but the payoff is big: a creamy, structured set and that classic “homemade fudge” character people remember.
Ingredients (for an 8-inch pan)
2 cups granulated sugar
½ cup milk or evaporated milk
¼ cup butter
¾ to 1 cup peanut butter (use 1 cup for bold peanut flavor)
1 teaspoon vanilla
Pinch of salt
This old-fashioned peanut butter fudge is the classic candy-shop method: cook to the soft-ball stage (234–236°F), rest briefly, then beat until matte for that creamy, slice-clean set. Save this card if you want traditional holiday-tray fudge with the key timing cues that prevent grainy or crumbly batches.
Step-by-step
Prep the pan. Line an 8-inch pan with parchment and set it right beside the stove. Timing matters later.
Dissolve the sugar. In a heavy saucepan, combine sugar, milk, and butter. Heat over medium, stirring until the mixture is smooth and the sugar is dissolved.
Boil hands-off. Bring to a steady boil. Once boiling, stop stirring. If you see sugar crystals on the sides early on, brush them down with a little water.
Cook to soft-ball stage. Cook until the mixture reaches 234–236°F (112–113°C).
Cool undisturbed. Remove from heat and let it sit 5–10 minutes without stirring. This short rest helps you land on creamy instead of gritty.
Add peanut butter + finishers. Add peanut butter, vanilla, and salt. Stir until smooth.
Beat until it turns matte. Stir vigorously until it thickens, loses gloss, lightens slightly, and starts holding its shape. This usually takes 1–3 minutes. Stop as soon as it reaches a thick, pourable stage—overbeating can make it crumble.
Pour immediately. Scrape into the pan right away and smooth the top quickly.
Set and slice. Let it set at room temperature, then refrigerate if you want extra clean edges when slicing.
Why this Cooked Peanut Butter Fudge is “classic”
The cooling pause and the beating step create tiny crystals that make fudge taste creamy and slice cleanly. The timing is the whole game.
If it’s not perfect, fix it
Too soft: It likely didn’t reach temperature. Reheat gently, bring back to 234–236°F, then finish again.
Grainy: Usually caused by stirring while boiling or crystals on the pan sides. Next time: hands off once boiling + brush down sides early.
Crumbly: Usually cooked too hot or beaten too long. Pull it off a touch earlier (closer to 234°F) and beat less.
Buckeye fudge is the gift-worthy upgrade: a firm peanut butter fudge base topped with a smooth, glossy chocolate layer. Save this card for clean layers every time—chill the PB layer first, pour the melted chocolate cap, then slice with a warm, dry knife for sharp edges.
Variation A: Cocoa in the base (simple chocolate-peanut flavor)
Best for: a unified chocolate peanut fudge taste.
How to do it
Make any base you like (no-bake, condensed milk, or marshmallow).
Stir 2–4 tablespoons cocoa powder into the mixture. If it thickens too much, add 1–2 tablespoons warm peanut butter to loosen.
Keto peanut butter fudge (low-sugar direction, still rich)
Keto-style batches depend on the sweetener you choose. Because sugar alternatives vary, the texture can shift—sometimes firmer, sometimes softer. Still, a good base formula delivers a sliceable, satisfying result.
For a helpful overview of sweetener types, the American Diabetes Association’s PDF guide to sugar substitutes provides useful context. If you’re deciding on monk fruit specifically, Cleveland Clinic’s overview of monk fruit sweetener is a clear introduction.
Ingredients (8-inch pan)
1 cup peanut butter (no added sugar)
½ cup coconut oil or butter, melted
¾ to 1 cup powdered-style keto sweetener blend
½ teaspoon vanilla
Pinch of salt
This keto peanut butter fudge is a simple no-bake, low-sugar method that still tastes rich and slices clean. Save this card if you’re making sugar-free peanut butter fudge with monk fruit/erythritol—use powdered sweetener for the smoothest texture, then chill until firm and let pieces rest briefly before serving if they set extra hard.
Step-by-step recipe
Line your pan with parchment.
Stir peanut butter and melted fat until glossy and smooth.
Add sweetener gradually and mix until thickened. Taste as you go; sweetness builds quickly with some blends.
Add vanilla and salt, mixing thoroughly.
Press into the pan firmly and smooth the surface.
Chill 2–3 hours until set.
Texture note for keto peanut butter fudge
If it sets very hard, let slices sit at room temperature for 5–10 minutes. Conversely, if it stays too soft, add a bit more powdered-style sweetener next time.
Sugar-free peanut butter fudge and candy-style squares
Sugar-free versions often feel closer to “peanut butter candy” than traditional cooked fudge. That’s not a downside—rather, it’s a different texture expectation. The goal is a cohesive, sliceable slab with clean sweetness and strong peanut flavor.
For a grounded take on sweeteners, the NHS overview on whether sweeteners are safe is a practical read. If you prefer a research-focused summary, Harvard’s Nutrition Source page on low-calorie sweeteners adds nuance.
Ingredients (8-inch pan)
1 cup peanut butter
½ cup butter or coconut oil, melted
¾ to 1 cup powdered sugar-free sweetener blend
½ teaspoon vanilla
Pinch of salt
Save this sugar-free peanut butter fudge recipe card for an easy no-bake, candy-style treat that still slices clean. The key to a smooth bite is using a powdered sugar-free sweetener (granular can taste gritty). Mix, press into a lined pan, chill, and you’ve got quick peanut butter fudge squares without the sugar.
Step-by-step
Line the pan with parchment.
Combine peanut butter and melted fat until smooth.
Add sweetener gradually until the mixture becomes thick and pressable.
Stir in vanilla and salt to finish.
Press into the pan firmly.
Chill until set and slice.
Avoiding grit
Powdered-style sweeteners generally work better than granular ones in no-bake candy squares. Additionally, mixing thoroughly helps eliminate pockets of sweetness that can feel sharp.
Peanut-free fudge (allergy-friendly recipe, still sliceable)
Peanut-free fudge is completely doable when you swap the spread. The method stays the same; the flavor shifts. For substitution ideas, Food Allergy Research & Education has a helpful list of peanut butter alternatives, including sunflower seed butter and soy nut butter.
Ingredients (8-inch pan, no-bake style)
1 cup sunflower seed butter (or another peanut-free alternative)
¼ cup melted butter (or coconut oil)
2 cups powdered sugar (or suitable alternative)
½ teaspoon vanilla
Pinch of salt
This peanut-free fudge uses sunflower seed butter for an allergy-friendly, no-bake treat that still slices clean. Save this card for school events, parties, and potlucks—same easy method, different spread. Always check labels for cross-contact if you’re cooking for peanut allergies.
Step-by-step
Line your pan with parchment.
Warm the seed butter slightly so it stirs smoothly.
Mix in melted butter until glossy.
Add vanilla and salt.
Stir in powdered sugar gradually until thick and spreadable.
Press into the pan and chill until set.
Important reminder
Even when you use peanut-free ingredients, always check labels for cross-contact warnings if you’re cooking for someone with severe allergies.
Even when you follow directions, fudge can surprise you. Fortunately, most problems have straightforward fixes.
Fudge didn’t turn out the way you wanted? Save this quick troubleshooting guide for peanut butter fudge—fix grainy batches, rescue fudge that’s too soft or too firm, handle oil pooling (common with natural peanut butter), and recover crumbly or won’t-set slabs without starting over.
If it’s grainy
Graininess usually comes from sugar crystallization in cooked batches. To reduce the chance:
Avoid stirring while the mixture boils.
Use a clean pastry brush and water to wash sugar crystals from the sides early.
Consider the corn syrup method if you want extra insurance. King Arthur’s explanation of corn syrup’s role is helpful for understanding why it works.
Your Peanut butter fudge is too soft
Chill longer first; many slabs firm up with time.
For no-bake versions, add a bit more powdered sugar (or powdered sweetener) next time.
For condensed milk versions, slightly increase peanut butter or reduce condensed milk a touch.
If it’s too firm
Let it sit at room temperature for several minutes before serving.
In future batches, reduce powdered sugar slightly, or add a bit more fat (butter/coconut oil).
And If oil pools on top of your peanut butter fudge
This happens most often with natural peanut butter that separates easily.
Stir the peanut butter extremely well before measuring.
Chill the slab, then blot any surface oil gently with paper towel.
Next time, use the 3-ingredient method or a condensed milk base for a more stable set.
If it crumbles when slicing
Crumbly no-bake fudge usually needs more binding:
Add a spoonful of warmed peanut butter and mix again.
Alternatively, add a tablespoon of melted butter and re-press.
Slicing goes best when the slab is cold and firm. Use a long knife, warm it under hot water, wipe dry, and slice in decisive downward cuts. Then, wipe the blade between slices for clean edges.
Want clean, sharp peanut butter fudge squares? Save this slicing + storage guide: chill the slab, warm and dry your knife, cut straight down, and wipe between slices. It also shows the best way to store peanut butter fudge (airtight + parchment layers) and how to freeze it without the surface getting messy when thawed.
For a peanut-butter-themed dessert plate, pairing squares with cookies makes everything feel intentional. MasalaMonk’s peanut butter cookies fit naturally alongside any of these methods. Meanwhile, if you want a lighter contrast, these healthy oat cookies balance rich fudge nicely. Finally, for something bright and fruity on the same spread, MasalaMonk’s mango dessert ideas bring a fresh counterpoint.
A closing thought (and a simple way to pick your winner)
If you’re short on time, start with the 2-ingredient batch. If you’re after creamy reliability, choose the condensed milk method. And if you want plush nostalgia, marshmallow creme is the move. When you want true candy-shop character, go cooked soft-ball stage. After that, chocolate turns any version into a showpiece—especially buckeye-style with a glossy cap.
Once you’ve made two or three styles, you’ll notice something: the “best” one changes depending on the day. Sometimes you want the easiest pan imaginable. Other times you want a softer melt, a deeper cooked flavor, or an allergy-friendly swap so everyone can share. Luckily, all of those are within reach—one method at a time.
1. What is the best peanut butter fudge recipe for beginners?
If you’re new to fudge, start with a no-bake peanut butter fudge that uses powdered sugar (the 2-, 3-, or 4-ingredient styles). It’s straightforward, doesn’t require a thermometer, and sets firmly in the fridge. After that, try the condensed milk or cooked soft-ball versions when you want a more candy-shop finish.
2. What are the ingredients in peanut butter fudge?
Peanut butter fudge usually needs peanut butter + a sweetener/structure. Depending on the method, that structure can be powdered sugar, sweetened condensed milk, marshmallow creme, or a cooked sugar base. In addition, many recipes include butter, vanilla, and salt to improve texture and flavor.
3. How do you make two ingredient peanut butter fudge?
Two-ingredient peanut butter fudge is typically peanut butter + powdered sugar. Warm the peanut butter just until stirrable, then mix in powdered sugar until the mixture becomes thick and pressable. Finally, press it into a lined pan and chill until firm.
4. How do you make three ingredient peanut butter fudge?
Three-ingredient versions usually add melted butter to peanut butter and powdered sugar. The butter makes the mixture creamier and easier to spread. Once combined, chill until sliceable.
5. What makes four ingredient peanut butter fudge taste “best ever”?
Four-ingredient peanut butter fudge often includes vanilla (plus peanut butter, butter, and powdered sugar). Vanilla and salt make the flavor taste more complete, while the butter keeps the bite smoother. As a result, it reads more like a finished candy than a quick mix.
6. Can I make peanut butter fudge with sweetened condensed milk?
Yes. For a reliable, creamy set, condensed milk versions usually need an additional “setting” ingredient (commonly white chocolate chips) or extra dry structure (like powdered sugar). Otherwise, condensed milk and peanut butter alone can stay too soft, especially in warmer kitchens.
7. What is marshmallow creme or fluff peanut butter fudge?
Marshmallow creme (or fluff) versions are often called fantasy-style peanut butter fudge. Typically, you cook a sugar base to the soft-ball stage, then beat in marshmallow creme and peanut butter. Consequently, the texture turns plush, cohesive, and sliceable for days.
8. How do you make old fashioned peanut butter fudge?
Old fashioned peanut butter fudge is a cooked method that usually requires reaching the soft-ball stage (about 234–236°F / 112–113°C). After cooking, you cool it briefly, then beat until it thickens and loses some shine before pouring into the pan. That timing is what creates the classic creamy bite.
9. What is corn syrup peanut butter fudge, and why use it?
Corn syrup versions are cooked fudge with an extra helper ingredient. Corn syrup helps reduce crystallization, which can lead to a smoother texture. In other words, it’s a more forgiving route when you want cooked fudge flavor without as much risk of graininess.
10. How do you make chocolate peanut butter fudge?
You can add chocolate in three easy ways: mix cocoa into the base, swirl melted chocolate through before chilling, or add a top layer for a buckeye-style finish. Meanwhile, using milk chocolate chips gives a softer, sweeter “candy bar” vibe, while dark chocolate makes the peanut flavor pop.
11. What is buckeye fudge?
Buckeye fudge is a peanut butter fudge base topped with a firm chocolate layer. Once the peanut butter layer is set, pour melted chocolate (often with a little butter or coconut oil for shine) over the top. Then chill again and slice with a warm knife for neat layers.
12. Can I make no bake peanut butter fudge?
Definitely. No-bake peanut butter fudge usually sets by using powdered sugar or a structured base like frosting. Because there’s no cooking stage, it’s faster and less fussy. Still, measuring and mixing thoroughly matters for a clean set.
13. Why is my peanut butter fudge grainy?
Graininess usually comes from sugar crystallization in cooked fudge, or from undissolved granules. To prevent it, avoid stirring once the mixture boils, keep crystals off the sides of the pan, and use a thermometer for accuracy. Conversely, if it’s a no-bake sweetener issue, switching to a powdered-style sweetener often helps.
14. Why is my peanut butter fudge too soft?
First, give it more chill time—many batches firm up as they cool fully. If it’s still soft, the mixture likely needs more structure: add a bit more powdered sugar (or powdered sweetener) next time. For cooked versions, it may not have reached soft-ball temperature, so a thermometer is the quickest fix.
15. Why is my peanut butter fudge crumbly or dry?
This usually means there’s too much dry structure or not enough fat. Add a spoonful of warmed peanut butter (or a little melted butter) and mix again, then press firmly into the pan. Next time, use slightly less powdered sugar or choose the condensed milk or marshmallow method for a creamier set.
16. Why did oil pool on top of my peanut butter fudge?
This happens most often with natural peanut butter that separates easily. Stir the jar extremely well before measuring, then chill and blot any surface oil if needed. Additionally, choosing a method with more stability (butter, condensed milk, or cooked fudge) can reduce pooling.
17. Can I make sugar free peanut butter fudge?
Yes, as long as you use a powdered-style sugar-free sweetener for the smoothest texture. Granular sweeteners can feel gritty in no-bake candy squares. Also, sweetness levels vary by brand, so taste as you go and adjust slowly.
18. Can I make keto peanut butter fudge?
Keto peanut butter fudge typically uses peanut butter with no added sugar, a fat like butter or coconut oil, and a powdered keto sweetener. If it sets very hard, let it sit at room temperature briefly before serving. On the other hand, if it stays too soft, add a little more powdered sweetener next time.
19. How do you make peanut free fudge?
To make peanut-free fudge, swap peanut butter for a safe alternative like sunflower seed butter or soy nut butter, then follow the same no-bake method. However, if you’re baking for allergies, always check labels and watch for cross-contact warnings.
20. How long does peanut butter fudge last and how should I store it?
For the best texture, store peanut butter fudge in an airtight container with parchment between layers. In a cool room, it can last several days; in the fridge, it lasts longer and slices cleaner. Furthermore, freezing works well—wrap tightly and thaw in the fridge so the surface doesn’t sweat.