If you’re trying to eat healthier or just want a speedy breakfast, you’ve probably noticed two convenient oat choices in every store: quick oats and instant oats. But are they actually the same thing? Why are there so many options—and does it matter which you choose for your porridge, overnight oats, or baking? Here’s the full story, with practical tips, cooking advice, and nutrition facts so you can pick the best oats for your lifestyle.
What Exactly Are Quick Oats?
Quick oats (also called “quick-cooking oats”) start with the same whole oat groats used for all oat products. These groats are first steamed, then rolled thinner and sometimes cut into smaller pieces than traditional rolled (old-fashioned) oats. The extra processing makes them cook faster and break down more easily when prepared.
Texture: Soft and fluffy, but still has some bite.
Cooking time: Just 1–3 minutes on the stovetop or microwave.
Best uses: Hot porridge, overnight oats, soft cookies, pancakes, and quick breads.
Quick oats give you a hot breakfast or recipe base in almost no time—no need for long simmering. If you’re curious about the differences between rolled oats, old-fashioned oats, and when you can swap them, check out our detailed guide on substituting old-fashioned oats for rolled oats.
Instant Oats: Even Faster, Even Softer
Instant oats (often found as “instant oatmeal”) take processing a step further. Oat groats are steamed, fully cooked, dried, rolled even thinner than quick oats, and then sometimes chopped so they cook immediately when you add hot water or microwave them. Most commonly, instant oats are sold in single-serve packets, often with flavorings and sugar already mixed in.
Texture: Creamy, smooth, and very soft—almost pudding-like when cooked.
Cooking time: Instantly ready with boiling water or in 1 minute in the microwave.
Best uses: Instant breakfast, office snacks, travel, camping, or for kids who prefer a smoother texture.
It’s important to note that instant oats in packets are often pre-flavored and sweetened. The added sugars, salt, and flavorings can make them less healthy than plain oats. For ultimate control, buy plain instant oats and add your own healthy toppings at home.
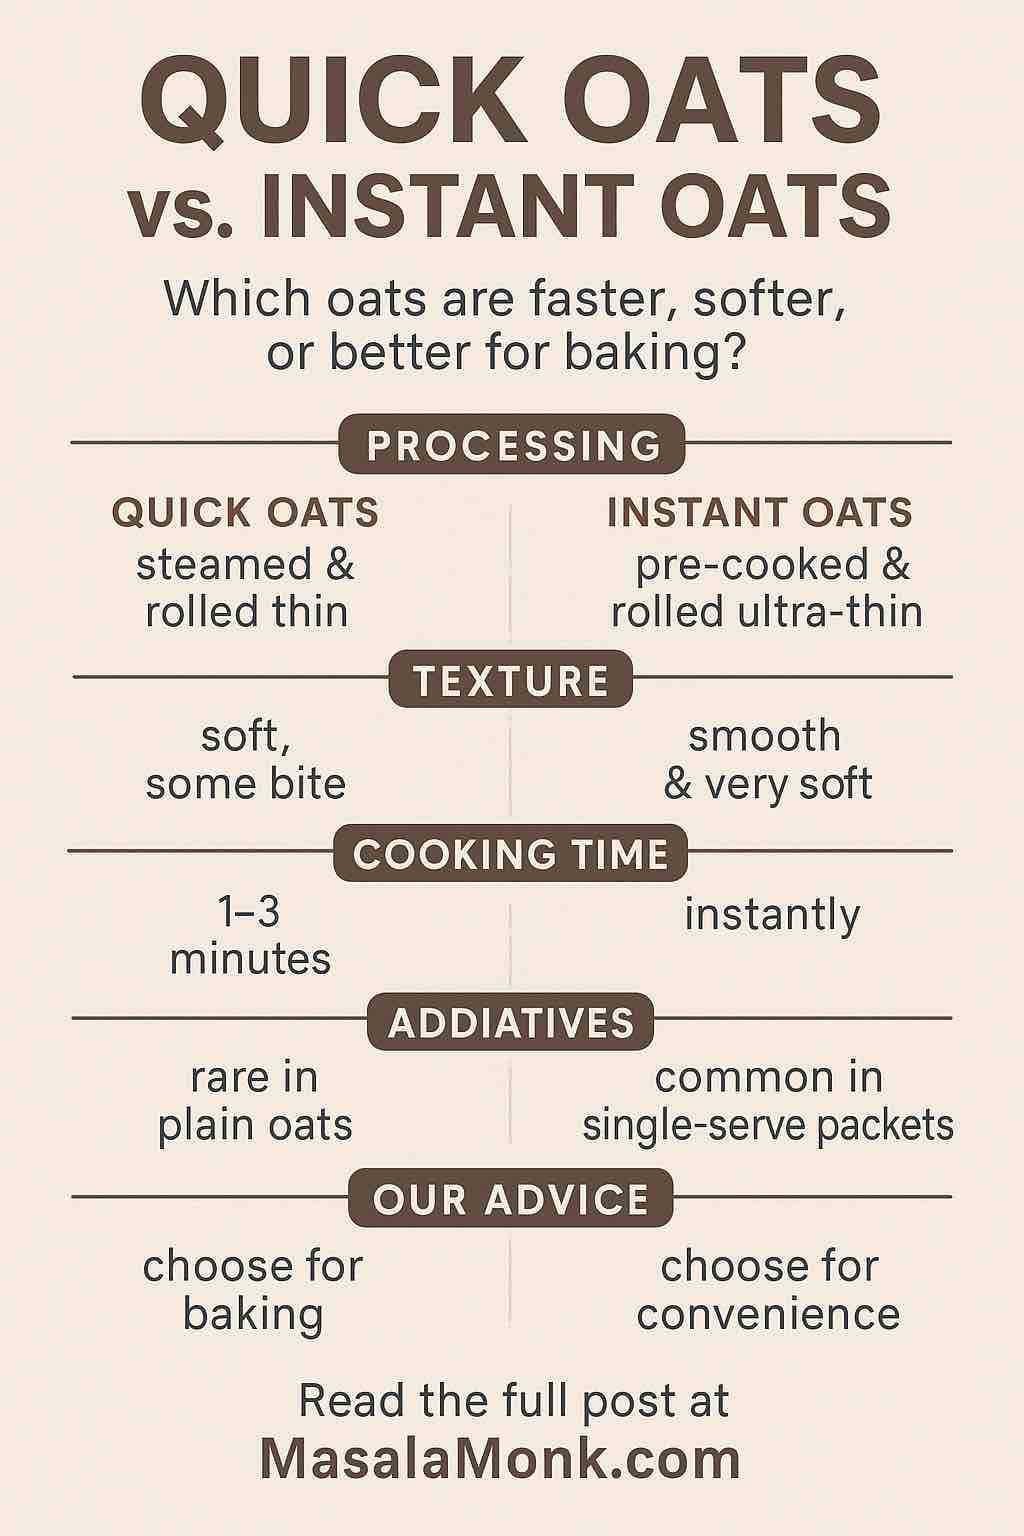
Quick Oats vs Instant Oats: What Really Matters?
Although both are designed for speed, quick oats and instant oats are not identical. The differences matter in real-life cooking, texture, and health:
Feature
Quick Oats
Instant Oats
Processing
Steamed & rolled thin
Pre-cooked, rolled ultra-thin, often chopped
Texture
Soft, still some bite
Silky, very soft, can be mushy
Cook Time
1–3 minutes
Instant—just add hot water
Packaging
Sold in bulk
Often single-serve flavored packets
Additives
Rare in plain quick oats
Common in instant oat packets (sugar, salt)
Recipe use
Great for baking
Not ideal for baking (gets too mushy)
When it comes to taste and mouthfeel:
Quick oats make a thicker, heartier porridge or baked good with a little more chew.
Instant oats dissolve into a creamy, very smooth mixture—great if you like a super-soft texture.
Hot oatmeal when you’re short on time but still want real oat texture.
Adding to muffin or pancake batters for extra fiber.
Thickening smoothies (just toss them in raw).
Making “overnight oats” with a softer texture, perfect for meal prep.
Instant oats shine when:
You need breakfast or a snack instantly—just pour boiling water and stir.
You’re traveling, camping, or need food on the go.
You’re serving kids, or anyone who prefers a creamy, pudding-like bowl.
If you love baking or making granola, quick oats will hold up much better than instant oats. Instant oats will break down and make recipes mushy—so stick to using them in porridge or as a speedy meal.
Nutrition: Is One Healthier?
Plain quick oats and plain instant oats are virtually identical in nutrition, with about 150 calories, 4 grams of fiber, and 5 grams of protein per serving. Both deliver the heart-healthy benefits of oats, including beta-glucan fiber.
BUT: Instant oat packets are often loaded with sugar, salt, and flavorings—sometimes as much as a dessert! Always check the ingredients, and whenever possible, choose unsweetened varieties so you can control the flavors and sweetness.
If you’re interested in how glycemic index, satiety, and fiber stack up across all oat types (including steel cut and rolled), you’ll find a full comparison in our oat guide.
Can You Substitute Quick Oats for Instant Oats (and Vice Versa)?
For hot porridge, you can swap them—just expect a difference in texture: quick oats are thicker, instant oats are silkier.
In baking, quick oats are better; instant oats can turn recipes gooey or pasty.
For overnight oats, quick oats work best; instant oats will dissolve and become almost like pudding.
And if you’re comparing all oats head to head (steel cut, rolled, quick, instant), our “Steel Cut Oats vs Rolled Oats: Nutrition, Taste, Cooking & More” post breaks it down further: Read the in-depth comparison
Conclusion
Quick oats and instant oats are both designed to help you get nutritious, hearty meals on the table—fast. Their key differences are in texture, use in recipes, and (with instant) the likelihood of extra additives. For the healthiest choice, stick to plain varieties and add your own flavors at home.
Want to learn even more about all things oats? Browse our Ultimate Guide to Oats for practical cooking tips, nutrition details, and the best ways to enjoy oats every day!
10 FAQs – Are Quick Oats the Same as Instant Oats?
1. Are quick oats and instant oats the same thing?
No. Quick oats are rolled thinner and cut smaller to cook faster, but instant oats are pre-cooked, dried, and rolled even thinner for truly instant preparation.
2. Can I substitute quick oats for instant oats in recipes?
In hot cereal, yes—the texture will just be thicker. In baking, quick oats are usually better; instant oats may make recipes too mushy.
3. Are instant oats less healthy than quick oats?
Plain instant oats have similar nutrition to quick oats. However, most instant oats packets have added sugar, salt, and flavors—check labels!
4. Why do instant oats cook faster than quick oats?
Instant oats are pre-cooked and rolled much thinner than quick oats, allowing them to absorb water and soften immediately.
5. Can I use instant oats for overnight oats?
You can, but they will dissolve and become very soft, almost pudding-like. Quick oats work better for classic overnight oats texture.
6. Do quick oats and instant oats taste the same?
They’re both mild, but instant oats have a smoother, softer texture and can taste sweeter if flavored.
7. Are quick oats and instant oats gluten-free?
Oats are naturally gluten-free, but always check for certified gluten-free labeling, as cross-contamination can occur during processing.
8. Which is better for baking: quick oats or instant oats?
Quick oats are better. Instant oats tend to break down and make baked goods mushy.
9. Do quick oats and instant oats have the same calories and nutrients?
Yes, if both are plain and unsweetened. Most differences come from flavorings and additives, not the oats themselves.
10. Which should I choose for the healthiest breakfast?
Choose plain quick oats or plain instant oats, and add your own fruit or nuts. Avoid flavored instant oat packets with added sugar.
Oats are one of the healthiest, most versatile whole grains you can buy, but the options—steel cut oats and rolled oats especially—can leave even experienced cooks scratching their heads. What actually makes them different? Does one have a real advantage for health, flavor, or recipes? Here’s a practical, detailed breakdown that will make you an oats expert, with links only where you truly need more detail.
What Sets Steel Cut Oats Apart?
Steel cut oats (sometimes called Irish oats or pinhead oats) are made by chopping the whole oat groat into coarse pieces with steel blades. That’s almost all the processing they get—no flattening, rolling, or steaming. What does this mean for you?
Texture: Extremely hearty and chewy, with a distinct, nubby bite
Cooking time: 20–40 minutes on the stovetop, unless you soak or use a pressure cooker
Flavor: Robust, nutty, and full-bodied
Practical tip: Steel cut oats are perfect for those who want their breakfast to feel substantial and filling. They keep their shape well, making them ideal for meal prep—just cook a batch and reheat through the week. For those who love savory breakfast bowls (think sautéed veggies, a runny egg, spices), steel cut oats give you the structure to carry those flavors.
Why Choose Rolled Oats?
Rolled oats—also known as old-fashioned oats—start the same way, but get steamed and then flattened into thin flakes by heavy rollers. That bit of extra processing changes everything:
Texture: Creamy and soft, with just enough chew to stay interesting
Cooking time: Super quick—just 5–10 minutes on the stovetop, or no cooking at all for overnight oats
Flavor: Mild, sweet, and easy to pair with fruits, spices, or honey
When to use rolled oats: Rolled oats are the MVP of breakfast for busy mornings and for anyone who loves classic oatmeal. They also star in overnight oats, muesli, granola, pancakes, muffins, and cookies—offering just enough bite without any toughness. If you want to know more about substituting old-fashioned oats and rolled oats, check out this post on swapping the two in recipes.
Nutrition: Is There a Winner?
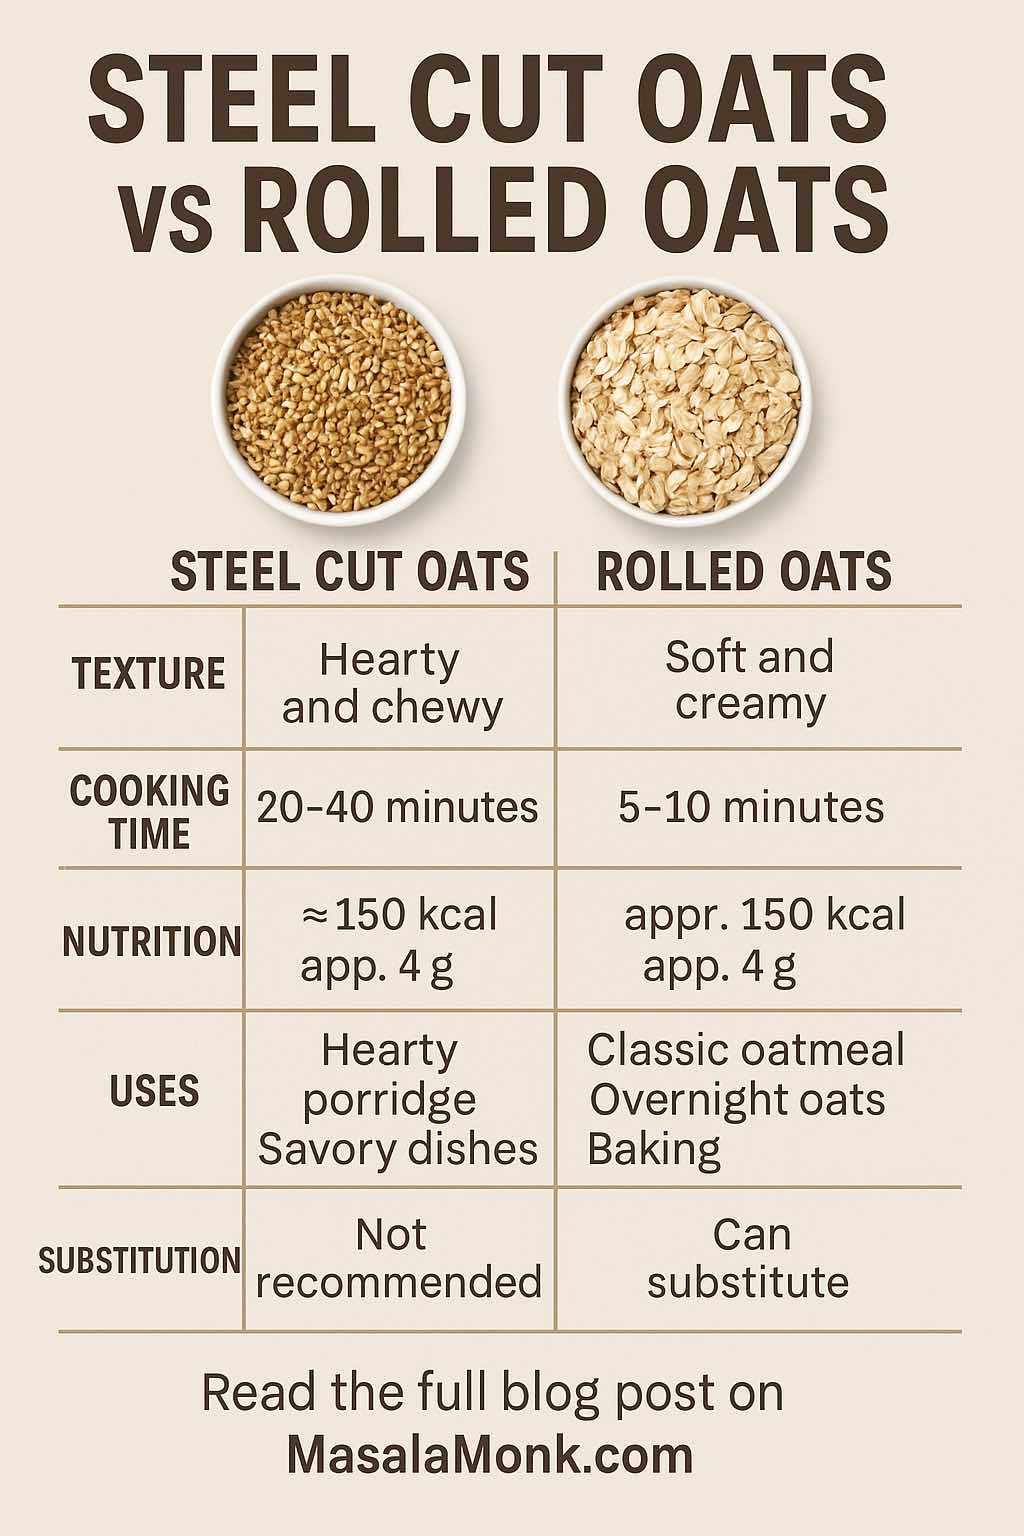
Steel cut oats and rolled oats are almost identical nutritionally. Both are whole grains, rich in fiber (especially beta-glucan, which is great for heart health), protein, and slow-digesting carbs. Here’s how they compare per 40g (about 1/2 cup dry):
Type
Calories
Fiber
Protein
Fat
Glycemic Index
Steel Cut
~150
~4g
~5g
~2.5g
52
Rolled
~150
~4g
~5g
~2.5g
59
Steel cut oats: Slightly lower glycemic index, digest more slowly, so you feel fuller longer.
Rolled oats: Slightly higher GI, but still a slow carb compared to most grains.
Bottom line: If you want oats for blood sugar management, weight loss, or heart health, both options are equally smart. The biggest difference is in texture and cooking time, not nutrition.
Taste & Texture: What’s Best for You?
Steel cut oats deliver a truly hearty, chewy, and substantial experience—like a rice or barley porridge. Each spoonful holds its shape and soaks up flavor slowly. Rolled oats create the classic, creamy oatmeal you might remember from childhood, and take on the flavor of whatever you add: cinnamon, cardamom, apple, banana, or berries.
Use steel cut oats if:
You want a breakfast that sticks with you
You meal-prep porridge or like making savory oat bowls
You love a chewy, substantial bite
Use rolled oats if:
You want something quick and creamy
You love overnight oats or make granola/muffins often
You want oats to absorb flavors fast (great for sweet or spiced bowls)
Cooking, Prep, and Everyday Tips
Steel Cut Oats:
Stovetop: Simmer 1 part oats to 3–4 parts liquid for 20–40 minutes
Pressure Cooker: 10–12 minutes, natural release
Soak overnight to cut cook time in half
Batch-cook for the week; they reheat beautifully with a little milk
Rolled Oats:
Stovetop: 1 part oats to 2 parts liquid, ready in 5–10 minutes
Overnight Oats: Soak in equal parts milk/yogurt and oats overnight in the fridge—no cooking!
Microwave: 2–3 minutes for a creamy bowl on busy mornings
Bake into cookies, bars, or granola for added fiber and texture
Pro tip: If you bake with oats, always use rolled/old-fashioned oats—steel cut are too tough for most baked recipes. Rolled oats give you the best of both worlds: nutrition, speed, and a little bite.
Can You Substitute One for the Other?
Not really, except for simple porridge. Steel cut oats are just too dense and require too much liquid for most recipes that call for rolled oats—especially baking and overnight oats. If a recipe calls for steel cut oats, using rolled oats will make the result much softer and creamier. For traditional oatmeal bowls, you can swap in a pinch (just adjust cook time), but for baking or muesli, stick to rolled.
If you want a full breakdown on oat types and swaps (including quick and instant oats), you’ll love our complete oat guide.
Substitution Guide
Use/Recipe
Steel Cut → Rolled
Rolled → Steel Cut
Hot Porridge
Not recommended*
Yes, but creamier
Overnight Oats
Only if pre-cooked
Yes
Cookies/Granola
No
Yes (but more chewy)
Savory Bowls
Yes
Yes
*Steel cut oats won’t soften enough without long cooking—don’t use them raw for overnight oats or in quick bakes.
Practical Uses & Ideas
Steel Cut Oats:
Make a big batch, store in the fridge, and enjoy all week
Use in savory bowls with veggies, sautéed greens, and eggs
Try oat risotto: cook steel cut oats in broth and finish with Parmesan
Rolled Oats:
Prep overnight oats in jars for grab-and-go breakfasts
Bake into cookies or granola for easy snacks
Blend into smoothies for a creamy, fiber-rich boost
Add to pancake or muffin batter for extra nutrition
Conclusion
There’s no wrong answer in the steel cut vs rolled oats debate—just what fits your taste, lifestyle, and recipes.
Want chewy and hearty? Steel cut is for you.
Want quick and versatile? Rolled oats win.
Both will fill you up, boost your health, and make breakfast better. Hungry for more oat insights? Read our Ultimate Guide to Oats for a deep dive on every oat type, nutrition, and the best ways to use them in your kitchen.
Oats are more than just a breakfast staple—they’re one of the most versatile, nutritious, and misunderstood whole grains you’ll find. Whether you call it oatmeal, porridge, or just “oats,” there’s a surprising amount of confusion around the types you see on supermarket shelves. Is there really a difference between rolled oats and old-fashioned oats? Are steel cut oats healthier than regular oats? What about quick oats, instant oats, or those porridge blends?
Let’s unravel the mystery, once and for all.
What Are Oats?
Oats are the edible seeds of the grass species Avena sativa. They’ve been a core part of traditional diets across the world for centuries—from hearty Scottish porridge to savory Indian oat upma and everything in between. At their core, all oat products start from the same whole oat “groat.” Oats refers to the raw, unprocessed grain, while oatmeal is the name for a meal or porridge made from oats. However, in everyday use, the terms get mixed up—sometimes even on product labels.
Key Takeaway:
Oats = the grain in all forms (raw, steel cut, rolled, quick, etc.)
Oatmeal = any dish prepared from oats, typically boiled into a porridge.
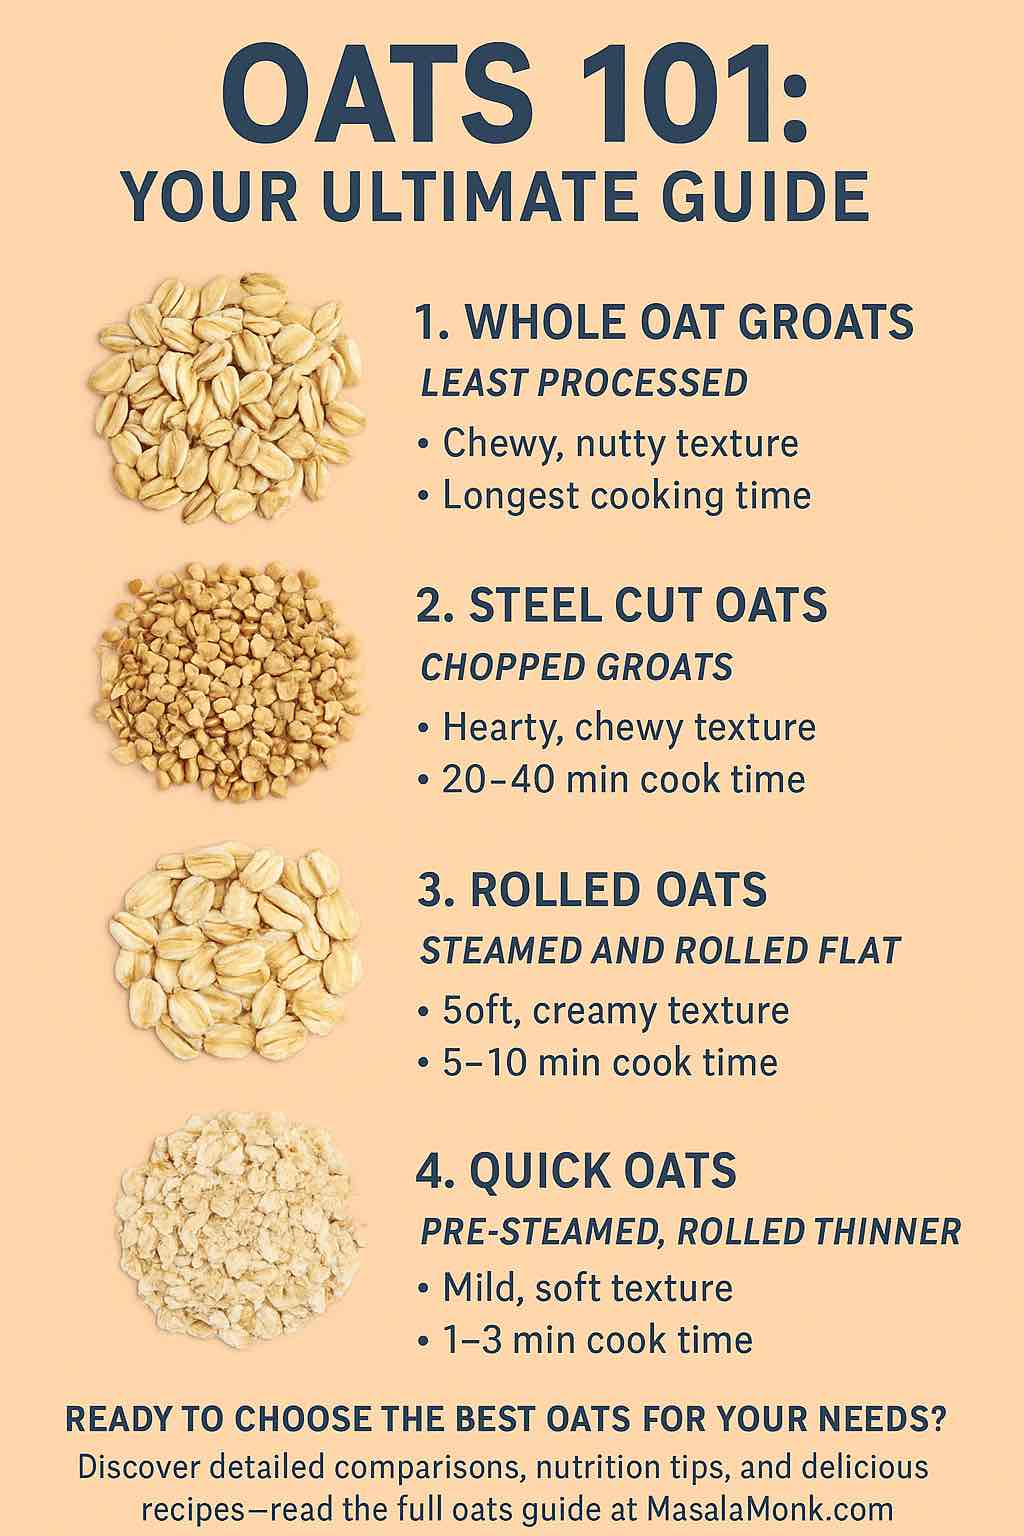
The journey from oat field to your breakfast bowl involves several stages. All oat products begin with whole oat groats—the de-husked, cleaned oat kernel. From there, the differences come down to how the oats are cut, steamed, and rolled:
Steel Cut Oats (a.k.a. Irish oats, pinhead oats):
The groats are chopped into 2-4 pieces with steel blades.
No rolling or flattening.
Texture: Chunky, chewy, hearty.
Rolled Oats (a.k.a. old-fashioned oats):
Groats are steamed and then pressed flat by large rollers.
Texture: Flaky, tender, with more bite than quick oats.
Quick Oats:
Start as rolled oats, then cut into smaller pieces and rolled even thinner.
Texture: Soft, cook quickly, become mushy faster.
Instant Oats:
The most processed. Pre-cooked, dried, then rolled ultra-thin. Often found in single-serve packets, usually with added flavors or sugar.
Sprouted Oats: Oats are soaked, allowed to sprout, then processed as above. Supposedly easier to digest, with a slightly nuttier flavor.
Porridge Oats: In the UK, this can refer to rolled oats or finely ground oats used for traditional porridge. Sometimes it’s a blend for extra creaminess.
Types of Oats: A Detailed Comparison
Let’s break down the differences and similarities in detail:
Steel Cut Oats
Also Known As: Irish oats, pinhead oats.
Processing: Whole oat groats chopped into pieces, not flattened.
Texture: Chewy, nubby, and hearty. Retains a bite even after cooking.
Flavor: Nutty and slightly sweet.
Cooking Time: 20-40 minutes on the stovetop; can be made in a pressure cooker or slow cooker.
Best For: Hearty porridge, overnight oats (with long soaking), savory oat bowls.
Fun Fact: Steel cut oats are the closest to whole oat groats, meaning they take longest to digest and keep you full the longest.
Processing: Rolled oats cut into smaller pieces and rolled even thinner.
Texture: Cooks up soft, loses distinct flake structure, becomes mushy if overcooked.
Flavor: Neutral; takes on flavor of add-ins.
Cooking Time: 1-3 minutes—just add boiling water or microwave.
Best For: Quick breakfasts, mixing into batters, no-bake bars.
Note: Quick oats and instant oats are not exactly the same, but many people (and brands) use the terms interchangeably. See the deep dive: Are Quick Oats the Same as Instant Oats?
Instant Oats
Processing: Pre-cooked, dried, and rolled ultra-thin (often into a powdery texture).
Texture: Silky and creamy, almost pudding-like.
Flavor: Mild; often enhanced with added flavors, sugar, or salt in commercial packets.
Cooking Time: Instant! Just add hot water or microwave for 1 minute.
Best For: Emergency breakfasts, travel, kids, when you need food now.
Warning: Check instant oat packets for added sugars and flavors. “Plain” versions are best if you want to avoid excess sugar.
Sprouted Oats
Processing: Groats are soaked, allowed to sprout (germinate), then dried and rolled or cut.
Texture/Flavor: Slightly nuttier, potentially easier to digest.
Use: As you would rolled oats or steel cut oats.
Porridge Oats / Pinhead Oats
Porridge Oats: In the UK and other countries, “porridge oats” might refer to rolled oats, sometimes ground for a creamier texture.
Pinhead Oats: Another name for steel cut oats.
Oats vs Oatmeal: Clearing Up the Confusion
Oats are the raw ingredient (groats, steel cut, rolled, quick, instant).
Oatmeal refers to the dish made from oats (porridge) or, in some places, any processed oat product.
If you’re buying oats for a recipe, always check if it calls for a specific type, because texture and cooking time can change the final result!
Let’s be clear: All oats are nutritious! But, the processing can slightly change how your body digests them:
Type
Calories
Fiber
Protein
Glycemic Index
Cook Time
Steel Cut
~150
~4g
~5g
~52
20–40 min
Rolled/Old-Fash
~150
~4g
~5g
~59
5–10 min
Quick Oats
~150
~4g
~5g
~66
1–3 min
Instant Oats
~150
~4g
~5g
75+
1 min
Key points:
The macro nutrition (calories, protein, fiber) is nearly identical between all unsweetened oat types.
Steel cut oats are digested a bit more slowly, leading to a lower glycemic index and possibly longer-lasting energy.
Rolled oats strike a balance: faster to cook than steel cut, more texture than quick or instant.
Quick and instant oats digest faster, raising blood sugar more quickly—especially if sugar is added.
For people watching blood sugar: Choose steel cut or rolled oats. For convenience? Quick or instant is fine (just watch for extra sugar!).
Key Vitamins and Minerals in Oats (all types, per 40g dry serving):
While the macros (calories, protein, fiber) are very similar across all oat types, the micronutrient (vitamin and mineral) content is also quite consistent, because the different forms (steel cut, rolled, quick, instant) all start from the same whole grain. Minor losses in B-vitamins can occur with additional processing, but for most people, the differences are negligible.
Manganese: 70–90% Daily Value (DV)
Phosphorus: 20–30% DV
Magnesium: 15–20% DV
Iron: 8–10% DV
Zinc: 10–15% DV
Copper: 15–20% DV
Vitamin B1 (Thiamin): 10–15% DV
Folate: 5–8% DV
Selenium: 15–20% DV
Oats also contain:
Small amounts of potassium, calcium, and B5 (pantothenic acid)
The powerful antioxidant avenanthramides (unique to oats)
Does Processing Change the Mineral Content?
Steel cut, rolled, and quick oats: Very similar micronutrient profiles, as the oat bran and germ are retained.
Instant oats: Slightly lower levels of some B-vitamins due to extra steaming and pre-cooking, but still a rich source of minerals compared to most cereals. Main concern is usually added sugar/salt in flavored packets—not loss of minerals.
How Do Oats Support Health?
Manganese, phosphorus, and magnesium: For energy metabolism, bone health, and nerve function.
Iron and zinc: For immune support and oxygen transport.
Beta-glucan fiber: Supports cholesterol reduction, heart health, and gut microbiome.
Antioxidants (avenanthramides): Anti-inflammatory, may help lower blood pressure.
Bottom Line
Oats of all types are nutrient-dense, especially for minerals and certain B vitamins.
Choose plain, unsweetened varieties for maximum health benefit.
Processing for quick or instant oats may reduce B-vitamins slightly, but minerals remain high.
Cooking With Different Oat Types
Steel Cut Oats:
Use for a hearty, chewy porridge.
Great in savory oat “risottos” or grain bowls.
Overnight soak or pressure cook to save time.
Rolled/Old-Fashioned Oats:
Perfect for traditional oatmeal, overnight oats, and muesli.
Use in baking: cookies, muffins, breads, pancakes.
Make homemade granola or snack bars.
Quick Oats:
Great for instant breakfast or to thicken smoothies.
Use in batters (pancakes, muffins) for softer texture.
Not ideal for recipes where you want oat texture to stand out.
Instant Oats:
Best for emergencies, travel, or super-fast prep.
Often sweetened—use plain, then add your own toppings for a healthier bowl.
Can You Substitute One Oat for Another?
Rolled oats ↔ Old-fashioned oats: YES, always!
Rolled/old-fashioned ↔ Quick oats: Usually yes, but final texture will be softer/mushier.
Rolled/quick ↔ Steel cut: Not directly. Steel cut oats require more liquid, longer cooking, and have a totally different texture.
Instant oats ↔ Any other: Not a good swap for most recipes, as they dissolve or get mushy quickly.
Tip: When baking, always use the type of oat called for in the recipe—especially for cookies or granola, where texture is key.
Why Choose One Oat Type Over Another?
Steel cut oats for chew, hearty texture, slow digestion.
Rolled oats for versatility, classic oatmeal, baking.
Quick oats for speed and convenience.
Instant oats for emergencies or travel.
Sprouted oats for those who want easier digestion or a slightly different flavor.
Final Thoughts: Which Oats Are Best?
There’s no single “best” oat for everyone. It depends on your:
Time: Steel cut for slow mornings, quick or instant for busy days.
Texture: Chewy (steel cut), soft but still textured (rolled), or creamy (quick/instant).
Nutrition: All are healthy, just be mindful of instant oat ingredients.
The bottom line? All oats are good oats. Pick the type that fits your taste, recipe, and schedule best!
Ready to Go Deeper? Explore These Detailed Guides:
Do you have a favorite way to use oats? Share your tips and questions in the comments below!
10 FAQs About Oats
1. Are steel cut oats healthier than rolled oats?
Steel cut and rolled oats have almost identical nutrition—same calories, fiber, and protein. Steel cut oats have a slightly lower glycemic index and digest more slowly, which may help you feel full longer.
2. Can I substitute rolled oats for old-fashioned oats in recipes?
Yes! Rolled oats and old-fashioned oats are the same product, just two names. Use them interchangeably in any recipe.
3. Are quick oats and instant oats the same thing?
Not exactly. Quick oats are cut and rolled thinner to cook in 1–3 minutes. Instant oats are pre-cooked, dried, and rolled ultra-thin for “just add water” convenience. Instant oats often have added sugar or flavors.
4. Which type of oats is best for overnight oats?
Rolled (old-fashioned) oats work best for overnight oats, providing the right texture after soaking. Steel cut oats will be too chewy unless pre-cooked or soaked very long; quick oats become mushy.
5. Is there a big difference in calories or protein between oat types?
No. Steel cut, rolled, quick, and instant oats (plain, unsweetened) all have nearly the same calories, protein, and fiber per serving.
6. Why do steel cut oats take longer to cook?
Steel cut oats are just chopped, not rolled or steamed. Their thicker, denser shape takes more time and liquid to soften fully.
7. What are porridge oats?
In the UK and some other countries, “porridge oats” typically means rolled oats or a blend of rolled and ground oats for a creamy texture.
8. Can I use instant oats in baking recipes?
Not recommended. Instant oats tend to dissolve and make baked goods mushy. Use rolled or quick oats for better texture in cookies, muffins, and bars.
9. Are flavored instant oat packets healthy?
Many instant oat packets contain added sugars, salt, and artificial flavors. Choose plain instant oats and add your own healthy toppings for a better option.
10. Do oats contain gluten?
Oats are naturally gluten-free, but are often processed in facilities that also handle wheat. If you need gluten-free oats, look for oats specifically labeled “gluten-free.”
Cast iron skillets have an almost mythical status in the kitchen. People talk about them being “forever pans,” capable of making the best steak or cornbread of your life. But cast iron, for all its hype, isn’t for everyone—and even seasoned cooks sometimes get tripped up by classic mistakes. If you’re considering buying your first (or next) cast iron skillet, read on. This post goes well beyond the marketing to give you real, practical advice—plus five honest warnings you need to know before making the commitment.
The Romance of Cast Iron—And the Reality
Owning a cast iron skillet feels like joining a secret club. The stories are true: with proper care, it can last generations, and it delivers incredible browning, searing, and oven-to-table versatility. But cast iron also requires a shift in habits. It’s not just a pan; it’s a relationship, and like all relationships, it comes with quirks you need to embrace—or at least understand.
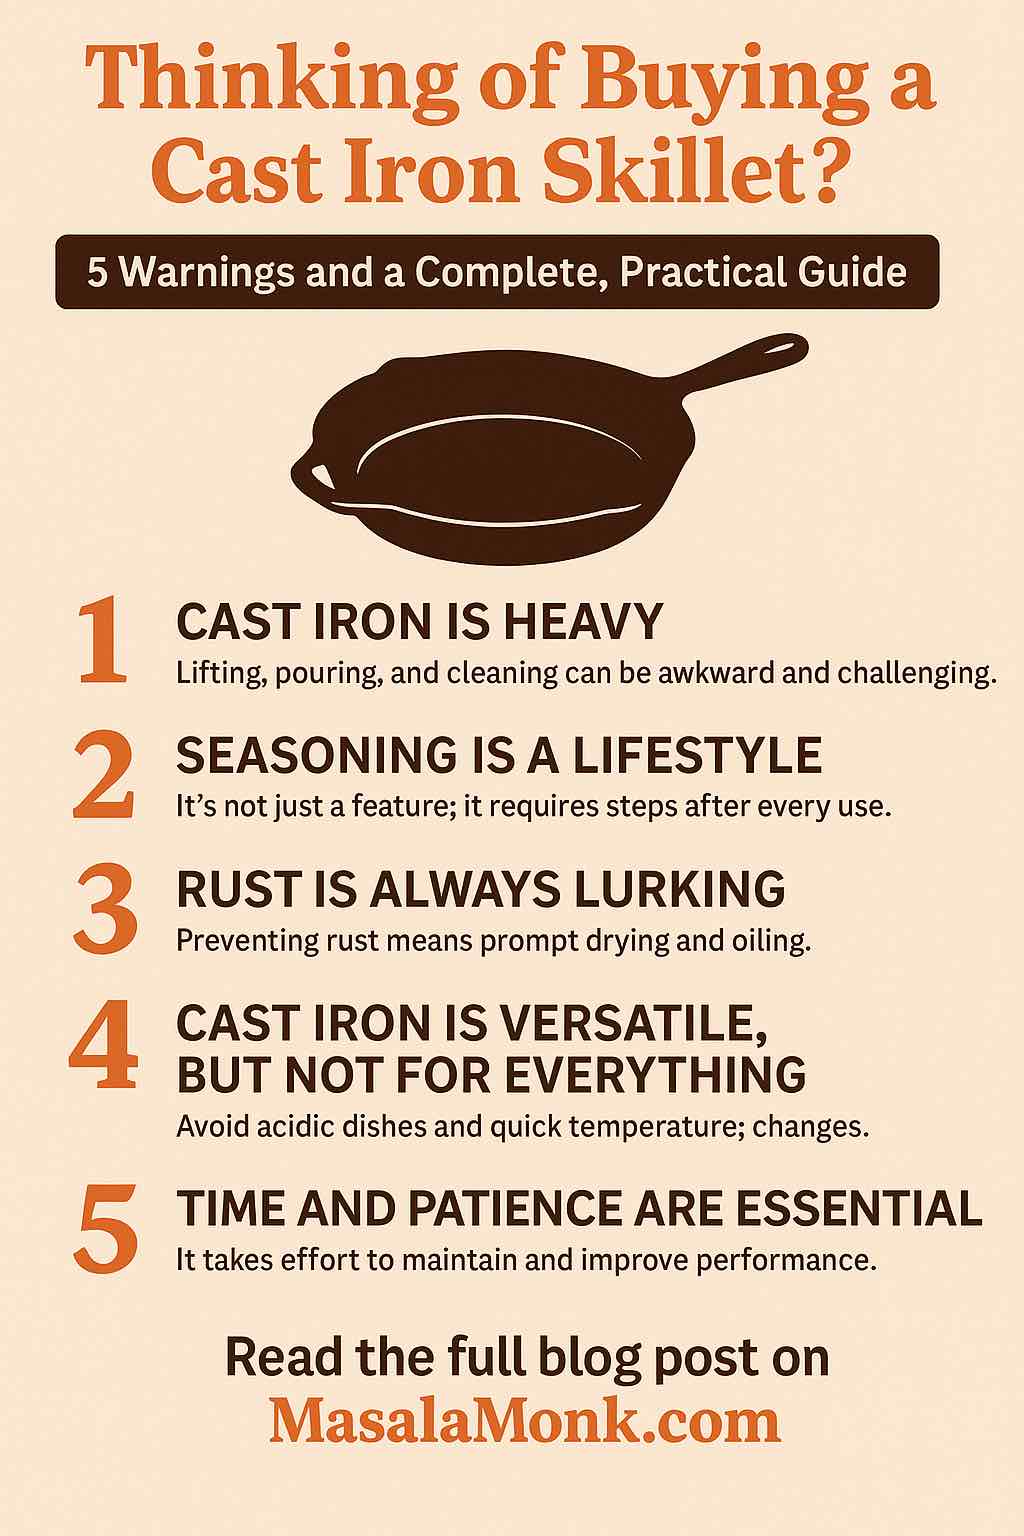
1. Warning: Cast Iron Is Heavy—And That Matters More Than You Think
If you’re used to lightweight nonstick or stainless-steel pans, you may be surprised the first time you heft a cast iron skillet. These pans are solid metal, often weighing as much as a small bowling ball. That heft is part of what makes cast iron great—it helps with heat retention and stability. But it can also make a difference in daily life:
Lifting and Pouring: Pouring off hot oil or moving a full skillet from stovetop to oven can be awkward or risky if you’re not prepared.
Cleaning: Scrubbing, rinsing, and drying a heavy, slippery pan isn’t trivial, especially if you have limited grip strength or wrist issues.
Storage: Cast iron pans take up space and can damage delicate surfaces if dropped or stacked carelessly.
Practical Tip: Before you commit, try lifting a few pans in a store (if possible) or compare the weight to something you own. If you cook for just one or two people, consider a smaller skillet. Larger pans are great for volume but multiply the challenges.
2. Warning: Seasoning Isn’t One-and-Done—It’s a Lifestyle
One of the first things you’ll hear about cast iron is “seasoning.” This isn’t just a buzzword; it’s the heart of cast iron care. Seasoning is a thin layer of polymerized oil that forms a protective, naturally nonstick coating on your skillet. While many pans are “pre-seasoned,” the reality is that maintaining and improving this seasoning is an ongoing responsibility.
What You’ll Actually Be Doing:
After Each Use: Rinse your pan promptly (avoid letting it soak), scrub away stuck-on bits (using coarse salt if needed), dry thoroughly, and rub on a very thin coat of cooking oil. Heat briefly to seal it in.
If Food Starts Sticking: It’s a sign your seasoning needs a boost. A few extra rounds of oiling and heating can help.
If Rust Appears: Don’t panic—rust can be scrubbed off and the pan re-seasoned.
Why This Matters: Skipping these steps leads to rust, sticky food, or metallic flavors. Seasoning is a rhythm you get into—like making your bed or brushing your teeth.
Practical Tip: Make seasoning a habit, not a chore. Keep a small bottle of oil near your stove and consider it part of the cooking process.
3. Warning: Cast Iron Isn’t for Everything—And That’s Okay
Cast iron is versatile, but it’s not a universal solution. There are foods and techniques that don’t play well with cast iron, especially with a newer or lightly-seasoned skillet:
Acidic Foods: Tomato sauce, vinegar, wine, and lemon juice can strip seasoning and cause off-flavors. Use another pan for these until your skillet is deeply seasoned.
Delicate Dishes: Eggs, fish, or pancakes may stick in a new pan until the seasoning is built up.
Quick-Change Cooking: Cast iron heats slowly and stays hot. If you’re making dishes that need fast temperature changes or precise control, another pan may be better.
Practical Tip: Think of cast iron as a specialist—fantastic for searing, frying, baking, and roasting, but not the only pan you need. Let it excel at what it does best.
4. Warning: Rust Is Always Lurking—And It’s Your Job to Fight It
The flip side of cast iron’s durability is its vulnerability to moisture. Water is the enemy of cast iron. Rust can show up overnight if a pan is left damp, air-dried, or stored in a humid environment. Even the most expensive or well-seasoned pan will rust if neglected.
How to Prevent Rust:
Always dry your skillet immediately after washing—ideally by heating it on the stove.
Store your pan in a dry place. If you live in a humid climate, consider placing a paper towel inside to absorb moisture.
Never put cast iron in the dishwasher or let it soak in the sink.
If Rust Appears: Don’t panic. Scrub the rust with steel wool or a stiff brush, rinse, dry, and re-season. Rust is a setback, not a disaster.
Practical Tip: Think of rust as feedback, not failure. If you see it, it just means the pan needs a little more attention. Fixing it is almost always possible.
5. Warning: Cast Iron Rewards the Patient—Not the Impulsive
The most beautiful thing about cast iron is how it gets better with time. Every meal, every oiling, every gentle scrub builds character and performance. But this is a long game.
Break-in Period: New pans are often a bit sticky, rough, or fussy. With regular use, they get smoother and slicker.
Appearance Changes: Don’t expect a glossy black patina immediately. Over months or years, your skillet will develop a deep, even finish and unique character.
Effort Up Front: The more you use and care for your skillet, the easier and better it gets.
Practical Tip: Don’t be discouraged by imperfections or slow progress. Think of your skillet as something you grow with—it’s a tool and a project.
Beyond the Warnings: How to Get the Most Out of Your Cast Iron Skillet
Embrace Simplicity
Start with simple foods that help build seasoning and boost your confidence:
Fry bacon or sausages (the fat helps the pan).
Roast vegetables at high heat.
Try cornbread, biscuits, or skillet pizza.
Cleaning Simplified
Clean your skillet while it’s still warm—this makes removing residue easier.
Use hot water and a stiff brush. Avoid soap, or use it sparingly.
For stubborn spots, a paste of coarse salt and water works wonders.
Maintenance Routine
Oil lightly after every wash.
Heat briefly on the stove to finish drying and set the oil.
Store in a dry place, ideally with something between the pan and any lid to prevent moisture buildup.
Cooking Mastery
Preheat well: Allow the skillet to warm up for several minutes before adding food. This ensures even cooking and prevents sticking.
Don’t be afraid of high heat: Cast iron shines for searing and baking.
Let it cool gradually: Avoid shocking the pan with cold water or rapid temperature changes.
Mindset: It’s a Journey
The first months may include minor sticking, some uneven color, or a little rust. Don’t give up.
With use and patience, your skillet will become a prized tool, better than nonstick and longer lasting than stainless.
The Takeaway
Buying a cast iron skillet isn’t just about getting a new pan. It’s about adopting a time-tested way of cooking that values patience, care, and tradition. The rewards—superior flavor, deep browning, and a kitchen heirloom—are well worth the investment of time and a little effort.
Remember:
The weight is real—choose what you can handle.
Seasoning is a process, not a feature.
Use it for what it does best, and don’t force it for everything.
Rust is fixable—prevention is easier.
Cast iron is a journey, not a destination.
If you’re ready for a tool that grows with you, challenges you, and will one day be part of your family’s story, cast iron is a worthy investment. Treat it well, and it will repay you in unforgettable meals for decades to come.
Ready to begin? Let your cast iron journey start with knowledge, care, and confidence!
10 Cast Iron Skillet FAQs
1. Do I need to season my skillet if it says “pre-seasoned”? Yes. Pre-seasoned skillets are ready to use, but regular seasoning after each use helps improve the nonstick surface and prevents rust. The more you cook (and oil it), the better it gets.
2. Why does food sometimes stick to my cast iron skillet? Sticking can happen with new pans or if the seasoning is thin. Make sure the pan is well preheated, use enough oil, and keep building the seasoning layer over time. Acidic or watery foods may also loosen seasoning on newer skillets.
3. How do I clean my cast iron skillet after cooking? Wipe out food residue while the pan is warm, rinse with hot water, scrub with a stiff brush (no soap or just a touch if needed), dry thoroughly, and lightly oil before storing.
4. What should I do if my cast iron skillet rusts? Don’t worry! Scrub the rust off with steel wool or a stiff brush, rinse, dry completely, and re-season by applying a thin coat of oil and heating the pan.
5. Can I cook tomato sauce or other acidic foods in my cast iron? Occasionally, yes—especially once the pan is well seasoned. Frequent or long cooking of acidic foods can strip seasoning, so use another pan for those until your skillet is well developed.
6. Is cast iron safe for all stovetops, including induction and glass? Yes, but use care on glass or ceramic cooktops to avoid scratching or cracking the surface due to the pan’s weight and rough bottom.
7. How do I store my cast iron skillet to prevent rust? Make sure it’s completely dry and lightly oiled. Store it in a dry place, with a paper towel or cloth inside to absorb moisture. Avoid putting the lid on tightly, which can trap humidity.
8. My skillet isn’t black and shiny yet—is that normal? Absolutely. New or freshly re-seasoned pans often appear brown, gray, or matte. Over time, with regular use and oiling, it will darken and become glossy.
9. Can I use metal utensils with my cast iron skillet? Yes. Metal spatulas, scrapers, and spoons won’t harm the seasoning. In fact, using them can help smooth out the surface over time.
10. Can I put my cast iron skillet in the dishwasher? No. The dishwasher strips seasoning and encourages rust. Always wash by hand, dry right away, and re-oil before storing.
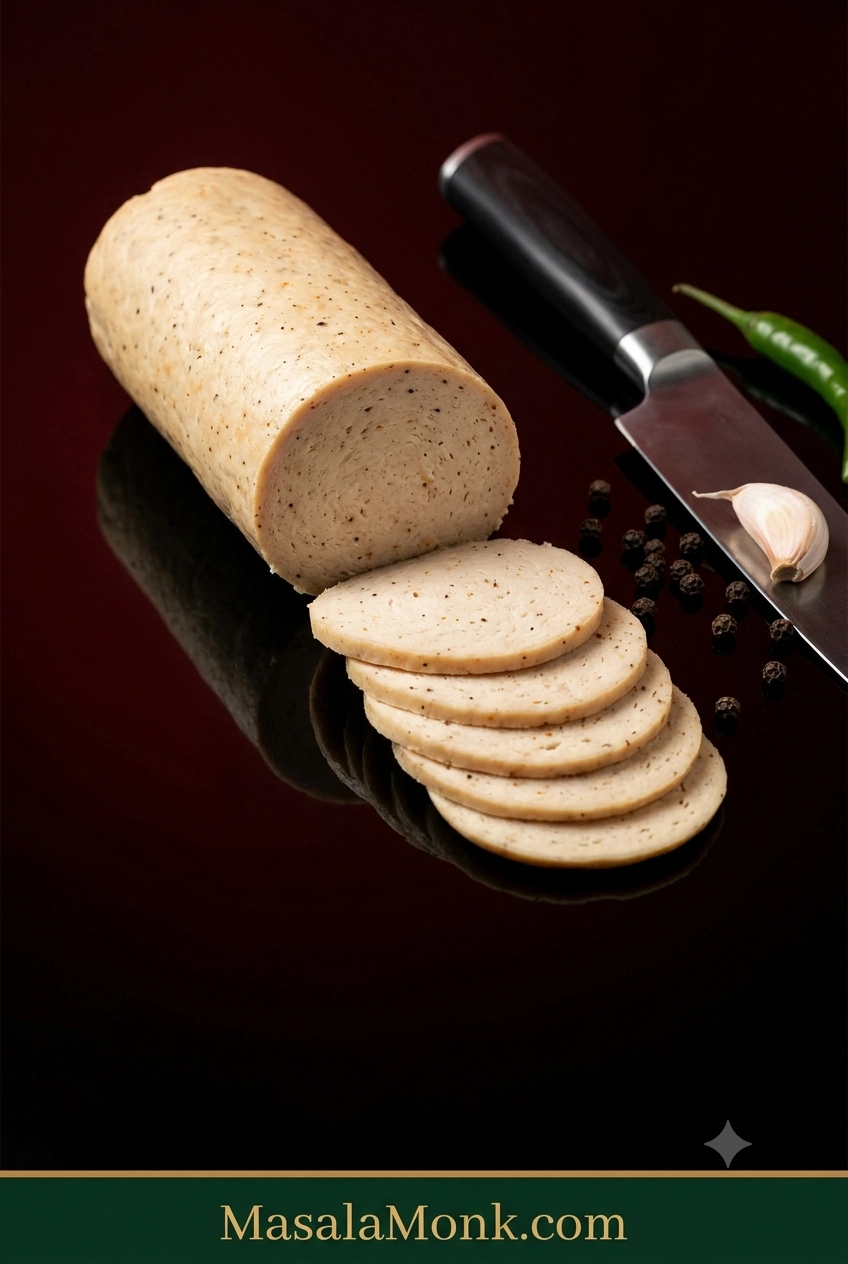
Cold from the fridge, a good slice of homemade chicken salami should bend a little before it breaks: fine-textured, juicy without being wet, peppery and garlicky, firm enough for a sandwich but nowhere near rubbery.
Thin slices sit neatly in toast or a roti wrap without crumbling through the filling, and the rest of the log waits in the fridge for breakfast or lunch tomorrow. Because you season the batch yourself, you decide whether it leans garlicky, peppery, smoky or hot with green chilli.
The ingredients are the easy part. Texture is where homemade chicken salami can get frustrating. The chicken stays loose instead of turning sticky, an ultra-lean batch dries out, air gets trapped through the middle, or the log gets sliced while it is still warm and seems much softer than expected.
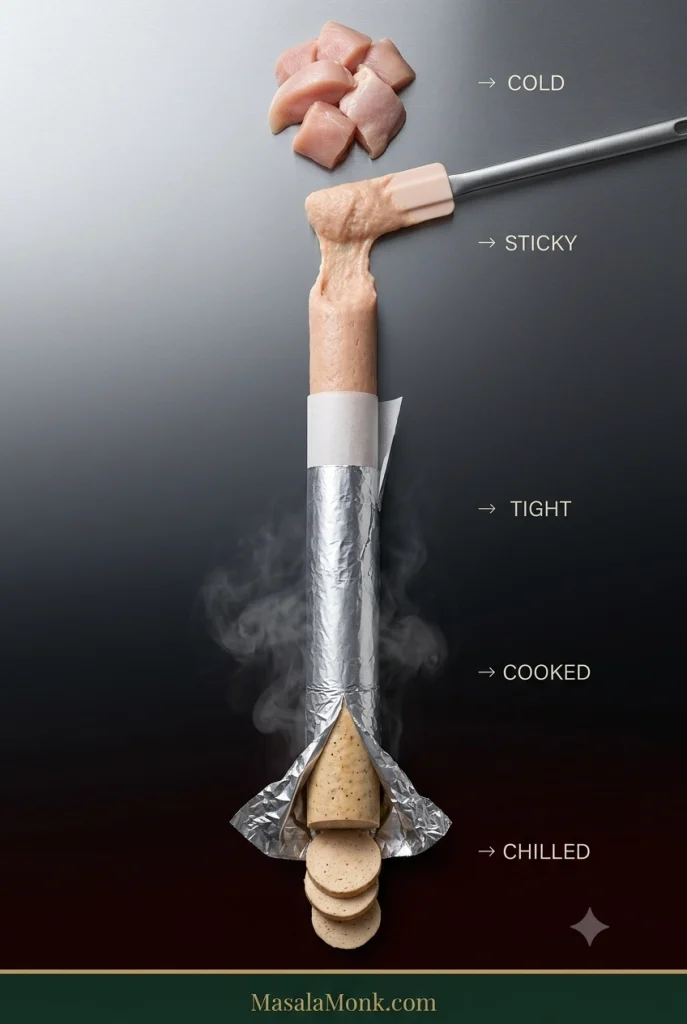
For this cooked deli-style version, a handful of details control almost everything: start with cold chicken, process it until sticky, pack the log tightly, cook it to temperature, and give it time to chill before slicing.
What we’re making: fully cooked, deli-style chicken salami—the soft sliced cold cut commonly used for sandwiches, breakfasts and wraps in India and across South Asia. It uses ordinary salt and spices, with no curing salt or separate preservative system, so it must stay refrigerated and has a short storage life. You won’t need a sausage casing, stuffer, grinder or curing chamber.
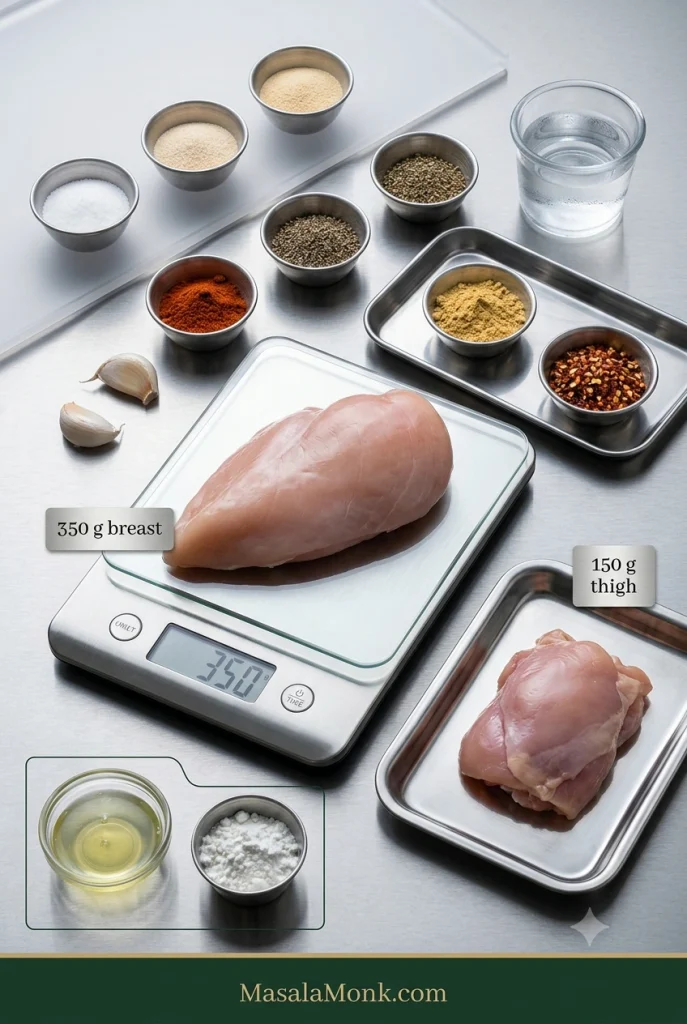
For one batch, use 500 g / 17.6 oz / about 1.1 lb cold chicken. A combination of breast and thigh gives you the mild flavour of breast with enough natural fat to help the salami stay tender.
Process the chicken with 8 g salt, garlic, black pepper and spices. Start with 15 ml / 1 tbsp ice-cold water, adding more only if needed, until the chicken changes from mince into a fine, sticky paste that clings to itself.
Shape two compact logs around 5 cm / 2 inches in diameter, wrap the chicken in baking parchment and then foil, and steam until the centre reaches 165°F / 74°C. Chill for at least 4 hours; overnight gives the cleanest slices.
Homemade Chicken Salami Recipe
Make the simple version first. Fresh vegetables, sauces and other wet additions are much easier to judge once you’ve seen what the chicken should look and feel like when it is ready to shape.
Prep
About 20 minutes
Cook
Typically 30–45 minutes for 5 cm / 2-inch logs; finish by temperature
Chill
4 hours minimum; overnight best
Total
About 5 hours minimum, mostly chilling; overnight is easiest
Yield
2 short logs; roughly 4–6 servings depending on use
Equipment
Food processor or powerful food chopper
Digital kitchen scale
Silicone or rubber spatula
Baking parchment / parchment paper
Aluminium foil for the outer wrapper
Steamer, or a large covered pot with a rack
Digital food thermometer
Sharp slicing knife
Ingredients
Salt is 1.6% of the chicken by weight. Egg white and cornstarch are optional alternatives, not ingredients you need together.
350 g / 12.3 oz boneless, skinless chicken breast, very cold
150 g / 5.3 oz boneless, skinless chicken thigh, very cold
8 g fine salt — about 1⅓ tsp fine table salt; weighing is strongly preferred because different salts fill a spoon differently
6 g garlic, about 2 medium cloves, finely grated or crushed
Onion powder — 1 tsp
Freshly ground black pepper — 1 tsp
Sweet or smoked paprika — 1 tsp
Mustard powder — ½ tsp
Red chilli flakes — ¼–½ tsp, optional
15–30 ml / 1–2 tbsp ice-cold water — start with 1 tbsp and add more only as needed
Optional binder
8 g / about 1 tbsp cornstarch (often called cornflour in India and the UK), or
1 large egg white
The base recipe works without either. Egg white gives a firmer, slightly springier slice; cornstarch adds a little extra structure without egg. If using egg white, begin without added water and add ice water a teaspoon at a time only if the processor needs it.
Raw-chicken note: there is no need to rinse chicken before processing it. Rinsing can splash raw poultry juices around the sink and nearby surfaces. Keep raw chicken and its utensils away from ready-to-eat foods, wash your hands well, and clean the processor parts, knife, board and work surface thoroughly afterwards.
Instructions
1. Get the chicken fridge-cold
Start with visibly cold chicken pieces. If the bowl warms before the mixture turns tacky, pause and chill.
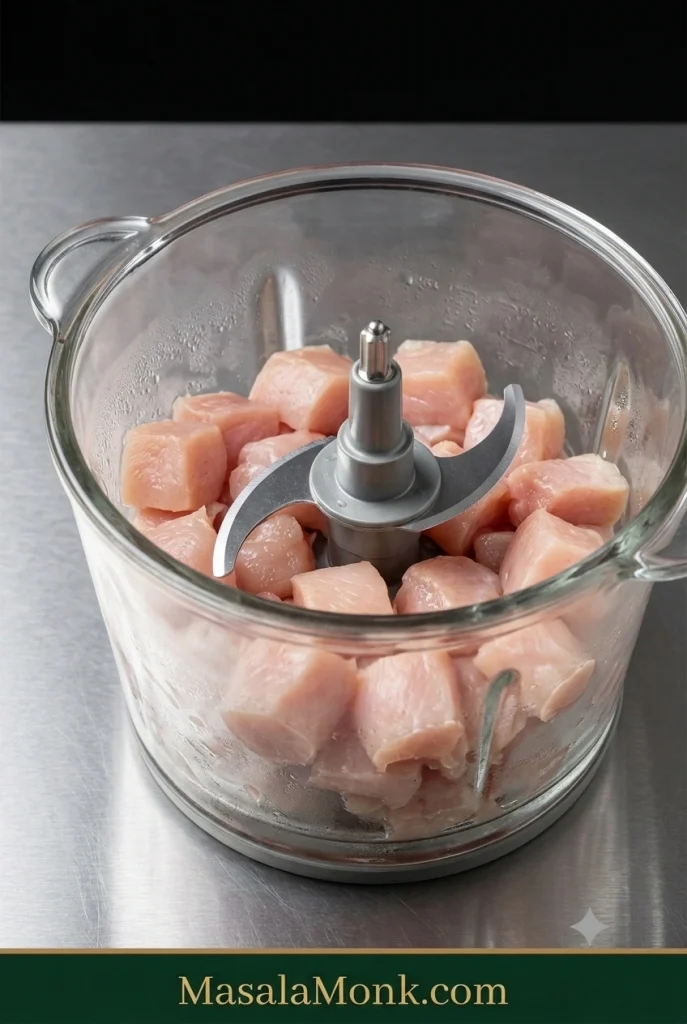
Cut the breast and thigh into roughly 2–3 cm / 1-inch pieces. Meat that has warmed while you gathered everything else can go back into the refrigerator for 15–20 minutes. In a hot kitchen, chilling the processor bowl and blade helps too.
A small processor is better handled in two batches. Keep the first batch chilled while you process the second, then combine them briefly at the end. Crowding the bowl makes the chicken process less evenly and gives it more time to warm up.
2. Start the sticky bind
Add the cold chicken and 8 g salt to the processor. Pulse until the larger pieces have broken down, then process briefly until the meat becomes finer.
Add the garlic, onion powder, black pepper, paprika, mustard and chilli flakes, along with the optional cornstarch or egg white if using.
3. Add the ice water gradually
Start with 1 tbsp / 15 ml ice-cold water and process in short bursts. A stiff mixture that the processor is struggling to move can take a little more, added a teaspoon at a time, up to another tablespoon.
The chicken should look moist and workable. A loose or runny paste has gone too far in the other direction.
4. Let the texture tell you when to stop
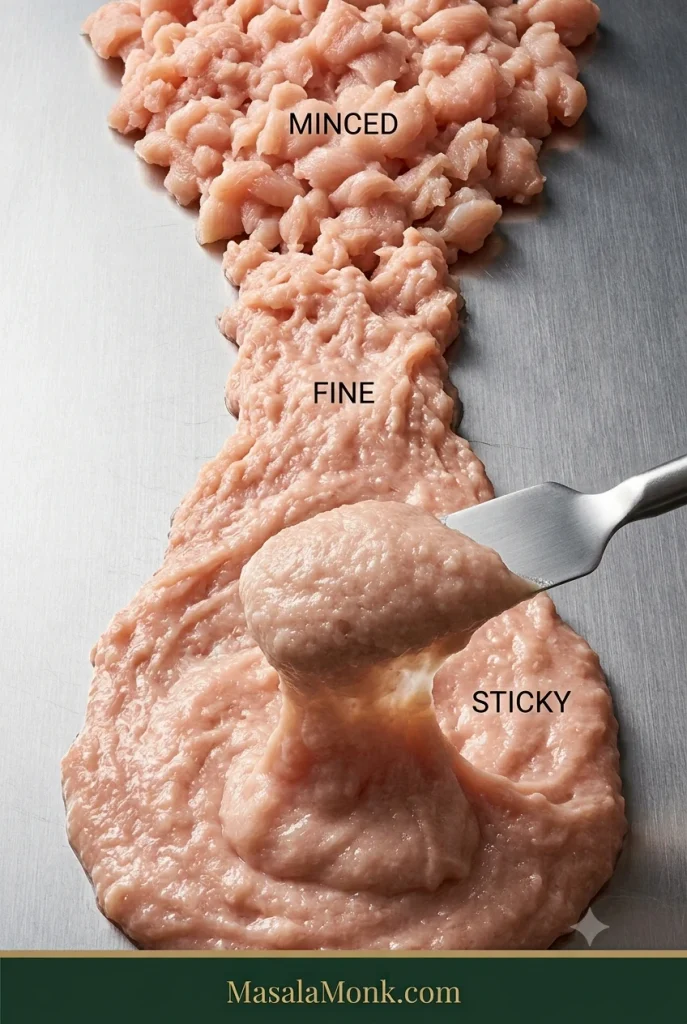
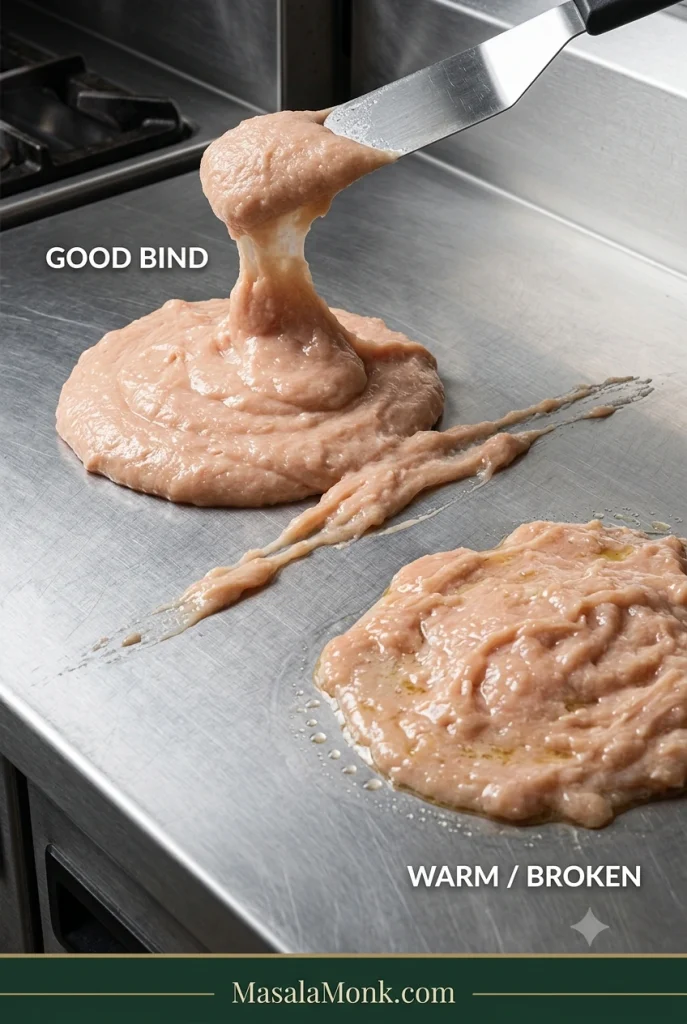
Loose mince should become a fine, sticky paste that moves with the spatula as one mass.
At first you have chopped chicken, then fine mince. Keep going and the texture changes again: the meat begins pulling together into one tacky mass instead of behaving like hundreds of separate grains.
Press a little against a spoon or clean palm. It should cling. Lift some with the spatula and the rest of the meat paste should tug along with it.
Fine, sticky and holding together as one mass is the endpoint. If the bowl starts getting warm before you reach that stage, stop and refrigerate the chicken for 10–15 minutes. Once the mixture is already fine and tacky, stop processing and move on.
5. Cook a tiny seasoning test
Fry about a teaspoon of the mixture in a small pan until completely cooked, then taste it. The garlic, pepper, chilli and paprika should come through clearly. Cold food mutes aroma and spice a little, so the hot test piece can taste a touch bolder than you want the final chilled slice without becoming aggressively salty.
Adjust the seasoning now. Use this little patty for flavour rather than texture; a hot fried spoonful and an overnight-chilled steamed log will feel very different.
6. Shape two tight logs
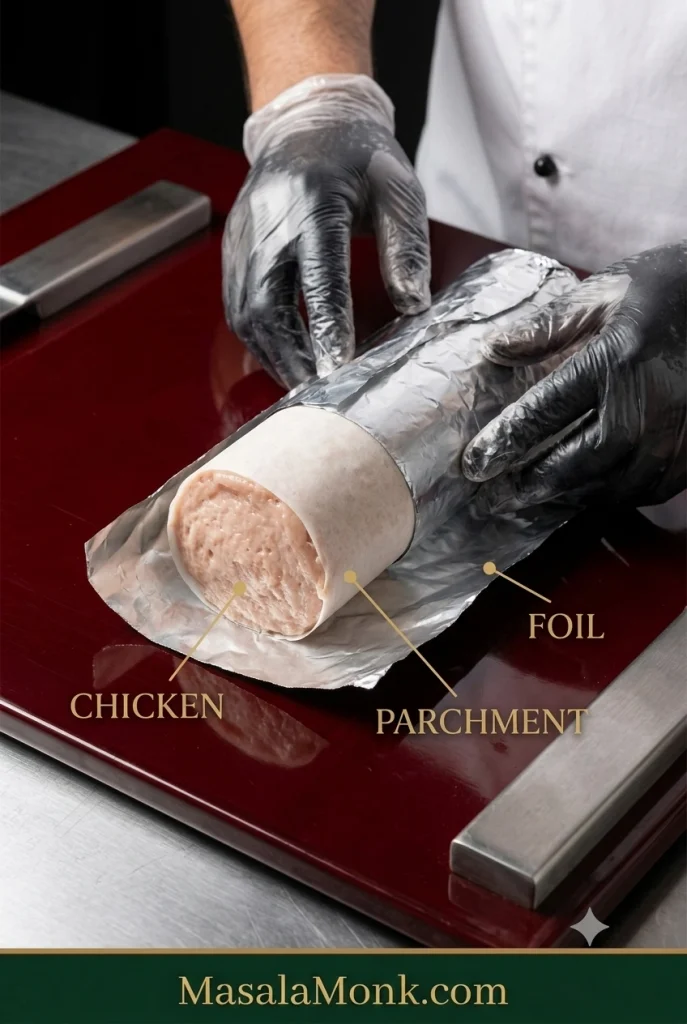
Chicken touches parchment first; foil stays outside as support while the log cooks.
Divide the chicken between two sheets of baking parchment and compact each portion into a cylinder around 5 cm / 2 inches in diameter. Press firmly as you shape and work obvious pockets of air toward the ends. A ruler-straight cylinder is unnecessary; reasonably even thickness and a snugly packed centre are enough.
Roll the parchment around the chicken and twist or fold the ends closed. Wrap each parchment-covered log in foil. The parchment stays between the meat and the aluminium.
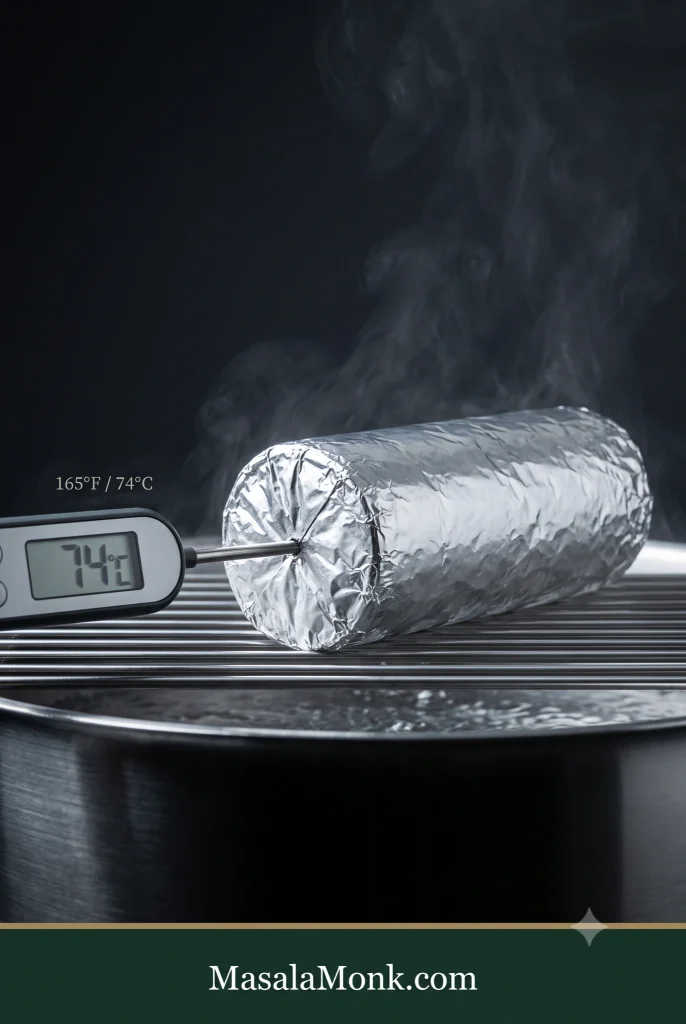
7. Steam to 165°F / 74°C
Insert the probe through one end and aim for the centre: 165°F / 74°C.
Bring the water in a steamer or covered pot to a steady simmer. Place the logs above the water and cover.
For logs around 5 cm / 2 inches thick, begin checking at about 25–30 minutes. Many batches take roughly 30–45 minutes, but diameter, starting temperature and the steaming setup all affect the timing.
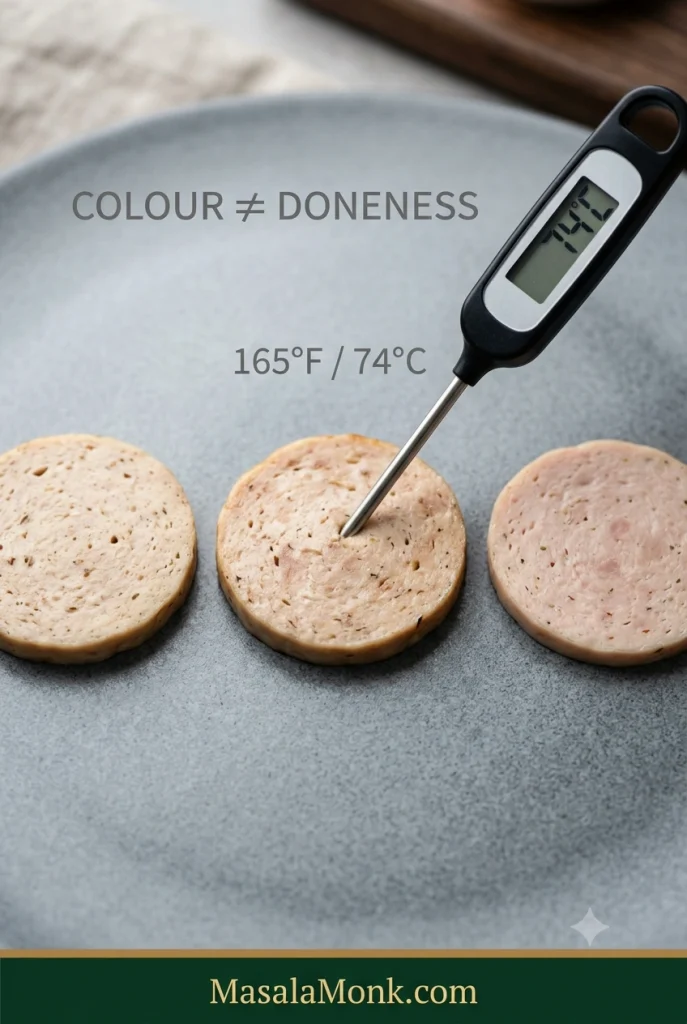
Slide the thermometer probe through one end of the log and aim for the centre. Ground poultry should reach 165°F / 74°C according to USDA safe-temperature guidance. Remove the log once the centre reaches that temperature.
8. Let the steam escape, then refrigerate
Leave the cooked logs for about 10–15 minutes, then carefully loosen the wrapper enough to release the heavy steam. Blot away obvious surface moisture.
Move the salami to the refrigerator promptly. Keep the total time at room temperature under 2 hours—or under 1 hour if the room is hotter than 90°F / 32°C.
9. Chill, unwrap and slice
Refrigerate the salami for at least 4 hours. Overnight gives the neatest texture. A freshly cooked log can feel surprisingly soft, so wait until it is completely cold before deciding how the final texture turned out.
Unwrap the chilled log. Pat the surface dry if needed, then cut with a sharp knife. Rewrap the unsliced portion or move it to an airtight container straight away.
What Good Homemade Chicken Salami Looks Like
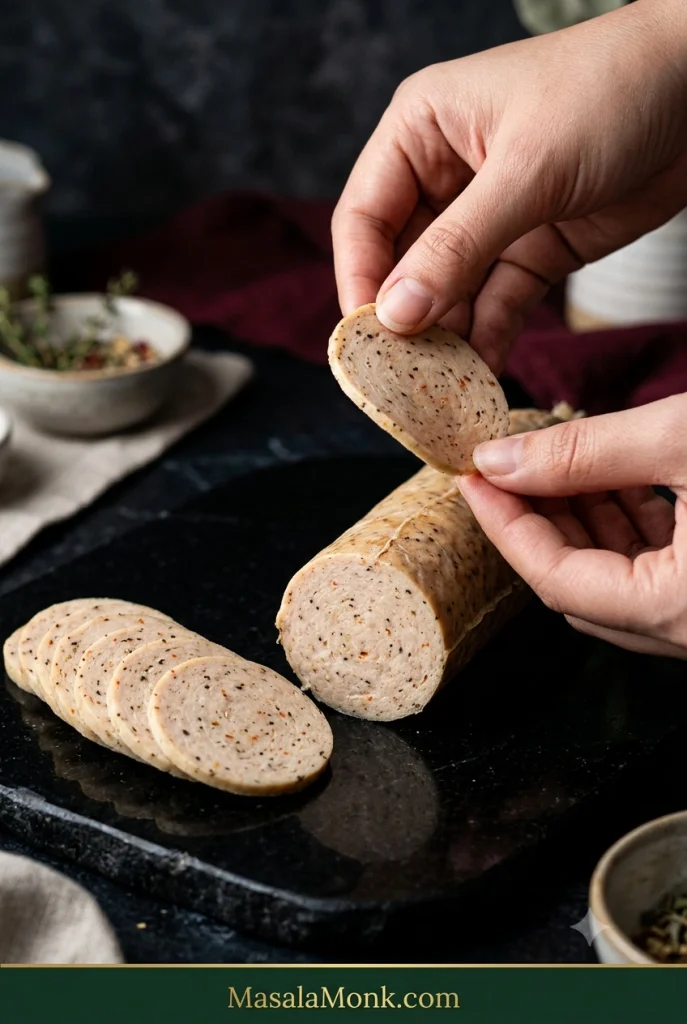
Judge the texture only when cold: a good slice lifts cleanly, stays cohesive and still bends a little.
Before worrying about whether your salami looks exactly like a packet from the supermarket, cut one cold slice and look at what it actually does.
Texture: fine and even rather than visibly granular like a burger.
Slice: sturdy enough to pick up cold, with a little tenderness and bend.
Moisture: juicy without large watery or oily pockets.
Interior: fairly even, with no large tunnels from trapped air.
Colour: naturally beige, pale brown or faintly rosy depending on the chicken and spices.
Flavour: savoury and aromatic enough to remain interesting straight from the refrigerator.
Packet chicken salami can be exceptionally smooth and springy because commercial producers can control particle size, mixing and temperature very precisely and may also use starches, fibres or proteins to shape the texture. A home batch can feel a little more meat-like and still slice beautifully.
For straightforward chilled chicken without the fine salami texture, the simpler baked chicken breast recipe may suit you better.
Cold → sticky → tight → cooked → chilled. If a slice fails, work backward to find which stage went wrong.
The recipe tells you what to do. This is the bit that explains why it works.
Salt and mixing draw out muscle proteins that make the chicken tacky. That stickiness helps the meat hold moisture and natural fat more evenly as it cooks, which is why a properly processed paste slices so differently from simply seasoned mince.
This recipe also takes the chicken finer than you would for a coarse fresh sausage. Here the goal is a smooth deli-style slice, so visible chunks of mince aren’t what you’re aiming for. Advice to stop grinding early can make perfect sense for another sausage and still give you the wrong texture here.
What each stage controls
Cold. A food processor creates heat quickly. Fridge-cold chicken gives you more working time, and a bowl beginning to feel warm belongs back in the refrigerator for a few minutes.
Sticky. Watch the bowl instead of the clock: loose mince → fine mixture → sticky paste that clings to itself. Stop at loose mince and the chilled salami may crumble. Once the meat is already tacky, extra processing mostly gives it more time to warm.
Sticky paste should lift cohesively. A loose, greasy sheen means the mixture needs chilling before shaping.
Tight. Compact the paste firmly enough to push out obvious pockets of air. Tiny bubbles in an otherwise good slice aren’t worth worrying about; large tunnels mean the next log needs tighter packing.
Cooked. A thick log simply needs longer than a thin one. Keeping the diameter around 5 cm / 2 inches makes the timing more predictable, while the thermometer takes the guesswork out of the centre.
Chilled. Cooking sets the log; refrigeration firms it. The cold slice should stay in one piece when you lift it, even if it still bends a little between your fingers.
Breast or thigh?
Chicken
What it gives you
Watch for
Breast only
Lean, mild, pale
Dries out most easily if cooked too far
Thigh only
Juicier and richer
Stronger chicken flavour and naturally more fat
Breast + thigh
Balanced flavour, juiciness and structure
Easiest place to start
Ground chicken
Convenient and already minced
Results depend on how lean the mince is
The 350 g breast + 150 g thigh mix gives a first batch some protection against dryness while keeping the flavour mild and chicken-forward. Fresh ground chicken works too; use 500 g as-is when it contains both light and dark meat.
Very lean breast mince needs closer temperature control and can benefit from the optional egg white or cornstarch. If an all-breast batch feels too lean, increasing the proportion of thigh is usually simpler than trying to rescue it with melted butter or oil. That little bit of dark meat is especially noticeable once the salami is cold, when dryness has nowhere to hide.
Egg, cornstarch—or neither?
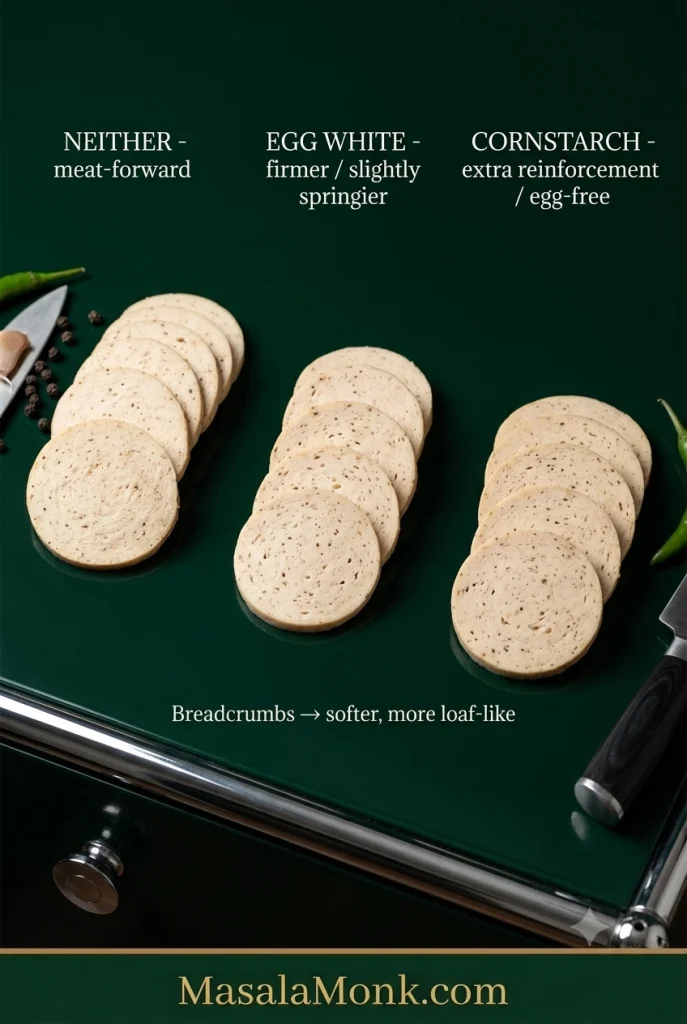
A strong sticky bind can work without extras; egg white and cornstarch make the slice firmer in different ways.
The chicken can hold together without an added binder. Cold meat, enough salt and enough mixing to reach the sticky stage matter more.
No added binder: the most meat-forward result and a good fit for the breast-thigh mixture once you’ve developed a strong sticky texture.
Egg white: gives a firmer, slightly springier slice and can be helpful with very lean chicken.
Cornstarch: adds a little extra reinforcement and is the obvious egg-free option.
Breadcrumbs: work, but move the texture toward a softer sausage loaf or meatloaf rather than a fine deli-style slice.
Egg or starch can help with firmness and moisture retention. If the mixture never became sticky, fix that before changing the recipe. Gelatin belongs to a different luncheon-meat method in which cooked meat and liquid are moulded and set as they chill.
For familiar round slices, put parchment directly against the chicken and use foil on the outside to reinforce the cylinder. Twist or fold the parchment ends firmly. Reasonably even thickness and a tightly packed centre matter more than a machine-perfect shape.
Don’t want to roll a cylinder? Pack the chicken firmly into a lightly oiled or appropriately lined heatproof mould, cover it and cook to the same internal temperature. The slices will be square or rectangular, which happens to fit sandwich bread rather nicely.
Once the paste is cold, sticky and tightly packed, most of the texture work is already done. From here, the cooking method matters less than keeping the heat sensible and stopping when the centre reaches the right temperature.
Steamer, Covered Pot, Oven or Air Fryer?
Steaming is still the easiest first choice for the soft, even deli-style texture we’re after. A covered pot can do essentially the same job, while the oven and air fryer are useful when that’s what you already have.
Method
Starting point
What to expect
Steam
Begin checking around 25–30 min
Soft, even deli-style texture; best first method
Covered pot + rack
Same general timing as steaming
Nearly the same result without a dedicated steamer
Oven
330°F / 165°C; begin checking around 30 min
Slightly firmer exterior
Air fryer
About 330°F / 165°C to start
More dry heat around the outside; easier with smaller logs
No steamer?
Keep the wrapped log above the waterline on a stable rack or trivet; it should cook in steam, not water.
Add a few centimetres of water to a large pot and set a rack, trivet or sturdy heatproof inverted bowl above the waterline. Put the wrapped logs on top, cover tightly and keep the water at a steady simmer. The chicken should sit in steam rather than in the water.
Some home recipes simmer a tightly wrapped log directly in hot water. Keeping this version above the waterline reduces the chance of water finding its way into the parcel, so steaming is the baseline method here.
Oven method
Place the parchment-and-foil-wrapped logs on a baking tray and bake at 330°F / 165°C. Begin checking the centre around 30 minutes and remove the salami when it reaches 165°F / 74°C.
Air fryer method
Smaller logs are easier to manage in an air fryer. Start around 330°F / 165°C, follow your appliance guidance for foil or wrapped foods, and cook to the same internal temperature instead of relying on one universal time.
After Cooking: Colour, Chilling & Clean Slices
Beige, pale brown or faintly rosy can all be normal. Use 165°F / 74°C, not colour, to judge doneness.
Use the thermometer for doneness rather than trying to read the colour. This is uncured cooked chicken, so the inside may be beige, pale brown or faintly rosy. It does not need the even pink colour associated with many commercial cured cold cuts.
If you simply prefer a rosier appearance, a little beetroot juice can tint the meat. Replace some of the recipe’s ice water with the same amount of beet juice so the total liquid stays under control. It changes the colour and adds a faint earthy note; it does not change the cooking temperature or preserve the salami.
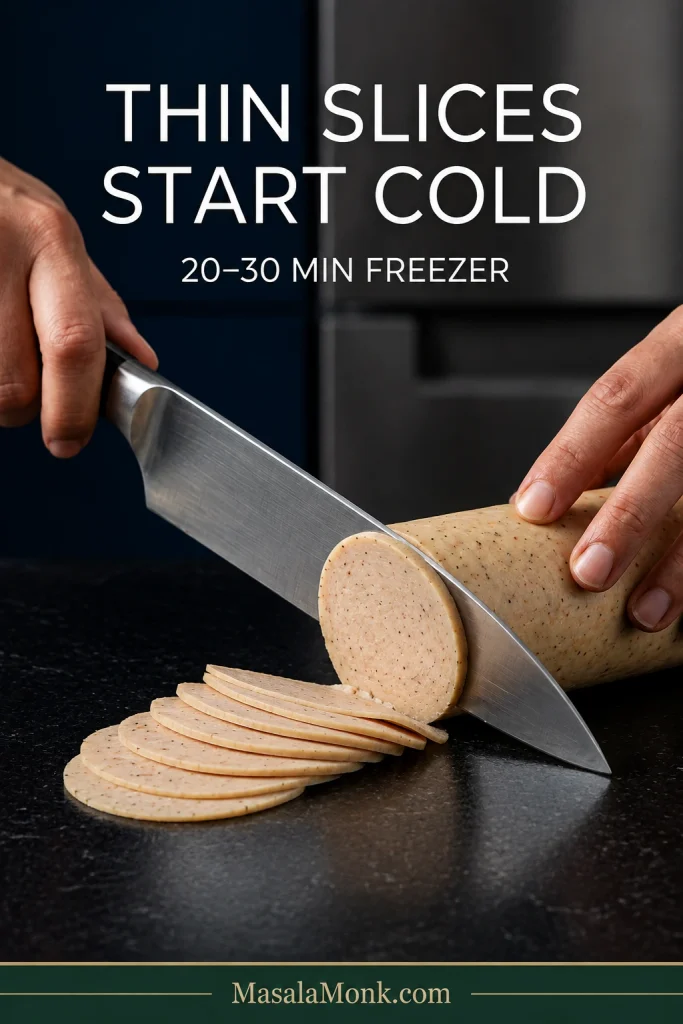
For thin deli-style slices, chill first
For thinner slices, chill until firm, then use a long clean knife stroke without pressing hard.
Start with completely cold salami and a sharp knife. Overnight refrigeration gives the easiest slicing. For finer rounds, put the chilled log in the freezer for 20–30 minutes so it firms up without freezing solid.
Don’t worry if the first few slices are thicker than deli-counter cuts. A clean slice that lifts intact matters more than getting it paper-thin.
Those thin slices are particularly good with egg and cheese; MasalaMonk’s breakfast sandwich guide has more ideas for breads, eggs, cheeses and sauces around them.
Chicken Salami Troubleshooting
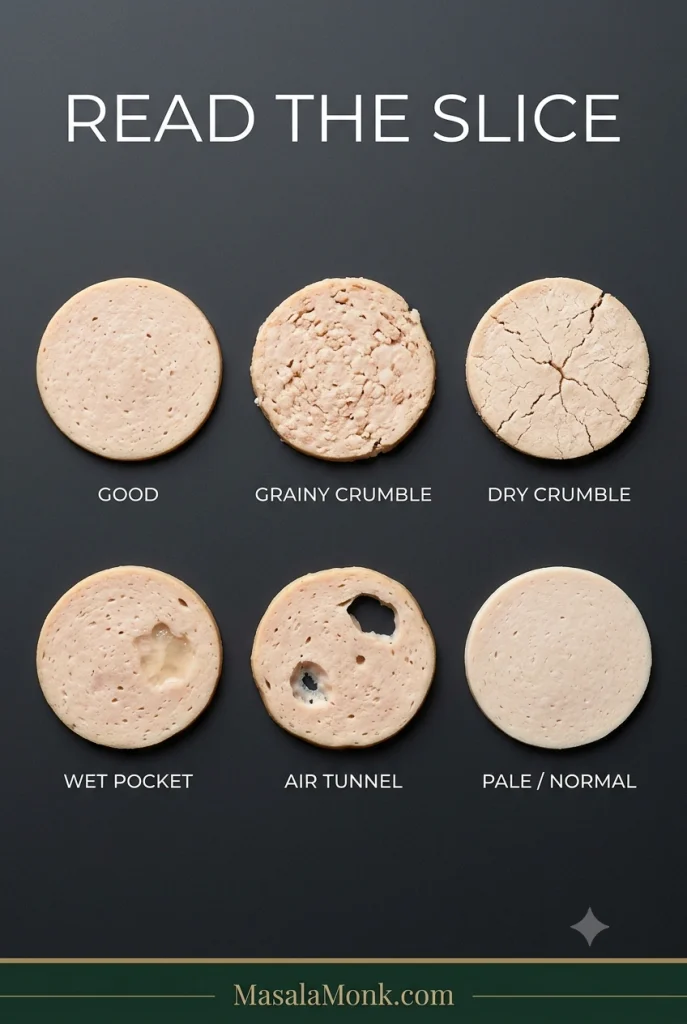
Read the whole slice: graininess, dry fracture, wet pockets and large tunnels point to different problems.
“Crumbly” can mean several different things. Look at the cold slice first; it usually tells you more than automatically adding extra egg, starch or water to the next batch.
What you see
First thing to try
Cold slices crumble into meat grains
Keep the chicken colder and process until genuinely sticky
Dry, crumbly slices
Use some thigh and stop cooking at 165°F / 74°C
Greasy puddle around the log
Keep the mixture colder and avoid large amounts of rendered fat
Wet or jelly-like pockets
Reduce free liquid and squeeze wet aromatics
Large holes through the slices
Pack the log more firmly
Pale or greyish interior
Usually normal for uncured chicken; check temperature, not colour
The cold slice crumbles into little pieces
Think back to the processor. Did the chicken ever reach the point where it clung to the spatula and pulled together as one mass? If it never did, start there rather than immediately increasing the binder.
Warm meat, very coarse processing, dramatically reduced salt or a generous amount of onion juice or sauce can all weaken the structure. Egg white or cornstarch can offer extra support, but they work best after the chicken itself has reached that sticky stage.
It is dry, mealy or strangely bouncy
All-breast chicken is easier to dry out, particularly when it cooks far beyond the safe endpoint. Thigh gives you more natural fat and moisture to work with.
A mealy or almost tofu-like bite can also turn up in a very lean, unstable mixture. At the opposite extreme, lots of processing and binder can push the texture toward an overly springy bounce. Think back to the earlier target: cold, cohesive and tacky—not warm and greasy.
There is grease, water or empty space inside
A teaspoon or two of cooking juice around the salami is ordinary. By contrast, a noticeable puddle of grease suggests that fat separated somewhere along the way, often because the chicken warmed up before its structure was properly developed.
Wet pockets point more toward excess free liquid. Start with less ice water next time and remember that fresh onion, sauces, yogurt and citrus juice all count toward the moisture in the bowl. Vinegar and generous amounts of lemon juice need care too: enough acid in the raw mixture can work against the sticky texture you’re trying to build. Add that sharpness later with chutney, mustard, pickles or a squeeze of citrus at the table.
Large air tunnels are simpler. Pack the next log more firmly. Tiny bubbles in an otherwise good slice aren’t worth worrying about.
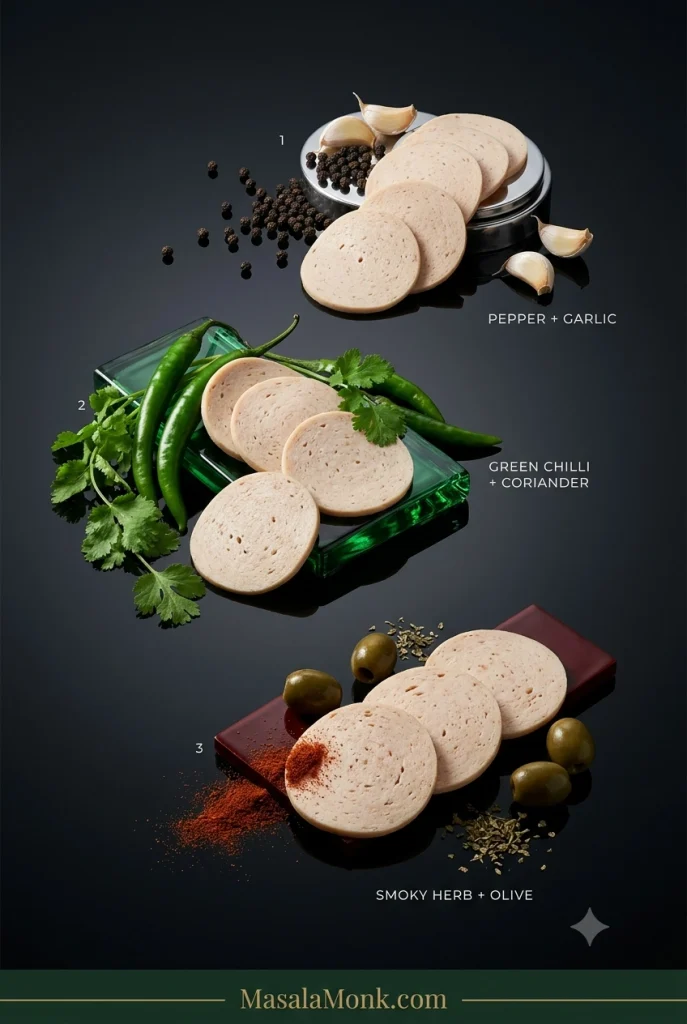
Change the aromatics, not the moisture balance: drain olives well and keep generous chutneys or citrus for serving.
Once you know what the basic chicken paste should feel like, keep the meat, salt and moisture balance steady and change the aromatics around them.
Pepper & Garlic
Keep the garlic from the base recipe, increase the black pepper to about 1½ tsp, keep the mustard and use sweet or smoked paprika. Leave out the chilli flakes for a gentler version.
It stays savoury and peppery even when cold, which makes it particularly good in sandwiches. A little honey mustard gives those flavours a sweet-sharp edge.
Ginger, Green Chilli & Coriander
Add 1 tsp finely grated ginger, 1 small green chilli and 2 tbsp finely chopped coriander. Keep the black pepper, and add chilli flakes only if you want another layer of heat.
The ginger and coriander keep the flavour fresh while the green chilli brings heat without flooding the chicken with sauce. Serve the slices with a thick green chutney for a brighter sandwich or roti wrap.
Smoky Herb & Olive
Use 1–1½ tsp smoked paprika, ½ tsp dried oregano, ¼ tsp dried thyme and 1–2 tbsp finely chopped, well-drained green olives. Add a small pinch of chilli flakes if you like.
Pat the olives dry before chopping. Their salty, briny flavour is welcome; a pocket of olive brine inside the salami isn’t.
Once There’s a Cold Log in the Fridge
Serve the slices cold in sandwiches and wraps, or brown them briefly for breakfast—the salami is already fully cooked.
It earns its fridge space quickly. Brown a couple of slices and add a fried egg for breakfast, or keep them cold with cucumber, lettuce, tomato, pickles, mustard and cheese. Shredded cabbage or crisp coleslaw is especially good against the softer salami.
For a quick roti wrap, add sliced onion, cucumber and green chutney, then squeeze over lime just before eating. When packing it for school or work, use an insulated lunch bag with a cold pack.
The salami is already cooked, so pizza, pasta and omelettes only need enough extra heat to warm or brown it. Add thin rounds toward the end of pizza baking, fold diced pieces into eggs, or colour thicker slices briefly in a pan before tossing them through pasta.
If both logs aren’t going to disappear into breakfasts, sandwiches and wraps within the next few days, freeze the second one while it’s still fresh.
How to Store and Freeze Homemade Chicken Salami
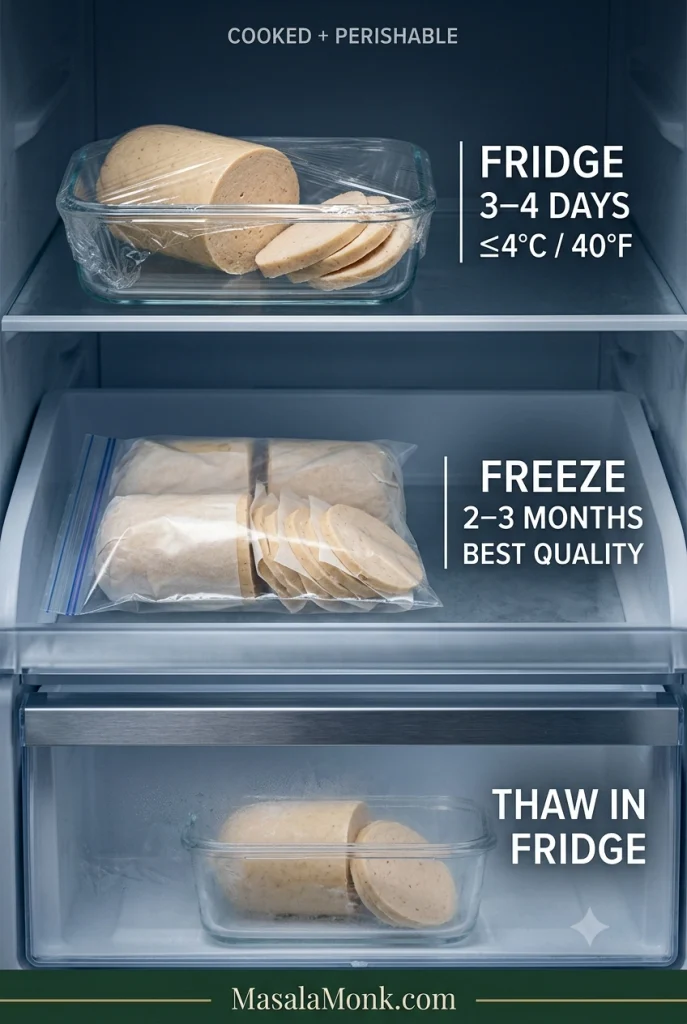
Treat this as cooked perishable chicken, not shelf-stable salami.
Refrigerate for 3–4 days, or freeze meal-sized portions for 2–3 months for best quality.
Refrigerator
Wrap a completely cold log tightly or transfer it to an airtight container. Cover cut surfaces once you begin slicing so they don’t dry out.
Freeze half logs or meal-sized portions rather than one large block. For sliced salami, put small sheets of parchment between portions so they separate easily.
Two to three months is a useful freezer window for best quality. Food kept continuously frozen remains safe beyond that, but flavour and texture gradually decline.
Thawing
Thaw the salami in the refrigerator. A frozen-and-thawed slice may be a little softer than one cut from a freshly chilled log, particularly with very lean or wetter batches.
That short refrigerator life is also the clearest reminder that this recipe is a very different thing from traditional dry salami.
Cooked Chicken Salami vs Traditional Dry-Cured Salami
Fermentation, controlled humidity and weeks of drying belong to a different process from this fully cooked, refrigerated chicken salami.
Traditional dry salami is perfectly possible to make at home, but it is a different project. Depending on the style, it can involve precisely measured curing ingredients, starter cultures, fermentation, appropriate casings, controlled temperature and humidity, and weeks of drying.
That process deserves a validated recipe of its own. Smell and appearance alone cannot establish that raw cured meat is safe, and curing products with different formulations should not be swapped spoon-for-spoon because their names look similar.
For this cooked chicken version, the rule is much simpler: cook the ground poultry fully, chill it promptly and keep it refrigerated.
A Few Remaining Questions
Does this use curing salt or added preservatives?
No. This version uses ordinary salt, but no curing salt or separate preservative system. Keep it refrigerated and use it within 3–4 days, or freeze it.
Does the chicken have to touch aluminium foil?
No. Baking parchment sits directly against the chicken and the foil goes around the outside for support. A covered heatproof mould is another option if you prefer not to use a foil-wrapped log.
Can I make it without a food processor?
Very finely ground chicken can be mixed vigorously with salt until tacky to make a coarser cooked sausage. For the smooth deli-style texture in this recipe, a food processor or powerful chopper is strongly preferred.
Can I freeze the slices?
Yes. Chill the salami completely first, freeze meal-sized portions with parchment between the slices, and thaw what you need in the refrigerator.
Can I use turkey, pork or beef?
The general cooked-log idea can be adapted, but this recipe is formulated around chicken. Ground turkey should also reach 165°F / 74°C. For ground pork and ground beef, use at least 160°F / 71°C. Different meats have different fat levels, so expect some change in texture rather than treating them as exact one-for-one substitutions.
Is homemade chicken salami healthy?
Homemade does not automatically mean healthier. Making the salami yourself gives you control over the chicken, salt, seasonings and optional binder, while the nutritional picture still depends on those choices and on portion size. It is better thought of as a homemade cooked cold cut than as a health food.
The Best Part Comes the Next Morning
After a night in the refrigerator, the knife should pass through cleanly and the cold slice should lift in one piece.
Brief pan contact adds browned flavour to already-cooked slices while keeping the centres tender.
Eat it cold, or give a couple of slices a minute in a hot pan until the edges brown and the garlic wakes up again. Add an egg, toast and mustard—or a swipe of green chutney—and breakfast is done.