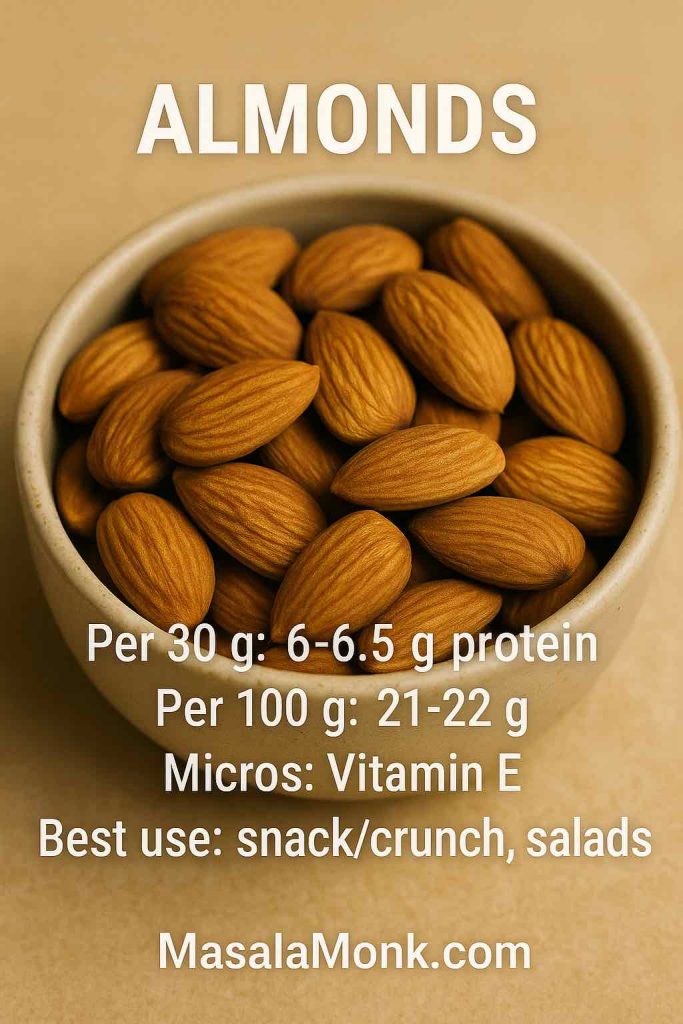
Healthy tuna salad is one of those quiet workhorse recipes that can shape-shift into almost anything you need. Some days it’s a classic deli tuna salad sandwich on soft bread; on others it becomes a bright Mediterranean tuna salad with beans and olives, or a quick avocado tuna salad piled onto toast. When you want comfort, there’s tuna macaroni salad. When you want light and fresh, there’s tuna salad on salad with crunchy cucumber and apple. And when you’re skipping fish entirely, a vegan “tuna” made from chickpeas steps in without anyone feeling short-changed.
At the same time, tuna brings a lot of nutrition to the table. It’s naturally rich in protein and provides omega-3 fats that support heart and brain health when eaten in reasonable amounts. The FDA’s own advice about eating fish puts canned light tuna in the “Best Choices” group and suggests that most adults, including many who are pregnant, can safely enjoy it two to three times per week as part of a mixed seafood pattern, as long as they keep overall portions within the limits they outline. When you combine tuna with vegetables, beans, whole grains and lighter dressings, you end up with meals that feel like comfort food but behave more like smart nutrition.
This guide pulls together ten different healthy tuna salad recipes and all their useful cousins: no-mayo Greek yogurt tuna salad, avocado tuna salad, Mediterranean tuna and bean salad, Italian tuna with chickpeas, tuna Niçoise salad, tuna pasta salad and tuna mac, tuna and egg salad, crunchy apple and cucumber tuna salad, and finally a vegan tuna salad built from chickpeas. You can treat these as ten discrete recipes or as ten patterns you customise with whatever you’ve got in your kitchen.
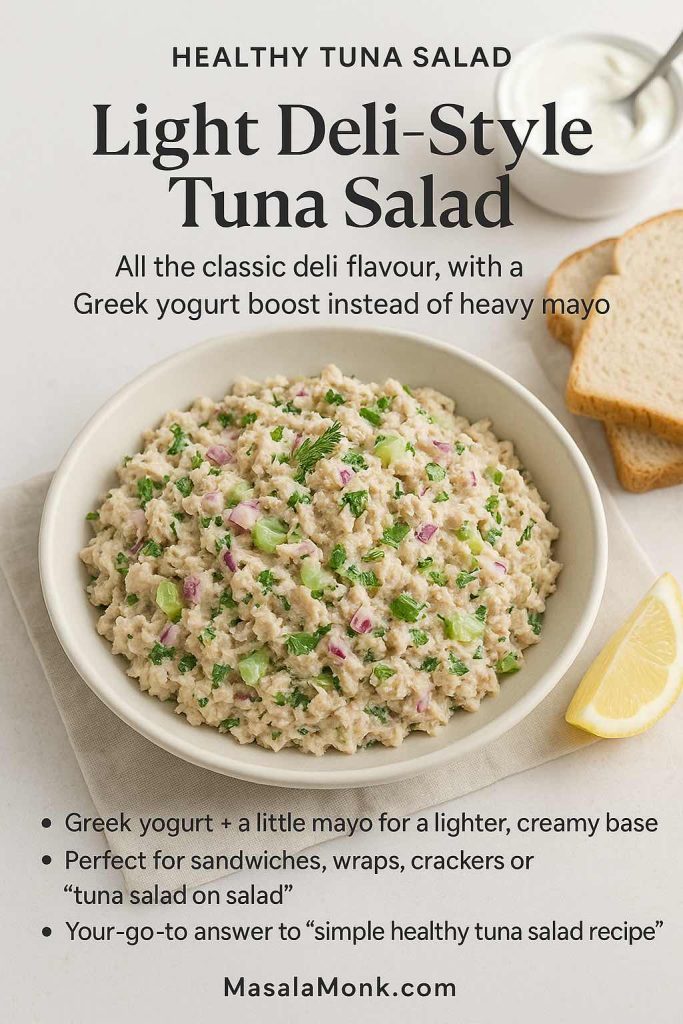
1. Light Deli-Style Healthy Tuna Salad (Your Everyday Base)
Most people’s mental picture of tuna salad is the classic deli tuna fish salad: creamy, a little tangy, speckled with celery and onion, sometimes a touch sweet from relish. Instead of banishing that flavour in the name of health, it’s much more satisfying to keep the same general profile and simply rebalance the dressing so it becomes a genuinely healthy tuna salad you can eat more often.
Ingredients (2–3 servings)
- 2 cans light tuna in water, well drained
- 3–4 tablespoons plain Greek yogurt
- 2–3 tablespoons mayonnaise
- 1–2 ribs celery, finely chopped
- 2 tablespoons red onion, very finely minced
- 1–2 tablespoons sweet relish or finely chopped pickles
- 1 teaspoon Dijon mustard
- Juice of half a lemon
- 1–2 tablespoons chopped fresh dill or parsley
- Salt and freshly ground black pepper
Greek yogurt stands in for a chunk of the mayonnaise here. Compared with mayo, Greek yogurt is naturally higher in protein and significantly lower in calories and saturated fat, yet it has enough body to keep the dressing thick and satisfying. That little swap moves this toward a low fat tuna salad without making it taste “diet”.
How to make it
- Tip the drained tuna into a medium bowl and flake it with a fork so there are no large clumps.
- In a separate bowl, whisk the Greek yogurt, mayonnaise, mustard, lemon juice, herbs, salt and pepper until smooth.
- Stir celery, onion and relish into the dressing so all the crunchy bits are lightly coated.
- Fold the dressing mixture into the tuna and stir until everything looks evenly combined.
- Taste and adjust; a splash more lemon brightens everything, while a spoon of relish sweetens and softens the edges.
- Let the bowl chill for at least 15–20 minutes if you have the patience. It’s even better the next day.
Once you’ve got this base healthy tuna salad, you can spin it in several directions:
- Pile it onto toast with lettuce and tomato for a quick tuna salad sandwich.
- Spoon it over mixed greens for an easy salad and tuna combo.
- Stuff it into a croissant and suddenly you’ve got a croissant tuna sandwich that feels like café food.
- Serve it with crackers and sliced veggies as a tuna lunch on the go.
If you’re curious how bowls like this fit into a more general “eat more plants” direction, you might enjoy MasalaMonk’s piece on the perks of eating salads everyday, which talks through fibre, micronutrients and why salad isn’t a throwaway side dish at all.
Treat this bowl as your basic tuna salad recipe, everything else is a tweak.
Also Read: Upma Recipe: 10+ Easy Variations (Rava, Millet, Oats, Semiya & More)
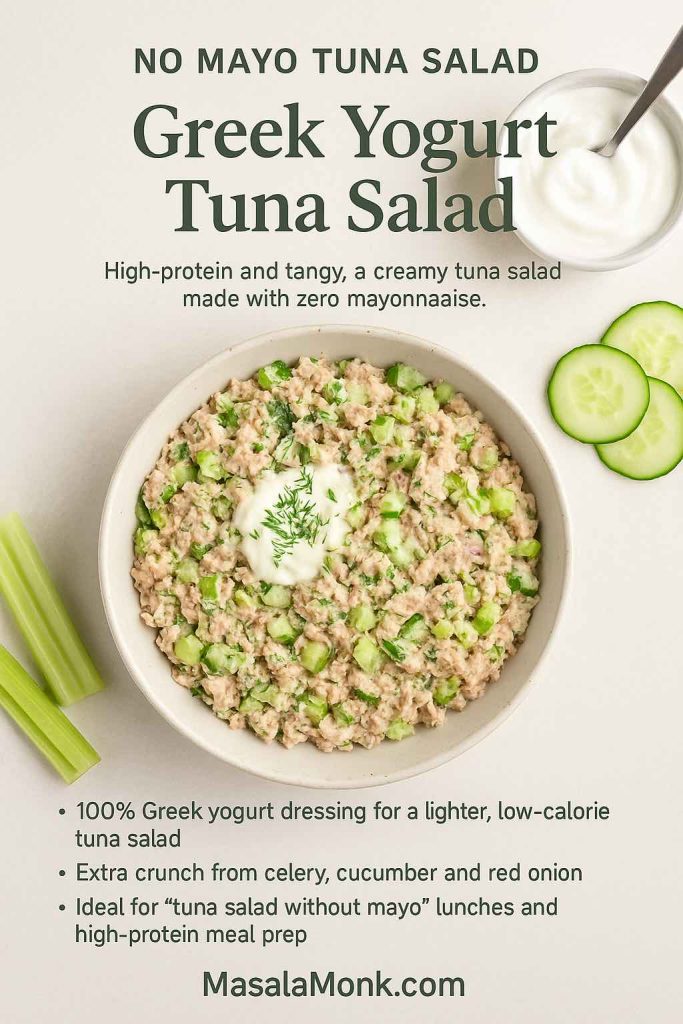
2. No-Mayo Greek Yogurt Healthy Tuna Salad Recipe
There are days when “lighter” still isn’t quite what you’re after; you want a tuna salad without mayo altogether. Maybe you’re chasing a low calorie tuna salad recipe, perhaps you simply prefer the clean tang of yogurt. In either case, a Greek yogurt tuna salad steps up nicely.
Why Greek yogurt works so well
Greek yogurt is strained, so it ends up thicker and creamier than regular yogurt while packing more protein per spoonful. At the same time, it typically has fewer calories and less fat, particularly if you choose a lower-fat version. Paired against mayonnaise, the difference is stark: Greek yogurt contains a fraction of the calories and dramatically less saturated fat, while bringing its own dose of protein and calcium. Used as the main base for tuna salad, it turns a standard tuna fish salad into a high protein tuna salad with far fewer calories than a traditional mayo-heavy version.
Ingredients
- 2 cans light tuna, well drained
- ½ cup plain Greek yogurt
- 1 rib celery, finely diced
- 2 tablespoons cucumber, seeded and chopped
- 1–2 tablespoons red onion, minced
- 1 teaspoon Dijon mustard
- Juice of half a lemon
- 1 tablespoon chopped fresh dill, chives or parsley
- Salt and pepper
Method
- Whisk Greek yogurt, lemon juice, mustard, herbs, salt and pepper together in a bowl until smooth.
- Stir in celery, cucumber and onion so the vegetables are lightly coated.
- Fold in the tuna, breaking up any remaining chunks, and mix gently until everything comes together.
- Taste and adjust seasoning. A little extra lemon juice or a pinch more salt can make the flavours pop.
- Chill briefly before serving.
This is the bowl that naturally satisfies all the no mayo or tuna fish salad recipe without mayonnaise needs. Moreover, because the dressing is so light, it fits neatly into days when you’re focused on weight management without feeling like a punishment.
Cottage cheese tuna salad variation
If you’d like to push the protein even higher, you can replace a couple of tablespoons of the yogurt with cottage cheese. The result is a cottage cheese and tuna salad that still feels creamy but loads up the protein even more. On days when you’re aiming for big protein numbers, that sort of mix can easily become part of a 100-grams-of-protein plan. If you’re curious how to sketch an entire day’s meals around that target, MasalaMonk’s guide on how to eat 100 grams of protein a day lays out practical examples.
Also Read: Double Chocolate Chip Cookies – Easy Recipe with 7 Variations
3. Avocado Tuna Salad, From Three Ingredients to Fully Loaded
As soon as avocado walks into the room, the tuna salad world shifts. Bringing avocado into the mix and your healthy tuna salad suddenly starts feeling like café food. It’s creamy, naturally dairy-free and works whether you’re in a hurry or feeling like layering flavours.
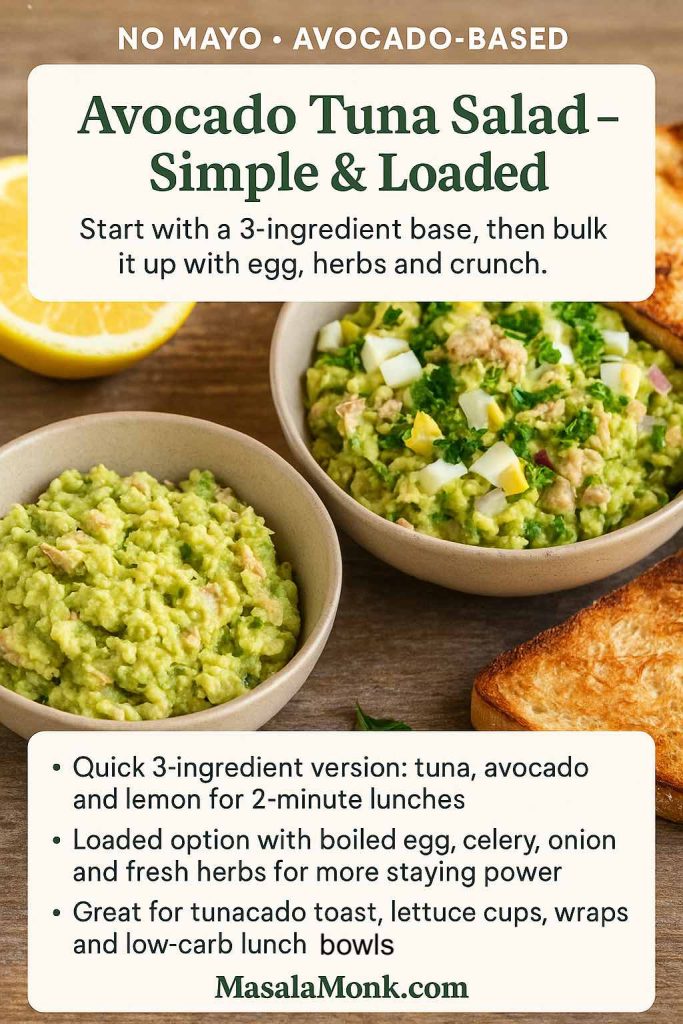
Ultra-simple three-ingredient avocado tuna salad Recipe
When you want something you can stir together while the kettle boils, this is the one:
- 1 ripe avocado
- 1 can light tuna, drained
- Juice of half a lemon (or lime)
- Salt and pepper
Mash the avocado with the lemon, salt and pepper until it’s smooth but not totally pureed. Fold in the tuna, taste and tweak the seasoning. That’s really all there is to it.
You can:
- Spoon it into lettuce cups for a low-carb tuna lunch.
- Spread it over toast for a quick tunacado-style open sandwich.
- Serve it with sliced cucumber and carrots as an easy tuna lunch idea when you don’t want bread.
Despite the tiny ingredient list, this still satisfies the search for a 3 ingredient tuna avocado salad and does it with zero mayo.
Loaded avocado and tuna salad recipe
On other days, you might want something closer to a full healthy tuna salad recipe built on avocado rather than yogurt or mayo.
Start with:
- The three-ingredient base above
Then add:
- 1–2 boiled eggs, chopped (for an avocado and tuna egg salad spin)
- 1 rib celery, finely chopped
- 2 tablespoons red onion
- Optional: ¼ of a crisp apple, finely diced, for sweetness and crunch
- A handful of chopped parsley, coriander or chives
Fold all of that through the avocado and tuna mix. The eggs make it especially satisfying, so this bowl covers everything from tuna and egg salad for weight loss days to avocado tuna salad wraps for hungrier ones.
Because both tuna and avocado show up regularly in pregnancy diets, this style of salad can sit happily in a pregnancy meal rotation as long as you pay attention to overall fish portions and choose lower-mercury tuna. For more context on that, MasalaMonk has a detailed guide on eating tuna while pregnant plus a recipe-focused piece, Motherhood and Meals: 5 Omega-3 Rich Seafood Recipes for Pregnancy, which includes a quick tuna–avocado idea.
Also Read: Carbonara Recipe: Italian Pasta (Creamy, Veggie, Chicken, Shrimp, Tuna & Keto)
4. Mediterranean Tuna and White Bean Salad Recipe
If your taste buds wander toward olives, beans, herbs and lemon, you’re firmly in Mediterranean tuna territory. Next up: a Mediterranean tuna salad recipe that combines tuna, white beans, vegetables, olive oil and herbs. This style of salad is filling, colourful and very meal-prep friendly. Fortunately, it’s one of the easiest and most nutritious patterns to build.
Why this style is such a win
Mediterranean-style eating, which emphasises fish, olive oil, vegetables, legumes and whole grains, has been repeatedly associated with better heart health and long-term disease prevention. Tuna and white beans together give you a double hit of protein plus plenty of fibre and complex carbohydrates from the beans, while olive oil supplies heart-friendly fats.
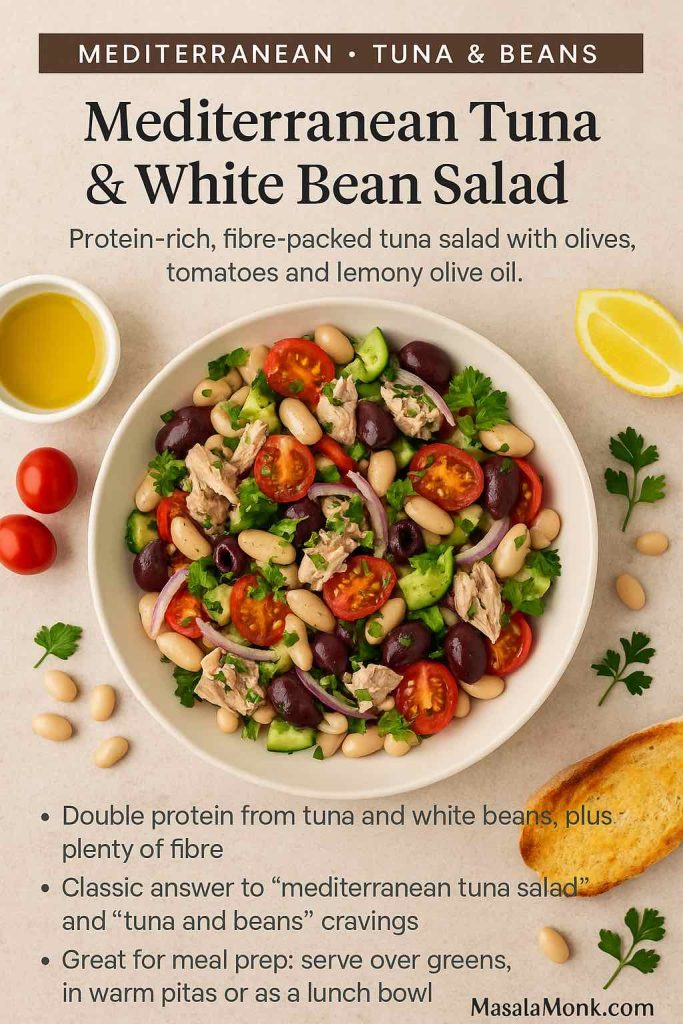
Ingredients
- 2 cans tuna (light tuna in water works, or tuna in olive oil for a richer version)
- 1½–2 cups cooked white beans (cannellini, navy or a mix)
- 1 cup cherry tomatoes, halved
- 1 small cucumber, diced
- ¼ red onion, very thinly sliced
- A handful of olives
- Fresh parsley and/or basil
For the dressing
- 3–4 tablespoons extra-virgin olive oil
- 1½–2 tablespoons lemon juice
- 1 teaspoon Dijon mustard
- 1 clove garlic, finely minced or grated
- ½ teaspoon dried oregano
- Salt and pepper
How to make this Mediterranean tuna salad recipe
- In a large bowl, whisk together olive oil, lemon juice, mustard, garlic, oregano, salt and pepper.
- Add the beans, tuna, tomatoes, cucumber, onion and olives.
- Toss gently, trying not to mash the tuna too much.
- Sprinkle over herbs and toss once more.
- Taste and adjust seasoning.
You can serve this Mediterranean tuna salad over mixed greens, spooned onto crunchy toast, or tucked into a warm pita with a bit of lettuce. It keeps well for several days in the fridge, which makes it perfect for meal prep if you like to batch healthy tuna salad lunches ahead of time.
Beans bring plenty of fibre and minerals along with their plant protein, so they help this salad feel more filling and support gut health and blood sugar control at the same time. If you’d like more ideas for gut-friendly meals that use the same logic, you can have a look at Top 10 Foods for Gut Health and Boosting Your Fiber Intake with Sandwiches. Both pieces show how salad-style ingredients can slip into everyday meals without a lot of fuss.
Also Read: Carbonara Recipe: Italian Pasta (Creamy, Veggie, Chicken, Shrimp, Tuna & Keto)
5. Italian Tuna Salad with Chickpeas Recipe
Slide a little further around the Mediterranean map and you arrive at Italian tuna salad territory. This Italian-leaning salad recipe shifts away from creaminess and toward bright, briny flavours: roasted red peppers, capers, herbs and chickpeas. It’s essentially a pantry-friendly tuna salad that just happens to be very high in fibre.
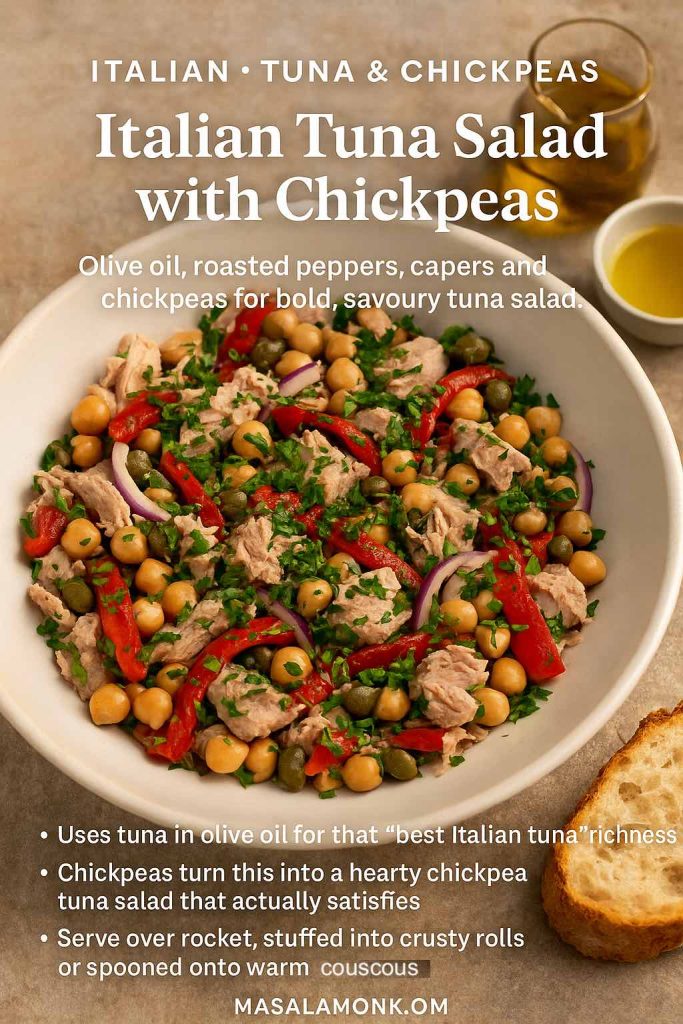
Ingredients
- 2 cans tuna, ideally in olive oil
- 1½ cups cooked chickpeas, rinsed and drained
- ½ cup roasted red peppers, sliced into strips
- ¼ cup red onion, thinly sliced
- 2 tablespoons capers, rinsed and drained
- A good handful of chopped fresh parsley
Dressing
- 3 tablespoons olive oil (use some of the oil from the tuna cans if they’re packed in oil)
- 1½ tablespoons red wine vinegar or lemon juice
- 1 small clove garlic, very finely grated
- ½ teaspoon dried oregano
- Salt and pepper
Method
- Add tuna, chickpeas, roasted peppers, onion, capers and parsley to a large bowl.
- In a small jug or bowl, whisk together olive oil, vinegar or lemon, garlic, oregano, salt and pepper until slightly thickened.
- Pour the dressing over the salad ingredients.
- Toss gently, folding rather than stirring roughly, so the tuna stays in nice bite-sized pieces.
This version of tuna salad is lovely over rocket or baby spinach, and it’s equally happy spooned into a crusty roll for a more substantial lunch. If you like couscous, you can serve it over a bed of warm couscous to create a rio mare couscous-style dish using pantry ingredients.
Chickpeas deserve a bit of attention in their own right here. They’re high in fibre and plant protein and have been linked to better satiety, improved cholesterol and improved blood sugar control when they show up regularly in place of more refined starches. If you enjoy this way of cooking, MasalaMonk’s pieces on using chickpeas instead of sardines and using seitan instead of tuna are packed with similar high-protein, Mediterranean-leaning meal prep ideas.
Also Read: Authentic Louisiana Red Beans and Rice Recipe (Best Ever)
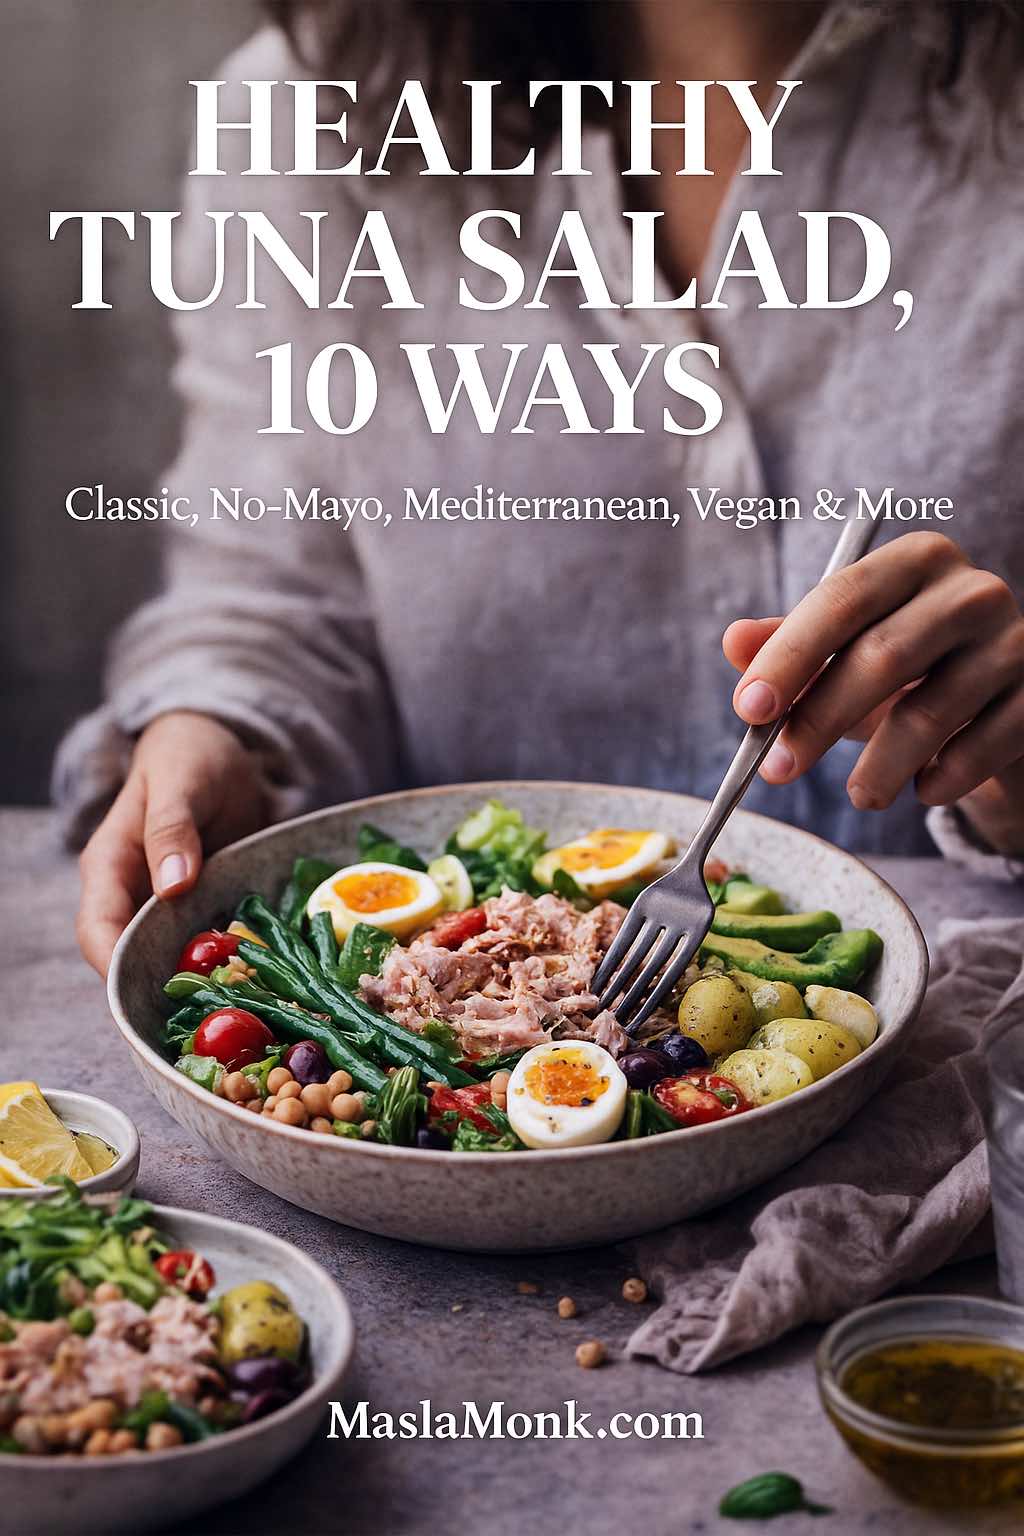
6. Tuna Niçoise Salad (Everyday and Occasion-Ready)
Every now and then, a simple bowl isn’t enough, and you want a full tuna Niçoise salad laid out on a big platter. The same tuna, eggs and vegetables, but laid out on a platter with potatoes, beans and olives so it looks like something you’d order in a bistro.
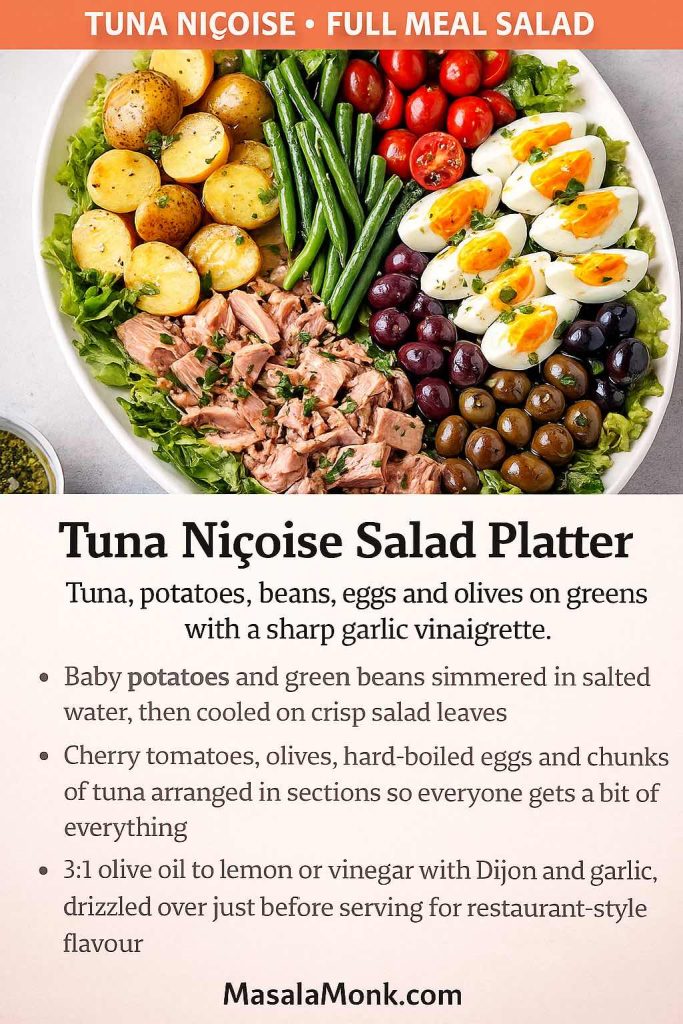
What you’ll need
- Mixed lettuce or baby greens
- 8–10 small new potatoes, boiled until just tender and halved
- A couple of handfuls of green beans, trimmed and blanched
- 1 cup cherry tomatoes, halved
- 3–4 hard-boiled eggs, cut into halves or quarters
- A handful of olives
- 2 cans tuna in olive oil, or seared fresh tuna steaks sliced thickly
For the Niçoise dressing
- 3 tablespoons olive oil
- 1½ tablespoons red wine vinegar or lemon juice
- 1 teaspoon Dijon mustard
- 1 clove garlic, finely grated
- A pinch of dried thyme or oregano
- Salt and pepper
Method
- Arrange the lettuce over a large serving platter.
- Nestle the potatoes, green beans, tomatoes, eggs, olives and tuna on top in little piles or rows so you get that classic composed look.
- Whisk together the olive oil, vinegar or lemon, mustard, garlic, herbs, salt and pepper until emulsified.
- Taste the dressing and adjust the acid and salt until it feels bright but balanced.
- Drizzle the dressing over everything just before you bring the platter to the table.
Because this salad leans so heavily on vegetables, olive oil, legumes and fish, it fits beautifully into the Mediterranean diet pattern that many large studies have associated with reduced risk of heart disease and other chronic illnesses. It’s also a neat answer for all the tuna nicoise salad, salade nicoise recipe and dressing for tuna nicoise searches that pop up whenever the weather warms up and people start craving big bowls.
Also Read: One-Pot Chicken Bacon Ranch Pasta (Easy & Creamy Recipe)
7. Healthy Tuna Pasta Salad and Old-School Tuna Macaroni Salad
Comfort food time. A tuna pasta salad recipe can easily turn into a calorie bomb, but a few tweaks give you the same creamy vibe in a more balanced way. Then, when nostalgia hits, you can slide back toward the classic tuna macaroni salad version by adjusting the dressing.
The trick is that you can make it as light or as old-school as you like just by sliding the dressing along the Greek yogurt ↔ mayo spectrum.
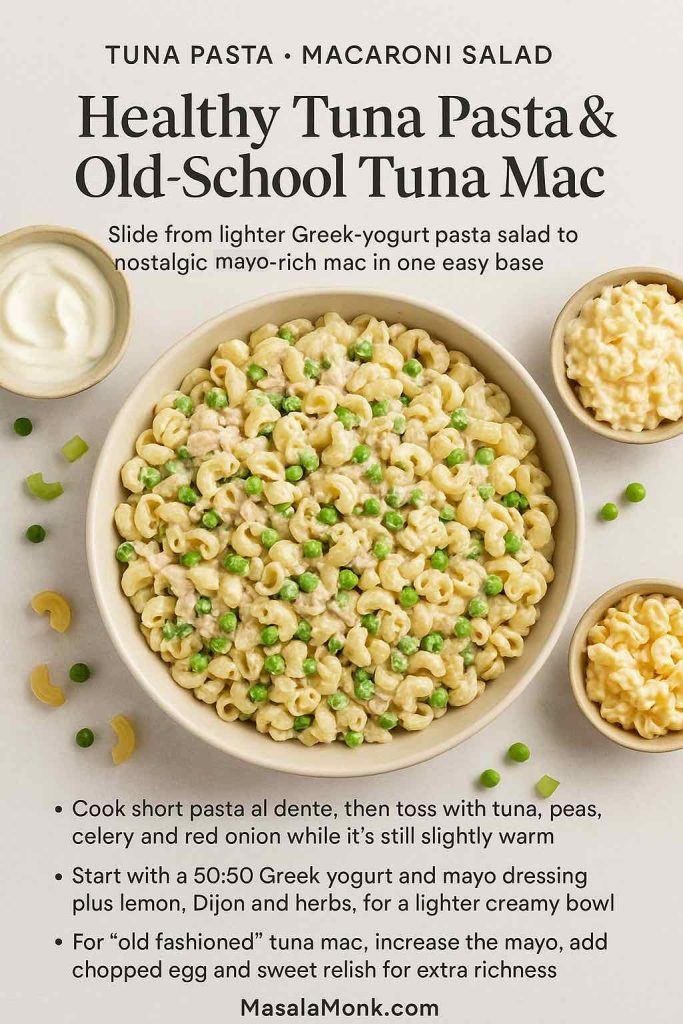
Lighter, creamy tuna pasta salad recipe
For a bowl that feels indulgent but still sits in the healthy tuna salad camp:
- 3 cups cooked short pasta (elbow macaroni, shells or fusilli)
- 2 cans tuna, drained
- 1 cup peas or sweetcorn (frozen is fine; just thaw and drain)
- ½ cup finely chopped celery
- ¼ cup finely chopped red onion
Dressing
- ½ cup Greek yogurt
- 2–3 tablespoons mayonnaise
- 1–2 teaspoons Dijon mustard
- Juice of half a lemon
- 2 tablespoons chopped fresh dill or parsley
- Salt and pepper
How to make it
- Stir together yogurt, mayonnaise, mustard, lemon, herbs, salt and pepper until smooth.
- Combine pasta, tuna, peas, celery and onion in a large bowl.
- Pour the dressing over the top and toss until everything is well coated.
- Chill for at least 30 minutes before serving.
Old-fashioned recipe for macaroni salad with tuna
If your heart belongs to old fashioned macaroni salad with tuna, you can easily nudge the dressing in that direction:
- Increase the mayonnaise and reduce or omit the yogurt.
- Add 2–3 chopped hard-boiled eggs to the salad.
- Stir in a generous amount of sweet relish.
- Throw in diced bell peppers and grated carrot for colour.
Now you’ve got a tuna mac salad that mirrors the macaroni salad with tuna fish many of us grew up with, while still giving you the option to sneak in more vegetables. That’s the version that belongs next to barbecues and potluck tables, the “best tuna mac salad recipe” in your head.
How to cook the pasta for this recipe
For cold pasta salads, slightly undercooked pasta that still has some bite tends to hold up better. Cook the pasta just to al dente, rinse briefly under cold water to stop the cooking and remove excess starch, then drain very well before combining it with the tuna and dressing.
Potato and tuna salad spin-off
For days when potato salad tuna feels more appealing than pasta, it’s simple to swap some or all of the noodles for boiled baby potatoes or cubes of sweet potato. Both can be part of a healthy plate when paired with lean protein and vegetables. If you’re wondering how sweet potatoes compare with white potatoes in terms of calories, glycaemic index and suitability for weight-focused or diabetes-friendly eating, MasalaMonk breaks it down in Sweet Potato Nutrition Facts and The Potato Debate: White vs Sweet. For even more potato inspiration, their collection of potato salad recipes walks through classic, German, Russian and vegan potato salads you can easily adapt with tuna.
8. Tuna and Egg Salad (For Bowls, Sandwiches and Breakfast)
Another very popular direction involves eggs. Merging tuna salad and egg salad into one bowl gives you something that feels almost decadent despite being very straightforward. It’s rich, savoury and incredibly satisfying.
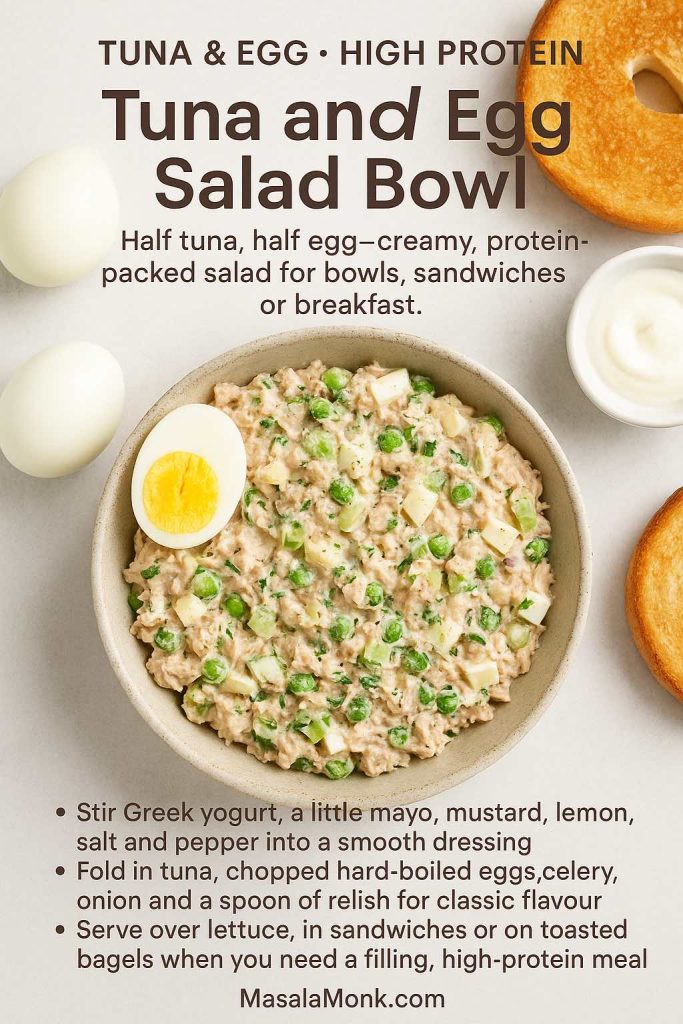
How to make Basic tuna and egg salad
- 2 cans tuna, well drained
- 3 hard-boiled eggs, chopped
- ¼ cup Greek yogurt
- 2–3 tablespoons mayonnaise
- 1 rib celery, finely chopped
- 2 tablespoons onion, finely minced
- 1–2 tablespoons relish or chopped pickles
- 1 teaspoon mustard
- Juice of half a lemon
- Salt and pepper
Mix the yogurt, mayonnaise, mustard, lemon juice, salt and pepper into a smooth dressing. Stir in the celery, onion and relish, then fold in the tuna and chopped eggs.
How to serve this recipe
You can scoop this mixture:
- Over lettuce for a boiled egg and tuna salad bowl
- Into sandwiches as a tuna and egg salad sandwich filling
- Onto toasted bagels or English muffins when you want something that covers tuna breakfast ideas as well as lunch
Because tuna and eggs are both rich in protein, this salad fits especially well into high-protein days. To keep the rest of your day balanced, you might pair it with something like Protein Oatmeal or a jar of High Protein Overnight Oats in the morning so that you hit your protein targets with real meals rather than relying entirely on supplements. For egg-cooking perfection, aim for 9–11 minutes in gently boiling water for hard-boiled eggs, followed by an ice bath. That timing usually gives firm whites and yolks without the grey ring.
Also Read: Sheet Pan Chicken Fajitas Recipe (Easy One-Pan Oven Fajitas)
9. Crunchy Apple and Cucumber Healthy Tuna Salad
Not all healthy tuna salad recipes revolve around what you swap into the dressing. Sometimes the biggest difference comes from loading the bowl with fruit and vegetables so each bite feels fresher and more textured. That’s exactly what’s happening in the apple and cucumber corner of tuna fish salad: you can make this with both apples and cucumber or you can just do apples or cucumbers – both rely on the same idea.
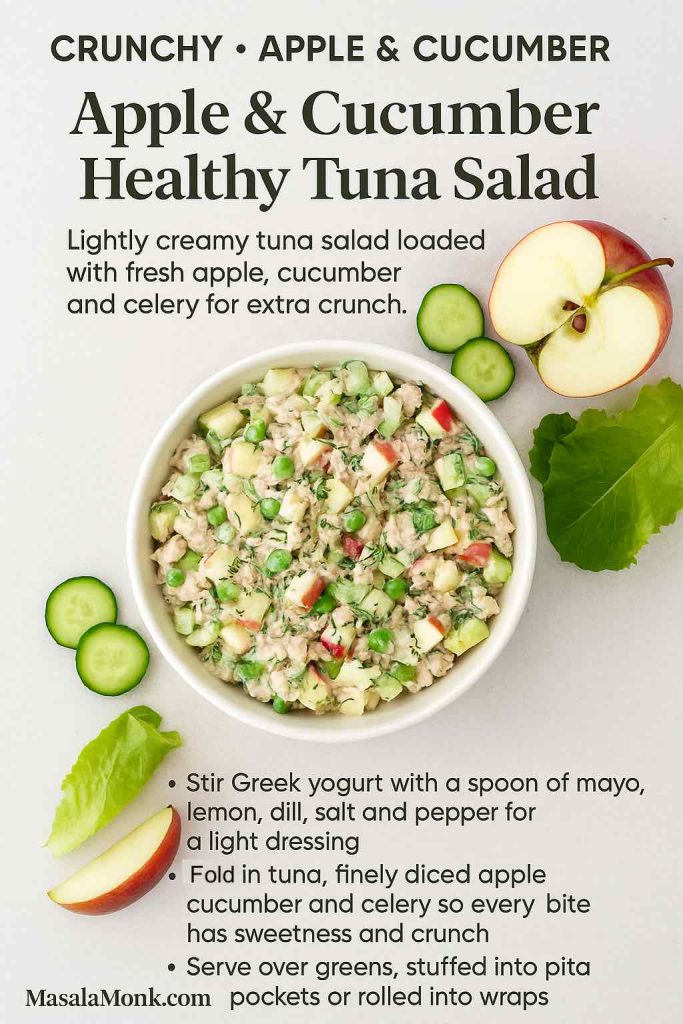
Ingredients
- 2 cans tuna, drained
- ½ a crisp apple (Granny Smith, Pink Lady or similar), finely diced
- ½ cup diced cucumber
- 1 rib celery, finely chopped
- ¼ cup Greek yogurt
- 1–2 tablespoons mayonnaise or sour cream (optional, for richness)
- 1–2 teaspoons lemon juice
- 1 teaspoon honey or maple syrup (optional, to balance the lemon)
- 1 tablespoon chopped fresh dill
- Salt and pepper
Method
- In a small bowl, whisk the Greek yogurt, mayonnaise or sour cream (if using), lemon juice, honey, dill, salt and pepper until smooth.
- Add the tuna, apple, cucumber and celery to a larger bowl.
- Pour the dressing over the top and fold gently until everything is lightly coated.
- Taste and adjust with extra lemon or a tiny bit more honey to find your perfect sweet-tart balance.
Where this recipe shines
- As a salad topping over mixed leaves.
- Stuffed into pita or wraps for a bit of crunch in every bite.
- As a side dish next to grilled chicken or roasted vegetables.
Apples and cucumbers add not only texture but also hydration and fibre. Verywell Health’s list of high-fibre foods is a good reminder of how simple ingredients like apples can quietly support digestion and blood sugar balance when they show up regularly.
If you want to make your everyday sandwiches and salad recipes more fibre-rich in general, MasalaMonk’s blog post on boosting fibre with sandwiches has lots of real-world combinations.
Also Read: Negroni Recipe: Classic Cocktail & Its Variation Drinks
10. Vegan “Tuna” Chickpea Salad Recipe
Finally, even in a tuna-focused world, there’s a big audience for vegan tuna salad, tuna vegan, tuna vegetarian and vegetarian tuna salad. Many of them still want a tuna salad sandwich experience; they simply don’t want fish in it. Chickpeas are perfect for this because they mimic the slightly chunky, creamy texture and bring plenty of nutrition of their own.
Why chickpeas are such a strong base
Chickpeas provide a mix of complex carbohydrates, protein and fibre plus micronutrients like folate, iron and manganese. When they replace refined grains or processed meats in the diet, they’ve been linked with better blood sugar control, improved satiety and lower cholesterol. All of that makes them a natural fit for anyone who wants their vegan tuna salad to feel like more than a compromise.
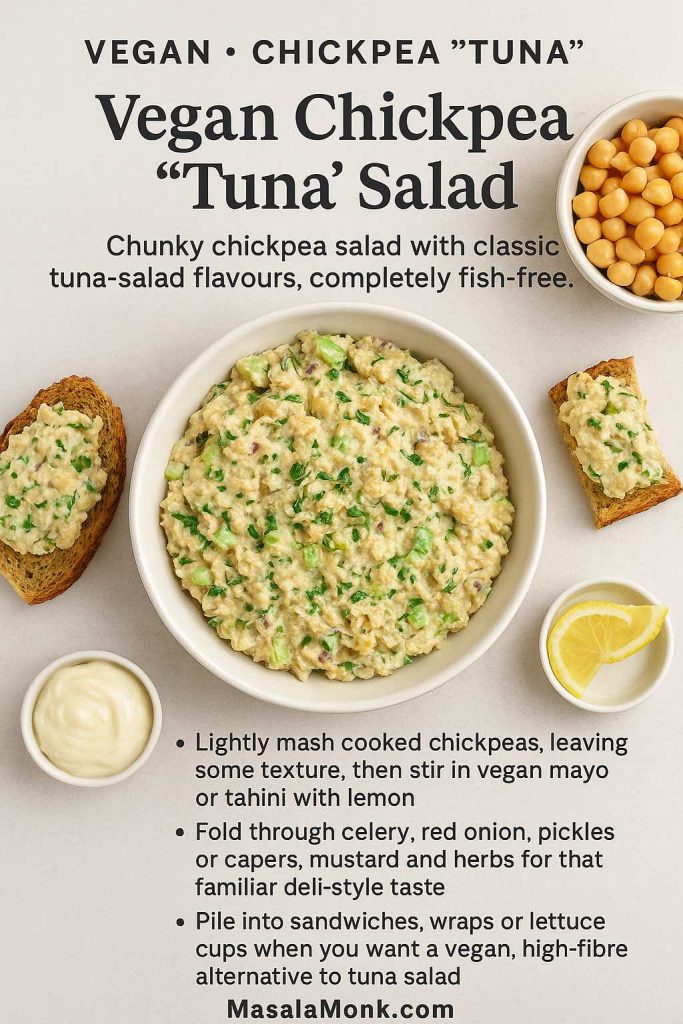
Vegan tuna salad with chickpeas
- 2 cups cooked chickpeas, drained and rinsed
- ¼–⅓ cup vegan mayonnaise, or a mix of tahini and lemon juice
- 1 rib celery, finely chopped
- 2 tablespoons red onion, finely diced
- 1–2 tablespoons chopped pickles or capers
- 1 teaspoon mustard
- Juice of half a lemon
- A pinch of nori flakes or other dried seaweed (optional)
- Salt, pepper, dill or parsley
Mash the chickpeas with a fork or potato masher until they’re mostly broken down but still have some texture. Stir in vegan mayo (or tahini and extra lemon), mustard, salt, pepper and herbs. Fold through celery, onion and pickles and taste.
Serve this vegan tuna salad in sandwiches with lettuce and tomato, spooned into lettuce cups, or over a bowl of mixed greens with chickpeas instead of tuna carrying the protein load.
If you’d like more ways to keep your week high in protein without leaning on animal foods, MasalaMonk has plenty of ideas, including Chickpeas Instead of Sardines and plant-based high-protein meal prep ideas using lentils instead of chicken. Between those and this chickpea tuna salad, you can cover a surprising number of “tuna-style” cravings with zero actual tuna.
Also Read: Whole Chicken in Crock Pot Recipe (Slow Cooker “Roast” Chicken with Veggies)
A Few Extra Ways to Play with Healthy Tuna Salad
By now you’ve got ten distinct healthy tuna salad recipes and at least as many ways to serve them. However, once you get comfortable with the basic patterns, it becomes easy to create your own riffs that still sit inside a healthy tuna salad framework.
A few ideas to keep exploring:
- Use Greek yogurt, sour cream or hung curd in place of most mayo for a lighter sour cream tuna salad, or mix yogurt and mayo for a balanced, creamy sauce that doesn’t overload calories.
- Swap part of the tuna for extra beans, chickpeas or lentils when you want a high-fibre, higher-bulk salad that stretches a single can further.
- Lean into herbs like dill in tuna salad, parsley in Italian versions, or oregano in Mediterranean tuna recipes to change the flavour without adding heaviness.
- Play with serving formats: croissant tuna sandwiches for brunch, bagel tuna melts, tuna with crackers on a snack board, or even a tunacado sandwich layered with avocado, tuna and greens.
- When you’re eating tuna more than once a week, keep an eye on variety and portion size, and lean more often on canned light tuna rather than big predatory species to respect mercury guidance.
If you like the feeling of having a set of “templates” rather than memorising dozens of separate recipes, you can think of these ten as your master pattern library.
Also Read: Cheesy Chicken Broccoli Rice – 4 Ways Recipe (One Pot, Casserole, Crockpot & Instant Pot)
Putting It All Together
Taken as a whole, these ten recipes give you a full toolkit for turning a can of tuna—or a bowl of chickpeas—into exactly the sort of meal you’re in the mood for.
On a busy weekday, you might stick with the light deli-style healthy tuna salad recipe and turn it into simple tuna sandwiches for everyone. Later in the week, when you crave something more vibrant, the Mediterranean tuna and white bean salad or Italian tuna with chickpeas will happily take over. When comfort is the priority, the healthy tuna pasta salad and the more nostalgic tuna mac salad version step up. On hotter days, crunchy apple and cucumber tuna salad or a big tuna Niçoise platter feel right, while avocado tuna salad is there for every rushed lunch when the only things you can manage to mash together are tuna, avocado and lemon.
Alongside these fish-based bowls, you’ve got the option of skipping tuna completely and relying on a vegan tuna salad built on chickpeas instead. As long as you pay attention to overall fish intake and choose lower-mercury options such as canned light tuna most of the time, salads like these can sit comfortably in a week that’s trying to balance health, flavour and real-life constraints. Between the recipes here and the extra reading on salad benefits, gut-friendly foods, seafood and pregnancy and high-protein meal planning, you’ve got more than enough to keep your healthy tuna salad rotation interesting for a very long time.
And if all else fails, you can always fall back on that three-ingredient tuna avocado salad, because sometimes the best healthy tuna salad is simply the one you can make in the two minutes between meetings.
Also Read: Crispy Homemade French Fries From Fresh Potatoes (Recipe Plus Variations)
FAQs
1. Is tuna salad healthy?
Often yes, tuna salad can be very healthy, especially when you treat tuna as lean protein and not just a vehicle for mayonnaise. When you build a healthy tuna salad with light tuna, Greek yogurt or avocado, plenty of crunchy vegetables and sensible portions, you get a high protein, nutrient-dense meal. On the other hand, a tuna salad recipe loaded with only mayo and no veg will lean more heavy than wholesome.
2. What is a good basic healthy tuna salad recipe?
To put it simply, a solid healthy tuna salad recipe starts with drained light tuna, Greek yogurt, a spoon or two of mayo, lemon juice, mustard, salt and pepper. After that, you fold in celery, onion and maybe a little relish or pickles for deli-style flavour. This kind of bowl covers “tuna salad recipe healthy” and works just as well in a tuna salad sandwich as it does over a green salad.
3. How do I make tuna salad without mayo?
If you want a tuna salad without mayo, Greek yogurt is the easiest swap. You mix tuna with plain Greek yogurt, lemon, mustard, herbs, salt and pepper, then add celery, cucumber and onion for texture. Alternatively, you can make a no mayo tuna salad with mashed avocado or a simple olive oil and lemon dressing if you prefer a lighter, Mediterranean feel.
4. What can I use instead of mayonnaise in tuna salad?
There are several tasty options. Greek yogurt gives you a creamy, tangy base for Greek yogurt tuna salad, while avocado creates a rich avocado tuna salad without any dairy. In addition, cottage cheese, hummus or a vinaigrette made from olive oil and lemon all work as alternative dressings, especially in Mediterranean tuna salad or tuna and bean salad recipes.
5. Which type of tuna is best for a healthy tuna salad?
Generally, light canned tuna in water is the most practical choice for a healthy tuna salad recipe because it’s lean and mild in flavour. Nevertheless, tuna packed in olive oil is lovely when you’re making Italian tuna salad or tuna nicoise salad, since the oil adds richness. For everyday healthy tuna, most people stick to light tuna and then adjust the dressing to suit their goals.
6. Can tuna salad help with weight loss?
In many cases, yes, especially when you build a healthy tuna salad that’s high in protein and full of vegetables. Because tuna and Greek yogurt or egg keep you satisfied, you’re less likely to overeat later. However, if your tuna salad recipe is mostly mayonnaise with very little tuna or veg, it can quickly become too calorie-dense for weight-loss plans.
7. How much protein is usually in a serving of tuna salad?
As a rough guide, a small can of tuna alone often provides around 25–30 grams of protein. Once you stir in Greek yogurt, cottage cheese or egg, a generous serving of high protein tuna salad can easily deliver 20–30 grams of protein. Consequently, recipes like tuna and egg salad, cottage cheese tuna salad or avocado tuna salad fit very neatly into high-protein meal plans.
8. How often can I eat tuna salad each week?
Typically, having tuna salad a couple of times per week is reasonable for most people, especially when you choose light tuna and vary your other protein sources. In practice, lots of people rotate healthy tuna salad lunches with chickpea salads, lentil dishes, chicken or vegan tuna salad to keep variety high. If you have pregnancy or medical concerns, it’s wise to keep portions moderate and mix in more plant-based recipes.
9. How long does homemade tuna salad keep in the fridge?
As a rule of thumb, homemade tuna salad keeps well for about 2–3 days in the fridge in a sealed container. After that, the texture of the dressing and vegetables usually starts to deteriorate. To keep things fresher, you can store lettuce, cucumber and tomato separately and add them to your tuna salad sandwich or salad bowl just before eating.
10. Can I freeze tuna salad?
Technically you can, but it isn’t ideal. Once thawed, the dressing often separates, and crunchy ingredients like celery, cucumber or apple lose their texture. Instead, a better approach is to freeze plain canned tuna portions and then mix a fresh healthy tuna salad recipe with yogurt, avocado or mayo on the day you plan to eat it.
11. How do I make a healthy tuna pasta salad?
For a healthier tuna pasta salad, you start with short pasta cooked al dente, then add tuna, peas or sweetcorn, celery and onion. After that, make a dressing that’s mostly Greek yogurt with just a little mayonnaise, plus lemon juice, mustard, salt, pepper and dill. This way, your healthy tuna pasta salad recipe stays creamy but lighter than a traditional tuna macaroni salad.
12. How can I lighten an old fashioned macaroni salad with tuna?
If you love old fashioned macaroni salad with tuna but want it less heavy, there are several simple tweaks. Firstly, swap part of the mayo for Greek yogurt to cut calories and add more protein. Secondly, stir in extra vegetables like celery, bell pepper and grated carrot so your tuna mac salad has more bulk from low-calorie ingredients. Finally, serve sensible portions and pair it with a green salad to balance the plate.
13. What can I add for extra crunch in tuna salad?
There are plenty of choices. Celery and cucumber are classic, while finely chopped bell peppers, red onion and radishes also add bite. Moreover, diced apple or pickles give you both crunch and contrast, so an apple and tuna salad or cucumber tuna salad feels fresh even when the dressing is creamy.
14. How do I make a Mediterranean tuna salad?
To create a Mediterranean tuna salad, mix tuna with white beans or chickpeas, cherry tomatoes, cucumber, olives and red onion. Then, dress it all with olive oil, lemon juice, garlic, oregano, salt and pepper. This kind of tuna and beans salad is naturally high in fibre and fits beautifully into “tuna recipes healthy” searches.
15. What goes into an Italian tuna salad?
An Italian tuna salad usually leans on tuna in olive oil, roasted red peppers, capers, red onion and fresh herbs like parsley. You then toss everything with a sharp red wine vinegar or lemon dressing and sometimes add chickpeas or cannellini beans. As a result, you get an Italian tuna salad that’s bold, savoury and perfect over greens or in a hearty sandwich.
16. How is tuna nicoise salad different from regular tuna salad?
Tuna nicoise salad is more of a composed meal than a simple spread. It usually includes lettuce, boiled potatoes, green beans, tomatoes, olives, hard-boiled eggs and tuna, all dressed with a garlicky vinaigrette. By contrast, a basic tuna salad recipe tends to be a mixed bowl used for tuna salad sandwiches or wraps, rather than a full platter.
17. Can I use fresh tuna instead of canned tuna in salad?
Yes, absolutely. You can sear fresh tuna steaks quickly so they stay pink inside, then slice or flake them into a salad with your usual dressing. Fresh tuna works especially well in tuna nicoise salad, Italian tuna salad or a gourmet healthy tuna salad recipe, though canned tuna remains more convenient for everyday use.
18. How do I make avocado tuna salad?
To put it briefly, avocado tuna salad starts with mashing a ripe avocado with lemon, salt and pepper, then folding in flaked tuna. Afterward, you can add celery, red onion, herbs and even chopped egg or apple for extra interest. Whether you keep it as a 3 ingredient tuna avocado salad or turn it into a loaded avocado and tuna salad recipe, it’s a great no-mayo option.
19. What can I add to make a high protein tuna salad?
Beyond tuna itself, there are several high-protein add-ins. Greek yogurt, cottage cheese, boiled eggs and chickpeas all boost protein levels, so bowls like tuna and egg salad, cottage cheese tuna salad or chickpea tuna salad are naturally more filling. Additionally, serving your healthy tuna salad alongside a protein-rich soup or bean salad turns the whole meal into a serious protein hit.
20. Is tuna salad suitable for breakfast?
Surprisingly, yes. A small portion of tuna and egg salad on toast, a tuna breakfast wrap with avocado, or a lighter healthy tuna salad on rye bread can make a savoury, protein-rich breakfast. Granted, it’s not everyone’s first thought, yet on busy days it’s a quick way to get protein in early without resorting to sugary options.
21. How do I build a healthier tuna salad sandwich?
Start with wholegrain or seeded bread for more fibre. Next, use a healthy tuna salad recipe based on Greek yogurt or avocado instead of just mayo, and layer in lettuce, tomato and cucumber. In addition, keeping an eye on portion sizes and pairing the tuna sandwich with a simple side salad rather than fries keeps the whole meal in the “tuna sandwich recipe healthy” category.
22. How can I stop tuna salad sandwiches from going soggy?
One simple approach is to create a barrier between the bread and the filling. You can line the bread with lettuce, cheese slices or even a thin layer of hummus before adding your tuna salad sandwich filling. Alternatively, pack the bread and tuna fish salad separately for lunch and assemble the sandwich when you’re ready to eat.
23. What are some quick tuna lunch ideas besides sandwiches?
There are plenty of easy options. For instance, you can spoon healthy tuna salad onto a big bowl of greens, tuck it into lettuce wraps, mix it with warm rice or quinoa, or stir it through pasta for a quick tuna noodle salad. Likewise, a simple tuna and bean salad with olive oil and lemon makes a fast high-protein lunch that travels well.
24. How can I make vegan tuna salad?
For a vegan tuna salad, mash cooked chickpeas until partly broken down, then mix them with vegan mayo or a tahini-lemon dressing. After that, add celery, onion, pickles, mustard and herbs so it resembles classic tuna salad in flavour and texture. This kind of tuna vegan recipe works brilliantly in sandwiches, wraps and salad bowls when you want a vegetarian tuna salad stand-in.
25. Is tuna salad good for meal prep?
Yes, tuna salad can be a useful meal prep option, particularly for lunches. You can prepare a batch of healthy tuna salad, divide it into containers and store it in the fridge for two or three days. Even so, it’s better to add delicate ingredients like lettuce, tomato or cucumber just before serving, so they stay crisp.
26. How do I make tuna salad more kid-friendly?
Generally, kids prefer simpler flavours and softer textures. So, keep the seasonings gentle, use a smoother dressing, and chop vegetables very finely. You might also try adding sweetcorn or a little grated cheese and serving the tuna fish salad sandwich on soft bread or as small tuna mac salad portions to make it more familiar.
27. How can I turn tuna salad into a full dinner?
One straightforward way is to build a large salad bowl or platter. Place your healthy tuna salad on top of greens, roasted vegetables, potatoes, beans or pasta to create a more substantial tuna casserole salad or tuna nicoise-style meal. Alternatively, bake a tuna salad casserole with wholegrain pasta and vegetables for a warm dinner version.
28. Which herbs and spices go best in tuna salad?
Dill, parsley, chives and coriander are classic herbs for a healthy tuna salad recipe. Meanwhile, dried oregano and thyme work well in Mediterranean tuna salad, and paprika, black pepper or a pinch of chilli flakes add depth. Ultimately, a squeeze of lemon and a little mustard tie everything together without overpowering the tuna.
29. How can I cut calories in tuna pasta salad or tuna mac?
To start, use more Greek yogurt and less mayonnaise in the dressing. Then, add plenty of vegetables—peas, celery, peppers, cucumber—so your healthy tuna macaroni salad feels generous without relying on huge amounts of pasta. Finally, serving smaller portions alongside a green salad lets you enjoy tuna mac salad without overdoing calories.
30. What are some creative healthy tuna salad ideas beyond the basics?
Besides the usual deli-style bowl, you can experiment with tuna and avocado salad wraps, Mediterranean tuna and white bean salad jars, Italian tuna and chickpea salad over couscous, or crunchy apple and tuna salad pitas. You could also explore vegan tuna salad made from chickpeas on some days and high protein tuna salad with egg or cottage cheese on others. In the end, rotating these ideas keeps “healthy tuna salad” interesting instead of repetitive.