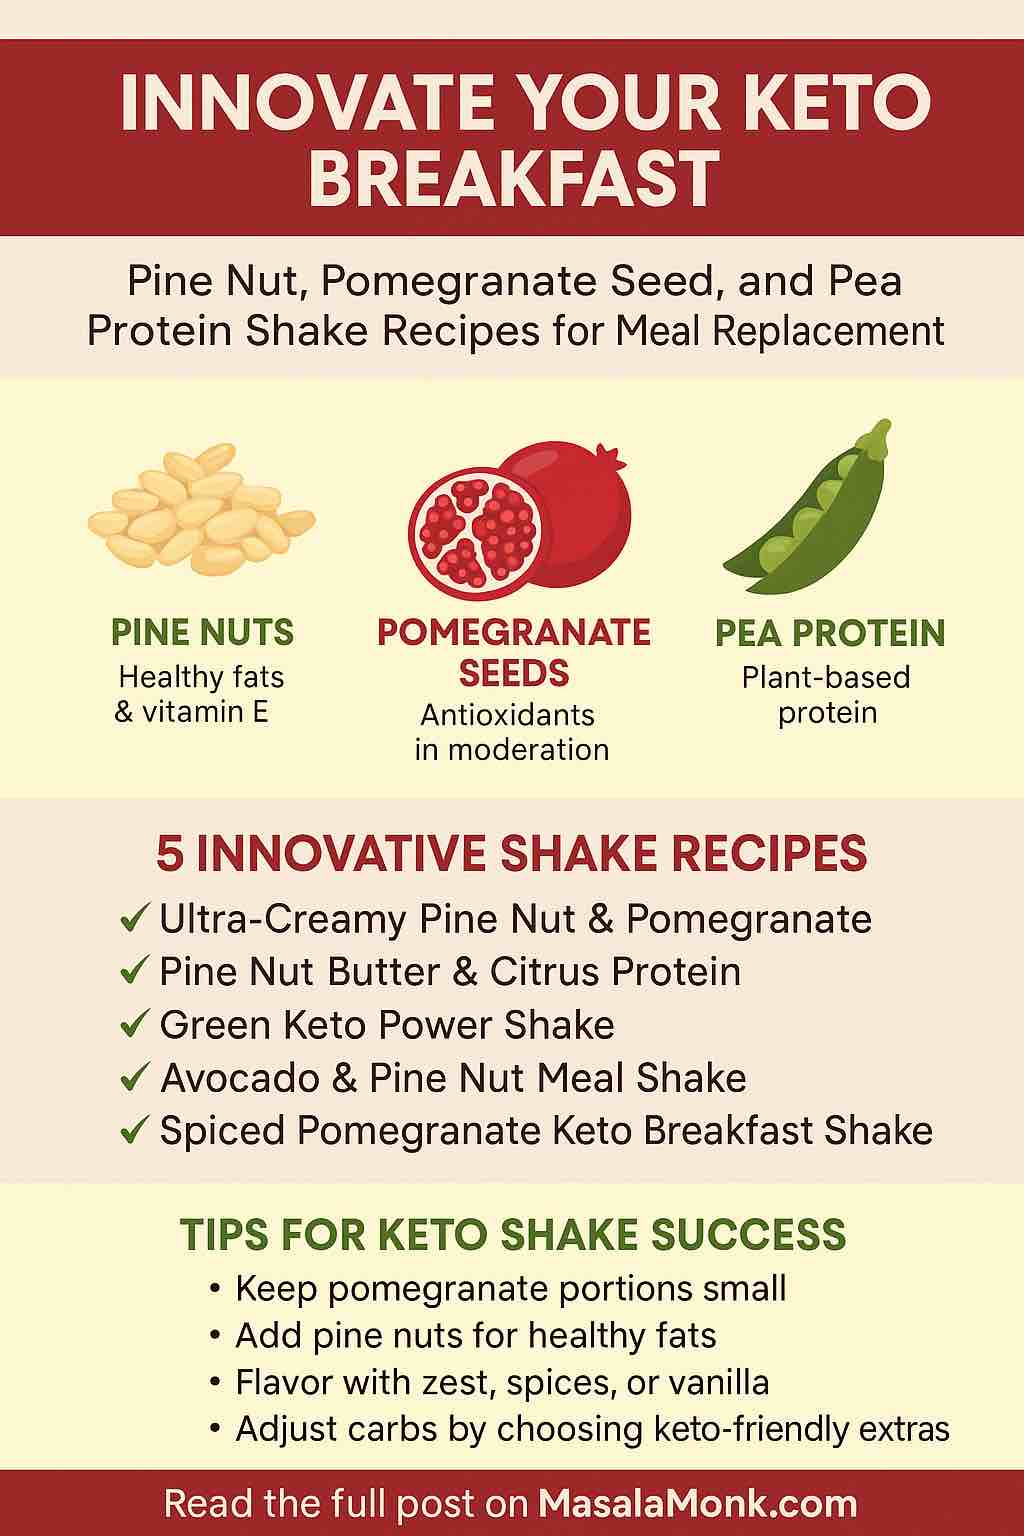
Are you tired of the same bacon and eggs every morning on keto? Looking for something plant-forward, fresh, and truly energizing—but still low in carbs and high in satiety? Let’s break the mold with keto meal-replacement shakes that bring together three powerhouse ingredients: pine nuts, pomegranate seeds, and pea protein.
These shakes aren’t just novel—they’re delicious, nutrient-dense, portable, and can be precisely customized to fit your macros. This post will walk you through why these ingredients are perfect for keto, how to combine them, and then give you five inventive, tested recipes (with pro tips and macro guides!) to make your mornings as satisfying as they are healthy.
Why These Ingredients?
Pine Nuts
Small but mighty, pine nuts are rich in healthy monounsaturated fats, vitamin E, magnesium, and plant sterols. Their creamy texture and subtly buttery taste add luxury to your morning, while their fat content supports ketosis and long-lasting fullness.
Pomegranate Seeds
While pomegranate isn’t typically “keto,” a tablespoon or two of the seeds offers a pop of color, antioxidants, and tart-sweet flavor with only a minor carb contribution. When used judiciously, they brighten your shake without breaking ketosis.
Pea Protein
Unlike dairy-based proteins, pea protein is plant-based, low in carbs, and suitable for most allergies. It has a neutral flavor, blends smoothly, and provides complete protein to keep you energized all morning.
The Art of Building a Keto Shake
Base: Start with 1–1.5 cups unsweetened nut or seed milk (almond, coconut, macadamia, or even hemp milk).
Protein: Add 1 scoop pea protein isolate (usually 18–22g protein, <2g net carbs per scoop).
Fats: Include 1–2 tablespoons of pine nuts (or pine nut butter for extra creaminess).
Flavor and Antioxidants: 1–2 tablespoons of pomegranate seeds—just enough for tang, color, and health benefits.
Extras: Add spices, nut butter, avocado, or coconut cream for variety. Sweeten only if needed with monk fruit, stevia, or allulose.
Pro Tip: For a meal replacement, aim for ~20g protein, 20g fat, and <8g net carbs per serving.
5 Innovative Shake Recipes
Each recipe below is formulated for one generous serving, perfect as a stand-alone breakfast.
1. Ultra-Creamy Pine Nut & Pomegranate Morning Shake
Ingredients:
1.25 cups unsweetened almond milk
1 scoop vanilla pea protein
1 Tbsp pine nuts, finely ground
1 Tbsp pomegranate seeds
1 Tbsp chia seeds (optional, for fiber and texture)
Ice cubes (to desired thickness)
1–2 tsp allulose or monk fruit sweetener (optional)
Directions:
Add all ingredients except pomegranate to a blender.
Blend until creamy and smooth.
Stir in or sprinkle the pomegranate seeds on top before serving.
Macros: ~6g net carbs, 21g protein, 17g fat
Why you’ll love it: Silky and slightly tangy with bursts of juicy pomegranate—perfect for a refreshing start!
2. Pine Nut Butter & Citrus Protein Shake
Ingredients:
1 cup unsweetened vanilla almond milk
1 scoop unflavored or vanilla pea protein
1 Tbsp pine nut butter
Zest of ½ lemon or lime
1 Tbsp pomegranate seeds (garnish)
Sweetener to taste
Ice
Directions:
Blend all ingredients except pomegranate seeds.
Pour into a glass and top with pomegranate seeds for color.
Macros: ~5g net carbs, 20g protein, 16g fat
Pro Tip: Pine nut butter adds a unique richness that’s both creamy and luxurious—try swapping the citrus zest for orange if you like a softer note.
3. Green Keto Power Shake with Pine Nuts & Pomegranate
Ingredients:
1.25 cups unsweetened nut milk
1 scoop pea protein
½ cup baby spinach or kale
1 Tbsp pine nuts, ground
1 Tbsp pomegranate seeds
1 tsp vanilla extract
1–2 tsp sweetener (optional)
Ice
Directions:
Blend all except pomegranate until smooth.
Stir or layer in the seeds for a beautiful visual effect.
Macros: ~7g net carbs, 20g protein, 15g fat
Why you’ll love it: The greens add nutrients and color, but the pine nut and pomegranate balance the flavor beautifully.
4. Avocado & Pine Nut Keto Meal Replacement Shake
Ingredients:
1 cup unsweetened almond milk
¼ cup coconut cream or 2 Tbsp heavy cream
½ avocado
1 scoop pea protein
1 Tbsp ground pine nuts
1 Tbsp pomegranate seeds
Sweetener to taste
Ice
Directions:
Combine everything but pomegranate in the blender and blend until creamy.
Top with pomegranate seeds.
Macros: ~8g net carbs, 22g protein, 23g fat
Pro Tip: This is the most satiating shake on the list—great for days when you need to stay full for hours.
5. Spiced Pomegranate Keto Breakfast Shake
Ingredients:
1.25 cups nut milk (almond or coconut)
1 scoop pea protein
1 Tbsp pine nut butter or chopped pine nuts
1 Tbsp coconut cream
Pinch of cinnamon and ginger
1 Tbsp pomegranate seeds (stirred in after blending)
Ice
Sweetener to taste
Directions:
Blend everything except pomegranate.
Stir seeds in or sprinkle on top.
Macros: ~6g net carbs, 20g protein, 18g fat
Why you’ll love it: Warm spices make this shake feel cozy and comforting—perfect for cool mornings.
Practical Tips for Shake Success
Prep ahead: Pre-portion your dry ingredients in jars. Add milk and blend in the morning.
Go portable: Use a shaker bottle if you don’t have time to blend—just shake extra hard and use pine nut butter instead of whole nuts.
Customize: Adjust fat and protein to your needs by changing the amounts of pine nuts/cream and pea protein.
Carb count: Pomegranate is the main carb contributor. Stick to 1–2 Tbsp seeds per shake for best results.
Conclusion: The Future of Keto Breakfast Is Here
Don’t settle for boring mornings! With these five shakes, you can start each day with something creamy, colorful, and deeply nourishing—while still supporting your keto goals. The combination of pine nuts, pomegranate, and pea protein is not only innovative but also easy to fit into any meal-prep plan.
Try one tomorrow—then make it your own! Got a tweak, a favorite spice, or a new add-in? Share your version in the comments and let’s innovate together!
Ready to shake up your keto breakfast? Let’s make mornings exciting again—one pine nut, pomegranate, and pea protein shake at a time!
10 FAQs and Answers
1. Can I have these shakes every day on keto? Yes. As long as you manage the carb content (mainly from pomegranate seeds and milk), these shakes can be enjoyed daily. They provide balanced macros for a meal replacement and keep you in ketosis if you stick to the portion sizes.
2. How can I further lower the carbs in these shakes? Reduce or omit the pomegranate seeds, use unsweetened nut milks, and double-check your protein powder for hidden carbs. Adding more fat (like coconut cream or avocado) also improves satiety without raising carbs.
3. What are the benefits of using pea protein instead of whey or collagen? Pea protein is plant-based, hypoallergenic, and low in carbs. It’s a great choice for vegans, those with dairy allergies, or anyone looking to avoid animal-based ingredients while still getting a complete amino acid profile.
4. Do pine nuts have any health concerns I should be aware of? Pine nuts are generally healthy, but they are calorie-dense and contain moderate oxalates, so people with nut allergies or oxalate sensitivities should limit their intake or substitute with macadamia nuts or sunflower seeds.
5. Is it okay to prepare these shakes in advance? Absolutely. Prepare and refrigerate them up to 24 hours ahead for best texture. For longer storage, keep the dry ingredients separate and blend with fresh liquid in the morning.
6. Can I swap out the pomegranate seeds for another keto-friendly fruit? Yes. Use berries like raspberries or blackberries, which are lower in carbs. You can also try freeze-dried berry powder for flavor without extra carbs.
7. How do I make these shakes creamier? Add avocado, coconut cream, or use nut butters. Blending longer and using ice also creates a thick, creamy texture. For extra smoothness, grind pine nuts before blending.
8. What sweeteners work best for these shakes? Monk fruit, allulose, and stevia are all keto-friendly and won’t impact blood sugar. Taste and adjust, since some protein powders are already sweetened.
9. Are these shakes good for intermittent fasting? Yes, if used as your “break-fast” meal. They provide balanced nutrition and are easy on the stomach, making them ideal for breaking a fast while staying low-carb.
10. Can I use these shakes for weight loss? Definitely. These shakes are high in protein and healthy fats, which help control hunger and support muscle maintenance while reducing calories. Track your portions to align with your weight loss goals.
Strawberries on keto? Absolutely! While many people believe fruit is off-limits on a ketogenic diet, strawberries—in moderation—fit right into a low-carb lifestyle. Sweet, juicy, and bursting with flavor, strawberries can elevate your dessert game without tanking your carb count. In this blog post, I’m sharing five irresistible keto strawberry desserts that are practical for real life: they’re easy, delicious, and will satisfy your sweet tooth, all while keeping your macros on track.
Let’s dive into these guilt-free pleasures!
1. No-Bake Keto Strawberry Cheesecake Bites
Who doesn’t love a good cheesecake? Now, imagine all that creamy, tangy goodness transformed into adorable, bite-sized snacks that require no oven time. These cheesecake bites come together in minutes and are perfect for meal prep, after-dinner treats, or mid-day cravings.
Ingredients:
8 oz cream cheese, softened
1/3 cup powdered erythritol or monk fruit sweetener
1/2 tsp vanilla extract
1/2 cup diced strawberries or 1/4 cup freeze-dried strawberries (crushed)
1/2 cup almond flour
Optional: unsweetened coconut flakes or sugar-free chocolate chips for rolling/dipping
Directions:
Beat the softened cream cheese, sweetener, and vanilla until smooth.
Fold in strawberries and almond flour until you have a thick, scoopable dough.
Scoop out small portions and roll into balls.
Chill on a parchment-lined tray for 20 minutes. If desired, roll in coconut or dip in melted sugar-free chocolate.
Practical Tips:
Use freeze-dried strawberries for a stronger flavor and firmer texture.
Store in an airtight container in the fridge for up to 5 days, or freeze for a cool summer snack.
2. Creamy Strawberry Keto Chia Pudding
Busy mornings? Need an easy make-ahead breakfast or dessert? Keto chia pudding is your friend! Chia seeds soak up the liquid and thicken overnight, while strawberries lend a pop of sweetness and color.
Ingredients:
1 cup unsweetened almond or coconut milk
1/4 cup chia seeds
1/4 cup strawberries (fresh or frozen)
2-3 tbsp erythritol or monk fruit sweetener
1/2 tsp vanilla extract
Directions:
In a blender, puree strawberries with milk, sweetener, and vanilla.
Stir in chia seeds and pour into a mason jar or bowl.
Refrigerate for at least 4 hours, ideally overnight.
Stir before serving. Top with sliced strawberries, keto granola, or a dollop of whipped cream.
Practical Tips:
Double or triple the recipe for meal prep!
Layer with Greek yogurt or nut butter for a parfait-style treat.
3. Keto Strawberry Shortcake Mug Cake
Short on time but craving something special? This mug cake is a game-changer: you get all the nostalgia of strawberry shortcake, but it’s ready in under 5 minutes. Plus, it’s perfect for portion control.
Ingredients:
1 egg
3 tbsp almond flour
1 tbsp coconut flour
1 tbsp melted butter or coconut oil
1 tbsp erythritol or monk fruit sweetener
1/4 tsp baking powder
1/2 tsp vanilla extract
2-3 strawberries, diced
Directions:
In a large mug, whisk together the egg, sweetener, and melted butter.
Stir in almond flour, coconut flour, baking powder, and vanilla.
Gently fold in the strawberries.
Microwave for 90 seconds to 2 minutes, until set.
Let cool briefly, then top with keto whipped cream or a few more fresh berries.
Practical Tips:
Every microwave is different, so start with 90 seconds and add more time as needed.
For extra decadence, add a square of sugar-free white chocolate in the center before microwaving.
4. Keto Strawberry Fat Bombs
Fat bombs are a keto staple—and for good reason. They’re convenient, customizable, and crush sugar cravings. Add strawberries and you get a naturally sweet, refreshing twist perfect for summer!
Ingredients:
4 oz cream cheese, softened
4 oz unsalted butter or coconut oil, softened
1/4 cup strawberries, pureed or finely chopped
2-3 tbsp powdered sweetener
1/2 tsp vanilla or lemon zest (optional)
Directions:
Beat cream cheese, butter/coconut oil, sweetener, and vanilla until fluffy.
Fold in the strawberry puree.
Scoop into silicone molds or mini muffin liners.
Freeze for 1-2 hours, then pop out and store in a freezer bag or container.
Practical Tips:
For firmer fat bombs, use freeze-dried strawberries instead of fresh.
Experiment with flavor by adding a dash of lemon zest or swapping vanilla for almond extract.
5. Sugar-Free Strawberry Gelatin Parfaits
Craving a classic jello cup—but keto? These gelatin parfaits layer homemade sugar-free strawberry gelatin with whipped cream or mascarpone. They’re fun to eat, visually beautiful, and perfect for parties!
Ingredients:
1 cup fresh strawberries, pureed
1 cup water
1-2 tbsp powdered erythritol or monk fruit sweetener
1 tbsp grass-fed gelatin
1 cup heavy cream or mascarpone, whipped with sweetener
Directions:
Heat water and sweetener in a saucepan until steaming. Whisk in gelatin until dissolved.
Remove from heat and blend with strawberry puree.
Pour into small jars or cups and chill for 2-3 hours, until set.
Top with a swirl of whipped cream or mascarpone, and garnish with a sliced strawberry.
Practical Tips:
Use silicone molds for fun shapes, or layer in wine glasses for an elegant presentation.
Add a splash of lemon juice to enhance the strawberry flavor.
Final Thoughts
Keto desserts don’t have to be complicated—or boring. With a handful of fresh strawberries, the right keto-friendly ingredients, and a bit of creativity, you can enjoy indulgent sweets without the guilt. Whether you crave creamy cheesecake, fluffy cake, or refreshing gelatin, there’s a keto strawberry dessert here for every craving and every cook.
Ready to get started? Pick a recipe, share your creations with #KetoStrawberryDessert, and let me know your favorite in the comments. If you want even more keto dessert inspiration (or need help troubleshooting a recipe), just ask!
Pin this post for your next dessert craving, and happy low-carb baking! 🍓✨
10 Keto Strawberry Dessert FAQs
1. Can I use frozen strawberries in these recipes? Yes, frozen strawberries work well for all these recipes. Thaw them first and drain excess liquid for best texture, especially in no-bake and fat bomb recipes.
2. What are the best sweeteners for keto desserts? Erythritol, monk fruit, allulose, and stevia blends are excellent options. Powdered sweeteners dissolve more smoothly in no-bake recipes and fillings.
3. How do I calculate net carbs in these desserts? Net carbs are calculated by subtracting fiber and sugar alcohols (from keto sweeteners) from total carbohydrates. Always check labels, especially for almond flour and sweeteners.
4. How long can I store these desserts? Most no-bake and cheesecake-based desserts last 4–5 days refrigerated in airtight containers. Fat bombs and gelatin cups can be frozen for up to 1 month.
5. Can I make these recipes dairy-free? Absolutely! Substitute coconut cream for heavy cream and vegan cream cheese for dairy cream cheese. Use coconut oil or vegan butter in place of regular butter.
6. What can I use instead of almond flour for nut allergies? Sunflower seed flour or coconut flour can often be substituted. If using coconut flour, use only 1/3 the amount and add extra egg or liquid.
7. How do I keep my cheesecake bites from being too soft? Chill them well before serving. Using freeze-dried strawberries instead of fresh prevents excess moisture. You can also add a little more almond flour.
8. Can I make these desserts ahead for a party? Yes! All of these recipes can be prepared a day or two in advance. For best presentation, add whipped cream or garnishes just before serving.
9. Will these desserts raise my blood sugar? When made with approved keto sweeteners and portioned correctly, these desserts have minimal impact on blood sugar for most people. Monitor your own response if you’re sensitive.
10. Can I double or triple the recipes for meal prep or gatherings? Definitely. Most recipes scale easily. When increasing batch size, mix thoroughly for even distribution of ingredients, and adjust chill/bake times as needed.
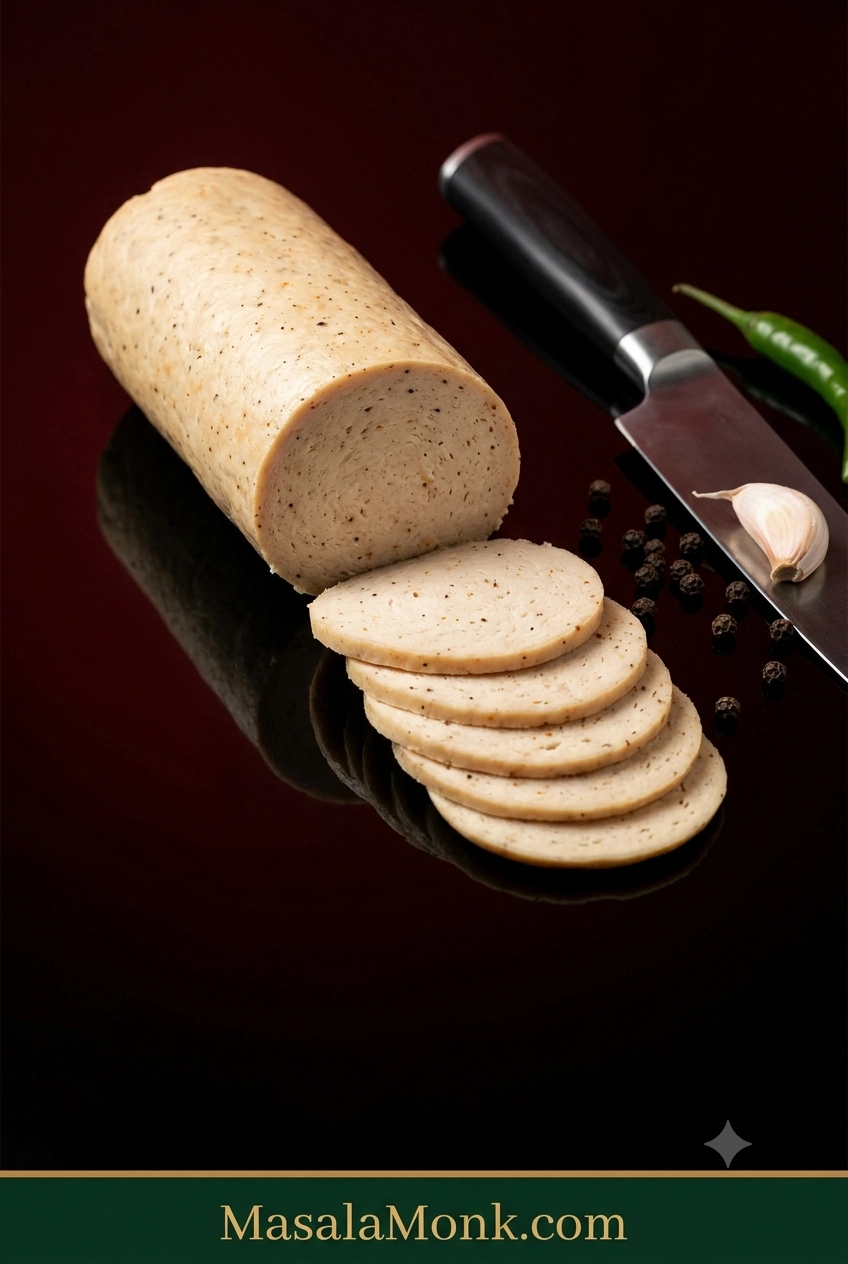
Cold from the fridge, a good slice of homemade chicken salami should bend a little before it breaks: fine-textured, juicy without being wet, peppery and garlicky, firm enough for a sandwich but nowhere near rubbery.
Thin slices sit neatly in toast or a roti wrap without crumbling through the filling, and the rest of the log waits in the fridge for breakfast or lunch tomorrow. Because you season the batch yourself, you decide whether it leans garlicky, peppery, smoky or hot with green chilli.
The ingredients are the easy part. Texture is where homemade chicken salami can get frustrating. The chicken stays loose instead of turning sticky, an ultra-lean batch dries out, air gets trapped through the middle, or the log gets sliced while it is still warm and seems much softer than expected.
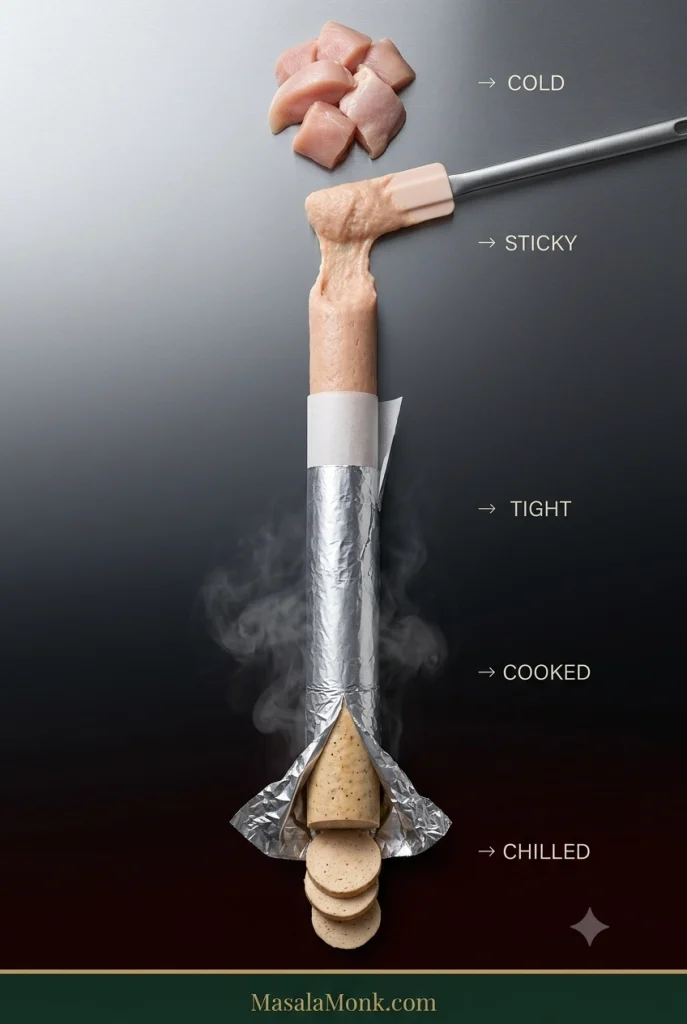
For this cooked deli-style version, a handful of details control almost everything: start with cold chicken, process it until sticky, pack the log tightly, cook it to temperature, and give it time to chill before slicing.
What we’re making: fully cooked, deli-style chicken salami—the soft sliced cold cut commonly used for sandwiches, breakfasts and wraps in India and across South Asia. It uses ordinary salt and spices, with no curing salt or separate preservative system, so it must stay refrigerated and has a short storage life. You won’t need a sausage casing, stuffer, grinder or curing chamber.
For one batch, use 500 g / 17.6 oz / about 1.1 lb cold chicken. A combination of breast and thigh gives you the mild flavour of breast with enough natural fat to help the salami stay tender.
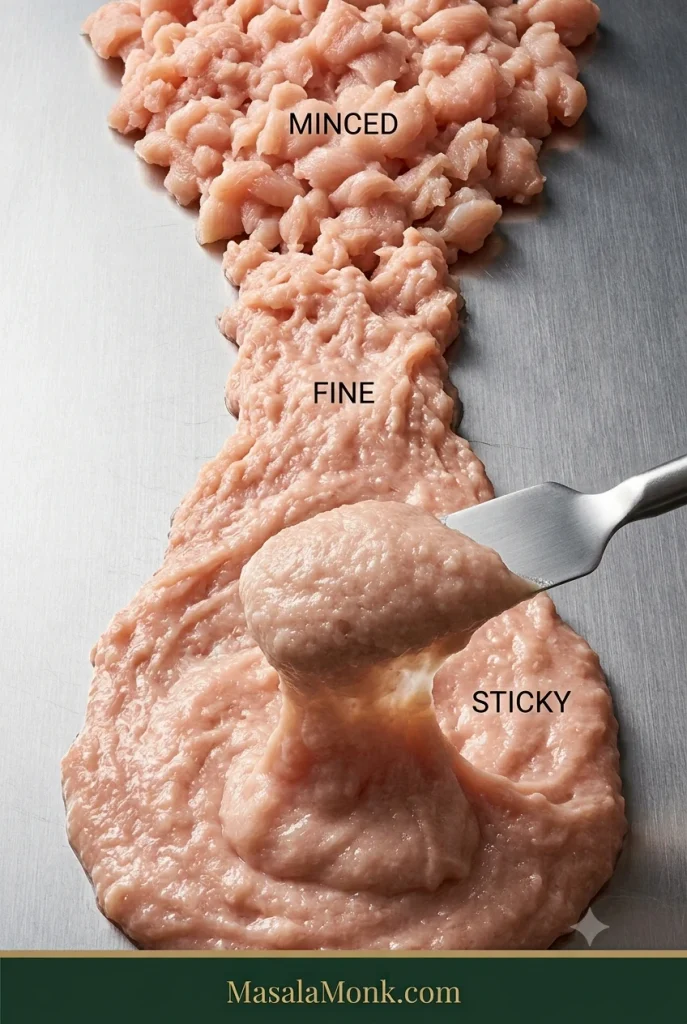
Process the chicken with 8 g salt, garlic, black pepper and spices. Start with 15 ml / 1 tbsp ice-cold water, adding more only if needed, until the chicken changes from mince into a fine, sticky paste that clings to itself.
Shape two compact logs around 5 cm / 2 inches in diameter, wrap the chicken in baking parchment and then foil, and steam until the centre reaches 165°F / 74°C. Chill for at least 4 hours; overnight gives the cleanest slices.
Homemade Chicken Salami Recipe
Make the simple version first. Fresh vegetables, sauces and other wet additions are much easier to judge once you’ve seen what the chicken should look and feel like when it is ready to shape.
Prep
About 20 minutes
Cook
Typically 30–45 minutes for 5 cm / 2-inch logs; finish by temperature
Chill
4 hours minimum; overnight best
Total
About 5 hours minimum, mostly chilling; overnight is easiest
Yield
2 short logs; roughly 4–6 servings depending on use
Equipment
Food processor or powerful food chopper
Digital kitchen scale
Silicone or rubber spatula
Baking parchment / parchment paper
Aluminium foil for the outer wrapper
Steamer, or a large covered pot with a rack
Digital food thermometer
Sharp slicing knife
Ingredients
Salt is 1.6% of the chicken by weight. Egg white and cornstarch are optional alternatives, not ingredients you need together.
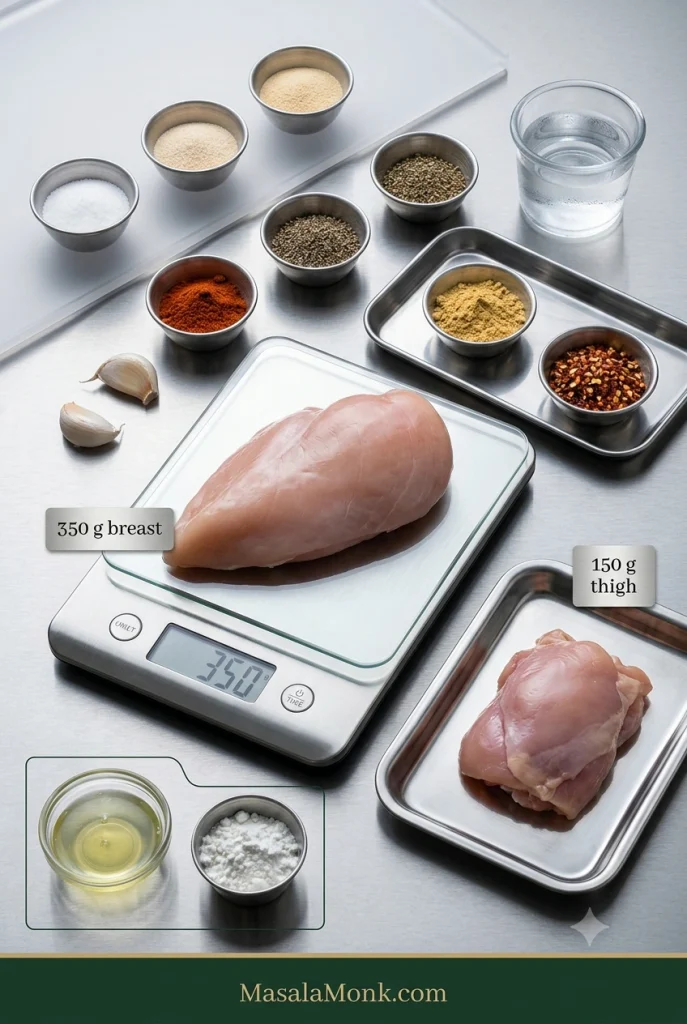
350 g / 12.3 oz boneless, skinless chicken breast, very cold
150 g / 5.3 oz boneless, skinless chicken thigh, very cold
8 g fine salt — about 1⅓ tsp fine table salt; weighing is strongly preferred because different salts fill a spoon differently
6 g garlic, about 2 medium cloves, finely grated or crushed
Onion powder — 1 tsp
Freshly ground black pepper — 1 tsp
Sweet or smoked paprika — 1 tsp
Mustard powder — ½ tsp
Red chilli flakes — ¼–½ tsp, optional
15–30 ml / 1–2 tbsp ice-cold water — start with 1 tbsp and add more only as needed
Optional binder
8 g / about 1 tbsp cornstarch (often called cornflour in India and the UK), or
1 large egg white
The base recipe works without either. Egg white gives a firmer, slightly springier slice; cornstarch adds a little extra structure without egg. If using egg white, begin without added water and add ice water a teaspoon at a time only if the processor needs it.
Raw-chicken note: there is no need to rinse chicken before processing it. Rinsing can splash raw poultry juices around the sink and nearby surfaces. Keep raw chicken and its utensils away from ready-to-eat foods, wash your hands well, and clean the processor parts, knife, board and work surface thoroughly afterwards.
Instructions
1. Get the chicken fridge-cold
Start with visibly cold chicken pieces. If the bowl warms before the mixture turns tacky, pause and chill.
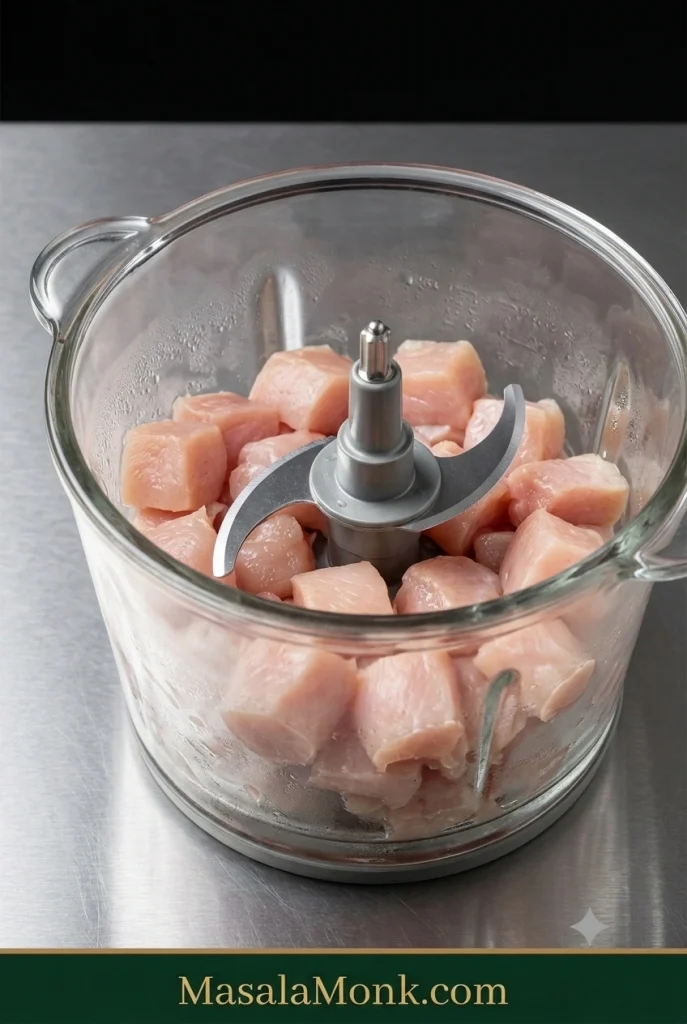
Cut the breast and thigh into roughly 2–3 cm / 1-inch pieces. Meat that has warmed while you gathered everything else can go back into the refrigerator for 15–20 minutes. In a hot kitchen, chilling the processor bowl and blade helps too.
A small processor is better handled in two batches. Keep the first batch chilled while you process the second, then combine them briefly at the end. Crowding the bowl makes the chicken process less evenly and gives it more time to warm up.
2. Start the sticky bind
Add the cold chicken and 8 g salt to the processor. Pulse until the larger pieces have broken down, then process briefly until the meat becomes finer.
Add the garlic, onion powder, black pepper, paprika, mustard and chilli flakes, along with the optional cornstarch or egg white if using.
3. Add the ice water gradually
Start with 1 tbsp / 15 ml ice-cold water and process in short bursts. A stiff mixture that the processor is struggling to move can take a little more, added a teaspoon at a time, up to another tablespoon.
The chicken should look moist and workable. A loose or runny paste has gone too far in the other direction.
4. Let the texture tell you when to stop
Loose mince should become a fine, sticky paste that moves with the spatula as one mass.
At first you have chopped chicken, then fine mince. Keep going and the texture changes again: the meat begins pulling together into one tacky mass instead of behaving like hundreds of separate grains.
Press a little against a spoon or clean palm. It should cling. Lift some with the spatula and the rest of the meat paste should tug along with it.
Fine, sticky and holding together as one mass is the endpoint. If the bowl starts getting warm before you reach that stage, stop and refrigerate the chicken for 10–15 minutes. Once the mixture is already fine and tacky, stop processing and move on.
5. Cook a tiny seasoning test
Fry about a teaspoon of the mixture in a small pan until completely cooked, then taste it. The garlic, pepper, chilli and paprika should come through clearly. Cold food mutes aroma and spice a little, so the hot test piece can taste a touch bolder than you want the final chilled slice without becoming aggressively salty.
Adjust the seasoning now. Use this little patty for flavour rather than texture; a hot fried spoonful and an overnight-chilled steamed log will feel very different.
6. Shape two tight logs
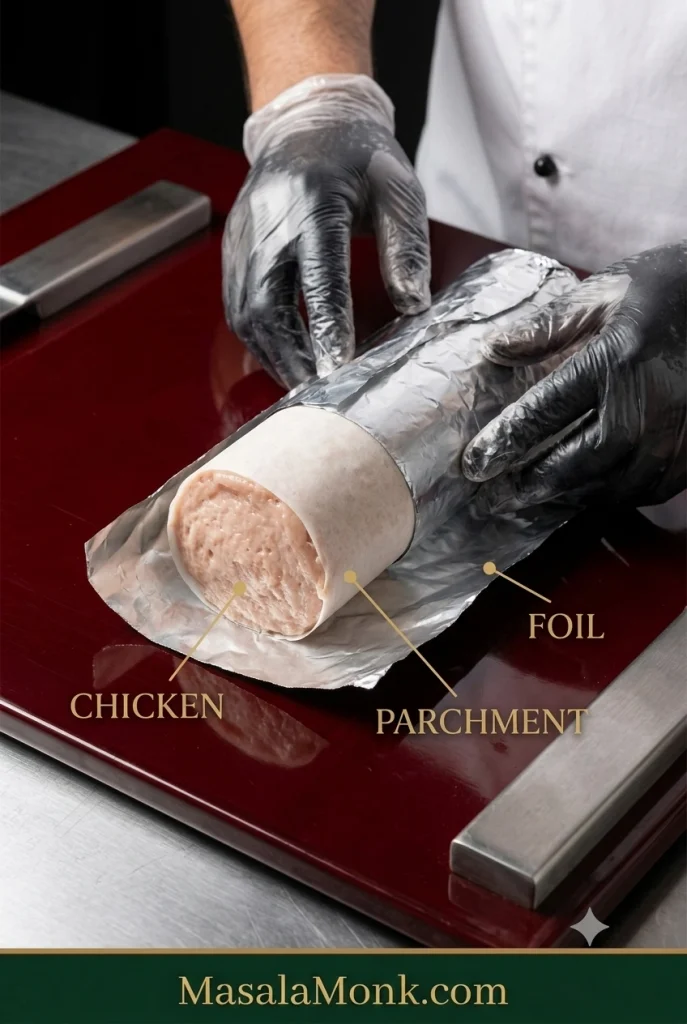
Chicken touches parchment first; foil stays outside as support while the log cooks.
Divide the chicken between two sheets of baking parchment and compact each portion into a cylinder around 5 cm / 2 inches in diameter. Press firmly as you shape and work obvious pockets of air toward the ends. A ruler-straight cylinder is unnecessary; reasonably even thickness and a snugly packed centre are enough.
Roll the parchment around the chicken and twist or fold the ends closed. Wrap each parchment-covered log in foil. The parchment stays between the meat and the aluminium.
7. Steam to 165°F / 74°C
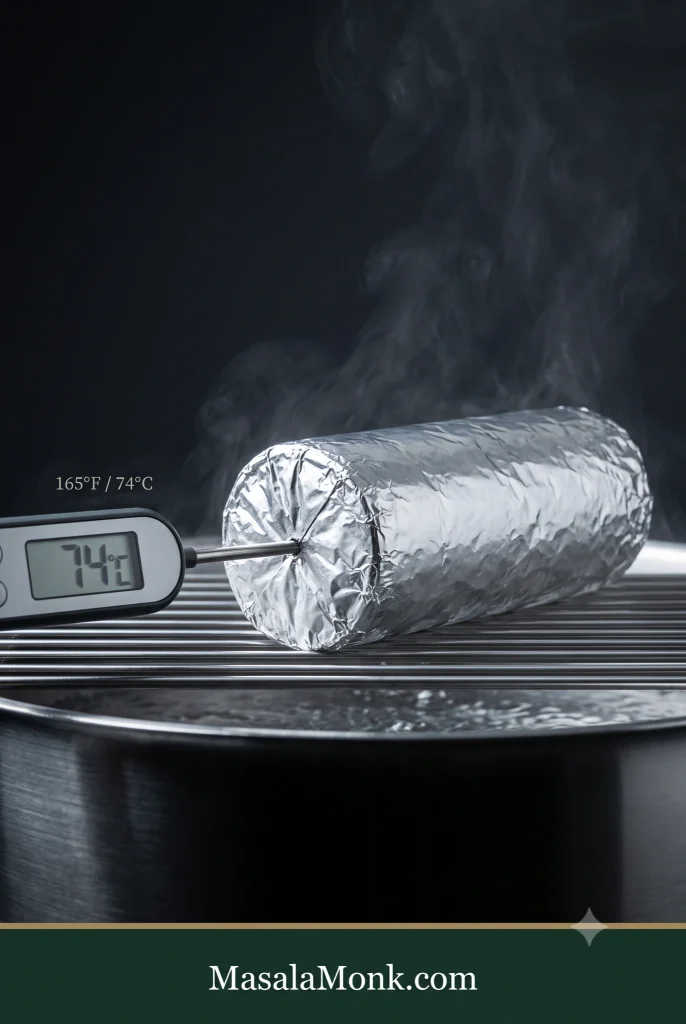
Insert the probe through one end and aim for the centre: 165°F / 74°C.
Bring the water in a steamer or covered pot to a steady simmer. Place the logs above the water and cover.
For logs around 5 cm / 2 inches thick, begin checking at about 25–30 minutes. Many batches take roughly 30–45 minutes, but diameter, starting temperature and the steaming setup all affect the timing.
Slide the thermometer probe through one end of the log and aim for the centre. Ground poultry should reach 165°F / 74°C according to USDA safe-temperature guidance. Remove the log once the centre reaches that temperature.
8. Let the steam escape, then refrigerate
Leave the cooked logs for about 10–15 minutes, then carefully loosen the wrapper enough to release the heavy steam. Blot away obvious surface moisture.
Move the salami to the refrigerator promptly. Keep the total time at room temperature under 2 hours—or under 1 hour if the room is hotter than 90°F / 32°C.
9. Chill, unwrap and slice
Refrigerate the salami for at least 4 hours. Overnight gives the neatest texture. A freshly cooked log can feel surprisingly soft, so wait until it is completely cold before deciding how the final texture turned out.
Unwrap the chilled log. Pat the surface dry if needed, then cut with a sharp knife. Rewrap the unsliced portion or move it to an airtight container straight away.
What Good Homemade Chicken Salami Looks Like
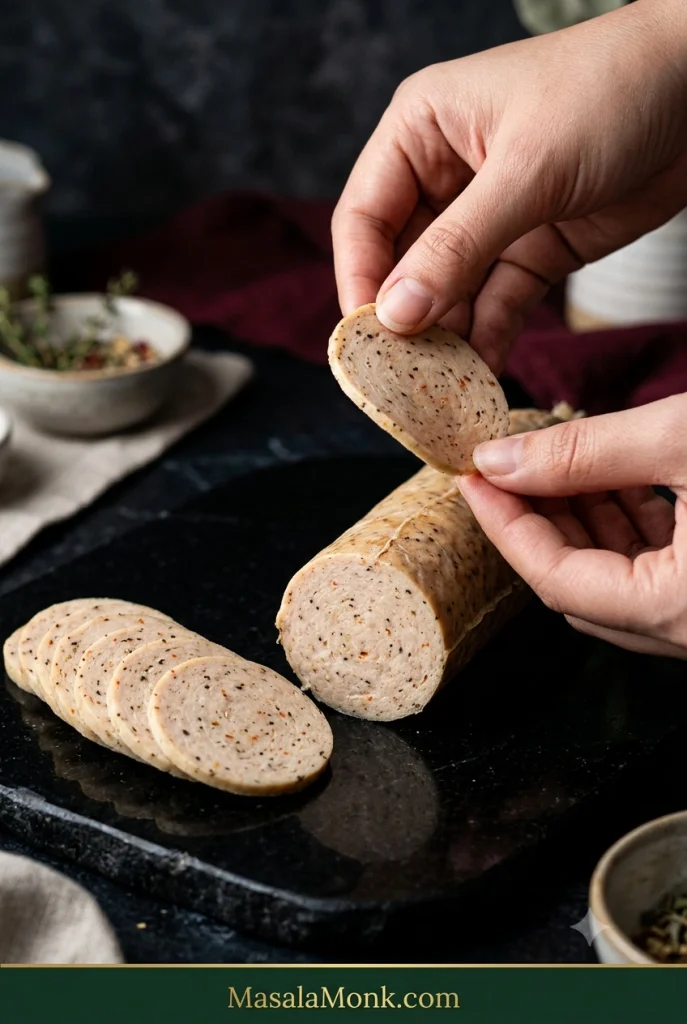
Judge the texture only when cold: a good slice lifts cleanly, stays cohesive and still bends a little.
Before worrying about whether your salami looks exactly like a packet from the supermarket, cut one cold slice and look at what it actually does.
Texture: fine and even rather than visibly granular like a burger.
Slice: sturdy enough to pick up cold, with a little tenderness and bend.
Moisture: juicy without large watery or oily pockets.
Interior: fairly even, with no large tunnels from trapped air.
Colour: naturally beige, pale brown or faintly rosy depending on the chicken and spices.
Flavour: savoury and aromatic enough to remain interesting straight from the refrigerator.
Packet chicken salami can be exceptionally smooth and springy because commercial producers can control particle size, mixing and temperature very precisely and may also use starches, fibres or proteins to shape the texture. A home batch can feel a little more meat-like and still slice beautifully.
For straightforward chilled chicken without the fine salami texture, the simpler baked chicken breast recipe may suit you better.
Cold → sticky → tight → cooked → chilled. If a slice fails, work backward to find which stage went wrong.
The recipe tells you what to do. This is the bit that explains why it works.
Salt and mixing draw out muscle proteins that make the chicken tacky. That stickiness helps the meat hold moisture and natural fat more evenly as it cooks, which is why a properly processed paste slices so differently from simply seasoned mince.
This recipe also takes the chicken finer than you would for a coarse fresh sausage. Here the goal is a smooth deli-style slice, so visible chunks of mince aren’t what you’re aiming for. Advice to stop grinding early can make perfect sense for another sausage and still give you the wrong texture here.
What each stage controls
Cold. A food processor creates heat quickly. Fridge-cold chicken gives you more working time, and a bowl beginning to feel warm belongs back in the refrigerator for a few minutes.
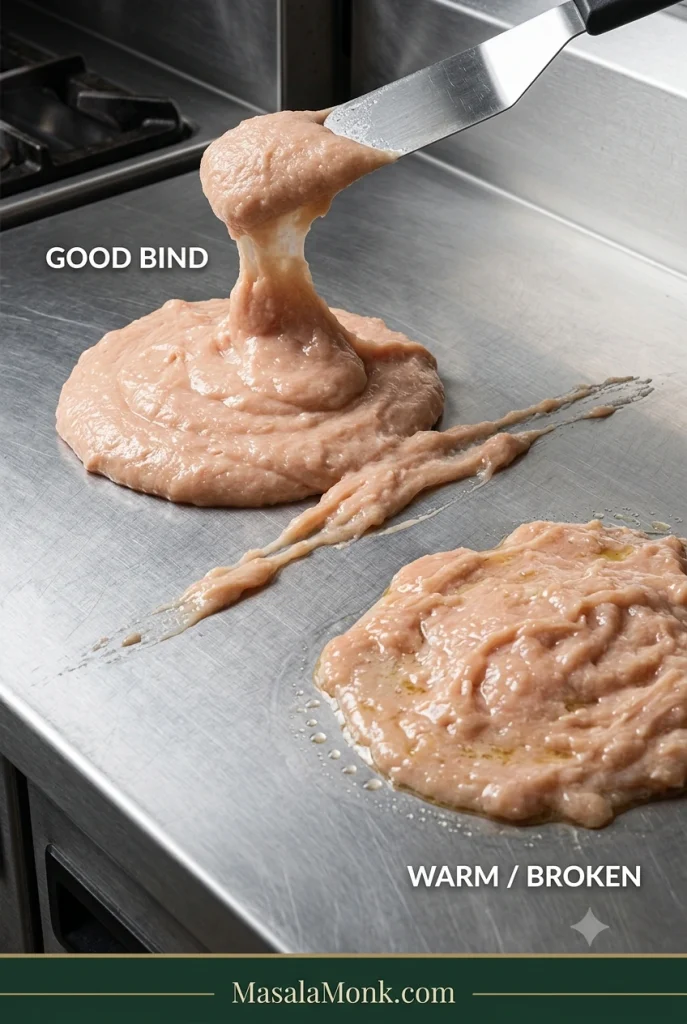
Sticky. Watch the bowl instead of the clock: loose mince → fine mixture → sticky paste that clings to itself. Stop at loose mince and the chilled salami may crumble. Once the meat is already tacky, extra processing mostly gives it more time to warm.
Sticky paste should lift cohesively. A loose, greasy sheen means the mixture needs chilling before shaping.
Tight. Compact the paste firmly enough to push out obvious pockets of air. Tiny bubbles in an otherwise good slice aren’t worth worrying about; large tunnels mean the next log needs tighter packing.
Cooked. A thick log simply needs longer than a thin one. Keeping the diameter around 5 cm / 2 inches makes the timing more predictable, while the thermometer takes the guesswork out of the centre.
Chilled. Cooking sets the log; refrigeration firms it. The cold slice should stay in one piece when you lift it, even if it still bends a little between your fingers.
Breast or thigh?
Chicken
What it gives you
Watch for
Breast only
Lean, mild, pale
Dries out most easily if cooked too far
Thigh only
Juicier and richer
Stronger chicken flavour and naturally more fat
Breast + thigh
Balanced flavour, juiciness and structure
Easiest place to start
Ground chicken
Convenient and already minced
Results depend on how lean the mince is
The 350 g breast + 150 g thigh mix gives a first batch some protection against dryness while keeping the flavour mild and chicken-forward. Fresh ground chicken works too; use 500 g as-is when it contains both light and dark meat.
Very lean breast mince needs closer temperature control and can benefit from the optional egg white or cornstarch. If an all-breast batch feels too lean, increasing the proportion of thigh is usually simpler than trying to rescue it with melted butter or oil. That little bit of dark meat is especially noticeable once the salami is cold, when dryness has nowhere to hide.
Egg, cornstarch—or neither?
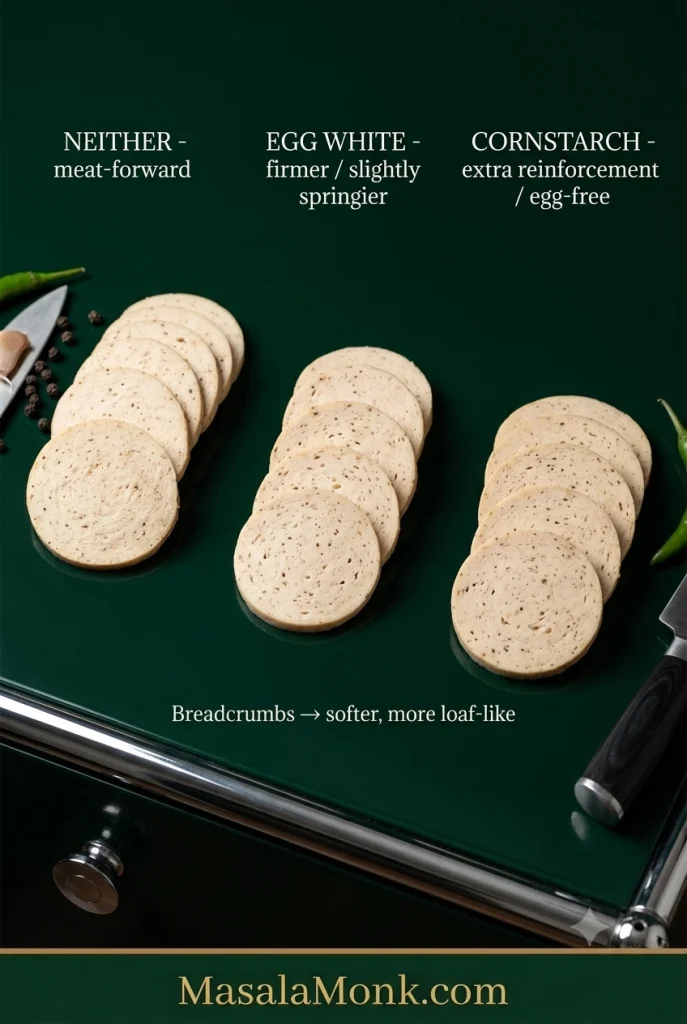
A strong sticky bind can work without extras; egg white and cornstarch make the slice firmer in different ways.
The chicken can hold together without an added binder. Cold meat, enough salt and enough mixing to reach the sticky stage matter more.
No added binder: the most meat-forward result and a good fit for the breast-thigh mixture once you’ve developed a strong sticky texture.
Egg white: gives a firmer, slightly springier slice and can be helpful with very lean chicken.
Cornstarch: adds a little extra reinforcement and is the obvious egg-free option.
Breadcrumbs: work, but move the texture toward a softer sausage loaf or meatloaf rather than a fine deli-style slice.
Egg or starch can help with firmness and moisture retention. If the mixture never became sticky, fix that before changing the recipe. Gelatin belongs to a different luncheon-meat method in which cooked meat and liquid are moulded and set as they chill.
For familiar round slices, put parchment directly against the chicken and use foil on the outside to reinforce the cylinder. Twist or fold the parchment ends firmly. Reasonably even thickness and a tightly packed centre matter more than a machine-perfect shape.
Don’t want to roll a cylinder? Pack the chicken firmly into a lightly oiled or appropriately lined heatproof mould, cover it and cook to the same internal temperature. The slices will be square or rectangular, which happens to fit sandwich bread rather nicely.
Once the paste is cold, sticky and tightly packed, most of the texture work is already done. From here, the cooking method matters less than keeping the heat sensible and stopping when the centre reaches the right temperature.
Steamer, Covered Pot, Oven or Air Fryer?
Steaming is still the easiest first choice for the soft, even deli-style texture we’re after. A covered pot can do essentially the same job, while the oven and air fryer are useful when that’s what you already have.
Method
Starting point
What to expect
Steam
Begin checking around 25–30 min
Soft, even deli-style texture; best first method
Covered pot + rack
Same general timing as steaming
Nearly the same result without a dedicated steamer
Oven
330°F / 165°C; begin checking around 30 min
Slightly firmer exterior
Air fryer
About 330°F / 165°C to start
More dry heat around the outside; easier with smaller logs
No steamer?
Keep the wrapped log above the waterline on a stable rack or trivet; it should cook in steam, not water.
Add a few centimetres of water to a large pot and set a rack, trivet or sturdy heatproof inverted bowl above the waterline. Put the wrapped logs on top, cover tightly and keep the water at a steady simmer. The chicken should sit in steam rather than in the water.
Some home recipes simmer a tightly wrapped log directly in hot water. Keeping this version above the waterline reduces the chance of water finding its way into the parcel, so steaming is the baseline method here.
Oven method
Place the parchment-and-foil-wrapped logs on a baking tray and bake at 330°F / 165°C. Begin checking the centre around 30 minutes and remove the salami when it reaches 165°F / 74°C.
Air fryer method
Smaller logs are easier to manage in an air fryer. Start around 330°F / 165°C, follow your appliance guidance for foil or wrapped foods, and cook to the same internal temperature instead of relying on one universal time.
After Cooking: Colour, Chilling & Clean Slices
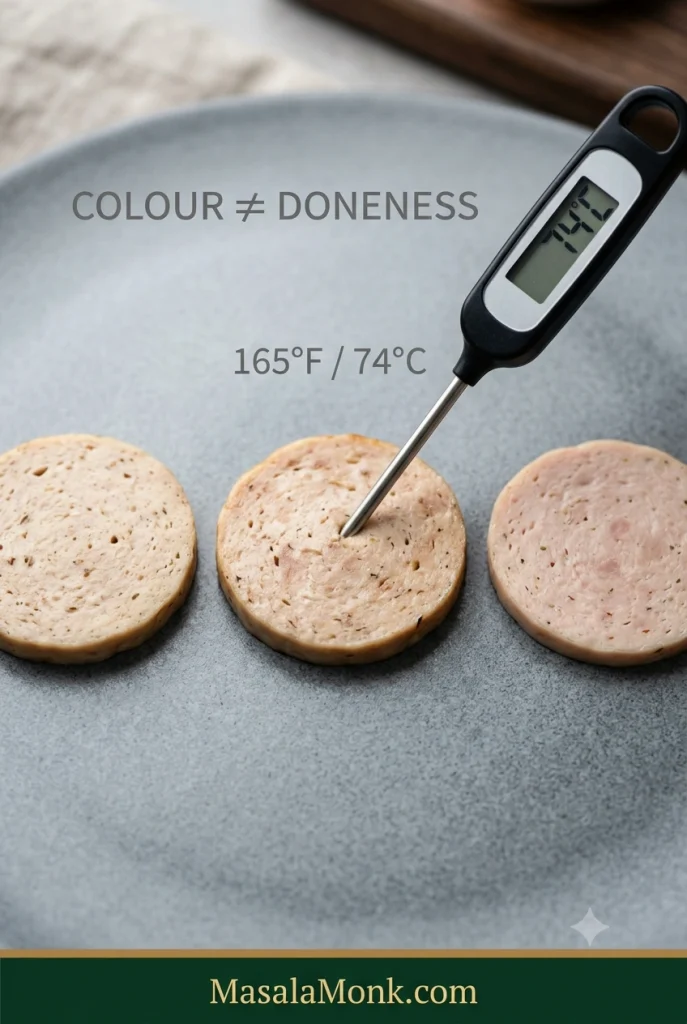
Beige, pale brown or faintly rosy can all be normal. Use 165°F / 74°C, not colour, to judge doneness.
Use the thermometer for doneness rather than trying to read the colour. This is uncured cooked chicken, so the inside may be beige, pale brown or faintly rosy. It does not need the even pink colour associated with many commercial cured cold cuts.
If you simply prefer a rosier appearance, a little beetroot juice can tint the meat. Replace some of the recipe’s ice water with the same amount of beet juice so the total liquid stays under control. It changes the colour and adds a faint earthy note; it does not change the cooking temperature or preserve the salami.
For thin deli-style slices, chill first
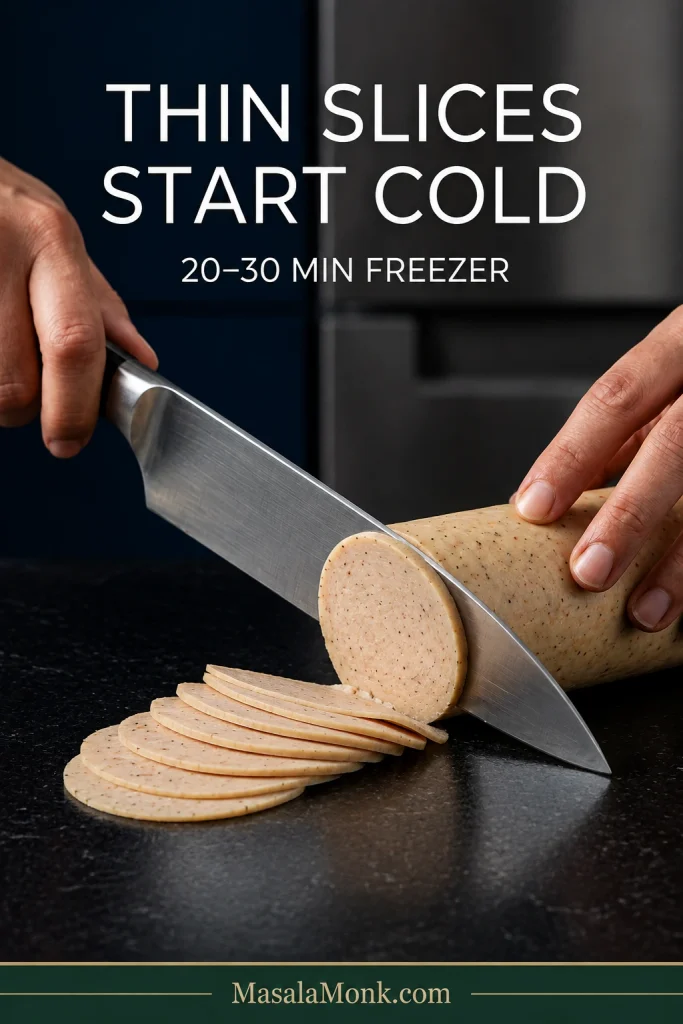
For thinner slices, chill until firm, then use a long clean knife stroke without pressing hard.
Start with completely cold salami and a sharp knife. Overnight refrigeration gives the easiest slicing. For finer rounds, put the chilled log in the freezer for 20–30 minutes so it firms up without freezing solid.
Don’t worry if the first few slices are thicker than deli-counter cuts. A clean slice that lifts intact matters more than getting it paper-thin.
Those thin slices are particularly good with egg and cheese; MasalaMonk’s breakfast sandwich guide has more ideas for breads, eggs, cheeses and sauces around them.
Chicken Salami Troubleshooting
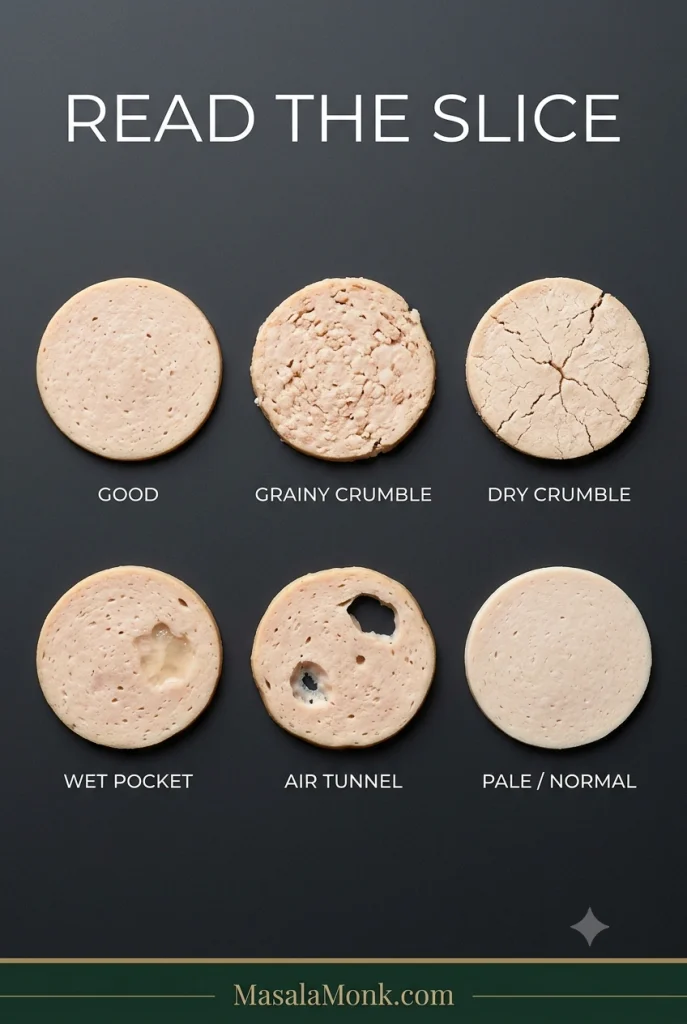
Read the whole slice: graininess, dry fracture, wet pockets and large tunnels point to different problems.
“Crumbly” can mean several different things. Look at the cold slice first; it usually tells you more than automatically adding extra egg, starch or water to the next batch.
What you see
First thing to try
Cold slices crumble into meat grains
Keep the chicken colder and process until genuinely sticky
Dry, crumbly slices
Use some thigh and stop cooking at 165°F / 74°C
Greasy puddle around the log
Keep the mixture colder and avoid large amounts of rendered fat
Wet or jelly-like pockets
Reduce free liquid and squeeze wet aromatics
Large holes through the slices
Pack the log more firmly
Pale or greyish interior
Usually normal for uncured chicken; check temperature, not colour
The cold slice crumbles into little pieces
Think back to the processor. Did the chicken ever reach the point where it clung to the spatula and pulled together as one mass? If it never did, start there rather than immediately increasing the binder.
Warm meat, very coarse processing, dramatically reduced salt or a generous amount of onion juice or sauce can all weaken the structure. Egg white or cornstarch can offer extra support, but they work best after the chicken itself has reached that sticky stage.
It is dry, mealy or strangely bouncy
All-breast chicken is easier to dry out, particularly when it cooks far beyond the safe endpoint. Thigh gives you more natural fat and moisture to work with.
A mealy or almost tofu-like bite can also turn up in a very lean, unstable mixture. At the opposite extreme, lots of processing and binder can push the texture toward an overly springy bounce. Think back to the earlier target: cold, cohesive and tacky—not warm and greasy.
There is grease, water or empty space inside
A teaspoon or two of cooking juice around the salami is ordinary. By contrast, a noticeable puddle of grease suggests that fat separated somewhere along the way, often because the chicken warmed up before its structure was properly developed.
Wet pockets point more toward excess free liquid. Start with less ice water next time and remember that fresh onion, sauces, yogurt and citrus juice all count toward the moisture in the bowl. Vinegar and generous amounts of lemon juice need care too: enough acid in the raw mixture can work against the sticky texture you’re trying to build. Add that sharpness later with chutney, mustard, pickles or a squeeze of citrus at the table.
Large air tunnels are simpler. Pack the next log more firmly. Tiny bubbles in an otherwise good slice aren’t worth worrying about.
Change the aromatics, not the moisture balance: drain olives well and keep generous chutneys or citrus for serving.
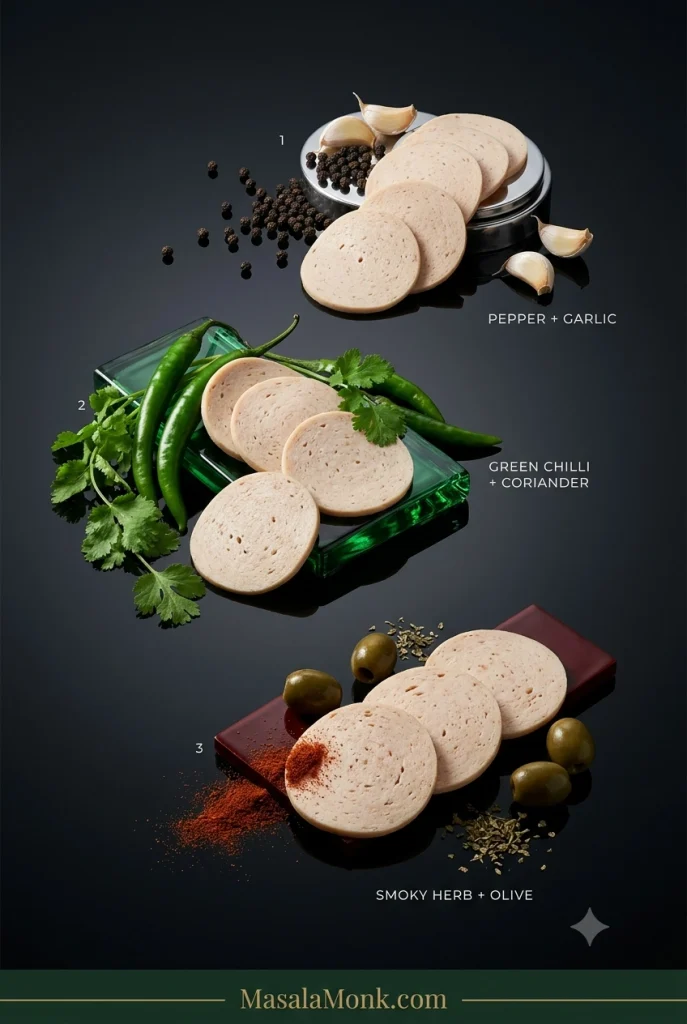
Once you know what the basic chicken paste should feel like, keep the meat, salt and moisture balance steady and change the aromatics around them.
Pepper & Garlic
Keep the garlic from the base recipe, increase the black pepper to about 1½ tsp, keep the mustard and use sweet or smoked paprika. Leave out the chilli flakes for a gentler version.
It stays savoury and peppery even when cold, which makes it particularly good in sandwiches. A little honey mustard gives those flavours a sweet-sharp edge.
Ginger, Green Chilli & Coriander
Add 1 tsp finely grated ginger, 1 small green chilli and 2 tbsp finely chopped coriander. Keep the black pepper, and add chilli flakes only if you want another layer of heat.
The ginger and coriander keep the flavour fresh while the green chilli brings heat without flooding the chicken with sauce. Serve the slices with a thick green chutney for a brighter sandwich or roti wrap.
Smoky Herb & Olive
Use 1–1½ tsp smoked paprika, ½ tsp dried oregano, ¼ tsp dried thyme and 1–2 tbsp finely chopped, well-drained green olives. Add a small pinch of chilli flakes if you like.
Pat the olives dry before chopping. Their salty, briny flavour is welcome; a pocket of olive brine inside the salami isn’t.
Once There’s a Cold Log in the Fridge
Serve the slices cold in sandwiches and wraps, or brown them briefly for breakfast—the salami is already fully cooked.
It earns its fridge space quickly. Brown a couple of slices and add a fried egg for breakfast, or keep them cold with cucumber, lettuce, tomato, pickles, mustard and cheese. Shredded cabbage or crisp coleslaw is especially good against the softer salami.
For a quick roti wrap, add sliced onion, cucumber and green chutney, then squeeze over lime just before eating. When packing it for school or work, use an insulated lunch bag with a cold pack.
The salami is already cooked, so pizza, pasta and omelettes only need enough extra heat to warm or brown it. Add thin rounds toward the end of pizza baking, fold diced pieces into eggs, or colour thicker slices briefly in a pan before tossing them through pasta.
If both logs aren’t going to disappear into breakfasts, sandwiches and wraps within the next few days, freeze the second one while it’s still fresh.
How to Store and Freeze Homemade Chicken Salami
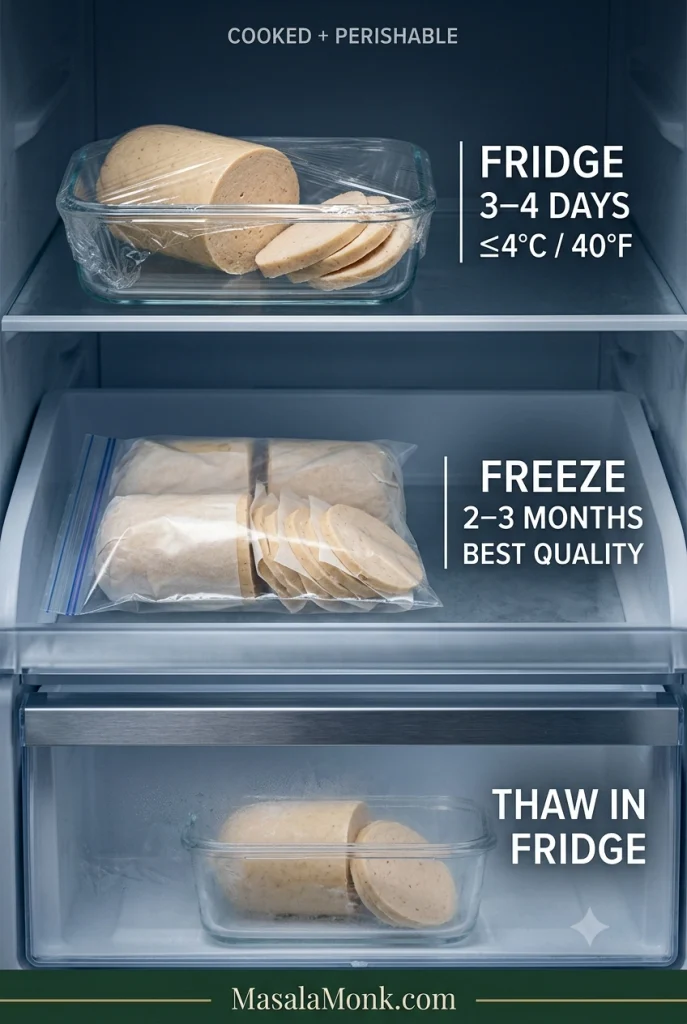
Treat this as cooked perishable chicken, not shelf-stable salami.
Refrigerate for 3–4 days, or freeze meal-sized portions for 2–3 months for best quality.
Refrigerator
Wrap a completely cold log tightly or transfer it to an airtight container. Cover cut surfaces once you begin slicing so they don’t dry out.
Freeze half logs or meal-sized portions rather than one large block. For sliced salami, put small sheets of parchment between portions so they separate easily.
Two to three months is a useful freezer window for best quality. Food kept continuously frozen remains safe beyond that, but flavour and texture gradually decline.
Thawing
Thaw the salami in the refrigerator. A frozen-and-thawed slice may be a little softer than one cut from a freshly chilled log, particularly with very lean or wetter batches.
That short refrigerator life is also the clearest reminder that this recipe is a very different thing from traditional dry salami.
Cooked Chicken Salami vs Traditional Dry-Cured Salami
Fermentation, controlled humidity and weeks of drying belong to a different process from this fully cooked, refrigerated chicken salami.
Traditional dry salami is perfectly possible to make at home, but it is a different project. Depending on the style, it can involve precisely measured curing ingredients, starter cultures, fermentation, appropriate casings, controlled temperature and humidity, and weeks of drying.
That process deserves a validated recipe of its own. Smell and appearance alone cannot establish that raw cured meat is safe, and curing products with different formulations should not be swapped spoon-for-spoon because their names look similar.
For this cooked chicken version, the rule is much simpler: cook the ground poultry fully, chill it promptly and keep it refrigerated.
A Few Remaining Questions
Does this use curing salt or added preservatives?
No. This version uses ordinary salt, but no curing salt or separate preservative system. Keep it refrigerated and use it within 3–4 days, or freeze it.
Does the chicken have to touch aluminium foil?
No. Baking parchment sits directly against the chicken and the foil goes around the outside for support. A covered heatproof mould is another option if you prefer not to use a foil-wrapped log.
Can I make it without a food processor?
Very finely ground chicken can be mixed vigorously with salt until tacky to make a coarser cooked sausage. For the smooth deli-style texture in this recipe, a food processor or powerful chopper is strongly preferred.
Can I freeze the slices?
Yes. Chill the salami completely first, freeze meal-sized portions with parchment between the slices, and thaw what you need in the refrigerator.
Can I use turkey, pork or beef?
The general cooked-log idea can be adapted, but this recipe is formulated around chicken. Ground turkey should also reach 165°F / 74°C. For ground pork and ground beef, use at least 160°F / 71°C. Different meats have different fat levels, so expect some change in texture rather than treating them as exact one-for-one substitutions.
Is homemade chicken salami healthy?
Homemade does not automatically mean healthier. Making the salami yourself gives you control over the chicken, salt, seasonings and optional binder, while the nutritional picture still depends on those choices and on portion size. It is better thought of as a homemade cooked cold cut than as a health food.
The Best Part Comes the Next Morning
After a night in the refrigerator, the knife should pass through cleanly and the cold slice should lift in one piece.
Brief pan contact adds browned flavour to already-cooked slices while keeping the centres tender.
Eat it cold, or give a couple of slices a minute in a hot pan until the edges brown and the garlic wakes up again. Add an egg, toast and mustard—or a swipe of green chutney—and breakfast is done.
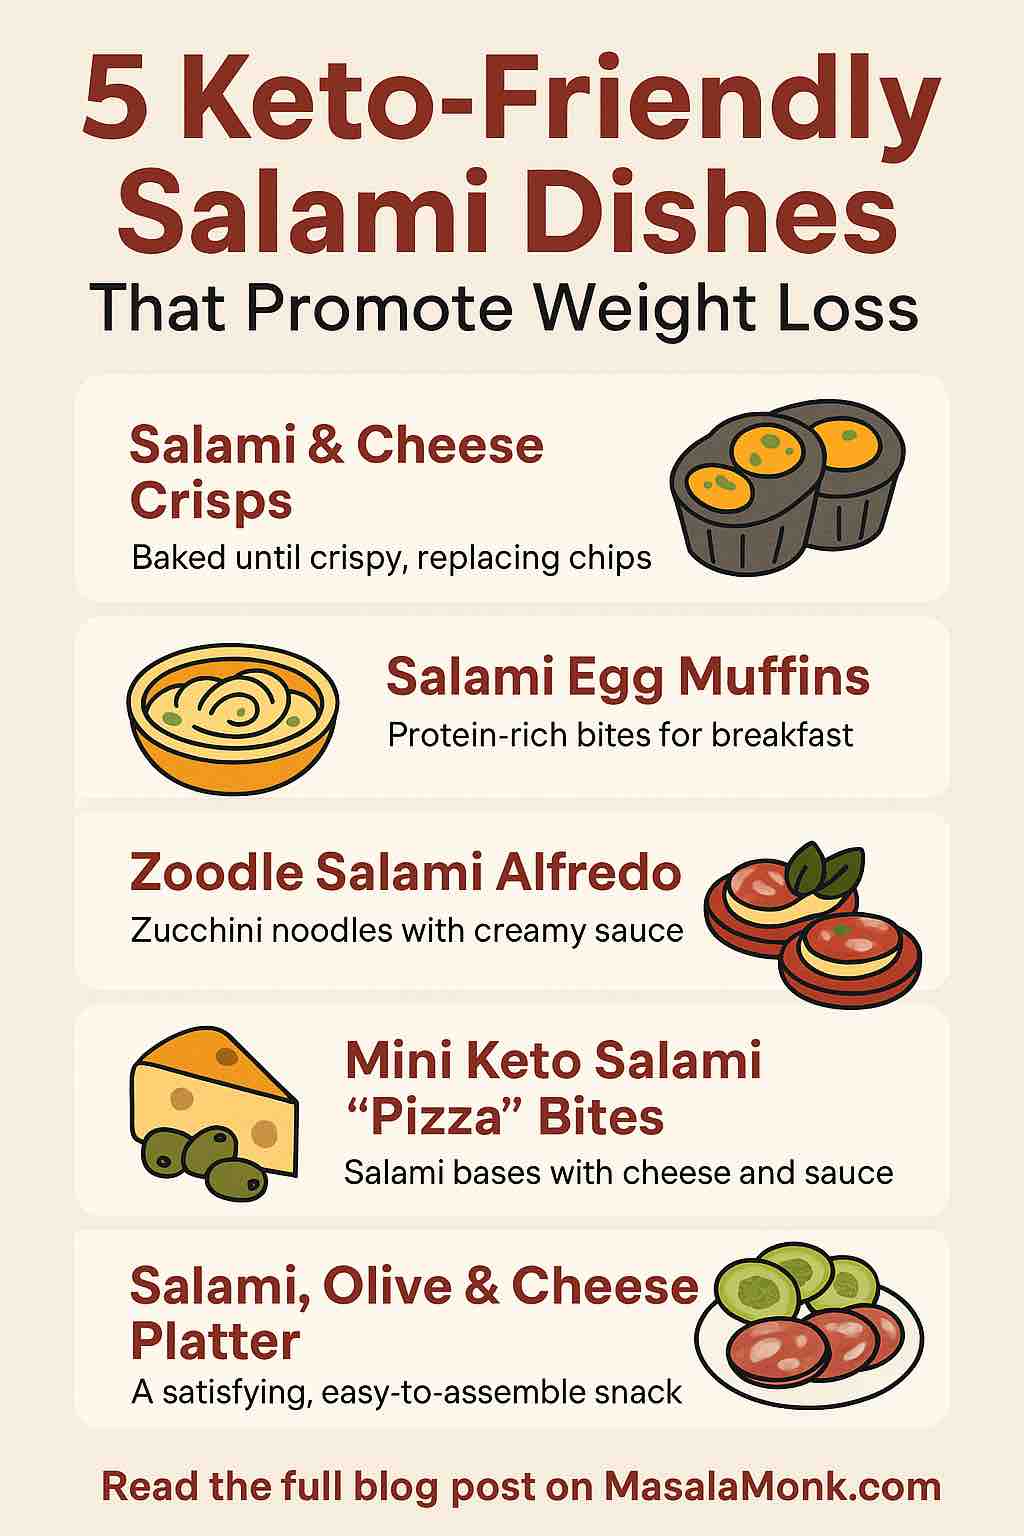
If you’re following a keto lifestyle and want variety, satisfaction, and simplicity in your meals, salami can be your secret weapon. Salami isn’t just for charcuterie boards—it’s a high-protein, high-fat, ultra-low-carb ingredient that can transform everyday keto cooking. But there’s more to it than just taste: let’s explore the latest science, answer common questions, and discover 5 delicious keto-friendly salami dishes that support real, sustainable weight loss.
Why Salami on Keto? Science & Nutrition Breakdown
Salami is a cured sausage made primarily from pork or beef, salt, and spices. For keto eaters, it offers:
Very low net carbs: Typically <1g per 100g.
High in fat & protein: 31g fat and 21g protein per 100g, supporting ketosis and satiety.
B-vitamins, iron, and zinc: Supporting metabolism and immune health.
Convenience: No cooking required for most recipes; portable and satisfying.
Recent studies and nutritionists agree: Foods that are high in protein and fat, but low in carbs, help suppress appetite and preserve muscle mass during weight loss. Salami fits these macros perfectly. The key is moderation and ingredient quality—look for nitrate/nitrite-free options, and don’t rely solely on processed meats.
1. Salami & Cheese Crisps (The Ultimate Keto Snack)
Why this works: Baking salami and cheese together creates crunchy, flavorful crisps that curb cravings for chips—without the carbs or guilt. They’re perfect for snacking or party platters.
How to make it:
Preheat oven to 400°F (200°C).
Lay thin salami slices on a parchment-lined tray.
Top each with shredded Parmesan or mozzarella.
Bake for 5-8 minutes, or until golden and crisp.
Cool and enjoy!
Macros: <1g net carb per serving. High in protein and fat.
Practical tip: Store in an airtight container for grab-and-go snacks. Kids love them, too!
Why this works: Eggs and salami provide protein, fat, and micronutrients—keeping you full for hours and helping avoid mid-morning cravings.
How to make it:
Preheat oven to 375°F (190°C).
Line muffin tin cups with salami slices.
Crack in one egg per cup (or scramble if preferred).
Add spinach, herbs, and a sprinkle of cheese.
Bake 12-15 minutes, until eggs are set.
Macros: ~2g net carbs per muffin (varies by add-ins).
Practical tip: Make ahead for busy mornings—these store well in the fridge for up to 4 days.
3. Zoodle Salami Alfredo (Pasta Without the Guilt)
Why this works: Zucchini noodles (“zoodles”) swap out high-carb pasta for fiber and hydration. Creamy Alfredo sauce and savory salami add richness and flavor—making this dish deeply satisfying.
How to make it:
Spiralize 2-3 zucchini and sauté briefly in olive oil.
Add 1/4 cup heavy cream, 2 tbsp butter, and 1/2 cup Parmesan for Alfredo sauce.
Toss in sliced salami (about 2 oz per serving) and cook until warmed through.
Season with pepper, garnish with parsley.
Macros: ~4g net carbs per bowl (mainly from zucchini).
Practical tip: For extra nutrition, toss in spinach, mushrooms, or chopped olives.
4. Mini Keto Salami “Pizza” Bites
Why this works: Mini salami “pizzas” capture all the flavor of your favorite slice—without dough, gluten, or carbs.
How to make it:
Arrange salami slices on a baking sheet.
Spread each with a teaspoon of low-carb marinara or tomato paste.
Add shredded mozzarella and a sprinkle of Italian herbs.
Broil for 2-3 minutes, until bubbly.
Macros: ~1g net carb per pizza bite (depends on sauce).
Practical tip: Perfect for party trays or kid-friendly snacks!
Why this works: This balanced “charcuterie box” provides protein, fat, and fiber—excellent for lunchboxes, travel, or office snacks. Olives add healthy fats and micronutrients.
How to make it:
Arrange 4-6 slices of salami, 2 oz cubed cheese, a handful of olives, and sliced cucumber or celery on a plate or in a bento box.
Optionally add nuts (macadamia or almonds) for extra crunch.
Macros: ~2-3g net carbs per serving (from veggies/olives).
Practical tip: Pre-pack several boxes at the start of the week for “keto fast food” on busy days.
The Latest Science: Does Salami Help With Weight Loss?
Keto diets work by reducing carbs, so your body burns fat for fuel. Salami supports this with high fat and protein, nearly zero carbs, and high satiety.
Appetite control: Research shows that protein- and fat-rich foods like salami, eggs, and cheese can help reduce hunger, making it easier to maintain a calorie deficit for weight loss.
Portion control is key: While keto-friendly, salami is also calorie-dense and high in sodium. Use as part of a balanced plate, not the sole protein source.
Tip: Always choose the highest-quality, minimally processed salami you can find—ideally organic, nitrate/nitrite-free, and with clear labeling.
Practical Tips for Including Salami in a Healthy Keto Diet
Balance processed meats with fresh vegetables and whole-food fats (avocado, olives, nuts).
Stay hydrated: Keto and salty foods can increase water loss.
Watch sodium and portion size: Too much can stall weight loss for some people.
Mix and match: Pair salami with a variety of cheeses, veggies, and sauces for endless combinations.
Conclusion: Salami Can Be Keto Gold—With the Right Approach
When used mindfully, salami is a versatile, satisfying ingredient that fits perfectly into a keto weight loss plan. The five recipes above are just the start—experiment, enjoy, and keep your meals interesting and convenient.
Remember: Keto works best when it’s sustainable, balanced, and delicious. Let salami add flavor and variety, but always aim for a colorful, nutrient-dense plate.
Want More Recipes or Tips?
Let me know if you want printable recipes, weekly meal plans, or a shopping guide for the best keto-friendly salami brands. Your keto journey should be tasty, practical, and full of real results!
Have you tried any keto salami dishes? Which is your favorite? Share your tips or questions below!
10 FAQs for Keto-Friendly Salami Dishes
1. Is salami really keto-friendly? Yes, most traditional salami is very low in carbohydrates—often less than 1 gram per serving—making it a great fit for keto. Always check the label for added sugars or fillers.
2. How much salami can I eat on keto? Moderation is key. While salami is low in carbs, it is calorie-dense and high in sodium. A reasonable serving is 1–2 ounces (about 4–6 slices) as part of a balanced meal.
3. What should I look for when buying salami for keto? Choose nitrate/nitrite-free, minimally processed options with simple ingredients (meat, salt, spices). Avoid salamis with added sugars or starches.
4. Is it okay to eat salami every day on keto? It’s best to enjoy salami a few times a week and not as your main protein source. Combine it with a variety of other proteins and plenty of non-starchy vegetables.
5. Does eating salami help with weight loss? Salami’s high protein and fat content can boost satiety and help control appetite. However, weight loss depends on overall calorie intake and lifestyle habits.
6. Can I eat pre-sliced packaged salami? Yes, but check the ingredients list for added sugars or unnecessary additives. When possible, buy from the deli counter for fresher, cleaner options.
7. What are some good foods to pair with salami on keto? Cheese, olives, avocado, nuts, leafy greens, and low-carb veggies like cucumbers and bell peppers all pair well with salami and keep meals balanced.
8. How can I reduce sodium intake when eating salami? Balance your diet with fresh, unsalted foods like vegetables and drink plenty of water. If sodium is a concern, choose lower-sodium brands or limit portion sizes.
9. Are there vegetarian or vegan alternatives to salami for keto? There are plant-based deli slices made from tofu or seitan, but check carb counts and ingredients, as many contain higher carbs and added fillers.
10. Can I meal prep with salami? Absolutely! Salami keeps well and is perfect for prepping snack boxes, wraps, or egg muffins ahead of time. Store in an airtight container in the fridge.
There are few foods as beloved—and as scientifically intriguing—as the humble avocado. Once considered a trendy “superfood,” this creamy green fruit is now a staple in kitchens worldwide. But what does the latest science say about avocados, health, and weight loss? Do they actually help you lose weight, or are their powers overhyped? Let’s go deeper.
Section 1: The Avocado—A Nutritional Powerhouse
Avocados aren’t your average fruit. While apples and oranges are high in carbs and natural sugars, avocados deliver healthy fats, fiber, and a spectrum of essential nutrients:
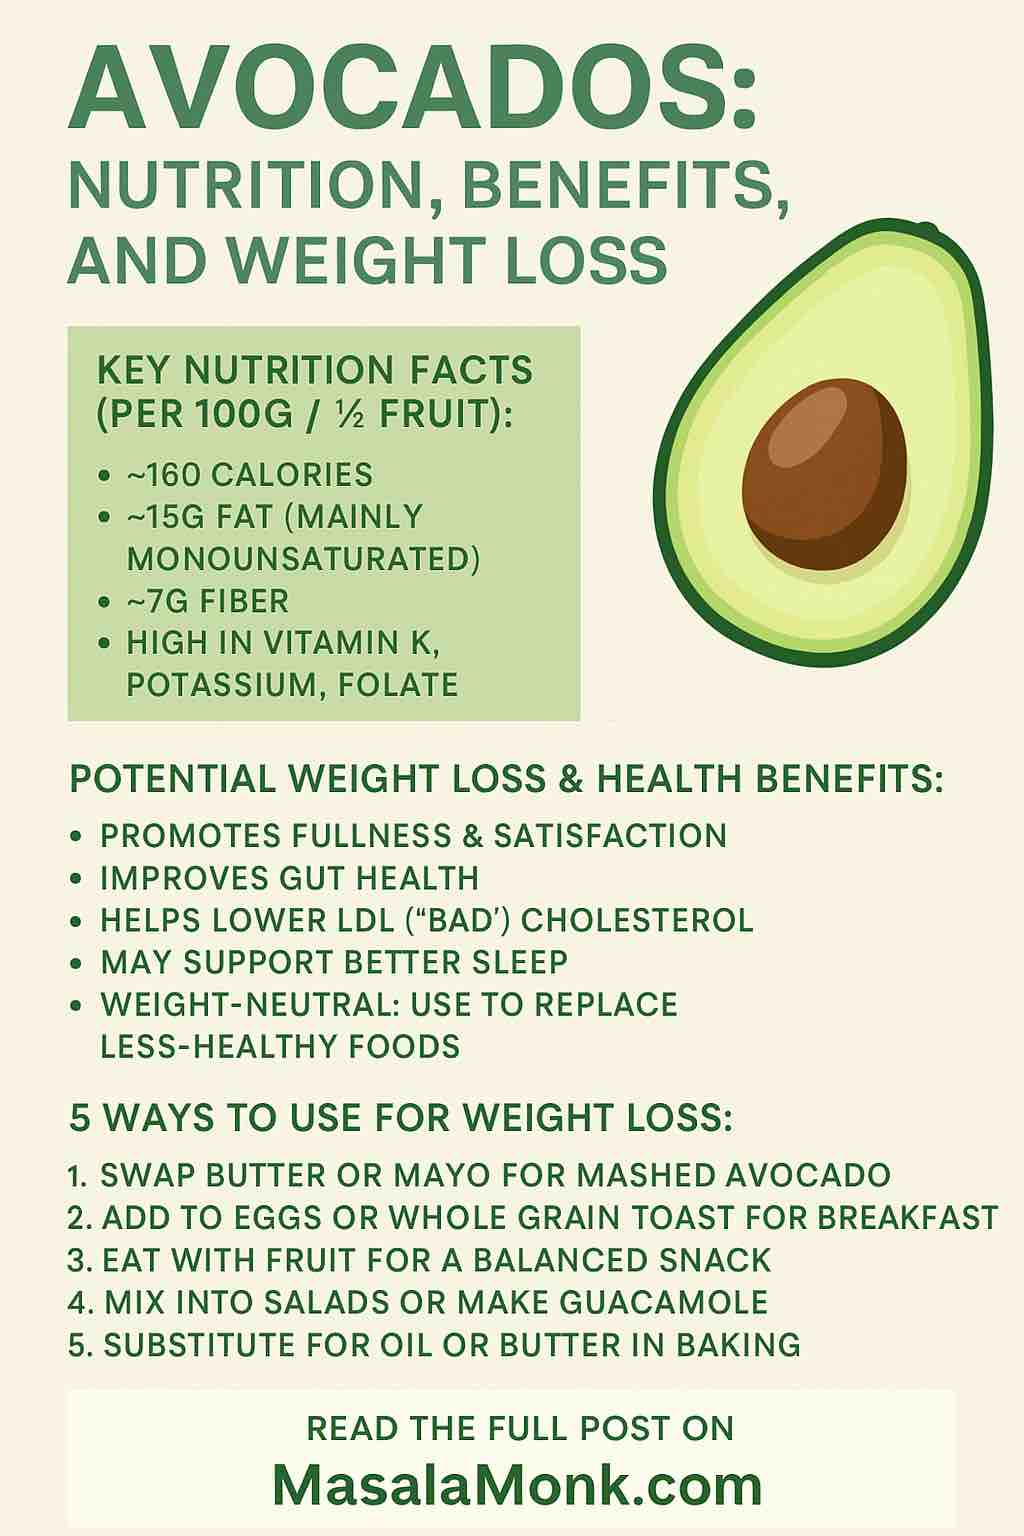
What’s In an Avocado? (per 100g / ~half a medium fruit):
Calories: ~160 kcal
Fat: 15g (most is monounsaturated, like olive oil’s heart-healthy oleic acid)
Carbs: 9g (but 7g is fiber—so net carbs are very low)
Protein: 2g
Vitamins: K, E, C, B5, B6, Folate
Minerals: Potassium (even more than bananas!), magnesium, copper
Phytonutrients: Lutein & zeaxanthin for your eyes
Bottom line: Avocados are nutrient-dense, low in sugar, and loaded with fiber and good fats.
Section 2: Health Benefits—What Does the Latest Science (2025) Show?
1. Fullness & Weight Management
The unique combo of fiber and monounsaturated fat keeps you full for hours, reducing the urge to snack.
Clinical trials show meals with avocado increase satiety, often leading to fewer calories eaten later in the day.
2. Gut & Microbiome Health
Recent research (2025, multi-month RCT) found that eating avocado daily increases beneficial gut bacteria and overall microbial diversity—good for digestion, immunity, and possibly even mood.
3. Heart & Metabolic Health
Large-scale studies link regular avocado consumption to lower LDL (“bad”) cholesterol, higher HDL, and better blood pressure—thanks to its fiber, potassium, and healthy fats.
Substituting carbs with avocado in meals trends toward better blood sugar and reduced inflammation.
4. Sleep Quality (Brand-New Discovery)
A 2025 clinical trial (969 adults!) found that eating an avocado daily improved sleep duration and quality, even among those struggling with abdominal weight.
Better sleep can indirectly support weight loss by reducing cravings and stabilizing appetite hormones.
5. Body Weight: Realistic Expectations
Here’s the truth: Avocados aren’t “fat-burning” by themselves.
Studies show they’re “weight-neutral”—you won’t lose fat by adding them to a junk-food diet, but using avocado to replace less healthy foods can help with overall weight management and metabolic health.
Section 3: Practical Cautions
Calorie Density: One avocado = ~240 calories. Not a reason to avoid them, but portion control matters if you’re watching calories.
Vitamin K: High levels may interfere with blood thinners—if you’re on medication, talk to your doctor.
Section 4: 5 Practical Ways to Use Avocado for Weight Loss
1. Swap for Spreads
Replace butter, mayo, or cream cheese with mashed avocado on toast or sandwiches. You’ll save calories, increase fiber, and feel fuller.
2. The Satisfying Breakfast
Add half an avocado to scrambled eggs or on whole grain toast. The fat + fiber combo keeps hunger away all morning.
3. Smarter Snacks
Try avocado with a little salt and lemon, or pair slices with apple or pineapple. Balanced, filling, and won’t spike blood sugar.
4. Upgrade Your Salads
Toss diced avocado into your salads, or blend it into creamy, homemade dressings. You’ll increase fiber and actually absorb more nutrients from your veggies.
5. Bake & Blend
Swap butter or oil for mashed avocado in recipes (like muffins or brownies) for moisture and nutrition—without sacrificing flavor. Or add to smoothies for creaminess.
Section 5: Tips for Success (Backed by Science)
Replace, Don’t Add: Avocados work best when they take the place of less healthy fats or carbs, not just as an extra.
Stick to ½–1 Avocado a Day: More isn’t better; balance is key.
Pair with Protein: For extra staying power, combine avocado with eggs, chicken, fish, or beans.
Embrace the Variety: Try avocado toast, guac, salads, sushi, smoothies, even desserts!
Conclusion
Avocados are more than a trend—they’re a research-backed superfood that can support a healthy lifestyle, better sleep, gut health, and more. While they’re not a “miracle weight loss food,” practical use can help you eat better, feel satisfied, and reach your goals.
Give avocado a central role in your kitchen—your body (and maybe your sleep) will thank you!
🥑 Avocado FAQ: 10 Common Questions Answered
Q: Can I eat avocado every day? A: Yes! Most studies use ½ to 1 avocado daily. This amount is safe and beneficial for most people, supporting heart, gut, and even sleep health.
Q: Will eating avocado make me gain weight? A: Not if you watch your portions. Avocados are calorie-dense, so use them to replace less healthy fats or snacks—not as an “add-on”—to help with weight management.
Q: Is avocado keto-friendly or low-carb? A: Absolutely. Avocados are very low in net carbs and high in healthy fat and fiber, making them perfect for keto and low-carb diets.
Q: Are there any people who should avoid avocados? A: If you take blood thinners (like warfarin), consult your doctor—avocado is high in vitamin K. Also, rare allergies exist.
Q: Can avocado really improve sleep? A: Yes! A 2025 clinical trial found daily avocado intake improved sleep duration and quality, possibly due to its healthy fats and magnesium.
Q: What’s the healthiest way to eat avocado? A: Raw or minimally processed—on toast, in salads, as guacamole, or blended in smoothies. Heating is fine but keep added sugars and oils low.
Q: How do I store an avocado to keep it fresh? A: Store ripe, uncut avocados in the fridge. Once cut, sprinkle with lemon or lime juice, cover tightly, and refrigerate to slow browning.
Q: Is avocado good for cholesterol and heart health? A: Yes. Avocado’s monounsaturated fats and fiber help lower LDL (“bad”) cholesterol and support healthy blood pressure.
Q: How can avocado help with weight loss? A: Its high fiber and healthy fat promote fullness and satisfaction, which can reduce snacking and overall calorie intake when used in place of more processed foods.
Q: What’s the best portion size for weight loss? A: ½ to 1 medium avocado per day is ideal. This gives health benefits without excess calories, especially if you use it as a swap for higher-calorie spreads or snacks.