If you’re following a keto lifestyle and want variety, satisfaction, and simplicity in your meals, salami can be your secret weapon. Salami isn’t just for charcuterie boards—it’s a high-protein, high-fat, ultra-low-carb ingredient that can transform everyday keto cooking. But there’s more to it than just taste: let’s explore the latest science, answer common questions, and discover 5 delicious keto-friendly salami dishes that support real, sustainable weight loss.
Why Salami on Keto? Science & Nutrition Breakdown
Salami is a cured sausage made primarily from pork or beef, salt, and spices. For keto eaters, it offers:
- Very low net carbs: Typically <1g per 100g.
- High in fat & protein: 31g fat and 21g protein per 100g, supporting ketosis and satiety.
- B-vitamins, iron, and zinc: Supporting metabolism and immune health.
- Convenience: No cooking required for most recipes; portable and satisfying.
Recent studies and nutritionists agree: Foods that are high in protein and fat, but low in carbs, help suppress appetite and preserve muscle mass during weight loss. Salami fits these macros perfectly. The key is moderation and ingredient quality—look for nitrate/nitrite-free options, and don’t rely solely on processed meats.
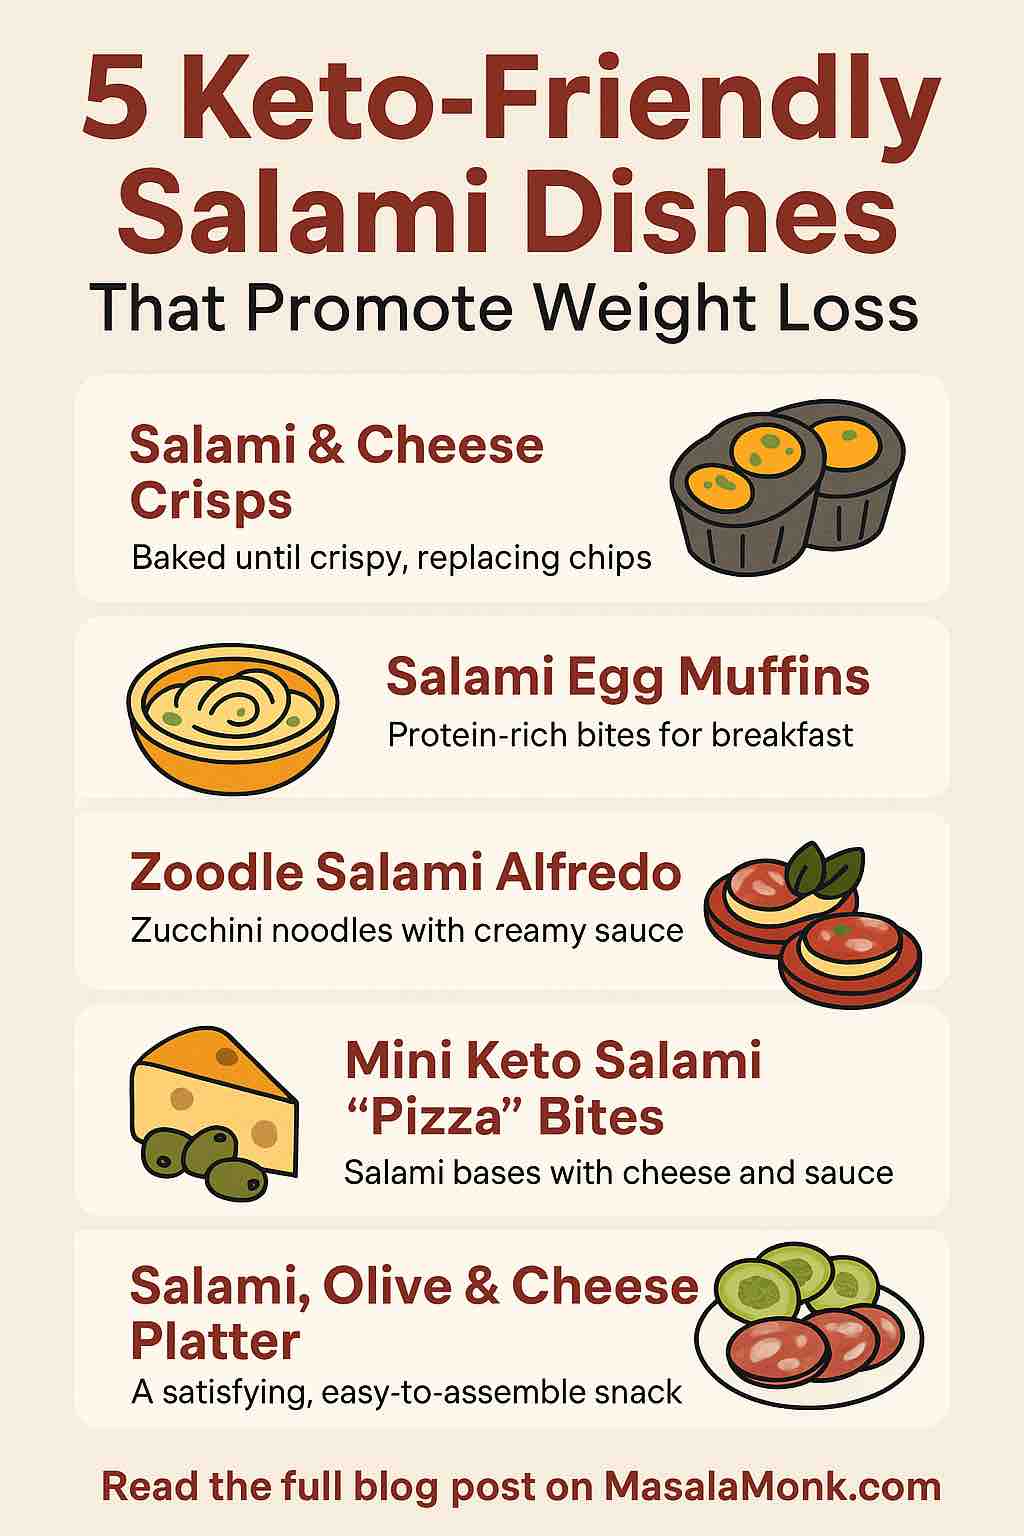
1. Salami & Cheese Crisps (The Ultimate Keto Snack)
Why this works:
Baking salami and cheese together creates crunchy, flavorful crisps that curb cravings for chips—without the carbs or guilt. They’re perfect for snacking or party platters.
How to make it:
- Preheat oven to 400°F (200°C).
- Lay thin salami slices on a parchment-lined tray.
- Top each with shredded Parmesan or mozzarella.
- Bake for 5-8 minutes, or until golden and crisp.
- Cool and enjoy!
Macros:
<1g net carb per serving. High in protein and fat.
Practical tip:
Store in an airtight container for grab-and-go snacks. Kids love them, too!
2. Salami Egg Muffins (Easy Keto Breakfast Meal Prep)
Why this works:
Eggs and salami provide protein, fat, and micronutrients—keeping you full for hours and helping avoid mid-morning cravings.
How to make it:
- Preheat oven to 375°F (190°C).
- Line muffin tin cups with salami slices.
- Crack in one egg per cup (or scramble if preferred).
- Add spinach, herbs, and a sprinkle of cheese.
- Bake 12-15 minutes, until eggs are set.
Macros:
~2g net carbs per muffin (varies by add-ins).
Practical tip:
Make ahead for busy mornings—these store well in the fridge for up to 4 days.
3. Zoodle Salami Alfredo (Pasta Without the Guilt)
Why this works:
Zucchini noodles (“zoodles”) swap out high-carb pasta for fiber and hydration. Creamy Alfredo sauce and savory salami add richness and flavor—making this dish deeply satisfying.
How to make it:
- Spiralize 2-3 zucchini and sauté briefly in olive oil.
- Add 1/4 cup heavy cream, 2 tbsp butter, and 1/2 cup Parmesan for Alfredo sauce.
- Toss in sliced salami (about 2 oz per serving) and cook until warmed through.
- Season with pepper, garnish with parsley.
Macros:
~4g net carbs per bowl (mainly from zucchini).
Practical tip:
For extra nutrition, toss in spinach, mushrooms, or chopped olives.
4. Mini Keto Salami “Pizza” Bites
Why this works:
Mini salami “pizzas” capture all the flavor of your favorite slice—without dough, gluten, or carbs.
How to make it:
- Arrange salami slices on a baking sheet.
- Spread each with a teaspoon of low-carb marinara or tomato paste.
- Add shredded mozzarella and a sprinkle of Italian herbs.
- Broil for 2-3 minutes, until bubbly.
Macros:
~1g net carb per pizza bite (depends on sauce).
Practical tip:
Perfect for party trays or kid-friendly snacks!
5. Salami, Olive & Cheese Keto Platter (Lunch or Snack Box)
Why this works:
This balanced “charcuterie box” provides protein, fat, and fiber—excellent for lunchboxes, travel, or office snacks. Olives add healthy fats and micronutrients.
How to make it:
- Arrange 4-6 slices of salami, 2 oz cubed cheese, a handful of olives, and sliced cucumber or celery on a plate or in a bento box.
- Optionally add nuts (macadamia or almonds) for extra crunch.
Macros:
~2-3g net carbs per serving (from veggies/olives).
Practical tip:
Pre-pack several boxes at the start of the week for “keto fast food” on busy days.
The Latest Science: Does Salami Help With Weight Loss?
- Keto diets work by reducing carbs, so your body burns fat for fuel. Salami supports this with high fat and protein, nearly zero carbs, and high satiety.
- Appetite control: Research shows that protein- and fat-rich foods like salami, eggs, and cheese can help reduce hunger, making it easier to maintain a calorie deficit for weight loss.
- Portion control is key: While keto-friendly, salami is also calorie-dense and high in sodium. Use as part of a balanced plate, not the sole protein source.
Tip: Always choose the highest-quality, minimally processed salami you can find—ideally organic, nitrate/nitrite-free, and with clear labeling.
Practical Tips for Including Salami in a Healthy Keto Diet
- Balance processed meats with fresh vegetables and whole-food fats (avocado, olives, nuts).
- Stay hydrated: Keto and salty foods can increase water loss.
- Watch sodium and portion size: Too much can stall weight loss for some people.
- Mix and match: Pair salami with a variety of cheeses, veggies, and sauces for endless combinations.
Conclusion: Salami Can Be Keto Gold—With the Right Approach
When used mindfully, salami is a versatile, satisfying ingredient that fits perfectly into a keto weight loss plan. The five recipes above are just the start—experiment, enjoy, and keep your meals interesting and convenient.
Remember: Keto works best when it’s sustainable, balanced, and delicious. Let salami add flavor and variety, but always aim for a colorful, nutrient-dense plate.
Want More Recipes or Tips?
Let me know if you want printable recipes, weekly meal plans, or a shopping guide for the best keto-friendly salami brands. Your keto journey should be tasty, practical, and full of real results!
Have you tried any keto salami dishes? Which is your favorite? Share your tips or questions below!
10 FAQs for Keto-Friendly Salami Dishes
1. Is salami really keto-friendly?
Yes, most traditional salami is very low in carbohydrates—often less than 1 gram per serving—making it a great fit for keto. Always check the label for added sugars or fillers.
2. How much salami can I eat on keto?
Moderation is key. While salami is low in carbs, it is calorie-dense and high in sodium. A reasonable serving is 1–2 ounces (about 4–6 slices) as part of a balanced meal.
3. What should I look for when buying salami for keto?
Choose nitrate/nitrite-free, minimally processed options with simple ingredients (meat, salt, spices). Avoid salamis with added sugars or starches.
4. Is it okay to eat salami every day on keto?
It’s best to enjoy salami a few times a week and not as your main protein source. Combine it with a variety of other proteins and plenty of non-starchy vegetables.
5. Does eating salami help with weight loss?
Salami’s high protein and fat content can boost satiety and help control appetite. However, weight loss depends on overall calorie intake and lifestyle habits.
6. Can I eat pre-sliced packaged salami?
Yes, but check the ingredients list for added sugars or unnecessary additives. When possible, buy from the deli counter for fresher, cleaner options.
7. What are some good foods to pair with salami on keto?
Cheese, olives, avocado, nuts, leafy greens, and low-carb veggies like cucumbers and bell peppers all pair well with salami and keep meals balanced.
8. How can I reduce sodium intake when eating salami?
Balance your diet with fresh, unsalted foods like vegetables and drink plenty of water. If sodium is a concern, choose lower-sodium brands or limit portion sizes.
9. Are there vegetarian or vegan alternatives to salami for keto?
There are plant-based deli slices made from tofu or seitan, but check carb counts and ingredients, as many contain higher carbs and added fillers.
10. Can I meal prep with salami?
Absolutely! Salami keeps well and is perfect for prepping snack boxes, wraps, or egg muffins ahead of time. Store in an airtight container in the fridge.