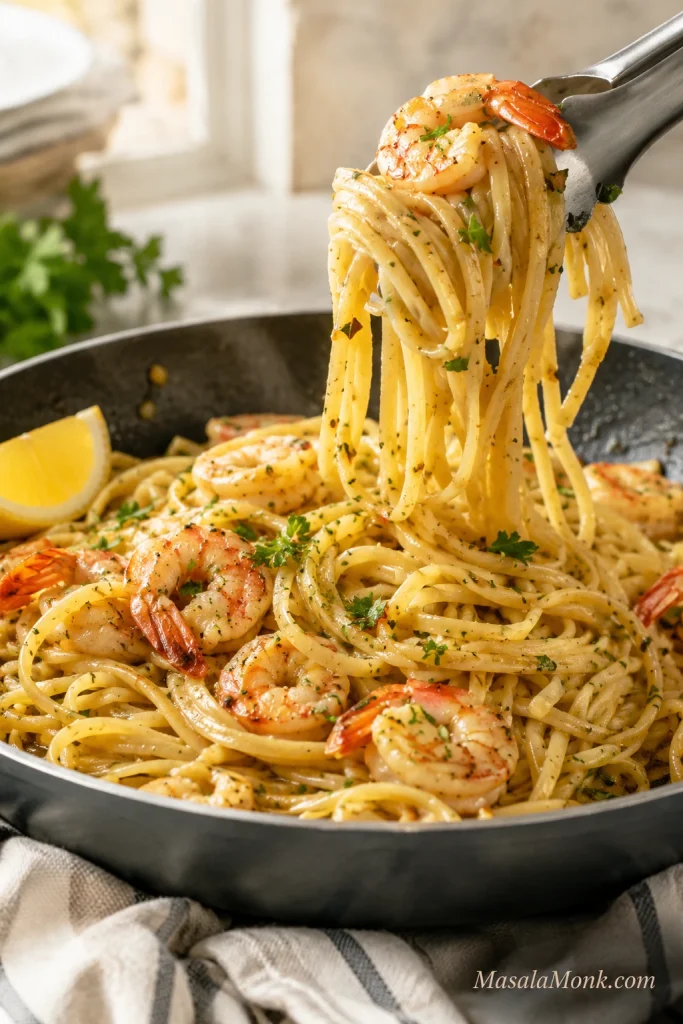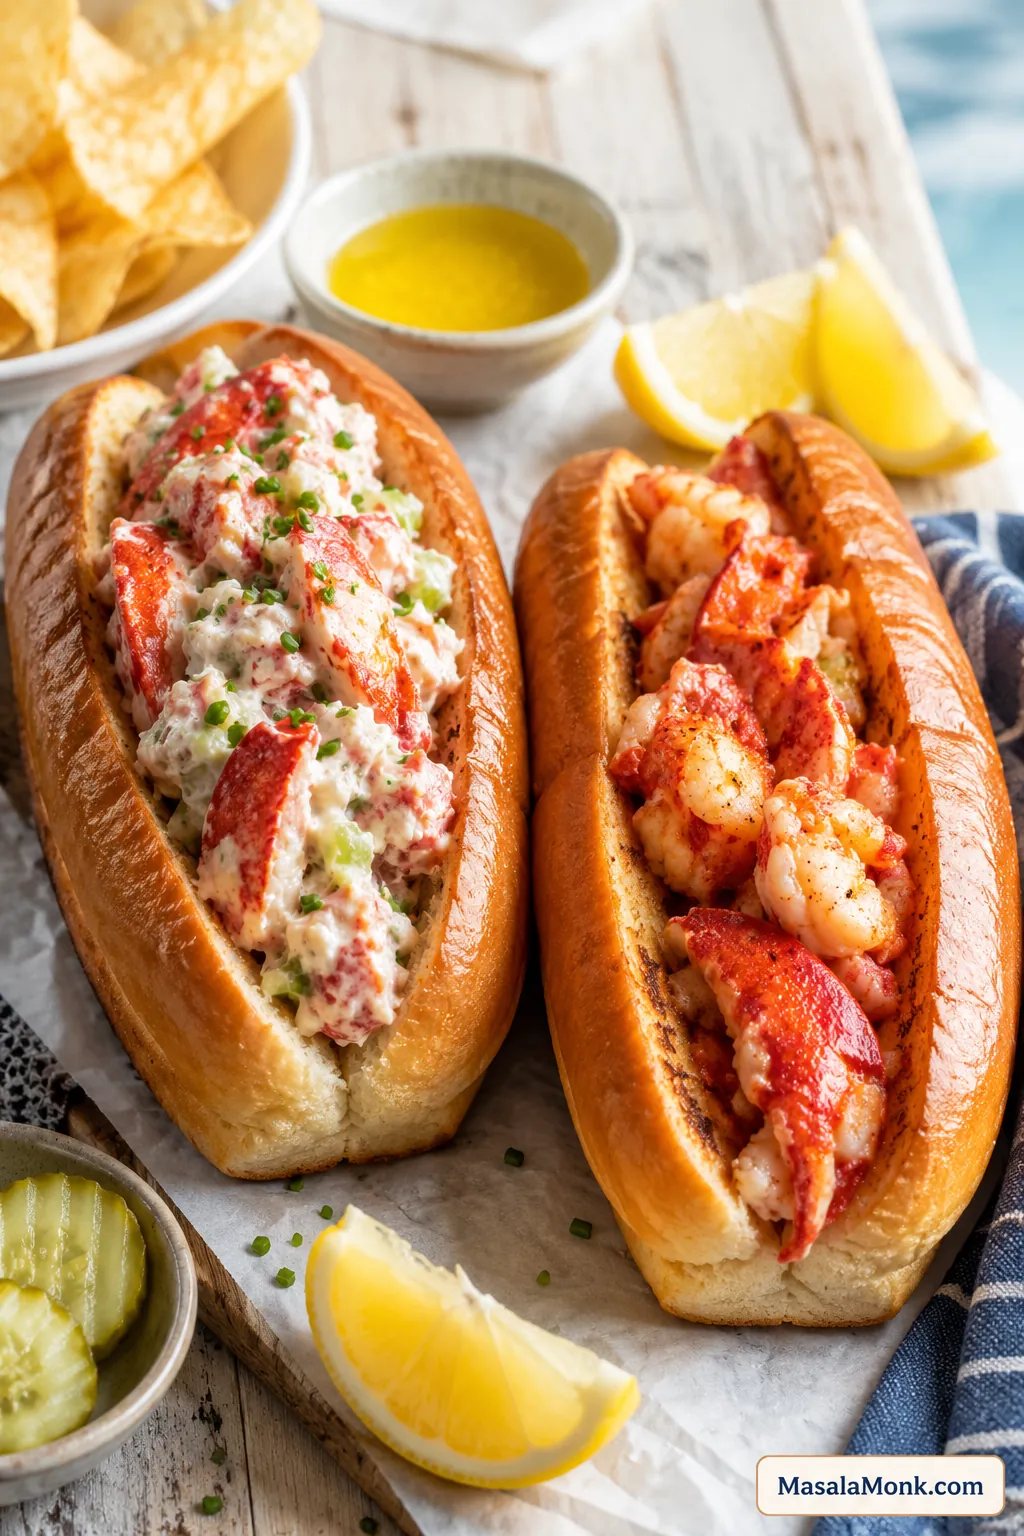
A great lobster roll should feel generous, buttery, and worth the lobster. The meat should stay sweet and tender, the bun should be soft with golden toasted sides, and the dressing should know when to step back.
This recipe gives you both classic styles: a cold Maine-style lobster roll with light mayo and a warm Connecticut-style lobster roll with melted butter. You can make one or serve both side by side. There is also an optional home-cook hybrid for buttery warm bread with cool, lightly dressed lobster.
Choosing a style? Compare Maine vs Connecticut lobster rolls before you start.
If this is your first time making lobster rolls at home, keep the goal simple: buy enough lobster, keep the pieces chunky, toast the bun well, and do not bury expensive seafood under too much mayo, too much butter, or a hard roll that fights every bite.
Jump to Section
- Quick Lobster Roll Recipe
- Maine vs Connecticut Lobster Rolls
- Ingredients
- How Much Lobster to Buy
- Best Buns
- How to Make Lobster Rolls
- Maine-Style Lobster Roll
- Connecticut-Style Lobster Roll
- Using Tails, Frozen Lobster, or Whole Lobster
- How to Season a Lobster Roll
- Mini Lobster Rolls and Sliders
- Variations
- What to Serve with Lobster Rolls
- Make-Ahead, Storage, and Food Safety
- Common Mistakes
- FAQs
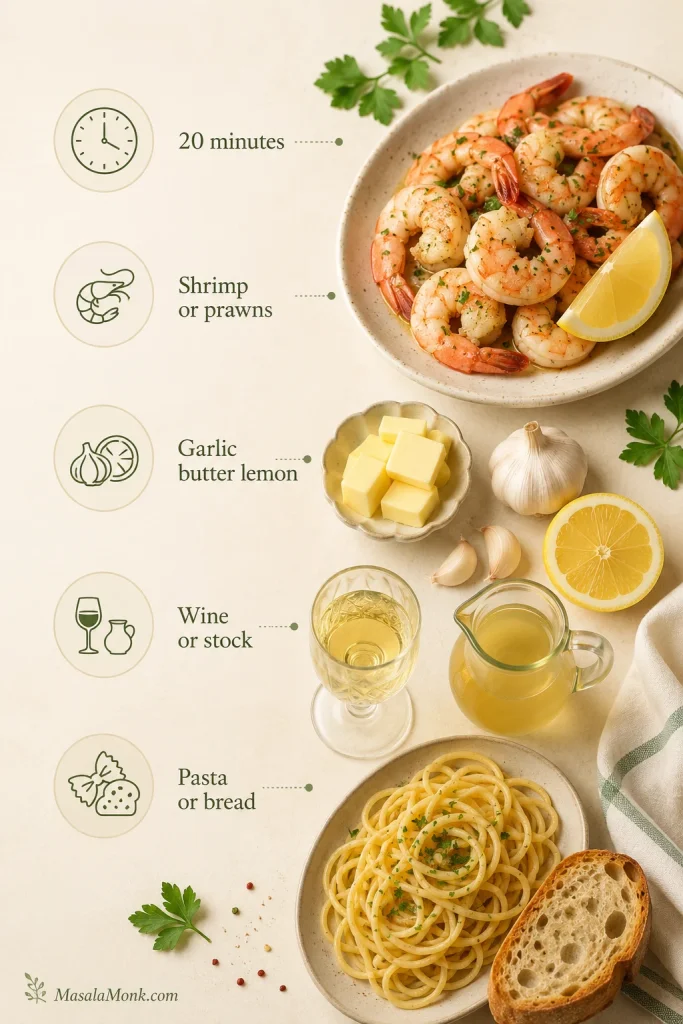
Quick Lobster Roll Recipe
With cooked lobster meat ready, lobster rolls come together quickly. Toast the buns, choose cold mayo or warm butter, fill generously, and serve while the bread is still warm.
| Servings | 4 lobster rolls |
| Total Time | About 20 minutes with cooked lobster meat |
| Lobster Meat | 1 lb / 454 g cooked lobster meat |
| Lobster Per Roll | 4 oz / 113 g standard, 5–6 oz / 140–170 g generous |
| Best Beginner Route | Cooked picked lobster meat + split-top buns + Maine-style finish |
| Classic Styles | Maine-style = cold lobster + light mayo. Connecticut-style = warm lobster + melted butter. |
For four standard rolls, use 1 lb / 454 g cooked lobster meat. For four generous rolls, buy 1¼–1½ lb / 565–680 g. Keep the lobster in large, recognizable pieces so each roll feels full.
Shopping first? Use the lobster amount guide before buying cooked meat, tails, or whole lobster.
Quick Ingredients
- 1 lb / 454 g cooked lobster meat
- 4 split-top buns or soft hot dog buns
- 2 tbsp / 30 ml butter for the buns
- Lemon juice, chives, salt, and black pepper
- For Maine-style: mayonnaise and optional celery
- For Connecticut-style: extra butter
Choose One Finish
| Style | Add | Method |
|---|---|---|
| Maine-style | 2–4 tbsp mayo + ¼ cup finely diced celery, optional | Fold cold with mayo; serve in warm toasted buns. |
| Connecticut-style | 4–6 tbsp butter + lemon + chives | Warm in butter for 2–3 minutes; serve hot. |
| Optional home-cook hybrid | Butter-toasted buns + very light mayo dressing | Serve cool lobster in buttery warm bread. |
Quick Method
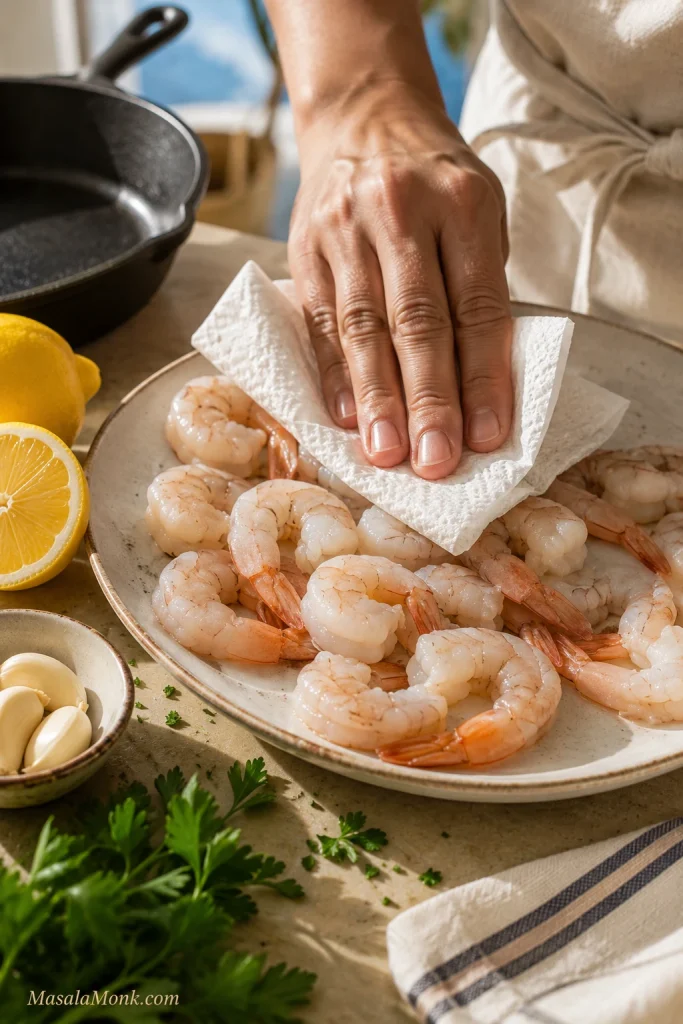
- Check the lobster meat for shell pieces, pat it dry, and keep it chunky.
- Butter the sides of the buns and toast for 1–2 minutes per side, until golden outside and soft inside.
- For Maine-style, fold lobster with mayo, lemon, celery, chives, salt, and pepper.
- For Connecticut-style, warm lobster gently in melted butter with lemon and chives for 2–3 minutes.
- Fill each bun with about 4 oz / 113 g lobster meat, or more for a generous roll, and serve right away.
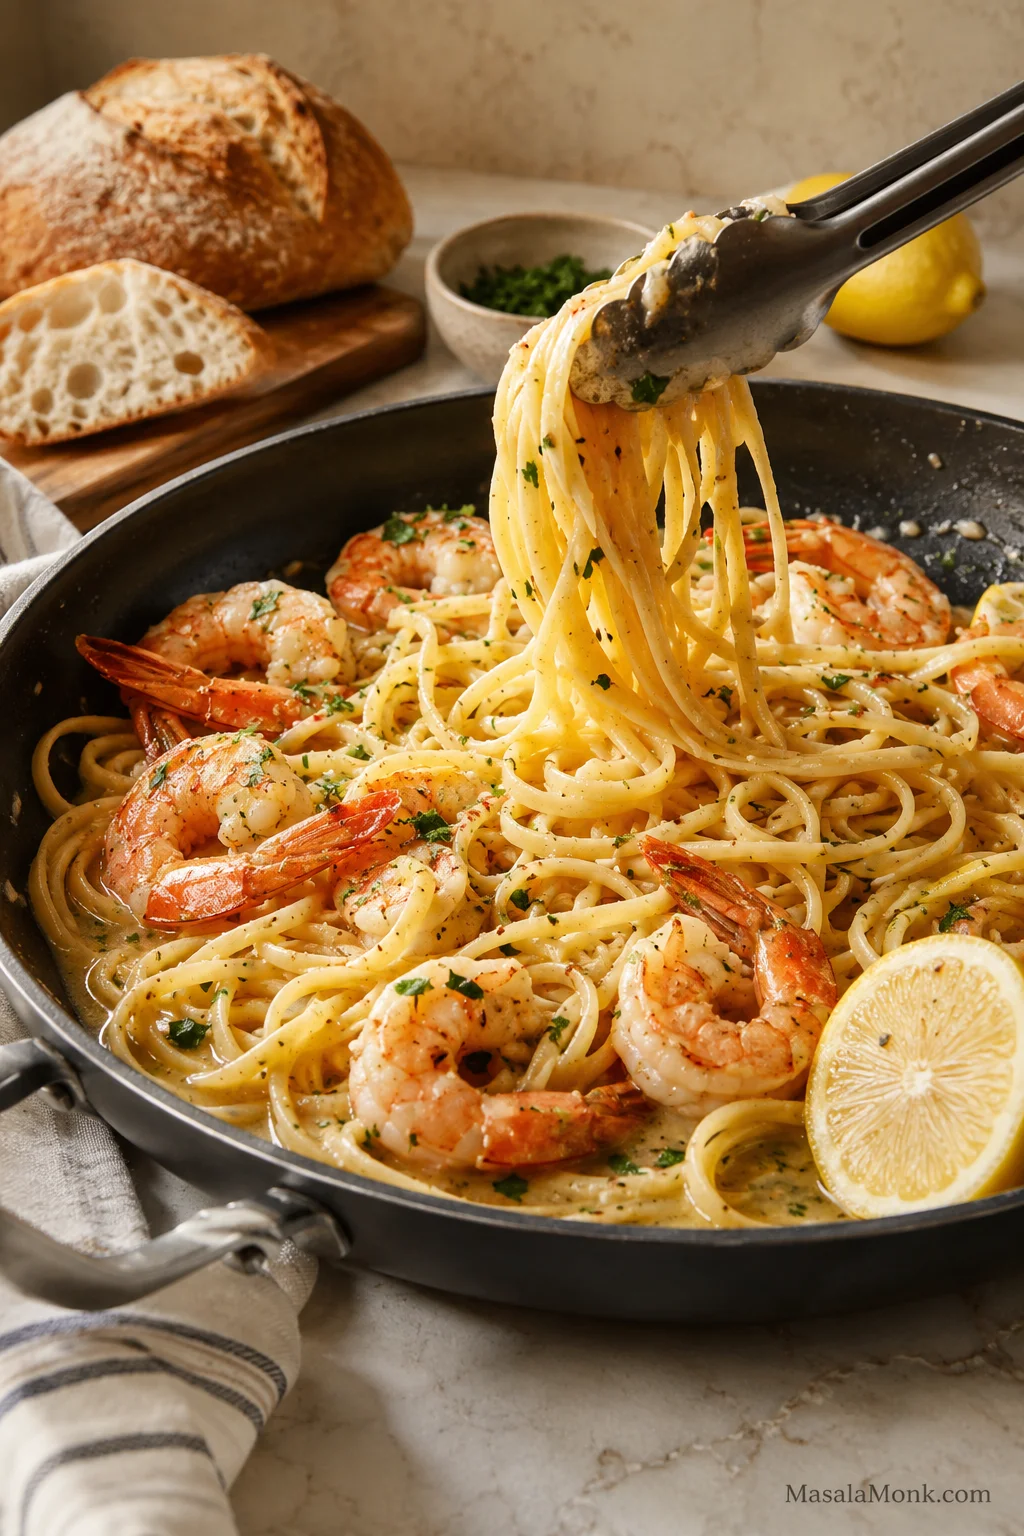
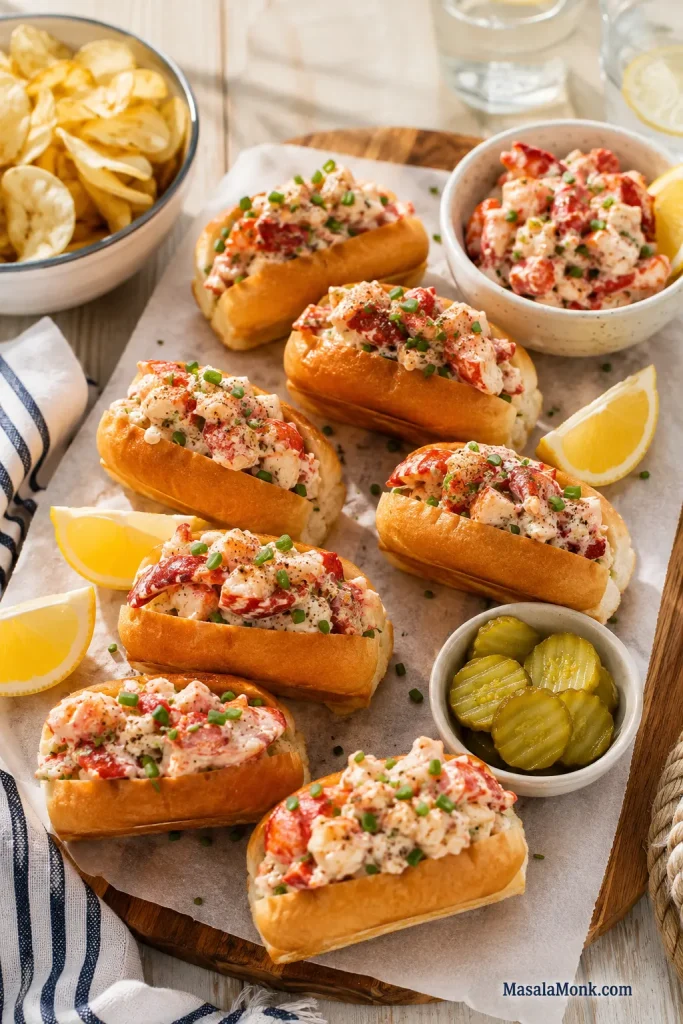
You’ll know it’s right when: the bun is golden on the sides but soft inside, the lobster pieces still look chunky, the dressing looks glossy instead of creamy-heavy, and the roll looks slightly overfilled.
Visual guide: Use this visual guide to check the roll before serving: golden bun sides, visible lobster pieces, a glossy coating, and a generous fill.

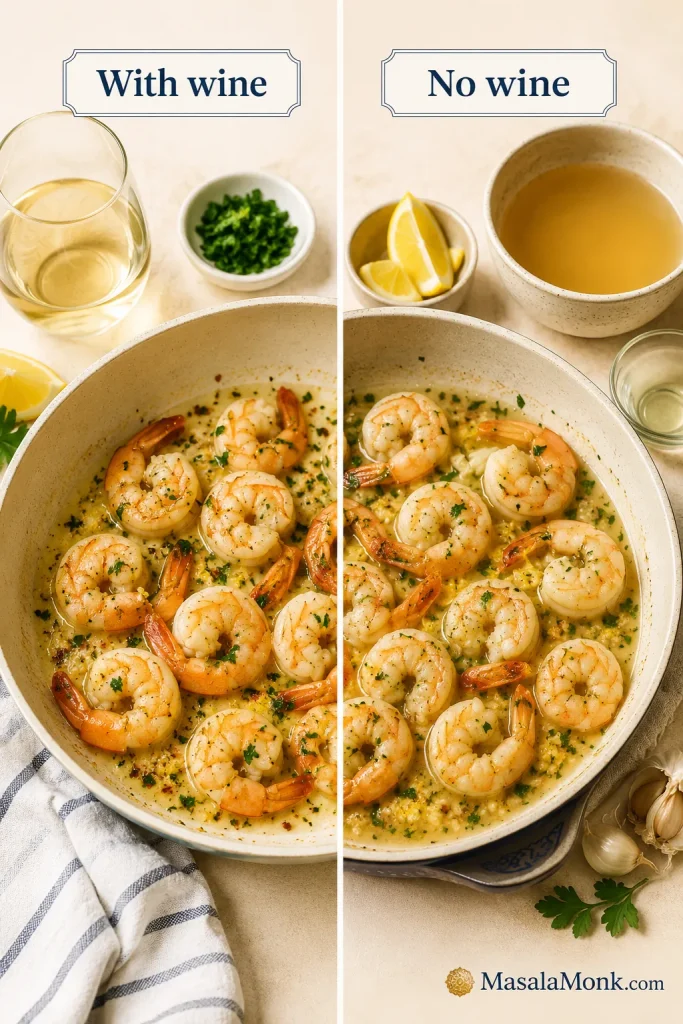
Maine vs Connecticut Lobster Rolls
Lobster roll arguments usually come down to two styles: Maine-style with cool, lightly dressed lobster, or Connecticut-style with warm butter. Both start with sweet lobster and a soft butter-toasted bun, but the filling changes the whole mood of the sandwich.
| Choose This | For This Kind of Roll |
|---|---|
| Maine-style | Cool lobster, light mayo, lemon, chives, a little crunch, and a warm toasted bun. |
| Connecticut-style | Warm lobster, melted butter, no mayo, and a richer seafood-shack feel. |
| Optional home-cook hybrid | Cool lightly dressed lobster with buttery warm bread. |
Visual guide: Use this comparison before choosing your style: Maine is cool and lightly mayo-dressed, while Connecticut is warm and buttery.

Simple decision: Choose Maine-style for cool, lightly creamy lobster. Choose Connecticut-style for warm, buttery, no-mayo lobster. Use the optional hybrid only for the comfort of buttered bread with the freshness of a cold lobster salad filling.
Why This Lobster Roll Recipe Works
Everything here is designed to protect the expensive part: the lobster. Dry lobster keeps the dressing clean. Big chunks keep the roll luxurious. Butter-toasted sides give the bun flavor and structure. Light mayo or gentle butter lets the lobster stay sweet.
The best lobster roll feels almost too simple when you read it, then completely right when you take the first bite: warm golden bread at the edges, sweet lobster in the middle, a little lemon, and just enough richness to make the meat glisten.
It is the kind of sandwich that looks casual on the plate but feels special the second you pick it up.
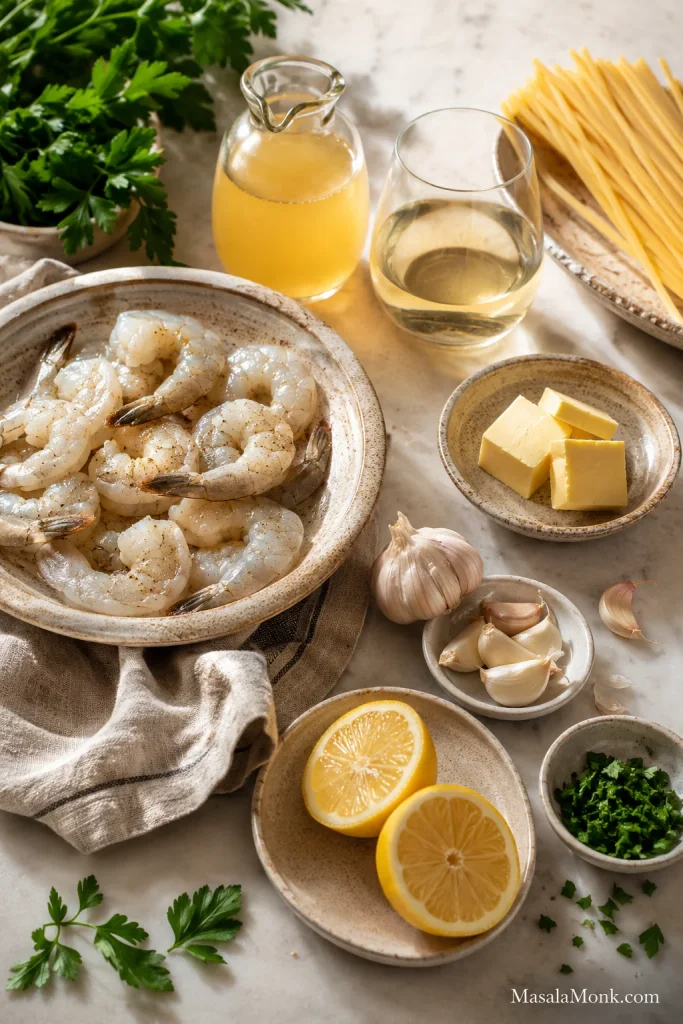
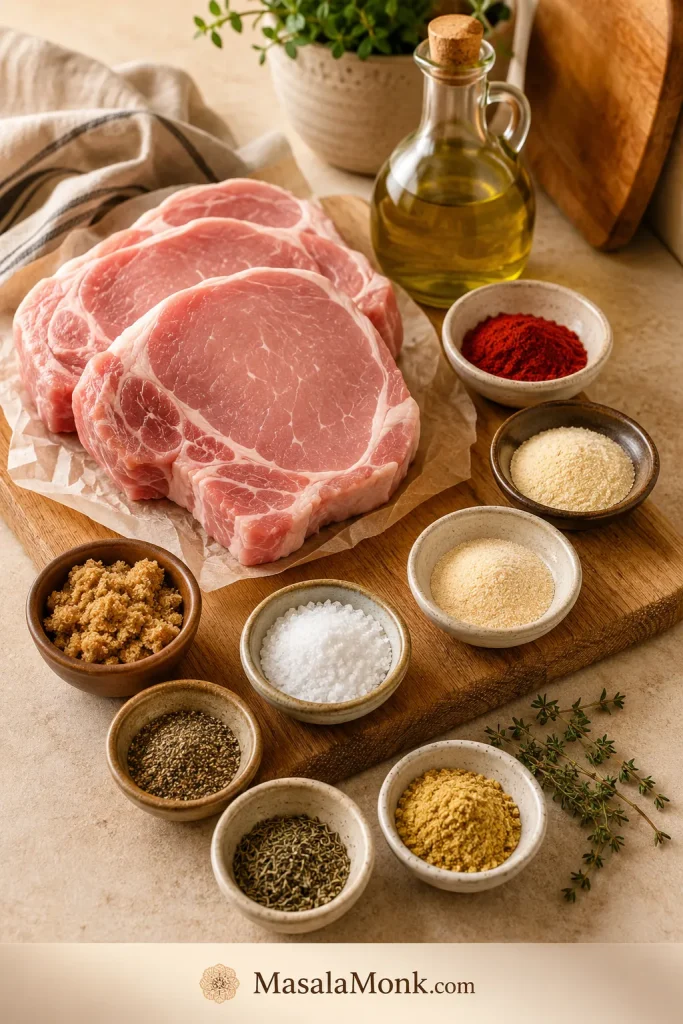
Ingredients
The ingredient list is short because lobster is doing the expensive work. Butter, lemon, chives, and a soft bun are there to support it, not compete with it.
Starting with tails, frozen lobster, or whole lobster? Jump to the lobster options guide.
Visual guide: Use this ingredient visual as a setup check before cooking, especially if you are choosing between the mayo and butter versions.
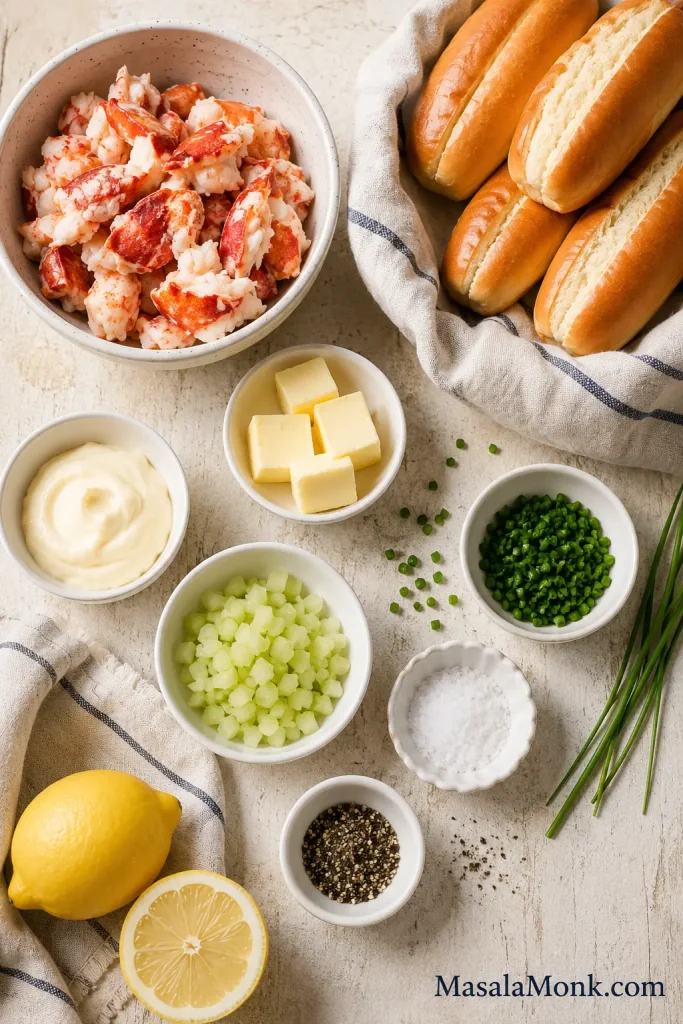
For the Rolls
- Cooked lobster meat: Use 1 lb / 454 g for 4 standard rolls, or more for generous rolls.
- Buns: New England split-top buns are the most reliable, but soft brioche or regular hot dog buns can work.
- Butter: Used for toasting the buns and, in the Connecticut version, for dressing the lobster.
- Lemon: Brightens the sweet lobster and balances the richness.
- Chives: Add freshness without taking over.
- Salt and pepper: Use lightly.
For the Maine-Style Mayo Version
- 2–4 tbsp / 30–60 ml mayonnaise
- ¼ cup finely diced celery, optional
- Extra chives or scallions, optional
- Tiny pinch of celery salt or Old Bay, optional
Celery is common because it adds crunch, but it is not required. Dice it finely and keep the amount modest so each bite still tastes like lobster.
Because the dressing is so simple, the mayo matters. For a cleaner homemade base, use this homemade mayo recipe in the Maine-style version.
For an egg-free roll, use a thick eggless mayo and keep the rest of the filling the same. MasalaMonk’s eggless mayonnaise recipe is the better fit for that swap.
For the Connecticut-Style Butter Version
- 4–6 tbsp / 60–90 ml butter
- 1 tbsp lemon juice or a little lemon zest
- 1–2 tbsp chopped chives
- Optional tiny amount of garlic
Garlic can join the butter, but it should whisper. Lemon, butter, and lobster should still be the main story.
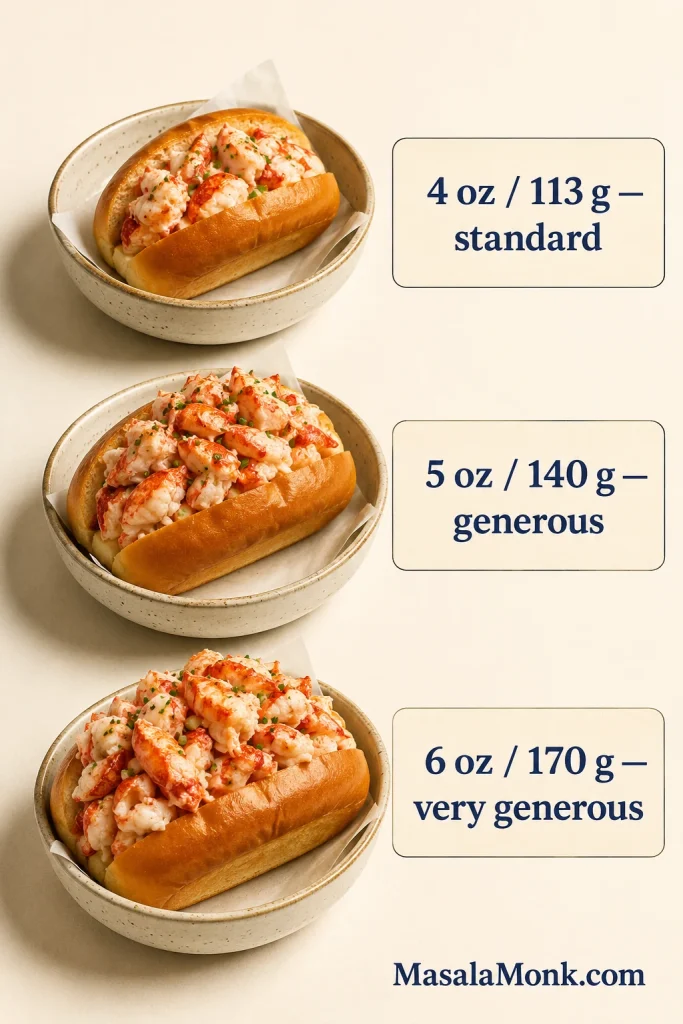
How Much Lobster to Buy
Buying enough lobster is the part that makes most home cooks nervous. Use about 4 oz / 113 g cooked lobster meat per standard roll. For a very generous restaurant-style roll, use 5–6 oz / 140–170 g.
Buying shell-on lobster? Check the whole lobster yield shortcut before you shop.
| Need | Cooked Lobster Meat |
|---|---|
| 1 standard lobster roll | 4 oz / 113 g |
| 1 generous lobster roll | 5–6 oz / 140–170 g |
| 4 standard lobster rolls | 1 lb / 454 g |
| 4 generous lobster rolls | 1¼–1½ lb / 565–680 g |
| 6 standard lobster rolls | 1½ lb / 680 g |
| 1 mini lobster roll | About 2 oz / 55–60 g |
| 8 mini lobster rolls | About 1 lb / 454 g |
Visual guide: Use this portion guide when deciding how much cooked lobster meat to buy for standard, generous, or very generous rolls.
For the least stressful route, buy cooked picked lobster meat. With lobster tails or whole lobsters, plan with a buffer because shell weight is not meat weight.
Whole Lobster Yield Shortcut
Whole lobster yield varies by size, shell hardness, season, and how carefully the meat is picked. As a rough planning shortcut, a 1½ lb whole lobster may give about 6–8 oz cooked picked meat.
| Buying Whole Lobster | Rough Picked Meat Yield | Approximate Rolls |
|---|---|---|
| 1 × 1½ lb lobster | About 6–8 oz | 1 generous roll or 2 small rolls |
| 2 × 1½ lb lobsters | About 12–16 oz | 3–4 standard rolls |
| 3 × 1½ lb lobsters | About 18–24 oz | 4 generous rolls |
Visual guide: Use this whole-lobster yield guide as a buying shortcut when you are starting with shell-on lobster instead of picked meat.

For four full rolls with the least guesswork, cooked picked lobster meat is still the easiest choice. Whole lobsters give excellent flavor and texture, but they add work and yield uncertainty.
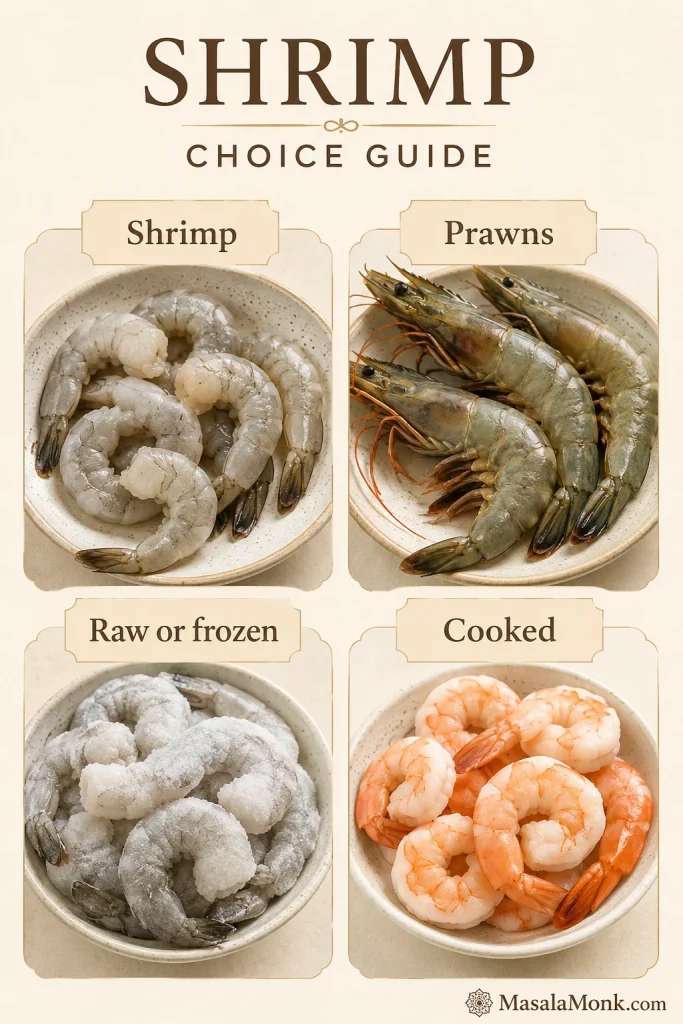
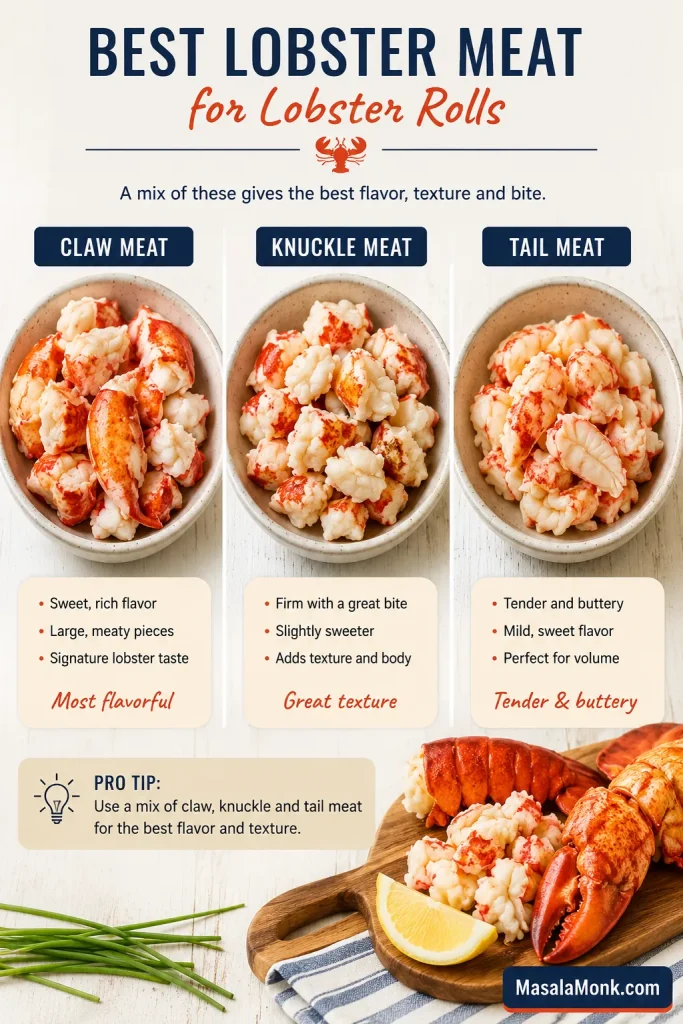
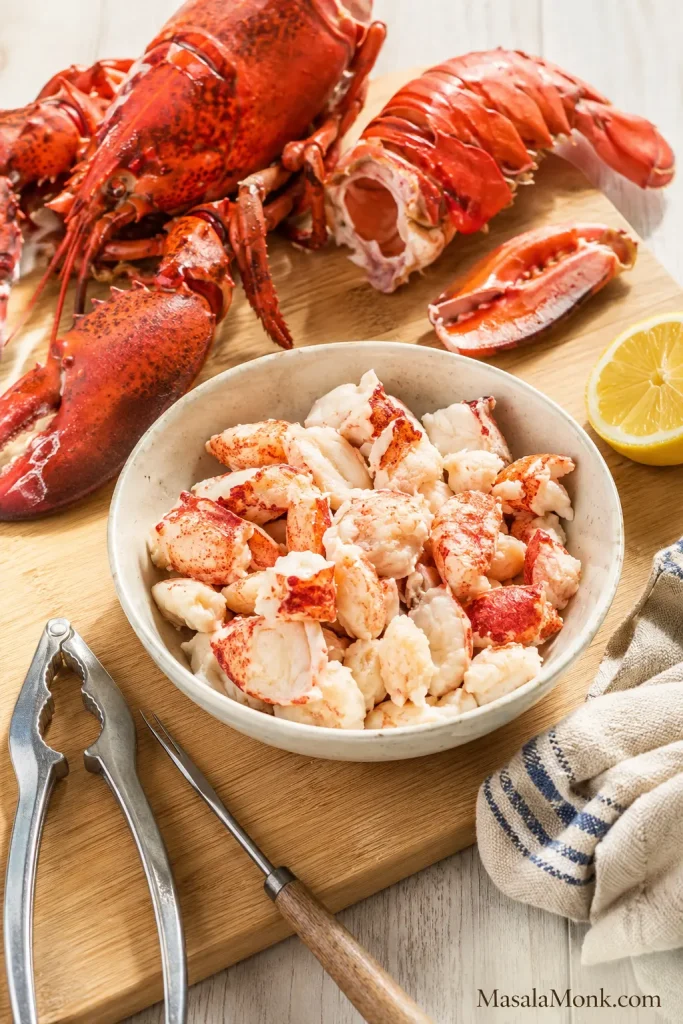
What Lobster Meat Is Best?
The best lobster meat for lobster rolls is a mix of claw, knuckle, and tail meat. Claw and knuckle meat are sweet and tender. Tail meat gives larger, meatier pieces. Together, they make the roll feel full and balanced.
Visual guide: Use this meat comparison to understand why claw, knuckle, and tail pieces give a lobster roll better texture than one uniform cut.
| Lobster Option | Verdict | Notes |
|---|---|---|
| Cooked picked lobster meat | Easiest | Best route for beginners and the easiest way to control quantity. |
| Claw and knuckle meat | Best texture | Sweet, tender, and ideal for a soft lobster roll filling. |
| Tail meat | Good | Meaty and easy to buy, but can turn firmer if overcooked. |
| Frozen cooked lobster meat | Works well | Thaw overnight, drain, and pat dry. |
| Lobster tails | Practical | Good when whole lobster or picked meat is not available. |
| Whole lobster | Classic | Great flavor and a mix of meat, but takes more work. |
| Canned lobster | Emergency option | Usable in a pinch, but usually softer and less sweet. |
| Imitation lobster | Budget-style variation | Not classic, but usable for a casual seafood-style roll. |
A full lobster roll should look almost overfilled when it lands on the plate. Do not use the filling to stretch lobster salad; build a roll that feels abundant.
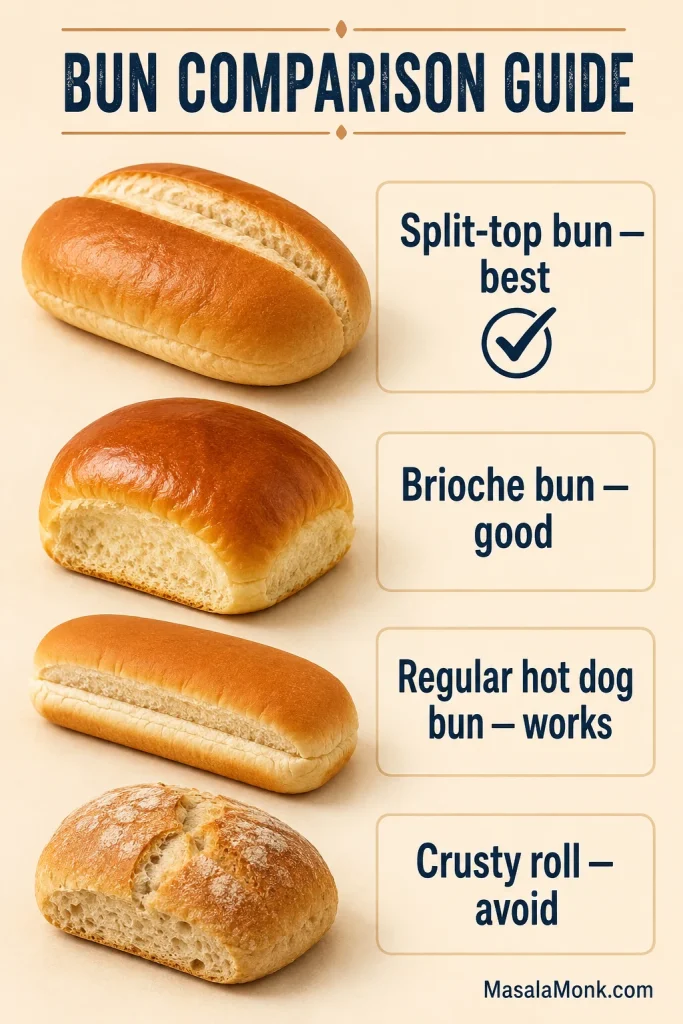
Best Buns for Lobster Rolls
The most reliable bun for lobster rolls is a New England-style split-top hot dog bun. It opens from the top, has soft sides, and toasts beautifully in butter.
A split-top bun is not just tradition. It gives you two flat sides to toast, so the outside browns evenly while the inside stays soft enough to cradle the lobster. If the bun is soft, warm, and buttery, you are already halfway there.
Bun Comparison
| Bun Type | Verdict | Notes |
|---|---|---|
| New England split-top bun | Best | Classic shape, soft texture, easy to toast on the sides. |
| Split-top brioche bun | Good | Richer and slightly sweeter, but very usable. |
| Regular hot dog bun | Works | Trim the sides and butter-toast well. |
| Soft bakery roll | Okay | Use only if soft, light, and not crusty. |
| Hawaiian-style roll | Possible | Better for mini rolls or party sliders. |
| Crusty roll | Avoid | Too hard and distracting. |
| Burger bun | Not ideal | Better for a lobster sandwich variation than a classic roll. |
Visual guide: Use this bun comparison before shopping: split-top buns are best, soft alternatives can work, and hard crusty rolls are the one to avoid.
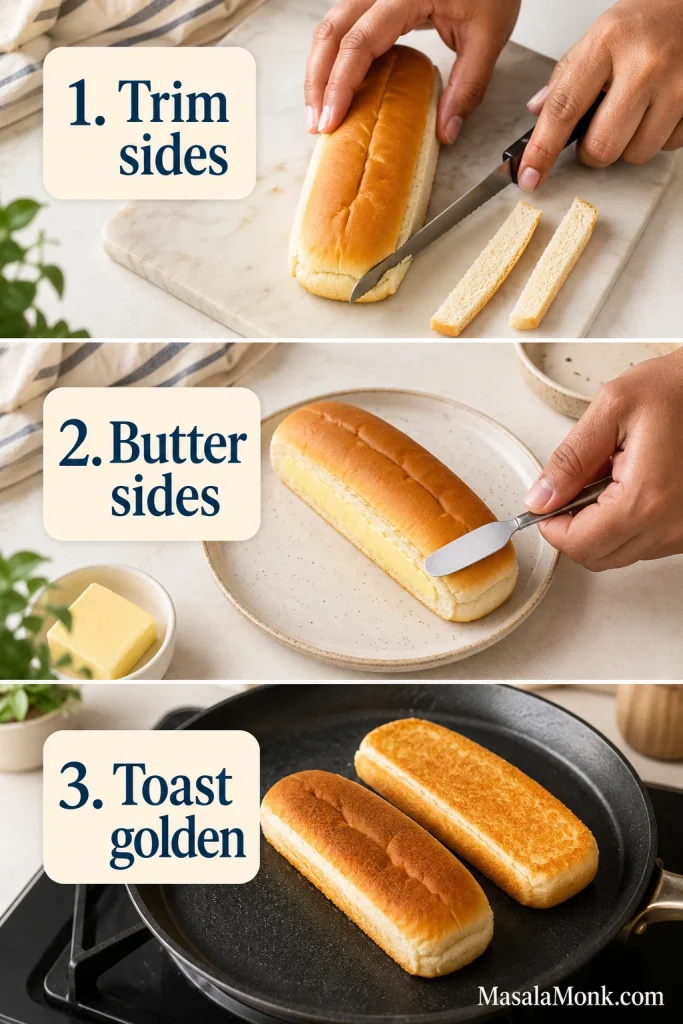
Bun workaround: If you cannot find split-top buns, use regular hot dog buns and trim a thin strip from both outer sides. This exposes more soft bread, so the sides can brown in butter like a classic lobster roll bun.
Ready to cook? Move to the step-by-step lobster roll method.
Visual guide: Use this workaround if regular hot dog buns are all you have: trim the sides, butter them, and toast until golden.
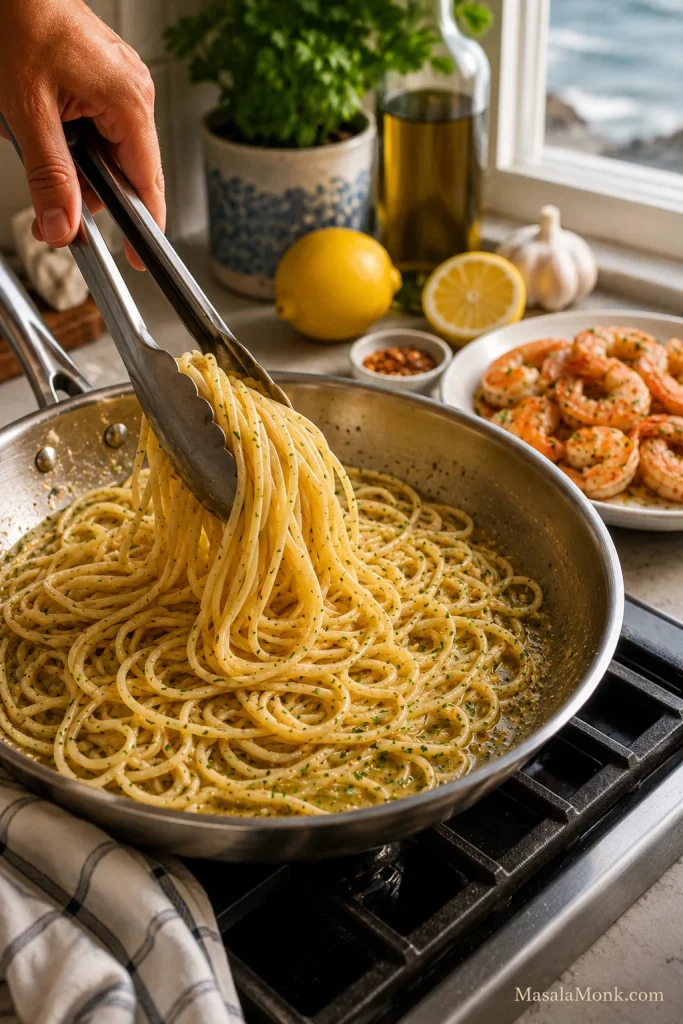
How to Make Lobster Rolls
Once the meat and buns are ready, the job is simple: keep the lobster chunky, toast the bread well, dress lightly, and serve before the bun loses its contrast.
Visual guide: Use this step-by-step visual to keep the method in order: dry the lobster, toast the bread, finish the filling, then assemble.
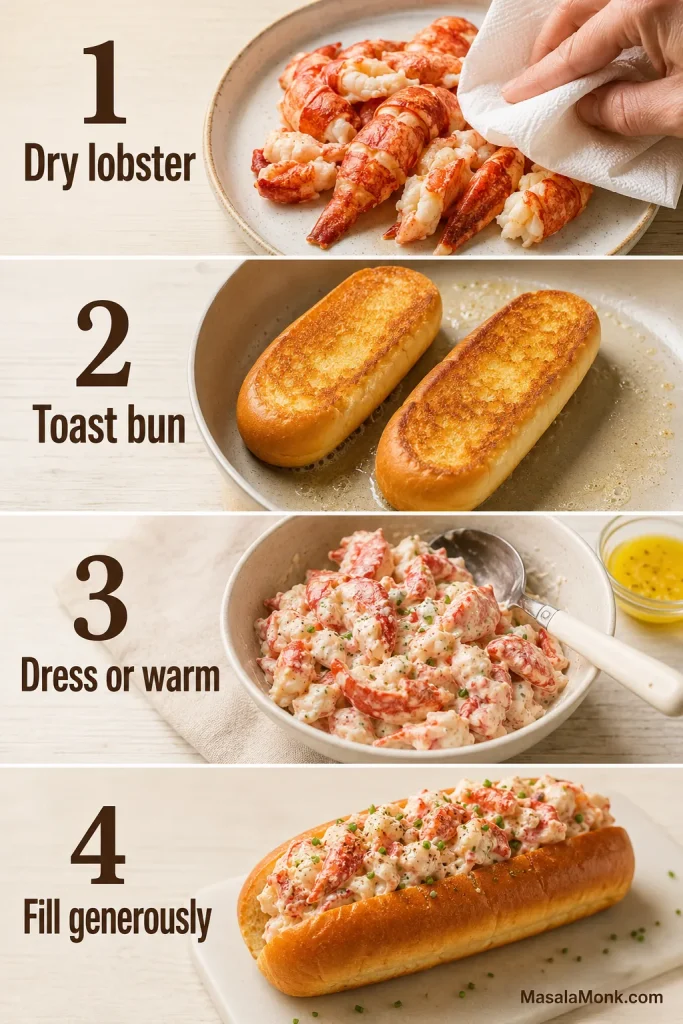
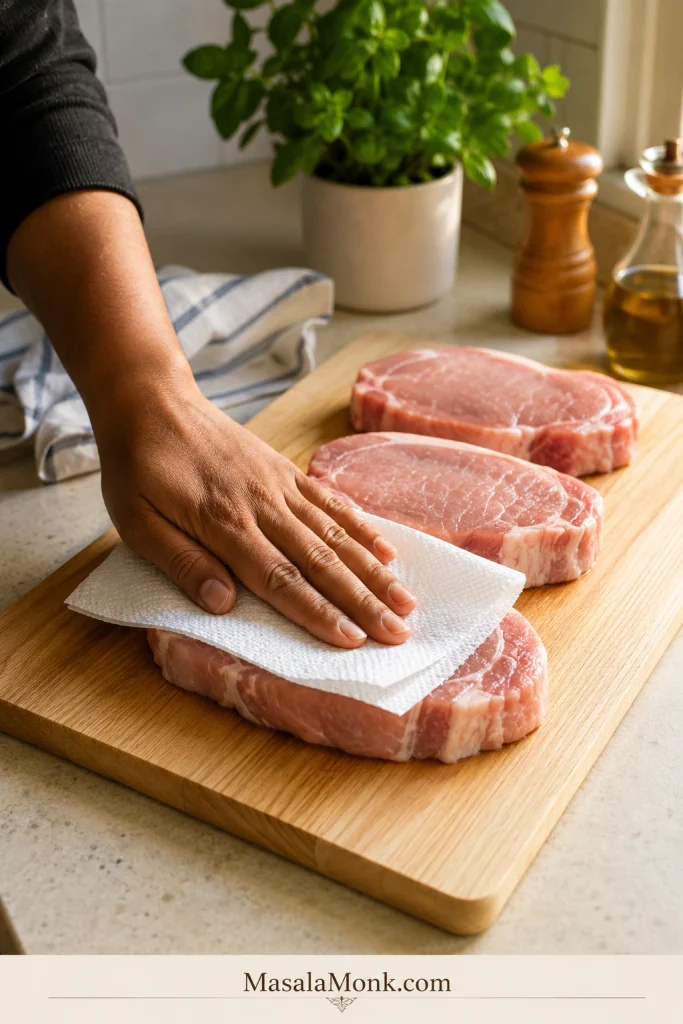
Step 1: Prepare the Lobster
Check the lobster meat for shell pieces. Pat it dry with paper towels, then cut or tear it into large chunks. Keep the pieces big enough that every bite still feels like lobster.
Step 2: Toast the Buns
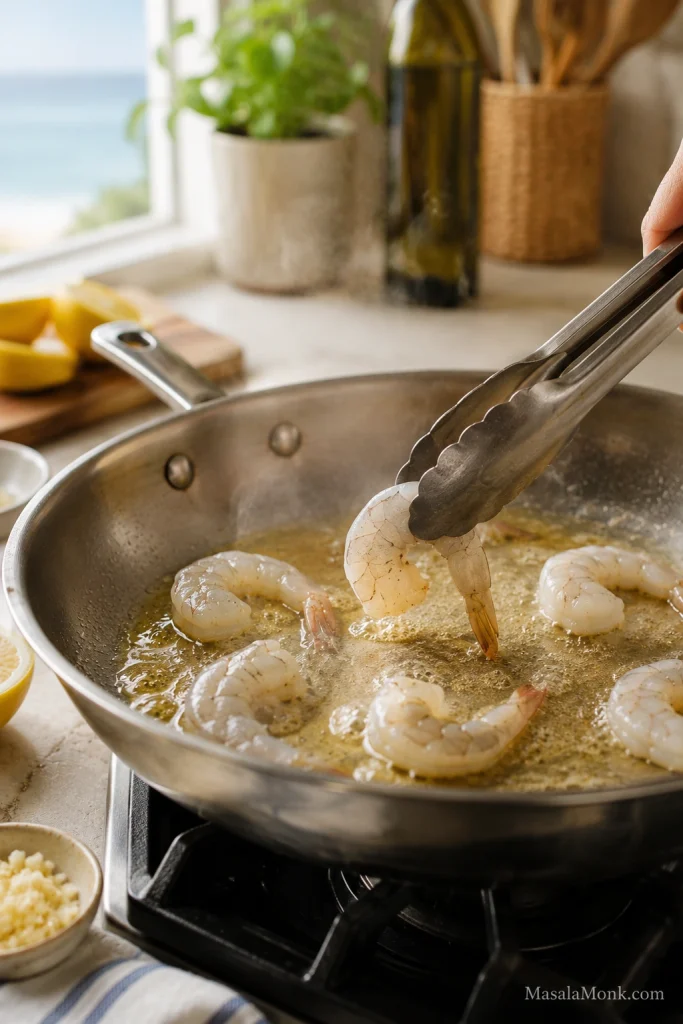
Butter the outside of the buns. Heat a skillet or griddle over medium heat and toast for 1–2 minutes per side, until the cut sides are golden and the center still feels soft when pressed.
Step 3: Choose the Filling
Make the Maine-style version for cool lobster with a light mayo dressing. For warm lobster with melted butter and no mayo, choose the Connecticut-style version.
Need exact seasoning? Check the seasoning guide before adjusting mayo, butter, lemon, or herbs.
Step 4: Fill Generously
Add about 4 oz / 113 g lobster meat to each bun, or more for a generous roll. Pile the lobster loosely so the roll looks full, abundant, and a little over the top.
Step 5: Serve
Lobster rolls are best when the bun is freshly toasted and the filling has the right texture. Serve with lemon wedges, chips, pickles, fries, coleslaw, corn, or a simple salad.
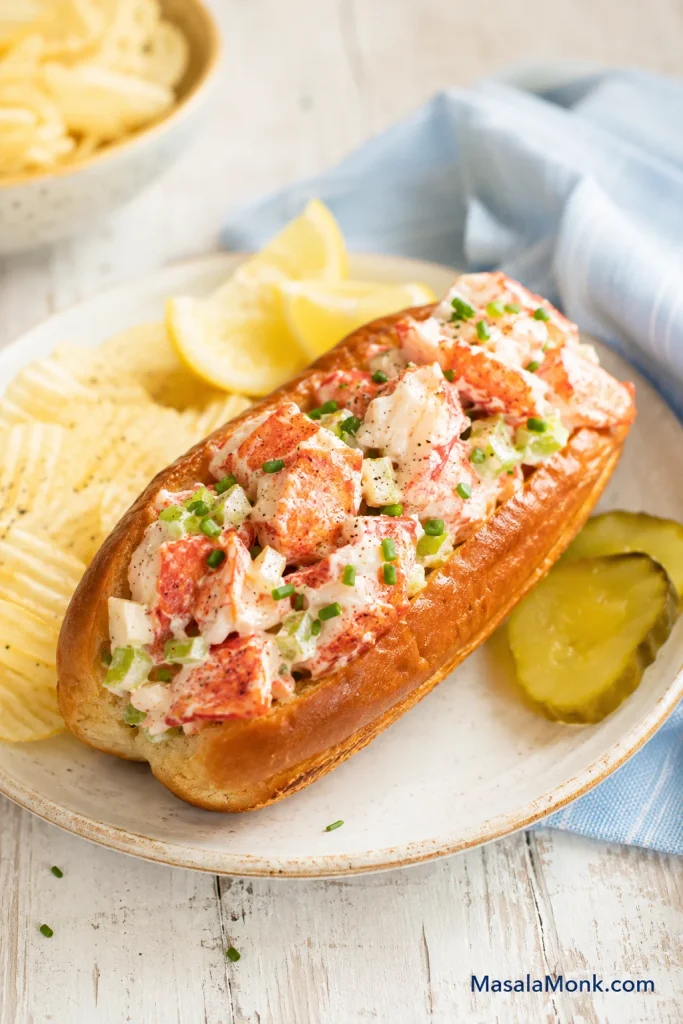
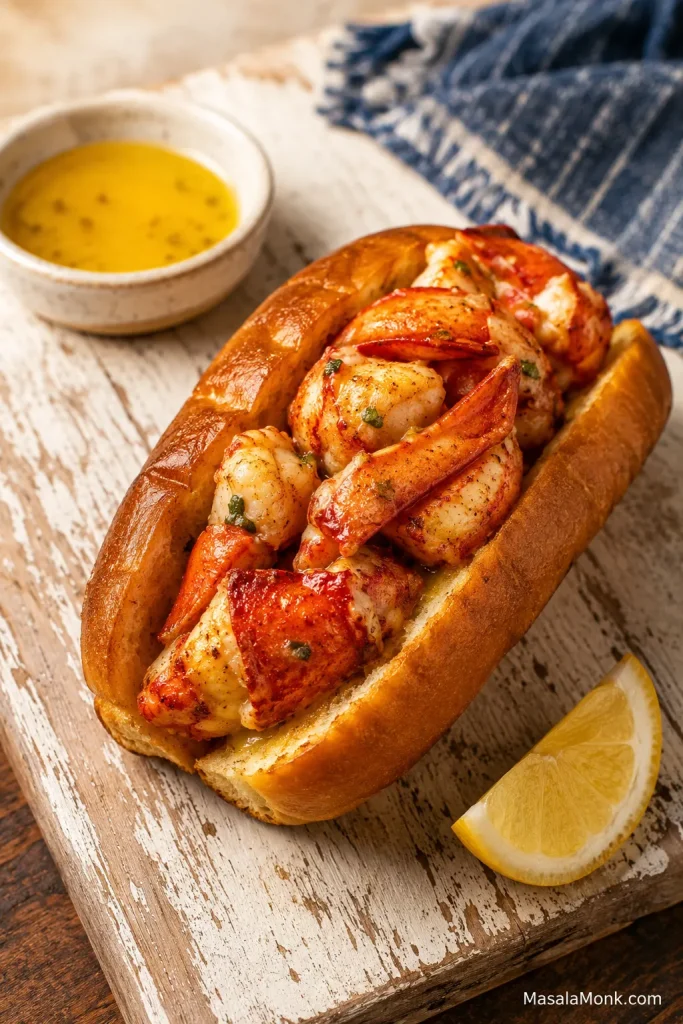
Maine-Style Lobster Roll
This is the cool, lightly creamy version: sweet lobster, warm buttery bread, lemon, chives, and optional celery for crunch. The bite should feel cool and soft in the middle, buttery at the edges, and bright enough from lemon that the lobster still tastes sweet.
Maine-Style Ingredients
- 1 lb / 454 g cooked lobster meat
- 2–4 tbsp / 30–60 ml mayonnaise
- ¼ cup finely diced celery, optional
- 1–2 tbsp lemon juice
- 1–2 tbsp chopped chives
- Salt and black pepper, to taste
- 4 butter-toasted split-top buns
Maine-Style Method
- Add 2 tablespoons mayonnaise, celery, lemon juice, chives, salt, and pepper to a mixing bowl.
- Stir until smooth.
- Add the lobster and fold gently so the pieces stay chunky.
- If the lobster looks dry, add more mayo 1 tablespoon at a time.
- Chill for 15–30 minutes for a colder filling.
- Spoon into warm butter-toasted buns close to serving time.
Visual guide: Use this texture cue for Maine-style filling: the lobster should be lightly coated and still easy to see, not stirred into a heavy salad.
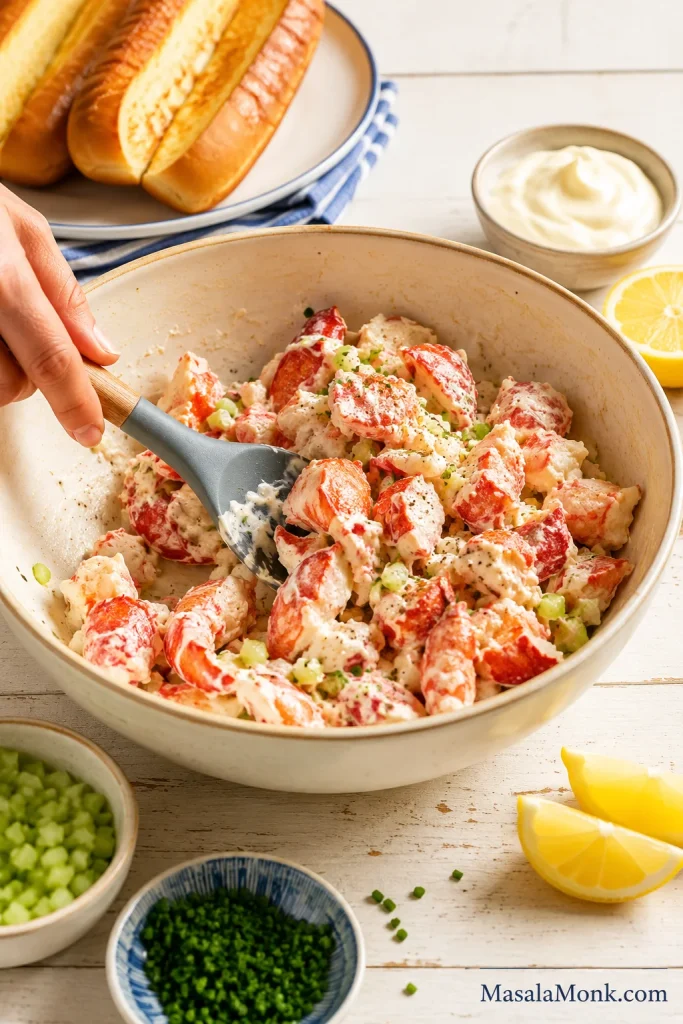
Look for a lightly glossy filling, not lobster buried in a thick creamy coating. Mayo should hold the pieces together, not turn them into seafood salad.
Maine-style filling does not need to be ice-cold. Slightly chilled lobster has a cleaner, sweeter flavor than lobster served straight from the coldest part of the refrigerator.
Visual guide: Use this finished Maine-style roll as the serving cue: chilled, fresh lobster in a warm toasted bun with a light creamy coating.
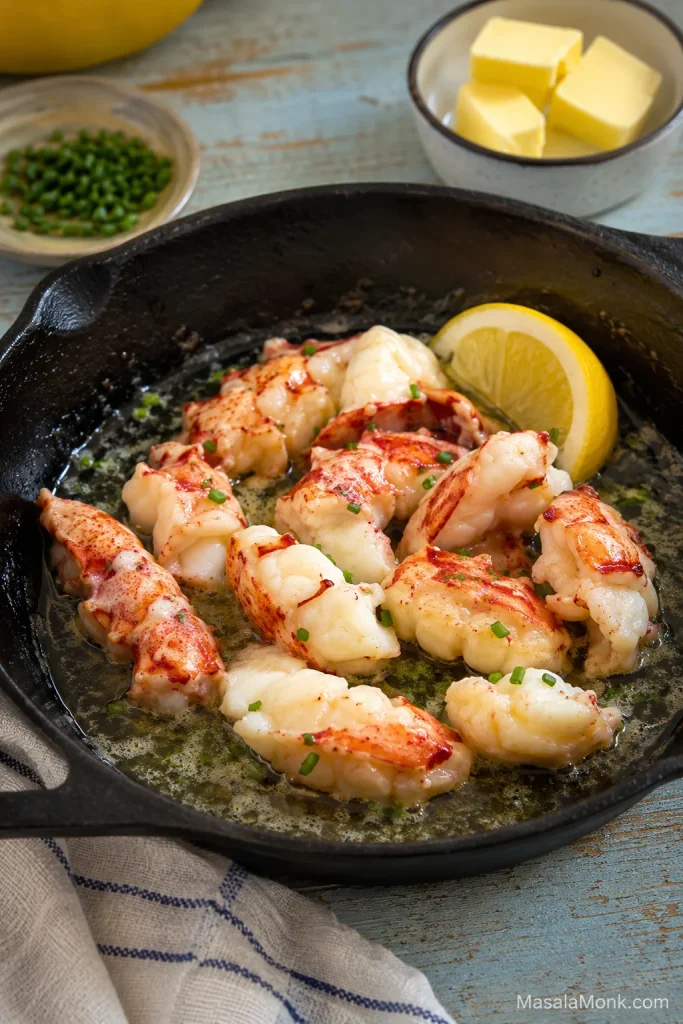
Connecticut-Style Lobster Roll
A Connecticut-style lobster roll is warm, buttery, and usually made without mayo. For this version, gently warm the lobster in melted butter, then tuck it into a hot butter-toasted bun.
A good warm version should smell like buttered toast first, then sweet lobster. Butter should coat the meat like a gloss, not pool in the bun. Think gentle warming, not a second cook.
Connecticut-Style Ingredients
- 1 lb / 454 g cooked lobster meat
- 4–6 tbsp / 60–90 ml butter
- 1 tbsp lemon juice or a little lemon zest
- 1–2 tbsp chopped chives
- Salt and black pepper, to taste
- 4 butter-toasted split-top buns
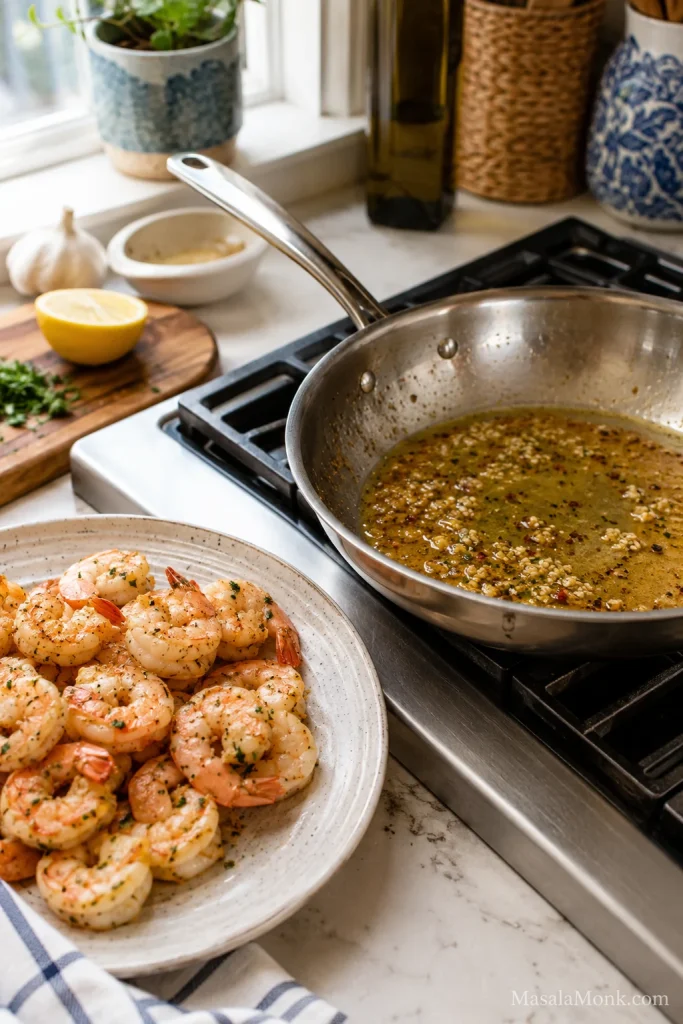
Connecticut-Style Method
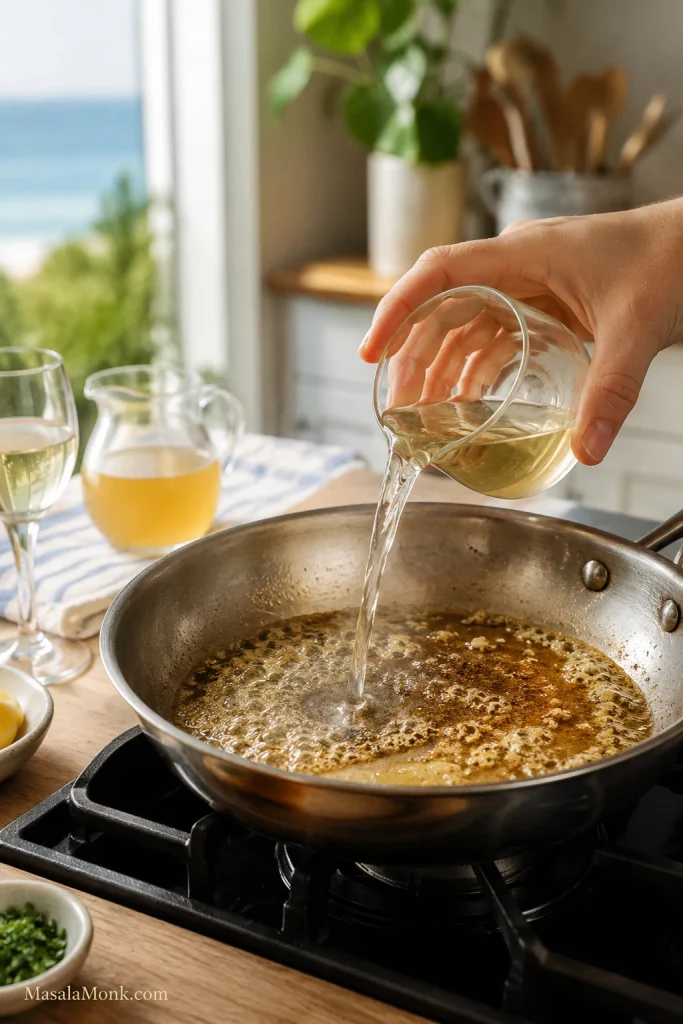
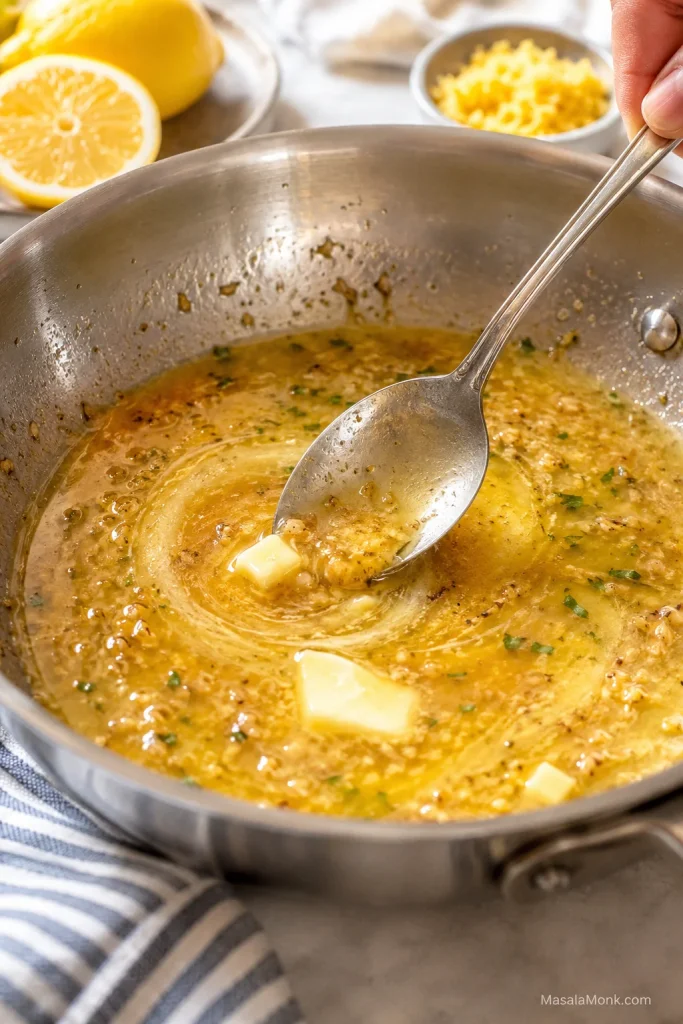
- Melt the butter in a skillet over medium-low heat.
- Add the cooked lobster meat.
- Warm gently for 2–3 minutes, just until heated through. The pieces should look glossy, not browned or curled tight.
- Add lemon juice or zest, chives, salt, and pepper.
- Keep the butter gently melted, not sizzling hard.
- Fill hot butter-toasted buns and serve while warm.
Visual guide: Use this skillet cue for Connecticut-style rolls: the lobster should look warm and glossy, not fried, browned, or curled tight.
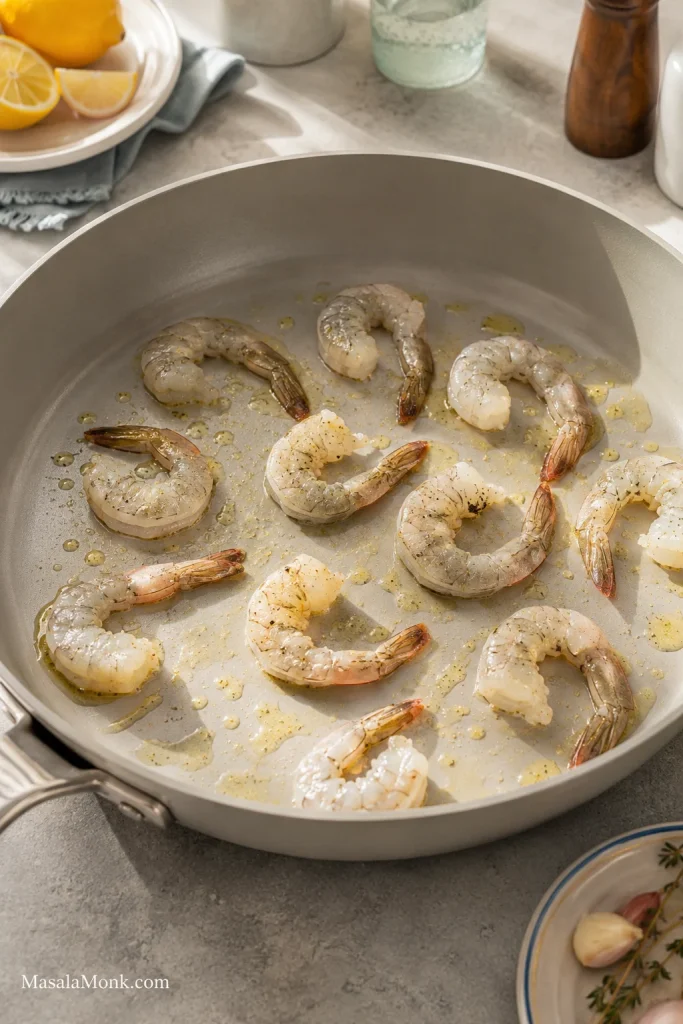
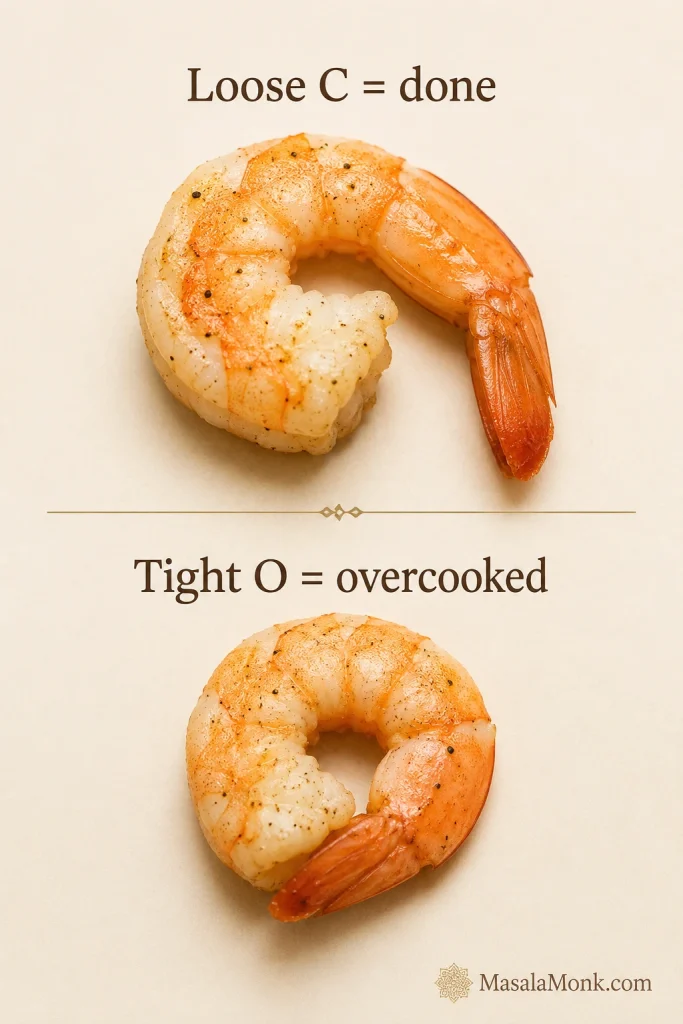
If you are starting with raw lobster meat instead of cooked lobster, cut it into even pieces and cook gently in butter until opaque and just cooked through, usually about 6–8 minutes depending on size. Stir gently and stop as soon as the meat is no longer translucent.
Visual guide: Use this finished Connecticut-style roll as the no-mayo serving cue: warm buttered lobster, soft toasted bun, and lemon on the side.
Using Lobster Tails, Frozen Lobster, or Whole Lobster
You can make excellent lobster rolls with different forms of lobster. However you start, the finished meat should be sweet, springy, and just opaque — never tight, dry, curled hard, or rubbery.
| Starting Point | What to Do | Best Use |
|---|---|---|
| Cooked lobster meat | Check for shell, pat dry, and cut into chunks. | Maine or Connecticut rolls |
| Frozen cooked lobster | Thaw overnight, drain well, and pat dry. | Best when convenience matters |
| Lobster tails | Thaw if frozen, then steam or boil gently until opaque. | Good when picked meat is unavailable |
| Whole lobster | Cook, cool, crack, pick, and check carefully for shell. | Classic texture and flavor |
Using Lobster Tails
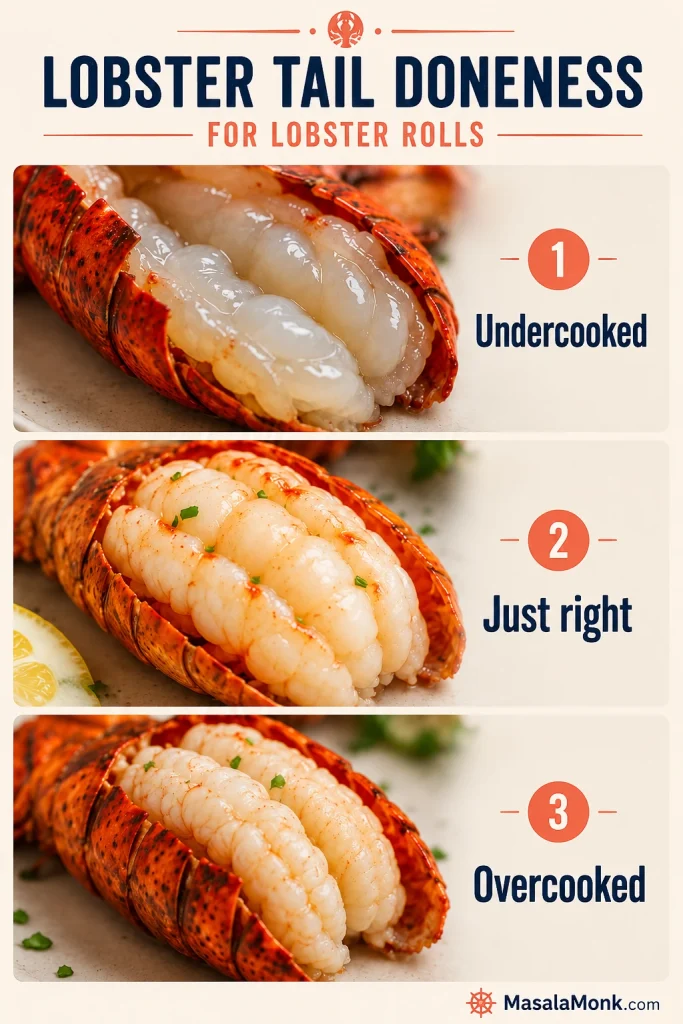
Small to medium lobster tails often take about 4–6 minutes once the water is steaming or boiling gently. Larger tails can take longer, so start checking early. The meat should be opaque, no longer translucent, and still springy when cut. If the tail meat curls tight or feels rubbery, it has gone too far.
For Maine-style rolls, cool the cooked tail meat before chopping and dressing. For Connecticut-style rolls, you can use the lobster while it is still warm and finish it gently in butter.
Visual guide: Use this doneness guide when cooking lobster tails so the meat turns opaque and springy instead of translucent or rubbery.
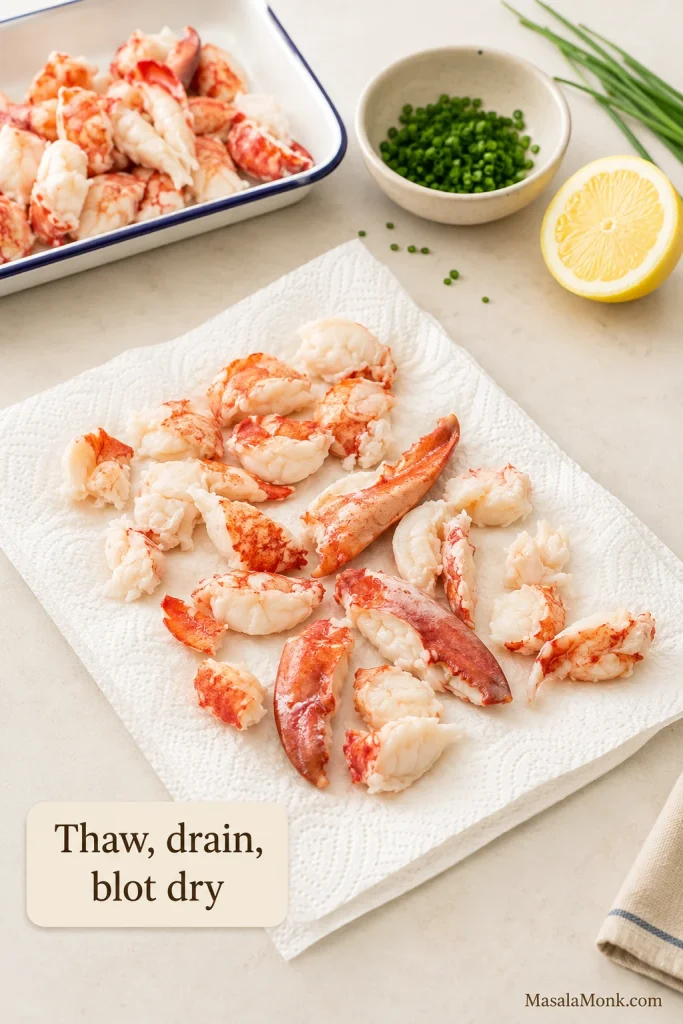
Using Frozen Cooked Lobster
Frozen cooked lobster can still make a good roll, but it needs a little patience before it meets the mayo or butter. Thaw it overnight in the refrigerator, drain it well, then spread it on paper towels for 10–15 minutes if it still seems watery. For Maine-style rolls, start with slightly less mayo. For Connecticut-style rolls, warm the lobster gently and leave excess liquid behind.
Visual guide: Use this frozen-lobster prep cue before adding mayo or butter: thaw, drain, and blot until the meat no longer looks wet.
Using Whole Lobster
If using whole lobster, cook it first, then cool it enough to handle. Crack the claws, knuckles, and tail, remove the meat, and check carefully for shell fragments. You can cook and pick the lobster a day ahead, then dress it close to serving.
Visual guide: Use this whole-lobster picking visual to see the mix you want in the bowl: claw, knuckle, and tail meat checked for shell.
How to Season a Lobster Roll Without Overpowering It
A lobster roll does not need a heavy sauce. The goal is simple: enough richness to keep the lobster juicy, enough lemon to brighten it, and no seasoning that steals the first bite.
If you are unsure, season the mayo or butter first, then fold in the lobster. It is easier to adjust lemon, salt, or mayo before the meat goes in than to fix an overworked filling later.
- Mayo: Use just enough to lightly coat Maine-style lobster.
- Butter: Use enough to gloss the lobster for Connecticut-style rolls, not soak the bun.
- Lemon: Add brightness in both versions.
- Celery and chives: Use lightly for crunch and freshness.
- Old Bay, celery salt, or hot sauce: Optional, but keep them in the background.
For a best-of-both-worlds roll, butter-toast the buns and keep the lobster cold with a very light mayo dressing. You get buttery bread and cool lobster salad without turning the filling heavy.
If you are serving the rolls with fries, a bowl of homemade tartar sauce works better on the side than inside the lobster roll.
Mini Lobster Rolls and Sliders
Mini lobster rolls are the party version of this recipe: easier to serve, easier to refill, and less risky than assembling full rolls too early. They work well for brunches, summer appetizers, or a seafood snack board.
Serving later? Read the make-ahead and seafood safety notes before filling a party tray.
- Use about 2 oz / 55–60 g lobster meat per mini roll.
- 1 lb / 454 g lobster meat makes about 8 mini lobster rolls.
- Toast the buns close to serving time.
- Keep Maine-style filling chilled until needed.
- Serve Connecticut-style mini rolls warm and fresh.
- For parties, keep extra filling chilled and refill buns as needed instead of assembling everything too early.
Visual guide: Use this party-board visual when scaling the recipe down into mini lobster rolls that can be filled close to serving.
Variations
Once the classic version makes sense, variations are easy. Keep the seafood generous and change only the accents.
- No mayo lobster roll: Make the Connecticut-style version with warm lobster, melted butter, lemon, and chives.
- Brown butter lobster roll: Brown the butter lightly before adding the lobster, but keep it gentle so it does not taste bitter.
- Spicy lobster roll: Add a few drops of hot sauce or a tiny pinch of cayenne to the mayo dressing.
- Lobster and shrimp roll: Use half lobster and half cooked shrimp for a more budget-friendly version.
- Crab roll: Use lump crab meat instead of lobster and keep the dressing light.
- Langostino roll: Use cooked langostino tails as a lobster-style variation.
- Egg-free mayo version: Use a thick eggless or plant-based mayo and keep the filling lightly dressed.
- Extra lemon-herb lobster roll: Add more lemon zest, chives, dill, or parsley for a fresher version.
What to Serve with Lobster Rolls
Lobster rolls are rich, so the best sides add contrast: something crisp, something cold, something acidic, or something salty.
- Classic: potato chips, pickles, lemon wedges, and coleslaw.
- Seafood-shack plate: fries, tartar sauce on the side, and corn on the cob.
- Picnic-style: potato salad, cucumber salad, iced tea, or lemonade.
- Lighter: green salad, tomato salad, or a vinegar-based cucumber salad.
Visual guide: Use this sides visual to build a complete plate with crunch, acidity, and contrast around the rich lobster roll.
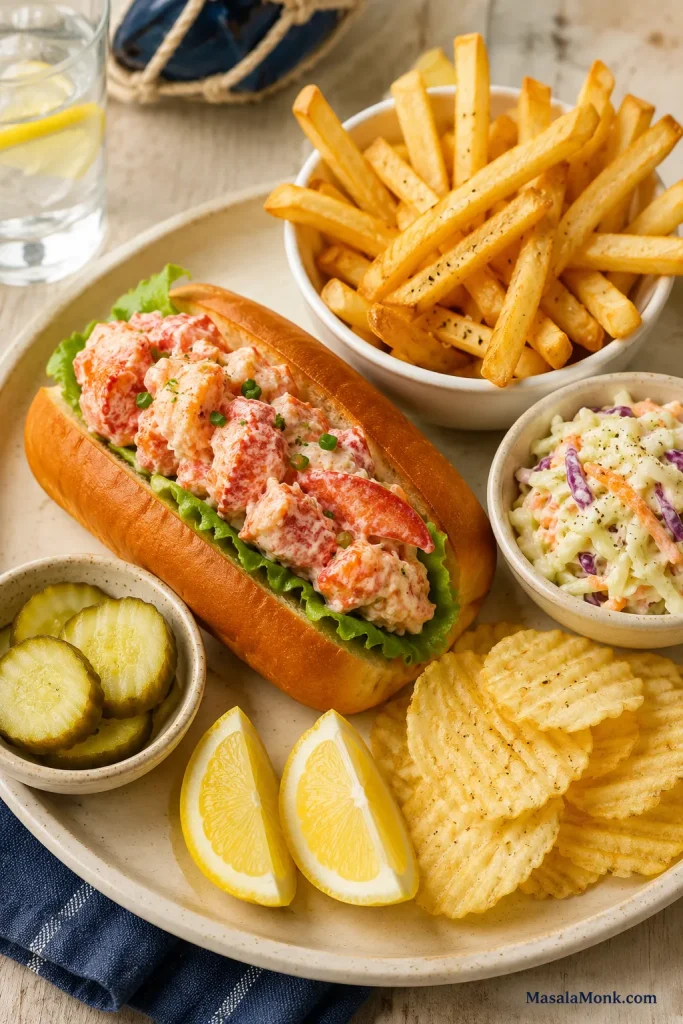
For a seafood-shack-style plate, serve them with crispy homemade French fries, pickles, and lemon wedges.
The cold, crunchy side that makes the plate feel complete is this easy creamy coleslaw. A more picnic-style meal works well with potato salad. For something lighter and sharper, a chilled cucumber salad with vinegar, dill, and onion cuts through the richness nicely.
Make-Ahead, Storage, and Food Safety
Lobster rolls are best assembled close to eating. You can prepare parts of the recipe ahead, but filled rolls and toasted buns do not hold well for long.
- Cooked lobster meat: Can be prepared up to 1 day ahead and stored covered in the refrigerator.
- Maine-style filling: Can be mixed a few hours ahead, but tastes best when freshly dressed.
- Connecticut-style filling: Best served warm, close to eating.
- Buns: Toast just before serving so they stay crisp outside and soft inside.
- Assembled rolls: Fill close to eating so the bread keeps its contrast.
- Leftover filling: Store chilled and use within 1–2 days.
Keep cold lobster filling refrigerated until serving, especially in warm weather. As a general food-safety rule, do not leave seafood or other perishable foods out for more than 2 hours, or more than 1 hour if the temperature is above 90°F / 32°C. For official seafood doneness and holding guidance, you can also check FoodSafety.gov’s safe minimum internal temperature chart.
If you are pregnant, use fully cooked, freshly handled lobster and keep the filling cold. Avoid lobster rolls made with pre-made seafood salad unless you are sure it has been stored safely. For more detail, read MasalaMonk’s guide to lobster and pregnancy.
For broader seafood choices during pregnancy and breastfeeding, the FDA’s fish advice explains the 8–12 oz weekly recommendation for a variety of lower-mercury seafood: FDA advice about eating fish.
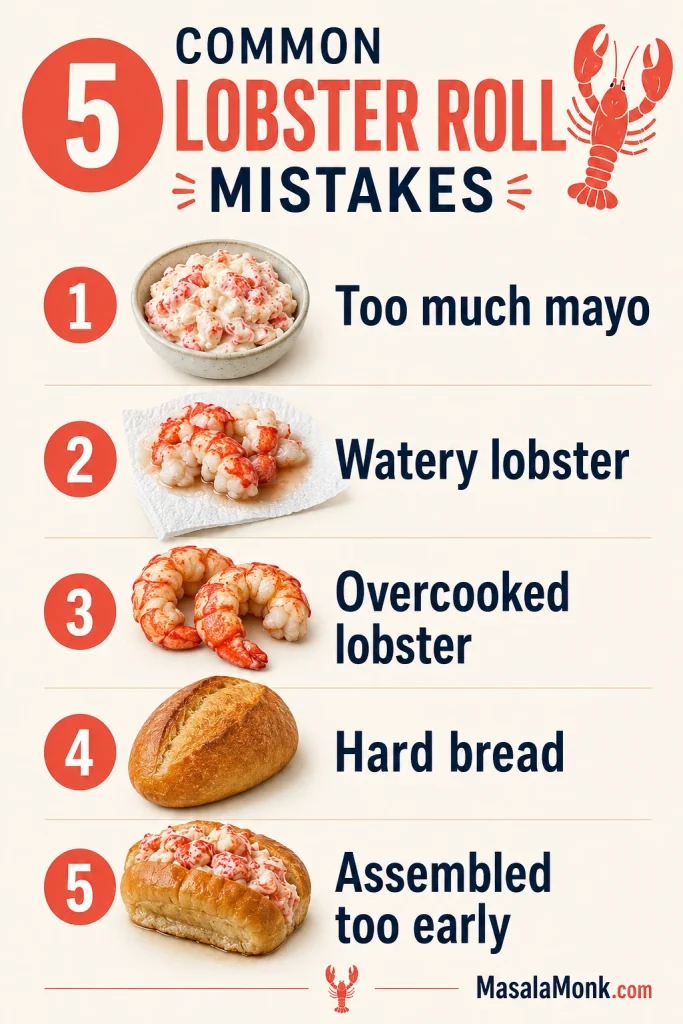
Common Mistakes
Most disappointing lobster rolls fail for simple reasons, and all of them are easy to avoid.
Visual guide: Use this mistake checklist before serving so you can catch watery meat, too much sauce, tough lobster, hard bread, or early assembly.
Quick Fixes for Common Lobster Roll Mistakes
- Using too much mayo: Start with 2 tablespoons per pound of lobster and add more only if needed.
- Overheating cooked lobster: For the warm version, gently heat it through instead of cooking it again.
- Using watery frozen lobster: Thaw, drain, and pat dry before mixing or warming.
- Chopping lobster too small: Keep the pieces chunky and visible.
- Using crusty bread: The bun should support the lobster, not fight it.
- Skipping the toast: Butter-toasting gives the bun flavor and structure.
- Underfilling the roll: Use about 4 oz / 113 g lobster meat per standard roll.
- Dressing too early: Freshly dressed lobster has the cleanest texture.
- Over-seasoning: Season lightly and let lemon do most of the lifting.
- Assembling too far ahead: The bun will soften and lose its contrast.
- Cold bun with cold filling: Chilled lobster is fine for Maine-style rolls, but the bun should still be warm and butter-toasted.
If something goes wrong, it is usually one of three things: the lobster was overcooked, the meat was too wet, or the bun was not toasted properly. Fix those, and the recipe becomes much more reliable.
Once the lobster is dry, the bun is warm, and the dressing is light, stop adjusting. A good lobster roll should taste expensive in the simplest possible way.
FAQs
What is the difference between a Maine and Connecticut lobster roll?
Maine-style lobster rolls are usually served cold with a light mayo dressing. Connecticut-style lobster rolls are served warm with melted butter and no mayo. Both are usually served in soft butter-toasted buns.
Are lobster rolls served hot or cold?
They can be either. Maine-style is chilled lobster with light mayo; Connecticut-style is warm lobster with butter. In both cases, the bun should be warm and freshly toasted.
What is the best lobster meat for lobster rolls?
A mix of claw, knuckle, and tail meat is best. Claw and knuckle meat are sweet and tender, while tail meat gives larger, meatier pieces. Lobster tails still work well when cooked gently.
How much lobster meat do I need per lobster roll?
Use about 4 oz / 113 g cooked lobster meat per standard roll. A very generous lobster roll uses 5–6 oz / 140–170 g. Four standard rolls need 1 lb / 454 g cooked lobster meat. Four generous rolls need 1¼–1½ lb / 565–680 g.
How much meat does a whole lobster give?
Yield varies, but as a rough home-cook shortcut, one 1½ lb whole lobster may give about 6–8 oz picked meat. Shell hardness, lobster size, and careful picking all affect the final amount.
What kind of bun is best for lobster rolls?
New England split-top hot dog buns are best because they toast beautifully on the sides while staying soft enough to cradle the lobster. Soft brioche or regular hot dog buns can also work when butter-toasted.
Can I use regular hot dog buns?
Yes. For the best result, trim a thin strip from both outer sides of regular hot dog buns, then toast those sides in butter until golden. This makes them behave more like split-top lobster roll buns.
Should lobster rolls have lettuce?
Traditional lobster rolls usually skip lettuce so the lobster stays the focus. For party serving, a small soft lettuce leaf can help protect the bun from moisture, but use it lightly.
Can I use lobster tails for lobster rolls?
Yes. Lobster tails are practical when whole lobster or picked lobster meat is not available. Thaw frozen tails first, cook gently until opaque and no longer translucent, then cut the meat into large chunks.
Can I use raw lobster meat?
Yes, especially for Connecticut-style rolls. Cut raw lobster meat into even pieces and cook it gently in butter until opaque and just cooked through. Stop before the pieces curl tight or feel rubbery.
Can I make lobster rolls with frozen lobster?
Yes. Thaw frozen cooked lobster overnight in the refrigerator, drain it well, and pat it dry before using. The drying step keeps the filling clean instead of watery.
How do I keep lobster rolls from getting watery?
Drain the lobster well, then pat it dry with paper towels before mixing. If frozen cooked lobster still seems wet, let it sit on paper towels for 10–15 minutes. Start with less mayo and add more only as needed.
Can I make lobster rolls without mayo?
Yes. Make Connecticut-style lobster rolls with warm lobster, melted butter, lemon, and chives. This is the classic no-mayo path.
Should lobster rolls have celery?
Celery is common in Maine-style lobster rolls because it adds crunch, but it is optional. Dice it finely and keep the amount modest so the lobster stays central.
Can I make mini lobster rolls?
Yes. Use mini buns or slider buns and about 2 oz / 55–60 g lobster meat per roll. One pound of lobster meat makes about 8 mini lobster rolls.
Can I make lobster rolls for a party?
Yes, but do not assemble all the rolls too early. Keep the filling chilled, toast buns in batches, and fill close to serving so the bread stays soft inside and crisp at the edges.
Can I make lobster roll filling ahead of time?
You can cook and pick lobster meat a day ahead. Maine-style filling can be mixed a few hours ahead, but it is best dressed close to serving. Connecticut-style warm butter lobster rolls should be made right before eating.
How long does lobster roll filling last?
Lobster filling is best fresh, but leftovers can be stored covered in the refrigerator and used within 1–2 days. Do not leave seafood filling at room temperature for more than 2 hours, or more than 1 hour above 90°F / 32°C.
Can pregnant women eat lobster rolls?
If you are pregnant, use fully cooked, freshly handled lobster and keep the filling cold. Avoid lobster rolls made with pre-made seafood salad unless you are sure it has been stored safely.