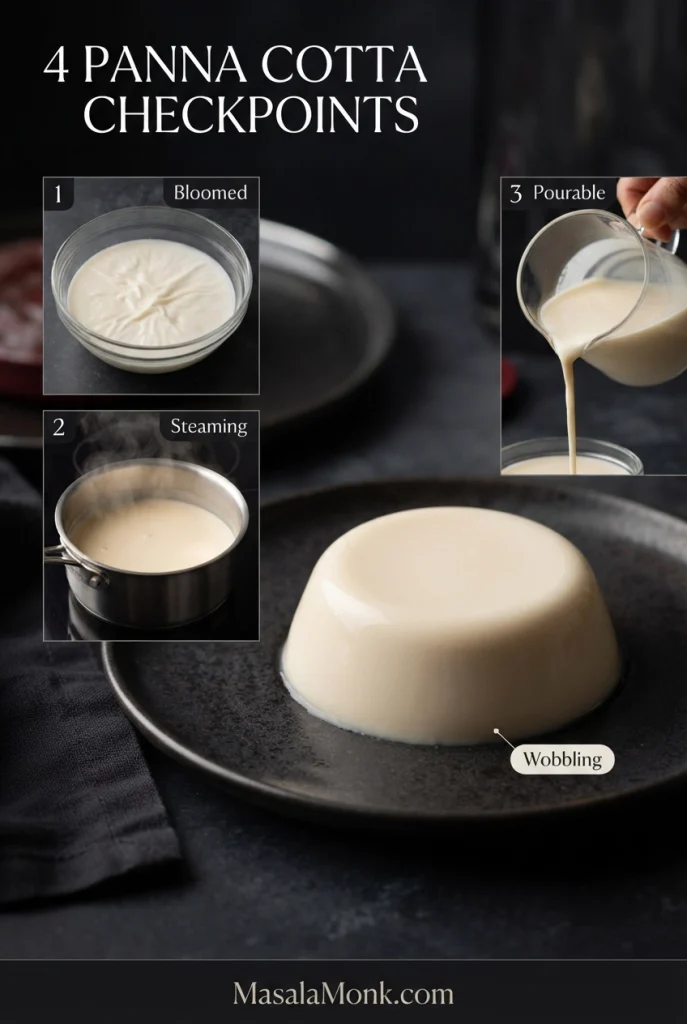
Posted on — Leave a comment

Gyoza Recipe: Crispy, Juicy & Easy

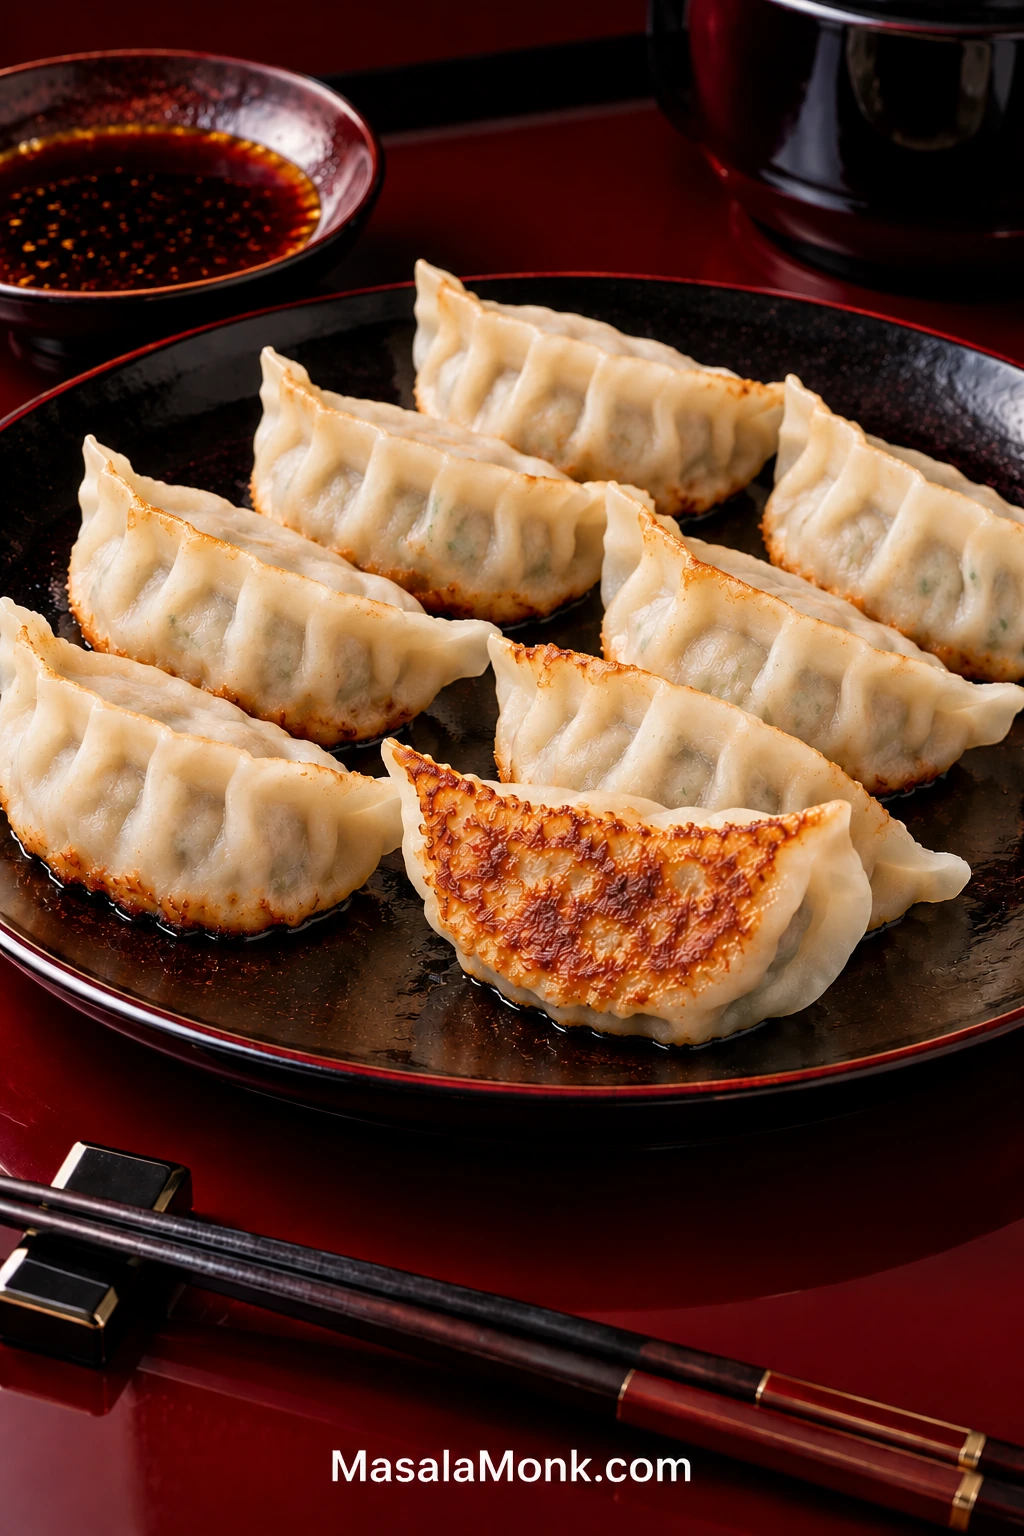
Pan-fried Japanese gyoza on a dark plate with pale pleated wrappers and golden crisp bases, including one dumpling turned to reveal its browned underside.

Good pan-fried gyoza have a deeply crisp golden base, a tender upper wrapper and a hot, juicy pork-and-cabbage center. Gyoza are Japanese dumplings, sometimes described as Japanese potstickers on US menus. Known as yaki-gyoza, this pan-fried style browns the bottoms, steams the dumplings under a lid, then lets the base crisp again.

For this gyoza recipe, thin store-bought wrappers keep folding manageable. Moisture is the main thing to control: squeeze excess water from the cabbage, but work a small measured amount into the pork so the filling stays juicy without soaking the wrappers.

Gyoza Recipe

Japanese pan-fried pork and cabbage dumplings seasoned with ginger, garlic and chives, with tender wrappers, juicy filling and crisp golden bottoms.

Yield
About 36–40 gyoza
Serves 4 with sides or about 6 as an appetizer

Prep Time
About 50–60 minutes

Cook Time
About 20–30 minutes

Total Time
About 1 hour 10 minutes to 1 hour 30 minutes

Wrapper Size
8.5–9 cm / about 3½ in

Skillet
10 in / 25 cm

Batch Size
About 12 gyoza

Water for About 12 Gyoza
⅓ cup / 80 ml

Equipment

  • 10-inch / 25 cm nonstick skillet with a tight-fitting lid
  • Large mixing bowl
  • Sharp knife and cutting board
  • Large tray or sheet pan lined with parchment
  • Small bowl of water for sealing wrappers
  • Kettle or small saucepan for the steaming water
  • Thin flexible spatula
  • Instant-read thermometer, optional

A well-seasoned carbon-steel skillet also works, but nonstick is the most forgiving choice for a first batch.

Ingredients

Pork and cabbage filling

  • 180 g / 6.3 oz green cabbage, tough core removed, weighed before salting and very finely chopped
  • ½ teaspoon fine sea salt, for the cabbage
  • 8 oz / 227 g regular ground pork, not extra lean
  • 1 tablespoon / 15 ml regular Japanese soy sauce
  • 1 tablespoon / 15 ml sake, optional
  • 2 teaspoons / 10 ml toasted sesame oil
  • 2 teaspoons / about 6 g potato starch or cornstarch
  • 1 tablespoon / 15 ml cold water or unsalted chicken stock, plus another 1 tablespoon / 15 ml if omitting the sake
  • 2 teaspoons finely grated fresh ginger
  • 2 garlic cloves, finely grated or minced
  • ¼ teaspoon ground white or black pepper
  • 25 g / about ⅓ cup finely chopped garlic chives (nira)
  • 2 scallions / about 20 g, finely chopped

Wrappers

  • 36–40 thin round gyoza wrappers, about 8.5–9 cm / roughly 3½ inches across
  • Water, for sealing as needed

For pan-frying

  • Neutral cooking oil, about 2 teaspoons per batch
  • Just-boiled water, ⅓ cup / 80 ml for about 12 gyoza
  • Toasted sesame oil, optional, about ½ teaspoon per batch for finishing

Gyoza dipping sauce

  • 3 tablespoons / 45 ml regular Japanese soy sauce
  • 3 tablespoons / 45 ml unseasoned rice vinegar
  • 1–2 teaspoons rayu or other chili oil, optional

Instructions

1. Chop, salt and squeeze the cabbage

Chop the cabbage very finely, aiming for pieces around 2–3 mm / roughly ⅛ inch. It should be much finer than cabbage for slaw so it disappears into the pork instead of leaving crunchy pockets.

Toss with ½ teaspoon fine sea salt and leave for 10–15 minutes. The cabbage will soften and begin releasing water. Gather it in your hands or a clean kitchen towel and squeeze firmly until very little more liquid comes out when you press it.
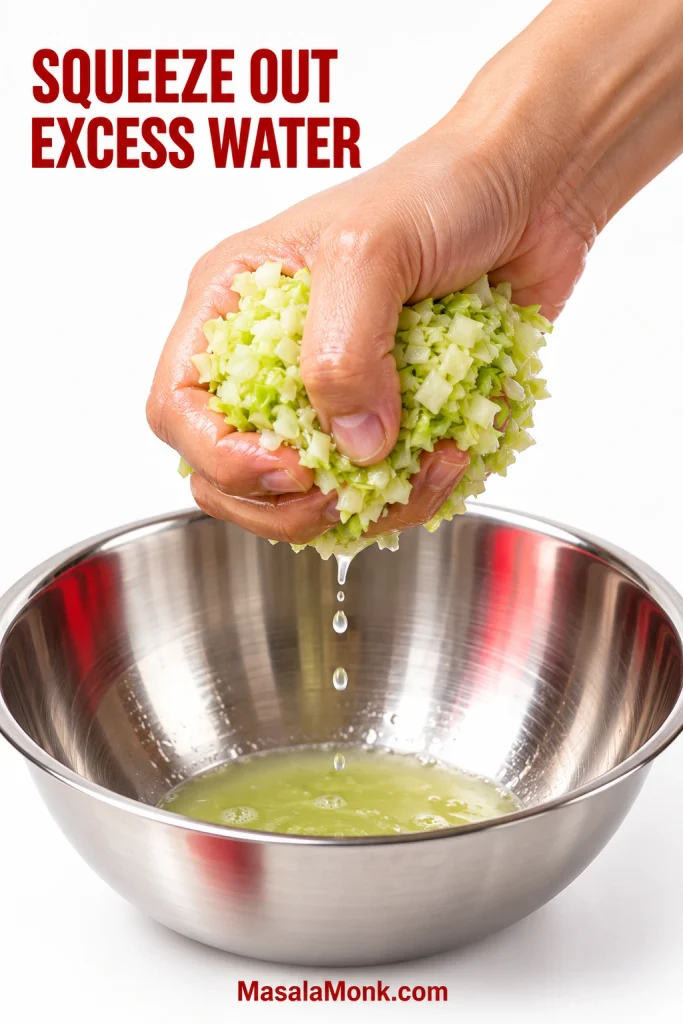
Hand squeezing finely chopped salted cabbage over a stainless-steel bowl, with a few drops of liquid falling from the compressed cabbage.
After squeezing, loosen the cabbage before mixing it into the pork. Fine separated pieces distribute evenly; a compressed clump can create uneven pockets even when the moisture level is right.

2. Mix the filling

Add the pork to a large bowl with the soy sauce, sake if using, sesame oil, potato starch or cornstarch, water or stock, ginger, garlic and pepper. Skipping the sake? Add the extra tablespoon of water or stock.

Mix vigorously until the pork turns sticky and tacky and starts holding together as one mass instead of loose crumbles.
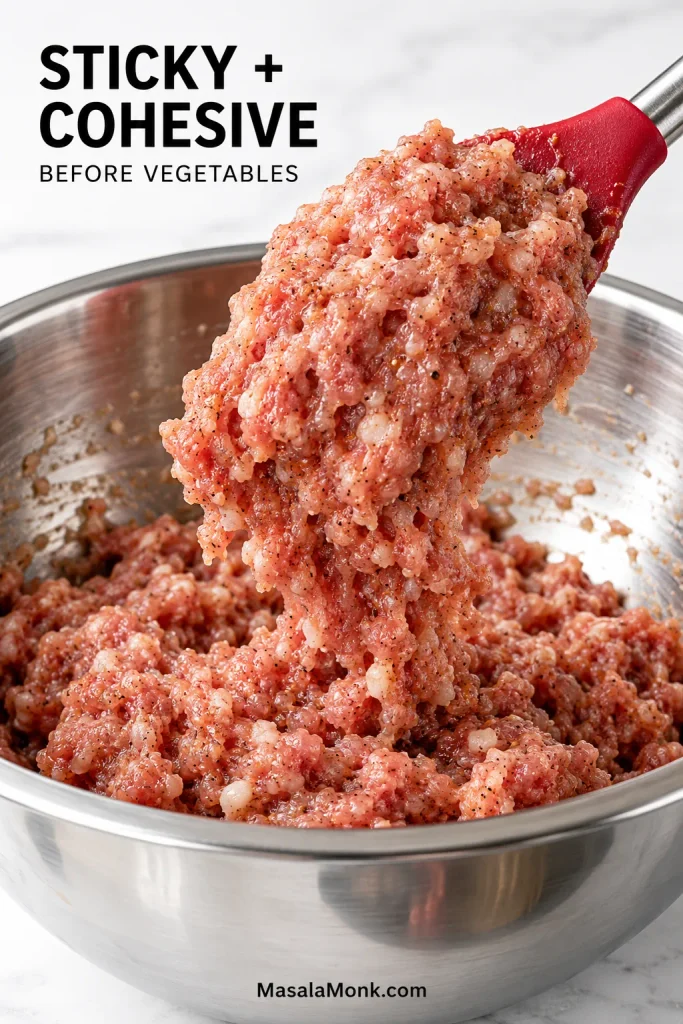
Seasoned raw ground pork being lifted from a metal bowl, showing a sticky cohesive texture while individual meat granules remain visible.
Properly mixed pork should cling to itself and move as a soft cohesive mass while still looking visibly ground. Think tacky and connected—not smooth paste or long stretchy strands.

Add the squeezed cabbage, garlic chives and scallions and mix them through. Cover and refrigerate for about 15 minutes. While the filling rests, line the tray, mix the dipping sauce and set out the sealing water. Leave the wrappers sealed until you’re ready to fold.

Keep the filling raw when it goes into the wrappers. The covered steaming stage cooks the pork; precooking it first would make the filling drier and more crumbly.

3. Cook a teaspoon before you start folding

Fry about 1 teaspoon of filling in the skillet until fully cooked, then taste it. Add a little more soy sauce or salt to the main bowl and mix it through if needed. This is the moment to fix the seasoning—not after three dozen dumplings are sealed. Wipe out the skillet afterward.
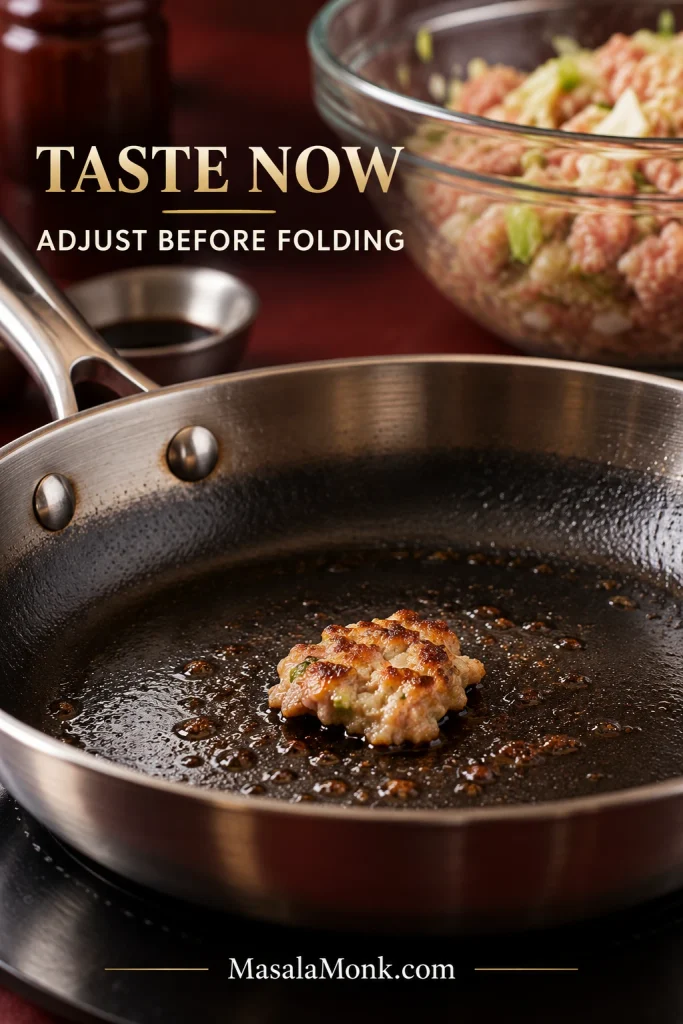
Small cooked tester portion of pork gyoza filling in a skillet, with a bowl of raw filling behind it before the dumplings are folded.
Use the tester as a balance check, not only a salt check. Ginger, garlic, soy and sesame should support the pork rather than letting one seasoning dominate the finished gyoza filling.

4. Fill and seal the gyoza

Keep the unused wrapper stack under plastic wrap or a lightly damp kitchen towel and take out one wrapper at a time. New to folding? Start with about 10 g / 2 level teaspoons of filling. Once sealing feels comfortable, move closer to 12 g for a fuller dumpling.
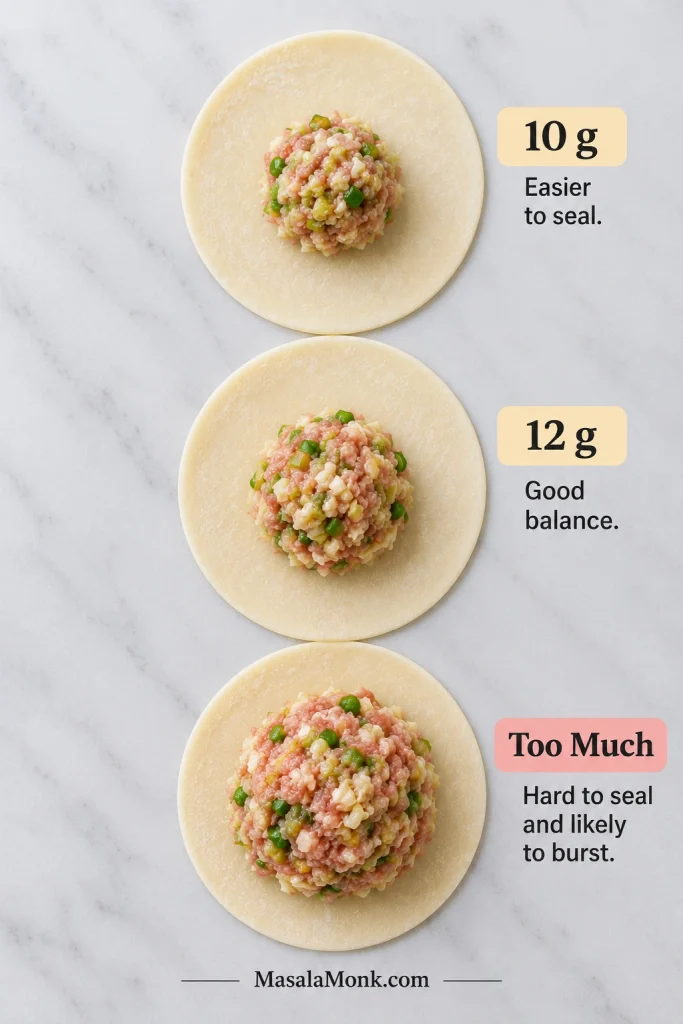
Three equal round gyoza wrappers with increasing amounts of pork filling labeled 10 g, 12 g and too much, showing progressively smaller sealing margins.
Watch the shape of the filling as much as the number on the scale: a low oval spreads naturally through the crescent, while a tall central mound makes the wrapper harder to close cleanly.

Spread the filling into a compact oval in the center and press out any obvious pockets of air. Moisten the wrapper edge lightly if needed, fold it into a half-moon and pinch the seam firmly shut.

You can stop there. A firmly sealed half-moon cooks perfectly well. For the familiar gyoza shape, make about 4–5 small pleats along the front edge while leaving the back layer relatively flat.
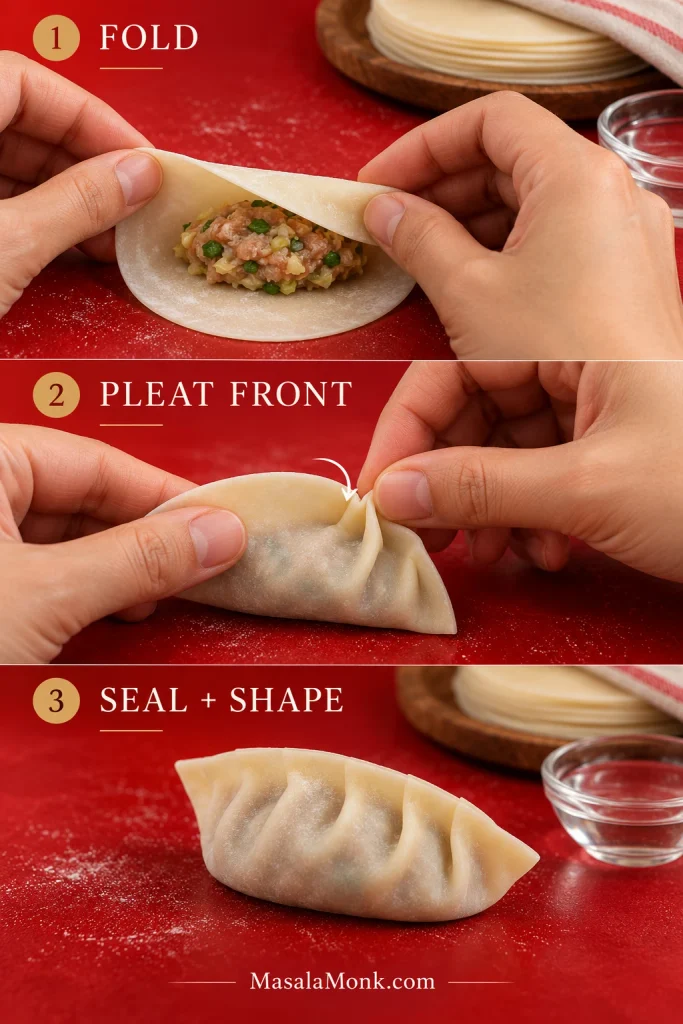
Three-step gyoza folding sequence showing a wrapper folded over filling, the front edge being pleated and the finished sealed crescent dumpling.
Pleats should redistribute the wrapper, not create extra bulk. Small front-layer folds preserve a tender seam while naturally curving the gyoza around the filling.

Stand the dumpling upright and press the bottom gently against the tray to give it a flatter base. That wider contact area becomes a broader patch of golden crust in the skillet. Keep the finished gyoza loosely covered with plastic wrap while you fold the rest.
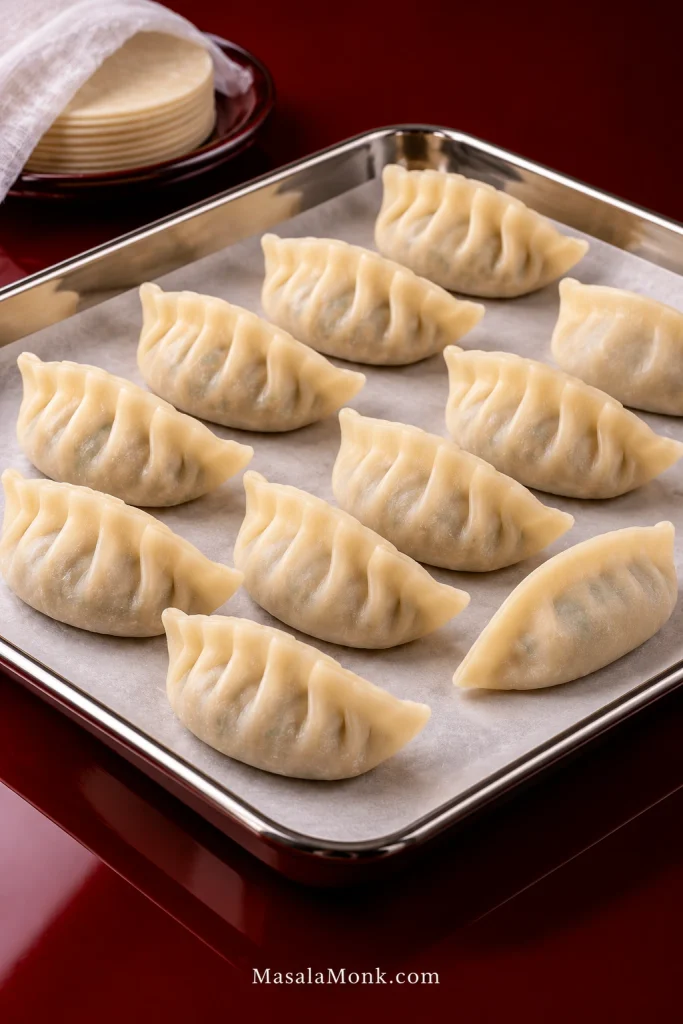
Raw handmade gyoza with varied pleats and crescent shapes spaced apart on a parchment-lined tray before cooking.
A little spacing protects the finished folds. When damp seams touch, raw gyoza can stick and tear apart later, while exposed wrappers can dry at the edges if left uncovered.

5. Brown the first batch

Bring the steaming water to a boil. Meanwhile, heat a 10-inch / 25 cm nonstick skillet over medium to medium-high heat for about 1 minute. Add about 2 teaspoons neutral oil. It should spread easily over the pan but should not be smoking.

Arrange about 12 gyoza flat-side down with a little room between them. Leave them alone for about 2 minutes, or until the bottoms are light to medium golden. Once that first crust forms, they release much more easily.

6. Add hot water and cover

Carefully pour ⅓ cup / 80 ml just-boiled water around the dumplings and cover the skillet immediately. Pour away from yourself and expect a sharp hiss when the water hits.
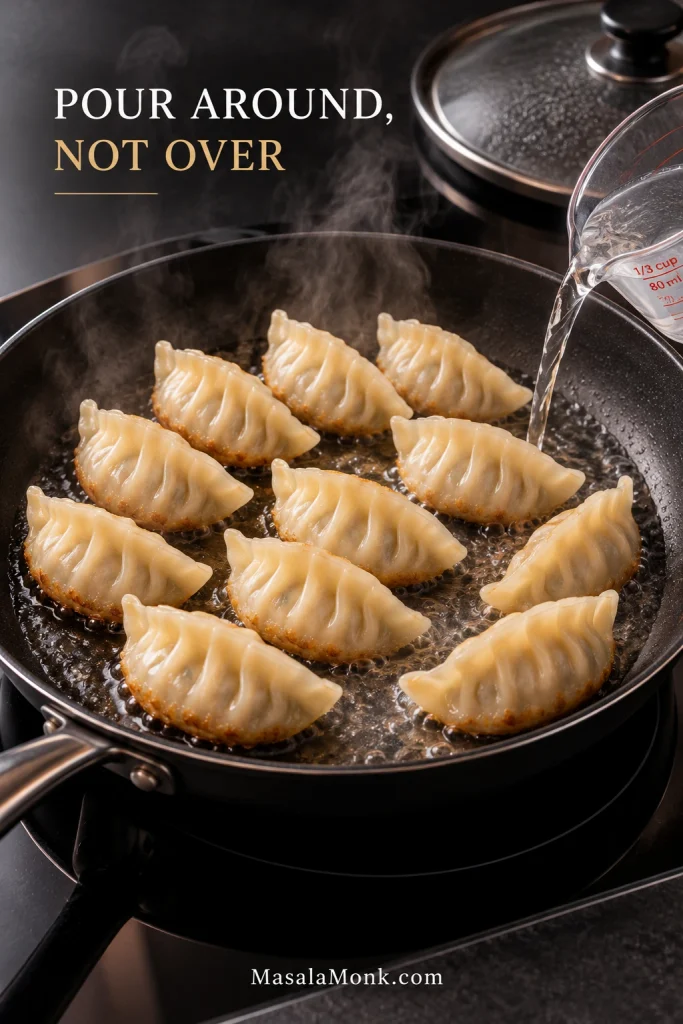
Hot water being poured into open spaces around pale gyoza in a nonstick skillet rather than directly over the dumpling tops.
Just-boiled water helps steam build quickly without cooling the skillet more than necessary. Pouring into the gaps also keeps the delicate pleated tops out of the direct stream.

Reduce the heat to medium and steam for about 3–4 minutes. The upper wrappers should soften and become slightly translucent.

7. Let the bottoms crisp again

Listen as well as look. As the water disappears, the softer bubbling gives way to a clearer frying sizzle. Remove the lid when that frying sound returns.

Let any remaining water evaporate, then fry for another 1–2 minutes until the bottoms are deeply golden. Stay close after the water disappears because the skillet heats quickly again.
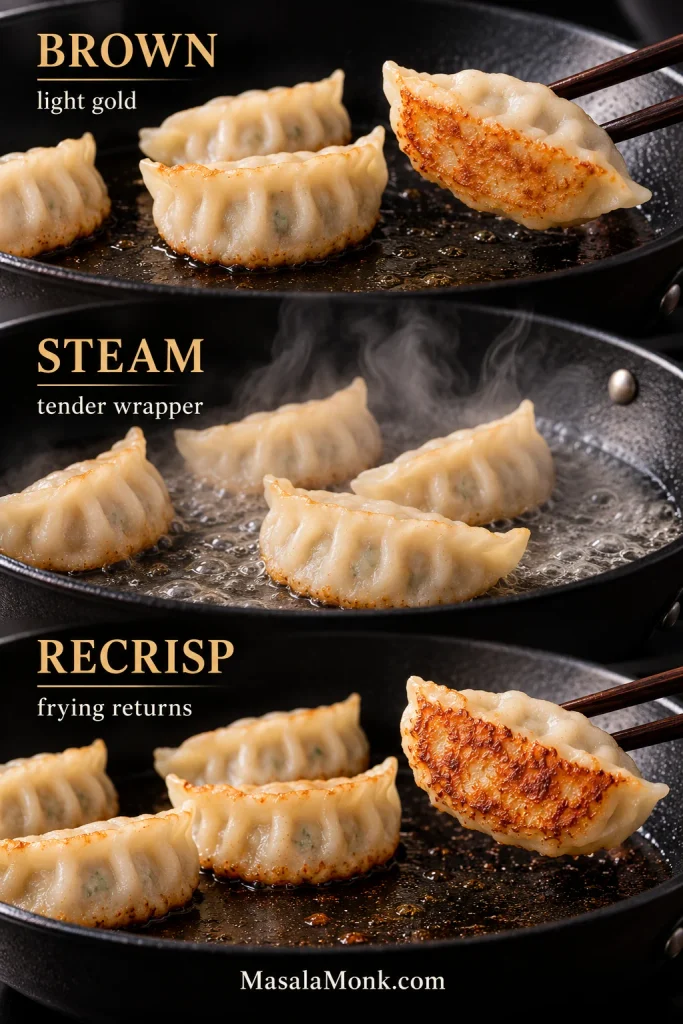
Three stages of cooking gyoza: a lightly browned underside, dumplings steaming in the skillet and a deeper golden underside after final recrisping.
Think of the method as dry heat → moist heat → dry heat. That sequence explains how pan-fried gyoza can cook through under the lid yet finish with a crisp bottom.

If you like, drizzle about ½ teaspoon toasted sesame oil around the edge for the final 30 seconds. Lift the gyoza onto a plate crisp-side up and serve them immediately; this is when the contrast between the golden base, tender wrapper and hot, juicy filling is at its best.

For an extra check on the first batch, insert an instant-read thermometer through the side of one of the fuller dumplings into the center of the pork filling. Ground pork should reach 160°F / 71°C.
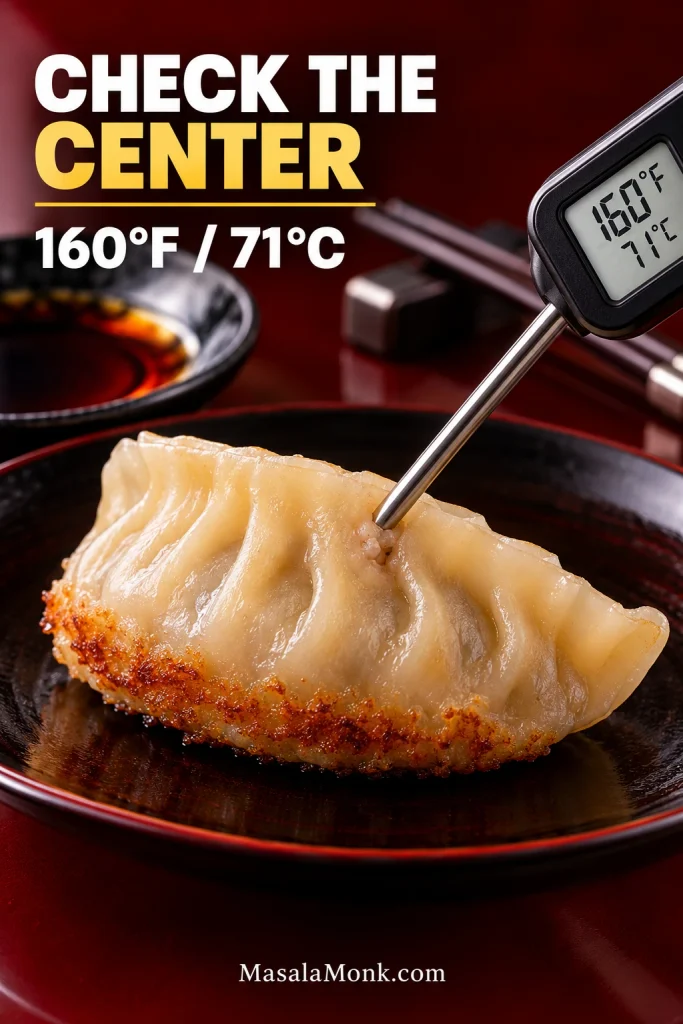
Instant-read thermometer inserted through the side of a cooked gyoza toward its center, showing 160°F or 71°C.
With pork gyoza, wrapper color alone cannot confirm doneness. The pleated top can look tender before the dense center has finished cooking, which is why the thermometer targets the filling.

Repeat with the remaining gyoza, using fresh oil and another ⅓ cup / 80 ml hot water for each full batch of about 12. Use less water for a small final batch, following the same wrapper-tenderness and evaporation cues.

8. Mix the dipping sauce

Mix the soy sauce and unseasoned rice vinegar 1:1, then add rayu to taste.

Serve the gyoza straight from the skillet while the bottoms are crisp. They work as an appetizer on their own, or beside fried rice for a fuller meal.

Recipe notes

  • Napa cabbage: substitute the same weight, then salt and squeeze it very well before adding it to the pork.
  • Garlic chive substitute: use regular chives, or add a little more scallion and garlic.
  • Skipping sake: add the extra tablespoon of water or unsalted stock instead. Sweet mirin is not a straight 1:1 replacement.
  • Potato starch substitute: use cornstarch.
  • Wrapper count: keep a few extras nearby. The exact number changes with wrapper diameter, cabbage moisture and how generously you fill them.
  • Extra filling: shape it into small patties and cook them thoroughly in a skillet.

What the Inside Should Look Like

Cut one finished gyoza open before moving on. The center should look moist but set, with pork, cabbage and chives distributed through the crescent rather than pooling liquid or tightening into a dense plug.
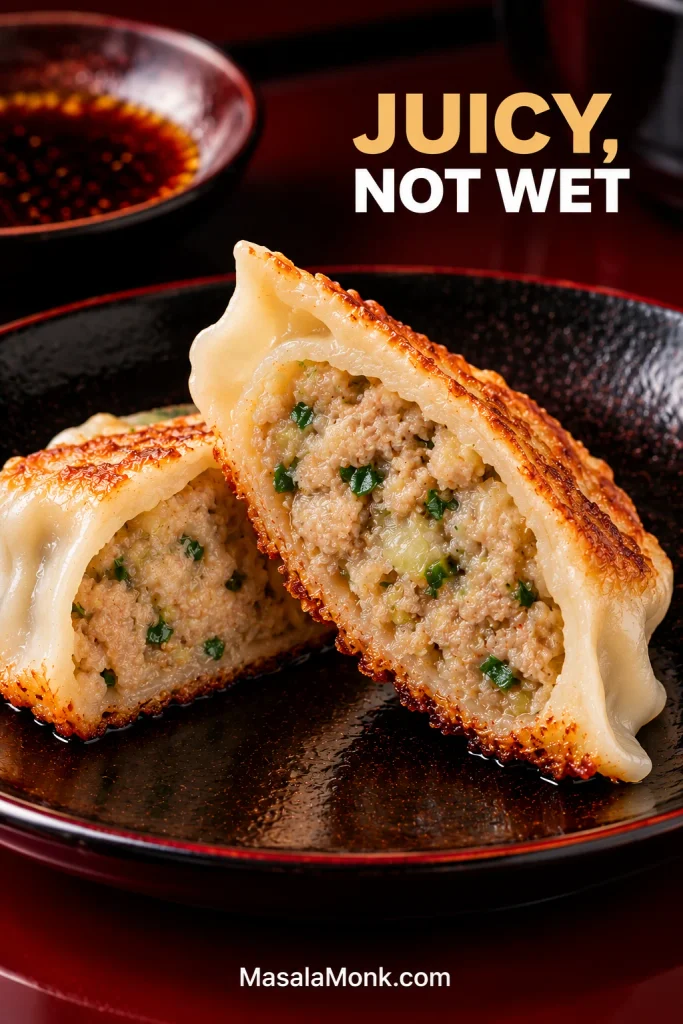
Cut-open cooked gyoza showing moist pale-brown pork filling with finely distributed cabbage and green chive flecks inside a thin wrapper with a golden base.
A cross-section can reveal folding quality too: the pork-and-cabbage filling should run through the crescent without a large hollow pocket trapped beneath the seam.

Pork and Cabbage Filling

Cabbage keeps the filling lighter, but excess water can soften thin wrappers while they wait. That is why the cabbage gets salted and squeezed before it reaches the pork.
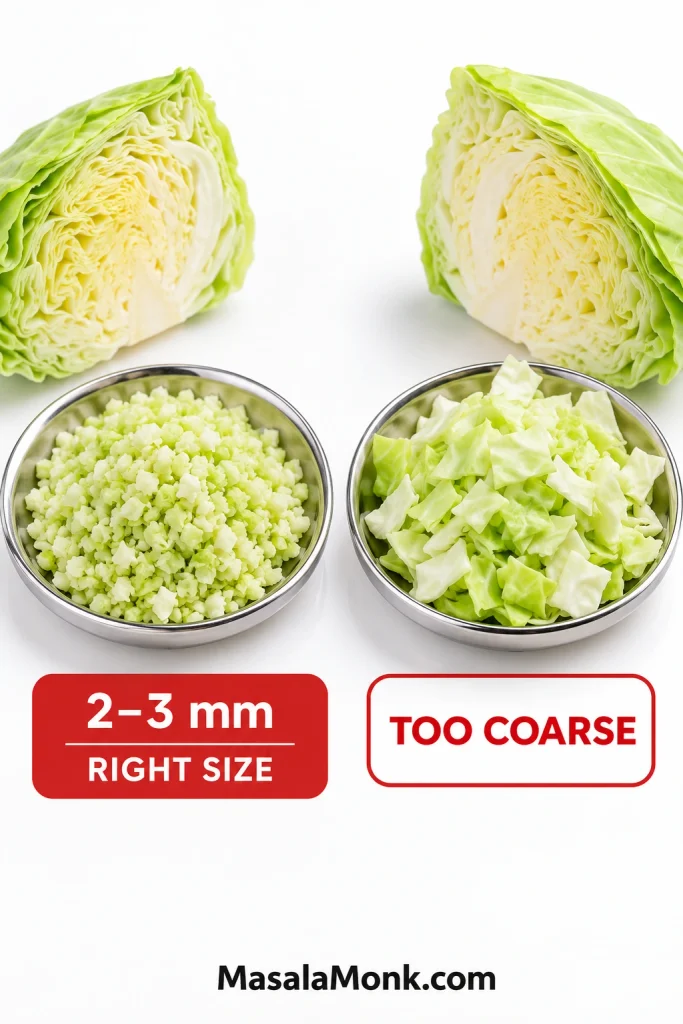
Side-by-side dishes comparing finely chopped 2–3 mm cabbage with much larger coarse cabbage pieces.
Fine cabbage protects the wrapper as well as the texture. Short, evenly chopped pieces mix into the pork cleanly, while coarse pieces are more likely to press against the thin skin and seam.

Mix the seasoned pork first, until it turns sticky and cohesive. That helps it hold the added liquid and stay juicy rather than crumbly.

If your pantry has several different soy sauces, our guide to soy sauce styles explains the differences in more detail.

Which Gyoza Wrappers to Use

Use thin round Japanese gyoza wrappers around 8.5–9 cm / roughly 3½ inches across if you can find them. The same style may be labelled gyoza skins.
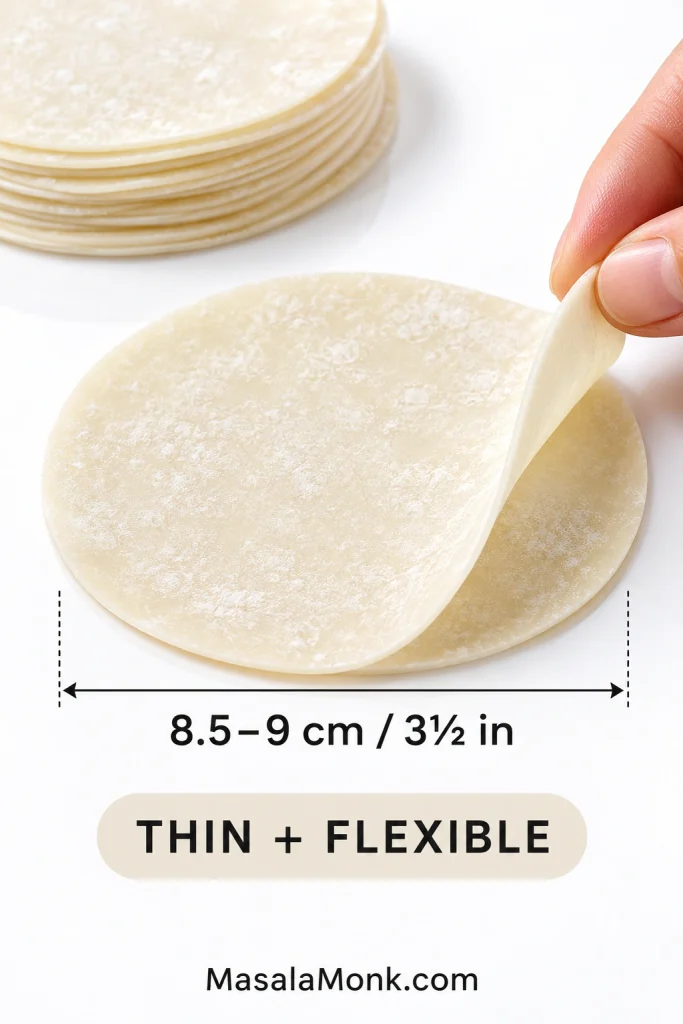
Thin round gyoza wrapper lifted at one edge beside a stack of wrappers, with a measurement indicating about 8.5–9 cm or 3½ inches.
A fresh gyoza wrapper should bend easily without cracking along the rim. If the edge starts feeling stiff before you fill it, the stack is drying and needs covering.
  • Good substitute: round potsticker wrappers of similar thickness.
  • Useful in a pinch: square wonton wrappers. They may be thicker, give the dumplings a different shape and need slightly longer under the lid.

Already have square wonton wrappers? The wonton soup recipe goes further into handling wonton skins, sticky pork filling, sealing and freezing.

Homemade wrappers are often larger or thicker, so they may take more filling and a little more steaming. Whatever you use, protect the unused wrappers from drying while you work.

Seal First, Pleat Second

The wrapper should close without stretching. If the seam keeps springing open or filling squeezes into the edge as you pinch, the dumpling is too full. Use a little less and keep the sealing edge clean. Press out trapped air as you close it.
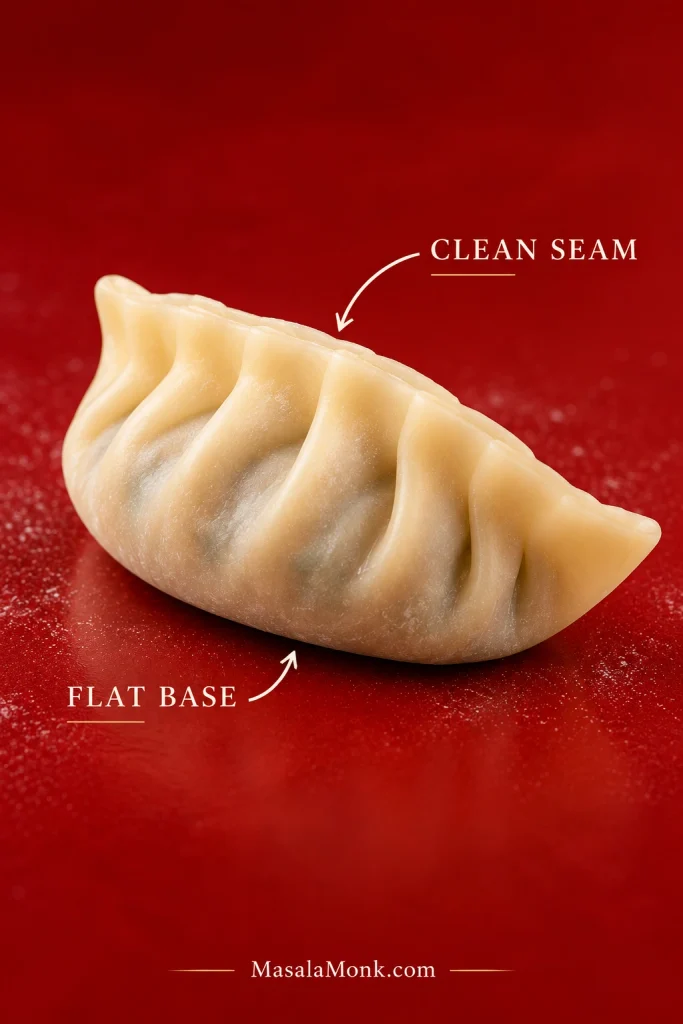
Close-up of a raw pleated gyoza with callouts identifying its sealed upper seam and broad flat base resting on the work surface.
Set each raw gyoza down once before it reaches the skillet. If it rocks or tips, gently flatten the base now so the wrapper can make even contact with the hot pan.

No perfect pleats? Fine. A firmly sealed half-moon is a complete gyoza, not a failed version of the pleated shape; the important checks are a clean seam, no trapped filling at the rim and a base that can sit steadily in the skillet.
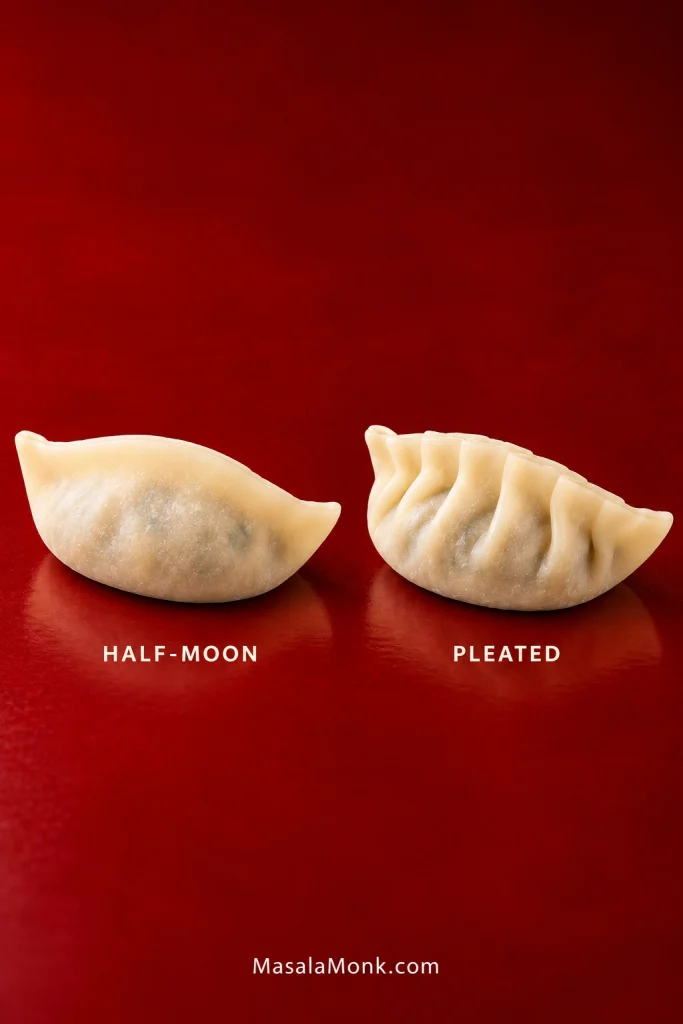
Two raw gyoza at the same scale, one with a plain half-moon seam and one with restrained front pleats, both resting on broad bases.
Pleating naturally curves the front edge while the flatter back helps support the base. A plain half-moon skips that shaping step but can still seal, steam and crisp just as successfully.

The Pan Has Three Modes

Cook gyoza in three stages: brown, steam, then recrisp.
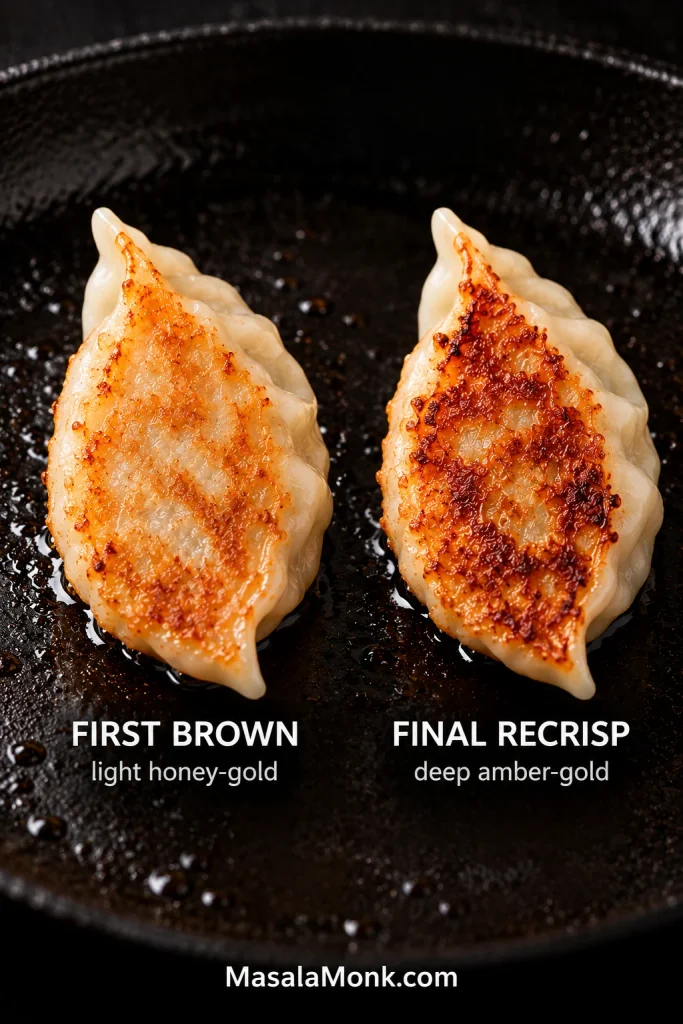
Two gyoza undersides compared side by side, showing a light honey-gold first brown and a deeper amber-gold final recrisp.
The color gap is your safety margin. If the first brown is already deep amber, the final recrisp has very little room left before the gyoza base starts to scorch.
StageWhat to watch for
BrownSteady frying and a flat side turning light to medium golden. The first crust is forming.
SteamA sharp hiss when the water enters, then softer bubbling. The upper wrapper turns tender and slightly translucent while the filling cooks.
RecrispThe bubbling fades and a clearer frying sizzle returns. Most of the free water is gone and the bottom can brown again.

Why the Water Is Measured

Water depth is an unreliable guide because it changes with pan diameter and dumpling size. For roughly 12 thin-wrapped gyoza in this 10-inch / 25 cm skillet, use ⅓ cup / 80 ml.
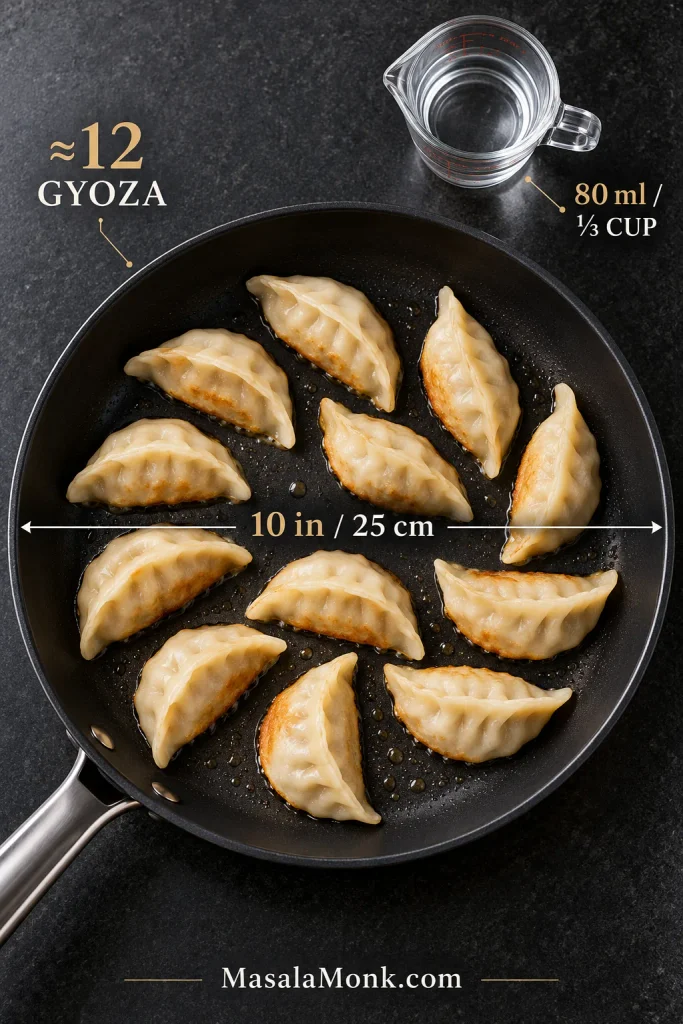
Top-down view of about twelve gyoza in a 10-inch nonstick skillet beside a measuring cup containing 80 ml or one-third cup water.
Spacing is part of the pan-and-water equation. Small gaps let steam circulate around roughly 12 gyoza and give each base room to return to direct skillet contact once the water evaporates.

While water remains in the pan, it keeps the temperature in check. After it evaporates, the skillet gets hot quickly again. Stay nearby for that last minute and let the deep golden color and clean release tell you when the bottoms are ready.

Simple Gyoza Dipping Sauce

Treat the sauce ratio in the recipe as a starting point. More rice vinegar makes the dip brighter and sharper; a little more soy sauce makes it saltier and more savory. Rayu brings heat without changing the basic balance too much.
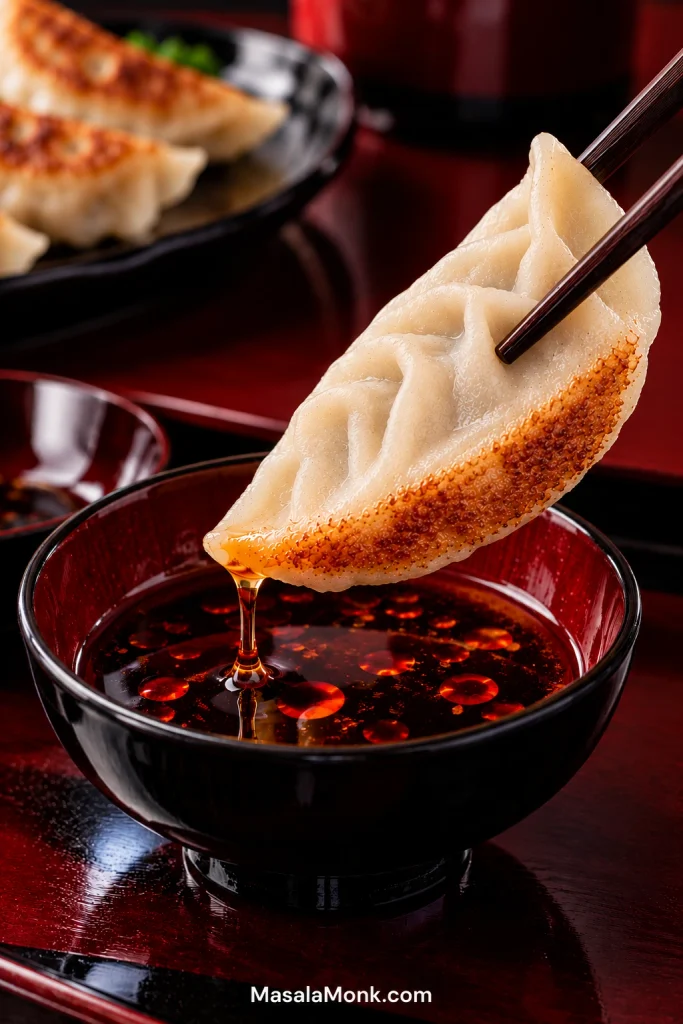
Pan-fried gyoza held in dark chopsticks over a black lacquer bowl of thin soy-vinegar sauce with red chili oil droplets and one falling drip.
Dip the lower edge rather than soaking the whole dumpling. A thin gyoza dipping sauce should sharpen the pork-and-cabbage filling without softening the crisp base you just worked to create.

The gyoza should still taste like gyoza.

A crisp cucumber salad gives you a cool, vinegary contrast to the hot pork filling and fried bottoms.

Freeze Them Raw, Cook Them Frozen

Yes—freeze assembled gyoza raw, then cook them directly from frozen without thawing. If you’re folding several hours or days ahead, freeze them rather than keeping the assembled raw dumplings in the refrigerator. You can then cook exactly what you need straight from the freezer.

  1. Arrange the raw gyoza on a parchment-lined tray without letting them touch.
  2. Keep them loosely covered until the tray is ready for the freezer.
  3. Freeze until each dumpling is completely solid, often about 1–2 hours.
  4. Transfer the solid gyoza to an airtight freezer bag or container and press out excess air.
  5. For the best quality, use them within about 1 month.

Transfer them to a bag too early, before they are frozen solid, and they can freeze into one clump. Leave them exposed for too long and the opposite happens: the thin skins dry out and become brittle.
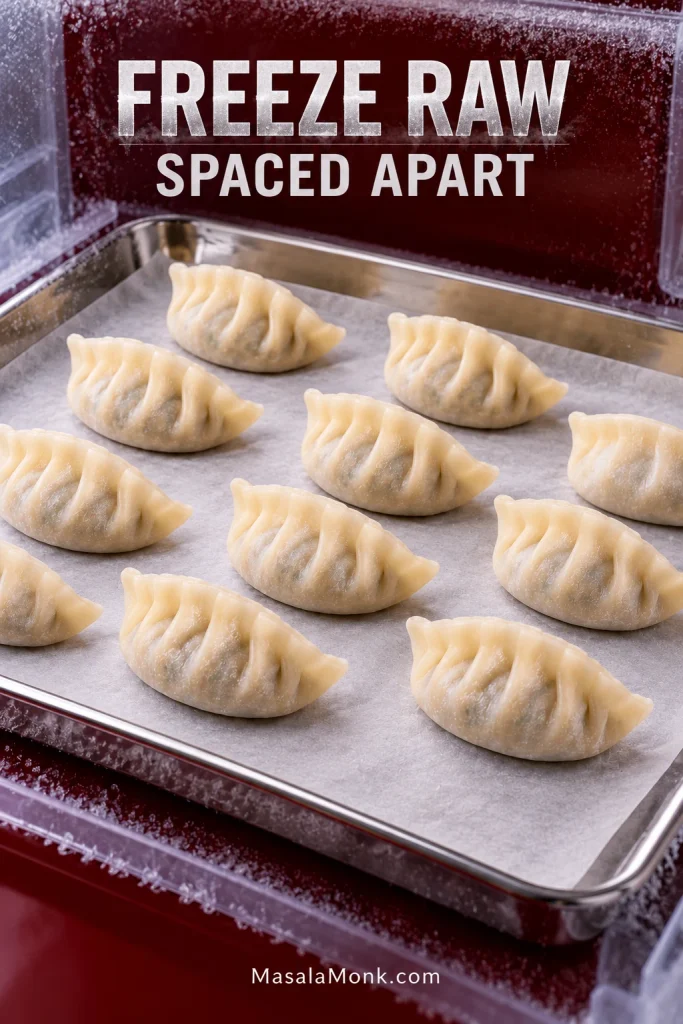
Raw pleated gyoza standing separately on a parchment-lined metal tray with space between each dumpling for freezing.
Freeze raw gyoza standing on their broad bases when you can. Once solid, they retain that pan-ready shape much better when transferred together into a freezer bag or container.

Cook Them Straight from Frozen

Do not thaw frozen gyoza. Put them straight into the oiled skillet and brown the bottoms as you would with a fresh batch.

For about 12 frozen gyoza, add the same ⅓ cup / 80 ml just-boiled water, cover and give them roughly 1–2 minutes longer under the lid. If the pan dries before the wrappers are tender and the filling is hot through, add a small splash of hot water and cover again briefly. Let the visible water disappear before the final fry.
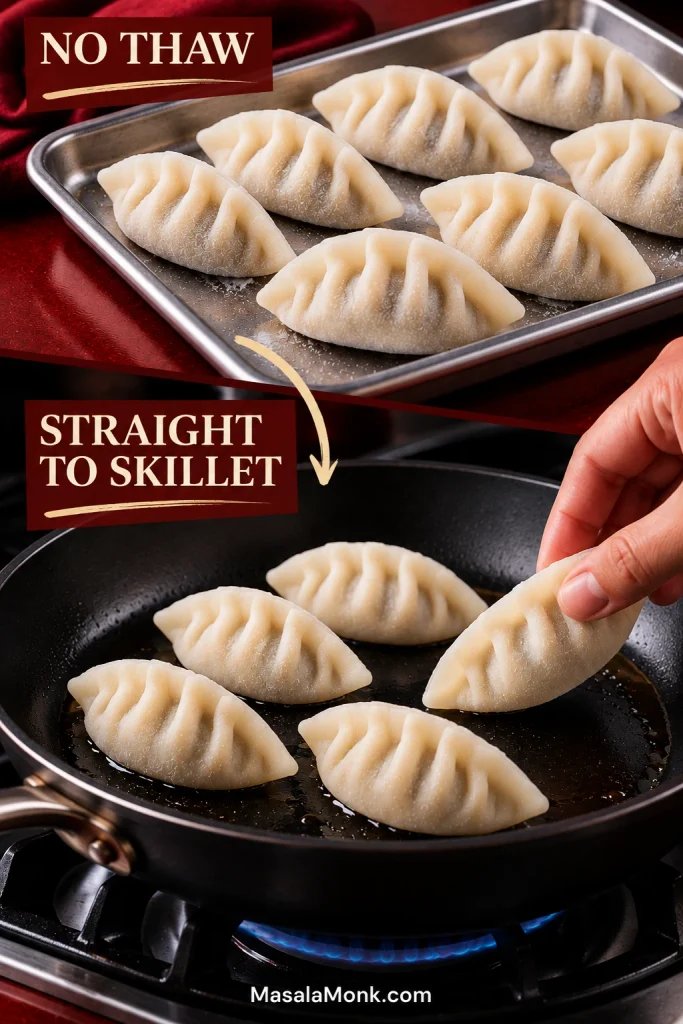
Lightly frosted raw gyoza on a cold tray above a second scene showing frozen dumplings being placed directly into a nonstick skillet.
Straight-to-pan cooking also avoids thawing condensation. As frozen gyoza warm slowly on the counter, moisture can make their thin wrappers tacky before cooking even begins.

Making a Larger Batch

For a double batch, keep most of the filling refrigerated and refill a smaller working bowl as needed. That keeps the raw pork cold and gives the vegetables less time to release moisture while you fold.

Move full trays into the freezer as space allows instead of making the first dumplings wait for the last ones. It also keeps the kitchen much calmer once you’re folding fifty or sixty instead of a couple of dozen.

Storing and Reheating Cooked Gyoza

Refrigerate leftover cooked gyoza within 2 hours in a covered container and use them within about 3 days. To reheat, put them in a skillet with a very small splash of water, cover just long enough to heat the centers, then uncover and let the water disappear so the bottoms brown again.
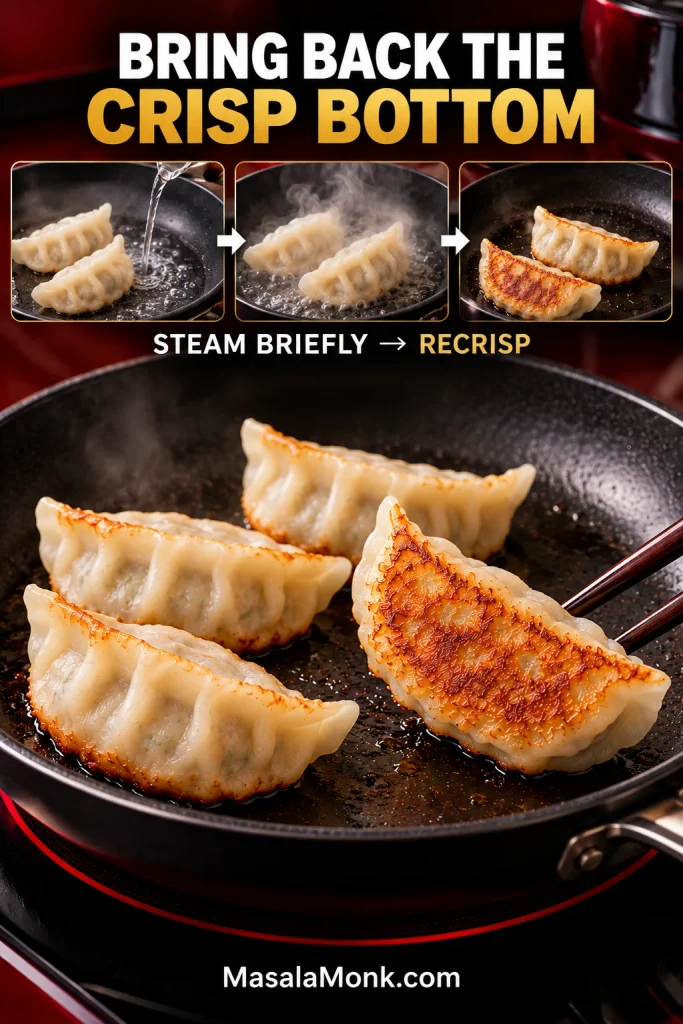
Skillet sequence showing a small splash of water with cooked gyoza, brief steaming and a reheated dumpling lifted to reveal a crisp golden underside.
Reheating gyoza requires two different jobs: steam warms the center and softens the wrapper, then dry skillet contact restores the crisp base that microwave reheating cannot.

Reheat leftovers until they reach 165°F / 74°C. A microwave is faster, but the wrappers will stay softer.

Gyoza Troubleshooting

When something goes wrong, start with what you can actually see in the dumpling or skillet. Most problems come back to moisture, wrapper handling or pan timing.

Pan and Crisping Problems

Let the first batch teach you something. Check the bottom color, notice whether water is still visible and listen for the frying sound to return. Those cues tell you whether the pan needs more browning, more evaporation or no more heat at all.
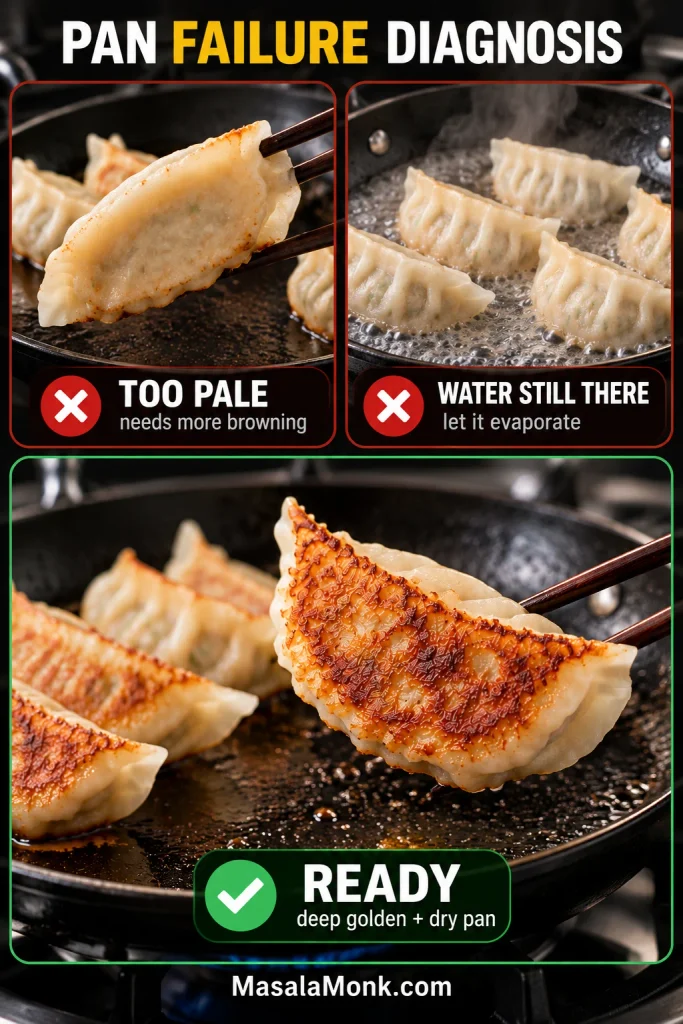
Troubleshooting graphic comparing a pale gyoza underside, dumplings with water remaining in the pan and a properly crisp deep-golden underside in a dry skillet.
Three pan states need three different responses: a pale base needs more contact time, visible water needs more evaporation, and a dry deep-golden base is ready to come off the heat.
ProblemLikely cause and what to change
Why did my gyoza stick or tear when I lifted them?The pan may have been too cool, or the dumplings were moved before the first crust formed. Let the oil heat until it spreads easily, leave the gyoza undisturbed until the bottoms set, then lift them with a thin flexible spatula.
Why did the bottoms burn?The heat was too high, the water disappeared sooner than expected or the final fry went too long. Later batches can also brown faster because the skillet is already hot, so stay close when frying returns.
Why are my gyoza bottoms soft or soggy?Water was still in the skillet or cooking stopped when steaming ended. Let the visible water evaporate completely, then give the bottoms their final uncovered fry.

Filling and Wrapper Problems

If the dumpling itself is watery, damp, leaking or tough, inspect the filling and seal before changing the heat. Those problems usually begin with moisture control, wrapper handling or how the pork was mixed.
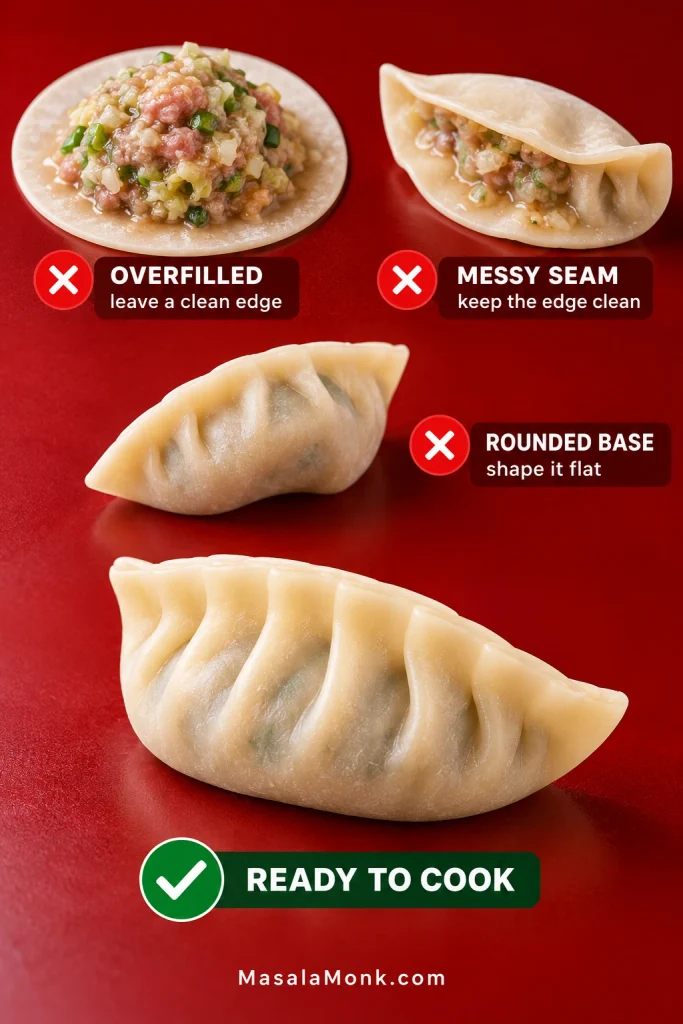
Gyoza troubleshooting graphic showing an overfilled wrapper, a messy filling-covered seam, a rounded unstable base and a correctly shaped pleated dumpling.
Do a five-second geometry check before cooking: the rim should be clean, the seam should stay shut without squeezing, and the finished gyoza should stand securely on its own base.
ProblemLikely cause and what to change
Why is my gyoza filling watery?The cabbage may not have been squeezed thoroughly enough, or the seasoned liquid was not fully worked into the pork before the vegetables went in. Squeeze the cabbage firmly and make sure the pork turns sticky and cohesive before adding the vegetables.
Why are my assembled gyoza getting damp or soft?They have probably been sitting too long after filling. Moisture gradually moves into the thin wrappers, so cook the gyoza promptly or move them to the freezer.
Why did my gyoza split or leak?The usual causes are too much filling, dried wrapper edges, trapped air or an incomplete seal. Use a little less filling and leave a clean edge to pinch shut.
Why is the pork filling tough or pulling away from the wrapper?Very lean pork, too little liquid or excessive cooking can make the filling tighten and shrink. Mixing until the pork turns tacky is intentional here; regular ground pork and the measured liquid help keep the center juicy.

Frozen Gyoza Problems

Freezer problems usually come down to when the gyoza were bagged, how well the wrappers were protected from drying, or whether the dumplings started to thaw before cooking.

ProblemLikely cause and what to change
Frozen gyoza stuck togetherThey were probably bagged before freezing solid. Freeze them separately on the tray first.
Frozen wrappers crackedThe skins probably dried during folding or stayed exposed too long in the freezer. Keep the dumplings covered and bag them once solid.
Frozen gyoza turned sticky after thawingTake them directly from freezer to skillet. Partial thawing lets condensation and filling moisture soften the thin wrappers.
Posted on — Leave a comment

Pavlova Recipe: Crisp Outside, Marshmallowy Inside & Easy

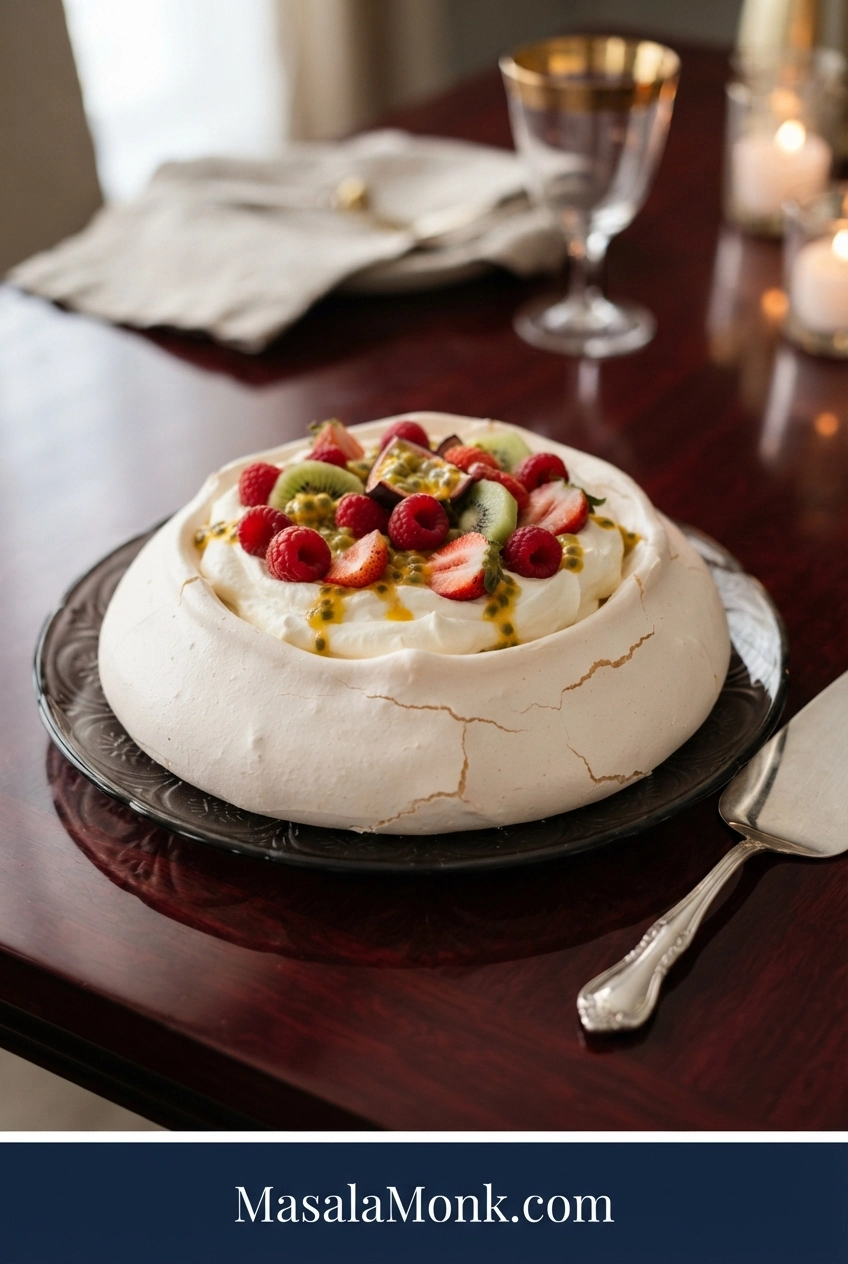
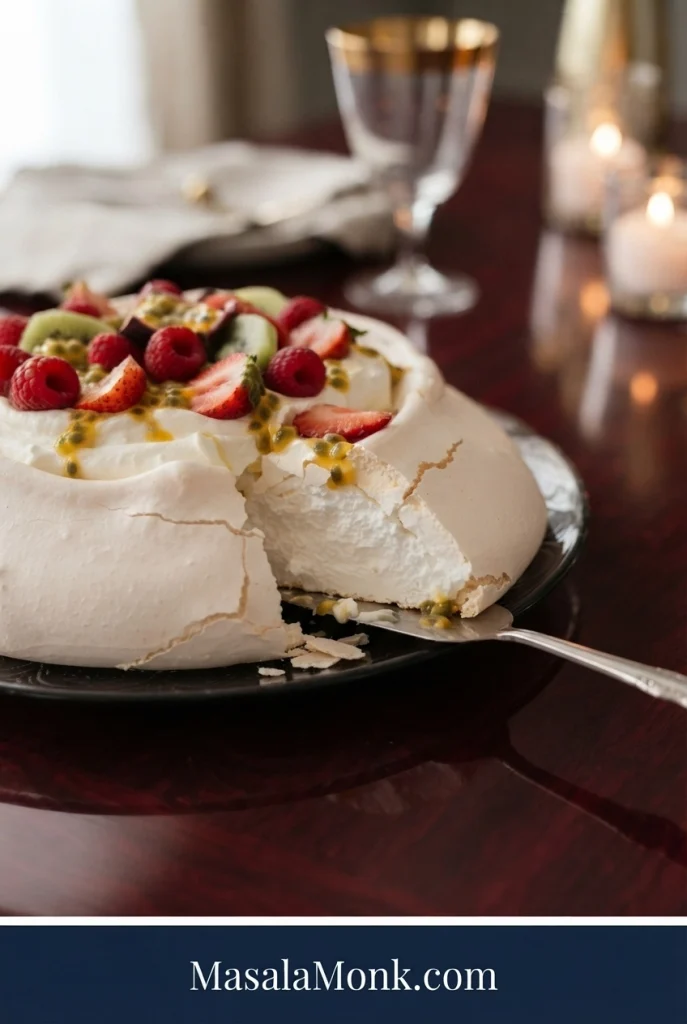
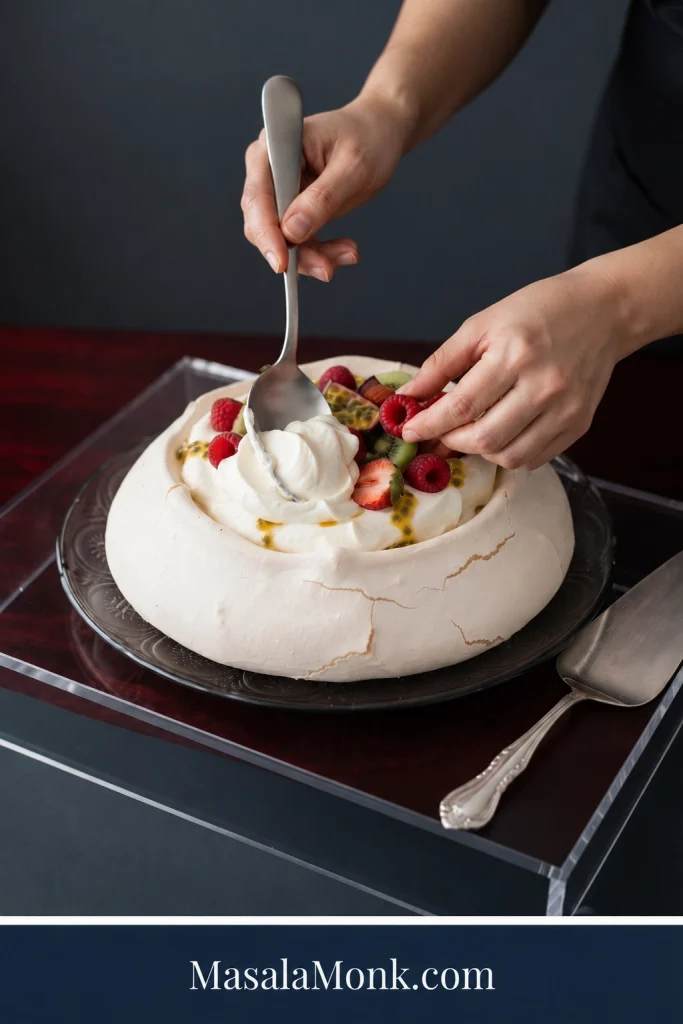
Whole round Pavlova with a pale cracked shell, whipped cream, raspberries, strawberries, kiwi and passion fruit on a dark glossy set.

A good pavlova should make a little noise when you cut into it. The spoon cracks through a thin crisp shell, then sinks into the marshmallowy center and cool cream, with tart fruit breaking through the sweetness.

With such a short ingredient list, the harder part is knowing when the meringue is ready, how dry the shell should become, and whether a crack, dip or soft center means something actually went wrong.

A few cracks? Fine. A center that settles a little? Also fine. Pavlova is delicate by nature, and the topping is going right into that shallow center anyway.

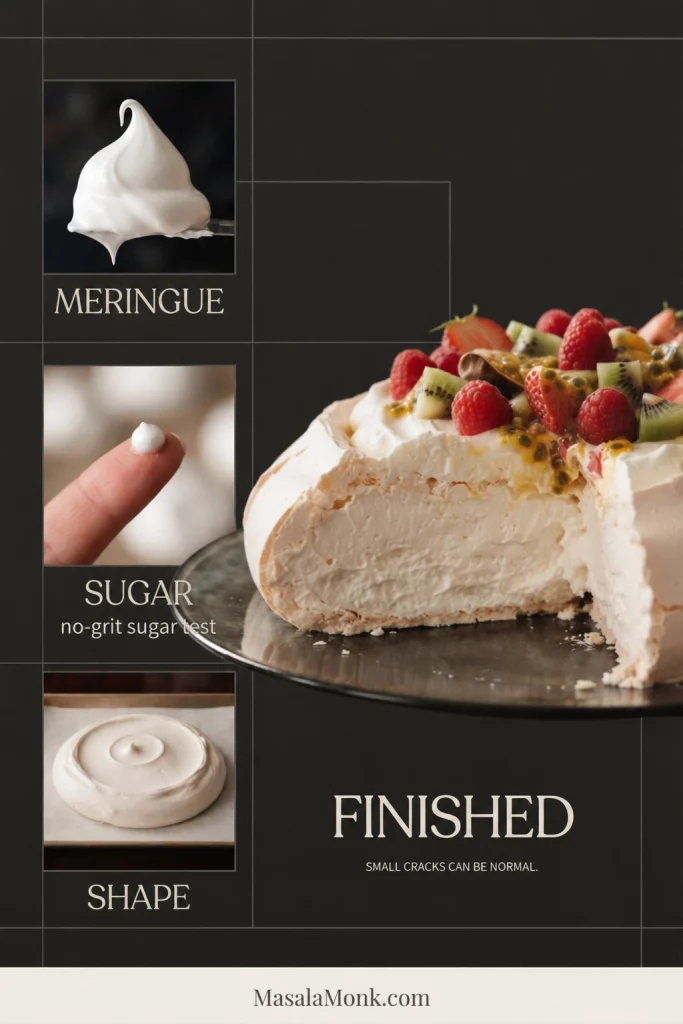
The Four Pavlova Checkpoints

Stage What you want
Meringue Dense, glossy and stiff enough to hold a peak
Sugar No obvious grit between clean fingertips
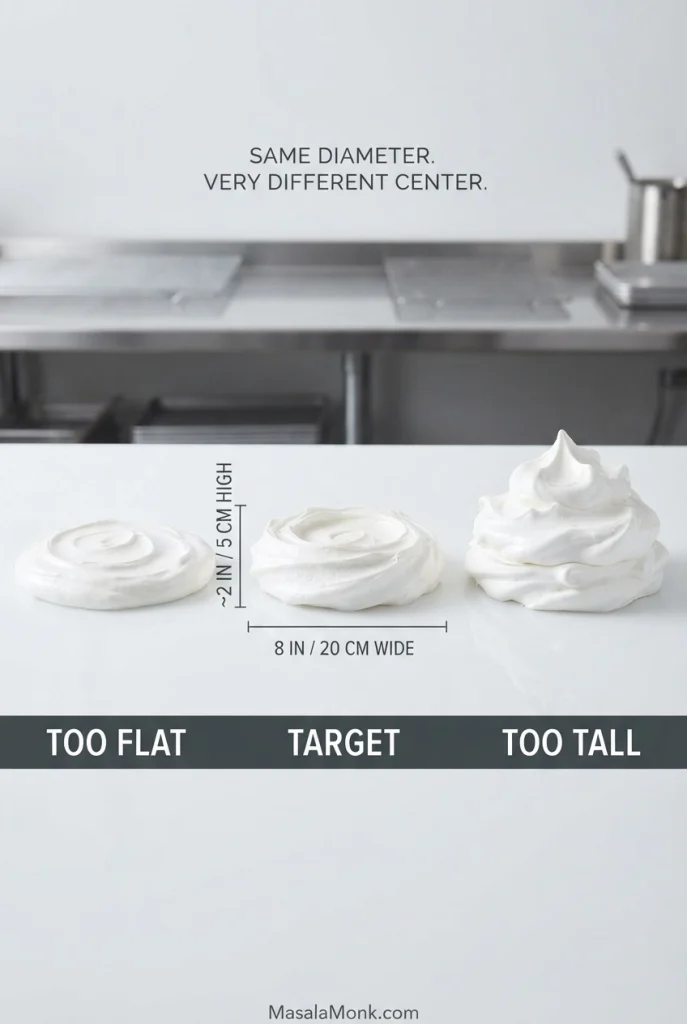
Shape About 8 inches / 20 cm wide and roughly 2 inches / 5 cm high, holding its mound
Finished pavlova Pale and dry outside, soft and marshmallowy inside
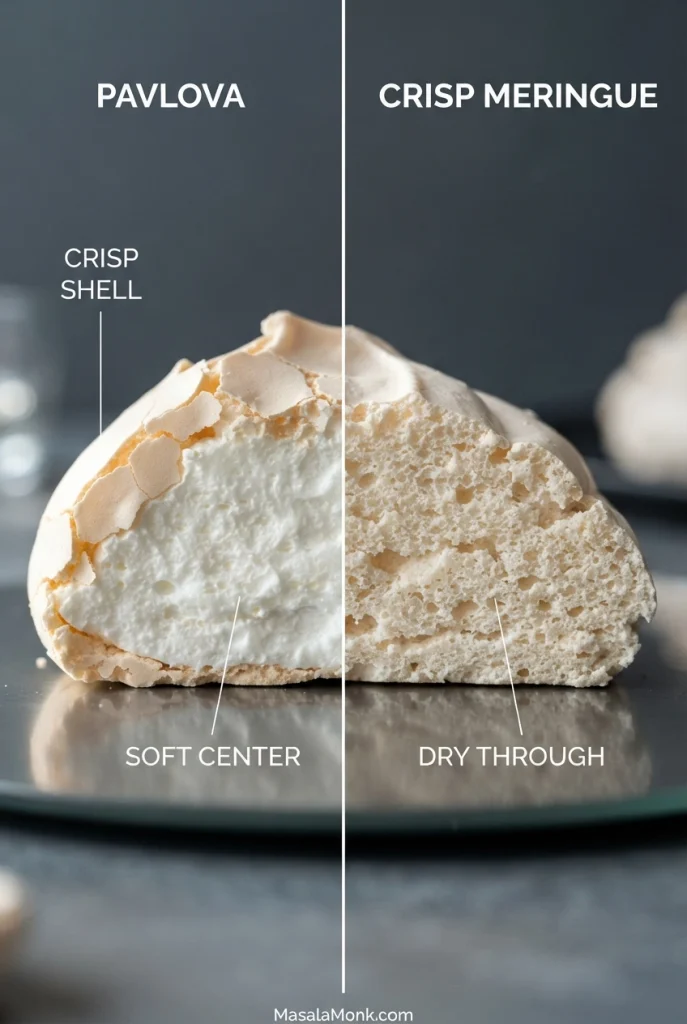
The soft center is intentional. Pavlova is not meant to dry all the way through like a crisp meringue cookie.
Four-part Pavlova guide showing glossy meringue, a fingertip sugar check, a shaped raw mound and a cut finished Pavlova.
Read the checkpoints in sequence. Weak meringue cannot be rescued by perfect shaping, and poorly dissolved sugar can still cause trouble later; the earliest wrong cue is usually the most useful diagnosis.

Pavlova Recipe

This 8-inch pavlova starts with 120 g egg whites—usually about four large whites—so the sugar ratio does not depend on egg size. The outside bakes into a pale crisp shell while the thicker center stays soft, ready for whipped cream and fresh fruit.

Serves
8
Prep
About 40 minutes
Bake
About 90 minutes
Cool
At least 2 hours
Finish
15 minutes
Total
About 4½ hours

Equipment

  • Digital kitchen scale
  • Stand mixer with whisk attachment or electric hand mixer
  • Clean, dry metal or glass mixing bowl
  • Sturdy baking sheet lined with parchment paper, not wax paper
  • Silicone spatula plus an offset spatula or large spoon for shaping

Optional but useful: an oven thermometer, especially if your oven tends to brown baked goods sooner than expected.

Ingredients

For the Pavlova

  • 120 g / 4.2 oz egg whites — use the weight; this is usually about 4 large whites
  • 200 g / 7.1 oz superfine sugar (caster sugar), about 1 cup
  • 3 g cornstarch, about 1 teaspoon
  • 5 ml white vinegar, 1 teaspoon
  • 5 ml vanilla extract, 1 teaspoon

For the Cream and Fruit

  • 300 ml / 1¼ cups heavy whipping cream, cold
  • 8 g powdered sugar, about 1 tablespoon
  • 5 ml vanilla extract, 1 teaspoon
  • About 300 g fresh fruit, roughly 2 cups depending on the fruit
  • 1 to 2 passion fruits, optional
  • A few spoonfuls of lemon curd, optional

Instructions

Prepare and Build the Meringue

  1. Prepare the oven and tray. Set a rack in the lower-middle part of the oven. Preheat a conventional oven to 300°F / 150°C, or a fan/convection oven to 275°F / 135°C. Trace an 8-inch / 20 cm circle onto parchment using a plate or cake pan, then flip the paper so the mark is underneath. Measure the cornstarch, vinegar and vanilla now so the finished meringue does not have to sit around later.
  2. Separate and weigh the whites. Make sure the mixer bowl and whisk are completely clean, dry and grease-free. Separate the eggs while cold, catching each white in a small clean bowl first. Once you know there is no yolk in it, transfer the white to the mixer bowl. Weigh out 120 g / 4.2 oz. Let the whites sit for about 20 minutes, or until they are no longer refrigerator-cold.
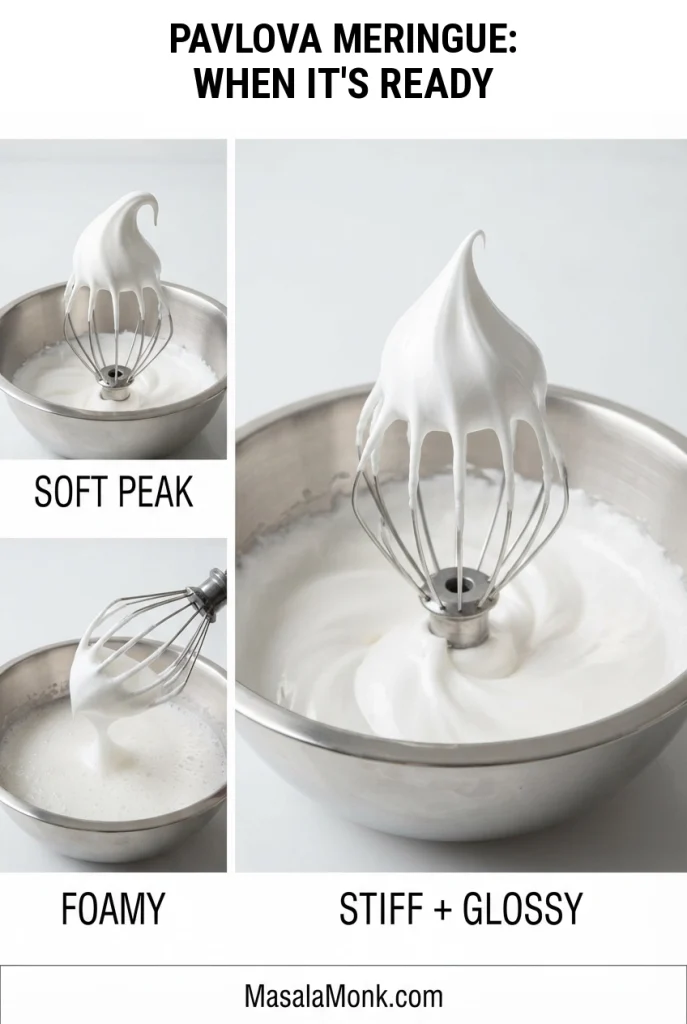
  3. Build the foam gradually. Whisk on medium-low until the whites are foamy throughout and no clear liquid remains at the bottom. Increase to medium and continue to soft peaks. Lift the whisk: the peak should rise, then bend gently at the tip.
  4. Add the sugar gradually. With the mixer running around medium speed, add the 200 g superfine sugar about one tablespoon at a time. Let each addition disappear into the foam before adding the next. Once all the sugar is in, increase to medium-high and whisk until the meringue is dense and glossy.
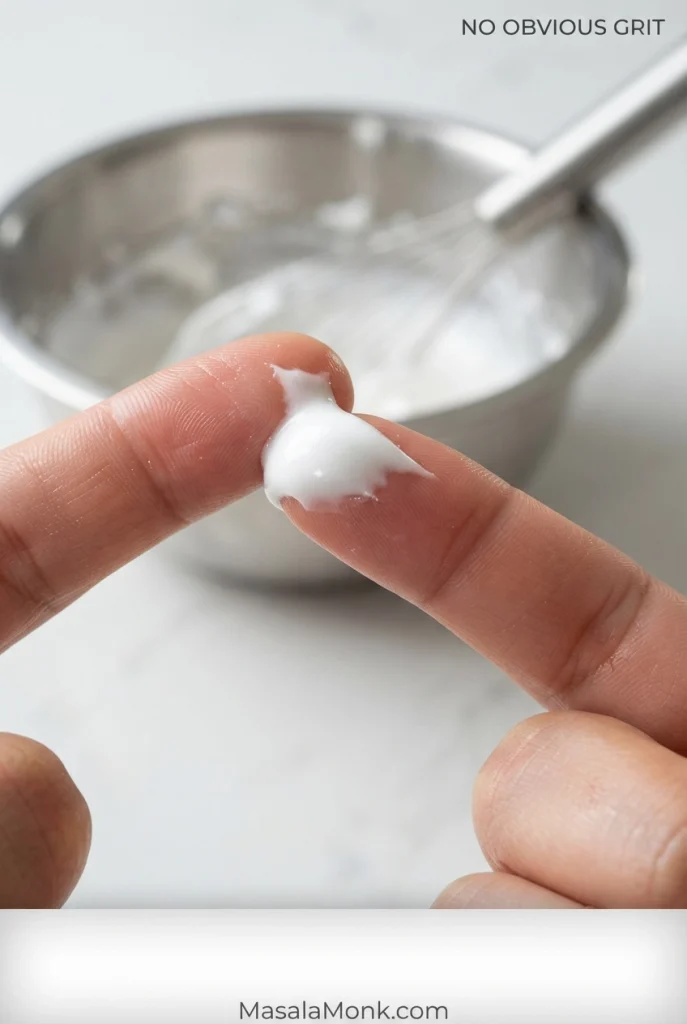
  5. Check the sugar and the meringue. Rub a tiny dab between two clean fingertips. It should feel essentially smooth, and the meringue should hold a glossy stiff peak. If it is still gritty while the foam remains glossy, whisk a little longer. Once the meringue starts looking dull or dry, stop rather than overbeating it.

Stabilize, Shape and Bake

  1. Fold in the cornstarch, vinegar and vanilla. Sift the 3 g cornstarch over the meringue. Add the 5 ml vinegar and 5 ml vanilla, then fold with a silicone spatula just until evenly distributed.
  2. Shape the pavlova. Spoon the meringue into the center of the traced circle. Shape it to roughly 8 inches / 20 cm wide and about 2 inches / 5 cm high, with gently sloping sides and a shallow well in the center. The mound should stay where you put it. It does not need to be perfectly round—you are controlling the thickness, not sculpting a showroom dessert.
  3. Lower the heat and bake. Put the tray in the oven and immediately reduce the temperature to 230°F / 110°C conventional or 210°F / 100°C fan/convection. Bake for about 90 minutes without repeatedly opening the door. Near the end, check once: the shell should look dry and feel set at the edge, not wet or tacky. If it still feels wet, bake another 10 to 15 minutes at the same low heat. White to pale ivory is normal; do not wait for browning.

Cool and Finish

  1. Cool it slowly. Turn the oven off and leave the pavlova inside with the door closed for at least 2 hours, or until completely cool.
  2. Remove the parchment carefully. Once the pavlova is completely cool, loosen the outer edges and gently peel the parchment away from the base. Peel the paper from the pavlova rather than pulling the pavlova upward. If the paper sticks under the center, start peeling from another edge and work gradually.
  3. Whip the cream and finish. Whip the cold cream with the powdered sugar and vanilla to soft-to-medium peaks. Stop while it is smooth, glossy and softly billowy. Spoon it into the center of the cooled pavlova, then add the fruit. Passion fruit or a little tart lemon curd is especially good when the other fruit is sweet. No need to make the topping pristine—pavlova looks good a little loose and generous.

Recipe Notes

  • Regular granulated sugar: if that is what you have, pulse it briefly in a food processor to make the crystals finer, stopping before it becomes powdery.
  • Use the full sugar amount: the sugar does more than sweeten the meringue. For a less-sweet finish, keep the cream lightly sweetened and use tart fruit.
  • Make ahead: bake and cool the bare shell ahead, then store it airtight at cool, dry room temperature. Do not refrigerate the bare shell.

Method note: This formula was developed by comparing established pavlova ratios, methods and troubleshooting guidance. MasalaMonk has not independently kitchen-tested this exact version.

The Sugar Test Matters More Than the Mixer Clock

Mixer times vary with bowl shape, egg temperature, mixer power and sugar crystal size. Six minutes in one kitchen can easily be eight in another.

Three Pavlova meringue stages showing foamy egg whites, a bending soft peak and a smooth glossy stiff peak.
As the foam strengthens, it should become finer, smoother and more cohesive. Stop at glossy stiff peaks; rough, cottony or clumpy meringue has gone too far.

The clock tells you when to start checking. Your fingertips tell you whether the sugar is ready.

Rub a little meringue between clean fingertips and lift the whisk. You want the sugar essentially dissolved and the foam glossy enough to hold a stiff peak. If coarse grit remains but the meringue still looks glossy, keep going a little longer. Once it becomes extremely stiff and starts losing its shine, stop before it turns dry and clumpy. Finer sugar and slower additions are the better fix next time.

Close-up of two fingertips rubbing a small dab of white meringue to check for undissolved sugar grit.
Look closely at the smear between the fingertips: obvious sugar crystals mean the meringue has not reached the smooth texture you want yet.

The meringue progression in our Japanese pancakes recipe is useful here too, because it shows the move from foamy whites through glossy peaks and into the dry, clumpy stage you want to avoid.

Do You Need Cornstarch or Vinegar?

Pavlova recipes handle starch and acid differently. This version uses 1 teaspoon cornstarch to help keep the center soft and 1 teaspoon white vinegar to stabilize the foam.

If you are reading an Australian or British recipe, cornflour means cornstarch here—not cornmeal. Other formulas use lemon juice or cream of tartar instead of vinegar, but they are not always one-for-one swaps.

Shape and Height Matter

An 8-inch pavlova spread only an inch high will not bake like an 8-inch pavlova built three or four inches tall. Same diameter, very different center.

Aim for roughly 8 inches / 20 cm wide and 2 inches / 5 cm high before baking. That leaves enough depth for the marshmallow middle without turning the pavlova into a huge mound that is difficult to dry evenly.

Three raw Pavlova profiles labelled too flat, target and too tall, with the target about 8 inches wide and 2 inches high.
The traced circle controls width, but the side view reveals height. Use both: the target should mound rather than spread flat or rise into an unnecessarily tall dome.

Give the sides a gentle slope and leave a shallow well in the middle. That gives the topping somewhere to sit without much pressing or spreading against the fragile shell.

How to Tell When Pavlova Is Done

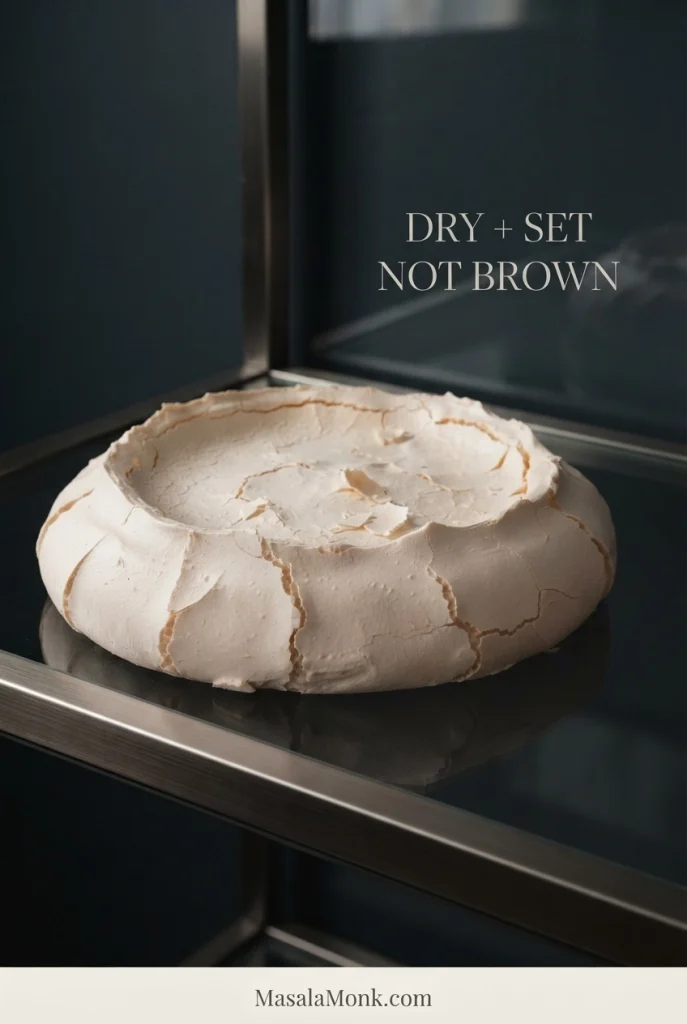
At about 90 minutes, check once. The shell should look dry and feel set under a very light touch at the edge, not wet or tacky all over. If it still feels wet, give it another 10 to 15 minutes at the same low temperature.

Bare untopped Pavlova with a pale matte shell, shallow central well and natural cracks, with text reading “Dry + Set, Not Brown.”
Pale is correct here. A finished Pavlova shell should look matte and set at the edge; browning is not the doneness target.

Color is secondary. White to pale ivory is normal.

If you are looking through the oven door thinking, “Why is this going brown when it still looks soft?” resist the urge to turn the heat up. The outside is already getting plenty of heat; it needs time to dry.

After Cooling: Read the Center

Once the cooled pavlova is cut, the center tells you how the bake turned out. The first cut tells you more than the color ever could: the knife should crack through the shell, then meet an opaque, set, marshmallow-soft center—not a glossy puddle and not a dry cookie.

Cut Pavlova showing a thin brittle outer shell around a deeper soft, opaque white center beneath cream and fruit.
Look at shell-to-center proportion: the brittle crust should stay relatively thin around a much deeper, opaque baked-meringue middle. A thick dry band means the Pavlova has dried farther through.
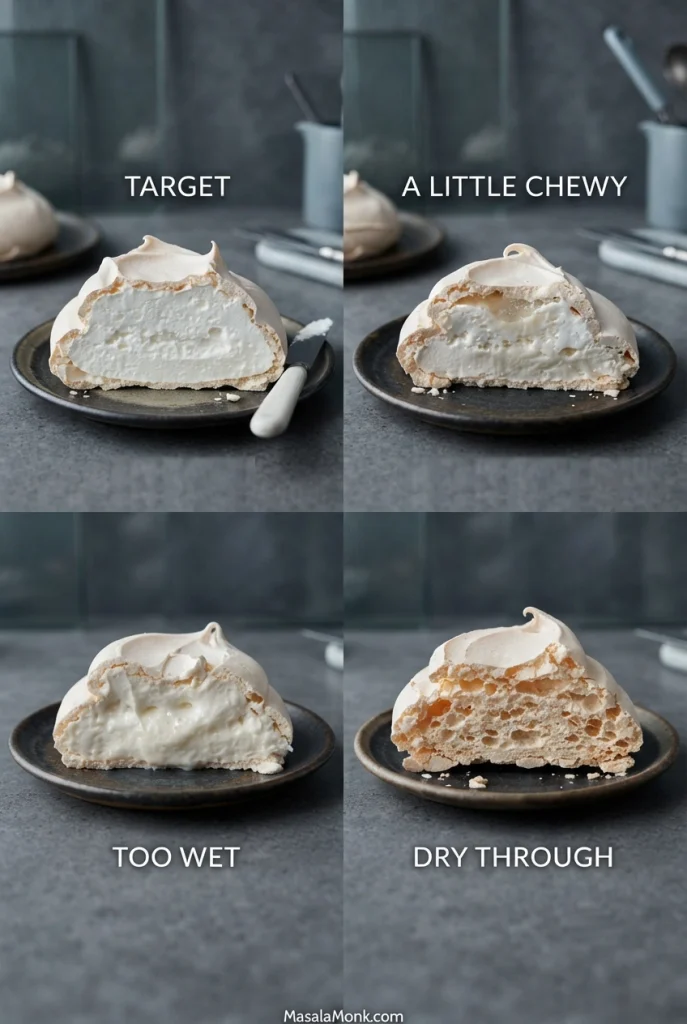
Center texture after cutting What it tells you
Soft, opaque, airy and marshmallow-like This is the target.
A little chewy near the shell Normal. A tacky exterior is a different issue.
Wet, glossy, syrupy or almost liquid Too wet for this pavlova. Check bake time, thickness and sugar dissolution.
Dry and crisp throughout Still edible, but closer to a large crisp meringue than this soft-centered pavlova.
Four cut Pavlovas compare a soft target center with chewier, wet under-set and completely dry center textures.
Read the baked meringue, not the cream above it. Small irregular air pockets suit a soft Pavlova center; glossy paste or uniform brittleness points to a different outcome.

Cream and Fruit for Pavlova

The meringue already brings plenty of sweetness. Let the topping cool it down.

Soft-to-medium peaks are enough for the cream here. It stays easy to spoon over the fragile shell and keeps the topping light rather than dense. If the difference between soft, medium and stiff peaks is unfamiliar, our whipped cream recipe walks through each stage.

Hands spooning whipped cream and arranging raspberries on a Pavlova topped with strawberries, kiwi and passion fruit.
Spoon the cream from the center outward rather than dragging it across the rim. Then place the fruit gently so the fragile shell carries the topping with less pressure.

Berries are an easy default. Kiwi adds brightness. Sweeter mango is better with something sharper beside it. Passion fruit is especially good here: its sharpness cuts straight through the sugary shell and rich cream.

The best bites catch crisp shell, soft center and cool cream together, with enough tart fruit to keep the sweetness in check.

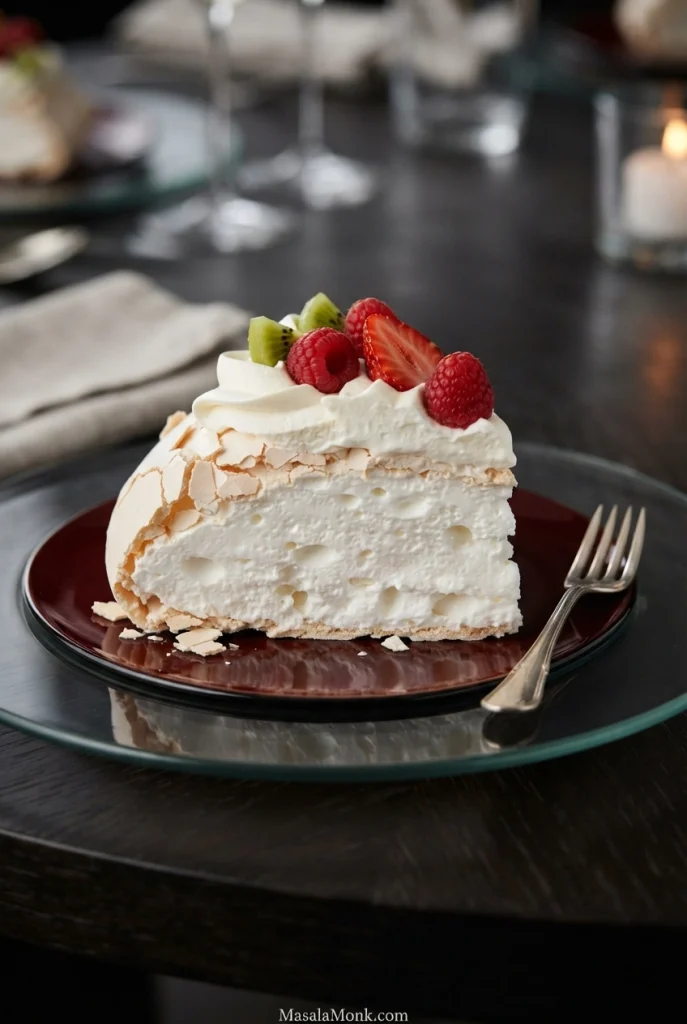
Plated Pavlova slice with a flaky crisp shell, soft white center, whipped cream, raspberries, strawberry and kiwi.
A good Pavlova slice does not need a bakery-clean edge. The shell should fracture while the soft center stays cohesive rather than crumbling dry or flowing wet.

The four leftover egg yolks are also a good excuse to make homemade lemon curd. A few tart spoonfuls go a long way.

Fresh fruit should be dry before it reaches the cream. Frozen berries release plenty of liquid as they thaw. For pavlova, they work better cooked into a sauce, cooled completely and spooned over individual servings.

Make-Ahead and Storage

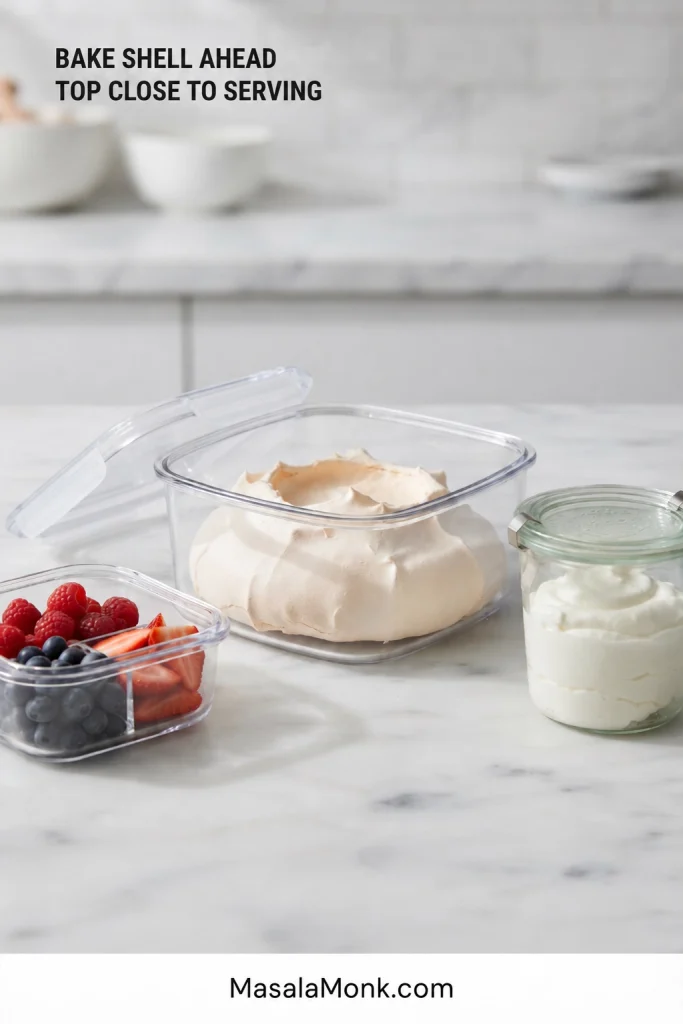
The easiest way to make pavlova ahead is to keep the shell, cream and fruit separate until close to serving.

Bare Pavlova shell in a clear storage container beside separate containers of fresh berries and whipped cream.
Make-ahead Pavlova is mostly moisture control: keep the shell airtight and rigid, the cream cold, and the fruit separate until close to serving.

Bare shell: once completely cool, store it airtight at cool, dry room temperature. Do not refrigerate it. A day ahead is a comfortable target.

Cream: whip it close to serving and keep it refrigerated.

Fruit: wash it ahead if you like, but dry it well before topping.

Assembled pavlova: for the crispest shell, top it within about an hour of serving—and closer to serving when the weather is humid.

Taking the pavlova somewhere else? Carry the bare shell and toppings separately, then assemble it when you arrive.

Refrigerate leftovers because of the whipped cream. By the next day the shell will be softer and chewier, but the dessert can still be very good.

Pavlova in Humid Weather

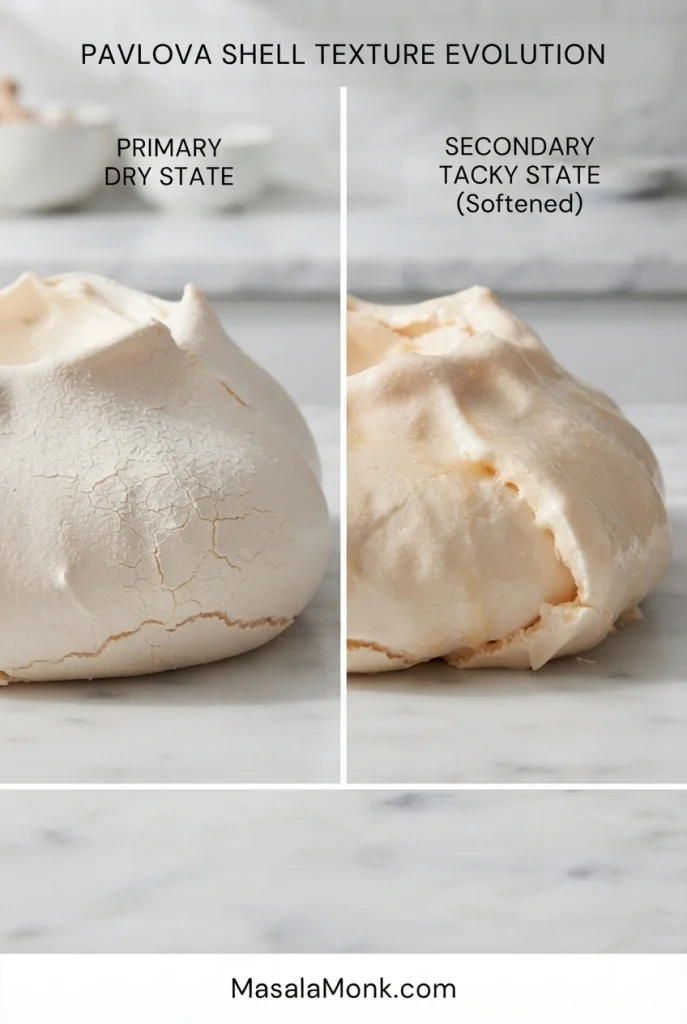
Humidity can turn a correctly baked shell tacky because the sugar absorbs moisture from damp air. On humid days, pay extra attention to dissolving the sugar, give the shell its full low-temperature drying time, and store it airtight once completely cool.

Still, the weather should not take the blame for everything. A shell that was already wet when the oven switched off, or syrup pooling underneath, sends you back to the meringue or the bake rather than storage.

Side-by-side Pavlova shells comparing a dry matte surface with a shinier, humidity-softened tacky surface.
A dry shell stays matte. As humidity softens it, the surface catches more light and feels tacky even before obvious syrup droplets appear.

Pavlova Troubleshooting: Start With When It Happened

Most pavlova problems become easier to diagnose once you start with when they appeared.

What happened and when Where to look next
Whites will not reach peaks
During mixing
Rule out yolk or grease first, then check the bowl, whisk and mixer attachment.
Sugar stays gritty
During mixing
Keep whisking while the foam remains glossy. Stop if it starts turning dull or dry.
Meringue puddles outward
Before baking
The foam is still too loose to hold the shape.
Browns early or before the shell dries
During baking
Check oven temperature, rack position and fan/convection setting.
Large or deep cracks
During baking or cooling
Small cracks are normal. For major splitting, check oven heat, meringue stability and abrupt temperature changes.
Crisp top but sticky bottom
After baking
Check bottom drying, thickness and possible sugar weeping.
Syrup underneath
During baking or cooling
Sugar dissolution is the first place to look.
Large hollow under the shell
After cooling
Some airiness is normal. For a large detached hollow, check meringue strength, sugar dissolution, oven heat and whether the center had enough time to set.
Major collapse
During cooling
Start with meringue strength, height, oven heat and cooling.
Center is dry and crisp throughout
After cutting
The pavlova may have been too shallow or dried too long.
Pavlova sticks badly to the parchment
During transfer
Cool it fully and peel the paper away gradually. A wet base can also signal incomplete drying or weeping.
Shell was crisp, then became sticky
During storage
Humidity or uncovered storage is much more likely.

Pavlova Cracks: Cosmetic or Structural?

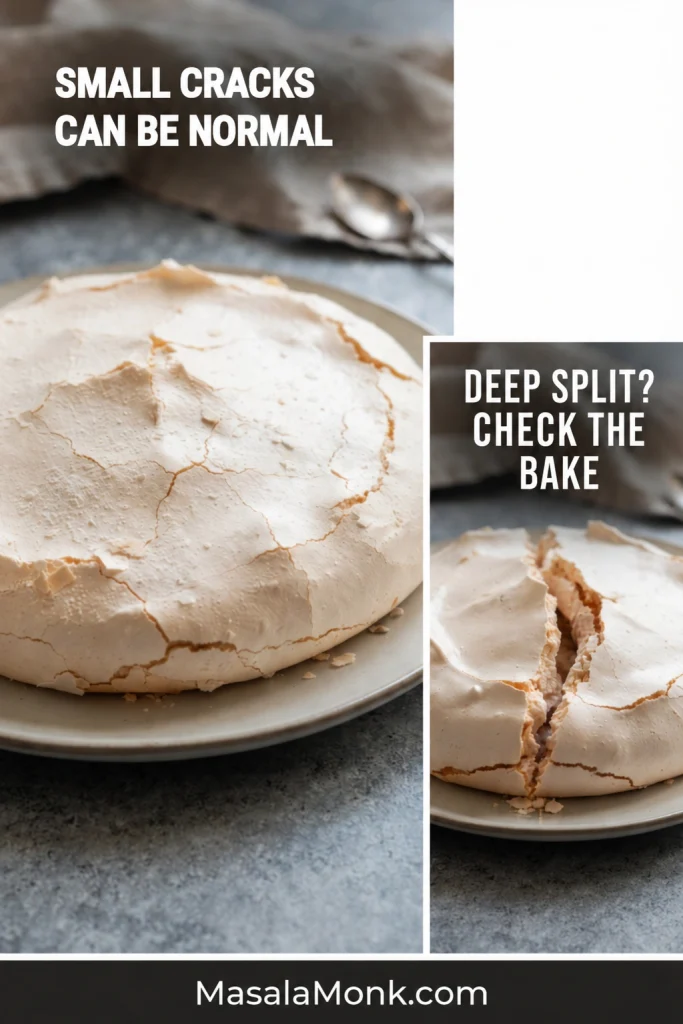
Cracks, a shallow crater or one broken edge rarely make the dessert unsalvageable. Some pavlova problems affect the texture; others mostly affect how it looks.

Two Pavlovas compare fine surface cracks with a deep structural split opening through the shell.
Depth matters more than the number of cracks. Fine hairlines leave the wall intact; a structural split opens a real gap through the shell.

Why Is My Pavlova Sticky?

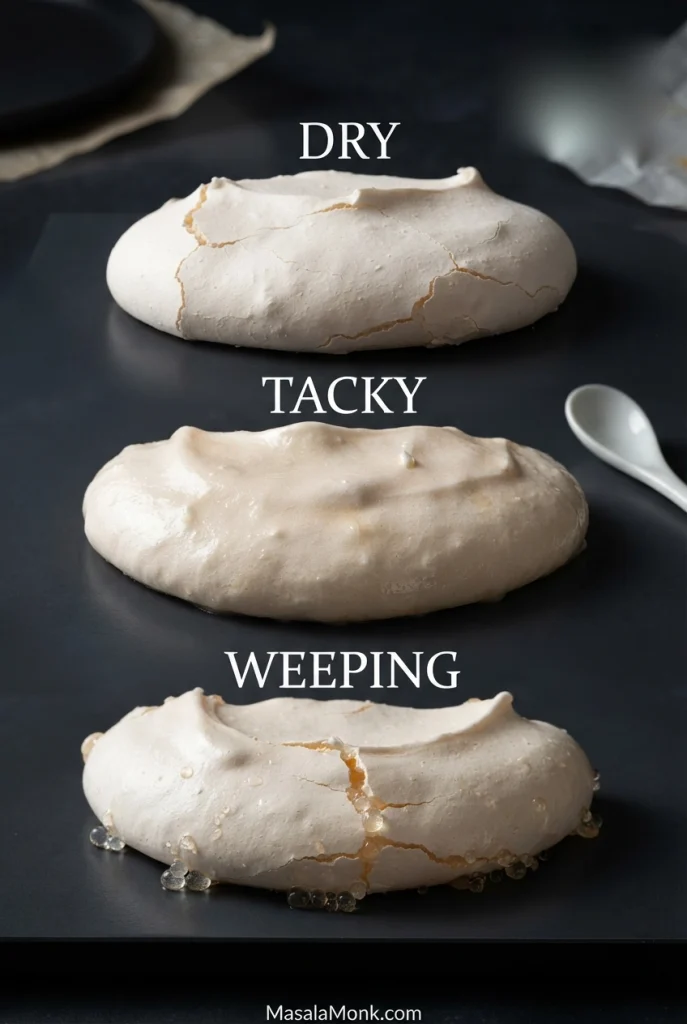
Pavlova can turn sticky because it did not dry enough, because sugar is weeping from the meringue, or because a previously crisp shell absorbed humidity after cooling. When it became sticky tells you which is more likely.

A shell that never dried properly sends you back to bake time, temperature and thickness. If syrup is collecting underneath, check the sugar first. A pavlova that was crisp when cool but turned tacky several hours later has probably picked up moisture from the air or storage.

Three Pavlova examples labelled dry, tacky and weeping, with visible syrup beads on the weeping example.
Look at where the moisture appears. Tackiness is mainly a softened, shinier shell; weeping creates distinct beads or syrup around the surface, cracks or base.

Why Did My Pavlova Collapse?

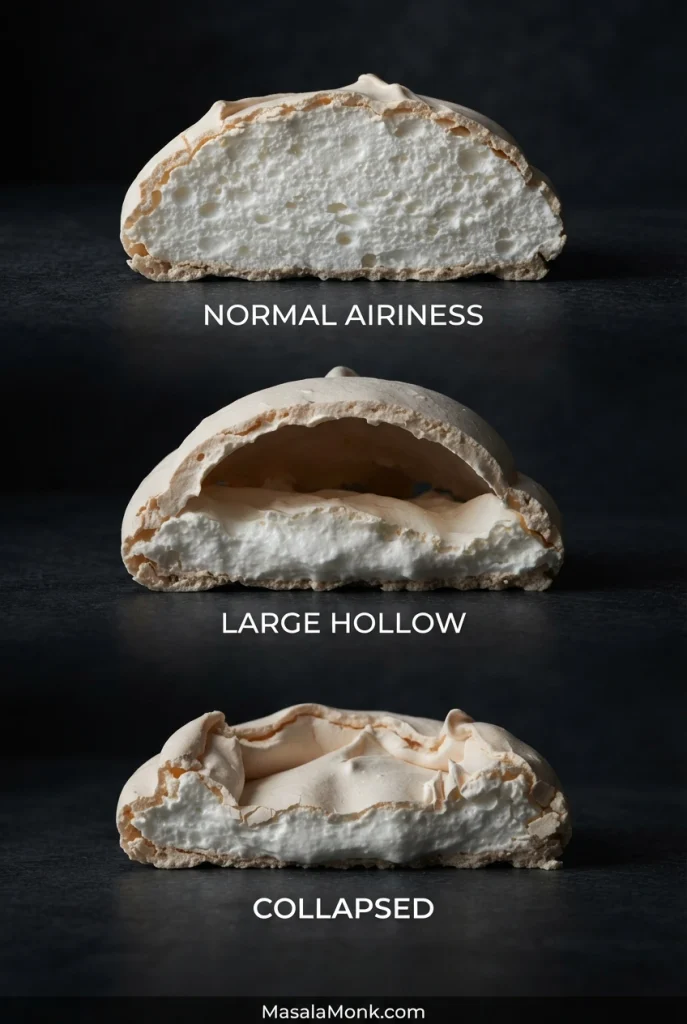
A little settling is ordinary. By contrast, a dramatic collapse is more likely when the meringue was weak, the mound was excessively tall, the oven ran too hot or the pavlova cooled too abruptly.

Three cut Pavlovas showing normal irregular air pockets, a large hollow beneath the shell and a visibly collapsed structure.
A hollow and a collapse are different. A hollow can leave the roof standing above a cavity; collapse changes the whole silhouette as the top sinks.

Why Is My Pavlova Brown but Still Soft?

A pavlova that browns while still soft is getting too much surface heat before the shell has dried. Check the actual oven temperature, rack position and fan/convection setting rather than turning the heat up.

Why Is Syrup Leaking From My Pavlova?

Syrup or amber beads usually send you back to the sugar. If the weather is dry and it keeps happening, check sugar crystal size, gradual addition and whether the meringue passed the finger-rub test.

Rescue a Cracked or Broken Pavlova

Pavlova does not need to be flawless to be worth serving.

  • Small cracks? Leave them alone and add the topping.
  • Center sank? That crater is useful. Fill it.
  • One edge broke? Turn it toward the back and cover it naturally with the topping.
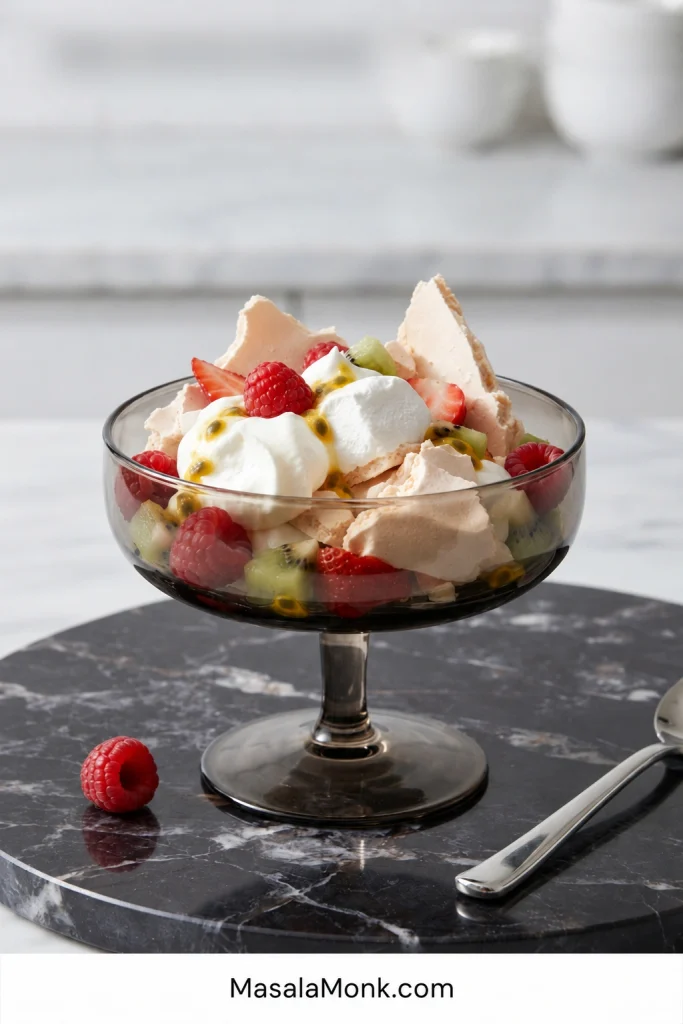
  • Too dry or badly shattered? Break it into pieces and layer it with cream and fruit, Eton-mess style.
Glass dessert bowl layered with broken Pavlova pieces, whipped cream, raspberries, strawberries, kiwi and passion fruit.
For a shattered Pavlova, keep some pieces large. Bigger meringue shards hold crisp edges longer and give the layered rescue dessert better textural contrast.

Once the pavlova is topped, those hairline cracks are usually the last thing anyone notices.

What Is Pavlova?

Pavlova is a large meringue dessert with a crisp shell and soft marshmallow center, usually topped with whipped cream and fruit.

Pavlova is closely associated with both Australia and New Zealand and takes its name from Russian ballerina Anna Pavlova. Both countries claim the dessert, and its exact origin remains disputed.

In the kitchen, the distinction is simpler. Small crisp meringues are usually dried much more thoroughly. A classic pavlova is usually shaped thick enough for the outside to dry while the center stays soft and marshmallowy, ready to carry its topping.

Side-by-side cutaway of Pavlova and crisp meringue, showing the Pavlova’s soft white center beside the drier meringue interior.
A dry-through center is not simply a more finished Pavlova. Pavlova deliberately keeps a soft middle; crisp meringue is dried much farther through.

That soft middle is not something you failed to dry out. It is the reason to make pavlova in the first place.

Posted on — Leave a comment

Cannoli Recipe: Crispy Shells, Creamy Ricotta & Easy

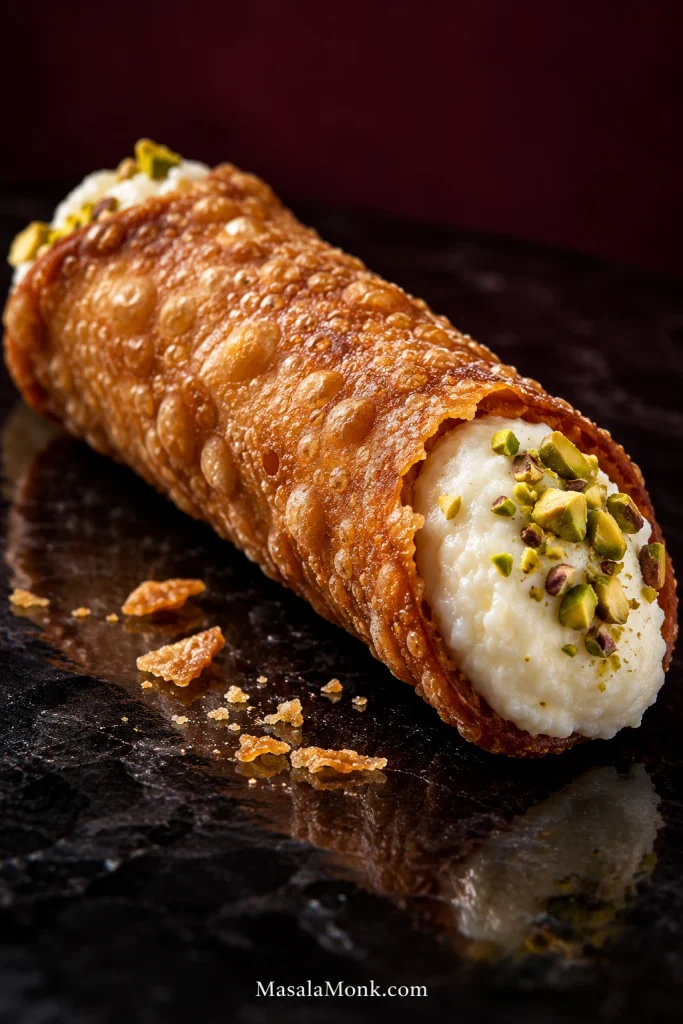
Use the finished cannoli as a visual benchmark: the shell rim should look delicate rather than thick, the ricotta should stay firmly in the open ends, and the garnish should frame the filling instead of covering it.

Pick up a freshly filled cannolo and the shell should feel almost too delicate for what it is holding. Bite down and it cracks; the ricotta stays cool and thick behind it.

When homemade cannoli go wrong, that contrast usually disappears first. A thick shell becomes hard instead of brittle. Wet ricotta softens even a well-fried shell. And a shell that was perfect out of the oil can lose its crunch simply because it was filled too early.

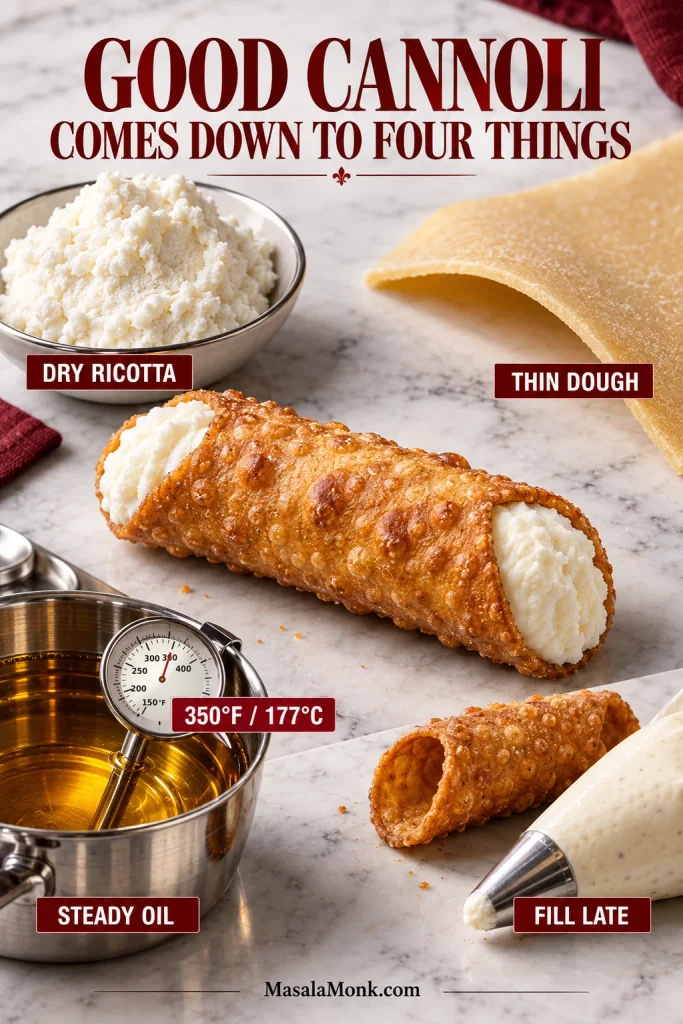
This cannoli recipe makes both the shells and ricotta cream from scratch. Get the ricotta dry, roll the dough thinner than feels natural, keep the oil steady and leave the filling until the end; most of the recipe follows from those four things.

Cannoli are more of a weekend project than a quick dessert, but each stage is manageable once you know what the ricotta, dough and first fried shell should look like.

Best workflow: Drain the ricotta first. Make the filling and chill it. Mix the shell dough, then use its 1-hour rest to set out the cannoli forms, thermometer, cooling rack and toppings. Fry one test shell before shaping the batch, then cool everything completely before assembly.

Finished cannolo surrounded by drained ricotta, thin dough, frying oil with thermometer and an empty shell with piping bag.
When a batch needs correcting, change one variable at a time—ricotta moisture, dough thickness, oil control or filling timing. That way, the next cannoli actually tells you which adjustment worked.

Cannoli Recipe

That first shell is worth the extra minute. It tells you whether the dough is thin enough, the seam will hold and the oil is behaving while there is still time to correct the rest of the batch.

YieldAbout 20–24 shells using a 4-inch / 10-cm cutter and 1.5–2 mm dough
Active timeAbout 2 hours; allow longer for your first batch
Dough restAbout 1 hour
Plan forAbout 2½–3 hours on serving day
Ricotta drainingAllow 12–24 hours beforehand when needed
Fry temperature350°F / 177°C target; roughly 345–355°F / 174–179°C while frying
Best servedSoon after filling

Special Equipment

  • 6–8 smooth metal cannoli forms, also sold as cannoli tubes or molds
  • deep-fry/candy thermometer, or another thermometer designed for hot oil
  • fine-mesh sieve
  • cheesecloth or a clean lint-free kitchen towel, if your ricotta needs draining
  • pasta machine or rolling pin
  • 4-inch / 10-cm round cutter, or a small bowl of similar size
  • piping bag with a wide round tip, or a bag you can cut to a generous opening

Metal cannoli forms are strongly recommended. You will also need a tall heavy pot, tongs, a wire rack and a folded kitchen towel or heatproof glove. If you do not have forms, the foil fallback is covered in the shell guide below.

Ricotta Filling

  • 680 g / 1½ lb drained whole-milk ricotta — if starting with wet supermarket ricotta, buy roughly 900 g / 2 lb, possibly a little more if it is especially loose
  • 125 g / about ½ cup + 2 tbsp superfine or caster sugar, plus up to 25 g more to taste
  • ½ tsp vanilla extract
  • 1 tsp finely grated orange zest, optional but recommended
  • up to ⅛ tsp ground cinnamon, optional
  • 60 g / about ⅓ cup mini dark chocolate chips, optional

Cannoli Shells

  • 250 g all-purpose flour / about 2 cups, preferably weighed, plus a little more for rolling
  • 25 g / 2 tbsp granulated sugar
  • 2 g / about ⅓ tsp fine salt
  • 40 g / about 3 tbsp lard; or 45 g / about 3 tbsp unsalted butter, cool and cut into small pieces
  • 1 large egg / about 50 g without shell
  • 55 ml / 3 tbsp + 2 tsp dry Marsala, plus another teaspoon or two only when the dough needs it
  • 7.5 ml / 1½ tsp white wine vinegar
  • 1 egg white from a second egg, lightly beaten, for sealing
  • neutral high-heat oil, such as canola or vegetable oil, enough for about 2½–3 inches / 6.5–7.5 cm depth in your pot

For Finishing

  • finely chopped unsalted pistachios
  • mini dark chocolate chips
  • small pieces of candied orange peel
  • powdered sugar, for a light dusting

Instructions

Part 1 — Prepare the Ricotta

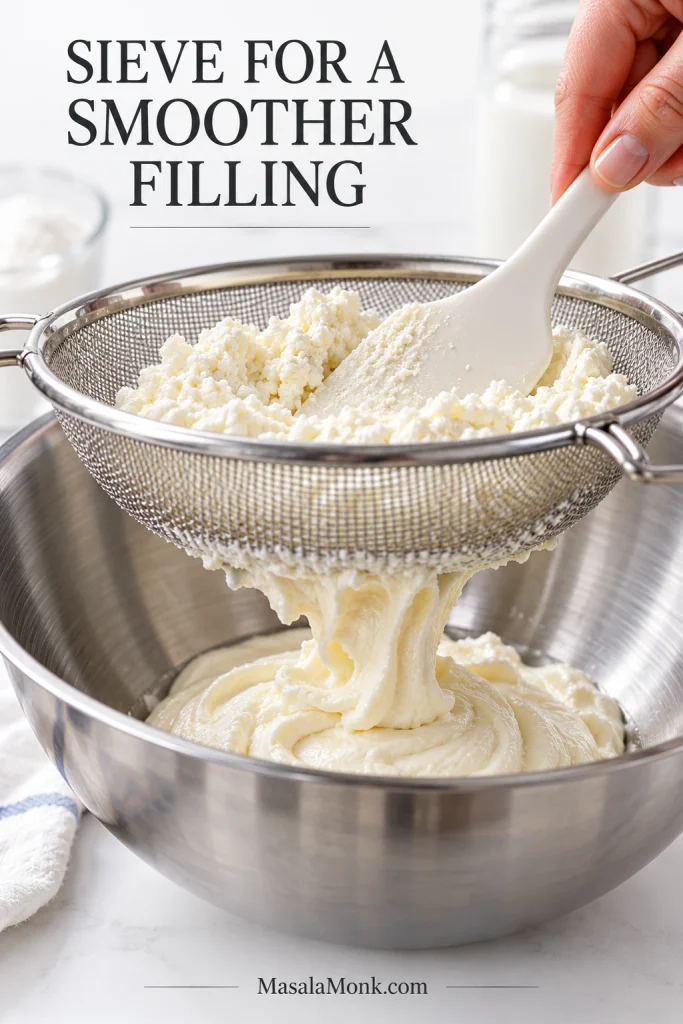
  1. Drain wet ricotta. Line a fine-mesh sieve with cheesecloth or a clean lint-free towel, set it over a bowl and add the ricotta. Cover and refrigerate for 12–24 hours when needed. A small plate can sit on top as a light weight for especially loose cheese. You need 680 g / 1½ lb after draining.
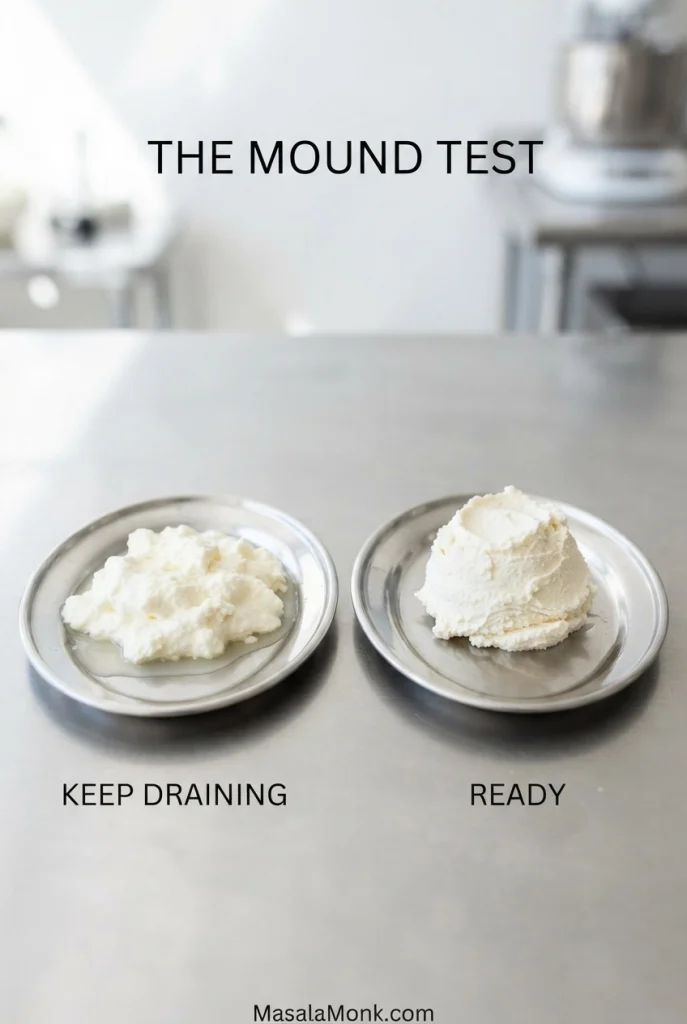
  2. Check the texture. Put a spoonful on a plate and leave it alone for a minute. The mound should keep its shape without a ring of watery whey spreading underneath. More liquid around the base means more draining time.
  3. Sweeten and rest. Gently mix in 125 g superfine sugar and refrigerate for 20–30 minutes so the crystals can begin dissolving. Taste the ricotta, then add some or all of the optional extra 25 g if you want it sweeter. Give any added sugar another 10–15 minutes to dissolve before sieving.
  4. Sieve and flavor. Press the sweetened ricotta through a fine-mesh sieve into a clean bowl. Fold in the vanilla, orange zest and cinnamon, when using.
  5. Finish and chill the filling. The cream should mound and hold its shape. Fold in mini chocolate chips only after the texture is right, then cover and refrigerate while you make the shells.

Part 2 — Make the Shell Dough

  1. Mix the dry ingredients. Whisk together the flour, sugar and salt. Rub in the lard with your fingertips until the flour looks evenly sandy. Use the same motion with cool butter when making the substitution.
  2. Add the wet ingredients. Add the egg, 55 ml Marsala and vinegar. Mix until shaggy, then begin bringing the dough together by hand.
  3. Adjust by feel. The dough should resemble firm pasta dough and hold together when squeezed. Work it for a minute before deciding it is too dry. Stubborn loose crumbs can take Marsala 1 teaspoon at a time; tackiness needs only the lightest dusting of flour.
  4. Knead and rest. Knead until the surface becomes smoother and the dough feels elastic, usually about 5–8 minutes by hand. Wrap tightly and rest at room temperature for about 1 hour.

Dough that keeps shrinking as you roll it is still tight. Cover it for another 10–15 minutes and come back to it.

Part 3 — Roll, Wrap and Fry

Roll, Wrap and Fry the Test Shell
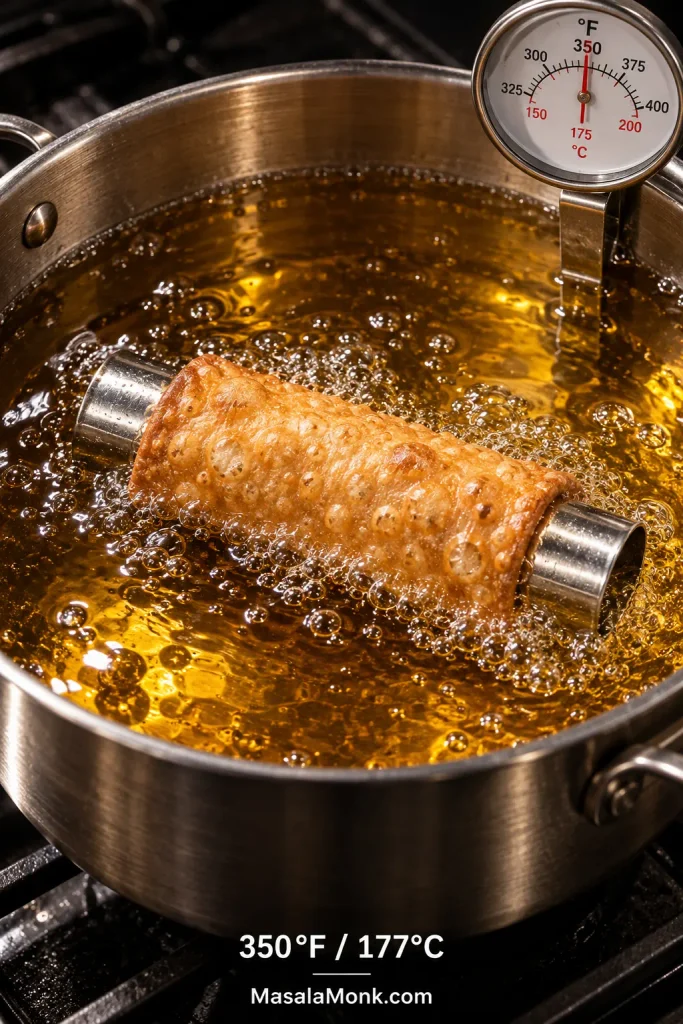
  1. Heat the oil. Pour oil into a tall, heavy pot to a depth of about 2½–3 inches / 6.5–7.5 cm. It should sit comfortably below halfway up the pot, leaving plenty of room for bubbling. Heat toward 350°F / 177°C.
  2. Roll one portion. Divide the rested dough into 4 pieces and keep the other 3 covered. Flatten the first piece and run it through the widest pasta-machine setting. Fold and pass it through once or twice more, then reduce the gap gradually until the sheet reaches about 1.5–2 mm / roughly 1/16 inch. With a rolling pin, aim for the same even thickness across the sheet.
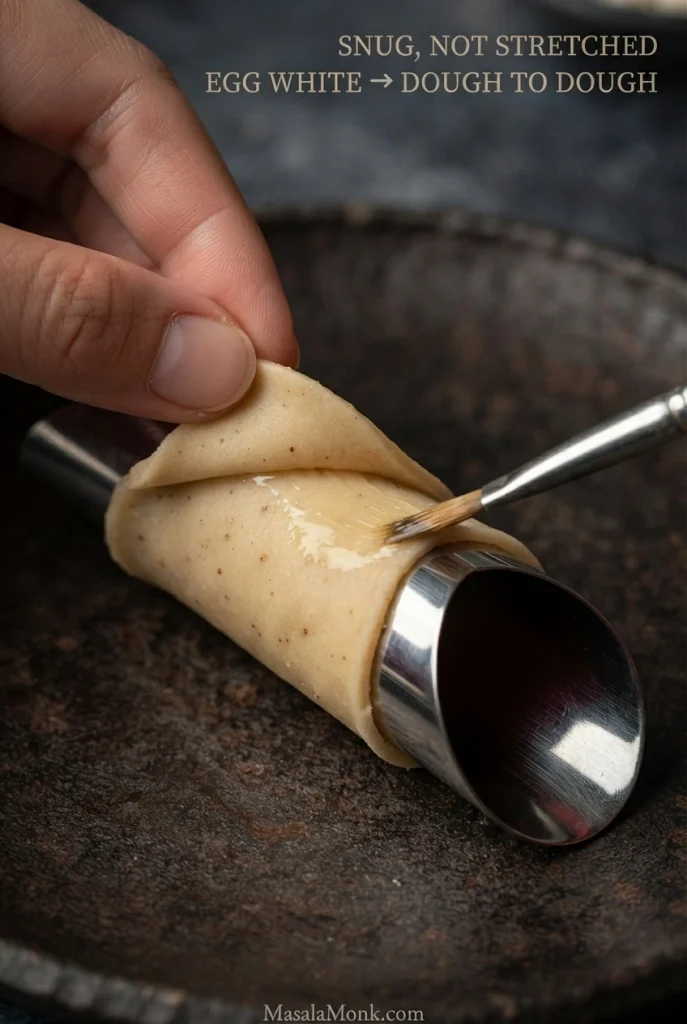
  3. Cut and wrap one shell. Cut a 4-inch / 10-cm round and wrap it around a cannoli form with about ½ inch / 1.25 cm overlap. It should sit snugly without being stretched hard against the metal.
  4. Seal the seam. Brush a small amount of egg white between the overlapping pieces of dough and press them together. Keep the egg white away from the metal tube.
  5. Fry the test shell. Lower it carefully into oil around 350°F / 177°C with the seam facing downward so the overlap sets first. Let the shell move freely in the oil instead of pinning it against the bottom of the pot. Turn as needed and fry until deep golden and blistered, usually about 1–2 minutes for dough this thin.
Check the Test Shell and Finish the Batch
  1. Cool it, then break it. The wall should be thin, dry and crisp all the way through, with no leathery or doughy band inside. Dense pastry needs thinner rolling; pale and oily suggests cool oil; very fast browning suggests oil that is too hot.
  2. Shape the remaining shells. A test shell that cracks cleanly tells you the setup is working. Continue rolling and cutting while keeping unused dough covered. Re-roll scraps once; save the smallest leftovers for cannoli chips.
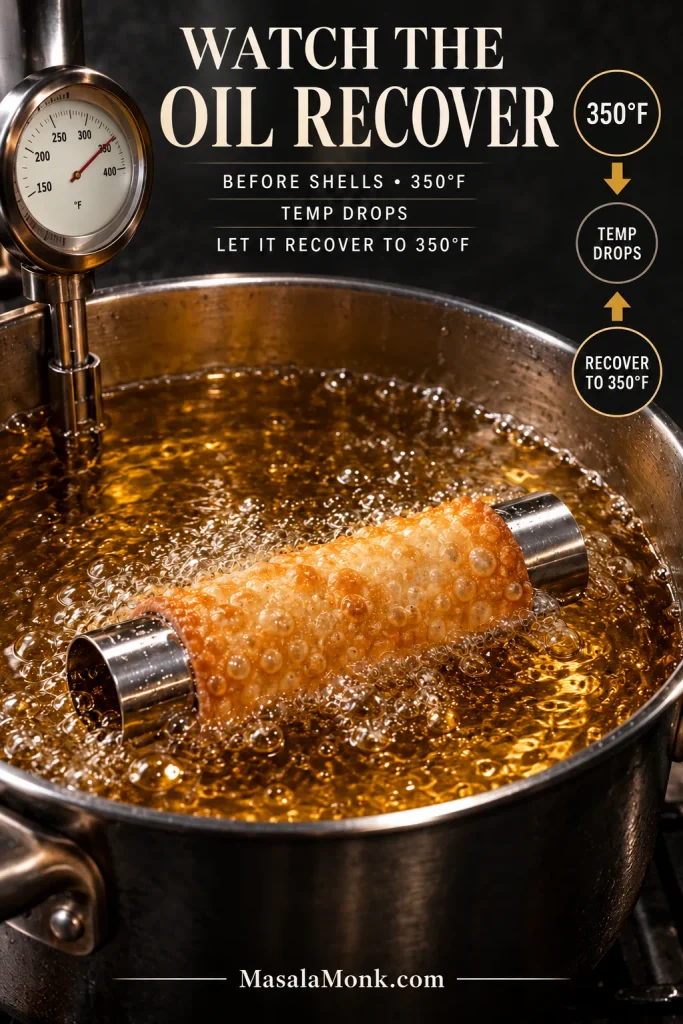
  3. Fry in small batches. Begin with 1–2 shells at a time. Add another only when the oil returns to temperature quickly. Aim to keep it roughly within 345–355°F / 174–179°C.
  4. Remove the shell from the form. Lift the shell and form from the oil with tongs and drain briefly. Set them on a heatproof surface until the metal is safe enough to handle with a folded towel or heatproof glove, then twist and slide the shell off gently.
  5. Cool the form before reusing it. Let the metal cool in air before wrapping more dough. Never rinse or dunk a hot cannoli form in water while frying; every form must be completely dry before it goes near hot oil again.
  6. Cool the shells completely. Set them on a wire rack before filling.

Part 4 — Fill and Finish

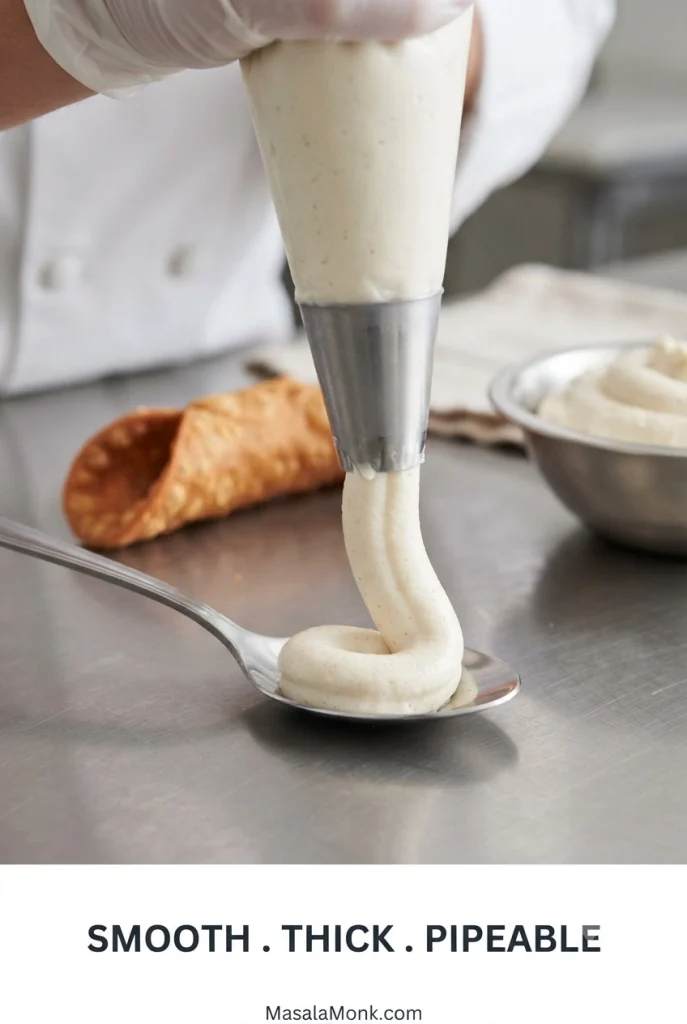
  1. Load the piping bag. Give the chilled ricotta one gentle stir and transfer it to a piping bag. Use a wide round tip or a generously cut opening, especially when mini chocolate chips are mixed through the filling.
  2. Fill from both ends. Pipe from one side toward the center, turn the shell, then fill from the other side. This fills the middle without forcing a long column of cream through from one end.
Cannoli shell being filled with ricotta from the second end after the opposite side has already been filled.
Aim for the two portions of ricotta to meet near the center, then stop. Rotating the shell and filling the second side is safer than squeezing harder and building enough pressure to crack the brittle pastry.
  1. Add the finish. Press the exposed ricotta into chopped pistachios or mini chocolate chips, or add a small piece of candied orange peel.
  2. Dust and serve. Add a light veil of powdered sugar and bring the cannoli to the table.

Recipe Notes

  • Ricotta: Fresh sheep’s-milk ricotta or ricotta impastata can replace well-drained whole-milk supermarket ricotta when available.
  • Sugar: Regular granulated sugar works too. Give it an extra 10–15 minutes to dissolve before the final sieve.
  • 00 flour: It can replace the all-purpose flour by weight. Because 00 flours vary, let the dough consistency determine any tiny liquid adjustment.
  • Fat: Lard is the more traditional choice in this version; butter is the practical substitute. Because butter contributes a little water of its own, judge the dough before adding extra Marsala.
  • No Marsala: Dry white wine can replace it directly. A fully alcohol-free dough needs a different hydration approach, covered in the shell guide below.
  • Pasta-machine settings: Machine numbers vary. Stop when the sheet itself reaches the target thickness.
  • Filling ahead: Keep the ricotta cream covered in the refrigerator and use it within about 1–2 days for best quality. A few drops of moisture after chilling can be stirred back in gently. If whey is pooling, chill the filling and use the troubleshooting steps below before piping.

At this point you can make the cannoli without reading another word. What follows is for the moments a recipe card cannot answer as neatly: dough that keeps shrinking, ricotta that still looks wet, a first shell that refuses to blister, or figuring out what can be done tomorrow instead of today.

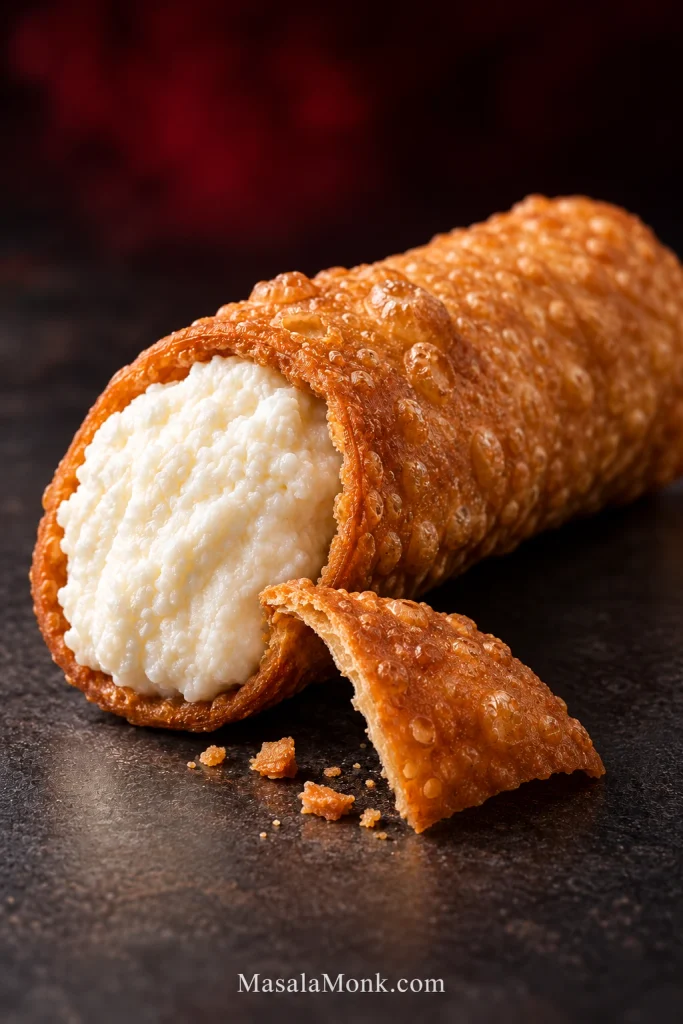
Close-up of a golden cannolo filled with thick ricotta beside a broken crisp shell fragment.
The shell should fracture into small crisp pieces instead of bending around the filling. Meanwhile, the ricotta should remain cohesive enough that gentle pressure does not force it out of the opposite end.

Shell, Filling & Troubleshooting

Master the Cannoli Shell: Crisp, Thin and Blistered

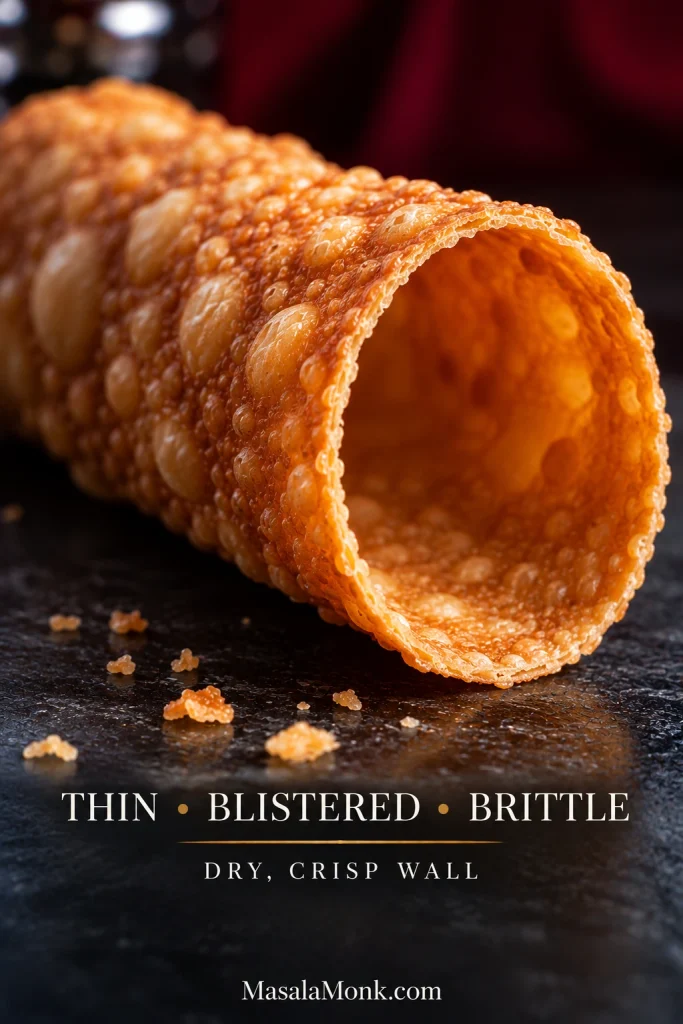
Once cooled, a properly fried shell should feel light in the hand and break quickly under your teeth. Small bubbles and blisters roughen the surface; the wall stays thin enough to shatter instead of resist. Crisp and hard are not the same thing. A hard shell usually points to thickness, uneven rolling or a center that still held too much moisture when the outside had already browned.

Close-up of the open end of a golden cannoli shell showing a thin wall and irregular blistered surface.
Surface blisters are only half the story. Check the exposed rim too: a thin, dry wall confirms that the dough crisped through, whereas a heavy edge can still produce a hard shell despite attractive blistering.

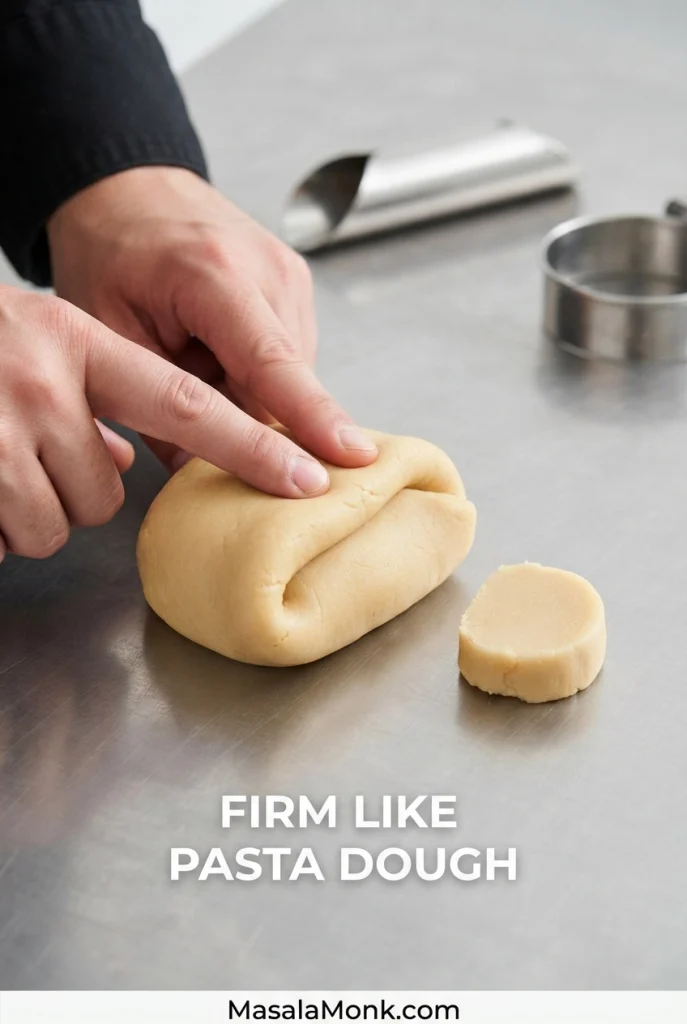
The Dough Should Feel Like Firm Pasta Dough

Squeeze a piece after mixing. It should stay together even though it feels considerably firmer than cookie or bread dough. Loose dusty crumbs mean the flour still needs a little more liquid; kneading then smooths the surface and builds elasticity.

Firm pale cannoli dough being pressed and folded on a work surface beside a metal cannoli form.
Judge cannoli dough by two signals together: it should hold when pressed, yet release cleanly from your fingers and the work surface. Cohesive but not tacky is the useful target.

Spring-back means the dough is still tight. A covered rest relaxes it; adding more flour usually takes you in the wrong direction.

Roll the Shells Almost Translucent

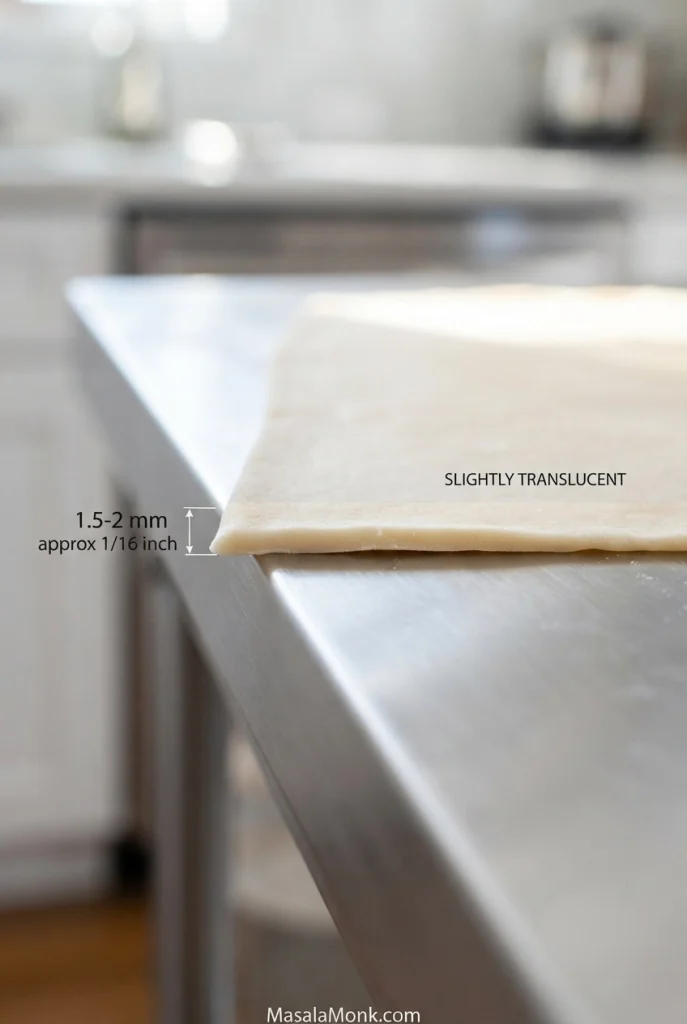
Roll cannoli dough about 1.5–2 mm / roughly 1/16 inch thick—thin enough to look slightly translucent but still strong enough to wrap around the form. Evenness matters as much as the number; a thick band through the middle can stay dense while the thinner edges fry perfectly.

Thin cannoli dough viewed at its edge and labeled 1.5–2 millimeters, or about 1/16 inch.
Backlight the rolled dough if you are unsure about evenness. The entire sheet should become faintly translucent; an opaque band through the center is the part most likely to stay dense after frying.

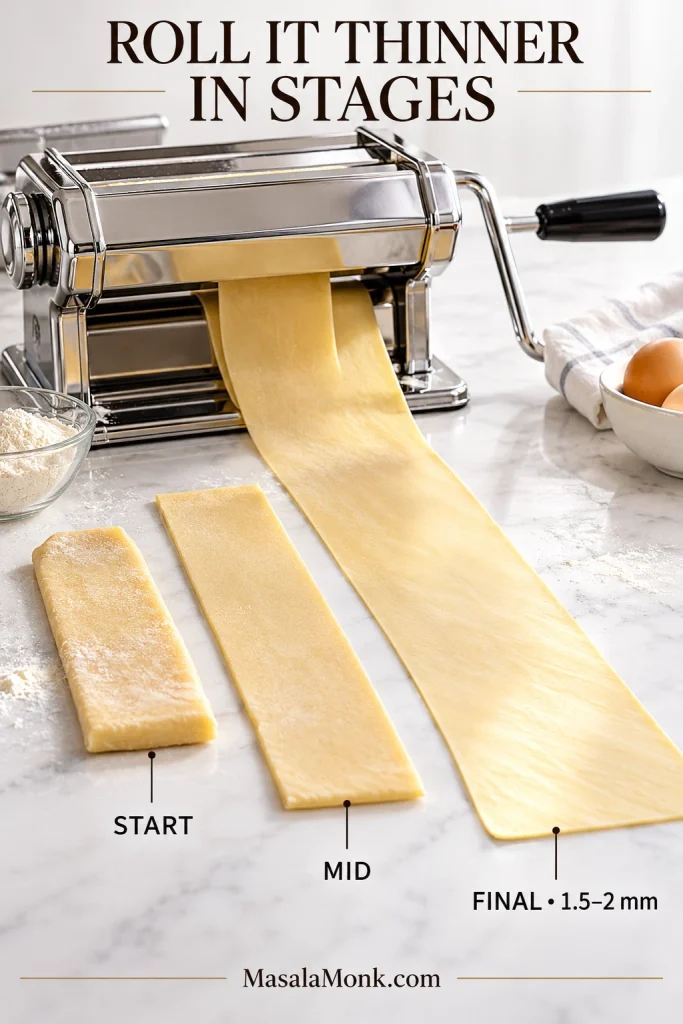
Both a pasta machine and rolling pin work. With a pasta machine, use the wide settings to smooth the dough first, then narrow the rollers gradually. If the sheet tears, buckles or fights the rollers, pause and correct the dough rather than forcing it through a tighter setting.

Three stages of cannoli dough becoming progressively thinner beside a pasta machine.
Watch the sheet edges as the rollers narrow. Ragged tearing or hard resistance means the dough needs attention before another pass; a smooth, even sheet can keep moving toward the final thin setting.

How Many Cannoli Forms Do You Need?

Six to eight metal forms keep the frying rhythm moving without long waits, and smooth metal gives the most reliable shape and release. If you have no forms, sturdy tightly rolled heavy-duty foil can get you through a batch, but it is less rigid and more awkward to remove.

Wrap the dough snugly without stretching it tight. A small overlap is enough, and the egg-white seal belongs between the two layers of dough, never on the tube.

Cannoli dough wrapped around a metal tube while egg white is brushed between the overlapping dough edges.
Treat the overlap as a small structural joint rather than a heavily glued seam. A thin film of egg white between the dough layers is enough; therefore, remove any that touches the metal form.

Use the First Shell to Calibrate the Batch

Thin dough blisters more readily because moisture inside can expand before the shell sets hard. A thick sheet, a dried surface, too much bench flour, or oil that has dropped too cool or is swinging sharply in temperature can make those bubbles harder to form.

Cannoli shell comparison showing a good golden shell beside dark, pale oily and dense shell examples.
Do not judge the first shell by color and blisters alone. Break it and inspect the wall as well: a golden exterior can still hide a thick interior that will eat hard rather than brittle.
  • Deep golden, blistered and crisp after cooling: keep going.
  • Dark almost immediately: cool the oil before the next shell.
  • Pale and oily: let the oil recover.
  • Golden but dense: thin the next sheet.
  • Almost smooth: check thickness, surface dryness and oil temperature.
  • Open seam: use a slightly wider overlap and firmer seal.

If the first shell is dense, it has still done its job: adjust the next sheet before shaping the batch. When a cooled shell cracks cleanly and tastes light rather than hard, your thickness and frying setup are working.

Give the Oil Time to Recover

Keep the oil around 350°F / 177°C and let it recover before each batch. Aim for roughly 345–355°F / 174–179°C while frying. Every cold piece of dough and metal form pulls heat from the pot, so a thermometer reading before frying tells you only where the oil started.

Cannoli shell frying around a metal form in bubbling oil beside a thermometer near 350 degrees Fahrenheit.
Watch the shell and thermometer together. Fine blisters should begin forming before the pastry becomes deeply colored; quick browning with little surface development is a reason to pause before adding the next shell.

Begin with small batches and watch the recovery. Slow electric and ceramic burners often need more patience than gas, while large knob adjustments can overshoot in either direction. Smaller batches make oil temperature easier to control, just as they do when frying churros.

Cannoli frying in oil beside a thermometer graphic showing 350 degrees, a temperature drop and recovery to 350.
Recovery time tells you how much the pot and burner can comfortably handle. If the oil takes progressively longer to return toward 350°F, reduce the batch size before making a large burner adjustment.

Making Cannoli Without Marsala

Dry white wine can replace Marsala in the same quantity. For a practical alcohol-free starting point, begin with about 35 ml water while keeping the vinegar already in the recipe, then add more water 1 teaspoon at a time until the dough becomes firm and cohesive.

Marsala isn’t just flavored water: its alcohol and dissolved solids change how the dough hydrates and fries. An alcohol-free version may feel more elastic and blister differently, so let the dough consistency and fried result guide the adjustment. Treat 35 ml water as a starting point, not a volume-for-volume replacement for Marsala.

For Classic Cannoli Texture, Fry the Shells

If the goal is the thin, brittle, blistered shell associated with classic cannoli, frying is the method to use. Baked or air-fried shells can still be crisp, but they won’t blister and shatter quite like dough immersed in hot oil.

Good Cannoli Filling Starts with the Ricotta

Fresh sheep’s-milk ricotta is the classic Sicilian choice when you can get a great one, and ricotta impastata gives you a drier, smoother bakery-style option. But you do not need specialty cheese to make good cannoli: well-drained whole-milk supermarket ricotta is the easiest reliable choice for most home cooks in the U.S.

Two tubs labeled whole-milk ricotta can contain very different amounts of whey, a moisture problem that matters in ricotta cheesecake too. Choose a full-fat ricotta with a fresh dairy flavor, then let its texture tell you when it is ready. Low-fat ricotta offers no useful advantage here.

The Mound Test Is More Useful Than the Clock

Draining times vary because ricotta brands carry different amounts of whey. Put a spoonful on a plate and leave it for a minute. It should stay where you put it without flattening or releasing watery liquid around the base.

Still seeing liquid? Give it longer. If no watery ring appears and the mound holds its shape, stop watching the clock and make the filling.

Side-by-side ricotta test showing wet ricotta spreading with whey and drained ricotta holding a firm mound.
Look at the plate as closely as the ricotta. Even when the mound appears fairly firm, a spreading ring of whey underneath tells you there is still enough free moisture to loosen the cannoli filling later.

Smooth the Filling Through a Fine Sieve

Ricotta naturally has a curd structure. The short rest gives the sugar time to begin dissolving; pressing the mixture through a fine sieve then smooths the curds without overworking them.

Sweetened ricotta being pressed through a fine metal sieve into a bowl, with smoother ricotta collecting underneath.
Watch what comes through the underside of the sieve: the ricotta should fall in soft, cohesive ribbons rather than watery beads. That gives you a useful texture check before flavorings and solid mix-ins complicate the picture.

How Thick Should Cannoli Filling Be?

After sieving and chilling, the filling should be thick enough to stay in the shell without becoming stiff or whipped. A small piping test is easier to read than the mixture sitting in a bowl.

Thick ricotta filling being piped into a ridged ribbon that holds its shape beside a cannoli shell.
A useful piping test is whether the ridges hold instead of immediately slumping outward at the base. If the ricotta spreads as soon as it is piped, excess moisture is still affecting the filling even if it looked thick in the bowl.

Keep the Filling Lightly Sweet

The base filling uses 125 g sugar for 680 g drained ricotta. Chocolate, candied orange and powdered sugar add more sweetness later, so the cream itself can stay milky and lightly sweet. For a sweeter Italian-American bakery style, add some or all of the optional extra 25 g after the initial rest, give it time to dissolve, then pass the filling through the sieve.

For a richer variation, replace about 100–150 g of the drained ricotta with the same weight of mascarpone and taste before adding extra sugar. Heavy whipped cream is unnecessary; properly drained ricotta already has enough body.

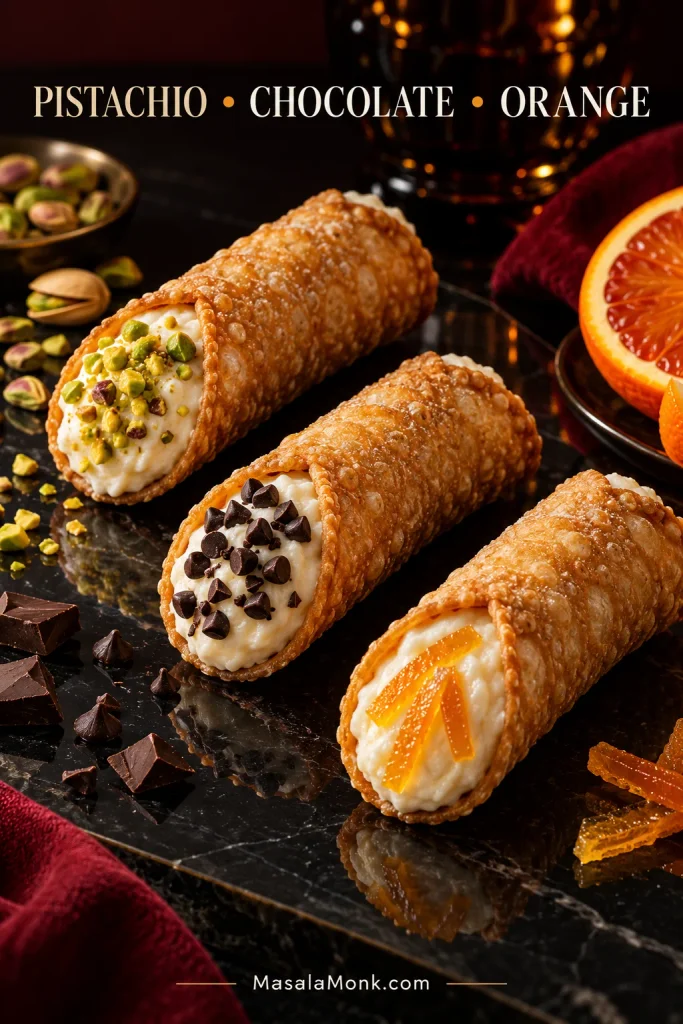
Chocolate, Pistachio and Orange

Dark chocolate adds a little bitterness against the sweet ricotta, pistachio brings toasted crunch, and orange lifts the dairy without turning the filling into a citrus dessert. Use one or combine them lightly, and let the ricotta remain the center of the pastry.

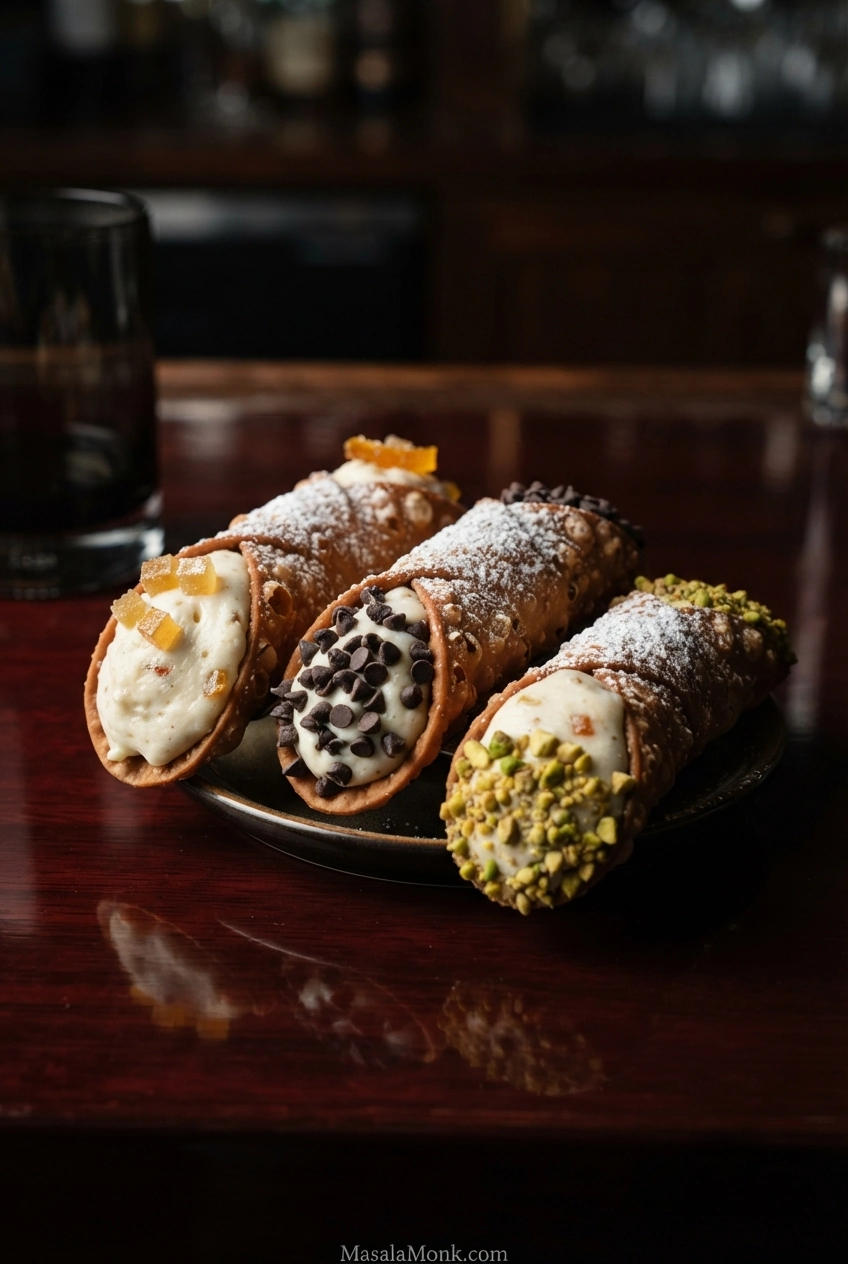
Three ricotta-filled cannoli finished separately with chopped pistachios, mini chocolate chips and candied orange peel.
Scale matters with cannoli toppings. Finely chopped pistachios, mini chocolate chips and small pieces of candied orange cling to the exposed ricotta better than large pieces and keep each bite balanced.
  • Mini chocolate chips: fold them through the cream or press them into the exposed ends. Their small size works better with a piping bag than large chunks.
  • Pistachios: finely chopped unsalted nuts give the ends color and crunch without putting nuts through every bite.
  • Orange: finely grated zest keeps the citrus subtle; candied peel gives a sweeter, more obvious orange note.
  • Chocolate-dipped shells: dip one or both cooled ends in melted dark chocolate and let them set before filling. A thin chocolate lining inside the shell can slow softening, although moisture will eventually reach the pastry.

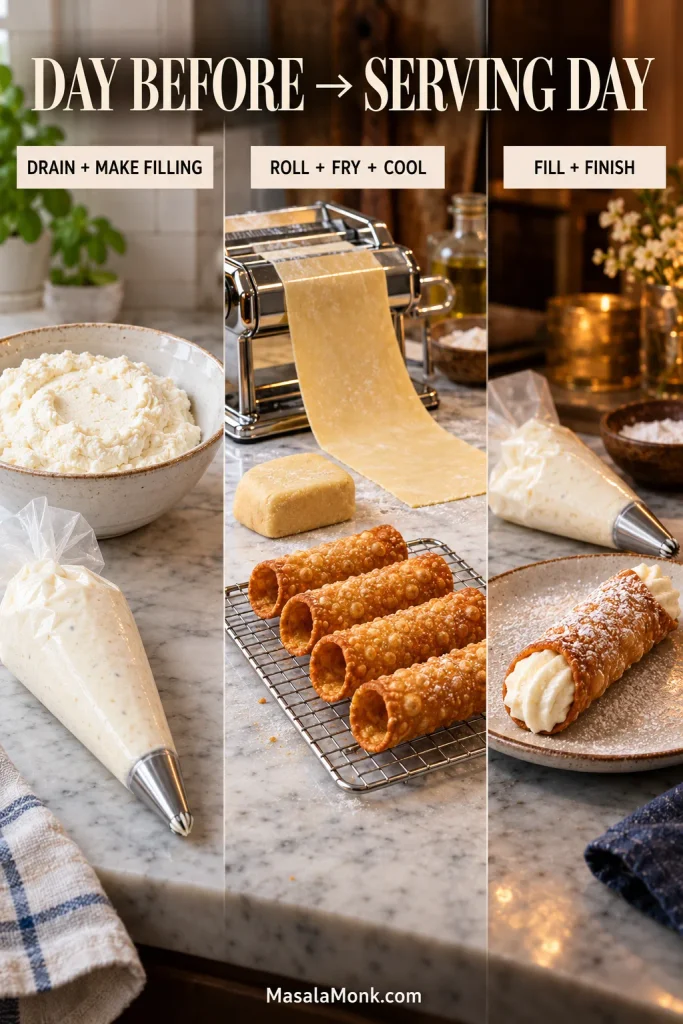
Make the Components Ahead, Then Fill at the End

Serving cannoli after dinner? Do the draining, dough work and frying earlier in the day. Then the only jobs left when dessert time arrives are piping, finishing and dusting.

Three-stage cannoli timeline showing ricotta preparation, shell making and final filling before serving.
This schedule does more than save time: it keeps the moisture-bearing ricotta cold and separate from the dry shells until the last stage. In practice, nearly all the labor can happen before dessert service.

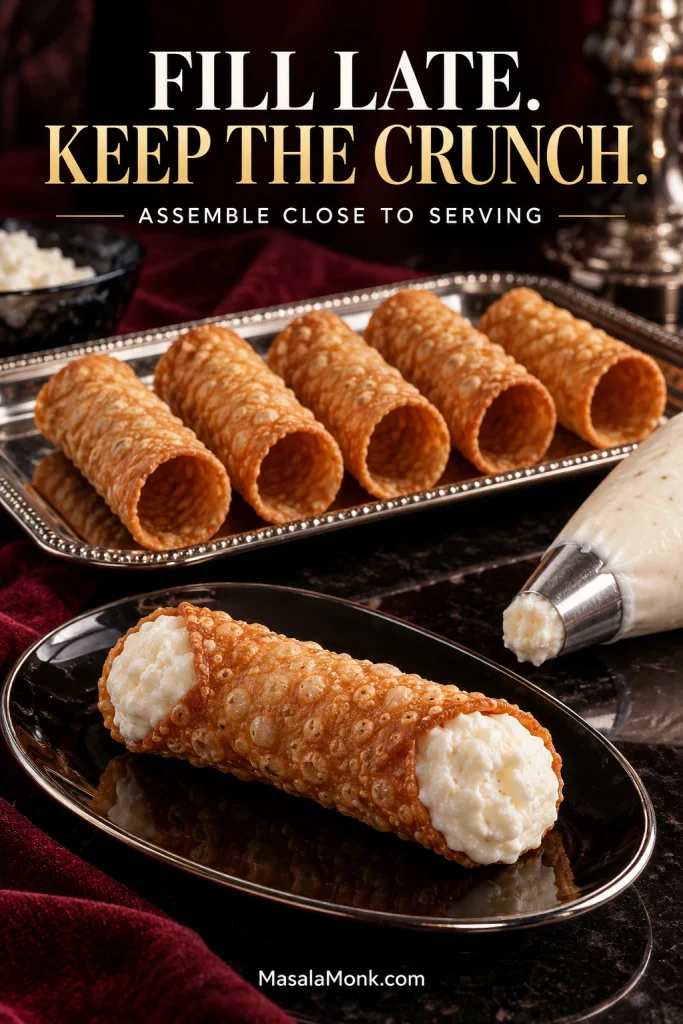
Fill completely cooled cannoli shells as close to serving as practical; moisture from the ricotta starts softening the pastry as soon as the two touch. Cream puffs have a similar shell-and-filling problem: both components can be prepared earlier, while assembly is better left closer to serving.

Empty cannoli shells beside a piping bag of ricotta and one freshly filled cannolo ready to serve.
For a long dessert service, fill cannoli in smaller rounds instead of assembling every shell at once. That keeps the later servings from spending as much time absorbing moisture from the ricotta.

The Day Before

  • Drain wet ricotta.
  • Make the ricotta filling once the cheese passes the mound test; cover and refrigerate.
  • Make the shell dough when that suits your schedule. Wrap it tightly and refrigerate, then let it sit until it is still cool but pliable enough to roll without cracking or fighting the rollers.

Earlier on Serving Day

  • Roll and fry the shells.
  • Cool them completely.
  • Store the shells airtight at room temperature.
  • Prepare pistachios, chocolate and orange garnish.

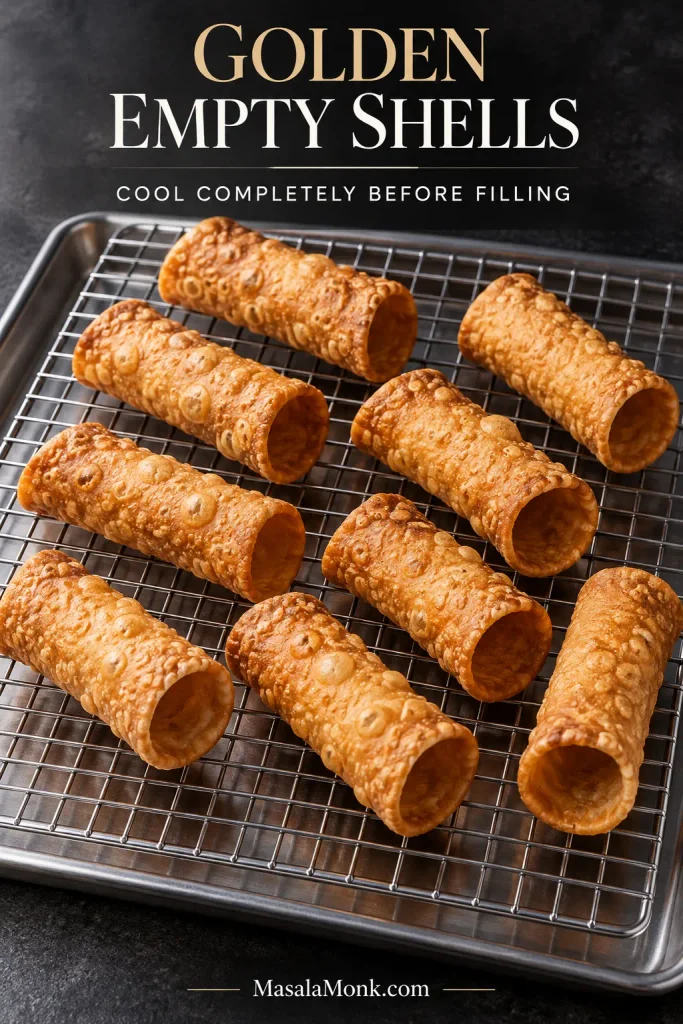
Cool the Fried Cannoli Shells Completely

Once the shells are off their forms, move them to a wire rack and let them cool fully before filling or storing.

Several empty golden cannoli shells cooling separately on a metal wire rack.
Give the hot shells breathing room on the rack rather than stacking or crowding them. Otherwise, escaping steam can collect at contact points and soften patches of pastry just as the final crisp texture is setting.

When It’s Time to Serve

Fill the shells, finish the ends and dust with powdered sugar. How quickly they soften depends on shell thickness, filling moisture and humidity.

Keep the ricotta cream refrigerated until assembly. Filled cannoli that are not being served should stay chilled. USDA food-safety guidance recommends no more than 2 hours at room temperature for perishable food, or 1 hour when the temperature is above 90°F / 32°C.

Storing and Refreshing Empty Shells

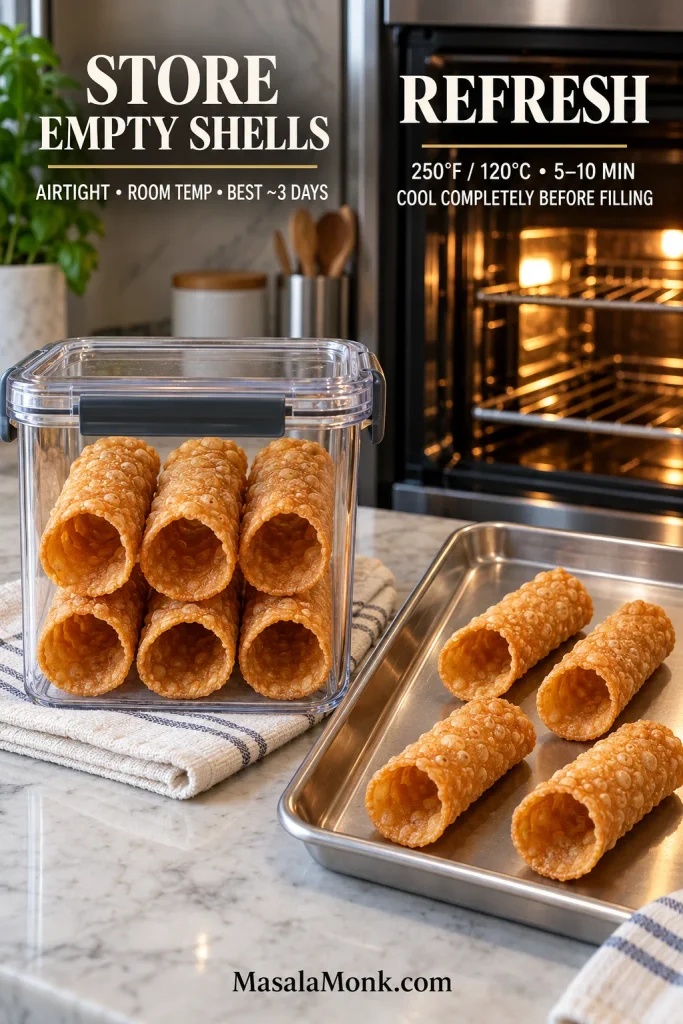
Cool unfilled shells completely before sealing them in an airtight container at room temperature. They are at their best within about 3 days; humidity can shorten that window, and refrigeration usually works against the texture.

If they soften slightly, set them on a rack in a 250°F / 120°C oven for 5–10 minutes, then cool them completely before filling. Raw dough scraps can be fried until crisp and dusted with powdered sugar. Broken cooked shells are useful too: serve them with leftover ricotta cream for dipping.

Empty cannoli shells in an airtight container beside shells on a baking tray for a 250-degree oven refresh.
A low oven can restore crispness lost to humid air, but it cannot undo moisture already absorbed from ricotta. So refresh only empty shells and cool them again before filling.

Fix My Cannoli

Change the variable closest to the problem before changing the entire recipe.

Filling and Dough Problems

What happened?Likely causeWhat to change
Ricotta filling is runnyRicotta started too wet or the filling has separatedChill and stir gently first. If it remains loose and no mix-ins are present, drain briefly and retaste; some dissolved sugar may leave with the whey. Once mix-ins are folded through, chilling may help but the texture may not fully recover.
Filling feels grainy or coarseLarge ricotta curds or sugar that has not fully dissolvedIf it feels gritty from sugar, let the sweetened ricotta rest another 10–15 minutes. Then press it through a fine-mesh sieve before adding chips or other mix-ins.
Dough falls apartNot enough liquidAdd Marsala 1 teaspoon at a time until the firm dough binds when squeezed.
Dough springs backNeeds more restCover and rest another 10–15 minutes.

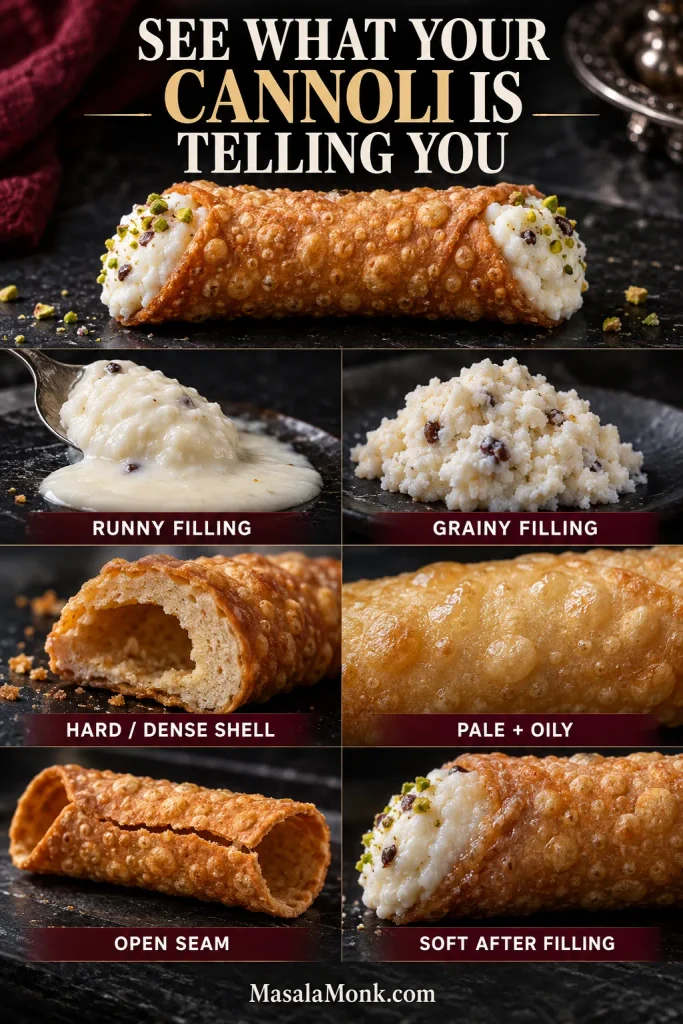
The timing of a cannoli failure is often the fastest clue to its cause. Problems that show up before frying usually point toward filling or dough preparation; problems during frying point toward thickness, sealing or oil control; softening after assembly points toward moisture transfer.

Cannoli troubleshooting chart showing runny filling, grainy filling, dense shell, pale oily shell, open seam and softened filled shell.
Diagnose cannoli by when the failure appears. Problems before frying usually point to filling or dough preparation; problems during frying point toward thickness, sealing or oil control; softening after assembly points toward moisture transfer.

Shell Frying and Assembly Problems

What happened?Likely causeWhat to change
Hard or dense shellDough too thick or unevenRoll the next sheet closer to 1.5–2 mm and fry another test shell.
Pale, greasy shellOil too coolReduce the batch size and let the oil recover toward 350°F / 177°C.
Shell darkens almost immediatelyOil too hotLet the temperature fall before adding another shell.
Very few blisters formThick dough, dry surface, excess flour or unstable oil temperatureCheck those variables before changing the formula itself.
Seam opens in the oilWeak seal or too much tensionUse a wider overlap, a small amount of egg white and lower the seam facing downward.
Shell sticks to the tubeEgg white on metal, tight wrapping or rough formKeep the seal between dough layers and slide the shell off gently once manageable.
Filled shells become softMoisture moving into pastryThe frying may be fine. Fill the next batch later.

Why Traditional Cannoli Vary

Once the shell is crisp and the ricotta is right, many of the smaller details can vary. Cannoli are Sicilian, and the official Visit Sicily cannoli recipe uses sheep’s-milk ricotta, very thin fried shells and a sieve for the cream.

Family formulas are not identical. Fat, wine, cocoa, cinnamon, citrus and shaping details vary from one version to another.

A finished cannolo should crack cleanly and then give way to cool ricotta. Chocolate, pistachio or orange can arrive afterward; none needs to bury the cheese.

Close-up of one golden cannolo filled with thick ricotta and finished with chopped pistachio on a dark surface.

The first shell does not have to be pretty. Once it is thin, blistered and crisp, the rest is adjustment. Cool the shells, fill them late, dust one lightly and eat it while the shell still has something to say.

Posted on — Leave a comment

Panna Cotta Recipe: Creamy, Silky & Easy

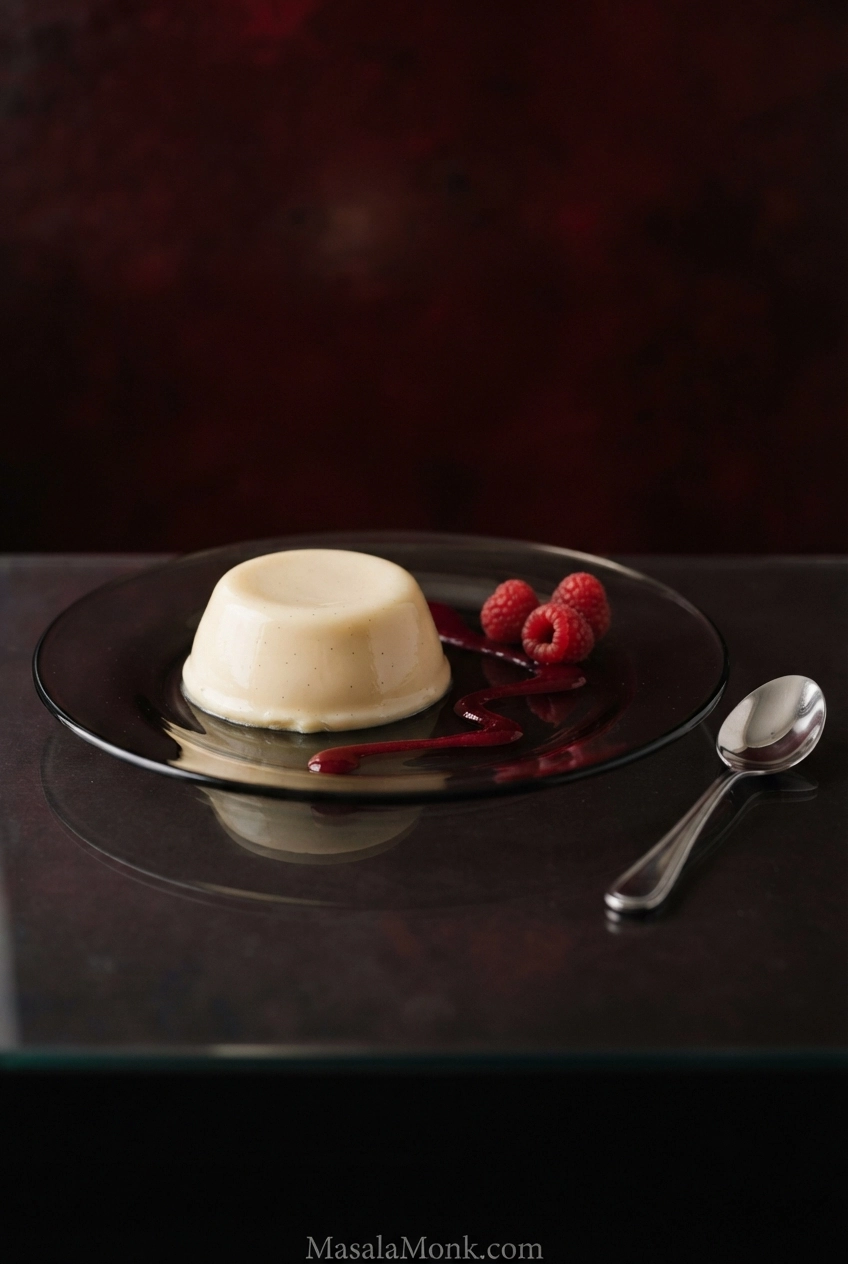
Unmolded vanilla panna cotta on a dark plate with raspberry coulis, fresh raspberries and a silver spoon.

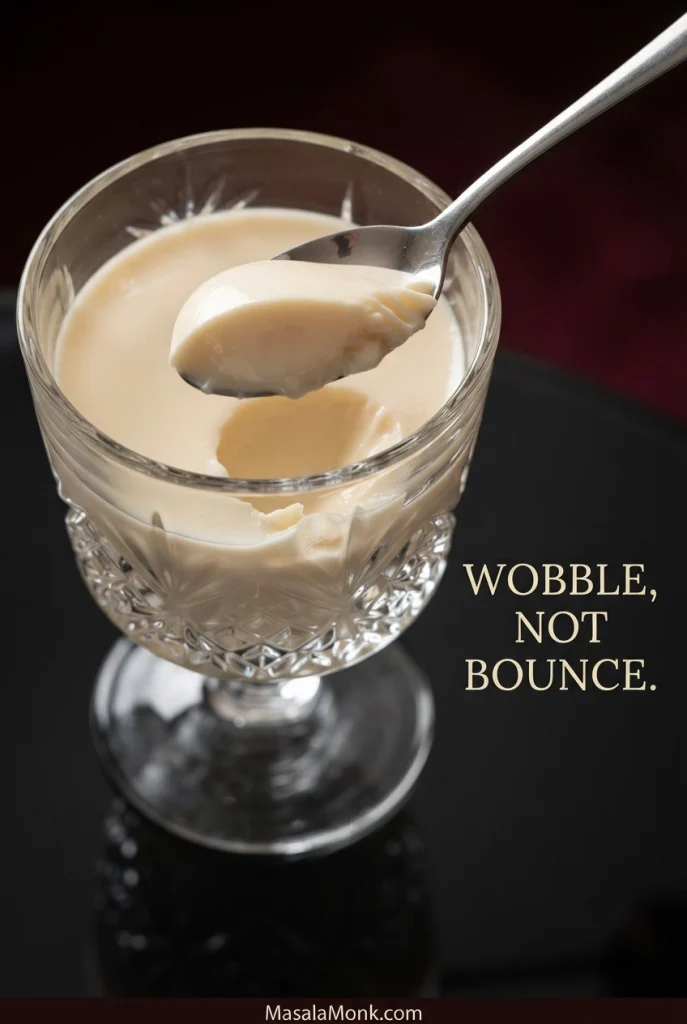
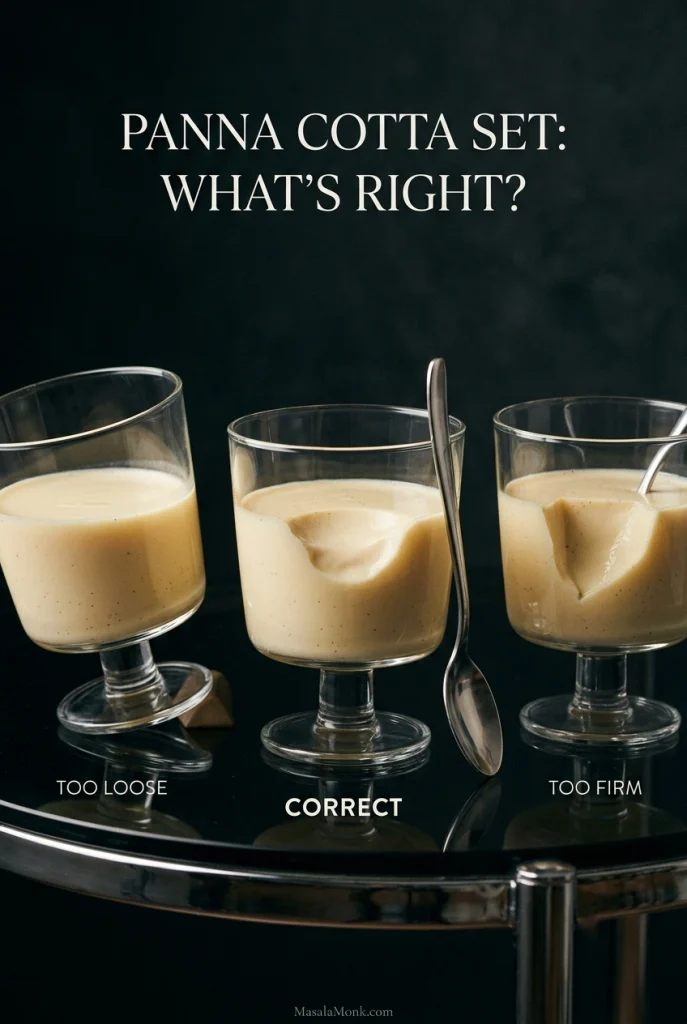
Good panna cotta should wobble when you move it, then give almost no resistance to the spoon. It should taste like cold vanilla cream that happens to hold its shape, then soften almost as soon as it reaches your mouth.

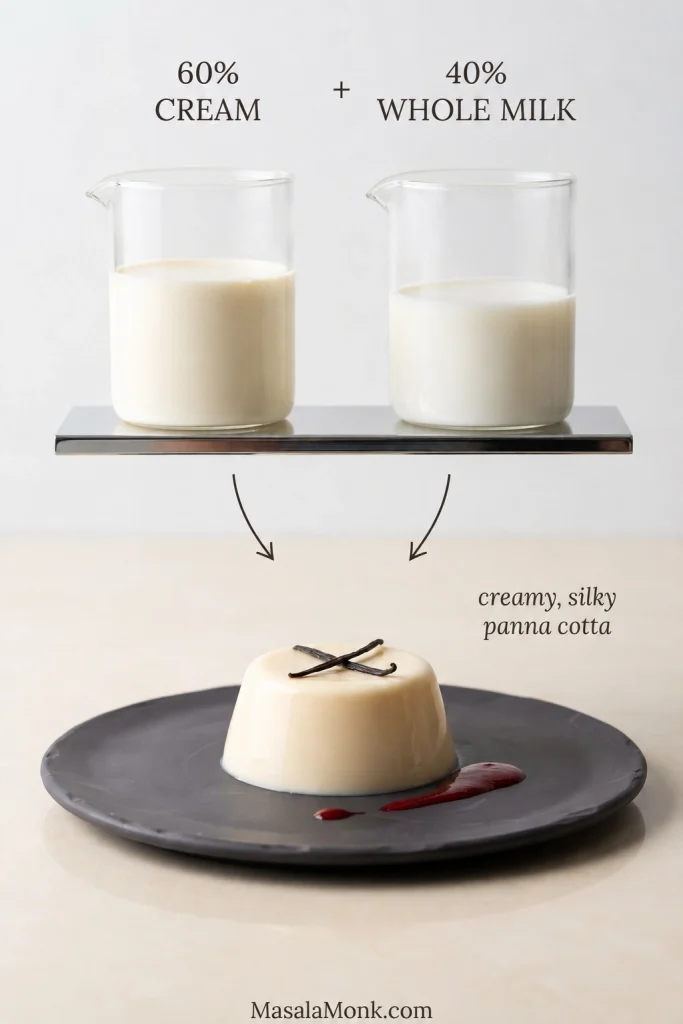
Panna cotta is a chilled Italian cream dessert associated with Piedmont in northern Italy, gently set with gelatin. Unlike crème brûlée, which relies on egg yolks for its custard set, panna cotta needs only a small amount of gelatin. This vanilla panna cotta combines heavy cream with whole milk so each spoonful stays lush without becoming heavy.

There are no eggs to temper and no oven or water bath—about 15 minutes of hands-on work, then the refrigerator takes over.

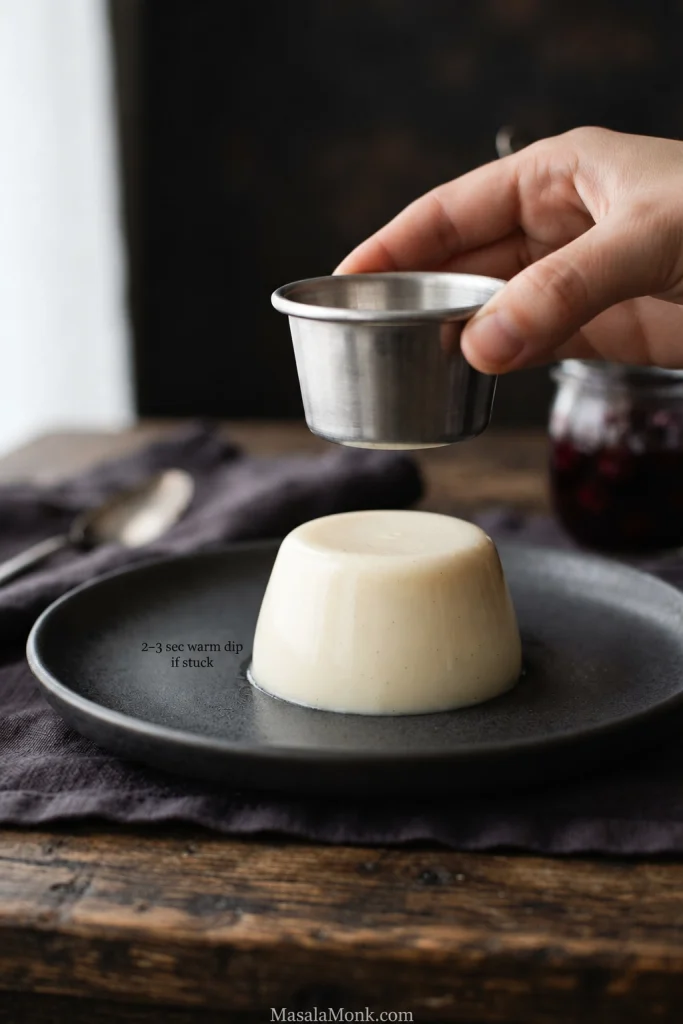
The main decision comes before you heat anything: will you serve it from a glass, or turn it out onto a plate? A glass-set panna cotta can stay softer. An unmolded one needs a little more support.

Before You Heat the Cream: Choose the Set

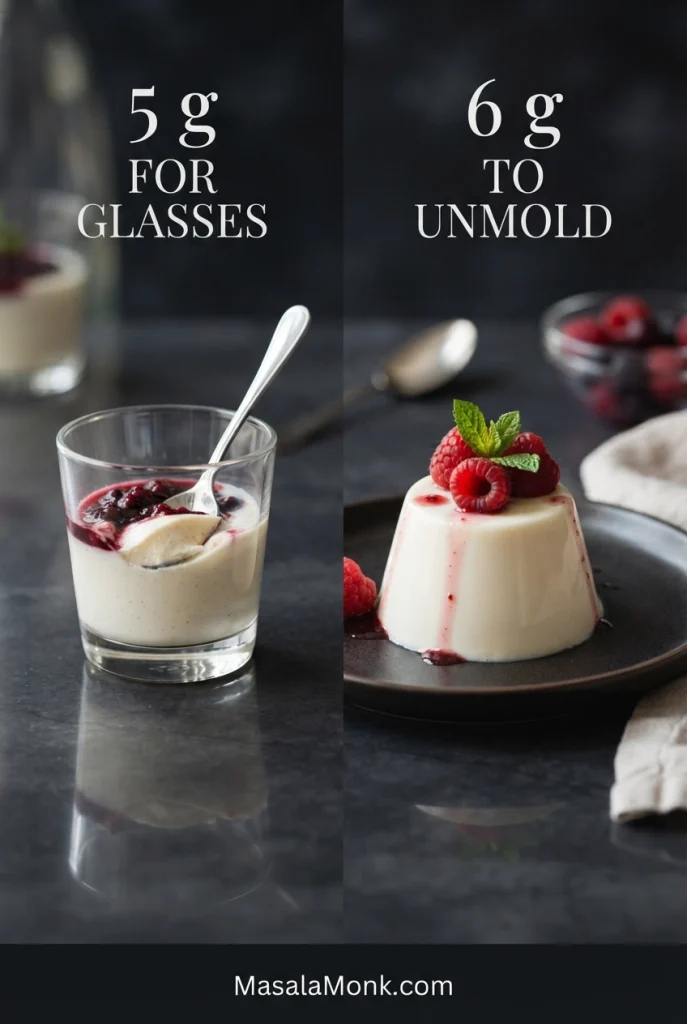
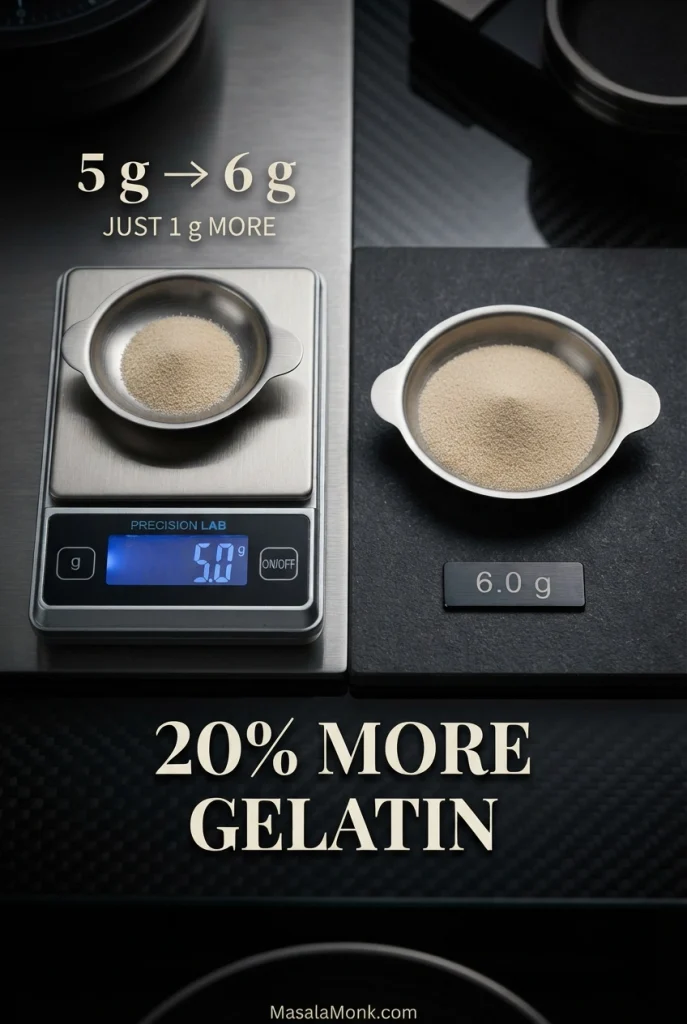
For this 600 ml cream-and-milk base, use 5 g powdered gelatin for panna cotta served in glasses or 6 g for small portions you plan to unmold.

How you will serve itWhat to use
In glasses or dessert cups5 g gelatin · chill at least 4 hours · softest, creamiest wobble
Unmolded onto plates6 g gelatin · chill at least 6 hours, preferably overnight · delicate but strong enough to stand

A soft wobble in a glass is not a failed panna cotta. For the least-fussy option, use glasses and skip unmolding altogether. Choose the firmer set only when you specifically want the plated presentation.

Side-by-side panna cotta: a softer portion in a glass and a firmer unmolded portion on a plate, labeled 5 g and 6 g gelatin.
The serving vessel changes what “set” needs to mean. A glass can hold a softer panna cotta, while a plated one needs just enough extra structure to stand without becoming bouncy.

Panna Cotta Recipe

A vanilla panna cotta with a creamy, delicate set.

Yield
6 small servings

Active
About 15 minutes

Chill
4 hours in glasses · 6 hours to unmold

Best Made
1 day ahead

Each serving is about 3½ fl oz / roughly 105 ml, ideal for a 4 oz ramekin or a 4–6 oz dessert glass when you want room for fruit or sauce.

Equipment

  • 6 small glasses, dessert cups, ramekins or panna cotta molds
  • Small bowl
  • Medium saucepan
  • Silicone spatula or wooden spoon
  • Fine-mesh sieve and heatproof bowl or pouring jug
  • A larger bowl with ice and cold water
  • Digital kitchen scale, strongly recommended for the gelatin

A thermometer is optional. The visual cues in the method are enough.

Ingredients

  • 1½ cups (360 ml) heavy cream or heavy whipping cream
  • 1 cup (240 ml) whole milk, divided
  • ⅓ cup (65 g) granulated sugar
  • 5 g unflavored powdered gelatin for glasses, or 6 g for unmolding
  • 2 teaspoons vanilla bean paste or pure vanilla extract, or 1 whole vanilla bean
  • A few drops neutral oil, optional but helpful for unmolding

Weigh the gelatin if possible; partial packets are difficult to estimate accurately. These amounts assume ordinary supermarket unflavored powdered gelatin. Specialty products can have different setting strengths, often described as Bloom strength. Collagen peptides and hydrolyzed collagen will not set panna cotta.

Using a whole vanilla bean? Split it lengthwise, scrape the seeds into the pan and add the pod while the cream and milk heat. Once the mixture is steaming, take it off the heat and steep for about 15 minutes. Remove the pod, then rewarm gently until steaming before adding the bloomed gelatin.

Instructions

  1. Prepare the glasses or molds. Glasses need no preparation. For unmolding, wipe the molds with the thinnest film of neutral oil, then remove visible excess.
  2. Bloom the gelatin. Pour ¼ cup (60 ml) cold whole milk into a small, wide bowl. Sprinkle 5 g gelatin for glasses or 6 g for unmolding evenly over the surface. Leave for 5–10 minutes, until swollen and gel-like.
  3. Warm the cream and milk. Combine 1½ cups (360 ml) heavy cream, the remaining ¾ cup (180 ml) whole milk and ⅓ cup (65 g) sugar. Heat over medium-low until the sugar dissolves and you see light steam, not a simmer—about 140°F (60°C) if checking.
  4. Dissolve the gelatin. Take the pan off the heat. Stir in all of the bloomed gelatin until no grains, strings or gummy pieces remain. Do not boil after the gelatin is added.
  5. Add the vanilla. If using vanilla bean paste or extract instead of a whole bean, stir it in now.
  6. Strain. Pour through a fine-mesh sieve into a heatproof bowl or jug.
  7. Cool briefly. Set the bowl over ice water and stir slowly for 3–5 minutes. Stop when the base is cooler, has the first hint of body and still pours freely.
  8. Portion and chill. Divide among six glasses, ramekins or molds. Chill at least 4 hours in glasses or 6 hours before unmolding; overnight is easiest for unmolded portions. Cover once cold.
  9. Unmold, if needed. Invert a fully chilled mold onto a plate and give it one controlled shake. If it stays put, dip the bottom and sides in warm water for 2–3 seconds, dry the outside and try again. The released panna cotta should stand cleanly and still tremble.

Recipe Notes

  • A brief bubble before the gelatin goes in is not a disaster. Take the pan off the heat and continue. Once the gelatin has dissolved, there is no reason to boil it again.
  • To double the recipe, keep the proportions the same, use a larger saucepan and allow a little more cooling time.

About this recipe: This panna cotta is research-derived from established ratios, technical guidance and reported troubleshooting. MasalaMonk has not independently kitchen-tested this exact formulation.

Four Useful Panna Cotta Checkpoints

Times help, but the mixture itself tells you more.

For the heating checkpoint, look for light steam rather than bubbles. The cream mixture should be hot but not simmering before the gelatin goes in.

Saucepan of cream-and-milk mixture giving off light steam beside a thermometer reading about 140°F / 60°C.
If you use a thermometer, about 140°F / 60°C is a reference point rather than a temperature to hold. The more useful cue is light steam with no active simmer.
  • After blooming: the gelatin is swollen and hydrated, with no obvious dry patches.
  • Before adding gelatin: the cream mixture is hot and lightly steaming, the sugar has dissolved, and nothing needs to be boiling.
  • Just before pouring: the strained base is cooler and has the first hint of body, but flows easily from the jug.
  • After chilling: it moves as one soft mass. The center trembles, the edges stay put, and loose liquid does not slosh underneath.
Four-panel panna cotta guide showing bloomed gelatin, steaming dairy, cooled pourable base and a finished set dessert.
These checkpoints are most useful when timing alone feels ambiguous. Let each visible change tell you whether to wait, move on or troubleshoot before the next stage.

Push in a spoon and there should be very little resistance. Wobble, not bounce. A glass-set panna cotta can be very soft and still be exactly right.

Spoon lifting a soft scoop from panna cotta in a clear glass, leaving a smooth rounded cavity.
The spoon should leave a clean, rounded cavity that stays open without liquid rushing back in. That small detail helps distinguish a deliberately soft glass-set panna cotta from one that never set properly.

Why This Panna Cotta Uses Cream and Milk

Heavy cream gives panna cotta its lushness. Whole milk pulls that richness back just enough that the last spoonful is as pleasant as the first.

The balance here is roughly 60% cream to 40% milk. A leaner base makes the gelatin more noticeable. Push the richness too far, though, and each spoonful starts to feel heavier on the palate.

Two clear beakers labeled 60 percent cream and 40 percent whole milk, with arrows pointing to a finished panna cotta.
If you scale the batch, keep the cream and milk in the same 3:2 proportion. Changing only one shifts both richness and how noticeable the gelatin feels.

What you want is a spoon that slides through cleanly, followed by a panna cotta that softens almost immediately in your mouth. Vanilla and cream should linger; the sensation of chewing gelatin should not.

Getting the Gelatin Right

Gelatin should hold the cream and milk together and then mostly disappear when you eat it. One gram sounds tiny, but moving from 5 g to 6 g means using 20% more gelatin. That is enough to give an unmolded panna cotta more support without turning it rubbery.

Precision scale comparison showing 5 g and 6 g portions of powdered gelatin with a 20 percent increase noted.
At this scale, a one-gram change is meaningful. Weigh the gelatin rather than splitting a packet by eye so you can control a soft glass set and a sturdier unmolded set more predictably.

For reference, Knox lists a 7 g envelope as about 2½ teaspoons. That makes 5 g roughly 1¾ teaspoons and 6 g about 2⅛ teaspoons, but grams are far more dependable when the difference is this small.

The difference becomes easiest to judge after chilling: compare how the panna cotta moves with how a spoon passes through it. Those two cues reveal a loose set, a tender set and an overly firm one more reliably than appearance alone.

Three panna cotta glasses comparing too loose, correct and too firm sets with different spoon marks.
Too loose looks sloshy; too firm keeps a sharper spoon cut and feels springier. The sweet spot moves as one soft mass yet yields without much resistance.

Bloom Powdered Gelatin Properly

Sprinkle the gelatin over cold liquid in an even layer. Give it 5–10 minutes to absorb the milk, then add the entire swollen mixture to the hot cream mixture. Nothing gets drained away.

Two bowls showing powdered gelatin just sprinkled over cold milk and the swollen hydrated gelatin after 5 to 10 minutes.
Fully bloomed powdered gelatin can look wrinkled, clumpy or sponge-like even though nothing is wrong. What matters is that the dry granules have absorbed the cold milk before they meet the hot dairy.

If you can see grains or gummy pieces after stirring, rewarm the mixture over low heat until smooth and strain it again. The refrigerator will not dissolve leftover gelatin for you.

Using sheets or agar instead? See the gelatin and agar substitutions.

Why Cool the Panna Cotta Before Pouring?

Brief cooling lets the base gain a little body before you pour it. That helps keep the cream and milk uniform and the vanilla seeds suspended instead of settling at the bottom.

Cooling over ice makes the change happen evenly and quickly, before the edges begin to set. Use a spatula instead of a whisk; vigorous whisking can leave an otherwise silky surface dotted with tiny bubbles.

Panna cotta base being cooled and poured, with an example showing vanilla seeds settled at the bottom of a glass.
Before portioning, give the cooled panna cotta base one slow stir. That redistributes any vanilla seeds beginning to settle while avoiding the fine bubbles a whisk can leave on the finished surface.

How to Unmold Panna Cotta Without Making It Too Firm

The goal is not to add enough gelatin to make release foolproof. Give the firmer set a complete chill and let the brief warm-water dip in the recipe card handle a stubborn mold. Adding more gelatin simply to make unmolding easier costs you the soft texture that makes panna cotta worth eating.

If a fully chilled panna cotta made for unmolding still slumps, give it more refrigerator time before increasing the gelatin. A softer glass-set panna cotta is doing a different job; leave that one in the glass.

Hand lifting a metal mold from an unmolded panna cotta, with a note about a 2 to 3 second warm-water dip if stuck.
After the brief warm-water dip, lift the mold straight up. If the panna cotta edges start to melt or smear, the dip was too long; if it stays stuck, another very short dip is safer than one long soak.

Panna Cotta Troubleshooting

“It didn’t set” can describe several different problems. Start with what you can actually see and feel.

Set and Release Problems

Still liquid after an overnight chill is different from a panna cotta that is simply soft. If it sloshes rather than moving as one mass, retrace the gelatin step before adding more gelatin next time.

Tilted glass of panna cotta that remains liquid after chilling, with a set panna cotta glass in the background.
Tilt the glass slightly: a failed set flows independently, while a deliberately soft panna cotta still moves as one coherent mass. That movement test helps separate a true setting failure from the soft texture panna cotta is supposed to have.
What happened?Why it happened — and what to do
Still liquid after an overnight chillCheck the gelatin weight, blooming and dissolution. One of those is more likely than simply needing much more gelatin.
Very soft but spoonableIf it holds together in a glass and tastes creamy, this may already be exactly right.
Firm, springy or rubberyThere is too much gelatin for the serving style. Use less next time.
Won’t release from the ramekin or moldGive it more chilling time, then use another very brief warm-water dip if needed.
Collapses after unmoldingWith 6 g gelatin, chill it longer before changing anything. A 5 g batch is better kept in the glass if it is that soft.

Appearance Problems

Visual clues can narrow the problem before you choose a fix. Grainy pieces suggest gelatin trouble, while distinct layers, a greasy ring or settled vanilla point to separation or settling.

Four panna cotta examples showing grainy texture, separated layers, a greasy ring and vanilla seeds settled at the bottom.
Where the defect appears matters. Flecks throughout the panna cotta can indicate incomplete gelatin dissolution, while a distinct lower layer or surface ring points toward separation during cooling or setting.
What you seeLikely cause and fix
Gummy or grainy piecesThe gelatin was not fully dissolved. Before chilling, rewarm over low heat until smooth and strain again.
Creamy layer over a clearer lower layerThe base separated while setting. Cool it until it gains a little body before portioning.
Yellow or greasy layerThis points to fat separation. Moderate heat is enough; unusually rich cream can also make separation more likely.
Vanilla seeds all at the bottomThe base was too warm and thin when poured. Cool it briefly first.

What Can Be Rescued?

Undissolved gelatin and a batch beginning to set in the bowl can usually be saved with low heat. The goal is only to make the base smooth and pourable again.

Panna cotta base beginning to set, being gently rewarmed in a saucepan, then poured smoothly into a glass.
Use the lowest heat that returns the base to a smooth, pourable state. As soon as the gelled patches disappear, take the pan off the heat; there is no need to simmer it.

If the cream mixture has badly curdled or split, starting again is more likely to give you the silky texture you wanted. For bright lemon flavor without curdling the cream, add a small spoonful of lemon curd after the panna cotta has set.

Back to the recipe · Back to the guide · Back to top

Gelatin Sheets, Agar and Dairy Substitutions

Some swaps are straightforward; others change the dessert enough to need a different recipe.

Gelatin Sheets and Agar

Powdered gelatin, gelatin sheets and agar can all create a set, but the form alone does not tell you how much to use. Strength and handling matter too.

Powdered gelatin, gelatin sheets and agar powder beside panna cotta, labeled as not one-to-one substitutes.
Gelatin sheet size and Bloom strength vary by manufacturer, so use the package conversion rather than leaf count alone. Agar behaves differently again and needs an agar-specific panna cotta formula.
SwapWhat changes
Gelatin sheetsSheet size and Bloom strength vary by manufacturer. Use the manufacturer’s conversion for replacing 5 g or 6 g of standard powdered gelatin; there is no universal sheet count.
AgarUnlike gelatin, agar needs a different recipe and much stronger heating to set properly. It also gives a firmer set with less of gelatin’s melt-away texture.
Beef or fish gelatinThese may suit some people avoiding pork gelatin, depending on certification. Check the manufacturer’s setting strength before using the same gram amount; they are still animal products and are not vegetarian.

Using standard powdered gelatin? Go back to how to bloom it properly.

Dairy Substitutions

SwapWhat changes
UK double creamIt is richer than typical US heavy cream, so the finished panna cotta will feel heavier on the palate.
Half-and-halfIt can make a good panna cotta, but it is leaner than this cream-and-milk blend, so the result will be less lush.
Low-fat or skim milkIt is not an equivalent replacement for the heavy cream. The panna cotta will be much leaner and the gel more noticeable.
Plant milks or coconut milkWater, fat, protein and stabilizer levels vary widely. These milks need a recipe balanced for those differences.

For a vegetarian or vegan panna cotta, start with a recipe built around its gelling system and base instead of converting this one ingredient by ingredient.

Back to the recipe · Back to the guide · Back to top

Flavor and Topping Ideas

Coffee, tea, strips of citrus zest and mild herbs can infuse the warm cream mixture without adding much extra liquid. Vanilla and other concentrated extracts are easiest stirred in after the pan comes off the heat.

Large amounts of fruit purée, citrus juice, chocolate or coconut milk change the balance of the base enough to need a recipe designed around them. Strong citrus juice can also destabilize hot cream, so it is usually better kept in a topping. For bright lemon flavor without adding juice to the hot cream, spoon a little lemon curd over the panna cotta once it has set.

Ripe mango and berry coulis keep things bright and fruity, while a thin ribbon of caramel takes the dessert in a richer direction. A spoonful of sharp raspberry coulis running into the cold vanilla cream is particularly hard to improve on.

Four vanilla panna cottas topped separately with raspberry, passion fruit, mango and caramel.
Panna cotta toppings work best when they contrast without burying the delicate set. Keep fruit sauces fluid enough to ribbon or pool, and use caramel as a thinner, more restrained drizzle.

Fruit Toppings and Gelatin

Fresh pineapple, kiwi and papaya contain protein-breaking enzymes that can interfere with gelatin setting. Avoid mixing them raw into a make-ahead panna cotta base. Illinois Extension recommends cooked or canned versions for gelatin desserts because heat deactivates those enzymes.

Vanilla panna cotta surrounded by fresh pineapple pieces, sliced kiwi and papaya on a polished surface.
Raw pineapple, kiwi and papaya are most relevant when mixed into a gelatin-set dessert in advance. Added at serving time, they do not spend the same setting time in contact with the gelatin.

For serving, you barely need a recipe. Tart raspberries or passion fruit keep the cold vanilla cream from feeling too rich.

Vanilla panna cotta topped with golden passion fruit pulp and black passion fruit seeds on a white plate.
Passion fruit gives panna cotta both acidity and texture: the juice cuts through the cream, while the seeds add a light crunch. For a smoother finish, strain part of the pulp and leave a few seeds for contrast.

Make Ahead, Storage and Serving

For best texture and freshness, keep panna cotta covered in the refrigerator and use it within about 3 days.

Add berries, herbs, sauces and anything crunchy closer to serving so the garnish stays fresh and the panna cotta surface stays clean.

Skip freezing this panna cotta. Thawing can leave it grainy, watery or separated. For transport, keep the portions properly chilled in a cooler with ice packs.

Take the panna cotta out of the refrigerator about 5–10 minutes before serving. It should still be cool, but the brief rest softens the texture just enough for the vanilla and cream to come through more clearly.

Partly spooned vanilla panna cotta on a dark plate with raspberry coulis and a silver spoon.
The 5–10 minute rest is about eating texture, not bringing panna cotta to room temperature. Serve while the center is still cool; the short rest softens the texture without intentionally warming the dessert through.

Back to the recipe · Back to the guide · Back to top

Posted on — Leave a comment

Bulgogi Sauce Recipe: Sweet, Savory & Easy

Thin browned bulgogi beef with onions, scallions and sesame in a skillet, beside a jar of dark sauce and a round Asian pear.

Pour bulgogi sauce over very thinly sliced beef and several things start happening at once. Soy seasons the meat. Pear and onion bring moisture and mild sweetness. Sugar waits for the hot pan, where it can help brown the edges beautifully—or scorch if too much wet marinade follows the beef into the skillet.

Bulgogi sauce is a thin soy-based Korean barbecue marinade flavored with garlic, toasted sesame and fruit. This version uses Asian pear, plenty of garlic and enough sugar to help the beef develop deeply browned edges once moisture can escape. Cooked well, the meat comes off glossy and garlicky, with toasted-sesame aroma rising from the pan.

Bulgogi Sauce Recipe

A soy-based bulgogi marinade with Asian pear, garlic, mirin and toasted sesame oil for thinly sliced beef.

Sauce Prep
10 minutes

Makes
About 1⅓–1½ cups / 320–360 ml before straining

Covers
About 2 lb / 900 g thinly sliced meat

Texture
Thin & pourable

Yield varies with the pear and onion. Straining reduces the final volume, so a heavily strained batch will leave less extra sauce after marinating.

Ingredients

  • ⅓ cup / 80 ml regular soy sauce
  • 90 g finely grated Asian pear
  • 60 g finely grated onion
  • 3 tablespoons / about 40 g packed light brown sugar
  • 2 tablespoons / 30 ml mirin
  • 2 tablespoons / 30 ml toasted sesame oil
  • 18 g garlic, about 4–6 cloves depending on size, finely grated or minced
  • 2 teaspoons / about 5 g finely grated fresh ginger
  • 2 scallions, thinly sliced
  • ½ teaspoon freshly ground black pepper
  • 1 teaspoon toasted sesame seeds, optional
Dark bulgogi marinade in a bowl surrounded by Asian pear, soy sauce, garlic, sesame and other marinade ingredients on a white surface.
Although bulgogi sauce has several aromatic ingredients, soy remains the liquid backbone; pear and onion add moisture and light body, while garlic and sesame build the aroma without making the marinade thick.

Before You Start

  • Use regular or all-purpose soy sauce. Low-sodium soy and tamari can work too, though saltiness varies by brand. Korean soup soy is much saltier, while kecap manis is much sweeter, so neither is a direct substitute. If you are comparing soy styles, our soy sauce guide explains the differences.
  • No mirin? Use 2 tablespoons / 30 ml unsweetened apple juice for an alcohol-free option. Rice vinegar is much sharper and is not a 1:1 replacement.
  • Want clean sauce for dipping or glazing later? Set that portion aside before raw meat goes into the bowl.

Make the Sauce

  1. Grate the pear and aromatics. Finely grate the Asian pear, onion, garlic and ginger into a medium bowl. For a smoother sauce, put them directly into a blender instead.
  2. Mix the sauce. Add the soy sauce, brown sugar, mirin, toasted sesame oil and black pepper. Whisk until the sugar dissolves. If using a blender, blend until smooth.
  3. Finish and taste. Stir in the scallions and sesame seeds, if using. The sauce should run easily from a spoon. Taste it as a marinade rather than a finished dipping sauce: soy should lead, garlic and sesame should be clear, and sweetness should sit behind them.

To Use on Beef

  1. Marinate. For 1 lb / 450 g finely sliced meat, start with about ½ cup / 120 ml. Toss and separate the slices so the sauce reaches them evenly. Add another spoonful only if some pieces still look barely coated. Cover and refrigerate for 30 minutes to 4 hours; overnight is optional when using pear, apple or no strong enzyme tenderizer.
  2. Cook for browned bulgogi. Lift the thin beef from the marinade and let obvious excess drip away. Cook in batches on a well-preheated skillet or griddle so the beef sizzles as soon as it lands. Turn as needed and cook until the thin slices are cooked through with browned edges.

Recipe Notes

  • Less sweet: reduce the brown sugar to 2 tablespoons / about 25 g.
  • No Asian pear: use the same weight of ripe regular pear or sweet apple.
  • Spicy variation: add 1 tablespoon gochujang; use gochugaru for more heat.

About this recipe: This formula follows established Korean bulgogi methods and has not been independently kitchen-tested by MasalaMonk. Because soy sauces, pears and stovetops vary, use the taste and pan cues alongside the measurements.

How Bulgogi Sauce Should Taste

Bulgogi marinade should taste savory first, gently sweet, garlicky and nutty with sesame. It should taste stronger from the spoon than a finished dipping sauce because that seasoning still has to spread across the meat.

Soy gives the marinade its savory backbone. Pear and brown sugar soften the salt, mirin brings sweetness and aroma, toasted sesame oil announces itself quickly, and garlic can be bolder. If sweetness is the first thing you notice and the soy and garlic disappear behind it, the balance has gone too far toward sugar.

Taste a clean spoonful before the sauce touches raw meat. An assertive marinade is normal; harsh saltiness is not. If it still tastes overwhelmingly salty after allowing for its job as a marinade, add water a tablespoon at a time. When sweetness is the problem, reduce the brown sugar in the next batch instead of automatically adding more soy.

Dark brown bulgogi sauce pouring in a narrow stream from a spoon into a clear glass bowl.
Because the marinade stays loose, it can slip between newly separated beef slices instead of clinging in thick patches; therefore, thorough tossing matters more than simply pouring in extra sauce.

Asian Pear, Apple—or No Fruit?

No Asian pear? Ripe regular pear or sweet apple both work, and naturally tender beef cut very thinly can also be marinated without fruit.

Asian pear brings plenty of moisture, mild sweetness and gentle tenderizing without making the marinade taste obviously fruity.

Whole and halved round Asian pears beside a metal grater and a mound of finely grated, juicy pale pear.
Finely grated Asian pear should resemble wet, juicy pulp rather than diced fruit; as a result, the pear disperses through the marinade instead of leaving concentrated sweet pockets.
ChoiceWhat to know
Asian or Korean pearJuicy, mildly sweet and gently tenderizing; the best all-round choice when available.
Ripe regular pearSimilar moisture and mild sweetness, with a familiar pear flavor.
Sweet appleGood for moisture and sweetness and can help with tenderizing, although it does not behave exactly like Asian pear.
No fruitStill workable with naturally tender beef cut very thinly, especially when the meat itself does not need much tenderizing help.

How Much Bulgogi Sauce Should You Use?

For 1 lb / 450 g meat, start with about ½ cup / 120 ml. Toss. Separate the slices. Look at them before adding more.

Every piece should have a glossy coating. A few spoonfuls of marinade in the bottom of the bowl are fine; the beef does not need to swim.

Thin raw beef coated with dark bulgogi marinade in a glass bowl beside a measuring cup of sauce.
Before adding more bulgogi sauce, pull apart any folded or clumped slices: the outside of a bundle can look glossy while the hidden surfaces inside are still barely coated.

For 2 lb / 900 g, begin with about 1 cup / 240 ml and add more only if the meat needs it.

Using bottled sauce? Follow its label; “Korean BBQ sauce” can describe products much thicker or more concentrated than this homemade marinade.

Planning on browned edges? Lift the beef with tongs or a slotted utensil and let obvious excess marinade drip away before it hits the skillet.

If the skillet still fills with bubbling liquid, see Read the Pan troubleshooting before changing the sauce itself.

How Long Should Bulgogi Marinate?

Thirty minutes is enough for thin beef; 1–4 hours gives deeper seasoning, and overnight is optional. Those timings assume Asian pear, regular pear, apple or no strong enzyme tenderizer—not kiwi or fresh pineapple.

Stronger Fruit Tenderizers Need Less Time

Kiwi and fresh pineapple are different tools. They tenderize much more aggressively than pear or apple, so do not use the same amount and then follow the longer timing above. Thin beef can move from tender to oddly soft surprisingly quickly.

Asian pear and apple shown as gentler fruit tenderizers, compared with kiwi and fresh pineapple shown as faster tenderizers.
Very thin slices expose more meat surface to fruit enzymes, so the gap between gentler pear or apple and faster kiwi or pineapple matters more here than it would on a thick cut.

Keep raw meat cold while it marinates. The FDA recommends marinating food in the refrigerator, not on the counter.

Chewy beef is not automatically asking for stronger tenderizer. Ribeye and sirloin are easy choices for beef bulgogi, but whichever cut you use, slicing matters: aim for about 2–3 mm thick, around ⅛ inch or a little thinner, and cut across the grain. The slicing guide in our Beef and Broccoli recipe shows how to identify the grain for fast, hot cooking.

Very thin raw beef slice hanging in a soft U-shaped drape from metal tongs, with more thin slices and a knife cutting beef in the background.
In practice, correctly sliced bulgogi beef should bend and drape easily; that flexibility is a faster kitchen check than stopping to measure every slice at roughly 2–3 mm.

Grated, Blended or Strained?

Grating is the simplest route and leaves a little texture. Blending gives you a more uniform sauce. Straining is most useful when you want fewer pear, onion and garlic solids hitting a very hot pan or grill.

Those solids carry flavor, and there is no need to strain them out for most skillet cooking. At very high heat, though, removing most of them leaves fewer sugary fruit and onion bits sitting directly against hot metal while the beef is still trying to brown.

Bulgogi marinade stays thin even when blended. If you actually want a sauce that thickens around the food, that is a different job; our Stir Fry Sauce Recipe uses that approach. For bulgogi itself, grated or blended sauce works well—strain only when the smoother texture or very high heat makes it useful.

Three glass containers of bulgogi sauce showing grated, blended and strained textures with progressively fewer visible solids.
Straining removes pear, onion and garlic solids, but dissolved salt and sugar remain; therefore, strained bulgogi sauce becomes cleaner and smoother—not automatically milder.

Read the Pan: Bulgogi Sauce Troubleshooting

The same marinade can give one cook browned edges and another a skillet full of pale beef, bubbling liquid or blackened sugary residue. Usually the pan is telling you exactly what changed.

When it is working, you hear a sizzle instead of a simmer. The sauce clings instead of pooling, the edges begin to brown, and the pan smells of garlic and toasted sesame rather than burnt sugar.

Thin slices of bulgogi beef browning in a hot skillet with exposed pan between the pieces, steam and very little pooled liquid.
Listen to the pan as each batch goes in: if a sharp sizzle fades into steady bubbling, the skillet has lost heat, so wait for it to recover before adding more beef.

Match the Pan to the Fix

What you seeWhy it happens & how to fix it
Pale or grey beef in bubbling liquidThe pan may not have been hot enough, or too much meat or wet marinade cooled it. Preheat well, let excess sauce drip away and cook smaller batches.
Black sticky residue with grey meatThe pooled liquid evaporated before the beef browned, leaving concentrated sugar and fruit solids to scorch. Transfer less marinade, give the beef more room and ease the heat as browning develops.
Brown edges with little liquid around themMoisture is leaving fast enough for the meat to sear. Keep working in similarly sized batches.
Beef stays toughThe meat may be too thick, cut with the grain, naturally tough or simply cooked too long. Fix the slicing and cut before reaching for stronger tenderizer.
Meat turns strangely soft or mushyA strong fruit tenderizer or excessive marinating has broken down the surface too far. Use pear or apple for gentler tenderizing and shorten the marinating time.
Three skillet states showing pale beef in bubbling liquid, beef with dark sticky scorched residue, and properly browned bulgogi with little liquid.
These pan states can happen in sequence: crowded beef may begin pale and wet; then, once that liquid boils away, concentrated sugars can scorch before the meat develops proper browning.

Browned vs Saucy Bulgogi

The troubleshooting above assumes you are aiming for browned skillet-style bulgogi. A deliberately juicier style is different.

That means a wet pan is not always a failed pan. Some bulgogi is meant to leave you with savory juices to spoon over rice.

Deeper browning starts with a drier trip to the pan. Let excess marinade drip away, heat the cooking surface properly and give the beef enough room for moisture to escape.

A juicier style goes the other direction. Let more marinade and vegetables cook with the meat, trading some deeply browned surface for flavorful cooking juices.

Comparison of browned bulgogi with little pan liquid and saucy bulgogi surrounded by visible cooking juices.
Use the pan bottom as the clue: exposed hot metal and dry sizzling edges point toward browned bulgogi, whereas free savory liquid between the slices signals an intentionally saucier finish.

Serve either style over hot rice. If rice is the unreliable part of dinner, our guide to cooking rice can help.

Finished thin-sliced bulgogi served with steaming white rice and a few Korean-style accompaniments on a dark table.
Serve bulgogi with rice while both are hot: the rice catches the savory pan juices, while the thin beef stays tender before it cools and firms.

Want Spicy Bulgogi Sauce?

Classic beef bulgogi is sweet-savory rather than chile-hot. One tablespoon of gochujang in this full batch gives mild warmth, fermented chile flavor and a little extra body.

For noticeably hotter bulgogi, build the heat with gochugaru. It raises the chile level without adding as much extra sweetness, salt and thickness as several more spoonfuls of gochujang would.

Can You Use Bulgogi Sauce as a Dip or Glaze?

Bulgogi sauce is a marinade first. Reserve some before the raw meat goes in; leave that clean portion thin for dipping, or simmer it gently until it lightly coats a spoon for a glaze.

As the sauce reduces, both salt and sweetness become stronger. A thick, glossy sweet-soy sauce from the start is closer to our Teriyaki Sauce Recipe.

Marinade that has already touched raw meat should not be served uncooked; the USDA advises bringing used marinade to a boil before reusing it.

Dark bulgogi sauce shown as a thin dipping sauce and as a slightly reduced glaze lightly coating a spoon.
A light bulgogi glaze is ready when it coats the spoon but still slides off; if it forms a slow, sticky ribbon, the reduction has moved beyond a light glaze.

What Else Can You Use Bulgogi Sauce On?

Chicken and thinly sliced pork both take this marinade well. Cooking time depends on the cut, so do not borrow the timing for very thin beef.

Tofu needs flavor rather than tenderizing, so a long fruit soak adds little. Brown it first if you want firmer edges, then add sauce. Mushrooms only need a coating; cook them until browned and juicy.

How to Store and Freeze Bulgogi Sauce

Refrigerate unused sauce that has not touched raw meat in an airtight container for up to 4 days. This fresh homemade sauce does not have the long refrigerator life you might expect from a commercially bottled sauce.

Freeze anything you will not use within that window in small airtight portions. For best quality, use it within about 2 months, then thaw it in the refrigerator and stir before using.

Once you know how the sauce should taste and how the pan should sound, the next batch gets much easier to judge by sight, smell and instinct.