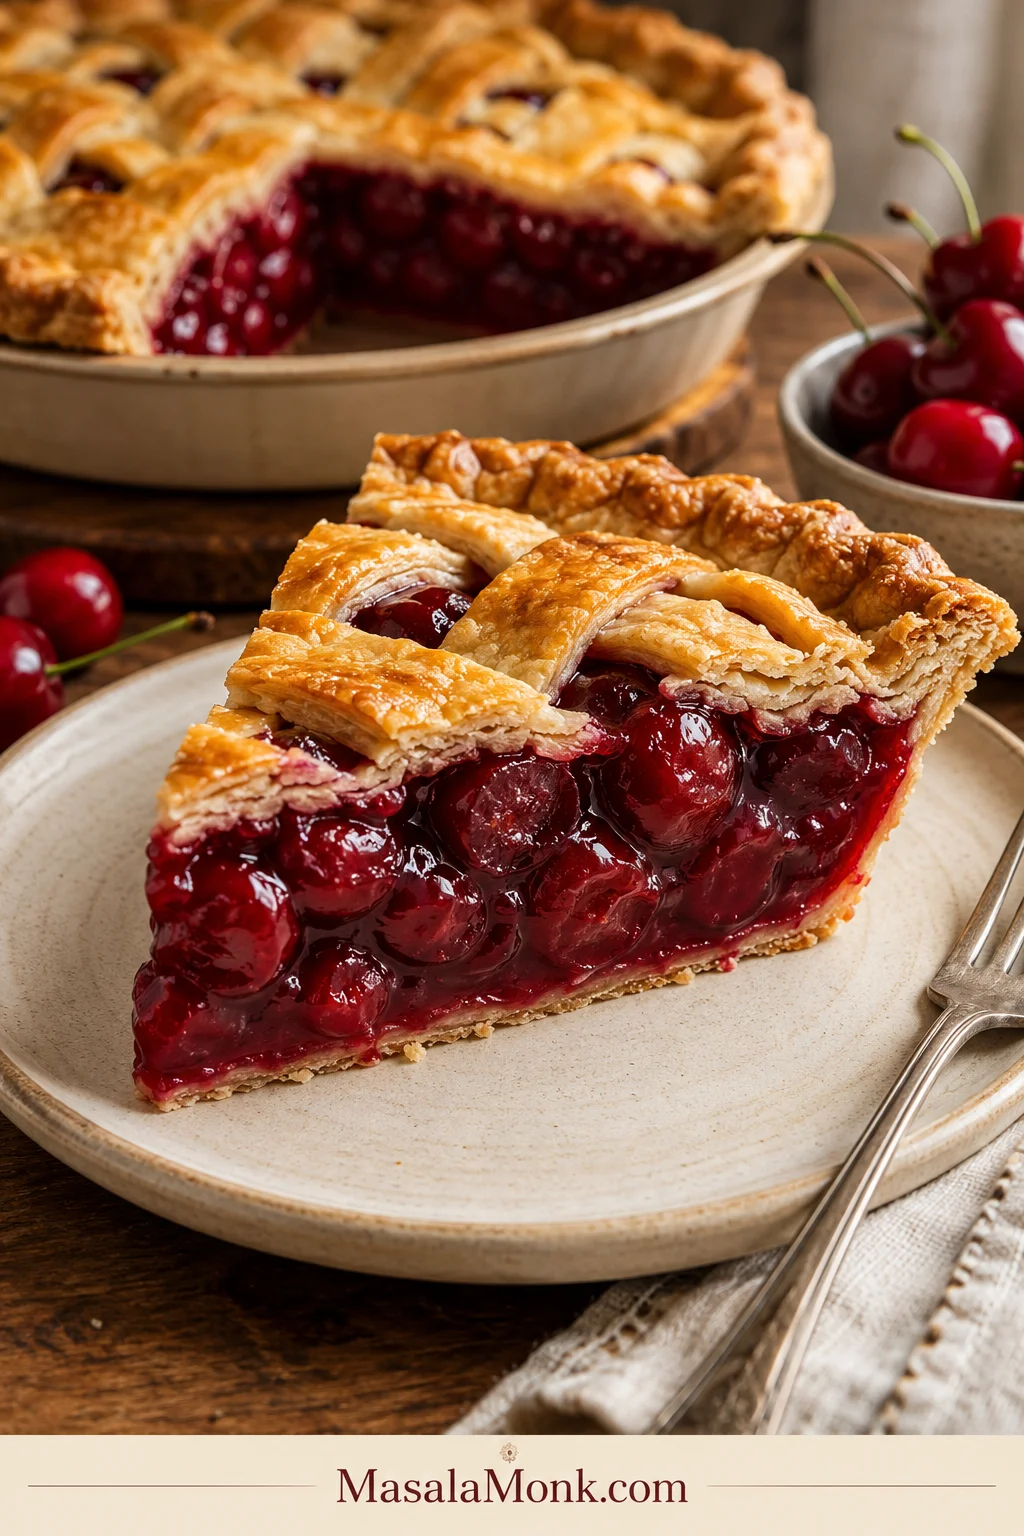
A good cherry pie should slice into deep ruby filling, not collapse into a puddle the moment the knife goes in. This cherry pie recipe is built around that exact problem: flaky golden crust, bright cherry flavor, and a thick filling that holds together after cooling.
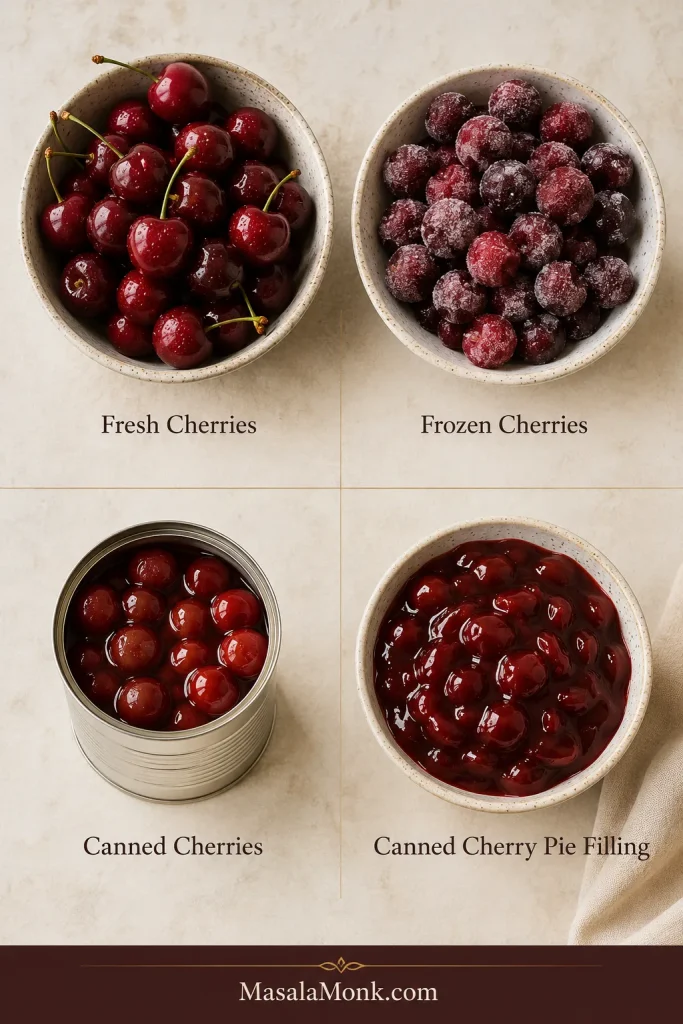
You do not need perfect fresh cherries to make it work. This guide gives you a clear path for fresh cherries, frozen cherries, canned cherries, sweet cherries, sour cherries, and even a shortcut version with canned cherry pie filling. You can make the crust from scratch or use store-bought pie dough. The filling is where the confidence matters most.
If pie crust is the part that makes you hesitate, this flaky homemade pie crust guide has the same cold-dough, lattice, and no-soggy-bottom logic you need here.
Cherry pie asks for a little patience, but not guesswork. Once you know how to manage the juice, thicken the filling, bake until the center is active, and let the pie cool before slicing, the whole thing becomes much easier. The hardest part is not the lattice. It is leaving the pie alone when the kitchen already smells like dessert.
What’s in This Guide
Quick Answer: How to Make Cherry Pie That Sets
To make cherry pie that sets, use about 5 1/2 cups pitted cherries, enough sugar for the type of cherries you have, lemon juice for brightness, and cornstarch to thicken the juices. Let the cherries sit with sugar and lemon first so they release some liquid, then reduce that liquid briefly and whisk in the cornstarch before adding it back to the fruit.
This small juice-control step keeps the filling from turning loose. The cherries still taste fresh and juicy, but the syrup starts in a more controlled place before the pie goes into the oven.
Bake at 425°F / 220°C for 20 minutes, then reduce the oven to 375°F / 190°C and bake for another 35 to 45 minutes. The pie is done when the crust is deep golden and the center filling bubbles through the lattice or vents for at least 5 minutes. Cool for at least 3 hours, ideally 4 hours, before slicing.
Want the full method? Jump to the recipe card. Still choosing fruit? Start with the cherry guide.
Cherry pie rules that matter most:
- Keep loose cherry liquid out of the crust until it has been reduced or thickened.
- Bake until the center bubbles, not just the edges.
- Cool the pie before slicing.
- Taste canned filling before adding anything sweet.
- Fix the filling first; the lattice can be simple.
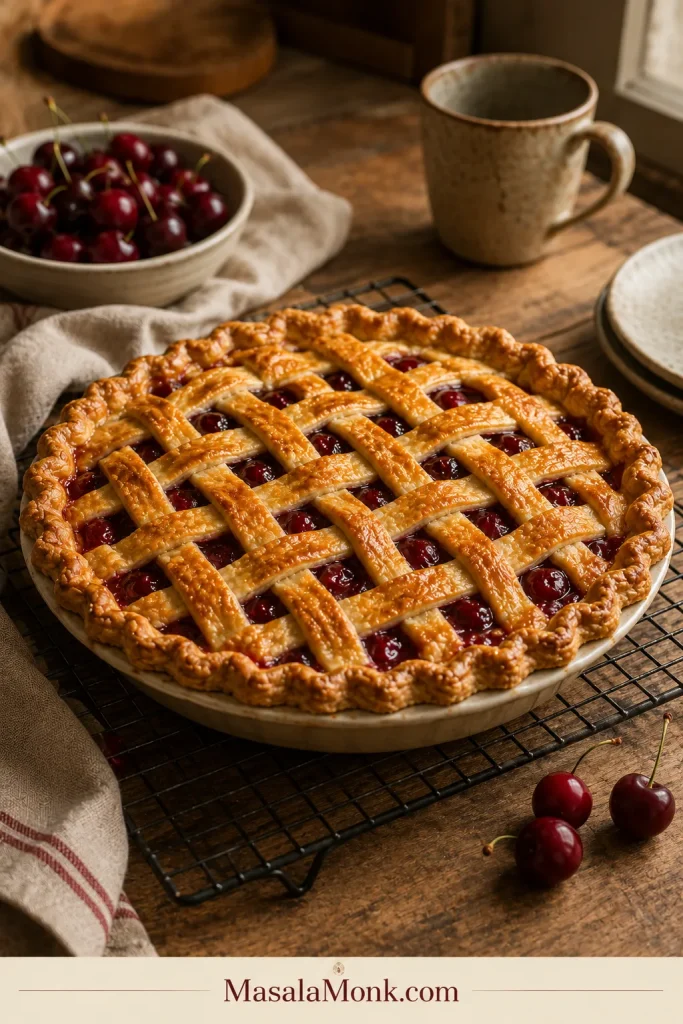
What a properly baked cherry pie should show
Use this as the visual goal after the quick method: deep color on the crust and filling activity in the center, not only at the edges.

Cherry Pie at a Glance
| Pie size | Standard 9-inch pie |
| Cherries | 5 1/2 cups pitted cherries, about 800–850g / 28–30 oz |
| Fresh cherries to buy | About 2 to 2 1/4 lb / 900g to 1kg whole cherries before pitting |
| Best default thickener | Cornstarch |
| Oven temperature | 425°F / 220°C first, then 375°F / 190°C |
| Bake time | 55–65 minutes total |
| Done cue | Center filling bubbles through lattice or vents for at least 5 minutes |
| Cooling time | 3 hours minimum; 4 hours for cleaner slices |
| Fastest version | Two 21-ounce cans cherry pie filling with store-bought crust |
Choose Your Cherry Pie Path
Before you start measuring, choose the version that matches the cherries in your kitchen. A fresh summer pie, a frozen cherry pie, and a canned-filling shortcut can all work. They just need different handling.
If this is your first cherry pie, start with the parts that matter most: active filling, a golden crust, and enough cooling time. A neat lattice is lovely, but it is not what makes the slice hold.
| What You Want | Best Path | Why It Works |
|---|---|---|
| Best classic flavor | Use sour/tart cherries or a sweet-tart mix | Bright, old-fashioned pie flavor. |
| Fresh summer pie | Use fresh sweet cherries, less sugar, and extra lemon | Sweet cherries need brightness more than extra sugar. |
| Easiest homemade version | Use frozen cherries and cook the filling briefly | Cooking controls the extra liquid. |
| Fastest pie | Use canned cherry pie filling and store-bought crust | Already thickened; needs flavor balance. |
| Cleanest slices | Reduce or cook the filling and cool for 4 hours | Thickening and cooling both help the slice hold. |
| Least crust stress | Use store-bought crust or a crumb topping | Filling matters most. |
Choose the cherry path before you measure
The right method depends on whether your cherries are fresh, frozen, canned in liquid, or already made into pie filling.
Already know what you have? Go to fresh cherries, frozen cherries, canned cherries, or the canned filling shortcut.
If you are nervous, choose the path that gives you the most control: use fresh or frozen cherries, reduce the juice, and give the pie the full cooling time. A slightly messy edge is not a failed pie. A watery filling is what disappoints people, and this recipe is built to avoid that.
The Recipe: Thick, Sliceable Cherry Pie
Cherry Pie Recipe
This classic cherry pie has a flaky double crust and thick, ruby-red cherry filling. The main method works with fresh or frozen cherries, with notes below for canned cherries and canned cherry pie filling. It is intentionally built to show you the juice before it goes into the crust, so you are not guessing once the pie is already baking.
| Yield | 1 9-inch pie, about 8 slices |
| Prep Time | 35 minutes |
| Bake Time | 55 to 65 minutes |
| Cooling Time | 3 to 4 hours |
| Total Time | About 4 1/2 to 5 1/2 hours |
| Difficulty | Moderate, but beginner-friendly with the notes |
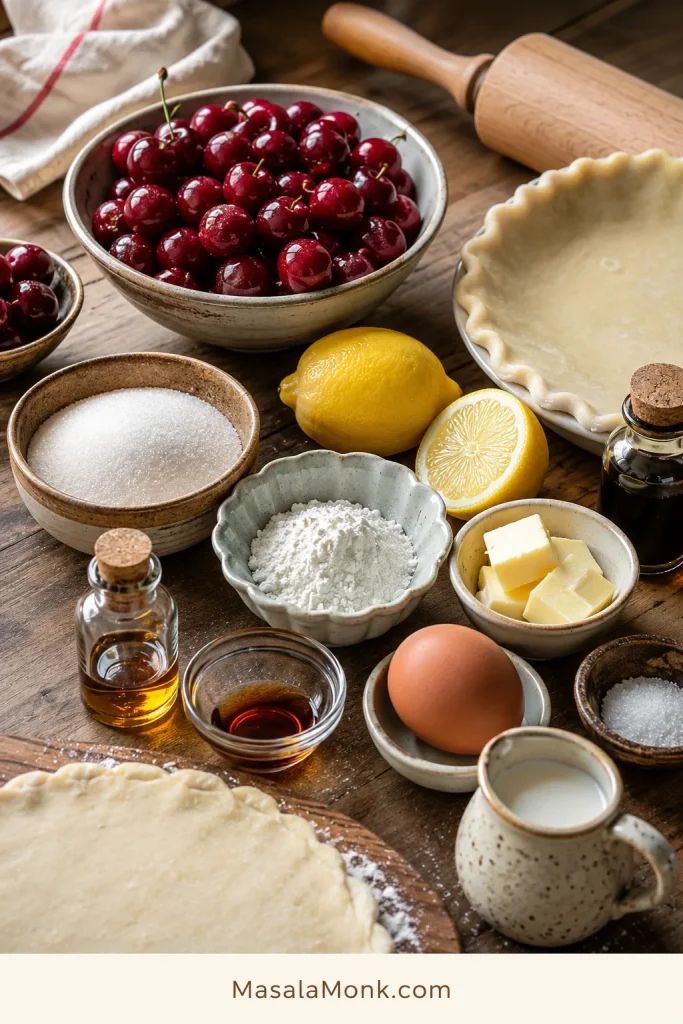
Ingredients
- 1 double pie crust, homemade or store-bought, enough for a 9-inch pie
- 5 1/2 cups pitted cherries, about 800 to 850g / 28 to 30 oz
- Granulated sugar: use 2/3 cup / 135g for sweet cherries, or 3/4 to 1 cup / 150 to 200g for sour or tart cherries
- 1/4 cup cornstarch, about 30 to 32g
- 2 to 3 tablespoons cold water, for making the cornstarch slurry
- 1 to 2 tablespoons lemon juice, 15 to 30ml
- 1 teaspoon vanilla extract, 5ml
- 1/4 teaspoon almond extract, optional but recommended
- 1/4 teaspoon fine salt
- 1 to 2 tablespoons unsalted butter, 14 to 28g, cut into small pieces
- 1 egg, for egg wash
- 1 tablespoon milk or water, for egg wash
- 1 tablespoon coarse sugar, optional, for sprinkling
Almond note: Almond extract is optional. Skip it for nut allergies or replace it with a little extra vanilla.
The ingredients that make the filling work
The filling depends on balance: fruit for body, sugar for sweetness, lemon for brightness, cornstarch for set, butter for richness, and cold dough for a flaky crust.
Instructions
Release and separate the cherry juice
1. Prepare the bottom crust. Roll out the bottom pie crust and fit it into a 9-inch pie plate. Leave a little overhang around the edge. Keep the lined pie plate chilled while you make the filling. A standard or slightly deep 9-inch pie plate is easiest; a very shallow plate may overflow.
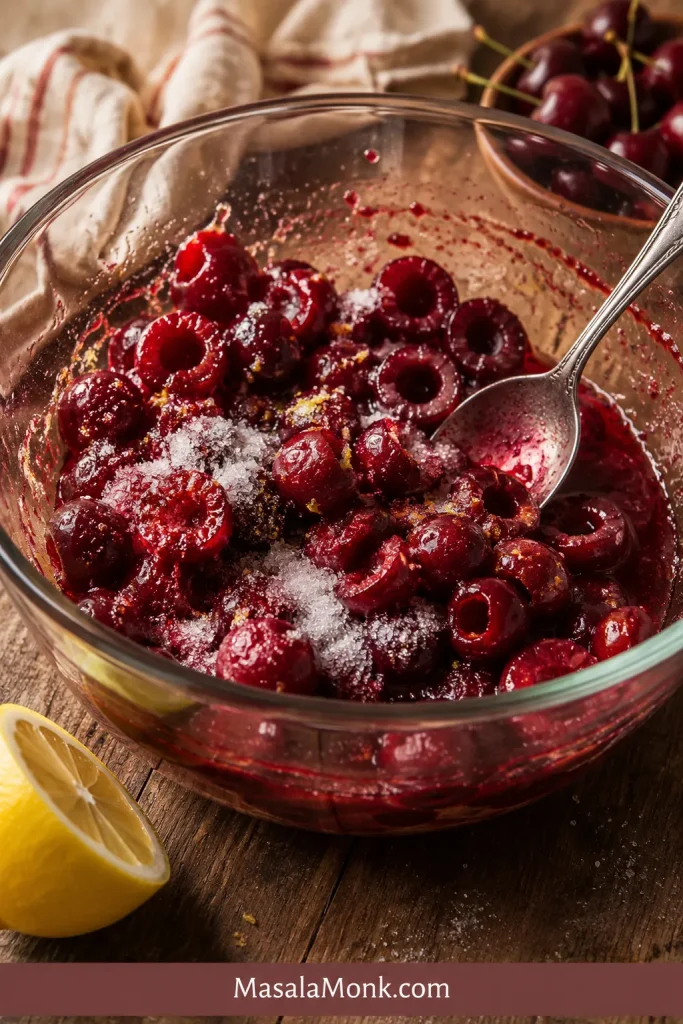
2. Mix the cherries. In a large bowl, combine the pitted cherries, sugar, lemon juice, vanilla extract, almond extract, and salt. Use the lower sugar amount for sweet cherries and the higher amount for sour or tart cherries.
3. Let the cherries rest. Set the bowl aside for 10 to 15 minutes. The fruit will release juice. This short rest shows you how much liquid you are dealing with before anything goes into the crust.
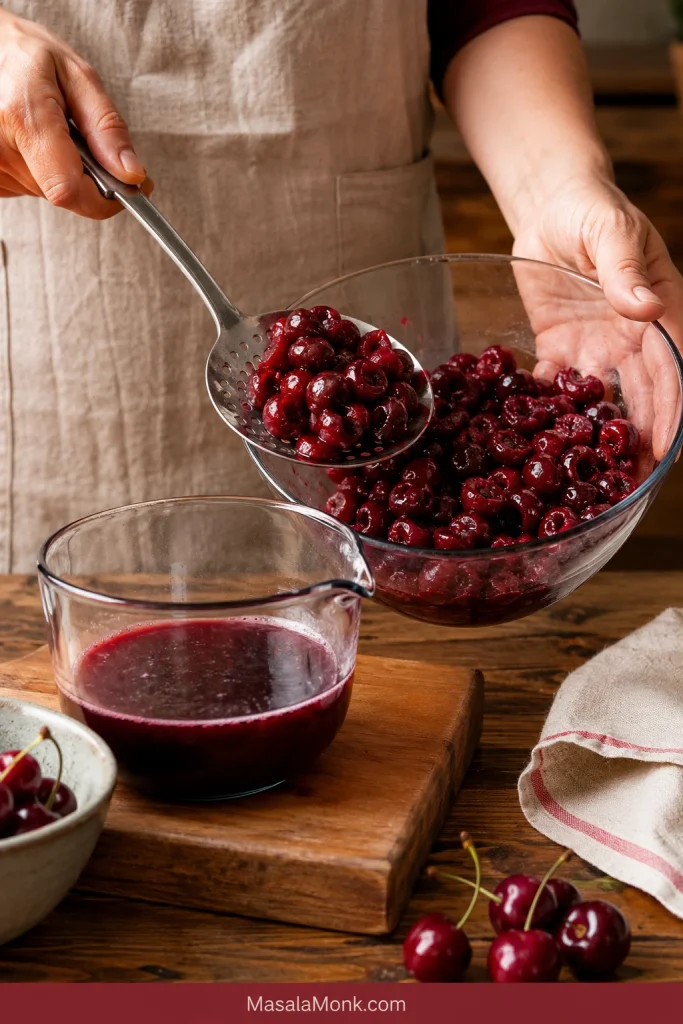
4. Separate the juice. Use a slotted spoon to lift the cherries into another bowl, leaving the collected juice behind. Pour the juice into a small saucepan.
Reduce and thicken the filling
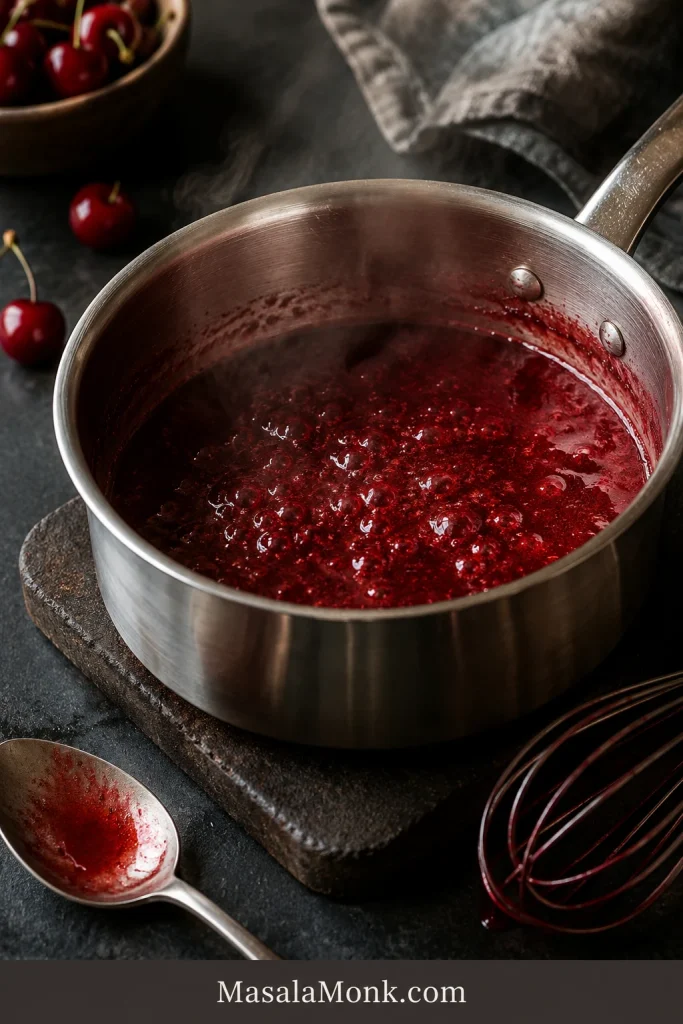
5. Reduce the juice. Simmer the cherry juice for 3 to 5 minutes, stirring often, until it looks slightly syrupy and more concentrated. When the cherries release less than 1/2 cup juice, keep the reduction brief. For much more than 3/4 cup, simmer until it is closer to 1/2 cup before thickening.
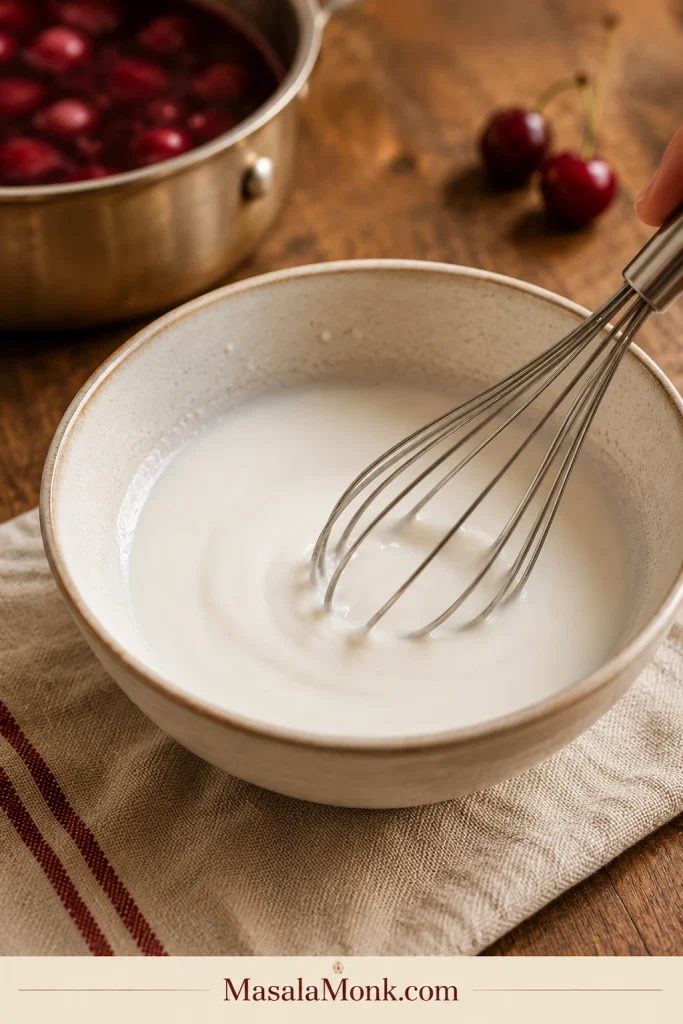
6. Make the slurry. In a small bowl, whisk the cornstarch with 2 to 3 tablespoons cold water until smooth. A slurry blends into hot juice more smoothly than dry cornstarch.
7. Thicken the juice. Whisk the cornstarch slurry into the simmering cherry juice. Cook for 30 to 60 seconds, stirring constantly, until the mixture looks shiny, thickened, and no longer cloudy. If it tightens too much, stir in a spoonful of cherry juice or water to loosen it.
8. Finish the filling. Pour the thickened cherry syrup back over the cherries and stir gently. The fruit should look coated, not soupy. Let the filling cool for a few minutes if it feels very hot.
Assemble the pie
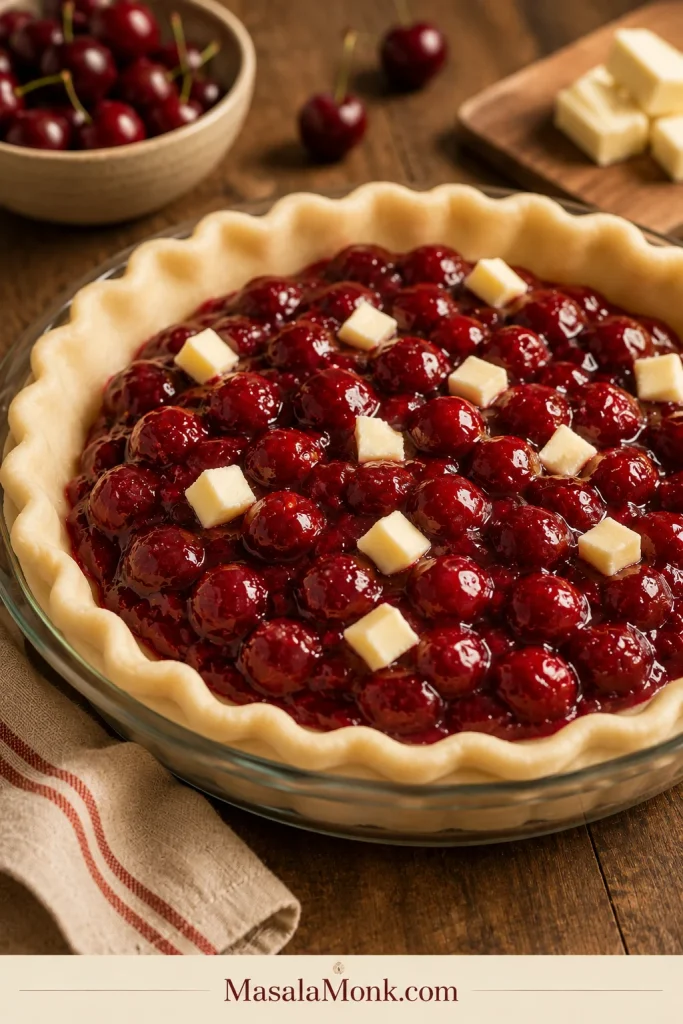
9. Fill the pie. Spoon the cherry filling into the chilled bottom crust. Dot the top with small pieces of butter.
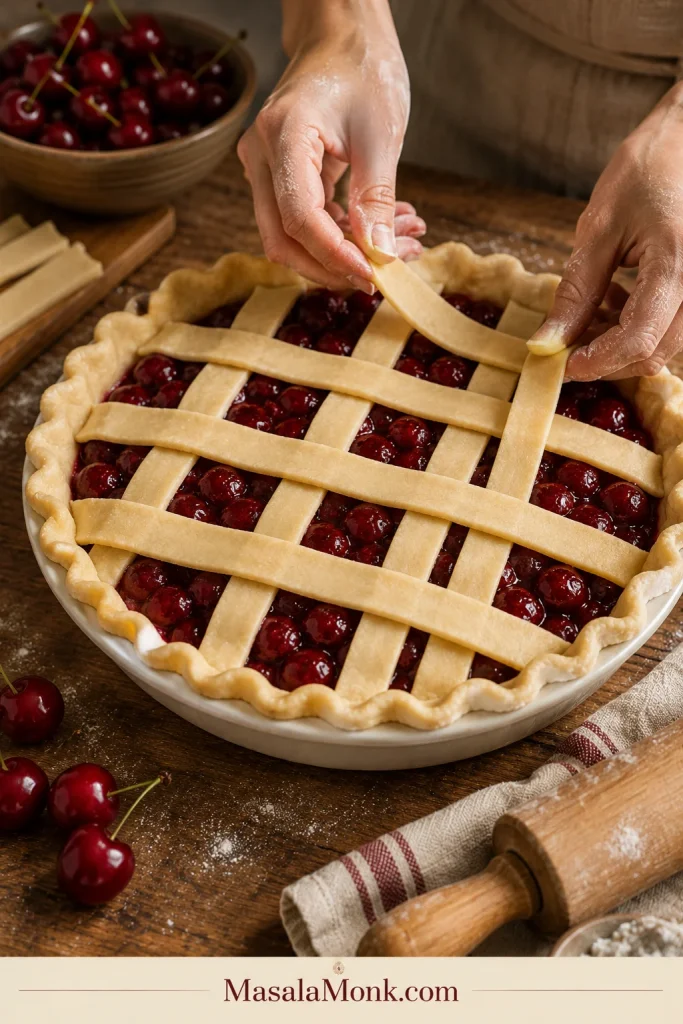
10. Add the top crust. Roll out the second crust and cut it into strips for a lattice, or place it over the pie as a full top crust. If using a full top crust, cut several vents in the center so steam can escape.
11. Seal and chill. Trim, fold, and crimp the edges. Chill the assembled pie for 15 to 20 minutes while the oven heats.
12. Heat the oven. Preheat the oven to 425°F / 220°C. Place a rimmed baking sheet on the lower-middle rack to catch drips and help the bottom crust bake well.
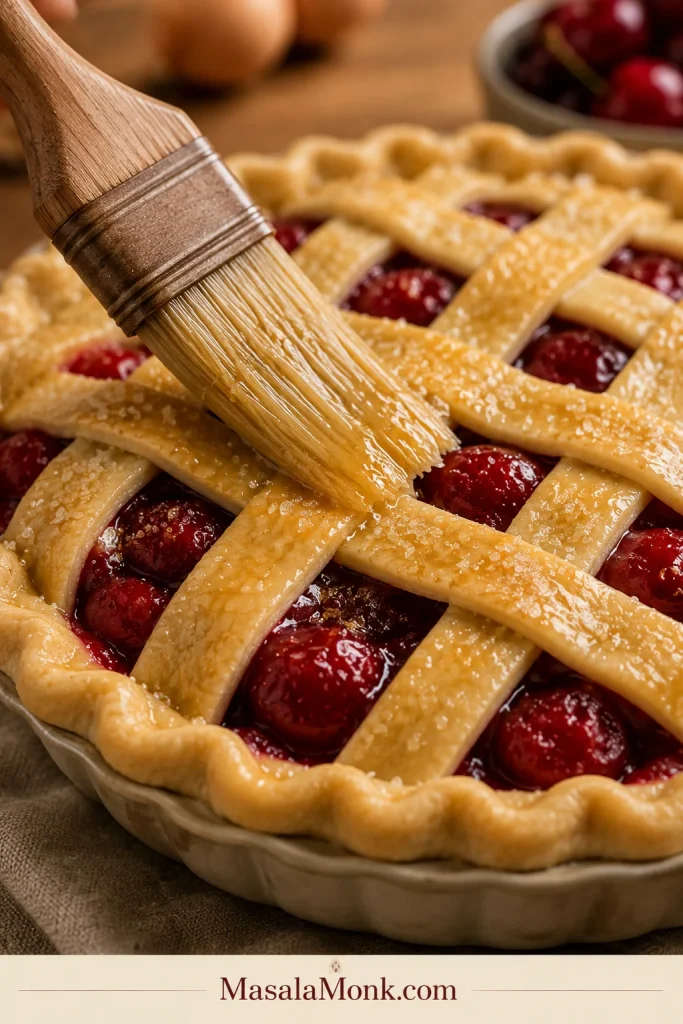
13. Brush the crust. Beat the egg with 1 tablespoon milk or water. Brush lightly over the top crust and sprinkle with coarse sugar if using.
Bake and cool
14. Start hot. Place the pie on the hot baking sheet and bake at 425°F / 220°C for 20 minutes.
15. Lower and finish. Reduce the oven temperature to 375°F / 190°C. Bake for another 35 to 45 minutes, until the crust is deep golden and the center filling bubbles through the lattice or vents for at least 5 minutes. If the crust edges brown too quickly, cover them with foil or a pie shield.
16. Cool before slicing. Transfer the pie to a cooling rack. Cool for at least 3 hours, ideally 4 hours, before slicing.
Cherry Notes
- Fresh cherries: If buying whole cherries, start with about 2 to 2 1/4 lb / 900g to 1kg so you have enough after pitting.
- Frozen cherries: Measure after thawing and draining. You want about 5 1/2 cups drained fruit, not 5 1/2 cups including a lot of thawed liquid.
- Canned cherries: If using canned cherries that are not already pie filling, aim for about 5 1/2 cups drained cherries. Reserve 1/2 to 3/4 cup of the canning liquid to reduce and thicken. If you come up short, combine canned cherries with thawed frozen cherries rather than adding extra liquid to fill the pie.
The same thickened-sauce idea works for other fruit fillings too. This apple pie filling recipe shows how a cooked fruit filling thickens with a cornstarch slurry before it goes into pies, crisps, or freezer desserts.
Why This Cherry Pie Works
This recipe works because it manages the part that usually causes trouble: the cherry juice. Cherries are naturally juicy, and that syrup needs enough thickener, enough oven heat, and enough cooling time to become sliceable.
The short resting step lets the fruit release juice before it goes into the crust. Reducing that juice concentrates the flavor. Whisking the cornstarch into a slurry gives the filling a smooth, thickened start instead of a lumpy one.
Let the cherries show you their juice first
This step turns guesswork into a visible cue. Once the cherries release liquid, you know what needs reducing or thickening.
Separate the fruit before thickening the syrup
Keeping the cherries out of the pan for this step helps the fruit stay plump while the extra juice becomes a controlled filling base.
Reduce the cherry juice for stronger flavor
A short simmer concentrates the juice before thickening, which helps the pie taste more like cherries and less like sweet liquid.
The lemon juice keeps sweet cherries from tasting flat, the almond extract adds a classic cherry-pie aroma, and the hot-start bake helps the crust set before the filling can make it soggy. Even then, the pie still needs to cool. It smells finished long before the filling has settled.
Why this method is safer: Raw cherry filling can work, but very ripe, frozen, or canned cherries often release more liquid than expected. Fully cooking the filling gives more control, but it can soften the fruit. This recipe uses a middle path: the cherries stay plump and juicy, while the extra liquid is reduced and thickened before it reaches the crust. It is built for the messy middle most home bakers actually face — cherries that are juicy, uneven, frozen, canned, or sweeter than expected.
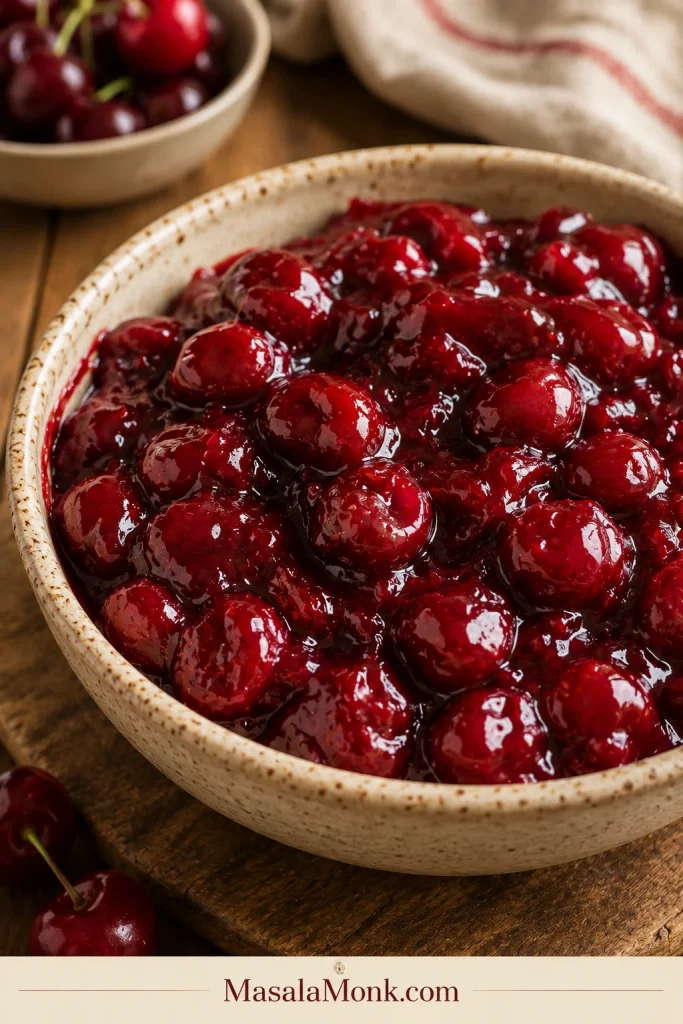
What good filling looks like: Before baking, the cherries should look shiny and coated, not dry and not swimming. After baking, the bubbles should look thick and slow, not thin and watery.
Which Cherries Should You Use?
Fresh, frozen, canned, sweet, and tart cherries can all make good pie. The difference is how much liquid they release and how much sugar or lemon they need.
| Cherries You Have | How to Use Them |
|---|---|
| Fresh sweet cherries | Use less sugar, add lemon juice, and keep the full thickener amount. |
| Fresh sour or tart cherries | Use more sugar and keep the filling bright and thick. |
| Frozen cherries | Thaw and drain them, or cook down the extra liquid before filling the pie. |
| Cherries packed in juice or water | Drain the cherries, reserve some liquid, and thicken the liquid into a filling. |
| Syrup-packed cherries | Drain well, reduce the sugar, and add lemon juice to balance the sweetness. |
| Prepared cherry pie filling | Use as a shortcut, but improve the flavor with lemon, vanilla or almond extract, salt, and butter. |
| Mixed sweet and tart cherries | Use them together for deeper flavor. Start with moderate sugar and adjust to taste. |
Best Cherries for Cherry Pie
Sour or tart cherries give the most classic flavor. They are bright, sharp, and strong enough to stand up to sugar, crust, and baking. Frozen tart cherries or canned tart cherries are often excellent when fresh sour cherries are hard to find.
Sweet cherries are easier to find and still make a beautiful pie, especially with less sugar and a little extra lemon juice. A mix of sweet and tart cherries gives some of the best flavor: round, juicy, and lively without tasting flat.
Best first choice: If you are not sure what to buy, frozen tart cherries or fresh sweet cherries are both good starting points. Frozen tart cherries give a more classic pie flavor; fresh sweet cherries are easier to find and need a little extra lemon to stay bright.
Fresh, Frozen, Canned, or Canned Filling?
This is where the recipe becomes flexible. The method stays mostly the same, but the way you handle the fruit changes. Cherry pie usually goes wrong not because it is hard, but because cherries look harmless while they are quietly releasing a lot of juice.
Fresh Cherries
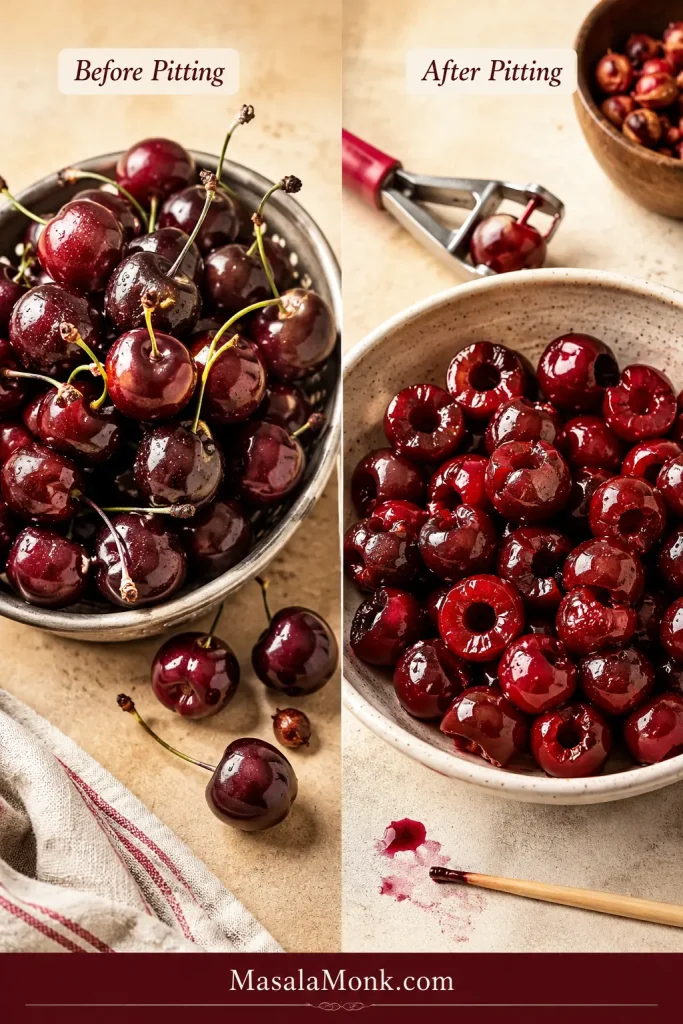
Fresh cherries give the pie a juicy fruit texture. Pit them first, then taste them. Sweet fresh cherries usually need less sugar and more lemon juice. Sour fresh cherries need more sugar but bring that classic cherry-pie brightness.
Very ripe fresh cherries can release a lot of juice. Letting them rest with sugar and lemon shows you how much syrup is in the bowl before the filling goes into the oven.
Fresh cherries: pit before measuring
Fresh cherries give the pie a juicy bite, but measuring them after pitting keeps the fruit amount honest and easier to thicken.
Frozen Cherries
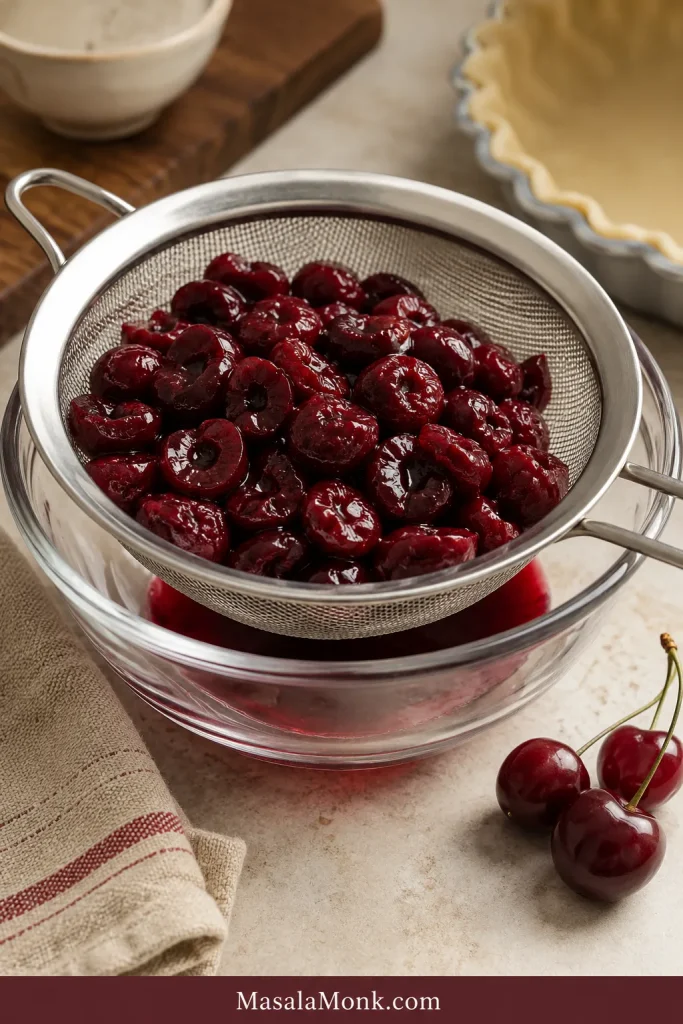
Frozen cherries are not second-best. They are often the calmer choice because they are already pitted and ready. The tradeoff is extra liquid, and that liquid needs somewhere to go before the fruit lands in the crust.
Keep the thawed liquid out of the crust until you know how much you need. Good-tasting liquid can be reduced and used. Watery liquid is better partly discarded.
Frozen cherries: thaw and drain first
Frozen cherries are convenient, but they often release extra liquid. Draining them first keeps that liquid from flooding the crust.
Canned Cherries
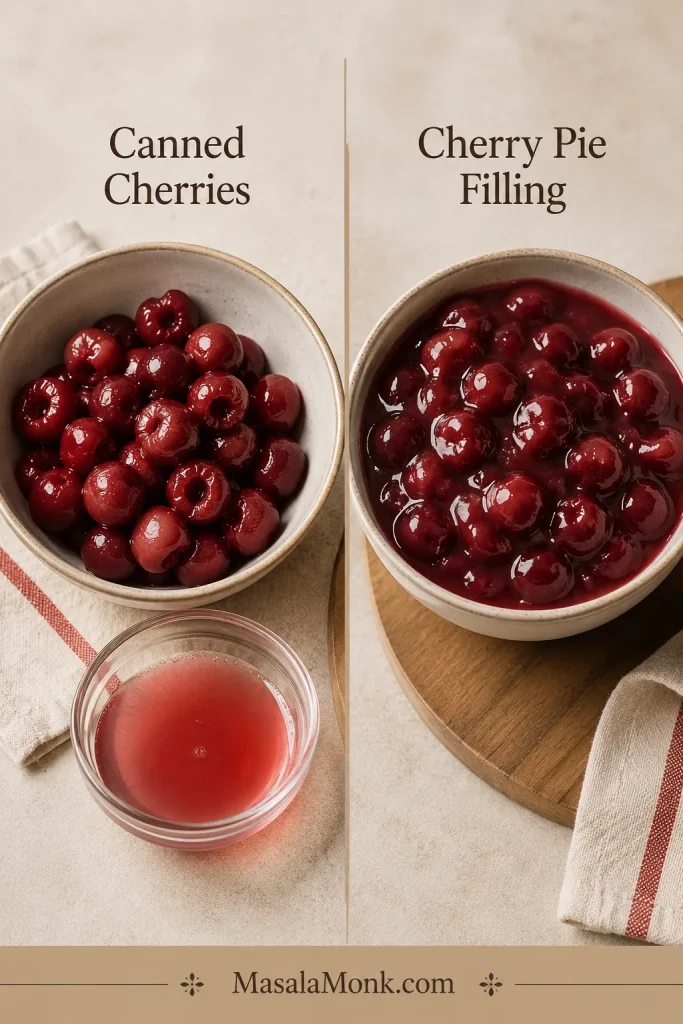
Canned cherries are different from canned cherry pie filling. If the cherries are packed in juice, water, or syrup, drain them first. Reserve some of the liquid and cook it with sugar and cornstarch slurry to make a thick filling before adding the cherries back.
Cherries packed in syrup may already be quite sweet. Taste first, then decide how much sugar the filling really needs. Most syrup-packed fruit benefits more from lemon than from extra sweetness.
Canned Cherry Pie Filling
Canned filling is not cheating. It is just already sweetened and thickened, which means the job changes from “make the filling” to “make the filling taste brighter.” Lemon juice, vanilla or almond extract, a pinch of salt, and a little butter do that better than extra sugar.
Canned Cherries vs Canned Cherry Pie Filling
This is one of the most common cherry pie mix-ups. Canned cherries and canned cherry pie filling are not the same product, and using them the same way can make the pie too watery, too sweet, or too flat.
How the shortcut products differ
This is the shortcut decision that matters most. One product still needs a filling made from its liquid; the other is already thickened.
How to read the can label
| Label on the Can | What It Means | What to Do |
|---|---|---|
| Pitted tart cherries in water | Cherries only, not filling | Drain, reserve liquid, add sugar, and thicken. |
| Cherries in juice | Cherries with usable liquid | Reserve some juice, reduce it, and thicken it. |
| Cherries in syrup | Sweeter canned cherries | Use less sugar and add lemon. |
| Dark sweet cherries | Milder, sweeter fruit | Use less sugar, more lemon, and full thickener. |
| Cherry pie filling | Already sweetened and thickened | Use as a shortcut. Add flavor, not more sugar. |
| More-fruit cherry pie filling | Shortcut filling with more cherries | Best canned-filling option for better texture. |
Quick label check: If the can lists cherries in water, juice, or syrup, you still need to make a filling. If it says cherry pie filling, it is already thickened and sweetened.
If you plan to preserve cherry pie filling in jars rather than bake this pie right away, follow tested home-canning guidance such as the National Center for Home Food Preservation cherry pie filling guide.
Shortcut rule: For a 9-inch pie, use two 21-ounce cans of cherry pie filling. Stir in 1 tablespoon lemon juice, 1 teaspoon vanilla extract or a few drops of almond extract, and a small pinch of salt. Dot with 1 tablespoon butter before adding the top crust.
Ingredients and Why They Matter
Once the fruit is chosen, the rest of the pie becomes much simpler. The next job is keeping that cherry flavor in the slice instead of on the plate.
Cherries
Use about 5 1/2 cups pitted cherries for a 9-inch pie. That usually means around 800 to 850g after pitting. Slightly more or less is fine, but avoid piling in so much fruit that the center cannot heat and bubble properly.
Sugar
Sugar is not one-size-fits-all here. Sweet cherries usually need restraint; sour cherries need enough sugar to taste bright instead of sharp. Taste the fruit before you choose the final amount.
| Cherry Type | Sugar Starting Point | Best Adjustment |
|---|---|---|
| Sweet cherries | 2/3 cup / 135g | Add 1 to 2 tablespoons lemon juice. |
| Very sweet cherries | 1/2 cup / 100g | Use more lemon and a pinch of salt. |
| Sour or tart cherries | 3/4 to 1 cup / 150 to 200g | Taste and adjust before filling the crust. |
| Mixed sweet and tart cherries | 2/3 to 3/4 cup / 135 to 150g | Usually the most balanced option. |
| Syrup-packed cherries | Start lower | Drain well and add lemon first. |
| Prepared cherry pie filling | No extra sugar | Add lemon juice and salt instead. |
Cornstarch
For most home bakers, cornstarch is the easiest way to turn cherry juice into a sliceable filling. It gives the filling a clear, shiny set, but it needs enough heat to activate. That is why center bubbling matters.
Make a slurry before the starch hits heat
Cornstarch thickens cleanly when it is mixed with cold water first, then whisked into the hot cherry juice.
Lemon Juice
Lemon juice makes the cherries taste brighter. Use less with sour cherries and more with sweet cherries. The goal is not to make the pie taste lemony; it is to make the cherry flavor feel awake.
Vanilla and Almond Extract
Vanilla makes the filling round and warm. Almond extract is classic with cherries, but it is strong, so use only a little. A quarter teaspoon gives that bakery-style cherry aroma without making the pie taste artificial.
Butter
A few dots of butter melt into the filling and add richness. Butter will not thicken the pie, but it makes the cherry syrup taste fuller and softer.
Pie Crust
Homemade pie crust is lovely, but store-bought crust is absolutely acceptable here. Keep it cold, handle it gently, and focus on getting the filling right. A good cherry filling can make even a simple crust feel special.
Best Thickener for a Sliceable Cherry Pie
Once the fruit and sugar are sorted, the next job is simple: hold the juice in place without turning the filling stiff. The pie should not feel jammy or tight. It should still look generous and juicy, just not loose enough to run.
| Thickener | Best For | Watch Out For |
|---|---|---|
| Cornstarch | Clear, shiny filling | Needs the filling to bubble fully. |
| Tapioca starch or tapioca flour | Very juicy cherries | Can become gummy if overused. |
| Quick-cooking tapioca | Frozen cherries | Granules can show if not softened. |
| All-purpose flour | Emergency pantry option | Makes the filling cloudier and softer. |
For this recipe, stick with cornstarch unless you already know you prefer tapioca. The more important detail is not just which thickener you use, but whether the center gets hot enough to activate it.
Crust color is only half the cue; the center bubbling matters just as much. You want visible, active bubbling through the lattice or vents before you call the pie done.
How to Make Thick Cherry Pie Filling Without Lumps
Good filling should feel generous, not controlled to the point of being stiff. You still want juicy cherries. You just want loose juice to become filling before it can run under the crust.
The safest method is to let the cherries release juice first, reduce that juice, then thicken it with a cornstarch slurry. This avoids the common problem of dry cornstarch hitting hot liquid and turning lumpy.
For frozen or canned cherries, you can cook the filling a little more fully. Warm the fruit with sugar and lemon, reduce the extra liquid, whisk in the slurry, and cook until the mixture looks clear, red, and slow-moving. Let it cool slightly before adding it to the crust so it does not soften the dough too quickly.
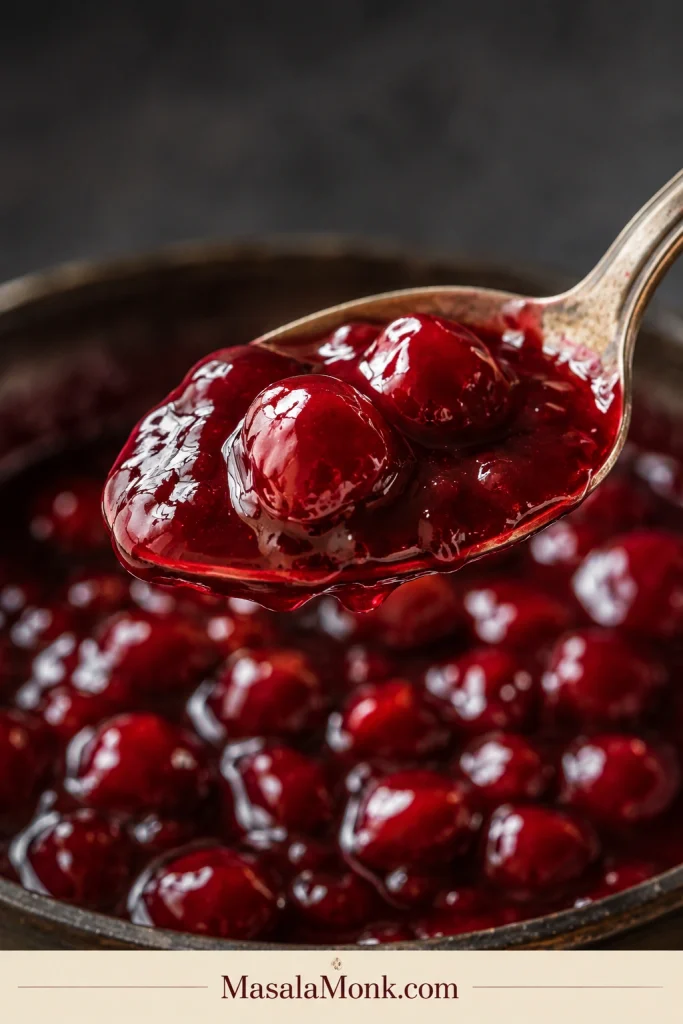
Filling cue: Wondering if it is thick enough? Look for syrup that clings to the cherries instead of pooling at the bottom of the bowl. If it looks cloudy, keep stirring and cooking briefly. If it looks shiny, red, and slow-moving, it is ready for the crust.
Use the spoon test for thickened syrup
The spoon gives a quick visual check before the filling goes into the crust: thin syrup runs away, while thickened syrup clings.
The filling should coat the cherries, not flood them
Right before baking, look at the bowl. A controlled cherry pie filling should cling to the fruit with little loose liquid underneath.
Still unsure? Compare the spoon test, coated filling cue, and center bubbling cue.
What the Filling Should Look Like at Each Stage
Cherry pie becomes easier when you know what to look for. Use these visual cues as you move from juicy fruit to a sliceable pie.
| Stage | What to Look For |
|---|---|
| After resting cherries | Juice collected at the bottom of the bowl. |
| After reducing juice | Slightly syrupy, not thin or watery. |
| After adding slurry | Glossy, red, and free of cloudy streaks. |
| Before baking | Cherries coated, not swimming. |
| Done baking | Thick bubbles in the center, not only around the edges. |
| After cooling | Filling moves slowly when sliced. |
Raw vs Cooked Cherry Filling: Which One Sets Better?
Both raw and cooked cherry fillings can work. Raw filling gives a fresher fruit texture, but it can be risky when the cherries are very juicy. Cooked filling gives more control, especially with frozen cherries, canned cherries, or very ripe fruit.
- Raw cherries with reduced juice: best for fresh cherries when you want a fresher fruit texture.
- Lightly cooked filling: best for frozen, canned, or very juicy cherries when you want more control.
- Canned pie filling shortcut: best for a fast pie, especially when you brighten the flavor first.
The hybrid method in this recipe gives you the best of both: fresh cherry texture with less risk of a runny pie. You are not making the pie less homemade by choosing the safer filling method.
How to Assemble Cherry Pie Without Making the Crust Soggy
Now that the filling is under control, the crust only has one job: stay cold until it hits the oven. Start with a chilled bottom crust in a 9-inch pie plate. Add the cherry filling, dot it with butter, then cover it with lattice strips or a full top crust.
Lattice is beautiful, but it is not the test of a good pie. Steam needs a way out, and the filling needs to bubble. A full crust with vents can do that perfectly well.
After the top crust is in place, trim and crimp the edges. Chill the assembled pie for 15 to 20 minutes before baking. Cold dough goes into the oven with a better chance of turning flaky instead of slumping.
Add thick filling to a chilled crust
Once the filling is under control, the crust has a better chance of staying flaky instead of soaking up loose juice.
A lattice top helps steam escape
The lattice does not need to be perfect. Its real job is to vent steam and let you see the filling bubble.
Finish the crust before baking
Egg wash and coarse sugar are small steps, but they help the top crust look golden, crisp, and bakery-style.
Want an Easier Topping?
Use a crumb topping instead of a top crust. Keep the bottom crust and cherry filling the same, then cover the filling with a buttery crumble. This turns the recipe into more of a cherry crumb pie and removes the pressure of making lattice strips.
For a full crumb-topped pie example, this Dutch apple pie recipe shows how a buttery crumb topping can replace a second crust while still giving the fruit filling enough structure underneath.
Store-bought crust is also fine here. A homemade crust is wonderful, but a properly thickened cherry filling in a ready-made crust is still a pie worth serving.
Cherry Pie Bake Time and Temperature
The oven step is where patience matters more than the timer. The pie needs enough heat to set the crust and enough time for the center filling to bubble. A hot start followed by a lower finish gives you both.
| Step | Temperature | Time |
|---|---|---|
| Start baking | 425°F / 220°C | 20 minutes |
| Finish baking | 375°F / 190°C | 35 to 45 minutes |
| Cooling | Room temperature | 3 to 4 hours |
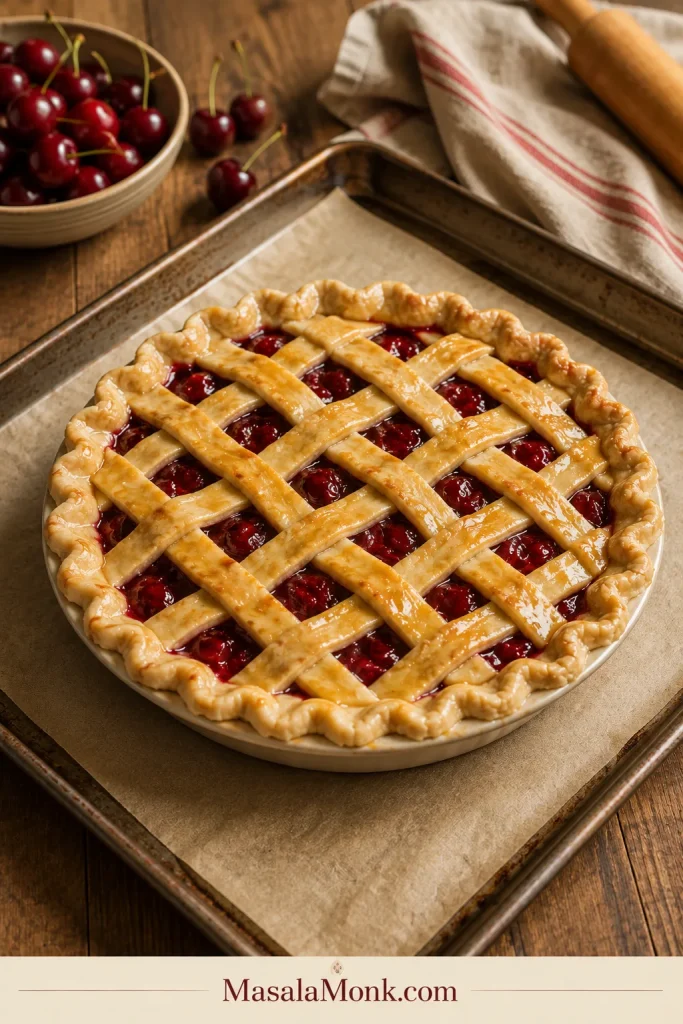
Bake on a parchment-lined rimmed baking sheet. Cherry filling can bubble over even when everything is done right. That is not disaster; that is cherry pie being cherry pie, and it is why the baking sheet is there.
Bake on a rimmed sheet pan
A sheet pan catches sticky cherry drips and helps the bottom crust get steady heat as the pie bakes.
Use a pie shield or foil only when you need it. When the edges are browning before the center has bubbled, cover the edges and keep baking. The filling needs time, not just a golden border.
The Doneness Cue That Prevents Runny Cherry Pie
Look for two signs before pulling the pie from the oven: a deep golden crust and thick bubbling in the center. A bubbling pie can look a little dramatic in the oven. That is fine. Thick cherry bubbles are a sign that the filling is finally doing what it needs to do.
Check the center for thick bubbles
The edge can bubble before the middle is ready. The center openings are where you confirm the filling has heated enough.

Check the middle, not just the edges. Let the filling bubble for at least 5 minutes before removing the pie from the oven. The bubbles should look thick and slow, not thin and watery.
Using a full top crust and cannot see the filling clearly? An instant-read thermometer inserted into the center should read about 213°F / 100°C. You do not need a thermometer, but it is helpful if you want a more exact doneness cue.
How Long Cherry Pie Must Cool for Clean Slices
Cool the pie for at least 3 hours before slicing. Four hours is better if you want the neatest slices. This waiting step is what turns hot cherry syrup into pie filling.
Cut too soon, and the filling will flood the plate. Wait long enough, and it will move slowly with the knife instead of chasing it across the dish.
Cooling is part of the recipe
The pie may smell ready as soon as it leaves the oven, but the filling needs time to settle before slicing.
If your pie usually runs after slicing, check the runny cherry pie fixes before changing the recipe.
Serving cue: If you want slightly warm pie, let it cool completely first, then gently rewarm individual slices. That gives you warmth without sacrificing the set filling.
Why Is My Cherry Pie Runny?
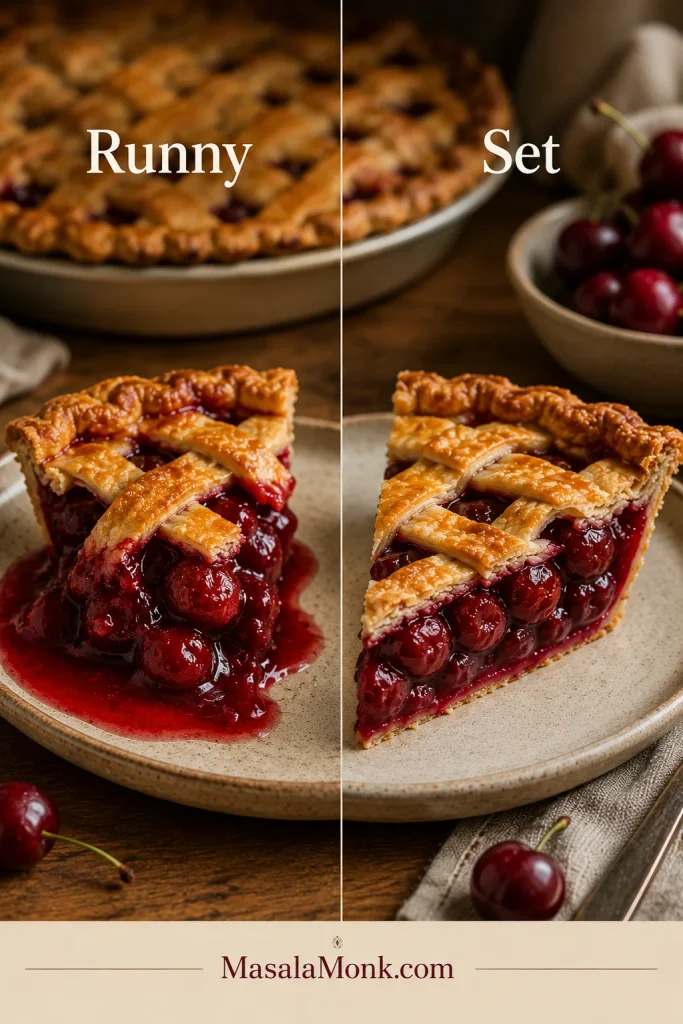
Runny pie is usually not a mystery or a failure. Most runny cherry pies come down to one of three things: too much liquid went into the crust, the center did not bubble long enough, or the pie was sliced before the filling cooled.
Compare runny filling with a set slice
This visual troubleshooting cue shows the difference between a filling that spills and one that moves slowly after cooling.
| Problem | Likely Cause | Fix |
|---|---|---|
| Filling runs across the plate | Sliced too warm | Cool for 3 to 4 hours before slicing. |
| Filling is thin | Not enough thickener | Use the full cornstarch amount. |
| Filling stayed loose | Underbaked center | Bake until the center bubbles for 5 minutes. |
| Frozen cherry pie is watery | Extra thawed liquid | Thaw, drain, or cook down the liquid first. |
| Canned cherry pie is too sweet | Syrup or canned filling already had sugar | Add lemon and salt; skip extra sugar. |
| Bottom crust is soggy | Wet filling or low starting heat | Reduce extra juice and bake on a hot sheet. |
| Filling is gummy | Too much cornstarch or tapioca | Measure thickener carefully. |
| Pie tastes flat | Not enough lemon or salt | Add lemon juice and a small pinch of salt. |
| Crust browns before filling bubbles | Edges exposed too long | Shield the crust and keep baking. |
The most common mistake is slicing too soon. It feels unfair because the pie looks finished and smells finished, but the filling is still settling. Give it time and the same pie will slice much more cleanly.
Shortcut Cherry Pie With Canned Filling
You can make cherry pie with canned cherry pie filling. It will not have the same fresh fruit texture as homemade filling, but it can still bake into a satisfying pie when you brighten the flavor first.
For a 9-inch pie, use two 21-ounce cans of cherry pie filling. Stir in 1 tablespoon lemon juice, 1 teaspoon vanilla extract or a few drops of almond extract, and a small pinch of salt. Spoon the filling into the crust, dot with 1 tablespoon butter, cover with lattice or a top crust, and bake until the crust is golden and the filling bubbles.
Mostly gel and very few cherries? Fold in 1 cup drained canned cherries or thawed frozen cherries. That small addition makes the pie taste fruitier and less flat.
Taste canned filling first. Most cans need brightness, not more sweetness. Lemon, salt, vanilla, almond, and butter do more for the flavor than extra sugar.
Simple Tools That Make Cherry Pie Easier
You do not need a drawer full of pastry tools for this pie. The helpful tools are the ones that keep the crust cold, the juice controlled, and the oven mess contained.
- 9-inch pie plate: A standard or slightly deep pie plate gives the filling room to bubble.
- Rimmed baking sheet: Catches sticky drips and helps the bottom crust bake better.
- Cherry pitter, chopstick, or sturdy straw: Useful for pitting fresh cherries without crushing them.
- Small saucepan: Needed for reducing and thickening the cherry juice.
- Slotted spoon: Helps separate cherries from the collected liquid.
- Pie shield or foil strips: Protects crust edges if they brown too quickly.
- Cooling rack: Helps the pie cool evenly before slicing.
- Instant-read thermometer: Optional, but helpful if you are using a full top crust.
Make Ahead, Storage, Freezing, and Reheating
Making Cherry Pie Ahead
This is a good make-ahead dessert because it needs time to cool. Bake it earlier in the day or the night before serving. Once fully cool, keep it loosely covered. The waiting time works in your favor here; the filling becomes cleaner and calmer as it rests.
Room Temperature and Refrigeration
Cherry pie can sit loosely covered at room temperature for up to 2 days if your kitchen is cool. For longer storage, refrigerate it for 4 to 5 days. The crust will soften slightly in the refrigerator, but the filling will stay set.
For food-safety guidance, Illinois Extension’s pie storage guidance notes that fruit pies without dairy can be stored loosely covered at room temperature for up to two days, while pies with dairy or eggs need refrigeration.
Freezing Cherry Pie
Baked cherry pie can be frozen for up to 3 months. Cool it completely, wrap it well, and freeze. Thaw overnight in the refrigerator, then reheat in the oven until warmed through.
Freezing Cherry Pie Filling
Cooked cherry pie filling also freezes well for up to 3 months. Cool it completely before freezing. After thawing, warm it in a saucepan for a few minutes if it looks loose.
Reheating Slices
For the best crust, reheat slices in a 325°F / 160°C oven or air fryer until warm. The microwave works for speed, but it softens the crust.
Cherry Pie Variations
Once you understand the filling, cherry pie becomes easy to adapt. Keep the same method in mind: bright fruit, controlled juice, enough oven heat, and enough cooling time for the slice to hold.
- Sweet cherry pie: Use fresh sweet cherries, less sugar, and extra lemon juice for a softer summer flavor.
- Sour cherry pie: Use tart cherries and increase the sugar for a bright, old-fashioned pie.
- Homemade cherry pie filling: Make just the filling for cakes, cheesecakes, bars, pancakes, or ice cream.
- Shortcut canned cherry pie: Use canned filling and store-bought crust for the fastest version.
- Crumb-topped cherry pie: Use a bottom crust and add a buttery, crisp crumble topping instead of lattice.
- Cherry almond pie: Keep the almond extract and add sliced almonds for a bakery-style aroma.
- Vanilla cherry pie: Skip almond extract and use a little extra vanilla for a softer, rounder flavor.
- Mixed berry cherry pie: Replace 1 to 2 cups cherries with blueberries, raspberries, or blackberries for a deeper, jammy fruit flavor.
- Mini cherry pies: Use the filling in muffin-pan pie crusts for small, party-friendly pies.
- Cherry hand pies: Use a thicker cooked filling so the pies are easier to seal and share.
Whichever version you make, the same rule applies: keep the cherry flavor bright, give the juice somewhere to go, and let the filling settle before you ask it to hold a slice.
Serving Ideas
Serve cherry pie plain, with vanilla ice cream, or with softly whipped cream. It works beautifully as a summer dessert, a holiday pie, a potluck dessert, or a weekend bake when you want something classic but still bright and fruit-forward.
If you want a homemade topping, this whipped cream recipe gives you soft, fluffy cream that works well with pies, fruit desserts, and chilled sweets.
Serve after the filling has set
Once the pie has cooled, the slice can handle a simple topping while keeping the ruby cherry filling visible.

The only real serving rule is to let it cool first. Warm cherry pie sounds tempting, but a properly set slice is much more satisfying than a hot slice that loses all its filling on the plate.
FAQ
If you are still second-guessing the cherries, thickener, or cooling time, these are the questions that usually come up right before baking.
Do frozen cherries work for cherry pie?
Yes. Thaw and drain them first, or cook them until the extra liquid reduces and the filling starts to thicken.
Should frozen cherries be thawed before baking?
Thawing gives you more control because you can drain or reduce the extra juice. For a cooked filling, you can start from frozen and simmer until the juices thicken.
What cherries make the best cherry pie?
Sour or tart cherries give the most classic flavor. Sweet cherries also work well, especially with lemon juice for balance. A sweet-tart mix gives excellent depth.
Why did my cherry pie turn runny?
Usually, too much fruit liquid went into the crust, the center did not bubble long enough, or the pie was sliced too warm.
How do you keep cherry pie from being watery?
Reduce extra cherry juice, thicken it with a cornstarch slurry, bake until the center bubbles, and cool the pie fully before slicing.
Cornstarch or tapioca: which is better?
Cornstarch is easiest for most home bakers and gives a clear, shiny filling. Tapioca also works, but it can become gummy if overused.
How do you make canned cherry pie filling taste better?
Add lemon juice, vanilla or almond extract, a pinch of salt, and a few small pieces of butter. If the can is mostly gel, fold in extra drained cherries.
What is the easiest shortcut version?
Use two 21-ounce cans of cherry pie filling and a store-bought double crust. Brighten the filling with lemon, vanilla or almond extract, salt, and butter.
Are canned cherries the same as canned cherry pie filling?
No. Canned cherries are whole cherries packed in water, juice, or syrup. Canned pie filling is already sweetened and thickened.
How long should cherry pie cool before slicing?
Cool it for at least 3 hours, ideally 4 hours. Slicing too soon is one of the main reasons the filling runs across the plate.
How do you know when cherry pie is done?
The crust should be deep golden and the center filling should bubble thickly for at least 5 minutes. With a full top crust, the center should be about 213°F / 100°C.
Should cherry pie be refrigerated?
It can sit loosely covered at room temperature for up to 2 days if your kitchen is cool. Refrigerate for longer storage.
Can cherry pie be frozen?
Yes. Cool it completely, wrap it well, and freeze for up to 3 months. Thaw overnight in the refrigerator and reheat in the oven for the best crust texture.
Before You Slice: The Cherry Pie Rule Worth Remembering
Cherry pie does not need perfect lattice or bakery-sharp edges to feel special. What matters is the moment the knife goes in and the filling stays ruby-red, generous, and slow-moving instead of running across the plate.
Give the cherries a little control, give the crust enough heat, and give the pie enough time to settle. That is the difference between a good-tasting pie and a cherry pie people remember by the slice.