Posted on Leave a comment

Homemade Pita Bread Recipe: Soft, Puffy Pockets in the Oven or on the Stovetop

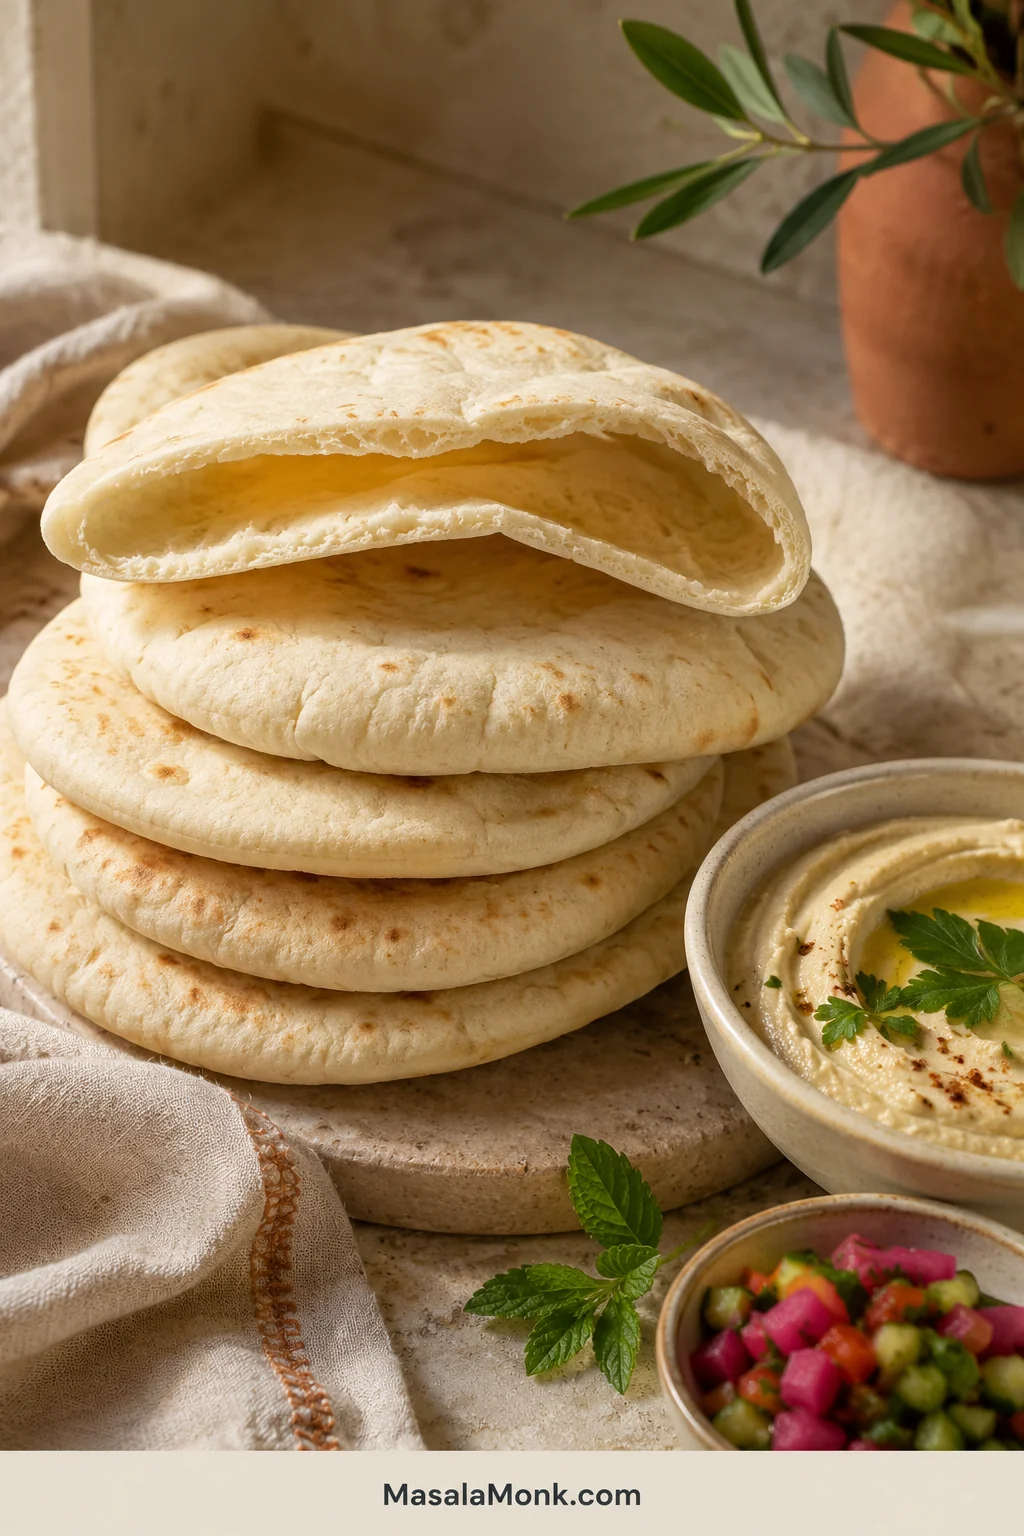
Stack of soft homemade pita with one bread cut open to show a hollow pocket beside a bowl of hummus.

The best part of making pita happens quickly. A flat round lands on the hot surface, a few bubbles appear, and then the bread lifts into a pale balloon. Once it settles, that balloon becomes a pocket ready for falafel, chicken, crunchy salad or the vegetables already waiting in the fridge.

A frustrating batch begins almost the same way. The dough cooks, picks up a few spots and stays stubbornly flat. One half may inflate while the other remains attached. A pocket may also appear, yet the bread can become too crisp to open without tearing.
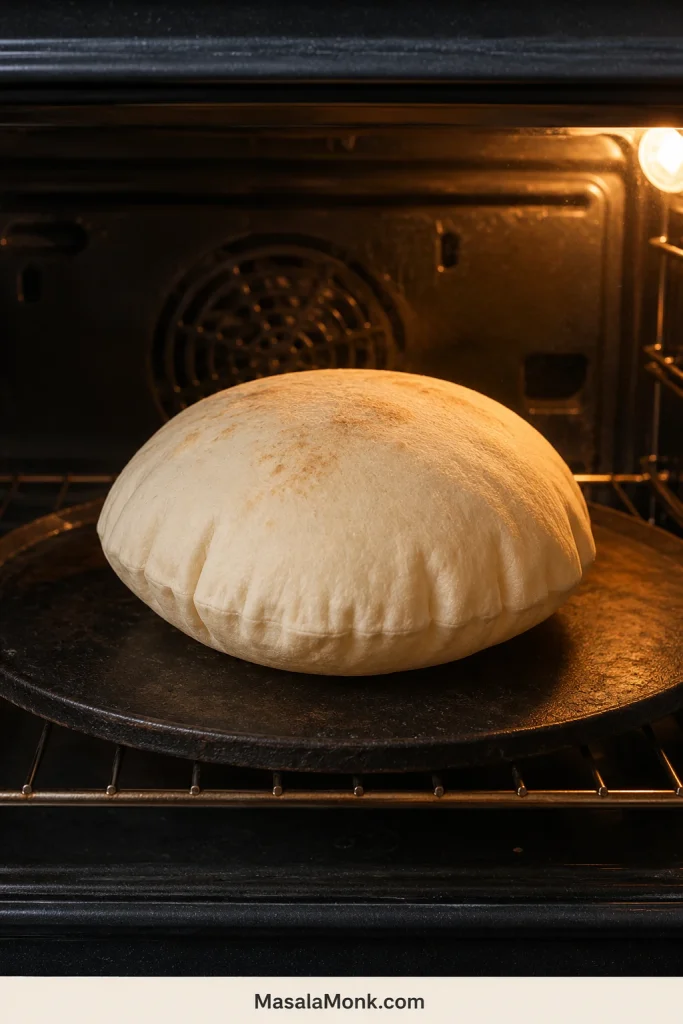
Whole pita fully inflated into a pale balloon on a dark baking surface inside an oven.
A perfectly symmetrical dome is unnecessary; once the lift travels across the round and the surface sets, remove it.

This recipe shows you how to make soft Middle Eastern-style pita that puffs into a pocket you can open and fill. The oven gives you the most reliable pocket; a skillet, griddle or tawa creates more browned flavor, although full pockets are less consistent. Soft dough, even rolling, a thoroughly heated surface and a towel beside the oven or stove do most of the work.

The first round gives you useful clues rather than a final verdict. Its bubbles, color and pocket show what to change before the next round: more heat, a longer rest or more even rolling.

Start here

The Pita Method in One Minute

Make a soft dough with 360 g all-purpose flour and 250 g water. Knead until elastic, let it double, then divide it into eight pieces weighing about 80 g each. After a short rest, roll the pieces to roughly 6½–7 inches / 16–18 cm and 3–4 mm thick.

For the strongest pocket, bake on a steel, stone or heavy inverted tray that has heated for a full 30–45 minutes at 475°F / 245°C. Watch through the oven window from about 2½–3 minutes and remove the pita once it is inflated and set, before deep browning.

No stone or steel? Preheat a heavy uncoated baking sheet upside down and use it as the hot surface.

Roll evenly. Heat fully. Cover quickly. Those three decisions matter more than making a perfectly circular pita.
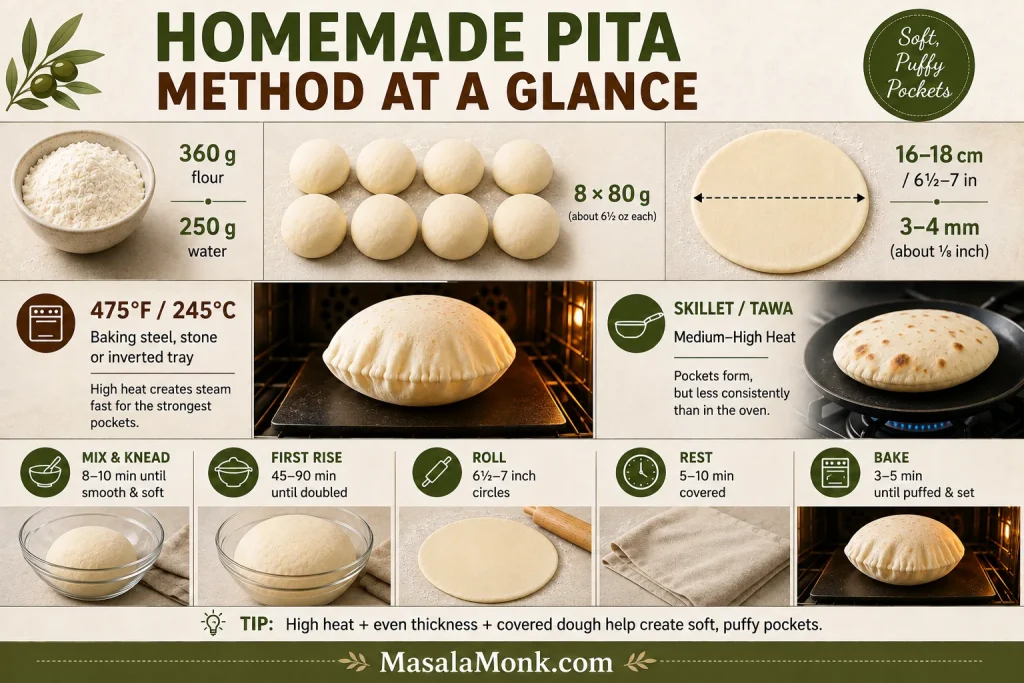
Pita method infographic showing flour and water weights, eight portions, rolling size, dough thickness and oven temperature.

Choose Your Cooking Method

  • Choose the oven for the strongest pocket. Intense heat from below gives steam its best chance to separate the two sides before the bread dries.
  • A skillet, griddle or tawa gives more browned flavor. Expect darker toasted spots, but full pockets will be less consistent.
  • Without a stone or steel, preheat a heavy inverted tray. It provides a flat oven surface, although it may need more time to recover between batches.

Both methods are useful, but they do not produce identical pita: the oven favors a complete pocket, while direct pan contact develops more toasted color.
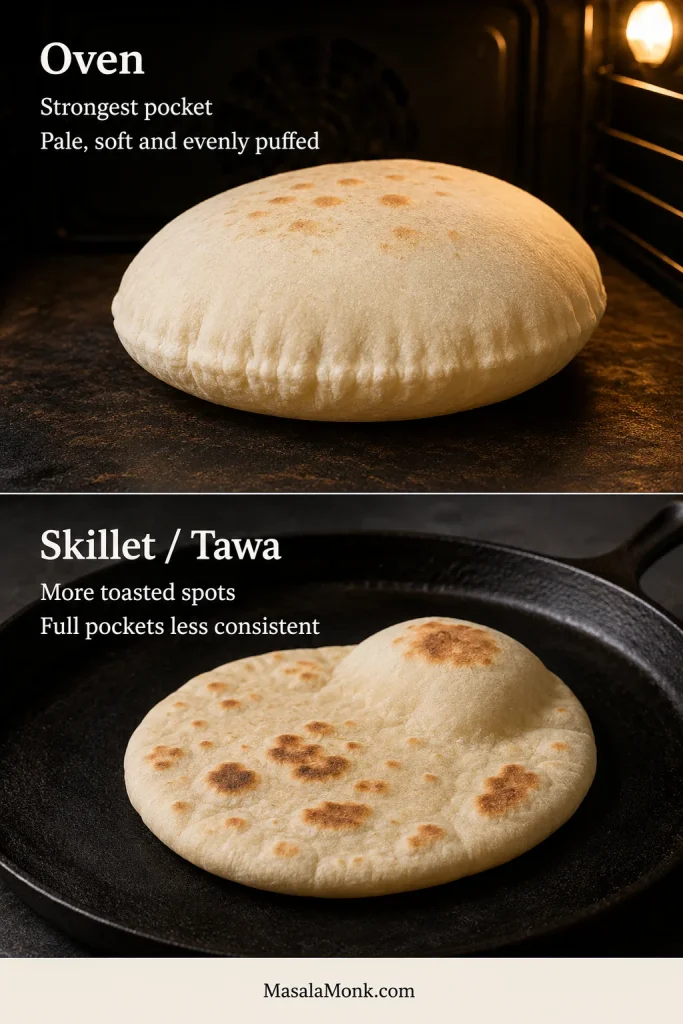
Comparison of a pale, evenly puffed oven pita and a more toasted pita cooked on a skillet or tawa.

Planning ahead? Use the reduced-yeast overnight schedule in the variations section.

Greek pita and quick yogurt flatbread are different breads, not two more cooking methods for this dough. Greek pita is thicker and deliberately pocketless; yogurt flatbread does not rely on yeast or promise a hollow center.

Making a folded Greek-style meal instead? The thicker pita used with chicken souvlaki is designed to bend around the filling; this thinner version is designed for stuffing.

Whichever method you choose, remove the bread before it becomes stiff. A flat pita is still dinner—it can be folded, dipped or toasted later.

Homemade Pita Bread Recipe

Soft, lightly chewy pita that puffs into a hollow pocket on a thoroughly heated surface. Use the oven for the strongest pocket or a skillet, griddle or tawa for a more browned finish.

Recipe at a glance

  • Yield: 8 whole pitas
  • Serves: About 4 as shared bread or 8 as sandwiches, using one pita per person
  • Active preparation: About 35–45 minutes
  • Rise and rest: About 65–115 minutes
  • Oven cooking: About 15–40 minutes, depending on whether the surface holds one or two pitas and how quickly it recovers between batches
  • Stovetop cooking: About 25–40 minutes
  • Oven-method total: About 2 hours to 2 hours 45 minutes
  • Stovetop-method total: About 2 hours 10 minutes to 3 hours
  • Oven temperature: 475°F / 245°C

Some stages overlap: Later rounds are rolled while earlier batches cook, so the preparation, resting and cooking ranges should not be added separately. Most of the elapsed time is hands-off rising, resting and preheating.

Equipment

  • Digital kitchen scale
  • Large mixing bowl
  • Dough scraper or sturdy spatula
  • Rolling pin
  • Clean kitchen towels
  • Baking steel, pizza stone or heavy uncoated baking sheet for the oven method
  • Heavy cast-iron skillet, carbon-steel pan, griddle or tawa for the stovetop method
  • Optional: Stand mixer with dough hook; infrared thermometer

Ingredients

Use the weights when possible. Flour and salt can vary noticeably by scooping method and crystal size.

  • 360 g all-purpose flour (12.7 oz / about 3 cups, spooned and leveled), plus a little for dusting
  • 250 g water (250 ml / about 1 cup plus 1 tablespoon)
  • 5 g instant yeast (about 1½ teaspoons)
  • 6 g granulated sugar (about 1½ teaspoons)
  • 8 g fine salt (about 1¼ teaspoons, depending on the salt)
  • 14 g olive oil (15 ml / 1 tablespoon), plus a few drops for the bowl

Using active dry yeast: Check the brand instructions before substituting. Some active dry yeasts can replace instant yeast 1:1 by weight; others recommend a slightly larger amount. Dissolve it first only when directed by the manufacturer, and allow more time if the dough rises slowly.

Make and shape the dough

Mix, rest and knead

  1. Mix the dry ingredients. Whisk together the flour, instant yeast, sugar and salt in a large bowl.
  2. Add the water and oil, then rest. Use room-temperature water in a hot kitchen or lukewarm water, about 90–105°F / 32–41°C, in a cool room. Stir until no dry flour remains. Cover and rest the rough dough for 10 minutes.
  3. Knead until elastic. Work the dough by hand for 8–10 minutes, or with a dough hook on low to medium-low speed for 6–8 minutes. It should become smooth, soft and slightly tacky.

Rise, divide and roll

  1. Let the dough double. Place it in a lightly oiled bowl, cover and leave until roughly twice its original volume, about 45–90 minutes. A clear or straight-sided bowl makes the increase easier to judge.
  2. Begin preheating early. For the oven method, start heating the steel, stone or inverted tray when the dough has risen by roughly half to two-thirds. Give the surface a full 30–45 minutes before the first pita goes in. For the stovetop method, begin heating the pan when the shaped rounds are nearly ready.
  3. Divide and shape. Cut or weigh the dough into eight portions of about 80 g each. Draw the edges underneath each portion to make a smooth ball, cover and rest for 15 minutes.
  4. Roll only enough for the next one or two batches. Working from the center outward, roll each ball while lifting and turning often, until it measures about 6½–7 inches / 16–18 cm and 3–4 mm thick.
  5. Rest the rounds. Run your fingertips over the center and rim. Your pita does not need to be perfectly round, but it should feel evenly thin. Place each round on a lightly floured cloth, board or peel and cover for 5–10 minutes, until relaxed but not noticeably puffy.
  6. Keep the remaining dough covered. Roll the next set while the first batch cooks. Before transferring a round, brush off visible excess flour so it does not scorch on the hot surface.

Cook the pita

Have the towel ready before the first round goes in; once the first blister appears, the batches can move quickly.

Oven method

  1. Give the surface its full preheat. Place the steel, stone or inverted tray on the middle rack and heat the oven to 475°F / 245°C. Position it slightly below the middle when the top of your oven browns aggressively.
  2. Check parchment before using it at 475°F / 245°C. Follow the manufacturer’s maximum temperature and transfer the pita directly to the hot steel, stone or tray whenever possible.
  3. Transfer without stretching. Place one or two rounds on the hot surface, depending on its size. Leave enough room to load and remove each pita without pulling, folding or crowding it.
  4. Watch for the first lift. Begin watching through the oven window after about 2½–3 minutes. Avoid repeatedly opening the oven; when the view is poor, make one quick check at about 3 minutes.
  5. Take it out before deep browning. Most pitas need about 3–5 minutes. Remove each one when most or all of the round has inflated and the surfaces look set but remain pale enough to bend.
  6. Cover immediately to keep it soft. Move each pita directly beneath a clean towel.

Stovetop, griddle or tawa method

  1. Preheat a heavy dry pan until evenly hot. Medium-high heat is a sensible starting point. When measured, aim for a surface temperature around 425–450°F / 218–232°C.
  2. Add one pita and watch for bubbles. Cook for 20–30 seconds, then flip when the first bubbles appear.
  3. Keep turning every 20–30 seconds. Cook until the pita inflates or the raw, damp-looking patches disappear. It should remain soft enough to bend, usually after about 2½–4 minutes in total.
  4. Cover before cooking the next round. Move the pita beneath the towel before it stiffens.

Pita bread guide

Pita Dough, Heat and Troubleshooting

You can begin with the recipe above. The guide below shows what to look for at each stage and what to change before the next round.

Why Pita Puffs Into a Pocket

The pocket is created by steam. Fermentation makes the dough lighter and easier to stretch, but the dramatic balloon happens when moisture inside the thin round heats rapidly.

As the bottom touches the hot surface, it begins setting almost immediately. Moisture trapped inside turns to steam and lifts the upper layer away from it. Once both sides have set, the bread can hold the balloon long enough for the pocket to move across the round. The pita settles as the steam escapes, but the two layers remain separated.
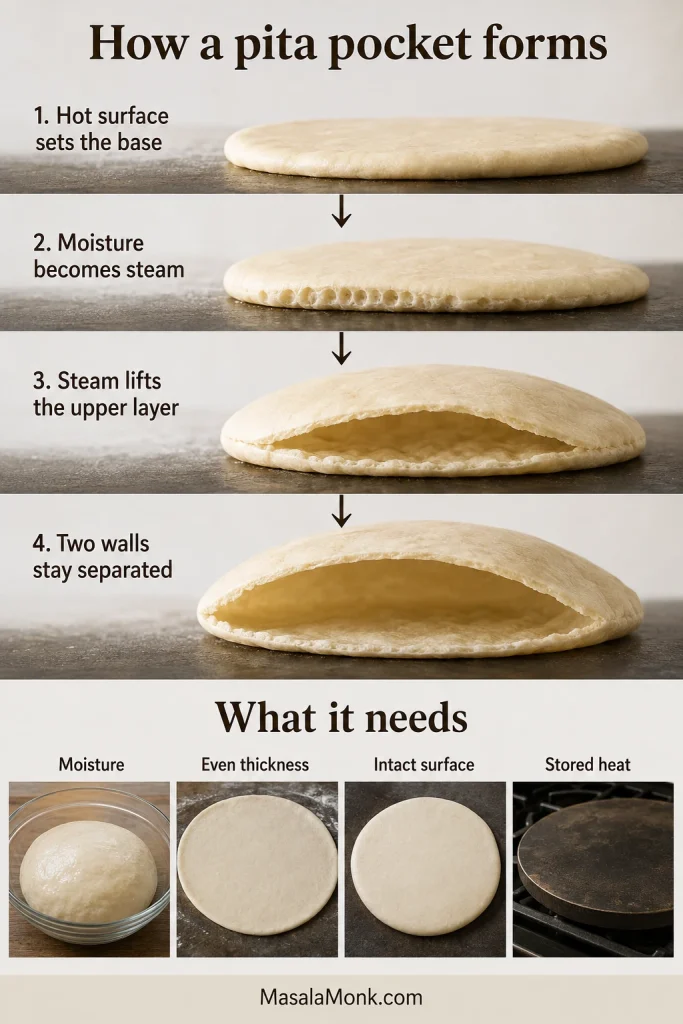
Infographic showing heat setting the pita base, steam lifting the upper layer and two thin walls remaining separated.

Four things open the pocket

  • Moisture: Soft dough supplies the steam.
  • Even thickness: The round heats at a similar rate from edge to edge.
  • An intact surface: Steam remains inside instead of escaping through a tear.
  • Stored heat: The pan, stone or tray sets the bread before it slowly dries.

After the balloon settles, the two cooked layers should remain separated through most of the round; a few isolated bubbles are not the same as a usable pocket.
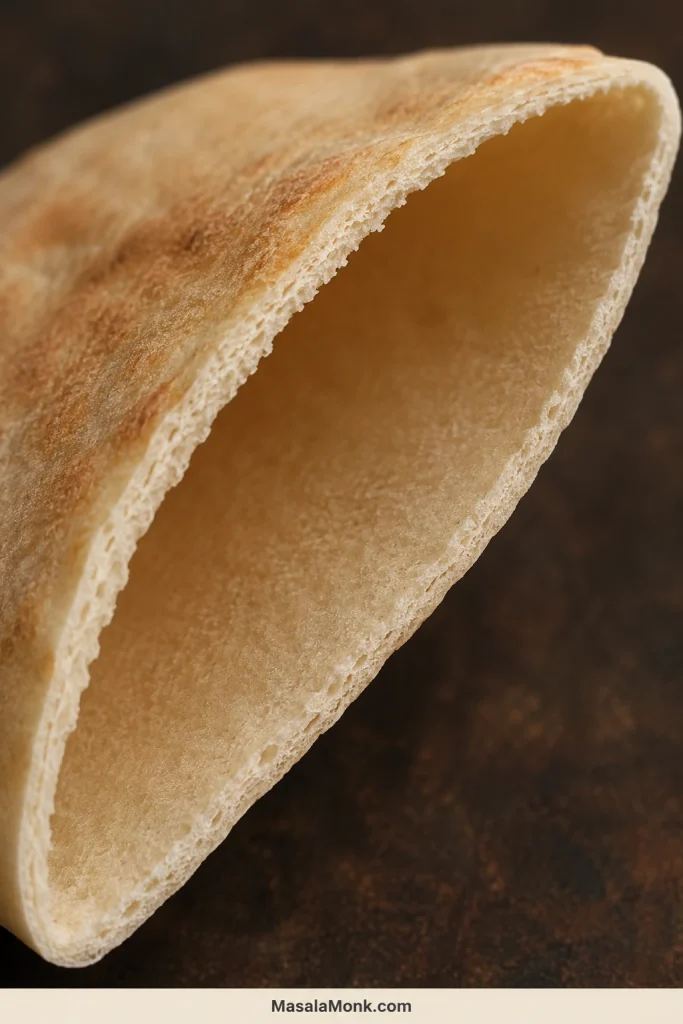
Close-up of a cut pita with two thin bread walls surrounding a continuous hollow center.
Look for one continuous cavity rather than isolated edge bubbles; that separation is what makes the bread easy to fill.

Pita Bread Ingredients and Dough Texture

Flour and water control structure and steam

All-purpose flour develops enough gluten for the dough to stretch and hold steam without making the bread excessively chewy. Bread flour can also work, although it may need a little more water and usually produces a firmer bite.

Milk Street’s pita troubleshooting identifies the same problem: excess flour creates a drier, thicker round with less moisture available for steam. Water hydrates the flour, helps the dough stretch and becomes the steam that opens the pocket. Its temperature mainly controls the pace of fermentation; it does not need to be hot.

Flour absorption varies by brand, climate and storage, so give the rough dough its 10-minute rest before deciding it needs more flour.
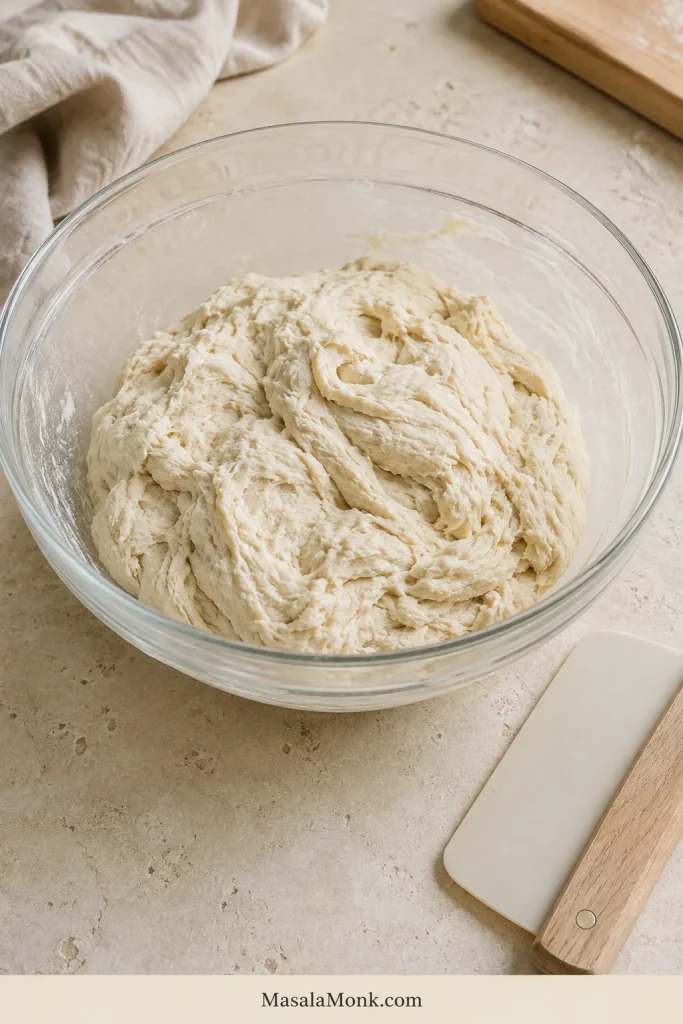
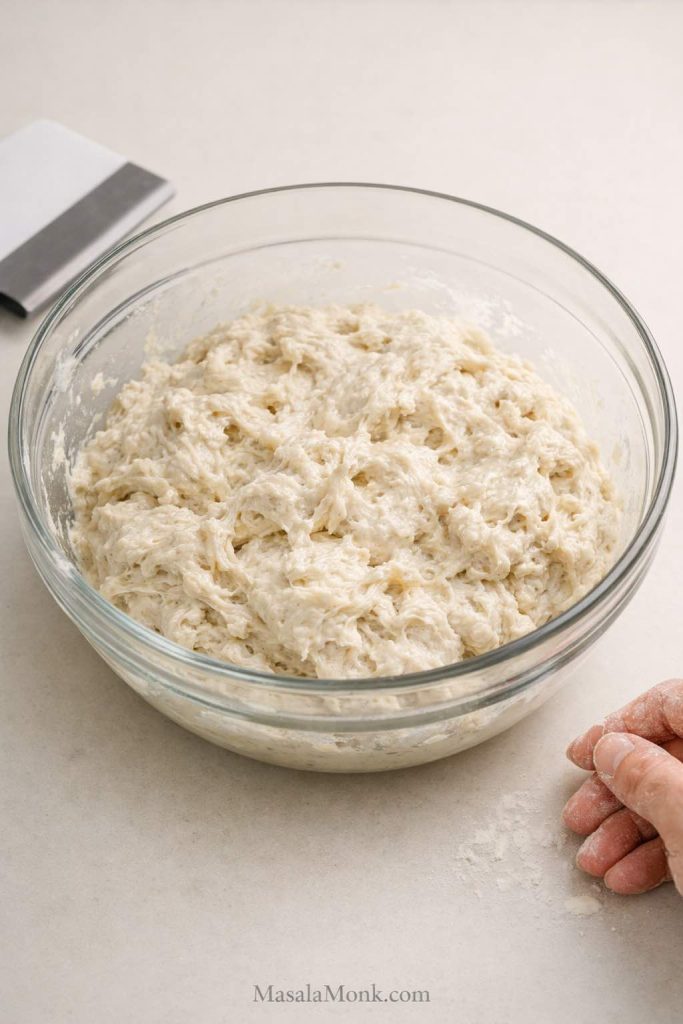
Rough, shaggy pita dough in a clear bowl with all visible flour hydrated.

Yeast, salt, sugar and oil shape fermentation and texture

Yeast produces gas and flavor during the first rise, but steam performs the final lift. Salt seasons the pita, strengthens the dough and steadies fermentation. Sugar supports light browning without making the bread sweet, while olive oil helps the cooled pita remain tender and flexible.

Both sugar and oil can be omitted for a leaner dough. The pita may color more slowly and feel less tender after cooling, but neither ingredient creates the pocket.

Soft dough is better than easy, dry dough

Sticky dough makes many bakers nervous. Stiff dough creates the harder problem here.

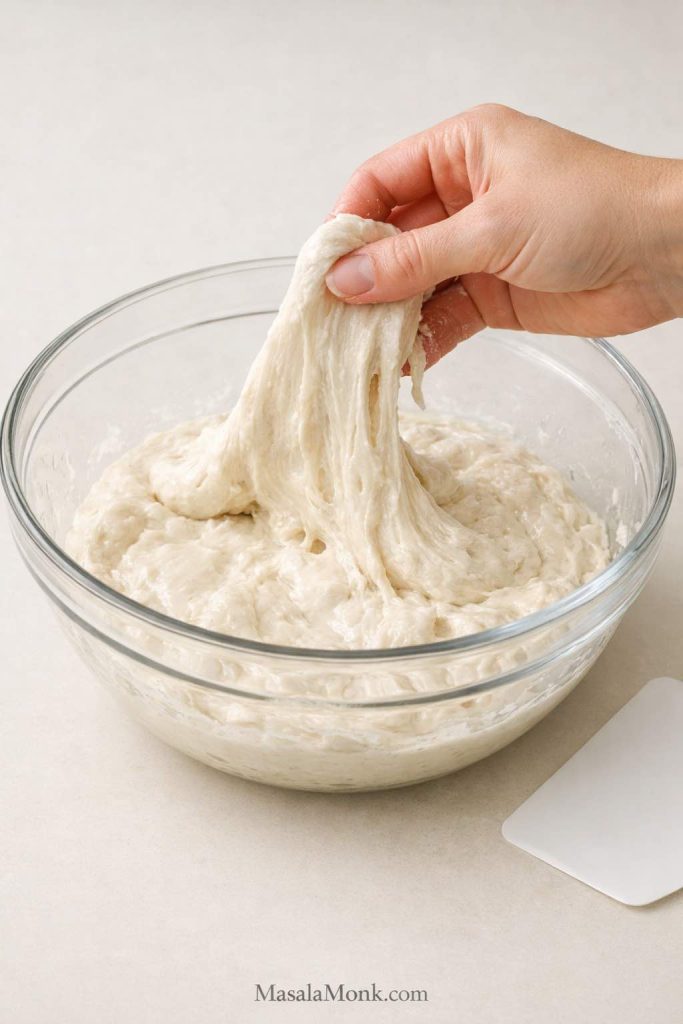
During the first minutes of mixing, the dough may cling to your fingers. After resting and kneading, it should gather into a smooth mass. If it clings lightly and then releases, you are closer than you may think. Do not make the dough dry simply because dry dough feels easier to handle.
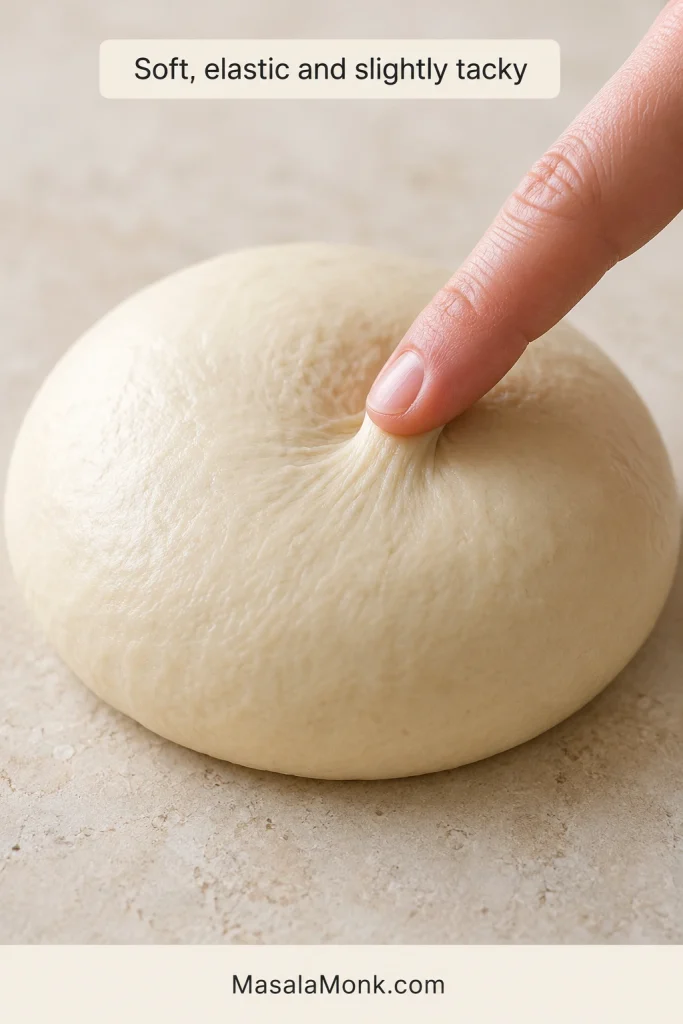
A fingertip pressing into smooth pita dough and leaving a shallow indentation.
  • Correctly tacky: Soft, elastic and lightly clinging before releasing.
  • Too wet: Flowing, spreading quickly or coating the hands heavily after kneading. Add flour one teaspoon at a time.
  • Too dry: Stiff, resistant or cracking around folded edges. Add water one teaspoon at a time during early mixing.

This is usually where another handful of flour feels tempting. Give the dough its rest first; it may become far easier to handle without changing the formula. A dough can look lively in the bowl and reveal its dryness only beneath the rolling pin.
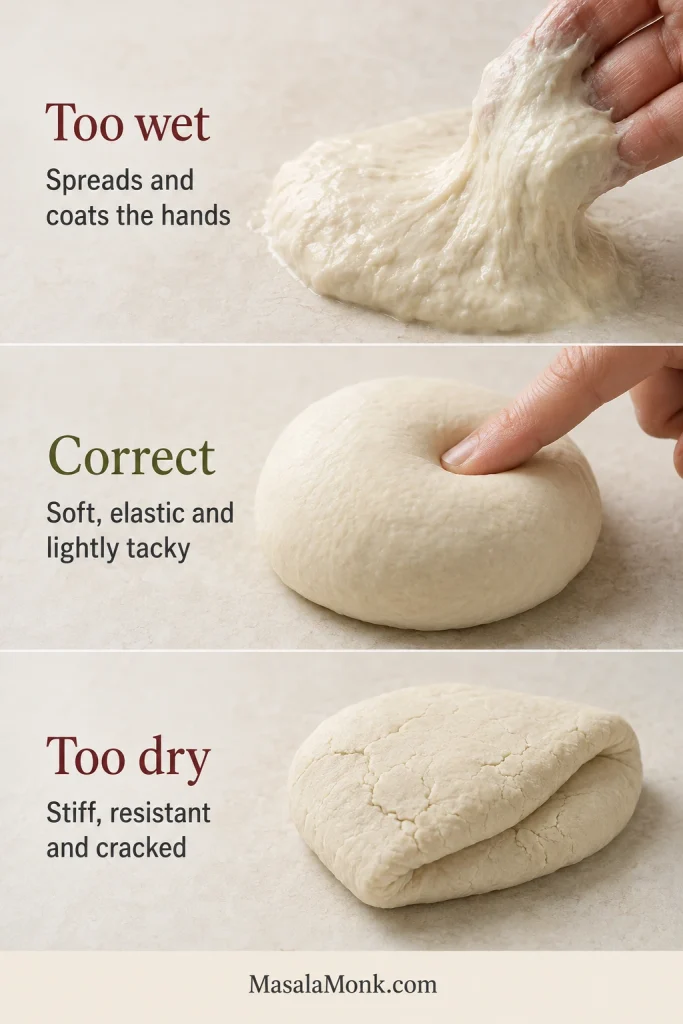
Comparison of wet pita dough coating the hands, correctly hydrated dough holding its shape and dry dough with cracks.

Let the dough double

Once the dough feels soft and elastic, give it enough time to rise and become airy. The rise may take 45–90 minutes. Move on when the dough has roughly doubled, the surface looks smooth and gently domed, and the dough feels lighter than it did after kneading.
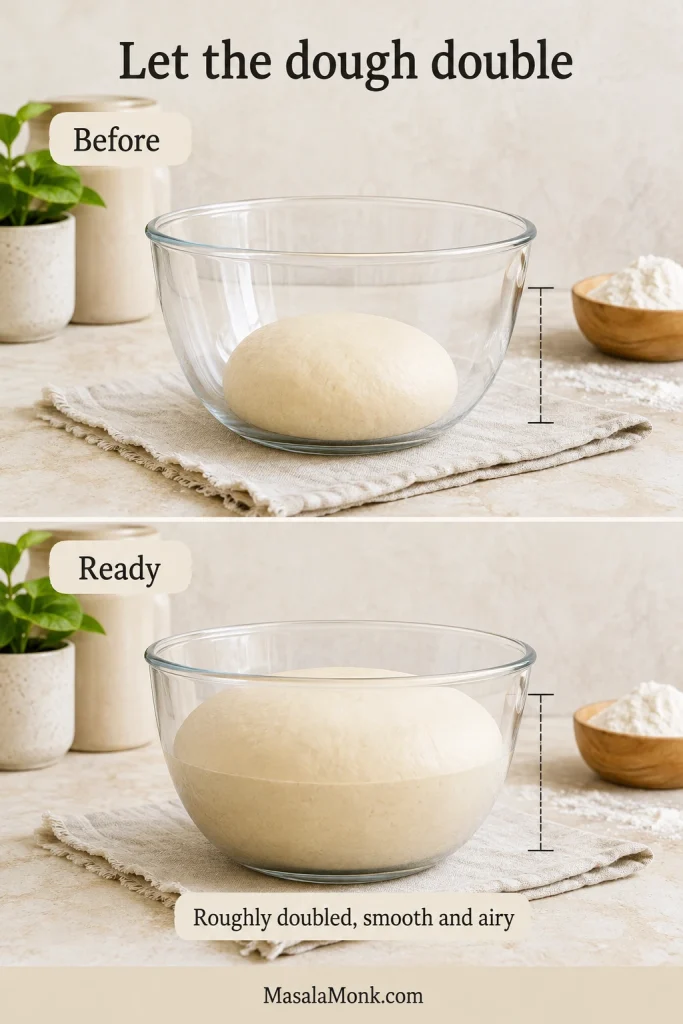
The same bowl of pita dough before proofing and after expanding to roughly twice its original volume.
Mark the starting level on the bowl; the height change is easier to judge than the clock.

How to Roll Pita So the Pocket Can Open

Portion and rest the dough

Keeping each piece close to 80 g makes it easier to roll every pita to the same diameter and thickness. Draw the rough edges underneath, close the seam at the base and rest the covered balls for 15 minutes.
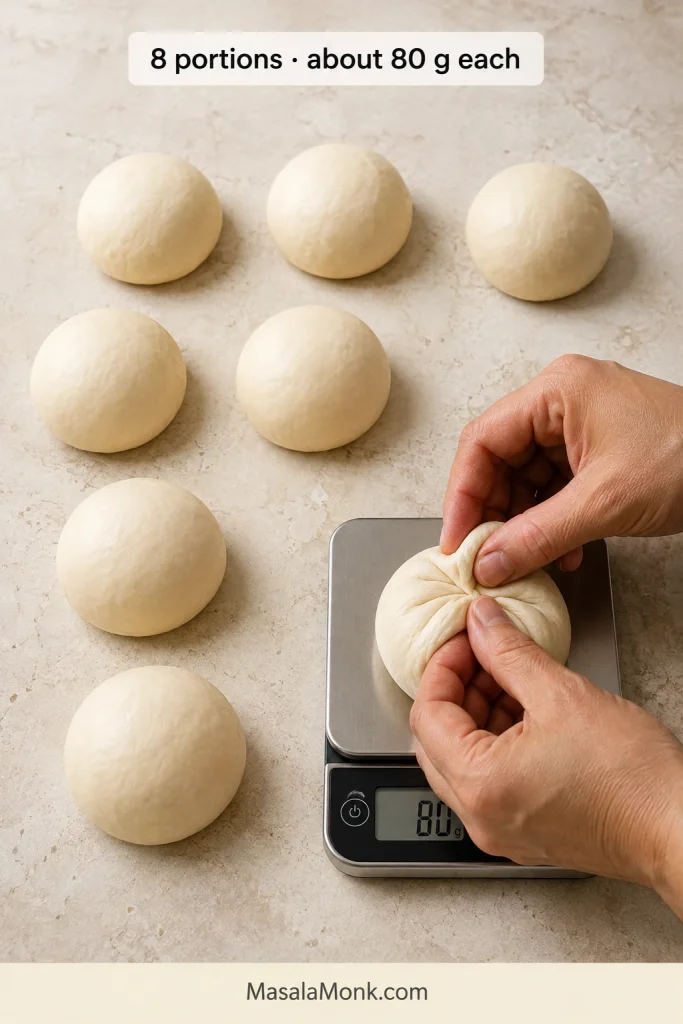
Seven smooth dough balls beside an eighth 80-gram portion being shaped on a digital scale.
Correct small weight differences while dividing; equal portions are easier to roll to the same size and cook at the same pace.

When a ball keeps shrinking toward the center, it is asking for more rest, not more force. Cover it, roll another piece and return in 5–10 minutes.
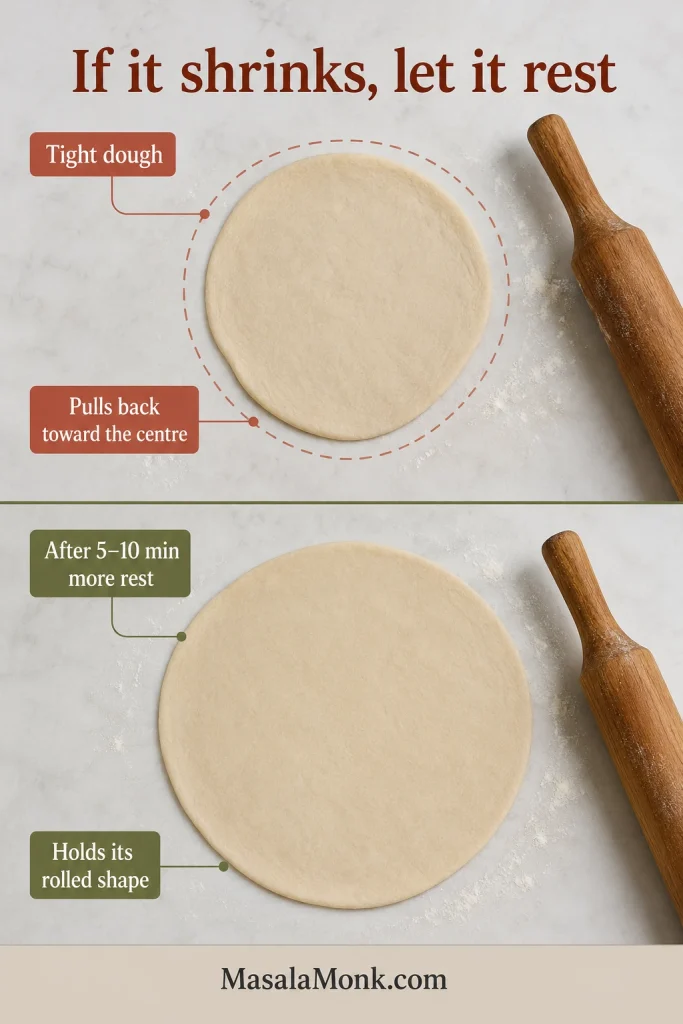
Comparison of tight pita dough shrinking after rolling and relaxed dough holding its larger shape after resting.

Roll to an even 3–4 mm thickness

Roll outward from the middle, rotate the dough and lift it frequently. Frequent turning spreads pressure more evenly than repeated passes in one direction.
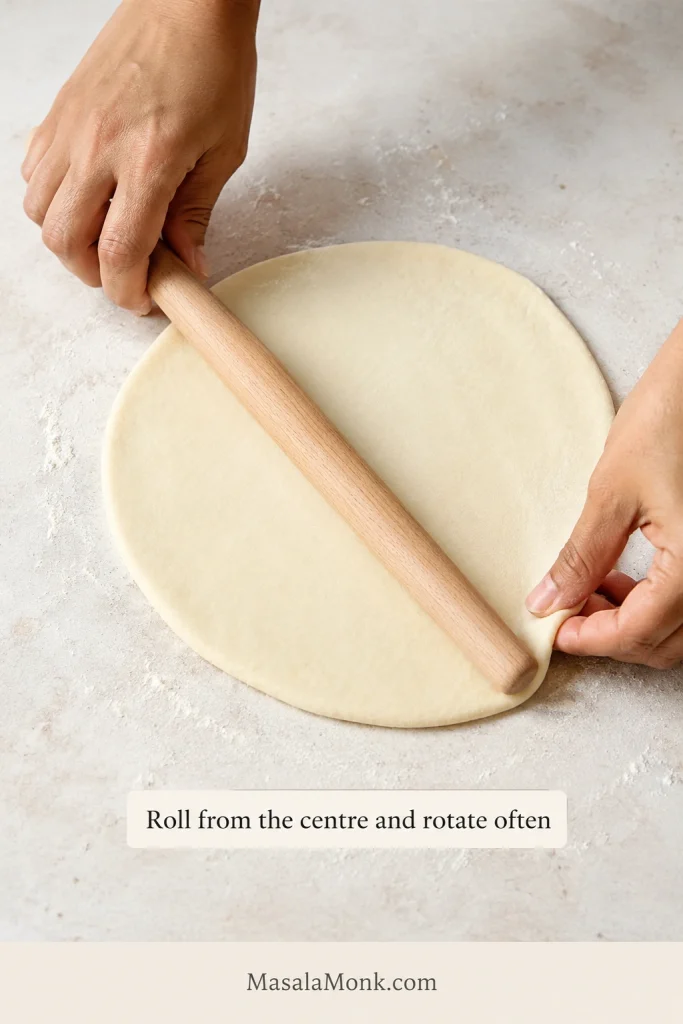
Hands rolling pita dough outward from the center while lifting the edge to rotate the round.

Use light, consistent fingertip pressure to compare the center, middle and rim. The target is an even 3–4 mm round without a paper-thin weak spot.
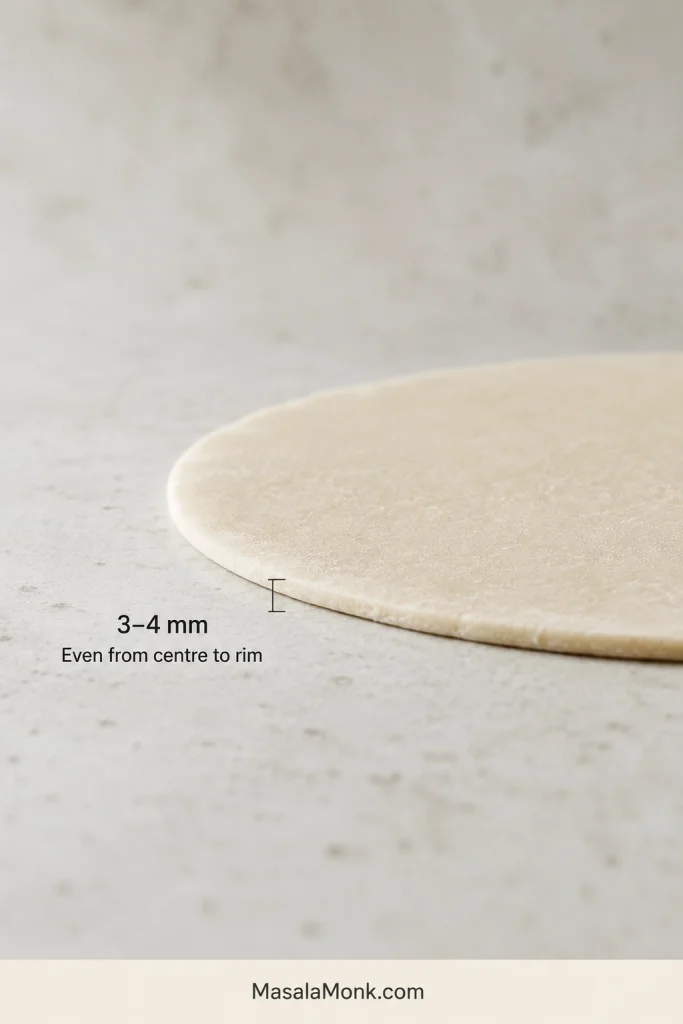
Side view of a raw pita round with an even edge measuring approximately 3 to 4 millimeters.
Check the center, middle and rim with the same fingertip pressure; one thin patch can vent steam.

Shape matters less than thickness. A slightly irregular outline can still puff well, while a thin middle surrounded by a padded rim heats unevenly.
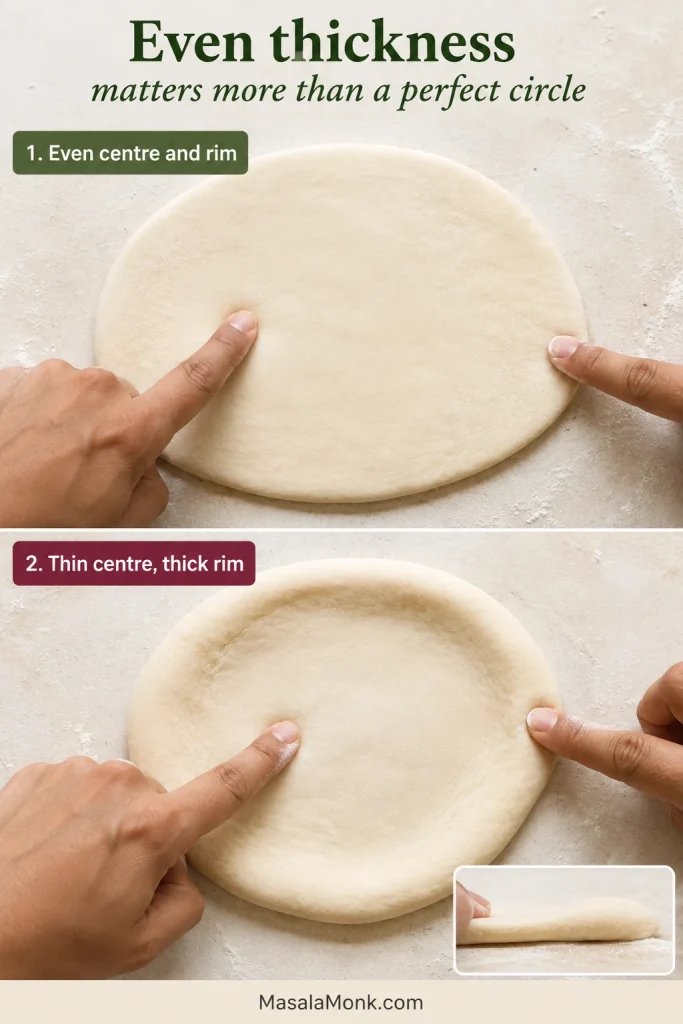
Comparison of evenly rolled pita dough and a round with a thin center and thicker outer rim.

Keep the rounds covered and intact

Roll only enough for the next one or two cooking batches. A large steel may hold two pitas; a small oven-toaster-grill (OTG), skillet or tawa may cook only one. Keeping the remaining dough as covered balls prevents later rounds from drying while they wait.

Keep each rolled surface smooth and intact. Dust lightly, brush away visible excess flour and support the round during transfer instead of pulling it from one edge.
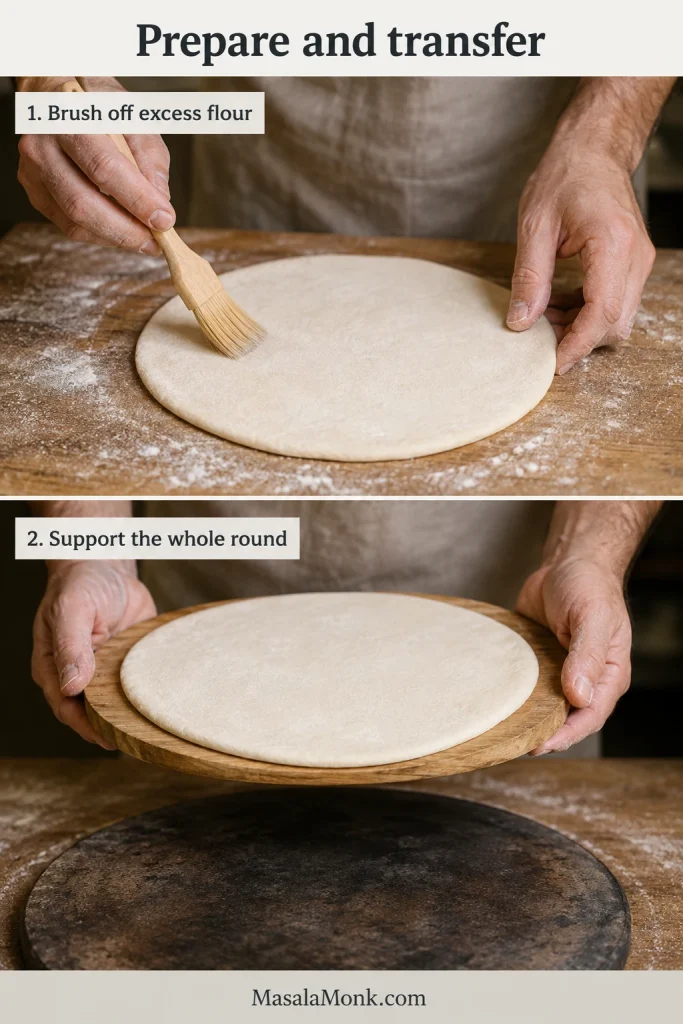
Two-step sequence showing loose flour brushed from a rolled pita and the full round supported during transfer.

Pita Temperatures for Ovens, OTGs and Skillets

A modest oven can make excellent pita. The important question is how much heat the surface beneath the dough has stored. Begin with these settings, then watch the first round. Fast bubbles signal strong heat; slow drying means the surface needs more time.

EquipmentBegin withWatch fromRemove when
Conventional oven475°F / 245°C; steel, stone or heavy inverted tray heated for 30–45 minutes2½–3 minutes through the windowInflated, set and flexible
Fan or convection ovenAbout 450°F / 230°C; conventional mode when availableAbout 2½ minutesThe pocket opens before the exterior dries
Small OTGHighest stable setting near 230–250°C; top and bottom heat where availableAbout 3 minutesThe pita inflates before either side hardens
Oven limited to 220–230°CMaximum heat; warm the surface for the full 45 minutesAbout 3 minutesThe layers have separated and the bread remains flexible, even without a complete balloon
Skillet, griddle or tawaHeavy dry surface; approximately 425–450°F / 218–232°C when measuredFirst flip after 20–30 secondsNo raw-looking patches remain and the bread bends easily

In a small OTG, move the tray higher when the underside darkens before the top lifts. Move it lower when the upper surface dries while the underside remains pale.
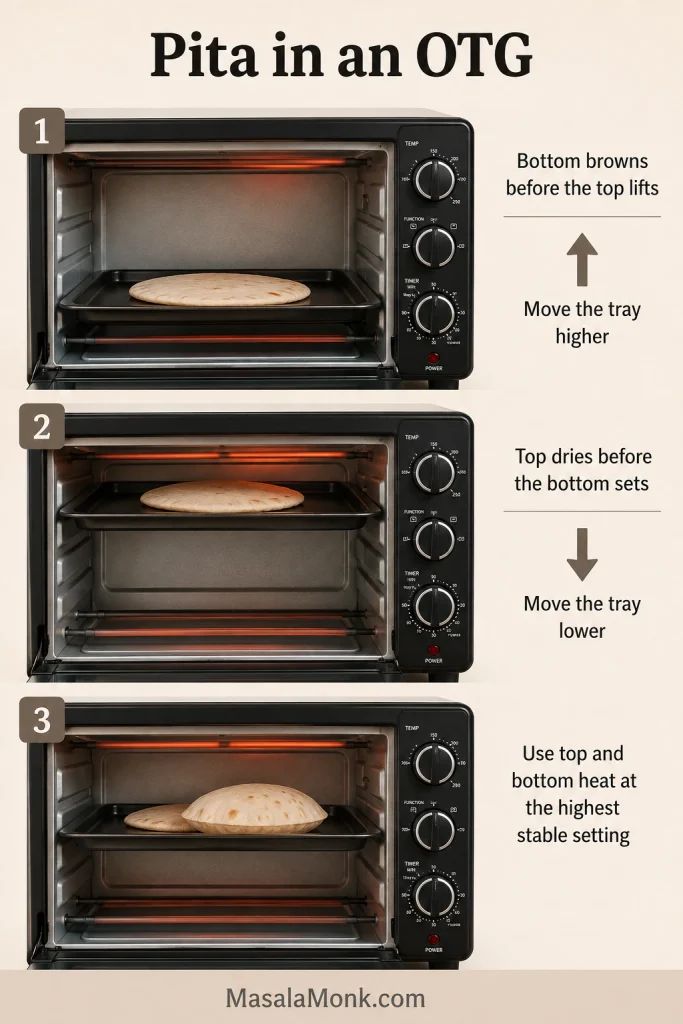
OTG guide showing higher, lower and balanced tray positions based on which side of the pita cooks first.

For the oven, preheat the surface—not only the air

The oven may announce that it is ready while a thick stone or steel is still catching up. Give the surface the full 30–45 minutes before loading the first pita. Steel transfers heat quickly and recovers well, stone gives steadier heat, and a heavy inverted tray offers an affordable alternative that may need a little longer between loads.
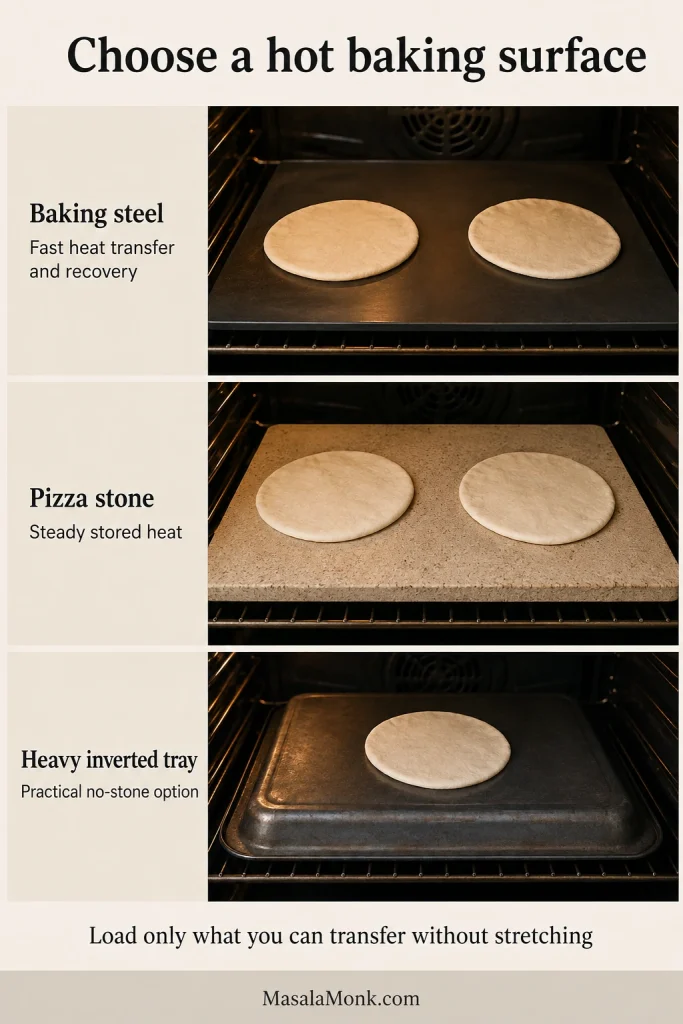
Comparison of pita rounds arranged on a baking steel, pizza stone and heavy inverted baking tray.

Support the round with both hands, a peel or a wide spatula during transfer. With enough stored heat, the first blisters appear quickly and one edge may rise before a wave of inflation moves across the bread.
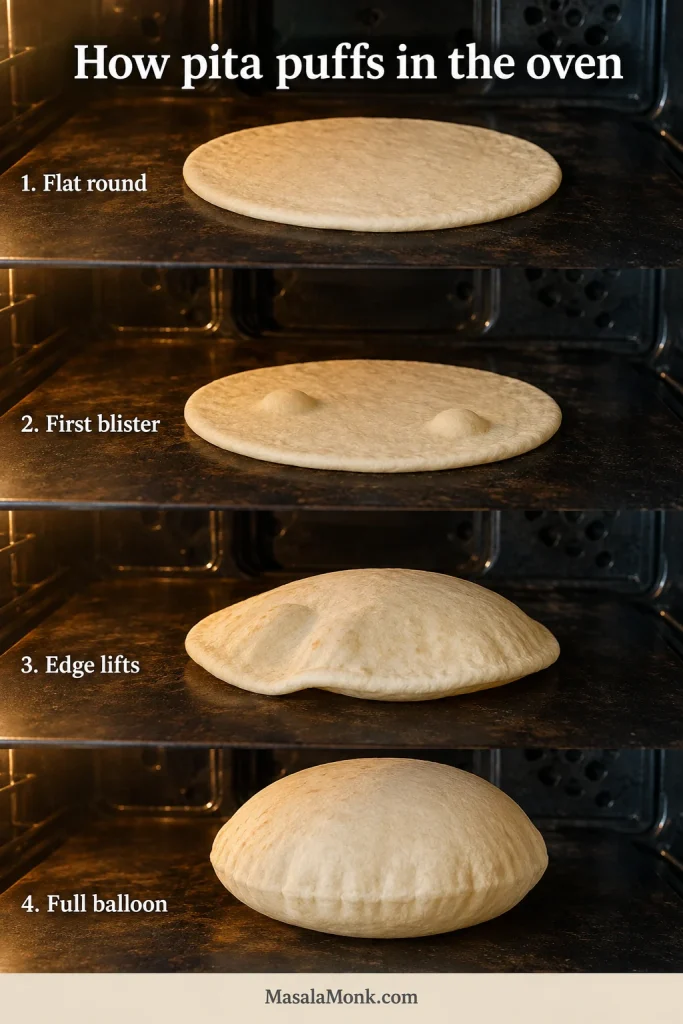
Four oven stages showing pita flat, developing blisters, lifting at one edge and inflating fully.
Watch the direction of the lift rather than waiting for a perfectly symmetrical balloon.

Remove the pita as soon as its surfaces are set and the bread still bends easily. Waiting for deep color can leave the pocket walls brittle.
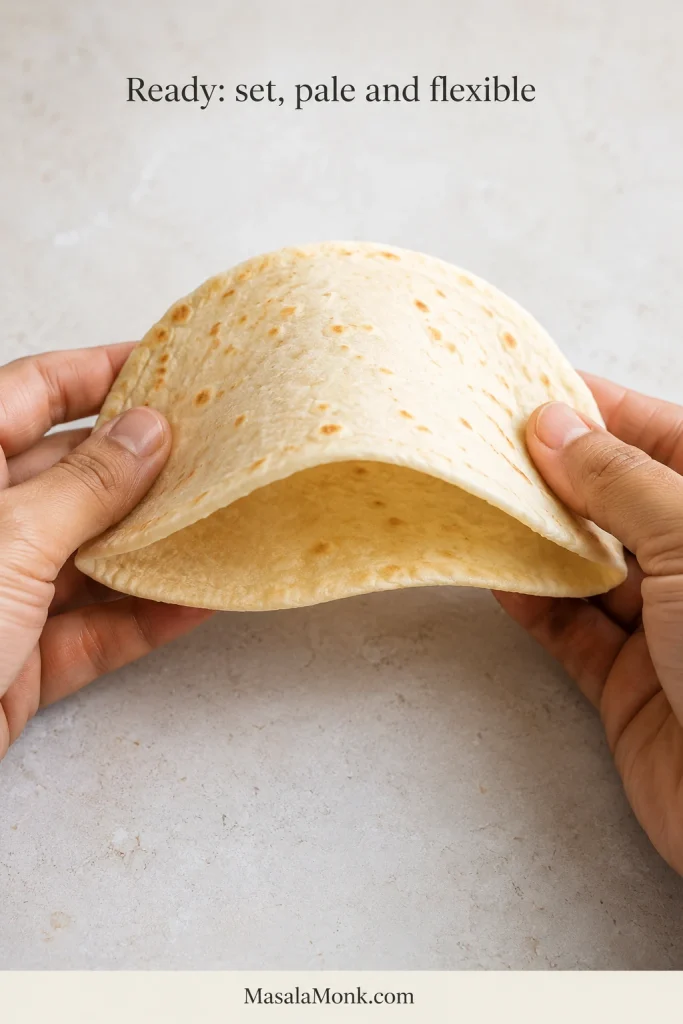
Two hands gently bending a pale cooked pita without cracking it.
Pale is a texture cue here, not a sign of underbaking; extra color usually costs flexibility.

The order matters. A flat first pita and a slow final pita usually point to different problems. If the first round barely bubbles, remove it while soft and give the surface another 10 minutes before loading the next one. A flat first pita is disappointing, but the other seven are still covered and waiting. When the early pitas puff and later ones slow down, close the oven for 2–3 minutes so the surface can recover.
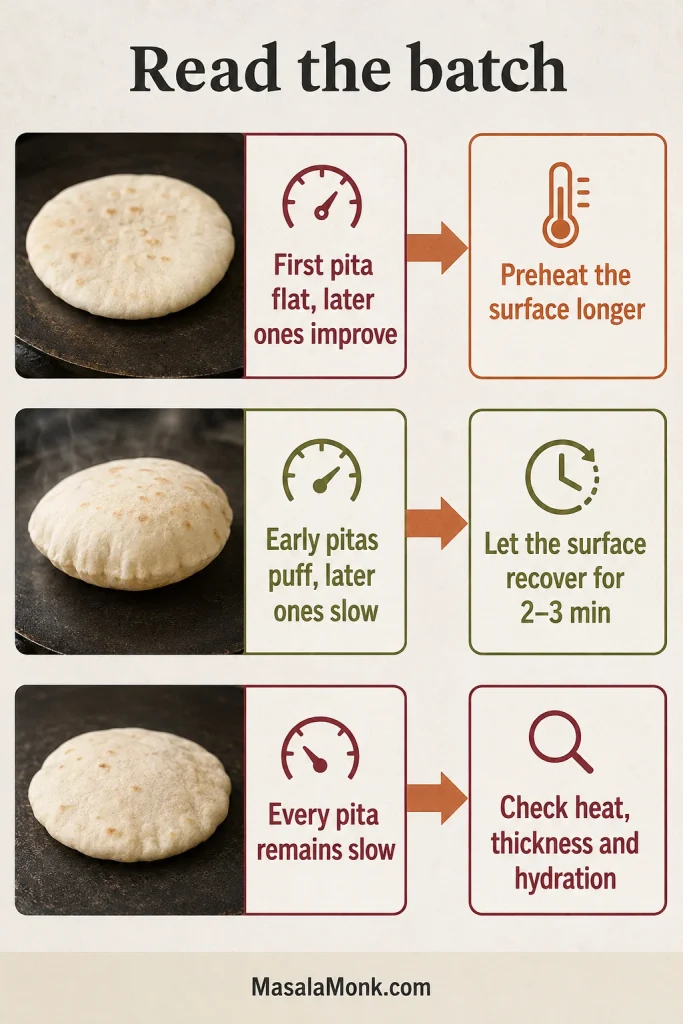
Decision guide linking a flat first pita, slowing later pitas and consistently weak puffing with different heat adjustments.

For the skillet, griddle or tawa, watch the bread

A surface around 425–450°F / 218–232°C is a useful starting range. King Arthur uses a similar measured range for its stovetop sourdough pita.

If the pita sits quietly and dries slowly, raise the heat. Dark spots appearing before the center cooks mean the heat should come down. Flip when the first bubbles appear and continue turning every 20–30 seconds.
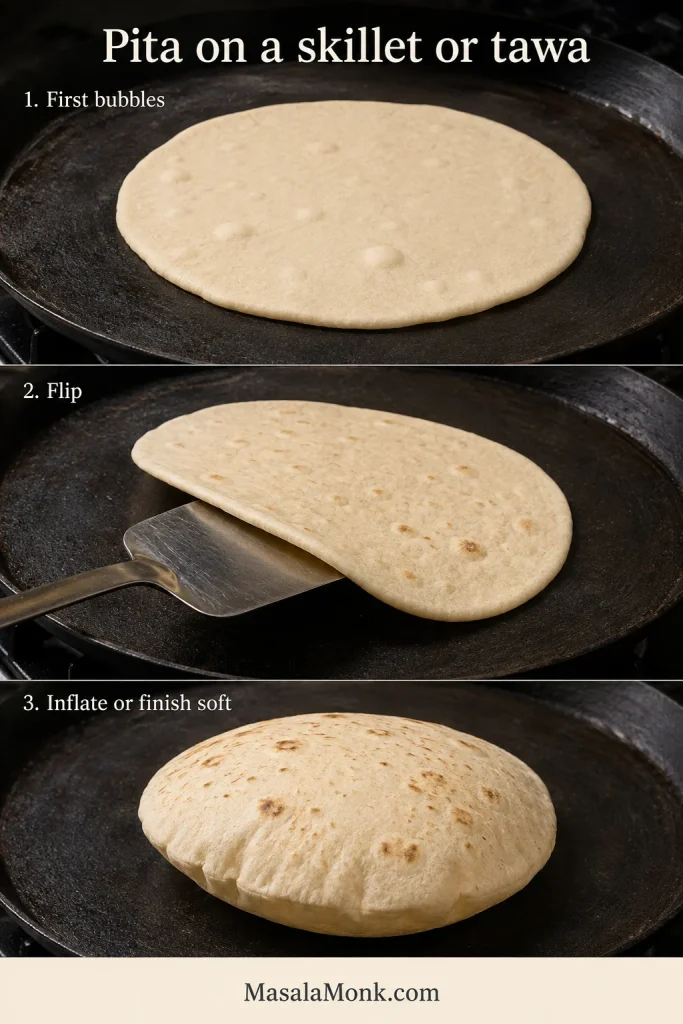
Three-stage sequence showing bubbles forming on pita, the round being flipped and the bread finishing soft on a tawa.

When one section inflates while another stays attached, press briefly beside the flat portion with a spatula without pressing directly on the balloon. Half a pocket does not mean the recipe failed; one area of that round may simply have been thicker or made weaker contact with the pan.

Once the damp-looking patches disappear, several more minutes usually produce a cracker instead of a late pocket. Remove the bread while it bends easily.

Why Your Pita Did Not Puff—and What to Change Next

Most flat pitas come back to four things: heat, thickness, moisture or a steam leak. Match what you saw to the most likely cause, then change one thing on the next round.
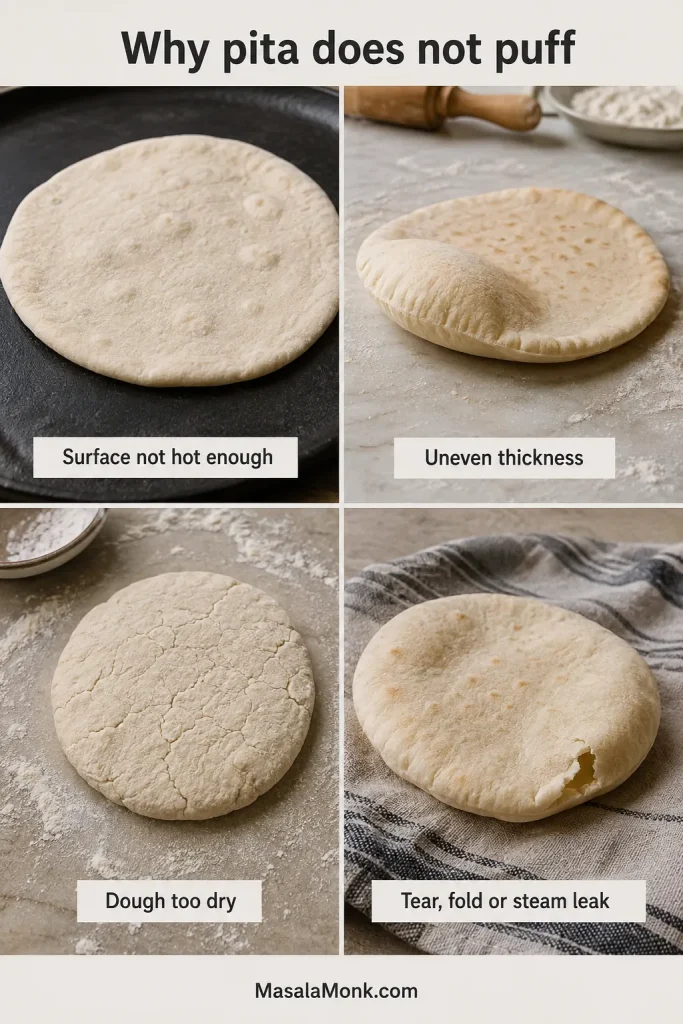
Four pita problems showing insufficient heat, uneven thickness, dry cracked dough and a tear that releases steam.
What you sawLikely causeWhat to change
No lift: no bubbles, tiny bubbles or only the first pita stayed flatCool surface, thick round or dry doughPreheat longer, check thickness and weigh the flour and water
Uneven lift: half inflated or the pocket stopped partway acrossUneven rolling, padded rim, fold or steam leakCompare the center and rim and inspect the round for damage
Poor cooking: brown outside and doughy inside, or puffed but hardExcess heat, excessive thickness or too much cooking timeLower the heat, roll evenly and remove the next pita sooner
Dough trouble: shrinking, sticking, cracking or excessive stickinessInsufficient rest, kneading or hydration adjustmentRest tight dough and adjust flour or water one teaspoon at a time

Use the first visible symptom to choose one adjustment. Keeping the other variables steady makes the next pita a useful test rather than another guess.
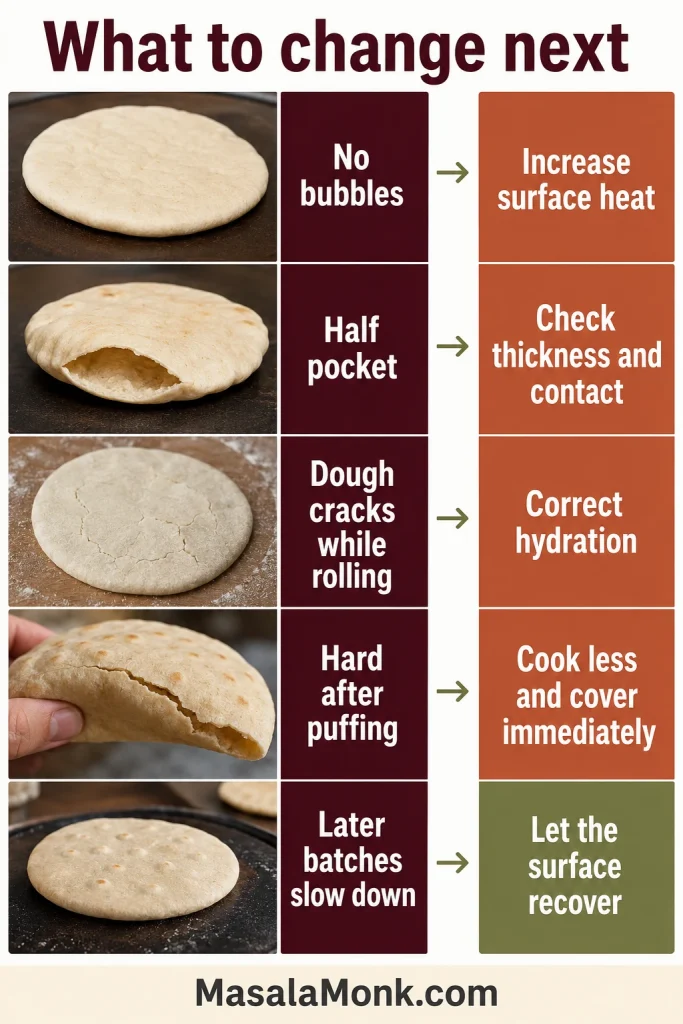
Five-row troubleshooting guide pairing visible pita problems with changes to heat, thickness, hydration, cooking time and surface recovery.

When the surface is too cool

An underheated surface produces slow bubbles and gradual drying instead of a quick wave of inflation. Give the steel, stone or tray more time before loading the next round.
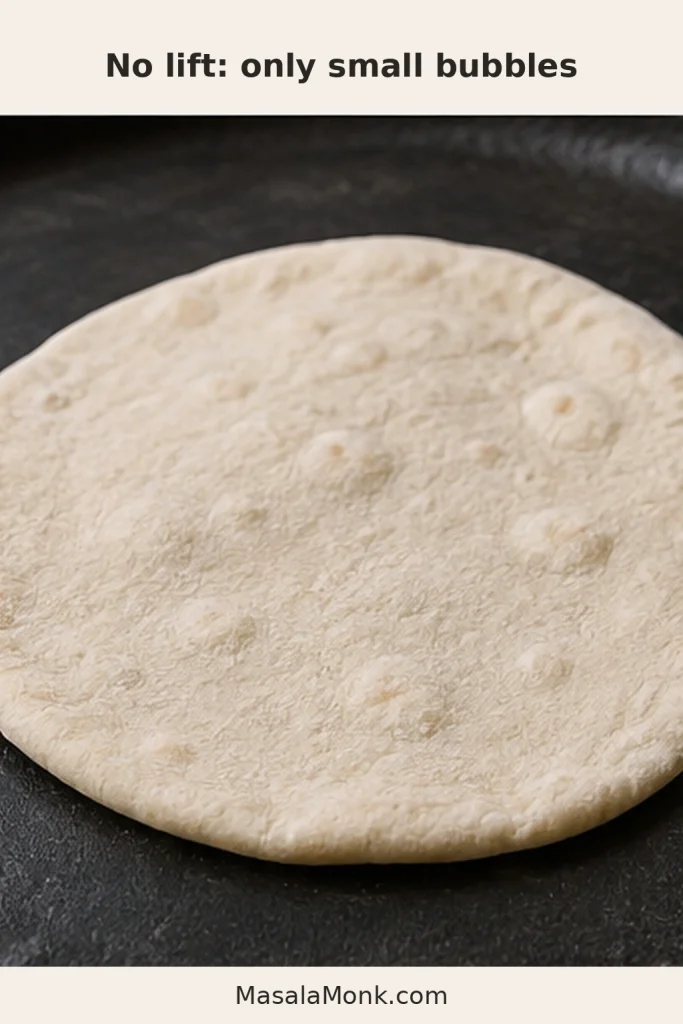
Pale cooked pita remaining flat on a dark surface with only a few small bubbles.

When the round is uneven

Only one half inflated. The tempting response is to keep cooking, but the problem probably began beneath the rolling pin. Compare the center and rim of the next round by touch, then rotate it more frequently as you roll.
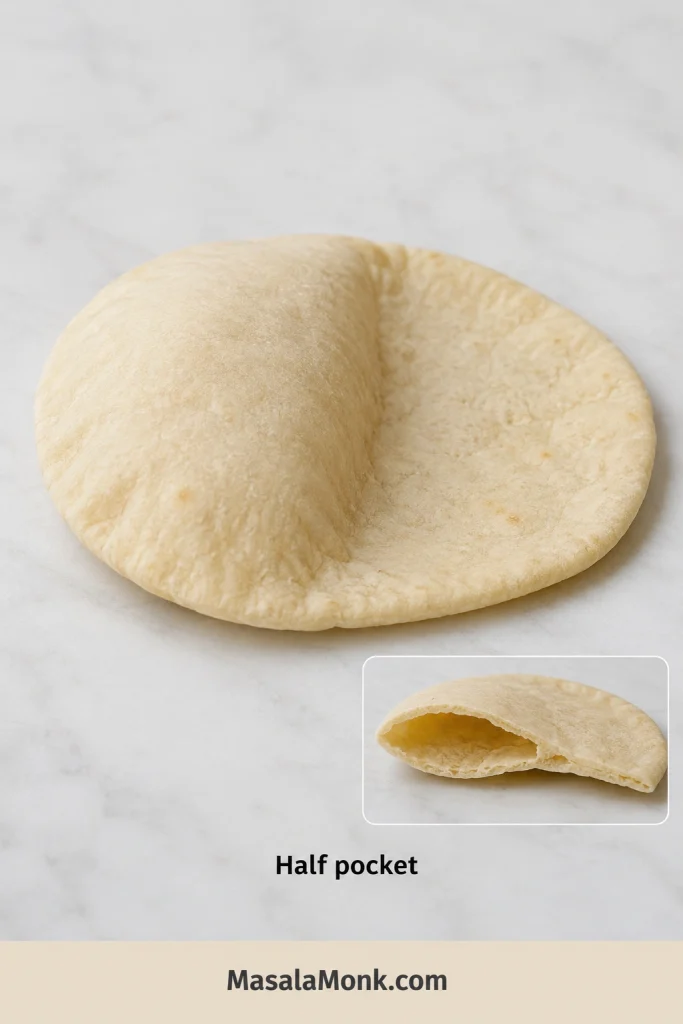
Pita with one side inflated and the other side flat, plus a cut view showing partial internal separation.
One inflated side proves the dough can trap steam; inspect thickness and pan contact before blaming the yeast.

When the outside browns before the center cooks

Strong color with a damp or dense center means the exterior set before heat reached the thicker interior. Lower excessively aggressive heat, roll the next round more evenly or correct both problems together.
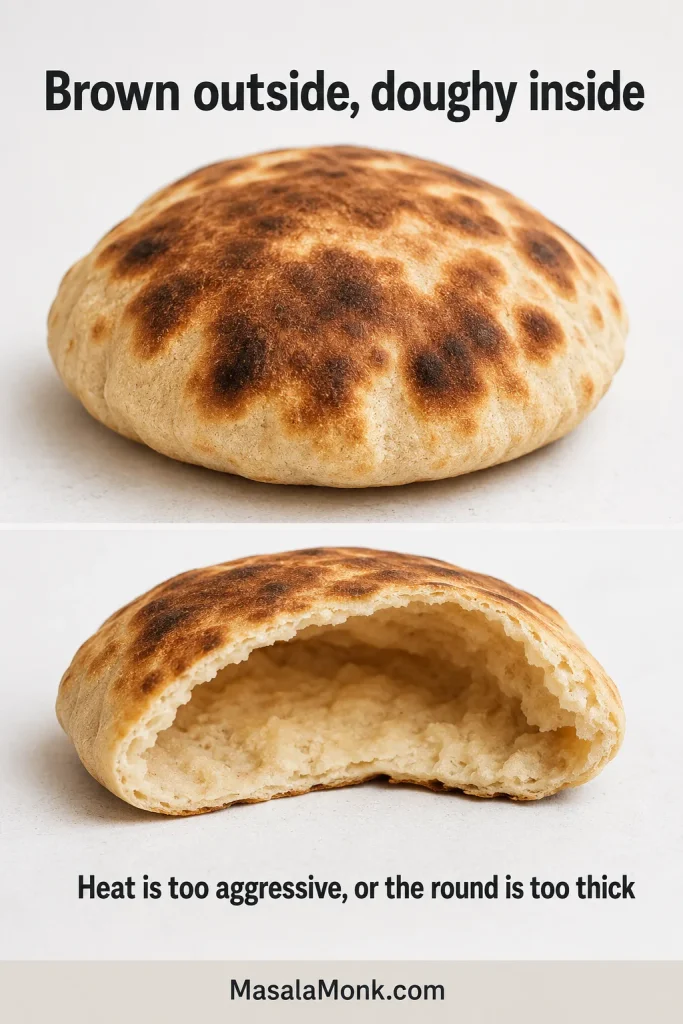
The same pita shown with strong exterior browning and a dense, damp center in its thicker section.
Exterior color is not proof the center is cooked; thickness controls whether heat reaches the middle in time.

When the dough is too dry

Dry dough may rise in the bowl but resist every pass of the rolling pin. Weigh the ingredients, allow the hydration rest and avoid adding large handfuls of flour simply to make the dough easier to handle.

When steam finds a way out

A small tear, dry crack, folded edge or stretched patch releases steam before the two sides separate. Loosen stuck dough gently instead of pulling it from one edge.
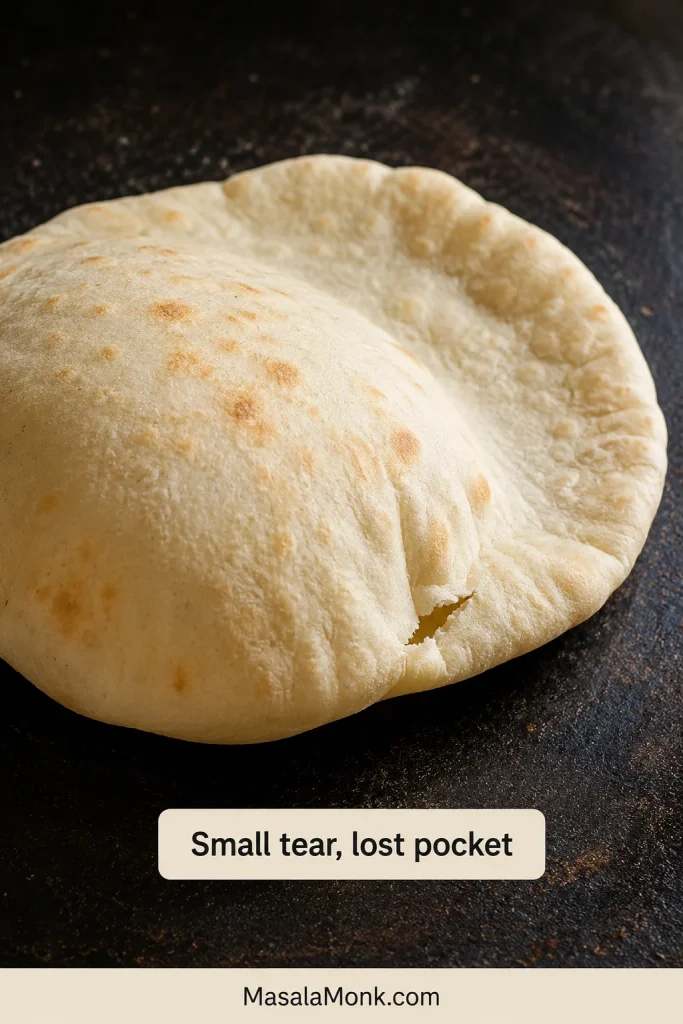
Partly inflated pita with a small tear near the rim and a flatter section beyond the damaged area.

When puffed pita turns hard

Hard pita usually points to excess cooking, overly dry dough or a delay before covering. Remove the next bread once it has puffed and set, then place it beneath a clean dry towel immediately.
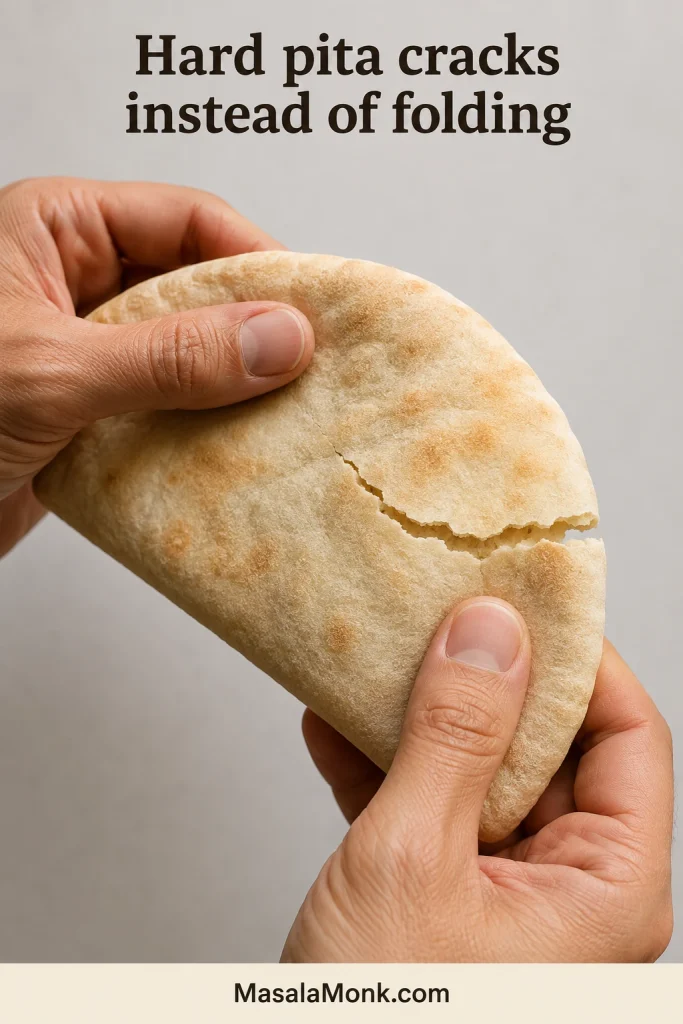
Two hands bending a dry pita as a crack opens across its pale surface.
The first crack during a gentle bend is a better dryness warning than color alone.

A pocketless pita still earns its place at the table: fold it while soft, toast it into chips or tear it into salads and dips.
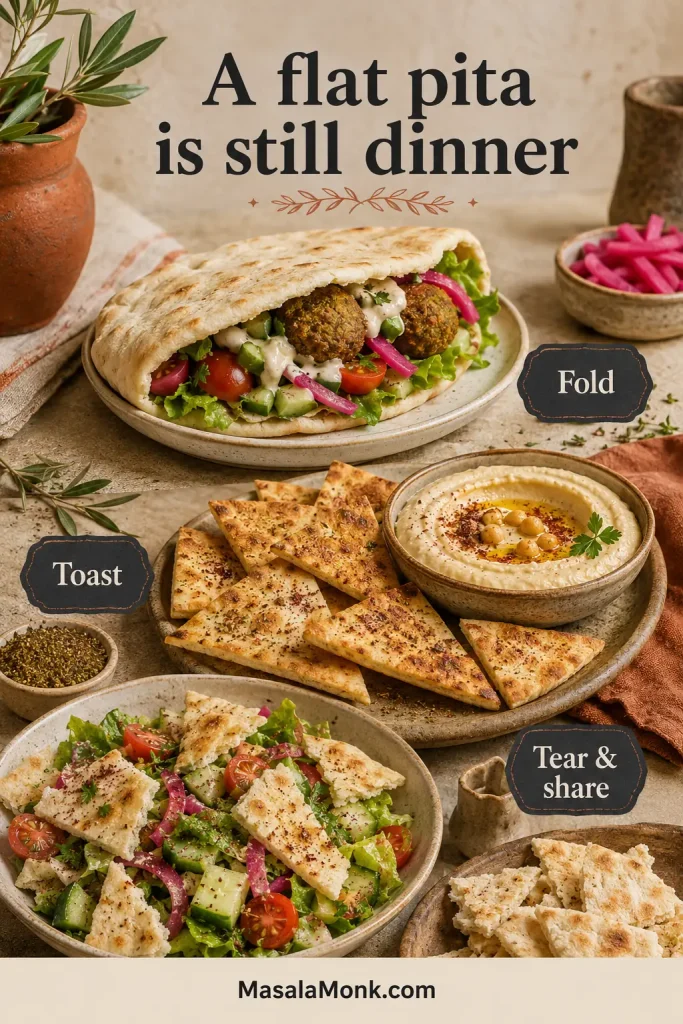
Three uses for pocketless pita: folded around filling, toasted into chips and torn for dips or salad.

Recheck the three stages most likely to change the next batch: dough texture, rolling thickness or surface heat.

Back to recipe cardBack to the top ↑

Keep Pita Soft, Then Store or Freeze It

The final texture is decided during the first few minutes after cooking. Lift the towel after a minute or two and the stack should feel warm, supple and lightly steamy, with the dry surfaces beginning to soften.
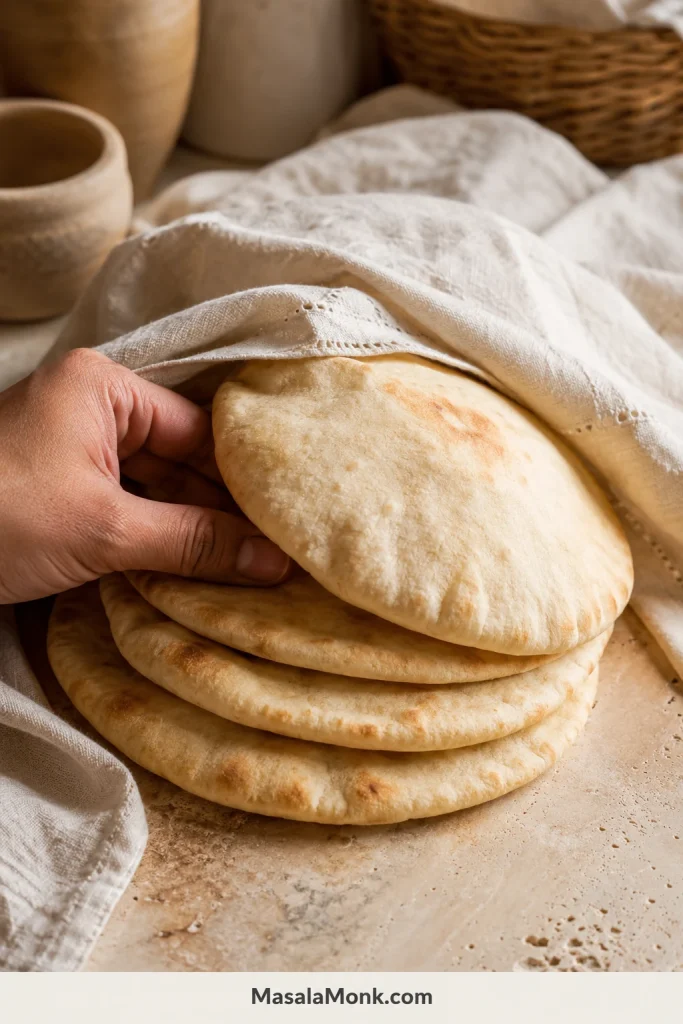
Freshly cooked pita being placed beneath a light towel over a warm stack of bread.
Use a dry towel, not a damp one; shared warmth softens the surface without making the stack wet.
  • Place each cooked pita directly beneath a clean dry towel.
  • Stack the pitas loosely so their shared warmth softens the surfaces.
  • Open the towel slightly once the completed stack stops steaming heavily.
  • Cool completely before sealing the bread in a bag or container.

Pita is one of those breads worth freezing on purpose. A brief reheat restores it more successfully than several days in the refrigerator.

Store at room temperature or freeze

Store completely cooled pita in an airtight bag or container at room temperature for up to two days for the best texture. Refrigeration may delay mold, but it also makes pita stale and firm more quickly. Freeze the bread instead when it will not be eaten within two days.

  1. Cool the pita completely.
  2. Place parchment between the rounds.
  3. Slide the stack into a freezer bag.
  4. Remove excess air and seal tightly.
  5. Freeze flat for up to three months.

Freezing the stack flat and separating the rounds prevents them from sticking together, so one pita can be removed without thawing the rest.
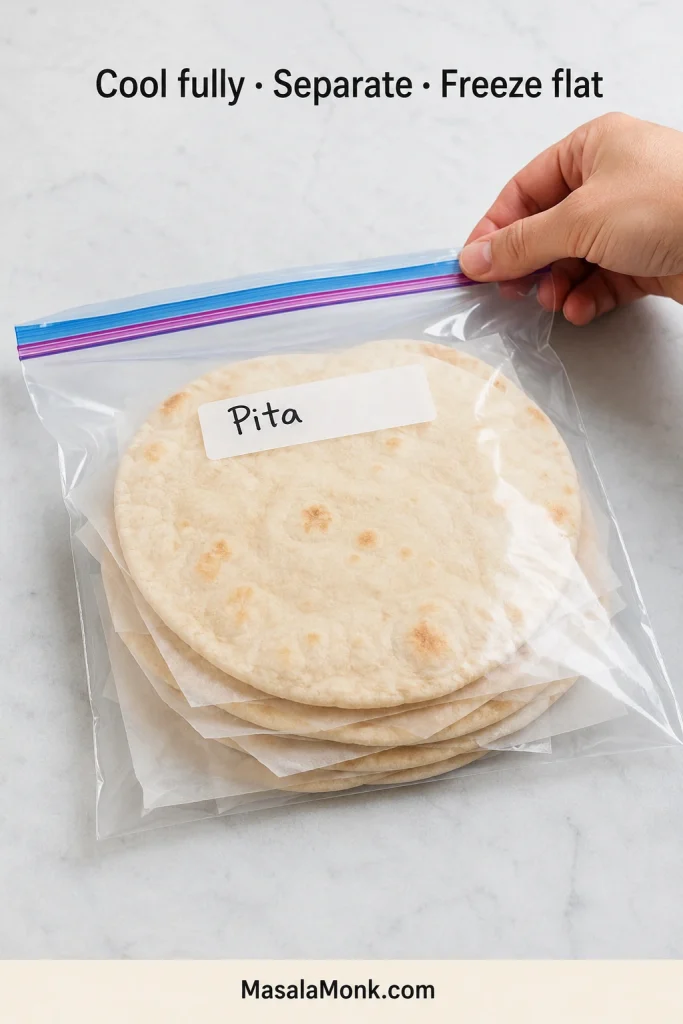
Cooled pita stacked with parchment between each bread inside a flat transparent freezer bag labeled Pita.

Reheat for the texture you want

  • Soft for opening and filling: Add a few drops of water to a skillet, add the pita, cover for 15–20 seconds, then uncover and heat for about 20 seconds per side.
  • Lightly browned: Heat in a dry skillet for about 20–30 seconds per side.
  • Several pitas together: Wrap the stack in foil and heat at 350°F / 175°C for about 5–8 minutes.
  • A fast single pita: Wrap it in a lightly damp towel and microwave for 10–20 seconds.
  • Crisp pita: Heat uncovered in the oven or air fryer, checking frequently.
  • Straight from frozen: Use gentle steam in a covered skillet or foil-wrapped oven first, followed by a short dry finish.

Begin with the shortest reheating time. Another ten seconds is easier to add than moisture is to put back.
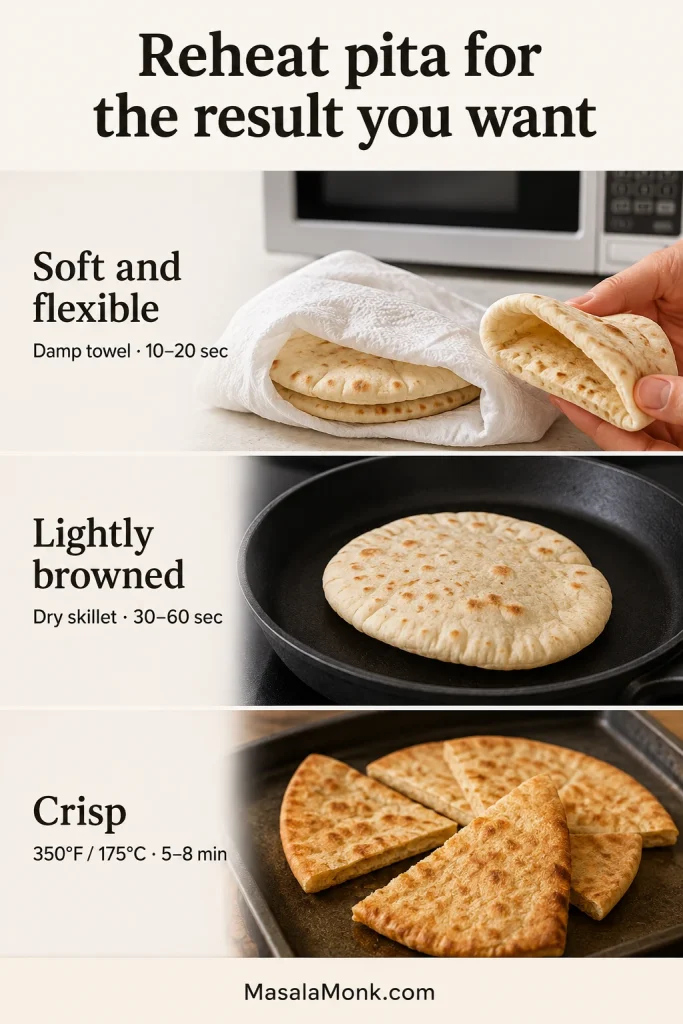
Three reheating methods showing pita softened under a damp towel, browned in a skillet and baked into crisp wedges.
Reheating is a texture decision: add moisture for flexibility, use dry heat for browning and extend dry heat only for crispness.

How to Open a Pita Pocket Without Tearing It

Let the pita rest beneath the towel until it is warm and comfortable to handle. Cut the round in half with a sharp knife instead of pulling it apart from the edge.

Along the cut edge, you should see two thin walls with a clear space between them. Ease the sides open with your fingers. A small blunt knife can loosen one lightly attached patch, but do not force a section that never separated.
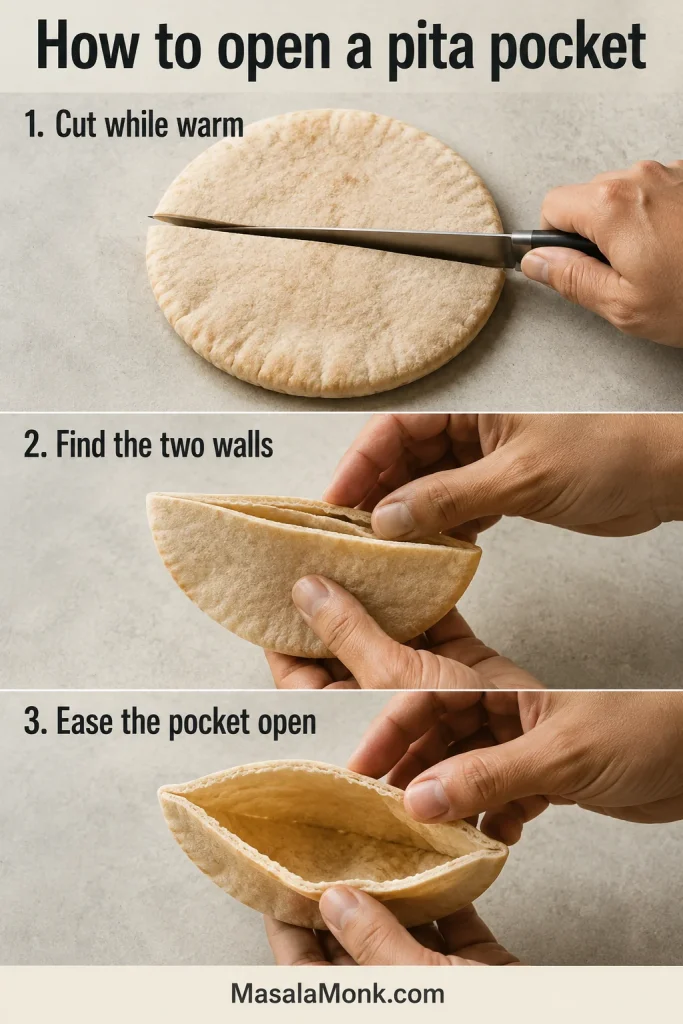
Three-step sequence showing a warm pita cut in half, its separated walls identified and the pocket gently opened.

When the cut edge separates cleanly beneath your fingertips, you know the pocket formed: two soft walls, open and ready to fill.

Partially puffed pita can still hold a compact filling. Use the open portion, fold the whole round around the food or cut it into wedges.

What to Serve With Homemade Pita

Fresh pita needs very little. Tear one while it is warm and drag it through hummus or olive oil, or cut it open while the bread is still soft enough to bend around the filling. Stuffing the bread rather than folding it? First see how to open a pita pocket without tearing it.

Fill or fold

Keep the filling compact when using a pocket. A thicker Greek-style pita is better suited to folding around a large gyro-style meal.
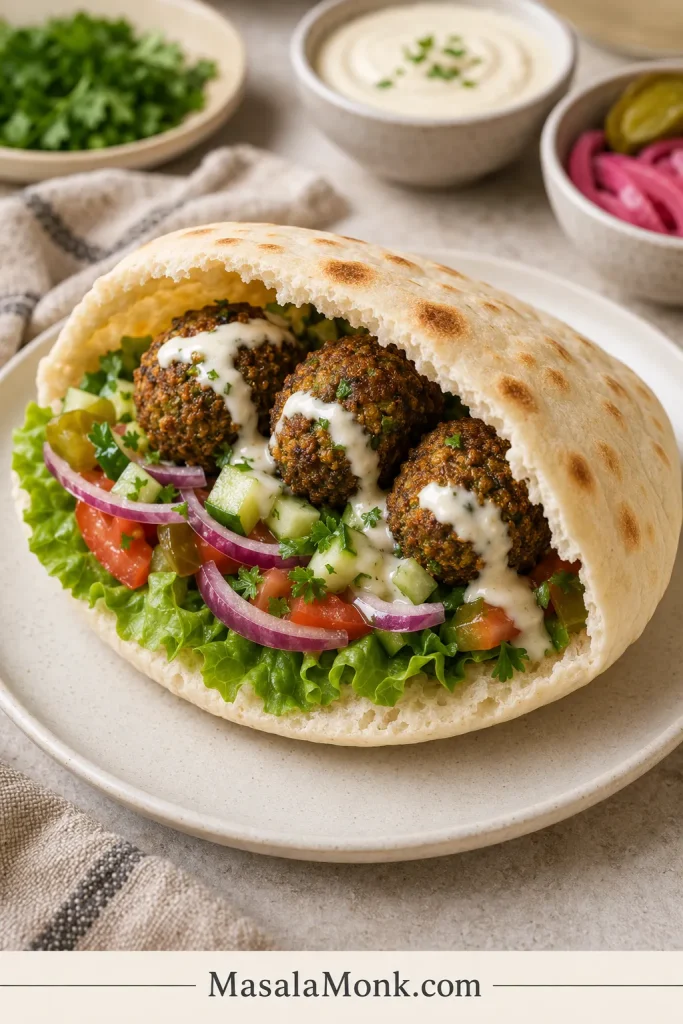
Pita pocket filled with falafel, cucumber, tomato, herbs, pickled turnip and tahini sauce.
Place sturdy fillings first, then add salad and sauce so pressure stays away from the cut edge.

For more sharpness, add a small spoonful of tangy amba sauce. Its sour mango, turmeric, chili and fenugreek work especially well with falafel, chickpeas, roasted vegetables, eggs and shawarma-style fillings.

Tear and share

  • Hummus
  • Baba ganoush
  • Labneh with olive oil and herbs
  • Olive oil with za’atar
  • Fresh tabbouleh with parsley, tomato, mint and lemon as part of a mezze plate

Use leftover pita

  • Cut it into wedges for pita chips
  • Toast pieces for fattoush
  • Spread a whole round lightly with pizza sauce, add cheese or vegetables and bake until the edges crisp
  • Toast and crush it over soup or salad

Pita Bread Variations and Scaling

Make the base recipe once before changing it. Once you know how the dough should feel, small variations become much easier to judge.

Flour variations

Use all-purpose flour as the baseline. Bread flour and partial whole wheat can work with small hydration adjustments, while fully whole-wheat pita needs a separately balanced formula.
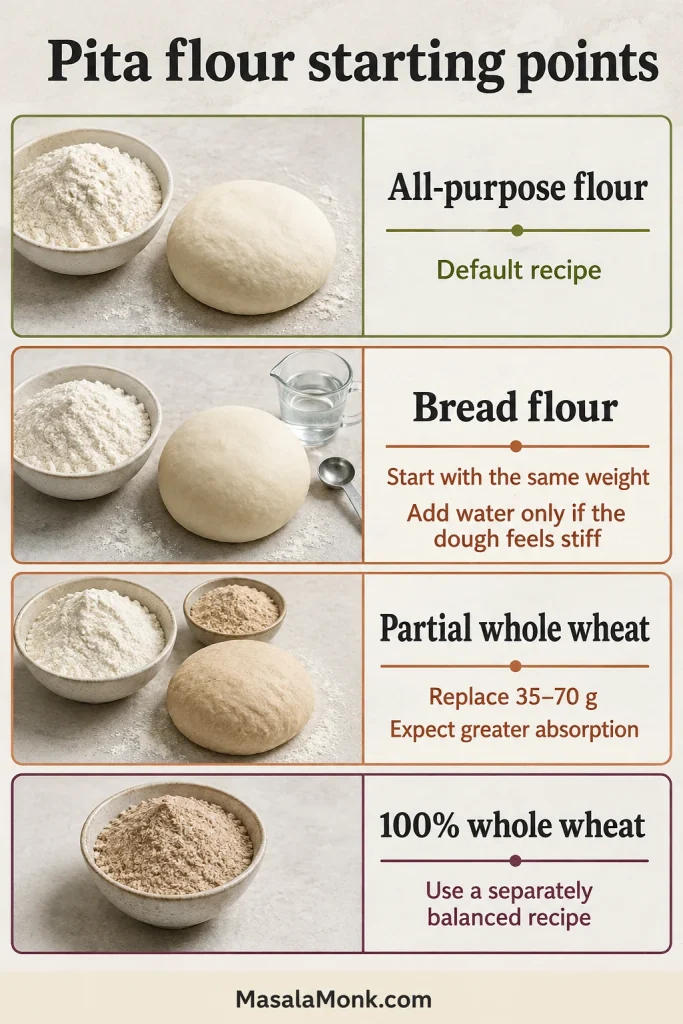
Guide showing all-purpose flour, bread flour, partial whole wheat and fully whole-wheat flour with different pita dough adjustments.

Bread flour gives a slightly chewier pita; replace the all-purpose flour with the same weight. After the hydration rest, add a teaspoon or two of water only when the dough feels noticeably firm.

To make part-whole-wheat pita, replace 35–70 g of the all-purpose flour with fine whole-wheat flour. That gives roughly 10–20% whole wheat, with a nuttier flavor and slightly greater water absorption. A 100% whole-wheat pita needs its own water range, resting strategy and handling guidance.

Make-ahead starting point

An overnight schedule works better with less yeast, so reduce the instant yeast to about 2 g / ⅔ teaspoon. Knead the dough as usual, leave it covered at room temperature for 20–30 minutes, then refrigerate for about 8–16 hours.

The next day, let the dough stand until relaxed and no longer refrigerator-cold—often 45–75 minutes—before dividing. Refrigerator temperature and yeast activity vary, so judge its softness instead of relying only on the clock.

Scale the batch

Scale every ingredient by weight and keep each dough ball close to 80 g. The oven temperature remains the same. For a double batch, use a larger bowl, roll in small waves and pause when the baking surface begins losing heat.

Changes that need more than a simple substitution

No-yeast yogurt flatbread, Greek pocketless pita, sourdough pita, gluten-free pita and 100% whole-wheat pita behave differently enough to need separately balanced recipes. Removing the yeast or replacing the flour in this dough will not reliably produce the same pocket.

Baker’s percentages for scaling

Flour 100% · Water 69.4% · Salt 2.2% · Instant yeast 1.4% · Sugar 1.7% · Olive oil 3.9%

Frequently Asked Questions

Puffing, texture and equipment

Why did my pita not puff?

The usual causes are insufficient surface heat, uneven thickness, dry dough or a tear that releases steam. Use the troubleshooting guide to match what you saw to the next adjustment.

Why did my pita turn hard or crisp?

Pita usually turns hard because it was cooked too long, made from overly dry dough or left uncovered after cooking. Remove it once it has inflated and set, before deep browning, and place it beneath a clean towel while warm.

Can I make pita without a baking stone?

Yes. Preheat a heavy uncoated baking sheet upside down to create a flat loading surface. It may need more recovery time between batches than a stone or steel.

Make-ahead, ingredients and pita styles

Can pita dough be made ahead or frozen?

For make-ahead dough, use the reduced-yeast starting point in the variations section, then let the refrigerated dough soften and relax before dividing. Baked pita freezes more predictably than raw dough, so freeze the cooked and fully cooled bread unless you already know how your dough behaves after thawing.

Can I omit the sugar or olive oil?

Yes. The pocket can still form without either ingredient. With no sugar, fermentation and browning may be slower. Without oil, the pita will be leaner and may feel less tender after cooling.

Is pita bread the same as naan?

No. Pita is rolled thin and heated quickly so steam can separate it into two sides. Naan is usually softer, thicker and more enriched, often with yogurt, milk, butter or ghee. Both are flatbreads, but they are made for different textures.

Is Greek pita the same as pocket pita?

No. A Greek-style pita is generally thicker, softer and deliberately pocketless. It is normally cooked in a skillet and folded around fillings. Pocket pita is rolled thinner and exposed to intense heat so steam can push the two sides apart.


The First Pita Is Allowed to Teach You

The first round may rise cleanly, or it may show that the surface needs another ten minutes. Either result tells you something before the other seven reach the heat.

Keep the remaining dough covered, adjust one thing and try again. When everything lines up, the change happens in seconds: the bread lifts, the pocket travels from one edge to the other, and the towel begins filling with warm, soft pitas.

How did your first pita behave—full balloon, half pocket or stubbornly flat—and were you using an oven, OTG, skillet or tawa?

Roll evenly. Heat fully. Cover quickly. The pocket may be the dramatic part, but those three quiet decisions are what make it possible.
Back to recipe cardBack to the top ↑

Posted on Leave a comment

Salt Bread Recipe (Shio Pan): Crispy-Bottomed Buttery Rolls

Golden crescent-shaped salt bread rolls on a cooling rack, with one roll torn open to show the crumb and another turned over to show the browned underside.

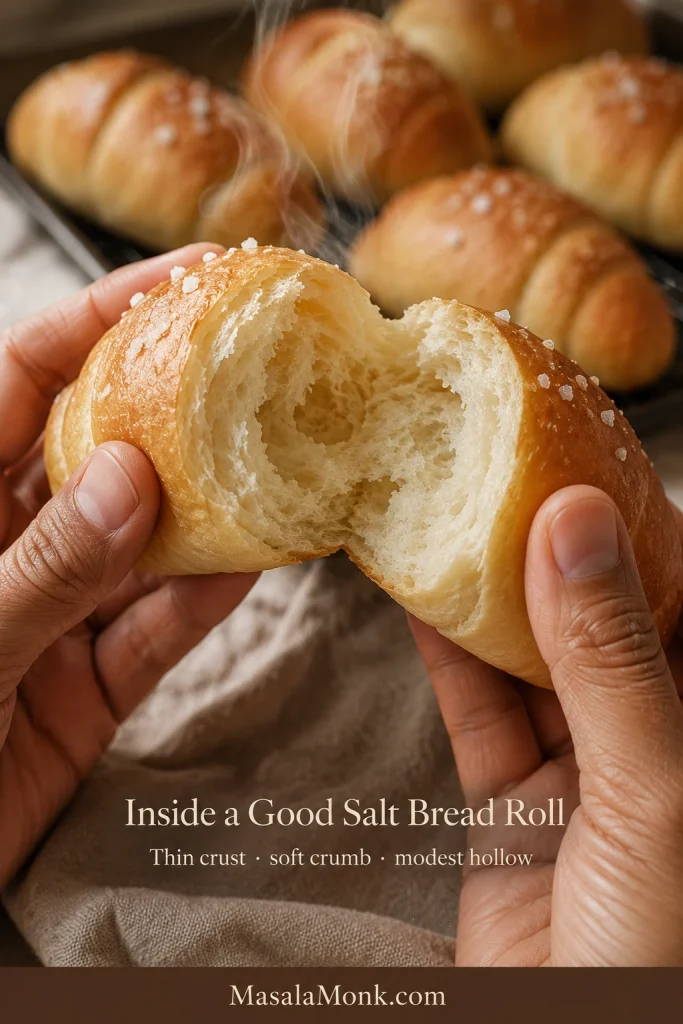
The first warm roll rarely waits for the rest to reach the table. Its underside is deep golden and lightly crisp, almost fried in the butter that escaped during baking. Pull it apart and the crumb stretches before it tears, revealing a small hollow where the cold butter used to be.

That contrast is the point of this salt bread recipe: a thin shell, a butter-crisped base, a soft middle with a gentle chew, and enough salt to sharpen the richness without turning the bread harsh.

Called shio pan in Japan and commonly known as sogeum-ppang in Korea, salt bread resembles a croissant but is much more approachable at home. It asks for patience more than advanced pastry skill: there is no lamination, and a short rest usually solves dough that resists the rolling pin.

Keep one rule in mind: the butter may soften during proofing, but it should remain wrapped inside the dough until the rolls begin rising in the oven. Once it melts, steam opens the hollow and some butter slips beneath the bread to crisp the base. A little butter on the tray is not defeat.

Salt bread feels special enough to tear open beside coffee, yet simple enough to serve with soup or turn into a small breakfast sandwich. What looks like a bakery showpiece is really an everyday pleasure: warm bread, melted butter, a little salt and an underside worth turning over to inspect.

Hands holding a freshly torn salt bread roll with a pale soft crumb, thin crust and small hollow, with more rolls blurred in the background.
Once the roll is torn open, look for bread-like softness rather than croissant layers: a thin crust, pale crumb and modest butter pocket.

Start here

Make the Crisp-Bottomed Bakery Style First

This is the classic version to make first and the clearest place to learn how the dough, butter and hot tray work together before exploring softer milk-bread or no-knead variations.

  • Use 200 g water first; add the reserved 10 g only after the dough has rested and begun developing strength, and only when it still feels unusually firm.
  • Keep the final proof moderate; the rolls should become puffy without a greasy sheen or butter seeping onto the tray.
  • Lift first, butter second; let the rolls begin expanding before a substantial butter pool appears, then bake until the underside is deeply browned.

For a softer roll that stays tender longer, use a separate tangzhong- or egg-enriched version.

Most of the time is hands-off. Pay closest attention when deciding on the final water, rolling the long triangles and judging the proof; uneven first crescents and a modest hollow can still make excellent salt bread.

Make it now

Salt Bread Recipe (Shio Pan)

This eggless dough uses water and milk powder rather than fresh milk. It makes eight rolls with crisp buttered bases and soft, lightly chewy centres. Use the gram measurements for the most dependable dough; cup and spoon measures are included for convenience.

Recipe at a Glance

  • Yield: 8 rolls
  • Preparation and shaping: About 55–75 minutes, including short rests
  • Skill level: Beginner-friendly; allow time for shaping
  • First rise: About 60–90 minutes
  • Final proof: About 60–120 minutes; begin checking at 60
  • Bake: About 17–20 minutes; begin checking at 15
  • Total time: About 3¾–5½ hours

Ingredients

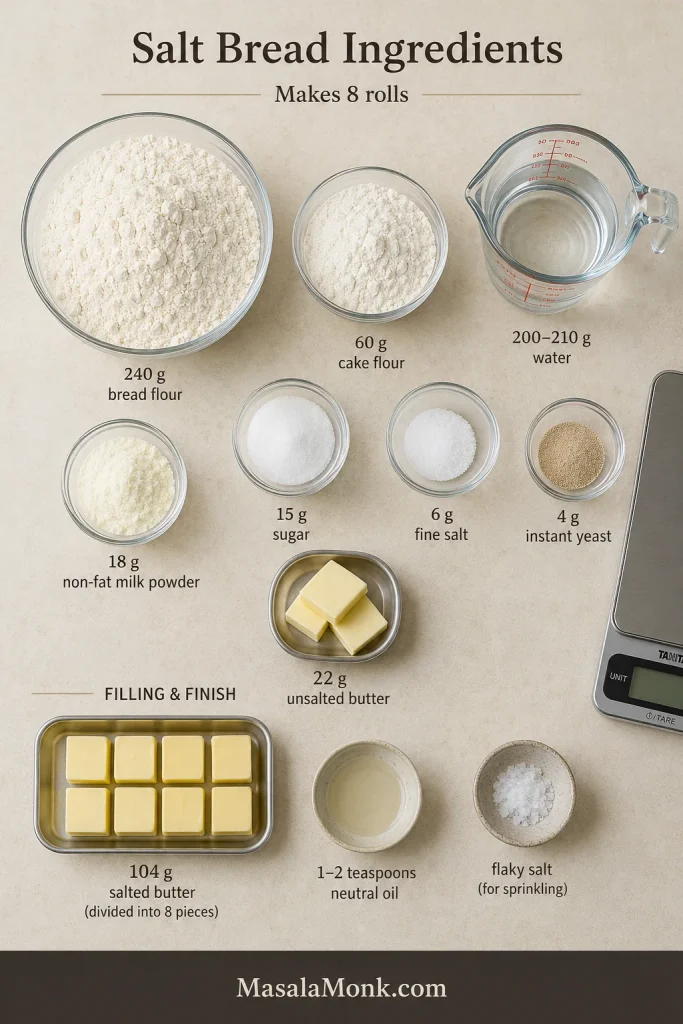
Overhead ingredient board showing bread flour, cake flour, water, milk powder, sugar, salt, instant yeast, butter, neutral oil and flaky salt.
Weigh the salt bread ingredients before mixing so the flour blend, water, dough butter and 13 g filling batons stay balanced from the start.

For the Dough

  • 240 g bread flour (about 2 cups, spooned and levelled)
  • 60 g cake flour (about ½ cup)
  • 18 g non-fat milk powder (about 2½ tablespoons)
  • 15 g granulated sugar (about 1 tablespoon plus ½ teaspoon)
  • 4 g instant yeast (about 1¼ teaspoons)
  • 6 g fine sea salt (about 1 teaspoon, depending on crystal size)
  • 200–210 g water
    Start with 200 g / 200 ml (about ¾ cup plus 1½ tablespoons); reserve the final 10 g / 10 ml (about 2 teaspoons).
  • 22 g unsalted butter, softened but not greasy (about 1½ tablespoons)

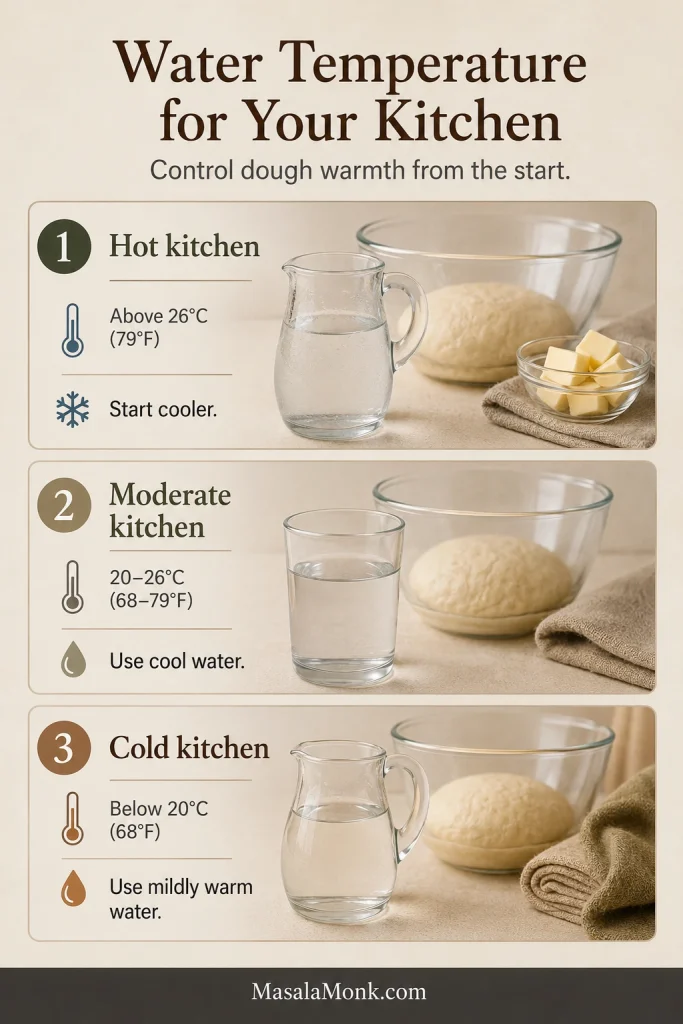
Choose the water temperature for your kitchen: chilled in a hot room, cool in a moderate room or mildly warm in a cold room. The goal is a finished dough near 24–26°C / 75–79°F.

For the Filling and Finish

  • 104 g cold salted butter, divided into eight 13 g pieces, about 3.7 oz total
  • 1–2 teaspoons neutral oil, for the rising bowl and a bare metal baking sheet
  • Water for lightly misting the shaped rolls
  • About ½ teaspoon flaky sea salt, or enough for a restrained finish
  • Optional: butter collected from the hot tray, for brushing over the baked rolls

The 13 g filling is deliberate: it is intended to create a modest hollow and help brown the base without making cavity size the main measure of success.

Essential Equipment

  • Digital kitchen scale
  • Stand mixer with dough hook, or a clean work surface for hand kneading; the full hand method appears beneath the main instructions
  • Large bowl and cover for fermentation
  • Bench scraper or flexible dough scraper
  • Rolling pin
  • Large rimmed, light-coloured metal baking sheet, about 33 × 46 cm / 13 × 18 inches
  • Wire cooling rack

Helpful, but not required: an instant-read thermometer, oven thermometer, fine-mist spray bottle, pastry brush and ruler. Without a thermometer, the finished dough should feel cool to neutral against the inside of your wrist—not distinctly warm.

Instructions

Prepare and Mix

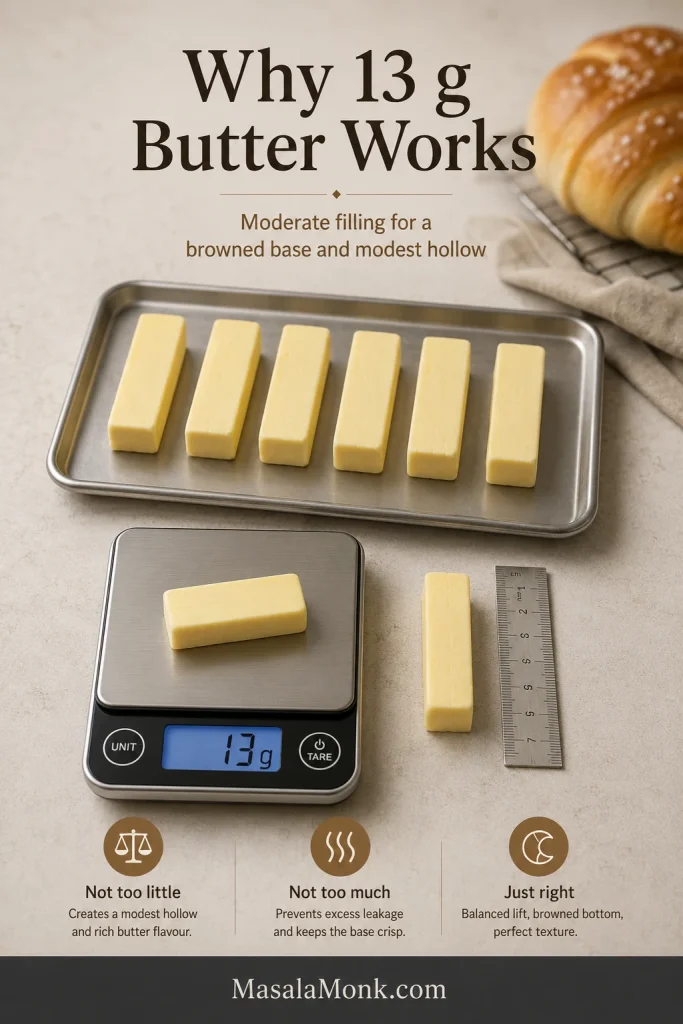
  1. Prepare the filling butter. Divide it into eight 13 g / 0.46 oz pieces and shape short batons roughly 4 cm / 1½ inches long. Aim for 13 g each; the batons do not need to look identical. Refrigerate until firm but not frozen hard.
Butter batons arranged on a tray, with one piece on a digital scale reading 13 g and another piece beside a ruler.
The 13 g butter baton is intentionally moderate; it encourages a small hollow and browned base without turning the tray greasy.
  1. Begin the dough. Place the bread flour, cake flour, milk powder, sugar and instant yeast in the mixer bowl. Add 200 g water at the temperature suited to your kitchen and mix on low until no dry flour remains. Cover and rest for 15 minutes.
  2. Add salt, build strength and decide on the final water. Knead with the fine salt on low to medium-low for about 5 minutes. If the dough still feels unusually firm, add the reserved water 2–3 g at a time, allowing each addition to disappear before adding more. Do not worry if the dough still looks sticky and uneven.
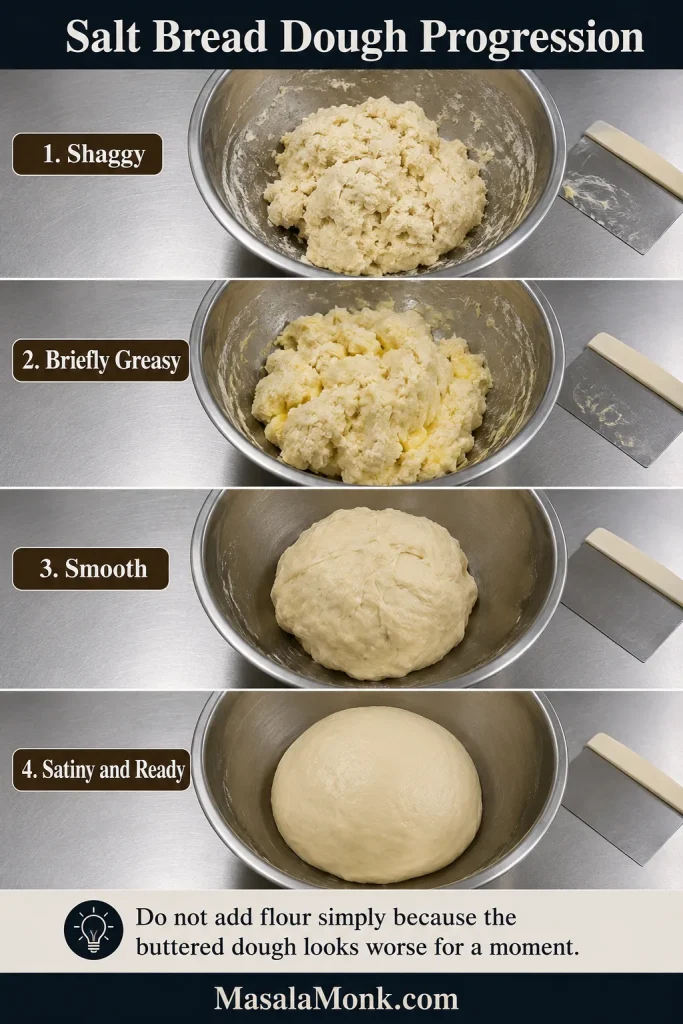
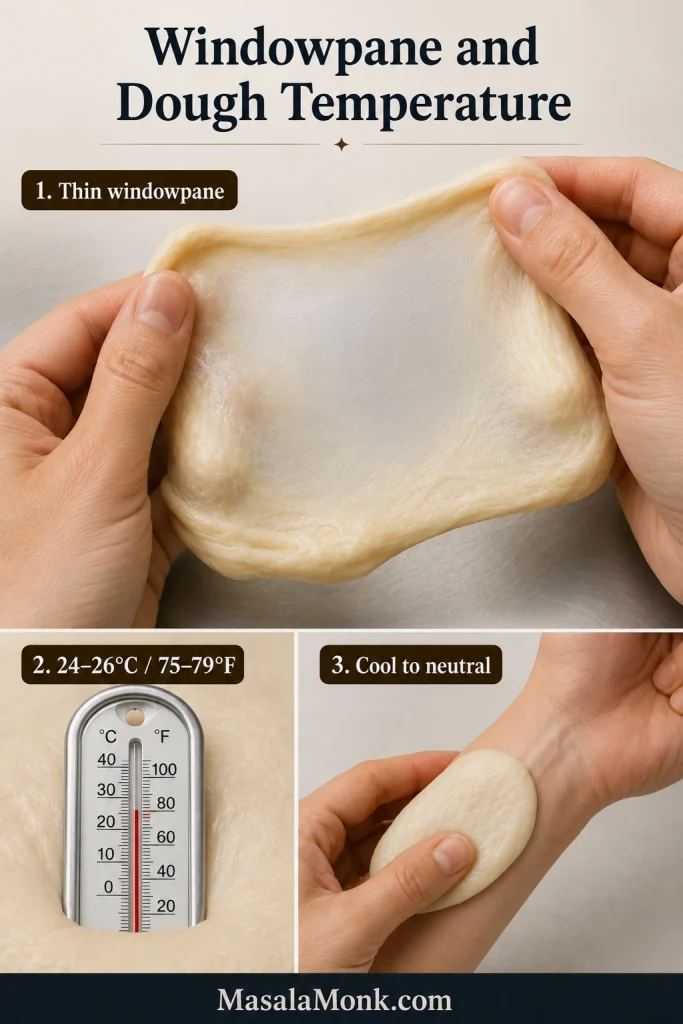
  1. Work in the dough butter. Add the softened butter gradually. The dough may briefly look greasy and broken; keep kneading instead of adding flour. Continue for 7–10 minutes, until smooth, elastic and able to pass a windowpane test: a small piece stretches into a thin film before tearing. Once it turns smooth again, the hardest mixing stage is over.
  2. Check the temperature. A useful final dough temperature is 24–26°C / 75–79°F. If it is much warmer, cover and refrigerate for 10–15 minutes. Without a thermometer, it should feel cool to neutral against your wrist, not distinctly warm.
Four-stage board showing salt bread dough changing from shaggy to briefly greasy, then smooth, then satiny and ready.
At first the dough looks shaggy; after butter is added, it may briefly look worse. Keep kneading until it turns smooth, satiny and elastic.

Rise, Divide and Shape

  1. Let the dough rise. Place it in a lightly oiled bowl, cover and leave at about 24–26°C / 75–79°F until noticeably fuller, close to doubled and lighter when you lift an edge, commonly 60–90 minutes.
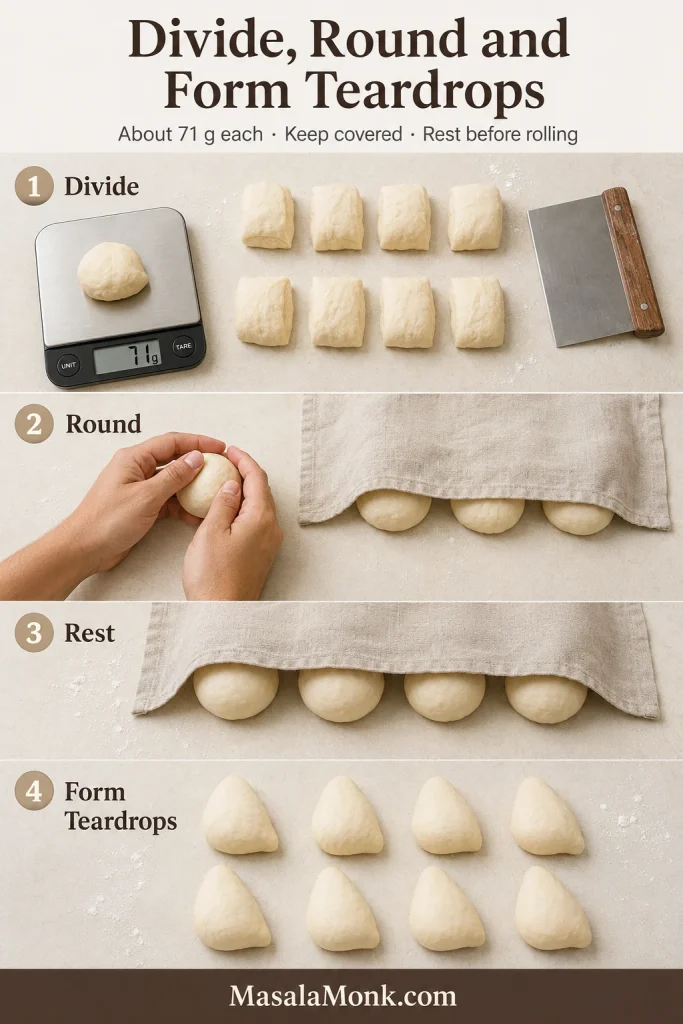
  2. Gently deflate, divide and round. Turn out the dough and press out only the largest gas pockets; do not flatten it aggressively. Divide into eight pieces of about 70–72 g / 2.5 oz, shape into balls and cover. Rest for 15 minutes, keeping pieces covered whenever they are waiting.
  1. Form tapered pieces. Roll each ball into a short carrot or teardrop about 10–12 cm / 4–5 inches long. Cover and rest another 10 minutes if the dough pulls back strongly.
Four-stage guide showing dough divided into eight portions, rounded by hand, rested under a cloth and shaped into teardrops.
After the first rise, divide evenly, keep each piece covered and shape short teardrops before rolling them into long triangles.
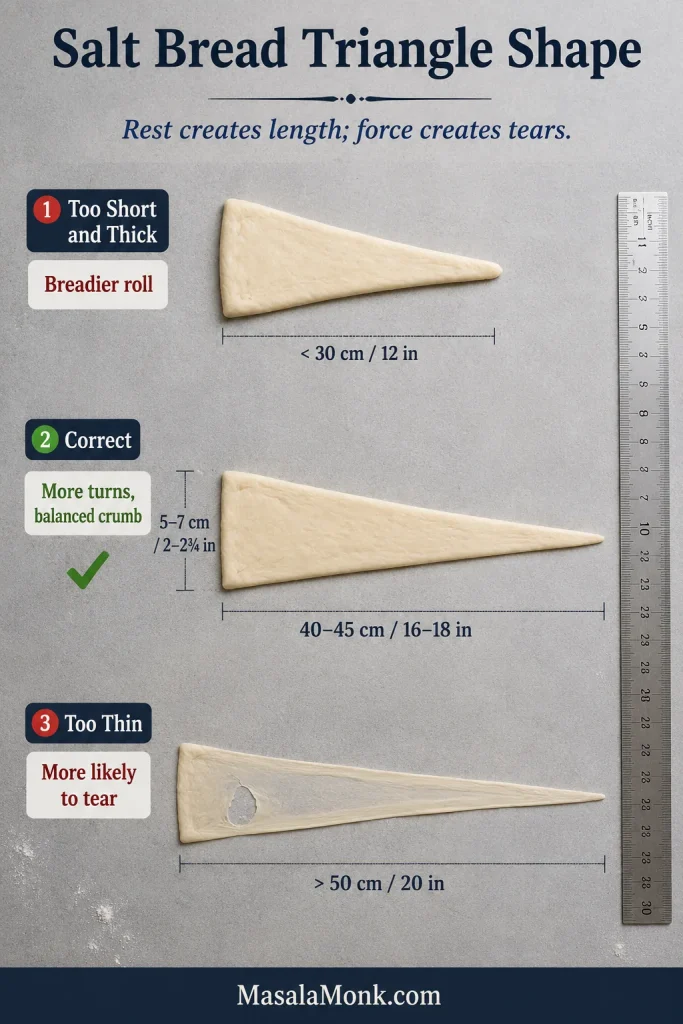
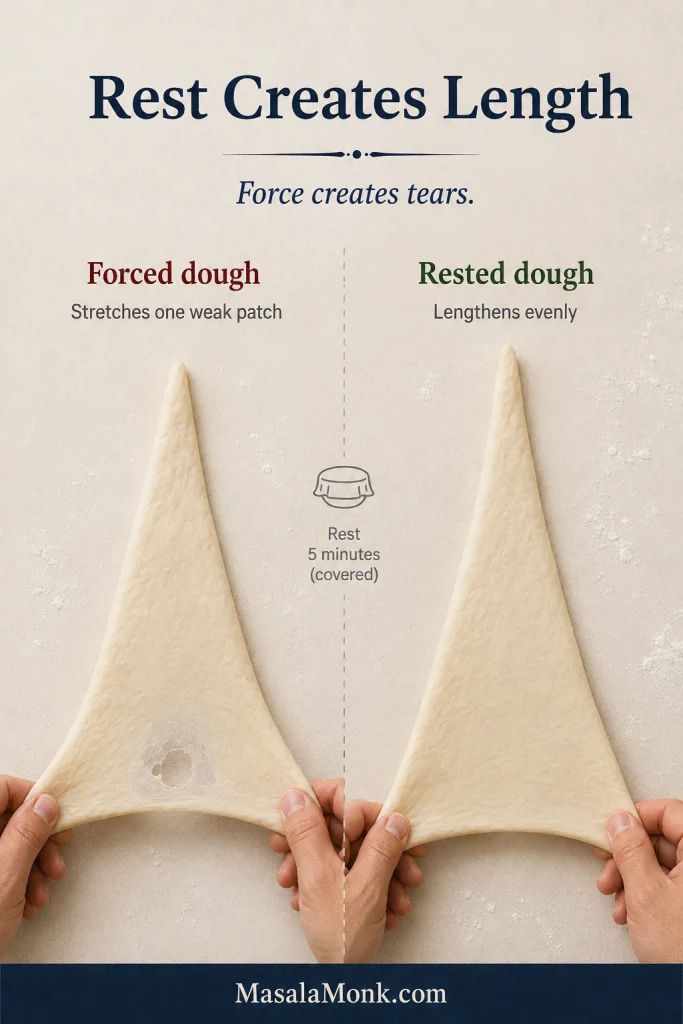
  1. Roll long triangles. Aim for 40–45 cm / 16–18 inches long and 5–7 cm / 2–2¾ inches wide at the base. Use only enough flour to prevent sticking. If the dough pulls back, cover it for five minutes before continuing.
    Why the length matters: A longer triangle creates more turns; a short, thick one produces a breadier roll, while translucent dough is more likely to tear. Rest creates length; force creates tears. Shaping usually feels easier by the third or fourth roll.
Comparison board showing a short thick dough triangle, a correct long triangle with measurements and an over-thin triangle with a tear.
For classic salt bread shaping, length matters more than force. A rested 40–45 cm triangle gives more turns without thin, tear-prone patches.
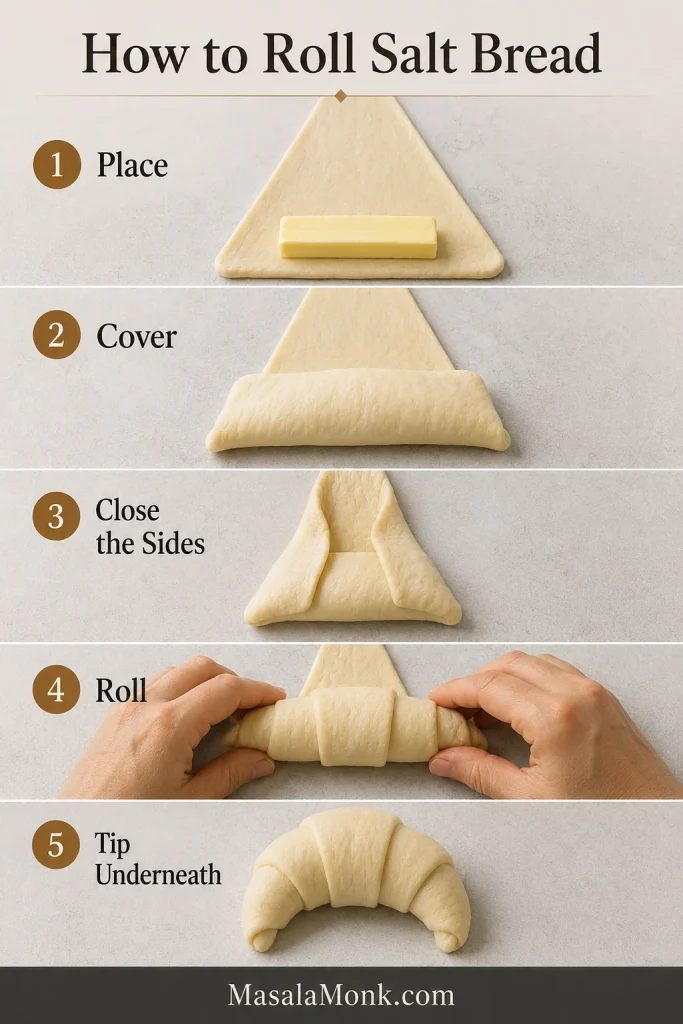
  1. Enclose the butter. Place one cold baton across the broad end, leaving enough dough at both sides to cover it. Roll forward with light tension, keep the butter centred and finish with the pointed tip beneath the roll.
Five-step salt bread rolling guide showing butter placed on the dough, covered, sealed at the sides, rolled and finished tip-side down.
Before rolling, cover the butter completely and close the sides gently; then finish with the final dough tip underneath.

Proof and Bake

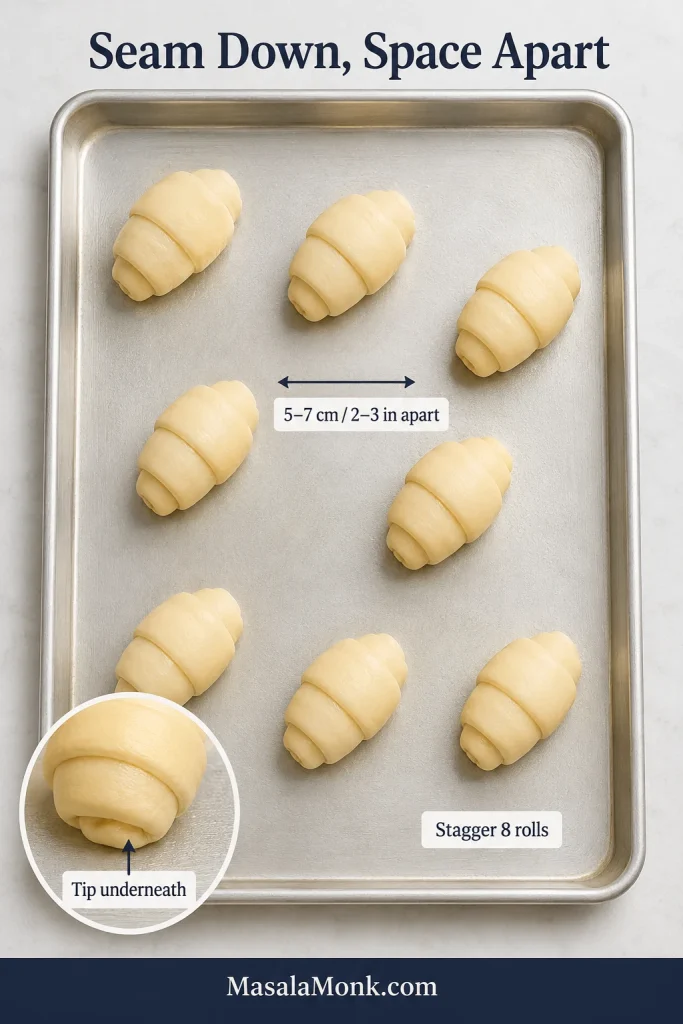
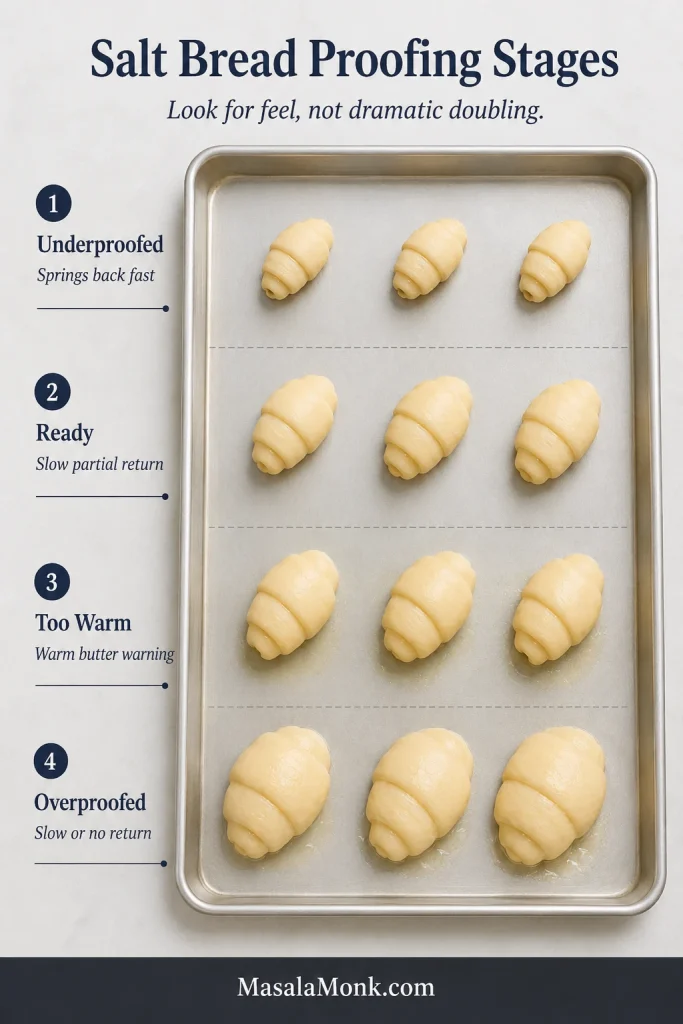
  1. Arrange and proof. Lightly oil a bare 33 × 46 cm / 13 × 18-inch metal sheet, or use parchment for gentler browning. Stagger the rolls 5–7 cm / 2–3 inches apart, cover and proof at 23–25°C / 73–77°F. Begin checking at 60 minutes. Ready rolls feel lighter and softer, jiggle gently and return slowly and partly after a light press; dramatic doubling is unnecessary.
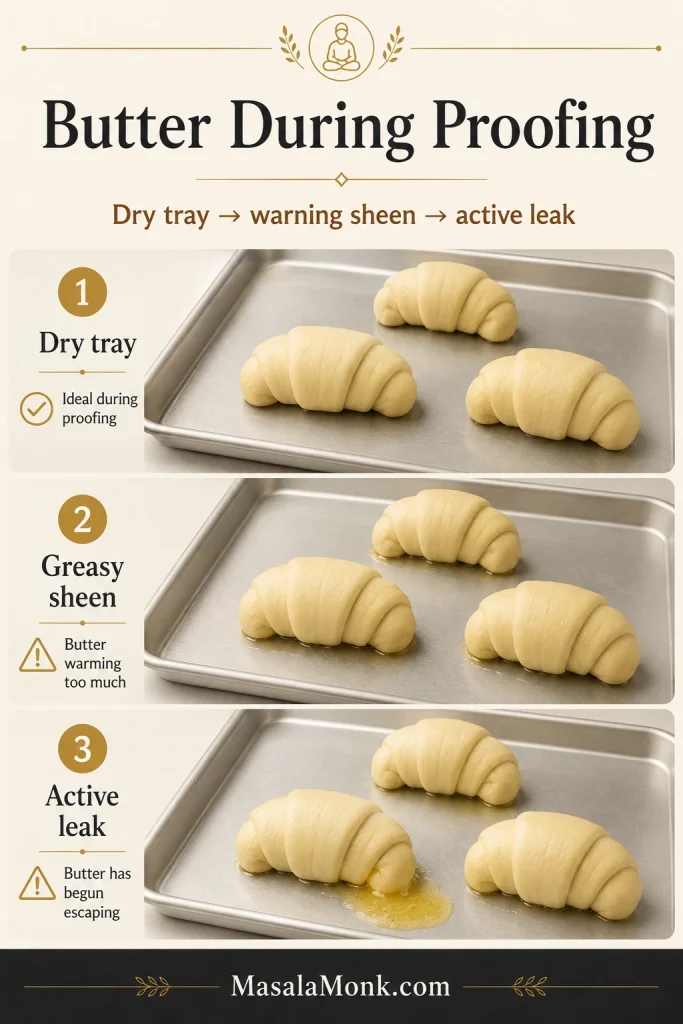
    Butter warning: The tray should ideally remain dry during proofing. A faint greasy sheen means the butter is becoming too warm; visible puddling or butter running from an end means it has begun escaping.
Eight unbaked crescent rolls spaced on a light metal baking tray with labels for tip underneath, spacing and staggered arrangement.
Before proofing, check two things: the tip should sit underneath, and the rolls need enough space to expand without crowding.
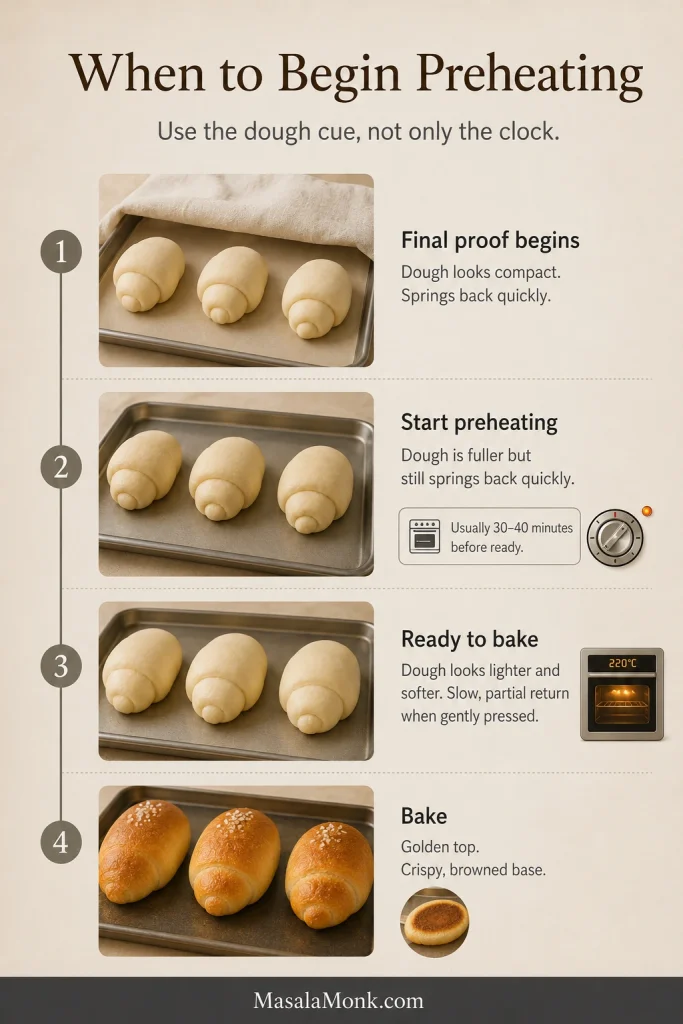
  1. Preheat while the rolls finish proofing. When they are visibly fuller but still spring back quickly—usually 30–40 minutes before readiness—set a rack in the middle or slightly below. Heat to 220°C / 425°F conventional or 205°C / 400°F fan.
  2. Mist and salt. Once the rolls are ready and the oven is fully heated, mist them lightly so the surfaces look evenly damp, not wet. Add a restrained pinch of flaky salt. If the filling butter tastes distinctly salty, use only a few flakes—or skip the topping on the first batch.
  1. Bake. Load the tray and immediately reduce to 205°C / 400°F conventional or 190°C / 375°F fan. Watch through the door during the early rise. Begin checking at 15 minutes; most batches finish in 17–20. Near the end, lift one: the underside should be firm and browned. As an optional backup, the crumb beside the hollow should reach about 91–93°C / 195–200°F.
  2. Cool correctly. Rest on the pan for 3–5 minutes, brush with pooled butter if desired, then move the rolls to a wire rack before trapped steam softens the bottoms.
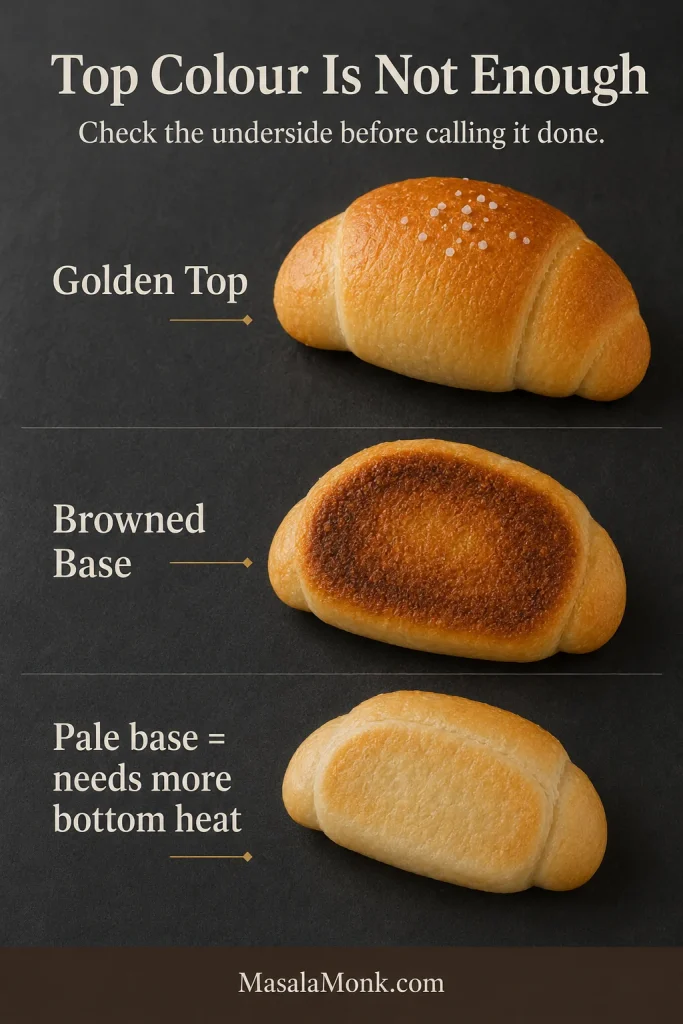
Board comparing a golden salt bread top, a browned underside and a pale underside that needs more bottom heat.
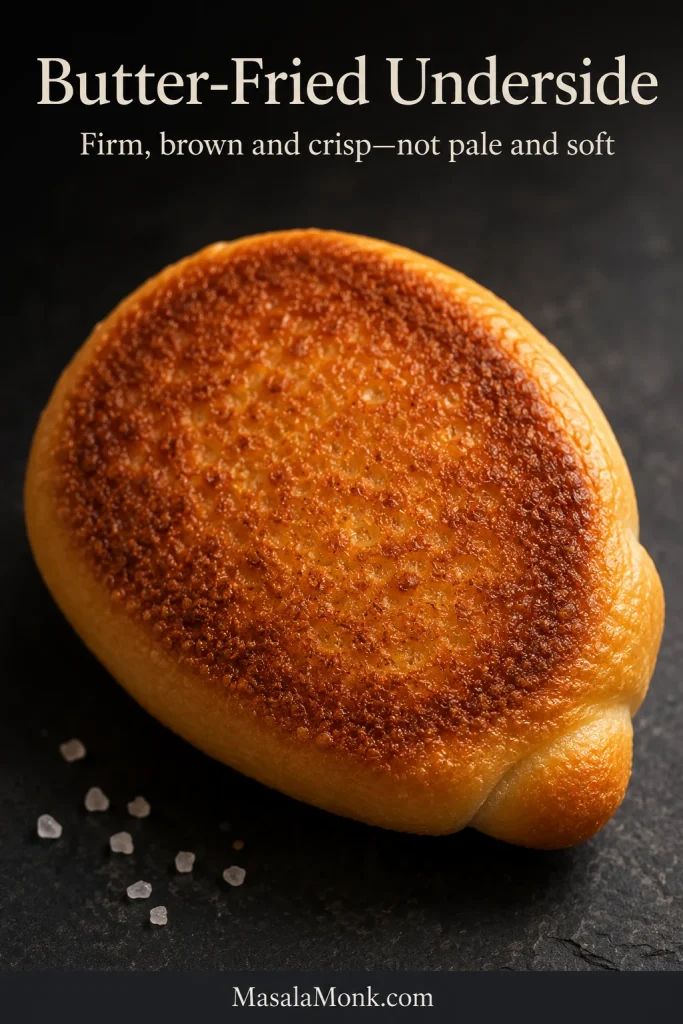
A golden top is not enough for shio pan. Turn one roll over and confirm the underside is firm, browned and crisp.

Hand-Kneading Method

Making the dough by hand

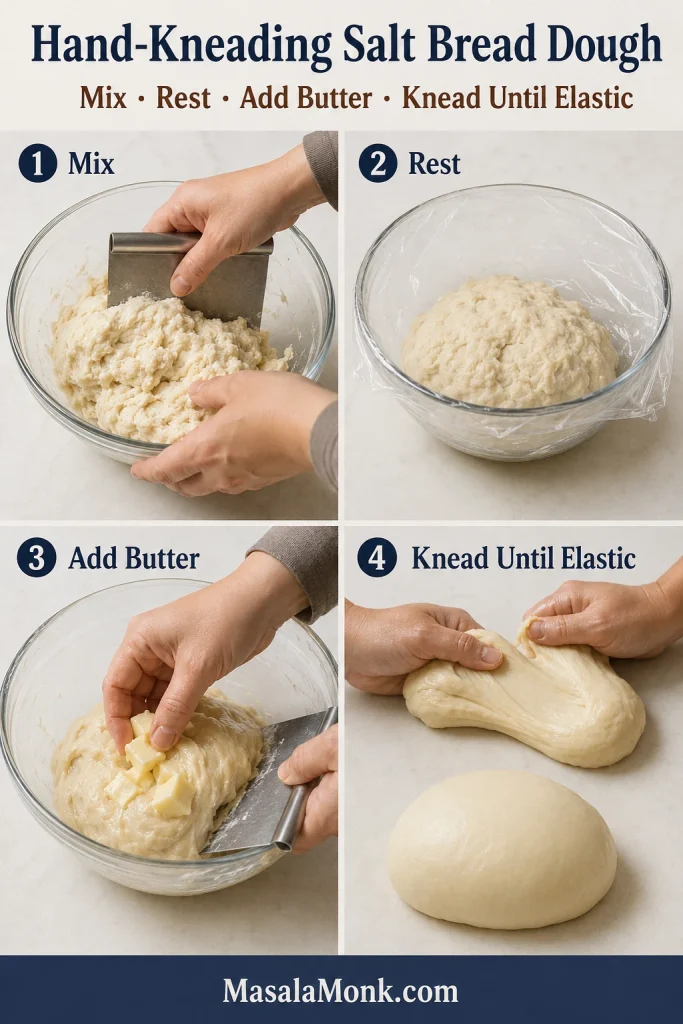
Mix the flours, milk powder, sugar, yeast and 200 g water until shaggy; cover and rest for 20 minutes. Add the salt and knead briefly. If the dough remains firm, add the reserved water a teaspoon or less at a time before adding the softened butter.

Knead the butter in gradually for 10–15 minutes, using short covered rests when the dough becomes slippery or tight. A bench scraper and lightly damp hands are better than extra flour. Stop when the dough is elastic and passes the same windowpane test.

Four-panel hand-kneading guide showing dough being mixed, rested, combined with butter and kneaded until smooth and elastic.
If kneading by hand, use short rests instead of extra flour. The enriched dough becomes easier to handle without drying out.

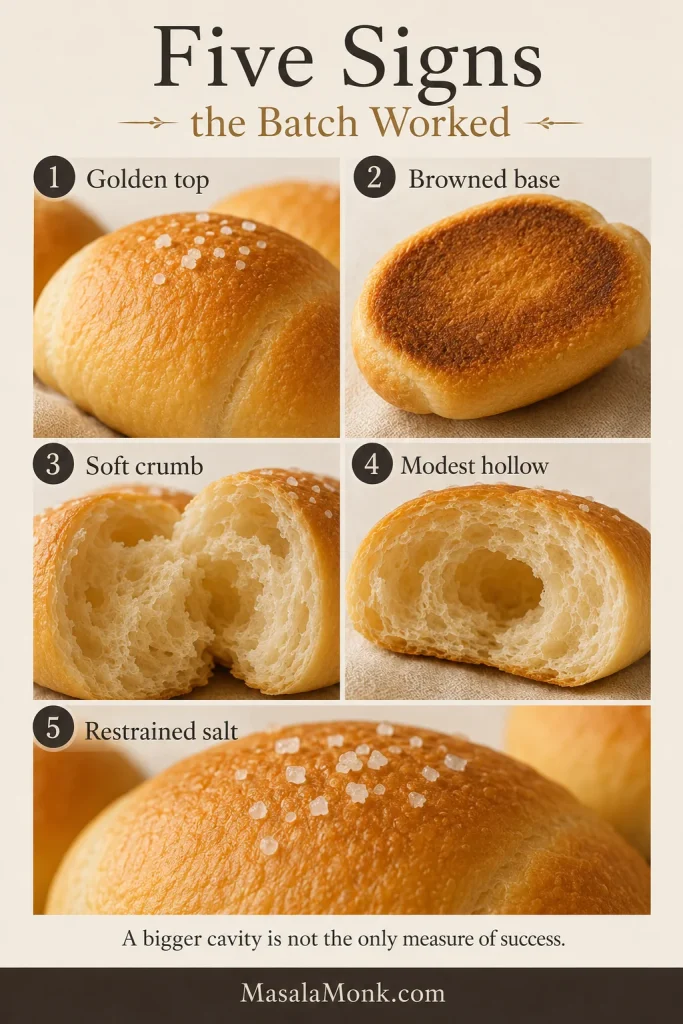
Five Signs the Batch Worked

  • Top: deep golden, not merely blond.
  • Underside: browned, crisp and glossy from the butter.
  • Inside: soft and airy with a gentle chew, not cakey or dense.
  • Hollow: modest and butter-made; it does not need to occupy half the roll.
  • Flavour: buttery and savoury, with flaky salt appearing in small bright bursts.

Prioritise a browned base and light crumb over an oversized cavity.

Five-part board showing close-ups of a golden top, browned base, soft crumb, modest hollow and light flaky salt on salt bread.
A successful salt bread batch does not need a giant cavity. Judge the top, base, crumb, hollow and salt balance together.

The recipe above is enough to begin. The guide below explains how the flour, butter, proofing and tray work together—and what to change when your batch looks different.

What Is Salt Bread?

Japanese salt bread, or shio pan, is a lightly enriched yeast roll wrapped around cold butter. In the oven, steam opens a small space inside while some butter reaches the metal sheet and browns the underside. King Arthur Baking’s guide shows the same classic crescent-and-butter structure.

The flavour should be buttery and savoury, not sharply salty. Developed dough holds the butter long enough to create the hollow, while direct tray heat turns later leakage into a crisp base. Despite the similar name, shio pan is unrelated to American salt-rising bread.

Shio Pan, Sogeum-Ppang and Croissants

Shio pan is the Japanese name most often used in English-language recipes; Korean salt bread is commonly called sogeum-ppang. The styles overlap, though Korean café versions often lean softer, milkier or more heavily filled. This recipe targets the classic crisp-bottomed style associated most closely with Japanese shio pan. Eater’s account of the Korean salt-bread boom follows its spread through bakeries and cafés.

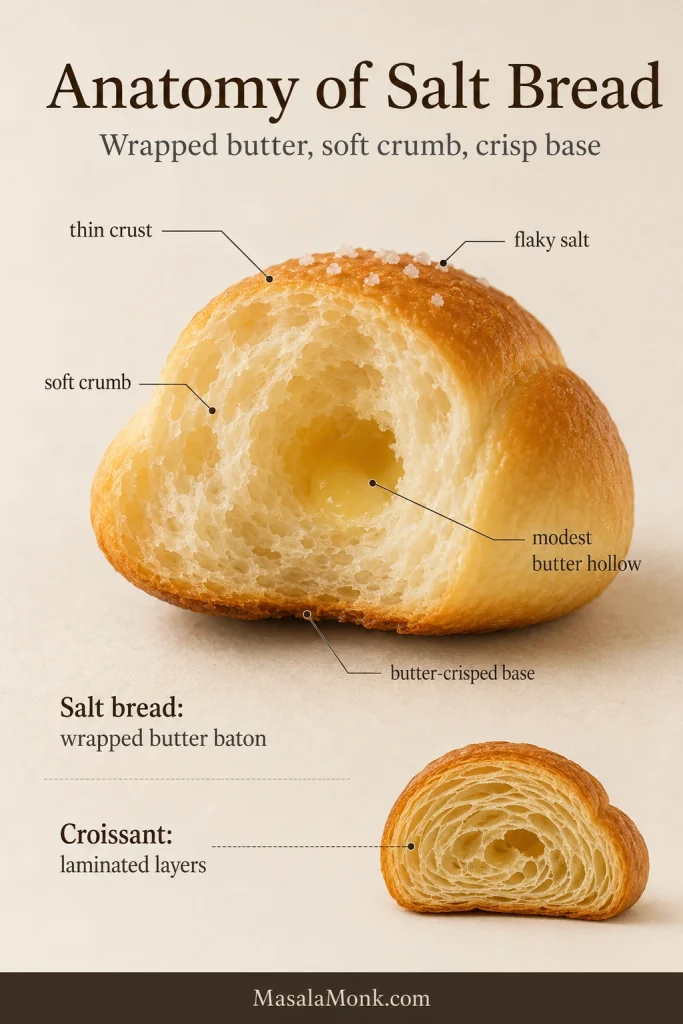
The crescent shape resembles a croissant, but the method is simpler. Croissants use repeated folds of dough and butter; salt bread is rolled once around one butter baton and has no laminated flaky layers.

Cutaway diagram of salt bread with labels for thin crust, soft crumb, butter hollow, butter-crisped base and flaky salt, plus a small croissant inset.
Salt bread is not laminated like a croissant. Instead, wrapped butter melts inside soft dough while the base fries against the tray.

Choose the Texture You Want

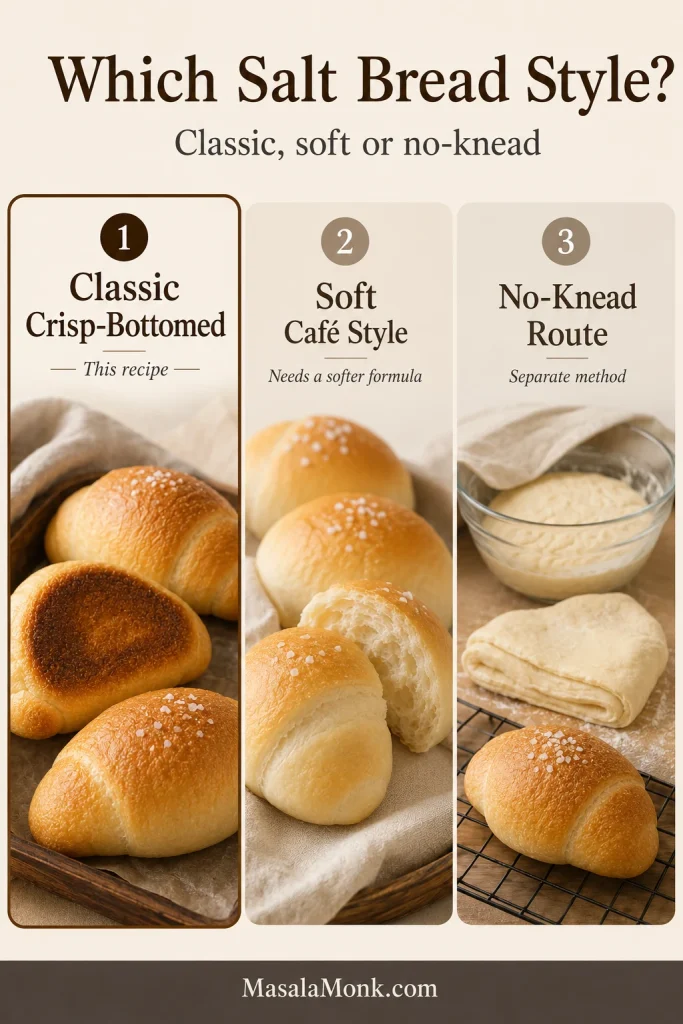
Salt bread recipes can look contradictory because they are aiming at different textures. The same crescent can feel chewy and crusty or milky and pillowy, depending on the dough beneath it.

Three-column board comparing classic crisp-bottomed salt bread, soft café-style salt bread and a no-knead salt bread route.
This recipe targets classic crisp-bottomed salt bread. However, softer café-style rolls and no-knead versions need different formulas or workflows.

The Classic Crisp-Bottomed Style

This lightly enriched dough is soft inside but keeps more chew and crust than a pillowy milk roll. Some bakeries describe that balance as semi-hard salt bread.

When to Choose a Softer Version

Tangzhong, milk, egg or more sugar can produce a softer Korean café-style roll, but they also change hydration, proofing and browning. Use a formula built for that result. Our soft cinnamon roll recipe shows how richer dough trades crust contrast for a plush crumb.

When to Choose No-Knead

No-knead salt bread relies on time, folds and usually refrigeration to build strength. It is a separate method, not this dough with the mixer step removed.

Ingredients, Swaps and What Changes

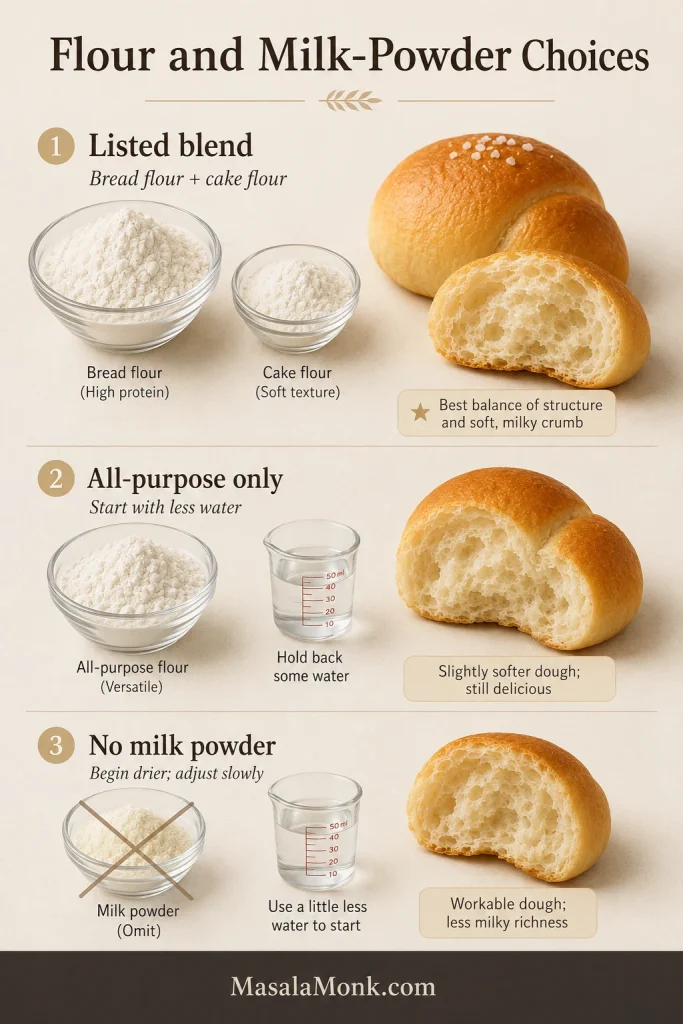
Once you know the texture you want, most first batches involve three decisions: which flour you have, whether milk powder is available and how salty the filling butter tastes. For the intended result, use the listed flour blend, plain milk powder and firm salted butter.

Bread Flour and Cake Flour

Bread flour supplies the strength needed for long shaping and butter containment; roughly 11.5–13 percent protein is useful when the package lists it. Our guide to what gluten is explains why that protein network gives dough its stretch.

Cake flour softens the dough and makes it easier to lengthen. All-purpose flour can replace it, though the roll may be slightly firmer.

Can You Use Only All-Purpose Flour?

Yes, but all-purpose flour varies widely. Begin with 195–200 g water, let the dough rest and start developing strength before deciding whether it needs more.

Milk Powder: What It Adds and How to Omit It

Plain non-fat milk powder adds dairy flavour, browning and tenderness without much extra liquid. Whole-milk powder is usually workable; malted or sweetened powders are not direct gram-for-gram substitutes.

You can omit it without replacing its weight with flour. Begin with 195–200 g water because the dough may feel looser, then add more only after the rest if needed. Expect less dairy flavour and lighter browning. A milk- or tangzhong-based roll needs its own balanced formula.

Sugar, Salt and Yeast

The small sugar quantity supports fermentation and browning without making the bread sweet. Fine salt seasons the dough evenly; flaky salt belongs on top.

Using active dry yeast: use 4 g and follow the packet. Many modern products can be mixed directly with the flour; when proofing is required, dissolve the yeast in 30 g / 2 tablespoons of the recipe water at the manufacturer’s stated temperature and count it in the total.

Butter in the Dough and Butter Inside

Softened unsalted butter tenderises the dough; add it only after some gluten has developed. Salted filling butter gives stronger savoury contrast, while unsalted butter gives tighter salt control. Avoid whipped, tub and spreadable butters because they melt and leak differently.

ChangeWhat to Expect
Use only bread flourA stronger, chewier roll that may resist shaping
Replace cake flour with all-purposeA slightly firmer inside, depending on protein level
Use only all-purpose flourVariable strength and water absorption; begin with less water
Omit milk powderA looser dough, less dairy flavour and lighter browning; begin with less water
Use a balanced milk-based doughA softer, richer roll with different liquid needs and faster browning
Use a tangzhong-based formulaA more pillowy crumb that stays soft longer
Each substitution changes dough strength, softness, browning or butter behaviour.
Decision board showing the listed flour blend, an all-purpose flour option with less water and a no-milk-powder option with adjusted hydration.
The listed flour blend is the most dependable path. If using all-purpose flour or skipping milk powder, adjust water slowly instead of guessing.

Equipment and Baking-Tray Choices

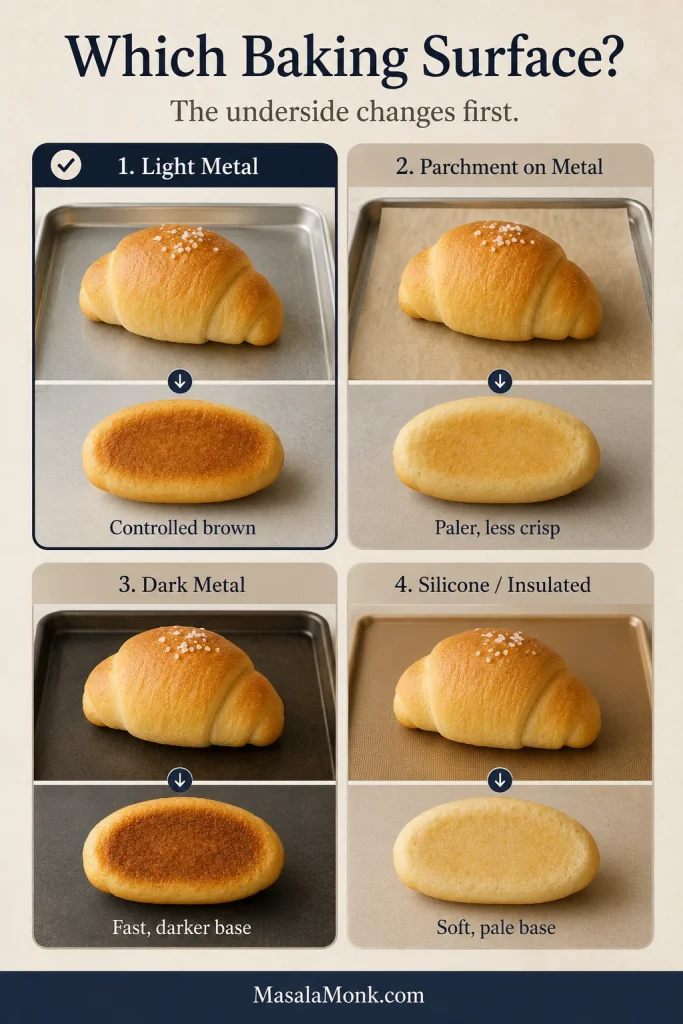
For a first batch, use a light-coloured bare metal sheet brushed with a thin film of oil. A scale keeps the rolls balanced; the tray determines whether escaped butter browns the base or leaves it greasy.

Baking SurfaceLikely ResultBest Use
Dark metalFast, strong base browningCheck early to prevent burning
Light metalCrispness with more controlled colourMost forgiving first choice
Parchment on metalEasy release with a slightly paler, less crisp baseWhen sticking is a concern
Silicone or insulated sheetPaler, softer baseNot preferred for this recipe
Tray material changes how quickly leaked butter browns the underside.
Four-way comparison board showing salt bread baked on light metal, parchment on metal, dark metal and silicone or insulated surfaces with different underside results.
The baking surface changes the underside first. Light metal gives controlled browning, while parchment, dark metal and insulated surfaces shift the texture.

A 33 × 46 cm / 13 × 18-inch sheet fits eight staggered rolls with roughly 5–7 cm / 2–3 inches between them. Use two batches on a smaller tray.

A light mist helps the salt adhere and slows early surface drying. Aim for evenly damp, not dripping; elaborate steam methods vary too much between home ovens to be necessary here.

Four Cues That Decide the Batch

The recipe gives the sequence. These four moments tell you whether the dough is ready to move on.

1. The Buttered Dough Turns Satiny Again

The dough may look greasy after the butter goes in. Keep kneading rather than adding flour. It is ready when the greasy film disappears, the surface becomes smooth and satiny, and a small piece stretches into a thin windowpane.

Hands stretching salt bread dough into a thin windowpane, with insets showing a dough thermometer range of 24–26°C and a wrist-touch cue.
Once the buttered dough turns smooth again, check for a thin windowpane and a cool-to-neutral feel before moving on.

2. The Triangle Stops Fighting the Rolling Pin

If the dough still shrinks, cover it for five minutes. It is tense, not failed; the triangle should lengthen without becoming translucent. More pressure usually stretches one weak patch, while rest relaxes the whole piece more evenly.

Split image showing forced dough with a weak torn patch beside rested dough stretched into a longer, smoother triangle.
If the triangle fights back, pause. Rest relaxes the whole piece, while extra pressure often stretches one weak patch.

Wrap the cold butter with light tension and tuck the pointed tail underneath. Once all eight are shaped, the difficult handwork is finished; the dough now needs time.

3. The Rolls Feel Light and Alive

Ready rolls feel lighter and softer, not merely larger. Dramatic doubling is unnecessary.

StageWhat the Press DoesWhat You SeeNext Move
UnderproofedSprings back quicklyCompact, firm and barely jigglyCover and continue proofing
ReadyReturns slowly and partlyClearly fuller, soft and gently jiggly; tray ideally dryMist, salt and bake
Warm but not readyStill returns with resilienceNeeds more lift, but butter is softening or a faint sheen appearsChill 5–10 minutes, then continue cooler
OverproofedDent remainsVery swollen, fragile and easy to deflateBake promptly
Begin checking at 60 minutes; dough condition matters more than strict doubling.
Four-stage proofing board showing underproofed, ready, too-warm and overproofed salt bread rolls on a metal tray.
Ready salt bread rolls look fuller and softer, not dramatically doubled. If the tray turns shiny, the butter is warming faster than the dough is proofing.

4. The Underside Turns Firm and Brown

The rolls should lift before butter begins hissing around their bases. Near the finish, lift one carefully: the underside should be firm, brown and glossy rather than pale and soft.

Extreme close-up of the deeply browned butter-fried underside of a salt bread roll on a dark surface.
The defining shio pan texture is underneath: a firm, browned base where melted butter crisps the dough against the hot tray.

Leave the rolls on the hot sheet for 3–5 minutes, then move them to a rack. Cutting immediately compresses the crumb; lingering on the tray lets condensation soften the base.

When Butter on the Tray Is Normal—and When It Is Not

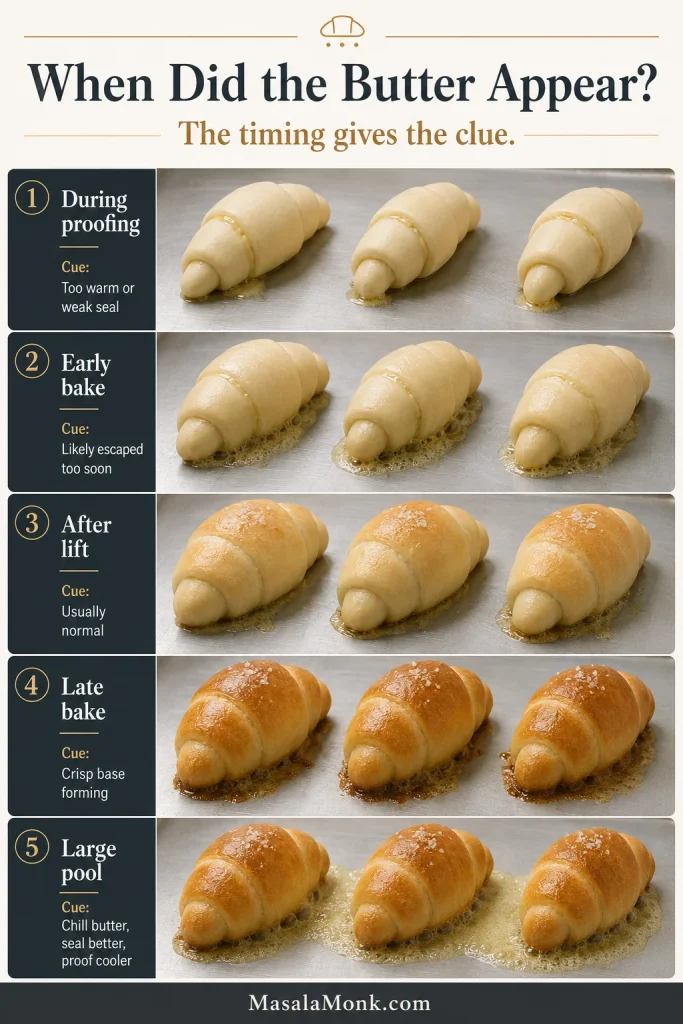
Once baking begins, the tray does not need to remain dry. During this stage, the useful question is when the butter appeared: later leakage helps build the crisp base, while butter lost during proofing escaped before the roll could hold it.

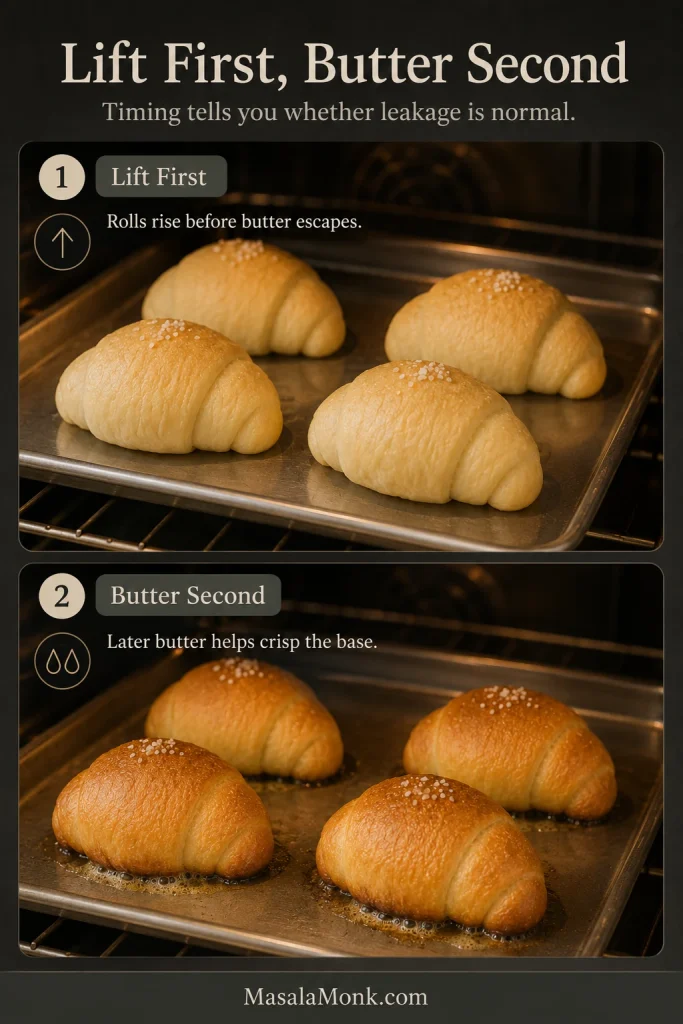
Lift First, Butter Second

The butter rule

Lift first, butter second. The tray should ideally stay dry during proofing. A faint sheen is a warning to cool the rolls; visible puddling or butter running from an end means the filling is escaping too early. Once the rolls have lifted in the oven, later sizzling is usually doing useful work.

Two-stage board showing salt bread rolls rising cleanly early in baking and later browning as butter bubbles lightly around the bases.
The key is timing. If the rolls lift first and butter appears later, that butter can help crisp the base instead of ruining the batch.

Proofing Leakage Cues

Three-stage proofing board showing unbaked salt bread rolls on a dry tray, then with a faint greasy sheen, then with visible butter leakage.
During proofing, a dry tray is ideal. A faint greasy sheen is a warning; visible butter running from the roll means leakage has started.

Use Timing to Diagnose the Butter

When the Butter AppearsWhat It Probably MeansWhat to Do
During final proofingToo early. The room or filling is too warm, the dough is overproofed, thin or open at one side.Move the tray somewhere cooler. If the rolls still need time, chill for 5–10 minutes, then continue proofing more moderately.
In a large rush immediately after loadingUsually too early. Look for exposed butter, a tear, warm dough, loose wrapping or an oven that was not fully heated.Continue baking this batch, then correct the weak spot, temperature or preheat on the next one.
Later, after the rolls expand and begin colouringUsually desirable. The dough has begun setting and the later butter pool is browning the base.Let the butter sizzle around the rolls, but watch that it does not turn black or smoke.
A large greasy pool with no hollowThe butter escaped before producing enough steam inside, often because the filling was warm, the dough weak or the wrapping loose.Keep the filling colder, develop the dough fully and cover the butter more securely. Do not add more butter simply to chase a larger hollow.
No visible leakageNot necessarily a problem; more butter may have remained inside the roll.Check the crumb and underside. A pale base and greasy interior point to insufficient tray heat or bake depth.
A useful butter pool appears after expansion, not while the shaped rolls are still proofing. Watch through the oven door where possible; repeated opening during the early rise costs heat.

Butter Timing Visual Guide

Five-stage butter timing guide showing leakage during proofing, early bake, after oven lift, late bake and a large butter pool.
Butter leakage means different things at different stages. So before changing the recipe, first check when the butter appeared.

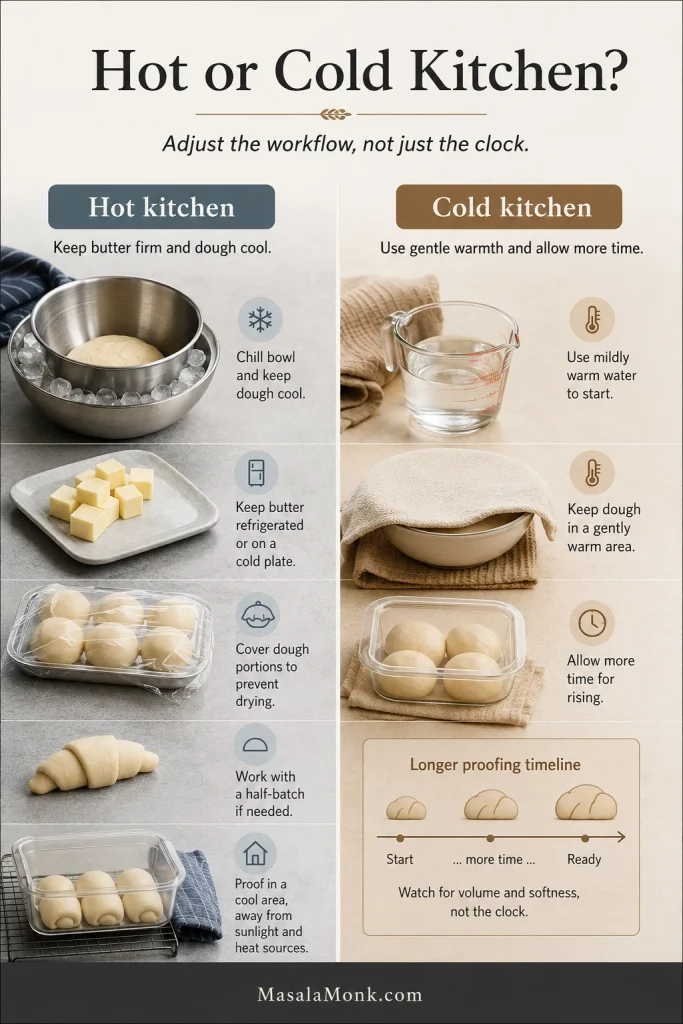
Salt Bread in a Hot or Cold Kitchen

Three-zone guide showing water choices for hot, moderate and cold kitchens with dough bowls and temperature cues.
Water temperature is one of the easiest ways to control enriched dough. Start cooler in a hot kitchen and use only mild warmth in a cold one.
Split guide showing hot-kitchen controls with chilled tools and covered dough, and cold-kitchen controls with mildly warm water and longer proofing.
Instead of relying only on the clock, adjust the workflow: keep butter firm in a hot kitchen and give dough gentler time in a cold kitchen.

Hot-Kitchen Guidance

In a room above about 27°C / 81°F, fixed times become much less useful. Dough ferments faster, mixer friction matters more and the filling can soften while the next roll is still being shaped.

  • Start with cold water; chill the mixer bowl as well when the room is especially hot.
  • Keep unused butter refrigerated and shape in two batches when working slowly.
  • Check the dough temperature after mixing and proof in the coolest practical place.
  • Briefly chill shaped rolls if a greasy sheen begins appearing.
  • Avoid aggressively warm oven-proofing settings.

A hot room is not a reason to add handfuls of flour. Cool the dough first, then reassess it.

Cold-Kitchen Guidance

  • Use mildly warm—not hot—water.
  • Allow fermentation to take longer.
  • Use a gently warm location away from direct heat.
  • Let expansion and softness decide the timing; a cool kitchen may simply need longer.

A slower rise is usually safer than overheating the dough. Give the yeast time to work while the butter stays neatly inside the rolls.

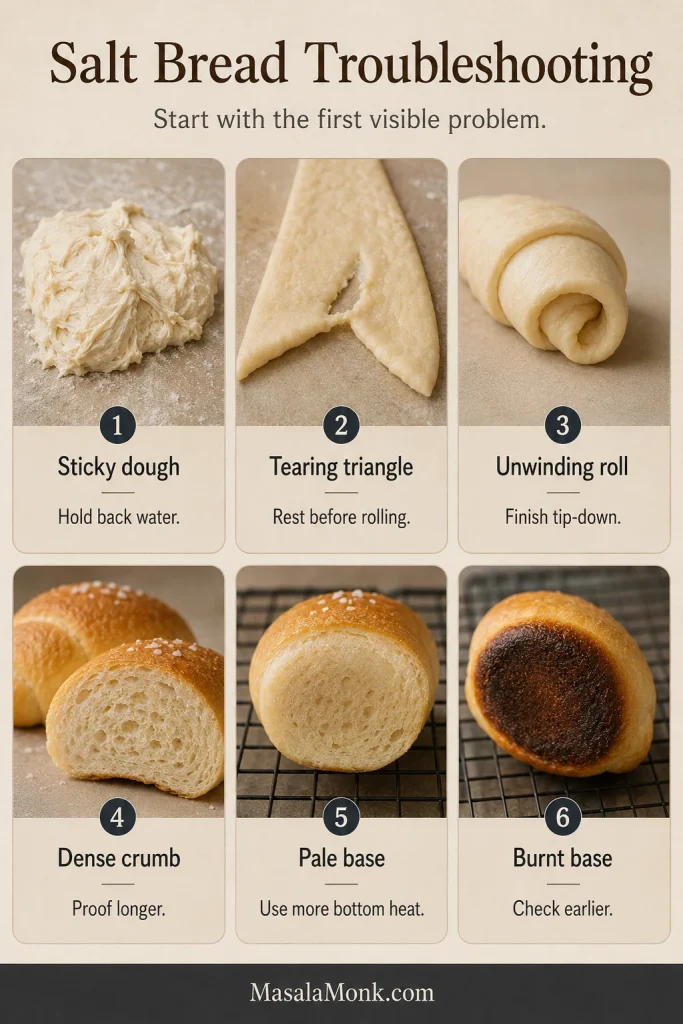
Salt Bread Troubleshooting: Dough, Butter and Browning Problems

An imperfect first tray rarely means the whole recipe is wrong. The earliest moment it differed from the cues above usually gives the clearest clue.

Match the First Visible Problem to the Fix

ProblemWhat Probably HappenedWhat to Change Next Time
Dough is extremely stickyGluten is underdeveloped or the dough is too warmRest it, continue mixing and cool it before adding flour
Dough snaps backThe gluten is tenseCover and rest for 10–15 minutes
Dough tears into thin patchesIt was rolled too quickly or still lacks strengthRoll gradually and allow another rest
Rolls unwindLoose shaping or the pointed tip faces upwardRoll with light tension and place the tip underneath
Bread is denseUnderproofing, weak yeast, underdeveloped gluten or too much flourDevelop the dough fully, then let volume, softness and feel guide the timing
Bread spreads instead of risingWeak gluten, overproofing or warm doughDevelop the dough fully and shorten or cool the final proof
Bottom stays paleInsulated tray, low heat, insufficient contact or a rack set too highUse a non-insulated metal sheet that browns the base more readily, or move the tray lower. If the top is already brown, shield it loosely while the underside finishes.
Bottom burnsVery dark tray, low rack or too much exposed butterRaise the tray, use light metal or reduce heat slightly
Inside feels greasyUnderbaking, premature leakage or filling pieces larger than 13 gBake more fully and confirm the filling weight. Reduce the butter only when larger pieces were used or a particular butter repeatedly leaves an excessively greasy crumb.

For butter leakage or a missing hollow, use the timing guide above. When a correctly baked base softens later, move to the storage and reheating section.

Visual Troubleshooting Guide

Six-panel troubleshooting board showing sticky dough, torn triangle, unwinding roll, dense crumb, pale base and burnt base with short corrections.
Salt bread troubleshooting starts with the first visible clue: sticky dough, tearing, unwinding, dense crumb, pale base or burnt base.

Make-Ahead, Storage and Reheating

An Example Four-and-a-Half-Hour Timeline

  • 0:00–0:30: portion the butter, mix and knead
  • 0:30–1:45: first rise, ending when the dough is close to doubled and lighter
  • 1:45–2:30: divide, rest and shape
  • 2:30–4:00: final proof, looking for soft, gently jiggly rolls
  • Around 3:20: begin preheating while the rolls finish proofing
  • 4:00–4:20: mist, salt and bake
  • 4:20–4:30: settle briefly, rack and serve warm

This example assumes a 75-minute first rise and a 90-minute final proof. Use the clock to plan your day, not to overrule the dough. Move the later times according to how quickly the dough develops.

Vertical timeline showing final proof beginning, when to start preheating, ready-to-bake rolls and baked salt bread with browned bases.
Begin preheating when the rolls are fuller but not ready yet; the oven should be hot before proofed, butter-filled dough has to wait.

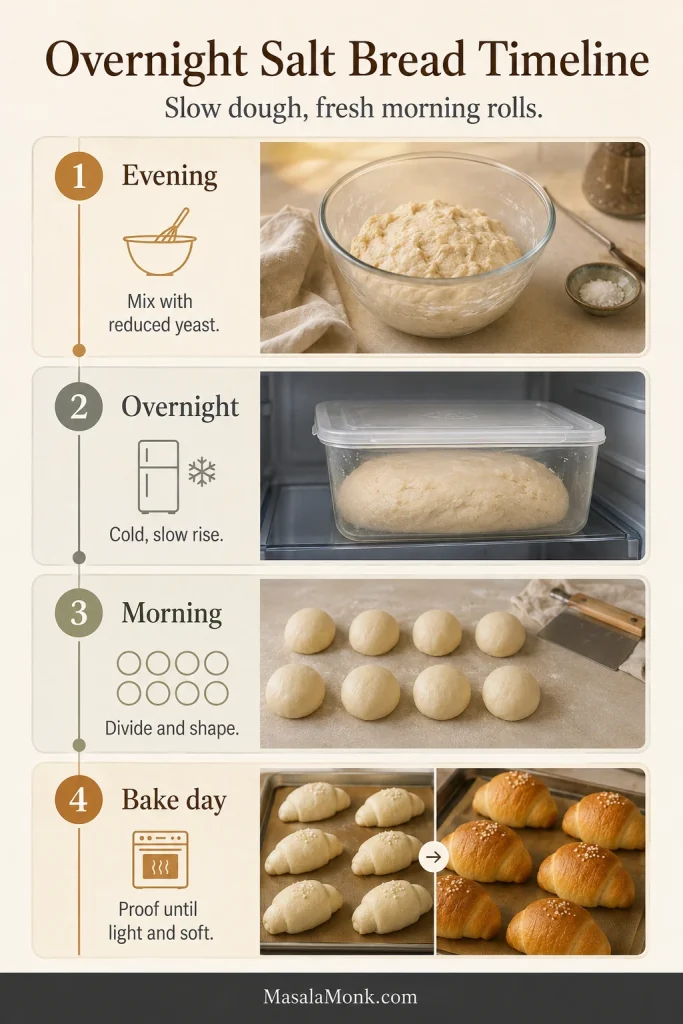
Making the Dough the Night Before

For morning shaping and baking, reduce the yeast so the dough does not outrun the refrigerator. As a cautious starting point, use 1.5 g instant yeast for a warmer refrigerator or a hold approaching 12 hours, and up to 2 g for a reliably cold refrigerator and a hold closer to 8 hours.

  1. Mix and knead, then leave the covered dough at room temperature for 15–20 minutes.
  2. Refrigerate for 8–12 hours at about 4°C / 40°F or colder.
  3. Divide while cool and rest until the pieces relax enough to shape.
  4. Use freshly chilled filling butter and proof by the same readiness cues; expect a longer final proof.
Timeline showing evening mixing, overnight dough in the refrigerator, morning dough portions and bake-day shaped and baked salt bread rolls.
For overnight salt bread, chill the dough before shaping. In the morning, divide, shape, proof until light and bake fresh.

Keep the butter-filled final proof on the day of baking. Shaped rolls held overnight leave less room between a good proof and softened filling.

Doubling the Recipe

Check the mixer’s dough capacity before doubling; when uncertain, mix two batches. Shape and proof the 16 rolls in staggered groups so the first tray does not finish proofing while the second is still being rolled.

Storage

  • Best texture: within the first hour
  • Room temperature: airtight for one day, or two days with some loss of crispness
  • Refrigerator: not preferred because bread stales faster
  • Freezer: freeze fully cooled rolls airtight while fresh
  • Day-old rolls: toast or turn into French-toast-style slices

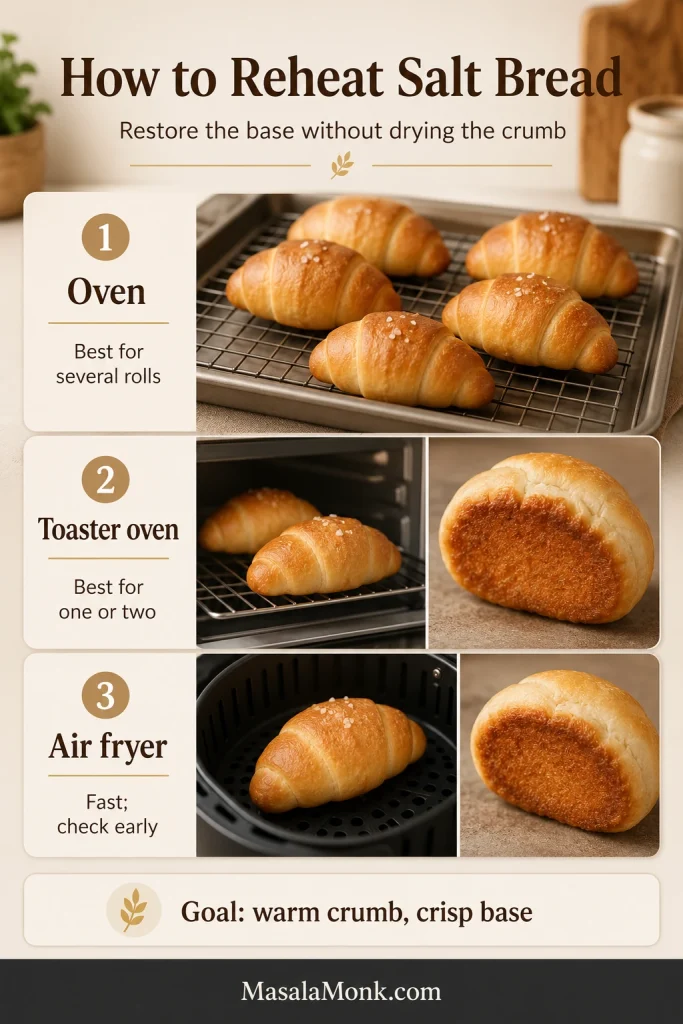
How to Reheat Salt Bread

MethodStarting GuidanceResult
Air fryer175°C / 350°F for 2–4 minutesFast, strong recrisping
Toaster oven175°C / 350°F for 4–6 minutesEven warming and crispness
Conventional oven175°C / 350°F for 5–8 minutesBest for several rolls
MicrowaveUse a very brief intervalWarm and soft, not crisp
Times are starting ranges; compact appliances may brown the salt and thin ends sooner.
Reheating guide showing salt bread warmed in an oven, toaster oven and air fryer, with close-ups of crisp browned undersides.
Reheat salt bread with dry heat, not steam. The goal is a warm crumb while the butter-crisped underside firms back up.

Serving Ideas and Easy Variations

Salt bread is at its best before it becomes a serving suggestion at all—torn open beside coffee while the underside still crackles. Once it reaches the table, its savoury butteriness makes it just as comfortable beside soup, eggs or something sweet.

  • Serve with coffee or tea.
  • Pair with a creamy bowl such as tomato bisque, keeping the roll above the broth until the moment you eat.
  • Split for a small egg sandwich while the crumb is still soft and the base remains crisp.
  • Add a thin layer of orange marmalade for a bright sweet-salty contrast that cuts through the butter.
  • Toast a day-old roll for a compact savoury sandwich.

Once the classic batch feels familiar, these are the easiest ways to change the flavour without losing the crescent shape and crisp base.

  • Garlic butter: use a firm, chilled garlic-herb butter; exposed garlic can scorch.
  • Cheese: tuck in a small piece of low-moisture cheese and resist overfilling.
  • Red bean and butter: use a modest spoonful of sweet red-bean paste and slightly less butter so the filling stays balanced.
  • Softer milk-bread style: use a separately balanced dough with milk, egg or tangzhong; those additions change hydration, proofing and browning together.

Frequently Asked Questions

Why Did My Salt Bread Not Form a Hollow?

A modest hollow is enough. When there is no hollow and a large greasy pool forms, use the butter-timing guide, then review dough strength, wrapping and proofing.

Diagnostic board showing three salt bread outcomes: no hollow with a large butter pool, no hollow with little leakage, and a small hollow with good bread.
No hollow does not automatically mean failure. Check leakage, butter position and dough strength, then judge the crumb and base before chasing a bigger cavity.

Can You Make Salt Bread Without a Stand Mixer?

Yes. Use the hand-kneading instructions beneath the main method, adding covered rests whenever the dough becomes slippery or tight. A true no-knead version needs its own fold-and-refrigerate formula.

Can the Dough Be Refrigerated Overnight?

Yes. Use the reduced-yeast method above, keep the refrigerator near 4°C / 40°F or colder and shape the cool dough the next day.

Can Salt Bread Be Frozen Before or After Baking?

Baked rolls are the dependable option: cool, wrap airtight and freeze while fresh. Shaped butter-filled dough needs a method developed specifically for freezing because yeast activity, proofing and leakage can change.

Is This Salt Bread Dairy-Free?

No. Milk powder and butter both affect flavour, browning and filling behaviour. Use a dedicated dairy-free formula instead of replacing both casually.

Can Salt Bread Be Baked in an Air Fryer?

Some air fryers can bake small trial batches, but basket size, element distance and fan strength vary too widely for one dependable timing. This formula is designed for a conventional oven and metal tray; use the air fryer primarily for reheating.


When the First Batch Comes Together

The first batch teaches you more than the timer can. Notice whether the dough relaxed under the rolling pin, whether the shaped rolls reached a light, resilient proof, and whether the underside browned before the top became too dark. Those moments tell you what to adjust next time.

Your first tray will tell its own story. Did the butter appear during proofing, immediately after loading, or only once the rolls had lifted? Share what you saw and which tray you used; those details may help another baker understand their batch.

Then pull one roll apart while it is still warm. The crumb should stretch before it tears, the warm centre should release a deep butter aroma, and the underside should give a light crackle between your fingers. That is the moment the extra rests, careful shaping and patient proofing stop feeling fussy and start feeling worthwhile.

Posted on Leave a comment

Gluten Free Sourdough Bread Recipe

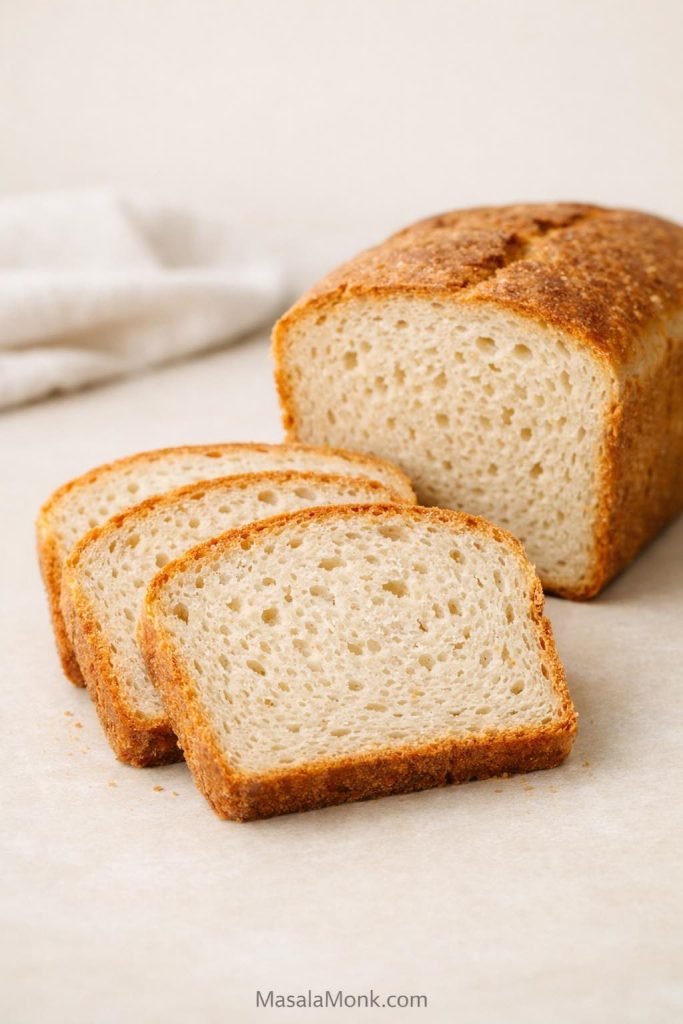
Gluten free sourdough bread recipe loaf in a pan with sliced crumb visible.

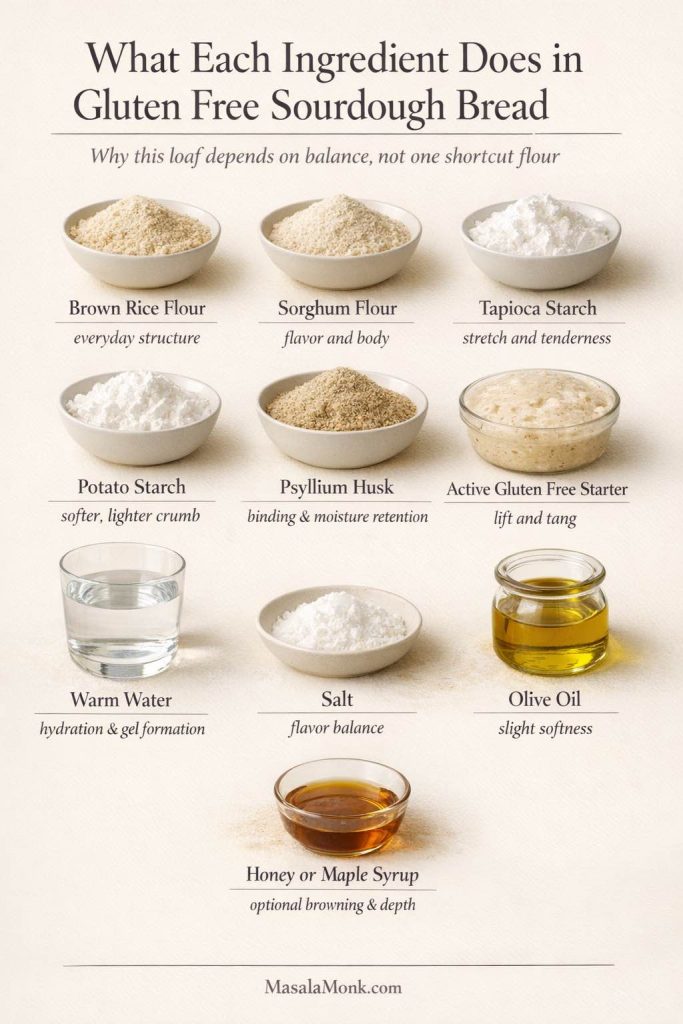
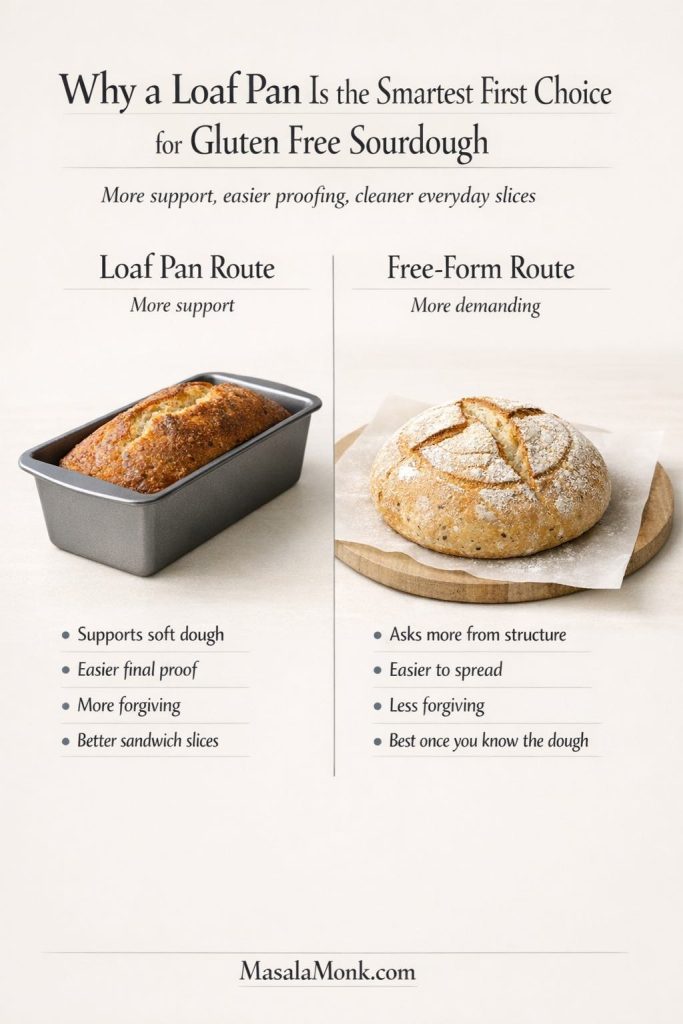
A good gluten free sourdough bread recipe should give you a loaf that feels properly baked, slices cleanly, and tastes like real bread rather than a compromise. This version is built as a loaf-pan, psyllium-supported, custom-blend method because that is the most dependable way to get structure, flavor, and repeatable home results without asking the dough to behave like a dramatic free-form boule.

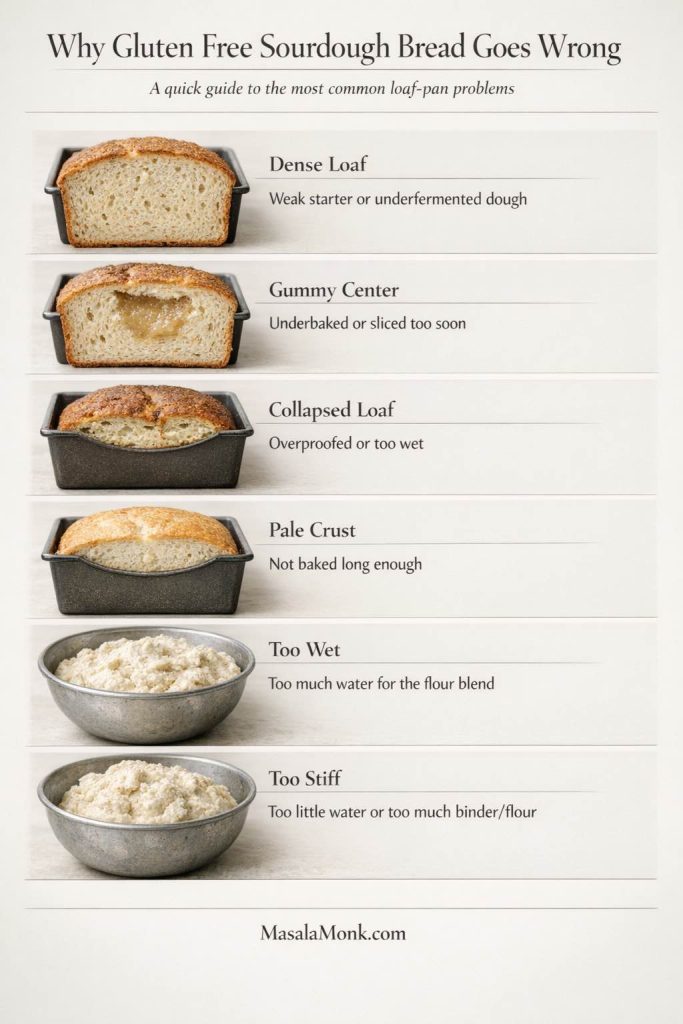
Gluten free sourdough can still be frustrating, though. Some loaves bake up dense, some stay gummy in the middle, and some look promising right until you cut into them too early. So this guide does more than hand you a formula. It shows you what the dough should look like, how to judge the starter, when to move forward, and what to fix if the loaf falls short.

If your culture still feels unpredictable, pause and strengthen that first with the sourdough starter guide before you bake a full loaf. A better starter solves more problems than most flour tweaks ever will.

Quick Answers for This Gluten Free Sourdough Bread Recipe

Best default route: custom flour blend, active starter, loaf pan. This is the safest place to start.

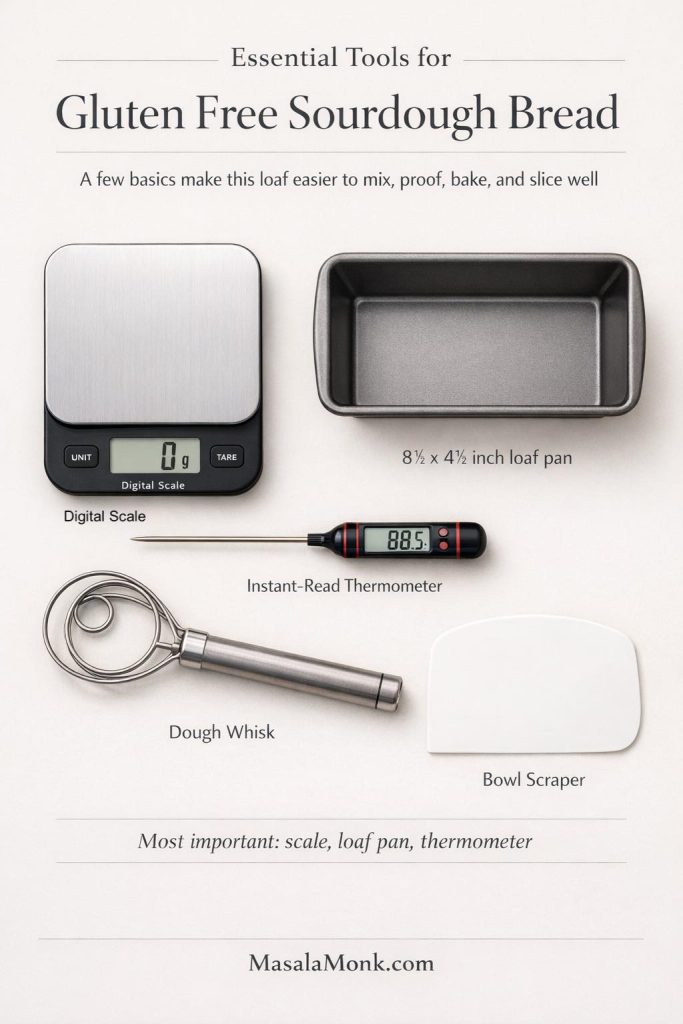
Best pan: an 8½ x 4½-inch loaf pan. It gives the most forgiving path to a well-set loaf.

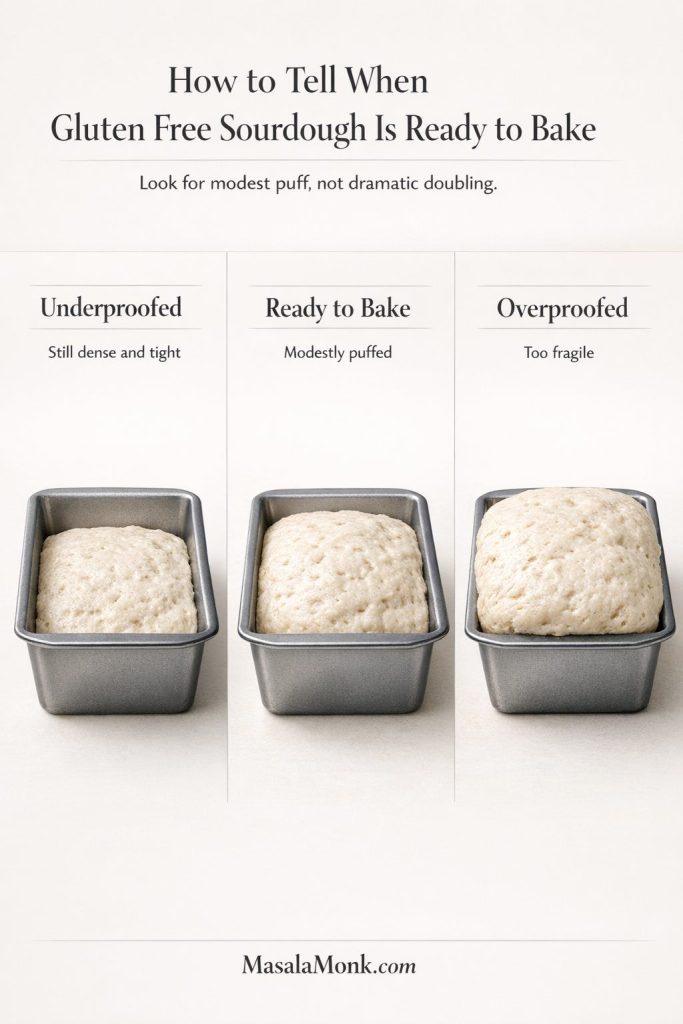
Main proof cue: bake when the loaf looks modestly puffy and lighter than before, not dramatically doubled.

Main bake cue: the loaf should reach about 205°F to 210°F internally and look fully set, not pale and soft.

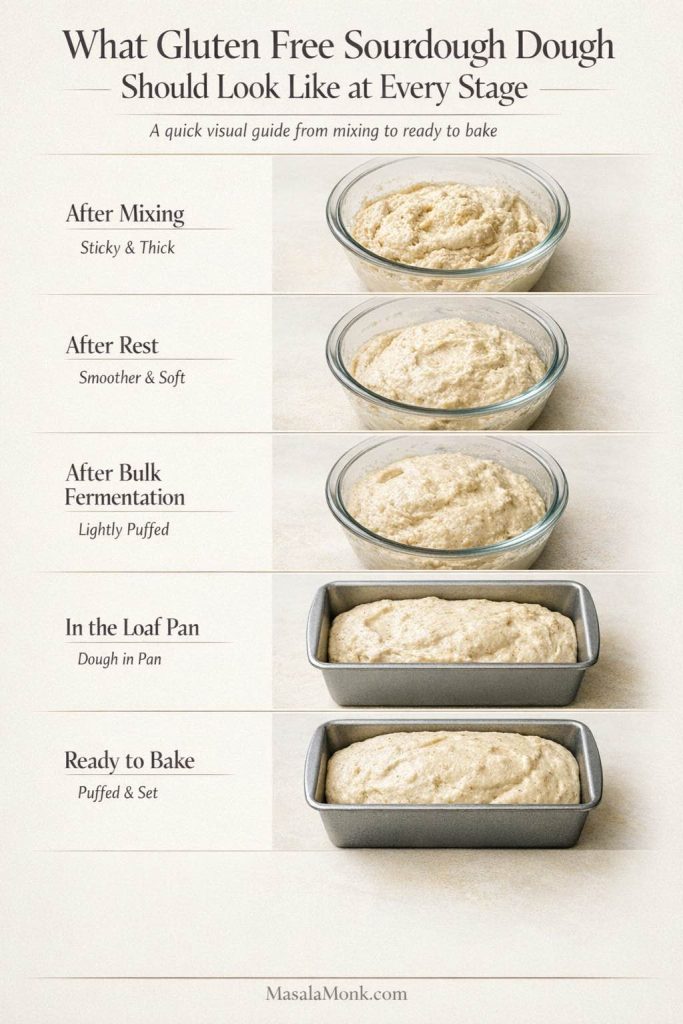
Expected dough feel: soft, sticky, cohesive, and more like a sculptable paste than kneadable wheat dough.

Biggest mistake: misreading a soft dough as “wrong” or slicing too early and blaming the recipe for a crumb that has not finished setting.

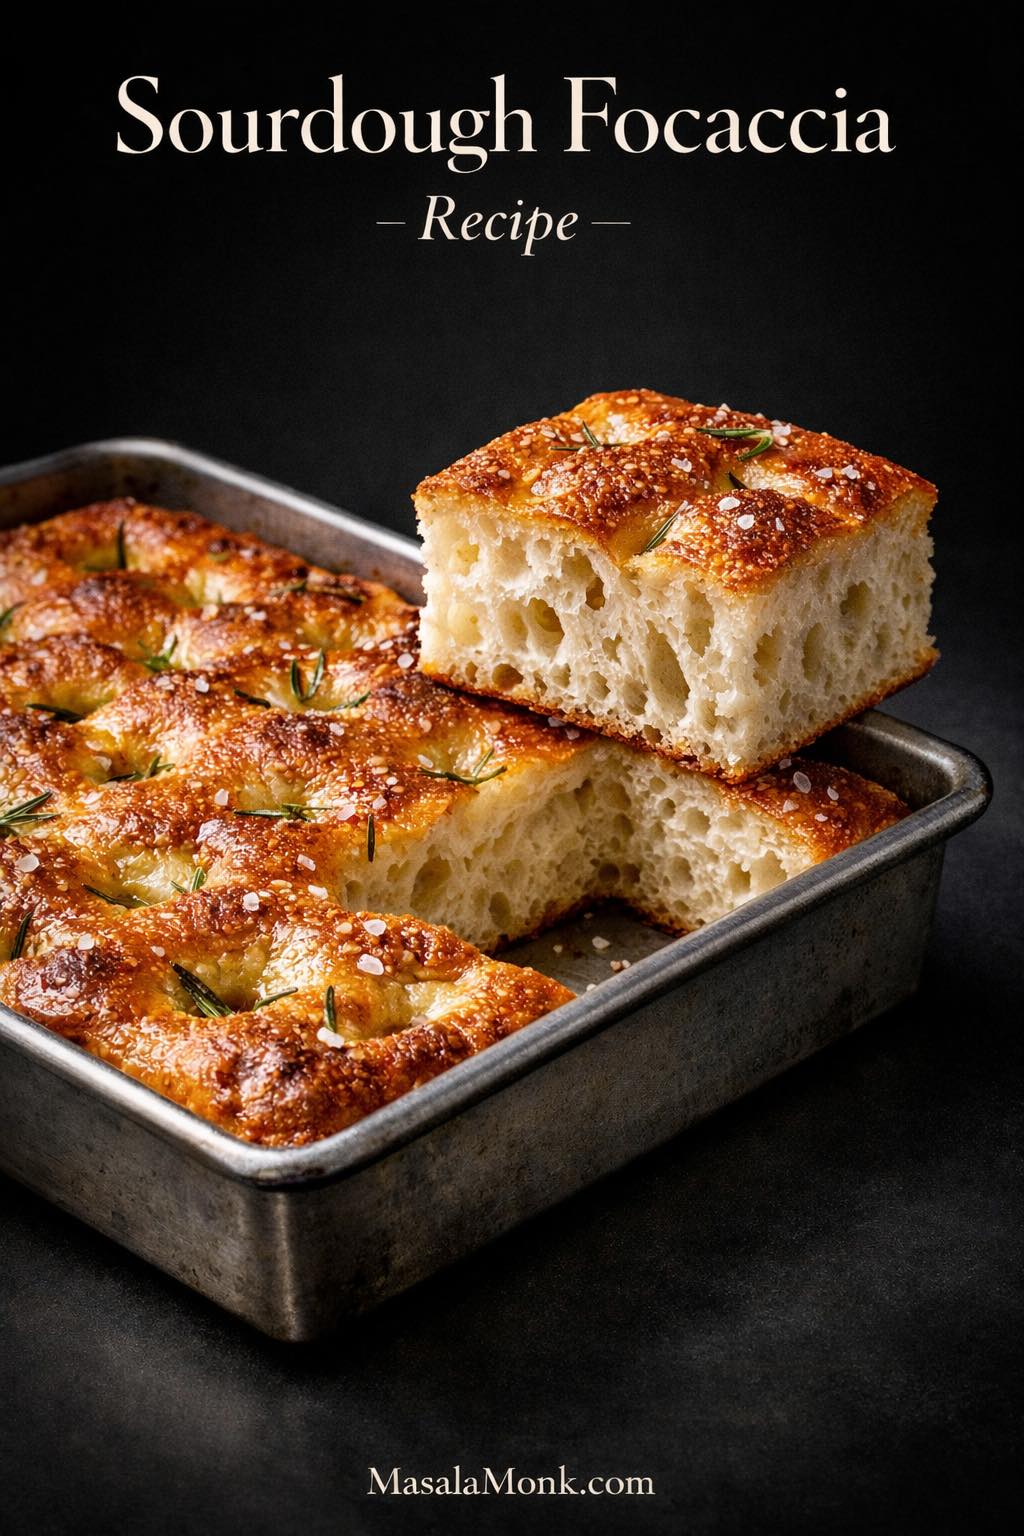
Also Read: Sourdough Focaccia Recipe

Who This Loaf Is For

  • Best for: readers making their first serious gluten free sourdough loaf and wanting a dependable pan bread for toast, sandwiches, and everyday slicing.
  • Best for: bakers who want visible dough cues, practical proofing guidance, and a method that prioritises consistency over drama.
  • Less ideal for: anyone chasing a lofty free-form artisan boule on the first try. This method is built around reliability first.

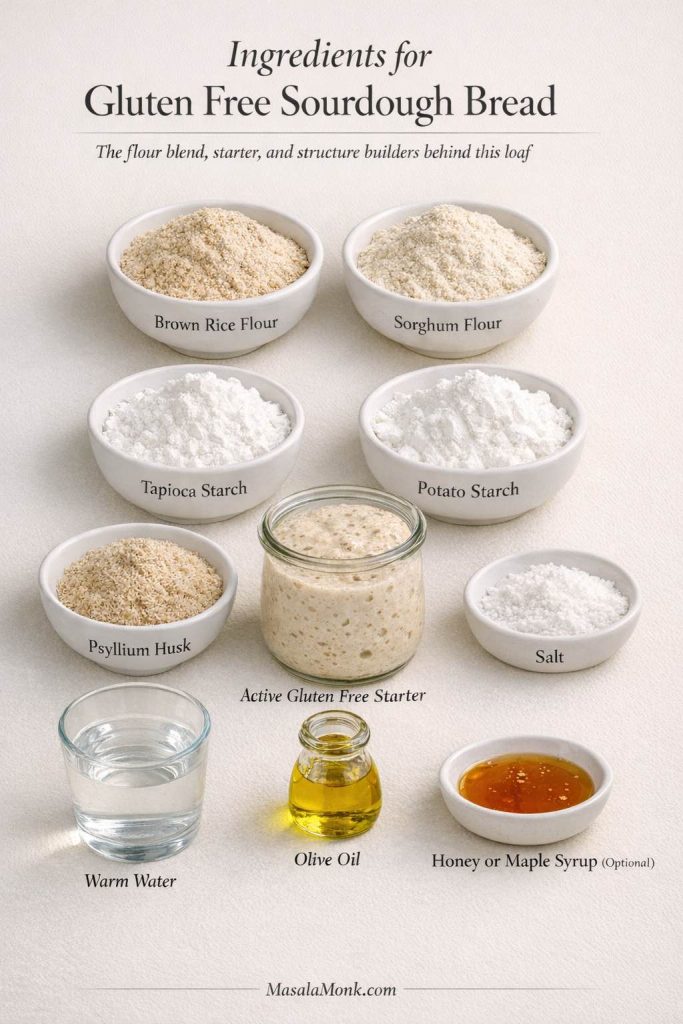
Tested direction: this loaf is written for an 8½ x 4½-inch metal loaf pan, whole psyllium husk, and a 100% hydration gluten free starter, with room-temperature fermentation in a normal home oven.

What Kind of Gluten Free Sourdough Bread to Expect

This loaf is meant to give you bread that feels genuinely useful at the table: a crust that looks properly baked, a crumb that stays moist without turning pasty, and slices sturdy enough for toast, sandwiches, or simple buttered bread. The sourness is usually present but not aggressively sharp, especially if your starter is healthy but your fermentation stays moderate.

It also helps to set one expectation early. This is not wheat dough, and it is not trying to behave like wheat dough. The loaf usually rises more modestly, the dough stays softer, and the best texture often shows up only after the bread has cooled completely. In many kitchens, day-two slices toast especially well.

Finished gluten free sourdough loaf with a moist crumb, clean slices, and a toasted slice, showing the everyday texture and use this bread is meant to have.
This gluten free sourdough is meant to bake up with a moist, properly set crumb and slices that work well for toast or everyday sandwiches, so this image shows the kind of loaf you should expect rather than a dramatic wheat-style boule.

Why Gluten Free Sourdough Bread Behaves Differently

In wheat sourdough, gluten gives the dough much of its stretch, gas-holding power, and structural resilience. Once fermentation begins, that network helps the loaf expand and keep shape. Gluten free dough does not have that advantage, so the bread has to build structure another way.

That does not mean a good rise is impossible. It means the loaf depends more heavily on flour balance, hydration, starter activity, binder support, proofing, and bake setup. As a result, gluten free bread tends to reveal mistakes faster. If the starter is weak, the dough is too tight, the hydration is too high for the blend, or the loaf is underbaked, the crumb usually tells on you.

That is why it should not be judged against wheat-dough cues. The dough often looks softer. The rise can be subtler. The shaping is gentler. The success markers are different.

For readers who want a quick refresher on the bigger picture, MasalaMonk’s what gluten is explainer makes the rest of this loaf easier to understand.

Structure comes from hydration, fermentation, and binders

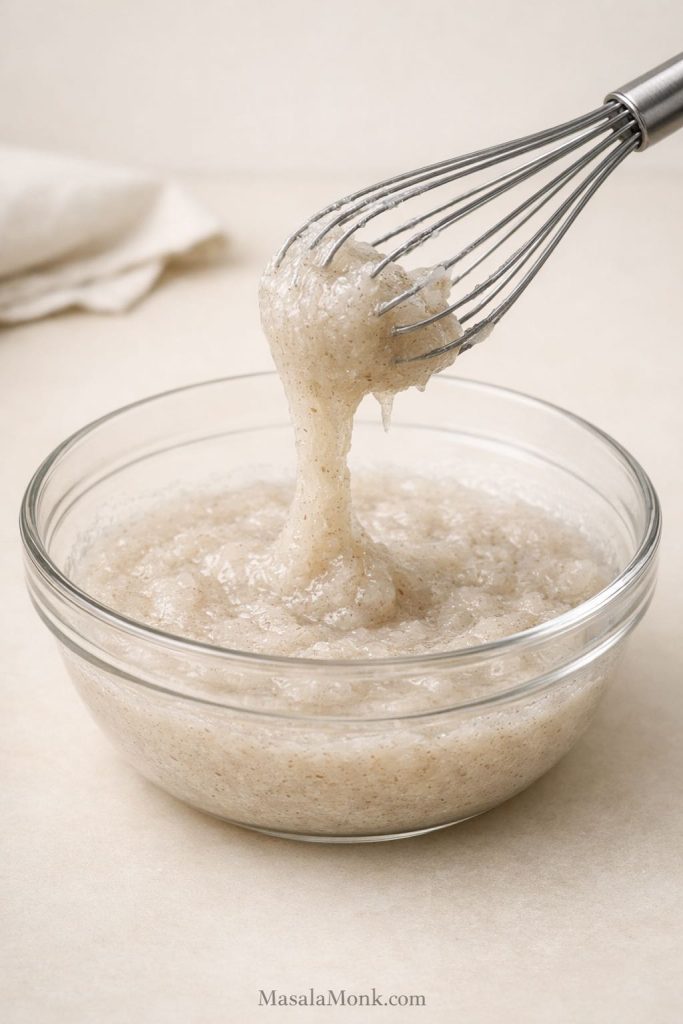
Once gluten is out of the picture, hydration starts doing far more than people expect. Water is not just there to bring the dough together. It helps the flours absorb fully, supports fermentation, activates psyllium, and shapes the final crumb.

Fermentation matters just as much. A lively starter does more than add tang. It lightens the dough, brings internal aeration, and gives the loaf a better chance of baking into something open enough to feel like bread rather than a dense substitute.

Then there is the binder. In this loaf, psyllium husk is the quiet structural engine. When hydrated properly, it creates a gel that helps hold water, improves cohesion, and supports gas retention. It does not recreate gluten, yet it does give the dough enough internal support to rise and set more convincingly.

Gluten free dough should not feel like wheat dough

This is one of the most important mindset shifts in the whole recipe. Gluten free sourdough dough often feels softer, stickier, and more paste-like than wheat dough. That can be completely normal.

The best mental model is this: think sticky, sculptable paste rather than kneadable wheat dough. After mixing, it should not run like batter, yet it should not feel firm enough to knead confidently either. This is exactly where many readers panic and start adding flour they did not need.

The opposite mistake happens too. Some readers assume a very loose dough must be right because gluten free dough is “supposed to be wet,” and they end up with more hydration than the flour system can hold. So the goal is not to force this dough into a wheat template. The goal is to learn what it looks like when it is on track, then trust those cues.

What success looks like

A successful loaf is not defined by one dramatic sign. It is a combination of smaller, more dependable ones.

Before baking, the dough should look more aerated and lighter than it did after mixing. It may not double dramatically, and that is fine. After baking, the loaf should feel set rather than damp and heavy. The crumb should be moist but not wet, tender but not fragile, and structured enough to slice without tearing into paste. Finally, the flavor should have real development. Even a mild loaf should taste deeper than a fast yeast bread made from the same flour.

That is the standard here: not “good for gluten free,” but genuinely good bread.

Also Read: Easy English Scone Recipe

Choose the Right Flour Path for Gluten Free Sourdough Bread

Gluten free sourdough recipes vary widely because they often start from very different flour systems. Some use a 1:1 blend for convenience. Others build a custom blend for control. Both routes can work. They simply reward different priorities.

Comparison guide for gluten free sourdough bread showing 1:1 flour blend versus custom blend, with the 1:1 route framed as easier to start and the custom blend framed as offering more control.
Choosing between a 1:1 blend and a custom mix changes how predictable your dough feels, so this side-by-side guide helps you decide whether you want maximum convenience or better control before you start baking.

Route A: Use a 1:1 blend for convenience

A 1:1 gluten free flour blend is the easier place to start. It cuts down the shopping list, simplifies measuring, and gets you to mixing faster. For some readers, that simplicity matters enough to make it the right choice.

Even so, convenience comes with trade-offs. One 1:1 blend may absorb water beautifully. Another may turn gummy with the same hydration. Some contain gums already. Others lean starch-heavy and stay pale or under-set unless everything else is dialed in. The first thing that usually shifts is hydration and handling, which is why a dough made with one blend can feel noticeably different from the same formula made with another.

Route B: Use a custom blend for more control

A custom blend asks more from you at the start, yet it gives more control in return. You can decide how much whole-grain body, softness, absorbency, and starch support the loaf gets instead of inheriting a generic mix with unknown priorities.

That matters in sourdough because fermentation interacts with each flour differently. One flour may add flavor but weigh the loaf down when overused. Another can make the dough feel stronger. Others tighten more during resting than readers expect. A custom blend turns those variables into recipe decisions instead of accidental surprises.

Which route this recipe uses

This recipe uses a custom blend as the default because it produces a more dependable, brand-agnostic result. It also makes the dough cues easier to teach. When I tell you what the dough should feel like after mixing, after resting, or after proofing, those cues mean more when the flour system is built deliberately rather than borrowed from an unknown premade blend.

That does not mean you cannot adapt this loaf to a 1:1 blend later. It means the cleanest way to learn the method is to make it once as written in a loaf pan, then adjust from there once you understand how the dough should behave.

Also Read: White Russian Recipe: 7 Variants to Try, From Classic to Frozen

Ingredients That Matter Most in Gluten Free Sourdough Bread

In a strong gluten free sourdough loaf, some ingredients build structure, some drive fermentation, and some only refine the final result. Knowing which is which makes substitutions much safer.

Ingredient roles card for gluten free sourdough bread showing how brown rice flour, sorghum flour, tapioca starch, potato starch, psyllium husk, starter, water, salt, olive oil, and optional honey or maple syrup support the loaf.
A good loaf comes from balance: the whole-grain flours build body, the starches lighten the crumb, psyllium holds moisture, and the starter brings the lift and tang that make the bread feel alive.

The flour blend

This loaf uses brown rice flour, sorghum flour, tapioca starch, and potato starch.

Brown rice flour gives dependable everyday structure without pushing the flavor too dark. Sorghum adds more character and helps the bread taste like bread instead of starch. Tapioca starch adds flexibility and tenderness, which helps keep the crumb from feeling rigid once cooled. Potato starch softens the blend further and supports a lighter eating texture.

The ratio matters. Too much whole-grain flour and the loaf can turn heavy. Too much starch and the crumb can become too soft or stay under-set in the middle. The point of this blend is balance: enough body to taste satisfying, enough lightness to avoid density, and enough structure to slice well.

The starter behind a good loaf

The starter is both the flavor engine and the lift source. In gluten free sourdough, that matters even more because the dough has fewer structural advantages to hide a weak culture.

A strong starter helps lighten the dough, deepen the flavor, and create the internal activity that keeps the loaf from baking into a compact block. A sluggish starter often leaves readers adjusting proof times, flour amounts, and oven settings when the real problem was the culture from the start.

For this loaf, use an active 100 percent hydration gluten free starter that has clearly risen after feeding, shows bubbles throughout the jar, and smells pleasantly sour rather than harsh. If your culture still feels inconsistent, go back to the sourdough starter guide before changing the bread formula.

Hydration

Hydration shapes nearly everything here. It influences how the flours absorb, how psyllium sets, how fermentation moves through the dough, and whether the crumb bakes up moist or gummy.

Because gluten free flour systems vary so much, hydration is never one-size-fits-all. It also changes during resting. A dough that seems slightly soft right after mixing can become far better behaved after the flours and psyllium absorb water fully. On the other hand, a dough that already feels very stiff at mixing usually tightens more as it rests.

That is why this recipe includes a deliberate short rest before you judge the dough too harshly.

Psyllium husk

Psyllium is the structural key in this formula. Once hydrated, it helps the dough hold water, improves cohesion, supports gas retention, and makes the finished loaf much easier to slice cleanly.

Without enough binder support, a loaf may ferment and still spread too much, collapse, or cool into a crumb that feels wet and fragile. With a good psyllium gel, the dough behaves with much more confidence.

Because psyllium quality varies, color can vary too. Some brands produce a slightly darker or faintly purple-gray crumb. That can look strange the first time, but it does not automatically mean the loaf failed.

Salt and optional additions

Salt does more than season the loaf. It sharpens flavor and helps keep fermentation balanced. Without enough salt, the bread can taste dull even when the starter is healthy. Too much, on the other hand, can make the dough feel tighter and less balanced.

A little olive oil softens the crumb slightly and rounds out the eating texture. A small amount of honey or maple syrup can help with browning and add a little flavor depth. These are fine-tuning ingredients, though, not rescue ingredients. They only help once the flour, starter, hydration, and binder are already doing their jobs.

Also Read: Mango Sorbet Recipe: Healthy & Plant Based Dessert

Gluten Free Sourdough Bread Formula and Why It Works

This loaf is built around a simple but deliberate balance: enough whole-grain flour to taste like bread, enough starch to keep the crumb from turning heavy, and enough psyllium support to hold that hydration together in a loaf pan.

The full measured ingredient list appears in the recipe card, but the logic matters here just as much as the numbers. Brown rice flour gives dependable structure, sorghum brings more flavor, tapioca and potato starch keep the crumb lighter, and psyllium helps the dough hold moisture and slice cleanly once baked.

The water level is generous because gluten free sourdough needs more moisture than many readers expect, yet it is still restrained enough to work reliably in a loaf pan. That pan matters too. A free-form loaf or Dutch oven can work later, but the loaf pan is the smartest route when consistency is the priority.

Why this recipe is written in grams

This recipe is written in grams because gluten free flour blends vary too much by volume for cups to stay dependable. Measuring by weight gives you a far better shot at repeating the same dough texture, the same fermentation behavior, and the same loaf structure next time.

Equipment That Improves Your Gluten Free Sourdough Bread Results

You do not need a professional bakery setup to make good gluten free sourdough, but a few tools genuinely improve consistency.

A digital scale is essential, not optional. Gluten free flours vary too much by volume for cups to stay dependable. An 8½ x 4½-inch loaf pan is the most forgiving format for most readers because it supports the dough during proofing and baking. A Dutch oven can work, yet it asks more from the dough and from your handling. If your goal is a repeatable first success, the loaf pan is the smarter default.

Comparison guide showing loaf pan route versus free-form route for gluten free sourdough bread, with the loaf pan framed as more supportive and forgiving for beginners.
A loaf pan gives gluten free sourdough more support during proofing and baking, so this comparison helps show why it is the more reliable first choice before you move on to a less forgiving free-form loaf.

A sturdy spatula or dough whisk helps with mixing. A bowl scraper makes transfer neater. Most importantly, an instant-read thermometer gives you a much clearer finish line than crust color alone. Gluten free loaves can look done before the center has fully set, so temperature is one of the best protections against gumminess.

Essential tools guide for gluten free sourdough bread showing a digital scale, 8½ x 4½-inch loaf pan, instant-read thermometer, dough whisk, and bowl scraper.
Gluten free sourdough gets much easier to repeat when you rely on a scale, a loaf pan, and an instant-read thermometer, because those three tools do more for consistent mixing, proofing, and doneness than extra gear ever will.

Also Read: Protein Ice Cream Recipe: 10 Creamy Homemade Recipes

Starter Readiness for Gluten Free Sourdough Bread

“Use an active starter” sounds straightforward until you realize how loosely that phrase gets used. For this loaf, active needs to mean something visible.

Active gluten free sourdough starter in a glass jar with visible bubbles and rise.
A starter like this should look clearly risen and bubbly through the jar, because visible activity matters more than guessing whether it is “probably ready.”

What an active starter should look like

A ready starter should look aerated throughout the jar, not just bubbly on top. After feeding, it should rise clearly enough that you do not have to guess whether anything happened. If your starter usually doubles, great. If it does not fully double but reliably rises, loosens, and fills with bubbles after feeding, that can still be enough. What matters most is clear activity, not dramatic performance.

Visually, you want a jar that looks clearly lifted, bubbly through the middle rather than just foamy at the top, and still strong rather than flat or separated. If the top has fully collapsed and the starter looks slack, refresh it before baking.

A sourdough starter is a live culture of wild yeast and lactic acid bacteria, so visible rise, bubbles, and recovery after feeding matter more than starter myths or wishful thinking.

The best times to use it

There are three especially useful starter states to understand here.

Guide showing peak, just-past-peak, and not-ready gluten free sourdough starter in glass jars.
A gluten free starter can look active, usable, or still too weak within a fairly short window, so reading the jar correctly is often what separates a lively loaf from a disappointing one.
  • At peak: the starter has risen clearly, still looks domed or almost domed, and feels lively throughout. This is the easiest and safest state to use.
  • Just past peak: the starter still looks active and aerated, but the top may be starting to flatten slightly rather than sit high and rounded. This can still work very well, especially if it remains strong and bubbly.
  • Straight from the fridge: sometimes workable if the culture was strong before refrigeration, but far less dependable if there is any sign of weakness. When in doubt, refresh it first.

When your starter is not ready yet

What should make you stop? Weak bubbling, sluggish recovery after feeding, a starter that separates badly, or a culture that smells more harsh than pleasantly sour. In those cases, the problem is rarely the bread formula. The culture simply is not ready yet.

Also Read: Homemade Mango Ice Cream Recipe

Timing Framework: What This Process Usually Looks Like

Times vary by starter strength, room temperature, and flour behavior, so use these as orientation points rather than strict rules.

Timing framework guide for gluten free sourdough bread showing mix dough, rest, bulk ferment, pan and smooth, final proof, bake, and cool completely.
A good gluten free sourdough loaf gets easier to manage when you can see the full rhythm of the bake, so this timeline helps you plan the day from mixing and proofing through baking and full cooling.

Warm kitchen: roughly 26°C to 28°C / 79°F to 82°F

If your kitchen runs warm, bulk fermentation may move along in about 3 hours, and the final proof may be ready in roughly 1 hour. Watch the dough closely so it does not overproof.

Moderate kitchen: roughly 22°C to 24°C / 72°F to 75°F

In a moderate room, bulk fermentation often lands around 4 to 5 hours, with a final proof of about 1 to 2 hours.

Cooler kitchen: roughly 18°C to 20°C / 64°F to 68°F

If your room runs cool, bulk fermentation may need 5 to 6 hours or even a bit more, and the final proof may take closer to 2 hours.

Optional overnight route

For a slightly more developed flavor, you can refrigerate the shaped loaf after a modest room-temperature start to the final proof, then bake the next day once it no longer feels cold and inert. This is best used after you have already made the loaf once and understand what the dough looks like when it is on track.

Also Read: Cookie Pie Recipe: 10 Best Flavors, Fillings and Variations

Ingredients for This Gluten Free Sourdough Bread Recipe

Before you start mixing, gather everything first. This loaf uses a custom flour blend, active starter, psyllium husk, water, salt, olive oil, and an optional small amount of honey or maple syrup. For the full recipe card with yield, timing, and notes, you can also jump to the recipe card here.

One-glance formula snapshot

  • Pan: 8½ x 4½-inch loaf pan
  • Starter: active gluten free starter at 100% hydration
  • Expected dough feel: soft, sticky, cohesive, and smoothable
  • Bake target: 205°F to 210°F internal temperature
  • Proof target: modestly puffy and lighter than before, not dramatically doubled
  • Cooling minimum: 3 to 4 hours before slicing
Labeled ingredients for gluten free sourdough bread including brown rice flour, sorghum flour, tapioca starch, potato starch, psyllium husk, starter, salt, water, olive oil, and honey.
This loaf works best when the flour blend, psyllium, starter, and hydration are treated as a system, which is why getting the ingredients lined up correctly matters before you start mixing.
  • 150 g active gluten free sourdough starter, 100% hydration
  • 220 g brown rice flour
  • 120 g sorghum flour
  • 80 g tapioca starch
  • 40 g potato starch
  • 14 g whole psyllium husk
  • 10 g fine sea salt
  • 430 g warm water
  • 15 g olive oil
  • 10 g honey or maple syrup, optional

How to Make Gluten Free Sourdough Bread Step by Step

Step 1: Make the psyllium gel

Whisk the warm water and psyllium husk together in a medium bowl. Leave it for 2 to 3 minutes until it thickens into a gel.

Psyllium husk gel for gluten free sourdough bread thickened in a bowl before mixing
Psyllium should look thickened, cloudy, and easy to whisk through at this stage, because that hydrated gel is what helps the dough hold water and bake into a loaf that slices more cleanly.

This step does more than hydrate the binder. It helps distribute psyllium evenly through the dough, which improves cohesion and reduces the chance of dry patches later.

The gel should look thickened but still stirrable. It should not look watery, yet it should not feel like a solid rubber mass either.

Step 2: Mix the dough

In a large bowl, whisk together the brown rice flour, sorghum flour, tapioca starch, potato starch, and salt. Add the psyllium gel, active starter, olive oil, and optional honey or maple syrup. Mix thoroughly until no dry pockets remain.

At this stage, the dough should look sticky, soft, and cohesive. Think thick, supple paste leaning toward very soft dough rather than anything you would knead like wheat bread. It should hold together, but it should not feel firm.

Gluten free sourdough dough after mixing in a bowl with soft sticky texture.
Right after mixing, the dough should look soft, sticky, and cohesive, so this is the stage where adding extra flour too quickly usually does more harm than good.

If it resists mixing and feels stubbornly tight, it is probably too stiff already. If it pours or sloshes like batter, it has likely gone too far in the wet direction.

Step 3: Rest the dough

Cover the bowl and leave the dough for 15 to 20 minutes. This short rest gives the flours and psyllium time to absorb water more fully before you judge the texture.

After resting, the dough should feel smoother, more organised, and slightly stronger. It should still be soft, but it should no longer feel shapeless. This is often the point where readers realise the dough was not “wrong” after all; it simply needed time to hydrate.

Gluten free sourdough dough after resting in a bowl with smoother more settled texture.
After the short rest, the dough should still look soft, but it should feel more settled and slightly better organised than it did right after mixing.

If it becomes dramatically tighter than expected, add a small splash of water. If it still looks unusually loose, continue with the loaf-pan format and note that the blend may need slight adjustment next time.

Step 4: Bulk ferment

Leave the dough covered at room temperature until it looks visibly aerated and somewhat lighter. In many kitchens this takes 3 to 5 hours, but room temperature and starter strength matter more than the clock.

You are not waiting for dramatic doubling. Instead, look for a dough that seems about 50 to 75 percent more lively rather than massively larger. It should look puffier, hold a bit more internal air, and feel less heavy than when it started.

Gluten free sourdough dough after bulk fermentation looking lighter and more aerated in a bowl.
After bulk fermentation, the dough should look a little lighter and more aerated, but not dramatically doubled the way wheat dough often does.

If the dough still looks almost exactly the same several hours later, the starter is usually the first thing to question.

Step 5: Transfer to the pan

Scrape the dough into a parchment-lined or well-greased loaf pan. Smooth the top with wet fingers or a spatula. Add seeds on top here if you want them.

Gluten free sourdough dough smoothed into a loaf pan before final proof.
Once the dough is in the pan, it should still look soft and hydrated, but the pan gives it the support that makes this loaf much easier to handle well.

This is not a dramatic shaping step. You are guiding the dough into place and preserving whatever lightness fermentation created. Gluten free sourdough rewards calm handling more than aggressive shaping.

The dough should smooth willingly, even if it remains soft. It should not fight you like stiff dough, and it should not look like it has no internal support at all.

Step 6: Final proof

Cover the pan and let the loaf proof until it looks slightly expanded, a little airy, and visibly lighter than when it first went into the pan. In many kitchens this takes about 1 to 2 hours.

What does ready look like? The loaf should seem modestly puffed, not dramatically tall. The surface should look a little more alive, and if you gently touch it, it should not feel dense and immovable. What you are chasing here is a loaf that looks ready, not maxed out.

Proofed gluten free sourdough loaf in a loaf pan ready to bake.
A properly proofed loaf should look lightly puffed and a little more alive, not dramatically doubled or fragile.

Bake now if: the loaf looks modestly puffed, lighter than before, and softly aerated without seeming fragile.

Wait longer if: it still looks dense, heavy, flat, or almost unchanged from when it first went into the pan.

You have probably gone too far if: it starts looking fragile, overexpanded, or slightly unstable, as though it might sink rather than hold itself.

Step 7: Bake

While the loaf proofs, preheat the oven to 230°C / 445°F.

Bake the loaf for 20 minutes at 230°C / 445°F. Then lower the oven to 210°C / 410°F and bake for another 35 to 45 minutes, until the crust is deep golden and the internal temperature reaches about 96°C to 99°C / 205°F to 210°F.

Freshly baked gluten free sourdough loaf in a metal loaf pan with deep golden crust.
A fully baked loaf should look well set and deeply golden in the pan, because crust color and internal temperature together tell you much more than color alone.

If the top darkens too quickly, tent it loosely with foil during the second part of the bake.

The loaf should look fully set when done, not pale and soft. It should also feel lighter than a wet, underbaked loaf of the same size. When you tap the top gently, it should feel firm rather than damp and delicate.

Step 8: Cool completely

Leave the loaf in the pan for about 10 minutes, then move it to a rack and cool completely, ideally for at least 3 to 4 hours.

Gluten free sourdough loaf cooling on a wire rack after baking.
Cooling is part of the bake, so letting the loaf rest fully on a rack helps the crumb finish setting before you slice into it.
Crumb guide for gluten free sourdough bread comparing a properly set loaf, a gummy underbaked loaf, and a dense tight loaf.
A good gluten free sourdough crumb should look moist and tender rather than wet or tight, so this side-by-side guide helps you tell the difference between a properly set loaf, a gummy center, and a denser result.

This is not a fussy extra step. Cooling is part of the bake. Slice too early and even a properly baked loaf can seem falsely gummy because the crumb has not finished setting.

Fully cooled gluten free sourdough bread sliced to show a moist tender crumb.
Once the loaf has cooled fully, the crumb should look moist, tender, and properly set, with slices that hold together cleanly instead of turning gummy or pasty.

Also Read: Punjabi Mutton Bhuna – Amritsari Village-Style Gosht Recipe

What Gluten Free Sourdough Bread Dough Should Look Like at Every Stage

Timing helps, yet appearance and feel matter more.

Visual guide showing gluten free sourdough dough from mixing through ready-to-bake stage.
Gluten free sourdough usually changes more through texture, structure, and slight puffing than through dramatic rise, which is why these stage cues are more useful than the clock.
  • After mixing: the dough should look fully hydrated, sticky, and cohesive. It should not have dry flour pockets. It should not pour like cake batter either.
  • After the short rest: the dough should feel smoother, slightly stronger, and more organised. It should still be soft, but less sloppy than it looked at first.
  • During bulk fermentation: look for dough that seems lighter, more aerated, and a little puffy rather than one that is simply sitting in the bowl unchanged.
  • Ready to proof in the pan: after transfer, the surface should smooth out easily. The dough should still be soft, yet it should not look like it has no internal support at all.
  • Ready to bake: the loaf should look modestly expanded and clearly lighter than before. Think “puffy and ready,” not “maxed out and fragile.”
  • Fully baked and fully cooled: the crust should feel set. The loaf should not feel suspiciously heavy for its size. When sliced, the crumb should look moist and tender, not wet and sticky.

How to Tell If Gluten Free Sourdough Bread Needs More Proofing

Proofing is where many loaves succeed or fail, so it helps to separate the three most common states clearly.

Proofing guide for gluten free sourdough bread showing underproofed, ready-to-bake, and overproofed dough in loaf pans.
Gluten free sourdough is usually ready when the loaf looks modestly puffed and lighter than before, so this side-by-side guide helps you avoid baking too early or waiting until the dough turns fragile.
  • Underproofed: the dough still looks dense, heavy, and only faintly active. It may bake into a loaf with a tight crumb and weak lift.
  • Properly proofed: the loaf looks modestly puffy, lighter than before, and softly aerated without seeming fragile. This is the target.
  • Overproofed: the loaf starts to look too delicate, overexpanded, or a little unstable. It may sink, spread, or lose structure in the oven.

When in doubt, remember that gluten free sourdough usually rewards restraint. You are not waiting for an enormous rise. You are looking for a loaf that seems clearly more alive than before, but still stable.

Also Read: Peach Cobbler with Canned Peaches (Dessert Recipe)

Troubleshooting by Symptom

Most gluten free sourdough problems come back to a few repeated causes: weak starter, mismatched hydration, unbalanced flour, overproofing, underbaking, or slicing too soon.

Troubleshooting card for dense gummy collapsed pale wet and stiff gluten free sourdough bread.
Most problems come back to starter strength, hydration, proofing, or bake time, so reading the symptom correctly is usually the fastest way to fix the next loaf.

Why is my loaf dense?

Most likely cause: weak starter, dough that was too stiff, or fermentation that never got far enough.

What you likely saw before baking: the dough barely changed during bulk fermentation and still looked heavy when it went into the pan.

How to confirm it: the crumb came out tight and heavy without much internal openness.

What to change next time: strengthen the starter first, then check whether the dough tightened too much during resting. If it did, increase hydration slightly.

Why is the center gummy?

Most likely cause: underbaking, too much hydration for the chosen flour system, or slicing too early.

What you likely saw before baking: the loaf may have looked fine in the oven and browned reasonably well, but it still felt heavier than it should for its size.

How to confirm it: the center still felt wet, sticky, or pasty even after cooling.

What to change next time: trust the thermometer, extend the bake if needed, and cool the loaf fully before slicing. If the problem persists, reduce hydration slightly or revisit flour absorption.

Why did the loaf spread or collapse?

Most likely cause: overproofing, excessive hydration, or weak binder support.

What you likely saw before baking: the loaf looked puffy but also a little fragile, overinflated, or unstable in the pan.

How to confirm it: it sank or spread instead of holding shape in the oven.

What to change next time: shorten the final proof slightly, keep the loaf pan as the default format, and check whether the dough looked too loose even after resting.

Why is the crust pale or underbaked?

Most likely cause: insufficient bake time or weak preheating.

What you likely saw before baking: the loaf entered the oven looking fine, but the oven itself may not have been thoroughly heated or the bake may have been cut short once the top gained some colour.

How to confirm it: the loaf colours slowly, the crust stays soft, or the bottom feels under-set even when the top looks done.

What to change next time: preheat more thoroughly, keep the loaf in longer, and use the thermometer rather than crust color alone.

Why is the dough too wet?

Most likely cause: flour variability or slightly excessive hydration.

What you likely saw before baking: even after the short rest, the dough still looked unusually loose and hard to smooth into the pan cleanly.

How to confirm it: the dough feels overly slack rather than soft and cohesive.

What to change next time: reduce water slightly next time, or revisit whether a flour swap changed how the blend absorbs moisture.

Why is the dough too stiff?

Most likely cause: too little water, overly absorbent flour, or too much binder.

What you likely saw before baking: the dough felt stubbornly tight early on and became even tighter during resting instead of smoothing out.

How to confirm it: it resists mixing, smoothing, and expansion more than it should.

What to change next time: increase hydration a little, and avoid adding extra flour just because the dough does not feel like wheat dough.

Why is the flavor not sour enough?

Most likely cause: a mild starter or a fermentation schedule that moved too quickly.

What you likely saw before baking: the dough rose reasonably well, but fermentation stayed efficient rather than especially long or flavour-building.

How to confirm it: the loaf performs reasonably well but tastes gentler than you wanted.

What to change next time: extend fermentation modestly where appropriate or use the optional overnight route once you know the dough well.

Why does the crumb look purple or gray?

Most likely cause: psyllium color reaction rather than a failed loaf.

What you likely saw before baking: nothing especially alarming in the dough itself, but the final crumb later showed an odd tint.

How to confirm it: the structure and taste are otherwise fine, but the crumb carries an unusual hue.

What to change next time: try a different psyllium brand if the appearance bothers you.

Also Read: Avocado Chocolate Mousse Recipe

Substitutions: What Is Usually Safe and What Is Risky

Once a loaf works, it is tempting to start swapping ingredients casually. Some changes are manageable. Others can change structure, hydration, or proofing enough to make the dough feel like an entirely different recipe.

Guide to safe swaps and risky changes in gluten free sourdough bread showing usually safe changes, caution swaps, and riskier changes like changing psyllium, removing starches, or adding extra flour.
Not every gluten free sourdough swap carries the same risk, so this guide helps you separate small flexible changes from the ones that can quickly alter hydration, structure, and the feel of the loaf.
  • Usually safer: swapping honey for maple syrup, adding seeds on top, or making small flavor additions that do not change the dough’s structure much.
  • Use caution: replacing the custom blend with a 1:1 blend. This can work, but hydration may need adjustment and blends with added gums may handle differently.
  • Riskier: changing psyllium casually, removing starches wholesale, or adding extra flour just to make the dough feel more familiar.
  • Best first-bake rule: make the loaf once as written in the loaf pan, then experiment after you know what the dough should look like.

If you do adapt the flour route later, change one variable at a time. That makes it much easier to tell whether the difference came from flour absorption, starter behavior, proofing, or bake time.

How to Store and Freeze Gluten Free Sourdough Bread

Gluten free sourdough changes noticeably over time, so storage matters more than many readers expect.

Storage guide for gluten free sourdough bread showing room-temperature storage, freezing sliced bread, and toasting for best texture.
Gluten free sourdough usually keeps best when you treat it in stages: short room-temperature storage for immediate use, sliced freezing for longer holding, and toasting later to bring the crumb back to its best texture.

The loaf is often at its best once fully cool and settled, then again the next day when sliced and toasted. Store it wrapped at room temperature for short-term use if your kitchen is cool and dry. For longer holding, sliced freezing is the better option.

Freeze slices individually or with parchment between them so you can toast only what you need. Toasting or reheating slices usually restores the texture more effectively than letting the loaf sit on the counter for days. In many kitchens, this is where it tastes most convincing.

Also Read: Mango Margarita Recipe (Frozen or On the Rocks)

Variations That Make Sense

Once the base loaf works, small changes can make it more useful without rewriting the whole method.

Variation guide for gluten free sourdough bread showing a seeded loaf, a softer sandwich loaf, and a more earthy loaf.
Once the base gluten free sourdough loaf is working well, you can take it in a few practical directions by adding seeds for more texture, leaning softer for everyday sandwich slices, or going a little darker for a more earthy grain-forward loaf.

A seeded version adds texture and extra flavor to the crust. A softer sandwich-style loaf can be encouraged with a bit more oil and a gentler baking finish. For a more earthy whole-grain direction, adjust the darker flours thoughtfully rather than replacing the starches wholesale.

Once your starter is reliable, sourdough pizza dough is also an excellent next bake. Sourdough English muffins make another good follow-up when you want a different texture payoff without leaving the sourdough rhythm behind.

Frequently Asked Questions About Gluten Free Sourdough Bread

Can I make this without psyllium husk?

Not without rebuilding the formula. Psyllium is doing real structural work here, so removing it changes cohesion, hydration, and final texture all at once.

Can I use a 1:1 flour blend?

Yes, though hydration may need adjustment and the dough may behave differently depending on the blend. Some premade mixes also contain gums, which changes handling.

Can I use starter straight from the fridge?

Sometimes. A very healthy starter can still perform well after refrigeration, but refreshing it first is the safer choice when consistency matters.

Why didn’t my loaf double in size?

Because gluten free sourdough often does not need dramatic doubling to work well. Look for visible aeration and moderate expansion instead of a huge rise.

Why is it gummy even though it looks done?

The loaf may still be underbaked, or it may have been sliced too early. In this category, crust color alone is not enough. Internal temperature and full cooling matter.

Is sourdough bread gluten free?

Regular wheat sourdough is not automatically gluten free just because it ferments longer. For anyone managing celiac disease or a medically necessary gluten-free diet, this loaf needs to be made entirely with gluten free ingredients and handled carefully to avoid cross-contact. Packaged ingredients labeled gluten free and careful kitchen handling both matter.

Also Read: Falafel Recipe: Crispy Homemade, Air Fryer and Baked Falafel

Gluten Free Sourdough Bread Recipe Card

Gluten Free Sourdough Bread Recipe

Yield: 1 medium loaf
Prep time: about 20 minutes active work
Bulk fermentation: about 3 to 5 hours in many kitchens
Final proof: about 1 to 2 hours
Bake time: about 55 to 65 minutes
Cooling time: at least 3 to 4 hours

Tested format: 8½ x 4½-inch metal loaf pan, whole psyllium husk, active 100% hydration gluten free starter.

Ingredients

  • 150 g active gluten free sourdough starter, 100% hydration
  • 220 g brown rice flour
  • 120 g sorghum flour
  • 80 g tapioca starch
  • 40 g potato starch
  • 14 g whole psyllium husk
  • 10 g fine sea salt
  • 430 g warm water
  • 15 g olive oil
  • 10 g honey or maple syrup, optional

Method

  1. Whisk the warm water and psyllium husk together and let it thicken into a gel.
  2. Mix the flours, starches, and salt in a large bowl.
  3. Add the psyllium gel, starter, oil, and optional sweetener. Mix until no dry patches remain.
  4. Rest the dough for 15 to 20 minutes.
  5. Bulk ferment until visibly aerated and somewhat lighter, usually 3 to 5 hours.
  6. Transfer the dough to a prepared loaf pan and smooth the top.
  7. Proof until slightly expanded and modestly puffy, usually 1 to 2 hours.
  8. Bake at 230°C / 445°F for 20 minutes, then at 210°C / 410°F for 35 to 45 minutes more, until the loaf reaches about 96°C to 99°C / 205°F to 210°F internally.
  9. Cool completely before slicing.

Notes

  • A loaf pan is the most reliable format for this recipe.
  • This recipe is written in grams for consistency and easier troubleshooting.
  • Let the dough rest before deciding it is too wet or too stiff.
  • When the loaf seems unusually sluggish, fix the starter before changing the entire formula.
  • The loaf is ready to bake when it looks modestly puffy and lighter than before, not dramatically doubled.
  • The bread is fully baked when the crust looks set and the center reaches about 205°F to 210°F.

Final Notes for Making the Best Gluten Free Sourdough Bread

The best loaves usually come down to three things.

  • Use a genuinely ready starter.
  • Judge the dough by its own cues instead of by wheat expectations.
  • Bake and cool the loaf fully before slicing.

Once that rhythm is in place, this gluten free sourdough bread recipe becomes much less intimidating and much more repeatable. The next natural step is either strengthening your culture with the sourdough starter guide or branching into another starter bake such as sourdough pizza dough, Sourdough English muffins, or the broader sourdough bread recipes collection.

Posted on 1 Comment

Sourdough Focaccia Recipe

Sourdough focaccia recipe hero image showing thick golden focaccia in a metal pan with airy open crumb, deep dimples, olive oil, flaky salt, and rosemary.

A good sourdough focaccia recipe should give you three things: a light, airy crumb, crisp olive-oil edges, and a method that feels clear before you even start mixing. This version is built around active sourdough starter, an overnight rest, and a 9×13-inch metal pan because that is the easiest way to get the best balance of lift, flavor, structure, and ease at home.

Real baking is rarely that tidy, though. Some days your starter is strong and you want focaccia by dinner. Other days you want to use discard and keep the dough moving without gambling on it. So this guide shows you the main route first, then helps you adjust when real life gets in the way. Just as importantly, it shows you what the dough should look and feel like at each stage, because that matters far more than blindly following the clock.

Quick answers before you bake

Best default route: active starter, overnight rest, 9×13-inch metal pan. This is the safest place to start.

Can you make it the same day? Yes, if your starter is strong and your kitchen is warm. You just need to watch the dough more closely.

Can you use discard? Yes. It usually moves more slowly, though, unless you add a little yeast.

Best pan: a well-oiled 9×13-inch metal pan. It gives the best browning, the best structure, and the fewest surprises.

Main success cue: bake when the dough looks puffy and lightly jiggly. If it still looks tight and reluctant, it is not ready yet.

Also Read: Easy English Scone Recipe

Choose your sourdough focaccia route

For the best overall result, choose active starter + overnight. This is the route I would hand to most people first. It gives you the best natural lift, the best flavor, and the calmest workflow.

Sourdough focaccia route guide comparing active starter overnight, active starter same day, discard only, and discard plus yeast options.
Start with active starter and an overnight rest when you want the strongest all-around result, move to same-day when your starter is lively, use discard when flexibility matters more than speed, and bring in a little yeast when you want the quickest dependable shortcut.

Choose active starter + same day when your starter is lively, the room is warm, and you want focaccia on the table by dinner. It can turn out beautifully, but you do need to stay more tuned in because the dough can move faster than you expect.

Choose discard only when using what you already have matters more than speed. Focaccia is forgiving enough that this can still work well, especially because the dough is pan-baked, but it usually takes more patience.

Choose discard + yeast when you want the safest shortcut. If you want a fast same-day focaccia and do not want to bet everything on tired discard, this is the smart route.

Why this sourdough focaccia recipe works

High hydration gives the crumb its open, airy texture

Focaccia dough should feel wetter and looser than many bakers expect at first. That extra water is what helps create the glossy irregular bubbles, soft interior, and lively bite that make focaccia feel worth baking. Add too much extra flour just to make the dough feel tidy and the crumb usually tightens fast.

Olive oil helps create the crisp, deeply golden edges

Focaccia needs enough olive oil under it and over it to bake the way focaccia should. The oil in the pan lightly fries the base as it bakes, while the oil on top helps browning, protects the surface, and gives the crust its rich golden finish. A cautious hand with the oil usually leads to a paler, drier result. Extra-virgin olive oil gives a stronger flavor, while regular olive oil tastes lighter; either one works. For a useful visual benchmark of how generously focaccia can be oiled without becoming greasy, King Arthur Baking’s big and bubbly focaccia is worth studying.

Time matters more than heavy kneading

This dough does not need aggressive kneading. It needs time, a few rounds of folds, and enough fermentation to become visibly airy before it goes into the oven. Put differently, the dough needs gas, softness, and some internal strength. Once it has those, the oven can do the rest.

A pan makes focaccia more forgiving than many sourdough loaves

One reason sourdough focaccia is such a strong beginner bake is that the pan supports the dough from start to finish. There is no shaping a boule, no scoring, and no need to trap oven spring inside a freestanding loaf. The pan also makes a wet dough much easier to handle, which is a big part of why focaccia is such a satisfying place to start.

Also Read: Sourdough English Muffins Recipe

Active starter vs discard: which should you use?

The best result in this article comes from active starter, and that is the route the full recipe follows. This formula assumes a 100% hydration starter, meaning equal weights of flour and water in the starter itself.

Use active starter for the strongest natural rise

Use active starter when it looks like a starter you would trust for a full loaf: domed, expanded, bubbly, and recently peaked or close to it. Ideally, it should have clearly risen after feeding and still look full of life. If it rose hours ago and has already collapsed back down, it is much less likely to give you the same lift here.

Use discard when flexibility matters more than maximum lift

Discard works well in focaccia because the dough is high-hydration and pan-baked. Even so, discard is usually weaker than active starter, so the rise may be slower, especially in a cool kitchen or on a tighter schedule. Serious Eats has a useful sourdough discard explainer if you want a broader look at how discard behaves in baking.

Use a little yeast with discard when you want speed and reliability

A small amount of instant yeast is the smartest shortcut when you want discard focaccia the same day. It does not make the bread less respectable. It simply makes the dough more dependable when the discard itself is not lively enough to do all the work quickly.

Also Read: White Russian Recipe: 7 Variants to Try, From Classic to Frozen

Same-day vs overnight sourdough focaccia

The main recipe below uses an overnight schedule because that route is easier to manage and easier to get right. Same-day focaccia is absolutely possible. Overnight focaccia is simply calmer, more flexible, and usually less stressful.
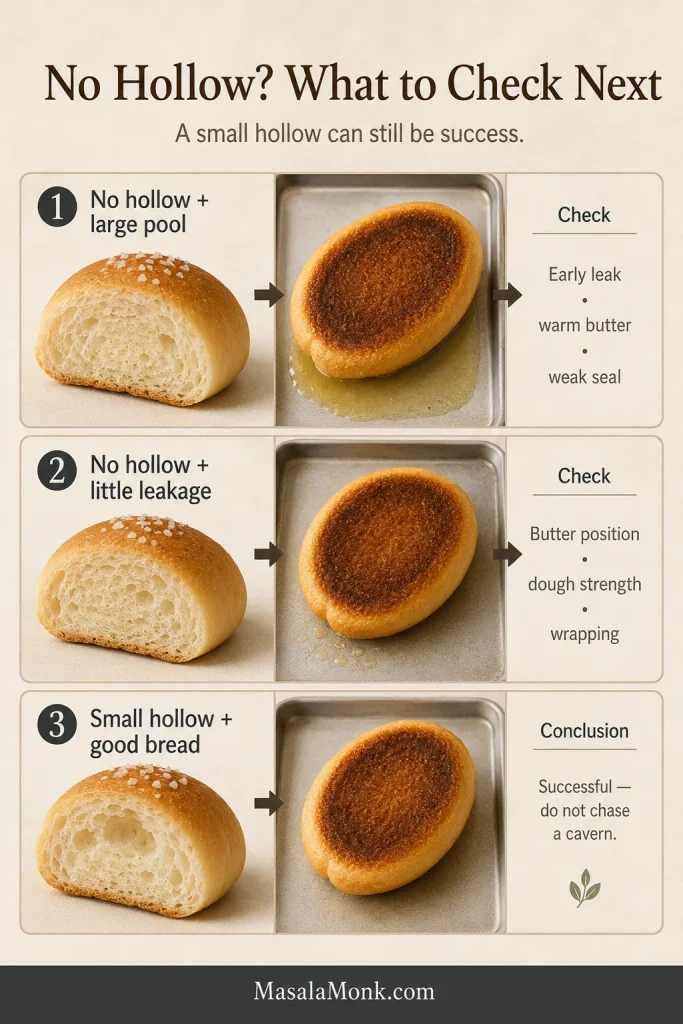
Choose the same-day method when you want bread by dinner

A same-day focaccia works best when your starter is active, the room is fairly warm, or you are willing to use a little yeast. It is a good route for spontaneous baking, but you do need to stay more attentive because the dough can move faster than you expect once the kitchen warms up.

Choose the overnight method when you want a calmer workflow

Overnight focaccia fits real life more easily. You can mix the dough in the evening, build some early strength, then refrigerate it and finish the pan proof the next day. The whole process feels less rushed, and the dough is usually calmer to handle.

Room temperature changes the timeline more than most recipes admit

At 76 to 78°F, dough can move much faster than it does at 68 to 70°F. That matters whether you are using active starter or discard. A warm kitchen can shorten fermentation by hours, while a cool kitchen can make the same dough seem stubborn. The dough matters more than the clock.

  • Warm kitchen, active starter: bulk fermentation can take around 4 to 5 hours.
  • Cool kitchen, active starter: bulk fermentation can take around 5 to 7 hours.
  • Discard only: expect more time unless the discard is unusually lively.
  • Discard + yeast: expect the fastest same-day route.

Ingredients for sourdough focaccia and what each one does

The main recipe below makes 1 thick focaccia in a 9×13-inch pan, enough for about 8 to 12 servings depending on how you cut it.

Main dough ingredients

  • 500 g bread flour
  • 400 g water
  • 100 g active sourdough starter, ripe and bubbly
  • 12 g fine sea salt
  • 20 g olive oil for the dough
  • 2 to 3 tablespoons olive oil for the pan
  • 1 to 2 tablespoons olive oil for the top
  • flaky salt for finishing
  • rosemary or other toppings as desired

Optional route adjustments

For an all-purpose flour version, replace the bread flour with all-purpose flour. The focaccia will still be very good, though usually a little softer and slightly less chewy.

For a discard-only version, replace the active starter with 100 g sourdough discard and expect a slower rise.

For a discard + yeast same-day version, use 100 g sourdough discard and add 4 g instant yeast when mixing.

Bread flour vs all-purpose flour

Bread flour gives the dough more strength, a little more height, and a chewier bite. For that reason, it is the better choice when you want more dramatic bubbles and better structure. All-purpose flour still works well and produces a slightly softer focaccia. If you are using standard all-purpose flour rather than bread flour, start by reducing the water by about 25 to 40 g and only add more if the dough still feels manageable. Weaker all-purpose flours usually absorb less water.

Why olive oil matters so much in focaccia

Olive oil is part of the structure as much as it is part of the flavor. It helps tenderize the crumb, improves browning, protects the surface, and creates the crisp underside and edges that make good focaccia feel rich rather than plain.

Salt, water, and hydration

Salt sharpens flavor and strengthens the dough. Water gives the dough its loose, airy potential. This is supposed to be a sticky dough. If you keep correcting it with extra flour until it feels tidy, you will lose the texture that makes focaccia worth baking. On humid days or with lower-protein flour, the dough may feel even looser than usual. Resist the urge to dump in a lot of extra flour all at once.

Toppings and when they should be added

Rosemary and flaky salt are the best place to start. Olives and thin onion slices also work well before baking because they bring strong flavor without flooding the dough. Wetter toppings such as fresh tomatoes or fresh mozzarella need a lighter hand or a later addition so they do not weigh down the surface. More delicate herbs are usually better added after baking, while harder herbs such as rosemary can go on before the bread hits the oven.

Also Read: Mango Sorbet Recipe: Healthy & Plant Based Dessert

Best pan for sourdough focaccia

The best pan for most home bakers is a 9×13-inch metal pan. It gives the most predictable thickness, the strongest browning, and the best balance between a soft interior and crisp olive-oil edges.

Best pan for sourdough focaccia guide comparing a 9x13 metal pan, sheet pan, cast iron skillet, and glass or ceramic pan for thickness, browning, and crust.
A 9×13 metal pan is still the safest default, but changing the pan changes the bread too: sheet pans bake thinner, cast iron deepens the bottom crust, and glass or ceramic usually leaves the base a little softer.

9×13-inch metal pan for classic thick focaccia

This is the pan the main recipe is built around. Use it when you want a bakery-style slab with height, chew, and deeply golden edges.

Sheet pan for thinner focaccia

Use a sheet pan when you want a thinner focaccia with more crust and less height. The dough will spread more, bake faster, and feel a little more snackable.

Cast iron skillet for deeper browning

A well-oiled cast iron skillet can give you a darker, more assertive bottom crust. It is a strong choice when deep browning matters more than the classic rectangular shape.

Glass and ceramic pans for a softer base

Glass and ceramic pans can still work, but they usually brown less aggressively than metal. As a result, the bottom tends to stay softer and the bake may need a little longer. If you use glass, grease it more carefully than you think you need to, because sticking can be more annoying there than in a well-oiled metal pan.

Also Read: Protein Ice Cream Recipe: 10 Creamy Homemade Recipes

How to make sourdough focaccia step by step

This is the main method and the one to choose first: active starter + overnight schedule + 9×13-inch metal pan.

Mix the dough

In a large bowl, combine the bread flour, water, active sourdough starter, salt, and 20 g olive oil. Mix until no dry flour remains.

The dough will look rough, sticky, and a little unruly at this stage. That is normal. You are not aiming for a smooth kneaded dough.

Freshly mixed sourdough focaccia dough in a glass bowl showing a rough sticky high-hydration early stage before folds.
At this stage, the dough should look rough, sticky, and looser than many bakers expect; that slightly unruly texture is exactly what sets up a lighter, airier focaccia later on.

Rest and strengthen the dough

Cover the bowl and let the dough rest for 20 minutes.

Then perform one round of stretch-and-folds by pulling one side of the dough up and folding it over itself. Rotate the bowl and repeat on all sides.

Repeat this process 3 more times, resting 20 to 30 minutes between rounds. By the final fold, the dough should still be sticky but noticeably smoother, more elastic, and better able to hold itself.

Hand lifting and folding sticky sourdough focaccia dough in a glass bowl during a stretch-and-fold.
This step is about gentle strength, not hard kneading; the dough should stretch softly, feel sticky, and fold back over itself without needing extra flour to make it behave.

Bulk ferment until the dough looks airy and alive

After the folds, cover the bowl and let the dough ferment at room temperature until it looks visibly fuller, lighter, and more aerated.

At 74 to 78°F, this usually takes about 4 to 6 hours total from mixing with active starter.

Do not chase a perfect doubling. What matters is that the dough looks alive. You want some visible bubbles, a softer feel, and a bowl of dough that no longer looks dense and inactive. If it still looks tight and compact, keep waiting.

Refrigerate for the overnight route

Once the dough has clearly gained strength and activity, cover it well and refrigerate it for 8 to 24 hours.

This rest makes the schedule easier, deepens the flavor, and usually leaves you with a calmer dough the next day. Cover it well so the surface does not dry out in the fridge. Also, do not assume that longer is always better: push the cold rest too far and the dough can get more sour while losing some of its lift.

Oil the pan and transfer the dough

Pour 2 to 3 tablespoons olive oil into a 9×13-inch metal pan and coat the bottom well.

Tip the dough gently into the pan. Turn it once or twice so the outside picks up some oil.

If it does not want to reach the corners yet, do not force it. Let it relax for 15 to 20 minutes, then stretch it gently again. Focaccia usually rewards patience.

Proof in the pan until puffy and jiggly

Let the dough proof in the pan at room temperature until it looks fuller, softer, and lightly inflated. In a warm room, this often takes 2 to 4 hours after the cold dough goes into the pan, but the dough is a better guide than the clock.

Look for a dough that feels easygoing rather than tense. It should wobble lightly when the pan moves, show some air under the surface, and accept dimples without fighting back. The full proofing cues are broken down in the next section.

Proofed sourdough focaccia dough in a 9x13 metal pan showing a puffy airy surface ready to dimple before baking.
By this stage, the dough should look fuller, softer, and lightly airy in the pan, with enough visible puff that dimpling feels easy rather than forced.

Dimple, top, and bake

Set the oven to 450°F.

Drizzle the top with 1 to 2 tablespoons olive oil. Lightly oil your fingertips, then press straight down to dimple the dough all over. Sprinkle with flaky salt and add your toppings.

Bake for 25 to 30 minutes, or until the top is deeply golden and the edges are richly browned. If the top darkens too quickly before the bread feels baked through, lower the oven slightly or move the pan to a lower rack.

Hands dimpling proofed sourdough focaccia dough in a 9x13 metal pan with olive oil before baking.
Once the dough is fully proofed, it should accept dimples easily and hold little pools of olive oil instead of springing back tight, which is one of the clearest signs that it is ready for the oven.

Cool, slice, and serve

Let the focaccia cool in the pan for 5 to 10 minutes, then lift it out and cool it a little more on a rack if possible. That helps the bottom stay crisper.
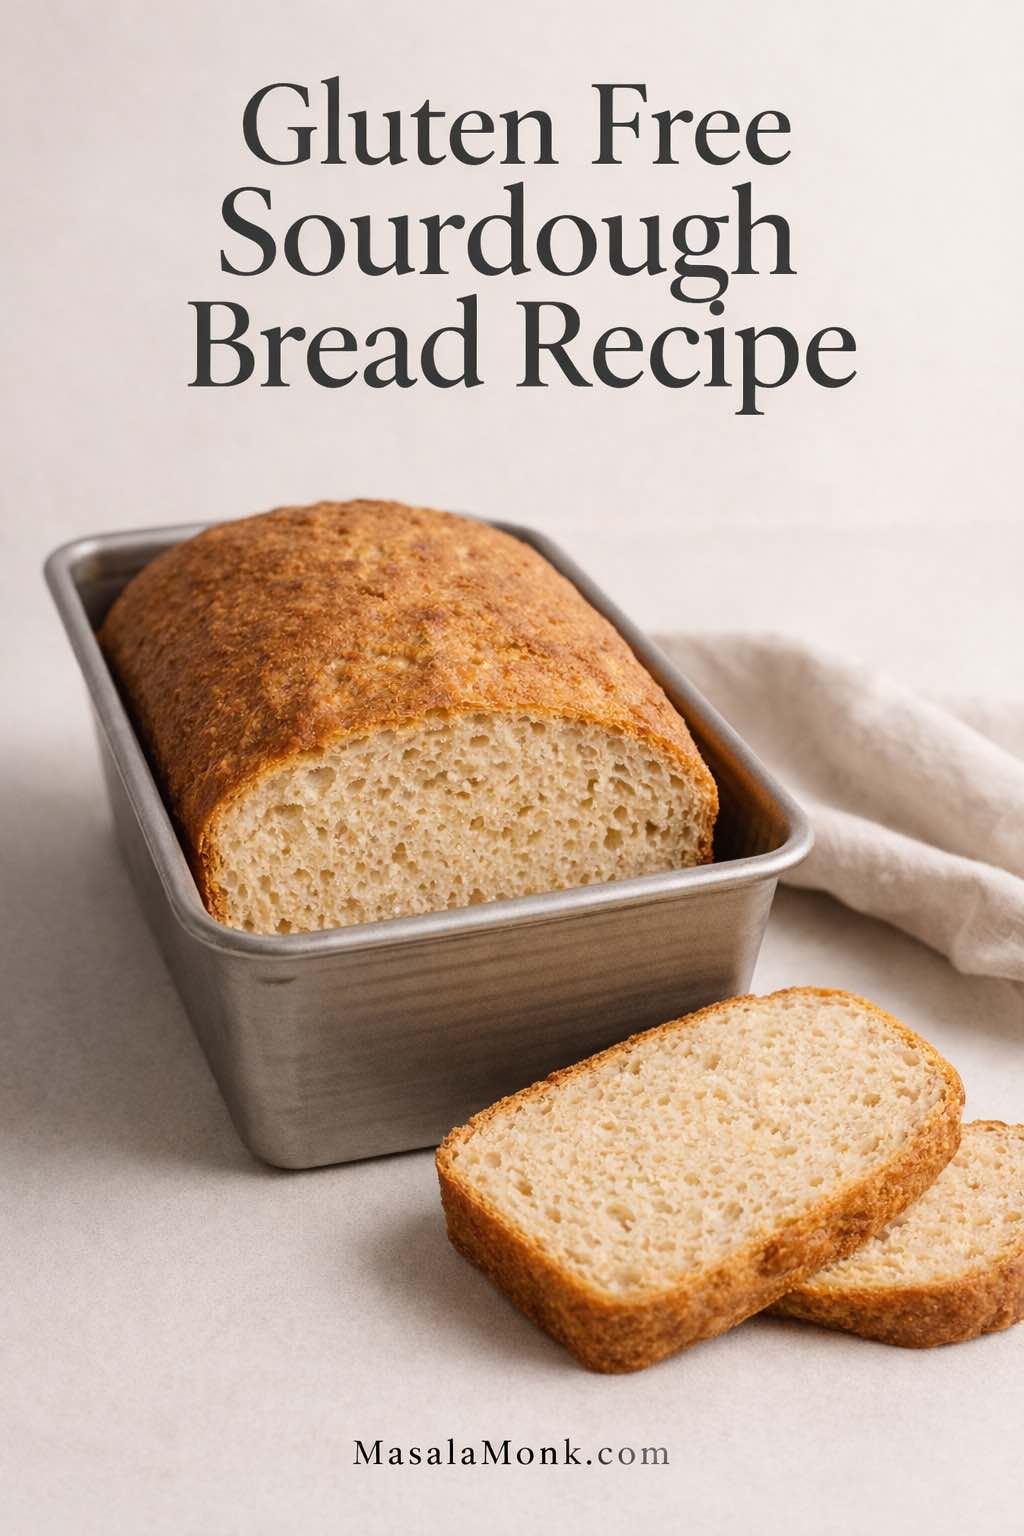
Slice while still slightly warm or at room temperature.

Close-up of a baked sourdough focaccia slice showing an airy crumb, golden top, olive-oil dimples, and crisp browned bottom edge.
This is the payoff you are aiming for: an airy interior, a bronzed top, and crisp olive-oil edges that feel generous rather than tight or bready.

Also Read: Cookie Pie Recipe: 10 Best Flavors, Fillings and Variations

How to tell when sourdough focaccia is proofed enough

This is the most important judgment call in the whole recipe. If the dough is proofed well, the crumb has a real chance of turning out airy and dramatic. Bake too early and the bread usually comes out flatter and tighter.

Sourdough focaccia proofing guide showing not ready, ready to bake, and slightly overproofed dough in pans before baking.
Tight dough still needs time, puffy dough with a light wobble is ready to bake, and slightly overproofed dough can still turn out well if you handle it gently.

Signs your dough needs more time

The dough looks flat in the pan, feels heavy rather than buoyant, and resists your fingertips. When you press into it, it springs back quickly and does not want to hold the dimple. This is where a lot of bakers go wrong: the dough looks spread out, so they assume it is ready. It is not. It still needs time.

  • tight surface
  • little to no wobble
  • heavy feel
  • resists stretching toward the corners

Signs it is ready to dimple and bake

The dough looks puffy, slightly wobbly, and airy under the surface. Your fingers can press in easily, and the dough feels soft and almost marshmallowy rather than tense. More importantly, it should look like a dough that has actually trapped gas, not one that is merely spreading because it is wet.

  • puffy appearance
  • light wobble when the pan moves
  • visible air pockets under the surface
  • easy dimpling without the dough fighting back

What slightly overproofed focaccia looks like

A slightly overproofed dough can feel extremely loose and fragile, and it may deflate more easily when handled. Even then, focaccia often still bakes reasonably well because the pan supports it. You may lose some height, but you can still get very good bread.

What underproofed focaccia looks like after baking

Underproofed focaccia usually comes out flatter, tighter, and less bubbly. The crumb feels more bread-like than airy, and the dramatic holes never really develop.

Also Read: Cookie Pie Recipe: 10 Best Flavors, Fillings and Variations

Best toppings for sourdough focaccia

The best toppings support the bread instead of burying it. Let the topping plan get too heavy or too wet and the focaccia starts losing the texture that made it worth baking in the first place.

Best toppings for sourdough focaccia guide showing simple toppings, before-baking toppings, wetter toppings to use lightly, and finishing toppings to add after baking.
The best focaccia toppings do not compete with the bread; they support it. Classic toppings such as rosemary, flaky salt, and olive oil keep the bake clean and balanced, while wetter toppings need a lighter hand and fresher finishes are often better added after baking.

The best simple topping: rosemary, olive oil, and flaky salt

This is still the most reliable and satisfying version. It lets the bread stay the star, smells incredible, and avoids the sogginess that comes from piling too much on top.

Toppings that work well before baking

Olives, thin onion slices, rosemary, and a restrained amount of garlic all work well before baking. Garlic, however, can burn if it is sliced too thin or left too exposed, so keep it modest and let the olive oil protect it.

Toppings that need a lighter hand

Fresh tomatoes, fresh mozzarella, and other watery toppings should be used in moderation. Too much moisture softens the surface, interferes with browning, and can weigh down the dough. Once you want a more heavily topped bread, the result starts leaning toward pizza rather than classic focaccia.

What to add after baking

More delicate herbs, a final drizzle of good olive oil, or finishing touches such as parmesan are often better after baking. That way the flavors stay fresh instead of getting dulled in the oven.

Topping combinations that work well together

  • rosemary and flaky salt
  • rosemary and olive
  • onion and olive
  • light cherry tomato and oregano
  • garlic and rosemary

Keep the topping plan focused. Let the bread do most of the talking.

Also Read: Peach Cobbler with Canned Peaches (Dessert Recipe)

Troubleshooting sourdough focaccia

Why is my sourdough focaccia dense instead of airy?

The most common causes are underproofing, weak starter, old discard without enough time, or too much added flour. Usually the fix is more fermentation, not more flour.

Why didn’t it get big bubbles?

Either the dough never built enough gas, or the gas it had was knocked out by rough handling. Good bubbles need both strong fermentation and gentle treatment.

Why is my focaccia gummy in the middle?

It may need a slightly longer bake, especially if it is thick or heavily topped. It can also seem gummier than it really is when sliced too hot. Let it cool briefly before cutting.

Why is it pale instead of deeply golden?

The oven may not be hot enough, the pan may not brown strongly, or there may not be enough olive oil on the dough and in the pan. A metal pan really helps here.

Why did it stick to the pan?

Usually there was not enough oil underneath, or the bread sat too long before being released. Oil the pan generously and loosen the focaccia while it is still warm if needed.

Why did it spread too much?

Either the dough never built enough strength during the folds, or it was proofed before it had enough internal structure. High hydration is good, but the dough still needs some strength.

Why does it taste too sour?

The dough may have fermented too long, the discard may have been especially acidic, or the kitchen may have been warm enough to push fermentation harder than expected. Use fresher discard or shorten the fermentation slightly next time.

Can you save overproofed focaccia?

Often yes. Transfer it gently to a well-oiled pan, dimple carefully, and bake it. You may lose some height, but focaccia is forgiving enough that the result can still be very good.

Also Read: Punjabi Mutton Bhuna – Amritsari Village-Style Gosht Recipe

Same-day and overnight schedules at a glance

These are working timelines, not hard laws. If the dough is moving faster than expected, refrigerate it sooner. If it is lagging, give it warmth or more time.

Sourdough focaccia schedule guide comparing active starter same day, active starter overnight, and discard plus yeast timing options.
The overnight route is easier to fit around real life, same-day focaccia works when your starter is strong and the room is warm, and discard plus yeast is the fastest way to get the dough moving without much drama.

Sample same-day timeline with active starter

Use this when you have strong starter and a warm kitchen.

  • 8:00 a.m. Mix the dough.
  • 8:20 a.m. to 9:30 a.m. Complete 4 rounds of folds.
  • 9:30 a.m. to 1:00 p.m. Let the dough bulk ferment until airy.
  • 1:00 p.m. Transfer to the pan.
  • 1:00 p.m. to 3:00 p.m. Pan proof until puffy and jiggly.
  • 3:00 p.m. Dimple, top, and bake.

Sample overnight timeline with active starter

This is the best default route in the article.

  • 6:00 p.m. Mix the dough.
  • 6:20 p.m. to 7:30 p.m. Complete 4 rounds of folds.
  • 7:30 p.m. to 10:00 p.m. Let the dough gain early strength and activity.
  • 10:00 p.m. Refrigerate overnight.
  • Next day, 10:00 a.m. Transfer to the pan.
  • 10:00 a.m. to 1:00 p.m. Pan proof until puffy.
  • 1:00 p.m. Dimple, top, and bake.

Sample discard + yeast fast timeline

Use this when you want the easiest quick route.

  • 9:00 a.m. Mix discard, flour, water, salt, olive oil, and instant yeast.
  • 9:20 a.m. to 10:30 a.m. Complete 4 rounds of folds.
  • 10:30 a.m. to 1:00 p.m. Bulk ferment until airy.
  • 1:00 p.m. Transfer to the pan.
  • 1:00 p.m. to 2:30 p.m. Pan proof.
  • 2:30 p.m. Dimple, top, and bake.

Also Read: Masterclass in Chai: How to Make the Perfect Masala Chai (Recipe)

Variations

Rosemary sourdough focaccia

Top the dough with rosemary, flaky salt, and olive oil for the cleanest and most classic version.

Whole wheat sourdough focaccia

Replace 100 to 150 g of the bread flour with whole wheat flour for a nuttier flavor and a slightly heartier crumb. Expect a little less loft and a little more chew.

Cast iron sourdough focaccia

Bake the dough in a well-oiled cast iron skillet when you want a darker, more assertive bottom crust and a rounder shape.

Sourdough focaccia pizza-style

Top more heavily after the first bake or split and fill it after baking when you want a pizza-inspired version. If you already like working with sourdough pizza dough, this is another satisfying way to use a soft, high-hydration dough.

Garlic and olive focaccia

Use sliced olives and a restrained amount of garlic so the top becomes aromatic and savory without turning harsh or greasy.

Also Read: Avocado Chocolate Mousse Recipe

How to store, reheat, and freeze sourdough focaccia

Best way to store focaccia for 1 to 2 days

Focaccia is best the day it is baked and still very good on day two. Once it is fully cool, wrap it well and keep it at room temperature. Do not trap it while warm, or the steam will soften the crust you just worked for.

How to reheat for crisp edges again

Reheat the focaccia in a hot oven or toaster oven for a few minutes rather than microwaving it. That is the easiest way to bring the edges back to life.

Can you freeze sourdough focaccia?

Yes. Freeze it once fully cool, either whole or in slices, wrapped well. Reheat from frozen or thaw first and warm it in the oven.

Best leftover uses

Use leftover focaccia for sandwiches, alongside soup, or lightly toasted with eggs. Day-old focaccia still has plenty to offer if you warm it well.

Also Read: Falafel Recipe: Crispy Homemade, Air Fryer and Baked Falafel

Frequently asked questions about sourdough focaccia

Can I use sourdough discard instead of active starter?

Yes. Discard works well in focaccia, but it is usually slower and less forceful than active starter. For the most reliable result, use active starter. For the quickest discard version, add a little yeast.

Do I need yeast for sourdough discard focaccia?

No. You can make it without yeast if you give it enough time. Yeast simply makes the rise faster and more dependable.

Is focaccia easier than sourdough bread?

For most bakers, yes. The pan makes it more forgiving, and there is no shaping or scoring to master. If you want another approachable follow-up bake after this, sourdough English muffins are another useful way to build confidence with fermentation and dough cues.

Can I refrigerate the dough overnight?

Yes. In fact, the overnight route is the main method here because it makes the process easier and more consistent.

What flour is best for sourdough focaccia?

Bread flour is the best all-around choice for height and structure, but all-purpose flour still works very well.

What pan gives the crispiest bottom?

A well-oiled metal pan or cast iron skillet usually gives the best browning and the crispest base.

Sourdough focaccia recipe card showing a baked focaccia in a 9x13 pan, a cut square with airy crumb, and a summary of timing, ingredients, and method.
Once the route is clear, the bake itself becomes straightforward: mix, fold, let the dough gain strength, give it enough time to look puffy and ready, and bake for a focaccia with a light crumb and crisp olive-oil edges.

Also Read: Mango Margarita Recipe (Frozen or On the Rocks)

Recipe card

Sourdough Focaccia Recipe

Yield: 1 focaccia in a 9×13-inch pan
Serves: 8 to 12
Prep time: 30 minutes active time
Bulk fermentation: about 4 to 6 hours with active starter at warm room temperature
Cold rest: 8 to 24 hours
Pan proof: about 2 to 4 hours
Bake time: 25 to 30 minutes

Ingredients

  • 500 g bread flour
  • 400 g water
  • 100 g active sourdough starter
  • 12 g fine sea salt
  • 20 g olive oil for the dough
  • 2 to 3 tablespoons olive oil for the pan
  • 1 to 2 tablespoons olive oil for the top
  • flaky salt
  • rosemary or other toppings as desired

Optional adjustments

  • use 100 g sourdough discard in place of active starter for a slower discard version
  • add 4 g instant yeast when using discard for a faster same-day version

Method

  1. Mix the bread flour, water, starter, salt, and 20 g olive oil until no dry flour remains.
  2. Rest the dough for 20 minutes.
  3. Perform 4 rounds of stretch-and-folds, resting 20 to 30 minutes between rounds.
  4. Let the dough bulk ferment until it looks fuller, lighter, and visibly airy.
  5. Refrigerate the dough for 8 to 24 hours once it has clearly gained activity.
  6. Oil a 9×13-inch metal pan well and transfer the dough.
  7. Let it proof in the pan until puffy, jiggly, and easy to dimple.
  8. Heat the oven to 450°F.
  9. Drizzle the top with olive oil, dimple all over, and add flaky salt and toppings.
  10. Bake for 25 to 30 minutes until deeply golden.
  11. Cool for 5 to 10 minutes in the pan, then lift out and cool a little more before slicing.

Notes

  • The best default route is active starter + overnight.
  • This formula assumes a 100% hydration starter.
  • Use starter that is recently peaked or close to peak for the best lift.
  • If using all-purpose flour, reduce the water slightly to keep the dough manageable.
  • Use discard when convenience matters more than maximum lift.
  • Add instant yeast to discard when you want the fastest and most dependable same-day result.
  • A 9×13-inch metal pan gives the best all-around crust and structure.
  • The dough is ready when it looks puffy, airy, and softly inflated, not flat and tight.

A good focaccia should feel generous, not tense. Once you know which route makes sense, what the dough should look like, and when to wait instead of forcing it, this becomes one of the easiest breads to come back to. For more ideas beyond this one, the site’s broader sourdough bread recipe guide is a useful next stop.

Posted on 1 Comment

Sourdough English Muffins Recipe

Fork-split sourdough English muffin with melted butter showing real nooks and crannies, styled as a dark editorial recipe cover with text overlay.

If you want sourdough English muffins with a chewy bite, deep toastability, and real nooks and crannies, this is the version to make. The dough is built around active starter for dependable natural lift, kept soft enough to open well inside, shaped thick enough to protect the crumb, and cooked slowly enough that the middles set before the outsides darken too fast. Once cooled and split with a fork, they toast the way a good English muffin should: crisp at the edges, rough in the middle, and ready to catch butter in every crevice.

This page does more than hand you one formula. It helps you choose the right route before you begin, whether that means active starter, fresh discard, overnight timing, same-day timing, or a small yeast assist for reliability. It also shows you how to avoid the problems that ruin texture: dense crumb, gummy middles, weak rise, flat rounds, or muffins that brown long before they cook through. If your culture still feels inconsistent, start with this guide on how to build a sourdough starter. If you already like baking with starter, save these sourdough bread recipes for later too.

Why this sourdough English muffins recipe works

A strong sourdough English muffins recipe depends on four things working together:

  • full fermentation
  • a soft but manageable dough
  • enough thickness to create an open interior
  • low pan heat so the middles cook through before the crust browns too fast
Explainer guide showing why sourdough English muffins work, with four key factors: full fermentation, soft dough, thick shaping, and low pan heat, plus a split muffin showing the open interior these choices create.
Great sourdough English muffins do not come from one trick alone. Full fermentation gives the dough enough internal life to rise well, a soft dough helps the crumb open instead of tightening up, thicker shaping protects the interior texture, and low pan heat gives the center time to set before the crust races ahead. When all those pieces line up, the muffins cook more evenly, split rougher after cooling, and deliver the nooks-and-crannies texture the whole recipe is built around.

When those four elements line up, the muffins rise better, cook more evenly, and split more raggedly after cooling. And when one slips, the batch usually shows it. Under-fermented dough stays tight and heavy. Dough rolled too thin cooks easily but loses interior texture. Dough handled too roughly loses gas. Heat that runs even a little too high gives you color before the middle is ready.

Texture is the real payoff. Good sourdough English muffins with nooks and crannies should not split open like soft sandwich bread. They should break into rough, irregular halves that toast crisp and hold butter properly. That open interior is part of what makes the format feel right, which is why King Arthur’s guide to nooks and crannies is worth reading if you want a clearer sense of the target.

Also Read: White Russian Recipe: 7 Variants to Try, From Classic to Frozen

Choose your sourdough English muffins route first

A disappointing batch often starts with the wrong route, not the wrong recipe. Choose the path that matches your starter, your schedule, and your kitchen.

Guide graphic showing which sourdough English muffins route to use, including active starter, fresh discard, overnight, same day, and yeast-assisted options.
Not every batch of sourdough English muffins should start the same way. This route guide helps you choose between active starter, fresh discard, overnight timing, same-day baking, and a yeast-assisted option, so the method fits your starter, your schedule, and the texture you want. Save it for quick reference, then use the full post for the detailed recipe and troubleshooting.

Active-starter sourdough English muffins

Use this route if:

  • your starter rises reliably after feeding
  • you want the best lift
  • you want the best chance of real nooks and crannies
  • you want sourdough English muffins no yeast
  • you want the strongest overall crumb

This is the main route on this page and the best path for sourdough starter English muffins.

Fresh-discard sourdough English muffins

Use this route if:

  • your discard is recent and still smells pleasantly tangy, not sharply harsh
  • you want to use it up instead of feeding again
  • you are willing to allow more fermentation time
  • you understand the rise may be less predictable
  • you are comfortable with a slightly less lofty result if needed

This can still make very good sourdough discard English muffins, especially when the discard comes from a healthy, recently maintained starter.

Overnight sourdough English muffins

Use this route if:

  • you want the easiest schedule
  • you want better flexibility the next morning
  • you prefer deeper flavor
  • you do not want to rush fermentation
  • you like shaping and cooking cooler dough

This is the easiest and most forgiving option for most readers. It is also the route I recommend first for overnight sourdough English muffins.

Same-day sourdough English muffins

Use this route if:

  • your starter is especially lively
  • your kitchen is warm enough to support a full rise
  • you want muffins today
  • you are willing to watch the dough, not just the clock

This can still produce easy sourdough English muffins, but it leaves much less room for a weak starter or a cool kitchen.

Yeast-assisted sourdough English muffins

Use this route if:

  • your discard is older or sluggish
  • your kitchen runs cool
  • you want more predictable rise
  • your schedule is tighter than your starter deserves
  • you still want sourdough flavor without relying on uncertain lift

That is a practical choice, not a compromise to hide. A hybrid route works well, and Serious Eats’ yeast-assisted sourdough English muffins are a useful reference point for that style.

Also Read: Mango Sorbet Recipe: Healthy & Plant Based Dessert

Quick route summary for sourdough English muffins

  • Best overall texture: active starter
  • Best schedule: overnight
  • Best discard use-up option: fresh discard with patience
  • Best safety net for weak discard: small yeast assist
  • Best path for no yeast: active starter with full fermentation

Sourdough English Muffins Recipe

This is the master version on the page: active starter, naturally leavened, overnight-friendly, skillet-cooked, and built for classic fork-split texture.

Sourdough English muffins served split and buttered, with recipe details for an overnight-friendly active starter version.
Use this as your quick-reference anchor for the batch: soft dough, thick rounds, low heat, and a fork-split finish are what give sourdough English muffins their best texture. Save it now, then come back to the full post for the route choices, troubleshooting, and variation details that make the recipe easier to get right.

Yield: 10 to 12 muffins
Prep time: 20 minutes
Rest and folds: 30 to 45 minutes
Bulk fermentation: about 4 to 8 hours at room temperature, depending on starter strength and kitchen temperature
Final proof: about 45 to 90 minutes
Cook time: about 10 to 14 minutes per batch
Total time: 8 to 14 hours, depending on whether you use the overnight route
Best route: active starter, naturally leavened, overnight-friendly

Ingredients for sourdough English muffins

Ingredients guide for sourdough English muffins showing active sourdough starter, water, milk, bread flour, softened butter, honey or sugar, fine salt, and cornmeal or semolina arranged in a labeled baking setup.
The base sourdough English muffins formula is simple, but each ingredient plays a specific role in the final texture. Active starter drives lift, bread flour gives structure and chew, milk and water balance tenderness and handling, butter softens the crumb, and honey or sugar helps with browning. Salt sharpens the flavor, while cornmeal or semolina helps with the classic finish and easier handling during proofing and cooking.
  • 120 g active sourdough starter
  • 180 g lukewarm milk
  • 60 g lukewarm water
  • 20 g honey or sugar
  • 30 g softened butter
  • 360 g bread flour
  • 7 g fine salt
  • cornmeal or semolina, for dusting

Recipe notes before you start

  • The dough should feel soft and slightly tacky, not stiff.
  • Shape to about 3/4 inch thick if you want a better interior.
  • Proof until the rounds look a little fuller and softer, not dramatically doubled.
  • Cook over truly low heat. This is where many batches go wrong.
  • Cool fully, then fork-split, then toast for the best final texture.

Also Read: Protein Ice Cream Recipe: 10 Creamy Homemade Recipes

Ingredient notes for sourdough English muffins

Active sourdough starter
Use starter that has been fed and is clearly lively. It should look airy, expanded, and capable of lifting dough on its own. If you are unsure what ready starter really looks like, go back to this guide on feeding and storing sourdough starter.

Milk and water
Milk softens the crumb and supports browning. Water keeps the dough from becoming too rich. Together they give homemade sourdough English muffins that stay tender without drifting into bun territory.

Honey or sugar
Either works. The amount is modest, so the dough will not taste sweet, but it helps browning and rounds out the flavor.

Butter
Butter adds tenderness. The amount stays moderate, so the dough still behaves like English muffin dough rather than enriched roll dough.

Bread flour
Bread flour gives the dough the strength to rise well and hold shape on the skillet. All-purpose flour can work, but bread flour is the better default for chew and structure.

Cornmeal or semolina
This helps with sticking and gives the classic finish. It does not create the open crumb. Fermentation, thickness, heat, and fork-splitting do that.

Making sourdough English muffins goes more smoothly when you can see the whole sequence before you start. This method guide walks through the full flow from mixing and folding to fermentation, shaping, proofing, skillet cooking, checking the center, and cooling before fork-splitting. Use it as your quick roadmap for the batch, then follow the detailed recipe for the exact dough cues, timing flexibility, and texture checkpoints that make the muffins come out light, cooked through, and ready to toast well.

How to make sourdough English muffins

1. Mix the dough

In a large bowl, stir together the active starter, milk, water, honey, and softened butter until mostly smooth. Add the bread flour and salt, then mix until no dry flour remains.

Do not chase a polished dough here. You only need even mixing, and a rough but cohesive dough is completely fine at this stage.

Step 1 process image for sourdough English muffins showing freshly mixed dough in a large bowl, rough and shaggy but fully combined, with no dry flour remaining and a wooden spoon resting in the dough.
This is what properly mixed sourdough English muffin dough should look like before the first rest: soft, shaggy, cohesive, and fully combined, but not smooth or polished yet. At this stage, you are only bringing the ingredients together until no dry flour remains. If the dough looks rough, that is normal. The goal here is not to knead it into a finished dough, but to set up the rest-and-fold stage that helps it relax, smooth out, and strengthen naturally.

When the dough feels drier than expected, add only a very small splash of liquid. When it feels shaggy and awkward, let it rest before correcting it with more flour. That pause matters. Dough often settles after the first rest, and overcorrecting early makes the final crumb tighter than it needs to be. The same general logic helps with sourdough pizza dough too: pause before you fix.

2. Rest and strengthen the dough

Cover the bowl and let the dough rest for 20 to 30 minutes. Then give it 3 to 4 folds in the bowl or on a lightly damp counter.

Step 2 process image for sourdough English muffins showing rested dough being gently folded in a bowl, with the dough looking softer, smoother, and stronger than after mixing but not fully polished.
After the first rest, sourdough English muffin dough should look calmer and more organized than it did right after mixing. This is the stage where gentle folds begin building strength without turning the dough stiff or overworked. If the dough feels softer, stretches more easily, and already looks less rough, that is exactly what you want before bulk fermentation begins.

You do not need a hard knead. The goal is to help the dough feel smoother, calmer, and stronger than it did right after mixing.

3. Bulk ferment until clearly airy

Cover the bowl again and let the dough rise until it is visibly puffier, lighter in feel, and more aerated. Use the dough, not the clock.

Signs it is ready:

  • it looks expanded rather than flat
  • the surface feels softer
  • the mass feels lighter under your hands
  • it shows visible airiness instead of a dense, heavy look
Step 3 process image for sourdough English muffins showing bulk-fermented dough in a bowl, puffier and more aerated than before, with a soft surface and visible air bubbles that signal the dough is ready for the next stage.
This is the look you want before shaping sourdough English muffins: the dough should feel lighter, look fuller, and show visible airiness across the surface. It should not seem dense, flat, or lifeless at this point. Bulk fermentation is one of the biggest texture drivers in the whole recipe, because dough that has not become properly airy usually bakes into tighter, heavier muffins with fewer nooks and crannies.

If you are making overnight sourdough English muffins, let the dough begin fermenting at room temperature until it shows clear activity, then refrigerate it. For a same-day batch, keep it at room temperature until it reaches those same cues.

4. Refrigerate if using the overnight route

For the overnight route, chill the dough only after it has clearly started fermenting. Do not refrigerate a lifeless dough and expect the fridge to solve it.

Step 4 process image for sourdough English muffins showing lightly active dough in a covered container, ready to be refrigerated for the overnight route after it has already started fermenting.
For overnight sourdough English muffins, the dough should go into the refrigerator only after it already looks active and lightly puffed. This is the stage where cold fermentation helps with flexibility and flavor, but it does not replace early fermentation. If the dough still looks flat and lifeless, it is too soon to chill it. What you want here is a dough that already shows movement before the overnight rest.

The next day, let it sit just long enough that it is no longer stiff and stubborn, then shape.

5. Shape and cut the muffins

Turn the dough onto a lightly floured surface and pat or roll it to about 3/4 inch thick. Keep the thickness as even as possible. A standard English muffin cutter size works well here and usually gives the most familiar result.
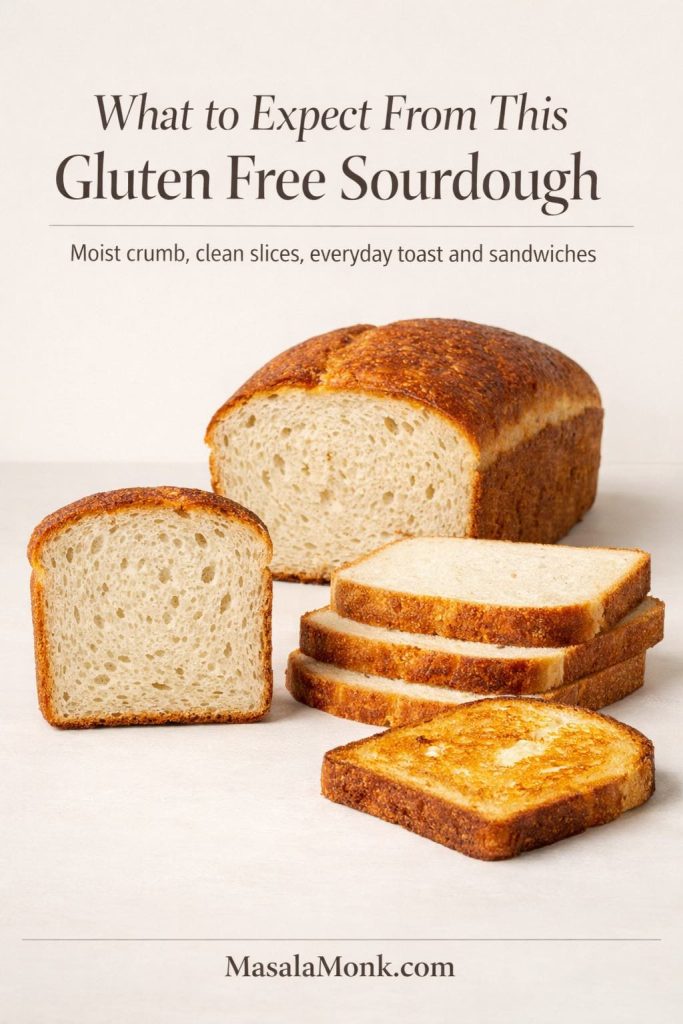
That thickness matters. Thinner rounds cook more easily but lose interior character. Thicker rounds create better texture but demand lower heat and more patience.

Step 5 process image for sourdough English muffins showing thick dough patted to about 3/4 inch on a lightly floured surface, with a cutter cutting rounds and several soft cut muffins visible beside the dough.
This is the shaping stage that helps protect the final texture of sourdough English muffins. The dough should be patted or rolled to about 3/4 inch thick before cutting, which gives the interior enough room to open instead of baking up flat and bread-like. The rounds should look soft and alive, not tight, dry, or heavily floured. This is also why repeated rerolling works against the crumb: every extra pass compresses the dough and makes it harder to get the rough fork-split texture you want later.

Cut rounds with a biscuit cutter or glass and transfer them to parchment or a tray dusted with cornmeal or semolina. Re-roll scraps once if needed, but not again and again. Every reroll compresses the dough and makes it harder to get the open interior you want.

If the dough sticks badly, lightly flour the surface and your cutter, but do not bury the dough under excess flour. Too much bench flour works directly against sourdough English muffins with nooks and crannies.

6. Proof the rounds

Let the cut rounds rest until they are slightly puffy and visibly softer. They should not double dramatically. They should simply look less dense and feel a little lighter.

Step 6 process image for sourdough English muffins showing proofed rounds on a parchment-lined tray dusted with cornmeal or semolina, slightly puffier and softer than when first cut but not dramatically doubled.
This is the look to aim for before sourdough English muffins hit the skillet: the rounds should seem a little fuller, softer, and more relaxed than when they were first cut, but they should still hold their shape cleanly. Final proofing here is not about dramatic volume. It is about giving the dough enough time to loosen and lighten so the muffins cook with better lift and a more open interior instead of staying tight and compact.

A round that still looks tight will usually cook tight. A round that looks overblown, fragile, or hard to move cleanly is already beyond ideal and should go straight to the skillet.

7. Cook low and patiently

Heat a heavy skillet or griddle over low heat. Low means low, not medium-low pretending to be low.

Place the muffins on the skillet and cook the first side slowly until evenly browned. Then flip and cook the second side just as gently. On many home stoves, expect roughly 5 to 7 minutes on the first side and 4 to 6 minutes on the second, though thickness, stove strength, and pan material can shift that a little.

Step 7 process image for sourdough English muffins showing thick muffins cooking on a skillet over low heat, with gradual even browning and one muffin lifted on a spatula to show the underside color.
Low skillet heat is what gives sourdough English muffins time to cook through before the outsides darken too fast. The bottoms should brown gradually and evenly, while the sides begin to look less raw and more set. When the pan runs too hot, the crust gets ahead of the center and the texture suffers. A patient cook here is what protects the crumb you built through fermentation, shaping, and proofing.

Watch for these signs before flipping:

  • the bottom is evenly browned
  • the sides are beginning to look more matte than raw
  • the muffin feels lighter when you lift an edge
  • the surface looks more set and less doughy

If the muffins are thick and the crust is coloring before the sides start to look set, cover the pan briefly to help trap enough heat for the center to catch up. If the muffins are well colored but still doubtful in the middle, move them to a low oven to finish gently instead of forcing more stovetop color.

That slow approach matters. Little Spoon Farm’s sourdough English muffins use similar low-heat logic for the same reason: English muffins need time to cook through, not just time to brown.

8. Check for doneness

A done muffin should feel lighter than it looks and set through the center. If you are unsure, pull one, let it rest briefly, then open it. The middle should look tender and cooked through, not shiny, sticky, or pasty.

A properly cooked sourdough English muffin should open to a crumb that looks set, tender, and lightly moist without any gummy or pasty center. What you are checking here is not whether the inside looks dry, but whether it has finished cooking through. If the middle still looks shiny or sticky, the muffins need more gentle heat. If it looks soft yet clearly set, you are ready to move on to cooling and fork-splitting.

A crumb that is fully set but slightly moist is not the same as a raw gummy center. Toasting finishes the texture beautifully. Raw gumminess is the problem, not tenderness.

9. Cool completely, then fork-split

Let the muffins cool all the way before opening them. Then use a fork to work around the sides until they separate.

Fork-splitting is what helps sourdough English muffins keep the rough interior that makes them so good once toasted. A knife gives a cleaner cut, but it smooths away some of the texture you worked for through fermentation, shaping, proofing, and low-heat cooking. Once the muffins have cooled fully, use a fork around the seam to open them and preserve that more jagged, butter-catching crumb.

This is not decorative. It is part of the texture. Fork-splitting preserves the rough interior a knife smooths away, which is why both King Arthur’s sourdough English muffin recipe and their broader English muffin guidance emphasize splitting with a fork.

Also Read: Homemade Mango Ice Cream Recipe

Dough cues that matter more than the clock

Sourdough English muffin dough cues guide showing how the dough should look after mixing, after resting, after folds, at the end of bulk fermentation, and after cutting, with visual cues for softness, strength, airiness, and shape.
Reading the dough correctly matters more than chasing a fixed timeline. This sourdough English muffin dough cues guide shows what to look for at each stage, from a soft shaggy mix to a calmer rested dough, a stronger dough after folds, a puffier and airier dough at the end of bulk fermentation, and cut rounds that hold shape without looking tight. Use it alongside the full recipe so you can judge readiness by feel and appearance, not just the clock.

After mixing

The dough should feel soft and slightly tacky, not dry and tight, and not wet enough to slump like batter. A dough that already feels stiff usually bakes up denser than it should.

After the rest

It should feel calmer and less rough. That is one reason not to add too much flour too early.

After the folds

The dough should feel smoother, more elastic, and more organized. Do not expect it to look perfect. What matters is that it feels stronger than it did at first.

At the end of bulk fermentation

It should look puffier, feel lighter, and show visible airiness. If it still feels heavy and dull, it is not ready.

After cutting

The rounds should hold shape without feeling tight. If they still look compact after proofing, they usually cook compact.

Also Read: Cookie Pie Recipe: 10 Best Flavors, Fillings and Variations

Timing guidance by kitchen temperature

Use these as working expectations, not promises. Starter strength still matters, but room temperature changes the pace more than many bakers expect.

Kitchen temperature guide for sourdough English muffins showing cool, moderate, and warm kitchen ranges with notes on how fermentation timing, bulk rise, and schedule flexibility change in each condition.
Room temperature changes how quickly sourdough English muffin dough moves, which is why timing should always be read through the dough instead of the clock alone. Cool kitchens usually need more patience and often suit the overnight route best, moderate kitchens are the most predictable, and warm kitchens can push fermentation along fast enough that earlier checks and shorter room-temperature stages matter. Use this guide to adjust the pace without losing the soft dough, proper proof, and low-heat cooking that give the muffins their best texture.

Cool kitchen, around 18 to 20°C

The dough will move slowly. Lean toward the overnight route, allow a longer bulk fermentation, and resist shaping too soon just because the clock says you should.

Moderate kitchen, around 21 to 24°C

This is the easiest range for the recipe. Most timing guidance behaves normally here, and same-day batches become more realistic when the starter is strong.

Warm kitchen, around 25 to 28°C

Fermentation can move surprisingly fast. Watch the dough earlier, shorten room-temperature stages where needed, and refrigerate sooner if the dough starts looking more inflated than airy.

Also Read: Punjabi Mutton Bhuna – Amritsari Village-Style Gosht Recipe

Sourdough starter vs discard for English muffins

This is one of the biggest search intents around the topic, so it deserves a direct answer.

Comparison guide for sourdough English muffins showing active starter, fresh discard, and discard with a small yeast assist, with visual differences in starter condition, rise reliability, texture expectations, and best-use recommendations.
Not every sourdough English muffin batch should start the same way. Active starter gives the best rise, the strongest chance of real nooks and crannies, and the clearest path to no-yeast sourdough English muffins. Fresh discard can still work well when it is recent and well kept, but it usually needs more time and may give a slightly less lofty result. If your discard is older, your kitchen runs cool, or you want a steadier rise, a small yeast assist is often the smartest backup.

When active starter is best

Use active starter when you want the best rise, the best crumb, and the cleanest path to sourdough English muffins no yeast. It is the strongest choice for english muffins with sourdough starter because it gives the dough the most dependable lift.

If your starter has been erratic, slow, or weak, go back to why your starter is slow or weak before blaming the recipe itself.

When discard works well

Use discard when it is fairly fresh and you are willing to allow extra time if the dough moves slowly. Sourdough discard English muffins can absolutely be flavorful and satisfying, especially if the discard comes from a healthy routine.

The real distinction is not starter versus discard as a label. It is active leavening power versus variable leavening power.

Can discard work alone?

Yes, but sourdough discard English muffins no yeast depend much more on the condition of the discard. Fresh discard has a much better chance than old, sharply acidic discard that has been sitting cold for too long.

If you go this route, watch the dough honestly. It may need more time than you hoped.

When a little yeast helps

A small yeast assist helps when the discard is older, the kitchen is cool, or the schedule is tight. It does not erase sourdough flavor. It simply makes the rise more dependable.

That is why recipes like Pantry Mama’s sourdough English muffins and other hybrid formulas treat a little commercial yeast as a practical tool rather than something to apologize for.

Also Read: Peach Cobbler with Canned Peaches (Dessert Recipe)

Discard adaptation for sourdough English muffins

If you specifically came here for sourdough discard English muffin recipe intent, this is the simplest way to adapt the master version.

Use fresh discard in place of active starter when possible. Expect bulk fermentation to move more slowly. Do not cut rounds until the dough is genuinely airy. If your discard smells sharply acidic, has been sitting cold for a long time, or your kitchen is cool, a small yeast assist is the smarter choice.
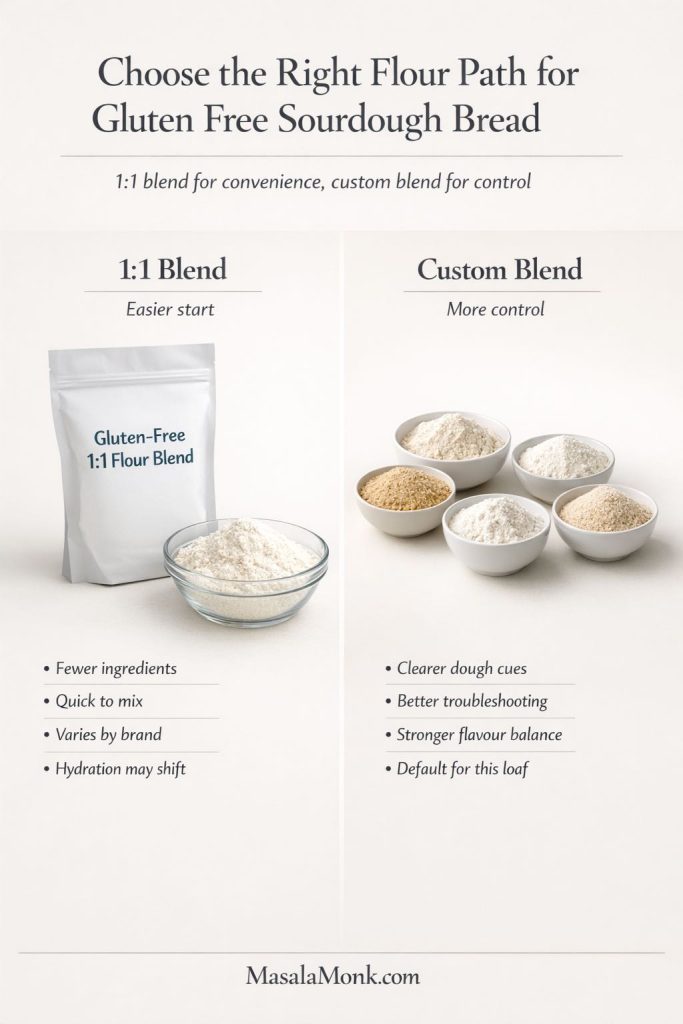
Discard adaptation guide for sourdough English muffins comparing what changes with sourdough discard, such as tangier flavor and slower rise, with what stays the same, including soft dough, thick shaping, low skillet heat, and cooling before fork-splitting.
Fresh sourdough discard can still make very good English muffins, but it changes the pace more than it changes the core method. The dough may rise more slowly, the crumb may come out a little less lofty, and shaping usually rewards more patience. What still matters just as much is keeping the dough soft, shaping thick enough to protect the interior, cooking over low skillet heat, and cooling before fork-splitting. When the discard is older or the kitchen runs cool, a small yeast assist is often the smarter safety net.

What changes with discard:

  • the flavor may be a little tangier
  • the rise may be slower and less predictable
  • the crumb may be slightly less lofty
  • the dough may need more patience before shaping

What does not change:

  • you still want a soft dough
  • you still want thick shaping
  • you still need low skillet heat
  • you still need to cool before fork-splitting

Also Read: Avocado Chocolate Mousse Recipe

Overnight sourdough English muffins vs same-day timing

Comparison guide showing overnight vs same-day sourdough English muffins, with step-by-step timelines for each route, including starter readiness, mixing, fermentation, shaping, proofing, and cooking, plus notes on flexibility, flavor, and when each schedule works best.
Not every batch of sourdough English muffins needs the same schedule. The overnight route is the easier, more forgiving option when you want flexibility and deeper flavor, while the same-day route works best with a very active starter, warmer conditions, and closer attention to dough cues. Use this guide to choose the timing that fits your kitchen and routine, then follow the full post for the detailed recipe, fermentation cues, and troubleshooting.
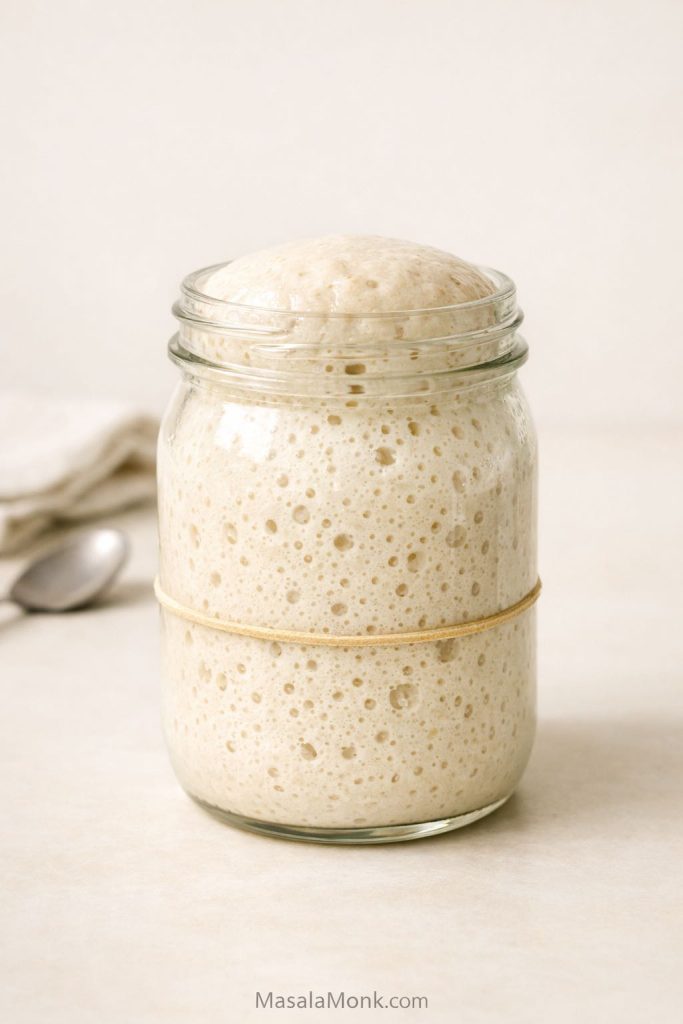
Overnight route

  • Feed the starter earlier in the day.
  • Mix the dough in the evening.
  • Let it begin fermenting at room temperature.
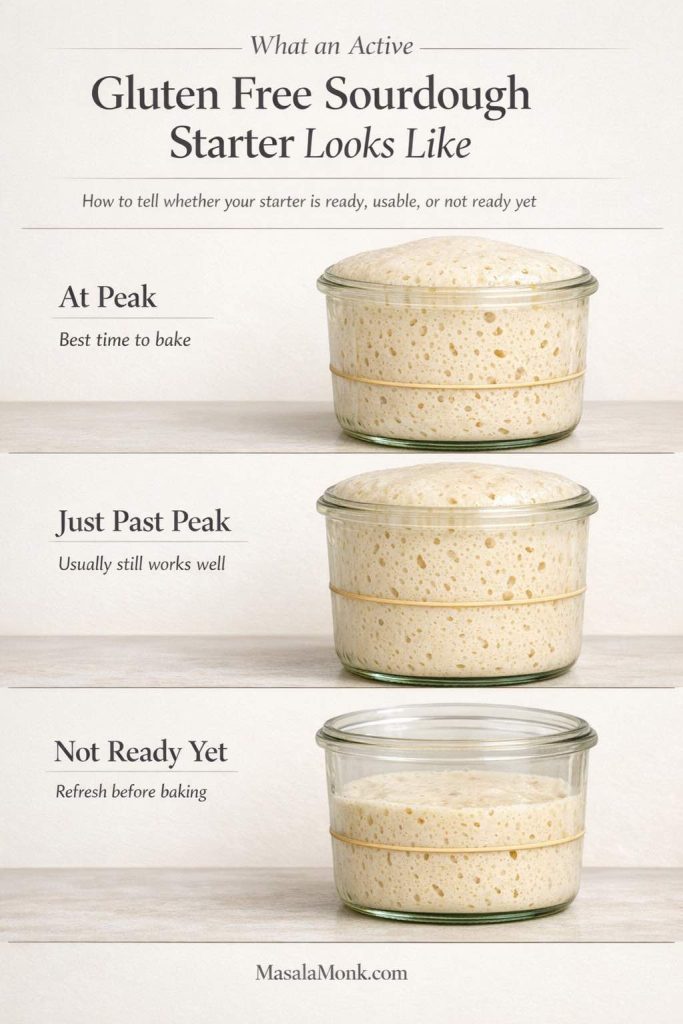
  • Refrigerate once it shows real activity.
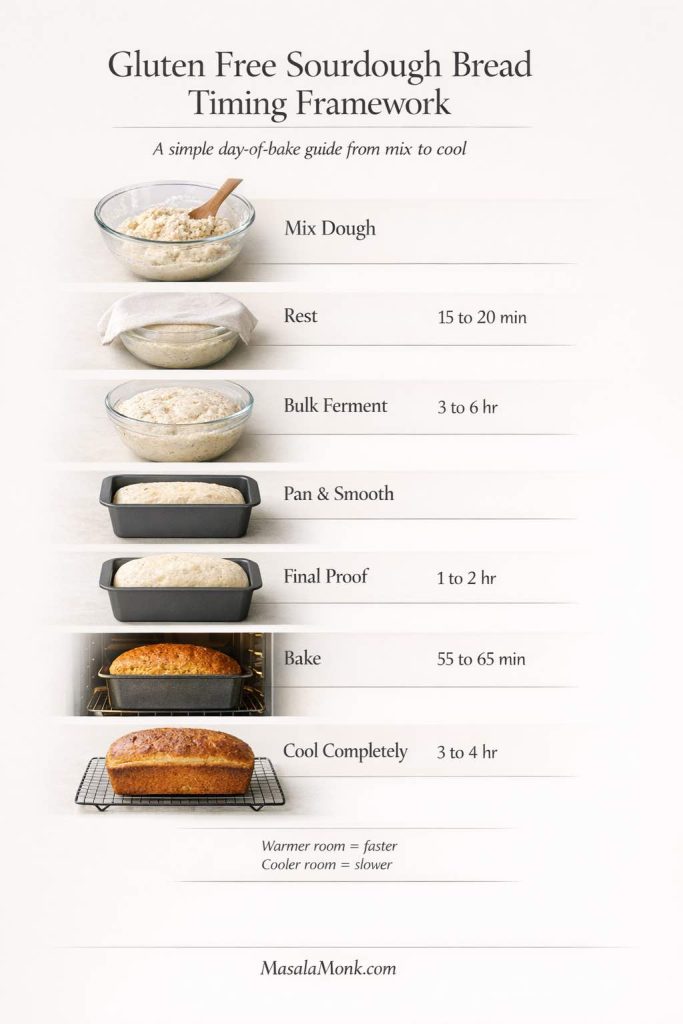
  • Shape, proof, and cook the next day.

This is the calmest and most forgiving route for most bakers.

Same-day route

  • Start with a very lively fed starter.
  • Mix early enough that bulk fermentation has time to finish.
  • Shape only once the dough is clearly airy.
  • Proof the rounds fully before cooking.
  • Stay flexible rather than locking yourself to a rigid clock.

This can still produce easy sourdough English muffins, but it demands stronger conditions and closer attention.

If that make-ahead rhythm suits you, save these other sourdough breakfast bakes for later too.

Also Read: Falafel Recipe: Crispy Homemade, Air Fryer and Baked Falafel

How to get nooks and crannies in sourdough English muffins

This deserves its own section because it is the texture people actually want.

Guide graphic showing how to get nooks and crannies in sourdough English muffins, with a fork-split muffin and callouts for full fermentation, soft dough, 3/4 inch shaping, slight proof, low heat, and cooling before splitting.
If you want sourdough English muffins with real nooks and crannies, focus on the combination that creates them: fully fermented dough, a soft texture that is not over-floured, thick shaping, a gentle final proof, low skillet heat, and fork-splitting only after the muffins have cooled. This is the texture roadmap for getting rough, toastable interiors instead of flat, bread-like middles.

Ferment fully

Underfermented dough is the fastest way to lose the texture you want. If the dough never becomes airy enough, the crumb usually stays tight no matter how careful you are later.

Keep the dough thick enough

If you want to know how to get nooks and crannies in sourdough English muffins, shaping thickness matters. Around 3/4 inch is a strong starting point because it gives the interior enough room to open while still being realistic to cook through.

Keep the dough soft, not stiff

A dough corrected too aggressively with flour often becomes easier to handle and worse to eat. English muffins need enough softness to open well later.

Handle the dough gently

Once the dough has fermented properly, your job is to preserve that structure. Avoid aggressively degassing it. Repeated rerolling also works against you. Do not press all the life out of it in pursuit of perfect-looking rounds.

Do not over-flour the bench

Too much bench flour makes shaping easier and texture worse. Use only enough to prevent sticking.

Use lower heat than you think

High heat gives fast color and weak middles. Low heat gives the interior time to set.

Proof the rounds properly

Too short and they stay tight. Too far and they spread too easily. You want the middle ground where the rounds look fuller and softer, not exhausted.

Fork-split after cooling

This is the final texture-preserving step. Split too early and you tear the crumb badly. Slice with a knife and you smooth away some of what you built.

If you want an external benchmark for the target texture, King Arthur’s English muffin texture guide is still one of the better references.

Also Read: Mango Margarita Recipe (Frozen or On the Rocks)

Common sourdough English muffin mistakes

  • using starter that is not really active
  • turning a soft dough into a stiff one with too much correction flour
  • shaping too thin
  • cutting before bulk fermentation is truly complete
  • overhandling or rerolling too much
  • rushing the final proof
  • cooking over medium heat instead of truly low heat
  • splitting too early or slicing with a knife

Troubleshooting sourdough English muffins

Sourdough English muffin troubleshooting guide showing common problems including dense muffins, gummy middle, no nooks and crannies, dark outside with raw center, weak discard rise, and sticky dough, with quick fixes for each.
When sourdough English muffins go wrong, the problem is usually visible before the batch is beyond saving. Dense muffins point to underfermentation or stiff dough, gummy centers usually mean the heat was too high, and a lack of nooks and crannies often comes from thin shaping or rough handling. Use this troubleshooting guide to diagnose what happened, then adjust fermentation, dough softness, shaping thickness, and skillet heat so the next batch comes out lighter, rougher inside, and easier to toast well.

Why are my sourdough English muffins dense?

Likely cause: underfermentation, dough that is too stiff, or overhandling
What the dough probably looked like earlier: heavy after bulk or cut too soon
What it looks like after cooking: tight crumb, little spring, more like flat bread than English muffin
Can this batch be rescued? Only partly. If the rounds are not cooked yet, proof longer. Once cooked, toasting helps but cannot fully reverse density.
Fix next time: keep the dough softer, ferment more fully, and handle more gently

Why are my sourdough English muffins gummy in the center?

Likely cause: skillet heat too high, rounds too thick for the way they were cooked, or pulling them too early
What the dough probably looked like earlier: often fine, though final proof may have been a bit tight
What it looks like after cooking: browned outside, sticky or damp middle
Can this batch be rescued? Yes. Finish gently in a low oven or toast split halves after cooling.
Fix next time: keep the pan lower from the start and use doneness checks before pulling the batch

Why didn’t my sourdough English muffins get nooks and crannies?

Likely cause: underfermentation, thin shaping, rough handling, too much bench flour, or knife-splitting
What the dough probably looked like earlier: compact after bulk or pressed too flat during shaping
What it looks like after cooking: smoother, tighter interior instead of a rough open crumb
Can this batch be rescued? Not fully. You can still fork-split and toast well, but the core crumb structure is mostly set already.
Fix next time: ferment more fully, keep the dough thicker, preserve more gas, and cool before fork-splitting

Why are the outsides dark before the middles cook?

Likely cause: too much heat
What the dough probably looked like earlier: often completely fine
What it looks like after cooking: good color outside, underdone center
Can this batch be rescued? Usually yes. Lower the heat and finish more gently or move them to a low oven.
Fix next time: preheat gently and stay low from the beginning

Why is my discard batch not rising well?

Likely cause: weak or old discard
What the dough probably looked like earlier: slow bulk fermentation, little real expansion, minimal puff after cutting
What it looks like after cooking: flatter muffins with tighter crumb
Can this batch be rescued? Sometimes. Give it more time if the dough still has life.
Fix next time: use fresher discard, warmer conditions, the overnight route, or a small yeast assist

Why is my sourdough English muffin dough too sticky?

Likely cause: hydration, temperature, or not enough rest
What it looks like during shaping: messy and sticking everywhere
Can this batch be rescued? Usually yes. Rest the dough, cool it slightly, and flour lightly.
Fix next time: resist adding too much flour too early and let the dough organize itself first

What changes in a warm kitchen?

Likely cause: faster fermentation
What it looks like: the dough moves faster than expected and can overproof without much warning
Can this batch be rescued? Usually yes, if you shorten room-temperature stages or refrigerate earlier
Fix next time: trust the dough cues sooner

What do overproofed rounds look like?

They tend to look too inflated, delicate, and hard to move cleanly. They may spread more than they rise on the skillet. If that happens, cook them immediately and shorten the final proof next time.

Also Read: Balti Paneer Gravy (Restaurant-Style, Creamy + Bold Recipe)

How to store, freeze, and reheat sourdough English muffins

Cool the muffins fully before storing them. Keep them wrapped or in an airtight container for short room-temperature storage, then freeze the rest.

Storage guide for sourdough English muffins showing how to cool completely, store short term in an airtight container, freeze split muffins, and toast to reheat for the best texture.
Sourdough English muffins keep their texture best when you handle them in stages. Let them cool completely before storing, keep short-term muffins airtight at room temperature, and freeze extras once split so they are easier to toast later. When you are ready to eat them, toasting is the best way to bring back crisp edges and that rough fork-split interior that makes homemade sourdough English muffins so satisfying.

Yes, you can freeze sourdough English muffins very well. In fact, freezing is often the smartest move because these shine when split and toasted. Splitting them before freezing makes reheating easier later.

To reheat, toast the fork-split halves until the rough interior crisps and the edges color well. That is when the texture really pays off.

Also Read: Mojito Recipe (Classic) + Ratios, Pitcher, Mocktail & Easy Variations

Variations on this sourdough English muffins recipe

Comparison guide for sourdough English muffins showing four variations: whole wheat, vegan and dairy-free, cinnamon raisin, and rye or einkorn, with quick notes on flavor, texture, and which version each one suits best.
Sourdough English muffins do not all need to go in the same direction. Whole wheat makes the batch heartier and nuttier, the vegan version keeps it lighter and plant-based, cinnamon raisin turns it into a sweeter breakfast option, and rye or einkorn pushes the flavor deeper and more grain-forward. Use this guide to choose the variation that matches the kind of crumb, flavor, and overall feel you want before moving into the full standalone recipe card for that version.

Whole wheat sourdough English muffins

Replace part of the bread flour with whole wheat flour rather than switching the full formula at once. Starting with about one-quarter to one-third whole wheat is usually the safest move.

What to expect:

  • nuttier flavor
  • slightly tighter crumb
  • a dough that may need a little more hydration
  • a heartier result overall
Standalone recipe card for whole wheat sourdough English muffins showing heartier skillet-cooked muffins with a split crumb, ingredient list, method, yield, time, and whole wheat notes about texture and hydration.
Whole wheat sourdough English muffins bring a nuttier flavor, a slightly tighter crumb, and a more wholesome chew while still keeping the core character of the original style. This card works as a full quick-reference version on its own, with the ingredient list, core method, timing, and the extra watch-outs that matter most for whole wheat dough. The biggest thing to protect here is softness: once the dough gets over-floured, the variation quickly turns heavier than it should.
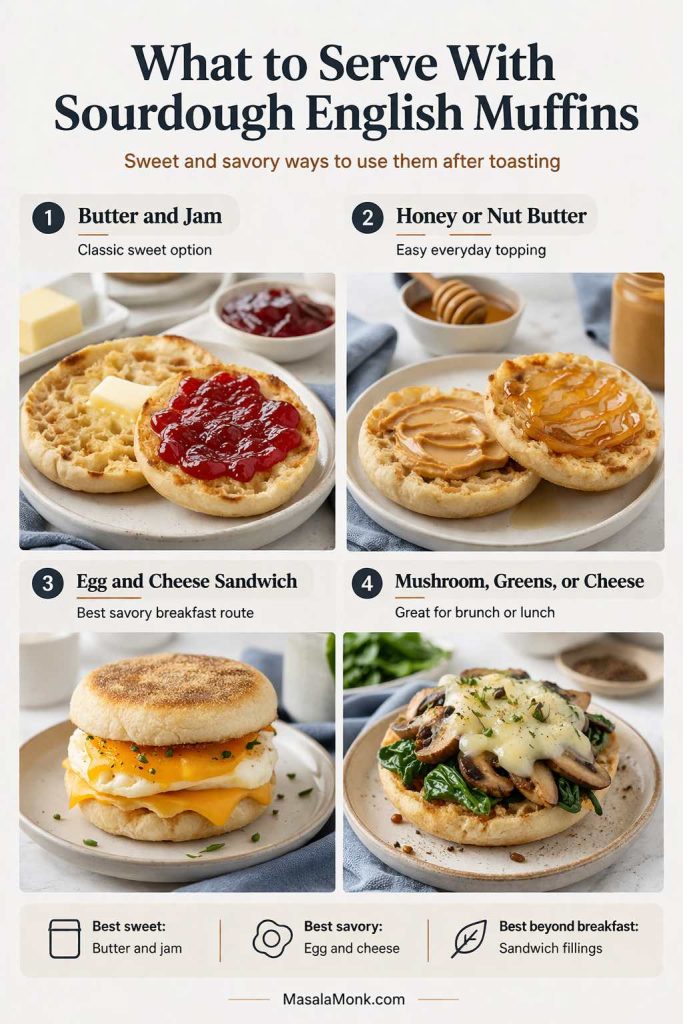
What to watch:

  • do not overcorrect with lots of extra flour
  • expect a more wholesome texture and a slightly less open interior

Vegan and dairy-free sourdough English muffins

Replace the milk with unsweetened plant milk or water, and use oil or vegan butter instead of butter.

Standalone recipe card for vegan and dairy-free sourdough English muffins showing skillet-cooked muffins with a split crumb, ingredient list, method, yield, time, and notes about plant milk, browning, and keeping the dough soft.
Vegan and dairy-free sourdough English muffins can still turn out soft, well-risen, and nicely textured when the dough stays supple and fully fermented. Plant milk or water keeps the formula workable, while neutral oil or vegan butter replaces richness without changing the core method too much. Browning can vary depending on the milk you use, so gentle skillet heat matters even more here if you want the centers set before the outsides get ahead.

What to expect:

  • a slightly less rich crumb
  • browning that may vary depending on the milk substitute
  • very workable texture if the dough stays soft and well fermented

What to watch:

  • avoid sweetened plant milk unless you want extra sweetness and quicker browning
  • keep the skillet heat gentle because some milk alternatives color fast

Cinnamon raisin sourdough English muffins

Add raisins and a moderate amount of cinnamon after the first rest so the dough can begin developing before the inclusions go in. This keeps the dough from getting weighed down too early.

Standalone recipe card for cinnamon raisin sourdough English muffins showing skillet-cooked muffins with visible raisins in the crumb, plus ingredient list, method, timing, yield, and notes about adding raisins after the first rest and keeping the skillet heat gentle.
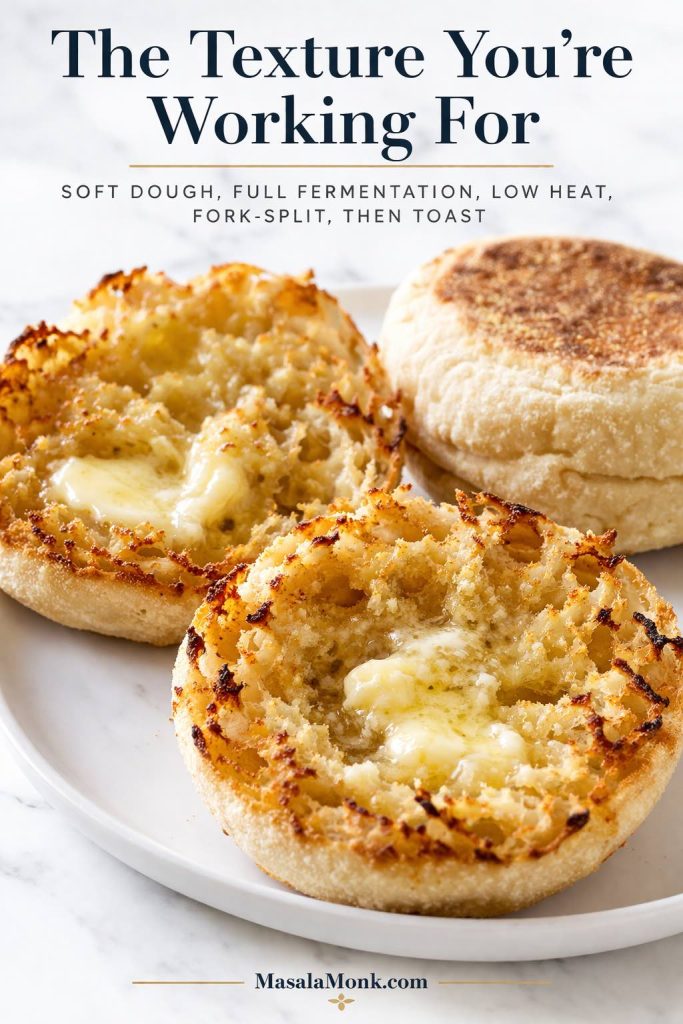
Cinnamon raisin sourdough English muffins work best when the spice stays warm and balanced and the raisins support the crumb instead of overwhelming it. Adding the cinnamon and raisins after the first rest helps protect the dough structure, while gentle skillet heat keeps the sweeter dough from browning too fast. This card gives the full variation in one place, so you can make a breakfast-style batch with soft interiors, light chew, and enough cinnamon-raisin character to feel distinct without turning heavy.

What to expect:

  • a sweeter breakfast-style variation
  • slightly less even shaping
  • faster browning because of added sweetness in the mix-ins

What to watch:

  • do not overload the dough with raisins or the rounds become harder to shape and cook evenly
  • keep the heat especially gentle

Rye or einkorn sourdough English muffins

Use rye or einkorn as partial substitutions rather than full replacements unless you are testing a dedicated formula.

Standalone recipe card for rye or einkorn sourdough English muffins showing darker grain-forward muffins with a split crumb, ingredient list, method, yield, time, and notes about partial substitution, reduced elasticity, and a slightly denser texture.
Rye or einkorn sourdough English muffins work best when the grain adds character without taking over the dough completely. A partial swap keeps the flavor deeper and more distinctive while still giving the muffins enough structure to rise, cook through, and split well later. Expect a slightly denser crumb and less elasticity than the base version, but not a heavy result if the dough stays soft, the substitution stays modest, and the skillet heat remains gentle.

What to expect:

  • more distinctive grain flavor
  • somewhat reduced elasticity
  • a slightly denser and more specialized result

What to watch:

  • keep substitutions modest at first
  • do not expect the same lift as the base recipe

Can you bake them instead of griddling them?

You can, but the result moves away from classic English muffin texture. The skillet is part of what gives them their identity. If a loaf-pan or baked version is what you really want, it is better to treat that as a separate style and point readers toward English muffin bread and other sourdough bakes instead of pretending the two methods produce the same thing.

What to serve with sourdough English muffins

Use them with butter, jam, honey, or nut butter if you want the classic sweet route.

Serving ideas guide for sourdough English muffins showing butter and jam, honey or nut butter, an egg and cheese sandwich, and a savory mushroom, greens, and cheese topping.
Sourdough English muffins are flexible enough to go sweet, savory, or fully meal-worthy once toasted. Butter and jam keep things classic, honey or nut butter makes an easy everyday option, and an egg and cheese sandwich turns them into a strong savory breakfast. For something more brunch-leaning, mushrooms, greens, and melted cheese work especially well because the rough fork-split interior holds toppings better than a smoother bread base.

For savory use, eggs, cheese, mushrooms, spinach, and breakfast meats all work naturally. If you want more serving direction, these breakfast sandwich ideas are the best next stop.

They also work beyond breakfast. A toasted muffin can handle fillings like this chicken salad sandwich recipe or a warm mushroom cheese sandwich recipe, even if breakfast remains their most natural home.

Also Read: Paloma Recipe: 12 Paloma Cocktail Drinks

Related recipes to try next

For more bakes in the same lane, start with the sourdough bread recipe roundup, which is the best next stop when you want to keep working with starter beyond this batch. Starter still giving you trouble? Go back to the sourdough starter guide for a clearer reset on feeding, strength, and consistency. And when you are ready to turn these muffins into something more practical, these easy breakfast sandwiches are the most useful next read.

Final notes before you bake

A good batch of sourdough English muffins does not come from one trick ingredient or one magic time stamp. It comes from choosing the right route, fermenting honestly, keeping the dough soft, shaping thick enough to protect the crumb, cooking low enough to set the center properly, and splitting with a fork after cooling. Those are the choices that turn a decent batch into one with real character.

Fork-split sourdough English muffins toasted until crisp at the edges, with melted butter settling into the rough nooks and crannies of the interior crumb.
This is the homemade sourdough English muffin texture the whole recipe is built around: rough fork-split interiors, crisp toasted edges, and melted butter catching in the nooks and crannies instead of sliding off a smooth cut surface. Soft dough, full fermentation, thick shaping, low skillet heat, and cooling before splitting are what create this kind of crumb, which is exactly why homemade sourdough English muffins feel more alive and toast so much better than the average store-bought version.

That is why this recipe is worth making from scratch. Store-bought English muffins can be fine, but when homemade ones are done well, the texture is rougher, the flavor is deeper, and the toastability is far better. The butter catches differently. The edges crisp differently. The whole thing feels more alive.

If you remember only the essentials, remember these: soft dough, full fermentation, thick shaping, low heat, full cooling, fork split, then toast. That is the path to the kind of English muffin people actually want.

Also Read: Air Fryer Salmon Recipe (Time, Temp, and Tips for Perfect Fillets)

Frequently Asked Questions

1. Can I make sourdough English muffins with discard instead of active starter?

Yes, you can make sourdough English muffins with discard, especially if the discard is fairly fresh and still comes from a healthy starter routine. The main difference is predictability. Active starter gives you the best rise and the strongest chance of a lighter crumb, while discard often moves more slowly and may need extra fermentation time. If your discard is older, sharply acidic, or clearly sluggish, a small yeast assist is usually the smarter choice.

2. Can I make sourdough English muffins without yeast?

Yes. If your starter is active, recently fed, and strong enough to lift dough on its own, you can absolutely make sourdough English muffins without commercial yeast. That is the best route when you want the most traditional naturally leavened result. The key is not just skipping yeast. The key is starting with a lively starter and giving the dough enough time to ferment properly.

3. Why are my sourdough English muffins gummy in the middle?

The most common reason is heat that is too high. The outsides brown quickly, but the center does not get enough time to set. Thick rounds can make that more obvious. If that happens, lower the skillet heat and finish the muffins more gently, or move them briefly to a low oven once they have enough color. A properly cooked muffin should feel lighter than it looks and should not have a shiny or sticky middle when opened.

4. Can I refrigerate the dough overnight?

Yes, and for many bakers that is the easiest route. Let the dough begin fermenting at room temperature first, then refrigerate it once it shows clear activity. That gives you better flexibility the next day and often makes shaping easier because the dough is cooler and calmer. Just do not refrigerate a dough that has barely started moving, because the fridge will not fix a weak fermentation.

5. Can I freeze sourdough English muffins?

Yes, sourdough English muffins freeze very well. Let them cool fully first, then freeze them whole or already split. Splitting before freezing makes them easier to toast straight from storage later. In many cases, freezing is the best option because these muffins are at their best when toasted, not when sitting at room temperature for too long.

6. Should I split sourdough English muffins with a knife or a fork?

Use a fork. That rough split helps preserve the irregular interior texture that makes English muffins toast so well. A knife gives you a much cleaner cut, but it also smooths away some of the nooks and crannies you worked to build. If texture is part of the goal, fork-splitting is the better choice.

7. Why didn’t my sourdough English muffins get nooks and crannies?

That usually comes down to underfermented dough, shaping too thin, too much extra flour during handling, rough degassing, or slicing with a knife instead of splitting with a fork. Good nooks and crannies depend on a soft dough, full fermentation, gentle handling, low heat, and a fork-split finish after cooling. If the dough never got airy enough, the interior usually stays tighter no matter what you do later.

8. Can I bake sourdough English muffins instead of cooking them on a skillet?

You can, but the result moves away from classic English muffin texture. Skillet cooking is part of what gives them their characteristic crust and interior. If you want a baked version, it is usually better to think of that as a separate style rather than a direct substitute. The classic result still comes from shaping, proofing, and cooking them low and slowly on a skillet or griddle.