
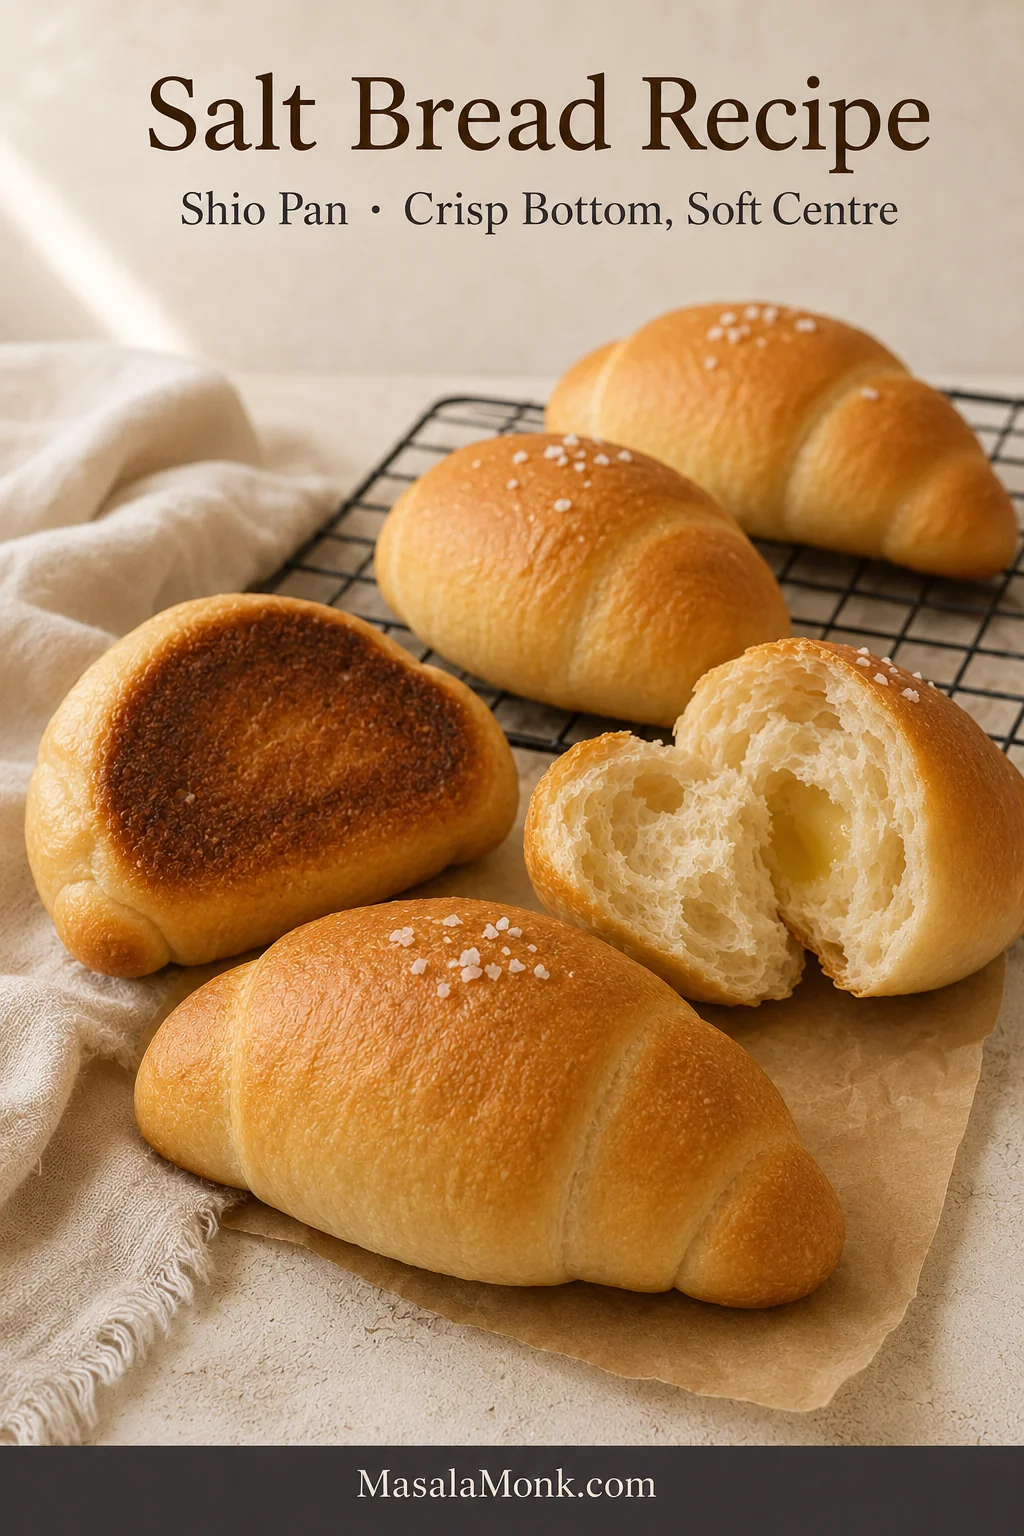
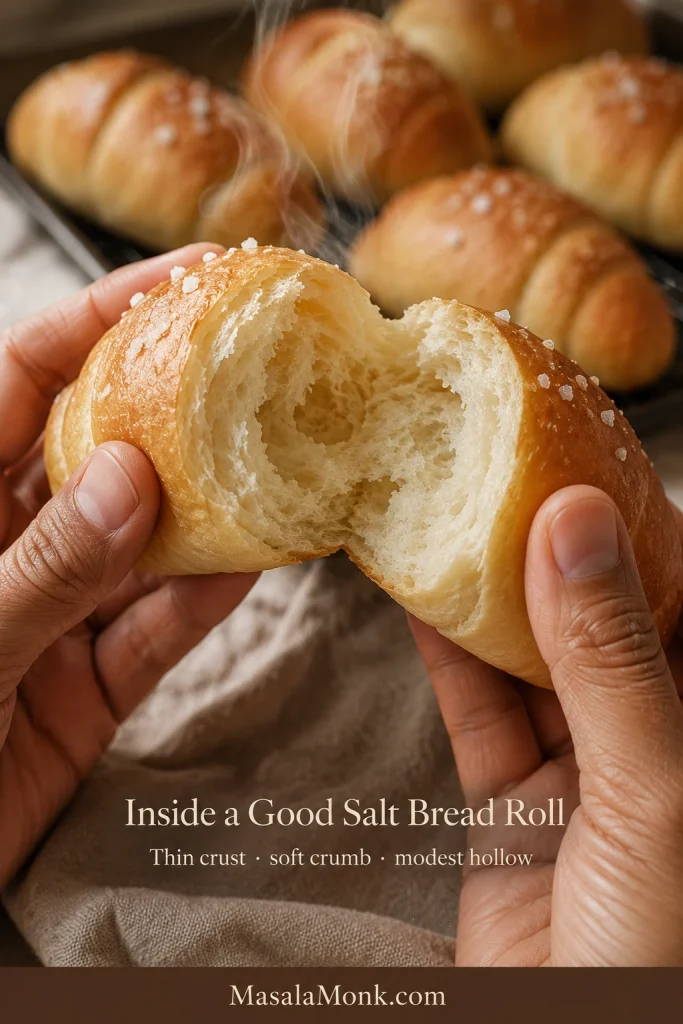
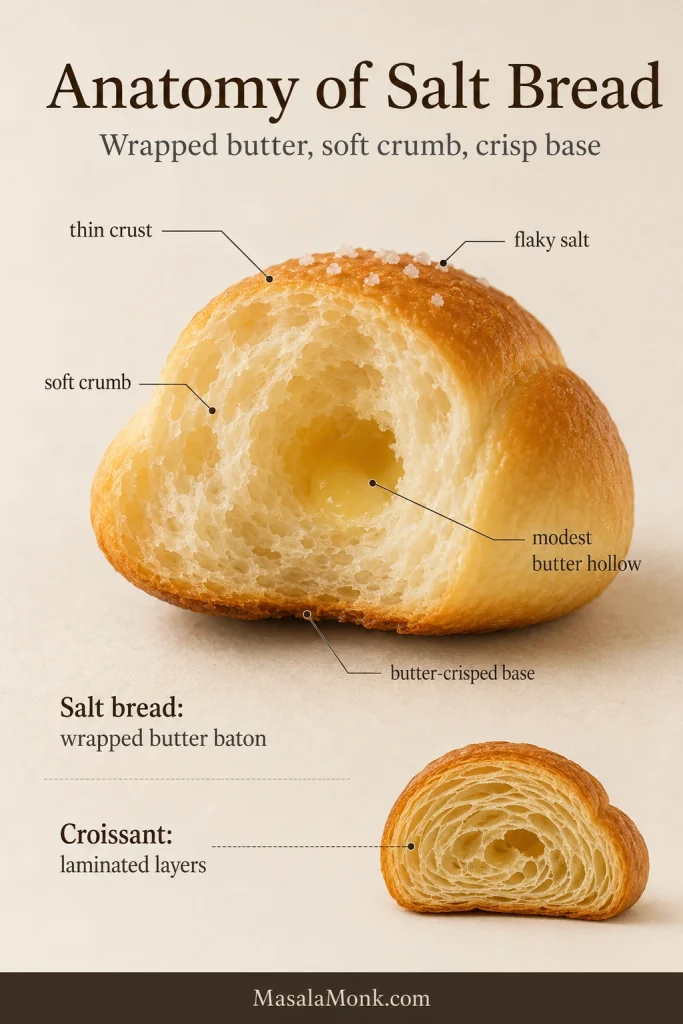
The first warm roll rarely waits for the rest to reach the table. Its underside is deep golden and lightly crisp, almost fried in the butter that escaped during baking. Pull it apart and the crumb stretches before it tears, revealing a small hollow where the cold butter used to be.
That contrast is the point of this salt bread recipe: a thin shell, a butter-crisped base, a soft middle with a gentle chew, and enough salt to sharpen the richness without turning the bread harsh.
Called shio pan in Japan and commonly known as sogeum-ppang in Korea, salt bread resembles a croissant but is much more approachable at home. It asks for patience more than advanced pastry skill: there is no lamination, and a short rest usually solves dough that resists the rolling pin.
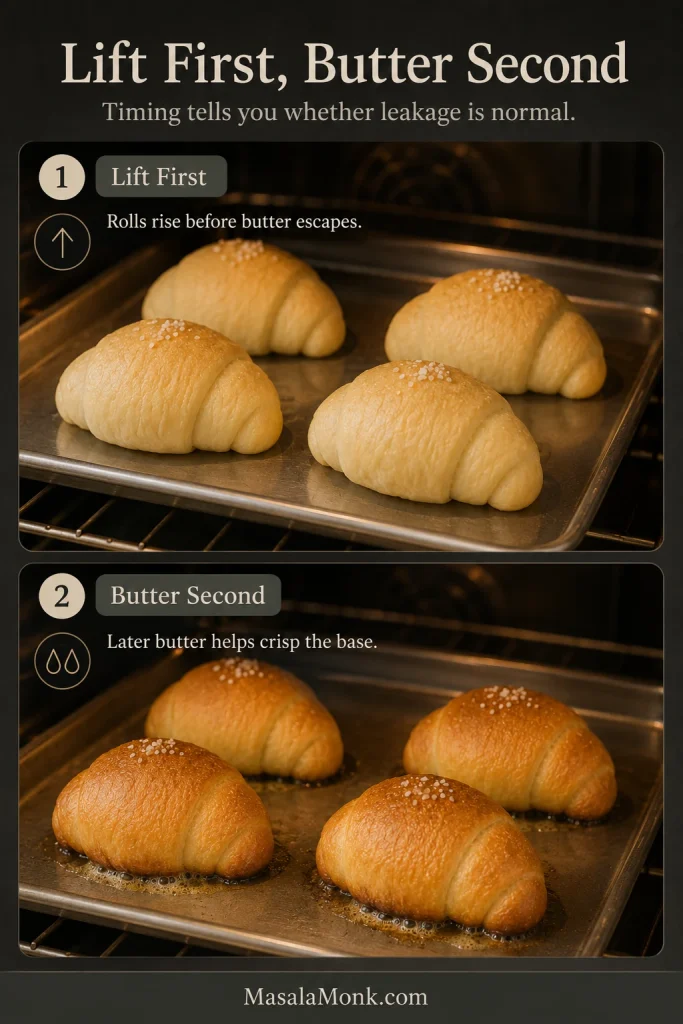
Keep one rule in mind: the butter may soften during proofing, but it should remain wrapped inside the dough until the rolls begin rising in the oven. Once it melts, steam opens the hollow and some butter slips beneath the bread to crisp the base. A little butter on the tray is not defeat.
Salt bread feels special enough to tear open beside coffee, yet simple enough to serve with soup or turn into a small breakfast sandwich. What looks like a bakery showpiece is really an everyday pleasure: warm bread, melted butter, a little salt and an underside worth turning over to inspect.
Start here
Make the Crisp-Bottomed Bakery Style First
This is the classic version to make first and the clearest place to learn how the dough, butter and hot tray work together before exploring softer milk-bread or no-knead variations.
- Use 200 g water first; add the reserved 10 g only after the dough has rested and begun developing strength, and only when it still feels unusually firm.
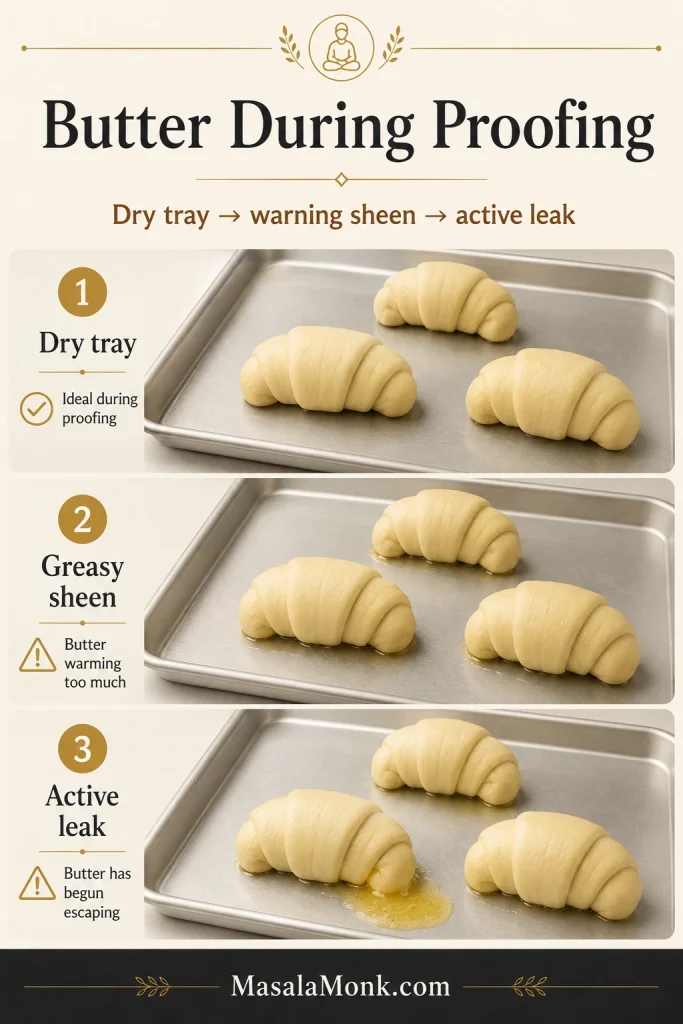
- Keep the final proof moderate; the rolls should become puffy without a greasy sheen or butter seeping onto the tray.
- Lift first, butter second; let the rolls begin expanding before a substantial butter pool appears, then bake until the underside is deeply browned.
For a softer roll that stays tender longer, use a separate tangzhong- or egg-enriched version.
Most of the time is hands-off. Pay closest attention when deciding on the final water, rolling the long triangles and judging the proof; uneven first crescents and a modest hollow can still make excellent salt bread.
Make it now
Salt Bread Recipe (Shio Pan)
This eggless dough uses water and milk powder rather than fresh milk. It makes eight rolls with crisp buttered bases and soft, lightly chewy centres. Use the gram measurements for the most dependable dough; cup and spoon measures are included for convenience.
Recipe at a Glance
- Yield: 8 rolls
- Preparation and shaping: About 55–75 minutes, including short rests
- Skill level: Beginner-friendly; allow time for shaping
- First rise: About 60–90 minutes
- Final proof: About 60–120 minutes; begin checking at 60
- Bake: About 17–20 minutes; begin checking at 15
- Total time: About 3¾–5½ hours
Ingredients
For the Dough
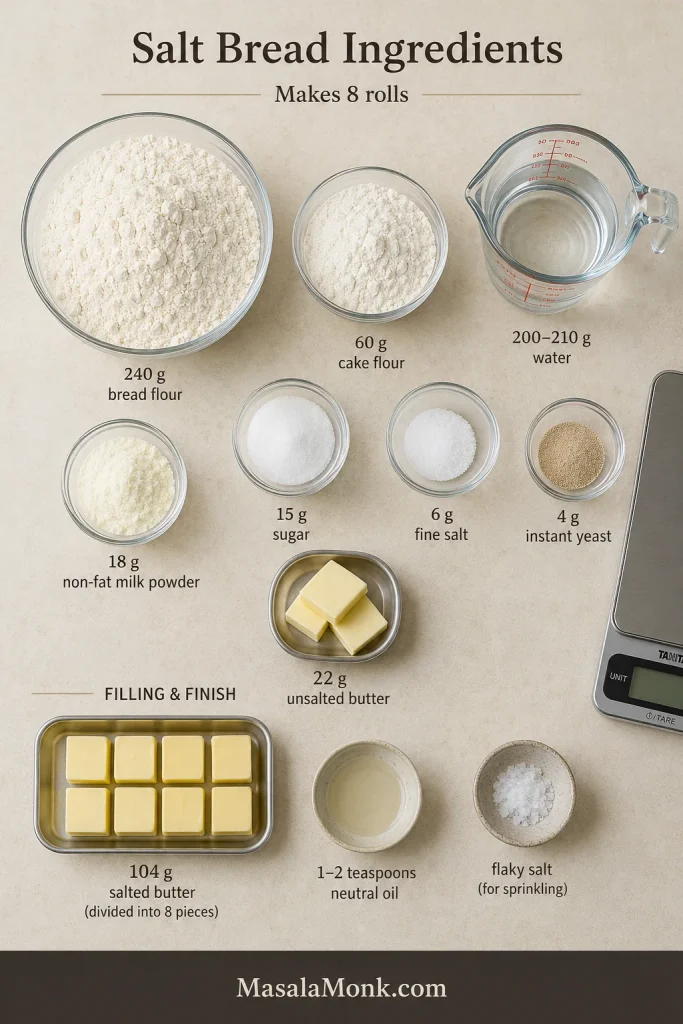
- 240 g bread flour (about 2 cups, spooned and levelled)
- 60 g cake flour (about ½ cup)
- 18 g non-fat milk powder (about 2½ tablespoons)
- 15 g granulated sugar (about 1 tablespoon plus ½ teaspoon)
- 4 g instant yeast (about 1¼ teaspoons)
- 6 g fine sea salt (about 1 teaspoon, depending on crystal size)
- 200–210 g water
Start with 200 g / 200 ml (about ¾ cup plus 1½ tablespoons); reserve the final 10 g / 10 ml (about 2 teaspoons). - 22 g unsalted butter, softened but not greasy (about 1½ tablespoons)
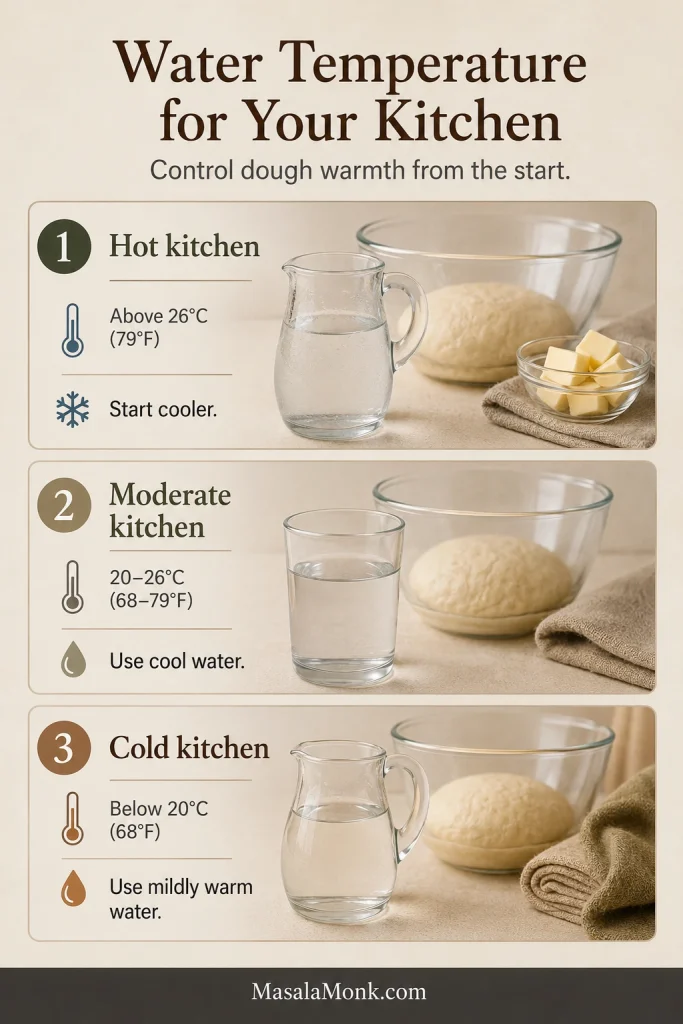
Choose the water temperature for your kitchen: chilled in a hot room, cool in a moderate room or mildly warm in a cold room. The goal is a finished dough near 24–26°C / 75–79°F.
For the Filling and Finish
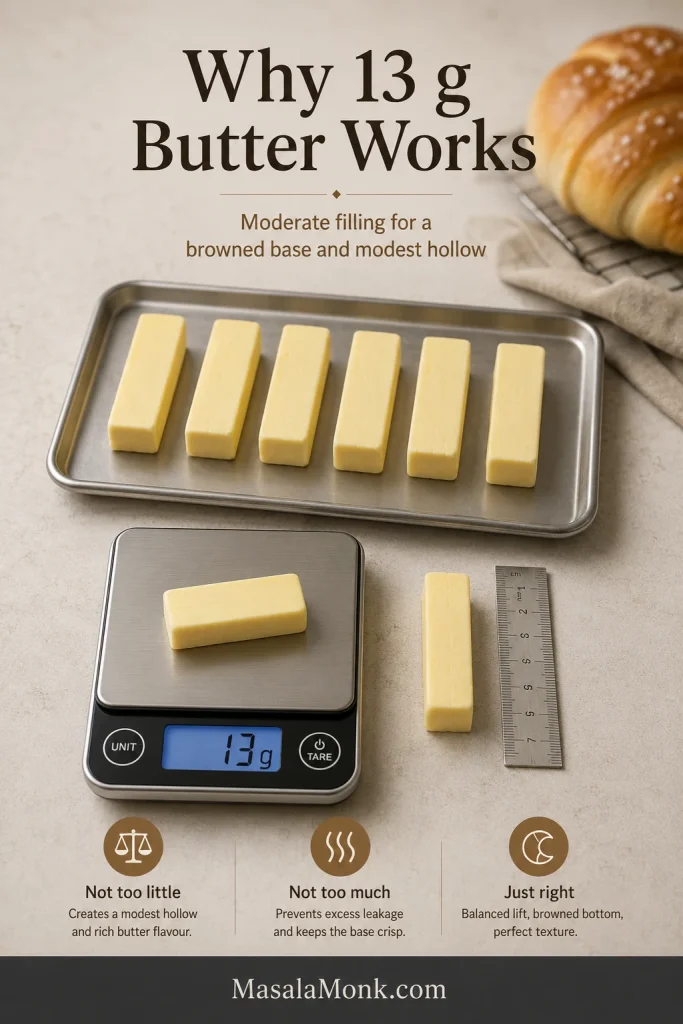
- 104 g cold salted butter, divided into eight 13 g pieces, about 3.7 oz total
- 1–2 teaspoons neutral oil, for the rising bowl and a bare metal baking sheet
- Water for lightly misting the shaped rolls
- About ½ teaspoon flaky sea salt, or enough for a restrained finish
- Optional: butter collected from the hot tray, for brushing over the baked rolls
The 13 g filling is deliberate: it is intended to create a modest hollow and help brown the base without making cavity size the main measure of success.
Essential Equipment
- Digital kitchen scale
- Stand mixer with dough hook, or a clean work surface for hand kneading; the full hand method appears beneath the main instructions
- Large bowl and cover for fermentation
- Bench scraper or flexible dough scraper
- Rolling pin
- Large rimmed, light-coloured metal baking sheet, about 33 × 46 cm / 13 × 18 inches
- Wire cooling rack
Helpful, but not required: an instant-read thermometer, oven thermometer, fine-mist spray bottle, pastry brush and ruler. Without a thermometer, the finished dough should feel cool to neutral against the inside of your wrist—not distinctly warm.
Instructions
Prepare and Mix
- Prepare the filling butter. Divide it into eight 13 g / 0.46 oz pieces and shape short batons roughly 4 cm / 1½ inches long. Aim for 13 g each; the batons do not need to look identical. Refrigerate until firm but not frozen hard.
- Begin the dough. Place the bread flour, cake flour, milk powder, sugar and instant yeast in the mixer bowl. Add 200 g water at the temperature suited to your kitchen and mix on low until no dry flour remains. Cover and rest for 15 minutes.
- Add salt, build strength and decide on the final water. Knead with the fine salt on low to medium-low for about 5 minutes. If the dough still feels unusually firm, add the reserved water 2–3 g at a time, allowing each addition to disappear before adding more. Do not worry if the dough still looks sticky and uneven.
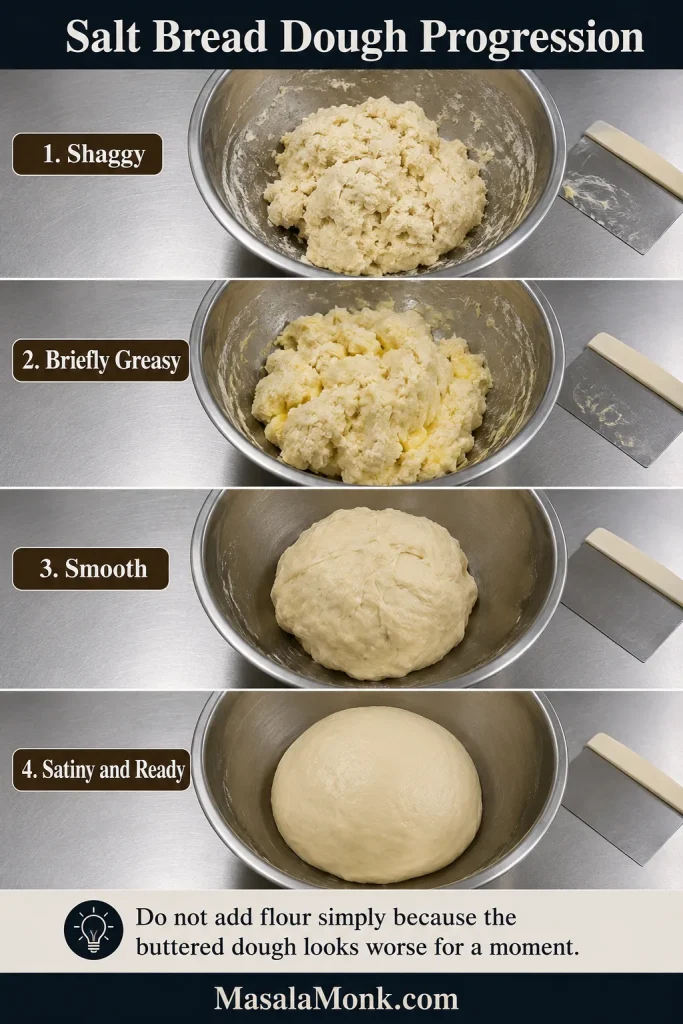
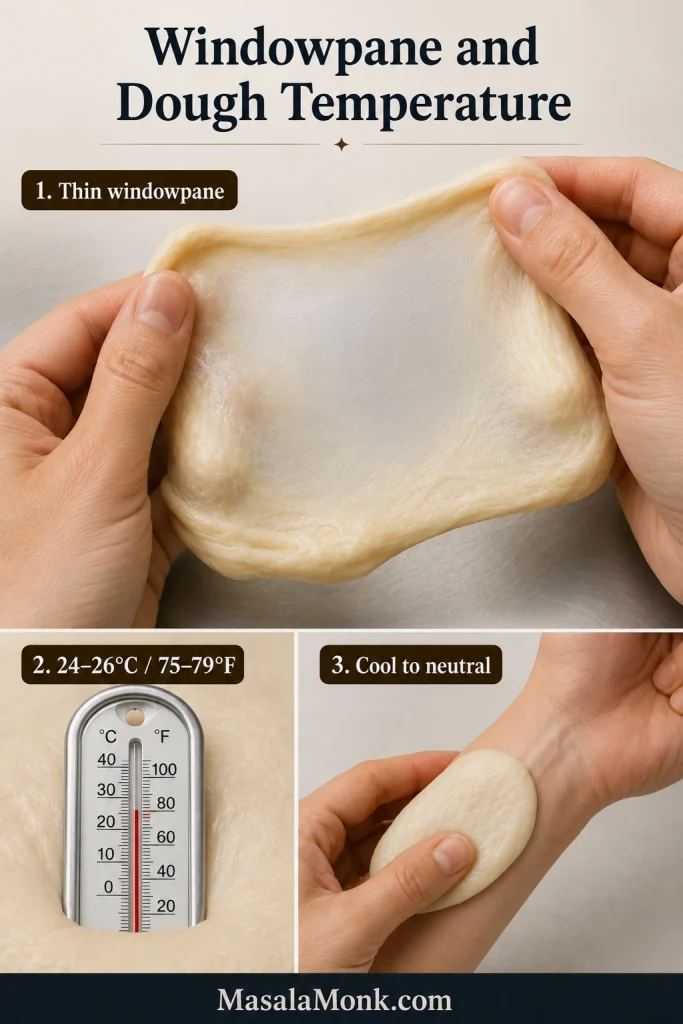
- Work in the dough butter. Add the softened butter gradually. The dough may briefly look greasy and broken; keep kneading instead of adding flour. Continue for 7–10 minutes, until smooth, elastic and able to pass a windowpane test: a small piece stretches into a thin film before tearing. Once it turns smooth again, the hardest mixing stage is over.
- Check the temperature. A useful final dough temperature is 24–26°C / 75–79°F. If it is much warmer, cover and refrigerate for 10–15 minutes. Without a thermometer, it should feel cool to neutral against your wrist, not distinctly warm.
Rise, Divide and Shape
- Let the dough rise. Place it in a lightly oiled bowl, cover and leave at about 24–26°C / 75–79°F until noticeably fuller, close to doubled and lighter when you lift an edge, commonly 60–90 minutes.
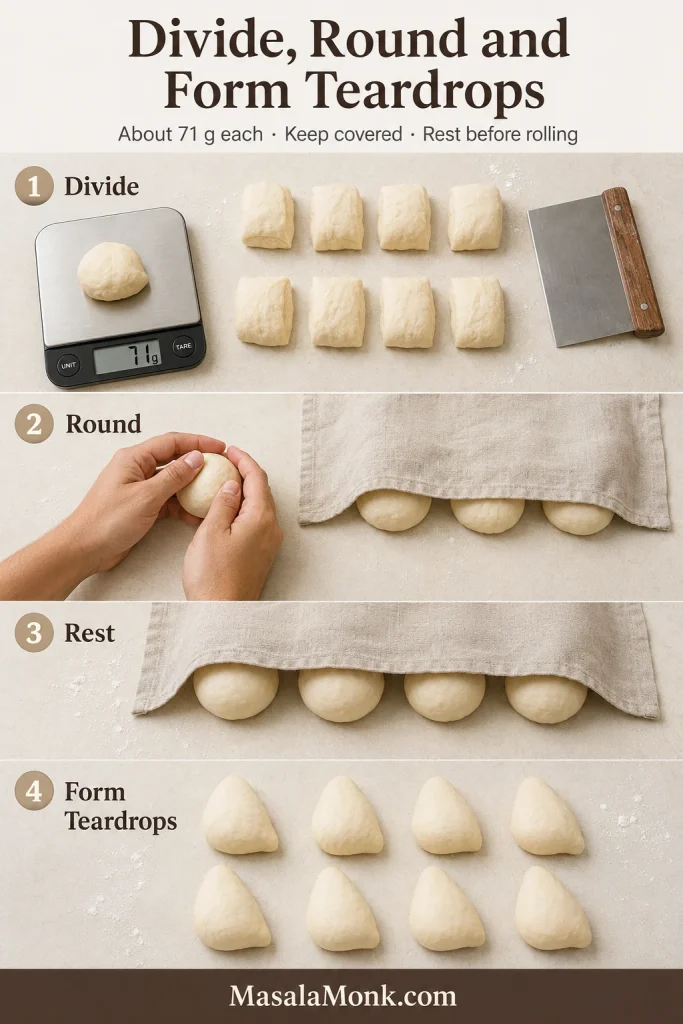
- Gently deflate, divide and round. Turn out the dough and press out only the largest gas pockets; do not flatten it aggressively. Divide into eight pieces of about 70–72 g / 2.5 oz, shape into balls and cover. Rest for 15 minutes, keeping pieces covered whenever they are waiting.
- Form tapered pieces. Roll each ball into a short carrot or teardrop about 10–12 cm / 4–5 inches long. Cover and rest another 10 minutes if the dough pulls back strongly.
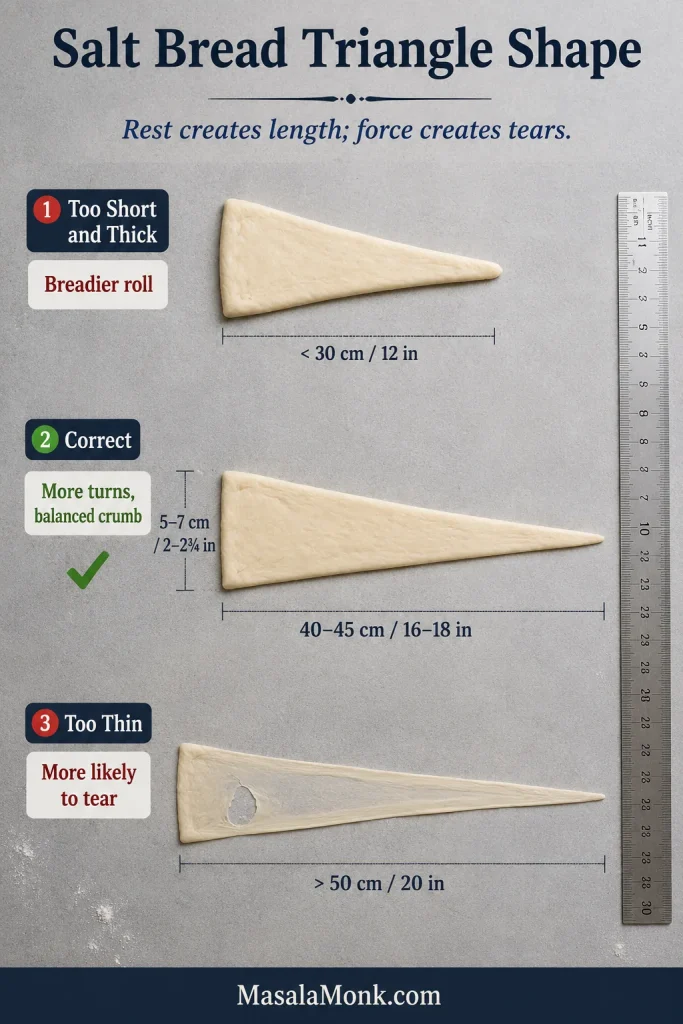
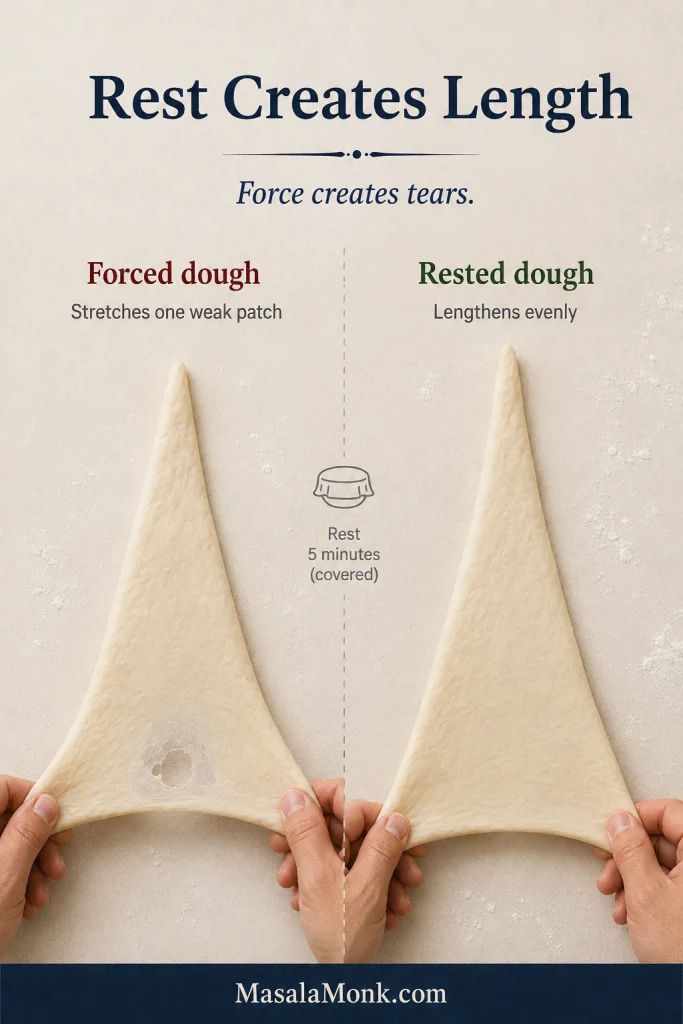
- Roll long triangles. Aim for 40–45 cm / 16–18 inches long and 5–7 cm / 2–2¾ inches wide at the base. Use only enough flour to prevent sticking. If the dough pulls back, cover it for five minutes before continuing.
Why the length matters: A longer triangle creates more turns; a short, thick one produces a breadier roll, while translucent dough is more likely to tear. Rest creates length; force creates tears. Shaping usually feels easier by the third or fourth roll.
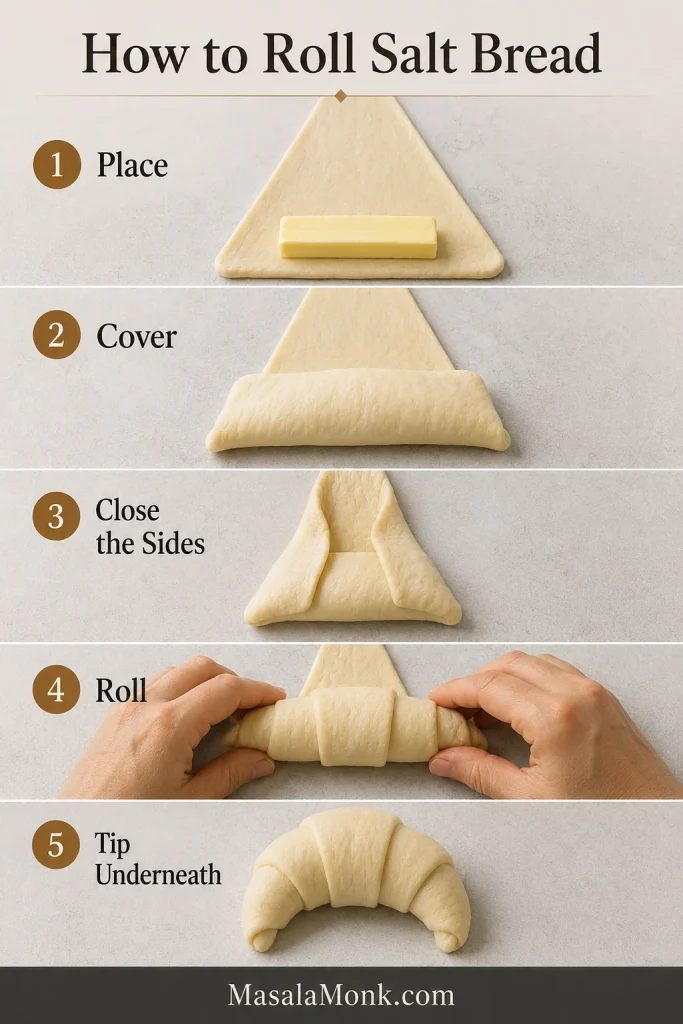
- Enclose the butter. Place one cold baton across the broad end, leaving enough dough at both sides to cover it. Roll forward with light tension, keep the butter centred and finish with the pointed tip beneath the roll.
Proof and Bake
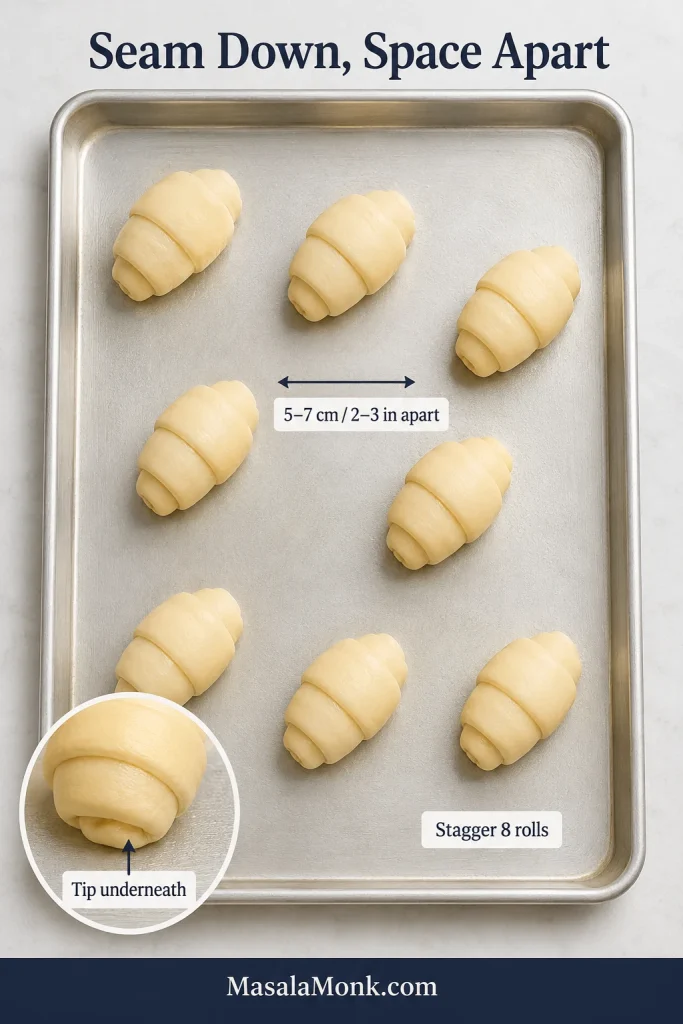
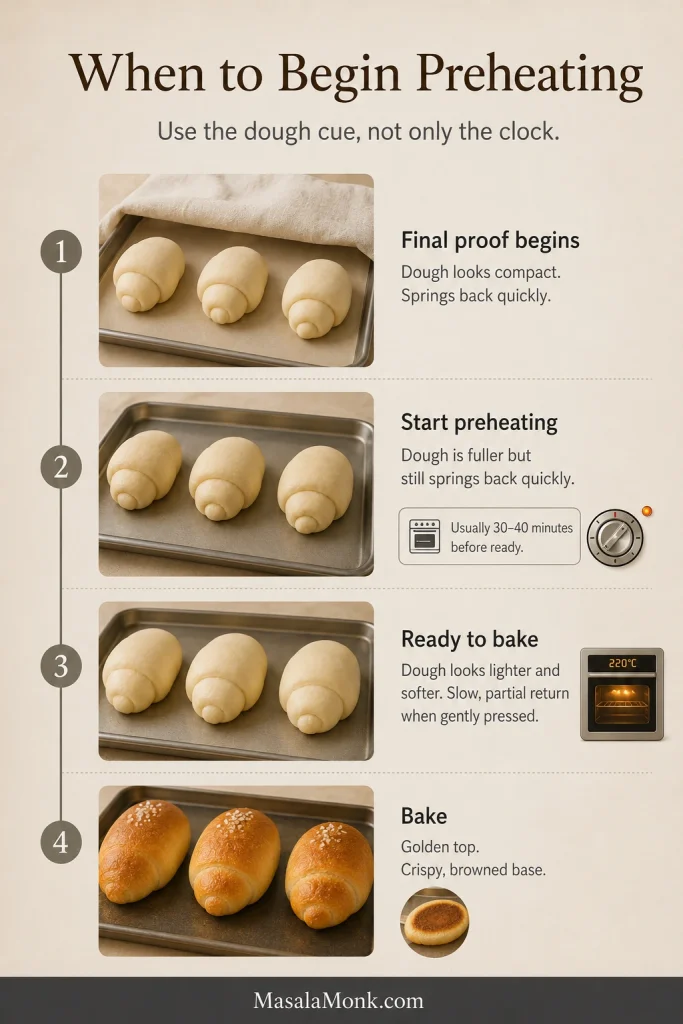
- Arrange and proof. Lightly oil a bare 33 × 46 cm / 13 × 18-inch metal sheet, or use parchment for gentler browning. Stagger the rolls 5–7 cm / 2–3 inches apart, cover and proof at 23–25°C / 73–77°F. Begin checking at 60 minutes. Ready rolls feel lighter and softer, jiggle gently and return slowly and partly after a light press; dramatic doubling is unnecessary.
Butter warning: The tray should ideally remain dry during proofing. A faint greasy sheen means the butter is becoming too warm; visible puddling or butter running from an end means it has begun escaping.
- Preheat while the rolls finish proofing. When they are visibly fuller but still spring back quickly—usually 30–40 minutes before readiness—set a rack in the middle or slightly below. Heat to 220°C / 425°F conventional or 205°C / 400°F fan.
- Mist and salt. Once the rolls are ready and the oven is fully heated, mist them lightly so the surfaces look evenly damp, not wet. Add a restrained pinch of flaky salt. If the filling butter tastes distinctly salty, use only a few flakes—or skip the topping on the first batch.
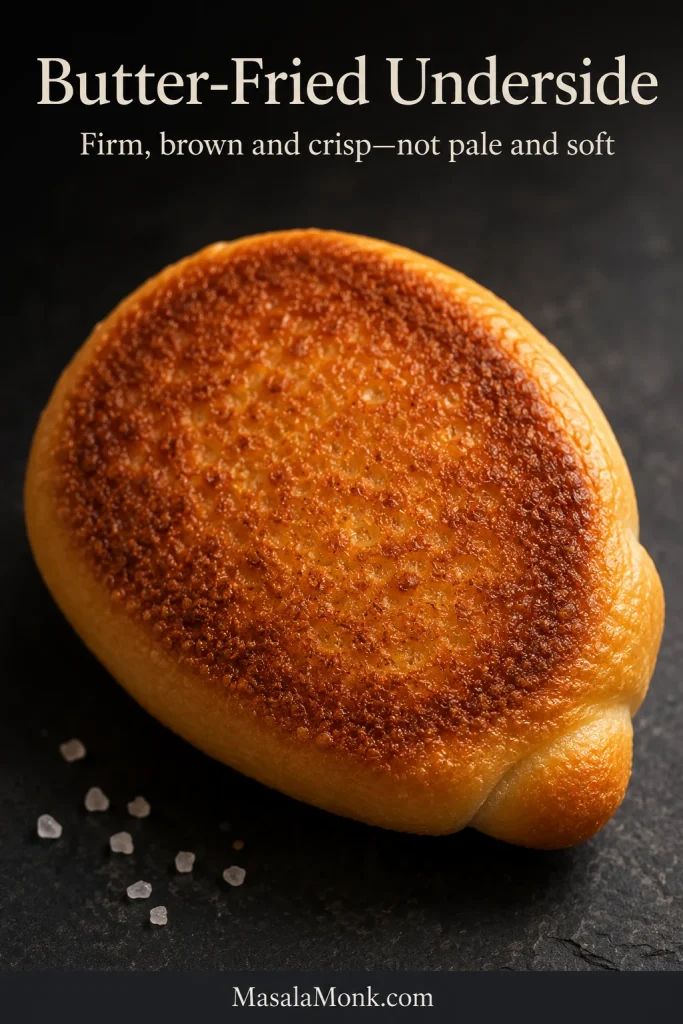
- Bake. Load the tray and immediately reduce to 205°C / 400°F conventional or 190°C / 375°F fan. Watch through the door during the early rise. Begin checking at 15 minutes; most batches finish in 17–20. Near the end, lift one: the underside should be firm and browned. As an optional backup, the crumb beside the hollow should reach about 91–93°C / 195–200°F.
- Cool correctly. Rest on the pan for 3–5 minutes, brush with pooled butter if desired, then move the rolls to a wire rack before trapped steam softens the bottoms.
Hand-Kneading Method
Making the dough by hand
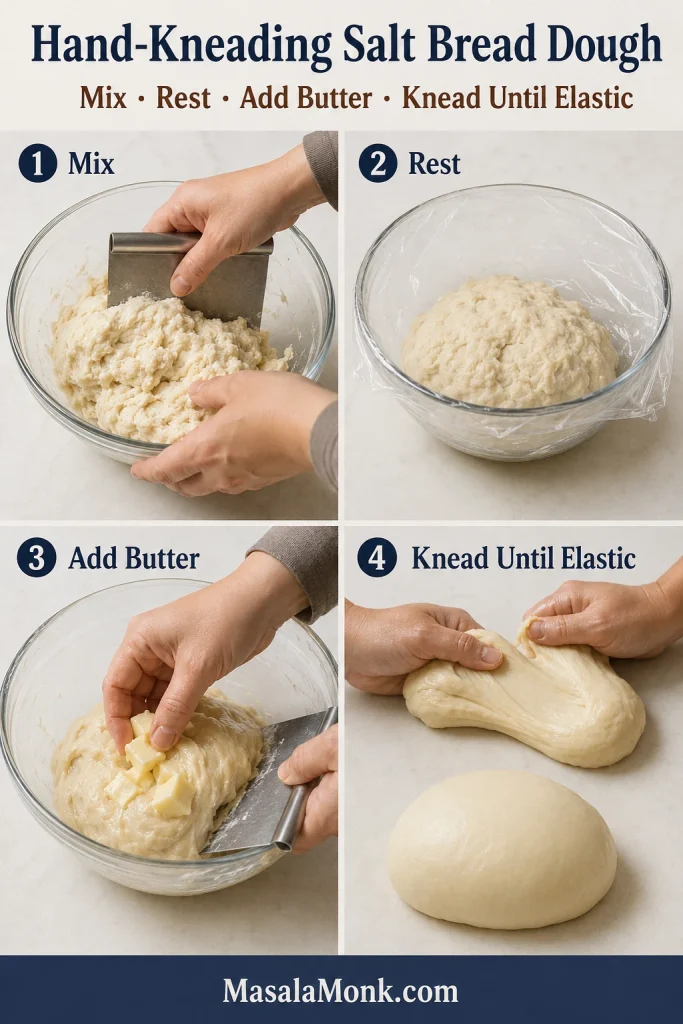
Mix the flours, milk powder, sugar, yeast and 200 g water until shaggy; cover and rest for 20 minutes. Add the salt and knead briefly. If the dough remains firm, add the reserved water a teaspoon or less at a time before adding the softened butter.
Knead the butter in gradually for 10–15 minutes, using short covered rests when the dough becomes slippery or tight. A bench scraper and lightly damp hands are better than extra flour. Stop when the dough is elastic and passes the same windowpane test.
After the recipe: · See the five success signs · Understand butter leakage · Back to top ↑
Five Signs the Batch Worked
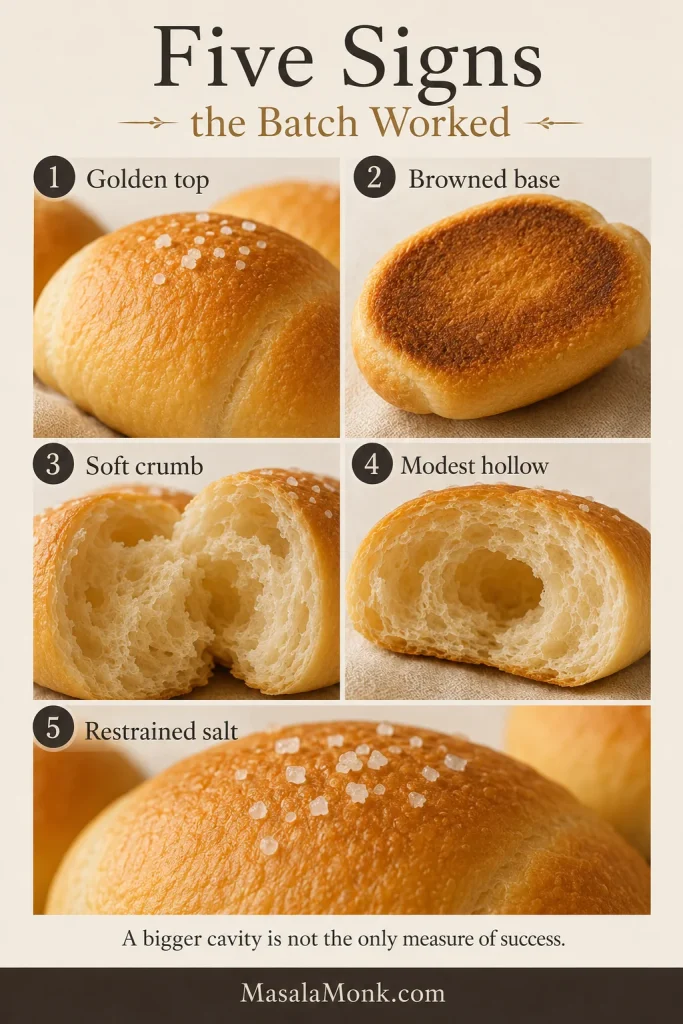
- Top: deep golden, not merely blond.
- Underside: browned, crisp and glossy from the butter.
- Inside: soft and airy with a gentle chew, not cakey or dense.
- Hollow: modest and butter-made; it does not need to occupy half the roll.
- Flavour: buttery and savoury, with flaky salt appearing in small bright bursts.
Prioritise a browned base and light crumb over an oversized cavity.
The recipe above is enough to begin. The guide below explains how the flour, butter, proofing and tray work together—and what to change when your batch looks different.
What Is Salt Bread?
Japanese salt bread, or shio pan, is a lightly enriched yeast roll wrapped around cold butter. In the oven, steam opens a small space inside while some butter reaches the metal sheet and browns the underside. King Arthur Baking’s guide shows the same classic crescent-and-butter structure.
The flavour should be buttery and savoury, not sharply salty. Developed dough holds the butter long enough to create the hollow, while direct tray heat turns later leakage into a crisp base. Despite the similar name, shio pan is unrelated to American salt-rising bread.
Shio Pan, Sogeum-Ppang and Croissants
Shio pan is the Japanese name most often used in English-language recipes; Korean salt bread is commonly called sogeum-ppang. The styles overlap, though Korean café versions often lean softer, milkier or more heavily filled. This recipe targets the classic crisp-bottomed style associated most closely with Japanese shio pan. Eater’s account of the Korean salt-bread boom follows its spread through bakeries and cafés.
The crescent shape resembles a croissant, but the method is simpler. Croissants use repeated folds of dough and butter; salt bread is rolled once around one butter baton and has no laminated flaky layers.
Choose the Texture You Want
Salt bread recipes can look contradictory because they are aiming at different textures. The same crescent can feel chewy and crusty or milky and pillowy, depending on the dough beneath it.
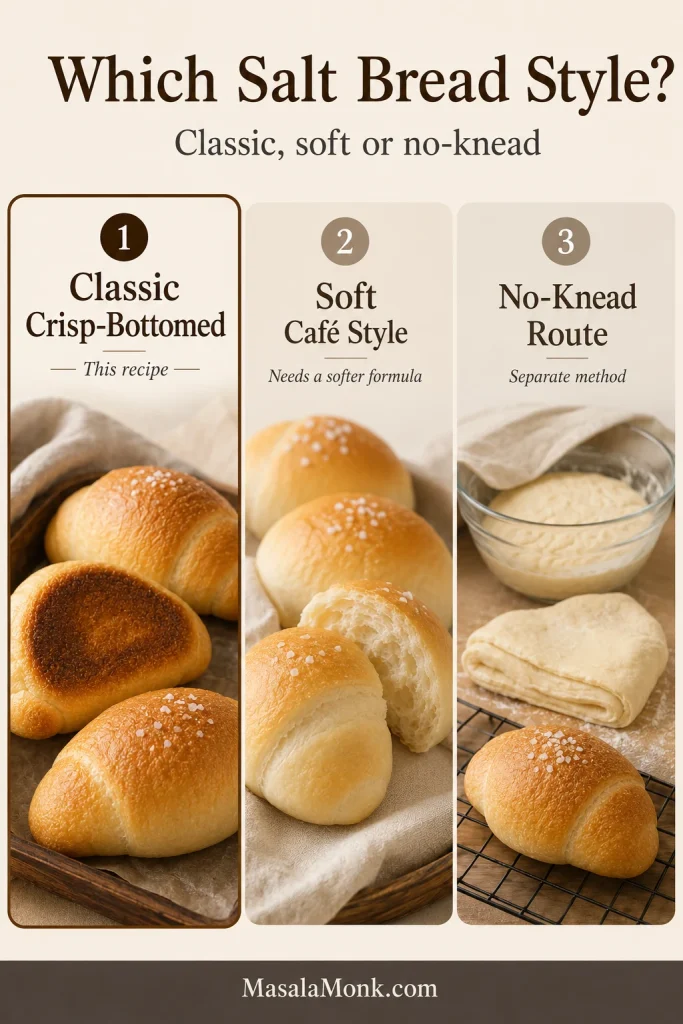
The Classic Crisp-Bottomed Style
This lightly enriched dough is soft inside but keeps more chew and crust than a pillowy milk roll. Some bakeries describe that balance as semi-hard salt bread.
When to Choose a Softer Version
Tangzhong, milk, egg or more sugar can produce a softer Korean café-style roll, but they also change hydration, proofing and browning. Use a formula built for that result. Our soft cinnamon roll recipe shows how richer dough trades crust contrast for a plush crumb.
When to Choose No-Knead
No-knead salt bread relies on time, folds and usually refrigeration to build strength. It is a separate method, not this dough with the mixer step removed.
Ingredients, Swaps and What Changes
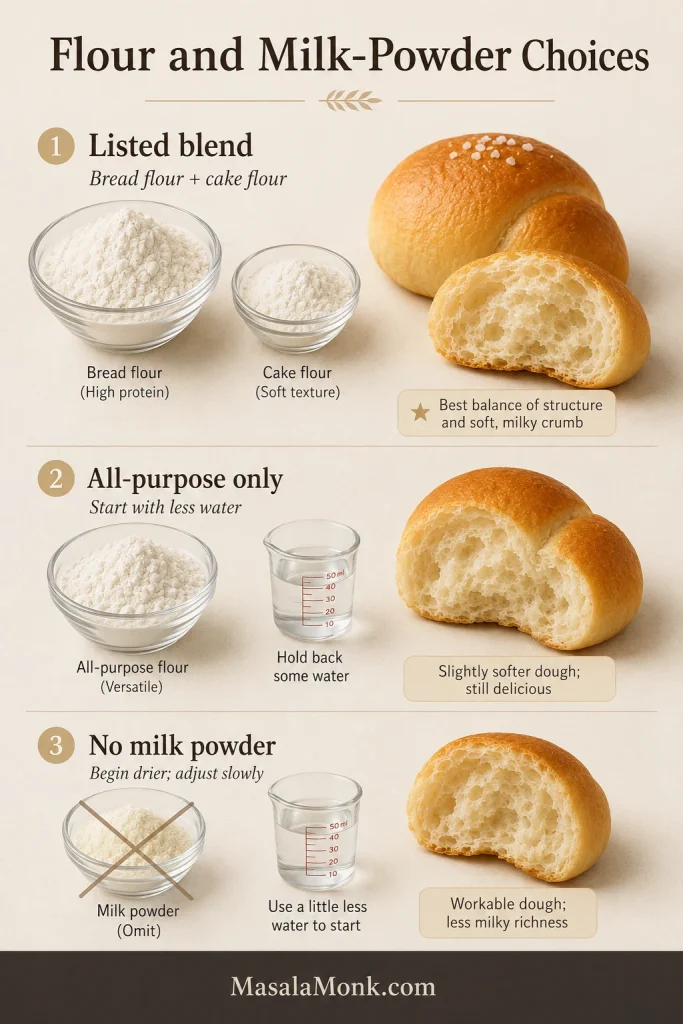
Once you know the texture you want, most first batches involve three decisions: which flour you have, whether milk powder is available and how salty the filling butter tastes. For the intended result, use the listed flour blend, plain milk powder and firm salted butter.
Bread Flour and Cake Flour
Bread flour supplies the strength needed for long shaping and butter containment; roughly 11.5–13 percent protein is useful when the package lists it. Our guide to what gluten is explains why that protein network gives dough its stretch.
Cake flour softens the dough and makes it easier to lengthen. All-purpose flour can replace it, though the roll may be slightly firmer.
Can You Use Only All-Purpose Flour?
Yes, but all-purpose flour varies widely. Begin with 195–200 g water, let the dough rest and start developing strength before deciding whether it needs more.
Milk Powder: What It Adds and How to Omit It
Plain non-fat milk powder adds dairy flavour, browning and tenderness without much extra liquid. Whole-milk powder is usually workable; malted or sweetened powders are not direct gram-for-gram substitutes.
You can omit it without replacing its weight with flour. Begin with 195–200 g water because the dough may feel looser, then add more only after the rest if needed. Expect less dairy flavour and lighter browning. A milk- or tangzhong-based roll needs its own balanced formula.
Sugar, Salt and Yeast
The small sugar quantity supports fermentation and browning without making the bread sweet. Fine salt seasons the dough evenly; flaky salt belongs on top.
Using active dry yeast: use 4 g and follow the packet. Many modern products can be mixed directly with the flour; when proofing is required, dissolve the yeast in 30 g / 2 tablespoons of the recipe water at the manufacturer’s stated temperature and count it in the total.
Butter in the Dough and Butter Inside
Softened unsalted butter tenderises the dough; add it only after some gluten has developed. Salted filling butter gives stronger savoury contrast, while unsalted butter gives tighter salt control. Avoid whipped, tub and spreadable butters because they melt and leak differently.
| Change | What to Expect |
|---|---|
| Use only bread flour | A stronger, chewier roll that may resist shaping |
| Replace cake flour with all-purpose | A slightly firmer inside, depending on protein level |
| Use only all-purpose flour | Variable strength and water absorption; begin with less water |
| Omit milk powder | A looser dough, less dairy flavour and lighter browning; begin with less water |
| Use a balanced milk-based dough | A softer, richer roll with different liquid needs and faster browning |
| Use a tangzhong-based formula | A more pillowy crumb that stays soft longer |
Equipment and Baking-Tray Choices
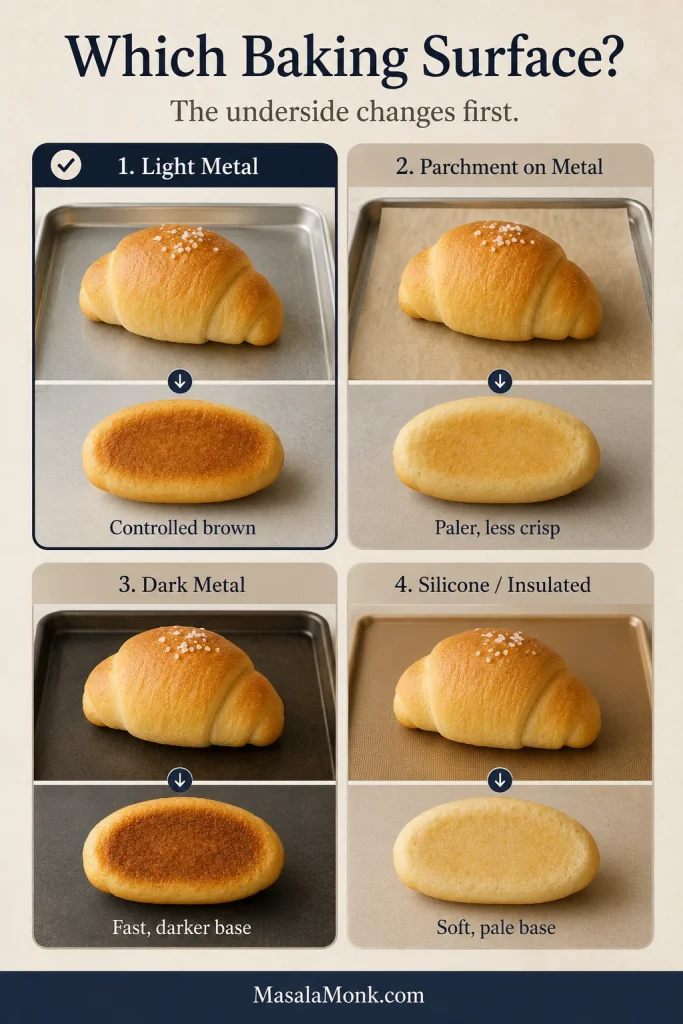
For a first batch, use a light-coloured bare metal sheet brushed with a thin film of oil. A scale keeps the rolls balanced; the tray determines whether escaped butter browns the base or leaves it greasy.
| Baking Surface | Likely Result | Best Use |
|---|---|---|
| Dark metal | Fast, strong base browning | Check early to prevent burning |
| Light metal | Crispness with more controlled colour | Most forgiving first choice |
| Parchment on metal | Easy release with a slightly paler, less crisp base | When sticking is a concern |
| Silicone or insulated sheet | Paler, softer base | Not preferred for this recipe |
A 33 × 46 cm / 13 × 18-inch sheet fits eight staggered rolls with roughly 5–7 cm / 2–3 inches between them. Use two batches on a smaller tray.
A light mist helps the salt adhere and slows early surface drying. Aim for evenly damp, not dripping; elaborate steam methods vary too much between home ovens to be necessary here.
Four Cues That Decide the Batch
The recipe gives the sequence. These four moments tell you whether the dough is ready to move on.
1. The Buttered Dough Turns Satiny Again
The dough may look greasy after the butter goes in. Keep kneading rather than adding flour. It is ready when the greasy film disappears, the surface becomes smooth and satiny, and a small piece stretches into a thin windowpane.
2. The Triangle Stops Fighting the Rolling Pin
If the dough still shrinks, cover it for five minutes. It is tense, not failed; the triangle should lengthen without becoming translucent. More pressure usually stretches one weak patch, while rest relaxes the whole piece more evenly.
Wrap the cold butter with light tension and tuck the pointed tail underneath. Once all eight are shaped, the difficult handwork is finished; the dough now needs time.
3. The Rolls Feel Light and Alive
Ready rolls feel lighter and softer, not merely larger. Dramatic doubling is unnecessary.
| Stage | What the Press Does | What You See | Next Move |
|---|---|---|---|
| Underproofed | Springs back quickly | Compact, firm and barely jiggly | Cover and continue proofing |
| Ready | Returns slowly and partly | Clearly fuller, soft and gently jiggly; tray ideally dry | Mist, salt and bake |
| Warm but not ready | Still returns with resilience | Needs more lift, but butter is softening or a faint sheen appears | Chill 5–10 minutes, then continue cooler |
| Overproofed | Dent remains | Very swollen, fragile and easy to deflate | Bake promptly |
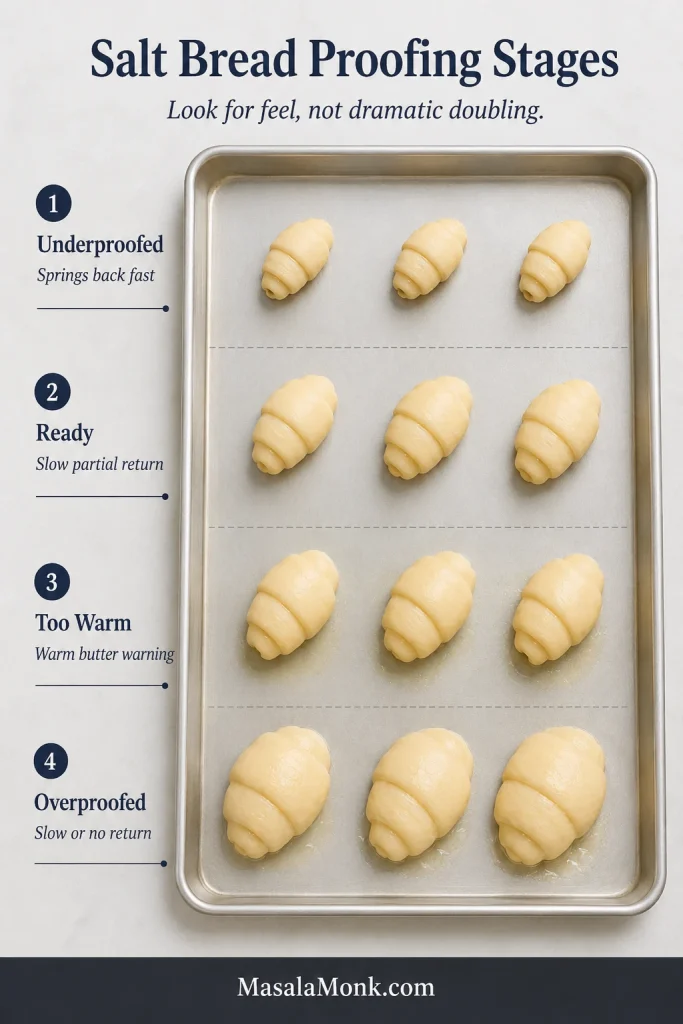
4. The Underside Turns Firm and Brown
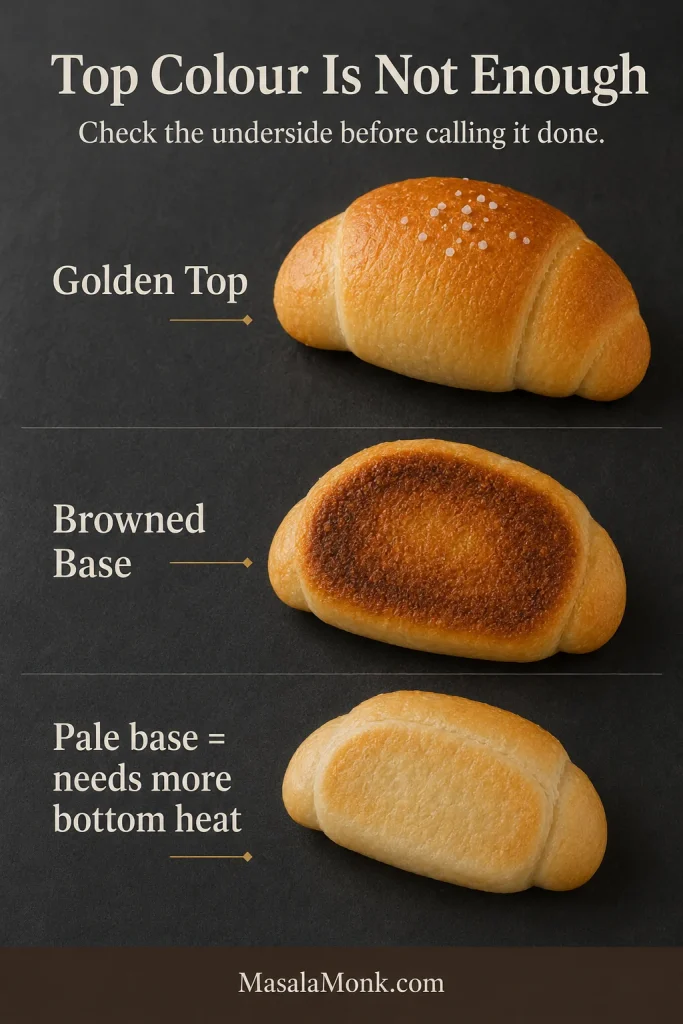
The rolls should lift before butter begins hissing around their bases. Near the finish, lift one carefully: the underside should be firm, brown and glossy rather than pale and soft.
Leave the rolls on the hot sheet for 3–5 minutes, then move them to a rack. Cutting immediately compresses the crumb; lingering on the tray lets condensation soften the base.
If something looks off: · Check butter timing · Use the troubleshooting table · Return to recipe card
When Butter on the Tray Is Normal—and When It Is Not
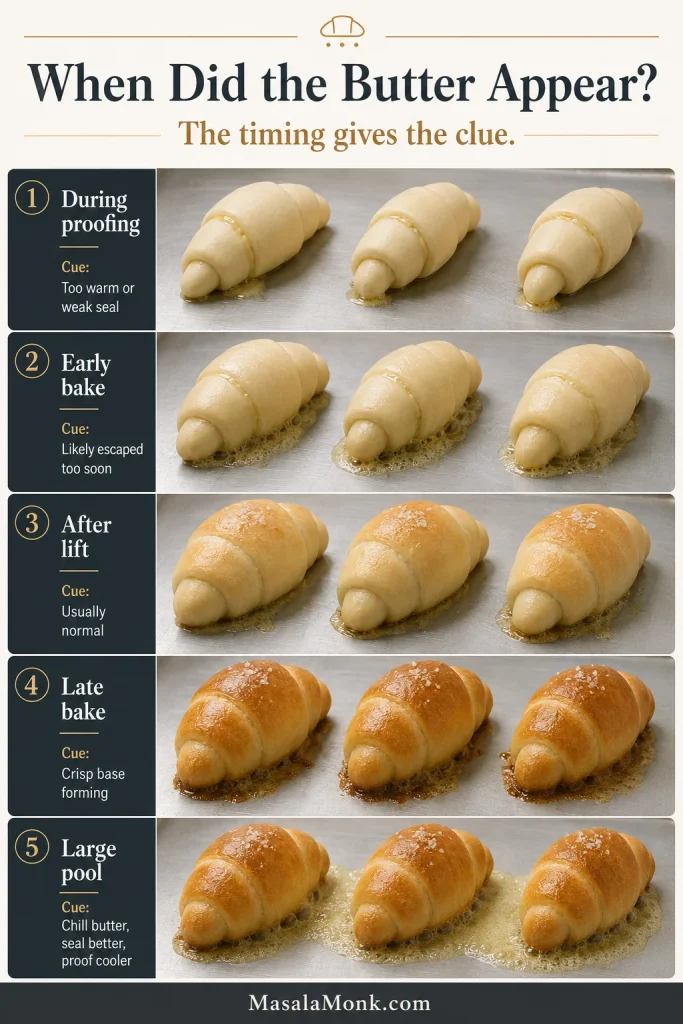
Once baking begins, the tray does not need to remain dry. During this stage, the useful question is when the butter appeared: later leakage helps build the crisp base, while butter lost during proofing escaped before the roll could hold it.
Lift First, Butter Second
The butter rule
Lift first, butter second. The tray should ideally stay dry during proofing. A faint sheen is a warning to cool the rolls; visible puddling or butter running from an end means the filling is escaping too early. Once the rolls have lifted in the oven, later sizzling is usually doing useful work.
Proofing Leakage Cues
Use Timing to Diagnose the Butter
| When the Butter Appears | What It Probably Means | What to Do |
|---|---|---|
| During final proofing | Too early. The room or filling is too warm, the dough is overproofed, thin or open at one side. | Move the tray somewhere cooler. If the rolls still need time, chill for 5–10 minutes, then continue proofing more moderately. |
| In a large rush immediately after loading | Usually too early. Look for exposed butter, a tear, warm dough, loose wrapping or an oven that was not fully heated. | Continue baking this batch, then correct the weak spot, temperature or preheat on the next one. |
| Later, after the rolls expand and begin colouring | Usually desirable. The dough has begun setting and the later butter pool is browning the base. | Let the butter sizzle around the rolls, but watch that it does not turn black or smoke. |
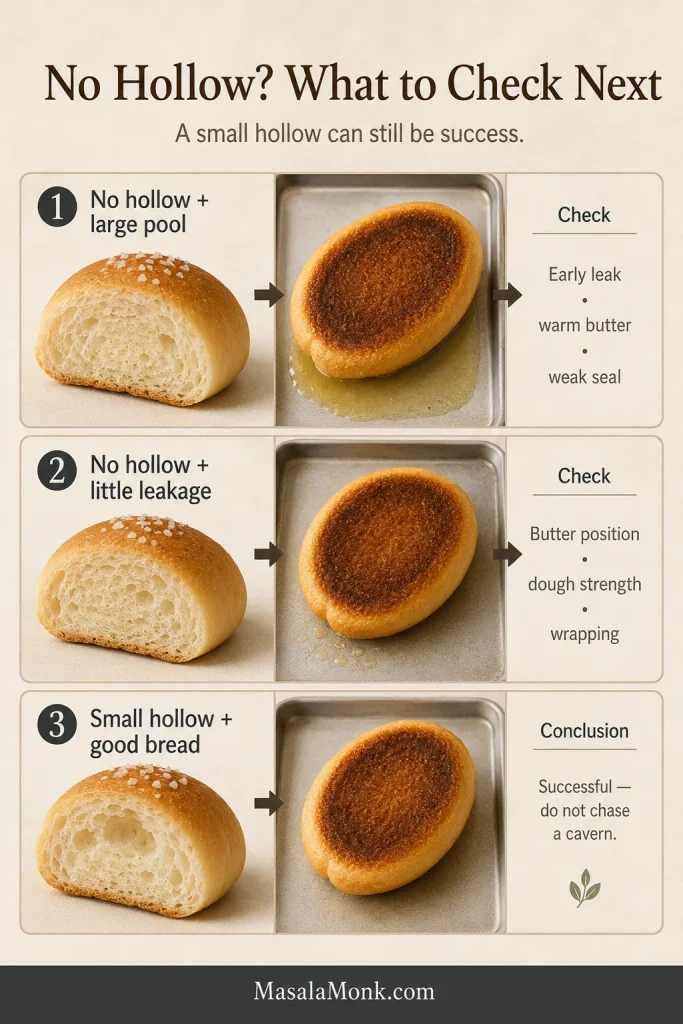
| A large greasy pool with no hollow | The butter escaped before producing enough steam inside, often because the filling was warm, the dough weak or the wrapping loose. | Keep the filling colder, develop the dough fully and cover the butter more securely. Do not add more butter simply to chase a larger hollow. |
| No visible leakage | Not necessarily a problem; more butter may have remained inside the roll. | Check the crumb and underside. A pale base and greasy interior point to insufficient tray heat or bake depth. |
Butter Timing Visual Guide
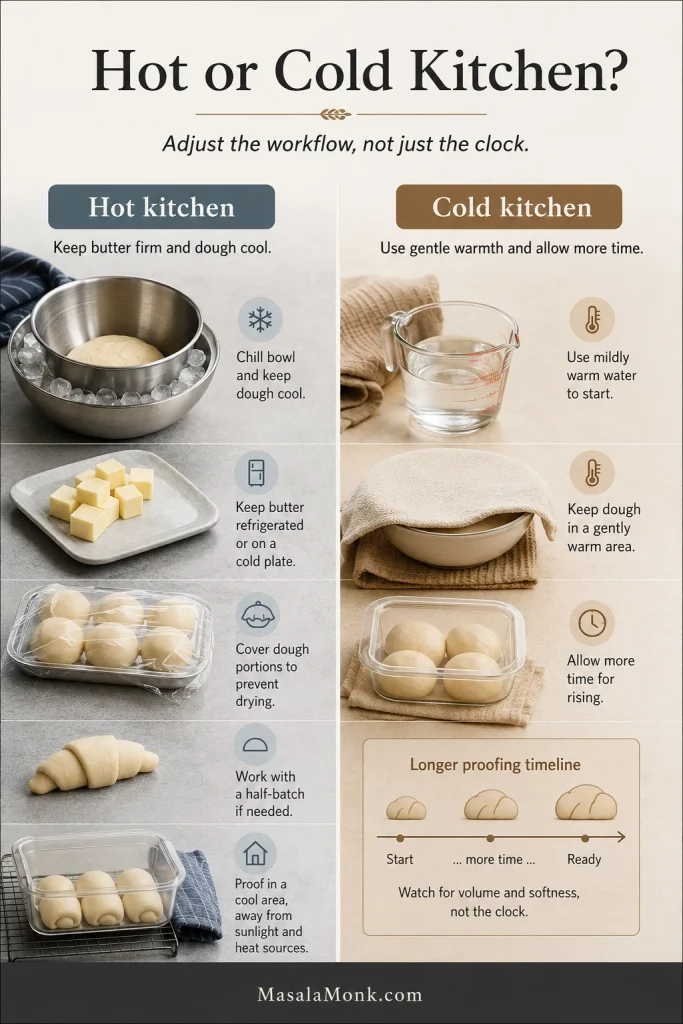
Salt Bread in a Hot or Cold Kitchen
Hot-Kitchen Guidance
In a room above about 27°C / 81°F, fixed times become much less useful. Dough ferments faster, mixer friction matters more and the filling can soften while the next roll is still being shaped.
- Start with cold water; chill the mixer bowl as well when the room is especially hot.
- Keep unused butter refrigerated and shape in two batches when working slowly.
- Check the dough temperature after mixing and proof in the coolest practical place.
- Briefly chill shaped rolls if a greasy sheen begins appearing.
- Avoid aggressively warm oven-proofing settings.
A hot room is not a reason to add handfuls of flour. Cool the dough first, then reassess it.
Cold-Kitchen Guidance
- Use mildly warm—not hot—water.
- Allow fermentation to take longer.
- Use a gently warm location away from direct heat.
- Let expansion and softness decide the timing; a cool kitchen may simply need longer.
A slower rise is usually safer than overheating the dough. Give the yeast time to work while the butter stays neatly inside the rolls.
Salt Bread Troubleshooting: Dough, Butter and Browning Problems
An imperfect first tray rarely means the whole recipe is wrong. The earliest moment it differed from the cues above usually gives the clearest clue.
Match the First Visible Problem to the Fix
| Problem | What Probably Happened | What to Change Next Time |
|---|---|---|
| Dough is extremely sticky | Gluten is underdeveloped or the dough is too warm | Rest it, continue mixing and cool it before adding flour |
| Dough snaps back | The gluten is tense | Cover and rest for 10–15 minutes |
| Dough tears into thin patches | It was rolled too quickly or still lacks strength | Roll gradually and allow another rest |
| Rolls unwind | Loose shaping or the pointed tip faces upward | Roll with light tension and place the tip underneath |
| Bread is dense | Underproofing, weak yeast, underdeveloped gluten or too much flour | Develop the dough fully, then let volume, softness and feel guide the timing |
| Bread spreads instead of rising | Weak gluten, overproofing or warm dough | Develop the dough fully and shorten or cool the final proof |
| Bottom stays pale | Insulated tray, low heat, insufficient contact or a rack set too high | Use a non-insulated metal sheet that browns the base more readily, or move the tray lower. If the top is already brown, shield it loosely while the underside finishes. |
| Bottom burns | Very dark tray, low rack or too much exposed butter | Raise the tray, use light metal or reduce heat slightly |
| Inside feels greasy | Underbaking, premature leakage or filling pieces larger than 13 g | Bake more fully and confirm the filling weight. Reduce the butter only when larger pieces were used or a particular butter repeatedly leaves an excessively greasy crumb. |
For butter leakage or a missing hollow, use the timing guide above. When a correctly baked base softens later, move to the storage and reheating section.
Visual Troubleshooting Guide
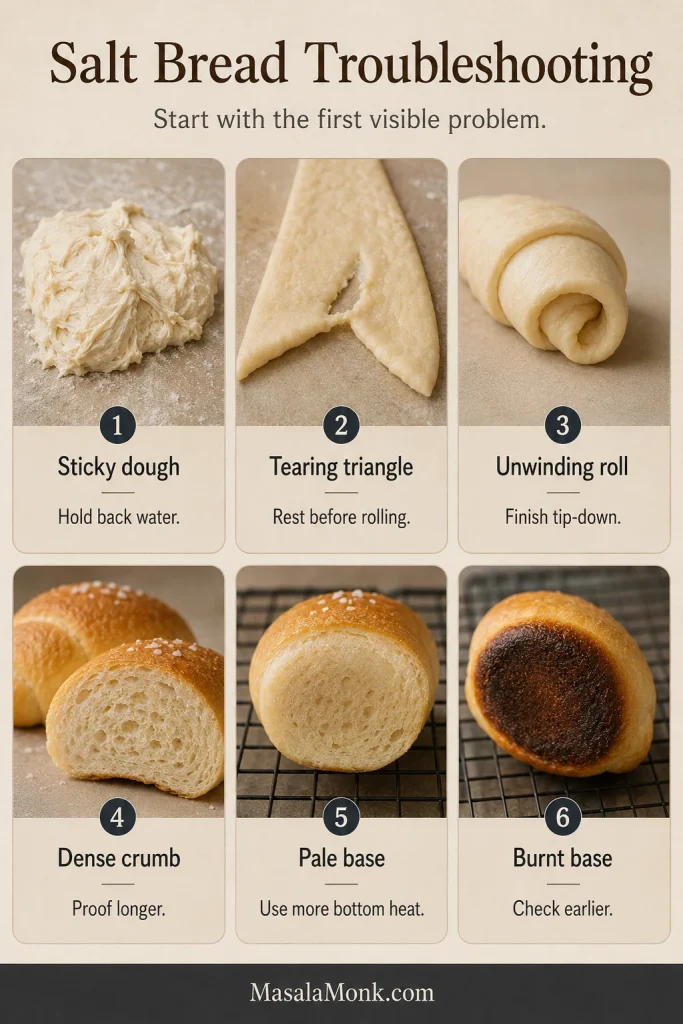
Still adjusting? · Butter timing guide · Storage and reheating · Back to recipe
Make-Ahead, Storage and Reheating
An Example Four-and-a-Half-Hour Timeline
- 0:00–0:30: portion the butter, mix and knead
- 0:30–1:45: first rise, ending when the dough is close to doubled and lighter
- 1:45–2:30: divide, rest and shape
- 2:30–4:00: final proof, looking for soft, gently jiggly rolls
- Around 3:20: begin preheating while the rolls finish proofing
- 4:00–4:20: mist, salt and bake
- 4:20–4:30: settle briefly, rack and serve warm
This example assumes a 75-minute first rise and a 90-minute final proof. Use the clock to plan your day, not to overrule the dough. Move the later times according to how quickly the dough develops.
Making the Dough the Night Before
For morning shaping and baking, reduce the yeast so the dough does not outrun the refrigerator. As a cautious starting point, use 1.5 g instant yeast for a warmer refrigerator or a hold approaching 12 hours, and up to 2 g for a reliably cold refrigerator and a hold closer to 8 hours.
- Mix and knead, then leave the covered dough at room temperature for 15–20 minutes.
- Refrigerate for 8–12 hours at about 4°C / 40°F or colder.
- Divide while cool and rest until the pieces relax enough to shape.
- Use freshly chilled filling butter and proof by the same readiness cues; expect a longer final proof.
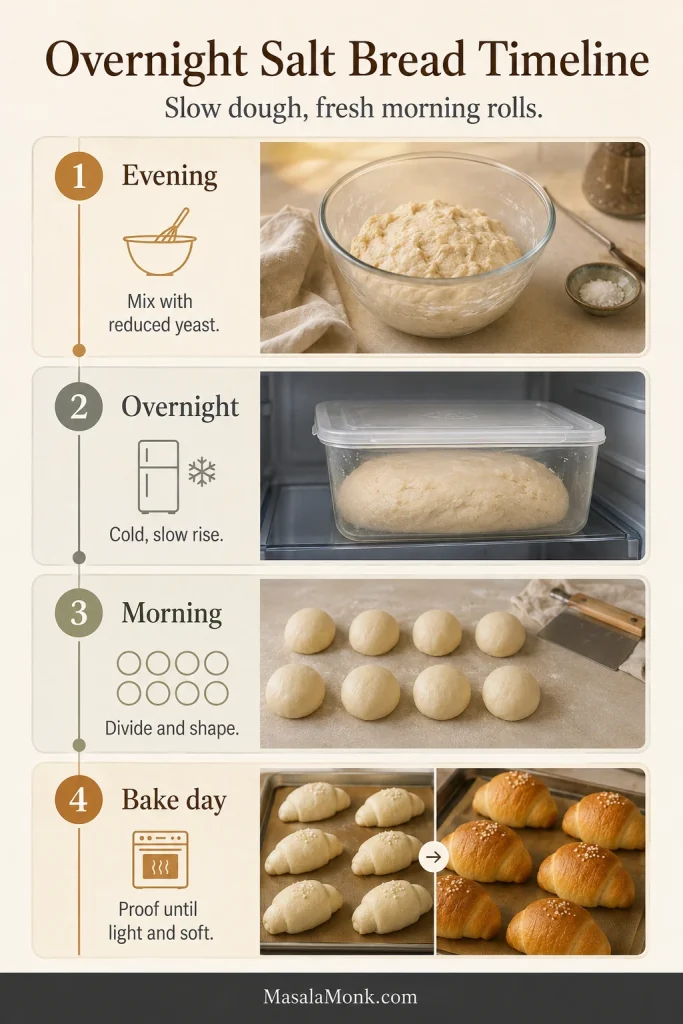
Keep the butter-filled final proof on the day of baking. Shaped rolls held overnight leave less room between a good proof and softened filling.
Doubling the Recipe
Check the mixer’s dough capacity before doubling; when uncertain, mix two batches. Shape and proof the 16 rolls in staggered groups so the first tray does not finish proofing while the second is still being rolled.
Storage
- Best texture: within the first hour
- Room temperature: airtight for one day, or two days with some loss of crispness
- Refrigerator: not preferred because bread stales faster
- Freezer: freeze fully cooled rolls airtight while fresh
- Day-old rolls: toast or turn into French-toast-style slices
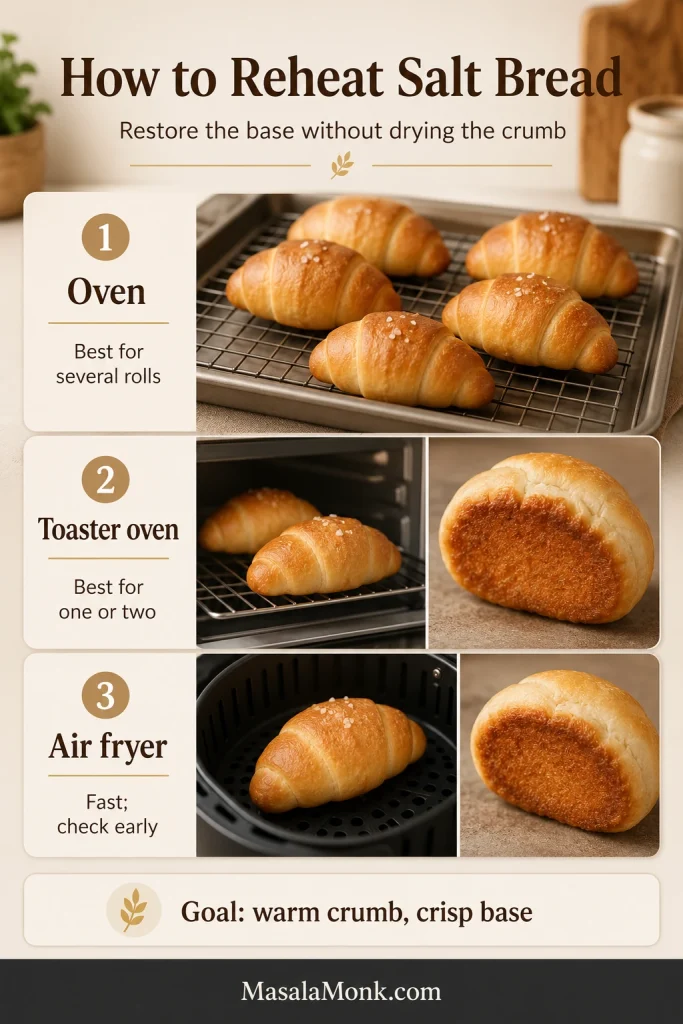
How to Reheat Salt Bread
| Method | Starting Guidance | Result |
|---|---|---|
| Air fryer | 175°C / 350°F for 2–4 minutes | Fast, strong recrisping |
| Toaster oven | 175°C / 350°F for 4–6 minutes | Even warming and crispness |
| Conventional oven | 175°C / 350°F for 5–8 minutes | Best for several rolls |
| Microwave | Use a very brief interval | Warm and soft, not crisp |
Keep going: · Serving ideas · FAQ · Back to top ↑
Serving Ideas and Easy Variations
Salt bread is at its best before it becomes a serving suggestion at all—torn open beside coffee while the underside still crackles. Once it reaches the table, its savoury butteriness makes it just as comfortable beside soup, eggs or something sweet.
- Serve with coffee or tea.
- Pair with a creamy bowl such as tomato bisque, keeping the roll above the broth until the moment you eat.
- Split for a small egg sandwich while the crumb is still soft and the base remains crisp.
- Add a thin layer of orange marmalade for a bright sweet-salty contrast that cuts through the butter.
- Toast a day-old roll for a compact savoury sandwich.
Once the classic batch feels familiar, these are the easiest ways to change the flavour without losing the crescent shape and crisp base.
- Garlic butter: use a firm, chilled garlic-herb butter; exposed garlic can scorch.
- Cheese: tuck in a small piece of low-moisture cheese and resist overfilling.
- Red bean and butter: use a modest spoonful of sweet red-bean paste and slightly less butter so the filling stays balanced.
- Softer milk-bread style: use a separately balanced dough with milk, egg or tangzhong; those additions change hydration, proofing and browning together.
Frequently Asked Questions
Why Did My Salt Bread Not Form a Hollow?
A modest hollow is enough. When there is no hollow and a large greasy pool forms, use the butter-timing guide, then review dough strength, wrapping and proofing.
Can You Make Salt Bread Without a Stand Mixer?
Yes. Use the hand-kneading instructions beneath the main method, adding covered rests whenever the dough becomes slippery or tight. A true no-knead version needs its own fold-and-refrigerate formula.
Can the Dough Be Refrigerated Overnight?
Yes. Use the reduced-yeast method above, keep the refrigerator near 4°C / 40°F or colder and shape the cool dough the next day.
Can Salt Bread Be Frozen Before or After Baking?
Baked rolls are the dependable option: cool, wrap airtight and freeze while fresh. Shaped butter-filled dough needs a method developed specifically for freezing because yeast activity, proofing and leakage can change.
Is This Salt Bread Dairy-Free?
No. Milk powder and butter both affect flavour, browning and filling behaviour. Use a dedicated dairy-free formula instead of replacing both casually.
Can Salt Bread Be Baked in an Air Fryer?
Some air fryers can bake small trial batches, but basket size, element distance and fan strength vary too widely for one dependable timing. This formula is designed for a conventional oven and metal tray; use the air fryer primarily for reheating.
When the First Batch Comes Together
The first batch teaches you more than the timer can. Notice whether the dough relaxed under the rolling pin, whether the shaped rolls reached a light, resilient proof, and whether the underside browned before the top became too dark. Those moments tell you what to adjust next time.
Your first tray will tell its own story. Did the butter appear during proofing, immediately after loading, or only once the rolls had lifted? Share what you saw and which tray you used; those details may help another baker understand their batch.
Then pull one roll apart while it is still warm. The crumb should stretch before it tears, the warm centre should release a deep butter aroma, and the underside should give a light crackle between your fingers. That is the moment the extra rests, careful shaping and patient proofing stop feeling fussy and start feeling worthwhile.








