A paloma recipe can be as simple as tequila, grapefruit soda, and a squeeze of lime—yet it has that rare talent of tasting like you tried harder than you did. One minute it’s a breezy patio drink; the next it’s the easiest cocktail to scale for a party. Even better, it’s forgiving: you can build it with Squirt, go cleaner with Fresca, lean tart with fresh grapefruit juice, or take it smoky with mezcal. The shape stays familiar, but the personality changes fast.
That said, a Paloma also exposes little mistakes. Too much fizz added too soon and it goes flat. A heavy hand with lime and it gets aggressively sharp. Use a very sweet grapefruit soda and it can taste like adult candy. Meanwhile, fresh grapefruit juice can swing bitter if you squeeze too hard or lean on pith. The fix isn’t complicated—it’s mostly small decisions made on purpose.
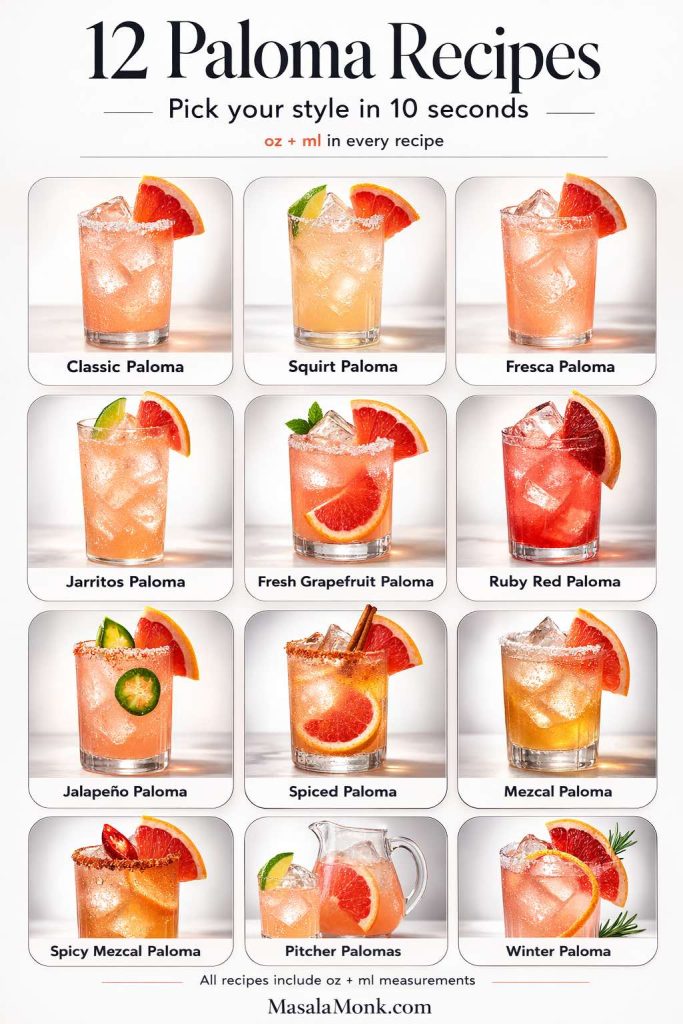
So this guide is built around one idea: learn one reliable Paloma structure, then apply it to twelve versions that still feel like a Paloma (not a random tequila drink wearing grapefruit as a costume). You’ll get a classic Paloma cocktail recipe with grapefruit soda, options for Squirt, Fresca, and Jarritos, a Paloma recipe without grapefruit soda using fresh grapefruit juice, pitcher Palomas for a crowd, plus spicy and mezcal variations that stay balanced.
If you’re putting out snacks while you make drinks, the Paloma loves anything crunchy, salty, creamy, or spicy. A plate of golden, stretchy bites like these homemade mozzarella sticks keeps the vibe classic. A bowl of cool, crowd-friendly spinach dip brings balance when citrus is doing the most. And if you’re going spicy, you already know how well heat + grapefruit plays—these baked jalapeño poppers are basically made for a spicy Paloma night.
Paloma recipe basics: what makes a Paloma taste “right”
A Paloma is a tequila highball with grapefruit at the center. In its most familiar form, it’s tequila + lime + grapefruit soda over ice. It’s often served with a salt rim or a pinch of salt in the drink—because salt pulls grapefruit forward and makes the whole thing taste more complete.
A widely used classic ratio is 2 oz tequila + ½ oz lime juice + grapefruit soda to top, plus a pinch of salt. You’ll see that structure echoed across many bar-style references, including Liquor.com’s blog post on Paloma Cocktail.
From there, everything is tuning. Want something more grown-up and less sweet? Swap the grapefruit soda for fresh grapefruit juice and sparkling water. Want a smoky edge? Make it a mezcal paloma cocktail. Want the party version? Use a pitcher paloma recipe that keeps carbonation separate until the last second.

Paloma ingredients (and what each one actually does)
Tequila
Blanco keeps the drink crisp and bright; reposado adds a soft warmth that’s beautiful in winter paloma variations and spice-forward builds. If you want to nerd out later with a different tequila direction, a tequila-friendly ratio thinking shows up in drinks like a Moscow Mule too—same idea: structure first, personality second.
Grapefruit (soda or juice)
Grapefruit soda makes the drink effortless and bubbly. Fresh grapefruit juice makes it taste “crafted,” but you may need a touch of sweetener to keep it from getting too stern.
Lime juice
Lime gives the Paloma its snap. It also prevents sweetness (especially in Squirt mixed drinks) from feeling heavy. Still, more lime isn’t always better; past a certain point it flattens grapefruit and turns the drink into a sour.
Salt
Salt is the secret handshake of the Paloma. You can rim the glass, or add a pinch directly to the drink. Either way, it rounds edges and makes grapefruit taste brighter.

Sweetener (optional)
Agave syrup or simple syrup belongs mainly in fresh grapefruit builds, or in cases where your grapefruit soda is very dry. When you’re using sweeter sodas, sweetener usually isn’t needed.
Best tequila for Paloma cocktail: blanco vs reposado
If you’re choosing quickly, here’s the simplest rule:
- Blanco tequila is the default for a classic paloma recipe. It’s clean, peppery, and keeps grapefruit and lime vivid.
- Reposado tequila is excellent when you’re adding spice, blood orange, or warm notes. It’s also nice in a “spiced paloma” where a salt rim and a little aromatic complexity are part of the point.
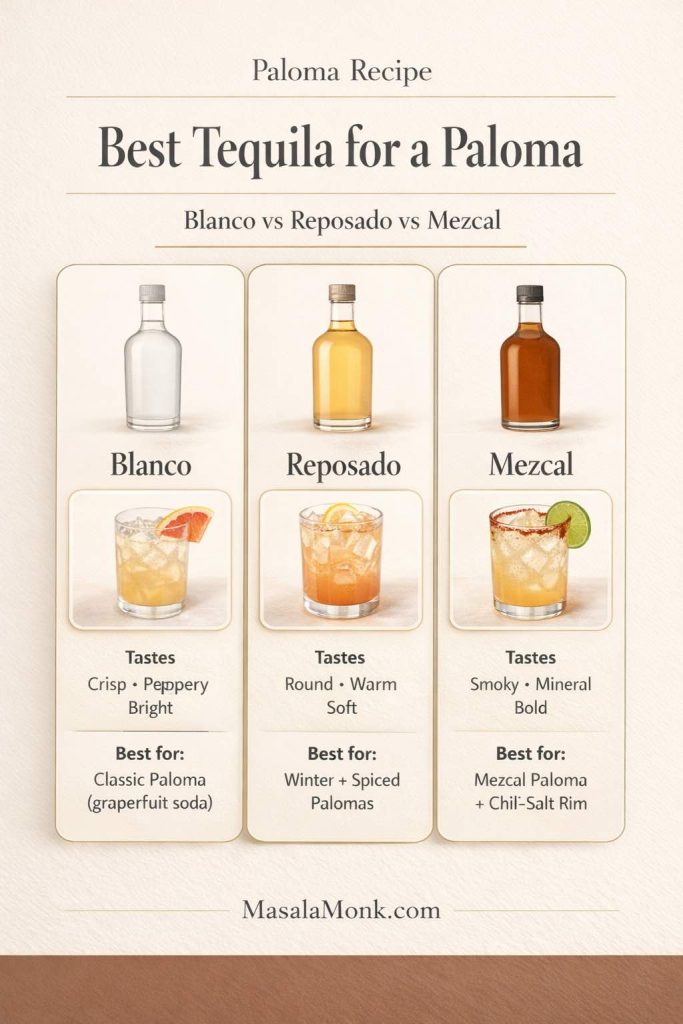
If you’re deciding between bottles for a party, go blanco. And if you’re doing a small round of winter palomas or a mezcal-adjacent smoky lineup, reposado can be surprisingly flattering.
Grapefruit soda for Paloma: why your drink tastes different every time
Grapefruit soda varies wildly. Some are sweet and punchy. Some are lighter and drier. That’s why tequila and squirt cocktail recipes can taste radically different from a paloma cocktail fresca build even with the same tequila and lime.
Instead of treating every grapefruit soda the same, use a tiny “adjustment” mindset:
- If your Paloma tastes too sweet, add a little more lime and a pinch of salt, or dilute with more sparkling water.
- If it tastes too tart, add a small amount of agave syrup and stir gently.
- If it tastes flat, it usually wasn’t the recipe—it was the order of operations. Add bubbles last, and stir once.
Also Read: Tapas Recipe With a Twist: 5 Indian-Inspired Small Plates
Classic Paloma recipe (with grapefruit soda)
This section gives you the foundation: the classic Paloma ingredients, the simple build method, and the most common grapefruit soda route. From here, the Squirt tequila drink versions, Fresca tequila drink versions, and Jarritos paloma versions are easy variations rather than entirely new learning curves.
For a classic reference ratio, Liquor.com’s Paloma cocktail is a clean baseline. If you prefer a more measurement-forward, ml-friendly approach with grapefruit juice, agave, and soda, Difford’s Guide has a widely cited Paloma spec that’s useful for comparing styles.
The build method that keeps it crisp (and not flat)
- Start with the still ingredients first: tequila, lime, and salt.
- Add ice next: this chills and adds dilution gradually.
- Top with grapefruit soda last: cold soda, freshly opened.
- Stir once, gently: one slow turn is plenty.
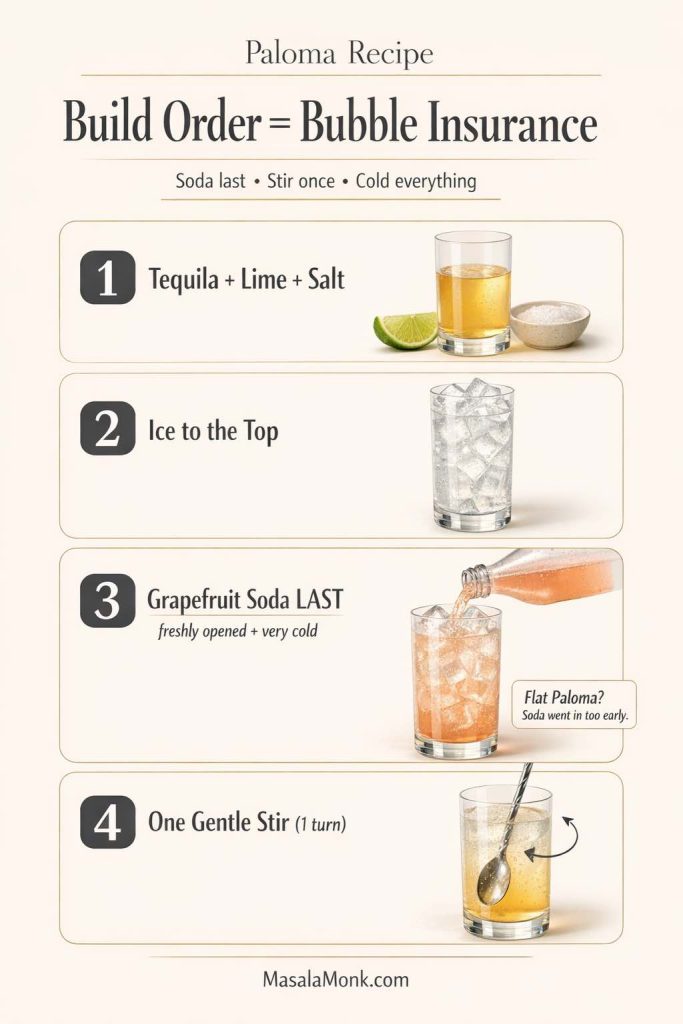
That’s it. The Paloma isn’t complicated—it just wants restraint.
Also Read: Air Fryer Salmon Recipe (Time, Temp, and Tips for Perfect Fillets)
Classic Paloma cocktail recipe with grapefruit soda
A classic Paloma is the rare cocktail that feels both effortless and intentional. On one hand, it’s a “build it in the glass” drink—no shaking, no straining, no drama. On the other, the details matter: cold grapefruit soda, fresh lime (not bottled), and just enough salt to make the grapefruit taste brighter instead of sweeter.
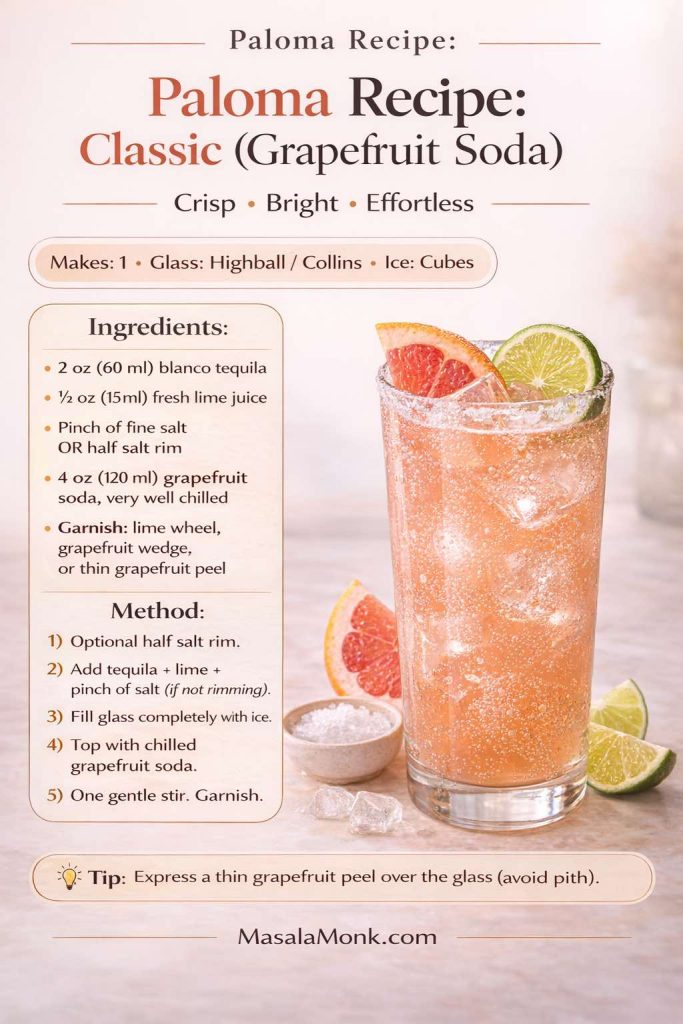
1) Classic Paloma recipe (grapefruit soda)
Makes: 1 drink
Glass: Highball / Collins
Ice: Cubes (fresh, not “freezer-burnt”)
Ingredients (oz + ml):
- 2 oz (60 ml) blanco tequila
- ½ oz (15 ml) fresh lime juice
- Pinch of fine salt or a half salt rim
- 4 oz (120 ml) grapefruit soda, very well chilled
- Garnish: lime wheel, grapefruit wedge, or a thin grapefruit peel
Method (step-by-step):
- Optional rim: If you want a rim, run a lime wedge around half the glass, then dip that side into fine salt. A half rim lets you choose salty or unsalted sips.
- Build the base: Add tequila and lime juice to the glass. Sprinkle in a pinch of salt (if you’re not rimming).
- Ice it down: Fill the glass completely with ice cubes. More ice actually helps here—it melts slower and keeps the drink snappy.
- Top carefully: Pour in the chilled grapefruit soda.
- One gentle stir: Give the drink a single slow turn to combine, then stop. Over-stirring knocks out the bubbles you’re trying to keep.
Serving idea:
This is a natural match for salty, gooey snacks like mozzarella sticks or something creamy and scoopable like spinach dip.
Make it nicer without making it harder:
Use a thin strip of grapefruit peel and express it over the glass—twist it once so the oils mist the surface—then drop it in. Keep the peel thin and avoid pith; that’s where harsh bitterness sneaks in.
Also Read: Masterclass in Chai: How to Make the Perfect Masala Chai (Recipe)
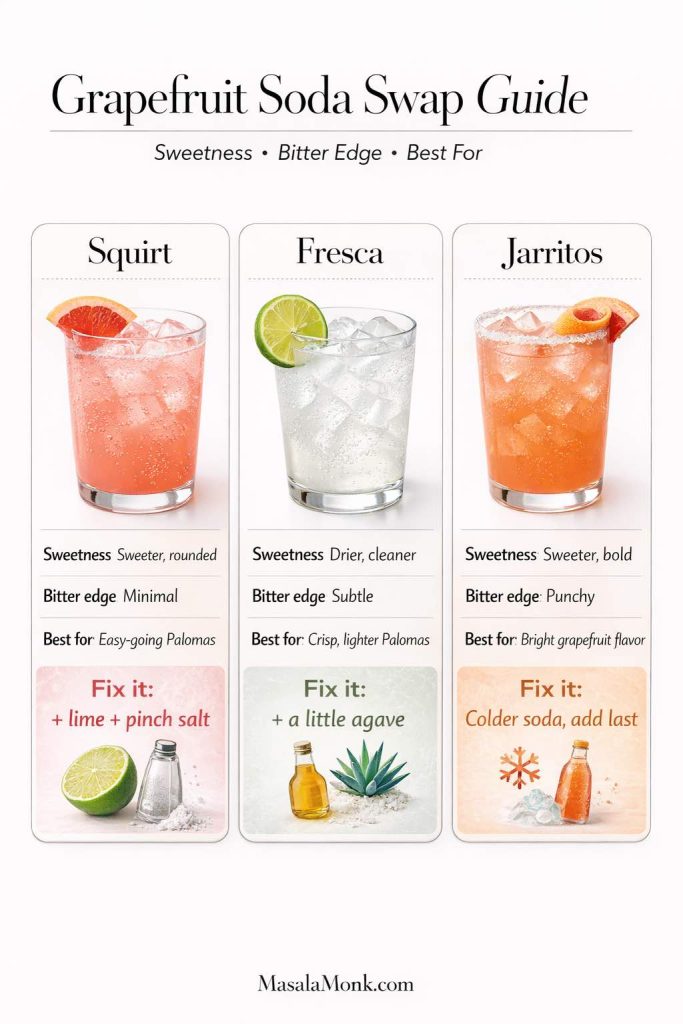
Paloma soda swaps: Squirt, Fresca, and Jarritos
Grapefruit sodas don’t behave the same way. Some are sweeter and rounder, while others are drier and more citrus-forward. As a result, a tequila and Squirt drink can feel dessert-y, whereas a Paloma cocktail Fresca build can taste clean and sharply refreshing. Instead of fighting the soda, these recipes lean into what each one does well—then balance it with lime, salt, and ice.
2) Paloma recipe with Squirt (tequila and Squirt Mexican drink)
This is the bright, familiar “squirt tequila cocktail” style—easygoing, crowd-friendly, and unapologetically fun. Still, because Squirt-style grapefruit sodas are often sweeter, this version benefits from a little extra precision so it doesn’t drift into syrupy territory.
Makes: 1 drink
Glass: Highball / Collins
Ice: Cubes
Ingredients (oz + ml):
- 2 oz (60 ml) blanco tequila
- ½ oz (15 ml) fresh lime juice
- Pinch of salt
- 4 oz (120 ml) grapefruit soda (Squirt-style), very cold
- Garnish: lime wedge (or grapefruit wedge)
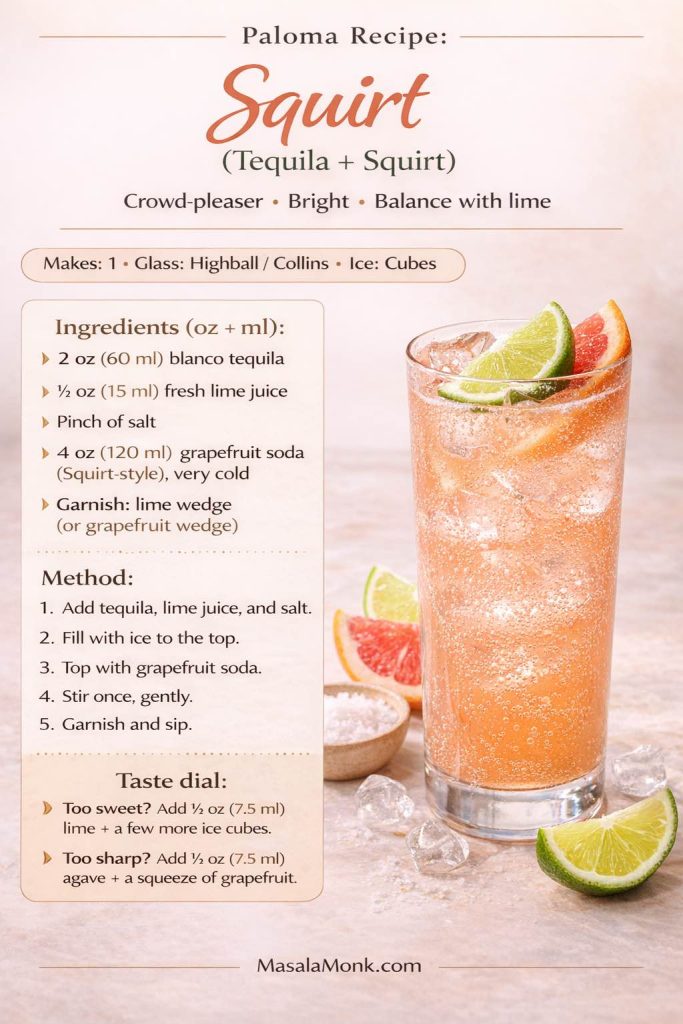
Method:
- Add tequila, lime juice, and salt to the glass.
- Fill with ice all the way to the top.
- Top with grapefruit soda.
- Stir once, gently.
- Garnish and sip.
Taste dial (quick adjustments that keep it “Paloma”):
- If it lands too sweet: add ¼ oz (7.5 ml) lime juice, then add a few more cubes of ice. Wait 30 seconds before deciding again.
- If it feels sharp instead: add ¼ oz (7.5 ml) agave syrup, stir gently, and finish with a squeeze of grapefruit wedge.
Serving idea:
This is the “game night” Paloma—make two or three back-to-back and put out a dip situation with Crispy Homemade French Fries From Fresh Potatoes (Recipe Plus Variations) so people can keep snacking without thinking.
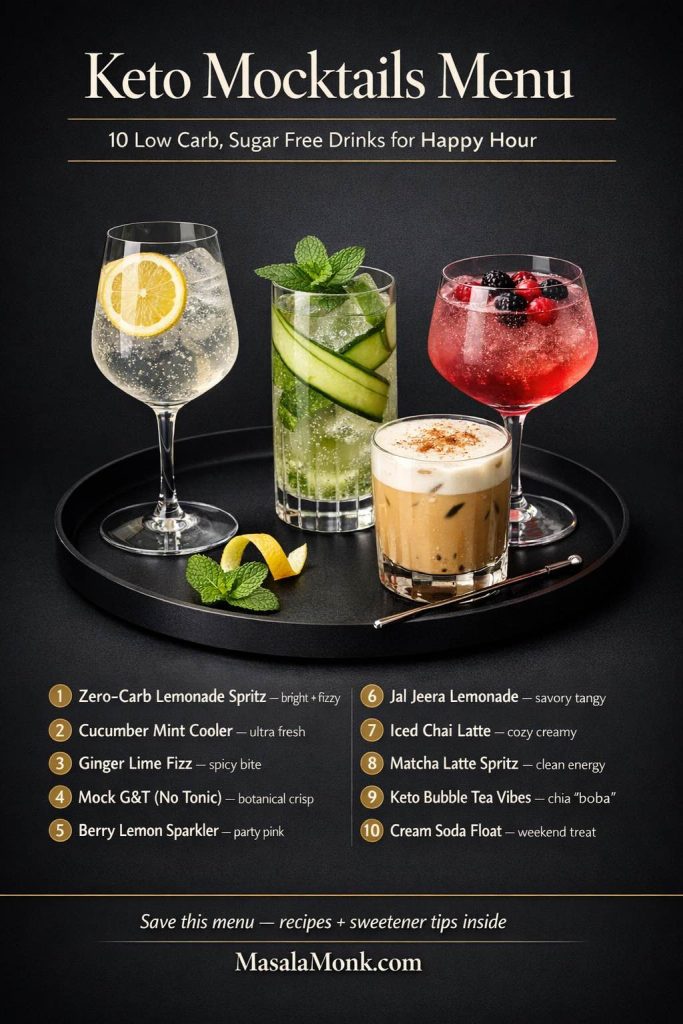
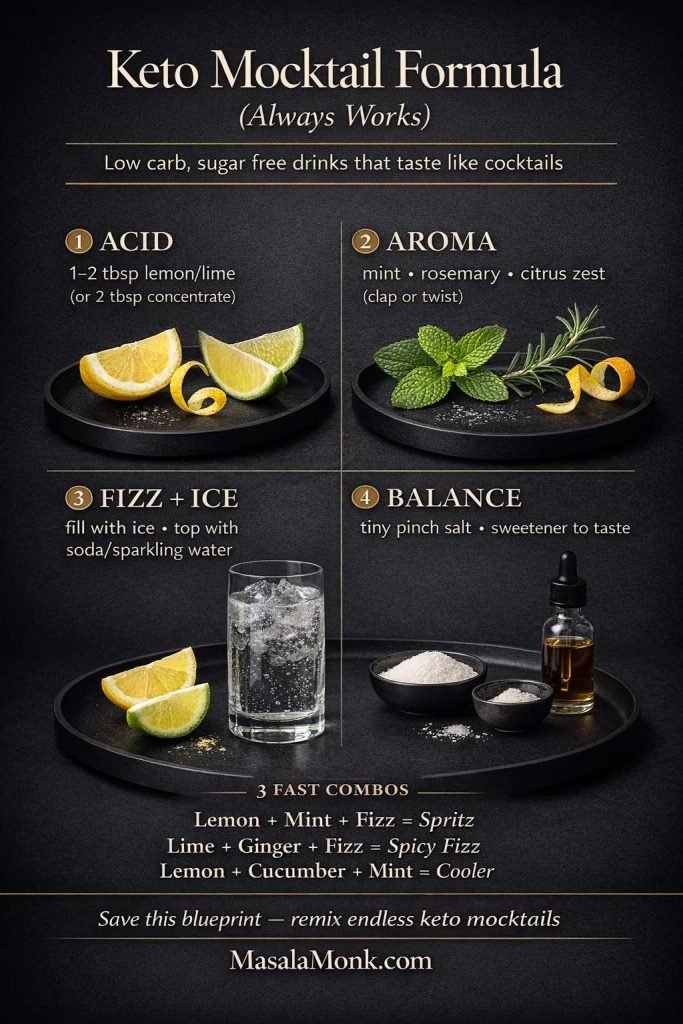
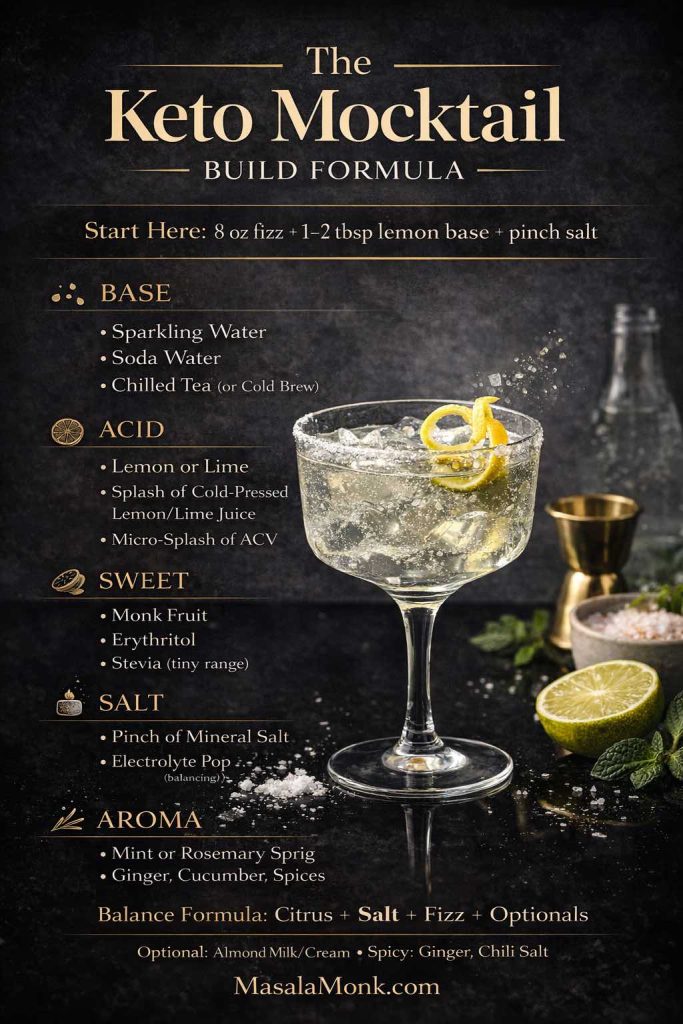
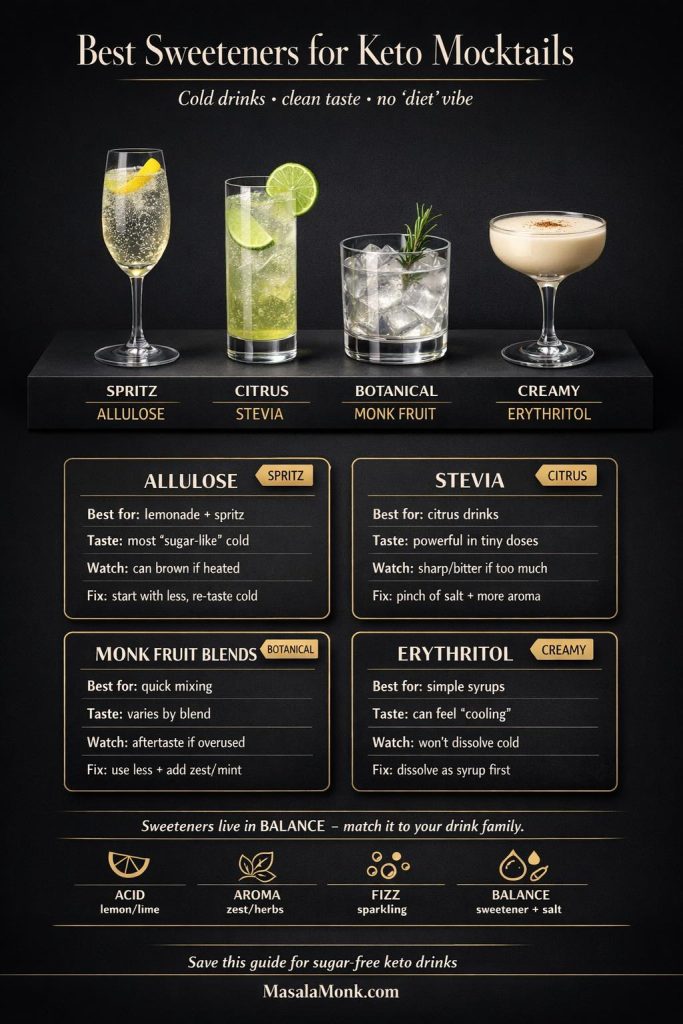
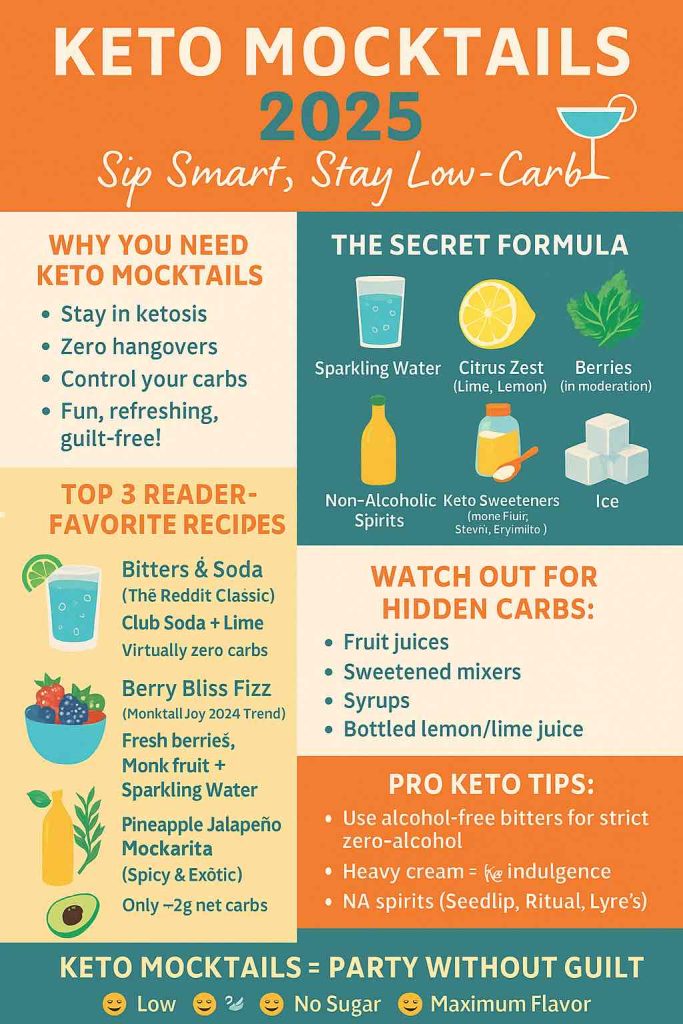
Also Read: Keto Mocktails: 10 Low Carb, Sugar Free Recipes
3) Paloma cocktail Fresca (Paloma recipe with Fresca)
Fresca-style grapefruit soda tends to taste lighter and cleaner, which makes this a great “simple paloma” option when you want something crisp rather than candy-bright. Moreover, it’s an easy way to keep the drink refreshing even when you’re pouring generous ice.
Makes: 1 drink
Glass: Collins
Ice: Cubes
Ingredients (oz + ml):
- 2 oz (60 ml) tequila (blanco is ideal; reposado also works)
- ½ oz (15 ml) lime juice
- Pinch of salt or a half salt rim
- 4–5 oz (120–150 ml) grapefruit soda (Fresca-style), chilled
- Garnish: grapefruit wedge or lime wheel
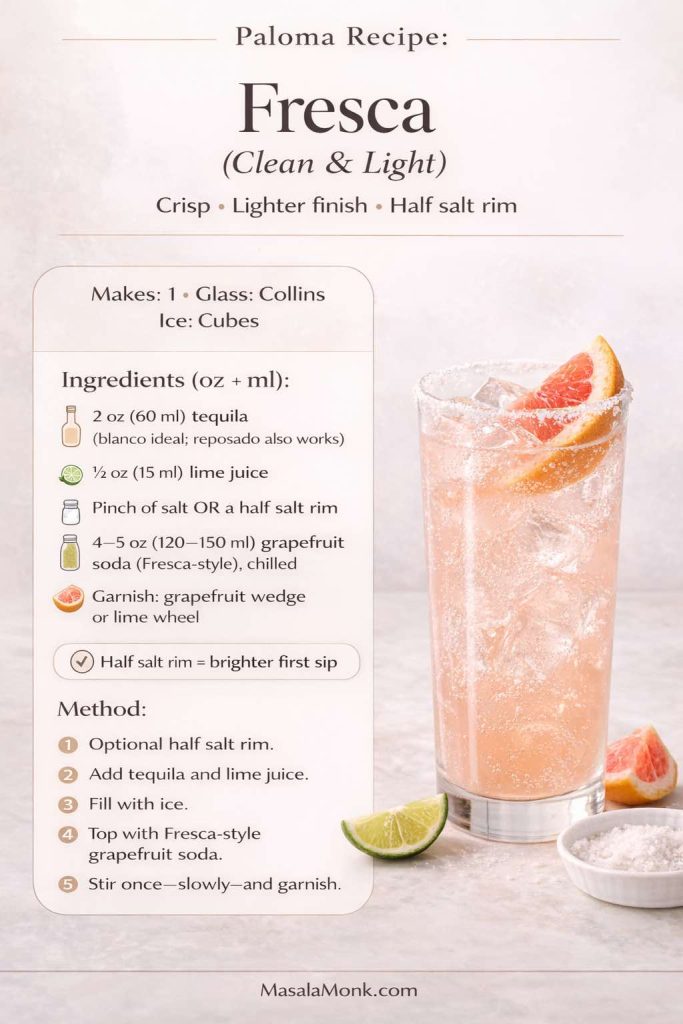
Method:
- Optional half rim with salt.
- Add tequila and lime juice.
- Fill with ice.
- Top with Fresca-style grapefruit soda.
- Stir once—slowly—and garnish.
Small upgrade that changes the whole feel:
Swap “salt in the drink” for a half salt rim. With lighter sodas, the rim gives you a brighter first sip without making the whole drink taste salty.
Serving idea:
Because this version is extra crisp, it pairs beautifully with creamy dips like spinach dip or a cooling yogurt-based dip such as tzatziki.
Also Read: Slow Cooker Pork Tenderloin (Crock Pot Recipe) — 3 Easy Ways
4) Jarritos Paloma (Paloma recipe Jarritos grapefruit)
Jarritos-style grapefruit sodas often read more candy-bright and bold. Therefore, this version depends on lime and salt doing their job—keeping the drink vibrant without letting sweetness dominate.
Makes: 1 drink
Glass: Highball / Collins
Ice: Cubes
Ingredients (oz + ml):
- 2 oz (60 ml) blanco tequila
- ½ oz (15 ml) lime juice
- Pinch of salt
- 4 oz (120 ml) grapefruit soda (Jarritos-style), very cold
- Garnish: grapefruit peel or lime wheel
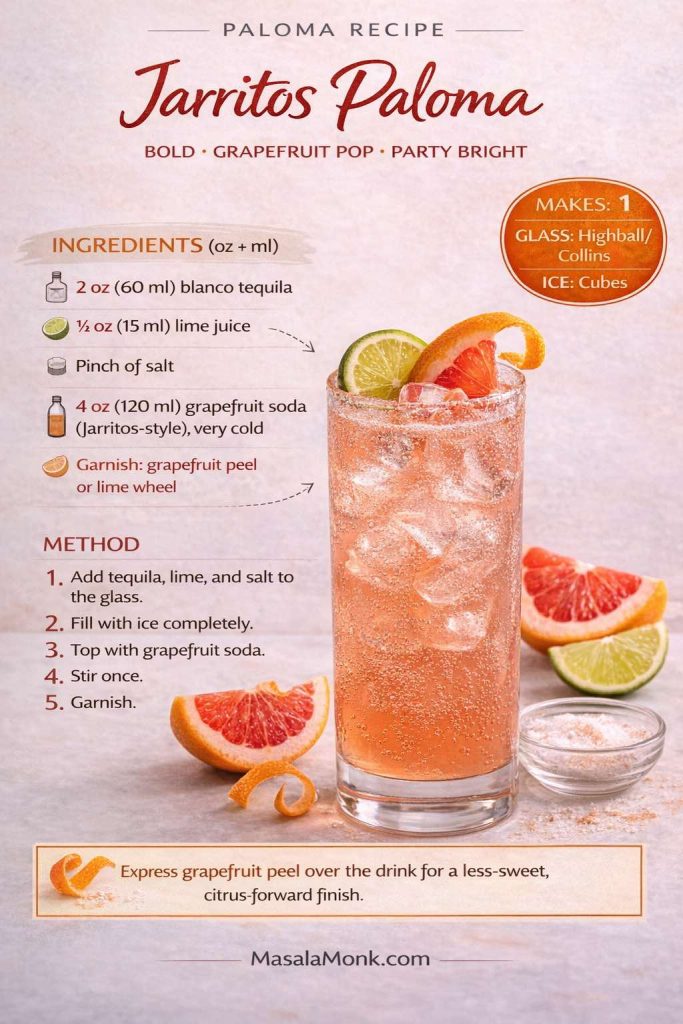
Method:
- Add tequila, lime, and salt to the glass.
- Fill with ice completely.
- Top with grapefruit soda.
- Stir once.
- Garnish.
Serving idea:
This version is perfect for a movie-night vibe. Pair it with a dip + snack set up built around Air Fryer Chicken Wings (Super Crispy, No Baking Powder) and a salsa you love.
Make it feel more “bar” without extra work:
Add a grapefruit peel expressed over the drink, then rub the peel briefly around the rim before dropping it in. That quick aromatic lift helps the drink taste less sweet and more citrus-forward.
Also Read: Chicken Pesto Pasta (Easy Base Recipe + Creamy, One-Pot, Baked & More)
Paloma recipe without grapefruit soda (fresh grapefruit juice)
Sometimes you want a Paloma that tastes more controlled—less like soda and more like a crafted cocktail. That’s where the fresh grapefruit version shines. It also answers the common “paloma recipe without grapefruit soda” situation: you still get bubbles, just from sparkling water (or club soda), not from a sweetened grapefruit soda.
If you enjoy comparing styles, Love and Lemons has a fresh-leaning Paloma method that aligns with the juice + bubbles approach, while Difford’s Guide offers a structured ml-based Paloma spec that includes grapefruit juice, sweetener, and grapefruit soda in a more “cocktail program” format.
Grapefruit juice for a Paloma: choosing the vibe
- Ruby red / pink grapefruit: softer, often sweeter, and generally easier to balance.
- White grapefruit: sharper, sometimes more bitter, and fantastic when you keep sweetness and salt in check.
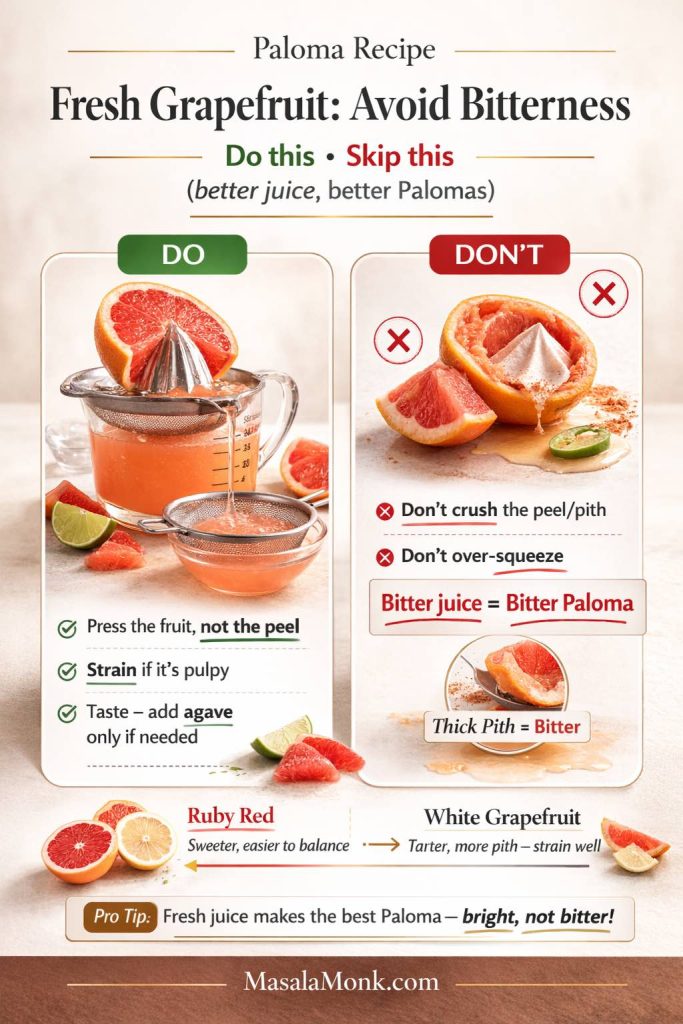
Either way, avoid pressing the peel. Once pith bitterness shows up, it’s hard to undo.
Also Read: Pork Tenderloin in Oven (Juicy, Easy, 350°F or 400°F) Recipe
5) Fresh grapefruit Paloma (Paloma with grapefruit juice + sparkling water)
This is the “fresh paloma” version that tastes clean, bright, and adjustable. It’s also the best place to use agave syrup thoughtfully—tiny amounts make a bigger difference than you think.
Makes: 1 drink
Glass: Collins
Ice: Cubes
Ingredients (oz + ml):
- 2 oz (60 ml) blanco tequila
- 2 oz (60 ml) fresh grapefruit juice
- ½ oz (15 ml) fresh lime juice
- ¼ oz (7.5 ml) agave syrup (optional; start here, then adjust)
- 3 oz (90 ml) sparkling water, very cold
- Pinch of salt
- Garnish: grapefruit wedge
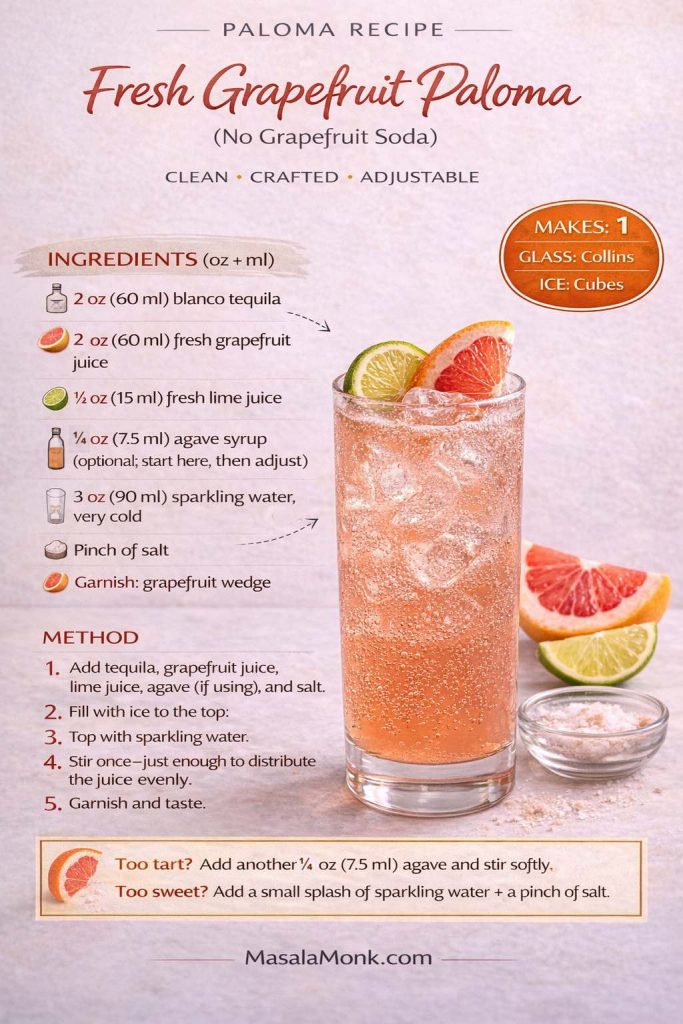
Method (more detailed):
- Add tequila, grapefruit juice, lime juice, agave (if using), and salt to the glass.
- Fill with ice to the top.
- Top with sparkling water.
- Stir once—just enough to distribute the juice evenly.
- Garnish and taste. If you want more brightness, squeeze the grapefruit wedge lightly over the top.
Taste dial (gentle corrections):
- Too tart? Add another ¼ oz (7.5 ml) agave and stir softly.
- Too sweet? Add a small splash of sparkling water and a pinch of salt.
Serving idea:
This version is especially good with creamy dips because it cuts richness without feeling sugary. Try it with spinach dip or a cooling yogurt dip like tzatziki.
Also Read: Sourdough Starter Recipe: Make, Feed, Store & Fix Your Starter (Beginner Guide)
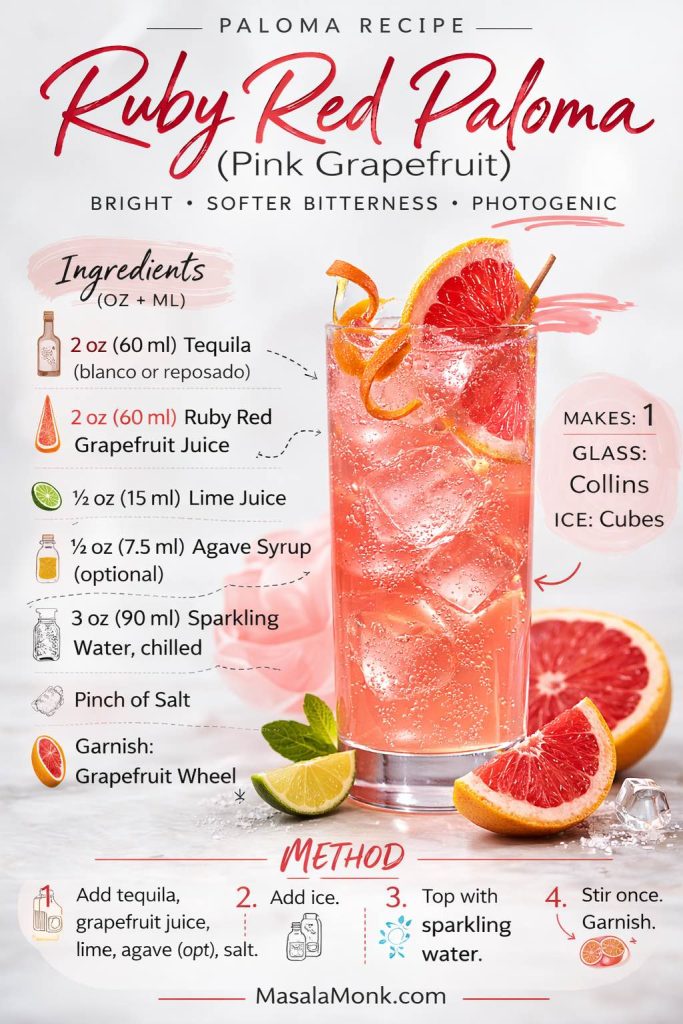
6) Ruby red Paloma (pink grapefruit Paloma)
This is the bright, photogenic lane: ruby red paloma, pink Paloma cocktail, pink grapefruit paloma recipe—same structure, softer bitterness, and a slightly rounder finish.
Makes: 1 drink
Glass: Collins
Ice: Cubes
Ingredients (oz + ml):
- 2 oz (60 ml) tequila (blanco for crisp; reposado for a warmer finish)
- 2 oz (60 ml) ruby red grapefruit juice
- ½ oz (15 ml) lime juice
- ¼ oz (7.5 ml) agave syrup (optional)
- 3 oz (90 ml) sparkling water, chilled
- Pinch of salt
- Garnish: grapefruit wheel
Method:
- Add tequila, grapefruit juice, lime, agave (if using), and salt to the glass.
- Add ice.
- Top with sparkling water.
- Stir once and garnish.
Fun serving idea:
If you’re in a brunch mood, this profile pairs beautifully with citrus + bubbles. For a different kind of pour later, our grapefruit-friendly mimosa collection is a natural companion post.
Spicy Paloma recipe variations (jalapeño, spice, and salted rims)
Spice changes the Paloma’s mood completely. Suddenly it’s less “poolside” and more “bar snack energy.” Even so, the goal isn’t punishment; it’s aroma and warmth that plays with grapefruit.
For food, the pairing almost chooses itself: baked jalapeño poppers make the whole thing feel planned, not random.
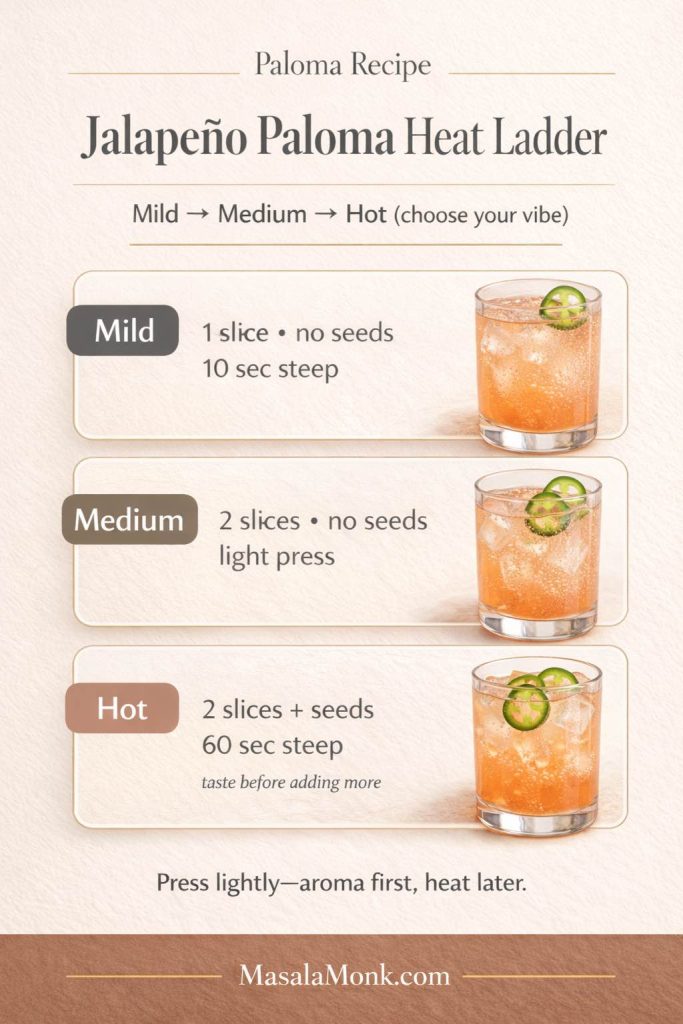
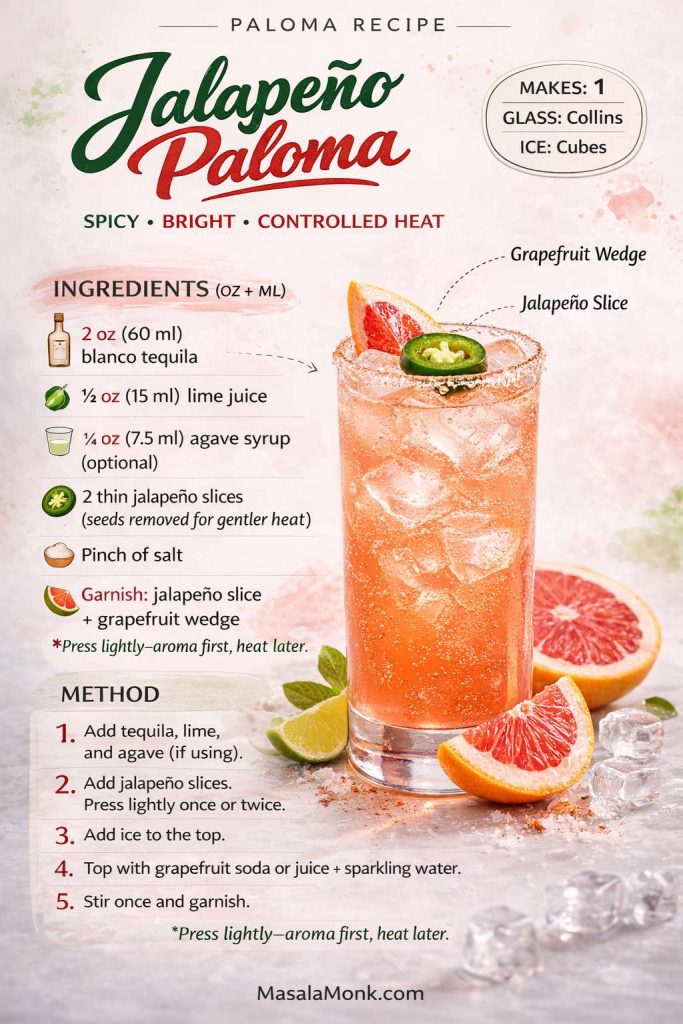
7) Jalapeño Paloma cocktail (spicy jalapeño Paloma recipe)
This one keeps the heat controlled and the grapefruit prominent. It’s spicy, yet still bright.
Makes: 1 drink
Glass: Collins
Ice: Cubes
Ingredients (oz + ml):
- 2 oz (60 ml) blanco tequila
- ½ oz (15 ml) lime juice
- ¼ oz (7.5 ml) agave syrup (optional)
- 2 thin jalapeño slices (seeds removed for gentler heat)
- 4 oz (120 ml) grapefruit soda or 2 oz (60 ml) grapefruit juice + 3 oz (90 ml) sparkling water
- Pinch of salt
- Garnish: jalapeño slice + grapefruit wedge
Method (more precise):
- Add tequila, lime, and agave (if using) to the glass.
- Add jalapeño slices. Press them lightly once or twice—think “wake them up,” not “mash them.”
- Add ice to the top.
- Top with grapefruit soda (or juice + sparkling water).
- Stir once and garnish.
Why this works:
The jalapeño gives aroma first, heat later. Meanwhile, grapefruit keeps the whole drink refreshing instead of heavy.
Serve with:
Make it a theme night with baked jalapeño poppers and a cooling side dip like tzatziki.
Also Read: Crock Pot Chicken Breast Recipes: 10 Easy Slow Cooker Dinners (Juicy Every Time)
8) Spiced Paloma (warm spice, not “hot”)
This version is for anyone who wants depth without fire. It’s also a great place to use reposado, because warm spice and a slightly richer tequila tend to agree.
Makes: 1 drink
Glass: Collins
Ice: Cubes
Ingredients (oz + ml):
- 2 oz (60 ml) reposado tequila
- 2 oz (60 ml) grapefruit juice
- ½ oz (15 ml) lime juice
- ¼ oz (7.5 ml) agave syrup
- 2 dashes aromatic bitters (optional)
- 3 oz (90 ml) sparkling water (or grapefruit soda)
- Rim: salt + a tiny pinch of cinnamon (optional)
- Garnish: grapefruit wedge
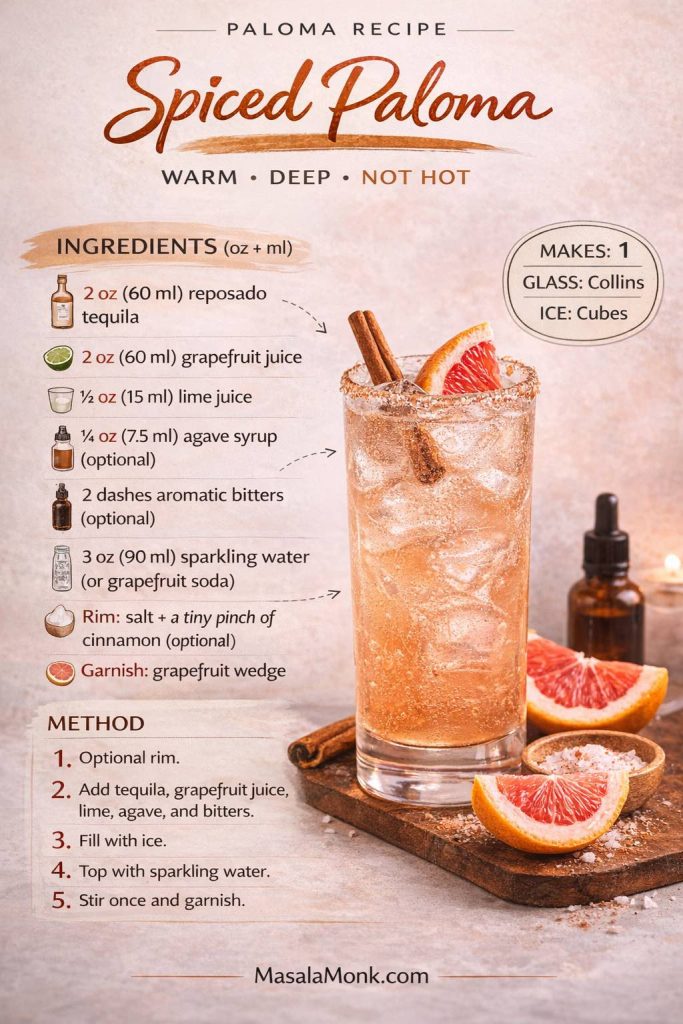
Method:
- Optional rim.
- Add tequila, grapefruit juice, lime, agave, and bitters.
- Fill with ice.
- Top with sparkling water.
- Stir once and garnish.
Serving idea:
Warm spice loves crunchy snacks. Keep it easy with keto chips and a creamy dip.
Also Read: Eggless Yorkshire Pudding (No Milk) Recipe
Mezcal Paloma drink variations (smoky and bright)
A mezcal paloma drink is smoky, citrusy, and quietly dramatic. Even so, it’s still a Paloma at heart—grapefruit and lime leading the sip, with smoke trailing behind.
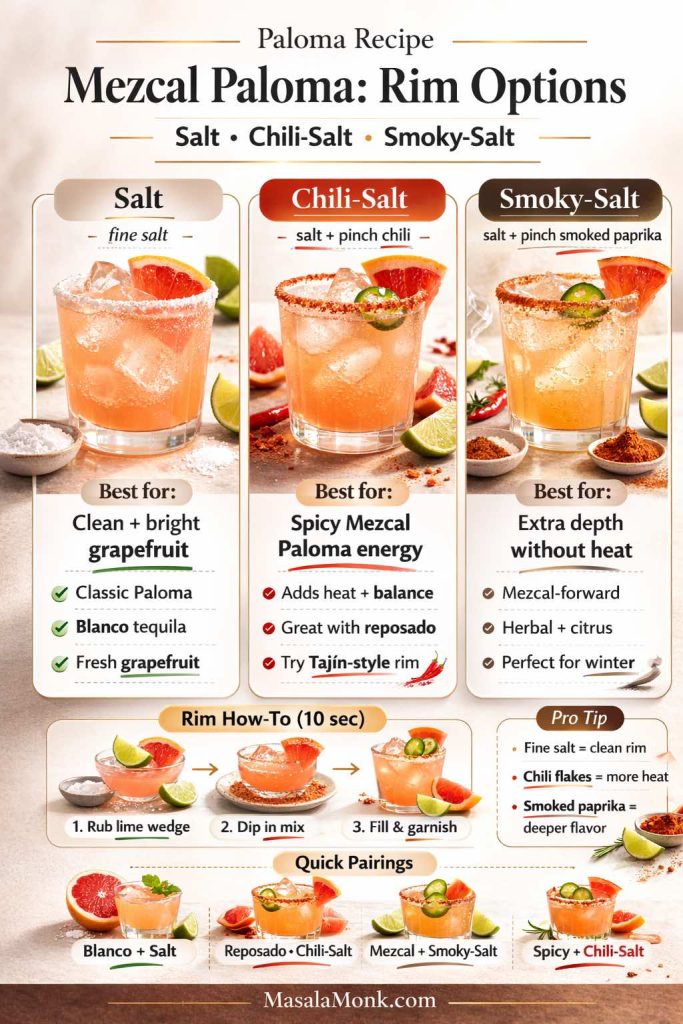
For a clean external reference on the style, Liquor.com’s mezcal Paloma uses the classic mezcal + lime + grapefruit soda approach, often paired with a chili-salt rim.
9) Mezcal Paloma cocktail (classic smoky build)
Makes: 1 drink
Glass: Collins
Ice: Cubes
Ingredients (oz + ml):
- 2 oz (60 ml) mezcal
- ½ oz (15 ml) lime juice
- 4 oz (120 ml) grapefruit soda, chilled
- Rim: salt (or salt + chili powder)
- Garnish: lime wedge
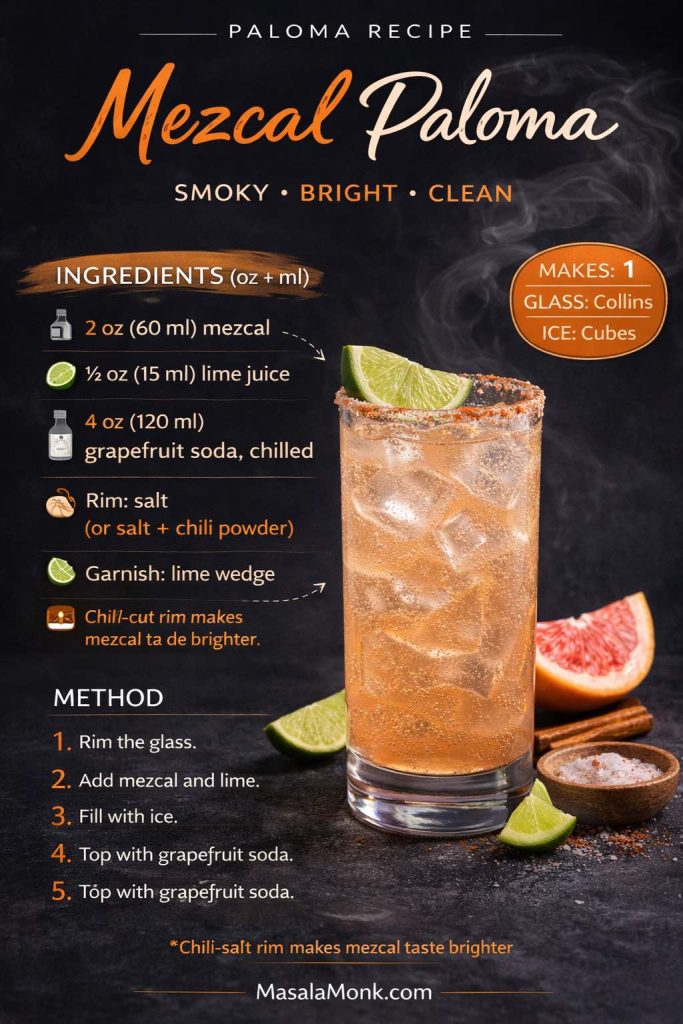
Method:
Rim the glass. Add mezcal and lime. Fill with ice. Top with grapefruit soda. Stir once and garnish.
Serving idea:
This version loves salty foods. Put out a board of crunchy bites—our croquettes guide is perfect for building a few options without repeating yourself.
Also Read: Garlic & Paprika Cabbage Rolls (Keto-Friendly Recipes) – 5 Bold Savory Twists
10) Spicy mezcal Paloma (smoke + heat, kept elegant)
This one is smoky, warm, and still refreshing. The trick is keeping mezcal slightly lower so grapefruit stays the star.
Makes: 1 drink
Glass: Collins
Ice: Cubes
Ingredients (oz + ml):
- 1½ oz (45 ml) mezcal
- ½ oz (15 ml) blanco tequila (optional)
- ½ oz (15 ml) lime juice
- ¼ oz (7.5 ml) agave syrup
- 1 thin jalapeño slice or 2 dashes chili bitters
- 2 oz (60 ml) grapefruit juice
- 3 oz (90 ml) sparkling water
- Pinch of salt
- Garnish: grapefruit wedge
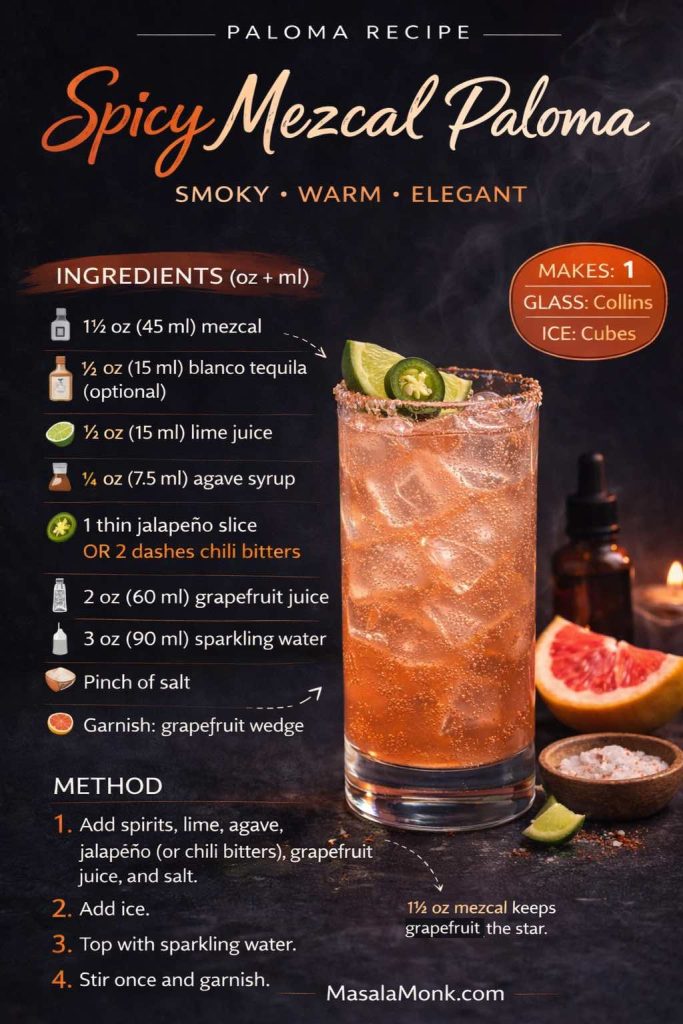
Method:
Add spirits, lime, agave, jalapeño (if using), grapefruit juice, and salt to the glass. Add ice. Top with sparkling water. Stir once and garnish.
Why it stays balanced:
Keeping mezcal at 1½ oz prevents smoke from dominating. Meanwhile, a little tequila rounds the mid-palate, so the finish reads bright rather than aggressive.
Also Read: Keto Hot Chocolate Recipe (Sugar-Free Hot Cocoa) + Best Homemade Mix
Pitcher Paloma recipe (paloma batch recipe that stays bubbly)
Pitcher Palomas make hosting easier. Still, the drinks only stay good if you treat carbonation like a last-minute ingredient. Batch the base, chill it hard, and then top each glass. That way, every serving tastes lively, not tired.
If you like having other party drinks in your rotation, the same “chill and balance first” mindset plays nicely with a large-format drink like this rum punch.
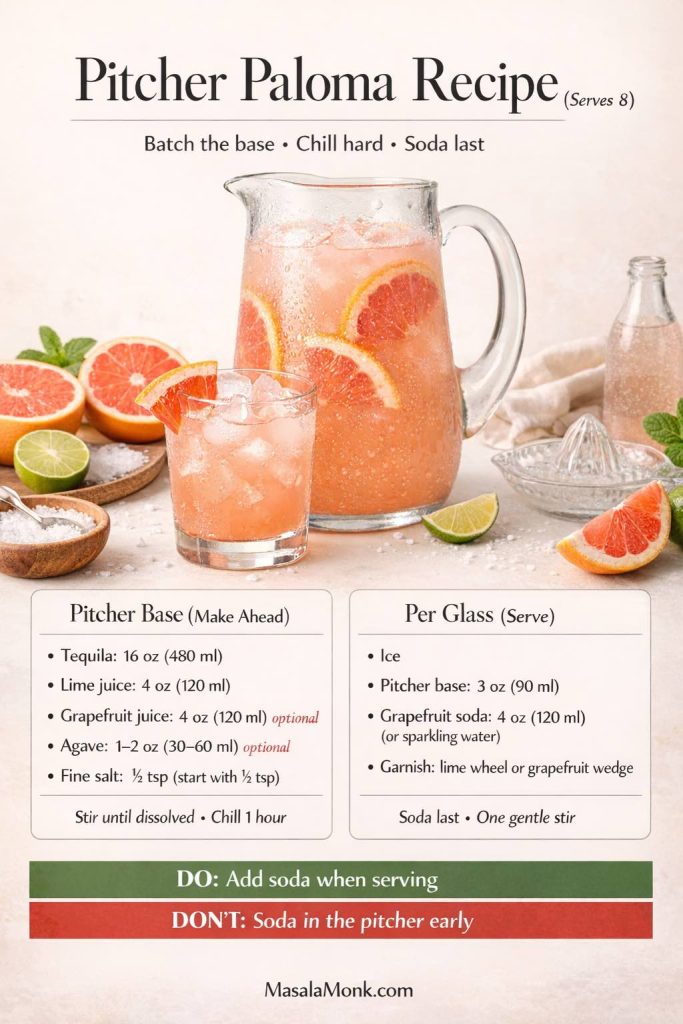
11) Pitcher Palomas (big batch paloma recipe for 8)
Makes: 8 drinks
You’ll need: a pitcher + chilled grapefruit soda
Pitcher base ingredients (oz + ml):
- 16 oz (480 ml) tequila
- 4 oz (120 ml) fresh lime juice
- 4 oz (120 ml) grapefruit juice (optional)
- 1–2 oz (30–60 ml) agave syrup (optional)
- ½ tsp fine salt (start with ¼ tsp if you prefer lighter seasoning)
To serve each drink:
- Ice
- 3 oz (90 ml) pitcher base
- 4 oz (120 ml) grapefruit soda (or sparkling water)
- Garnish: lime wheel or grapefruit wedge
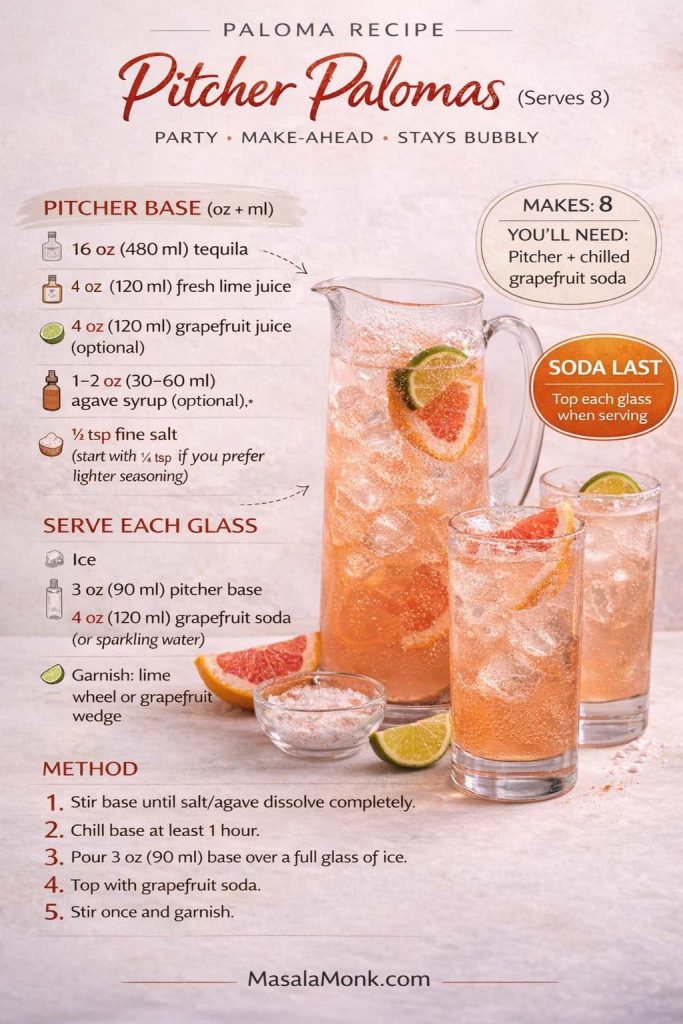
Method (clear and reliable):
- Stir the pitcher base until the salt and agave dissolve completely.
- Chill the base in the fridge for at least one hour.
- To serve, pour 3 oz (90 ml) base over a full glass of ice.
- Top with grapefruit soda.
- Stir once and garnish.
Make-ahead comfort:
The base holds well for a day, and it usually tastes better once thoroughly cold. The only thing you keep separate is the soda.
Serving idea:
This is where snack strategy pays off. Put out mozzarella sticks, a big bowl of spinach dip, and something crunchy like keto chips so guests can build their own bites between sips.
Also Read: 10 Low Carb Chia Pudding Recipes for Weight Loss (Keto, High-Protein, Dairy-Free)
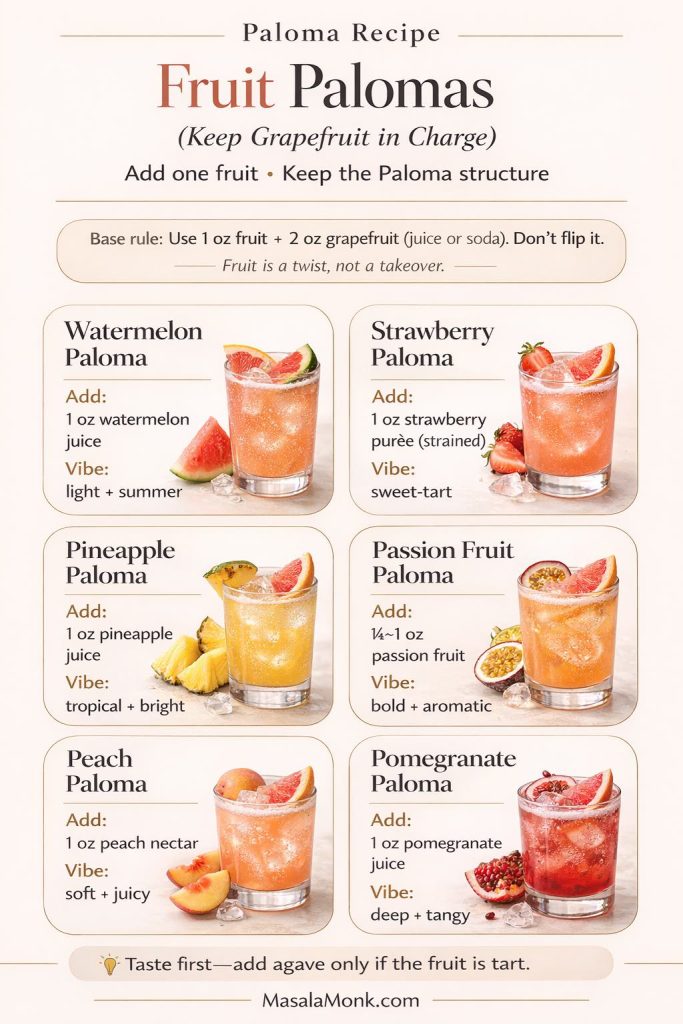
Fruit-forward Palomas (still Paloma, just dressed differently)
Fruit versions can be incredible; however, they’re best when they stay disciplined. Grapefruit should still lead. Tequila should still anchor. The fruit should feel like a twist, not a takeover.
You asked for twelve, so here’s the clean seasonal choice that stays unmistakably Paloma.
12) Winter Paloma (blood orange Paloma + grapefruit)
Makes: 1 drink
Glass: Collins
Ice: Cubes
Ingredients (oz + ml):
- 2 oz (60 ml) reposado tequila
- 1½ oz (45 ml) grapefruit juice
- 1 oz (30 ml) blood orange juice
- ½ oz (15 ml) lime juice
- ¼ oz (7.5 ml) agave syrup (optional)
- 3 oz (90 ml) sparkling water (or grapefruit soda)
- Pinch of salt
- Garnish: orange peel or blood orange wheel
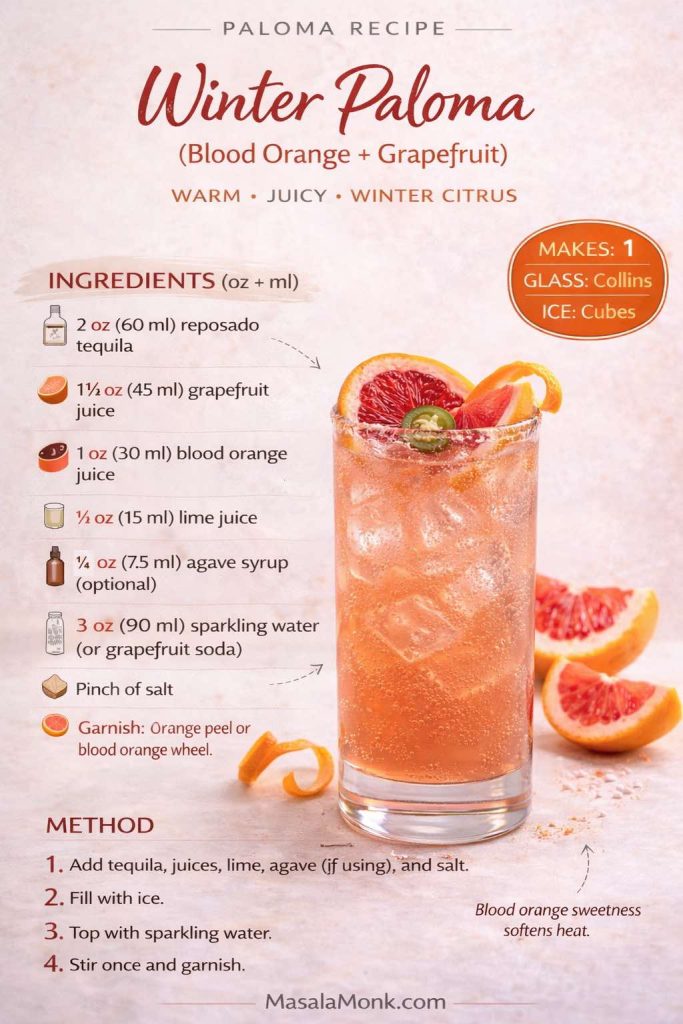
Method:
Add tequila, juices, lime, agave (if using), and salt to the glass. Fill with ice. Top with sparkling water. Stir once and garnish.
Serving idea:
This drink is especially good with spicy snacks because blood orange sweetness softens heat. Put out baked jalapeño poppers and a cooling dip beside them.
Also Read: Dirty Martini Recipe (Classic, Extra Dirty, No Vermouth, Spicy, Blue Cheese, Tequila + Batched)
A few “Paloma fizz” moves (without turning it into a different cocktail)
The phrase “Paloma fizz” gets used loosely. Sometimes it just means “extra lively” and bright. Sometimes it implies a shaken, foamy style like a traditional fizz. You can do either, but if you want to keep things Paloma-simple, here’s a middle ground that feels special without adding complexity.
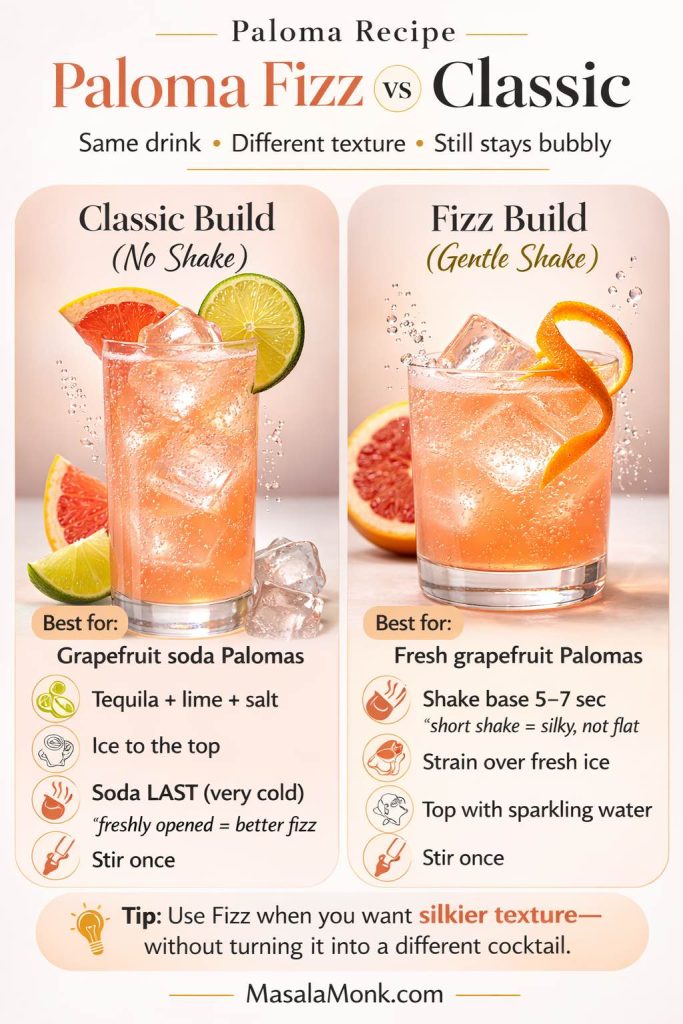
Gentle Paloma Fizz method (works with fresh grapefruit builds)
Use this for recipe #5 or #6 when you want a silkier texture:
- In a shaker (or jar), add: tequila + grapefruit juice + lime + agave (if using) + a pinch of salt.
- Add ice and shake briefly (5–7 seconds).
- Strain into a Collins glass filled with fresh ice.
- Top with sparkling water.
- Stir once.
You’ll get a slightly finer texture without turning it into a whole production.
Also Read: Fish and Chips Reimagined: 5 Indian Twists (Recipe + Method)
Serving ideas that make the Paloma feel like a full plan
A Paloma doesn’t need fancy pairings to feel right. It needs contrast: crisp drink against salty food, bright citrus against creamy dips, bubbles against rich bites. Once you think in contrasts, serving becomes easy.
- Classic Paloma night: build the classic paloma cocktail recipe, serve mozzarella sticks and a dip.
- Spicy Paloma night: make jalapeño palomas, bring out baked jalapeño poppers and a cooling dip like tzatziki.
- Pitcher party: do pitcher palomas, plus crunchy chips and something creamy. These keto chips are a convenient anchor for a “set it out and forget it” spread.
- Mezcal night: keep food salty and snackable; croquettes are a strong match, and this croquettes guide gives you endless directions.
Quick fixes when a Paloma tastes off
Even with a perfect paloma recipe on paper, real life has variables: grapefruit sweetness, soda intensity, ice melt, and lime size. Thankfully, Palomas are easy to correct in the glass.
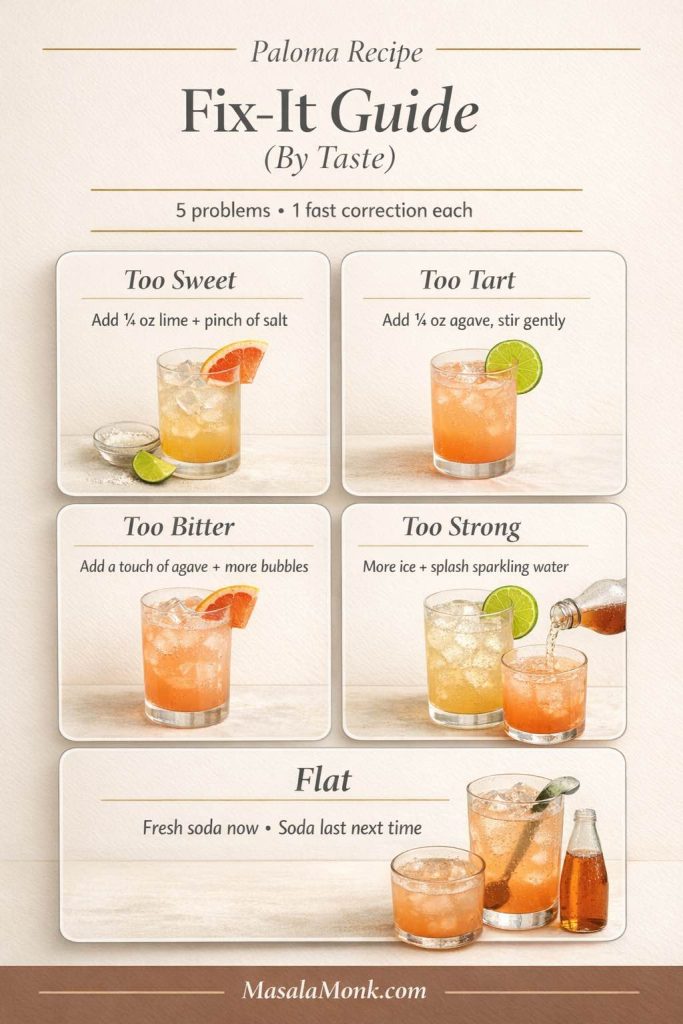
If it’s too sweet
Add a small squeeze of lime (start with ¼ oz / 7.5 ml) and a pinch of salt. If needed, top with sparkling water.
If it’s too tart
Add ¼ oz (7.5 ml) agave syrup and stir gently. Alternatively, add more ice and give it a minute; dilution can soften sharpness.
If it’s too bitter
Avoid squeezing grapefruit peel and pith next time. For now, add a touch of sweetener and extra soda/sparkling water.
If it’s too strong
Add more ice plus a splash of sparkling water. A Paloma should feel bright and drinkable, not heavy.
If it’s flat
The immediate fix is fresh soda—opened right now. For next time, remember: soda last, stir once.
Also Read: Baked Ziti Recipe Collection: 15 Easy Variations
About vodka Palomas, Aperol Palomas, and spritz riffs
You’ll see variations like a paloma recipe vodka or a “paloma aperol spritz” floating around. They can be tasty, yet they’re essentially different drinks wearing Paloma styling. If you love them, they deserve their own spotlight rather than being squeezed into a Paloma guide that’s trying to stay true to the tequila-grapefruit structure.
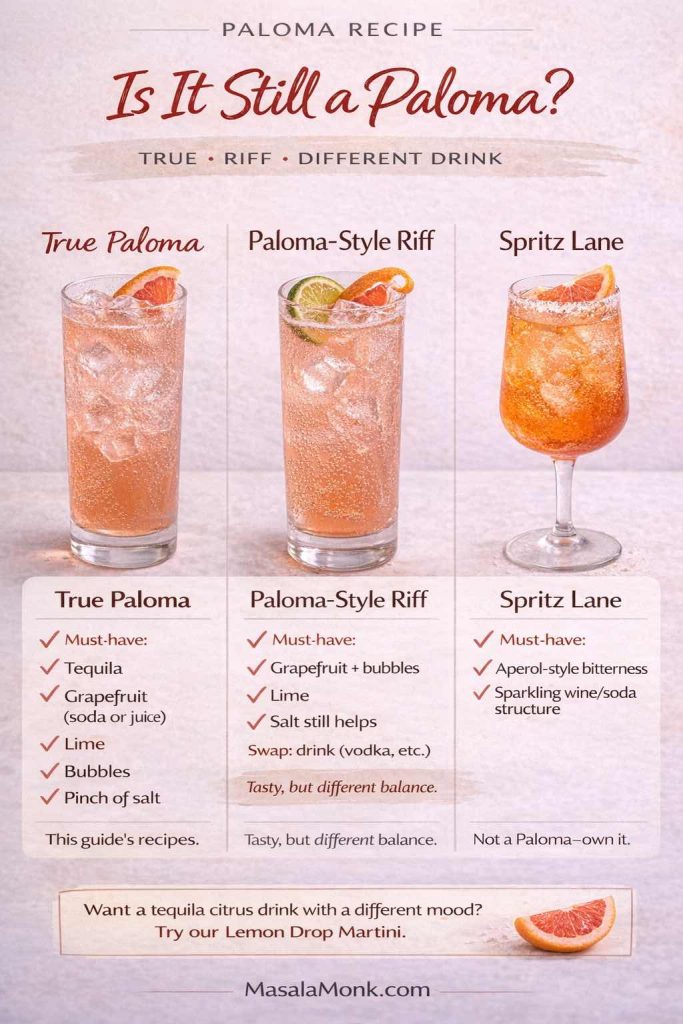
If you want a citrus tequila drink with a different mood, we already have tequila-citrus balance baked into other recipes, like our lemon drop martini blog (which also plays beautifully as a tequila lemon drop / lemon drop margarita style build).
Also Read: 19 Essential Kitchen Tools That Make Cooking Easier
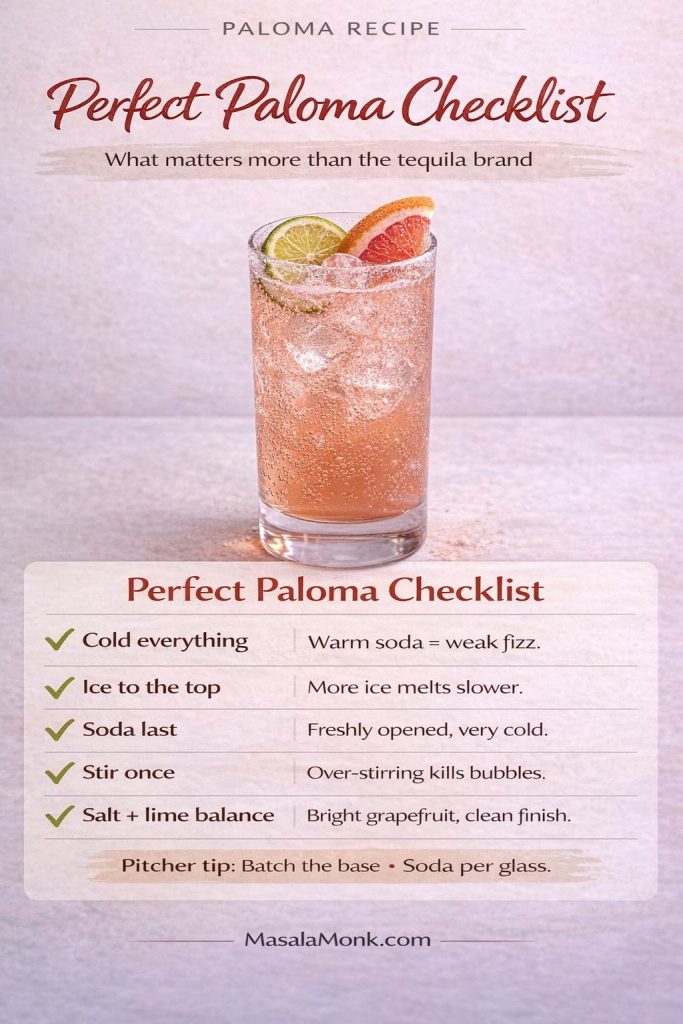
A final note on “best Paloma tequila” and keeping it simple
It’s tempting to obsess over the best tequila to make palomas. However, the bigger difference is usually how cold your ingredients are, how you handle carbonation, and whether your lime and salt are in balance. A decent tequila made carefully tastes better than an expensive tequila treated casually.
Once you’ve made a few of these, you’ll notice something satisfying: the Paloma becomes a skill, not a single recipe. You’ll start to adjust automatically. You’ll know when grapefruit soda tequila cocktail builds need more lime. And you’ll recognize when a grapefruit juice tequila cocktail wants a whisper of agave. And you’ll get comfortable scaling up to a pitcher of palomas without losing fizz.
When you’re ready for round two, pick a theme: classic, spicy, mezcal, or party pitcher. Then add one great snack, put on music, and let grapefruit do what it does best—make tequila feel effortless.
Also Read: Ravioli Recipe Reinvented: 5 Indian-Inspired Twists on the Italian Classic
FAQs
1) What are the ingredients in a Paloma cocktail?
A classic Paloma uses tequila, grapefruit soda, and lime juice, usually finished with a pinch of salt or a salt rim. In addition, many versions include a small amount of agave or simple syrup—especially when using fresh grapefruit juice instead of grapefruit soda.
2) What is the best tequila for a Paloma cocktail?
Most people prefer blanco tequila for a crisp, clean Paloma, because it keeps grapefruit bright and snappy. However, reposado tequila works beautifully when you want a softer, warmer drink—particularly for spiced Palomas or winter Paloma variations.
3) What’s the best type of tequila for Palomas: blanco or reposado?
If you want a sharp, refreshing classic Paloma recipe, go with blanco. On the other hand, if you like a rounder finish and subtle vanilla-oak notes, choose reposado—especially when you’re adding spices, blood orange, or a richer salt rim.
4) What is the traditional Paloma recipe?
A traditional Paloma recipe is tequila plus lime, topped with grapefruit soda over ice. Frequently, it’s served in a highball glass with a salt rim or a pinch of salt in the drink to enhance the grapefruit flavor.
5) Can I make a Paloma with grapefruit juice instead of grapefruit soda?
Yes—this is often called a fresh Paloma or fresh grapefruit Paloma recipe. Typically, you’ll use grapefruit juice and lime with tequila, then top with sparkling water for fizz. Optionally, add a little agave syrup if the juice is extra tart or bitter.
6) How do you make a Paloma recipe without grapefruit soda?
Instead of grapefruit soda, combine tequila, fresh grapefruit juice, and lime juice, then finish with sparkling water or club soda. As a result, you’ll get a cleaner, less sweet drink with a more “cocktail bar” feel.
7) How do you make a Paloma with Squirt?
For a Squirt tequila drink, build tequila and lime over ice, then top with Squirt and stir gently once. Because Squirt-style sodas are often sweeter, a small extra squeeze of lime can help the drink taste more balanced.
8) How do you make a Paloma cocktail with Fresca?
A Paloma cocktail Fresca version is made the same way as a classic Paloma, simply swapping the grapefruit soda for Fresca. Consequently, it often tastes lighter and cleaner, especially with a salt rim rather than salt added to the drink.
9) What is the best grapefruit soda for a Paloma?
It depends on whether you want sweet, dry, or bitter-leaning grapefruit flavor. For instance, sweeter sodas make an easy crowd-pleaser, while drier options feel crisp and less candy-like. Regardless, keeping the soda very cold and adding it last helps the drink stay lively.
A jalapeño Paloma is a spicy Paloma cocktail flavored with fresh jalapeño. Usually, it’s built in the glass, then topped with grapefruit soda; alternatively, you can use grapefruit juice and sparkling water for a fresher finish.
10) How do you make a perfect Paloma cocktail that doesn’t go flat?
First, chill the soda and the glass if possible. Next, build tequila and lime over ice, then top with soda last and stir only once. In contrast, stirring repeatedly or adding soda too early knocks out carbonation quickly.
11) What’s a mezcal Paloma drink and how is it different?
A mezcal Paloma uses mezcal instead of tequila, so it tastes smoky and slightly earthy while still being bright and citrusy. Moreover, a chili-salt rim can complement mezcal’s savory notes without making the drink feel heavy.
12) How do you make a spicy Paloma recipe?
A spicy Paloma typically uses jalapeño slices (or a chili-salt rim) with tequila, lime, and grapefruit soda or grapefruit juice plus sparkling water. Importantly, lightly pressing the jalapeño releases aroma without turning the drink harsh or overly hot.
13) What is a jalapeño Paloma cocktail?
14) How do you make a pitcher Paloma recipe for a party?
To make a Paloma pitcher recipe, batch tequila, lime juice, and (optionally) grapefruit juice in a pitcher and chill thoroughly. Then, top each glass with grapefruit soda when serving. Otherwise, adding soda to the pitcher too early will make the batch go flat.
15) Can you make Palomas ahead of time?
Yes—batch the base (tequila + citrus + sweetener if using) and refrigerate it. Then, when you’re ready to serve, pour over ice and add grapefruit soda or sparkling water. This way, the drink stays bubbly and fresh.
16) What’s a ruby red or pink grapefruit Paloma?
A ruby red Paloma or pink Paloma usually uses ruby red grapefruit juice for a softer, slightly sweeter flavor and a brighter color. As a bonus, it often needs less sweetener than a white grapefruit version.
17) What is a Paloma fizz?
A Paloma fizz usually refers to a Paloma that feels extra lively or slightly “foamy,” often made by briefly shaking tequila, grapefruit juice, and lime before topping with sparkling water. That said, many people simply use the term to mean a very bubbly Paloma served ice-cold.
18) What’s the difference between a Paloma and a grapefruit margarita Paloma?
A Paloma is typically a tall, fizzy highball with grapefruit soda or sparkling water. By comparison, a grapefruit margarita style drink is usually shaken and served without soda, often with orange liqueur. In other words, Palomas lean light and bubbly, while margaritas lean richer and more structured.