Posted on — Leave a comment

Birria Tacos Recipe: Crispy Beef Quesabirria with Consommé

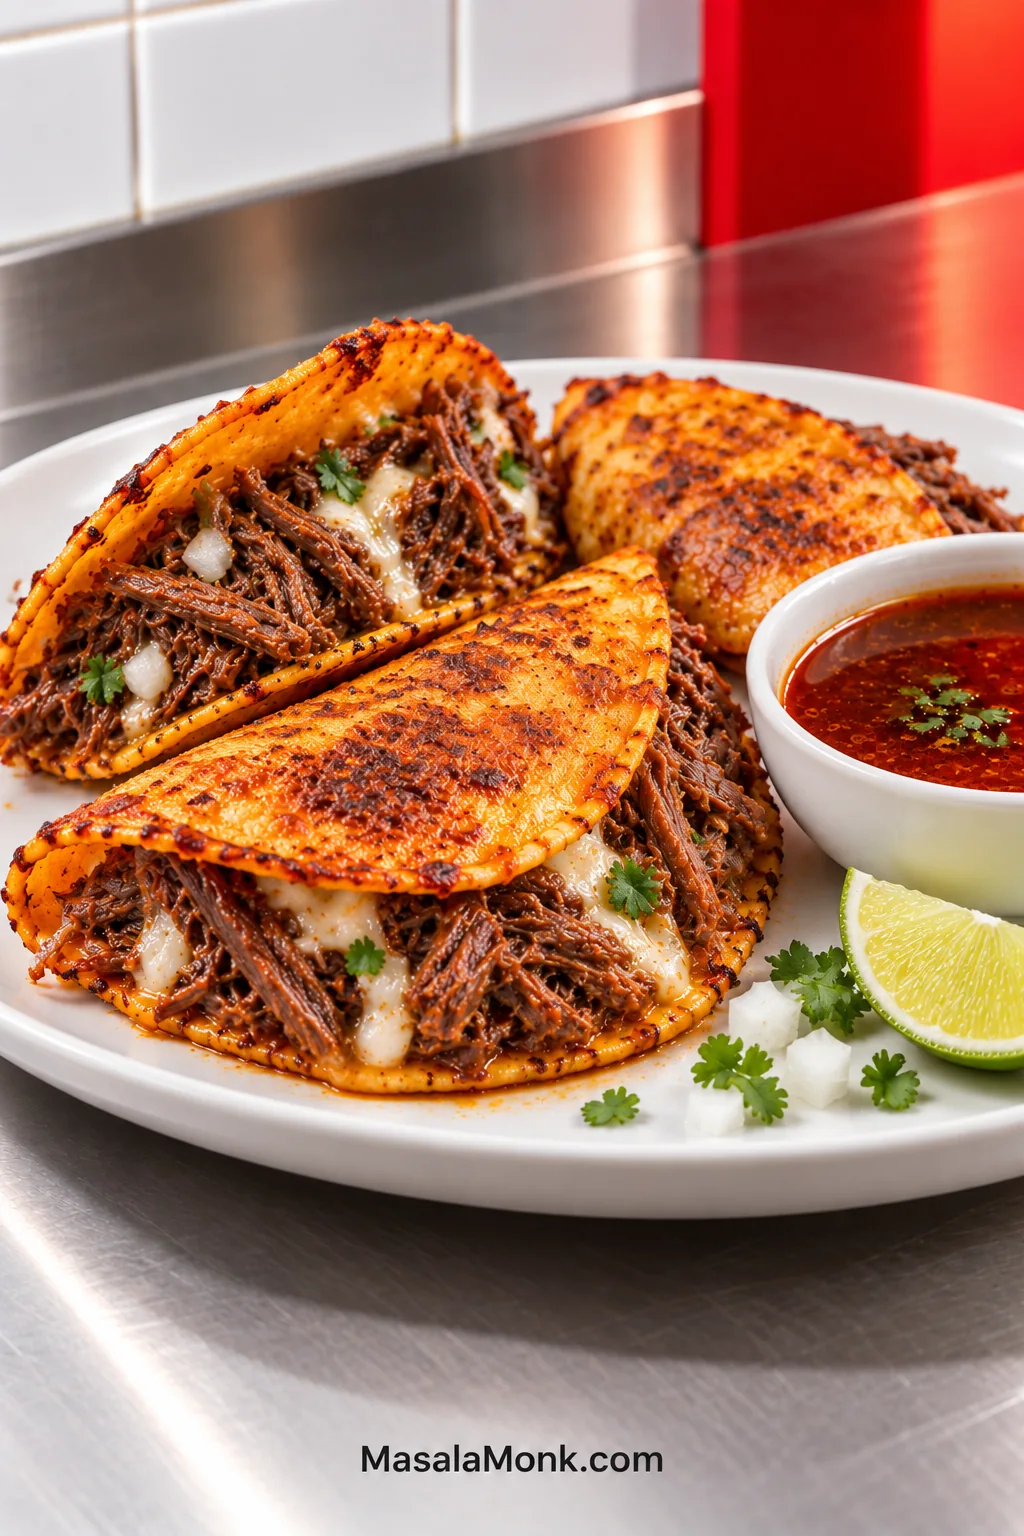
Three crisp beef quesabirria tacos filled with shredded beef and melted white cheese beside a bowl of dark red-brown consommé, onion, cilantro and lime.

Pull a good birria taco apart and several things happen at once. The corn tortilla cracks at the crisp edge, melted cheese stretches away from the fold, and the shredded beef underneath stays juicy without pouring broth down your hand. Then the whole thing gets dipped into hot, deeply savoury consommé with white onion, cilantro and lime.

They look like a restaurant project, and there is a long braise involved. At home, though, most of that time is waiting. The real work happens before the beef goes into the oven and after it comes out tender.

Birria tacos are corn tortillas filled with slow-braised, chile-seasoned meat; quesabirria adds melting cheese. In this version, the tortillas are crisped with the red fat from the beef braise and served with the finished consommé for dipping.

A finished braise gives you three useful things: seasoned beef, consommé and chile-stained red fat. The beef needs to stay succulent without soaking the tortilla. The consommé should taste concentrated while still pouring like broth. The red fat gets saved for the skillet, where a thin film helps the tortilla turn crisp and deeply coloured.
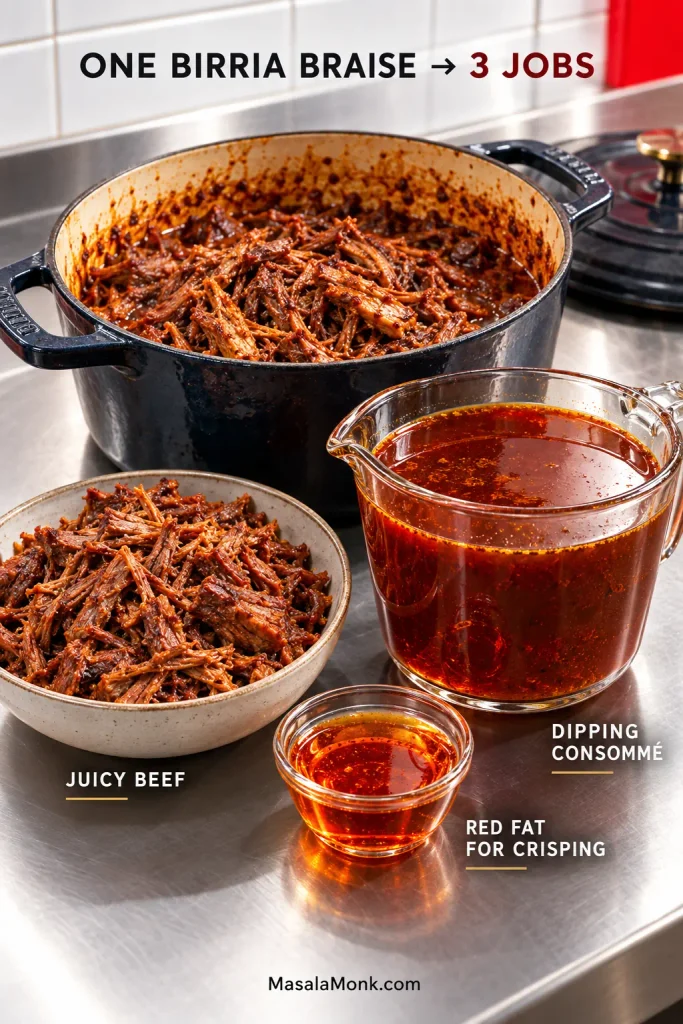
Shredded birria beef, dark consommé and a small bowl of translucent orange-red birria fat arranged separately beside a Dutch oven.
Once the beef leaves the pot, treat beef, consommé and red fat as three working ingredients. Keeping them separate gives you control over moisture, concentration and crisping.

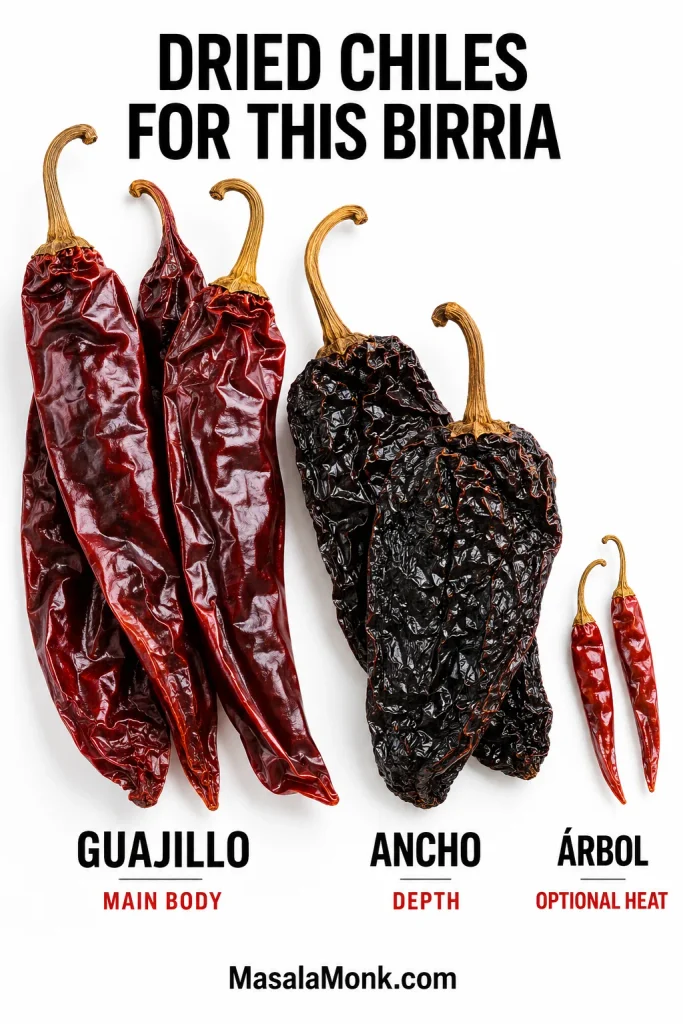
For this birria tacos recipe, chuck roast supplies most of the shreddable beef, while a smaller bone-in cut adds gelatin and rendered fat. Guajillo and ancho build the dried-chile flavour; chile de árbol is there only when you want more heat.

Allow about 5–6 hours from start to finish. The beef spends 3½–4 hours quietly braising, while total hands-on work comes to roughly 1½ hours.

How the Pot Becomes Birria Tacos

Once you see the pot as beef, consommé and red fat, the rest becomes much easier to follow.

  1. Build the birria sauce. Soften the dried chiles, blend them with tomatoes, aromatics and spices, then taste before the beef goes in.
  2. Braise the beef. Cook until the chuck is genuinely tender. The timer tells you when to start checking; the meat tells you when to stop.
  3. Finish the shredded beef. Return some concentrated birria liquid, then cook away the loose moisture until the meat is moist, not wet.
  4. Adjust the consommé. Reduce it if weak, loosen it if overly concentrated, then season once the flavour is right.
  5. Save the red fat. The chile-stained surface fat is what you want for the tortillas.
  6. Fry the quesabirria. Warm tortilla, thin film of fat, cheese, beef, hot griddle, plate.

Birria Tacos Recipe with Beef, Cheese and Consommé

This batch makes about 18 generously filled small quesabirria tacos and serves roughly six people at three tacos each. Short ribs and shank vary in how much edible meat they carry, so you may finish with some extra birria beef.

Recipe at a Glance

Yield
About 18 small tacos

Serves
About 6 people

Total time
About 5–6 hours

Hands-on
About 1½ hours

Same-day rhythm: sauce and browning → 3½–4 hour braise → finish the beef and consommé → fry the tacos in batches.

Primary method: covered Dutch-oven braise at 300°F / 150°C.

Ingredients

For the Beef

  • 3 lb / 1.36 kg boneless beef chuck roast, cut into roughly 3-inch / 7.5-cm pieces
  • 1 lb / 454 g bone-in beef short ribs or beef shank
  • 1½ teaspoons / about 9 g fine sea salt, plus more for finishing
  • 1 teaspoon freshly ground black pepper
  • 1 tablespoon / 15 ml neutral cooking oil

For the Birria Sauce

  • 8 guajillo chiles (dried), about 60 g / 2.1 oz before stemming and seeding
  • 4 ancho chiles (dried), about 45 g / 1.6 oz before stemming and seeding
  • 1–2 chiles de árbol (dried), about 1–2 g, optional for heat
  • 3 medium Roma tomatoes, about 300 g / 10.5 oz, quartered
  • 1 large white onion, about 250 g / 8.8 oz, quartered
  • 8 garlic cloves, about 30 g / 1 oz, peeled
  • 2 teaspoons Mexican oregano; regular oregano can work in a pinch, using slightly less
  • 1½ teaspoons ground cumin
  • ½ teaspoon ground cinnamon
  • ¼ teaspoon ground cloves
  • 2 tablespoons / 30 ml apple cider vinegar or distilled white vinegar
  • 5 cups / 1.18 litres low-sodium beef broth, divided, plus extra as needed
  • 2 bay leaves

Use the chile weights when you can. Dried peppers vary enormously in size. If eight guajillos or four anchos do not come close to the weights above, let the gram/ounce measurements guide the batch.

For the Quesabirria

  • 20 small fresh corn tortillas, 5–6 inches / 13–15 cm across, giving you two spares
  • 16 oz / 454 g Oaxaca (quesillo), Chihuahua, Asadero or Monterey Jack cheese
  • About 6 tablespoons / 90 ml reserved red birria fat
  • 1 small white onion, about 100 g / 3.5 oz, finely diced
  • ½ cup / about 15–20 g chopped fresh cilantro, plus more if wanted
  • 3 limes, cut into wedges

Oaxaca (quesillo) is the first choice when you can get it: mild, stretchy and excellent for melting. Chihuahua and Asadero work beautifully too; Monterey Jack is the easiest widely available substitute. Whichever you use, shred it finely so the cheese melts before the tortilla gets too dark.
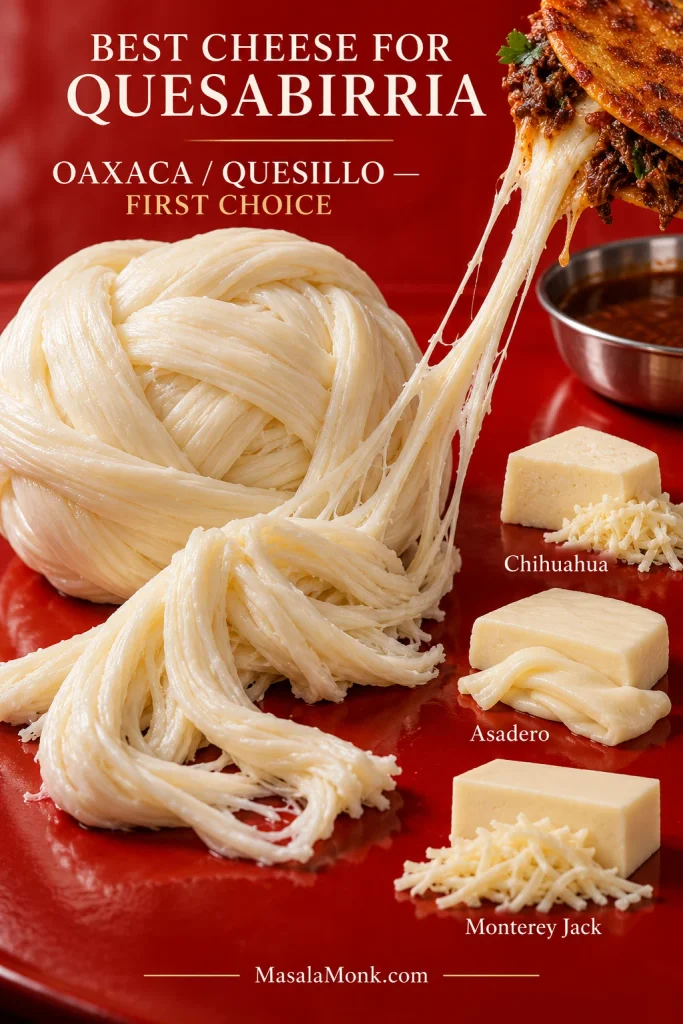
Oaxaca quesillo shown as the dominant cheese choice with smaller portions of Chihuahua, Asadero and Monterey Jack.
Cheese works best here as an adhesive, not the main filling: fast-melting Oaxaca or quesillo helps the beef stay put while the small corn tortilla develops its crisp shell.

Equipment

  • 6- to 7-quart / 5.7- to 6.6-litre Dutch oven or another heavy oven-safe pot with a lid
  • Medium saucepan
  • Blender
  • Fine-mesh strainer
  • Large bowl or tray for the cooked beef
  • Wide skillet, cast-iron pan or griddle
  • Tongs, ladle and heatproof spoon
  • Small heatproof bowl or jug for the red fat
  • Instant-read or probe thermometer for checking the beef, optional
  • Infrared thermometer for checking the griddle surface, optional

Phase 1: Make the Birria Sauce

1. Warm and Soften the Dried Chiles

Wipe the dried chiles clean, remove the stems and shake or scrape out most of the seeds.

Set a dry skillet over medium-low heat. Warm the guajillo and ancho chiles briefly, 10–15 seconds per side, until their aroma strengthens and the skins become more flexible. Chile de árbol needs even less time.

Pull them as soon as they smell fuller and fruitier. Smoke, an acrid smell or black scorched patches mean the heat has gone too far.

Cover the warmed chiles with very hot water and leave them for 15 minutes. They are ready when the skins bend easily and the softened flesh no longer feels brittle. Drain and discard the soaking water.
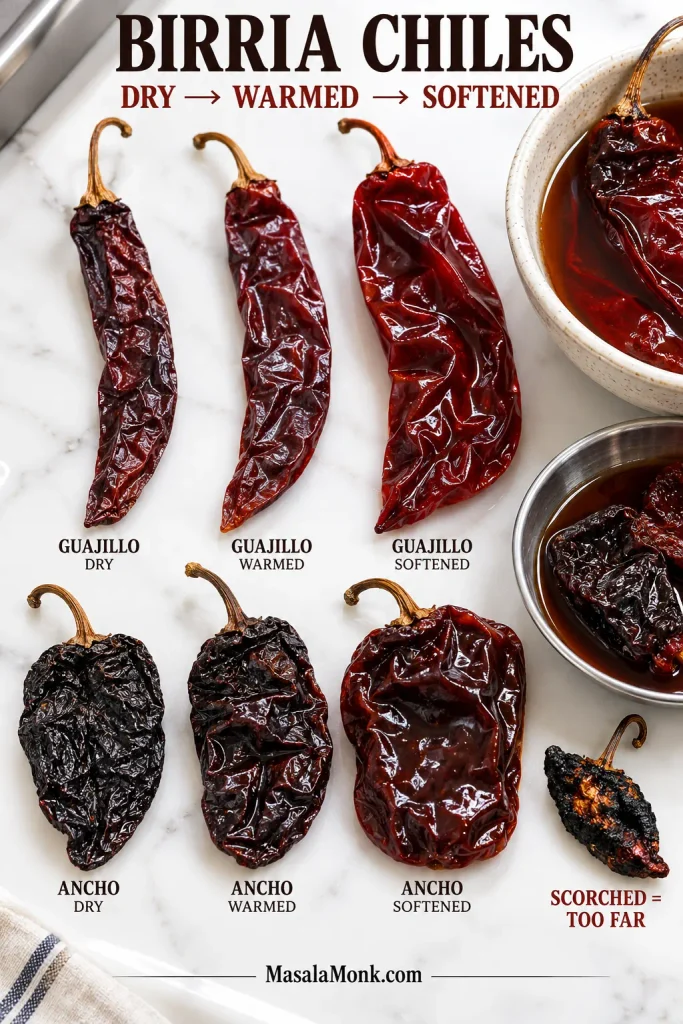
Guajillo and ancho chiles shown dry, gently warmed and softened after soaking, with a small blackened scorched chile for comparison.
The useful checkpoint is flexibility, not darkness. Warm dried chiles only until slightly pliable, then soak until fully bendable; brittle pieces blend poorly, while scorched ones can make the whole birria sauce bitter.

2. Soften the Tomatoes and Aromatics

Put the tomatoes, onion, garlic and 2 cups / 475 ml of the beef broth into a medium saucepan. Bring to a gentle simmer and cook for 10 minutes, until the tomato and onion have softened.

Let the mixture cool for several minutes before blending. If your blender is not designed for hot liquids, cool it further. Otherwise, follow the manufacturer’s instructions for venting steam safely and begin at low speed.

3. Blend, Strain and Taste

Transfer the softened chiles to the blender with the tomatoes, onion, garlic and their cooking broth. Add the Mexican oregano, cumin, cinnamon, cloves and vinegar. Blend until smooth.

As the mixture smooths out, it should turn a deep red-brown and smell distinctly of dried chile and warm spice rather than raw onion or garlic.

In this recipe, the birria sauce is the blended dried-chile, tomato, onion, garlic and spice base in which the beef braises. It is different from the finished consommé served beside the tacos.

Pour the sauce through a fine-mesh strainer, pressing with a flexible spatula. Once what remains is mostly fibrous chile skin and pulp, discard or compost the residue. A powerful blender may leave very little behind.

The strained sauce should pour in a steady stream. If yours sits like paste, loosen it with extra low-sodium broth.
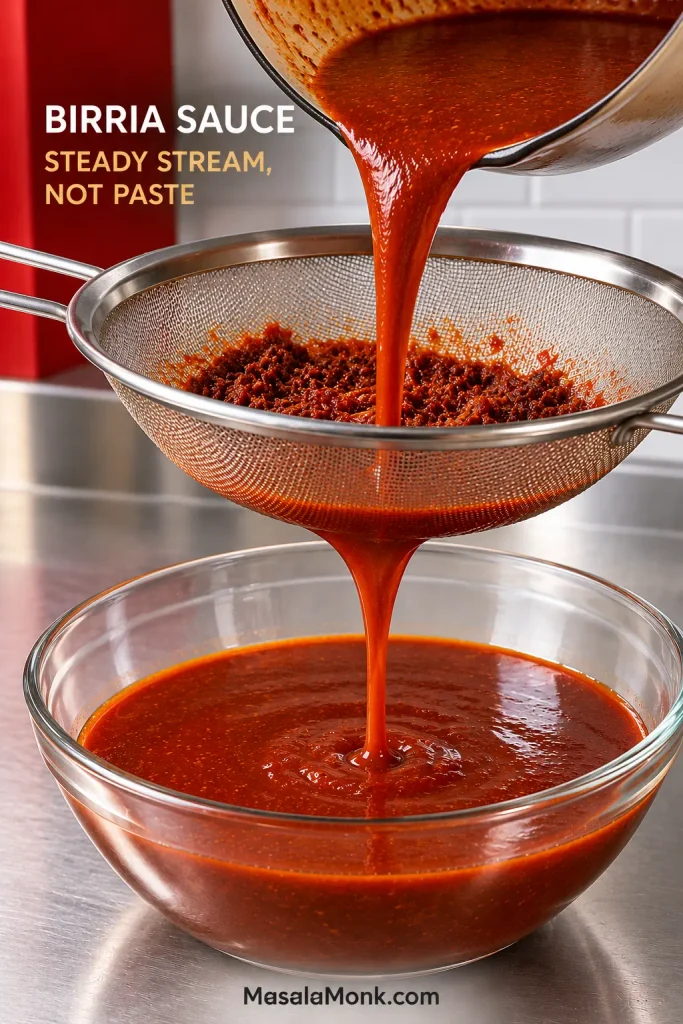
Smooth red-brown birria sauce flowing through a fine-mesh metal strainer into a glass bowl while coarse chile pulp remains in the sieve.
After straining, watch how the sauce settles in the bowl: it should level into a smooth surface instead of holding ridges. That flow helps the birria sauce move evenly around large pieces of beef.

Taste it now. It should be intense, fruity, earthy and savoury. A clearly scorched or acrid sauce is worth remaking before several pounds of beef go into it.

Phase 2: Braise the Beef

4. Brown the Beef

Heat the oven to 300°F / 150°C.

Pat the chuck and short ribs or shank reasonably dry. Season with the measured salt and black pepper.

Heat 1 tablespoon / 15 ml neutral oil in the Dutch oven over medium-high heat. Brown the meat in batches so the pieces have room to make contact with the pot.

A few properly browned surfaces are enough. The next few hours will do far more for the beef than chasing a perfect crust on every side.

5. Cover the Pot and Let the Beef Get Tender

Return all the beef to the Dutch oven. Pour in the birria sauce, the remaining 3 cups / 710 ml broth and the bay leaves.

Once everything settles, the liquid should reach about halfway to two-thirds of the way up the larger pieces. A particularly wide pot may need extra low-sodium broth.
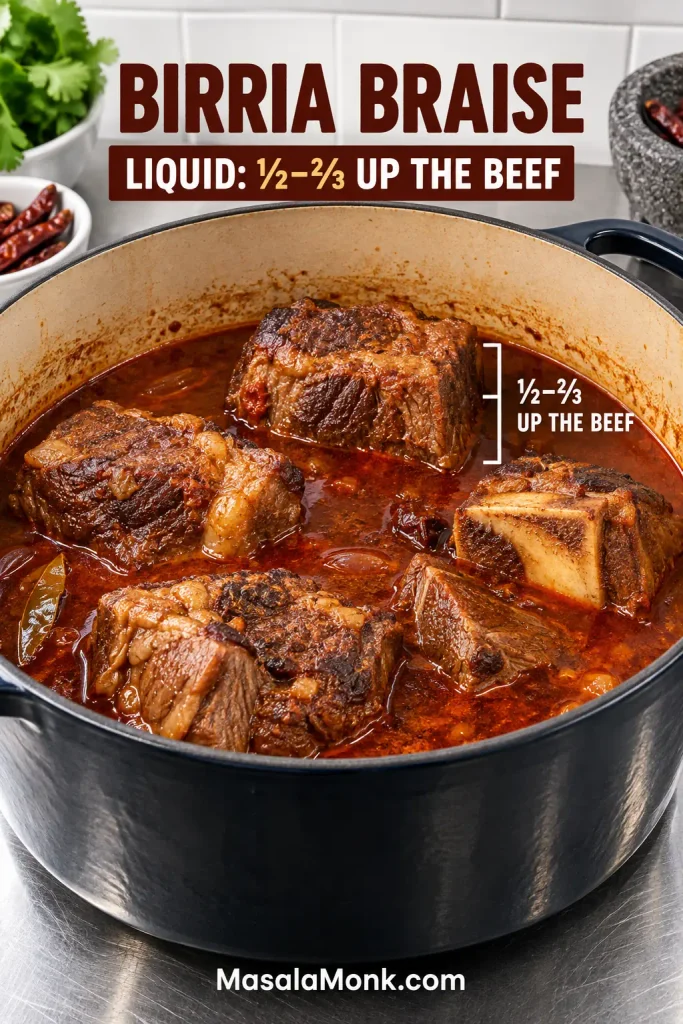
Large browned beef chunks in a Dutch oven with red birria braising liquid reaching roughly halfway to two-thirds up their sides.
Use the beef as the ruler. A wider Dutch oven may need a little extra broth to reach the same halfway-to-two-thirds depth.

Bring the liquid just to a simmer on the stovetop, cover the pot and put it in the oven.

Now there is not much to do. Start checking at 3 hours; most batches need 3½–4 hours.

The beef is done when a fork, skewer or probe slides into the chuck with almost no resistance and the meat pulls apart easily. Beef in this kind of braise often reaches the low 200s°F / mid-90s°C around the time it becomes tender, but the probe test decides when it is ready.

When the probe finally slips in without a fight, the long part is done. If the beef is still stubborn, close the pot and give it more time.
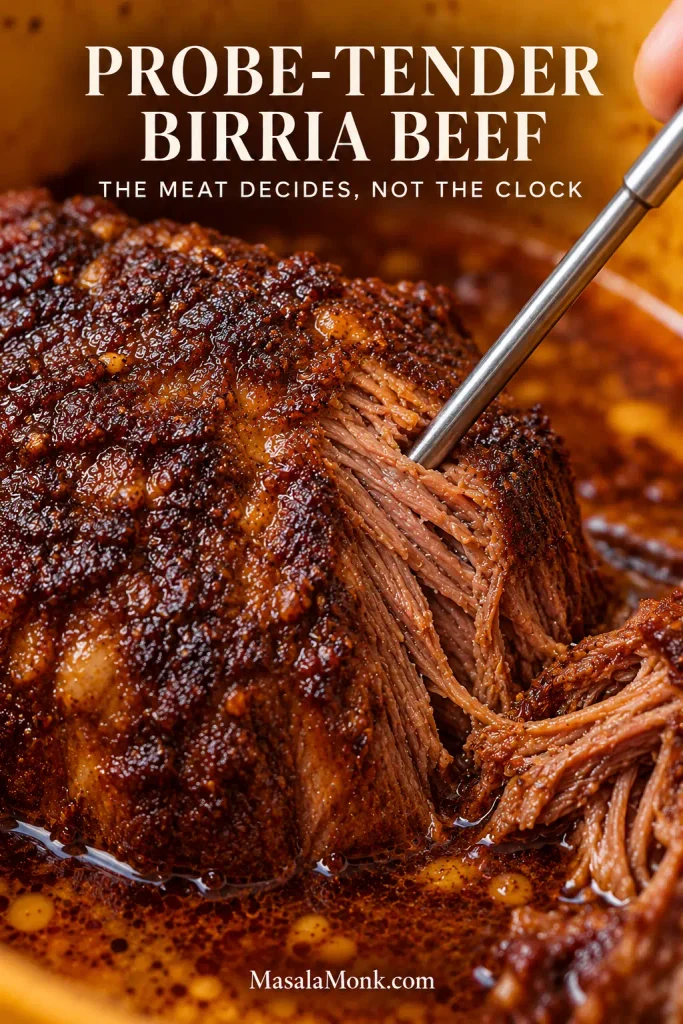
Metal probe entering a fully braised piece of chuck as softened beef fibres separate while the chunk remains intact.
Probe the thickest piece of chuck you can reach. Smaller or fattier pieces may soften sooner, so one tender edge is not enough to call the entire birria braise done.

Phase 3: Finish the Beef, Consommé and Red Fat

Use about 1 cup / 240 ml of the cooking liquid to finish the shredded beef. After that, aim to have roughly 3½–4½ cups / 830 ml–1.06 litres of consommé left for serving, plus about 6 tablespoons / 90 ml red fat for the 18 tacos.

Exact yield varies with the beef, pot and amount of reduction, so let flavour and texture guide the final adjustment.

6. Lift Out the Beef and Skim the Fat

Transfer the tender meat to a large bowl or tray and remove the bay leaves. Once the bone-in pieces are cool enough to handle, discard the bones and any tough pieces of gristle.

Let the pot sit for several minutes. Orange-red fat will gather over the darker consommé. Carefully skim about 6 tablespoons / 90 ml into a small heatproof bowl or jug.
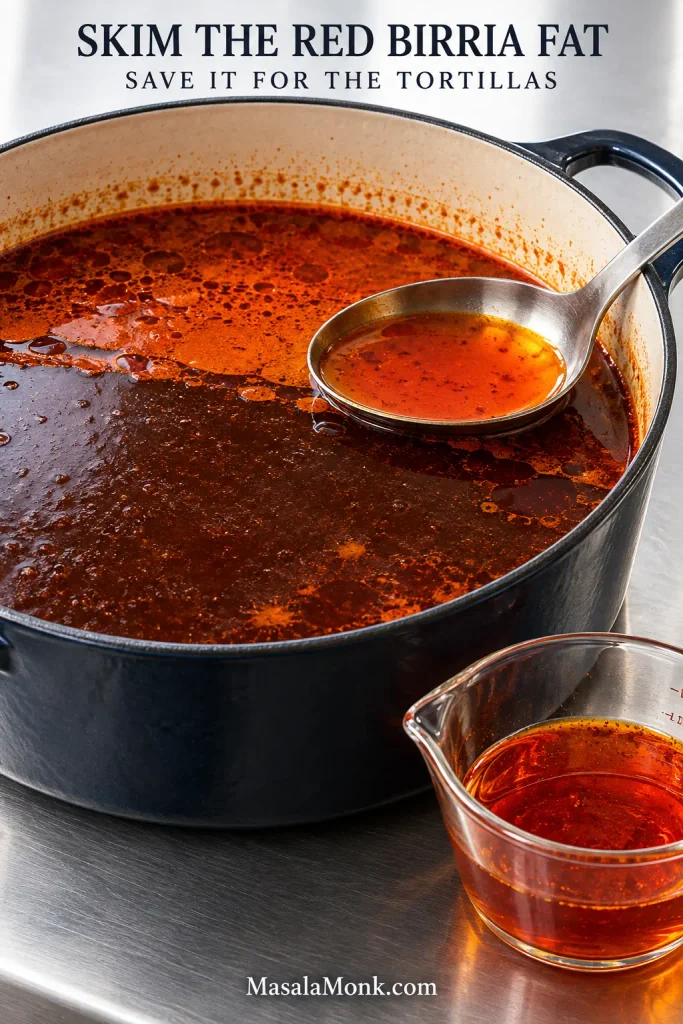
Ladle skimming a translucent orange-red fat layer from the surface of darker birria consommé in a Dutch oven.
Let the pot rest before skimming, then keep the spoon shallow. Clear orange-red fat is the target; if the ladle comes up dark and watery, you have dipped into the consommé.

That little bowl of red fat is worth protecting. It is what turns pale corn tortillas into the crisp red shells you are after.

A leaner batch may give you less. Save what you have and supplement it with enough beef tallow or neutral oil to coat the tortillas lightly.

7. Shred and Season the Beef

Shred the chuck and the usable meat from the short ribs or shank.

Transfer it to a wide skillet or saucepan with about 1 cup / 240 ml of the birria cooking liquid. Cook over medium heat for 5–8 minutes, tossing occasionally.

At first, broth will move around the bottom of the pan. Keep going until that puddle disappears and the beef looks glossy. Push some meat aside with your tongs: the surface underneath should be damp, not flooded.
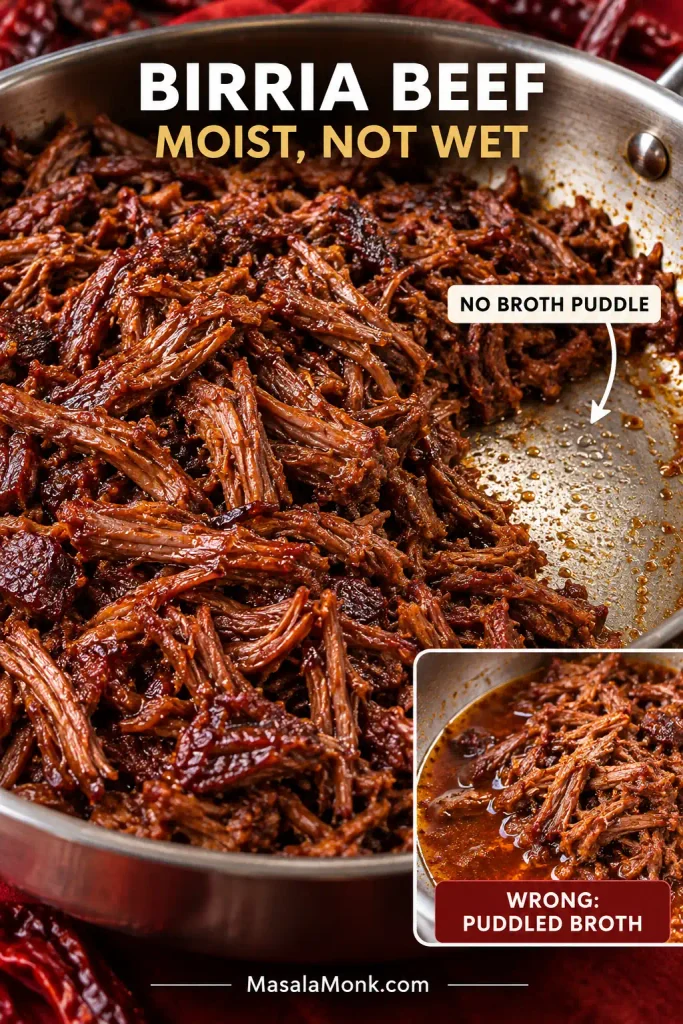
Glossy shredded birria beef with no standing broth beneath it beside a smaller comparison showing overly wet beef sitting in liquid.
Stopping at glossy-but-not-puddled protects two things at once: crisp tortillas and juicy birria beef. Reducing until the meat is completely dry would solve one problem by creating another.

Taste a strand. It should already be good enough to steal from the pan. If the beef itself tastes flat, add a small pinch of salt.

8. Taste and Adjust the Consommé

Good birria consommé should taste concentrated and beefy while remaining thin enough to drink like broth.

A light-looking broth is not automatically weak. If the beef, chile and spice flavours are already pronounced, leave it alone. If it tastes diluted, simmer uncovered until the flavour deepens.

A broth that has gone too far can be loosened gradually with unsalted broth or water. Once the strength is right, make the final salt adjustment.

Gelatin may make the consommé firm when cold; while hot, it should still pour easily from a ladle.

9. Check the Reserved Fat

Heat a small spoonful in the skillet. Normal sizzling is fine. Violent sputtering usually means watery consommé came along with the fat; warm it gently until that water cooks away.
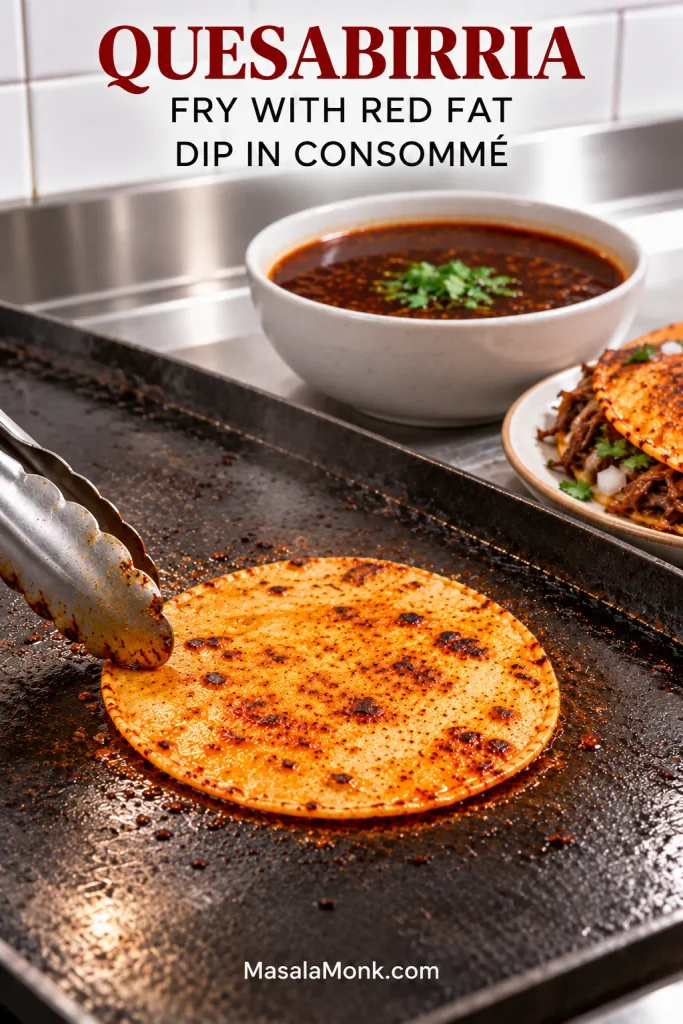
Corn tortilla crisping on a griddle in a thin film of orange-red birria fat beside a separate bowl of darker consommé.
Use the clear orange-red fat to crisp the tortilla; keep the darker consommé for dipping. If the fat spits violently, it probably carried some watery broth with it.

Phase 4: Fry the Quesabirria

This is the fast part. Have the beef hot, cheese shredded, tortillas ready and consommé waiting before you begin.

10. Warm the Tortillas

Warm the corn tortillas briefly on a dry skillet or griddle until pliable, 10–20 seconds per side. Refrigerated tortillas especially need this head start before they are folded.
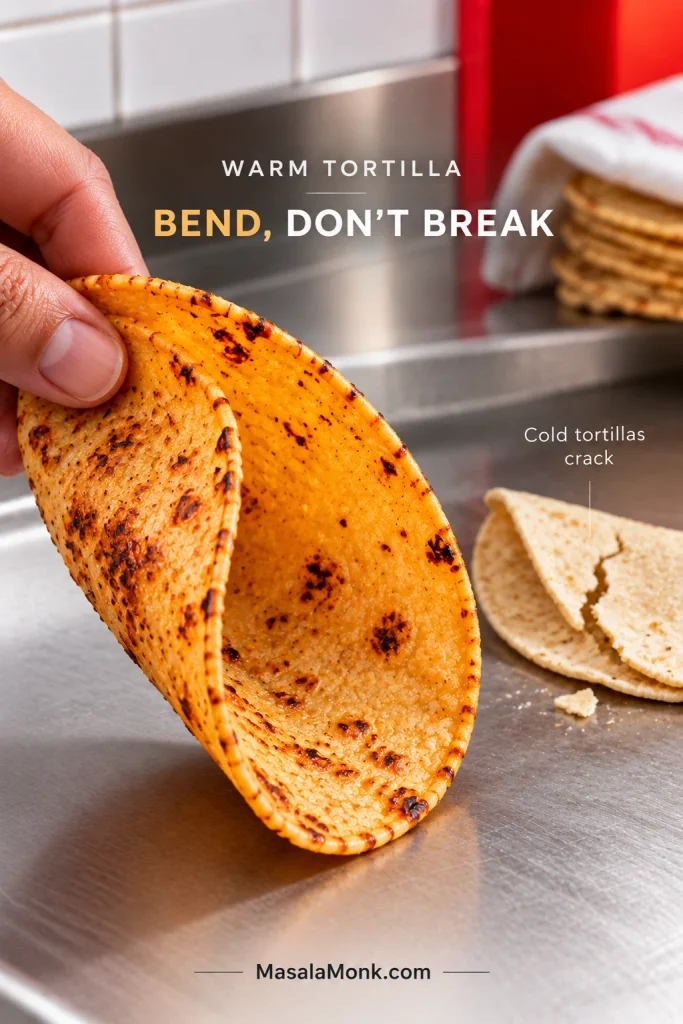
Warm corn tortilla bending smoothly in a hand beside a colder tortilla cracked along the fold.
Warm corn tortillas only until they fold without resistance; early browning steals griddle time from the final quesabirria, where you actually want the crisp crust to develop.

11. Portion the Filling

For each 5- to 6-inch / 13- to 15-cm tortilla, start with:

  • 1 teaspoon / 5 ml red birria fat
  • 25 g / a scant 1 oz finely shredded cheese
  • 1¾ oz / 50 g shredded birria beef

That gives you a generous taco without turning it into a stuffed pouch that barely touches the skillet.
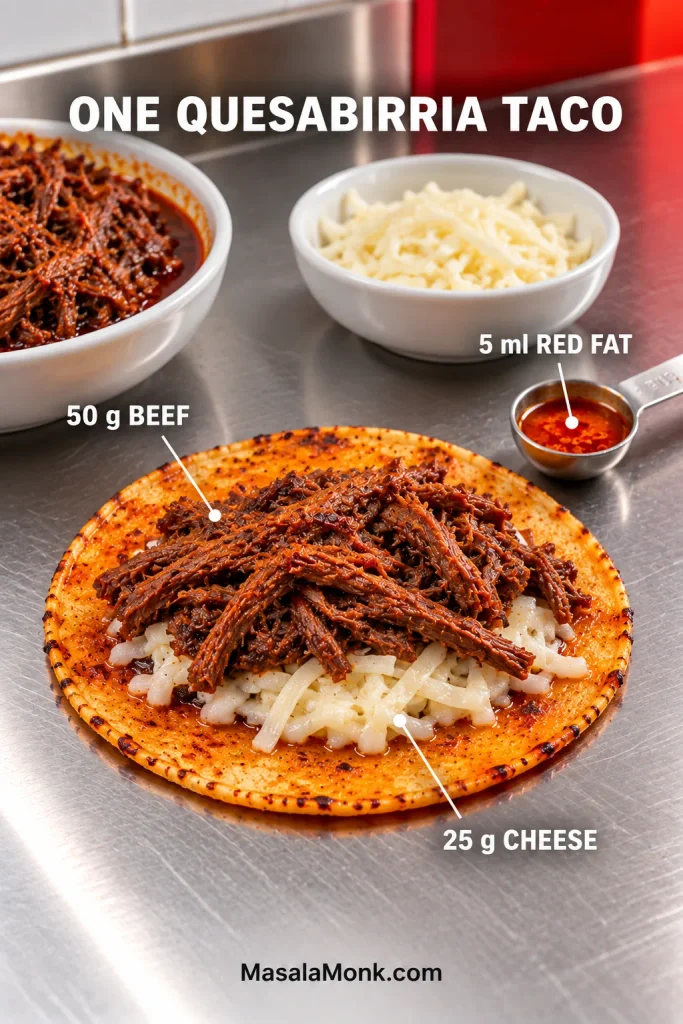
Small corn tortilla with 50 g shredded birria beef and 25 g cheese beside 5 ml of measured red birria fat.
Keep the filling slightly back from the tortilla edge. That bare border gives the folded quesabirria cleaner griddle contact and reduces beef and cheese squeezing out during the flip.

12. Coat, Fill and Crisp

Heat a large skillet or griddle over medium to medium-high heat. A surface around 350–375°F / 177–191°C is a useful working range if you use an infrared thermometer.

Work two or three tacos at a time unless you are using a large flat-top. Crowding makes them awkward to flip and can cool the cooking surface.

Add about 1 teaspoon / 5 ml red fat, then swipe a warm tortilla through it so the side against the pan gets a thin chile-red film.

Give it 15–30 seconds. Cheese over one half. Beef on top. Fold.

Then leave it alone long enough for the first side to turn red-golden and begin releasing from the pan, usually around 1½–2 minutes. Flip and crisp the second side until firm and browned.

The cheese should be melted and the shell should feel firm rather than floppy. A pale, damp tortilla simply needs more time against the heat.

The first taco tells you whether the pan is right: crisp edge, melted centre, and no stream of broth running out when you lift it.
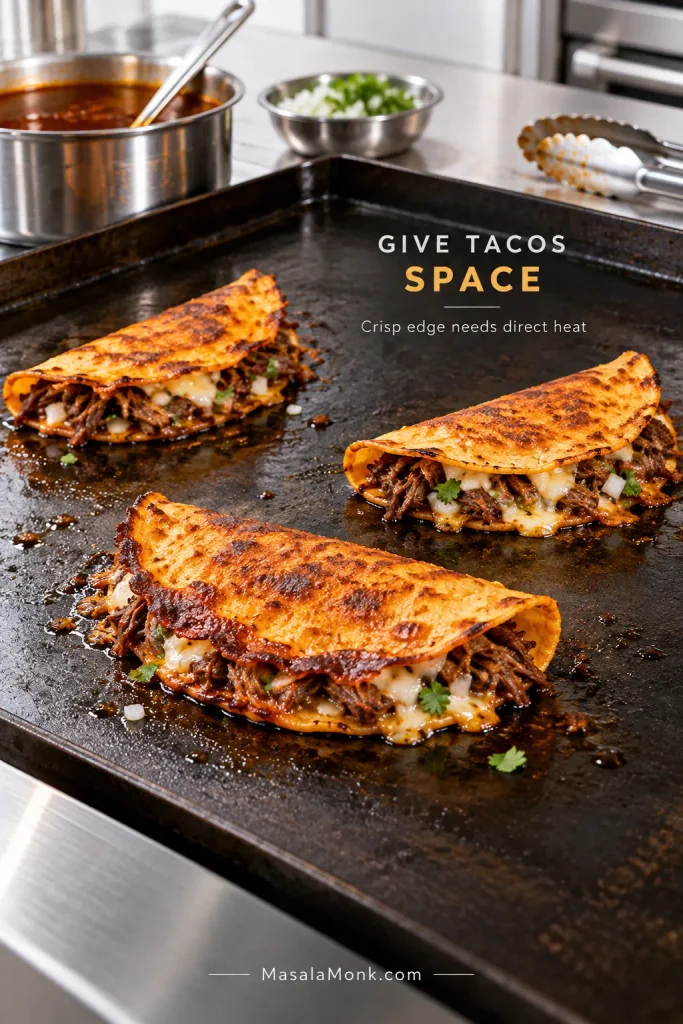
Three quesabirria tacos cooking with clear space between them on a hot griddle, with browned and blistered corn tortilla surfaces.
Use the first taco as a heat test: if browning is sluggish, let the griddle recover before loading the next batch. Empty hot metal between tacos matters as much as total pan size.

13. Serve Them Hot

Start with about ½–⅔ cup / 120–160 ml consommé per person and keep the rest hot for refills. Add diced white onion, cilantro and lime to taste.

Dip each taco just before you bite rather than letting it sit in the consommé; you get the hot broth without giving the crisp shell time to turn soggy.
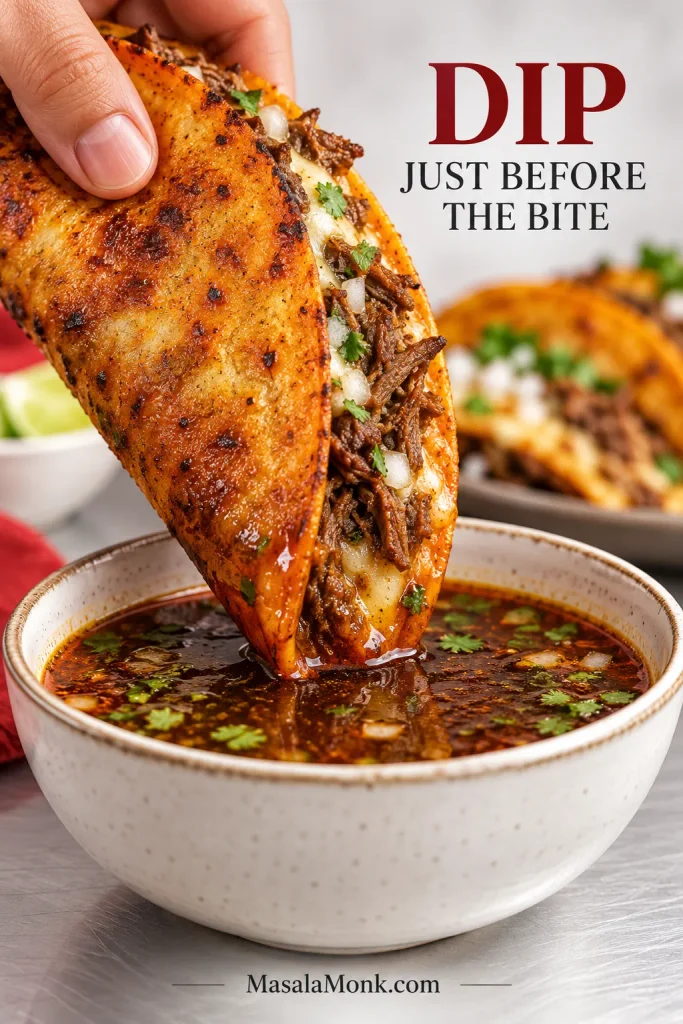
Hand dipping the pointed edge of a crisp beef quesabirria taco into dark birria consommé while most of the shell remains above the broth.
Dip the next bite, not the whole taco. A brief edge dip adds hot consommé and aroma; then a quick pause over the bowl keeps excess broth from softening the remaining shell.

Send the tacos straight from the griddle to the table. Steam and meat juices start softening the shell almost immediately, so this is not a meal that improves while waiting under foil.

If dinner is already underway, you can stop here. The guide below is for the questions that only matter when you are choosing a different cut, planning tomorrow’s batch or staring at a pot that is doing something you did not expect.

Choosing the Beef and Chiles

For this beef birria tacos recipe, chuck roast is the most practical main cut for most home cooks. It is widely available, gives a good yield of actual meat and contains enough connective tissue to become succulent after several hours of gentle cooking.

The smaller bone-in cut has a different job. Short ribs contribute fat and gelatin; shank brings connective tissue and bone. Oxtail gives you plenty of richness too, though comparatively little meat for the price.
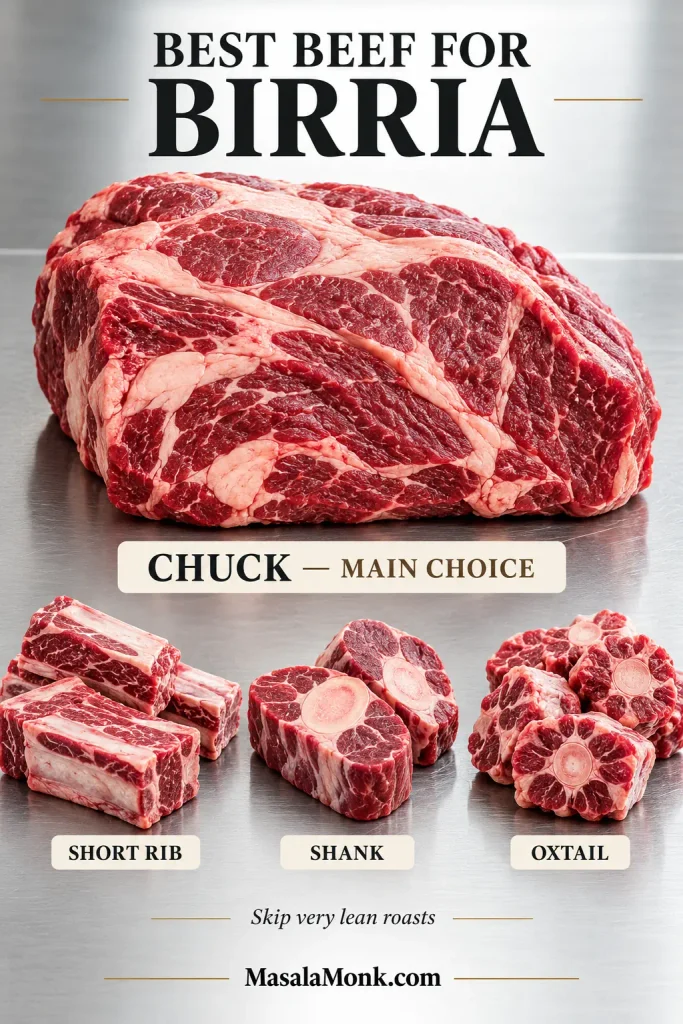
Raw beef chuck shown as the main birria cut with smaller portions of short ribs, beef shank and oxtail on a stainless surface.
Chuck supplies most of the meat; a smaller collagen-rich bone-in cut deepens the broth.
Cut What it contributes How to use it here
Chuck roast High meat yield, beef flavour, shreddable texture Main cut
Bone-in short rib Fat, gelatin and bone Rich secondary cut
Beef shank Gelatin, connective tissue and bone Excellent short-rib alternative
Oxtail Rich gelatin and fat Useful when cost and lower meat yield are acceptable
Brisket Beef flavour and shreddable texture Works, though chuck is simpler here

Avoid very lean steak or roasting cuts; they lack the connective tissue and fat that help this long braise produce succulent shredded beef and a fuller consommé.

Chuck alone works too. Choose a well-marbled roast; the consommé will generally be a little less gelatin-rich than when a bone-in cut joins the pot.

Whichever cut you choose, don’t use temperature alone to decide when it is done. Collagen-rich beef needs enough time at temperature to become tender, so the fork or probe test still matters; the ThermoWorks guide to birria temperatures has a useful deeper explanation of that relationship.

Guajillo and Ancho Build the Base; Árbol Controls the Heat

Chile What it brings Heat
Guajillo Red colour, fruity and earthy dried-chile character Mild
Ancho Darker fruitiness, sweetness and depth Mild
Árbol Sharper chile heat Hotter
Large group of long red guajillo chiles, smaller group of broad dark ancho chiles and two small chiles de árbol showing their relative amounts.
For dried chiles, trust weight more than count: one guajillo or ancho can be much larger than another. The gram ratio keeps the birria flavour steadier from batch to batch.

A pile of dried peppers makes birria look much fiercer than it has to be. Most of the weight here comes from guajillo and ancho. Leave the árbol out for a mild batch, use one for gentle warmth, or two when you want the heat to show up more clearly.

Look for dried chiles that still bend slightly and smell fruity and earthy. Very brittle, dusty-smelling peppers usually bring less character to the pot.

Birria, Tacos de Birria and Quesabirria

Birria is the chile-seasoned meat dish; tacos de birria put that meat into tortillas, while quesabirria—sometimes written quesa birria—adds melting cheese. The version here is beef quesabirria served with consommé.
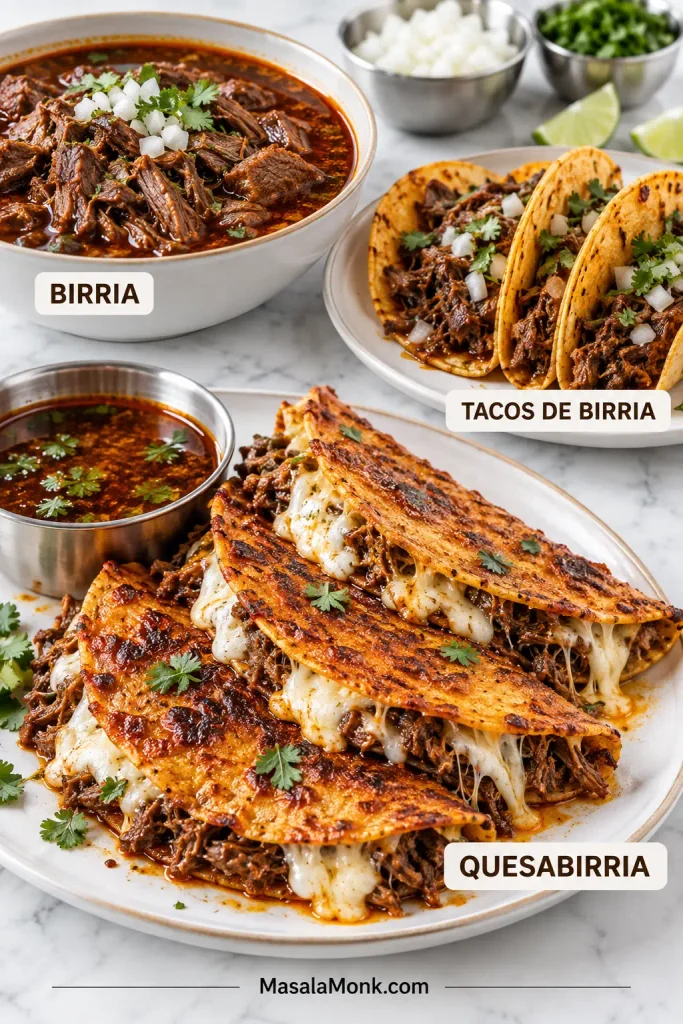
Bowl of birria with broth, soft tacos de birria filled with shredded beef and crisp cheese-filled quesabirria shown together.
Same birria, three serving formats: birria with broth, tacos de birria, and cheese-filled crisp quesabirria.

Birria has especially deep roots in Jalisco, where goat is strongly associated with older regional preparations. Beef birria, or birria de res, developed its own traditions too, and Tijuana became especially known for beef birria tacos and eventually the cheese-filled quesabirria style. Food writer Bill Esparza’s history of birria tacos in Tijuana and the United States traces some of the people and migrations behind that evolution.

So the tacos in this recipe belong to the modern beef-and-cheese quesabirria style rather than representing every older regional form of birria.

Keeping Quesabirria Crisp

Birria tacos usually turn soggy for three reasons: the beef is too wet, watery consommé ends up on the tortilla, or the pan is not hot enough. Overfilling and holding finished tacos too long make those problems worse.
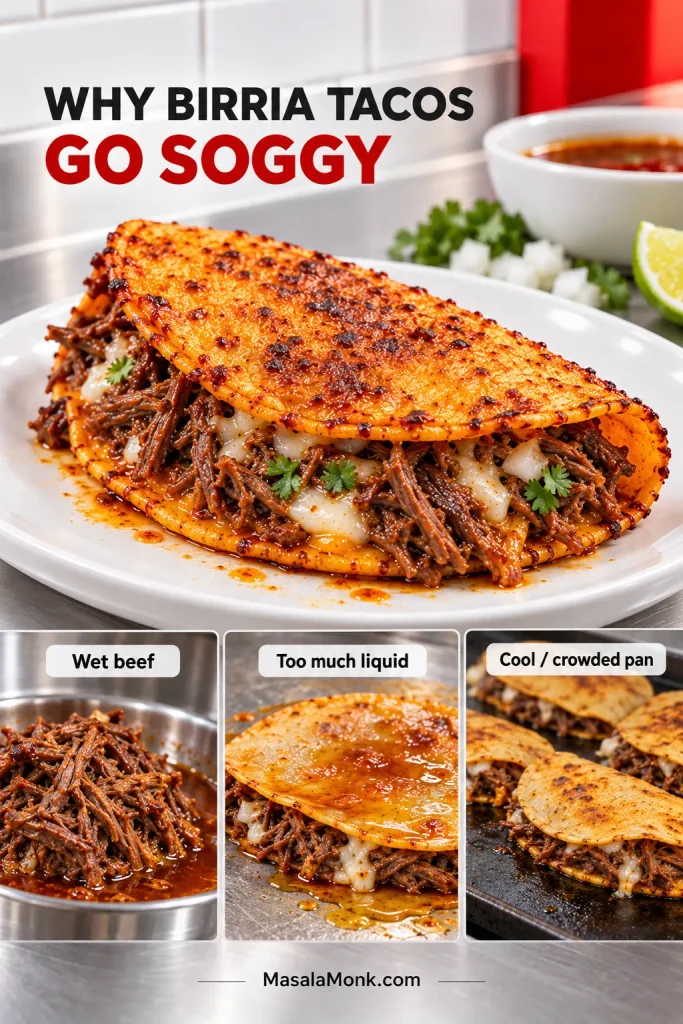
Crisp birria taco above smaller examples of wet shredded beef, a tortilla coated with excess liquid and tacos crowded on a griddle.
Diagnose soggy birria tacos in order: check the beef for loose moisture, then the tortilla coating, then the griddle heat. Turning up the pan will not rescue wet filling.

Warm cold corn tortillas until they bend easily before the fat and filling go on. If you make your own, our homemade corn tortilla recipe goes deeper into the hydration and resting cues that keep masa tortillas flexible.

Then resist the urge to pile them high. Around 50 g beef and 25 g cheese is enough for a small tortilla. Heavier filling means less tortilla against the pan and more steam trapped in the middle.

Fresh corn tortillas are easiest to work with. Very dry tortillas are more likely to split even after warming. Flour tortillas work too, though they give you a softer, chewier taco rather than the firmer corn shell used here.

Most importantly, fry in small waves. A taco can leave the skillet crisp and still soften ten minutes later as steam from the meat and cheese works into the shell.

Birria Is Often Easier the Next Day

Yes—birria is an excellent make-ahead meal. Braise and chill the beef and consommé a day or two ahead, then reheat the components and crisp the tacos just before serving.

Overnight chilling also firms the rendered fat at the surface, where you can lift it away cleanly instead of chasing it around a hot pot with a spoon.

Day 1

  • Make the sauce and braise the beef until tender.
  • Remove the beef, bay leaves and bones.
  • Shred the beef while it is still warm and toss it with just enough consommé to keep the meat juicy.
  • Transfer the beef and remaining consommé to separate shallow containers.
  • Refrigerate the cooked food within 2 hours.

If convenient, leave most of the rendered fat with the consommé overnight. It will firm into an easy-to-remove layer once chilled.

Day 2

The next day is the easy part. The beef is already shredded, the fat is firm on top and dinner is mostly reheating, seasoning and crisping.
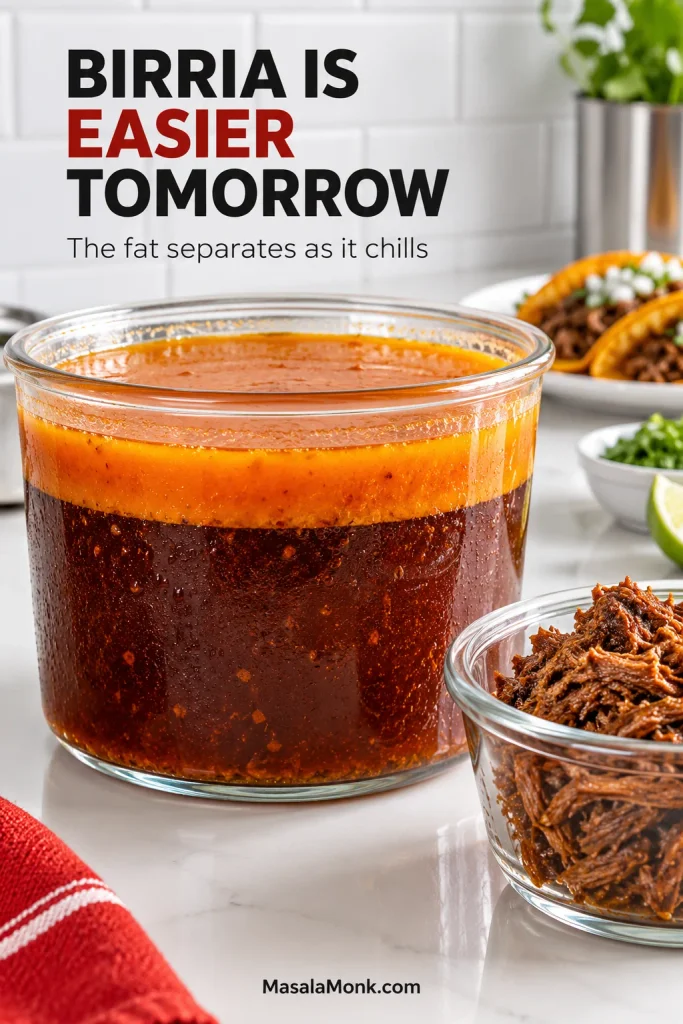
Chilled birria consommé in a clear container with a firm orange-red fat layer on top and shredded birria beef stored separately beside it.
Chilling makes the fat easy to lift and portion, while beef and consommé can be reheated and adjusted separately.

Lift off enough fat for the tortillas. Reheat the beef gently, adding consommé if it needs moisture, then let any loose liquid cook away. Warm the remaining consommé separately and melt the red fat gently before the tortillas hit the skillet.

Slow Cooker, Stovetop and Instant Pot Birria

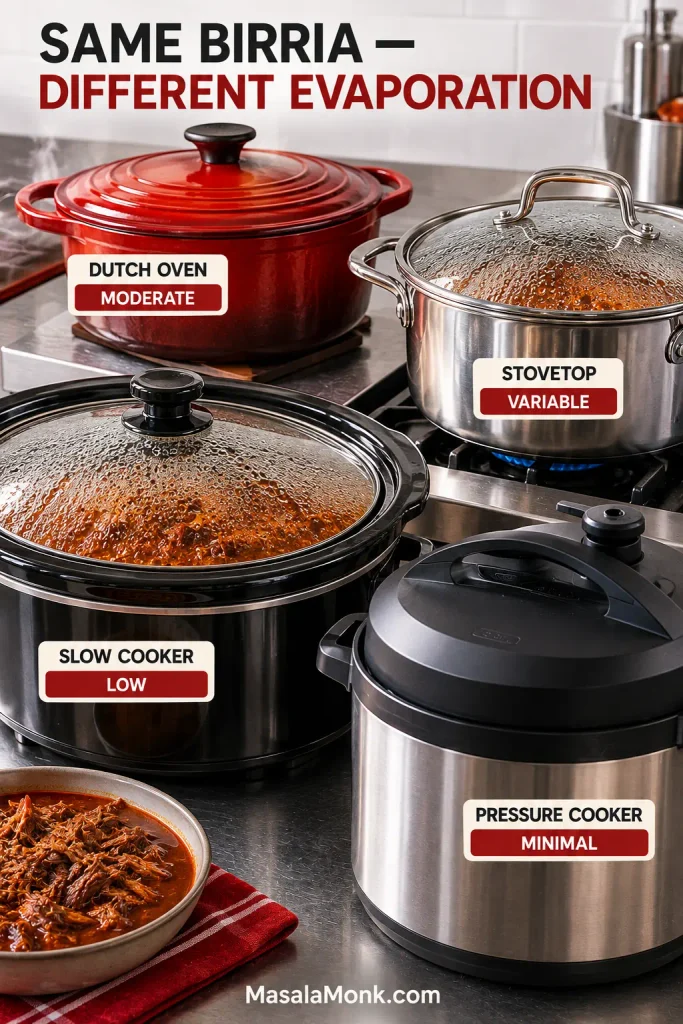
Make the sauce and brown the beef as written. What changes from here is the cooking time and how much water each cooker lets escape.

Method Timing and main difference
Dutch oven 300°F / 150°C for 3½–4 hours; moderate evaporation
Stovetop Gentle covered simmer for 3–3½ hours; check the liquid periodically
Slow cooker LOW for 7–8 hours; very little evaporation
Instant Pot / pressure cooker HIGH for 55 minutes + about 15 minutes natural release; very little evaporation
Covered Dutch oven marked moderate evaporation, lidded stovetop pot marked variable, closed slow cooker marked low and locked pressure cooker marked minimal evaporation.
Evaporation changes concentration as well as volume. Slow cookers and pressure cookers often need a post-cook reduction, so taste and salt the consommé after its final strength is set.

Slow Cooker

Prepare the sauce as written, using 2 cups / 475 ml broth in the sauce. Transfer it to the slow cooker with the browned beef, then add only 2 more cups / 475 ml broth. That gives you 4 cups / 950 ml total broth for the slow-cooker batch.

Cook on LOW for 7–8 hours. Once the beef is tender, take it out and taste the broth. Slow cookers lose little water, so a short uncovered reduction on the stove may make the consommé much better.

Instant Pot or Other Pressure Cooker

Use 2 cups / 475 ml broth while making the sauce, then add another 2 cups / 475 ml with the beef for 4 cups / 950 ml total.

This is a large pressure-cooker batch. Do not exceed your appliance’s maximum pressure-cooking fill line; divide the batch if necessary.

Cook at HIGH pressure for 55 minutes, followed by about 15 minutes of natural release. After 15 minutes, release any remaining pressure according to your cooker’s instructions before opening the lid.

Probe the chuck. Tight meat gets another 10–15 minutes at high pressure. Because almost no water has escaped, the consommé may still need reducing after the beef comes out.

Stovetop

Keep the covered pot at the gentlest steady simmer you can manage. Begin checking the beef at three hours, and add hot low-sodium broth if the pot gets too dry before the meat softens.

On nights when a four-hour braise is unrealistic, ground beef tacos get a taco dinner onto the table in about 20 minutes.

What to Serve with Birria Tacos and How to Feed a Crowd

Good sides for birria tacos either cut through the rich beef and cheese or make the meal more substantial without overwhelming the consommé. Keep diced onion, cilantro and lime on the table; a bowl of roasted salsa verde gives the tacos a tart green contrast, while creamy refried beans round out the meal without competing with the main event.

For a party, make the birria ahead and save your attention for the griddle. Keep the beef hot in one pan, consommé hot in another, tortillas wrapped and warm, cheese within reach and the red fat beside the cooking surface.

A standard skillet usually handles two or three tacos comfortably; a wide griddle handles more. Serve in waves and let people start eating. The tacos are better fresh from the skillet than waiting for the whole batch to finish.
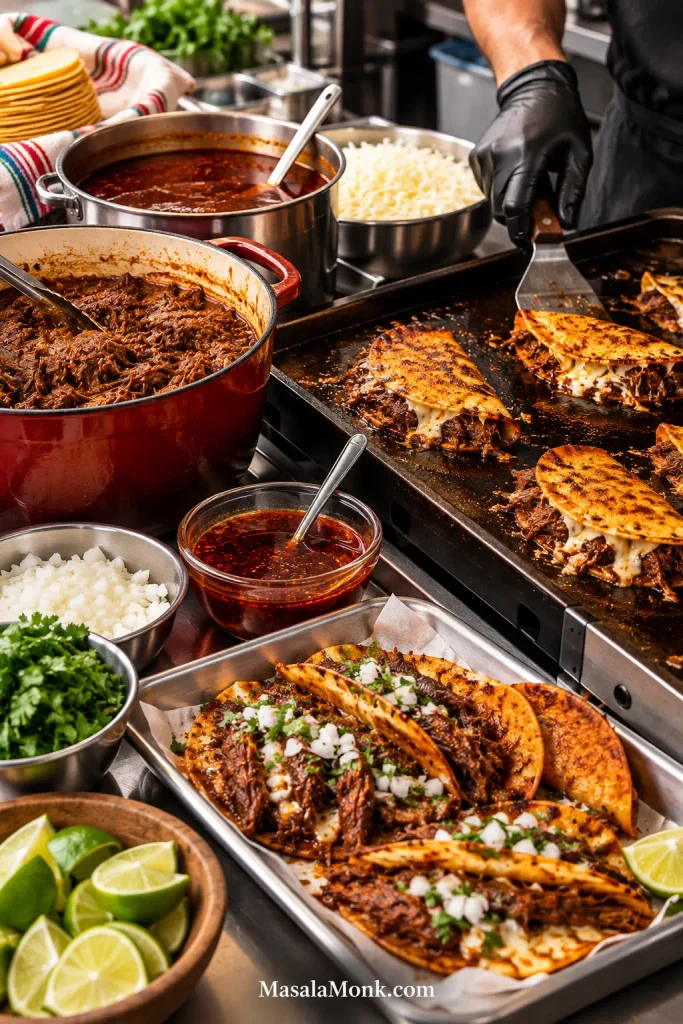
Active birria taco station with hot beef, consommé, tortillas, cheese, red fat and garnishes surrounding a griddle where quesabirria tacos are cooking.
For a crowd, the griddle is the bottleneck: keep the components hot and send tacos out as they crisp.

If people are grazing before the first tacos come off the pan, a cold 7 layer dip can already be on the table without tying up the stove.

When the Birria Doesn’t Behave

Start with the stage you are standing in. A scorched chile sauce needs a different fix from tough beef, and neither has much to do with a tortilla that refuses to crisp.

Before the Braise

The birria sauce tastes bitter or burnt: birria usually turns bitter when dried chiles, garlic or spices scorch. If the flavour is clearly burnt rather than simply intense, remake the sauce before adding the beef.

The sauce is too thick: dried chiles vary in size and dryness. Add low-sodium broth gradually until the sauce pours easily.

The heat got away from you: chile de árbol is usually responsible for the sharpest burn. Before the beef goes in, extra tomato and broth can spread that heat through a larger volume. Next time, reduce or omit the árbol.

After the Braise

The beef is still tough: it usually needs more cooking time. As long as it has enough braising liquid, keep going until the fibres loosen and a probe slides in easily.

The consommé tastes weak: remove the tender meat and reduce the broth uncovered. Finished beef does not need another twenty minutes in the pot just because the liquid needs concentration.

The consommé is too salty: add unsalted broth or water gradually until the balance returns.

There is hardly any red fat: some cuts simply render less. Save whatever chile-stained fat you have and extend it with beef tallow or neutral oil.

The skimmed fat spits violently: water probably came with it. Heat the fat gently until that water evaporates and the aggressive sputtering settles.

At the Griddle

What you see Likely cause What to do
Tortilla tears Cold, dry or brittle tortilla Warm until pliable before coating and folding
Birria taco is soggy or won’t crisp Wet beef, watery tortilla coating or cool pan Dry the filling further, use red fat rather than broth and let the skillet heat properly
Shell feels greasy Too much fat Use a thinner film; about 1 teaspoon / 5 ml is enough for a small tortilla
Cheese is slow to melt Thick shreds, cold filling or overloaded taco Finely shred the cheese and lighten the filling
First tacos were crisp; platter is soft Trapped steam Serve smaller waves and avoid stacking or sealing under foil

Storing, Freezing and Reheating Birria

Birria stores best when the beef, consommé and red fat are kept separately. Those components reheat well; an assembled crisp taco does not.
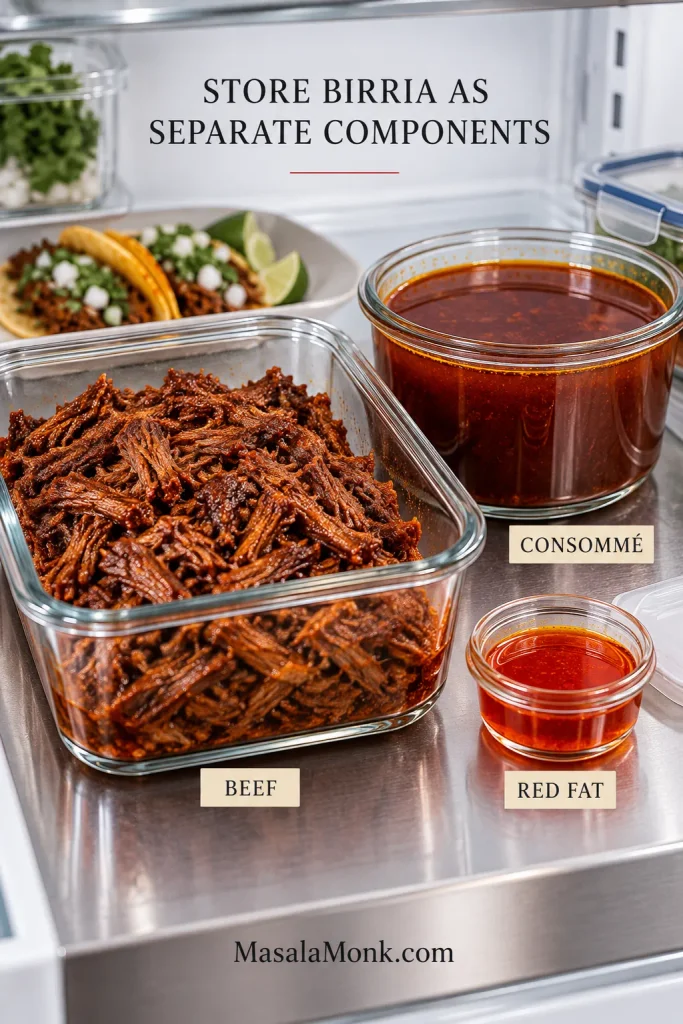
Separate glass containers holding shredded birria beef, dark consommé and a much smaller portion of red birria fat on a stainless shelf.
Store beef, consommé and red fat separately so each can be reheated and adjusted independently.

Divide the beef and consommé into shallow containers and refrigerate within 2 hours. Keep the refrigerator at 40°F / about 4°C or colder and use refrigerated cooked birria within 3–4 days. The USDA leftovers guidance has more detail on cooling and storing cooked food safely.

For longer storage, freeze the shredded beef and consommé rather than assembled tacos. Using them within 2–3 months gives the best quality.

Reheat leftover beef to 165°F / 74°C. Bring the consommé to a rolling boil, then lower the heat and keep it hot for serving. If the meat needs moisture, warm it with some consommé and let any loose liquid cook away before filling the tortillas.

An already cooked taco is best reheated in a dry skillet or air fryer rather than the microwave.

A Long Braise, Then a Very Fast Taco

The slow work happens in the pot; once the beef is tender, everything moves quickly.

Eat the tacos while the cheese is still melted, the red edges are crisp and the bowl of consommé beside you is still steaming.
Posted on — Leave a comment

Chicken Gyros Recipe: Juicy Greek Chicken with Tzatziki

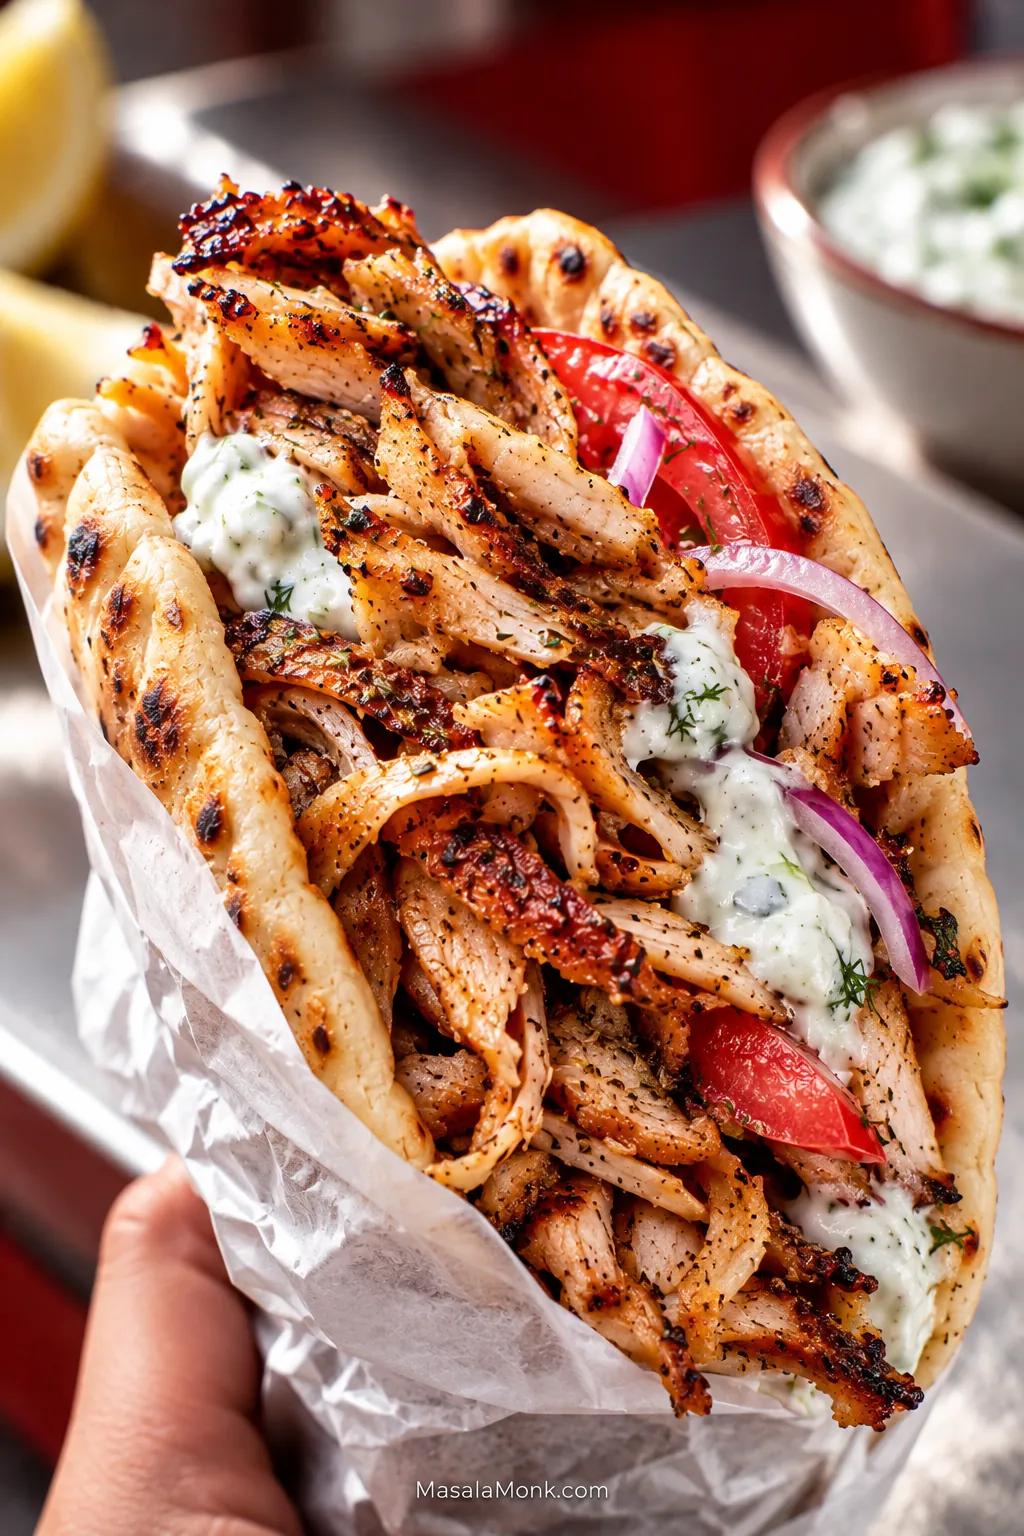
Hand-held chicken gyro filled with thin browned chicken thigh pieces, tzatziki, tomato and red onion in soft pita.

The giveaway is in the pile of chicken. If it comes out as six neat grilled thighs or tidy cubes from a skewer, it may taste excellent. But it still does not eat quite like the thin, irregular pieces shaved from a gyro stack.

Good chicken gyro meat gives you several textures at once. Some folds stay juicy and tender. Others pick up dark golden edges, while a few narrow ends turn almost crisp. Tuck those pieces into warm pita with cold, thick tzatziki, ripe tomato and sharp onion, and every bite catches a little of each.

The difficult part when you make chicken gyro meat at home is creating those layers without a commercial spit. Seasoning gets you only part of the way. The bigger job is building a compact roast that stays juicy, can be shaved thin, and still has enough moisture to survive one last blast of heat.

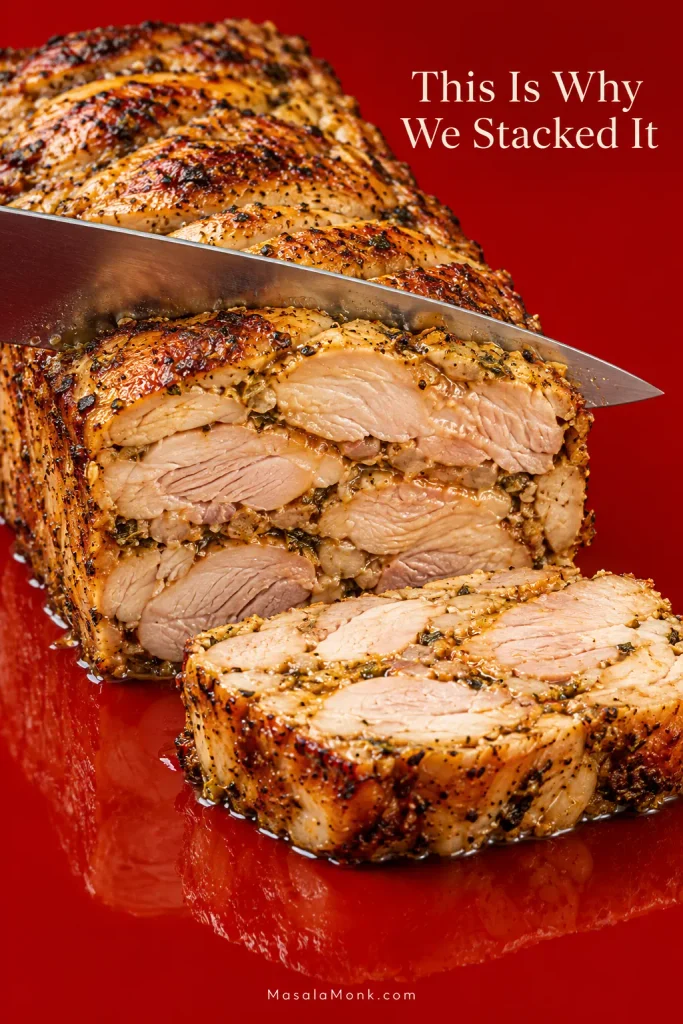
This Greek chicken gyro recipe uses an ordinary loaf pan to recreate that layered structure in a home oven. Boneless thighs are pressed together, roasted until just cooked through, rested, shaved thin and given one fast final hit of heat.

Chicken Gyros at a Glance

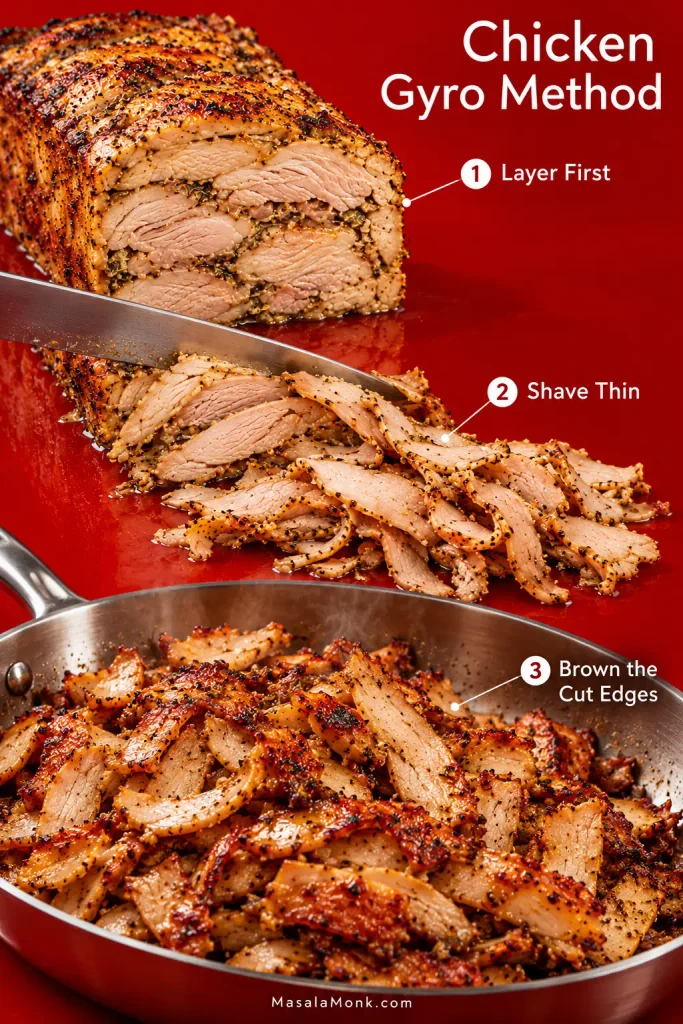
Layer first. Shave thin. Brown the cut edges. Those three jobs matter more here than adding another spoonful of spice.

Quick answer: Marinate whole chicken thighs, press them into a loaf pan and roast until the centre reaches 165°F / 74°C. Rest, shave the chicken into thin ribbons, then crisp small batches over high heat before wrapping them in warm pita with tzatziki.

Need dinner sooner? The fast version uses chicken strips, a 30–60 minute marinade and a hot sheet pan. You lose the layered shave, but you still get juicy browned chicken for pita tonight.

Three-stage chicken gyro method showing a layered cooked chicken roast, thin shaved pieces and the shaved chicken browned in a skillet.
Browning after shaving exposes far more hot surface area, adding crust without overcooking the protected inner chicken.

Chicken Gyros Recipe

Keeping the thighs whole is deliberate. Once roasted together and sliced across the stack, they retain natural folds, grain and irregular edges instead of becoming six separate pieces of chicken.

Yield
6 generous gyros

Prep
About 30 minutes

Marinate
2–12 hours
4–8 hours preferred

Roast
About 60–90 minutes

Rest
10 minutes

Slice + crisp
About 10–15 minutes

Warm + assemble
About 5–10 minutes

Total excluding marinating: roughly 1 hour 55 minutes to 2 hours 35 minutes.

For the chicken gyro meat

  • 1 kg / 2 lb 3 oz boneless, skinless chicken thighs
  • 80 g / about ⅓ cup thick plain Greek yogurt
  • 30 ml / 2 tbsp extra-virgin olive oil
  • 30 ml / 2 tbsp fresh lemon juice
  • Finely grated zest of 1 lemon
  • 4 large garlic cloves / about 16 g, finely grated or minced
  • 1 tbsp dried oregano
  • 2 tsp sweet paprika
  • 1 tsp Dijon mustard
  • 12 g / about 2 tsp fine sea salt; use weight when possible because salt density varies by brand and grind
  • 1 tsp freshly ground black pepper
  • 15–25 ml / 1–1½ tbsp extra olive oil for crisping, only if you do not get enough usable rendered chicken fat

For the thick tzatziki

  • 250 g / about 1 cup thick Greek yogurt
  • 170 g / about 6 oz English or Persian cucumber
  • ¼ tsp fine salt for draining the cucumber
  • 1 large garlic clove, finely grated; use 2 for a stronger sauce
  • 15 ml / 1 tbsp extra-virgin olive oil
  • 10 ml / 2 tsp fresh lemon juice
  • 1 tbsp finely chopped fresh dill, optional
  • ¼ tsp fine salt, then adjust after resting
  • Freshly ground black pepper to taste

To build 6 chicken gyro wraps

  • 6 soft Greek-style pitas, about 7–8 inches / 18–20 cm across
  • 2 medium ripe tomatoes / about 280–300 g, sliced or chopped
  • ½ small red onion / about 50–60 g, sliced very thin
  • Lemon wedges, for serving only if needed
  • Cooked fries, optional

Equipment that matters

  • 9 × 5-inch / 23 × 13 cm metal loaf pan
  • Parchment paper
  • Large mixing bowl or food-safe container
  • Instant-read thermometer
  • Sharp chef’s knife
  • 12-inch / 30 cm cast-iron or stainless-steel skillet, or a broiler-safe metal sheet pan
  • Box grater and clean kitchen towel for the cucumber

1. Even out the chicken

Trim away large loose pockets of fat and any hanging flaps that stop the thighs lying flat. Leave the smaller seams of fat; they help the meat stay supple through the roast and final crisp.

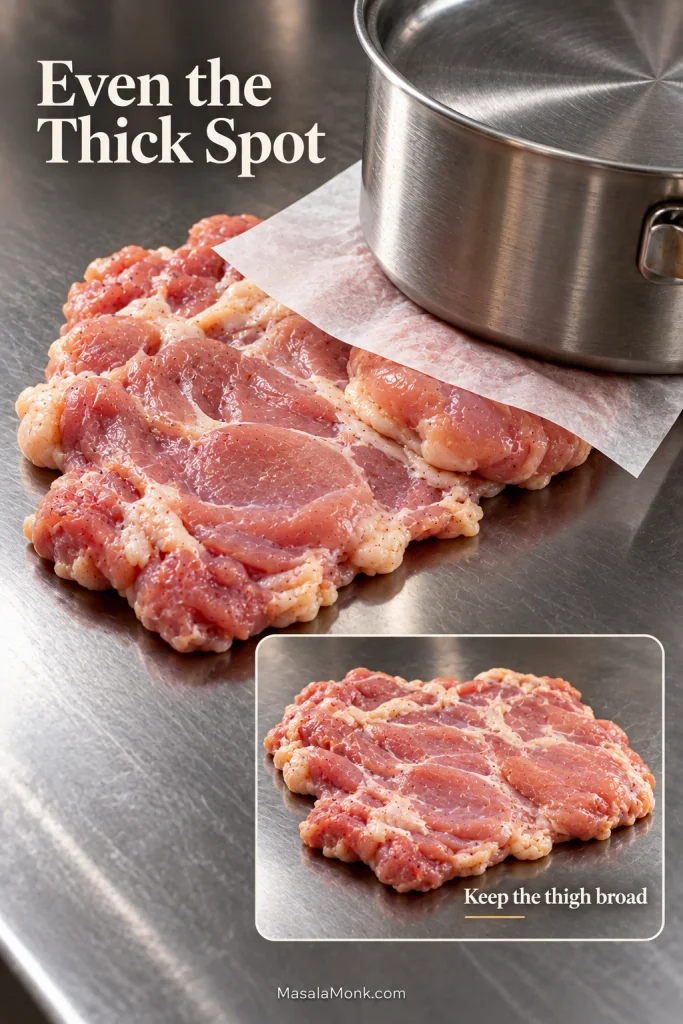
Open each thigh fully. If one section forms a dense knot while the rest is much thinner, cover the thigh with parchment. Give only that thick area a few firm taps with a meat mallet, rolling pin or heavy pan. Aim for broad, fairly even pieces that are still much thicker than cutlets. They do not need to look identical.

Raw boneless chicken thigh under parchment with a heavy pan pressing only its thicker section; inset shows the thigh still broad.
Even only the abrupt thick spot; the thigh itself can stay broad and irregular.

2. Make the chicken gyro marinade

Whisk the yogurt, olive oil, lemon juice, lemon zest, garlic, oregano, paprika, Dijon, salt and pepper until evenly combined.

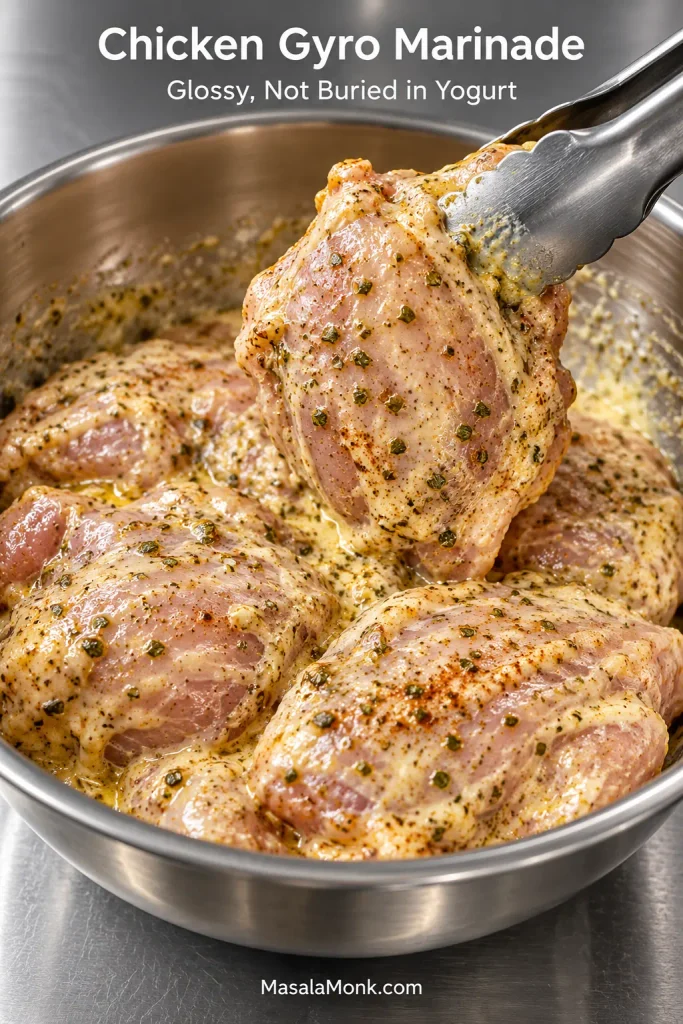
Add the thighs and turn them through the mixture. The right coating leaves the chicken glossy, speckled with oregano and paprika, with no heavy blanket of yogurt hiding the meat. Here, the seasoning stays oregano-led. Garlic and lemon are easy to taste, paprika brings warmth and colour, and the little bit of Dijon rounds things out without making the meat taste mustardy.

Whole raw chicken thighs lightly coated with a glossy yogurt, oregano and paprika marinade in a stainless bowl.
If the meat is still clearly visible beneath the marinade, the coating is light enough for stacking.

3. Marinate

Cover and refrigerate for at least 2 hours. For this marinade, 4–8 hours is a useful target and around 12 hours is plenty. That timing is about texture and flavour, not a food-safety cutoff.

4. Make the tzatziki while you wait

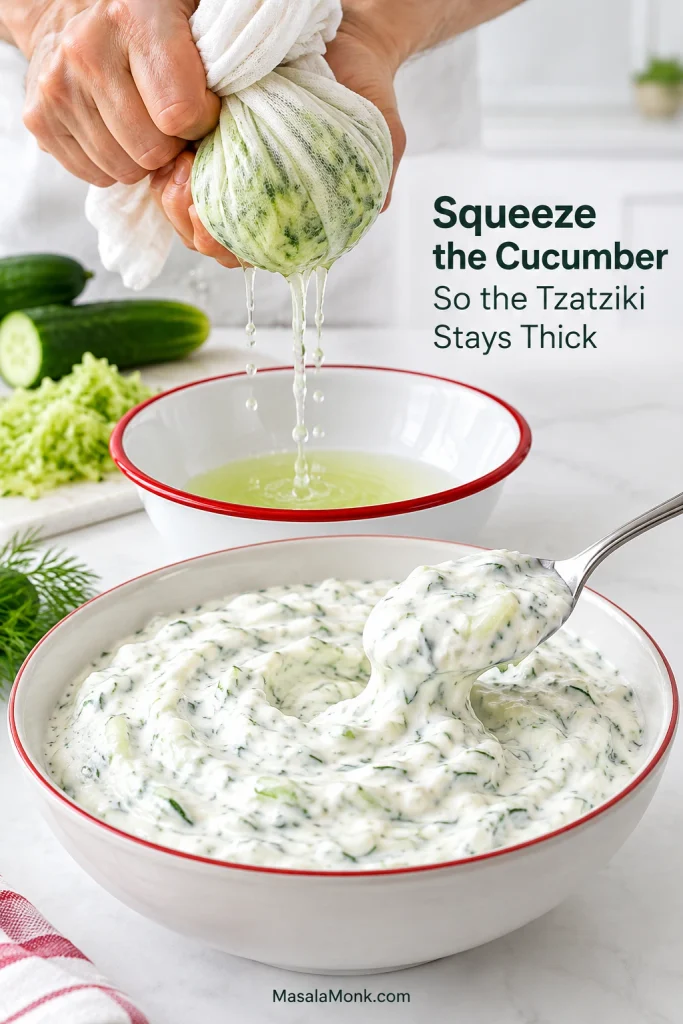
Grate the cucumber, toss it with ¼ teaspoon salt and leave it for about 10 minutes. Wrap it in a clean kitchen towel and squeeze firmly. Open the towel, gather it again and give it another hard twist. By then you should get only a few droplets, not another stream of cucumber water.

Mix the cucumber with the Greek yogurt, garlic, olive oil, lemon juice, dill if using, salt and pepper. Cover and refrigerate. The rest does the sauce good: the garlic settles down and the whole thing tastes more joined-up by the time the chicken is ready. You want it cool and thick enough to sit against hot meat without immediately running into the pita.

Grated cucumber being squeezed in cloth beside a bowl of thick tzatziki holding its shape on a spoon.
Salting starts the cucumber draining; squeezing finishes the job. The useful endpoint is grated cucumber that feels damp rather than wet, so the tzatziki stays creamy instead of loosening as it rests.

This batch makes a little more tzatziki than six wraps usually need. Put the rest on the table; somebody will use it.

5. Pack the loaf pan

Heat the oven to 375°F / 190°C conventional or about 350°F / 175°C fan. Line a 9 × 5-inch / 23 × 13 cm metal loaf pan with parchment, leaving enough overhang along the long sides to lift the chicken later.

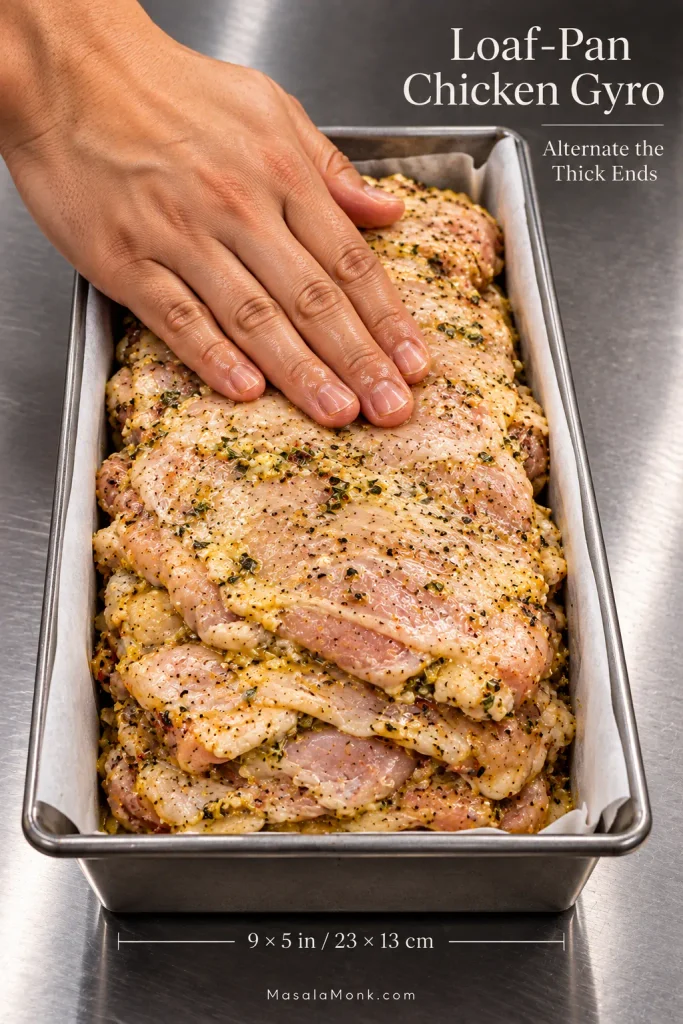
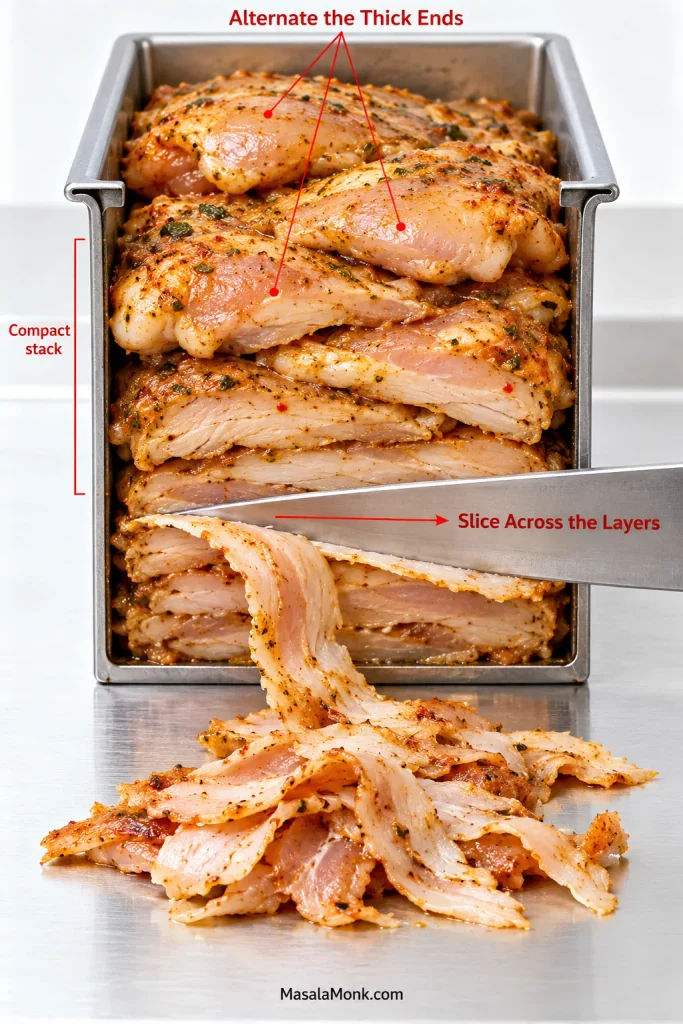
Lift one thigh from the bowl and let the heavy excess marinade fall back. Lay it across the bottom, then continue with the remaining thighs, alternating where the thicker end sits so those dense sections do not all collect on one side. Press firmly every few pieces.

The top may look a little uneven; that is fine. Nobody is going to see a perfect loaf once you start shaving it. What matters underneath is a tightly packed set of thighs without large loose gaps.

Parchment-lined loaf pan packed tightly with broad marinated chicken thighs layered over one another.
Stack over a shared footprint and alternate the dense ends so one side of the loaf does not grow much thicker.

Discard the remaining marinade that has been in contact with the raw chicken.

6. Roast to temperature

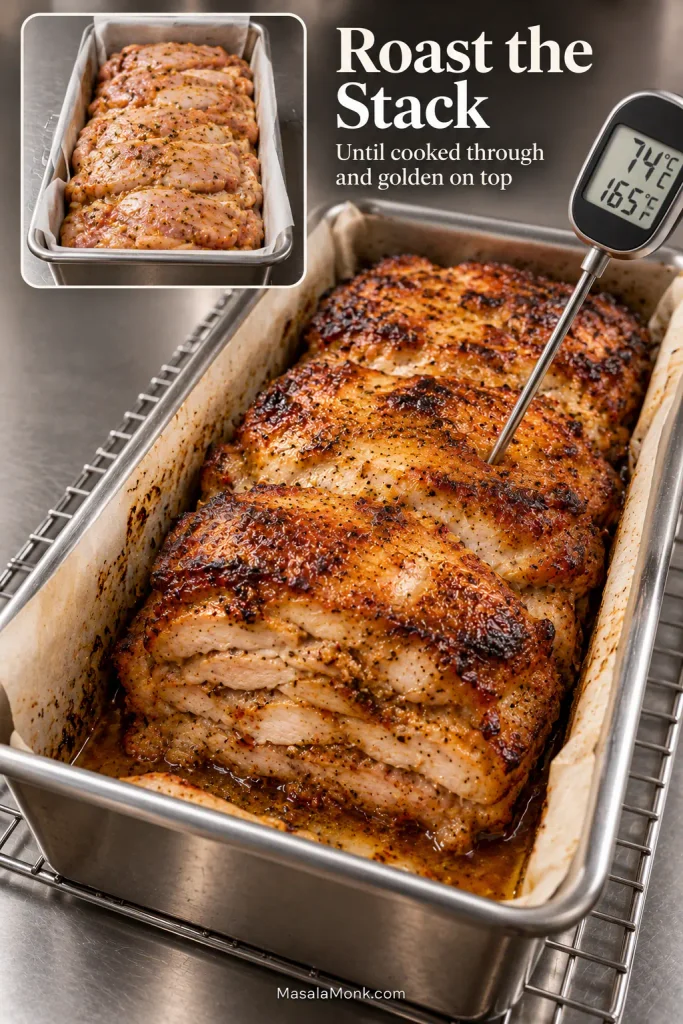
Roast uncovered on the middle rack. Begin checking around 55 minutes; most 1 kg stacks in this pan will finish somewhere around 60–90 minutes.

Insert an instant-read thermometer into the deepest central area without touching the pan. If the reading is close, check another nearby spot. The coldest reading should reach 165°F / 74°C, the USDA minimum internal temperature for poultry.

Meanwhile, the top should smell roasted and oregano-heavy and take on a deep golden colour. If it starts smelling sharply scorched or gets very dark while the middle is still below temperature, lay a loose piece of foil over the top and keep going.

Roasted layered chicken in a loaf pan with an instant-read thermometer inserted into the central meat and showing 165°F or 74°C.
Keep the thermometer tip suspended inside the deepest meat. Contact with the hot loaf pan—or slipping into a gap between thighs—can give a reading that does not represent the coldest part of the chicken.

7. Rest, then separate the fat and juices

Rest the chicken in the pan for 10 minutes. Meanwhile, slice the tomato and onion, set out the pita and get the crisping skillet ready.

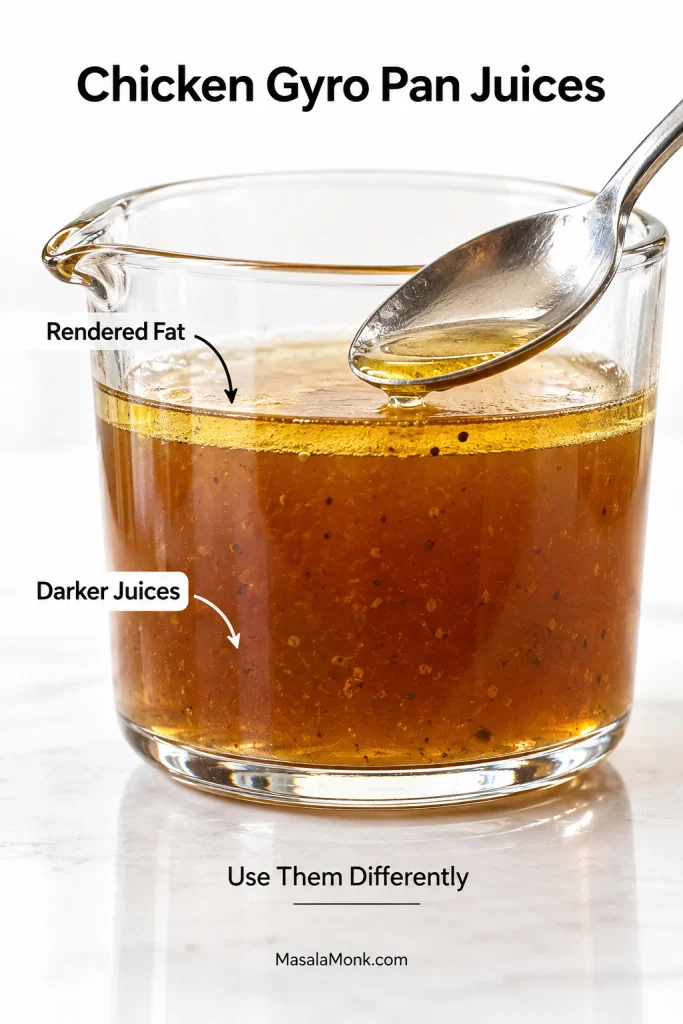
Pour the pan juices into a small heat-safe bowl and let them sit for a few minutes. Clear fat may gather on top, with the darker watery juices underneath.

When enough fat collects, spoon a little from the top for crisping and save the darker juices for leftovers. Barely any separation? Don’t fight it—use olive oil in the skillet and keep the pan juices for later. Lift the rested chicken onto a cutting board using the parchment sling.

Heatproof glass container holding darker roasted chicken juices with a thin clear golden layer of rendered fat above them.
Save the watery chicken juices for moisture, not for frying. Added to the crisping skillet, they lower the pan temperature and can turn the second browning stage back into steaming.
8. Shave across the layers

Now comes the part that explains why we bothered packing the thighs together. Cut across the roast and several pieces of chicken appear in each thin, irregular ribbon instead of six separate thigh-shaped slices.

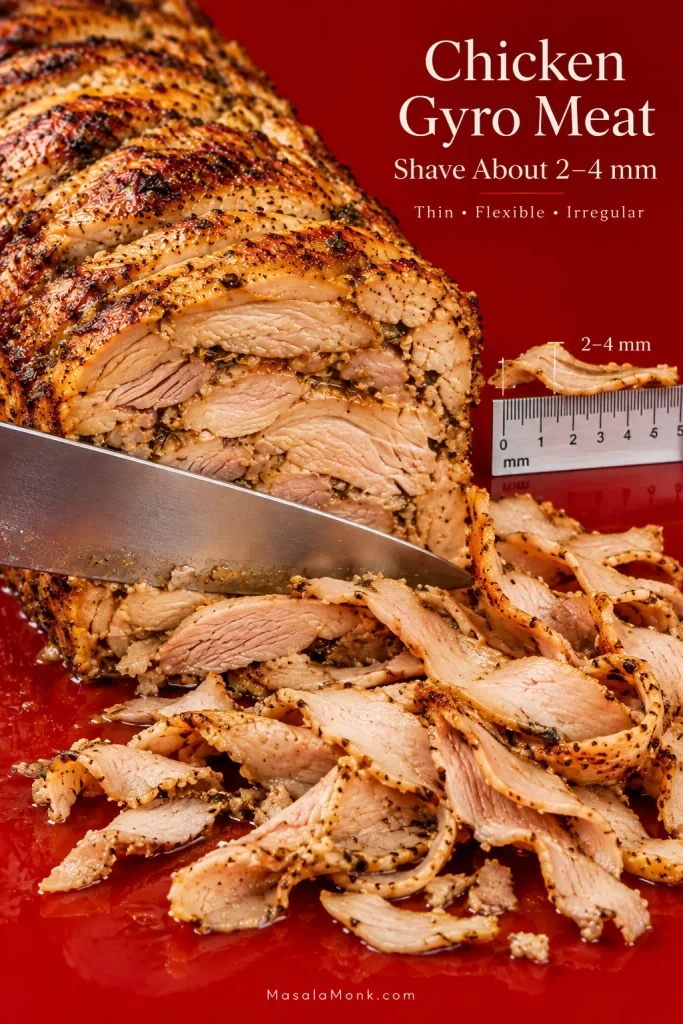
Aim for roughly 2–4 mm. Some slices will stay broad and layered; others will split into little shards and ends. Keep all of them. Gyro meat looks better—and eats better—when the pile is a little unruly. If the board is filling with thick roast-chicken slices, take another pass with the knife.

Layered cooked chicken being sliced crosswise into thin irregular pieces beside a 2 to 4 millimeter measurement guide.
Cut across the width of the loaf rather than following its layers. That knife direction crosses several thighs in one stroke, so the slices break naturally into mixed-size gyro ribbons instead of individual thigh portions.

9. Brown the cut faces

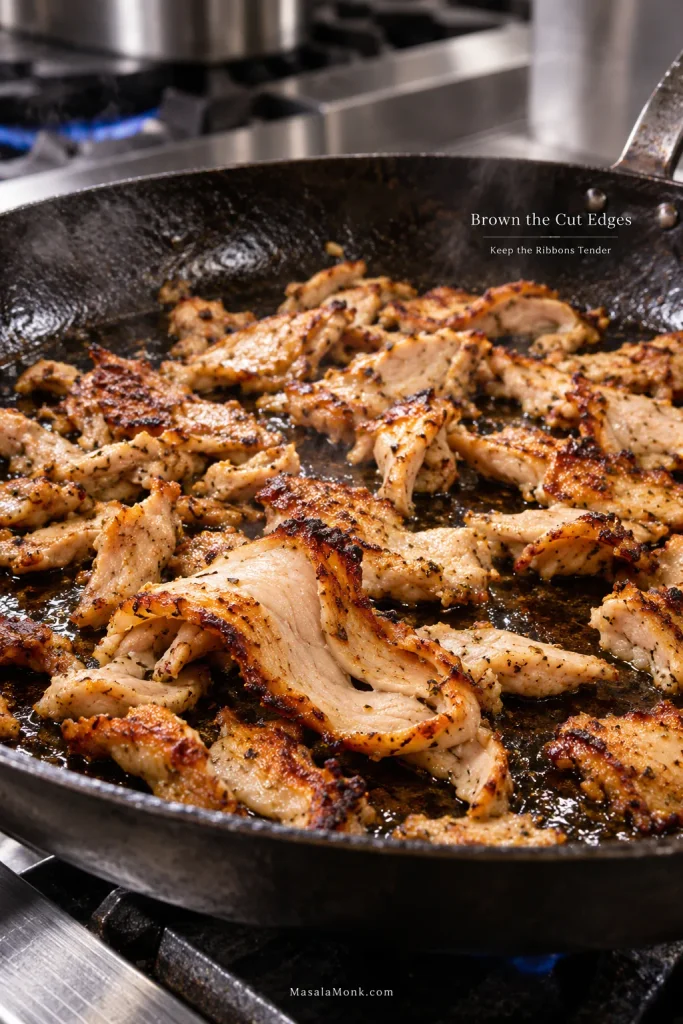
Heat a 12-inch / 30 cm cast-iron or stainless-steel skillet over medium-high to high heat. Add about 1 teaspoon of rendered chicken fat or olive oil, followed by about 150–200 g shaved chicken. In a smaller skillet, use less; you want a loose layer with bits of hot pan still visible between the meat.

The first batch is where the loaf finally starts looking like gyro.

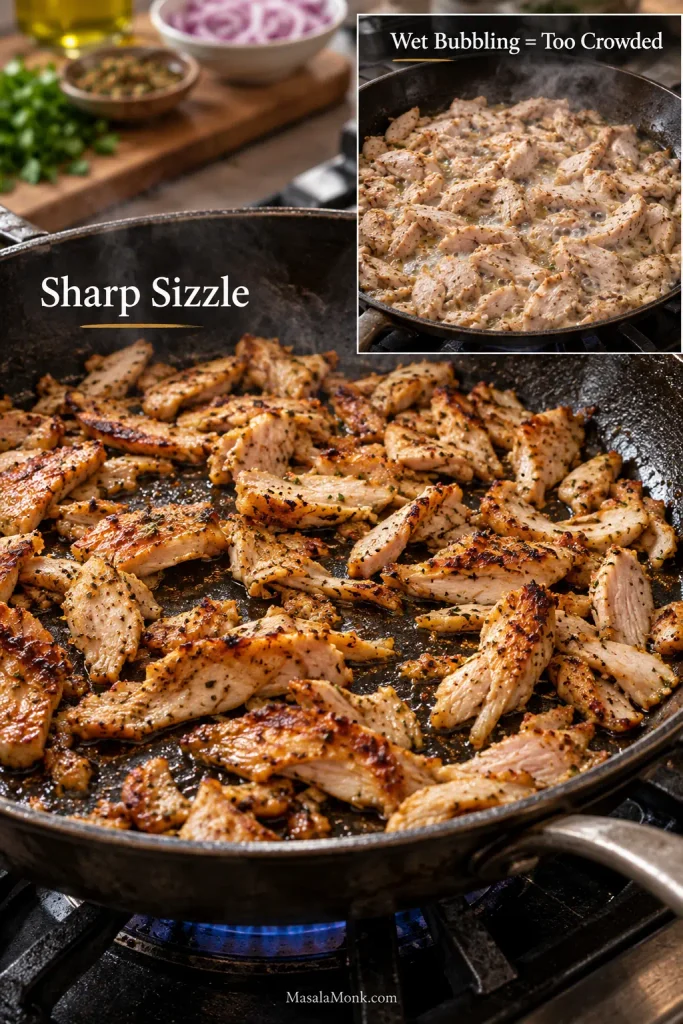
As it lands, the chicken should hit the pan with a sharp sizzle. Leave the first side alone for roughly 60–90 seconds, until the narrow edges begin curling and scattered rims turn dark golden. Toss and give the second side another 30–60 seconds.

Pull the chicken while the broader ribbons still bend easily. A few crisp tips are welcome; an entire batch of stiff chicken is not. Transfer each finished batch to a warm platter and leave it uncovered or only very loosely tented while you crisp the rest.

Thin shaved chicken gyro meat browning in a dark skillet with golden edges, crisp tips and moist lighter interiors.
Do not chase the same colour on every piece. Fresh cut faces brown quickly, while the broader chicken gyro ribbons should still look moist and bend easily when the batch leaves the skillet.

Wet bubbling means the skillet is getting crowded. Take some chicken out and let the pan recover its sharp sizzle before continuing.

10. Warm the pita and build the gyros

Warm each pita in a dry skillet for about 20–30 seconds per side, just until soft and flexible. Keep the warm rounds under a clean towel.

The simplest build is tzatziki → hot chicken → tomato → onion → optional fries. Keep most of the filling through the centre so the pita still folds easily. Use about 35–45 g / 2–3 tablespoons tzatziki and 120–130 g hot shaved chicken per pita.

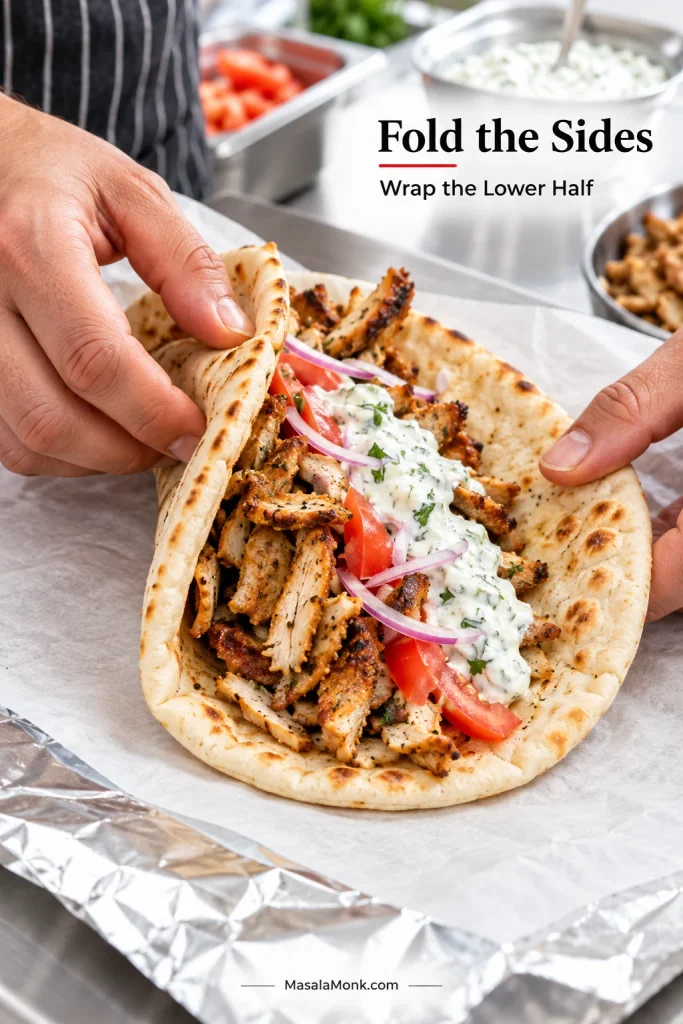
Fold the sides around the filling and, for easier eating, wrap the lower half in parchment or foil.

Hands folding soft pita around browned chicken gyro meat, tzatziki, tomato and red onion over parchment and foil.
If the pita starts resisting the fold, rewarm it instead of squeezing harder. A soft round wraps a generous chicken gyro more cleanly and is much less likely to split along the edge.

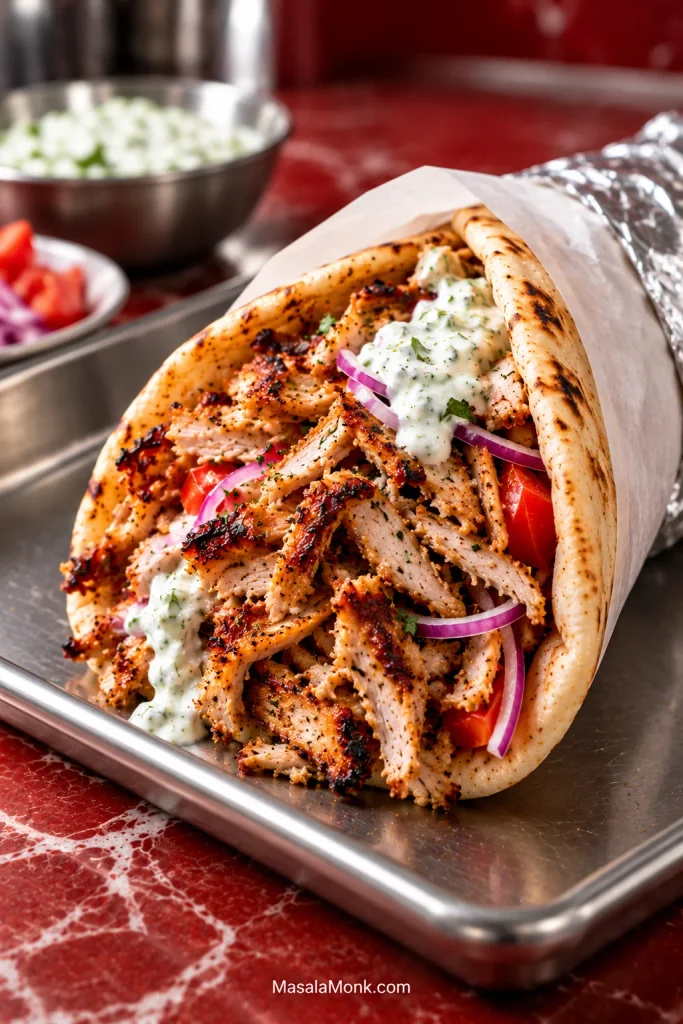
The best bite has hot browned chicken against cold garlicky tzatziki and soft warm pita. Add fries inside if you like, then taste before reaching for the lemon wedge. There is already acidity in the chicken, yogurt and tomato.

Finished chicken gyro on a stainless tray with browned shaved chicken, tzatziki, tomato and red onion in folded pita.
Keep the finished gyro chicken-first, with enough sauce and vegetables for contrast but plenty of browned meat still exposed.

Chicken Gyro Guide

If the recipe is all you needed, you can stop there. For the reasoning behind the stack, the gyro-versus-souvlaki distinction and the fixes for steaming instead of browning, keep reading.

When Something Goes Wrong

Why the Stack Matters More Than Another Spoonful of Spice

The loaf-pan method makes more sense once you look at what a commercial gyro stack is doing as it cooks. As the outside browns, that layer is shaved away, and meat that was protected a moment ago becomes the new exterior. That repeated cycle creates the mixture of tender shaved meat and darker little edges that makes the pile so distinctive.

Cook those same flavours on separate thighs and the chicken can still be delicious, but the texture lands somewhere else. A tall homemade spit can imitate the restaurant setup more closely. The loaf pan gives up the theatre and keeps the useful part: meat cooked together in layers.

Cross-section of cooked chicken gyro meat showing several irregular whole-thigh layers and visible natural muscle grain.
A little layer separation is normal; natural grain and irregular seams are what you want.

In other words, the pan builds the layers; the knife and skillet finish the job.

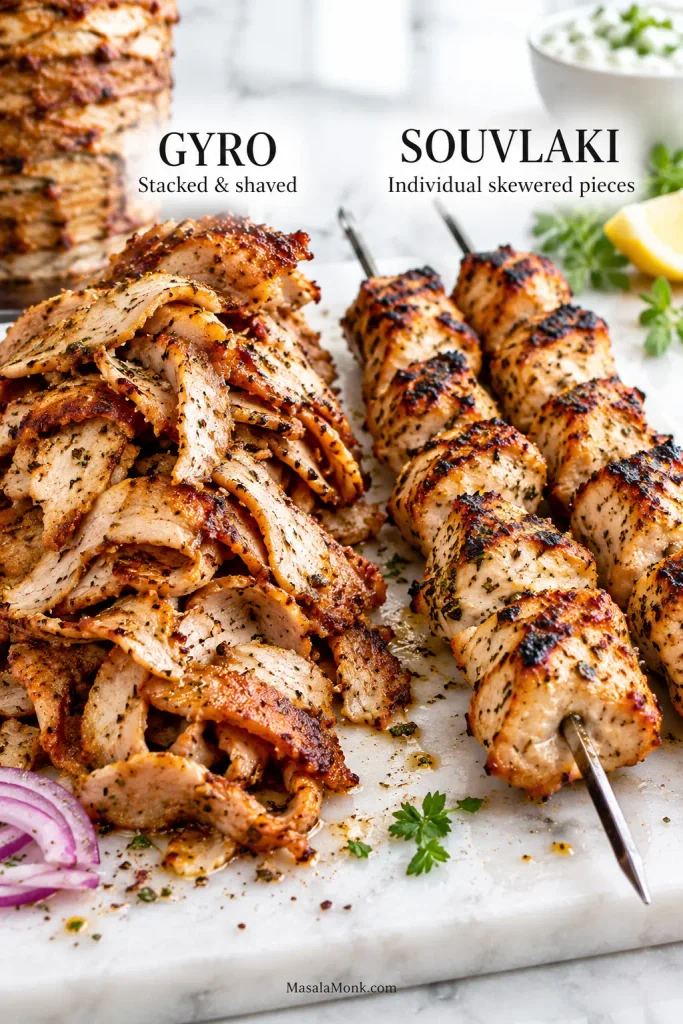
Chicken gyro vs souvlaki: what’s the difference?

Traditionally, gyro refers to meat cooked on a rotating stack and shaved from the browned exterior. In everyday use, especially outside Greece, “gyro” is also commonly used for the finished pita wrap.

With the traditional stack-and-shave style, chicken gyro meat is cooked as part of a larger stack. Chicken souvlaki is usually cut into individual pieces, threaded onto skewers and cooked directly over high heat. The fillings around them may look similar, but gyro gives you shaved layered ribbons while souvlaki gives you separate charred pieces.

Thin shaved chicken gyro meat beside larger grilled chicken pieces threaded onto metal souvlaki skewers.
Gyro shows up as thin irregular ribbons; souvlaki as separate, similarly sized charred pieces.

If charred pieces straight from a skewer are what you have in mind, the chicken souvlaki recipe is built around that result. Shawarma sits closer to gyro structurally because it also relies on stacked meat and browned exposed edges, although its seasoning moves in a warmer, more heavily spiced direction. The chicken shawarma recipe heads there deliberately; this gyro stays brighter and more oregano-led.

Chicken Thighs, Seasoning and Marinade

Thighs earn their place here twice. They stay forgiving during the roast, then handle the short blast of skillet heat without drying out as quickly as breast. For breast, use the quicker method farther down; flatter, faster cooking gives you much better control over doneness.

Chicken gyro seasoning varies widely across home and restaurant versions. Here, the profile stays bright and oregano-led, with sweet paprika for warmth and a little Dijon for savoury tang.

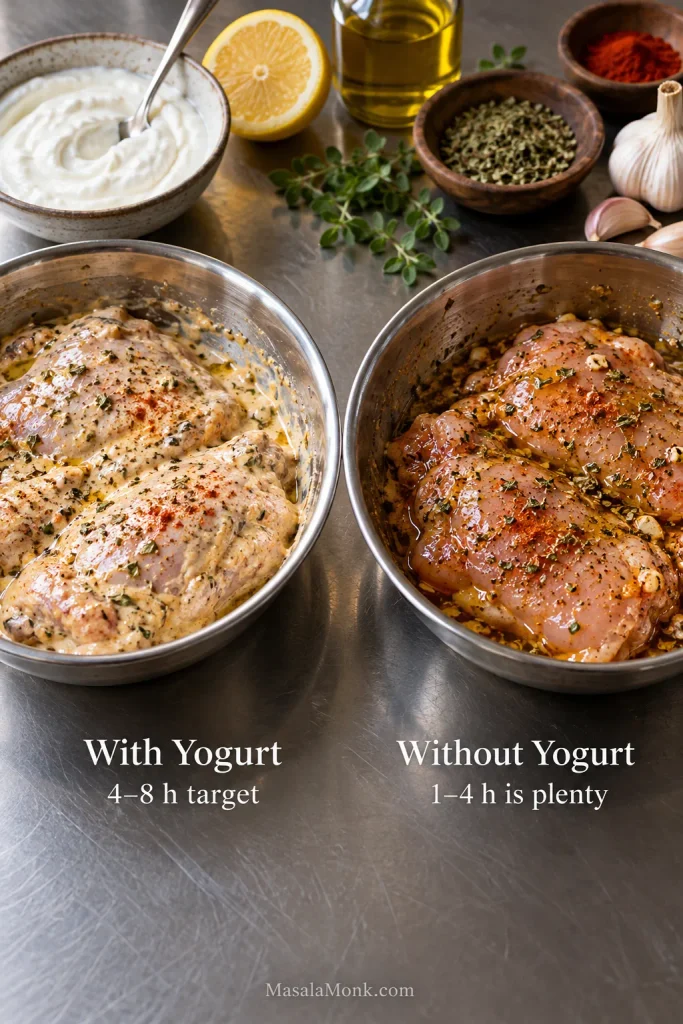
Yogurt helps the seasoning stay put, but the chicken does not need to swim in it. The modest amount here leaves the thighs glossy and seasoned, with no thick yogurt layer to cook away first.

For a yogurt-free version, leave out the yogurt and increase the olive oil to about 3 tablespoons. A shorter 1–4 hour marinade is plenty; there is little benefit to leaving this more citrus-forward version on the chicken all day.

Two bowls of raw chicken thighs, one with a lightly creamy yogurt marinade and one with a clear oil, lemon and herb marinade.
The yogurt-free marinade should still look glossy; it simply lacks the lightly creamy film.

If yogurt-coated chicken stays pale or develops a grainy white surface, look at the coating before blaming the heat. A heavy wet layer has to lose a lot of water before the meat can brown.

Pack the Pan So the Chicken Can Be Shaved Later

The loaf pan presses broad thighs into one stable roast that can be cut across several layers at once. A 9 × 5-inch pan gives about 1 kg of chicken a manageable shape without the balancing act of a homemade vertical spit.

Once the stack is packed, the oven does most of the work; apart from checking the temperature near the end, there is nothing to turn or balance.

Alternate the thicker ends as you build and press every few pieces so large gaps do not run through the middle. For a double batch, use two pans. One extra-tall loaf changes the distance heat has to travel before the centre is cooked.

Technical view of whole chicken thighs layered in a loaf pan with alternating thick ends and a knife cutting across several layers.
Alternate the thick ends to control stack depth so one crosswise cut can pass through several overlapping thighs.

Some liquid around the chicken is normal. The protected inner layers cannot shed moisture directly into the oven, so water and rendered fat collect in the pan. Rest the roast, pour the liquid off and keep going. The browned edges come later.

Shave First, Then Chase the Crust

Those first few slices are the payoff. Each knife stroke cuts through several packed thighs at once and gives you ribbons with natural folds running through them. Broader pieces stay soft. Narrower shards and little ends colour faster.

Then listen.

A properly heated skillet gives a sharp frying sound as soon as the meat lands. Wet bubbling tells you the pan has become too crowded. The best batch still has plenty of tender chicken in it—you want browned edges scattered through the pile, not every slice cooked until crunchy.

Spaced browned chicken pieces in a hot skillet compared with crowded pale chicken bubbling in released liquid.
More oil does not fix an overcrowded skillet; more exposed hot pan does. Once the sound changes from frying to wet bubbling, remove some chicken and let the heat recover.

For a larger amount, a hot broiler is easier than working through endless skillet batches. Spread the shaved chicken over a preheated metal tray with a light sheen of fat or oil and stay close; the narrow tips can darken quickly.

Now Turn the Chicken into a Gyro

Once the chicken is hot and browned, the wrap does not need much decoration. Warm pita, shaved chicken, thick tzatziki, ripe tomato and very thin onion are enough.

Keep the tzatziki thick enough to stay put against the hot chicken. For different cucumber, garlic and herb ratios, the Greek tzatziki sauce guide goes much deeper.

A soft, pocketless Greek-style pita is ideal because it folds around the filling. If you cannot find one, a soft pocket pita works too; the homemade pita bread recipe shows how to keep those rounds tender and flexible.

Fries can go straight inside. Feta, lettuce, cucumber and olives can all taste good too. Still, if you have spent this much time getting the chicken right, let the chicken be the thing you taste first.

Tzatziki is not the only sauce you’ll find with Greek chicken pita. The Greek Foodie notes that in Athens, chicken souvlaki is often served with a creamy mustard-yogurt sauce. If that is the flavour you remember, changing the sauce may get you closer than adding more spice to the chicken.

For a Build-Your-Own Chicken Gyro Meal

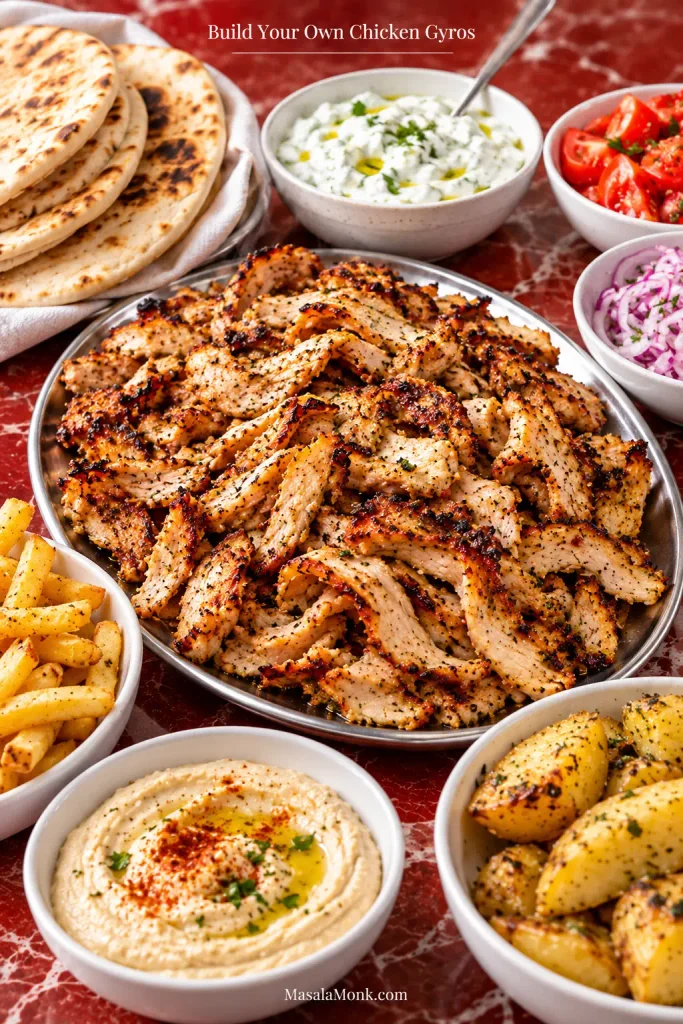
For a larger meal, put the chicken and warm pita on the table with extra-creamy hummus or a tray of Greek lemon potatoes and let everyone build their own plate.

Build-your-own chicken gyro spread with shaved chicken, pita, tzatziki, tomato, red onion, fries, hummus and lemon potatoes.
At the table, manage temperature as well as toppings: keep the chicken warm, the tzatziki cold and the pita covered until everyone is ready to assemble.

When You Want Chicken Gyros Tonight

Sometimes dinner just needs to happen. For an easy chicken gyro recipe on a weeknight, change the shape of the meat instead of trying to rush the layered roast. With only a 30-minute marinade and a short roast, this version fits much more comfortably into an ordinary evening.

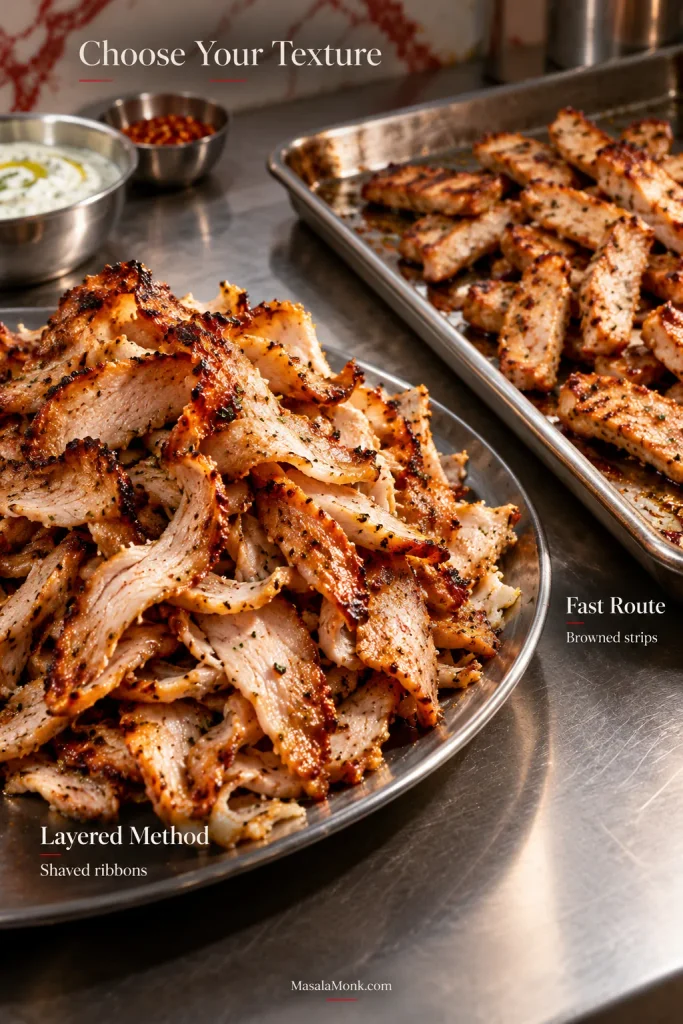
The trade-off is texture. You still get plenty of browned chicken, but the result is closer to Greek-marinated strips than meat shaved from a compact gyro stack.

Thin shaved chicken from the layered gyro method beside thicker browned chicken strips cooked on a sheet pan.
Sheet-pan strips brown during the main cook; the layered method exposes fresh cut faces only after shaving, so it benefits from a second crisp.

Fast Sheet-Pan Chicken Gyros

Use the marinade formula from the main recipe above. Open the thighs flat before cutting, then divide any thick folded sections so the pieces are reasonably even. Cut into strips about 1–1.5 cm / ⅜–½ inch wide, coat them and refrigerate for 30–60 minutes. Discard any marinade left in the bowl after the raw chicken is removed.

  1. Heat a conventional oven to 425°F / 220°C or a fan oven to about 400°F / 200°C.
  2. Let heavy excess marinade drip away, then spread the strips in one layer on a large rimmed sheet pan. An 18 × 13-inch / 46 × 33 cm pan works well. Crowded chicken needs a second tray.
  3. Begin checking around 14–15 minutes. Expect roughly 16–22 minutes depending on strip thickness, tray load and oven, turning once during cooking.
  4. Remove the chicken once the thickest pieces reach 165°F / 74°C. If they need more colour, use a fully heated broiler for another 1–2 minutes.

Chicken Breast and Air-Fryer Options

Chicken breast belongs with this quicker route too. Cut it into similarly sized strips, marinate for roughly 30–60 minutes and begin checking 2–3 minutes earlier than the thigh strips. Pull it as soon as the thickest piece reaches 165°F / 74°C. Yogurt can flavour breast beautifully; it cannot save meat that has simply stayed on the heat too long.

For the air fryer, leave the thighs whole and opened flat, use the gyro marinade here and follow the boneless-thigh method in the air fryer chicken thighs recipe. Slice the cooked thighs afterwards and build the gyros as usual.

Chicken Gyro Troubleshooting

A watery marinade, a dark top, loose slices and chicken that steams in the skillet all start at different stages. Find the symptom below and fix the part of the process that caused it.

Marinade and Roasting Problems

Problem Why it happens + what to do
Before cooking: marinade looks thin and watery Loose yogurt, wet chicken or excess liquid can thin the coating. Use thick Greek yogurt, measure the liquids and pat visibly wet chicken before marinating.
Before cooking: chicken has become unusually soft or mushy A very long acidic marinade can soften the surface. Four to eight hours is plenty for this yogurt version; shorten the marinating time next round.
Roasting: top is dark but centre is below temperature The exposed top is cooking faster than the packed centre. Cover loosely with foil and keep roasting until the middle reaches temperature.
Roasting: there is lots of liquid in the pan Some liquid is normal. An unusually large amount can come from loose marinade or water-heavy chicken. Rest the roast and separate usable fat from the pan juices if you can.

Slicing, Crisping and Assembly Problems

Problem Why it happens + what to do
Slicing: the roast separates into pieces Natural thigh layers will not behave like a processed meat loaf. Give the chicken its full rest, use a sharp knife and slice across several layers at once.
Crisping: chicken steams instead of sizzling The skillet is crowded. Remove some chicken, expose more hot pan and wait for the sharp frying sound to return.
Crisping: chicken becomes dry The second cook has run too long. Stop once scattered edges are dark golden while the broader ribbons still bend easily.
Assembly: tzatziki becomes watery The cucumber was not drained enough or the yogurt was loose. Use strained Greek yogurt and wring the salted cucumber more firmly.
Assembly: pita cracks It is probably cold or has been heated until dry. Warm briefly, remove while soft and keep covered until filling.
At the table: the whole gyro tastes too sour Acid has accumulated through chicken, yogurt, tomato and finishing lemon. Taste the assembled gyro before adding the lemon wedge.

How to Store and Reheat Chicken Gyro Meat

Keep the parts separate if you are cooking ahead. The storage and reheating limits below follow USDA leftovers guidance. Tomato and tzatziki start softening pita almost as soon as the wrap is assembled.

Storage How long Best approach
Refrigerator 3–4 days Cool promptly and store the chicken separately from pita, sauce and vegetables.
Freezer About 3–4 months for best quality Freeze cooked chicken in meal-sized portions. Raw marinated chicken can also be frozen promptly after coating; thaw completely in the refrigerator before cooking.
Reheating To 165°F / 74°C internally Use a hot skillet when you also want to restore the browned edges.

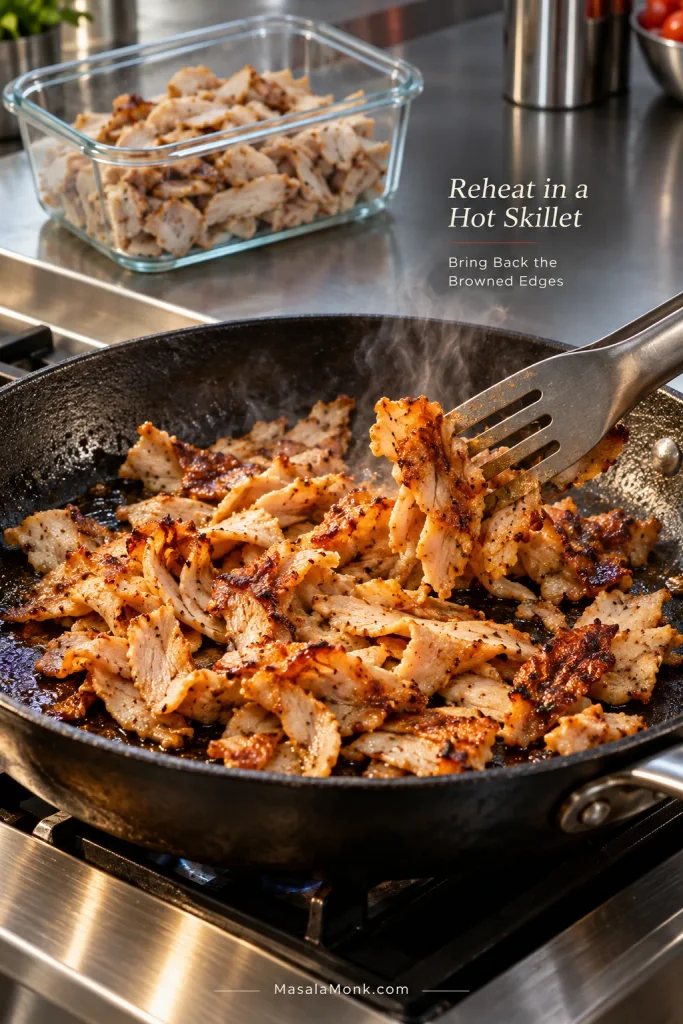
For the best day-two texture, give the chicken a short turn in a hot skillet. Use a little rendered fat when it needs browning or a spoonful of reserved pan juice when it needs moisture. A broiler or air fryer works too; the microwave is fine when speed matters more than crisp edges.

Leftover shaved chicken in a glass container behind a skillet where thin chicken pieces are reheating and browning at the edges.
Thin leftover gyro ribbons reheat fast, so work in a small batch and stop as soon as the edges wake up. Repeated or prolonged reheating turns the smallest pieces dry before the larger folds need it.

Leftover shaved chicken is also excellent over a cold Mediterranean chickpea salad. Reheat only the meat and keep the salad cold, and the next meal feels deliberately different from yesterday’s gyro.

The Best Bite Usually Is Not the Neatest One

You want a soft ribbon of thigh, one browned edge, cold tzatziki, a little tomato and onion, all caught in warm pita.

If the chicken pile has juicy folds, darker shaved edges and a few crisp little ends, leave it alone. That is the gyro.

Posted on — 1 Comment

Chicken Hibachi Recipe: Juicy, Buttery & Restaurant-Style at Home

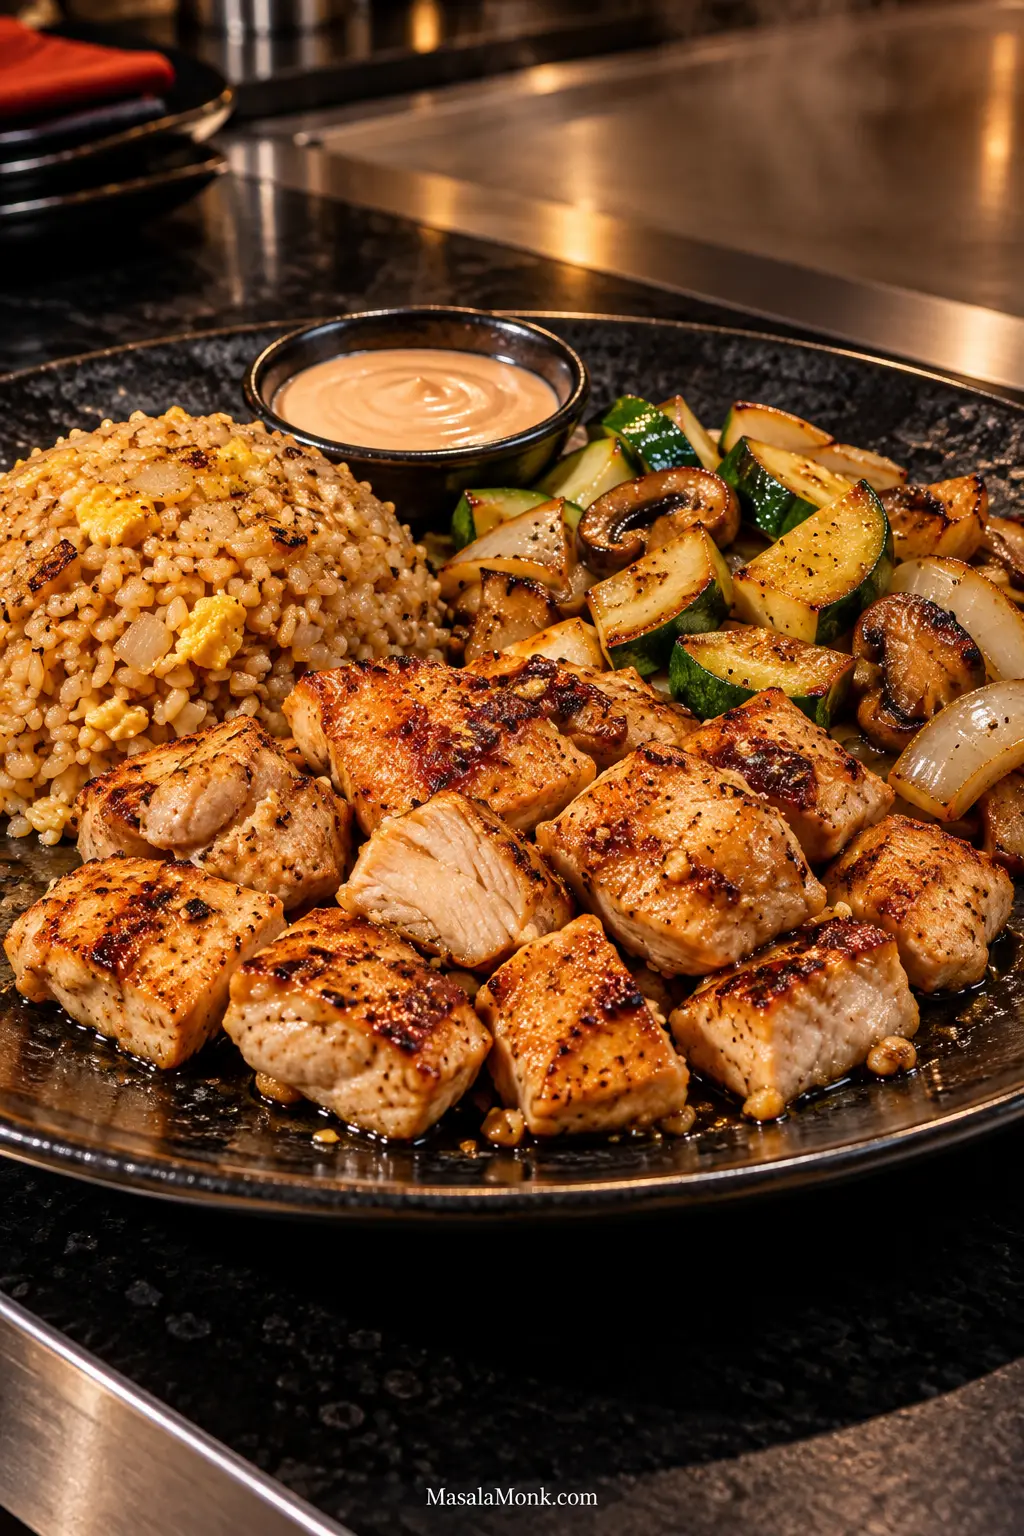
Finished chicken hibachi dinner with browned chicken pieces, fried rice, sautéed zucchini, mushrooms and onion, plus a small bowl of pale pink Yum Yum Sauce.

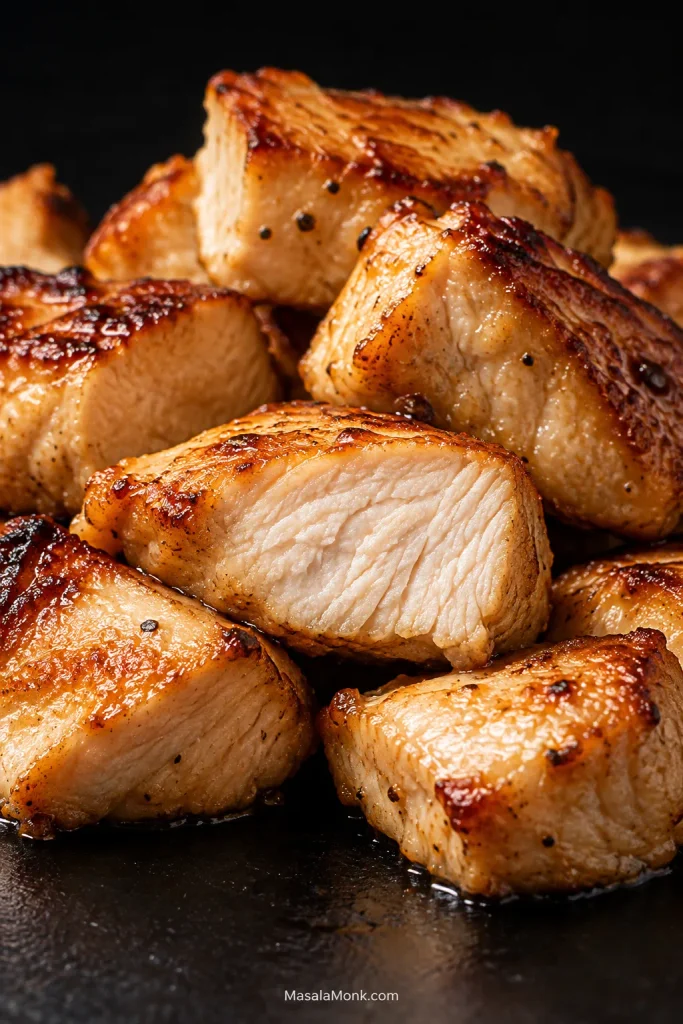
Good hibachi chicken should reach the table with browned edges, a juicy middle, buttery savory flavor, and enough garlic, black pepper, and lemon to keep every bite lively.

The smell is part of the appeal: chicken hitting hot metal, butter melting around garlic, and soy catching the heat for just a moment. You hear that lively sizzle before the plate ever reaches the table.

At home, the main challenge is not finding a secret marinade. It is giving the chicken enough hot surface to brown before anything wet reaches the skillet. A packed 12-inch pan does not have the open cooking area of the flat-top Japanese-steakhouse style most U.S. diners call hibachi—more technically, teppanyaki—so this recipe keeps the chicken in larger pieces for the initial sear and cooks it in sensible batches.

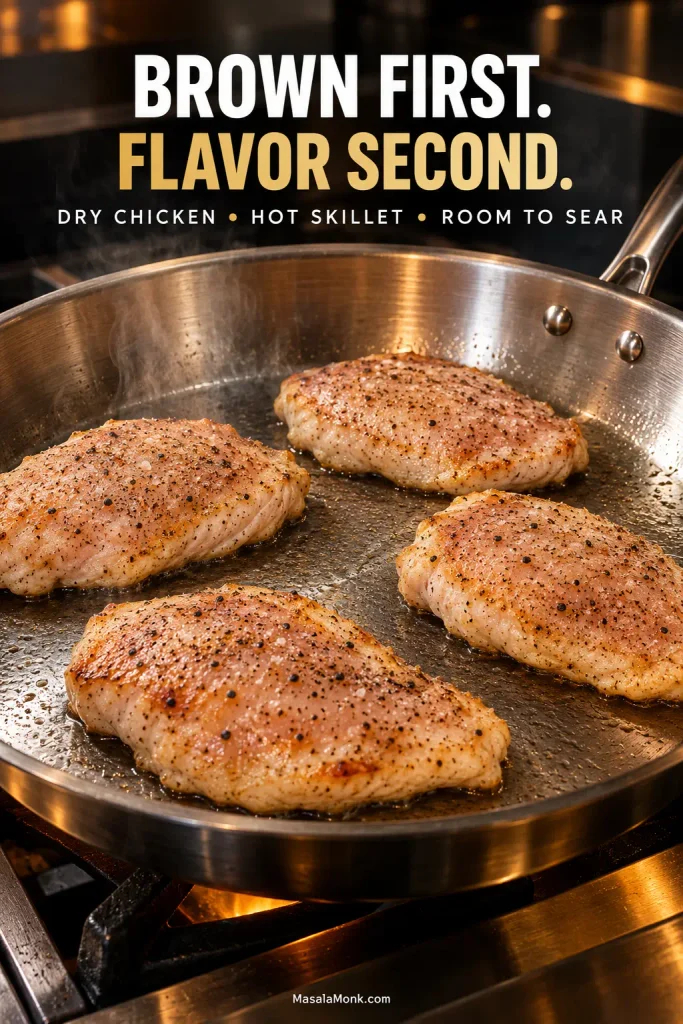
Brown First. Flavor Second.

Three things matter most here: dry chicken, a properly hot skillet, and enough room for the pieces to sear. Get those right and the rest becomes much easier.

Start with neutral oil, salt, and black pepper. Let the chicken develop real color before soy sauce or garlic butter reaches the skillet. The wet, flavorful ingredients come later, once the browning is already there.

Broad chicken breast cutlets spaced apart in a hot skillet with bare metal visible between them, illustrating dry chicken, high heat and room for searing.
Neutral oil handles the hardest sear; butter comes later, once its milk solids can brown aromatically instead of scorch.

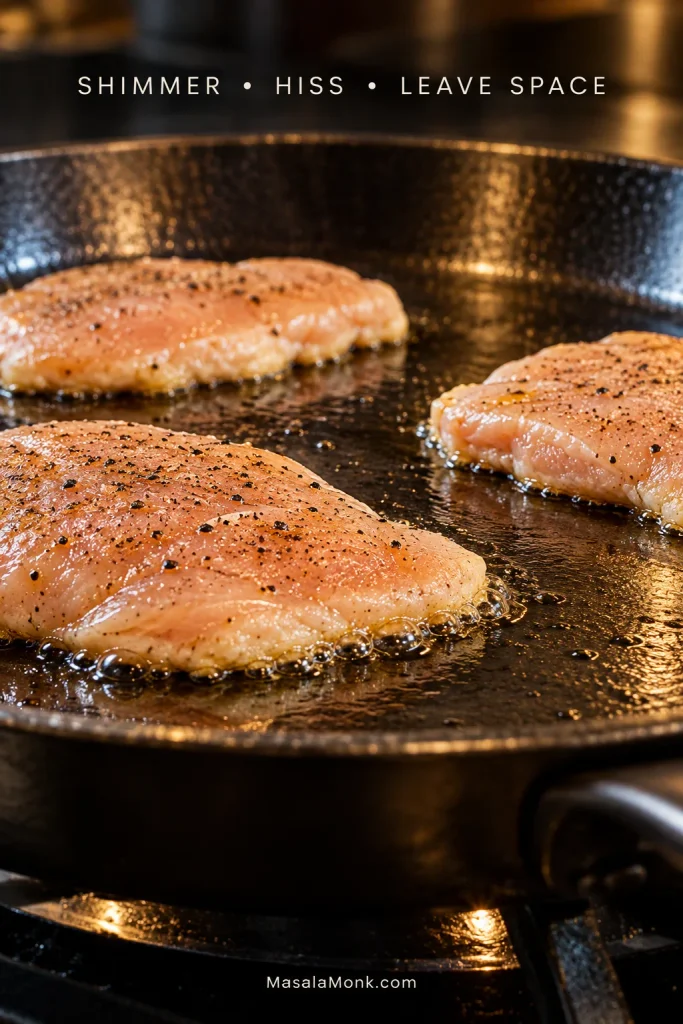
Listen to the pan. The chicken should hiss loudly when it touches the skillet. If that sound fades into wet bubbling and liquid gathers around the pieces, give the pan more space and heat before moving on.

Before the Pan Gets Hot

Four servings, one skillet, and no marinade required.

DecisionBest Default Here
ChickenBoneless, skinless breast for the closest steakhouse-style result
MarinadeNone required
PanWide 12-inch / 30 cm heavy skillet
Batch sizeHalf the chicken at a time in a typical 12-inch skillet
Flavor timingNeutral oil first; soy + garlic butter after browning
Doneness165°F / 74°C

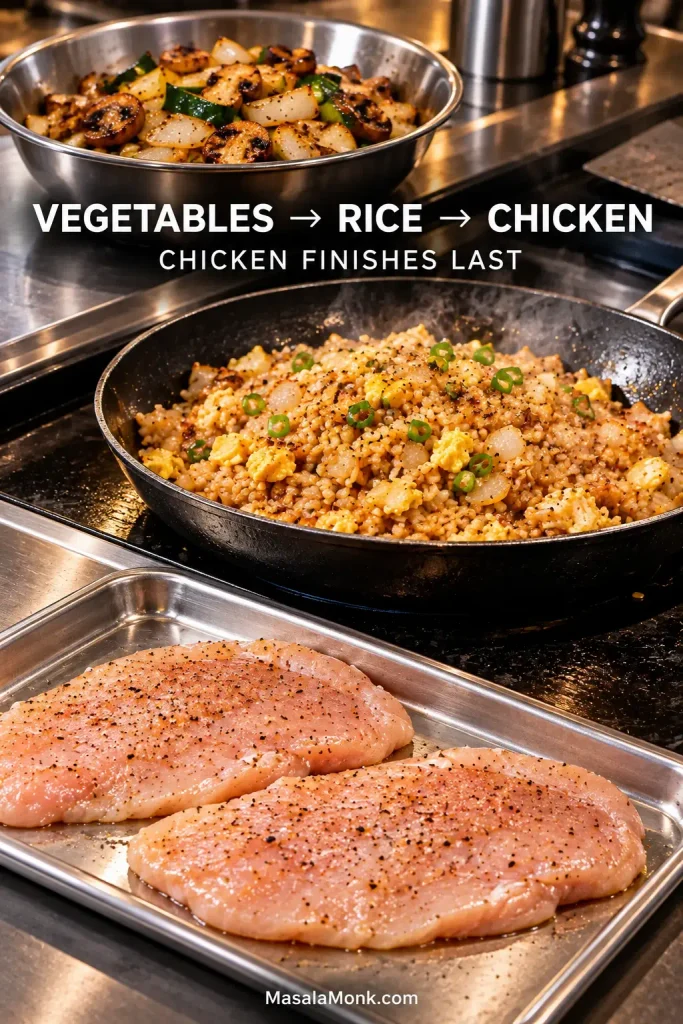
Making fried rice and vegetables too? Cook the vegetables first, rice second, and chicken last. Rice and vegetables tolerate a short, loosely covered hold much better than chicken breast does, so the chicken can reach the table while its browned edges are still hot and the center is juicy.

Chicken Hibachi Recipe

Yield4 servings
Prep Time15 minutes
Cook Time15–18 minutes
Total Time30–35 minutes
Chicken1½ lb / 680 g
Pan12-inch / 30 cm heavy skillet
Doneness165°F / 74°C

What you’re after is juicy chicken with browned edges, savory garlic-soy butter, and enough fresh lemon to keep the finish from feeling heavy.

Equipment

  • 12-inch / 30 cm cast-iron, carbon-steel, or heavy stainless-steel skillet
  • Instant-read food thermometer
  • Tongs or a thin spatula
  • Sharp knife and cutting board
  • Small bowl for the garlic-soy butter

For the Chicken

  • 1½ lb / 680 g boneless, skinless chicken breasts
  • 1½ to 2 tablespoons / 22 to 30 ml neutral high-heat oil, divided
  • ½ teaspoon / about 3 g fine sea salt (use ¼ teaspoon / about 1.5 g with regular soy sauce)
  • ¾ teaspoon / about 1.5 g finely ground black pepper

For the Garlic-Soy Butter

  • 3 tablespoons / 42 g unsalted butter, softened
  • 3 medium garlic cloves / about 9 g, finely grated or mashed
  • 1 tablespoon / 15 ml low-sodium soy sauce

For Finishing

  • 1 tablespoon / 15 ml low-sodium soy sauce
  • 1 tablespoon / 15 ml fresh lemon juice
  • ½ teaspoon / 2.5 ml toasted sesame oil, optional
  • 1 tablespoon / about 9 g sesame seeds, preferably toasted, optional

1. Mix the Garlic-Soy Butter

Before you heat the skillet, mix the softened butter, garlic, and 1 tablespoon / 15 ml soy sauce in a small bowl. Measure the finishing soy, juice the lemon, and have the thermometer and a clean plate nearby. Once cooking begins, things move quickly.

2. Thin, Dry and Season the Chicken

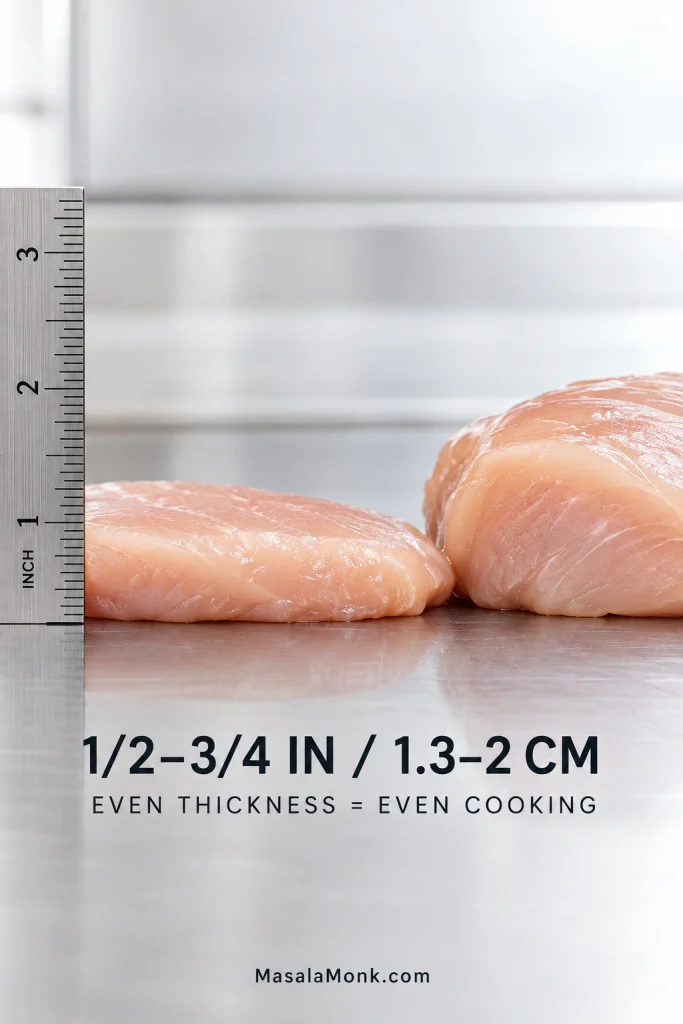
Slice very thick breasts horizontally into thinner cutlets or butterfly them. Aim for pieces ½ to ¾ inch / 1.3 to 2 cm thick across most of their surface. Lightly pound any much thicker areas.

Side-by-side chicken breast thickness comparison: a broad cutlet about one-half to three-quarters inch thick beside a much thicker whole breast section, shown with a ruler.
A ½–¾-inch cutlet gives you more flat contact with the skillet and less distance for heat to travel to the center.

Pat every surface thoroughly dry, then season both sides with salt and black pepper. Pick up a piece: the surface should feel dry, not slick.

Food-safety note: Wash your hands and thoroughly clean the knife and board that touched raw chicken, or switch to a clean set. The cooked chicken will be cut later.

3. Preheat the Skillet

Heat a heavy 12-inch / 30 cm skillet over medium-high until it is hot all the way across. Cast iron and heavy stainless steel usually need several minutes.

Add about half the oil, or enough to leave a thin film across the skillet. The oil should move easily and shimmer. Touch one edge of a chicken piece to the surface; an immediate lively hiss means the skillet is ready.

Thin chicken breast cutlets searing with open skillet space between them and small bubbles forming around the contact edges in a thin film of hot oil.
On a wide skillet, test more than the center. Every cutlet needs genuinely hot metal underneath it.

4. Sear the First Batch

Add half the chicken, leaving visible space between the pieces.

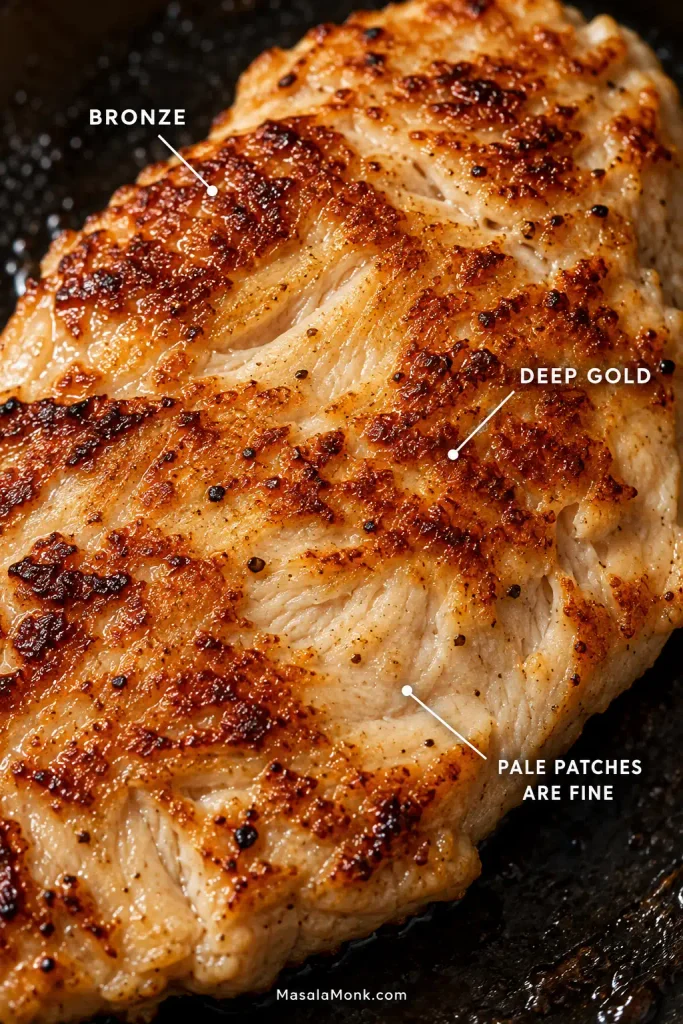
Leave the first side alone for 2½ to 3½ minutes. When you turn it, the underside should have patches of bronze and deep gold. Do not chase perfectly even color; those darker patches are exactly what you want.

Extreme close-up of skillet-seared chicken showing irregular bronze, deep-gold and lighter cooked patches, with labels identifying the different browning levels.
Pale ridges are normal. Judge the cutlet by its deepest contact browning and internal temperature, not by whether every bump turns uniformly golden.

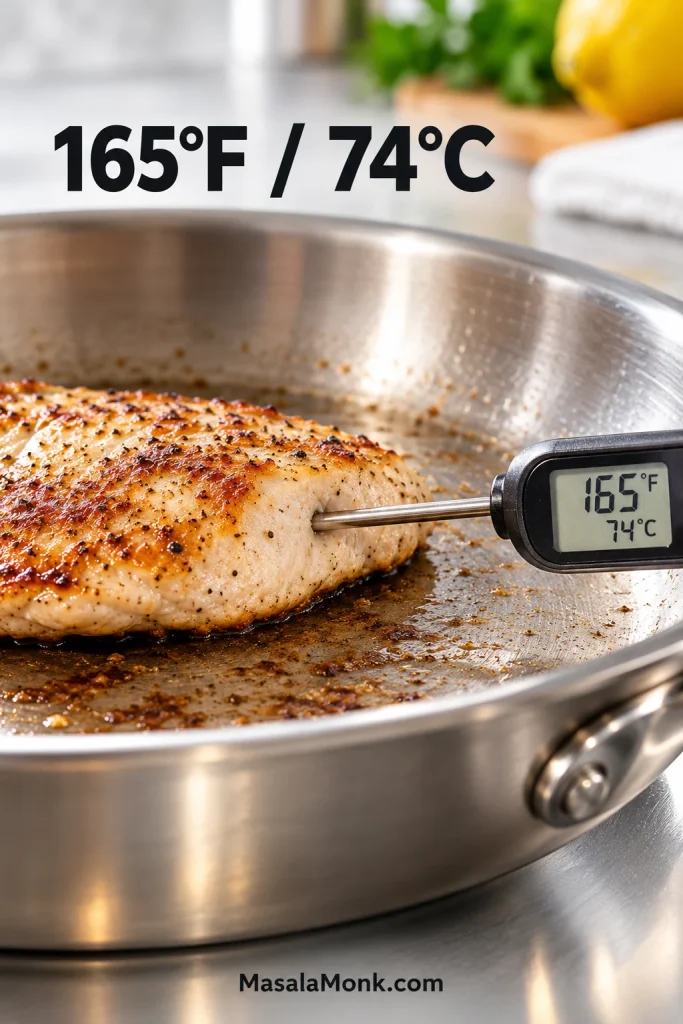
Flip and start checking after 1½ to 2 minutes. Insert the thermometer from the side so the probe reaches the center without touching the skillet; chicken breasts vary, so let the thermometer—not the clock—decide. Cook to 165°F / 74°C, the USDA safe minimum for poultry, then transfer the chicken to a clean plate.

Digital instant-read thermometer inserted horizontally into the side of a cooked chicken breast cutlet, with the display showing 165°F and 74°C.
For thin cutlets, slide the thermometer in from the side so the sensing tip stays centered without touching the skillet.

Leave it uncovered while the second batch cooks. A tight cover traps steam and softens the browned surface.

If liquid starts collecting around the chicken: stop thinking about sauce. Give the pieces more room and let that moisture evaporate until the loud sizzle comes back.

5. Cook the Second Batch

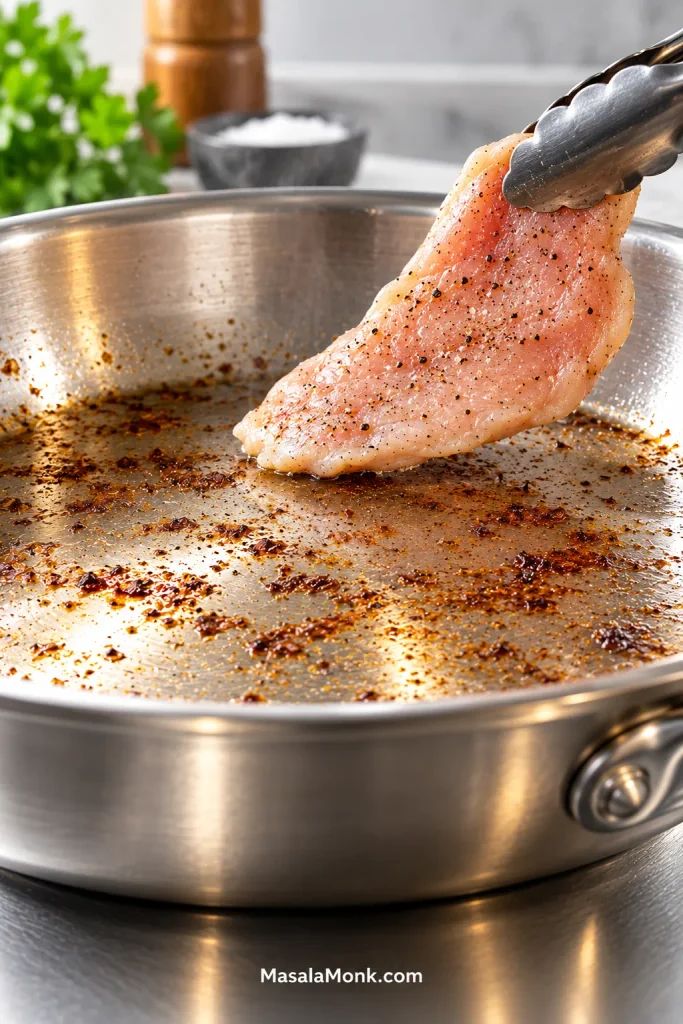
Before the remaining chicken goes in, give the skillet a moment to recover. Add a little more oil if the surface looks dry. You’ll know the heat has come back when the chicken hits the skillet with that same sharp sizzle.

Thin raw chicken breast cutlet held with tongs just above a mostly empty skillet containing browned fond and a thin hot oil film from the previous batch.
If batch one cooled the skillet, more oil will not fix it. Give the empty pan a moment to recover; when a test edge hisses sharply again, restore only the thin oil film and start the next batch.

Repeat with the remaining chicken, again cooking it to 165°F / 74°C, then move it to the clean plate.

6. Make the Garlic-Soy Finish

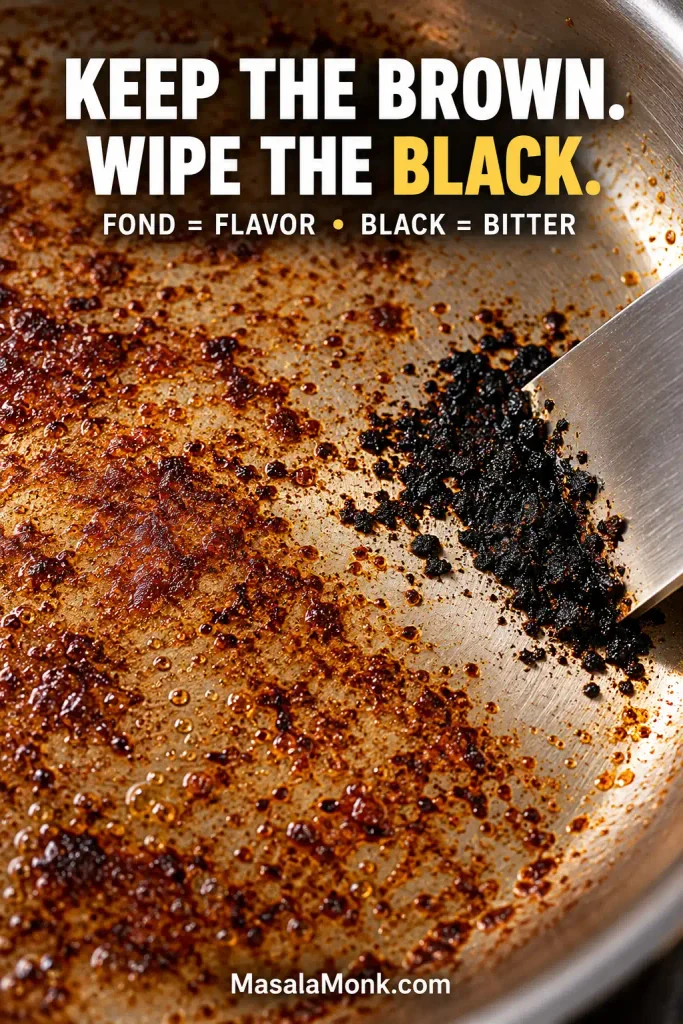
Lower the heat. Wipe out any blackened bits; leave the brown fond.

Add the garlic-soy butter and stir for 20 to 30 seconds, until the sharp raw-garlic smell softens. Now it starts smelling like hibachi.

Stir in the remaining soy sauce, then turn the burner off.

7. Cut and Toss Off Heat

While the second batch finishes resting, cut the first into bite-size pieces, about 1 inch / 2.5 cm. Once the second batch has rested for about 3 minutes in total, cut it too.

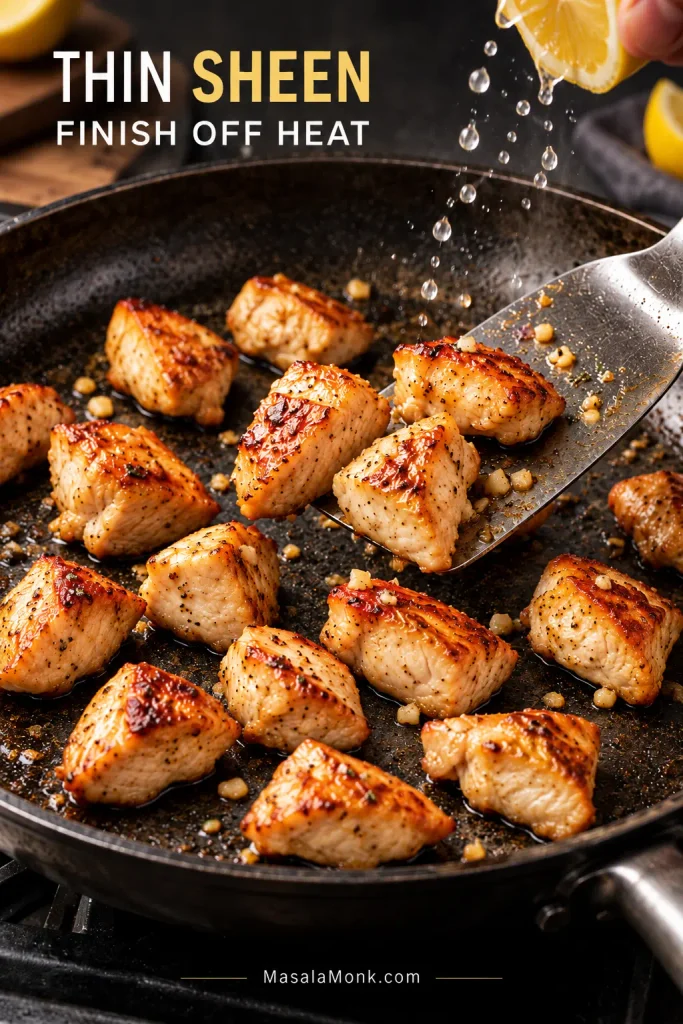
Return both batches and any juices on the plate to the skillet. Toss briefly, just until the garlic butter clings to the chicken in a thin sheen. With the burner off, the skillet is still hot enough to coat and warm the chicken without drying it out.

Bite-size browned hibachi chicken in a mostly dry skillet as lemon juice is squeezed over the pieces and a metal spatula lifts several from the pan.
Drag the spatula through the skillet: bare metal should stay visible behind it. If liquid floods the trail, the finish is turning into sauce.

8. Finish with Lemon and Sesame

Add the lemon juice and optional sesame oil, toss, then taste for salt. The lemon should sharpen the buttery soy flavor without taking over.

Scatter over the sesame seeds, if using, and get the chicken onto the plate while the garlic butter still clings to those browned edges.

What Good Hibachi Chicken Looks Like

Look for irregular patches of bronze and deep gold directly on the chicken. Cut into a piece and the center should still look juicy, while the outside carries a thin buttery sheen.

Close-up of browned hibachi chicken breast pieces, including one cut open to show a moist pale interior with visible cooked meat fibers.
Moist, distinct breast fibers are the proof; a chalky, tight interior usually means the chicken went too far.

The garlic should smell sweet and savory, with black pepper quietly in the background. Lemon keeps the butter from feeling heavy.

Most of all, the first flavor should still be browned chicken—not soy sauce.

Why Home Hibachi Chicken Turns Watery

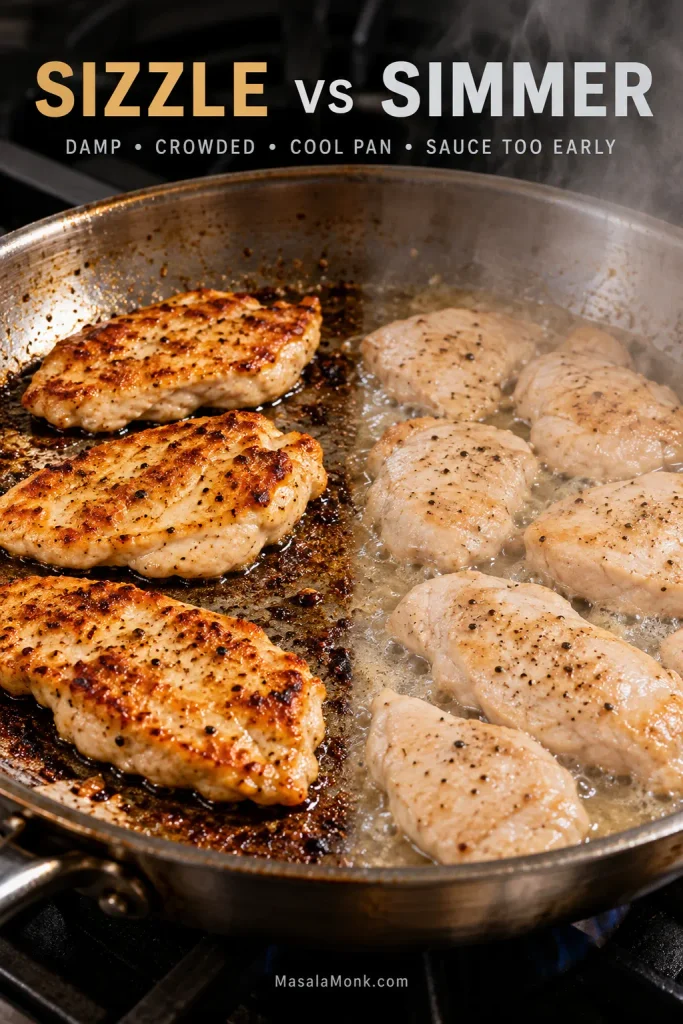
Hibachi chicken turns watery when moisture reaches the skillet faster than the heat can drive it away. Damp chicken, crowding, a pan that has cooled, partially frozen meat, and sauce added too early can all push the skillet from searing into steaming.
You can hear it happening. The sharp sizzle softens into wet bubbling, liquid appears between the pieces, and the chicken starts simmering. Meanwhile, the breast keeps cooking inside while the surface struggles to brown.

Comparison in one skillet: spaced chicken browning on a relatively dry surface beside crowded, paler chicken surrounded by bubbling released liquid.
Watch the bubbles. A good sear keeps tight activity close to the chicken where it meets the oil; broad bubbling through a visible pool means moisture is overwhelming the skillet and the chicken is simmering instead.

That is when another splash of soy can seem tempting. It brings more water and salt when the thing you actually need is heat and evaporation.

What to Do When You See the Puddle

Create more space. Let the liquid cook away. Increase the heat if your cookware permits. You’ll know the skillet is back on track when the sharp sizzle returns and the exposed chicken starts taking on color.

Save the soy and butter for later.

Butter, Soy, Garlic & Lemon: How the Flavor Comes Together

The familiar hibachi flavor comes from browned chicken, garlic butter, measured soy sauce, black pepper, and fresh lemon, added at different stages rather than all at once.

IngredientWhen It Goes InJob
Neutral oilBeginningHandles the high-heat sear
Black pepperBefore searingWarm background bite
Soy sauceAfter browningSalt + umami
Garlic butterAfter the searRichness + aroma
Fresh lemonOff heatBrightness
Toasted sesame oilOptional finishSesame aroma

Timing matters. Neutral oil can handle the hard sear. Butter and garlic arrive later, once the intense browning stage is over. Soy follows the color instead of getting in its way, while lemon stays fresh because it goes in at the end.

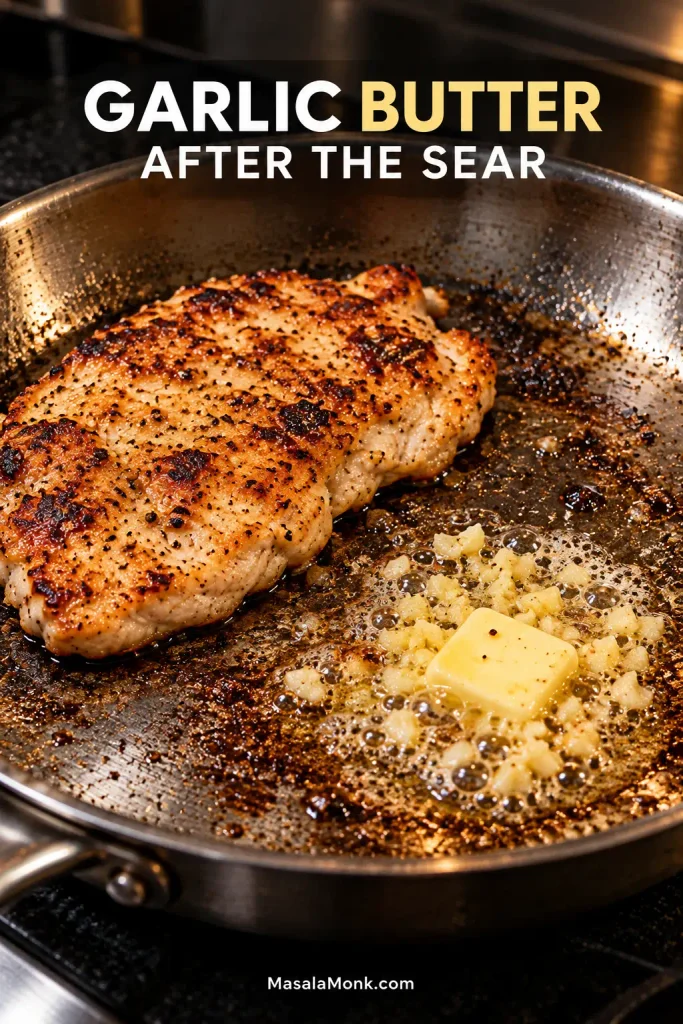
Browned chicken cutlet on one side of a skillet while a small amount of butter and minced garlic melts and bubbles over brown fond on the exposed pan surface.
The butter should foam over the brown fond while the garlic softens. If the garlic starts darkening, the pan is still too hot.

Taste before adjusting the seasoning. Saltiness and savory depth are not the same thing.

Toasted sesame oil needs restraint. Half a teaspoon / 2.5 ml is enough to perfume the whole batch. Use it as a finishing aroma; frying the chicken in it makes sesame dominate.

What Is Hibachi Seasoning?

There is no single universal dry “hibachi seasoning” blend. In this chicken recipe, salt and black pepper season the meat first, while butter, garlic and soy build the familiar savory steakhouse flavor during cooking.

Ginger appears in some hibachi-style chicken recipes and dipping sauces, and commercial hibachi seasoning blends can include it too. It is not essential to the garlic-butter profile used here.

Keeping the seasoning simple also makes problems easier to diagnose. Browning, garlic, acidity, and salt each do a different job.

Cut Before or After Cooking? Match the Method to the Pan

For a home skillet, sear larger thin pieces and cut them afterward. On a roomy Blackstone or flat top, raw bite-size pieces are much easier to spread out and brown without steaming.
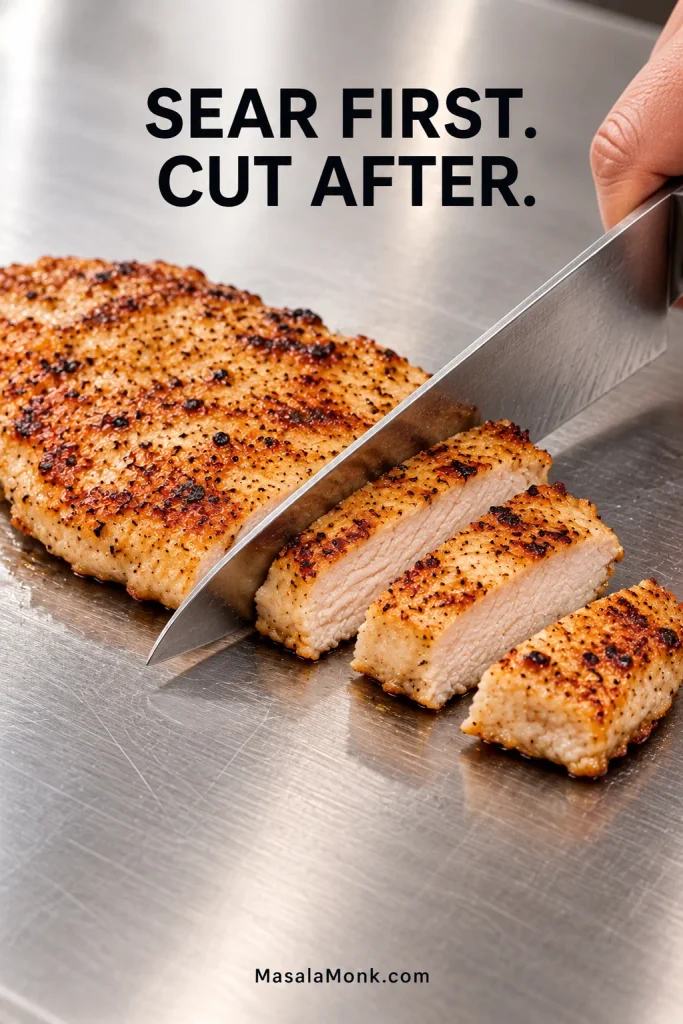
Broad cooked chicken breast cutlet being sliced with a chef's knife into bite-size pieces on a stainless surface, with moist cut interiors visible.
Let the cutlet rest briefly before slicing so less juice runs straight onto the board.
MethodBest Place to Use ItMain Trade-Off
Raw cubes firstBlackstone or very large flat topCan steam quickly in a small skillet
Thin pieces, then cutHome skilletLess like the restaurant chopping show
Sear, partly cook, chop, finishFlat top / experienced griddle cookingMore awkward handling of partly cooked poultry at home

Keeping the breasts larger gives them more uninterrupted contact with the skillet. That extra contact time helps the meat pick up color before released moisture cools the surface.

Does Hibachi Chicken Need a Marinade?

No. You do not need a wet marinade for this steakhouse-style method. Most of the flavor is built through seasoning, browning, garlic-soy butter, black pepper, and lemon.

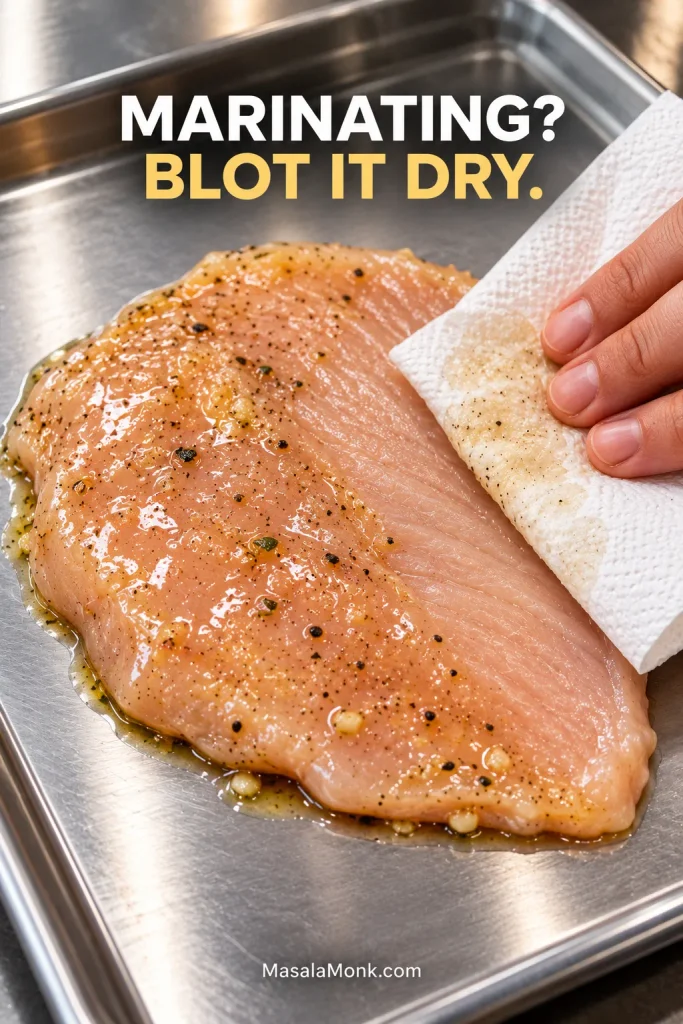
A wet marinade can make browning harder because the chicken carries more surface moisture into the skillet. Prefer marinated chicken anyway? Drain it well and blot it thoroughly before cooking.
Raw marinated chicken breast cutlet on a stainless tray as a white paper towel blots part of the wet surface, leaving the blotted area visibly drier.
Blot marinated chicken until the surface looks matte, not slick. You are removing free liquid, not undoing the seasoning.
Be especially careful with honey, sugar, or sweet bottled sauces. They can darken quickly on a hot skillet while the chicken underneath is still pale.

Chicken Breast or Thighs?

Use breast for the firmer, leaner Japanese-steakhouse-style bite in this recipe. Choose boneless thighs when you want richer meat and a little more forgiveness if the timing runs long.
Benihana currently describes its Hibachi Chicken as chicken breast with mushrooms and sesame seeds, so breast is a useful reference point for the style we are recreating here.
Thighs are especially forgiving on a Blackstone or when cooking larger batches. The same brown-first approach still applies.

Hibachi Sauces & Yum Yum Sauce

Choose the sauce by the kind of contrast you want beside the chicken. The chicken itself already has its soy-and-garlic-butter finish; these are dipping sauces or alternate flavor directions.

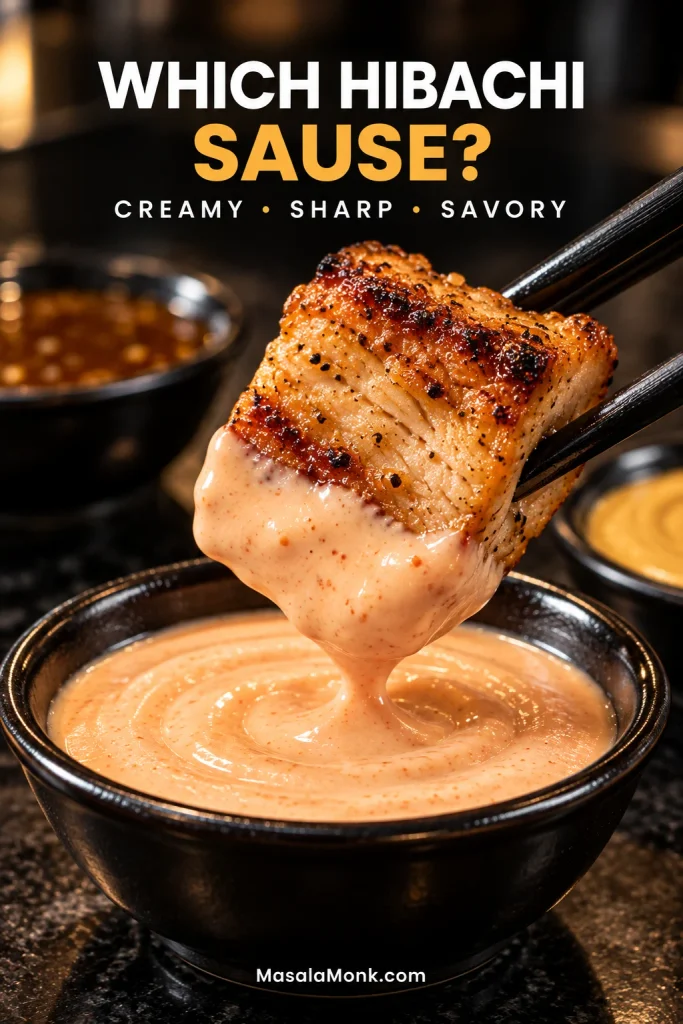
Creamy and cool: our Yum Yum Sauce gives you the familiar pale pink, mildly sweet steakhouse dip. That cold creamy sauce is particularly good beside chicken that has just come hot from the skillet.

Browned hibachi chicken bite held with dark chopsticks and dipped partway into pale pink Yum Yum Sauce, with the upper browned portion still visible.
Keep Yum Yum Sauce on the side so every browned bite gets as much—or as little—as you want.

Sharp and fresh: ginger dipping sauce is thinner and more acidic, so it cuts through buttery chicken without adding more richness.

Savory and punchier: mustard-style steakhouse sauce works especially well when you want a stronger companion for chicken or steak.

Sweet and glossy: use our homemade teriyaki sauce when you want the chicken to move in a sweeter, glaze-heavy direction.

If what you really want is sticky, sauce-forward chicken rather than a butter-led steakhouse finish, our Sesame Chicken recipe is the better direction.

Making Hibachi Chicken on a Blackstone

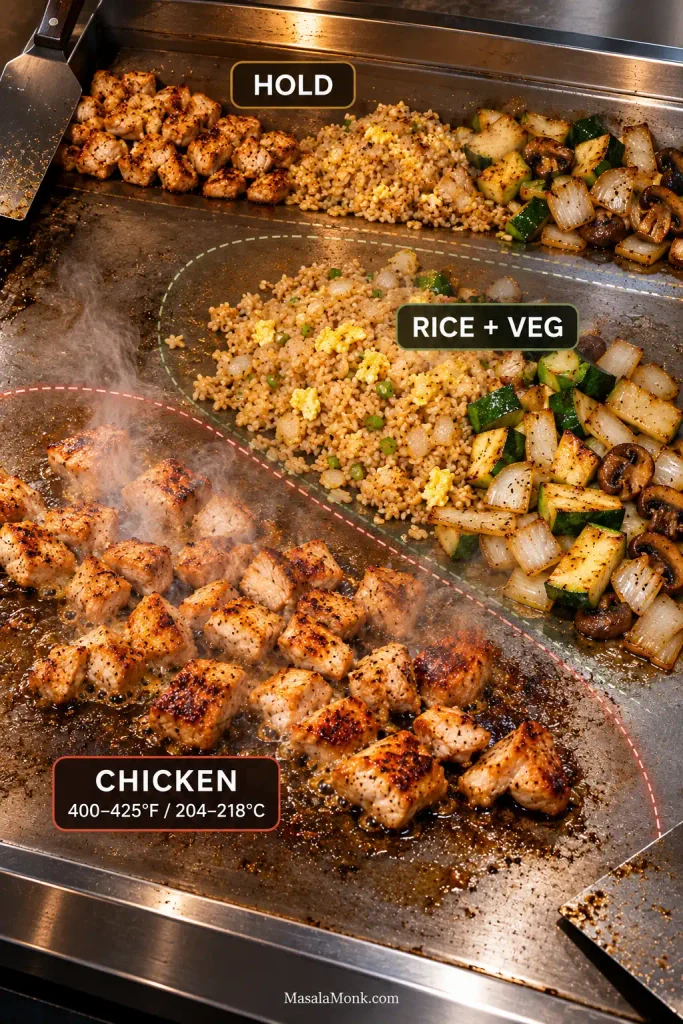
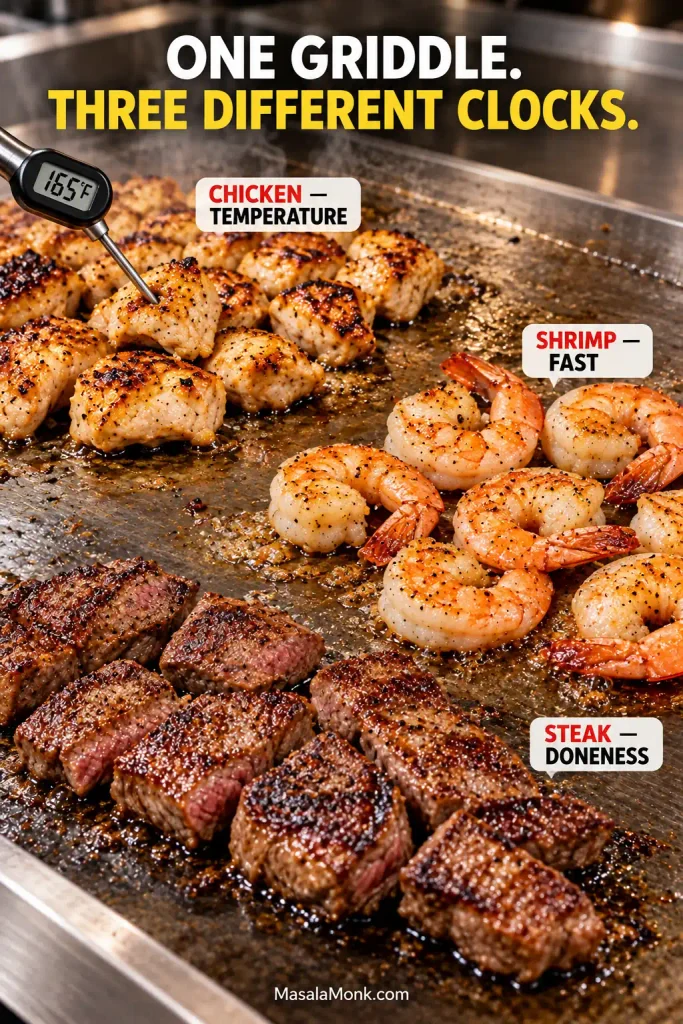
For Blackstone hibachi chicken, preheat the chicken zone to about 400–425°F / 204–218°C and keep separate areas for hard searing, vegetables or rice, and holding finished food.

The large griddle changes the main constraint. You have far more hot surface than a 12-inch skillet, so raw bite-size chicken can brown well as long as you actually spread it out. Larger breast pieces still work too.

Use the hotter area for the chicken. Keep vegetables and rice on their own medium-hot sections, with a cooler edge available for anything that finishes early.

Overhead Blackstone-style flat-top showing separate working areas for chicken at 400–425°F, rice and vegetables, and a cooler holding zone for finished food.
Treat the zones as working temperatures, not painted boundaries. Chicken should hiss immediately in the hot zone; rice and vegetables need their own working space, while finished food stays warm at the edge without continuing to brown aggressively.

A wide field of sizzling chicken is what you want. By contrast, a steaming mound in the middle of the griddle is not.

Brown the chicken before adding the garlic butter and soy. Once it reaches 165°F / 74°C, move it away from the strongest heat, coat it briefly, and finish with lemon.

That extra surface area is the advantage of the Blackstone: chicken, vegetables, and rice can occupy different zones instead of competing for the same patch of hot metal.

Hibachi Fried Rice & Vegetables: The Best Cooking Order

For a one-skillet hibachi dinner, cook the vegetables first, fried rice second, and chicken last. Keep the first two components loosely covered while the chicken cooks; they tolerate the short wait far better than chicken breast.

Cooked zucchini, mushrooms and onion held separately behind a skillet of fried rice, with thin raw chicken breast cutlets waiting on their own stainless tray for the final stage.
After the vegetables leave, let the pan dry before frying the rice; restore strong heat again before the chicken goes in.

Have everything cut and the cooked rice ready before the skillet gets hot. Once the first component starts cooking, this meal moves quickly.

Vegetables First

For four servings, start with 1 medium onion, 2 small zucchini, and 8 oz / 225 g mushrooms. Cook the onion and mushrooms first, then add the zucchini later so it keeps some structure.

Move the vegetables to a bowl and cover loosely. Cook mushrooms here, not beside the chicken during its initial sear; they release enough moisture to make chicken browning harder.

Fried Rice Second

Cold cooked rice works well because the surface is drier and the grains are firmer. “Day-old” is not magic, though. Rice that started undercooked can become unpleasantly hard after refrigeration and another round of high heat.

Fry the rice in a reasonably thin layer, season it lightly, then move it to a loosely covered bowl while the chicken cooks. Starting with uncooked rice? Our guide to cooking rice covers stovetop and rice-cooker methods before you move on to cooling and frying.

You want savory grains, not rice soaked in soy sauce.

Chicken Last

Finish with the chicken using the recipe above. By the time it is tossed through the garlic butter, the vegetables and rice should already be waiting.

The payoff is a plate with contrast: juicy browned chicken, buttery fried rice, mushrooms with real color, zucchini that still has some bite, and something cool and creamy on the side if you are serving Yum Yum Sauce.

Adding Shrimp or Steak

Cook each protein on its own clock. Shrimp, steak, and chicken have different doneness windows, so forcing them onto one timer is the easiest way to overcook something.

Keep juices and utensils that touched raw chicken away from shrimp, steak, and cooked food; switch to clean utensils once the chicken is cooked.

Flat-top griddle with separate areas of browned chicken and a thermometer, just-cooked pink shrimp, and browned steak pieces with pink centers.
Different proteins finish on different clocks. Separate zones let chicken, shrimp and steak reach their own doneness instead of forcing them onto one timer.

Chicken and Shrimp

Large shrimp on a properly heated griddle often need only 1 to 2 minutes per side. Watch for the flesh to turn opaque and curl loosely.

Finish most of the chicken cooking first, then cook the shrimp separately or add it much later on a griddle.

If shrimp becomes the main event rather than an add-on, our Shrimp Fried Rice gives it its own cooking window while using the same useful habits: dry surfaces, a properly heated pan, cold rice, and restrained sauce.

Chicken and Steak

Steak may be ready well before the chicken, depending on thickness and preferred doneness. Give it its own section of the griddle or cook it separately, then judge the beef and chicken independently.

Read the Pan: Hibachi Chicken Troubleshooting

When hibachi chicken goes wrong, the skillet usually tells you before the finished plate does. Listen to the sound, look at the surface of the chicken, and pay attention to what is collecting around it.

Close-up of a skillet with widespread brown fond beside a distinct black burned patch being scraped away while the brown residue remains.
Use both sight and smell. Brown fond is roasted and savory; truly burned residue turns sharp, acrid or smoky. Keep the brown, remove the black, and do it before butter can dissolve that bitterness into the pan.
What You See or HearWhat It Usually MeansWhat to Do
Pale chicken sitting in liquidWet chicken, cool skillet, crowding, or liquid added earlyCreate space and let the strong sizzle return
No sharp sizzle when batch two landsThe skillet has not recovered its heatWait before adding more chicken
Brown outside but dry insidePieces too small, uneven thickness, or too much cookingUse even cutlets and a thermometer
Dark sticky surface, pale chicken underneathSugar or sauce browned before the meatSear the chicken before adding sweet sauces
Salty but still flatSoy is replacing browning, garlic, pepper, or acidityStop adding soy and fix the missing layer
Bitter garlicGarlic hit high heat too earlyAdd it with the finishing butter
Blackened bits smokingBurned fond or garlicWipe them out before adding the butter
Sesame dominatesToo much toasted sesame oilUse it sparingly at the end
Everything finishes at different timesToo many components started togetherCook sequentially indoors or use separate griddle zones

Brown but Dry

Very small raw cubes can cook through before much crust develops. Thick uneven breasts create the opposite problem: the thin parts wait while the center catches up. Even thickness and a thermometer give you far more control.

Salty but Still Not Right

Do not add more soy. If the chicken is already salty, soy is not the missing ingredient. Check the sear, garlic butter, black pepper, and lemon.

If you already cook with MSG, a small optional pinch can deepen the savory flavor. It still cannot replace browning or rescue burnt garlic.

Dark Does Not Always Mean Seared

Honey, brown sugar, teriyaki sauce, hoisin, and sweet Japanese barbecue sauces can darken quickly on a hot skillet. A proper initial sear leaves dry bronze or deep-golden patches directly on the chicken. Sticky dark sauce over pale meat is a different result.

Storage & Reheating

For the best texture, reheat hibachi chicken gently in a skillet; the microwave works too when speed matters.

Following USDA food-safety guidance, refrigerate cooked chicken within 2 hours, or within 1 hour when the surrounding temperature is above 90°F / 32°C. Store it in a shallow airtight container and use it within 3 to 4 days.

For skillet reheating, use medium-low heat with a teaspoon of water or a small amount of butter if the chicken looks dry. Cover briefly if needed and reheat the leftovers to 165°F / 74°C.

Leftover browned hibachi chicken pieces being gently reheated and turned with a metal spatula in a stainless skillet, with a storage container blurred behind them.
Reheat in one layer and stop as soon as the center is hot; chasing a new crust only dries cooked breast meat.

For the microwave, use short covered intervals and stir between them. Stop as soon as the chicken is hot through so the smaller edge pieces do not spend several minutes drying out.

If you stored a full hibachi dinner, keeping dipping sauce separate makes reheating much easier. Rice and vegetables can be warmed alongside the chicken, while cold Yum Yum or ginger sauce stays cold.

Practical Hibachi Chicken FAQs

1. Can I double the recipe?

Yes, but keep roughly the same amount of chicken in each batch. Doubling the recipe should not mean doubling the amount crowded into the skillet.

2. Can I make it in a nonstick skillet?

Yes. Follow the manufacturer’s heat limits and preheat more moderately. The crust may be lighter than it would be in cast iron, carbon steel, or stainless steel, but the larger-piece method still works.

3. Can I cook the chicken from frozen?

Not for this method. Thaw it completely first. Partially frozen chicken releases extra water as it cooks and makes browning much harder to control.

4. What oil is best for hibachi chicken?

Use a neutral oil that handles fairly high heat, such as avocado, canola, grapeseed, or another neutral cooking oil you normally use for searing. Save strongly flavored oils and toasted sesame oil for lower-heat cooking or the finish.

5. Can I use tamari instead of soy sauce?

Yes. If you are avoiding gluten, choose a tamari specifically marked gluten-free because products vary. Sodium levels vary too, so keep the measured amount modest and adjust after tasting.

The Difference Is in the Order

Dry chicken. Hot skillet. Enough room for the pieces to sear. Get those three things right before you worry about sauce.

Then the payoff comes quickly: garlic butter hits the browned fond, soy brings the savory edge, and lemon wakes everything up at the end.

When it all comes together, the chicken reaches the plate bronzed around the edges, glossy with garlic butter, juicy through the middle, and bright enough that the richness never feels heavy.

That is the whole idea behind this chicken hibachi recipe: brown first, flavor second.

Posted on — Leave a comment

Beet Hummus Recipe: Creamy Roasted Beetroot Hummus

Wide bowl of vivid magenta beet hummus with smooth spoon swirls, a light olive-oil finish, silver spoon and blistered pita.

The color arrives first. A bowl of beet hummus can look almost impossibly pink. Yet the first spoonful should still taste recognizably like hummus: nutty tahini and chickpeas up front, with roasted beet underneath. Lemon, garlic and salt should keep everything lively rather than muddy or overly sweet.

This recipe uses enough beet to give the hummus real character without letting it take over. That’s especially useful if you love the color more than you usually love the earthy taste of beets. You should notice the beet, but chickpeas, sesame, lemon and garlic still need room in every spoonful.

The finished hummus should be glossy and creamy, with enough looseness to sweep across a plate. At the same time, it should still cling to warm pita without feeling heavy or pasty.

Close-up of charred pita holding an even coating of bright magenta beet hummus above a serving bowl on a golden-yellow background.
If beet hummus pulls away from pita in one heavy lump, it is probably still too stiff. A creamy batch leaves a smoother, more even coating.

Quick Answer: How Do You Make Creamy Beet Hummus?

For creamy beet hummus, roast a red beet until completely tender. Then blend 150 g cooked beet with 250 g very soft chickpeas, tahini, lemon, garlic, cumin and salt. Purée the beet first, add liquid gradually, and process until the hummus becomes glossy and softly spoonable.

For a fresh whole beet, roast at 400°F / 200°C conventional or 180°C fan. It is ready when a thin knife slides easily through the center. Let the garlic sit briefly with lemon and salt while the beet cools, then loosen the tahini before the chickpeas go in.

Already have cooked beetroot? Skip the roasting step and the hummus itself takes about 15–20 minutes.

Before You Blend

1. Weigh the cooked beet

Beetroot brings water, sweetness and earthiness as well as color, so two roots sold as “medium” can behave quite differently. Use 150 g cooked beet with 250 g cooked chickpeas as the starting balance here.

A larger roasted beet doesn’t all have to go into the processor. Save the extra for a roasted beet salad with feta and walnuts.

Cooked red beet and a larger portion of cooked chickpeas in metal vessels labeled 150 g cooked beet and 250 g cooked chickpeas.
Weigh the beet after cooking and peeling because roasting changes its weight. The raw beet on your counter is not the useful 150 g measurement.

2. Get the chickpeas softer than salad chickpeas

Press one between your thumb and forefinger. It should collapse almost immediately and smear easily. A firm or chalky center is one of the main reasons homemade hummus stays grainy.

Dried chickpeas work perfectly well. Cook them until very soft, drain, then weigh 250 g cooked chickpeas. MasalaMonk’s extra-creamy hummus with canned chickpeas goes deeper into chickpea softness, skins and processor technique.

Fingertips pressing a cooked chickpea into a soft smear against a white background, demonstrating a properly softened chickpea.
Once chickpeas smear this easily, peeling every skin becomes optional; for creamy hummus, tenderness usually matters far more than perfectly bare chickpeas.

3. Start cautiously with the water

A whole roasted beet may be fairly concentrated. Steamed, vacuum-packed and canned beetroot can be much wetter. Begin conservatively and let the processor run before deciding the hummus needs more water.

A mixture already moving smoothly around the blade needs no extra water simply because some is left in the measuring cup.

Roasted beet and wetter cooked beet beside measuring glasses showing about 30 ml water versus a much smaller 0–15 ml starting amount.
Packaged beet can hold moisture inside the flesh even after draining. Let the first blend tell you whether the hummus actually needs more water.

Beet Hummus Recipe: Creamy Roasted Beetroot Hummus

Creamy Roasted Beetroot Hummus

Roasted beet, very soft chickpeas, tahini and lemon come together in a hummus that is vivid, creamy and savory before sweet.

Hands-on
About 20 minutes

Roast
45–60 minutes

Total
About 1 hr 15–30 min

Yield: about 2–2¼ cups / 475–530 ml / roughly 520–580 g, depending on the beet and final water adjustment

Servings: about 8–9 appetizer servings of ¼ cup / 60 ml each

Equipment

  • Full-size food processor; a high-speed blender also works, although a small batch may need more scraping or tamper use
  • Digital kitchen scale
  • Baking tray or small covered roasting dish
  • Fine-mesh strainer or colander
  • Silicone spatula
  • Small saucepan if the chickpeas need softening

Ingredients

  • 1 medium-large red beet, around 225–275 g / about 8–10 oz raw. After roasting and peeling, weigh 150 g / 5.3 oz for the hummus.
  • 250 g / 8.8 oz drained cooked chickpeas, about 1½ cups. That is roughly the drained contents of a 15–15.5 oz / 425–440 g can.
  • 70 g tahini, about 4½ tablespoons, stirred smooth before measuring
  • 2 tablespoons + 2 teaspoons fresh lemon juice, 40 ml, divided
  • 1 small garlic clove, about 3 g, finely chopped
  • 4 g fine sea salt, about ¾ teaspoon depending on the salt, plus more if needed
  • ½ teaspoon ground cumin, about 1 g
  • 2 tablespoons cold water, 30 ml, plus another 1–2 tablespoons / 15–30 ml only if needed. For canned or particularly wet precooked beet, start with 0–15 ml instead.
  • ½ teaspoon baking soda, about 2–2.5 g, optional, only if firmer chickpeas need softening
  • 1–2 teaspoons extra-virgin olive oil, 5–10 ml, optional for serving
  • Optional finishing ingredients: sumac, sesame seeds, parsley, dill, a few whole chickpeas or finely diced roasted beet
Cooked beet, chickpeas, tahini, lemon, garlic, cumin, salt, water and a small olive-oil portion arranged on a red-orange studio surface.
Lemon and water do different jobs here: lemon brightens beet hummus, whereas water changes movement and texture without adding more acidity.

Ingredient checks before you start

Taste the tahini first. It should taste nutty and pleasantly sesame-rich. Stale, rancid or aggressively bitter tahini will carry that flavor into the finished hummus.

Prefer aquafaba? Reserve a little chickpea liquid before draining. Mild, unsalted aquafaba can replace some or all of the water, but plain cold water gives the most consistent result.

This recipe uses measured cold water rather than ice cubes so the hydration stays easy to control. That matters especially when the beet itself may already be wet.

For milder garlic: wrap one small unpeeled garlic clove loosely in foil and roast it alongside the beet. Begin checking around 20 minutes and remove it as soon as completely soft. Squeeze it from the skin and add it with the beet. Skip the raw-garlic rest; add the 30 ml lemon juice and 4 g salt with the tahini in Step 6 instead.

Method

Prepare the beet, chickpeas and garlic

  1. Roast the beet. Heat the oven to 400°F / 200°C conventional or 180°C fan. Scrub the beet and trim away the leafy top without cutting deeply into the root. Roast covered or loosely wrapped. A medium-large beet usually needs 45–60 minutes and is done when a thin knife slides through the thickest part with little resistance.
Thin knife inserted through the thick center of a roasted red beet on a metal tray, exposing moist, fully cooked ruby-red flesh.
Test the beet through its thickest section. The outer flesh can feel tender while a firm center still leaves harder pieces in the purée.
  1. Soften firm chickpeas while the beet cooks. Chickpeas that already crush almost effortlessly can go straight into the recipe. Cover firmer chickpeas with fresh water by about 1 inch / 2–3 cm. Simmer them with ½ teaspoon / about 2–2.5 g baking soda for 10–15 minutes. Drain and rinse extremely well once very soft.
  2. Rest the garlic with lemon and salt. Combine the chopped garlic with 2 tablespoons / 30 ml lemon juice and the 4 g salt. Leave it for about 10 minutes while the beet cools. The brief acidic rest softens some of raw garlic’s harsher edge.
  3. Peel and weigh the beet. Once comfortable to handle, rub or peel away the skin. Cool running water or a paper towel can keep some of the pink staining off your fingers and cutting board. Cut the beet into chunks and weigh 150 g / 5.3 oz.

Build the beet hummus base

  1. Purée the beet first. Process the measured beet for 30–45 seconds, until finely broken down, then scrape the bowl.
Transparent food processor holding a shallow layer of vivid red beet purée around the central blade before other hummus ingredients are added.
The beet-only purée can look denser than the finished hummus. Do not judge the final creaminess before tahini, chickpeas and controlled hydration join it.
  1. Loosen the tahini. Add the rested garlic-lemon-salt mixture, tahini and the starting water. Fresh roasted beet gets 2 tablespoons / 30 ml; canned or particularly wet precooked beet should begin with only 0–15 ml. Process for about 45–60 seconds, scraping as needed, until the mixture looks smooth and creamy.
Thick beige tahini pouring in a slow ribbon into vivid beet purée inside a transparent food processor.
Pale tahini marbling is temporary. Process until it disappears into the beet base before adding chickpeas and asking the machine to move a heavier mixture.
  1. Add the chickpeas and cumin. Process for 2 minutes, scrape the sides, bottom and area around the blade, then process for another 2 minutes. The mixture should eventually move continuously around the blade rather than sitting in a heavy ring around the bowl.
Two processor views compare beet hummus stuck in a high outer ring with smoother hummus folding inward toward the central blade.
Scrape the processor before reaching for more water. Hummus stranded on the wall may simply need returning to the blade before you diagnose it as too thick.

Fine-tune texture, flavor and finish

  1. Check the texture. Heavy hummus that still struggles to circulate can take another 1 tablespoon / 15 ml cold water. Process for at least 30 seconds before deciding whether it needs the final tablespoon. A soft, glossy batch needs nothing more.
Nearly smooth beet hummus in a food processor as water pours from a small graduated cup marked at 15 ml.
After adding 15 ml water, give the processor time to redistribute it before judging again. The blade area loosens before the entire batch catches up.
  1. Taste and adjust. Check the salt first. If the bowl still seems dull, overly sweet or strongly earthy, add some or all of the remaining 2 teaspoons / 10 ml lemon juice. Good flavor with a stiff texture calls for water rather than more acid.
  2. Serve. Spoon the hummus onto a shallow plate or bowl and sweep the back of a spoon through the surface. Finish with olive oil and any garnishes you like.

What should the finished hummus feel and taste like? A spoon dragged through the bowl should leave a soft furrow that relaxes slightly at the edges. Chickpea and tahini should arrive first, followed by roasted beet, with lemon cleaning up the finish. It should not taste sugary, aggressively earthy or sharply acidic. Once it tastes good and moves like this, stop adjusting it.

Macro view of smooth magenta beet hummus with one shallow spoon channel whose rounded edges begin to soften inward.
Check the furrow while the hummus is freshly blended. Chilling firms chickpeas and tahini, so a well-balanced batch can look considerably thicker later.

Freshly blended, the hummus is at its softest and most vivid. Spread it onto a plate while the pink is bright, then make a few loose spoon swirls across the surface. Let the texture look as generous as it feels.

Why this sequence works

Puréeing the beet first prevents larger pieces from surviving in the finished hummus. Meanwhile, the garlic gets time to mellow in lemon and salt. Loosening the tahini before the chickpeas arrive also helps the mixture move more freely. Very soft chickpeas matter more here than individually peeling every skin. Once a chickpea smears easily between your fingers, peeling is optional for this recipe.

Choose Your Beet: Fresh Roasted, Precooked or Canned?

A fresh whole roasted beet gives the most control over sweetness, flavor and moisture. However, beet hummus does not depend on starting from a raw root. Precooked beet can turn this into a much faster recipe.

Beet you haveWhat to expectBest adjustment
Fresh whole roastedSweet, concentrated beet flavor; tender and juicy without browned edgesUse the main recipe as written
Cubed roastedTender centers with darker roasted edges and stronger roasted notesCook until completely tender; weigh 150 g afterward
Air-friedRoasted edges without the long whole-beet cookCut into roughly 1-inch / 2.5 cm pieces and air-fry around 390°F / 200°C until completely fork-tender. Begin checking around 12–15 minutes; many batches need roughly 15–20 minutes.
Steamed or pressure-cookedVery tender, with less roasted character and often more moistureUse 150 g, dry the surface and begin with little or no added water
Vacuum-packed cooked beetConvenient, tender and often a little wetter; sweetness varies by brandPat dry, use 150 g and begin with little or no added water
Plain canned beetSoft, usually wetter and sometimes milderDrain and pat dry, use 150 g and begin with little or no added water
Pickled beetAlready acidic and often sweet and saltyNot a direct swap; its vinegar, salt and often sugar throw off this recipe’s lemon and seasoning
Three beet preparations on stainless steel: relatively dry roasted beet, glossy wet precooked beet and sliced pickled beet in brine.
Think about moisture and acidity, not just packaging: roasted, vacuum-packed and canned beets can all work, but pickled beet changes the seasoning equation too.

Can I use raw beet for beet hummus?

This recipe is built around tender cooked beet. Raw beet is much firmer and earthier, so 150 g raw beet is not a direct substitute if you want the same creamy texture.

Can I use canned beets for beet hummus?

Yes—use 150 g plain canned beet, drain and pat it dry, and begin with only 0–15 ml water. Process the hummus first, then add more water by the tablespoon only when it actually needs loosening.

Plain canned red beets draining through a stainless sieve beside drained beet pieces and a small 0–15 ml water measure.
Use plain canned beet rather than pickled beet; vinegar, added salt and sometimes sugar can throw off the lemon-and-seasoning balance of beet hummus.

Ready to blend? Return to the full beet hummus recipe ↑

Adjusting Beet Flavor, Sweetness and Color

This recipe deliberately leans toward hummus with beet in it rather than a beet dip built around chickpeas. That’s an intention, not a universal rule. A sweeter, darker and more beet-forward bowl can be excellent too.

Want more beet flavor? Add cooked beet 15–20 g at a time, blend and taste. The bowl gets sweeter, darker and usually a little softer as the beet increases.

Two beet hummus bowls compare a brighter recipe target with taller ridges and a darker more-beet version with lower, softer ridges.
After adding more beet, retaste salt and lemon before adding water; the extra beet may already have softened the hummus while muting its seasoning.

Has the beet taken over? More chickpeas pull the flavor back toward classic hummus. A little tahini restores richness and sesame flavor too, but stop before the sesame starts taking over.

Texture good but flavor flat? Taste for salt first, then lemon. Water loosens hummus; it does not make a dull bowl taste brighter.

Plain hummus already sitting in the refrigerator can be turned pink the same way. Blend in a small amount of cooked beet, taste, then decide whether it needs more. There is no advantage to committing an entire beet at once.

When the beet tastes too earthy

Some beets simply taste earthier than others, and some people notice that flavor much more strongly. Salt often helps first; a little lemon can brighten a bowl that still tastes dull. If beet still dominates after the seasoning is right, add more chickpeas. A little tahini can help too, rather than another pile of garlic.

Something cold and sharply dressed beside the hummus can change the whole plate too. A crisp cucumber salad with vinegar, dill and onion brings cool crunch against the creamy beet.

When the color is softer than expected

Individual beets vary in pigment. Cooking method, beet quantity and the amount of pale chickpea and tahini around them all affect the final shade. Red beet gives the familiar pink-to-magenta hummus; golden or striped beets work too, but naturally produce a different color.

Good flavor and texture matter more than matching a photograph. A bowl that lands closer to rose than neon pink may need no correction at all.

Two matching bowls of smooth beet hummus on white, one soft rose-pink and the other vivid natural magenta.
Paler color does not automatically mean the bowl needs more beet. Increasing beet also changes moisture and flavor, so judge the hummus by taste and texture first.

Still not quite right? Go straight to Beet Hummus Troubleshooting → for texture and flavor fixes.

Beet Hummus Troubleshooting

Not every batch needs correcting. If the hummus tastes good and spreads the way you like, small differences from the target are simply variation. Start troubleshooting only when the flavor or texture actually gets in the way of enjoying it.

Taste before changing two or three things at once. Sometimes a little more salt is all the bowl needs; adding lemon, tahini and water together only makes the result harder to read.

Texture problems

ProblemCheck firstBest first move
Too thin or runnyWet beet or too much added waterBlend in more chickpeas first; a little tahini can add body too
Too thick or pastyDry chickpeas, too little water or refrigerator chillAdd water 1 tbsp / 15 ml at a time and process
GrainyFirm chickpeas, short processing or poor circulationSoft chickpeas: add a little water and process longer. Firm chickpeas cannot be fully rescued after blending.
Blender will not circulateBatch too small or mixture too dryStop, scrape and add the minimum water needed to get it moving—or use a food processor
Very firm after chillingNormal refrigeration effectLet some of the chill come off, stir, then loosen 1 tsp / 5 ml at a time if needed

Flavor problems

ProblemCheck firstBest first move
BitterTahini, harsh raw garlic or poorly rinsed chickpeas after baking soda; bitterness after plating may come from the finishing oilWork out where the bitterness is coming from before adding more lemon
Too sour or sharpToo much lemon juiceBlend in more chickpeas first; add a little tahini if the bowl then tastes too lean
Soapy or alkalineToo much baking soda or poor rinsingMild: blend in more chickpeas, beet and tahini. Strong: remaking the batch usually tastes better.
Too earthyBeet amount, then seasoningTaste for salt and lemon; add more chickpeas if beet still dominates
Too sweetBeet-heavy mixtureSalt and lemon first, then more chickpeas if needed
BlandSaltAdd a small pinch, mix well and taste before reaching for anything else
Too garlickyA large or particularly pungent raw cloveBlend in more chickpeas, beet and tahini rather than trying to cover the garlic with more acid
Tastes mostly of tahiniToo much or very strong tahiniAdd more chickpeas and a little beet, then retaste before changing the lemon
Barely tastes of beetLow beet amount or too much pale baseAdd cooked beet in small weighed increments

A bitter batch

Taste the tahini separately if the jar is still nearby. Then consider the garlic or whether chickpeas softened with baking soda were rinsed thoroughly. Bitterness that appeared only after serving points toward the finishing oil. More lemon is not an automatic cure; sourness layered over bitterness leaves you with two problems instead of one.

Hummus that stays grainy

Crush a chickpea between your fingers. A soft chickpea may respond to a little more water and another minute or two in the processor. By contrast, a genuinely firm center will not become creamy through endless processing once everything has already been blended.

That batch is still usable—serve it a little more rustic and soften the chickpeas further next time. Extra oil can make grainy hummus richer while leaving it just as grainy.

Matching beet hummus samples compare a rough, visibly grainy spoon surface with a smooth, creamy spoon surface under identical lighting.
Surface shine is not the same as smoothness. Drag a spoon through grainy hummus and the fine chickpea particles remain visible beneath any added oil.

Tahini and Other Substitutions

Can I make beet hummus without tahini?

Yes, but tahini contributes sesame flavor, richness and body, so removing it changes more than taste alone. When allergies are not an issue, a mild unsweetened nut or seed butter can replace some of that richness. However, the finished hummus will taste different.

You don’t need olive oil in the hummus itself. Tahini provides the richness; water controls the texture. The finishing drizzle is optional, and the recipe as written is naturally vegan.

Making it sesame-free

For a sesame allergy, choose a substitute the person eating it can safely have. Another nut or seed butter is not automatically safe simply because it isn’t sesame. Thick plain Greek yogurt is another creamy option when dairy is suitable, although it makes the dip tangier and no longer vegan.

Want the beet dip without chickpeas?

You can absolutely make one, but the proportions need rebuilding rather than simply deleting the chickpeas. Beet-and-tahini, beet-and-walnut, yogurt-based and white-bean dips all behave differently from chickpea hummus.

If you’re building a larger mezze spread, roasted red pepper and walnut muhammara makes a good second dip. Its smoky pepper and walnuts bring something completely different beside the cool beet hummus.

What to Serve with Beet Hummus

Beetroot’s mild sweetness is particularly good beside warm bread, crisp vegetables, fresh herbs and something salty or pickled. For simple scooping, soft homemade pita bread is hard to beat.

  • Cucumber, radish, carrots, celery, sweet peppers or snap peas
  • Olives, pickled vegetables and fresh herbs
  • Warm flatbread or crisp pita chips
  • Wraps, sandwiches and toast
  • Grain bowls and salad plates
  • Roasted vegetables or vegetable fritters

Crisp homemade falafel adds hot, crunchy contrast against the cool, smooth hummus.

A parsley-heavy lemony tabbouleh salad brings the opposite kind of contrast: herbs, acidity and chopped-vegetable crunch.

Put the pink hummus beside green tabbouleh, golden falafel and warm pita and most of a mezze table is already there.

Large bowl of bright beet hummus served with green tabbouleh, golden falafel, blistered pita, pickled vegetables and lemon.
For the best contrast, let chilled beet hummus lose some of its chill while pita and falafel stay warm. The temperature difference makes the mezze feel livelier.

Thicker hummus works especially well spread inside pita, layered into a sandwich or spooned underneath roasted vegetables. For something more substantial, try it with roasted cauliflower and potatoes and finish the plate with herbs and lemon.

Browned roasted cauliflower florets and golden potato pieces resting on a broad layer of magenta beet hummus with parsley and lemon.
Keep beet hummus slightly thicker for a vegetable plate. Hot roasted cauliflower and potatoes will gently warm and loosen the surface as they sit.

Serve the hummus straight from the processor if you like it at its loosest and most aromatic. After refrigeration it becomes denser on the spoon. Giving it 15–30 minutes out of the fridge before serving brings some of that softness and aroma back.

Making it ahead? Jump to storage and freezing → for refrigeration time, color changes and freezing guidance.

Make Ahead, Storage and Freezing

For a conservative home-kitchen rule, keep beet hummus refrigerated for about 3–4 days at 40°F / 4°C or below. That is consistent with FoodSafety.gov’s cold-storage guidance for cooked leftovers. Transfer it to a clean airtight container and refrigerate promptly.

The beet itself can be roasted earlier in the day or the day before. Let it cool enough to handle, then refrigerate it promptly in a covered container. Once the beet is ready, the hummus itself takes about 15–20 minutes.

Beet hummus may deepen or darken slightly in the refrigerator; that color change alone does not mean it has spoiled. Stir before serving. After some of the chill has come off, check the texture again. If it still feels too stiff, loosen it with water just 1 teaspoon / 5 ml at a time.

Two matching clear containers of beet hummus in a refrigerator, with the fresh sample brighter pink and the chilled sample slightly darker and firmer.
Date the container rather than judging safety by color alone: beet hummus can darken after chilling, while refrigeration time and temperature matter far more.

Can you freeze beet hummus?

Yes, although the texture can change. Freeze small portions in airtight containers, thaw overnight in the refrigerator, then stir or briefly reprocess. Hummus that feels heavier after thawing can take a teaspoon or two of water before blending again. For the glossiest texture and brightest presentation, fresh or simply refrigerated hummus is better.

Once the hummus is smooth, softly spoonable and savory, it is ready. Beet should taste like part of the dish rather than the whole story.

Back to top ↑

Posted on — Leave a comment

Potatoes Au Gratin Recipe: Creamy, Cheesy & Foolproof

A spoon lifts a steaming portion of golden potatoes au gratin from a shallow dark red casserole, revealing thin potato layers coated with creamy sauce beneath a deeply browned cheese crust.

A good spoonful of potatoes au gratin breaks through a deeply browned top and lifts tender layers with silky cream caught between them. The potatoes still hold their shape, the sauce clings, and the space left by that first serving does not immediately flood with thin cream.

The frustrating part is that gratin can look finished before it actually is. Cheese colors quickly; a stack of potatoes takes longer. A beautiful top can hide a firm middle, and adding more cream does not automatically make the finished dish creamier.

This from-scratch potatoes au gratin recipe uses Russets sliced to ⅛ inch (3 mm), a short simmer in garlic-thyme cream, Gruyère and Parmesan, then a covered bake until the center is tender before the final browning.

The timer helps. The potatoes get the final say.

Jump To

Before You Slice the Potatoes

For This GratinUse
PotatoRusset
Slice thickness⅛ inch / 3 mm
Baking dishShallow 9 × 13 in / 23 × 33 cm, about 3 qt / 2.8 L
Oven350°F / 175°C conventional / 160°C fan
Oven rackCenter
Rest before serving15 minutes

Slice thickness is only half of the story. Even perfectly sliced 3 mm potatoes cook more slowly in a deep casserole because the center takes longer to heat through. If your dish is noticeably smaller than 9 × 13 inches, move some potatoes to a second dish rather than piling them higher.

Two dark red casseroles compare a shallow potato gratin with a deeper stack; on-image text says deeper stacks cook more slowly at the center.
Compare the finished stack depth, not just pan capacity. Similar-volume dishes can create very different potato heights, and the taller stack usually needs more covered time at the center.

A mandoline makes those thin slices easy to repeat, but use the hand guard; a cut-resistant glove adds another layer of protection. Alternatively, a sharp chef’s knife works too.

Put the casserole on a rimmed sheet pan before it goes into the oven. Bubbling cream is much easier to clean from a tray than from the oven floor.

Potatoes, Cream and Cheese

Russet or Yukon Gold?

Russets are the better fit for this method because starch released from their cut surfaces helps the cream gain body while the layers soften. Yukon Golds work too, but stay firmer and more defined.

You can taste the same contrast in our creamy mashed potatoes, where Russets turn out lighter and Yukon Golds naturally stay denser and more buttery.

Why the Potatoes Go Into the Cream First

The short stovetop simmer starts cooking the potatoes and brings some of their surface starch into the cream, so the sauce begins gaining body before the casserole reaches the oven.

Don’t rinse the slices. We want that starch here.

Heavy cream brings richness and enough fat for a smooth sauce, while a smaller amount of whole milk keeps it from feeling quite so rich. Replacing all the cream with low-fat milk would give you a much thinner result because there is no roux to compensate.

Gruyère for Melt, Parmesan for the Top

Gruyère has enough nutty, savory character to flavor a whole pan of potatoes without overwhelming them, and it melts smoothly into the sauce as the gratin bakes. Parmesan is stronger and saltier, so a smaller amount on top brings extra depth and better browning.

Sharp cheddar can stand in if Gruyère is difficult to find; the flavor will shift noticeably toward cheddar. Whichever cheese you use, grate it from a block if you can.

Before the potatoes go in, taste the hot cream. More than two pounds of potato can turn seasoning surprisingly quiet once everything is baked, while Gruyère and Parmesan bring salt of their own.

How to Make Potatoes Au Gratin

The oven has two jobs. Covered, it cooks the potatoes through. Uncovered, it concentrates the sauce and browns the cheese.

1. Slice the Potatoes and Warm the Cream

Peel the Russets; their thicker skins interrupt the soft layered texture we’re after. Slice the potatoes ⅛ inch (3 mm) thick. A few noticeably thicker pieces can remain firm after everything around them is ready, so consistency matters here.

A peeled potato slice is measured edge-on with a digital caliper reading 3.0 mm beside a visibly thicker slice.
Use the caliper only to calibrate the first few slices. Once 3 mm feels familiar, consistency matters more than measuring every potato.

Combine the heavy cream, milk, garlic, thyme, salt, black pepper and nutmeg in a wide saucepan or Dutch oven. Warm over medium-low heat until steaming, with the first gentle bubbles appearing around the edge. The raw edge of the garlic will soften as the cream heats and the thyme becomes more noticeable.

2. Give the Potatoes a Head Start

Add the potatoes and gently separate the slices in the hot cream. Keep everything at a quiet simmer for about 5–7 minutes, lifting and turning them once or twice so the bottom doesn’t catch.

At first the cream moves freely around the slices. After a few minutes it becomes silkier and leaves a light coating when you lift a potato from the pan. The slice itself bends more easily than it did raw without becoming fragile.

Three-stage graphic shows peeled potato slices entering cream, simmering 5–7 minutes, then bending gently on a spoon while holding their shape.
Treat 5–7 minutes as a window. Burner strength and pan width vary, so stop when the slices bend easily but still hold together.

3. Build the Gratin

Butter the baking dish. Arrange roughly half of the potatoes in overlapping layers, close together without packing them into a solid mass. Scatter over half of the Gruyère, then add the remaining potatoes.

Pour the cream mixture over and between the slices. The potatoes need to be well surrounded, but the uppermost layer should remain visible. If a smaller or deeper dish would force you to bury the top just to use every last drop, stop pouring.

Three-stage graphic shows layered potatoes, cream being poured, and the finished assembly with the top potato layer still visible.
Let the casserole decide when to stop pouring. If the top layer starts disappearing, hold back the extra cream rather than flooding the gratin.

4. Cook Until the Middle Is Tender

Cover tightly with foil and bake on the center rack at 350°F (175°C; 160°C fan). Begin checking at 35 minutes.

The covered bake is finished when a thin knife slides through the very center with almost no resistance. The potatoes around the outside soften first, so don’t use an easy edge test to judge the middle.

If the middle is still firm, nothing has gone wrong.

This stage is especially tempting to rush when the rest of dinner is nearly ready. But a few extra covered minutes are much better than carrying a casserole to the table with crunchy potatoes hidden underneath.

Foil is folded back from a red casserole while a thin knife tests the center of the pale, creamy potato layers.
Check tenderness before color. If the center still resists, cover again; the final browning can wait until the potatoes are fully tender.

5. Brown the Cheese and Let the Gratin Settle

Once the potatoes are tender, remove the foil and scatter over the remaining Gruyère and Parmesan. Bake uncovered for about 20–25 minutes, until the sauce bubbles slowly around the edges and the cheese develops deep golden patches rather than simply looking melted.

If everything underneath is ready but the surface is still pale, a brief blast under the broiler/grill can finish the color—but only if your baking dish is broiler-safe. Watch closely.

Now wait 15 minutes.

The sauce is at its loosest straight from the oven. After the rest, the first serving should lift with glossy cream clinging around the potatoes rather than leave thin sauce rushing into the space behind it.

Comparison shows the same gratin just baked and after 15 minutes, with less loose cream in the rested serving cavity.
Resting changes the sauce, not the doneness. The potatoes should already be tender; the 15-minute pause simply helps the cream settle around the layers.

If the Gratin Isn’t Behaving

Why Are My Au Gratin Potatoes Still Hard?

Usually the slices are thicker than expected, the casserole is deeper, the foil isn’t sealing well, or the oven is running a little cool. Cover the dish again, give it another 10–15 minutes, then test the middle.

If the potatoes are still firm and the edges look visibly dry, moisten those dry areas with a little warm cream or milk before covering the dish again. The center needs time more than it needs a hotter oven.

Why Is My Potato Gratin Watery?

First check the potatoes. If they are tender but thin cream is still pooling, leave the gratin uncovered a little longer so more moisture can evaporate. Then give it the full rest before deciding the sauce is too loose.

A deeper pan, lower-starch potatoes, too much liquid for the dish or simply too little uncovered baking can all leave excess sauce behind.

The Sauce Looks Oily or Grainy

Clear yellow fat around a grainy-looking sauce points toward separation rather than simple looseness. Excessive heat, too much cheese or aggressive reheating can all encourage it; pre-shredded cheese may also melt less smoothly.

A badly split sauce is difficult to make completely smooth again, so prevention matters more here: keep the heat moderate and grate the cheese fresh when you can.

Comparison shows smooth thin cream on one side and a grainy broken sauce with visible yellow fat on the other.
Smooth but thin cream is still intact. Graininess with visible yellow fat signals separation, so looseness and splitting are different problems.

The Potatoes Taste Bland

Potatoes mute seasoning quickly. Taste the hot cream before adding the slices, especially if you change either cheese. A particularly salty Parmesan may call for less added salt; a mild Gruyère substitute may need a little more.

Making Potatoes Au Gratin Ahead? Do This Tonight

For this method, the cleanest place to stop is after the short stovetop cook and assembly, before the gratin goes through its full oven bake. You finish the actual tenderizing and browning on the day it is served.

Unbaked layered potatoes sit in a red casserole with cream between the slices, reserved grated cheese in bowls, and foil nearby.
Think “assembled, not finished.” Keep the reserved Gruyère and Parmesan separate overnight so the topping can go on fresh before the final uncovered bake.
  1. Simmer the sliced potatoes in the seasoned cream for 5–7 minutes and assemble the gratin as directed.
  2. Add the first half of the Gruyère, keeping the remaining Gruyère and Parmesan refrigerated separately.
  3. Let the most vigorous steaming subside briefly, then cover and refrigerate promptly for up to 24 hours. Don’t leave the casserole at room temperature to cool completely.
  4. If you’re using glass or ceramic bakeware, follow the manufacturer’s guidance before moving a refrigerator-cold dish into a hot oven.
  5. Bake covered and begin checking at 50 minutes. Continue until a thin knife passes through the middle with almost no resistance.
  6. Add the reserved Gruyère and Parmesan, uncover and brown as usual.

Reheating and Freezing Potatoes Au Gratin

USDA leftovers guidance recommends using refrigerated cooked leftovers within 3–4 days and reheating them to 165°F / 74°C. Reheat a larger portion covered at 325–350°F (165–175°C), then uncover briefly if you want to refresh the top.

If the gratin looks dry before reheating, add a spoonful or two of cream around the edge. Individual portions can be reheated gently in short microwave intervals.

Freezing is possible, but it is not my first choice if texture matters. Potatoes can become grainier or release water after thawing, and cream-and-cheese sauces are more likely to separate.

Is This the Same as Scalloped Potatoes?

In modern American recipe usage, potatoes au gratin usually include cheese and a browned top, while classic scalloped potatoes are generally baked in milk or cream without cheese.

Modern recipe names are much less tidy. Plenty of dishes called scalloped potatoes contain cheese, and many families use the two names almost interchangeably. With Gruyère between the potatoes and a browned cheese crust on top, this one sits comfortably on the au gratin side.

Gratin dauphinois is another close French relative, centered on potatoes and dairy and not necessarily the generous cheese topping common in modern American au gratin recipes.

What to Serve With Potatoes Au Gratin

A rich gratin does not need an equally complicated main course. A prime rib roast gives you deeply browned beef and pan juices against the soft potatoes. Ham, lamb, pork or a simple roast chicken are equally at home beside it.

Something green keeps the plate from becoming one long note of richness. Roasted Brussels sprouts bring caramelized edges and a little bitterness, while green beans, asparagus, broccoli or a sharp leafy salad work just as well.

Golden potatoes au gratin are plated with sliced medium-rare roast beef and green broccolini on a dark green plate.
Let the gratin be the rich element on the plate. A simple protein plus something green, crisp or acidic keeps the meal balanced.

Potatoes Au Gratin Recipe

Tender 3 mm slices of Russet potato baked in garlic-thyme cream with Gruyère and Parmesan. A brief stovetop simmer starts cooking the potatoes and brings their starch into the cream before the casserole reaches the oven.

Serves: 8 as a side
Prep: about 25 minutes
Cook: usually about 65–90 minutes; occasionally longer if the middle needs extra covered time
Rest: 15 minutes
Total: usually about 1 hour 45 minutes to 2 hours 10 minutes

Whole rectangular casserole of potatoes au gratin with overlapping potato slices and a deeply golden, patchy cheese top.
The top should be deeply golden in patches, but center tenderness must already be confirmed before browning. This visual is the finish cue, not the doneness test.

Equipment: shallow 9 × 13-inch (23 × 33 cm), approximately 3-quart / 2.8-liter ceramic or glass baking dish; rimmed sheet pan; wide saucepan or Dutch oven; mandoline or sharp chef’s knife; foil; cheese grater.

Ingredients

  • 2½ lb / 40 oz / 1.13 kg Russet potatoes, weight before peeling
  • 1½ cups / 12 fl oz / 360 mL heavy cream
  • ½ cup / 4 fl oz / 120 mL whole milk
  • 2 garlic cloves, finely grated or minced
  • 1 teaspoon fresh thyme leaves
  • 8 g fine sea salt, about 1½ teaspoons depending on brand
  • ½ teaspoon freshly ground black pepper
  • ⅛ teaspoon freshly grated nutmeg, optional
  • 6 oz / 170 g Gruyère, freshly grated and divided
  • 1½ oz / 43 g Parmesan, finely grated
  • 1 tablespoon / 14 g unsalted butter, for the baking dish

Instructions

  1. Heat the oven. Set a rack in the center and heat to 350°F / 175°C conventional / 160°C fan. Butter a shallow 9 × 13-inch (23 × 33 cm) baking dish and place it on a rimmed sheet pan.
  2. Slice the potatoes. Peel the Russets and cut them evenly to ⅛ inch / 3 mm. Leave the slices unrinsed.
  3. Warm the cream. Combine the heavy cream, milk, garlic, thyme, salt, pepper and nutmeg in a wide saucepan or Dutch oven. Bring to a gentle simmer over medium-low heat.
  4. Give the potatoes a head start. Add the slices and separate them gently in the cream. Simmer for 5–7 minutes, lifting and turning once or twice. They should bend easily and carry a light coating of cream without becoming fragile.
  5. Assemble. Layer half the potatoes, half the Gruyère, then the remaining potatoes. Pour the cream around them, keeping the uppermost slices visible. Reserve the remaining Gruyère and all of the Parmesan.
  6. Cover and cook until tender. Cover tightly with foil and bake for 35 minutes, then test the center with a thin knife. If the potatoes resist, cover again and continue in 10–15 minute increments until the knife passes through with almost no resistance.
  7. Brown the top. Remove the foil, add the remaining Gruyère and Parmesan, and bake uncovered for 20–25 minutes until the sauce bubbles slowly at the edges and the cheese is deeply golden in patches. If needed, broil/grill briefly only in broiler-safe bakeware, watching closely.
  8. Rest. Leave the gratin for 15 minutes before serving so the sauce can settle around the potatoes.

Recipe Notes

  • Keep the slices close to 3 mm. Thicker pieces can stay firm long after their neighbors are ready.
  • Yukon Golds give a firmer result. They hold cleaner layers and release less starch into the cream than Russets.
  • No flour is used. The recipe contains no added gluten as written; if you need it strictly gluten-free, check labels on packaged ingredients such as cheese and seasonings.
  • For a double batch, use two pans. Keeping the gratin shallow makes the cooking much more predictable.