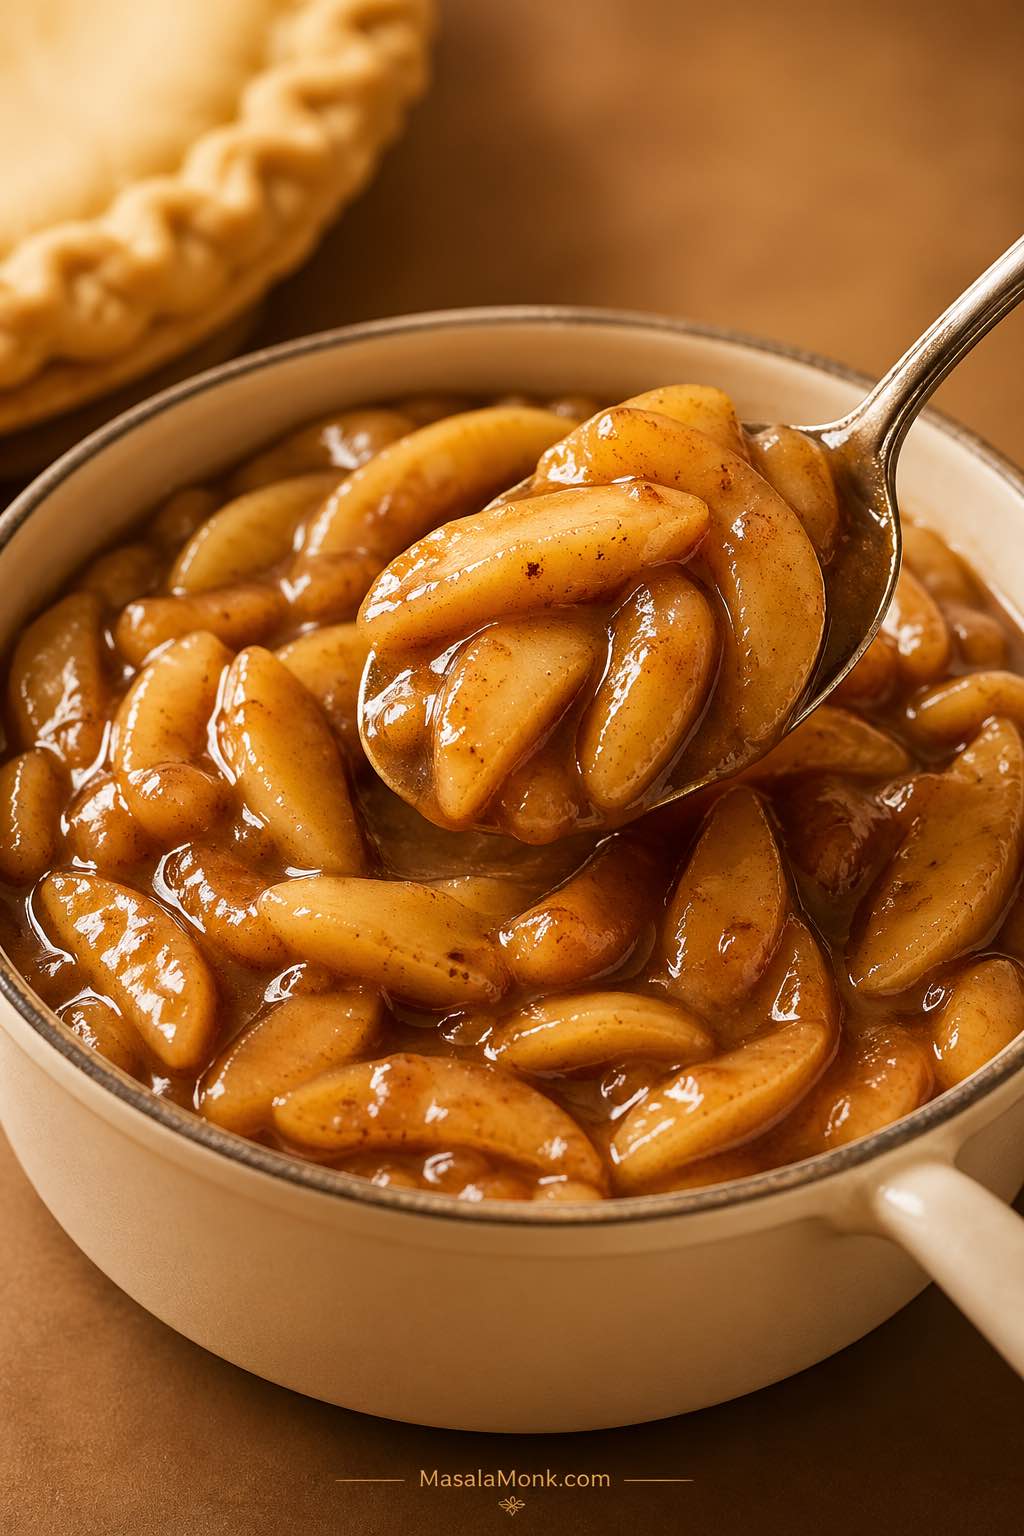
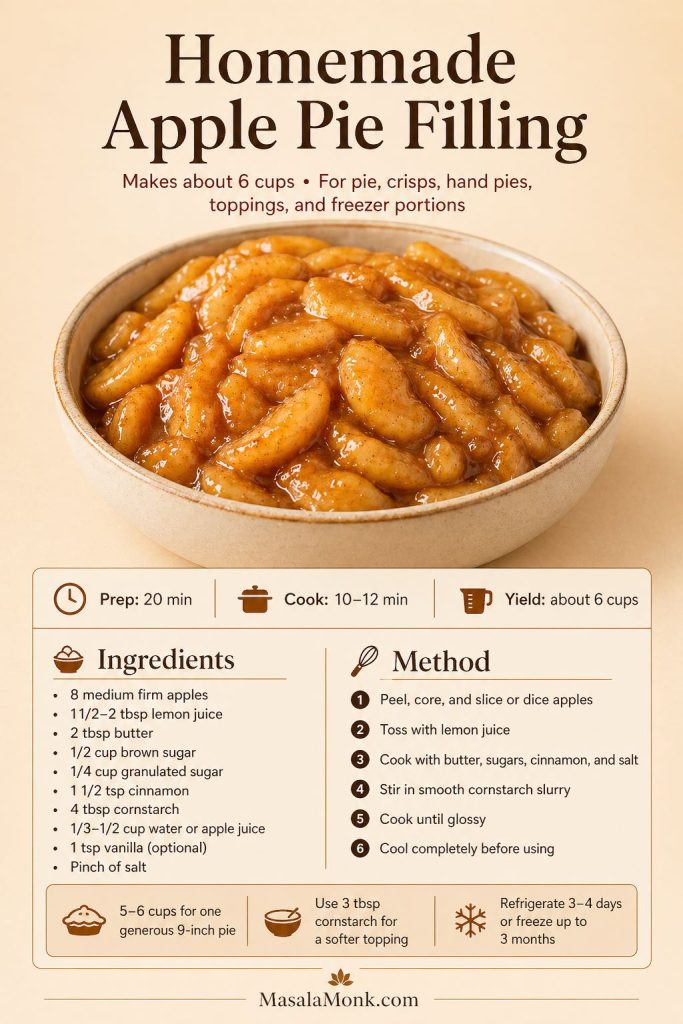
A good apple pie filling recipe should give you tender apple pieces, warm cinnamon flavor, and a thick, glossy sauce that holds together without turning gluey. This stovetop method cooks the filling before baking, so you can control the apple texture, sauce thickness, sweetness, and final use before anything goes into pie crust, crisp topping, hand pies, turnovers, freezer bags, or breakfast bowls.
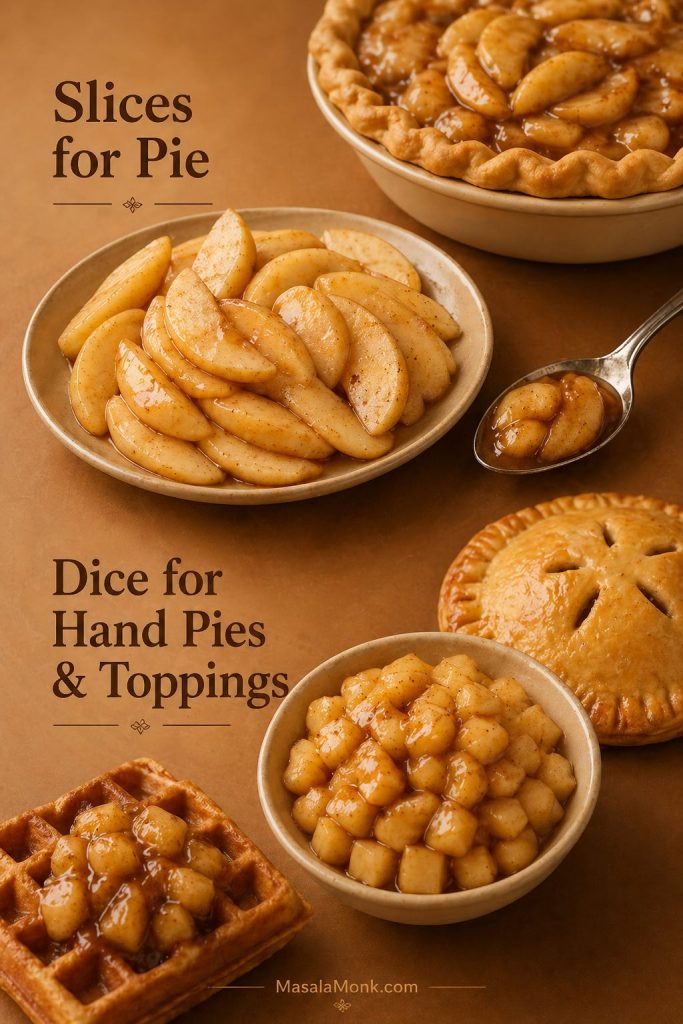
The best part is that one batch can do several jobs. Use sliced apple filling for classic pie and crisp, diced apple filling for hand pies and turnovers, or a softer spoonable version for pancakes, waffles, oatmeal, yogurt, and ice cream.
Because this recipe makes a cooked apple filling before it ever reaches pie crust, you can taste, thicken, cool, and portion the batch with much more control. As a result, the same recipe works for a full apple pie, canned-style replacement portions, freezer bags, crisps, toppings, and small pastries without guessing later.
In This Guide
Make the Filling
Quick Answer: How to Make Apple Pie Filling
To make apple pie filling, cook peeled and sliced or diced apple pieces with butter, brown sugar, granulated sugar, cinnamon, lemon juice, and a pinch of salt. Once the apple pieces begin to soften and release their juices, stir in a cornstarch slurry and cook briefly until the sauce turns glossy and coats the filling.
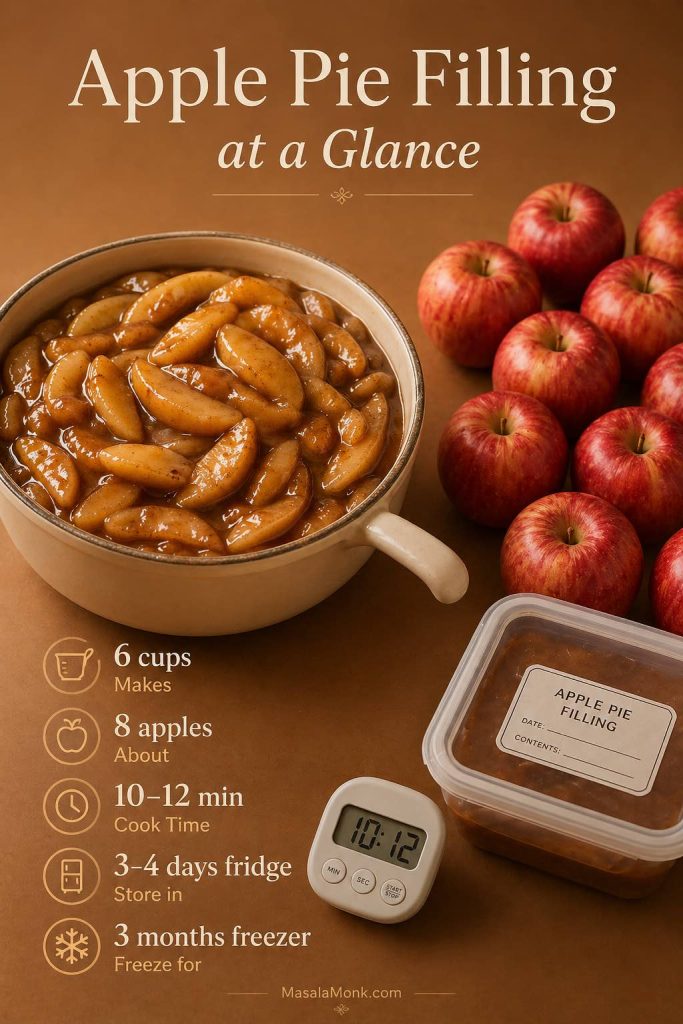
This apple pie filling recipe makes about 6 cups / 1.4 liters of homemade filling. That is enough for one generous 9-inch pie, one 9×9 apple crisp, several hand pies, or a few smaller freezer portions. For a canned-style replacement, portion about 2 to 2 1/2 cups into a container or freezer bag.
In other words, this recipe gives you apple filling that can go straight into pie or be saved for later desserts. Since the filling is cooked first, it is easier to adjust than a raw apple mixture that releases liquid inside the oven.
Apple Pie Filling at a Glance
| Detail | Best Choice |
|---|---|
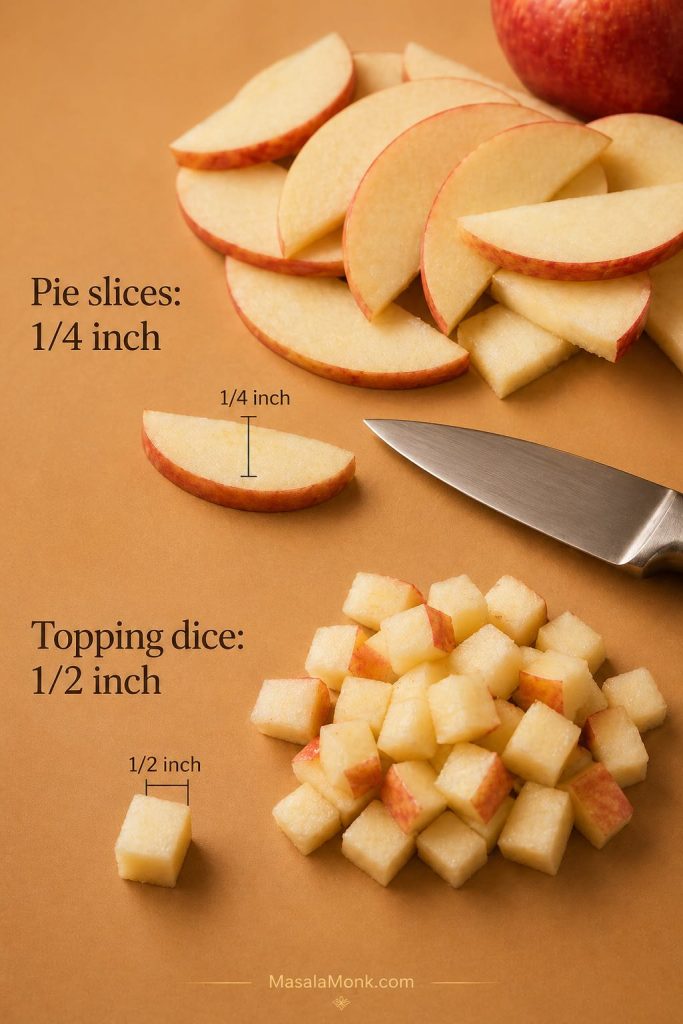
| Best apple cut for pie | 1/4-inch / 6 mm slices |
| Best apple cut for hand pies and toppings | 1/2-inch / 1.25 cm dice |
| Best thickener for this recipe | Cornstarch slurry |
| Canned filling replacement | 2 to 2 1/2 cups replaces one 20–21 oz can |
| Canning | Do not can this recipe; use tested canning guidance |
Why This Apple Pie Filling Recipe Works
This recipe works because the apple filling thickens in the pan instead of releasing extra liquid inside the pie. Rather than hoping raw apple pieces bake down evenly under the crust, you soften the fruit briefly on the stovetop and thicken the juices before baking.
As the apple pieces cook, they release enough liquid to form a cinnamon-apple sauce. From there, the cornstarch slurry turns those juices glossy and spoonable. Therefore, the recipe is easier to fix if the filling looks too loose, too stiff, or too sweet before it goes into pie.
- The apple pieces stay tender, not mushy. They cook only until they begin to soften, so they can still hold their shape in pies, crisps, and pastries.
- The sauce turns glossy. A cornstarch slurry thickens the apple juices into a smooth filling without making it heavy.
- The cut changes the use. Slices are best for pie, while diced apple filling works better for hand pies, turnovers, and toppings.
- The batch size is practical. Six cups gives you enough for one generous 9-inch pie or several smaller freezer portions.
- The texture can be adjusted. For toppings, use slightly less cornstarch; for pies and turnovers, keep the filling thicker.
Ingredients for Apple Pie Filling
Although this recipe uses simple ingredients, the timing and balance matter. Choose firm apples, brighten them with lemon, let the sugar pull out their juices, and then thicken those juices with a smooth slurry once the apples have started to soften.
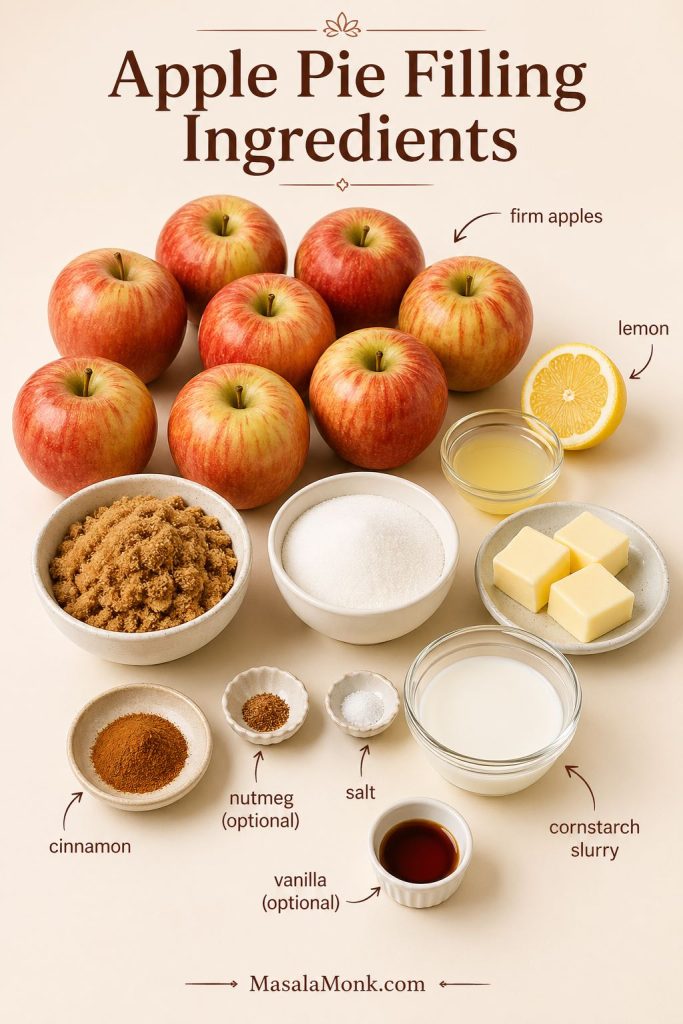
Firm Apples
Start with firm baking apples that can soften without collapsing. Granny Smith, Honeycrisp, Pink Lady, Braeburn, and similar firm apples all work well. For deeper flavor, use a mix of tart and sweet apples instead of relying on only one variety.
For pie, this recipe works best when the apple filling has enough structure to survive a second bake. That is why very soft or mealy apples are better saved for applesauce-style toppings, not a filling that needs to hold its shape.
Lemon Juice
Lemon juice keeps the filling bright and balances the sweetness. It also helps slow browning while you prep the apples. For a fuller prep guide, see MasalaMonk’s guide on how to prevent sliced apples from turning brown. Use 1 1/2 to 2 tablespoons lemon juice in this filling, depending on how tart your apples are.
For example, this recipe uses lemon juice to keep the apple flavor bright while cornstarch helps the filling set cleanly in pie. That said, if you are following a tested canning recipe, use the type and amount of acid that source specifies because acidity matters for shelf-stable storage.
Brown Sugar and Granulated Sugar
Brown sugar gives the filling a warmer, slightly caramel-like flavor, while granulated sugar keeps the sweetness cleaner and helps draw juice from the apple pieces. If your apples are already very sweet, reduce the granulated sugar first before cutting the brown sugar.
Together, the two sugars give the sauce enough body without making it taste heavy. As the apples cook, they release juice into the pan, which then becomes the base of the glossy cinnamon sauce.
Butter
A little butter gives the sauce a richer finish without making it greasy or heavy. It also helps the cinnamon and sugar taste rounder once the filling cools.
Cinnamon, Nutmeg and Salt
Cinnamon is the main spice here. Nutmeg is optional, but a small amount adds warmth. Salt is just as important because it keeps the filling from tasting flat and makes the apple flavor clearer.
Cornstarch Slurry
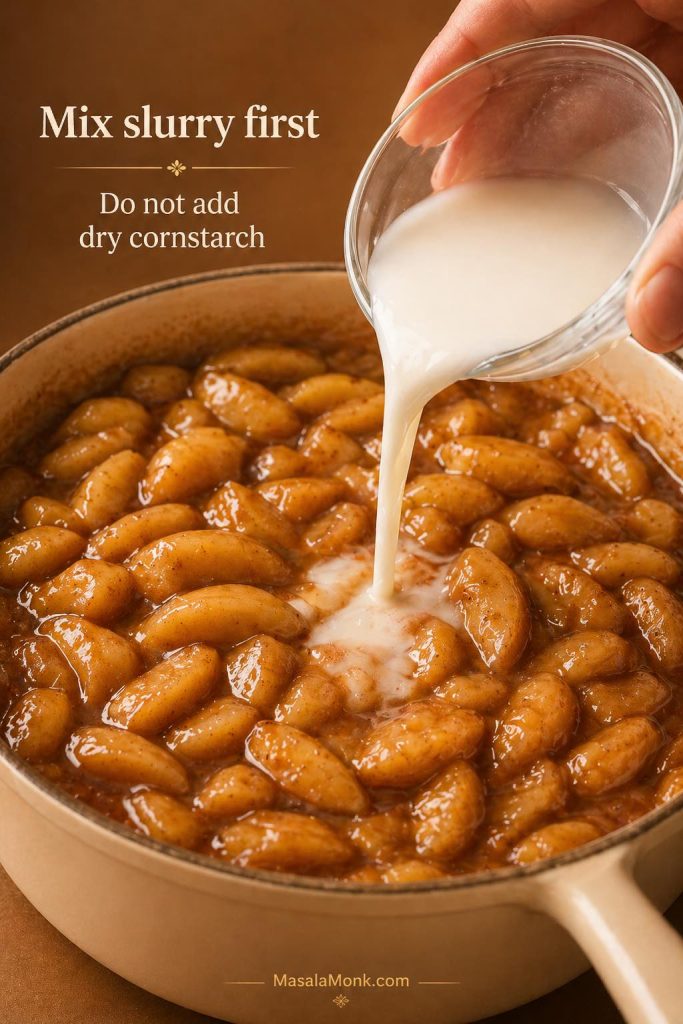
This is an apple pie filling with cornstarch, so the sauce should turn glossy once it bubbles. Before adding the thickener to the pan, mix the cornstarch with water or apple juice until smooth. Do not sprinkle dry cornstarch directly into the apple pieces, because it can clump.
At this stage, the change should be easy to see. The sauce will go from thin and slightly cloudy to shiny and thicker within a minute or two. The apple pieces should look coated with filling, not buried in a heavy paste.
Once the slurry goes in, the recipe should turn the apple juices into a glossy filling that can hold its shape in pie. However, long overcooking can make the sauce too stiff or cloudy, so stop once the filling thickens and coats the fruit.
Can You Make Apple Pie Filling Without Cornstarch?
You can make refrigerator or freezer apple filling without cornstarch, but the recipe will behave differently in pie. Tapioca starch can give a slightly more elastic finish, arrowroot can look glossy but may thin if overheated, and flour makes the sauce more opaque and rustic.
For the cleanest stovetop apple pie filling, cornstarch is still the easiest choice. If you are making shelf-stable canned pie filling, do not swap thickeners casually; use a tested canning recipe with the approved thickener and processing method.
Vanilla
Vanilla is optional. It works especially well when the cooked apple filling will be used as a topping for pancakes, waffles, oatmeal, yogurt, or ice cream.
Best Apples for Apple Pie Filling
The best apples for apple pie filling are firm apples that hold their shape after cooking. A blend of tart and sweet apples usually tastes better than a single variety because the filling gets both brightness and natural sweetness.
In most kitchens, you do not need one perfect apple variety to make this work. The best flavor usually comes from mixing one tart apple with one sweeter, firmer apple. In addition, a mixed-apple recipe gives the filling more depth once it bakes inside pie.
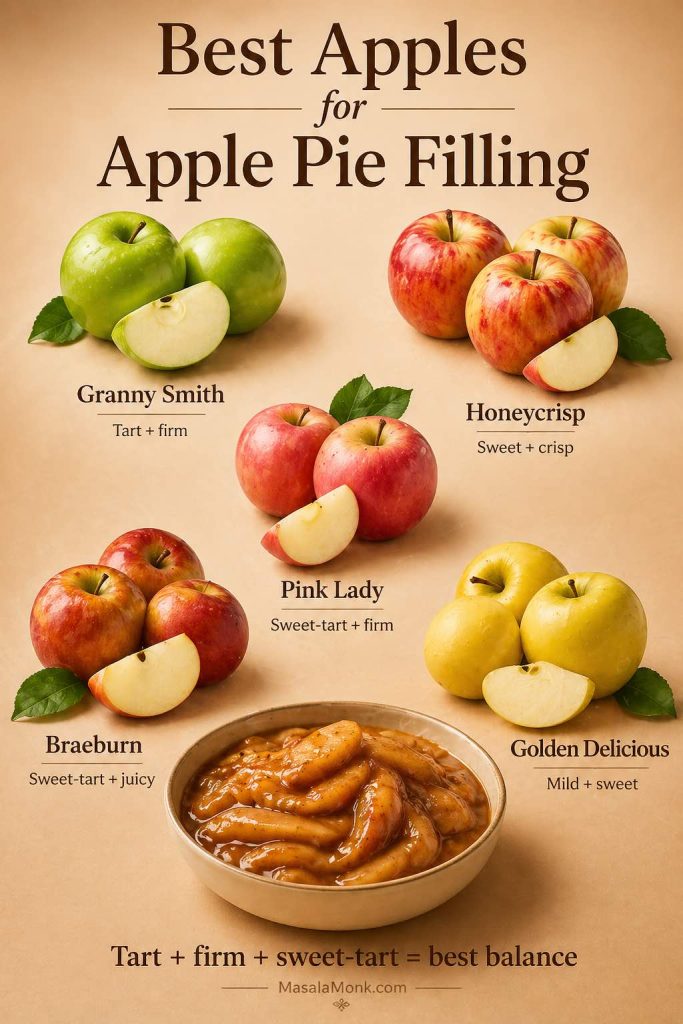
| Apple | Flavor | Texture | Best Use |
|---|---|---|---|
| Granny Smith | Tart | Very firm | Best tart base for pies |
| Honeycrisp | Sweet-tart | Firm and juicy | Great blended with Granny Smith |
| Pink Lady | Bright and balanced | Firm | Good all-purpose filling apple |
| Braeburn | Sweet-tart and aromatic | Holds well | Good for pies and crisps |
| Golden Delicious | Sweet and mellow | Softer | Best blended, not used alone |
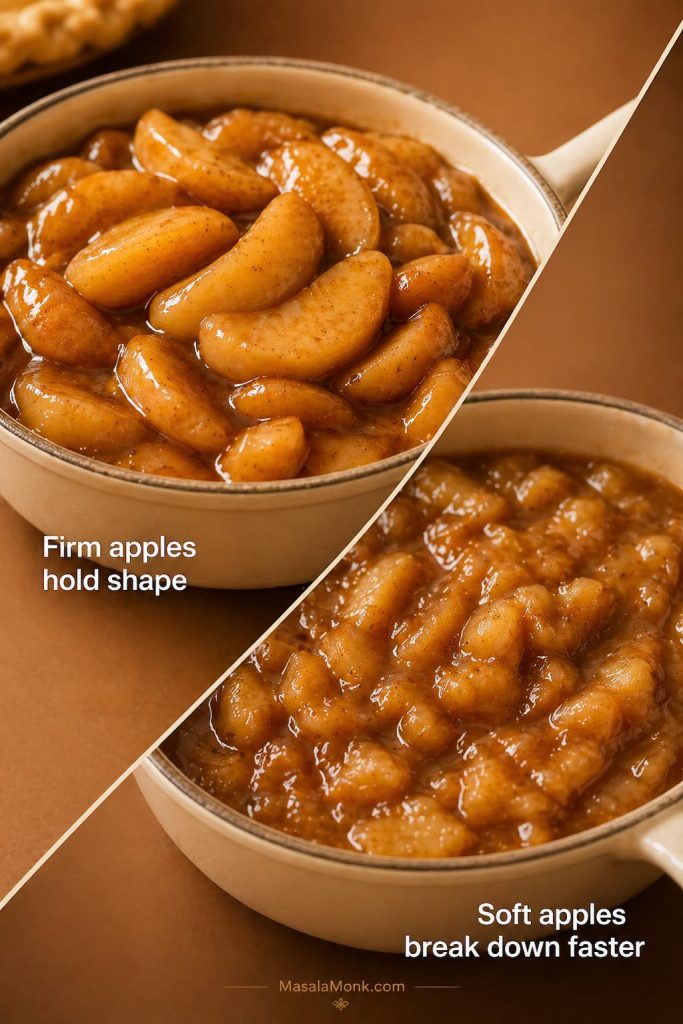
Avoid very soft or mealy apples if you want distinct apple pieces. Softer apples can work for toppings, but they are more likely to break down if you cook them on the stovetop and then bake them again in a pie or crisp.
Sliced vs Diced Apples for Apple Pie Filling
The apple cut may seem like a small detail, but it changes how the filling behaves once it goes into pastry, crisp topping, or a spoonable dessert. Before cooking, decide whether this recipe is headed for a full apple pie or a diced filling for smaller pastries.
For pie, this recipe works best when the apple filling is sliced thin enough to layer neatly inside the crust. For hand pies, turnovers, and toppings, diced apple filling is easier to spoon, seal, freeze, and reheat.
Once you know how you want to use the filling, the cut becomes much easier to choose: slices for pie, dice for pastries, and smaller pieces for toppings. That small choice matters, because a slice that feels perfect in a pie can be awkward inside a hand pie.
| Final Use | Best Apple Cut | Why It Works |
|---|---|---|
| Classic apple pie | 1/4-inch / 6 mm slices | Layers neatly and feels like pie |
| Deep-dish pie | 1/4- to 1/3-inch slices | Holds structure in a taller pie |
| Apple crisp or crumble | Slices or chunky dice | Both work depending on texture |
| Hand pies | 1/2-inch / 1.25 cm dice | Easier to seal inside pastry |
| Turnovers | 1/2-inch dice | Prevents large pieces from tearing pastry |
| Cinnamon roll bake | Small dice or chopped slices | Mixes better with dough |
| Pancakes, waffles and oatmeal | Dice | Easier to spoon and serve |
When in doubt, dice the apples if you want the most flexible batch. Diced filling is easier to freeze, spoon, seal into pastry, and reheat for quick desserts.
How to Make Apple Pie Filling
This stovetop method is simple, but the texture cues matter. First, cook the apple pieces until they begin to soften. Next, thicken the juices briefly. Finally, cool the filling before using it in pastry so the crust does not soften too early.
The goal is not applesauce, though. You only want firm apple pieces to become partly tender, with enough structure left to survive a second bake in pie, crisp, or pastry.
1. Peel, Core and Cut the Apples
First, peel and core the apples. Then slice or dice them depending on how you plan to use the filling. For pie, cut 1/4-inch / 6 mm slices. For hand pies, turnovers, cinnamon roll bakes, pancakes, waffles, or oatmeal, use 1/2-inch / 1.25 cm dice.
2. Toss with Lemon Juice
After cutting the apples, toss them with lemon juice right away. This keeps the flavor bright and slows browning while you prepare the rest of the ingredients.
3. Cook the Apples with Butter, Sugar and Spices
Melt the butter in a wide pan over medium heat. Add the apples, brown sugar, granulated sugar, cinnamon, nutmeg, and salt. Cook covered for 4 to 6 minutes, stirring once or twice, until the apple pieces begin to release juice and soften slightly.
At this stage, the apples should bend a little when stirred, but they should not be falling apart. Meanwhile, a wide pan helps the pieces cook more evenly and gives the juices room to reduce slightly before the slurry goes in.
4. Add the Cornstarch Slurry
Before adding the thickener, whisk the cornstarch with water or apple juice until smooth. From there, stir the slurry into the apples. This helps it blend into the filling more evenly than dry cornstarch and gives the sauce a cleaner, glossier finish.
5. Cook Until Glossy
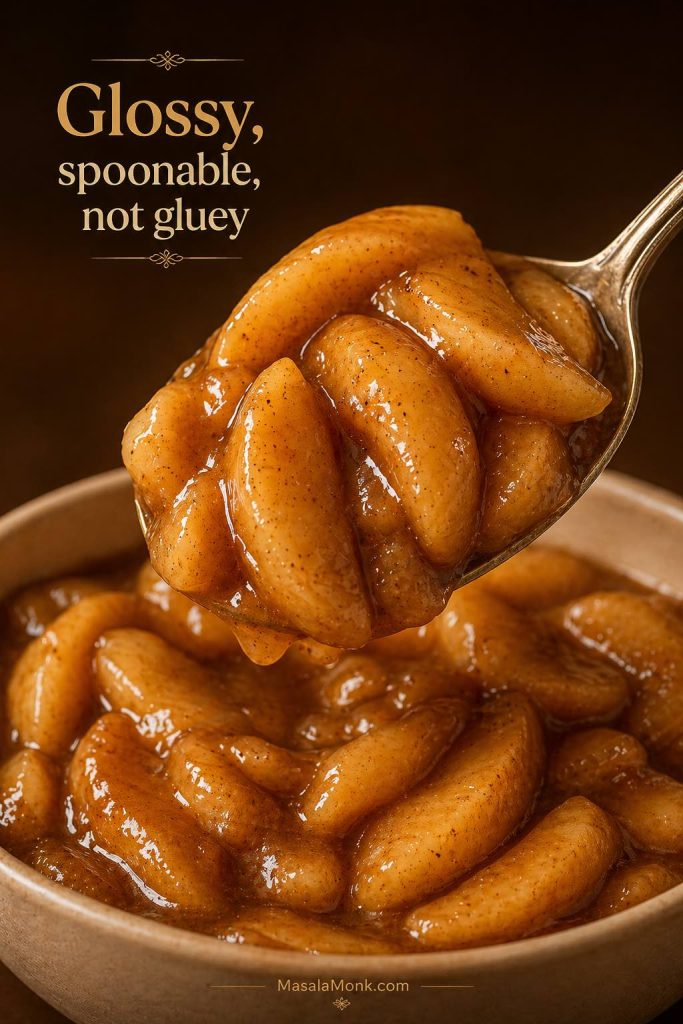
After the slurry goes in, cook for 1 to 2 minutes, stirring gently. The filling is ready when the sauce turns glossy, the liquid thickens enough to coat the apple pieces, and the pieces still hold their shape.
A good cue is the spoon test: drag a spoon through the filling and watch the sauce cling lightly to the apples instead of running back into a thin puddle. If it looks pasty, loosen it with a small splash of apple juice or water.
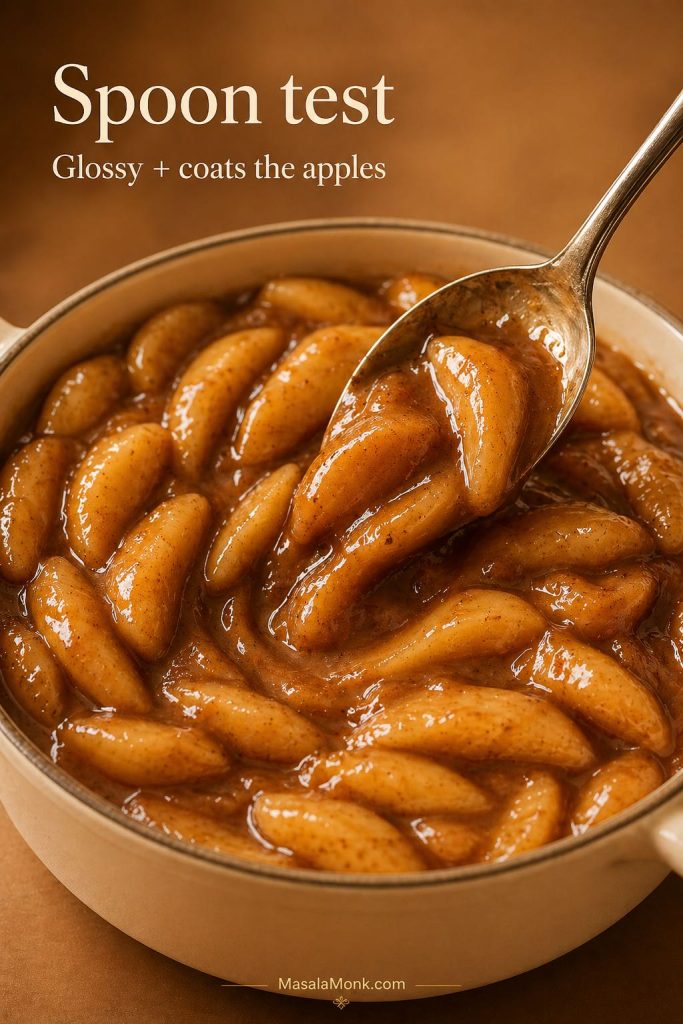
By the end of cooking, this recipe should give you apple filling that looks glossy enough for toppings and sturdy enough for pie. If it still looks watery, let it bubble for another minute before adding more starch.
6. Cool Before Using
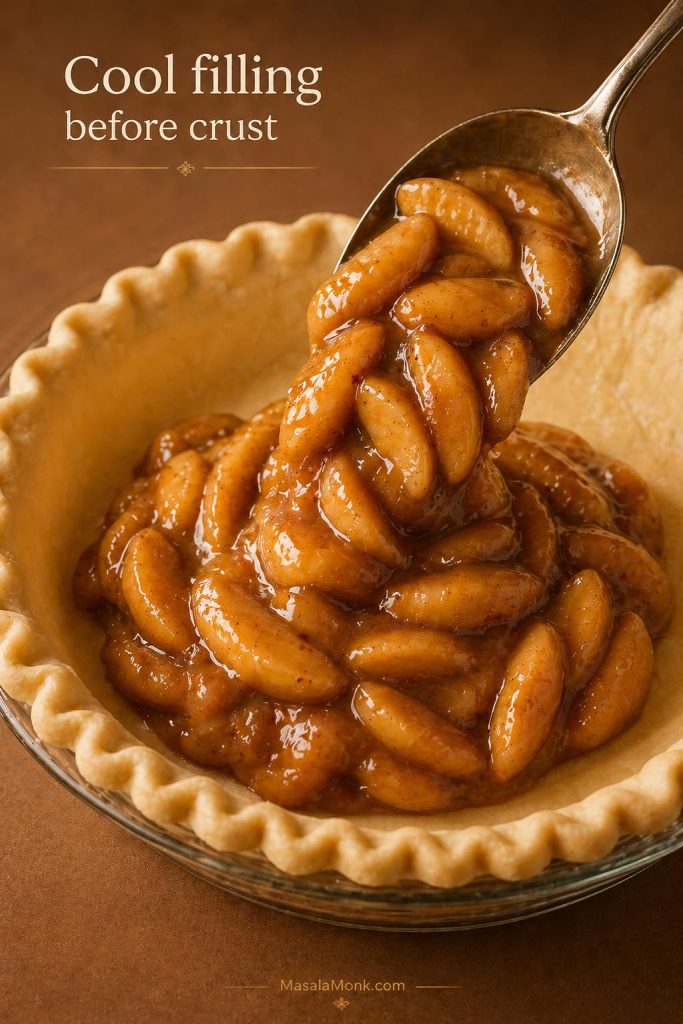
Remove the pan from the heat and stir in vanilla, if using. Spread the filling in a shallow dish so it cools faster. Before adding it to pie crust, hand pies, turnovers, or freezer bags, cool it completely.
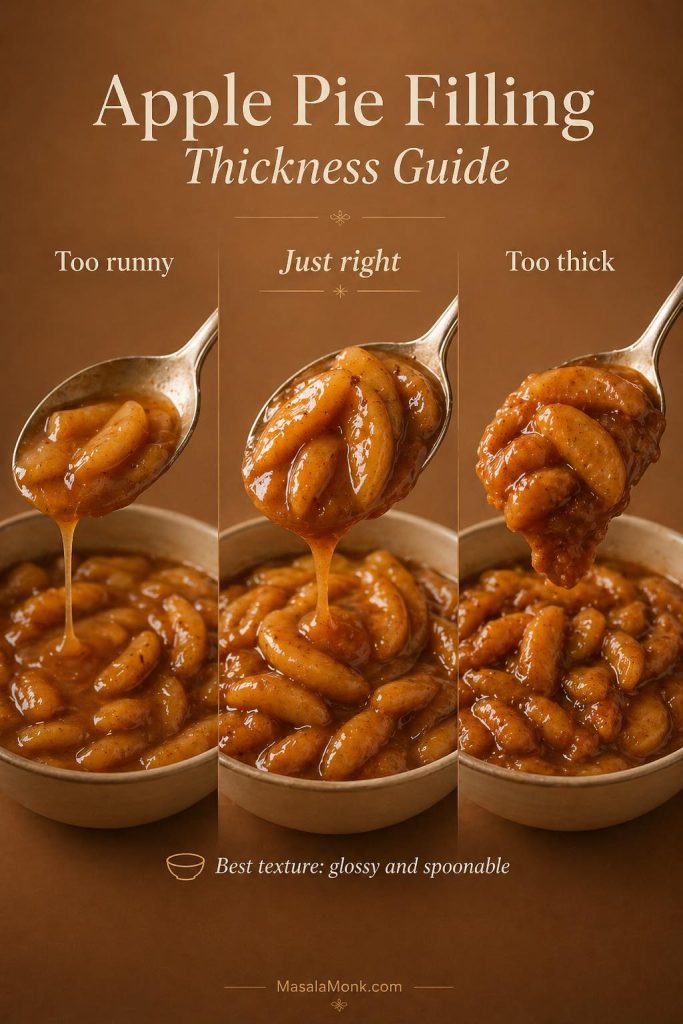
How Thick Should Apple Pie Filling Be?
The best apple pie filling should look shiny and loose enough to spoon, but thick enough that the sauce clings to the apple pieces. In other words, the hot filling should look a little looser than the final cooled filling because it will thicken more as it rests.
For pie, this recipe should give you apple filling that mounds softly on a spoon instead of running like syrup. However, if you are using the recipe as a topping, the filling can stay slightly looser and more spoonable.
By the time it cools, the apple filling should look glossy and thick enough to sit inside a pie crust without spreading everywhere. If it turns stiff or pasty, loosen it gently with apple juice or water before using.
| Use | Cornstarch for 6 Cups Filling | Texture Goal |
|---|---|---|
| Pancakes, waffles, oatmeal, yogurt | 3 tbsp / 24 g | Soft and spoonable |
| Crisps, crumbles, cobblers | 3 1/2 to 4 tbsp / 28–32 g | Glossy but not stiff |
| Pies, hand pies, turnovers | 4 to 5 tbsp / 32–40 g | Holds shape better |
| Canning | Do not use this recipe | Use tested canning guidance |
The base version uses 4 tablespoons / about 32 g cornstarch, which is the best middle ground for pies, crisps, freezer portions, and spoonable desserts. For a softer topping-style filling, reduce the cornstarch slightly.
Since apple juiciness varies, start with 1/3 cup liquid in the slurry and add more only if the filling becomes too stiff. It is much easier to loosen a thick filling than to fix one that starts watery.
How Much Apple Pie Filling for One Pie?
For one generous apple pie, this recipe gives you about 5 to 6 cups of filling. A shallower 8- or 9-inch pie may need closer to 4 to 5 cups, while a deep-dish pie may need 6 to 7 cups.
At this point, the filling becomes easier to use if you think in portions. The right amount depends less on the dessert name and more on the pan size, crust style, and how full you want the finished bake to be.
For a shallower pie, this recipe may need only 4 to 5 cups of apple filling. For deep-dish pie, the recipe may need to be scaled so you have closer to 6 to 7 cups of filling.
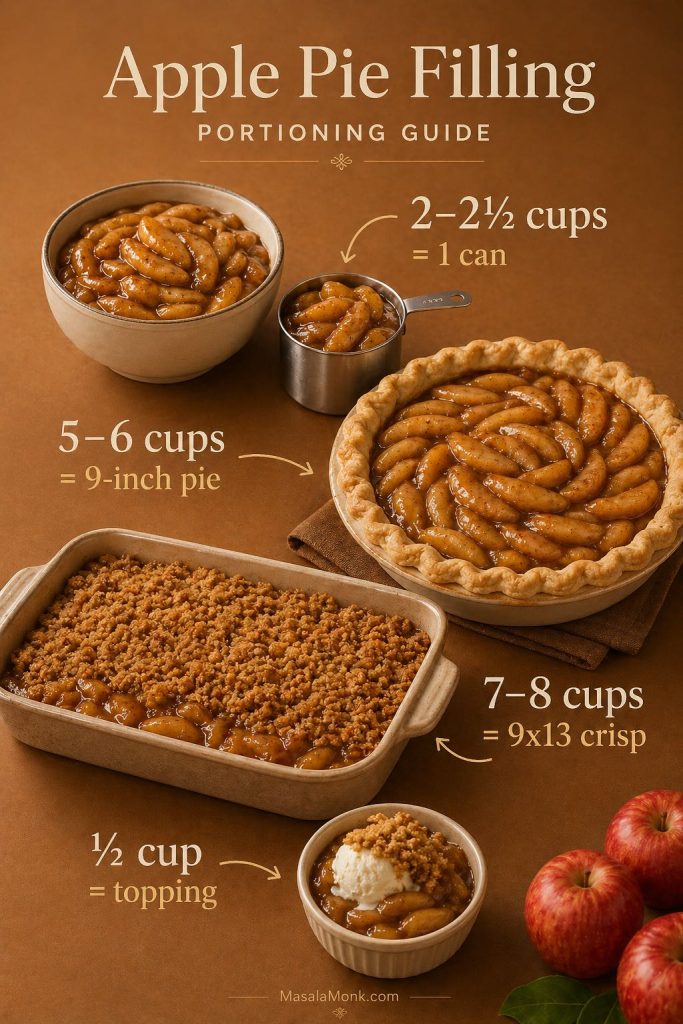
| Use | Filling Amount |
|---|---|
| Standard 8- or 9-inch pie | 4–5 cups |
| Generous 9-inch pie | 5–6 cups |
| Deep-dish 9-inch pie | 6–7 cups |
| One 20–21 oz can replacement | 2 to 2 1/2 cups |
| 8×8 apple crisp | 3–4 cups |
| 9×9 apple crisp | 4–5 cups |
| 9×13 apple crisp | 7–8 cups |
| Hand pies | 2–3 cups |
| Turnovers | 2–3 cups |
| Large 9×13 cinnamon roll bake | 4 1/2–5 1/2 cups |
| Pancake or waffle topping | About 1/2 cup per serving |
Using the filling right away? Go to how to use it in apple pie, ways to use apple pie filling, or freezer portions.
Small-Batch Apple Pie Filling
If you only need enough apple pie filling for pancakes, waffles, oatmeal, mini desserts, or one small crisp, make a half batch instead of freezing leftovers. Use 4 medium firm apples, 3/4 to 1 tablespoon lemon juice, 1 tablespoon butter, 1/4 cup brown sugar, 2 tablespoons granulated sugar, 3/4 teaspoon cinnamon, a pinch of salt, 2 tablespoons cornstarch, and 3 to 4 tablespoons water or apple juice.
The method stays the same, but the cooking time may be slightly shorter because there are fewer apples in the pan. From there, add the slurry and cook just until the sauce turns glossy.
This smaller recipe is handy when you want apple filling for a quick dessert or a small pie-style topping without committing to a full batch.
Can This Replace Canned Apple Pie Filling?
Yes. This homemade filling can replace canned filling in many desserts. Use about 2 to 2 1/2 cups as a rough replacement for one standard 20- to 21-ounce can. For one generous 9-inch pie, use about 5 to 6 cups.
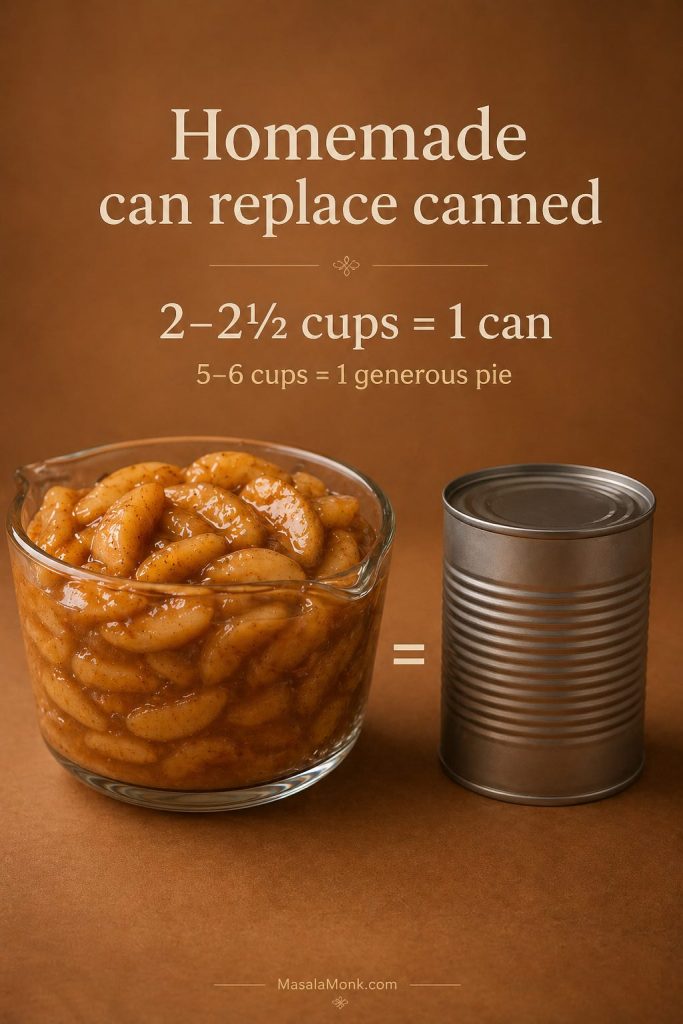
In many desserts, this recipe can replace canned apple pie filling without making the final dish overly syrupy. Compared with canned filling, the homemade version is usually less sweet, less gelled, and easier to adjust with lemon juice or a pinch of salt.
For one standard can, use about 2 to 2 1/2 cups of apple filling from this recipe in pie-style desserts. If a dessert calls for two cans of apple pie filling, this recipe usually replaces them with about 4 1/2 to 5 cups.
The full 6-cup batch gives you a little extra, which helps if you want a fuller pie, a deeper crisp, or a small topping portion left over. If you are replacing canned filling in a dessert, check the quick use chart for pie, crisp, cinnamon roll bake, dump cake, and toppings.
How to Use This Apple Pie Filling in a Pie
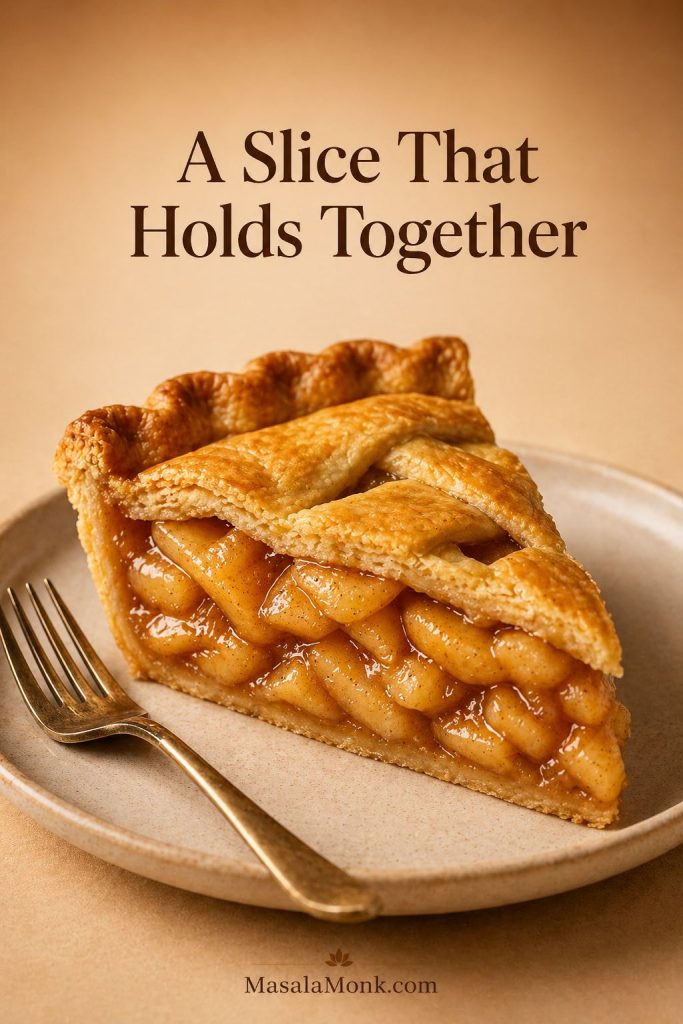
Although this is not a full pie-crust recipe, you can use the filling to make a classic apple pie. The key is to cool the batch first so it does not soften the crust before the pie goes into the oven.
For pie, this recipe works best when the apple filling is cooled completely before it meets the dough. Use the timing below as a starting point because pie crust thickness, pie plate material, and oven behavior can all change the final bake time.
| Step | What to Do |
|---|---|
| Filling amount | Use 5–6 cups cooled filling for one generous 9-inch pie |
| Crust | Use one bottom crust and one top crust, lattice, or crumble topping |
| Filling temperature | Use cooled or chilled filling, not hot filling |
| Oven temperature | Start at 400°F / 200°C, then reduce to 375°F / 190°C |
| Bake time | Bake 20 minutes at 400°F, then 30–35 minutes at 375°F |
| Done when | The crust is deep golden and the filling bubbles through the vents |
| Cooling | Cool at least 2–3 hours before slicing |
With the apple filling already cooked, the oven time is mostly about baking the crust and heating the pie until the center bubbles. If the crust browns too quickly, cover the edges with foil or a pie shield.
Recipes with Apple Pie Filling: How to Use It
Once the apple filling is cooked and cooled, it can go far beyond pie. In real use, the important part is matching the cut, thickness, and amount to the dessert you are making.

Use this chart as a starting point, not a full recipe card for every dessert. That way, you can quickly see how much filling to use, what temperature usually works, and what “done” should look like before you commit to a separate recipe.
| Use | Filling Amount | Temperature | Approx. Time | Done When |
|---|---|---|---|---|
| 9-inch apple pie | 5–6 cups | 400°F, then 375°F | 20 min, then 30–35 min | Crust golden, filling bubbling |
| 8×8 apple crisp | 3–4 cups | 350°F / 175°C | 25–35 min | Topping browned, edges bubbling |
| 9×9 apple crisp | 4–5 cups | 350°F / 175°C | 30–40 min | Topping golden, filling hot |
| 9×13 cinnamon roll bake | 4 1/2–5 1/2 cups | 350°F / 175°C | 45–50 min | Center dough baked through |
| Dump cake | 4 1/2–5 1/2 cups | 350°F / 175°C | 45–60 min | Top golden, filling bubbling |
| Pancake or waffle topping | 1/2 cup per serving | Low stovetop heat | 3–5 min | Warm and spoonable |
Apple Pie
For one generous 9-inch apple pie, 5 to 6 cups of cooled filling is usually the right amount. Since the apple pieces are already cooked, focus on baking the crust until deeply golden and crisp. Do not add hot filling to chilled pie dough, or the bottom crust can soften before baking.
Apple Crisp or Apple Crumble with Apple Pie Filling
Apple crisp is one of the easiest desserts to make with this filling because the apple pieces are already cooked and the sauce is already thickened. Use 3 to 4 cups for an 8×8 pan, 4 to 5 cups for a 9×9 pan, or 7 to 8 cups for a larger 9×13 dessert. Spread the filling evenly, add a buttery oat crumble or simple flour crumble, and bake until the topping is golden and the edges are bubbling.
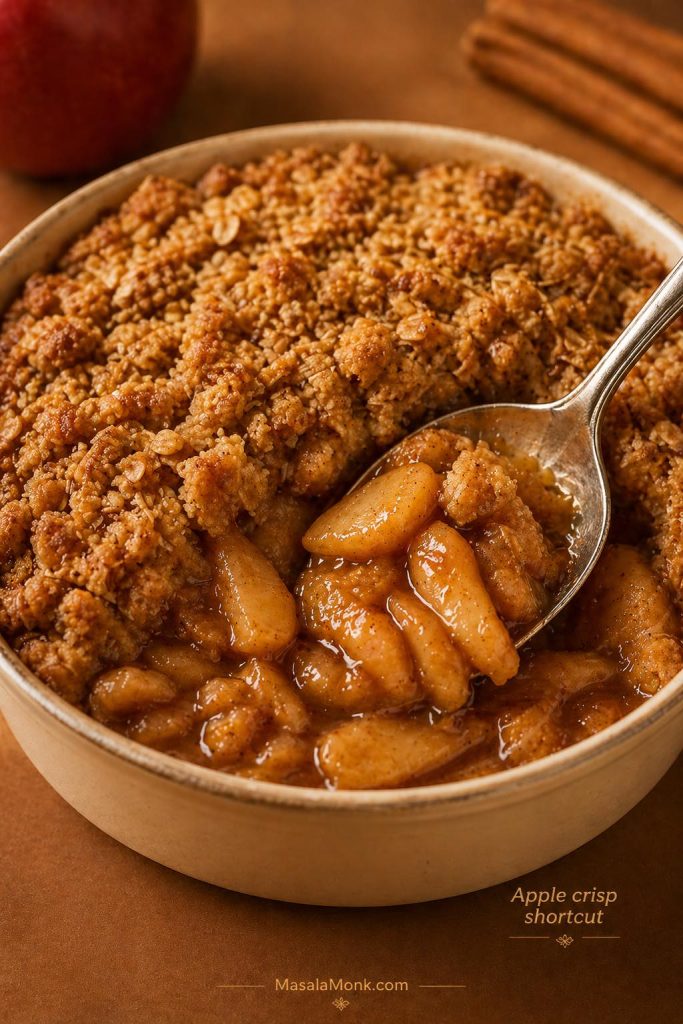
For a quick crumble topping, mix 3/4 cup oats, 1/2 cup flour, 1/2 cup brown sugar, 1/2 teaspoon cinnamon, a pinch of salt, and 6 tablespoons cold butter until crumbly. Then scatter it over 3 to 4 cups of filling for an 8×8 crisp and bake until the edges bubble and the topping is golden.
Because this homemade apple filling is usually less syrupy than canned pie filling, do not make the crumble topping too dry. If the recipe has thickened a lot after chilling, loosen the filling with a spoonful of apple juice or water before baking.
Hand Pies and Turnovers
Small pastries do not forgive large apple slices. For hand pies and turnovers, diced filling is easier to seal inside pastry and less likely to leak. After the cooked apple filling cools completely, use a modest spoonful in each pastry so it does not push through the edges.

Mini Apple Pies
Diced filling works better than long slices for muffin-tin mini pies. Since the pieces are smaller, they sit neatly inside small crust rounds and make the pies easier to eat.
Cinnamon Roll Bake
For a large 9×13 cinnamon roll bake, use about 4 1/2 to 5 1/2 cups of chopped or diced apple pie filling with two tubes of cinnamon roll dough. For a smaller one-tube bake, use about 2 to 2 1/2 cups. If the filling has long slices, chop them roughly before combining so the center can bake through more evenly.
Apple Dump Cake
Use about 4 1/2 to 5 1/2 cups of this homemade filling as a replacement for two standard cans in many dump cake-style desserts. Homemade filling may be less syrupy than canned filling, so spread it evenly before adding the topping.
Pancakes, Waffles, Oatmeal, Yogurt and Ice Cream
If the filling is headed for breakfast bowls or ice cream, keep it a little softer. It should spoon easily over pancakes, waffles, oatmeal, yogurt, or ice cream instead of sitting stiffly on top. It works especially well over fluffy buttermilk pancakes, oat pancakes, almond flour pancakes, or a warm bowl of protein oatmeal.
Making the filling ahead instead? Jump to make-ahead tips, freezing and portioning, or the recipe card.
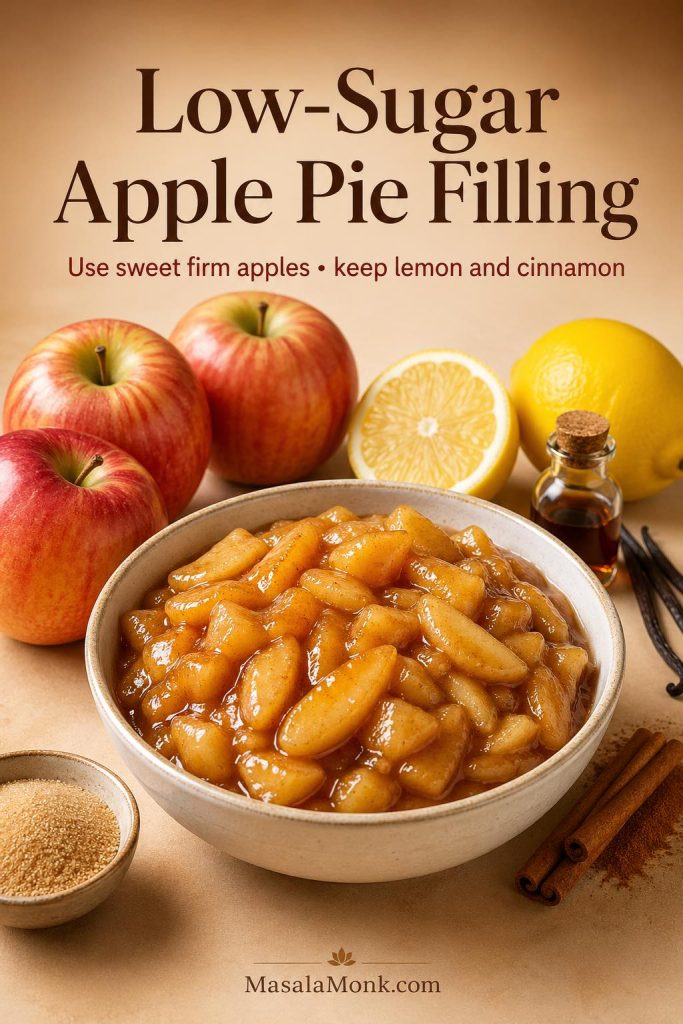
Low-Sugar and No-Added-Sugar Apple Pie Filling
If you want a lower-sugar version, you can reduce the sugar, but the texture will change slightly. Sugar does more than sweeten the apples; it also helps pull out juice and gives the sauce a fuller, glossier finish. As a result, a low-sugar batch may taste brighter and less syrupy than a classic pie filling.
For a lower-sugar recipe, use naturally sweet apple varieties and keep enough thickener for the filling to hold in pie. Reduce the granulated sugar first, keep some brown sugar for warmth if possible, and use lemon juice, cinnamon, vanilla, and a pinch of salt so the filling does not taste flat.
| Version | How to Adjust | Best Use |
|---|---|---|
| Lightly reduced sugar | Use 1/2 cup brown sugar and skip the granulated sugar | Pies, crisps, toppings |
| Low sugar | Use 1/4 to 1/3 cup brown sugar total | Breakfast bowls, pancakes, oatmeal |
| No-added-sugar style | Use sweet apples and a heat-stable sweetener to taste, or skip sweetener for a tart topping | Toppings and freezer portions |
If you remove most of the sugar, taste the filling before cooling. A little extra lemon juice can make it brighter, while a pinch of salt and a splash of vanilla can make the apple flavor taste rounder without adding more sweetness.
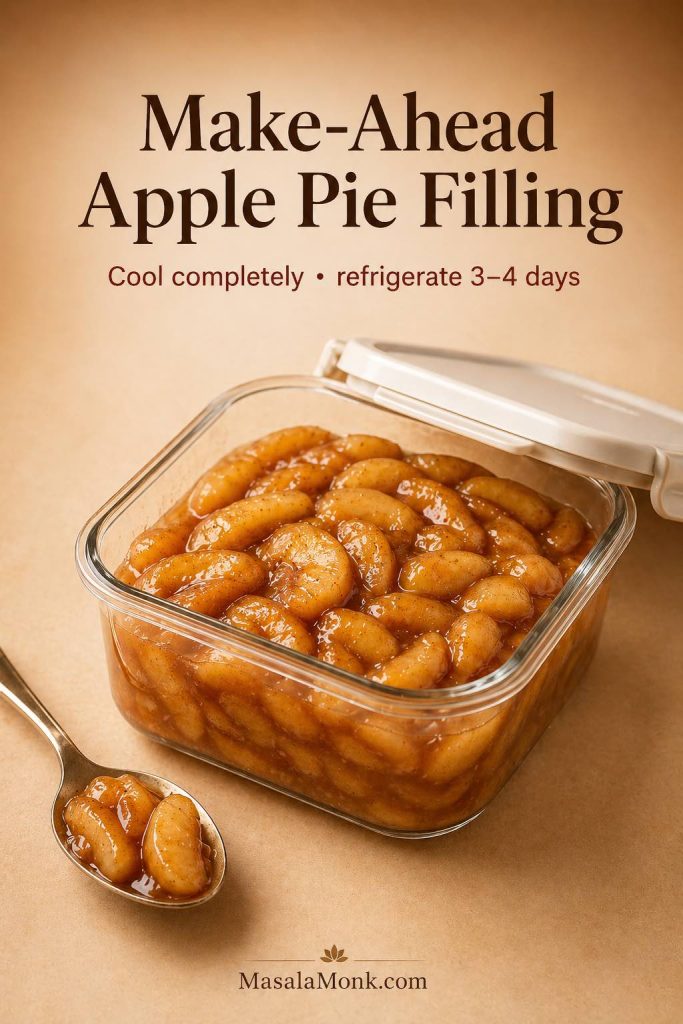
Can You Make Apple Pie Filling Ahead?
Yes. This filling is a strong make-ahead option because the cooked batch chills, portions, and freezes well. After cooking, cool it completely and refrigerate it in an airtight container for 3 to 4 days.
For pie, hand pies, turnovers, or other pastry desserts, use the filling chilled or at room temperature rather than hot. Hot filling can soften dough before baking, especially in bottom crusts and small pastries.
Because this recipe freezes well, you can portion the apple filling for one pie, one can replacement, or small breakfast toppings. However, when the batch is meant specifically for pie, sliced apple filling gives you a more classic texture.
For apple-cinnamon meal prep, this same flavor direction also works well in oat-based snacks like healthy oat protein bars. Keep this filling softer if you plan to spoon it over bars, bowls, or breakfast jars instead of baking it inside pastry.
How to Freeze Apple Pie Filling
The most useful freezer bag is the one you can use without thinking later. Since this batch makes about 6 cups, you can freeze it as one full pie batch or divide it into smaller canned-style replacement portions.
Before freezing, decide how you will use the apple filling later. For example, a 1-cup breakfast topping portion is very different from a full pie batch, so label each bag by amount as well as date.
- Cook the filling until glossy and thickened.
- Spread it in a shallow dish and cool completely.
- Portion it into freezer bags or airtight freezer-safe containers.
- Label each portion with the date and amount.
- If using bags, freeze them flat so they stack easily.
- Use within 3 months for best quality.
- Before using in pastry, thaw overnight in the refrigerator.
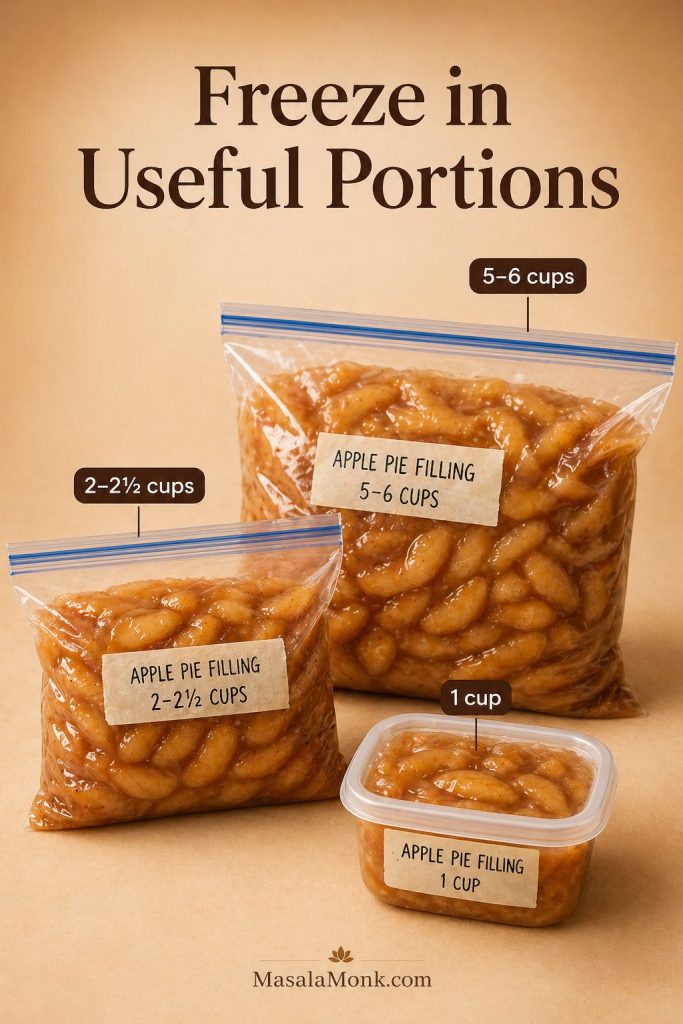
Best Freezer Portions
For later pie baking, freeze the recipe in a 5- to 6-cup apple filling portion so the full batch is ready to thaw at once. For quick desserts, smaller bags are easier to thaw than one full pie-size portion.
| Portion | Best Use |
|---|---|
| 1 cup | Oatmeal, waffles, pancakes, yogurt |
| 2 to 2 1/2 cups | One-can replacement |
| 3 to 4 cups | Small apple crisp or crumble |
| 5 to 6 cups | One 9-inch apple pie |
| 7 to 8 cups | 9×13 crisp or larger dessert |
How to Thaw Frozen Apple Pie Filling
For pastry, thaw frozen filling overnight in the refrigerator and use it cold or at room temperature. That way, the filling is thick enough to handle and does not soften the dough before baking.
For small breakfast portions, 1-cup bags are the most useful. They thaw quickly and can be warmed for pancakes, yogurt bowls, or oatmeal. For a cold breakfast option, spoon a small amount over high protein overnight oats.
If using a rigid freezer container, leave a little headspace because the filling can expand as it freezes. If using freezer bags, press out excess air before sealing.
How to Reheat Apple Pie Filling
For toppings, reheat apple pie filling gently in a small pan over low heat. Add a splash of water or apple juice if the sauce has thickened in the refrigerator, then stir often and warm only until the filling is spoonable.
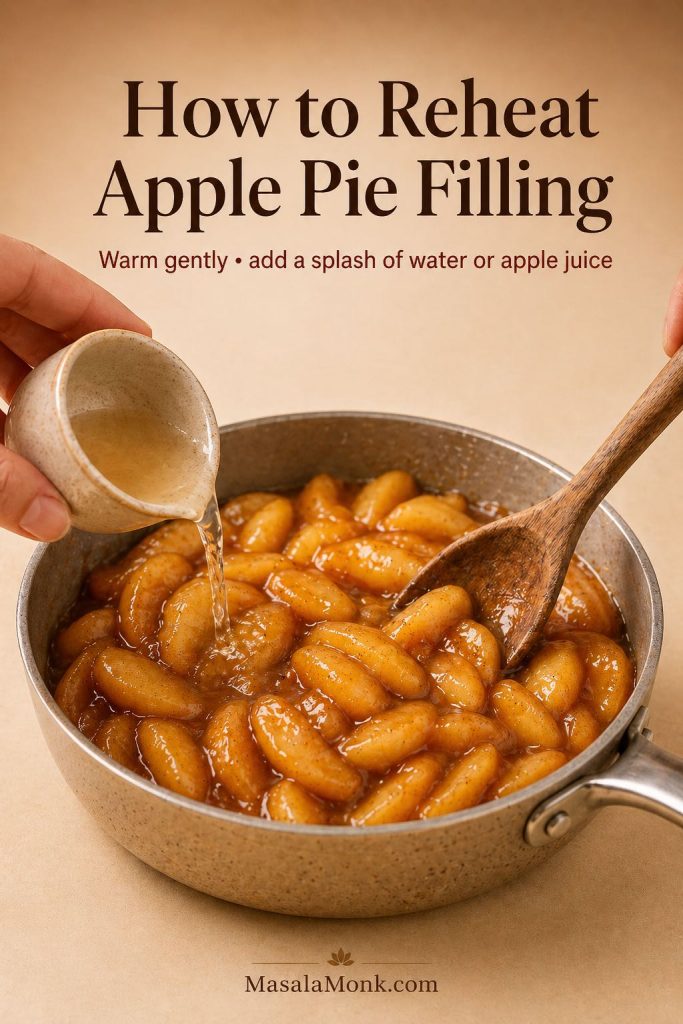
For pie, hand pies, turnovers, and other pastry desserts, thaw frozen filling overnight in the refrigerator and use it cold or at room temperature rather than hot. This helps protect the pastry and keeps the filling from loosening too much before baking.
Can You Can This Apple Pie Filling?
Not this version. This is a refrigerator and freezer apple pie filling recipe, not a shelf-stable canning recipe. Don’t water-bath can this cornstarch-thickened filling. Safe home-canned pie fillings require tested formulas, correct acidity, proper processing, and approved thickeners such as cook-type Clear Jel®.
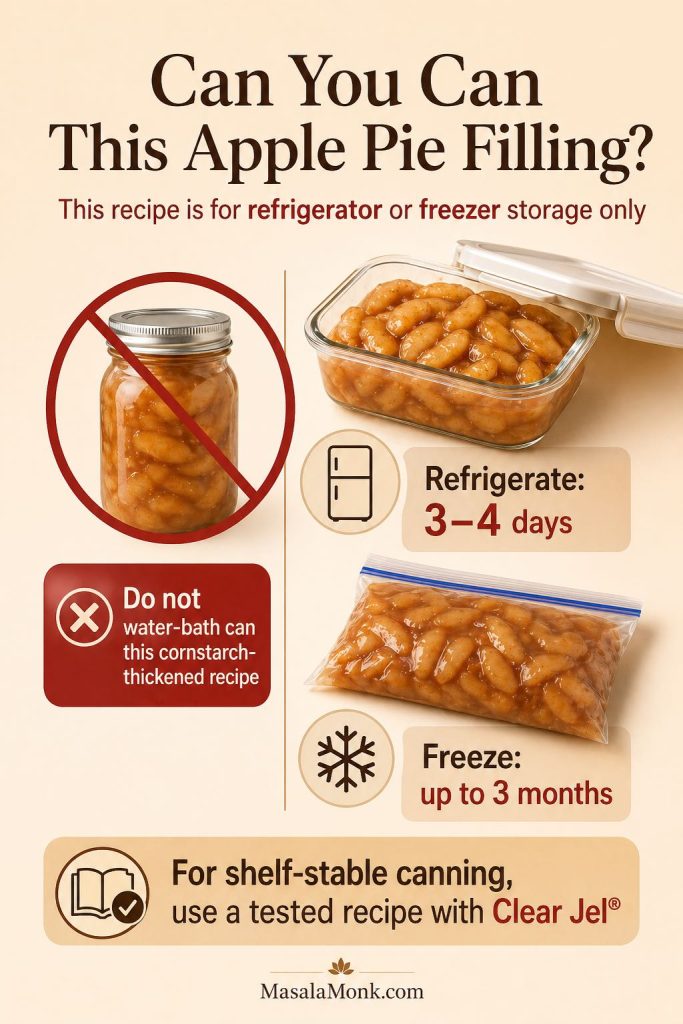
Instead, keep this recipe as a refrigerator or freezer apple filling, and use tested canning guidance for pantry-safe pie filling. If you want to can apple pie filling for pantry storage, use a trusted extension or food-preservation source, such as the National Center for Home Food Preservation apple pie filling instructions.
Troubleshooting Apple Pie Filling
Most filling problems are fixable before the apples go into pastry. If the sauce looks too loose, too thick, or too cloudy, adjust it in the pan instead of hoping the oven will solve it later.
Usually, the cause is apple choice, cut size, cooking time, or starch. Luckily, the fix is often simple if you catch it before baking the filling into pie, crisp, or pastry.
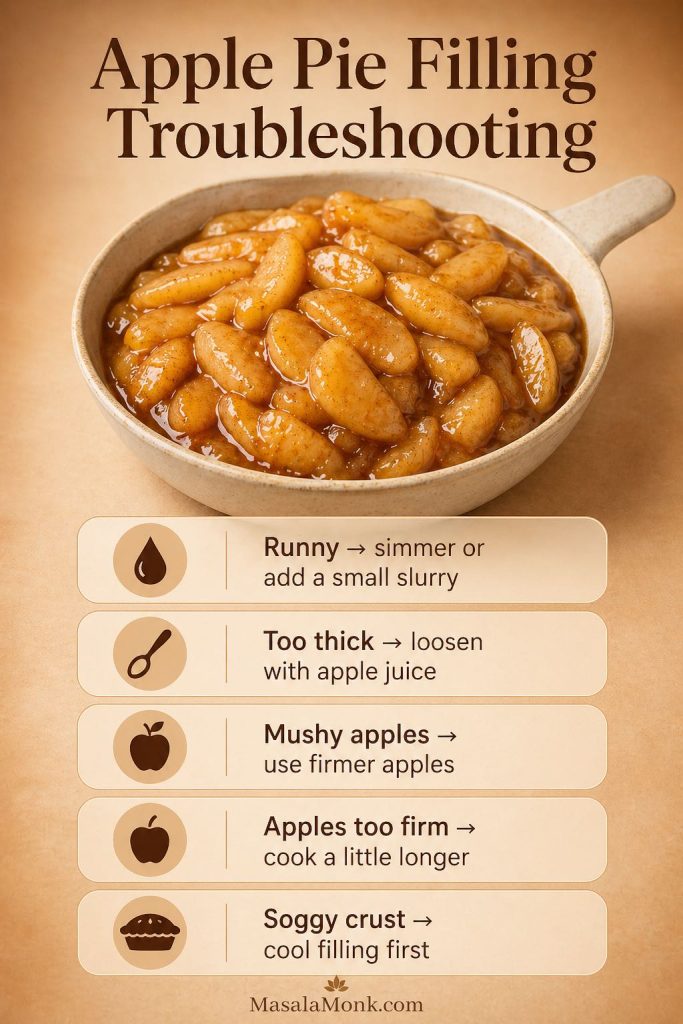
| Problem | Why It Happened | Fix |
|---|---|---|
| Filling is runny | Not enough starch, not bubbled long enough, or very juicy apples | Simmer 1–2 minutes more or add a small cornstarch slurry |
| Filling is too thick | Too much cornstarch or overcooking | Loosen with a splash of apple juice or water |
| Apple pieces are mushy | Soft apples or too much cooking | Use firmer apples and cook only until partly tender |
| Apple pieces are too firm | Pieces are too thick or undercooked | Slice thinner or cook covered a few minutes longer |
| Filling is too sweet | Very sweet apples plus too much sugar | Add lemon juice and a pinch of salt |
| Filling is too tart | All tart apples or too much lemon | Add brown sugar or blend in sweeter apples next time |
| Pie crust gets soggy | Hot filling added to pastry | Cool the filling completely before filling the pie |
| Filling looks cloudy | Starch was overheated, clumped, or flour was used | Use a smooth cornstarch slurry and simmer briefly |
If the recipe gives you apple filling that looks runny before it goes into pie, fix it in the pan. After baking, the same problem is much harder to correct.
Apple Pie Filling Recipe
Homemade Apple Pie Filling
This apple pie filling recipe makes about 6 cups of thick, glossy cinnamon apple filling for pies, crisps, hand pies, turnovers, toppings, and freezer portions.
Ingredients
- 8 medium firm apples, about 3 lb / 1.35 kg whole apples, or about 900 g to 1 kg after peeling and coring, sliced or diced
- 1 1/2 to 2 tablespoons lemon juice / 22–30 ml
- 2 tablespoons unsalted butter / 28 g
- 1/2 cup packed brown sugar / 100 g
- 1/4 cup granulated sugar / 50 g
- 1 1/2 teaspoons ground cinnamon / about 4 g
- 1/8 to 1/4 teaspoon ground nutmeg, optional
- 1/4 teaspoon fine salt
- 4 tablespoons cornstarch / about 32 g
- 1/3 to 1/2 cup water or apple juice / 80–120 ml
- 1 teaspoon vanilla extract / 5 ml, optional
Method
- Peel, core, and cut the apples. Use 1/4-inch / 6 mm slices for pie or 1/2-inch / 1.25 cm dice for hand pies, turnovers, toppings, and cinnamon roll bakes.
- Toss the apples with lemon juice.
- Melt the butter in a wide pan over medium heat. Add the apples, brown sugar, granulated sugar, cinnamon, nutmeg, and salt.
- Cook covered for 4–6 minutes, stirring once or twice, until the apple pieces begin to release juice and soften slightly. They should bend a little but still hold their shape.
- Meanwhile, in a small bowl, whisk the cornstarch with 1/3 cup water or apple juice until smooth.
- Stir the slurry into the apples. Cook for 1–2 minutes, stirring gently, until the sauce turns glossy and thick enough to coat the apple pieces. Add a little more water or apple juice only if the filling looks too stiff.
- Remove the pan from the heat and stir in vanilla, if using.
- Spread the filling in a shallow dish and cool it completely before using in pie crust, hand pies, turnovers, or freezer bags.
Notes
- For one generous 9-inch pie, use 5 to 6 cups of filling.
- For a softer topping-style filling, reduce cornstarch to 3 tablespoons.
- For hand pies or turnovers, dice the apples instead of slicing them.
- Cool the filling before adding it to pastry to reduce sogginess.
- This recipe is for refrigerator or freezer storage, not shelf-stable canning.
Storage
Refrigerate cooled filling in an airtight container for 3–4 days, or freeze in labeled portions for best quality within 3 months. Thaw overnight in the refrigerator before using.
FAQs About Apple Pie Filling
How much apple pie filling do I need for one pie?
For one apple pie, this recipe gives you about 5 to 6 cups of filling. A shallower pie may need 4 to 5 cups, while a deep-dish pie may need 6 to 7 cups.
How many apples do I need for apple pie filling?
For this apple pie filling recipe, use about 8 medium firm apples, or about 3 pounds / 1.35 kg whole apples. After peeling and coring, that gives enough apple pieces for about 6 cups of cooked filling.
Do you have to peel apples for apple pie filling?
For classic apple pie filling, peeling the apples gives the smoothest texture. That said, you can leave the peels on for a more rustic filling, especially if you are using it for crisps, oatmeal, yogurt, or pancake toppings.
Can I use this instead of canned apple pie filling?
For most recipes, use about 2 to 2 1/2 cups of this homemade filling as a rough replacement for one standard 20- to 21-ounce can of apple pie filling. For a full 9-inch pie, use about 5 to 6 cups.
Can I freeze apple pie filling?
To freeze the recipe, cool the apple filling completely, portion it into bags, and thaw it overnight before using it in pie. For best quality, use frozen portions within 3 months.
Can I make apple pie filling ahead?
For make-ahead baking, prepare the filling 3 to 4 days in advance and keep it refrigerated in an airtight container. Before using it in pies, hand pies, turnovers, or other pastry desserts, let it stay chilled or come to room temperature rather than adding it hot.
Should I slice or dice the apples?
Slice the apples for classic apple pie and crisps. Dice the apples for hand pies, turnovers, cinnamon roll bakes, pancakes, waffles, oatmeal, yogurt, and ice cream toppings.
Can I use apple pie spice instead of cinnamon?
Yes. Replace the cinnamon and nutmeg with about 1 1/2 to 2 teaspoons apple pie spice. Start with the smaller amount if your blend contains cloves, allspice, or ginger, because those spices can become strong quickly.
Should apple pie filling be cooked before baking?
For this recipe, yes. Cooking the filling first gives you better control over apple texture and sauce thickness. It also helps prevent surprises like watery pie filling after baking.
Is cornstarch or flour better for apple pie filling?
Cornstarch gives apple pie filling a glossier, cleaner sauce. Flour gives a duller, more rustic filling and can look cloudier. For this stovetop filling, cornstarch is the better choice.
Why is my apple pie filling runny?
Apple pie filling is usually runny because there was too little thickener, the slurry did not bubble long enough, or the apples released more juice than expected. The easiest fix is to simmer the filling a little longer, or add a small extra cornstarch slurry if needed.
Can I make apple pie filling without cornstarch?
You can make refrigerator or freezer apple filling without cornstarch, but the recipe will behave differently in pie. Arrowroot, tapioca starch, or flour can work in some cases, although each one thickens differently. If you are making shelf-stable canned filling, do not substitute casually; use a tested canning recipe.
Can I make low-sugar apple pie filling?
For a lower-sugar recipe, use naturally sweet apple varieties and keep enough thickener for the filling to hold in pie. Since a lower-sugar filling may be less syrupy, taste before cooling and adjust with lemon juice, salt, cinnamon, or vanilla as needed.
Can I can this apple pie filling?
Not this version. This cornstarch-thickened filling is for refrigerator or freezer storage only. For shelf-stable canning, use a tested canning formula with approved ingredients and processing instructions.
What can I make with apple pie filling?
You can use apple pie filling in apple pie, apple crisp, apple crumble, hand pies, turnovers, mini pies, cinnamon roll bakes, dump cakes, pancakes, waffles, oatmeal, yogurt bowls, cheesecake topping, or ice cream topping.