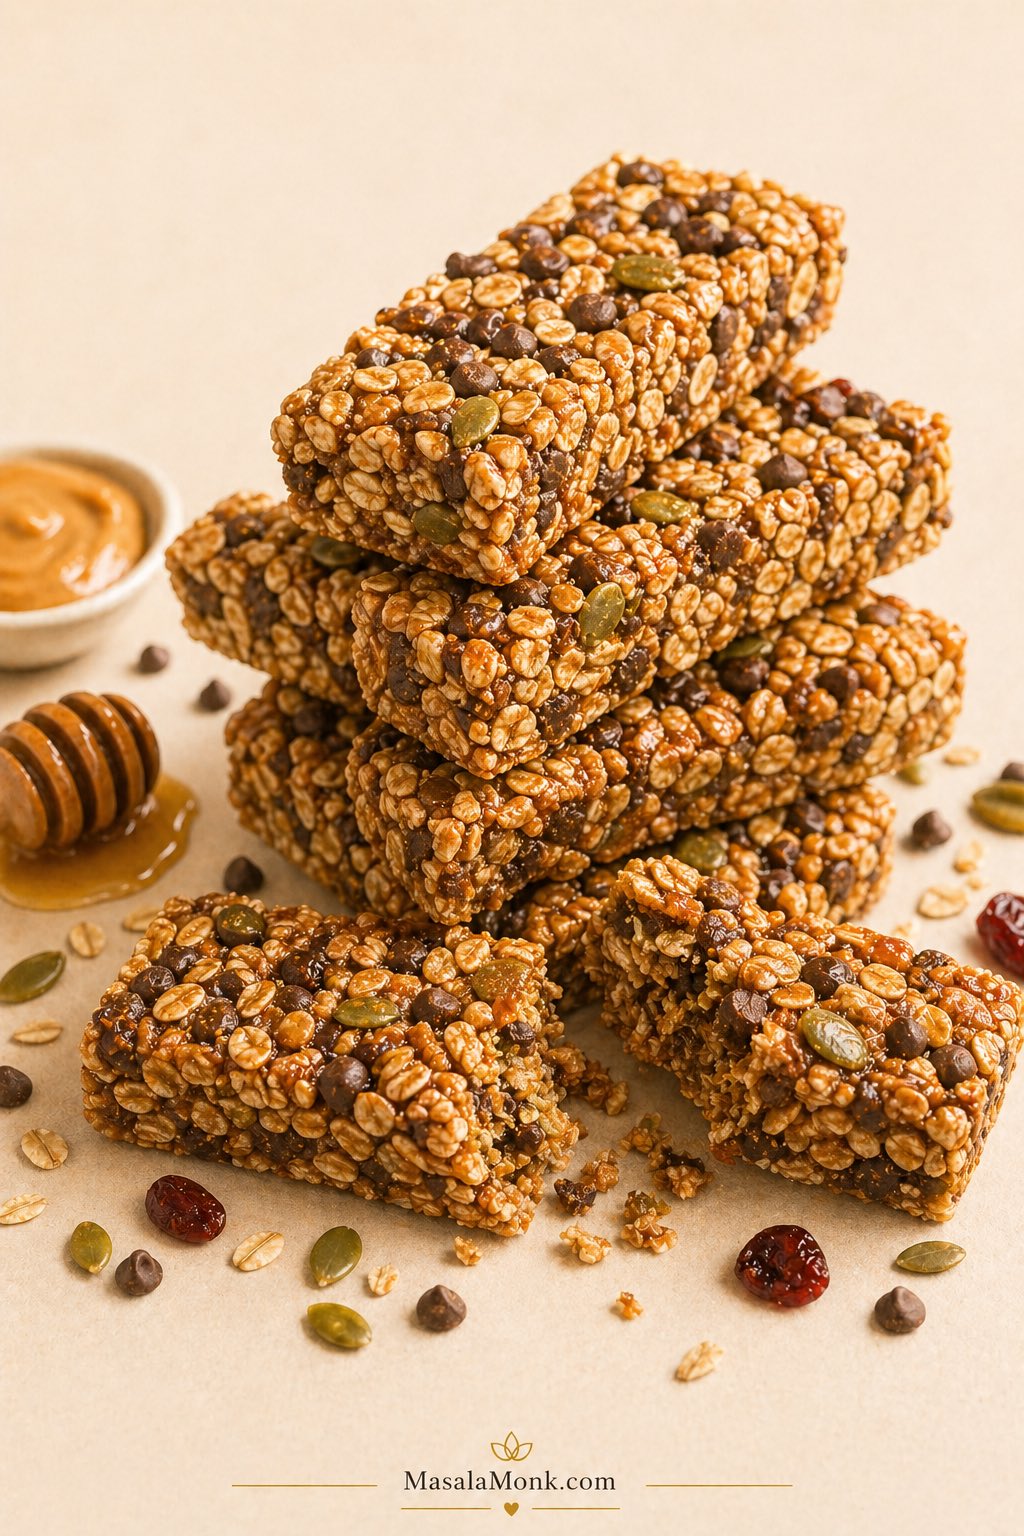
A good healthy homemade granola bars recipe should give you bars that are chewy, sturdy, lightly sweet, and easy to pack without crumbling into oat clusters. This version starts with a simple no-bake base of oats, nut butter, a sticky sweetener, salt, and mix-ins. Once that base works, you can adjust it for peanut butter, chocolate chip, protein, low-sugar, gluten-free, vegan, nut-free, cereal-style, or baked flapjack-style bars.
The best part is that these healthy homemade granola bars can fit the way you actually snack. Keep them simple for lunchboxes, add protein powder for a more filling post-workout bar, use sunflower seed butter for a nut-free lunchbox option, or bake the mixture briefly when you want a crunchier texture. Once you know how the oat-binder-sweetener formula works, homemade granola bars become much easier to customize.
If this is your first batch, start with the basic chewy no-bake version. Do not try to make the bars protein-rich, vegan, low-sugar, crunchy, and nut-free all at once. Instead, make one reliable batch first, learn how the mixture should feel before pressing, and then use the variations to change the flavor, sweetness, texture, or diet fit.
Healthy Homemade Granola Bars Guide
Start with the chewy no-bake base, then use the guides below to make the bars firmer, softer, crunchier, lower in sugar, higher in protein, vegan, gluten-free, nut-free, cereal-style, or flapjack-style.
Start Here
Understand the Formula
Quick Answer: Healthy Homemade Granola Bars Recipe
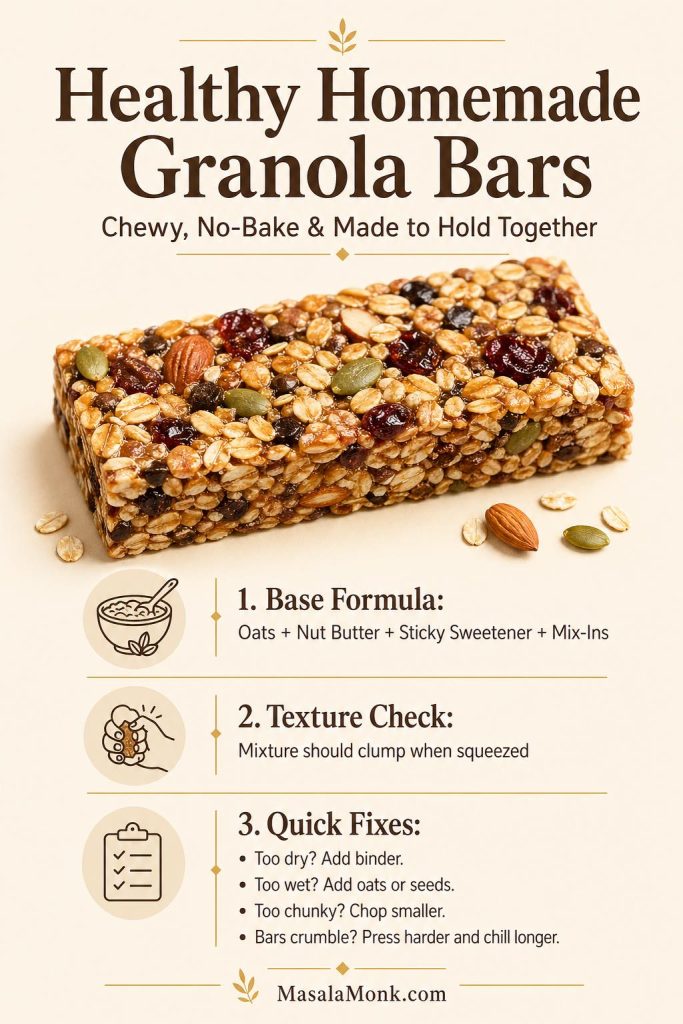
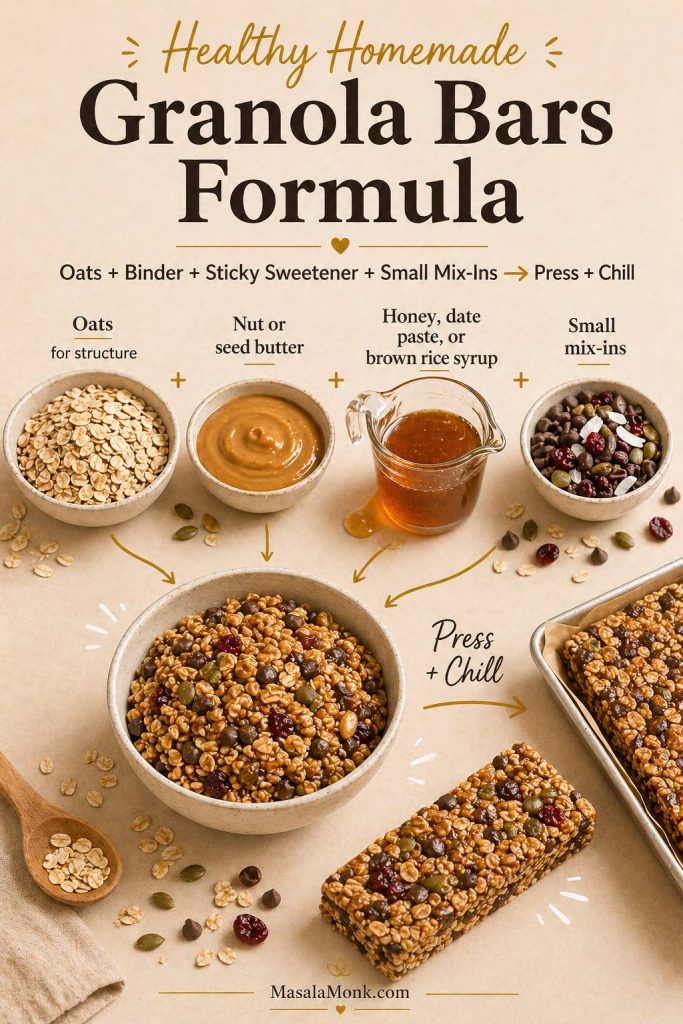
To make chewy, healthy homemade granola bars, mix rolled oats with creamy nut butter or seed butter, a sticky sweetener such as honey, brown rice syrup, or date paste, a little salt, and small mix-ins. Then, press the mixture very firmly into a lined pan, chill until set, and slice it into bars.
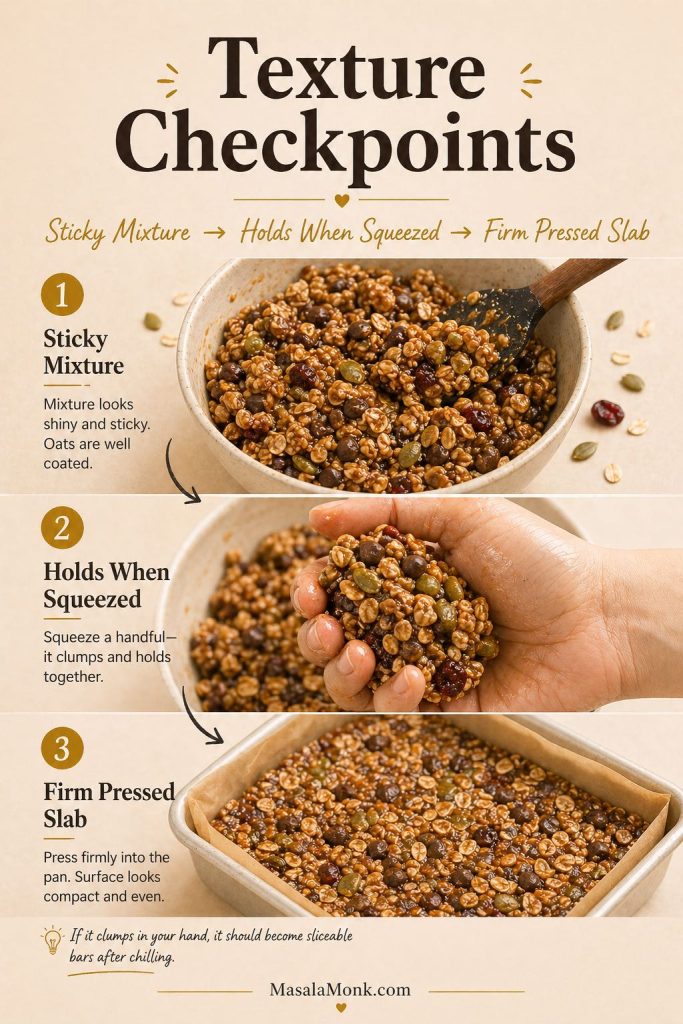
The bars hold together best when the mixture looks sticky and slightly glossy before it goes into the pan. However, if it looks dusty, it will probably slice dusty. If it feels wet and loose, add more oats, seeds, or ground flaxseed. In the end, the goal is a dense mixture that clumps when squeezed in your hand.
In this recipe, the homemade oat mixture turns into chewy granola-style bars once it is pressed firmly and chilled. That texture cue matters more than any single mix-in, especially if you want a healthier bar that still slices cleanly.
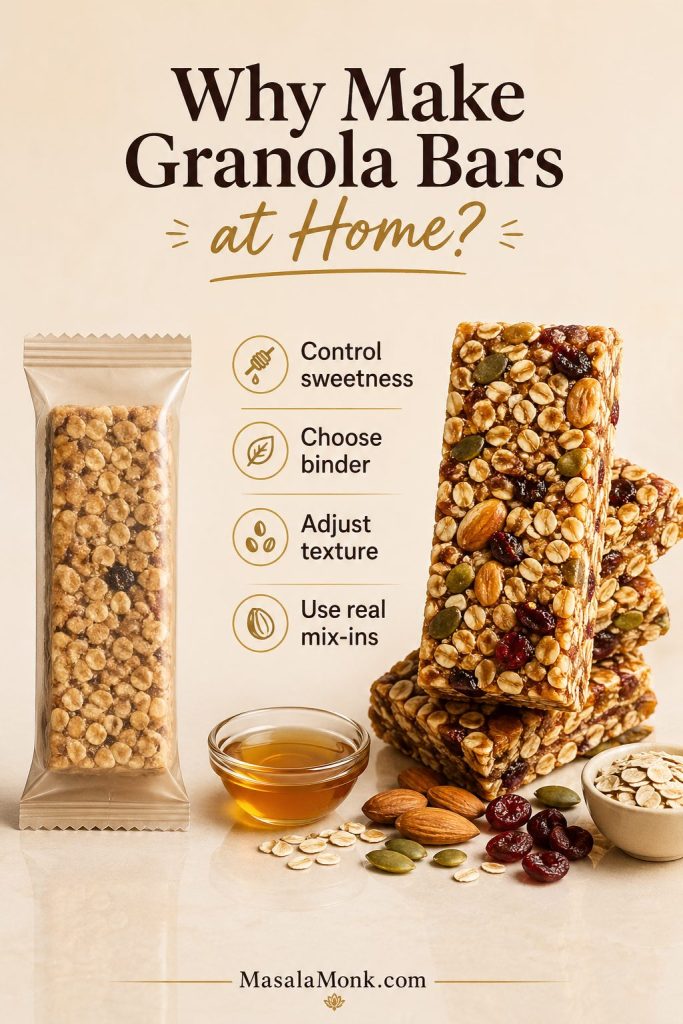
Why Make Granola Bars at Home?
Making granola bars at home gives you more control over sweetness, texture, binder choice, and mix-ins. That matters because the same basic oat mixture can become a chewy snack bar, a firmer lunchbox bar, a lower-sugar seed bar, a vegan date bar, or a protein-focused bar once you know how to adjust the formula.
5-Ingredient Homemade Granola Bars
When you want the simplest possible version, use this 5-ingredient formula. It is the easiest way to make homemade granola bars without turning the recipe into a project.
Because this recipe keeps the bars homemade, you can control the granola-style base, the binder, and the final sweetness without relying on a packaged snack bar.
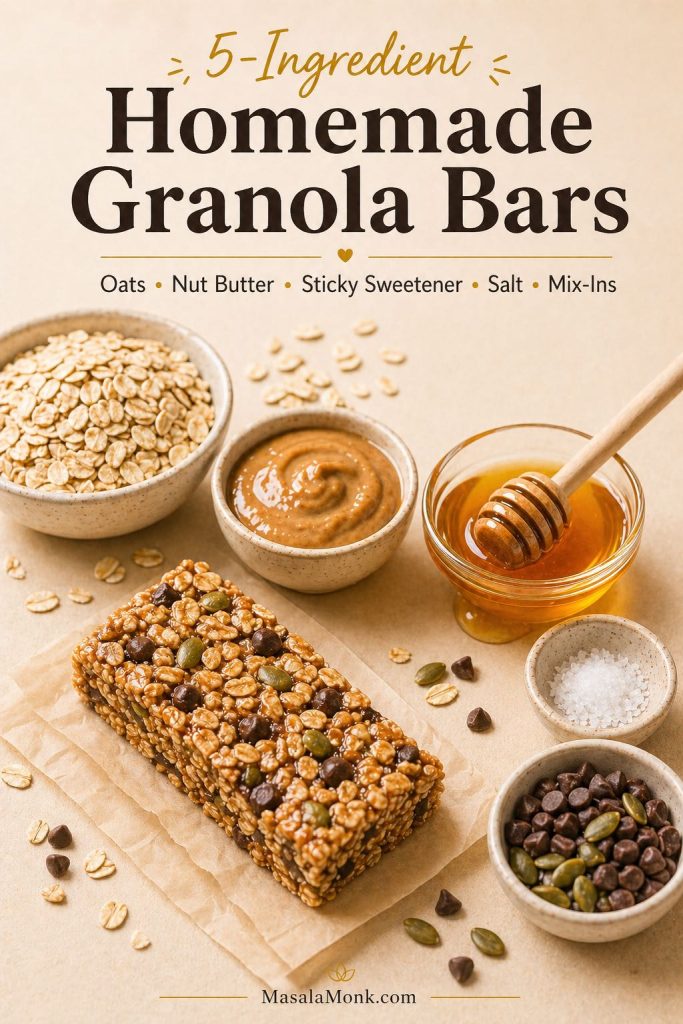
- Oats for structure and chew
- Peanut butter or sunflower seed butter for richness and binding
- Honey, brown rice syrup, or date paste for stickiness
- Salt for balance
- Mini chocolate chips, seeds, raisins, or chopped nuts for flavor
If you are making these for older kids, start with oats, peanut butter, honey, salt, and mini chocolate chips. For a nut-free version, use sunflower seed butter and seeds instead. When you want a less sweet batch, use seeds or chopped nuts as the fifth ingredient instead of chocolate or dried fruit.
For a lighter, crispier bar, replace 1/2 to 1 cup of the oats with puffed rice cereal, crisp rice cereal, or crisp oat cereal. Since cereal is lighter than oats, keep the sticky binder strong so the bars hold together.
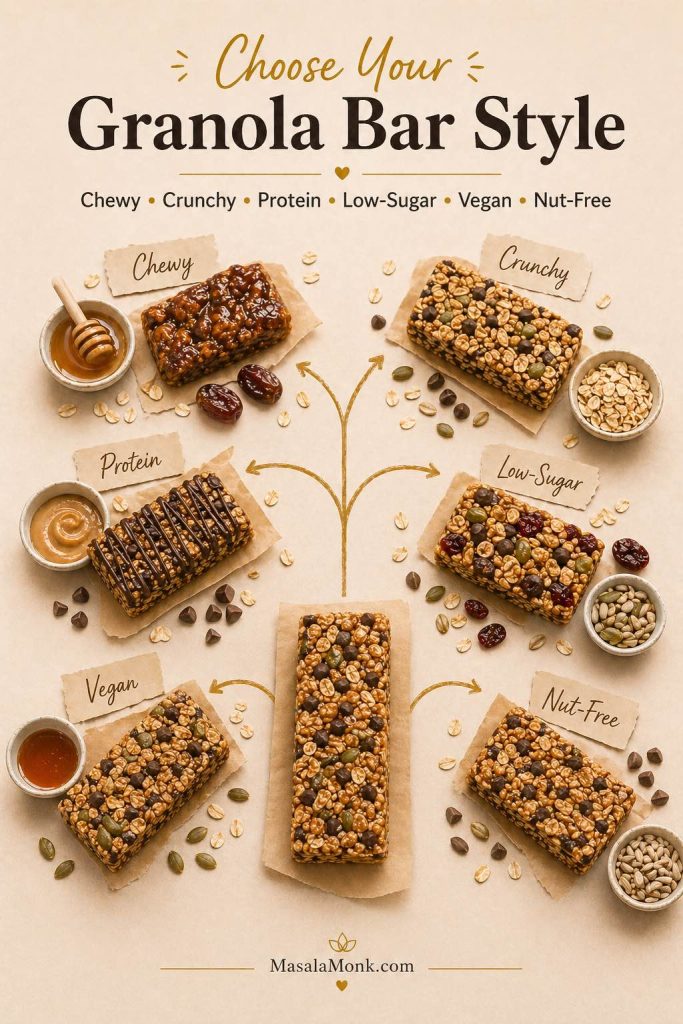
Choose Your Granola Bar Style
This recipe works because homemade granola bars do not all need the same texture. A lunchbox bar, breakfast bar, protein bar, cereal bar, and crunchy bar each need slightly different handling.
| You Want | Best Version to Make | What to Remember |
|---|---|---|
| Easiest first batch | Chewy no-bake granola bars | Use peanut butter and honey, then press hard and chill fully. |
| Bars that hold together best | Honey or brown rice syrup + nut butter | Brown rice syrup is especially sticky; honey is easier to find. |
| Prepared granola version | Ready-made granola + sticky binder | Crush large clusters first and use less added sweetener if the granola is already sweet. |
| Nut-free lunchbox option | Sunflower seed butter + seeds | Skip nuts and use pumpkin seeds, sunflower seeds, sesame, coconut, or mini chocolate chips. |
| Higher-protein bars | Protein granola bars | Start with a small amount of protein powder so the bars do not turn chalky. |
| Less sweet bars | Seed-heavy bars with less dried fruit and chocolate | Do not remove all sticky binder, or the bars will crumble. |
| Crunchy granola bars | Toasted and briefly baked bars | Cool completely before slicing; crunchy bars firm as they cool. |
| Cereal bars | Oats + puffed rice or crisp cereal | Use a strong binder and press firmly because cereal is lighter than oats. |
| Vegan granola bars | Date paste or brown rice syrup bars | Maple syrup can work, but it usually needs extra support from nut butter or flax. |
| Soft breakfast bars | Oat bars with banana or applesauce | These are softer and more breakfast-like than classic granola bars. |
| Flapjack-style oat bars | Baked granola bar variation | Use the crunchy baked method, but keep the sweetener measured for a lighter bar. |
Recipe Card: Chewy No-Bake Healthy Homemade Granola Bars
Tip: Use your browser’s print option to save this recipe card, or screenshot it if you want to keep the basic formula on your phone.
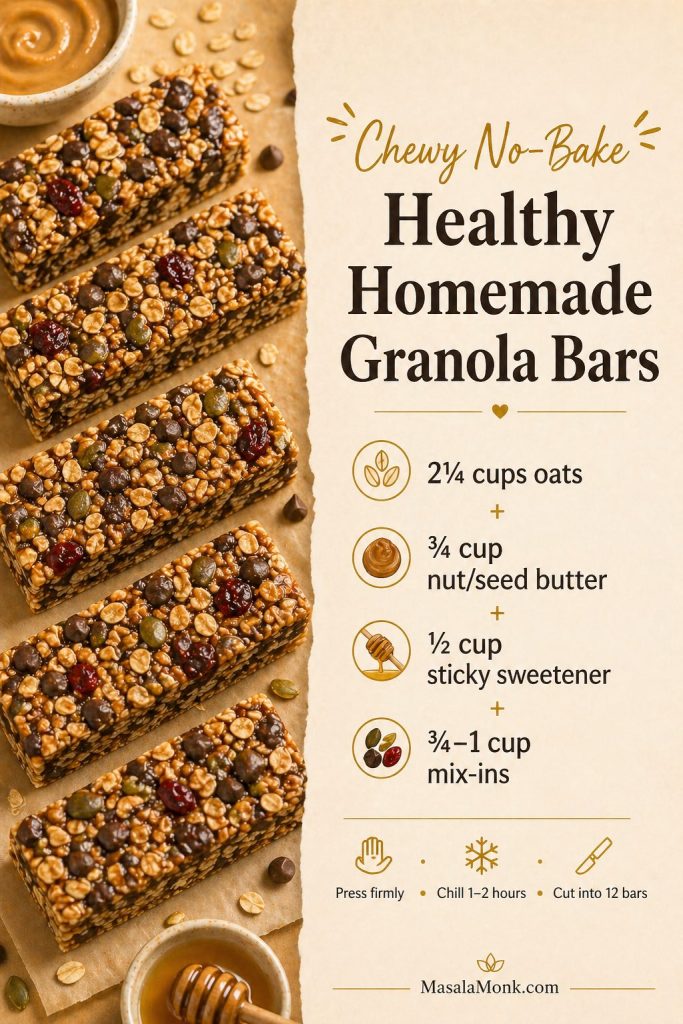
Chewy No-Bake Healthy Homemade Granola Bars Recipe
These healthy homemade granola bars are chewy, no-bake, easy to customize, and made with oats, nut butter, honey or date paste, seeds, and mini chocolate chips. Start with the base recipe, then use the variations below to change the flavor, texture, sweetness, or diet fit.
Ingredients for Chewy Homemade Granola Bars
- 2 1/4 cups rolled oats or old-fashioned oats, about 200 g / 7 oz
- 3/4 cup creamy peanut butter, almond butter, sunflower seed butter, or tahini, about 190–205 g / 6.7–7.2 oz
- 1/2 cup honey, brown rice syrup, or thick date paste, about 160–170 g / 5.6–6 oz / 120 ml
- 1 teaspoon vanilla extract, 5 ml
- 1/2 teaspoon cinnamon, optional
- 1/2 teaspoon fine salt, about 3 g, or less if your nut butter is salted
- 1/3 cup pumpkin seeds or sunflower seeds, about 45–55 g / 1.6–2 oz
- 1/3 cup chopped nuts, chopped dried fruit, or extra seeds, about 40–55 g / 1.4–2 oz
- 1/3 cup mini chocolate chips, about 55–60 g / 2 oz, optional
- 1 to 2 tablespoons ground flaxseed or chia seeds, about 7–18 g, optional
Instructions for Homemade Granola Bars
- Line an 8-inch / 20 cm square pan with parchment paper, leaving overhang on two sides. For thinner bars, use a 9-inch / 23 cm square pan. For thicker bars, use a 9 x 5-inch / 23 x 13 cm loaf pan or press the mixture into only part of a larger pan.
- In a small saucepan over low heat, warm the nut butter and honey until smooth and pourable. Then, stir in vanilla, cinnamon, and salt. Do not boil for the basic no-bake version.
- In a large bowl, mix the oats, seeds, chopped nuts or dried fruit, and flaxseed or chia seeds if using.
- Pour the warm binder over the oat mixture. Stir thoroughly until every oat and mix-in is coated. At this point, the mixture should feel sticky and dense, not dry or dusty.
- Let the mixture cool for 3 to 5 minutes, then fold in the mini chocolate chips.
- Transfer to the lined pan. Cover with parchment and press very firmly into an even layer. Use the bottom of a measuring cup to compact the mixture into the corners.
- Chill for at least 1 hour, or 2 hours for firmer bars. Before slicing, the center should feel firm when pressed.
- Lift out of the pan and slice into 12 bars. Store chilled for the firmest texture.
Recipe Notes for Homemade Granola Bars
- The mixture should look sticky and dense before pressing. If dry oats collect at the bottom of the bowl, add 1 tablespoon more nut butter or honey before pressing.
- When the mixture crumbles before pressing, add more nut butter or honey. If it feels wet and sticky, add more oats, seeds, or ground flaxseed.
- Use brown rice syrup or thick honey instead of thin maple syrup when you want firmer bars.
- Vegan granola bars work best with brown rice syrup or date paste.
- Nut-free bars need sunflower seed butter or tahini, plus seeds instead of nuts.
- Gluten-free bars need certified gluten-free oats and checked labels on all mix-ins.
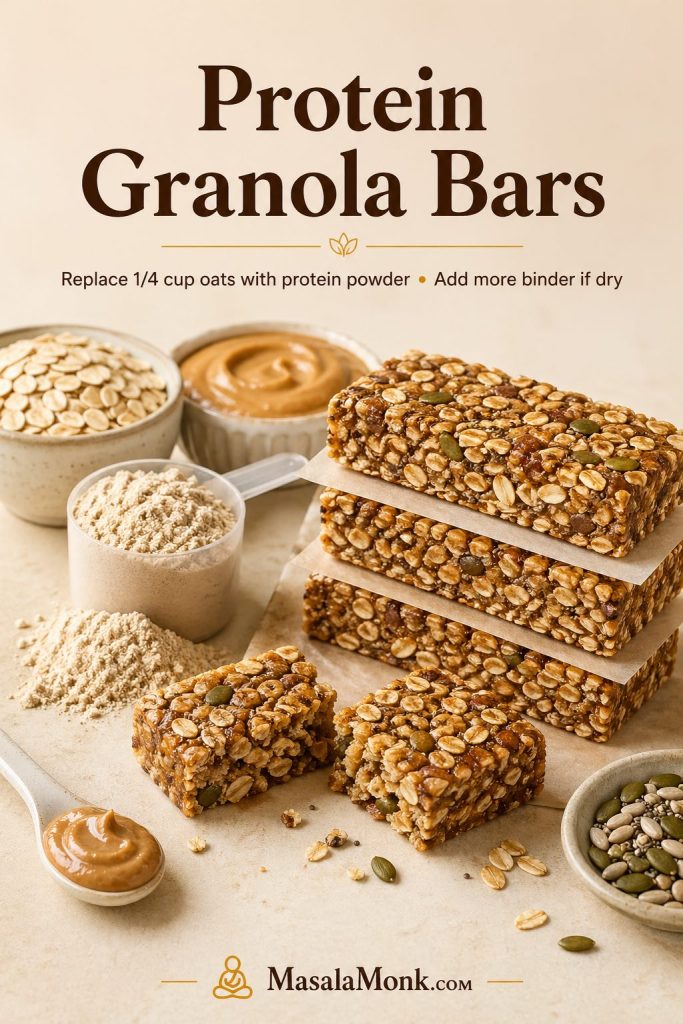
- Protein granola bars work best when you replace 1/4 cup oats with protein powder and add 1 to 2 extra tablespoons nut butter if the mixture feels dry.
- For a lighter crisp texture, replace 1/2 to 1 cup of the oats with puffed rice cereal, crisp rice cereal, or crisp oat cereal.
- Bars made with ready-made granola need about 2 1/2 cups prepared granola in place of the oats, with less sweetener if the granola is already sweet.
- A warm lunchbox needs a firmer binder, so use brown rice syrup or a short-cooked honey binder and pack with an ice pack.
- Do not use honey in bars for children under 12 months old. Use date paste or another suitable sweetener instead.
Nutrition Estimate for Homemade Granola Bars
Nutrition will vary depending on the nut butter, sweetener, seeds, chocolate, dried fruit, and protein powder you use. As a rough estimate, one of 12 bars from the basic peanut butter and honey version will usually fall in the range of 180 to 230 calories, with most of the energy coming from oats, nut butter, seeds, and sweetener. For a lighter bar, cut the slab into 16 smaller squares.
How to Cut Homemade Granola Bars
Cut the slab into 12 rectangles when you want regular snack bars. For smaller lunchbox portions, slice it into 16 squares. Bite-size freezer snacks work well as 24 mini bars. In general, thicker bars hold together better, while thinner bars feel lighter and chill faster.
Texture Notes for Chewy Homemade Granola Bars
For the most reliable first batch, use peanut butter and honey because both help the oats stick together. Brown rice syrup makes firmer bars, especially if you need them to hold up longer outside the fridge. Maple syrup tastes good, but it usually makes softer, more fragile bars unless you add extra nut butter or ground flaxseed.
The mixture should feel sticky before it goes into the pan. If dry oats are still sitting at the bottom of the bowl, do not press yet. Instead, add another spoonful of nut butter or honey, stir again, and test a small handful. Once it clumps when squeezed, it is ready to press.
Best Pan Size for Homemade Granola Bars
An 8-inch / 20 cm square pan gives the best balance of thickness, chilling time, and clean slicing. A 9-inch / 23 cm square pan makes thinner bars that chill faster, but they can break more easily if the mixture is not pressed firmly. A 9 x 5-inch / 23 x 13 cm loaf pan makes thicker bars that hold together well, although the yield will be smaller.
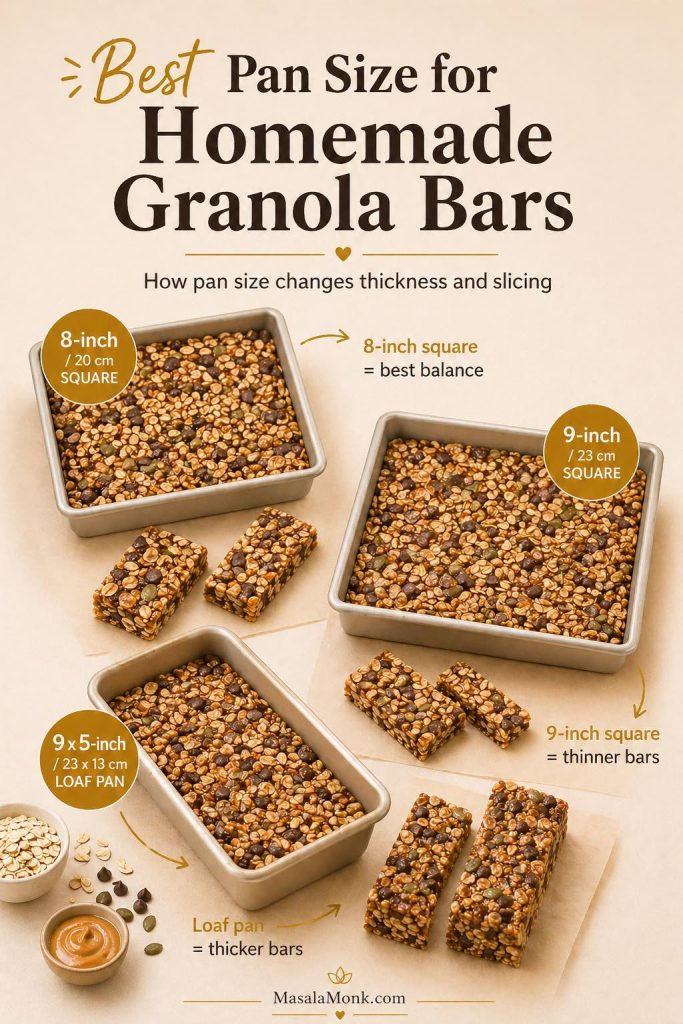
Whatever pan you use, press the mixture into a tight, even layer before chilling. Otherwise, the slab may look set on top but crumble when sliced.
Why These Healthy Homemade Granola Bars Work
Granola bars are simple, but they can fail in frustrating ways. Sometimes they taste good but crumble as soon as you cut them. At other times, they are so sticky that they feel unfinished. Occasionally, they become hard because the binder was cooked too long.
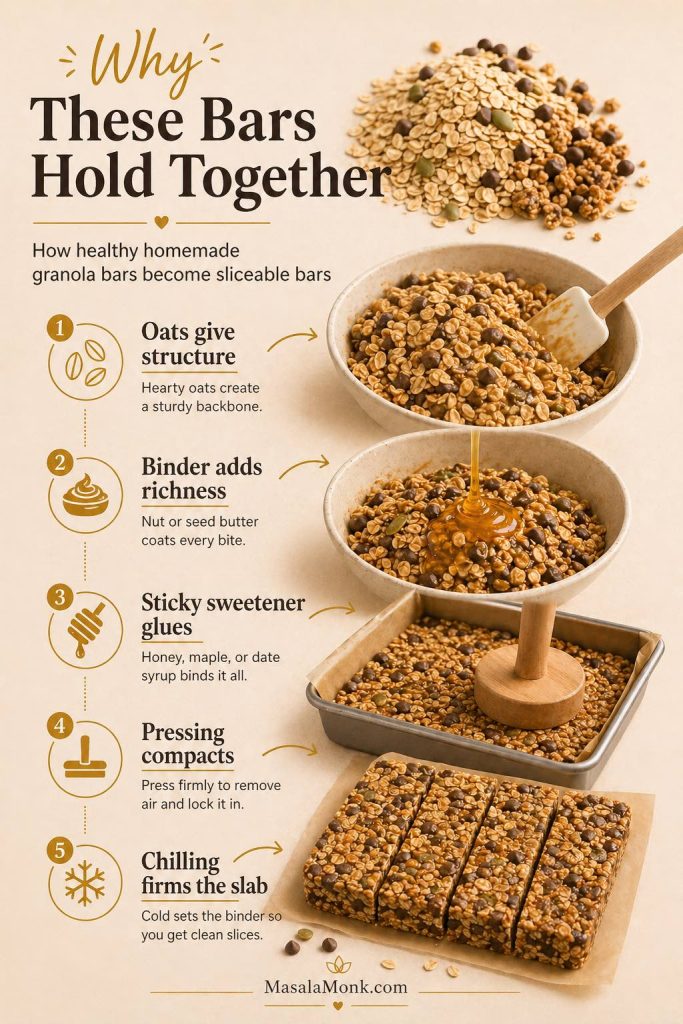
These bars work because the oats, binder, sweetener, and mix-ins are balanced before anything goes into the pan. First, the oats give chew and structure. Then, the nut butter or seed butter adds richness and helps glue the mixture together. Meanwhile, the sticky sweetener holds the dry ingredients in place. Because small mix-ins spread through the bars instead of creating big break points, the slab cuts more cleanly. Finally, firm pressing and proper chilling turn the mixture into sliceable bars.
Oats are also a strong base for a filling snack because they are a whole grain and contain beta-glucan, the main soluble fiber in oats. Harvard’s Nutrition Source notes that beta-glucan has been studied for slowing digestion and increasing satiety, which is one reason oats work so well in breakfasts and snacks. Read Harvard’s guide to oats and beta-glucan here.
Are Homemade Granola Bars Healthy?
Homemade granola bars can be a healthier everyday snack, especially when you build them around oats, nuts, seeds, and a measured amount of sweetener. Still, homemade does not automatically mean sugar-free, low-calorie, or high-protein. The real benefit is that you decide what goes in and how sweet, filling, or protein-rich the bars should be.
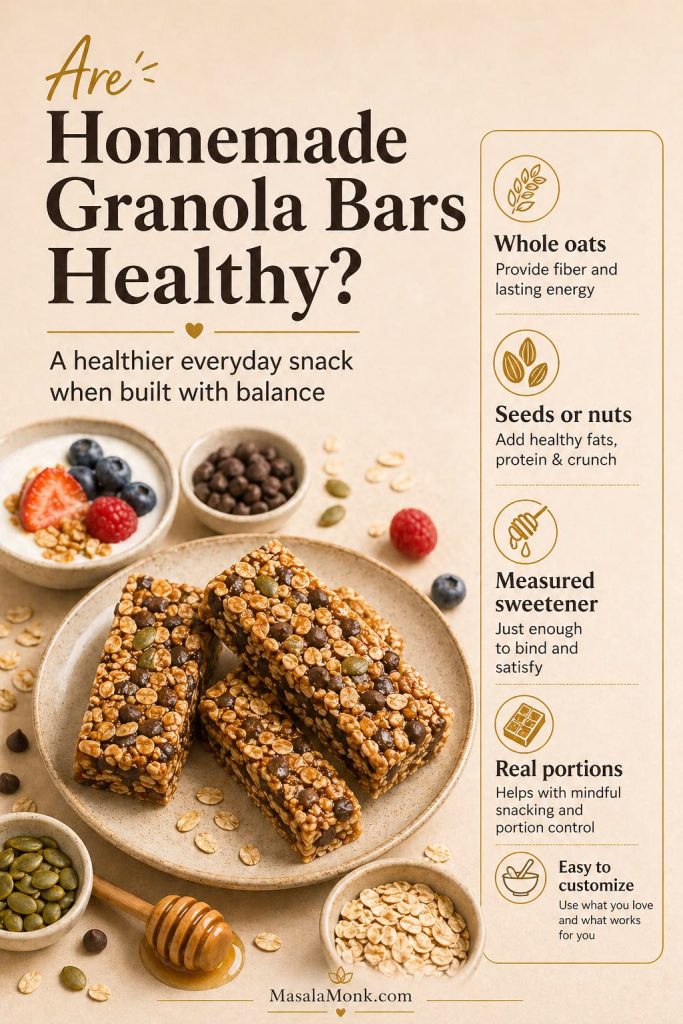
For a more balanced homemade granola bar, start with whole oats, a moderate amount of nut or seed butter, seeds for texture, a sticky sweetener used with restraint, and enough salt to make the flavors taste complete. If the bar is meant to replace breakfast, consider protein and fiber. However, if it is meant to be a small snack, keep the portion size realistic.
In practice, a healthy homemade granola bars recipe should not depend only on removing sugar. It should also help the bars stay satisfying, easy to portion, and sturdy enough to eat without falling apart.
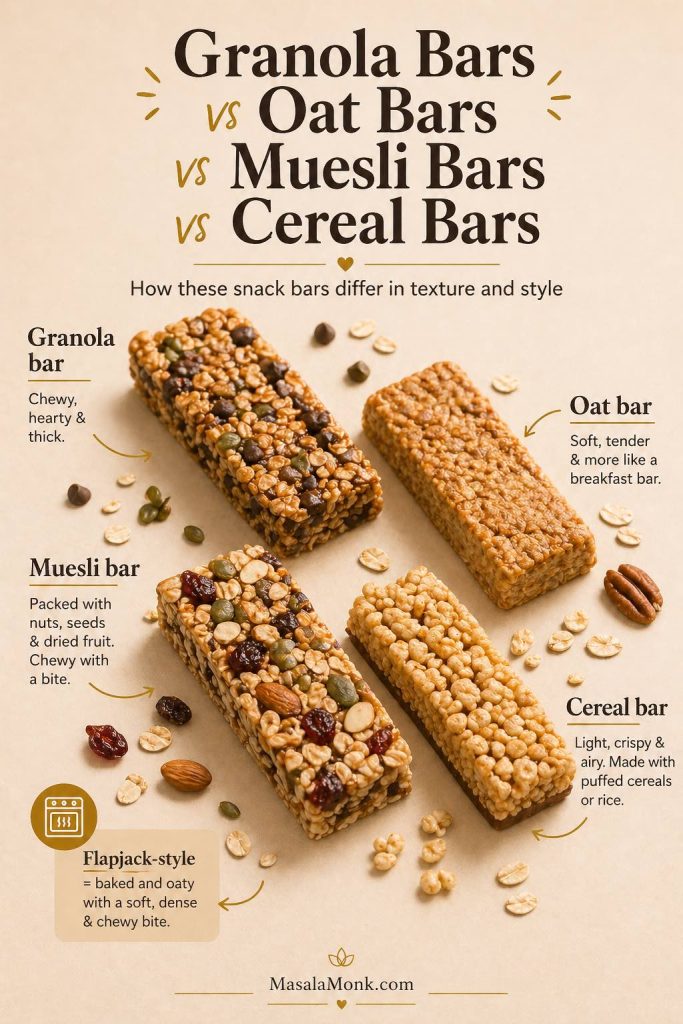
Granola Bars vs Oat Bars vs Muesli Bars vs Cereal Bars
These names overlap, but they are not always used the same way. Knowing the difference helps you choose the right style instead of forcing one recipe to do everything.
| Bar Type | What It Usually Means | Best For |
|---|---|---|
| Granola bars | Oat-based bars with nuts, seeds, dried fruit, chocolate, and a sticky binder. | Classic snack bars, lunchboxes, road trips, meal prep. |
| Oat bars | Often softer, more breakfast-like, and sometimes made with banana, applesauce, or baked oatmeal-style mixtures. | Breakfast, kids’ snacks, softer meal-prep bars. |
| Muesli bars | A common name in some regions for oat, nut, seed, and dried fruit bars. | Chewy oat bars with fruit, nuts, and seeds. |
| Cereal bars | Bars made with puffed rice, toasted cereal, oat cereal, or similar breakfast cereals. | Quick no-bake lunchbox bars and kid-friendly snacks. |
| Protein bars | Bars built around extra protein from protein powder, nuts, seeds, dairy, soy, or other protein-rich ingredients. | Post-workout snacks, higher-protein breakfasts, gym bags. |
| Flapjacks | In UK-style usage, usually baked oat bars made with oats, fat, sugar, and syrup. | People who want a firmer baked oat bar texture. |
For this recipe, rolled oats or old-fashioned oats are the best starting point because they give homemade granola-style bars visible texture and chew. If you are still deciding which oats to use, MasalaMonk’s guide to oats, types, nutrition, and differences explains rolled oats, quick oats, instant oats, and steel-cut oats in more detail.
Ingredients for Healthy Homemade Granola Bars
This recipe uses simple homemade granola bar ingredients, but each one has a job. Once you understand what each ingredient does, it becomes much easier to make substitutions without ending up with crumbly, sticky, or dry bars.
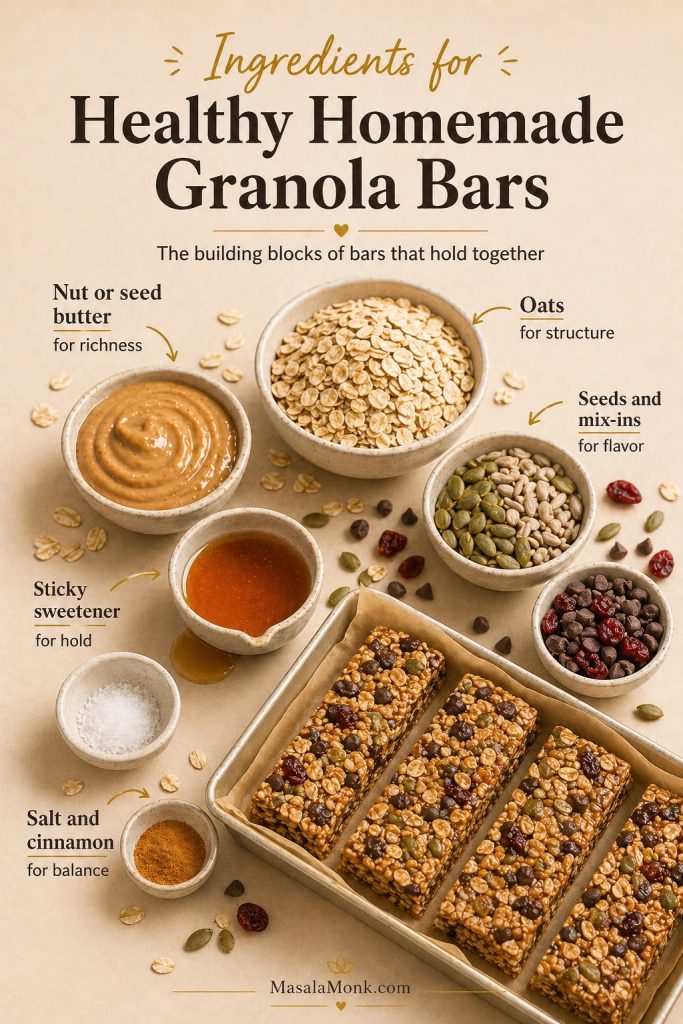
Rolled Oats or Old-Fashioned Oats
Rolled oats are the best all-purpose choice for chewy granola bars. They are flat enough to bind into the mixture, but they still keep enough texture to feel hearty. Old-fashioned oats and rolled oats are usually the same thing, so either label works here. MasalaMonk has a full guide on substituting old-fashioned oats for rolled oats if you want the details.
Quick oats can work when you want softer bars, although the texture will be less defined. On the other hand, steel-cut oats are not ideal for this no-bake recipe because they stay too hard and do not bind well unless they are cooked or processed first.
Nut Butter or Seed Butter
Creamy peanut butter is the easiest binder for a first batch because it is thick, flavorful, and sticky. Almond butter, cashew butter, sunflower seed butter, pumpkin seed butter, and tahini can also work. If you use natural nut butter, stir it very well before measuring, since separated oil can make some parts of the bars greasy while other parts stay dry.
For peanut butter granola bars, use creamy peanut butter. For nut-free granola bars, use sunflower seed butter or tahini. If you want full control over salt, sweetness, and texture, you can also make peanut butter at home and use it as the binder.
Sticky Sweetener and Best Binders
A sticky sweetener turns oats and mix-ins into bars instead of loose granola. Honey is the easiest choice for chewy no-bake granola bars. Brown rice syrup is even stickier and can help bars hold together more firmly. Date paste works well for a no-refined-sugar version. Maple syrup tastes good, but it is thinner and less sticky, so bars made only with maple syrup can be more fragile unless you adjust the formula.
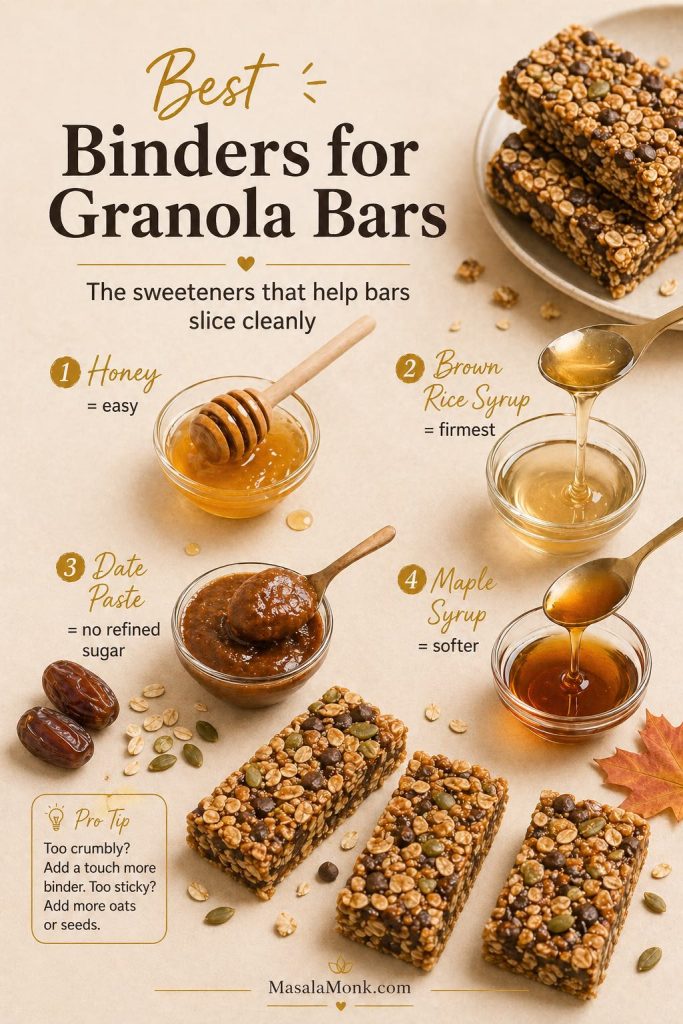
For vegan granola bars, brown rice syrup and date paste usually give a better hold than maple syrup alone. If you use maple syrup, add extra nut butter, ground flaxseed, or a slightly longer chill time. Also, if you are making bars for a baby under 12 months old, do not use honey; the CDC advises against giving honey to children younger than 12 months because of infant botulism risk. Read the CDC guidance here.
The binder is where most granola bars succeed or fail. Use this quick guide when you are choosing between honey, maple syrup, date paste, brown rice syrup, peanut butter, tahini, or seed butter.
| Binder Goal | Best Choice | Why It Works |
|---|---|---|
| Best first batch | Peanut butter + honey | Easy, sticky, familiar, and reliable. |
| Firmest vegan bars | Seed butter + brown rice syrup | Brown rice syrup is thick and sticky, so it holds better than thin maple syrup. |
| No-refined-sugar bars | Nut butter + date paste | Thick, sweet, and caramel-like, though still naturally sweet. |
| Flapjack-style bars | Honey or golden syrup + butter or nut butter | Gives a firmer baked oat-bar texture. |
| No-peanut-butter bars | Almond butter, cashew butter, tahini, or sunflower seed butter | Useful for allergies, taste preference, and lunchbox planning. |
| Lunchbox-firm bars | Brown rice syrup or short-cooked honey binder | Helps bars hold up better outside the fridge. |
Nuts, Seeds, Dried Fruit, and Chocolate
Mix-ins make homemade granola bars more interesting, but they can also make the bars break apart. Large almonds, whole cashews, big chunks of dates, and oversized chocolate chips create weak spots in the slab. Therefore, chop nuts and dried fruit before mixing, and use mini chocolate chips when possible.
Good mix-ins include pumpkin seeds, sunflower seeds, chia seeds, flaxseed meal, sesame seeds, chopped nuts, shredded coconut, dried cranberries, raisins, dates, mini chocolate chips, cacao nibs, and a pinch of cinnamon. In general, smaller pieces make cleaner bars because they compress more evenly into the oat mixture.
Salt, Vanilla, and Cinnamon
Do not skip the salt. A small amount keeps the bars from tasting flat and makes the nut butter, oats, and sweetener taste more complete. Vanilla adds warmth, while cinnamon gives the bars a breakfast-like flavor. You can also use cardamom, ginger, cocoa powder, orange zest, or espresso powder in specific variations.
Optional Protein Powder
Protein powder can turn this into a homemade protein granola bars recipe, but it changes the texture quickly. Whey protein usually blends more smoothly than many plant proteins. Meanwhile, plant protein powders often absorb more moisture and can make bars dry or chalky. Start small, then add more nut butter or a splash of milk if the mixture feels dry before pressing.
For a more protein-focused oat recipe, MasalaMonk already has healthy oat protein bars. If you want to understand protein powder in oats more deeply, this protein oatmeal guide explains whey, plant protein, yogurt, egg whites, paneer, tofu, and other ways to raise protein in oat-based meals.
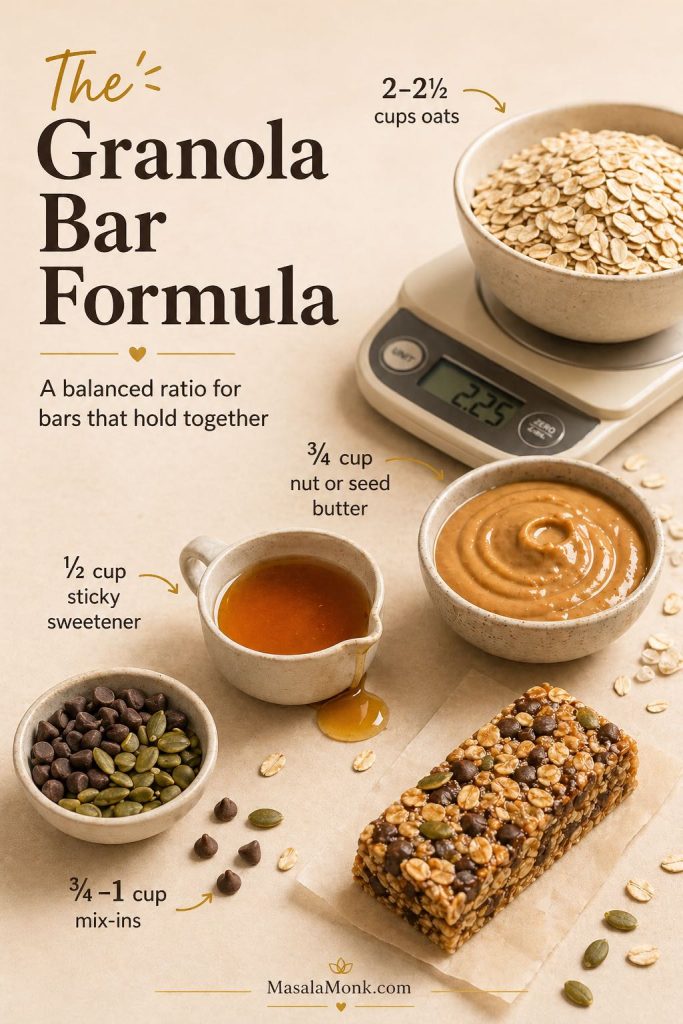
The Simple Formula Behind Homemade Granola Bars
Think of this recipe as a balance between dry structure and sticky glue. The oats and mix-ins give the bars body, while the nut butter and sweetener hold everything together. If either side gets too heavy, the texture suffers.
| Ingredient Type | Starting Amount | Purpose | Best Choices |
|---|---|---|---|
| Oats | 2 to 2 1/2 cups | Structure and chew | Rolled oats or old-fashioned oats |
| Nut or seed butter | 3/4 cup | Binder, richness, flavor | Peanut butter, almond butter, sunflower seed butter, tahini |
| Sticky sweetener | 1/2 cup | Glue and sweetness | Honey, brown rice syrup, date paste |
| Mix-ins | 3/4 to 1 cup | Flavor, crunch, chew | Mini chips, seeds, chopped nuts, chopped dried fruit |
| Flavor boosters | Small amounts | Balance | Salt, vanilla, cinnamon, cocoa, cardamom |
As a rule, do not keep adding dry mix-ins just because they sound good. Too many seeds, nuts, dried fruit pieces, chocolate chips, or protein powder will overwhelm the binder. Ideally, the mixture should look compact and sticky before pressing, with no dry oats collecting at the bottom of the bowl.
Can You Make Granola Bars with Ready-Made Granola?
Yes, you can make granola bars with ready-made granola, but the texture depends on what is already in the granola. If your granola is very crunchy, very sweet, or full of large clusters, crush or pulse it lightly before mixing so the bars can compact properly. Large clusters taste good in a bowl, but they can make sliced bars break apart.
Because prepared granola is often already sweetened, use less added sweetener than the main recipe. As a starting point, use 2 1/2 cups granola, 1/2 cup creamy nut or seed butter, 1/3 cup honey or brown rice syrup, and 1/4 to 1/2 cup extra seeds, mini chocolate chips, or chopped dried fruit. After that, warm the binder, mix everything well, press very firmly into a lined pan, and chill before slicing.
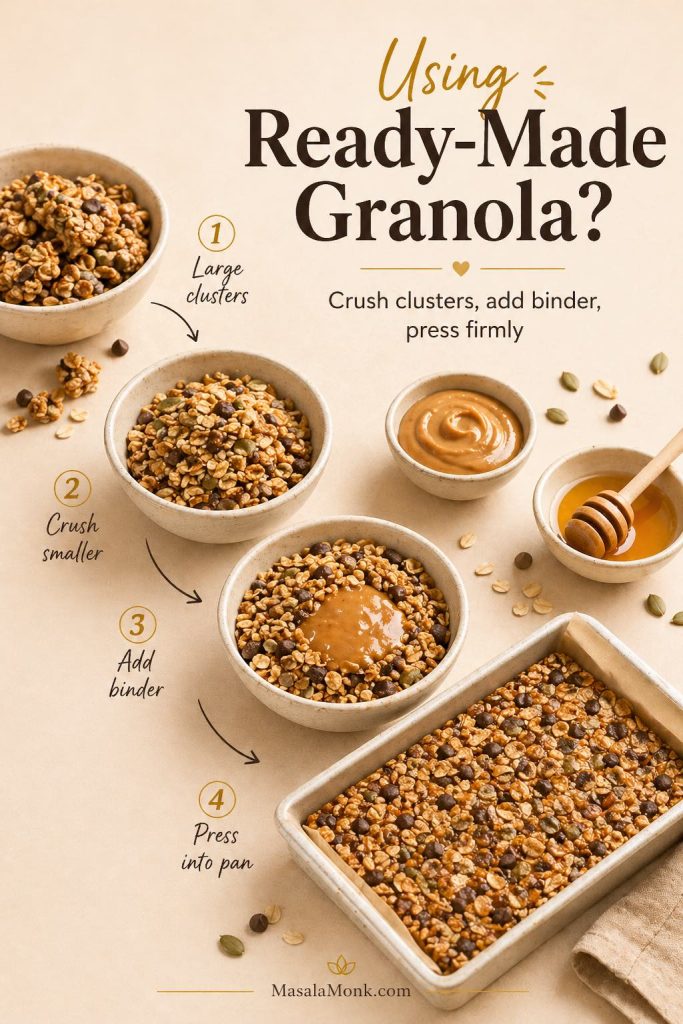
With ready-made granola, the recipe still works, but homemade-style bars need smaller clusters and a strong binder. Otherwise, the slab may taste good but crumble when sliced.
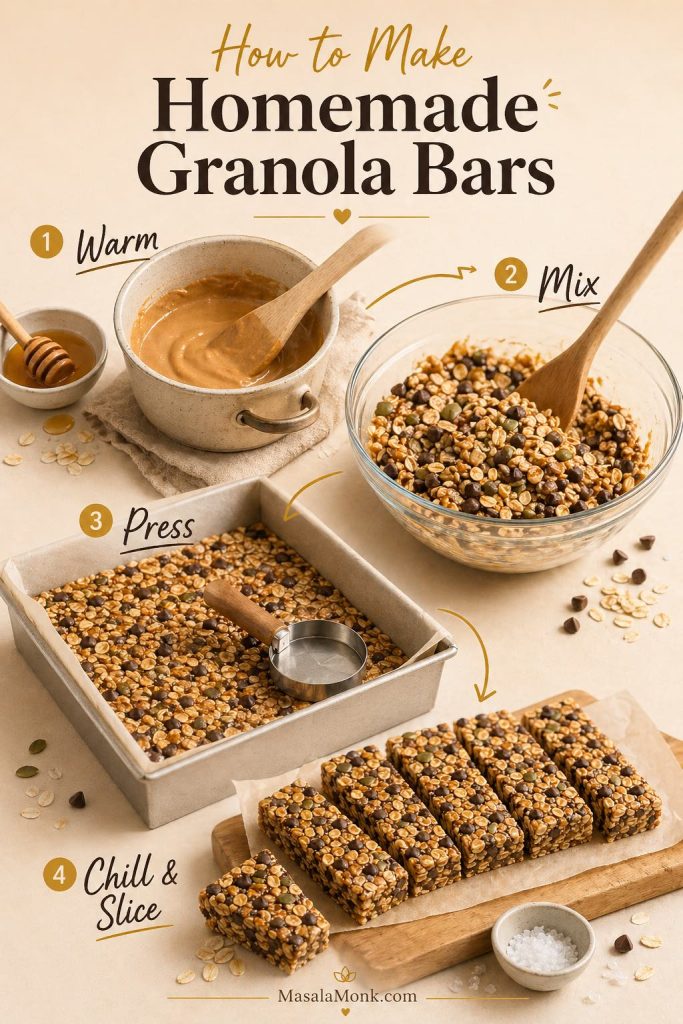
How to Make Homemade Granola Bars Step by Step
This step-by-step recipe shows how a homemade granola mixture becomes firm, sliceable bars after warming, mixing, pressing, chilling, and cutting.
1. Line the Pan
Line an 8-inch / 20 cm square pan with parchment paper, leaving some overhang on two sides. This makes it easier to lift the chilled slab out cleanly. For thinner bars, use a 9-inch / 23 cm square pan. For thicker bars, use a 9 x 5-inch / 23 x 13 cm loaf pan or press the mixture into only part of a larger pan.
2. Warm the Binder
Add the nut butter, honey or other sticky sweetener, vanilla, and salt to a small saucepan. Warm over low heat just until smooth and pourable. For the basic no-bake version, you are not trying to boil the mixture. Instead, you only want it loose enough to coat the oats evenly.
If you need firmer room-temperature bars, gently simmer honey for about 1 minute before mixing it with the nut butter. This creates a stickier binder, but it can also make the bars harder if cooked too long.
3. Mix the Oats and Dry Ingredients
In a large bowl, combine the rolled oats, seeds, chopped nuts, chopped dried fruit, cinnamon, and any protein powder or flaxseed meal. Keep chocolate chips aside until the binder has cooled slightly, especially if you want visible chips instead of melted chocolate streaks.
4. Combine Wet and Dry
Pour the warm binder over the oat mixture. Stir until every oat and mix-in is coated. Scrape the bottom and sides of the bowl so there are no dry pockets. The mixture should look sticky, dense, and slightly glossy. If it still looks dusty, add another spoonful of nut butter or honey.
5. Add Chocolate Chips Last
Let the mixture cool for a few minutes before folding in mini chocolate chips. Small chips work better than large chips because they spread through the bars evenly and do not create big break points. If the mixture is very warm, the chips will melt, which is fine for flavor but less tidy for slicing.
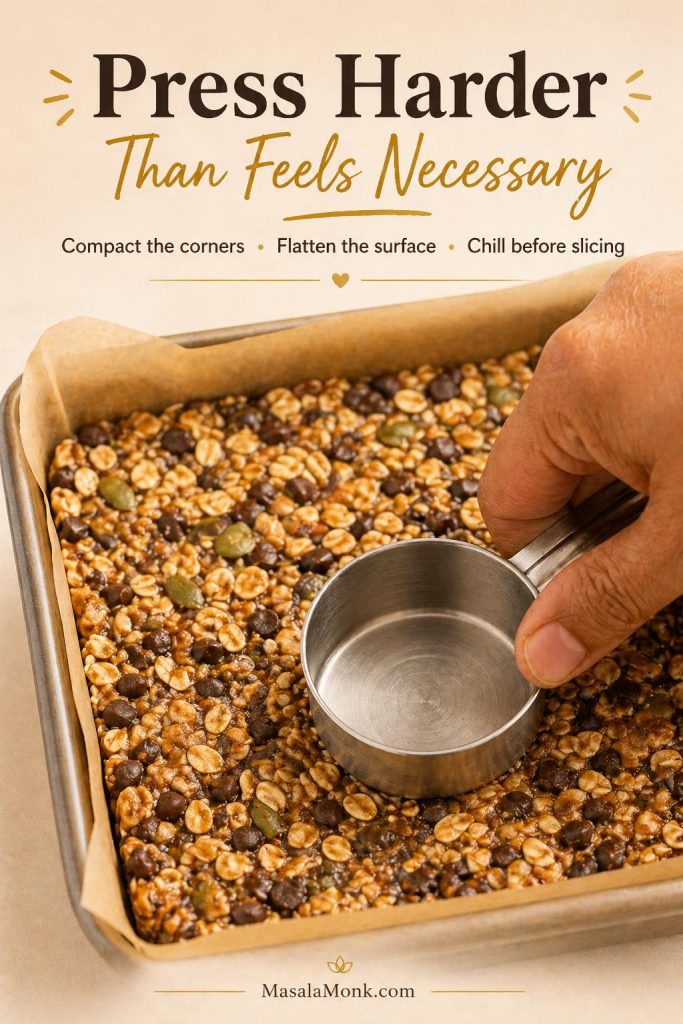
6. Press Harder Than Feels Necessary
Transfer the mixture to the lined pan. Cover the top with another piece of parchment paper and press down firmly with your hands, the bottom of a measuring cup, or a flat spatula. Push into the corners and flatten the surface. Then press again. This step is what turns a sticky oat mixture into actual bars.
7. Chill Before Slicing
Chill for at least 1 hour, or 2 hours if your kitchen is warm. Do not judge the final texture while the slab is still soft. After chilling, lift the slab out using the parchment, then slice with a sharp knife. Press straight down instead of sawing back and forth.
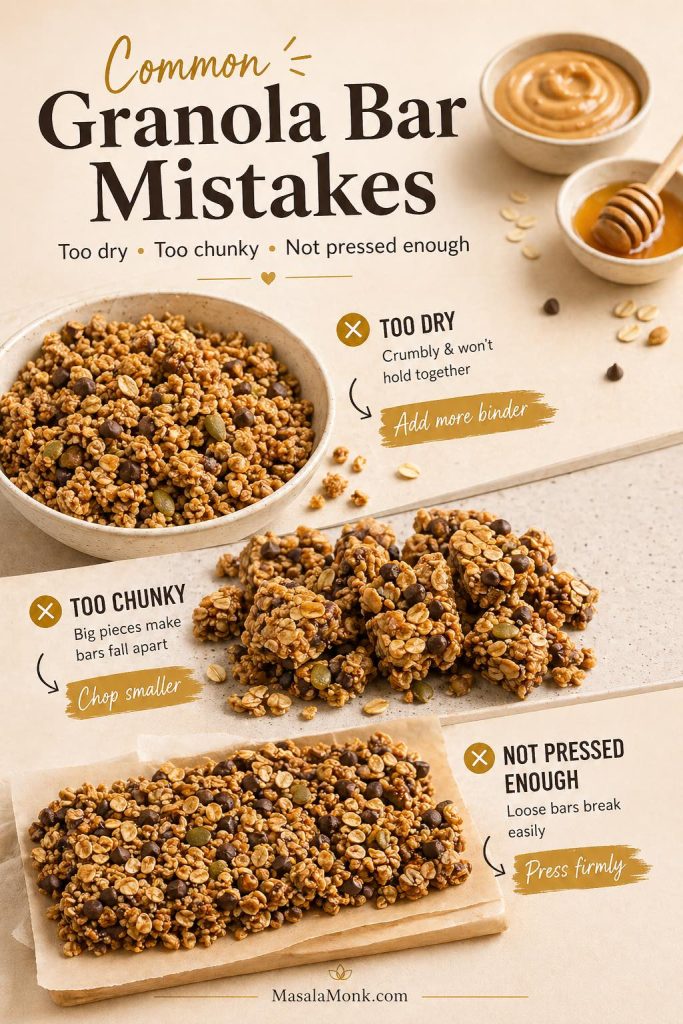
Common Mistakes When Making Homemade Granola Bars
Even a simple homemade granola bars recipe can fail when the mixture is too dry, too wet, too chunky, or not pressed firmly enough.
- Avoid overloading the mix-ins. Too many nuts, seeds, dried fruit pieces, chocolate chips, or protein powder can overwhelm the binder.
- Keep large chunks out of the mixture. Big almonds, dates, chocolate pieces, and granola clusters create weak spots.
- Press harder than feels necessary. Otherwise, the mixture may stay loose instead of compacting into one slab.
- Wait before slicing. No-bake granola bars need chilling time before they cut cleanly.
- Keep some sticky sweetener in the recipe. Sweetener is part of the structure, not just the flavor.
- Let protein bars rest before judging texture. Protein powder absorbs moisture as the mixture sits.
Why Homemade Granola Bars Fall Apart
If homemade granola bars fail, they usually fail here. The recipe may taste good, but the slab slices into crumbs. Fortunately, the fix is rarely complicated: use enough sticky binder, chop the mix-ins smaller, press harder than feels necessary, and chill the slab until it is genuinely firm.
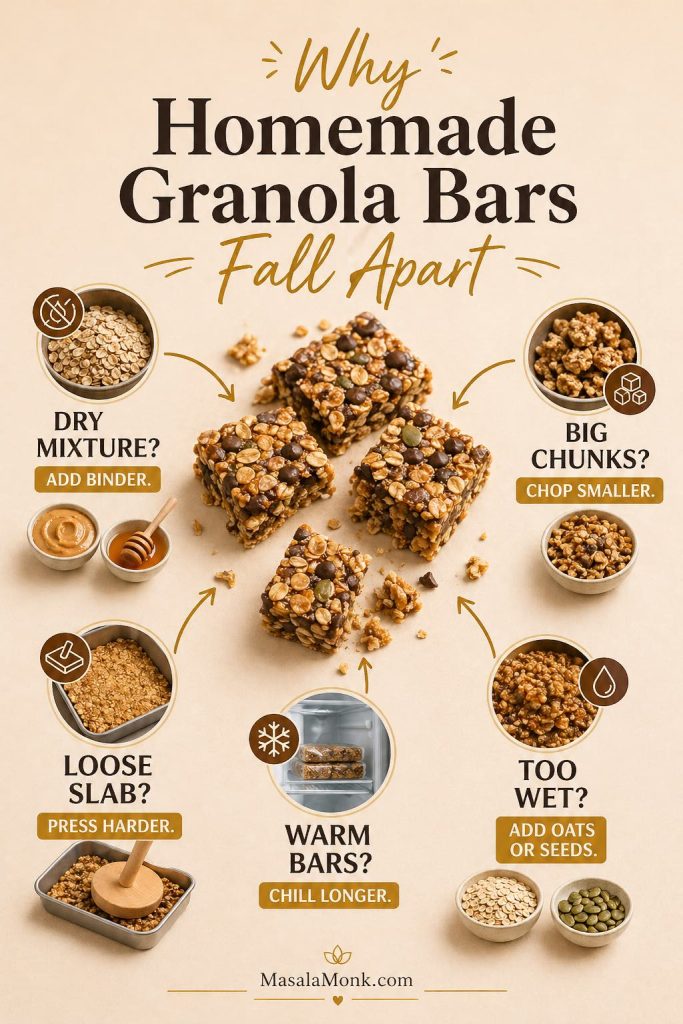
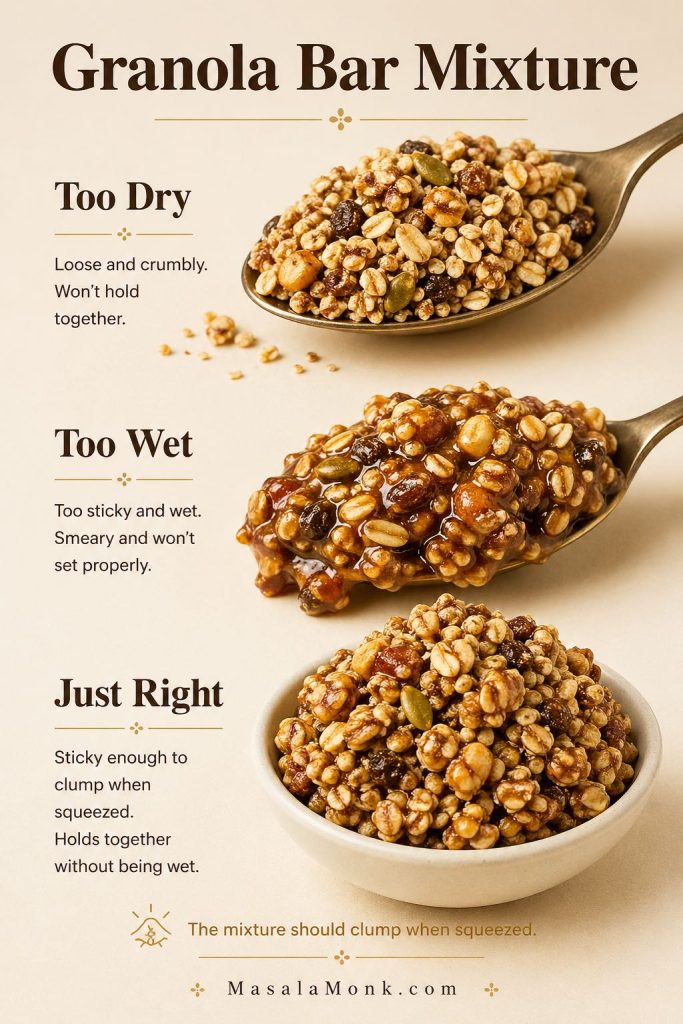
The Hand-Squeeze Test
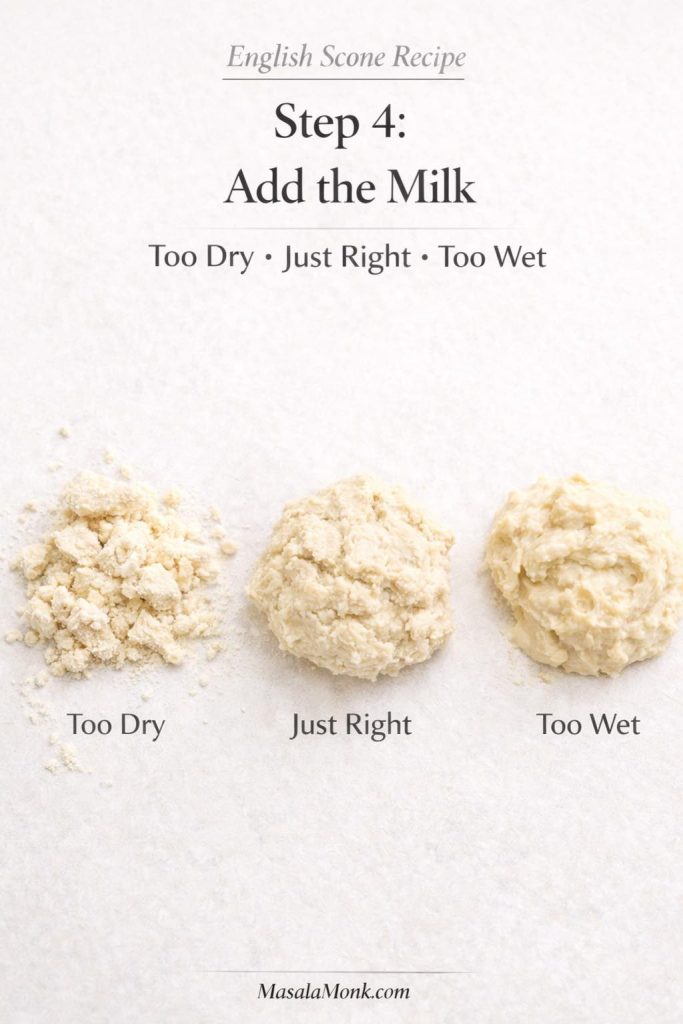
Before pressing the mixture into the pan, squeeze a spoonful in your hand. A good mixture should hold together like a sticky cluster after a firm squeeze. When it falls apart immediately, add a little more nut butter, honey, date paste, or brown rice syrup. When it smears and feels wet, balance it with more oats, seeds, or ground flaxseed.
What to Adjust Before Pressing
Crumbly bars usually need more sticky binder, even when the homemade granola mixture looks well mixed. That is why the hand-squeeze test is so useful before everything goes into the pan. Once the mixture clumps in your hand, press it firmly into the pan instead of adding more dry mix-ins.
Clean Slicing Cues
Before slicing, press the center of the slab gently. A firm center means the bars are ready to cut. Deep dents mean they need more chilling time. Smearing on the knife usually means the bars are too warm or too wet, while sharp cracking can mean the mixture is too dry or too cold.
Quick Troubleshooting Guide
| Problem | Most Likely Cause | Best Fix |
|---|---|---|
| Crumbles when sliced | Not enough sticky binder | Add 1 to 2 tablespoons more nut butter, honey, date paste, or brown rice syrup next time. |
| Breaks around nuts or fruit | Mix-ins are too large | Chop nuts and dried fruit smaller before mixing. |
| Falls apart after chilling | Mixture was not pressed firmly enough | Cover with parchment and press hard with a measuring cup before chilling. |
| Sticky and messy texture | Too much wet binder or not enough dry structure | Add more oats, seeds, shredded coconut, or ground flaxseed. |
| Too hard after setting | Binder was cooked too long or too much syrup was used | Warm only until smooth for chewy no-bake bars. Avoid over-boiling. |
| Softens in a lunchbox | No-bake bars are warmer than ideal | Pack with an ice pack, use brown rice syrup, or make the firmer cooked-binder version. |
| Chocolate melts into the mixture | Binder was too hot when chips were added | Cool the mixture for a few minutes, then add mini chocolate chips. |
| Slab cracks when cut | Mixture is too dry or too cold | Let it sit for 5 minutes before slicing, and add slightly more binder next time. |
| Knife smears through the bars | Bars are too warm or too wet | Chill longer, then slice with a sharp knife. Add more oats next time if needed. |
Granola Bar Mixture: Too Dry, Too Wet, or Just Right
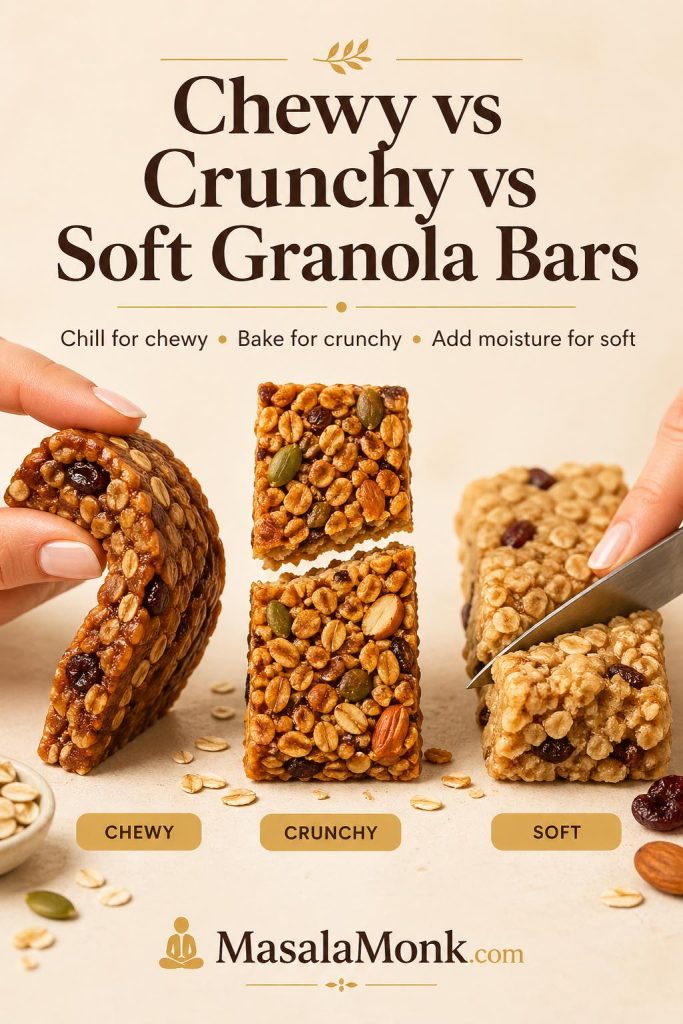
Chewy vs Crunchy vs Soft Granola Bars
This homemade recipe can make chewy, crunchy, or soft granola bars depending on how you handle the binder, oats, baking, and chilling.
| Texture | How to Get It | Best For |
|---|---|---|
| Chewy no-bake bars | Use nut butter + sticky sweetener, press firmly, and chill. | Classic homemade granola bars, lunchbox snacks, freezer snacks. |
| Crunchy granola bars | Toast the oats and nuts first, use slightly less wet binder, then bake briefly and cool fully. | People who prefer crisp edges and toasted flavor. |
| Soft breakfast oat bars | Add mashed banana, applesauce, yogurt, egg, or flax egg and bake like oatmeal bars. | Breakfast, toddlers, softer snack bars, meal prep. |
| Firm travel bars | Use brown rice syrup or a short cooked honey binder and keep mix-ins small. | Road trips, office snacks, gym bags, warmer weather. |
For Chewy Granola Bars
Use the main no-bake recipe. Keep the oats mostly whole, use creamy nut butter, choose a sticky sweetener, and chill fully. Chewy bars are the best first version because they are easy, flexible, and forgiving.
For Crunchy Granola Bars
For crunchy granola bars, toast the oats, nuts, and seeds at 325°F / 165°C until fragrant, then use slightly less wet binder than the chewy no-bake version. Press the mixture firmly into a parchment-lined pan and bake at 300°F / 150°C for 15 to 20 minutes, until the edges look lightly golden. Let the slab cool completely before slicing. If you cut while warm, the bars may bend or crumble instead of snapping cleanly.
Extra crispness comes from replacing 1/2 to 1 cup of the oats with puffed rice cereal, crisp rice cereal, or crisp oat cereal. Brown rice syrup gives a firmer bite than maple syrup because it is thicker and stickier.
For Soft Breakfast Oat Bars
Use more moisture and a baking method. Add mashed banana, applesauce, yogurt, or a flax egg to the oats. The result will be closer to oatmeal breakfast bars than classic granola bars. If you want a spoonable make-ahead breakfast instead of a sliced bar, MasalaMonk’s high protein overnight oats are a better fit.
Recipe Variations for Homemade Granola Bars
Once the basic healthy homemade granola bars recipe works, the variations become much easier. Keep the oat-binder balance in mind, and change one or two things at a time.
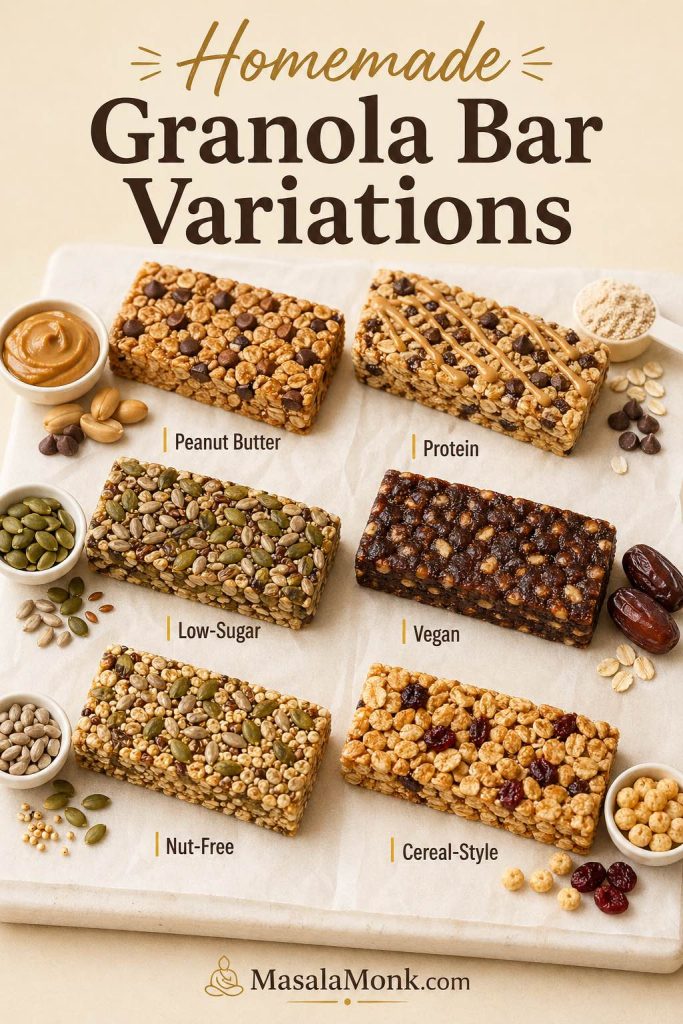
Peanut Butter Granola Bars
Peanut butter is the easiest flavor to start with because it binds well, tastes familiar, and makes the bars feel richer without extra steps. Use creamy peanut butter with honey, then add mini chocolate chips, chopped roasted peanuts, or a pinch of cinnamon. If your peanut butter is very thick, warm it gently before mixing so it coats the oats instead of clumping.
To make the peanut flavor stronger, use roasted peanut butter and add chopped peanuts as part of the mix-ins. A softer bar needs finely chopped peanuts and slightly more peanut butter. When the bars need to hold up better in a lunchbox, choose honey or brown rice syrup rather than maple syrup.
Chocolate Chip Granola Bars
Mini chocolate chips are better than large chips because they spread evenly through the bars and do not create big gaps. Let the oat mixture cool for a few minutes before adding them. If you add chocolate while the binder is very hot, the chips will melt into the mixture instead of staying visible.
For a more chocolate-forward bar, stir 1 tablespoon cocoa powder into the warm binder before adding the oats. For a less sweet version, use cacao nibs or chopped dark chocolate instead of regular chocolate chips.
Protein Granola Bars
Protein granola bars need a little more care because protein powder absorbs moisture. Start by replacing 1/4 cup oats with protein powder. Then, mix the bars and check the texture before pressing. If the mixture feels dry, add 1 to 2 tablespoons more nut butter or a small splash of milk.
Whey protein usually blends more smoothly, while many plant protein powders make the mixture thicker and drier. Do not expect a homemade protein granola bar to feel exactly like a store-bought protein bar. The best homemade version should still taste like oats, nut butter, and real mix-ins, with extra protein added carefully.
For a simple protein version, use 2 cups oats, 1/4 cup protein powder, 3/4 cup peanut butter or almond butter, 1/2 cup honey or brown rice syrup, 1/3 cup seeds, and 1/3 cup mini chocolate chips. If the mixture feels stiff before pressing, add 1 tablespoon milk or extra nut butter at a time until it clumps when squeezed.
Low-Sugar Granola Bars
For lower-sugar granola bars, the goal is not to remove every sweet ingredient. Instead, keep the sticky binder measured, use fewer dried fruits and chocolate chips, and build more of the texture from oats, seeds, nuts, coconut, cacao nibs, or chopped dark chocolate.
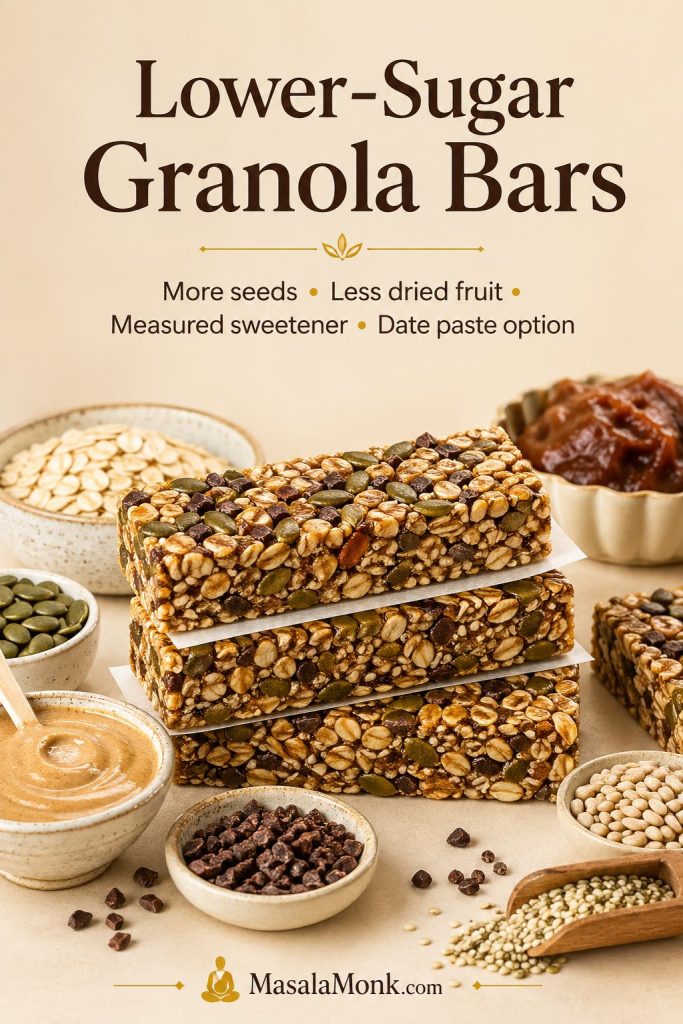
For a lower-sugar batch, use more seeds and nuts, reduce dried fruit and chocolate, and keep the sticky binder measured. If you want a no-refined-sugar version, use date paste. For flavor without extra syrup, try cinnamon, vanilla, cocoa, orange zest, toasted coconut, or a small pinch of salt.
EatingWell’s dietitian guidance on granola bars recommends looking at added sugar, fiber, protein, whole grains, and recognizable whole-food ingredients when deciding whether a granola bar is a healthy choice. Read their granola bar health guide here.
Gluten-Free Granola Bars
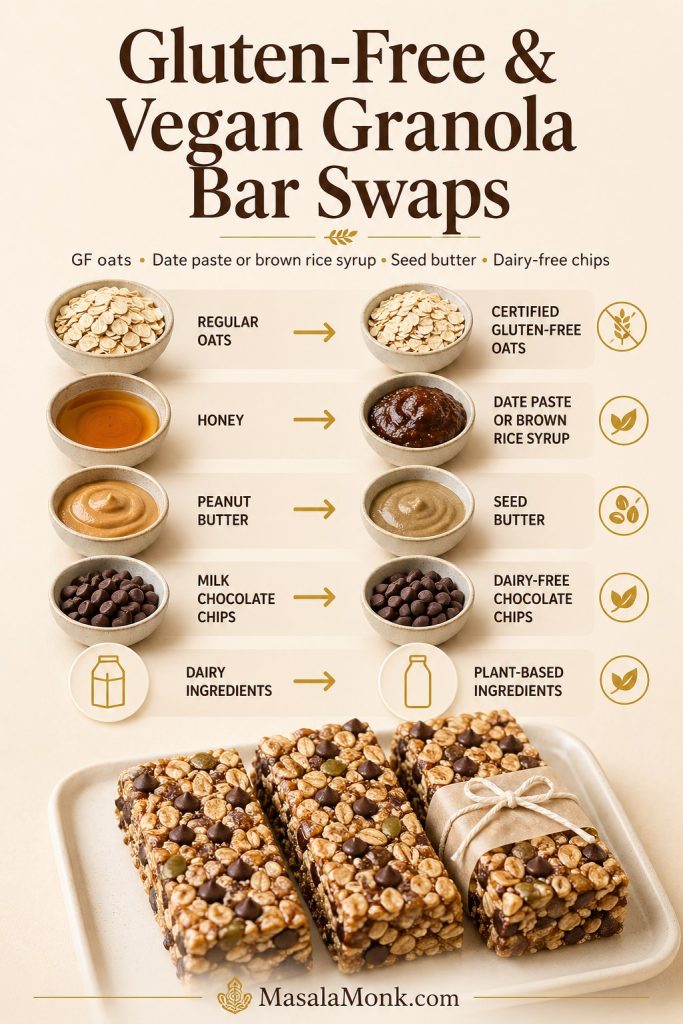
For gluten-free granola bars, start with certified gluten-free oats and then check the smaller ingredients too, especially chocolate chips, protein powder, cereal-style mix-ins, and flavorings. As long as the oats and add-ins are gluten-free, the base recipe can be gluten-free too.
Gluten-Free and Vegan Granola Bar Swaps
Vegan Granola Bars
For vegan granola bars, choose brown rice syrup, date paste, or maple syrup instead of honey. Brown rice syrup gives the firmest result, while date paste adds softer caramel-like sweetness. Also check that your chocolate chips are dairy-free if needed.
Nut-Free Granola Bars
For nut-free granola bars, start with sunflower seed butter, pumpkin seed butter, or tahini instead of nut butter. Then, replace nuts with pumpkin seeds, sunflower seeds, sesame seeds, chia seeds, flaxseed, dried fruit, coconut, or chocolate chips. This can be useful for lunchboxes, depending on allergy rules where the bars will be eaten.
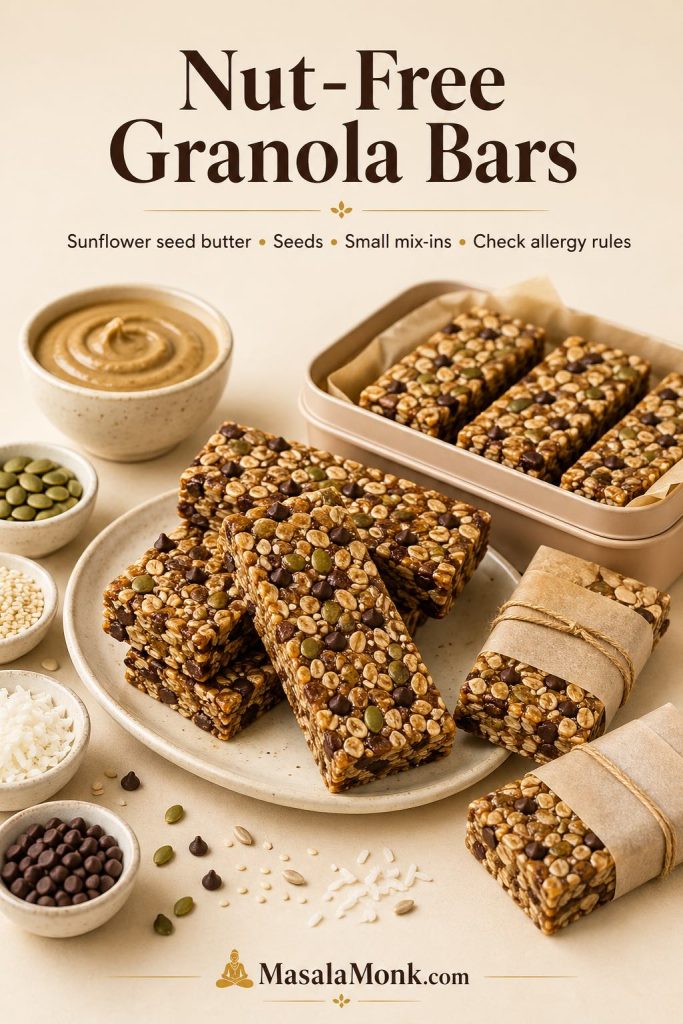
Sunflower seed butter is one of the easiest nut-free binders, and sunflower seeds also work well as crunchy mix-ins. For the best texture, keep the seeds small, use a sticky binder, and press the mixture firmly before chilling.
Muesli-Style Granola Bars
For muesli-style bars, use oats, chopped almonds, pumpkin seeds, sunflower seeds, raisins, dried cranberries, chopped dates, and a little coconut. Because fruit-and-nut bars can become chunky, keep everything chopped small and press the mixture especially firmly.
Breakfast Granola Bars
For breakfast bars, keep the chocolate light and build the flavor around oats, seeds, nut butter, cinnamon, dried fruit, and maybe protein powder. If you want something softer and more filling, use the soft oat bar variation with mashed banana or applesauce.
Date Granola Bars
Blend soft dates with a splash of warm water to make a thick date paste, then use it as part or all of the sticky sweetener. Date paste gives the bars caramel-like sweetness and helps avoid refined sugar. Even so, dates are still sweet, so balance them with salt, seeds, and unsweetened nut butter.
No-Peanut-Butter Granola Bars
If you do not want peanut butter, use almond butter, cashew butter, sunflower seed butter, tahini, or pumpkin seed butter. Almond butter gives a mild flavor, cashew butter makes the bars softer and creamier, sunflower seed butter works well for nut-free bars, and tahini gives a slightly earthy flavor that pairs well with honey, sesame, dates, and dark chocolate.
Cereal Bar Variation
For a lighter, crispier cereal bar, replace 1 cup of the oats with puffed rice cereal, toasted oat cereal, or another crisp breakfast cereal. Keep the binder sticky, because cereal is lighter than oats and can fall apart if the mixture is too dry. For chocolate chip cereal bars, use mini chocolate chips and press the mixture especially firmly before chilling.
For a stronger cereal-bar texture, use half oats and half crisp cereal. However, if you want the bars to taste more like classic granola bars, keep more oats than cereal.
No-Bake Oat Bars
If you want softer no-bake oat bars instead of classic granola bars, use quick oats for part of the oats and add a softer ingredient such as mashed banana, applesauce, or date paste. The bars will be less crisp and less granola-like, but they will feel more like breakfast bars. This is a good direction for kids, softer snacks, and make-ahead breakfasts.
For a simple no-bake oatmeal bar, use 1 cup rolled oats, 1 cup quick oats, 3/4 cup peanut butter or sunflower seed butter, 1/2 cup date paste or honey, and 1/2 cup small mix-ins. Press firmly and chill before slicing.
Healthy Granola Flapjack Variation
If you know flapjacks as baked oat bars, this recipe can move in that direction too. Use the crunchy baked variation, press the mixture into a lined tin, and bake until the edges look lightly golden. Traditional flapjacks are usually richer and sweeter because they often use butter, sugar, and syrup. This version stays closer to a healthy granola bar because it uses oats, nut or seed butter, measured sweetener, seeds, and dried fruit.
For a more flapjack-like texture, use slightly more binder and bake the slab until it looks set at the edges but still a little soft in the center. Let it cool completely before slicing, because baked oat bars firm up as they rest.
Best Mix-Ins for Homemade Granola Bars
The best mix-ins depend on what you want from the bar. Crunchy batches work well with pumpkin seeds, sunflower seeds, sesame seeds, chopped almonds, cacao nibs, or toasted coconut. Chewier batches are better with raisins, chopped dates, dried cranberries, dried apricots, figs, or dried blueberries.
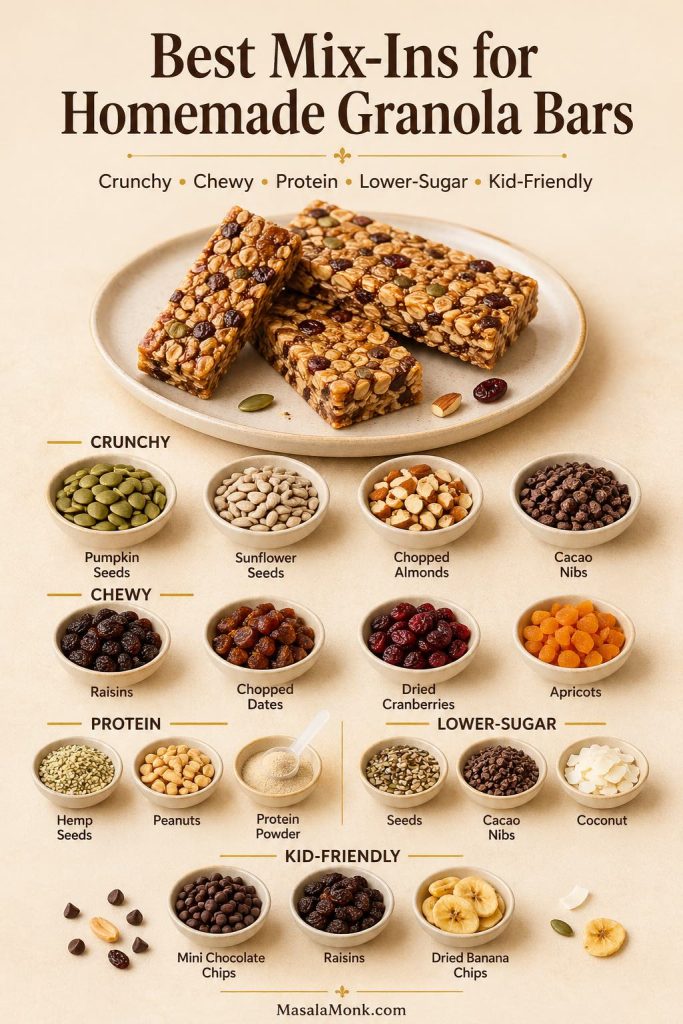
To add more protein, use hemp seeds, pumpkin seeds, peanuts, almonds, protein powder, or extra peanut butter. Meanwhile, kid-friendly bars work best when the flavor stays familiar, so try peanut butter, mini chocolate chips, cinnamon, vanilla, raisins, or dried banana chips. If you want a lower-sugar feel, lean on seeds, nuts, unsweetened coconut, cinnamon, cacao nibs, or chopped dark chocolate instead of large amounts of dried fruit.
Whatever you add, keep the pieces small. Although that sounds like a minor detail, small mix-ins make a huge difference. They help the slab compress tightly and slice cleanly.
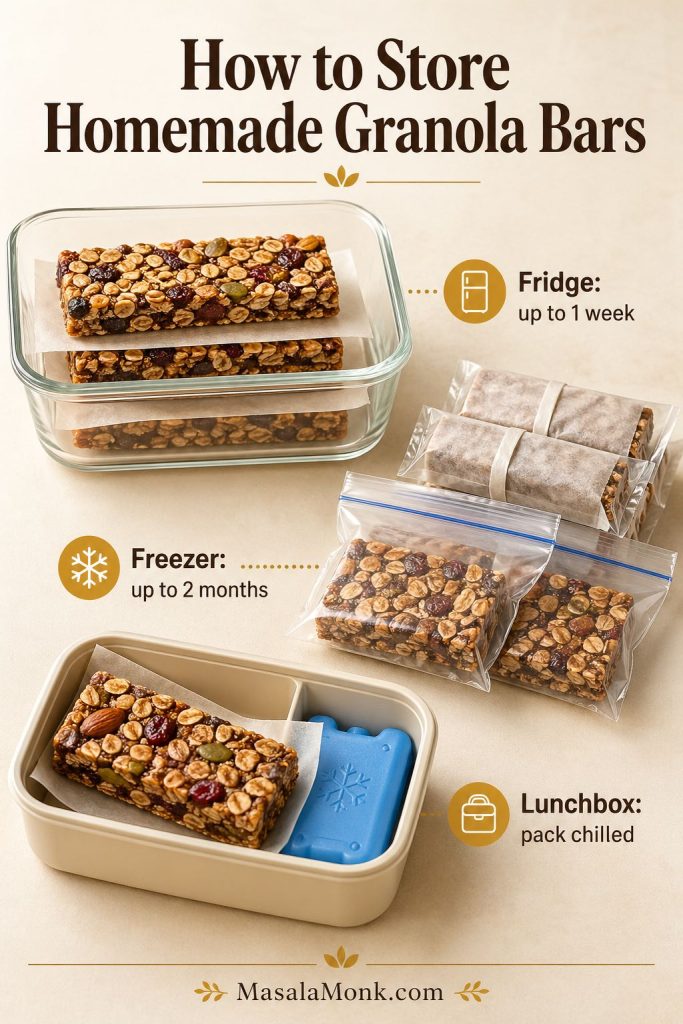
How to Store and Freeze Homemade Granola Bars
No-bake homemade granola bars are firmest when stored cold. Once sliced, place parchment between layers so the bars do not stick together. Therefore, if your kitchen is warm, the fridge is the safest place for clean, chewy bars.
For lunchboxes, this recipe makes homemade granola bars that slice more cleanly when chilled first. If the room is warm, pack them with an ice pack or use the firmer binder variation.
Make-Ahead Plan
For weekly meal prep, make the bars the night before you need them. Chill the whole slab overnight, then slice in the morning. After that, wrap individual bars in parchment and store them in an airtight container in the fridge or freezer. This gives the cleanest slices and the firmest texture.
| Storage Method | How Long | Best For |
|---|---|---|
| Room temperature | 1 to 2 days, only if firm enough | Short-term snacking, cool kitchens, firmer cooked-binder bars. |
| Refrigerator | Up to 1 week | Best texture for chewy no-bake bars. |
| Freezer | Up to 2 months | Meal prep, lunchbox planning, batch cooking. |
| Lunchbox | Same day | Pack with parchment. Use an ice pack if the weather is warm. |
To freeze, wrap bars individually or layer them with parchment in an airtight container. Thaw in the fridge or let a frozen bar sit at room temperature for a few minutes before eating. Frozen bars are especially useful in hot weather because they soften gradually instead of falling apart immediately.
As with any homemade snack, store the bars in a clean airtight container and discard them if they smell off, look moldy, or become unusually wet or sticky during storage.
How to Serve Homemade Granola Bars
Homemade granola bars are useful at several points in the day. For example, you can serve one with tea or coffee, pack one in a lunchbox, crumble one over yogurt, eat one before a workout, or keep a few in the freezer for rushed mornings.
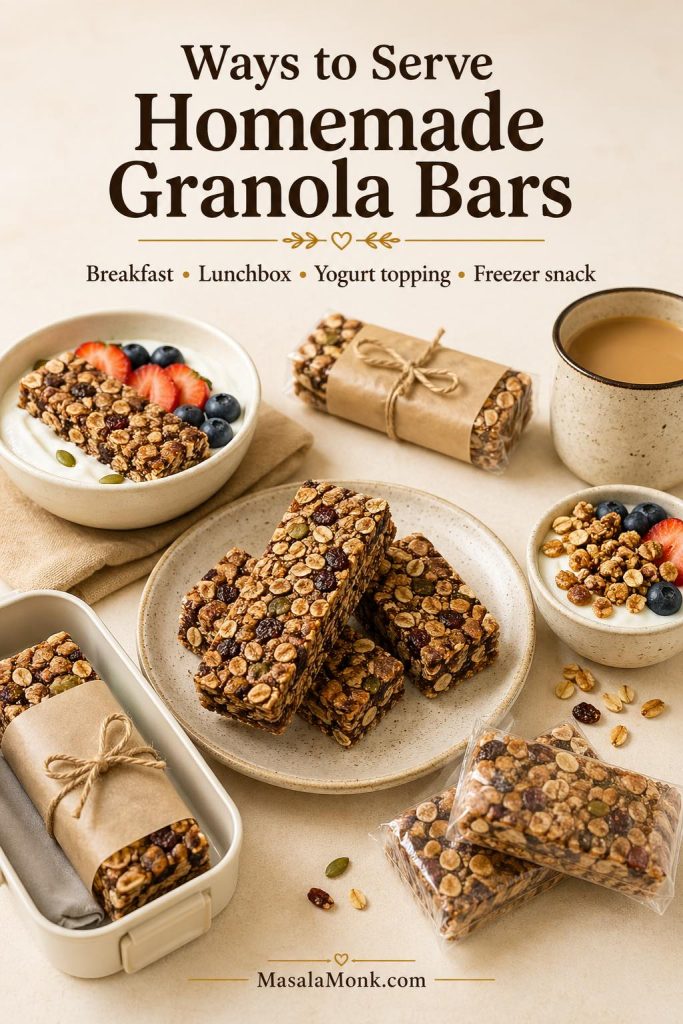
For a more complete breakfast, pair a bar with fruit, yogurt, eggs, cottage cheese, paneer, milk, or a smoothie. The bar gives you oats and energy; the extra protein or fruit makes the meal feel more complete.
FAQs About Healthy Homemade Granola Bars
Why do homemade granola bars fall apart?
Homemade granola bars usually fall apart because they do not have enough sticky binder, the mix-ins are too large, the mixture was not pressed firmly enough, or the bars were sliced before chilling. Use enough nut butter and sticky sweetener, chop large nuts and dried fruit, press hard, and chill fully.
What is the best binder for homemade granola bars?
A combination of creamy nut butter and honey is the easiest binder for chewy granola bars. Brown rice syrup is even stickier and works well for firm or vegan bars. Date paste is useful for no-refined-sugar bars. Maple syrup tastes good, but it is thinner and usually needs extra support from nut butter, flaxseed, or longer chilling.
Can I make granola bars without peanut butter?
Absolutely. Almond butter, cashew butter, sunflower seed butter, pumpkin seed butter, and tahini can all work. For a nut-free version, sunflower seed butter and tahini are usually the easiest swaps.
Can I use quick oats instead of rolled oats?
You can, although the texture will be softer and less defined. Rolled oats give a chewier, more classic granola bar texture, while quick oats make the bars more compact and softer for kids.
Can I use maple syrup instead of honey?
You can, but maple syrup is usually less sticky than honey or brown rice syrup. If you use maple syrup, add extra nut butter, ground flaxseed, or date paste to help the bars hold together. Chill the bars longer before slicing.
How do I make vegan granola bars?
For vegan granola bars, choose brown rice syrup, date paste, or maple syrup instead of honey. Brown rice syrup gives the firmest result, while date paste adds softer caramel-like sweetness. Also check that your chocolate chips are dairy-free if needed.
How do I make gluten-free granola bars?
Start with certified gluten-free oats, then check the labels on your chocolate chips, protein powder, cereal mix-ins, and flavorings. As long as the oats and add-ins are gluten-free, the base recipe can be gluten-free too.
How do I make nut-free granola bars?
Start with sunflower seed butter, pumpkin seed butter, or tahini instead of nut butter. Then, replace nuts with pumpkin seeds, sunflower seeds, sesame seeds, coconut, dried fruit, or chocolate chips. Depending on allergy rules where the bars will be eaten, this can be a useful lunchbox direction.
Can I add protein powder to granola bars?
Yes, but start small. Replace 1/4 cup oats with protein powder. If the mixture becomes dry or chalky, add more nut butter or a splash of milk. Plant protein powders usually absorb more moisture than whey protein.
How do I make crunchy or crispy granola bars?
Toast the oats, nuts, and seeds first, then press the mixture into a pan and bake it briefly at a low temperature. Let the slab cool completely before slicing. For a lighter crisp texture, replace part of the oats with puffed rice cereal or crisp rice cereal.
How long do homemade granola bars last?
Chewy no-bake granola bars keep best in the fridge for about 1 week. They can be frozen for up to 2 months. At room temperature, they are best eaten within a day or two unless you make a firmer cooked-binder version.
Can I freeze homemade granola bars?
Freezing works well. First, wrap bars individually or layer them with parchment in an airtight container. After that, freeze them for up to 2 months. To serve, thaw in the fridge or let a frozen bar sit at room temperature for a few minutes before eating.
Are homemade granola bars good for breakfast?
They can be, especially if they include oats, nut or seed butter, seeds, and a moderate amount of sweetener. To make breakfast more complete, pair a granola bar with fruit, yogurt, milk, eggs, cottage cheese, paneer, or another protein source.
What is the difference between granola bars and oat bars?
Granola bars are usually chewy or crunchy snack bars made with oats, nuts, seeds, dried fruit, and a sticky binder. Oat bars can be softer and more breakfast-like, especially when made with banana, applesauce, yogurt, or a baked oatmeal-style base.
Can I make granola bars with dates instead of honey?
Yes. Blend soft dates with a small amount of warm water to make a thick paste, then use it as the sticky sweetener. Date paste gives the bars a caramel-like flavor and helps avoid refined sugar, but it still adds sweetness.
Can I make granola bars with ready-made granola?
Prepared granola can work well. As a starting point, use about 2 1/2 cups prepared granola, 1/2 cup creamy nut or seed butter, and 1/3 cup honey, brown rice syrup, or date paste. Since prepared granola is often already sweetened, start with less added sweetener than you would use for plain oats.
Are granola bars the same as flapjacks?
They overlap, especially in UK-style usage. A British flapjack is usually a baked oat bar made with oats, fat, sugar, and syrup, while granola bars are often made with oats, nuts, seeds, dried fruit, and a sticky binder. This recipe is closer to a healthy homemade granola bar, but the baked variation can work like a lighter flapjack-style oat bar.
Can I add crisp rice cereal or puffed rice to granola bars?
Yes. Replace 1/2 to 1 cup of the oats with crisp rice cereal, puffed rice, crisp oat cereal, or another light breakfast cereal. This makes the bars lighter and crispier. Because cereal is less dense than oats, keep the binder sticky and press the mixture firmly before chilling.
What is the best sweetener for granola bars that hold together?
Honey and brown rice syrup are the easiest sweeteners for granola bars that hold together. Brown rice syrup is especially sticky and works well for firm or vegan bars. Date paste is useful for no-refined-sugar bars. Maple syrup tastes good, but it is thinner and usually needs extra nut butter, flaxseed, or longer chilling.
If you try this healthy homemade granola bars recipe, leave a comment with the binder, sweetener, and mix-ins you used. That helps other readers choose their own chewy, crunchy, protein, nut-free, or low-sugar version.