Posted on 15 Comments

10 Spinach Dip Recipes: Cold, Baked, Artichoke & More

Woman dipping bread into a creamy spinach dip recipe surrounded by colorful veggie sticks, bread cubes, and small bowls of dip on a wooden table.

Some recipes feel trendy for a season and then vanish. A really good spinach dip recipe is the opposite. It shows up at potlucks, game nights, Diwali parties, Christmas dinners, and casual Friday evenings, and somehow the bowl is always scraped clean.

This long, cozy guide gathers several kinds of spinach dip recipes into one place: classic cold party dip, ranch-style, vegetable soup mix in a bread bowl, two versions of spinach artichoke dip (cold and baked), a lighter yogurt-based dip, a cheesy queso-style dip, plus a few ultra-simple three- and five-ingredient options. Along the way, you’ll find ideas for what to serve with them, how to handle fresh versus frozen spinach, and a little bit of context about spinach itself.

If you’d like to nerd out on the health side later, you can always read more about spinach nutrition and weight loss benefits on MasalaMonk or check the nutrient breakdown on Healthline’s spinach nutrition page. For now, though, let’s get straight into creamy bowls and warm bread.


Why spinach makes such a good dip base

Before diving into the first spinach dip recipe, it helps to quickly appreciate why spinach works so well in dips.

Spinach has a fairly mild, earthy flavor that doesn’t overpower other ingredients, yet it adds a lovely deep green color and just enough personality. Because it shrinks dramatically when cooked or thawed, a small amount of raw spinach turns into a concentrated, almost buttery pile of greens that blends beautifully into sour cream, yogurt, mayonnaise, and cheese.

Nutritionally, spinach is one of those leafy greens that keeps turning up in research. It’s naturally low in calories yet high in vitamins A, C, K, several B vitamins including folate, and minerals such as iron and potassium. If you want to dig into the numbers, the USDA’s FoodData Central database lists exact values for fresh and cooked spinach. Spinach also contains plant compounds like carotenoids and nitrates, which are frequently associated with heart and eye health in studies cited by major nutrition sources.

Of course, the creamy parts of a spinach dip recipe still make this more of a treat than a salad. However, it’s a treat with at least some leafy-green goodness baked in, which is a nice bonus.

Also Read: How to Cook Bacon in the Oven (Crispy, No-Mess, Crowd-Ready Recipe)


Fresh, frozen, or canned spinach: choosing the right one

A question that comes up surprisingly often is whether fresh, frozen, or canned spinach is “best” for a spinach dip recipe. The honest answer is that all three can work, as long as you handle them properly.

Frozen spinach

Frozen chopped spinach is usually the easiest option for dips. It’s already blanched and chopped, so the main task is thawing and squeezing.

  • Thaw overnight in the fridge or quickly in the microwave.
  • Squeeze out as much water as possible.
  • For most recipes here, one 10 oz / 280 g packet of frozen spinach is perfect.

Because it’s blanched soon after harvest, frozen spinach keeps much of its nutritional value. If you like numbers, both Healthline and similar sources note that cooked or frozen spinach often contains more concentrated amounts of certain vitamins and minerals per serving than raw spinach, simply because the volume shrinks.

Fresh spinach

Fresh spinach is fantastic when you already have a big bag in the fridge.

  • Rinse and dry the leaves.
  • Wilt them in a pan with a splash of water or a tiny amount of oil.
  • Once cool, squeeze out the liquid and chop.

You’ll need more fresh spinach by weight than frozen, because it shrinks significantly. Roughly 300–350 g of raw leaves will give you a similar amount of cooked spinach to one frozen packet.

Canned spinach

Canned spinach is less common, yet it can absolutely stand in when that’s what you have.

  • Pour it into a sieve and rinse briefly.
  • Press firmly with the back of a spoon or your hands to remove excess liquid.
  • Measure out about 1½ cups of firmly packed, drained spinach for one batch of dip.

As long as you treat any of these options like a sponge that needs wringing out, your spinach dip recipe will be thick and creamy instead of runny.

Also Read: How to Make Churros (Authentic + Easy Recipe)


Classic cold spinach dip recipe (your party-style base)

This is the backbone of everything that follows. Once you can make this classic cold spinach dip recipe with your eyes closed, you can riff on it endlessly.

Ingredients (about 3 cups)

  • 1 packet (10 oz / 280 g) frozen chopped spinach, thawed
  • 1 cup (240 ml) sour cream
  • 1 cup (240 ml) mayonnaise
  • ½ cup (about 50 g) finely grated hard cheese (parmesan or similar, optional but delicious)
  • 2–3 tablespoons finely minced onion or 2 teaspoons dried minced onion
  • 1–2 cloves garlic, finely minced or ½ teaspoon garlic powder
  • ½–1 teaspoon salt, to taste
  • ¼–½ teaspoon black pepper
  • Optional mix-ins
    • ½ cup finely chopped water chestnuts for crunch
    • ¼–½ cup sliced green onions
    • ¼ cup finely diced bell pepper or pimentos
Classic spinach dip in a ceramic bowl with a hand dipping crusty bread, surrounded by carrot and cucumber sticks on a wooden board, with mini recipe text overlay.
Classic cold spinach dip recipe – a creamy party favorite made with frozen spinach, sour cream and mayo, served with crusty bread and fresh veggie sticks.

Step-by-step Recipe – How to make a Spinach Dip

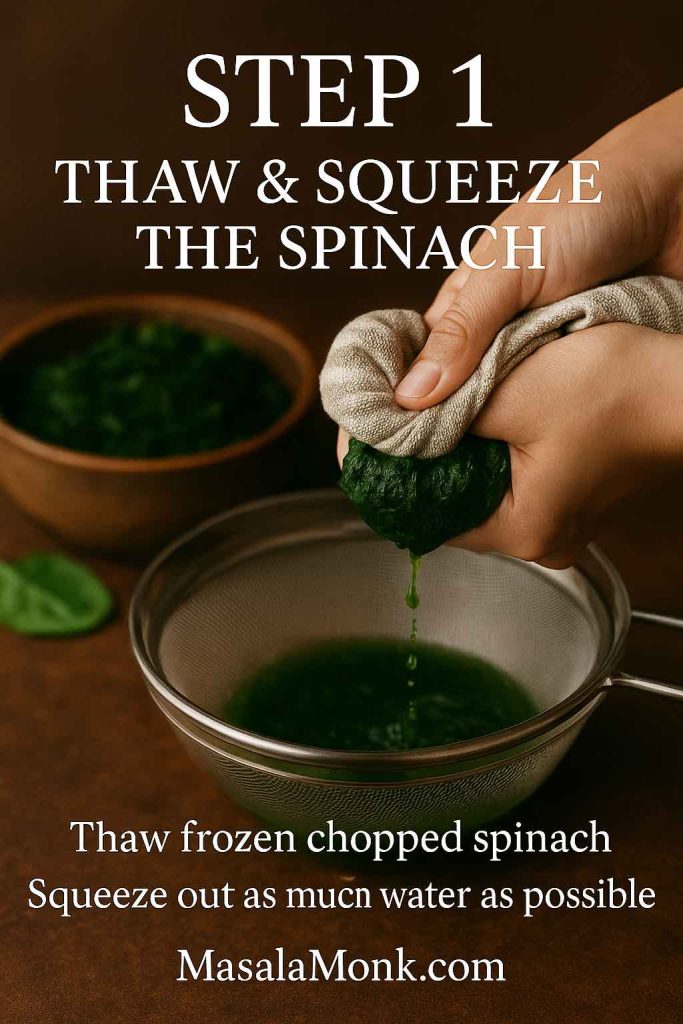
1. Thaw and squeeze the spinach

Start by thawing the frozen chopped spinach. You can do this overnight in the fridge, in a bowl of cold water, or quickly in the microwave. Once thawed, gather the spinach in your hands or in a clean kitchen towel and squeeze firmly over the sink. Quite a lot of liquid will come out; keep going until it feels as dry as you can manage.

This part might seem fussy, yet it makes all the difference between a thick, scoopable spinach dip recipe and a watery one.

Step 1 of classic spinach dip recipe showing hands squeezing thawed chopped spinach in a towel over a sieve, with green liquid dripping into a bowl.
Step 1 – Thaw and squeeze the spinach: thaw frozen chopped spinach, then squeeze out as much water as possible so your spinach dip stays thick and creamy.

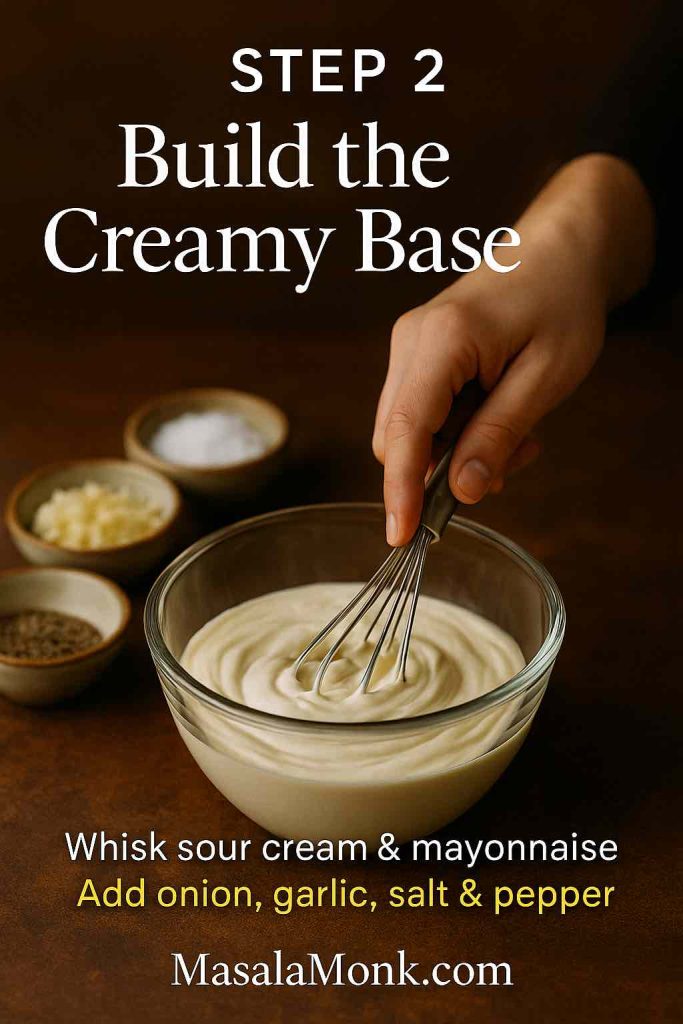
2. Build the creamy base

In a medium mixing bowl, whisk together the sour cream and mayonnaise until smooth. Add the onion, garlic, salt, and pepper. Give it another good stir so the seasonings are nicely dispersed.

If you’re one of those people who likes a mild onion flavor, start with the lower end of the onion amount and adjust later. It will intensify as the dip rests.

Step 2 of classic spinach dip recipe showing a hand whisking sour cream and mayonnaise in a glass bowl with small bowls of onion, garlic, salt and pepper on a wooden surface.
Step 2 – Build the creamy base: whisk sour cream and mayonnaise together, then add onion, garlic, salt and pepper to create the smooth foundation for your spinach dip.

3. Fold in the spinach

Next, add the squeezed spinach to the bowl. Use a spoon or spatula to fold it into the creamy base, breaking up any clumps so the greens are evenly moved through the mixture. At this stage you can also sprinkle in parmesan (or another hard cheese) if you’re using it, along with optional water chestnuts, green onions, or bell peppers.

Step 3 of classic spinach dip recipe showing a hand using a spatula to fold a mound of squeezed spinach into a creamy dip base in a glass bowl, with grated cheese and green onions in small bowls nearby.
Step 3 – Fold in the spinach: stir the squeezed spinach into the creamy base until evenly green, then add parmesan and any crunchy mix-ins like water chestnuts or green onions.

4. Chill to develop flavor

Cover the bowl and refrigerate for at least 1–2 hours. If you can, prepare this spinach dip recipe the day before and let it rest overnight. The onion softens, the garlic mellows, and the spinach flavor infuses into the creamy base in a way that simply doesn’t happen if you eat it right away.

Step 4 of classic spinach dip recipe showing a hand pressing plastic wrap over a bowl of creamy spinach dip on a wooden surface before refrigerating.
Step 4 – Chill the dip: cover the bowl and refrigerate, letting the spinach dip rest for 1–2 hours or overnight so the flavors deepen and the texture thickens.

5. Taste and serve

Just before serving, give the dip a stir, then taste it. Adjust the salt and pepper if needed. If it feels a little too thick, you can loosen it with a tablespoon or two of milk, cream, or yogurt.

Step 5 of classic spinach dip recipe showing a hand dipping toasted bread into a bowl of creamy spinach dip, surrounded by carrot sticks, celery sticks, spinach leaves and bread cubes.
Step 5 – Taste and serve: give the spinach dip a final stir, adjust the salt and pepper, then serve it with bread, crackers and fresh veggies for dipping.

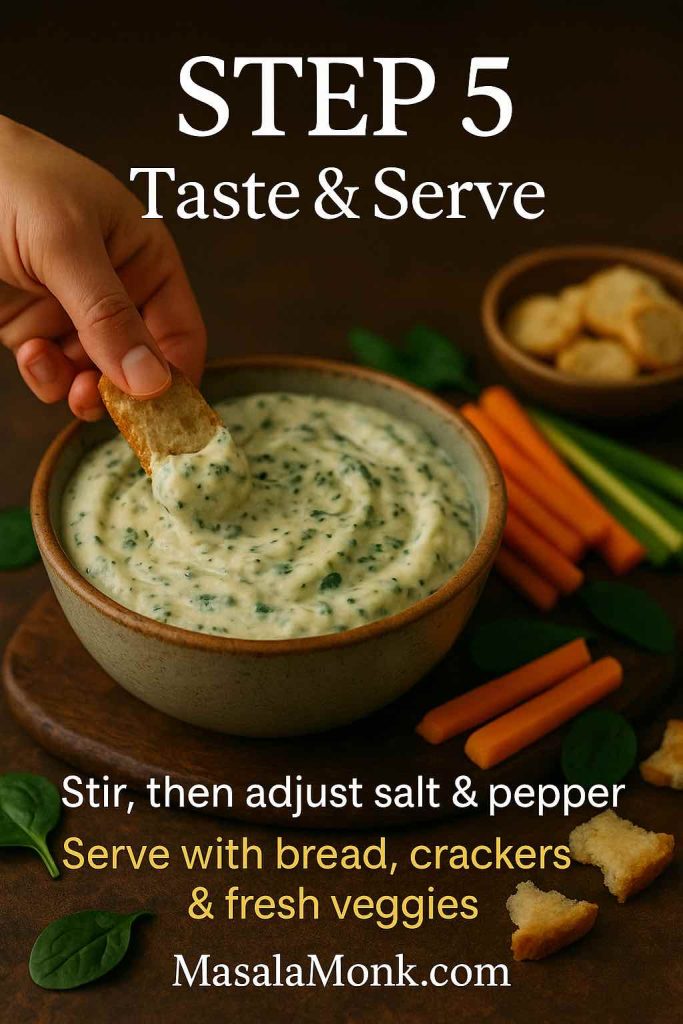
Spoon into a serving bowl and surround it with sliced bread, vegetables, or any dippers you like. Later in this post we’ll get into detailed serving ideas; for now, you’ve just made a classic cold spinach dip recipe that can stand on its own at any gathering.

If this made you fall in love with the creamy-spinach combo, you might also enjoy the Indian-inspired spinach raita (palak raita), which takes similar flavors in a lighter, yogurt-based direction.


Ranch spinach dip recipe variation

Once you’ve mastered the base, the next easy twist is a ranch spinach dip recipe. Ranch seasoning brings herbs, garlic, onion, and a slight tang, turning the classic dip into something just a little more familiar and “snacky”.

What you’ll need

  • 1 batch classic cold spinach dip base
  • 1 packet ranch-style seasoning mix (about 1 oz)
    or 3–4 tablespoons thick ranch dressing
  • A splash or two of milk or yogurt if the dip ends up too thick
Top-down view of a bowl of ranch spinach dip with a hand holding a spoon, surrounded by spinach leaves, crackers, and ranch seasoning on a teal background with mini recipe text overlay.
Ranch spinach dip recipe – a herby, tangy twist on classic spinach dip made with sour cream, mayo, ranch seasoning, and plenty of spinach, perfect with crisp crackers or veggies.

How to make ranch spinach dip

To keep things simple, start by mixing the ranch with the creamy ingredients before adding spinach:

  1. In a clean bowl, whisk together the sour cream and mayonnaise from the base recipe with the ranch seasoning mix until it’s completely blended.
  2. Add the squeezed, chopped spinach and fold it through.
  3. Taste before adding extra salt; most ranch mixes bring plenty of salt on their own.
  4. Chill the ranch spinach dip recipe for at least an hour, then adjust the seasoning once more if needed.

This version is excellent with crunchy vegetable sticks, but it really shines next to potatoes. For a full party-snack spread, you can pair it with some of these easy potato appetizers, which range from crispy bites to cheesy loaded options.


Vegetable soup mix spinach dip recipe in a bread bowl

For many people, the most nostalgic spinach dip recipe involves a packet of vegetable soup mix and a big round loaf of bread. It’s the kind of thing that appears on buffet tables surrounded by chunks of bread and vanishes within an hour.

Ingredients

  • 1 batch classic spinach dip recipe base, without onion and garlic added yet
  • 1 packet dry vegetable soup and dip mix
  • ½ cup finely chopped water chestnuts
  • ½ cup chopped green onions or sautéed leeks
  • 1 large round loaf of bread (sourdough, rye, or pumpernickel all work)
Bread bowl filled with creamy spinach dip made with vegetable soup mix, surrounded by carrot and celery sticks and torn bread pieces, with mini recipe text overlay.
Bread bowl spinach dip – a crowd-pleasing veggie soup mix spinach dip recipe served in a hollowed loaf with crunchy vegetables and rustic bread for dipping.

Method

1. Stir the soup mix into the base

Whisk together sour cream and mayonnaise in a large bowl. Sprinkle in the dry vegetable soup mix and stir well. Let this sit for 5–10 minutes so the dehydrated vegetables can soften slightly.

2. Add spinach and mix-ins

Fold in the drained, chopped spinach. Stir through the water chestnuts for crunch and the green onions or leeks for a sweet onion note.

3. Chill thoroughly

Because the soup mix needs a little time to hydrate, this version benefits from at least 2 hours in the fridge, and overnight is even better.

4. Turn it into a bread bowl

While the dip chills, prepare your bread:

  1. Slice off the top of the loaf like a lid.
  2. Hollow out the center with your hands, leaving a good 2–3 cm wall so the dip bowl is sturdy.
  3. Cut the removed bread into rough bite-sized cubes.

Just before serving, spoon the dip into the hollowed loaf and arrange the bread cubes around it on a platter. Add some fresh vegetables for color and extra crunch.

If you’d like an even more indulgent bread pairing another time, consider baking a homemade garlic bread loaf and cutting it into chunks for dipping. On days when you want something heartier but still relatively wholesome, slices of quick and healthy oatmeal bread also make a great base for spinach dip.

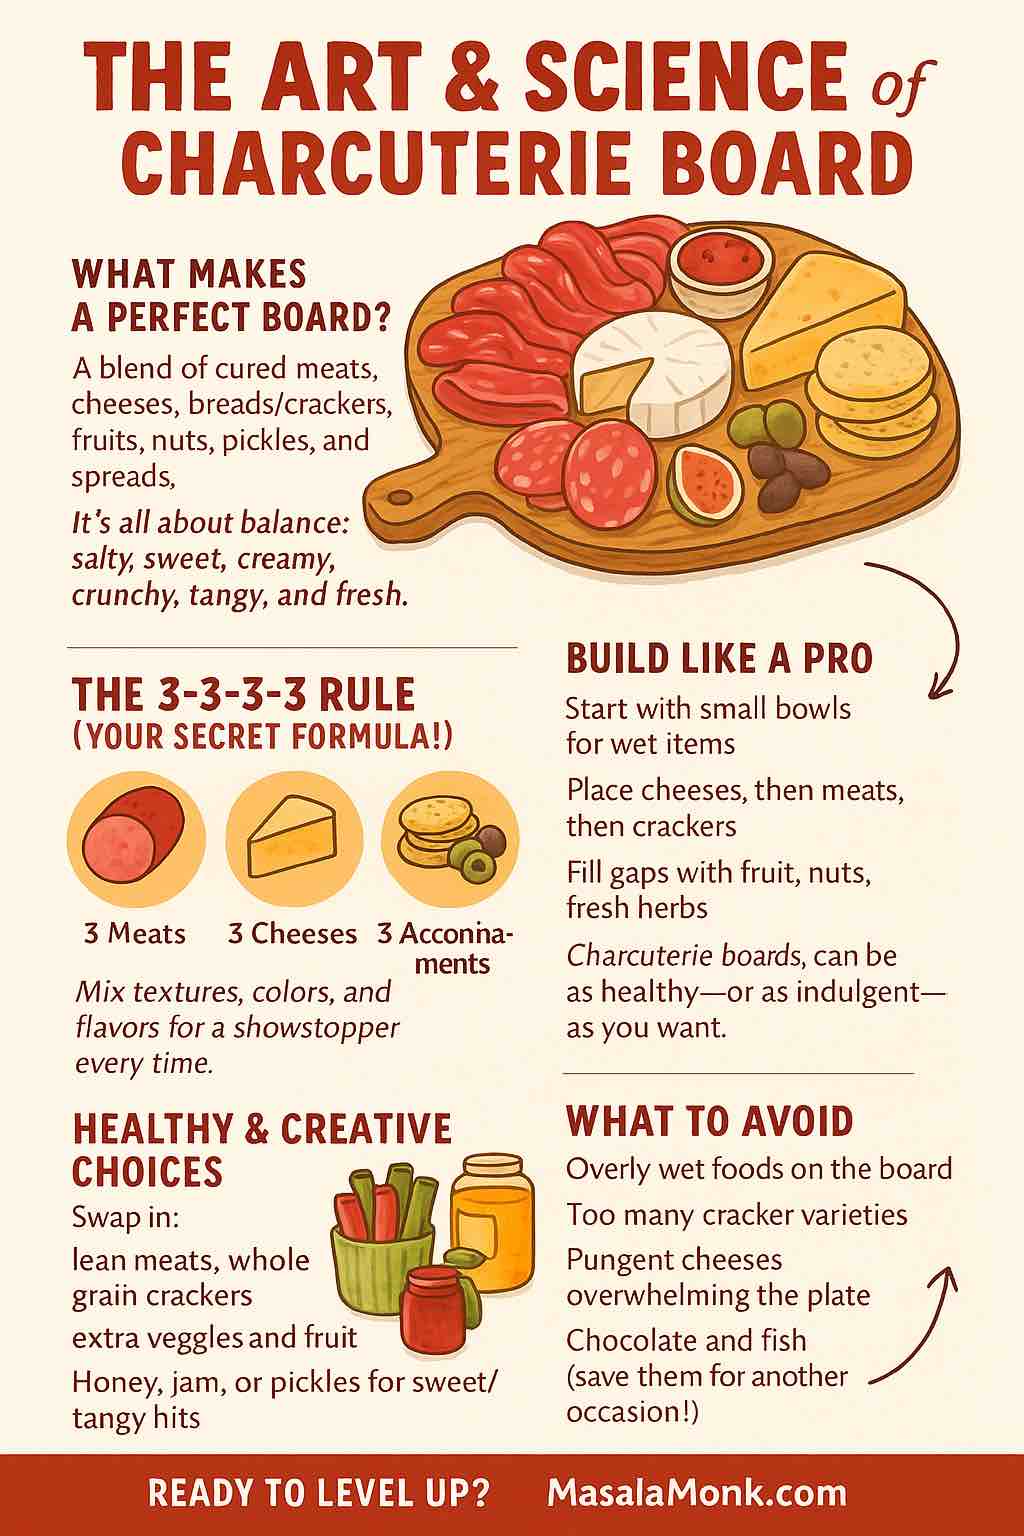
To turn the whole setup into a full grazing platter, you can borrow some ideas from the guide on assembling charcuterie boards using the 3-3-3-3 rule, then tuck this bread-bowl dip right into the center.


Spinach artichoke dip recipes: cold and baked

Whenever people talk about restaurant-style spinach dip, they’re usually imagining spinach artichoke dip. The artichokes add a tangy, tender bite that cuts through the richness. It’s worth having both a cold version and a baked one in your personal spinach dip recipe collection.

Cold spinach artichoke dip

This version is brilliant when you need something make-ahead that can sit on a buffet.

Ingredients

  • 1 batch classic cold spinach dip recipe
  • 1 cup chopped marinated artichoke hearts, drained
  • ½ cup shredded mozzarella or mild cheese blend (optional)
  • 2–3 tablespoons lemon juice
Cold spinach artichoke dip in a light ceramic bowl with a hand holding a crostini scoop, surrounded by lemon wedges, spinach leaves, artichoke hearts, and toasted baguette slices on a pale stone surface, with mini recipe text overlay.
Cold spinach artichoke dip – a make-ahead spinach dip recipe with sour cream, mayo, cheese, lemon and plenty of artichoke hearts, perfect for serving with crisp crostini or vegetables.

Directions

  1. Prepare the classic spinach dip base and let it chill for at least an hour.
  2. Stir in the chopped artichoke hearts and shredded cheese, if using.
  3. Add lemon juice a tablespoon at a time, tasting as you go, until it feels bright but not sour.
  4. Chill for another hour so the flavors mingle.

Serve with crackers, toasted bread slices, or vegetable sticks. The artichokes make this spinach dip recipe feel more complex, even though the method stays very simple.

Baked spinach artichoke dip (hot and bubbly)

For a cozier option, especially in cooler months, a baked spinach artichoke dip recipe gives you that golden top and stretchy cheese pull.

Ingredients

  • 1 block (8 oz / 225 g) cream cheese, softened
  • ½ cup sour cream
  • ½ cup mayonnaise
  • 1 cup shredded mozzarella
  • ½ cup grated parmesan or similar hard cheese
  • 1½ cups cooked, chopped spinach (frozen and thawed, or sautéed fresh)
  • 1 cup chopped artichoke hearts
  • 2 cloves garlic, minced
  • Salt and pepper, to taste
Baked spinach artichoke dip in a cast-iron skillet with a hand lifting a cheesy scoop on toasted bread, the golden bubbling top surrounded by extra crostini, with mini recipe text overlay.
Baked spinach artichoke dip – a hot, cheesy spinach dip recipe made with cream cheese, sour cream, spinach and artichokes, baked until golden and bubbling and served straight from the skillet with crisp toasted bread.

Instructions

  1. Preheat your oven to 180°C / 350°F. Lightly grease a small baking dish.
  2. Beat the cream cheese in a mixing bowl until smooth. Add the sour cream and mayonnaise and blend again.
  3. Stir in mozzarella, parmesan, garlic, spinach, and artichokes. Season with a small pinch of salt and pepper; the cheeses are salty, so it’s easy to overdo it.
  4. Spread the mixture into the baking dish in an even layer.
  5. Bake for 20–25 minutes, until hot and bubbling at the edges.
  6. For a browned top, switch to the broiler for 2–3 minutes at the end, watching carefully to avoid burning.

Place the hot dish on a board surrounded by baguette slices, breadsticks, and roasted vegetables. If you’re planning a fuller meal, this cheesy, comforting bowl sits nicely beside cozier dishes like cottage cheese lasagna with spinach or green bean casserole recipe ideas for holiday or Sunday dinners.


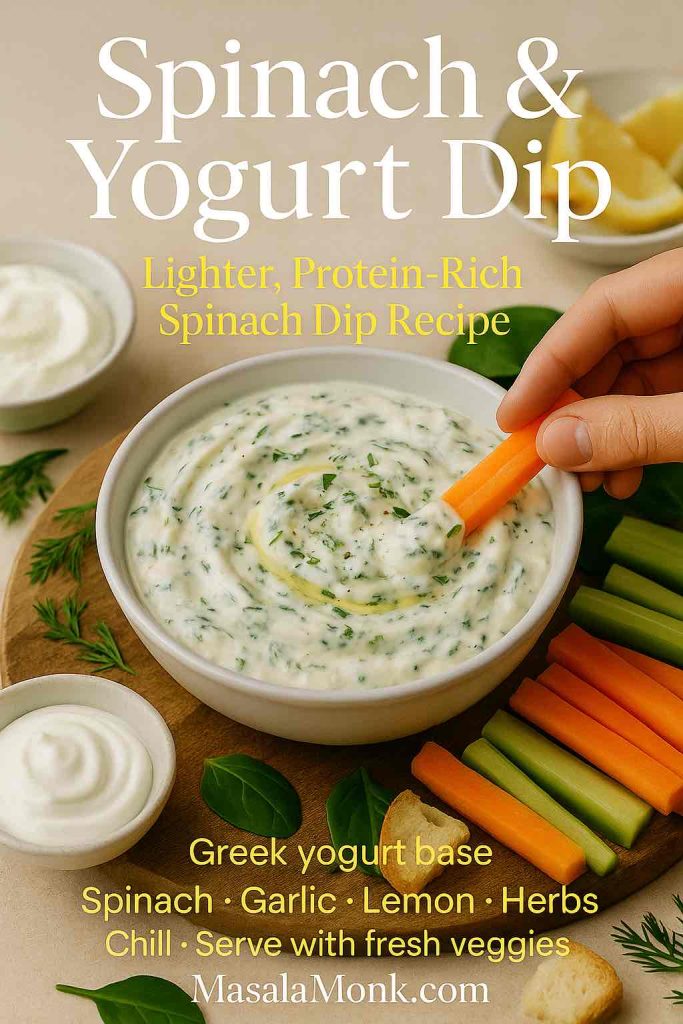
Lighter spinach and yogurt spinach dip recipe

Sometimes you want the flavor of a spinach dip recipe without quite so much heaviness. A yogurt-forward version keeps everything creamy but brings in more protein and a pleasant tang.

Ingredients

  • 1 cup thick Greek yogurt or hung curd
  • ½ cup light mayonnaise or additional yogurt
  • 1 packet (10 oz) frozen chopped spinach, thawed and squeezed dry
  • 2 cloves garlic, minced
  • 2–3 tablespoons lemon juice
  • 2–3 tablespoons chopped fresh herbs (dill, parsley, coriander – choose your favorite)
  • Salt and pepper, to taste
Spinach and yogurt dip in a white bowl with a hand dipping a carrot stick, surrounded by fresh veggie sticks, lemon wedges, herbs and small bowls of Greek yogurt, with mini recipe text overlay.
Spinach & yogurt dip – a lighter, protein-rich spinach dip recipe made with Greek yogurt, spinach, garlic, lemon and fresh herbs, served with crunchy vegetable sticks.

Directions

  1. In a bowl, whisk together the yogurt and mayonnaise until smooth.
  2. Add garlic, lemon juice, salt, and pepper, and whisk again.
  3. Fold in the spinach and chopped herbs.
  4. Chill for at least 1 hour so the garlic and herbs soften and flavor the yogurt.
  5. Taste, then adjust salt, pepper, and lemon juice.

This lighter spinach dip recipe pairs wonderfully with fresh vegetables and seeded crackers. Because yogurt plays the starring role, it feels especially at home next to Indian-leaning dishes. If you enjoy this style, you might also like the creamy spinach raita mentioned earlier or the hung curd spinach cheese sandwich, which uses strained yogurt in a protein-rich filling.

For a completely different spin, check out the idea of lentil-and-green dips like the lentil and spinach hummus. It’s another clever way to bring spinach into snack time, this time with extra fiber and plant protein from pulses.


Simple 3-ingredient and 5-ingredient spinach dip recipes

On some days, there’s time to shop and prep; on others, you want a spinach dip recipe that works almost like a magic trick. That’s where minimalist versions come in handy.

3-ingredient spinach dip

For a basic three-ingredient bowl:

  • 1 cup sour cream or thick Greek yogurt
  • 1 cup mayonnaise or softened cream cheese
  • 1 packet (10 oz) frozen chopped spinach, thawed and squeezed dry
Top-down view of a 3-ingredient spinach dip in a bowl surrounded by small bowls of sour cream, mayonnaise or cream cheese, and spinach on a light surface, with mini recipe text overlay.
3-ingredient spinach dip – a fast and simple spinach dip recipe made with sour cream, mayo or cream cheese, and spinach, just mix until creamy and chill before serving.

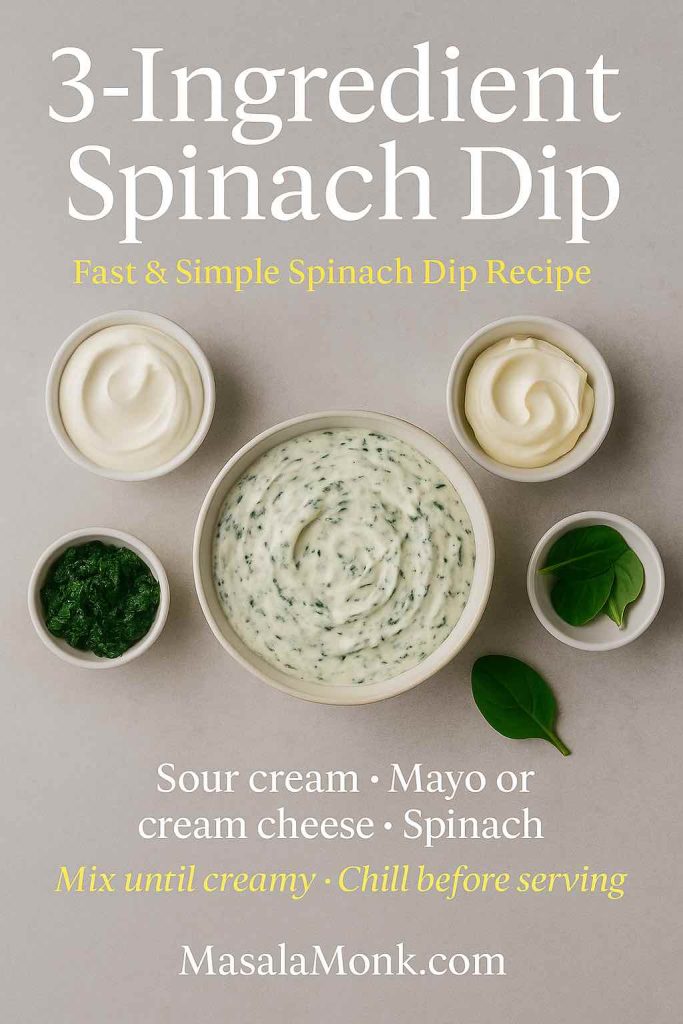
Stir everything together, season lightly with salt and pepper, and chill. If you’d like more flavor without technically adding a “fourth ingredient”, you can use a seasoned cream cheese or a flavored mayonnaise to sneak in herbs and spices.

5-ingredient baked spinach artichoke dip

Another shortcut version keeps the ingredient list short but still gives you an impressive baked dish:

  • 1 block (8 oz) cream cheese
  • 1 cup shredded cheese (mozzarella or a blend)
  • ½ cup sour cream or yogurt
  • 1 cup chopped spinach
  • 1 cup chopped artichoke hearts
5-ingredient spinach artichoke dip baked in a white dish with a spoon, surrounded by small bowls of cream cheese, shredded cheese, sour cream, spinach and artichokes, with mini recipe text overlay.
5-ingredient spinach artichoke dip – a quick baked spinach dip recipe using just cream cheese, shredded cheese, sour cream, spinach and artichokes, baked at 180°C / 350°F until hot and melty.

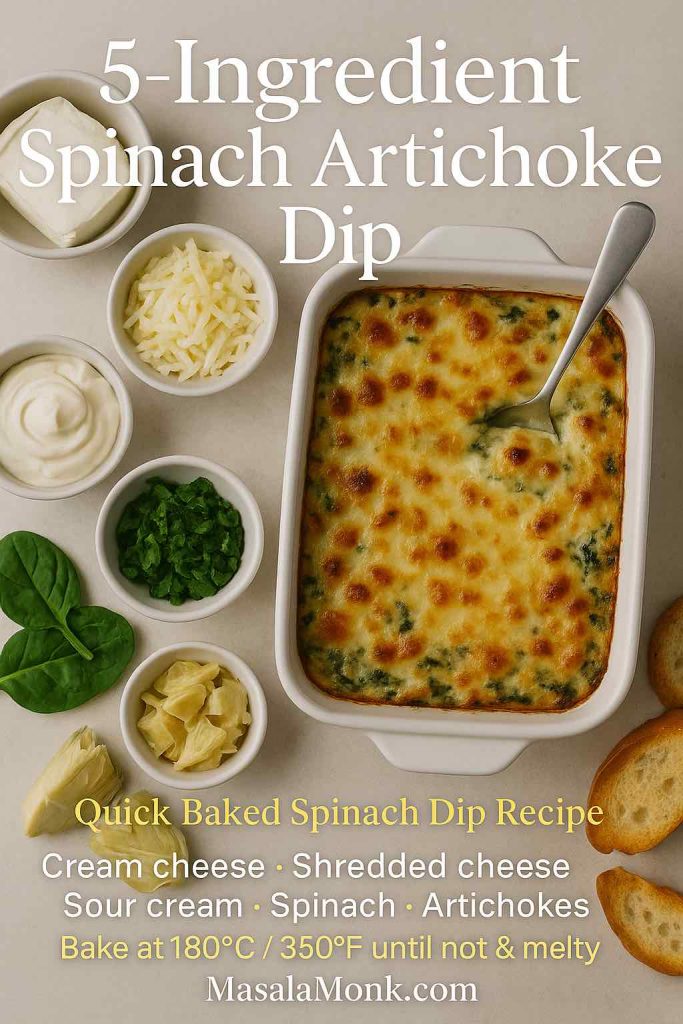
Beat the cream cheese until smooth, then stir in sour cream, cheese, spinach, and artichokes. Spread into a small baking dish and bake at 180°C / 350°F for 20 minutes or so, until everything is hot and melty.

These versions are especially useful when you already have something like baked jalapeño poppers or cheese balls with Indian-inspired flavors in the oven and just want one more dish without adding much work.


Warm cheesy spinach queso dip

If you’re hosting game night or movie night, a spinach dip recipe with a queso twist always gets attention. It’s stretchy, melty, and perfect with crunchy sides.

Ingredients

  • 250 g processed melting cheese or cheese loaf, cubed
  • ½ cup milk or cream
  • 1 cup cooked, chopped spinach
  • Optional:
    • ½ cup diced tomatoes with green chilies, drained
    • 1 jalapeño, finely chopped
    • ½ teaspoon onion powder or garlic powder
Spinach queso dip in a cast-iron skillet with a tortilla chip lifting a stretchy cheesy scoop, surrounded by tortilla chips, salsa, jalapeños and shredded cheese, with mini recipe text overlay.
Spinach queso dip – a warm, cheesy spinach dip recipe made by melting cheese with milk, stirring in spinach and chilies, and serving hot with crunchy tortilla chips and hearty dippers.

Method

  1. Add the cheese cubes and milk to a small saucepan or deep skillet.
  2. Warm over low heat, stirring often, until the cheese melts into a smooth sauce.
  3. Stir in spinach and any optional add-ins.
  4. Keep over very low heat, just enough to keep the queso fluid, not boiling.

Serve this warm spinach dip recipe in a heat-safe bowl. Although tortilla chips are a classic pairing, it’s also fun with toasted bread fingers, roasted potato wedges, and even vegetable sticks for contrast.

Also Read: Air Fryer Chicken Wings (Super Crispy, No Baking Powder)


What to serve with your favorite spinach dip recipe

Once you’ve chosen which spinach dip recipe to make, the next question is what to put around the bowl. The possibilities are genuinely endless, but a few categories cover most occasions.

Breads and crackers

Bread and spinach dip are such a natural pairing that it’s easy to build a whole platter around them.

  • Cubes of crusty bread or baguette
  • Slices of homemade garlic bread loaf for extra flavor
  • Toasted slices of oatmeal bread when you want something a little heartier
  • Pita chips, breadsticks, or crispbread
  • Seeded crackers for crunch

If you enjoy assembling boards, you can place the dip as the centerpiece of a small grazing board. Surround it with breads, crackers, nuts, and fruit, taking cues from the charcuterie tips in the 3-3-3-3 rule guide.

Vegetables

Creamy dips always benefit from fresh, crisp vegetables as dippers. They add color, crunch, and a lighter option for guests who don’t want too much bread.

Try:

  • Carrot and cucumber sticks
  • Bell pepper strips
  • Cherry tomatoes
  • Blanched broccoli or cauliflower florets
  • Snap peas or green beans

Spinach is already part of the leafy-greens family that many nutrition experts say we should eat more of; adding assorted vegetables around the bowl brings you even closer to that goal. If you ever want to zoom out and read more about the role of vegetables and fruits in healthy eating patterns, Harvard’s Nutrition Source has an accessible overview.

Other appetizers for a full spread

For a larger gathering, it’s nice to add a few more bite-sized dishes so your spinach dip recipe shares the table with other flavors and textures.

Some options that work beautifully alongside dip include:

Together with one or two spinach dips, these give you an appetizer table that feels far more elaborate than the actual work involved.


Drinks that pair well with spinach dips

Because most spinach dip recipes are rich and creamy, they pair best with drinks that either cut through that richness or wrap around it in a cozy way.

For a sparkling, citrusy option, a French 75 cocktail is a classic choice. The combination of gin, lemon, a touch of sugar, and sparkling wine feels bright and celebratory, and the bubbles help refresh the palate between bites of dip.

If you prefer something on the slightly bitter side, you might like the balance of a Negroni with variations, while fans of shaken sour cocktails can explore the classic whiskey sour recipe with its sharp lemon edge. On evenings when you’d rather keep things non-alcoholic or cozy, mugs of homemade hot chocolate with cocoa powder feel surprisingly right next to hot spinach artichoke dip and roasted potatoes.

If you’re in the mood to experiment further, a roundup of creative gin cocktail recipes or playful ideas like the green tea shot with Jameson can help you match your drinks to the energy of the evening.


Storing spinach dips safely

Finally, because most versions of a spinach dip recipe are built on sour cream, yogurt, mayonnaise, and cheese, it’s worth paying attention to storage.

A few simple guidelines go a long way:

  • Keep spinach dips refrigerated in a covered container.
  • Try to eat them within 3–4 days for the best quality and safety.
  • During gatherings, avoid letting the dip sit out at room temperature for more than 2 hours. If the weather is very hot, aim for 1 hour. After that point, it’s safer to discard leftovers that have been sitting out.

If you’d like specific, broader advice beyond dips, the general recommendations on FoodSafety.gov are a useful reference for how long different chilled foods can safely stay out and how long they should be stored in the fridge.

For long parties, a good strategy is to serve half the dip at a time and keep the rest chilled. When the bowl runs low, swap in fresh, cold dip rather than topping up what’s been sitting out for hours.

Also Read: 6 Wellness Shot Recipes to Boost Your Immune System

Overhead view of four leftover spinach dip ideas including creamy spinach pasta, a skillet of baked dip, stuffed mushrooms and a stuffed baked potato, with text suggesting ways to use leftover spinach dip.
Leftover spinach dip ideas – turn extra dip into creamy pasta sauce, a cheesy pizza or toast topping, or use it to stuff mushrooms, baked potatoes and sandwiches so every last spoonful gets enjoyed.

Bringing it all together

By now, you’ve walked through a whole mini-universe of spinach dip recipes: the classic cold party version, ranch and vegetable soup mix twists, spinach artichoke variations (both cold and baked), lighter yogurt-based dips, shortcut three- and five-ingredient bowls, and a cheesy queso option for game day. You’ve also seen how to adapt fresh, frozen, or canned spinach, how to build a simple but impressive appetizer table around your dip, and how to think about drinks and storage.

You don’t have to make all of them at once. Instead, treat this as your personal spinach dip recipe toolbox. Pick one for a quiet evening with toasted bread and a movie, another for a big holiday meal with green bean casserole and lasagna, and keep the quickest versions in mind for those nights when someone messages, “We’re stopping by in 20 minutes,” and you still want to put something homemade on the table.

Also Read: What to Eat with Hummus for Weight Loss 🏋️‍♀️

FAQs

1. Can I make a spinach dip recipe ahead of time?

Yes, a spinach dip recipe actually tastes better when made ahead. Firstly, mixing everything together and letting it sit in the fridge for a few hours allows the onion, garlic, herbs, and spinach to fully flavor the creamy base. Secondly, the texture improves as the dip thickens slightly while it chills. Ideally, make your spinach dip 8–24 hours in advance, then give it a good stir and a quick taste before serving. If it feels too thick after chilling, you can gently loosen it with a tablespoon or two of milk, cream, or yogurt. In short, “make ahead” is not just okay; it is one of the secrets to a truly delicious spinach dip recipe.


2. Should I use fresh, frozen, or canned spinach for spinach dip?

All three can work in a spinach dip recipe; they simply need slightly different handling. Frozen chopped spinach is the most convenient option because it is already blanched and finely cut. After thawing, you only have to squeeze out as much water as possible. Fresh spinach is lovely when you already have it at home; just wilt it in a pan, cool it down, squeeze well, and chop. Canned spinach is the least common, yet it is still usable if you drain it thoroughly and press out the extra liquid. Overall, the most important step—no matter which kind you choose—is removing excess moisture, so the spinach dip stays thick and creamy instead of watery.


3. How do I stop my spinach dip recipe from being watery?

Excess water in the spinach is almost always the culprit. Therefore, the first step is to squeeze the spinach very well, whether it is frozen, fresh, or canned. Additionally, avoid adding watery ingredients like tomatoes or cucumbers directly into the dip; serve them on the side as dippers instead. If you accidentally end up with a loose spinach dip, you can stir in a bit of extra cream cheese, sour cream, or grated hard cheese to help thicken it. Another simple trick is to chill the dip for a longer time, since it tends to firm up as it rests in the refrigerator. Ultimately, good draining plus proper chilling are the best defenses against a runny spinach dip recipe.


4. What is the best base for a cold spinach dip recipe—sour cream, mayo, or cream cheese?

Each base creates a slightly different personality for your spinach dip recipe. Sour cream gives a tangy, smooth texture and classic “party dip” flavor. Mayonnaise adds richness and a glossy mouthfeel, making the dip feel more luxurious. Cream cheese, on the other hand, produces a thicker, spreadable consistency that is excellent for bread and crackers. Very often, the tastiest dips use a combination of these: for example, half sour cream and half mayonnaise, or sour cream with a portion of cream cheese for extra body. As a general guideline, use more sour cream and yogurt if you want a lighter dip, and more mayonnaise or cream cheese if you prefer something richer and denser.


5. Can I make a healthier spinach dip recipe with yogurt?

Absolutely, you can create a lighter spinach dip recipe by replacing part or even all of the sour cream and mayonnaise with thick yogurt or hung curd. To begin, choose a full-bodied yogurt like Greek yogurt so the dip does not become too runny. Then mix it with a smaller amount of mayonnaise or olive oil for smoothness and flavor. Moreover, you can lean on garlic, lemon juice, herbs, and black pepper to make the dip exciting without needing loads of fat. Over time, you can adjust the ratio in favor of yogurt as your taste buds get used to a tangier, fresher flavor. This kind of spinach and yogurt dip works wonderfully with raw vegetables and whole-grain crackers, and it still feels indulgent even though it is a bit kinder to your daily calories.


6. How can I turn a basic spinach dip recipe into a spinach artichoke dip?

Transforming a classic spinach dip recipe into a spinach artichoke dip is surprisingly straightforward. Simply fold in chopped artichoke hearts—marinated or canned both work—after you have mixed the base. As a starting point, add about one cup of chopped artichokes to a standard batch of dip. Additionally, consider including shredded mozzarella and a little extra parmesan if you are aiming for that familiar restaurant-style flavor. If you want a cold dip, you can serve it immediately after chilling. Conversely, for a baked spin on the same idea, spread the mixture into an oven-safe dish, sprinkle more cheese on top, and bake until it is hot and bubbling. In either case, the artichokes add a lovely tang and texture that makes the spinach dip feel even more special.


7. What is the difference between a cold spinach dip recipe and a baked one?

A cold spinach dip recipe is usually based on sour cream, mayonnaise, and sometimes yogurt, and it relies on chilling time to thicken and develop flavor. It stays soft and scoopable straight from the refrigerator and is perfect for bread, chips, and raw vegetables. A baked spinach dip, in contrast, features more cheese—especially mozzarella, parmesan, and cream cheese—and is heated in the oven until hot and gooey. As a result, it has a stretchy, melty texture and a lightly browned top. Because of that, baked versions feel cozier and more suited to winter dinners, holiday parties, and game nights. Cold dips, meanwhile, are especially refreshing for warm-weather gatherings but also hold their own at any buffet table.


8. Can I make a spinach dip recipe without mayonnaise?

Yes, you can absolutely create a spinach dip recipe without mayonnaise. One straightforward option is to replace mayonnaise entirely with sour cream, Greek yogurt, or a blend of both. Cream cheese also works well as a base; it produces a thick, spreadable dip when combined with sour cream or yogurt. Furthermore, seasonings like garlic, onion, lemon juice, pepper, and herbs will provide plenty of flavor so you do not miss the mayonnaise at all. If you want even more richness without mayo, you can add a small splash of olive oil or a bit of grated cheese to round out the taste. In the end, the structure of the dip comes from something creamy plus the spinach, while the flavor comes mainly from aromatics and spices, so you have lots of freedom.


9. How can I make a gluten-free spinach dip recipe?

A spinach dip recipe is often naturally close to gluten-free, but there are a few details to check. Firstly, the core ingredients—spinach, sour cream, yogurt, mayonnaise, cream cheese, and most cheeses—do not contain gluten. The potential issues usually come from packets of soup mix, seasoning blends, and certain processed cheeses. Therefore, you need to read the labels on any mixes or flavored ingredients to ensure they are certified gluten-free. Instead of using packaged vegetable or onion soup mix, you can season your dip with plain dried herbs, garlic powder, onion powder, smoked paprika, and salt. As for serving, choose gluten-free dippers such as rice crackers, corn chips labeled gluten-free, sliced vegetables, or gluten-free bread. Once you take these simple steps, your spinach dip recipe can be enjoyed safely by guests who avoid gluten.


10. Can a spinach dip recipe be made vegan or dairy-free?

Yes, with a few strategic swaps you can create a dairy-free or even fully vegan spinach dip recipe. To begin, replace sour cream and yogurt with plant-based alternatives made from coconut, soy, or almonds. Next, swap out cream cheese and other cheeses for vegan cream cheese or shredded plant-based cheese. In addition, use a vegan mayonnaise made from vegetable oils instead of eggs. As you adjust these ingredients, you might need to rely more heavily on garlic, lemon juice, nutritional yeast, and herbs to build up a satisfying savory flavor. For a thicker texture, you can blend in a small amount of soaked cashews or silken tofu. When everything is combined and chilled, you will have a creamy, scoopable spinach dip that fits into a dairy-free or vegan lifestyle while still feeling indulgent.


11. How long does a homemade spinach dip recipe last in the fridge?

As a general guideline, a homemade spinach dip recipe keeps well in the refrigerator for about three to four days. The ingredients—especially sour cream, yogurt, mayonnaise, and cheeses—are all perishable, so they need to be stored in a covered container at a consistently cold temperature. Try not to leave the dip out at room temperature for more than two hours during parties; if it has been sitting out for longer than that, it is safer to discard the remainder. One practical approach is to serve part of the dip in a bowl and keep the rest chilled, refilling as needed. In this way, the majority of your spinach dip remains at a safe temperature while guests are enjoying the portion on the table.


12. Can I freeze leftover spinach dip?

Freezing a spinach dip recipe is possible, although the results depend on the ingredients. Dips that are mostly cream cheese and shredded cheese tend to freeze and thaw better, because they have less water. On the other hand, dips with a high proportion of sour cream or yogurt can sometimes become grainy or separated after freezing. If you choose to freeze spinach dip, place it in an airtight container, leaving a little room for expansion. When you want to use it again, thaw it slowly in the refrigerator, then stir it thoroughly. If the texture feels slightly broken, you can try whisking in a spoonful of fresh cream cheese or yogurt to smooth it out. Even so, for the very best texture and flavor, it is usually preferable to enjoy a spinach dip recipe freshly made or only chilled in the fridge.


13. What can I do with leftover spinach dip besides serving it with bread or crackers?

Leftover spinach dip is surprisingly versatile, so you do not have to keep eating it in exactly the same way. Firstly, you can transform it into a pasta sauce by thinning it with a little milk or pasta cooking water, then tossing it with hot pasta and extra parmesan. Secondly, you can spread it over pizza dough as a “white” sauce base for a spinach dip pizza topped with mozzarella and vegetables. Additionally, it works well as a filling in stuffed mushrooms or as a layer inside baked sandwiches and wraps. You can even spoon a thicker spinach dip recipe into baked potatoes or use it as a topping for grilled chicken or fish. With just a bit of imagination, the leftovers become an ingredient rather than a problem.


14. How can I add more flavor to a basic spinach dip recipe?

If your basic spinach dip recipe tastes a little flat, you have lots of options for boosting flavor. Garlic and onion are the first and most obvious helpers; you can use them fresh, sautéed, or in powdered form. Beyond that, herbs like dill, parsley, coriander, basil, and chives add freshness. Spices such as smoked paprika, cayenne, black pepper, and mustard powder introduce warmth and complexity. A squeeze of lemon juice or a splash of vinegar brightens everything, especially in richer dips. Grated parmesan or another sharp cheese can also deepen the savory notes. Finally, a pinch of salt added after chilling can tighten the flavors, since cold food often needs slightly more seasoning than warm dishes. Bit by bit, these small additions turn a simple spinach dip recipe into something truly memorable.

Posted on 6 Comments

Air Fryer Chicken Wings (Super Crispy, No Baking Powder)

Magazine-style portrait of super crispy air fryer chicken wings with a cook’s hand sprinkling parsley; dip bowl and air fryer in background; no baking powder.

Crispy air fryer chicken wings don’t need a vat of oil or a dusting of baking powder. This method relies on a simple dry brine, generous airflow, and a two-stage cook that renders fat first and crisps the skin second. The result: shatteringly crisp wings with juicy meat—and a base technique that welcomes multiple finishes without sacrificing crunch. For serving, a tangy blue cheese dip for wings is the classic counterpoint that cools the heat and amplifies the texture (blue cheese dip for wings).

Before we dive in, a quick safety note: wings are ready when the thickest part reaches 165°F / 73.9°C. Use an instant-read thermometer and let them rest briefly before saucing (source: USDA safe minimum internal temperatures).

Ingredients For Air Fryer Chicken Wings (Base)

  • 2 lb (900 g) chicken wings, whole or separated into flats and drumettes
  • 1¼ tsp fine kosher salt (or ¾ tsp table salt)
  • 1 tsp garlic powder
  • 1 tsp paprika (sweet or smoked)
  • ½ tsp black pepper
  • 1 tsp onion powder (optional)
  • 1–1½ tbsp neutral oil (avocado, canola, or light olive)

Keep the base seasoning restrained; the fireworks happen after crisping when you finish with a sauce or dry rub so the skin stays glassy.

Method: Two-Stage Air Fryer Chicken Wings (Crisp Without Baking Powder)

  1. Dry Brine (Optional But Powerful). Pat wings very dry, toss with only the salt, and refrigerate uncovered for 8–24 hours. This lightly dehydrates the skin and seasons the meat end-to-end.
  2. Season And Oil. Blot any surface moisture, then add oil, garlic, paprika, pepper, and onion powder if you like.
  3. Preheat. Warm the air fryer to 190°C / 375°F for 3–5 minutes.
  4. Stage 1 — Render. Cook 190°C / 375°F for 16–18 minutes, flipping halfway; keep a single layer with air gaps so steam never softens the skin.
  5. Stage 2 — Finish. Increase to 205–210°C / 400–410°F and cook 6–10 minutes more, flipping once, until deep golden and blistered.
  6. Safety Check And Rest. Confirm 165°F / 73.9°C, then rest 2 minutes before saucing (see USDA poultry temperature).

Why This “No Baking Powder” Approach Still Crisps

Some recipes raise skin pH with baking powder; if readers want the science, this explainer clarifies how alkalinity affects browning (why baking powder crisps poultry skin). Here, a truly dry surface plus high, moving heat renders subcutaneous fat and blisters the skin—clean flavor, stellar texture, zero metallic notes.

Doneness & Texture Guide

  • Golden but not fully crisp: add 3–5 mins at 205°C/400°F.
  • Uneven browning: rotate basket or swap tray positions in tray-style models.
  • Skin blistering but meat drying: reduce finishing temp to 200°C/392°F and extend 2–4 mins.

Time & Temperature Chart (Reference)

Wings TypeStarting StateStage 1Stage 2Total Time
Flats & Drumettes (standard, 2–2.5 lb)Raw, patted dry190°C/375°F × 16–18 min (flip at 8–9)205–210°C/400–410°F × 6–10 min (flip once)22–28 min
Whole wings (tips on)Raw, patted dry190°C/375°F × 18–20 min205–210°C/400–410°F × 8–12 min26–32 min
Wingettes (small)Raw, patted dry190°C/375°F × 14–16 min205–210°C/400–410°F × 5–8 min19–24 min

Frozen method: Times differ and require an initial thaw-render stage.

Flavor Finishes: Five Ways To Sauce Or Season Air Fryer Chicken Wings

Start with the base method above; then finish after crisping so the coating clings without softening the crust.

Buffalo (Hot)

Toss wings with ¼ cup hot sauce + 2 tbsp melted butter + ½ tsp garlic powder. Serve immediately with crisp celery and a cooling dip. If you want a parallel take to reference, this tested guide to air-fryer Buffalo wings offers a useful comparison while you keep the core technique intact (air-fryer Buffalo wings). For pairing, put a creamy blue cheese dip for wings front and center (blue cheese dip for wings).

Lemon Pepper

Stir 1 tbsp melted butter with 1–1½ tsp lemon pepper seasoning, then add a squeeze of fresh lemon; a little zest adds bright lift without extra salt. Toss, plate, and sprinkle with chopped parsley.

Garlic Parmesan

Bloom 2 minced garlic cloves in 1 tbsp butter + 1 tbsp olive oil for 30–45 seconds over low heat. Toss the wings in that garlicky fat, then finish with 2–3 tbsp finely grated Parmesan and parsley. Finely grated cheese clings better than coarse shreds, preserving the crackly shell.

Honey BBQ

Warm ⅓ cup BBQ sauce with 1–1½ tbsp honey. If the sauce is thick, whisk in 1–2 teaspoons of water so it coats evenly; for a tackier set, return the sauced wings to the basket for 1 minute.

All-Purpose Dry Rub

Mix 1 tsp paprika, ½ tsp garlic powder, ½ tsp onion powder, ½ tsp brown sugar, ¼ tsp cayenne, ½ tsp kosher salt, ¼ tsp black pepper. Dust immediately after cooking so the residual surface fat grabs the spices.

Pro Tips That Keep Air Fryer Chicken Wings Ultra-Crispy

  • Don’t Crowd. Airflow is everything; cook in batches if necessary. For quick fixes to pale skin, smoke, or uneven browning, read this practical guide to common air fryer mistakes (common air fryer mistakes).
  • Flip And Rotate. Basket models often brown harder on the bottom; tray-style machines benefit from a mid-cook tray swap.
  • Mind Your Model. Capacity, wattage, and basket shape influence timing.
  • Sauce Late. Toss after the high-heat finish to protect the glassy crust. If someone prefers an oven method, here’s a respected oven-fried wings approach for context (oven-fried wings).

What “Air Fryer” Really Means (And Why Airflow Matters For Wings)

An air fryer is essentially a compact convection oven: a heating element and a powerful fan drive hot air across food in a tight chamber. That setup excels at blasting moisture from skin while rendering fat—a perfect match for air fryer chicken wings. For readers new to the appliance, this primer explains basket versus oven-style designs in plain English (what is an air fryer).

Because airflow is central, basket shape and chamber width affect results. Wide, shallow baskets often brown more evenly and handle wings without stacking, which means fewer batches and better texture. Narrow, tall baskets can work well too, but they demand stricter spacing and more flipping for even color.

Gear Notes: Choosing The Best Air Fryer For Wings (Capacity, Basket Shape, Airflow)

When readers are shopping, steer them toward capacity and shape before bells and whistles. A broad, shallow basket encourages airflow; sufficient wattage helps the unit recover heat after you add cold wings. For current, test-driven picks, here’s an expert shortlist of the best air fryers. And for airflow-focused designs that cook faster and more evenly, this in-depth review showcases why a wide, shallow basket can be a game-changer (Typhur Dome 2 review).

Multi-rack countertop ovens can get close to basket-style results—just rotate trays halfway and keep wings in a single layer on each rack to maintain airflow.

Serve And Pair

Classic Buffalo begs for contrast—so put that blue cheese dip for wings front and center and add crunchy celery and carrot sticks for texture (blue cheese dip for wings). If you’re making Lemon Pepper or Garlic Parmesan, a squeeze of lemon at the table adds a bright top note without dampening the crust. Keep sauces warm—not scorching—so they don’t tighten the skin when they hit it. For a simple appetizer board, pair the wings with pickled peppers, crisp radishes, and a crunchy salad.

Troubleshooting In Real Kitchens

If a batch smokes, fat likely pooled under the basket or residue baked on from a previous cook; add a small splash of water to the drawer and clean between rounds. Then if the wings look pale, extend the finishing phase or rotate the basket/tray to expose different sides to the hottest zones. And if some pieces crisp while others lag, you may have mixed sizes—separate wingettes and drumettes so smaller pieces don’t overcook while larger ones catch up. For a quick refresher on pitfalls and fixes, this guide to common air fryer mistakes is a solid reference (common air fryer mistakes).

From Base Technique To Brand-Specific Tweaks

Different machines run hot or gentle, and presets can mislead. We encourage readers to watch color and texture—not only the timer—on the first run. Owners of compact units like the Philips HD9252/90 will benefit from stricter spacing; larger baskets such as the Inalsa 5.5L or Sous Chef 6.5L can spread wings wider and finish faster at the same settings.

Scaling Air Fryer Chicken Wings For A Crowd

Cooking for a party? Rather than cramming more into one batch, repeat the process in batches. Hold finished wings on a rack over a sheet pan in a low oven (95–115°C / 200–240°F) to keep them crisp while you cook the next round; then toss everything with warm sauce right before serving. Larger machines with wide baskets naturally reduce the number of rounds, which makes entertaining easier and keeps the wings crisp.

Also, spice blends with sugar can darken early during the finishing phase. If you’re running sweet rubs, drop the finishing temperature by about 5–10°C (10–15°F) and extend the time slightly to avoid scorching. Conversely, salt-forward rubs thrive at the higher finish: the surface dries faster, fat renders more completely, and the bite stays delicate.

Storing And Reheating Leftover Air Fryer Chicken Wings

Wings reheat beautifully if you protect the surface. Refrigerate in a shallow layer, leave uncovered for 30 minutes to off-gas steam, then cover. Reheat at 180°C / 356°F for 5–7 minutes, shaking once; if the skin needs a boost, go 1–2 minutes at 200°C / 392°F to refresh the crust. Avoid microwaving unless you immediately re-crisp in the air fryer.

Quick Recap for Air Fryer Chicken Wings Recipe

  • Dry brine if you can; otherwise, pat very dry.
  • Cook in two stages: render at 190°C / 375°F, then finish at 205–210°C / 400–410°F.
  • Hit 165°F / 73.9°C internal; rest briefly. (USDA temperature)
  • Sauce or season after crisping.
  • Keep airflow sacred: space pieces, flip, and rotate as needed. For fast fixes, see common air fryer mistakes (common air fryer mistakes).

FAQs

1) How long do air fryer chicken wings take to cook?

Generally, 22–28 minutes total. Start at 190°C/375°F for 16–18 minutes (flip once), then finish at 205–210°C/400–410°F for 6–10 minutes until the skin is deeply golden and crackly.

2) What internal temperature should air fryer chicken wings reach?

Aim for 165°F/73.9°C in the thickest part of the meat (not touching bone). Let the wings rest a couple of minutes before saucing so the crust stays crisp.

3) Can I make air fryer chicken wings from frozen?

Yes. Cook longer and in stages: begin at a lower temp to thaw/render, separate any stuck pieces, then increase the heat to crisp. Expect roughly 28–35 minutes depending on size and model.

4) Do I need baking powder for crispy air fryer chicken wings?

No. A dry brine, thorough surface drying, proper spacing, and a hot finish deliver shatteringly crisp skin without baking powder or a metallic aftertaste.

5) How much oil should I use on air fryer chicken wings?

Use about 1–1½ tablespoons per 2 lb (900 g)—enough to help browning without greasiness. Too much oil can inhibit crisping and cause smoke.

6) Should I preheat the air fryer for wings?

Yes. A 3–5 minute preheat helps jump-start browning and keeps timing consistent across batches.

7) Do I flip air fryer chicken wings while cooking?

Absolutely. Flip halfway through Stage 1, and once during the hot finish. Also rotate trays in oven-style units to even out hot spots.

8) Can I stack wings to save time?

Avoid stacking during the main cook. Overlap traps steam and softens skin. If you must, separate pieces after a few minutes and finish in a single layer.

9) What’s the best seasoning base for air fryer chicken wings?

Keep it simple: salt, garlic powder, paprika, pepper. Then, after crisping, finish with Buffalo, Lemon Pepper, Garlic Parmesan, Honey BBQ, or a Dry Rub so the crust stays crunchy.

10) How do I stop smoke when cooking wings?

Clean the drawer/basket between batches and avoid excess oil. If needed, add a small splash of water beneath the basket to catch drips and minimize smoking.

11) Why aren’t my air fryer chicken wings crispy?

Common culprits: crowded basket, damp skin, no preheat, or skipping the high-heat finish. Spread wings out, pat dry thoroughly, and finish hotter for blistered skin.

12) Whole wings or flats & drumettes—which is better?

Either works. Separated pieces (flats/drumettes) generally cook more evenly and crisp faster; whole wings may need a few extra minutes.

13) Can I marinate wings before air frying?

Yes, though pat very dry before cooking. For sticky marinades, cook first, then toss in sauce to prevent soft skin and burnt sugars.

14) Is parchment or foil okay under air fryer chicken wings?

Only if your manufacturer allows it and never during preheat. Perforated liners are better for airflow; solid liners can block circulation and reduce crispness.

15) What’s the best way to reheat leftover wings?

Air fry at 180°C/356°F for 5–7 minutes until hot, then 200°C/392°F for 1–2 minutes to re-crisp. Avoid microwaving unless you finish in the air fryer.

16) How many wings can I cook at once?

As many as fit in a single layer with gaps. For parties, cook in batches and hold finished wings on a rack in a low oven so they stay crisp.

17) Do different air fryers change timing?

Yes. Basket size, wattage, and chamber shape matter. Start with the suggested ranges, then watch color and texture and adjust a minute or two as needed.

18) Can I use flour or cornstarch on air fryer chicken wings?

You can, sparingly. However, the dry-brine + hot finish method already crisps beautifully; extra starch may dull the clean, glassy texture.

19) When should I sauce air fryer chicken wings?

After they’re fully crisp. Toss quickly and serve right away so the skin stays snappy.

20) What side dishes pair best with air fryer chicken wings?

Celery sticks, carrot sticks, and a creamy dip are classics. Additionally, light salads, pickled vegetables, or coleslaw cut through richness without softening the crust.

Posted on 4 Comments

Charcuterie Boards: History, Assembly, Health, and the 3-3-3-3 Rule

CHARCUTERIE BOARD

A well-crafted charcuterie board is more than just food—it’s a statement piece, a conversation starter, and a delicious way to bring people together. Whether for a cozy family gathering or a festive celebration, the art of arranging meats, cheeses, and their accompaniments is timeless and endlessly creative.

Let’s dive deep into the world of charcuterie boards—what they are, where they come from, how to make them healthy, and, most importantly, how to build a show-stopping spread at home.


What Is a Charcuterie Board?

At its core, a charcuterie board is an artful arrangement of cured meats (charcuterie), cheeses, bread, crackers, fruits, nuts, pickles, and spreads—all beautifully presented on a platter or wooden board. The word “charcuterie” is French, originally referring to shops that sold cured pork products. Today, charcuterie has expanded to encompass a much wider variety of meats, cheeses, and snacks.

Modern charcuterie boards are as diverse as their creators, often blending traditions from around the world. They’re now a mainstay at parties, wine nights, and even as a casual dinner option for families.


The History & Evolution of Charcuterie

  • European Roots: The tradition of curing meats began in France and Italy centuries ago as a way to preserve food before refrigeration. Meats were salted, air-dried, and sometimes smoked, then enjoyed with bread and local cheese.
  • Charcuterie Shops: In 15th-century France, “charcutiers” specialized in preparing and selling pork products—everything from pâté to sausage and rillettes.
  • The Modern Board: In recent decades, charcuterie boards have evolved, especially in the US, to include a wide array of cheeses, fruits, nuts, and even sweet elements like chocolate or honeycomb.

The Anatomy of a Charcuterie Board

A truly great charcuterie board offers balance, variety, and visual appeal. Here’s what usually makes the cut:

  • Cured Meats: Salami, prosciutto, coppa, soppressata, chorizo, turkey or chicken salami, pâté.
  • Cheeses: Soft (brie, camembert, goat), semi-hard (manchego, gouda), hard (aged cheddar, parmesan), blue cheese.
  • Bread & Crackers: Baguette slices, rustic bread, grissini (breadsticks), artisanal crackers, crostini.
  • Accompaniments: Fresh/dried fruits (grapes, figs, apricots), olives, pickles, nuts (almonds, walnuts, pistachios), jams, honey, mustards, and fresh herbs for garnish.

The secret: Mix flavors and textures—salty, sweet, tangy, creamy, crunchy.


The 3-3-3-3 Rule: Your Charcuterie Blueprint

Feeling overwhelmed by all the options? Use the 3-3-3-3 rule to guarantee a well-rounded, visually stunning board:

  • 3 Meats: (e.g., prosciutto, salami, chorizo)
  • 3 Cheeses: (e.g., brie, aged cheddar, blue cheese)
  • 3 Starches: (e.g., crackers, sliced baguette, breadsticks)
  • 3 Accompaniments: (e.g., olives, fruit, nuts)

This formula makes shopping simple and ensures a good mix without overloading the board.


How to Arrange Your Charcuterie Board Like a Pro

  1. Start Big: Place small bowls for olives, jams, and spreads on the board first.
  2. Add Cheese: Arrange cheese in different corners. Vary the shape—wedge, block, crumbled.
  3. Meats: Fold or fan out slices of meat for volume and easy grabbing. Group different meats together.
  4. Starches: Add stacks of crackers and bread in gaps, fanned or leaning for height.
  5. Fill Gaps: Tuck in fruits, nuts, and pickles to fill empty spaces and add pops of color.
  6. Finishing Touches: Garnish with fresh herbs (rosemary, thyme, basil) or edible flowers.

Tip: Serve at room temperature (let the board sit out for 15-30 minutes) to bring out the best flavors and textures.

CategoryClassic OptionVeg/Vegan OptionBudget-Friendly
MeatsProsciutto, SalamiRoasted Veggies, HummusTurkey slices
CheesesBrie, CheddarPlant-based cheeseLocal fresh cheese
StarchesBaguette, CrackersSeed crackers, PitaPopcorn, Breadsticks
AccompanimentsOlives, Grapes, NutsFruit, Pickles, NutsDried fruit
“Build-Your-Own Board” table for easy planning
CHARCUTERIE BOARD

5 Things to Avoid on a Charcuterie Board

  1. Overly Wet Foods: Juicy fruits or olives without bowls can make crackers soggy and messy.
  2. Super-Pungent Cheeses or Meats: Very strong flavors (like aged blue cheese or spicy sausage) can dominate—use sparingly and keep separate.
  3. Pre-Sliced Cheese: It dries out fast. Use blocks or wedges and slice just before serving.
  4. Too Many Crackers/Breads: Stick to 2-3 types so the board isn’t overwhelming.
  5. Chocolate or Fish: Chocolate can clash with savory items, and seafood flavors may overpower the board.

Are Charcuterie Boards Healthy?

Charcuterie boards can be healthy—or indulgent—depending on what you include. Tips for a more nutritious board:

  • Opt for lean, minimally processed meats (turkey, chicken, nitrate-free options).
  • Include fresh fruits and veggies for fiber, color, and vitamins.
  • Choose whole-grain crackers for more nutrients and fiber.
  • Add nuts for healthy fats and crunch.
  • Use cheese in moderation (watch out for high-fat, high-sodium varieties).

Remember: Processed meats, even those cured “naturally,” should be enjoyed in moderation. Pair with fresh foods and plenty of hydration.


Pro Tips & Pairing Ideas

  • Balance is Key: Always have something salty, something sweet, something creamy, and something crunchy.
  • Regional Pairings: Pair Italian meats with Italian cheeses and crackers; Spanish chorizo with Manchego and Marcona almonds.
  • Wine Pairings: White wines pair well with softer cheeses and lighter meats; bold reds with hard cheeses and spicy cured meats.

Charcuterie Board FAQ

1. What is a charcuterie board?
A charcuterie board is a platter featuring an assortment of cured meats, cheeses, breads or crackers, fruits, nuts, pickles, and spreads, arranged artfully for sharing.

2. How do I use the 3-3-3-3 rule for charcuterie boards?
Include 3 meats, 3 cheeses, 3 starches (crackers or breads), and 3 accompaniments (such as fruit, nuts, or pickles) for a well-balanced, visually pleasing board.

3. What should I avoid putting on a charcuterie board?
Avoid overly wet foods, very pungent cheeses or meats, pre-sliced cheese, too many types of crackers, and chocolate or fish, which can clash with other flavors.

4. How far in advance can I prepare a charcuterie board?
Prep ingredients a few hours in advance, but assemble the board just before serving to keep everything fresh and prevent drying out.

5. How much should I serve per person?
As an appetizer, plan for about 2 ounces of meat and 2 ounces of cheese per person.

6. Are charcuterie boards healthy?
They can be! Choose lean meats, lots of fruits and vegetables, whole grain crackers, and limit high-fat cheeses and processed meats for a more nutritious board.

7. What’s the best way to arrange a charcuterie board?
Start with bowls for spreads and olives, place cheeses and meats next, then fill in with breads, crackers, fruits, nuts, and garnishes for color and balance.

8. Can I include vegetarian or vegan options?
Yes! Add hummus, plant-based cheeses, marinated veggies, roasted nuts, and fruit for vegetarian or vegan guests.

9. What drinks pair best with a charcuterie board?
Wine is classic (red, white, or sparkling), but craft beers, ciders, and even mocktails pair well depending on the board’s flavors.

10. How do I keep the board looking fresh?
Keep wet foods in small bowls, use herbs for garnish, and avoid overcrowding—leave a little space so each item stands out.


Conclusion: The Joy of Sharing

Charcuterie boards celebrate abundance, flavor, and togetherness. With the right mix of elements—and a few pro tips—you can create a spread that delights the eyes as much as the tastebuds. Whether you’re a purist or a creative host, the charcuterie board is your canvas.

Want more tips, recipes, or printable guides?
Visit MasalaMonk.com for in-depth how-tos, shopping lists, and inspiration!


What’s your favorite element on a charcuterie board? Share your thoughts or questions below!

Posted on 2 Comments

5 Sweet Potato Appetizers Ideas to Inspire the Chef in You

SWEET POTATO APPETIZERS

Sweet potatoes have officially moved beyond the Thanksgiving table and into the culinary spotlight as a versatile, healthful, and flavor-packed ingredient. Whether you’re a home chef or running a professional kitchen, the latest trends in sweet potato appetizers are all about global flavors, striking visuals, and creative textures.

In this post, we dive deep into five trending sweet potato appetizers for 2025, blending research from top food publications, chef menus, and recent product innovations. Each idea is presented with a chef’s rationale, practical how-to guidance, and tips for home and pro kitchens alike.


1. Grilled Purple Sweet Potato Salad Bites

Why It’s Trending:
Purple sweet potatoes are a visual knockout and rich in antioxidants. Recently featured by Bon Appétit (July 2025), grilling intensifies their natural sweetness while adding smokiness—a modern update for plant-forward appetizers.

How to Make It Practical:

  • Slice purple sweet potatoes into ½-inch rounds.
  • Toss with olive oil, salt, and pepper.
  • Grill on high heat until blistered and tender (about 4 minutes per side).
  • Dress with a creamy sesame-mayo or a lemony vinaigrette.
  • Top with scallions, toasted sesame seeds, and microgreens.

Pro Tip:
For parties, skewer grilled rounds and serve with the dressing on the side for dipping. The color and char will stand out on any appetizer tray.


2. Nashville-Spiced Sweet Potato Balls

The Inspiration:
A twist on classic croquettes, these crispy, spice-laden balls are inspired by the hot chicken craze, but made for vegetarians and flexitarians. Recent recipes (Cherry on My Sundae, June 2025) blend sweet potato with smoky paprika, cayenne, and a crunchy coating.

How to Make Them Practical:

  • Roast and mash sweet potatoes.
  • Mix with breadcrumbs, Nashville-style spices, finely diced green onions, and (optional) shredded cheese or bacon bits.
  • Form into balls; dredge in flour, egg, and panko.
  • Fry or bake until golden and crisp.
  • Serve with a creamy ranch or tangy comeback sauce.

Pro Kitchen Variation:
Pipe spiced sweet potato puree into mini choux pastry shells for an upscale passed hors d’oeuvre.


3. Roasted Sweet Potato “Crostini” with Guacamole & Corn

Why Chefs Love It:
Bread-free “crostini” are trending among gluten-free diners and those seeking lighter fare. Roasted sweet potato rounds are the perfect vehicle for colorful, bold toppings. This concept is popular with food bloggers and professional caterers alike (A Couple Cooks, Jan 2025).

How to Make at Home or Work:

  • Slice sweet potatoes into thick rounds (about ½ inch).
  • Roast with olive oil, cumin, and smoked paprika at 425°F until caramelized (20–25 minutes).
  • Top each round with a dollop of guacamole, roasted corn kernels, diced red onion, and chopped cilantro.
  • Finish with lime juice and a sprinkle of cotija cheese.

Chef’s Tip:
Try different toppings, such as whipped feta with pomegranate seeds or spicy black bean mash with pickled jalapeños.


4. Loaded Sweet Potato with Maple-Sriracha Yogurt & Crispy Chickpeas

On the Cutting Edge:
Loaded sweet potatoes are evolving, now being downsized into appetizer “boats” for maximum flavor and visual impact. The latest takes layer sweet, spicy, tangy, and crunchy elements for a full flavor experience (Good Mood Food, April 2025).

How to Make Them Practical:

  • Halve small sweet potatoes lengthwise; roast until just soft.
  • Scoop out a little center to make a well (save the scooped flesh for another use).
  • Fill with maple-sriracha Greek yogurt, crispy roasted chickpeas, crumbled feta, and pickled onions.
  • Drizzle with almond salsa verde (blend toasted almonds, parsley, lemon, olive oil, and a pinch of chili).

Meal Prep Friendly:
Both the yogurt sauce and chickpeas can be made days in advance, making this ideal for parties.


5. Tempura Sweet Potato Rounds with Flavored Salt

The Industry Insight:
Pre-cooked, tempura-battered sweet potato slices are gaining traction in restaurant and catering sectors for their crispness and convenience (US Foods Chef’s Line, 2025). This idea translates well to home kitchens using basic tempura batter.

How to Bring to Your Table:

  • Cut sweet potato into ½-inch thick rounds.
  • Dip in a simple tempura batter (flour, cornstarch, cold seltzer).
  • Fry in hot oil until golden and crispy.
  • Sprinkle immediately with flavored salt (smoked paprika, garlic powder, or furikake).
  • Serve with a dipping sauce—try spicy mayo, ponzu, or garlic aioli.

Entertaining Tip:
Offer a trio of dips and salts, and let guests mix and match.


Expert Tips for Sweet Potato Appetizer Success

  • Visual Appeal: Use a mix of purple, orange, and white sweet potatoes for color contrast.
  • Batch Prep: Many components (roasted rounds, sauces, toppings) can be made ahead for fast assembly.
  • Texture Matters: Combine creamy, crunchy, and chewy elements for memorable bites.
  • Global Flavors: Don’t be afraid to borrow from global cuisines—sriracha, gochujang, furikake, and curry powder all pair beautifully with sweet potatoes.

Final Thoughts

From smoky grilled salads to street-food-inspired croquettes, sweet potato appetizers are having a major moment in 2025. They’re healthy, photogenic, endlessly adaptable, and equally at home at a casual party or a fine-dining table. Whether you’re looking for a new plant-based favorite or a show-stopping party snack, these ideas bring the best of today’s trends straight to your kitchen.

Ready to experiment? Which idea will you try first? Let us know in the comments or share your own sweet potato creations!


FAQs

1. Can I use regular potatoes instead of sweet potatoes in these recipes?

Answer:
Yes, you can substitute regular potatoes for sweet potatoes in most appetizer recipes, but you’ll lose the characteristic sweetness and vibrant color. Adjust seasonings to balance flavors accordingly.


2. How do I keep sweet potato rounds from getting soggy when roasting or grilling?

Answer:
Slice rounds evenly (about ½ inch), don’t overcrowd the pan, and roast or grill at high heat (425°F/220°C) to encourage caramelization. Let them cool on a wire rack to preserve crispness.


3. Can I make sweet potato appetizers ahead of time?

Answer:
Yes! Many components (roasted rounds, dips, toppings) can be made a day ahead. Store separately and assemble just before serving for best texture and flavor.


4. What are some gluten-free options for breading or crisping sweet potatoes?

Answer:
Use gluten-free panko, crushed rice crackers, or cornmeal for coating. Tempura batter can be made with rice flour and cornstarch.


5. How do I make sweet potato appetizers vegan?

Answer:
Omit dairy (cheese, yogurt) and use plant-based alternatives like cashew cream, vegan cheese, or dairy-free yogurt. Use aquafaba or flaxseed “egg” for binding in fritters or balls.


6. What’s the best oil for frying sweet potato appetizers?

Answer:
Use oils with a high smoke point like canola, peanut, or avocado oil. For added flavor, try a touch of sesame oil in the batter or as a finishing drizzle.


7. Can I air-fry sweet potato appetizers instead of deep frying?

Answer:
Absolutely! Air frying is a healthier alternative and works well for rounds, wedges, and even “balls.” Toss lightly in oil, arrange in a single layer, and cook at 375°F/190°C, flipping halfway.


8. How do I add more flavor to plain sweet potato appetizers?

Answer:
Experiment with spice blends (cajun, za’atar, curry powder), citrus zest, fresh herbs, or flavored salts. Don’t be afraid to use bold, global-inspired dips.


9. Are these sweet potato appetizers suitable for kids?

Answer:
Yes! They’re naturally sweet and can be made mild by adjusting spices. Offer a range of dips and let kids assemble their own bites for fun.


10. How should I store leftovers, and can I reheat sweet potato appetizers?

Answer:
Store leftovers in an airtight container in the fridge for up to 3 days. Reheat in a hot oven or air fryer to restore crispness; avoid microwaving as it makes them soggy.

Posted on 1 Comment

5 Creative Ideas for Bacon-Wrapped Potatoes

happy woman with rolling pin cooking at home

If you’re a fan of crispy bacon and tender potatoes, then you’re in for a treat! In this delectable blog post, we’ll explore the mouthwatering world of bacon-wrapped potatoes. These bite-sized gems are bursting with flavor and make an excellent appetizer or side dish for any occasion. Get ready to indulge in the perfect combination of smoky, savory bacon and creamy, tender potatoes that will have everyone coming back for more. 🥓🥔

🍟 1️⃣ Classic Bacon-Wrapped Potato Bites Let’s start with the classic bacon-wrapped potato bites that are guaranteed to be a hit at any gathering. Here are some additional ideas to spice up your potato bites:

1️⃣ Sweet and Spicy: Before wrapping the potato bites with bacon, lightly brush them with a mixture of maple syrup and sriracha for a sweet and spicy twist. The combination of the smoky bacon and the heat from the sriracha will create a tantalizing flavor experience that will keep your guests coming back for more.

2️⃣ Cheesy Goodness: Place a small cube of your favorite cheese, such as cheddar or pepper jack, inside each potato bite before wrapping them with bacon. As the potatoes bake, the cheese will melt, creating a gooey and delicious surprise in every bite. The combination of the crispy bacon, creamy potatoes, and melted cheese is sure to be a crowd-pleaser.

🍟 2️⃣ Stuffed Bacon-Wrapped Potatoes Take your bacon-wrapped potatoes to the next level by adding a delicious filling to the equation. Here are some creative stuffing ideas:

3️⃣ Jalapeño Poppers: Fill the cavity of each halved potato with a mixture of cream cheese, diced jalapeños, and shredded cheddar cheese. Wrap each potato half with bacon and secure it with toothpicks. The creamy and spicy filling combined with the crispy bacon will create a flavor explosion that will have your guests reaching for seconds.

4️⃣ Savory Herb and Garlic: Mix softened butter with minced garlic, chopped fresh herbs (such as rosemary, thyme, or parsley), salt, and pepper. Fill the cavity of each halved potato with this flavorful butter mixture. Wrap with bacon and bake until crispy. The herb-infused butter will melt into the potatoes, infusing them with irresistible flavor. The aroma of the herbs and garlic will entice your guests as they take their first bite.

🍟 3️⃣ Sweet and Savory Maple-Glazed Bacon-Wrapped Sweet Potatoes For a delightful twist on the classic, try these sweet and savory maple-glazed bacon-wrapped sweet potatoes. Here are some variations to consider:

5️⃣ Candied Bacon: Before wrapping the sweet potato bites with bacon, sprinkle the bacon with brown sugar and a pinch of cayenne pepper for a sweet and spicy candied bacon effect. The caramelized sugar will add a delightful crunch and a touch of sweetness to complement the natural sweetness of the sweet potatoes. This combination of sweet and savory flavors will have your guests raving about this unique twist on a classic favorite.

6️⃣ Smoky BBQ: Brush the bacon-wrapped sweet potatoes with your favorite smoky barbecue sauce before baking. The combination of the smoky flavors from the bacon and the tangy sweetness of the barbecue sauce will create a mouthwatering flavor profile that will leave your guests wanting more. The smoky aroma and sticky glaze will make these bacon-wrapped sweet potatoes an instant hit at your next gathering.

🍟💡 These bacon-wrapped potato recipes offer a perfect balance of flavors and textures, making them ideal for parties, game nights, or simply indulging in a delicious snack. Feel free to experiment with different types of bacon, seasonings, and fillings to create your own unique variations. And remember, if you want to share your creations and get more inspiration, join us on our Facebook group where a vibrant community of over 75,000 Foodies awaits! Let’s celebrate the irresistible combination of bacon and potatoes together. Enjoy! 🥓🥔