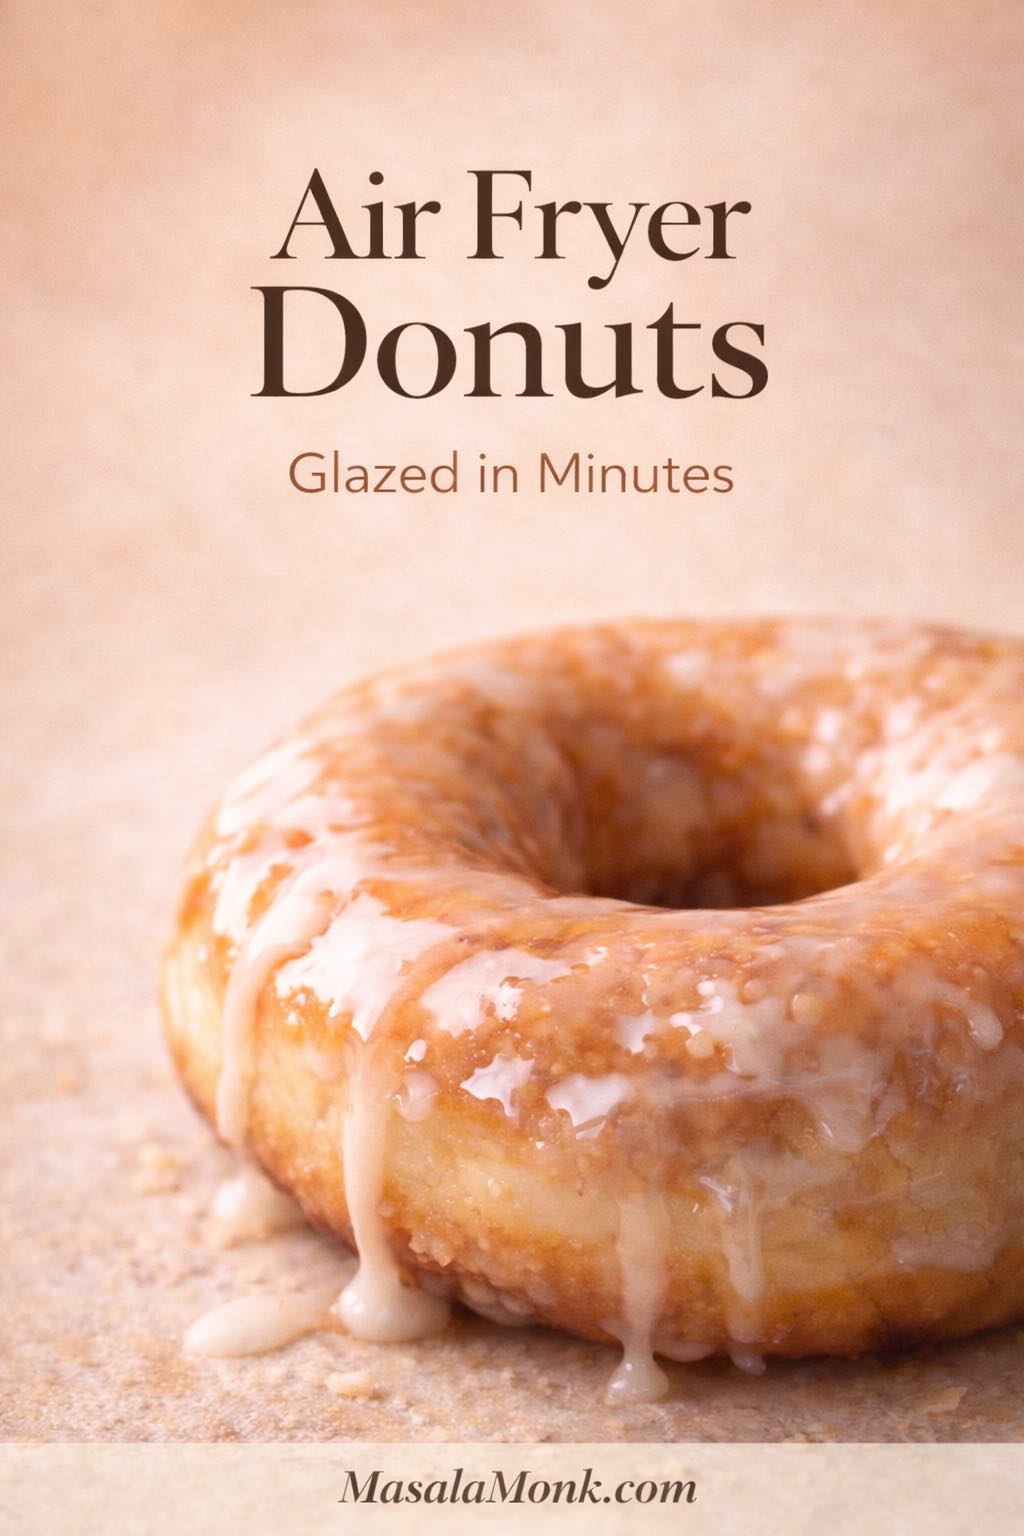
Warm donuts have a way of making a normal day feel like a small celebration. The problem is that classic donuts frying at home can turn into a whole production—oil, thermometers, splatters, lingering smells, and that “now I have a pot of oil to deal with” moment. Air fryer donuts solve that in a surprisingly satisfying way.
Air Fried Donuts are not trying to be a deep-fryer stunt. Instead, they’re built for repeatability: soft, fluffy centers, a delicate outer set, and finishes that make them feel like a real treat. Even better, you can make air fried doughnuts in two very different styles depending on the time you have and the mood you’re in:
- Homemade air fryer donuts made from scratch, risen until airy, then dipped in a simple glaze that sets into that classic thin shell.
- Air fryer biscuit donuts made with biscuit dough, shaped in minutes, and finished with cinnamon sugar or glaze for instant gratification.
So whether you want an all-in weekend project or a shortcut dessert that still looks like you tried, donuts in the air fryer can fit the moment.
If you’re building a full breakfast spread, you can balance the sweetness with something crisp and dunkable like these French toast sticks. Meanwhile, if you’re serving a crowd and want a make-ahead option on the table, no-bake banana pudding keeps things generous without chaining you to the kitchen.
Also Read: Air Fryer Salmon Recipe (Time, Temp, and Tips for Perfect Fillets)
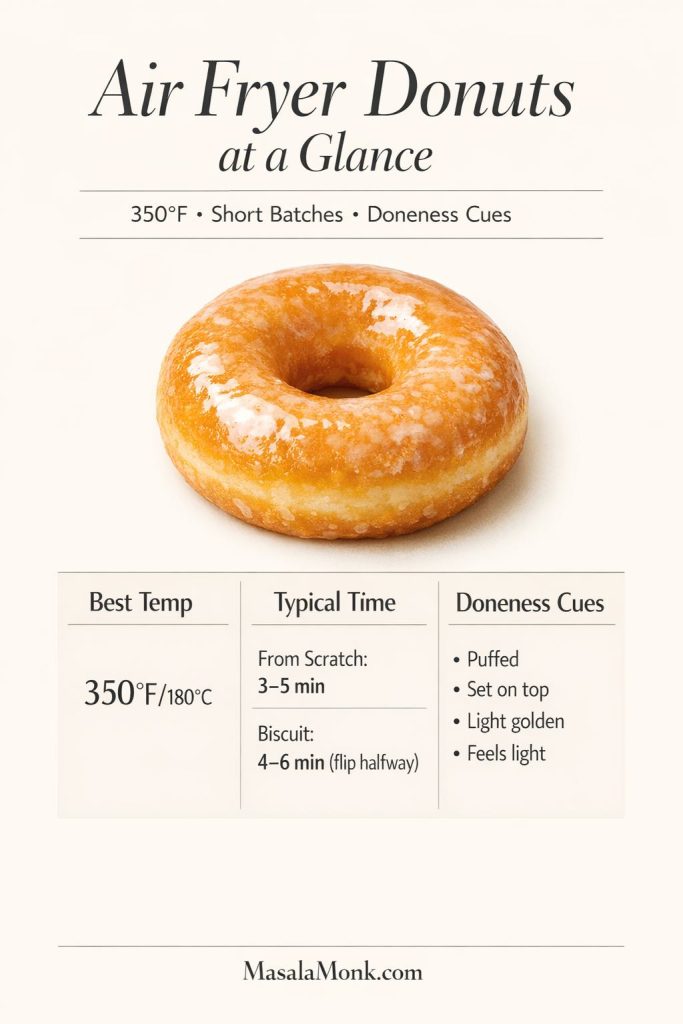
Air Fryer Donuts at a Glance (Time, Temp, Doneness)
Before you start mixing dough or cutting biscuit rings, it helps to understand what makes doughnuts in the air fryer behave differently from a pot of oil. The air fryer is basically a compact convection oven with attitude: powerful heat + fast airflow + a small cooking chamber. That combination can turn out beautifully tender donuts, as long as you cook for structure first and color second.
Best temperature for air fryer donuts
Most air fried doughnuts do best at 350°F / 180°C. That temperature gives the dough enough time to puff and set without turning the outside too dark too quickly.
If your air fryer runs hot, stay on the lower end of the range. Conversely, if your air fryer runs cool, a small bump can help. Still, it’s usually smarter to add time rather than crank the temperature, because pale donuts are fixable with glaze, while dry donuts are a little harder to rescue.
How long to cook donuts in the air fryer
Air fryer times vary more than people expect. Basket size, fan power, and even where the heating element sits can change the outcome. With that said, these ranges keep you grounded:
- From-scratch donut dough: 3–5 minutes per batch
- Biscuit donuts in air fryer: 4–6 minutes, flipping halfway
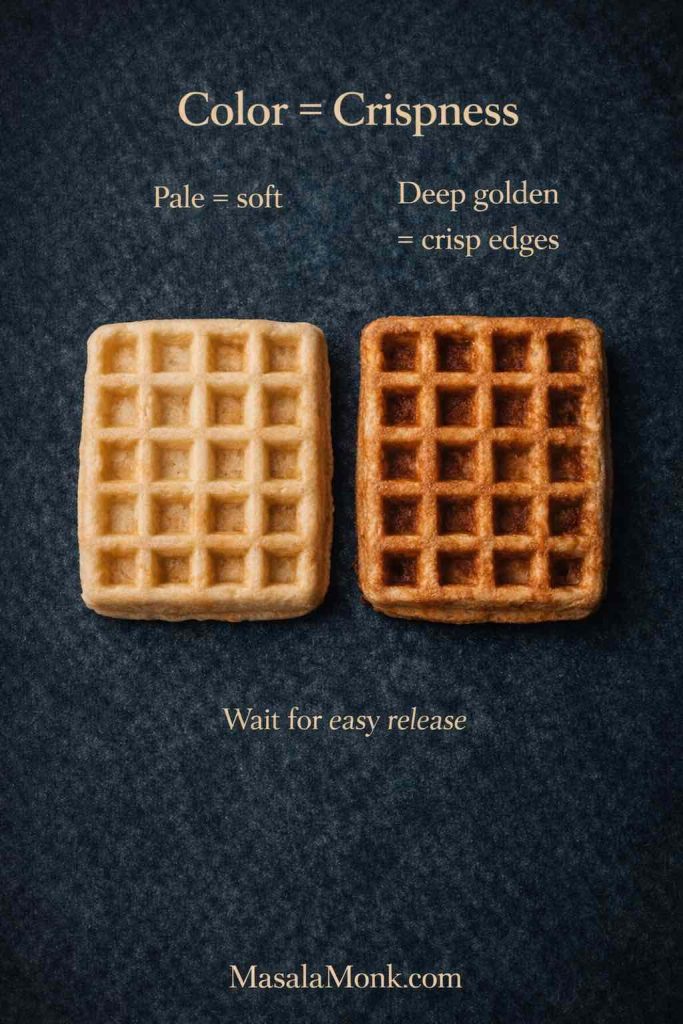
Even so, don’t let the numbers boss you around. Instead, treat the clock like a guide and use doneness cues to make the final call.

Doneness cues for air fried doughnuts
Air fried doughnuts are done when they look set and feel light. In practice, that usually means:
- The donut is visibly puffed, not flat.
- The surface looks dry and set, not wet or tacky.
- The color is light golden, not deep brown.
- When you lift one, it feels airy for its size.
Once you get comfortable with those cues, “donut in air fryer recipe” stops being a rigid script and becomes a flexible method.
Also Read: Masterclass in Chai: How to Make the Perfect Masala Chai (Recipe)
Why Air Fryer Donuts Work (and when they don’t)
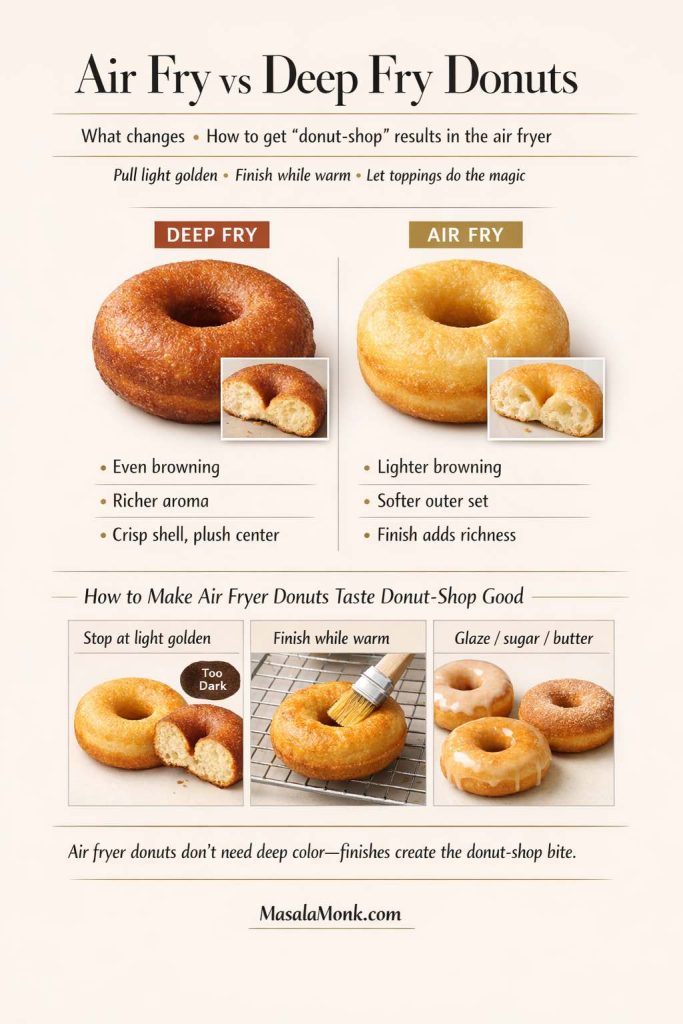
Deep fryer donuts and air fryer doughnuts don’t cook the same way, and that’s okay. Oil surrounds the dough and transfers heat aggressively, so the surface browns quickly and evenly. Air fryers cook with moving hot air, so browning is often gentler and more patchy unless you manage airflow and don’t overcrowd the basket.
Fortunately, donuts don’t need an intensely browned shell to taste amazing. They need softness, freshness, and a finish that makes the bite feel rich. That’s why glazes, cinnamon sugar, and butter-brushed coatings matter so much in air fryer doughnuts: the finish supplies the “donut shop” satisfaction even when the crust is lighter.
Air fryer donuts vs deep fryer donuts
If you’ve ever done deep fryer donuts, you already know the magic: fast browning, plush interior, and that unmistakable fried aroma. Still, deep frying has its own learning curve. Oil temperature control is everything, and a few degrees can change the outcome.
For a classic overview of doughnuts frying at home—temperature cues, timing, and what to look for—Serious Eats’ guide is a solid reference: Sweet Technique: How to Make Doughnuts. Likewise, King Arthur Baking’s yeast-raised doughnut recipe is a clean baseline for the traditional method: Yeast-Raised Doughnuts.
Even so, if you’re using an air fryer for donuts, you’re usually choosing it for the opposite reasons: less mess, less fuss, and more repeatability. In that sense, air fryer doughnuts are more like a dependable weekly ritual than a once-in-a-while frying project.
The most common reason homemade air fryer donuts turn dry
Overcooking happens fast in an air fryer. Sometimes it’s because you want more color. Other times it’s because you’re making a bigger batch and the later donuts sit longer “just to be safe.” Either way, the fix is simple: cook until set and lightly golden, then let glaze, butter, or cinnamon sugar finish the job.
Dry donuts are rarely under-flavored. Instead, they’re just overdone. Once you learn where “done” actually sits in your air fryer, everything gets easier.
Also Read: Crock Pot Pork Chops and Sauerkraut (No Dry Chops Recipe)
Air Fryer Donuts: Homemade Glazed Doughnuts From Scratch
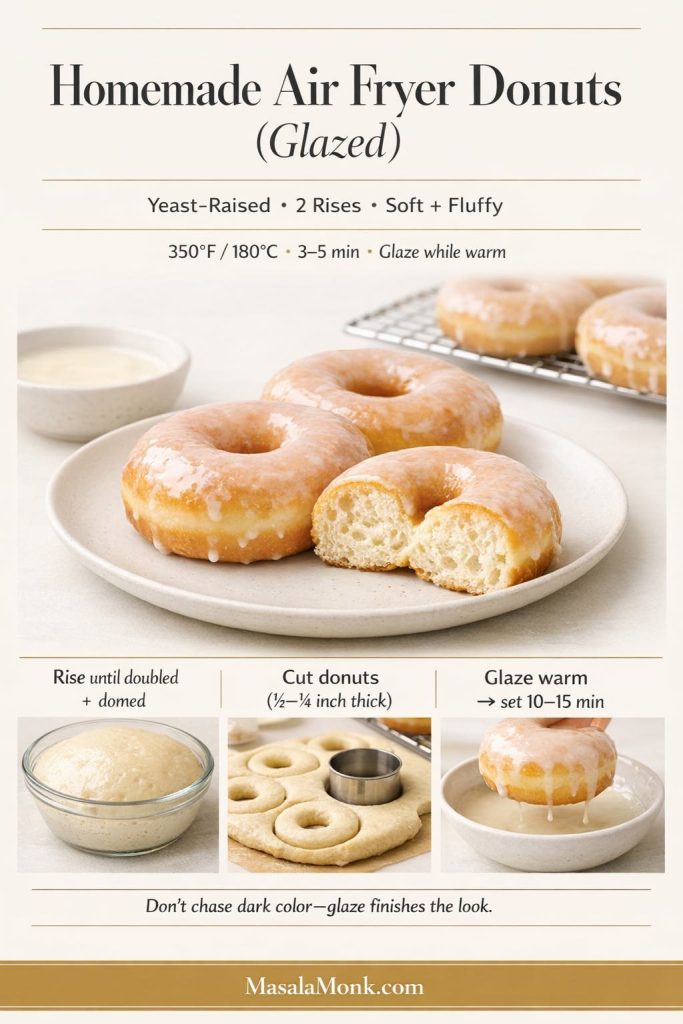
This homemade air fryer donuts method is the “real deal” version: yeasted dough, two rises, and that fluffy interior that makes a plain glazed donut feel almost elegant. It’s also the method that turns air fryer doughnuts into something you’ll be proud to serve.
If you like seeing a well-tested reference point for this style, Emma Fontanella’s air fryer glazed donuts are widely shared for a reason: the approach is straightforward and the result is genuinely donut-like. You can see that method here: Air Fryer Glazed Donuts. In the version below, you’ll get a full, reader-friendly recipe with the kind of details that make it repeatable in a real kitchen.
Ingredients for homemade air fryer donuts
For the donut dough
- 2 ¾ cups (330 g) all-purpose flour, plus extra for dusting
- 2 ¼ teaspoons instant yeast (1 packet)
- ¼ cup (50 g) sugar
- ¾ teaspoon fine salt
- ¼ teaspoon nutmeg (optional, but classic)
- ¾ cup (180 ml) warm milk (warm, not hot)
- 1 large egg
- 3 tablespoons (42 g) melted butter
- 1 teaspoon vanilla extract (optional)
For the simple glaze
- 1 ½ cups (180 g) powdered sugar
- 2–3 tablespoons milk (as needed)
- 1 tablespoon melted butter
- ½ teaspoon vanilla extract
- Pinch of salt
And for the basket
- Neutral oil spray or a light brush of oil
A quick yeast note
Instant yeast can go straight into the flour. If you’re using active dry yeast, it’s still easy—just dissolve it in the warm milk with a pinch of sugar and wait until it looks foamy, then proceed.
Step-by-step recipe: homemade donuts in the air fryer
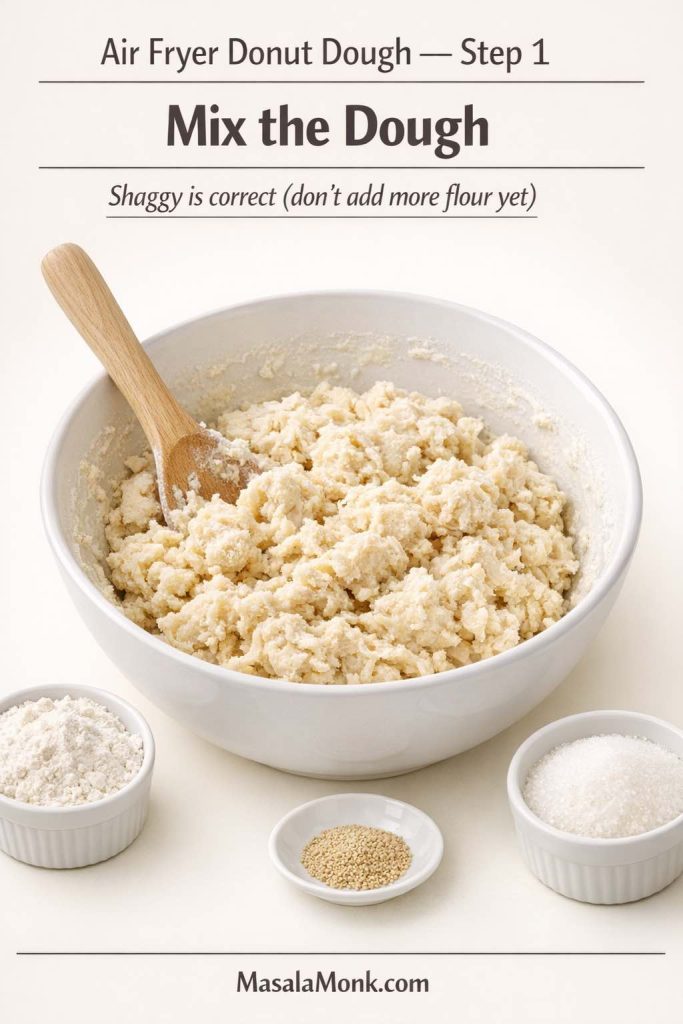
1) Mix the dough
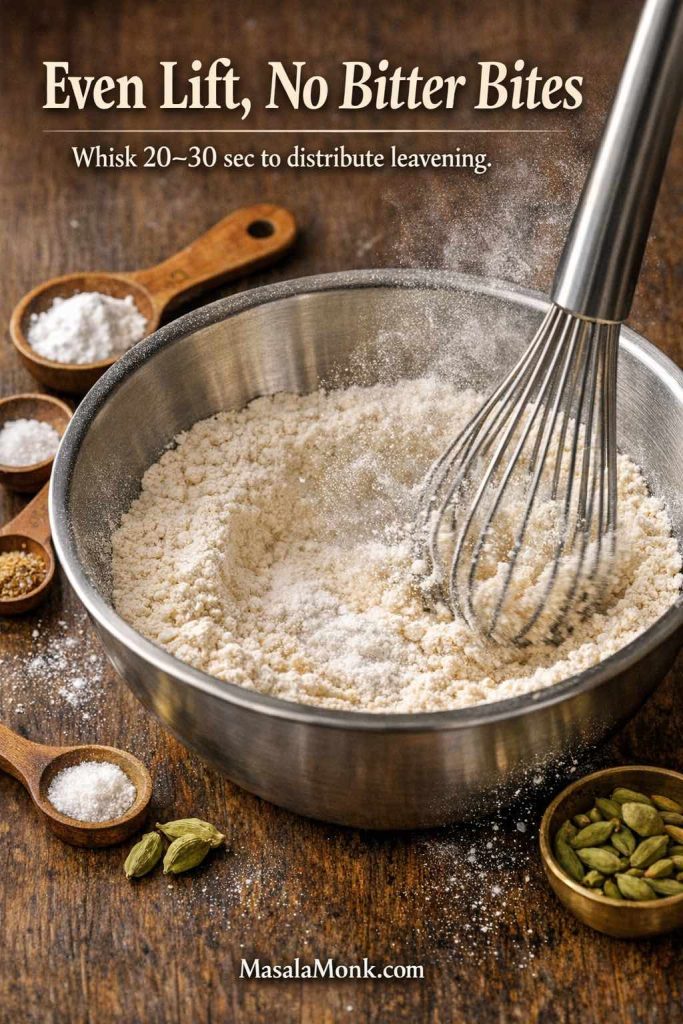
Start by whisking the dry ingredients together in a large bowl: flour, yeast, sugar, salt, and nutmeg.
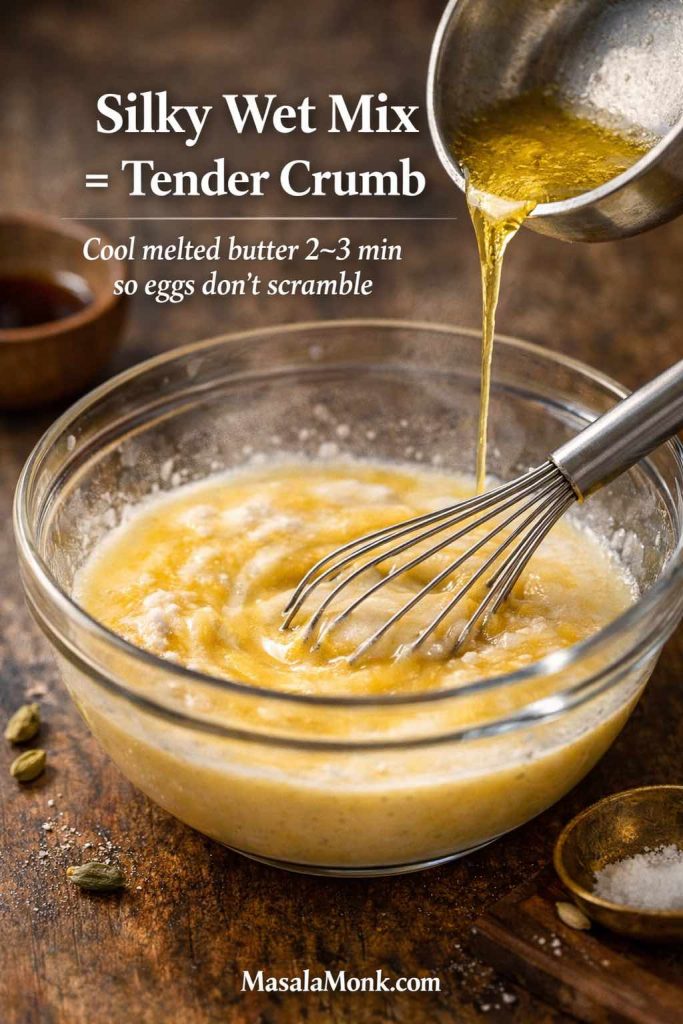
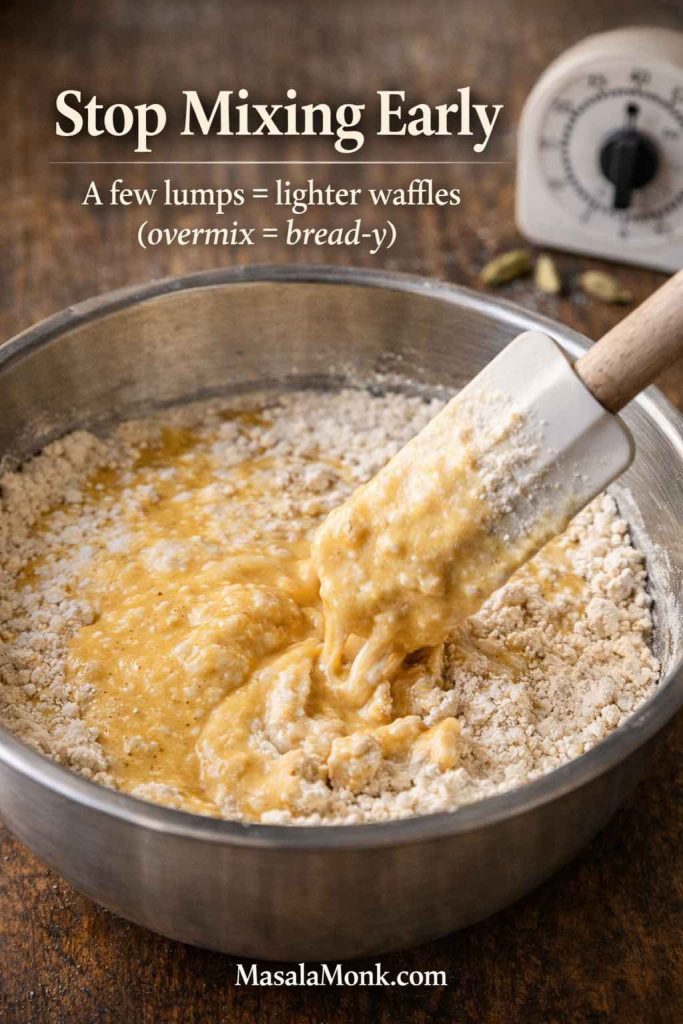
In another bowl, whisk the warm milk, egg, melted butter, and vanilla until smooth. Pour the wet mixture into the dry mixture and stir until a shaggy dough forms. It will look messy at first, but give it a minute—flour needs a moment to hydrate.
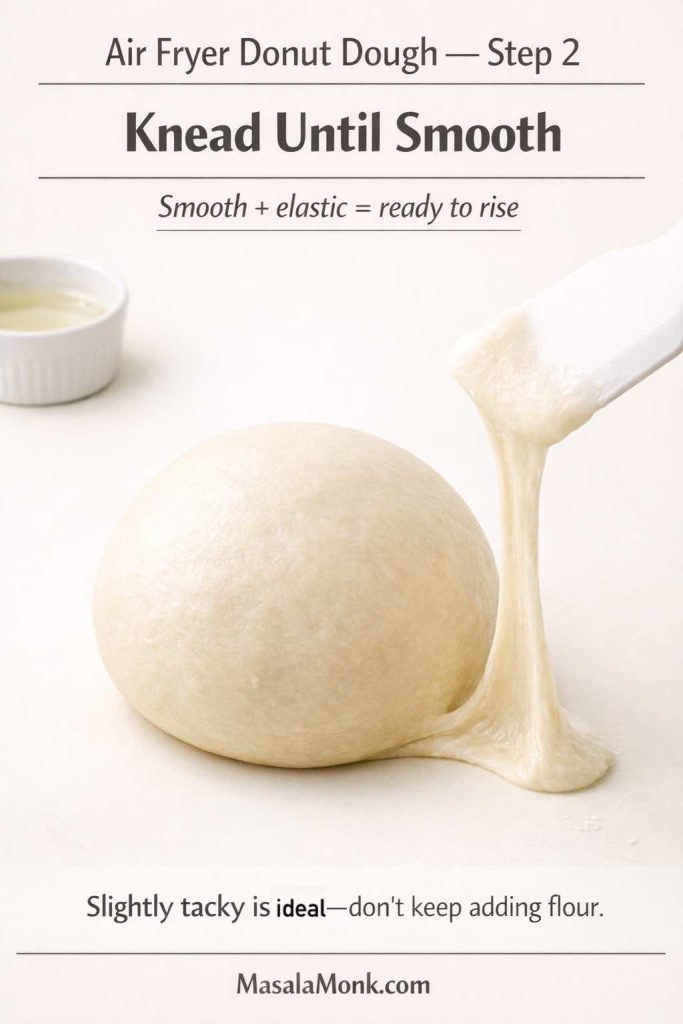
2) Knead until smooth and elastic
Now knead. You can do this by hand on a lightly floured surface, or use a stand mixer with a dough hook.
- By hand: knead for about 8–10 minutes.
- With a mixer: knead 5–6 minutes on medium-low.
The dough should become smooth, supple, and slightly tacky. It should not be so sticky that it smears everywhere, but it also shouldn’t be stiff. If you keep adding flour because you want it “clean,” you’ll often trade softness for density.
What to look for: the dough should feel soft enough that it will rise into something airy, not tight and bread-like.
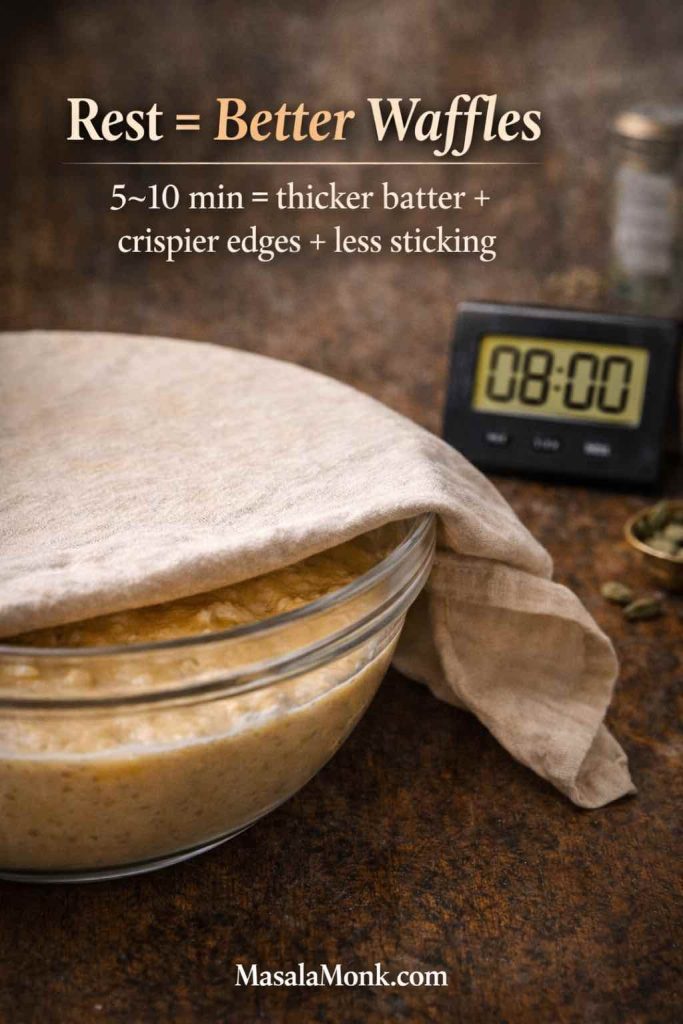
3) First rise: let it get puffy
Place the dough in a lightly oiled bowl, cover it, and let it rise until doubled and noticeably puffy. Depending on your room, that could be 60 minutes or it could be 90.
If your kitchen is cool, you can create a warm spot by turning your oven on for 60 seconds, turning it off, then letting the covered bowl rise inside.

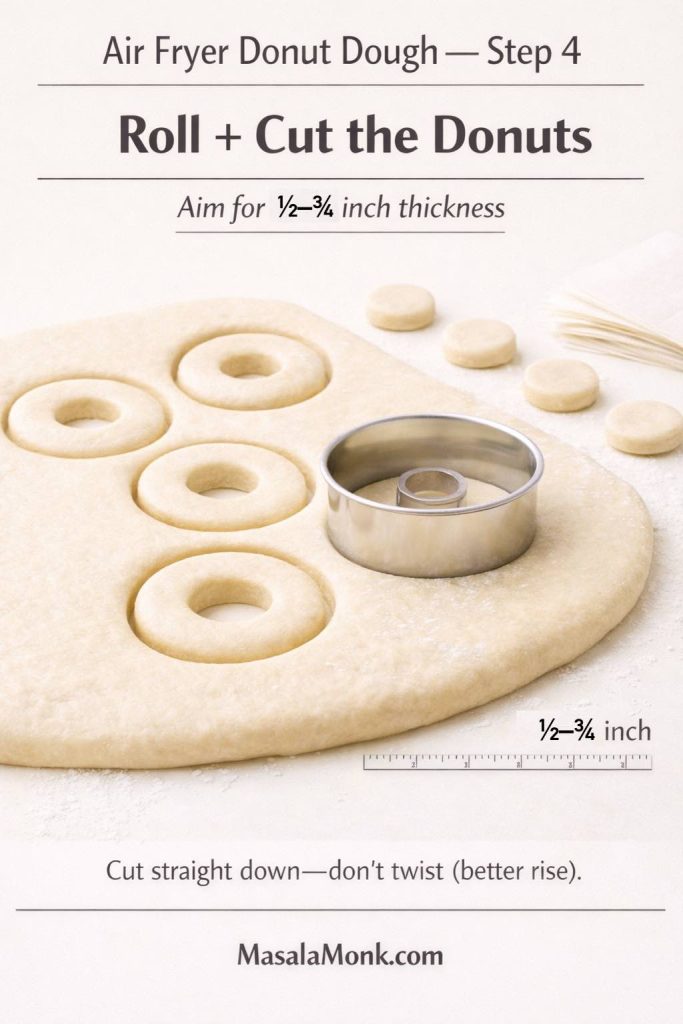
4) Roll and cut your donuts
Lightly flour your surface. Roll the dough to about ½ to ¾ inch thick.
Cut donuts using a donut cutter, or use two cutters: one larger round cutter and one smaller cutter for the center. If you don’t have cutters, even a glass and a bottle cap can work in a pinch.
Set each donut on a small square of parchment paper. That little trick makes transferring delicate risen donuts into the air fryer much easier.
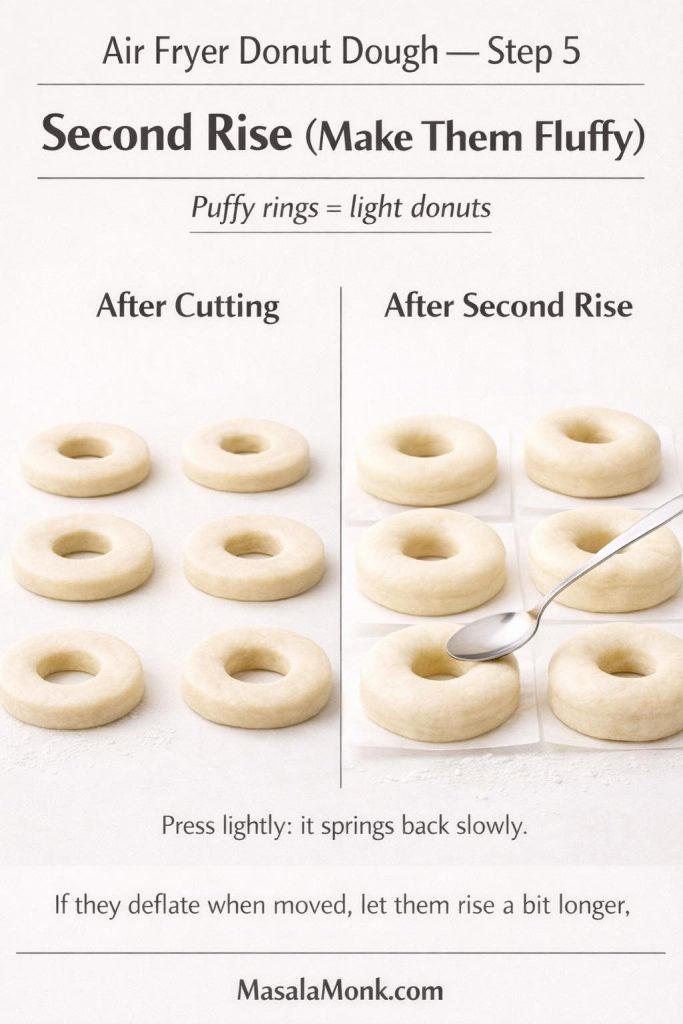
5) Second rise: the fluff-maker
Cover the donuts gently and let them rise again until they look airy and feel light. This rise is where a homemade air fryer donuts recipe shifts from “fine” to “wow.”
A good sign: if you lightly press the dough, it should spring back slowly, leaving a soft indentation for a moment.
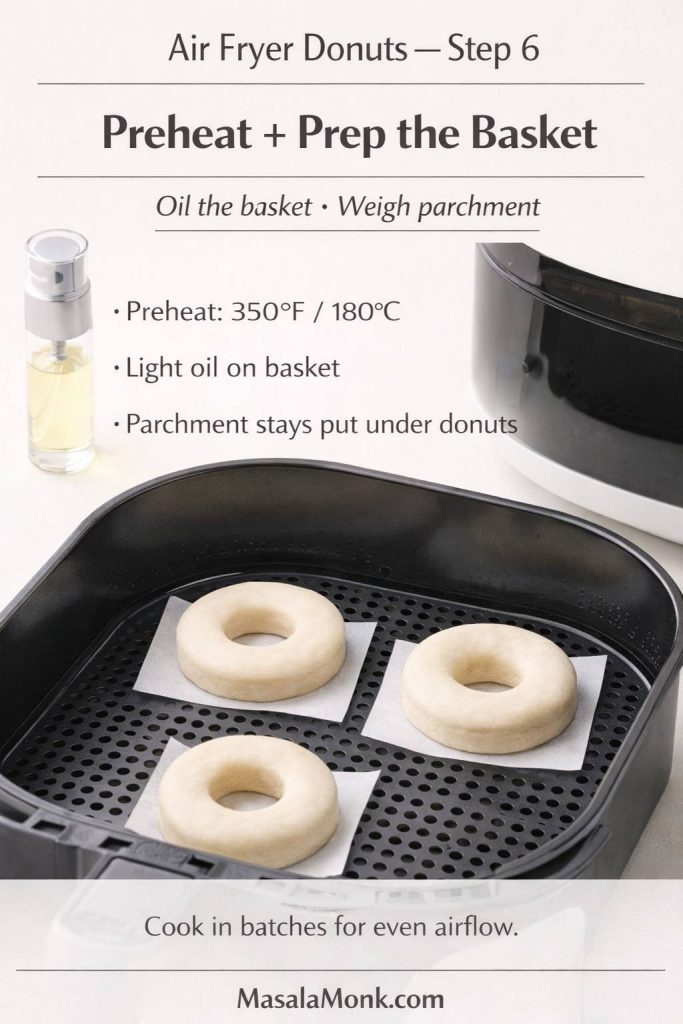
6) Preheat and prep
Preheat your air fryer to 350°F / 180°C for about 3–5 minutes.
Lightly oil the basket or tray. If you’re using parchment under the donuts, ensure the parchment is weighed down by the donut so it doesn’t get pulled into the heating element by airflow.
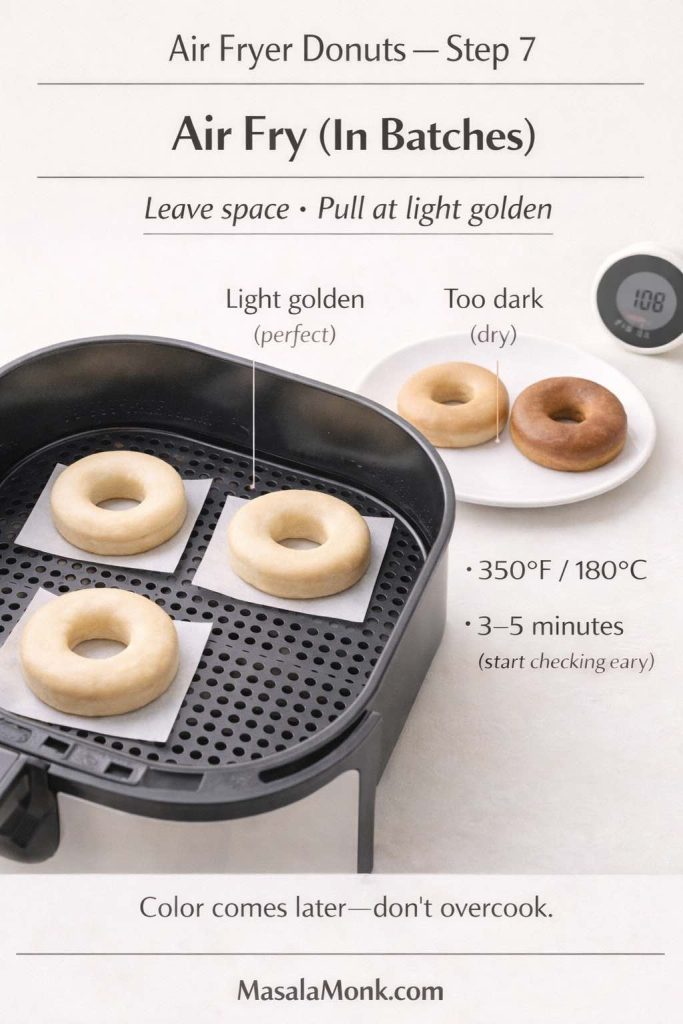
7) Air fry the donuts (in batches)
Place donuts in a single layer, leaving space between them so air can circulate.
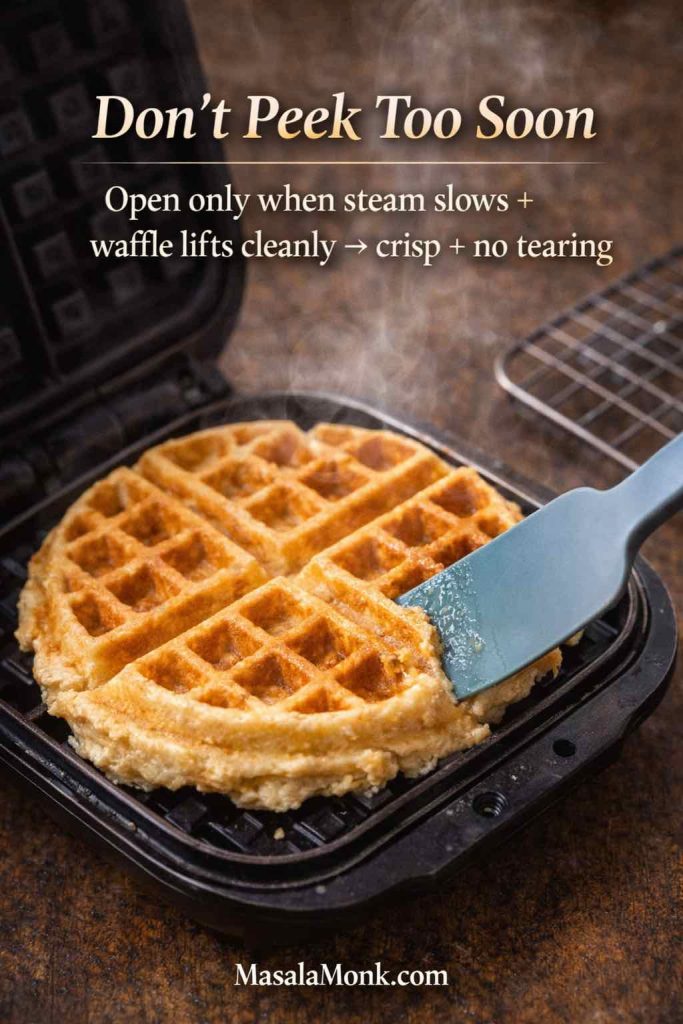
Cook for 3–5 minutes. Start checking early, especially on the first batch. Air fryer models vary a lot, and the first batch teaches you the truth about your machine.
Don’t chase dark color. Aim for set + light golden. The glaze will make them look finished and glossy.
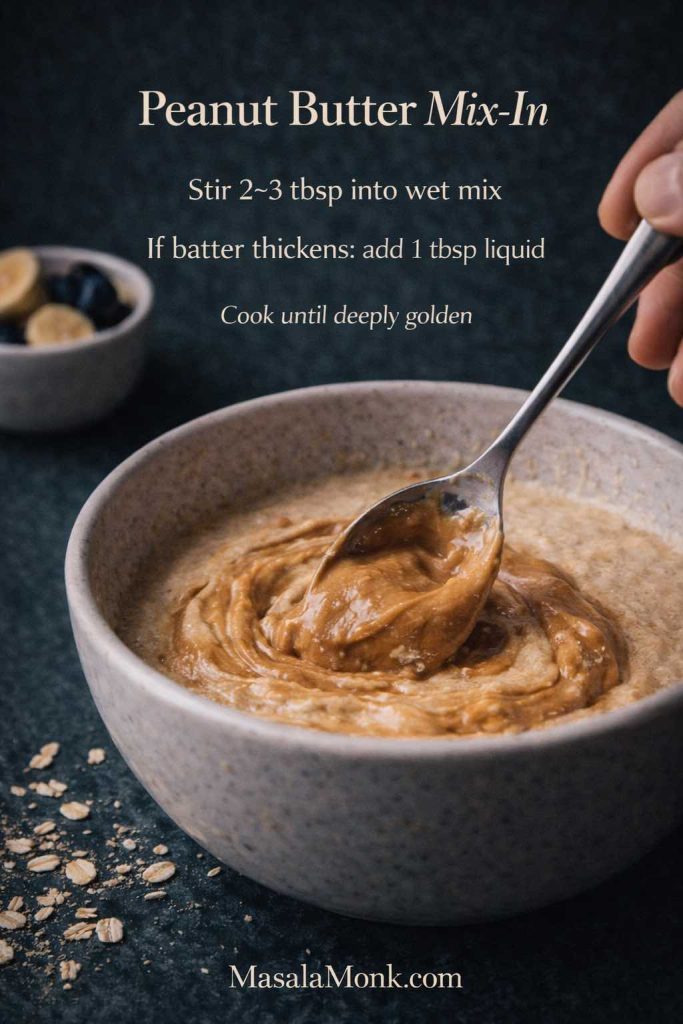
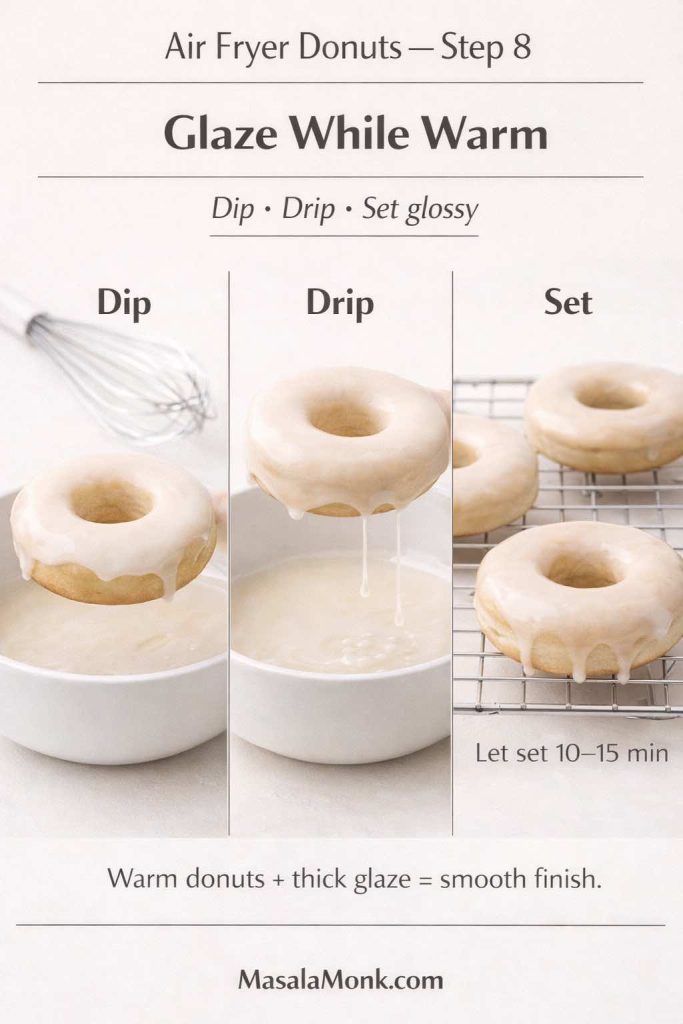
8) Glaze while warm
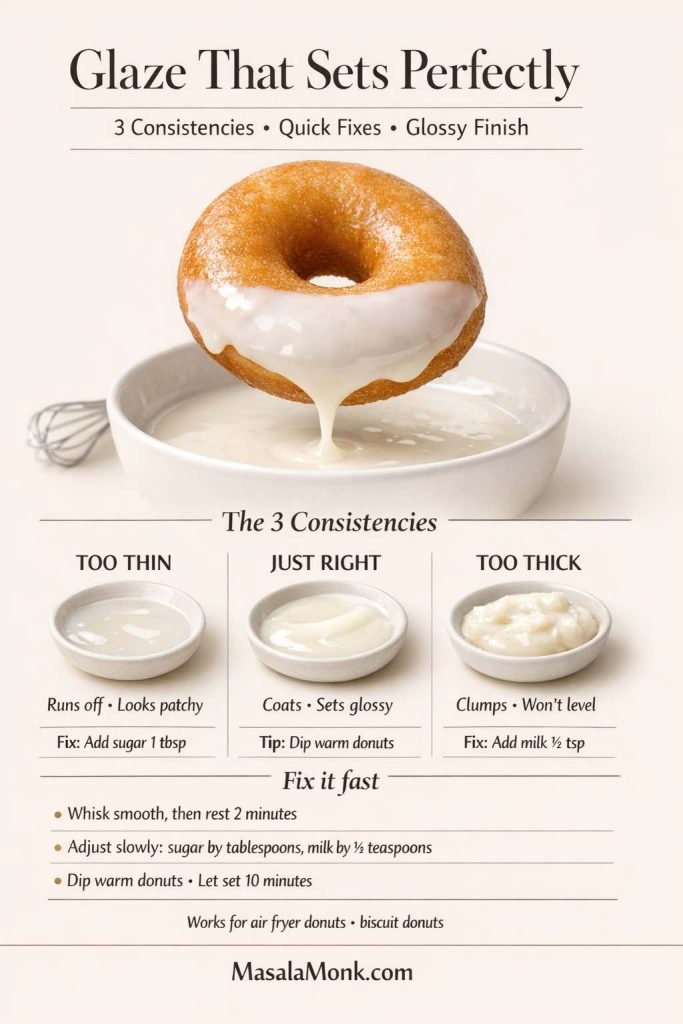
While the donuts cook, whisk together the glaze ingredients. Start with 2 tablespoons of milk and add more only if needed. You want the glaze to be thick enough to cling, yet fluid enough to settle into a smooth surface.
Dip each warm donut into the glaze, let excess drip off, and place on a rack to set. Give them 10–15 minutes and the glaze will form that thin, slightly crackly shell that makes a glazed donut feel “right.”
Making the glaze taste like it matters
Glaze can be flat if it’s just powdered sugar and water. That’s why a little melted butter and a pinch of salt are worth it—they add richness and balance without making the glaze heavy.
If you want to go one step further, you can add a tiny touch of nutmeg or cardamom. The flavor stays subtle, yet the donut suddenly tastes like it belongs in a good bakery case.
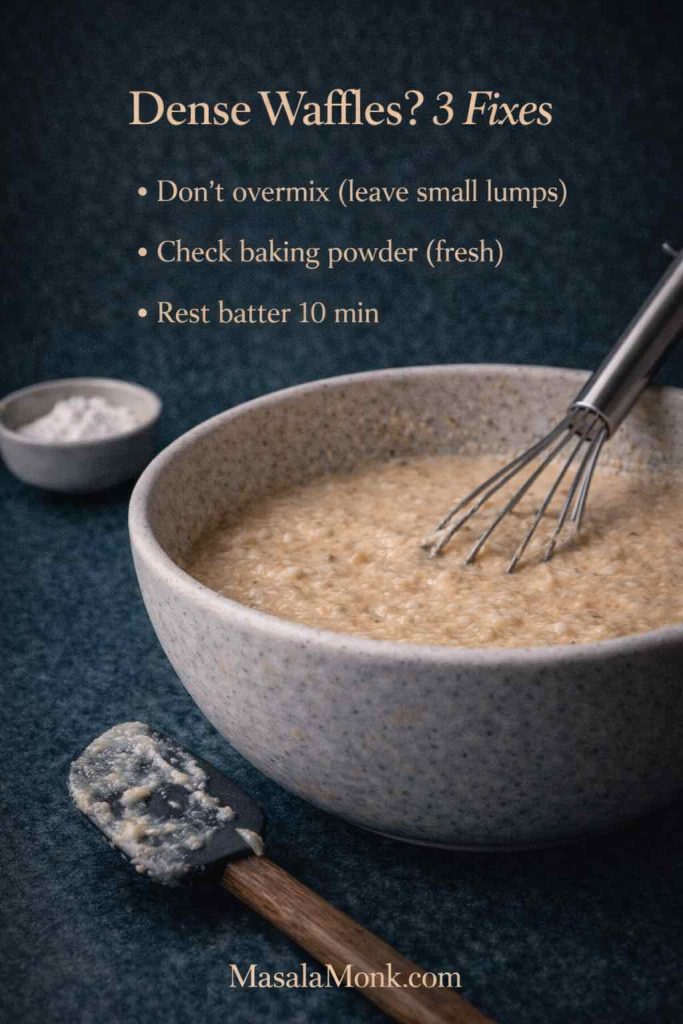
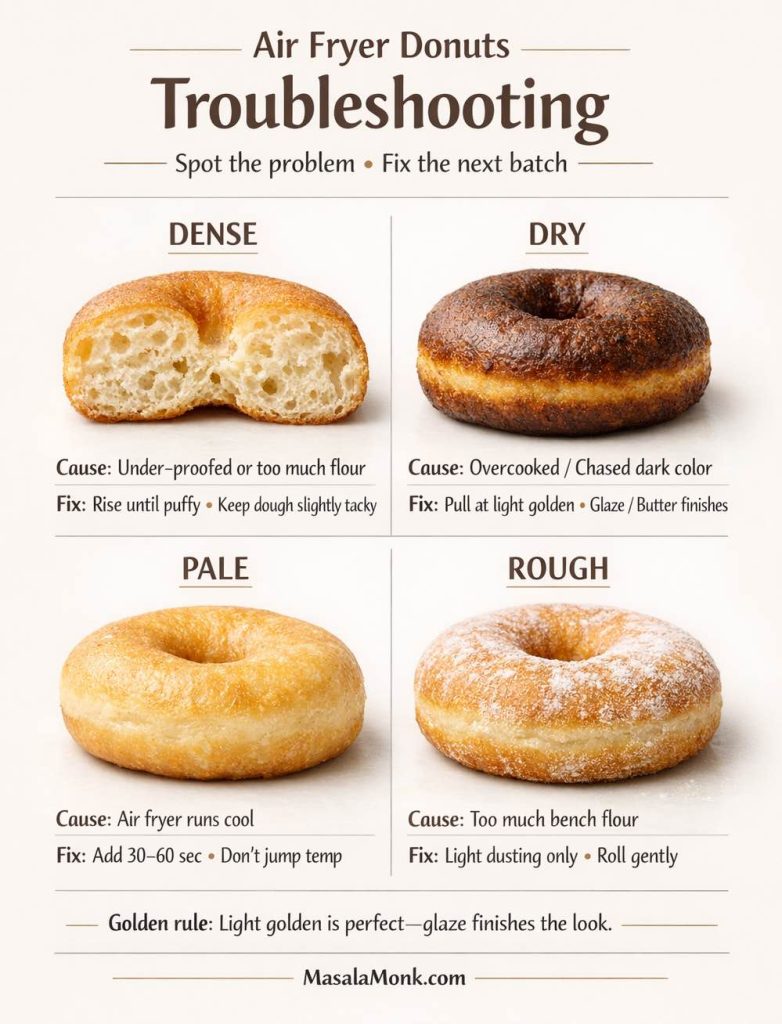
Troubleshooting homemade air fryer donuts
Donuts are forgiving, but a few problems show up again and again. Thankfully, each has a simple fix.
If they’re dense:
Usually the dough didn’t rise enough, or too much flour was added during kneading and rolling. Next time, keep the dough soft and give the second rise the time it needs.
If they’re dry:
Most often they cooked too long. Pull earlier and rely on glaze. Also, keep in mind that air fryer donuts continue to firm slightly as they cool, so stopping at “just done” matters.
If they’re pale:
Your air fryer might run cool. Add a minute, but don’t jump the temp too high. Pale donuts with glaze still look inviting. Dark donuts often taste overcooked.
If the surface looks rough:
Too much bench flour during rolling can leave the dough dry. Use a light dusting and roll gently.
At this point, you’ve got a complete air fryer doughnuts recipe you can keep repeating. However, sometimes you want donuts fast—without mixing, rising, or waiting. That’s where biscuit donuts come in.
Also Read: Hot Chocolate Coffee: 3 Easy Recipes (Cocoa, Mix, or Espresso)
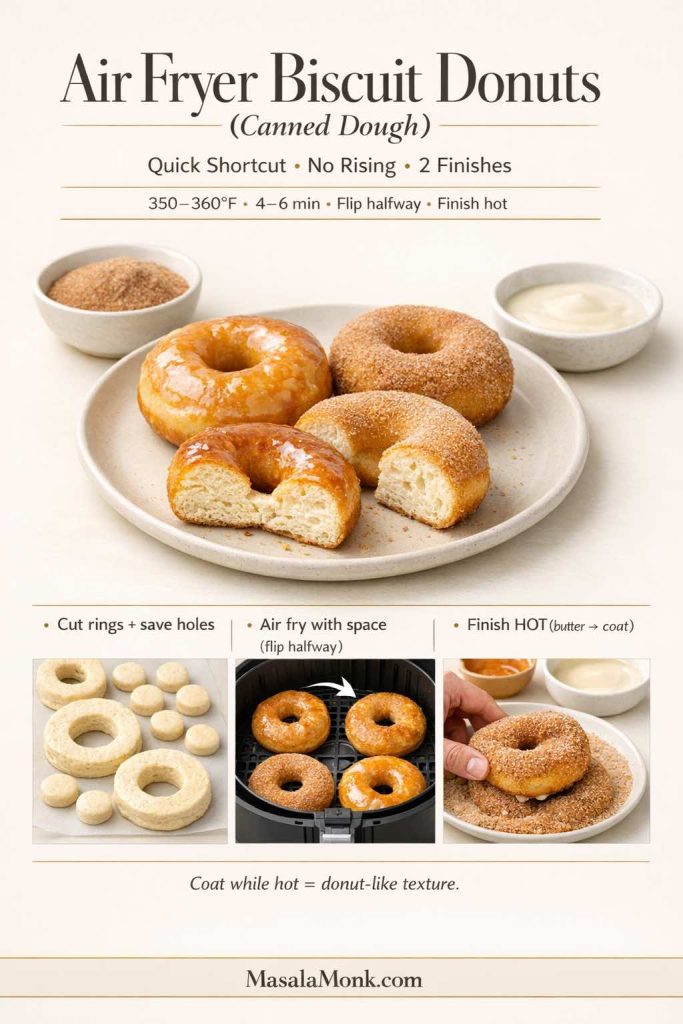
Air Fryer Biscuit Donuts (Donuts From Biscuit Dough)
Biscuit donuts are the shortcut that feels almost unfair. They’re quick, they’re fun, and they’re exactly the kind of dessert you can make on a whim.
You’ll see this style described in dozens of ways: biscuit donuts recipe, homemade donuts from biscuits, donuts made from biscuits, donuts using canned biscuits, donuts from biscuits in air fryer, or canned biscuit donuts in air fryer. No matter the wording, the idea is the same: use biscuit dough, cut a hole, air fry, then finish immediately while hot.
If you want a straightforward reference for this approach, RecipeBoy has a clear step-by-step method using canned dough in the air fryer: Air Fryer Canned Biscuit Donuts. What matters most is the finish and the timing—cook just until set and golden, then coat while warm.
Ingredients for air fryer biscuit donuts
- 1 can of biscuit dough (any standard biscuit-style dough works)
- A small cutter for the donut hole (or the wide end of a piping tip)
- Neutral oil spray (optional)
- Melted butter (highly recommended for coating)
For cinnamon sugar
- ½ cup sugar
- 1–2 teaspoons cinnamon (to taste)
For glaze
Use the same simple glaze from the homemade recipe above.
How to make donuts from biscuits in air fryer (Step-by-step recipe)
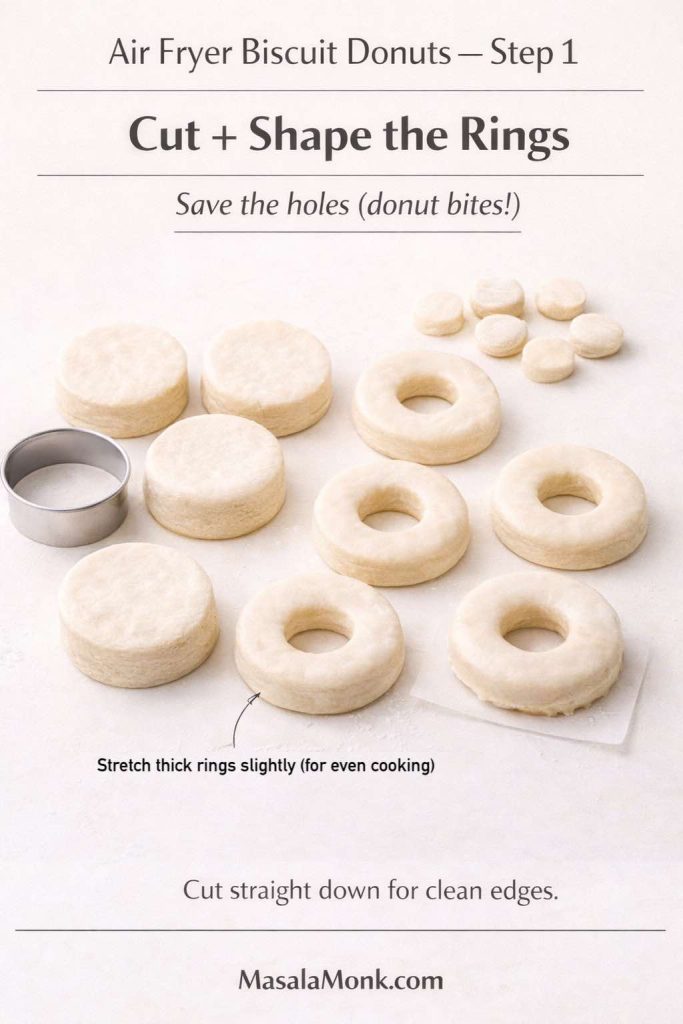
1) Cut and shape
Separate the biscuits and place them on a board. Cut the center out of each biscuit to make a donut shape. Save the holes; they turn into donut bites that cook faster and coat beautifully.
If your biscuit dough is thick, stretch each ring slightly. That little adjustment helps them cook evenly.
2) Prep for cooking
Lightly spray both sides with oil, or leave them plain and brush with melted butter after cooking. Either way works, although a light spray can encourage a more even golden surface.

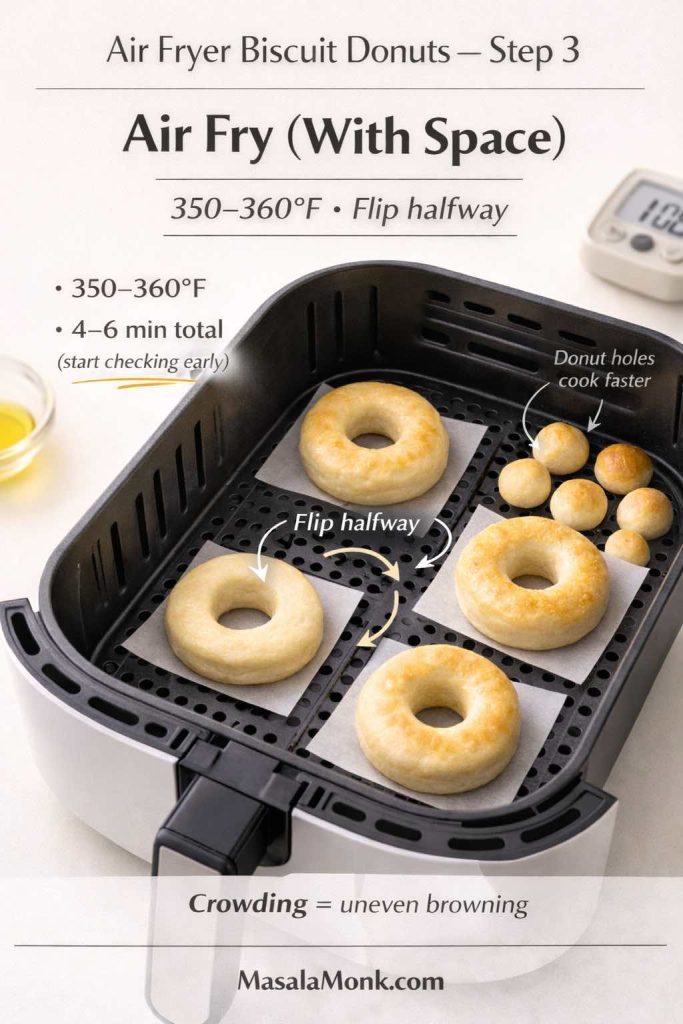
3) Air fry (with space)
Preheat your air fryer to 350–360°F.
Place the donuts in a single layer. Leave space between them. Air flow is your friend here, and crowding makes everything uneven.
Cook for 4–6 minutes total, flipping halfway. A useful starting point is:
- 3 minutes on the first side
- Flip
- 2 minutes on the second side
- Add 30–60 seconds if needed
Donut holes usually cook faster, so check them early.
4) Finish immediately
This part is non-negotiable. Coating warm donuts is what makes them taste like a treat instead of a biscuit.
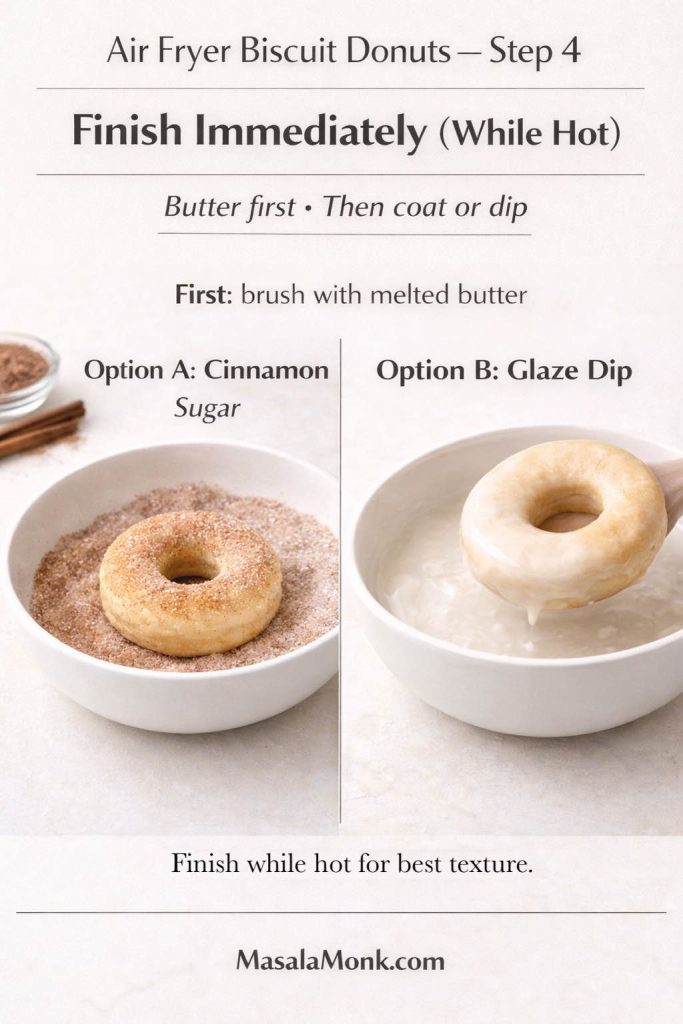
Cinnamon sugar biscuit donuts in the air fryer
Brush the hot donuts with melted butter, then toss them in cinnamon sugar. The butter helps the cinnamon sugar cling and gives the finish that rich “just made” taste.
If you like cinnamon sugar desserts and want a natural pairing on the same sweet-coating theme, this churros guide fits beautifully at the table. Churros and biscuit donuts scratch a similar itch, yet they feel different enough to justify both.
Glazed canned biscuit donuts air fryer style
Dip the warm donuts in glaze, let them drip, then set them on a rack. If you want a thicker glaze that clings more heavily, hold back a little milk so the glaze stays plush.
Once you’ve done this once, you’ll understand why so many people keep this method in their back pocket. It’s the quickest route to donuts made from biscuits that actually feel like a real dessert.
Also Read: Iced Coffee: 15 Drink Recipes—Latte, Cold Brew, Frappe & More
Air Fryer Donut Pan vs Basket (Do You Need One?)
Some kitchens love specialty tools. Others prefer a clean counter and fewer things to wash. Either approach is valid, especially when it comes to an air fryer donut pan.
If you’re wondering about a donut pan for air fryer donuts, it helps to know what it changes—and what it doesn’t.
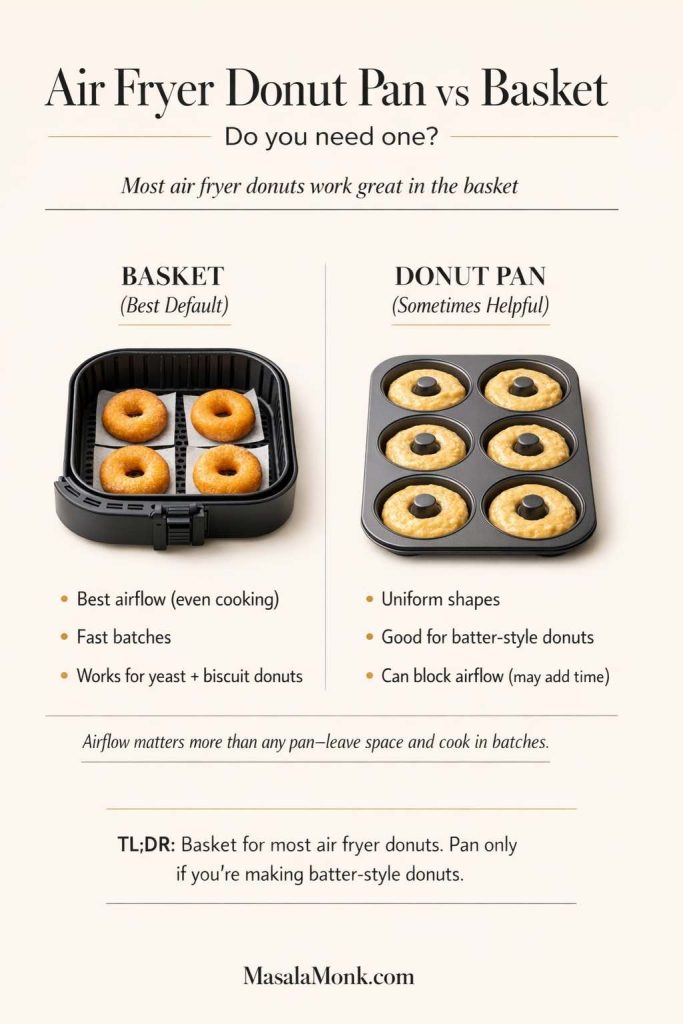
Air fryer donut pan: what it’s good for
A donut pan can be helpful if you’re making batter-style donuts (more like baked donuts) or if you want consistent shapes with minimal handling. In addition, if you’re aiming for uniformity—say, for a party platter—a pan can keep rings neat and predictable.
Donut pan for air fryer donuts: when to skip it
If you’re making yeasted donuts, you’ll still be shaping and moving risen dough. If you’re making biscuit donuts, you already have a shape. In both cases, the basket method is plenty.
Moreover, pans can block airflow. That’s not always a deal-breaker, but it can reduce browning and add cook time. If your goal is speed and simplicity, the basket wins.
Simple spacing rules that matter more than any pan
No matter what you use, spacing is the quiet hero of air fryer donuts. Give each donut room. Let the air do its job. Cook in batches. Then finish while warm.
That’s the habit that makes donuts in the air fryer feel consistent.
Also Read: Cappuccino Recipe: How to Make a Perfect Cappuccino at Home
Air Fryer Donuts vs Deep Fryer Donuts (A Real-World Comparison)
Sometimes you want a fair comparison, not a hype statement. Here’s the honest version.
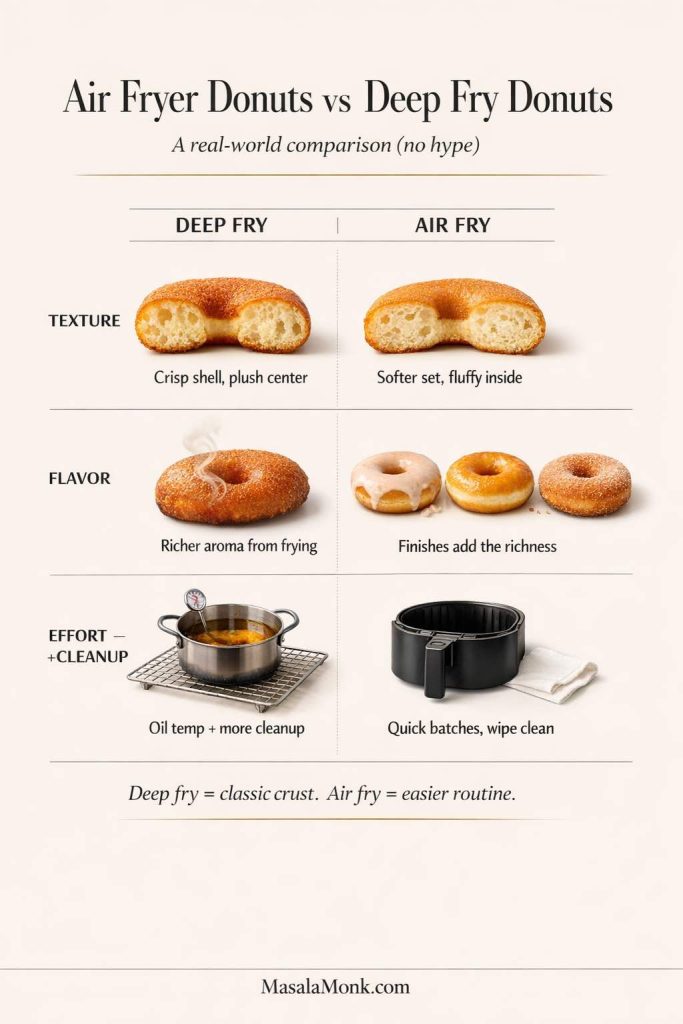
Texture
Deep fryer donuts tend to have a more distinct fried crust with a plush interior. Air fryer donuts tend to have a softer outer set and a lighter crust. Still, the interior can be beautifully fluffy—especially with yeasted dough—so the overall experience is still donut-like.
Flavor
Deep frying adds a subtle richness that comes from oil browning. Air frying doesn’t. That’s why finishes matter more in the air fryer: glaze, butter, cinnamon sugar, and flavored coatings supply richness and aroma.
Effort and cleanup
Deep fryer donut recipes usually require managing oil temperature, careful timing, draining, and cleanup. Air fryer doughnuts reduce that entire workload to a few batches and a quick wipe-down.
If you’re curious about traditional frying technique, temperature cues, and what “done” looks like in a pot of oil, this Serious Eats piece is a strong explainer: Sweet Technique: How to Make Doughnuts. Likewise, King Arthur Baking’s yeast-raised doughnuts recipe is an excellent reference for the classic path: Yeast-Raised Doughnuts.
Even so, for everyday ease, the air fryer is hard to beat. That’s why so many people keep an airfryer donut method on rotation.
Also Read: Homemade Hot Chocolate with Cocoa Powder Recipe
How to Keep Air Fryer Donuts Soft (Small Choices, Big Payoff)
Donuts are at their best fresh. Still, you can keep them tender longer with a few practical habits.
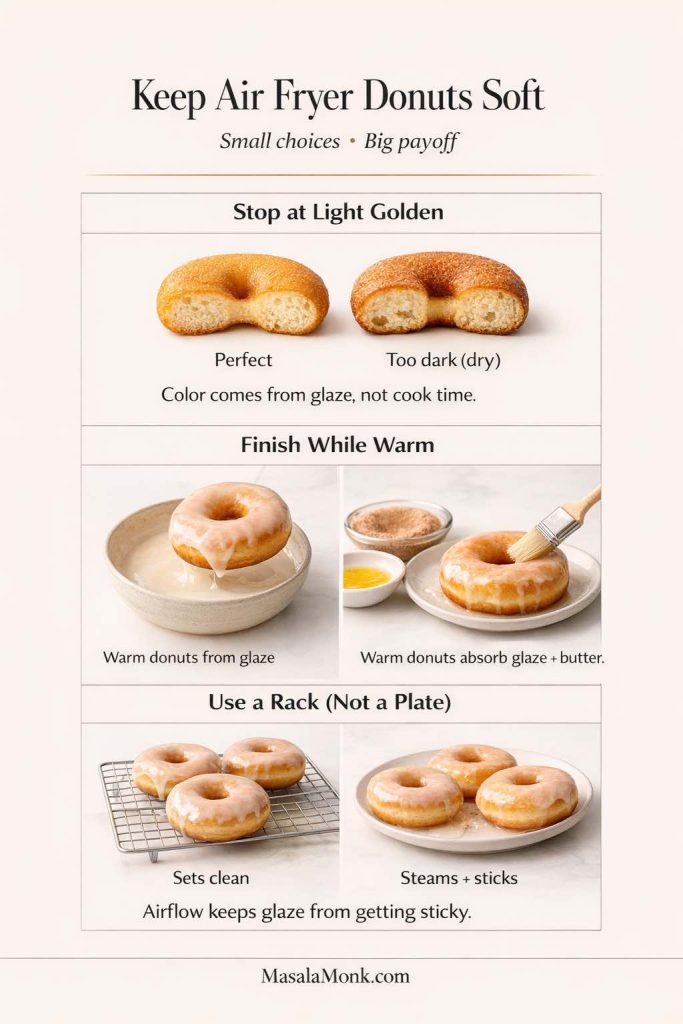
Don’t over-brown them
This is worth repeating because it’s the most common mistake. Air fryer donuts don’t need deep color. A light golden set is the target, and glaze makes them look finished.
Finish while warm
Warm donuts absorb glaze better, and cinnamon sugar clings more evenly. Additionally, melted butter brushed onto hot donuts adds moisture and richness that carries into the final bite.
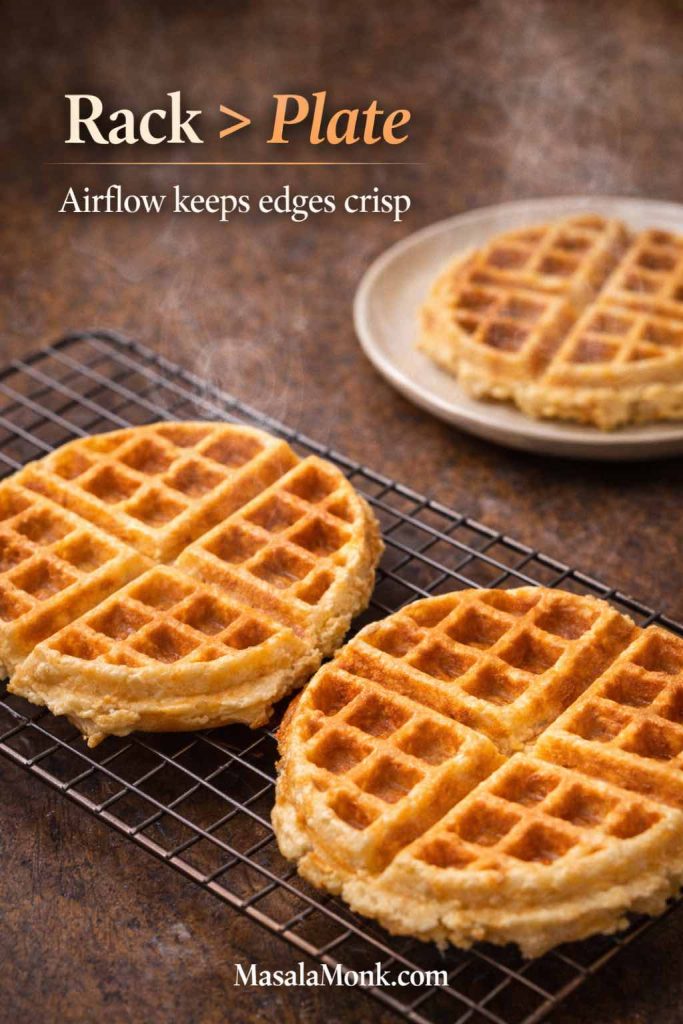
Use a rack, not a plate
Glazed donuts sitting on a flat plate can steam underneath and turn sticky. A rack lets air circulate and helps the glaze set cleanly.
Also Read: Double Chocolate Chip Cookies – Easy Recipe with 7 Variations
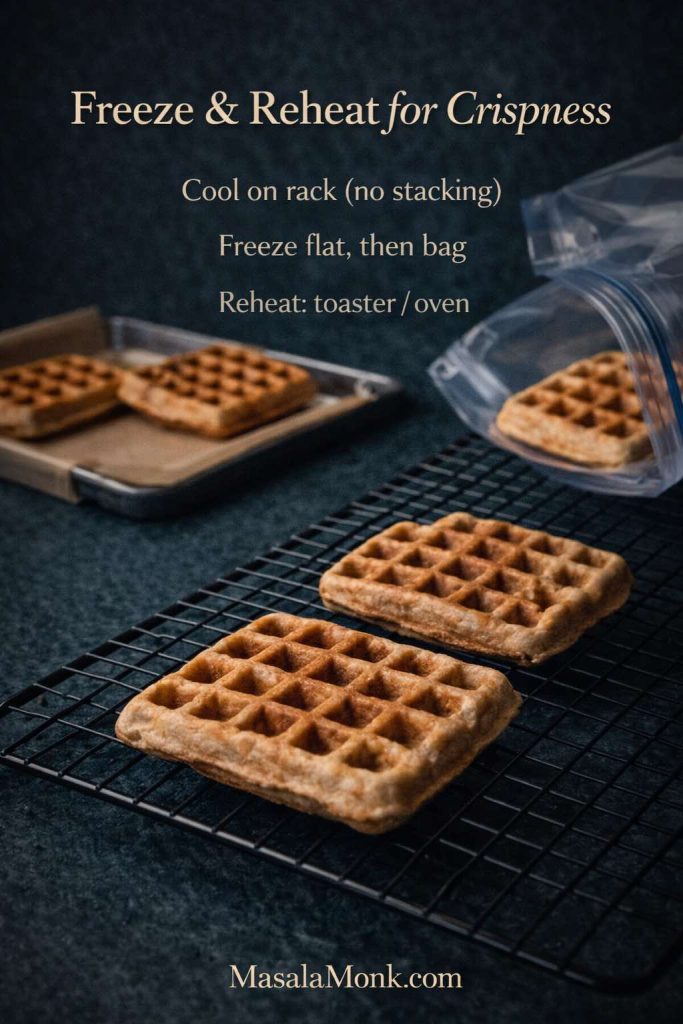
Storage and Reheat: Donuts in the Air Fryer (Again)
Air fryer donuts are best the day they’re made. Nevertheless, leftovers happen, and reheating in the air fryer is far better than the microwave.
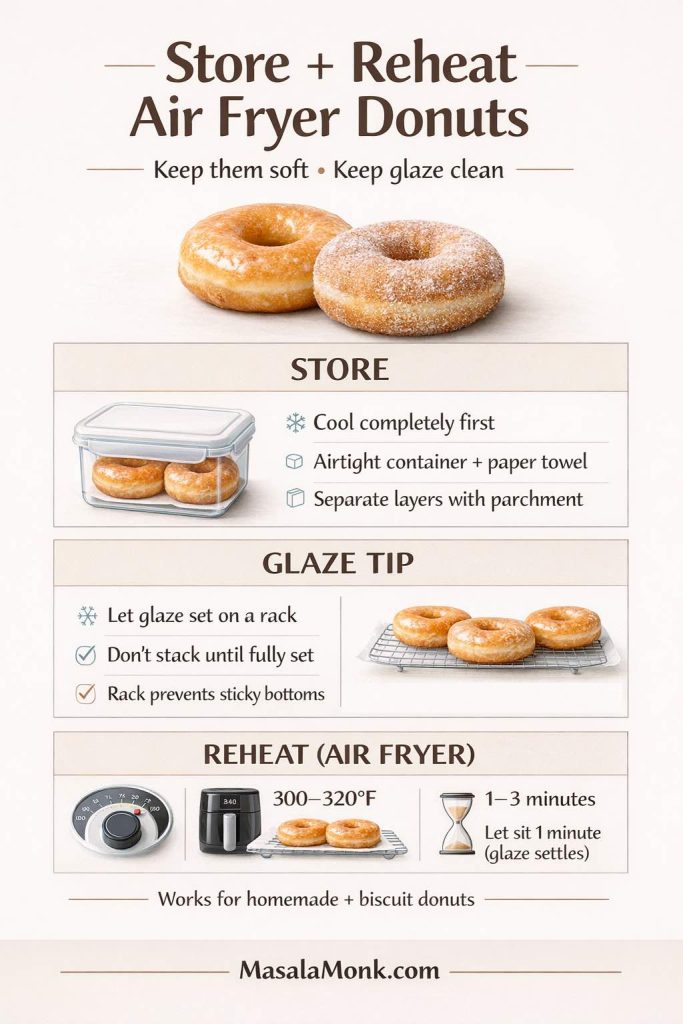
How to store air fryer donuts
- Let donuts cool fully first.
- Store in an airtight container with a paper towel underneath.
- If your kitchen is humid, crack the lid slightly to prevent condensation.
Glazed donuts can get sticky if they’re stacked. If you need to stack them, separate layers with parchment.
How to reheat donuts in the air fryer
Reheating donuts in the air fryer works beautifully when you keep the temperature low:
- 300–320°F for 1–3 minutes
That’s enough to warm the interior without drying it out. If the donuts are glazed, they may look slightly melty right away. Give them a minute and they’ll settle.
A simple safety note for parties
If you’re serving donuts with dairy-based toppings and they sit out during a long brunch, it’s smart to follow basic food safety guidance about time at room temperature. The USDA explains the “danger zone” concept and timing here: 40°F–140°F Danger Zone.
Also Read: Easy Lemon Pepper Chicken Wings (Air Fryer, Oven & Fried Recipe)
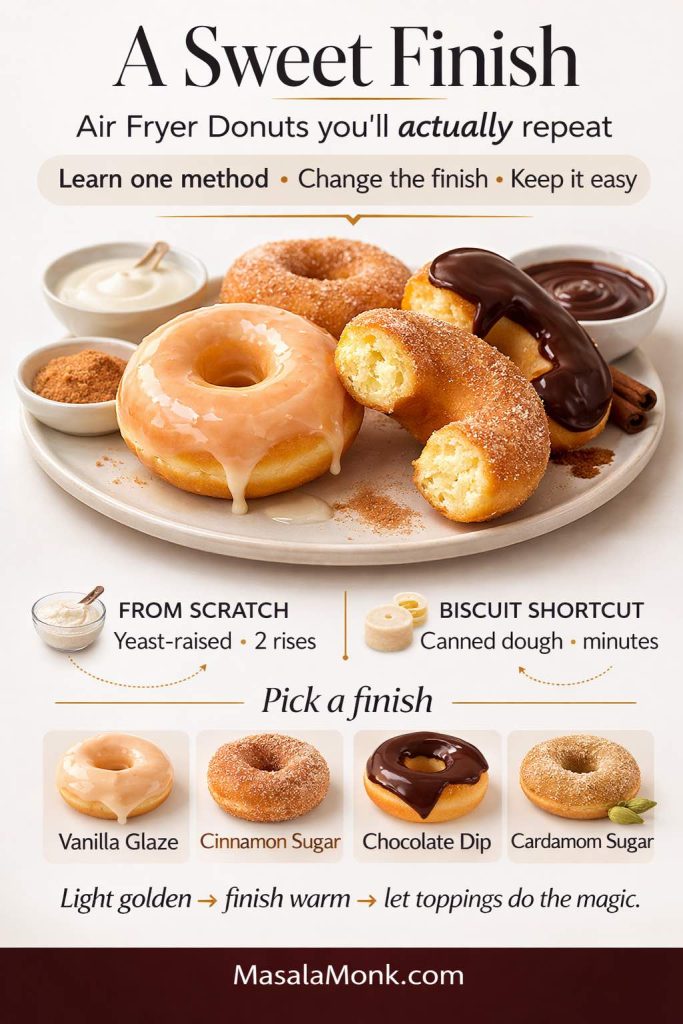
Air Fryer Donuts: Finishes That Make Them Feel New Every Time
Once you’ve got the base method down—whether it’s homemade air fryer donuts or biscuit donuts in air fryer form—you can keep things interesting by changing the finish.
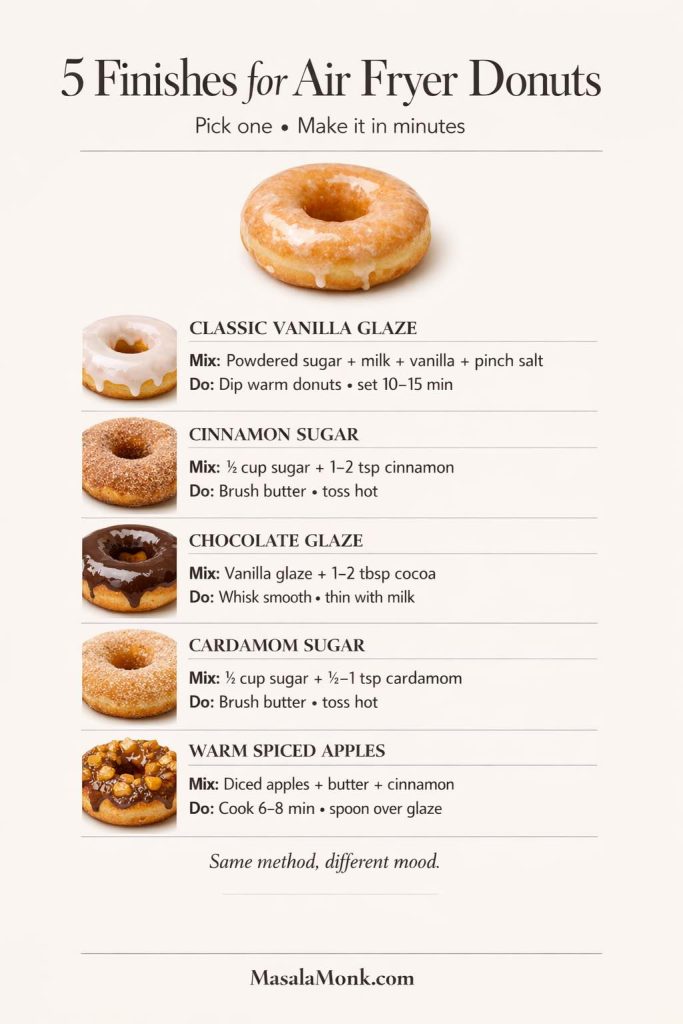
Classic vanilla glaze (the everyday favorite)
Use the glaze recipe above. Keep it thick enough to cling, and dip while warm.
Cinnamon sugar (fast, cozy, impossible to hate)
Brush hot donuts with melted butter, then toss in cinnamon sugar. The butter matters—it gives the coating depth and keeps the bite tender.
Chocolate glaze (for the “dessert” version)
Turn your vanilla glaze into chocolate by whisking in cocoa powder. Thin with milk a little at a time until smooth.
If you’re also building a chocolate dessert theme on the table, a natural companion can be vegan chocolate cake recipes, especially if you want extra frosting ideas that can translate into donut drizzles or dips.
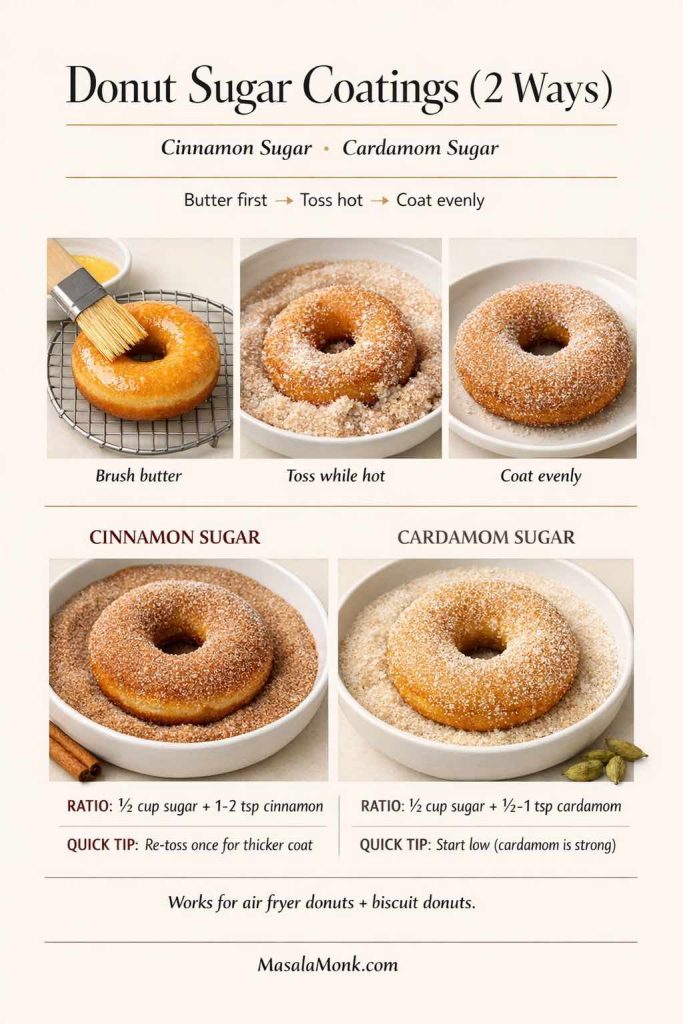
Cardamom sugar (quietly luxe)
Swap cinnamon for ground cardamom in your sugar coating. It’s fragrant and a little unexpected, yet still comforting.
Warm spiced fruit topping (brunch energy)
If you want something that feels a little more “special occasion,” spoon warm spiced apples over glazed donuts. Our stewed cinnamon apples pancake recipe fits that flavor direction beautifully and makes a natural add-on without forcing anything.
Also Read: 19 Essential Kitchen Tools That Make Cooking Easier
A Simple Brunch Spread Built Around Air Fryer Donuts
Air fryer donuts can stand alone, yet they also shine as part of a spread. With a few thoughtful additions, you can turn one batch into a whole “help yourself” table.
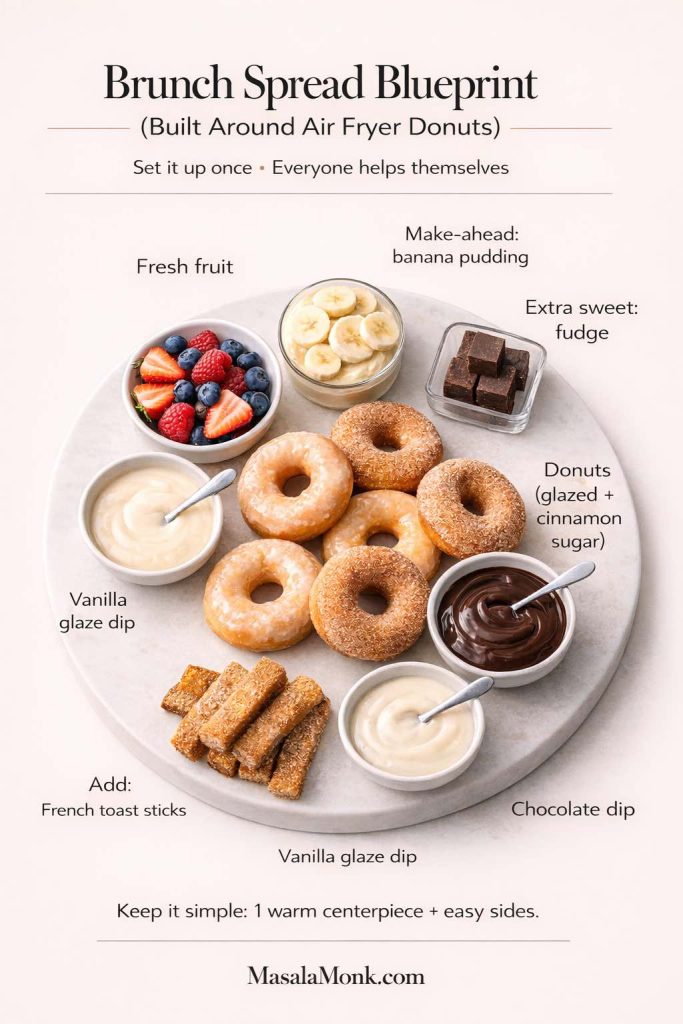
- Add a crunchy, dunkable item like French toast sticks.
- Include a make-ahead dessert that holds well, such as no-bake banana pudding.
- Offer a second sweet that doesn’t require last-minute work, like sweetened condensed milk fudge recipes or peanut butter fudge.
That way, donuts become the warm centerpiece rather than the only thing you’re responsible for.
Air Fryer Donuts: A Calm First-Time Game Plan
If you’re making doughnuts in the air fryer for the first time, the most helpful approach is treating the first batch like a gentle calibration.
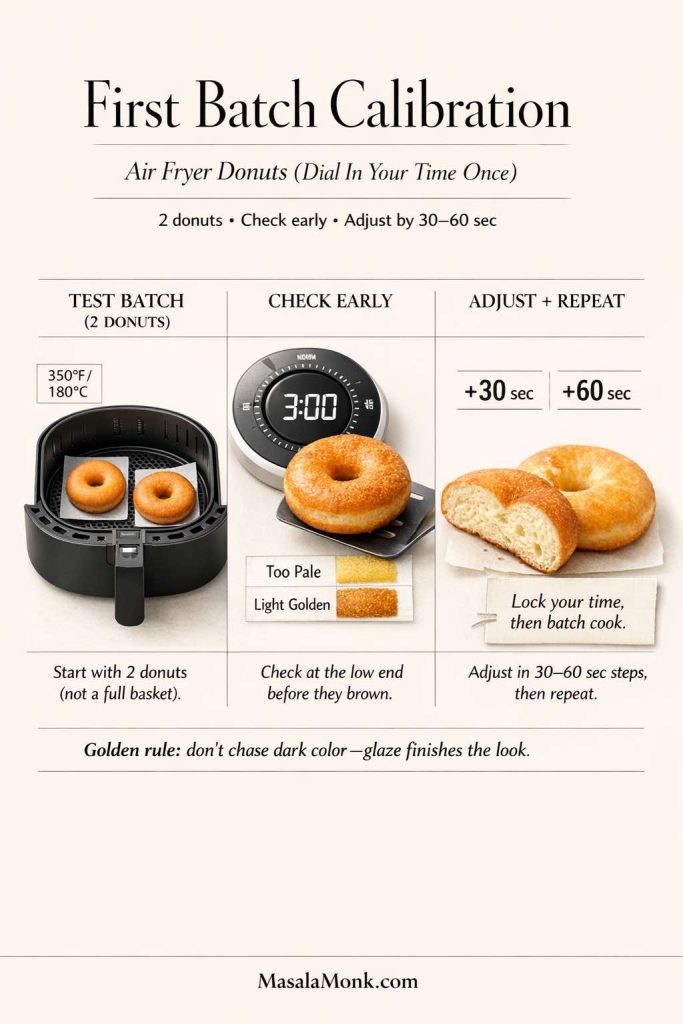
Start with a small batch. Check early. Pull one donut and look at the inside. Adjust time by 30–60 seconds. Then repeat.
After that, everything becomes automatic. The recipe stops feeling like a “special event,” and it becomes the kind of thing you can do on a random afternoon—because you already know what your air fryer donut method looks like when it’s right.
Also Read: How to Cook Tortellini (Fresh, Frozen, Dried) + Easy Dinner Ideas
Full Recipe: Homemade Air Fryer Donuts (Glazed)
Makes: about 10–12 donuts
Air fryer temp: 350°F / 180°C
Cook time: 3–5 minutes per batch
Ingredients
Dough
- 2 ¾ cups (330 g) all-purpose flour
- 2 ¼ tsp instant yeast
- ¼ cup (50 g) sugar
- ¾ tsp fine salt
- ¼ tsp nutmeg (optional)
- ¾ cup (180 ml) warm milk
- 1 egg
- 3 tbsp melted butter
- 1 tsp vanilla (optional)
Glaze
- 1 ½ cups powdered sugar
- 2–3 tbsp milk
- 1 tbsp melted butter
- ½ tsp vanilla
- Pinch of salt
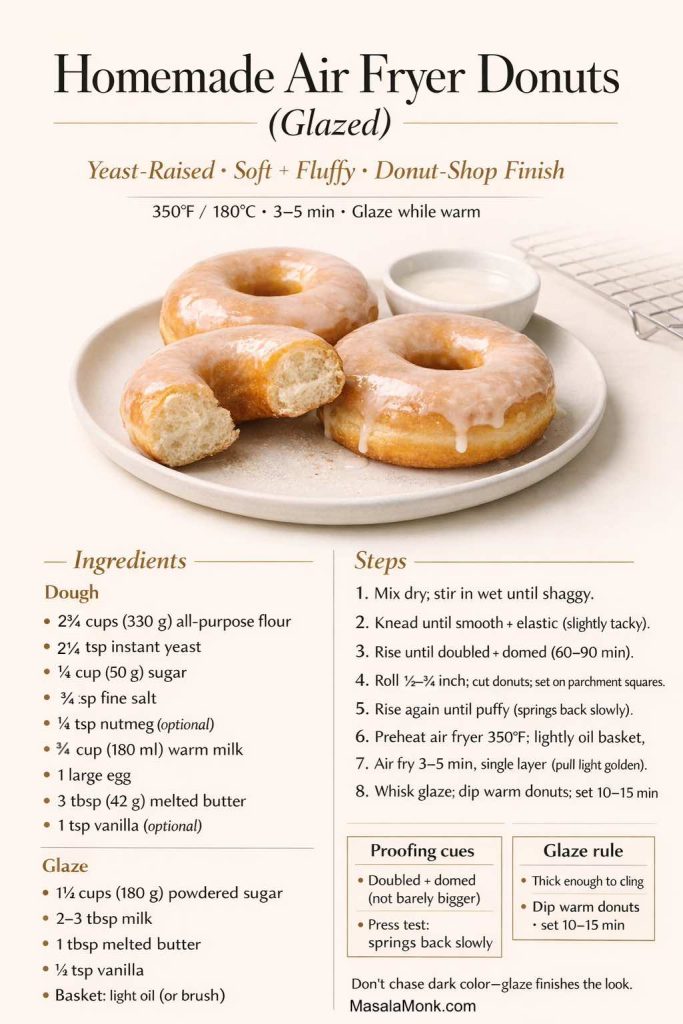
Instructions
- Whisk flour, yeast, sugar, salt, and nutmeg in a bowl.
- Whisk warm milk, egg, butter, and vanilla in another bowl.
- Combine wet and dry until a shaggy dough forms.
- Knead until smooth and elastic.
- Cover and rise until doubled and puffy.
- Roll to ½–¾ inch thick and cut donuts.
- Rise again until airy.
- Preheat air fryer to 350°F / 180°C and lightly oil the basket.
- Air fry donuts in a single layer for 3–5 minutes, until set and lightly golden.
- Whisk glaze; dip warm donuts; set on a rack until glaze firms.
Also Read: Easy and Healthy Oat Cookies- No Sugar | No Butter | No Refined Flour
Full Recipe: Air Fryer Biscuit Doughnuts (Canned Dough)
Makes: depends on the can
Air fryer temp: 350–360°F
Cook time: 4–6 minutes total, flipping halfway
Ingredients
- 1 can biscuit dough
- Oil spray (optional)
- Melted butter (for coating)
Cinnamon sugar
- ½ cup sugar
- 1–2 tsp cinnamon
Optional glaze
Use the glaze recipe above.
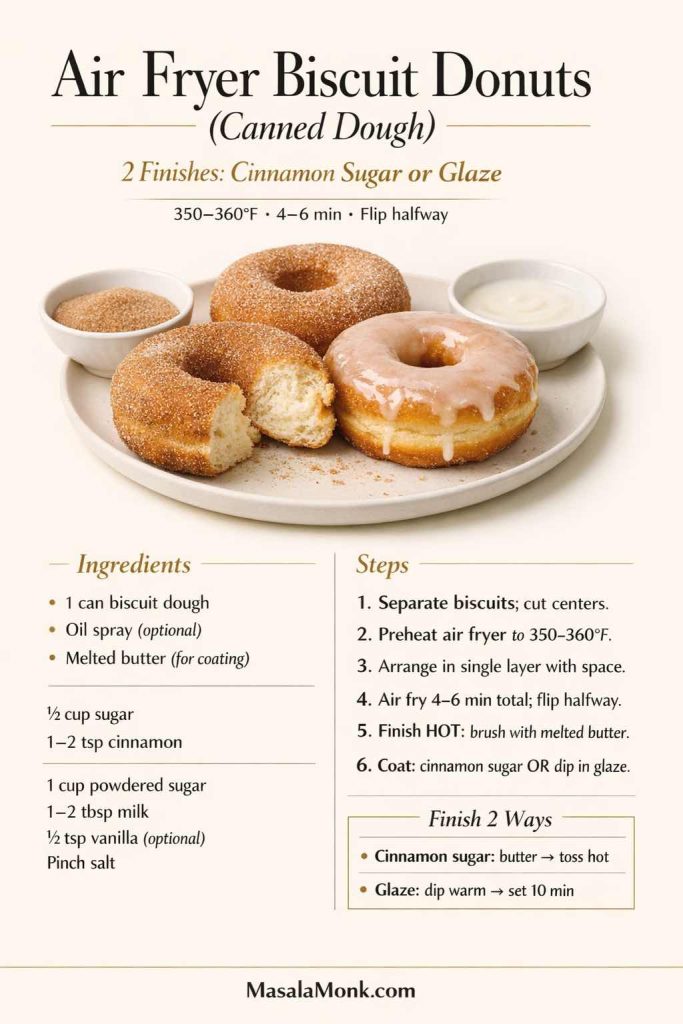
Instructions
- Separate biscuits and cut centers to form rings. Save holes.
- Preheat air fryer to 350–360°F.
- Arrange donuts in a single layer with space.
- Air fry 4–6 minutes total, flipping halfway.
- While hot, brush with melted butter and toss in cinnamon sugar, or dip in glaze.
A Sweet Finish
Air fryer donuts are one of those rare recipes that feel both comforting and practical. On one day, you can make homemade donuts in the air fryer—yeasted, airy, and glazed. On another, you can throw together biscuit donuts in the air fryer in minutes and still get that warm, fresh treat experience.
Either way, once you’ve made them once, you’ll start seeing all the possibilities: glazed, cinnamon sugar, chocolate, spiced, topped, shared. Then, before you know it, air fryer donuts stop being a novelty and start becoming a simple habit—one you’ll be genuinely happy to repeat.
Also Read: Sourdough Recipe: 10 Easy Bread Bakes (Loaves, Rolls & Bagels)
FAQs
1) What is the best temperature for air fryer donuts?
For most air fryers, air fryer donuts cook best at 350°F / 180°C. That temperature helps the dough puff and set without drying out. If your air fryer runs hot, drop slightly toward 340–345°F; if it runs cool, extend the cook time instead of cranking heat.
2) How long do donuts cook in the air fryer?
Timing depends on thickness and your machine, yet typical ranges are:
- Homemade air fryer donuts (yeast dough): about 3–5 minutes
- Air fryer biscuit donuts: about 4–6 minutes, flipping halfway
Rather than relying only on time, stop when the donuts look set, feel light, and turn a soft golden color.
3) How do I know when air fried doughnuts are done?
Look for a donut that’s puffed, set on top, and light golden. In addition, it should feel lighter than it looks when you lift it. If the surface is getting dark but the center seems underdone, lower the temperature next batch and add a minute.
4) Can I make doughnuts in the air fryer without a donut pan?
Absolutely. In fact, most donut in air fryer recipe methods use a standard basket or tray. As long as you leave space for airflow and cook in batches, you can make air fryer doughnuts without any specialty tools.
5) Do I need an air fryer donut pan or donut pan for air fryer donuts?
Not necessarily. A donut pan for air fryer cooking can help with uniform shapes in batter-style donuts, but it isn’t required for yeast donuts or donuts from biscuit dough. For many kitchens, the basket method is simpler and just as effective.
6) Why are my homemade air fryer donuts dry?
Most often, homemade air fryer donuts turn dry when they cook too long or at too high a temperature. Instead, pull them when they’re just set and lightly golden, then finish with glaze, butter, or cinnamon sugar while warm.
7) Why did my air fryer donuts come out dense instead of fluffy?
Typically, density comes from under-proofing (not rising long enough) or adding too much flour during kneading/rolling. For fluffier air fryer donuts, keep the dough soft, allow a full second rise, and roll gently without pressing out the air.
8) Can I make air fryer doughnuts from canned biscuits?
Yes—air fryer donuts from canned biscuits are one of the quickest versions. Simply cut centers, air fry at about 350–360°F, flip halfway, then coat immediately. This approach covers canned biscuit donuts in air fryer style with minimal effort.
9) How do I make donuts from biscuits in air fryer without them turning tough?
First, avoid overcooking—biscuit donuts air fryer batches can go from tender to firm quickly. Next, coat while warm (butter + cinnamon sugar or glaze) so the outside stays soft. Finally, don’t overcrowd the basket, because uneven airflow can dry edges.
10) What’s the easiest biscuit donuts recipe for the air fryer?
The simplest biscuit donuts recipe is: cut rings from biscuit dough, air fry 4–6 minutes total (flip halfway), then brush with melted butter and toss in cinnamon sugar. As a result, you get donuts made from biscuits with a classic, cozy finish.
11) Can I make air fryer biscuit donuts with biscuit dough that has no layers?
Yes. Even non-layered biscuit dough works for air fryer biscuit donuts. However, layered dough tends to puff more dramatically. If your dough is thicker, stretch the ring slightly so it cooks evenly.
12) Why are my canned biscuit doughnut in air fryer unevenly browned?
Usually it’s spacing. If donuts touch, airflow can’t circulate, so browning becomes patchy. Additionally, some air fryers heat more strongly in certain zones, so rotating the basket once mid-cook can help.
13) Should I flip doughnut in the air fryer?
For biscuit donuts in the air fryer, flipping halfway usually improves even browning. For homemade yeast donuts, flipping may or may not be needed depending on your air fryer; if the tops color faster than the bottoms, flip gently near the end.
14) Can I cook doughnut holes in the air fryer too?
Definitely. Donut holes cook faster, so check them early. Because they’re small, they’re also perfect for glazing, cinnamon sugar, or quick chocolate dip—especially when you want variety without extra work.
15) Can I make air fried donuts ahead of time?
You can, although they’re best fresh. If you need to plan ahead, make the donuts, cool completely, and store airtight. For the best texture later, reheat briefly in the air fryer and glaze afterward.
16) How do I reheat donuts in the air fryer without drying them out?
Use a lower temperature—around 300–320°F—for 1–3 minutes. That warms the center without toughening the outside. If the donuts are glazed, let them sit a minute after reheating so the glaze settles.
17) How do I store air fried donuts so the glaze doesn’t get sticky?
Let glazed donuts set fully on a rack, then store in a container with a paper towel underneath. Also, avoid stacking unless you separate layers with parchment. If your kitchen is humid, cracking the lid slightly can reduce condensation.
18) What’s the difference between air fryer doughnut and air fryer donut?
They’re the same food—just two common spellings. You’ll see air fryer doughnuts recipe and air fryer donut recipe used interchangeably, and both refer to donuts made in an air fryer.
19) Can I use a deep fryer donut recipe dough in the air fryer?
Sometimes, but results vary. Deep fryer donuts are built for fast oil cooking, so they may brown differently in hot air. Even so, a yeast-raised dough can still work well as air fried doughnuts if you cook gently and finish with glaze.
20) Is an air fryer for donuts worth it if I also deep fry?
If you enjoy deep fried donuts, you’ll still love frying for that classic crust. On the other hand, an air fryer for donuts is great when you want fewer steps, less cleanup, and a repeatable treat you can make more often.