Cast iron skillets have an almost mythical status in the kitchen. People talk about them being “forever pans,” capable of making the best steak or cornbread of your life. But cast iron, for all its hype, isn’t for everyone—and even seasoned cooks sometimes get tripped up by classic mistakes. If you’re considering buying your first (or next) cast iron skillet, read on. This post goes well beyond the marketing to give you real, practical advice—plus five honest warnings you need to know before making the commitment.
The Romance of Cast Iron—And the Reality
Owning a cast iron skillet feels like joining a secret club. The stories are true: with proper care, it can last generations, and it delivers incredible browning, searing, and oven-to-table versatility. But cast iron also requires a shift in habits. It’s not just a pan; it’s a relationship, and like all relationships, it comes with quirks you need to embrace—or at least understand.
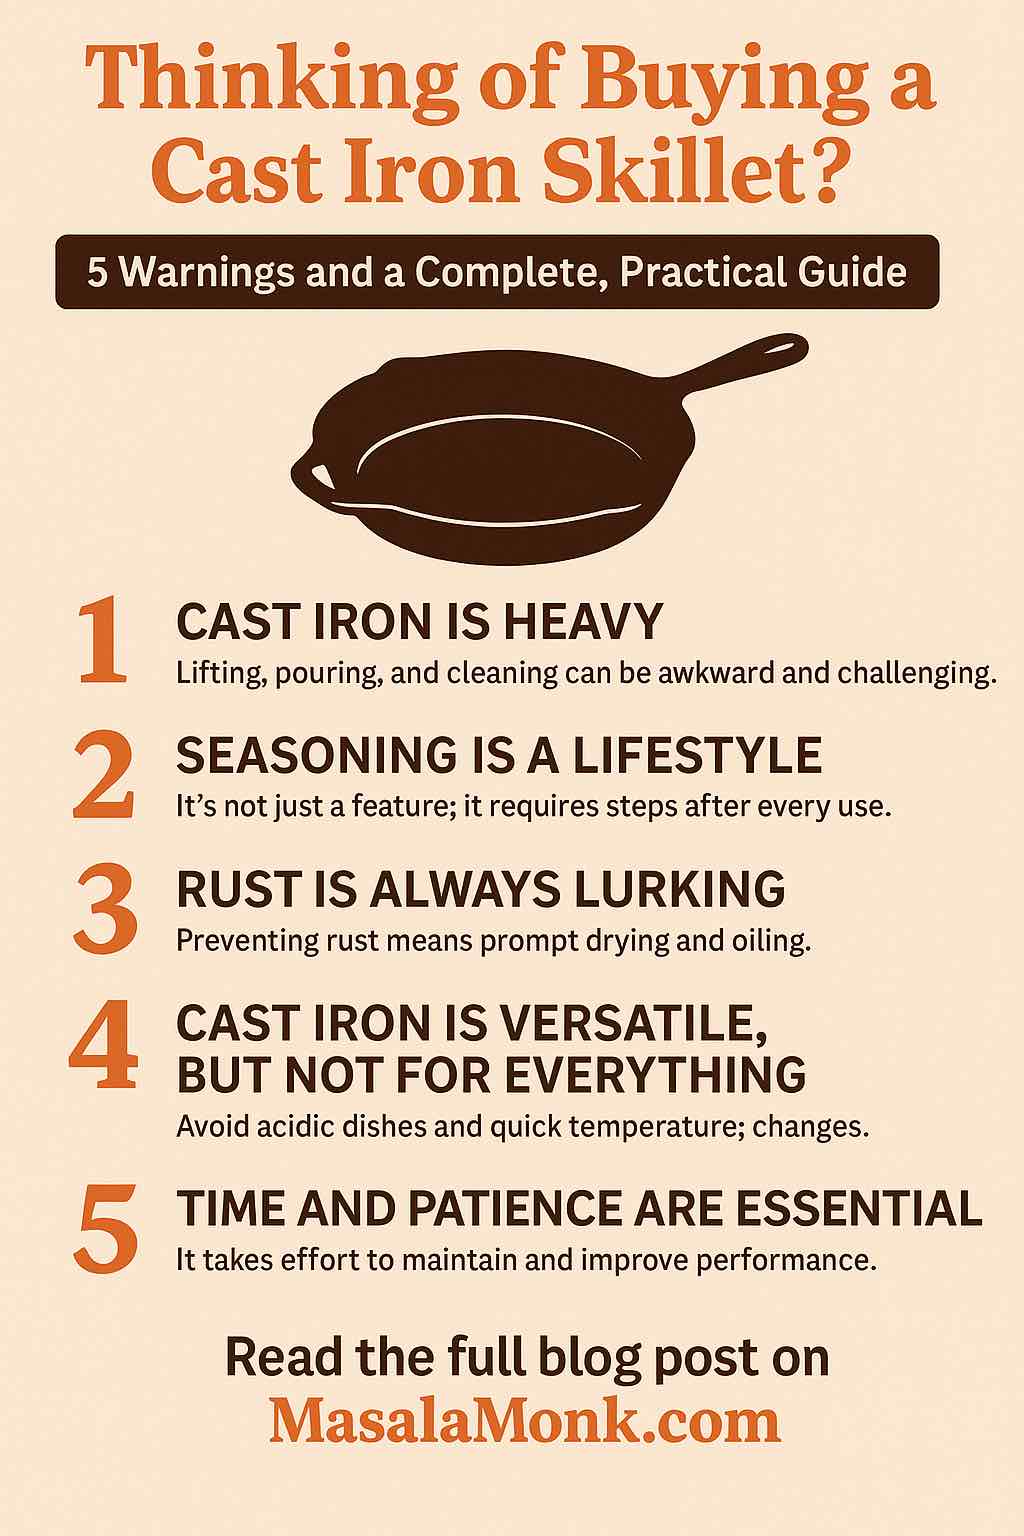
1. Warning: Cast Iron Is Heavy—And That Matters More Than You Think
If you’re used to lightweight nonstick or stainless-steel pans, you may be surprised the first time you heft a cast iron skillet. These pans are solid metal, often weighing as much as a small bowling ball. That heft is part of what makes cast iron great—it helps with heat retention and stability. But it can also make a difference in daily life:
Lifting and Pouring: Pouring off hot oil or moving a full skillet from stovetop to oven can be awkward or risky if you’re not prepared.
Cleaning: Scrubbing, rinsing, and drying a heavy, slippery pan isn’t trivial, especially if you have limited grip strength or wrist issues.
Storage: Cast iron pans take up space and can damage delicate surfaces if dropped or stacked carelessly.
Practical Tip: Before you commit, try lifting a few pans in a store (if possible) or compare the weight to something you own. If you cook for just one or two people, consider a smaller skillet. Larger pans are great for volume but multiply the challenges.
2. Warning: Seasoning Isn’t One-and-Done—It’s a Lifestyle
One of the first things you’ll hear about cast iron is “seasoning.” This isn’t just a buzzword; it’s the heart of cast iron care. Seasoning is a thin layer of polymerized oil that forms a protective, naturally nonstick coating on your skillet. While many pans are “pre-seasoned,” the reality is that maintaining and improving this seasoning is an ongoing responsibility.
What You’ll Actually Be Doing:
After Each Use: Rinse your pan promptly (avoid letting it soak), scrub away stuck-on bits (using coarse salt if needed), dry thoroughly, and rub on a very thin coat of cooking oil. Heat briefly to seal it in.
If Food Starts Sticking: It’s a sign your seasoning needs a boost. A few extra rounds of oiling and heating can help.
If Rust Appears: Don’t panic—rust can be scrubbed off and the pan re-seasoned.
Why This Matters: Skipping these steps leads to rust, sticky food, or metallic flavors. Seasoning is a rhythm you get into—like making your bed or brushing your teeth.
Practical Tip: Make seasoning a habit, not a chore. Keep a small bottle of oil near your stove and consider it part of the cooking process.
3. Warning: Cast Iron Isn’t for Everything—And That’s Okay
Cast iron is versatile, but it’s not a universal solution. There are foods and techniques that don’t play well with cast iron, especially with a newer or lightly-seasoned skillet:
Acidic Foods: Tomato sauce, vinegar, wine, and lemon juice can strip seasoning and cause off-flavors. Use another pan for these until your skillet is deeply seasoned.
Delicate Dishes: Eggs, fish, or pancakes may stick in a new pan until the seasoning is built up.
Quick-Change Cooking: Cast iron heats slowly and stays hot. If you’re making dishes that need fast temperature changes or precise control, another pan may be better.
Practical Tip: Think of cast iron as a specialist—fantastic for searing, frying, baking, and roasting, but not the only pan you need. Let it excel at what it does best.
4. Warning: Rust Is Always Lurking—And It’s Your Job to Fight It
The flip side of cast iron’s durability is its vulnerability to moisture. Water is the enemy of cast iron. Rust can show up overnight if a pan is left damp, air-dried, or stored in a humid environment. Even the most expensive or well-seasoned pan will rust if neglected.
How to Prevent Rust:
Always dry your skillet immediately after washing—ideally by heating it on the stove.
Store your pan in a dry place. If you live in a humid climate, consider placing a paper towel inside to absorb moisture.
Never put cast iron in the dishwasher or let it soak in the sink.
If Rust Appears: Don’t panic. Scrub the rust with steel wool or a stiff brush, rinse, dry, and re-season. Rust is a setback, not a disaster.
Practical Tip: Think of rust as feedback, not failure. If you see it, it just means the pan needs a little more attention. Fixing it is almost always possible.
5. Warning: Cast Iron Rewards the Patient—Not the Impulsive
The most beautiful thing about cast iron is how it gets better with time. Every meal, every oiling, every gentle scrub builds character and performance. But this is a long game.
Break-in Period: New pans are often a bit sticky, rough, or fussy. With regular use, they get smoother and slicker.
Appearance Changes: Don’t expect a glossy black patina immediately. Over months or years, your skillet will develop a deep, even finish and unique character.
Effort Up Front: The more you use and care for your skillet, the easier and better it gets.
Practical Tip: Don’t be discouraged by imperfections or slow progress. Think of your skillet as something you grow with—it’s a tool and a project.
Beyond the Warnings: How to Get the Most Out of Your Cast Iron Skillet
Embrace Simplicity
Start with simple foods that help build seasoning and boost your confidence:
Fry bacon or sausages (the fat helps the pan).
Roast vegetables at high heat.
Try cornbread, biscuits, or skillet pizza.
Cleaning Simplified
Clean your skillet while it’s still warm—this makes removing residue easier.
Use hot water and a stiff brush. Avoid soap, or use it sparingly.
For stubborn spots, a paste of coarse salt and water works wonders.
Maintenance Routine
Oil lightly after every wash.
Heat briefly on the stove to finish drying and set the oil.
Store in a dry place, ideally with something between the pan and any lid to prevent moisture buildup.
Cooking Mastery
Preheat well: Allow the skillet to warm up for several minutes before adding food. This ensures even cooking and prevents sticking.
Don’t be afraid of high heat: Cast iron shines for searing and baking.
Let it cool gradually: Avoid shocking the pan with cold water or rapid temperature changes.
Mindset: It’s a Journey
The first months may include minor sticking, some uneven color, or a little rust. Don’t give up.
With use and patience, your skillet will become a prized tool, better than nonstick and longer lasting than stainless.
The Takeaway
Buying a cast iron skillet isn’t just about getting a new pan. It’s about adopting a time-tested way of cooking that values patience, care, and tradition. The rewards—superior flavor, deep browning, and a kitchen heirloom—are well worth the investment of time and a little effort.
Remember:
The weight is real—choose what you can handle.
Seasoning is a process, not a feature.
Use it for what it does best, and don’t force it for everything.
Rust is fixable—prevention is easier.
Cast iron is a journey, not a destination.
If you’re ready for a tool that grows with you, challenges you, and will one day be part of your family’s story, cast iron is a worthy investment. Treat it well, and it will repay you in unforgettable meals for decades to come.
Ready to begin? Let your cast iron journey start with knowledge, care, and confidence!
10 Cast Iron Skillet FAQs
1. Do I need to season my skillet if it says “pre-seasoned”? Yes. Pre-seasoned skillets are ready to use, but regular seasoning after each use helps improve the nonstick surface and prevents rust. The more you cook (and oil it), the better it gets.
2. Why does food sometimes stick to my cast iron skillet? Sticking can happen with new pans or if the seasoning is thin. Make sure the pan is well preheated, use enough oil, and keep building the seasoning layer over time. Acidic or watery foods may also loosen seasoning on newer skillets.
3. How do I clean my cast iron skillet after cooking? Wipe out food residue while the pan is warm, rinse with hot water, scrub with a stiff brush (no soap or just a touch if needed), dry thoroughly, and lightly oil before storing.
4. What should I do if my cast iron skillet rusts? Don’t worry! Scrub the rust off with steel wool or a stiff brush, rinse, dry completely, and re-season by applying a thin coat of oil and heating the pan.
5. Can I cook tomato sauce or other acidic foods in my cast iron? Occasionally, yes—especially once the pan is well seasoned. Frequent or long cooking of acidic foods can strip seasoning, so use another pan for those until your skillet is well developed.
6. Is cast iron safe for all stovetops, including induction and glass? Yes, but use care on glass or ceramic cooktops to avoid scratching or cracking the surface due to the pan’s weight and rough bottom.
7. How do I store my cast iron skillet to prevent rust? Make sure it’s completely dry and lightly oiled. Store it in a dry place, with a paper towel or cloth inside to absorb moisture. Avoid putting the lid on tightly, which can trap humidity.
8. My skillet isn’t black and shiny yet—is that normal? Absolutely. New or freshly re-seasoned pans often appear brown, gray, or matte. Over time, with regular use and oiling, it will darken and become glossy.
9. Can I use metal utensils with my cast iron skillet? Yes. Metal spatulas, scrapers, and spoons won’t harm the seasoning. In fact, using them can help smooth out the surface over time.
10. Can I put my cast iron skillet in the dishwasher? No. The dishwasher strips seasoning and encourages rust. Always wash by hand, dry right away, and re-oil before storing.
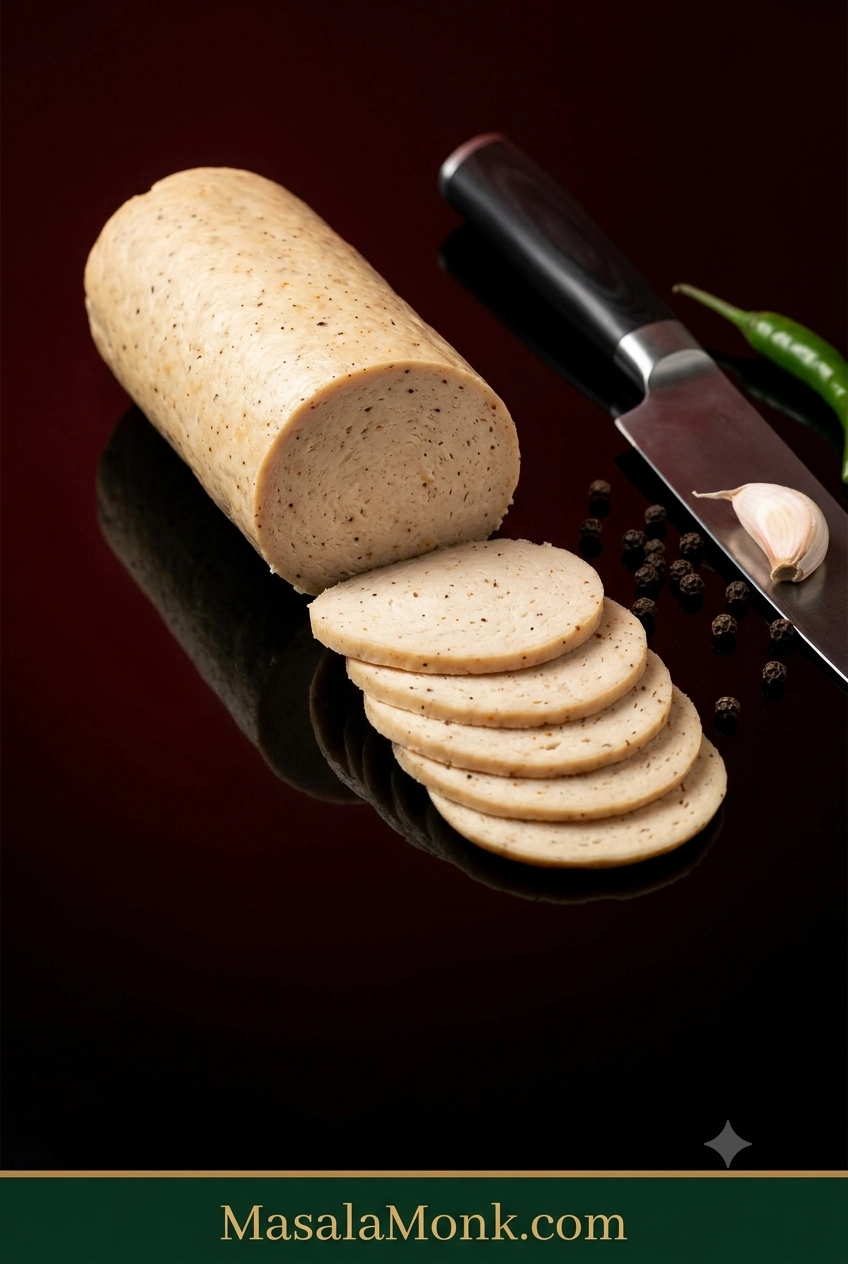
Cold from the fridge, a good slice of homemade chicken salami should bend a little before it breaks: fine-textured, juicy without being wet, peppery and garlicky, firm enough for a sandwich but nowhere near rubbery.
Thin slices sit neatly in toast or a roti wrap without crumbling through the filling, and the rest of the log waits in the fridge for breakfast or lunch tomorrow. Because you season the batch yourself, you decide whether it leans garlicky, peppery, smoky or hot with green chilli.
The ingredients are the easy part. Texture is where homemade chicken salami can get frustrating. The chicken stays loose instead of turning sticky, an ultra-lean batch dries out, air gets trapped through the middle, or the log gets sliced while it is still warm and seems much softer than expected.
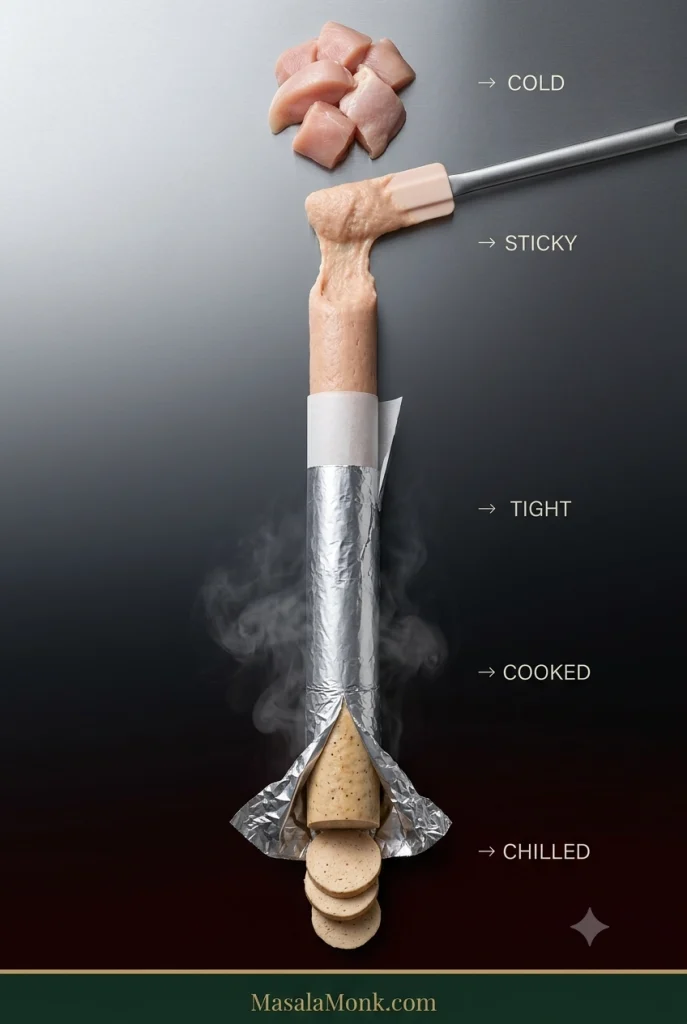
For this cooked deli-style version, a handful of details control almost everything: start with cold chicken, process it until sticky, pack the log tightly, cook it to temperature, and give it time to chill before slicing.
What we’re making: fully cooked, deli-style chicken salami—the soft sliced cold cut commonly used for sandwiches, breakfasts and wraps in India and across South Asia. It uses ordinary salt and spices, with no curing salt or separate preservative system, so it must stay refrigerated and has a short storage life. You won’t need a sausage casing, stuffer, grinder or curing chamber.
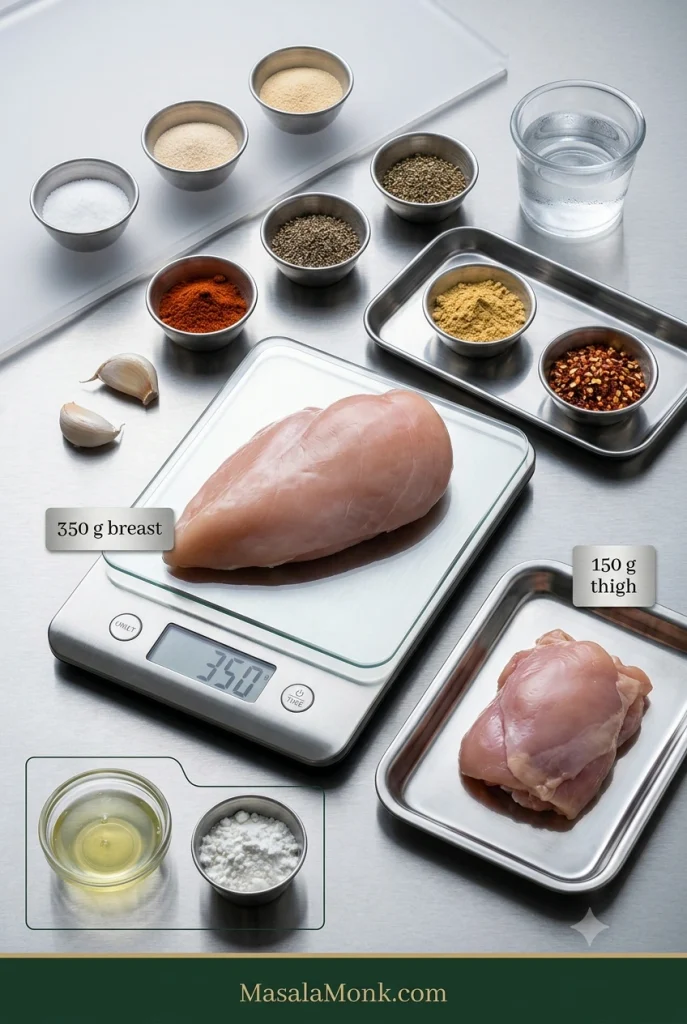
For one batch, use 500 g / 17.6 oz / about 1.1 lb cold chicken. A combination of breast and thigh gives you the mild flavour of breast with enough natural fat to help the salami stay tender.
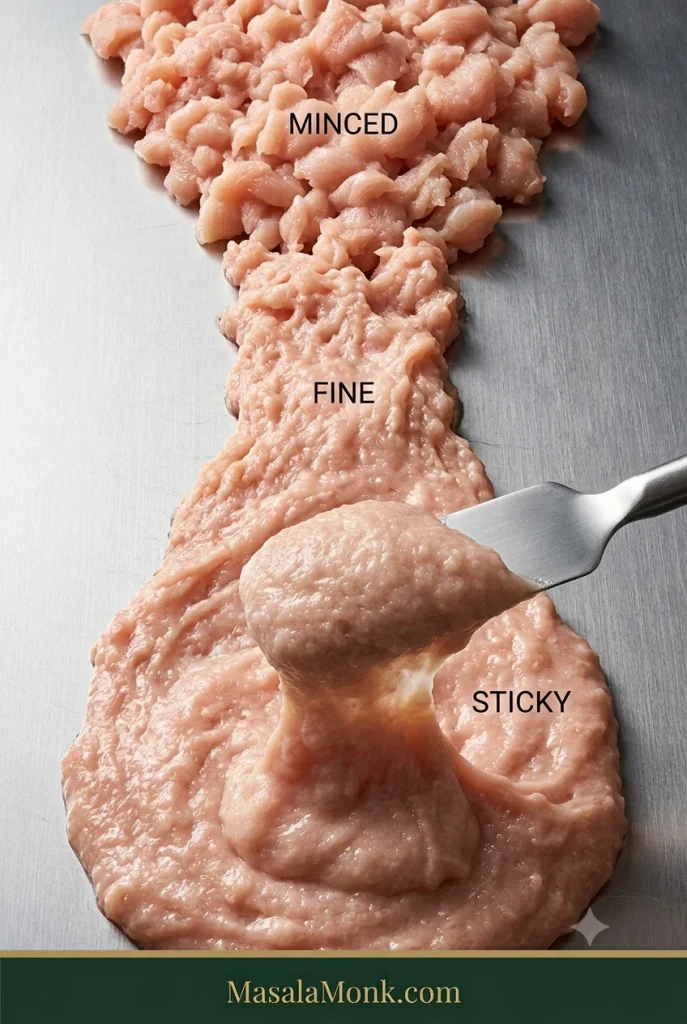
Process the chicken with 8 g salt, garlic, black pepper and spices. Start with 15 ml / 1 tbsp ice-cold water, adding more only if needed, until the chicken changes from mince into a fine, sticky paste that clings to itself.
Shape two compact logs around 5 cm / 2 inches in diameter, wrap the chicken in baking parchment and then foil, and steam until the centre reaches 165°F / 74°C. Chill for at least 4 hours; overnight gives the cleanest slices.
Homemade Chicken Salami Recipe
Make the simple version first. Fresh vegetables, sauces and other wet additions are much easier to judge once you’ve seen what the chicken should look and feel like when it is ready to shape.
Prep
About 20 minutes
Cook
Typically 30–45 minutes for 5 cm / 2-inch logs; finish by temperature
Chill
4 hours minimum; overnight best
Total
About 5 hours minimum, mostly chilling; overnight is easiest
Yield
2 short logs; roughly 4–6 servings depending on use
Equipment
Food processor or powerful food chopper
Digital kitchen scale
Silicone or rubber spatula
Baking parchment / parchment paper
Aluminium foil for the outer wrapper
Steamer, or a large covered pot with a rack
Digital food thermometer
Sharp slicing knife
Ingredients
Salt is 1.6% of the chicken by weight. Egg white and cornstarch are optional alternatives, not ingredients you need together.
350 g / 12.3 oz boneless, skinless chicken breast, very cold
150 g / 5.3 oz boneless, skinless chicken thigh, very cold
8 g fine salt — about 1⅓ tsp fine table salt; weighing is strongly preferred because different salts fill a spoon differently
6 g garlic, about 2 medium cloves, finely grated or crushed
Onion powder — 1 tsp
Freshly ground black pepper — 1 tsp
Sweet or smoked paprika — 1 tsp
Mustard powder — ½ tsp
Red chilli flakes — ¼–½ tsp, optional
15–30 ml / 1–2 tbsp ice-cold water — start with 1 tbsp and add more only as needed
Optional binder
8 g / about 1 tbsp cornstarch (often called cornflour in India and the UK), or
1 large egg white
The base recipe works without either. Egg white gives a firmer, slightly springier slice; cornstarch adds a little extra structure without egg. If using egg white, begin without added water and add ice water a teaspoon at a time only if the processor needs it.
Raw-chicken note: there is no need to rinse chicken before processing it. Rinsing can splash raw poultry juices around the sink and nearby surfaces. Keep raw chicken and its utensils away from ready-to-eat foods, wash your hands well, and clean the processor parts, knife, board and work surface thoroughly afterwards.
Instructions
1. Get the chicken fridge-cold
Start with visibly cold chicken pieces. If the bowl warms before the mixture turns tacky, pause and chill.
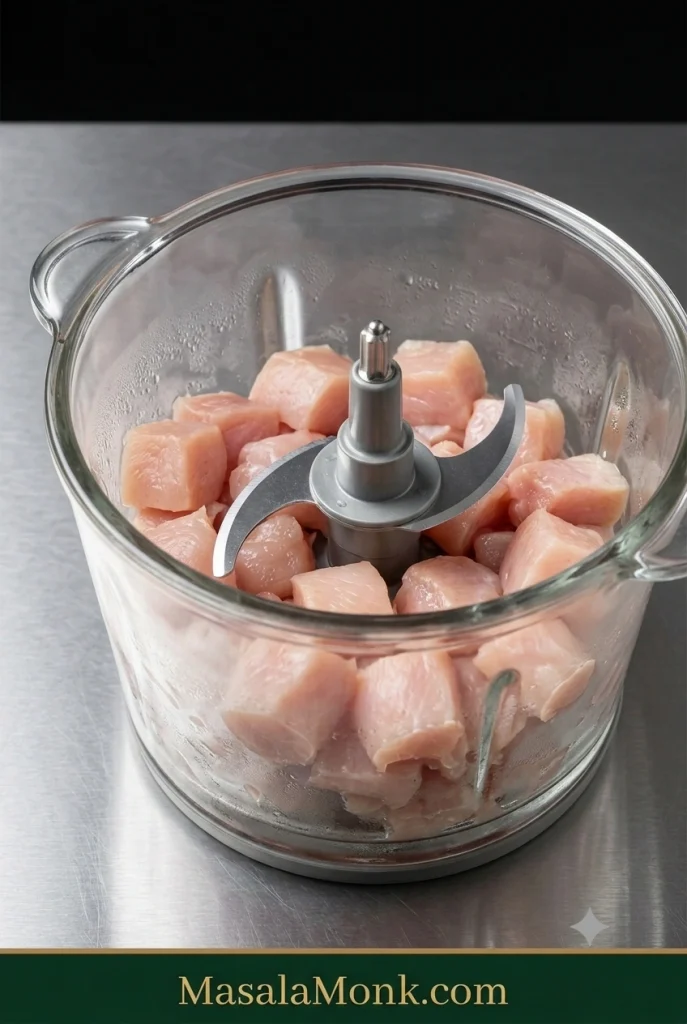
Cut the breast and thigh into roughly 2–3 cm / 1-inch pieces. Meat that has warmed while you gathered everything else can go back into the refrigerator for 15–20 minutes. In a hot kitchen, chilling the processor bowl and blade helps too.
A small processor is better handled in two batches. Keep the first batch chilled while you process the second, then combine them briefly at the end. Crowding the bowl makes the chicken process less evenly and gives it more time to warm up.
2. Start the sticky bind
Add the cold chicken and 8 g salt to the processor. Pulse until the larger pieces have broken down, then process briefly until the meat becomes finer.
Add the garlic, onion powder, black pepper, paprika, mustard and chilli flakes, along with the optional cornstarch or egg white if using.
3. Add the ice water gradually
Start with 1 tbsp / 15 ml ice-cold water and process in short bursts. A stiff mixture that the processor is struggling to move can take a little more, added a teaspoon at a time, up to another tablespoon.
The chicken should look moist and workable. A loose or runny paste has gone too far in the other direction.
4. Let the texture tell you when to stop
Loose mince should become a fine, sticky paste that moves with the spatula as one mass.
At first you have chopped chicken, then fine mince. Keep going and the texture changes again: the meat begins pulling together into one tacky mass instead of behaving like hundreds of separate grains.
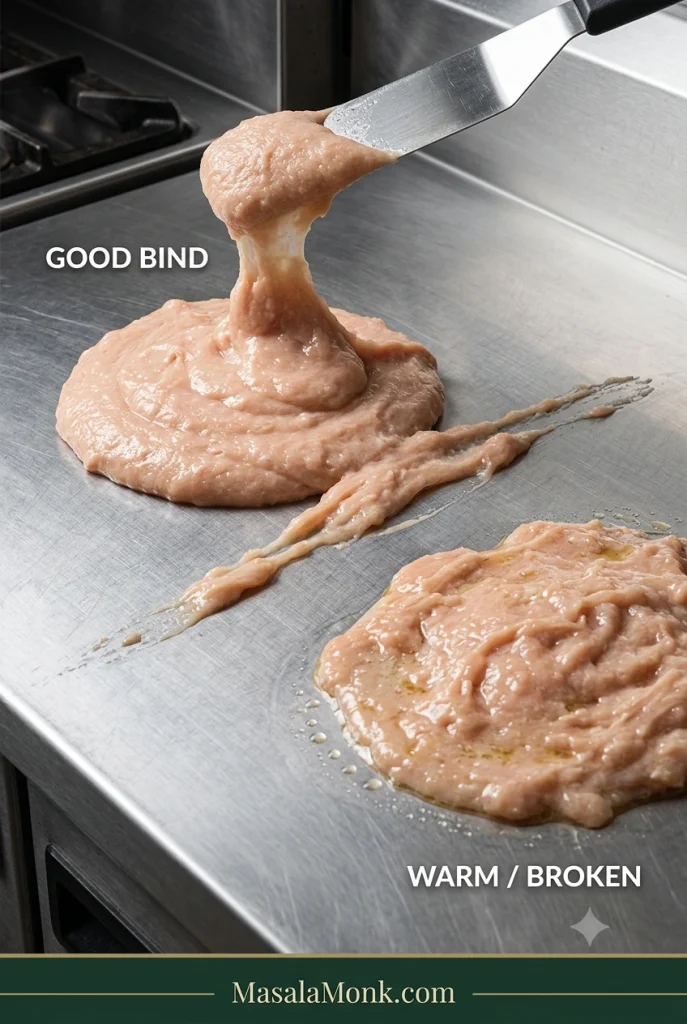
Press a little against a spoon or clean palm. It should cling. Lift some with the spatula and the rest of the meat paste should tug along with it.
Fine, sticky and holding together as one mass is the endpoint. If the bowl starts getting warm before you reach that stage, stop and refrigerate the chicken for 10–15 minutes. Once the mixture is already fine and tacky, stop processing and move on.
5. Cook a tiny seasoning test
Fry about a teaspoon of the mixture in a small pan until completely cooked, then taste it. The garlic, pepper, chilli and paprika should come through clearly. Cold food mutes aroma and spice a little, so the hot test piece can taste a touch bolder than you want the final chilled slice without becoming aggressively salty.
Adjust the seasoning now. Use this little patty for flavour rather than texture; a hot fried spoonful and an overnight-chilled steamed log will feel very different.
6. Shape two tight logs
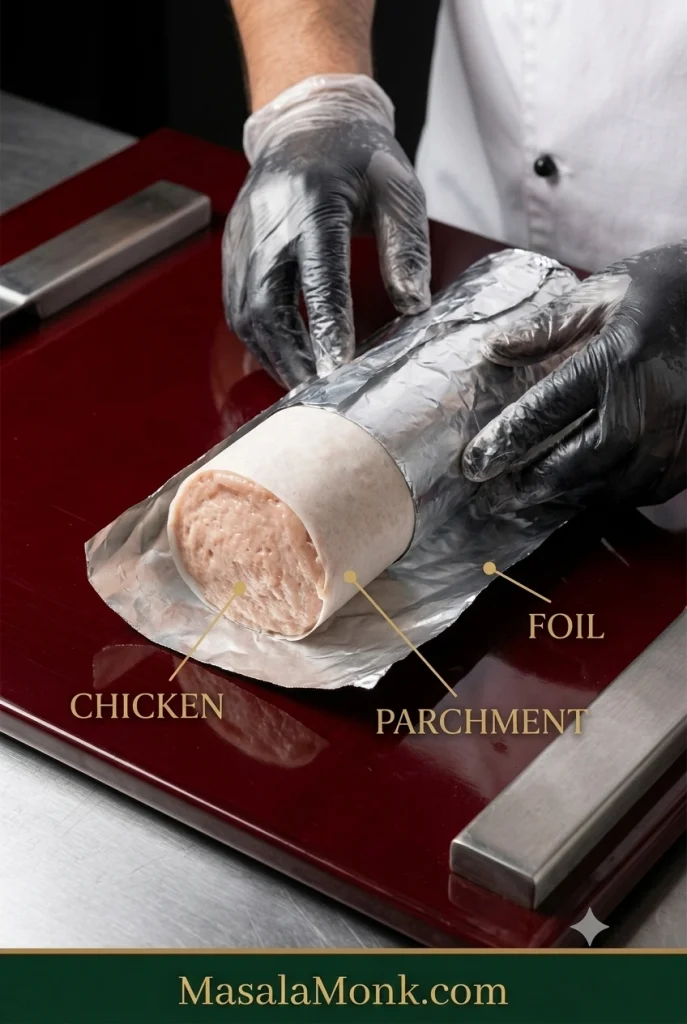
Chicken touches parchment first; foil stays outside as support while the log cooks.
Divide the chicken between two sheets of baking parchment and compact each portion into a cylinder around 5 cm / 2 inches in diameter. Press firmly as you shape and work obvious pockets of air toward the ends. A ruler-straight cylinder is unnecessary; reasonably even thickness and a snugly packed centre are enough.
Roll the parchment around the chicken and twist or fold the ends closed. Wrap each parchment-covered log in foil. The parchment stays between the meat and the aluminium.
7. Steam to 165°F / 74°C
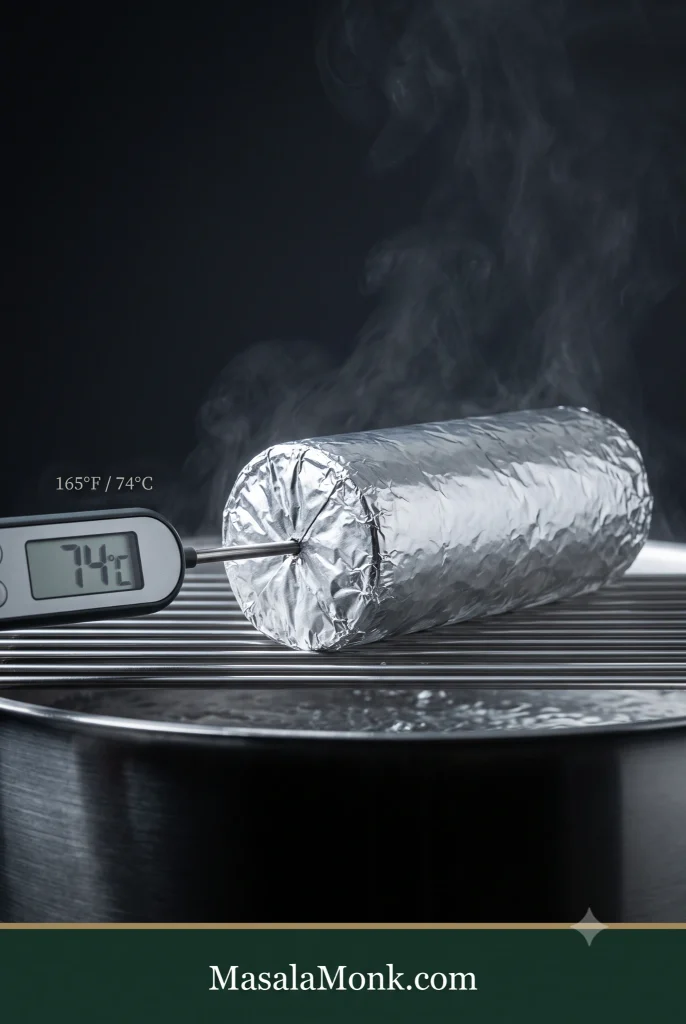
Insert the probe through one end and aim for the centre: 165°F / 74°C.
Bring the water in a steamer or covered pot to a steady simmer. Place the logs above the water and cover.
For logs around 5 cm / 2 inches thick, begin checking at about 25–30 minutes. Many batches take roughly 30–45 minutes, but diameter, starting temperature and the steaming setup all affect the timing.
Slide the thermometer probe through one end of the log and aim for the centre. Ground poultry should reach 165°F / 74°C according to USDA safe-temperature guidance. Remove the log once the centre reaches that temperature.
8. Let the steam escape, then refrigerate
Leave the cooked logs for about 10–15 minutes, then carefully loosen the wrapper enough to release the heavy steam. Blot away obvious surface moisture.
Move the salami to the refrigerator promptly. Keep the total time at room temperature under 2 hours—or under 1 hour if the room is hotter than 90°F / 32°C.
9. Chill, unwrap and slice
Refrigerate the salami for at least 4 hours. Overnight gives the neatest texture. A freshly cooked log can feel surprisingly soft, so wait until it is completely cold before deciding how the final texture turned out.
Unwrap the chilled log. Pat the surface dry if needed, then cut with a sharp knife. Rewrap the unsliced portion or move it to an airtight container straight away.
What Good Homemade Chicken Salami Looks Like
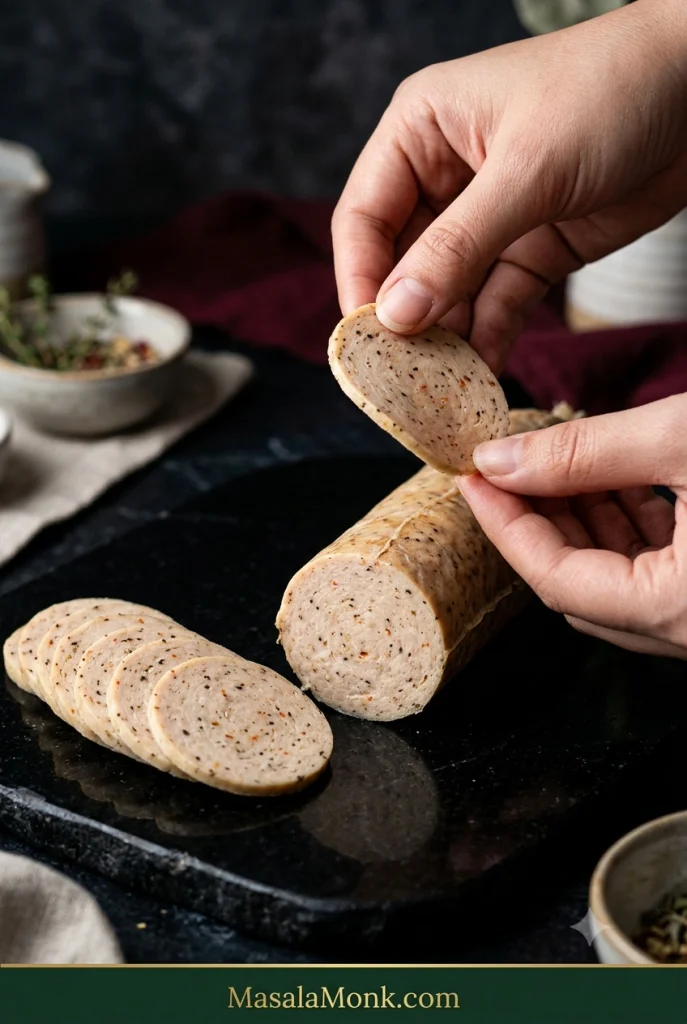
Judge the texture only when cold: a good slice lifts cleanly, stays cohesive and still bends a little.
Before worrying about whether your salami looks exactly like a packet from the supermarket, cut one cold slice and look at what it actually does.
Texture: fine and even rather than visibly granular like a burger.
Slice: sturdy enough to pick up cold, with a little tenderness and bend.
Moisture: juicy without large watery or oily pockets.
Interior: fairly even, with no large tunnels from trapped air.
Colour: naturally beige, pale brown or faintly rosy depending on the chicken and spices.
Flavour: savoury and aromatic enough to remain interesting straight from the refrigerator.
Packet chicken salami can be exceptionally smooth and springy because commercial producers can control particle size, mixing and temperature very precisely and may also use starches, fibres or proteins to shape the texture. A home batch can feel a little more meat-like and still slice beautifully.
For straightforward chilled chicken without the fine salami texture, the simpler baked chicken breast recipe may suit you better.
Cold → sticky → tight → cooked → chilled. If a slice fails, work backward to find which stage went wrong.
The recipe tells you what to do. This is the bit that explains why it works.
Salt and mixing draw out muscle proteins that make the chicken tacky. That stickiness helps the meat hold moisture and natural fat more evenly as it cooks, which is why a properly processed paste slices so differently from simply seasoned mince.
This recipe also takes the chicken finer than you would for a coarse fresh sausage. Here the goal is a smooth deli-style slice, so visible chunks of mince aren’t what you’re aiming for. Advice to stop grinding early can make perfect sense for another sausage and still give you the wrong texture here.
What each stage controls
Cold. A food processor creates heat quickly. Fridge-cold chicken gives you more working time, and a bowl beginning to feel warm belongs back in the refrigerator for a few minutes.
Sticky. Watch the bowl instead of the clock: loose mince → fine mixture → sticky paste that clings to itself. Stop at loose mince and the chilled salami may crumble. Once the meat is already tacky, extra processing mostly gives it more time to warm.
Sticky paste should lift cohesively. A loose, greasy sheen means the mixture needs chilling before shaping.
Tight. Compact the paste firmly enough to push out obvious pockets of air. Tiny bubbles in an otherwise good slice aren’t worth worrying about; large tunnels mean the next log needs tighter packing.
Cooked. A thick log simply needs longer than a thin one. Keeping the diameter around 5 cm / 2 inches makes the timing more predictable, while the thermometer takes the guesswork out of the centre.
Chilled. Cooking sets the log; refrigeration firms it. The cold slice should stay in one piece when you lift it, even if it still bends a little between your fingers.
Breast or thigh?
Chicken
What it gives you
Watch for
Breast only
Lean, mild, pale
Dries out most easily if cooked too far
Thigh only
Juicier and richer
Stronger chicken flavour and naturally more fat
Breast + thigh
Balanced flavour, juiciness and structure
Easiest place to start
Ground chicken
Convenient and already minced
Results depend on how lean the mince is
The 350 g breast + 150 g thigh mix gives a first batch some protection against dryness while keeping the flavour mild and chicken-forward. Fresh ground chicken works too; use 500 g as-is when it contains both light and dark meat.
Very lean breast mince needs closer temperature control and can benefit from the optional egg white or cornstarch. If an all-breast batch feels too lean, increasing the proportion of thigh is usually simpler than trying to rescue it with melted butter or oil. That little bit of dark meat is especially noticeable once the salami is cold, when dryness has nowhere to hide.
Egg, cornstarch—or neither?
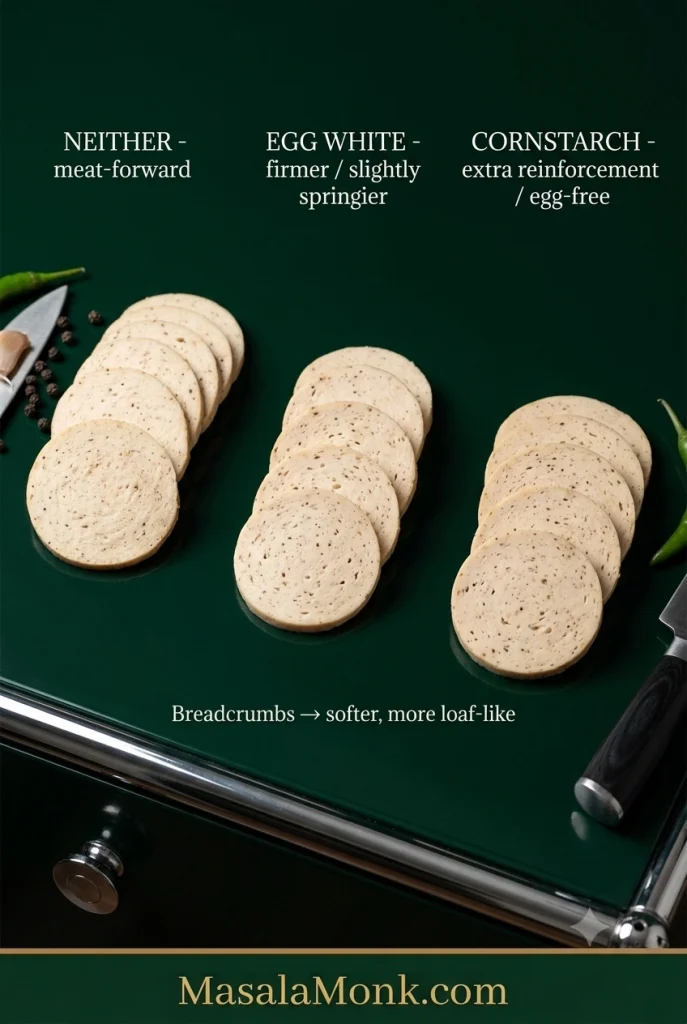
A strong sticky bind can work without extras; egg white and cornstarch make the slice firmer in different ways.
The chicken can hold together without an added binder. Cold meat, enough salt and enough mixing to reach the sticky stage matter more.
No added binder: the most meat-forward result and a good fit for the breast-thigh mixture once you’ve developed a strong sticky texture.
Egg white: gives a firmer, slightly springier slice and can be helpful with very lean chicken.
Cornstarch: adds a little extra reinforcement and is the obvious egg-free option.
Breadcrumbs: work, but move the texture toward a softer sausage loaf or meatloaf rather than a fine deli-style slice.
Egg or starch can help with firmness and moisture retention. If the mixture never became sticky, fix that before changing the recipe. Gelatin belongs to a different luncheon-meat method in which cooked meat and liquid are moulded and set as they chill.
For familiar round slices, put parchment directly against the chicken and use foil on the outside to reinforce the cylinder. Twist or fold the parchment ends firmly. Reasonably even thickness and a tightly packed centre matter more than a machine-perfect shape.
Don’t want to roll a cylinder? Pack the chicken firmly into a lightly oiled or appropriately lined heatproof mould, cover it and cook to the same internal temperature. The slices will be square or rectangular, which happens to fit sandwich bread rather nicely.
Once the paste is cold, sticky and tightly packed, most of the texture work is already done. From here, the cooking method matters less than keeping the heat sensible and stopping when the centre reaches the right temperature.
Steamer, Covered Pot, Oven or Air Fryer?
Steaming is still the easiest first choice for the soft, even deli-style texture we’re after. A covered pot can do essentially the same job, while the oven and air fryer are useful when that’s what you already have.
Method
Starting point
What to expect
Steam
Begin checking around 25–30 min
Soft, even deli-style texture; best first method
Covered pot + rack
Same general timing as steaming
Nearly the same result without a dedicated steamer
Oven
330°F / 165°C; begin checking around 30 min
Slightly firmer exterior
Air fryer
About 330°F / 165°C to start
More dry heat around the outside; easier with smaller logs
No steamer?
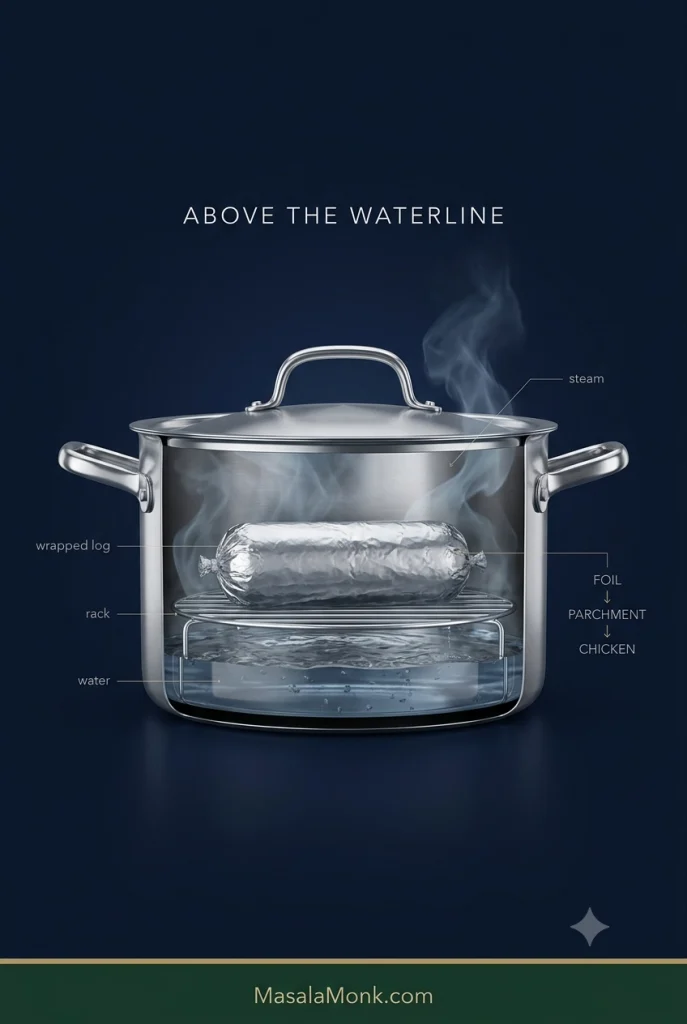
Keep the wrapped log above the waterline on a stable rack or trivet; it should cook in steam, not water.
Add a few centimetres of water to a large pot and set a rack, trivet or sturdy heatproof inverted bowl above the waterline. Put the wrapped logs on top, cover tightly and keep the water at a steady simmer. The chicken should sit in steam rather than in the water.
Some home recipes simmer a tightly wrapped log directly in hot water. Keeping this version above the waterline reduces the chance of water finding its way into the parcel, so steaming is the baseline method here.
Oven method
Place the parchment-and-foil-wrapped logs on a baking tray and bake at 330°F / 165°C. Begin checking the centre around 30 minutes and remove the salami when it reaches 165°F / 74°C.
Air fryer method
Smaller logs are easier to manage in an air fryer. Start around 330°F / 165°C, follow your appliance guidance for foil or wrapped foods, and cook to the same internal temperature instead of relying on one universal time.
After Cooking: Colour, Chilling & Clean Slices
Beige, pale brown or faintly rosy can all be normal. Use 165°F / 74°C, not colour, to judge doneness.
Use the thermometer for doneness rather than trying to read the colour. This is uncured cooked chicken, so the inside may be beige, pale brown or faintly rosy. It does not need the even pink colour associated with many commercial cured cold cuts.
If you simply prefer a rosier appearance, a little beetroot juice can tint the meat. Replace some of the recipe’s ice water with the same amount of beet juice so the total liquid stays under control. It changes the colour and adds a faint earthy note; it does not change the cooking temperature or preserve the salami.
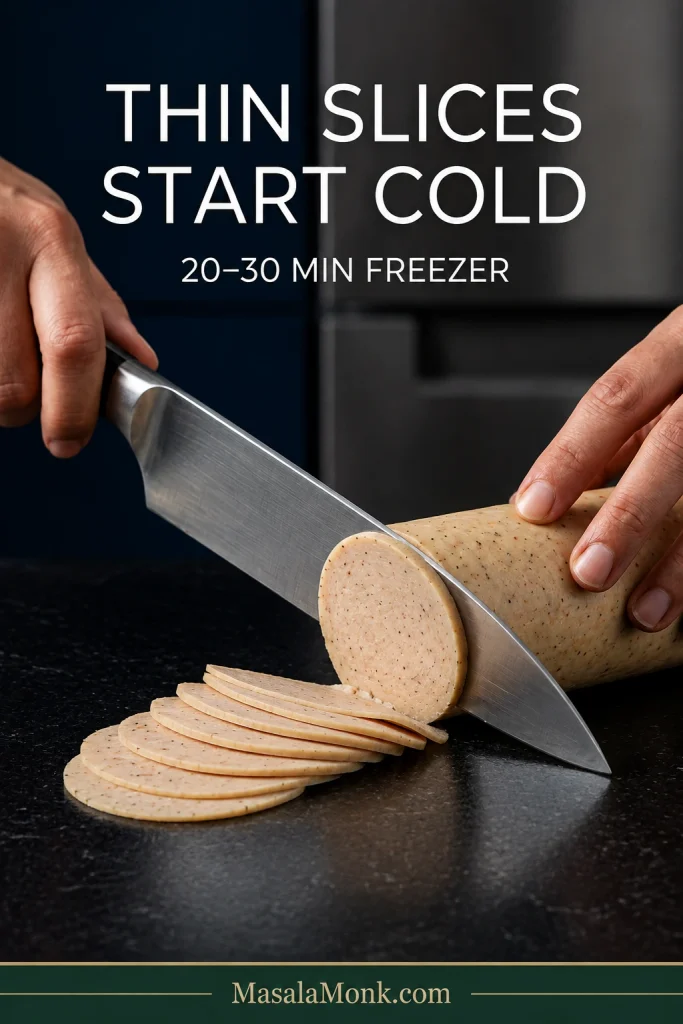
For thin deli-style slices, chill first
For thinner slices, chill until firm, then use a long clean knife stroke without pressing hard.
Start with completely cold salami and a sharp knife. Overnight refrigeration gives the easiest slicing. For finer rounds, put the chilled log in the freezer for 20–30 minutes so it firms up without freezing solid.
Don’t worry if the first few slices are thicker than deli-counter cuts. A clean slice that lifts intact matters more than getting it paper-thin.
Those thin slices are particularly good with egg and cheese; MasalaMonk’s breakfast sandwich guide has more ideas for breads, eggs, cheeses and sauces around them.
Chicken Salami Troubleshooting
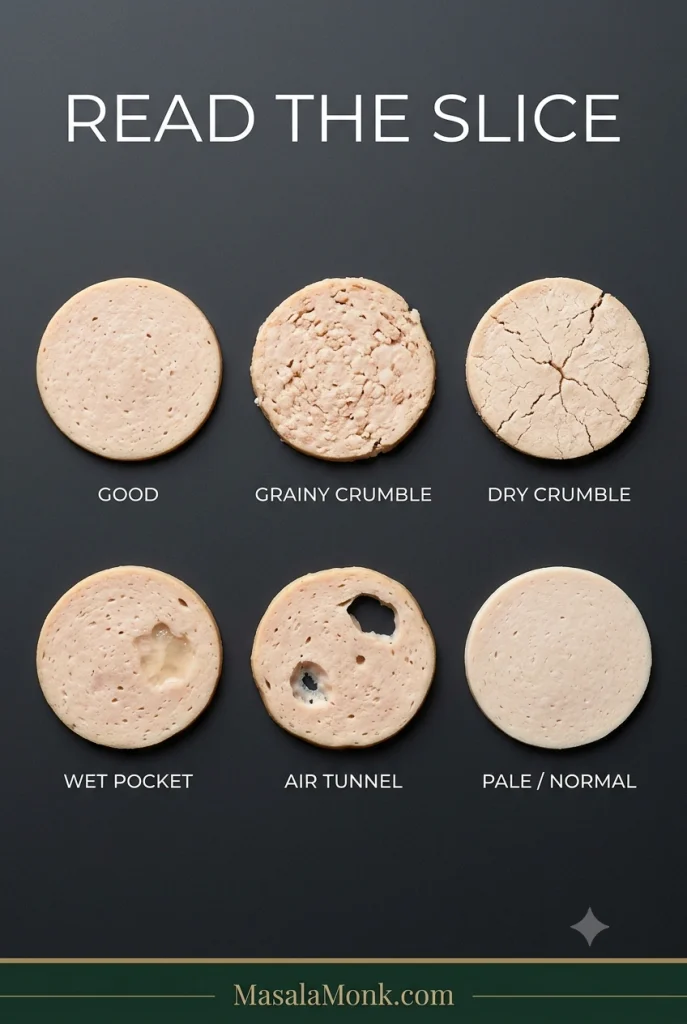
Read the whole slice: graininess, dry fracture, wet pockets and large tunnels point to different problems.
“Crumbly” can mean several different things. Look at the cold slice first; it usually tells you more than automatically adding extra egg, starch or water to the next batch.
What you see
First thing to try
Cold slices crumble into meat grains
Keep the chicken colder and process until genuinely sticky
Dry, crumbly slices
Use some thigh and stop cooking at 165°F / 74°C
Greasy puddle around the log
Keep the mixture colder and avoid large amounts of rendered fat
Wet or jelly-like pockets
Reduce free liquid and squeeze wet aromatics
Large holes through the slices
Pack the log more firmly
Pale or greyish interior
Usually normal for uncured chicken; check temperature, not colour
The cold slice crumbles into little pieces
Think back to the processor. Did the chicken ever reach the point where it clung to the spatula and pulled together as one mass? If it never did, start there rather than immediately increasing the binder.
Warm meat, very coarse processing, dramatically reduced salt or a generous amount of onion juice or sauce can all weaken the structure. Egg white or cornstarch can offer extra support, but they work best after the chicken itself has reached that sticky stage.
It is dry, mealy or strangely bouncy
All-breast chicken is easier to dry out, particularly when it cooks far beyond the safe endpoint. Thigh gives you more natural fat and moisture to work with.
A mealy or almost tofu-like bite can also turn up in a very lean, unstable mixture. At the opposite extreme, lots of processing and binder can push the texture toward an overly springy bounce. Think back to the earlier target: cold, cohesive and tacky—not warm and greasy.
There is grease, water or empty space inside
A teaspoon or two of cooking juice around the salami is ordinary. By contrast, a noticeable puddle of grease suggests that fat separated somewhere along the way, often because the chicken warmed up before its structure was properly developed.
Wet pockets point more toward excess free liquid. Start with less ice water next time and remember that fresh onion, sauces, yogurt and citrus juice all count toward the moisture in the bowl. Vinegar and generous amounts of lemon juice need care too: enough acid in the raw mixture can work against the sticky texture you’re trying to build. Add that sharpness later with chutney, mustard, pickles or a squeeze of citrus at the table.
Large air tunnels are simpler. Pack the next log more firmly. Tiny bubbles in an otherwise good slice aren’t worth worrying about.
Change the aromatics, not the moisture balance: drain olives well and keep generous chutneys or citrus for serving.
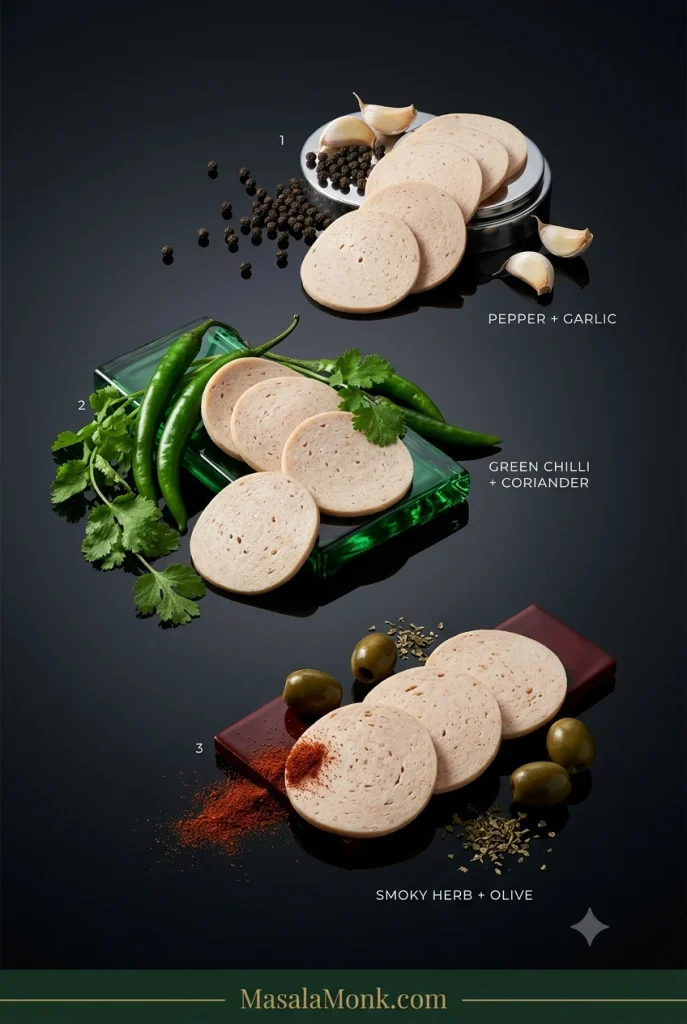
Once you know what the basic chicken paste should feel like, keep the meat, salt and moisture balance steady and change the aromatics around them.
Pepper & Garlic
Keep the garlic from the base recipe, increase the black pepper to about 1½ tsp, keep the mustard and use sweet or smoked paprika. Leave out the chilli flakes for a gentler version.
It stays savoury and peppery even when cold, which makes it particularly good in sandwiches. A little honey mustard gives those flavours a sweet-sharp edge.
Ginger, Green Chilli & Coriander
Add 1 tsp finely grated ginger, 1 small green chilli and 2 tbsp finely chopped coriander. Keep the black pepper, and add chilli flakes only if you want another layer of heat.
The ginger and coriander keep the flavour fresh while the green chilli brings heat without flooding the chicken with sauce. Serve the slices with a thick green chutney for a brighter sandwich or roti wrap.
Smoky Herb & Olive
Use 1–1½ tsp smoked paprika, ½ tsp dried oregano, ¼ tsp dried thyme and 1–2 tbsp finely chopped, well-drained green olives. Add a small pinch of chilli flakes if you like.
Pat the olives dry before chopping. Their salty, briny flavour is welcome; a pocket of olive brine inside the salami isn’t.
Once There’s a Cold Log in the Fridge
Serve the slices cold in sandwiches and wraps, or brown them briefly for breakfast—the salami is already fully cooked.
It earns its fridge space quickly. Brown a couple of slices and add a fried egg for breakfast, or keep them cold with cucumber, lettuce, tomato, pickles, mustard and cheese. Shredded cabbage or crisp coleslaw is especially good against the softer salami.
For a quick roti wrap, add sliced onion, cucumber and green chutney, then squeeze over lime just before eating. When packing it for school or work, use an insulated lunch bag with a cold pack.
The salami is already cooked, so pizza, pasta and omelettes only need enough extra heat to warm or brown it. Add thin rounds toward the end of pizza baking, fold diced pieces into eggs, or colour thicker slices briefly in a pan before tossing them through pasta.
If both logs aren’t going to disappear into breakfasts, sandwiches and wraps within the next few days, freeze the second one while it’s still fresh.
How to Store and Freeze Homemade Chicken Salami
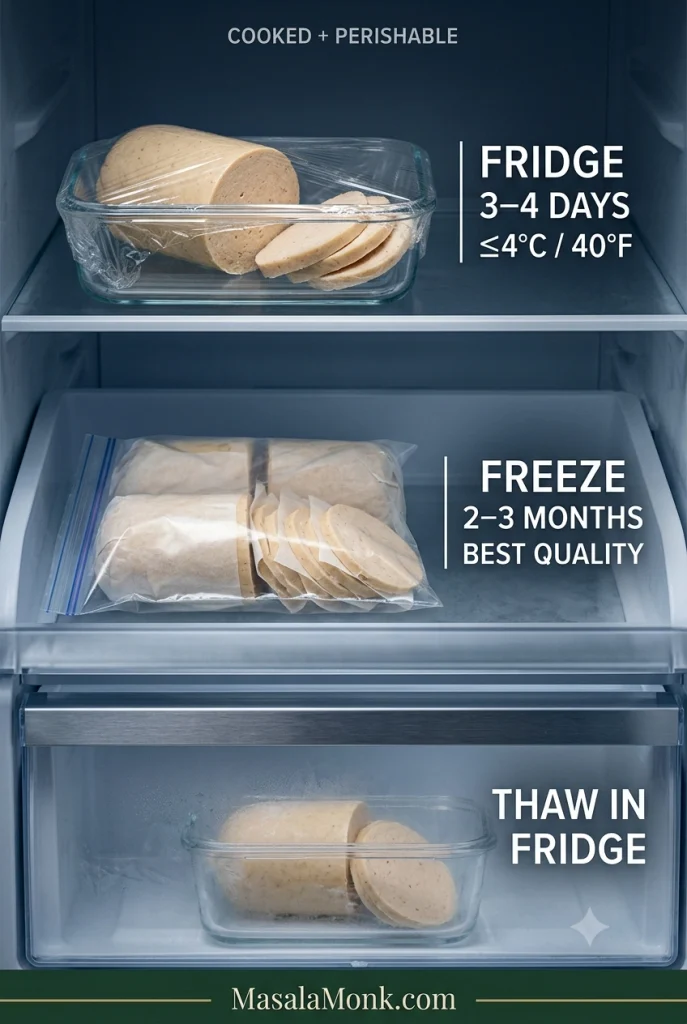
Treat this as cooked perishable chicken, not shelf-stable salami.
Refrigerate for 3–4 days, or freeze meal-sized portions for 2–3 months for best quality.
Refrigerator
Wrap a completely cold log tightly or transfer it to an airtight container. Cover cut surfaces once you begin slicing so they don’t dry out.
Freeze half logs or meal-sized portions rather than one large block. For sliced salami, put small sheets of parchment between portions so they separate easily.
Two to three months is a useful freezer window for best quality. Food kept continuously frozen remains safe beyond that, but flavour and texture gradually decline.
Thawing
Thaw the salami in the refrigerator. A frozen-and-thawed slice may be a little softer than one cut from a freshly chilled log, particularly with very lean or wetter batches.
That short refrigerator life is also the clearest reminder that this recipe is a very different thing from traditional dry salami.
Cooked Chicken Salami vs Traditional Dry-Cured Salami
Fermentation, controlled humidity and weeks of drying belong to a different process from this fully cooked, refrigerated chicken salami.
Traditional dry salami is perfectly possible to make at home, but it is a different project. Depending on the style, it can involve precisely measured curing ingredients, starter cultures, fermentation, appropriate casings, controlled temperature and humidity, and weeks of drying.
That process deserves a validated recipe of its own. Smell and appearance alone cannot establish that raw cured meat is safe, and curing products with different formulations should not be swapped spoon-for-spoon because their names look similar.
For this cooked chicken version, the rule is much simpler: cook the ground poultry fully, chill it promptly and keep it refrigerated.
A Few Remaining Questions
Does this use curing salt or added preservatives?
No. This version uses ordinary salt, but no curing salt or separate preservative system. Keep it refrigerated and use it within 3–4 days, or freeze it.
Does the chicken have to touch aluminium foil?
No. Baking parchment sits directly against the chicken and the foil goes around the outside for support. A covered heatproof mould is another option if you prefer not to use a foil-wrapped log.
Can I make it without a food processor?
Very finely ground chicken can be mixed vigorously with salt until tacky to make a coarser cooked sausage. For the smooth deli-style texture in this recipe, a food processor or powerful chopper is strongly preferred.
Can I freeze the slices?
Yes. Chill the salami completely first, freeze meal-sized portions with parchment between the slices, and thaw what you need in the refrigerator.
Can I use turkey, pork or beef?
The general cooked-log idea can be adapted, but this recipe is formulated around chicken. Ground turkey should also reach 165°F / 74°C. For ground pork and ground beef, use at least 160°F / 71°C. Different meats have different fat levels, so expect some change in texture rather than treating them as exact one-for-one substitutions.
Is homemade chicken salami healthy?
Homemade does not automatically mean healthier. Making the salami yourself gives you control over the chicken, salt, seasonings and optional binder, while the nutritional picture still depends on those choices and on portion size. It is better thought of as a homemade cooked cold cut than as a health food.
The Best Part Comes the Next Morning
After a night in the refrigerator, the knife should pass through cleanly and the cold slice should lift in one piece.
Brief pan contact adds browned flavour to already-cooked slices while keeping the centres tender.
Eat it cold, or give a couple of slices a minute in a hot pan until the edges brown and the garlic wakes up again. Add an egg, toast and mustard—or a swipe of green chutney—and breakfast is done.
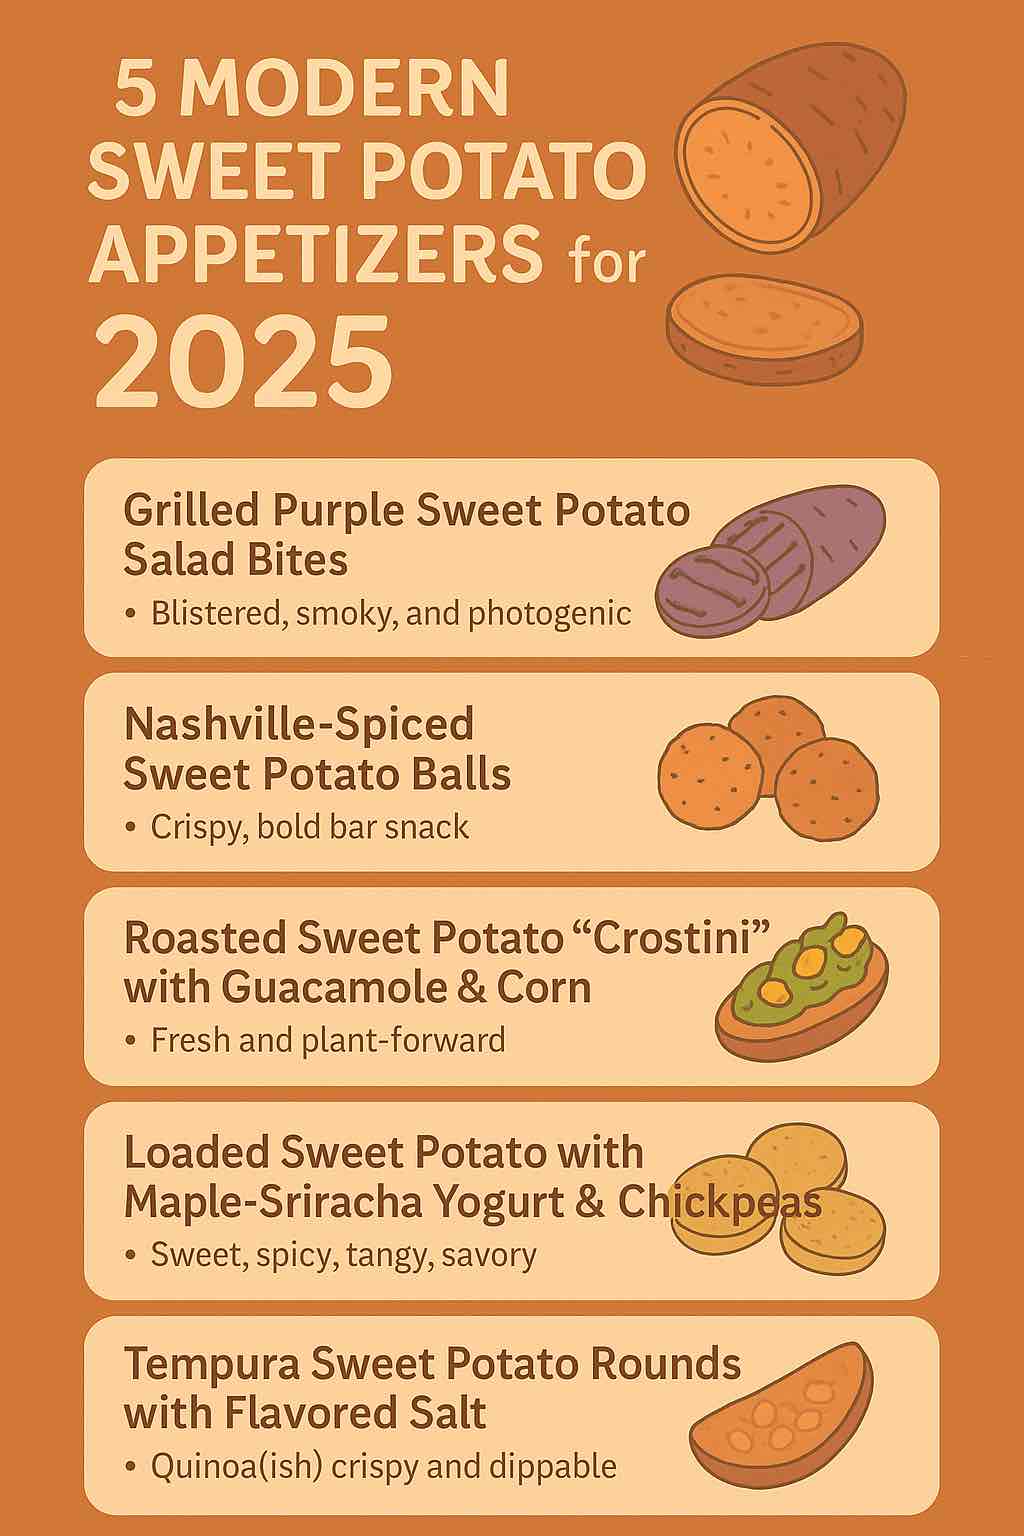
Sweet potatoes have officially moved beyond the Thanksgiving table and into the culinary spotlight as a versatile, healthful, and flavor-packed ingredient. Whether you’re a home chef or running a professional kitchen, the latest trends in sweet potato appetizers are all about global flavors, striking visuals, and creative textures.
In this post, we dive deep into five trending sweet potato appetizers for 2025, blending research from top food publications, chef menus, and recent product innovations. Each idea is presented with a chef’s rationale, practical how-to guidance, and tips for home and pro kitchens alike.
1. Grilled Purple Sweet Potato Salad Bites
Why It’s Trending: Purple sweet potatoes are a visual knockout and rich in antioxidants. Recently featured by Bon Appétit (July 2025), grilling intensifies their natural sweetness while adding smokiness—a modern update for plant-forward appetizers.
How to Make It Practical:
Slice purple sweet potatoes into ½-inch rounds.
Toss with olive oil, salt, and pepper.
Grill on high heat until blistered and tender (about 4 minutes per side).
Dress with a creamy sesame-mayo or a lemony vinaigrette.
Top with scallions, toasted sesame seeds, and microgreens.
Pro Tip: For parties, skewer grilled rounds and serve with the dressing on the side for dipping. The color and char will stand out on any appetizer tray.
2. Nashville-Spiced Sweet Potato Balls
The Inspiration: A twist on classic croquettes, these crispy, spice-laden balls are inspired by the hot chicken craze, but made for vegetarians and flexitarians. Recent recipes (Cherry on My Sundae, June 2025) blend sweet potato with smoky paprika, cayenne, and a crunchy coating.
How to Make Them Practical:
Roast and mash sweet potatoes.
Mix with breadcrumbs, Nashville-style spices, finely diced green onions, and (optional) shredded cheese or bacon bits.
Form into balls; dredge in flour, egg, and panko.
Fry or bake until golden and crisp.
Serve with a creamy ranch or tangy comeback sauce.
Pro Kitchen Variation: Pipe spiced sweet potato puree into mini choux pastry shells for an upscale passed hors d’oeuvre.
3. Roasted Sweet Potato “Crostini” with Guacamole & Corn
Why Chefs Love It: Bread-free “crostini” are trending among gluten-free diners and those seeking lighter fare. Roasted sweet potato rounds are the perfect vehicle for colorful, bold toppings. This concept is popular with food bloggers and professional caterers alike (A Couple Cooks, Jan 2025).
How to Make at Home or Work:
Slice sweet potatoes into thick rounds (about ½ inch).
Roast with olive oil, cumin, and smoked paprika at 425°F until caramelized (20–25 minutes).
Top each round with a dollop of guacamole, roasted corn kernels, diced red onion, and chopped cilantro.
Finish with lime juice and a sprinkle of cotija cheese.
Chef’s Tip: Try different toppings, such as whipped feta with pomegranate seeds or spicy black bean mash with pickled jalapeños.
4. Loaded Sweet Potato with Maple-Sriracha Yogurt & Crispy Chickpeas
On the Cutting Edge: Loaded sweet potatoes are evolving, now being downsized into appetizer “boats” for maximum flavor and visual impact. The latest takes layer sweet, spicy, tangy, and crunchy elements for a full flavor experience (Good Mood Food, April 2025).
How to Make Them Practical:
Halve small sweet potatoes lengthwise; roast until just soft.
Scoop out a little center to make a well (save the scooped flesh for another use).
Fill with maple-sriracha Greek yogurt, crispy roasted chickpeas, crumbled feta, and pickled onions.
Drizzle with almond salsa verde (blend toasted almonds, parsley, lemon, olive oil, and a pinch of chili).
Meal Prep Friendly: Both the yogurt sauce and chickpeas can be made days in advance, making this ideal for parties.
5. Tempura Sweet Potato Rounds with Flavored Salt
The Industry Insight: Pre-cooked, tempura-battered sweet potato slices are gaining traction in restaurant and catering sectors for their crispness and convenience (US Foods Chef’s Line, 2025). This idea translates well to home kitchens using basic tempura batter.
How to Bring to Your Table:
Cut sweet potato into ½-inch thick rounds.
Dip in a simple tempura batter (flour, cornstarch, cold seltzer).
Fry in hot oil until golden and crispy.
Sprinkle immediately with flavored salt (smoked paprika, garlic powder, or furikake).
Serve with a dipping sauce—try spicy mayo, ponzu, or garlic aioli.
Entertaining Tip: Offer a trio of dips and salts, and let guests mix and match.
Expert Tips for Sweet Potato Appetizer Success
Visual Appeal: Use a mix of purple, orange, and white sweet potatoes for color contrast.
Batch Prep: Many components (roasted rounds, sauces, toppings) can be made ahead for fast assembly.
Texture Matters: Combine creamy, crunchy, and chewy elements for memorable bites.
Global Flavors: Don’t be afraid to borrow from global cuisines—sriracha, gochujang, furikake, and curry powder all pair beautifully with sweet potatoes.
Final Thoughts
From smoky grilled salads to street-food-inspired croquettes, sweet potato appetizers are having a major moment in 2025. They’re healthy, photogenic, endlessly adaptable, and equally at home at a casual party or a fine-dining table. Whether you’re looking for a new plant-based favorite or a show-stopping party snack, these ideas bring the best of today’s trends straight to your kitchen.
Ready to experiment? Which idea will you try first? Let us know in the comments or share your own sweet potato creations!
FAQs
1. Can I use regular potatoes instead of sweet potatoes in these recipes?
Answer: Yes, you can substitute regular potatoes for sweet potatoes in most appetizer recipes, but you’ll lose the characteristic sweetness and vibrant color. Adjust seasonings to balance flavors accordingly.
2. How do I keep sweet potato rounds from getting soggy when roasting or grilling?
Answer: Slice rounds evenly (about ½ inch), don’t overcrowd the pan, and roast or grill at high heat (425°F/220°C) to encourage caramelization. Let them cool on a wire rack to preserve crispness.
3. Can I make sweet potato appetizers ahead of time?
Answer: Yes! Many components (roasted rounds, dips, toppings) can be made a day ahead. Store separately and assemble just before serving for best texture and flavor.
4. What are some gluten-free options for breading or crisping sweet potatoes?
Answer: Use gluten-free panko, crushed rice crackers, or cornmeal for coating. Tempura batter can be made with rice flour and cornstarch.
5. How do I make sweet potato appetizers vegan?
Answer: Omit dairy (cheese, yogurt) and use plant-based alternatives like cashew cream, vegan cheese, or dairy-free yogurt. Use aquafaba or flaxseed “egg” for binding in fritters or balls.
6. What’s the best oil for frying sweet potato appetizers?
Answer: Use oils with a high smoke point like canola, peanut, or avocado oil. For added flavor, try a touch of sesame oil in the batter or as a finishing drizzle.
7. Can I air-fry sweet potato appetizers instead of deep frying?
Answer: Absolutely! Air frying is a healthier alternative and works well for rounds, wedges, and even “balls.” Toss lightly in oil, arrange in a single layer, and cook at 375°F/190°C, flipping halfway.
8. How do I add more flavor to plain sweet potato appetizers?
Answer: Experiment with spice blends (cajun, za’atar, curry powder), citrus zest, fresh herbs, or flavored salts. Don’t be afraid to use bold, global-inspired dips.
9. Are these sweet potato appetizers suitable for kids?
Answer: Yes! They’re naturally sweet and can be made mild by adjusting spices. Offer a range of dips and let kids assemble their own bites for fun.
10. How should I store leftovers, and can I reheat sweet potato appetizers?
Answer: Store leftovers in an airtight container in the fridge for up to 3 days. Reheat in a hot oven or air fryer to restore crispness; avoid microwaving as it makes them soggy.
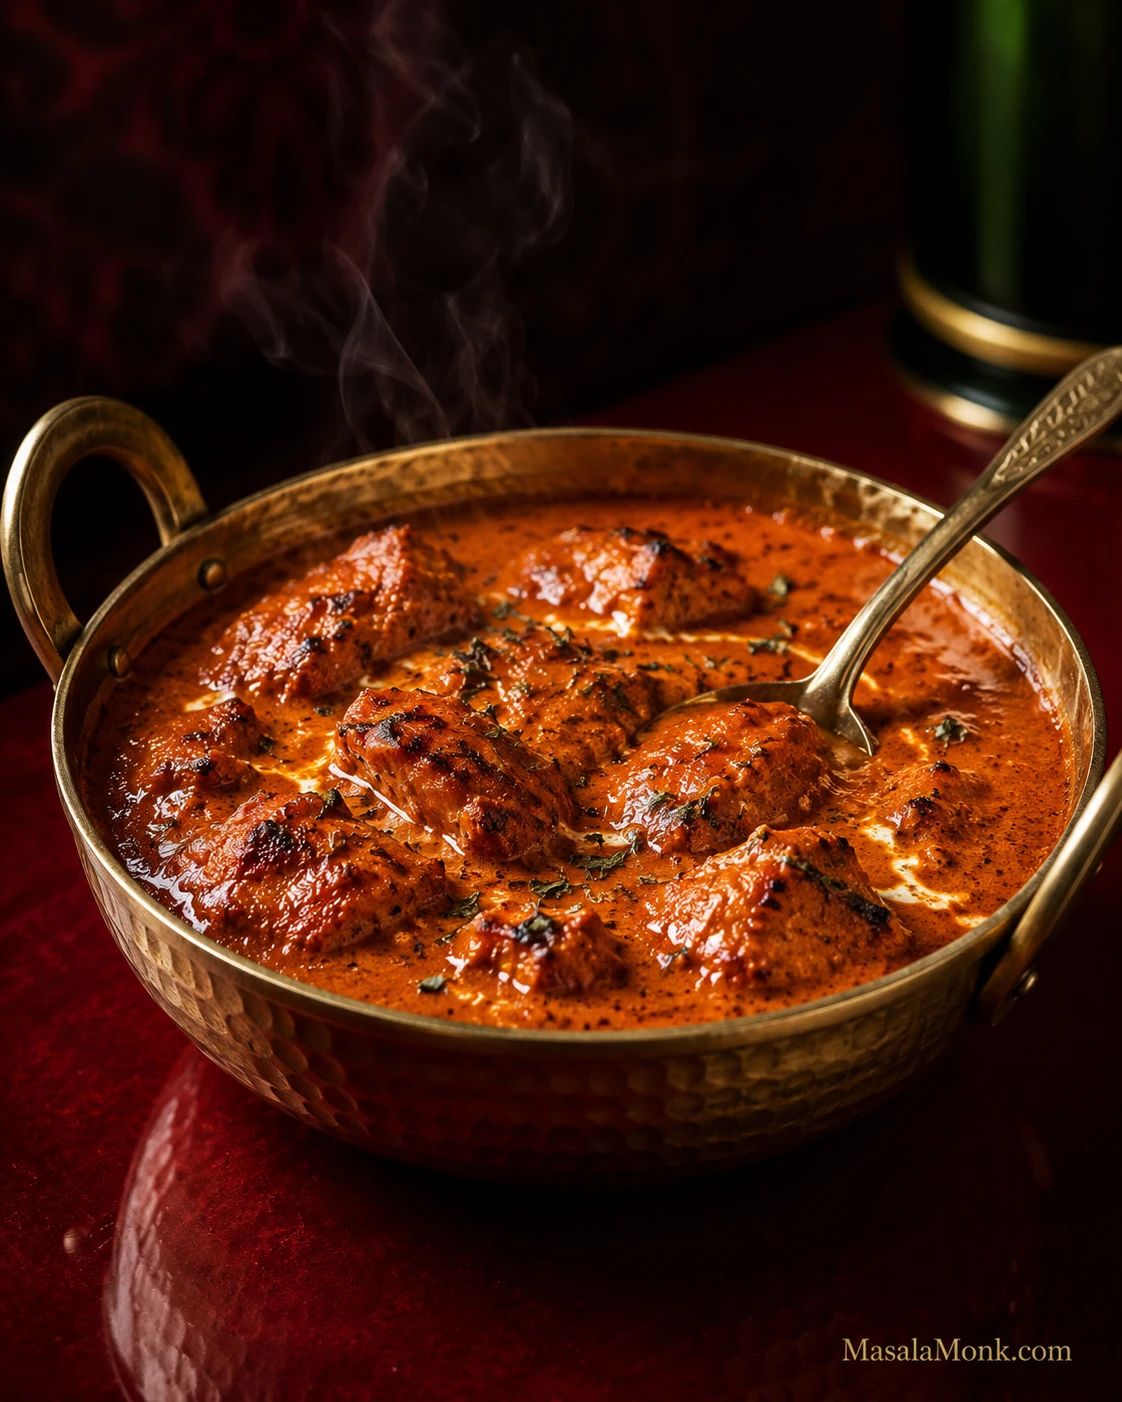
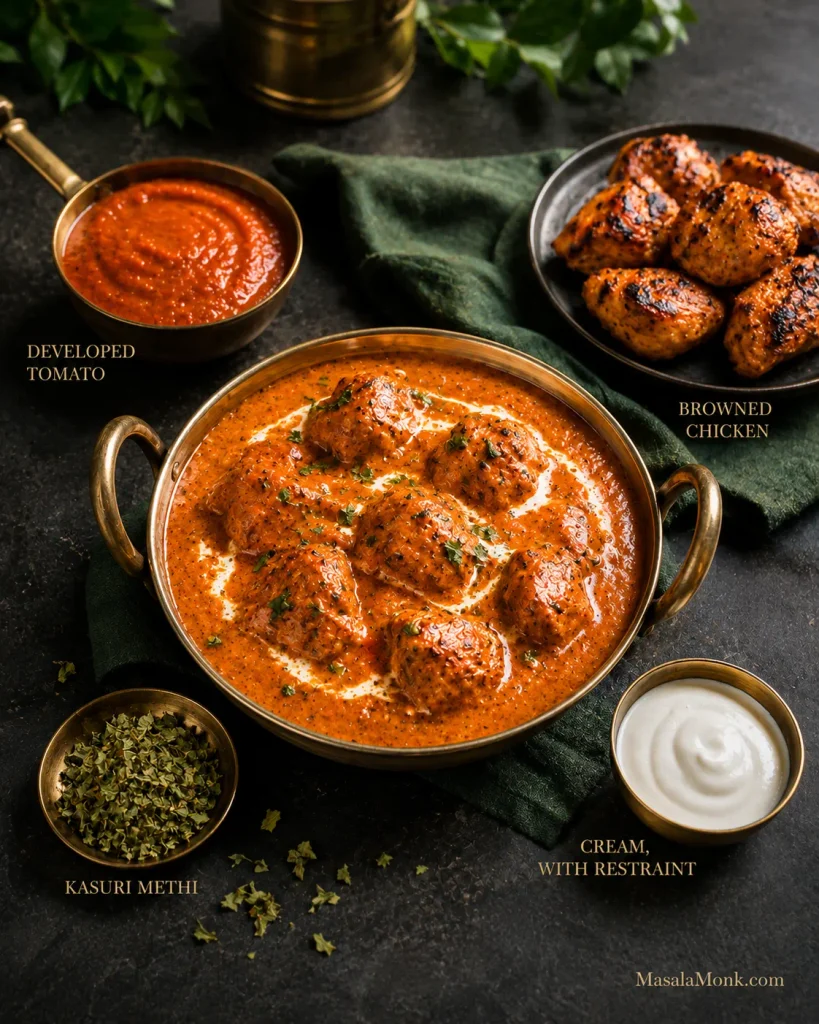
A good butter chicken has contrast, and keto doesn’t change that.
The chicken should have browned, sometimes lightly charred edges. The gravy should cling to those pieces and still move around them, with a soft butter sheen. Tomato gives the sauce its backbone, cream smooths the acidity, and crushed kasuri methi leaves the aroma that makes the finished curry recognizably butter chicken.
If butter chicken is one of the dinners you’ve been missing since cutting back on carbs, most of what makes it worth eating can stay. Or maybe you’ve already tried a low-carb version and ended up with perfectly decent creamy tomato chicken that somehow never quite became butter chicken. This recipe is meant to solve both problems.
This version is savory and tomato-deep, with browned chicken, a smooth orange-red gravy, moderate cream and kasuri methi still noticeable after the bite. A favourite takeaway may be much sweeter or richer. If yours is, this will taste different—and nothing has gone wrong.
Butter chicken—murgh makhani—already starts with plenty of ingredients that fit naturally into a lower-carb meal. Most of the carb difference comes from added sugar, how much tomato and onion go into the gravy, cashews or starches, prepared sauces and, very often, the rice and naan served with it.
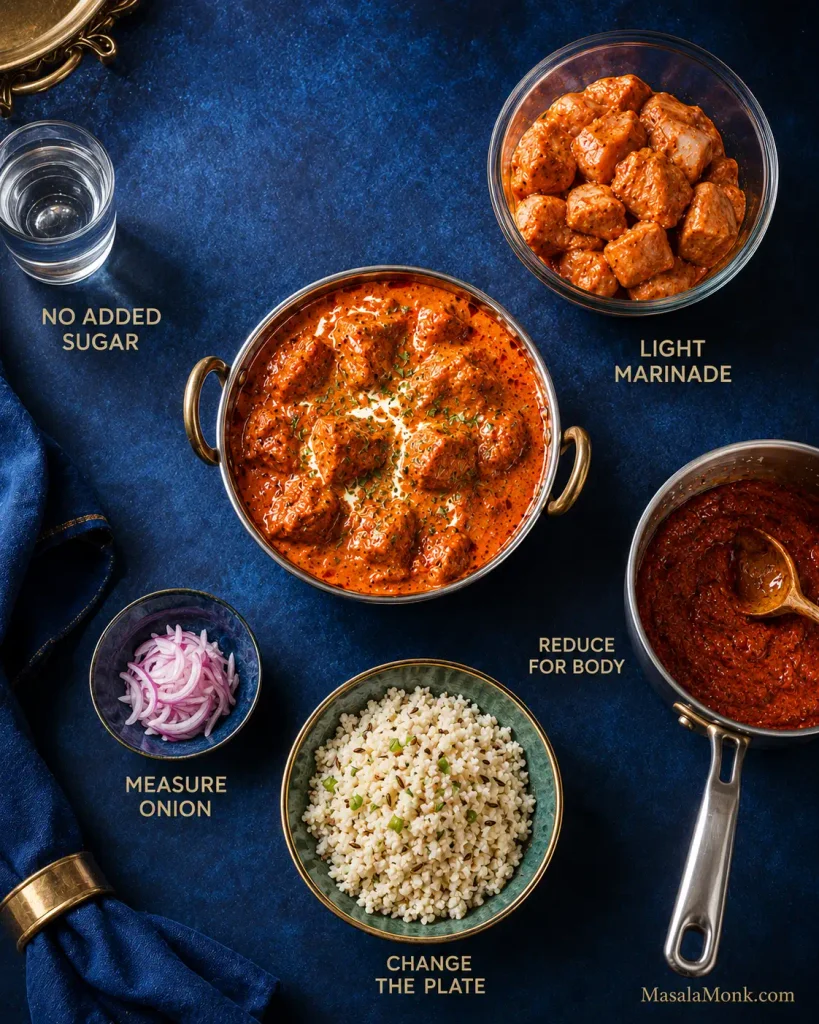
Keep the butter chicken. Change the carbs that matter.
Yes. Homemade butter chicken can be keto-friendly. This version comes to roughly 7g net carbs per serving, with no added sugar, cashews or flour-based thickener.
Chicken, butter, ghee, cream and spices contribute relatively little carbohydrate in the amounts used here. Tomato, onion and plain yogurt contribute some. Restaurant and packaged gravies may add sugar, ketchup, flour, cornstarch, cashews or simply a much larger amount of sauce.
Homemade is easier to calculate because you know what went into the pan. Whether roughly 7g net carbs fits your day depends on the carbohydrate target you’re following.
Skip the added sugar. Give the tomato enough time to lose its raw, sharp edge before deciding the sauce needs sweetness.
Keep the yogurt-and-lemon marinade. Leave only a light coating on the chicken before browning so the spices stay with the meat without flooding the pan.
Let the gravy thicken through cooking. Tomato reduction and blending give this sauce plenty of body. Flour and specialty keto thickeners are unnecessary.
Measure the onion; skip the cashews in this version. A modest amount of onion still gives the gravy body and sweetness, while the tomato, butter and cream supply enough richness.
Look at the whole plate. Jeera cauliflower rice, greens and something crisp can save more carbohydrates than stripping character out of the curry itself.
That’s most of the keto work. From here, cook it like butter chicken.
No specialty keto thickeners are needed here: reduction, measured gravy ingredients and the plate do the work.
Keto Butter Chicken Recipe
The ingredient list looks long, but the cooking itself is straightforward. Most of the work is measuring, browning the chicken and giving the tomato enough time.
If other people at the table aren’t eating low-carb, you do not need a second curry. Put rice or naan on their side of the table and cauliflower rice or vegetables on yours.
At a Glance
Detail
What to expect
Serves
4 generous main-course portions
Chicken
700g / 1½ lb boneless skinless thighs
Prep
About 15 minutes
Marinating
30 minutes minimum; 2–4 hours is better
Cook
About 30–40 minutes
Minimum elapsed time
About 1¼–1½ hours
Pan
11–12in / 28–30cm wide, reasonably deep skillet or sauté pan
Heat level
Mild to medium
Estimated net carbs
About 7g per serving, before sides
Equipment
11–12in / 28–30cm wide, reasonably deep skillet or sauté pan
mixing bowl
knife and cutting board
instant-read thermometer
immersion blender, recommended for a smoother gravy
digital kitchen scale, useful but not essential
A countertop blender works too. If the gravy is too shallow for an immersion blender to stay submerged, transfer it to a tall heatproof jug. Let very hot gravy settle briefly and follow your blender manufacturer’s guidance for hot liquids. A fine-mesh strainer is optional.
For carb tracking, weigh the tomato and onion first; tiny spice differences matter far less.
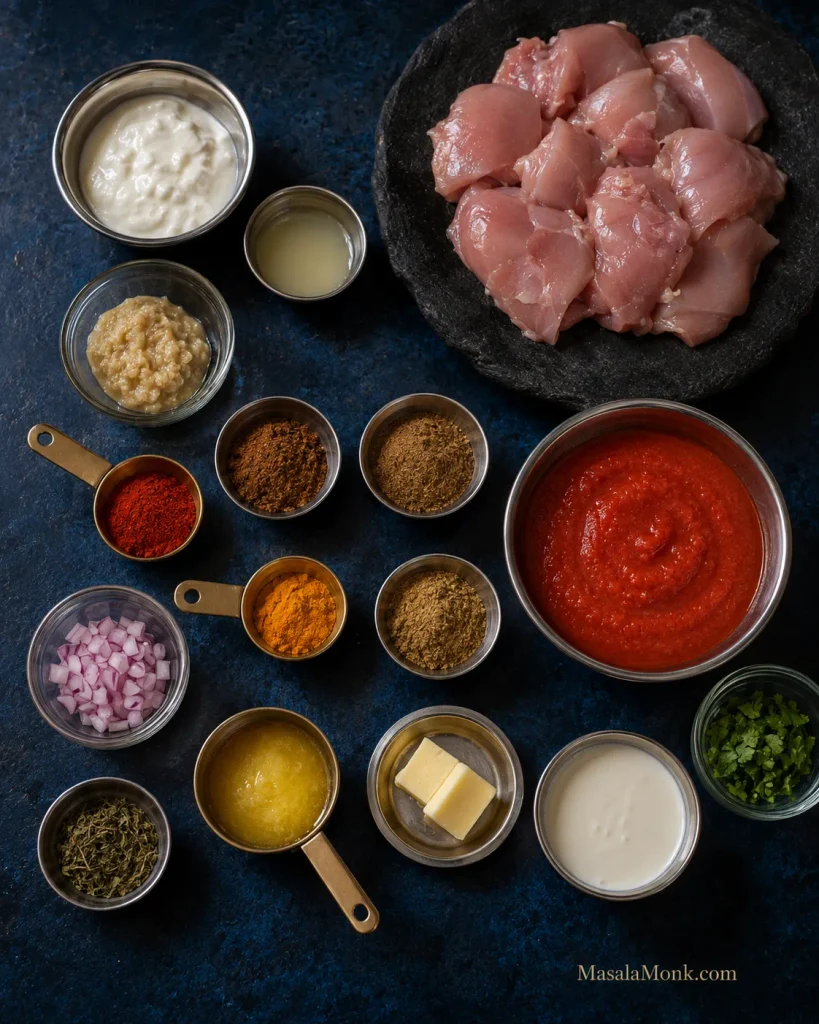
80g / ⅓ cup thick plain full-fat yogurt or dahi; mild full-fat Greek yogurt also works
15ml / 1 tbsp lemon juice
15g / 1 tbsp ginger-garlic paste
1 tsp Kashmiri red chilli powder
1 tsp garam masala
½ tsp ground cumin
4g / about ¾ tsp fine sea salt
Makhani Gravy
14g / 1 tbsp ghee, for browning the chicken
14g / 1 tbsp ghee or butter, for the gravy
50g / roughly ½ small onion, finely chopped
15g / 1 tbsp ginger-garlic paste
1 tsp ground coriander
½ tsp ground cumin
½ tsp garam masala
¼ tsp ground turmeric
¼–½ tsp Kashmiri red chilli powder
225g / 8oz / scant 1 cup plain passata or strained tomatoes, with no added sugar
60ml / ¼ cup hot water or unsalted/lightly salted chicken stock, plus more if needed
3g / about ½ tsp fine sea salt
To Finish
120ml / ½ cup heavy or whipping cream
14g / 1 tbsp butter
1 tsp dried kasuri methi
fresh coriander/cilantro, optional
A fresh cream around 25% milk fat works too. The gravy will be slightly lighter and looser and may need another minute of gentle reduction. The nutrition estimate later in the post assumes heavier cream in roughly the 30–36% range.
Kashmiri chilli is being used mainly for colour and gentle warmth. Add cayenne or a hotter Indian chilli powder separately when you want more heat. For a mixed table, keeping the main pan mild and sharpening individual portions at the end is usually easier.
1. Marinate the Chicken
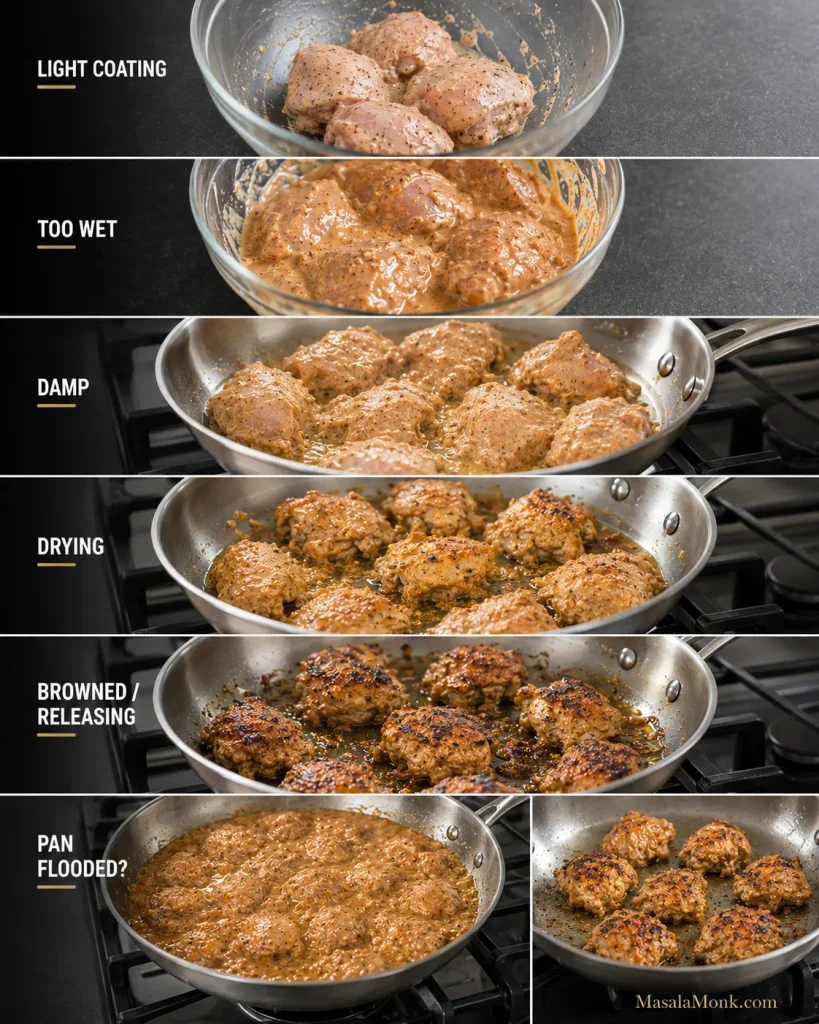
Mix the yogurt, lemon juice, ginger-garlic paste, Kashmiri chilli, garam masala, cumin and salt. Add the chicken and turn until every piece carries a light coating.
Cover and refrigerate for at least 30 minutes. Two to four hours works particularly well, and overnight is fine when that suits your schedule.
Before cooking, lift the chicken from the bowl and scrape or shake away the heavy excess marinade. Discard what remains after contact with the raw chicken. A little yogurt-spice coating should stay on the meat, but there should not be enough to form a puddle in the pan.
2. Brown the Chicken
Heat the pan over medium-high heat and add the ghee. If you’re cooking in two batches, divide that tablespoon between them. Arrange the chicken in a single layer with some room around the pieces.
At first you’ll hear a damp hiss as moisture leaves the surface. As the pan dries, the sound becomes sharper and the yogurt-spice coating begins catching and darkening around the edges. Give the first side roughly 2–3 minutes before checking it. Chicken that still grips the pan usually needs another few moments; once the surface has browned properly, it releases more easily.
Turn and colour the second side briefly, then transfer the chicken to a plate while the centre is still underdone. A few uneven dark patches are exactly what you want. The pieces do not need to look identical.
Pan filling with water? Stop adding chicken. Remove the pieces if necessary, let the excess liquid evaporate, add a touch of ghee once the pan is dry again and continue in smaller batches.
Between batches, let the pan get hot and dry again before adding more yogurt-marinated chicken. Otherwise, the next batch inherits the moisture from the last one.
For stronger tandoori-style edges, the marinated chicken can go under a very hot broiler/grill until a few spots blister, then finish cooking in the gravy.
3. Build the Makhani Base
Lower the heat to medium and add the second tablespoon of ghee or butter. Add the onion and measured salt and cook for about 4–6 minutes, until the onion softens and loses its sharp raw smell. A little gold around the edges is welcome.
Add the ginger-garlic paste and cook for roughly 30 seconds, until its raw aroma mellows. Stir in the coriander, cumin, garam masala, turmeric and Kashmiri chilli for another 20–30 seconds. Lower the heat if the spices begin sticking or darkening quickly.
4. Give the Tomato Enough Time
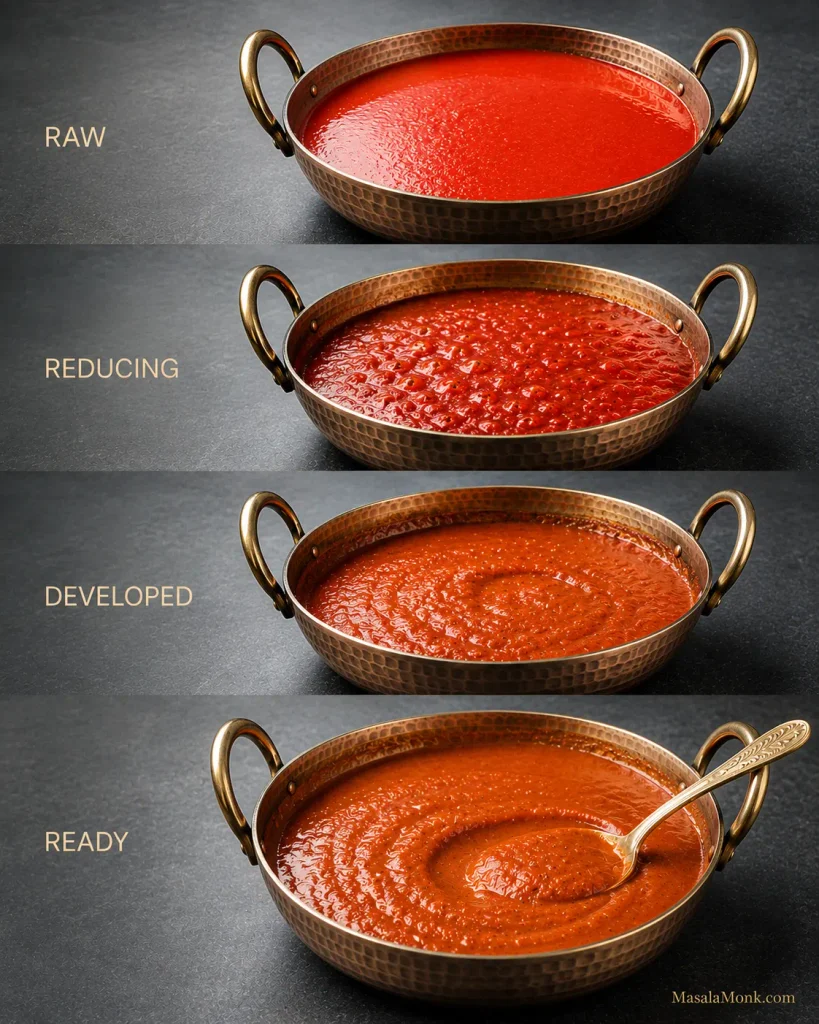
Pour in the passata and scrape the bottom of the pan to release the browned chicken and spice residue. Cook uncovered over medium to medium-low heat, stirring regularly.
Expect roughly 8–15 minutes, sometimes longer. Tomato products vary, and so do burners and pans. If yours needs 18 minutes, nothing has gone wrong.
The sauce starts bright and loose. As water cooks away, the colour deepens, the texture tightens and the obvious bottled-tomato smell fades. Draw a spoon through the pan: the trail should remain visible briefly before the sauce flows back. Small beads or streaks of fat may appear near the edges; you do not need a dramatic oil layer.
Taste a little. A sharp, raw tomato flavour means it needs more cooking. Extra tomato paste makes the colour stronger, but it can push the gravy towards a concentrated pasta-sauce flavour. Use it only when the tomato product itself is unusually pale or weak.
A wide pan speeds evaporation, concentrating passata without flour, cornstarch or another gravy thickener.
5. Blend the Gravy, Then Finish the Chicken
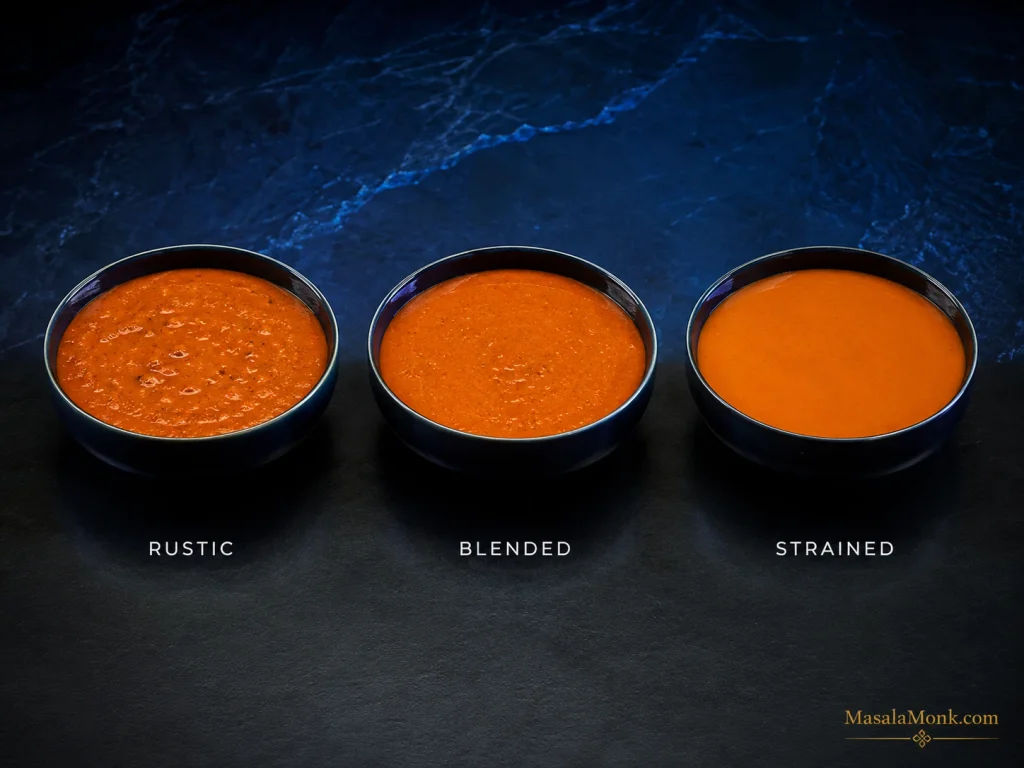
Pour in 60ml / ¼ cup hot water or stock and remove the pan briefly from the heat. Blend until smooth. For an especially silky gravy, strain it before returning it to the pan. Leaving it a little rustic is fine too.
Return the blended gravy to medium-low heat for 2–3 minutes, stirring as it comes back together and thickens slightly. Tiny beads of fat may appear around the edge.
If the gravy tightens before the chicken is ready, add hot water or stock 1 tbsp / 15ml at a time.
6. Finish With Cream, Butter and Kasuri Methi
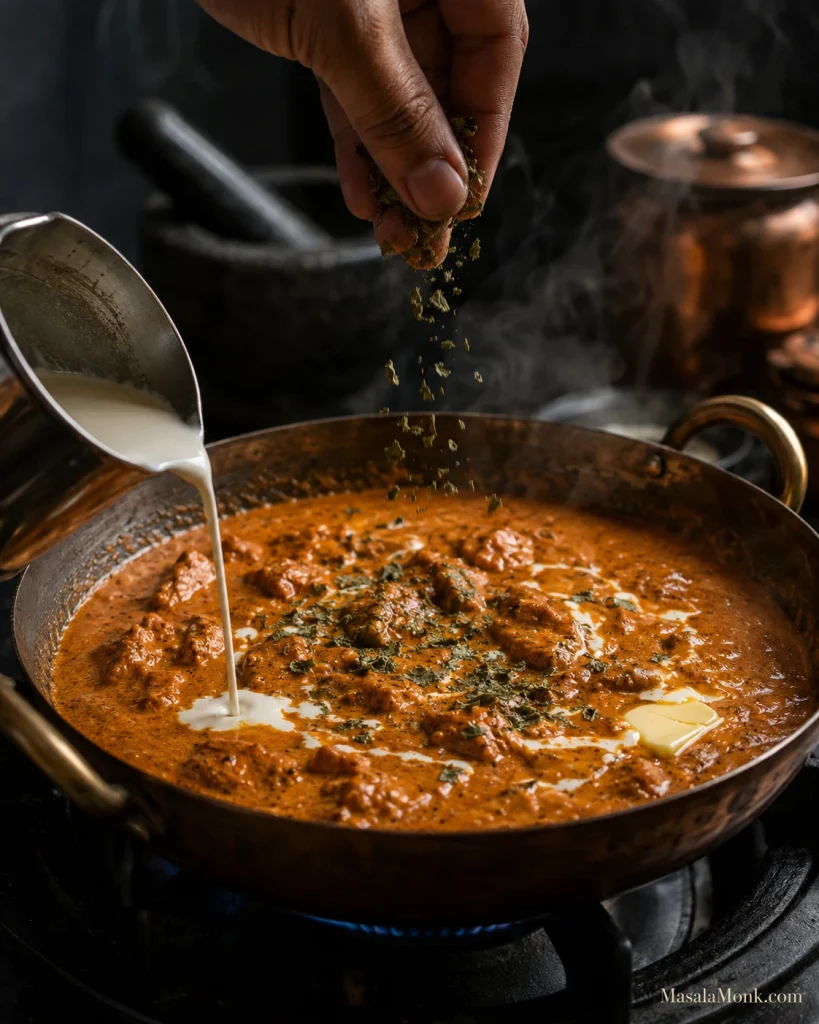
Reduce the heat to low and let hard bubbling settle. Stir in the cream, then crush 1 teaspoon kasuri methi between your palms over the pan and add it with the finishing butter. Warm everything gently for another minute.
Once the cream is in, keep the heat gentle. A hard boil can split the dairy, while prolonged cooking also softens the fresh aroma of butter and kasuri methi.
Taste and check the salt first. After that, make only the adjustment the gravy needs: another ¼ teaspoon methi, a touch more heat, a small finishing pinch of garam masala, a spoonful of water or perhaps one more spoonful of cream.
If the tomato is still sharply acidic after it has cooked fully and the salt, butter and cream are in place, a very small amount of your preferred low-carb sweetener can help. Add it only at the end and only if the sauce genuinely needs it.
Turn off the heat and let the curry rest for about 5 minutes.
The Finished Butter Chicken
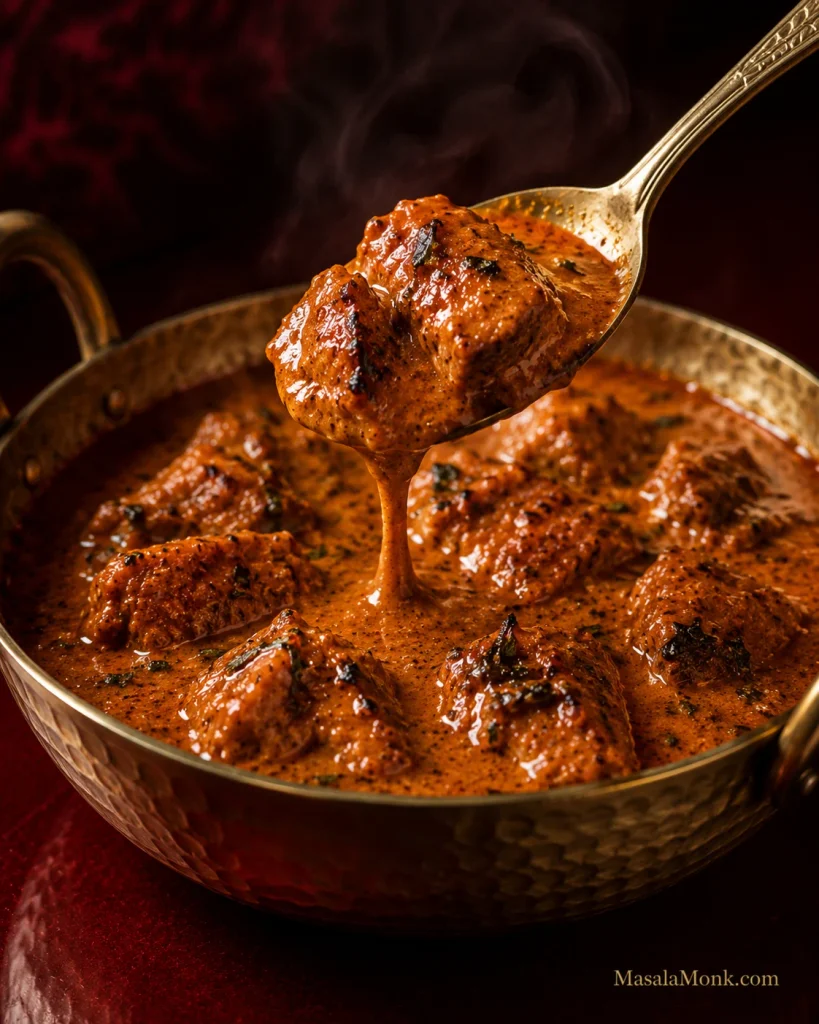
Some of the yogurt-spice coating should have darkened around the chicken while the centre stays juicy. The gravy should settle naturally around the pieces, with no watery pool underneath. The raw tomato edge should be gone, but you should still taste tomato, ginger, chilli and spice after the cream goes in.
Kasuri methi should be easy to notice when you lean over the pan. Drag a spoon through the gravy; the line should stay open for a moment and then slowly close. Lift the spoon and the sauce should cling before falling back in a slow ribbon.
Too thick? Stir in 1 tbsp / 15ml hot water. Too loose? Give it another minute or two uncovered.
Perfect texture can still mean too much sauce. Fix the ratio, not the chicken.
Then stop adjusting.
Spoon it over hot jeera cauliflower rice and get some browned chicken and gravy in the first bite. At that point, nobody needs to be thinking about what was removed.
If dinner is already on the table, stop here and eat. Everything below is for the question that comes next: why another recipe claims fewer carbs, why a gravy tastes wrong, what changes at a restaurant or how to make the next batch easier.
What Makes Butter Chicken Taste Like Butter Chicken?
The hardest butter chicken to diagnose is the one that isn’t bad. The chicken is tender, the sauce is creamy and the seasoning seems reasonable, yet the first bite still tastes like generic tomato curry.
Usually there isn’t one secret ingredient missing. Tomato that has cooked far enough, properly browned chicken, enough salt and a sensible amount of cream all matter. Kasuri methi adds one of the most recognizable aromas in the finished gravy, and even a small amount can change the character of the sauce.
If the curry tastes seasoned but still smells anonymous, smell the kasuri methi before reaching for another spoonful of spice.
When butter chicken tastes almost right, change one variable at a time: check salt first, then char and kasuri methi before adding more cream or another spoonful of spice.
Where the Carbs in Butter Chicken Come From
Two bowls of butter chicken can look nearly identical and still produce very different nutrition numbers. Much of that variation comes from the gravy and from what somebody has decided counts as one serving.
Variable
Lower-carb direction
Higher-carb direction
Tomato
Measured tomato base
Large tomato-heavy gravy
Onion
Small measured amount
Onion-heavy base
Added sweetness
None
Sugar, honey or ketchup
Cashews
None or a little
Cashew-rich gravy
Yogurt
Plain and measured
Sweetened or larger amounts
Thickening
Reduction
Flour or cornstarch
Prepared sauce
Plain/no-added-sugar
Sweetened commercial gravy
Serving size
Clearly defined
Tiny or vague
The plate
Vegetables or cauliflower rice
Rice plus naan
For this recipe, one serving means one-quarter of the finished curry.
The 225g / 8oz tomato gives the gravy enough acidity and fruitiness without making tomato the whole story. Once properly cooked, it tastes much less dominant than it does straight from the bottle.
Some butter chicken is sweet and some isn’t. This version starts without added sugar because cooked tomato, salt, butter and cream usually provide enough balance.
The 50g onion contributes body and natural sweetness while keeping the quantity predictable. Cashew paste can make a lovely rich butter chicken gravy, but this sauce does not need it.
Same curry, different plate: hold the portion steady and let the sides change the carb load.
Ingredient Notes That Change the Result
Thick yogurt helps the seasoning cling to the chicken, and lemon adds brightness. Moisture is the part to watch during browning: a heavy yogurt coating cools the pan, releases water and can leave pale coagulated clumps. Plain unsweetened yogurt or dahi works well. A particularly tangy Greek yogurt can make the finished curry noticeably more sour.
Chicken thighs are more forgiving through browning and the final simmer. Breast works too; keep the pieces evenly sized and avoid cooking them through during the first sear. MasalaMonk’s baked chicken breast recipe goes deeper into thickness, temperature and keeping lean breast meat juicy.
For the tomato, smooth plain passata is the easiest choice. Finely crushed tomatoes can be used too and may need more cooking and blending. Sweet pasta sauce, ketchup and seasoned marinara change the flavour substantially. Tomato paste is far more concentrated, so save it for the rare batch where the tomato itself seems unusually pale or weak.
Spices, Kasuri Methi and Cream
Kashmiri chilli gives deep colour with moderate heat. Paprika can provide much of that colour when Kashmiri chilli is unavailable, with stronger chilli added separately. Garam masala varies considerably from brand to brand, so a small finishing pinch can help when its aroma seems muted.
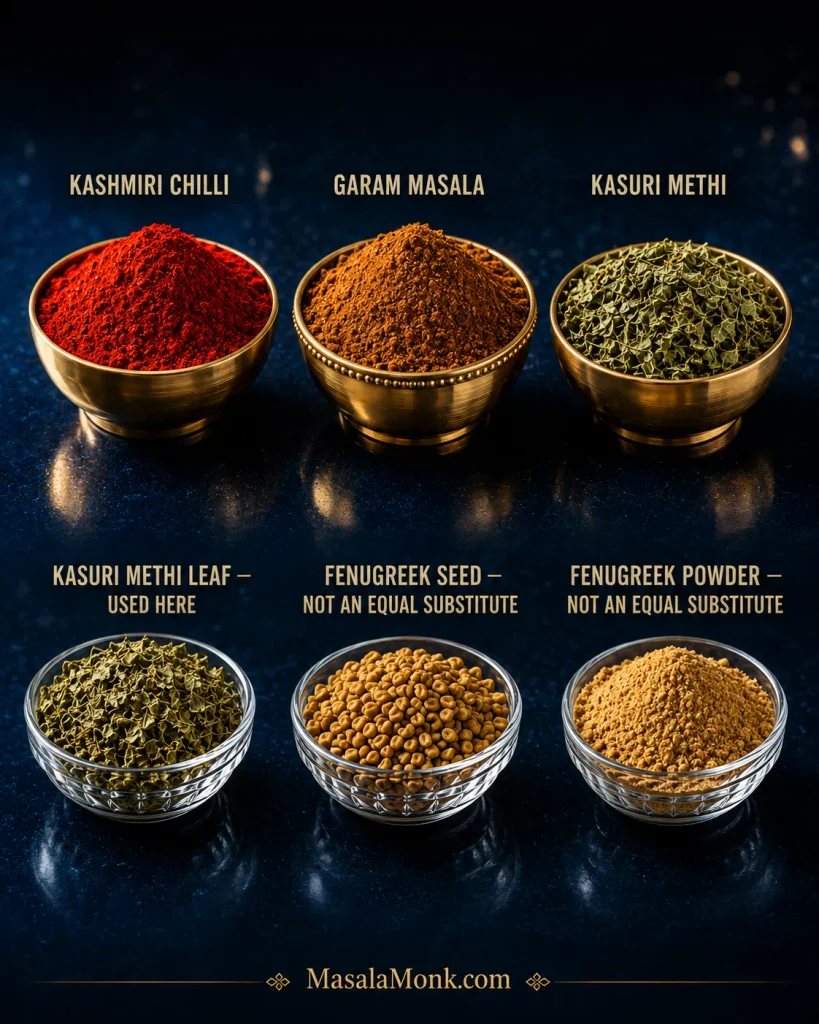
Kasuri methi is dried fenugreek leaf. Fenugreek seed and ground fenugreek are much stronger and should not replace it measure-for-measure. Start with 1 teaspoon of the leaves and increase in ¼-teaspoon steps only after tasting. If you cannot find kasuri methi, leaving it out is safer than substituting the same quantity of seed or powder.
At the shop, look for “kasuri methi” or “dried fenugreek leaves” on the packet. Then crush the leaves just before finishing the gravy to release more of their aroma.
The 120ml / ½ cup cream used here softens the tomato and carries the spices through the gravy. Add much more and the curry can turn pale while the ginger, chilli and methi recede into the background.
Want a Smoother, More Restaurant-Style Finish?
Restaurant butter chicken is not one fixed flavour. Some gravies are sweeter, some tangier and some substantially richer with cream or cashew. You can reproduce much of the char, silkiness and aroma at home, but a particular restaurant may still taste quite different.
A very hot broiler or grill gives the chicken darker blistered edges than most home pans can manage when they are full. A few charred spots are enough.
For the gravy, thorough blending makes the biggest difference. Straining takes the texture one step further when you specifically want the very smooth finish found in many restaurant versions.
Keep the butter and kasuri methi for the end so their aroma stays fresh. A brief dhungar smoke can add another layer when that is a technique you already use comfortably. Good chicken char gets you a long way without it.
Blending gets you most of the silkiness; straining is optional polish.
Fix Your Butter Chicken
Butter chicken problems often sound alike. “Too tomatoey,” “bland” and “thin” can each describe more than one failure, and throwing more cream or spice at a confused gravy rarely helps. Work out what is actually wrong first.
Problem
Likely cause
First move
Raw or harsh tomato
Tomato base undercooked
Keep reducing
Tastes like pasta sauce
Too much concentrate or underdeveloped gravy
Cook the base further
Bland
Salt, char or finishing aroma lacking
Check salt first
Too sour
Acidic or undercooked tomato
Cook, then balance
Too sweet
Too much sweetener
Restore salt and spice balance
Generic creamy curry
Weak char, little methi or rushed tomato
Correct those elements
Watery
Too much liquid
Remove chicken and reduce
Pasty
Over-reduced
Add hot water 15ml at a time
Too much gravy
Sauce volume drifted upward
Remove some sauce
Chicken released lots of water
Wet coating, cool pan, crowding or high-water chicken
Dry the pan and brown smaller batches
White yogurt clumps
Wet marinade or crowded/cool pan
Less coating, more heat, smaller batches
Greasy or split
Excess fat or hard boiling after dairy
Lower the heat
Dry chicken
Overcooked during both stages
Brown first; finish only to 165°F / 74°C
Bitter methi
Too much kasuri methi
Dilute if possible
Too spicy
Excess hot chilli
Add a little cream
Too pale
Too much cream
Use less next time
Read the pan before changing the seasoning. Pooling liquid, separated fat, pale gravy and yogurt clumps describe four different failures—and therefore four different fixes.
Too Tomatoey or Too Sour
Bright, raw tomato needs more cooking. A heavy concentrated-tomato flavour is different and often comes from too much tomato paste. For sourness, make sure the tomato is fully cooked and then check the salt. Butter or a little more cream can soften what remains; sweetener comes last.
Bland—or Just Not Tasting Like Butter Chicken?
Flat flavour usually calls for salt first. A curry that is already seasoned but still tastes generic needs a different diagnosis: check the chicken browning, tomato development and kasuri methi. Smell the garam masala and methi straight from their containers too. Old spices can be present in the recipe and almost absent in the bowl.
Watery Sauce
Once the chicken reaches temperature, take it out. Reduce the gravy uncovered and return the chicken only long enough to coat and warm through.
Great Sauce, Wrong Ratio?
Sometimes the gravy is perfectly thick and there is simply too much of it. An oversized onion, extra tomato or accidentally scaled-up sauce can do that. Remove some and save it for another meal instead of continuing to cook the chicken.
White Yogurt Clumps
The pan was probably too cool, too crowded or carrying too much wet marinade. The curry is still edible. Next time, leave only a light coating on the chicken and give the pieces more space.
Bitter Kasuri Methi
Once too much methi is in the sauce, there is no clean way to remove it. Extra unsweetened gravy or a little cream can dilute the bitterness. Starting with the first teaspoon and increasing slowly is much easier than rescuing an over-methi’d pan.
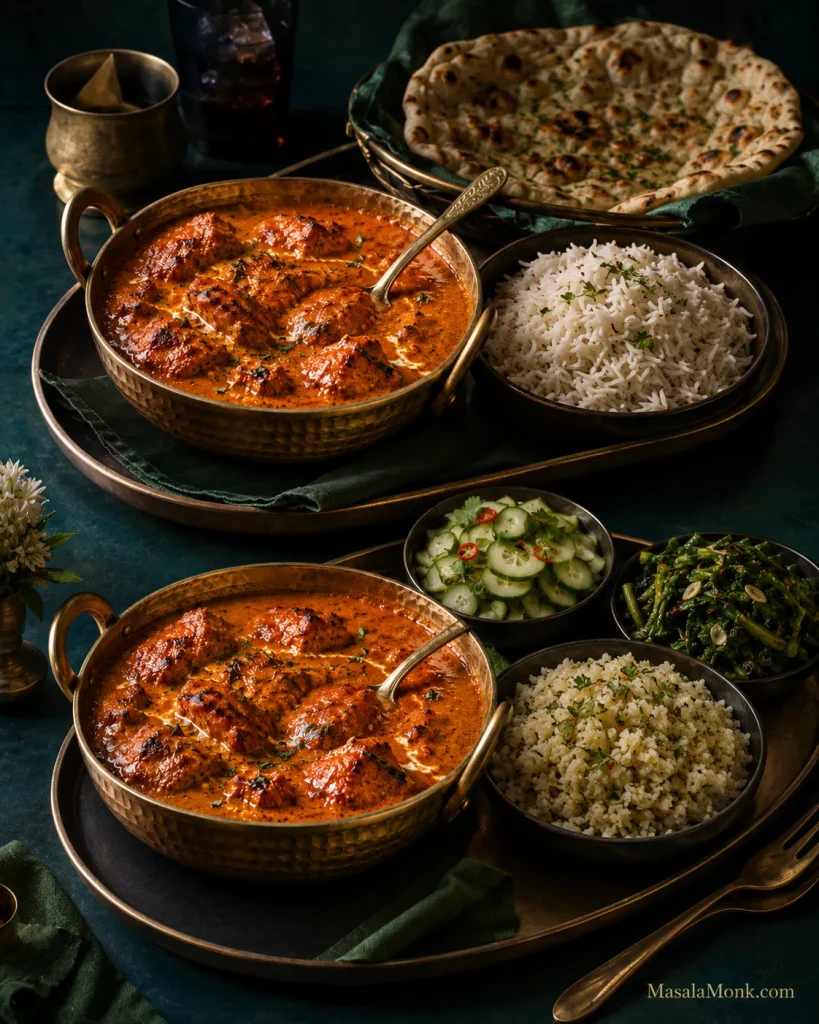
A lower-carb butter chicken dinner does not need to look like curry surrounded by substitutes you’re merely tolerating. Give the gravy something warm to sit on, something green to cut through the richness and something cold and crisp beside it.
Jeera Cauliflower Rice
Cumin makes cauliflower rice feel like part of dinner.
Serves 4
Ingredients: 600g / about 6 cups cauliflower rice, 1 tbsp ghee or butter, 1 tsp cumin seeds, ½–¾ tsp salt, plus coriander and a small squeeze of lemon if you like.
Heat a wide pan over medium heat and add the ghee. Let the cumin seeds sizzle for 20–30 seconds, until fragrant, then add the cauliflower rice and salt. Increase the heat to medium-high and cook uncovered for about 5–7 minutes.
There will be plenty of steam at first. As it eases, the cauliflower should become tender while the small grains remain separate. Stop before it turns soft and wet.
Garlic spinach is especially good here because its slight bitterness cuts through the buttery gravy. Roasted cauliflower, cabbage, broccoli and green beans are easy alternatives.
Something Cold and Crisp
Cucumber, coriander, mint and lemon bring crunch and acidity. MasalaMonk’s cucumber salad recipe gives you several ways to build that fresh side.
If You Miss Naan
A low-carb naan or roti can make the meal feel much closer to the dinner you were craving. With packaged low-carb breads, check the actual carbohydrate amount and serving size on the label.
Cauliflower rice, one green vegetable and something cold already make a generous plate.
Put the hot jeera cauliflower rice under the curry so it catches the makhani gravy; keep cucumber alongside it so the crunch, acidity and temperature contrast stay intact.
Is Restaurant Butter Chicken Keto?
Restaurant butter chicken is harder to calculate because the gravy has usually made most of its decisions before you sit down.
It may contain sugar or honey, ketchup, more onion, cashew paste, flour or cornstarch, sweetened tomato products or a premade curry base. Because that gravy is often prepared in a large batch, asking for “no sugar” may not change what is already in the pot.
The most useful question is simple: Does the butter chicken gravy contain added sugar or flour/cornstarch?
Can’t get a clear answer? Simpler grilled dishes are easier to judge when you’re keeping carbohydrates particularly low: tandoori chicken, chicken tikka, kebabs, grilled fish and some dry-style meat preparations. MasalaMonk’s green chutney recipe is a natural partner for those dishes.
Then look at the rest of the order. Rice, naan and sweet chutneys can change the meal far more than a measured amount of tomato in the curry.
Your favourite takeaway may taste quite different from this recipe even when both are good butter chicken. Some house gravies are much sweeter, saltier or richer. If that is exactly the butter chicken you love, a different result at home does not mean the recipe failed; you’re simply aiming at another style.
Batch gravy may already contain sugar or starch; when it does, a simpler grilled dish is easier to estimate.
A jarred butter chicken sauce can make dinner much faster. Check the total carbohydrates, added sugars, flour or starch, stated serving size and how much sauce you will actually use. A sauce that fits your numbers but tastes flat can often be improved with a little butter, cream and crushed kasuri methi.
The full recipe takes roughly 45–55 minutes of active work plus at least a short marinade. For a quicker weeknight, marinate the chicken first and use those 20–30 minutes to chop and measure everything else. Smooth passata and skipping the optional straining save time without giving up the chicken browning or tomato reduction.
For nights when fifteen minutes really is the limit, MasalaMonk’s 15-minute sesame ground chicken works well over cauliflower rice, sautéed cabbage or lettuce.
Instant Pot
Pressure cooking traps moisture, so the finished gravy tends to be thinner. Use Sauté for the aromatics, deglaze the pot thoroughly and follow the minimum-liquid requirement for your cooker. Once the chicken is cooked, remove it and reduce a loose sauce with Sauté uncovered before adding the chicken back with the cream, butter and kasuri methi.
Slow Cooker
Slow cooking gives tenderness but very little browning, so sear the marinated chicken first when you can. For boneless pieces, 2–3 hours on High or 4–6 hours on Low is a reasonable starting range; the chicken still needs to reach 165°F / 74°C. Add the cream and finishing butter near the end, and reduce a thin gravy separately.
Make Ahead, Store and Reheat
The chicken can be marinated the day before. The blended tomato gravy can also be cooked ahead. If dinner is for tomorrow, refrigerate the gravy before adding the final cream, butter and kasuri methi, then add those as you reheat it.
Cool leftovers promptly and refrigerate them in a covered container. Use them within 3–4 days, in line with USDA leftover-storage guidance.
Cold butter chicken will look much thicker after a night in the refrigerator. That is normal. Warm it gently and add a splash of water or stock as the gravy loosens. Bring reheated leftovers back to 165°F / 74°C.
Butter chicken freezes well too. Portion it before freezing and aim to use it within about 3 months for best quality.
Reheat first, then thin only if needed; melted fats loosen chilled gravy naturally.
Keto Butter Chicken Nutrition
Based on typical nutrition values for the ingredients listed, one-quarter of the finished curry is approximately:
Per serving
Estimated amount
Calories
About 500 kcal
Protein
About 36g
Fat
About 36g
Total carbohydrates
About 9g
Fiber
About 2g
Estimated net carbohydrates
About 7g
Here, net carbs means total carbohydrate minus fiber. The estimate assumes full-fat plain yogurt and heavy/whipping cream in roughly the 30–36% fat range; a lighter fresh cream will lower the fat and calorie numbers somewhat.
The calculation includes the chicken, yogurt, lemon, onion, tomato, ginger, garlic, ghee, butter, cream and measured spices. It does not include cauliflower rice, bread, optional sweetener, extra cream at serving or other sides.
1 serving = ¼ of the finished curry. If you track carbohydrates closely, the labels on the ingredients in your own kitchen are the most relevant numbers.
Frequently Asked Questions
Does Butter Chicken Usually Contain Sugar?
Sometimes. Some home and restaurant versions add sugar or honey to soften tomato acidity; many others don’t. It isn’t required here. Cook the tomato fully and balance the gravy before deciding it needs sweetness.
Do I Really Need Kasuri Methi?
You can make good creamy tomato chicken without it, but kasuri methi contributes an aroma closely associated with butter chicken. Use dried fenugreek leaves, not the same quantity of fenugreek seed or powder. If the leaves are unavailable, omission is safer than an equal substitution.
Can I Make This Dairy-Free?
Yes, although the flavour will shift. Use plain unsweetened dairy-free yogurt in the marinade and full-fat coconut cream in the gravy, along with a suitable non-dairy cooking fat. The finished sauce becomes more coconut-forward and moves away from classic murgh makhani.
If you’re avoiding dairy because of a milk allergy, don’t assume ghee is automatically suitable.
Is This Butter Chicken Gluten-Free?
The recipe itself doesn’t use wheat flour. Stocks, packaged spice blends and prepared sauces can vary, so check labels when avoiding gluten strictly.
Can I Make It Without a Blender?
Absolutely. Use smooth passata, chop the onion finely and leave the gravy a little more rustic. You lose some silkiness, not dinner.
Keep the Butter Chicken
Once the bowl reaches the table, “keto” shouldn’t be the first thing you notice.
There should be a browned edge on the chicken and enough gravy to drag through whatever is underneath it. The tomato should taste deep and fully cooked, the cream should leave the spices easy to taste, and the butter should give the sauce a soft sheen.
The kasuri methi lingers after the bite.
Cauliflower rice does not need to impersonate basmati. Here its job is simpler: catch the silky makhani gravy and bring toasted cumin into the same bite as the charred chicken.
Keep the butter chicken. Change the carbs that matter.
Eggs have long been heralded as a powerhouse of nutrition. Whether you’re a fitness enthusiast, a busy professional, or someone looking for a reliable source of quality protein, boiled eggs are often at the top of the list. But how much protein is really in two boiled eggs? And what makes them such a staple in diets worldwide?
Let’s break it all down — from grams and amino acids to digestibility and practical tips.
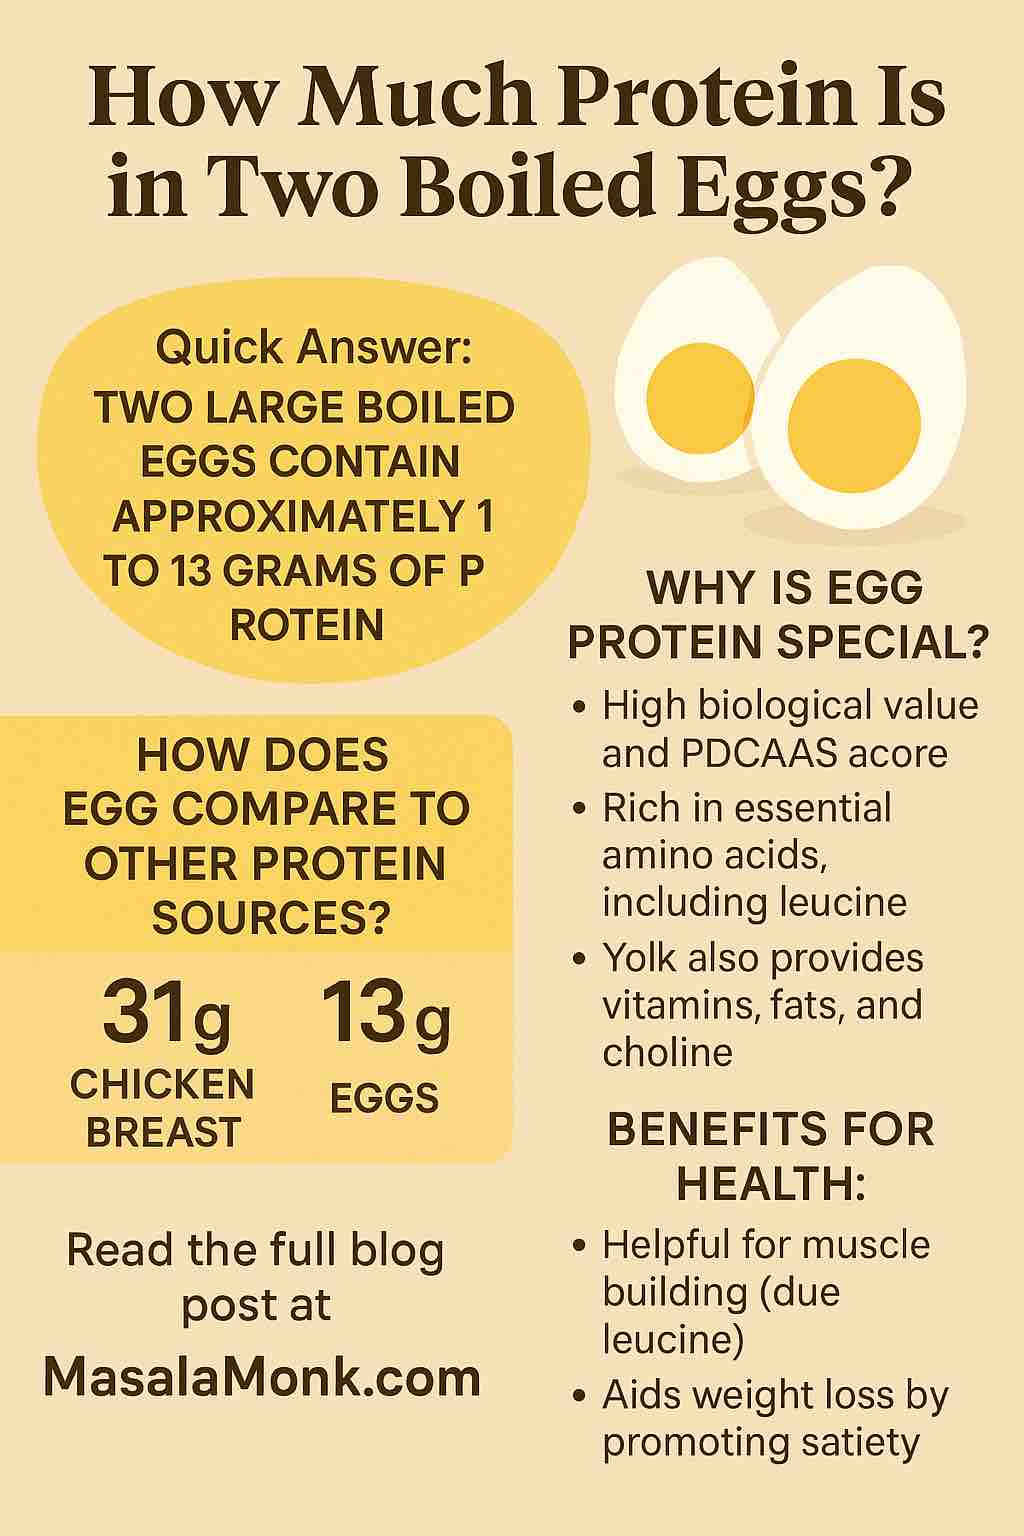
Quick Answer: How Much Protein in Two Boiled Eggs?
A single large boiled egg contains approximately 6 to 6.5 grams of protein, depending on size and cooking method. Therefore:
➡️ Two large boiled eggs contain approximately 12 to 13 grams of protein.
But numbers alone don’t tell the whole story. Let’s understand why this protein is valuable, how it compares to other sources, and how you can best utilize it in your diet.
What Makes Egg Protein So Special?
Protein is not just about quantity — it’s about quality, too.
Egg protein is considered a complete protein, meaning it contains all nine essential amino acids in the right ratios your body needs. These amino acids can’t be synthesized by the body and must be obtained from food.
✅ Highlights of Egg Protein:
High Biological Value (BV): Eggs score a perfect 100 on the BV scale, meaning their protein is highly bioavailable and easily utilized by the body.
PDCAAS Score: On the Protein Digestibility Corrected Amino Acid Score (PDCAAS), eggs also score 1.0 — the highest possible score, shared with whey and casein.
Rich in Leucine: Leucine is a key amino acid for muscle protein synthesis, and eggs offer a good dose per serving.
Egg Whites vs. Egg Yolks: Where Is the Protein?
A common misconception is that all the protein is in the egg white. While whites contain a significant portion, the yolk also contributes.
Egg Component
Protein (approx.)
Other Nutrients
Egg White
3.6 grams
Almost no fat; some B vitamins
Egg Yolk
2.7 grams
Fats, vitamins A, D, E, K, and cholesterol
So, skipping the yolk not only reduces the protein content by almost 45%, but also discards valuable nutrients like choline, vital for brain function.
Protein Needs: How Do Two Eggs Fit In?
The Recommended Dietary Allowance (RDA) for protein is around:
0.8g per kg of body weight for a sedentary adult
1.2–2.0g per kg for active individuals or athletes
For a 70kg (154 lb) person:
Basic RDA: ~56g protein/day
Active needs: up to 140g/day
Two boiled eggs provide ~13g — that’s about 23% of the RDA for a sedentary person, and still a meaningful chunk for athletes as part of a balanced meal plan.
Comparing Eggs to Other Protein Sources
Let’s put eggs into context by comparing with other common protein-rich foods:
Food Item
Protein (per 100g)
Boiled Eggs
~13g
Chicken Breast
~31g
Greek Yogurt
~10g
Tofu (Firm)
~8g
Lentils (cooked)
~9g
Almonds
~21g (but high fat)
Whey Protein (1 scoop)
~20-25g
While eggs don’t have the highest protein content by weight, their convenience, completeness, and nutrient density make them stand out.
Boiled Eggs for Muscle Building and Weight Loss
💪 For Muscle Gain:
Eggs are anabolic-friendly — thanks to leucine and high bioavailability.
Pairing eggs with resistance training supports muscle hypertrophy.
🥗 For Weight Loss:
Eggs are filling and score high on the satiety index.
The fat and protein in eggs help reduce overall calorie intake.
Best Time to Eat Boiled Eggs
Morning: Protein kickstart to your metabolism.
Pre/Post Workout: Ideal due to leucine content and digestibility.
Evening: Great for satiety and overnight recovery.
They’re also a perfect snack — portable, non-messy, and naturally portion-controlled.
Boiled vs. Fried vs. Scrambled: Does It Affect Protein?
Frying may add extra fats (depending on the oil used).
Overcooking can slightly reduce bioavailability.
Boiling is one of the cleanest methods — no added fat, minimal nutrient loss.
Exploring the Nutritional World of Eggs and Delicious Egg Recipes
Before we delve into the nutritional profiles of various egg preparations, let’s start with a culinary adventure featuring 10 Examples of Egg Dishes with 2 Eggs. This post showcases ten delightful egg dishes prepared with just two eggs each. It offers creative culinary ideas and expands your options for incorporating eggs into your meals, making it a delightful introduction to the world of eggs.
Now, let’s continue our exploration of the nutritional aspects of eggs with the following articles:
How Much Protein in Two Boiled Eggs: This article emphasizes the high protein content in boiled eggs, detailing their comprehensive nutritional profile, including calories, fats, vitamins, and minerals. It’s a must-read for those looking to understand the full nutritional value of this simple yet powerful food.
Egg Yolks or Yellow: Nutritional Protein Profile: Focusing on the often-debated egg yolk, this post explores its rich nutrient content, including proteins, vitamins, minerals, and fatty acids. It’s an essential read for understanding the health benefits and culinary uses of egg yolks.
Calories & Nutrition in Egg Whites: This article delves into the low-calorie and high-protein profile of egg whites, discussing their role in various diets and their versatility in cooking. It’s particularly useful for those interested in weight management and muscle building.
Protein in 3 Scrambled Eggs: Nutritional Insights and Benefits: Highlighting the protein-rich nature of scrambled eggs, this post provides insights into their caloric and fat content, along with tips for healthier preparation. It’s a great guide for anyone looking to incorporate scrambled eggs into a balanced diet.
These articles collectively offer a well-rounded perspective on the nutritional aspects of eggs, catering to fitness enthusiasts, health-conscious individuals, and culinary aficionados alike. Whether you’re exploring delectable egg dishes, understanding the protein-packed world of boiled eggs, delving into the nutrient-rich yolk, or opting for the lean protein of egg whites, these posts provide valuable information to enhance your dietary choices and cooking repertoire.
Tips to Maximize Protein from Eggs
Combine with whole grain toast or vegetables for a balanced meal.
Add eggs to salads, sandwiches, or bowls for an easy protein upgrade.
Use eggs as a post-workout snack with fruit or a small carb.
Conclusion: Tiny Package, Powerful Punch
So how much protein is in two boiled eggs? Roughly 12 to 13 grams — but that’s just scratching the surface.
What makes boiled eggs a superstar is their nutritional profile, versatility, and efficiency. They’re not just a protein source — they’re a complete, accessible, and budget-friendly superfood that deserves a place in almost every diet.
Whether you’re looking to bulk up, slim down, or just eat cleaner, two boiled eggs might be the simplest and smartest addition to your plate.
FAQs
What is the exact protein content in two large boiled eggs? Two large boiled eggs typically contain about 13 grams of high-quality protein. This amount can slightly vary depending on the size of the eggs.
Are boiled eggs good for weight loss? Yes, due to their high protein content and moderate calorie count, boiled eggs can be a great addition to a weight loss diet. The protein helps in keeping you full for longer, reducing the urge to snack.
Can boiled eggs help in muscle building? Absolutely! The complete protein in boiled eggs, containing all essential amino acids, is crucial for muscle repair and growth, making them a popular choice among athletes and fitness enthusiasts.
How many calories are in two boiled eggs? Two large boiled eggs contain around 155 calories. The calorie content can be less if you choose to eat only the egg whites.
Is there a difference in nutritional value between soft and hard-boiled eggs? The cooking method (soft-boiled vs. hard-boiled) does not significantly affect the nutritional value of the eggs, including their protein content.
Can people on a low-carb or keto diet eat boiled eggs? Yes, boiled eggs are an excellent choice for low-carb and keto diets due to their high protein and fat content and virtually zero carbohydrates.
How do the fats in boiled eggs impact heart health? Boiled eggs contain mostly unsaturated fats, which are healthier for the heart. However, they also have dietary cholesterol, so individuals with specific heart conditions should consult a healthcare provider.
What other nutrients do boiled eggs provide besides protein? Boiled eggs are rich in several vitamins and minerals, including Vitamin A, B vitamins, Vitamin D, selenium, and zinc. They are also a source of healthy fats.
Are boiled eggs suitable for a diabetic diet? Yes, the low carbohydrate content in boiled eggs makes them a suitable option for people managing diabetes.
How should boiled eggs be stored for maximum freshness? Store boiled eggs in their shells in the refrigerator. They can be kept for up to a week, ensuring they retain their taste and nutritional quality.