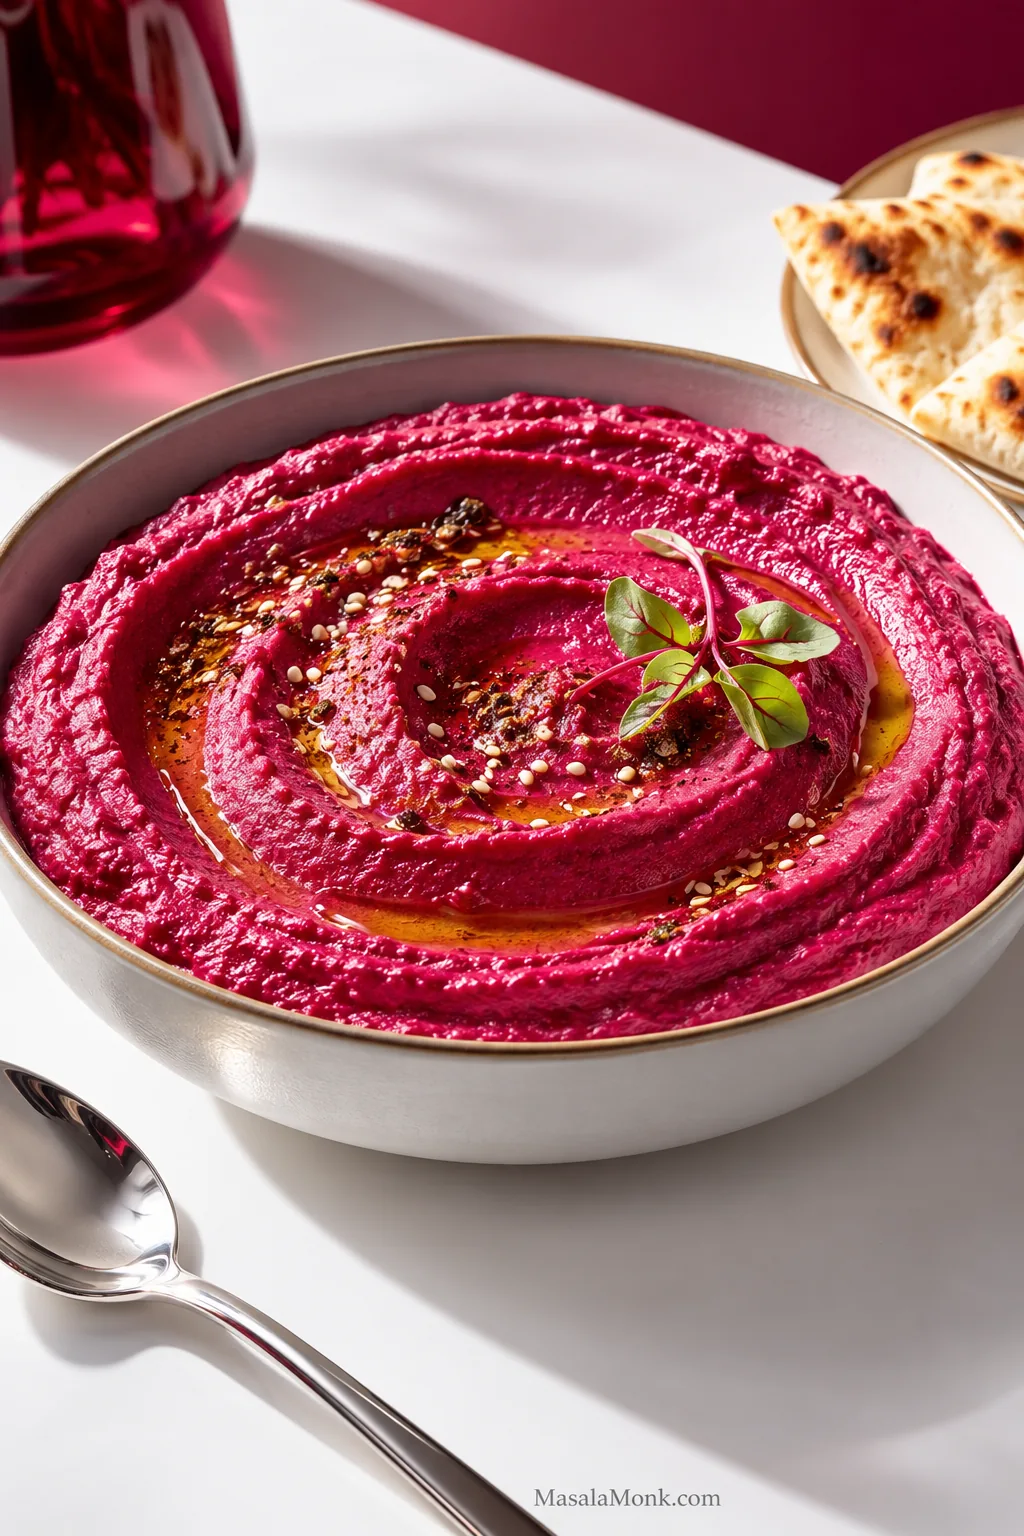
Your chole can smell wonderfully spicy and still taste strangely flat. Maybe the first spoonful is mostly tomato and chickpea, then the chilli arrives afterwards. Or perhaps it is plenty hot but somehow doesn’t taste like the chole you were trying to make.
If you’ve already reached for more cumin, another spoonful of garam masala or a hotter chilli, you probably don’t need a mystery ingredient. The balance between the spices you already have matters more.
This homemade chana masala powder recipe, also called chole masala powder, is built for the common “hot but flat” problem. Coriander and cumin get the longer toast, quicker aromatics join later, and amchur stays out of the pan so the blend keeps its depth without letting one note take over.
The result is earthy, tangy and warmly aromatic without letting chilli dominate. Heat is only one dial. Once you separate it from tang, earthiness and aroma, a disappointing pot becomes much easier to understand.
Making the powder is straightforward. Keep the pan gentle and the spices moving; aroma matters more than chasing a darker colour.
MakesAbout 90 g / 3.2 oz
Active timeAbout 15–20 minutes
Cooling10–15 minutes
TotalAbout 25–35 minutes
Chilli heatMild–medium with Kashmiri/Byadgi chillies
Peak aromaBest within 2–3 months
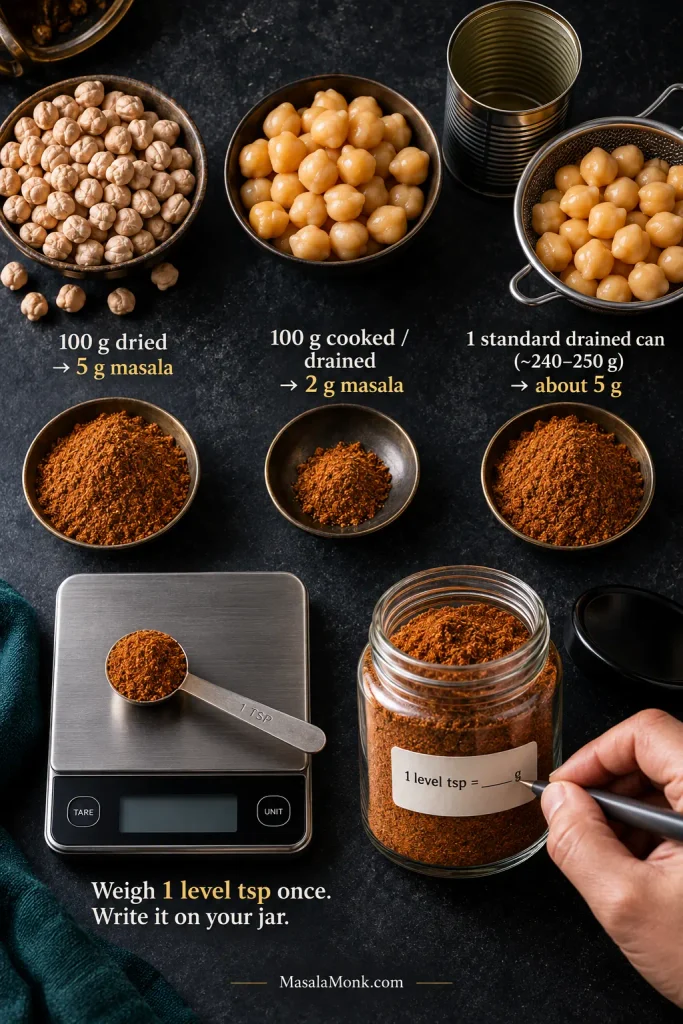
Starting dose: about 5 g per 100 g dried chickpeas, or around 2 g per 100 g cooked or drained chickpeas.
Ingredients
Use the gram weights when you can. Spoon and count measures are rough guides, but chillies, cinnamon sticks, cardamom pods and dried leaves don’t come in standard sizes.
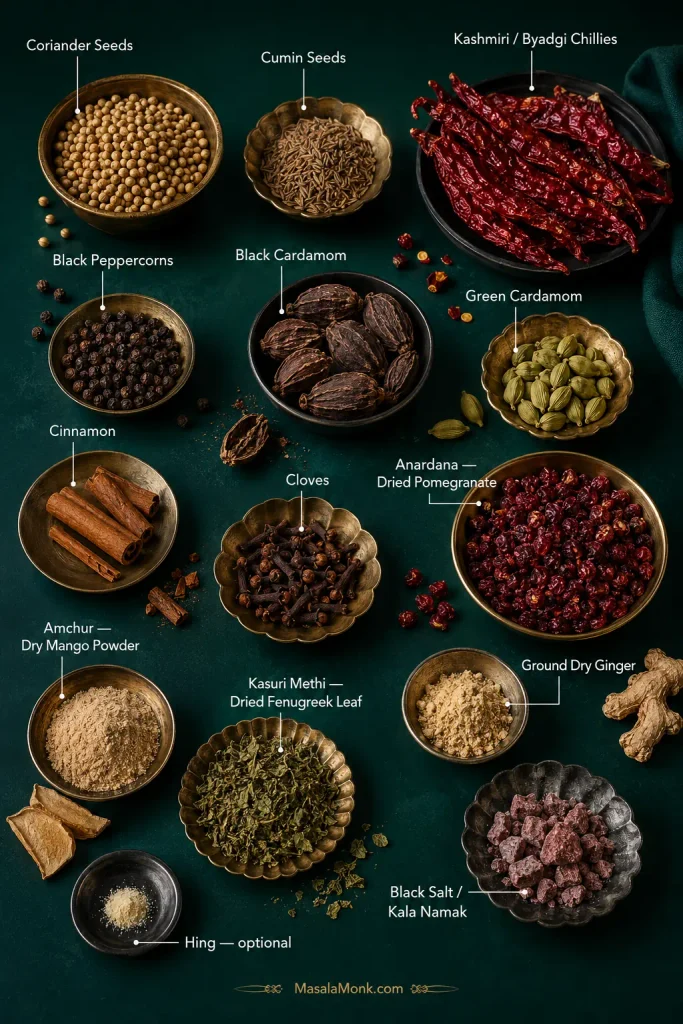
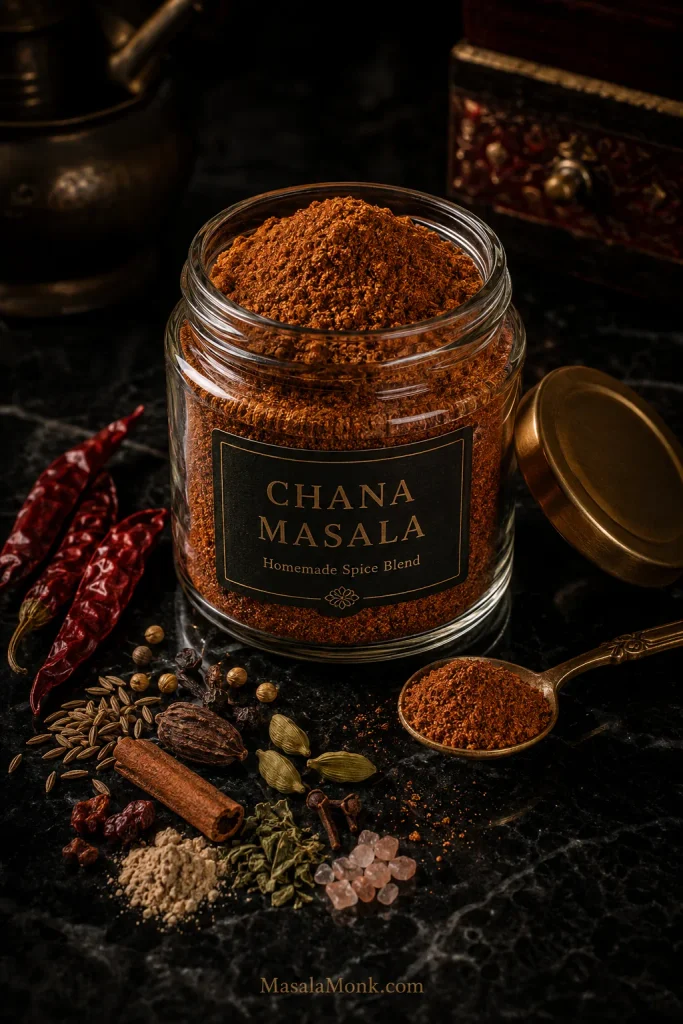
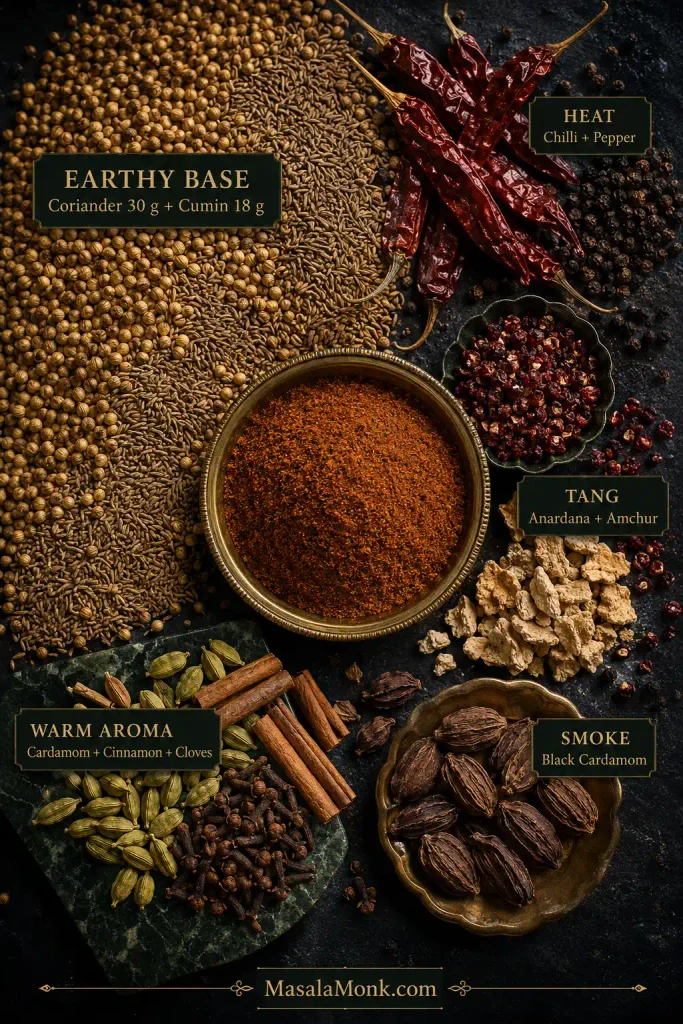
A visual guide to the whole blend: identify the less familiar ingredients here, then use the gram-weighted list below for the actual formula.
30 g coriander seeds — about 6 tablespoons
18 g cumin seeds — about 3 tablespoons
8 g Kashmiri or Byadgi dried red chillies, stems removed — roughly 6–10 depending on sizeA hotter chilli needs a smaller amount.
4 g black peppercorns — about 1½ teaspoons
2 g black cardamom — roughly 1–2 large pods or about 2 smaller podsUse the weight if yours are unusually large.
1 g green cardamom — roughly 5 pods
3 g cinnamon — roughly one moderate 2-inch / 5-cm pieceA thin curl and a thick cassia stick can weigh very differently.
6 g amchur / dry mango powder — about 2½–3 teaspoons
2 g kasuri methi / dried fenugreek leaves — about 1–2 tablespoons, loosely crumbledThis is dried fenugreek leaf, not fenugreek seed.
2 g ground dry ginger — about 1 teaspoon
2 g black salt / kala namak — about ⅓ teaspoon
Optional: a tiny pinch of ordinary compounded hing / asafoetida, added after grindingAvoiding gluten? Check the label; some compounded asafoetida contains wheat flour.
Before You Start
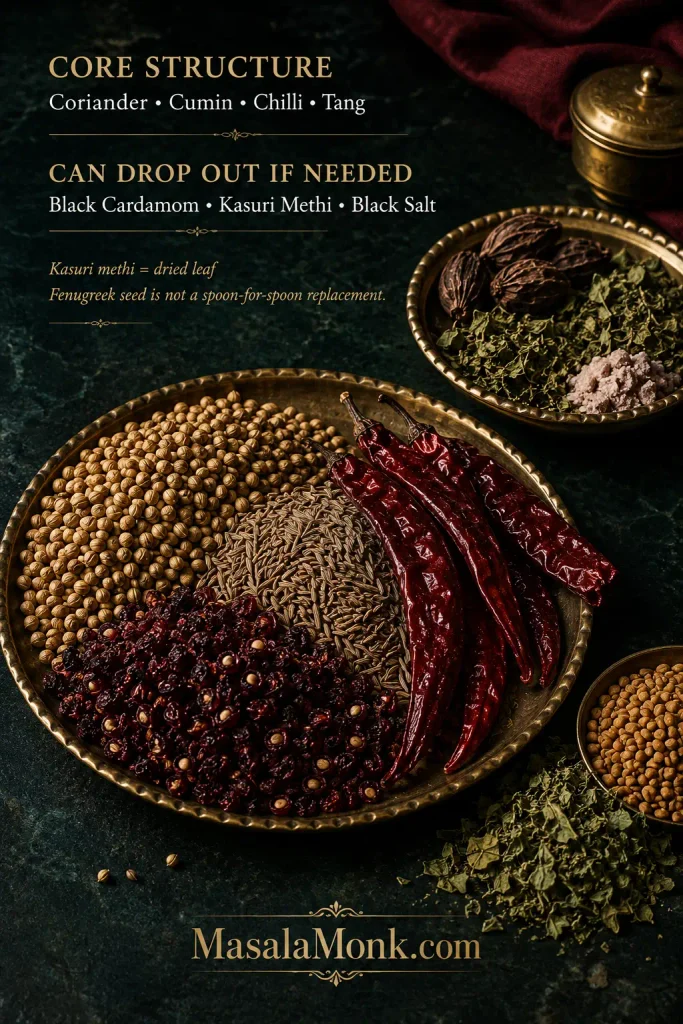
Don’t have every last spice? Keep going. The heart of the blend is coriander, cumin, chilli and tang. Black cardamom, kasuri methi and black salt can drop out when necessary and you’ll still have a perfectly workable chole masala. See what you can leave out and what not to substitute.
Turmeric and regular cooking salt are left out deliberately. Both are easier to adjust in the finished chole.
You’ll need a dry skillet or kadai, a cooling plate, a spice grinder or mixer grinder, and a dry airtight jar. A fine sieve helps when cinnamon or anardana refuses to grind cleanly.
Method
For this blend, don’t chase dark colour in the pan. Some chole formulas deliberately roast their spices more deeply, but this recipe uses a gentler roast. For darker Pindi- or chole-bhature-style chickpeas, build the colour while cooking the chickpeas—some methods use dried amla (Indian gooseberry) or black tea—instead of scorching this powder.
Roast the Spices in Stages
Measure everything first. Check the coriander, cumin and anardana for grit, stones or damaged pieces, especially if the spices were bought loose. Remove the chilli stems and keep a cool plate beside the stove.
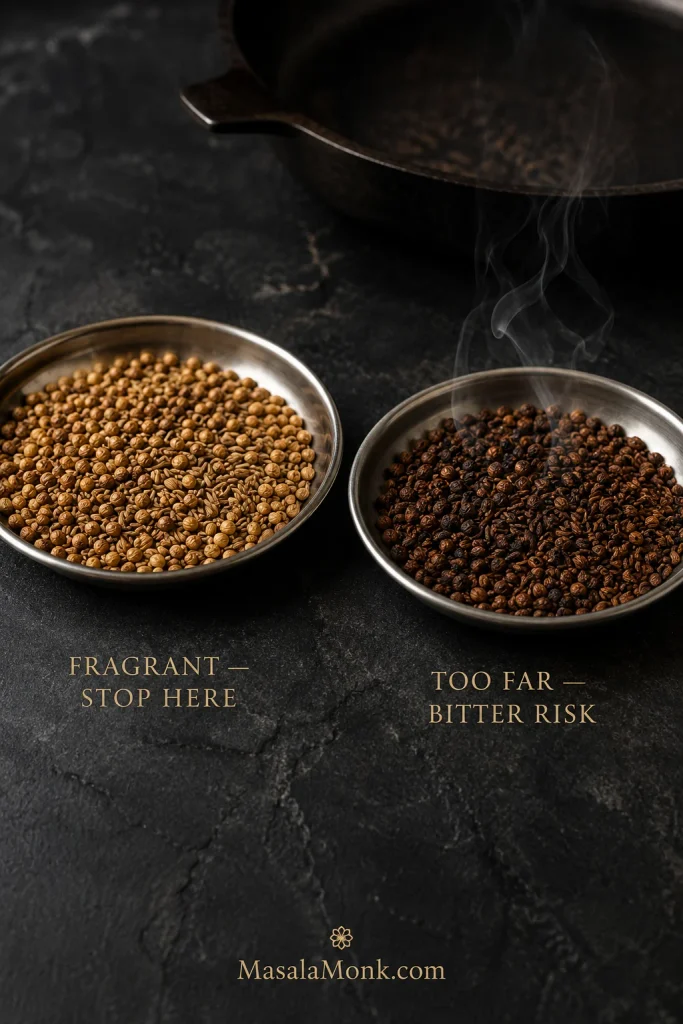
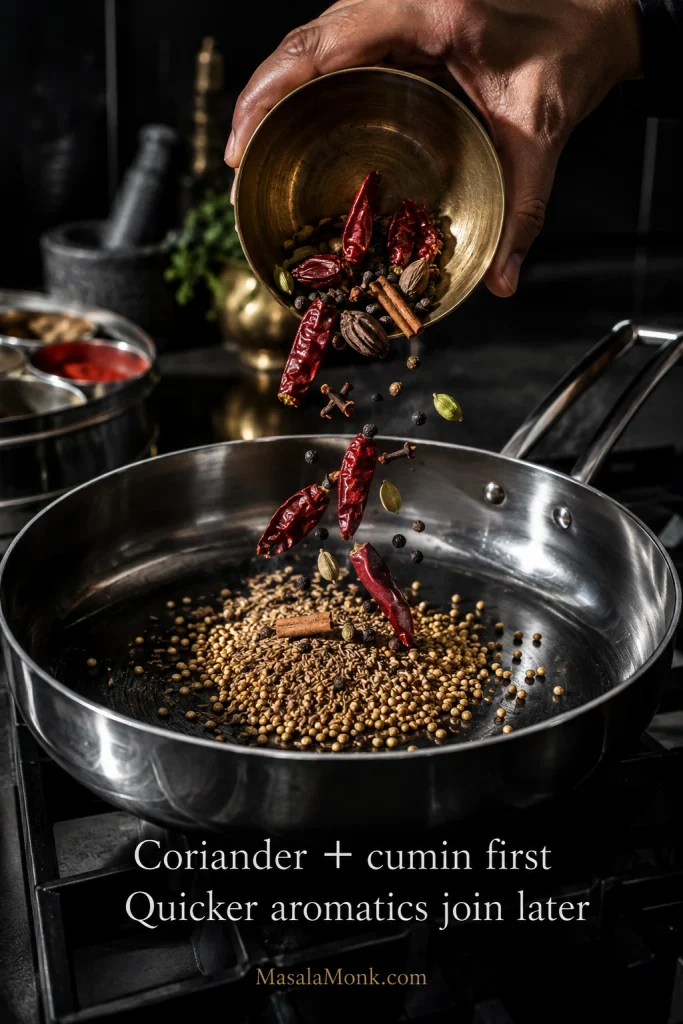
Heat a dry skillet over low to medium-low heat. Add the coriander and cumin and stir or shake the pan frequently for about 3–4 minutes. They should smell clearly fragrant before they change much colour. Smoke or very dark cumin means the pan is too hot.
Take coriander and cumin off the flame a little earlier than your eyes may suggest. Their stored heat keeps working after they leave the pan, so a fragrant, gently deepened roast gives you more margin than waiting for dramatic browning.
Add the chillies, pepper, black cardamom, green cardamom, cinnamon and cloves. Stir continuously for another 1–2 minutes. The chillies should feel drier and may puff slightly. Once the aroma becomes vivid, tip everything onto the cool plate.
Different spices reach their aromatic peak at different speeds. Coriander and cumin can take the head start; meanwhile, bringing chillies, pepper and the warmer aromatics in later gives them enough heat to bloom without making scorched notes part of the blend.
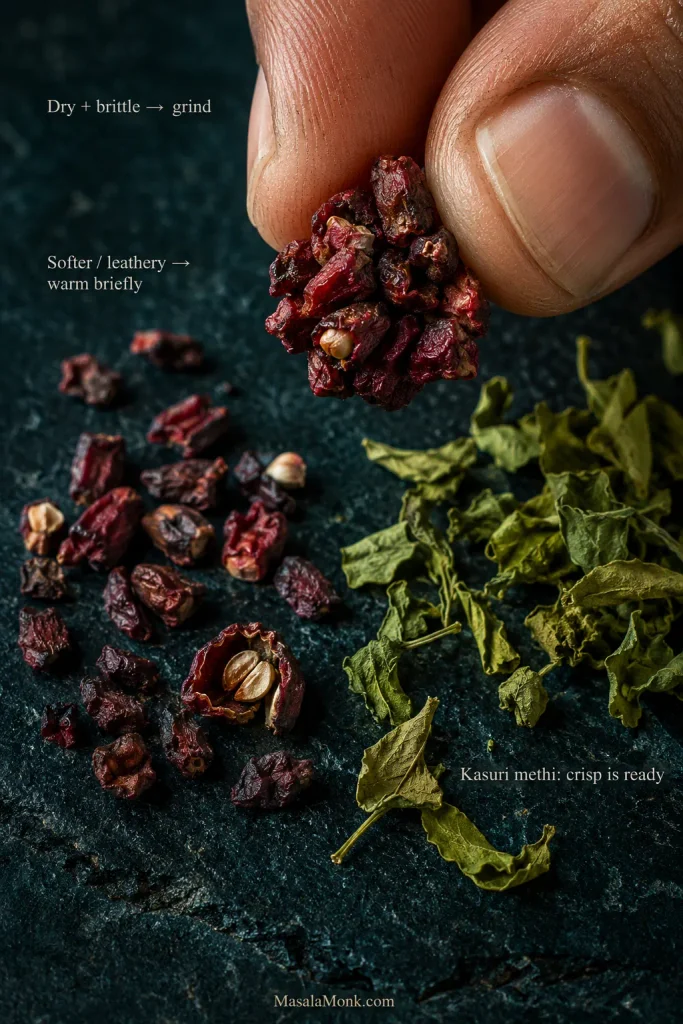
Check the anardana and kasuri methi. Very dry, brittle anardana can go straight to the grinder. Softer or leathery seeds benefit from a brief warming over low heat so they grind more cleanly. Crisp kasuri methi can go in as-is; softer leaves only need a few seconds of gentle heat. Cool anything you warmed.
Clean grinding is the goal. Already-brittle anardana and crisp kasuri methi need no extra roasting just for colour.
Cool, Grind and Jar the Blend
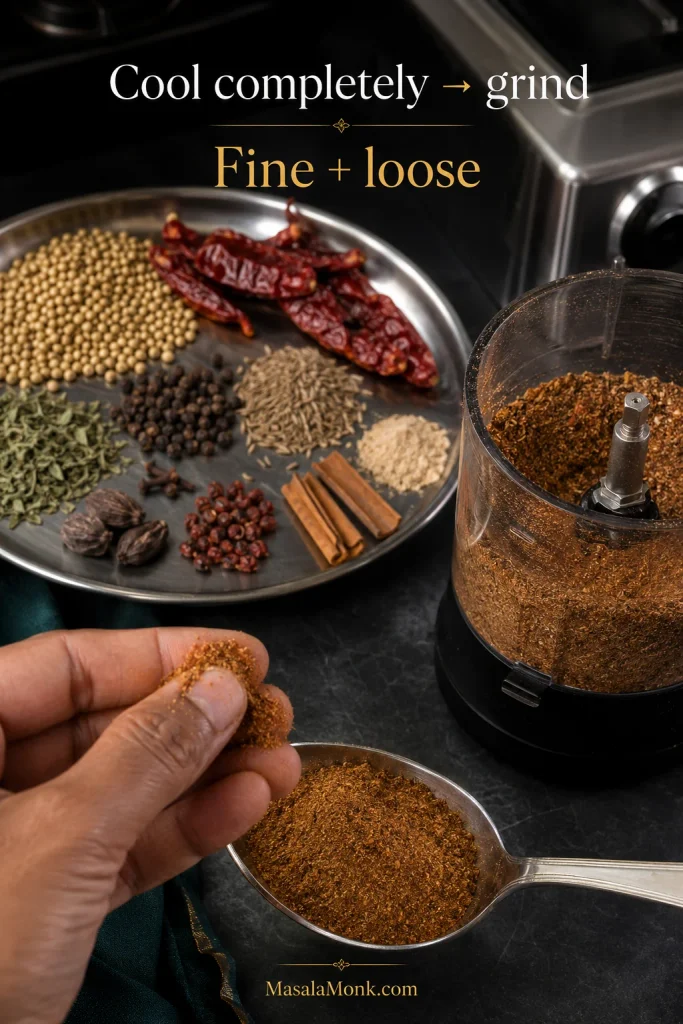
Let everything cool completely, usually 10–15 minutes. There shouldn’t be obvious warmth left when you pick up the spices.
Pulse the cooled whole spices until fairly fine. Add the amchur, dry ginger, black salt, cooled kasuri methi and optional hing, then pulse again just until evenly mixed. A noticeably hot grinder needs a break before you continue.
Rub a little powder between your fingers. It should feel fine and loose, never damp or pasty. Tiny flecks are fine; obvious cinnamon or pomegranate pieces need another grind. Let the dust settle for a few seconds before opening the grinder. With hotter chillies, keep your face back, avoid touching your eyes and wash your hands well after handling them; good ventilation helps.
If only a few pieces refuse to grind finely, sieve them out and regrind those fragments rather than repeatedly heating the entire batch. That keeps the finished powder fine while reducing unnecessary grinder heat.
Transfer the completely cool powder to a clean airtight jar. Smell it before you close the lid. Coriander and cumin should come first, followed by fruity anardana, pepper and chilli. Cloves and black cardamom should remain in the background.
Give the finished jar one last smell before you put it away. If a small aromatic ingredient such as clove or black cardamom is shouting over the coriander-cumin base, it is easier to rebalance the powder now than after it has seasoned an entire pot.
How Much Chana Masala Powder Should You Use?
Starting Dosage by Chickpea Weight
One recipe tells you to use a couple of teaspoons; another seems to want tablespoons. Both can make sense when the powders themselves aren’t equally concentrated.
For this homemade masala, start with 5 g for every 100 g dried chickpeas, or roughly 2 g for every 100 g cooked or drained chickpeas.
The blend is not your pot’s total salt adjustment. Season the finished chole separately, especially when using canned chickpeas or a packet spice blend.
Chickpeas
Start with this blend
Starting with dried chickpeas
100 g / 3.5 oz dried
About 5 g
200 g / 7 oz dried, roughly 1 cup
About 10 g
250 g / 8.8 oz dried
About 12–13 g
Starting with cooked or canned chickpeas
400 g / 14 oz cooked
About 8 g
About 3 cups cooked, roughly 450–500 g
About 9–10 g
1 standard 15-oz / 425-g can, about 240–250 g after draining
About 5 g
2 standard cans, about 480–500 g drained
About 10 g
Calibrate Your Teaspoon
No scale beside the stove? Weigh one level teaspoon from your finished batch once and write that weight on the jar. Grind fineness changes density, so your own teaspoon conversion is more reliable than a universal spoon measure.
Write your calibrated teaspoon weight on the jar, then recheck it after a major grind or formula change. A finer powder can pack more densely into the same spoon.
Let the first dose simmer into the gravy before deciding it is weak. If the pot really needs salt, a direct adjustment to tang, or a few more minutes of reducing, fix that directly instead of using extra masala as a catch-all.
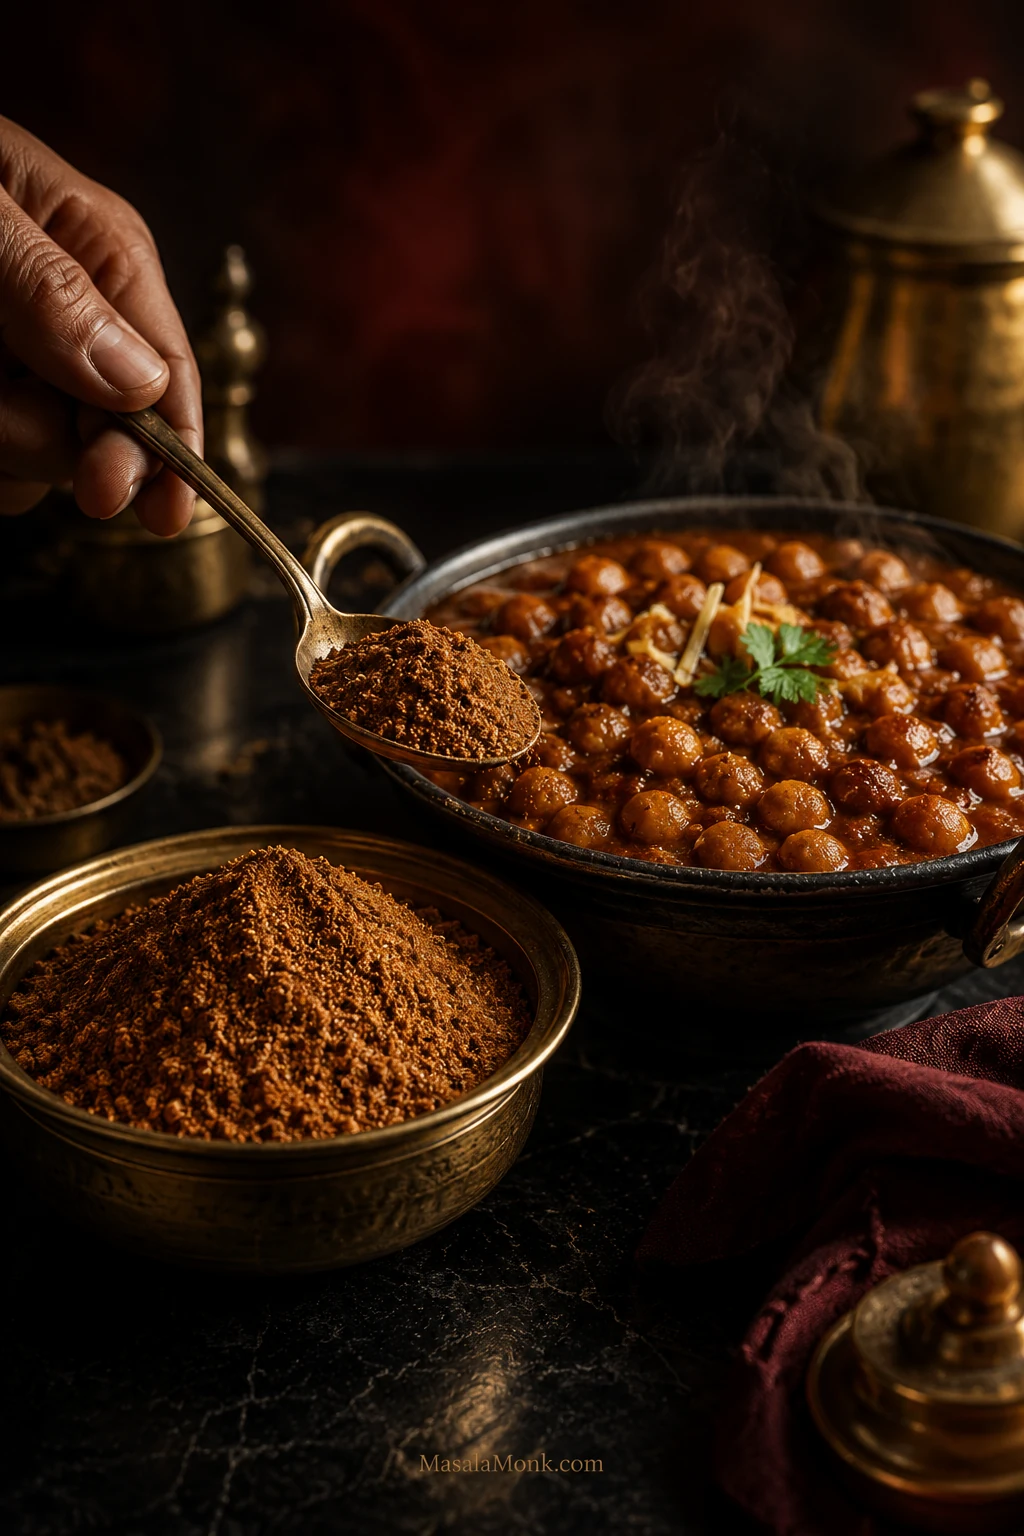
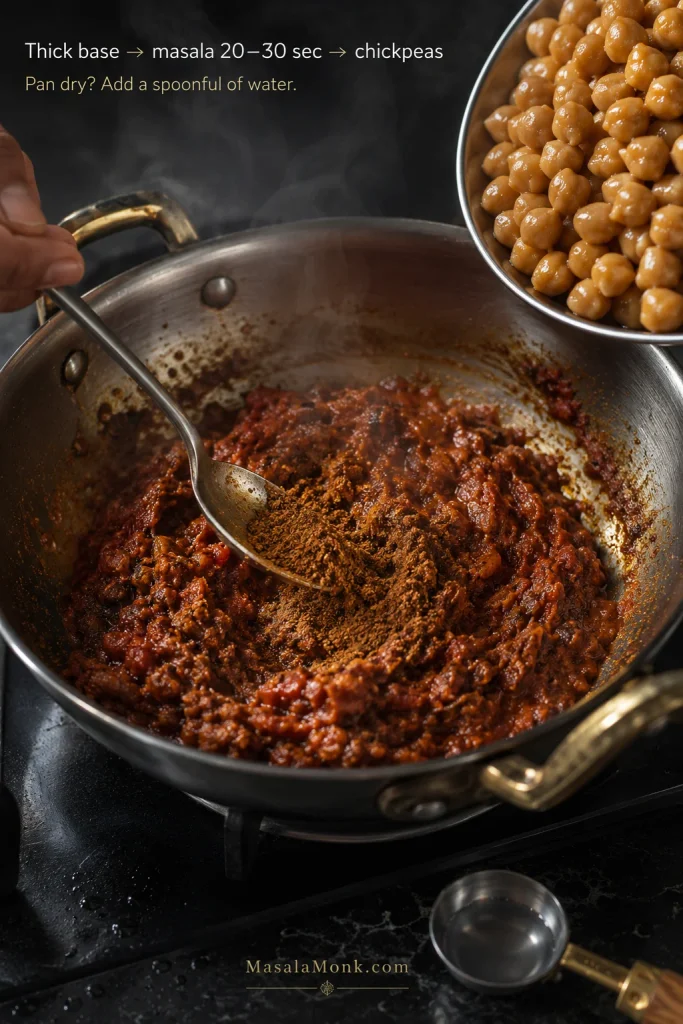
Cook the onion-tomato base until it is thick and no longer smells raw. Lower the heat, stir in most of the masala and give it about 20–30 seconds. A dry pan needs a spoonful of water before the spices catch. Add the chickpeas and cooking liquid straight afterwards.
When the chole tastes balanced but the aroma seems quiet, a small finishing dose works better than another long cook.
A brief bloom is enough: keep the reduced base moving and get the chickpeas in before the ground spices scorch.
Made the Powder? Here’s Dinner
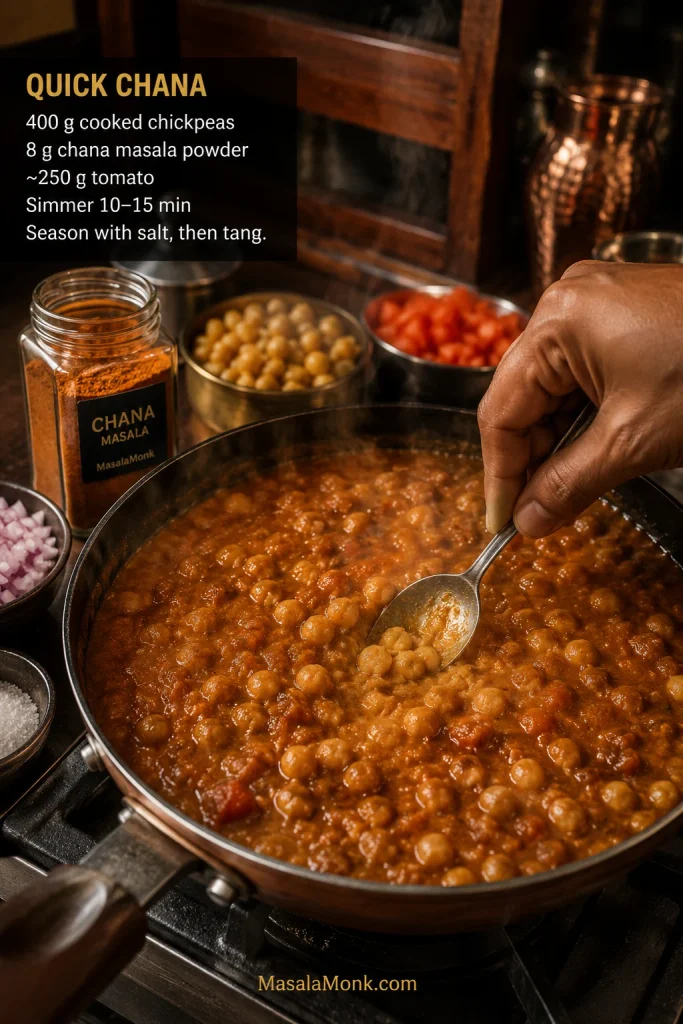
For an easy everyday chana, soften and lightly brown 1 medium chopped onion, about 120–140 g, in 1–2 tablespoons oil or ghee. Add about 1 teaspoon each of grated ginger and garlic, if using, then about 250 g chopped or puréed tomato. Cook until the tomato has reduced into a thick base.
Lower the heat and stir in 8 g of this chana masala powder for 400 g / 14 oz fully tender cooked chickpeas. Give it 20–30 seconds, adding a spoonful of water when the pan looks dry, then add the chickpeas and enough water or cooking liquid for the consistency you like.
Mash only a small portion of the chickpeas while the curry simmers. The released starch gives the gravy extra body, so it coats the remaining whole chickpeas more naturally without needing flour, cream or an unnecessarily long reduction.
Finish the Chole
Simmer for 10–15 minutes and mash a small spoonful of chickpeas into the gravy for body. Season with salt, then taste for tang. Only after those are right should you decide whether the pot needs another little dose of masala.
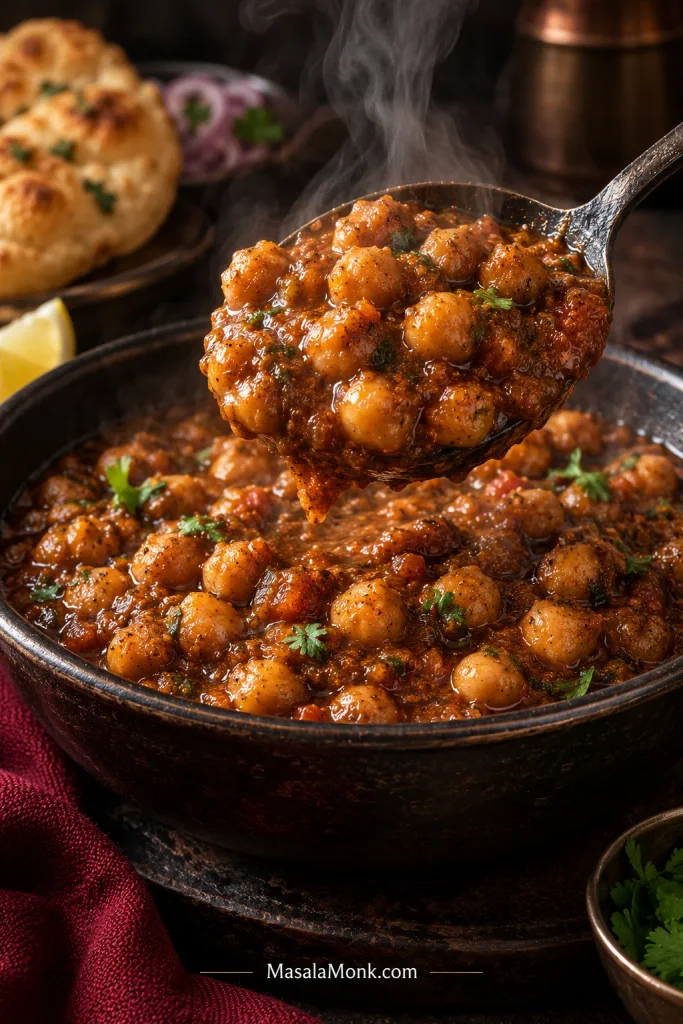
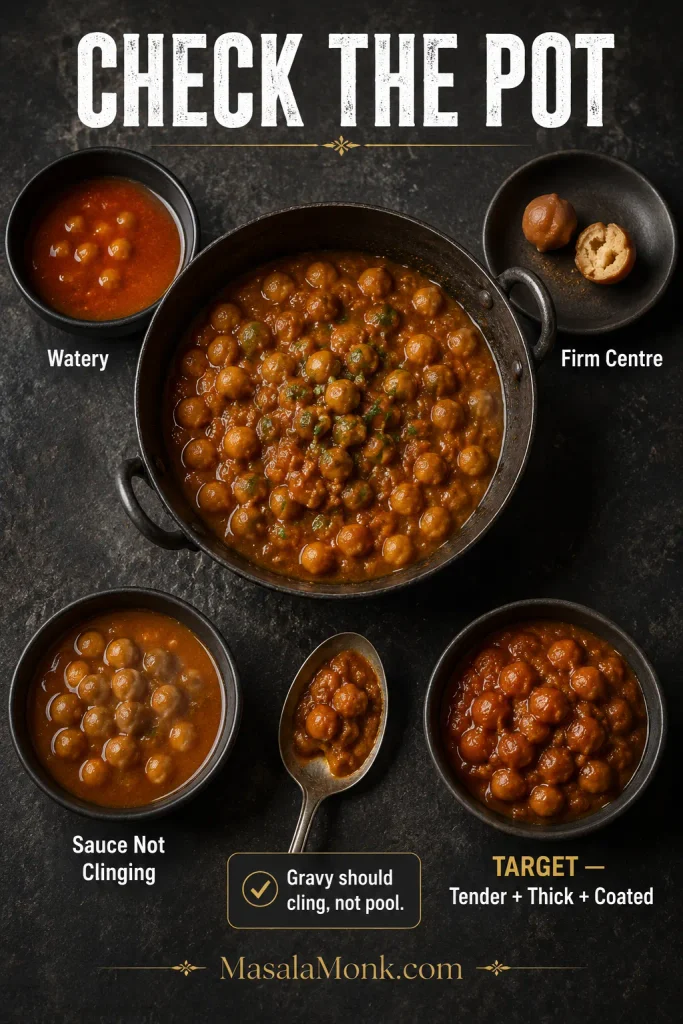
What are you aiming for? Tender chickpeas coated in gravy that clings instead of pooling around them. The first bite should taste savoury and tangy, and the chilli should warm the finish instead of arriving afterwards as a separate blast.
Do not use colour alone as your doneness test. Chole can legitimately finish lighter or darker depending on the method; instead, pay closer attention to whether the chickpeas are fully tender and whether the gravy moves with them rather than separating around them.
That is enough for a dependable everyday chana. The rest of the guide is about understanding the blend and changing it when you want something different.
Chana masala powder and chole masala powder usually refer to the same broad family of spice blends made for chickpeas. There is no single fixed formula.
This version leaves onion and garlic for the curry base instead of putting them into the stored powder; some commercial chana masalas include dried garlic.
Chana masala powder is also not besan or chickpea flour. “Chana powder” can sometimes mean ground chickpeas or gram flour; here we’re talking about a spice mixture.
The easiest way to remember the blend is by the job each group does. Coriander and cumin form the earthy base. Chilli and pepper control heat. Anardana and amchur bring tang. Cardamom, cinnamon and cloves supply warm aroma, while black cardamom adds smoke. Most of the salt stays in the curry.
Use the flavour map when a batch feels “hot but flat”: identify the missing dimension first instead of adding more chilli by reflex.
How the Blend Is Balanced
The 30 g coriander to 18 g cumin ratio keeps coriander in front. It brings a fresh, citrusy earthiness; cumin takes the flavour deeper. Together they give the masala enough body to settle into the gravy instead of leaving only warm spice on top.
Chilli and pepper have different jobs too. Kashmiri or Byadgi chilli carries colour and a broad warmth; pepper catches up later with a sharper heat.
Cardamom, cinnamon and cloves should remain in the background.
Why Chole Masala Recipes Look So Different
Compare five good recipes and you may find five convincing formulas. Some nearly match coriander and cumin. Others lean much harder on coriander. One uses amchur, another anardana, while plenty use both. Kasuri methi, black salt, turmeric, fennel, ajwain, mace and nutmeg come and go.
The grind changes as well. A coarse masala can feel pleasantly rustic; a finer one disappears more easily into gravy and is easier to dose consistently.
Punjabi chole isn’t one rigid template. Pindi and Amritsari styles alone can differ noticeably in method, gravy and seasoning, and family versions move again. One family’s spice tin may smell smokier, another’s fruitier with anardana, and both can taste immediately like chole.
Adjusting the Tang: Anardana and Amchur
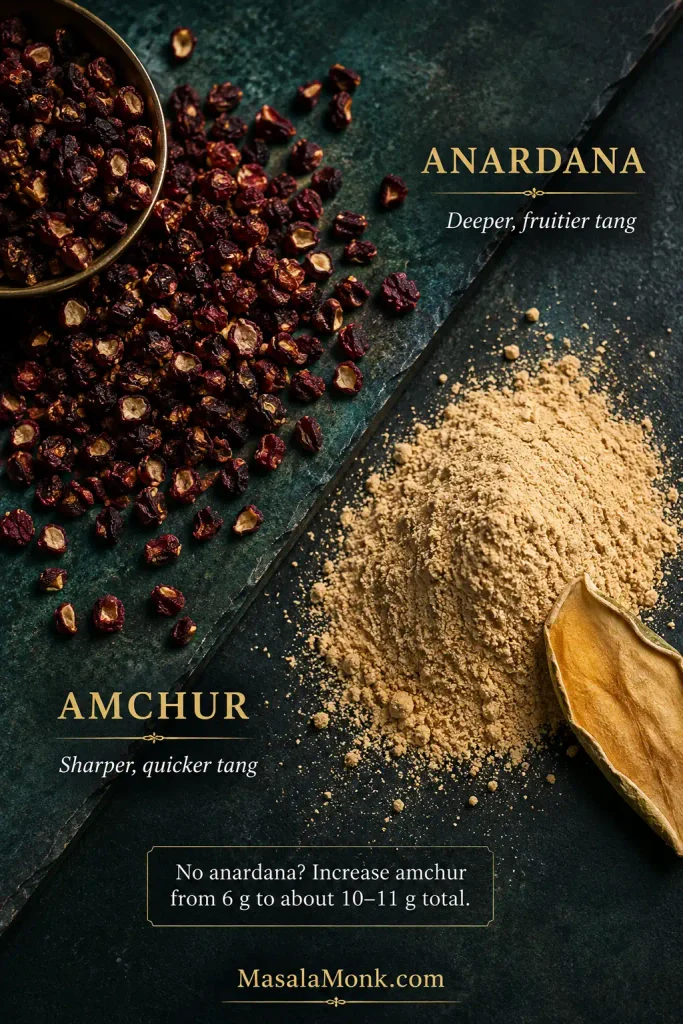
Tang is one of the biggest reasons two chole masalas can taste so different. Anardana and amchur aren’t identical: anardana gives a deeper, fruitier tang, while amchur is sharper and hits sooner on the tongue.
This recipe uses 10 g anardana with 6 g amchur so the tang has both depth and lift.
More amchur can replace the acidity of missing anardana, but it will not recreate its fruitiness. Judge the substitute by balance, not by trying to make the two taste identical.
Out of anardana? Skip the 10 g anardana and increase the amchur from 6 g to about 10–11 g total. The blend will taste sharper and less fruity. No amchur? Leave it out and let the anardana carry the dry tang, then finish the cooked chole with lemon if it needs more lift.
Count the sour ingredients already in the pot. Tomato, anardana, amchur, lemon, tamarind and acids in some packet masalas can pile up faster than you expect.
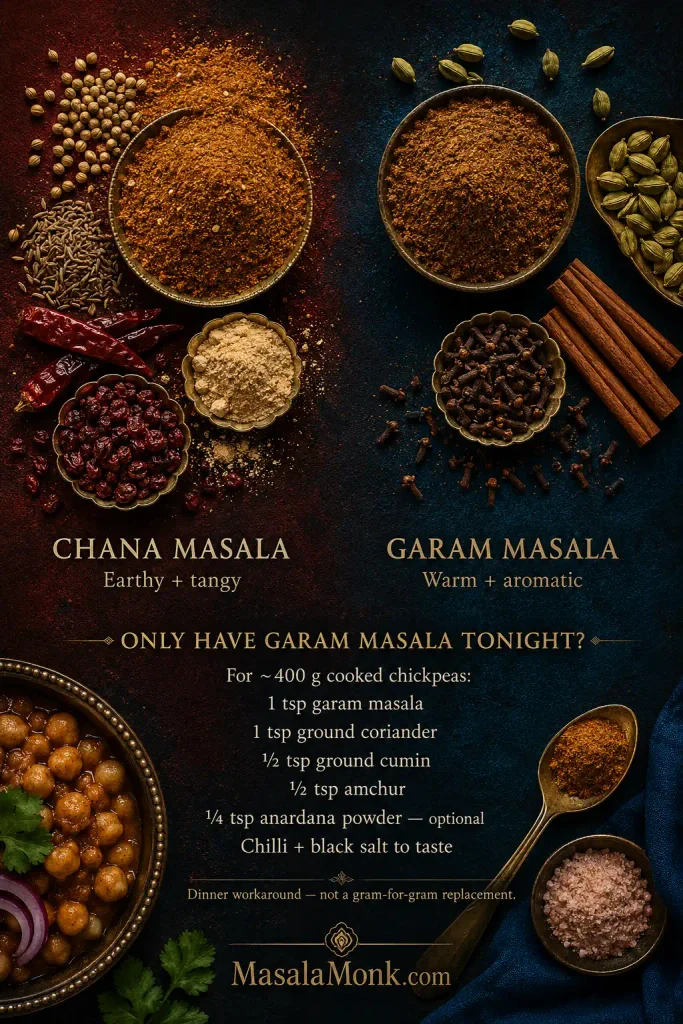
Chana Masala Powder vs Garam Masala
Garam masala can stand in for chana masala powder in a pinch, but it usually needs help from coriander, cumin and something tangy.
The two blends share several warm spices. Garam masala generally leans much more towards aroma, while chole masala usually has a clearer coriander-cumin base and often gets part of its character from anardana or amchur. Chickpeas seasoned only with garam masala can smell wonderful yet miss the earthy, tangy flavour you were chasing.
Think of this as a dinner workaround, not a gram-for-gram copy of the blend above. Simmer it into the gravy before deciding whether it needs more; the result will depend on the garam masala you started with. Making dinner now? Jump back to the quick chana method.
If the workaround smells fragrant but the chickpeas still taste flat, rebuild the missing earthy and tangy structure instead of piling on more warm spice.
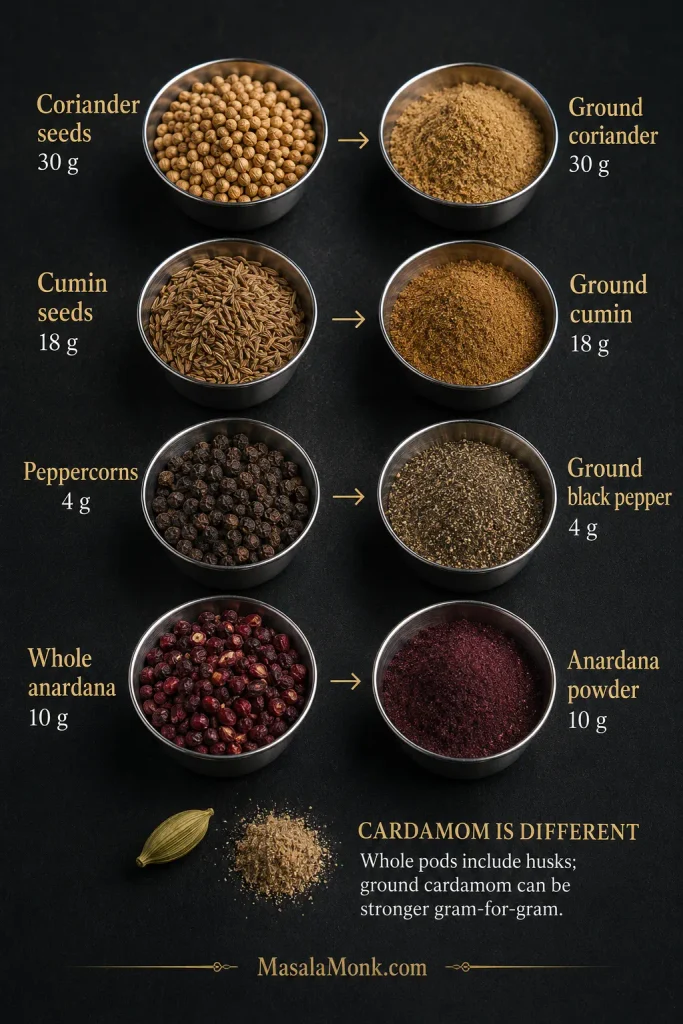
Using Ground Spices Instead of Whole
For coriander, cumin, pepper and anardana, approximately equal weight is a sensible starting point. Pre-ground spices vary in freshness and strength, so equal weight does not promise identical flavour.
30 g coriander seeds → about 30 g ground coriander
18 g cumin seeds → about 18 g ground cumin
4 g peppercorns → about 4 g ground black pepper
10 g whole anardana → about 10 g anardana powder
Once spices are pre-ground, freshness can matter more than the arithmetic. Equal weight is a starting point, but an old jar may contribute far less aroma than a fresh grind at the same weight.
Pre-ground coriander, cumin and pepper don’t need the same dry-roasting treatment as whole spices. Mix them in unheated when finishing the blend, or toss them for a few seconds in the pan’s residual warmth after taking it off the stove. They scorch quickly.
Old ground cumin or coriander is a different problem. A jar that has been open for months may smell much quieter even at the same weight. Judge the cooked chole before automatically adding more.
Cardamom is the exception to the easy weight swap. Whole pods include husks; ground cardamom may contain mostly seed and can be much stronger gram-for-gram.
What You Can Leave Out
Black cardamom adds a distinctive low smoky note, but the masala works without it. Don’t compensate with extra green cardamom; that takes the blend in a sweeter, more floral direction.
Kasuri methi can go too. Fenugreek seed is much more bitter, so don’t replace the leaf spoon-for-spoon with seed.
No black salt? Salt the finished chole normally.
When an accent ingredient is missing, omission is often cleaner than forced substitution. Protect the earthy, hot and tangy foundation first; then decide which smoky, herbal or mineral accents can disappear.
Tune the Next Batch
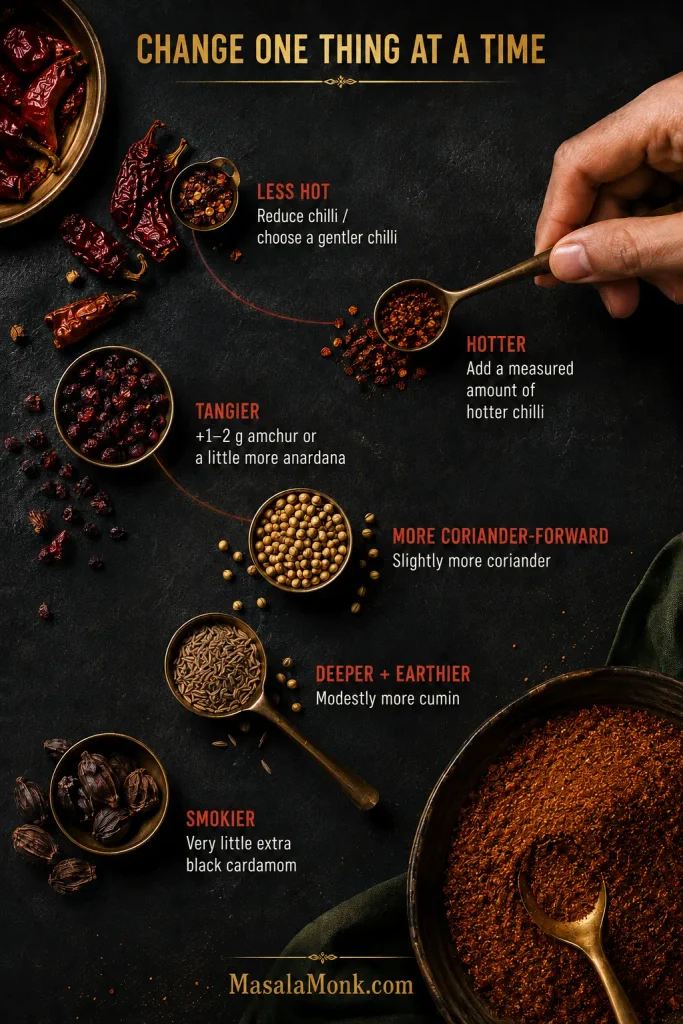
Changing one part of the blend changes one part of the flavour. More chilli makes the next batch hotter; it doesn’t make it tangier or more aromatic. Change one thing at a time so you know which adjustment actually improved the blend.
When you make the next batch, small changes are enough:
Less hot: reduce the chilli or choose a gentler variety.
Hotter: keep Kashmiri/Byadgi chilli for colour and add a measured amount of something hotter.
Tangier: add another 1–2 g amchur or a little more anardana.
More coriander-forward: increase the coriander slightly.
Deeper and earthier: increase the cumin modestly.
Smokier: add very little black cardamom at a time.
Keep the main formula steady, change one lever, and jot the change on the jar. That turns the next batch into useful feedback instead of guesswork.
A jar that smells more perfumed than appetising already has plenty going on. Check the cloves, cinnamon and cardamom before reaching for more chilli.
Homemade gives you control over chilli, tang and salt. A packet gives you consistency—and sometimes that consistency is exactly what you’re trying to reproduce.
A packet can be part of the flavour memory too.
Shan Chana Masala shows why packet and homemade measurements don’t transfer neatly. Its ingredient list starts with salt and includes dried garlic, and its directions call for 25 g mix with 250 g dried chickpeas. This entire homemade recipe contains only 2 g black salt. Equal spoonfuls clearly aren’t equivalent.
Use the packet’s own directions as your first guide. Draining and rinsing canned chickpeas also gives you more control over salt before the gravy reduces.
If a packet gives you exactly the chole you like, use it. Homemade matters when you want to choose the balance yourself.
My Chana Masala Powder Tastes Wrong
First decide whether the problem is in the jar or in the pot. Taste a tiny pinch of the powder and notice what arrives first: chilli, clove, tang, smoke—or almost nothing. The jar itself can tell you a lot.
A fast diagnostic question is: would this flaw follow the powder into every pot? If yes, investigate the jar. Otherwise, look harder at cooking variables such as chickpea tenderness, reduction, salt and final acidity before adding another spoonful of masala.
Match the Symptom to the Fix
When a batch needs diluting, make a small fresh portion built mainly around coriander and cumin. Leave out whichever ingredient is dominating, then mix the fresh portion into the original powder gradually, tasting as you go.
Use appearance to decide what to investigate first: darkening, clumps and coarse fragments each point somewhere different. Heat, tang and aromatic balance still need your nose and palate.
Problem
Likely cause
Try this
Bitter
Scorched spices, overheated pepper or a hot grinder
Burnt: discard. Mild bitterness: add the fresh coriander-cumin-heavy portion gradually.
Hot but flat
Chilli is too far ahead of the earthy base or tang
Add a chilli-free coriander-cumin-heavy portion, then reassess the tang.
Too tangy
Too much anardana or amchur
Add fresh coriander-cumin-heavy masala with no extra souring ingredients.
Too smoky
Black cardamom dominates
Add the fresh portion with no extra black cardamom. More chilli won’t hide the smoke.
Perfumed or medicinal
Clove, cinnamon or cardamom is too strong
Add fresh coriander-cumin-heavy masala with no extra clove, cinnamon or cardamom.
Flat or dusty
Old spices or prolonged hot grinding
A fresh batch will help more than doubling stale powder in the curry.
Gritty
Anardana, cinnamon or cardamom husk hasn’t ground finely
Sieve and regrind the coarse pieces.
Clumpy
Moisture, warm powder, a wet spoon or steam
Fix the storage problem; discard if you see clear signs of spoilage.
Before You Blame the Masala, Check the Chole
And sometimes there is nothing wrong with the jar at all. A perfectly good masala cannot rescue chickpeas that are chalky in the centre or gravy that hasn’t reduced enough.
Fix the curry’s physical state before chasing seasoning. A spice blend cannot soften an undercooked chickpea, and extra masala will not rescue watery gravy; once texture and concentration are right, seasoning becomes much easier to judge.
Your chole is…
More masala?
Check first
Bland overall
Maybe
Salt and gravy concentration
Hot but one-note
Usually no
Tang, warm-spice balance and salt
Watery
No
Reduce the gravy; mash a few chickpeas if useful
Chickpeas are firm
No
Cook them until fully tender
Beans taste separate from the sauce
No
Simmer longer; mash a small portion into the gravy
Too tangy
No
Count tomato, amchur, anardana, lemon, tamarind and packet acidity together
Bitter or oddly soapy
No
Check scorched aromatics or masala, excess hing, and too much baking soda/alkalinity
Too salty
No
Packet masala, chickpea brine and added cooking salt
Balanced, but aroma is quiet
A little
Add a small finishing dose
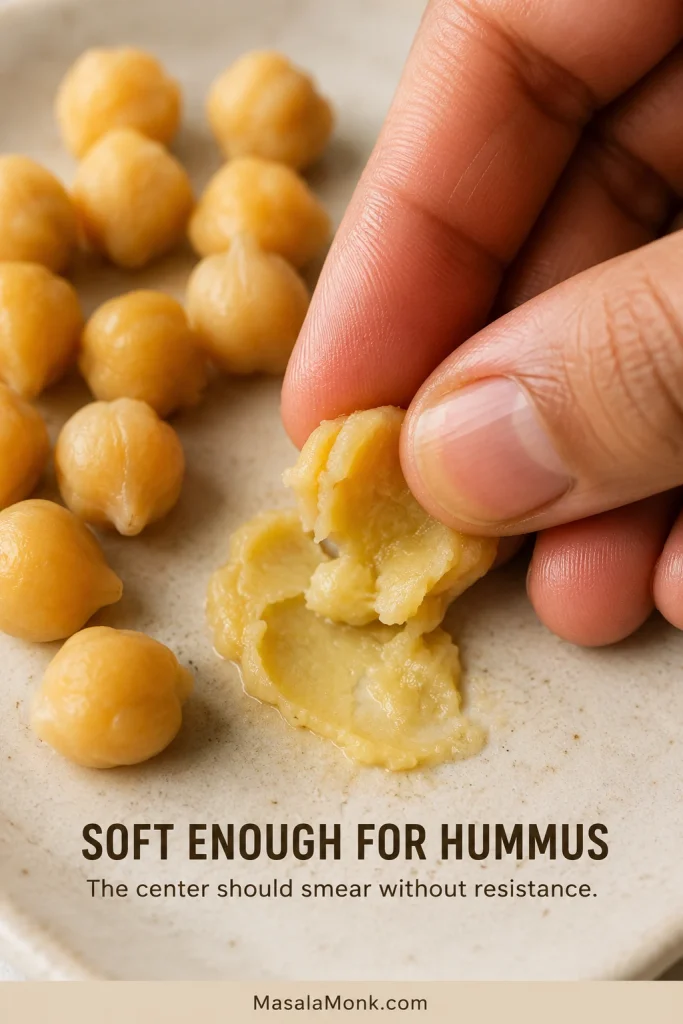
Press one chickpea between your fingers. A properly tender centre should crush easily instead of feeling chalky or springing back.
If the gravy tastes weak at first but leaves a strong spice aftertaste, it often needs time more than another spoonful. Once the sauce clings and the chickpeas are tender, the seasoning becomes much easier to judge.
If the curry’s texture and seasoning seem right but the powder itself tastes wrong, check the jar instead.
For the liveliest aroma, aim to use the powder within about 2–3 months. That is a freshness target, not a hard spoilage deadline. A dry blend kept clean and properly stored may remain usable longer, but coriander, chilli and cardamom gradually lose their lift.
Keep it in an airtight jar in a cool, dark cupboard away from the stove. Jar the powder only when it is completely cool, use a dry spoon, don’t hold the open container over a steaming pan, and date the jar when you make it.
Cook chole only occasionally? Halve the recipe. The full batch seasons roughly 9–11 batches made with about 400–500 g / 14–18 oz cooked chickpeas each, so a half batch is more likely to stay aromatic right to the bottom.
The masala also works with kala chana, aloo chana, pindi chole, chole bhature and other drier chickpea preparations. Start a little lighter when there is less gravy to absorb the tang and spice.
Doubling the recipe? Roast and grind it in two batches so neither the pan nor the grinder is crowded.
Once You Know the Balance
The recipe gives you a dependable place to begin. After a few pots, the useful part isn’t remembering every gram. It’s knowing what you want more of—and what to leave alone.
Then make the chole you remember, the one your family makes, the restaurant bowl you’ve been chasing, or simply the bowl you want tonight.
A good bowl of hummus without tahini should still feel generous. The spoon should leave a smooth trench, the surface should fold back softly, and the first bite should taste bright with lemon and garlic—not dry, sandy or strangely oily.
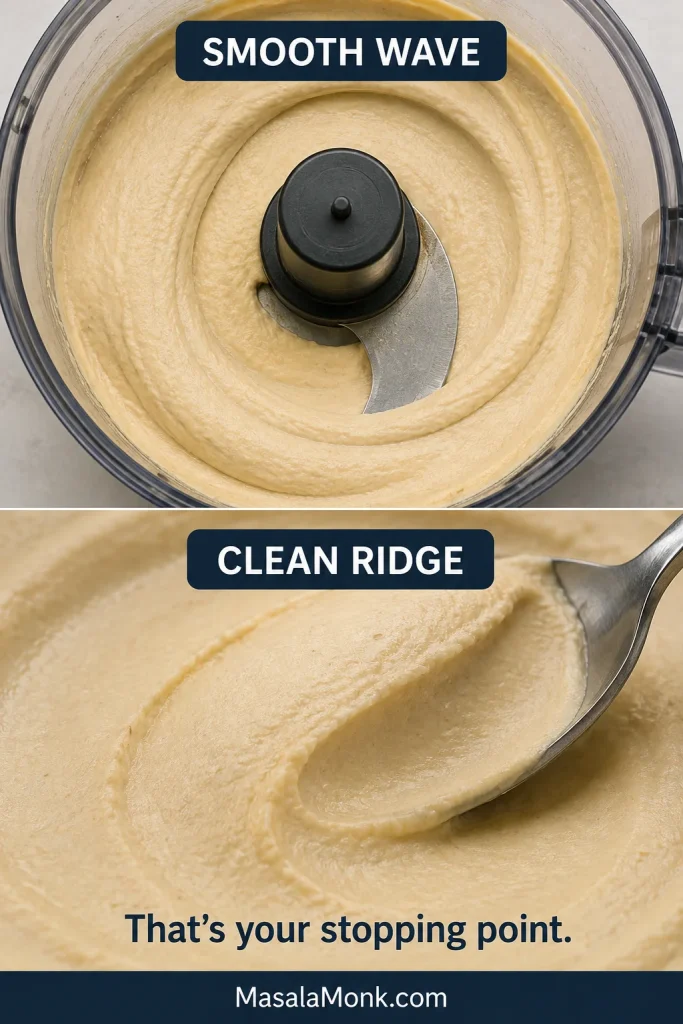
A smooth spoon trail should hold for a moment, then relax at the edges. Cracks mean too stiff; an instantly vanishing trail means looser hummus.
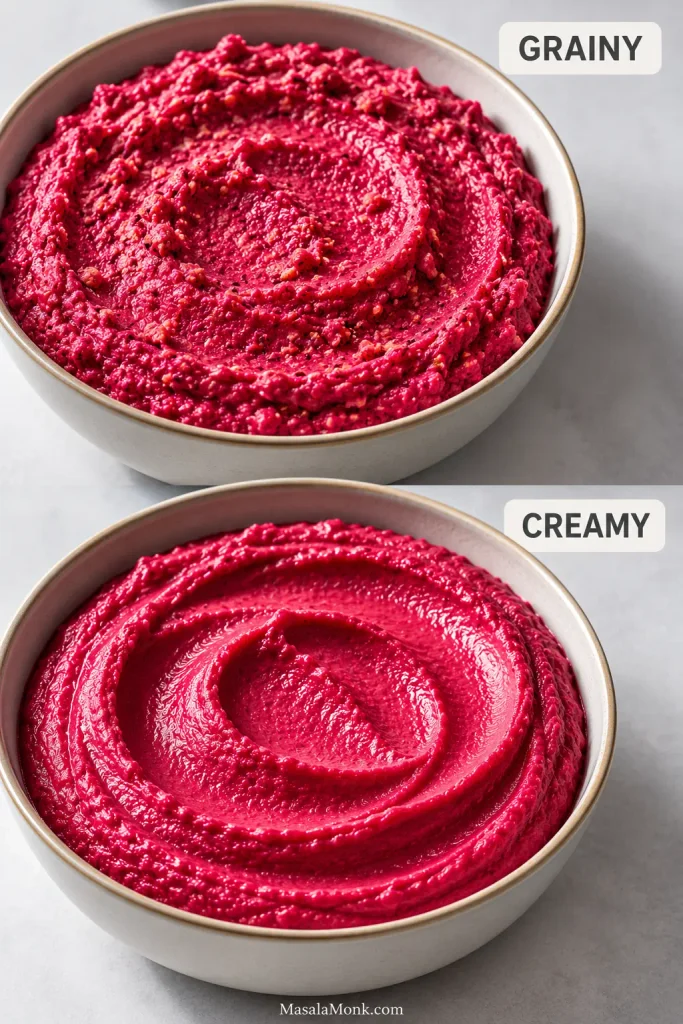
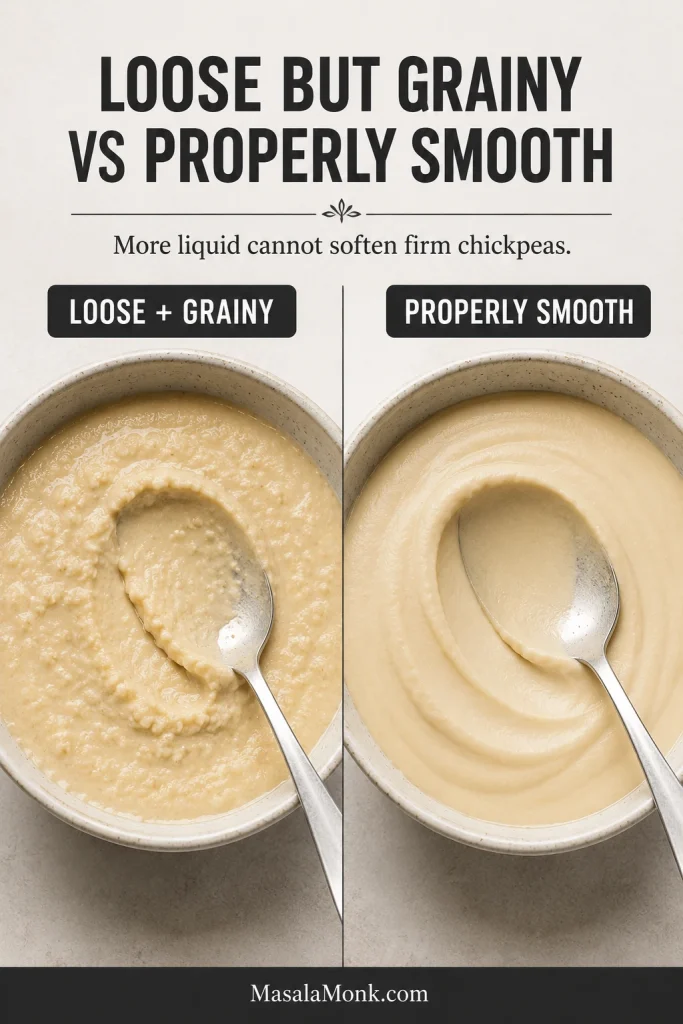
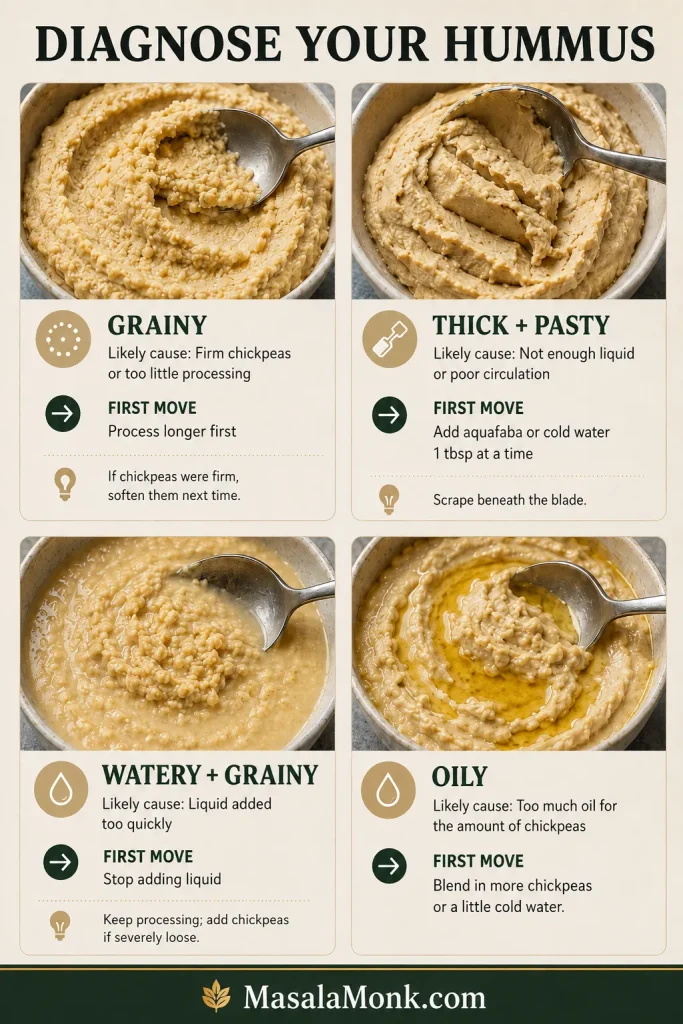
If your last tahini-free batch turned loose but somehow stayed grainy, adding more water was probably never going to fix it. Smoothness starts with the chickpeas themselves.
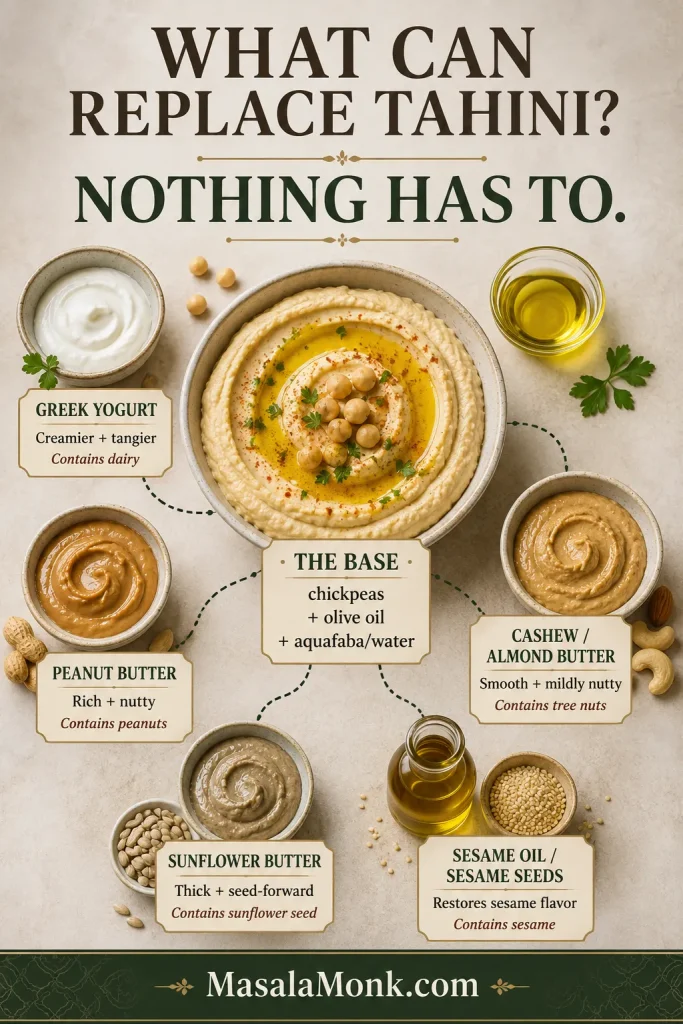
Tahini normally brings toasted sesame flavor, richness and body. Leave it out without adjusting the method and the chickpeas can become a heavy paste that never quite turns creamy. Fortunately, you do not need peanut butter, yogurt, seed butter or another specialty substitute to make the recipe work.
This homemade version is for days when the tahini jar is empty, tahini is difficult or expensive to find, you dislike its flavor or you need a dip made without sesame ingredients. It tastes lighter and more chickpea-forward than classic hummus, with the lemon and garlic coming through more clearly.
The MasalaMonk rule: softness decides whether the chickpeas can become creamy; liquid decides whether that creamy hummus ends up thick, spoonable or loose.
If you came here looking for a tahini substitute, the simplest answer may be the best one: you do not need one.
For one standard can, blend about 1½ cups (240–260 g) drained chickpeas with 2 tablespoons (30 ml) fresh lemon juice, 1 small garlic clove, ½ teaspoon fine salt, 2 tablespoons (30 ml) olive oil and 2 tablespoons (30 ml) reserved chickpea liquid or cold water.
Use the measured ingredients as the starting point, then adjust only the liquid. The chickpeas need to become smooth before you decide the final thickness.
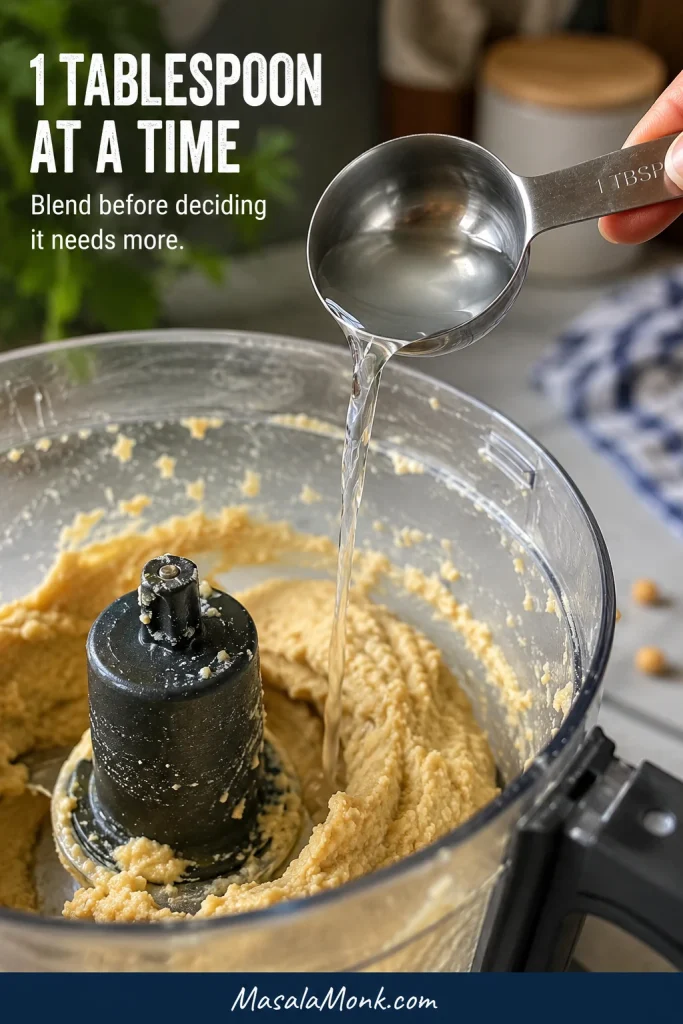
Process for several minutes, stopping to scrape underneath the blade. Add more liquid only 1 tablespoon (15 ml) at a time. If a chickpea does not flatten easily between your fingers, simmer the drained chickpeas in fresh water before blending.
The hummus is ready when the mixture follows the blade in a soft wave and a spoon leaves a smooth ridge rather than a cracked or sandy trail.
Hummus Recipe Without Tahini
This base contains no tahini, sesame seeds or sesame oil. Chickpeas provide the body, olive oil adds restrained richness, and aquafaba or cold water lets you choose the final thickness.
Recipe at a glance
Yield: about 1½ cups, depending on the final consistency
Serves: 4–6 as a dip or spread
Preparation: about 10 minutes
Cooking: none when the canned chickpeas are already soft
Total time: about 10 minutes, or roughly 15–30 minutes when the chickpeas need softening
Dietary notes: vegan; no tahini, sesame ingredients, dairy, peanuts or tree nuts are used in the base recipe. No gluten-containing ingredients are added, but check packaged ingredients when needed.
Equipment
A food processor is the easiest option for a thick, controlled texture. A full-size blender, personal blender, Indian mixer-grinder or stick blender can also work with a few adjustments.
Ingredients
Chickpeas: 1 can, 14–15 oz (400–425 g) before draining, usually yielding about 8½–9 oz (240–260 g), or roughly 1½ cups
Fresh lemon juice: 2 tablespoons (30 ml)
Garlic: 1 small clove, about 2–3 g after peeling; use ½ clove for a milder version
Fine salt: ½ teaspoon, about 2½–3 g depending on the salt, plus more after tasting
Ground cumin: ¼ teaspoon, optional
Extra-virgin olive oil: 2 tablespoons (30 ml)
Reserved chickpea liquid or cold water: start with 2 tablespoons (30 ml), then add up to 3 tablespoons (45 ml) more as needed
Optional for serving: a small drizzle of olive oil, paprika or sumac, chopped parsley, whole chickpeas, chili flakes or finely chopped herbs.
Instructions
Build the hummus base
Reserve and taste the chickpea liquid. Drain the chickpeas over a bowl, keeping at least ½ cup of the liquid. Taste a drop. If it tastes very salty, metallic or strongly canned, rinse the drained chickpeas briefly and use cold water for blending instead.
Taste the aquafaba before using it. If it is very salty, metallic or strongly canned, rinse the chickpeas and blend with cold water instead.
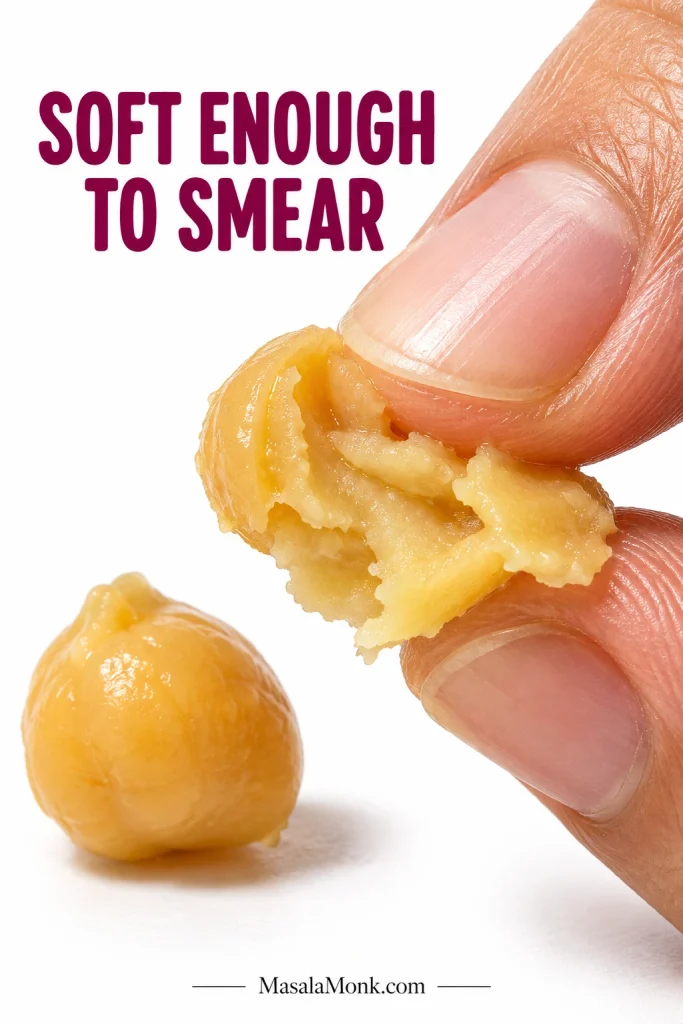
Check the chickpeas. Press one between your fingers. It should flatten easily through the center. If it feels springy, firm or chalky, soften the batch using the simmering method later in the guide.
Press the chickpea through the center. If it smears easily, it is soft enough; a firm or chalky core will stay gritty in the hummus.
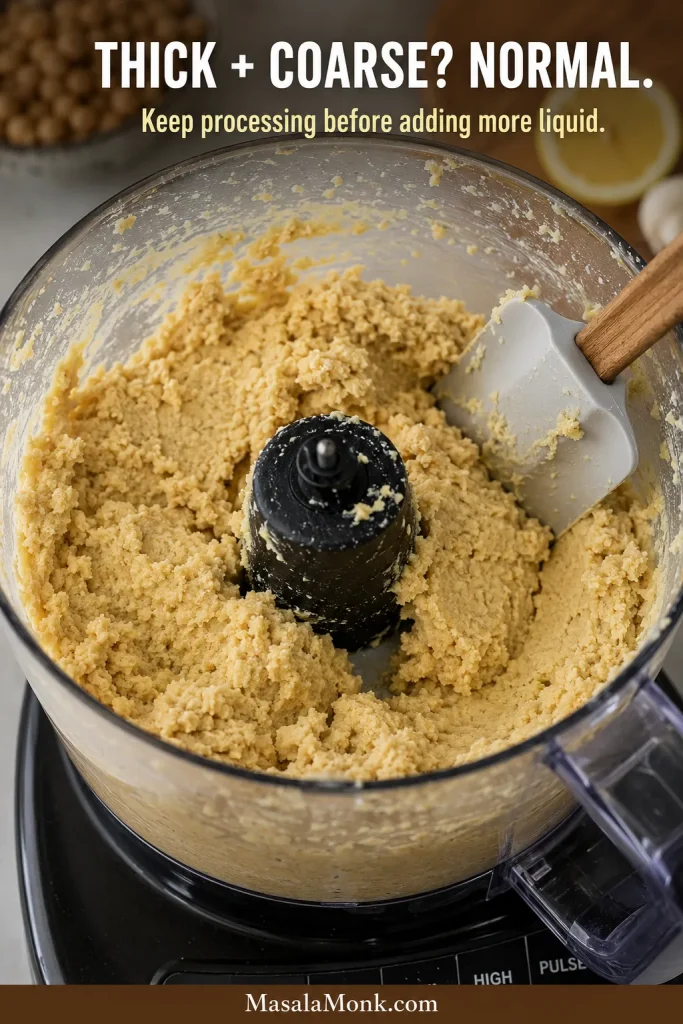
Start the paste. Add the chickpeas, lemon juice, garlic, salt and optional cumin to a food processor. Process for 45–60 seconds, then scrape the sides, bottom and area beneath the blade. It may look alarmingly thick and coarse at this point; do not fix it yet. Give the chickpeas more time in the processor first.
That thick, coarse first stage is normal. If each scrape-and-process cycle makes the paste finer, keep going before adding anything else.
Add the olive oil. Run the processor and pour in the oil gradually. Process for another 45–60 seconds, then stop and scrape again.
Loosen, smooth and finish
Loosen it slowly. Add 2 tablespoons (30 ml) aquafaba or cold water. Process for 30–45 seconds before deciding whether it needs more. Continue 1 tablespoon (15 ml) at a time.
Add one tablespoon, process, then look again. Hummus often loosens after a short run, so slow additions keep you from overshooting.
Watch the movement. Keep processing until the visible graininess disappears and the hummus follows the blade in a smooth wave. Most food-processor batches need about 3–5 minutes in total, including pauses for scraping.
Once the graininess is gone, stop judging smoothness and start judging use: firmer for toast, a little looser for dipping.
Taste and serve. Make the final salt, lemon and texture adjustment, then serve immediately. If time allows, let the hummus rest for 5–10 minutes and taste once more before serving; the garlic and acidity become easier to judge after a short rest. Taste it with the bread, vegetables or crackers you plan to serve, because the right thickness is easier to judge in context than from the spoon alone.
Blender and personal-blender adjustments
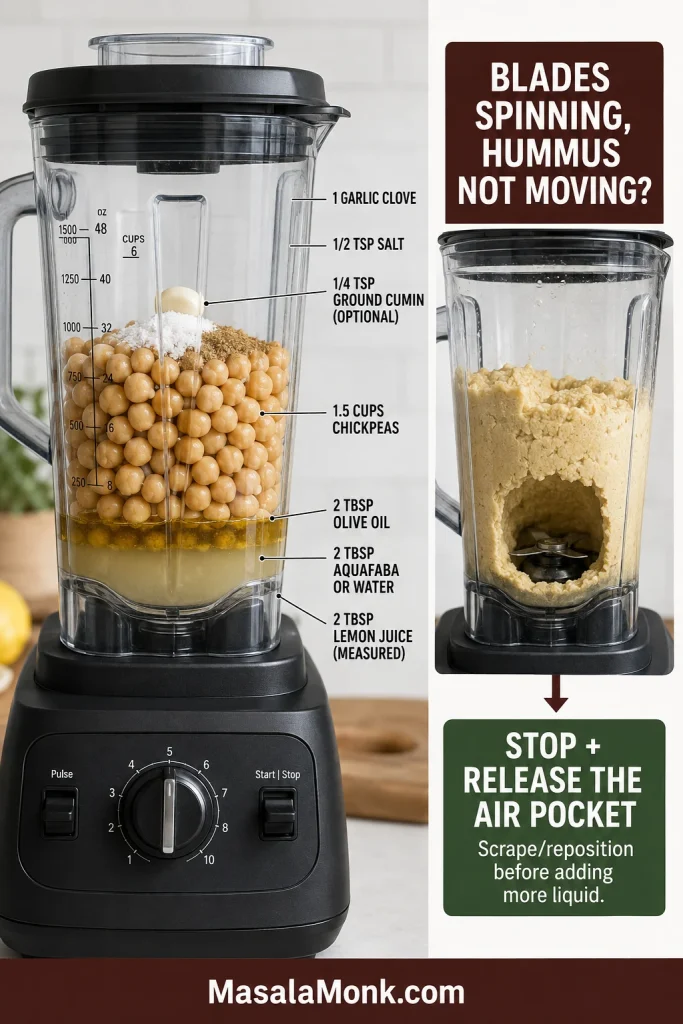
Place the lemon juice, olive oil and first 2 tablespoons of aquafaba or water near the blades, then add the chickpeas and seasonings. Stop and release trapped air before adding more liquid. Let simmered chickpeas cool before placing them in a sealed personal-blender cup, and never blend hot ingredients in a sealed container unless the manufacturer specifically says it is safe.
If the blades spin but the hummus sits still, release the trapped air pocket before adding more water. The problem may be circulation, not dryness.
Recipe notes
Hold back the remaining liquid until the first 2 tablespoons have been fully incorporated. A thick mixture is much easier to loosen than an over-thinned one is to repair.
Cumin is optional. Leaving it out changes the flavor, not the texture.
A strongly peppery olive oil can taste bitter after prolonged high-speed blending. Use a milder oil in the mixture and save the stronger one for serving.
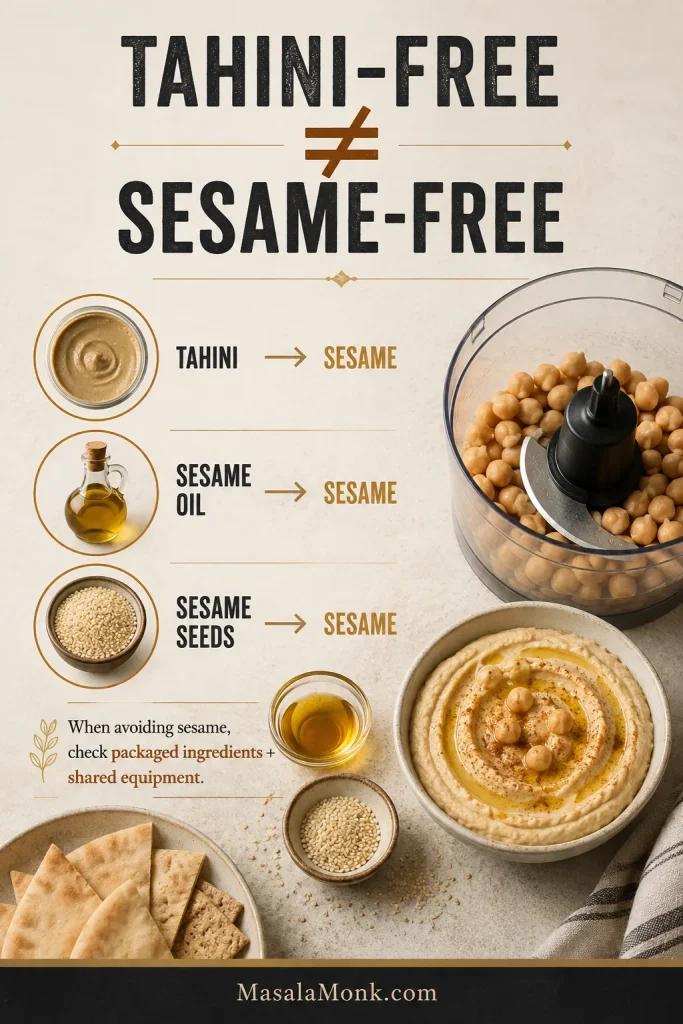
Tahini-Free and Sesame-Free Are Different Promises
Tahini is made from sesame seeds. A recipe can leave out the prepared paste while still using sesame oil or whole sesame seeds. That recipe may be tahini-free, but it still contains sesame.
The base recipe here contains no tahini, sesame seeds or sesame oil. It also avoids yogurt, peanut butter, tree-nut butter and sunflower butter, so skipping tahini does not automatically introduce another ingredient you may also need to avoid.
Tahini-free does not automatically mean sesame-free. Bread, seasonings, packaged foods and shared equipment can still introduce sesame.
Classic hummus commonly contains tahini, so do not assume restaurant or packaged hummus is free from sesame ingredients unless you have verified it.
Why the Recipe Works
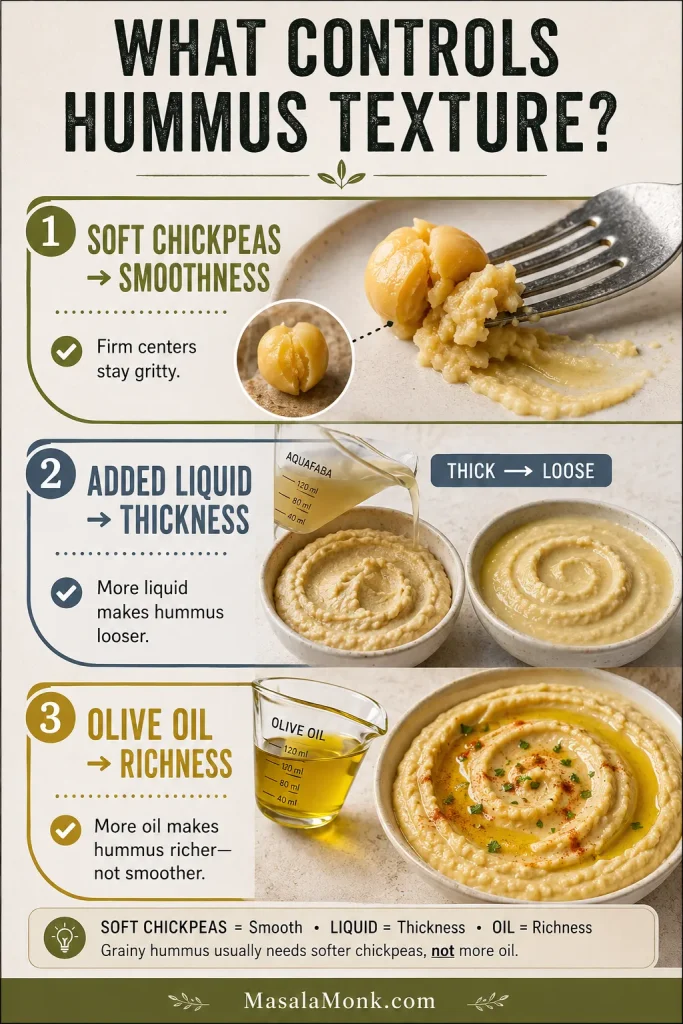
Three qualities that often get lumped together are different: soft chickpeas create smoothness, added liquid controls thickness, and olive oil adds richness. Once those jobs are clear, the recipe becomes much easier to adjust.
Think in three separate controls: chickpea softness for smoothness, liquid for thickness, olive oil for richness.
Soft chickpeas make a smoother paste
A soft chickpea collapses under the blade. A firm one breaks into tiny gritty pieces. That is why hummus can become increasingly watery while stubbornly remaining grainy.
If the chickpeas are still firm, more liquid simply makes those gritty pieces easier to move around.
Thin and grainy is still grainy. Fix the texture problem first instead of trying to wash firm chickpea particles away with more liquid.
Aquafaba helps the mixture move
Aquafaba is the liquid from canned or home-cooked chickpeas. It helps a dense chickpea paste circulate around the blade while contributing some chickpea body of its own. Firm centers still need softening.
Cold water works too, and it can be the better choice when canned aquafaba tastes overly salty, metallic or strongly canned.
Olive oil makes the hummus richer
Olive oil carries the garlic and cumin and gives the hummus a rounder mouthfeel. More oil will make it richer, but it will not smooth firm chickpea centers.
How the flavors should land
The finished hummus should taste of chickpeas first, followed by lemon and garlic. Salt brings those flavors into focus, while cumin adds optional warmth rather than taking over.
Fresh lemon juice gives the cleanest flavor. Bottled juice can work in a pinch, but it may taste flatter or more sharply acidic, so add it gradually.
Let this version be its own thing: a bright, smooth chickpea dip rather than an imitation of tahini hummus.
The Extra-Smooth Canned-Chickpea Method
Peeling every chickpea can refine the finish, but it turns an easy recipe into a fiddly project. Softening the whole batch usually makes a larger difference for much less effort.
You do not need to peel every chickpea. What matters is getting the centers soft enough to smear easily before blending.
Plain-water softening
Place the drained chickpeas in a small saucepan and cover them with fresh water.
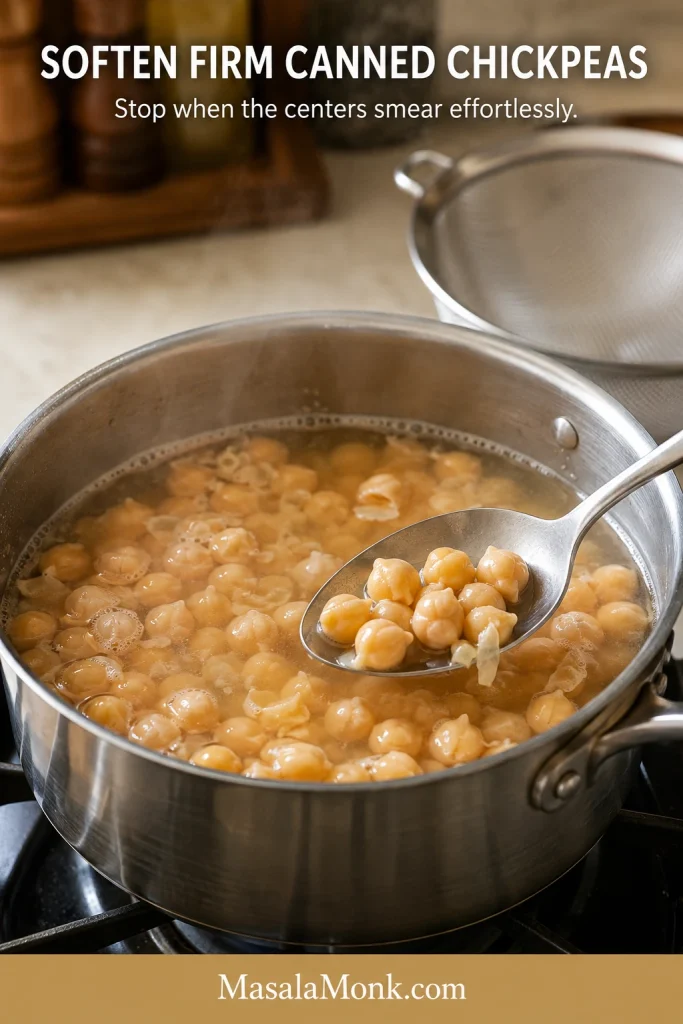
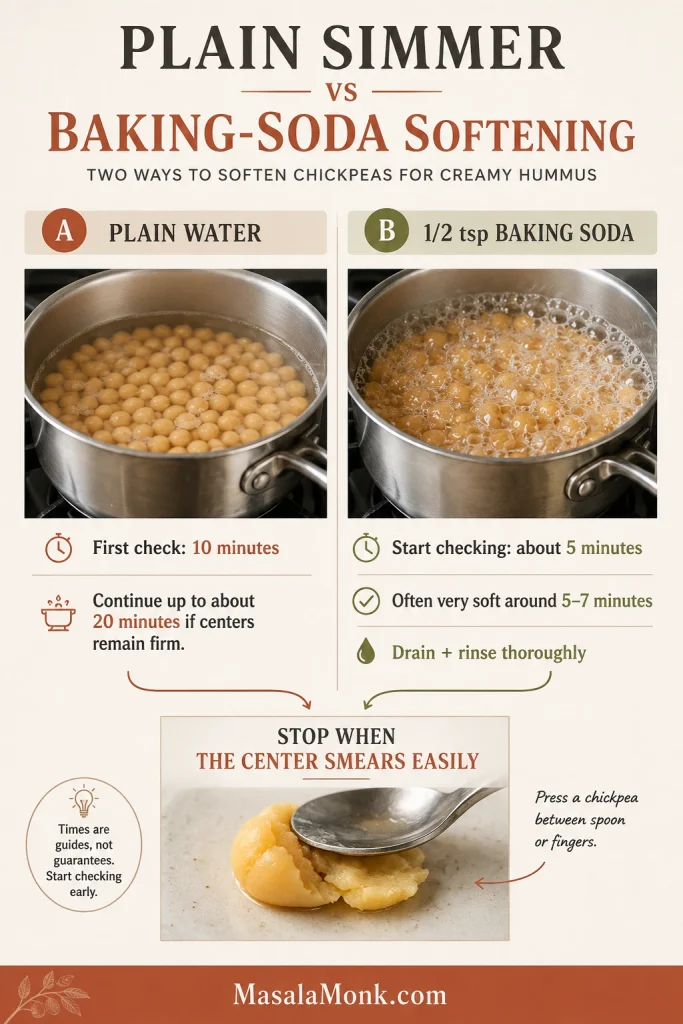
Bring to a steady simmer. Without baking soda, check after 10 minutes and continue for up to about 20 minutes if the centers still feel firm.
Stop when the chickpeas look swollen and smear immediately between your fingers, with no firm center.
Drain thoroughly. If a few skins float free, remove them. There is no need to turn dinner into a chickpea-peeling project.
Process the chickpeas while they are warm in a food processor or suitable vented blender. Cool them before using a sealed personal-blender cup.
Faster baking-soda softening
For roughly 1½ cups drained chickpeas, simmer them in fresh water with ½ teaspoon baking soda and start checking at about 5 minutes. Around 5–7 minutes is often enough to make canned chickpeas very soft; once the centers smear effortlessly, drain and rinse them thoroughly before blending. Longer cooking can make the chickpeas begin to break apart, which is unnecessary once they are already soft enough for hummus.
Plain water is slower; baking soda speeds things up. In either case, stop when the centers smear easily—and rinse a baking-soda batch well.
When the chickpeas already crush effortlessly, skip the extra simmer. This step earns its place only when the beans need help.
Properly softened chickpeas let the spoon glide through the hummus instead of dragging across a cracked, grainy surface.
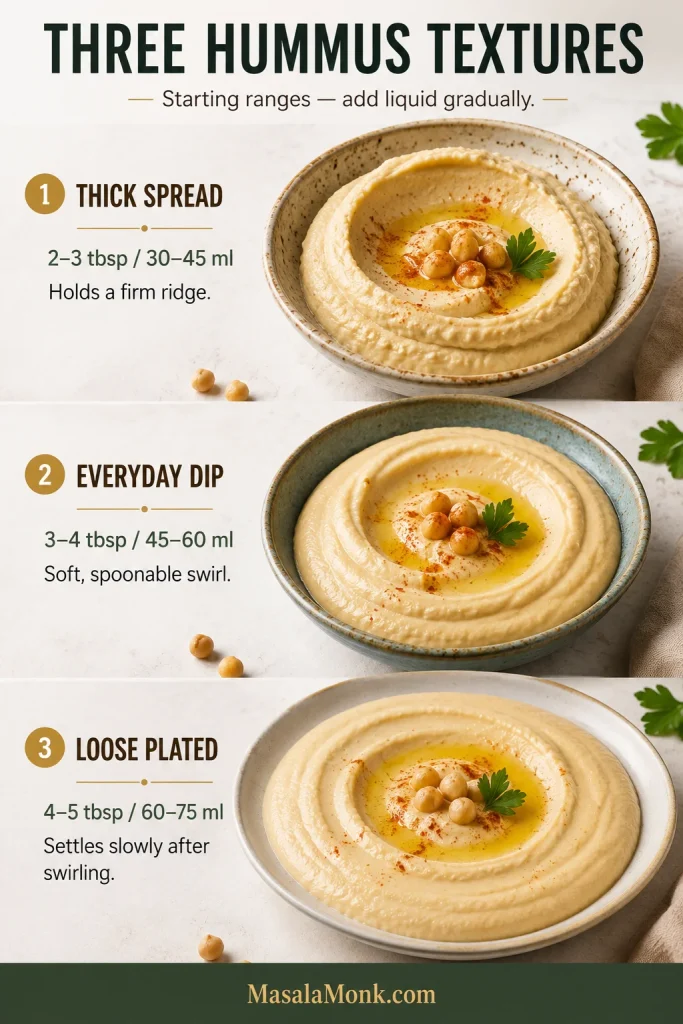
The right consistency depends on how you plan to eat it. A wrap needs firmer hummus than a mezze plate, and neither version is wrong.
Finish
Typical total added liquid
Best use and visual cue
Thick spread
About 2–3 tablespoons (30–45 ml)
Holds a firm ridge for sandwiches, wraps and toast
Everyday dip
About 3–4 tablespoons (45–60 ml)
Holds a soft swirl while letting pita pass through easily
Loose plated hummus
About 4–5 tablespoons (60–75 ml)
Settles slowly after swirling for falafel plates and grain bowls
One smooth batch can finish three ways: thick for sandwiches, medium for dipping, or looser for plating.
These are starting ranges for the total aquafaba or water added to the batch. Warm chickpeas may need less; a narrow blender may need slightly more before the mixture begins circulating.
If tonight’s hummus is going into a sandwich, stop while it still holds a firm ridge. A loose restaurant-style swirl is useful only when that is the texture you want.
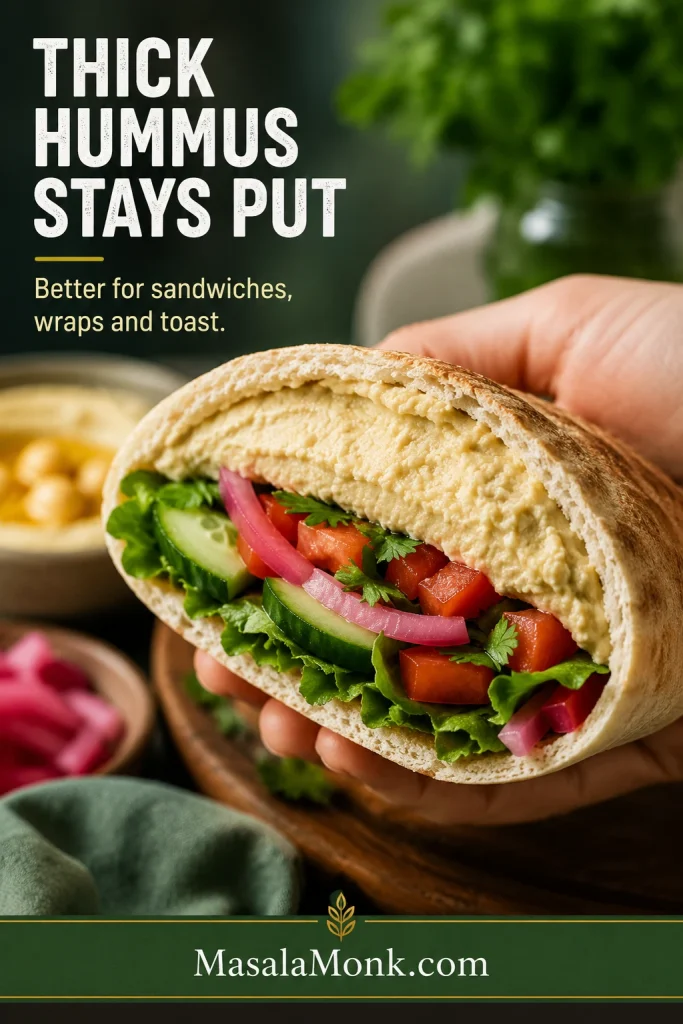
For sandwiches and wraps, thicker hummus is useful: it clings to the bread and is less likely to squeeze out with the filling.
For dipping, aim for the middle texture and serve it with warm wedges from this homemade pita bread recipe. The hummus should yield easily without running off the bread.
Garlic: Mild to Bold
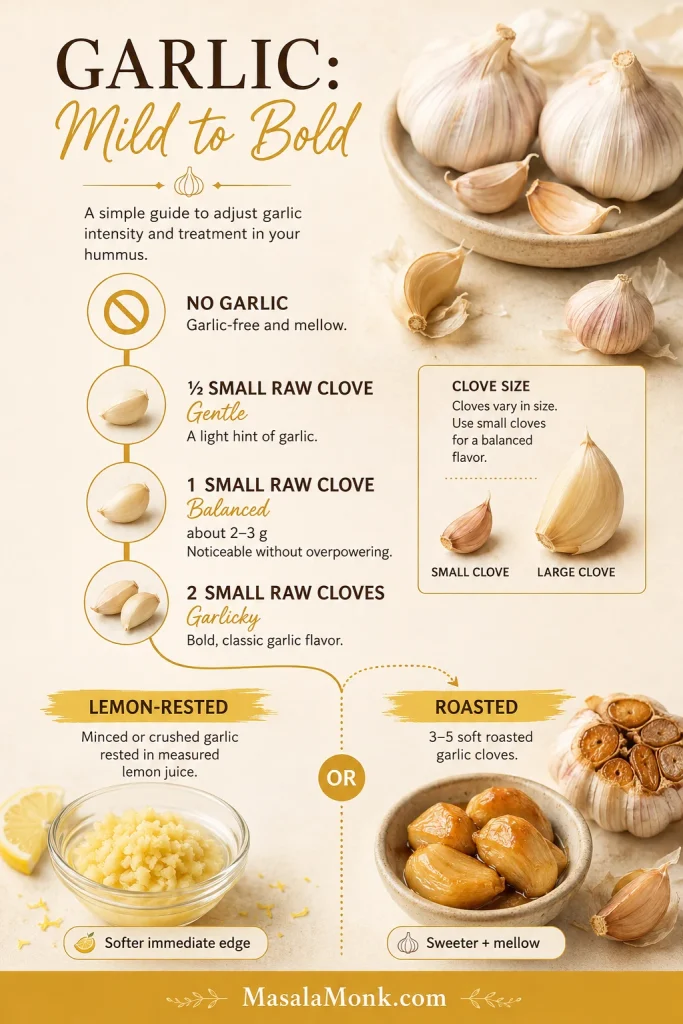
Garlic stands out more clearly when tahini is absent. A large raw clove can become sharp, especially after the hummus has rested overnight.
One clove is a surprisingly loose measurement: a tiny clove and a large one can produce completely different results.
Style
Amount per standard can
How it tastes
No garlic
None
Clean, lemony and chickpea-forward
Gentle
½ small clove
Mild, with very little raw-garlic bite
Balanced
1 small clove, about 2–3 g
Clear garlic flavor without excessive burn
Garlicky
2 small cloves
Bold raw-garlic hummus
Lemon-mellowed
1–2 cloves rested in the measured lemon juice for 10 minutes
Raw garlic flavor with a softer immediate edge
Roasted
3–5 soft roasted cloves
Sweet, mellow and deeper
Raw garlic is sharpest, a lemon rest softens the edge, and roasting turns it sweeter and rounder.
When preparing the hummus ahead, choose one level gentler than you think you need. Garlic preparation changes its strength, too: our garlic aioli guide compares grated, pressed, minced and roasted garlic and explains how a short lemon rest softens its bite.
Food Processor, Blender or Mixer-Grinder?
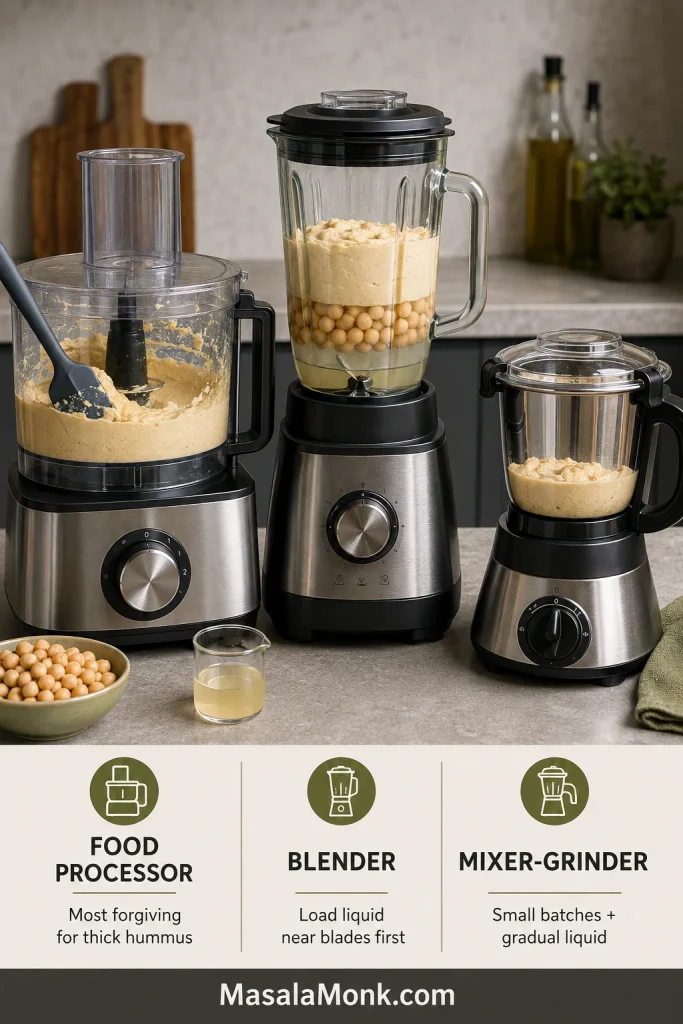
Every machine needs enough movement to smooth the chickpeas without forcing you to pour in unnecessary liquid. The loading order, batch size and amount of scraping are what change.
The recipe stays the same, but the machine changes the technique. Blenders need better circulation; food processors tolerate thicker mixtures.
How each machine behaves
Food processor: the most forgiving choice for thick hummus. Start with the chickpeas and flavorings, then add the oil and liquid gradually. Scrape beneath the blade when dense paste gathers there.
Full-size blender: put the lemon, oil and starting liquid near the blades first. When a hollow pocket forms, stop and release the trapped air before deciding it needs more water.
Personal blender: place liquid nearest the blade and make half a batch when the cup is narrow. Use short runs, redistribute the mixture and never seal hot ingredients inside.
Stick blender: use very soft chickpeas in a tall, narrow vessel and move the blender around the container rather than holding it in one place.
Fork or masher: warm chickpeas can become a satisfying rustic spread, but the texture will stay coarser than machine-blended hummus.
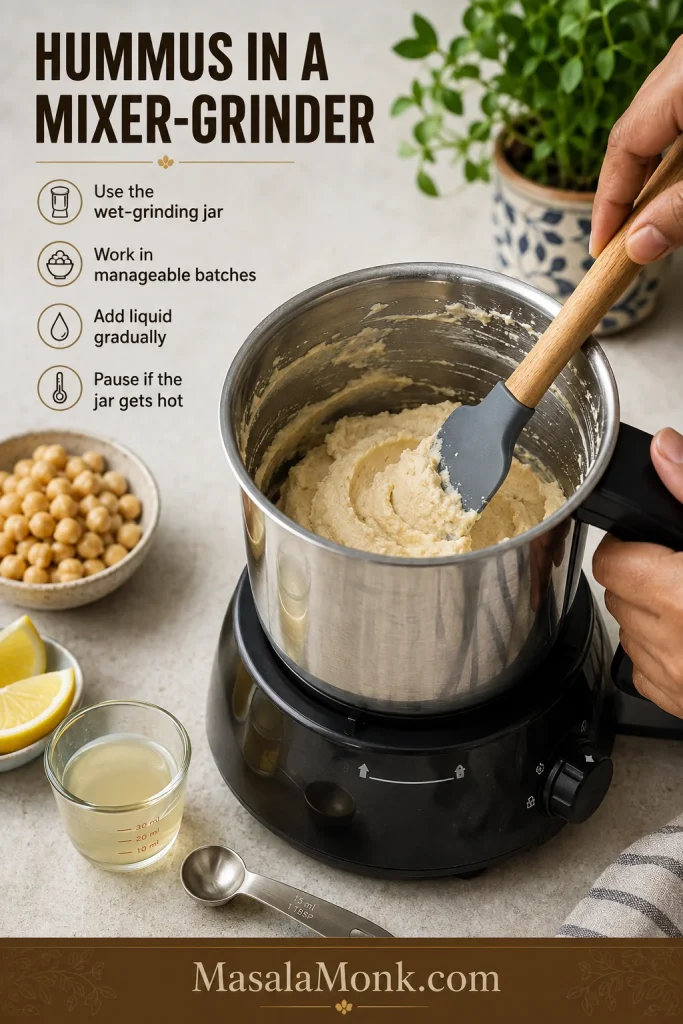
Indian mixer-grinder technique
Use a wet-grinding jar and work in manageable batches. Pulse first, add liquid gradually and pause when the jar becomes hot.
With an Indian mixer-grinder, smaller batches and short pauses help the hummus move without heating the jar or forcing in too much liquid.
A powerful blender may finish much faster than a food processor. Once the hummus is smooth, there is no benefit in running the motor simply to match a written time.
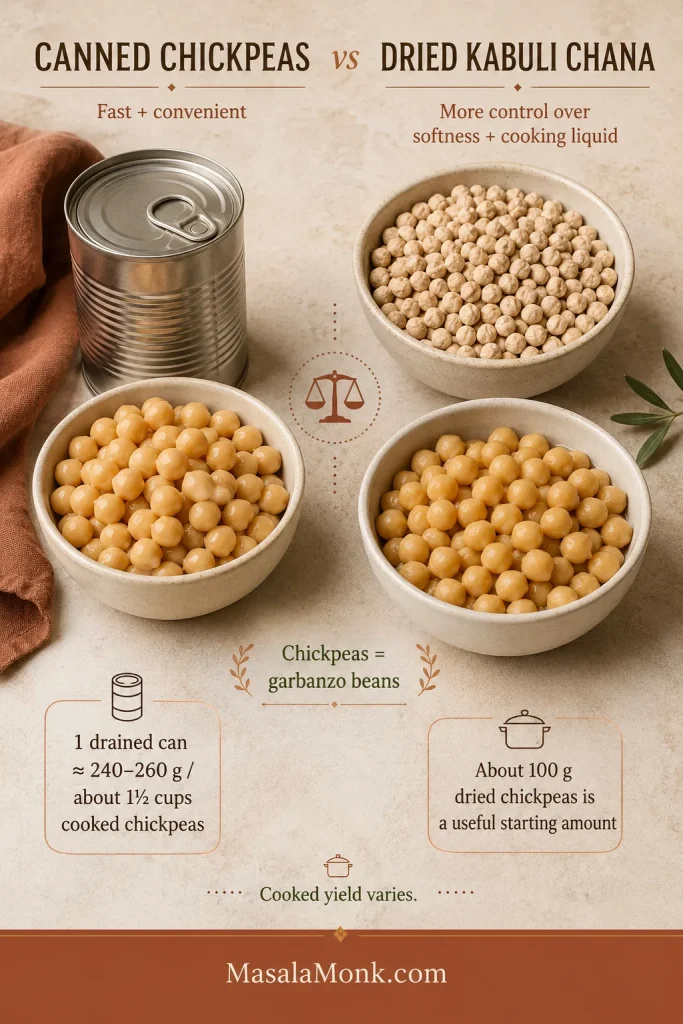
Chickpeas and garbanzo beans are two names for the same legume. In India, the large pale chickpeas commonly used for hummus are usually sold as kabuli chana.
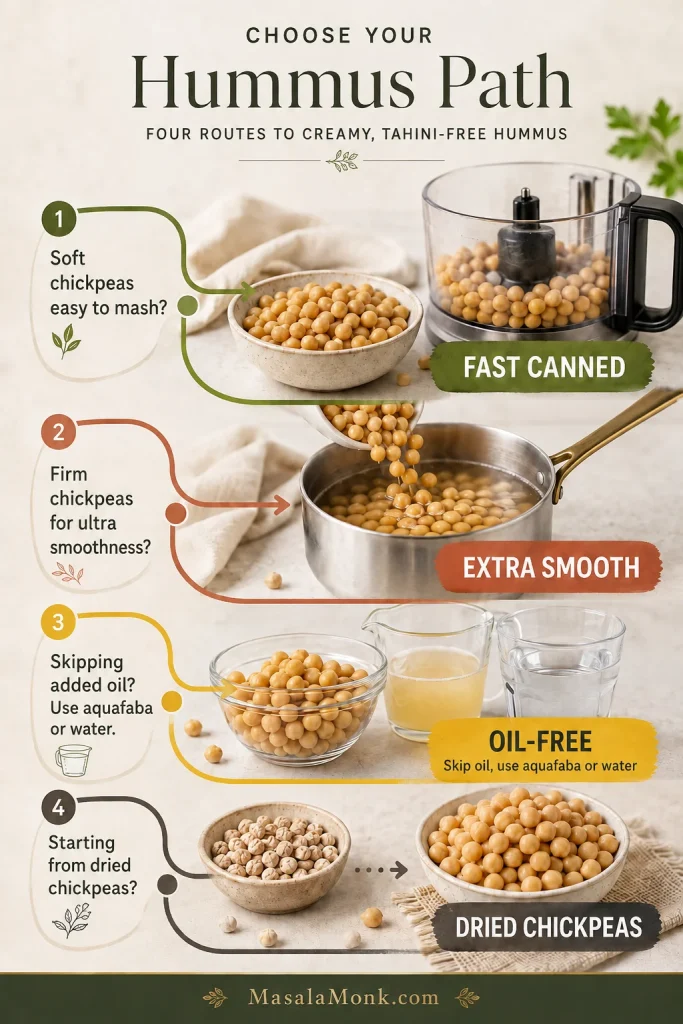
Canned chickpeas are the weeknight answer. Dried kabuli chana takes longer, but you control exactly how soft and salty the chickpeas become and how the cooking liquid tastes.
Canned chickpeas save time; dried kabuli chana gives you more control. Once cooked soft enough, either can feed the same hummus formula.
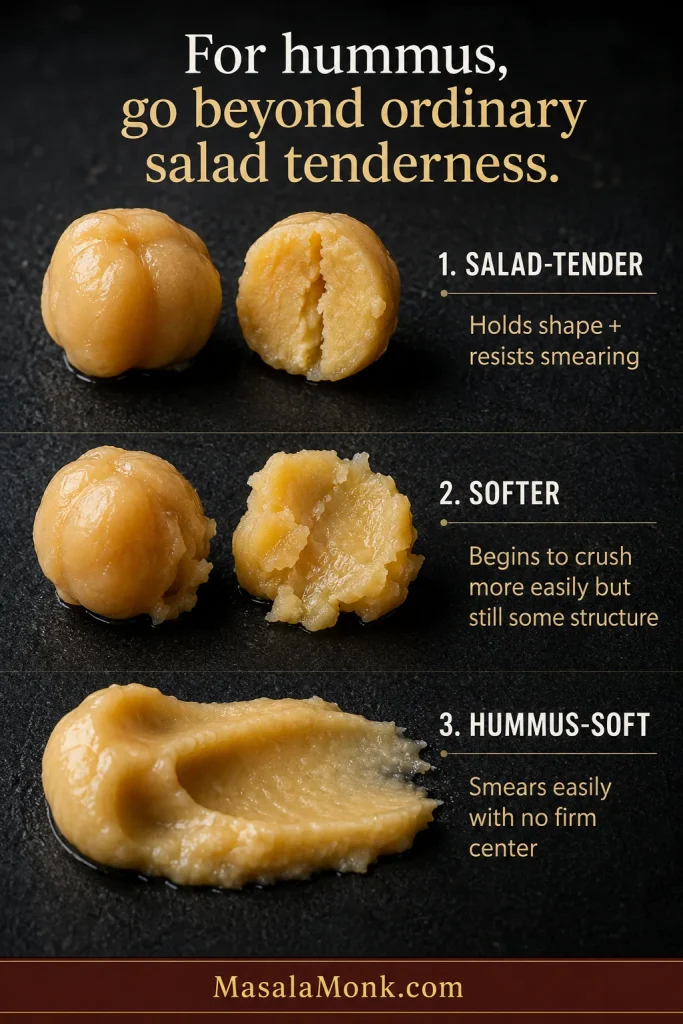
For hummus, take chickpeas beyond ordinary salad tenderness. The center should crush into a smooth paste without resistance. Use the timings below as first checks; the chickpea itself decides when it is soft enough.
Salad-tender is not always hummus-soft. Keep cooking until the center smears rather than merely splits.
One drained can can be replaced with 8½–9 oz (240–260 g), or about 1½ cups, cooked chickpeas. About 3½ oz (100 g), or a little over ½ cup, dried chickpeas is a useful starting amount, although the final cooked yield varies with age, soaking and cooking.
Falafel can begin with soaked, uncooked chickpeas; hummus needs them fully cooked and soft. If you are making both, this homemade falafel guide explains the different texture and handling.
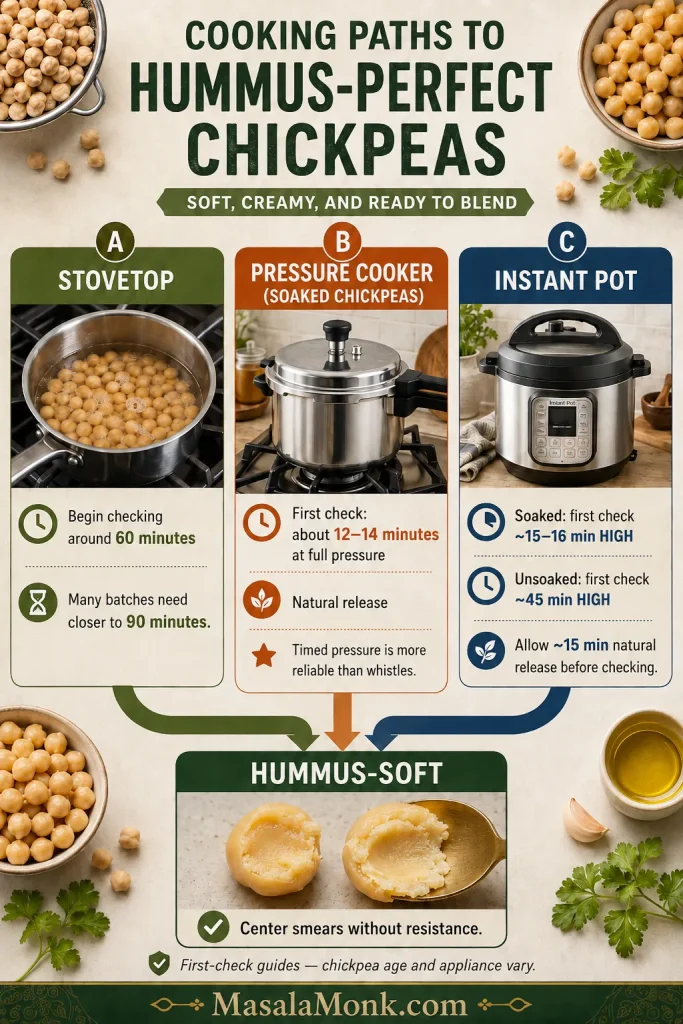
Choose a cooking method
The cooker changes the timing, not the endpoint. Start checking by the clock; stop when the chickpea center smears without resistance.
Stovetop
Soak the chickpeas in plenty of water for 8–12 hours.
Drain, rinse and cover with several inches of fresh water.
Bring to a boil, then simmer. Begin checking around 60 minutes; many batches need closer to 90 minutes, and older chickpeas can take longer.
Reserve some cooking liquid, then drain and weigh the chickpeas once they pass the softness test above.
Indian stovetop pressure cooker
For about 3½ oz (100 g) soaked kabuli chana, add enough fresh water to cover the chickpeas by about 1½ inches (4 cm). As a first check, cook for about 12–14 minutes at full pressure, then allow a natural release. Continue for another few minutes under pressure if the centers still resist crushing.
Timed pressure is more dependable than whistle count because burner strength, cooker design and operating pressure vary.
Instant Pot
Place the chickpeas in the inner pot and cover them with fresh water by at least 2 inches (5 cm), while meeting the minimum liquid requirement for your model.
For chickpeas deliberately cooked soft enough for hummus, begin checking soaked chickpeas after about 15–16 minutes on high pressure, followed by about 15 minutes of natural release. For unsoaked chickpeas, begin around 45 minutes on high pressure, again allowing about 15 minutes of natural release before checking. Cooker models and chickpea age vary, so give them additional pressure time when the centers still feel firm.
Substitutes and Easy Variations
What Can I Use Instead of Tahini in Hummus?
Nothing has to replace it. Soft chickpeas, olive oil and enough aquafaba or water already produce a creamy dip. Other ingredients can add richness or change the flavor, so use them because you want what they bring.
Option
What it changes
Dietary note
No substitute — base recipe
Olive oil and aquafaba or water keep the flavor light and chickpea-forward
Vegan; the base contains no sesame ingredients
Greek yogurt
Softer, creamier and tangier
Contains dairy and is not vegan
Peanut butter
Rich and distinctly nutty
Contains peanuts
Cashew or almond butter
Smooth and mildly nutty
Contains tree nuts
Sunflower butter
Thick and seed-forward
Contains sunflower seed
Sesame oil or sesame seeds
Restores sesame aroma and flavor
Contains sesame
Nothing has to replace tahini. Add yogurt, nut butter or seed butter only when you actually want the flavor and texture it brings.
A substitute is only useful if you like what it does to the hummus.
Oil-free hummus without tahini
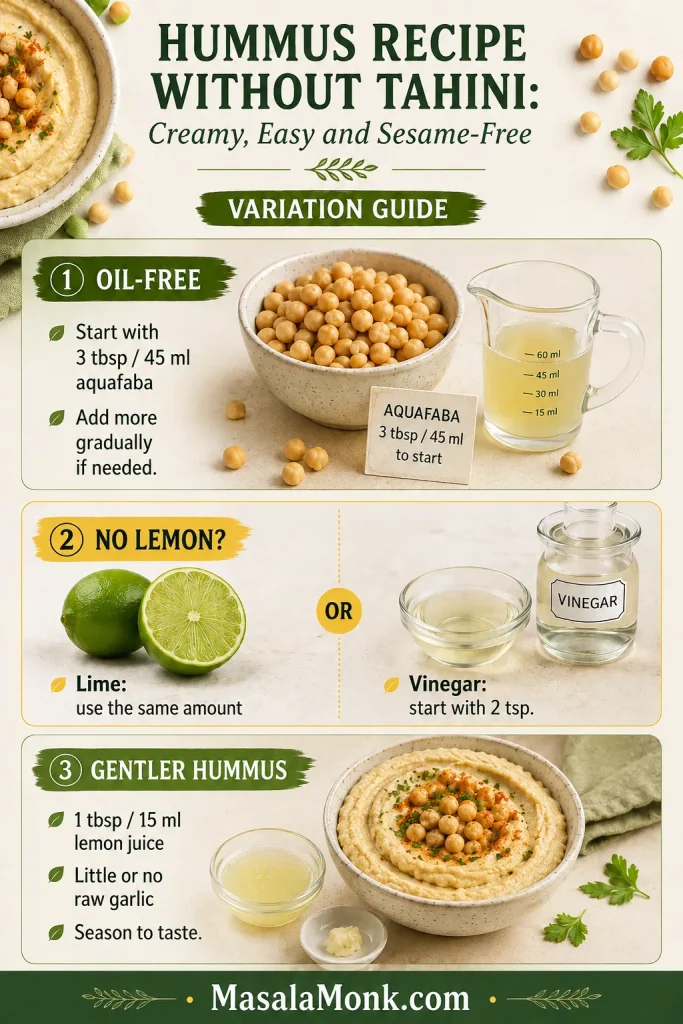
Leave out the olive oil and add 3 tablespoons (45 ml) aquafaba first. Process fully, then add more aquafaba or cold water 1 tablespoon (15 ml) at a time. The finish will be lighter, so chickpea tenderness and seasoning become even more noticeable.
Hummus without lemon
Lime juice can replace the lemon in the same amount, but the citrus flavor will be noticeably different. For apple-cider or white-wine vinegar, start with 2 teaspoons, then blend and taste before adding more.
Mild hummus without garlic or cumin
Leave out the garlic for a cleaner, gentler dip, or omit the cumin for a brighter lemon-and-chickpea flavor. For an especially gentle version, use 1 tablespoon (15 ml) lemon juice and little or no raw garlic, then season to taste.
For cleaner troubleshooting, change one thing at a time: oil, acid or garlic. Then taste before making another adjustment.
Greek-yogurt hummus
Add 1–2 tablespoons thick plain Greek yogurt after the chickpeas have become smooth. Hold back some aquafaba and adjust the thickness afterwards. The result is softer and tangier, but no longer vegan or dairy-free.
When you want yogurt and cucumber to lead rather than chickpeas, make this Greek tzatziki sauce recipe instead.
Peanut, nut or sunflower-butter hummus
Add 1–2 teaspoons smooth unsweetened peanut, cashew, almond or sunflower butter first. Blend and taste before using more. None disappears completely into the hummus, so choose the one whose flavor you want.
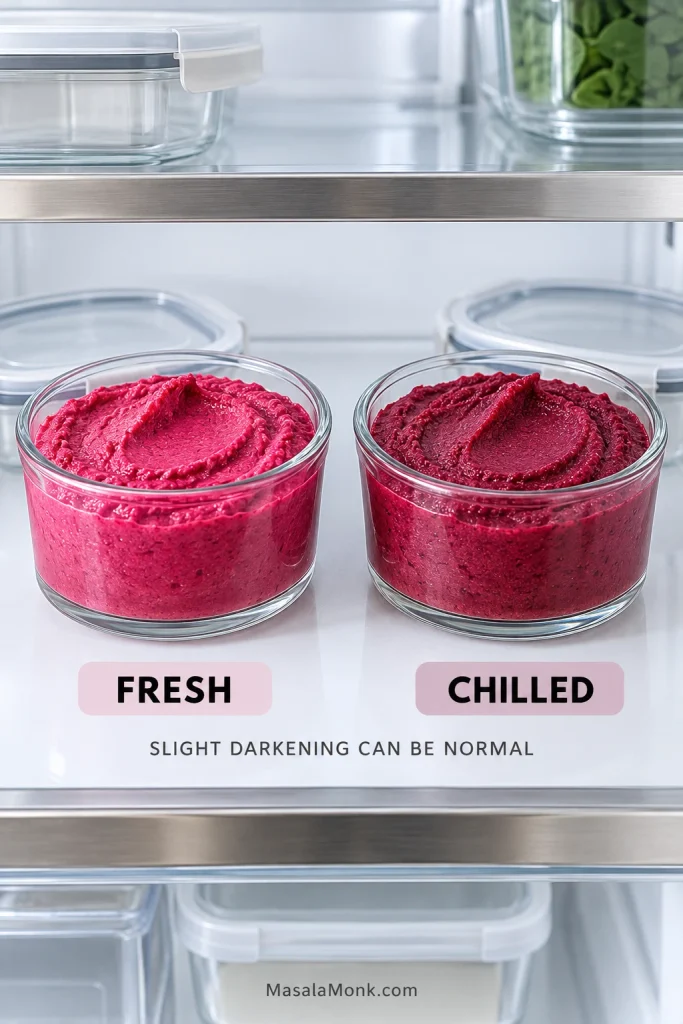
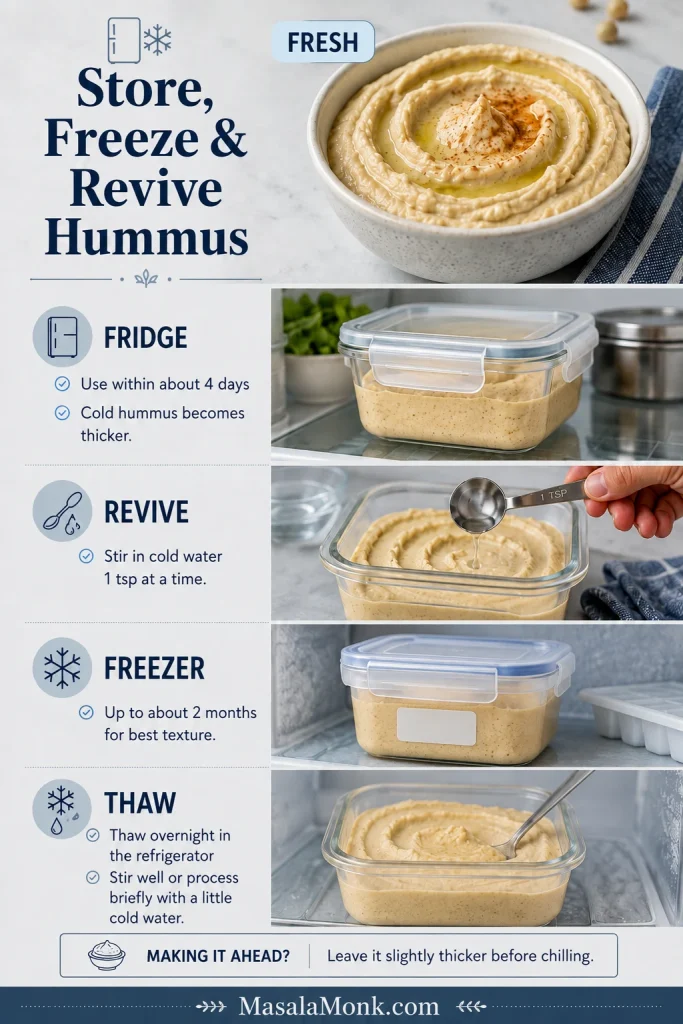
Cold hummus almost always feels thicker than freshly blended hummus, but it usually needs only a good stir and a little water to come back to life. Raw garlic can also become more noticeable as the dip rests.
Chilled hummus often firms up. Stir first, then loosen with cold water a teaspoon at a time rather than thinning it before storage.
Transfer the hummus to a clean airtight container and refrigerate it promptly. For a conservative home-storage window, use it within about four days. The USDA’s general leftovers guidance recommends keeping refrigerated cooked leftovers for about three to four days.
If the hummus becomes too thick, stir in cold water 1 teaspoon at a time. A dry surface usually means too much air exposure; smooth the hummus into a smaller airtight container before refrigerating it.
Freeze plain hummus in small airtight portions for up to about two months for the best texture. Leave a little room for expansion, thaw overnight in the refrigerator, then stir vigorously or process briefly with a spoonful of cold water.
Versions containing yogurt, fresh herbs or watery vegetables may thaw less evenly than the plain base. When making the hummus a day ahead, leave it slightly thicker and make the final adjustment after chilling.
Yes. Soft chickpeas, enough time in the processor and gradually added liquid can produce creamy hummus. Without tahini, the flavor is lighter and more directly of chickpeas, lemon and garlic.
Can I use water instead of aquafaba?
Yes. Cold water is especially useful when the canned chickpea liquid tastes very salty, metallic or strongly flavored by the can. In that case, rinse the drained chickpeas briefly as well.
Do I need to peel the chickpeas?
No. Very soft chickpeas and enough processing provide a large improvement without the extra work. Remove skins that loosen naturally after simmering if convenient.
Can I make hummus in a blender or NutriBullet?
Yes. Put the liquid near the blades, reduce the batch when the jar is narrow and stop to redistribute the mixture. Let warm chickpeas cool before placing them in a sealed personal-blender cup.
Serving Ideas
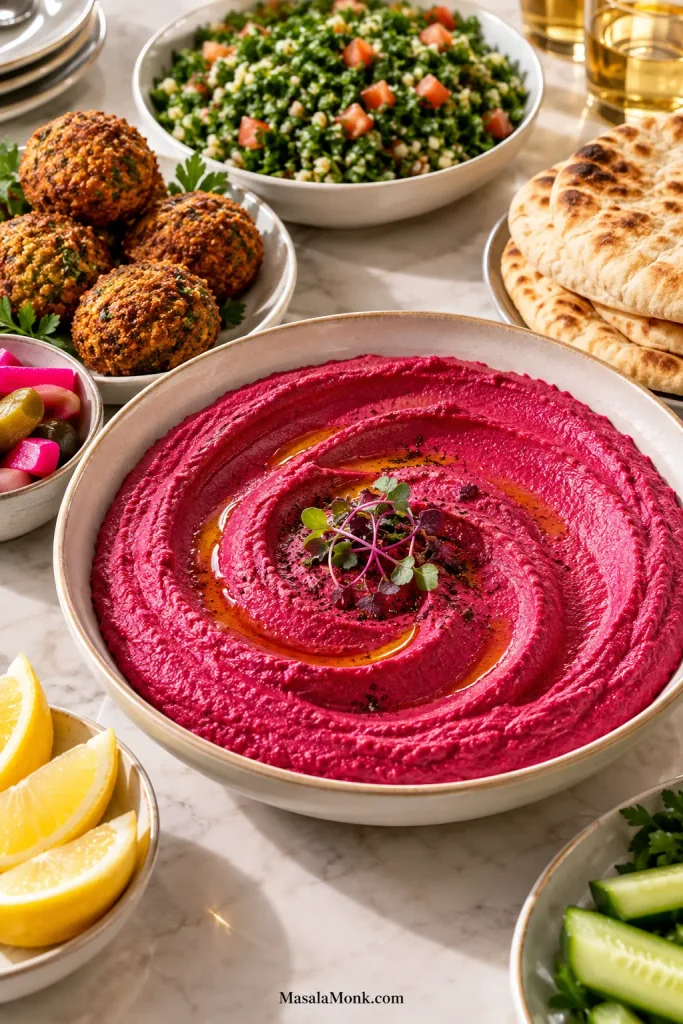
Warm pita against cool hummus; crisp cucumber adds snap, while a sharp pickle cuts through the chickpeas and olive oil. Those contrasts are often more satisfying than piling on extra toppings.
For a fresher mezze plate, add this parsley-heavy tabbouleh recipe. Its lemon, tomato and herbs balance the creamy hummus and keep the plate bright rather than heavy.
Dipping: warm pita, cucumber, carrots, radishes, peppers or crackers
Lunch: sandwiches, wraps, toast or stuffed pita
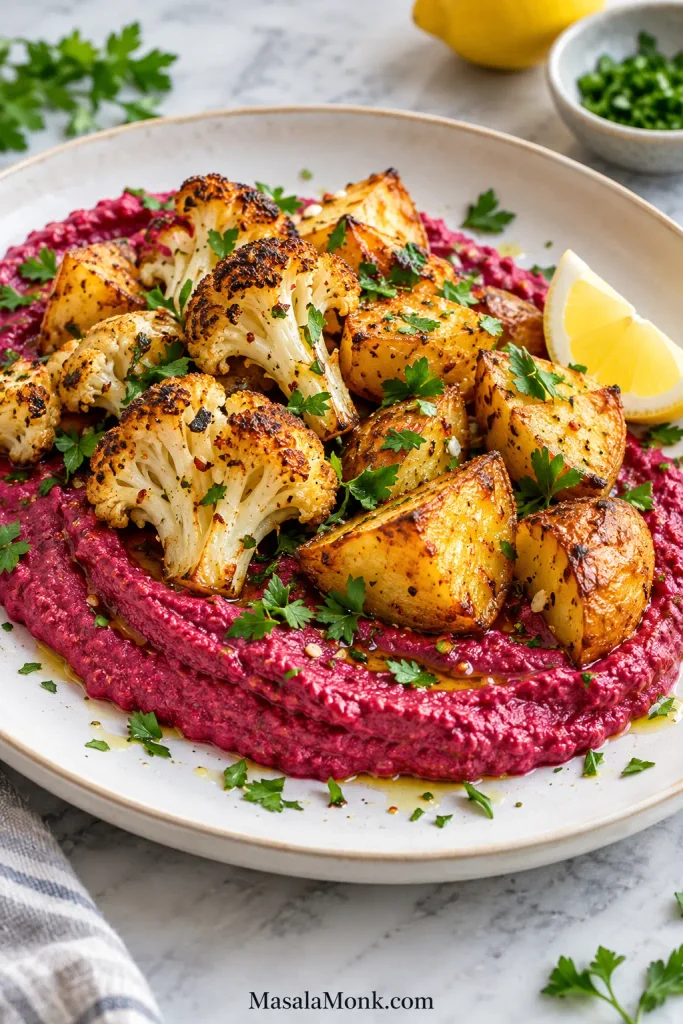
Dinner: falafel plates, grain bowls and roasted vegetables
Dressing: thin with cold water and lemon until it falls from a spoon in a steady ribbon
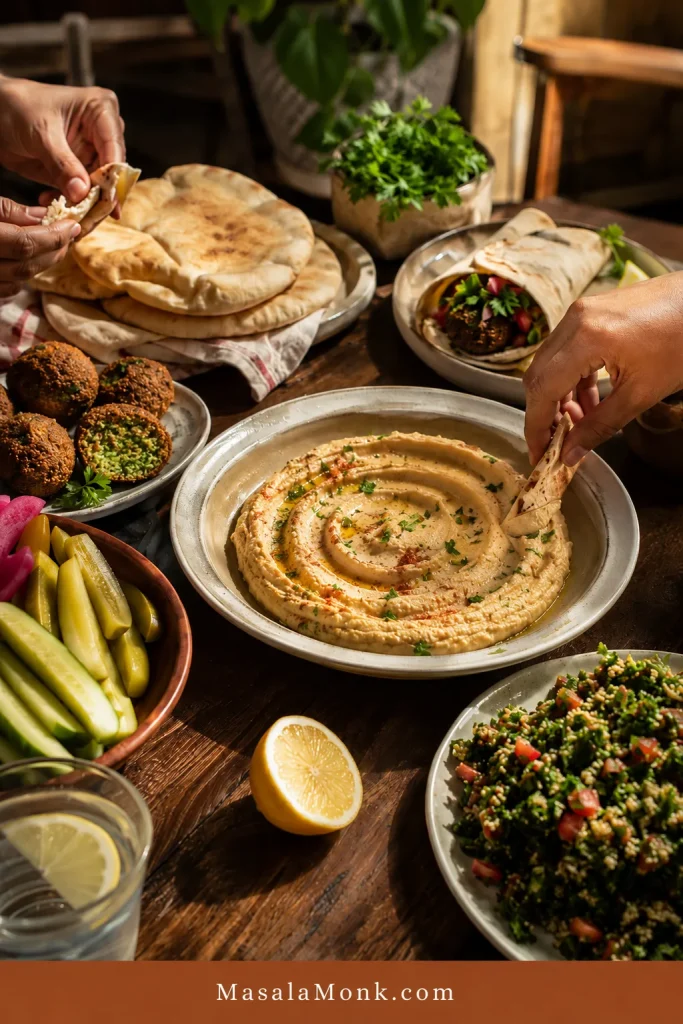
Warm pita, crisp vegetables, pickles, falafel and tabbouleh bring contrast. Let the hummus stay the creamy center of the table.
To plate it, spoon the hummus into a shallow dish and push outward with the back of the spoon. Finish with just enough olive oil, herbs or paprika to complement the flavor while the surface is still soft and freshly swirled.
Give the hummus one final stir, then taste it with the bread, vegetables or crackers you plan to serve. A texture that seems slightly loose on the spoon may feel exactly right once warm pita passes through it.
If the chickpeas are soft, the seasoning is balanced and the texture suits the meal, the hummus has already done its job.
This chickpea salad recipe turns canned chickpeas into a fresh no-cook salad with cucumber, tomatoes, red onion, herbs, and lemon dressing in about 15 minutes. It is bright enough for a side dish, filling enough for lunch, and sturdy enough for meal prep.
Keep the chickpeas whole for a crisp salad bowl, lightly mash them for wraps or pita pockets, or smash them more deeply for a creamy chickpea salad sandwich. The same recipe can lean Mediterranean with feta and olives, vegan with avocado or tahini, or Indian-style with cilantro, cumin, chili, and lemon.
Chickpeas and garbanzo beans are the same ingredient, so this also works as a garbanzo bean salad recipe. The key is simple: drain the chickpeas well, season them boldly, and use enough lemon, salt, herbs, and crunch so the salad tastes fresh instead of flat.
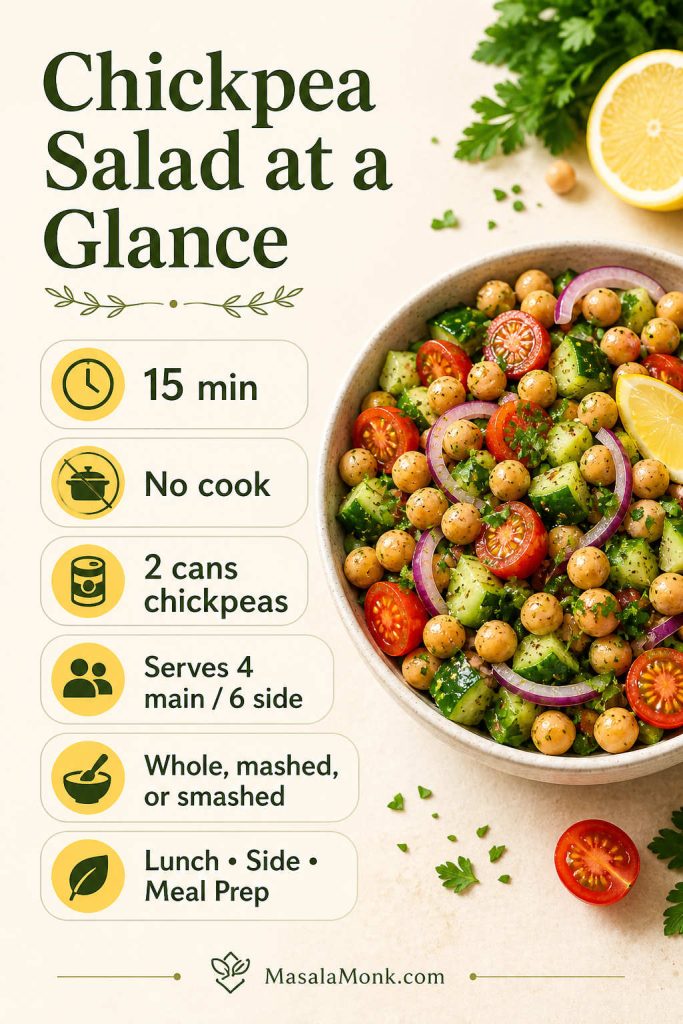
At a glance: This recipe takes about 15 minutes, uses 2 cans of chickpeas, serves 4 as a main or 6 as a side, and needs no cooking. Keep it whole for a salad bowl, lightly mash it for wraps, or smash it for sandwiches.
Why this version is easy to use: The base salad stays simple, but you also get dressing ratios, substitution options, storage cues, and texture choices. As a result, the same chickpeas can become a bowl, wrap, pita filling, sandwich, or meal-prep lunch without starting over.
Canned chickpeas make this a fresh salad with cucumber, tomatoes, herbs, and lemon dressing in about 15 minutes. Make the dressing first, drain and rinse the chickpeas, chop the vegetables, toss everything together, and let the bowl sit for 10 minutes if you have time.
The salad can be served cold or at room temperature. For a side salad or lunch bowl, leave the chickpeas whole. However, if you are making wraps or pita pockets, lightly mash some of them so the filling holds together. When you want a thicker sandwich filling, smash most of the chickpeas instead.
First time making it? Start with chickpeas, cucumber, tomatoes, red onion, parsley, lemon, olive oil, garlic, salt, and pepper. Once the base tastes good, add feta, olives, avocado, paneer, or extra spices.
Before you start, note the useful basics: this chickpea salad takes about 15 minutes, needs no cooking, and works as a bowl, wrap, sandwich filling, or meal-prep lunch.
Ingredients for Chickpea Salad
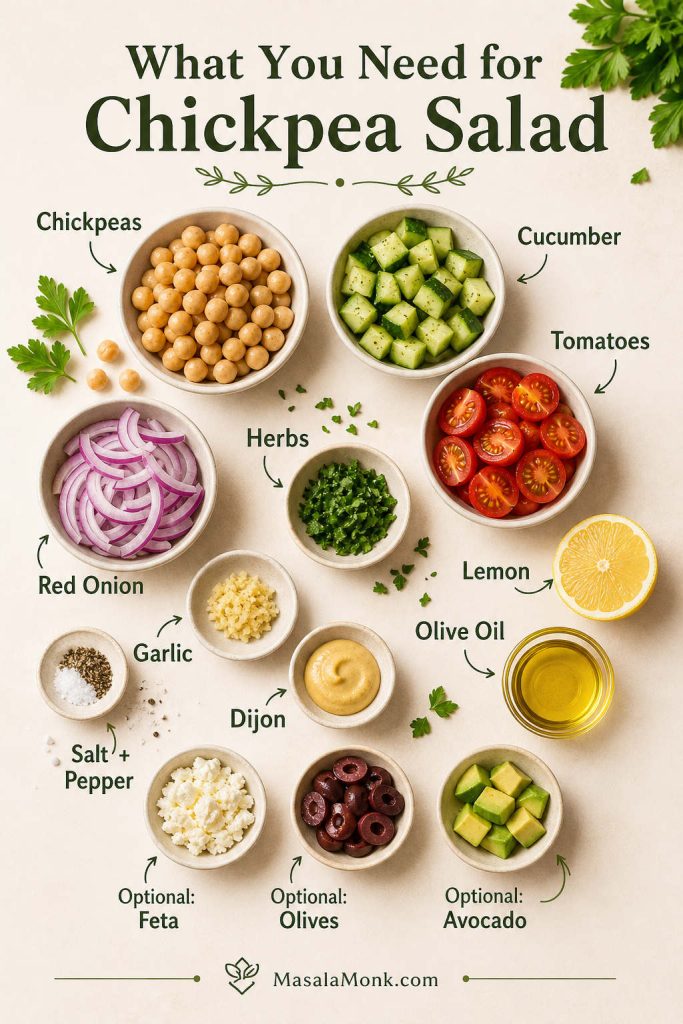
You only need a few ingredients, so each one should add something useful. The chickpeas make the salad filling, cucumber and tomatoes keep it fresh, herbs lift the flavor, and lemon dressing pulls this recipe together.
A good chickpea salad needs contrast, so chickpeas make it filling, cucumber adds crunch, tomatoes bring juiciness, herbs lift the flavor, and lemon dressing keeps everything bright.
Chickpeas or Garbanzo Beans?
Chickpeas and garbanzo beans are the same ingredient, so this recipe works no matter which name is on the can or how the salad is labeled. Use two cans of chickpeas or garbanzo beans, drain and rinse them well, and treat them the same way in the bowl.
Why Canned Chickpeas Work in This Salad Recipe
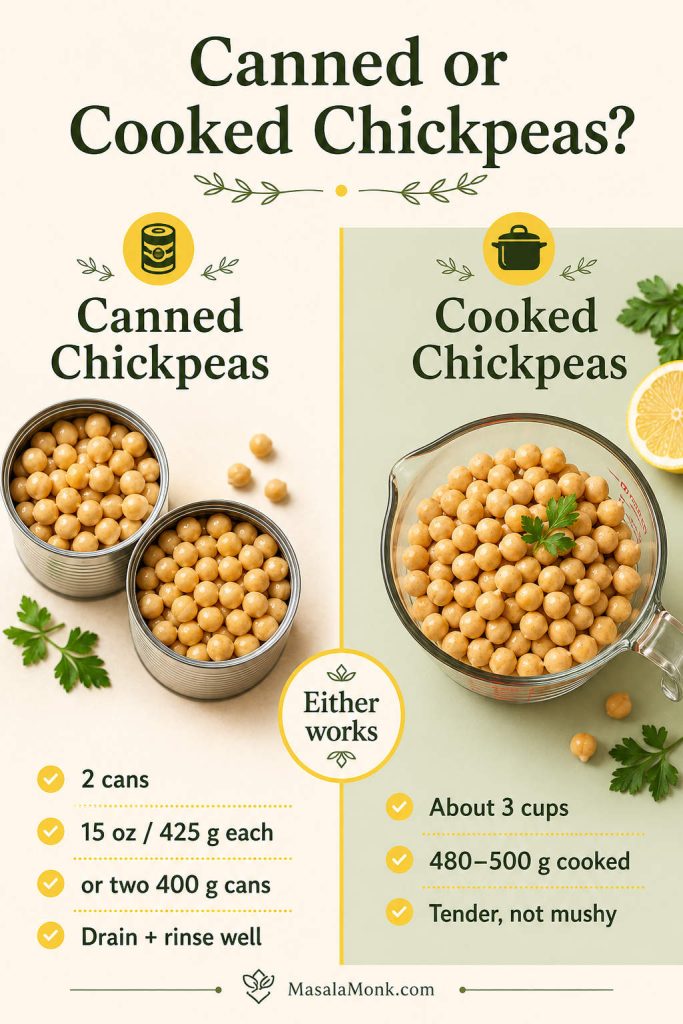
Canned chickpeas are already cooked, which makes this recipe quick enough for a weekday salad or lunch bowl. Use two 15-ounce / 425 g cans, or two 400 g cans, drained and rinsed. Once drained, that usually gives you about 480–500 g chickpeas total, or about 3 cups cooked chickpeas.
Rinsing matters because it removes excess canning liquid and gives the salad a cleaner flavor. After rinsing, let the chickpeas drain well. If they still look wet, pat them lightly with a clean towel so the dressing does not get diluted.
Using Cooked Chickpeas Instead of Canned
If you cook chickpeas from dry, use about 3 cups / 480–500 g cooked chickpeas. They should be tender enough to eat cold in the salad, but not so soft that they collapse when tossed.
Cooked-from-dry chickpeas can taste nuttier than canned ones. However, canned chickpeas are still the easiest choice when you want a fast salad.
Canned chickpeas are the easiest choice when you want a fast chickpea salad recipe; however, cooked chickpeas work just as well if they are tender, well-drained, and not too soft.
Fresh Vegetables That Keep the Salad Crisp
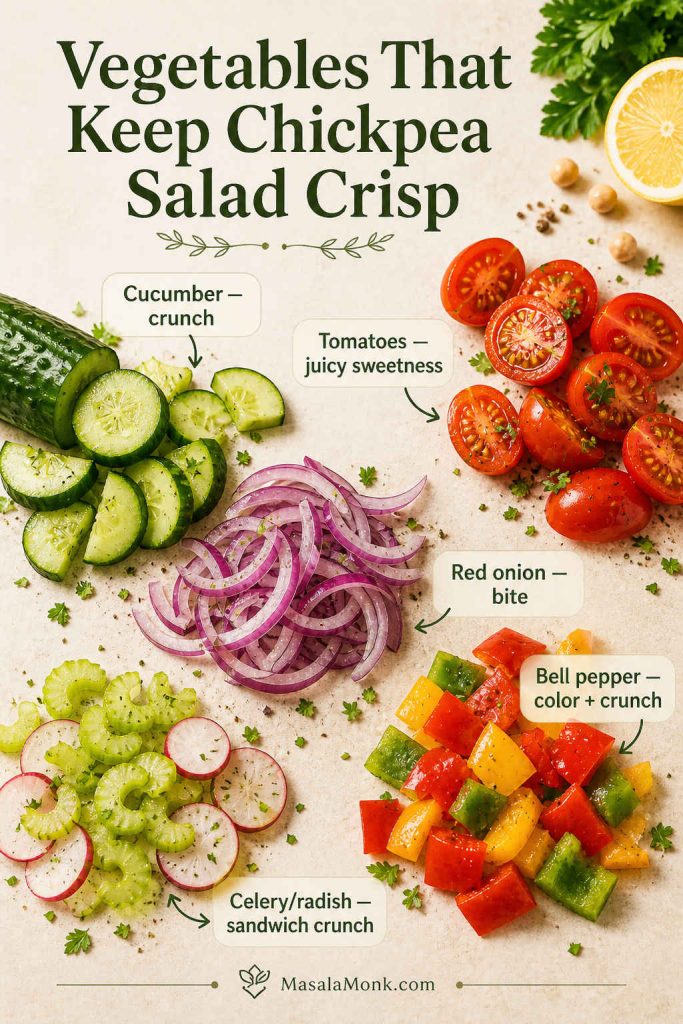
For this recipe, chickpeas give the salad body, so the vegetables should bring crunch, juice, and freshness. Cucumber adds crispness, cherry or grape tomatoes bring sweetness, red onion gives bite, and bell pepper adds color if you want extra crunch.
For the freshest texture, choose vegetables that add contrast: cucumber brings crunch, tomatoes add juiciness, red onion adds bite, and bell pepper adds extra color as well as crispness.
If you like fresh no-cook sides, this pairs well with MasalaMonk’s cucumber salad recipe. That one leans lighter and tangier, while this chickpea version is more filling.
Herbs That Make Chickpea Salad Taste Fresher
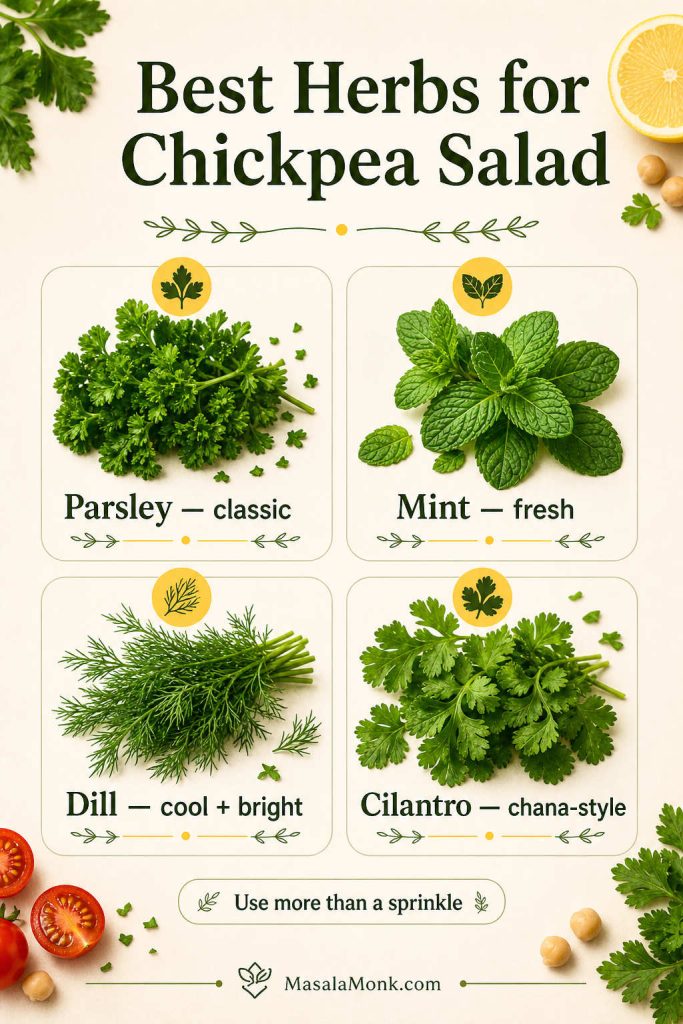
Parsley is the most classic choice, but mint, dill, and cilantro all work. For a Mediterranean-style salad, pair parsley with mint. For a cooler, brighter bowl, add dill. If you want the recipe to lean closer to Indian chana salad, go with cilantro, cumin, and chili.
Be generous with the herbs. Chickpeas are dense, so a small sprinkle can disappear in the bowl.
Herbs can shift the whole direction of a chickpea salad, so parsley keeps it classic, mint makes it brighter, dill makes it cooler, and cilantro pushes it toward a chana-style version.
Optional Add-Ins for This Recipe
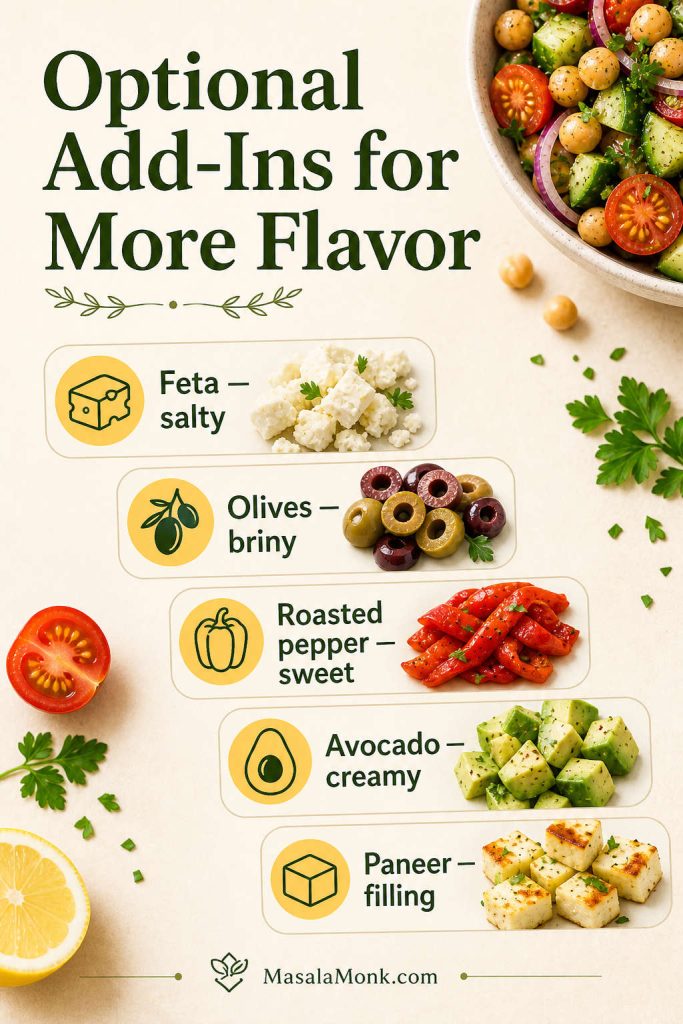
Olives, feta, roasted red pepper, avocado, and paneer all work, but they change the salad in different ways. Olives and feta make it more Mediterranean. Avocado makes it creamy. Paneer adds a firmer vegetarian protein option. Roasted red pepper brings sweetness and color.
If you are making this recipe ahead, add avocado just before serving. It tastes great with chickpeas, but it browns and softens quickly once mixed into the salad.
Once the base tastes balanced, add-ins can change the whole mood: feta and olives make it more Mediterranean, avocado makes it creamier, and paneer makes it more filling.
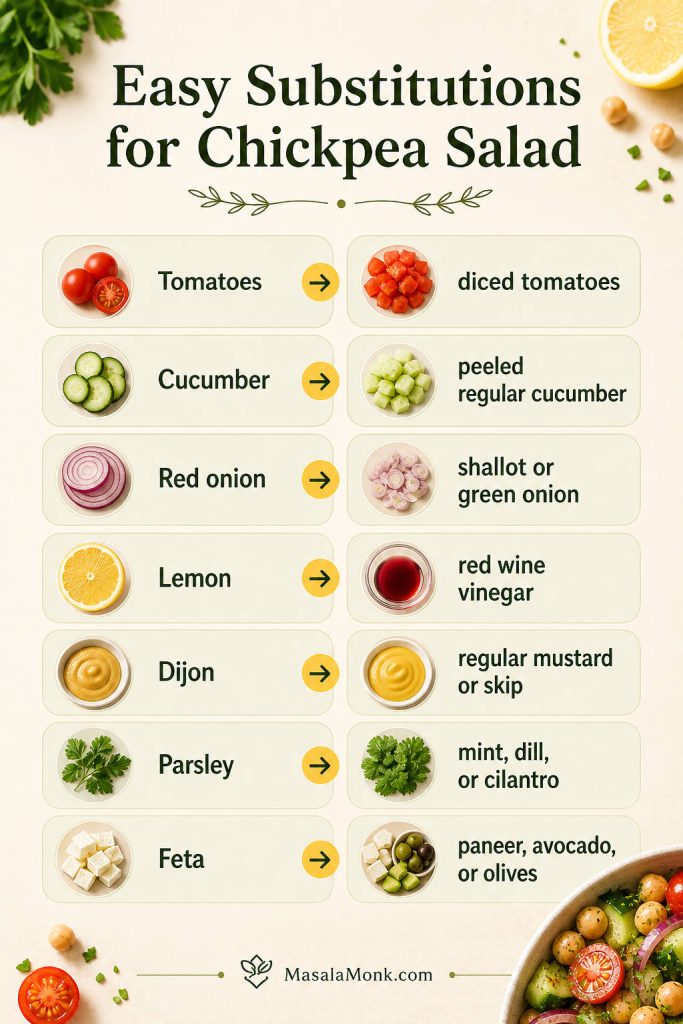
Easy Substitutions
This salad is flexible, so you do not need every optional ingredient. As long as you keep the chickpeas, something crisp, something juicy, enough herbs, and a bright dressing, the recipe still works. Then you can adjust with what you have.
If you do not have…
Use this instead
Cherry tomatoes
Diced regular tomatoes, drained if they are very juicy
English or Persian cucumber
Regular cucumber, peeled if the skin is tough and seeded if watery
Red onion
Shallots, green onion, or white onion soaked in cold water for 10 minutes
Fresh lemon
Red wine vinegar or apple cider vinegar, added to taste
Dijon mustard
A small spoon of regular mustard, or skip it and whisk the dressing well
Parsley
Mint, dill, cilantro, or a mix of fresh herbs
Feta
Paneer, avocado, olives, toasted seeds, or simply leave it out
Missing one ingredient should not stop the recipe, because a good chickpea salad still works when you keep the same balance of chickpeas, crunch, herbs, acidity, and seasoning.
The Lemon Dressing That Makes the Salad Work
The dressing should taste bright, salty, and slightly sharp before it touches the chickpeas. Once everything is tossed together, the chickpeas, cucumber, and tomatoes soften that intensity, so the dressing needs enough lemon, garlic, mustard, and salt to season the whole salad.
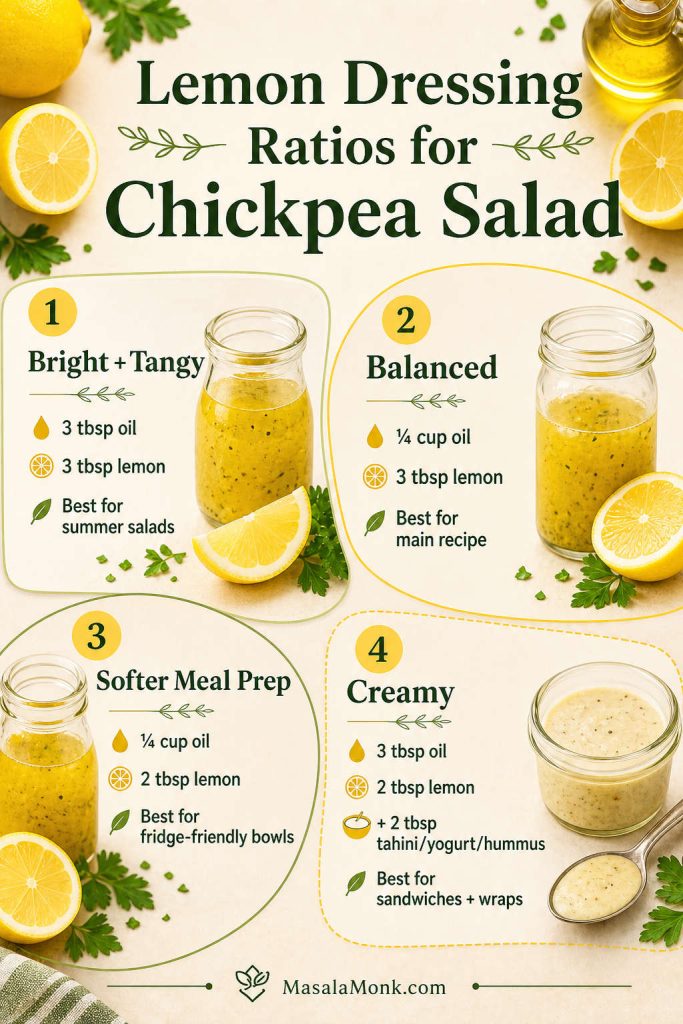
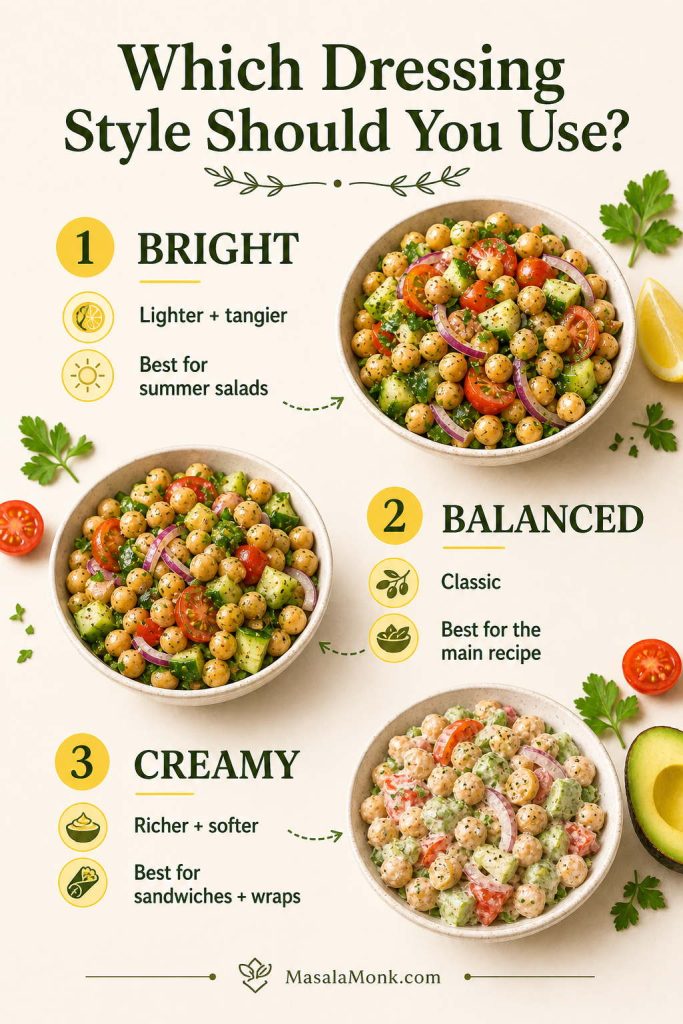
A small change in oil, lemon, or creamy binder can shift the whole bowl, so this dressing guide helps you choose the best chickpea salad texture for bowls, meal prep, wraps, or sandwiches.
Balanced Lemon Dressing
For the main recipe, use ¼ cup / 60 ml olive oil and 3 tablespoons / 45 ml fresh lemon juice. Add Dijon mustard, garlic, salt, black pepper, and either cumin or oregano. This gives the salad a balanced flavor without making it oily or sour.
A Brighter Lemon Dressing
If your chickpeas taste a little flat or your vegetables are very juicy, use equal parts olive oil and lemon juice. This sharper version works well for summer salads, cucumber-heavy bowls, and versions served with pita or grilled foods.
Creamy Dressing for Chickpeas and Sandwiches
When the recipe is going toward wraps or sandwiches, add 2 tablespoons of tahini, Greek yogurt, hummus, vegan mayo, or mashed avocado. A creamy dressing helps the chickpeas hold together instead of rolling out of the bread.
Indian-Style Lemon Dressing
For a chana salad variation, use lemon juice, olive oil, roasted cumin powder, black pepper, chopped cilantro, chili flakes or green chili, and salt. A tiny pinch of chaat masala can work if you want a sharper snack-style flavor, but keep it light so it does not overpower the chickpeas.
Bright, Balanced, and Creamy Dressing Guide
Dressing style
Olive oil
Lemon or vinegar
Best for
Bright and tangy
3 tbsp / 45 ml
3 tbsp / 45 ml
Summer salad, cucumber-heavy versions
Balanced
¼ cup / 60 ml
3 tbsp / 45 ml
Main recipe
Softer meal-prep
¼ cup / 60 ml
2 tbsp / 30 ml
Fridge-friendly version
Creamy
3 tbsp / 45 ml
2 tbsp / 30 ml plus 2 tbsp tahini, yogurt, hummus, or vegan mayo
Sandwiches, wraps, and bowls
Choose a brighter dressing when you want a sharper summer salad, a balanced dressing for the classic version, and a creamy dressing when the chickpea salad is headed for wraps or sandwiches.
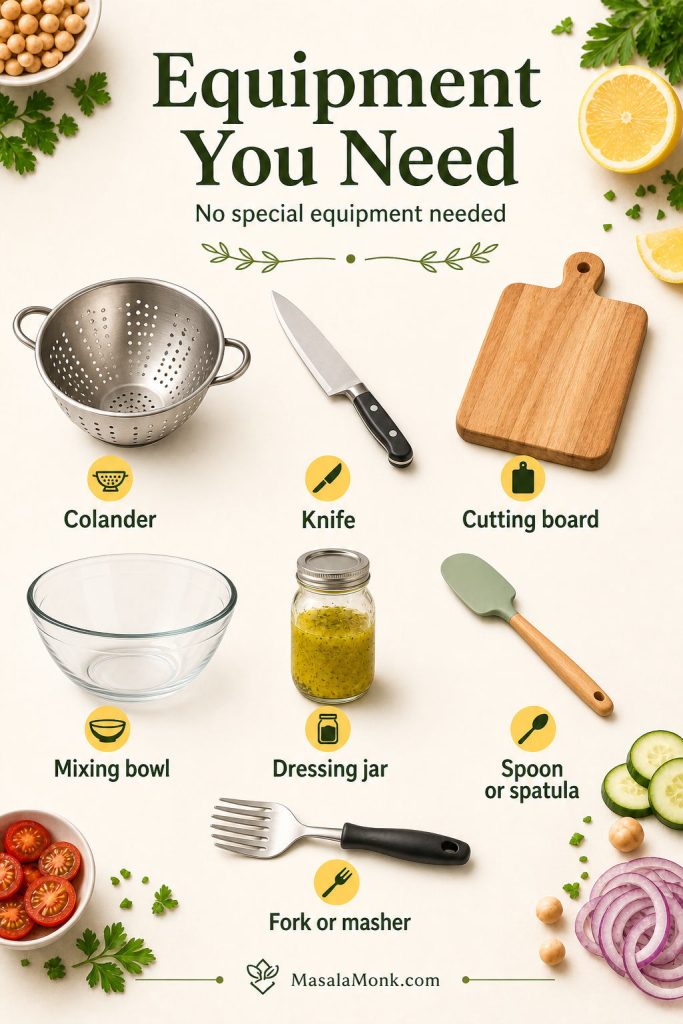
Equipment You Need
You do not need special equipment for this salad. A colander, cutting board, sharp knife, large mixing bowl, small bowl or jar for the dressing, and a spoon or spatula are enough. For the sandwich version, keep a fork or potato masher nearby so you can lightly smash the chickpeas.
This chickpea salad recipe stays practical because it only needs a few everyday tools, so you can make it easily without special equipment or unnecessary cleanup.
How to Make Chickpea Salad
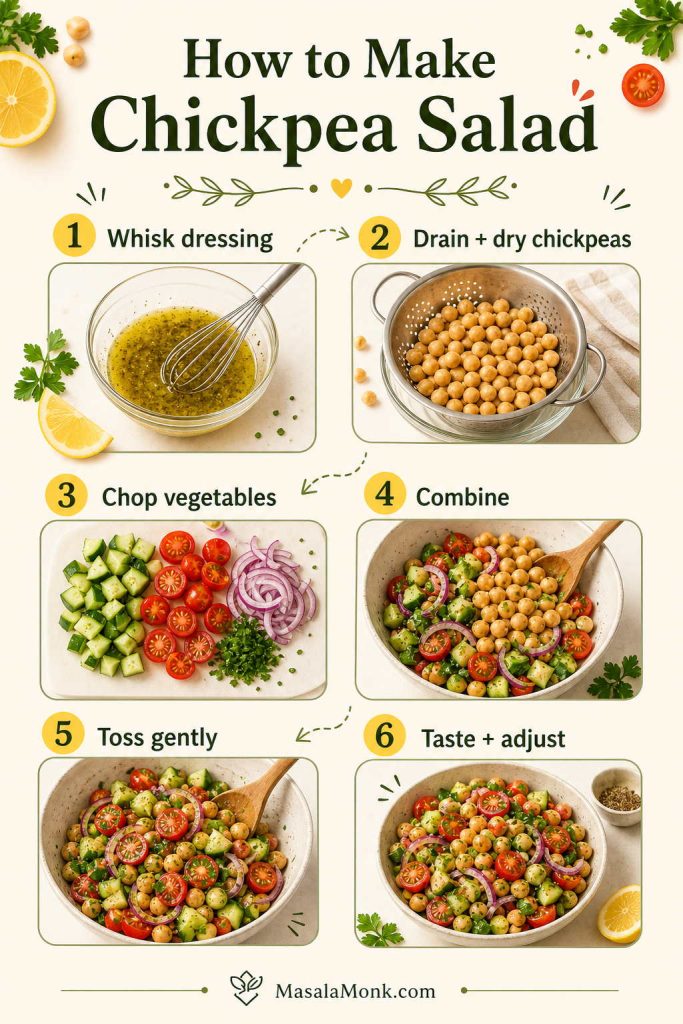
Because this is a no-cook recipe, making the salad is mostly about dressing the chickpeas well, chopping the vegetables, tossing gently, and tasting at the end.
Make the dressing first. Whisk olive oil, lemon juice, Dijon, garlic, salt, pepper, and cumin or oregano in a large bowl. You can also shake it in a jar.
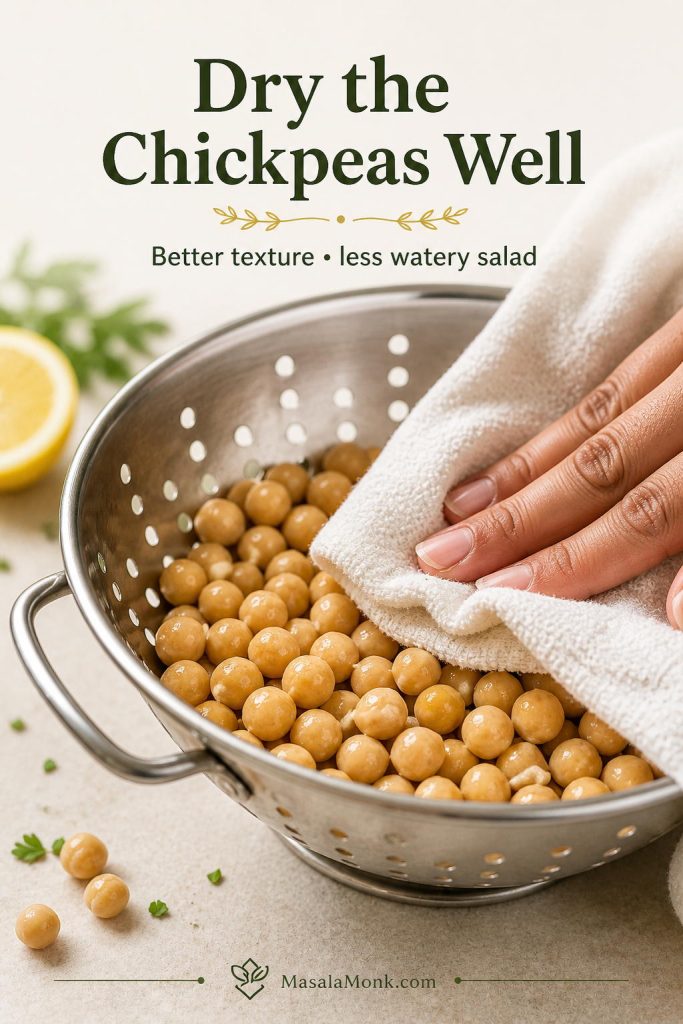
Drain, rinse, and dry the chickpeas. Let them sit in a colander for a minute, then pat them lightly with a clean towel if they still look wet. Drier chickpeas hold the lemon dressing better and keep the salad from turning watery.
Chop the vegetables. Dice the cucumber, halve the tomatoes, and finely chop the onion or shallot.
Add everything to the bowl. Add chickpeas, vegetables, herbs, and sturdy add-ins to the dressing.
Toss gently. Coat everything without crushing the chickpeas.
Rest briefly. Let the salad sit for 10 minutes if you have time.
Check the bowl. The chickpeas should look lightly glossy, not oily, and the salad should taste bright before it tastes salty.
Taste and adjust. Add more lemon, salt, pepper, herbs, or olive oil as needed.
The method matters more than it first seems: whisk the dressing first, dry the chickpeas well, toss gently, and then taste again so the salad stays bright instead of bland or watery.
Avoid bland chickpeas: rinse them well, season the dressing boldly, and let the salad rest for 10 minutes before judging the flavor.
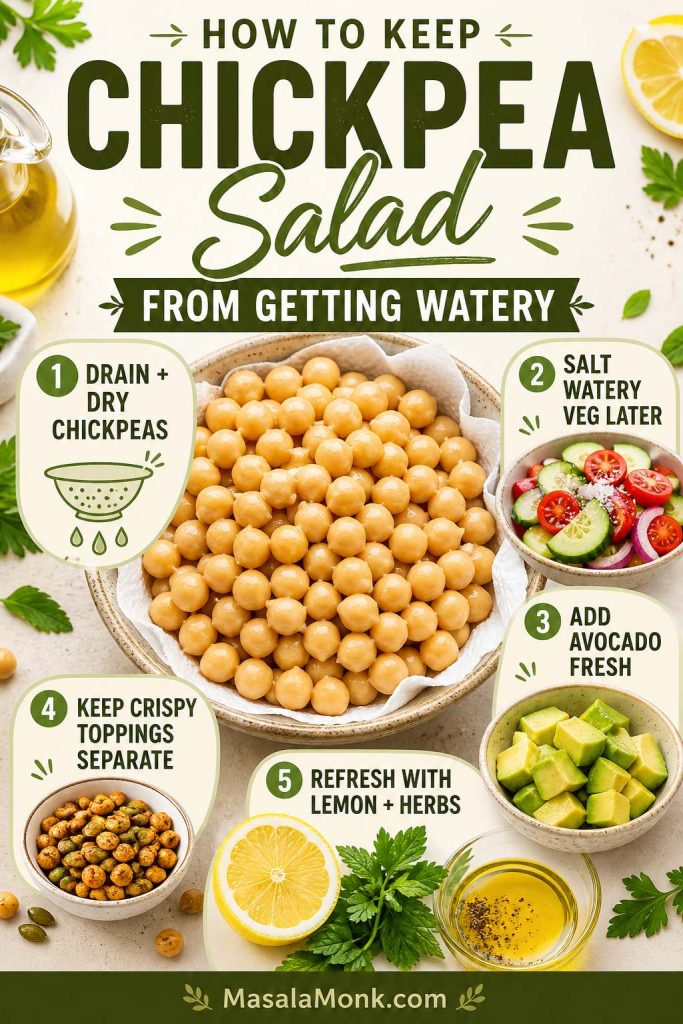
Avoid a watery salad: drain the chickpeas well, dry them if needed, do not over-salt cucumber and tomatoes too early, and add avocado only when you are close to serving.
Dry the Chickpeas Before Making Salad
Drying the chickpeas is one of the easiest upgrades because it helps the dressing cling better and, in turn, keeps the chickpea salad from turning loose or watered down.
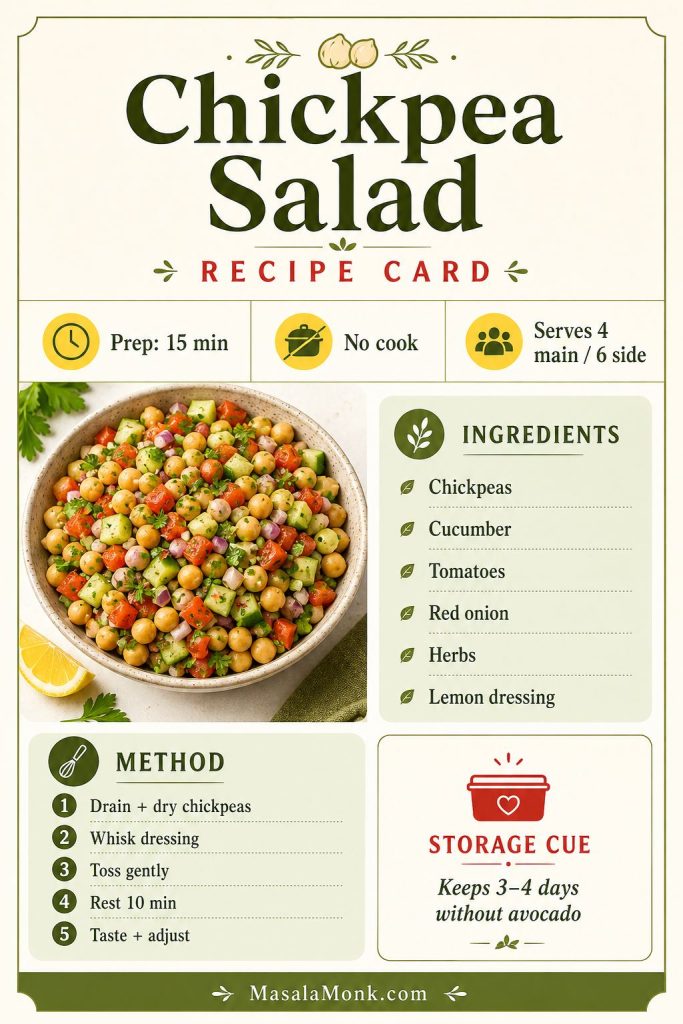
Recipe Card
Chickpea Salad Recipe
A 15-minute no-cook salad made with chickpeas, cucumber, tomatoes, herbs, and lemon dressing. Serve it whole as a fresh salad bowl, lightly mashed in wraps or pita, or smashed into a creamy chickpea salad sandwich filling.
Prep Time15 minutes
Cook Time0 minutes
Total Time15 minutes
Servings4 main or 6 side servings
Optional rest time: 10 minutes Course: Salad, Lunch, Side Dish Cuisine: Mediterranean-inspired Diet: Vegetarian; vegan if feta or paneer is omitted
Ingredients
Salad
2 cans chickpeas, 15 oz / 425 g each, or two 400 g cans, drained and rinsed
Or use about 3 cups / 480–500 g cooked chickpeas
1 large English cucumber or 3 Persian cucumbers, diced
2 cups cherry or grape tomatoes, halved
1 small red onion or 2 shallots, finely chopped
½ cup olives, sliced, optional
½ cup roasted red pepper, chopped, optional
¾–1 cup chopped fresh herbs: parsley, mint, dill, cilantro, or a mix
½ cup feta or paneer cubes, optional
1 avocado, diced, optional and best added just before serving
Lemon Dressing
¼ cup / 60 ml extra-virgin olive oil
3 tbsp / 45 ml fresh lemon juice
1 tsp Dijon mustard
1 garlic clove, grated or minced
½ tsp fine salt, plus more to taste
½ tsp black pepper
½ tsp ground cumin or dried oregano
½–1 tsp sumac or lemon zest, optional
Pinch chili flakes or Aleppo pepper, optional
Instructions
Whisk olive oil, lemon juice, Dijon mustard, garlic, salt, pepper, cumin or oregano, and sumac or lemon zest if using in a large bowl.
Drain and rinse the chickpeas well. Let them sit in a colander for a minute, then pat dry if needed so the salad does not turn watery.
Add chickpeas, cucumber, tomatoes, onion, olives, roasted red pepper, and herbs to the dressing. Toss gently.
Add feta, paneer, or avocado only if serving soon.
Let the salad rest for 10 minutes if possible.
Taste and adjust with more lemon, salt, pepper, herbs, or olive oil.
Serve cold or at room temperature as a salad, side dish, wrap filling, pita filling, or sandwich base.
Notes
For the cleanest flavor, rinse canned chickpeas well and let them drain before mixing.
If the chickpeas still look wet after draining, pat them lightly with a clean towel before mixing.
For a vegan version, skip feta and paneer. Use olives, avocado, roasted pepper, tahini, or extra herbs for richness.
For sandwiches, mash 60–70% of the chickpeas and add 2–4 tablespoons of a creamy binder.
For meal prep, add avocado, crispy chickpeas, and delicate herbs right before serving.
If using dried chickpeas, cook them until tender and use about 3 cups / 480–500 g cooked chickpeas.
Keep this recipe card handy when you need the short version: drain and dry the chickpeas, whisk the lemon dressing, toss gently, rest briefly, and adjust before serving.
The salad works because chickpeas make it filling without any cooking, while cucumber, tomatoes, onion, herbs, and lemon keep it fresh. The dressing is bright enough to season the chickpeas properly, and the same base can stay whole for bowls, lightly mashed for wraps, or smashed for sandwiches.
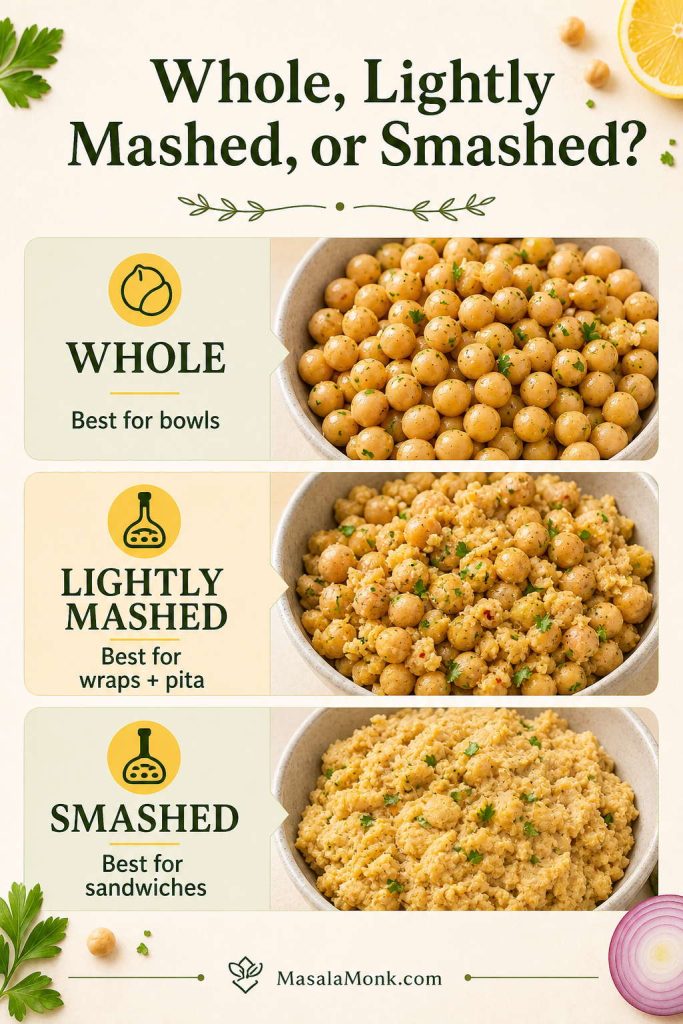
Whole, Lightly Mashed, or Smashed Chickpeas?
A small change in texture changes how you can use the salad. Whole chickpeas make the best fresh bowl. Lightly mashed chickpeas help the salad sit better in wraps or pita. Smashed chickpeas turn the same ingredients into a sandwich filling that holds together instead of rolling out of the bread.
Texture
What to do
Best use
Whole chickpeas
Toss gently and do not mash
Fresh salad bowls and side salads
Lightly mashed
Press ¼–⅓ of the chickpeas
Wraps, pita pockets, and lunch bowls
Smashed
Mash 60–70% of the chickpeas
Chickpea salad sandwiches
Creamy
Mash deeply and add mayo, yogurt, tahini, hummus, or avocado
Vegan tuna-style chickpea salad
Texture changes how the recipe works, so whole chickpeas suit salad bowls, lightly mashed chickpeas hold better in wraps, and smashed chickpeas make the most reliable sandwich filling.
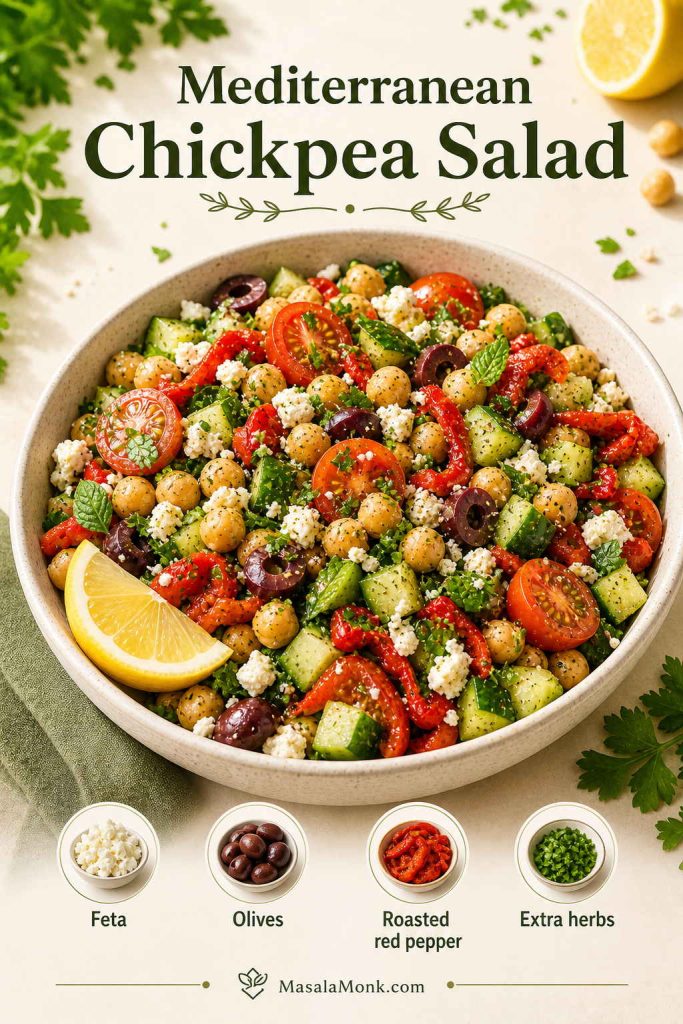
To make this recipe more Mediterranean, add olives, feta, roasted red pepper, parsley, mint, oregano, and extra lemon. Keep the cucumber, tomato, and red onion because they give the salad the fresh chopped texture that works so well with chickpeas.
This version is especially good with pita, hummus, grilled vegetables, rice bowls, roasted chicken, fish, or a simple soup. If you like herb-heavy Mediterranean salads, it also sits well next to MasalaMonk’s tabbouleh recipe, especially when serving pita, hummus, grilled vegetables, or mezze-style plates.
For a Mediterranean chickpea salad, feta, olives, roasted red pepper, and extra herbs deepen the flavor while still keeping the recipe fresh, colorful, and easy to serve.
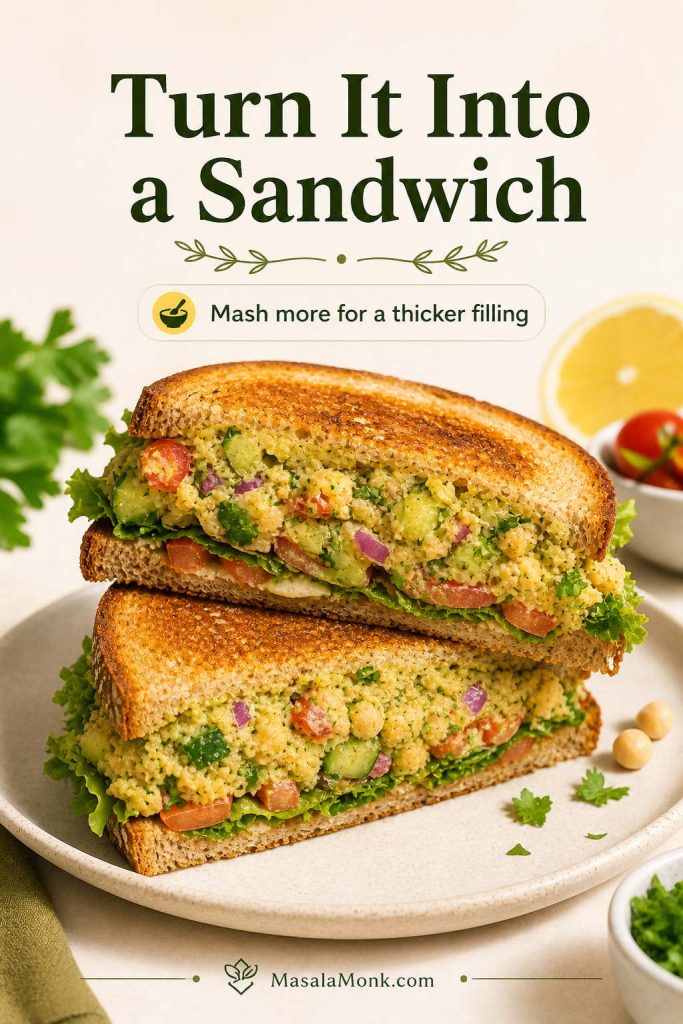
Turn This Recipe Into a Chickpea Salad Sandwich
For a sandwich, mash most of the chickpeas and add a creamy binder. Greek yogurt, vegan mayo, tahini, hummus, mashed avocado, or a mix of mayo and yogurt all work. Then add something crunchy, such as celery, cucumber, onion, radish, or pickles.
Toasted bread, pita, wraps, and lettuce cups all work. If you are packing lunch, store the filling separately and assemble the sandwich later so the bread stays firm. This is also a useful plant-based alternative when you want a creamy, tangy sandwich filling. For a non-vegetarian comparison, see MasalaMonk’s chicken salad sandwich recipe.
Sandwich formula: 2 cups chickpea salad + 2–4 tbsp creamy binder + ¼ cup crunchy vegetables + lemon, mustard, herbs, salt, and pepper to taste.
If you want a cooler, yogurt-based sauce for wraps or pita, MasalaMonk’s Greek tzatziki sauce recipe is a natural fit with cucumber, herbs, chickpeas, and toasted bread.
Turning chickpea salad into a sandwich works best when you mash more of the chickpeas, because the filling becomes thicker, creamier, and much easier to hold together.
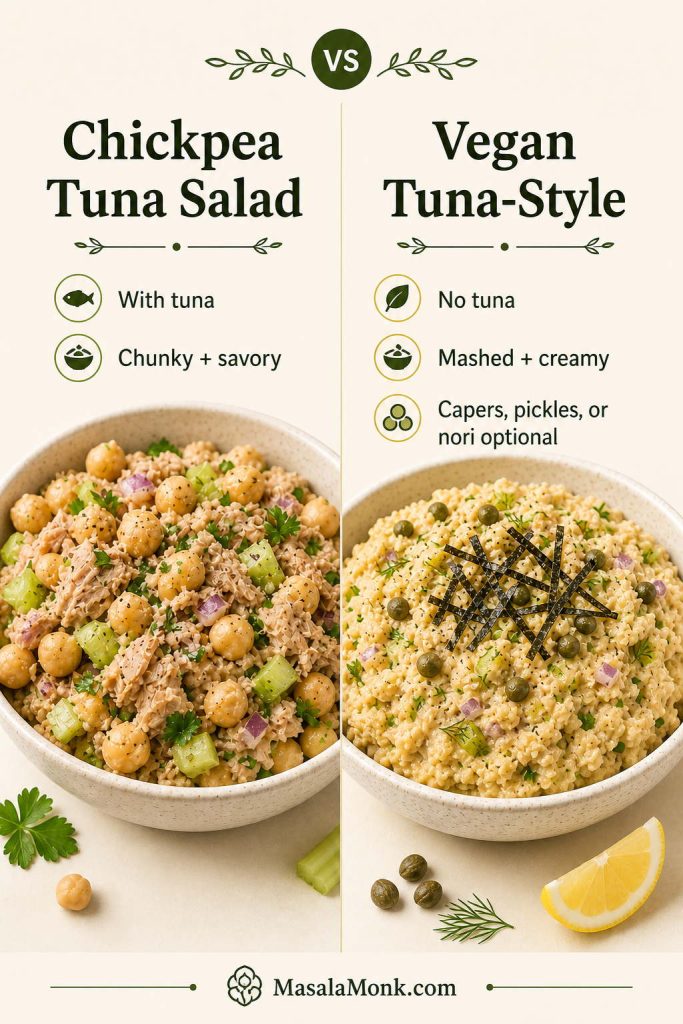
This base can move in two directions. To make a real chickpea tuna salad, add drained tuna, celery, lemon, herbs, and a little Greek yogurt or mayo. If you want a vegan tuna-style version, skip the tuna, mash the chickpeas more deeply, and add celery, lemon, pickles or capers, herbs, and a creamy binder such as vegan mayo, tahini, hummus, or avocado.
A more sea-like vegan flavor can come from finely crushed nori or a tiny pinch of kelp flakes. Keep it optional; the mashed chickpea version still works as a creamy salad filling without any sea flavor.
For a chickpea tuna salad, add real tuna for a chunkier, savory version; for a vegan tuna-style salad, mash the chickpeas more and use capers, pickles, or nori for extra depth.
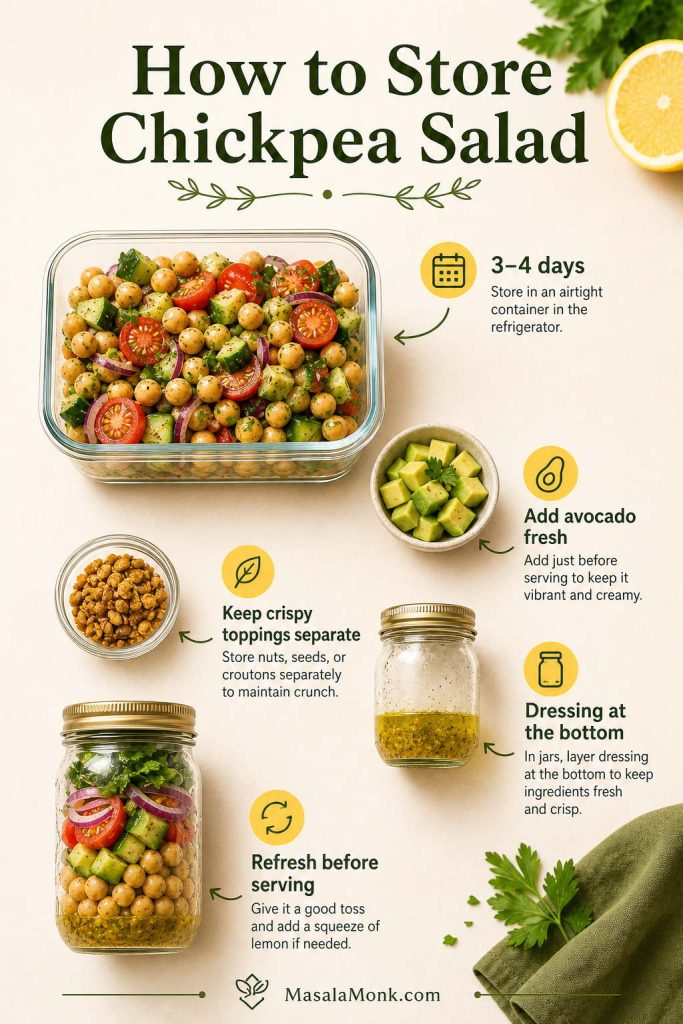
Chickpea salad is good for meal prep because chickpeas hold their shape better than leafy greens, so the salad stays useful for lunches over several days. However, a few ingredients are better added fresh. For example, avocado browns, crispy chickpeas soften, and delicate herbs taste brighter when added closer to serving.
Chickpea salad is meal-prep friendly; however, it stores best when avocado, crispy toppings, and delicate herbs are added later instead of being mixed in too early.
For the best make-ahead version, store the base salad without avocado and add delicate toppings just before serving. If you are making lunch jars, put the dressing at the bottom, then chickpeas and firmer vegetables, then herbs or greens near the top.
If you are making the salad more than a few hours ahead, keep some of the herbs fresh for serving and go lighter on the salt at first. Salt draws water from cucumber and tomatoes, so a final pinch right before serving keeps the salad fresher.
How to Store This Recipe Without Making the Salad Watery
Drain and dry the chickpeas well, avoid over-salting watery vegetables too early, and keep avocado or crispy toppings separate. If the salad sits overnight, refresh it with a little lemon juice, olive oil, and fresh herbs before serving.
If your chickpea salad turns watery, the fix usually starts earlier: dry the chickpeas well, salt juicy vegetables later, and add avocado or crunchy toppings closer to serving time.
Version
Fridge life
Best method
Plain chickpea salad, no avocado
3–4 days
Store in an airtight container
With avocado
Same day best
Add avocado fresh just before serving
With feta or paneer
2–3 days best
Add fresh if you want the cleanest texture
Dressing mixed in
2–3 days best texture
Stir before serving and refresh with lemon or herbs
Dressing only
7–10 days
Keep in a sealed jar in the fridge
Sandwich filling
3–4 days
Store filling separately from bread
Crispy chickpeas
Same day best
Keep separate and add just before eating
Meal-prep jars
4–5 days
Dressing bottom, chickpeas and vegetables middle, herbs top
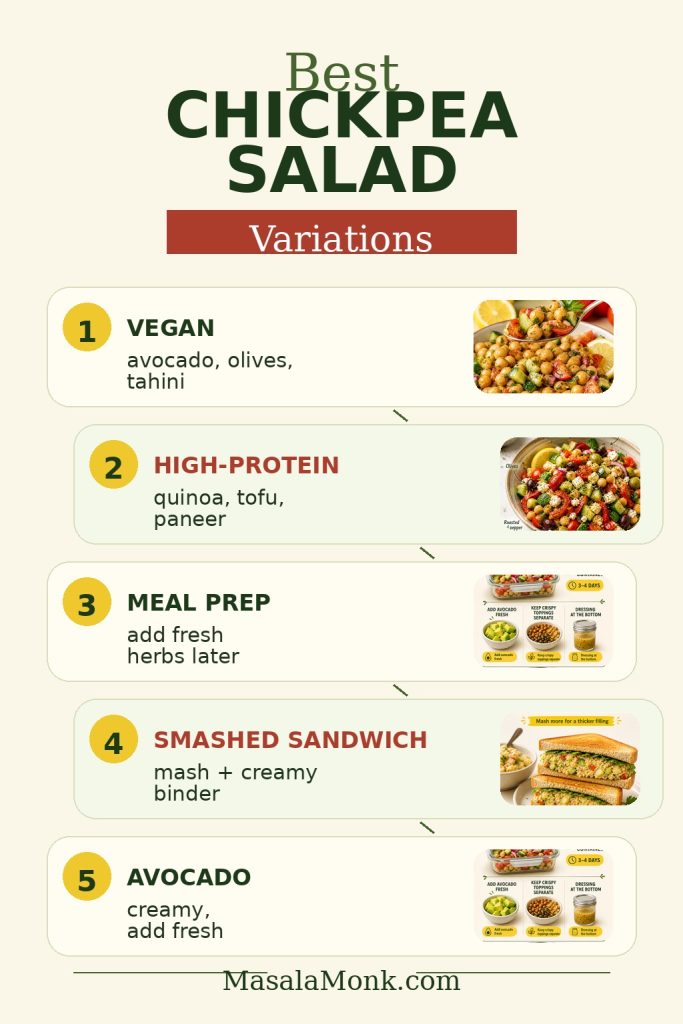
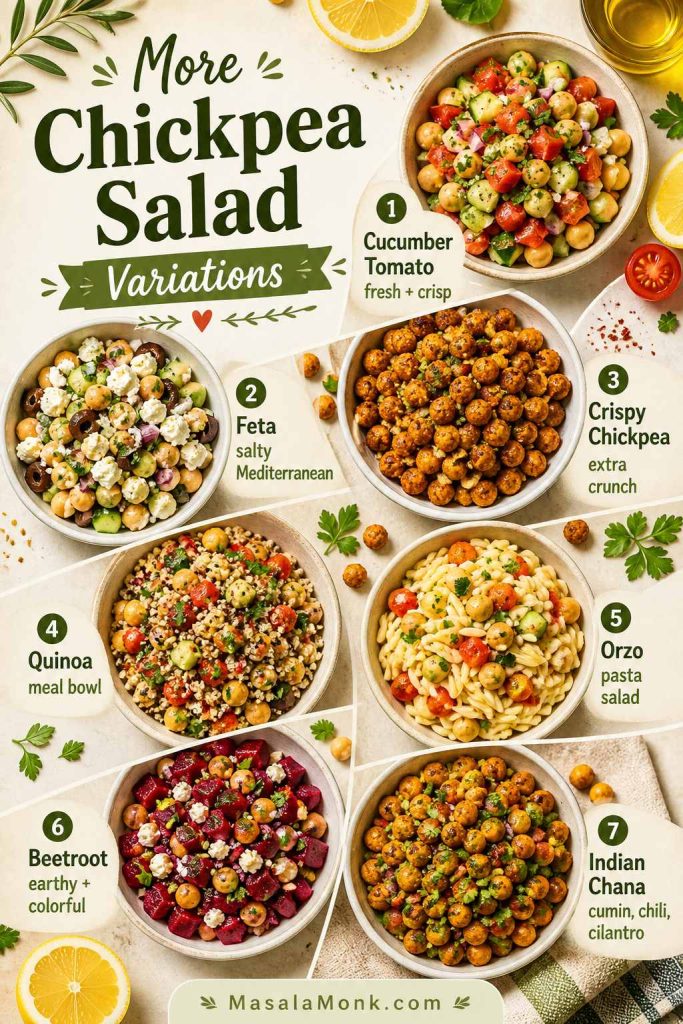
Once the base recipe is balanced, the same chickpeas can move in several salad directions. Keep lemon, salt, and herbs as the anchor, then change the add-ins based on how you want to serve it.
Lunch, Meal Prep, and Sandwich Versions
If you want…
Make this version
What to add
A dairy-free lunch
Vegan chickpea salad
Avocado, olives, roasted red pepper, extra herbs, toasted seeds, or tahini dressing
A more filling meal
High-protein salad with chickpeas
Quinoa, tofu, paneer, boiled eggs, Greek yogurt dressing, feta, grilled chicken, or extra chickpeas
A lunchbox or picnic salad
Meal-prep chickpea salad
Keep avocado and crispy toppings separate, use a slightly softer dressing, and add fresh herbs before serving
A sandwich filling
Smashed chickpea salad
Mash most of the chickpeas and add yogurt, tahini, hummus, vegan mayo, or avocado
A creamier bowl or wrap
Avocado chickpea salad
Diced avocado added just before serving, or a little mashed avocado in the dressing
The same base recipe can become a vegan lunch, higher-protein bowl, meal-prep container, smashed sandwich filling, or avocado chickpea salad with only a few targeted changes.
Extra cucumber, tomatoes, red onion, parsley, lemon, olive oil, salt, and pepper
A saltier Mediterranean side
Feta chickpea salad
Feta, olives, oregano, and lemon zest; taste before adding extra salt
A crunchy topping
Crispy chickpea salad
Add roasted or air-fried chickpeas right before serving so they stay crisp
A meal-prep grain bowl
Quinoa chickpea salad
Cooked and cooled quinoa plus extra dressing because grains absorb liquid
A pasta salad direction
Orzo chickpea salad
Cooked and cooled orzo, cucumber, tomato, herbs, feta, and extra lemon dressing
An earthy, colorful bowl
Beetroot chickpea salad
Cooked and cooled beetroot, feta or paneer, cumin, herbs, lemon, and red onion
An Indian-style side
Indian chana salad
Use kabuli chana for the closest chickpea salad texture, or kala chana for a firmer, earthier Indian-style version with cilantro, lemon, cumin, chili, onion, cucumber, and tomato
For more variety, the chickpea salad can turn crisp with cucumber and tomato, salty with feta, hearty with quinoa or orzo, earthy with beetroot, or spicier as Indian chana salad.
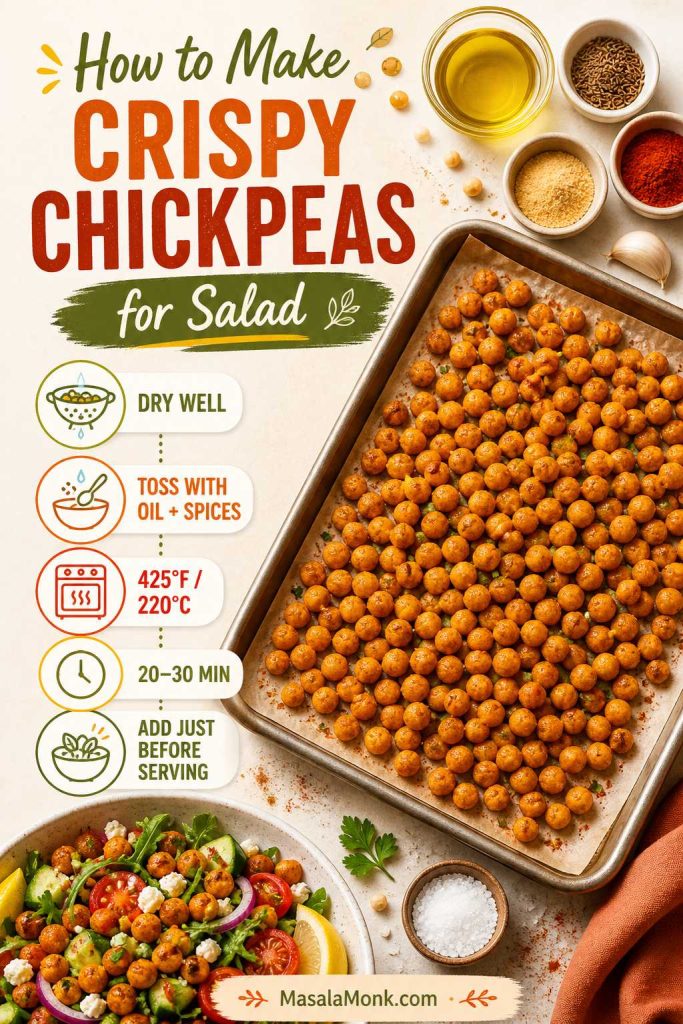
For crispy chickpeas, dry the drained chickpeas very well, toss them with a little oil, salt, cumin, paprika, or garlic powder, and roast at 425°F / 220°C for about 20–30 minutes, shaking the pan once or twice. Add them to the salad right before serving so they stay crisp.
Crispy chickpeas add the most texture when they are roasted until dry and added right before serving, so they stay crunchy instead of softening in the salad.
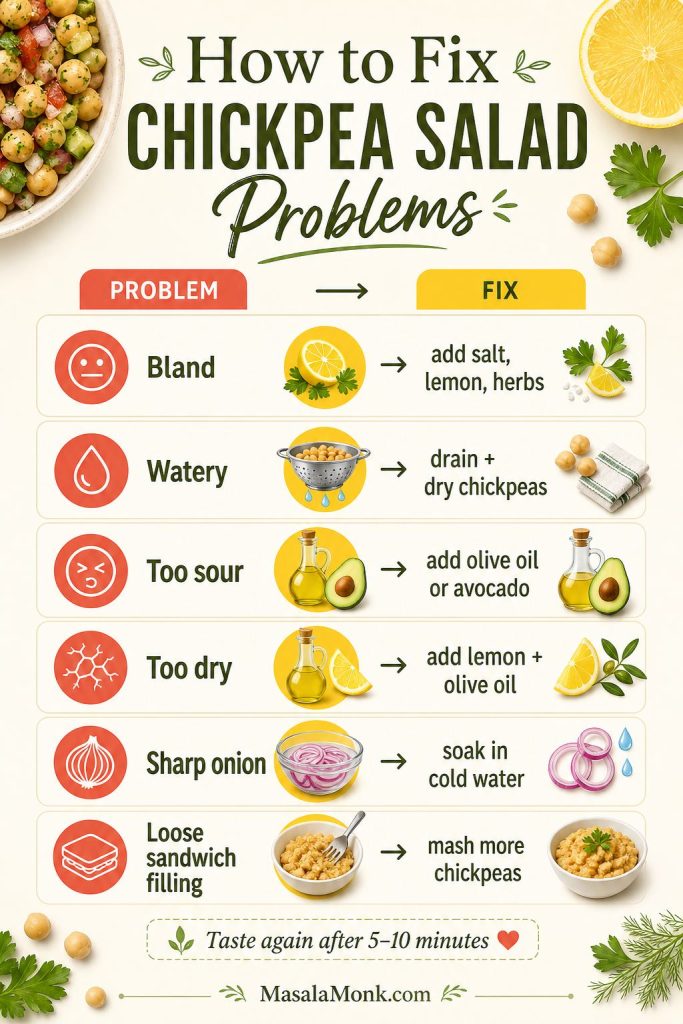
Because this recipe is not cooked, most chickpea salad problems can be fixed before serving. If the chickpeas taste bland, watery, sour, or dry, adjust the dressing first. Then give the salad a few minutes to settle before judging it again.
Problem
Likely cause
Fix
Salad tastes bland
Not enough salt, acid, or herbs
Add salt first, then lemon, then more herbs
Salad is watery
Chickpeas or vegetables were too wet
Drain and dry chickpeas well, and add tomatoes closer to serving
Chickpeas taste canned
They were not rinsed well or not seasoned enough
Rinse thoroughly and let them sit in dressing for 10 minutes
Onion is too sharp
Raw onion is too strong
Soak chopped onion in cold water for 10 minutes, then drain
Salad is too sour
Too much lemon or vinegar
Add olive oil, chickpeas, avocado, or feta to soften it
Salad is too dry
Chickpeas absorbed the dressing
Add a splash of olive oil and lemon juice before serving
Avocado browned
It was added too early
Add avocado fresh, or toss it with lemon before mixing
Sandwich filling is too loose
Too much dressing or not enough mashing
Mash more chickpeas and add a thicker binder
Crispy chickpeas went soft
They sat in the wet salad
Keep them separate and add just before eating
Before starting over, fix the bowl: bland salad usually needs salt, lemon, and herbs; watery salad needs better draining; and loose sandwich filling needs more mashed chickpeas.
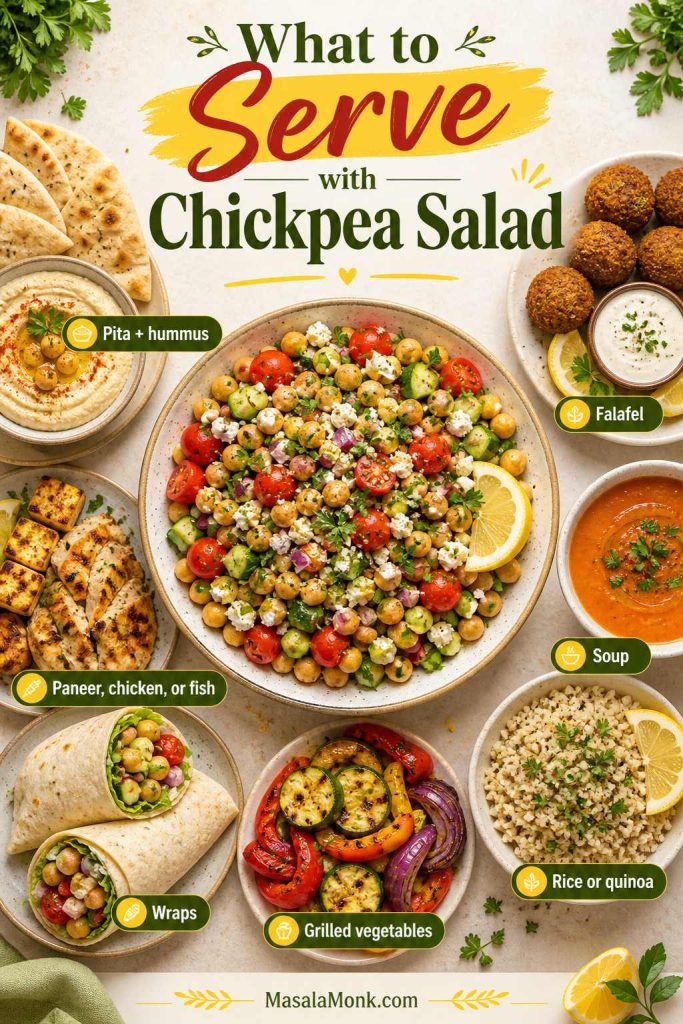
What to Serve with Chickpea Salad
Serve chickpea salad with pita, hummus, grilled vegetables, rice, quinoa, soup, roasted potatoes, grilled chicken, fish, or paneer. It also works inside wraps, lettuce cups, toasted sandwiches, or meal-prep bowls. To make a fuller chickpea-based mezze plate, add MasalaMonk’s falafel recipe on the side.
A lighter plate can be as simple as cucumber salad, tomato soup, or a green salad. For a sharper Middle Eastern-style plate, serve it with pita and a spoon of MasalaMonk’s amba sauce recipe for a tangy mango-chili contrast.
Chickpea salad becomes a fuller meal more easily when you pair it with pita, hummus, soup, falafel, grains, or grilled vegetables, rather than serving it as a plain side alone.
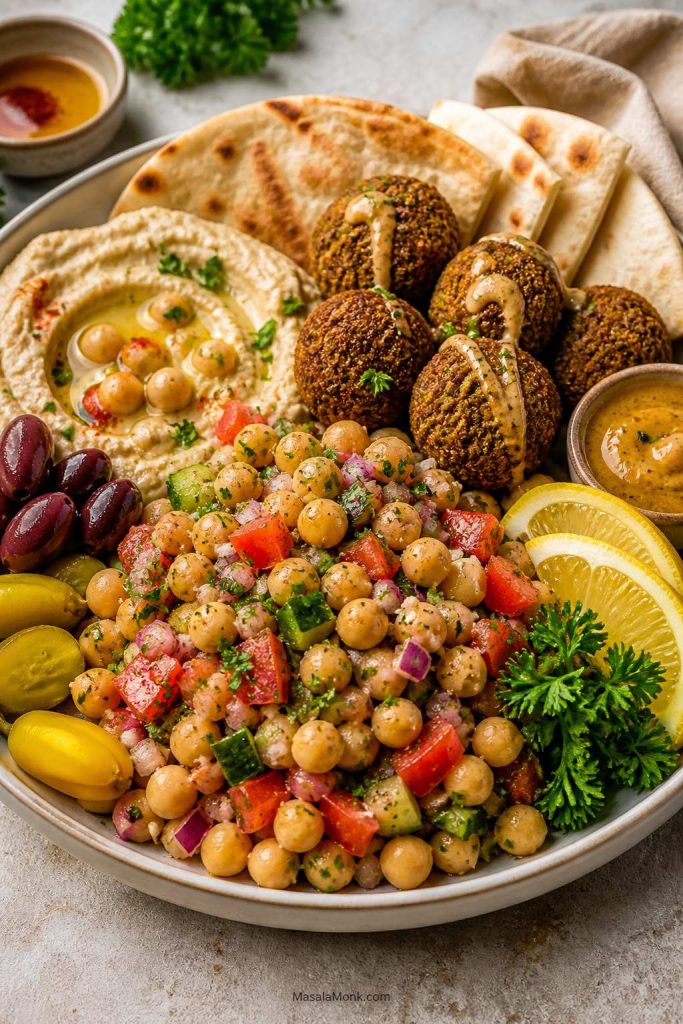
Chickpea Salad Mezze Plate
Serving chickpea salad as part of a mezze plate adds variety and makes the recipe more useful for lunch or dinner, especially when paired with hummus, pita, and falafel.
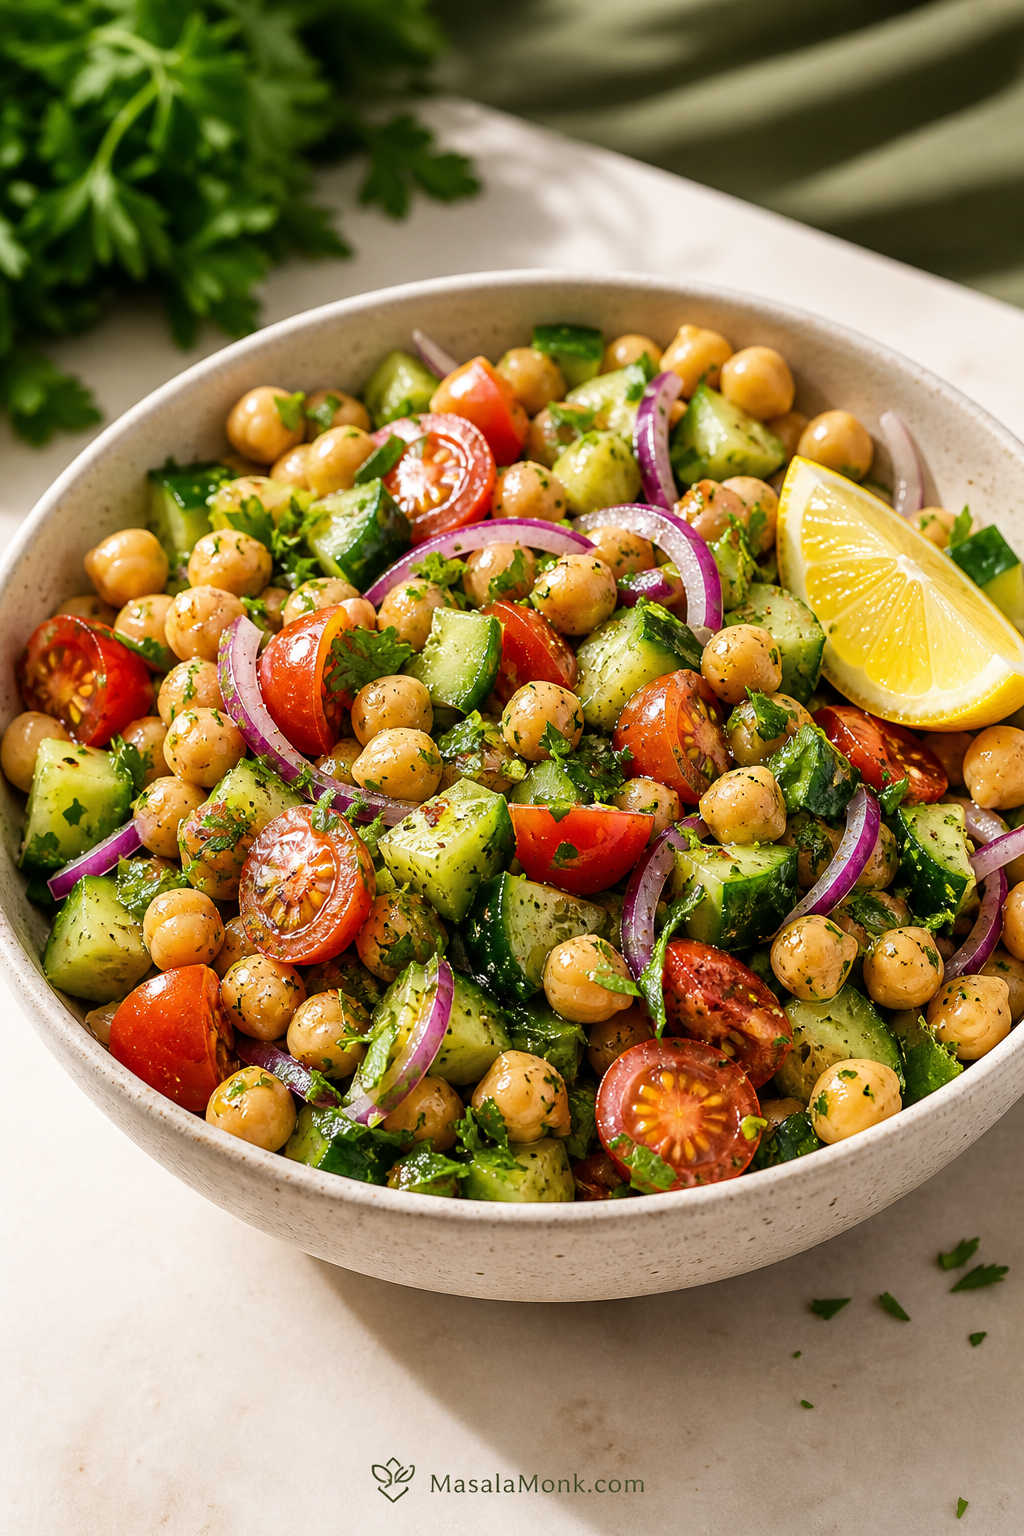
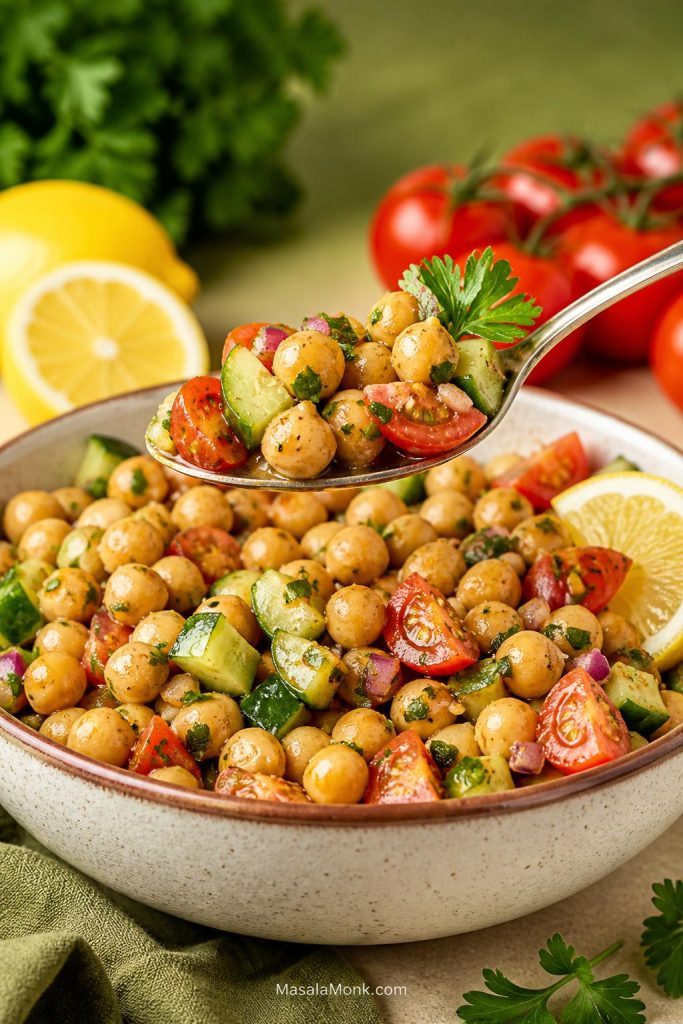
Final Serving Texture
A final serving image highlights the texture that makes this recipe work so well: chickpeas stay distinct, vegetables stay crisp, and the dressing coats the salad without drowning it.
Chickpeas and garbanzo beans are the same ingredient. “Chickpea” is more common in many recipe titles, while “garbanzo bean” often appears on cans and packaging. Use either one for this salad.
What kind of chickpeas work best for this salad?
Canned chickpeas are the easiest choice because they are already cooked and ready to use. Drain and rinse them well, then let them sit in a colander for a minute so extra water does not dilute the dressing.
Do canned chickpeas need to be cooked first?
No cooking is needed. Canned chickpeas are already cooked, so this recipe only needs draining, rinsing, chopping, dressing, and tossing.
How long does this chickpea salad recipe last in the fridge?
This chickpea salad recipe keeps well for about 3–4 days without avocado. Store it in an airtight container, then add avocado, crispy chickpeas, or delicate herbs closer to serving for the best texture.
How do you keep chickpea salad from getting watery?
Drain and dry the chickpeas well, use tomatoes that are not overly watery, and go lighter on salt if you are making the salad ahead. Salt pulls moisture from cucumber and tomatoes, so a final pinch before serving keeps the salad fresher.
Is this chickpea salad vegan?
The base salad is vegan when you skip feta, paneer, yogurt, and any dairy-based creamy add-ins. For richness, use olives, avocado, tahini, hummus, vegan mayo, roasted red pepper, toasted seeds, or extra herbs.
Is chickpea salad healthy?
Chickpea salad can be a nourishing meal or side because chickpeas provide plant-based protein and fiber, while the vegetables and herbs add freshness. Keep the dressing balanced and use richer add-ins like feta, paneer, avocado, or creamy binders according to how filling you want the salad to be. For more general chickpea nutrition background, see the Harvard Nutrition Source guide to chickpeas.
What can I use instead of lemon juice?
Red wine vinegar or apple cider vinegar can replace lemon juice. However, start with a little less than the recipe calls for, then taste and add more only if the salad needs extra brightness.
How do I make chickpea salad without mayo?
The base salad uses lemon and olive oil dressing, so it does not need mayo. For a creamy no-mayo version, use tahini, hummus, Greek yogurt, or mashed avocado.
How do I turn this into chickpea salad sandwiches?
Mash 60–70% of the chickpeas, add 2–4 tablespoons of a creamy binder, and keep the filling thick. Toasted bread, pita, wraps, and lettuce cups all work, but the filling should be stored separately from bread until serving.
What goes well with chickpea salad?
Pita, hummus, grilled vegetables, soup, rice, quinoa, roasted potatoes, paneer, grilled chicken, fish, and simple green salads all pair well with chickpea salad. It also works inside wraps, lettuce cups, and meal-prep bowls.
How can I make the salad higher in protein?
Add quinoa, paneer, tofu, boiled eggs, Greek yogurt dressing, feta, grilled chicken, or extra chickpeas. For a vegan version, use tofu, quinoa, hummus, tahini, seeds, or another legume.
Should you freeze chickpea salad?
Freezing is not worth it for this recipe. Cucumber, tomatoes, herbs, and dressing lose their fresh texture after thawing. If you want to prep ahead, freeze cooked chickpeas separately and make the salad fresh.
There are some foods that feel bigger than the sum of their ingredients. Falafel is one of them. At a glance, a falafel recipe seems humble enough: chickpeas, herbs, onion, garlic, spices, and a little patience. Yet when everything comes together properly, the result is far more memorable than that short ingredient list suggests. A really good falafel has a crisp, deeply golden shell, a tender green center, and the kind of savoury, herb-packed character that makes one bite lead to another before you have even reached for the sauce.
That contrast is exactly why a proper falafel recipe deserves more than a quick set of instructions. It helps to understand what falafel is, why some versions turn light while others become heavy, why soaked dried chickpeas behave differently from canned chickpeas, and how the cooking method changes the final texture. Once those pieces fall into place, making falafel at home becomes less mysterious and much more rewarding.
Why a homemade falafel recipe can feel intimidating at first
For many home cooks, falafel falls into that frustrating category of dishes they happily order but hesitate to make themselves. One person worries about dealing with hot oil, while another is put off by the fear of a dense or crumbly result. Quite often, the concern is that the mixture will turn bland, fall apart in the pan, or end up pasty rather than light. There is also the lingering question of method: does an authentic falafel recipe really need deep frying, or can air fryer falafel and baked falafel still be crisp, satisfying, and fully worth making?
Then again, the hesitation does not only come from technique. Plenty of people also wonder whether a chickpea falafel recipe made with canned chickpeas can ever be as good as one made with soaked dried chickpeas. Others are unsure about the herbs, the spices, or the right sauce to serve alongside the final plate. Once all those questions pile up, a dish that sounds simple in theory can start feeling strangely complicated in practice.
A great falafel recipe is easier to understand once the biggest choices are clear from the start. This opening guide highlights the best base for strong texture, the coarse mixture that keeps falafel light instead of dense, the three main cooking routes, and the simple plate elements that make the final meal feel complete. It works as a quick visual roadmap for the rest of the post while still showing the crisp shell, green center, and contrast that make homemade falafel worth getting right.
What this falafel recipe guide covers
This guide brings all of that together in one place. It begins with the classic foundations, moves through the ingredient choices that matter most, explains how to make falafel from scratch, and then walks through fried, air fryer, and baked options with the kind of detail that helps in a real kitchen. Along the way, it also makes room for serving ideas, falafel sauces, pita and wrap combinations, bowl variations, canned chickpea options, make-ahead advice, and the troubleshooting that turns a frustrating first attempt into a dependable homemade meal.
Falafel is widely understood as a Middle Eastern dish made from chickpeas, fava beans, or both, shaped and cooked until crisp, and often served with pita, salad, and tahini. It is also often linked to Egypt in origin discussions, although it now belongs to a much broader and richly shared regional story. If you enjoy food history, both Britannica’s overview of falafel and its notes on daily life and cuisine in Egypt give helpful background without getting in the way of dinner.
Why falafel becomes a repeat recipe
Still, what matters most here is what happens on the plate. Whether you want an easy falafel recipe for a weekday lunch, a more traditional homemade falafel for a weekend spread, a healthy falafel option for meal prep, or a crisp falafel wrap with sauce and salad, the fundamentals remain the same. Start with the right base. Build in enough herbs and seasoning. Respect the texture. Choose the cooking method that suits the meal in front of you.
Once you do that, falafel stops feeling like a specialty and starts feeling like one of the smartest things you can cook with chickpeas.
What Is Falafel and What Makes a Good Falafel Recipe
Falafel is often described in a sentence or two, but it becomes much easier to appreciate once you think of it not as a single rigid recipe but as a family of preparations built around legumes, herbs, aromatics, and spice. The basic idea is straightforward: chickpeas or fava beans are combined with onion, garlic, parsley, cilantro, cumin, coriander, salt, and sometimes other seasonings, then shaped into balls or patties and cooked until crisp outside and tender inside.
Great falafel is built on contrast. The shell should be crisp and deeply golden rather than oily, the center should stay tender and green instead of turning dense, and the seasoning should feel lively enough that the chickpeas, herbs, and spices all register clearly in each bite. A guide like this helps readers understand what they are aiming for before they move deeper into the ingredient, texture, and cooking-method sections of the post.
What makes a good falafel recipe so satisfying
Still, that basic definition does not fully explain why falafel has such lasting appeal. At its best, it is earthy without feeling heavy, fragrant without becoming overpowering, and substantial without tipping into stodgy territory. Just as importantly, it slips easily into different kinds of meals. One day it becomes lunch tucked into pita, while on another it lands in a grain bowl, joins a mezze-style spread, or turns into a quick snack with tahini sauce on the side. Depending on how you serve it, falafel can feel firmly traditional or pleasantly flexible.
A good falafel recipe is also built around contrast. The shell should be crisp rather than oily. The center should be tender and herb-flecked rather than pasty. The chickpeas should still feel like chickpeas, yet the mixture should be processed enough to hold together with confidence. In other words, the pleasure of falafel comes not from one single element but from the way texture, aroma, seasoning, and serving all work together.
Chickpeas, fava beans, and authentic falafel variation
Because falafel has spread so widely across kitchens, restaurants, and home tables, there is more than one accepted version. Some cooks build an authentic falafel recipe around chickpeas. Others lean toward fava beans. Some make small balls. Others prefer patties. Some stay very close to a classic seasoning profile, while others add chillies, sesame seeds, or regional twists. What ties these approaches together is the pursuit of that unmistakable texture: crisp shell, soft center, lively flavour.
That broader view matters because people often search for falafel as though there is only one correct version. In reality, there is a core identity, but there is also room for regional nuance. A chickpea falafel recipe may be the most familiar style in many kitchens, whereas a broad bean falafel recipe may feel more connected to Egyptian tradition. Both belong to the wider falafel story.
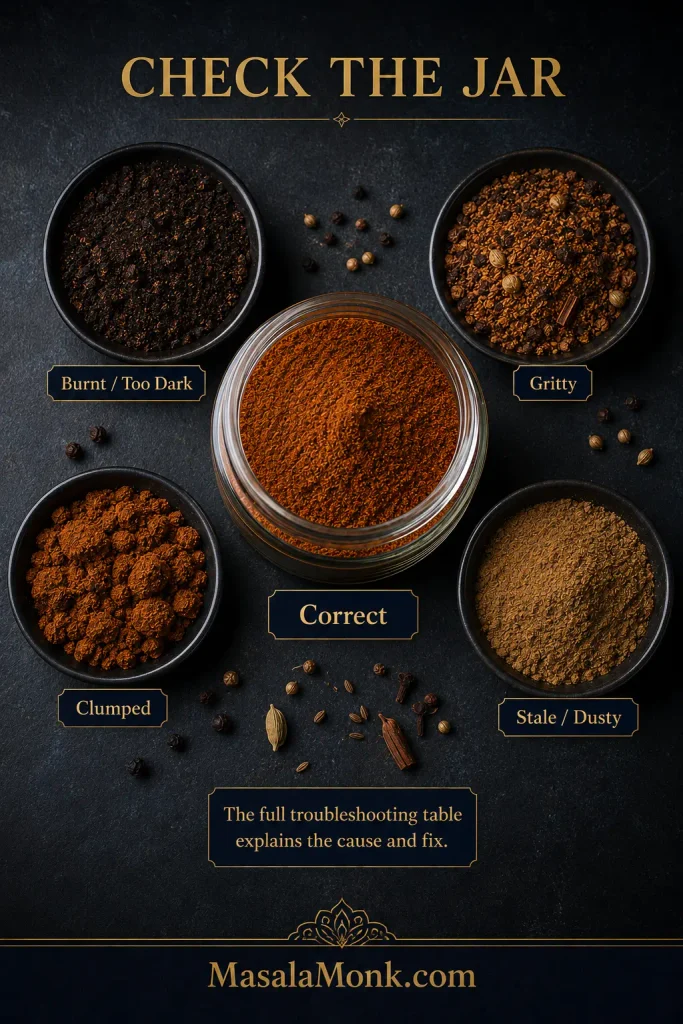
Why homemade falafel can surprise you
That is also why homemade falafel can be such a surprise if your main reference point is dry takeaway falafel. When it is fresh and properly seasoned, it tastes greener, brighter, warmer, and more alive. The herbs are more pronounced. The crust is more delicate. The interior has more nuance. In other words, a good homemade falafel recipe does not simply recreate something familiar. It can completely change how you think about the dish.
Falafel Recipe Ingredients: What Falafel Is Made Of
At its heart, falafel relies on a handful of ingredients that each play a distinct role. The list is not long, yet the balance is everything.
This falafel ingredient guide shows how a great falafel recipe is built: dried chickpeas for structure, parsley and cilantro for the fresh green center, onion and garlic for savoury depth, and cumin, coriander, and black pepper for warm spice. It also highlights chickpea flour as an optional helper when the mixture needs a little extra support. Use this card to quickly understand what gives homemade falafel its crisp exterior, flavorful interior, and distinctive texture before moving into the step-by-step method.
The best chickpeas for a falafel recipe
Chickpeas are the base most people have in mind when they picture falafel. They bring body, earthy flavour, and enough structure to create the right interior once processed properly. For a traditional falafel recipe, dried chickpeas are soaked and used raw rather than boiled first. That step matters more than it may seem, because their firmness affects both texture and how the mixture holds together.
A chickpea falafel recipe made this way usually has the most satisfying interior. The chickpeas stay structured, the mixture remains textured, and the final falafel cooks into something crisp outside and tender inside. By contrast, softer cooked chickpeas move much more quickly toward a paste.
The aromatics
Onion and garlic build the savoury backbone. Without them, the mixture can taste flat and timid. They also contribute a little moisture, which is helpful in moderation and troublesome in excess. That is one reason why the exact balance of onion, garlic, and herbs matters so much.
Too much onion can loosen the mixture more than you expect, especially if the onion is watery. Too little garlic, meanwhile, can leave the final falafel feeling mild rather than warmly savoury. The aim is not sharpness for its own sake, but depth.
The herbs that lift a homemade falafel recipe
Parsley and cilantro are not decorative extras. They are central to the flavour and appearance of falafel. They create that fresh, green interior that sets a truly good falafel apart from a beige, dense one. If you have ever bitten into a falafel that felt oddly dull, the herb ratio was often part of the problem.
Parsley brings clean freshness, while cilantro adds brightness and a slightly sharper herbal note. If you prefer less cilantro, it is usually better to replace it with more parsley than to reduce the herbs overall. Otherwise, the mixture can lose the lively quality that makes falafel feel fresh rather than heavy.
The spices behind an authentic falafel recipe
Cumin and coriander are the classic pair. Cumin adds warmth and depth, while coriander lifts the flavour and keeps the mixture from leaning too heavily into earthiness alone. Black pepper appears often. So does a little chilli in some kitchens. Beyond that, there is room for modest variation, though it is usually wiser to perfect the fundamentals before adding too many extra notes.
The salt
Salt is not a background player here. Since falafel contains chickpeas, herbs, onion, and garlic, it needs enough seasoning to prevent all that wholesome goodness from becoming merely worthy. One of the most common issues with a homemade falafel recipe is not texture but blandness, and that often begins with under-seasoning the raw mixture.
The optional helpers
Some recipes include chickpea flour, a little plain flour, or baking powder. These are not always necessary, especially when the mixture is well balanced and the chickpeas have been handled correctly. Still, they can be useful in specific contexts, particularly for baked falafel, air fryer falafel, or mixtures that feel slightly too loose after processing.
For a gluten free falafel recipe, chickpea flour is especially useful because it helps bind without changing the character of the mixture too much. Baking powder, on the other hand, is best seen as a small supporting detail rather than the secret to success.
What Makes This Homemade Falafel Recipe So Good for Texture and Flavor
The difference between average falafel and memorable falafel is rarely about extravagance. More often, it comes down to texture, balance, and timing.
A strong falafel recipe should deliver contrast at every stage. The first bite should meet a crisp exterior rather than a soft, oily shell. The interior should feel tender and almost fluffy, yet still have enough texture to remind you it came from soaked chickpeas and herbs, not from a smooth purée. The seasoning should taste warm and rounded rather than harsh or flat. The herbs should be present enough to brighten each bite without turning the whole mixture grassy.
The difference between average falafel and memorable falafel usually comes down to a few details that are easy to overlook. A softer shell, denser center, and flatter flavor often come from rushed processing, weak herb balance, or timing that is just slightly off, while great falafel keeps its contrast: crisp outside, tender green center, and seasoning that feels lively instead of dull. Seeing those differences side by side makes it much easier to understand what you are actually aiming for before you cook the next batch.
This is exactly where rushed methods tend to disappoint. Over-process the chickpeas and the mixture quickly turns pasty instead of textured. Treat canned chickpeas the same way as soaked dried chickpeas and the finished falafel often comes out denser than you hoped. Skimp on the herbs and the center loses the freshness that makes falafel so distinctive. Meanwhile, if the oil temperature is off, the exterior may brown too fast or soak up more oil than it should.
Writers who focus closely on texture, such as Serious Eats, and cooks who emphasize practical home technique, such as The Mediterranean Dish, return to these same points again and again for good reason. They are not small details. They are the difference between falafel you politely finish and falafel you start planning to make again before the meal is over.
Here is a balanced ingredient list for a classic chickpea falafel that works beautifully as a base recipe.
Ingredients
1 1/2 cups dried chickpeas
1 small onion, roughly chopped
4 to 6 garlic cloves
1 packed cup parsley leaves and tender stems
1/2 to 1 cup cilantro leaves and tender stems
2 teaspoons ground cumin
1 teaspoon ground coriander
1/2 to 1 teaspoon black pepper
1 1/2 to 2 teaspoons salt
1 to 2 tablespoons chickpea flour, only if needed
1 teaspoon baking powder, optional
neutral oil for frying, or a little oil for brushing in air fryer and baked methods
A clear ingredient card makes homemade falafel easier to save, shop for, and cook without scrolling back and forth through the whole post. This classic base starts with dried chickpeas, onion, garlic, parsley, cilantro, cumin, coriander, black pepper, and salt, while chickpea flour and baking powder stay in the optional-helper category for batches that need a little support. Seeing the full list in one place is especially useful before soaking chickpeas or setting up your prep station.
A few ingredient notes
For a greener and fresher falafel, add a little more parsley to the mixture. Anyone who does not love cilantro can scale it back and replace that volume with extra parsley rather than leaving the herbs unbalanced. A touch of chilli can also be introduced for heat, although the classic flavour profile leans far more on cumin and coriander than on spice alone.
For a gluten free falafel recipe, chickpea flour is the simplest binder when needed. Since chickpeas themselves are naturally gluten free, the key is simply to avoid unnecessary additions that introduce gluten.
This is also naturally very close to a vegan falafel recipe. The mixture itself relies on chickpeas, herbs, aromatics, and spices, so the falafel can easily remain vegan as long as the sauces and sides you choose do the same.
Dried Chickpeas vs Canned Chickpeas for a Falafel Recipe
This question sits at the center of nearly every serious falafel conversation, and rightly so. The choice between dried chickpeas and canned chickpeas changes the texture, the handling, and often the final method.
This falafel comparison card shows why dried chickpeas usually make the best falafel recipe, while canned chickpeas work as a faster shortcut. Soaked dried chickpeas give homemade falafel a firmer mixture, a lighter interior, and a more classic crisp result. Canned chickpeas, by contrast, are softer and wetter, so they tend to produce a denser falafel unless the mixture is handled carefully. Use this guide to choose the right base before moving into the method, especially if you are deciding between authentic falafel texture and weeknight convenience.
Why dried chickpeas make the best falafel recipe
For a traditional or authentic falafel recipe, dried chickpeas are soaked in water until they swell, then drained and processed raw. They have enough firmness to create a mixture that stays textured rather than turning creamy. They also behave better in hot oil because they are not already fully cooked and softened.
That is why many respected falafel recipes insist on dried chickpeas and warn against canned chickpeas for the classic version. Both The Mediterranean Dish and Serious Eats make this point clearly, and once you have seen the difference in the food processor, it becomes obvious.
Can canned chickpeas work in a falafel recipe?
Yes, canned chickpea falafel can work. It simply behaves differently. Canned chickpeas are already cooked and much softer, so they are more likely to become mushy when processed. That can make it harder to form balls that stay light inside. The resulting falafel may still taste good, but it usually has a denser, less open texture.
When to use canned chickpeas anyway
There are moments when convenience matters more than orthodoxy. If you need an easy falafel recipe on a weekday and did not soak dried chickpeas ahead of time, canned chickpeas can still get dinner on the table. In that case, it helps to pulse very carefully, dry the chickpeas thoroughly, use a modest amount of binder if needed, and lean toward flatter patties for baking or air frying.
The honest difference
If you are chasing the best falafel recipe you can make at home, dried chickpeas are worth it. If you are chasing speed and flexibility, canned chickpeas remain an option. The key is knowing that these are not interchangeable choices with identical results. They are two related but different paths.
How to Soak Dried Chickpeas for the Best Falafel Recipe
Soaking chickpeas is easy, though it does require a little foresight.
Place the dried chickpeas in a large bowl and cover them generously with cold water. They need far more room than you might expect because they expand as they absorb liquid. Leave them overnight, or for roughly 18 to 24 hours if your kitchen is cool and your timing allows. Then drain them well.
This soaked chickpea guide shows the texture you want before making falafel from scratch. Properly soaked chickpeas for a falafel recipe should look plump, hydrated, and larger than before, yet still feel firm rather than soft like cooked chickpeas. That difference matters because the right chickpea texture helps the falafel mixture stay structured, shape well, and cook into a crisp outside with a tender green center instead of turning mushy.
What you are looking for is this: the chickpeas should be larger and hydrated, but still firm. They should not resemble boiled chickpeas, and they definitely should not be soft enough to mash between your fingers with almost no effort. That firmer state is what helps create the right falafel texture later.
Once drained, it helps to let them sit in a colander for a few minutes so extra moisture can run off. Too much lingering water can loosen the mixture more than necessary.
Although chickpea falafel is the version many readers will be searching for, it is worth noting that falafel is not limited to chickpeas alone. In some traditions, especially those tied more closely to Egypt, falafel may be made with fava beans or broad beans instead. That version can taste slightly different and may have a softer, more delicate character depending on the recipe.
Falafel is not limited to one exact formula, which is why chickpea falafel and broad bean falafel are both worth understanding. Chickpea falafel is the version many home cooks recognize most easily, while broad bean falafel is often more closely tied to Egyptian tradition and can have a slightly softer, more delicate character. Seeing the legumes and the finished falafel side by side makes the distinction clearer and helps explain why falafel can feel familiar in one kitchen and slightly different in another.
For that reason, when people search for an Egyptian falafel recipe or a broad bean falafel recipe, they are often looking for a related but not identical dish. Chickpea falafel tends to be the most familiar version in many home kitchens, and it is also the easiest one to build a broad guide around. Even so, knowing that fava bean falafel exists adds useful context. It reminds us that falafel has regional breadth and a longer story than one single formula can capture.
How to Make Falafel from Scratch: Step-by-Step Falafel Recipe
Making falafel at home becomes much less intimidating once you see that the steps are logical and manageable.
This step-by-step falafel guide shows the full flow of a homemade falafel recipe, from soaked chickpeas and the freshly pulsed herb mixture to shaped falafel and the final crisp, golden result. Use it as a quick visual roadmap before diving into the full method, especially if you are making falafel from scratch for the first time and want to understand how the texture should look at each stage.
Step 1: Prepare the ingredients
Drain the soaked chickpeas. Roughly chop the onion if it is large. Peel the garlic. Wash and dry the herbs. Gather the spices and salt. This is not a fussy recipe, but having everything ready makes it easier to stop processing at the right moment rather than scrambling for ingredients while the food processor is running.
Getting everything ready before the food processor starts makes the rest of the falafel recipe much smoother. Drained chickpeas, chopped onion, peeled garlic, washed herbs, and measured spices let you stop at the right texture instead of scrambling for ingredients halfway through. It is a simple prep step, but it makes the mixture easier to control and the method far less messy.
Step 2: Process the mixture
Add the chickpeas, onion, garlic, parsley, cilantro, cumin, coriander, salt, and pepper to a food processor. Pulse in short bursts. Scrape down the bowl as needed. The goal is a coarse, even mixture that holds together when pressed but still shows texture.
The texture of the falafel mixture matters more than most people expect. After pulsing, it should look evenly mixed and hold together when pressed, but still keep a nubbly chickpea-and-herb texture. Stay too coarse and the falafel can fall apart. Go too smooth and it starts turning dense and pasty instead of giving you the light, textured center that makes homemade falafel so satisfying.
Step 3: Check the texture
Take a small amount of the mixture in your palm and press it gently. A mixture that holds together under light pressure is usually in good shape. On the other hand, if it crumbles straight away, it needs a little more pulsing. Should it feel wetter than expected, add a small spoonful of chickpea flour and pulse again briefly until the texture looks more cooperative.
Before shaping the falafel, press a small amount of the mixture in your hand. It should hold together without feeling wet or turning into paste. If it crumbles too easily, the mixture may need a little more pulsing or a small amount of chickpea flour to help it bind. This quick hand test makes the next steps far easier and helps prevent falafel that falls apart during cooking.
Step 4: Rest the mixture
Cover and chill the processed mixture for at least 30 minutes. This resting time helps in two ways. First, it firms the mixture and makes shaping easier. Second, it gives the flavors a moment to settle together.
A short rest in the fridge gives the falafel mixture time to firm up before shaping. That small pause makes the mixture easier to handle, helps it feel more cohesive in the hand, and reduces the chances of frustration in the next step. It is one of those quiet details that makes homemade falafel feel much more manageable.
Step 5: Shape the falafel
Use your hands, a spoon, or a falafel scoop if you have one. Small balls are traditional and beautiful when fried. Slightly flattened patties are particularly useful for baked falafel and air fryer falafel, since they brown more evenly and are easier to turn.
Shape affects how falafel cooks. Balls are the more classic choice and work especially well for frying, while flatter patties brown more evenly in the oven or air fryer and are easier to turn without breaking. Picking the shape that matches your cooking method makes the recipe more predictable and helps you get better texture with less guesswork.
Step 6: Cook by your chosen method
From here, you can fry, air fry, or bake. Each route has its own appeal, and none of them are difficult once the mixture is right.
Cooking method changes the final character of falafel more than most people expect. Frying gives the deepest crust and the most classic result, air frying offers a lighter route with good browning, and baking is especially practical for batch cooking and meal prep. Choosing the method that matches the meal you want makes the whole recipe feel more intentional and helps set the right expectations before you move into the detailed method sections below.
For many cooks, fried falafel remains the benchmark. There is a reason for that. Hot oil creates a crust that is difficult for any other method to match. The shell becomes deeply crisp, the center stays tender, and the whole thing tastes unmistakably falafel in the way many people first fell in love with it.
How to fry falafel
Fill a deep pan or pot with enough neutral oil to allow the falafel to cook without touching the bottom too aggressively. Heat the oil until it is hot but not smoking. If the oil is too cool, the falafel may absorb excess oil and feel greasy. If it is too hot, the exterior will brown too quickly.
Lower a few pieces in at a time. Avoid crowding the pan, since that can drop the temperature and make the batch less crisp. Let them cook until evenly golden brown, then remove and drain on paper towels or a wire rack.
Fried falafel stays the benchmark because hot oil creates the strongest contrast between a crisp shell and a tender center. The most important cues are simple but easy to miss: heat the oil properly without letting it smoke, fry only a few pieces at a time so the temperature does not drop, and cook until the crust turns deeply golden rather than pale. A method card like this is useful because it shows both the process and the finish readers should be looking for when they want truly classic falafel.
What fried falafel should look like
The outside should be dark golden and crisp, not pale. The inside should be cooked through but still moist and green-flecked. If you split one open and it looks smooth or pasty, the mixture was likely processed too far or the chickpeas were not ideal for the method.
Why people keep coming back to fried falafel
Because it is hard to beat. Fried falafel offers the strongest crust and the clearest contrast between crisp exterior and tender middle. For a weekend lunch, a dinner spread, or any time you want the most classic version, it remains the method that most fully expresses what falafel can be.
Air fryer falafel occupies a very useful place in a modern kitchen. It gives you a lighter option, avoids a pot of oil, and still creates browning and texture when done well. It is not identical to fried falafel, but it can be genuinely satisfying rather than a compromise made with resignation.
Why air fryer falafel works
The circulating heat of the air fryer encourages the exterior to dry and color while keeping the inside relatively tender. A light brushing or spraying of oil helps enormously here. Without a little exterior fat, the surface can dry before it crisps.
Air fryer falafel works best when the shape and cooking style match the method. Slightly flatter patties brown more evenly than thick balls, a light coating of oil helps the surface crisp instead of drying out, and enough space in the basket keeps the hot air moving properly around each piece. A guide like this is useful because it shows the difference between merely cooked falafel and air fryer falafel that is browned outside, tender inside, and worth making again.
How to shape air fryer falafel
Slightly flattened patties often work best because they expose more surface area and cook more evenly. Small balls can also work, although they may need turning and a little more attention.
How to cook falafel in an air fryer without drying it out
Preheat the air fryer if your model allows it. Arrange the falafel in a single layer with space between each piece. Cook until the surface is browned and the falafel feels set, turning once if needed. Since every air fryer behaves a little differently, it helps to watch the first batch closely rather than trusting one exact minute count.
How to keep air fryer falafel from drying out
There are several ways. Use enough herbs so the interior stays lively. Do not over-process the mixture. Do not make the patties too small. Lightly oil the exterior. Most importantly, stop cooking as soon as they are crisp rather than pushing for a darker shade at the expense of tenderness.
Baked falafel is sometimes dismissed too quickly, usually because people expect it to behave exactly like fried falafel. It does not. Still, when approached on its own terms, it can be delicious, practical, and surprisingly satisfying.
What a baked falafel recipe does well
Baked falafel has several practical advantages. Larger batches are much easier to manage in the oven, and the process is notably less messy than frying. It also suits make-ahead cooking particularly well. Better still, baked falafel reheats nicely, which makes it a strong option for lunchboxes, grain bowls, and easy weeknight wraps.
Baked falafel works best when the shape, tray setup, and expectations all match the method. Flatter patties brown more evenly than thick balls, a lightly oiled tray and brushed tops help build better color, and turning partway through makes the finished falafel feel more balanced on both sides. A card like this is worth saving because it shows how baked falafel can stay practical, flavorful, and meal-prep-friendly without pretending to be the same as deep-fried falafel.
How to bake falafel so it stays crisp and tender
Use a hot oven. Place the falafel on a lightly oiled tray or parchment. Brush or spray the tops with a little oil. Patties rather than thick balls usually bake more evenly. Turn them partway through so both sides color well.
What baked falafel tastes like
The crust is gentler, and the overall result is slightly drier than deep-fried falafel, though not unpleasantly so when the mixture itself is well balanced. In fact, baked falafel often shines most when served with generous sauces, crunchy vegetables, and warm bread or grains.
When a baked falafel recipe is the smart choice
When you want a healthy falafel recipe, when you are feeding more people at once, or when you want leftovers that hold up well the next day. It may not be the purest expression of the dish, yet it is one of the most practical.
Since many cooks still want a canned chickpea falafel option, it is worth setting out a practical approach.
Use 2 cans of chickpeas, drained and dried very thoroughly. Reduce the onion slightly if you know yours is especially watery. Pulse carefully, because canned chickpeas go from chunky to mushy fast. Use chickpea flour a little more readily than you would in the dried-chickpea version. Prefer patties rather than balls. Then cook in the oven or air fryer rather than expecting the mixture to behave exactly like traditional fried falafel.
Canned chickpeas can still make a workable falafel, but they need gentler handling than soaked dried chickpeas. Drying them thoroughly, keeping watery onion in check, pulsing carefully, and using chickpea flour sooner all help prevent the mixture from turning soft and pasty. Leaning toward patties and choosing the oven or air fryer usually gives the most reliable shortcut version when you want falafel without the overnight soak.
Tips for canned chickpea falafel
Dry the chickpeas as thoroughly as you can. Pat them dry with a clean towel if needed. Do not over-process. Chill the mixture before shaping. Use a binder sooner rather than later if the mix seems soft. Keep expectations honest and shape for the method rather than for tradition.
Why canned chickpea falafel turns mushy
Because the chickpeas are already cooked. They are softer, more hydrated, and easier to turn into paste. Once that happens, the interior loses the airy, crumbly quality that makes falafel feel so good. The goal, therefore, is not to make canned chickpeas behave like dried ones. The goal is to get the best possible shortcut version from the ingredient you have.
Will it be identical to an authentic falafel recipe made with soaked dried chickpeas? No. Can it still be tasty, crisp in places, and absolutely worth eating in a pita with salad and sauce? Certainly.
This is one of the classic falafel frustrations, and it nearly always comes down to structure and moisture.
When falafel falls apart, the problem is usually not random. Most batches fail because the mixture is too wet, too coarse to bind, not rested long enough, made with chickpeas that are too soft, or fried before the oil is properly hot. Catching the real cause early makes the fix much easier, whether that means draining better, pulsing a little more, chilling the mixture, switching to soaked dried chickpeas, or waiting for the oil to come up to temperature.
The mixture may be too wet
Extra water from poorly drained chickpeas, very watery onion, or excessive herbs can all loosen the mixture. If the mix feels sticky and sloppy rather than cohesive, it needs help. A spoonful of chickpea flour can make a real difference.
The mixture may be too coarse
If the ingredients have not been pulsed enough, they may not bind. Falafel should not be puréed, but it does need enough processing for the particles to catch and hold together when pressed.
The mixture may need rest
Resting the mixture in the fridge gives it time to firm up. If shaping feels difficult, a half-hour of chilling often improves things.
The chickpeas may be the issue
Canned chickpeas are more prone to creating a softer mix that struggles in hot oil. That is one reason why so many cooks prefer dried chickpeas for a true homemade falafel recipe.
The oil may be part of the problem
If you are frying, oil that is not hot enough can weaken the structure before the exterior sets. Consequently, the falafel may seem as though it lacks binding when the real issue is that the crust never had a chance to form quickly enough.
Mushy falafel is usually a sign that the mixture lost too much structure before it ever reached the pan or oven.
One common culprit is over-processing. Once chickpeas become a smooth paste, the interior tends to lose that delicate, crumbly quality. Another frequent cause is over-reliance on canned chickpeas. Since they are already cooked, they are easier to reduce to something dense and creamy.
Mushy falafel usually starts before the mixture ever reaches the pan, oven, or air fryer. The most common causes are processing the mixture too far, using chickpeas that are too soft, letting too much moisture from onion or herbs loosen the mix, or skipping the resting time that helps it firm up. Fixing those early texture problems is what gives falafel its crisp exterior and tender, structured center instead of a soft, dense interior.
Too much onion can also play a role, as can insufficient resting time. In some cases, falafel that looks mushy after cooking was not actually undercooked; it was simply too wet and too smooth going in.
The simplest prevention is this: start with soaked dried chickpeas, pulse rather than blend, drain everything well, and chill the mixture before shaping.
How to Build More Flavor into a Homemade Falafel Recipe
Even when the texture is right, falafel can disappoint if it tastes muted. Fortunately, that is one of the easiest problems to fix.
Falafel can be technically correct and still taste flat, which is why flavor-building matters as much as texture. More herbs give the center a fresher, livelier character, confident seasoning keeps chickpeas from tasting dull, and the raw mixture should already smell aromatic before it ever gets cooked. Once the falafel reaches the plate, sauce, salad, pickles, and bread are not extras so much as the final layer that makes the whole meal feel balanced, bright, and complete.
Use enough herbs
A pale falafel interior often points to not enough parsley and cilantro. The herbs do not merely add freshness. They shape the identity of the dish.
Season assertively
Chickpeas are mild. Onion and herbs mellow as they cook. Salt, cumin, coriander, and garlic all need to be generous enough to remain clear in the finished falafel.
Smell the raw mixture carefully
You cannot eat it in the same carefree way you might taste a dressing, but you can smell it and assess the seasoning in that sense. Does it smell aromatic and warm? Or does it smell mostly like wet chickpeas? Your nose gives a useful clue.
Think about the whole plate
Falafel often sits alongside tahini, yogurt sauce, salad, pickles, hummus, and bread. The main falafel mixture should therefore be flavourful in its own right, but it does not need to carry the entire meal alone. Balance across the plate matters.
Best Falafel Sauce Ideas for Wraps, Bowls, and Pita
Falafel without sauce can still be good. And then falafel with the right sauce becomes a complete meal.
The right sauce changes falafel from good to complete. Tahini brings the classic nutty, lemony richness that most people expect, yogurt sauce adds cool creaminess, cucumber yogurt sauce feels especially fresh in wraps and summer plates, and a spicy sauce gives the whole meal more edge. Choosing the sauce that matches the kind of falafel plate you want is one of the easiest ways to make the recipe feel more personal and more satisfying.
Tahini sauce for falafel
This is the classic partner for falafel. Tahini mixed with lemon juice, garlic, water, and salt creates a sauce that is creamy yet bright. Its slight bitterness and richness work beautifully against the crisp shell and herb-forward center.
Yogurt sauce for falafel
A cool yogurt sauce offers a different kind of balance. It softens the warmth of cumin and coriander and pairs especially well with pita, salad, and crunchy vegetables. A cucumber-based version is even better on warm days. That is one reason why this Greek tzatziki sauce guide fits so naturally alongside falafel.
Cucumber yogurt sauce for falafel
If you want something especially fresh, a cucumber yogurt sauce is hard to beat. It brings coolness, moisture, and tang, all of which make it excellent for wraps and summer platters.
Creamy dairy-free options
If you want something richer without dairy, a tahini-forward mayo or a vegan herb sauce can be excellent. For readers who enjoy that style, the ideas in these vegan mayo variations can be adapted into very good sandwich and wrap sauces.
Spicy sauces
Falafel also welcomes heat. Harissa, chilli sauce, or a spicy yogurt dressing can shift the whole plate in a livelier direction. The warmth of the falafel base gives these sauces something solid to lean against.
How to Serve Falafel in Pita, Wraps, Bowls, and Platters
One of falafel’s greatest strengths is how easily it slides into different meals. A batch made in the afternoon can become lunch, dinner, and leftovers the next day without feeling repetitive.
Falafel becomes far more versatile once you stop thinking of it as only a pita filling. It works just as well tucked into a wrap, layered over grains or greens in a bowl, or spread across a platter with hummus, salad, bread, and dips for a more generous meal. Seeing the four main serving directions side by side makes it easier to choose the version that fits your mood, your meal, and how much time you want to spend assembling the plate.
Falafel in pita bread
This is the classic arrangement for good reason. Warm pita, falafel, chopped tomato, cucumber, onion, herbs, tahini sauce, and perhaps a few pickles create a balance of crisp, creamy, bright, and warm. It feels complete in a way that many simple sandwiches do not.
Falafel wrap ideas
Wraps offer a slightly more flexible version of the same idea. Flatbread, lavash, or even tortillas can work if you are using what you have. Layer in lettuce, crunchy vegetables, sauce, and perhaps a spoonful of hummus. If you enjoy this lunch-friendly direction, plant-based sandwich inspiration and chickpea meal prep ideas make useful companions.
Falafel bowls for lunch or meal prep
For a lighter or more meal-prep-friendly route, serve falafel over rice, bulgur, couscous, quinoa, or greens. Add chopped vegetables, pickles, hummus, and sauce. A bowl can feel hearty or fresh depending on what you add, and it is an excellent home for air fryer falafel or baked falafel. If you like this format, this vegan bowl idea shows how satisfying sauce-and-grain bowls can be even outside a Mediterranean flavour profile.
Falafel platter
There is also something especially inviting about serving falafel as part of a broader spread. Place it alongside hummus, chopped salad, pickled onions, olives, warm bread, yogurt sauce, and a few herbs. Suddenly a simple chickpea preparation becomes the center of a table. That broader serving style connects naturally with your own guide to what to eat with hummus, which includes pairings that can sit comfortably beside falafel as well.
Falafel with playful twists
Once the classic version is secure, it can also be fun to explore other directions. Your post on falafel with Indian twists opens up a more inventive path without losing the core appeal of the dish.
This pairing deserves special mention because it is one of the most satisfying ways to serve falafel. Falafel brings crispness, warmth, and structure. Hummus brings creaminess, earthiness, and a soft counterpoint. Add pickles, lemon, chopped salad, and bread, and suddenly the plate has everything it needs.
Falafel and hummus work so well together because each one brings what the other lacks. Falafel adds crispness, warmth, and structure, while hummus adds creaminess, richness, and a softer counterpoint that makes the whole plate feel more complete. Add bread, salad, olives, or something tangy on the side, and the pairing turns into one of the easiest ways to build a generous, deeply satisfying falafel meal.
What makes falafel and hummus work so well is contrast. One is crisp, the other smooth. One is herb-forward, the other mellow. And then one is hot, the other can be room temperature or cool. Together, they make each other better.
That is also why this pairing works across formats. It can be part of a platter, spread inside a wrap, spooned into a bowl, or layered into pita bread. It feels generous, complete, and deeply comforting without being complicated.
Falafel is rich enough to appreciate something fresh and cooling on the side. Since the plate often includes tahini, hummus, bread, salad, and spice, a drink with brightness and lift feels especially welcome.
Falafel feels best with drinks that refresh the plate instead of weighing it down. Jal jeera brings tang, mint, and spice that echo the meal beautifully, a mint lemon cooler adds brightness and lift, and a cucumber-herb drink keeps everything feeling crisp and cooling. Pairings like these work especially well with tahini, hummus, salad, and warm bread because they cut through richness without fighting the flavors on the plate.
A minty, tangy option like jal jeera works surprisingly well, particularly in hot weather. Its cumin, mint, and citrus notes echo some of the aromatic qualities in the meal without competing with them. For a more playful summer table, a chilled mint-forward mocktail can also fit, though falafel rarely needs anything too sweet beside it.
In general, the most natural drink pairings are refreshing rather than rich. Think lemon, herbs, mint, cucumber, and cooling acidity rather than cream-heavy beverages.
Is Falafel Healthy? Fried vs Air Fryer vs Baked Falafel
Falafel occupies an interesting space in the kitchen because it can feel both hearty and wholesome at the same time. Much of that comes from its base. Chickpeas are a legume, and legumes are valued for protein, fiber, folate, iron, and other useful nutrients. If you enjoy reading more about the nutritional side of ingredients, both USDA FoodData Central and the NIH Office of Dietary Supplements glossary offer broad, reliable context around foods like chickpeas and legumes.
Falafel can fit into very different kinds of meals depending on how it is cooked and what it is served with. Fried falafel gives the deepest crust and the most classic result, air fryer falafel feels lighter while still browning well, and baked falafel is especially practical for batch cooking and meal prep. The method changes the feel of the plate, but balance still depends on the sauces, vegetables, and sides that come with it.
That said, whether falafel feels especially light or more indulgent depends on the method and the company it keeps.
Fried falafel is richer. Air fryer falafel and baked falafel are lighter. A pita packed with sauce can feel very different from a bowl of greens, chopped vegetables, and tahini. A platter with hummus, pickles, salad, and warm bread can be both nourishing and abundant.
The better way to think about healthy falafel is not by trying to strip it of pleasure. Instead, think in terms of balance. Use plenty of herbs. Do not under-season the mixture. Choose the method that fits your needs. Pair it with vegetables and sauces that add freshness rather than heaviness alone.
Why this is naturally a vegan falafel recipe
The falafel itself is usually vegan, because it is built from chickpeas, herbs, spices, onion, and garlic. The main thing to watch is what you serve with it. Tahini sauce keeps the whole meal vegan. Yogurt sauce, naturally, does not. Accordingly, vegan falafel is often less about changing the falafel itself and more about choosing the right accompaniments.
Why falafel is often gluten free
Falafel can also be gluten free, provided the binder and accompaniments cooperate. Chickpeas, herbs, and spices are naturally gluten free. If a recipe needs help holding together, chickpea flour is usually the easiest gluten free option. The falafel itself may be gluten free even when the pita is not.
Falafel Recipe Variations: Green, Spicy, Mini, and Breakfast Falafel
Once the base technique feels familiar, falafel becomes an invitation to explore.
Once the base falafel recipe feels familiar, small changes can take it in very different directions. More parsley and cilantro create a greener, fresher version, chilli or harissa adds heat, smaller balls make falafel more platter-friendly, and serving it with eggs and yogurt turns it into a savory brunch plate. Seeing the variation, the tweak, and the payoff together makes it much easier to decide which version fits the mood of the meal.
Green falafel
Increase the herb ratio for a brighter, more vivid interior. This version feels particularly fresh in wraps and bowls.
Spicy falafel
Add green chilli, red chilli flakes, or a little harissa to the mixture or the accompanying sauce. The chickpeas soften the heat nicely.
Mini falafel
Shape smaller balls for platters, snack boards, or party spreads. These are especially useful if you want falafel as part of a larger mezze table.
Falafel pockets
Stuff pita pockets with chopped salad, tahini, and smaller falafel pieces. This works well for packed lunches because the filling stays more contained.
Breakfast falafel
While not a traditional breakfast dish everywhere, falafel can be excellent in the morning with eggs, chopped tomatoes, yogurt sauce, herbs, and warm bread. The savory, spiced character suits a relaxed brunch surprisingly well.
Falafel and hummus
This pairing deserves mention again because it is so satisfying. Falafel with hummus, pickles, vegetables, and bread offers creamy, crisp, tangy, and earthy elements all in one plate. If you want more ideas in that direction, the pairings in what to eat with hummus make an easy extension.
Falafel is one of the smartest foods to batch once you know the fundamentals.
Falafel becomes much more useful once you treat it as a meal prep base instead of a one-time recipe. The mixture can be made ahead and chilled, shaped falafel can be frozen for later, cooked falafel stores well in the fridge, and the oven or air fryer is the best way to bring back texture when it is time to eat. That flexibility is part of what makes homemade falafel such a smart repeat recipe for wraps, bowls, and quick lunches through the week.
Prepare the mixture ahead
The raw mixture can be made and chilled in advance, which makes shaping and cooking much easier the next day. This is especially helpful if you are using dried chickpeas and want to spread the work out.
Shape and freeze
You can shape falafel and freeze it on a tray before transferring it to a container. Later, you can fry, bake, or air fry smaller portions without starting from scratch.
Cook and store
Cooked falafel keeps well in the fridge for a few days. It is excellent for quick lunches when tucked into wraps or bowls with fresh vegetables and a sauce.
Reheat the right way
The oven or air fryer is the best route for reviving texture. The microwave softens the crust, which is not ideal unless speed matters more than crispness.
Build flexible meals around it
This is where falafel becomes especially useful. One batch can become pita sandwiches one day, bowls the next, and a snack plate later in the week. Because the base is so adaptable, meal prep rarely feels repetitive.
neutral oil for frying, or a little oil for brushing
This homemade falafel recipe card brings the core recipe into one saveable reference: yield, prep notes, ingredient list, and a compact method, all paired with the crisp shell and tender green center the post is aiming for. It is especially useful once you are ready to cook, because it turns a long guide into a quicker working version you can pin, screenshot, or revisit without hunting through every section again.
Step-by-Step Method for this Falafel Recipe
Soak the dried chickpeas in plenty of water overnight or up to 24 hours. Drain well.
Add the chickpeas, onion, garlic, parsley, cilantro, cumin, coriander, salt, and pepper to a food processor.
Pulse until the mixture is finely chopped and holds together when pressed, but do not purée it.
If needed, add chickpea flour to help bind. Pulse briefly again.
Chill the mixture for at least 30 minutes.
Shape into balls or patties.
Fry in hot oil until deeply golden, or cook in an air fryer or hot oven until crisp and cooked through.
Serve hot with tahini sauce, yogurt sauce, pita, salad, and pickles.
A Few Serving Menus Built Around the Falafel Recipe
Sometimes the easiest way to picture a recipe is to see how it can shape a full meal.
One of the best things about falafel is how easily one batch can turn into very different meals. It can stay simple for a quick weekday lunch, become a packed office bowl or box, expand into a generous dinner platter, or shift into a lighter summer spread with wraps and cooling sides. Seeing those menu directions together makes the recipe feel more flexible, more practical, and easier to use in real life.
A simple weekday lunch
Air fryer falafel, chopped cucumber and tomato, tahini sauce, and warm pita.
The Small Decisions That Improve a Falafel Recipe the Most
Once you have made falafel a few times, you begin to notice that the biggest improvements often come from surprisingly small adjustments.
The biggest improvements in falafel usually come from details that seem minor at first. Drying the chickpeas properly, using enough herbs, stopping the food processor at the right moment, chilling before shaping, and matching the shape to the cooking method all make a noticeable difference to texture and flavor. A guide like this is useful because it turns scattered tips into a short set of choices that can quietly improve every future batch.
Drying the chickpeas well matters. Using enough herbs matters. Stopping the food processor a little earlier matters. Chilling the mixture matters. Choosing patties for the oven and balls for frying matters. Serving the falafel while still warm matters. Adding enough sauce and crunch on the plate matters.
These are not glamorous insights, yet they are what turn a decent falafel recipe into one that becomes part of your regular cooking rhythm.
It is also worth saying that confidence changes the result. The first time, you may second-guess the texture, the seasoning, or the shape. The second time, you will already know more. The third time, you will make small decisions more naturally. Falafel rewards repetition in a very tangible way.
Some recipes are enjoyable once and then forgotten. Falafel rarely belongs to that category. It tends to become more useful the more often you make it. The first time, you are learning the texture. The second time, you are refining the seasoning. The third time, you are already deciding whether the batch should become pita sandwiches, bowls, or a platter for friends.
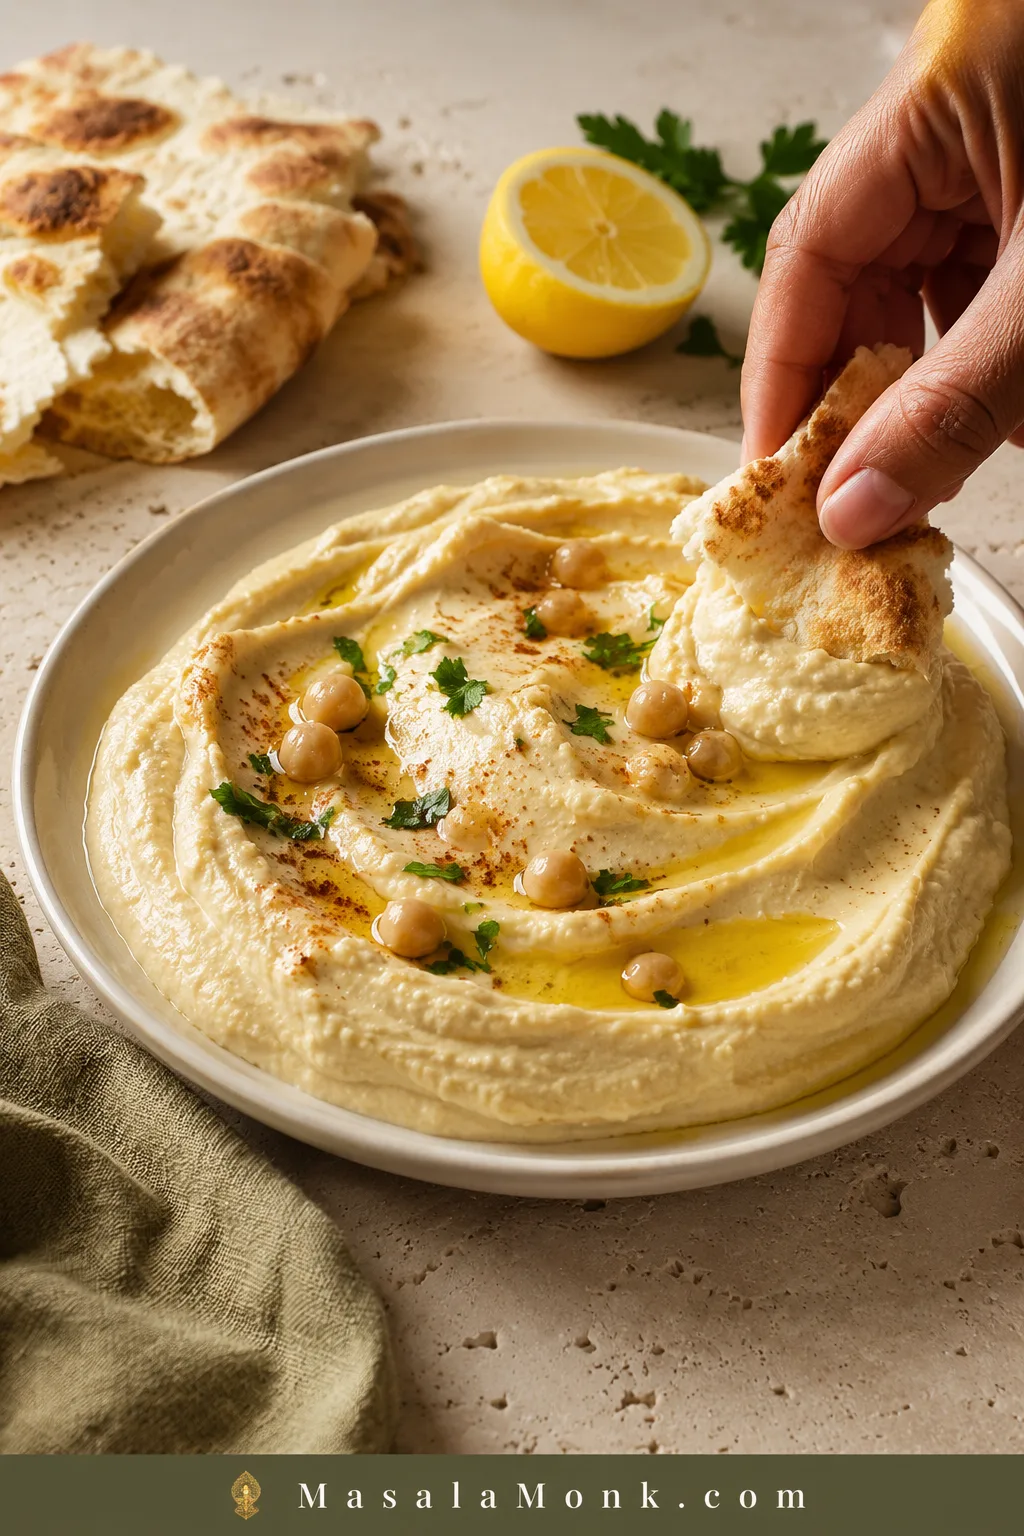
That repeatability is part of what makes falafel so lovable. It adapts easily without losing the qualities that make it recognisable in the first place. A batch can become a quick lunch, a casual dinner, or the centerpiece of a table meant for sharing. On some days it leans more traditional; on others it takes on a slightly more flexible role. You can fry it for maximum crispness, air fry it for convenience, or bake it for meal prep, yet the heart of the dish remains the same: chickpeas, herbs, aromatics, spice, and that irresistible contrast between crust and center.
A good falafel recipe, then, is not only about one successful meal. It is about opening the door to many meals that follow naturally from the same set of ingredients.
Falafel rewards care, though it does not demand fussiness. If you soak dried chickpeas, pulse the mixture to the right texture, season with confidence, and choose a cooking method that suits the meal you want, you are already most of the way there.
A good falafel recipe gets much easier once the biggest decisions are clear. Start with soaked dried chickpeas, aim for a coarse mixture instead of a paste, adjust quickly if the mix is crumbly or too wet, and match the shape to the cooking method for better results. Once the texture is right, the final meal becomes easy to build with the right sauce and serving format, which is why a guide like this works well as a quick reference before making falafel again.
From there, the process stops feeling like effort and starts feeling like pleasure. One meal might see the falafel tucked into pita with salad and tahini, while the next turns it into a bowl with grains and pickles. It can sit beside tzatziki, pair beautifully with hummus, or anchor a fuller spread of sauces, vegetables, and bread. Some batches are worth keeping classic, whereas others invite a spicier, greener, or more playful variation the next time around.
What matters most is that the falafel feels alive. Crisp outside. Tender inside. Fragrant with herbs. Warm with spice. Worth making again.
And once you have that, you do not simply have a homemade falafel recipe. You have one of the most versatile, satisfying, and generous chickpea dishes a home kitchen can offer.
Falafel is usually made from chickpeas or fava beans, along with onion, garlic, parsley, cilantro, cumin, coriander, salt, and pepper. In many homemade versions, chickpeas are the main base, especially in a classic chickpea falafel recipe. Some variations also use a little chickpea flour or baking powder to improve texture. Although the ingredient list is fairly simple, the balance of herbs, aromatics, and seasoning is what gives falafel its distinct flavor.
2. What is falafel, exactly?
Falafel is a savory Middle Eastern dish made by grinding soaked legumes with herbs, aromatics, and spices, then shaping the mixture into balls or patties and cooking it until crisp outside and tender inside. It is often served in pita, wraps, bowls, or on a platter with salad and sauce. As a result, falafel can work as a snack, lunch, or full meal depending on how it is served.
3. How do you make falafel from scratch?
To make falafel from scratch, start by soaking dried chickpeas until they are plump but still firm. After that, pulse them with onion, garlic, herbs, and spices until the mixture is finely chopped and holds together when pressed. Then chill the mixture, shape it, and fry, bake, or air fry it. The key is to pulse rather than puree, because that keeps the texture light instead of pasty.
4. Do you need dried chickpeas for an authentic falafel recipe?
Traditionally, yes. An authentic falafel recipe is usually made with dried chickpeas that have been soaked but not boiled. That method creates a mixture with better texture and structure, which helps the falafel stay crisp outside and tender inside. By contrast, canned chickpeas are much softer, so they tend to produce a denser result.
5. Can you make falafel with canned chickpeas?
Yes, you can make falafel with canned chickpeas, though the texture will be different. Since canned chickpeas are already cooked, they are softer and wetter than soaked dried chickpeas. Because of that, canned chickpea falafel can turn mushy or dense if the mixture is over-processed. Even so, it can still work well for a quicker homemade falafel, especially in baked or air fryer versions.
6. Why does falafel fall apart?
Falafel usually falls apart when the mixture is too wet, too coarse, or not rested long enough before cooking. Occasionally, canned chickpeas are the reason, since they create a softer mixture that may struggle to hold shape. In other cases, the issue is simply that the ingredients were not pulsed enough. Chilling the mixture and adding a small amount of chickpea flour, if needed, often helps.
7. Why is my falafel mushy instead of crisp?
Mushy falafel usually happens when the chickpeas are too soft, the mixture is too wet, or the food processor turns everything into a paste. Canned chickpeas can cause this more easily than soaked dried chickpeas. Likewise, overcrowding an air fryer or baking tray can prevent the exterior from crisping properly. For better results, keep the mixture textured, drain ingredients well, and give each piece enough space while cooking.
8. How do you make falafel crispy?
For crisp falafel, start with the right texture in the mixture. It should be finely chopped and cohesive, not smooth. Then chill it before shaping. Fried falafel usually gives the crispiest shell, although air fryer falafel can also turn out very well if lightly oiled and spaced properly. In the oven, shaping flatter patties instead of thick balls helps create more surface area for browning.
9. Is air fryer falafel good?
Yes, air fryer falafel can be very good when made carefully. While it does not have exactly the same crust as deep-fried falafel, it still develops a nicely browned exterior and keeps the inside tender. For many home cooks, air fryer falafel is the best balance between convenience, lighter cooking, and satisfying texture. It is especially useful for weeknight dinners and meal prep.
10. How do you cook falafel in an air fryer?
To cook falafel in an air fryer, shape the mixture into small patties or compact balls, lightly oil the outside, and arrange them in a single layer with space between each piece. Then cook until browned and crisp, turning if your air fryer needs it. Since machines vary, it is best to check the first batch closely. Generally, air fryer falafel works best when the basket is not crowded and the falafel is not too thick.
11. Is baked falafel worth making?
Absolutely. Baked falafel does not taste exactly like fried falafel, yet it can still be delicious. It is particularly useful for larger batches, meal prep, and lighter meals. Moreover, baked falafel reheats well and works beautifully in bowls, wraps, and lunchboxes. A hot oven, a lightly oiled surface, and flatter patties all help improve the final texture.
12. Is falafel healthy?
Falafel can be part of a healthy meal, especially when made with plenty of herbs and served with vegetables, hummus, yogurt sauce, or tahini. Chickpeas bring fiber and plant-based protein, which makes falafel filling and satisfying. Naturally, fried falafel is richer than baked or air fried falafel, so the cooking method changes the overall feel of the meal. Even then, falafel can still fit easily into balanced vegetarian eating.
13. Is falafel vegan?
Most classic falafel recipes are vegan because they are made from chickpeas or fava beans, herbs, spices, and aromatics. That said, it is always worth checking the binder or sauce being served alongside it. The falafel itself is often vegan, whereas yogurt sauce or certain accompaniments may not be.
14. Is falafel gluten free?
Falafel can be gluten free, though it depends on the recipe. Chickpeas, herbs, and spices are naturally gluten free, but some recipes use flour as a binder. If you want gluten free falafel, chickpea flour is one of the easiest alternatives. Accordingly, it is always a good idea to check the ingredients if you are cooking for someone who avoids gluten.
15. What sauce goes best with falafel?
Tahini sauce is the classic choice for falafel. Its creamy, nutty, lemony flavor pairs beautifully with the crisp shell and herb-filled center. Still, falafel also works very well with yogurt sauce, tzatziki, spicy sauces, or even a creamy garlic dressing. The best option depends on whether you want the meal to feel more classic, cooling, or bold.
16. What do you serve with falafel?
Falafel goes well with pita, wraps, chopped salad, hummus, tahini sauce, pickles, yogurt sauce, slaw, and grain bowls. It can be the centerpiece of a simple lunch or part of a larger mezze-style spread. Depending on the occasion, you can serve it in pita bread, over rice or couscous, or alongside fresh vegetables and dips.
17. Can falafel be made ahead of time?
Yes, falafel is excellent for make-ahead cooking. You can prepare the mixture in advance and chill it until you are ready to shape and cook it. Alternatively, you can shape the falafel and freeze it for later. Cooked falafel also stores well, which makes it useful for quick lunches and easy dinners throughout the week.
18. Can you freeze falafel?
Yes, falafel freezes very well. In fact, one of the best ways to do it is to freeze the shaped, uncooked falafel first on a tray, then transfer it to a container once firm. That way, you can cook only as much as you need later. Cooked falafel can also be frozen, though freshly cooked falafel usually gives the best texture.
19. How do you reheat falafel so it stays crisp?
The best way to reheat falafel is in the oven or air fryer. That helps the outside crisp up again instead of turning soft. A microwave will warm it quickly, but it usually softens the crust. Therefore, if texture matters, the oven or air fryer is the better choice.
20. What is the difference between falafel balls and falafel patties?
Falafel balls are more traditional and are especially popular for frying. Falafel patties, on the other hand, are often easier for baking and air frying because they cook more evenly and expose more surface area to heat. The flavor is essentially the same, but the shape can affect the texture and the method that works best.
21. Can you make easy falafel at home without deep frying?
Yes, easy falafel can absolutely be made at home without deep frying. Air fryer falafel and baked falafel are both practical options, especially for home cooks who want less mess and lighter cooking. The most important thing is getting the mixture right first. Once that is in place, the cooking method becomes much easier to adapt.
22. What makes the best falafel recipe?
The best falafel recipe starts with the right chickpeas, plenty of fresh herbs, enough seasoning, and the right texture in the mixture. It should hold together well, cook up crisp outside, and stay tender inside. Beyond that, the best falafel recipe is the one that suits how you want to eat it, whether that means a traditional fried version, a homemade baked falafel, or a lighter air fryer falafel for everyday meals.
23. What is the difference between falafel and hummus?
Falafel and hummus both often begin with chickpeas, yet they become very different foods. Hummus is a smooth dip or spread, whereas falafel is a shaped mixture that is cooked until crisp. They are often served together because their textures contrast so well.
24. Can I use falafel in a wrap instead of pita?
Absolutely. Falafel works beautifully in wraps. In fact, wraps can be easier to eat than stuffed pita pockets because the filling stays more contained. Add lettuce, chopped vegetables, sauce, and hummus if you like, then roll everything tightly.
25. What herbs are best in a falafel recipe?
Parsley and cilantro are the classic herb combination. Parsley keeps the mixture fresh and green, while cilantro adds brightness and a slightly sharper edge. If you dislike cilantro, extra parsley is usually the best substitute rather than skipping herbs altogether.
26. Why is my falafel bland?
Falafel usually tastes bland when the mixture is under-seasoned or under-herbed. Chickpeas are mild, so they need enough salt, garlic, cumin, coriander, and fresh herbs to feel alive once cooked. Bland falafel is often not a structural problem at all. It is simply a seasoning problem.
27. Can I make mini falafel for a party?
Yes, mini falafel is excellent for platters and party food. Smaller pieces work especially well on mezze boards with hummus, tahini, pickles, olives, chopped salad, and warm bread. They also make it easier for guests to sample more than one sauce.
28. What is the best oil for frying falafel?
A neutral oil with a suitable frying profile works best. You want an oil that lets the herbs, spices, and chickpeas speak for themselves rather than adding a strong flavor of its own.
29. Can falafel be part of a vegetarian meal prep plan?
Very easily. Falafel is one of the best vegetarian meal prep options because it holds well, reheats nicely in the oven or air fryer, and works in wraps, bowls, and platter-style lunches. It is filling, flexible, and easy to pair with vegetables, sauces, and grains.
30. Why does homemade falafel become a repeat recipe?
Because once you understand the texture and the method, it pays you back in many forms. One batch can become a quick lunch, a casual dinner, a platter for guests, or several meal-prep boxes across the week. It is deeply versatile, satisfying, and far more generous than its ingredient list first suggests.
Constipation is exhausting, but lunch can actually help. These high-fiber sandwiches are built the way your gut prefers: sturdy whole-grain bread for gentle bulk, creamy legume spreads for steady fiber, seed “gel boosters” for softness, and juicy produce for moisture. Moreover, they’re practical—quick to assemble, easy to repeat, and sized to deliver meaningful fiber without feeling heavy.
Now, how much fiber do most adults need? A realistic daily target sits around 25–38 g. However, jumping there overnight can backfire. Instead, increase gradually—about 5 g extra per day each week—and pair each meal with fluids so fiber can actually hold water and move comfortably (see this concise intake overview and NIDDK hydration guidance). Meanwhile, short habits matter: drink a glass of water with your sandwich, then take a 10–15-minute walk. Little by little, those simple moves add up to relief.
Because details determine outcomes, every recipe below was designed with fiber grams, moisture, and texture in mind. In other words, the builds aren’t random—they’re engineered for comfort, regularity, and flavor you’ll actually crave tomorrow.
How much fiber these sandwiches deliver & of what kinds?
First, how much: each sandwich aims to contribute roughly 12–20 g of fiber toward your day. Which means, two thoughtfully built high-fiber sandwiches can cover most of what you need, leaving breakfast and snacks to top you up gently.
Second, which kinds: not all fibers behave the same, so the layers do different jobs.
Viscous, soluble fibers make a soft gel that holds water in the stool, which often makes passing easier. You’ll get these from oats and barley (thanks to β-glucans), plus chia and ground flax (rich in mucilage). we have used oat/barley-leaning breads, avocado-chia mixes, and flax-boosted hummus throughout. If you’re curious about the mechanics, here’s a clear look at β-glucans and stool-softening and a friendly explainer on chia’s mucilage-rich fiber.
Insoluble fibers—from bran, leafy greens, and vegetable skins—add gentle bulk and help speed transit. As a result, grated carrots, greens, and crunchy slaws live inside the sandwich, not just on the side, so every bite pulls its weight.
Moisture is the multiplier. Because fiber needs water to work, spreads are creamy, fillings are juicy, and sauces are built in rather than left out. Additionally, we suggest sipping water with the meal, since fluids help fiber function.
Finally, how the recipes are structured: each sandwich states its intent (relief or maintenance), lists realistic portions, and includes make-ahead notes, smart swaps, and small finishing touches. Therefore, you can choose what fits today—and repeat it tomorrow—without turning lunch into a project.
Why High-Fiber Sandwiches help (and how to build them)
Put simply, sandwiches make fiber doable. They bundle the right textures (soft + crisp), the right moisture (creamy + juicy), and the right amounts (measured slices and scoops) into a meal you can repeat tomorrow. Moreover, the format nudges consistency—arguably the most important factor for regularity.
They’re effortless to measure—and easy to stick with
Whole-grain slices are pre-portioned, spreads are spoonable, and veg layers are visible. Making it easy for you to assemble, eat, and actually hit useful daily fiber targets with minimal guesswork. If you like to prep once and assemble fast, this MasalaMonk idea for lentil meal-prep (as a sandwich filling) shows how a single batch can anchor multiple sandwiches during the week.
Moisture is built in by design
Dry, dense meals can backfire. We have ensured, each of these high-fiber sandwiches are built in a way that anchors moisture inside the bread: creamy hummus or yogurt-tahini underlayers, avocado folded with seeds, and juicy produce (carrot, greens, citrus segments) on top. That layering keeps bites slick rather than pasty, which, in turn, supports comfortable stool texture. If you like dairy or dairy-free yogurt as a base, a quick example is this hung curd spinach sandwich—the same idea powers our “Green Goddess” stack.
Layer order actually helps transit
Then start with a creamy spread to “seal” the crumb; next, add your fiber engine (chickpeas, lentils, or black beans) so it clings; in the end, finish with watery produce for slip. Additionally, a squeeze of lemon or a spoon of salsa adds acidity and fluid without heaviness. Small choices like these often determine whether a sandwich just sits—or genuinely supports movement.
Seeds add gentle gel—without bulky portions
A teaspoon of chia or finely ground flax disappears into spreads yet changes texture meaningfully after a glass of water. In brief, chia’s soluble, mucilage-rich fiber is well-documented (concise overview, open-access review; see also a broader nutrient profile in this MDPI review of chia’s composition: open access). For flax specifics you can use in everyday cooking, here’s a MasalaMonk primer: flax seeds for strong digestion.
The hand-held format supports satiety and travel
Because each of these high-fiber sandwiches pairs intact grains with legumes and produce, you get slower digestion and steadier fullness; which means, you’re less likely to graze later. For a clear big-picture explainer on fiber’s roles (beyond “roughage”), Harvard’s Nutrition Source summarizes the two fiber types and their effects.
Gentle routines amplify the effect
Right after eating, your body’s gastrocolic reflex naturally increases colon motility—so a brief 10–15-minute walk can nudge momentum in the right direction. For a plain-language primer, see Cleveland Clinic’s overview of the gastrocolic reflex. Moreover, even light movement supports regularity; their constipation guide underscores that exercise can stimulate the intestines. If symptoms persist despite these habits, the NIDDK’s constipation page outlines when to speak with a clinician.
Build template (at a glance)
Bread (2 slices): 100% whole-grain or sprouted; look for ≥3–4 g fiber per slice.
Spread (2–4 tbsp): hummus, white-bean mash, or yogurt-tahini; optionally stir in 1 tsp chia or ground flax.
Engine (⅓–½ cup): chickpeas, lentils, or black beans; lightly mash so it anchors.
Produce (heaped): grated carrot + leafy greens + a juicy element (cucumber, tomato, or citrus).
Finish: lemon or vinegar splash; herbs; pepper. Additionally, sip water and, if possible, take a short walk afterward.
For background reading that ties food choices to gut comfort more broadly (in case you want to deepen the “why”), this MasalaMonk primer on gut inflammation and digestive health connects everyday plant foods with a calmer baseline—useful context for readers who like understanding the bigger picture.
When constipation drags on, lunch is often the easiest place to add high fiber foods for constipation relief—without cooking an entire pot of anything. In practice, plant based foods high in fiber (beans, chickpeas, lentils, leafy greens) plus high fiber fruits and vegetables for constipation (kiwi, pear, apple, carrots) work together; as a result, you get both moisture and bulk. Along the way, foods rich in soluble fiber—like oats, barley, chia, and ground flax—form a gentle gel that supports softer stools and calmer bellies. Because you asked for a high fiber plant based diet approach, every sandwich below is fully plant-forward, practical for weekdays, and aligned with high fiber foods for gut health, colon health, and everyday digestive health. For hydration cues that make this even easier, see NIDDK’s diet & constipation guidance; for grain choices that add viscous fiber, here’s a friendly β-glucan overview.
Format you’ll see below: brief “why,” a clear ingredient list, step-by-step method, fiber-forward upgrades, and make-ahead tips—so these fiber rich foods for bowel movement become an easy habit, not homework.
1) Hummus–Kiwi–Greens “Softener” — flagship of High-Fiber Sandwiches (Relief)
Estimated fiber: ~17 g • Taste & texture: cool, fresh, silky When to choose it: stools feel dry; you want gentle moisture without heaviness
Why it works (quickly yet gently) This is a purpose-built combo of foods that are rich in soluble fiber and high fiber fruits for constipation. Specifically, creamy hummus (legumes = plant based foods high in fiber) and a teaspoon of ground flax (mucilage) create a moist base; then, thin-sliced kiwi and a mound of grated carrot supply juicy volume. Resulting in every bite that stays soft, which supports easier bowel movements and overall gut health. If you’d like a plain-English primer on adding flax safely, skim flax seeds for strong digestion; if you prefer the science on chia/flax-style gels, here’s a concise chia fiber review for later.
Moist hummus + ground flax soften; kiwi and grated carrot add fluid; whole-grain bread supplies gentle bulk. Aim for ~17 g fiber here and drink water with the meal for best effect.
Ingredients (serves 1)
2 slices 100% whole-grain bread (≥3–4 g fiber/slice; oats or barley in the mix add foods rich in soluble fiber)
Hummus, 4 tbsp (legume base = high fiber foods for digestive health)
Ground flaxseed, 1 tsp (stirred into the spread)
Kiwi, 1 medium, thin-sliced (one of the most convenient high fiber fruits for constipation)
Baby spinach, big handful (leafy greens = fiber rich foods for gut health)
Carrot, finely grated, ½ cup (insoluble lift for bowel movement comfort)
Lemon juice, black pepper, tiny pinch of salt
Method
In a small bowl, whisk lemon into the hummus; then stir in ground flax until creamy.
Spread the mixture edge-to-edge on both slices; afterwards, pile on spinach, layer kiwi, and shower with grated carrot.
Season with pepper and a pinch of salt; and then, close gently and press once with your palm.
Fiber-forward upgrades (choose 1–2, not all)
Add 2–3 tbsp chickpeas into the hummus; which will make you push the legume count higher for a plant based high fiber diet day.
Scatter 1 tsp chia over the carrot before closing; helping you nudge the soluble fiber profile without adding bulk.
Swap bread for a dense oat-bran or barley loaf to increase β-glucans (i.e., foods rich in soluble fiber)—see β-glucan basics.
Make-ahead & serving
Grate carrot the night before; store sealed so it stays juicy.
Assemble within 10 minutes of eating (kiwi looks and tastes brightest right away).
Serve with a full glass of water; thus, the high fiber foods to ease constipation you just ate can actually hold fluid as intended.
On very sensitive days, replace raw spinach with tender arugula for similar benefits and gentler texture.
Why it fits the brief This sandwich champions high fiber foods for constipation relief without heaviness—because moisture, viscosity, and volume are layered on purpose. In turn, you’ll notice comfort during the afternoon rather than bloat
Estimated fiber: ~19–20 g • Taste & texture: warm, savory, cohesive When to choose it: you need relief and long-lasting satiety
Why it works (comfort + momentum) Here you combine two plant based foods high in fiber—a white-bean mash and saucy lentils—with a crunchy layer of broccoli slaw. Which helps you get soluble-leaning moisture from tomato-braised lentils and insoluble lift from brassica shreds. Because the filling is warm and glossy, this tastes indulgent; nevertheless, it is textbook high fiber foods for bowel movements, colon health, and all-day digestive health. Prefer batch cooking? This lentil meal-prep filling anchors several sandwiches across the week—convenient for a high fiber plant based diet.
Warm, saucy lentils + creamy white-bean mash keep the filling moist, while broccoli slaw adds insoluble lift. Press 2–3 min/side for a cohesive, ~19–20 g fiber sandwich—drink water with the meal to help the soluble fibers gel.
Ingredients (serves 1)
2 slices sprouted-grain bread (≥3–4 g fiber/slice; excellent high fiber foods for gut health)
Warm a small pan; sauté onion and garlic until tender; then add tomato paste and smoked paprika.
Stir in lentils with 2–3 tbsp water and a splash of vinegar; simmer 3–4 minutes until thick, glossy, and spoonable.
Spread white-bean mash on both bread slices; afterwards, pile on the lentils; then crown with broccoli slaw.
Press in a grill pan or sandwich press 2–3 minutes per side until toasty outside and steamy inside.
Fiber-forward upgrades (pick what fits your day)
Fold 1 tsp ground flax into the bean mash; in practice, you add foods that are rich in soluble fiber without changing flavor.
Replace one slice with an oat-bran slice for extra β-glucans (again, high fiber foods for colon health).
Add 2 tbsp grated carrot to the slaw for more insoluble volume (i.e., fiber rich fruits and vegetables for constipation in practice).
Make-ahead & serving
Simmer a bigger batch of lentils on Sunday; cool quickly and refrigerate up to 4 days (or freeze flat in bags).
Keep slaw dry until assembly so it stays crisp; alternatively, dress slaw lightly with lemon just before toasting.
Serve with a sliced apple or pear (skin on): those are easy fiber rich fruits for constipation that travel well.
Hydrate alongside; that helps the sandwich’s foods rich in soluble fiber can do their gel-forming job.
Why it fits the brief Because it layers legumes two ways, this toastie moves from “filling” to truly high fiber foods to ease constipation. Moreover, it stays moist, which many readers find is the missing piece in at-home “healthy” & high-fiber sandwiches.
Estimated fiber: ~17 g • Taste & texture: cool, herby, packable When to choose it: you want balance, not “power relief,” especially on workdays
On days you want reliability rather than “power relief,” this build blends foods rich in soluble fiber (barley’s β-glucans) with legume bulk from chickpeas. Consequently, you get a gentle gel plus comfortable volume—exactly what high fiber foods for digestive health should deliver. If you’re curious about the science behind β-glucans and softness, here’s a clear overview.
Balanced, packable fiber: barley’s β-glucans for gentle softness, chickpeas for comfortable bulk, and an avocado–chia base to keep moisture. Spread thickly on rye/whole-grain (3–4 g fiber/slice) and sip water to help soluble fibers work.
Ingredients (serves 1)
2 slices rye or 100% whole-grain bread (≥3–4 g fiber/slice; supports high fiber foods for gut health)
Avocado, ¼ fruit, mashed (creamy base for moisture)
Chia seeds, 1 tsp (disappears into the mash; classic foods rich in soluble fiber) — background: chia’s mucilage review
Cooked chickpeas, ⅓ cup (plant based foods high in fiber)
Cooked barley, ¼ cup (β-glucans for stool comfort)
Celery (finely diced), dill, lemon, pepper, small pinch salt
Method
Mash avocado with lemon; then stir in chia and chopped dill until glossy.
Fold in chickpeas, barley, and celery; afterwards, season to taste.
Spread thickly; after that, close and press lightly for a tidy, travel-worthy sandwich.
Fiber-forward upgrades
Add 2 tbsp grated carrot for extra insoluble lift—useful among high fiber fruits and vegetables for constipation.
Swap one slice for an oat-bran slice to nudge β-glucans (again, foods rich in soluble fiber).
For herb lovers, a handful of parsley adds polyphenols without changing fiber math.
Make-ahead & serving
Mix the filling up to 48 hours ahead; which means, weekday assembly takes 2 minutes.
Serve with apple slices (skin on) for simple fiber rich fruits for constipation and satisfying crunch.
Sip water alongside; therefore, the sandwich’s soluble fibers can actually do their job.
Why it fits the brief This is a dependable high fiber plant based diet lunch: creamy, not dry; hearty, not heavy; and quietly supportive for bowel movements, colon health, and long-term gut health.
Estimated fiber: ~12–13 g • Taste & texture: juicy, herb-bright, light When to choose it: you want support without heaviness
Why it works (light yet helpful) Some days you want a lift without intensity. Here, juicy pear (skin on) brings pectin, leafy greens add volume, and a yogurt-tahini herb sauce keeps everything moist. Ultimately you get high fiber foods for constipation relief that feel bright rather than dense—ideal for easy digestive health.
Light yet effective: pear pectin provides soft, juicy fiber; greens add comfortable volume; yogurt-tahini keeps moisture so bites stay bright—not heavy. Aim for ~12–13 g fiber here and sip water to help soluble fibers do their job.
Ingredients (serves 1)
2 slices oat-bran or whole-grain bread (≥3–4 g fiber/slice)
The sauce keeps 3–4 days; making weekday builds stay fast.
Serve with a small bowl of berries for additional fiber rich fruits for constipation that don’t weigh you down.
Drink water; subsequently, the pectin and seed gels work more comfortably.
Why it fits the brief Although gentle, the stack still qualifies as high fiber foods for bowel movements, and, importantly, it supports colon health without the heaviness that sometimes derails weekday lunches.
Estimated fiber: ~18.5–19 g • Taste & texture: warm, saucy, satisfying When to choose it: you need soothing relief and an easy win at dinner
Why it works (warm, saucy, effective) This is comfort food with a purpose. Black beans (core to any plant based high fiber diet) supply both soluble and insoluble fiber; avocado keeps things lush; and fresh salsa provides juicy acidity so the sandwich never feels dry. Meaning, you get high fiber foods to ease constipation that also satisfy.
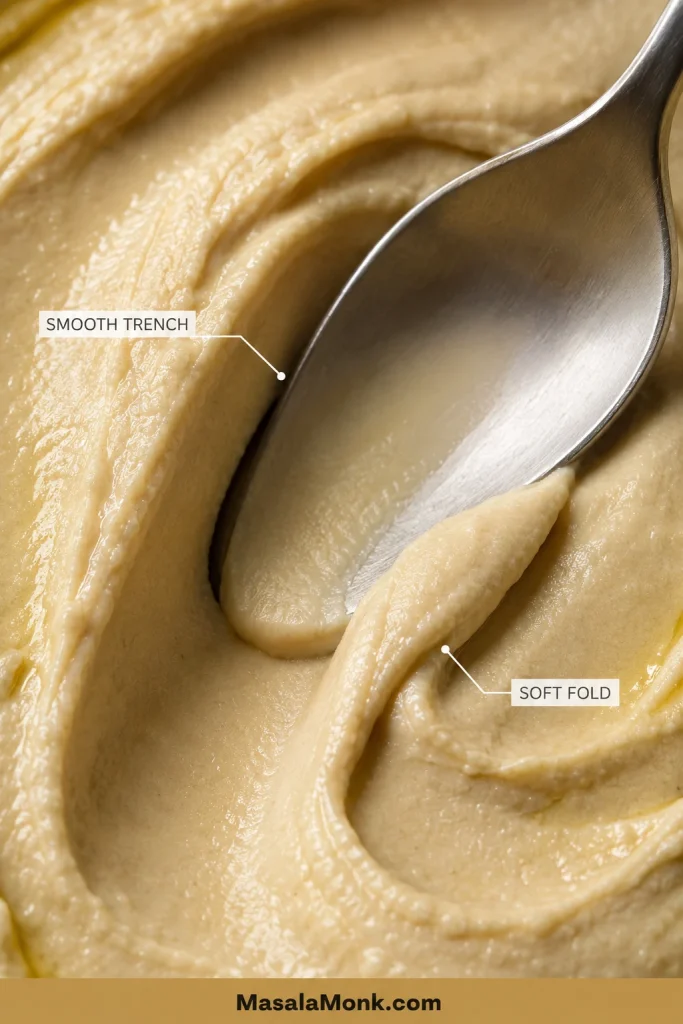
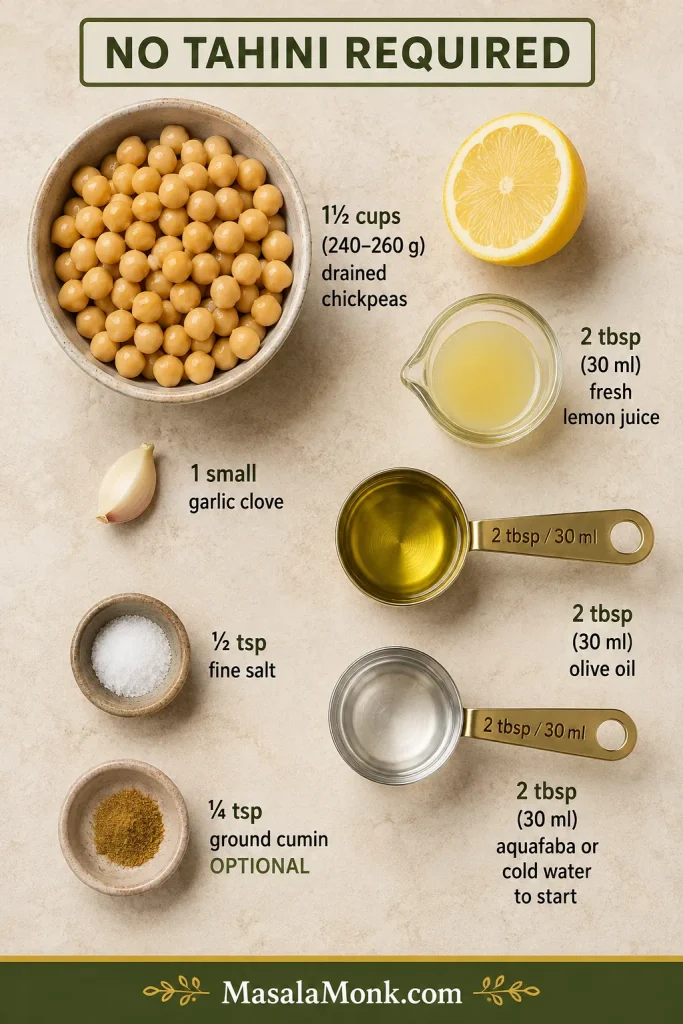
Warm, saucy relief: black beans deliver soluble + insoluble fiber, avocado keeps bites lush, and salsa adds juicy acidity so the sandwich never eats dry. Toast until just melty; aim for ~18.5–19 g fiber and sip water to help fiber work comfortably.
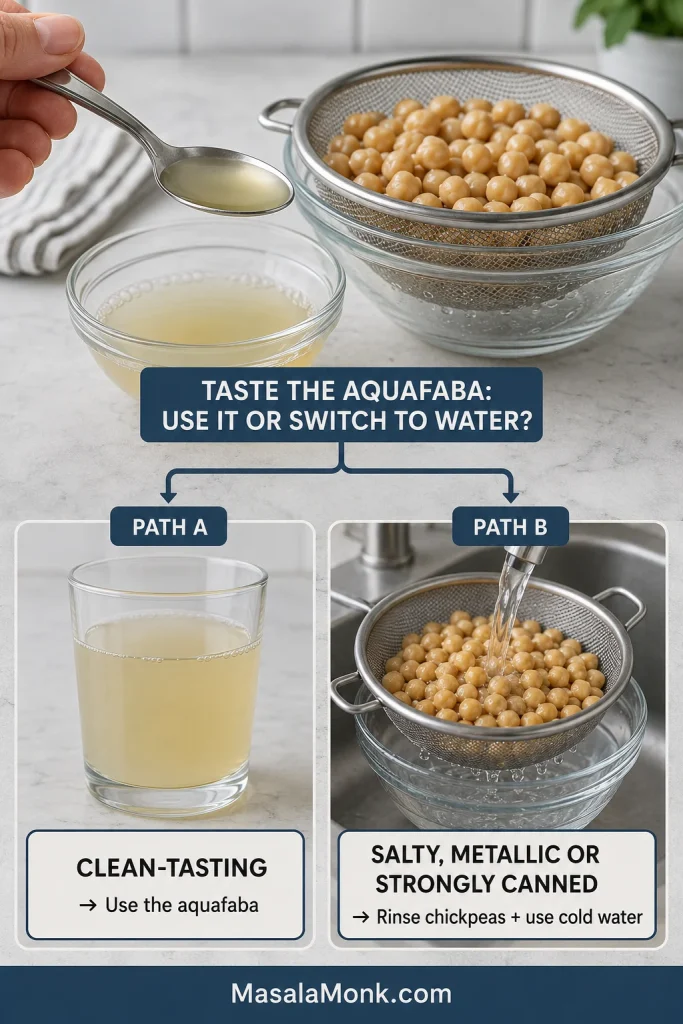
Ingredients (serves 1)
2 slices sprouted-grain bread (≥3–4 g fiber/slice; great for high fiber foods for gut health)
Avocado, ¼ fruit, mashed
Black beans, ½ cup (lightly mashed so they cling)
Fresh tomato-onion salsa, ¼ cup (or tomato-lime if onion-sensitive)
Optional: thin slice cheddar or plant cheese
Lime, cumin, pinch salt
Method
Mash avocado with lime and a pinch of cumin; spread from edge to edge.
Spoon on black beans; then add salsa; top with cheese if using.
Toast or grill until warmed through and a little melty.
Fiber-forward upgrades
Stir 1 tsp ground flax into the avocado to lean toward foods rich in soluble fiber.
Add 2 tbsp grated carrot for extra insoluble support (a staple among high fiber fruits and vegetables for constipation).
Swap one slice for oat-bran bread to increase β-glucans.
Make-ahead & serving
Beans keep 3–4 days; meanwhile, mash just before assembly for best texture.
Serve with orange segments or cucumber spears; which makes you add fluid and crunch that amplify results.
Hydrate; in turn, these fiber rich foods for bowel movement do their job more comfortably.
Why it fits the brief It’s a weeknight win: cozy, fast, and firmly in the lane of high fiber foods for colon health and everyday digestive health.
Estimated fiber: ~14 g • Taste & texture: savory-tangy, deli-style When to choose it: things are moving, and you want to keep the gut ecosystem happy
Why it works (tangy and sustaining) Once things are moving, pairing plant based foods high in fiber with fermented vegetables is a smart way to maintain momentum. Tempeh offers satisfying protein and fiber; kimchi or sauerkraut adds acidity, moisture, and live cultures; as a result, you get high fiber foods for gut health in a deli-style package. For more combinations, browse Probiotic-Rich Sandwiches.
Steady maintenance, deli-style: fiber-rich tempeh plus fermented kimchi/kraut bring moisture, acidity, and live cultures; rye adds whole-grain fiber. Grill lightly to meld. Tip—stir 1 tsp chia into the sauce or add tomato slices for extra softness and juiciness; sip water alongside.
Ingredients (serves 1)
2 slices whole-grain rye (≥3–4 g fiber/slice)
Tempeh, ~100 g, sliced and sautéed
Kimchi or sauerkraut, ¼ cup
Spinach, big handful
Yogurt-mustard (or a dairy-free version)
Method
Sear tempeh in a thin film of oil until browned; then set aside.
Add thin tomato slices for juicy slip (handy within high fiber fruits and vegetables for constipation).
Stir 1 tsp chia into the yogurt-mustard for a small soluble nudge (again, foods that are rich in soluble fiber).
Prefer milder ferments? Use kraut and a dab of pickle brine for acidity without heat.
Make-ahead & serving
Cook tempeh 2–3 days ahead; consequently, weekday assembly is trivial.
Serve with carrot sticks and apple wedges (skin on) for easy fiber rich fruits for constipation and crunch.
Water alongside, then a brief walk; helping the meal support predictable bowel movements.
Why it fits the brief This one keeps the momentum you’ve built—supporting colon health and digestive health while staying firmly in the high fiber plant based diet lane.
Sidekicks that make High-Fiber Sandwiches even more effective
Kiwifruit (1–2/day)—slice one into Sandwich #1 and enjoy the second on the side. Trials show kiwi improves bowel movements and overall comfort (kiwi RCT overview; gold-kiwi RCT).
Chia or ground flax add-ins—a teaspoon whisked into spreads boosts softness without heaviness. Chia’s mucilage is well documented (chia fiber review), and flax blends easily into hummus or avocado (see flax seeds for strong digestion).
Hydration reminder—fluids help fiber function; thus, pair every High-Fiber Sandwich with water or herbal tea (NIDDK guidance).
Gentle ramp-up (comfort matters with High-Fiber Sandwiches)
If you’re coming from a low-fiber baseline, jumping to 30+ grams immediately can feel rough. Therefore, increase gradually—about 5 g per day each week—and keep fluids steady. On a day that feels gassy, reduce raw brassicas, emphasize oats, barley, chia/flax, and use ripe pears or kiwi for a softer profile; subsequently, bring the extra crunch back as comfort improves. For a neutral reference on intake ranges, most adults do well around 25–38 g/day (scale up gradually: concise intake overview).
Ultimately, relief comes from meals that are moist, fibrous, and easy to repeat. These six High-Fiber Sandwiches were engineered for exactly that: whole-grain bread for steady bulk, legume spreads for satisfying depth, chia or ground flax for gentle gel, and fruit-veg add-ins—kiwi, pear, apple, carrots, greens—for softness and volume. Add water, take a short walk, and give it a few consistent days. Consequently, your gut will notice; meanwhile, your schedule won’t suffer; and, importantly, your lunches will finally pull their weight.
1) What makes these High-Fiber Sandwiches good for constipation relief?
Because they combine foods rich in soluble fiber (oats, barley, chia, ground flax) with insoluble sources (bran, leafy greens, vegetable skins), they add moisture and gentle bulk together. Consequently, stools hold water, bowel movements become easier, and overall digestive health feels steadier. Meanwhile, the format is practical—so you actually repeat it.
2) How many grams of fiber should I aim for with a high fiber plant based diet?
Most adults do well around 25–38 g per day. That said, increase gradually. For example, add about 5 g per day each week and space it across meals. In practice, two High-Fiber Sandwiches can provide a big share, while breakfast and snacks top up the rest.
3) Which ingredients are the best high fiber foods for constipation relief inside a sandwich?
Start with plant based foods high in fiber: chickpeas, lentils, and black beans. Then, add foods that are rich in soluble fiber—chia, ground flax, oats, and barley—for gel-forming softness. Finally, tuck in high fiber fruits and vegetables for constipation like kiwi, pear, apple (skin on), carrots, and leafy greens for comfortable volume.
4) Are there specific fiber rich fruits for constipation that work especially well between bread?
Yes—pears and apples (with the skin), berries, and kiwi slot neatly into layers. Moreover, citrus segments and grated carrot add juiciness without heaviness. In turn, those choices support bowel movements while keeping sandwiches fresh and bright.
5) What bread should I pick for high fiber foods for gut health?
Choose 100% whole-grain or sprouted loaves that list whole grain first and give at least 3–4 g fiber per slice. Better yet, rotate rye, oat-bran, and barley-forward breads to keep textures interesting and to boost foods rich in soluble fiber via β-glucans.
6) I feel gassy when I jump into a plant based high fiber diet. What should I tweak?
First, slow the ramp—add fiber gradually. Next, emphasize moist builds with foods that are rich in soluble fiber (chia, ground flax, oats, barley) and slightly reduce raw brassicas for a few days. Subsequently, bring crunch back as comfort improves. Hydration and a brief walk after meals often help.
7) How can I hydrate wisely so high fiber foods to ease constipation actually work?
Pair each sandwich with a full glass of water. Additionally, use juicy layers—tomato, cucumber, citrus segments—to keep bites moist. Consequently, soluble fibers can form the soft gel that supports smoother bowel movements.
8) What are smart add-ins for high fiber foods for colon health?
Sprinkle 1 teaspoon of chia or finely ground flax into spreads; fold beans into hummus; or add a spoon of barley or oat-bran to legume salads. Therefore, you raise soluble fiber without making the sandwich bulky or dry.

9) Can I keep these High-Fiber Sandwiches fully vegan?
Absolutely. In fact, a high fiber plant based diet is the default here. Use hummus, white-bean mash, avocado-chia spreads, and yogurt-style dairy-free sauces. Meanwhile, tempeh, kimchi, and sauerkraut bring plant-forward protein and tang that support gut health.


10) What are easy meal-prep moves so my high fiber foods for digestive health stick all week?
Batch-cook lentils and chickpeas; chill barley; pre-grate carrots; wash greens; and keep ground flax and chia within arm’s reach. Consequently, assembly takes five minutes, and you’ll actually repeat the habit.
11) How do I balance high fiber foods for bowel movements with a sensitive stomach?
Begin with softer, moist builds: creamy spreads, thin-sliced fruit, and tender greens. Moreover, keep portions moderate, chew thoroughly, and add a short post-meal walk. On balance, that trio supports comfort while still moving fiber intake upward.
12) Are raw veggies mandatory, or can I still get high fiber foods for constipation relief with gentler textures?
You can. Lightly sautéed onions/peppers, roasted carrots, or softened greens still count. In practice, you’ll retain fiber while improving tolerance. Therefore, choose textures your gut likes and keep moisture high.
13) Which spreads quietly raise foods rich in soluble fiber without changing flavor?
Hummus mixed with 1 tsp ground flax, avocado blended with 1 tsp chia, or yogurt-tahini whisked with oat-bran. Subsequently, you’ll notice creamier bites and better stool softness—without extra weight.
14) Do I need fruit at every meal to hit high fiber foods for gut health targets?
Not necessarily, but it helps. For instance, one high fiber fruits for constipation choice (pear, apple, berries, or kiwi) inside or beside a sandwich boosts totals and adds moisture. Meanwhile, legumes and whole-grain bread carry the rest.
15) What’s the simplest “starter” High-Fiber Sandwich if I’m brand-new to this?
Begin with whole-grain bread, hummus + 1 tsp ground flax, thin-sliced pear or apple, and a handful of spinach. Therefore, you’ll get foods rich in soluble fiber plus gentle bulk in a mild, friendly package.
16) How do I keep high fiber foods for colon health from feeling dry or dense?
Layer moisture at every step: creamy spread, juicy produce, and a quick acidity hit (lemon, vinegar, salsa). Consequently, the sandwich eats soft, not stodgy—and your bowel movements tend to follow suit.
17) Are there kid-friendly options that still count as plant based foods high in fiber?
Yes: mashed black beans with mild salsa and avocado on soft whole-grain bread; chickpea “salad” with finely diced cucumber; or thin pear slices with yogurt-tahini. Moreover, cutting sandwiches into small squares improves traction with picky eaters.
18) How can I vary flavors yet stay within high fiber foods for digestive health?
Rotate breads (rye, oat-bran, sprouted), spreads (hummus, white-bean, avocado-chia), and high fiber fruits and vegetables for constipation (pear, apple, kiwi, carrot, greens). In turn, you’ll keep taste buds happy while the fiber keeps working.
19) Do these ideas help if I’m focused on high fiber foods for gut health beyond constipation?
Generally, yes. While everyone’s different, a steady mix of soluble and insoluble fiber plus plant diversity often supports gut health and overall comfort. Nevertheless, adjust portions and textures to your tolerance.
20) What’s a quick checklist before I make any High-Fiber Sandwiches?
Whole-grain bread (3–4 g fiber/slice) ✅ Legume base (⅓–½ cup) ✅ Seed booster (1 tsp chia or ground flax) ✅ Juicy produce (heaped) ✅ Water alongside + brief walk ✅ Therefore, you’ve covered high fiber foods for constipation relief and set up a predictable, comfortable day.