Managing blood sugar—especially after meals—is a concern for millions, whether you’re living with diabetes, prediabetes, or just aiming for better metabolic health. While many foods claim to stabilize glucose levels, few are as hyped as chia seeds.
But do chia seeds actually help? How do they work, and how should you use them to see real benefits?
In this post, we dive into the science, break down the latest research (2024–2025), and give you practical strategies to make chia a smart part of your glucose game plan.
🌾 What Are Chia Seeds?
Chia seeds (from Salvia hispanica L.) are tiny black or white seeds native to Central America. Nutritionally, they’re powerhouses:
- 10g fiber per 28g (1 oz) serving
- Rich in omega-3s (ALA), antioxidants, protein, calcium, magnesium
- Naturally gluten-free, vegan, and incredibly shelf-stable
Most interestingly for us? Their viscous gel-forming ability when mixed with water—a property that directly impacts how your body handles sugar.
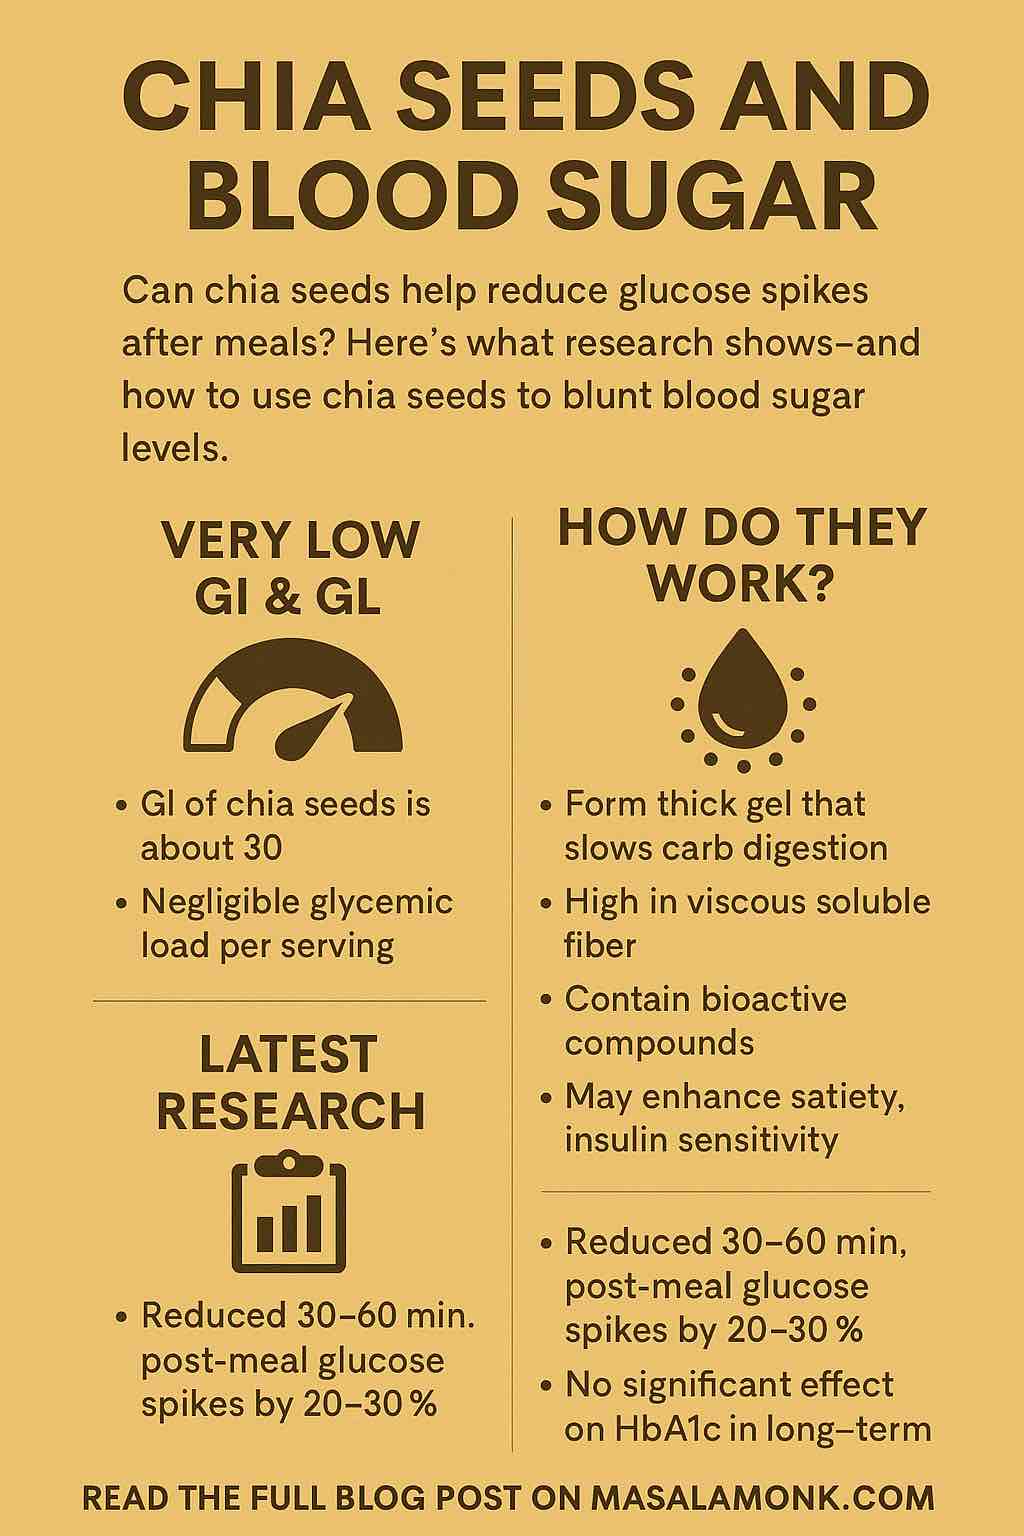
📈 What Is the Glycemic Index of Chia Seeds?
- Glycemic Index (GI): ~30 or even <5 depending on how it’s tested (because most of its carbs are fiber).
- Glycemic Load (GL): Extremely low—about 1–2 per serving (28g), due to minimal available carbohydrates.
✅ Conclusion: Chia seeds are a low-GI, low-GL food—safe and stabilizing for blood sugar.
🧬 How Do Chia Seeds Reduce Blood Sugar Spikes?
Chia seeds work through a combination of physical, chemical, and biochemical mechanisms:
1. Gel Formation & Viscous Fiber
When soaked, chia seeds absorb up to 12x their weight in liquid and form a thick gel. This slows:
- Gastric emptying
- Enzymatic digestion of carbs
- Glucose absorption
2. Slower Carb Digestion
Their fiber forms a physical barrier around starches, reducing the breakdown of sugars in the upper gut.
3. Bioactive Compounds
Chia contains flavonoids (like quercetin) and phenolic acids, which may:
- Inhibit alpha-amylase and alpha-glucosidase (enzymes that digest carbs)
- Act as mild anti-inflammatories
4. Satiety & Insulin Sensitivity
Chia’s fat, fiber, and protein increase satiety and slow food transit, which may help reduce insulin spikes.
📚 Latest Research (2024–2025): What the Science Says
🔍 Meta-Analysis (Pedram et al., June 2024)
- 8 RCTs, 362 people
- No significant effect on fasting glucose, insulin, or HbA1c
- But some post-meal reductions observed in individual studies
🧪 Postprandial Glucose Reduction
- Chia added to cookies or baked products reduced post-meal glucose by 22–30% in 2023–2024 trials
- Best effects seen 30–60 minutes after eating
💡 Chia vs. Flaxseed
In a head-to-head glucose challenge:
- 25g of ground chia outperformed flaxseed in lowering blood glucose after 50g of pure sugar.
🔬 Other Benefits
- May lower systolic blood pressure by 6–7 mmHg
- No consistent change in weight, fasting glucose, or cholesterol in medium-term use
🍴 How to Use Chia Seeds to Control Blood Sugar
✅ Best Practices
- Use before or with meals: Especially carb-rich ones (oats, rice, bread, etc.)
- Soak them: 1 tablespoon chia + ¼ cup water for 15–20 minutes before use
- Aim for 5–25g per dose (1–2 tablespoons)
💡 Tip: Ground chia may work faster and more effectively than whole seeds.
🥣 5 Simple Ways to Add Chia to Your Diet
| Idea | Glycemic Benefit |
|---|---|
| Chia water (1 tbsp + lemon + cinnamon) | Pre-load to slow carb absorption |
| Oatmeal with chia | Adds fiber and protein; lowers GL |
| Chia pudding (overnight with milk/fruit) | Slow digesting, fiber-rich breakfast |
| Chia in smoothies | Slows sugar spike from fruit |
| Chia in baking (e.g., muffins, pancakes) | Reduces GL of flour-based items |
⚖️ Should Everyone Take Chia for Glucose Control?
✔️ Best for:
- People with pre-diabetes, insulin resistance
- Those with post-meal glucose spikes
- Anyone managing metabolic syndrome
❗ Less useful for:
- People looking for fasting glucose or HbA1c improvements only
- Those eating very low-carb already
📌 Final Verdict: Does Chia Help With Blood Sugar?
✅ Yes—for post-meal glucose control.
Consuming 3–7g chia with meals significantly reduces glucose spikes within 60 minutes.
🚫 No—for long-term fasting markers alone.
Studies don’t show consistent changes in HbA1c or fasting insulin without other interventions.
🧠 Smart Strategy
Use chia strategically, not blindly.
💡 Pair chia with:
- Carbs like oats, bread, or rice
- Pre-meal hydration
- Other glucose-stabilizing habits (walks, protein, vinegar, etc.)
🛠️ Bonus: Build Your Own Glucose Protocol
Step-by-Step Plan:
- Choose a carb-heavy meal you eat often
- Add 1 tbsp chia, soaked or ground, before or during
- Measure your blood glucose (optional)
- Track how you feel—satiety, energy, clarity
- Adjust dose, timing, and combination over time
💬 Final Thoughts
Chia seeds aren’t magic—but they’re a powerful tool in your blood sugar toolkit.
Used wisely, they can reduce the burden of postprandial glucose spikes, improve satiety, and support overall metabolic health—with virtually no downside.
🔎 Frequently Asked Questions (FAQs)
1. What is the best time to eat chia seeds for blood sugar control?
The most effective time is 15–30 minutes before or with a high-carb meal. This allows the chia gel to form and slow down digestion and glucose absorption.
2. Do I need to soak chia seeds before eating them?
Yes, ideally. Soaking chia seeds (1 tbsp in ¼ cup water) allows them to form a gel, which enhances their ability to blunt glucose spikes. Ground chia can also be used without soaking.
3. How much chia should I consume per day for glucose benefits?
Research supports using 5–25g/day (1–2 tablespoons), preferably spread across meals. Even as little as 3g per meal can reduce post-meal glucose spikes by 20–30%.
4. Can chia seeds help lower fasting blood sugar or HbA1c?
Not consistently. Most studies show little to no change in fasting glucose or HbA1c. Chia’s benefits are mainly in reducing post-meal spikes, not chronic glucose markers.
5. Whole chia or ground chia: which is better?
Ground chia may be more effective for quick blood sugar impact because the nutrients are more bioavailable. However, soaked whole chia still works well.
6. Are chia seeds safe for people with diabetes?
Yes. Chia seeds are generally safe and beneficial for people with diabetes. They have a very low glycemic load and can help reduce glucose spikes. Always start with small amounts if new to high-fiber foods.
7. Do chia seeds work instantly?
They work within 30–60 minutes post-meal, especially for lowering blood sugar spikes. However, long-term benefits on insulin or HbA1c require consistent use and meal pairing.
8. Can I bake chia seeds and still get the benefits?
Yes. Chia retains much of its fiber and gel-forming capacity even when baked into muffins, pancakes, or breads—especially at doses of 3–7g per serving.
9. Can chia seeds replace medication or other diabetes treatments?
No. Chia is a supportive food, not a substitute for medication or medical guidance. It can be a valuable adjunct, but should not replace prescribed treatment.
10. What’s the difference between chia and flax for blood sugar control?
Both are high in fiber, but studies suggest chia is slightly more effective at reducing post-meal glucose, likely due to its superior gel formation and higher mucilage content.