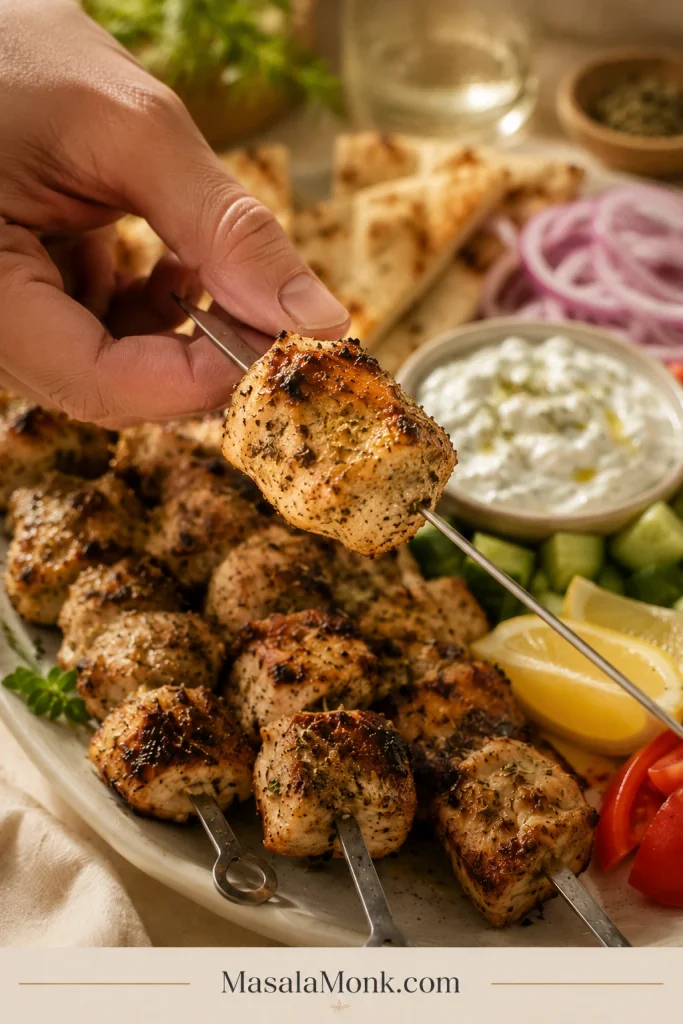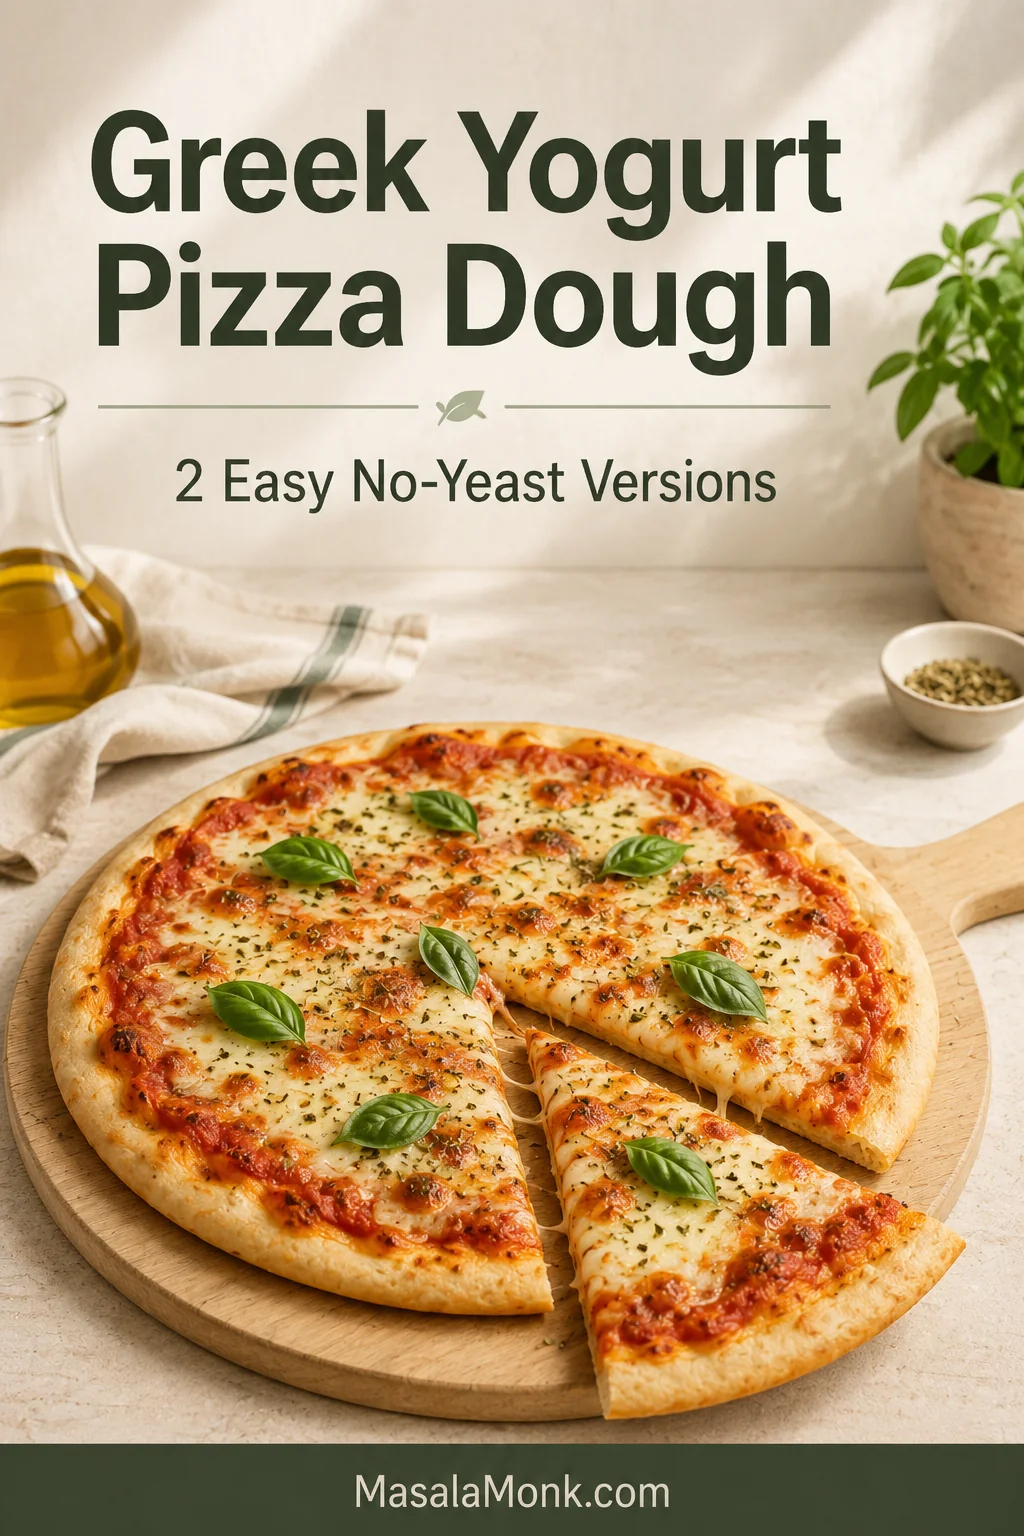
Pizza cravings rarely arrive with two hours of notice.
This Greek yogurt pizza dough is for the night when the sauce, cheese and appetite are ready, but no dough is rising on the counter. Thick Greek yogurt and flour come together in minutes, there is no yeast to activate, and dinner does not need to become an afternoon project.
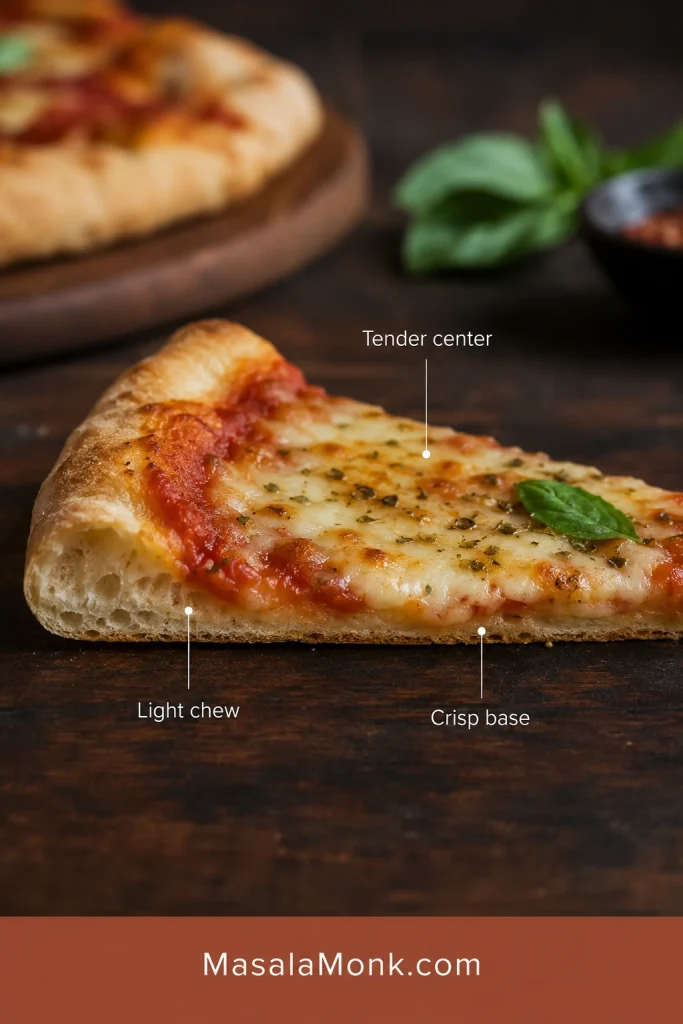
The crust bakes up soft through the center, lightly chewy at the rim and crisp around the edges. It is not as stretchy or deeply flavored as an overnight yeast dough, but it gives you something that matters more tonight: genuinely good homemade pizza without the wait.
The dough is ready in about 15 minutes, including its short rest. With a heated metal baking sheet, the whole pizza usually reaches the table in about 35–45 minutes. A stone or steel needs a longer head start.
Quick Answer
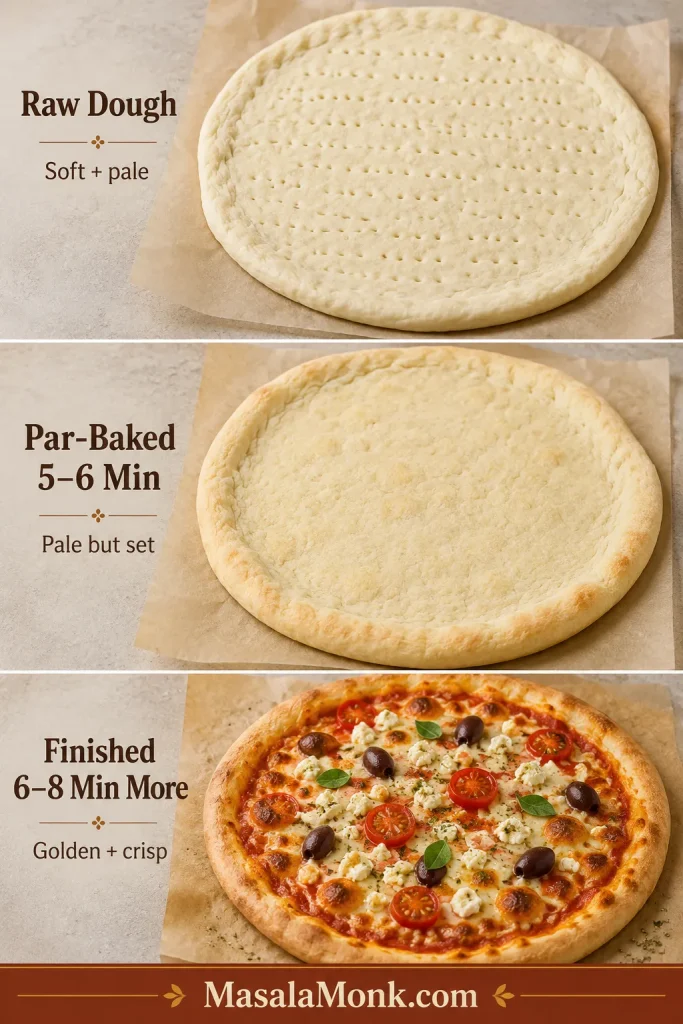
Mix all-purpose flour with baking powder and salt, then add thick plain Greek yogurt until a soft dough forms. Rest it for five minutes, roll it into an 11–12-inch crust and par-bake at 450°F (230°C) for 5–6 minutes. Add the toppings and bake for another 6–8 minutes, until the cheese bubbles and the base develops golden-brown patches. For the true two-ingredient version, use self-rising flour and begin with slightly less yogurt.
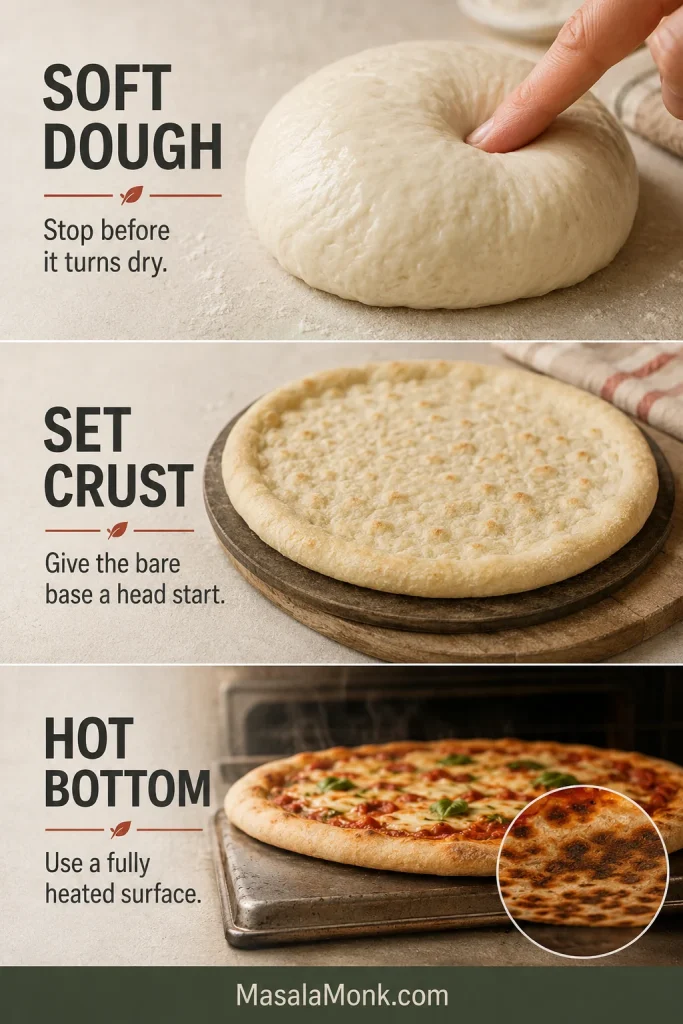
Soft dough. Set crust. Hot bottom. Keep the dough slightly tacky, give the bare crust a short first bake before wet toppings and use a fully heated baking surface.
Greek Yogurt Pizza Dough Recipe
Easy No-Yeast Greek Yogurt Pizza Dough
A soft, lightly chewy pizza crust with crisp edges and enough structure to carry sauce and bubbling cheese—all without yeast or rising time.
Baseline method in this guide: Thick 2% Greek yogurt, the all-purpose flour formula, an 11–12-inch crust and a fully heated heavy metal sheet give the clearest route to a tender middle, crisp edge and browned base.
Choose Your Flour
| Version | Best for | Main advantage |
|---|---|---|
| All-purpose flour | The easiest first batch | Full control over the salt and baking powder |
| Self-rising flour | The shortest ingredient list | A true two-ingredient dough |
Useful Equipment
Medium mixing bowl, spoon or spatula, rolling pin, heat-rated parchment, heavy metal baking sheet, wide spatula and wire rack.
All-Purpose-Flour Dough
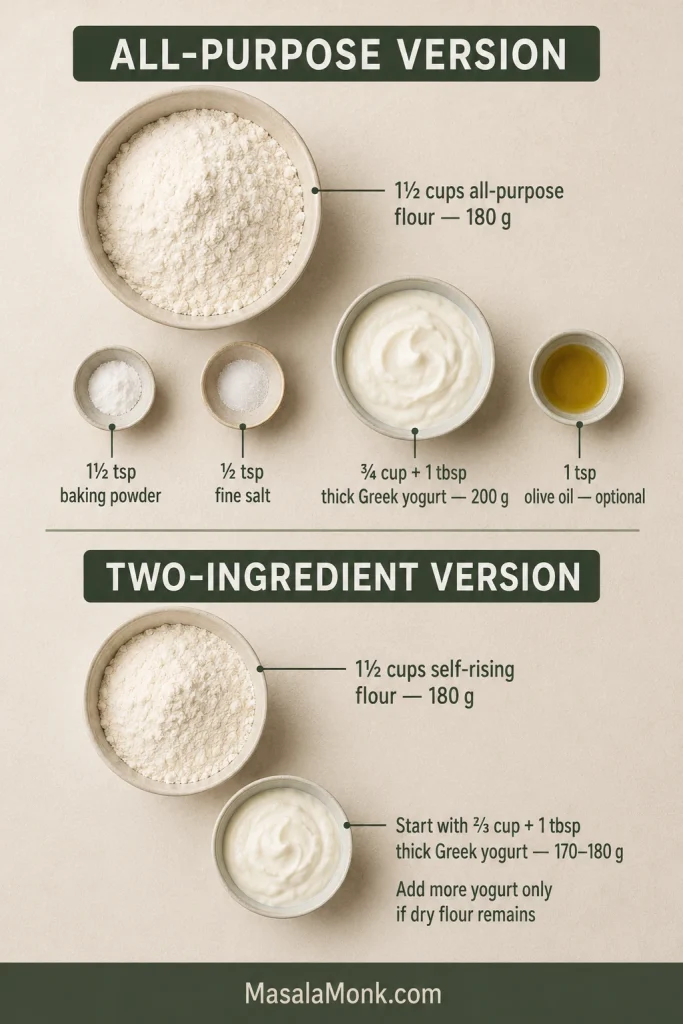
- 1½ cups all-purpose flour (180 g / 6.3 oz), plus up to 2 tablespoons (20 g / 0.7 oz) if needed
- 1½ teaspoons baking powder (about 6 g)
- ½ teaspoon fine salt (about 3 g)
- ¾ cup plus 1 tablespoon thick plain Greek yogurt (200 g / 7.1 oz), preferably 2%
- 1 teaspoon olive oil (5 ml), optional
Two-Ingredient Self-Rising Variation
Use this variation instead of the all-purpose ingredient list:
- 1½ cups self-rising flour (180 g / 6.3 oz)
- Start with about ⅔ cup plus 1 tablespoon thick plain Greek yogurt (170–180 g / 6–6.3 oz)
- Add more yogurt a spoonful at a time, up to about ¾ cup plus 1 tablespoon (200 g / 7.1 oz), only until the final dry patches disappear
Do not add separate baking powder or salt. Place the self-rising flour in the bowl and, at Step 3, begin with the lower yogurt amount.
Toppings for One 11–12-Inch Pizza
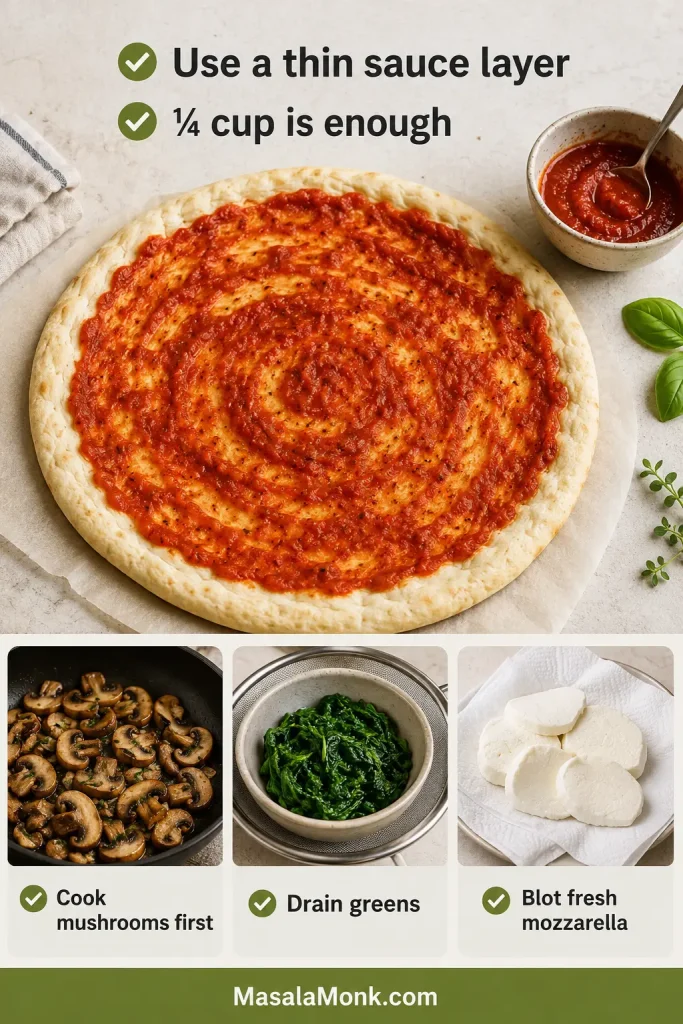
- ¼ cup thick pizza sauce or marinara (60 ml)
- ¾ cup shredded low-moisture mozzarella (80–90 g / 2.8–3.2 oz)
- Up to ½ cup cooked or well-drained toppings
- Olive oil, oregano, chili flakes or grated Parmesan for the rim, optional
Make and Rest the Dough
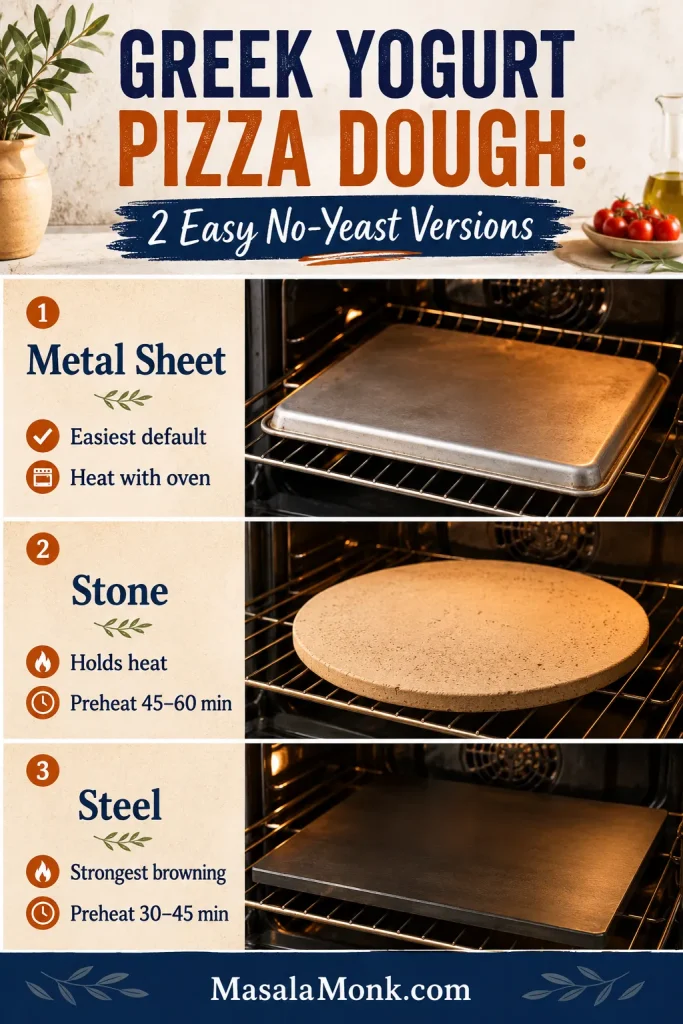
- Heat the oven and metal sheet. Place a rack in the lower-middle of the oven. Turn a heavy metal baking sheet upside down and heat it at 450°F (230°C). Use it once the oven is fully heated, or give it another 5–10 minutes for stronger browning.
- Mix the dry ingredients. Whisk the all-purpose flour, baking powder and salt in a medium bowl.
- Add the yogurt. Stir in about 180 g yogurt and the optional olive oil. Add the remaining yogurt a spoonful at a time, stopping when the last dry patches disappear. For the self-rising variation, begin with 170–180 g and add more only as needed.
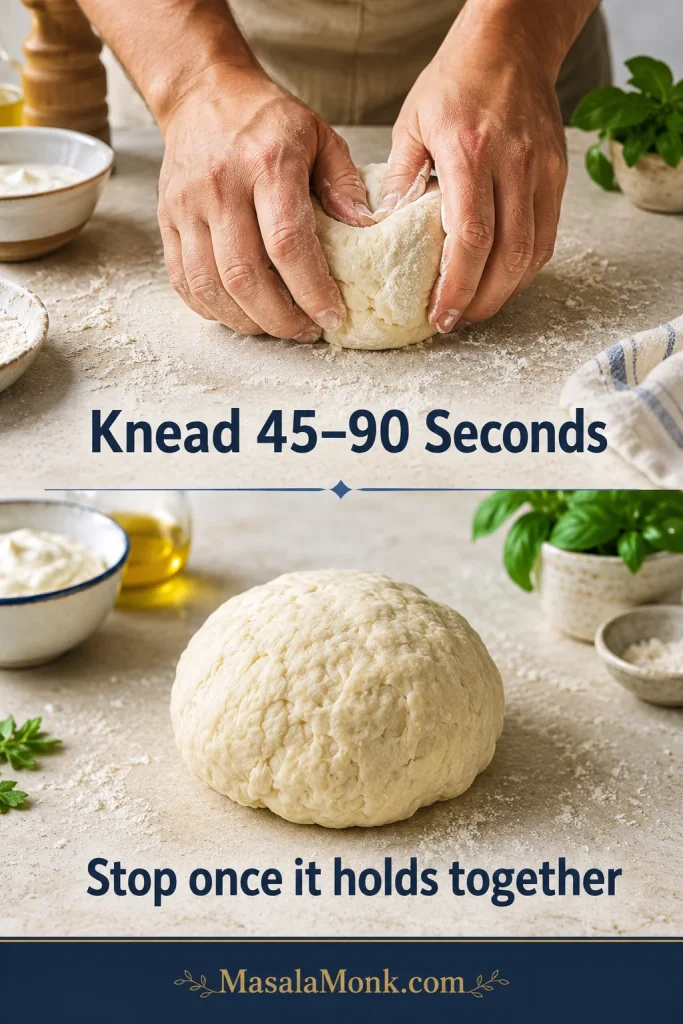
- Bring the dough together. Mix until a rough dough forms. Turn it onto a lightly floured surface and knead for 45–90 seconds, just until it holds together and looks mostly smooth.
- Rest, then assess. Cover the dough for 5 minutes. If it leaves wet paste on your fingers, add flour 1 tablespoon (8–10 g) at a time. If it cracks or refuses to hold together, add yogurt 1 teaspoon (about 5 g) at a time.
Shape and Par-Bake the Crust
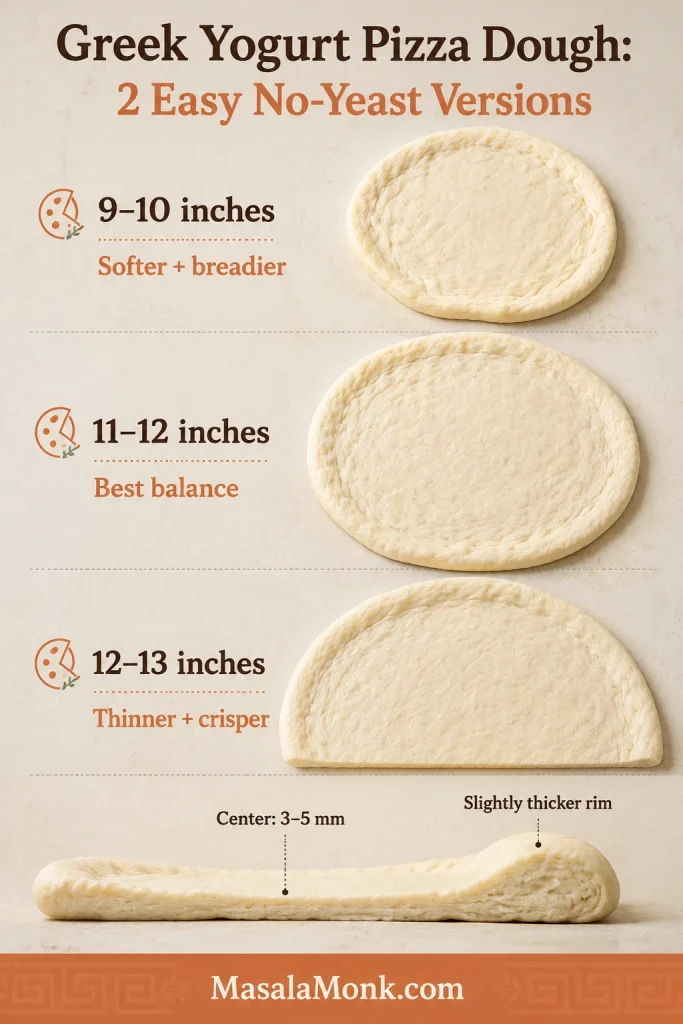
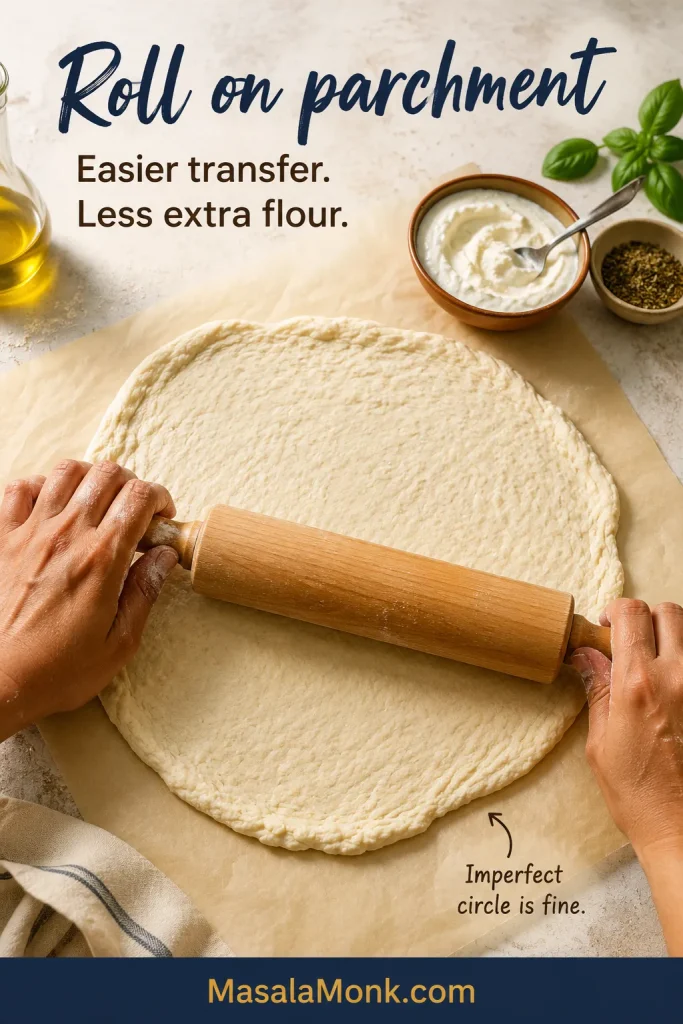
- Shape the crust. Place the dough on parchment rated for at least 450°F (230°C), or use a lightly floured peel or inverted tray. Roll or press it into an 11–12-inch circle, with a center about ⅛–3/16 inch (3–5 mm) thick and a slightly thicker rim.
- Give the bare crust a head start. Pierce the center lightly with a fork, avoiding the rim. Transfer it to the hot surface and bake for 5–6 minutes. It will still look pale; the surface only needs to look dry and firm enough to hold the toppings.
Top, Finish and Cool
- Add the toppings. Spread the sauce thinly, leave a visible rim and avoid crowding the center. Add the cheese and any cooked or well-drained toppings.
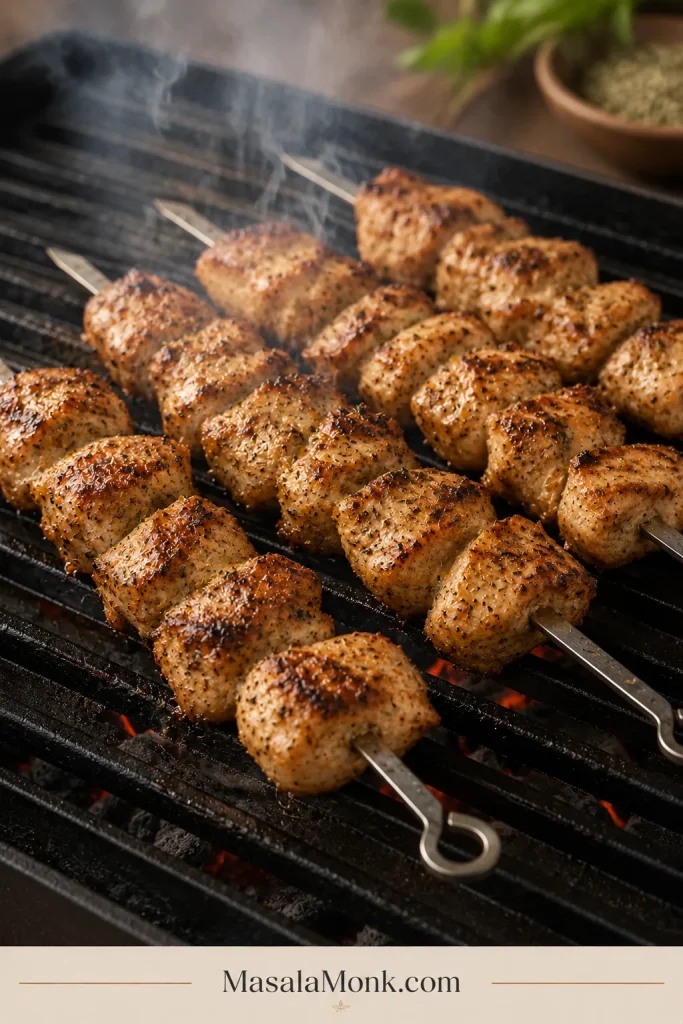
- Finish baking. Bake for another 6–8 minutes, until the cheese bubbles, the rim turns golden and the base develops browned patches. Near the end, the cheese will bubble more actively and the exposed rim will begin to smell toasted.
- Cool briefly. Transfer the pizza to a wire rack for 2 minutes before slicing. This lets steam escape so the bottom stays crisp.
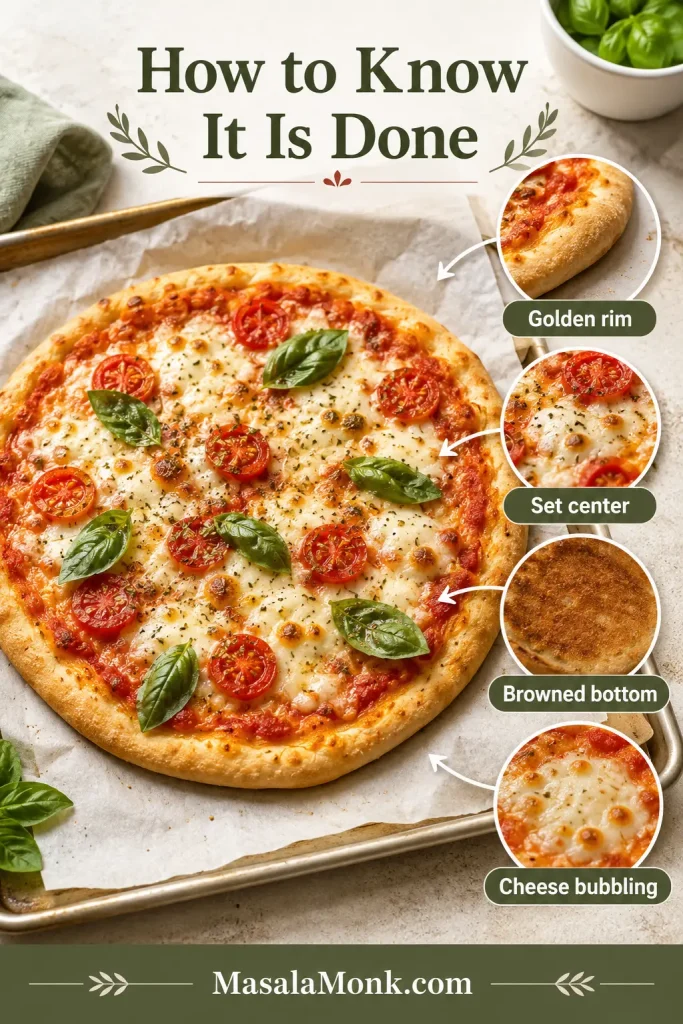
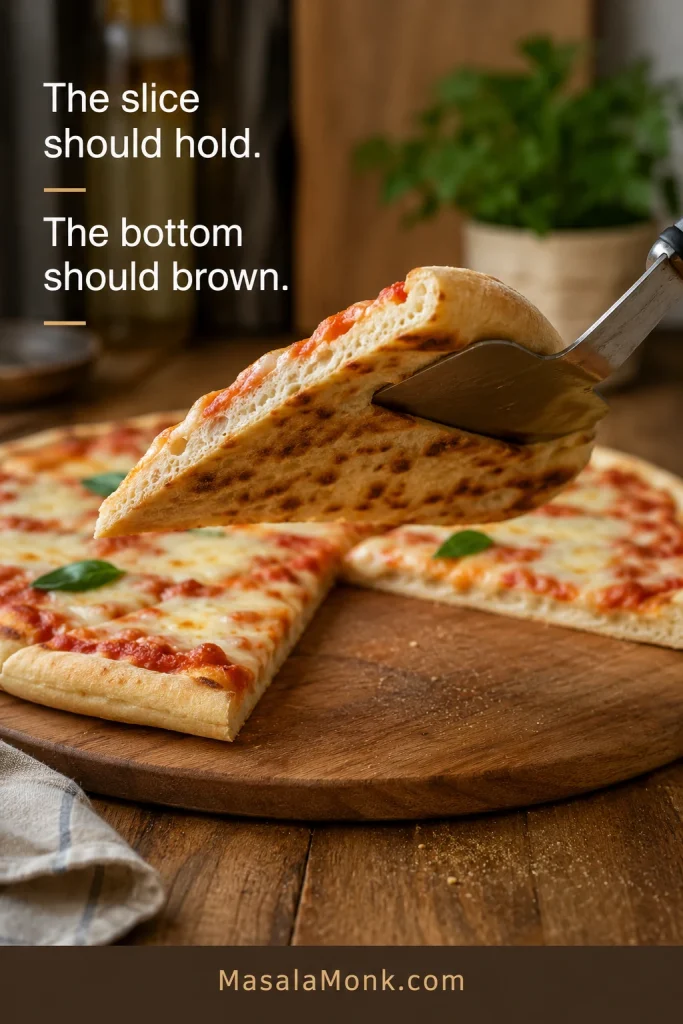
What success looks like: Lift an edge with a wide spatula. The base should show golden-brown patches, and the center should lift with the slice instead of folding like wet dough. After cutting, the middle should look set rather than wet or shiny, while remaining tender.
If the cheese is ready before the bottom, move the pizza lower in the oven. Trim exposed parchment and keep it away from the broiler.
Using a stone or steel? Heat a pizza steel for 30–45 minutes or a stone for 45–60 minutes. Start it first; either surface needs longer to heat than the dough needs to come together.
Once the basic method makes sense, the sections below will help you adjust for your yogurt, flour, baking surface and toppings without making the dough feel complicated.
Need help before shaping? See how the dough should feel, or skip to baking without a gummy center.
The recipe works best when you keep one simple system in mind: soft dough, a crust that sets before heavy toppings sink in and enough bottom heat for browning.
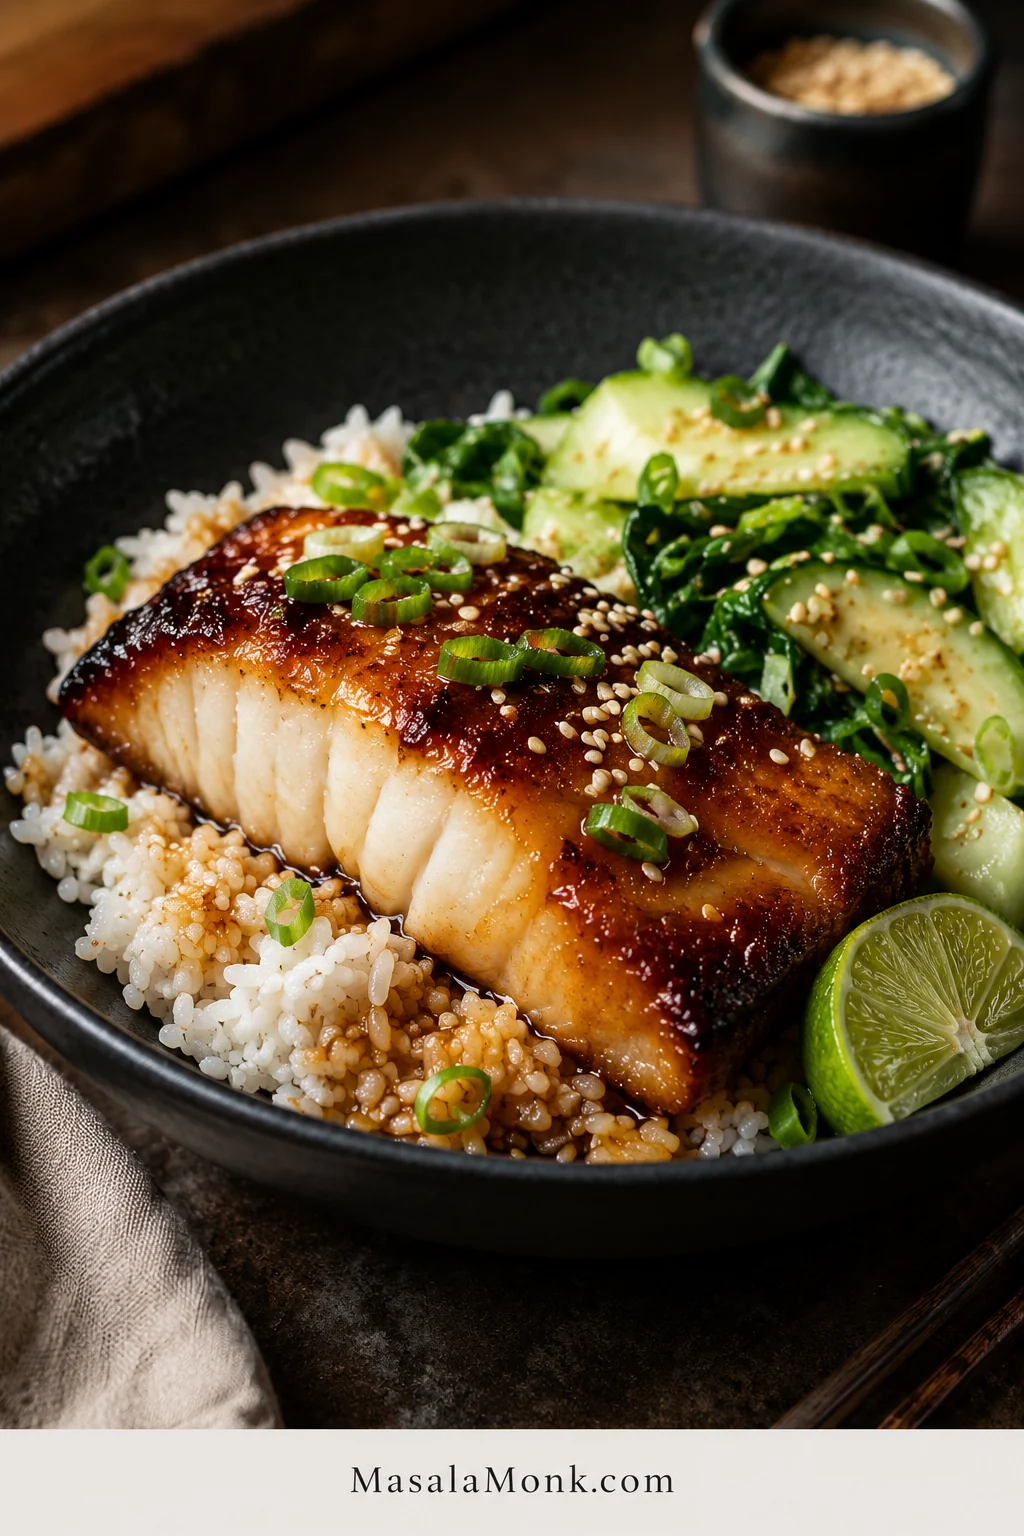
What Does Greek Yogurt Pizza Dough Taste Like?
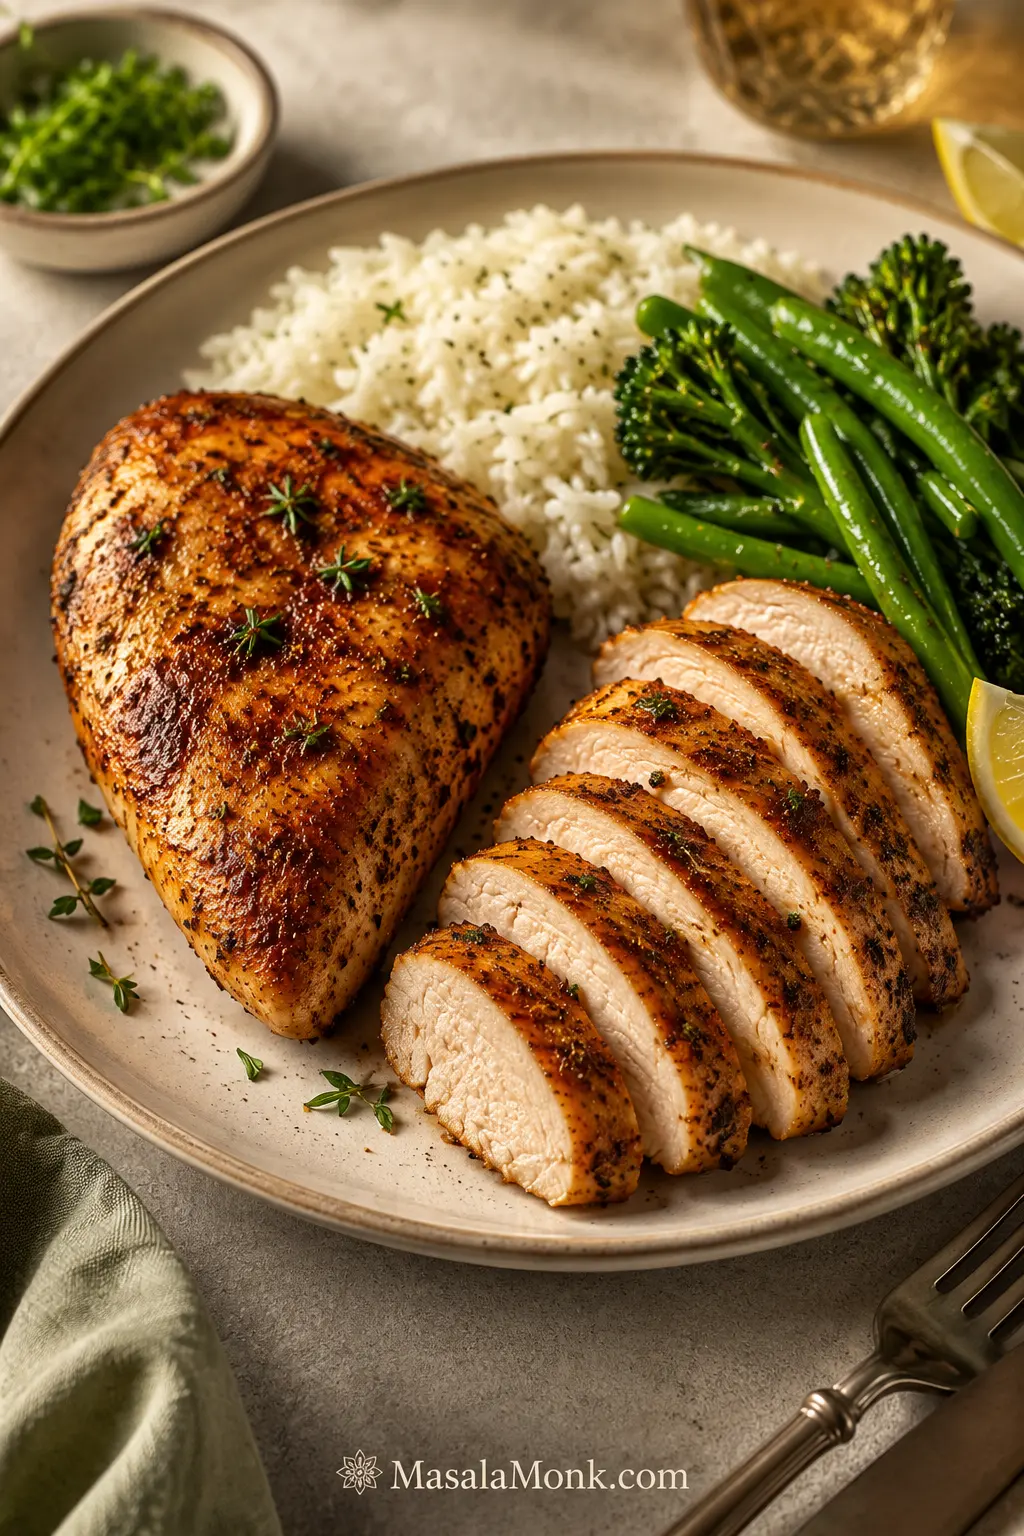
The crust has a mild tang, a tender center and a light chew. Rolled to 11–12 inches and baked on a properly heated surface, it develops crisp edges and enough structure to lift as a slice without becoming dry.
The middle bends gently instead of snapping like a cracker. Once the sauce and cheese go on, the yogurt stays quietly in the background and does not make the finished pizza taste sour.
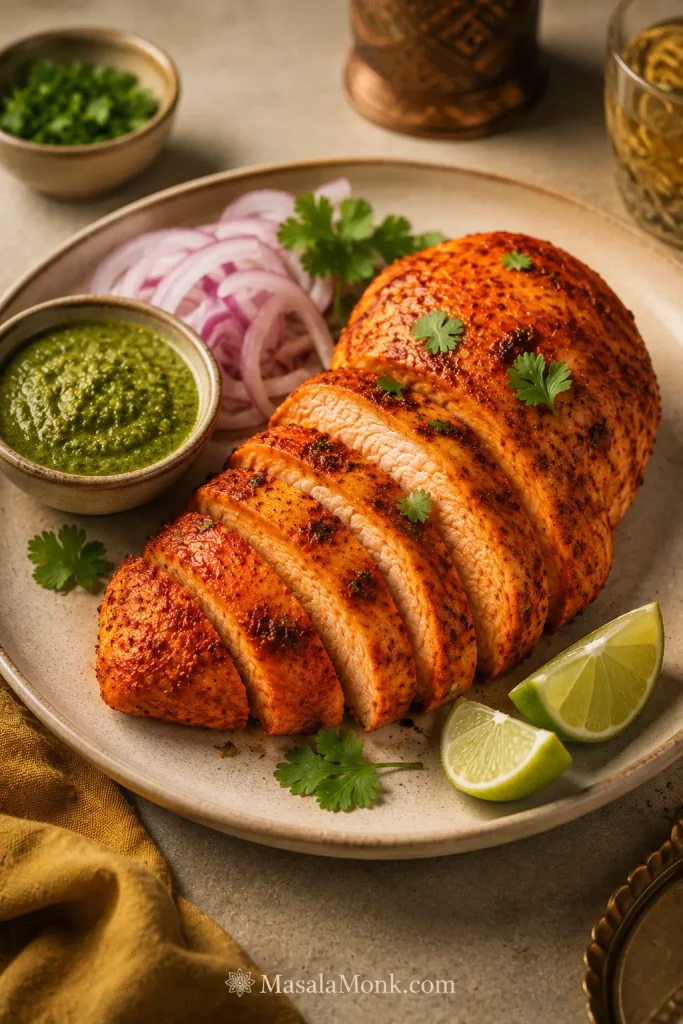
This dough is less stretchy than yeast dough, so rolling or pressing works better than tossing it. For a stretchier crust with deeper fermented flavor, use MasalaMonk’s sourdough pizza dough recipe. The sliced crust below shows the close, tender texture to expect from a quick yogurt dough.
Choosing the Yogurt and Flour
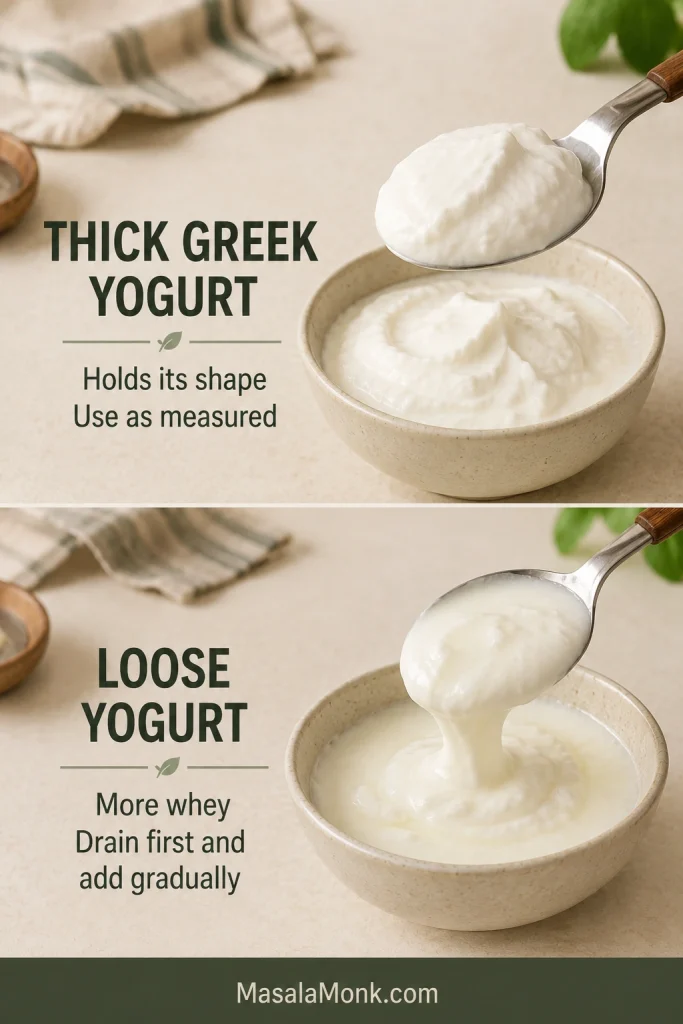
Thick Greek yogurt supplies the moisture while adding mild tang, richness and protein. Plain 2% yogurt is a practical starting point because it is thick enough to control the dough and rich enough to keep the crust tender.
Whole-milk yogurt often gives the edge a softer, more tender texture. Nonfat yogurt can bake a little firmer, and the optional teaspoon of olive oil helps soften the result.
The yogurt can go straight from the refrigerator into the bowl. A small amount of whey can be stirred back in. If there is a large pool of whey or the yogurt becomes pourable, drain it briefly or measure from the thicker portion. Vanilla, fruit-flavored and sweetened yogurts belong at breakfast, not in this dough.
Check yogurt texture before measuring; a little whey is fine, but pourable yogurt can push the dough too wet.
All-Purpose or Self-Rising Flour?
All-purpose flour is widely available and lets you control the baking powder and salt. Weighing it gives the most consistent result. When using cups, spoon the flour lightly into the cup and level the top without packing it down.
Self-rising flour gives you the classic two-ingredient version because the leavener and salt are already included. It may need less yogurt. In the UK and Australia, look for self-raising flour; “Greek yoghurt” is simply the regional spelling.
These two routes use the same bowl method, but the all-purpose version controls leavening separately while self-rising flour already includes it.
Bread flour adds chew but may spring back while rolling. Replacing up to half the all-purpose flour with whole wheat produces a heartier crust. Gluten-free blends absorb moisture differently and need a separate, blend-specific ratio.
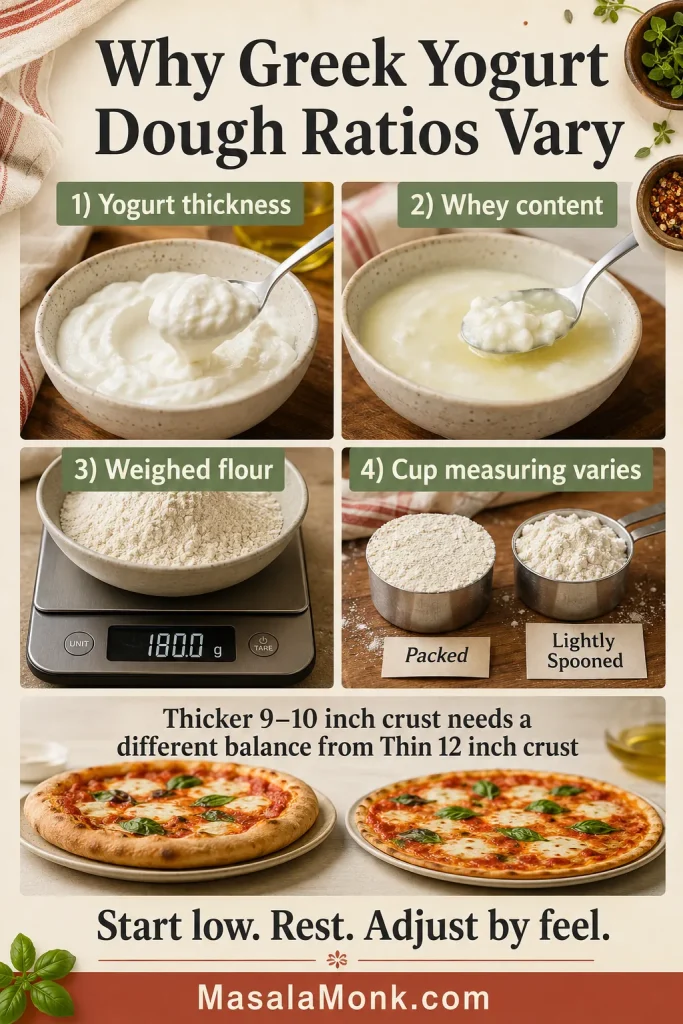
Why Greek yogurt dough ratios vary: Yogurt brands contain different amounts of whey, cup-measured flour can vary considerably, kitchen humidity can shift hydration slightly, and a thicker 9–10-inch crust needs a different balance from a thin 12-inch crust. Begin with the lower yogurt amount and adjust by feel rather than forcing every brand into one exact cup ratio.
A practical protein estimate: Depending on the flour and yogurt labels, the untopped all-purpose crust contains approximately 35–45 grams of protein in total. Cut into eight slices, that is roughly 4–6 grams per slice before toppings. The exact number changes with the brands used, so treat it as an estimate.
How the Dough Should Feel and How to Shape It
Once the ingredients are combined, texture matters more than whether the dough looks perfectly smooth.
Mix, Rest and Correct
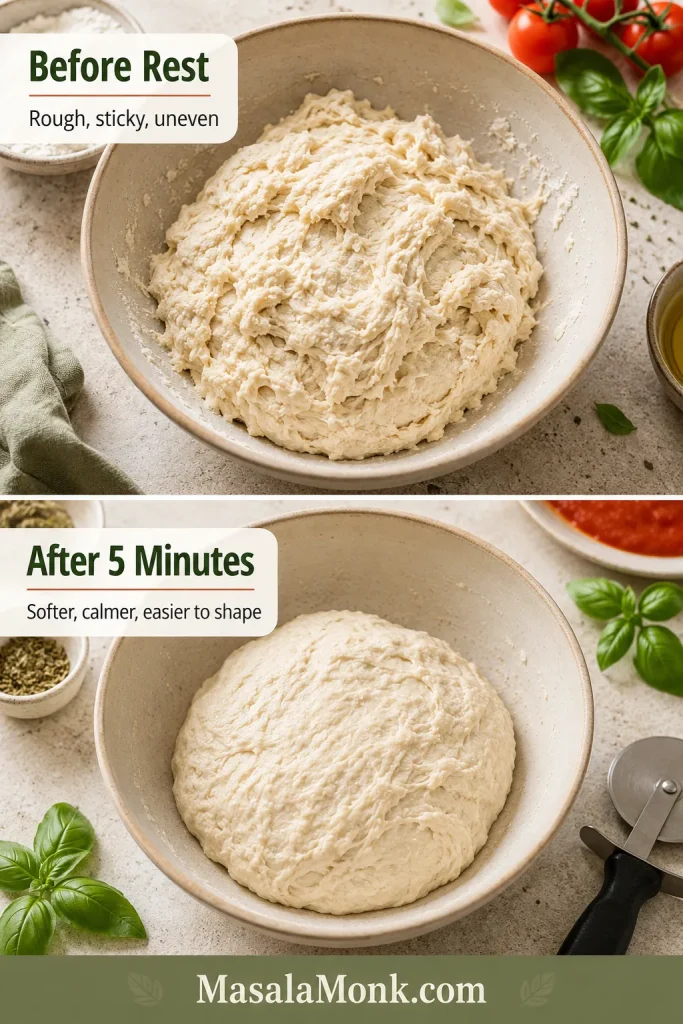
At first, the bowl may look more like yogurt-coated flour than pizza dough. It will look untidy before it looks promising, and that is normal. Keep folding gently. This rough stage is where it is easiest to add too much flour too early.
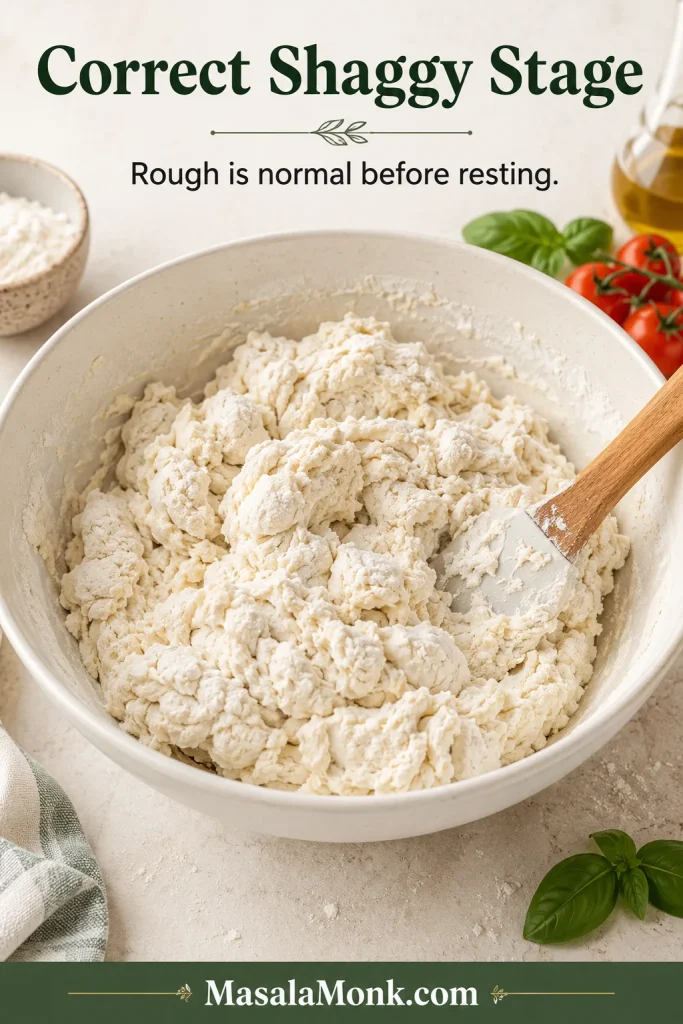
Once the rough dough holds together, cover it for five minutes. Rest first, correct second; many sticky-looking batches settle as the flour absorbs moisture.
Correct the Dough Texture
| Dough condition | What it means | What to do |
|---|---|---|
| Soft and slightly tacky | It holds a ball and releases without leaving wet paste. | Start shaping. |
| Wet and smearing | It spreads on the counter or heavily coats your fingers. | Add flour 1 tablespoon (8–10 g) at a time. |
| Dry and cracking | The edges split and the dough breaks instead of bending. | Add yogurt 1 teaspoon (about 5 g) at a time. |

Stop while the dough is still a little tacky. Knead only until it holds together; extra flour and extra kneading can make the crust tough.
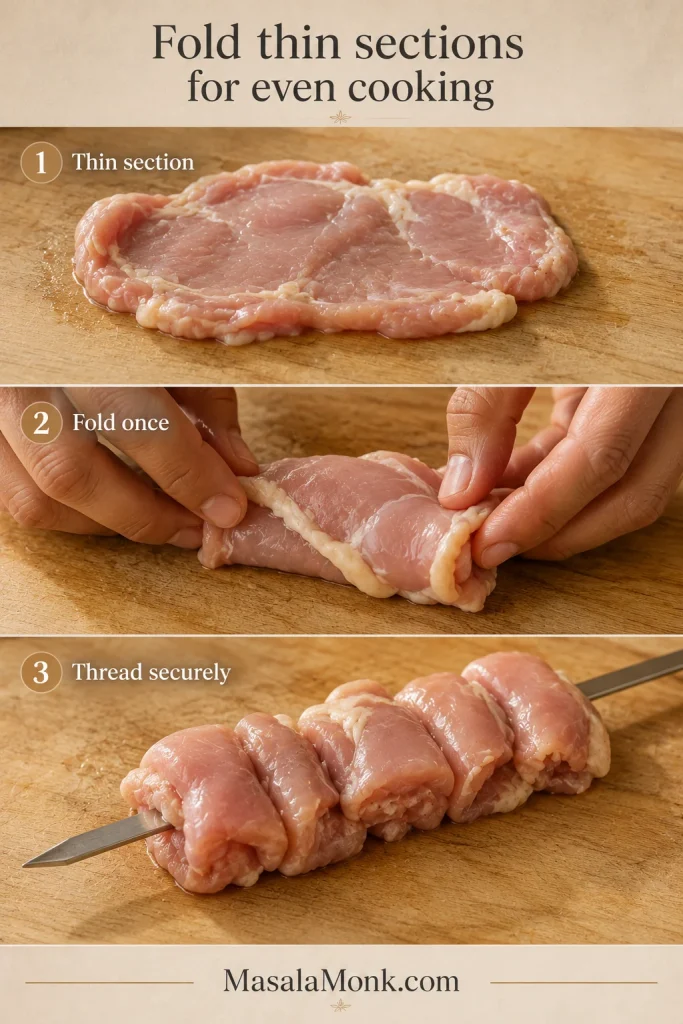
Roll and Shape Without Chasing Perfection
Thickness matters more than achieving a perfect circle. An uneven homemade edge will taste better than a neat round made tough with too much flour.
- Full batch, 11–12 inches: The most balanced crust, with a tender center and crisp edge.
- Full batch, 9–10 inches: A softer, breadier crust that may need another minute during the first bake.
- Half batch, 6½–7 inches: A personal pizza sized for most air-fryer baskets.
Shape the dough on the parchment, peel or inverted tray you will use to transfer it. If the rolling pin sticks, dust it lightly or roll between two sheets of parchment. A slightly uneven circle is better than a tough, over-floured one.
Dough feels right? Move on to baking it without a gummy center.
How to Bake It Without a Gummy Center
Give the Bare Crust a Head Start
Give the bare crust five or six minutes first. That small head start keeps the sauce and cheese from sinking into a soft center. The first bake is only to set the crust, so it should still look pale.
Do you have to par-bake it? Not always. A thin crust on a fully heated stone or steel with light toppings can bake in one stage. For an 11–12-inch crust on a standard metal sheet—or whenever the toppings carry more moisture—the short first bake is the more reliable route.
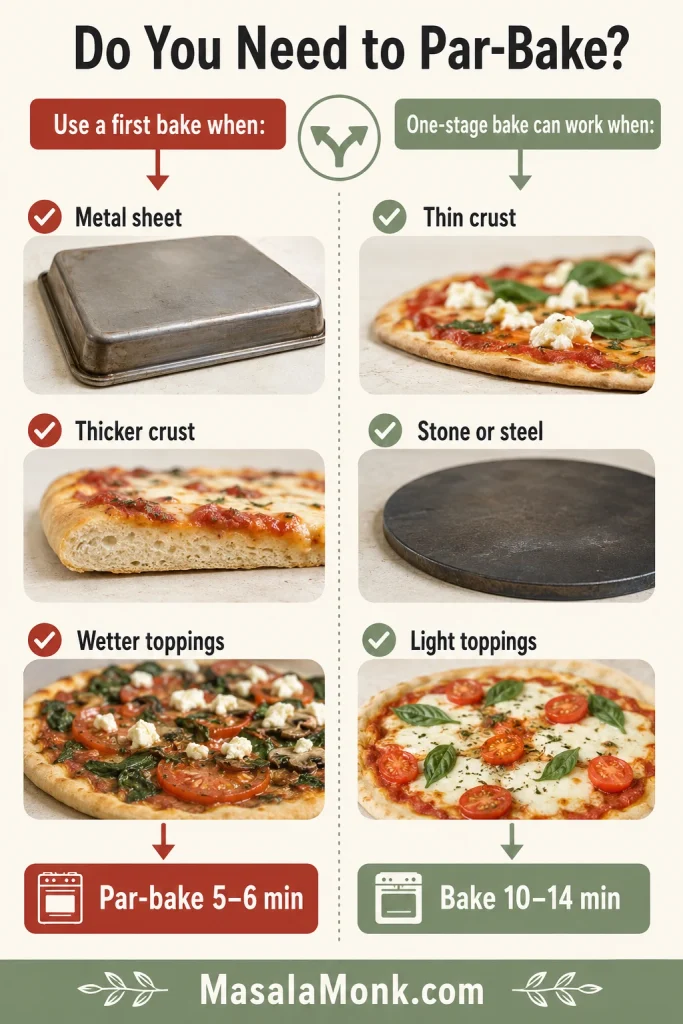
For a one-stage bake, roll the crust to 12–13 inches and bake it for about 10–14 minutes at 450°F (230°C). Use a fully heated surface, add a light layer of toppings and begin checking the base at 10 minutes.
Control Moisture on Top
Sauce should leave a thin, even coating across the dough. A crowded center traps moisture, so cook mushrooms and spinach before using them and drain fresh mozzarella on paper towels for 10–15 minutes.
A thick homemade marinara sauce works better here than watery tomato purée.
Give the Bottom Real Heat
A cool tray absorbs heat from the dough and leaves the base pale. A hotter tray will do more for the crust than another handful of flour will ever do for the dough.
Turn a sturdy metal baking sheet upside down and heat it with the oven. A stone or steel needs longer to heat through fully; King Arthur Baking provides additional guidance on preparing pizza baking surfaces.
Parchment makes a soft round easier to move, but heat limits vary. Check the package, trim exposed paper and keep it away from the broiler. Once the crust has set, carefully pull away the parchment and finish directly on the hot surface.
Lift an edge before taking the pizza out. Once the base has distinct golden-brown patches and the slice holds itself, the nervous part is over.
Toppings That Work Best on This Quick Crust
This dough can carry plenty of flavor, but the best combinations add interest without burying the center under a heavy layer. MasalaMonk’s pizza sauce guide covers red, white, pesto, buffalo and barbecue directions.
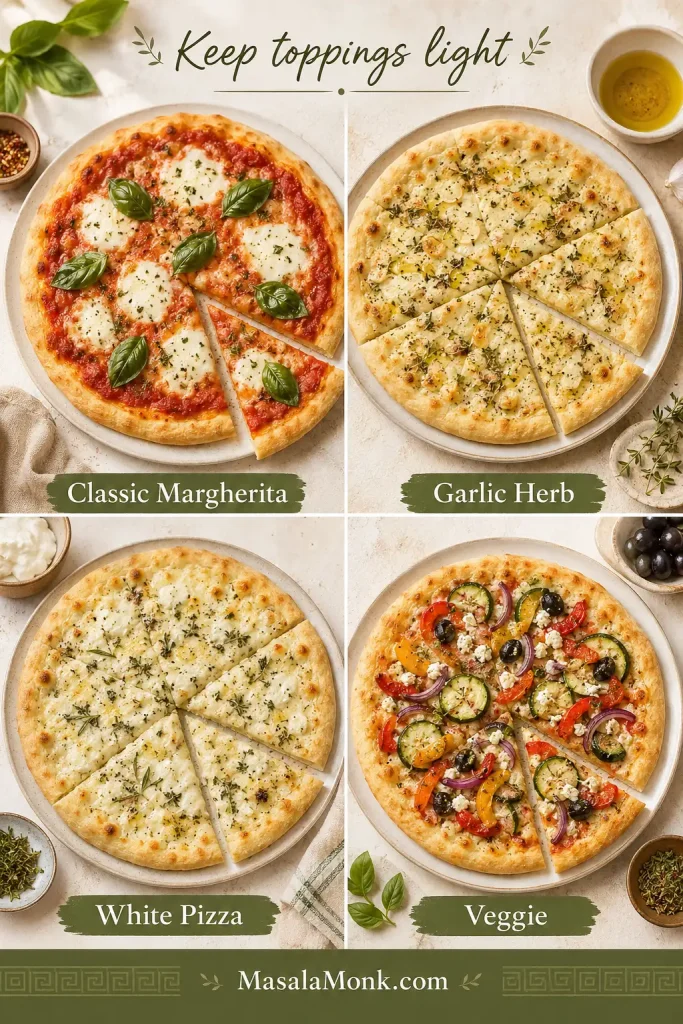
- Margherita-style: Thick marinara, low-moisture mozzarella, oregano and basil after baking.
- Garlic herb: A thin layer of olive oil or white sauce, mozzarella, garlic, oregano and a little Parmesan.
- White pizza: Use a restrained layer of ricotta or white sauce with low-moisture mozzarella and keep the center light.
- Vegetable: Cooked mushrooms, peppers, onion and well-drained spinach.
- Extra protein: Cooked chicken, turkey pepperoni, tofu or firm paneer with peppers and onion. MasalaMonk’s homemade paneer method produces cubes that stay tender under the cheese.
- Pesto or buffalo: Use a thin layer and avoid heavy wet toppings in the center.
Air Fryer Greek Yogurt Pizza
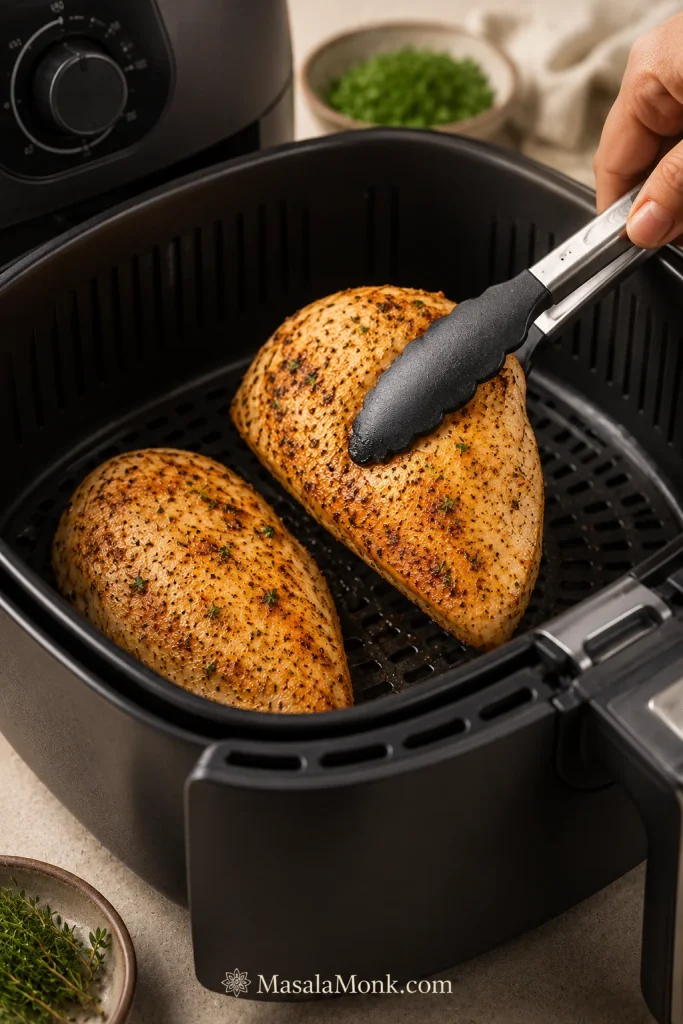
The oven gives the most even result, but half the dough makes a good personal pizza in an air fryer. Keep it small enough to check underneath before adding toppings.
- Half the dough batch
- 2–3 tablespoons thick pizza sauce
- 40–50 g (1.4–1.8 oz) low-moisture mozzarella
- A small handful of cooked or well-drained toppings
- Preheat the air fryer to 375°F (190°C) when your model recommends preheating.
- Roll the dough into a 6½–7-inch circle, or slightly smaller than the basket, and dock the center lightly with a fork.
- Transfer it to the basket, using suitable perforated parchment when needed.
- Air fry the bare crust for 6–8 minutes, until the surface looks dry and set.
- Check underneath. If the base is still pale, flip the crust and cook for another 1–2 minutes.
- Turn it upright, add the toppings and cook for another 5–7 minutes.
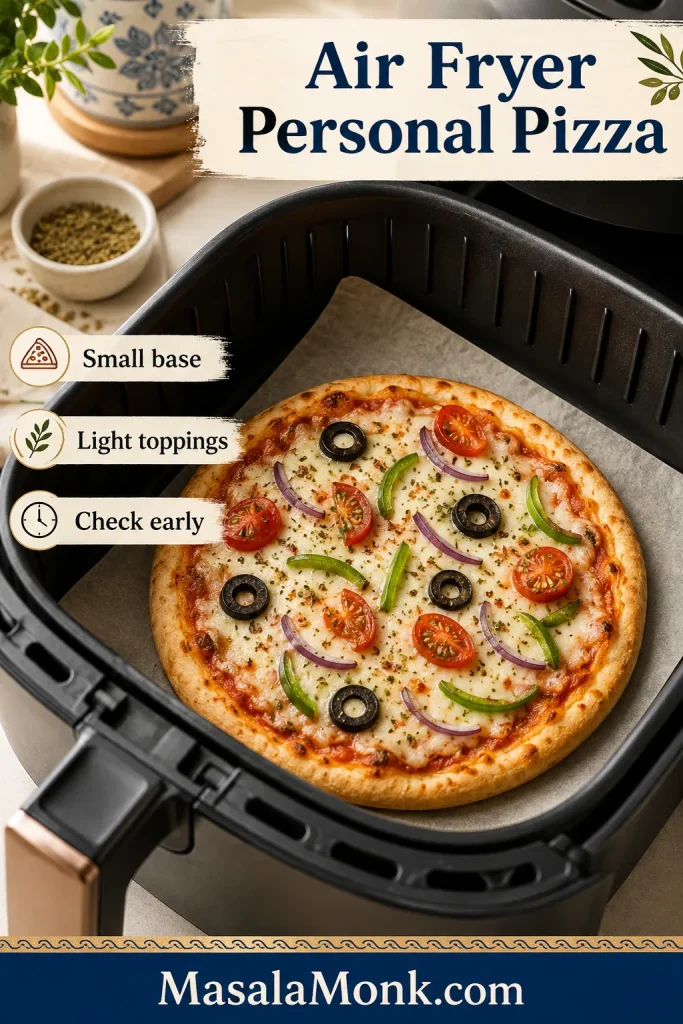
The first air fryer pizza is partly a conversation with your machine. Some baskets brown underneath quickly, while others need the flip. The center should feel set and the base should show visible color before it comes out.
Never preheat loose parchment by itself. It can lift toward the heating element unless the dough is holding it down.
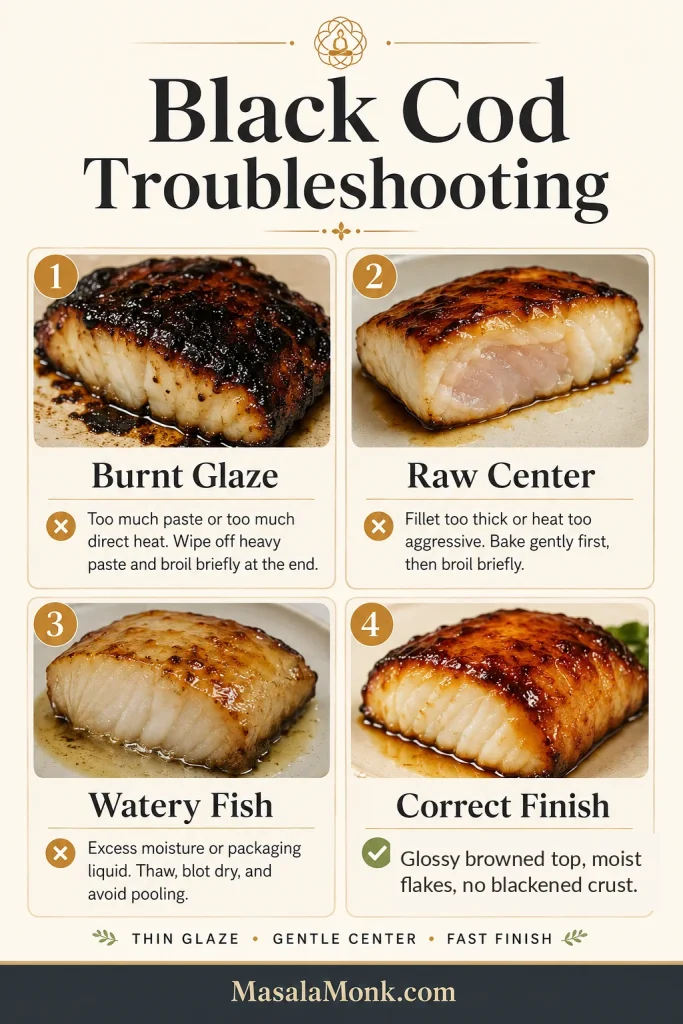
Greek Yogurt Pizza Dough Troubleshooting
Most batches need no rescue. When something does go wrong, the problem usually traces back to hydration, thickness, bottom heat or topping moisture. The visual below groups those causes before the table gets specific.
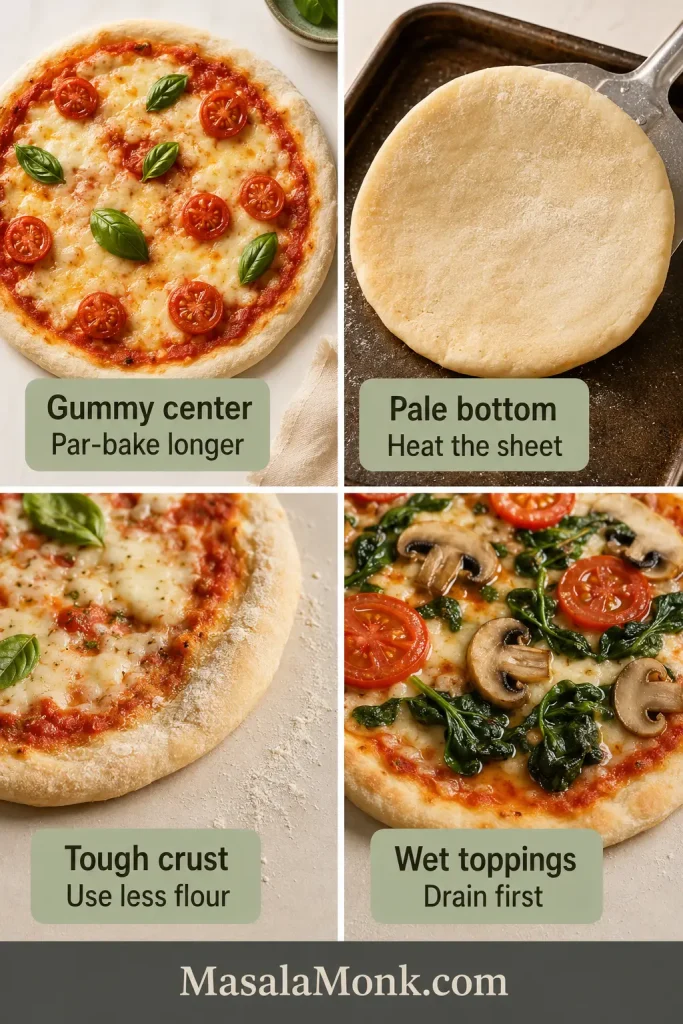
| Problem | Likely cause and fix |
|---|---|
| The dough is extremely sticky | The yogurt may be loose or too much was added. Rest the dough, then work in extra flour a spoonful at a time. |
| The dough is dry and cracking | There is too much flour or the yogurt is exceptionally thick. Work in yogurt 1 teaspoon at a time. |
| The dough tears while rolling | It may be too dry or too tight. Cover it and leave it for 5–10 minutes before rolling again. |
| The dough springs back | This happens more often with bread flour. Let the dough relax before widening it again. |
| The crust is tough | Too much flour or kneading is the usual cause. Stop while the dough remains slightly tacky. |
| The center is gummy | The crust is too thick or carrying too much moisture. Roll it wider, drain wet toppings and give the bare crust a head start. |
| The bottom is pale | The baking surface needs more heat. Preheat it longer and remove the parchment near the end when possible. |
| The edge browns before the center cooks | Roll the center thinner or extend the first bake. Cover a dark rim loosely with foil while the middle finishes. |
| The dough barely rises | The baking powder may be old. Replace it and bake the dough soon after mixing. |
| The air fryer bottom stays raw | Your machine heats more strongly from above. Flip the crust during the first cooking stage. |
Ready to bake again? Return to the recipe card, or see storage and reheating.
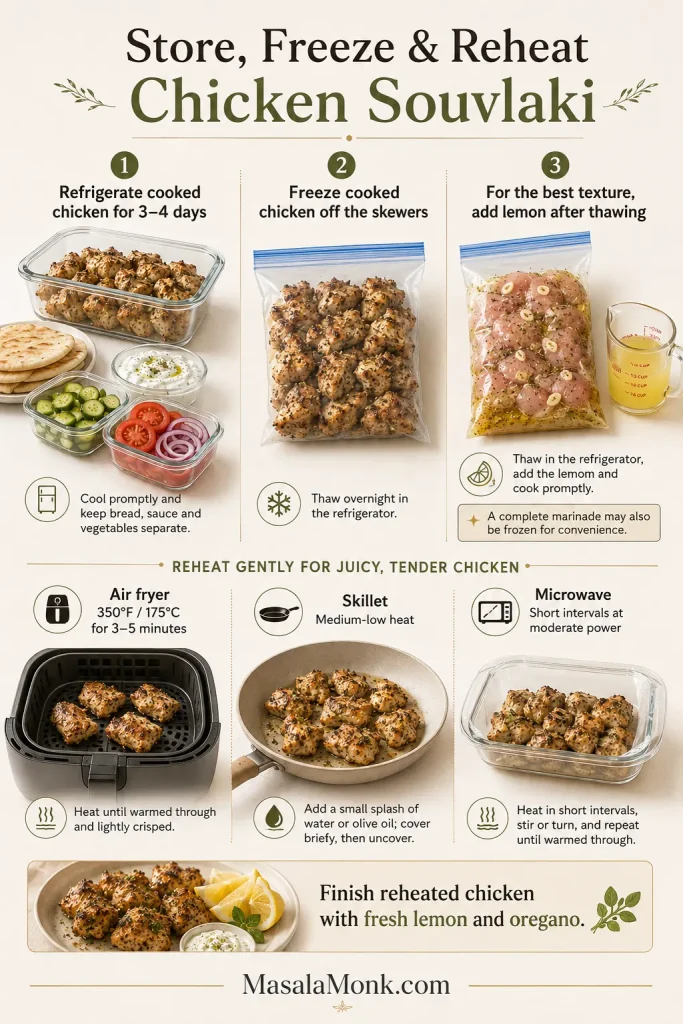
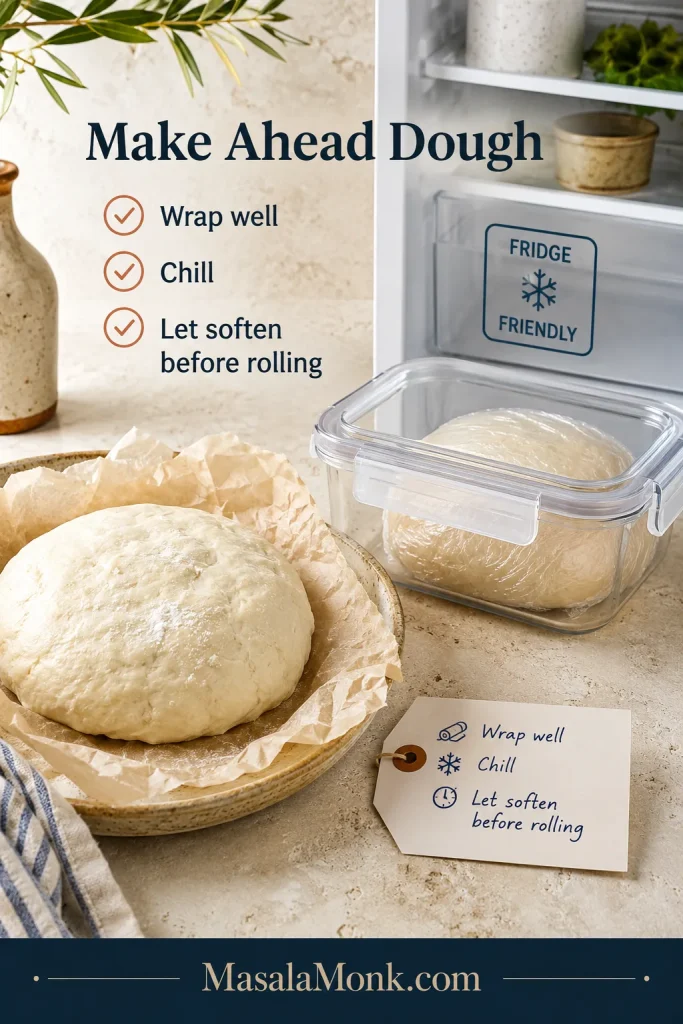
Storage, Freezing and Reheating
Best Make-Ahead Route
This dough is best shaped and baked soon after mixing. If you need a short pause while the oven heats or toppings are prepared, keep the dough covered so it does not dry out. For true make-ahead prep, par-bake the crust, cool it completely and then refrigerate or freeze that base.
Refrigerate leftover pizza within two hours and keep it in an airtight container for 3–4 days. Separate stacked slices with parchment so the cheese does not stick. These timings follow the FoodSafety.gov cold-food storage chart.
How to Reheat It

- Air fryer: 350°F (175°C) for 3–5 minutes
- Oven: 375°F (190°C) for 6–10 minutes
- Skillet: Warm over medium-low heat, then cover briefly to melt the cheese
- Microwave: Fast, but the crust will be softer
Store or Freeze the Par-Baked Crust
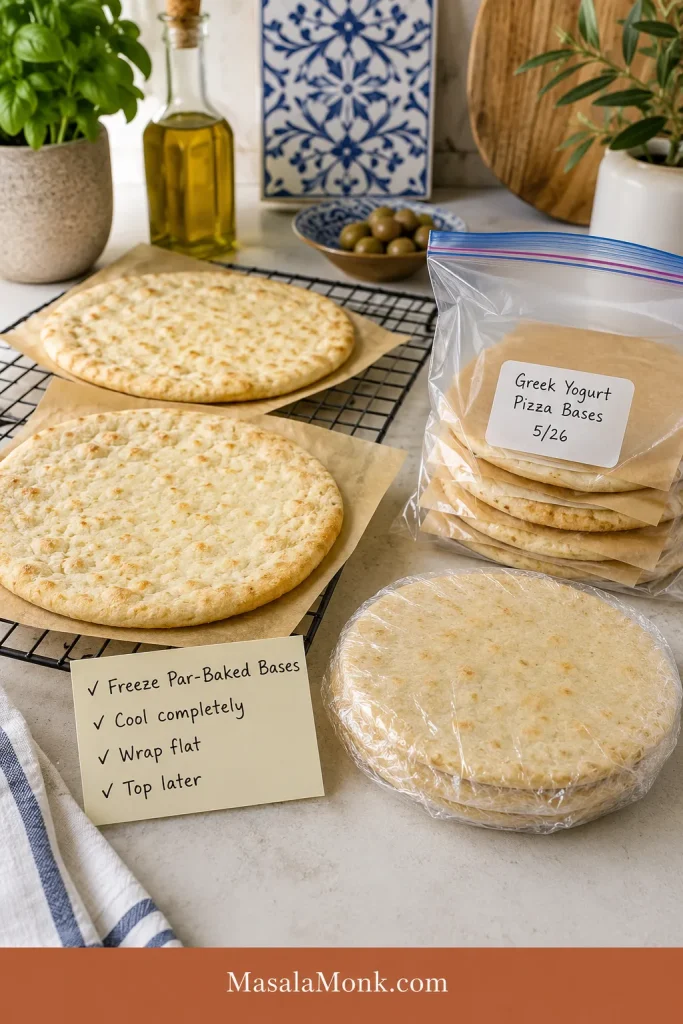
For shorter storage, cool the par-baked crust completely, wrap it well and refrigerate it for up to two days.
For longer storage, freeze the cooled crust flat. Once firm, wrap it well and keep it frozen for up to two months for the best texture. Add toppings while the crust is frozen or partly thawed, then finish at 450°F (230°C), checking from about 10 minutes.
For freezer mini pizzas, divide the dough into four rounds, par-bake and cool them, then add sauce and cheese before freezing flat. Raw dough is less dependable because the baking powder begins reacting as soon as the yogurt is mixed in.
Frequently Asked Questions
Does the finished crust taste like yogurt?
Only faintly. The plain crust has a mild tang, but sauce, cheese and toppings quickly move that flavor into the background.
Do I have to par-bake Greek yogurt pizza dough?
Not always. A thin crust on a fully heated stone or steel with light toppings can bake in one stage. On a standard metal sheet—or with a thicker crust or wetter toppings—the short first bake gives the center a more reliable structure.
What can I use instead of self-rising flour?
Use the all-purpose version with baking powder and salt. There is no need to prepare a separate homemade self-rising-flour mixture.
Does regular yogurt work?
Regular yogurt is usually looser than Greek yogurt. Drain it until thick, add it gradually and expect to use less.
Will nonfat Greek yogurt make the crust dry?
It can make the edge firmer, but it still works. The optional teaspoon of olive oil helps keep the crust tender.
How far ahead can I prepare the crust?
Cool the par-baked crust completely, then refrigerate it for up to two days or freeze it for up to two months.
The bowl may look messy, the first bake may look pale and the final circle may never resemble a pizzeria’s. None of that matters once the bottom is crisp, the cheese is bubbling and a homemade pizza is on the table while the craving still matters.
When the first slice lifts cleanly and the browned edge gives under the cutter, the rough bowl of yogurt and flour finally feels like pizza.
Which version did you make, and what topping did you reach for when the craving hit?