A good salmon bowl recipe should be easy enough for dinner tonight and flexible enough to change with whatever rice, sauce, vegetables, and toppings you already have. This version starts with tender cooked salmon, warm rice, crunchy vegetables, avocado, and a creamy sauce, then gives you simple ways to make it sweeter, spicier, lighter, or more meal-prep friendly.
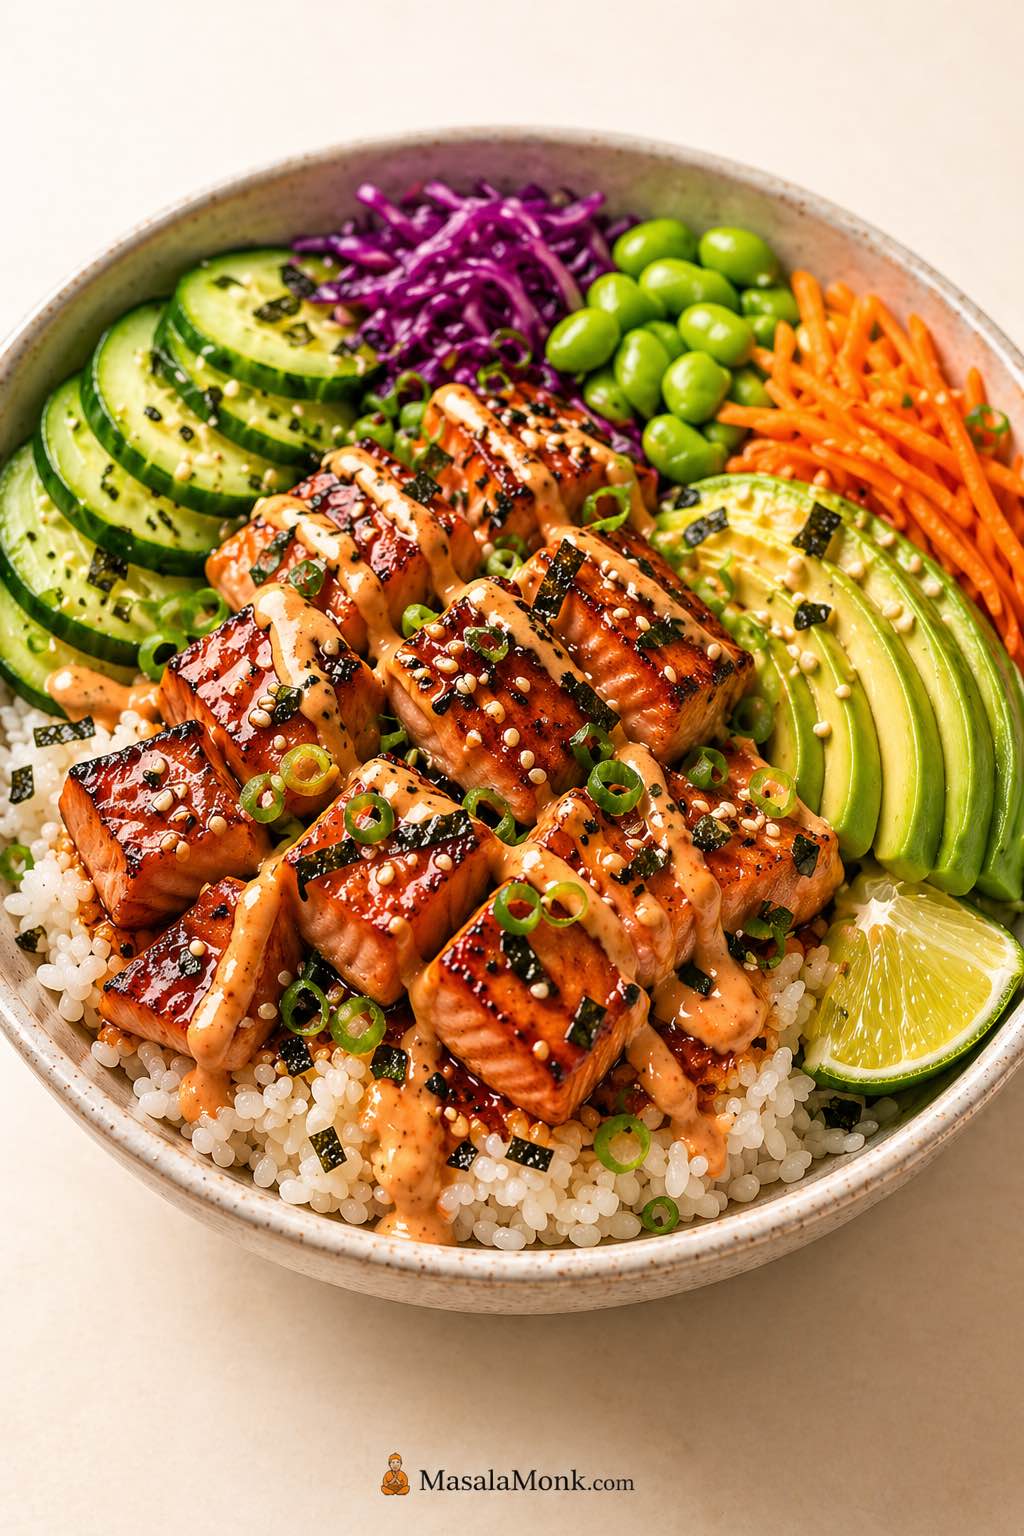
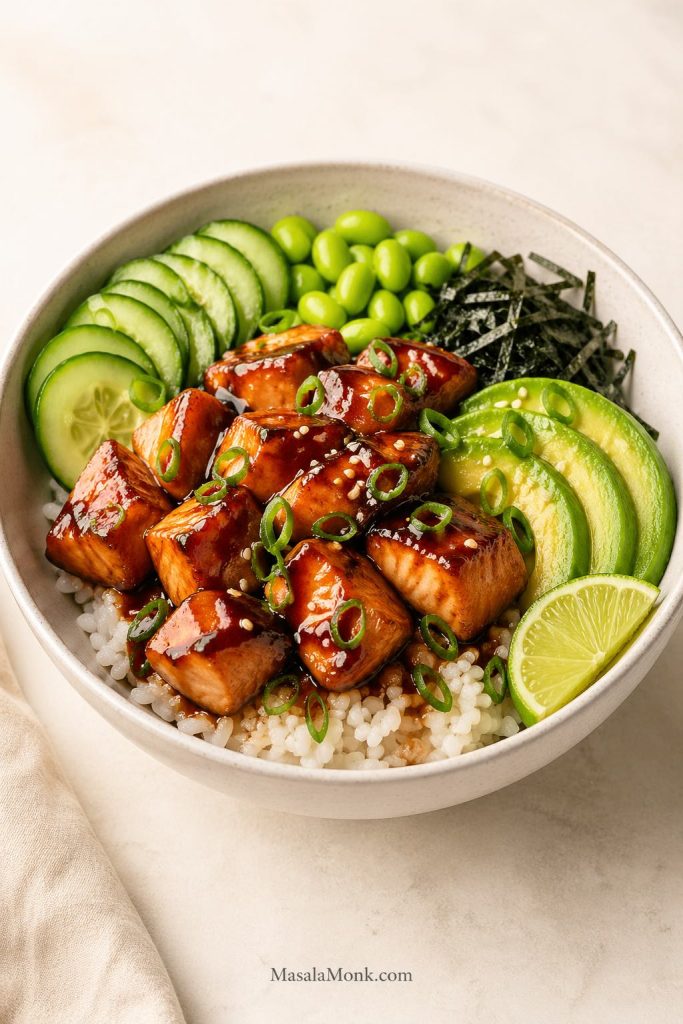
This cooked salmon rice bowl is not a raw salmon poke recipe. Instead, the main version uses salmon bites seasoned with soy sauce, garlic, ginger, honey, and lime or rice vinegar, then finishes them with cucumber, avocado, edamame or cabbage, scallions, sesame, and a creamy sriracha yogurt sauce.
Make the main bowl first if you want the easiest version. After that, use the rice guide, sauce guide, topping guide, and variation ideas to turn the same base into a teriyaki salmon bowl, spicy salmon bowl, sushi-style salmon bowl, air fryer salmon bowl, Asian sesame soy salmon bowl, or healthy salmon quinoa bowl.
Quick Answer: The Best Salmon Bowl Recipe Formula
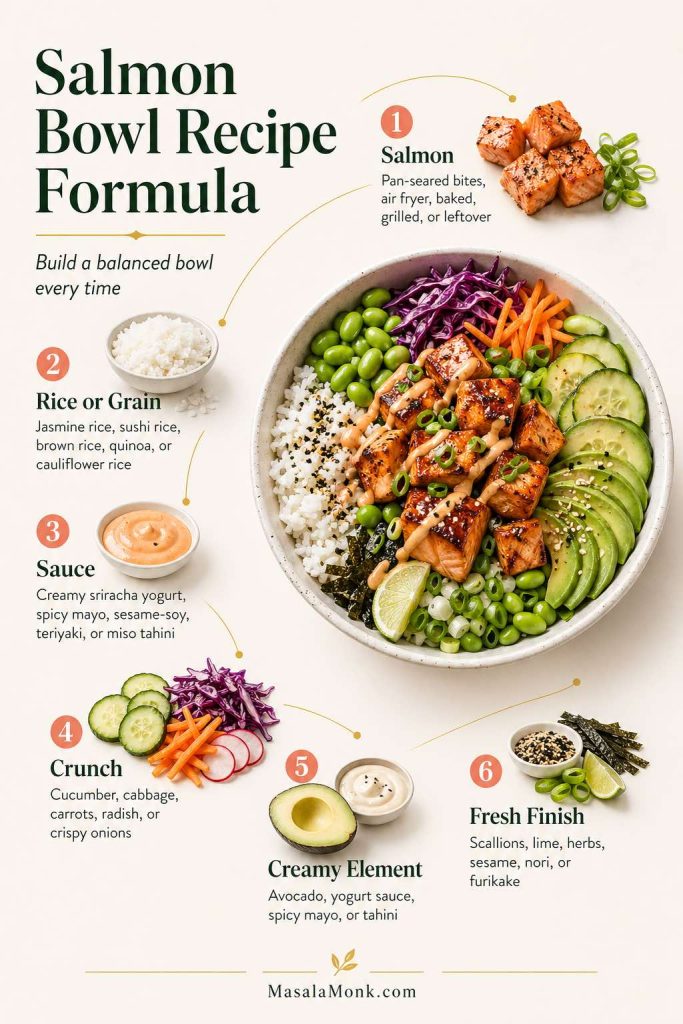
The easiest formula is simple: cooked salmon + rice or grain + sauce + crunch + something creamy + a fresh finish. Start with warm rice, add tender salmon bites, then balance the bowl with cucumber, cabbage, carrots, edamame, avocado, scallions, sesame seeds, and lime.
For the best first version of this salmon bowl recipe, make a pan-seared salmon rice bowl with jasmine rice or sushi rice, cucumber, avocado, edamame or shredded cabbage, and creamy sriracha yogurt sauce. Because the base is simple, it tastes fresh and filling without needing a long ingredient list.
Once you understand the formula, the same bowl can go in many directions. For example, choose teriyaki sauce for a sweeter weeknight bowl, spicy mayo for a sushi-style bowl, sesame soy dressing for a lighter bowl, quinoa for a higher-protein base, or air fryer salmon bites when you want the easiest cooking method.
Why This Salmon Bowl Recipe Works
This salmon bowl recipe works because every part balances the next. The warm rice makes it filling, while the salmon brings richness. Meanwhile, the cucumber and cabbage add crunch, avocado softens the salty sauce, and lime or rice vinegar keeps the bowl bright. Cutting the salmon into bites also helps it cook quickly and gives you more browned edges than a whole fillet.
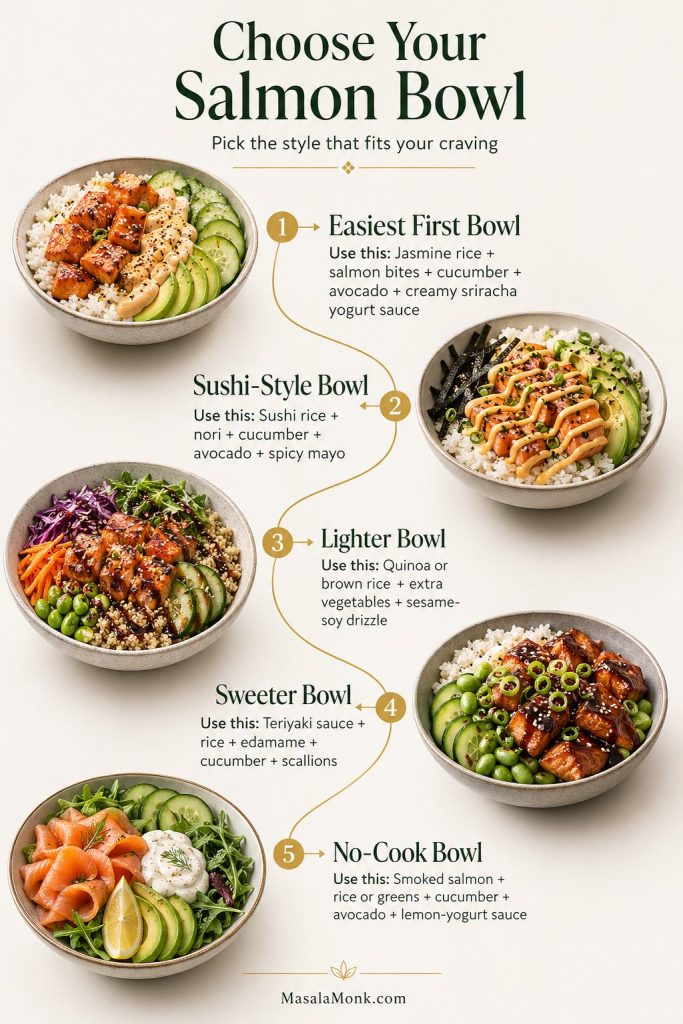
| If You Want | Use This |
|---|---|
| The easiest first bowl | Jasmine rice + pan-seared salmon bites + cucumber + avocado + creamy sriracha yogurt sauce |
| A sushi-style bowl | Sushi rice + nori + cucumber + avocado + spicy mayo |
| A lighter bowl | Quinoa or brown rice + extra vegetables + sesame-soy drizzle or Greek yogurt sauce |
| A sweeter bowl | Teriyaki sauce + rice + edamame + cucumber + scallions |
| A no-cook bowl | Smoked salmon + rice or greens + cucumber + avocado + lemon-yogurt sauce |
Salmon Bowl Recipe
This is the best salmon bowl recipe to make first because it gives you a clear base before you start changing sauces, toppings, or cooking methods. It uses cooked salmon bites, warm rice, crisp vegetables, avocado, and a creamy sriracha yogurt sauce. However, you can also pan-sear the salmon as written, use the air fryer or oven, or build the bowl with leftover cooked salmon using the notes below.
Easy Salmon Rice Bowl
Equipment
- Nonstick or well-seasoned skillet
- Mixing bowl
- Small bowl for sauce
- Rice cooker or saucepan
- Air fryer, optional
Ingredients
For the salmon
- 10 to 12 oz / 285 to 340 g salmon fillet, skin removed, cut into 1-inch / 2.5 cm pieces
- 1 tablespoon / 15 ml soy sauce or tamari
- 1 teaspoon / 5 ml honey or maple syrup
- 1 teaspoon / 5 ml lime juice or rice vinegar
- 1 teaspoon grated ginger
- 1 small garlic clove, grated or minced
- 1 teaspoon / 5 ml sesame oil or neutral oil
- 1/4 teaspoon black pepper
- Pinch of salt, only if needed
- 1 to 2 teaspoons neutral oil for the pan, if needed
For the creamy sriracha yogurt sauce
- 1/3 cup / about 80 g Greek yogurt
- 1 to 2 teaspoons / 5 to 10 ml sriracha, to taste
- 1 teaspoon / 5 ml lime juice
- 1 teaspoon / 5 ml honey or maple syrup, optional
- Pinch of salt
- 1 to 2 teaspoons / 5 to 10 ml water, to loosen if needed
Optional lighter sesame-soy drizzle
- 1 tablespoon / 15 ml soy sauce or tamari
- 1 teaspoon / 5 ml rice vinegar or lime juice
- 1 teaspoon / 5 ml sesame oil
- 1 teaspoon / 5 ml honey or maple syrup
- 1 teaspoon / 5 ml water, to loosen
- Optional: grated ginger, chili crisp, or sesame seeds
For the bowls
- 2 cups / about 320 to 370 g cooked rice, warm
- 1 cup / about 120 g cucumber, diced or sliced
- 1 cup cooked shelled edamame, shredded cabbage, or carrots
- 1 avocado, sliced or diced
- 2 tablespoons sliced scallions
- 1 tablespoon sesame seeds
- Lime wedges, for serving
- Optional: nori strips, furikake, chili crisp, pickled ginger, or cilantro
Instructions
- Cook the rice. Prepare your rice or grain first so it is warm when the salmon is ready. As a rough guide, about 2/3 cup dry white rice makes about 2 cups cooked rice, depending on the rice.
- Pat dry and season the salmon. Pat the salmon pieces dry with paper towels so they brown instead of steaming. Then, in a bowl, toss them with soy sauce, honey, lime juice or rice vinegar, ginger, garlic, oil, and black pepper.
- Pan-sear the salmon. Heat a nonstick or well-seasoned skillet over medium-high heat. Add a little neutral oil if the pan looks dry. After that, add the salmon in a single layer and cook for 5 to 7 minutes total, turning once or twice, until browned outside and cooked through.
- Mix the sauce. Stir together Greek yogurt, sriracha, lime juice, honey if using, salt, and enough water to make it drizzleable. If you prefer a lighter bowl, mix the sesame-soy drizzle instead.
- Assemble the bowls. Divide warm rice between two bowls. Then add salmon, cucumber, edamame or cabbage, avocado, scallions, sesame seeds, and sauce.
- Finish and serve. Add lime, nori, furikake, chili crisp, pickled ginger, or cilantro if you like. Before serving, taste and adjust with more lime if the bowl feels flat, more sauce if it feels dry, or more cucumber if it tastes too salty.
Recipe Notes
- The creamy sauce makes about 1/3 cup, enough for 2 bowls.
- Double the sauce if you like a saucier bowl or are using brown rice, quinoa, or extra vegetables.
- Use skinless salmon if you want neat salmon bites. If your salmon has skin, cook it as a fillet and flake it over the bowl.
- Jasmine rice is the easiest weeknight base. Sushi rice gives the bowl a sushi-style feel.
- Use mayo instead of Greek yogurt for a richer spicy mayo sauce.
- Use tamari instead of soy sauce for a gluten-free option.
- For a dairy-free bowl, use dairy-free mayo for the sauce or choose the sesame-soy drizzle.
- Use low-sodium soy sauce if you are sensitive to salt.
- Skip sesame oil and sesame seeds if avoiding sesame.
- If using frozen salmon, thaw it in the refrigerator and pat it very dry before seasoning.
- To serve 4, double all ingredients and cook the salmon in batches so it browns instead of steaming.
- For an air fryer salmon bowl, use the air fryer method later in the post.
- Cook salmon until opaque and cooked through. For general seafood safety guidance, salmon is commonly cooked to 145°F / 63°C.
Ingredients for Salmon Bowls
This salmon bowl recipe works best when every component has a job. The salmon gives the bowl protein and richness, while the rice makes it filling. Meanwhile, the sauce ties everything together, and the toppings add crunch, freshness, creaminess, spice, or brightness.
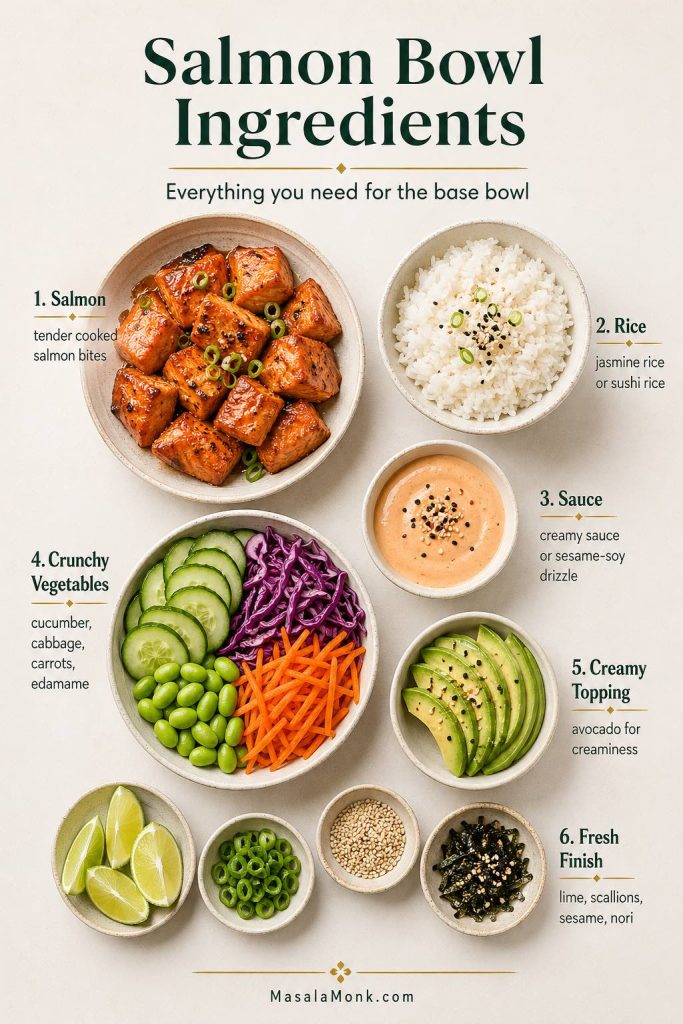
Salmon
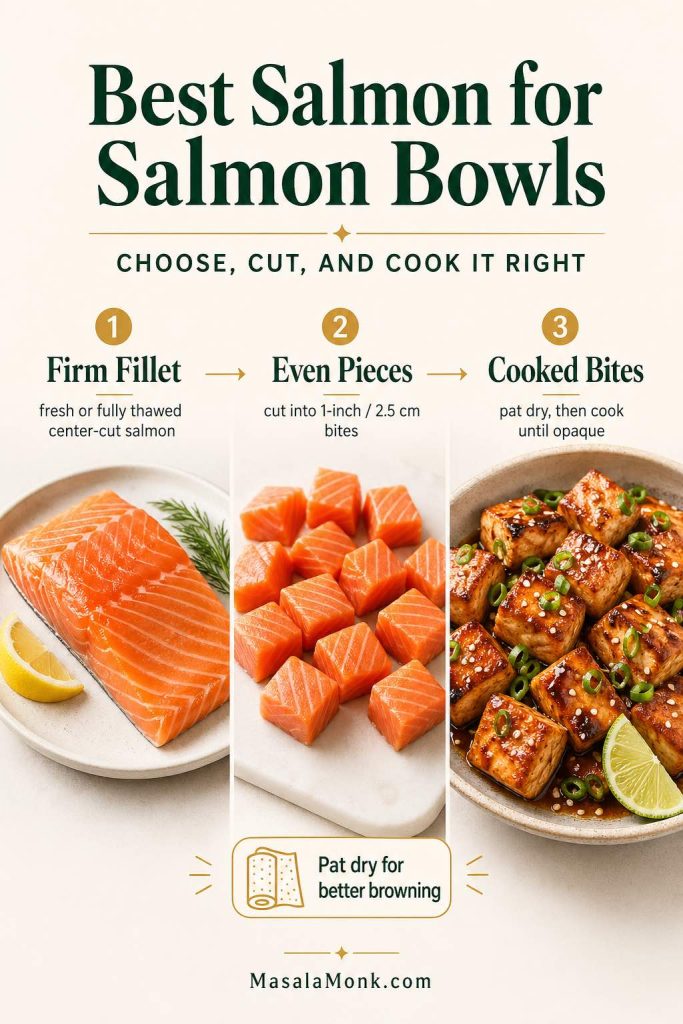
Use fresh or fully thawed salmon. Skinless salmon is easiest if you want salmon bites, but full fillets also work. If you cook full fillets, simply flake the salmon over the rice before adding sauce and toppings.
The best salmon for salmon bowls is a fresh or fully thawed center-cut fillet that can be cut into even 1-inch / 2.5 cm pieces. Atlantic salmon, sockeye, coho, or any firm salmon fillet can work; however, the most important thing is to pat it dry and cook it just until opaque.
This recipe is designed for cooked salmon. As a result, it is easier for most home kitchens than raw salmon bowls, while still giving you the fresh, colorful rice-bowl feel.
Rice or Grain
White rice, jasmine rice, sushi rice, brown rice, quinoa, cauliflower rice, and coconut rice can all work. For example, use sushi rice for a sushi-style bowl, jasmine rice for an easy salmon and rice bowl, quinoa for a healthy salmon bowl, and coconut rice for a spicy or mango-topped version.
Sauce
The creamy sriracha yogurt sauce is the easiest first choice because it is tangy, spicy, and lighter than classic spicy mayo. For something richer, use spicy mayo. For something lighter, use the sesame-soy drizzle. If you want a sweeter bowl, use teriyaki sauce instead.
Toppings
The easiest salmon bowl toppings are cucumber, avocado, edamame, cabbage, carrots, scallions, sesame seeds, lime, nori, or furikake. For a sweet-bright topping, spoon over fresh mango salsa instead of using plain diced mango.
How to Make a Salmon Bowl
This recipe comes together best when you build the salmon bowl in layers. First, keep the rice warm. Then, cook the salmon just until tender. After that, add cold crunchy toppings for contrast and drizzle the sauce at the end so the bowl stays fresh instead of heavy.
1. Cook the Rice
Start with the rice because it can sit covered while you cook the salmon. Warm rice makes the bowl feel more complete and helps the sauce spread through the bowl. Leftover rice also works; however, reheat it before assembling so the bowl does not taste cold and dry.
2. Season and Cook the Salmon
Cut the salmon into 1-inch / 2.5 cm pieces, pat them dry, then season them with soy sauce, garlic, ginger, honey, lime juice or rice vinegar, and a little oil. Because salmon bites cook quickly, avoid crowding the pan and watch closely near the end.
3. Mix the Sauce
For the creamy sauce, stir Greek yogurt with sriracha, lime juice, a pinch of salt, and a small spoon of honey if you want a rounder flavor. Then add a splash of water until it drizzles easily. For a lighter bowl, use the sesame-soy drizzle instead.
4. Assemble the Bowl
Add warm rice to the bowl first, then salmon, crunchy vegetables, avocado, sauce, and garnishes. Finally, finish with scallions, sesame seeds, lime, nori, furikake, chili crisp, or herbs. The best bowls have a little warmth, crunch, creaminess, acidity, and spice in every bite.
Before serving, taste one bite with rice, salmon, sauce, and toppings together. Add lime if it tastes flat, more sauce if it feels dry, cucumber or rice if it tastes salty, and chili crisp or sriracha if you want more heat.

Best Rice for Salmon Bowls
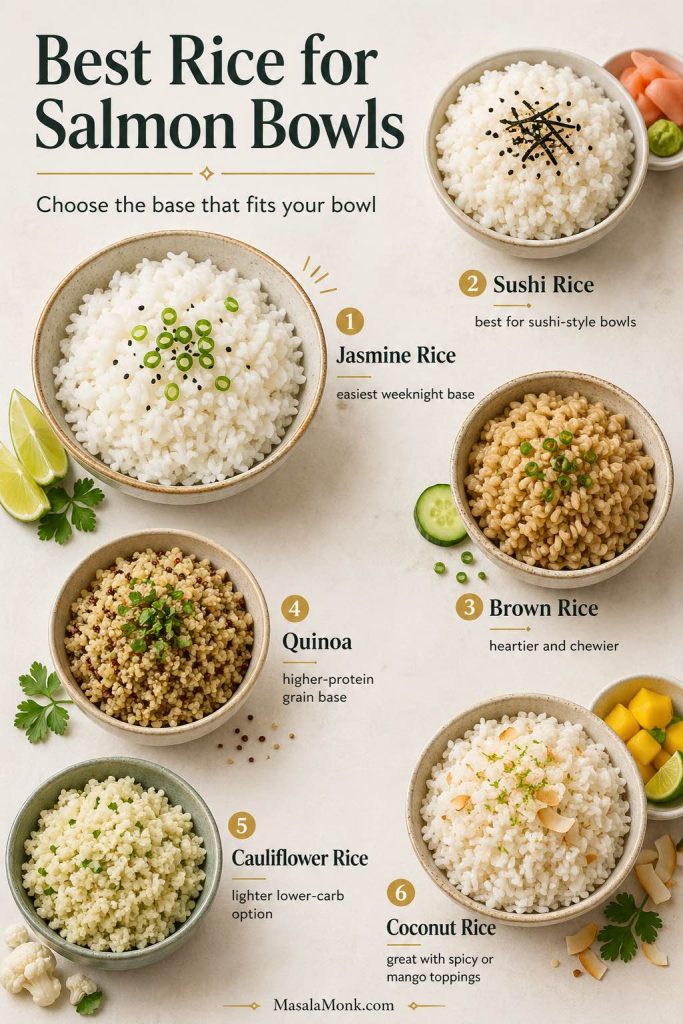
The rice changes the whole bowl, which is why this recipe gives you several options for pairing it with salmon. For example, soft white rice makes it feel like a quick weeknight dinner, while sushi rice makes it taste closer to a deconstructed sushi roll. Meanwhile, quinoa or brown rice makes the bowl heartier and more meal-prep friendly.
| Rice or Base | Best For | Why It Works |
|---|---|---|
| Jasmine rice | Easy weeknight salmon bowls | Soft, fragrant, simple, and easy to pair with most sauces. |
| Sushi rice | Sushi-style or poke-style salmon bowls | Sticky enough to hold sauce and toppings well. |
| Brown rice | Heartier salmon rice bowls | Nuttier, chewier, and more filling than white rice. |
| Quinoa | Healthy salmon bowls | A good choice when you want a higher-protein grain base. |
| Cauliflower rice | Lower-carb salmon bowls | Lightens the bowl while keeping the sauce and toppings central. |
| Coconut rice | Spicy or tropical salmon bowls | Pairs nicely with chili, lime, mango, and herbs. |
| Crispy rice | Texture-heavy salmon bowls | Adds crunch and makes the bowl feel more restaurant-style. |
Jasmine Rice
Jasmine rice is the easiest base for a weeknight bowl because it is soft, lightly fragrant, and quick to pair with creamy sauce, sesame soy dressing, teriyaki sauce, green chutney yogurt, or spicy mayo.
Sushi Rice
Sushi rice is best when you want a sushi-style or poke-style bowl. Its slightly sticky texture helps the salmon, cucumber, avocado, nori, sesame, and sauce feel connected instead of scattered.
Brown Rice
Brown rice gives the bowl a nuttier flavor and a chewier texture, so use it when you want the meal to feel more filling or meal-prep friendly.
Quinoa
Quinoa is useful for a healthy salmon bowl or high-protein salmon bowl. It also pairs nicely with Greek yogurt sauce, tzatziki, green chutney yogurt, cucumber, avocado, herbs, and lemon.
Cauliflower Rice
Cauliflower rice is useful when you want a lower-carb salmon bowl. However, keep the toppings generous and the sauce flavorful so the bowl still feels satisfying.
Coconut Rice
Coconut rice shines with spicy salmon, mango salsa, lime, cilantro, chili crisp, and cucumber. As a result, it turns a simple bowl into something warmer, sweeter, and more tropical.
Crispy Rice
Crispy rice is best when texture is the whole point. Use warm rice pressed into a pan until crisp in spots, then add salmon, cucumber, avocado, and spicy sauce on top.
How to Cook Salmon for Bowls
This salmon bowl recipe is flexible because the fish can be pan-seared, air fried, baked, grilled, or flaked from leftovers. For food safety, fish such as salmon is generally cooked to 145°F / 63°C, or until the flesh is no longer translucent and separates easily with a fork, according to FoodSafety.gov safe minimum internal temperature guidance.
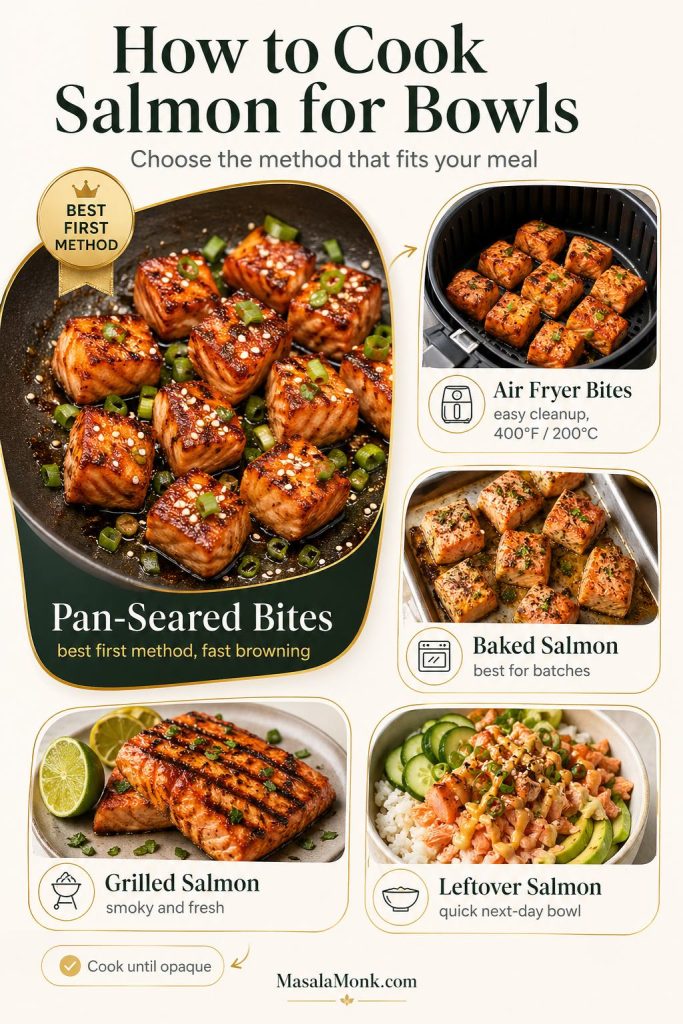
Pan-Seared Salmon Bites
Pan-seared salmon bites are the best first method for this recipe. Cut the salmon into 1-inch / 2.5 cm pieces, pat them dry, season them, then cook in a single layer for 5 to 7 minutes total, turning once or twice, until browned outside and opaque inside.
Air Fryer Salmon Bowl
To make an air fryer salmon bowl, season the salmon bites the same way, then arrange them in a lightly oiled air fryer basket in a single layer. Air fry at 400°F / 200°C for about 6 to 8 minutes, shaking or turning once, until the salmon is opaque and cooked through. After that, serve over rice with cucumber, avocado, edamame, and sauce.

Baked Salmon Bowl
When you want less stovetop cleanup, bake seasoned salmon bites or fillets at 400°F / 200°C until cooked through. Salmon bites usually take about 8 to 12 minutes, while fillets often take about 10 to 14 minutes depending on thickness. This method is especially helpful if you are making several bowls at once.
Grilled Salmon Bowl
Grilled salmon suits fresh summer toppings like cucumber, cabbage, mango salsa, herbs, lime, avocado, and yogurt sauce. Once the salmon is cooked, flake it over the bowls and add sauce right before serving.
Leftover Cooked Salmon
Leftover cooked salmon can make a very good salmon rice bowl. Reheat it gently or serve it cool over warm rice with a bold sauce. If the salmon feels a little dry, flake it and use extra sauce, avocado, lime, and cucumber to bring the bowl back to life.
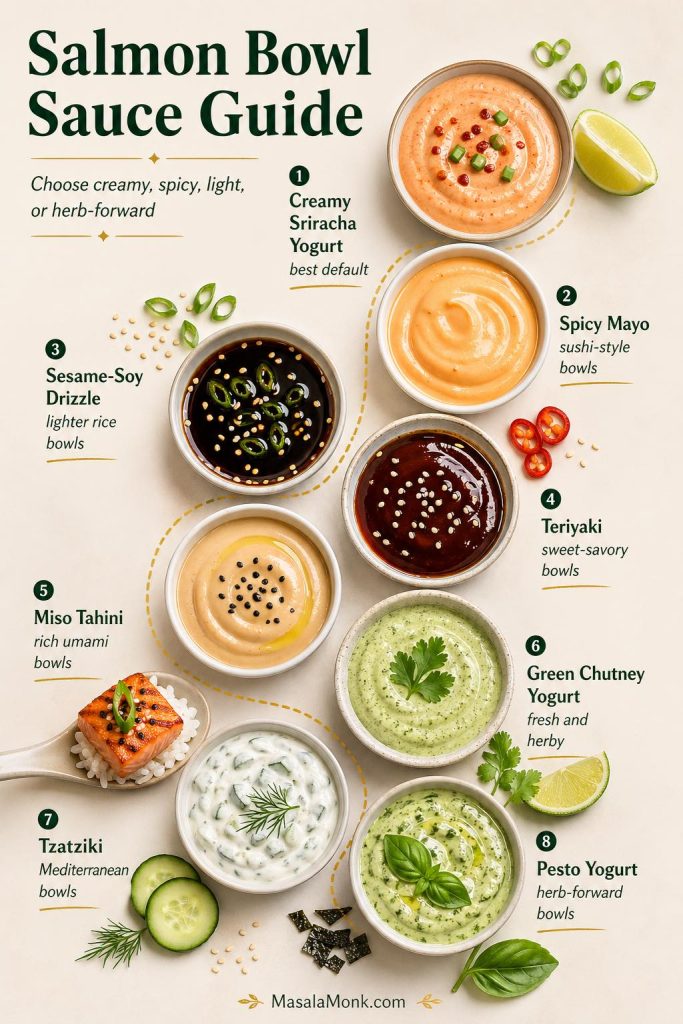
Salmon Bowl Sauce Guide
The sauce is what makes the salmon, rice, and toppings feel like one complete bowl recipe. A good sauce should bring moisture, salt, acidity, and flavor direction. Therefore, use this as a quick salmon bowl sauce recipe and dressing guide: choose one based on the bowl you want, whether creamy, spicy, sweet-savory, herb-forward, Mediterranean, or light and citrusy.
| Sauce | Quick Formula for 2 Bowls | Best Use |
|---|---|---|
| Creamy sriracha yogurt | 1/3 cup / 80 g Greek yogurt + 1–2 tsp sriracha + 1 tsp lime juice + pinch of salt | Best default sauce |
| Spicy mayo | 3 tbsp mayo + 1–2 tsp sriracha + 1 tsp lime juice + splash of water | Sushi-style or spicy salmon bowls |
| Sesame-soy drizzle | 1 tbsp soy sauce or tamari + 1 tsp rice vinegar + 1 tsp sesame oil + 1 tsp honey | Lighter salmon rice bowls |
| Teriyaki sauce | Use 2 to 3 tbsp teriyaki sauce, or brush it over the salmon near the end of cooking | Sweet-savory weeknight bowls |
| Miso tahini | 1 tbsp tahini + 1 tsp white miso + 1 tsp lime juice or rice vinegar + warm water to loosen | Richer umami bowls |
| Green chutney yogurt | 2 tbsp Greek yogurt + 1 tbsp green chutney + squeeze of lime | Fresh MasalaMonk-style bowls |
| Tzatziki | Use prepared tzatziki, or thin with lemon juice if needed | Mediterranean salmon bowls |
| Pesto yogurt | 2 tbsp Greek yogurt + 1 tbsp pesto + lemon juice + water to loosen | Herb-forward bowls |
Creamy Sriracha Yogurt Sauce
This is the best default sauce for the main recipe because it gives the bowl tang, heat, and creaminess without becoming too heavy. Stir Greek yogurt with sriracha, lime juice, salt, and a tiny bit of honey if you want balance.
Spicy Mayo
Use spicy mayo when you want a richer sushi-style bowl. Mix mayonnaise with sriracha, lime juice, and a splash of water. It suits sushi rice, cucumber, avocado, nori, sesame seeds, furikake, and chili crisp.
Teriyaki Sauce
Teriyaki sauce is the best choice when you want a sweeter, glossy bowl. Pair it with rice, cucumber, edamame, avocado, sesame, and scallions. However, if using bottled teriyaki sauce, taste before adding extra salt because some sauces are already quite salty.
Sesame Soy Drizzle
For a lighter salmon rice bowl sauce, mix soy sauce or tamari with rice vinegar or lime juice, sesame oil, ginger, and a little honey. This keeps the bowl fresh and savory without adding a creamy element.
Miso Tahini Sauce
Miso tahini sauce is a strong choice when you want a deeper, nuttier bowl. Whisk tahini with white miso, lime juice or rice vinegar, warm water, and a touch of honey. Then pair it with brown rice, cucumber, cabbage, carrots, and sesame seeds.
Green Chutney Yogurt Sauce
For a fresh MasalaMonk-style bowl, stir green chutney into Greek yogurt with a squeeze of lime. It turns the bowl herby, spicy, tangy, and bright, especially with cucumber, cabbage, rice, and avocado.
Tzatziki Sauce
Use tzatziki sauce for a Mediterranean salmon bowl. It is a good match for rice or quinoa, cucumber, tomato, herbs, lemon, olive oil, and grilled or baked salmon.
Pesto Yogurt Sauce
For an herb-forward bowl, thin pesto sauce with Greek yogurt, lemon juice, and a little water. It suits salmon, quinoa, tomatoes, cucumber, avocado, and greens.
Best Toppings for Salmon Bowls
A good salmon bowl recipe needs toppings that do more than fill space. If you are wondering what to put in a salmon bowl, think in roles instead of random extras. Instead of piling on toppings randomly, choose ingredients that add crunch, creaminess, freshness, spice, savory depth, or brightness.
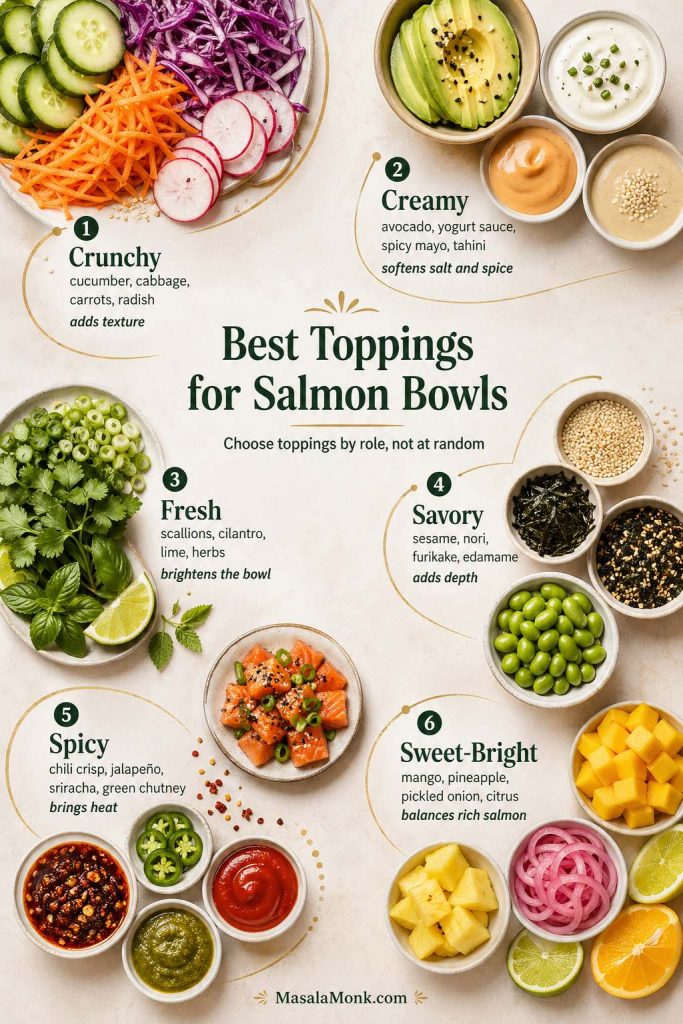
Crunchy Toppings
Cucumber, cabbage, carrots, radish, and crispy onions add the crunch that keeps the bowl from feeling soft or heavy. Cucumber is the easiest default because it suits nearly every sauce.
Creamy Toppings
Avocado is the most useful creamy topping because it softens salty sauces, balances spice, and makes the bowl feel more satisfying. Yogurt sauce, spicy mayo, tahini sauce, and pesto yogurt sauce can also add creaminess.
Fresh Toppings
Scallions, cilantro, lime, herbs, and mango salsa make the bowl taste brighter. If the salmon or sauce feels rich, add more lime, herbs, or a spoon of mango salsa to lift the whole bowl.
Savory Toppings
Sesame seeds, edamame, nori, furikake, and pickled ginger bring savory depth. These are particularly useful for sushi-style bowls, poke-style cooked salmon bowls, spicy bowls, and sesame-soy salmon rice bowls.
Spicy Toppings
Chili crisp, jalapeño, sriracha, green chutney, crushed red pepper, and spicy mayo all pair nicely with salmon. However, if you are adding a spicy topping, keep the sauce slightly creamy or acidic so the heat does not feel harsh.
Sweet-Bright Toppings
Mango, pineapple, pickled onion, and citrus are useful when the bowl needs freshness. They shine with spicy salmon, coconut rice, cucumber, avocado, and lime.
Salmon Bowl Variations
Once you know the basic formula, this recipe can become almost any style of salmon bowl. Instead of rewriting the whole recipe, keep the salmon, rice, sauce, and toppings balanced, then change one or two components to create a new version.
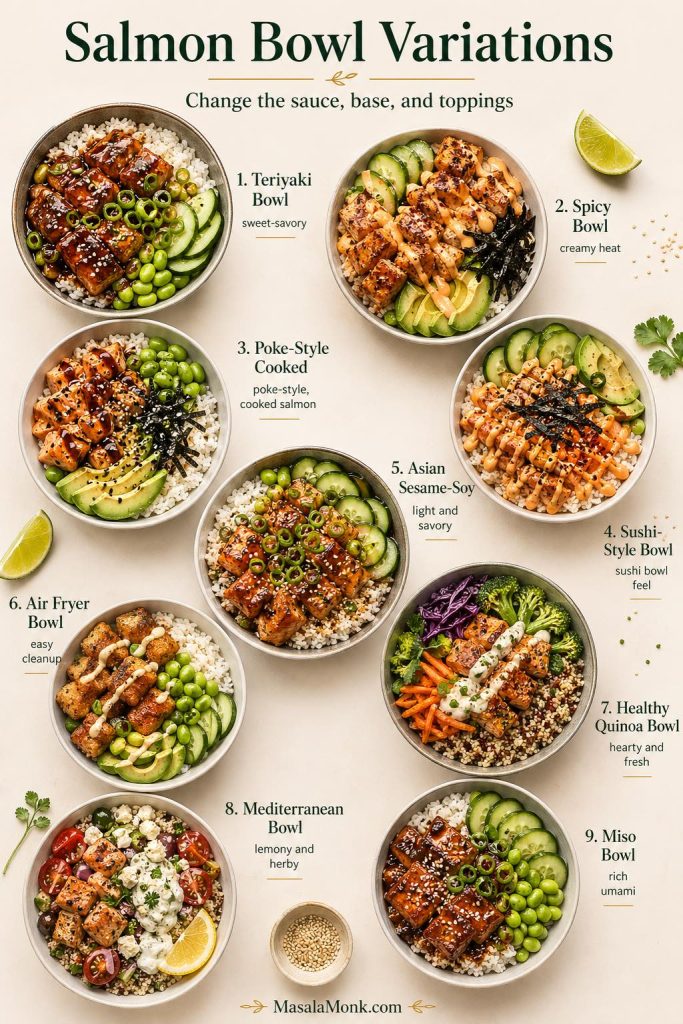
Teriyaki Salmon Bowl
Choose teriyaki sauce when you want a sweeter, glossy weeknight bowl. Then serve the salmon over rice with cucumber, avocado, edamame, sesame seeds, and scallions.
Spicy Salmon Bowl
Make it spicy by adding spicy mayo, chili crisp, cucumber, avocado, nori, sesame seeds, and lime. This version is a natural fit for sushi rice or jasmine rice.
Poke-Style Cooked Salmon Bowl
A poke-style cooked salmon bowl works best with sushi rice, cucumber, avocado, edamame, sesame seeds, nori, and a sesame-soy drizzle. If you are considering raw salmon, read the FDA seafood safety guidance first; cooked salmon is the safer default for homemade bowls.
Salmon Sushi Bowl
To make it sushi-style, use cooked salmon, sushi rice, cucumber, avocado, nori, sesame seeds, furikake, and spicy mayo. Then add pickled ginger if you want a sharper sushi-style finish.
Asian Sesame Soy Salmon Bowl
For an Asian salmon bowl, use the sesame-soy drizzle, rice, cucumber, edamame, avocado, scallions, sesame seeds, and nori. Add chili crisp or sriracha if you want more heat.
Air Fryer Salmon Bowl
Use the air fryer when you want quick salmon bites with less stovetop cleanup. After cooking, serve them over rice with crunchy toppings and either creamy sriracha yogurt sauce, spicy mayo, teriyaki sauce, or sesame soy drizzle.
Healthy Salmon Bowl
To keep the bowl lighter, start with brown rice, quinoa, or cauliflower rice. Then add extra cucumber, cabbage, carrots, edamame, herbs, avocado, and a Greek yogurt-based sauce. Keep it satisfying rather than sparse: the goal is fresh, balanced, and filling.
Mediterranean Salmon Bowl
The Mediterranean version works best with rice or quinoa, cucumber, tomato, herbs, lemon, olive oil, and tzatziki sauce. Grilled or baked salmon is especially good here.
Miso Salmon Bowl
Miso gives the bowl a deeper, more savory flavor. Glaze the salmon with miso, honey, ginger, and rice vinegar, then serve it with rice, cucumber, edamame, scallions, sesame seeds, and a little extra lime or rice vinegar for brightness.
Smoked Salmon Bowl
A no-cook version is easiest with smoked salmon over sushi rice or greens, cucumber, avocado, scallions, sesame, and a light lemon-yogurt or sesame-soy sauce. Since smoked salmon is already salty, keep the sauce lighter.
Crispy Salmon Rice Bowl
For extra texture, cook the salmon bites until the edges are deeply browned. Then serve them over warm rice or crispy rice with cucumber, avocado, spicy sauce, sesame, and nori.
How to Make a Healthy Salmon Bowl
A healthy salmon bowl recipe should still feel satisfying. Instead of removing everything rich or flavorful, build the bowl with a filling base, enough vegetables, a good sauce, and toppings that add texture.
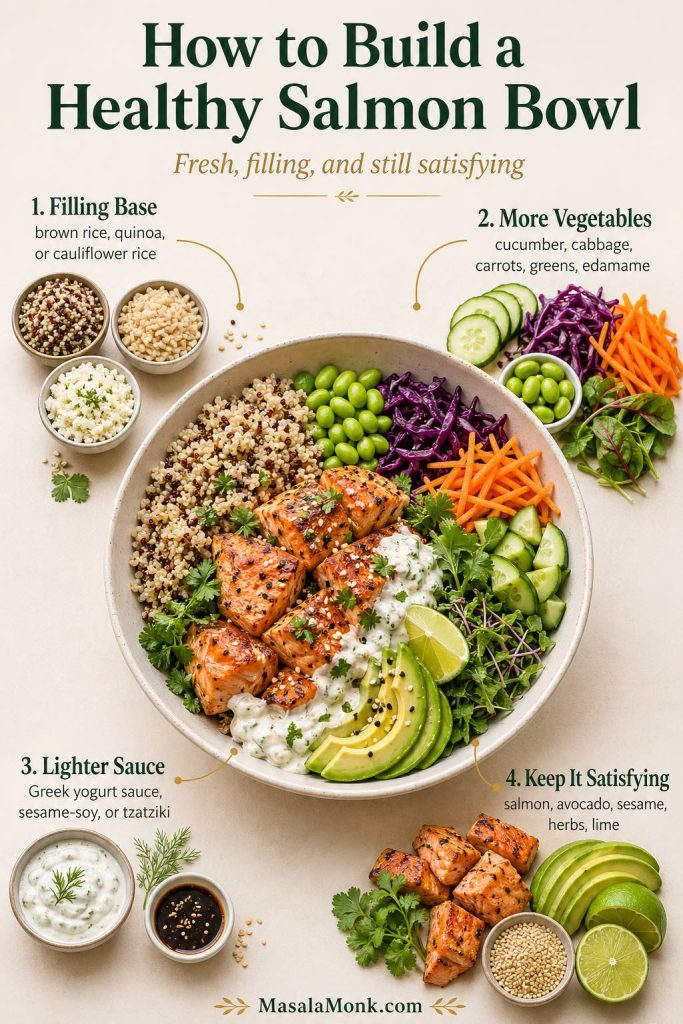
Choose a Filling Base
Use brown rice for a heartier bowl, quinoa for a higher-protein grain base, or cauliflower rice if you want a lighter, lower-carb option. However, white rice is also fine when the rest of the bowl has plenty of salmon, vegetables, and sauce.
Add More Vegetables
Cucumber, cabbage, carrots, edamame, greens, radish, and herbs make the bowl more colorful and fresh. Add at least two vegetables so the bowl has crunch and contrast.
Use a Lighter Sauce
Greek yogurt sauce, sesame soy drizzle, chutney yogurt sauce, and tzatziki are all good choices when you want a lighter salmon bowl. They add flavor and moisture without making the bowl feel too heavy.
Keep the Bowl Satisfying
Do not skip all the rich ingredients. A little avocado, sesame, yogurt sauce, or olive oil can make the bowl feel complete. As a result, a good healthy salmon bowl should taste fresh and filling, not plain.
Salmon Bowl Meal Prep and Storage
This salmon bowl recipe can work for meal prep, but it is best when the warm and cold parts are stored separately. As a result, the rice, sauce, and sturdy vegetables can be prepped ahead, while delicate toppings should be added right before serving.
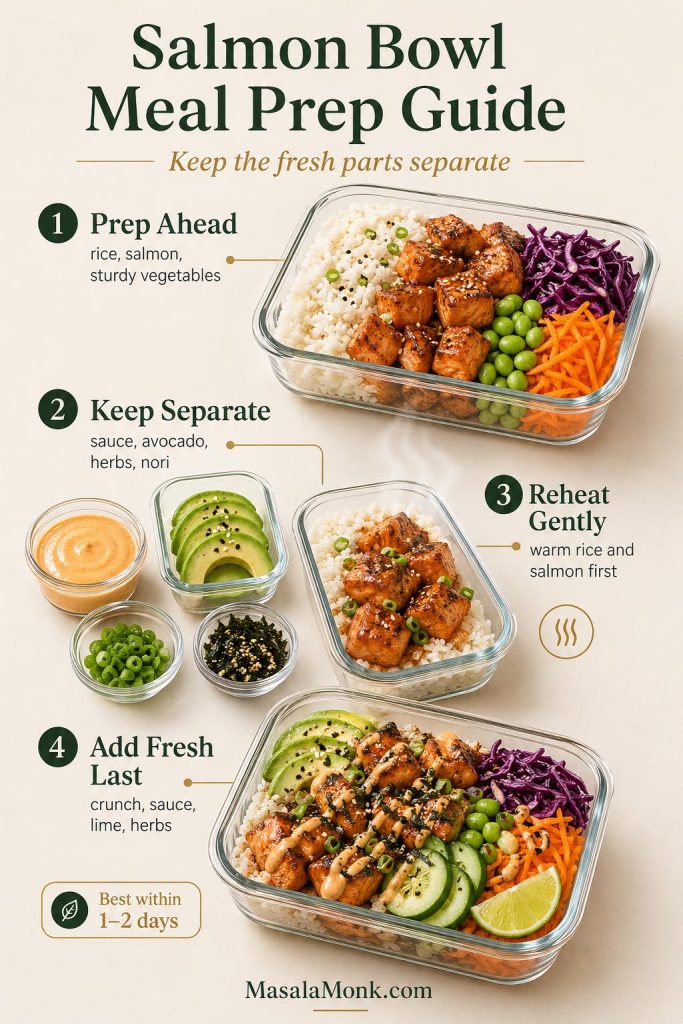
What to Prep Ahead
Cook the rice, mix the sauce, wash and chop sturdy vegetables, and portion your toppings. You can also cook the salmon ahead, although it tastes best freshly cooked or gently reheated.
Cool cooked rice promptly, refrigerate it in a covered container, and reheat it until steaming before building the bowl.
What to Keep Separate
Keep sauce, avocado, herbs, nori, furikake, and crispy toppings separate until serving, especially if packing the bowls for lunch. This keeps the bowl from becoming soggy and helps the toppings stay fresh.
How to Reheat
Reheat the rice and salmon gently, then add cold toppings and sauce after warming. If the salmon was already cooked, avoid overheating it or it can become dry.
For food safety, reheat leftovers until steaming hot. FoodSafety.gov lists leftovers at 165°F / 74°C on its safe minimum internal temperature chart.
How Long It Keeps
For best texture, eat salmon bowls within 1 to 2 days. Store cooked salmon, rice, sauce, and fresh toppings in separate airtight containers whenever possible.
Leftover Salmon Ideas
Leftover cooked salmon is perfect for quick bowls because it already has flavor and texture. Flake it over warm rice, add cucumber, avocado, herbs, and sauce, then finish with lime or sesame seeds.
You can also turn leftover salmon into a salmon salad bowl, salmon wrap, salmon fried rice-style bowl, or salmon croquettes for another meal.
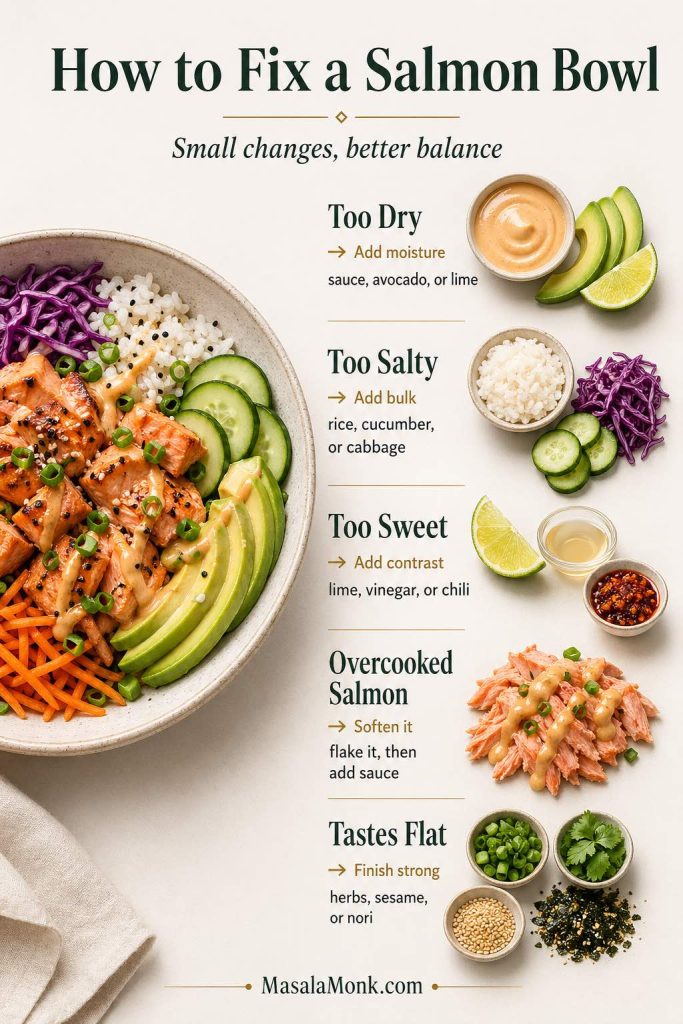
Troubleshooting Salmon Bowls
If your bowl tastes almost right but not quite finished, the fix is usually sauce, acid, crunch, or balance. Therefore, use the guide below before changing the whole recipe.
| Problem | How to Fix It |
|---|---|
| The bowl tastes dry | Add more sauce, avocado, lime juice, or a small spoon of sesame soy drizzle. |
| The bowl is too salty | Add more rice, cucumber, avocado, cabbage, or yogurt sauce. |
| The bowl is too sweet | Add lime juice, rice vinegar, chili crisp, cucumber, or herbs. |
| The salmon is overcooked | Flake it into the bowl and use extra sauce, avocado, cucumber, and lime. |
| The bowl feels flat | Add acid, crunch, herbs, sesame, nori, furikake, or a stronger sauce. |
What to Serve with Salmon Bowls
Salmon bowls are usually filling enough on their own, but you can serve them with a small side if you want a bigger meal. Good options include miso soup, cucumber salad, seaweed salad, roasted broccoli, pickled vegetables, simple greens, or mango salsa.
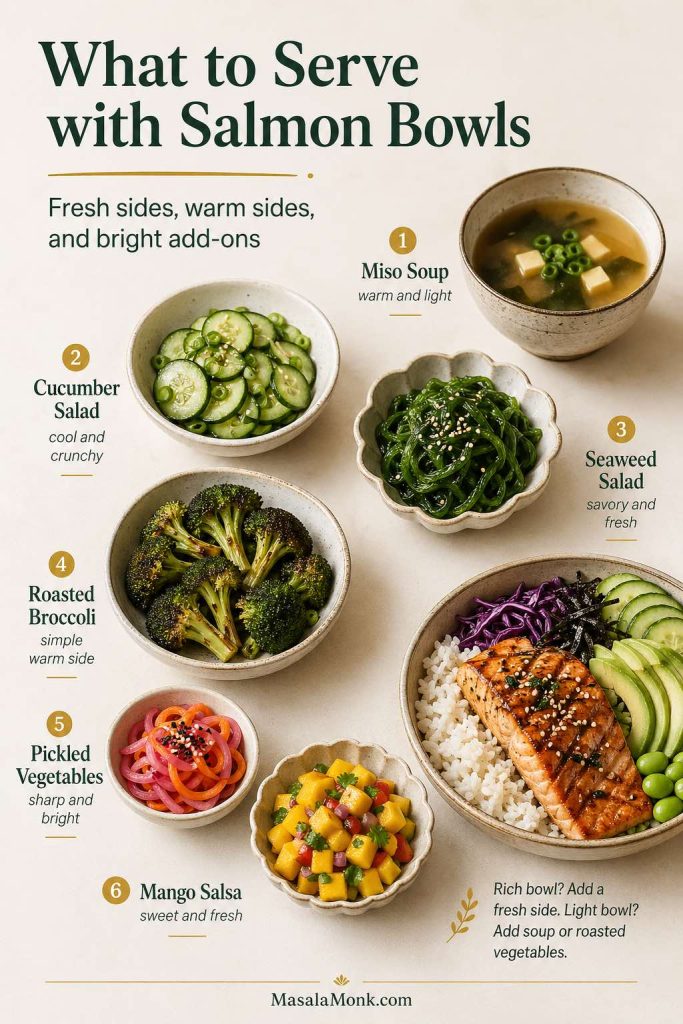
If the bowl is spicy or rich, choose a fresh side. If the bowl is light, choose something warmer like soup or roasted vegetables.
FAQs About Salmon Bowls
What is a salmon bowl made of?
A salmon bowl recipe is usually made with cooked salmon, rice or grains, sauce, vegetables, and toppings. For example, a simple version can include salmon, rice, cucumber, avocado, edamame or cabbage, scallions, sesame seeds, and a creamy or soy-based sauce.
What is the best rice for salmon bowls?
Jasmine rice is the easiest everyday choice, while sushi rice is best for sushi-style or poke-style bowls. Brown rice and quinoa are good for heartier or healthier bowls, and coconut rice is a strong match for spicy salmon, mango, lime, and herbs.
What sauce goes best with salmon and rice?
Creamy sriracha yogurt sauce is the best default because it adds tang, spice, and moisture. Spicy mayo, teriyaki sauce, sesame soy drizzle, miso tahini sauce, green chutney yogurt, tzatziki, and pesto yogurt also work depending on the flavor you want.
Can I make a salmon bowl in the air fryer?
Yes. Cut the salmon into 1-inch / 2.5 cm pieces, season it, and air fry at 400°F / 200°C for about 6 to 8 minutes, depending on the size of the pieces. Arrange the salmon in a single layer and turn or shake once so it cooks evenly.
Is a salmon bowl healthy?
A healthy salmon bowl recipe usually includes salmon, a filling base, vegetables, and a balanced sauce. Use brown rice, quinoa, or cauliflower rice if you want a lighter or higher-protein bowl, and choose Greek yogurt sauce or sesame soy drizzle instead of a heavier mayo-based sauce.
Can I make a salmon bowl without rice?
Yes. Use quinoa, cauliflower rice, greens, cabbage, or a mix of vegetables instead of rice. If you skip rice, make sure the bowl still has enough sauce, avocado, vegetables, and toppings so it feels complete.
Is a salmon poke bowl raw or cooked?
A traditional poke-style bowl is often made with raw fish, but this homemade salmon bowl uses cooked salmon by default. Therefore, you can still use sushi rice, cucumber, avocado, edamame, sesame, nori, and soy-sesame sauce to get a poke-style flavor without using raw salmon.
Can I use leftover salmon for a salmon bowl?
Yes. Leftover cooked salmon works well in salmon bowls. Reheat it gently or serve it cool over warm rice, then add sauce, cucumber, avocado, herbs, sesame, and lime.
Can I use canned salmon for a salmon bowl?
Yes. Drain canned salmon well, remove any large bones or skin if you prefer, then flake it over warm rice with cucumber, avocado, scallions, sesame, and a bold sauce. Canned salmon works best with spicy mayo, green chutney yogurt, or sesame-soy drizzle because those sauces bring back freshness.
Can I use frozen salmon?
Yes. Thaw frozen salmon in the refrigerator, pat it very dry, then cut and season it as written. Avoid cooking frozen salmon bites directly for this bowl because the outside can overcook before the center is ready.
Can I use smoked salmon?
Yes, but use it as a no-cook variation rather than cooking it again. Since smoked salmon is already salty, pair it with a lighter sauce, cucumber, avocado, lemon, herbs, and rice or greens.
Can I make a salmon avocado bowl?
Yes. Use the main salmon rice bowl recipe and make avocado one of the main toppings. Avocado adds creaminess, balances salty sauce, and pairs nicely with spicy mayo, sesame-soy drizzle, teriyaki sauce, and lime.
What vegetables go well in salmon bowls?
Cucumber, cabbage, carrots, edamame, radish, avocado, scallions, greens, and herbs all work well. Choose at least one crunchy vegetable and one fresh garnish so the bowl does not feel too soft or rich.
How long does a salmon rice bowl last in the fridge?
For best texture, eat a salmon rice bowl within 1 to 2 days. Store the salmon, rice, sauce, and toppings separately when possible, then assemble after reheating the warm components.
This salmon bowl recipe is easiest when you start with the main version first, then adjust the rice, sauce, toppings, and cooking method to fit the bowl you want. Once you have the formula, you can make it creamy, spicy, lighter, teriyaki-style, sushi-style, or meal-prep friendly without starting over.