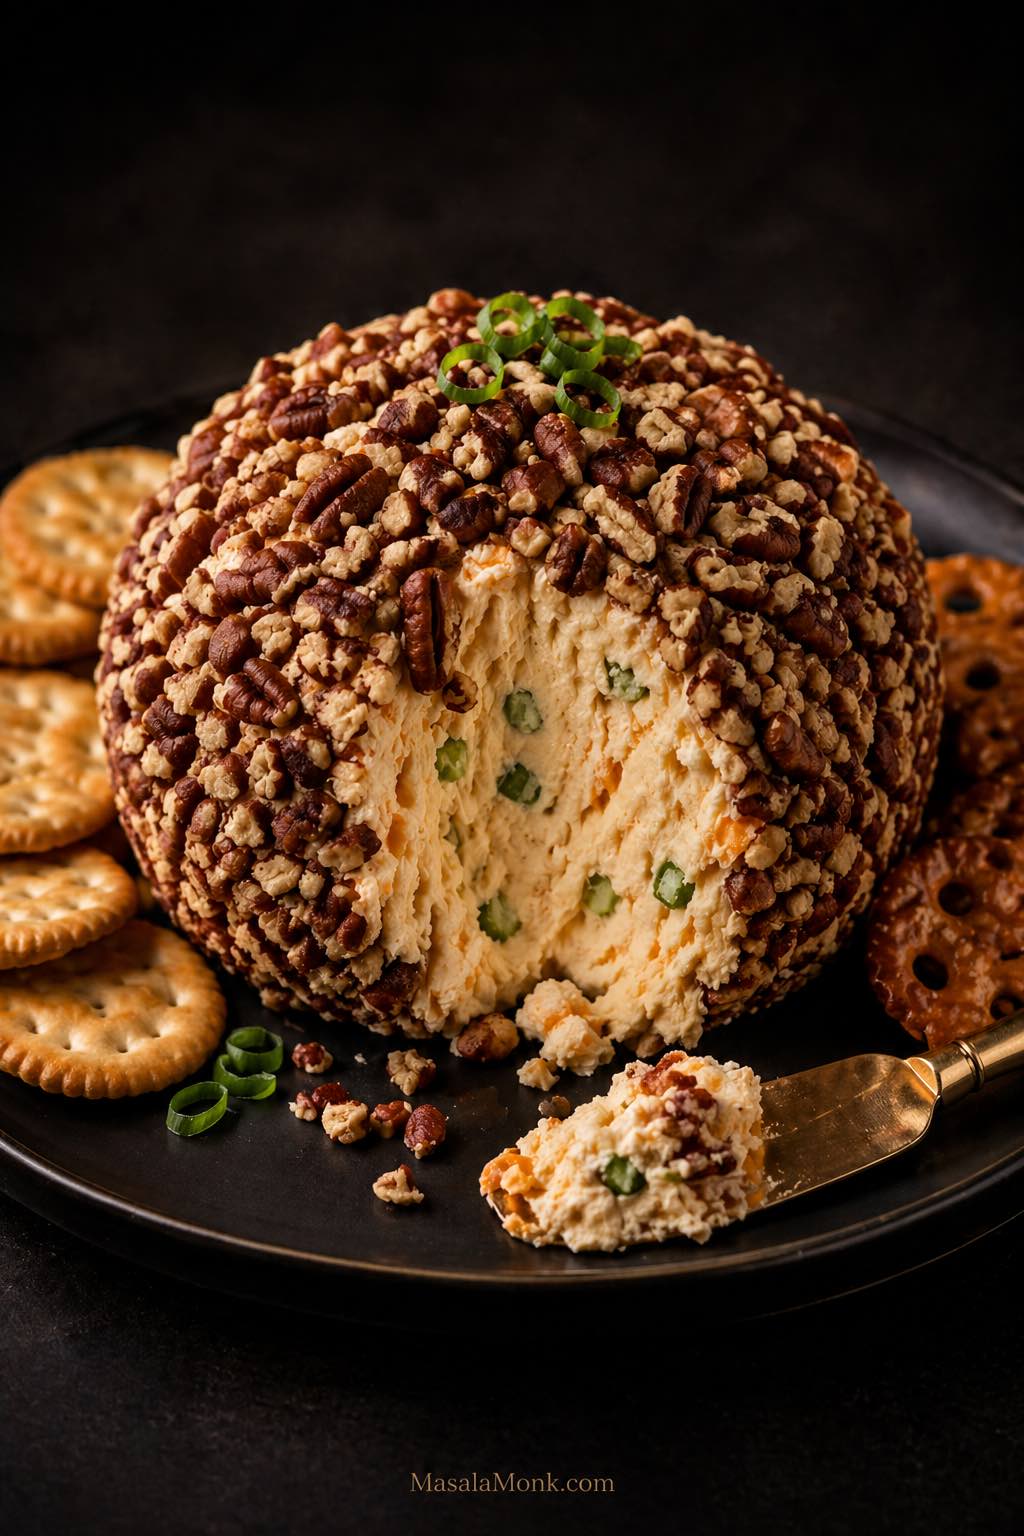
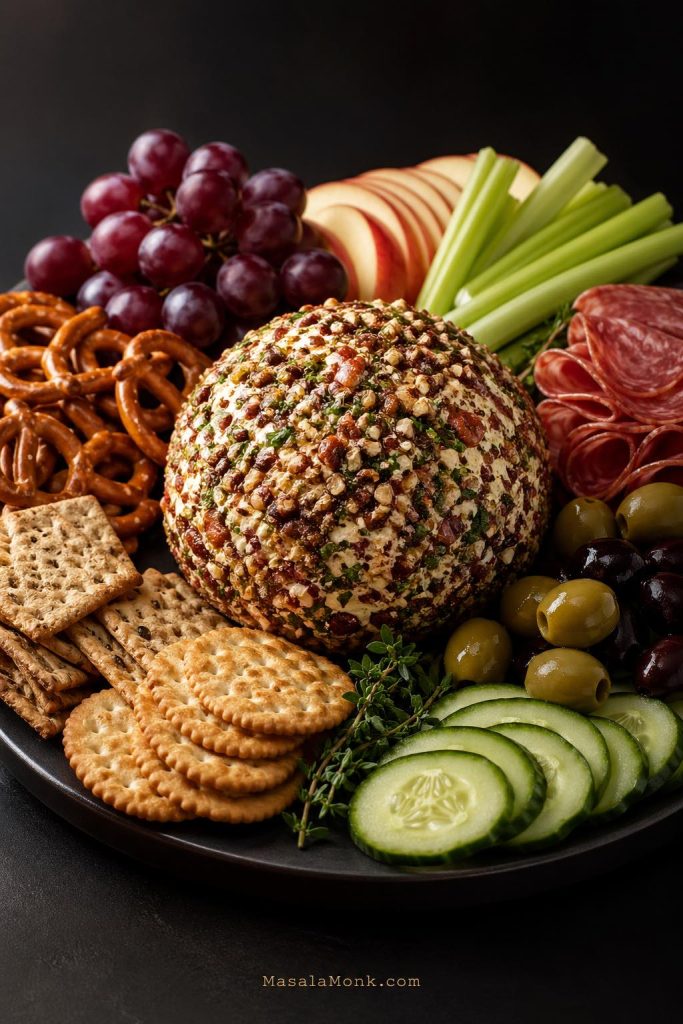
This easy cheese ball recipe is the classic no-cook party appetizer you want when you need something creamy, savory, make-ahead friendly, and reliable. It starts with cream cheese, sharp cheddar, green onion, simple seasonings, and a crunchy pecan coating, then chills into a firm but spreadable ball that works with crackers, pretzels, vegetables, holiday boards, game day snacks, and party platters.
A good cheese ball should not taste like plain cream cheese with nuts stuck to the outside. Instead, the filling should be creamy, savory, a little sharp from the cheddar, fresh from the green onion, and easy to scoop once it softens slightly on the platter. Since the base recipe is simple, you can also turn the same cheese mixture into a bacon ranch cheese ball, dried beef cheese ball, pineapple cheese ball, cranberry pecan cheese ball, mini cheese ball bites, cheese ball dip, or a no-nut version without starting over.
This is the chilled cream cheese appetizer, not the crispy fried snack. If you are looking for hot, fried cheese balls with an Indian-inspired flavor profile, MasalaMonk already has a guide to crispy Indian-inspired cheese balls. Here, we are making the classic cheese ball served with crackers, vegetables, and party boards.
Active prep is only about 15 minutes. The rest of the time is chilling, which makes this an easy make-ahead appetizer rather than a last-minute kitchen project.
Table of Contents
Make the Cheese Ball
Quick Answer: What Is a Cheese Ball?
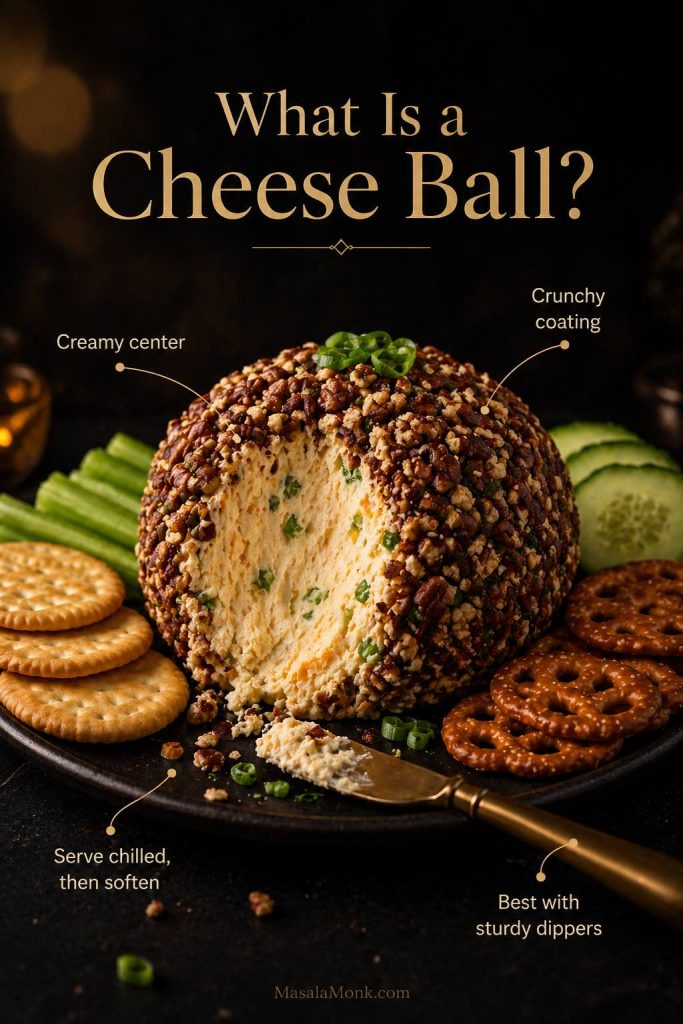
A cheese ball is a chilled, spreadable appetizer made with cream cheese, shredded cheese, seasonings, and an outer coating such as chopped pecans, walnuts, herbs, bacon, crushed pretzels, or dried cranberries. Once the filling is mixed, it is shaped into a ball, chilled until firm, rolled in the coating, and served with crackers, vegetables, pretzels, crostini, or a party board.
Unlike fried cheese balls, this version is creamy, cold, and spreadable rather than hot, breaded, or crisp. First, the cream cheese makes it smooth. Then, the cheddar gives it sharper flavor, the seasonings keep it from tasting flat, and the coating adds crunch and color. After chilling, the ball should hold its shape on the platter; however, this recipe should still soften enough to spread after 15 to 20 minutes at room temperature.
Cheese Ball Ingredients at a Glance
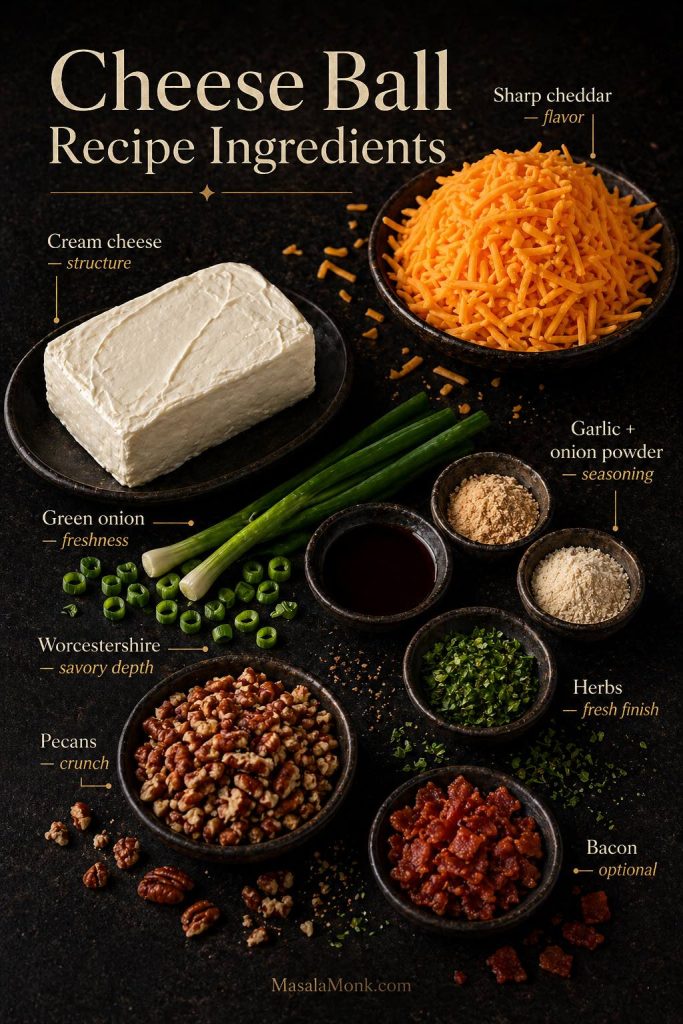
If you only remember one thing, remember this: cream cheese gives the ball body, cheddar gives this recipe sharper flavor, seasonings make it taste complete, and the coating makes it party-ready. Once those jobs are clear, it becomes much easier to adjust the recipe without making the filling too soft, salty, or bland.
| Ingredient | What It Does | Best Tip |
|---|---|---|
| Cream cheese | Creamy base and structure | Use softened block-style cream cheese, not melted cream cheese |
| Sharp cheddar | Real cheese flavor | Freshly shredded cheddar blends best, although pre-shredded works in a pinch |
| Green onion | Freshness and mild onion bite | Slice it finely so every bite gets a little |
| Worcestershire sauce | Savory depth | Start with 1 teaspoon / 5 ml, then taste before adding more |
| Garlic and onion powder | Even seasoning | Use powders because they spread smoothly through the cream cheese |
| Pecans, herbs, bacon, or pretzels | Crunch, color, and finish | Roll the cheese ball in crunchy coatings close to serving |
How to Make a Cheese Ball
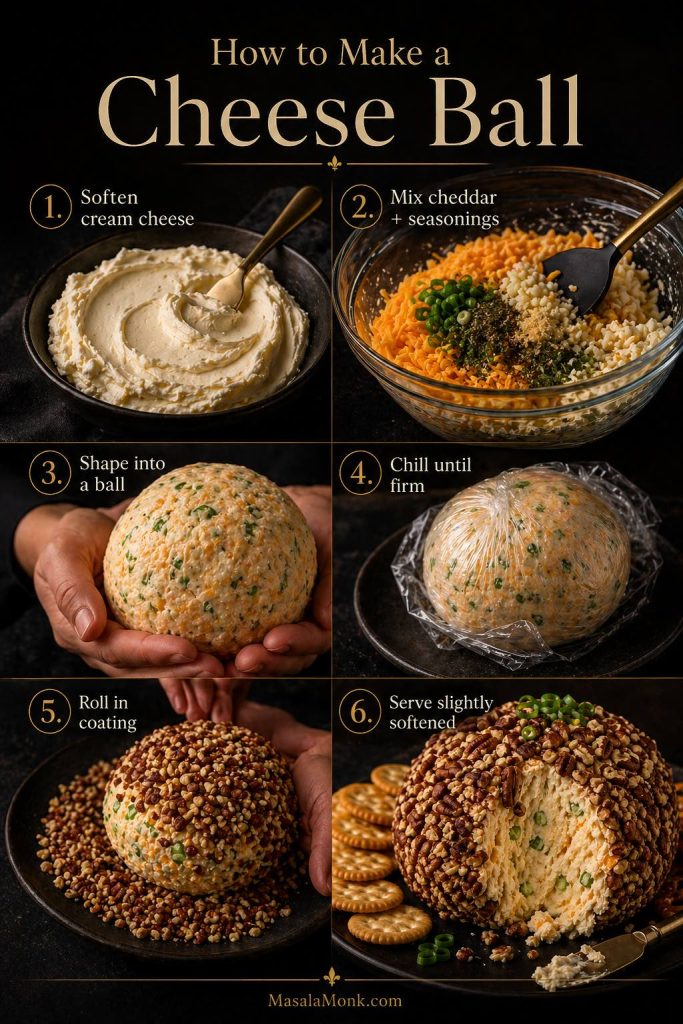
The method is easy, but the order matters. First, beat the cream cheese until smooth. Next, mix in the flavorings, shape the filling before it gets too warm, chill until firm, and add the coating close enough to serving that it stays fresh. That way, the cheese ball recipe stays simple without turning soft, lumpy, or messy.
Step 1: Soften the Cream Cheese
Start with softened cream cheese. Leave it at room temperature until it is easy to press with a spoon. If the cream cheese is too cold, it will not mix smoothly. If it is melted, the filling may become loose and harder to shape. For that reason, softened but still-cool cream cheese gives you the best balance.
Step 2: Mix the Filling
Beat the cream cheese until smooth. Then mix in shredded cheddar, green onion, Worcestershire sauce, garlic powder, onion powder, black pepper, and any add-ins. Scrape the bowl well so the seasoning is evenly spread through the filling.
Before shaping, taste the mixture. It should taste slightly bold because crackers and vegetables will soften the flavor. If it tastes flat, add a little more green onion, black pepper, garlic powder, onion powder, or Worcestershire sauce. At this stage, the recipe is easier to fix because the cheese has not yet been shaped into a ball.
Step 3: Shape and Chill
Spoon the filling onto a large piece of plastic wrap or parchment. Then, gather the wrap around the mixture and shape it into a ball. It does not need to be perfect yet because chilling will make it easier to smooth and coat. After the first chill, you can gently reshape it if needed.
Refrigerate for at least 1 hour. For a cleaner shape, chill for 2 hours. If you are making the cheese ball ahead, stop here and keep it wrapped until the day you plan to serve it.
Step 4: Roll in the Coating
Spread chopped pecans, herbs, bacon, pretzels, or your chosen coating on a plate. After that, unwrap the chilled cheese ball, then roll and press it gently into the coating until the outside is covered.
Nuts hold up better than most coatings. However, bacon, pretzels, crackers, and fresh herbs are best added closer to serving. That keeps the outside crisp, fresh, and more appetizing. The cheese ball also looks cleaner when the final coating is added after the recipe has had time to chill.
Step 5: Serve Slightly Softened
A cheese ball is usually too firm right from the refrigerator. So, let it sit for 15 to 20 minutes before serving so it becomes easier to spread. It should soften slightly, but it should not sit out for the entire party. Instead, serve it in a planned window and keep extra portions chilled if the gathering will last longer.
Easy Cheese Ball Recipe
Easy Cheese Ball Recipe with Cream Cheese
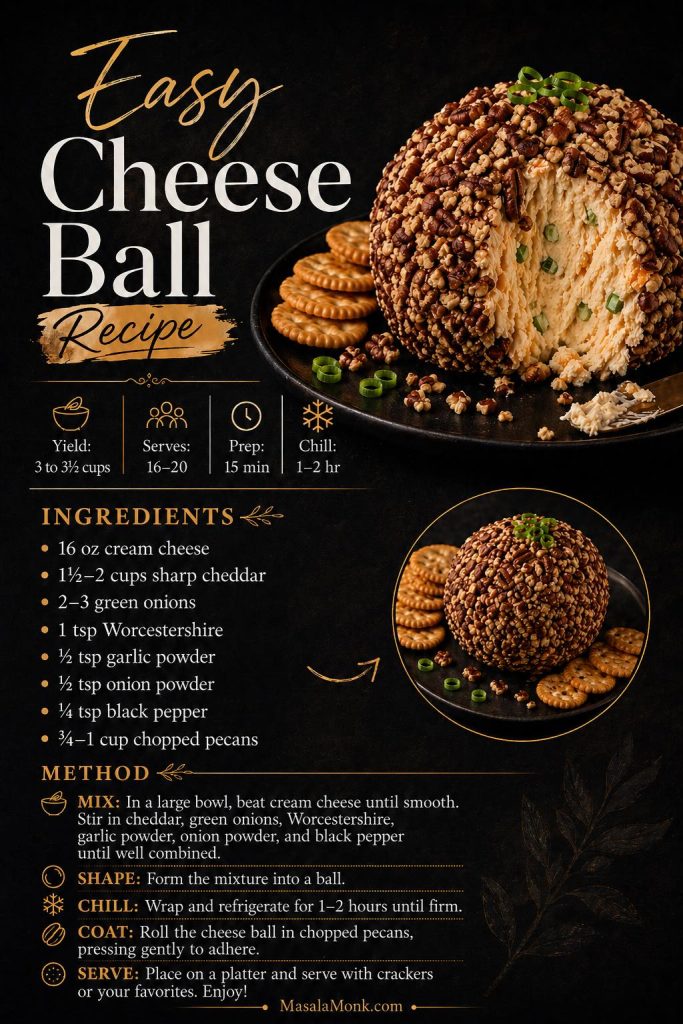
This classic cheese ball recipe is creamy, savory, make-ahead friendly, and perfect with crackers, vegetables, pretzels, and party boards.
Ingredients
- 16 oz / 450 g cream cheese, softened
- 1½ to 2 cups / about 170 to 225 g shredded sharp cheddar cheese
- 2 to 3 green onions, finely sliced, about 20 to 30 g
- 1 teaspoon / 5 ml Worcestershire sauce
- ½ teaspoon garlic powder
- ½ teaspoon onion powder
- ¼ teaspoon black pepper
- Pinch of salt, only if needed
For the Coating
- ¾ to 1 cup / about 85 to 115 g finely chopped pecans or walnuts
- 2 tablespoons chopped parsley, chives, or green onion
- Optional: ¼ to ½ cup / about 25 to 50 g cooked crumbled bacon
Instructions
- Add softened cream cheese to a mixing bowl and beat until smooth
- Add shredded cheddar, green onion, Worcestershire sauce, garlic powder, onion powder, black pepper, and a small pinch of salt if needed
- Mix until evenly combined, then taste and adjust the seasoning before shaping
- Spoon the mixture onto plastic wrap or parchment and shape it into a ball
- Wrap tightly and refrigerate for at least 1 hour, or 2 hours for a firmer, cleaner shape
- Spread chopped pecans, herbs, and optional bacon on a plate
- Unwrap the chilled cheese ball and roll it in the coating, pressing gently so the outside is covered
- Let it sit for 15 to 20 minutes before serving with crackers, pretzels, vegetables, or crostini
Recipe Notes
- Taste the filling before shaping. It should taste slightly bold because crackers, vegetables, and pretzels soften the flavor once served
- For a softer spread, use 1½ cups / 170 g cheddar instead of 2 cups / 225 g
- For a firmer cheese ball, chill longer or mix in a little more shredded cheddar
- For a no-nut cheese ball, coat it with herbs, bacon, crushed pretzels, crushed crackers, everything seasoning, or toasted breadcrumbs
- For mini cheese ball bites, chill the mixture, scoop into 1-tablespoon portions, roll each one in coating, and add pretzel sticks right before serving
Why This Cheese Ball Recipe Works
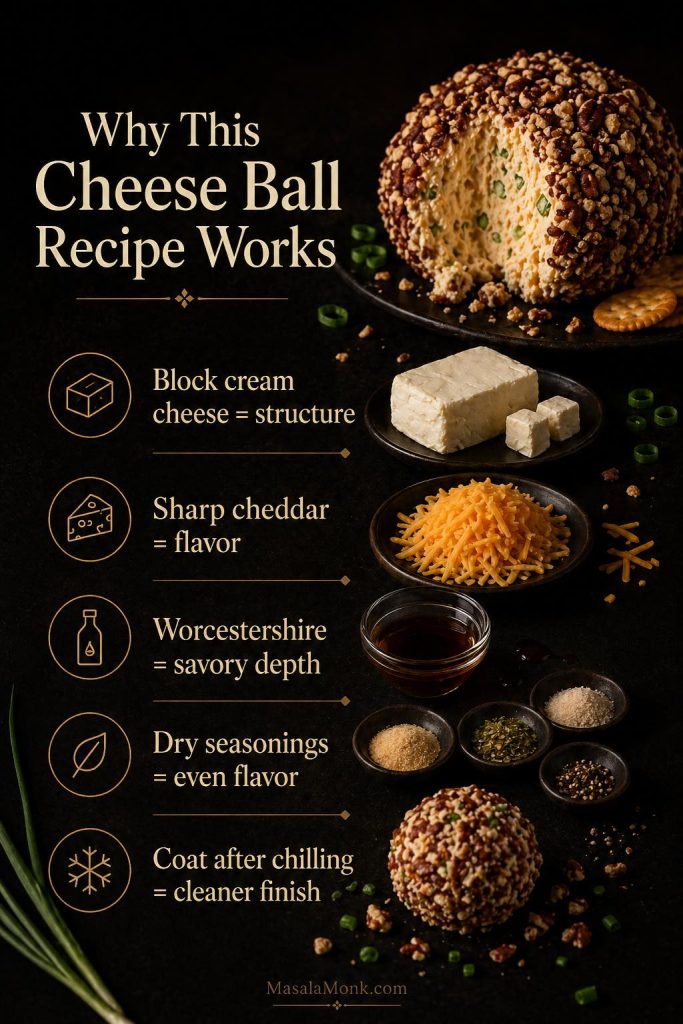
This cheese ball recipe works because it keeps the base firm, flavorful, and easy to spread. Instead of adding too many wet ingredients, it uses full-fat block cream cheese for structure, sharp cheddar for stronger cheese flavor, and dry seasonings that blend smoothly through the filling.
Also, the coating goes on after the ball has chilled. That timing matters because the outside stays cleaner, the nuts or herbs stick better, and the finished appetizer looks fresher on the platter. That way, the cheese ball stays make-ahead friendly without tasting flat or turning messy.
| Recipe Choice | Why It Helps |
|---|---|
| Full-fat block cream cheese | Firms up enough to shape into a ball |
| Sharp cheddar | Adds enough flavor to stand up to crackers and vegetables |
| Garlic powder and onion powder | Season evenly without harsh raw pieces |
| Worcestershire sauce | Adds savory depth so the filling does not taste one-note |
| Coating after chilling | Keeps the outside fresher, cleaner, and crunchier |
That is what keeps the recipe flexible without making it vague. You can change the coating, the add-ins, or the serving style, while the cream cheese and cheddar base still keeps the ball structured enough to slice, scoop, and spread.
Cheese Ball Ingredient Notes
The base is simple, but each ingredient matters. Because the recipe is no-cook, the flavor comes from good cheese, proper seasoning, and the contrast between the creamy inside and the textured coating. That is why bland cheese, cold cream cheese, and watery add-ins can make the whole appetizer fall flat.
Cream Cheese
Use full-fat block-style cream cheese for the best structure. Because this is a chilled recipe, the cheese needs to firm up around the ball without turning stiff or crumbly. Block-style cream cheese softens smoothly, firms up well in the refrigerator, and gives the finished cheese ball a rich but spreadable texture. By contrast, whipped cream cheese can make the mixture looser, while cold cream cheese can leave small lumps in the filling.
Let the cream cheese soften at room temperature until it presses easily with a spoon. It should be soft enough to beat, but not melted or greasy. If it melts, the cheese mixture can become loose, and the ball may take much longer to firm up in the refrigerator. On the other hand, if it is too cold, the filling can stay lumpy even after mixing.
If your kitchen is cool, cream cheese may need 45 to 60 minutes to soften. If your kitchen is warm, check it sooner so it softens without turning greasy.
Sharp Cheddar
Sharp cheddar is the easiest choice because it brings more flavor than mild cheddar. Also, it balances the cream cheese, so the finished appetizer tastes like a proper cheddar cheese ball instead of a plain cream cheese spread. For this recipe, the cheese should be bold enough that the ball still tastes savory after it is spread onto crackers.
Whenever possible, shred the cheddar fresh because it blends more smoothly into the cream cheese base. Still, pre-shredded cheddar can work when convenience matters. If the mixture feels dry after using packaged shredded cheese, let it sit for a few minutes and mix again before shaping. In practice, the recipe is forgiving as long as the cheese tastes bold and the ball still holds together after chilling.
Best Cheese for a Cheese Ball
For most versions, sharp cheddar is the best first choice because it has enough flavor to balance the cream cheese. However, this recipe can move in different directions depending on the cheese you choose. If you want the ball to taste milder, sharper, smokier, or spicier, start with the guide below.
| Cheese | Best For | How to Use It |
|---|---|---|
| Sharp cheddar | Classic cheese ball recipe | Main shredded cheese for the strongest everyday version |
| White cheddar | Holiday boards | Use like yellow cheddar for a sharper but cleaner-looking ball |
| Colby Jack | Milder family-style cheese ball | Use when you want a softer flavor |
| Pepper Jack | Spicy cheese ball | Use half pepper Jack and half cheddar |
| Smoked gouda | Smoky party flavor | Use a small amount with cheddar rather than replacing all the cheese |
| Blue cheese | Bold retro appetizer | Use a little because the flavor is strong |
| Goat cheese | Tangier variation | Use as a partial swap, but expect a softer ball |
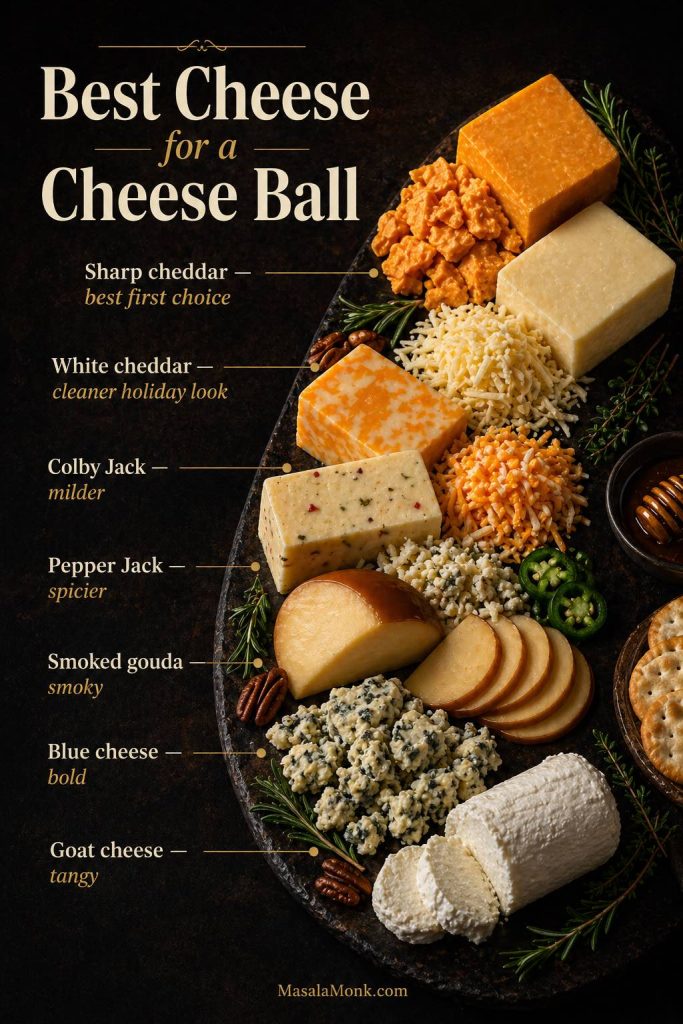
When in doubt, start with sharp cheddar. After that, use the table as a flavor guide rather than a strict rule. For example, pepper Jack makes sense for a spicy cheese ball, while white cheddar looks cleaner on a holiday board.
Green Onion, Garlic, Onion, and Worcestershire
Green onion adds freshness, while garlic powder and onion powder season the filling evenly. Meanwhile, Worcestershire sauce adds a savory note that makes the cheese ball taste fuller and less one-dimensional. Together, they make the recipe taste seasoned without adding extra moisture.
Because crackers, pretzels, bacon, dried beef, and seasoning blends can all be salty, add salt carefully. Before shaping the ball, taste the cheese filling; then decide if the recipe needs even a small pinch.
Pecans, Walnuts, Herbs, Bacon, or Pretzels
Although chopped pecans are the classic coating, walnuts, herbs, bacon, and crushed pretzels can all work depending on the flavor you want. Pecans add crunch and a slightly sweet nuttiness, while herbs such as parsley, chives, and green onion make the outside fresher and brighter.
For a game-day cheese ball, add cooked crumbled bacon to the coating. For a no-nut cheese ball, use herbs, bacon, crushed pretzels, crushed crackers, everything seasoning, or toasted breadcrumbs instead.
Do You Need Sour Cream, Mayo, or Butter?
You do not need sour cream, mayo, or butter for this classic shaped cheese ball recipe. In fact, keeping them out makes the ball easier to shape because the filling stays thicker and cleaner. Full-fat cream cheese already gives the recipe enough richness, while cheddar and seasonings bring the flavor.
That said, sour cream or mayo can be useful if you are making cheese ball dip instead of a shaped appetizer. In that case, add only 1 to 2 tablespoons at first, then check the texture before adding more. Otherwise, the dip can move from creamy to loose very quickly.
Equipment You Need
You do not need special equipment for this recipe, but a few basic tools make the cheese mixture smoother and the final ball easier to shape. If the cream cheese is properly softened, even a sturdy spatula can work. However, a hand mixer makes the filling smoother faster, especially when you are doubling the recipe.
| Tool | Why It Helps |
|---|---|
| Mixing bowl | For beating the cream cheese and folding in cheddar |
| Hand mixer or sturdy spatula | For a smoother filling |
| Box grater | For freshly shredded cheddar |
| Plastic wrap or parchment | For shaping the filling into a clean ball |
| Plate or shallow tray | For rolling the chilled cheese ball in coating |
| Serving knife or spreader | For easier spreading without breaking crackers |
Common Mistakes to Avoid
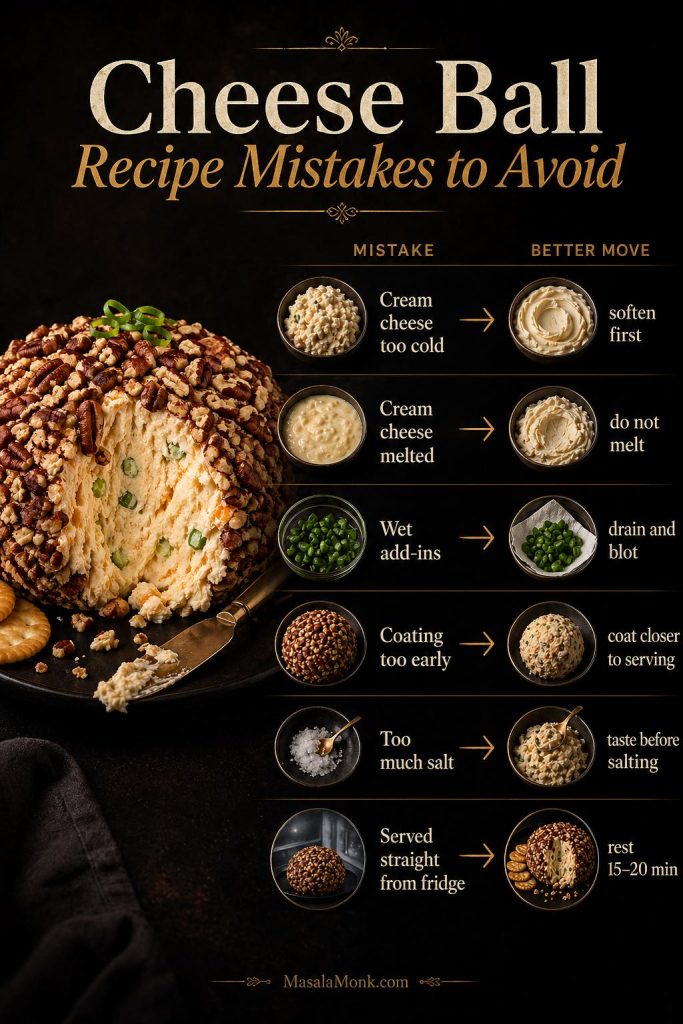
Before you start mixing, it helps to know what can go wrong. Most cheese ball problems come from cream cheese that is too cold, add-ins that are too wet, or coatings that are added too early. Fortunately, each problem is easy to avoid if you build the recipe in the right order. More importantly, fixing the filling before shaping is much easier than fixing a finished ball after the coating is already on.
| Mistake | What Happens | Better Move |
|---|---|---|
| Melting the cream cheese | Loose or greasy filling | Soften at room temperature instead |
| Using cold cream cheese | Lumpy cheese ball mixture | Let it soften until it presses easily |
| Adding wet pineapple, pickles, or jalapeños | Soft or watery filling | Drain and blot before mixing |
| Coating with pretzels or bacon too early | Soft outside layer | Add crunchy coatings closer to serving |
| Adding salt too soon | Overly salty cheese ball | Taste first, then salt only if needed |
| Serving straight from the fridge | Firm texture and broken crackers | Rest 15 to 20 minutes before serving |
How Much Cheese Ball to Make
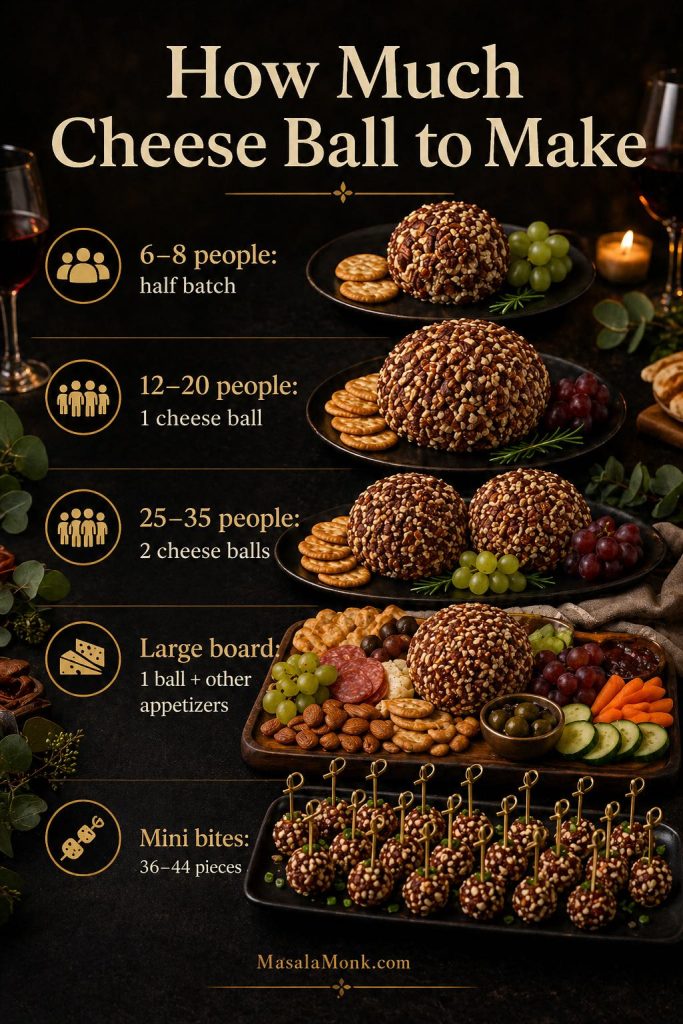
Because this cheese ball recipe is usually served as part of a snack table, the right amount depends on what else you are serving. If the ball is the main appetizer, plan more. However, if it sits on a board with dips, crackers, vegetables, fruit, and hot snacks, one batch can stretch further. In that case, variety matters more than making one oversized cheese ball.
| Crowd Size | Amount to Make | Best Plan |
|---|---|---|
| 6 to 8 people | Half batch | Smaller ball or full recipe as dip with leftovers planned |
| 12 to 20 people | 1 full cheese ball | Crackers, vegetables, pretzels, and at least one fresh side |
| 25 to 35 people | 2 cheese balls | Two flavors, such as classic pecan and bacon ranch |
| Large party board | 1 cheese ball plus other appetizers | Warm dip, crunchy snack, fruit, pickles, olives, and sturdy crackers |
| Individual portions | 36 to 48 mini cheese ball bites | 1-tablespoon portions with pretzel sticks added right before serving |
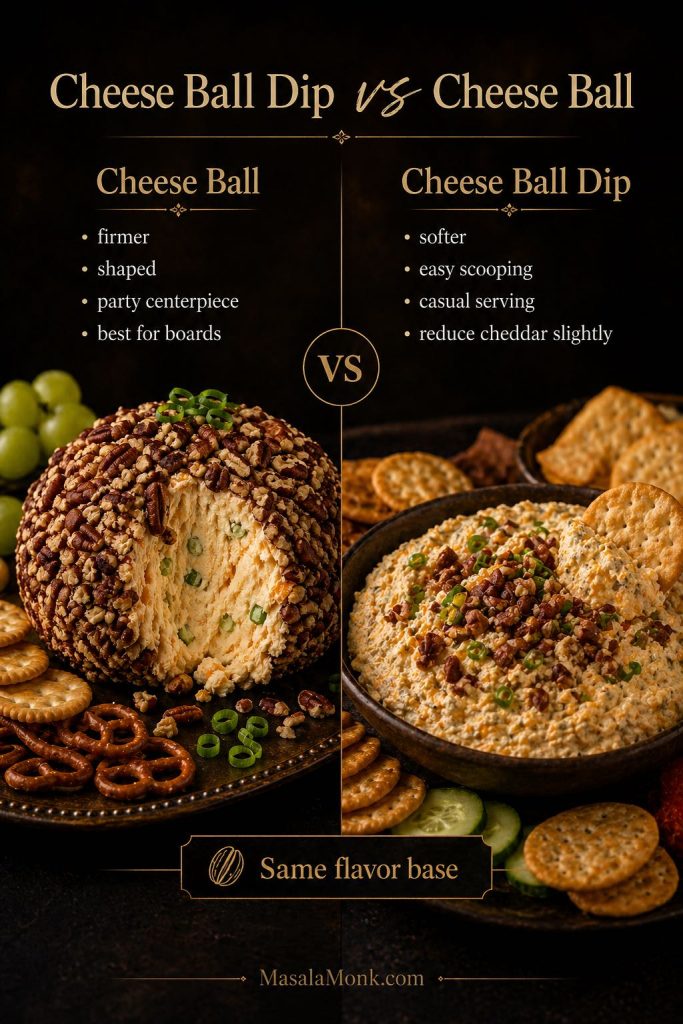
Cheese Ball Dip: How to Serve This Without Shaping It
If you want the flavor of a cheese ball without shaping it, turn the mixture into cheese ball dip. This is useful for casual parties, snack boards, and smaller gatherings where a bowl of spread is easier than a shaped appetizer. Instead of changing the whole recipe, you only need to adjust the cheese slightly so the ball mixture becomes softer and more scoopable.
To make cheese ball dip, use the same base recipe but reduce the cheddar to 1½ cups / about 170 g so the texture stays softer. Then, mix the filling, spoon it into a shallow serving bowl, smooth the top, and sprinkle the coating over the surface. Chill for 30 to 60 minutes if making it ahead; afterward, let it soften slightly before serving so you get the same flavor with less shaping and easier scooping.
| For Cheese Ball Dip | Use This Adjustment |
|---|---|
| Softer texture | Use 1½ cups / 170 g cheddar instead of 2 cups / 225 g |
| Easy serving | Spoon into a shallow bowl instead of shaping into a ball |
| Better topping | Add pecans, herbs, bacon, or pretzels right before serving |
| Best dippers | Crackers, pretzel crisps, celery, cucumber, bell pepper, crostini, or pita chips |
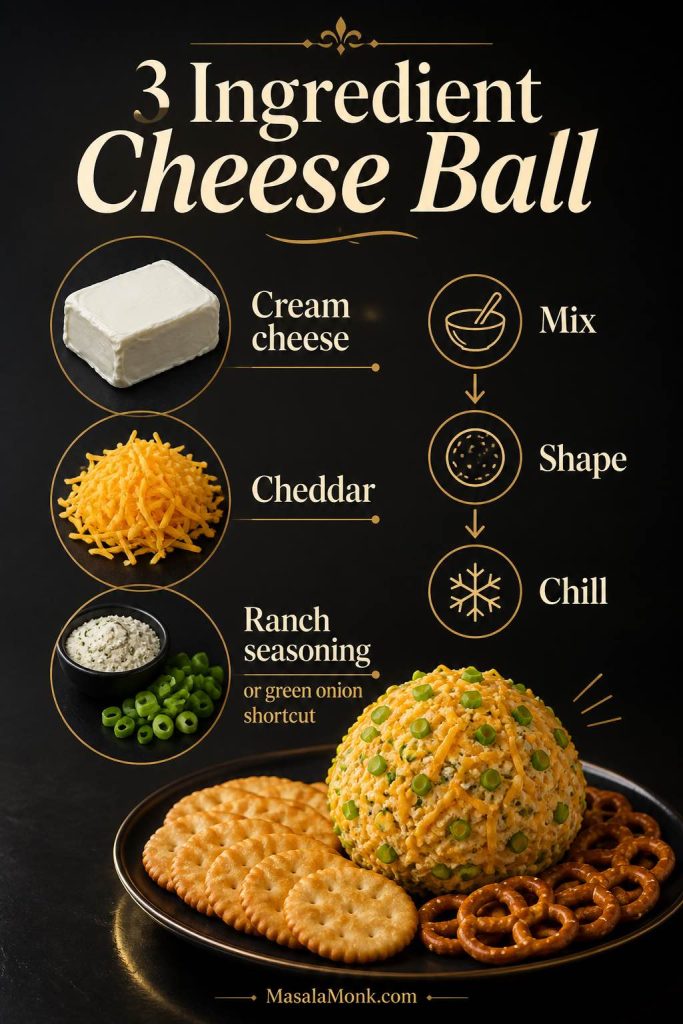
3 Ingredient Cheese Ball
A 3 ingredient cheese ball is useful when you need the fastest possible appetizer. However, it will not have the same depth as the full recipe because garlic, onion, pepper, and Worcestershire add much of the savory background flavor. Still, when time is short, cream cheese, cheddar, and one strong seasoning can form a simple ball that works with crackers and pretzels.
| Version | Ingredients | Best Use |
|---|---|---|
| Classic shortcut | 16 oz / 450 g cream cheese + 1½ cups / 170 g cheddar + 1 packet / about 28 g ranch seasoning | Fast game-day cheese ball |
| No-ranch shortcut | 16 oz / 450 g cream cheese + 1½ cups / 170 g cheddar + 3 sliced green onions | Milder cheese ball for simple crackers |
| Coated shortcut | 16 oz / 450 g cream cheese + 1½ cups / 170 g cheddar + ¾ cup / 85 g chopped pecans | Basic party cheese ball with crunch |
For the best flavor, though, use the full recipe. Worcestershire sauce, garlic powder, onion powder, black pepper, and green onion make the cheese ball taste more complete without making the method harder. Still, the shortcut version is useful when speed matters more than building the most layered flavor.
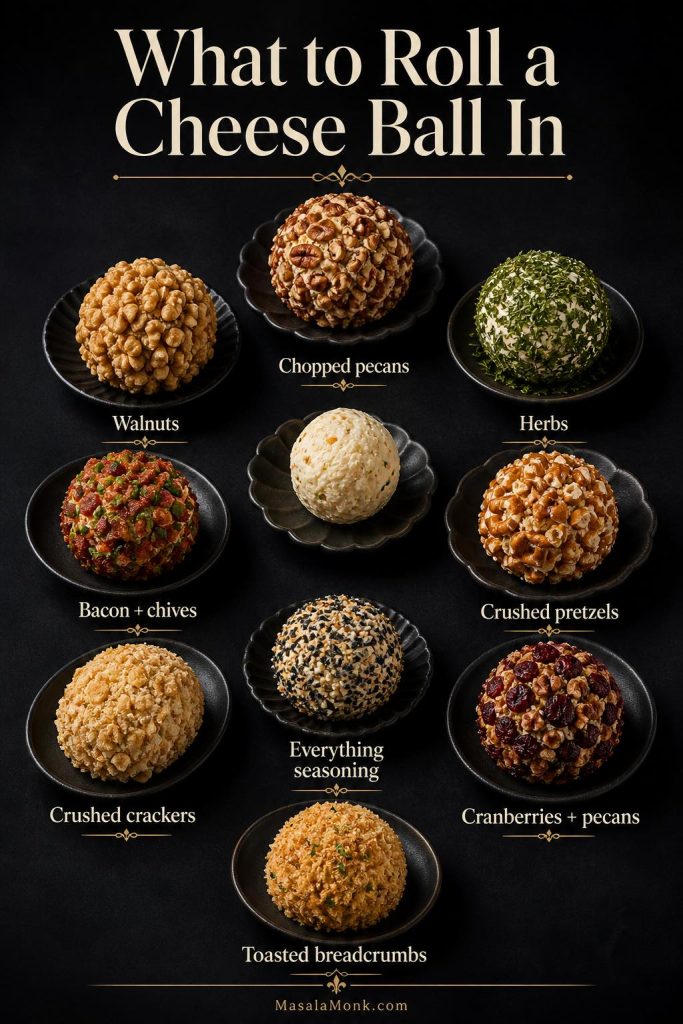
What to Roll a Cheese Ball In
The coating does more than make the cheese ball look finished. It adds texture, controls richness, and tells people what kind of flavor to expect. Although pecans are classic, there are plenty of good nut-free and holiday-friendly options. For example, this recipe can move from a classic cheese ball to a game-day ball or holiday cheese board centerpiece just by changing the outside layer.
| Coating | Best For | Notes |
|---|---|---|
| Chopped pecans | Classic cheese ball | Toast lightly, then cool before using |
| Chopped walnuts | Earthier flavor | Chop finely so the pieces stick well |
| Parsley, chives, or green onion | Fresh green finish | Good for a lighter-looking or no-nut version |
| Bacon and chives | Game day | Add close to serving so the bacon stays crisp |
| Crushed pretzels | No-nut crunch | Add shortly before serving because pretzels soften |
| Crushed crackers | Simple no-nut coating | Use sturdy crackers and crush finely |
| Everything seasoning | Bagel-style flavor | Use lightly because it can be salty |
| Dried cranberries and pecans | Holiday cheese ball | Sweet, salty, colorful, and festive |
| Toasted breadcrumbs | Nut-free coating | Use dry crumbs and add close to serving |
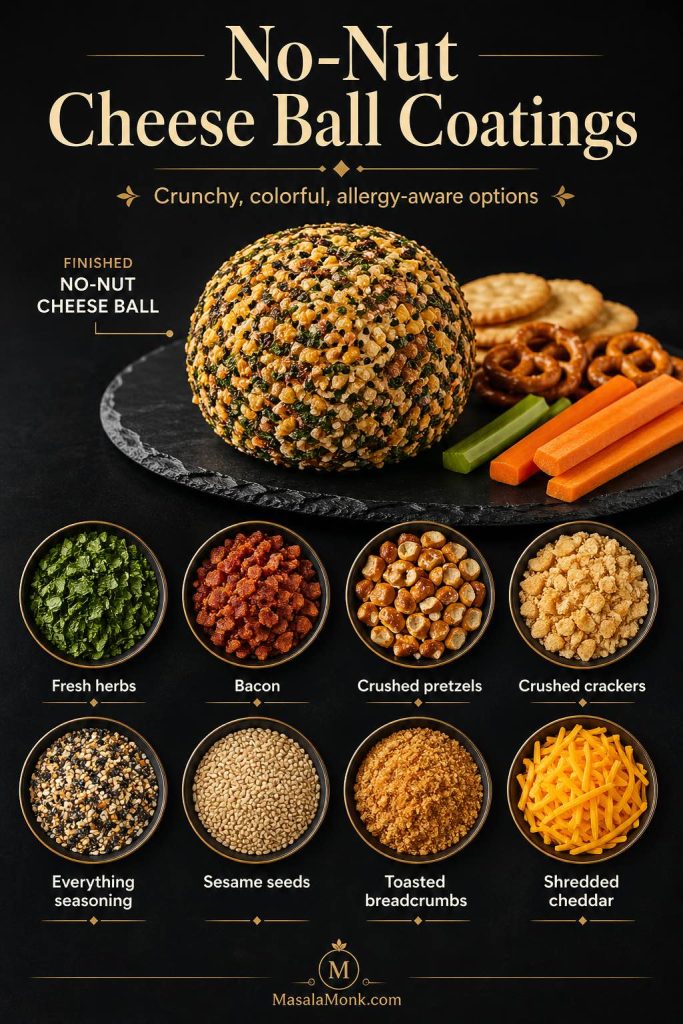
No-Nut Cheese Ball Coatings
For a cheese ball without nuts, use chopped herbs, cooked bacon, crushed pretzels, crushed crackers, everything seasoning, toasted breadcrumbs, sesame seeds, or a mix of herbs and shredded cheddar. If allergies are a concern, avoid using nut coatings anywhere near the same platter, utensils, or serving board. In that case, keep the whole platter nut-free rather than relying on separate corners of the same board.
What to Serve With a Cheese Ball
A cheese ball works best with dippers that can handle a creamy spread. So, put out a mix of crackers, vegetables, pretzels, and a few fresh or tangy sides so the platter does not feel too heavy. Since this recipe is rich, the best cheese board pairings usually include something crisp, something salty, and something fresh. That balance keeps guests coming back without making every bite feel the same.
Best Crackers for a Cheese Ball
| Cracker or Dipper | Why It Works | Best Pairing |
|---|---|---|
| Buttery crackers | Classic party flavor and easy crunch | Classic pecan or cranberry pecan |
| Wheat crackers | Sturdy, nutty, and less fragile | Dried beef or bacon ranch |
| Seeded crackers | More texture and grown-up flavor | Herb or no-nut cheese ball |
| Water crackers | Clean flavor that lets the cheese stand out | Classic cheddar once slightly softened |
| Pretzel crisps | Salty, crunchy, and strong enough for scooping | Bacon ranch, jalapeño, or dill pickle |
| Crostini or baguette slices | Strongest option for a firmer cheese ball | Party boards and holiday platters |
| Celery, cucumber, and bell pepper | Fresh, lighter, and crisp | Rich cheese balls and game-day spreads |
| Apple slices and grapes | Sweet and fresh against savory cheese | Cranberry pecan, pineapple, or classic pecan |

Because the cheese ball can be firm when it first comes out of the fridge, sturdy crackers work better than very thin ones. So let it soften for 15 to 20 minutes before serving, or include a small spreading knife on the platter.
For a low-carb platter, serve the cheese ball with celery, cucumber rounds, bell pepper strips, cheese crisps, pork rinds, or other sturdy options from MasalaMonk’s guide to keto chips for dips. This works especially well when the cheese ball is part of a heavier game-day table and you want a few lighter, crunchier options.
Turn It Into a Party Board
For a fuller spread, place the cheese ball on a board with crackers, pretzels, fruit, nuts, pickles, olives, cured meats, and a small bowl of jam or chutney. If you want a simple layout formula, MasalaMonk’s guide to charcuterie board ideas gives you an easy structure for building a balanced board. From there, add one crunchy item, one fresh item, and one sweet or tangy item around the cheese ball.
For a game-day table, pair this cheese ball with buffalo chicken dip, crispy mozzarella sticks, or a tray of potato appetizers. That gives guests a mix of cold, creamy, hot, crispy, salty, and fresh bites.
Make Ahead, Storage, and Freezing
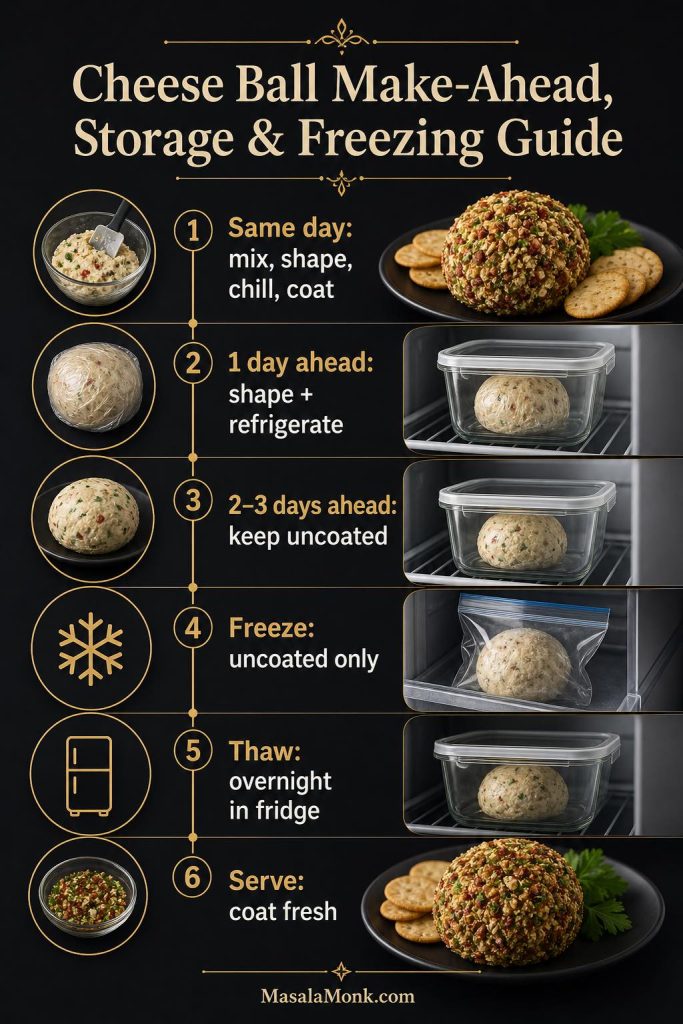
A cheese ball is one of the easiest make-ahead appetizers because chilling helps it firm up. In fact, the recipe often tastes better after a few hours because the cheese, onion, and seasonings have time to settle. The best approach is to make and shape the filling ahead, then add the coating closer to serving. That way, the inside gets time to develop flavor while the outside still tastes fresh.
Make-Ahead Timeline
| When You Are Serving | What to Do | Best Coating Timing |
|---|---|---|
| Same day | Mix, shape, chill for 1 to 2 hours | Coat after chilling |
| 1 day ahead | Mix, shape, wrap tightly, and refrigerate | Coat the day you serve |
| 2 to 3 days ahead | Shape uncoated and keep tightly wrapped | Coat shortly before serving |
| Freezer prep | Freeze the shaped, uncoated cheese ball | Thaw overnight, then coat fresh |
How to Store a Cheese Ball
After shaping, wrap the cheese ball tightly in plastic wrap or store it in an airtight container in the refrigerator. If it has already been coated, use a container large enough that the outside does not get crushed.
For best texture, keep a shaped, uncoated cheese ball refrigerated for up to 3 days before serving. Once the cheese ball has been coated or served, store leftovers tightly covered in the refrigerator and use them within 3 to 4 days. For freezing, freeze the shaped, uncoated cheese ball for up to 1 month, then thaw it overnight in the refrigerator and coat it fresh before serving.
Keep the cheese ball refrigerated at 40°F / 4°C or colder. For the cleanest presentation, store the shaped cheese ball uncoated, then roll it in pecans, herbs, bacon, or crumbs shortly before serving.
Can You Freeze a Cheese Ball?
If you need to make it further ahead, freeze the cheese ball before adding the coating so the outside stays fresher after thawing. Wrap the shaped cheese ball tightly, place it in a freezer-safe bag or container, and freeze at 0°F / -18°C. Then thaw it overnight in the refrigerator and roll it in a fresh coating before serving.
Freezing works best with the plain cream cheese, cheddar, green onion, and seasoning base. Wet add-ins such as pineapple, pickles, or jalapeños can release moisture after thawing, so those versions are better made fresh or only 1 to 2 days ahead. After thawing, always add a fresh coating so the outside tastes crisp instead of stale or soft.
How Long Can a Cheese Ball Sit Out?
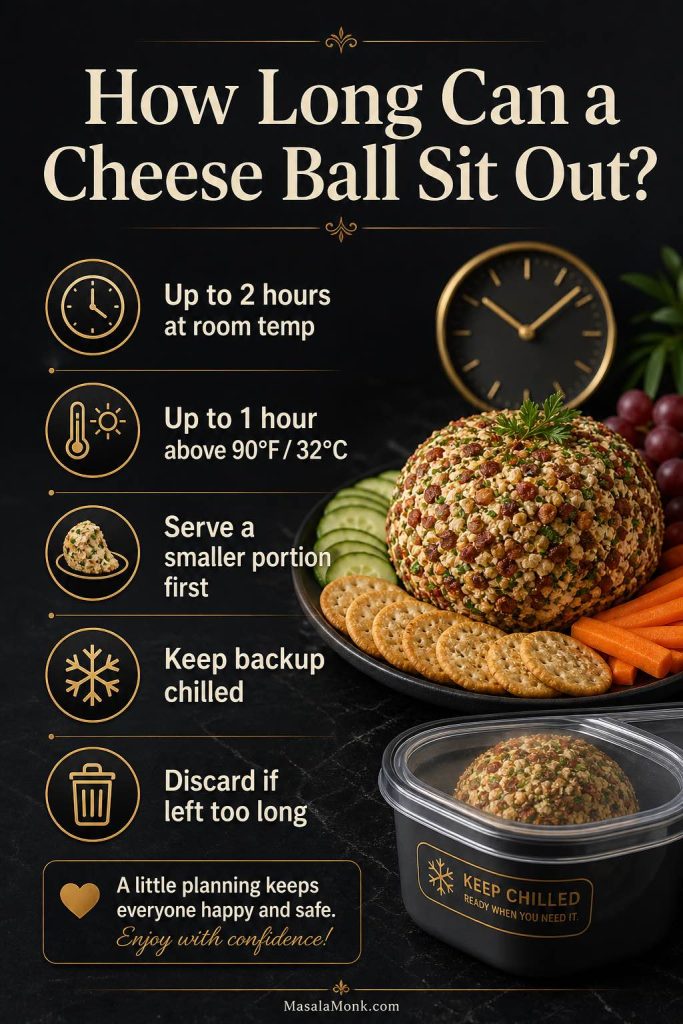
Because a cheese ball is made with cream cheese and shredded cheese, treat it like a perishable appetizer. According to USDA food safety guidance, perishable food should not be left out for more than 2 hours at room temperature, or more than 1 hour when the temperature is above 90°F / 32°C.
For a long party, serve a smaller cheese ball first and keep the backup chilled. Then, if the platter runs low, bring out a fresh one instead of letting the same ball sit for hours. If the cheese ball has been sitting out too long, do not wrap it back up for later. Instead, refrigerate safe leftovers promptly and discard anything that has been left out beyond the safe window.
Cheese Ball Variations
Once the base recipe works, the variations are easy. Instead of rebuilding the appetizer from scratch, keep the cream cheese structure, then change the cheese, seasonings, add-ins, and coating. The formulas below are designed as practical starting points, so you do not have to guess how much bacon, dried beef, pineapple, jalapeño, or cranberry to add to each ball. After that, you can adjust salt, heat, sweetness, or crunch to match the occasion.
Which Cheese Ball Variation Should You Make?
| Choose This Version | Best For | Flavor Direction |
|---|---|---|
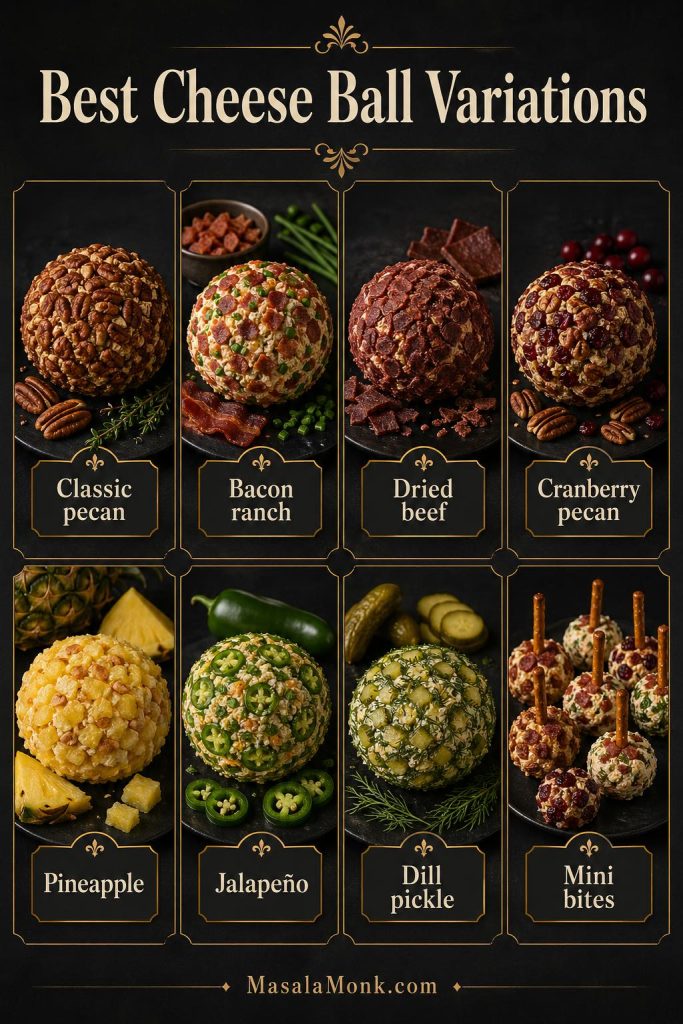
| Classic pecan | Safest party version | Creamy, savory, nutty, familiar |
| Bacon ranch | Game day | Salty, herby, bold, snacky |
| Dried beef or chipped beef | Old-school party flavor | Salty, savory, retro |
| Cranberry pecan | Thanksgiving or Christmas | Sweet-salty, colorful, festive |
| Pineapple | Retro sweet-savory spread | Creamy, tangy, slightly sweet |
| Jalapeño | Spicy snack table | Cheesy, peppery, fresh heat |
| Mini bites | Easy individual serving | Party-friendly and mess-light |
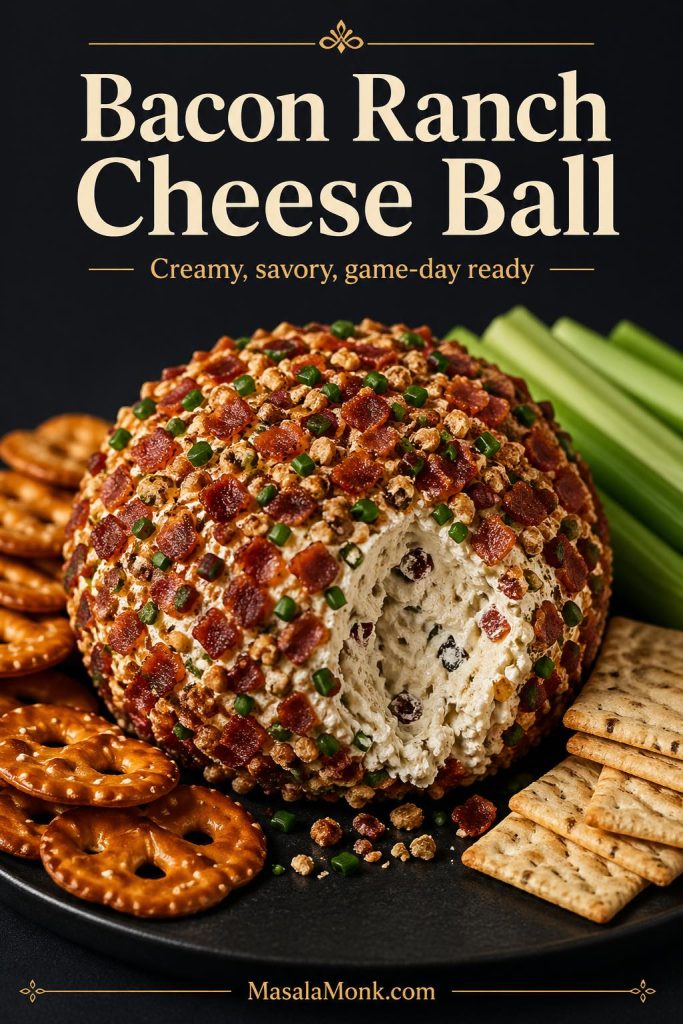
Bacon Ranch Cheese Ball
For a bacon ranch cheese ball, use 16 oz / 450 g cream cheese, 1½ cups / 170 g shredded cheddar, 1 packet / about 28 g ranch seasoning, ½ cup / about 50 g cooked crumbled bacon, and 2 sliced green onions. Then roll the outside in more bacon, chopped chives, and pecans or crushed pretzels.
Because ranch seasoning and bacon are both salty, do not add extra salt until you taste the filling. If the cheese ball tastes strong on its own, serve it with celery, bell pepper strips, or unsalted crackers for balance. Otherwise, pretzel crisps, wheat crackers, and sturdy buttery crackers all work well.
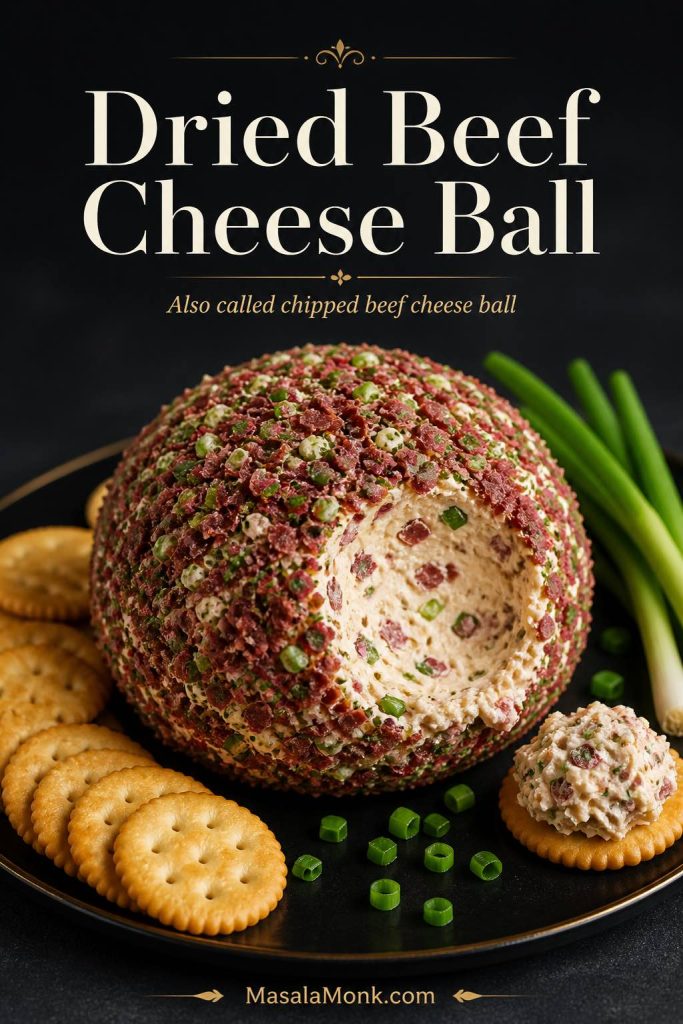
Dried Beef Cheese Ball or Chipped Beef Cheese Ball
For a dried beef cheese ball, use 16 oz / 450 g cream cheese, 1½ cups / 170 g shredded cheddar, 4 to 5 oz / 115 to 140 g finely chopped dried beef or chipped beef, 2 sliced green onions, 1 teaspoon / 5 ml Worcestershire sauce, ½ teaspoon onion powder, and ½ teaspoon garlic powder.
Because dried beef is already salty, skip the added salt. Then roll the outside in chopped pecans, herbs, more finely chopped dried beef, or a mix of all three. If you like a sharper old-school flavor, add 1 to 2 teaspoons prepared horseradish, but blot any extra moisture first.
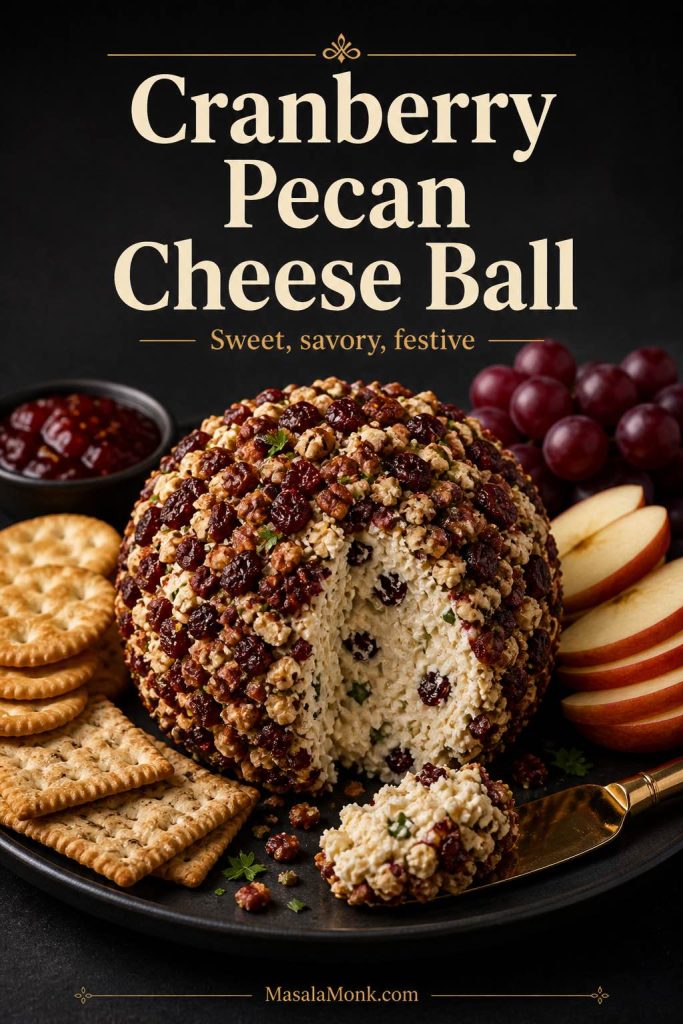
Cranberry Pecan Cheese Ball
For a cranberry pecan cheese ball, use the base recipe and mix in ½ cup / about 60 g chopped dried cranberries. Then roll the outside in ½ cup / 55 g chopped pecans, ¼ cup / 30 g chopped dried cranberries, and 2 tablespoons chopped parsley or chives.
A little orange zest makes this version brighter, especially for Thanksgiving or Christmas. Because this version already has sweetness from the cranberries, salty or buttery crackers usually work better than sweet dippers. For that reason, it is especially good with apple slices, grapes, and a small bowl of pepper jelly or chutney.
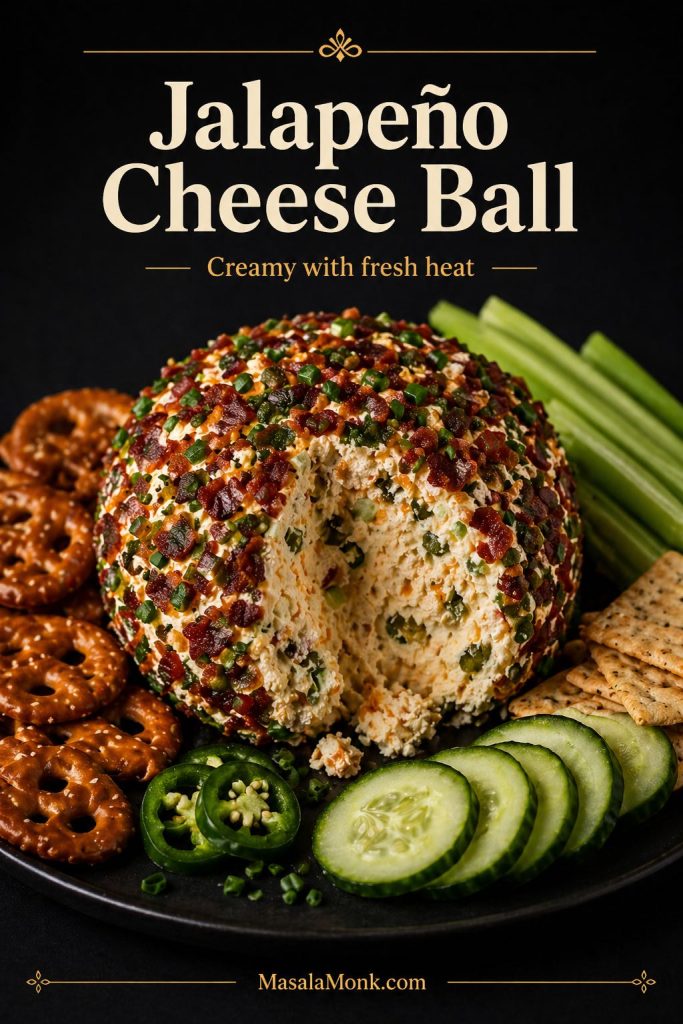
Jalapeño Cheese Ball
For a jalapeño cheese ball, add 1 to 2 finely chopped jalapeños to the base recipe. Fresh jalapeño tastes brighter, while pickled jalapeño adds tang. Either way, blot the pieces dry before mixing so the filling does not become watery.
Cheddar, bacon, smoked paprika, and chives all work well here. For more heat, add a pinch of cayenne instead of adding too much hot sauce, which can loosen the texture. If your crowd likes creamy heat, this jalapeño version also pairs well with baked jalapeño poppers on the same snack table. Meanwhile, celery and cucumber help cool the heat without making the platter boring.
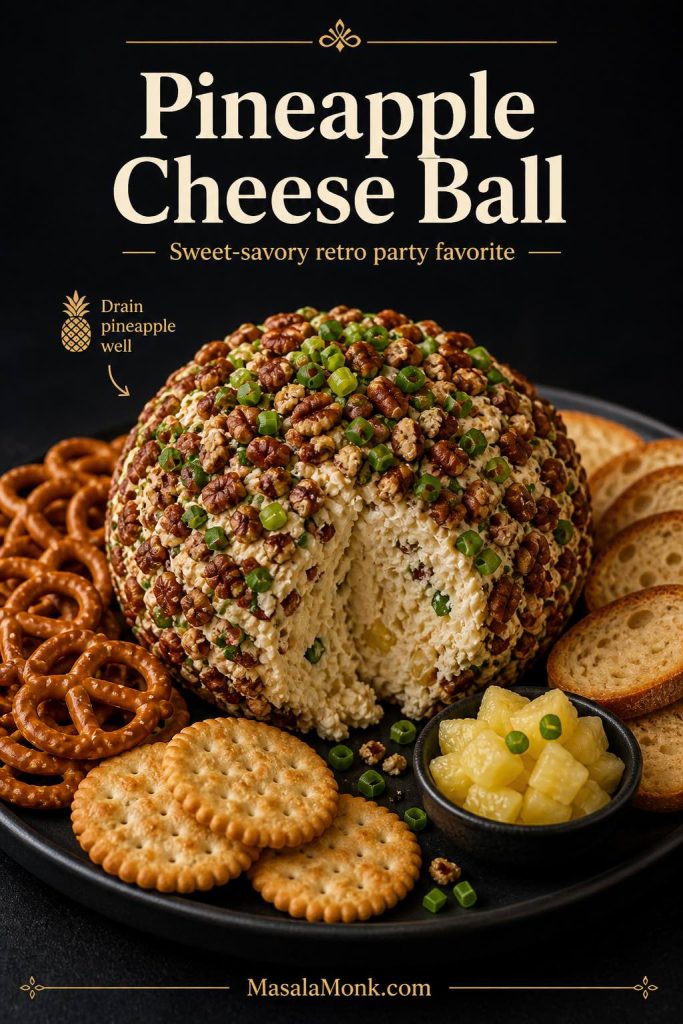
Pineapple Cheese Ball
For a pineapple cheese ball, use 16 oz / 450 g cream cheese, 1 to 1½ cups / 115 to 170 g shredded cheddar, ¾ cup / about 180 g crushed pineapple that has been drained and blotted very well, 2 sliced green onions, and ½ cup / about 55 g chopped pecans.
The pineapple must be very dry before it goes into the filling. If it is watery, the cheese ball will turn soft and loose. Therefore, drain it well, press out extra juice, and blot it before mixing. Since this version is sweet-savory, it works especially well with salty crackers, pretzels, and toasted baguette slices.
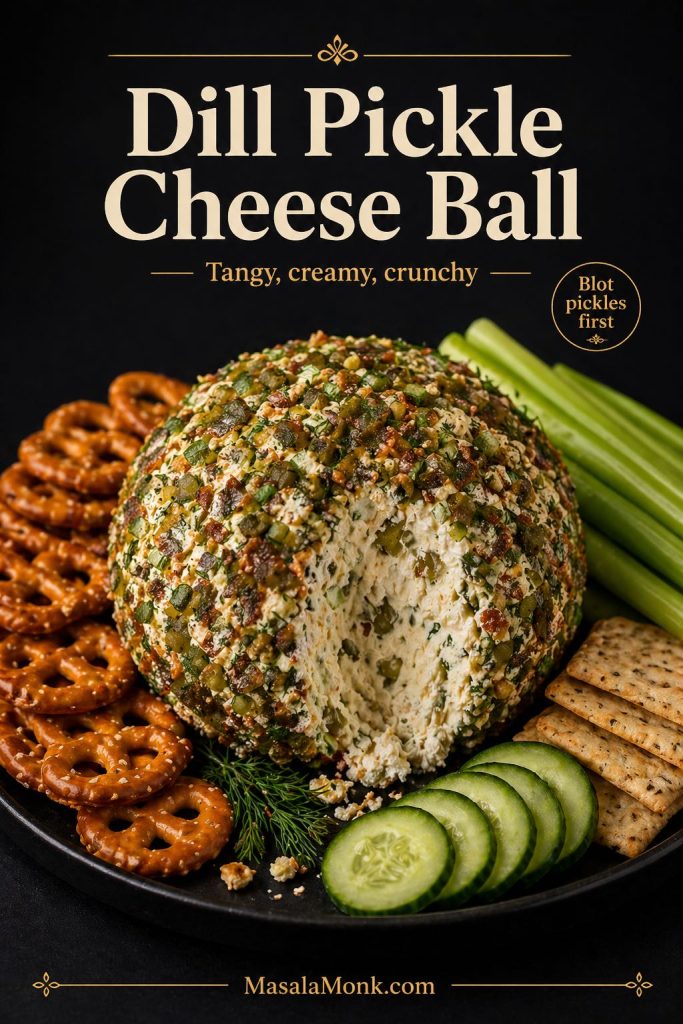
Dill Pickle Cheese Ball
For a dill pickle cheese ball, add ½ cup / about 75 g finely chopped pickles, 1 to 2 teaspoons dill, 1½ cups / 170 g cheddar, garlic powder, and green onion to the cream cheese base. Before mixing, blot the chopped pickles very well so the filling stays thick.
After chilling, roll the outside in chopped herbs, crushed pretzels, or a mix of herbs and shredded cheddar. Since pickles add both salt and moisture, taste before adding extra salt and serve this version with pretzel crisps, celery, cucumber rounds, and sturdy crackers.
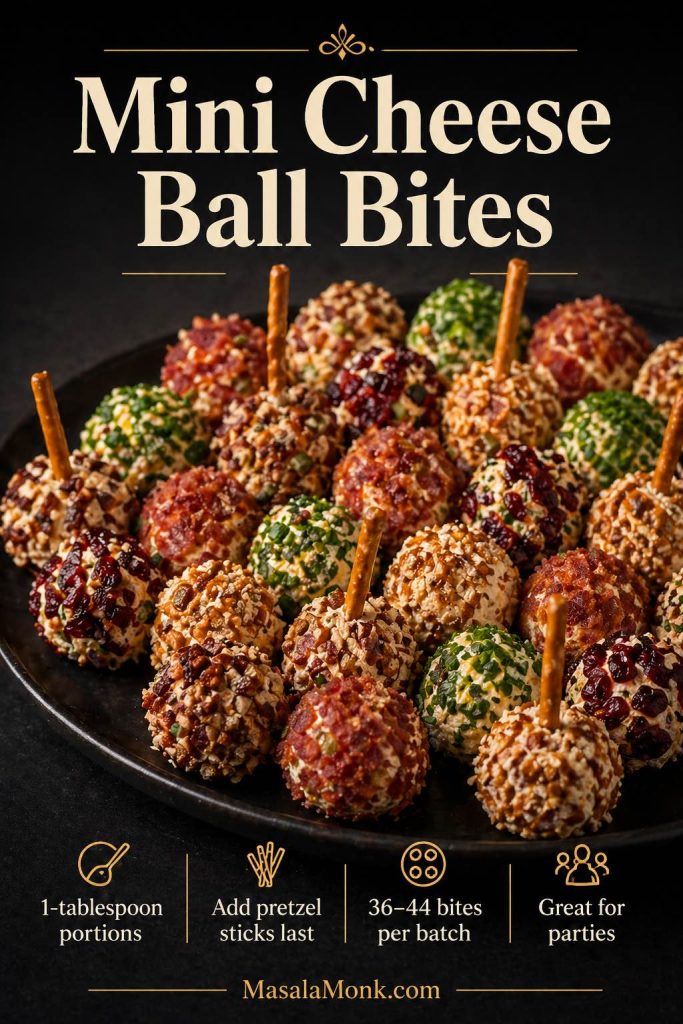
Mini Cheese Ball Bites
Mini cheese ball bites are ideal when you want individual party portions instead of one large cheese ball. After the filling chills until firm, scoop it into generous 1-tablespoon portions. A full batch usually makes about 36 to 48 mini cheese ball bites, depending on how generously you scoop and how much coating you use.
From there, roll each mini cheese ball in chopped pecans, herbs, bacon, crushed pretzels, or dried cranberries. Then add pretzel sticks right before serving so they stay crisp and do not soften in the cheese mixture. If you are making this recipe ahead, chill the coated bites without the sticks and add the pretzels only when the platter is ready.
Christmas Cheese Ball
For a Christmas cheese ball, use the cranberry pecan version or roll the outside in a red-and-green mix of dried cranberries, pecans, parsley, and chives. You can keep it round, shape it into a wreath, or make a simple ornament-style cheese ball for a holiday board.
Still, flavor should come first. A simple round cheese ball with cranberries, pecans, herbs, crackers, grapes, and apple slices usually looks festive without needing a complicated shape. Plus, it is easier to chill, coat, transport, and serve.
Pumpkin Cheese Ball
For Halloween or Thanksgiving, shape the cheese ball into a pumpkin. After wrapping the cheese ball, use rubber bands or kitchen twine around the outside to create pumpkin-like ridges while it chills. Once firm, remove the wrap and add a bell pepper stem or pretzel rod on top.
For a more orange look, use a cheddar-heavy filling or press finely shredded cheddar onto the outside. Since this is mostly a shaping idea, keep the flavor familiar and serve it with crackers, pretzels, and vegetables for a seasonal appetizer board.
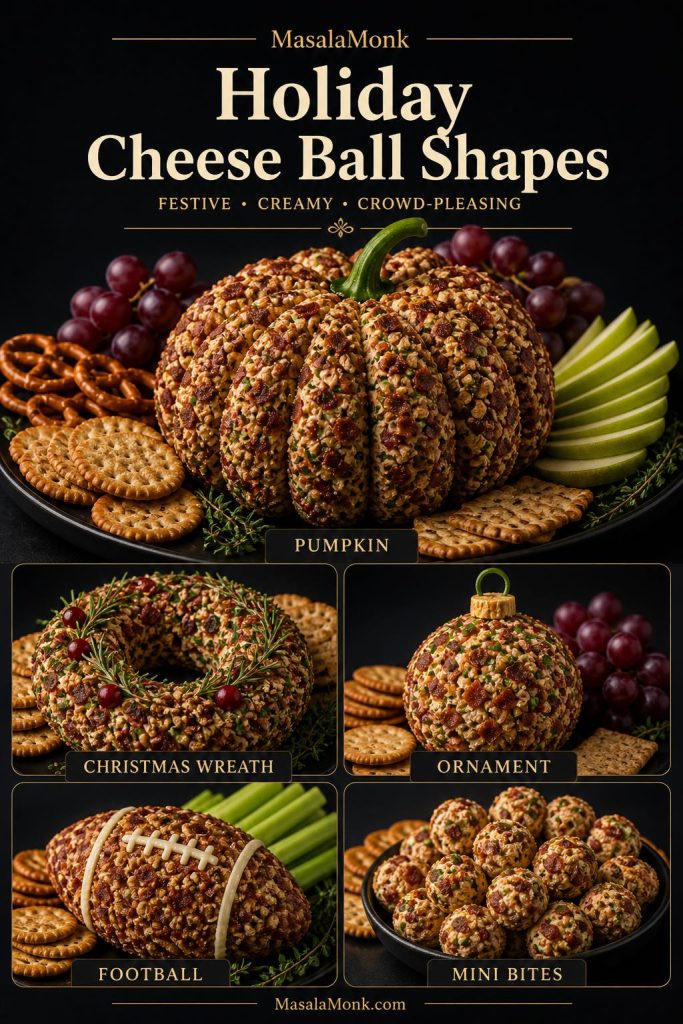
Holiday Cheese Ball Shapes
If you want the cheese ball to match a holiday or party theme, change the shape without changing the whole recipe. The easiest approach is to keep the same cream cheese base, chill it well, and shape the ball before adding the final coating. That way, the design changes but the flavor stays reliable.
| Shape | Best Season | How to Do It |
|---|---|---|
| Pumpkin | Halloween or Thanksgiving | Wrap, tie with twine or rubber bands, chill, then add a pepper stem or pretzel rod |
| Christmas wreath | Christmas | Shape into a ring, chill, then coat with herbs, pecans, and dried cranberries |
| Ornament | Christmas | Keep round and use a cranberry-herb coating |
| Football | Game day | Shape into an oval, coat with bacon or nuts, then add thin cheese strips as laces |
| Mini bites | Any party | Scoop into 1-tablespoon balls and serve with pretzel sticks |
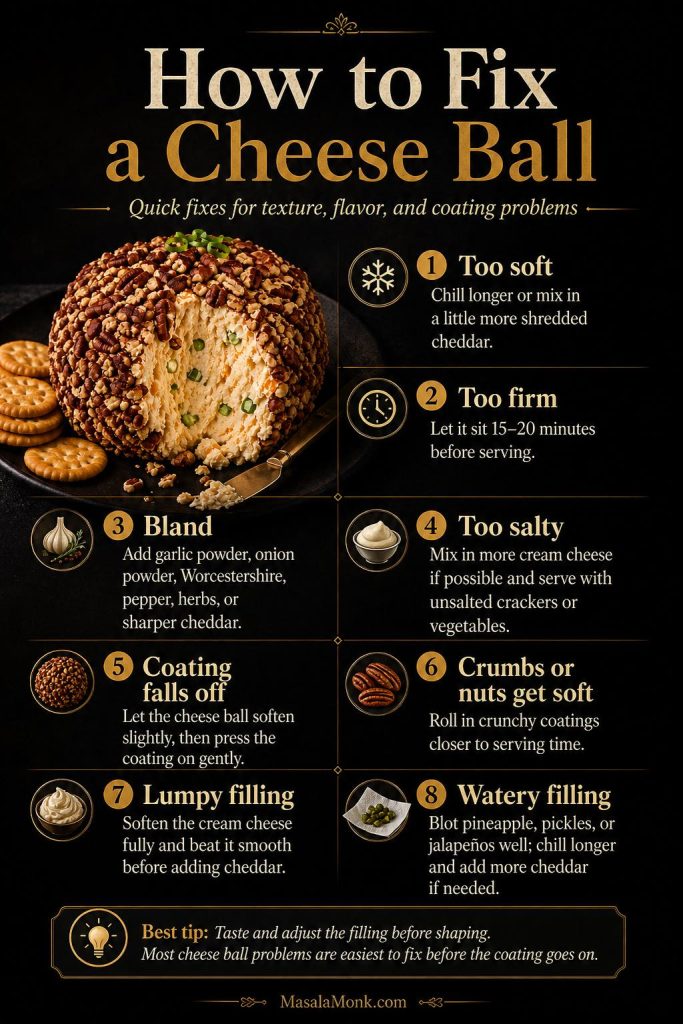
How to Fix a Cheese Ball
Most cheese ball problems are easy to fix before the coating goes on. So, taste and adjust the filling first, then shape, chill, and roll it once the texture is right. If the recipe feels off after the ball is coated, the fix usually gets messier. Use the troubleshooting table as a quick check before the cheese ball goes on the platter.
| Problem | Why It Happened | How to Fix It |
|---|---|---|
| Too soft | Warm cream cheese, short chill, or wet add-ins | Chill longer; if needed, mix in more shredded cheddar |
| Too firm | Too much shredded cheese or very cold serving temperature | Let it sit for 15 to 20 minutes before serving |
| Bland | Not enough seasoning | Add garlic powder, onion powder, Worcestershire, pepper, herbs, or sharper cheddar |
| Too salty | Bacon, dried beef, ranch seasoning, or everything seasoning | Add more cream cheese if possible and serve with unsalted crackers or vegetables |
| Coating falls off | Outside too cold, dry, or loosely pressed | Let the cheese ball soften slightly, then press the coating on gently |
| Nuts, pretzels, or crumbs get soft | Coated too far ahead | Roll in crunchy coatings closer to serving time |
| Lumpy filling | Cream cheese was too cold | Soften fully and beat smooth before adding cheddar |
| Watery filling | Pineapple, pickles, or jalapeños were not drained enough | Blot wet add-ins well, chill longer, and mix in more cheddar if needed |
More Cheese Appetizers and Party Snacks
If you are building a larger party table, this chilled cheese ball can anchor the cold, creamy side while hot appetizers bring crunch. For more cheese-forward snacks, try MasalaMonk’s mozzarella sticks or Indian-inspired cheese balls. For a broader small-plates spread, add croquettes or build an Indian-inspired tapas night. Together, those options give the table contrast instead of making everything soft, cold, or cheese-heavy.
FAQs
What is a cheese ball made of?
A classic cheese ball is usually made with cream cheese, shredded cheese, seasonings, and an outer coating. In this recipe, cream cheese gives the ball structure, while sharp cheddar, green onion, Worcestershire sauce, garlic powder, onion powder, black pepper, and pecans add flavor and texture.
What cheese is best for a cheese ball?
Because sharp cheddar has strong flavor without making the recipe complicated, it is the best first choice. However, white cheddar, Colby Jack, pepper Jack, smoked gouda, blue cheese, or goat cheese can work if you want the cheese ball to taste milder, smokier, spicier, or tangier.
How long should a cheese ball chill?
At minimum, chill a cheese ball for 1 hour. However, 2 hours is better if you want a cleaner shape and easier coating. If you make it the night before, let it soften for 15 to 20 minutes before serving so crackers do not break as easily.
Can I make a cheese ball the night before?
Yes. For the freshest texture, shape and wrap the cheese ball the night before, then refrigerate it. After that, roll it in the coating closer to serving, especially if the coating includes bacon, pretzels, crackers, or herbs.
Can you freeze a cheese ball?
Yes, but freeze it before adding the coating. That way, the outside tastes fresher after thawing. Wrap the shaped cheese ball tightly, freeze it in a freezer-safe container, thaw it overnight in the refrigerator, and then roll it in a fresh coating before serving.
How long can a cheese ball sit out?
Because it is made with cream cheese and shredded cheese, a cheese ball should not sit out for more than 2 hours at room temperature. If the temperature is above 90°F / 32°C, keep that window to 1 hour. After that, refrigerate safe leftovers promptly or discard anything that has been sitting out too long.
What crackers are best for a cheese ball?
Because the cheese ball firms up in the fridge, sturdy crackers work better than very thin ones. Buttery crackers, wheat crackers, seeded crackers, pretzel crisps, pita chips, crostini, and baguette slices all work well. If the ball is still very firm, let it soften briefly or add a small spreading knife.
Can I make a cheese ball without nuts?
Yes. Instead of pecans or walnuts, use chopped herbs, bacon, crushed pretzels, crushed crackers, everything seasoning, sesame seeds, or toasted breadcrumbs. If allergies are a concern, keep the whole platter nut-free rather than using separate sections of the same board.
Do I need sour cream or mayo in a cheese ball?
No, not for a classic shaped cheese ball recipe. Sour cream and mayo can loosen the mixture, which makes the ball harder to shape. If you are making cheese ball dip, though, a small spoonful can help make the texture softer.
Why is my cheese ball too soft?
A cheese ball is usually too soft because the cream cheese was too warm, the mixture did not chill long enough, or there were too many wet add-ins. First, chill it longer. If it is still too loose, mix in more shredded cheddar before adding the coating.
Can I serve this as cheese ball dip?
Yes. If you want cheese ball dip, use slightly less cheddar for a softer texture, spoon the mixture into a shallow bowl, and add the coating on top instead of shaping it into a ball. This works especially well for casual parties where easy scooping matters more than presentation.
Is this the same as fried cheese balls?
No. This is a chilled cream cheese appetizer served with crackers and vegetables. Fried cheese balls are a different snack style, often made with potato, cheese, breadcrumbs, and frying or baking. So, if you want a hot crispy snack, use a fried cheese ball recipe instead.
Can I make mini cheese ball bites?
Yes. After the cheese mixture chills until firm, scoop it into 1-tablespoon portions, roll each one in coating, and add pretzel sticks right before serving. A full batch usually makes about 36 to 48 mini cheese ball bites.
A classic cheese ball recipe is simple, but the small details make it better. First, soften the cream cheese properly. Then, season the filling before shaping, chill it until firm, and add the coating at the right time. Once the base is right, you can keep it classic with pecans, make it festive with cranberries, turn it bold with bacon ranch, add old-school flavor with dried beef, or serve it as mini cheese ball bites for an easy party platter. In the end, the best version is the one that tastes good, spreads easily, and fits the way you are serving it.