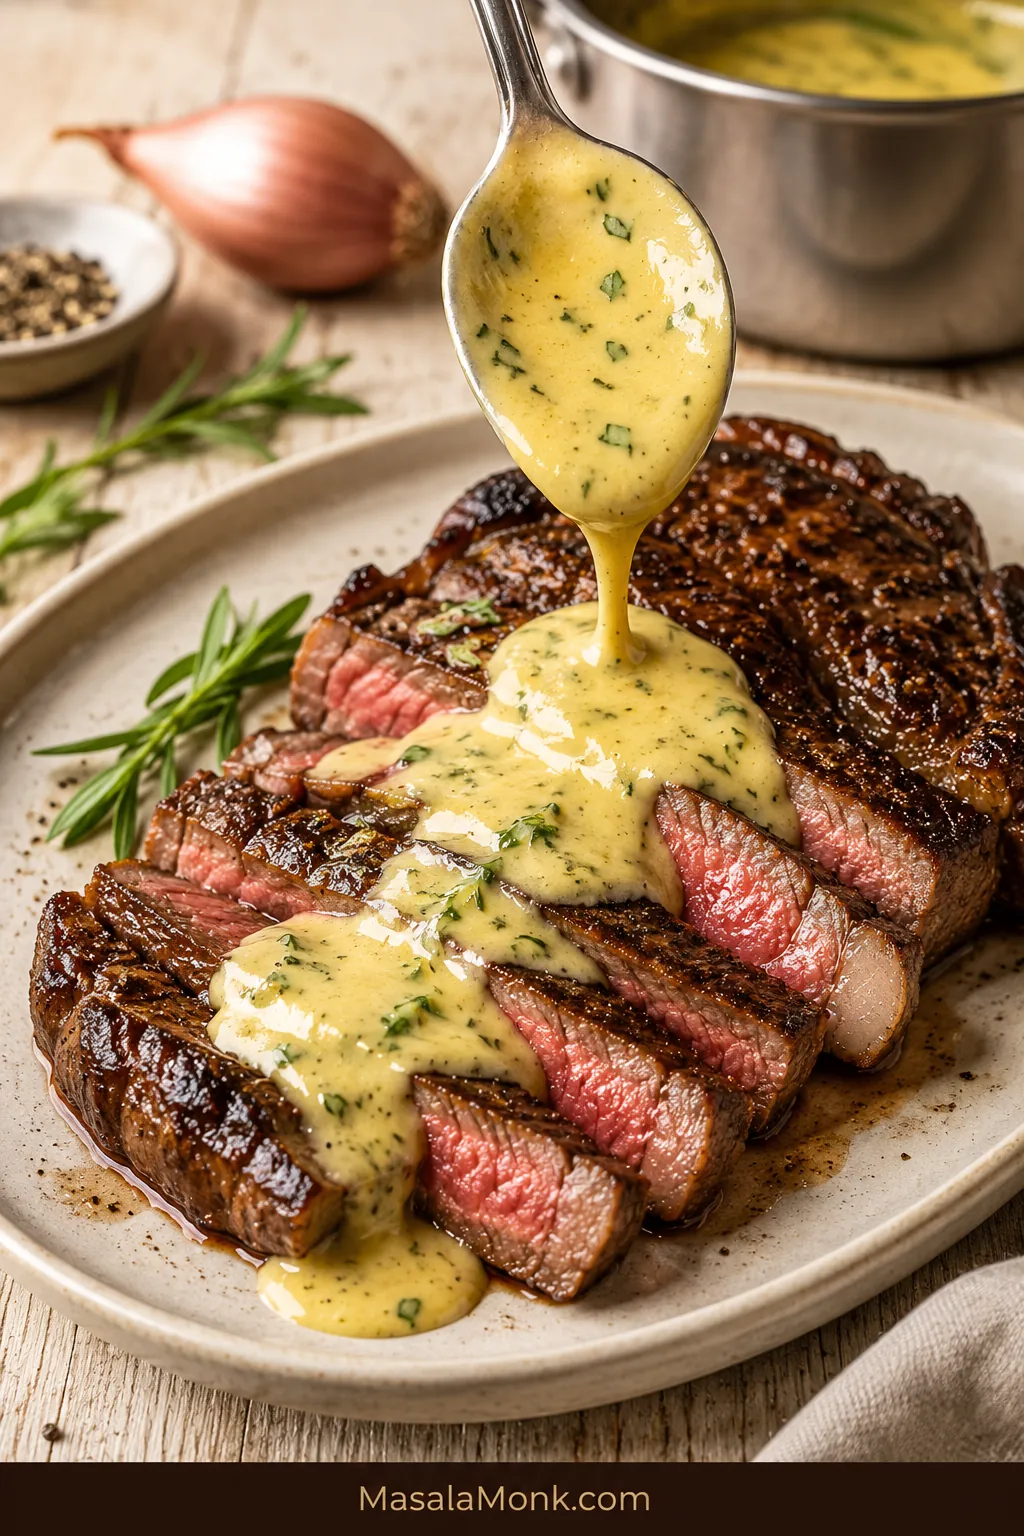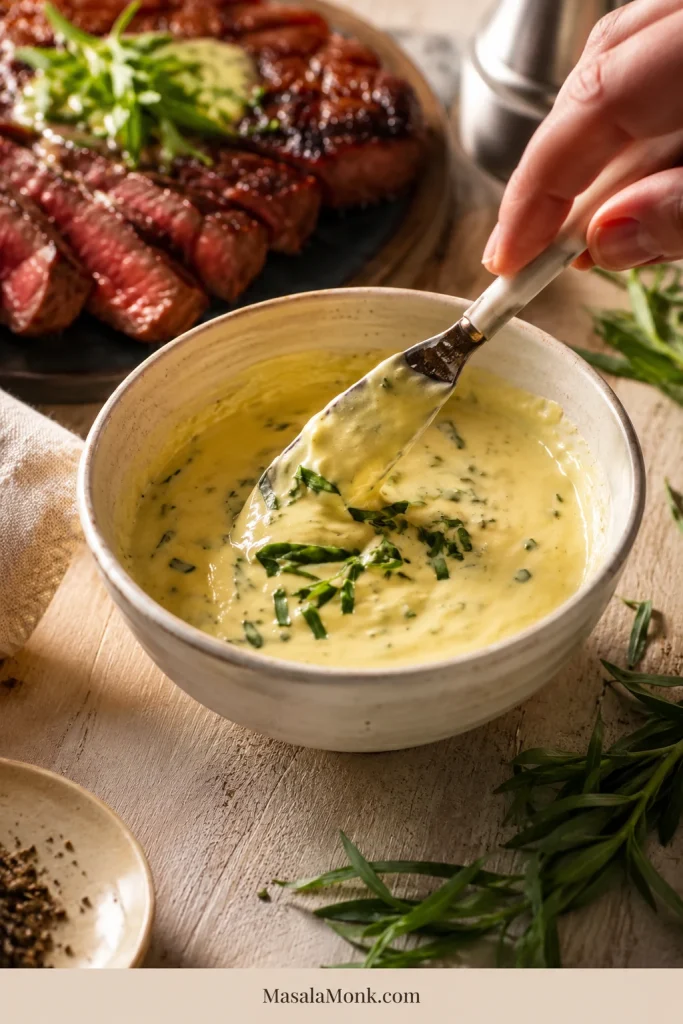
Boneless pork chops look like the easy dinner choice until you remember how quickly lean pork can turn dry. This air fryer method is built around the moment that usually ruins them: the last few minutes, when the outside looks done but the center can go from juicy to tight if you wait too long.
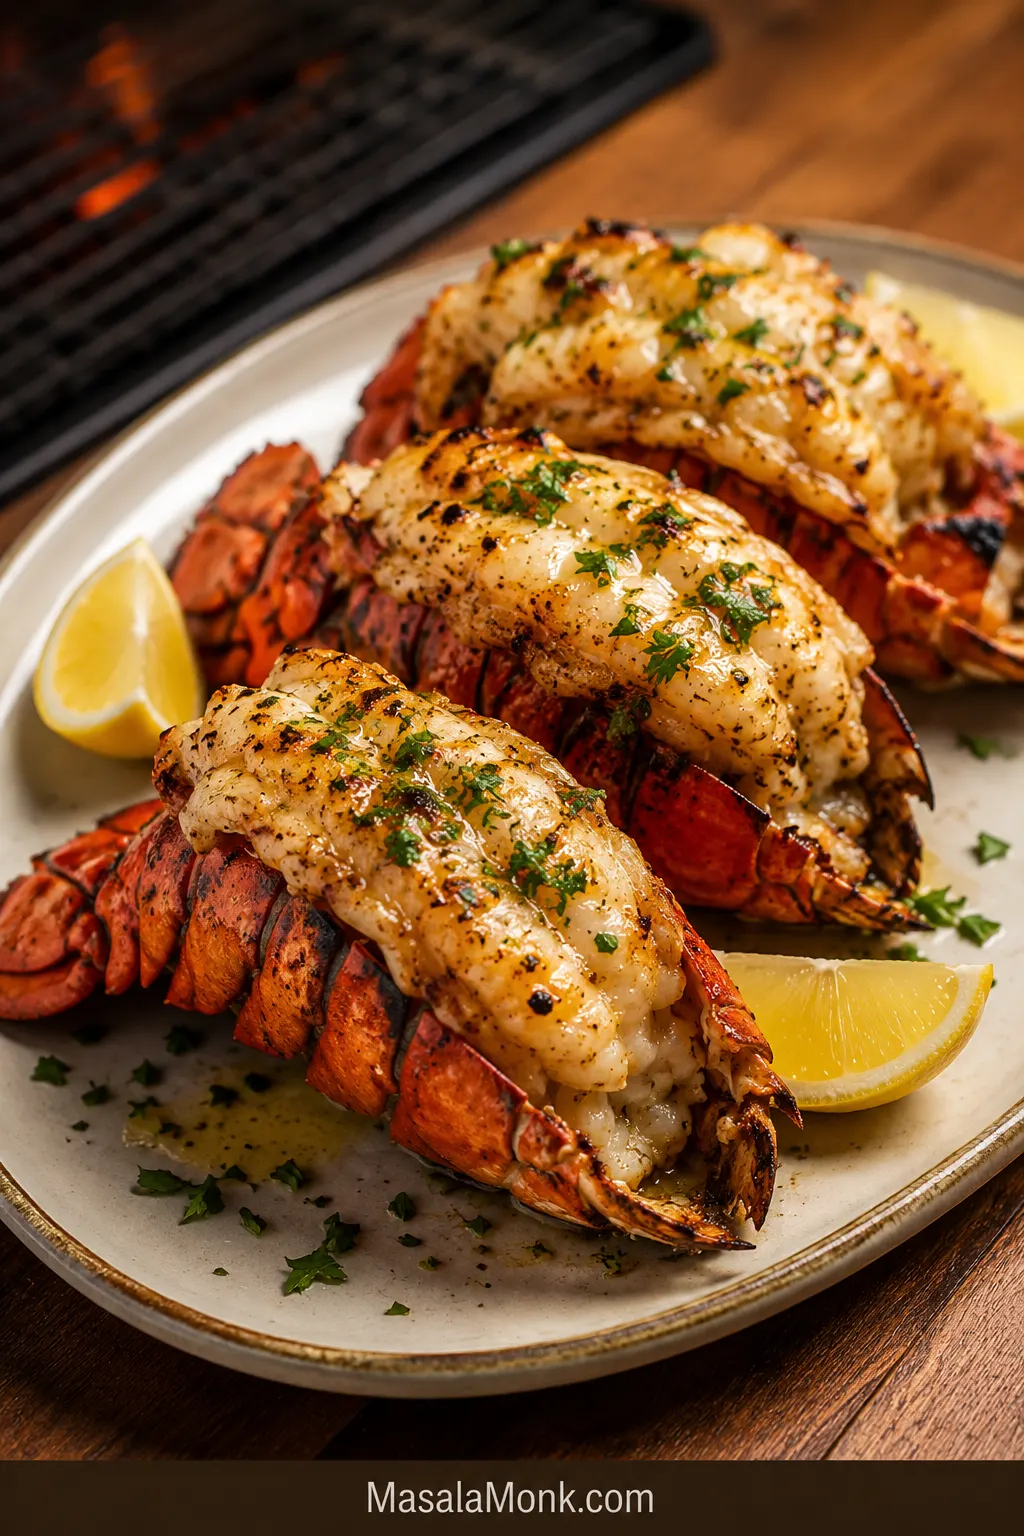
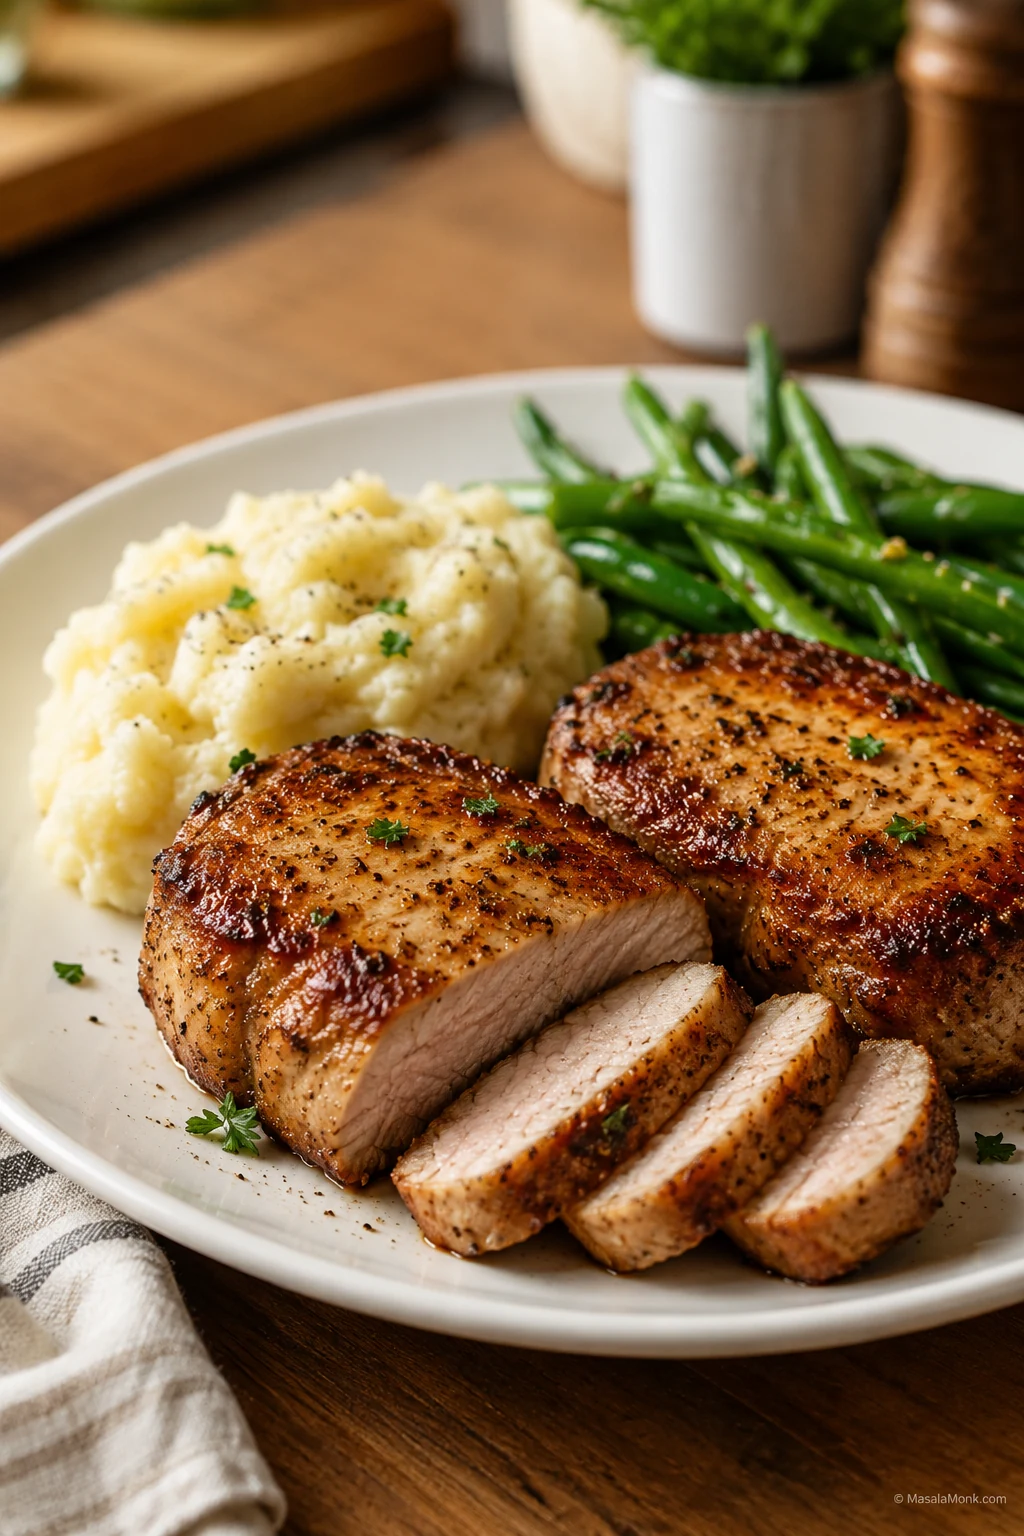
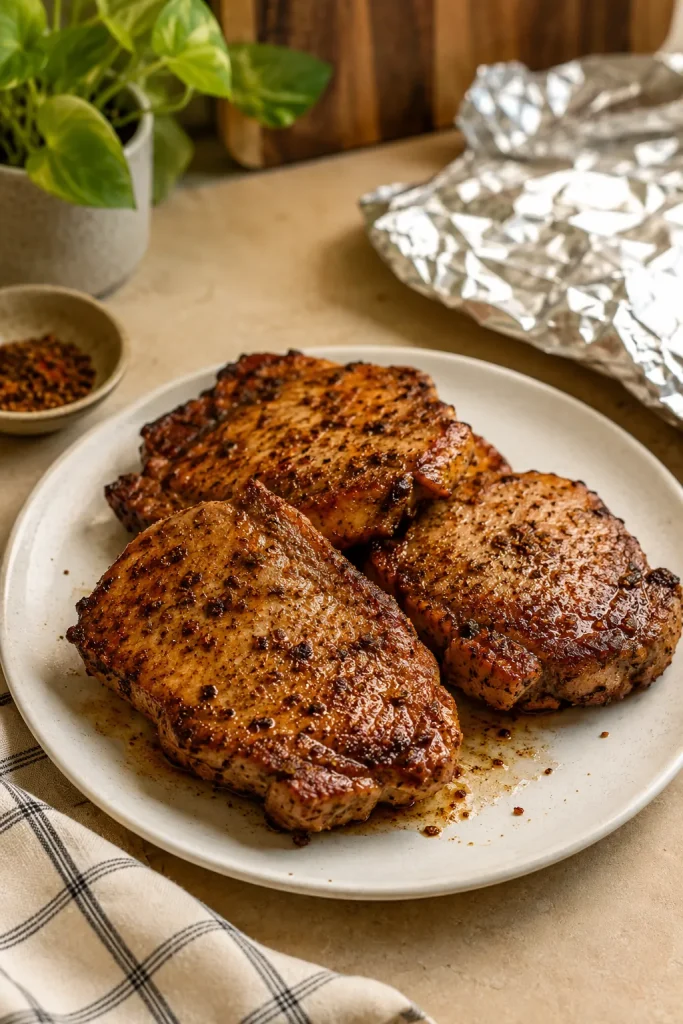
For juicy air fryer boneless pork chops, cook 1-inch chops at 380°F / 193°C for 10–12 minutes, flipping halfway, until the thickest center reaches 145°F / 63°C. Rest them for 3–5 minutes before slicing. The pork should come out lightly browned at the edges, with a savory rub that clings and a center that stays moist instead of chalky.
This is the no-dry method by thickness: start with the 1-inch timing, then adjust for the chop in front of you. Thin chops need an early check at the center, thick chops need steadier heat, frozen chops need a few minutes before seasoning will stick, and breaded chops usually need a little more heat for crisping.
Quick Answer: How Long to Cook Boneless Pork Chops in the Air Fryer
| Best temperature | 380°F / 193°C for juicy unbreaded boneless pork chops |
| Default cook time | 10–12 minutes for 1-inch chops |
| Flip? | Yes, flip halfway through cooking |
| Safe internal temperature | 145°F / 63°C in the thickest part |
| Rest time | 3–5 minutes before slicing |
| Most useful tool | An instant-read thermometer |
For most 1-inch chops, that answer is enough to get dinner moving. If your pork is thinner, thicker, frozen, or breaded, use the shortcut below first, then fine-tune with the detailed chart after the recipe.
Start Here: Time by Pork Chop Type
If your chops are already on the counter, match them to the closest situation here. The goal is to know when to use the thermometer, not to guess from color alone.
| Situation | Starting point |
|---|---|
| Standard 1-inch chops | 380°F / 193°C for 10–12 minutes |
| Thin chops | Start around 4 minutes |
| Thick chops | 380°F / 193°C; start around 12 minutes |
| Breaded chops | 390°F–400°F / 199°C–204°C with a light oil spray |
| Frozen chops | Cook 5 minutes first, then oil, season, and finish |
Need the special version? Jump to thin boneless pork chops, thick boneless pork chops, breaded and Shake-and-Bake pork chops, or frozen boneless pork chops.
The easy rule: 1-inch chops usually need 10–12 minutes at 380°F. Thin chops need an early check at the center, thick chops need steadier heat, and every chop should come out when the center reaches 145°F / 63°C.
Why Thickness Matters Before You Start
Use thickness as the first decision point. It tells you when to start checking the center and keeps the air fryer timer from turning into guesswork.
Ready to cook the standard 1-inch version? Start with the recipe below. If one chop is smaller than the others, it is not cheating to pull it first; it is how you keep every piece from drying out while the thicker ones finish.
Air Fryer Boneless Pork Chops Recipe
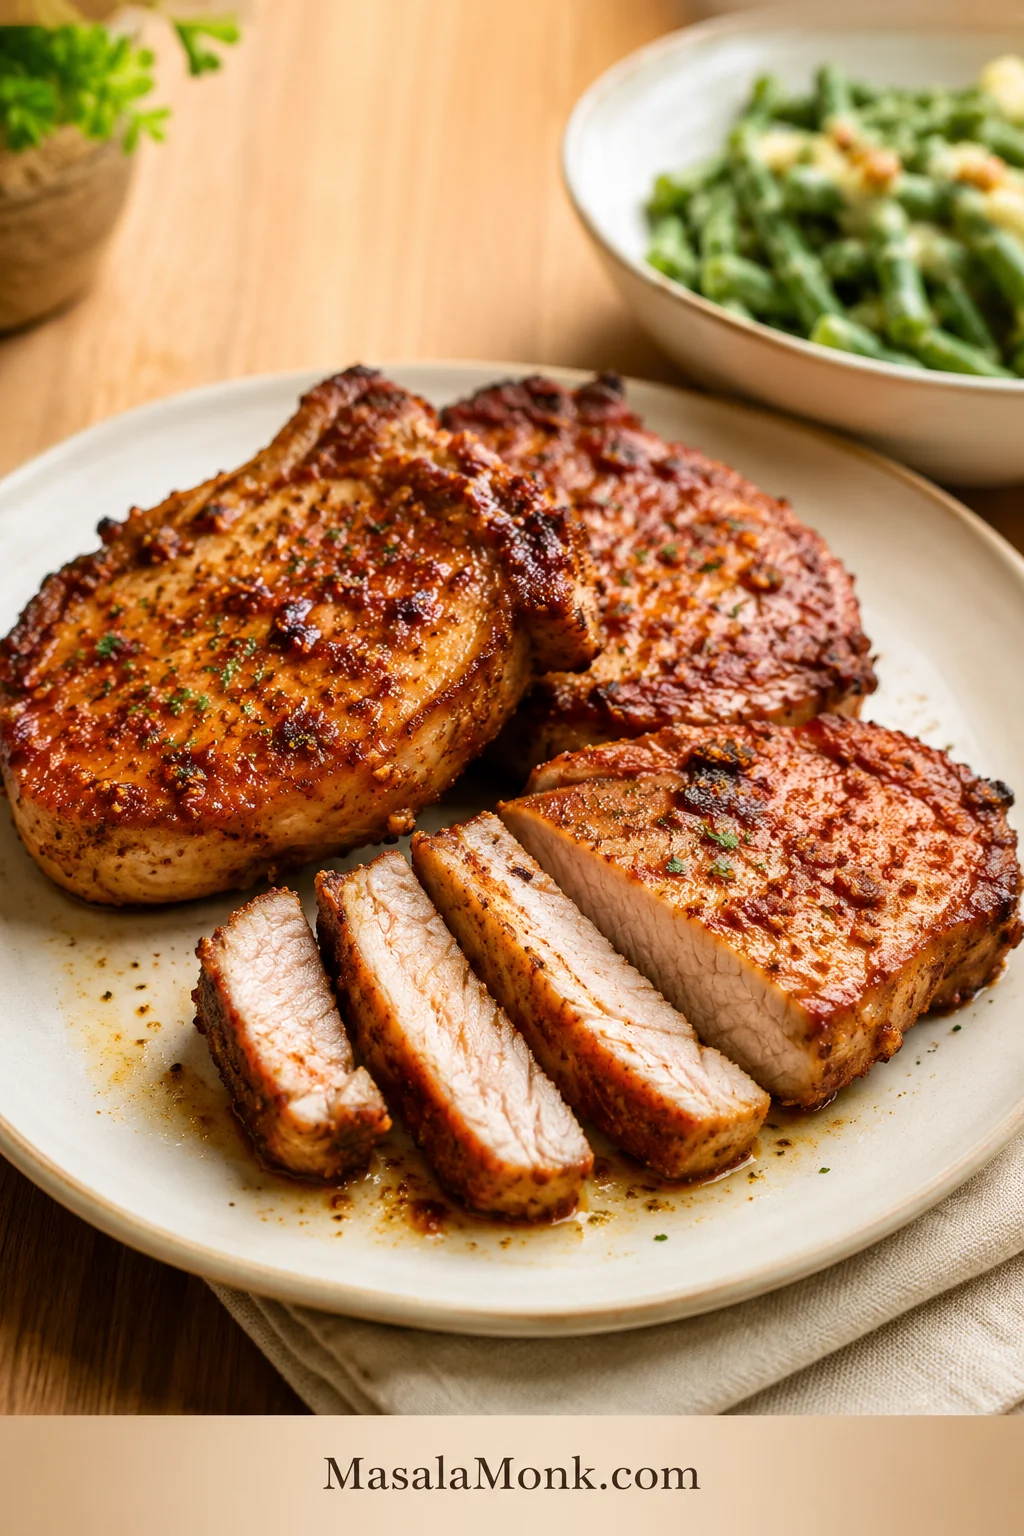
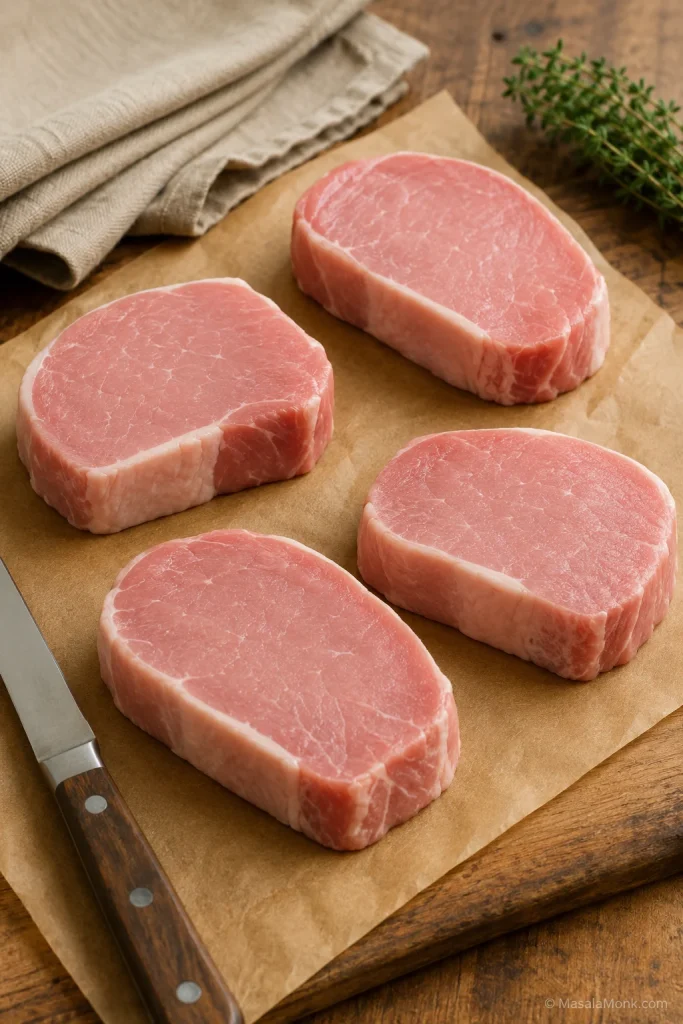
The most reliable version starts with 4 boneless pork chops about 1 inch thick — thick enough to stay juicy, but still quick enough for a weeknight dinner. This recipe makes 4 pork chops and takes about 20 minutes total, including rest time.
Using a different thickness? Check the air fryer pork chops time chart before you start, then come back to the recipe steps.
Ingredients
| Ingredient | Amount |
|---|---|
| Boneless pork chops | 4 chops, about 1 inch thick, 5–6 oz / 140–170 g each |
| Olive oil or avocado oil | 1½ tbsp / 22 ml |
| Brown sugar, optional | 1 tbsp / 12 g |
| Smoked or sweet paprika | 2 tsp / about 4–5 g |
| Garlic powder | 1 tsp / about 3 g |
| Onion powder | ½ tsp / about 1–1.5 g |
| Fine salt | ¾–1 tsp / about 4–6 g |
| Black pepper | ½ tsp / about 1 g |
| Dried thyme or sage, optional | ½ tsp |
What You Need Before Cooking
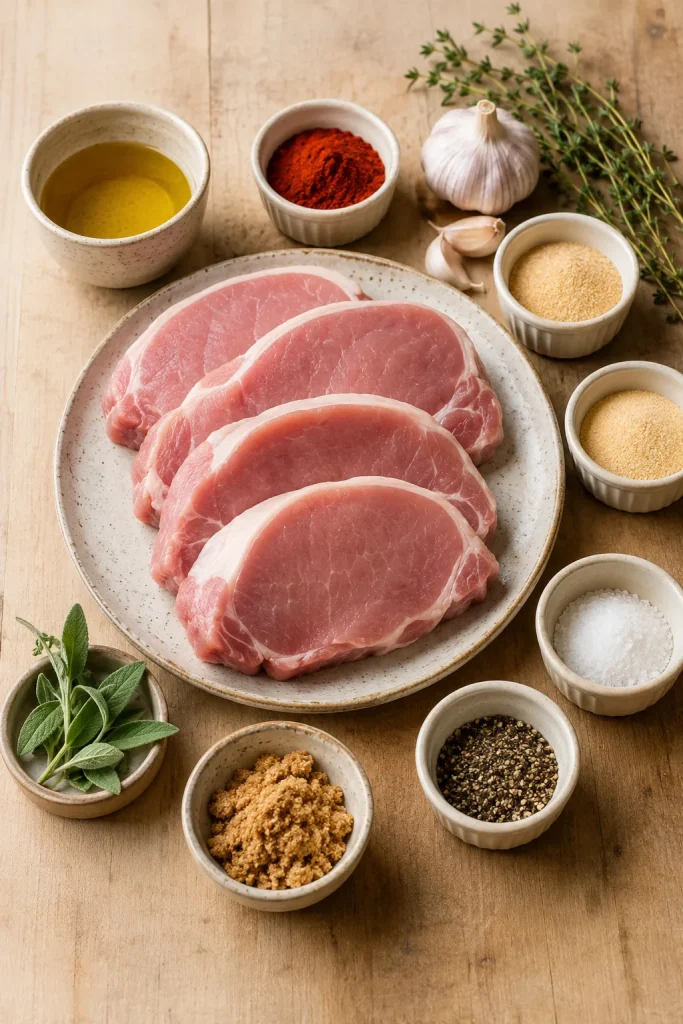
Brown sugar is optional, but it helps the pork brown and balances the savory seasoning. Without it, the chops may brown a little less but still cook well. Smoked paprika gives deeper color and a subtle smoky edge; sweet paprika keeps the flavor milder.
If using kosher salt, the volume can vary by brand. Use the lower amount for smaller chops, salty seasoning blends, or if you are unsure. You can always add a pinch more at the table, but you cannot take salt back once it is cooked in.
Instructions
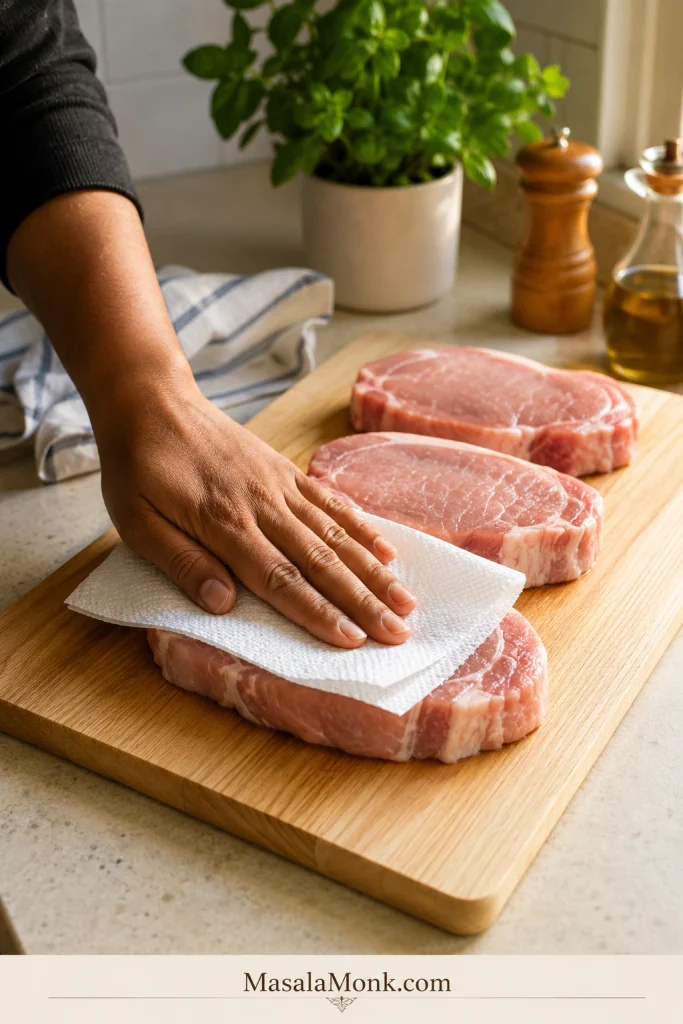
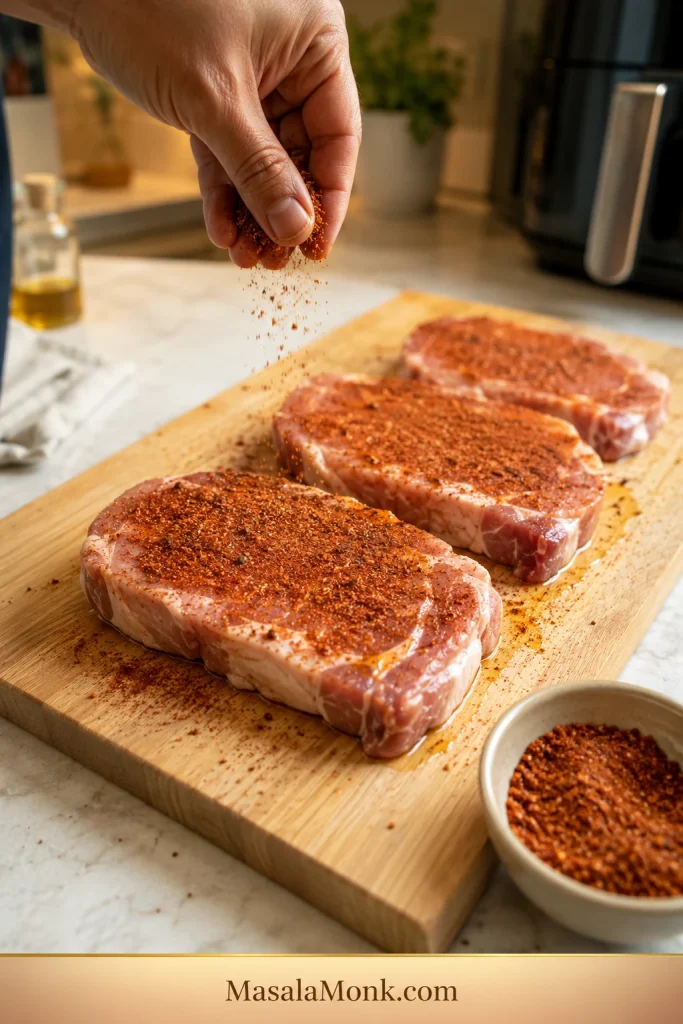
Prep and Season the Pork Chops
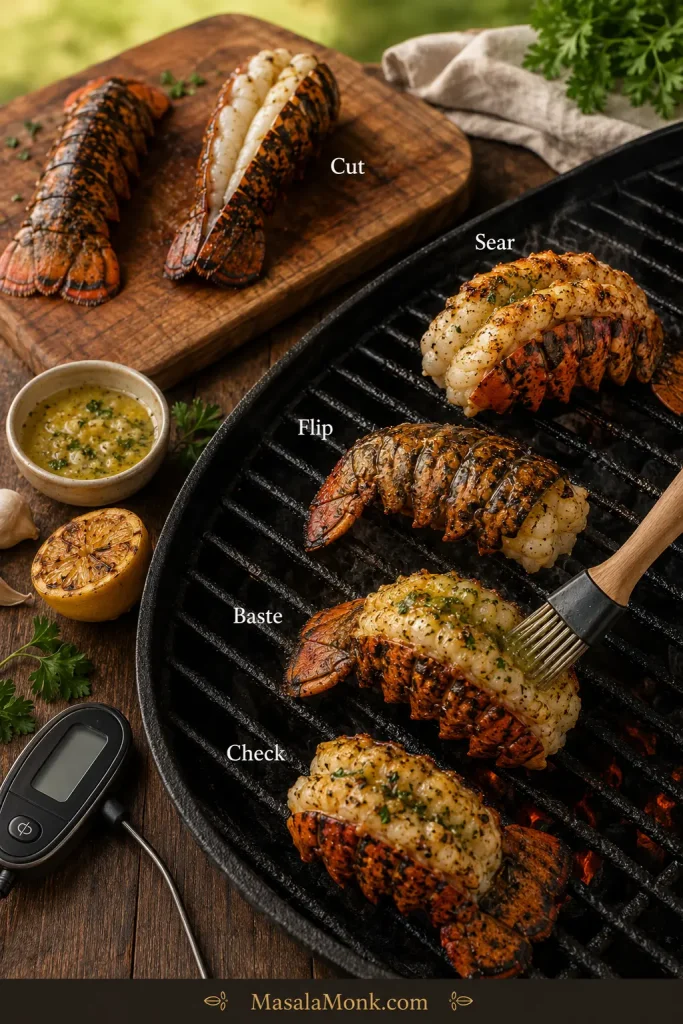
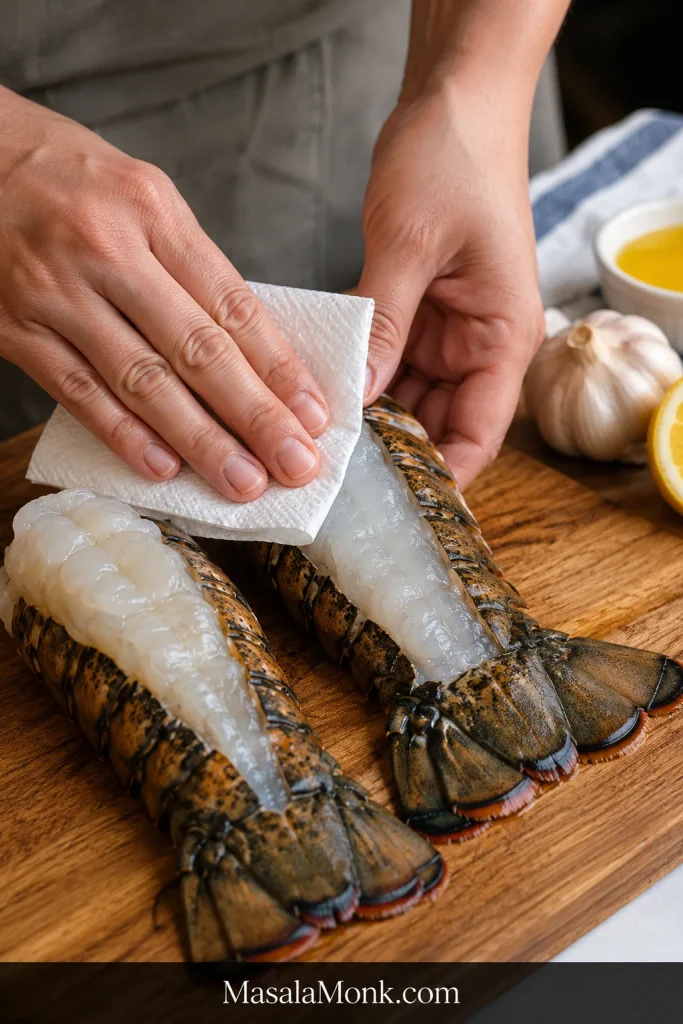
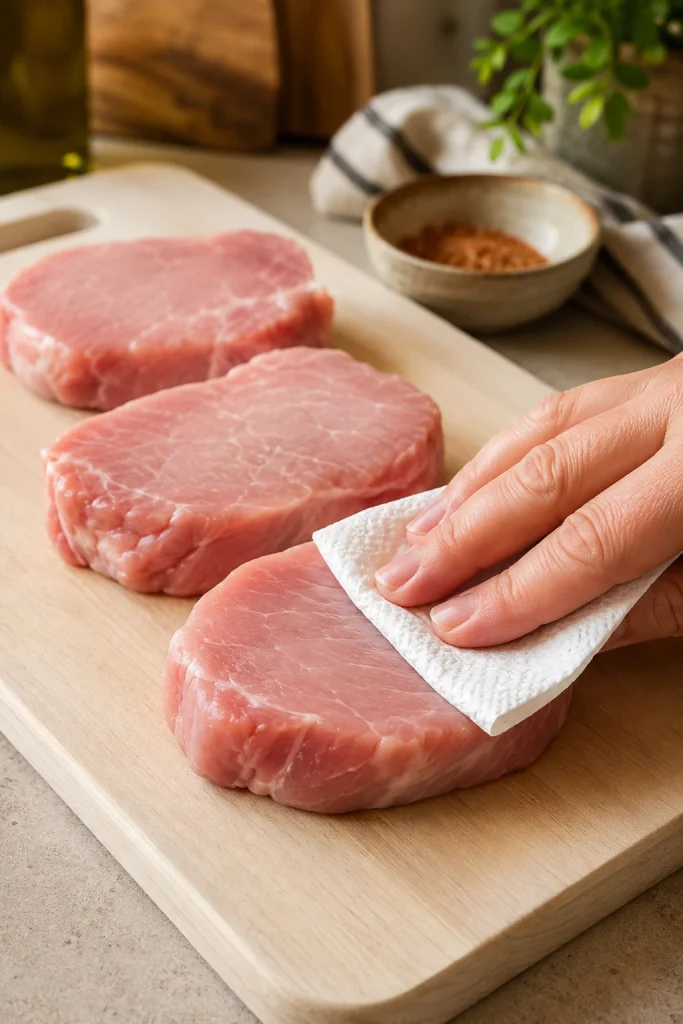
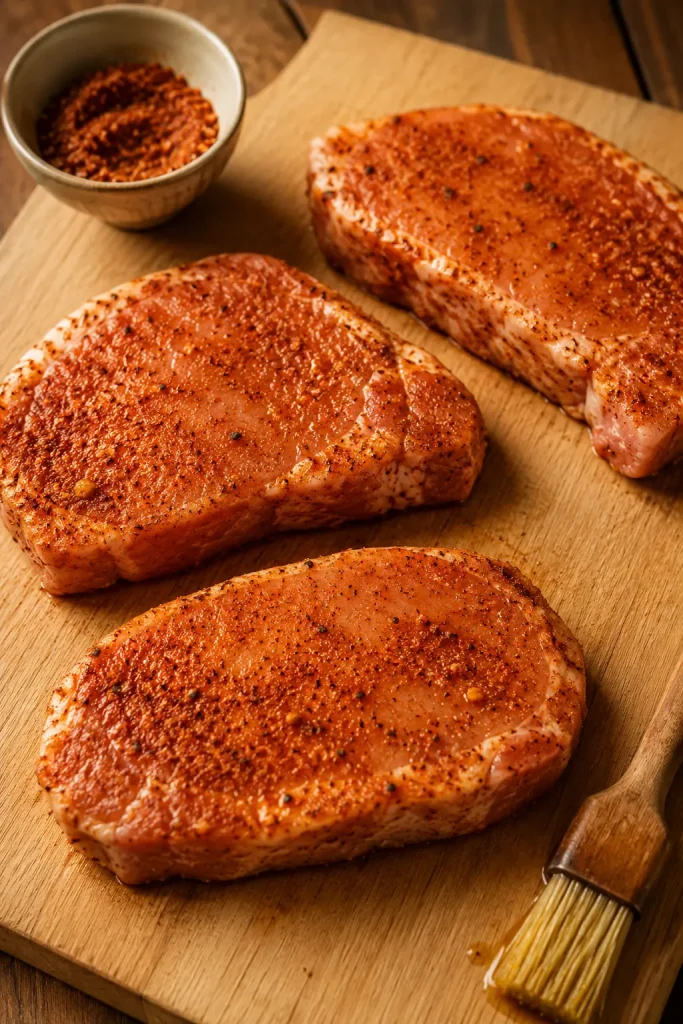
These first steps set up the crust and flavor. Dry the surface, oil lightly, and press the rub in so the pork browns instead of steaming.
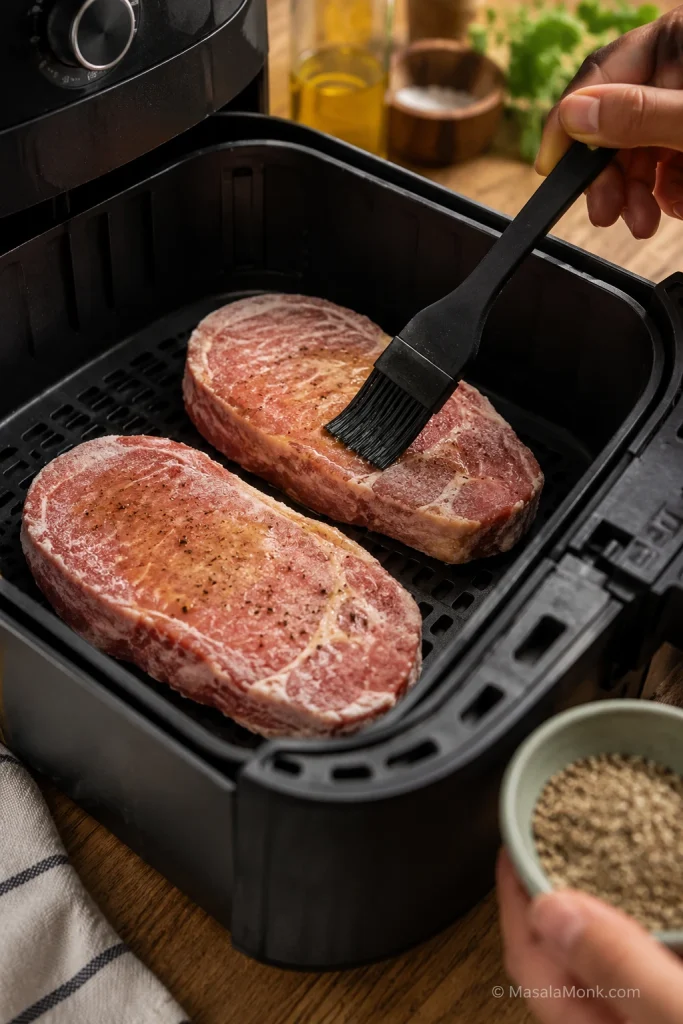
- Pat the pork chops dry. Use paper towels to remove surface moisture. Dry pork browns better and holds seasoning more evenly.
- Oil both sides. Rub the chops with olive oil or avocado oil. You want a light coating, not a greasy layer.
- Mix the seasoning. In a small bowl, combine the brown sugar, paprika, garlic powder, onion powder, salt, black pepper, and thyme or sage if using.
- Season generously. Sprinkle the seasoning over both sides and press it in gently so it clings.
Pat the Pork Chops Dry Before Seasoning
Season the Pork Evenly
Air Fry, Check, and Rest
The cooking stage is about control: space the chops, flip once, measure the thickest center, and rest before slicing.
- Preheat if needed. If your air fryer recommends preheating, preheat to 380°F / 193°C for 3–5 minutes. If the chops are straight from the fridge, they may need an extra minute. Do not leave raw pork sitting out for long; just season while the air fryer preheats.
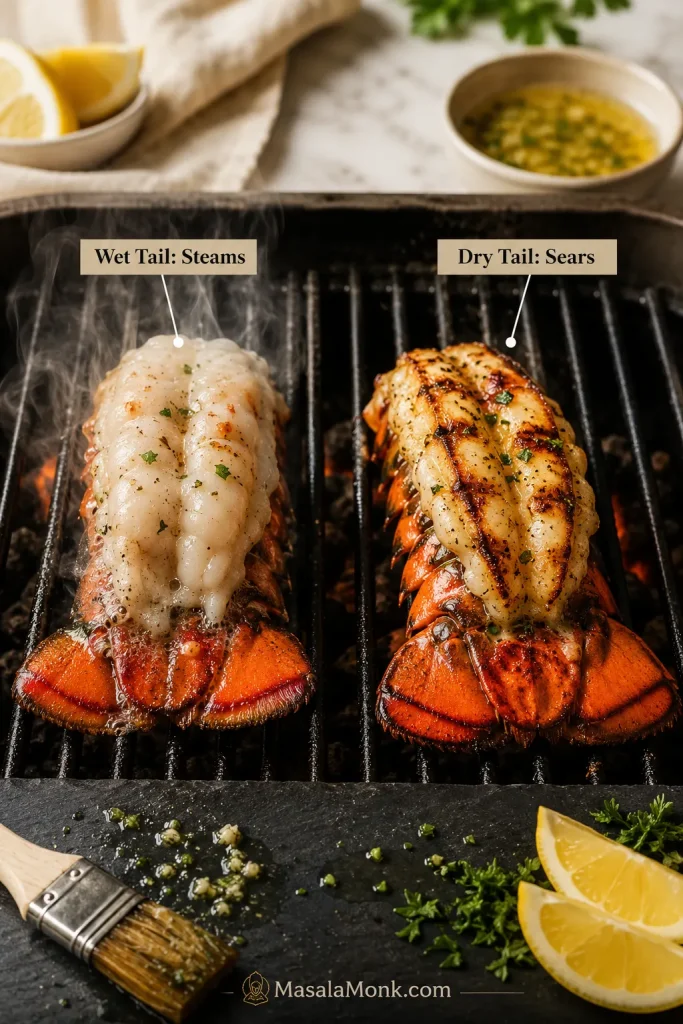
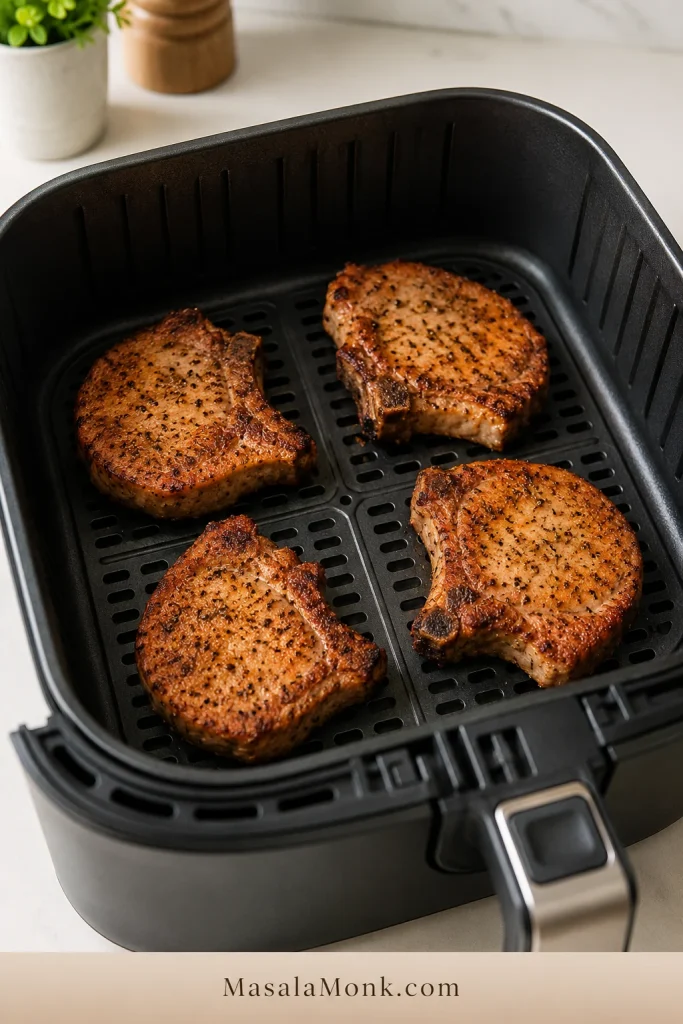
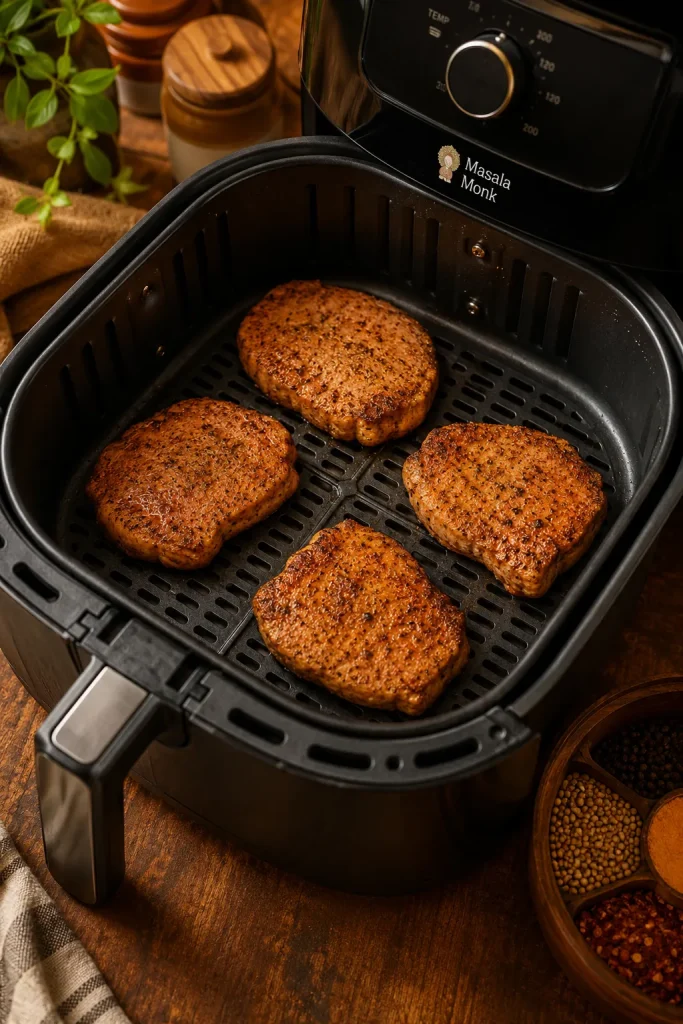
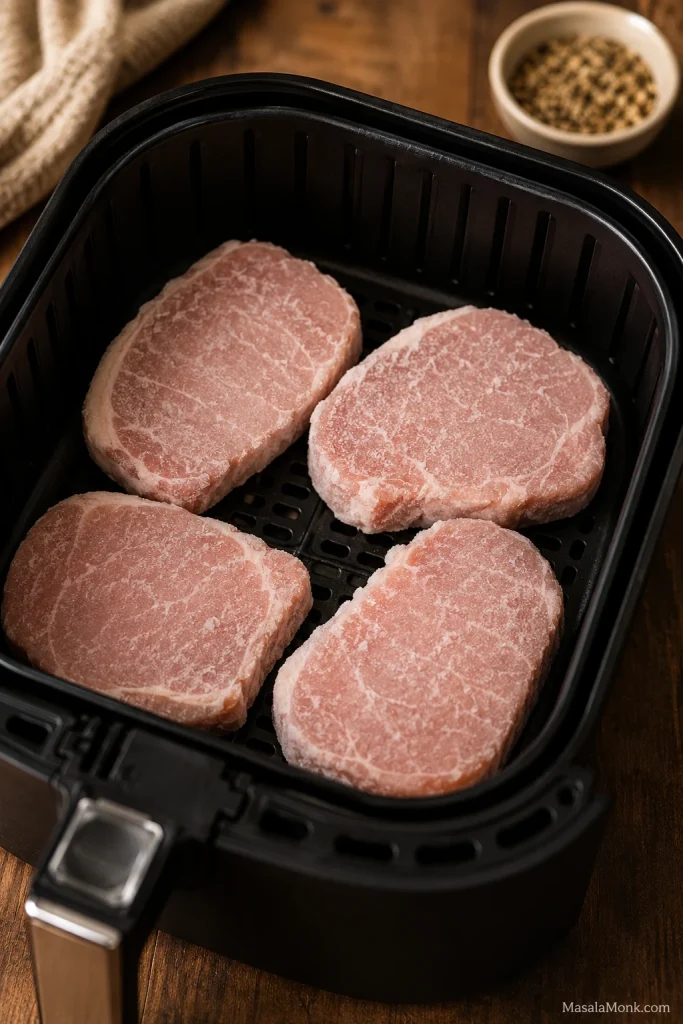
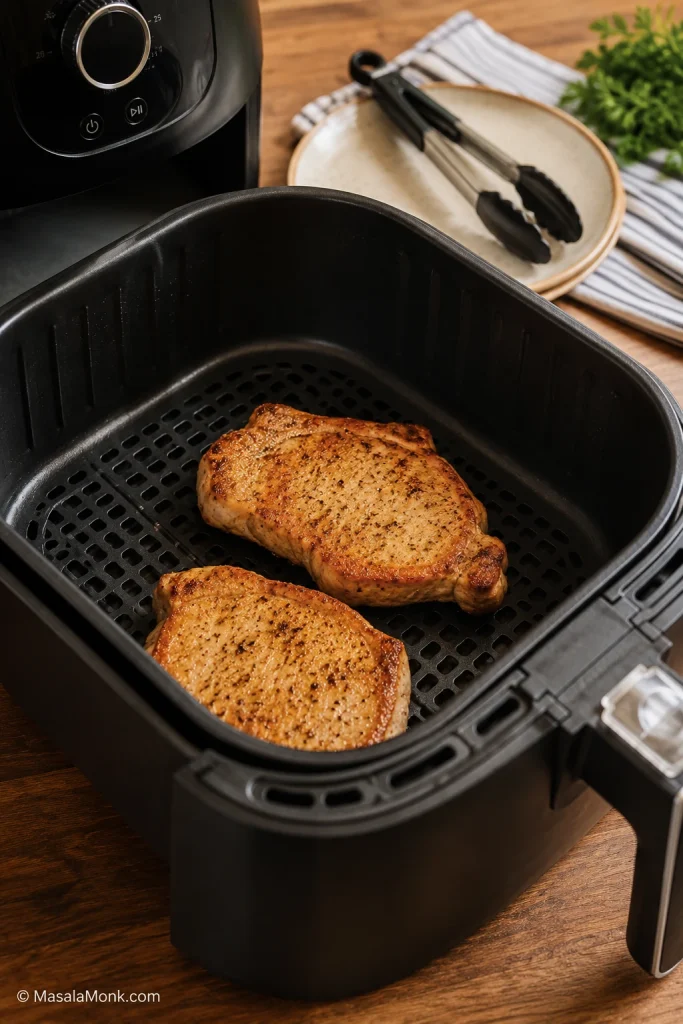
- Arrange in one layer. Place the chops in the basket with a little space between them. Do not stack or overlap. If one piece is thinner than the others, plan to take its temperature first and remove it early if needed.
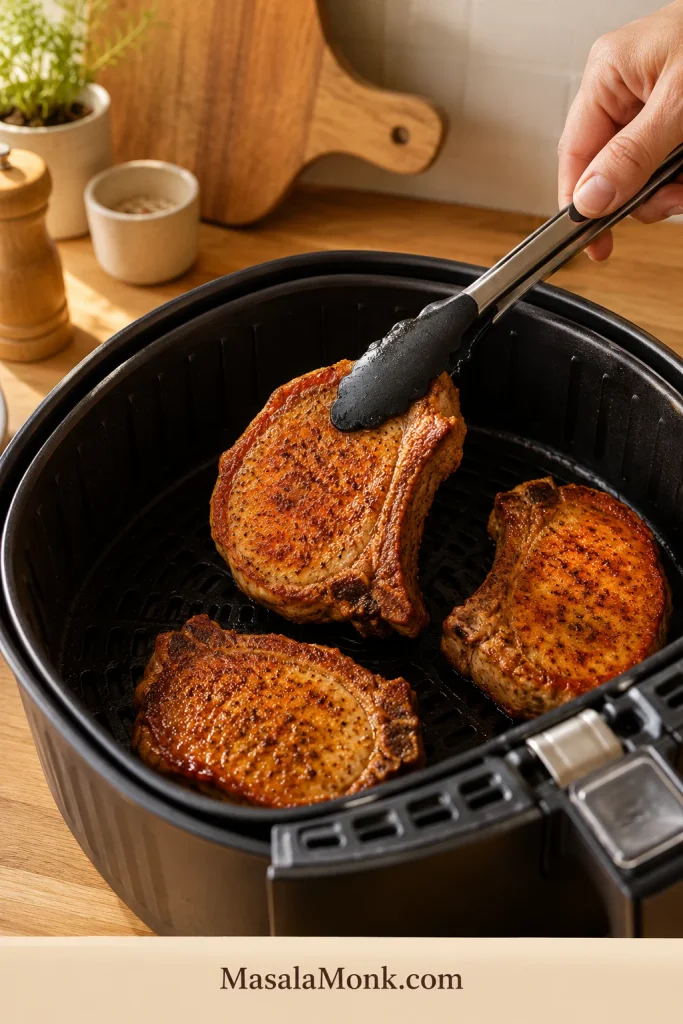
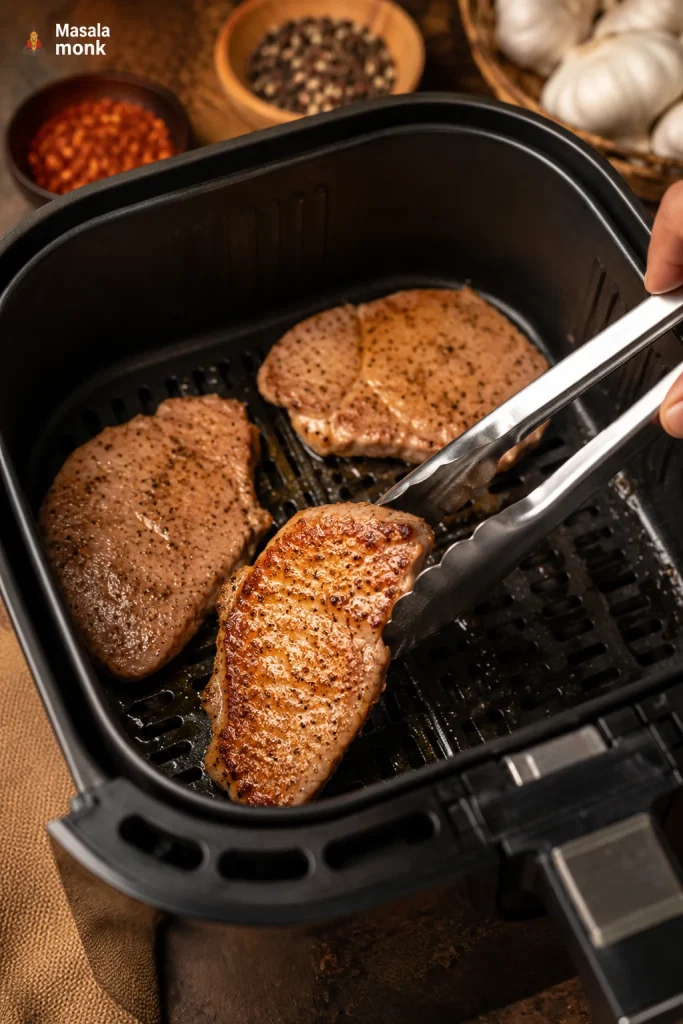
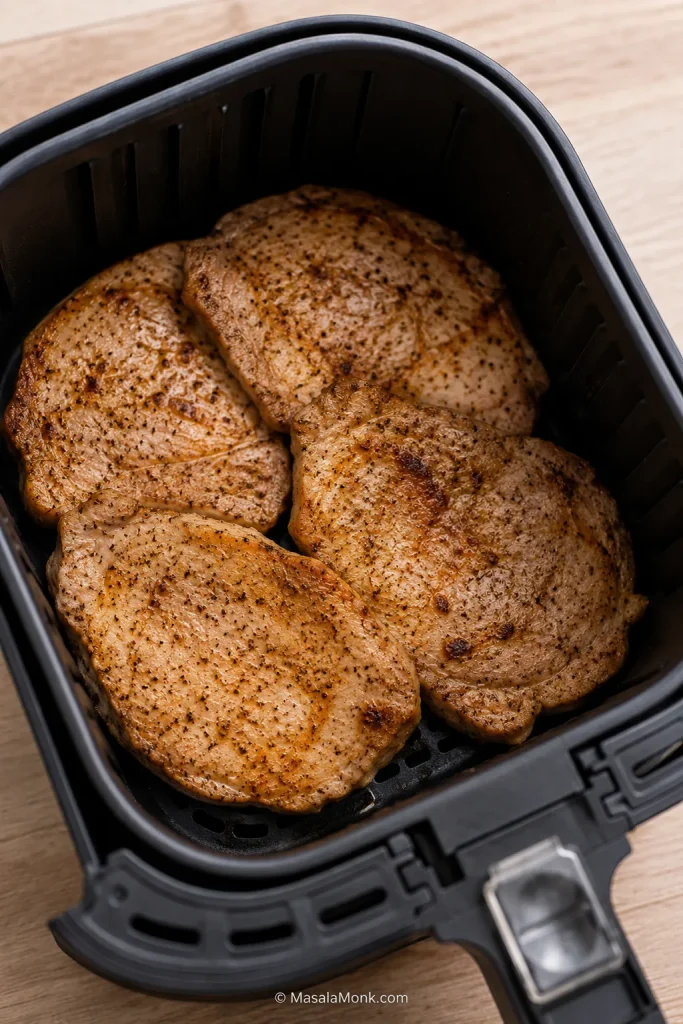
- Cook and flip. Air fry at 380°F / 193°C for 5–6 minutes, flip, then cook 4–6 minutes more depending on thickness.
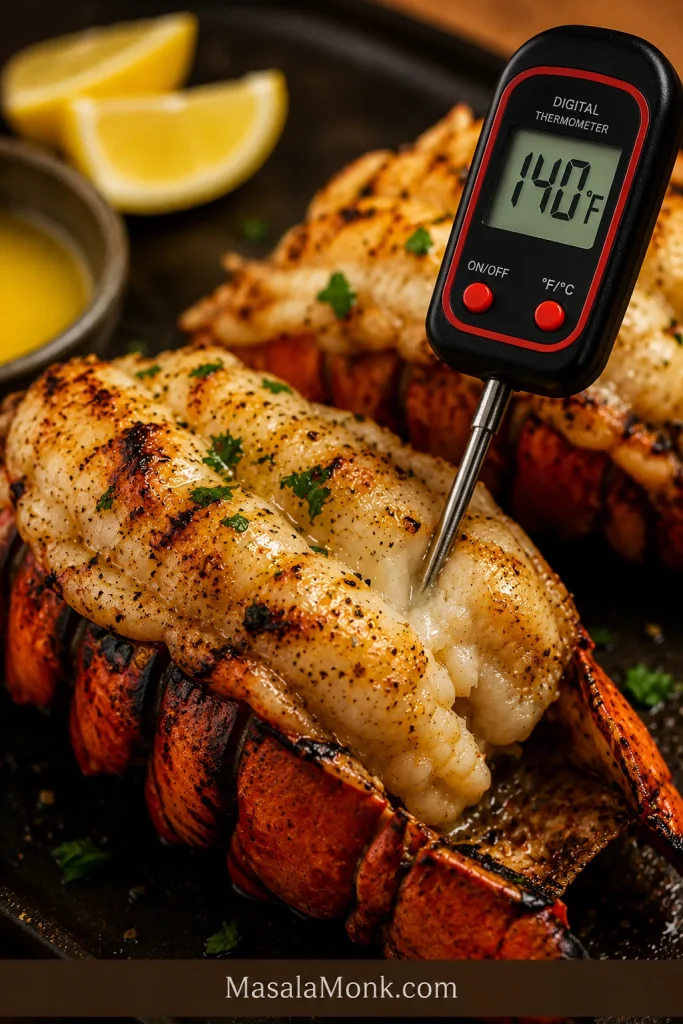
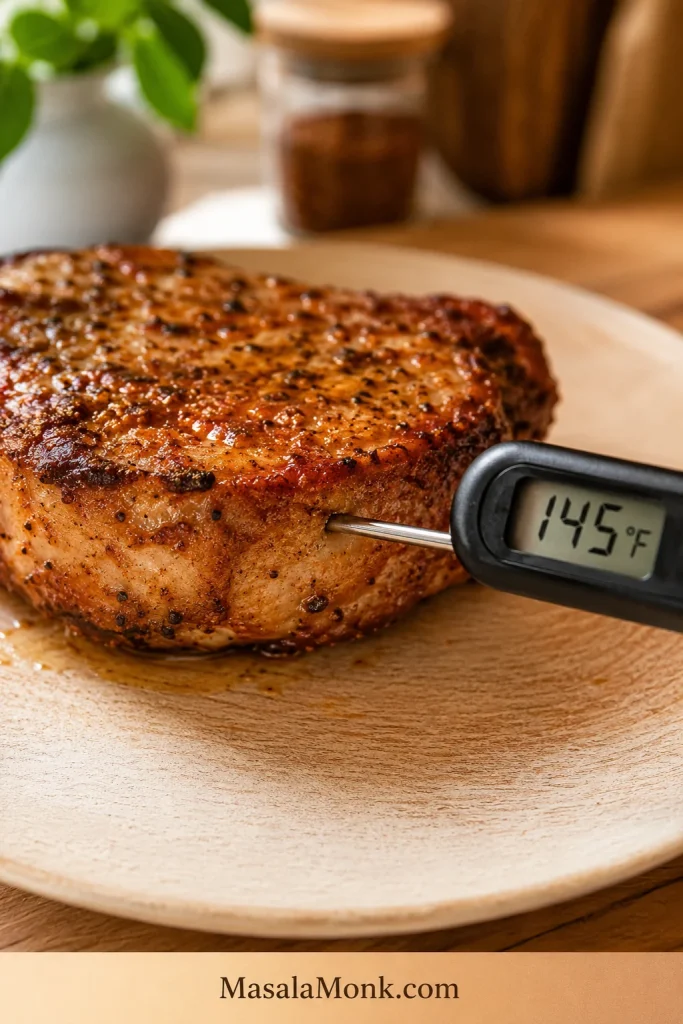
- Take the temperature. Around the 9-minute mark, slide an instant-read thermometer into the thickest center of the chop, not the edge. The pork is done at 145°F / 63°C.
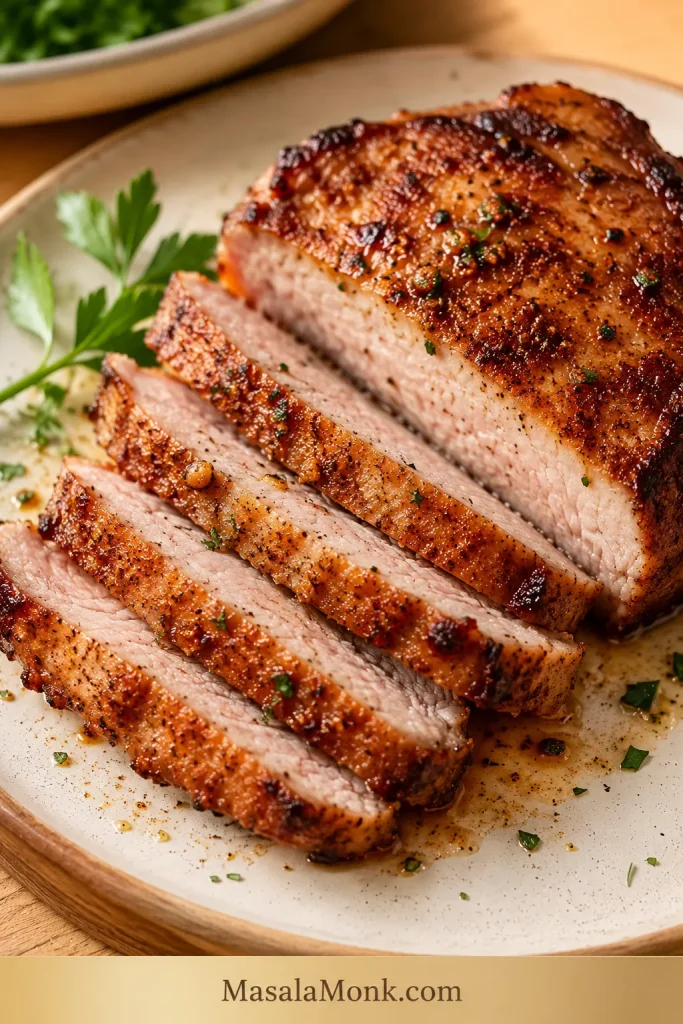
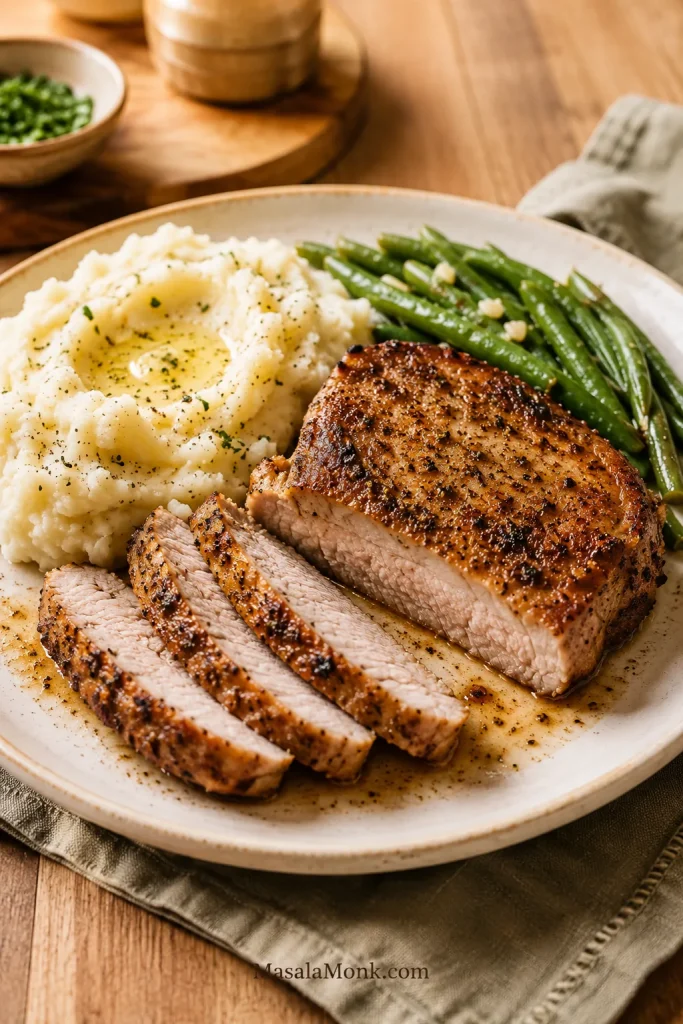
- Rest before slicing. Transfer the chops to a plate and rest uncovered for 3–5 minutes. If they are very thick, you can tent them loosely. That short pause helps the juices stay in the meat instead of running out onto the cutting board.
Give the Chops Space in the Basket
Air fryer heat works best when it can move around the food. If the chops overlap, the covered spots steam and cook unevenly.
Flip Halfway Through Cooking
Check the Thickest Center
The edge can read hotter than the middle. Aim the thermometer into the thickest center so you pull the pork at the right moment.
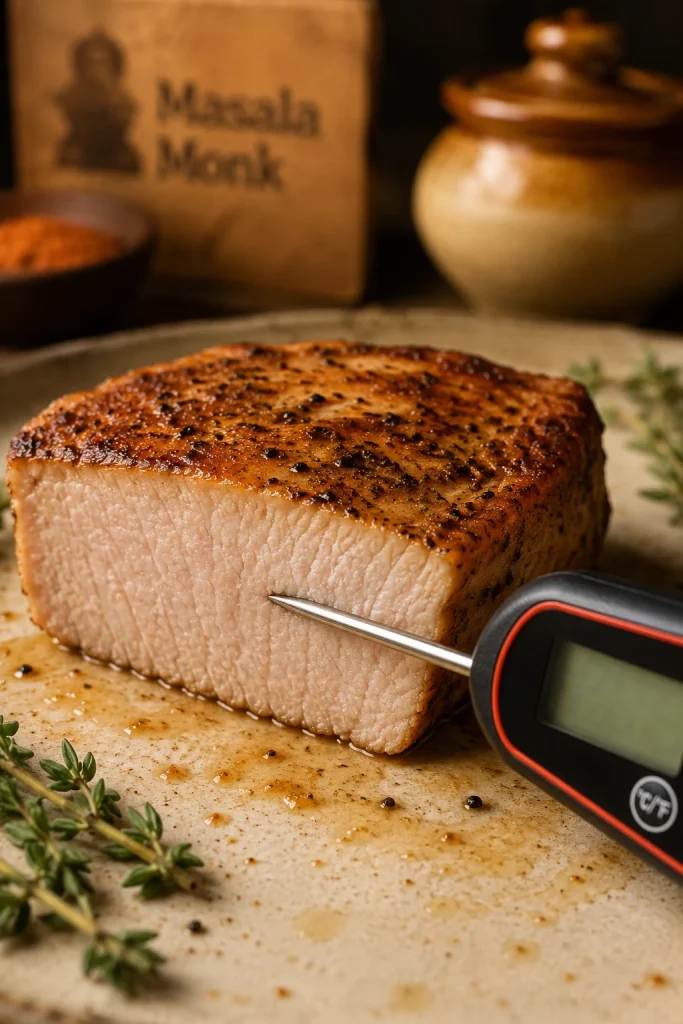
Rest Before Slicing
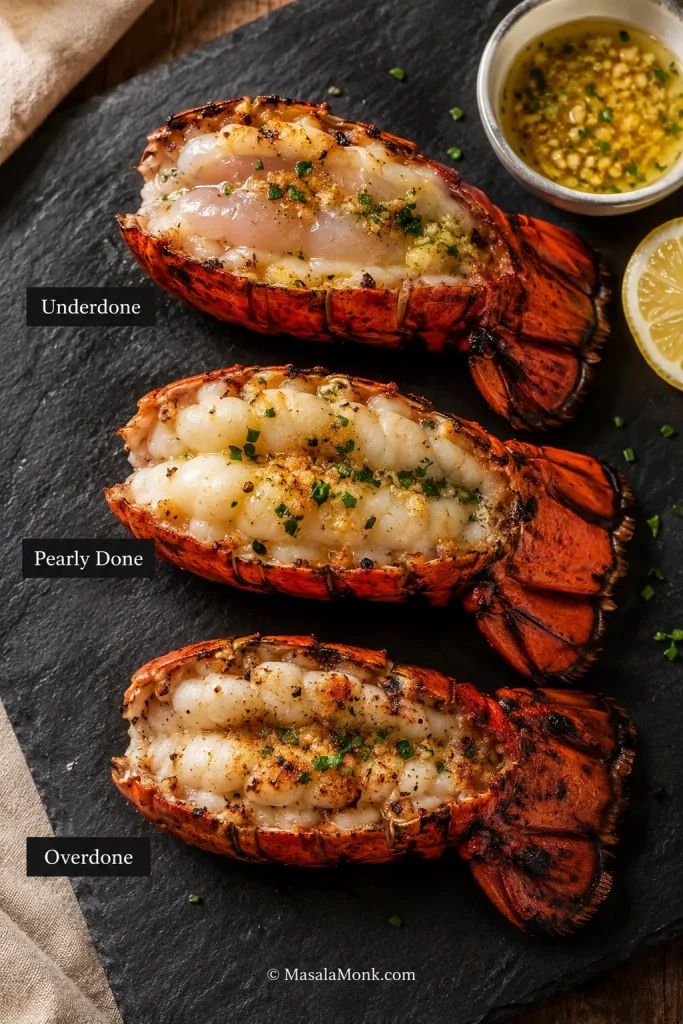
Look for a Moist Sliced Center
The slice should look moist and gently firm, not hard or chalky. Color can vary, so use this cue with the thermometer instead of replacing it.
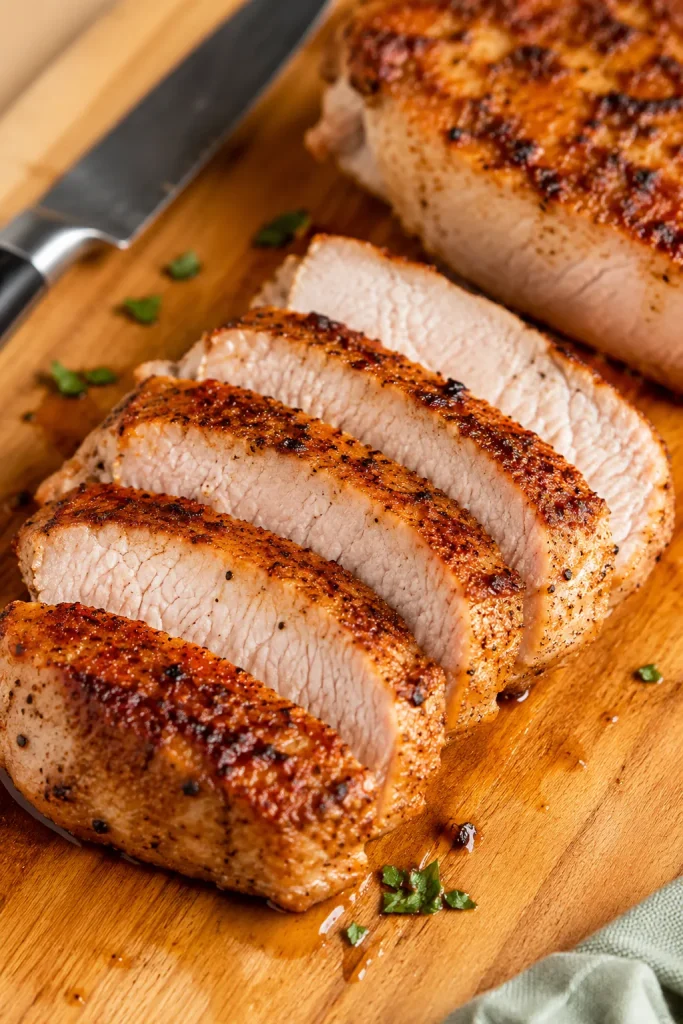
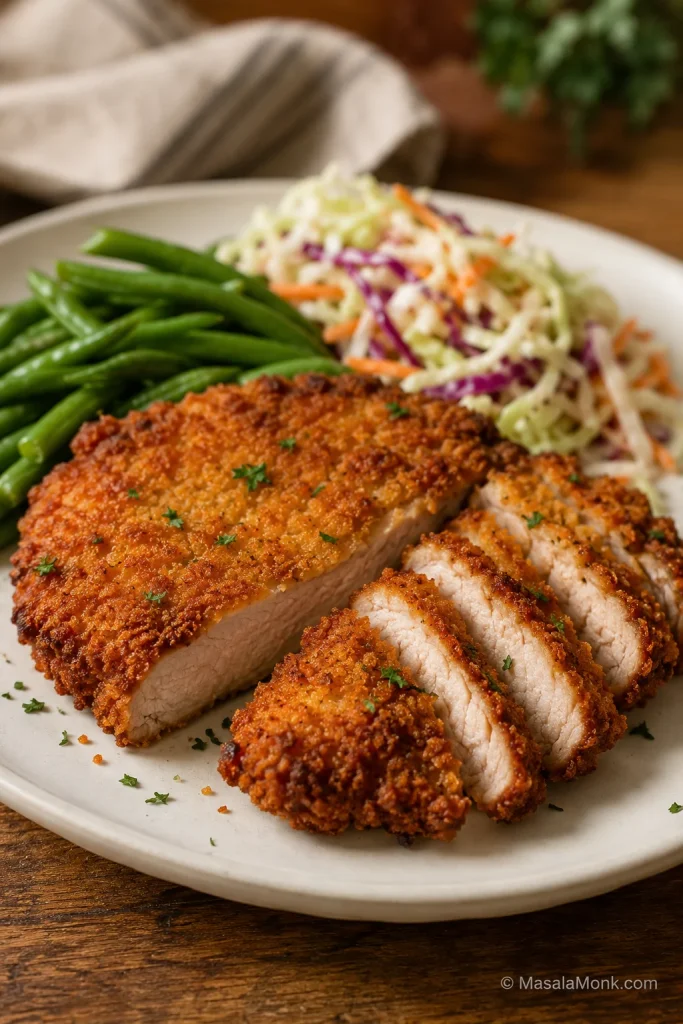
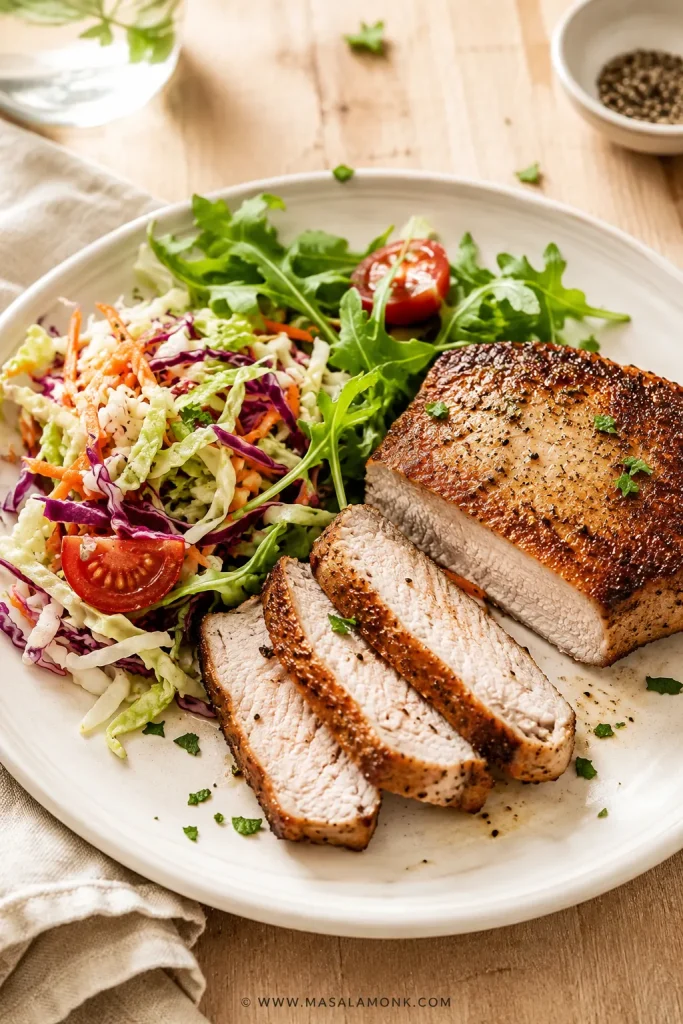
When the chops are close to 145°F but not quite there, give them another 1–2 minutes and take another reading. At 145°F / 63°C, take them out right away. The best batch should have browned, seasoned edges, a juicy center, and enough flavor from the rub that you do not need to hide it under sauce.
When they are done, the outside should look browned and seasoned, not wet or pale. The rub should taste savory and a little smoky-sweet, with enough browned edge to make the pork feel finished even without breading. The center should feel firm but not hard when pressed, and it may still have a slight blush if it has reached temperature. Trust the thermometer more than color alone.
For more help with doneness, use the time and temperature chart, the thin chop notes, or the thick chop notes below.
More Air Fryer Pork Chop Help
- Recipe
- Time and Temperature Chart
- Thin and Thick Chops
- Breaded, Frozen, and Other Versions
- Air Fryer Models
- Troubleshooting
- Serving, Storage, and Variations
- FAQ
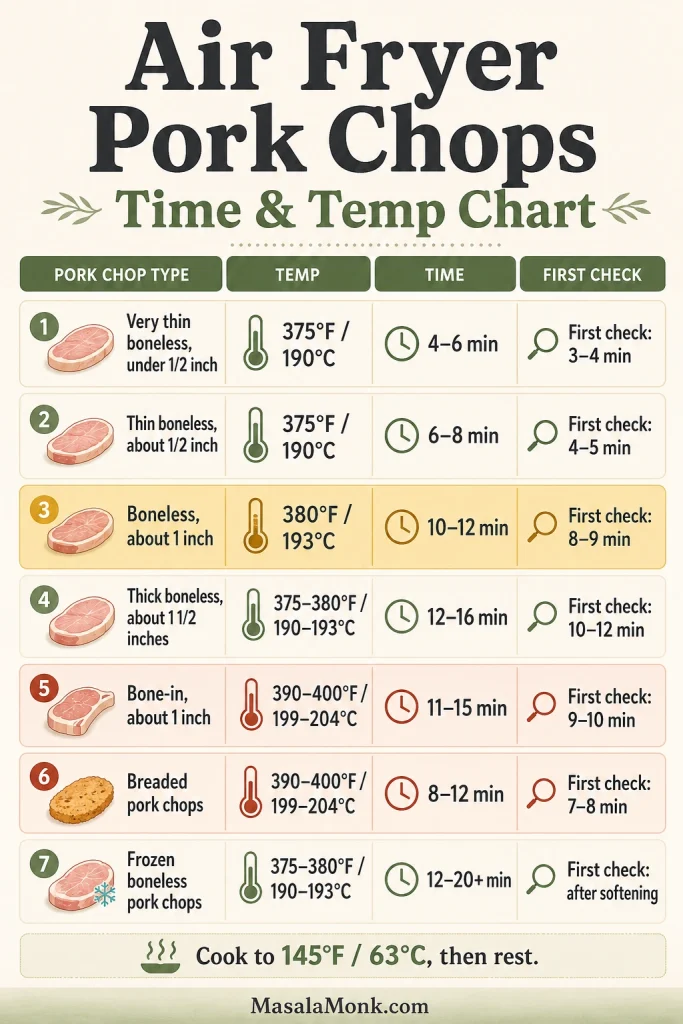
Air Fryer Boneless Pork Chops Time and Temperature Chart
For most 1-inch chops, the recipe timing above is enough. Use this chart when the pork is thinner, thicker, frozen, or breaded so you know when to start and when to pull it from the air fryer.
These ranges are starting points, not promises, because air fryers and pork chop thickness vary. A thin ½-inch chop and a thick 1½-inch chop need different treatment, even if both packages say “boneless pork chops.”
| Boneless pork chop type | Air fryer temp | First reading | Likely total time | Internal target | Rest |
|---|---|---|---|---|---|
| Thin ½-inch / 1.25 cm chops | 375°F–380°F / 190°C–193°C | 4 min | 5–8 min | 145°F / 63°C | 3 min |
| ¾-inch chops | 380°F–390°F / 193°C–199°C | 8 min | 9–11 min | 145°F / 63°C | 3–5 min |
| 1-inch chops | 380°F / 193°C | 9 min | 10–12 min | 145°F / 63°C | 3–5 min |
| Thick 1¼–1½ inch chops | 380°F / 193°C | 12 min | 13–16 min | 145°F / 63°C | 5 min |
| Very thick 2-inch chops | 375°F–380°F / 190°C–193°C | 16 min | 18–22 min | 145°F / 63°C | 5–8 min |
| Breaded 1-inch chops | 390°F–400°F / 199°C–204°C | 9 min | 10–12 min | 145°F / 63°C | 3–5 min |
| Frozen boneless chops | 360°F–380°F / 182°C–193°C | After first 5 min | 15–23 min total | 145°F / 63°C | 5 min |
Breaded, frozen, or unusually thin pork chops can move quickly. Use the breaded pork chop section, the frozen pork chop method, or the thin chop guide for the closest match.
Visual Time Chart by Thickness
The visual chart works as a quick reminder; the full table above gives exact ranges for thin, thick, breaded, or frozen pork chops.

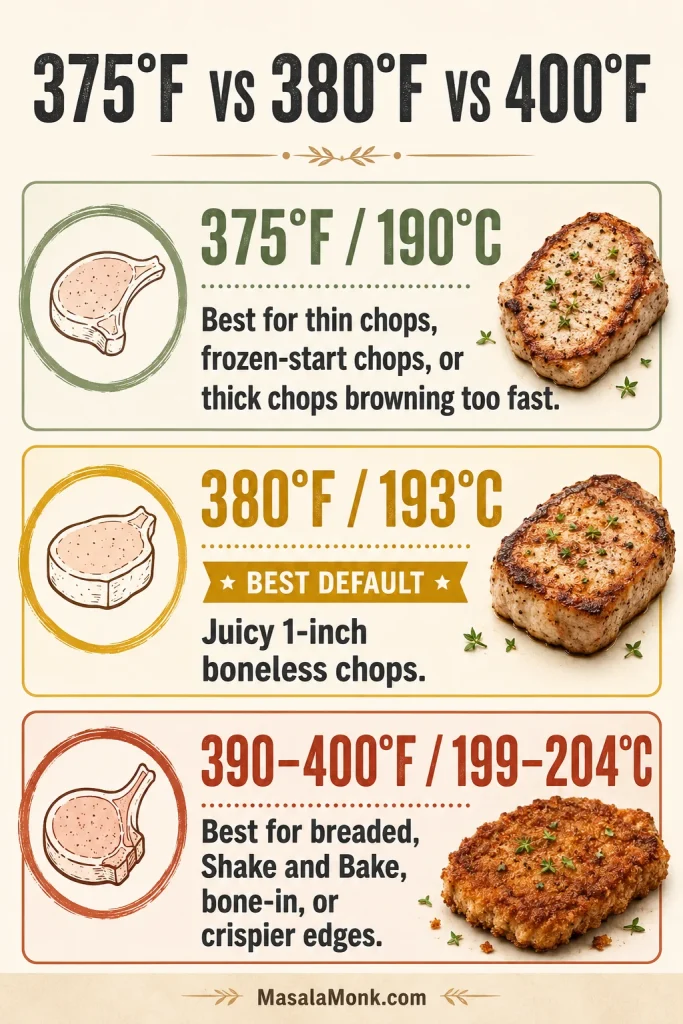
Once you know where your chop fits, the rest is simple: give it space, use the thermometer well, and pull it before the center tightens. Go with 375°F for very lean thin chops if you are worried about overcooking. Use 400°F / 204°C for thin chops only if you are watching them closely. Choose 390°F–400°F when breading needs help crisping.
If one chop is smaller than the others, pull it when it reaches 145°F / 63°C and let the thicker pieces keep cooking. For the clearest home-cook rule, cook the thickest part to 145°F / 63°C, then rest before slicing.
Why This Method Works
Boneless pork chops are lean, so they cook quickly and tighten quickly once they pass the right temperature. The air fryer gives you fast browning, but the method needs enough control to keep the center juicy.
That is why 380°F / 193°C works well for lean, unbreaded chops. The outside still browns, but the center has a little breathing room. Breaded chops or thicker pieces can handle more heat when they need extra browning.
Oil helps the seasoning cling, flipping evens out the browning, and resting keeps the first slice from losing all its juice. Spacing matters too: when food is crowded, the air fryer cannot move hot air around the surface properly. If your air fryer meals often turn out uneven, this guide to common air fryer mistakes is a helpful companion.
For food safety, pork chops should reach 145°F / 63°C with a 3-minute rest. You can confirm the current safety guidance through the FoodSafety.gov safe minimum internal temperatures chart. At this temperature, pork can still have a slight blush in the center; the thermometer matters more than color alone.
Thin Boneless Pork Chops in the Air Fryer
Thin chops are not hard, but they are unforgiving. The good news is that they cook fast, so one early check at the center is usually all it takes. This is the version where you do not want to set the timer and walk away.
If your chops are about ½ inch / 1.25 cm thick, start around 4 minutes and expect them to finish around 5–8 minutes in many air fryers. For very thin, lean pieces, 375°F / 190°C gives you more control. If you use 390°F–400°F / 199°C–204°C, stay close during the final stretch.
Thin chops are often done before they look deeply browned, so do not wait for a dramatic crust before measuring the center. A lighter crust is better than a dry center, especially with thin pork. If the chops are breaded, be even more careful because the coating can brown before the meat is perfectly cooked.
Thin Chop Doneness Cue
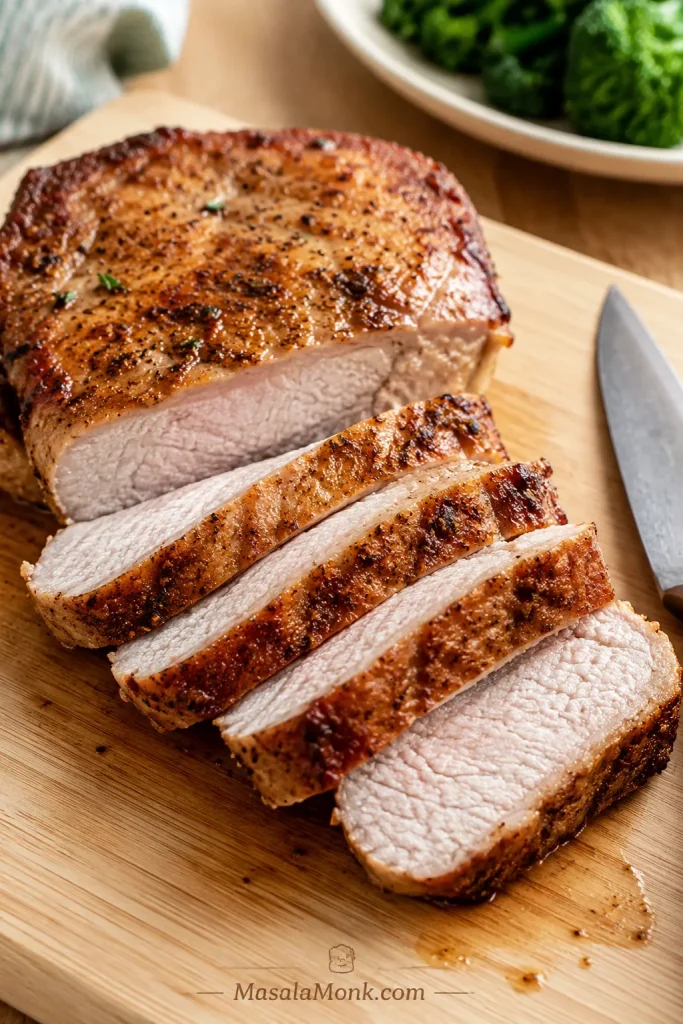
Thick Boneless Pork Chops in the Air Fryer
Thicker chops need patience more than extra heat. A 1-inch chop is the easiest size for this recipe. Once you get into 1¼-inch, 1½-inch, or 2-inch chops, the outside can brown while the center is still catching up.
For thick chops, use 375°F–380°F / 190°C–193°C and let the heat work more steadily. Take your first thermometer reading around 12 minutes for 1¼–1½ inch chops and around 16 minutes for very thick 2-inch chops. Slide the probe into the middle of the meat, not near the edge, because the edge can read hotter than the center.
If the outside is getting dark before the center reaches temperature, lower the heat slightly next time rather than blasting the pork hotter. A thick chop should feel springy when pressed, not stiff, and the first slice should look moist rather than fibrous.
Thick Chop Sliced Center
Thicker pieces also benefit from a slightly longer rest. Five minutes is usually enough for 1¼–1½ inch chops. Very thick ones can rest closer to 8 minutes without losing their warmth, especially if you tent them loosely.
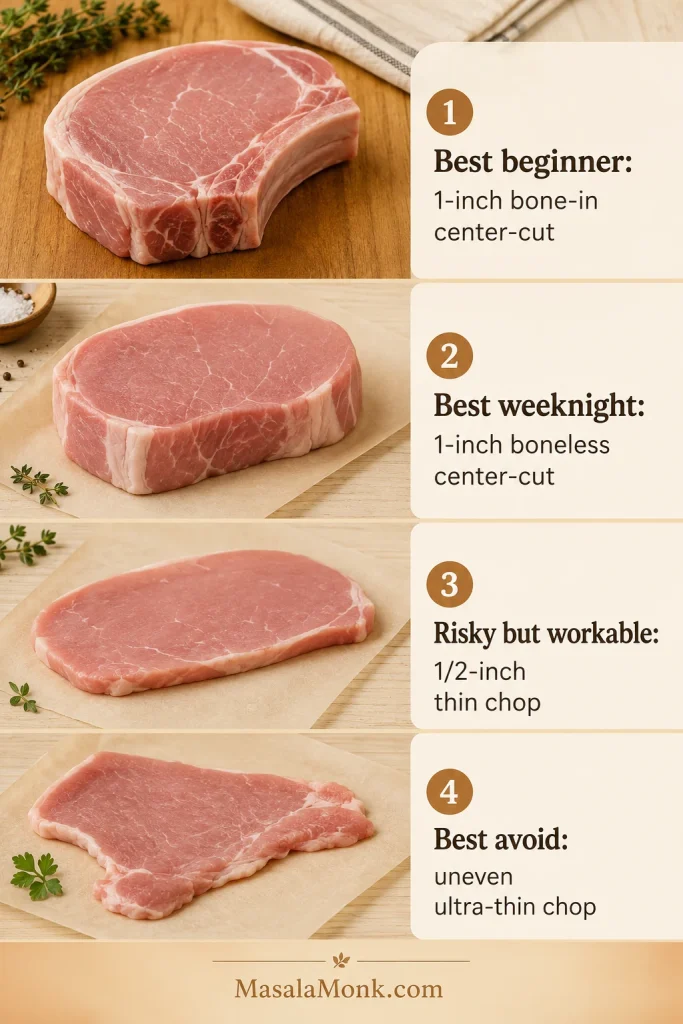
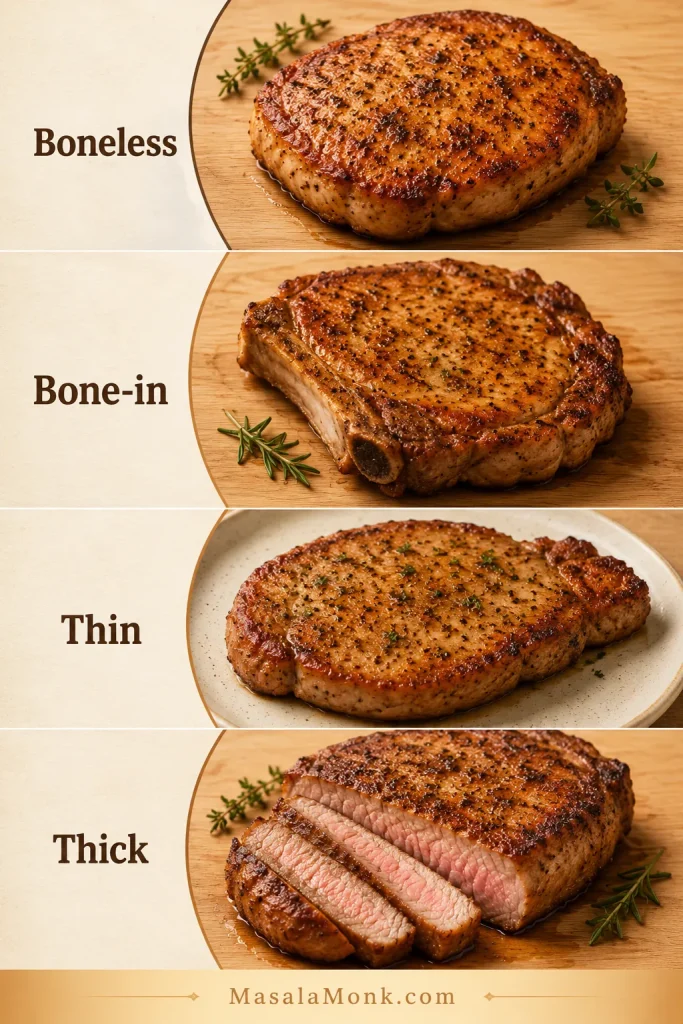
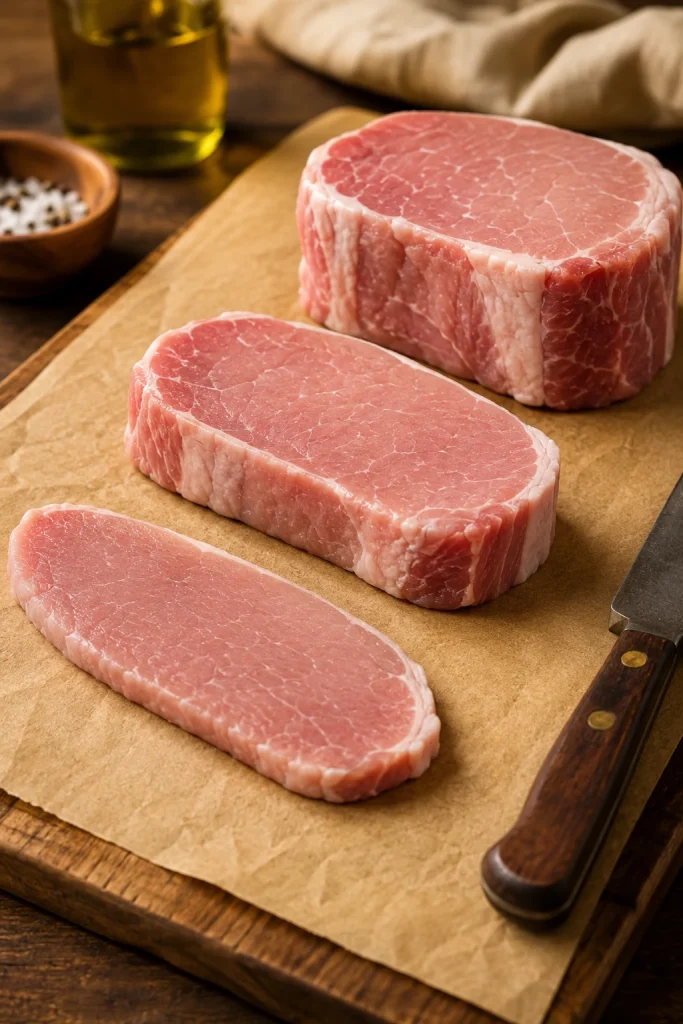
Best Boneless Pork Chops to Buy for the Air Fryer
For the easiest air fryer pork chops, buy center-cut boneless chops that are ¾ inch to 1 inch thick. That size cooks quickly but still gives you enough room to keep the center juicy.
If your package just says “boneless pork chops,” measure thickness first. That matters more than the exact label. When two packs look similar, choose the one with even thickness over the one with the prettiest label.
Choose Even-Thickness Chops
Even thickness helps every piece finish at about the same time. It also keeps you from sacrificing a thin chop while waiting for a thicker one.
- Boneless pork loin chops: Lean and common; avoid pushing them past temperature.
- Center-cut boneless pork chops: Best default for this recipe.
- Boneless ribeye pork chops: Often more forgiving because they can have more marbling.
- Butterfly pork chops: Often thinner once opened; use thin-chop timing if needed.
- Pork cutlets: Very thin; take the first reading sooner than standard chops.
- Boneless sirloin chops: Can be uneven or a little tougher; the thermometer matters.
Very thin pieces cook fast but dry out quickly. Very thick ones can be juicy, but they need more careful temperature checks. If you are comparing lean pork cuts beyond chops, this pork tenderloin in oven guide follows the same basic idea: cook gently, check the center, and rest before slicing.
No Breading, Breaded, and Shake-and-Bake Pork Chops
Once thickness is sorted, the next question is usually coating: plain seasoning, breadcrumbs, or Shake-and-Bake. The main recipe uses oil and a dry seasoning rub, but breaded chops and Shake-and-Bake style chops also work well in the air fryer.
| Version | Best temp | Likely time | Key move |
|---|---|---|---|
| Unbreaded 1-inch chops | 380°F / 193°C | 10–12 min | Oil first, then season well. |
| Thin unbreaded chops | 375°F–380°F / 190°C–193°C | 5–8 min | Take an early reading. |
| Breaded 1-inch chops | 390°F–400°F / 199°C–204°C | 10–12 min | Spray the coating lightly with oil. |
| Thin breaded cutlets | 390°F / 199°C | 6–10 min | Watch closely; coating browns fast. |
| Shake-and-Bake chops | 390°F–400°F / 199°C–204°C | 6–12 min | Oil first, coat well, and spray dry patches. |
Oil Spray for Breaded Pork Chops
Breaded chops need a little surface fat to crisp in the air fryer. Spray lightly, especially on dry patches, instead of soaking the coating.
For thin unbreaded chops, a hotter setting can work only if you are watching closely. If the pork is very lean or very thin, the lower temperature gives you more room to catch it before it dries out.
No-Breading Air Fryer Boneless Pork Chops
Choose the dry-rub version when you want a quick weeknight dinner without flour, egg, or crumbs. Oil the pork first, then season both sides generously. The oil helps the spice rub cling and keeps the surface from tasting dry.
Because there is no coating, these chops can cook a little faster than breaded ones, especially when they are thin. A 1-inch chop works best at 380°F / 193°C. Smaller pieces should stay near the lower end of the time range.
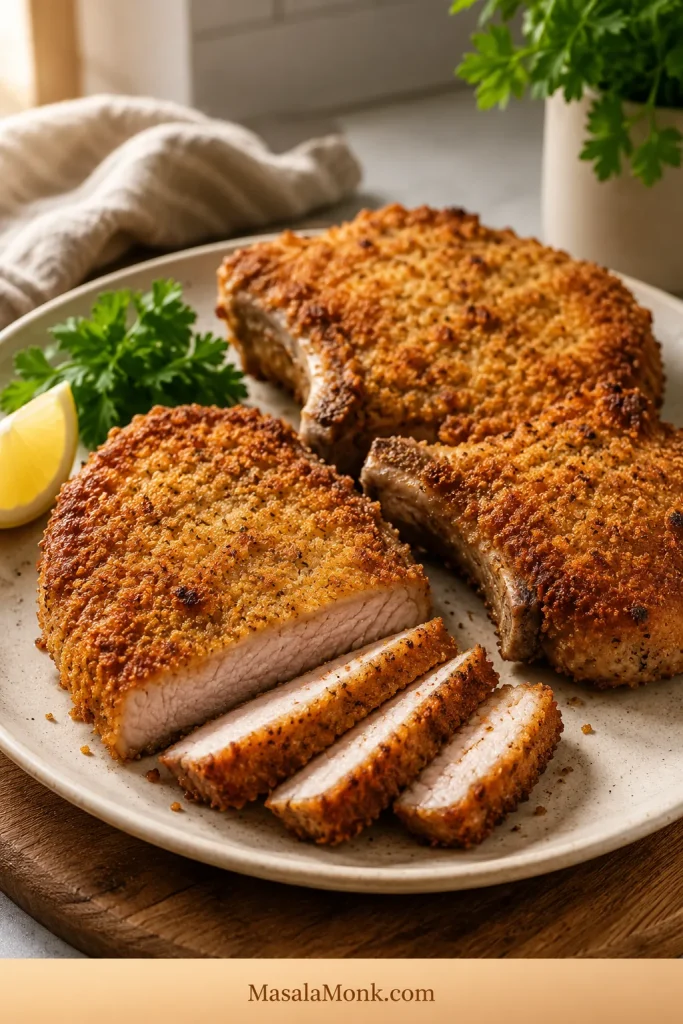
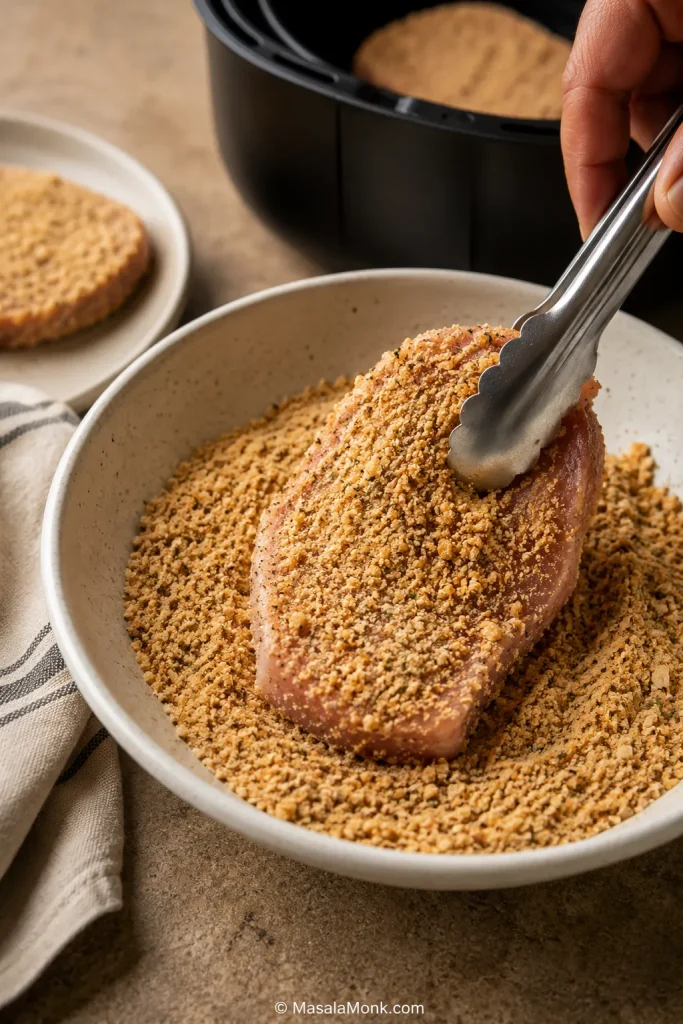
Breaded Boneless Pork Chops
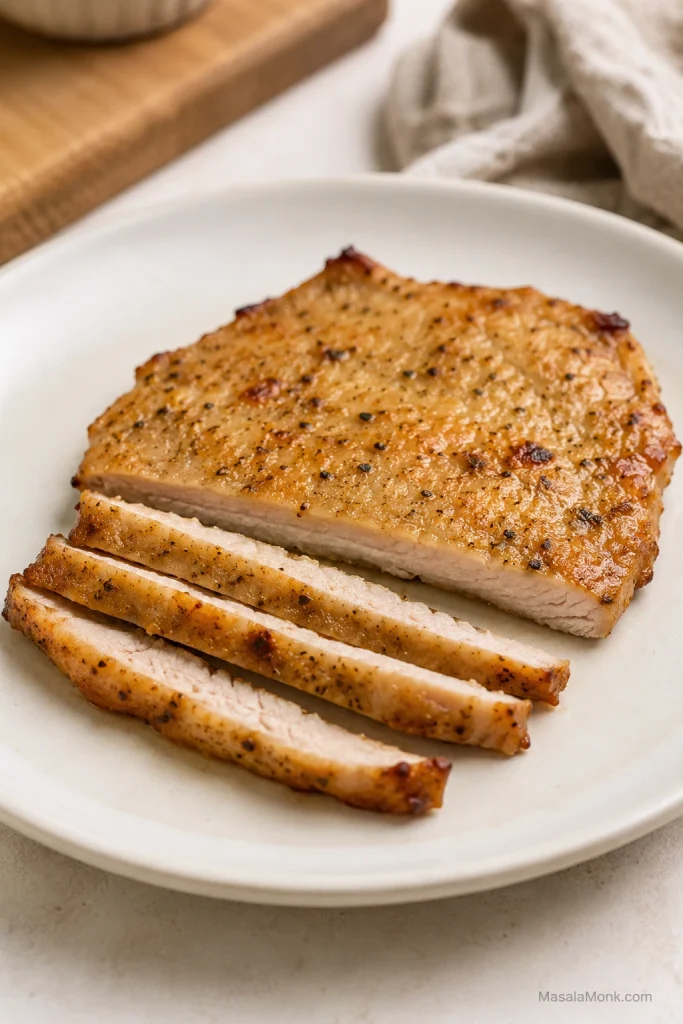
For breaded boneless pork chops, use a simple flour, egg, and panko or breadcrumb coating. Air fry at 390°F–400°F / 199°C–204°C until the coating is crisp and the pork reaches 145°F / 63°C in the center.
Crispy Breaded Pork Chop Doneness Cue
A golden crust is only part of the signal. The pork inside still needs to reach 145°F / 63°C before it rests.
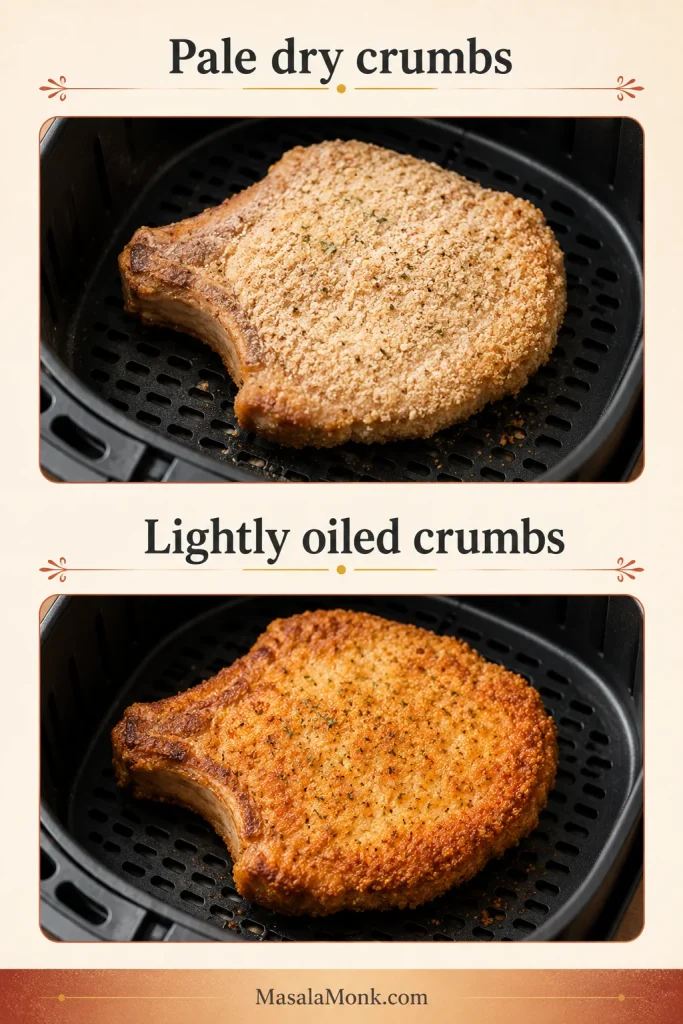
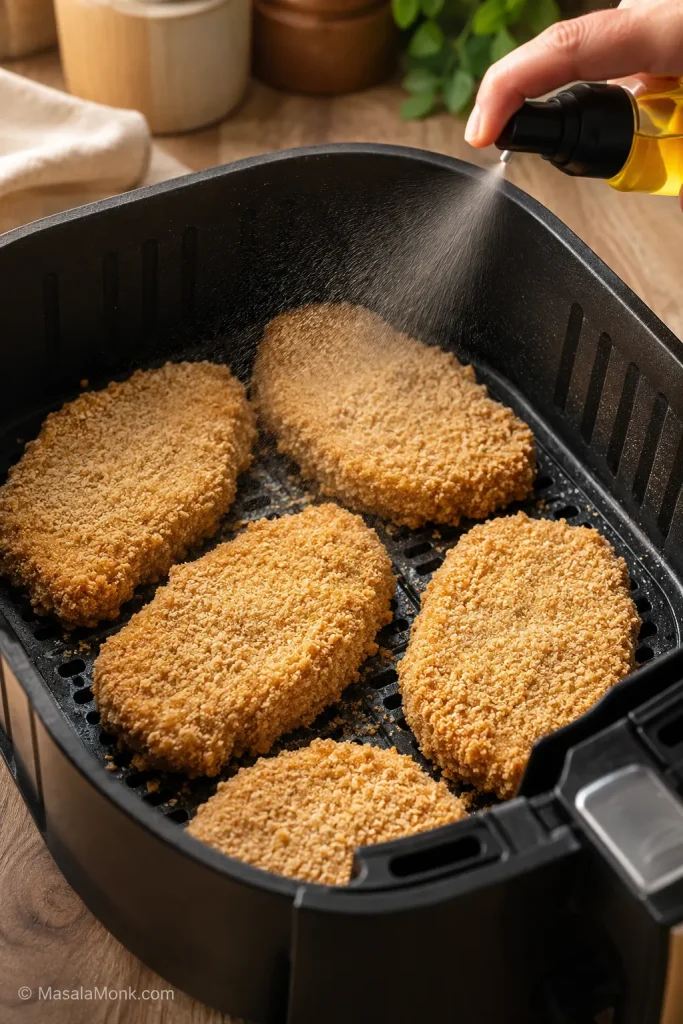
The small but important detail is oil spray. Spray the breaded surface lightly before cooking, then look for dry patches after flipping. Dry crumbs stay pale and powdery in the air fryer; a little oil helps them crisp and brown. The goal is a coating that tastes crisp, not dusty. Use a refillable oil sprayer, brush, or the type of oil spray your air fryer manufacturer recommends.
Shake-and-Bake Pork Chops in the Air Fryer
Shake-and-Bake style pork chops work well in the air fryer if the coating has enough moisture to stick. Oil the pork first, coat it well, shake off the excess, and place the chops in a single layer.
Cook at 390°F–400°F / 199°C–204°C and use a thermometer in the center instead of judging only by the crust. If the coating still looks dusty after flipping, spray those spots lightly with oil and continue cooking. Give the chops space in the basket so the coating can crisp instead of steaming.
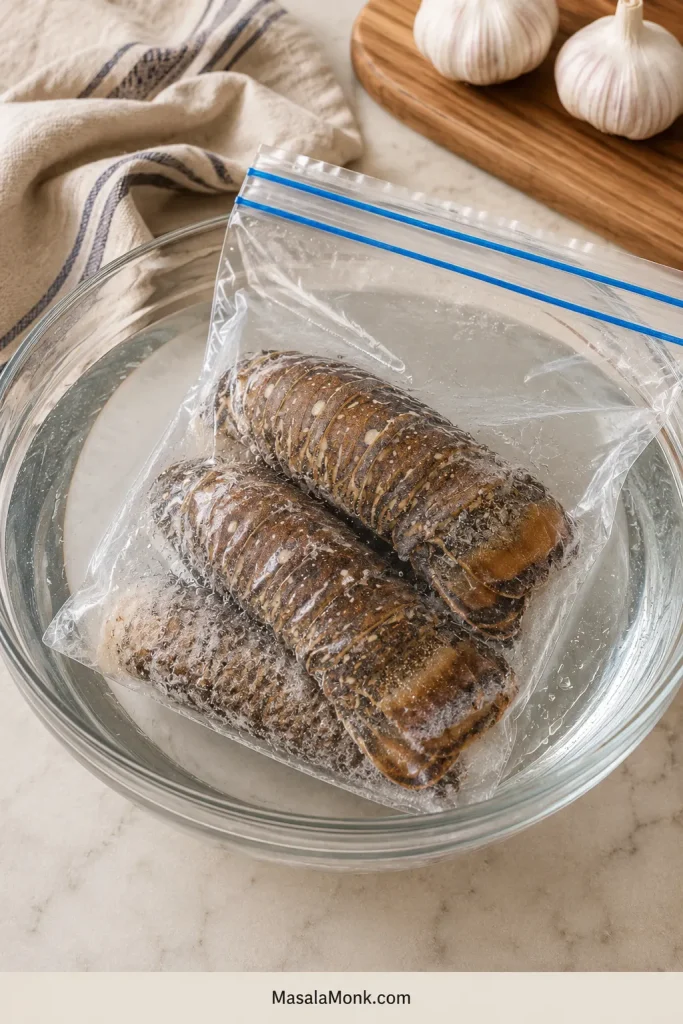
Frozen Boneless Pork Chops in the Air Fryer
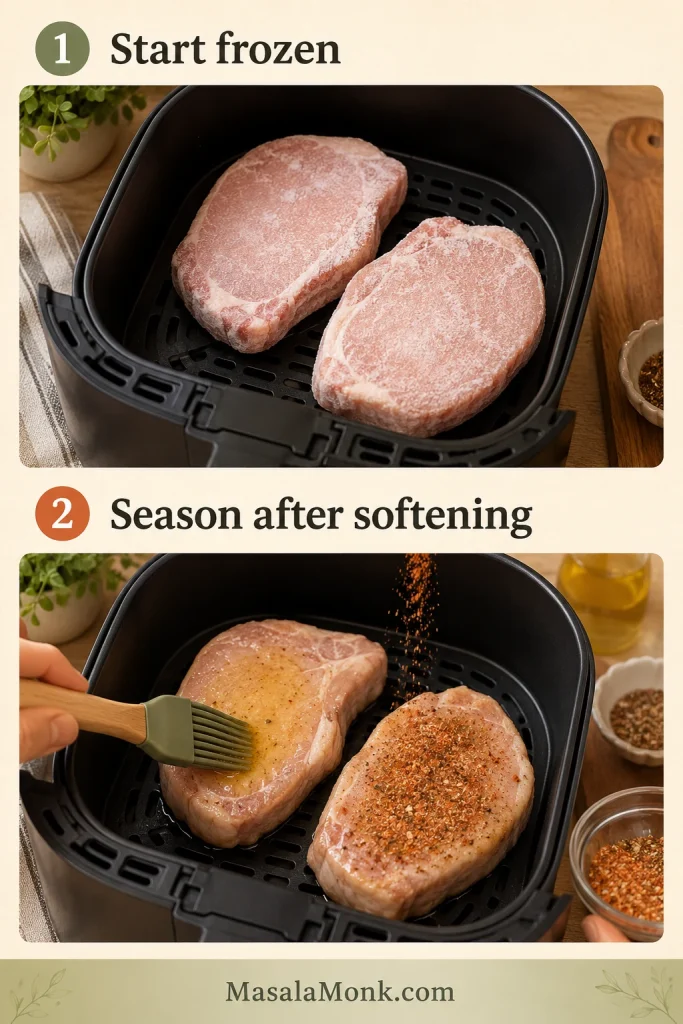
Frozen chops are not ideal, but they are absolutely workable when dinner needs to happen. You are not trying to make them perfect from frozen; you are trying to make them seasoned, safe, and still pleasant to eat.
Give Frozen Chops a Short Head Start
Start frozen pork chops plain for a few minutes. That softens the surface so seasoning can cling instead of falling off ice.
Thawed chops usually cook more evenly and hold seasoning better, but frozen pieces can still come out well if you season them after the surface softens. The same staged approach works for other frozen air fryer foods too, including these frozen chicken wings in the air fryer.
- Place the frozen pork chops in the air fryer basket.
- Air fry at 380°F / 193°C for 5 minutes to soften the surface.
- If the chops are stuck together, separate them carefully.
- Brush or rub with oil, then season both sides.
- Return to the basket in a single layer.
- Cook 10–18 minutes more, depending on thickness, flipping halfway.
- Use a thermometer in the center and cook until the pork reaches 145°F / 63°C.
- Rest for 5 minutes before slicing.
Season Frozen Chops After Softening
After the first few minutes, the surface is ready for oil and spices. This is the point where seasoning starts doing real work.
A thin frozen chop may finish quickly after the first softening step, while a thick frozen chop may need the full range or a little more. Very thick frozen chops can take longer than the chart, so the thermometer matters more than the timer. Seasoning sticks much better after those first few minutes, so do not waste your best rub on an icy surface.
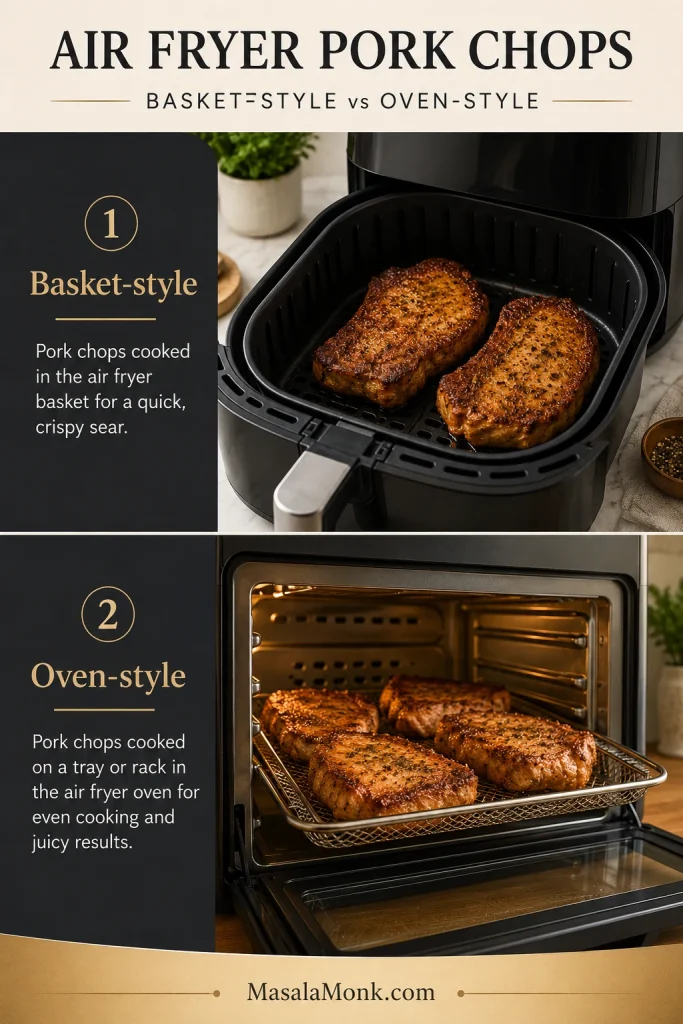
Air Fryer Model Notes: Ninja Foodi, Cosori, Instant Vortex, PowerXL
Most basket-style air fryers can use this timing. The brand matters less than basket size, airflow, and how aggressively your model browns. That includes Ninja Foodi, Cosori, Instant Vortex, PowerXL, and similar air fryers.
- 5–6 quart basket: Best size for 4 average chops.
- 3–4 quart basket: Cook in batches if the chops crowd or overlap.
- Large basket air fryer: May brown faster, so take a reading sooner.
- Oven-style air fryer: Can cook less evenly, so rotate or flip carefully.
- Ninja Foodi or multicooker style: Use the air crisp or air fry setting and learn how quickly your model runs.
- Very powerful model: Reduce the time slightly or use the lower end of the range.
Your first batch is the calibration batch. After that, you will know whether your air fryer runs fast, slow, or a little aggressive around the edges. When the pork reaches temperature early, reduce the time next round. Slow browning usually needs another minute or two while you watch the internal temperature.
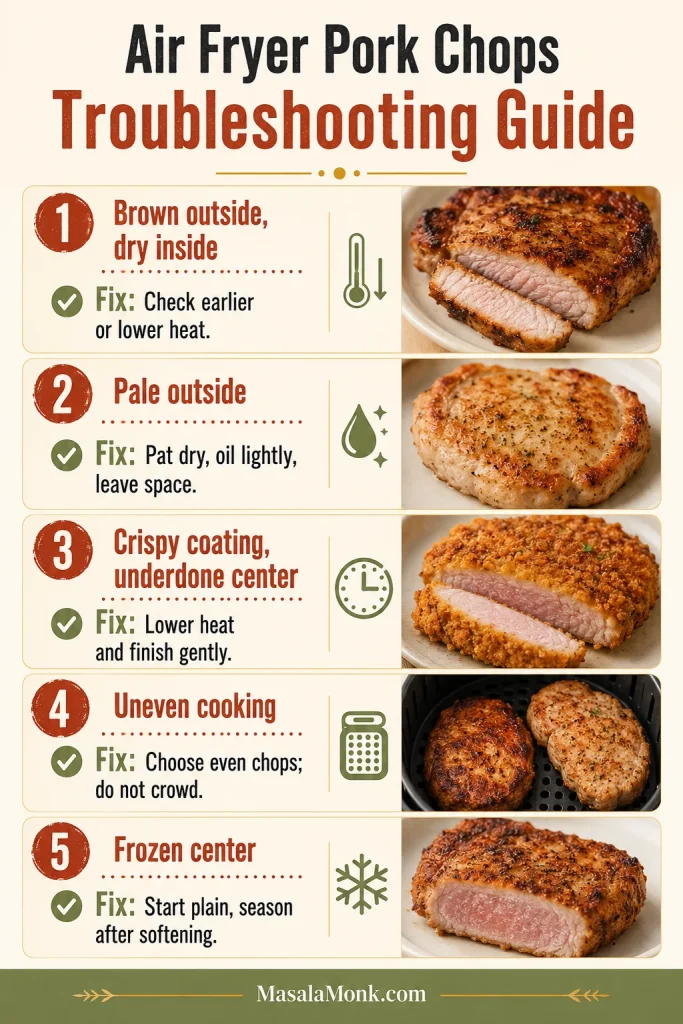
Troubleshooting Air Fryer Boneless Pork Chops
A dry, pale, or uneven batch usually comes back to thickness, crowding, heat, or a few minutes too long. Start with the table below, then check the timing chart again before the next batch.
Avoid Overcrowding the Basket
Crowding is one of the easiest problems to fix. Leave space around each piece so the air fryer can brown the pork instead of steaming it.
| Problem | Likely reason | Fix next time |
|---|---|---|
| Pork chops are dry | Overcooked, very thin, sliced too soon, or reheated too long | Shorten the cook, check the center earlier, and rest before slicing. |
| Outside browned but inside underdone | Heat too high for the thickness | Use 375°F–380°F and cook more steadily. |
| Seasoning tastes flat | Not enough salt or seasoning did not stick | Oil first, season both sides, and press the rub in gently. |
| Chops steamed instead of browned | Basket overcrowded | Cook in one layer or use batches. |
| Breaded coating has dry patches | Not enough oil spray | Spray lightly before cooking and again after flipping if needed. |
| Frozen chops taste bland | Seasoning was added while the surface was icy | Cook frozen chops 5 minutes first, then oil and season. |
| Chops cooked unevenly | Uneven thickness or oven-style air fryer airflow | Flip, rotate if needed, and check the thickest part. |
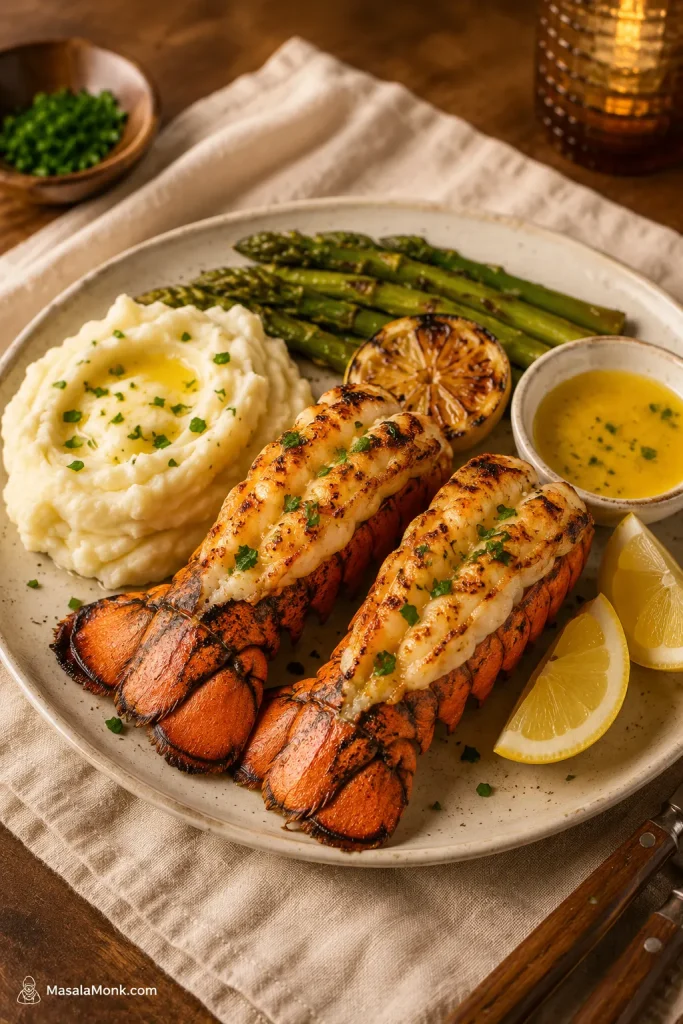
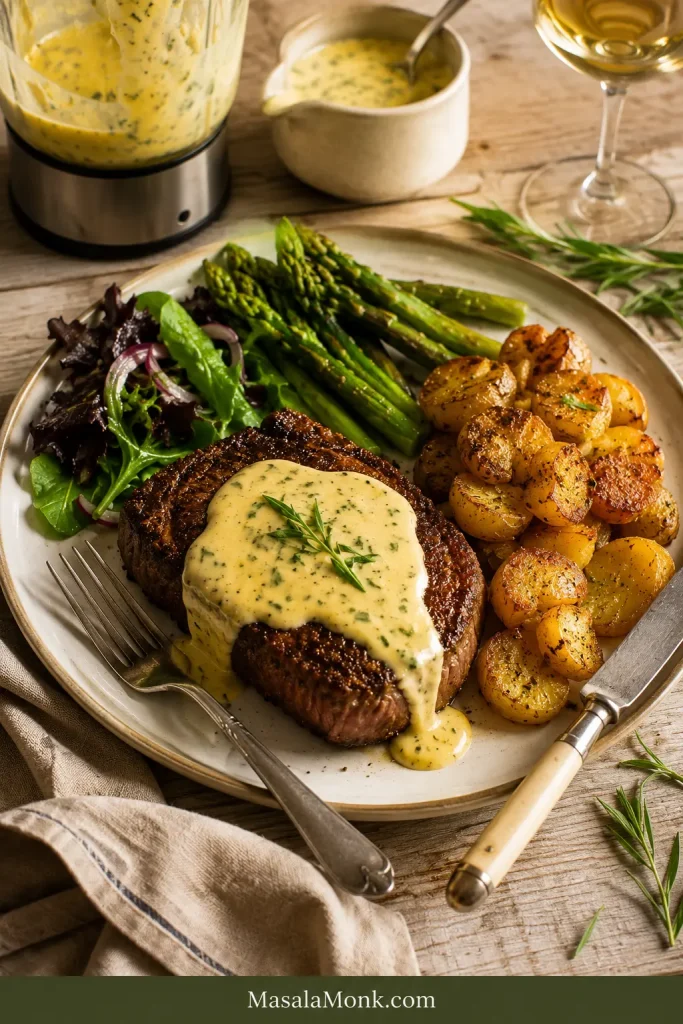
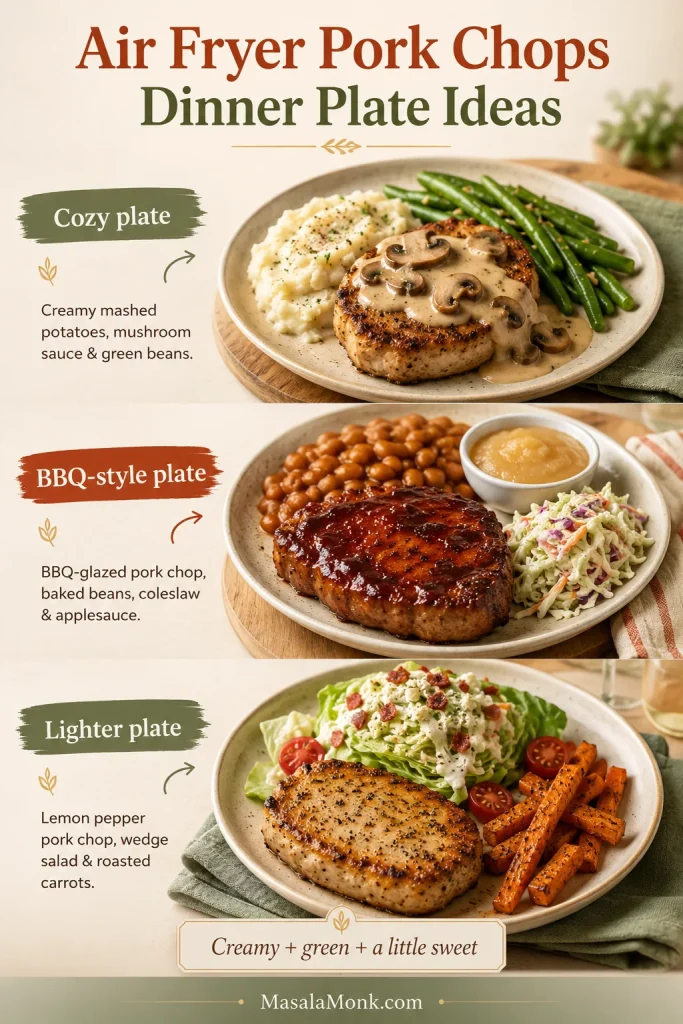
What to Serve With Air Fryer Boneless Pork Chops
Because the pork is lean and savory, it loves something creamy, crisp, or sweet-tangy on the plate. The best plate is simple: juicy pork, a side that balances it, and something that catches the seasoned juices.
Comfort Plate
A classic comfort plate can start with garlic mashed potatoes, gravy, roasted potatoes, or buttered rice. If you want a classic vegetable side, green bean casserole works especially well with juicy pork chops.
Next time you want a saucier pork chop dinner, MasalaMonk’s smothered pork chops with onion gravy takes the same comfort-food mood even further.
Lighter Plate
A crisp, fresh plate can start with a wedge salad with blue cheese and bacon, cucumber salad, coleslaw, cabbage slaw, steamed broccoli, green beans, or asparagus.
Cookout or Leftover Plate
Cookouts, leftovers, or a colder plate pair well with this potato salad guide, which gives you creamy, tangy, warm, chilled, and lighter directions. Leftover sliced pork chops also work well in sandwiches, rice bowls, salads, wraps, or quick breakfast plates with eggs.
Planning for leftovers? Jump to storage and reheating so the pork stays useful without drying out the next day.
Sauces That Work Well
- Honey mustard or mango mustard sauce
- Garlic butter
- BBQ sauce
- Apple chutney or applesauce
- Quick pan-style gravy
Storage and Reheating
These chops taste best fresh from the air fryer, when the edges are still warm and the center has just rested. Leftovers can still be useful, but the key is to warm them gently instead of cooking them all over again.
- Refrigerate: Store cooled pork chops in an airtight container for 3–4 days.
- Freeze: Freeze cooked pork chops if needed, though the texture is best when fresh.
- Reheat in the air fryer: Warm at 350°F / 177°C for 3–5 minutes, just until hot.
- Avoid repeated reheating: Cooked pork dries out quickly when warmed again and again.
Reheat Gently in the Air Fryer
If you know you are saving some for later, pull the chops from the air fryer as soon as they reach temperature and avoid slicing until you are ready to eat or pack them.
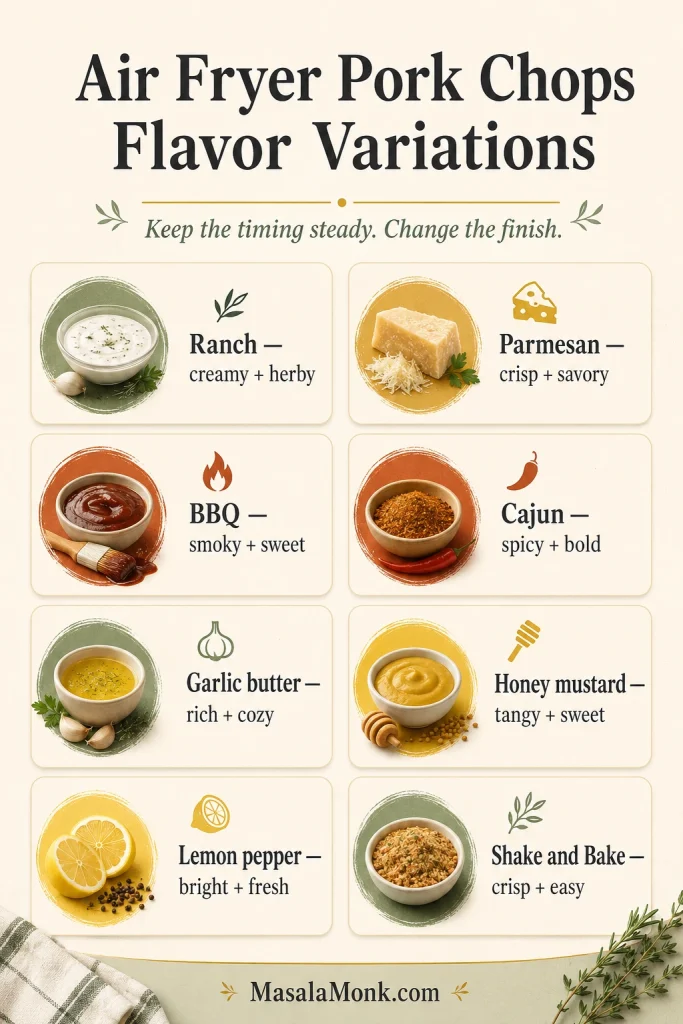
Flavor Variations
Once the time and temperature feel easy, the seasoning can change with dinner. Keep the oil, salt, spacing, and thermometer habit the same, then adjust the flavor around the sides or sauce you want.
- Garlic herb: Use garlic powder, onion powder, thyme, black pepper, and a little lemon zest after cooking. Best with mashed potatoes, green beans, or a simple salad.
- Smoky paprika: Use smoked paprika, garlic powder, onion powder, black pepper, and a pinch of brown sugar. Good with roasted potatoes, corn, or slaw.
- BBQ-style: Season with paprika, garlic, onion, and pepper, then brush lightly with BBQ sauce near the end. Serve with potato salad, coleslaw, or buttered rice.
- Ranch-style: Use ranch seasoning lightly, then reduce added salt if the mix is salty. Pair with fries, salad, or roasted vegetables.
- Spicy: Add cayenne, chili powder, or Cajun seasoning to the dry rub. Good in rice bowls, wraps, or with a cooling creamy side.
- Garlic parmesan: Add grated parmesan after cooking or use it in a breaded coating. Serve with pasta, salad, or roasted broccoli.
- Marinated: Marinate briefly, then pat the chops dry before air frying so the surface browns instead of steaming.
For a creamy pork chop direction, these cream of mushroom pork chops are a cozy pantry-style option.
Once you know the thickness and trust the thermometer, the guesswork drops quickly. Give the chops space, pull them when the center reaches 145°F / 63°C, and let them rest before slicing. The next batch will feel less like guessing and more like dinner on purpose.
FAQ
How long do boneless pork chops take in the air fryer?
Most 1-inch boneless pork chops take 10–12 minutes at 380°F / 193°C. Thin chops may finish in 5–8 minutes, while thick chops can need 13–16 minutes or more. Cook to 145°F / 63°C in the thickest center.
What temperature is best for air fryer boneless pork chops?
For juicy unbreaded chops, 380°F / 193°C is a strong default. Breaded chops usually crisp better at 390°F–400°F, while very thick chops can benefit from 375°F–380°F.
How do you keep boneless pork chops juicy in the air fryer?
Choose chops that are not too thin, oil and season the surface, cook in one layer, take the temperature before they overcook, and rest before slicing.
Do thin boneless pork chops cook faster?
Yes. Thin ½-inch / 1.25 cm chops can cook in about 5–8 minutes. Start around 4 minutes because thin pieces dry out quickly once they pass the right temperature.
What about thick boneless pork chops?
Thick chops need steadier heat and more time. Cook 1¼–1½ inch chops at 380°F / 193°C for about 13–16 minutes. Very thick 2-inch chops may need 18–22 minutes at 375°F–380°F.
Should boneless pork chops be flipped in the air fryer?
Yes. It is a small step, but it helps both sides cook and brown more evenly, especially in powerful basket-style air fryers.
Is 145°F safe for pork chops?
Yes. Pork chops are considered safe when they reach 145°F / 63°C in the thickest part and rest for at least 3 minutes. The center may still have a slight blush. The National Pork Board’s pork cooking temperature guide also uses 145°F followed by a 3-minute rest for fresh pork cuts.
Why did my air fryer pork chops turn out dry?
They were probably overcooked, very thin, cooked too hot for their thickness, sliced too soon, or reheated too long. Check the center earlier next time and rest before cutting.
Can you cook frozen boneless pork chops in the air fryer?
Yes. Cook frozen chops for 5 minutes first to soften the surface, then oil and season them. Most frozen chops take about 15–23 minutes total depending on thickness, and the center should reach 145°F / 63°C.
Do breaded boneless pork chops need more time?
Not always, but they usually need a hotter setting for better crisping. Use 390°F–400°F, spray the coating lightly with oil, and use a thermometer instead of relying only on crust color.
Can Shake-and-Bake pork chops go in the air fryer?
Yes. Oil the pork first, coat it well, place the chops in a single layer, and air fry at 390°F–400°F. Spray dry patches lightly with oil so the coating crisps instead of staying powdery.
Are boneless pork loin chops the same as boneless pork chops?
Boneless pork loin chops are one common type of boneless pork chop. They work well here, but they are lean, so avoid overcooking them.
Does this timing work for bone-in pork chops?
Use it as a starting point, but bone-in pork chops usually need a little more time than boneless chops of the same thickness. Use a thermometer in the center.
Will this work in a Ninja Foodi or Cosori air fryer?
Yes. It works in Ninja Foodi, Cosori, Instant Vortex, PowerXL, and most similar air fryers. Since models vary, start a little earlier the first time.