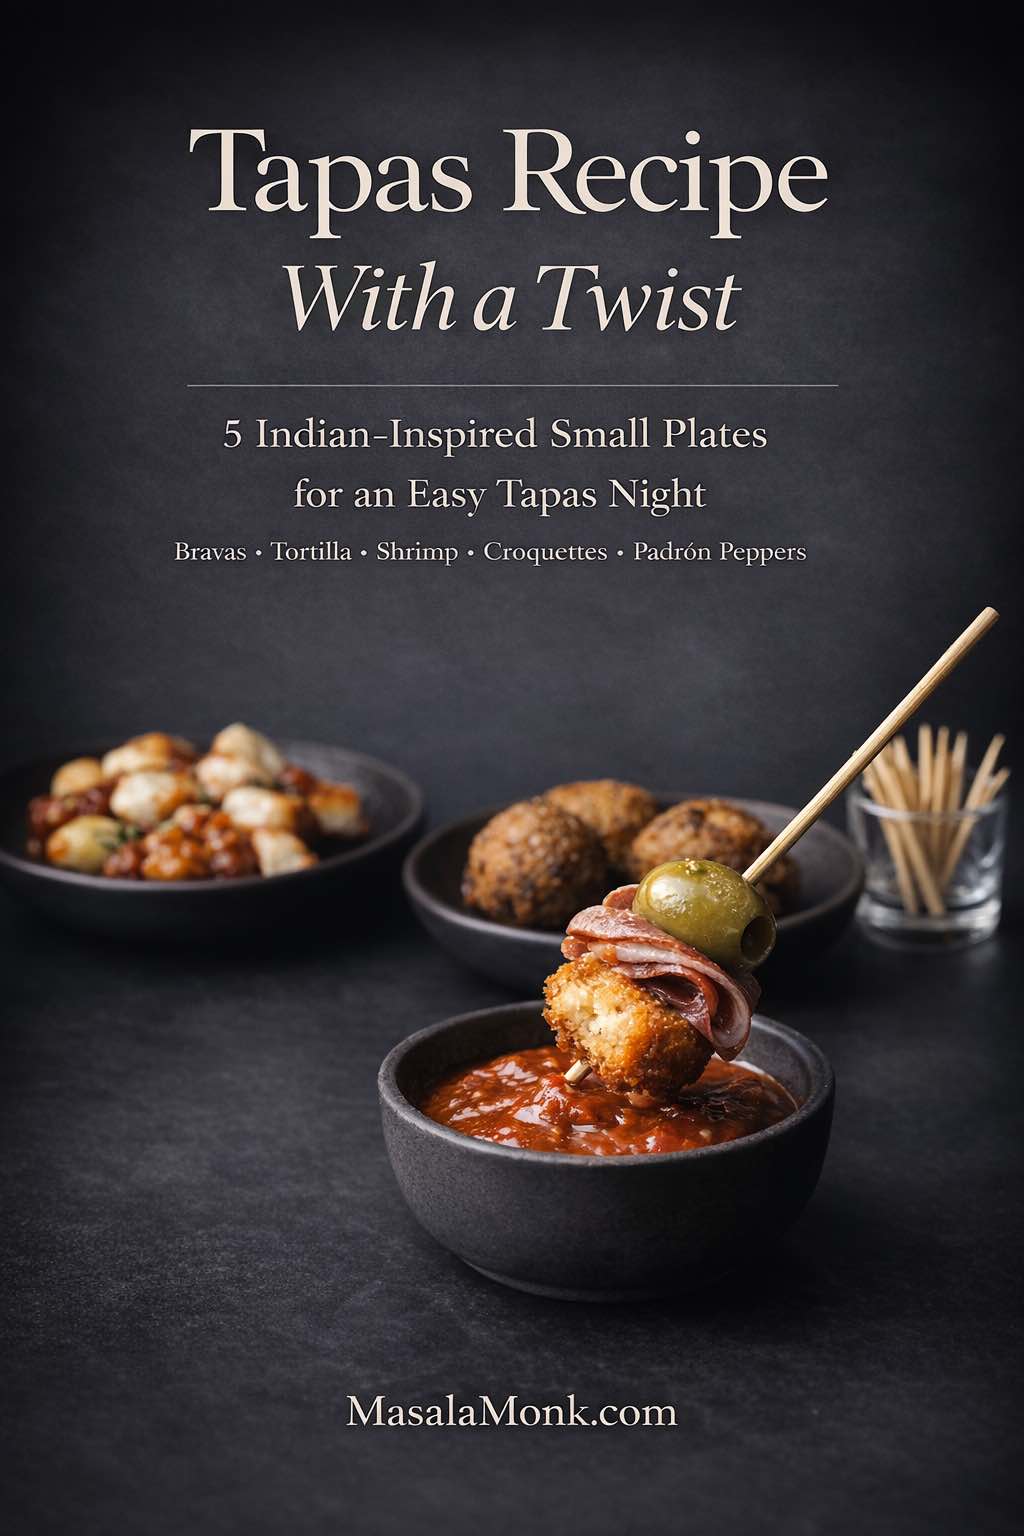
A great Tapas Recipe night is never about one big centerpiece. Instead, it’s about a table full of small plates that arrive in waves—crispy potatoes first, then something warm and garlicky, then a soft tortilla wedge, then a peppery bite, and finally a platter that vanishes before you can refill it. Because of that rhythm, tapas feel generous without feeling heavy, and a casual evening at home suddenly turns into a celebration.
At its heart, tapas are meant to be shared, and that spirit is what makes them perfect for an Indian-inspired spread. You still get the familiar shape of Spanish small plates—patatas bravas, tortilla española, croquettes, garlic shrimp, blistered peppers—but now the flavor path moves through cumin, Kashmiri chili, green chutney, curry leaves, coriander, and lime. As a result, the table feels rooted in tapas culture while still sounding unmistakably like MasalaMonk.
If you’re planning a tapas dinner, looking for easy tapas recipes for a weekend gathering, or simply want tapas party food ideas that don’t feel repetitive, this spread is built to be practical, bold, and deeply shareable. Moreover, every dish here can be adjusted for vegetarian, gluten-free, or mixed-party preferences, so you can host confidently without making two separate meals.
Tapas roots and the idea behind a real tapas table
Tapas work so well at home because they’re naturally flexible. You can serve hot tapas dishes, cold tapas ideas, quick bites, and small bowls all on the same table without forcing everything into one flavor profile. At the same time, the spread still feels cohesive when you build it around contrast: crispy and creamy, spicy and cooling, rich and bright, hot and room temperature.
If you enjoy the cultural side of the meal, the guide to tapas in Spain is a lovely read. It captures the social side of tapas beautifully and explains why these small plates feel so relaxed and festive. Likewise, the roundup of popular Spanish tapas is a helpful way to see the classic lineup that inspired this post—especially patatas bravas, tortilla, croquettes, and pintxos.
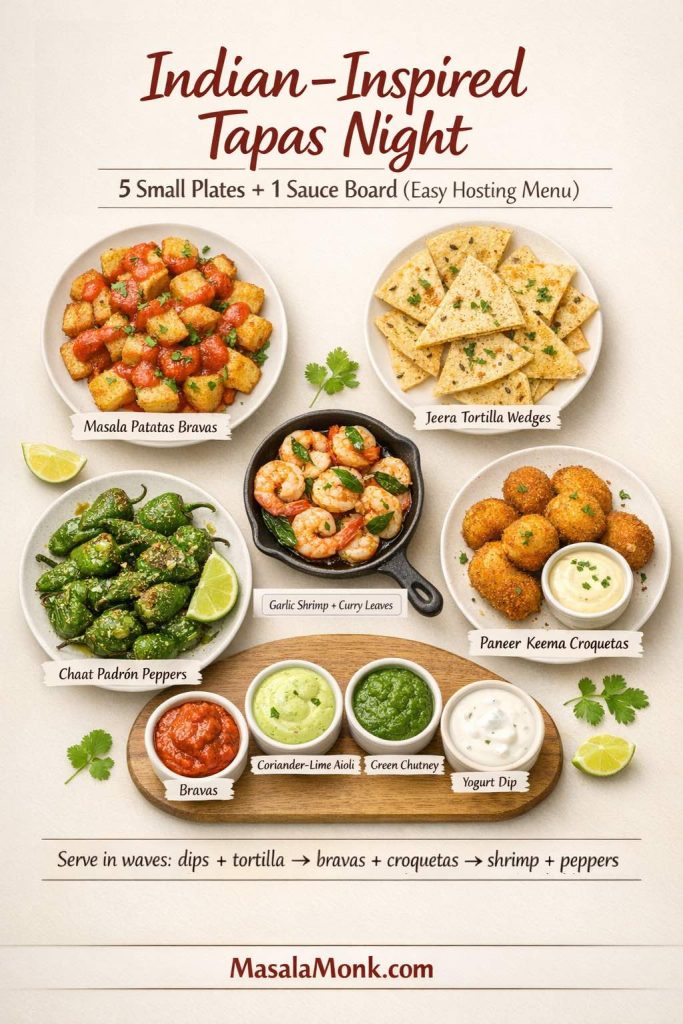
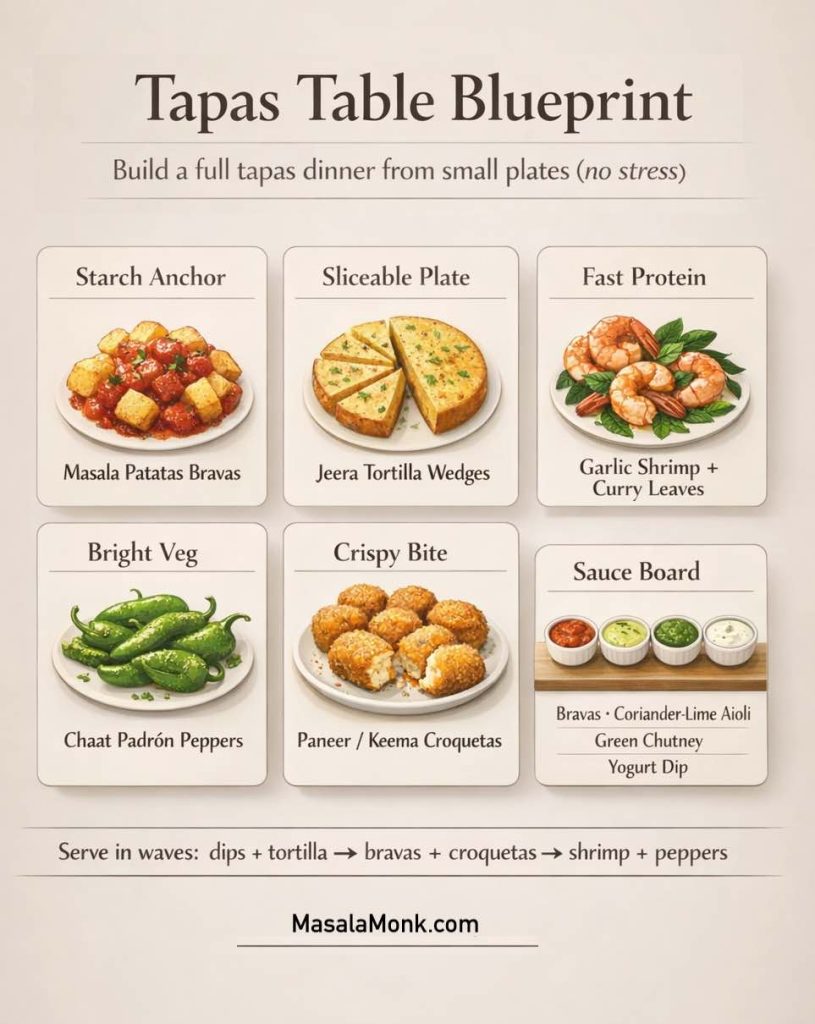
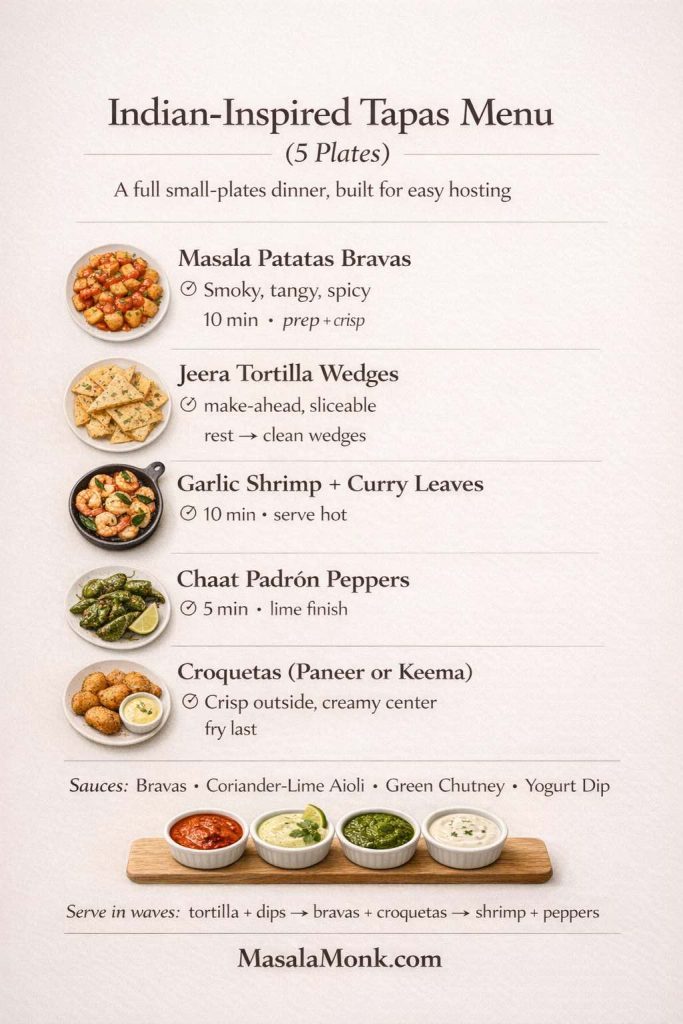
For this Indian-inspired tapas recipe spread, we’ll build the table around five anchors:
- a potato tapa with bold bravas sauce
- an egg-based tapa that slices neatly
- a seafood tapa that cooks fast
- a pepper tapa that adds brightness
- a croquette tapa with a crisp shell and creamy center
Then, just as importantly, we’ll use a small sauce board to connect the whole table. That one move makes the meal feel thoughtfully designed rather than random.
Also Read: Baked Ziti Recipe Collection: 15 Easy Variations
How to plan an easy tapas night at home
Before the first potato hits the pan, decide what kind of evening you want. That choice shapes everything else.
For a quick tapas dinner, keep the spread small and nimble. In that case, make three plates and two sauces, and let the meal stay casual. On the other hand, if you want a full tapas dinner party menu, plan on five plates and a slightly slower pace so the table builds over time.
A good home setup usually includes:
- one filling starch dish
- one fast-cooking protein
- one vegetable or pepper dish
- one rich finger-food plate
- one make-ahead item
- two or three dips or sauces
That balance gives you the “best tapas ideas” feeling without overloading your kitchen.
Meanwhile, if you’re serving a mixed crowd, this structure helps even more. You can keep one vegetarian tapas recipe, one seafood tapas recipe, and one meat option on the same table, and everyone still gets a full meal. In other words, tapas dinner ideas become much easier when you stop treating them like a single-course dinner and start treating them like a sequence of small wins.
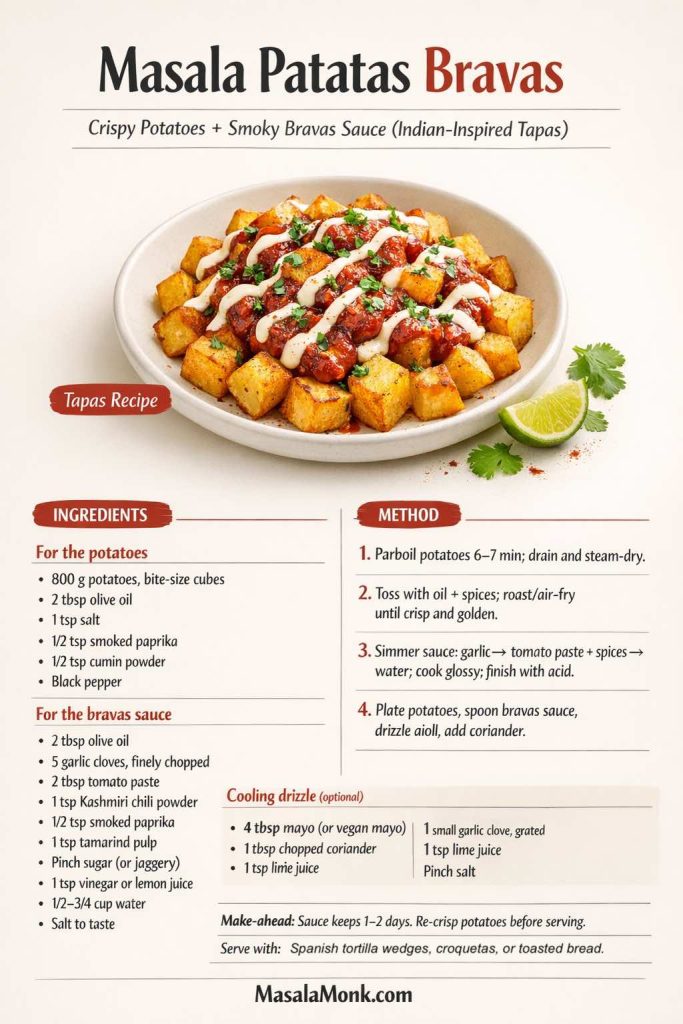
Tapas Recipe 1: Masala Patatas Bravas with smoky bravas sauce
Patatas bravas belong on almost every tapas table for a reason. They’re crisp, saucy, comforting, and easy to scale. Even better, they’re one of the best tapas recipes to make at home because most of the work can happen before guests arrive.
For a classic Spanish reference, this version of patatas bravas from Foods & Wines from Spain is a great place to see the traditional spirit of the dish. Here, we keep that same idea—crisp potatoes with bravas sauce—but shift the flavor toward an Indian-style finish.
Flavor profile for this bravas tapas recipe
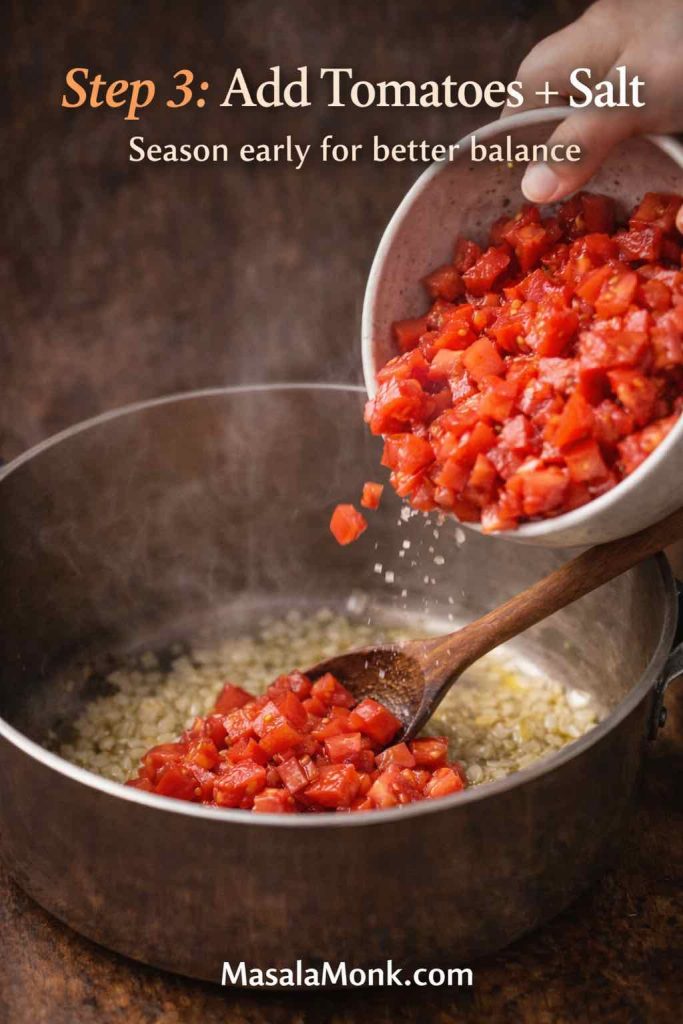
The twist here is subtle but clear. Instead of leaning only on paprika and chili, the sauce brings in a little extra depth with cumin and tamarind. Consequently, the potatoes stay recognizably patatas bravas, yet the sauce tastes warmer and more layered.
This version works especially well if you like:
- bravas potato recipes with a sharper kick
- potato tapas dishes that hold up on a buffet
- simple tapas ideas that still look restaurant-worthy
Ingredients for Masala Patatas Bravas tapas recipe
For the potatoes
- 800 g potatoes, cut into bite-size chunks
- 2 tbsp olive oil
- 1 tsp salt
- 1/2 tsp smoked paprika
- 1/2 tsp cumin powder
- black pepper
For the bravas sauce
- 2 tbsp olive oil
- 5 garlic cloves, finely chopped
- 2 tbsp tomato paste
- 1 tsp Kashmiri chili powder
- 1/2 tsp smoked paprika
- 1/4 tsp cayenne (optional)
- 1 tsp tamarind pulp
- a pinch of sugar or jaggery
- 1 tsp vinegar or lemon juice
- 1/2–3/4 cup water
- salt to taste
And for the cooling drizzle
- 4 tbsp mayonnaise (or vegan mayonnaise)
- 1 small garlic clove, grated
- 1 tbsp chopped coriander
- 1 tsp lime juice
- pinch of salt
If you want to make the sauce board feel special, the creamy drizzle is a perfect place to use MasalaMonk’s homemade mayo recipe or, for a plant-based version, this vegan mayo recipe.
Method for Masala Patatas Bravas
First, parboil the potatoes for 6 to 7 minutes. Then drain them well and let them steam dry for a few minutes. That pause matters because dry potatoes crisp more beautifully than wet ones.
Next, toss them with olive oil, salt, smoked paprika, cumin, and pepper. Roast at a high temperature until golden and crisp, or air-fry in batches if that’s easier.
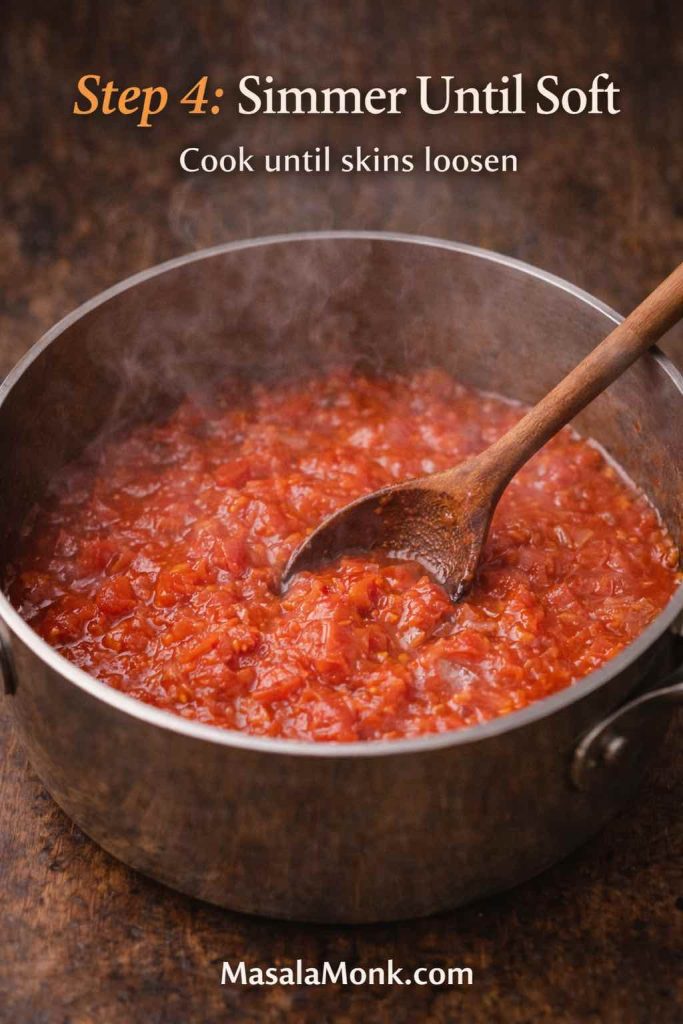
Meanwhile, make the bravas sauce. Warm olive oil in a small pan, add garlic, and cook only until fragrant. After that, stir in tomato paste, Kashmiri chili, smoked paprika, cayenne, tamarind, and a pinch of sugar. Add water gradually, simmer until glossy, and then finish with vinegar or lemon juice.
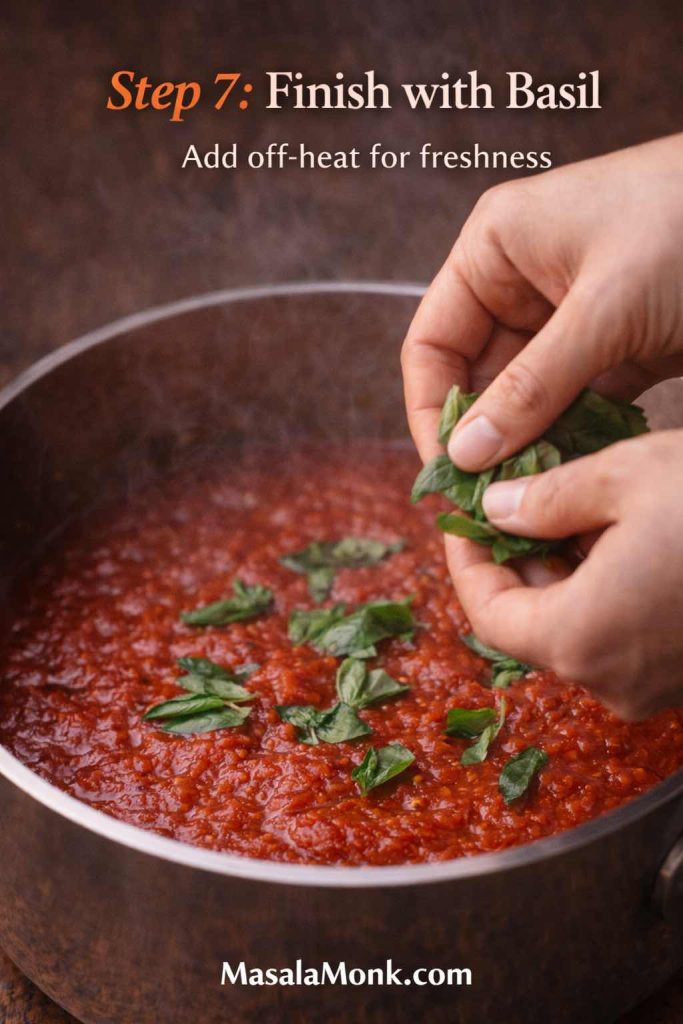
Finally, stir together the cooling drizzle and assemble the plate. Spoon the potatoes into a shallow bowl, add the bravas sauce, and finish with a light drizzle plus chopped coriander.
Make-ahead note for bravas
This dish is ideal for make ahead tapas nights. The sauce can be made one or two days in advance, and the potatoes can be par-cooked earlier, then re-crisped before serving. Because of that flexibility, patatas bravas are one of the strongest anchors in a tapas dinner party menu.
Also Read: Easy and Healthy Oat Cookies- No Sugar | No Butter | No Refined Flour
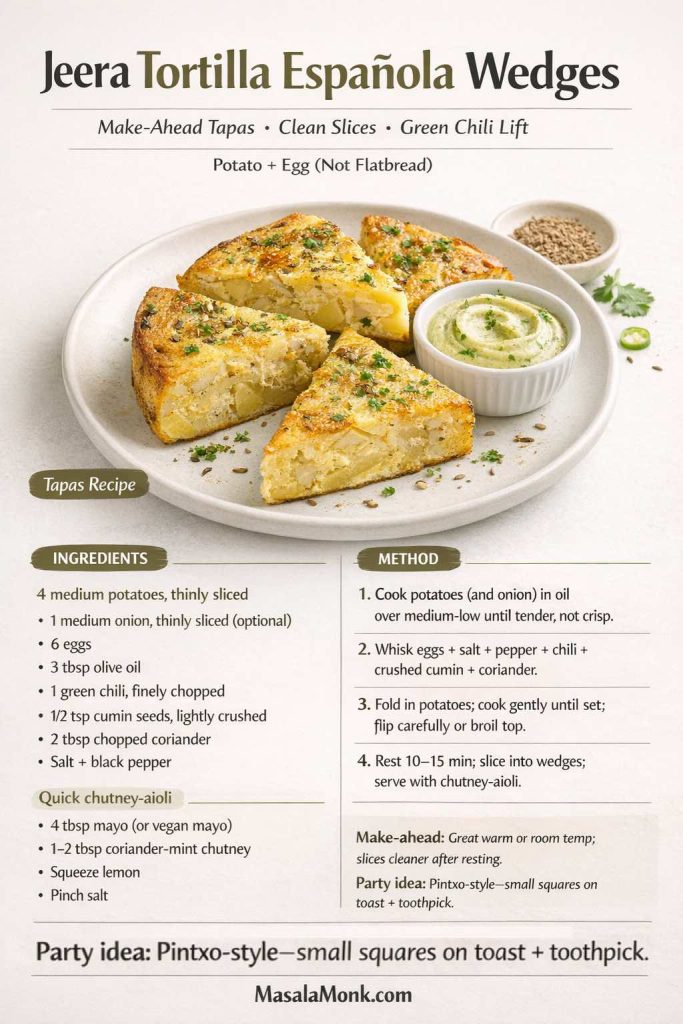
Tapas Recipe 2: Tortilla Española wedges with jeera, green chili, and coriander
Tortilla española is one of the most dependable tapas recipes because it can be cooked ahead, sliced cleanly, and served warm or at room temperature. It’s also one of the easiest places to add an Indian-inspired twist without changing the soul of the dish.
If you want the classic point of reference, this Spanish tortilla recipe from Foods & Wines from Spain is useful. The core remains the same here: potatoes, eggs, olive oil, and patience. However, cumin, coriander, and green chili add just enough lift to make it feel distinct.
Texture and serving style for tortilla wedges tapas recipe
The goal is not a dry omelette. Instead, you want soft potatoes suspended in gently set eggs, with enough structure to slice into small wedges. Once plated, those wedges become excellent tapas appetizer recipes because they’re tidy, satisfying, and easy to pick up.
Moreover, tortilla wedges fit into:
- tapas for lunch spreads
- tapas style dinner menus
- make ahead tapas party food
Ingredients for Green Chili Tortilla Española
- 4 medium potatoes, thinly sliced
- 1 medium onion, thinly sliced (optional, but lovely)
- 6 eggs
- 3 tbsp olive oil
- 1 green chili, finely chopped
- 1/2 tsp cumin seeds, lightly crushed
- 2 tbsp chopped coriander
- salt and black pepper
Quick chutney-aioli
- 4 tbsp mayo or vegan mayo
- 1–2 tbsp coriander-mint chutney
- squeeze of lemon
- pinch of salt
For the herb chutney, MasalaMonk’s green chutney recipe is a natural fit here and doubles as a dip for croquettes later.
Method for tortilla wedges
To begin, heat olive oil in a skillet and cook the potatoes (plus onions if using) over medium-low heat until tender and silky. You don’t want crisp browning here; rather, you want soft slices that melt into the eggs.
Meanwhile, whisk the eggs with salt, pepper, green chili, crushed cumin seeds, and chopped coriander. Once the potatoes are ready, fold them into the egg mixture and return everything to the skillet.
Cook the tortilla gently until the bottom sets. Then either flip it carefully or finish the top under a broiler. Afterward, let it rest before slicing. That short rest makes the wedges cleaner and more attractive on the plate.
Stir together the chutney-aioli, and serve either a small dot on each wedge or a bowl on the side.
Pintxo-style variation for parties
For larger gatherings, you can turn this into a pintxo-style bite. Cut the tortilla into smaller pieces, place each one on a toast square, and secure with a toothpick. If you’re curious about the Basque-style format, Britannica’s entry on pintxo offers a quick background and explains why this style is so popular for Spanish finger food.
Also Read: Double Chocolate Chip Cookies – Easy Recipe with 7 Variations
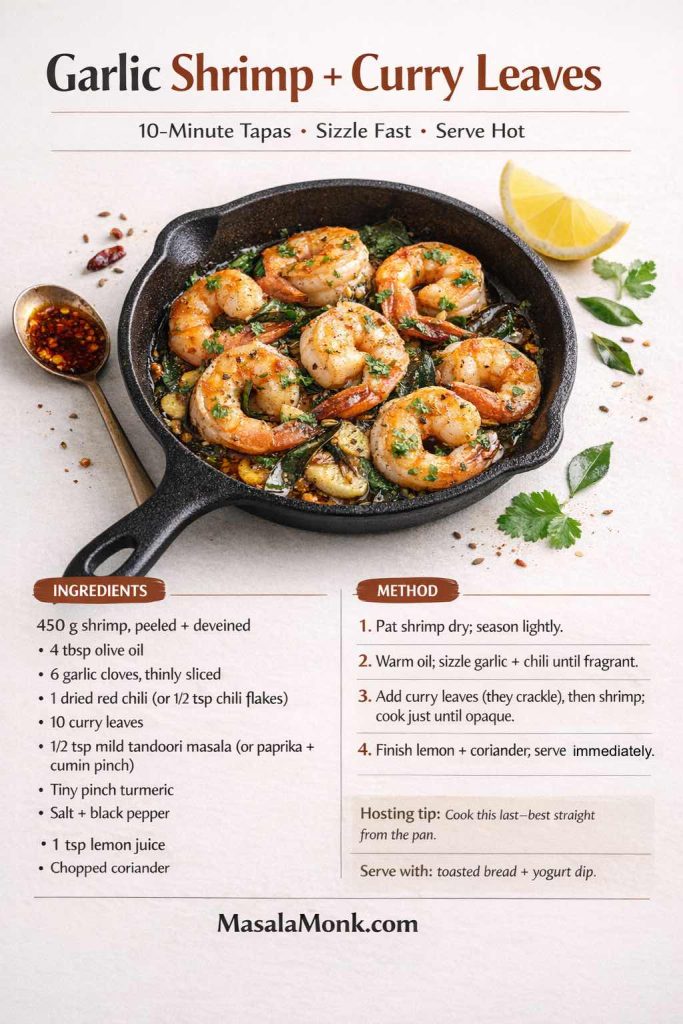
Tapas Recipe 3: Garlic shrimp with curry leaves and chili oil
A seafood tapas plate changes the energy of the table. Suddenly, the spread feels vivid and aromatic, and everyone reaches for bread to mop up the pan. That’s exactly why gambas al ajillo is such a classic.
For a traditional baseline, this gambas al ajillo reference from Foods & Wines from Spain shows the essence of the dish. Here, the Indian-inspired version keeps the garlic-and-oil backbone while adding curry leaves and a mild spice blend.
Reasons this seafood tapas recipe works so well
This is one of the fastest tapas recipes in the entire spread, which is a huge advantage while hosting. In addition, it brings a very different texture from the tortilla and croquettes, so the meal doesn’t feel repetitive.
It’s also perfect for:
- seafood tapas ideas
- shrimp tapas recipe nights
- quick tapas dishes for dinner parties
Ingredients for Garlic Shrimp with Curry Leaves
- 450 g shrimp or prawns, peeled and deveined
- 4 tbsp olive oil
- 6 garlic cloves, thinly sliced
- 1 dried red chili or 1/2 tsp chili flakes
- 10 curry leaves
- 1/2 tsp mild tandoori masala (or paprika + cumin pinch)
- tiny pinch turmeric
- salt and black pepper
- 1 tsp lemon juice
- chopped coriander
Method for garlic shrimp
First, pat the shrimp dry and season lightly with salt, pepper, spice blend, and turmeric. Dry shrimp sear better, so this step is worth the extra minute.
Next, warm olive oil in a small skillet. Add sliced garlic and the dried chili, and let them sizzle gently until fragrant. Then add the curry leaves carefully—they crackle as soon as they hit the oil.
After that, add the shrimp and cook quickly over medium-high heat until opaque and just curled. Finish with lemon juice and chopped coriander.
Serve immediately, ideally in the same pan or a warm dish, with toast on the side.
Food-safety rhythm for seafood hosting
Because this dish cooks so quickly, it’s easy to make fresh even during a busy evening. Still, keep raw shrimp separate during prep and cook close to serving time. If you like having a clear reference nearby, FoodSafety.gov’s safe cooking temperature chart is helpful for general guidance, and the FDA’s safe food handling guide is practical for party prep and leftovers.
Cooling dip pairing for shrimp
This shrimp dish becomes even better with a cool dip nearby. For that reason, a yogurt-based sauce works beautifully. MasalaMonk’s tzatziki sauce recipes make a great companion, especially if your bravas sauce and croquettes are on the spicier side.
Also Read: How to Cook Tortellini (Fresh, Frozen, Dried) + Easy Dinner Ideas
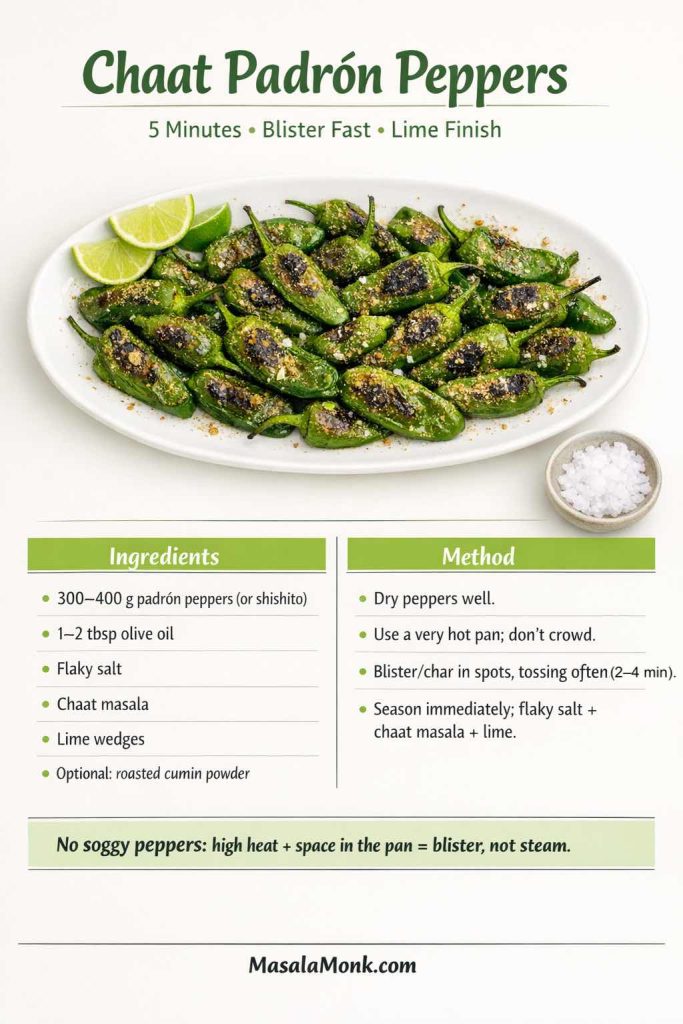
Tapas Recipe 4: Blistered Padrón peppers with chaat masala and lime
Every great tapas table needs one plate that feels almost effortless. Padrón peppers are that plate. They cook in minutes, they bring brightness to the table, and they make the spread feel complete even though the ingredient list is tiny.
The classic version is wonderfully simple, and this padrón peppers recipe from Foods & Wines from Spain captures it well. Here, the only twist is the finish: chaat masala and lime instead of only salt.
Role of peppers in a full Tapas spread
After a saucy potato plate and a rich croquette, the peppers act like a reset. They’re quick, bright, and lightly bitter in the best way. As a result, the whole meal feels more balanced.
This plate fits beautifully into:
- vegetarian tapas ideas
- vegan tapas ideas
- healthy tapas recipes
- quick and easy tapas dishes
Ingredients for Chaat-Spiced Padrón Peppers tapas recipe
- 300–400 g padrón peppers (or shishito peppers)
- 1–2 tbsp olive oil
- flaky salt
- chaat masala
- lime wedges
- optional roasted cumin powder
Method for peppers
Start with a hot skillet and a little olive oil. Once the oil shimmers, add the peppers and blister them quickly, tossing often so they char in spots without collapsing completely.
As soon as they’re done, move them to a plate and season immediately with flaky salt, a pinch of chaat masala, and a squeeze of lime. If you like a deeper spice note, add a little roasted cumin powder too.
Serve hot or warm.
Optional pintxo-style add-on beside the peppers in a tapas recipe
If you want an extra cold bite without cooking another full dish, add a simple anchovy-olive-pepper skewer on the same platter. That gives you a classic pintxos recipes feel and expands the spread without much effort. Spain’s roundup of popular tapas dishes is a good place to read about these iconic combinations and how they appear on tapas menus.
Also Read: 19 Essential Kitchen Tools That Make Cooking Easier
Tapas Recipe 5: Indian-inspired croquetas with paneer-potato or keema filling
Croquettes are one of the most beloved tapas appetizer ideas because they deliver exactly what people want from party food: a crisp shell, a creamy center, and a flavor that lingers. Spanish croquetas are often made with ham, and the classic croquetas de jamón from Foods & Wines from Spain is the perfect example.
This tapas recipe version offers two filling paths. One stays vegetarian with paneer and potato. The other goes toward meat tapas with a spiced keema center.
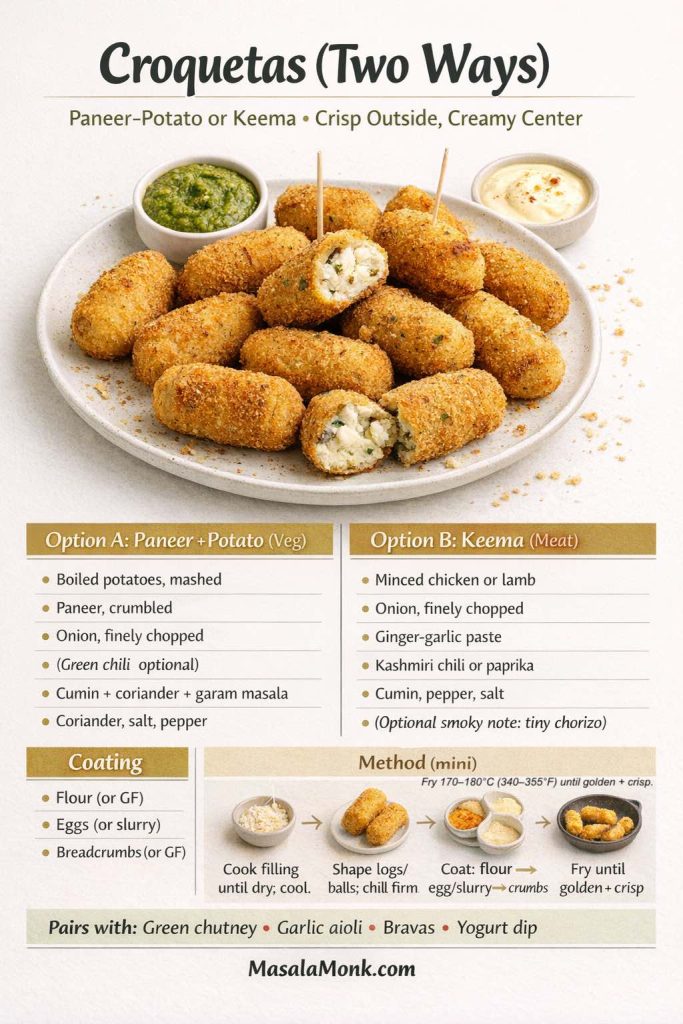
Option A: Paneer and potato croquetas recipe for tapas
This version feels very natural in an Indian-inspired spread because paneer and potato already behave beautifully in a croquette-style format.
Ingredients
- 2 medium potatoes, boiled and mashed
- 150 g paneer, grated or crumbled
- 1 small onion, finely chopped
- 1 green chili, finely chopped (optional)
- 1/2 tsp cumin powder
- 1/2 tsp coriander powder
- pinch garam masala
- chopped coriander
- salt and black pepper
For coating
- flour (or gluten-free flour)
- 2 eggs (or a flour slurry for egg-free)
- breadcrumbs (or gluten-free crumbs)
Option B: Keema croquetas recipe for meat tapas dishes
This filling is ideal if you want a more robust party plate. It also fits nicely if you’re building a table that includes chorizo tapas or other meat-forward small plates.
Ingredients
- 250 g minced chicken or lamb
- 1 small onion, finely chopped
- 1 tsp ginger-garlic paste
- 1 tsp Kashmiri chili powder or paprika
- 1/2 tsp cumin powder
- black pepper
- salt
- optional: a little finely chopped chorizo for a smoky note
Croqueta method for both fillings
First, cook the filling until dry and flavorful. If you’re making paneer-potato croquetas, simply mix and season thoroughly. If you’re making keema croquetas, cook the mince fully and let it cool.
Then shape the mixture into small logs or balls and chill until firm. After that, coat each piece in flour, then egg or slurry, then breadcrumbs.
Finally, fry in hot oil until golden and crisp.
Dips for croquetas that tie the whole table together
Croquettes love options, so serve at least two dips:
- a bright herb dip like MasalaMonk’s green chutney
- a creamy garlic aioli built from MasalaMonk’s mayo recipe
If you want a cooler, more refreshing contrast as well, a bowl from MasalaMonk’s tzatziki recipe collection works beautifully alongside spicy croquetas.
Make-ahead flow for croquetas
These are ideal make ahead tapas. You can shape and bread them in advance, refrigerate for several hours, and fry right before serving. Better yet, you can freeze them breaded and cook in batches later. That makes croquettes one of the easiest tapas recipes for dinner party planning, even though they look fancy on the table.
Also Read: Garlic & Paprika Cabbage Rolls (Keto-Friendly Recipes) – 5 Bold Savory Twists
Sauce board: the easiest way to make a tapas recipe feel complete
A tapas table gets better when sauces echo across multiple plates. Instead of creating one sauce for each dish, build a compact sauce board that everyone can mix and match.
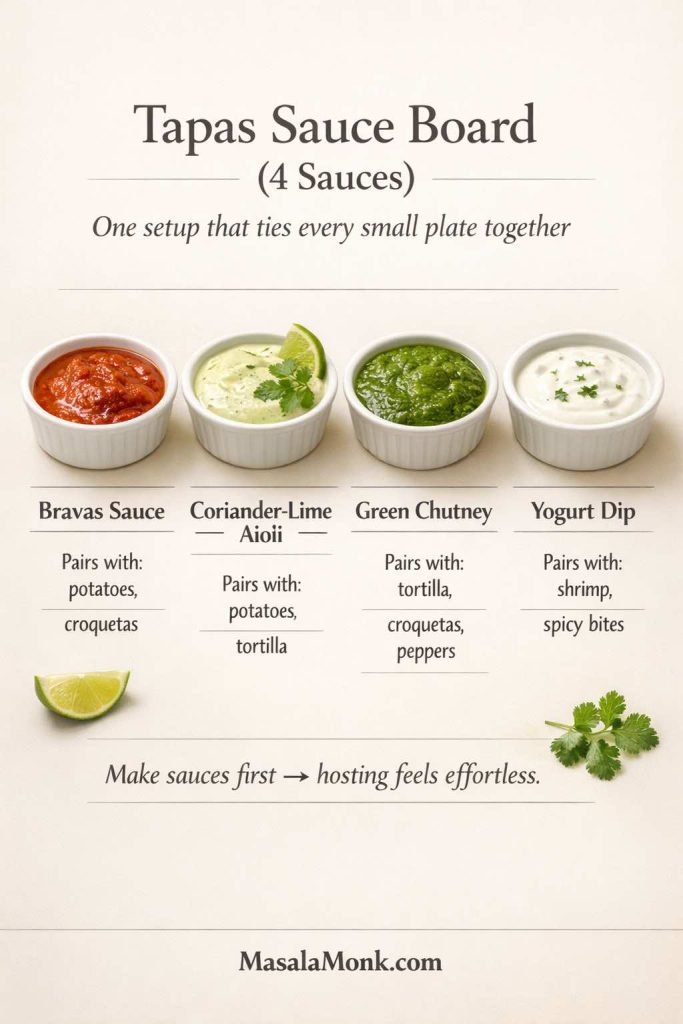
Here’s a simple four-sauce setup that works with the entire spread:
- bravas sauce for potatoes and croquetas
- coriander-lime aioli for potatoes and tortilla
- green chutney for tortilla, croquetas, and even peppers
- cooling yogurt dip or tzatziki for shrimp and spicy bites
Because the sauces overlap, the table feels layered without becoming complicated. Also, guests can customize each bite, which makes the meal more interactive.
If you want one larger “party bowl” dip to anchor the spread, MasalaMonk’s spinach dip recipes are excellent, especially for holiday tapas ideas or bigger groups.
Also Read: Eggless Yorkshire Pudding (No Milk) Recipe
Menu ideas for a relaxed tapas dinner at home
Once you have the five anchor dishes, you can shape the evening in different ways depending on your crowd. That flexibility is exactly why tapas dinner ideas work so well for hosting.
Menu idea: an easy tapas dinner for 2 to 4
If you’re cooking for a smaller table, don’t make all five dishes at once. Instead, choose a focused trio and let the night stay easy.
A lovely combination is:
- Masala Patatas Bravas
- Tortilla Española wedges
- Garlic shrimp with curry leaves
Then add one sauce board and a plate of olives. That’s enough for a satisfying tapas dinner without turning the evening into a production.
Menu idea: a full tapas dinner party menu for 6 to 8
For a bigger group, use all five featured tapas plates:
- patatas bravas
- tortilla wedges
- garlic shrimp
- padrón peppers
- croquetas
Serve them in waves rather than all at once. Begin with tortilla and sauces, then bring out potatoes and croquetas, and finally finish with shrimp and peppers. As a result, the meal feels lively and fresh, and you don’t get stuck trying to hold everything at the perfect temperature.
Menu idea: tapas for lunch or a lighter spread
For a daytime table or a relaxed lunch tapas plan, make it simpler:
- tortilla wedges
- padrón peppers
- a smaller bravas bowl
- one dip and some bread
It still feels complete, yet it stays light enough for an afternoon meal.
Variations & Ideas for vegetarian and vegan tapas recipes
One of the best things about tapas is how naturally it supports different dietary preferences. Small plates make it easy to swap one or two dishes without rebuilding the entire menu.
Vegetarian tapas ideas that feel substantial
A vegetarian tapas spread can be deeply satisfying if you mix textures well. For example:
- patatas bravas for crunch and comfort
- tortilla española for softness and richness
- padrón peppers for brightness
- paneer-potato croquetas for a crisp, hearty bite
That combination covers starch, protein, and vegetables beautifully.
If you want to expand beyond the Spanish-inspired core while keeping the same small-plates energy, MasalaMonk’s falafel with Indian twists makes an excellent add-on plate.
Vegan tapas ideas that still feel festive
A vegan tapas table is easy to build if you lean into potatoes, peppers, mushrooms, chickpeas, and good sauces.
A simple vegan spread could include:
- patatas bravas with vegan coriander-lime mayo
- chaat-spiced padrón peppers
- garlic mushrooms with smoked paprika
- marinated chickpeas with lemon and herbs
- olives and toasted almonds
For the creamy element, MasalaMonk’s vegan mayo recipe helps keep the table rich without eggs.
Healthy tapas ideas without losing flavor
If you want lighter plates, the easiest changes are method-based:
- roast or air-fry instead of deep-fry
- keep one creamy dip and one yogurt-based dip
- add more peppers and mushrooms
- make smaller croquetas rather than skipping them entirely
That way, the table still feels abundant, but the meal doesn’t become overly heavy.
Also Read: Sourdough Starter Recipe: Make, Feed, Store & Fix Your Starter (Beginner Guide)
Tapas Recipe variations for gluten free and mixed groups
Gluten free tapas are much easier than people expect because many classic tapas dishes are already built on potatoes, eggs, vegetables, seafood, and olive oil.
Gluten free base plates
These four are naturally close to gluten-free:
- patatas bravas
- tortilla española
- padrón peppers
- garlic shrimp
The only places to watch are sauces and bread accompaniments.
Gluten free croquetas and swaps
Croquettes are the one dish that usually needs adjustment, but it’s a simple fix:
- use gluten-free flour in the coating
- use gluten-free crumbs
- keep the filling the same
Alternatively, if you don’t want to bread anything at all, add a crisp lentil patty or tikki plate instead. MasalaMonk’s moong dal ki tikki is a fantastic option here and fits naturally into a tapas-style spread with chutney and yogurt dips.
Mixed-table planning for easy hosting
If you’re feeding a group with mixed preferences, label the plates lightly and keep sauces separate. For instance, place vegan mayo in one ramekin and dairy-based sauce in another. Similarly, keep bread on the side so gluten-free guests can build a plate around the naturally gluten-free dishes.
Because tapas are served in separate small dishes, this kind of hosting feels seamless instead of restrictive.
Also Read: Keto Hot Chocolate Recipe (Sugar-Free Hot Cocoa) + Best Homemade Mix
Make-ahead plan for stress-free Tapas dinner parties
The biggest difference between a calm tapas night and a frantic one is timing. Fortunately, this tapas recipe spread is easy to break into stages.
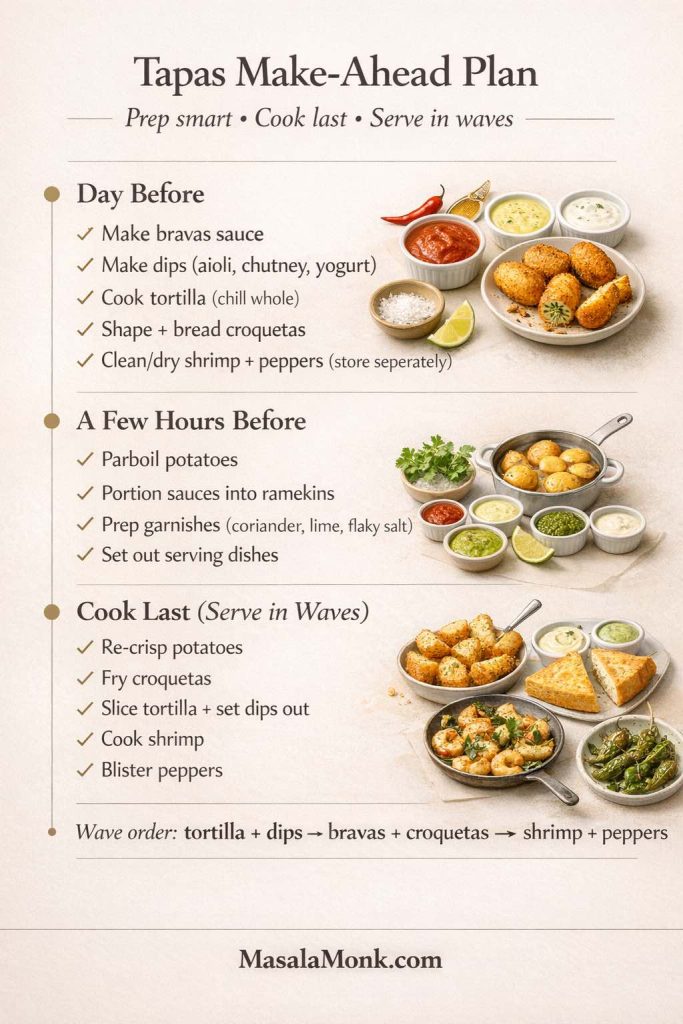
Day before Prep for Tapas
A day ahead, you can:
- make the bravas sauce
- make the chutney-aioli and other dips
- cook the tortilla and chill it whole
- shape and bread the croquetas
- clean and dry the shrimp
- wash and dry the padrón peppers
With those steps done, the actual hosting window becomes much easier.
Prep a few hours before guests arrive
A few hours before serving:
- parboil potatoes for bravas
- set out serving bowls and plates
- slice bread and prep garnish bowls
- cut lemons or limes
- portion sauces into ramekins
At this point, the evening is mostly assembly and finishing.
Last-minute cooking sequence for a Tapas recipe
Right before serving:
- re-crisp the potatoes
- warm the bravas sauce
- fry the croquetas
- slice and plate the tortilla
- cook shrimp
- blister peppers
This sequence works because the longest-cooking items (potatoes and croquetas) can hold briefly, while shrimp and peppers are fastest and best fresh.
Hosting rhythm that keeps you at the table
Serve in waves. Start with tortilla and dips while the potatoes finish crisping. Then bring out bravas and croquetas. Finally, serve the shrimp and peppers hot.
That pacing feels natural, and it also gives the meal the “tapas at home menu” energy people love—plates arriving one after another instead of all at once.
Also Read: Dirty Martini Recipe (Classic, Extra Dirty, No Vermouth, Spicy, Blue Cheese, Tequila + Batched)
Small plate and serving dish ideas that make the tapas table look special
Presentation matters with tapas, but it doesn’t need to be expensive. In fact, the table usually looks better when the dishes are simple.
If you like the classic look, one or two terracotta or clay-style bowls instantly add warmth. The Spain tapas guide even mentions clay pots as part of the tapas tradition, so that style suits the meal beautifully.
Plate setup for a balanced table
Here’s an easy layout:
- one shallow bowl for patatas bravas
- one warm skillet or oven-safe dish for shrimp
- one plate for tortilla wedges
- one plate for croquetas
- one bowl for peppers
- three or four small ramekins for sauces
Spread the dishes out rather than clustering everything in the center. As a result, the table looks abundant and easy to navigate.
Garnish ideas that don’t overwhelm a Tapas Recipe
Keep garnish light and purposeful:
- chopped coriander
- flaky salt
- lemon and lime wedges
- a little smoked paprika dusting
- tiny drizzle of sauce instead of heavy pooling
Too much garnish makes tapas look busy. By contrast, a few clean finishing touches make the table look polished and still relaxed.
Also Read: Ravioli Recipe Reinvented: 5 Indian-Inspired Twists on the Italian Classic
Add-ons in a different direction for a bigger small-plates night
Sometimes you want a tapas style dinner that stretches beyond Spanish-inspired plates while still keeping the shared-plates format. In that case, a few MasalaMonk dishes fit beautifully as “second-wave” options.
A vegetarian small-plate extension with a Tapas Recipe
If you want another vegetarian bite, MasalaMonk’s falafel with Indian twists works wonderfully alongside the chutney and yogurt dips already on the table. Because falafel are small, crisp, and dip-friendly, they slide naturally into the tapas format.
A crisp seafood extension
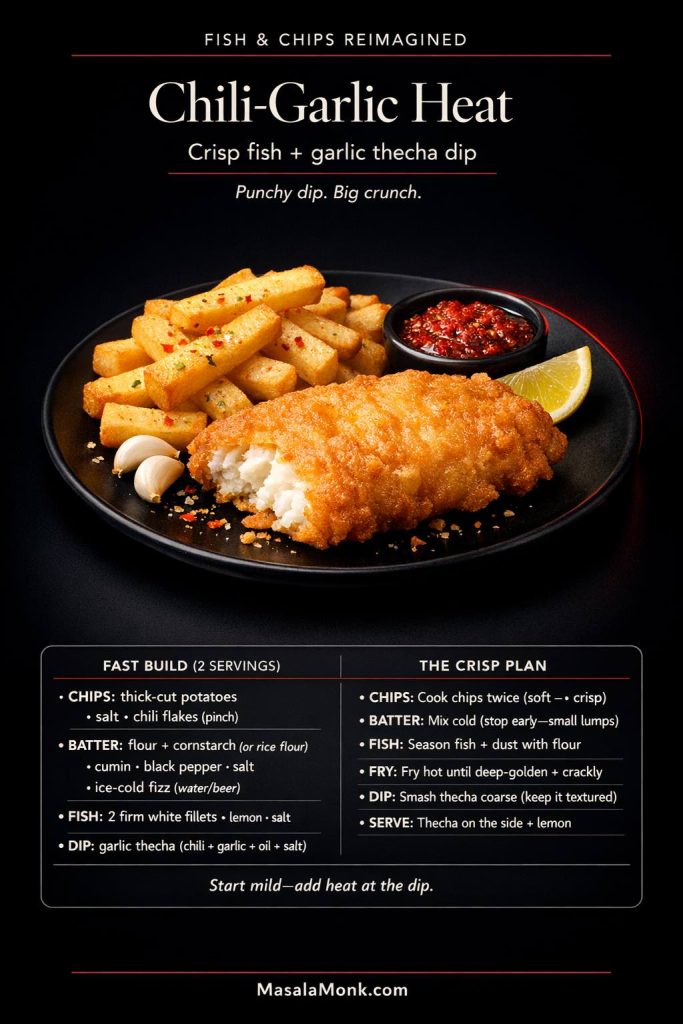
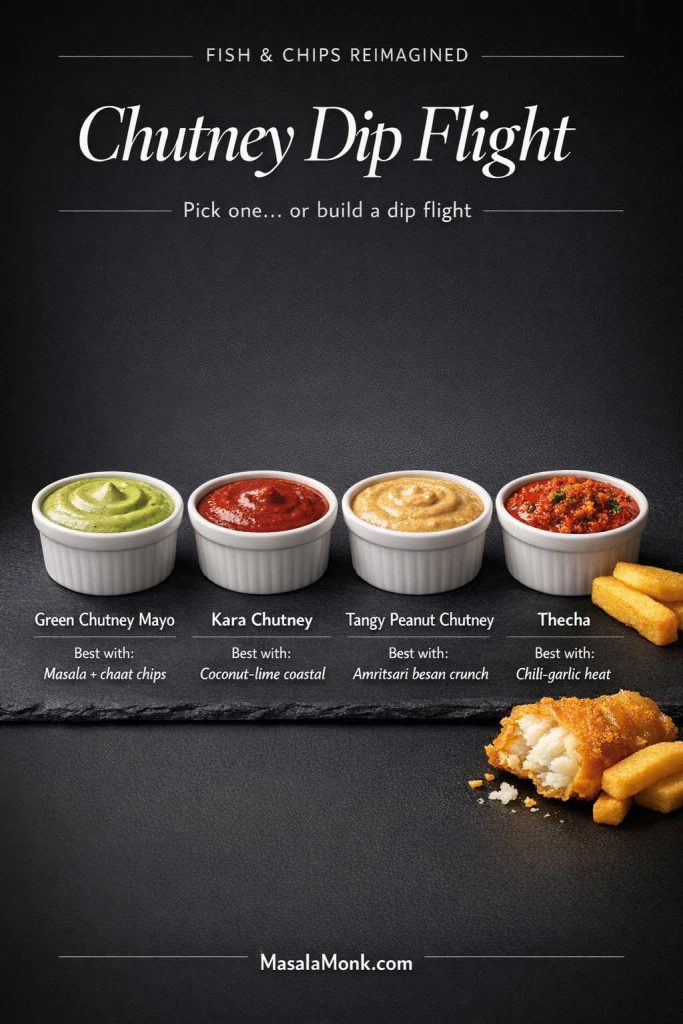
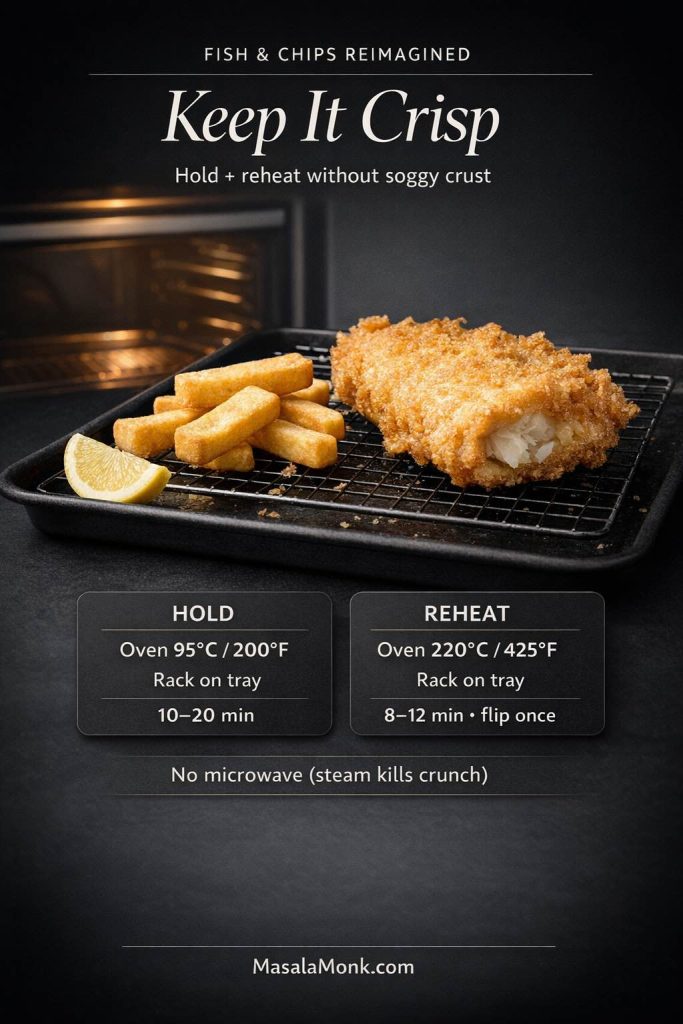
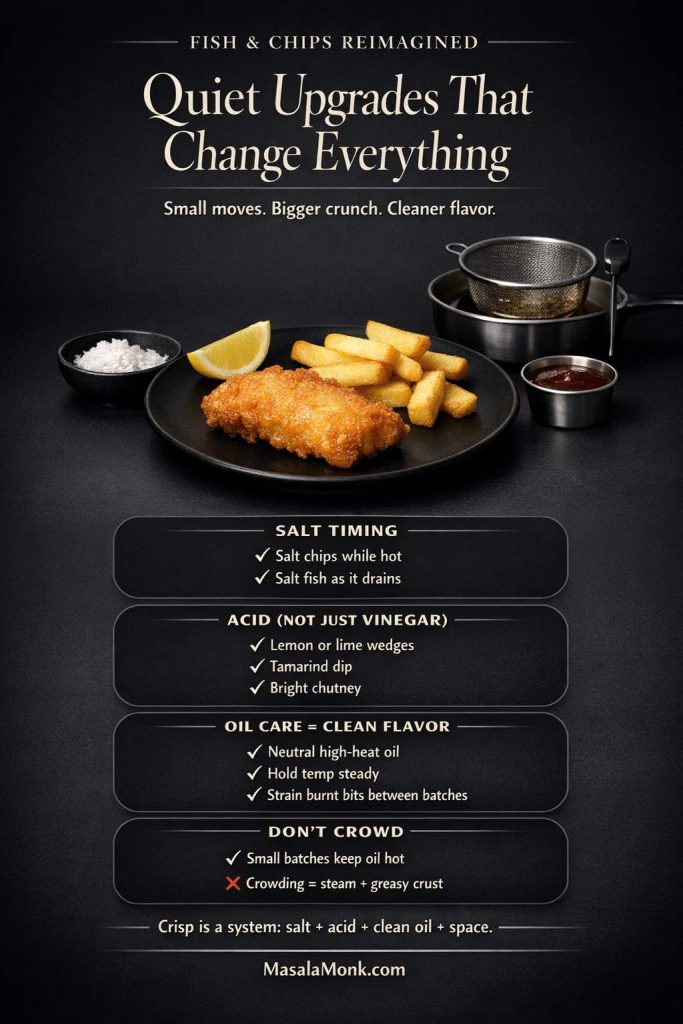
If your guests love seafood tapas, you can add a more substantial crisp fish plate later in the evening. MasalaMonk’s fish and chips with Indian twists offers great flavor inspiration, and even a small batch of fish bites can feel like a special “bonus tapa.”
Easy party snacks for larger groups
For a bigger crowd, a plate of MasalaMonk’s cheese balls with Indian-inspired variations can act like a second croquette-style dish. They’re crisp, bite-size, and extremely party-friendly, so they fit right into tapas party food ideas without much explanation.
These add-ons aren’t necessary, of course. Still, they’re a lovely way to turn one tapas dinner into a full small-plates evening when guests linger longer than expected.
Also Read: Croquettes Recipe: One Master Method + 10 Popular Variations
Ready-made add-ons to a Tapas Recipe that still feel intentional
Not everything on a tapas table needs a recipe. In fact, “ready made tapas” elements are part of what makes the meal feel relaxed and generous.
Simple no-cook plates to add
You can round out the spread with:
- olives and pickled vegetables
- toasted almonds
- sliced cured meat for a serrano ham tapas plate
- cheese cubes or wedges
- anchovy and olive skewers for a pintxo-style bite
These additions are especially useful for holiday tapas ideas because they fill the table quickly while you finish the hot dishes.
Anchovy and olive pintxo as a quick classic nod
For a fast cold bite, skewer an olive, an anchovy, and a pickled pepper on a toothpick. It takes minutes, yet it adds a distinctly Spanish touch to the meal. Spain’s popular tapas guide describes these classic combinations beautifully and can inspire a few more easy Spanish tapas dishes if you want to expand later.
Also Read: How to Make a Flax Egg (Recipe & Ratio for Vegan Baking)
Drinks and finishing touches for a complete evening
Tapas are as much about pace as they are about flavor, so drinks matter. You want something that refreshes between bites and keeps the table feeling lively.
Drink pairing ideas for a non-alcohol spread
Citrusy, low-sugar drinks pair especially well with spicy potatoes and garlic shrimp. For that reason, MasalaMonk’s keto mocktail recipes are a great place to pull a couple of options for a party-friendly drinks tray.
Warm-finish idea for cooler evenings
If your evening leans cozy—think winter tapas ideas or a Christmas tapas gathering—you can finish with something warm instead of jumping straight to dessert. A pot from MasalaMonk’s masala chai masterclass turns the meal into a long, relaxed hang, especially after a table full of salty, crispy tapas.
Dessert follow-up that stays easy
When you do want dessert, keep it simple and soft. A no-bake option is perfect after a tapas spread because you’re already juggling several dishes. MasalaMonk’s banana pudding without an oven is an easy crowd-pleaser and a gentle finish after the garlic, chili, and bravas sauce.
Also Read: Chicken Pesto Pasta (Easy Base Recipe + Creamy, One-Pot, Baked & More)
Tapas Recipe timing recap for a smooth, enjoyable night
Tapas feel fancy when the host looks relaxed. Therefore, the goal is not to cook everything at once. The goal is to set up the evening so each plate arrives at the right time with minimal stress.
What to cook first
Start with the dishes that hold:
- tortilla
- sauces
- dips
- ready-made add-ons
These can wait happily while you finish the hot plates.
What to cook second
Next, move to the items that can crisp and hold briefly:
- patatas bravas potatoes
- croquetas
Keep them warm while you prep the last two fast dishes.
What to cook last in a Tapas Recipe
Finish with:
- garlic shrimp
- padrón peppers
Both are at their best right out of the pan, and they bring a burst of aroma that makes the table feel freshly made.
Because of this sequence, a five-plate tapas dinner party menu becomes genuinely manageable, even on a regular weeknight.
Also Read: Keto Mocktails: 10 Low Carb, Sugar Free Recipes
Variations for meat tapas, chorizo tapas, and heartier appetites
If your guests want a more protein-heavy table, you can shift the spread without losing the tapas feel.
Chorizo and meat add-ons in a Tapas Recipe
A quick chorizo pan dish is one of the easiest meat tapas recipes:
- slice chorizo
- warm in a skillet until lightly crisp
- finish with black pepper and lemon
Serve it in a small dish with toothpicks, and it instantly feels like a proper tapas bar bite.
Likewise, the keema croquetas version already gives you a hearty meat option. If you want even more, you can add small meatballs or skewers later, but in most cases chorizo and keema croquetas are more than enough.
Pork-friendly direction for a different kind of tapas night
For a fuller tapas style dinner, sliced pork can work as a warm platter in place of one of the vegetarian items. If you want ideas that translate well to small plates, MasalaMonk’s slow cooker pork tenderloin and pork tenderloin in oven both offer great starting points for a tapas-style sliced meat plate.
Just slice thinly, serve with sauce, and keep the portions small so the table still feels like tapas rather than a plated main course.
Also Read: Masterclass in Chai: How to Make the Perfect Masala Chai (Recipe)
Final serving flow: how to make a Tapas meal feel generous and relaxed
Now that the dishes are ready, the last step is simply how you serve them. This part is easy to overlook, but it changes the whole feel of the evening.
Start by putting out the sauce board, olives, and tortilla wedges. Then, once people are settled, bring the patatas bravas and croquetas. A little later, finish the table with garlic shrimp and padrón peppers straight from the pan.
That sequence matters. First, it gives guests something to snack on while the hot plates finish. Next, it creates a natural rhythm, which is what makes tapas nights feel social. Finally, it keeps the food tasting better because not everything is sitting on the table for too long.
The beauty of a Tapas Recipe spread like this is that it feels layered without being complicated. You get traditional Spanish tapas shapes—patatas bravas, tortilla española, croquetas, pintxo-style bites, and seafood tapas—while the Indian-inspired seasonings and dips make the whole meal feel new.
So set out the small plates, let the sauces do some of the heavy lifting, and serve in waves. Before long, you’ll have one of those rare meals that feels both festive and easy: a full tapas dinner at home, built from simple small plates that invite everyone to take one more bite.
Also Read: Air Fryer Salmon Recipe (Time, Temp, and Tips for Perfect Fillets)
FAQ: Tapas Recipe, Small Plates, and Indian-Inspired Tapas Ideas
1. What is a tapas recipe, exactly?
A tapas recipe is any small-plate dish designed to be served as part of a shared spread rather than as a single main course. Traditionally, tapas can be hot or cold, simple or elaborate, and often appear in combinations so the table feels varied. In this post, the tapas recipe concept stays true to that format, yet the flavors lean Indian-inspired through spices, chutneys, curry leaves, and bright herb finishes. In other words, the structure is Spanish small plates, while the flavor direction adds a new personality.
2. Are tapas and appetizers the same thing?
They overlap, but they are not always the same. Appetizers usually come before a main meal, whereas tapas can become the meal itself. That distinction matters when you plan portions. For example, one or two small bites may work as appetizers, but a tapas dinner needs a fuller mix of potatoes, protein, vegetables, and dips. So, if you are building a tapas dinner at home, think beyond starters and aim for a complete small-plates menu.
3. Can tapas be a full dinner, not just snacks?
Absolutely. In fact, a tapas dinner often feels more satisfying than a single plated meal because you get contrast in every round. A good tapas-style dinner includes at least one hearty dish, one quick protein, one vegetable plate, and a sauce or dip element. As a result, the table feels abundant without becoming too heavy. For a home setup, four to five dishes usually create a complete dinner, especially when bread, olives, or a no-cook plate are included.
4. What are the easiest tapas to make at home for beginners?
The easiest tapas recipes are the ones that need simple ingredients and quick finishing: patatas bravas, blistered peppers, tortilla wedges, garlic shrimp, and marinated olives. Among these, patatas bravas and padrón peppers are especially beginner-friendly because the methods are straightforward and forgiving. Meanwhile, tortilla española is also approachable once you understand that the potatoes should be tender, not crisp. If you are new to tapas, start with one potato dish, one pepper dish, and one dip, then expand from there.
5. How many tapas dishes should I make for a dinner party?
For a small gathering of 4 to 6 people, 4 to 5 tapas dishes is a very good target. For a bigger group, 6 to 8 dishes works better, but not all of them need to be cooked. Ideally, combine hot tapas dishes with a few ready-made tapas plates such as olives, cheese, or cured meats. That way, your menu feels generous while your kitchen stays manageable. As a rule of thumb, variety matters more than quantity per dish, because guests enjoy trying more than one flavor.
6. What are good tapas dinner party menu ideas for mixed groups?
A balanced tapas dinner party menu should include at least one vegetarian dish, one seafood or meat dish, one potato or starch dish, and one bright vegetable plate. For instance, a strong mix is patatas bravas, tortilla española, garlic shrimp, padrón peppers, and croquetas. Beyond that, you can add olives, bread, and a sauce board to make everything feel complete. This approach works well because everyone can build a plate they like without needing a separate meal.
7. Which tapas recipes are best for make-ahead prep?
Tortilla española, croquetas, bravas sauce, and most dips are excellent make-ahead tapas options. Tortilla can be cooked earlier and sliced before serving, while croquetas can be shaped and breaded in advance, then fried at the last minute. Likewise, bravas sauce often tastes better after a little rest because the flavors settle. By comparison, garlic shrimp and blistered peppers are best cooked close to serving time. So, a smart tapas plan combines dishes that hold well with a couple of fast-cook plates.
8. What are good hot tapas dishes for a home party?
Hot tapas dishes are usually the stars of the table because they bring aroma and energy. Great choices include patatas bravas, croquetas, garlic shrimp, chorizo in a skillet, and blistered peppers. If you want a more filling spread, tortilla wedges can also be served warm. Even so, the best hot tapas menu still benefits from one or two cold plates to balance the meal. That contrast keeps the table lively and prevents everything from tasting too rich.
9. What are easy cold tapas ideas to add without extra cooking?
Cold tapas ideas can be wonderfully simple: olives, marinated chickpeas, cheese cubes, anchovy skewers, sliced cured meats, and pickled vegetables. In addition, a chilled dip or aioli instantly makes the spread feel bigger. These no-cook additions are especially useful for tapas party food because they fill the table while you finish the hot plates. Put differently, cold tapas are not just backups—they are part of what makes a tapas spread feel relaxed and complete.
10. Are there gluten free tapas recipes that still feel substantial?
Yes, many classic tapas are naturally close to gluten-free, including patatas bravas, tortilla española, garlic shrimp, and blistered peppers. The main things to watch are bread, breadcrumbs, and any packaged sauces. Croquetas can still be included if you use gluten-free flour and gluten-free crumbs. Therefore, a gluten free tapas spread is usually easy to build without changing the core menu. If needed, you can also add roasted vegetables or lentil patties for an extra hearty plate.
11. What are the best vegetarian tapas ideas for a full meal?
A satisfying vegetarian tapas table should mix crispy, creamy, and bright elements. A strong combination includes patatas bravas, tortilla española, padrón peppers, and paneer-potato croquetas. Then, to round out the spread, add one herb dip and one creamy dip. This works well because potatoes and eggs provide substance, while peppers and chutneys keep the meal from feeling heavy. If you want one more plate, marinated chickpeas or mushrooms fit naturally into a vegetarian tapas menu.
12. Can I make vegan tapas that still feel festive?
Definitely. Vegan tapas recipes can be just as fun and flavorful when you build them around potatoes, peppers, mushrooms, chickpeas, and bold sauces. For example, vegan patatas bravas, chaat-spiced peppers, garlic mushrooms, and marinated beans make a great base. Then add a vegan mayo or herby dip so the table still has that creamy element people expect from tapas. Consequently, the spread feels celebratory instead of “diet” or restricted.
13. Are tapas healthy, or are they usually too heavy?
Tapas can be as light or as rich as you want. Some tapas dishes, such as croquetas and fried potatoes, are definitely indulgent; however, others like peppers, seafood, olives, and tortilla wedges can be quite balanced. If you want healthy tapas ideas, use more roasting and air-frying, serve smaller portions of fried dishes, and add more vegetable plates. Another helpful trick is to include one yogurt-based dip alongside richer sauces. That way, the table still feels abundant but not overly heavy.
14. What is the difference between patatas bravas and other potato tapas dishes?
Patatas bravas are specifically potatoes served with a bold, spicy bravas sauce, often with an aioli-style drizzle. Other potato tapas dishes may be roasted or fried potatoes with herbs, garlic, or cheese, but they do not necessarily include bravas sauce. So, the sauce is what makes patatas bravas distinct. If you are planning a tapas recipe spread, patatas bravas are a strong choice because they are crowd-friendly, easy to scale, and pair well with both vegetarian and meat tapas plates.
15. What is bravas sauce made of, and can I make it ahead?
Bravas sauce is typically built from oil, garlic, tomato, paprika, and chili, then thinned to a spoonable consistency. Some versions are sharper, while others are smokier or more tomato-forward. In an Indian-inspired tapas recipe, cumin, tamarind, or Kashmiri chili can add depth without changing the identity of the dish. Fortunately, bravas sauce is one of the best make-ahead components on a tapas table. In fact, making it a day early often improves the flavor.
16. What is tortilla española, and is it the same as a regular omelette?
Tortilla española is a Spanish potato-and-egg dish, often called Spanish omelette, but it is not the same as a quick breakfast omelette. The texture is denser, the potatoes are cooked until soft, and the whole dish is sliced into wedges. Unlike a fluffy omelette, tortilla española is meant to hold its shape and serve beautifully at room temperature. For that reason, it is one of the most reliable tapas recipes for parties and make-ahead menus.
17. Can I serve tortilla española cold or at room temperature?
Yes, and that is one of its biggest advantages. Tortilla española tastes great warm, room temperature, or lightly chilled, which makes it ideal for tapas party food and lunch spreads. Moreover, it slices more cleanly after resting, so the presentation is often better when you do not serve it straight from the pan. If you want extra flavor, add a small chutney-aioli or herb dip on the side. That keeps the wedges neat while giving guests an optional finish.
18. What is gambas al ajillo, and how is it different from gambas pil pil?
Gambas al ajillo is a classic Spanish garlic shrimp dish cooked quickly in olive oil with garlic and chili. Gambas pil pil, depending on the region or menu, can also refer to a garlicky shrimp preparation, often with a more pronounced chili-oil character and bubbling pan presentation. In practice, many home cooks use the names loosely. What matters most is the method: hot oil, garlic, chili, quick-cooked shrimp, and immediate serving. For an Indian-inspired version, curry leaves fit beautifully into that same format.
19. How do I cook padrón peppers for tapas without making them soggy?
The key is high heat and a quick cook. First, dry the peppers well. Then cook them in a hot skillet with a little oil so they blister rather than steam. Once they char in spots, remove them promptly and season right away. If the pan is too cool or crowded, the peppers soften without getting that signature blistered finish. A squeeze of lime and a light spice dusting can be added afterward, but the technique matters more than the seasoning.
20. What are croquetas, and can I make them without ham?
Croquetas are small breaded and fried bites with a creamy or soft filling. Traditional Spanish croquettes often use ham, but you can absolutely make them with other fillings. Paneer-potato, chicken keema, mushrooms, spinach, or even cheese-based fillings all work well. Therefore, croquetas are one of the most adaptable tapas dishes for mixed groups. Just keep the filling flavorful and not too wet, then chill before breading so they hold their shape while frying.
21. What is the difference between tapas and pintxos?
Tapas are small plates served in bowls, plates, or little dishes, while pintxos are often bite-size items assembled on bread and secured with a toothpick. Pintxos are especially associated with the Basque region and tend to be more “built” or stacked. Meanwhile, tapas can include anything from saucy potatoes to shrimp skillets to croquetas. Both styles work beautifully together on a home table, so you can mix them freely if you want more variety.
22. Can I use ready-made tapas items and still call it a tapas night?
Absolutely. A great tapas night does not need every item to be homemade. In fact, ready-made tapas elements such as olives, cheese, cured meats, pickles, and nuts are part of what makes hosting feel easy. The trick is to pair them with a few hot dishes so the table still feels fresh and intentional. For example, make patatas bravas and garlic shrimp, then fill the rest of the spread with simple no-cook plates. That combination is practical and still feels special.
23. What are good tapas ideas for lunch instead of dinner?
For tapas lunch ideas, keep the menu lighter and a little simpler than a dinner spread. Tortilla wedges, padrón peppers, a small bowl of bravas, olives, and one dip make a great midday table. Since lunch usually calls for less richness, you can skip heavier fried dishes like croquetas or serve a smaller portion. As a bonus, many lunch-friendly tapas dishes are make-ahead friendly, so the meal comes together quickly.
24. What serving dishes work best for tapas at home?
Small plates, shallow bowls, ramekins, and one or two warm serving dishes are usually all you need. Terracotta dishes look beautiful and suit the tapas style, especially for potatoes or baked items, but plain white bowls work just as well. The main goal is to keep each dish separate so the table looks abundant and easy to navigate. Rather than crowding everything onto one platter, spread the dishes across the table so guests can reach and build their own plate comfortably.
25. How do I keep a tapas dinner from feeling stressful to cook?
Plan the menu in layers. Start with make-ahead items like tortilla, sauces, and prepared croquetas. Then, cook the dishes that can hold for a few minutes, such as potatoes. Finally, finish with quick-cook tapas like garlic shrimp and blistered peppers. This sequence keeps the kitchen calm and gives the meal a natural flow. Most importantly, serve in waves instead of trying to put every dish out at the same time. That one change makes tapas hosting much easier.