Posted on 1 Comment

Keto Flour: Guide to Low-Carb Flours That Bakes Like the Real Thing

A reliable keto flour isn’t one ingredient—it’s the right flour (or blend) for the job. Use this guide to choose low-carb flours that behave like “real” flour in the oven, so bread slices clean, bakes stay tender, and pie crust holds together without turning dry or crumbly.

There’s a moment in low carb baking that feels almost universal: you pull something warm from the oven—maybe a tray of brownies, maybe a “simple keto bread,” maybe a batch of cookies—and the first bite tells you the truth. Keto flour can still deliver something genuinely delicious, yet the texture often feels different at first. Drier than you hoped. More fragile than you expected. Sometimes oddly eggy. Occasionally too dense, as if the batter never learned how to lift.

That moment isn’t failure. It’s feedback.

Regular flour is predictable because gluten does so much of the heavy lifting. Keto flour, on the other hand, asks you to be a little more intentional. Once you understand what each flour brings—bulk, tenderness, moisture, chew, browning—your results get calmer and more repeatable. In fact, you can go from “random experiments” to a pantry that reliably turns out low carb brownies, keto pancakes, keto pie crust, muffins, and even sandwich-style bread that doesn’t crumble into confetti.

So think of this as your reset: not a lecture, not a set of rules, but a cooking-minded guide to choosing a keto flour substitute that actually works.

Also Read: A Guide to Keto Diet for Beginners


Keto flour basics: why low carb baking plays by different rules

Traditional wheat flour is a whole system. When it meets liquid and mixing, gluten forms a stretchy network that traps air, holds moisture, and gives bread that familiar tear. Consequently, even a “just okay” recipe can still turn out fine because gluten forgives a lot.

Keto flour cheat sheet comparing almond flour and coconut flour for baking. Shows two bowls labeled almond flour and coconut flour with guidance for brownies, pancakes, pie crust, bread, and pizza. Notes almond flour works well for fudgy brownies and easy-start pancakes, while coconut flour is best only in recipes built for it. Reminds flours aren’t one-bag-fits-all and gives fixes: dry add fat/liquid, crumbly add binder like psyllium or xanthan.
Choosing keto flour gets easier when you pick by texture, not the label. This cheat sheet shows when almond flour shines (fudgy brownies, easiest-start pancakes, buttery pie crust) and when coconut flour should only be used in recipes designed for it. It also covers the “structure first” mindset for bread and the crisp vs foldable decision for pizza. Keep the bottom fixes handy too: if it turns dry, add fat + liquid; if it crumbles, add a binder like psyllium or xanthan. Save this for your next bake.

Keto flour alternatives rarely have that safety net. Instead, low carb baking is built from smaller pieces that you assemble on purpose:

  • A base for bulk and tenderness (almond flour, coconut flour, some wheat-based keto blends, or a low carb all purpose flour mix)
  • A binder for structure (eggs, psyllium husk, flax, xanthan/guar)
  • A moisture plan (fat, dairy, extra liquid, or a sweetener that helps retain softness)
  • A lift plan (fresh baking powder, baking soda plus acid, or whipped egg whites)
Infographic titled “Low-Carb Baking = 4-Part System (Stop Guessing).” A 2x2 grid explains the keto flour “system”: Base (almond flour, coconut flour—recipe-built, blends) for bulk/tenderness; Binder (eggs, psyllium, xanthan/guar, flax/chia) for structure; Moisture (butter/oil, yogurt/sour cream, cream cheese/extra liquid) for softness; Lift (baking powder, baking soda + acid, whipped eggs) for rise. Bottom strip shows quick fixes for dry, crumbly, gummy, and eggy results. MasalaMonk.com footer.
Low-carb baking gets way easier when you stop treating “keto flour” like one magic bag. Think in four parts: a base for tenderness, a binder for structure, a moisture plan to keep bakes soft, and a lift plan so they don’t turn dense. The bottom row is your rescue kit for the most common problems (dry, crumbly, gummy, eggy). Save this as your “preheat-the-oven checklist” before brownies, muffins, pancakes, pie crust, or keto bread.

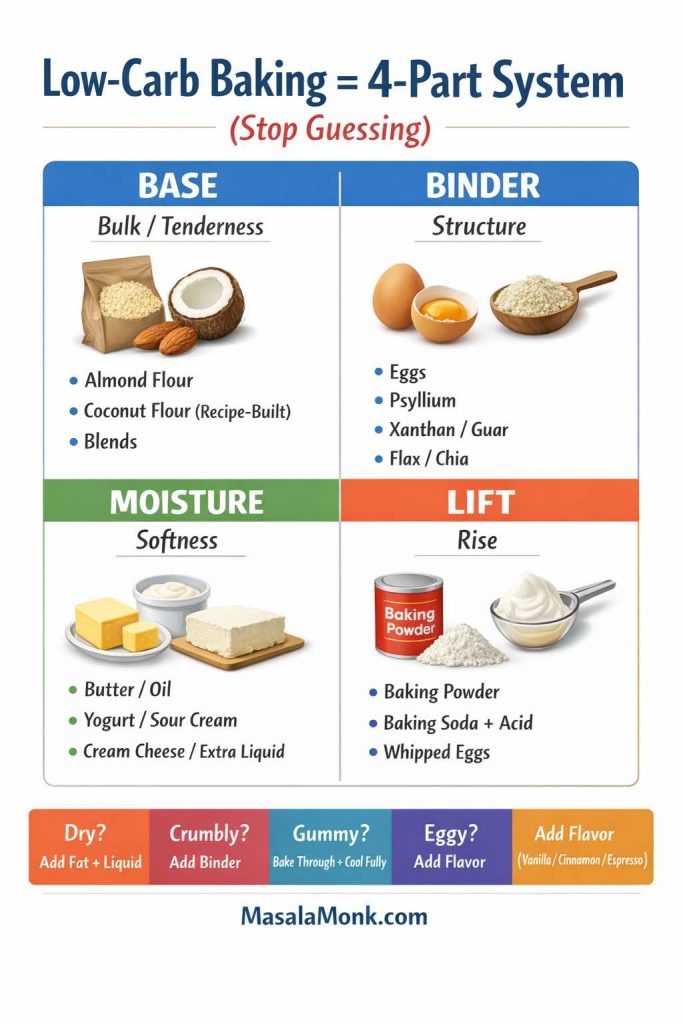
That’s why one “keto flour” doesn’t do everything. A flour that makes an incredible cookie can make a sad loaf. Similarly, a bread-focused mix can feel tough in brownies. Once you accept that each bake wants a slightly different toolkit, your kitchen gets easier.

Also Read: The Must-Have Condiment for Keto: Mustard – Flavorful, Low-Carb, and Versatile


Keto flour labels: how to read carbs on mixes, tortillas, and “net carb” claims

Low carb packaged products—especially tortillas, wraps, and baking mixes—often lean on “net carbs.” Net carbs can be a useful shorthand, but it isn’t a standardized number on the Nutrition Facts label. The label gives you total carbohydrate, and under that, it breaks down fiber and sugars; your “net” number is a calculation people do from the label.

A “Net Carbs Checklist (Keto Baking + Tortillas)” infographic showing a checklist: start with serving size, read total carbs, check fiber, check sugar alcohols, and choose your net-carb rule. A nutrition label example and a simple formula are shown: total carbs minus fiber minus sugar alcohols equals net carbs. MasalaMonk.com is printed at the bottom.
Net carbs look simple… until you flip the package around. This checklist is a quick way to read tortillas, baking mixes, and “keto” cookies without getting tricked by the front label. Start with serving size, then total carbs, then fiber and sugar alcohols — but here’s the key: net carbs aren’t officially standardized, and sugar alcohols aren’t all the same (maltitol often hits harder than erythritol). When in doubt, check the ingredient list + type of sugar alcohol, and trust the full nutrition panel over the bold claims. Save this for your next grocery run. MasalaMonk.com

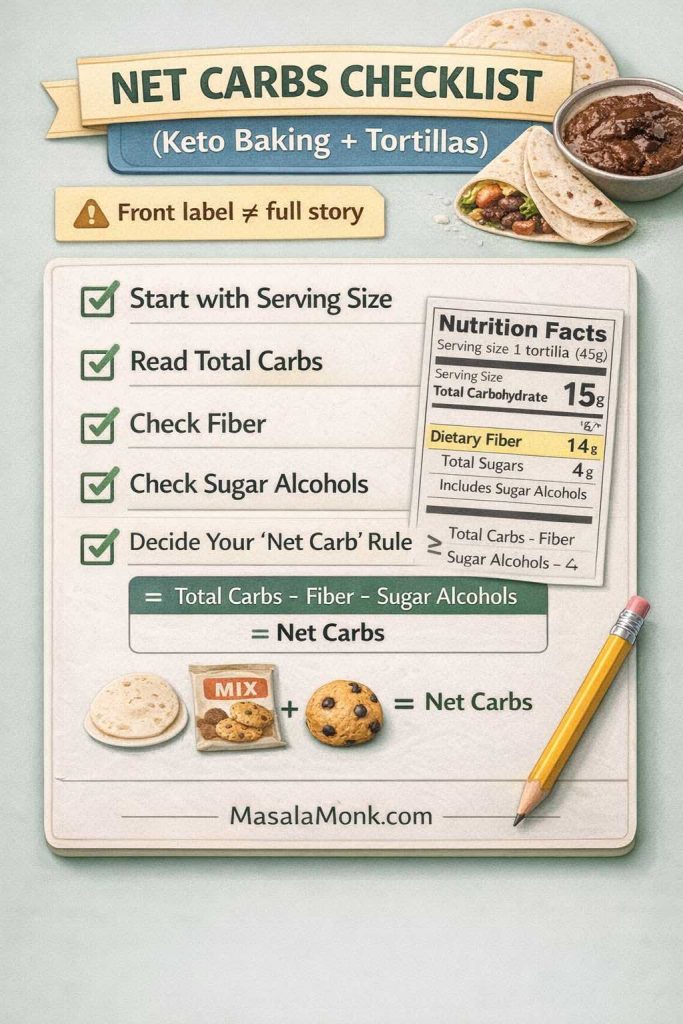
The FDA explains how to interpret the Nutrition Facts label and why serving size matters, because every number on the label is tied to that serving size. That alone changes the story more than most people realize. See: How to understand and use the Nutrition Facts label.

Meanwhile, the American Diabetes Association notes that net carbs are commonly calculated by subtracting fiber and sugar alcohols from total carbohydrate; however, that calculation isn’t always accurate because different fibers and sugar alcohols can be partially absorbed and still affect blood glucose in some people. See: ADA: Get to know carbs.

If you’re counting carbs for any reason—keto goals, blood sugar management, or simple preference—this is the practical takeaway:

Use the label as the source of truth, then decide how you personally interpret it. Don’t let marketing language do the math for you.

For additional clarity, the FDA’s Interactive Nutrition Facts Label PDF on “Total Carbohydrate” breaks down what that line includes and how fiber fits into the definition: Interactive Nutrition Facts Label: Total Carbohydrate (PDF).

Also Read: How to make No-Bake Banana Pudding: No Oven Required Recipe


Best keto flour for baking: a quick chooser by what you’re making

Before you choose any low carb flour substitute, pick the result you want. Then you can choose the flour that behaves that way.

Infographic titled “Best Keto Flour for Baking: Quick Chooser.” Four panels: Brownies & bars (almond flour = fudgy; blends = cakey); Pancakes & waffles (almond flour easiest; coconut flour only in recipes built for it); Pie crust & cookies (almond flour tender; coconut flour in small doses; binders add structure); Bread & pizza (use a flour system with binders). Bottom fixes: dry add fat+liquid; crumbly add binder; gummy bake through+cool longer. MasalaMonk.com footer.
This “pick your result first” cheat sheet is the fastest way to stop guessing with keto flour. Choose the quadrant that matches what you’re baking (brownies & bars, pancakes & waffles, pie crust & cookies, or bread & pizza), then follow the one-line rule for the texture you want. The bottom strip is your rescue plan: dry = add fat + liquid, crumbly = add a binder (psyllium/xanthan/flax), gummy/dense = bake through + cool longer. Save it to your keto baking board so the next batch turns out calm and repeatable.

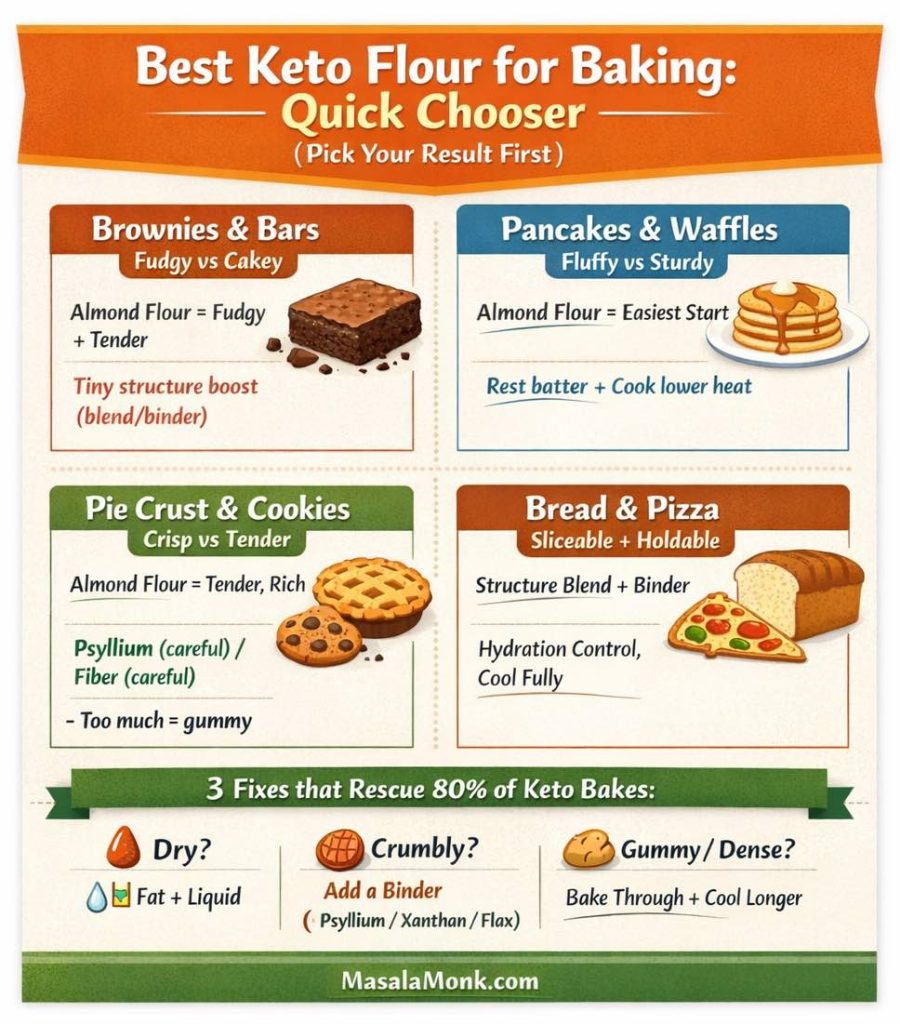
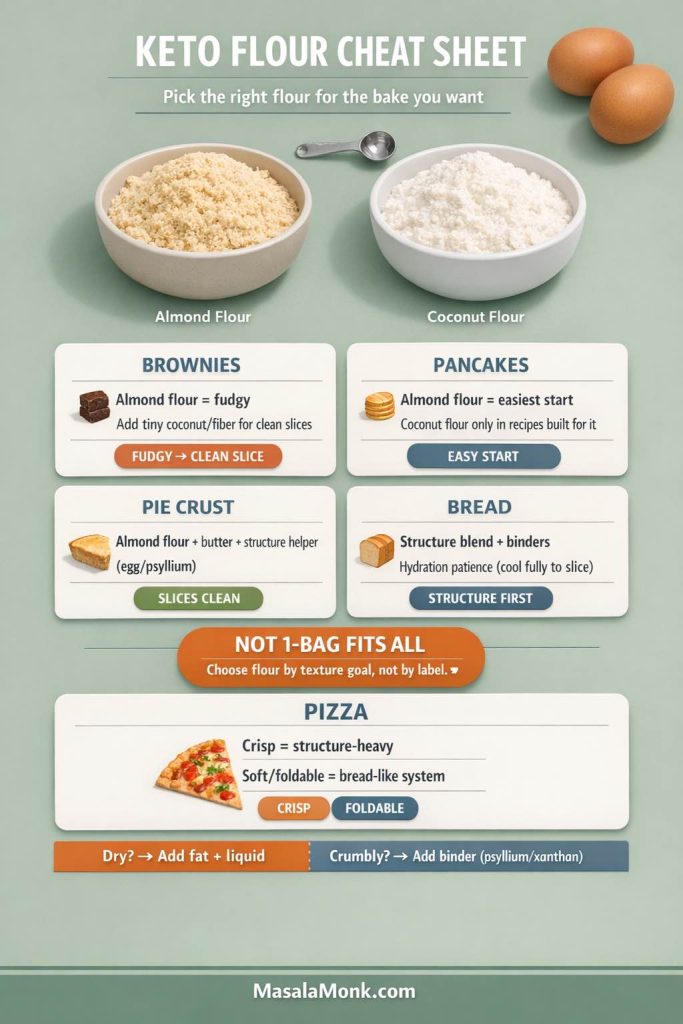
Brownies and bars: fudgy vs cakey

Brownies are where keto baking can feel either magical or tragic.

  • If you want fudgy brownies, you typically want a flour that stays tender and doesn’t drink every drop of moisture. Almond flour often shines here.
  • If you want a more cakey brownie, you’ll usually need more structure—either from a blend designed to mimic wheat flour, or from careful binder choices (and sometimes a touch of coconut flour).
When keto brownies turn out too dry, too crumbly, or weirdly dense, it’s usually a flour-system issue—not “bad baking.” This quick chooser helps you decide fudgy vs cakey first, then pick the right approach: almond-flour-forward for tender/fudgy brownies, or a more structured blend for cakey, clean-slice bars. The bottom “quick fixes” strip is the real lifesaver: dry = add fat + a splash of liquid; crumbly = add a tiny binder (psyllium/xanthan); too dense = reduce binder and cool fully before judging texture.

If you’re using a keto brownies mix or low carb brownie mix, the best question isn’t “Is it good?” but “What kind of flour system is it?” Almond-based mixes and wheat-style keto blends can both work, yet they produce different textures.

Pancakes and waffles: the fastest way to learn your flour

Waffles & Pancakes are a low-risk training ground: quick feedback, easy to tweak, forgiving enough to repeat.

Infographic titled “Keto Pancakes & Waffles: The Fastest Way to Learn Your Flour” comparing three bases: almond flour (pourable but thick; medium-low heat; browns fast), coconut flour (thickens as it sits; rest 10–12 minutes; not a 1:1 swap; needs more eggs/liquid), and cottage cheese/high-protein (blend smooth; lower, slower heat; add 1 egg or tiny binder). Includes “Fix it fast” tips for eggy, rubbery, breaking, and too-dark results. MasalaMonk.com footer.
Pancakes (and waffles) are the quickest way to “feel” how keto flour behaves—because you get instant feedback. This one-page guide helps you choose the right base (almond, coconut, or cottage-cheese/high-protein), spot the key batter cues, and cook with the right heat so you don’t end up with an eggy, rubbery stack. Keep the “Fix it fast” strip in mind too: it gives simple, realistic tweaks for the most common failures—breaking, over-browning, or a texture that tightens up as it cools.

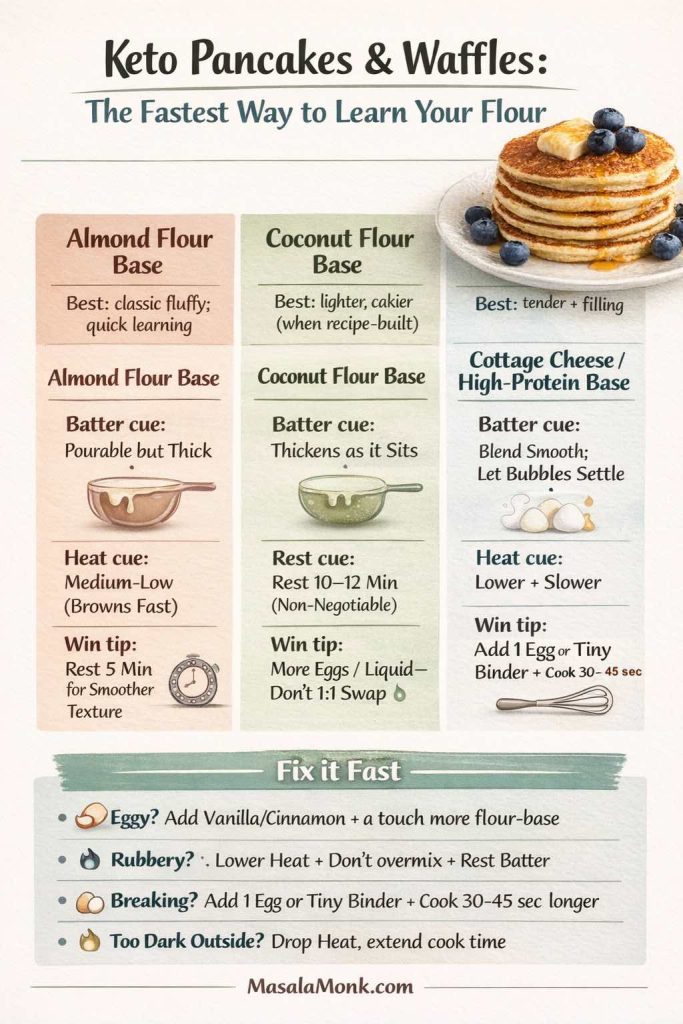
If you want a gentle on-ramp, start with a dependable keto approach like Keto Pancakes: almond flour, coconut flour, and cottage cheese methods.
Then, if you want a broader “this is how pancakes behave with different bases” baseline, Blueberry Pancakes (6 recipes + homemade pancake mix) gives you a useful reference point for batter rest, browning, and texture.

Pie crust and cookies: crisp vs tender

A keto pie crust needs to slice cleanly, so structure matters. On the cookie side, you may want crisp edges and a tender middle, or you may want chewy softness. Those are different jobs.

  • Almond flour tends to give a tender, rich crumb.
  • Coconut flour can firm and tighten texture, but it can also dry things out if you push it too far.
  • Psyllium husk and certain fibers can help crusts hold together, although too much can make things gummy.

Bread and pizza: structure first, tenderness second

Bread is where low carb baking stops being “swap flour, hope for the best” and becomes “choose a system.” Keto bread usually needs binders, hydration control, and a flour blend that can hold gas.

For a reminder of how much structure matters in conventional bread, Sourdough Bread Recipes: 10 easy bread bakes (loaves, rolls & bagels) is a helpful example of how fermentation, hydration, and timing shape the crumb—even if you’re not baking sourdough on keto.

Also Read: Chicken Adobo — Step-by-Step Recipe — Classic Filipino Adobong Manok


Keto flour substitutes: the low carbohydrate flour list that actually earns its space

You’ll see endless “low carb flour” lists online. The problem is that many of them treat these flours as interchangeable. They aren’t.

Here’s the kitchen-reality version—what each keto flour does well, what it does poorly, and how to use it without wasting a weekend.

Keto flour substitutes infographic comparing almond flour, coconut flour, lupin flour, oat fiber, bamboo fiber, psyllium husk, flax/chia, and xanthan/guar. Each card lists absorption or role, best uses, common baking failures (dry, crumbly, gummy, strong taste), and quick fixes like adding eggs/liquid, resting batter, measuring binders carefully, and cooling fully before slicing. MasalaMonk.com footer.
Keto baking gets easier when you stop forcing one “keto flour” to do every job. Save this cheat sheet for the moment a bake turns dry, crumbly, or gummy—it shows what each option is best for (brownies, muffins, bread, pizza, doughs) and the simplest fix to try next (rest the batter, add moisture, use a binder, cool longer). Coconut flour is powerful but picky, almond flour is the easiest all-rounder, and psyllium/xanthan are the quiet heroes for clean slices and structure. Full keto flour guide on MasalaMonk.com.

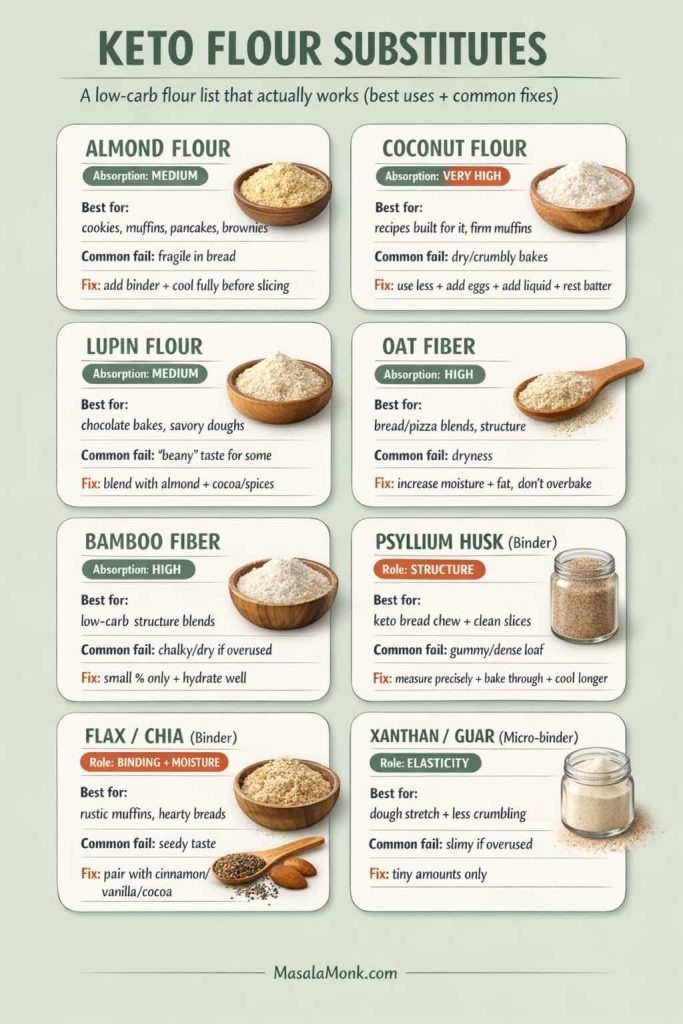
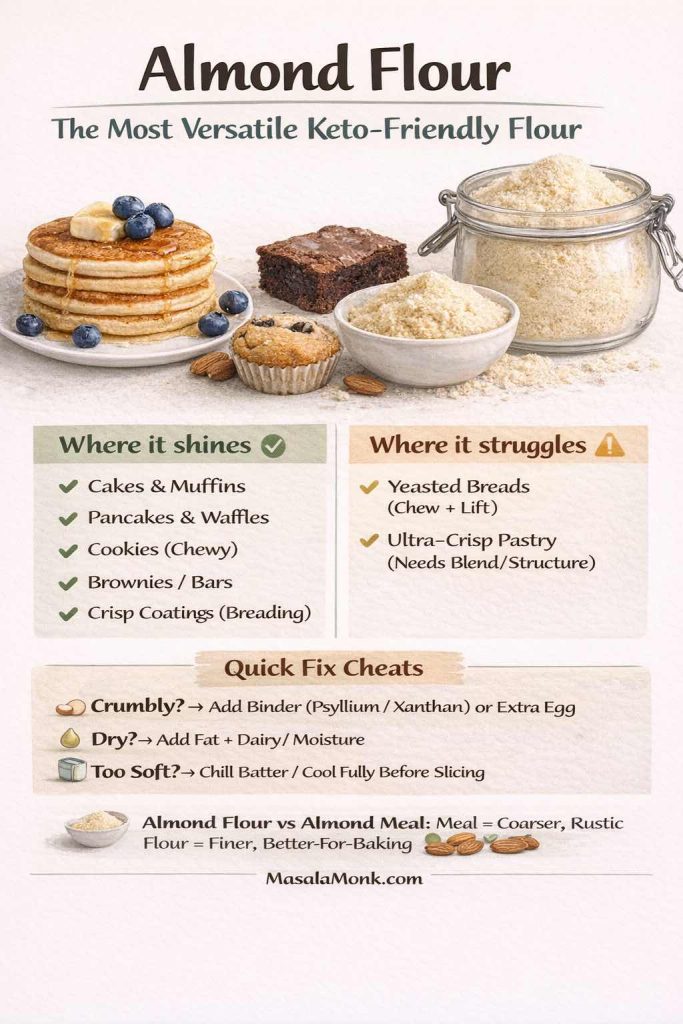
Almond flour: the most versatile keto friendly flour

Almond flour is popular for a reason: it’s forgiving. It browns nicely, tastes rich, and tends to produce tender baked goods without advanced technique.

Where it shines

  • Cakes, muffins, pancakes, waffles
  • Cookies (especially chewy styles)
  • Brownies, bars, crumb toppings
  • Coating and breading jobs (especially when you want a crisp outside)

Where it struggles

  • Yeasted breads that need chew and lift
  • Ultra-crisp pastry unless you blend for more structure
Infographic titled “Almond Flour: The Most Versatile Keto-Friendly Flour.” Shows almond flour in a jar and bowl with keto bakes (pancakes, brownie, muffin). Lists where almond flour shines: cakes and muffins, pancakes and waffles, chewy cookies, brownies and bars, crisp breading/coatings. Lists where it struggles: yeasted breads needing chew and lift, ultra-crisp pastry needing added structure. Includes quick fixes: if crumbly add binder (psyllium or xanthan) or extra egg; if dry add fat plus dairy/moisture; if too soft chill batter and cool fully before slicing. Notes almond flour vs almond meal: meal is coarser and rustic; flour is finer and better for baking. MasalaMonk.com at bottom.
Almond flour is usually the easiest “starter” keto flour because it browns well, tastes rich, and stays tender—especially in pancakes, muffins, cookies, and brownies. Use this card as a quick chooser: if your bake turns crumbly, add a binder (psyllium/xanthan) or an extra egg; if it turns dry, add fat + dairy/moisture; if it’s too soft, chill the batter and let the bake cool completely before slicing. Bottom reminder: almond flour vs almond meal matters—meal is coarser and rustic, while fine almond flour is smoother and more reliable for baking.

If you want a practical internal guide that frames almond flour in everyday cooking (including a diabetes/blood sugar perspective), Almond Flour and Diabetes: a low-carb swap for better blood sugar is a relevant read.

And if you want a straightforward “make it taste good fast” use case, Almond Flour Pancakes is an easy entry point for batter thickness, browning control, and fluffiness without turning it into a science project.

A note on almond flour vs almond meal
Almond meal is coarser, which can make bakes feel heavier or more rustic. Sometimes that’s exactly what you want. Other times, it’s the reason your cookie feels gritty. When in doubt, choose almond flour for baking and save almond meal for breading and hearty muffins.

Two bowls on a sage background labeled “Almond Flour” and “Coconut Flour.” Almond flour shows medium absorption and “moist + tender”; coconut flour shows high absorption and “light but can dry out.” Center box says “Not 1:1 swap rule” with tips for swapping between them. Bottom tips: “Dry? add fat + liquid” and “Crumbly? add binder (psyllium/xanthan).” MasalaMonk.com footer.
Almond flour vs coconut flour in keto baking isn’t a 1:1 swap—this quick guide shows why coconut flour absorbs far more, how that changes texture, and what to fix when bakes turn dry or crumbly. Use it as a fast reference before making low carb brownies, muffins, pancakes, or pie crust.

Coconut flour: extremely absorbent, powerful in small doses

Coconut flour is one of the most misunderstood keto flour alternatives. People love it because it’s compact and can be very low net carb in small quantities. Then they treat it like all-purpose flour and wonder why everything turns to sand.

Coconut flour is high in fiber, which means it absorbs a lot of liquid during baking. Bob’s Red Mill emphasizes that you should follow coconut flour recipes closely and not make additional substitutions, because dough will often be much thicker than expected—and the absorbency changes everything. See: Bob’s Red Mill on coconut flour baking.

Iowa State University Extension notes that coconut flour shouldn’t be substituted 1:1 for wheat flour and can hold up to four times its weight in liquid, which helps explain why “just swap it” usually fails. See: Coconut flour (Iowa State Extension PDF).

Infographic titled “Coconut Flour: The Absorbency Rules” explaining that coconut flour is highly absorbent and not a 1:1 swap. Shows an absorbency meter (high), a bowl of coconut flour, where it shines (cake-like quick breads, firmer muffins, small amounts in blends), where it struggles (chewy bakes without binders, free-form cookies), and quick fixes for sandy/dry, dense, or crumbly results. MasalaMonk.com footer.
Coconut flour is powerful because it’s extremely absorbent—so the biggest mistake is treating it like all-purpose flour. This quick card shows when coconut flour works best (recipe-built quick breads, firmer muffins, and small amounts in blends), when it tends to disappoint (chewy bakes without binders, free-form cookies), and the first fixes to try if your batter turns sandy, tight, or crumbly. Use it as a “before you bake” reference so your results feel intentional.

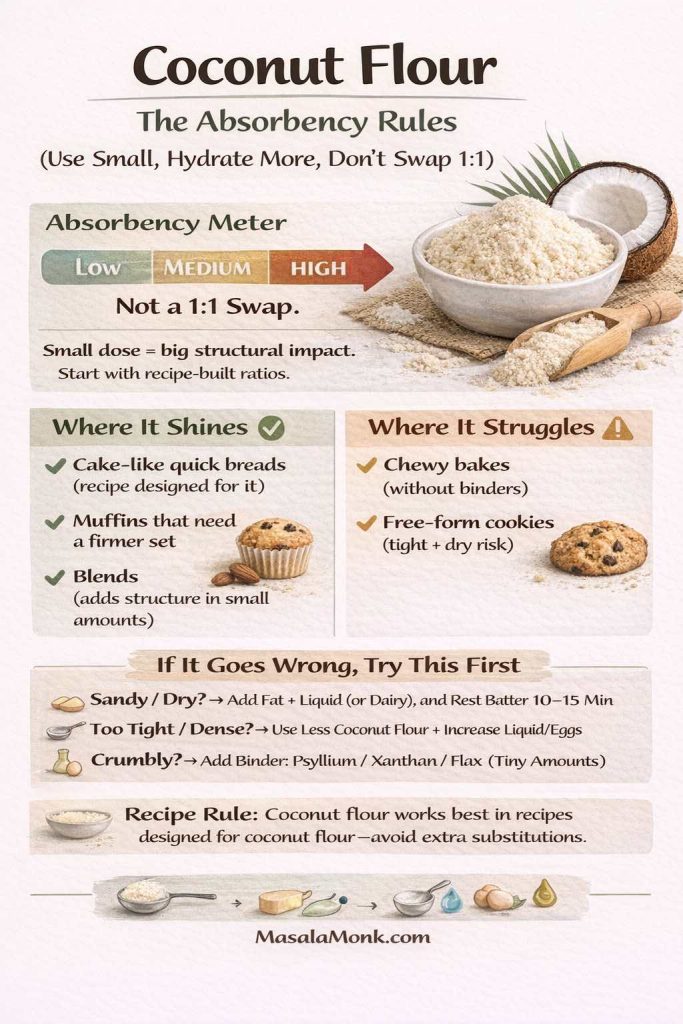
Where coconut flour shines

  • “Cake-like” quick breads when the recipe is designed for it
  • Muffins that need a firmer set
  • Blends, where a small amount adds structure

Where coconut flour struggles

  • Anything you want chewy unless you pair it with the right binders
  • Free-form cookies (it can over-tighten and dry)

If you love coconut flour, treat it like a concentrated ingredient. Use it with intention, not as a general-purpose low carb flour replacement.

Lupin flour: protein-forward structure with a distinct personality

Lupin flour can be a useful keto flour substitute because it brings protein and structure. It can also bring a flavor that some people notice more than others, especially in lightly flavored bakes.

Where lupin flour shines

  • Chocolate bakes (the flavor hides well)
  • Savory bakes and crackers
  • Blends designed for more structure

Where lupin flour struggles

  • Delicate cakes unless blended thoughtfully
  • Light, buttery cookies where you want clean sweetness

Oat fiber, bamboo fiber, and other fiber flours: bulk without traditional starch

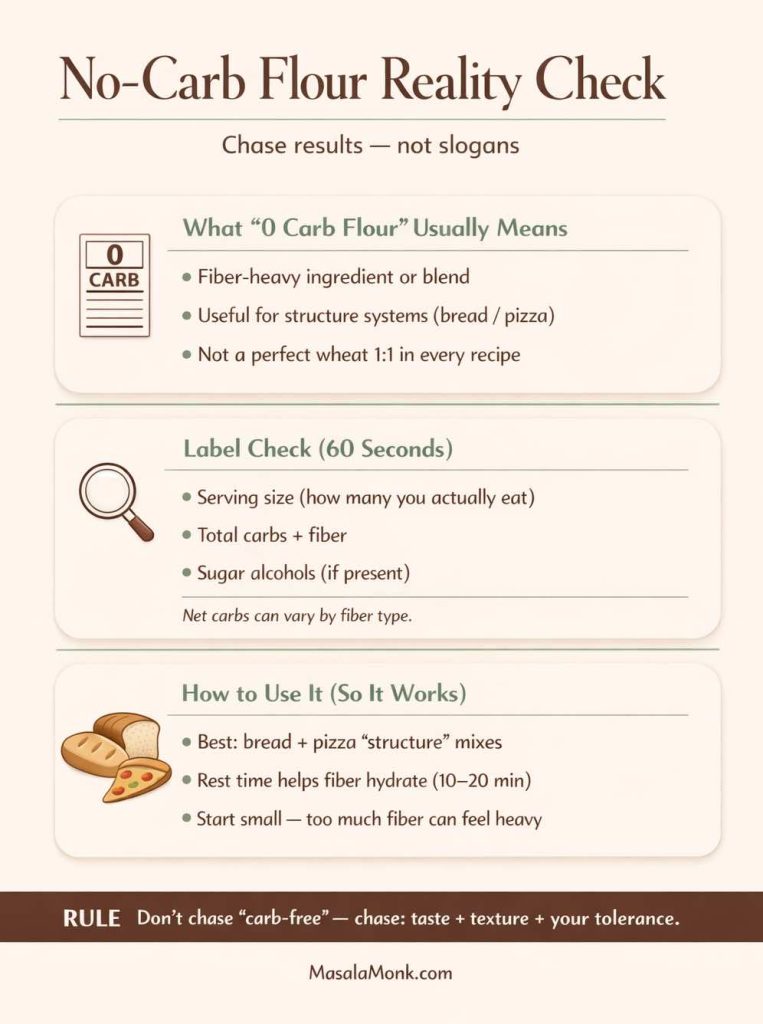
If you’ve seen “0 carb flour,” “zero net carb flour,” or “carb free flour substitute,” it’s often tied to fiber-heavy ingredients. These can be helpful, particularly in bread and pizza systems where you want bulk and structure without starch. Still, they can also turn baked goods dry if you overdo them.

Fiber choices vary widely, and not all “added fiber” behaves the same. If you want a grounded, label-oriented reminder that fiber type matters, it’s useful to keep the ADA’s note about net carb calculations in mind: ADA: net carbs aren’t always fully accurate.

Where fiber flours shine

  • Bread and pizza systems when paired with binders and hydration
  • Thick batters (mug cakes, pancakes) where you can control moisture

Where fiber flours struggle

  • Cookies and cakes when they’re used as the primary “flour”
  • Anything where you want a soft, bouncy crumb without gumminess

Psyllium husk: the binder that makes keto bread behave like bread

Psyllium isn’t “flour” in the classic sense, yet in keto baking it functions like architecture. It can provide elasticity, moisture retention, and a more bread-like chew, especially when paired with eggs and the right hydration.

Vertical infographic titled “Psyllium Husk: The Binder That Makes Keto Bread Slice.” Shows what psyllium does (elasticity, moisture retention, structure), common fails with fixes (crumbly: add a tiny bit more binder + rest; gummy/dense: reduce binder slightly + bake through + cool longer; purple/gray tint: try different brands/types), best uses (bread, rolls, pizza dough, tortillas/flatbreads), and a reminder that cooling sets the crumb before slicing. MasalaMonk.com footer.
If keto bread keeps crumbling or turning gummy, psyllium husk is usually the missing “structure” piece. This quick card shows exactly what it does (elasticity + moisture retention), where it works best (bread, rolls, pizza dough, tortillas), and the fastest fixes when things go wrong—especially the underrated step: cool fully before slicing. Save it as your binder reference the next time a loaf feels fragile.

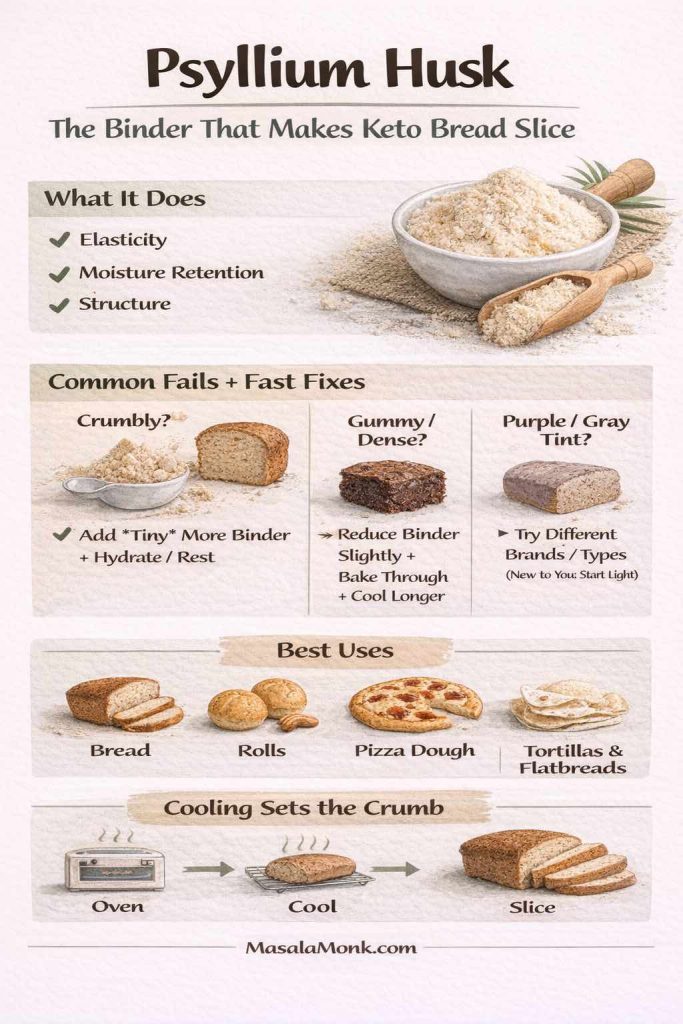
The trick is balance. Too little and your loaf crumbles. Too much and the texture can turn dense or slightly gummy. When it’s right, though, it’s one of the main reasons keto bread can slice.

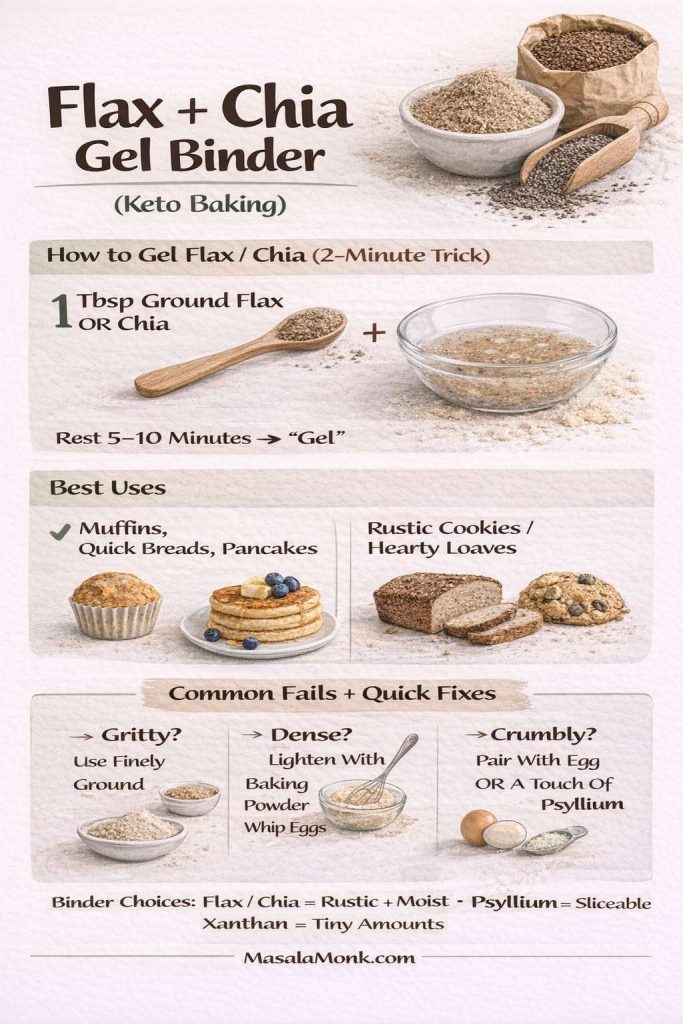
Flax meal and chia: binding, moisture, and a rustic crumb

Flax and chia add structure and moisture control. They also add flavor, so they’re often better in spiced bakes, nutty muffins, and hearty breads than in a delicate vanilla cake.

Flax + chia gel binder infographic for keto baking. Shows how to make a flax/chia “egg” (1 tbsp ground flax or chia + water, rest 5–10 minutes), best uses (muffins, quick breads, pancakes; rustic cookies/hearty loaves), and common fails with fixes (gritty = grind finer, dense = add lift/whip eggs, crumbly = pair with egg or a touch of psyllium). MasalaMonk.com footer.
Flax and chia aren’t “flour,” but they’re powerful structure tools in low carb baking—especially when you want moisture + binding without turning a batter into rubber. Use this card as a quick reference: gel your flax/chia first, then choose the right bake (pancakes, muffins, rustic cookies). If the result goes gritty, dense, or crumbly, the bottom fixes tell you what to adjust next—so you don’t waste a whole batch.

“Pork rind flour” and seed crumbs: the crunch category

Sometimes you don’t need flour at all—you need texture. For breading, coating, and crisp topping jobs, pork rind crumbs and crushed seeds can do what flour would do, without pretending to be something else.

That’s how you keep keto cooking satisfying: by choosing the tool that matches the task.

Also Read: Keto Mocktails: 10 Low-Carb Recipes for Guilt-Free Happy Hour Indulgence


Keto all purpose flour: what it can do, and what it can’t

A keto all purpose flour sounds like a dream: one bag, every bake, no guesswork. In practice, it depends on what that “all purpose” blend is made to mimic.

Some blends aim to behave like wheat flour in a one-to-one swap. Others aim for a gluten-free style. Some focus on fiber bulk. Each approach can work. The only problem is expecting a cookie blend to behave like a bread blend.

Infographic titled “Keto All-Purpose Flour System” showing 3 jars: Tender Jar (best for brownies, muffins, cookies, pancakes; almond flour base + minimal fiber; common fail fragile slices; fix add small binder or chill + cool fully), Structure Jar (best for bread, pizza, rolls; blend + psyllium + optional fiber; common fail gummy/dense; fix reduce binder or bake through + cool longer), and Nut-Free Jar (best for nut-free cakes, muffins, pancakes; coconut flour system + eggs + extra liquid; common fail dry/crumbly; fix use less flour + add liquid + rest batter). Bottom: dry add fat+liquid; crumbly add binder; gummy bake through + cool longer. MasalaMonk.com footer.
If you’ve ever bought a “keto flour” and still ended up with dry muffins, crumbly slices, or a gummy loaf—this is the shortcut. Instead of chasing one magic bag, build three simple jars based on the texture you want: Tender (brownies/cookies/pancakes), Structure (bread/pizza/rolls), and Nut-Free (coconut-flour bakes made recipe-built). The bottom strip is your quick fix: dry = add fat + liquid, crumbly = add a binder, gummy = bake through + cool longer. Save this for your next bake.

Store-bought wheat-style keto blends (the “1:1” promise)

A well-known example is King Arthur’s Keto Wheat Flour, described as a 1:1 swap for recipes calling for all-purpose flour, with a traditional wheat taste and low net carbs per serving. See: King Arthur Keto Wheat Flour.

That kind of flour can be appealing if you want wheat-like structure for bread, rolls, or yeasted bakes, and you’re not aiming for gluten-free baking.

DIY low carb flour mix: why it’s often better

Even if you love a store blend, it’s worth having a simple DIY approach, because your baking goals change. Some days you want brownies that stay fudgy. Other days you want a pizza crust that can be picked up. Those are different recipes, so it helps to have different “default blends.”

DIY Keto Flour Mix infographic showing three labeled blend cards: “Tender Blend” for cakes/muffins/brownies (almond-flour-forward, minimal fiber), “Structure Blend” for bread/pizza/rolls (includes psyllium, optional fiber; hydrate + rest; bake through; cool fully), and “Nut-Free Blend” coconut-flour system (coconut flour + binders, extra liquid/eggs; not 1:1; batter rests; tiny amounts matter). Bottom notes: choose by texture goal; dry add fat + liquid; gummy bake through + cool longer. MasalaMonk.com footer.
If “keto flour” keeps giving you random results, this is the fix: stop chasing one magic bag and build three simple blends you label once—Tender (brownies/muffins/cakes), Structure (bread/pizza/rolls), and Nut-Free (coconut-flour recipes built for absorbency). Use it like a decision card: pick the texture goal first, then choose the blend that behaves that way. And keep the bottom strip handy—dry = add fat + liquid, gummy = bake through + cool longer—because most keto baking “fails” are just hydration + structure mismatches.

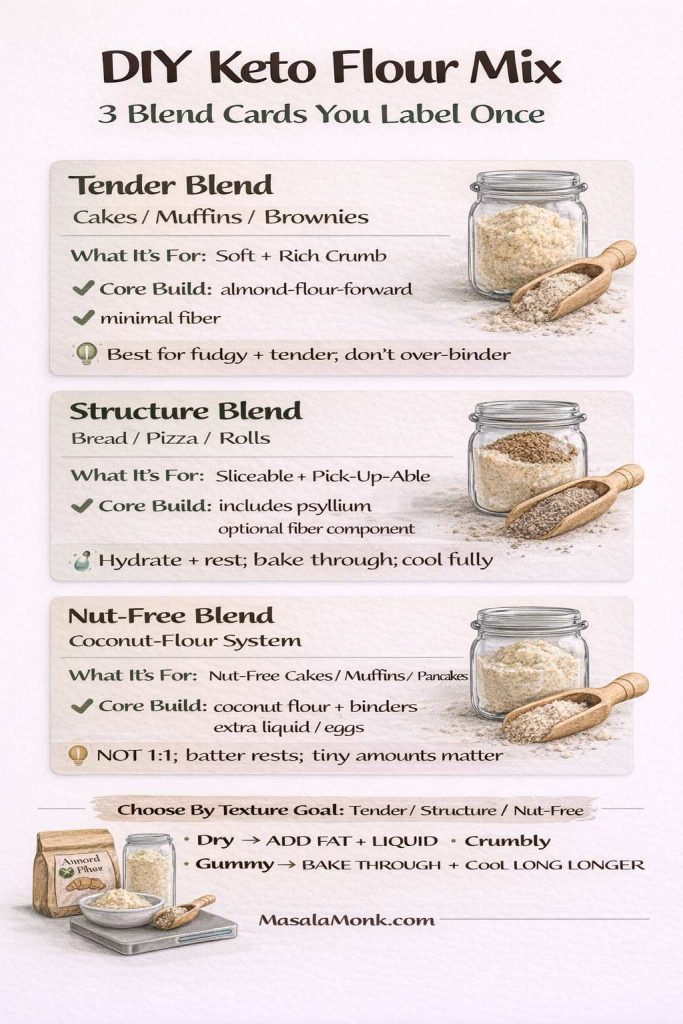
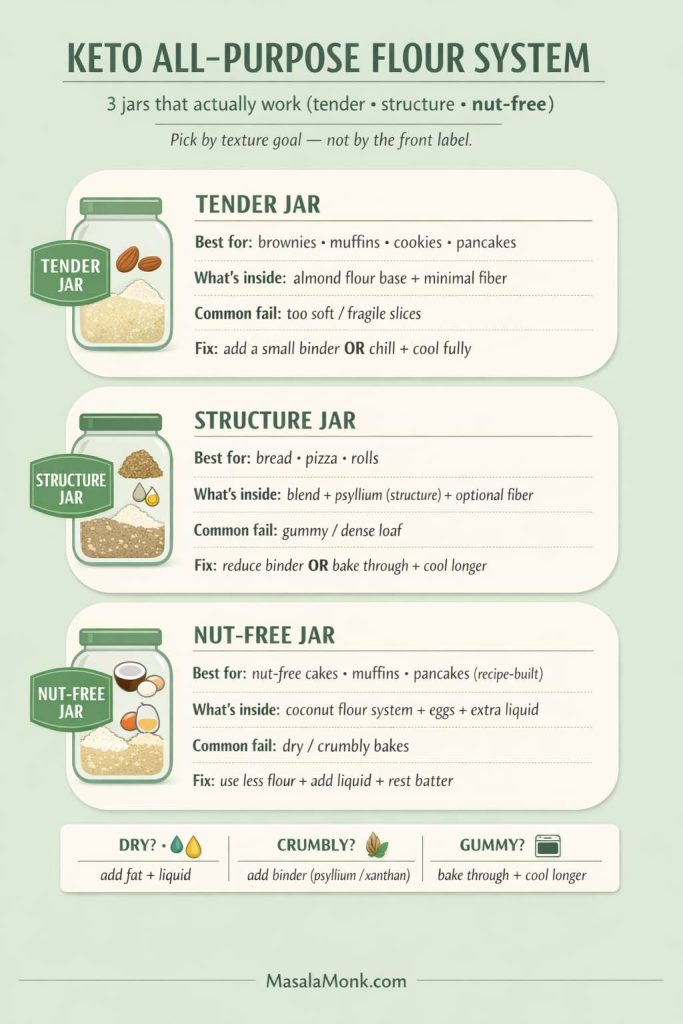
A practical way to think about DIY blends is:

  • Tender blend for cakes, muffins, and brownies: almond flour-forward, minimal fiber
  • Structure blend for bread and pizza: includes psyllium and/or fiber components, with careful hydration
  • Nut-free blend when needed: coconut flour plus binders, used in recipes designed around its absorbency

Once you label your jars that way—tender, structure, nut-free—you stop expecting one bag to do everything. Then your baking suddenly feels easier.

Also Read: Creamy Cauliflower Soup—Keto-Friendly, Ultra-Comforting (Vegan Option)


Keto baking mixes and keto flour blends: what changes in the bake

Keto baking products have expanded quickly. There are keto baking mixes for brownies, pancakes, biscuits, cakes, and even “shake and bake” style coatings. You’ll also see brand-specific products such as Atkins bake mixes, Carbquik baking mix, Lakanto baking mix, and specialty companies offering cookies and brownie mixes.

Vertical infographic titled “Keto Baking Mix Decoder” with a keto flour bag illustration and the subtitle “4 Things to Check Before You Buy/Bake.” Four numbered panels explain: (1) Primary flour system—almond-based = tender, coconut-based = firms fast, wheat-style = more breadlike; (2) What provides structure—fiber/gums need rest time; egg-heavy can taste eggy unless flavored; (3) Sweetener profile—affects aftertaste, browning, moisture, and “stays soft” factor; (4) Serving size reality check—net carbs depend on serving size plus fiber/sugar alcohols. Bottom “Fix It Fast” strip: Dry add fat/dairy; Gritty rest batter longer; Eggy add vanilla + salt + cocoa/espresso; Dense bake through + cool fully. MasalaMonk.com at the footer.
Keto mixes can be great—when the mix matches the texture you want. Use this “decoder” before you bake: identify the primary flour system, how the mix gets structure, what the sweetener is likely to do, and whether the serving size makes the “net carb” claim feel realistic. The bottom “Fix It Fast” strip is your quick rescue guide for the most common outcomes (dry, gritty, eggy, dense) so you can adjust once and get a better second bake.

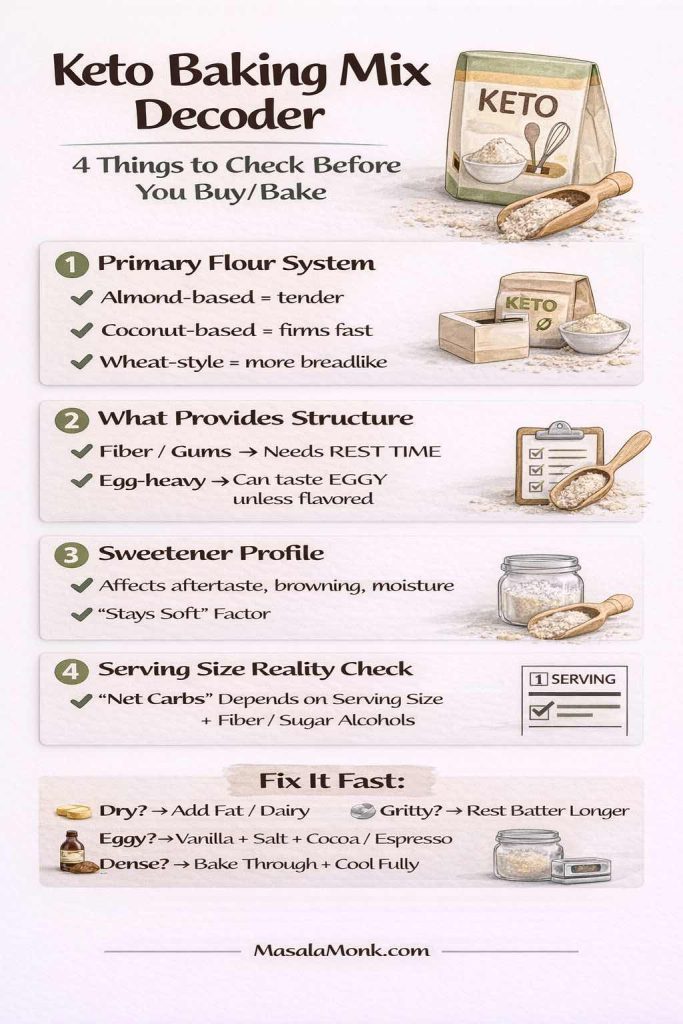
These products can be helpful, especially when you want consistency or when you’re new to low carb baking. Still, mixes vary hugely in results, so it helps to evaluate them using a simple lens:

  1. What’s the primary flour system?
    Almond flour-based mixes tend to be tender. Coconut flour-based mixes tend to firm quickly. Wheat-style keto blends tend to mimic flour-like structure.
  2. What’s providing structure?
    If the mix relies on added fiber and gums, it may need extra resting time for hydration. If it relies heavily on egg, it may risk an eggy finish unless flavor is boosted.
  3. What’s the sweetener profile?
    Sweetener choice affects aftertaste, browning, moisture, and how soft the bake stays after cooling.
  4. How is “serving size” defined?
    The FDA’s label guidance is useful here because serving sizes can make products look more “carb friendly” than they feel in real life. See: FDA Nutrition Facts Label basics.

If you’ve tried a few mixes and felt disappointed, it’s often not because keto baking is doomed. Instead, it’s because the mix wasn’t designed for the texture you wanted.

Also Read: Green Tea for Weight Loss: The No-Hype, Done-For-You Guide


Keto flour for brownies: how to get that rich, not-dry finish

Brownies are the emotional center of keto baking. They’re what people want to feel “normal” again. The good news is that brownies are also one of the easiest places to win—provided you choose the right flour approach.

Vertical infographic titled “Keto Brownie Mix Makeover.” Shows a brownie pan photo and three columns: Flavor Boosters (vanilla + pinch of salt, espresso powder ½–1 tsp, extra cocoa), Moisture Boosters (1–2 tbsp melted butter/oil, 2 tbsp sour cream or Greek yogurt, optional chopped nuts), and Texture Control (rest batter 10–15 min, don’t overbake, cool fully). Bottom section lists doneness cues and quick fixes.
If your keto brownie mix turns out dry, eggy, or dense, this quick “makeover” card gives you the simplest upgrades that actually change texture. Use vanilla + a pinch of salt for a fuller chocolate flavor, add a little espresso powder for depth, and boost moisture with a small spoon of butter/oil or sour cream/Greek yogurt. Then control texture the smart way: rest fiber-heavy batters, pull brownies when the edges are set but the center is still slightly soft, and cool fully for clean, fudgy slices. (Save-worthy, but also meant to be used mid-bake.)

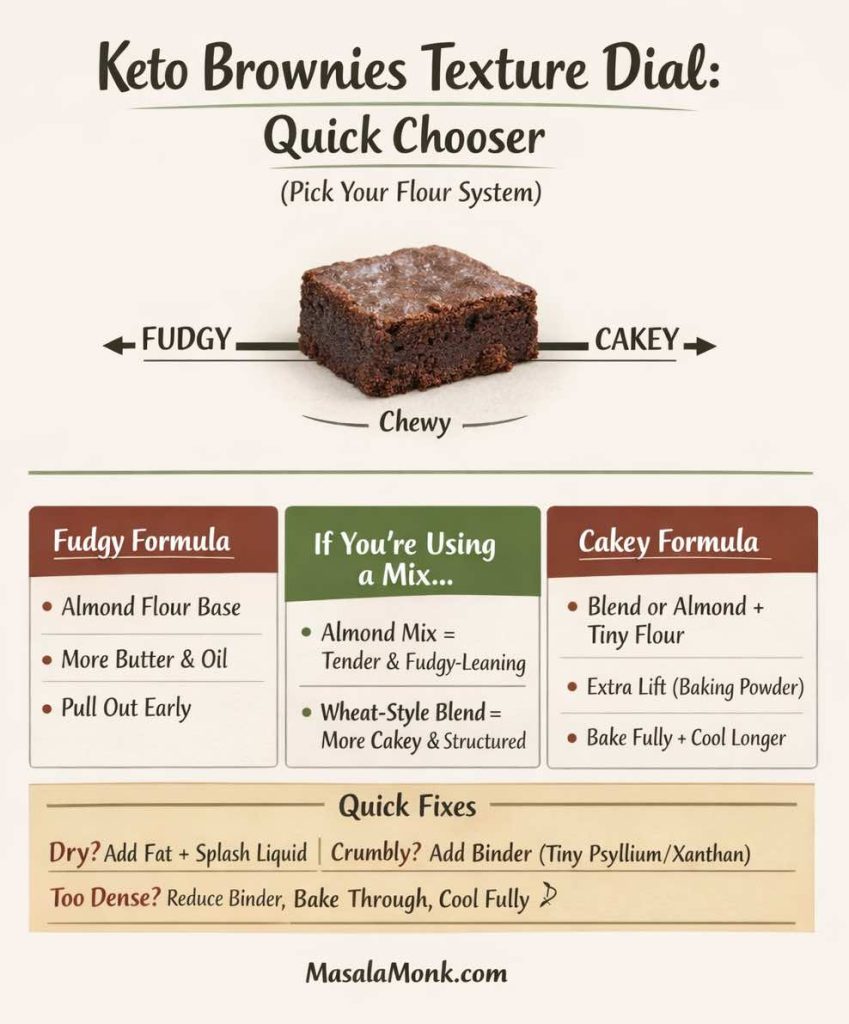
Pick your brownie style first

A “best keto brownies” goal can mean three different things:

  • Fudgy and dense (almost truffle-like)
  • Soft and cakey (more like a snack cake)
  • Chewy with crisp edges (classic pan brownie energy)

Each style wants a different flour strategy.

The fudgy path: almond flour plus moisture control

Almond flour tends to be your friend here because it stays tender. To keep brownies from drying out, focus on:

  • Enough fat (butter, coconut oil, or a neutral oil)
  • A sweetener that doesn’t turn the crumb dusty
  • Not overbaking—pull them when the center is set but still soft

If you like learning by contrast, it can help to taste a conventional brownie and pay attention to what flour contributes: structure, yes, but also how it holds moisture in place. Keto brownies replicate that by balancing almond flour with eggs and fat, then keeping bake time gentle.

The “clean slice” path: tiny amounts of coconut flour or fiber support

If your almond flour brownies feel too soft or fall apart, you can add a small amount of coconut flour or a touch of fiber/binder support. This is where restraint matters. Coconut flour is powerful; too much turns brownies dry. Used lightly, it tightens the structure and helps slices hold.

Mixes: how to make a keto brownie mix taste homemade

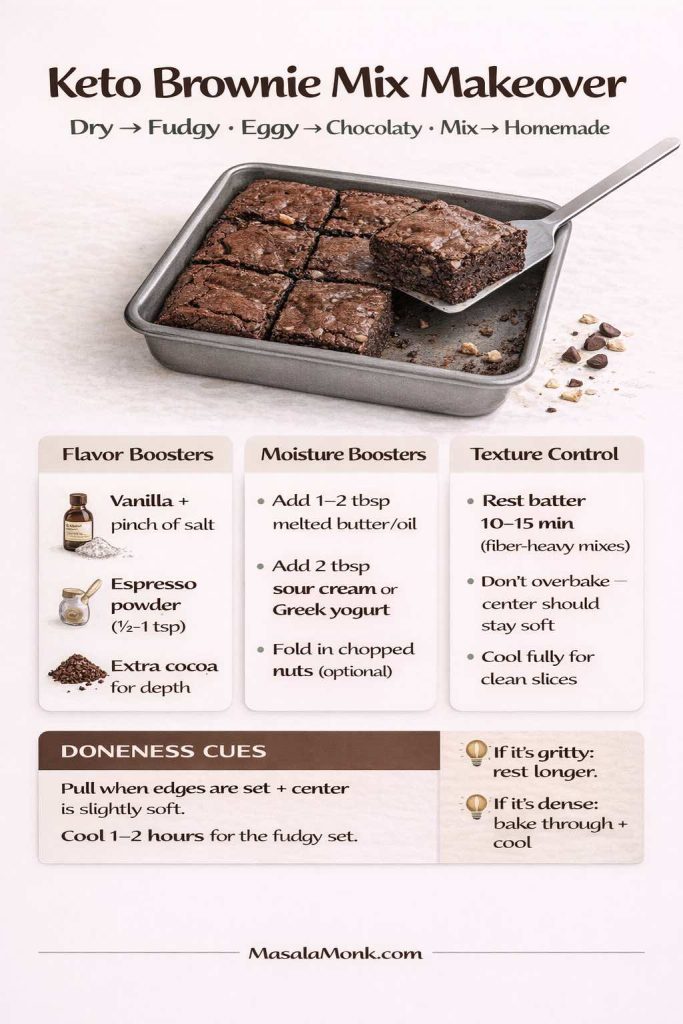
A low carb brownie mix can be excellent, although it often benefits from a few simple upgrades:

  • Add a pinch of salt if it tastes flat
  • Add vanilla or espresso powder for depth
  • Add extra fat if the mix bakes up dry
  • Rest the batter briefly if it includes fiber-heavy ingredients

In other words, treat the mix like a base. You’re still the baker.

Also Read: A Guide to Choosing Keto-Friendly Milk Alternatives: Exploring Nutritional Profiles and Tips for Selection


Keto flour for pie crust: the butter + structure balance

Pie crust is the place where people chase unicorns: “no carb pie crust,” “sugar free low carb pie crust,” “keto pie crust that tastes like bakery pastry.” You can get close, but only if you accept what makes classic crust work.

Classic crust is about fat layers, controlled hydration, and just enough structure to hold a slice.

Keto crusts often use almond flour because it tastes good and handles butter well. However, almond flour crust can be fragile, particularly when warm. That fragility is not a flaw; it’s a clue that you need a bit more structure.

Vertical infographic titled “Keto Pie Crust Blueprint” with subtitle “Butter + Structure = Clean Slices (No Crumble).” Shows a slice of pie and a crisp vs tender finish toggle. Explains almond flour for tenderness, butter for flake and flavor, plus structure helpers: egg for cleaner slices, psyllium for strongest hold, and a tiny amount of coconut flour to firm quickly. Includes crisp (cookie-like) vs tender (pastry-like) tips, best-use notes, and troubleshooting: crumbly add structure or chill and press; dry add butter/dairy and don’t overbake; too soft bake longer and cool fully; flat add salt. MasalaMonk.com footer.
If your keto pie crust tastes great but falls apart the moment you slice it, this is the fix: almond flour for tenderness + butter for flavor + a small “structure helper” for clean slices. Use the crisp vs tender guide to match your crust to the filling (cookie-like for creamy pies, pastry-like for fruit/custard), then lean on the quick troubleshooting strip when something turns crumbly, dry, or too soft. Bookmark this “keto pie crust blueprint” before your next bake.

A reliable keto pie crust strategy

  • Almond flour for tenderness and richness
  • Butter for flavor and flake-like feel
  • A small structure helper for sliceability (egg, psyllium, or a small amount of coconut flour, depending on your preferred texture)
  • Salt, always—otherwise the crust tastes like “health food,” even when it isn’t

Crisp vs tender crust: choose your finish

If you want a crisp, cookie-like crust, you can lean more toward almond flour plus sweetener and bake it like a shortbread base. On the other hand, if you want a more pastry-like crust, you’ll usually prefer a less sweet, more structured approach that can be rolled or pressed without cracking.

This is also where your sweetener choice matters. Some sweeteners keep crusts softer; others crisp more readily. Either can be good—it just depends on what you’re making.

Also Read: Navigating Beans on the Keto Diet: Which Varieties Are Suitable?


Keto flour for muffins, banana bread, and “quick breads” that stay moist

Muffins and banana bread are deceptively tricky on keto because the classic versions rely on sugar and starch for moisture retention. When you remove both, you need a new plan.

The win here is simple: build moisture on purpose, then choose a flour that supports it.

Vertical infographic titled “Keto Quick Breads That Stay Moist.” Shows a sliced keto quick bread loaf and a “Moisture Map” with three levers: moisture builders (Greek yogurt/sour cream, cream cheese, butter/coconut oil, extra yolk), flour behavior (almond flour is tender; coconut flour absorbs and works best in recipe-built batters), and bake + cool rules (don’t overbake, rest batter 10–15 minutes, cool fully, wrap after cooling). Bottom troubleshoot boxes: dry, eggy, gritty, crumbly.
Keto quick breads stay tender when you treat moisture like a plan, not a hope. Use this “Moisture Map” to choose the right add-ins (yogurt, cream cheese, extra yolk), match the flour to the texture you want (almond flour for tender crumb, coconut flour only in recipe-built batters), and follow the two rules that matter most: don’t overbake and cool fully before slicing. If your loaf turns dry, eggy, gritty, or crumbly, the bottom strip gives the fastest fix to try next.

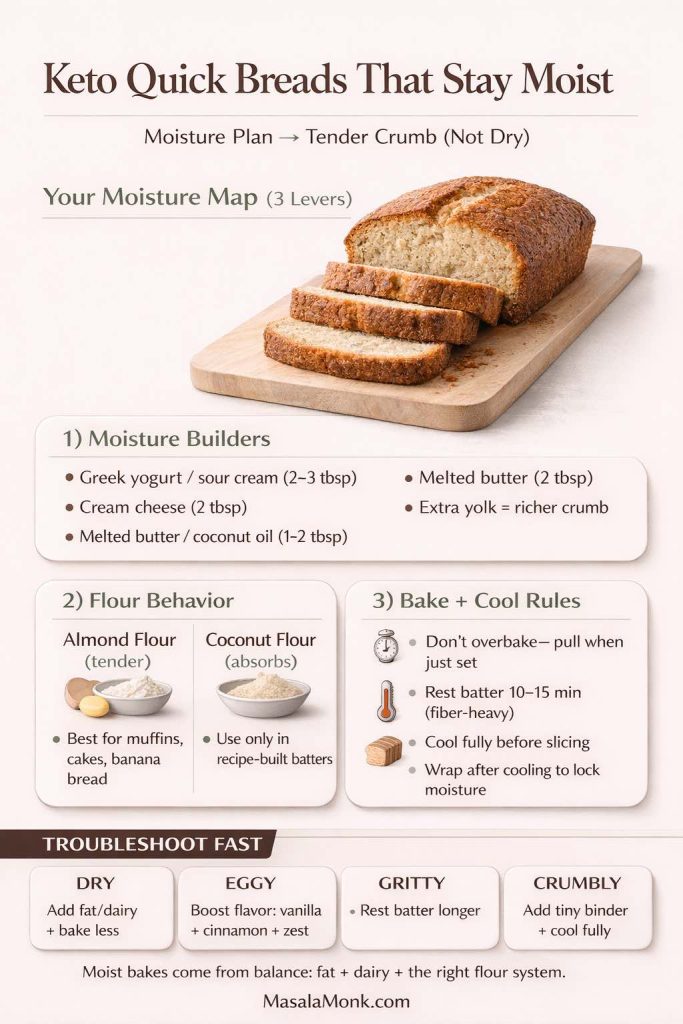
Almond flour muffins: soft, rich, forgiving

Almond flour muffins tend to stay tender, especially if they include yogurt, sour cream, or a bit of cream cheese. They also reheat well, which matters more than you’d think. Warmed muffins taste fresher; chilled muffins can taste drier than they are.

Coconut flour muffins: light, structured, but easy to dry out

Coconut flour muffins can be excellent when the recipe is designed for them, because they can set into a neat crumb and feel pleasantly cakey. The danger is treating coconut flour as a 1:1 substitute. As Bob’s Red Mill notes, coconut flour absorbs a lot of liquid and requires careful recipe adherence; it also often calls for more eggs to compensate. See: Bob’s Red Mill coconut flour baking guidance.

Banana bread on keto: pick your “banana” strategy

“Keto banana bread” usually means one of two things:

  • A banana-flavored bread with extracts/spices (banana without the carbs)
  • A low-carb “banana-ish” bread that uses a small amount of banana, portioned carefully

Either can work. The point is to decide what you mean by “banana bread” first: aroma and comfort, or literal banana content.

A non-keto but useful comparison: why “no refined flour” baking still teaches you something

Even when you’re staying keto, it can be useful to look at how other styles of baking build sweetness and moisture without relying on refined ingredients. For example, Easy and healthy cookies (no sugar, no butter, no refined flour) uses a whole-food approach to sweetness and softness—different macros, yes, but still a reminder that texture is often created by technique and ingredient roles, not just flour.

Also Read: 5 Keto-Friendly Salami Dishes That Promote Weight Loss


Keto pancakes and low carb pancakes: how to avoid the eggy, rubbery trap

Pancakes are where people either fall in love with keto baking or swear it off forever. The main complaint is usually the same: “Why does this taste like an omelet pretending to be breakfast?”

That eggy taste happens when the batter is built mainly from eggs and dairy without enough flour-like bulk and flavor support.

A strong approach is to choose a base that actually behaves like a flour system, then cook with gentler heat so the pancake sets without overbrowning. Both Keto Pancakes and Almond Flour Pancakes lean into practical texture cues like resting batter, controlling browning, and choosing the right thickness.

Why almond flour pancakes brown faster

Almond flour has fat and fine particles that brown quickly. That’s why a medium-low heat approach often gives better results: slower setting inside, less overbrowning outside. The almond flour pancakes guide calls this out directly as a common issue and solution.

“Keto Pancake Success Map” infographic showing a stack of keto pancakes with butter and syrup. It explains 3 key dials: batter thickness (too thick = dry/crumbly, too thin = wet center; aim for slow ribbon), rest time (10–15 minutes; coconut flour needs more), and pan heat (medium-low; flip when bubbles form and edges set). Includes troubleshoot fixes for eggy, rubbery, crumbly, and gritty pancakes. MasalaMonk.com.
Fluffy keto pancakes come down to three controllable dials: batter thickness, rest time, and pan heat. Use this quick map to avoid the usual traps—eggy flavor, rubbery texture, crumbly edges, or gritty coconut-flour batter. The bottom troubleshooting row is your fast fix when a batch goes sideways, and the flipping cue (bubbles + set edges) is the simplest “don’t guess” rule. Save it as your weekday pancake reference.

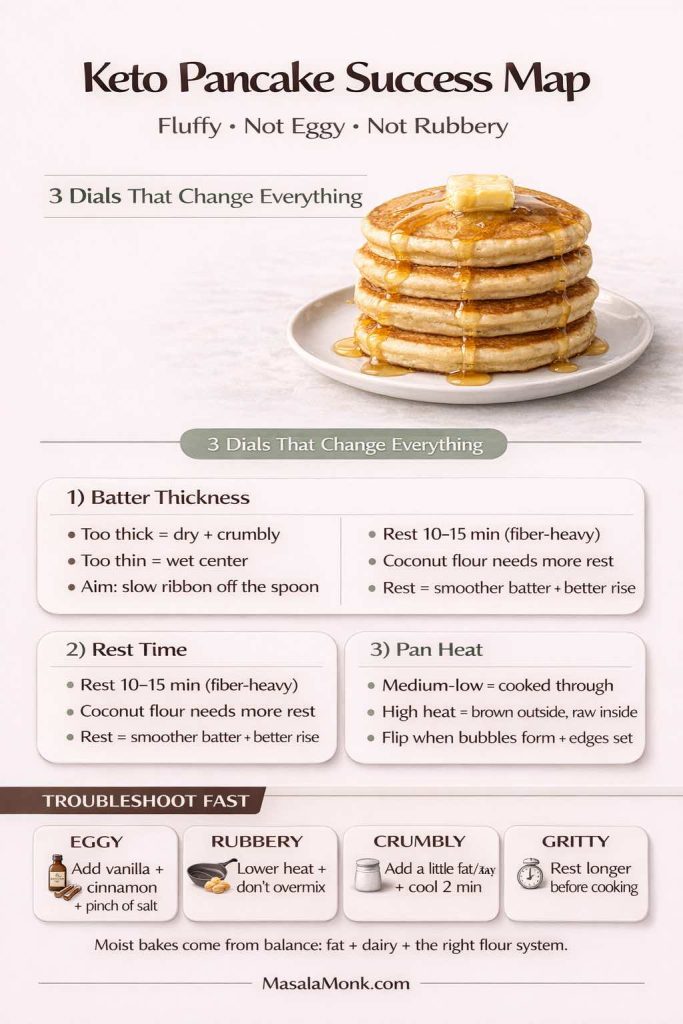
Why coconut flour pancakes need a different mindset

Coconut flour pancakes can be excellent, yet they often want more resting time because hydration changes the batter dramatically. If you cook too soon, the batter can feel grainy or tight. If you rest, it smooths out and sets more evenly.

A quick way to keep pancakes interesting without turning them into dessert

One of the most practical ways to stick with low carb baking is to keep flavors rotating. Berries, citrus zest, cinnamon, and vanilla all pull attention away from “this is a substitute” and toward “this is breakfast.”

If you want a general pancake playground (keto or not), Blueberry Pancakes (6 variations) is useful for mix upgrades and batter handling tips.

Also Read: Katsu Curry Rice (Japanese Recipe, with Chicken Cutlet)


Keto flour for bread: how to build lift, chew, and clean slices

Bread is the most emotionally loaded category in keto baking, and understandably so. Bread isn’t just food; it’s a format—sandwiches, toast, grilled cheese, wraps, “something you can hold.”

To make bread without traditional flour, you need a structure plan.

Keto Bread Structure Plan infographic showing a sliced keto sandwich loaf and a simple framework for better texture: three bread jobs (trap gas for rise, hold moisture to prevent crumble, set crumb for sliceable loaf after cooling). Includes a structure toolkit (base flour systems like almond/fiber/wheat-style keto blends; binders such as psyllium, flax, eggs; hydration with rest time; bake through and cool 60–120 minutes). Bottom troubleshooting strip covers crumbly, dry, gummy, and dense/flat loaves with quick fixes. MasalaMonk.com.
Bread is the toughest “keto flour” test because it needs rise, moisture retention, and a crumb that sets cleanly when cooled. Use this structure plan as your quick reference: pick a base flour system, build structure with binders (psyllium/flax/eggs), expect thicker dough and let it rest, then bake fully and cool before slicing. If your loaf turns crumbly, dry, gummy, or dense, the bottom strip gives the fastest fix to try next.

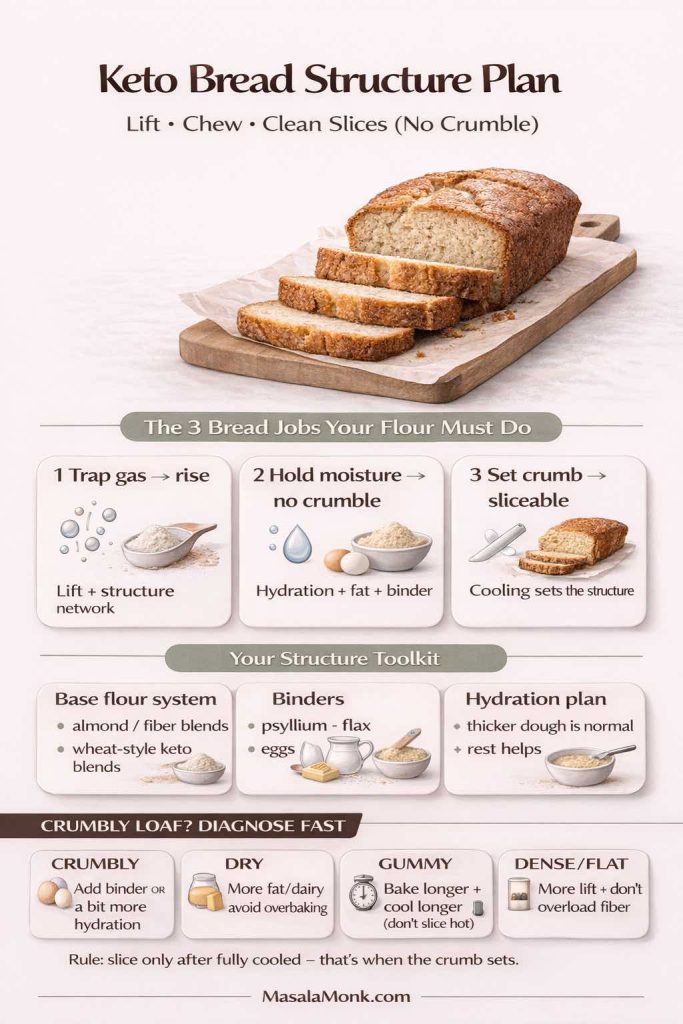
The three bread jobs your flour must do

A good bread flour system—keto or not—must do these things:

  1. Trap gas so the loaf rises
  2. Hold moisture so it doesn’t crumble
  3. Set into a sliceable crumb when cooled

Gluten does all three in wheat bread. Keto bread recreates them through binders and careful hydration.

That’s why a conventional bread roadmap like Sourdough Bread Recipes: 10 easy bakes is still useful as a learning lens: it reinforces that bread texture is shaped by hydration, timing, and structure—not just ingredients.

The “crumbly loaf” fix: binders and patience

If your keto loaf crumbles, it’s usually one of these:

  • Not enough binder support (psyllium/flax/eggs)
  • Too dry (coconut flour pushed too far, or fiber flours without enough hydration)
  • Overbaked (keto breads dry out quickly)
  • Sliced too early (cooling sets the crumb)

Cooling is underrated. Even wheat bread slices better once it’s fully cooled. Keto bread often needs that time even more.

Wheat-style keto flour blends for bread and yeasted bakes

If you’re using a wheat-style keto blend like King Arthur Keto Wheat Flour, the promise is that you can swap 1:1 for all-purpose flour while keeping a more traditional wheat taste and texture.

That may be attractive if you’re aiming for a more classic bread feel and gluten-free isn’t your goal. Even then, treat it like any flour: test once, adjust once, then keep notes. Bread rewards repetition.

Also Read: Beyond Chicken: 5 Tofu-Tastic Keto-Friendly Dinner Meal Prep Ideas, Chicken-Free and Protein-Rich


Keto pizza flour and crusts: crisp edges, tender center, sturdy slice

Pizza is another category where “best keto flour” depends entirely on the style you want.

Keto Pizza Crust Identity infographic comparing two styles. Left: CRISP/THIN crust with best flour mix (almond flour + fiber flour like oat or bamboo fiber, psyllium or xanthan, optional whey protein isolate), binder/hydration tips, and hot bake strategy with par-bake and cooling for crisp. Right: SOFT/FOLDABLE crust with wheat-style keto flour blend (1:1 style) or almond flour + psyllium, higher hydration, rest time, and moderate bake approach. Footer: MasalaMonk.com.
If your keto pizza crust keeps “failing,” it’s usually a style mismatch—you’re judging a crisp thin base like it should fold, or expecting a foldable slice to snap. This quick visual shows the two best keto pizza crust paths (CRISP/THIN vs SOFT/FOLDABLE), the flour system that fits each one, plus the bake strategy that makes the texture actually happen. Save it as your “pizza reset” card—then pick your crust identity first and your results get way more consistent.
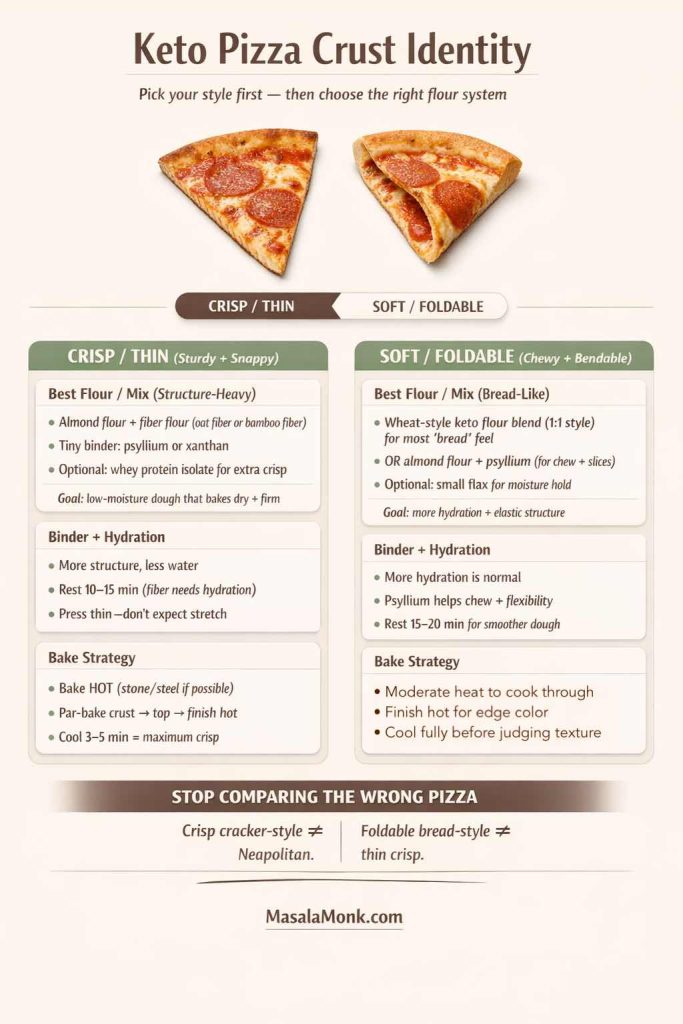
  • If you want a thin, crisp crust, you’ll likely choose a structure-heavy approach (often with binders and a bake-hot strategy).
  • If you want a soft, foldable slice, you’ll usually lean into a more bread-like system with moisture and chew.

In either case, the same principle applies: choose your crust identity first. Otherwise, you’ll keep judging a “crisp cracker crust” as if it was a Neapolitan base, and nothing will feel right.

Also Read: Carbs in Cheese: Keto Diet Perspective


Keto flour tortillas and low carb flour tortillas: how to make the section genuinely useful

Tortillas and wraps are where “low carb” becomes everyday. A tortilla can be breakfast, lunch, dinner, and a quick snack format—so it makes sense to include a real section that isn’t just a brand list.

Infographic checklist for choosing low carb flour tortillas: check serving size, total carbs per tortilla, fiber amount and type, sugar alcohols if present, and ingredient list (added fibers/gums) to compare wraps realistically.
Use this 5-point label check when buying low carb tortillas: start with serving size, compare total carbs per tortilla, review fiber and sugar alcohols, then scan the ingredients (added fibers/gums change texture and how filling a wrap feels). Save this quick guide for your next grocery run.

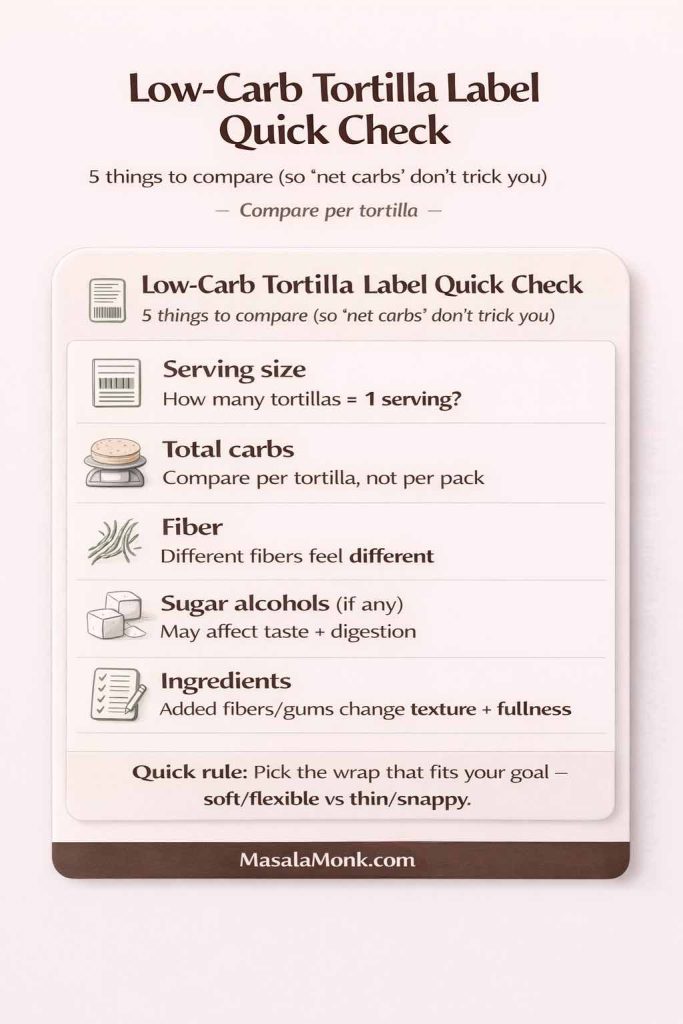
Store-bought low carb wraps: what actually matters

If you’re using packaged low carb tortillas, focus on:

  • Serving size (and how many you actually eat)
  • Total carbohydrate and fiber (then decide how you interpret net carbs)
  • Sugar alcohols, if present
  • Ingredient list, especially added fibers

The FDA’s label guidance is the clearest reference point for serving size and how numbers are presented: How to understand and use the Nutrition Facts label.
Additionally, the ADA notes that net carb math can be imperfect because fiber and sugar alcohol absorption varies: ADA: Get to know carbs.

In practical terms, that means one “mission carb balance tortilla” style product may feel different from another depending on fiber type and serving size, even when the front label looks similar.

Make tortillas useful even when you don’t want to rely on packaged wraps

The easiest way to keep this part of the guide valuable is to offer wrap-format meal ideas that work whether you use low carb tortillas, lettuce wraps, or bowls.

For example, Sheet Pan Chicken Fajitas is a perfect “build-your-own” filling that adapts to any wrap format.

In other words, even if your tortilla choice changes week to week, the meal stays consistent.

Also Read: Keto Indulgence: Decadent Cheesecake Fat Bombs with Irresistible Spice Variations!


Keto baking sweeteners: how to choose a keto sugar substitute for baking without ruining texture

Flour gets most of the attention, yet sweetener can make or break low carb baking. Sweeteners affect:

  • Moisture retention (soft brownies vs dry brownies)
  • Browning (some brown faster)
  • Crispness (cookies that snap vs cookies that bend)
  • Aftertaste and flavor clarity
“Keto Sweetener Pick (By Bake Result)” infographic showing three choices for low carb baking: Allulose for soft and chewy bakes like brownies, cakes, and chewy cookies (browns faster—use slightly lower heat); Erythritol blend for crisp, snappy cookies and firm bars (can cool gritty—powder or dissolve better); Monk fruit blend for general baking (check the base—if erythritol-based, same grit risk). Bottom tip: fix grittiness by powdering or dissolving better and judge texture after cooling.
Keto sweeteners change texture as much as flour does. Use this quick picker based on the result you want: allulose for softer, chewier brownies/cakes, erythritol blends for crisp cookies and firmer bars, and monk fruit blends for everyday baking (always check what it’s blended with). If a bake turns gritty, the fix is usually simple: powder the sweetener or dissolve it better — and judge texture only after cooling.

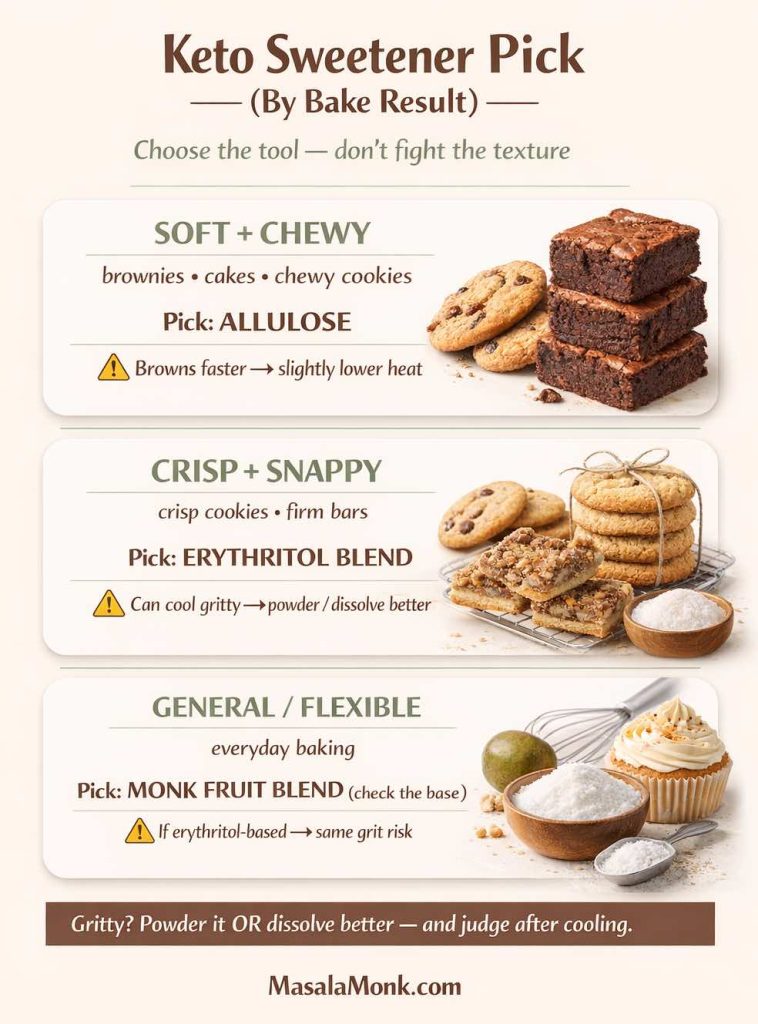
Stevia blends, erythritol blends, and “baking” sweeteners

If you’ve used a sweetener that left your cookies gritty or your brownies dry, you’re not imagining it. Some sweeteners recrystallize as they cool, which can change mouthfeel.

For a general reference on what Truvia is and how it compares, What is Truvia sweetener? offers a clear overview of common formulations and comparisons.

If you’re choosing between stevia and aspartame in a broader sugar-free context, Stevia vs Aspartame provides a readable comparison and notes key considerations (including PKU cautions for aspartame).

Allulose: why bakers like it

Allulose is often discussed as a sugar-like option because it can behave more like sugar in recipes. Cleveland Clinic explains what allulose is and why people use it as a sugar substitute, including for diets that aim to reduce sugar intake. See: Cleveland Clinic: What is allulose?.

Oregon State University Extension also describes allulose as about 70% as sweet as sugar with far fewer calories and notes it’s relatively new on the market with limited research on long-term health effects: OSU Extension: Sweeteners (allulose section).

From a baking standpoint, the practical note is this: allulose can brown faster and keep things softer, which is great in some recipes and requires slight temperature awareness in others.

Also Read: Mozzarella: A Keto-Friendly Cheese Powerhouse for Your Low-Carb Journey


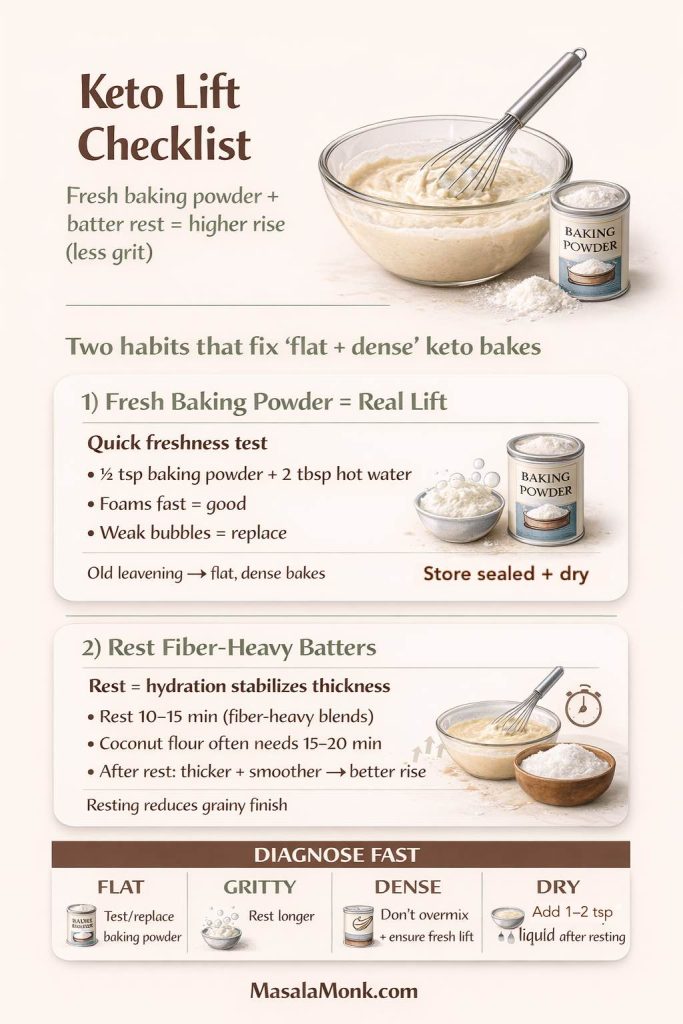
Keto baking powder, lift, and why “resting batter” matters more with low carb flour

Keto baking often leans on baking powder because it creates lift in batters that don’t have gluten. Two simple habits improve results dramatically:

  1. Use fresh baking powder. Old leavening gives flat, dense results, and you’ll blame your flour when it wasn’t the flour.
  2. Let fiber-heavy batters rest. Resting allows hydration to stabilize thickness, which improves rise and prevents a grainy finish.
Infographic titled “Keto Lift Checklist” showing two fixes for flat, dense keto bakes: test baking powder freshness with ½ tsp baking powder plus 2 tbsp hot water (fast foam = good; weak bubbles = replace) and rest fiber-heavy batters 10–15 minutes (coconut flour often 15–20) so batter thickens and rises better with less grainy texture. Includes a quick diagnose strip: flat, gritty, dense, dry.
Keto Lift Checklist: If your low-carb muffins, pancakes, or quick breads keep baking up flat, dense, or gritty, it’s usually not “bad keto flour.” Start with two high-impact habits: (1) use fresh baking powder (quick foam test) and (2) rest fiber-heavy batters 10–15 minutes so hydration stabilizes thickness for a better rise. This is especially helpful with coconut flour and fiber-forward blends.

This rest-and-hydrate approach shows up in practical pancake guidance too—both in keto pancake methods and in broader pancake mix handling tips.

Also Read: Are Lentils Keto-Friendly?


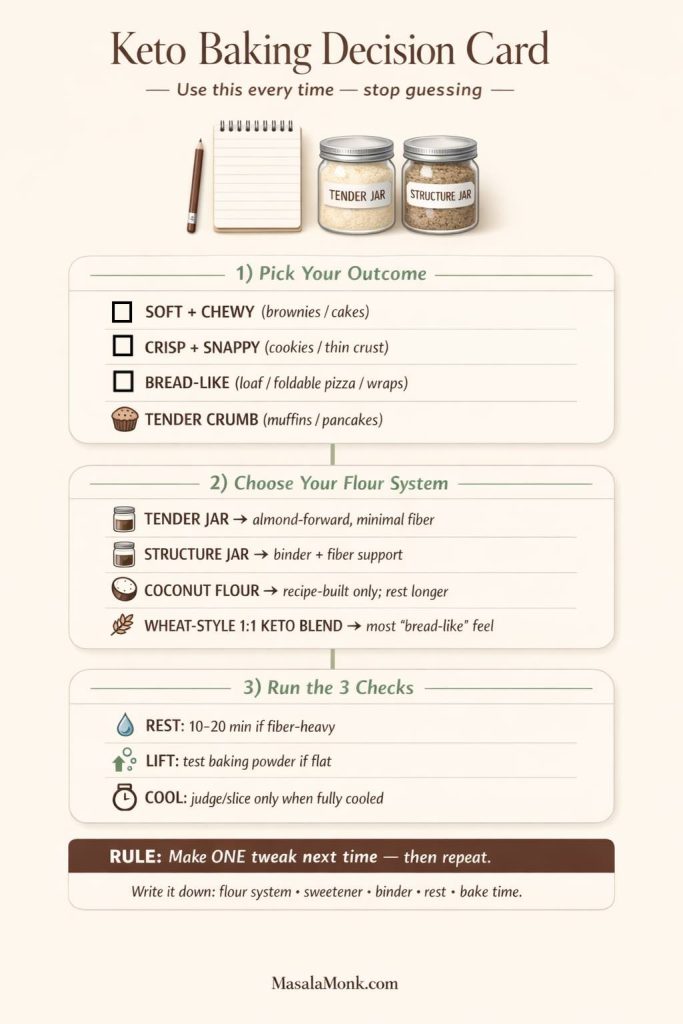
Putting it into a kitchen rhythm: a simple way to stop guessing

Once you’ve read enough about keto flour, the real win is building a routine you can repeat. Here’s a calm, practical way to get there:

Keto Baking Rhythm infographic showing a repeatable routine: choose 2 anchor bakes (fast: pancakes/mug cake/cookies; slow: bread/pizza crust/pie crust), build two default flour jars (Tender Jar: almond flour-forward, minimal fiber; Structure Jar: binder + fiber support for bread/pizza), and keep flavor boosters ready (vanilla, cinnamon, espresso powder, citrus zest, pinch of salt). Includes a simple loop: anchor bake → adjust once → repeat → write it down.
Stop guessing with a simple keto baking routine: repeat two “anchor bakes,” keep two default flour systems on hand (a Tender Jar for soft bakes and a Structure Jar for bread/pizza), and rely on a small set of flavor boosters (vanilla, cinnamon, espresso, citrus zest, salt) to make low-carb baking taste complete. Use this as your quick reference whenever you’re testing a new keto flour blend or troubleshooting texture.

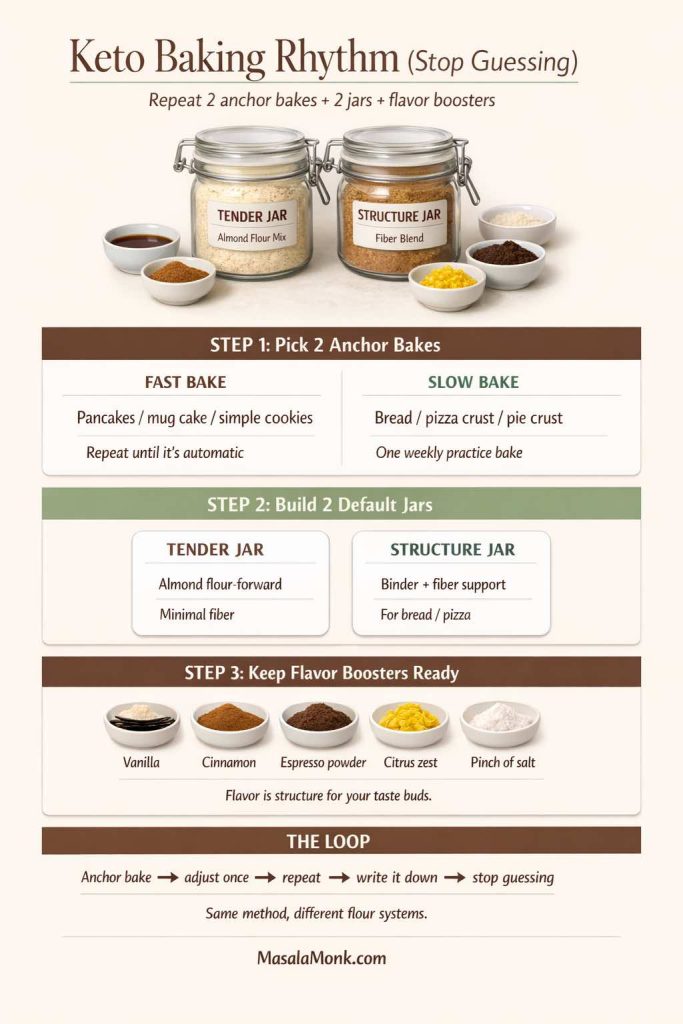
Step 1: Choose two “anchor bakes” you’ll repeat until they’re easy

Pick:

  • One fast bake (pancakes, mug cake, or simple cookies)
  • One slow bake (bread, pizza crust, or pie crust)

For pancakes, use Keto Pancakes and/or Almond Flour Pancakes as your baseline so you’re not reinventing the wheel every time.

Step 2: Build a “tender jar” and a “structure jar”

  • Tender jar: almond flour-forward, minimal fiber
  • Structure jar: includes psyllium and/or fiber support, tuned for bread/pizza

Even if you still buy a keto baking mix now and then, these jars give you control when you want it.

Step 3: Keep flavor boosters ready

Low carb baking tastes better when flavor is intentional. Cinnamon, vanilla, espresso powder, citrus zest, and a pinch of salt are not optional extras—they’re how you make the bake taste complete.

Also Read: Keto Vegan Indulgences: 5 Dessert Recipes with Hemp Seeds, Walnuts, and Ginger


A broader, useful perspective: flour choices that aren’t strictly keto, but teach you technique

A strong guide doesn’t pretend only one eating style exists. It gives you perspective.

If you bake for a household where not everyone eats keto all the time, it’s helpful to understand how other flour systems behave—because it sharpens your intuition. Oat-based pancakes, for example, teach you about batter hydration and tenderness in a way that directly carries over to almond and coconut flour batters. See: Oat Pancakes Recipe (healthy oatmeal pancakes + variations).

Technique Transfer (Beyond Keto) infographic showing how non-keto flour systems teach keto baking skills: oat pancakes teach hydration and tenderness (batter thickness, rest, moisture strategy), wheat/buttermilk pancakes teach gluten bounce and structure (structure creates rise, don’t overmix), and no-refined-flour cookies teach moisture and method (softness from fat/binders, cooling changes texture). Bottom line: hydrate → rest → structure → cool → judge. MasalaMonk.com
Other flour systems sharpen keto instincts: oats teach hydration and resting, wheat pancakes teach structure and the cost of overmixing, and “no refined flour” cookies remind you that method + moisture often matter as much as ingredients. Translate the skills: hydrate → rest → build structure → cool → judge.

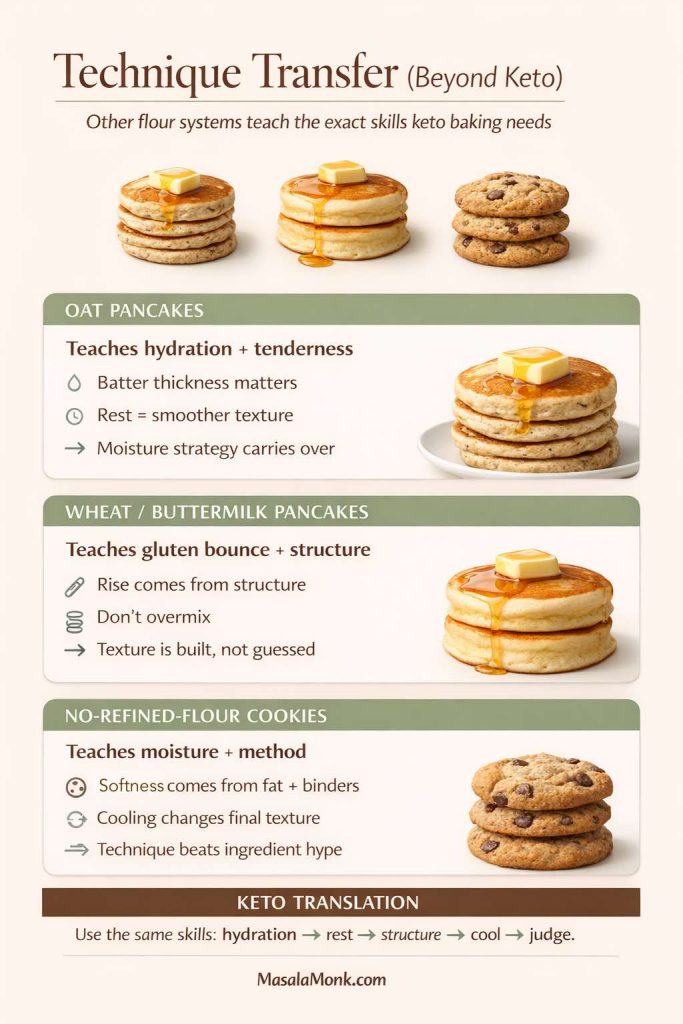
Likewise, a classic wheat-flour pancake recipe highlights how gluten and starch create a certain bounce, which is exactly what you’re rebuilding in keto baking through different tools. See: Fluffy Buttermilk Pancakes.

And if you want the “whole-food sweetness” approach (different macros, but helpful technique), Easy and healthy cookies (no refined flour) is a reminder that texture often comes from method and moisture strategy, not just flour choice.

Also Read: Celery: The Keto Superfood You Didn’t Know About! Boosting Nutrition, Flavor, and Versatility


The quiet truth about “no carb flour,” “0 carb flour,” and “carb free flour”

It’s tempting to chase a mythical flour with zero carbs that behaves like wheat. In practice, “no carb flour” language usually points to fiber-heavy ingredients or specialized blends. Those can be useful, particularly in bread and pizza systems, yet they can also create digestive discomfort for some people, and they don’t behave like wheat flour in every recipe.

Infographic titled “No-Carb Flour Reality Check” explaining what “0 carb flour” usually means (fiber-heavy ingredient or blend), a 60-second label check (serving size, total carbs + fiber, sugar alcohols), and how to use it (best for bread/pizza structure mixes, rest 10–20 minutes, start small). Includes rule: chase taste, texture, and your tolerance.
“0 carb flour” and “carb free flour” claims usually mean fiber-heavy blends—useful for keto bread and keto pizza crust structure, but not a perfect wheat 1:1 in every recipe. Save this quick label-check cheat sheet: start with serving size, then total carbs + fiber, and note sugar alcohols if present (net carbs can vary by fiber type). Best move: use these blends in structure recipes, rest the dough/batter 10–20 minutes to hydrate, and start small.

This is where label literacy matters again. Total carbohydrate and fiber are defined on the label, and what counts as “fiber” can vary by type. The FDA’s Interactive Nutrition Facts Label on total carbohydrate is a grounded reference point for what that line means: Interactive Nutrition Facts Label: Total Carbohydrate (PDF).
Meanwhile, the ADA’s note about net carb calculations explains why subtracting fiber and sugar alcohols isn’t always perfectly accurate across products: ADA: Get to know carbs.

So rather than chasing a slogan, chase results: a flour system that tastes good, bakes well, and fits your preferences.

Also Read: is Aspartame Keto Friendly? Aspartame and Ketosis


A simple “starter kit” pantry for keto baking that actually covers real life

If you want a keto pantry that makes you feel capable on a random Tuesday, not just inspired on a Sunday, aim for a kit that supports multiple outcomes.
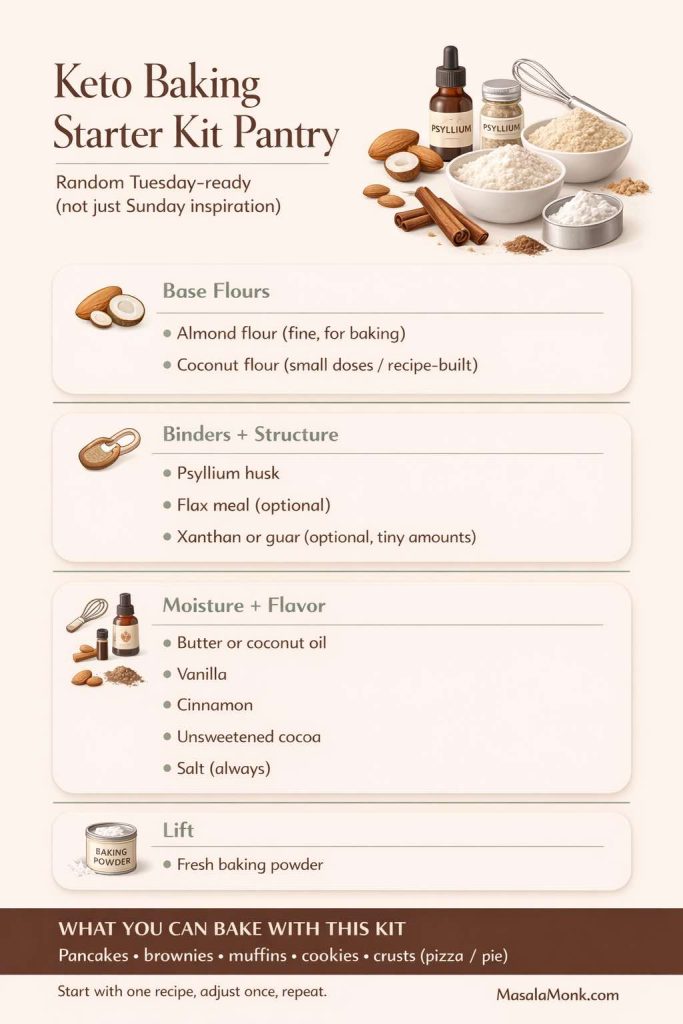
Infographic titled “Keto Baking Starter Kit Pantry” showing a simple pantry checklist: base flours (almond flour, coconut flour), binders/structure (psyllium husk, optional flax meal, optional xanthan or guar), moisture and flavor (butter or coconut oil, vanilla, cinnamon, unsweetened cocoa, salt), and lift (fresh baking powder). Bottom line: “What you can bake with this kit—pancakes, brownies, muffins, cookies, crusts (pizza/pie).” MasalaMonk.com.
A “random Tuesday” keto baking pantry that actually makes you capable, not just inspired: almond flour + coconut flour, psyllium (plus optional flax/xanthan), everyday flavor builders (vanilla, cinnamon, cocoa, salt), and fresh baking powder for lift. With this kit you can reliably make pancakes, brownies, muffins, cookies, and simple pizza/pie crusts—without waiting on a specialty mix. Save this checklist, then use it alongside the full keto flour guide above, in this post.

Base flours

  • Almond flour (fine, for baking)
  • Coconut flour (for recipes designed around it; small doses in blends)

Binders and structure

  • Psyllium husk
  • Flax meal (optional, but useful)
  • Xanthan or guar gum (optional, in tiny amounts)

Moisture and flavor

  • Butter or coconut oil
  • Vanilla
  • Cinnamon
  • Unsweetened cocoa
  • Salt (always)

Lift

  • Fresh baking powder

Flexible add-ons

  • Sugar-free chocolate options for baking (choose based on your sweetener preference)
  • Nuts, seeds, and shredded coconut for texture

When you have that kit, the question “What can I bake?” becomes practical. You’re no longer waiting for a specialized product to arrive. You can make pancakes, brownies, and a basic crust without drama.

Also Read: How to Keto – 5 Ways Butter Chicken can be Made Keto-Friendly


If keto bakes feel inconsistent, use this Keto Bake Notes Card like a tiny experiment log. Track your flour system (tender vs structure), sweetener, binder, rest time, and bake settings—then change one variable next time. This is the fastest way to dial in clean slices, better lift, and better texture with almond flour, coconut flour, and fiber-heavy blends.

Closing: keto flour gets easier when you stop asking it to be one thing

Keto baking feels hard when you keep asking one flour to behave like every flour. It becomes surprisingly approachable when you treat keto flour as a set of tools:

  • Almond flour for tenderness and comfort
  • Coconut flour for structure, used carefully
  • Psyllium and binders for bread-like results
  • Thoughtful sweeteners for moisture and flavor
  • Good label reading habits so products don’t confuse you

Start with one bake you’ll repeat—pancakes are perfect for that—and let the results teach you what your flour wants. From there, move into brownies, crusts, and bread with a calmer hand. If you want a strong baseline for that first step, Keto Pancakes and Almond Flour Pancakes are both reliable starting points.

And when you’re choosing packaged foods or mixes, keep the label grounding close. The FDA’s Nutrition Facts label guide and the ADA’s net carb explanation we have linked earlier in this ost – are two references worth returning to whenever something feels “too good to be true.”

Also Read: Pepperoni: The Keto-Friendly Pizza Topping You Love

Infographic titled “Keto Baking Decision Card” showing a 3-step flow: pick bake outcome (soft/chewy, crisp/snappy, bread-like, tender crumb), choose flour system (tender jar almond-forward, structure jar with binder/fiber, coconut flour recipe-built, wheat-style 1:1 keto blend), then run 3 checks—rest 10–20 minutes if fiber-heavy, test baking powder for lift if flat, and judge only when fully cooled. MasalaMonk.com.
Stop guessing with keto flour: pick your desired texture first, then match the right flour system (tender jar vs structure jar), and run the 3 checks that fix most fails—rest, lift, cool. Save this card for your next batch so you only change one thing at a time and get consistent results.

FAQs

1) Is keto flour the same as low carb flour?

Not always. “Keto flour” usually implies a flour or blend that can fit stricter carb targets, while “low carb flour” can include options that are lower than wheat flour yet still too high for many keto plans. Because labels and serving sizes vary, it helps to treat them as overlapping categories rather than identical ones.

2) Can you eat flour on keto?

Yes—if it’s a keto-friendly flour substitute. Instead of regular wheat flour, many people use almond flour, coconut flour, or a keto all purpose flour blend. Even so, the best choice depends on what you’re baking and how you count carbs.

3) What flour has the least carbs?

There isn’t one universal winner. Some fiber-forward “carb free flour” style products can be extremely low net carb per serving, whereas almond flour and coconut flour are low-carb staples with more predictable baking behavior. Rather than chasing a single “0 carb flour,” aim for the option that gives you the best texture for the bake you’re making.

4) Is there a true zero carb flour?

In practical kitchen terms, “zero carb flour” is usually shorthand for fiber-heavy ingredients or specialty blends that calculate very low net carbs per serving. However, those ingredients may behave differently than regular flour, so results can range from excellent to oddly dry if the recipe isn’t designed for them.

5) What is the best keto flour for baking overall?

If you want one starting point, almond flour is often the easiest because it’s forgiving and produces tender cakes, cookies, muffins, and pancakes. That said, coconut flour can be fantastic when used correctly, while blends can outperform both for bread-like structure.

6) What’s the best keto flour substitute for all-purpose flour?

A keto all purpose flour blend is usually the closest substitute, especially if it’s designed for 1:1 swapping. Still, “closest” depends on the recipe: brownies want tenderness, whereas bread wants structure, so a single substitute won’t be perfect in every bake.

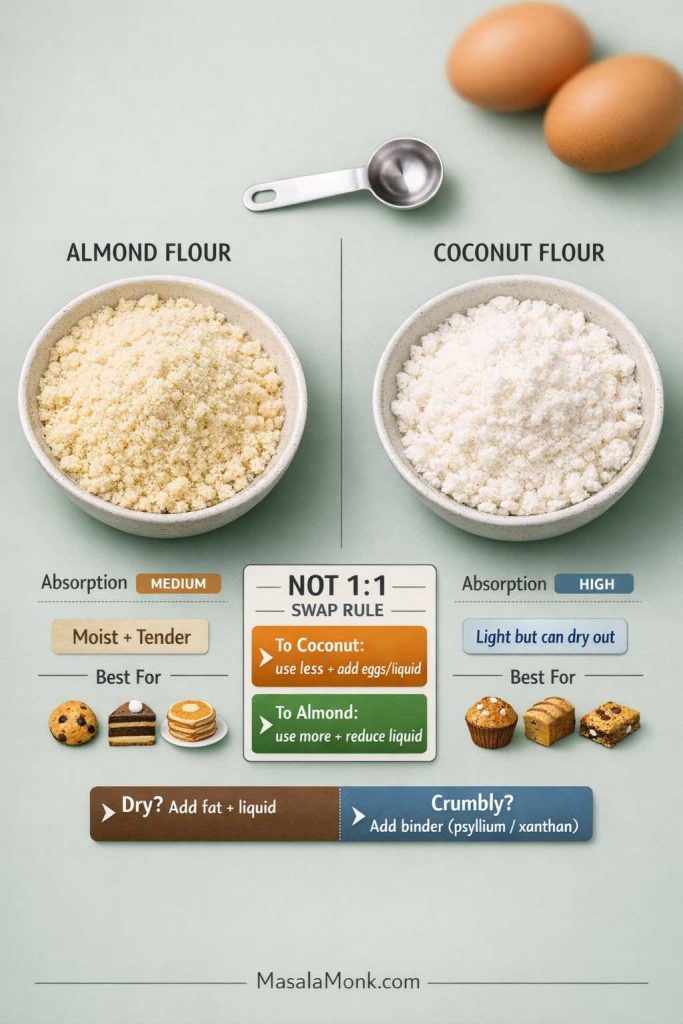
7) Almond flour vs coconut flour: which is better for keto baking?

Almond flour tends to be richer and more tender, so it shines in brownies, cookies, muffins, and pancakes. Coconut flour, on the other hand, is much more absorbent, which means it can create a lighter, cake-like crumb when the liquid and eggs are adjusted properly.

8) Why does coconut flour make recipes dry?

Because coconut flour absorbs a lot of moisture. Consequently, recipes that use coconut flour usually need more eggs, more liquid, and often a short resting time so the batter can hydrate fully before baking.

9) Can I swap coconut flour for almond flour 1:1?

Usually not. Coconut flour is far more absorbent, so a direct swap often leads to a stiff batter and a dry final bake. Instead, use coconut flour recipes as written, or use it in small amounts to help firm up a blend.

10) Why does my keto bread crumble?

Most often, it’s a structure issue. Either the loaf needs more binder support (like psyllium or flax), more moisture, or a gentler bake. Additionally, slicing too soon can make the crumb fall apart, so cooling fully can help a lot.

11) What is keto bread and pastry flour used for?

Keto bread and pastry flour blends are typically designed to mimic flour-like structure in doughs and batters. As a result, they’re often used for sandwich-style loaves, rolls, pizza crust, and bakes where you want a more “traditional” bite.

12) What’s the best keto flour for bread?

Bread usually benefits from a blend that prioritizes structure, not just tenderness. For that reason, many bakers use a keto flour mix that includes binders such as psyllium, plus a base flour that supports a sliceable crumb.

13) What is a low carb flour mix?

A low carb flour mix is a blended “system” meant to behave more predictably than a single flour. Typically, it combines a base flour (for bulk), a binder (for structure), and sometimes fiber ingredients (for texture and lower net carbs).

14) What’s the best keto flour for brownies?

For fudgy brownies, almond flour is often the easiest path because it stays tender and rich. If you prefer a more cake-like brownie, a more structured keto flour blend—or a tiny amount of coconut flour used carefully—can help the bars set neatly.

15) Are keto brownies mix products worth it?

They can be, especially if you want convenience. Even so, mixes vary in texture depending on whether they’re almond-based, coconut-based, or built from a more flour-like blend. Therefore, it’s smart to pick a mix that matches your preferred brownie style.

16) What’s the difference between low carb brownie and keto brownie?

Often, it’s about how strict the carb target is and how the product is labeled. In practice, both can be made with similar ingredients, yet serving size and sweetener choice can change the final numbers dramatically.

17) What’s the best flour for keto pie crust?

Almond flour is the classic choice for a tender, buttery crust. However, if you want cleaner slices and less crumbling, a small amount of binder or a carefully measured blend can make the crust sturdier without making it tough.

18) Can you make a sugar free low carb pie crust?

Yes. Many low carb pie crusts use almond flour plus butter, then rely on a keto baking sweetener only if you want a sweeter, cookie-like base. Otherwise, you can keep it savory and let the filling provide sweetness.

19) Is there a no carb pie crust?

Some “no carb” claims refer to fiber-heavy crust approaches or very small serving-size calculations. Even if a crust is extremely low net carb, it still needs a solid texture plan; otherwise, it can turn either brittle or gummy.

20) What’s the best keto sugar substitute for baking?

It depends on the bake. Some sweeteners create crisp cookies but drier cakes, while others keep brownies softer yet brown faster. Accordingly, it helps to match your sweetener to your goal—crisp, chewy, cakey, or fudgy.

21) Why do keto cookies sometimes turn out gritty?

That grit usually comes from a sweetener that recrystallizes as the cookies cool. If that happens, try a different sweetener blend, adjust baking time slightly, or use recipes designed for that sweetener’s behavior.

22) What are keto baking chips and do they melt like chocolate?

Keto baking chips vary based on sweetener and fat composition. Some melt smoothly, while others soften but hold their shape more. If you want gooey pockets, choose chips known for melting well; if you want defined chips, pick a variety that stays intact.

23) Can I use keto baking chocolate in brownies and frosting?

Yes, although the sweetness level and texture can vary. For brownies, it can deepen flavor without adding extra sweetness. For frosting, it helps to balance with enough fat so the finish stays smooth rather than stiff.

24) What is carbquik and how is it used?

Carbquik is a low carb baking mix often used for biscuit-style doughs and quick bakes. Since mixes differ by formula, results can range from fluffy to dense depending on liquid ratios and baking time.

25) Where can I buy keto bread mixes or low carb bread mixes?

Keto bread mix and low carb bread mixes are commonly sold online and at larger grocery retailers. Still, before buying, compare serving sizes and ingredients to make sure the mix matches your preferences for taste, texture, and carbs.

26) Are keto baked goods from an online keto bakery always low carb?

Not automatically. “Keto bakery online” offerings vary in ingredients and portion sizes, so it’s worth checking how they calculate carbs, what sweeteners they use, and how large each serving is.

27) Are low carb flour tortillas keto friendly?

Sometimes, yes—depending on serving size, fiber content, and how you count net carbs. Because wraps can be easy to overeat, it helps to decide in advance whether you’re having one tortilla, two, or building a bowl instead.

28) What are Mission Carb Balance tortillas and how many carbs do they have?

Mission Carb Balance tortillas are marketed as reduced net-carb tortillas, yet the exact carbs depend on the variety and serving size. Therefore, check the label for the specific package you’re buying rather than assuming all versions match.

29) Are “no carb tortillas” or “zero net carb wraps” too good to be true?

They can be very low net carb on paper; however, fiber type and portion size still matter. If you feel better with a conservative approach, treat them as an occasional convenience rather than an unlimited staple.

30) Can I make keto flour tortillas at home?

Yes. Homemade versions often use almond flour, coconut flour, or binder-based doughs that roll and cook like tortillas. The main advantage is control: you can tune thickness, softness, and flavor to your liking.

31) What can I use instead of flour for keto bread crumbs?

Almond flour, almond meal, crushed seeds, and pork rind crumbs are popular substitutes. Depending on the dish, each can deliver crispness, although seed-based crumbs add a nuttier flavor.

32) What’s the best low carb flour substitute for thickening sauces?

Instead of wheat flour, many people use small amounts of xanthan gum, psyllium, or even a reduced cream-based approach. The key is to add slowly, because a little goes a long way and can thicken quickly.

33) Is lupin flour keto friendly?

Often, yes, and it can add helpful structure because it’s protein-forward. Still, taste varies by person, so it’s usually best to try it first in chocolate bakes or blended recipes.

34) What is bamboo flour keto baking used for?

Bamboo fiber-style ingredients are typically used to add bulk and help reduce net carbs in certain blends. Since they can be drying, they usually work best when paired with enough moisture and binders.

35) Is there a keto alternative to wheat flour for chapati or roti?

Many people try low carb atta blends or nut-and-fiber based doughs. Results vary, though, because chapati texture depends heavily on gluten. A more realistic goal is a soft flatbread that satisfies the role of roti, even if it isn’t identical.

36) Why does keto cake sometimes sink in the middle?

This can happen when batter is under-structured, over-leavened, or baked at too high a temperature. Additionally, opening the oven early can cause a fragile keto cake to collapse before it sets.

37) How do I store keto baked goods so they don’t dry out?

Because low carb bakes can lose moisture quickly, store them tightly wrapped. Also, many keto breads and muffins taste better after a brief rewarm, since heat softens fats and improves texture.

38) What’s the best way to start keto baking if I’m new?

Begin with a simple bake that teaches you how the flour behaves—pancakes or brownies are ideal. Then, once you understand your preferred base flour and sweetener, move into pie crust and bread with more confidence.

39) Can keto baking be nut-free?

Yes. Coconut flour is the most common nut-free keto flour option, and some blends avoid nuts entirely. Even so, nut-free keto baking often requires more careful moisture and binder balance to avoid dryness.

40) What’s the “ultimate guide to keto baking” mindset?

Think in systems, not swaps. Choose the flour and binder that fit the bake, control moisture on purpose, and treat texture as feedback. Over time, keto baking becomes less experimental and far more reliable.

Posted on 5 Comments

Protein Oatmeal: Turn Plain Oats into a High-Protein Meal

Person holding a bowl of high-protein oatmeal topped with banana, peanut butter, nuts and chia seeds on a rustic breakfast table.

Most people think of oatmeal as “a healthy carb.” It’s warm, comforting, full of fibre… and then you’re hungry again two hours later. Now imagine that same cozy bowl redesigned as a high-protein meal that actually keeps you full, supports your training or weight-loss goals, and still tastes like dessert if you want it to. That’s the idea behind protein oatmeal: you keep everything good about oats and simply upgrade the protein.

In this guide, you’ll learn:

  • Why oats are such an excellent starting point
  • How much protein you actually get from oats (and why that’s not enough)
  • Different ways to build high protein oatmeal – with and without protein powder
  • How to tweak your bowl for muscle gain, weight loss, vegan or gluten-free diets
  • Flavour ideas so your oatmeal protein breakfast never feels boring

By the end, you’ll have a simple framework you can use to turn any plain oats into a high-protein meal that fits your life.

Also Read: High Protein Overnight Oats | 5 Recipes (Low Calorie, Vegan, Bulking & More)


Why Oats Deserve a Spot in a High-Protein Breakfast

Before you add anything to your oats, it helps to understand why they’re worth eating in the first place.

Oats are one of the most nutrient-dense whole grains available. They provide:

  • A generous amount of soluble fibre, especially beta-glucan, which supports heart health and more stable blood sugar
  • Complex carbohydrates that digest slowly
  • Useful amounts of vitamins, minerals and antioxidant compounds
Person scooping rolled oats from a glass jar into a bowl on a wooden table with milk and a heart-shaped dish, illustrating oats as a nutrient-dense breakfast base.
Oats quietly do the heavy lifting: fibre for digestion, slow carbs for steady energy and nutrients that set the stage for a high-protein oatmeal breakfast.

If you want a clear, friendly overview of oat types, benefits and basic nutrition, MasalaMonk already has a detailed guide to oats, types and nutrition. It walks through steel-cut, rolled, quick and instant oats, and explains how each behaves in your bowl.

In addition, articles on major health sites consistently link regular oatmeal consumption to improved cholesterol profiles, better blood sugar control and long-term heart health. Oats are often highlighted as one of the top whole grains to include in a heart-supportive diet.

So from a health perspective, oats already do a lot:

  • The fibre helps with appetite and digestion.
  • The slow carbs give you steady energy rather than a hard crash.
  • The nutrients quietly check off several boxes in your daily needs.

However, there’s one big limitation: protein.

Also Read: The Science of Protein: Maximizing Muscle Growth and Recovery


How Much Protein Is in Oats – and Why It’s Not Enough

Oats have a reputation as a higher-protein grain, and that’s true compared with many cereals. Yet the actual numbers matter.

Most nutrition databases show that:

  • 100 g of dry oats provide roughly 13–17 g of protein (depending on variety and brand).

That certainly makes oats more protein-dense than, say, rice. Nevertheless, most people don’t eat 100 g of dry oats in one sitting. A typical portion might be:

  • 40–50 g dry oats (around ½ cup), which only gives 5–7 g of protein.

That’s… okay. It’s better than a sugary breakfast cereal, but it doesn’t come close to the 20–30 g of protein that many people aim for in a high protein oatmeal breakfast.

Two bowls of oatmeal on a wooden table, one plain and one topped with yogurt, banana and seeds, showing how the same oats can become high-protein oatmeal.
Same oats, different protein: a plain bowl gives you only a few grams of protein, while layering yogurt, banana, nut butter and seeds turns it into a 20–30 g high-protein oatmeal meal.

Meanwhile, research on higher-protein breakfasts suggests:

  • Meals with more protein tend to improve appetite control later in the day.
  • People often experience fewer cravings and less late-night snacking when breakfast has a solid protein dose.

So oats alone are “protein friendly,” yet they don’t automatically become high protein oatmeal on their own. To reach that level, you need to layer proteins onto the oat base.

That’s good news, because it means you can keep everything you like about oats and simply upgrade them instead of replacing them.

Also Read: 10 High Calorie Protein Shakes & Smoothie Recipes for Healthy Weight Gain


Step 1: Choose the Right Oats for Your Protein Bowl

The type of oats you start with changes cooking time, texture and even how “heavy” the meal feels. Once you choose your base, it becomes much easier to design your version of protein oatmeal.

Rolled, Steel-Cut or Quick: Which Is Best?

For everyday high protein oatmeal, you’ll usually work with three main options:

  1. Rolled / Old-Fashioned Oats
    • Steamed and flattened whole oats
    • Cook in just a few minutes
    • Turn soft and creamy, ideal for classic porridge
  2. Steel-Cut Oats
    • Whole oat groats chopped into pieces
    • Need more simmering time
    • Stay chewy and nutty, with a slightly lower glycaemic impact
  3. Quick or Instant Oats
    • More finely processed
    • Cook quickly or even just by soaking
    • Can turn mushy if overcooked
Three bowls showing rolled oats, steel-cut oats and quick oats on a wooden board, with a hand scooping rolled oats to illustrate different oatmeal textures.
Rolled, steel-cut or quick: choosing your oat texture is the first step to building protein oatmeal that feels creamy, chewy or ultra-fast to make.

If you’d like a deep comparison, have a look at MasalaMonk’s breakdown of steel-cut oats vs rolled oats. It goes into texture, cooking methods and nutrition in much more detail, and it’s a helpful companion piece if you’re trying to decide which to stock at home.

For protein oatmeal, rolled oats are usually the most practical choice: they cook fast, hold mix-ins well and can be used in the microwave, on the stove or baked. Steel-cut oats work beautifully on days when you want something hearty and leisurely. Quick oats shine when you need a high protein oatmeal in under five minutes.

If you ever wonder whether you can swap different oat types in recipes, MasalaMonk also answers that in a simple guide to substituting old-fashioned oats for rolled oats. Knowing how flexible oats actually are makes it easier to experiment.

A Word on “Oats” vs “Oatmeal”

Sometimes people use “oats” and “oatmeal” as if they were the same thing. Technically:

  • Oats are the raw grain (rolled, steel-cut, instant, etc.).
  • Oatmeal is the prepared dish—what you actually eat from the bowl.

If that distinction ever feels fuzzy, MasalaMonk has a short explainer on the difference between oats and oatmeal that clears things up in everyday language.

Once your base is clear, you can move on to the next decision: what to cook the oats in.


Step 2: Liquids That Quietly Boost Your Protein

The liquid you choose influences flavour, creaminess and, in some cases, the total protein content of your oatmeal.

Here are the main contenders:

Water

  • Zero calories from the liquid
  • Very neutral base
  • Leaves all the work to your add-ins

Cow’s Milk

  • Adds extra protein, calcium and creaminess
  • Works well for both sweet and savoury bowls

Soy Milk

  • The highest-protein plant milk
  • Excellent choice for high protein vegan oatmeal

Oat Milk, Almond Milk and Others

  • Lovely texture and flavour
  • Lower in protein but often fortified with vitamins and minerals
  • Great when you rely on other ingredients for the main protein boost
Glass of water, bottles of milk, soy milk and oat milk arranged around a bowl of rolled oats with a hand reaching in, showing different liquid bases for oatmeal.
Water keeps it lean, milk adds creaminess and protein, soy boosts plant protein, while oat and nut milks bring comfort and flavour to your protein oatmeal bowl.

If you enjoy doing things from scratch, you can even make your own oat milk and then cook your oats in it. MasalaMonk’s method for easy homemade oat milk is designed to avoid the classic slimy texture people complain about.

There’s also a full discussion of oat milk and its benefits, including how it may support weight management and digestion. That information can help you decide when oat milk belongs in your protein oatmeal, and when you might prefer dairy or soy instead.

At this point, you have a base:

  • The kind of oats you like
  • A liquid that fits your preferences

Next, you can finally add the star of the show: protein.

Also Read: How to make Almond Milk at Home


Step 3: Oatmeal with Protein Powder – The Quickest Upgrade

When people look for “oatmeal with protein powder,” “protein powder oats” or “oatmeal and protein powder,” they’re usually looking for a shortcut. They want high protein oatmeal that’s fast, simple and predictable.

Protein powder fits that brief perfectly.

Choosing a Protein Powder for Oatmeal

Several types of protein powders work well with oats. The best one for you depends on taste, digestion, budget and whether you eat animal products.

Bowl of creamy oatmeal surrounded by jars of whey, pea, plant and collagen protein powders, with a hand scooping powder as text highlights how to choose a protein for oats.
Pick your protein partner: whey for creamy bowls, casein for thick pudding-style oats, plant blends for vegan protein oatmeal and collagen as a gentle booster to your oats.

Here’s how they generally behave:

Whey Protein

  • Mixes very easily
  • Tends to give you the creamiest texture
  • Ideal for chocolate protein oatmeal, vanilla bowls, mocha oats and other dessert-style flavours

Casein Protein

  • Thickens more than whey
  • Fantastic when you want a pudding-like effect, almost like a custard or thick protein porridge
  • Often very filling, which is useful for appetite control

Plant-Based Proteins (Pea, Soy, Rice–Pea Blends)

  • Essential for oatmeal high in vegan protein.
  • Might be slightly thicker or more “earthy” in flavour, but blends improve every year
  • Work very well when you pair them with spices, cocoa or fruits

Collagen Powder

If you’re trying to build more plant-forward meals, have a look at MasalaMonk’s list of plant-based protein sources for meal prep. Many of those ingredients also slide neatly into high protein oatmeal bowls.

How to Add Protein Powder Without Ruining Your Oats

Nobody wants lumpy, chalky oatmeal. Fortunately, there’s a simple method that makes oatmeal with protein powder smooth and enjoyable:

  1. Cook your oats with water or milk until they’re just how you like them.
  2. Take the pan off the heat and let it stand for a minute so the mixture stops bubbling.
  3. In a separate cup or small bowl, whisk your protein powder with a little liquid to create a smooth, pourable paste.
  4. Stir that paste into the warm oats until everything looks creamy and uniform.

You can then adjust thickness with more liquid if needed.

Hand whisking protein powder with milk into a smooth paste next to a warm bowl of oatmeal, showing how to avoid lumpy protein oats.
Whisk protein powder with a little liquid first, then stir the smooth paste into warm oatmeal to enjoy creamy, high-protein oats without any chalky lumps.

This technique works beautifully for:

  • Vanilla protein oatmeal topped with banana and cinnamon
  • Chocolate porridge protein with cocoa powder and a few dark chocolate shavings
  • Berry-heavy bowls where the oats and powder form a base for strawberries, blueberries or cherries

Finally, if you prefer to drink your breakfast, you can turn this into a high protein oatmeal shake. Blend cooked oats, liquid and protein powder until completely smooth, then add ice or frozen fruit for a milkshake-like texture.

Also Read: Healthy Wholewheat Carrot Chia Seed Pancakes- Vegetarian High Protein Recipe


Step 4: High Protein Oatmeal Without Protein Powder

Protein powders are convenient, yet they’re not mandatory. You can still build protein rich oatmeal using everyday foods you probably already have in your kitchen.

Egg Whites and Whole Eggs

One of the simplest ways to raise the protein content of oatmeal is to add egg whites directly into the pot.

Egg whites are:

  • Almost pure protein
  • Very low in fat and carbohydrate
  • Mild in flavour when cooked properly

To make egg white oatmeal, you can:

  1. Cook your oats in water or milk as usual.
  2. Turn the heat down to low once they’re nearly done.
  3. Slowly pour in liquid egg whites while whisking continuously.
  4. Keep stirring for another minute or two until the mixture thickens and the eggs are cooked.

The result is a subtly fluffy, silky high protein oatmeal that doesn’t taste like scrambled egg. This method is ideal for low calorie high protein oatmeal, particularly if you combine it with water or low-fat milk.

If you use a microwave, simply cook your oats in a deep bowl until almost done, stir in whisked egg whites, then microwave again in short bursts, stirring in between to avoid overcooking.

For even more protein, you can add one whole egg (for richness and nutrients) plus extra whites (for volume and total protein) in the same way.

Also Read: Egg Yolks or Yellow: Nutritional & Protein Profile

Person spooning yogurt into a bowl of oatmeal on a wooden table surrounded by paneer, peanut butter, nuts, seeds and an egg, showing how to boost protein without powder.
Boost protein without powder: egg whites, yogurt or paneer, plus nuts and seeds can turn a simple bowl of oats into rich, high-protein oatmeal using everyday kitchen staples.

Greek Yogurt, Curd, Cottage Cheese and Paneer

Dairy is another excellent way to transform plain oats into high protein oatmeal without any powders.

A few effective combinations include:

  • Oats cooked with water, then cooled slightly and mixed with thick Greek yogurt
  • Porridge swirled with hung curd or a high-protein curd
  • Warm oatmeal topped with soft paneer or cottage cheese, either plain or lightly blended

These additions not only increase protein, they also boost creaminess and tang. You can easily create a bowl that feels indulgent while still staying within your calorie target.

This method works especially well for:

  • High protein oatmeal for weight loss – use low-fat dairy and plenty of fruit or spices
  • Bulking oatmeal – use full-fat versions and add nuts or nut butter on top

Because the dairy is stirred in after cooking, you maintain control over the final texture. You can keep things thick like a cheesecake, or loosen them into a smoother high protein porridge.

Also Read: is Greek Yogurt A Healthy Choice for People with Diabetes?

Nuts, Seeds and Nut Butters

Nuts and seeds play two roles in protein oatmeal:

  • They add extra protein and healthy fats.
  • They provide crunch and flavour, which makes your bowl more satisfying.

Some favourites are:

  • Peanut butter, almond butter or cashew butter
  • Chopped almonds, walnuts, peanuts or pistachios
  • Chia, flax and hemp seeds

A classic example is oatmeal with peanut butter protein and banana. This combination hits all the right notes: creamy, slightly salty, naturally sweet and very filling. If that pairing interests you, it’s worth reading MasalaMonk’s detailed article on oatmeal and peanut butter for effective weight loss. It explains how the blend of fibre, protein and fat can support hunger management instead of fighting it.

Similarly, oats and chia seeds for weight loss shows how combining those two ingredients gives you both protein and fibre in a single scoop. That’s exactly what you want when you’re building high fibre high protein oatmeal that keeps you full for hours.

Also Read: Benefits of Nuts and Seeds – Protein-Packed Superfoods


High Protein Oatmeal for Muscle Gain and Bulking

Once you understand the building blocks, you can tune your bowl for different goals. Let’s start with muscle gain and strength training.

When your focus is building muscle, calories and protein both matter. You’re often aiming for:

  • A calorie surplus to support growth
  • Plenty of protein for recovery and repair
  • Enough carbohydrates to fuel workouts

In this context, your protein oatmeal becomes more than breakfast; it’s part of your training gear.

Bowl of bulking protein oatmeal topped with banana slices, peanut butter and mixed nuts with a protein shaker in the background, showing a high-protein pre- or post-workout breakfast.
Bulking protein oatmeal with oats, milk, whey or casein, banana, peanut butter and nuts – a 25–35 g protein bodybuilder breakfast that works perfectly before or after your workout.

A bulking-oriented bowl might look like this:

  • Rolled or steel-cut oats cooked in milk
  • Whey or casein protein mixed in after cooking
  • A sliced banana for extra carbohydrates and sweetness
  • A spoon of peanut butter or almond butter
  • A sprinkle of nuts and seeds on top

That kind of bowl easily turns into bodybuilder oatmeal with 25–35 g of protein, substantial carbs and healthy fats. It’s perfect as oats for pre-workout or even as a post-training meal when you want something warm instead of a shake.

To see how a breakfast like this fits into your total daily intake, MasalaMonk’s guide on how to eat 100 grams of protein a day can be helpful. When your first meal is already a serious oatmeal protein breakfast, hitting that number becomes far easier.


High Protein Oatmeal for Weight Loss and Appetite Control

On the flip side, you might be trying to lose fat or manage your weight. In that case, you still want high protein oatmeal, but with a different emphasis:

  • Enough protein to protect muscle and control hunger
  • Plenty of fibre and volume
  • Moderated calories and sugars
Bowl of lean protein oatmeal topped with berries, apple pieces and chia seeds beside a tape measure and notebook, illustrating a high-protein high-fibre breakfast for weight loss.
Lean protein oatmeal with oats, low-fat milk, egg whites or lean protein, chia seeds and fresh fruit – a high-protein, high-fibre breakfast that keeps you full while fitting a calorie deficit.

A weight-loss-oriented bowl could look like this:

  • A moderate portion of oats, cooked in water or a mix of water and low-fat milk
  • Egg whites or a scoop of lean protein powder for high protein low calorie oatmeal
  • Chia seeds for thickness and extra fibre
  • A generous handful of berries or chopped apple
  • Cinnamon and vanilla for flavour instead of lots of sugar

This type of high protein oatmeal for weight loss is designed to:

  • Keep you full until your next meal
  • Fit into a calorie deficit
  • Feel like a proper breakfast rather than “diet food”

Because oats already support steady blood sugar and digestion, and added protein increases satiety, combining them intelligently can make it easier to stay consistent with your plan.


Vegan High Protein Oatmeal

If you follow a plant-based diet, oats are one of your best friends. They’re naturally vegan, widely available and extremely flexible. You simply need to make sure you pair them with solid plant proteins.

Bowl of vegan protein oatmeal made with soy milk and topped with plant yogurt, banana slices, raspberries, hemp seeds, chia seeds and nuts.
Vegan protein oatmeal with soy milk, plant-based yogurt, seeds, nuts and fresh fruit shows how easy it is to build a 20–25 g protein bowl without any dairy or eggs.

A vegan-friendly high protein oatmeal might include:

  • Oats cooked in soy milk or a fortified pea-based drink
  • A plant-based protein powder (pea, soy or a blend)
  • Soy yogurt or coconut yogurt stirred in at the end
  • Hemp seeds, chia seeds and roasted nuts for crunch and extra protein

You can easily reach 20–25 g of protein in a bowl like that, especially if you’re generous with soy milk and a decent scoop of vegan protein.

If you’d like more ideas for plant-based proteins to plug into your protein oatmeal, MasalaMonk’s post on plant-based protein sources for high-protein meal prep is a great starting point. Several of the ingredients there—beans, lentils, tofu, tempeh, seeds and nuts—can be adapted to both sweet and savoury oat bowls.

There’s also a playful guide to using tofu instead of eggs in breakfast which can give you even more ideas for protein-rich, plant-based mornings.


Gluten-Free Protein Oatmeal: Doing It Safely

Many people who follow a gluten-free diet would love to enjoy oats, yet they’re understandably cautious. The situation is a little nuanced.

On one hand, pure oats are naturally gluten-free. The main proteins in oats are called avenins, not gluten. On the other hand, oats are often grown, transported or processed in facilities that also handle wheat, barley or rye. Because of that, they can easily become contaminated with gluten.

Coeliac-focused organisations explain that:

  • Certified gluten-free oats are produced and tested to contain less than a small threshold of gluten (typically 20 parts per million).
  • Most people with coeliac disease can tolerate these certified oats.
  • A small percentage are sensitive even to pure oats and may need to avoid them entirely.

If you’d like to read more, Beyond Celiac’s overview of oats and the gluten-free diet and Celiac Canada’s statement on oats both summarise the current thinking very clearly.

Jar of certified gluten-free oats beside a warm bowl of oatmeal, protein powder and wheat stalks with a gluten-free symbol, illustrating how to make gluten-free protein oatmeal safely.
Gluten-free oats done right: choose certified gluten-free oats, keep them away from wheat, barley and rye, and always check protein powders and toppings for hidden gluten before you build your protein oatmeal.

To enjoy gluten free protein oatmeal safely, you can:

  • Choose certified gluten-free oats
  • Check your protein powders for hidden gluten sources
  • Be careful with toppings such as granola or flavoured additions that might include malt, barley or wheat

Once you’ve covered that base, you can use all the same protein-boosting strategies—egg-free if needed—to build high protein gluten free oatmeal that feels just as comforting as any other bowl.

Also Read: All About Gluten: Symptoms, Testing, Diet & 7-Day Gluten-Free Meal Plan


Flavour Ideas for Protein Oatmeal (Without Losing the Macros)

Now that the structure is clear, it’s time for the fun part: flavour. The beauty of protein oatmeal is that you can dress it up in almost any direction while keeping the macros on your side.

Here are a few themes you can play with.

Chocolate Protein Oatmeal

This one is perfect when you want breakfast to taste like dessert.

  • Rolled oats cooked in milk or soy milk
  • Chocolate or cocoa-flavoured protein powder blended in after cooking
  • A spoon of Greek yogurt or soy yogurt for extra creaminess
  • Berries and a few dark chocolate chips on top

By adjusting the amount of sweetener and chocolate, you can tilt this bowl toward high protein low sugar oatmeal or make it a richer treat for bulking phases.

Bowl of banana peanut butter protein oatmeal topped with banana slices, peanut butter swirl and chopped nuts, with recipe text overlay on a rustic wooden table.
Banana Peanut Butter Protein Oatmeal – oats with milk, vanilla protein or Greek yogurt, mashed banana in the base and a peanut butter–nut topping for a cosy, high-protein breakfast.

Banana Peanut Butter Protein Oatmeal

This bowl feels like comfort in a mug: warm, nutty, slightly salty and sweet.

  • Oats cooked in milk
  • Vanilla protein powder or a big spoon of Greek yogurt
  • Mashed ripe banana stirred in
  • A swirl of peanut butter and some chopped nuts on top

The mix of fibre, protein and fats here makes this classic oatmeal peanut butter protein bowl very satisfying. For more ideas in this flavour lane, you can dig into MasalaMonk’s article on oatmeal and peanut butter as a power combo.

Apple Cinnamon Protein Oatmeal

Think of this as apple pie for breakfast, minus the pastry.

  • Oats cooked with water or milk
  • Vanilla protein powder, yogurt or cottage cheese mixed through
  • Diced apple simmered with the oats or briefly sautéed with a bit of cinnamon
  • Ground cinnamon, nutmeg and a teaspoon of maple syrup or date syrup

With a few tweaks, this becomes either a lean high protein oatmeal or a more indulgent autumn bowl, and it naturally matches phrases like “apple cinnamon protein oatmeal” and “cinnamon protein oatmeal” without forcing anything.

Maple Brown Sugar Protein Oatmeal (Lightened)

Those maple brown sugar packets are nostalgic, but they’re easy to upgrade.

  • Cook oats in a mix of water and milk.
  • Stir in plain or lightly sweetened protein powder.
  • Add a small spoon of brown sugar and a drizzle of maple syrup—less than you’d usually use.
  • Finish with plenty of cinnamon and a pinch of salt.

Here, most of the sweetness comes from a modest amount of sugar and the natural flavour of oats and milk, while protein acts as the backbone. That’s how you end up with low sugar protein oatmeal that still tastes like the original.

Four bowls of protein oatmeal on a wooden table showing chocolate, apple cinnamon, maple brown sugar and cranberry almond flavours with text saying one protein oatmeal base, many flavours.
One protein oatmeal base, many flavours: chocolate, apple cinnamon, maple brown sugar and cranberry almond bowls show how easy it is to change the toppings while keeping your macros on track.

Cranberry Almond Protein Oatmeal

For something brighter and slightly tart:

  • Oats cooked in milk or soy milk
  • Protein blended into the base
  • A handful of sliced almonds
  • A sprinkle of dried cranberries or fresh cranberries cooked down briefly with a touch of sweetener

This variation is an easy way to enjoy “cranberry almond” style oats while keeping a firm eye on protein and fibre.

Also Read: Basics of Macronutrients: Diet’s Building Blocks


Beyond the Bowl: Protein Oats as Bars, Puddings and Snacks

Once you’re comfortable building protein oatmeal, it’s natural to wonder what else you can do with oats and protein. The same ingredients often morph beautifully into bars, puddings and grab-and-go snacks.

If you like the idea of portable oat-based snacks, you might enjoy:

For a more dessert-like approach, chia pudding with steel-cut oats and mango shows how oats and chia can transform into a cold, spoonable treat that still offers plenty of fibre and some protein.

All of these recipes work on the same core principle you’re using for protein oatmeal: combine oats, protein sources and fibre, then adjust flavours and textures to suit your tastes.


Where Overnight Oats Fit In

You might have noticed that this guide focuses mostly on hot or freshly prepared oats. That’s deliberate.

Hot bowl of protein oatmeal with banana and seeds next to a jar of high protein overnight oats with yogurt and blueberries, showing two ways to use the same oat and protein base.
Same building blocks, different routine: enjoy hot protein oatmeal right now and keep a jar of high protein overnight oats ready in the fridge for later.

Overnight oats are essentially cold oatmeal made in advance. They soak instead of simmering, but they rely on the same ideas:

  • A base of oats
  • A liquid
  • Protein sources like yogurt, milk or protein powder
  • Flavourings and toppings

Because MasalaMonk already has a full guide to jar-based recipes, you can treat this article and that one as siblings:

  • Use this piece when you’re thinking about hot protein oatmeal, microwave oats and stovetop porridge.
  • Switch to the dedicated guide to high protein overnight oats when you want set-and-forget jars that live in the fridge and are ready when you wake up.

The underlying logic is the same; the difference is mainly temperature and convenience.


A Simple Framework You Can Use Every Day

Instead of memorising dozens of recipes, it’s often more helpful to keep a simple framework in mind. Once you understand the structure, you can improvise endlessly.

Hand holding a spoon over a bowl of protein oatmeal surrounded by small bowls of oats, milk, yogurt, tofu, nuts, seeds and spices with text explaining how to build your own protein oatmeal.
Build your own protein oatmeal: start with oats, choose a liquid, add your favourite protein source, then layer in seeds, nuts, fruit and spices to create a high-protein bowl that fits your day.

Think of high protein oatmeal like this:

  1. Base
    • 40–60 g oats (rolled, steel-cut or quick)
  2. Liquid
    • Enough water, milk or plant milk to reach your favourite consistency
  3. Main Protein
    • 1 scoop of protein powder or
    • Several egg whites or
    • A generous amount of yogurt, curd, cottage cheese, paneer or tofu
  4. Fibre and Extras
    • Chia, flax or hemp seeds
    • Fruits or grated vegetables
    • Nuts or nut butters
  5. Flavour
    • Cocoa, vanilla, cinnamon, cardamom, nutmeg, citrus zest, coffee, fruit, or a touch of sweetener

From there, you simply adjust:

  • More oats + nut butter + toppings → bulking oatmeal and bodybuilder oatmeal
  • Fewer oats + extra egg whites or lean protein + lots of berries → low calorie high protein oatmeal
  • Soy milk + vegan protein + plant yogurt → high protein vegan oatmeal
  • Certified gluten-free oats + careful choice of protein powder → gluten free protein oatmeal

Once you’ve played with this a few times, upgrading your oats stops feeling like a “recipe” and becomes second nature. You’ll look at a bowl of plain oats and immediately see three or four different ways to turn it into a high-protein meal that actually matches your day.

And that’s the real power of protein rich oatmeal: it’s not just one dish, it’s a flexible system. You start with oats, you layer in protein, you add fibre and flavour, and you walk away from the table feeling properly fed—rather than wondering what snack you’re going to hunt down next.

FAQs

1. How much protein is in oatmeal, and what makes it “protein oatmeal”?

Plain oats usually provide around 5–7 grams of protein per ½ cup (40–50 g) of dry oats. That’s more than most breakfast cereals, but on its own it’s still not a high protein meal.
You turn it into protein oatmeal by adding extra protein sources like whey or plant protein powder, egg whites, Greek yogurt, cottage cheese, tofu, or soy yogurt until the bowl reaches roughly 15–30 grams of total protein.


2. What is the best protein for oats?

The “best protein for oats” depends on your preferences and goals:

  • Whey protein mixes smoothly and is great for creamy high protein oatmeal.
  • Casein protein makes thicker, more filling bowls and works well for dessert-style oats.
  • Pea or soy protein are excellent options if you want high protein vegan oatmeal.
  • Egg whites or Greek yogurt are ideal when you prefer whole foods over powders.

As long as you enjoy the taste and digest it well, it can become your best protein for oats.


3. How do I add protein powder to oatmeal without clumps?

To make smooth oatmeal with protein powder, cook your oats first and let them cool slightly. Separately, whisk the protein powder with a small amount of liquid into a thin paste. After that, stir this paste into the warm oats until everything is blended. This approach avoids chalky lumps and gives you creamy protein oatmeal every time.


4. Does heating protein powder in oatmeal destroy the protein?

Gently heating protein powder in oatmeal and protein powder recipes will not destroy the protein or make it useless. Moderate cooking temperatures might change texture a bit, but the amino acids remain intact. However, extremely high, prolonged heat can sometimes affect flavour, so it’s usually better to stir protein powder into warm oats after cooking instead of boiling it for a long time.


5. How can I make high protein oatmeal without protein powder?

If you don’t want to use any powders, you can still build high protein oatmeal by combining oats with:

  • Egg whites or whole eggs
  • Greek yogurt or hung curd
  • Cottage cheese or paneer
  • Tofu or soy yogurt
  • Nuts, seeds and nut butters

Blending these into your bowl creates protein rich oatmeal with impressive macros, even though there is no protein powder.


6. Is oatmeal good for bodybuilding and muscle gain?

Yes, oatmeal can be excellent for bodybuilding when you turn it into high protein oatmeal. Oats provide slow-digesting carbohydrates and fibre, which support training performance and steady energy. When you mix in enough protein from powders, egg whites, dairy or tofu, you get bodybuilder oatmeal that fits perfectly into a muscle gain meal plan. It’s especially useful as a pre-workout or post-workout meal when you want sustained fuel rather than a fast sugar hit.


7. Can I eat protein oatmeal for weight loss?

Absolutely. In fact, oatmeal and protein powder for weight loss is a very common strategy. A bowl of low calorie high protein oatmeal made with a moderate amount of oats, lean protein (like egg whites or low-fat Greek yogurt), berries and chia seeds can keep you full for hours. The combination of fibre and protein helps manage appetite, so you’re less likely to overeat later in the day, as long as your overall calorie intake stays in a deficit.


8. What’s the difference between protein oatmeal and high protein porridge?

The terms often overlap. In many cases:

  • Protein oatmeal refers to any oatmeal that has been upgraded with extra protein.
  • High protein porridge is usually hot, spoonable oats with a thicker, more traditional porridge texture.

In practice, both describe oats cooked with liquid and fortified with ingredients like protein powder, egg whites, yogurt, or paneer. The exact word you use matters less than making sure the bowl has enough protein for your needs.


9. Are proats and overnight protein oatmeal the same thing?

Proats” is a casual term that usually means “protein oats.” It can refer to hot oats with protein powder or to overnight protein oatmeal stored in jars. On the other hand, overnight oats specifically soak in the fridge instead of cooking on the stove. So:

  • All overnight protein jars are a type of proats.
  • Not all proats are overnight oats, because some are cooked and served hot.

Both formats use the same idea: oats plus liquid plus a protein source.


10. How do I make low calorie high protein oatmeal that’s still filling?

For low calorie high protein oatmeal, focus on three things:

  1. Portion control for oats – use a moderate amount (e.g., 30–40 g dry) instead of a huge serving.
  2. Lean protein – add egg whites, low-fat yogurt, cottage cheese or a lean protein powder to raise protein without many extra calories.
  3. Volume and fibre – stir in grated zucchini or carrot, chia seeds, berries or apple to bulk up the bowl and slow digestion.

This combination creates a big, satisfying portion of high protein oatmeal without pushing your calories too high.


11. Can I have protein oatmeal at night?

Yes, you can enjoy protein oatmeal in the evening as well. Many people like a warm bowl of oats as a pre-bed snack, especially when they add slow-digesting protein like casein, paneer or Greek yogurt. This kind of high protein porridge can help you feel relaxed and keep hunger away overnight. Just consider your total daily calories and your personal digestion; some prefer lighter meals very close to bedtime.


12. Is oatmeal high in protein compared to other grains?

Oats are relatively high in protein compared to many other grains, which is why people talk about oats high in protein. However, even though 100 g of dry oats may contain 13–17 g of protein, a typical serving is smaller, so it’s not enough to qualify as a full high protein meal. That’s why combining oats with eggs, dairy, tofu or protein powder is so effective: you retain the advantages of oats while lifting total protein to a more substantial level.


13. What is the best type of oats for protein oatmeal?

You can turn any oat type into protein oatmeal, but some work better for certain preferences:

  • Rolled oats are versatile and ideal for most bowls.
  • Steel-cut oats are great for chewier, slow-cooked high protein porridge.
  • Quick oats are perfect when speed matters and you want almost instant breakfast.

Ultimately, the best oats are the ones you enjoy eating and can cook consistently, because consistency matters more than tiny differences in macros.


14. How do I make high protein vegan oatmeal?

To create high protein vegan oatmeal, combine oats with plant-based proteins:

  • Cook oats in soy milk or pea-based milk.
  • Add a scoop of vegan protein powder (pea, soy or a blend).
  • Stir in soy yogurt or coconut yogurt for extra creaminess.
  • Top with hemp seeds, chia seeds, nuts and nut butter.

By layering these ingredients, you can easily build high protein vegan oatmeal bowls with 20–25 grams of protein or more, without using any animal products.


15. Can I prep protein oatmeal in advance?

Yes, there are several ways to prep protein oatmeal ahead of time:

  • Cook a batch of plain oats and store in the fridge, then reheat with extra liquid and add protein just before serving.
  • Prepare jar-style proats with oats, liquid and protein powder or yogurt to keep in the fridge for a few days.
  • Bake oat-based dishes like protein oat bars, which you can grab as a portable breakfast.

As long as you store everything in the fridge and reheat gently, prepped high protein oatmeal can make busy mornings much easier while still giving you a balanced start to the day.

Posted on Leave a comment

Low Histamine Diet: Food List, Easy Meals & 7-Day Plan

low-histamine-diet-cover-food-list-7-day-meal-plan-portrait-masalamonk

If you’re exploring a low histamine diet, you’re likely looking for calm, clear direction—not another rabbit hole of contradicting charts. To make this practical, let’s anchor the essentials in simple cooking habits, walk through a flexible meal pattern, and, importantly, call out where evidence sits today. For balance and credibility, you can skim neutral overviews from the American Academy of Allergy, Asthma & Immunology, check the clinician handout from Johns Hopkins Medicine, and review patient-friendly pages from Allergy UK and the British Dietetic Association as you go. Meanwhile, when you want a concise consumer explainer, the Cleveland Clinic overview is a solid quick read.


Low Histamine Diet Basics: What It Is—and What It Isn’t

To begin with, a low histamine diet is a short-term elimination and re-challenge strategy that reduces foods high in histamine (and some that may liberate histamine) while you observe your own symptoms. Crucially, this approach is not the same as a classic IgE-mediated food allergy. Instead, you’re aiming to lower dietary histamine intake, tighten up food handling, and separate triggers from safe choices by testing them one at a time. In short, you create a peaceful baseline for two to four weeks and then, step by step, you bring foods back.

Furthermore, because histamine levels fluctuate with time and storage, freshness matters as much as the ingredient list. Consequently, simple habits—buying smaller amounts more often, cooking promptly, rapid-chilling leftovers, and rotating meals—do much of the heavy lifting. On balance, you may find the diet less about restriction and more about logistics.

Download the Low Histamine Diet Interactive Tracker (free PDF)—7-day meal plan, fillable shopping list, daily log, and re-intro worksheet—right here.


What to Eat on a Low Histamine Diet (Core “Yes” List)

Proteins (fresh is everything). Choose fresh chicken, turkey, lamb, and eggs; likewise, opt for very fresh white fish cooked the day you buy it. Even so, individual tolerance varies, so you’ll still reintroduce cautiously later.

Carbs & grains (gentle, steady energy). Reach for rice, quinoa, buckwheat, oats, rice noodles, and rice cakes. If you want context about buckwheat’s versatility, scan this short primer on buckwheat benefits—it’s naturally gluten-free and easy to slot into bowls or breakfast porridge.

Vegetables (crisp, quick-cooking choices). Lean on zucchini, carrots, green beans, cucumbers, bok choy, lettuce, and other mild greens (many people sidestep spinach during the elimination phase). Because quick heat helps you avoid long simmer times, sautéing or steaming works beautifully.

Fruit (light and predictable). Apples, pears, and blueberries usually fit early; nevertheless, trial citrus later since it can act as a liberator for some.

Fats (simple and stable). Olive oil is your everyday staple; avocado oil is fine for many, although some people prefer to test avocado itself later.

Drinks (keep it calm). Plain water and gentle herbal teas—ginger, rooibos, peppermint if tolerated—keep hydration easy without complicating the elimination phase.

For a concise, public-facing cross-check, compare your cart with the Histamine Intolerance Food List; and for a helpful “what to expect” overview, see Cleveland Clinic’s guide as well. Meanwhile, if you want a mainstream media digest that echoes many of these items, BBC Good Food’s low-histamine picks are straightforward.


What to Limit First (and Why)

Fermented or aged foods. Soy sauce, vinegar, kombucha, sauerkraut/kimchi, aged cheeses, and cured meats rise to the top of the “hold for later” list.

Alcohol. Wine and beer are frequent irritants during the elimination window.

Seafood that’s canned, smoked, or not cooked promptly. Since histamine can accumulate post-harvest, storage becomes a major factor; fish kept too long, even when cooked later, is a common issue.

Produce commonly flagged as potential liberators. Tomatoes, spinach, eggplant, avocado, and citrus often move into mid-to-late reintroduction instead of day one.

Long-simmered dishes and bone broth. Because amines build with time and temperature, short, bright cooking methods generally suit the elimination phase better than all-day simmering.

All told, the idea is not to demonize foods forever; rather, you’re reducing confounders temporarily. Afterwards, you’ll add items back with intention.


Low Histamine Diet Breakfasts: Fast, Cozy, and Repeatable

To set the tone, start mornings with warm, simple textures and minimal ingredients. In particular:

  • Oats with pear and chia. Cook rolled oats in water or a mild non-dairy base; top with diced pear and a spoon of chia. When you want more control over ingredients, consider making your own non-dairy options—this quick explainer on coconut milk nutrition and glycemic impact gives you a sense of how it fits.
  • Eggs with sautéed zucchini on toast. Keep the pan hot, cook fast, and season with herbs.
  • Chia pudding with apple. For an adaptable method, peek at this chia pudding how-to and simply swap the fruit for something you tolerate early on (e.g., apple or pear).
  • Puffed rice “cereal.” Use coconut milk and a sprinkle of pumpkin seeds for crunch without leaning on additives.

Moreover, you’ll notice how often breakfast success comes from short cooking times and rapid cooling. That’s not accidental; those mechanics help you keep amine accumulation low while still eating familiar food.


Snacks, Sweets & “Fun Food” on a Low Histamine Diet

Because snacks can derail plans quickly, it helps to pre-commit to two or three options you actually enjoy:

  • Rice cakes with pumpkin-seed butter. Smooth and salty works; add sliced pear if you want contrast.
  • DIY oat bars you fully control. This template for healthy oat protein bars is easy to adapt, and when you’re in a rush, these oat bars in 5 minutes keep ingredients tight.
  • Light granola. Combine rolled oats, coconut flakes, and pumpkin seeds; toast lightly; store briefly.
  • Simple desserts. Baked apples, pears with a hint of olive oil and cinnamon, or a coconut-rice pudding when you want comfort without complexity.

Incidentally, chocolate tends to split audiences during reintroduction, so if you trial it later, do so in tiny amounts and document how you feel.


Low Histamine Diet Cooking & Storage: Tiny Tweaks, Big Wins

Now for the logistics that quietly make the diet work:

Buy smaller amounts more often. Instead of massive shops, pick up just enough meat or fish for a day or two. That way, you’ll naturally cook promptly rather than parking proteins for days.

Cook promptly and cool rapidly. Transfer cooked food into shallow containers and move it into the refrigerator as soon as steam subsides; then, ideally, eat within 24 hours or freeze.

Favor quick methods. Searing, steaming, sautéing, roasting en papillote, and short simmering keep both time and ingredient lists short.

Label and rotate. Even when you’re meticulous, unlabeled containers sabotage the plan. A marker and a roll of tape keep you honest.

Why so fussy? Because histamine is a small, heat-stable molecule—cooking doesn’t reliably destroy it—so your best lever is handling. For a plain-language reminder about storage and histamine formation (especially relevant to fish), skim histamine toxicity basics and you’ll see why these habits matter.


Low Histamine Diet: 7-Day Meal Plan (Mix & Match)

Although individual tolerance differs, this pattern keeps flavors bright and prep times short. Feel free to swap proteins and vegetables across days, and, of course, keep portions aligned to your energy needs.

Day 1
Breakfast: Oats with pear and chia.
Lunch: Poached chicken, quinoa, zucchini and carrot bowl.
Dinner: Pan-seared fresh cod, sweet potato mash, green beans.
Snack ideas: Rice cakes with pumpkin-seed butter; apple slices.

Day 2
Breakfast: Buckwheat porridge with blueberries.
Lunch: Turkey lettuce wraps with cucumber and herbs.
Dinner: Baked lamb meatballs with rice and roasted carrots.
Snack ideas: Coconut yogurt alternative; oat bar square.

Day 3
Breakfast: Scrambled eggs with sautéed courgette; slice of toast (gluten-free if needed).
Lunch: Rice-noodle chicken soup (short simmer; add bok choy at the end).
Dinner: Stir-fried chicken or very fresh prawns with rice and pak choi.
Snack ideas: Pear; rice crackers.

Day 4
Breakfast: Chia pudding (coconut milk) with diced apple.
Lunch: Chicken and rice salad with zucchini ribbons and fresh herbs.
Dinner: Herb-rubbed chicken thighs, quinoa, steamed greens (avoid spinach for now).
Snack ideas: Blueberries; pumpkin seeds.

Day 5
Breakfast: Puffed rice with coconut milk and pumpkin seeds.
Lunch: Lamb and sweet potato bowl with green beans.
Dinner: White fish en papillote with rice and carrot coins.
Snack ideas: Rice cakes; cucumber slices with olive oil and salt.

Day 6
Breakfast: Oat pancakes (trial banana later if you suspect it’s a trigger).
Lunch: Egg fried rice with finely diced zucchini (use day-old rice that was chilled promptly).
Dinner: Roast turkey breast, buckwheat, and a leafy salad (choose non-spinach greens).
Snack ideas: Baked apple; small oat bar.

Day 7
Breakfast: Eggs, rice cakes, and cucumber.
Lunch: Quinoa “tabbouleh-style” (skip tomato for now), plus sliced chicken.
Dinner: Quick chicken stew (short simmer), sweet potato, tender carrots.
Snack ideas: Pear; a few pumpkin seeds.

Naturally, you’ll adjust seasoning to taste—think fresh parsley, chives, dill, or a squeeze of non-citrus brightness (e.g., a splash of mild vinegar only during reintroduction if tolerated). Until then, rely on herbs, garlic-infused oil if whole garlic bothers you, and a confident hand with salt.

Grab the Low Histamine Diet Interactive Tracker (free PDF) with a 7-day meal plan, fillable shopping list, and re-introduction log – Download Here.


Low Histamine Diet × Anti-Inflammatory Eating: How to Blend Without Stress

Because many readers are also trying to reduce background inflammation, it helps to build plates around lean protein + colorful vegetables + gentle carbs + olive oil. Beyond that, consider polyphenol-rich fruit such as blueberries if you tolerate them. Notably, while fermentation can improve nutrient availability in some contexts, the early days of a low histamine diet emphasize unfermented choices first. Later—once you’ve stabilized—you’ll reintroduce candidates gradually and keep what loves you back.

For newcomers who want a conventional medical voice alongside this plan, the Cleveland Clinic introduction is a handy companion; and for a concise checklist you can cross-verify, the Histamine Intolerance UK food list is easy to scan. Meanwhile, keep your own notes—what you ate, when you stored it, how you felt—since your tolerance is the final referee.


Low Histamine Diet Breakfast Variations (So You Never Get Bored)

Even with a tight ingredient set, breakfast can feel fresh day after day. Consider these rotations:

  • Oats three ways. Classic porridge; oven-baked oat squares; or overnight oats in a non-dairy base. For a controlled approach to snacks that double as breakfast, tweak healthy oat protein bars to your tolerance.
  • Eggs beyond scrambled. Poached on quick-sautéed greens; omelettes with fine-diced zucchini; or frittata cups baked for 12–15 minutes for fast weekday reheats.
  • Buckwheat porridge and pancakes. Soft, nutty, and easy to digest, buckwheat performs well in both sweet and savory directions; for background, skim this buckwheat overview and adapt freely.
  • Chia pudding two ingredients at a time. A spoon of chia plus a mild base and a small fruit portion—this chia method is a template you can strip down and rebuild without fuss.

Meanwhile, remember that repetition in structure doesn’t mean monotony in taste; herbs, textures, and plating can carry variety even before you reintroduce more adventurous items.


Low Histamine Diet: Smart Flavor Without Ferments

At first glance, removing ferments looks like removing flavor. Nevertheless, you can still cook boldly:

  • Fresh herb pastes. Blend parsley, dill, or cilantro with olive oil and a pinch of salt; freeze in small portions for instant brightness.
  • Allium strategy. If whole garlic or onion bothers you, use garlic-infused oil for aroma without the same compounds that trouble some people.
  • Crunch and contrast. Pair soft grains with crisp vegetables; add pumpkin seeds or cucumber ribbons to keep each bite interesting.
  • Heat control. Sear meats quickly for browning, then finish gently to avoid extended cook times.

In practice, these techniques make “simple” food taste restaurant-level, which makes adherence easier while you figure out your unique tolerance.


Low Histamine Diet: How to Re-Introduce Foods Confidently

Once you’ve had a quiet baseline for two to four weeks, reintroduce foods one by one. To that end:

  1. Pick one candidate (e.g., tomato). Eat a small portion at one meal.
  2. Wait 48–72 hours, noting symptoms as well as sleep, stress, and storage variables.
  3. Increase portion if day one went well.
  4. Decide: keep, limit, or postpone.

To stay grounded in cautious, evidence-aware advice while you test, a neutral synthesis from the British Dietetic Association helps temper expectations, and the Allergy UK explainer offers practical reminders. Notably, divergent opinions in the literature are normal; your day-to-day response trumps theory.


DAO, Supplements & “Foods That Help”: A Balanced View

Your small intestinal enzyme diamine oxidase (DAO) degrades dietary histamine; thus, you’ll see supplements marketed as a quick fix. However, while some people report benefits, formal evidence and testing standards are still evolving. Accordingly, treat supplements as adjuncts, not anchors. If you want to read an allergy specialist’s cautionary note in plain language, try this DAO Q&A from AAAAI; then, if you experiment, change only one variable at a time so you can tell what helped.

As for “antihistamine foods,” nutrients like vitamin C and polyphenols are interesting, and yet, the basics still win: fresh food, tidy storage, short cooking times, and consistent meal patterns. Consequently, the plan above does more good than hunting for a magic ingredient.


Low Histamine Diet Troubleshooting: When Something Feels Off

Despite best efforts, you may hit snags. If symptoms persist, widen the lens:

  • Check storage and timing. Even a “safe” food can feel unsafe if it lingered too long.
  • Evaluate stress and sleep. Mast-cell behavior isn’t isolated from the rest of your life.
  • Consider overlap with other GI patterns. Some people run a low histamine diet alongside low-FODMAP for a short, supervised window; if that’s you, a cautious, clinician-guided approach is wise.
  • Rule out mimickers. True food allergy, celiac disease, and inflammatory bowel disease deserve medical evaluation when symptoms are significant.

Parallel to this, precise, trustworthy resources keep you grounded. Keep Cleveland Clinic’s overview and the BDA guidance bookmarked for readers who want a conventional lens.


Closing Thoughts: Calm Food, Clear Decisions

Ultimately, a low histamine diet is less about memorizing an encyclopedic list and more about running a clean, fair experiment. First, simplify meals and tighten storage. Next, listen to your body for two to four quiet weeks. Finally, bring foods back systematically and keep the ones that love you back. Meanwhile—and this is the part many people skip—stay flexible. Your goal isn’t a permanent cage; it’s a personal map.

If you keep that spirit, you’ll find this way of eating not only tolerable but surprisingly freeing: fewer variables, fewer surprises, and more breakfasts, lunches, and dinners that feel like you—steady, satisfying, and refreshingly uncomplicated.

Ready to use? Download the Low Histamine Diet Interactive Tracker (free PDF)—7-day meal plan, fillable shopping list, daily log, and re-intro worksheet—right here.

FAQs

1) What is a low histamine diet?

A low histamine diet is a short-term elimination and re-challenge approach that reduces high-histamine foods and potential “liberators,” then gradually reintroduces them to identify personal tolerance.

2) How long should I follow a low histamine diet before reintroducing foods?

Typically 2–4 weeks of a calm baseline works well; subsequently reintroduce one item every 2–3 days while tracking symptoms, sleep, stress, and storage habits.

3) Which foods are best to eat on a low histamine diet?

Emphasize fresh chicken or turkey, eggs, very fresh white fish, rice, quinoa, buckwheat, oats, zucchini, carrots, green beans, lettuce, apples, pears, blueberries, and olive oil.

4) Which foods should I avoid at first on a low histamine diet?

Initially sidestep fermented and aged items (soy sauce, vinegar, sauerkraut, aged cheese, cured meats), alcohol, canned or smoked fish, long-simmered stews, and common liberators like tomato, spinach, eggplant, avocado, and citrus.

5) What are histamine liberating foods?

They’re foods that may prompt your body to release histamine even if the food itself isn’t high in histamine; examples often include citrus, tomato, spinach, eggplant, and avocado.

6) What does a simple low histamine diet meal plan look like?

Build each plate with fresh protein, a gentle carb (rice, quinoa, buckwheat, oats), half a plate of mild vegetables, and olive oil; rotate options through seven days to keep variety.

7) What are easy low histamine breakfast ideas?

Think warm oats with pear, eggs with sautéed zucchini, chia pudding with apple, and puffed rice with a non-dairy base and pumpkin seeds.

8) Are bone broth and long-simmered soups okay on a low histamine diet?

Generally not during elimination; as cooking time lengthens, biogenic amines tend to rise. Prefer quick soups or short simmers, then test longer cooks later.

9) Can I have yogurt, cereal, crackers, granola, or protein bars?

Fermented dairy yogurts are usually high; consider non-dairy alternatives first. Choose plain oats or puffed rice for cereal, simple rice/oat crackers, light DIY granola, and homemade bars with minimal additives.

10) How should I handle leftovers to keep histamine lower?

Cook promptly, cool rapidly in shallow containers, refrigerate early, and eat within 24 hours or freeze. Moreover, label dates so rotation stays tight.

11) Can a low histamine diet be combined with low FODMAP?

Yes, for a short, guided window. Select overlapping “safe” foods from both patterns, keep recipes simple, and stage reintroductions to avoid confounding results.

12) Do DAO supplements or “DAO foods” help on a low histamine diet?

They might assist some people, though evidence is mixed. Treat them as optional adjuncts; first optimize freshness, storage, and structured reintroductions.

13) Are there “antihistamine foods” that reduce symptoms?

Nutrients like vitamin C and polyphenols are discussed, yet no single food is a cure. Consistently low-histamine patterns plus careful prep tend to matter more.

14) What about chocolate, coffee, and tea?

Chocolate often triggers people and is best tested later in tiny amounts. Coffee and tea vary by individual; trial cautiously and note dose, timing, and any symptoms.

15) How do I reintroduce foods on a low histamine diet without confusion?

Select one food, try a small portion once, wait 48–72 hours, then increase if tolerated. Keep notes, avoid adding two new items together, and decide to keep, limit, or pause.

16) What are good low histamine snacks and sweets?

Rice cakes with pumpkin-seed spread, fruit like apples or pears, light oat bars you control, simple granola, baked apples, and coconut-rice pudding are reliable starters.

17) Is fish allowed, and if so, which types?

Yes—choose very fresh white fish and cook the same day. Conversely, avoid canned, smoked, or long-stored fish during elimination.

18) Can I follow a vegetarian or vegan low histamine diet?

Absolutely, though protein variety requires planning. Center plates on eggs (if included), quinoa, buckwheat, oats, rice, and tolerated seeds; then stage legumes later if needed.

19) Will a low histamine diet help mast-cell–related symptoms?

It may help some people by reducing dietary triggers; nevertheless, consider it supportive, not curative, and coordinate with your clinician for comprehensive care.

20) What’s the single most important success tip for a low histamine diet?

Prioritize freshness over perfection: buy smaller quantities, cook quickly, cool fast, and reintroduce foods with intention so your long-term pattern fits your life.

Posted on 3 Comments

Electrolyte Elixir: The Science Behind Coconut Water as a Natural Sports Drink

Athlete sprinkles salt into a bottle of coconut water beside halved coconut and lime—Coconut Water & Electrolytes cover

For years, athletes and everyday movers have reached for coconut water after a run, ride, or humid commute. Coconut water delivers a naturally occurring electrolytes mix of potassium, sodium, magnesium, calcium, & phosphorus—a profile that can hydrate efficiently for everyday use and light-to-moderate training. The appeal is obvious: it tastes light, it’s easy on the stomach, and it comes with minerals that your body uses to keep fluids where they belong. Even so, hydration is more than “drink something wet.” The composition of your drink—especially the balance of sodium and potassium—changes how quickly you absorb fluid and how well you retain it during heat, illness, or long workouts.

To ground this discussion, it helps to start with a simple idea: effective hydration is about water + electrolytes + context. In other words, what you’re doing (a slow 30-minute jog vs. a 2-hour tempo run), where you’re doing it (cool office vs. tropical afternoon), and how much you sweat all determine whether plain coconut water is enough—or whether you’ll want to tweak it.

If you want a primer on the broader health story, you can skim our friendly overview of the health benefits of coconut water before diving deeper. It sets the stage without repeating what follows.


The science under the sip

When you drink, the small intestine absorbs fluid fastest when the solution is roughly isotonic and when sodium is present to drive water across the gut wall via sodium–glucose co-transport. Meanwhile, potassium is crucial inside cells, stabilizing nerve impulses and muscle function. Coconut water naturally provides potassium, a little sodium, and smaller amounts of magnesium and calcium. Consequently, many people feel great sipping it during day-to-day life or after light training.

However, two real-world factors complicate things. First, sweat sodium losses can vary wildly by person (some lose under 500 mg per liter of sweat; others lose over 1,000 mg). Second, the electrolyte numbers in coconut water vary by variety, growing conditions, and processing. To keep claims concrete, compare brand labels against a public reference. As a starting point for nutrient baselines and cross-checking, browse USDA FoodData Central. It’s not a substitute for your exact bottle, but it keeps you anchored in real data.

Also Read: Benefits of Lemon and Lime Water: Refreshing Hydration with a Citrus Twist


What Coconut Water & Electrolytes actually look like in the bottle

In practice, packaged coconut water tends to be potassium-forward with modest sodium. That’s a wonderful profile for everyday hydration, and it explains why people feel refreshed quickly without the heavy, syrupy feel of many sports drinks. Notably, individual labels tell the real story; for example, one typical retail panel for a premium pink Nam Hom style lists hundreds of milligrams of potassium per serving with tens of milligrams of sodium—a pattern you’ll see often. If you’re curious about a concrete example of this potassium-high, sodium-modest pattern, take a look at a representative store label for a leading organic brand like this Harmless Harvest nutrition panel. Once you start scanning a few labels, you’ll notice how consistent that ratio can be.

All the same, your needs might not be “typical.” If you’re training in hot weather, racing, working outdoors, or you consider yourself a “salty sweater,” sodium replenishment matters more than flavor. That’s where a practical approach to Coconut Water & Electrolytes comes in—enjoy the taste and potassium, then adjust the sodium to match the day.

Also Read: Watermelon: The Hydration Hero for Your Skin – Benefits, Myths, and 5 Quenching Recipes for Dewy Skin


Coconut Water & Electrolytes vs. sports drinks: choosing with intention

Although sports drinks dominate stadium coolers for a reason, coconut water holds its own for many scenarios. To decide confidently, focus on use case rather than brand loyalty.

For short efforts and daily sipping, coconut water’s natural sweetness and high potassium content are often perfect. You hydrate, you avoid sticky aftertastes, and you take in gentle carbohydrates. For extended efforts, heavy sweat, or back-to-back sessions, sodium drives the bus. In that context, products formulated specifically for higher sodium can be advantageous.

To see how labels differ, peek at a few manufacturer pages. For instance, Gatorade lists about 160 mg sodium per 12 fl oz on its official panel (PepsiCo Product Facts). Meanwhile, Pedialyte Classic—built as an oral rehydration solution—comes in far higher, around 390 mg sodium per 12 fl oz, with a notable potassium contribution as well (Pedialyte Classic). By contrast, Liquid I.V. Hydration Multiplier supplies a robust sodium dose per stick when mixed as directed, which many endurance athletes appreciate for long efforts or very hot days (Hydration Multiplier). Finally, Electrolit Coconut offers a ready-to-drink, pharmacy-style electrolyte profile; the brand’s coconut flavor showcases the flavor you like alongside a broader mineral blend (Electrolit Coconut), and some retail panels show substantially more sodium than plain coconut water in a similar serving (example retail facts).

In short, coconut water shines when you don’t need so much sodium; sports drinks or ORS-style formulas shine when you do.

Also Read: Pedialyte and Electrolytes for Diarrhea


Making Coconut Water & Electrolytes “endurance-ready” without losing the taste

Happily, you don’t need to abandon coconut water on hard days—you can upgrade it. Rather than reinvent the wheel, start with a bottle you enjoy, then follow three steps:

  1. Add sodium deliberately. A pinch of fine salt (⅛–¼ tsp) raises sodium quickly without turning the drink into soup. Stir, sip, and adjust for taste.
  2. Dilute to the day. If it’s sweltering outside, top up with cold water and ice; you’ll keep coconut flavor while bringing the overall drink closer to an easy-to-absorb concentration.
  3. Match carbohydrates to effort. For longer sessions at a steady tempo, a teaspoon or two of sugar or honey smooths energy delivery; for easy days, you can skip the extras.

For more ideas—and to keep your pantry versatile—check our kitchen-tested guide to natural homemade electrolyte drinks. You’ll find straightforward combinations you can tailor on the fly, including coconut-forward options that don’t taste like liquid candy.

Also Read: Coconut Water Cocktails: 10 Easy, Refreshing Drinks


When Coconut Water & Electrolytes aren’t the right tool

Despite its many strengths, coconut water isn’t always ideal. During gastrointestinal illness, severe dehydration, or sustained heat stress, the body benefits from a composition close to oral rehydration solution (ORS) standards. Clinically, ORS balances sodium and glucose to enhance absorption at a known osmolarity. For a concise medical summary—not marketing—review this professional write-up on oral rehydration therapy. It outlines why sodium and glucose together move water efficiently across the gut wall.

Accordingly, on tough days, you may choose a stick of Liquid I.V., a bottle of Electrolit, or a serving of Pedialyte to meet higher sodium needs, then return to coconut water as your pleasant, everyday baseline.

Also Read:  Is Energy drink Gatorade Worth the Hype?


Everyday uses for Coconut Water & Electrolytes that feel effortless

While race-day decisions get attention, most hydration moments are ordinary: a gym session squeezed between meetings, a walk in muggy weather, or a late night after spicy food. In those moments, coconut water’s gentle taste and naturally high potassium make it easy to sip enough without forcing it.

  • Desk days: keep a chilled bottle nearby and alternate sips with plain water. You’ll cover potassium comfortably while staying light.
  • Hot commutes: pre-cool the bottle; the cold shock plus mild sweetness makes consistent drinking almost automatic.
  • Short workouts: drink a little before to prime, a little after to re-balance, and keep the rest in the fridge for cooking (it brightens smoothies surprisingly well).

And because delight matters, try flavor pivots that keep the profile clean. For instance, these cooling cucumber electrolyte quenchers ride the same hydration logic while giving you a fresh, spa-like twist that never feels cloying.


A practical recipe: build your own Coconut Water & Electrolytes

Here’s a fast, flexible mix that scales up effortlessly:

  • Base: 1 cup coconut water
  • Sodium: ⅛–¼ tsp fine salt (start small; increase on hotter, longer days)
  • Citrus: 1–2 tbsp lemon or lime juice for brightness
  • Optional carbs: 1–2 tsp sugar or honey if you’re training long
  • Top up: cold water/ice to ~700–750 ml total

Shake, taste, and adjust. On easy days, reduce salt. On simmering afternoons or hilly runs, nudge it upward. If you prefer a precise pantry system with variations for different goals, you’ll love our roundup of post-workout electrolyte drink recipes; it maps effort to ingredients without overcomplicating your kitchen.

Meanwhile, if you’re experimenting with low-carb or keto, you can still keep coconut water in your rotation, just in smaller, well-timed amounts. For templates that respect carb budgets yet remain practical, lean on these keto electrolyte drink ideas and tweak from there.

And if you’re training while fasting—or supporting long focus blocks with minimal calories—you can use fasting-friendly builds that stay gentle on the stomach. For thoughtful, tasteful options, see our fasting electrolyte recipes.


Brand reality check without the noise

Because labels evolve, it’s smart to verify numbers at the source. Manufacturer or retailer panels let you check sodium and potassium per serving and compare apples to apples.

  • For a mainstream benchmark, consult Gatorade’s nutrition panel here: PepsiCo Product Facts.
  • When you need ORS-style sodium, Pedialyte Classic spells out its formulation clearly on the brand site: Abbott Nutrition Pedialyte.
  • If you want portable sticks with a stronger sodium profile, Liquid I.V. lists ingredient details and serving directions on the Hydration Multiplier page.
  • For a coconut-flavored RTD electrolyte drink, Electrolit Coconut blends sodium with other minerals; browse the product page and, when comparing, peek at a retail nutrition panel example to gauge per-serving sodium.

By checking labels periodically and matching them to your use case, you’ll stay ahead of reformulations without chasing trends.


How to choose: a label checklist for Coconut Water & Electrolytes

When your goal is clear, decisions get easy. Use this quick, human-friendly checklist:

  1. Sodium: for long, sweaty sessions—or if you know you’re a salty sweater—prioritize higher sodium or plan to add a pinch of salt.
  2. Potassium: coconut water typically covers this well. If you’re aiming for balanced daily intake, you’re already winning here.
  3. Total sugars: align to effort; enjoyable sweetness supports longer sessions, but on easy days you can dilute.
  4. Serving size realism: convert the label to per bottle numbers, not just per cup, so you know what you actually drink.
  5. Stomach feel: if syrupy drinks never sit right, let coconut water lead; if you need punch on race day, use a higher-sodium option sparingly and test in training.
  6. Context: hot weather, double sessions, or illness change the math—choose accordingly.

As you refine the habit, your taste buds and performance will tell you when you’ve hit the sweet spot.

Also Read: Lemon Mint Water: 5 Refreshing Recipes to Hydrate and Invigorate


Whole-food pairings that elevate Coconut Water & Electrolytes

Hydration doesn’t happen in a vacuum. Pair your drink with foods that bring potassium and a touch of sodium to the table. A banana with a lightly salted rice cake, a baked potato with a pinch of salt, or a bowl of broth alongside your bottle can round out recovery without extra fuss. For a concise reference you can save on your phone, grab our printable Potassium-Rich Foods List. It keeps choices simple when you’re busy or traveling.


Putting Coconut Water & Electrolytes to work—scenarios and solutions

Because “what should I drink?” is usually a context question, here are a few everyday scenarios with practical decisions:

  • Morning mobility + short jog (cool weather): sip half a bottle of coconut water beforehand, finish it afterward, and call it good. No tweaks necessary.
  • Lunchtime strength session (air-conditioned gym): start with coconut water, add a whisper of salt if your shirt shows salt rings regularly, and keep plain water nearby.
  • Evening tempo run (warm, humid): pre-salt your coconut water lightly, top with ice, and bring a small soft flask; refill with plain water at a fountain if needed.
  • Outdoor workday (high heat): alternate between coconut water and a higher-sodium helper such as Electrolit or a Liquid I.V. mix; prioritize cooling the drinks.
  • Travel day + spicy dinner: coconut water plus a salty snack balances fluids without overdoing sugar; finish with herbal tea and call it a night.
  • Recovery after mild stomach upset: when you’re ready for fluids again, begin with small sips; if losses were significant, consider an ORS-style drink guided by the oral rehydration therapy overview, then return to coconut water as appetite normalizes.

Step by step, you’ll learn to treat hydration less like a rulebook and more like a dial you turn with weather, effort, and taste.


A final word on confidence and consistency

Ultimately, the smartest hydration routine is the one you’ll follow consistently. Coconut Water & Electrolytes make that easier because they taste good, feel light, and deliver real minerals your cells use every minute. On easy days, drink it straight. On hard days, salt it and dilute. When illness or extreme heat raises the stakes, reach for an ORS-style option, then transition back.

Rather than chase perfect numbers, choose clarity over complication: keep a bottle of coconut water in the fridge, a small salt tin in your gym bag, and a plan for long or hot days. With those simple tools—and a habit of checking labels on official pages like Gatorade, Pedialyte, Liquid I.V., and Electrolit Coconut—you’ll hydrate on purpose, not by accident.

Meanwhile, keep things enjoyable. Rotate flavors, add citrus, pour over ice, or build one of our gentle post-workout electrolyte drink recipes. You’ll feel the difference not only in how you perform, but also in how quickly you bounce back. And that, more than anything, is what smart hydration is supposed to deliver.

FAQs

1) What are Coconut Water & Electrolytes, exactly?

Coconut Water & Electrolytes refers to the naturally occurring minerals—primarily potassium, plus sodium, magnesium, calcium, and phosphorus—found in coconut water. Collectively, they help regulate fluid balance, nerve impulses, and muscle contraction during activity.

2) Does coconut water actually have enough electrolytes for workouts?

Generally, yes for light-to-moderate sessions because potassium is abundant; however, sodium is often modest. Consequently, for long, sweaty efforts many people benefit from adding extra sodium or alternating with a higher-sodium drink.

3) How much sodium and potassium are typical in Coconut Water & Electrolytes?

Typically per cup (240 ml), many packaged coconut waters provide several hundred milligrams of potassium but only a few dozen milligrams of sodium. Therefore, the drink is potassium-forward and sodium-light compared with classic sports drinks.

4) Is coconut water isotonic?

Broadly speaking, the carbohydrate concentration can be near isotonic, yet the sodium concentration is usually below sweat losses. Accordingly, coconut water is excellent for everyday hydration and shorter workouts, while endurance sessions may require additional sodium.

5) Is coconut water good for electrolyte balance after running?

Frequently, yes. Potassium helps restore intracellular balance and supports normal muscle function. Still, runners who lose lots of salt may need to complement Coconut Water & Electrolytes with a sodium boost to feel fully recovered.

6) Which is better: Coconut Water & Electrolytes or Gatorade?

It depends on the situation. Coconut water offers a lighter taste and higher potassium with fewer additives; Gatorade typically supplies more sodium and predictable carbohydrates for extended or very hot workouts.

7) How does coconut water compare with Liquid I.V. or similar mixes?

Powdered mixes often deliver substantially more sodium per serving and a set ratio with glucose for rapid absorption. Meanwhile, Coconut Water & Electrolytes bring natural potassium and an easy-drinking profile—great for moderate efforts or daily use.

8) What about Electrolit, Pedialyte, or ORS-style options?

Those formulas emphasize sodium first, targeting fast rehydration during illness, heat stress, or prolonged exercise. In contrast, coconut water is typically more pleasant for routine hydration but may need sodium support in these tougher scenarios.

9) Best coconut water for electrolytes—what should I look for?

Prioritize straightforward ingredient lists and transparent nutrition panels. Ideally, you’ll see high potassium per serving and, if you train in heat, either moderate sodium or a plan to add a pinch of salt.

10) Is coconut water high in sodium?

Usually, no. Most packaged options are relatively low in sodium compared with sports drinks. Consequently, heavy sweaters should either add salt or pair Coconut Water & Electrolytes with a higher-sodium beverage.

11) Does coconut water contain magnesium and calcium?

Yes, but in modest amounts relative to potassium. These minerals still contribute to overall electrolyte intake, though they shouldn’t be your sole source if you specifically need higher magnesium or calcium.

12) Can Coconut Water & Electrolytes help with cramps?

Sometimes. Adequate potassium and fluids can ease cramp risk in certain cases; however, cramps are multifactorial. When sweat sodium losses are high, meeting sodium needs typically matters as much—or more—than potassium alone.

13) Is coconut water good for low sodium levels (hyponatremia)?

No beverage should be used to “treat” a medical condition without guidance. That said, because coconut water is usually low in sodium, it is not the ideal choice when sodium repletion is urgently required.

14) Are “coconut juice” or “buko juice” different from Coconut Water & Electrolytes?

Terminology varies by region. Many products labeled “coconut juice” are essentially coconut water. Nevertheless, always check the label for added sugars or flavors, which can change the electrolyte-to-carb balance.

15) Is coconut milk or coconut oil useful for electrolytes?

Not really. Electrolytes reside in the water portion of the fruit. Coconut milk is predominantly fat and coconut oil is pure fat—neither is an electrolyte beverage.

16) Can Coconut Water & Electrolytes fit keto or low-carb plans?

Often in small, well-timed servings. Because coconut water contains natural carbs, strict keto followers tend to use smaller amounts around workouts or dilute with water to manage carbohydrate totals.

17) What’s the best time to drink coconut water for training?

Commonly: a little before easy sessions to prime, then more afterward to replenish. During longer efforts, many athletes sip steadily while ensuring separate sodium coverage if conditions are hot or sweat rates are high.

18) How can I make Coconut Water & Electrolytes more “endurance-ready”?

Practically speaking, add a small pinch of fine salt, top with cold water to taste, and—if needed—include a teaspoon of sugar or honey for longer efforts. This simple adjustment raises sodium, improves absorption, and keeps flavor clean.

19) Are flavored coconut waters okay for electrolytes?

Often yes, provided the flavoring doesn’t dramatically increase sugar or mask the mineral profile. Prefer options with straightforward ingredients and consistent nutrition panels so you know what you’re getting each bottle.

20) Do brands like BODYARMOR, NOOMA, ROAR Organic, or Vita Coco change the equation?

Each positions Coconut Water & Electrolytes a bit differently—some add minerals or vitamins, others keep it simple. Because formulations can vary, the smartest move is to compare sodium, potassium, and total sugars per serving against your training demands.

21) Can kids or older adults use coconut water for hydration?

Typically, yes for casual hydration when eating normally. However, during illness or significant fluid loss, higher-sodium solutions are often preferred; Coconut Water & Electrolytes can still play a role alongside regular food once appetite returns.

22) Will Coconut Water & Electrolytes upset my stomach during workouts?

Rarely, as coconut water is generally easy to tolerate. Even so, personal digestion differs. Therefore, test during training—not on race day—and adjust dilution and sodium to your comfort.

23) What serving size makes sense?

A practical starting point is 250–500 ml around easy sessions, then adjust for duration, temperature, and sweat rate. For long or hot efforts, scale volume gradually and ensure your sodium strategy keeps pace.

24) Do I still need plain water if I’m drinking coconut water?

Usually, yes. Alternating Coconut Water & Electrolytes with water helps you manage sweetness and total carbohydrate intake while maintaining steady fluid absorption over time.

25) Quick summary: when should I choose Coconut Water & Electrolytes?

Choose it for day-to-day hydration, short or moderate workouts, and times you want a lighter, more natural taste. Choose a higher-sodium option—or fortify your coconut water—when heat, duration, or heavy sweat make sodium replacement the priority.

Posted on Leave a comment

Potassium-Rich Foods List & Serving Sizes

Potassium-rich foods list cover showing bananas, spinach, baked potato, white beans, yogurt, dried apricots and a coconut with a hand reaching in—portrait layout

Looking for a practical, trustworthy potassium-rich foods list that translates smoothly into everyday meals? You’re in the right kitchen. This long-form guide focuses on foods that deliver meaningful potassium per common serving, so you can plan, shop, and cook without second-guessing. Along the way, we’ll unpack how much potassium most adults generally need, which fruits and vegetables quietly top the charts, where beans and dairy punch above their weight, and when potassium-forward drinks like coconut water or ORS actually make sense. You’ll also find a one-day plan, friendly shopping notes, and a serving-based table build along in this blog post.

As we go, you’ll notice links to reliable external references (for data you can rely) and MasalaMonk deep dives that turn knowledge into action—think banana potassium breakdown, coconut water buyer’s guide, and DIY electrolyte drink recipes. Read straight through or hop using the table of contents below.


Daily Potassium Needs & Safety (Quick Primer)

Before we dive into the delicious part of this potassium-rich foods list, a brief primer helps set expectations. On food labels, the referenced Daily Value (DV) for potassium is 4,700 mg/day. In practice, Adequate Intake estimates commonly used in guidance sit around 3,400 mg for adult men and 2,600 mg for adult women. Most healthy kidneys regulate excess efficiently through urine; however, this isn’t universal. If you live with chronic kidney disease (CKD) or take certain medications—such as ACE inhibitors, ARBs, or potassium-sparing diuretics—your clinician may assign a lower daily target and specific portion strategies.

For clear, authoritative detail, keep these two bookmarks close: the NIH Office of Dietary Supplements – Potassium (Health Professional) and the more conversational NIH Potassium Fact Sheet (Consumer). Both outline needs, safety, and interactions you’ll want to consider as you adjust your plate.


The Potassium-Rich Foods List You’ll Actually Use

Let’s start with the heavy hitters, ranked conceptually by mg per typical serving. Although bananas are iconic, they rarely lead the pack once you standardize portions. Instead, dependable anchors include cooked beet greens, baked potatoes with skin, white lima beans, cooked spinach, yams, acorn squash, breadfruit, bamboo shoots, and water chestnuts. These staples are easy to fold into weeknight meals and batch-cooking routines.

Fruits high in potassium—banana, half avocado, cantaloupe cubes, orange slices, dried apricots, and a bowl of yogurt; overlay with serving-based potassium values.

How to translate that into action? Center each meal around one potassium anchor and build flavor around it. Roast a tray of yams or acorn squash on Sunday, then scatter cubes into salads and bowls. Bake a few potatoes while you prep; top with herbs and a spoon of yogurt for a fast, mineral-rich dinner. Fold beet greens into soups, stir cooked spinach into omelets, and lean on white lima beans for stews or quick warm salads. For rigor and numbers you can check, use the searchable USDA FoodData Central database.

Download our FREE Printable PDF of Potassium Rich Foods for quick reference : Click Here.

But What About Bananas?

Everyone asks about bananas, so let’s address them head-on. Depending on size, a banana typically lands in the ~360–420 mg range per fruit, which certainly helps your daily count—especially around training or as part of a balanced snack. Even so, variety wins. Pairing banana with protein and tang can blunt a mid-morning slump; our banana potassium guide explores portion ideas, comparisons with other fruits, and flavor pairings you’ll actually crave.


Fruits & Vegetables Highest in Potassium (Serving-Based)

Planning thrives on realism, so we stick to amounts you’d actually serve: 1 cup cooked vegetables, 1 medium potato, ½ cup cooked beans, and one small to medium fruit. With those portions in mind, the following moves make a high-potassium day astonishingly easy:

  • Roast trays of yam or acorn squash on Sunday. Thereafter, fold them into salads, bowls, and wraps for three to four days.
  • Sauté spinach in olive oil with garlic until just wilted; a half cup cooked delivers an outsized potassium return for minimal effort.
  • Stir beet greens into brothy soups or lentil stews; their mineral edge brightens the pot.
  • Add water chestnuts to stir-fries when you want texture and extra potassium.
  • Bake potatoes while you prep; the skin not only tastes fantastic but also retains more minerals.

Prefer fruit-first snacks? Consider melon, oranges, or the classic banana paired with yogurt or cottage cheese. And if you want to lean into recipes, our piece on Greek yogurt shows how to balance richness, tang, and staying power.


Where Potassium Hides: Beans, Lentils, Dairy & More

Beyond produce, pulses and dairy quietly support your goals. A ½ cup of pinto beans lands around the mid-300s mg, and milk or yogurt typically contributes ~350–400 mg per serving—useful numbers when you’re assembling bowls or building smoothies. Moreover, legumes pair beautifully with bright acids (lime, vinegar), fresh herbs, and modest dairy to turn simple food into something you’ll look forward to.

For richer textures in curries and soups, skim Coconut Milk – Nutrition, Glycemic Index & Impact and Coconut Milk for Keto Cooking. Both articles show how to harness creaminess while keeping portions sensible within a balanced diet.


Drinks That Deliver Potassium (When, Why & How Much)

Liquid choices can complement your potassium-rich foods list, although it’s easy to overshoot sugar or miss the point of an electrolyte drink. Consequently, context matters.

Coconut water is the standout everyday option for many healthy adults: typically ~500–600 mg potassium per 240 mL (1 cup), plus a touch of natural sweetness. Notably, it doubles as a gentle, food-first electrolyte beverage for light training or hot days. For how to choose a quality brand, avoid cloying blends, and understand benefits beyond potassium, skim The Ultimate Guide to Coconut Water. And if you’re curious about its place in workouts, Electrolyte Elixir: The Science Behind Coconut Water as a Natural Sports Drink breaks down when it shines—and when it doesn’t.

Potassium in drinks—coconut water, orange juice, prune juice, sports drink, and water on a white marble surface with a hand pouring; labels show per-cup values (coconut water 500–600 mg, orange juice ~495 mg, prune juice ~705 mg, sports drink ~30–45 mg, water 0–5 mg).
Potassium in drinks per 1 cup: coconut water 500–600 mg, orange juice ~495 mg, prune juice ~705 mg, sports drink ~30–45 mg, water 0–5 mg—use for quick comparisons.

By contrast, Oral Rehydration Solutions (ORS) are built for illness-related dehydration. The WHO’s low-osmolar formula provides a higher sodium load and about 20 mmol/L potassium, intended to correct losses rapidly and safely. Thus, ORS is a therapy, not a daily sipper.

If you’d rather avoid commercial bottles altogether, you’re covered. Try 5 DIY Natural Electrolyte Drinks for mix-and-match templates, Spice Up Your Electrolyte Game for cardamom-and-clove twists, Electrolyte Drinks for Hangovers for morning-after pragmatism, and Cooling Cucumber Electrolyte Quenchers when the day runs hot. Likewise, for cozy evenings, Warm & Soothing Electrolyte Infusions keep hydration gentle and flavorful.


A One-Day Potassium-Forward Meal Plan

Because it’s easier to act on a plan than a principle, here’s a flexible day built from foods you can get almost anywhere. Use it as written, or swap in the foods you prefer—either way, you’ll notice how each meal has a single potassium anchor.

  • Breakfast: Greek yogurt topped with banana, a sprinkle of seeds, and a squeeze of lime.
    Why it works: yogurt brings ~350–400 mg; banana adds another ~360–420 mg; seeds supply crunch and micronutrients. As a result, you start with a balanced, high-satisfaction bowl.
  • Lunch: Lentil or bean salad with roasted yam, a fistful of spinach, and a bright vinaigrette.
    Why it works: legumes and yams layer potassium while spinach provides a concentrated boost in a small volume; acidity keeps the bowl lively.
  • Snack: Dried apricots, or a small baked potato wedge with yogurt dip.
    Why it works: concentrated foods help you bridge a low-potassium day; meanwhile, portion control ensures you don’t overdo it.
  • Dinner: Baked potato (skin on) with herbed yogurt and sautéed beet greens; serve alongside grilled fish or paneer.
    Why it works: a classic high-potassium dinner with protein and plenty of flavor; it also reheats nicely the next day.

To tighten the blood-pressure angle—especially if your clinician is encouraging food-first strategies—there’s regulatory support you can cite. The FDA recognizes that diets containing foods that are good sources of potassium and low in sodium may reduce the risk of high blood pressure and stroke; you can read the context directly at the FDA health claim explanation. Accordingly, the biggest day-to-day wins come when you add potassium-rich foods and cut sodium in tandem.


Shopping & Prep Notes That Save Time

Even with the best intentions, habits hinge on convenience. Thus, consider a few friction-removers:

  1. Plan from the anchor. Pick one potassium-dense component per meal (potato, beans, spinach, yam). Thereafter, layer in protein, herbs, and a splash of acid.
  2. Cook once, use twice. Roast or bake two anchors on Sunday (say, yams and potatoes). Afterwards, plug them into salads, bowls, tacos, or wraps for midweek agility.
  3. Keep dairy in rotation. If tolerated, milk and yogurt offer ~350–400 mg per serving with minimal prep. In smoothies or raita, they’re a quick pathway to better intake.
  4. Dial drinks to your day. Coconut water suits casual heat or training; ORS is for illness and heavier losses. Likewise, homemade electrolyte mixes let you control sugar and salt levels; explore a template you can tweak in 5 DIY Natural Electrolyte Drinks.

When to Limit Potassium (CKD, Hyperkalemia & Salt Substitutes)

If your labs show high serum potassium (hyperkalemia) or your clinician has diagnosed CKD, this potassium-rich foods list flips: many “power foods” become items to reduce, portion carefully, or swap. Common high-potassium foods in this context include baked or boiled potatoes and sweet potatoes, tomato products, cooked leafy greens (spinach, beet greens), dried fruits (apricots, prunes), coconut water, and generous servings of legumes. Moreover, label vigilance matters because many “low-sodium” seasonings rely on potassium chloride as a salt substitute.

For pragmatic tactics—leaching techniques for potatoes, portion swaps, and label reading—lean on the National Kidney Foundation’s potassium guidance. And, naturally, keep decisions individualized with your renal dietitian; targets and tolerances vary widely.


Vegetables high in potassium—spinach leaves, whole and sliced sweet potato, cherry tomatoes, and beet cubes with a hand picking a piece; serving-based values shown (spinach 1 cup ~839 mg, sweet potato 1 cup ~754 mg, tomatoes ~534 mg, beets 1 cup ~518 mg).
Vegetables high in potassium at a glance—spinach, sweet potato, tomatoes, and beets—listed per common serving to make meal planning easy.

Potassium-Rich Foods List — Serving Chart

The table below is serving-based to mirror real-world portions. Values draw primarily from DietaryGuidelines.gov (Food Sources of Potassium) and the NCBI/USDA tabulation, with specific items cross-checked via USDA FoodData Central and MyFoodData.

To download our FREE Printable PDF of Potassium Rich Foods for quick reference : Click Here.

FoodServingPotassium (mg)NotesSource
Beet greens, cooked1 cup1309Fold into dal/soups for an easy boost.DietaryGuidelines.gov
Lima beans (white), cooked1 cup955Great in stews and salads.DietaryGuidelines.gov
Potato, baked with skin1 medium~926Top with herbs & Greek yogurt.DietaryGuidelines.gov
Yam, cooked1 cup911Batch roast on Sundays for easy bowls.DietaryGuidelines.gov
Acorn squash, cooked1 cup896Roast & toss with chili-lime.DietaryGuidelines.gov
Amaranth leaves, cooked1 cup846Quick sauté with garlic and mustard seeds.DietaryGuidelines.gov
Spinach, cooked1 cup839Stir into omelets, khichdi, pasta.DietaryGuidelines.gov
Breadfruit, cooked1 cup808Starchy staple; great in curries.DietaryGuidelines.gov
Bamboo shoots, raw1 cup805Add crunch to stir-fries.DietaryGuidelines.gov
Water chestnuts1 cup724Texture + potassium in quick sautés.DietaryGuidelines.gov
Salmon, baked1 small fillet763Pairs well with roasted yam.NCBI/USDA table
Spinach, cooked1/2 cup591Half-cup still packs a punch.NCBI/USDA table
Coconut water (unsweetened)1 cup (240 mL)~600See coconut water guide.MyFoodData/USDA
Cantaloupe, raw1 cup417Great in breakfast bowls.NCBI/USDA table
Milk, 1%1 cup388Easy add-in for smoothies/porridge.NCBI/USDA table
Pinto beans, cooked1/2 cup373Protein + potassium in one spoon.NCBI/USDA table
Yogurt, low-fat with fruit6 oz366Balance with seeds/nuts; see Greek yogurt tips.NCBI/USDA table
Banana1 small362Details: banana potassium guide.NCBI/USDA table
Edamame, boiled1/2 cup338Snack or toss into salads.NCBI/USDA table
Dried apricots1/2 cup~755Concentrated; portion if limiting potassium.MyFoodData/USDA
Potato, baked (medium)1 potato (173 g)~926Nutrition breakdown here.MyFoodData/USDA
Avocado1/2 avocado (mashed, ~1/2 cup)~560Creamy add-in for bowls.USDA FoodData Central
Orange juice1 cup~496Use in moderation if watching sugars.USDA FoodData Central
Prune juice1 cup~707Another concentrated option.USDA FoodData Central

Why This Potassium-Rich Foods List Emphasizes “Per Serving”

Some lists rank foods by 100 grams, which certainly standardizes comparisons. Nevertheless, you rarely eat on a scale. In practice, serving-based rankings better match how you shop and cook: a cup of cooked vegetables, a medium potato, a half-cup of beans, a single piece of fruit. Consequently, “mg per serving” helps you visualize a plate, not a lab bench.

Taste, Texture, and the Art of Making It Stick

Good nutrition sticks when it tastes good. Accordingly, think less about discipline and more about design:

  • Build contrast. Pair creamy potatoes with bright yogurt and herbs; offset sweet yams with chili-lime crunch.
  • Use spice for momentum. A pinch of chaat masala on fruit, cumin on beans, or mustard seeds in spinach can convert “healthy” into “craveable.”
  • Keep a default dinner. For example, “hot pan + greens + leftover roasted veg + eggs or paneer,” finished with a squeeze of lemon. In other words, a dependable blueprint means you’ll actually do it.

Likewise, hydration should complement flavor instead of fighting it. On lighter days, a splash of coconut water in a tall glass with ice, cucumber, and mint can be refreshing without being cloying—see Cooling Cucumber Electrolyte Quenchers for easy riffs. Conversely, after tougher sessions or heat waves, lean on recipes from Spice Up Your Electrolyte Game to keep variety high and boredom low.

Bowls of dry legumes—kidney beans, lentils, white beans, and chickpeas—with a hand touching one bowl; text shows potassium per serving (lentils 731 mg, kidney beans 622 mg, chickpeas 474 mg, white beans 421 mg).
Legumes pack potassium: lentils, kidney beans, chickpeas, and white beans—use half- to one-cup servings to boost daily intake.

Safety, Interactions & Sensible Boundaries

Because potassium plays a central role in nerve and muscle function—including heart rhythm—excess from supplements can be risky in the wrong context. For that reason, many over-the-counter potassium products cap each serving at ~99 mg, whereas larger, targeted doses are prescribed and monitored when clinically indicated. If you’re considering supplements for cramps or blood pressure, speak with your clinician and skim the NIH ODS overview to understand interactions and contraindications.

Furthermore, when blood pressure is your main concern and your kidneys are healthy, the food pattern with the best evidence pairs higher dietary potassium with lower sodium. To see how regulators frame this, review the FDA’s authorized health claim; then, in your kitchen, make it tangible: swap salty packaged snacks for a yogurt-and-banana bowl, trade one restaurant meal for a home-roasted yam plate, and season generously with herbs, citrus, and spice.


Bringing It All Together

Ultimately, the simplest habit is the most resilient: choose one potassium anchor per meal. A baked potato with skin, a half cup of lentils, a cup of cooked spinach, or a roasted yam will nudge your day in the right direction almost automatically. Additionally, rotate in potassium-aware drinks when appropriate—coconut water’s benefits and buyer’s tips are a great start.

And yes, life is messy. Some days you’ll under-shoot; other days you’ll nail it without thinking. On balance, what matters is the drift of your week, not the perfection of your day. Consequently, set the table with food you enjoy, keep one or two potassium-dense staples prepped, and let taste lead the way.

Download our FREE Printable PDF of Potassium Rich Foods for quick reference : Click Here.


FAQs

1. What is a potassium-rich foods list?

A potassium-rich foods list is a grouped, serving-based rundown of foods that provide a meaningful amount of potassium per typical portion—think 1 cup cooked vegetables, 1 medium baked potato with skin, ½ cup beans, or 1 small banana. Using servings instead of 100 g weights makes it easier for readers to apply nutrition data directly to meals at home.

2. How much potassium do most adults need in a day?

Most healthy adults aim around the nutrition-label Daily Value of 4,700 mg per day, while common intake targets sit near 3,400 mg for men and 2,600 mg for women. However, anyone with kidney disease, high potassium on blood tests, or on certain medications may be given a lower, personalized goal by their health team.

3. Which foods are naturally highest in potassium per serving?

Generally, cooked beet greens, baked potatoes with skin, white lima beans, cooked spinach, yams, acorn squash, and some fruits or juices can supply a large amount in one go. Dried fruits such as apricots and prune juice can be even more concentrated, so they should be portioned carefully, especially when potassium must be limited.

4. Are bananas really the best source of potassium?

Bananas are a solid and convenient source, usually around 360–420 mg each depending on size. Yet several vegetables and legumes can provide more per serving. So, bananas are good, but they are not the only or even the top item on a thorough potassium-rich foods list.

5. Can I get potassium from drinks instead of food?

Yes, to a point. Coconut water, some vegetable juices, orange juice, and prune juice can add noticeable potassium. Even so, they may also bring sugar, so it’s smarter to rely on whole foods first and then use drinks to top up or to hydrate in hot weather or post-workout.

6. When should someone avoid high-potassium foods?

People who have chronic kidney disease, are prone to hyperkalemia, or use medications that raise potassium may need to limit high-potassium foods. In such cases, items like baked potatoes, tomato products, large portions of beans, dried fruits, and coconut water are often reduced or swapped.

7. Is a potassium-rich foods list good for blood pressure?

Very often, yes. Diet patterns that are rich in potassium and at the same time lower in sodium tend to support healthier blood pressure. That said, the benefit is clearest in people with normal kidney function, so anyone with kidney issues should check first.

8. What fruits and vegetables have potassium but in moderate amounts?

Apples, berries, grapes, lettuce, cabbage, cucumbers, and onions usually contain potassium but in smaller quantities per serving. These are useful for readers who must keep potassium down but still want variety and color on the plate.

9. Do dairy foods count toward potassium intake?

They do. A cup of milk or a bowl of yogurt can add roughly 350–400 mg, which is handy when you want to build potassium gradually through the day. Moreover, dairy is easy to slot into breakfast or snacks, making consistency simpler.

10. Are salt substitutes safe if I am watching potassium?

Not always. Many low-sodium or “lite” salts use potassium chloride, which raises potassium intake. For people who need to track or restrict potassium, these substitutes can push totals up quickly, so labels should be reviewed carefully.

11. Can I follow a potassium-rich diet if I have diabetes?

In many cases, yes, because most potassium-rich foods are also whole, minimally processed foods. The key is to watch the carbohydrate part—juices, sweetened drinks, large fruit portions, and dried fruit can raise blood sugar. Choosing cooked vegetables, beans in measured amounts, and balanced plates helps.

12. What is the easiest way to add more potassium without changing everything?

Start by adding one high-potassium anchor to each meal—a baked potato, a cup of cooked spinach, half a cup of beans, or a potassium-rich drink. Then, rotate through these options during the week so intake stays high but meals don’t feel repetitive.


Related Reads on MasalaMonk