Posted on 1 Comment

Tabbouleh Recipe: Fresh Lebanese Tabouli Salad with Bulgur

A dark bowl of parsley-heavy tabbouleh with tomato pieces, mint, lemon wedges, romaine leaves, and a small amount of fine bulgur.

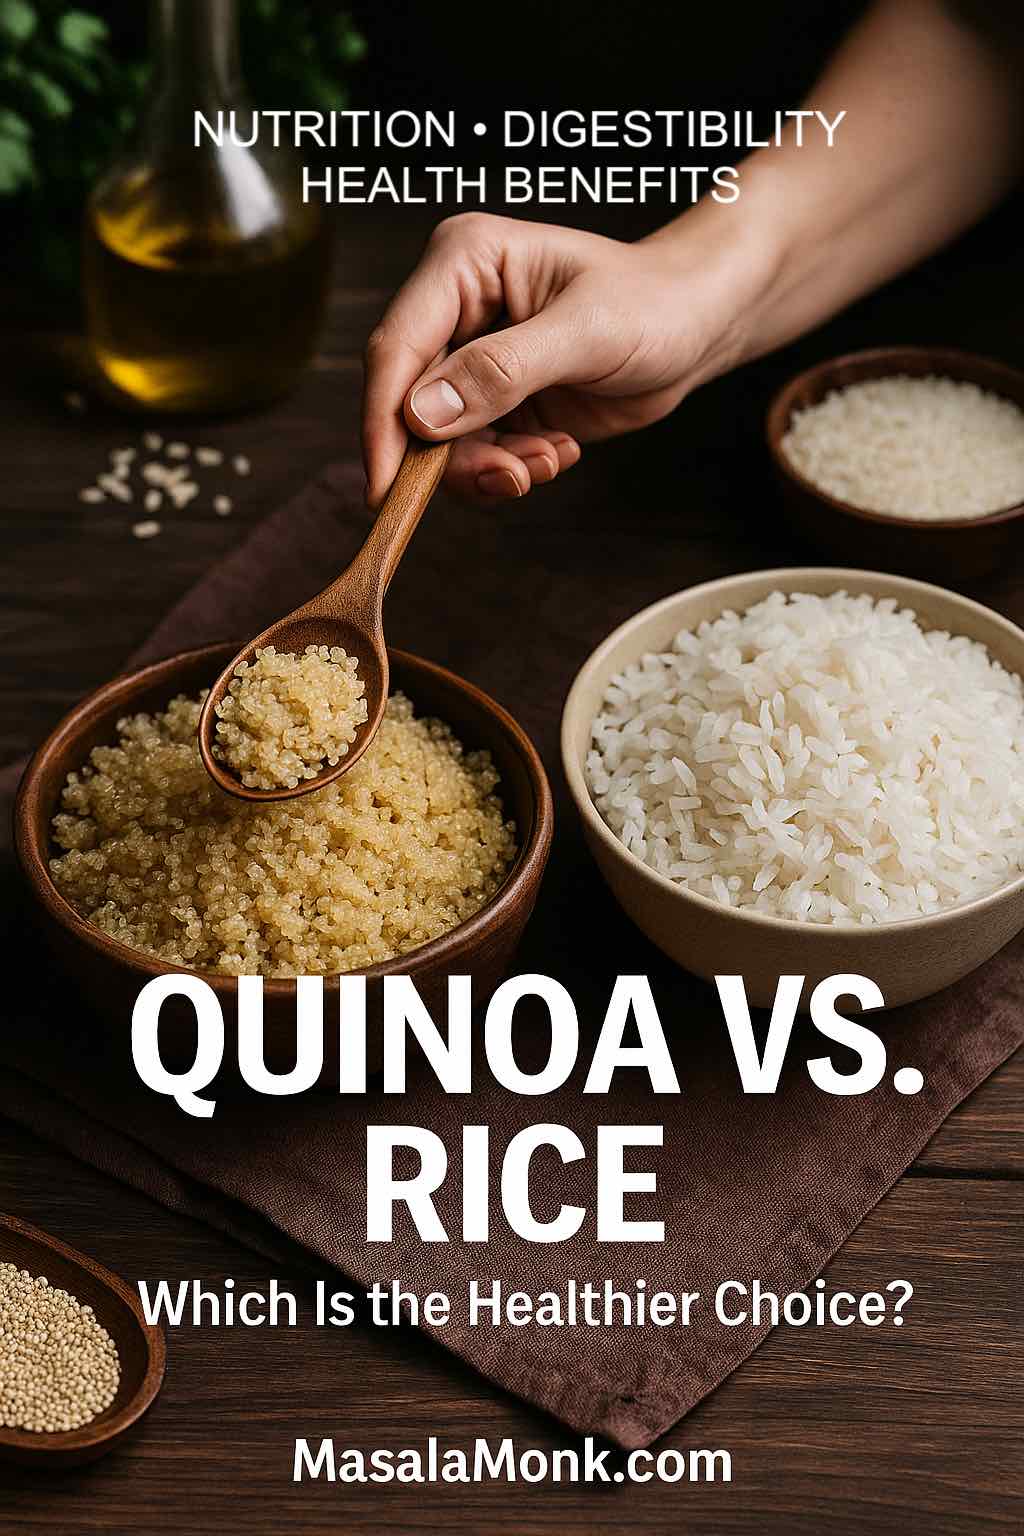
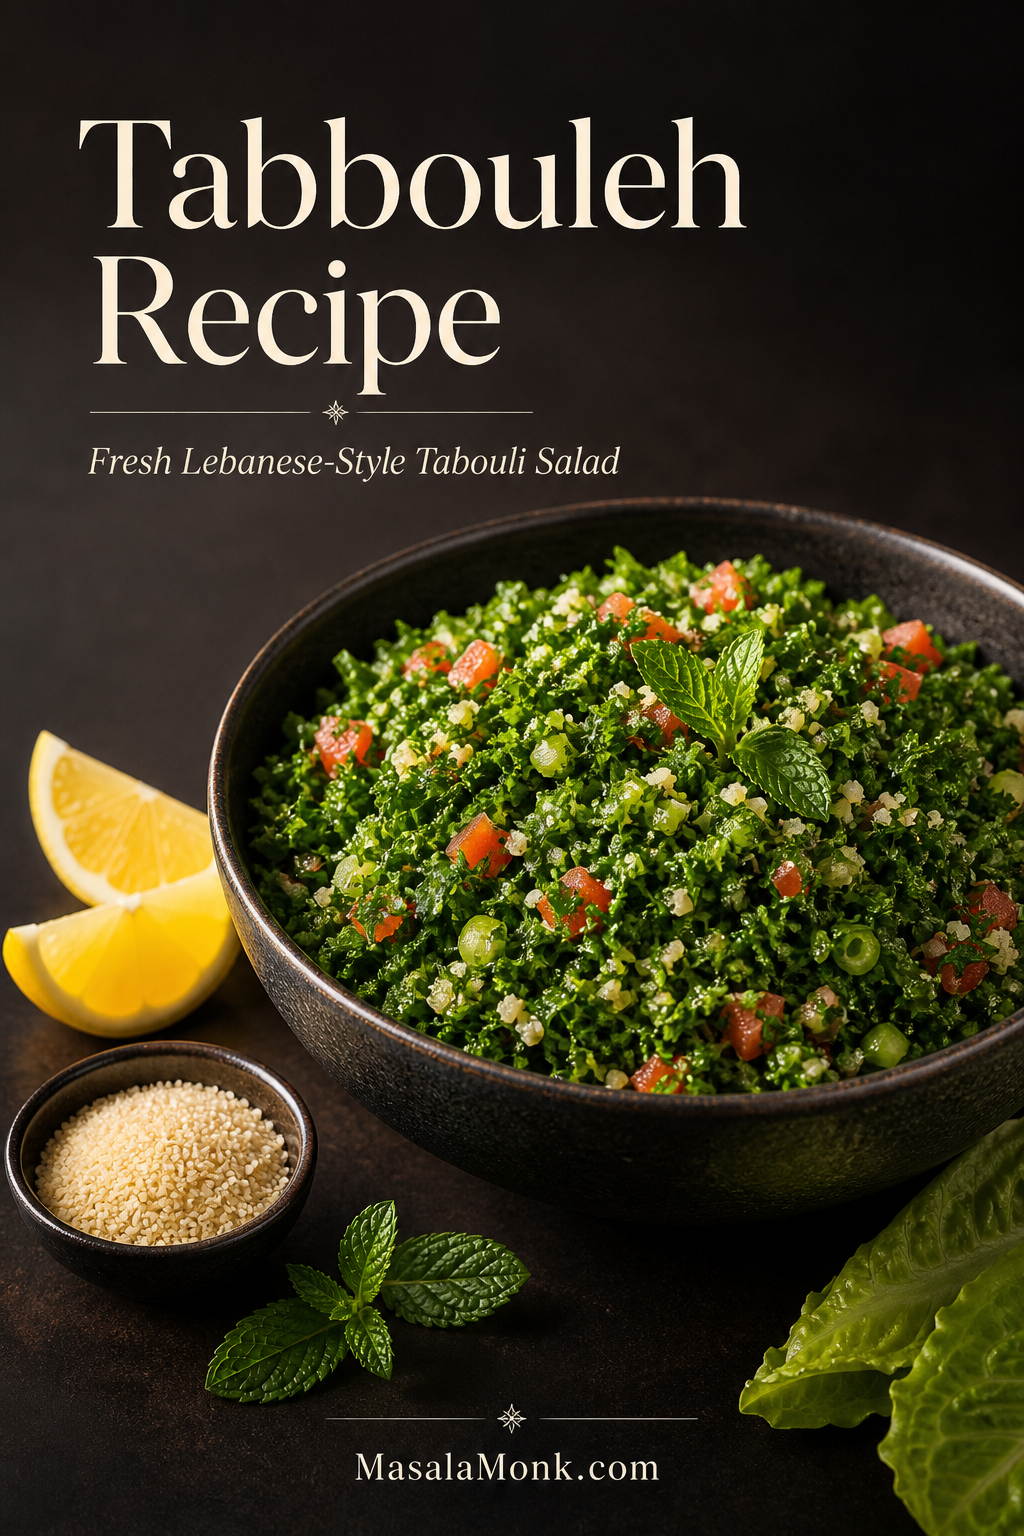
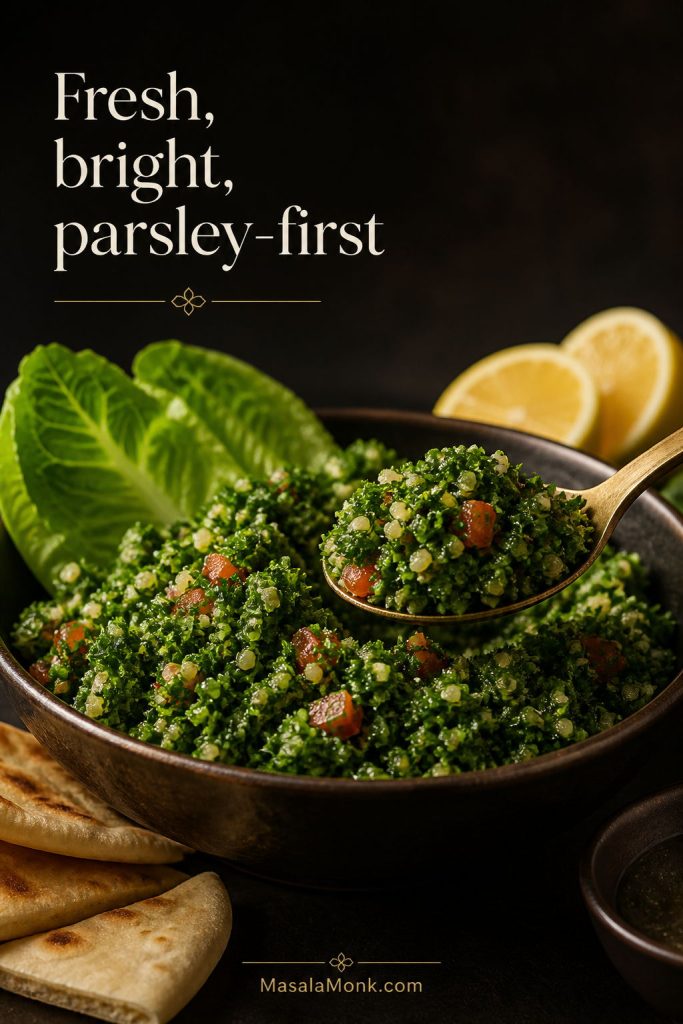
This tabbouleh recipe is fresh, lemony, parsley-heavy, and built around the detail that matters most: tabbouleh should taste like a chopped herb salad, not a bowl of bulgur with a few herbs mixed in.

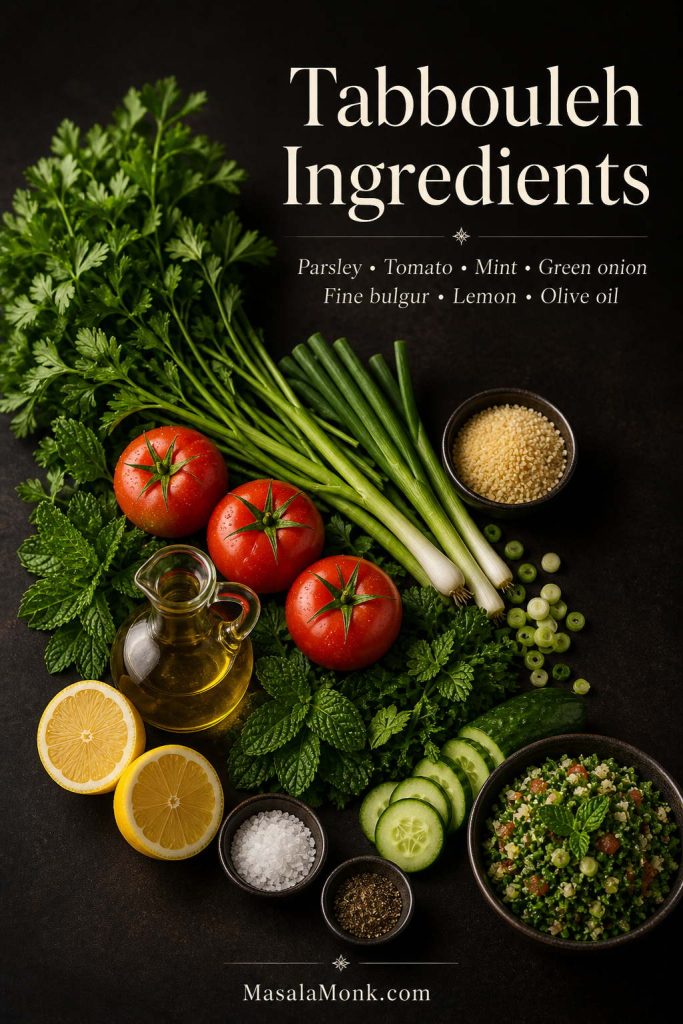
Also spelled tabouli, this Lebanese-style salad is made with finely chopped parsley, tomato, mint, green onion, fine bulgur, lemon juice, olive oil, salt, and pepper. Although the bulgur adds texture, parsley is the star.

To keep the recipe no-cook, the method below soaks fine bulgur directly in the lemon-olive oil dressing while you chop the herbs. As a result, the bulgur gets more flavor, the salad stays bright, and you avoid the watery, grain-heavy tabbouleh that often happens at home.

Table of Contents

Use this guide to make fresh tabbouleh, choose the right bulgur, keep it from turning watery, and adapt it for quinoa, cauliflower, or couscous versions.

Quick Answer: What Is Tabbouleh?

Tabbouleh is a fresh Middle Eastern parsley salad made with finely chopped parsley, tomato, mint, green onion, fine bulgur wheat, lemon juice, olive oil, salt, and pepper. In a good tabbouleh recipe, the herbs should lead and the bulgur should support.

Classic tabbouleh is usually served as part of a mezze spread with pita, hummus, falafel, grilled meats, or lettuce leaves. It is naturally vegan and dairy-free, though it is not gluten-free because bulgur is made from wheat.

Quick ratio: For a parsley-first tabbouleh, use about 3 packed cups finely chopped parsley with only 1/3 cup fine bulgur. That keeps the salad fresh and herb-heavy instead of turning it into a grain salad.

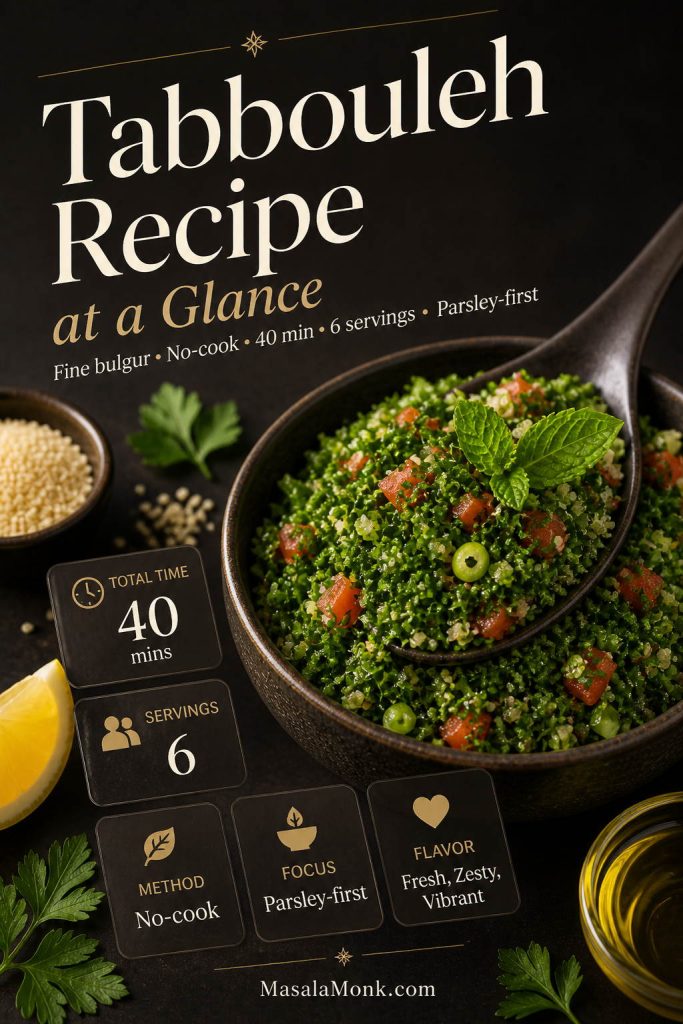
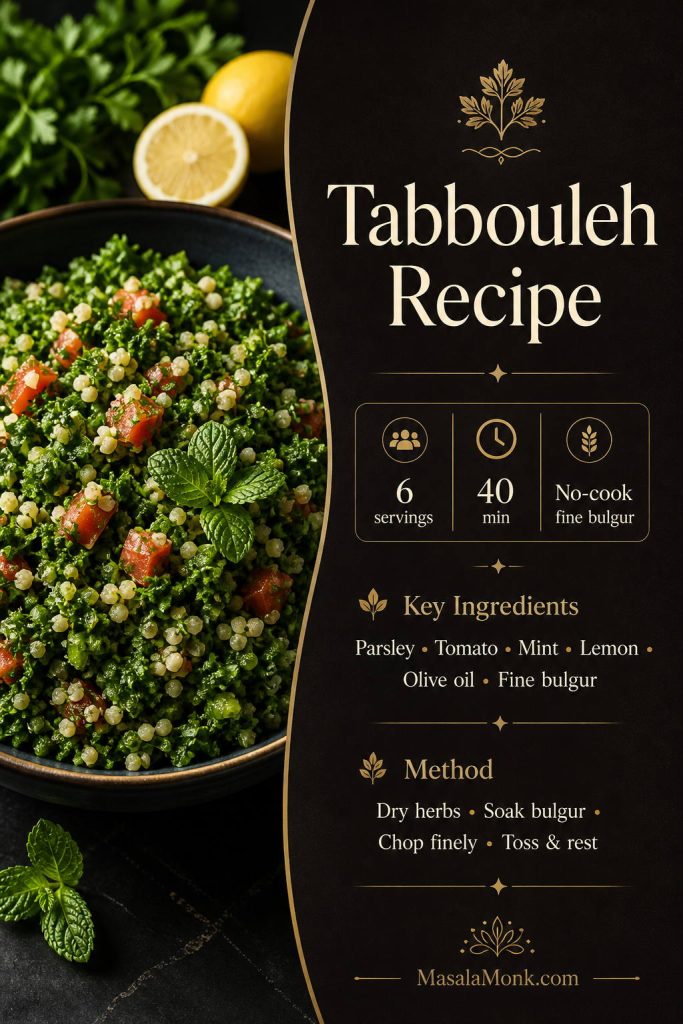
Tabbouleh Recipe at a Glance

This tabbouleh recipe is built for a fresh, parsley-heavy texture with fine bulgur, bright lemon dressing, and no cooking required when you use the right grain.

Best bulgur Fine #1 bulgur wheat
Cook time 0 minutes for fine bulgur
Total time About 40 minutes
Yield 6 servings, about 5–6 cups
Flavor Fresh, lemony, herb-heavy, lightly juicy
Best texture Finely chopped herbs, tender bulgur, no puddle of dressing
Make-ahead Best same day; leftovers keep 2–3 days
A tabbouleh recipe overview graphic with a finished salad, parsley, lemon, fine bulgur, and text showing no-cook method, 40 minutes, 6 servings, and parsley-first.
This tabbouleh recipe uses fine bulgur, needs no cooking, and takes about 40 minutes. The main texture goal is simple: plenty of parsley with just enough bulgur to support it.

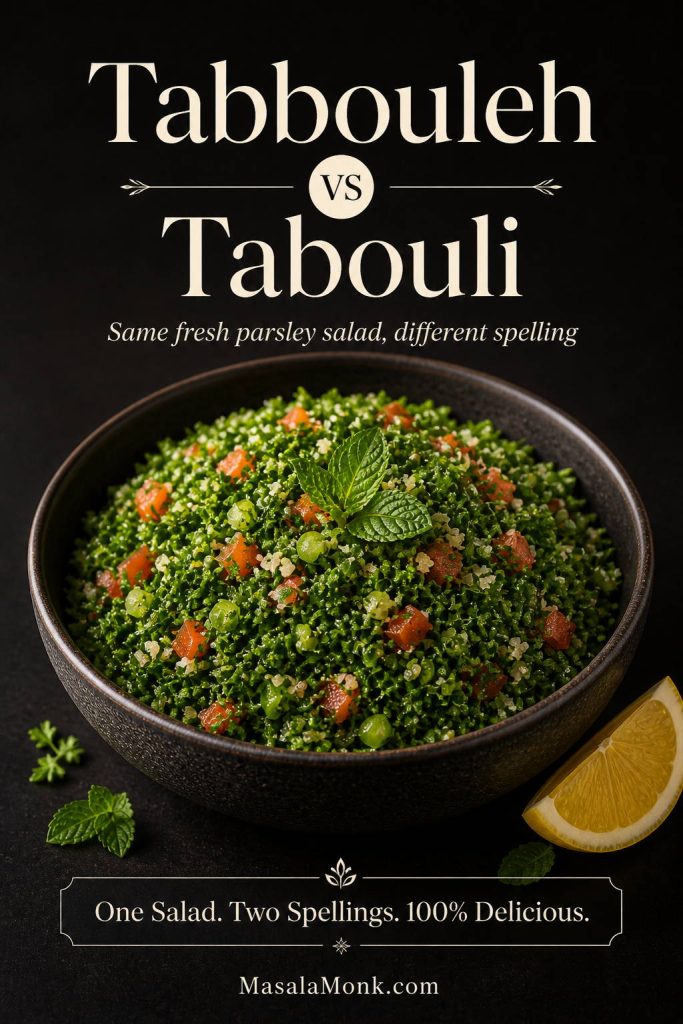
Tabbouleh vs Tabouli: Same Salad, Different Spelling

Tabbouleh and tabouli usually refer to the same salad. The spelling changes because the Arabic word is transliterated into English in different ways.

You may see it written as tabbouleh, tabouli, tabouleh, tabouli salad, or tabbouleh salad. The spellings vary by region, family tradition, and how the Arabic word is transliterated into English.

Here, the salad follows a Lebanese-style direction: finely chopped parsley, tomato, mint, green onion, fine bulgur, lemon juice, and olive oil.

A spelling comparison graphic showing one bowl of tabbouleh labeled with both “Tabbouleh” and “Tabouli.”
Tabbouleh and tabouli usually mean the same salad. The spelling changes, but the base stays familiar: parsley, tomato, mint, fine bulgur, lemon juice, and olive oil.

Why This Tabbouleh Recipe Works

Homemade tabbouleh usually goes wrong in a few predictable ways: too much bulgur, wet herbs, bland dressing, hard grains, or a watery bowl after 20 minutes. To avoid those problems, this version uses a parsley-first ratio, fine bulgur, careful draining, and a simple dressing that seasons the grain as it softens.

  • It is parsley-first. The salad tastes fresh and green, not heavy or grainy.
  • Fine bulgur keeps it no-cook. Fine #1 bulgur softens in lemon juice and olive oil while you chop the herbs.
  • The tomatoes are drained if needed. That keeps the salad juicy without turning soupy.
  • The dressing is simple. Lemon juice, olive oil, salt, and pepper are enough when the herbs are fresh.
  • The amounts are precise. Cups, grams, and milliliters are included so the parsley-to-bulgur balance stays right.

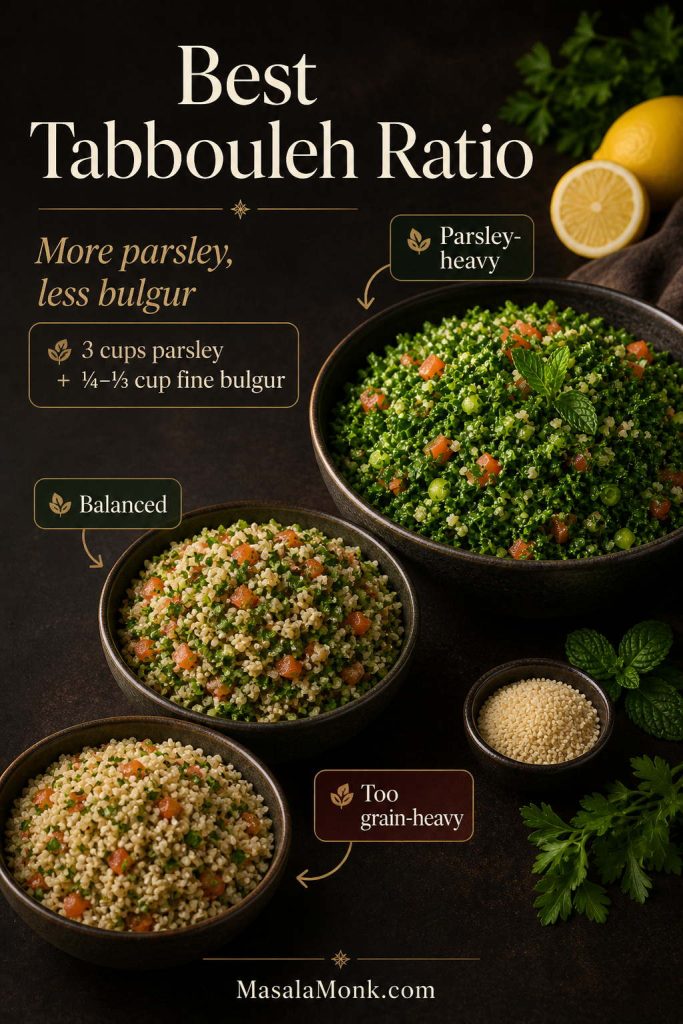
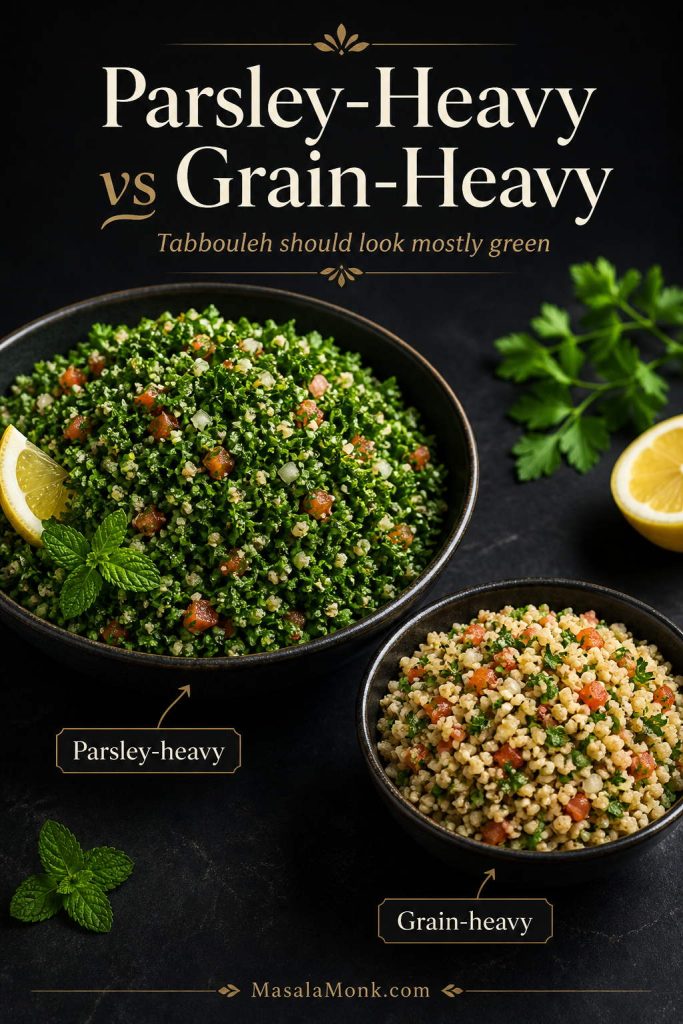
Best Parsley-to-Bulgur Ratio for Tabbouleh

The easiest way to keep tabbouleh fresh is to use a lot of parsley and only a small amount of bulgur. The bulgur should soften the bite and absorb flavor, but it should not make the salad heavy.

Style Parsley Bulgur Result
Parsley-heavy Lebanese-style 3 packed cups 1/4 to 1/3 cup fine bulgur Fresh, green, herb-led tabbouleh
Balanced everyday style 3 packed cups 1/2 cup fine bulgur Still fresh, but slightly more filling
Grain-heavy style 2–3 cups 3/4 cup or more More like bulgur salad than classic tabbouleh
A ratio comparison graphic with three tabbouleh bowls showing parsley-heavy, balanced, and grain-heavy versions.
For a Lebanese-style tabbouleh ratio, start with about 3 packed cups of chopped parsley and only ¼ to ⅓ cup fine bulgur. More bulgur makes the salad heavier and less herb-led.

Tabbouleh Ingredients

For tabbouleh, this recipe keeps the ingredient list simple but pays close attention to texture: dry herbs, firm tomatoes, fine bulgur, fresh lemon, and enough olive oil to round everything out.

A dark ingredient board with parsley, mint, tomatoes, green onions, fine bulgur, lemon, olive oil, salt, pepper, and optional cucumber for tabbouleh.
The best tabbouleh ingredients are simple, but prep matters. Dry the herbs, use firm tomatoes, choose fine bulgur, and rely on fresh lemon juice rather than bottled citrus.

Parsley

Because parsley is the main ingredient, its texture matters. You can use curly parsley or flat-leaf parsley, but the leaves need to be very dry before chopping. Wet parsley is one of the main reasons tabbouleh becomes watery.

Chop the parsley finely with a sharp knife. A food processor can bruise the herbs and turn them wet or pasty if you overdo it.

Tomatoes

Use firm Roma tomatoes or another firm, meaty tomato. Chop them small, then drain off extra liquid if they are very juicy. You want tomato freshness, not a pool of tomato water at the bottom of the bowl.

Mint

Fresh mint gives tabbouleh its cooling lift. Do not use dried mint as a full replacement here; it will not give the same fresh, bright finish.

Green Onions or Scallions

Green onions add mild onion flavor without overpowering the herbs. Slice them finely so they disappear into the salad rather than standing out in large pieces.

Fine Bulgur

Fine #1 bulgur is best for Lebanese-style tabbouleh. It softens quickly and blends into the herbs without making the salad feel heavy.

Lemon Juice and Olive Oil

Fresh lemon juice gives tabbouleh its sharp, clean brightness. Extra-virgin olive oil rounds out the dressing and helps soften the bulgur. Bottled lemon juice is not ideal because the salad depends on a fresh citrus flavor.

Cucumber, Optional

Cucumber is optional. It adds crunch and freshness, especially in modern tabouli salad versions, but the salad still works beautifully without it. If you use cucumber, dice it small and drain it if it is watery.

If cucumber is the part you love most, you may also like this crisp cucumber salad recipe with vinegar, dill, and onion.

Tabbouleh Dressing

In this tabbouleh recipe, the dressing is simple: fresh lemon juice, extra-virgin olive oil, salt, and black pepper. It should lightly coat the herbs, season the tomatoes, and soften the fine bulgur without drowning the salad.

Lemon juice and olive oil being whisked into a tabbouleh dressing with salt, pepper, lemon halves, and fine bulgur nearby.
Tabbouleh dressing is not a thick vinaigrette. Lemon juice, olive oil, salt, and pepper should lightly coat the herbs and help fine bulgur soften without drowning the salad.

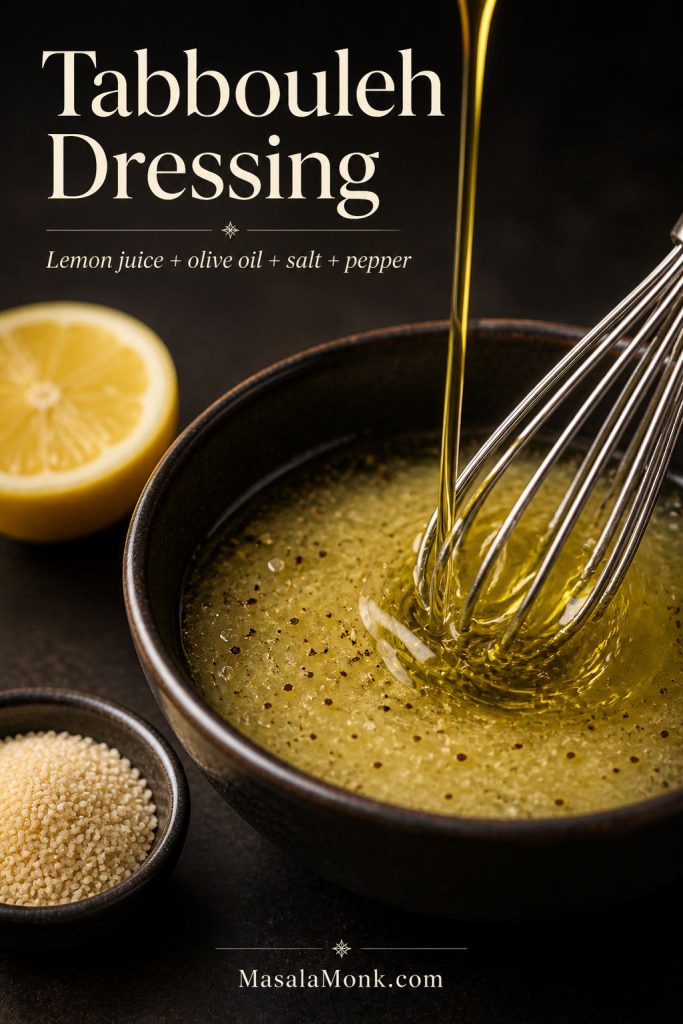
Here, the fine bulgur sits in the lemon-olive oil dressing while you chop the parsley, mint, tomatoes, and green onions. That gives the bulgur better flavor than soaking it in plain water.

Once the salad rests, taste before adding anything else. A pinch of salt usually fixes flat flavor, extra lemon brings brightness, and a small drizzle of olive oil softens a sharp edge.

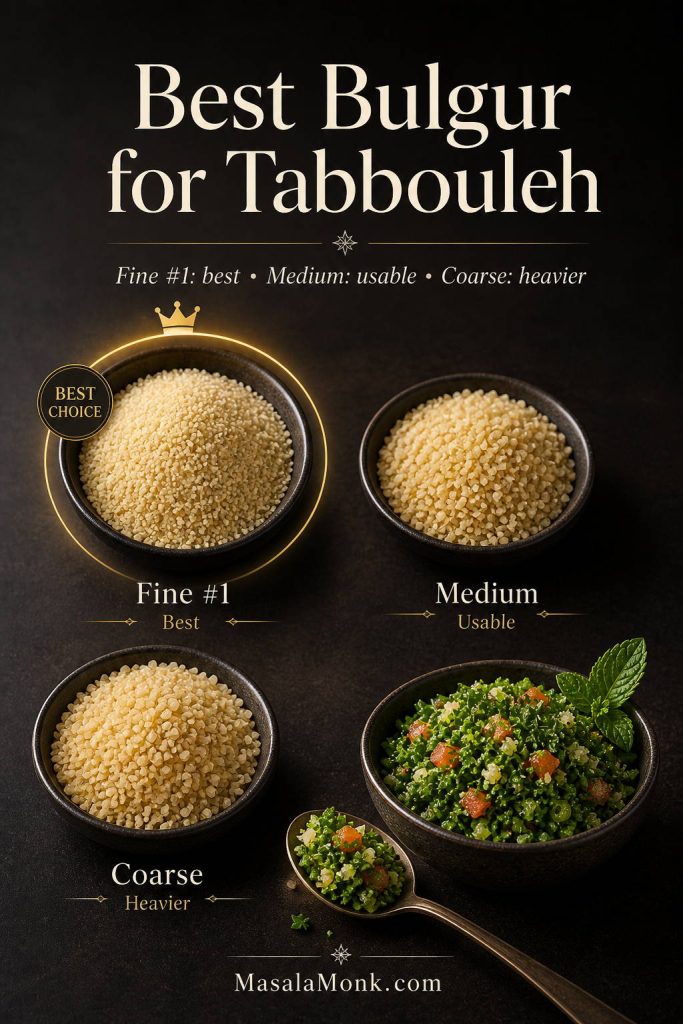
Best Bulgur for Tabbouleh

The best bulgur for tabbouleh is fine #1 bulgur. It is small enough to soften without boiling and delicate enough to stay in the background. That matters because tabbouleh should taste like a fresh herb salad, not a bulgur bowl.

Bulgur is wheat that has already been parboiled, dried, cracked, and sorted by size. That is why fine bulgur can soften quickly in dressing instead of needing a full boil. For more background, see the Whole Grains Council guide to bulgur and freekeh.

If your bulgur is medium or coarse, you can still use it, but the texture will be different and it usually needs hot water before mixing.

Bulgur or Swap Best For How to Prepare It
Extra-fine / #1 bulgur Best choice for Lebanese-style tabbouleh Soak in the lemon-olive oil dressing for 20–30 minutes. No cooking needed.
Fine bulgur Good everyday choice Soak until tender. Drain if you use water.
Medium bulgur Usable, but less delicate Soak in hot water, drain well, and cool before mixing.
Coarse bulgur More of a grain-salad texture Cook or hot-soak until tender, then cool completely. Use less than you would in a grain salad.
Cracked wheat Depends on grind and processing Usually needs longer soaking or cooking. Check texture before adding.
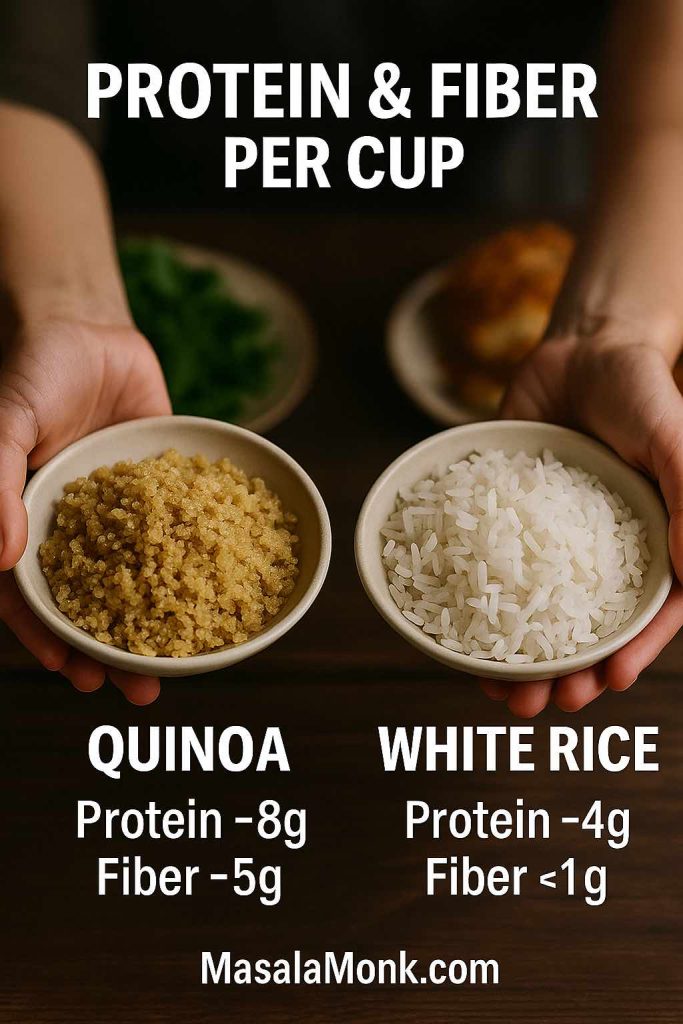
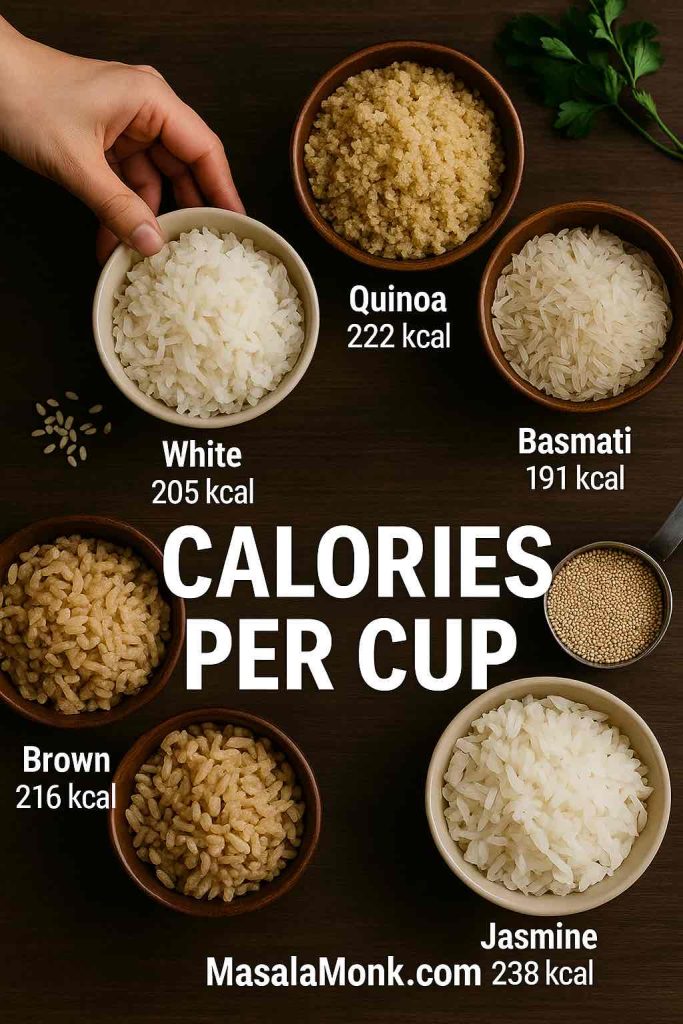
Quinoa Gluten-free tabbouleh variation Cook, cool completely, then mix with the herbs and dressing.
Cauliflower rice Grain-free variation Use raw or lightly salted and drained. Keep the pieces small and dry.
Couscous Quick variation, not classic tabbouleh Steam or soak, fluff, cool completely, then mix.
A bulgur comparison graphic showing fine, medium, and coarse bulgur, with fine bulgur marked as the best choice for tabbouleh.
Fine #1 bulgur is best for tabbouleh because it softens quickly and stays delicate. Medium or coarse bulgur can work, but it usually needs hot soaking and gives a heavier texture.
Do not overuse bulgur. If you add too much, the salad shifts from tabbouleh into a bulgur salad. For this recipe, 1/3 cup fine bulgur is enough for 6 servings.

What If You Only Have Medium or Coarse Bulgur?

If you only have medium or coarse bulgur, you can still make tabbouleh, but the texture will be less delicate. Put the medium or coarse bulgur in a bowl, cover it with hot water, and let it sit until tender. Drain it very well, press out excess moisture, and cool it completely before adding it to the herbs.

Use a smaller amount than you would in a grain salad. The goal is still a parsley-forward tabbouleh, not a heavy bulgur salad.

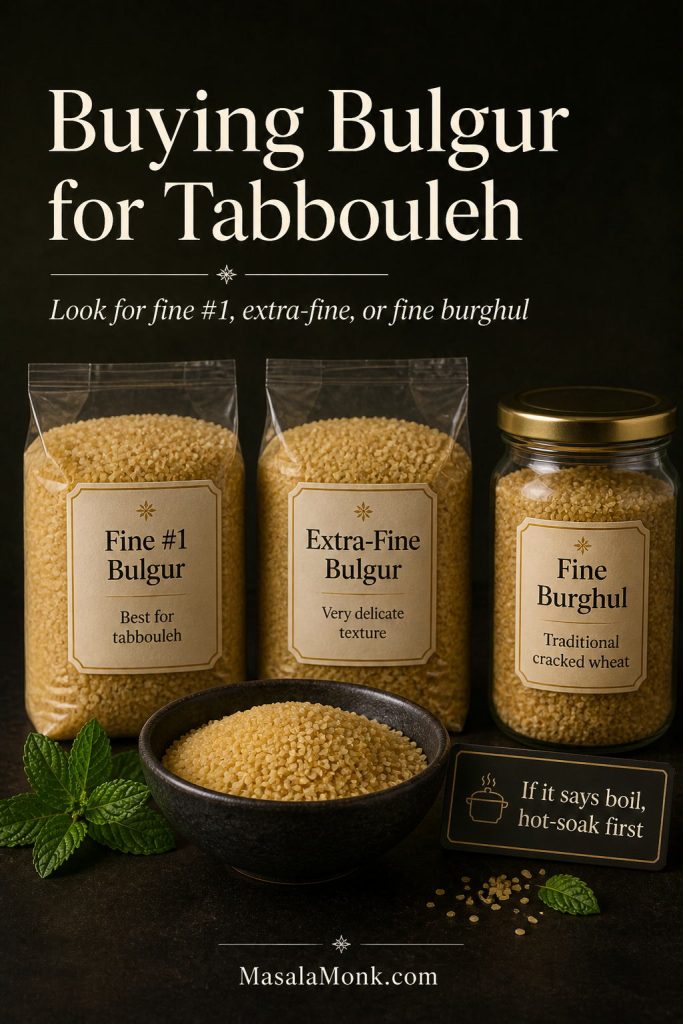
How to Buy Bulgur for Tabbouleh

When shopping, look for fine #1 bulgur, extra-fine bulgur, or fine burghul. It is often easier to find in Middle Eastern grocery stores, international aisles, or natural-food stores than in the regular grain aisle. If the package says it must be boiled, treat it like medium or coarse bulgur and cool it before mixing.

A shopping guide graphic with bags or jars labeled fine #1 bulgur, extra-fine bulgur, and fine burghul for tabbouleh.
When buying bulgur for tabbouleh, look for fine #1, extra-fine bulgur, or fine burghul. If the package says it must be boiled, treat it like a coarser grain.

Equipment You’ll Need

You do not need special equipment, but a few basic tools make a big difference in the final texture.

  • Sharp chef’s knife: for finely chopping parsley without bruising it.
  • Large cutting board: tabbouleh uses a lot of herbs, so space helps.
  • Salad spinner or clean towels: for drying parsley and mint thoroughly.
  • Large mixing bowl: gives you room to toss without crushing the herbs.
  • Small bowl or measuring jug: for the lemon-olive oil dressing.
  • Fine-mesh strainer or colander: useful for draining tomatoes, cucumber, or soaked bulgur.

How to Make Tabbouleh

Good tabbouleh is mostly about prep. Although the ingredients are simple, the herbs need to be dry, the chopping needs to be fine, and the bulgur needs enough time to soften.

A step-by-step tabbouleh method graphic showing washing herbs, soaking bulgur, chopping parsley, chopping vegetables, and tossing the salad.
The tabbouleh method is mostly about order: dry the herbs first, soak fine bulgur in dressing, chop everything small, toss gently, then rest before the final seasoning check.

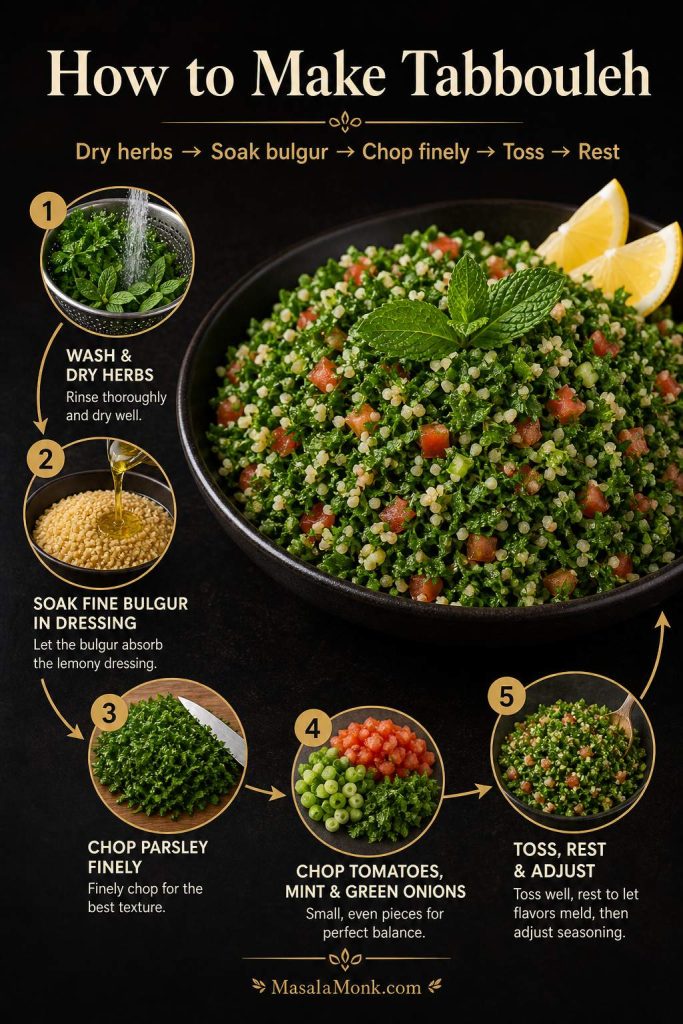
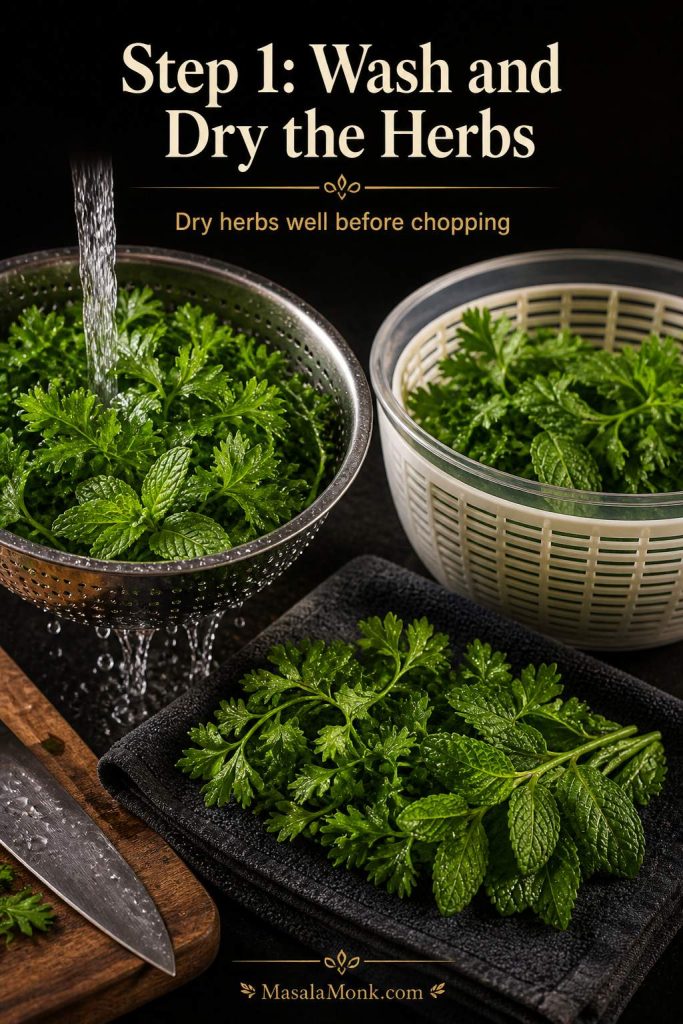
Step 1: Wash and Dry the Herbs

Wash the parsley and mint, then dry them very well. A salad spinner is helpful, but you can also spread the herbs on clean towels and pat them dry.

This step matters because wet herbs dilute the dressing and make the salad watery faster.

Fresh parsley and mint being washed, drained, and dried on a towel and in a salad spinner before making tabbouleh.
Dry parsley and mint thoroughly before chopping. Even a little extra water on the herbs can dilute the lemon-olive oil dressing and make tabbouleh turn watery.

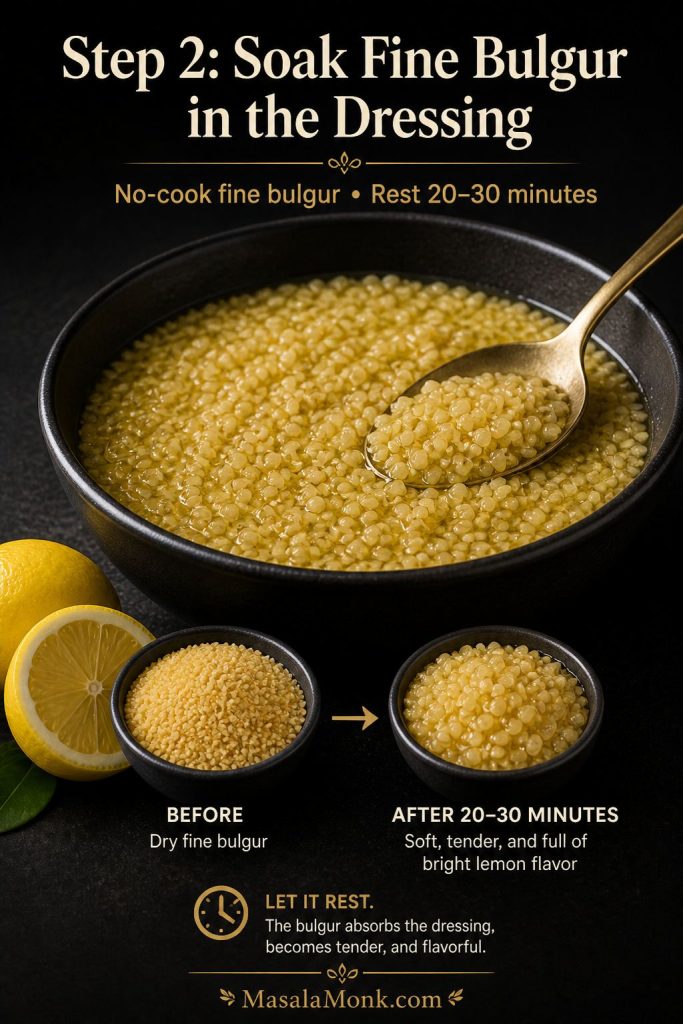
Step 2: Soak the Fine Bulgur in the Dressing

In a large mixing bowl, whisk together the lemon juice, 1/4 cup olive oil, salt, and pepper. Stir in the fine bulgur and let it sit for 20–30 minutes while you chop the herbs and vegetables.

The bulgur should soften but not become mushy. If it still tastes hard after resting, add 1 tablespoon of warm water or lemon juice, stir, and wait another 10 minutes.

Fine bulgur soaking in lemon and olive oil dressing in a dark bowl, with lemon and olive oil nearby.
Fine bulgur does not need boiling for this tabbouleh recipe. Let it sit in the lemon-olive oil dressing for 20–30 minutes so it becomes tender and better seasoned.

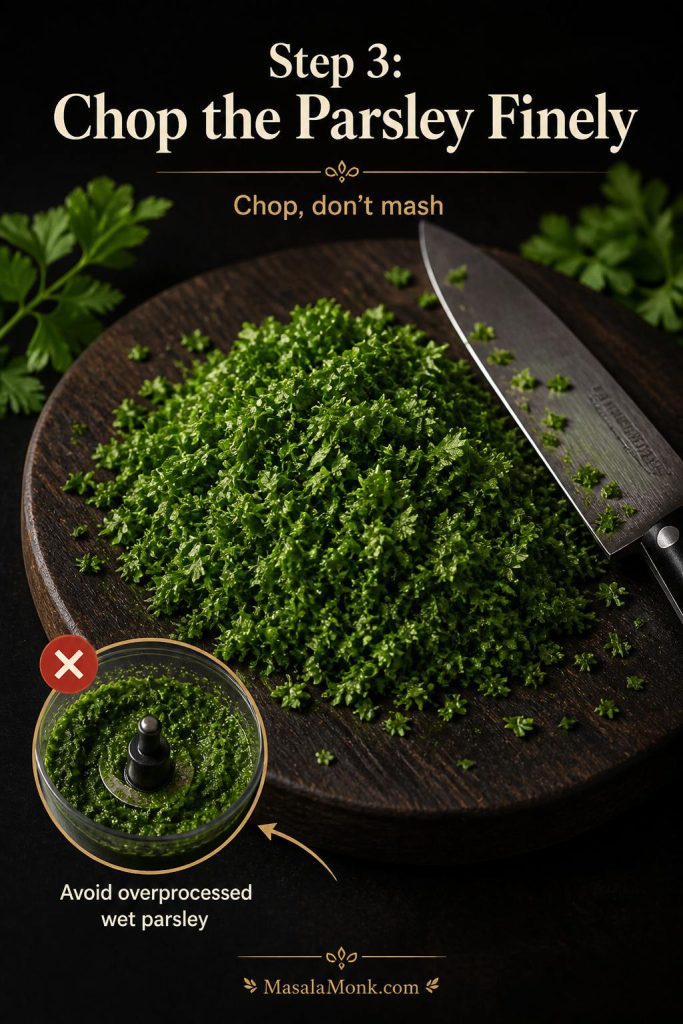
Step 3: Chop the Parsley Finely

Gather the dry parsley into small bunches and chop it finely with a sharp knife. You want small, even pieces, not large leaves and not a wet green paste.

Tender stems are fine if they are chopped very small. Thick stems should be removed.

A parsley chopping guide showing finely chopped parsley on a cutting board and an inset warning against overprocessed wet parsley.
Hand-chopped parsley gives tabbouleh a lighter texture. A food processor can work only if pulsed carefully, but overprocessing turns the herbs wet, dark, and pasty.

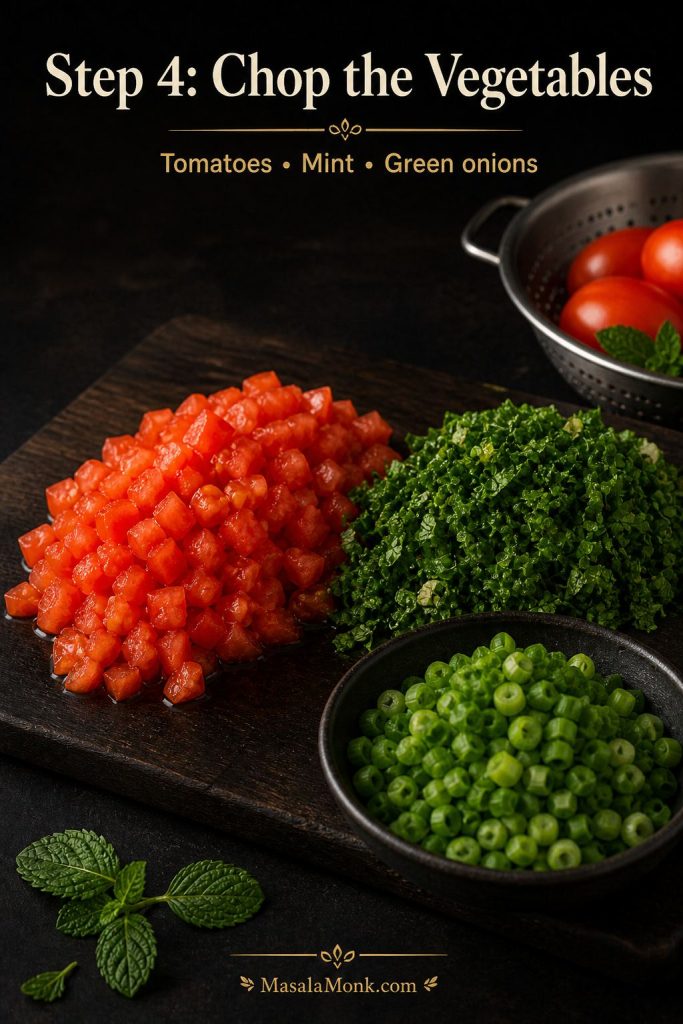
Step 4: Chop the Tomatoes, Mint, and Green Onions

Finely chop the tomatoes, mint, and green onions. If the tomatoes release a lot of juice, drain them briefly before adding them to the bowl. If using cucumber, dice it small and drain it too.

Finely chopped tomatoes, mint, and green onions arranged on a dark cutting board for tabbouleh.
Chop tomatoes, mint, and green onions small enough to blend into every bite. If the tomatoes are juicy, drain them before mixing so the salad stays fresh instead of soupy.

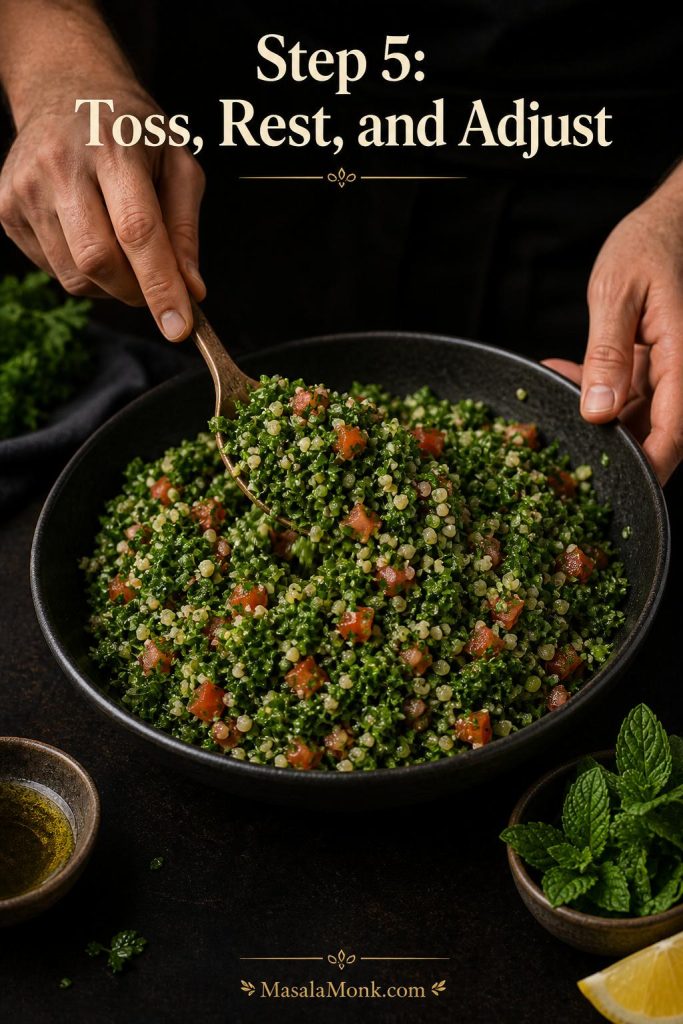
Step 5: Toss, Rest, and Adjust

Add the parsley, mint, tomatoes, green onions, and optional cucumber to the soaked bulgur. Toss gently until everything is evenly coated, but do not crush the herbs.

Let the tabbouleh rest for 10 minutes, then taste and adjust. Start with salt if the flavor feels flat, brighten it with lemon if needed, or round it out with a little olive oil if the salad tastes too sharp. Add the remaining olive oil only if the salad needs a softer finish.

Hands gently tossing parsley-heavy tabbouleh with a spoon in a dark bowl.
Once the herbs, tomatoes, and softened bulgur are combined, toss gently and let the salad rest for about 10 minutes. After that, adjust salt, lemon, or olive oil.

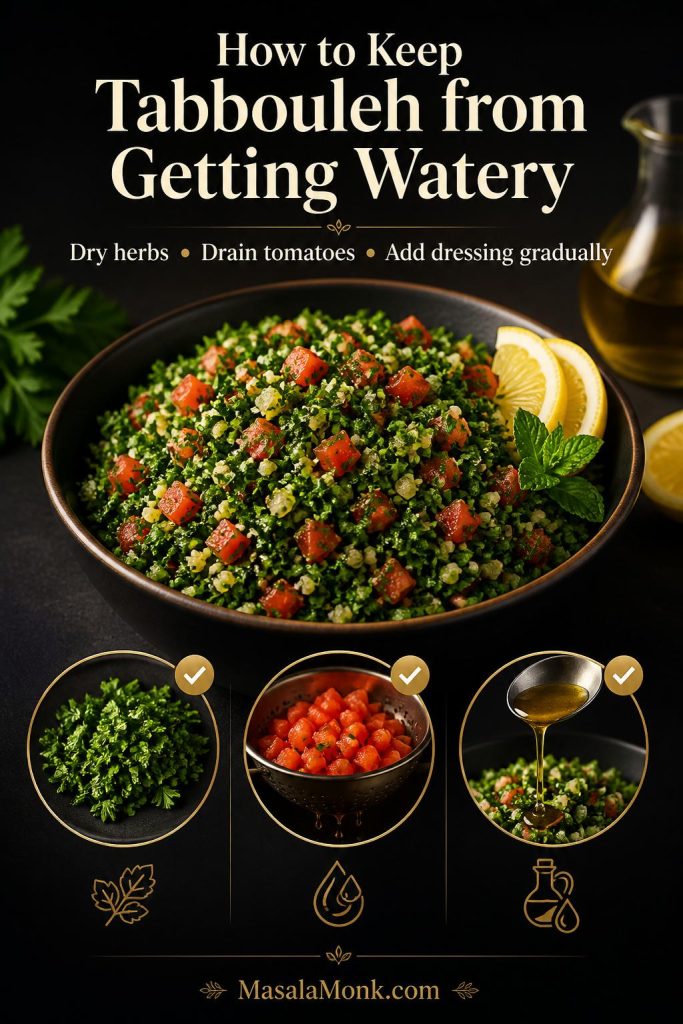
How to Keep Tabbouleh from Getting Watery

Watery tabbouleh usually comes from wet herbs, juicy tomatoes, too much dressing, or bulgur that has not been drained properly. The best fix is to control moisture before everything goes into the bowl.

Drain Juicy Tomatoes and Cucumber First

If your tomatoes or cucumber are very juicy, sprinkle them with a small pinch of salt and let them sit in a strainer for 10 minutes while you chop the herbs. After 10 minutes, drain the liquid before mixing. This keeps the salad fresh and juicy without creating a puddle at the bottom of the bowl.

A watery tabbouleh prevention graphic showing dry herbs, drained tomatoes, gradual dressing, and a finished bowl of tabbouleh.
Watery tabbouleh usually comes from wet herbs, juicy tomatoes, or too much dressing. Fix it before mixing by drying the herbs, draining the tomatoes, and adding dressing gradually.

Quick Fixes for Watery Tabbouleh

Problem Likely Cause Best Fix
Tabbouleh is watery Wet parsley, juicy tomatoes, or too much dressing Dry herbs thoroughly, drain tomatoes, and add dressing gradually.
Bulgur is hard Bulgur is too coarse or under-soaked Add 1–2 tablespoons warm water or lemon juice and rest 10–15 minutes.
Bulgur is soggy Too much soaking liquid Drain or blot if possible, then add more parsley, mint, or tomato.
Salad tastes flat Not enough salt or lemon Add salt first, then lemon juice in small amounts.
Salad tastes too sharp Too much lemon juice Add a little olive oil and extra tomato to round it out.
Parsley tastes harsh Pieces are too large or salad has not rested Chop finer next time and let the salad rest 10–20 minutes before serving.
Herbs look mushy Food processor overuse or wet herbs Chop by hand and dry herbs well before cutting.

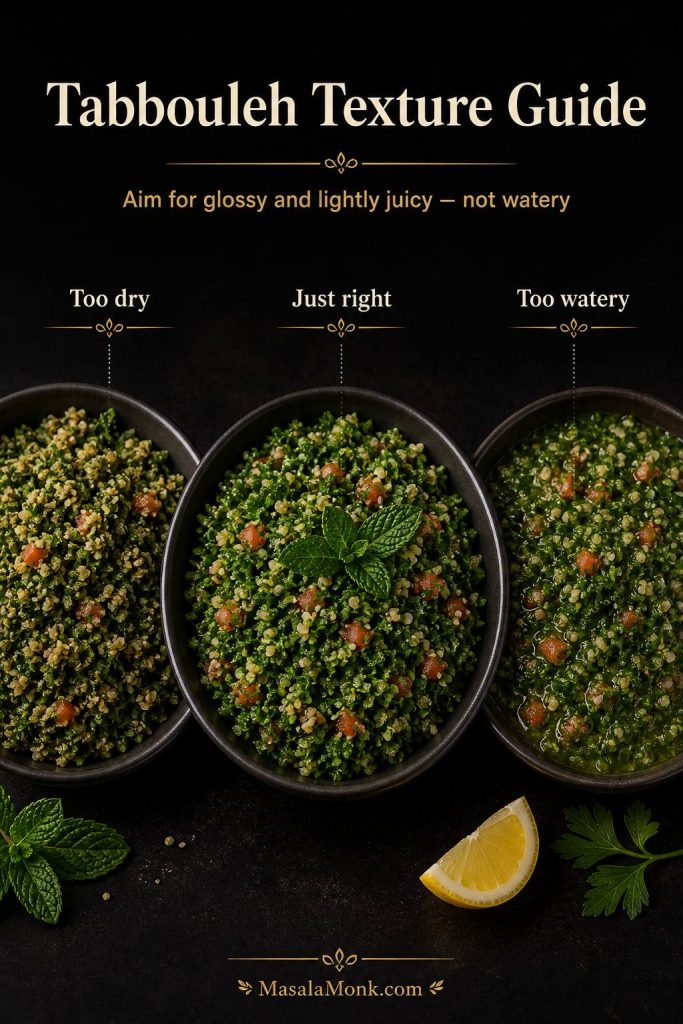
What the Finished Tabbouleh Should Look Like

For the best texture, serve tabbouleh the same day it is made. Although it keeps well for a couple of days, the herbs soften as they sit.

Best texture target: The finished tabbouleh should be finely chopped, glossy, lemony, and lightly juicy, but there should not be a puddle of dressing at the bottom of the bowl.

Do not worry if the herbs darken slightly after dressing. Proper tabbouleh should look moist and glossy, not dry and fluffy. The warning sign is excess liquid pooling underneath, not a lightly dressed herb texture.

A tabbouleh texture guide comparing too dry, just right, and too watery versions of the salad.
Finished tabbouleh should be glossy and lightly juicy, not dry and not puddled. If liquid collects at the bottom, lift the salad out with a slotted spoon and drain juicier vegetables next time.

Authentic Lebanese-Style Tabbouleh Tips

Lebanese-style tabbouleh is usually much more herb-heavy than many restaurant or grocery-store versions. Parsley should be the main ingredient, while the bulgur should add texture in the background rather than making the salad feel like a grain bowl.

A Lebanese-style tabbouleh tips graphic showing a mostly green parsley-heavy bowl with lemon wedges and romaine leaves.
Lebanese-style tabbouleh is usually much more herb-led than many store-bought versions. Use fine bulgur sparingly so the salad stays light, fresh, and finely chopped.
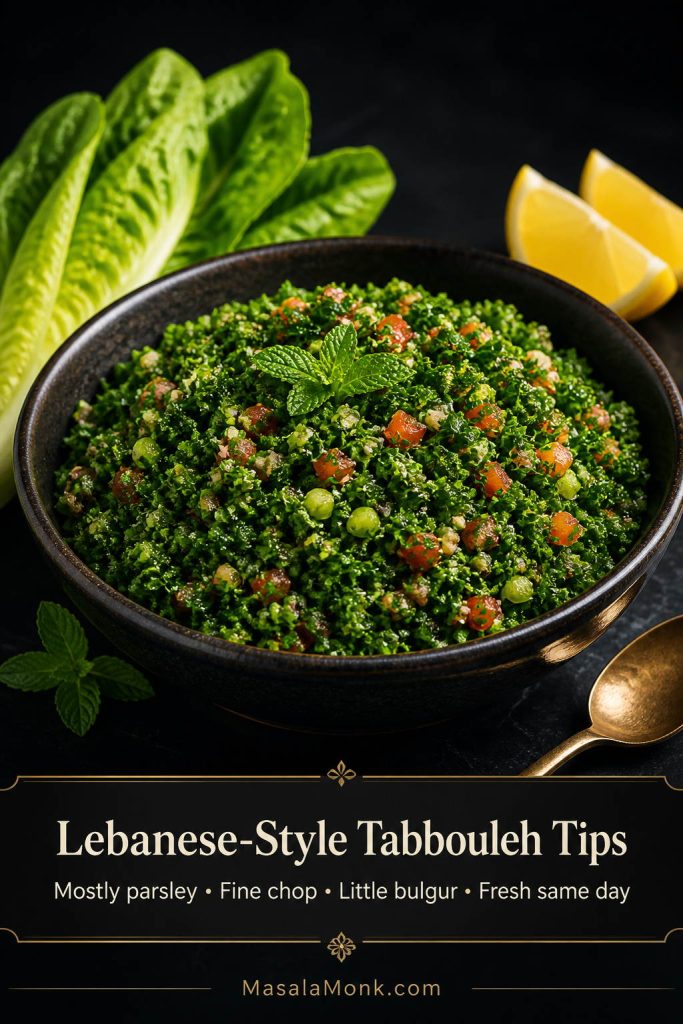
  • Use more parsley than bulgur. A small amount of fine bulgur is enough to give texture without taking over.
  • Chop everything finely. The parsley, tomatoes, mint, and green onions should feel evenly mixed in every bite.
  • Use fine bulgur if possible. Fine #1 bulgur gives the most delicate texture and does not need boiling.
  • Keep cucumber optional. Cucumber is common in many modern tabouli salad versions, but the salad still works beautifully without it.
  • Serve it fresh. Tabbouleh can be stored, but the brightest flavor and best herb texture are usually the same day.
Texture cue: If the bowl looks mostly green with small flecks of tomato, mint, onion, and bulgur, you are close to a Lebanese-style tabbouleh texture. If it looks mostly grain-based, there is probably too much bulgur.
A comparison graphic with a green parsley-heavy tabbouleh bowl beside a beige grain-heavy bulgur salad bowl.
A parsley-heavy tabbouleh bowl looks green, fresh, and finely chopped. When the bowl looks beige or grain-led, the recipe has moved closer to bulgur salad.

Tabbouleh Recipe Card

Tabbouleh Recipe: Fresh Lebanese Tabouli Salad with Bulgur

This fresh tabbouleh recipe is parsley-first, lemony, and no-cook. Fine bulgur softens in the lemon-olive oil dressing while you chop the herbs, keeping the salad bright instead of watery.

Prep Time40 minutes
Cook Time0 minutes
Total Time40 minutes
Yield6 servings, about 5–6 cups

Ingredients

  • 1/3 cup fine #1 bulgur wheat, about 50g
  • 1/4 cup fresh lemon juice, 60ml
  • 1/4 to 1/3 cup extra-virgin olive oil, 60–80ml
  • 3/4 teaspoon fine salt, plus more to taste
  • 1/4 teaspoon black pepper
  • 3 packed cups finely chopped parsley, about 90–120g chopped leaves and tender stems
  • 2–3 firm Roma tomatoes, finely chopped and drained, about 250–300g
  • 3–4 green onions or scallions, finely chopped, about 45–60g
  • 1/4 to 1/3 cup finely chopped fresh mint, about 10–15g
  • 1 cup finely diced English cucumber, about 120–150g, optional
  • Romaine lettuce leaves, optional, for serving

Instructions

  1. Wash and dry the herbs. Wash the parsley and mint, then dry very well in a salad spinner or with clean kitchen towels.
  2. Soak the bulgur. In a large bowl, whisk lemon juice, 1/4 cup olive oil, salt, and pepper. Stir in the fine bulgur and let it sit for 20–30 minutes while you chop the herbs and vegetables.
  3. Chop the parsley. Finely chop the parsley by hand. Remove thick stems, but tender stems are fine if chopped small.
  4. Prepare the vegetables. Finely chop the tomatoes, green onions, mint, and optional cucumber. Drain tomatoes and cucumber if they release a lot of liquid.
  5. Mix the tabbouleh. Add the parsley, tomatoes, green onions, mint, and cucumber to the soaked bulgur. Toss gently until evenly combined.
  6. Rest and adjust. Let the salad rest for 10 minutes. Taste and adjust with more salt, lemon juice, or olive oil as needed. Use the remaining olive oil only if the salad needs a softer finish.
  7. Serve. Serve chilled or at room temperature, with romaine leaves, pita, hummus, falafel, or grilled dishes.

Notes

  • Fine #1 bulgur gives the best no-cook texture for tabbouleh.
  • If using medium or coarse bulgur, soak it separately in hot water, drain very well, and cool completely before mixing.
  • Dry the parsley thoroughly before chopping. Wet herbs make watery tabbouleh.
  • Drain juicy tomatoes and cucumber before adding them to the bowl.
  • For a stricter parsley-heavy version, skip the cucumber.
  • For gluten-free tabbouleh, use cooked and cooled quinoa or finely riced cauliflower instead of bulgur.
  • Best texture is the same day, but leftovers keep 2–3 days in the fridge.
A visual tabbouleh recipe card with a finished salad, 6 servings, 40 minutes, no-cook fine bulgur, key ingredients, and method steps.
This tabbouleh recipe card keeps the essentials together: 6 servings, about 40 minutes, no-cook fine bulgur, fresh herbs, lemon dressing, and a short rest before serving.

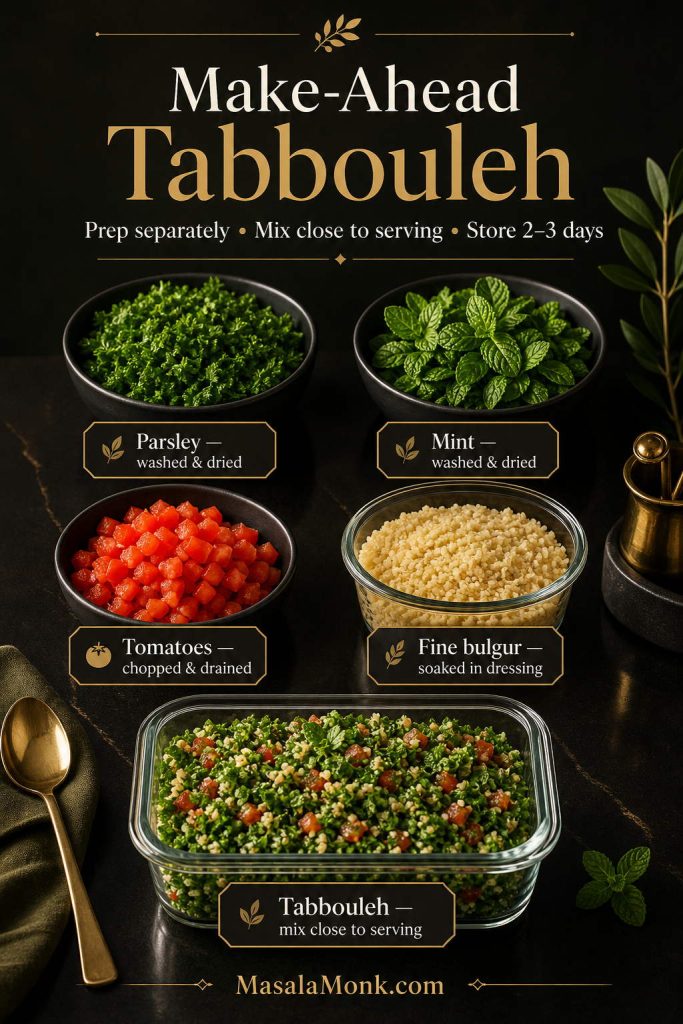
Make-Ahead and Storage

Although tabbouleh can be made ahead, it is best when the herbs still taste fresh and lively. If you want to prepare it early, wash and dry the herbs first, then chop and mix closer to serving.

For the freshest texture, keep the chopped herbs, drained tomatoes, and soaked bulgur separate until close to serving, then toss and adjust the seasoning. This is especially helpful if you are making tabbouleh for guests.

  • Best same day: Tabbouleh has the brightest texture and flavor within a few hours of mixing.
  • Best for guests: Mix the salad within 30–60 minutes of serving for the freshest herb texture.
  • Best for leftovers: Store dressed tabbouleh in an airtight container for 2–3 days, knowing the herbs will soften over time.
  • Make-ahead tip: Wash and dry parsley up to 1 day ahead. Keep it wrapped in towels in the fridge.
  • Do not freeze: The tomatoes and herbs turn limp and watery after thawing.
A make-ahead tabbouleh guide showing dried parsley, dried mint, drained tomatoes, fine bulgur soaked in dressing, and finished tabbouleh in a container.
For make-ahead tabbouleh, prep the herbs, tomatoes, and fine bulgur separately. Then mix close to serving and store leftovers in the fridge for 2–3 days.

If the salad tastes dull after sitting, refresh it with a small squeeze of lemon juice, a pinch of salt, and a drizzle of olive oil before serving. This brings back brightness without needing a full new batch of dressing.

What to Serve with Tabbouleh

Tabbouleh works as a salad, side dish, or part of a mezze spread. Its bright lemon and herb flavor makes it especially good beside richer dishes.

  • Hummus and warm pita
  • Falafel
  • Grilled chicken, kebabs, or kofta
  • Lentil soup
  • Stuffed pita wraps
  • Roasted eggplant or grilled vegetables
  • Romaine lettuce leaves for scooping
  • Rice bowls or grain bowls
A mezze spread with tabbouleh, pita, hummus, falafel, pickles, grilled vegetables, lemon, and lettuce leaves.
Tabbouleh works well with mezze because its lemony herbs cut through richer foods. Serve it with pita, hummus, falafel, grilled dishes, pickles, or crisp lettuce leaves.

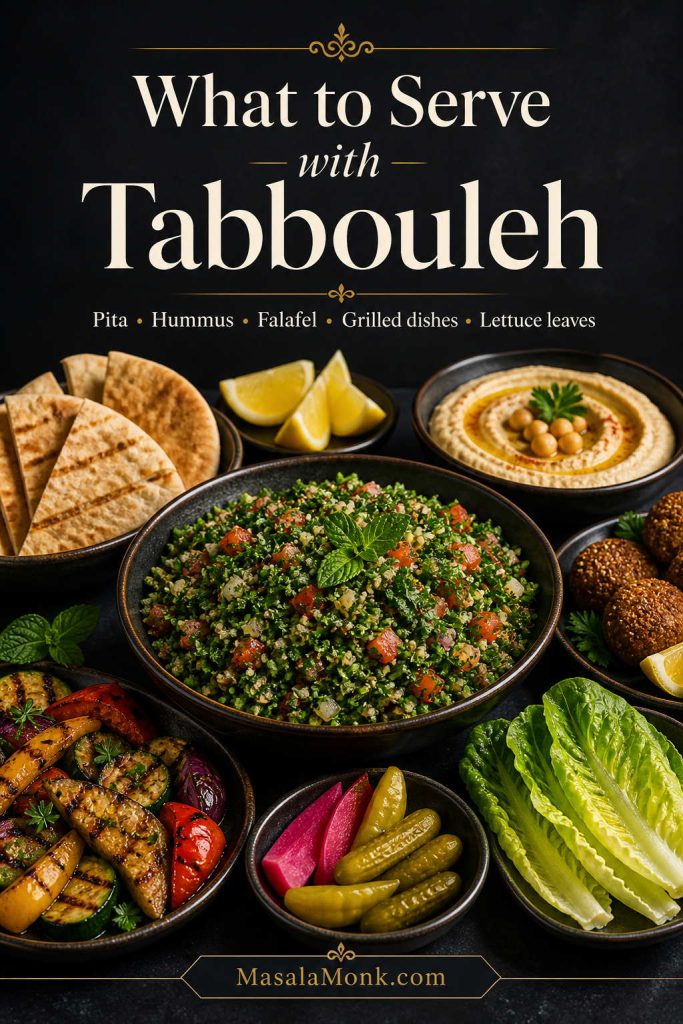
For a full mezze-style meal, serve tabbouleh with warm pita, hummus, pickles, and homemade falafel. If you are building a falafel, shawarma, or pita spread, a spoon of amba sauce adds a sharp, tangy contrast beside the fresh herbs.

For grilled chicken, wraps, or pita plates, tabbouleh also works well with a cooling tzatziki sauce. You can also spoon it into pita pockets with hummus, cucumber, and crisp vegetables, similar to this hummus veggie sandwich.

For a lighter plate, serve tabbouleh with hummus, raw vegetables, olives, and pita. For a fuller dinner, pair it with grilled chicken or lamb and a creamy yogurt sauce.

Tabbouleh Variations

Once you understand the base recipe for tabbouleh, the variations are easy. For example, you can swap bulgur for quinoa, cauliflower rice, or couscous while keeping the herbs generous, the pieces small, and the lemon-olive oil balance bright.
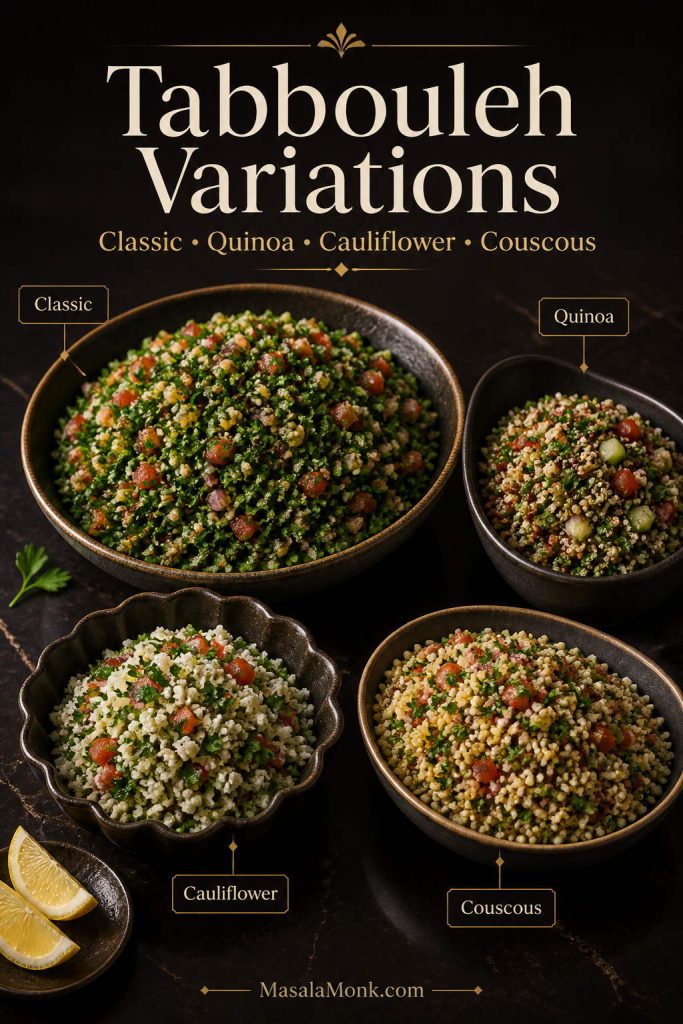
A tabbouleh variations graphic showing classic bulgur, quinoa, cauliflower, and couscous versions in separate bowls.
Once the parsley-heavy base is clear, tabbouleh variations are easy. Use quinoa for gluten-free tabbouleh, cauliflower rice for grain-free tabbouleh, or couscous for a quick variation.

Quinoa Tabbouleh

Use cooked and fully cooled quinoa instead of bulgur. Quinoa tabbouleh is the best gluten-free version because quinoa has a small grain size and absorbs lemon dressing well. Keep the parsley generous so it still tastes like tabbouleh, not just quinoa salad.

If you are using quinoa for meal prep, this quinoa and chickpea salad idea shows how well quinoa works with cucumber, tomatoes, red onion, and lemon-tahini dressing.

Cauliflower Tabbouleh

Use finely riced cauliflower instead of bulgur for a grain-free version. Raw cauliflower rice works well if it is chopped small and not watery. For a softer texture, salt it lightly, let it sit for a few minutes, then squeeze out extra moisture before mixing.

Couscous Tabbouleh

Couscous tabbouleh is a quick variation, but it is not the traditional version. Cook or soak the couscous, fluff it, cool it completely, then mix with the herbs, tomato, lemon, and olive oil.

No-Bulgur Tabbouleh

You can skip the bulgur for a lighter herb salad. The texture will be less traditional, but it works if you want a very fresh salad with parsley, tomato, mint, lemon, and olive oil.

Extra-Lemony Tabbouleh

If you like a sharper salad, add another tablespoon of lemon juice after the salad rests. Add it gradually because too much lemon can overpower the herbs.

Tabbouleh FAQs

Is tabbouleh the same as tabouli?

Yes. Tabbouleh and tabouli usually mean the same parsley, tomato, mint, bulgur, lemon, and olive oil salad. The difference is mostly spelling.

What is tabbouleh made of?

Tabbouleh is made with parsley, tomatoes, mint, green onions, fine bulgur, lemon juice, olive oil, salt, and pepper. Some versions also include cucumber.

What kind of bulgur is best for tabbouleh?

Fine #1 bulgur is best for tabbouleh because it softens quickly and does not overpower the parsley. Medium or coarse bulgur can work, but it usually needs hot water and gives the salad a heavier texture.

Do you cook bulgur for tabbouleh?

You do not need to cook fine bulgur for tabbouleh. In this recipe, it softens in the lemon-olive oil dressing while you chop the herbs and vegetables. Medium or coarse bulgur should be hot-soaked or cooked, then cooled before mixing.

Can I make tabbouleh without bulgur?

Yes. You can leave out the bulgur for a lighter parsley salad, but the texture will be less traditional. If you want a gluten-free version with a similar small-grain feel, cooked and cooled quinoa is the best swap.

Is tabbouleh gluten-free?

Classic tabbouleh is not gluten-free because bulgur is made from wheat. For a gluten-free version, use cooked quinoa or cauliflower rice instead of bulgur.

Is tabbouleh vegan?

Yes. Traditional tabbouleh ingredients are plant-based, so the salad is naturally vegan and dairy-free.

Is tabbouleh healthy?

Tabbouleh is a fresh, herb- and vegetable-heavy salad made with parsley, tomatoes, mint, lemon juice, olive oil, and a small amount of bulgur. It can fit well into a balanced Mediterranean-style meal with vegetables, legumes, whole grains, and olive oil. For broader context, Harvard’s Nutrition Source has a useful overview of the Mediterranean diet pattern.

Why is my tabbouleh watery?

Tabbouleh becomes watery when the parsley is wet, the tomatoes are too juicy, the cucumber is not drained, or too much dressing is added. Dry the herbs well, drain juicy vegetables, and let the salad rest before adjusting the final seasoning.

Should tabbouleh be served cold?

Tabbouleh can be served chilled or at room temperature. It tastes best after a short rest, but it should not sit out for too long because the herbs soften and the tomatoes release more liquid.

How long should tabbouleh rest before serving?

Let tabbouleh rest for about 10–30 minutes after mixing. That gives the bulgur time to finish softening and lets the lemon, olive oil, herbs, and tomatoes settle into a brighter flavor.

Can I make tabbouleh ahead of time?

Yes, but it tastes freshest the same day. You can wash and dry the herbs ahead of time, then chop and mix the salad closer to serving. Leftovers keep 2–3 days in the fridge.

Can I freeze tabbouleh?

No. Tabbouleh does not freeze well because the herbs and tomatoes become limp and watery after thawing.

Can I use quinoa instead of bulgur?

Yes. Use cooked and cooled quinoa instead of bulgur for a gluten-free quinoa tabbouleh. Keep the herbs generous so the salad still tastes fresh and parsley-forward.

Can I use couscous instead of bulgur?

Yes, but couscous tabbouleh is a quick variation rather than the classic version. Cook or soak the couscous, cool it completely, then mix with the herbs, tomatoes, lemon, and olive oil.

Can I use cauliflower rice instead of bulgur?

Yes. Finely riced cauliflower makes a grain-free tabbouleh variation. Use it raw for crunch or salt and drain it lightly for a softer texture.

Should I use curly parsley or flat-leaf parsley?

Both can work. Curly parsley gives a fluffy, traditional-looking texture, while flat-leaf parsley has a stronger flavor and is easier to chop. Whichever you use, dry it very well before chopping.

Can I chop parsley in a food processor?

You can, but hand-chopping gives better texture. If using a food processor, pulse carefully and stop before the parsley becomes wet or pasty.

A close serving image of fresh parsley-first tabbouleh with a spoon, pita wedges, lemon, and romaine leaves.
Before serving, taste the rested tabbouleh one last time. Salt fixes flat flavor, lemon adds brightness, and a small drizzle of olive oil softens sharp edges.

Tabbouleh Recipe Tips to Remember

For the best tabbouleh, keep the salad parsley-first, use fine bulgur, dry the herbs thoroughly, drain juicy tomatoes, and taste after the salad rests. Those small details make the difference between a fresh, bright herb salad and a watery, grain-heavy bowl.

Posted on Leave a comment

Beyond Chicken: 5 Hemp Seed High Protein Tofu Meal Prep Ideas

Beyond Chicken cover image showing five hemp seed high-protein tofu meal prep ideas, including a smoky chili tofu rice bowl, lemon herb quinoa box, spicy peanut tofu noodle prep, Mediterranean tofu bowl, and buffalo tofu wrap.

Tofu meal prep can be substantial, flavorful, and still worth opening on day four. That is exactly what this guide is built to deliver.

These lunches are designed for real weekday life. They are filling enough to count as proper lunch, varied enough to keep the week from feeling repetitive, and practical enough to prep ahead without sliding into bland tofu, soggy vegetables, or disappointing containers by midweek.

Just as importantly, the hemp seeds are doing real work throughout the lineup. Rather than sitting on top like a token healthy ingredient, they show up as a nutty crust, a creamy dressing base, a richer sauce builder, a fresh herby crunch, and a proper ranch-style finish that makes wraps feel complete instead of merely assembled.

If you want to build a broader plant-based lunch system beyond this page, MasalaMonk’s guide to plant-based protein sources for high-protein meal prep is a natural companion.

Quick answers before you cook

Can tofu be meal prepped? Yes. Tofu is one of the best meal-prep proteins because it roasts well, absorbs flavor, and works naturally in rice bowls, quinoa bowls, noodles, and wraps.

What tofu is best for meal prep? Extra-firm tofu is the easiest and most reliable option because it holds shape well and develops better edges after roasting. Firm tofu also works when you want a slightly softer bite.

How long does tofu meal prep last? Most tofu meal prep keeps well for 3 to 4 days in the fridge when sauces, watery vegetables, and crunchy toppings are packed separately.

What is the biggest mistake? Packing hot tofu with wet vegetables or dressing too early. As a result, a good meal-prep container can turn soggy by day three.

What is the key rule for better tofu meal prep? Press well, roast until it has real color, cool before sealing, and keep wet and dry elements separate whenever texture matters.

Also Read: Easy English Scone Recipe

Tofu Meal Prep at a Glance

Use this as your fast decision guide before choosing a recipe. When you already know you want something warm, cold, craveable, or easy to eat on the go, this section makes the choice quicker. Better yet, it helps you match the right lunch to the right point in the week instead of rereading every recipe section once time is already tight.

Tofu meal prep comparison graphic showing five lunch ideas: smoky tofu rice bowls, lemon herb tofu quinoa bowls, spicy peanut noodles with crispy tofu, Mediterranean tofu bowls, and buffalo tofu wraps with hemp ranch.
Use this tofu meal prep at-a-glance guide to choose the right lunch for your week: smoky rice bowls for a familiar warm option, lemon herb quinoa bowls for cold lunches, spicy peanut noodles when you want something craveable, Mediterranean bowls for a fresher reset, and buffalo wraps for an easy hand-held meal.
  • Best beginner option: Smoky Tofu Rice Bowls
  • Best cold lunch: Lemon Herb Tofu Quinoa Bowls
  • Best reheated lunch: Smoky Tofu Rice Bowls
  • Best craveable lunch: Spicy Peanut Noodles with Crispy Tofu
  • Best fresh midweek reset: Mediterranean Tofu Bowls
  • Best hand-held option: Buffalo Tofu Wraps with Hemp Ranch
  • Best choice if you are tired of bowls: Buffalo Tofu Wraps with Hemp Ranch
  • Best day-three or day-four option: Lemon Herb Tofu Quinoa Bowls

New to tofu meal prep? Start with the smoky rice bowls. They are the clearest proof that tofu can feel just as satisfying as the classic protein-rice-and-vegetable lunch people usually build around chicken. From there, branching into the colder, fresher, or more sauce-driven options becomes much easier.

Why Tofu Meal Prep Often Disappoints by Day Three — and How This Guide Fixes It

Too often, tofu meal prep falls off by day three because moisture builds, texture softens, and the containers start tasting repetitive. Sometimes the tofu was never pressed or browned enough to begin with. In other cases, the real problem is packing hot ingredients with wet vegetables or dressing too early, which quietly sets everything up to turn soggy in the fridge.

This guide fixes that by treating texture and packing order as part of the recipe, not as an afterthought. Instead of stretching one baked-tofu method across several near-identical boxes, it gives you five genuinely different lunches with different textures, different flavor directions, and different kinds of lunch appeal. Consequently, the week feels less repetitive, while the food itself holds up better.

Hemp seeds make that system stronger. Here, they are not just included for nutrition. They help create a nutty crust, a creamier dressing, a fuller sauce, a brighter finishing crunch, and a better ranch-style spread. In practice, that means the recipes eat better as the week goes on instead of feeling like containers you are forcing yourself to finish.

Also Read: Sourdough English Muffins Recipe

Best Tofu for Meal Prep and How to Prep It

For these recipes, extra-firm tofu is the easiest place to start. It gives you stronger edges, cleaner pieces, and better structure after cooking. Firm tofu also works well, particularly when you want a slightly softer center or a more delicate bite in the finished meal. If you can get super-firm tofu, that is even better because it usually needs less pressing and holds its shape beautifully.

However, silken tofu is not the right fit here. It can be useful in sauces or creamy blends, but it is not built for bowls, noodles, and wraps like these. Even if it sounds convenient, it will not give you the kind of meal-prep texture that keeps well through the week.

Best tofu for meal prep guide comparing extra-firm, firm, and super-firm tofu, plus pressed vs unpressed tofu and pale vs browned tofu for better meal prep texture.
Extra-firm tofu gives the most reliable meal-prep texture, especially when it is pressed well, roasted until properly browned, and cooled before sealing so it stays firmer through the week.

The prep matters just as much as the type you choose. First, press the tofu until it no longer feels waterlogged when you cut it. Twenty to thirty minutes is a good minimum, and longer is even better if time allows. Then season it with more intention than just a splash of soy sauce and hope for the best. Tofu responds well to layered flavor: salt or soy, aromatics, acid, herbs, spices, and a finishing element.

Most importantly, cook for texture rather than mere doneness. Pale tofu rarely improves in the fridge. Instead, what you want is visible browning, firmer edges, and enough structure that the tofu can survive storage and reheating without collapsing into softness. Once cooked, let it cool before sealing it into containers. That pause protects more texture than most people expect.

If you like crisp, prep-friendly plant-based lunches in general, MasalaMonk’s high-protein vegan meal prep ideas using an air fryer are worth a look too.

How to Make Tofu Meal Prep More Filling Without Making It Heavy

One of the easiest ways to improve tofu meal prep is to make it more filling without turning it into a heavy lunch you stop looking forward to by Wednesday. The answer is not to pile in random extras until the meal feels joyless. Rather, build in staying power with a proper base, a good texture contrast, and a sauce or dressing that adds body without flooding the container.

In practice, that usually means tofu plus rice, quinoa, or noodles for structure; vegetables that either roast well or stay crisp; and hemp seeds, yogurt, tahini, or peanut-based sauces that make the lunch feel complete instead of sparse. That is where these recipes work especially well. Tofu carries the main protein role, while hemp seeds add richness, body, and texture in ways that improve the actual eating experience.

Guide to making tofu meal prep more filling without making it heavy, showing protein, structure, freshness, texture, and body with tofu, grains, vegetables, hemp seeds, and sauce.
A satisfying tofu lunch depends less on piling in more ingredients and more on balancing the right five roles: protein for staying power, a base for structure, vegetables for freshness, hemp seeds for texture, and sauce or dressing for body.

This matters because the best tofu meal prep recipes are the ones you actually want to repeat. A filling lunch should still feel bright, balanced, and easy to eat. That is precisely why these bowls, noodles, and wraps are designed to hold well in the fridge while still eating like lunch first and meal prep second.

For a grain-forward prep angle, MasalaMonk’s plant-based meal prep ideas using quinoa as a protein source pair especially well with the quinoa bowls below.

Also Read: White Russian Recipe: 7 Variants to Try, From Classic to Frozen

The 5 Tofu Meal Prep Recipes

The recipes below are built to cover different lunch moods across the week, from a warm rice bowl to a bright quinoa bowl, spicy noodles, a crisp Mediterranean option, and a hand-held buffalo wrap. Protein estimates are approximate and based on generic ingredient values, so they can vary slightly depending on the tofu, noodles, tortillas, and yogurt you use.

If you landed here mainly for the recipes, you can jump straight into the one that fits your week best. On the other hand, if you are still deciding, the short intros and quick snapshots will help you match the right lunch mood to the right container.

1) Smoky Tofu Rice Bowls

Choose this bowl when you want the most familiar lunch format in the post. If your idea of dependable tofu meal prep still looks like some version of protein, rice, and vegetables, this one gives you that same structure with much more character.

The tofu roasts into something smoky, toasty, and lightly nutty from the hemp crust, while roasted broccoli and bell peppers bring sweetness and body. Shredded cabbage keeps the bowl from feeling too soft, and a sharp lime yogurt drizzle wakes everything back up after reheating. For that reason, this is the easiest recipe here to trust on the first try.

Quick recipe snapshot

  • Best served: Warm, with cool toppings added after reheating
  • Fridge life: 4 days
  • Reheats well: Yes
  • Pack separately: Lime yogurt drizzle, avocado, and lime wedges
  • Best texture trait: Smoky, browned tofu with rough hemp-crusted edges
  • Approximate protein per serving: about 29 g

Yield: 4 bowls

Prep time: 25 minutes

Cook time: 30 minutes

Total time: 55 minutes, plus tofu pressing time

Ingredients

Hemp-crusted tofu

  • 2 (14-ounce / 396 g) blocks extra-firm tofu, pressed and cubed
  • 1 tablespoon soy sauce or tamari
  • 1 tablespoon olive oil
  • 1 tablespoon cornstarch
  • 1 teaspoon smoked paprika
  • 1 teaspoon chili powder
  • 1/2 teaspoon garlic powder
  • 1/2 teaspoon onion powder
  • 1/4 teaspoon black pepper
  • 1/3 cup hemp seeds

Rice bowl base

  • 4 cups cooked rice
  • 2 cups broccoli florets
  • 1 red bell pepper, sliced
  • 2 cups shredded cabbage
  • 1 avocado, sliced for serving
  • Lime wedges

Lime yogurt drizzle

  • 1/2 cup plain yogurt
  • 1 tablespoon lime juice
  • 1 teaspoon hot sauce
  • Pinch of salt

Method

  1. Heat the oven to 425°F and line two trays.
  2. Toss the tofu with soy sauce, olive oil, cornstarch, smoked paprika, chili powder, garlic powder, onion powder, and black pepper.
  3. Add the hemp seeds and toss again so they cling to the tofu.
  4. Spread the tofu on one tray in a single layer.
  5. Toss the broccoli and bell pepper with a little oil and salt and spread them on the second tray.
  6. Roast for 25 to 30 minutes, flipping the tofu once, until the tofu is browned at the edges and the hemp seeds smell lightly toasted.
  7. Stir together the yogurt, lime juice, hot sauce, and salt.
  8. Cool the hot ingredients slightly, then divide the rice, tofu, vegetables, and cabbage among containers.
  9. Pack the drizzle, avocado, and lime wedges separately.

What you should notice

The tofu should have darkened corners, a lightly rough hemp crust, and a savory smoky aroma. Meanwhile, the cabbage and lime should keep the bowl from feeling too dense. Once you open the container later in the week, the bowl should still feel balanced rather than heavy.

Best storage tip

Keep the drizzle separate until serving. That one move helps the tofu keep more of its edge and keeps the cabbage crisp longer. In turn, the reheated bowl feels much closer to freshly built lunch rather than day-four leftovers.

Smoky tofu rice bowls recipe card showing browned tofu over rice with broccoli, cabbage, lime, and creamy drizzle for tofu meal prep.
Built for readers who want the most familiar place to start, this smoky tofu rice bowl turns a classic warm lunch format into something more interesting with browned tofu, rice, vegetables, and a limey creamy finish.

Also Read: Mango Sorbet Recipe: Healthy & Plant Based Dessert

2) Lemon Herb Tofu Quinoa Bowls

Reach for this bowl when you want a cold lunch that still feels full, bright, and properly satisfying instead of dry and dutiful. At the same time, it stays calm and clean enough to work especially well later in the week.

The tofu is seasoned simply so the lemon, herbs, and creamy hemp dressing can lead. Quinoa gives the bowl structure and extra staying power, while the fresh herbs keep the flavor from flattening in the fridge. As a result, this becomes one of the smartest later-week lunches in the lineup and one of the easiest to eat straight from the container.

Quick recipe snapshot

  • Best served: Cold
  • Fridge life: 4 days
  • Reheats well: Not necessary
  • Pack separately: Creamy hemp dressing
  • Best texture trait: Bright, herby, fresh-tasting quinoa bowl with creamy finish
  • Approximate protein per serving: about 31 g

Yield: 4 bowls

Prep time: 20 minutes

Cook time: 25 minutes

Total time: 45 minutes, plus tofu pressing time

Ingredients

Lemon-herb tofu

  • 2 (14-ounce / 396 g) blocks firm tofu, pressed and cubed
  • 1 tablespoon olive oil
  • 1 tablespoon lemon juice
  • 1 teaspoon dried oregano
  • 1 teaspoon garlic powder
  • 1/2 teaspoon salt
  • 1/4 teaspoon black pepper

Quinoa bowl base

  • 4 cups cooked quinoa
  • 1 cucumber, chopped
  • 1 1/2 cups cherry tomatoes, halved
  • 1/2 red onion, thinly sliced
  • 1 cup chopped parsley
  • 1/4 cup chopped dill or mint
  • 3 tablespoons hemp seeds, for topping

Creamy hemp dressing

  • 1/3 cup hemp seeds
  • 3 tablespoons plain yogurt
  • 2 tablespoons lemon juice
  • 1 tablespoon olive oil
  • 1 teaspoon Dijon mustard
  • 1 small garlic clove
  • 2 to 4 tablespoons water
  • Salt and pepper to taste

Method

  1. Heat the oven to 425°F.
  2. Toss the tofu with olive oil, lemon juice, oregano, garlic powder, salt, and black pepper.
  3. Roast for about 25 minutes, flipping once, until lightly golden and firm.
  4. Blend or whisk together the dressing ingredients until smooth and lightly creamy.
  5. Divide the quinoa among containers, then add the cucumber, tomatoes, red onion, herbs, and tofu.
  6. Sprinkle with hemp seeds.
  7. Pack the dressing separately and spoon it over just before eating.

What you should notice

When you open this bowl cold, it should smell lemony and herby right away. At the same time, the dressing should coat the quinoa and tofu without making the container loose or watery. Ideally, the whole bowl should feel bright first and creamy second, not the other way around.

Best storage tip

Do not toss everything with the dressing in advance unless you are eating it within a day. Keeping it separate makes the bowl feel fresher for longer. More importantly, it stops the herbs and vegetables from collapsing too early.

Lemon herb tofu quinoa bowls recipe card showing quinoa, golden tofu, cucumber, cherry tomatoes, red onion, herbs, and creamy lemon dressing for cold tofu meal prep.
Cold lunches hold up especially well when they stay bright and composed, and this lemon herb tofu quinoa bowl does exactly that with quinoa, fresh vegetables, herbs, and a creamy dressing packed separately.

Also Read: Protein Ice Cream Recipe: 10 Creamy Homemade Recipes

3) Spicy Peanut Noodles with Crispy Tofu

Pick this one when you want the least “meal prep feeling” lunch in the lineup. Sometimes the smartest way to stay consistent with prep is to make at least one meal that feels saucy, bold, and a little indulgent.

Here, the sauce is the whole point. Peanut butter gives it body, the hemp seeds make it feel fuller and smoother, the tofu brings chew, and the noodles give the whole thing real comfort-food energy without turning it heavy or dull. Since it works cold, at room temperature, or lightly warm, it is also one of the most flexible containers in the entire post.

Quick recipe snapshot

  • Best served: Cold, room temperature, or gently warmed
  • Fridge life: 3 to 4 days
  • Reheats well: Lightly, but also good cold
  • Pack separately: Spicy peanut-hemp sauce
  • Best texture trait: Glossy noodles with crisp-edged tofu and rich clingy sauce
  • Approximate protein per serving: about 34 g

Yield: 4 containers

Prep time: 25 minutes

Cook time: 25 minutes

Total time: 50 minutes, plus tofu pressing time

Ingredients

Crispy tofu

  • 2 (14-ounce / 396 g) blocks extra-firm tofu, pressed and torn into chunks
  • 1 tablespoon soy sauce
  • 1 tablespoon neutral oil
  • 1 tablespoon cornstarch
  • 1 teaspoon garlic powder

Noodle base

  • 12 ounces dry noodles, such as wheat noodles or rice noodles
  • 2 cups shredded cabbage
  • 2 cups shredded carrots
  • 1 red bell pepper, thinly sliced
  • 3 green onions, sliced
  • Cilantro, optional

Spicy peanut-hemp sauce

  • 1/3 cup peanut butter
  • 2 tablespoons soy sauce
  • 1 tablespoon rice vinegar
  • 1 tablespoon maple syrup
  • 1 to 2 teaspoons sriracha
  • 1 teaspoon sesame oil
  • 1/4 cup hemp seeds
  • Warm water, as needed

Method

  1. Heat the oven to 425°F.
  2. Toss the tofu with soy sauce, oil, cornstarch, and garlic powder.
  3. Roast for about 25 minutes, flipping once, until crisp at the edges.
  4. Cook the noodles until just tender, then drain and cool slightly.
  5. Blend or whisk together the sauce ingredients, adding warm water until the sauce is smooth, glossy, and thick enough to cling.
  6. Divide the noodles and vegetables among containers, then add the tofu and green onions.
  7. Pack the sauce separately and toss through just before eating.
How to pack peanut noodles for meal prep guide showing noodles, crispy tofu, vegetables, and peanut sauce packed separately for better texture.
Packing spicy peanut noodles well matters almost as much as making them well, especially when you want the noodles to stay loose, the vegetables to keep some life, and the sauce to coat everything only when you are ready to eat.

What you should notice

The sauce should coat the back of a spoon. The tofu should have crisp edges and a slightly chewy center. Once everything is tossed together, the noodles should look glossy and coated, not soupy. Even so, the whole bowl should still feel lively because of the raw vegetables, not weighed down by the sauce.

Best storage tip

A tiny bit of oil on the noodles after draining helps keep them from clumping in the fridge. After that, keeping the sauce separate gives you much more control over texture when it is time to eat.

Spicy peanut noodles with crispy tofu recipe card showing glossy noodles, browned tofu, cabbage, carrots, bell pepper, green onion, and peanut sauce for tofu meal prep.
When tofu meal prep needs to feel more craveable than dutiful, spicy peanut noodles with crispy tofu bring the right kind of comfort: glossy sauce-coated noodles, browned tofu, and plenty of crunch, with the sauce packed separately so the texture stays under your control.

Also Read: Homemade Mango Ice Cream Recipe

4) Mediterranean Tofu Bowls

Go with this bowl when richer lunches start feeling repetitive. By the middle of the week, something brighter and sharper often sounds much more appealing.

The tofu is warmly spiced and roasted, but the real lift comes from the finish. A lemony herbed hemp crunch gives the bowl a clear texture role instead of hiding quietly in the background, while cucumbers, tomatoes, olives, and romaine keep everything crisp, savory, and bright. By contrast with the noodle prep, this lunch is not trying to comfort you. It is trying to refresh you, which is exactly why it works so well in the same lineup.

Quick recipe snapshot

  • Best served: Cold or cool room temperature
  • Fridge life: 3 to 4 days
  • Reheats well: Not ideal once assembled
  • Pack separately: Romaine, dressing, and herbed hemp crunch for best texture
  • Best texture trait: Crisp, briny, lemony contrast with nutty finishing crunch
  • Approximate protein per serving: about 33 g

Yield: 4 bowls

Prep time: 25 minutes

Cook time: 30 minutes

Total time: 55 minutes, plus tofu pressing time

Ingredients

Spiced tofu

  • 2 (14-ounce / 396 g) blocks firm tofu, pressed and cubed
  • 1 tablespoon olive oil
  • 1 tablespoon lemon juice
  • 1 teaspoon smoked paprika
  • 1 teaspoon ground cumin
  • 1/2 teaspoon garlic powder
  • 1/2 teaspoon salt
  • Black pepper to taste

Mediterranean bowl base

  • 4 cups cooked quinoa
  • 1 cucumber, chopped
  • 1 1/2 cups chopped tomatoes
  • 1/2 cup sliced olives
  • 1 cup shredded romaine
  • 1 cup roasted chickpeas

Creamy lemon dressing

  • 3 tablespoons tahini
  • 2 tablespoons lemon juice
  • 1 small garlic clove
  • 2 to 4 tablespoons water
  • Salt and pepper to taste

Herbed hemp crunch

  • 1/3 cup hemp seeds
  • 2 tablespoons chopped parsley
  • 1 tablespoon chopped dill
  • 1 teaspoon lemon zest
  • Pinch of salt
  • Black pepper

Method

  1. Roast the tofu at 425°F for 25 to 30 minutes until browned and firm.
  2. Whisk together the dressing ingredients.
  3. Stir together the hemp crunch ingredients in a small bowl.
  4. Divide the quinoa among containers and add the cucumber, tomatoes, olives, tofu, and roasted chickpeas.
  5. Pack the romaine, dressing, and hemp crunch separately when possible for the best texture.
  6. Add the fresh elements just before serving.

What you should notice

The hemp topping should smell lemony and fresh and add a real nutty bite. As a result, the finished bowl should feel crisp, bright, and layered rather than soft and one-note. Even on day three, it should still taste awake rather than tired.

Best storage tip

Store the romaine outside the main hot ingredients if you want the best texture on days three and four. In the same way, keeping the crunch and dressing separate protects the part of this bowl that makes it feel fresh in the first place.

Mediterranean tofu bowls recipe card showing quinoa, spiced tofu, roasted chickpeas, romaine, cucumber, tomatoes, olives, and creamy dressing for cold tofu meal prep.
Sharper, brinier lunches can be the difference between finishing your meal prep happily and getting bored by midweek, and this Mediterranean tofu bowl leans into that with spiced tofu, quinoa, crisp vegetables, olives, roasted chickpeas, and a lemony creamy finish.

Also Read: Cookie Pie Recipe: 10 Best Flavors, Fillings and Variations

5) Buffalo Tofu Wraps with Hemp Ranch

This is the lunch that breaks the bowl rhythm. After several container-style meals, that shift alone makes the lineup feel more useful.

Buffalo tofu brings heat and punch, the fresh vegetables add crunch and lift, and the hemp ranch gives the wrap its real identity by cooling the buffalo heat and adding creamy body. Using shredded or finely crumbled tofu also makes the filling feel more natural inside a wrap rather than like bowl tofu folded into a tortilla at the last second. That difference matters, because this lunch is supposed to feel packed on purpose.

Quick recipe snapshot

  • Best served: Cold, assembled fresh
  • Fridge life: 3 to 4 days for components
  • Reheats well: Not as a full wrap
  • Pack separately: Buffalo tofu, wrap vegetables, tortillas, and hemp ranch
  • Best texture trait: Sticky spicy tofu balanced by cool creamy ranch and fresh crunch
  • Approximate protein per serving: about 28 g

Yield: 4 wraps

Prep time: 20 minutes

Cook time: 20 minutes

Total time: 40 minutes, plus tofu pressing time

Ingredients

Buffalo tofu

  • 2 (14-ounce / 396 g) blocks extra-firm tofu, pressed and shredded or finely crumbled
  • 1 tablespoon olive oil
  • 1/2 teaspoon garlic powder
  • 1/2 teaspoon paprika
  • 1/2 teaspoon salt
  • Black pepper to taste
  • 1/3 cup buffalo sauce

Wrap filling

  • 4 large flour tortillas or wraps
  • 2 cups shredded lettuce
  • 1 cup shredded carrots
  • 1 cup finely chopped celery
  • 1/2 red onion, thinly sliced
  • 2 tablespoons hemp seeds, for sprinkling

Hemp ranch

  • 1/4 cup hemp seeds
  • 1/2 cup plain yogurt
  • 1 tablespoon lemon juice
  • 1 teaspoon Dijon mustard
  • 1 tablespoon chopped parsley or dill
  • Pinch of garlic powder
  • Salt and pepper to taste
  • Splash of water, if needed

Method

  1. Heat the oven to 425°F.
  2. Toss the shredded or finely crumbled tofu with olive oil, garlic powder, paprika, salt, and black pepper.
  3. Spread it out on a tray and roast for about 20 minutes, stirring once, until the edges are lightly browned.
  4. Toss the hot tofu with buffalo sauce and let it cool slightly.
  5. Blend or whisk together the hemp ranch ingredients until creamy and spreadable.
  6. For the best texture, store the wrap filling separately and assemble fresh before eating.
  7. To serve, spread hemp ranch on the wrap, then layer the lettuce, carrots, celery, onion, tofu, and a light sprinkle of hemp seeds before rolling tightly.
How to build buffalo tofu wraps guide showing hemp ranch spread on a tortilla, crunchy vegetables, buffalo tofu, and the finished wrap rolled tightly for meal prep.
Building the wrap in the right order makes the difference between a crisp, satisfying lunch and a soft one, which is why the ranch goes down first, the cool vegetables create the crunch, and the buffalo tofu gets added last before rolling everything tightly.

What you should notice

The tofu should look sticky and spicy at the edges, while the ranch should be thick enough to spread without making the wrap soggy. Once assembled, the wrap should feel cool, crisp, creamy, and sharp in the right order, not like a sauce-heavy bundle that falls flat after two bites.

Best storage tip

If you fully assemble these on day one, they soften much faster. Therefore, they are better when the components are prepped ahead and wrapped fresh. That way, you keep the convenience without giving up the texture that makes the wrap worth eating.

Buffalo tofu wraps with hemp ranch recipe card showing cut wraps filled with spicy tofu, lettuce, carrots, celery, red onion, and creamy ranch for tofu meal prep.
A meal-prep wrap only earns its place when it still feels crisp, creamy, and worth eating, and these buffalo tofu wraps do that by pairing punchy tofu with cool hemp ranch, crunchy vegetables, and fresh assembly right before lunch.

Also Read: Punjabi Mutton Bhuna – Amritsari Village-Style Gosht Recipe

Which Tofu Meal Prep Recipes Are Best Hot, Cold, or Build-Fresh?

The Smoky Tofu Rice Bowls reheat best because the rice and roasted vegetables are built for warmth, and the bowl can be refreshed with cool cabbage and lime yogurt drizzle afterward. So if you want the most classic microwave-friendly tofu meal prep option in the post, start there.

Meanwhile, the Spicy Peanut Noodles with Crispy Tofu work both ways. Some people prefer them cold or at room temperature, while others like them gently warmed before tossing with sauce. Because of that flexibility, they are one of the easiest lunches here to fit into different workday setups.

Tofu meal prep comparison guide showing which recipes are best reheated, best cold, best build-fresh, or flexible either way, including smoky tofu rice bowls, lemon herb tofu quinoa bowls, Mediterranean tofu bowls, buffalo tofu wraps, and spicy peanut noodles.
How you want to eat lunch changes which tofu meal prep recipe makes the most sense, and this guide helps you choose fast: smoky rice bowls for reheating, lemon herb and Mediterranean bowls for colder meals, buffalo wraps for fresh assembly, and spicy peanut noodles when you want the most flexibility.

For cold lunches, the Lemon Herb Tofu Quinoa Bowls are excellent. Likewise, the Mediterranean Tofu Bowls are at their best when the romaine, dressing, and herbed hemp crunch stay fresh until serving. In both cases, the freshness is the point, so there is no need to force reheating into the equation.

By contrast, the Buffalo Tofu Wraps with Hemp Ranch are best assembled from cold components just before eating. They can still be fully meal-prepped, of course. Even so, the smartest move is to treat them as a build-fresh lunch rather than a fully wrapped make-ahead one.

Also Read: Peach Cobbler with Canned Peaches (Dessert Recipe)

How to Meal Prep Tofu for the Week in Under 90 Minutes

You do not need to treat this like five separate cooking projects. Instead, the smarter move is to overlap the work so the whole prep session stays manageable.

Start by pressing all the tofu first. While that happens, get your grains cooking. Then preheat the oven and prep your vegetables. Once the tofu goes in, mix the sauces and dressings while everything roasts. Meanwhile, chop herbs and pack the fresh components during that same window. In practice, that overlap is what keeps a big prep session from turning into an all-afternoon chore.

A practical workflow looks like this:

Tofu meal prep workflow guide showing how to prep lunches in under 90 minutes by pressing tofu, cooking grains, chopping vegetables, roasting tofu, mixing sauces, cooling ingredients, packing containers, and labeling what to eat first.
A good tofu meal prep session runs better when the work overlaps, and this under-90-minute workflow shows the smartest order: press tofu first, cook grains while it presses, prep vegetables during that window, roast and cool the hot components, then pack and label everything with texture in mind.
  1. Press all the tofu first.
  2. Cook rice or quinoa while it presses.
  3. Preheat the oven and line your trays.
  4. Chop vegetables, herbs, and crunchy toppings.
  5. Season the tofu and roast it.
  6. Mix the hemp dressing, peanut sauce, tahini dressing, and hemp ranch while the oven is working.
  7. Cool the hot components before closing containers.
  8. Pack wet and dry elements separately wherever texture matters.
  9. Label the containers you want to eat first.

That kind of workflow keeps the prep manageable and makes the whole post more useful in real life. It also makes a big difference in texture, because cooling before packing is one of the easiest ways to avoid condensation and sogginess. Once you start overlapping the work instead of treating every recipe like a separate task, the whole system becomes much more realistic.

Also Read: Masterclass in Chai: How to Make the Perfect Masala Chai (Recipe)

Troubleshooting Tofu Meal Prep

Use this as a quick check before blaming tofu itself. In most cases, the problem is moisture, weak seasoning, or packing order.

Tofu meal prep packing guide showing which ingredients can be packed together and which should be packed separately, including dressings, greens, avocado, lime wedges, crunchy toppings, wraps, and fresh finishing elements.
Texture usually falls apart long before flavor does, so this tofu meal prep packing guide shows what can stay in the main container and what is better held back until serving, from dressings and greens to avocado, wraps, lime wedges, and crunchy toppings.

If tofu turns soggy

The most likely reason is too much moisture or sauce added too early. So press longer, roast longer, and sauce later. In many cases, the fix is not dramatic at all. It is simply a matter of letting the tofu get drier before you ask it to hold texture for several days.

If tofu tastes bland

The issue is usually weak seasoning or under-salted sauce. So use soy, acid, garlic, herbs, chili, and enough salt where needed. More specifically, do not expect one last-minute sauce to rescue tofu that never had enough flavor built into it from the start.

If the container turns watery

Wet vegetables were probably packed too early or against hot ingredients. Therefore, keep cucumbers, tomatoes, lettuce, and dressings separate whenever possible. Once the hot ingredients cool, you can combine more confidently without setting off that slow soggy slide in the fridge.

If reheated tofu turns rubbery

It was probably overcooked twice or reheated too aggressively. Instead, reheat more gently and stop once warm rather than blasting it until very hot. That small change alone usually keeps the texture much more pleasant.

If noodles clump

They were likely packed dry and cooled too tightly. In that case, toss them with a tiny bit of oil after draining and keep the sauce separate. Then, when it is time to eat, the noodles loosen more easily and the sauce coats them more evenly.

If wraps go soft too fast

They were assembled too early or loaded with too much wet sauce. So pack the filling and the wraps separately and build them fresh. That way, you still get the convenience of prep without sacrificing the crisp bite that makes the wrap work.

Also Read: Air Fryer Salmon Recipe (Time, Temp, and Tips for Perfect Fillets)

Tofu meal prep troubleshooting guide showing quick fixes for soggy tofu, bland tofu, watery containers, rubbery reheating, clumpy noodles, and soft wraps.
When tofu meal prep starts going wrong, the fix is usually more about handling than the recipe itself: press and roast tofu longer, season earlier, cool containers before sealing, keep sauce separate, reheat gently, and assemble wraps fresh instead of too far ahead.

How Long Does Tofu Meal Prep Last?

For both quality and practicality, these meals are best treated as a 3-to-4-day refrigerator plan. That way, the textures still feel intentional rather than tired. Meals like the quinoa bowls and Mediterranean bowls tend to hold especially well when the dressing stays separate. Meanwhile, the rice bowl and noodle prep also sit comfortably in that window. For wraps, the components are best prepped ahead and assembled fresh.

Tofu meal prep storage guide showing how long smoky tofu rice bowls, lemon herb tofu quinoa bowls, spicy peanut noodles, Mediterranean tofu bowls, and buffalo tofu wraps last in the fridge and how each is best served.
Planning the week gets easier when you know which lunches hold strongest: smoky rice bowls and lemon herb quinoa bowls can comfortably carry four days, peanut noodles stay flexible, Mediterranean bowls need greens and dressing held back, and buffalo wraps are best kept in components until you assemble them fresh.

Planning for a full five-day workweek? The easiest move is either to prep a smaller second batch midweek or to freeze part of the cooked tofu early and rotate it in later. That approach usually works better than asking one big Sunday prep to stay perfect longer than it really should. For general food-safety guidance on refrigerated leftovers, the USDA’s leftovers and food safety guidance is a useful reference point.

4-day tofu meal prep rotation guide showing a suggested order for smoky tofu rice bowls, spicy peanut noodles with crispy tofu, lemon herb tofu quinoa bowls, Mediterranean tofu bowls, and buffalo tofu wraps with hemp ranch.
A smart tofu meal prep week gets easier when the lunches are eaten in the right order, starting with the warm smoky rice bowls, moving through the more flexible peanut noodles, then into the colder quinoa and Mediterranean bowls, while the buffalo wraps stay best as fresh-built components on any day.

Final thoughts on tofu meal prep

These tofu meal prep ideas work because they treat tofu like a genuinely useful weekday protein instead of a backup option. Once the texture is handled properly, the sauces are built with intention, and the wet elements are packed separately where needed, tofu stops feeling like the compromise lunch and starts feeling like one of the smartest things you can prep for the week.

A practical place to start is the Smoky Tofu Rice Bowls, then follow with the Lemon Herb Tofu Quinoa Bowls or Mediterranean Tofu Bowls later in the week when colder, brighter lunches sound more appealing. Likewise, if you want a different flavor direction for the same weekday problem, these high-protein Indian meal prep ideas are worth bookmarking too. Above all, strong texture, smart packing, and enough variety to keep lunch interesting will take your tofu meal prep much further than novelty alone.

Also Read: Tapas Recipe With a Twist: 5 Indian-Inspired Small Plates

Tofu meal prep recap guide showing five lunch options and their moods: smoky tofu rice bowls, lemon herb tofu quinoa bowls, spicy peanut noodles with crispy tofu, Mediterranean tofu bowls, and buffalo tofu wraps with hemp ranch.
Some tofu lunches feel warm and dependable, others stay brightest cold, and a few are all about craveability or portability, so this quick recap helps you match each recipe to the kind of lunch mood you actually want that week.

Tofu Meal Prep FAQs

1. Is tofu meal prep good for high-protein lunches?

Yes. Tofu meal prep works well for high-protein lunches, especially when you pair tofu with ingredients like hemp seeds, quinoa, chickpeas, yogurt- or tahini-based sauces, or peanut sauce. More importantly, it can still feel like real food rather than a protein project when the texture and seasoning are handled properly.

2. What tofu is best for meal prep?

Extra-firm tofu is usually the best choice because it holds shape well and roasts into stronger edges. However, firm tofu also works well when you want a slightly softer bite. Silken tofu, by contrast, is not the right fit for bowls, noodles, and wraps like these.

3. How do I keep tofu from getting soggy in meal prep?

Press it well, avoid drowning it in marinade, roast it until it has real color, cool it before sealing, and keep sauces separate whenever crispness matters. Taken together, those steps solve most soggy tofu meal prep problems. In other words, the answer is usually better moisture control, not giving up on tofu.

4. Can I eat these tofu meal prep ideas cold?

Yes. Lemon Herb Tofu Quinoa Bowls and Mediterranean Tofu Bowls are especially good cold. Meanwhile, the noodle prep also works well cold or at room temperature. By contrast, rice bowls usually benefit most from reheating.

5. Do hemp seeds really help in meal prep, or are they just for nutrition?

They help with both. Hemp seeds add protein, but they also add creaminess, nuttiness, body, and texture. In this post, they matter most because they improve the actual eating experience, not just the nutrition label. That is precisely why they belong here.

6. Which recipe is best if I am new to tofu meal prep?

Start with the Smoky Tofu Rice Bowls. They feel the most familiar, reheat well, and give you the clearest sense of how satisfying tofu meal prep can be when the texture is right. After that, the other recipes make much more sense because you already trust the base ingredient.

Posted on 5 Comments

Top 10 Foods for Gut Health (+ Pre/Probiotics, Best Drinks, Gut-Reset Plan)

Top-down photo of foods for gut health—yogurt with blueberries and flax, kimchi, sauerkraut, kefir, asparagus, salmon, kiwi, walnuts—on a rustic table.

Some days your gut feels calm and steady; other days it’s… not. Fortunately, a handful of everyday choices can quietly nudge things back into balance—easing discomfort, supporting regularity, and, over time, fostering a more resilient microbiome. Below you’ll find ten dependable foods for gut health, each with simple ways to use them, gentle portion ideas, and credible sources woven naturally into the text. Try one or two this week, notice how you feel, and keep the habits that actually fit your life.


Fermented foods for gut health: kefir, live-culture yogurt, kimchi, sauerkraut, miso

Let’s begin with the heavy hitters. Fermented foods deliver living microbes that can shift the ecosystem in your gut toward greater diversity and calmer immune signaling. In a 10-week randomized diet trial, adults following a fermented-food pattern showed increases in microbiome diversity and reductions in multiple inflammatory proteins—real, human outcomes reported in Cell and summarized by Stanford Medicine. For everyday life, start with ½ cup plain kefir or live-culture yogurt at breakfast, or 2–4 tablespoons of kimchi or sauerkraut alongside lunch. Begin small, observe how you feel, and build gradually.

Hands holding live-culture yogurt beside kefir, kimchi, sauerkraut and miso—natural probiotics for gut health with starter portions.
Fermented foods act like natural probiotics: begin with ½ cup kefir/yogurt or 2–4 tbsp fermented veg, unsweetened and labeled “live & active cultures.”

Meanwhile, a quick shopper’s cue helps: choose plain, unsweetened yogurt or kefir and look for “live & active cultures.” Harvard’s Nutrition Source has a straightforward guide to choosing yogurt wisely. And because not every fermented food is automatically a probiotic, professionals lean on the ISAPP consensus for clear definitions; if you like digging into the “why,” the prebiotic/probiotic framework is outlined in this Nature Reviews Gastroenterology consensus paper.

How to use today: stir kimchi through fried rice, whisk miso into a warm broth, or blend kefir with berries and a spoon of oats for a quick, gut-friendly smoothie.

Also Read: Hemorrhoids High Fiber Diet: Best Foods, What to Avoid, and a 7-Day Plan


Whole-grain staples as foods for gut health: oats, barley, quinoa

Next, whole grains act like long-game allies. Their fermentable fibers are broken down by your microbes into short-chain fatty acids (SCFAs)—including butyrate, which helps maintain the integrity of the gut lining and keeps immune crosstalk on an even keel. For a readable primer that connects dietary fiber to SCFAs and gut function in humans, see this open-access review: “Short-Chain Fatty Acids and Human Health”.

Bowls of oats, barley and quinoa with warm porridge—high-fiber foods for gut health that feed prebiotic bacteria and support SCFAs like butyrate.
Rotate oats, barley, quinoa—about ½–1 cup cooked per serving. Their prebiotic fiber ferments to SCFAs (incl. butyrate) that support the gut lining.

Practically speaking, rotate oats (comforting and quick), barley (hearty in soups), and quinoa (light yet satisfying). If you’re deciding which base suits a given day, here’s a plain-spoken comparison of quinoa vs rice that covers texture, fiber, and when each shines. Consistency matters more than perfection; even one grain swap most days can move the needle.

Easy wins: overnight oats with ground flax; barley-vegetable soup on batch-cook day; quinoa salad with cucumber, lemon, and herbs for packable lunches.

Also Read: Guide to Oats: Types, Nutrition, and Differences Explained


Resistant-starch foods for gut health: slightly green bananas & cooked-then-cooled potatoes/rice

Now for a small tweak with outsized benefits. Resistant starch (RS) behaves like fiber: it escapes digestion in the small intestine, reaches the colon, and is fermented into SCFAs—especially butyrate. Two everyday RS moves stand out:

  1. Slightly green bananas you can blend into kefir or slice over oats.
  2. Cooked-then-cooled potatoes or rice you can enjoy as a salad or reheat gently—some RS remains even after warming.
Green bananas, cooled rice and a bowl of herbed cooled potatoes—resistant starch foods that feed gut bacteria and increase butyrate.
Cook, cool fully, then serve or gently reheat potatoes/rice—or add a slightly green banana to oats. Resistant starch reaches the colon and ferments into SCFAs (esp. butyrate).

For the “why,” see a clear narrative review on RS and the microbiome (e.g., this overview on National Library of Medicine): “Resistant Starch as a Prebiotic and Its Effects on the Gut Microbiota”. And for the practical detail that cooling rice increases RS and can blunt post-meal glycemia compared with freshly cooked rice, this 2021 review in Science Direct discusses times, temperatures, and reheating implications: “Rice Processing and Resistant Starch Formation”.

If bananas confuse you because sometimes they help and sometimes they don’t, ripeness is the missing variable. Our blog post and guide to bananas for constipation: ripe vs green explains when each makes sense and how to use both.

Tonight’s idea: roast a tray of potatoes, chill them completely, then fold into a lemon-olive-oil salad with herbs. Keep some chilled for quick add-ins all week.

Also Read: Teas for Digestion, Bloating, and Gut Health


Legumes as everyday prebiotic foods: lentils, chickpeas, beans

Moving on, legumes combine soluble fiber, resistant starch, and plant protein in one budget-friendly package—and they behave like prebiotics, i.e., substrates selectively utilized by host microorganisms to confer benefit (see the ISAPP definition in Nature Reviews Gastroenterology & Hepatology). Importantly, beyond mechanism, recent human work points to meaningful outcomes. A 2025 randomized controlled trial reported that a legume-enriched diet improved metabolic health via gut-microbiome mediation in adults at risk (summary in the Proceedings of the Nutrition Society). While the endpoint is metabolic, the pathway ran through microbial changes—another nudge to fold pulses into regular rotation.

Hands holding a bowl of soft cooked lentils with bowls of chickpeas and beans—prebiotic legumes for gut health and regularity.
Lentils, chickpeas and beans deliver prebiotic fibers plus resistant starch. Start soft and small—about ¾–1 cup cooked for steady comfort.

If beans feel tricky at first, soak thoroughly and cook until very soft. Red lentils are often gentler; hummus on whole-grain toast makes an easy entry; and black-bean-quinoa bowls work beautifully for dinner.

How to use now: dal with ginger-garlic; chickpea salad with lemon and herbs; or quick bean tacos with avocado and salsa.

Also Read: How to Make Lentil Patties that Are Better Than Meat? Vegan Protein-Rich Recipe


Allium & spear heroes: garlic, onions, leeks, asparagus, artichokes (prebiotic foods for gut health)

Here’s where we feed your beneficial microbes more directly. Inulin and fructo-oligosaccharides (FOS)—rich in onions, garlic, leeks, asparagus, and Jerusalem artichokes—are classic prebiotic fibers by the field’s gold-standard definition. If you’d like the professional framing (useful when filtering marketing claims), skim the ISAPP prebiotic consensus and you’ll see these foods listed repeatedly in both research and practice.

Roasted asparagus with bowls of onions, leeks, garlic and artichokes—prebiotic vegetables rich in inulin/FOS for gut health.
Allium and spear veggies supply inulin/FOS—classic prebiotic fibers. Start small, cook gently, and use a heaped handful daily.

To improve tolerance, build up slowly. Sauté onions and leeks low and slow for sweetness without sharpness; roast asparagus with olive oil and lemon; stir garlicky yogurt sauce through cooked grains for a creamy, friendly finish.


Walnuts: a small habit that supports butyrate-friendly taxa

A simple handful of walnuts (about 28–43 g) can matter more than it looks. In an eight-week randomized, controlled feeding trial, daily walnut intake increased butyrate-producing taxa such as Faecalibacterium and Roseburia and favorably shifted microbial metabolites. You can scan the study via PubMed or read the full methods in The Journal of Nutrition. As for the kitchen: sprinkle chopped walnuts onto oats or live-culture yogurt; toss them into grain salads; or blend into a parsley-lemon pesto.

Tip: store nuts in the fridge or freezer to keep their fats fresh.

Also Read: Flax Seeds and Walnuts: 5 Omega-3 Boosting Morning Smoothies for Better Health


Hands sprinkling ground flax over yogurt beside walnut halves—nuts and seeds for gut health supporting butyrate producers and regularity.
A small handful of walnuts can favor butyrate-producing bacteria; 1–2 tbsp ground flax daily supports stool frequency and is an easy add-in.

Flaxseed for digestive comfort: regularity support with real-world outcomes

Because comfort counts, ground flaxseed earns a spot for clinically meaningful, GI-specific outcomes. In randomized trials with constipated adults, flaxseed improved bowel movement frequency and stool consistency versus common comparators. One open-access example appears in Nutrition & Metabolism (“Flaxseed dietary fibers lower cholesterol and increase fecal fat excretion”), and there are more trials, that offer similar results in functional constipation. Start with 1 teaspoon daily, then build to 1–2 tablespoons as tolerated; drink water alongside. Stir into oats, yogurt, smoothies, or pancake batter.

Why flax vs. psyllium? There’s room for both; flax brings lignans, omega-3 ALA, and a gentler texture many people enjoy.

Also Read: Psyllium Husk (Isabgol/Ispaghula) Side Effects: Risks, Benefits & How to Take It Safely


Kiwifruit (green): small, sweet, and surprisingly effective for gut health

Some foods punch above their weight. In a multicenter randomized, cross-over trial across New Zealand, Japan, and Italy, eating two green kiwifruits per day improved constipation symptoms and abdominal comfort in constipated adults (including IBS-C) and compared favorably with psyllium. You can read the study by The American College of GastroenterologyKiwifruit-A Specific Food to Improve Stool Frequency in Patients With Mild Constipation”. Slice kiwi over yogurt, cube it into a citrusy fruit bowl, or blend into kefir; the enzyme actinidin plus soluble fiber makes it a gentle, practical add-in.

Serving note: the “two per day” dose comes from trials; many people feel fine benefits at one, especially when the rest of the day is fiber-forward.

Also Read: The Kiwi – Nutrition, Benefits, and 5 Practical Ways for Weight Loss


Sliced green kiwifruit with a bowl of prunes and water—fruit choices for gut health and gentle constipation relief.
Evidence-backed duo: two green kiwis/day or 4–8 prunes (or ½ cup diluted prune juice) can ease constipation without harshness.

Prunes & prune juice: fast, food-first relief that fits a gut-friendly pattern

When you need a quick nudge toward normal, prunes and prune juice are unusually dependable. A double-blind, randomized, placebo-controlled trial showed prune juice improved stool form and constipation symptoms without provoking diarrhea (see NIH: “Effect of Prune Juice on Chronic Constipation”). Earlier, a head-to-head trial found dried plums outperformed psyllium in mild–moderate constipation (Alimentary Pharmacology & Therapeutics, 2011: “Dried plums vs psyllium”). For straightforward dosing and timing, this practical walkthrough on prune juice & prunes for constipation keeps things simple.

How to use: 4–8 prunes as an afternoon snack, or ½ cup prune juice diluted with water in the evening—then reassess the next day.

Also Read: Optimize Digestion with These 5 Fruit Juice Recipes


Omega-3-rich fish as foods for digestive health: a savory nudge toward SCFA-producers

Lastly, think pattern, not pills. Omega-3-rich fish (salmon, sardines, mackerel) slot neatly into a gut-friendly week. In a human randomized trial, omega-3 PUFA intake increased several SCFA-producing bacteria, complementing the effects of fiber and ferments. For a quick understanding, skim the trial abstract here “n-3 PUFA and gut microbiota: human RCT evidence”. Then, build meals around fish plus fiber: grilled salmon with roasted asparagus and a cooled-then-reheated potato; sardine-lemon mash over brown rice; or mackerel flaked into a warm quinoa salad.

Baked salmon with asparagus and cooled potatoes on a dark plate—omega-3 fish paired with fiber sides to support SCFA-producing bacteria.
Pair omega-3 fish with greens + cooled starch to encourage SCFA-producers; keep portions modest (about 4–6 oz fish) and favor baked/poached.

Sustainable rhythm: one to two fish meals weekly is plenty for most people—and easier to maintain.

Also Read: Best Fish Oil Supplements on Amazon India


Drinks for gut health: simple sips, low sugar, steady benefits

Even modest adjustments in your glass can make the day feel better—especially when sugar stays low.

  • Diluted kefir or a kefir-berry smoothie gives you a fermented “sip” that delivers live microbes without a sugar dump, echoing the fermented-foods trial noted earlier.
  • Unsweetened kombucha can be enjoyable in small servings, yet brands vary widely in sugar. The U.S. military’s Human Performance Resource Center offers pragmatic guidance on kombucha benefits and risks—choose low-sugar options and keep portions modest. For label sticklers, the U.S. Alcohol and Tobacco Tax and Trade Bureau explains when kombucha crosses 0.5% alcohol and becomes regulated as an alcoholic beverage; their page on kombucha regulation clarifies the cutoff.
  • Water, herbal tea, and miso broth round out a calm, low-sugar trio anyone can manage on a busy day.

Also Read: Health Benefits of Kombucha

Kefir smoothie, small glass of low-sugar kombucha and a cup of miso broth—best drinks for gut health with portion guidance.
Small, steady sips beat sugar hits: kefir ½ cup, kombucha 4–8 oz, or miso broth. Hydrate and keep sugars low to support a calmer gut.

How to combine these foods for gut health into a week that actually works

Rather than overhaul everything at once, stitch together a rhythm you’ll keep.

To begin with, anchor most days with one ferment. A tablespoon or two of sauerkraut or kimchi, or ½ cup of kefir or live-culture yogurt, is enough to start. If you’re picking yogurt quickly, Harvard’s piece on how to choose yogurt is worth bookmarking.

Next, add one resistant-starch move per day. Stir slices of a slightly green banana into oats; make a cooled potato salad with olive oil and herbs; or pack leftover cooled rice for lunch. For the science of why cooling matters, the resistant starch reviews above offer a helpful explainer.

After that, build a legume habit. A scoop of hummus, a bowl of dal, or quick black beans folded into quinoa count. Over time, the combination of prebiotic fibers you’ll be eating—legumes plus the alliums/asparagus you’re cooking with—does the quiet daily work (the ISAPP prebiotic definition keeps your filter sharp).

Meanwhile, keep snack time strategic. For something you’ll actually repeat, mix chopped walnuts through live-culture yogurt and top with kiwi; or make a small bowl of oats with ground flax and cinnamon. The walnut trial (butyrate-producing taxa ↑), the flax constipation data, and the kiwifruit study mean these aren’t just “healthy vibes”—they’re practical, evidence-tied swaps.

Finally, have a plan for “those days.” If you’re backed up, prunes and prune juice remain the most reliable, food-first nudge—and yes, randomized trials support that. For dosing and timing you can actually use, this plain guide to prune juice and prunes keeps things simple.

Also Read: Fermented Garlic Honey: Benefits, Safety, and How to Use This Ancient Remedy


A gentle 3-day reset built around foods for gut health (no gimmicks, just calm structure)

This isn’t a cleanse; it’s a practical way to gather these gut-friendly foods into a few quiet days so your system can settle. Adjust portions to your needs and preferences.

Day 1 of the Gut Health Reset Meal Plan

  • Breakfast: Plain live-culture yogurt or kefir with two kiwifruits and a spoon of ground flax.
  • Lunch: Lentil-quinoa bowl with cucumbers, herbs, olive oil, and lemon.
  • Snack: 2–4 tablespoons of sauerkraut with a small handful of walnuts.
  • Dinner: Salmon; roasted asparagus; a cooled-then-reheated small potato for resistant starch.
  • If needed: ½ cup prune juice diluted with water in the evening; reassess tomorrow.

Day 2 of the Gut Health Reset Meal Plan

  • Breakfast: Oats cooked with ground flax; top with slightly green banana coins.
  • Lunch: Hummus on whole-grain toast with mixed leafy greens.
  • Snack: Warm miso broth; sip slowly.
  • Dinner: Black-bean and quinoa tacos with salsa and avocado.
  • Evening: Ginger-lemon herbal tea; lights out on time.

Day 3 of the Gut Health Reset Meal Plan

  • Breakfast: Kefir smoothie (kefir + spinach + frozen berries).
  • Lunch: Chickpea-vegetable soup with leeks and garlic simmered until sweet.
  • Snack: A small bowl of prunes or a few slices of kiwifruit.
  • Dinner: Sardines mashed with lemon and herbs over cooled brown rice; quick cucumber salad.
  • Later: A few ounces of unsweetened kombucha if you enjoy it—check the label and keep sugars modest.

Also Read: The Art of Fermented Fruit Juices: 5 DIY Recipes to Try at Home


A few plain-spoken caveats (because real life matters)

Go slow. Ferments, legumes, and prebiotic fibers are potent—especially if your baseline diet has been low in fiber. Start with tablespoons, not cups, and increase every few days as comfort allows. Your notes beat generic rules; if raw veg bothers you, cook it soft and keep flavors simple for now. On supplements, food first; if you experiment with probiotics or prebiotic powders, choose products that transparently list strains (for probiotics) or fiber types (for prebiotics), and introduce them gradually. When in doubt about terminology, the ISAPP prebiotic consensus is the simplest way to sanity-check marketing claims.


The take-home

You don’t need perfection; you need repetition. Pick one ferment you’ll eat most days, one resistant-starch move you enjoy, and one legume dish you’ll actually cook. Add allium-rich aromatics, rotate in asparagus, snack on walnuts, sprinkle ground flax, and keep kiwifruit and prunes on hand for the weeks that go sideways. Over time, these foods for gut health stop feeling like a plan and start feeling like your normal—and your gut will thank you for it.

FAQs

1) What are the best foods for gut health right now?

First, think in patterns: a small daily serving of fermented foods (kefir, live-culture yogurt, kimchi, sauerkraut, miso), plenty of fiber-rich plants (oats, barley, quinoa, beans, lentils, leafy greens), and consistent prebiotic vegetables (onions, garlic, leeks, asparagus, artichokes). Additionally, add resistant-starch options like slightly green bananas and cooked-then-cooled potatoes or rice, plus nuts and seeds (walnuts, flax, chia).

2) What exactly are prebiotics, probiotics, and postbiotics—and how do they relate to foods for gut health?

Put simply: prebiotics are fibers and plant compounds your good microbes love to eat; probiotics are beneficial live microbes you ingest (often from fermented foods); and postbiotics are the helpful compounds those microbes make (like short-chain fatty acids, including butyrate). Altogether, they form a supportive loop for digestion and gut lining integrity.

3) Can you share a simple prebiotic foods list I can use today?

Certainly. Start with onions, garlic, leeks, asparagus, Jerusalem artichokes, slightly green bananas, oats, barley, legumes (chickpeas, lentils, beans), and seeds (flax, chia). Moreover, rotate several in the same day for fiber diversity.

4) Which fermented foods and probiotics are most practical for everyday gut health?

Begin with plain kefir or live-culture yogurt (½ cup is enough to start). Next, add 2–4 tablespoons of kimchi or sauerkraut with meals, and occasionally whisk miso into warm broth. Meanwhile, keep sugars low and servings modest, then slowly increase if you feel comfortable.

5) What are butyrate foods—and why do they matter?

Strictly speaking, butyrate is produced by your microbes when they ferment certain fibers. Consequently, “butyrate foods” means foods that help you make it: oats, barley, legumes, nuts and seeds, green bananas, and cooled starches (potatoes/rice). In turn, steady butyrate production supports a healthy gut barrier.

6) Best drink for gut health—what should I actually sip?

Start simple: water (still or sparkling), ginger-lemon herbal tea, diluted kefir, miso broth, and modest amounts of unsweetened kombucha. Additionally, keep sugars low and aim for consistency over cleverness.

7) What’s a healthy gut breakfast that won’t bloat me?

Try kefir or yogurt with kiwi and a spoon of ground flax; or warm oats topped with a few walnut pieces and slices of slightly green banana. Alternatively, a savory option like eggs with sautéed greens and a side of kimchi works beautifully.

8) I’m dealing with bloating—what foods for gut health are gentler at first?

Go with cooked vegetables (carrots, zucchini, spinach), tender grains (oats, quinoa), and smaller portions of ferments. Furthermore, introduce prebiotics gradually: start with well-cooked onions/leeks and increase over several days.

9) What are the worst foods for gut health to dial back?

Ultra-processed choices, frequent high-sugar treats, heavy alcohol, and your known trigger foods. However, approach changes kindly: crowd the plate with fiber-rich, minimally processed options rather than focusing only on restriction.

10) Is there a gut reset diet or meal plan that actually helps?

Yes—think “calm structure,” not extremes. For 3 days, include one ferment daily, one resistant-starch move (cooled potatoes/rice or a slightly green banana), and at least one legume meal. Additionally, keep drinks low in sugar and season foods with gentle herbs like ginger.

11) How does a plant-forward gut health diet compare with other approaches?

Broadly, plant-forward patterns offer fiber and polyphenol diversity that microbes thrive on. Nevertheless, include quality proteins and healthy fats, and adjust textures (more cooked than raw) when your gut feels sensitive.

12) Do mushrooms, seeds, and nuts contribute meaningfully to gut health?

Absolutely. Mushrooms add fiber and umami; seeds (flax, chia) bring gel-forming fibers that aid regularity; nuts—especially walnuts—support a friendly microbial profile. Even so, start with small amounts if your gut is reactive.

13) Greek yogurt vs regular yogurt—does the choice matter for digestive health?

Both can fit. Greek yogurt simply has more protein and a thicker texture. Crucially, pick unsweetened varieties with live cultures; then add fruit or cinnamon for flavor rather than sugar.

14) What’s the difference between prebiotic fiber and resistant starch?

Prebiotic fiber (like inulin/FOS) is a broad category selectively used by beneficial microbes; resistant starch is a particular type that resists digestion and reaches the colon intact. Interestingly, both can be in the same meal: cooled potatoes (RS) topped with garlicky yogurt sauce (prebiotic).

15) Are psychobiotic foods a real thing or just hype?

They’re an emerging area. In essence, foods that nurture a resilient microbiome—ferments plus prebiotic-rich plants—may influence mood-relevant pathways. While the term sounds trendy, the practical advice remains the same: diversify fibers and include a small daily ferment.

16) What about a leaky gut diet plan—where should I begin?

Begin gently: emphasize minimally processed foods, steady fiber diversity, a small daily ferment, and omega-3-rich choices like salmon or sardines. Additionally, reduce alcohol and added sugars, and reintroduce potential triggers one at a time to spot patterns.

17) I’ve heard about akkermansia and other “next-gen” probiotics—should I chase them?

For most people, no. Instead, support Akkermansia and other beneficial taxa indirectly with consistent fiber, polyphenols (berries, greens, cocoa nibs), and moderate ferments. Later, discuss targeted supplements with a professional if symptoms persist.

18) How can I choose a probiotic with prebiotic (a synbiotic) without overcomplicating it?

Look for transparent strain names (e.g., Lactobacillus rhamnosus GG), clear CFU counts, and a well-tolerated prebiotic (like PHGG or inulin) in modest doses. Moreover, add it after you’ve established food basics, not before.

19) Are gummies, powders, or capsules better for digestive health?

It depends on tolerance and sugar. Powders often allow flexible dosing; capsules are convenient; gummies can hide added sugars. Therefore, if you try gummies, choose low-sugar versions and keep portions conservative.

20) What are easy gut-friendly snacks I can keep on repeat?

Think Greek yogurt with chia and berries; a few prunes with walnuts; hummus on whole-grain toast; or a spoonful of kimchi with a small omelet. Likewise, mini oat bowls with ground flax and cinnamon make a soothing evening option.

21) How do I increase fiber without feeling miserable?

Gradually. Add one fiber move at a time—say, 1 teaspoon of ground flax daily—then scale up every 3–4 days. In the meantime, drink enough water, cook vegetables soft, and spread fiber across meals rather than loading up at once.

22) Is there a best greens-for-gut-health rotation?

Variety wins: spinach, kale, arugula, and herbs like parsley or coriander. Crucially, alternate raw and cooked textures; for sensitive days, wilted greens or blended soups tend to feel calmer.

23) Can fish oil or omega-3-rich fish genuinely support the microbiome?

Yes—indirectly. Omega-3-rich fish appear to favor SCFA-producing bacteria when eaten consistently. Nevertheless, the real magic happens when you pair fish with fiber-rich sides, not when you rely on supplements alone.

24) What’s the smartest way to start—today?

Choose one ferment you’ll actually eat, one resistant-starch habit you enjoy, and one legume dish you can cook on autopilot. Then, sprinkle in prebiotic vegetables and a nut-or-seed boost. Gradually, these foods for gut health become your normal—not a temporary fix.

25) Finally, how do I know it’s working?

Notice trends, not one-off days: more regularity, less urgent bloating, steadier energy after meals, and a generally calmer belly. If progress stalls despite consistent changes, jot notes and adjust portions, textures, and timing—your gut’s feedback is the best guide.

Posted on 5 Comments

Quinoa vs Rice: Nutrition, Glycemic Index, and When to Choose Each

Hand scooping cooked quinoa beside a bowl of white rice; magazine-style cover comparing calories, carbs and glycemic index to choose the healthier base

We reach for rice or quinoa because both are comforting. They carry flavor, welcome vegetables and both of them make a plate feel complete. Yet, when you compare them closely, they behave differently in your body and in your kitchen. This guide unpacks quinoa vs rice with practical numbers, plain language, and easy cooking moves you can use tonight.

Although both are starches, they do not play the same role. Quinoa brings more protein and more fiber. Rice, especially white rice, brings a softer texture and a neutral base. As a result, each shines in different meals. In the sections below, you will see where quinoa wins. You will also see where rice still fits beautifully. Most importantly, you will learn how to choose the right base for your goals and your taste.

Before we dive in, remember one key fact. Quinoa is a seed. It cooks like a grain, but botanically it is not a cereal. This small detail explains some of its unique traits. It also explains why its protein and fiber numbers stand out.

Also Read: Glycemic Index (GI) VS Glycemic Load (GL)


Quinoa vs Rice: the short, honest take

Let’s set the stage with a clear summary. Then we will build details under it.

  • Quinoa offers more protein and fiber per cooked cup. Therefore, it usually keeps you full longer.
  • White rice is slightly lower in calories per cup. It tastes neutral. It lets sauces and curries take center stage.
  • For steadier energy, quinoa, brown rice, and basmati are generally better picks than standard white or jasmine.

If you want more context on varieties, skim our explainer on basmati rice and glycemic index. For a simple primer on blood sugar and carbs, read Harvard’s guide to carbohydrates and blood sugar. Both links will help you turn this article into action.


Quinoa vs Rice: nutrition, per cooked cup

Numbers make decisions easier. Let’s compare typical cooked portions you see in bowls and plates.

Two hands holding bowls of cooked quinoa vs white rice with text showing protein and fiber per cup.
Why quinoa keeps you fuller: more protein and fiber per cup compared with standard white rice.

Which has fewer calories per cup? White rice does, by a modest margin.
Which supports fullness better? Quinoa does, because of protein and fiber.
Is quinoa lower carb than rice? Per cup, quinoa has slightly fewer carbs than many white rices. The gap is small. The bigger win is quinoa’s fiber and protein.

Prefer metric? No problem. Per 100 g cooked, quinoa averages about 4.4 g protein and ~2.8 g fiber. White rice averages roughly 2.7 g protein and ~0.4–0.6 g fiber. Consequently, quinoa sticks a bit longer and often delivers better satiety. Rice, meanwhile, usually needs support from protein and vegetables to keep hunger steady and digests faster unless you add partners like beans, tofu, eggs, fish, or chicken.

Now step back. Nutrition is not only macros. Micronutrients matter. So do amino acids. Quinoa offers a broader amino acid profile and helpful minerals. Rice offers consistency, digestibility, and a clean flavor stage. Therefore, let your meal goal guide your choice. Are you building a lean, filling bowl for lunch? Quinoa might serve you well. Are you plating a rich curry that needs a soft base? White or basmati rice may be perfect.

Also Read: Glycemic Index and Secrets of Weight Loss


Overhead bowls of quinoa, white, brown, basmati and jasmine rice labeled with calories per cooked cup for quinoa vs rice types.
Quick glance: typical calories per cooked cup across quinoa and common rice varieties—use it to portion bowls fast.

Quinoa vs Rice: per cup and per 100 g at a glance

Per cup (cooked)

1 cup cookedCaloriesCarbsProteinFiber
Quinoa (~185 g)~222~39 g~8 g~5 g
White rice (~158 g)~205~45 g~4 g<1 g
Brown rice (~195 g)~216~45 g~5 g~3.5 g
Comparing Quinoa VS Rice Macros, based on Per Cup Serving.

Source the quinoa and white rice figures from USDA/MyFoodData for quinoa and USDA/MyFoodData for white rice. Values vary by brand and moisture, but the pattern remains stable.

Tip: Use the cup table for quick menu planning. Use the gram table below for macro tracking.

Per 100 g (cooked)

Food (100 g)CaloriesCarbsProteinFiber
Quinoa~120~21.3 g~4.4 g~2.8 g
White rice~130~28.3 g~2.7 g~0.4–0.6 g
Brown rice~123~25.6 g~2.7–2.9 g~1.6–1.8 g
Basmati (white)~121–130~25–28 g~2.7–3.0 g~0.4–0.8 g
Jasmine (white)~129–135~28–30 g~2.7–3.0 g~0.4–0.8 g
Comparing Quinoa VS Rice Macros, based on Per 100 gm Serving.

These tables helps in calories vs carbs vs protein comparison. They also support quick menu planning. If you build bowls by volume, the per-cup table helps. If you track macros by weight, the 100 g snapshot helps more. You can now place the base that matches your day.


Glycemic index in quinoa vs rice (and why it matters)

The glycemic index (GI) estimates how fast a carb-rich food raises blood sugar. As a rule of thumb, ≤55 is low, 56–69 is medium, and ≥70 is high. For clear definitions and practical examples, read Harvard’s overview on carbohydrates and blood sugar. If you want to look up specific foods or brands, use the University of Sydney GI database.

Five bowls of rice varieties labeled with approximate glycemic index values including basmati, jasmine, brown and white.
Variety matters: basmati tends to test lower on GI than many white rices, while jasmine often trends higher.

Here is the part that matters for your day.

  • Quinoa is generally low-GI, often reported around the low 50s. Its fiber and protein contribute to that steadier curve. That is why quinoa bowls often feel satisfying for longer.
  • Rice spans a wide range. Brown rice averages around the low-to-medium boundary. Standard white rice sits medium on average. Basmati often lands lower among white rices. Jasmine tends to land higher.

Here it is important to keep on mind cooking changes starch, GI can shift with methods. Cooling cooked rice and then reheating increases resistant starch. That change can soften the post-meal rise for some people. Pairings matter too. When you add protein, fiber, and healthy fats, digestion slows. Therefore, you can keep rice in rotation and still aim for steady energy.

Summarizing GI in quinoa vs rice

  • What is the GI of quinoa vs rice? Quinoa is generally low-GI (often ~53). Rice varies widely by type.
  • Which rice types run lower GI? Brown rice often averages ~55. Basmati is frequently lower among white rices.
  • Which rice types run higher GI? Jasmine tends to be higher. Many standard white rices fall in the medium range.

Is quinoa healthier than rice for blood sugar? Often yes, because quinoa starts low-GI and brings fiber and protein. However, brown rice and basmati can also be smart picks. Therefore, choose variety first, then use cooking methods that encourage steadier curves.

If you want practical levers, walk through our guide to reducing the glycemic impact of rice. You will see how cook → cool → reheat, slightly firmer texture, and protein-fiber pairings smooth the ride. For a neutral, health-organization perspective on using GI wisely, review Diabetes UK’s GI overview.


GI by rice variety (white, brown, basmati, jasmine)

Variety matters. So do cultivar and cooking. Here is a quick comparison you can trust.

  • White rice (general): medium GI on average. Soft and easy to over-serve.
  • Brown rice: low-to-medium GI. More fiber than standard white. Chewier bite and nutty notes.
  • Basmati (white): often lower GI among white rices. Higher amylose helps keep grains separate.
  • Jasmine (white): often higher GI. Plush texture and a perfumed aroma.

For a broader context on GI and health outcomes, skim Harvard’s overview of rice. For brand or product specifics, check entries in the University of Sydney GI database.


How cooking and pairing change GI (so rice stays in your life)

Small technique shifts change how grains behave.

Pot of cooked white rice and bowl of quinoa with text explaining the cook–cool–reheat method to lower GI.
Batch smart: chill cooked grains and reheat—resistant starch goes up, and meals feel steadier.
  1. Cook → cool → reheat. Cooling cooked rice forms resistant starch. That starch resists digestion and can blunt the spike.
  2. Keep grains slightly firm. Very soft grains digest faster. Slightly firmer grains slow things down.
  3. Pair smartly. Add protein, fiber, and healthy fats. Beans, tofu, eggs, fish, chicken, vegetables, nuts, and seeds all help.
  4. Mind portions. A modest scoop leaves room for vegetables and protein. You get the texture you love without losing balance.

For a clear walkthrough, open our practical guide on reducing rice’s GI. The methods are simple, repeatable, and budget-friendly.


Quinoa vs Rice for different goals

This section folds several “which is better” questions directly into the guidance. That way, you decide by goal, not by hype.

Quinoa vs Rice for fullness and everyday nutrition

Which is healthier, rice or quinoa, for satiety? Quinoa usually wins. If satiety is your priority, start with quinoa. It delivers more protein and more fiber per cup. Those two levers slow digestion. They also help curb snack cravings later. For the full panel, compare USDA/MyFoodData for quinoa with USDA/MyFoodData for white rice. For a friendly overview, read Harvard Nutrition Source on quinoa.

Even so, rice can still support fullness when you structure the plate. First, add bulk with non-starchy vegetables. Next, add protein. Then finish with a little fat for flavor and texture. Together, those pieces change how the whole meal feels.

What about brown rice vs quinoa? That contest is closer. Brown rice is a whole grain with moderate fiber and low-to-medium GI. However, quinoa still edges it on protein and often on fiber per cup. If you love the chew of brown rice, you can still get great meals. Just add beans or tofu to push protein higher.

Quinoa vs Rice for steady energy and blood sugar

If you want stable post-meal energy, lean on low- or medium-GI bases. Quinoa is a reliable choice. Brown rice and basmati are strong options too. Moreover, dial in technique. Use the cook-cool-reheat sequence. Keep grains a touch firm. Pair with protein, vegetables, and healthy fats. For a clean, balanced view from a health organization, read Diabetes UK on the GI.

Does quinoa have a lower GI than jasmine rice? Usually yes. Jasmine often trends higher. If you love jasmine for aroma, balance the plate. Add vegetables and protein. Keep the serving controlled.

Quinoa vs Rice for weight management

Is quinoa better than rice for weight loss? Sometimes. Weight management is about patterns, not single foods. Still, the base matters. White rice is slightly lower in calories per cup than quinoa. That small edge can help when you want a lighter base. However, quinoa’s higher protein and fiber can improve fullness. Consequently, the “better” choice depends on the rest of the plate.

Here are two simple frameworks:

  • Quinoa-forward bowl: quinoa base + beans or tofu + mixed vegetables + yogurt-tahini dressing + lemon.
  • Light rice bowl: modest scoop of white or basmati rice + vegetable-heavy stir-fry + lean chicken or shrimp + crunchy side salad.

Is quinoa more filling than rice? Often yes. The protein and fiber explain that feeling. But remember preference and texture. If rice helps you enjoy more vegetables and lean protein, that also supports the goal. If you want more structure, explore our guide on choosing the best rice for weight loss. It shows how to set portions and choose cooking methods that support a calorie plan.

Quinoa vs Rice for bodybuilding and training days

Training changes needs. Sometimes you want faster carb delivery. Other times you want meals that stick. Therefore, match the base to the session.

  • Around training: white or basmati rice digests a bit faster. That can help when you need quick refueling. Pair with lean protein and a small amount of fat.
  • Away from training: quinoa brings more protein and fiber. That helps fullness as you spread meals through the day. Add legumes, eggs, tofu, or fish for extra protein.

As always, test and notice. Your body will tell you which base supports your work.

Also Read: Quinoa for Weight Loss: Benefits, Nutrition, and How to Cook Ideas


Quinoa vs Rice by variety (white, brown, basmati, jasmine)

As the risk of repeating ourselves, however for sake of more clarity on topic, let’s now fold some comparisons directly into short, practical sub-sections. Each one answers “which is better” in the specific context.

Quinoa vs White Rice

White rice is plush and neutral. It absorbs sauces and lets other flavors lead. On average, it is medium GI and low in fiber. Therefore, watch portions. Pair it with vegetables and protein. In contrast, quinoa is typically lower GI and higher in protein and fiber. It brings a nutty note and a slight pop to each bite.

For facts while you cook, keep USDA/MyFoodData for white rice open in a tab. For quinoa context, browse Harvard Nutrition Source on quinoa. If you want a broad view of rice varieties, read Harvard Nutrition Source on rice.

When to choose which: use white rice when the dish is rich and saucy. Use quinoa when you want the base to contribute protein and fiber. Or mix them half-and-half for a balanced compromise.

Quinoa vs Brown Rice

Here the gap narrows. Brown rice is a whole grain. It keeps the bran and germ. As a result, it carries more fiber and micronutrients than standard white rice. Its GI usually sits in the low-to-medium band. If you enjoy the chewier bite and nutty flavor, it can anchor meals beautifully. Quinoa still edges brown rice on protein and fiber per cup. That edge can aid fullness when calories are tight.

For averages and a sensible overview, see Harvard’s rice page. For a narrative comparison of brown and white rice, skim Harvard Health’s head-to-head explainer.

When to choose which: pick brown rice when you want the rice experience with extra texture and a friendlier GI. Pick quinoa when you want more protein, more fiber, and quicker cooking.

Quinoa vs Basmati Rice

Among white rices, basmati is a standout. It often lands lower on the GI spectrum than many standard white rices. Higher amylose helps keep grains separate. The aroma is a bonus. If you want a white rice experience with a gentler curve, basmati is a smart choice. For deeper detail and cooking notes, open our basmati GI analysis. If you want brand-specific values, search the University of Sydney GI database.

When to choose which: pick basmati when you want long, separate, fragrant grains. Pick quinoa when you want more protein and fiber in the base. Or serve basmati with lentils or chickpeas to boost protein and fiber.

Also Read: ‘Quinoa’ Instead of ‘Chicken’: 5 High Protein Plant-Based Meal Prep Ideas

Quinoa vs Jasmine Rice

Jasmine rice is aromatic and soft. It is lovely with Thai curries and dishes that want a perfumed base. However, jasmine tends to sit higher on the GI than basmati and many brown rices. Therefore, if blood sugar steadiness is a priority, choose jasmine less often. For variety differences and a clear overview, read Harvard’s rice page.

When to choose which: pick jasmine for aroma and softness. Pick quinoa when you want steadier energy and extra protein.


Top-down view of a bowl split 50–50 with cooked quinoa and white rice, showing an easy transition strategy.
Start with a 50–50 base—quinoa for protein and fiber, rice for comfort—then shift to 60–40 as your taste adapts.

Other rice styles in brief (so you can branch out)

There are so many rice varieties, it’s hard to cover them all, however some of the more popular ones and which keep trending every now and then are covered below in comparison with Quinoa.

Wild rice vs quinoa

Wild rice is a grass seed, much like quinoa is a seed. It brings a chewy bite and an earthy, nutty flavor. It has more protein than many standard white rices. Choose wild rice when you want texture and a whole-grain feel. Choose quinoa when you want more protein per cup and a faster cook.

Red and black rice vs quinoa

Red and black rices keep their bran. They bring color, antioxidants, and a bit more fiber than standard white rice. They usually land in the medium-GI range. Choose them when you want a classic rice experience with extra character. Choose quinoa when you want more protein and a typically lower GI.

Parboiled rice vs quinoa

Parboiled rice is steamed in the husk before milling. That process helps retain some nutrients. It also tends to keep grains separate and can yield a lower GI than standard white rice. Use parboiled rice when you want distinct grains for pilaf. Use quinoa when you want higher protein and fiber in the base.

Cauliflower rice and shirataki rice vs quinoa

Cauliflower and shirataki “rice” are low-calorie substitutes, not grains. They drastically reduce carbs and calories. However, they change texture and flavor. Use them for low-carb meals or as volume extenders. Use quinoa or rice when you want true grain structure and lasting fullness.

Also Read: Healthy Oat Protein Bars – 5 Easy No Sugar Recipes for Snacks


Taste, texture, and kitchen behavior (so your swaps stick)

Food should satisfy. Numbers help, but flavor keeps habits alive. Therefore, pay attention to texture and taste.

Quinoa tastes nutty with a gentle chew. Rinse it well to remove saponins. For extra depth, toast the dry grains for a minute or two. Then add water. A 1:2 quinoa-to-water ratio works for many cooks. Simmer until you see tiny germ rings and the pot looks just dry. Cover and rest for five minutes. Finally, fluff and season. A drizzle of olive oil and a squeeze of lemon go a long way.

Spoon lifting cooked quinoa above a pot with tip to rinse before cooking to reduce bitterness.
Pro tip: rinsing removes saponins so quinoa tastes cleaner and pairs better with delicate sauces.

White rice is soft and neutral. It lets sauces sing and stews shine. Brown rice is chewier and slightly nutty. Basmati cooks fragrant and separate, which makes it ideal for pilafs. Jasmine is plush and perfumed, perfect for Thai and Southeast Asian flavors.

If you are not ready for a full swap, start gently. Mix half quinoa and half rice. The bowl will feel familiar yet more filling. Over time, you can push the ratio toward your goals without losing comfort.

Does quinoa taste like rice? Not exactly. It is nuttier and slightly chewy. However, with the right dressing or sauce, most eaters enjoy the swap quickly.


Real-world plates you can build tonight

Real life asks for simple moves, you do not need new recipes to start. You only need patterns that repeat well, here are patterns that work.

Protein-forward quinoa bowl
Base: quinoa. Add roasted chickpeas or grilled tofu. Pile on vegetables. Finish with a yogurt-tahini drizzle and lemon. Because quinoa brings protein and fiber, the bowl satisfies. For more ideas, see quinoa meal-prep ideas.

Light, saucy rice bowl
Base: a modest scoop of white or basmati rice. Top with a vegetable-heavy stir-fry. Add lean chicken or shrimp. Add a crunchy side salad. The plate stays light yet complete.

Basmati pilaf with legumes
Toast basmati with spices. Simmer until long and separate. Fold in cooked lentils and herbs. Serve with a bright cucumber salad. The dish tastes rich but lands gently.

Half-and-half “transition” bowl
Mix equal parts cooked quinoa and cooked brown rice. Add roasted vegetables, a protein, and a nutty dressing. You get rice comfort and quinoa’s staying power.

Cold grain salad for busy weeks
Toss cooked and cooled quinoa with chopped greens, beans, cucumbers, tomatoes, olives, and a lemon vinaigrette. Store for lunches. Because quinoa holds texture, the salad keeps well. For higher-protein patterns, explore high-protein quinoa strategies.


Quinoa vs Rice: cooking smarter for better curves

You can improve rice’s glycemic profile without abandoning it, which means you can keep rice and still aim for steady energy. Use these simple levers.

  • Cook → cool → reheat. Resistant starch goes up. The glycemic hit can soften.
  • Pair with protein, fiber, and healthy fats. Beans, eggs, tofu, fish, chicken, leafy greens, nuts, and seeds slow digestion.
  • Keep texture slightly firm. Very soft grains digest faster.
  • Scale portions down. A smaller scoop plus more vegetables often feels better.
  • Prefer lower-GI choices. Basmati and brown rice are friendlier than standard white or jasmine.

For step-by-step help, read reducing the glycemic impact of rice. For a neutral, health-org perspective on using GI well, see Diabetes UK’s GI overview.


Pantry, storage, and prep notes that make the habit easy

Logistics shape success. Set up your kitchen so good choices happen on autopilot.

  • Store uncooked grains in airtight jars away from heat and light.
  • Cool cooked grains quickly, then refrigerate within two hours.
  • Use cooked grains within three to four days, or freeze flat for later.
  • Reheat with a splash of water and cover to restore moisture.
  • Batch once; eat many times. Cook big on one night. Portion into containers. Rotate through bowl formulas all week.
  • Season simply. Try lemon zest, garlic, toasted cumin, turmeric, parsley, cilantro, sesame, or a spoon of pesto. Little touches amplify flavor.

When you cook a pot, cook a little extra. Future-you will thank present-you.


Pulling it together: how to choose with confidence

You now have the facts and the levers. Let’s convert them into confident choices.

  • Choose quinoa when you want more protein and fiber, generally lower GI, and a base that can stand on its own in bowls and salads. For numbers and context, revisit USDA quinoa and Harvard’s quinoa guide.
  • Choose brown or basmati rice when you want a classic rice experience with a gentler glycemic impact than standard white. For a balanced overview of varieties, see Harvard’s rice page.
  • Choose white rice when you need a lighter-calorie, neutral base that keeps the spotlight on the main dish. Then round out the plate with vegetables and protein so the meal satisfies and digests steadily. For exact cup-for-cup figures, compare white rice per cup with quinoa per cup.

If blood sugar steadiness is a priority, focus on technique. Cook, cool, and reheat. Keep grains slightly firm. Pair with protein and vegetables. Favor lower-GI varieties. For simple steps, use our guide to reducing rice’s GI. For a neutral, health-org stance on GI, read Diabetes UK’s overview.

Finally, keep cooking joyful. Food is fuel, but it is also comfort. Try one new method this week. Swap in a half-and-half mix. Add a bright pickle or a crunchy salad. Notice how the plate feels. Then iterate. With a little curiosity, quinoa vs rice stops being an argument. It becomes a flexible toolkit you can use with ease.

FAQs

1) What is the glycemic index of quinoa vs rice?

Generally, quinoa sits in the low-GI range, while rice varies widely by type. Consequently, brown and basmati rice tend to be friendlier than standard white or jasmine. Even so, cooking, cooling, and reheating can shift the numbers a bit.

2) Which is healthier overall: quinoa or rice?

It depends on your goal. Typically, quinoa wins on protein, fiber, and a steadier blood-sugar response. However, white rice is slightly lower in calories per cup and works well as a neutral base when portions and pairings are smart.

3) Is quinoa better than rice for weight loss?

Often, yes—because quinoa’s extra protein and fiber can improve fullness. Nevertheless, a modest serving of rice with plenty of vegetables and lean protein can also fit well.

4) Brown rice vs quinoa: which should I choose?

Both are solid. Brown rice offers a whole-grain experience with chew and moderate fiber. Meanwhile, quinoa usually brings more protein and fiber per cup. Therefore, choose by texture preference and how long you want the meal to keep you satisfied.

5) Basmati rice vs quinoa: which has the advantage?

Each brings different strengths. Basmati often lands lower on the GI spectrum among white rices and has a fragrant, separate grain. Conversely, quinoa adds more protein and fiber. As a result, you might even combine them.

6) Jasmine rice vs quinoa: which supports steadier energy?

Typically quinoa. Jasmine rice is delicious and plush, yet it often trends higher on the GI scale. Thus, if you choose jasmine, balance the plate with vegetables, protein, and mindful portions.

7) Does quinoa have fewer carbs than rice?

Per cooked cup, quinoa usually has slightly fewer carbs than many white rices. Still, the difference is small. Instead, quinoa’s bigger edge is its protein and fiber.

8) Quinoa vs white rice: which has fewer calories?

White rice, by a modest margin. Even so, quinoa often feels more filling thanks to its higher protein and fiber content.

9) Protein in quinoa vs rice: how do they compare?

Quinoa commonly provides about twice the protein per cup compared with white rice. Consequently, it can help when you want more protein from the base itself.

10) Fiber in quinoa vs brown rice: who wins?

Quinoa usually edges out brown rice on fiber per cup. Nevertheless, both beat standard white rice. Therefore, either can help you build more satisfying bowls.

11) What is the difference between quinoa and rice?

Botanically, quinoa is a seed that cooks like a grain, while rice is a cereal grain. Hence, quinoa tends to carry more protein and fiber, whereas rice delivers a softer, more neutral canvas.

12) Is quinoa better than rice for diabetics?

Often yes, due to lower GI and higher fiber. That said, brown rice and basmati can also be sensible choices. Furthermore, pairings, portions, and cooking methods matter just as much.

13) Which is better for bodybuilding or training days: quinoa or rice?

It depends on timing. Around workouts, white or basmati rice can digest a bit faster. Conversely, away from training, quinoa’s extra protein and fiber can help with satiety across the day.

14) Quinoa vs rice for weight loss: what portion strategies work?

First, keep the base modest. Next, pack in vegetables. Then, add lean protein and a little fat for flavor. Consequently, both quinoa bowls and rice bowls can fit your plan.

15) Wild, red, or black rice vs quinoa: how do these compare?

These colorful rices retain more of the grain and usually bring extra texture and character. Even so, quinoa still tends to offer more protein per cup. Thus, choose based on flavor and the role you want the base to play.

16) Parboiled rice vs quinoa: which should I use?

Parboiled rice often cooks into separate grains and can be gentler than some standard white rices. Nevertheless, quinoa remains stronger on protein and fiber. Therefore, pick parboiled for pilafs and quinoa for protein-forward bowls.

17) Cauliflower rice or shirataki rice vs quinoa: which is “lighter”?

Those substitutes are extremely low in calories and carbs. However, they change texture and flavor dramatically. Meanwhile, quinoa behaves like a true grain and offers staying power. Hence, use the alternatives for very low-carb plates and quinoa for fuller meals.

18) Does quinoa taste like rice?

Not exactly. Quinoa is nutty with a slight chew; rice is softer and more neutral. That said, with dressings, sauces, and herbs, the swap feels natural surprisingly quickly.

19) Can I mix quinoa and rice in one dish?

Absolutely. In fact, a half-and-half mix is an easy transition strategy. As a result, you get rice’s familiarity and quinoa’s extra protein and fiber in the same bowl.

20) Is quinoa more expensive than rice?

In many markets, yes, because quinoa is less widely grown and processed differently. Even so, mixing quinoa with rice or using quinoa for specific meals can manage cost while preserving benefits.

21) Quinoa vs rice calories per 100 g vs per cup: which view should I use?

Use the per 100 g view for precise macro tracking. Alternatively, use the per cup view for quick home cooking decisions. Either way, keep consistency in your method.

22) Which is healthier: brown rice or quinoa?

Often quinoa, thanks to protein and fiber. Nonetheless, brown rice remains a strong whole-grain option. Therefore, rotate both and pick based on texture, budget, and the rest of the plate.

23) Is quinoa or rice better for beginners who want steadier energy?

Start with quinoa or basmati, since both usually support a smoother glucose response than many standard white rices. Additionally, keep portions steady and add protein.

24) Why do cooking methods change the GI of rice?

Because heat, cooling, and reheating alter starch structure. Specifically, cooling increases resistant starch, which resists digestion. Consequently, the post-meal rise can be gentler.

25) How do I choose between quinoa and rice on busy weeks?

Plan for versatility. Batch-cook one pot of quinoa and one of rice. Then, alternate: quinoa bowls on high-satiety days; rice bowls when you want a lighter base or faster digestion.

Posted on 3 Comments

All About Gluten: Symptoms, Testing, Diet & 7-Day Gluten-Free Meal Plan

Portrait cover image for a gluten sensitivity diet: gluten-free millet salad on rustic table with text “Symptoms, Testing & 7-Day Plan” – MasalaMonk

If you’re wondering whether a gluten sensitivity diet could finally calm the bloating, brain fog, fatigue, or stubborn skin issues—you’re far from alone. Yet the landscape can be confusing: is it celiac disease, non-celiac gluten sensitivity (NCGS), or a wheat allergy? And once you figure that out, what exactly should you eat? This guide clears the path step by step—so you can move from guesswork to a steady routine that supports your gut, your energy, and your everyday life.

Before we dive into testing, food lists, and meal plans, a brief refresher helps. If you’re new to the topic, start with our quick primer on what gluten actually is—it’ll make everything else easier to follow.

⚠️ Disclaimer: This article is for educational purposes only and is not medical advice. It does not diagnose, treat, cure, or prevent any condition. Always consult a qualified healthcare professional for personalized guidance, especially before starting a gluten sensitivity diet, changing medications, or interpreting tests. If you have urgent or severe symptoms, seek medical care immediately.


Celiac, NCGS, or Wheat Allergy—Why Your Diagnosis Shapes the Gluten Sensitivity Diet

Although the symptoms can overlap, these conditions aren’t the same—and the plan you follow depends on which one you have.

  • Celiac disease (CeD) is an autoimmune condition: gluten triggers immune damage in the small intestine. Left untreated, it can lead to nutrient deficiencies, anemia, bone loss, and more.
  • Non-celiac gluten sensitivity (NCGS) involves gluten-related symptoms without celiac’s intestinal damage and without wheat-allergy markers. Interestingly, a subset of people with NCGS-like symptoms may actually be reacting to fructans (fermentable carbohydrates found in wheat) rather than gluten itself; Monash’s overview explains how wheat is rich in fructans, and a randomized trial explored whether fructans—not gluten—trigger symptoms in some. See Monash on wheat and fructans and the study via PubMed.
  • Wheat allergy is an IgE-mediated allergy to wheat proteins (not just gluten). Reactions can include hives, wheezing, and—rarely—anaphylaxis, which clearly requires a different approach.

Because treatment and strictness differ, testing first—and only then committing to a gluten sensitivity diet—is the smartest move.


Gluten Sensitivity Symptoms: What to Watch For

If you’re considering a gluten sensitivity diet, it helps to recognize the most common gluten intolerance symptoms first. Although everyone’s experience differs, the patterns below appear consistently in clinical summaries and patient reports.

Core digestive signs of Gluten Sensitivity

To begin with, keep an eye on:

  • Bloating and gas (often within hours)
  • Abdominal pain or cramping
  • Diarrhea, constipation, or an alternating pattern
  • Nausea and early fullness
  • Reflux/heartburn after wheat-heavy meals

For a clear, medical overview of GI complaints (including how they differ by age), see the NIDDK symptom summary and the Celiac Disease Foundation symptoms list.

Extra-intestinal symptoms of Gluten Sensitivity (the sneaky ones)

Meanwhile, many people notice issues outside the gut: persistent fatigue, brain fog or headaches, mood changes, joint or muscle aches, and skin flares. For accessible detail, skim Mayo Clinic’s celiac symptoms page.

Possible nutrient-deficiency clues of Gluten Sensitivity

Over time, malabsorption can show up as iron-deficiency signs (dizziness, brittle nails), mouth ulcers, or even hair thinning. Notably, dental enamel defects in kids can be an early clue—dentists are encouraged to refer when they spot tell-tale enamel patterns. Start with the NIDDK note on enamel defects and CDF’s oral-health overview.

In children (additional pointers on Gluten Sensitivity )

By contrast, kids may present with growth faltering, frequent tummy aches, loose stools, or irritability—sometimes long before anyone suspects gluten. A concise digest for families appears in CDF’s symptoms page and the NIDDK children overview.

Timing, dose, and patterns

Just as important, symptoms can spike within 30 minutes up to 48 hours after eating gluten. Some people notice a dose–response (bigger portions → bigger flares). Others discover that wheat’s fructans—a FODMAP, not gluten—drive bloating and gas; in that case, a short low-FODMAP strategy (not lifelong strict GF) may help. For context, read Monash on avoiding wheat during the low-FODMAP phase and their brief fructan/oligos explainer.

When to seek care (don’t DIY this part)

However, certain red flags need prompt medical evaluation rather than diet trials: unintentional weight loss, blood in stool, persistent vomiting, fever, severe dehydration, or night sweats. A reliable, plain-English checklist appears in Mayo Clinic’s guidance.

Quick self-audit before you change everything

Before you overhaul your routine, keep a 3–5 day food & symptom log (time eaten, portion, symptoms 0–10). Note oats, sauces/spice blends, and possible cross-contact (shared fryers, toasters, or boards). Bring the log to your appointment; clinicians can then decide on testing first—and only afterward a tailored gluten sensitivity diet. For accuracy, remember you should be on gluten before serology; the rationale is laid out in the NIDDK provider handout.


Testing First (Then Diet): How to Avoid False Negatives and Frustration

Here’s the crucial rule many people miss: don’t remove gluten before screening, or blood tests can turn falsely negative.

  • First-line bloodwork typically includes tissue transglutaminase IgA (tTG-IgA) with a total IgA to check for IgA deficiency. Some clinicians add deamidated gliadin (DGP) antibodies, particularly in younger children. For approachable, trustworthy guidance, see the American College of Gastroenterology’s celiac disease overview and the NIDDK’s clear explainer for clinicians and patients on celiac testing.
  • Confirmation: when screens are positive, specialists usually confirm celiac disease with an endoscopy and small-bowel biopsies.
  • Why “stay on gluten” matters: the NIDDK’s provider handout is explicit—patients should be consuming gluten before testing to ensure accuracy. Skipping this step risks months of confusion. See the NIDDK PDF guidance: Provider Points—Celiac Disease.

Once you’re properly screened, you can commit to the right path—be it a strict celiac protocol or a carefully structured gluten sensitivity diet for non-celiac cases.

⚠️ Disclaimer: This article is for educational purposes only and is not medical advice. It does not diagnose, treat, cure, or prevent any condition. Always consult a qualified healthcare professional for personalized guidance, especially before starting a gluten sensitivity diet, changing medications, or interpreting tests. If you have urgent or severe symptoms, seek medical care immediately.


“Is It Gluten-Free?”—Clear Answers You Can Trust (So Labels Don’t Drive You Mad)

Label reading gets overwhelming quickly; nevertheless, a few rules of thumb dramatically reduce stress.

  • Oats / Oatmeal: Oats are naturally gluten-free, but they’re frequently contaminated with wheat, barley, or rye during harvesting and processing. Choose certified gluten-free oats and introduce them gradually if you’re sensitive; a small subset of people reacts to avenin (the oat protein). For a balanced overview, see the Celiac Disease Foundation’s explainer on oats and contamination. Meanwhile, the FDA clarifies that gluten-free claims generally mean <20 ppm gluten—use their resources to understand labels: FDA gluten & food labeling and the consumer piece, Gluten-Free Means What It Says.
    For kitchen-level practicality, compare our quick primers on rolled vs old-fashioned oats and quick vs instant oats.
  • Sourdough bread: Despite the buzz, regular wheat sourdough is not gluten-free or celiac-safe. Only sourdough made entirely with gluten-free grains and a gluten-free starter is safe. For clarity, see Beyond Celiac—Is sourdough bread gluten-free?.
  • Quinoa: Naturally gluten-free, higher in protein than most grains, and fantastic for pulao, upma, bowls, and salads.
  • Coffee: Plain black coffee is gluten-free; flavored products may vary—check labels.
  • Ezekiel bread: The classic sprouted version contains wheat; it’s not gluten-free. If you love the texture, look specifically for GF-labeled sprouted breads.

Meanwhile, many Indian staples are naturally GF. To diversify your pantry (and your recipes), explore our primer on millets—the gluten-free superfood.


The Core of a Gluten Sensitivity Diet (So You Feel Satiated, Not Deprived)

A sustainable gluten sensitivity diet leans on naturally gluten-free foods, treats packaged items with care, and prioritizes satisfaction (so you’ll actually stick with it).

Build your plate around:

  • Protein: dal, chickpeas, rajma, tofu/tempeh, paneer, eggs, fish, chicken.
  • High-fiber carbs: rice, millets (jowar, bajra, ragi), quinoa, potatoes, sweet potatoes, buckwheat (kuttu).
  • Colorful plants: as many vegetables and fruits as you’ll enjoy daily.
  • Healthy fats: olive oil, ghee (if tolerated), avocado, nuts and seeds.
  • Smart pantry swaps: GF tamari (instead of soy sauce), GF pasta when you want convenience, chickpea flour (besan), tapioca, and cornstarch for binding and crisping.

Label-reading shortcut: Prefer products clearly marked “gluten-free.” In many markets, that aligns with the <20 ppm rule; the FDA pages above are handy to link inside your shopping sections so readers can fact-check in one tap.

Treats, thoughtfully: A little joy helps long-term adherence. Keep a couple of easy add-ons—like our quick dairy- and gluten-free chocolate syrup for pancakes, fruit, or yogurt (or dairy-free alt).


Pantry Setup and Batch-Cooking: The Secret Sauce of Consistency

Because weeknights are busy, a gluten sensitivity diet works best when your kitchen is prepped for “grab-and-combine.”

Your weekend hour, well spent:

  1. Cook two grains (say, quinoa and rice or millet) and refrigerate in clear containers.
  2. Pressure-cook two legumes (moong/masoor or chickpeas/rajma) and freeze in meal-size portions.
  3. Prep sauces you love—tahini-lemon, mint-yogurt (or coconut yogurt), and a jar of GF tamari-ginger.
  4. Wash and chop a big tray of vegetables; store in zip bags or boxes for stir-fries, upma, khichdi, bowls, and quick sides.

As a result, dinner becomes assembly: grain + protein + veg + sauce. Ten minutes, tops.

Also Read: How to Make Lentil Patties that Are Better Than Meat? Vegan Protein-Rich Recipe.


Your 7-Day Gluten Sensitivity Diet Meal Plan (Flexible, Flavor-First, and Realistic)

This plan favors batch cooking and repeats pantry staples to lower effort. Nevertheless, it remains varied—so you won’t feel boxed in. Wherever helpful, we’ve linked to MasalaMonk ideas you can plug in immediately.

Day 1

  • Breakfast: Certified GF oats porridge with chia + berries (add cinnamon)
  • Lunch: Millet khichdi (moong + carrots/peas) with a squeeze of lemon
  • Dinner: Lemon rice + sautéed paneer/veg or chicken tikka (check spice blends are GF)
  • Snack: Roasted chana; seasonal fruit

Day 2

  • Breakfast: Ragi dosa + coconut chutney
  • Lunch: Quinoa pulao with peas and carrots
  • Dinner: Grilled fish (or tandoori chicken), herbed potatoes, kachumber salad
  • Snack: Yogurt (or coconut yogurt) with seeds and a drizzle of honey

Day 3

  • Breakfast: Millet pancakes with a light drizzle of our gluten-free chocolate syrup recipe.
  • Lunch: Brown rice + rajma (verify masala blends are GF)
  • Dinner: Stir-fried tofu/veg with GF tamari; top with sesame seeds (for more plant-based swap ideas, see our lentil-forward meal prep guide)
  • Snack: Peanut chaat with lemon

Day 4

  • Breakfast: Besan chilla + mint chutney
  • Lunch: Kuttu (buckwheat) rotis + mixed sabzi
  • Dinner: Baked sweet potato, black beans, salsa, avocado (squeeze of lime)
  • Snack: A small handful of nuts + dates

Day 5

  • Breakfast: Poha (confirm GF processing) with peanuts and coriander
  • Lunch: Quinoa upma with mixed vegetables
  • Dinner: Rice, dal tadka, cucumber salad
  • Snack: Roasted makhana, lightly spiced

Day 6

  • Breakfast: Smoothie (banana, spinach, peanut butter, milk or plant milk)
  • Lunch: Millet bowl—jowar, chickpeas, roasted veg, tahini-lemon dressing
  • Dinner: GF pasta aglio e olio with tomatoes and basil; side salad
  • Snack: Dark chocolate (check label)

Day 7

  • Breakfast: Scramble (eggs or tofu) with peppers and onions
  • Lunch: Rice paper rolls (shrimp or tofu) + peanut dip (GF)
  • Dinner: Slow-cooked dal + jeera rice + kachumber
  • Snack: Hummus with veggie sticks

Dairy-free tweaks: Swap yogurt/milk for coconut or almond options; use olive oil or ghee if tolerated. Additionally, consider a calcium source (tofu set with calcium, leafy greens, fortified plant milks) if you’re dairy-free long-term.


Shopping Made Simple (Copy This to Notes Before You Head Out)

Grains & starches: basmati + parboiled rice, quinoa, millets (jowar, bajra, ragi), certified GF oats, buckwheat flour, potatoes, sweet potatoes, GF pasta.
Proteins: eggs, chicken/fish, paneer/tofu/tempeh, moong, masoor, chickpeas, rajma.
Pantry & swaps: besan, cornstarch, tapioca, GF tamari, tomato paste, coconut milk, tahini, seeds (chia/linseed), nuts, extra-virgin olive oil.
Spices: prefer single-ingredient spices; double-check blends for wheat fillers.
Treats & condiments: dark chocolate (check label), honey, nut butters, etc.

When deciding between brands, opt for those clearly marked “gluten-free,” which (in many regions) aligns with the <20 ppm standard; the FDA’s resources are concise and dependable: Gluten & Food Labeling and Gluten-Free Means What It Says.


Cross-Contact: The Invisible Gotcha (and How to Avoid It)

Even with perfect shopping, cross-contact can undo your efforts—especially if someone at home still eats gluten. Therefore:

  • Divide utensils and surfaces: dedicate a toaster, cutting board, and strainer for GF foods.
  • Handle flour carefully: airborne flour can linger; keep GF prep separate in time and space.
  • Fryers and oil: avoid shared fryers; batter residues contaminate oil.
  • Sauces and spreads: use squeeze bottles or separate knives; crumbs are sneaky.

These small systems are the backbone of a reliable gluten sensitivity diet at home.


Eating Out Without Anxiety (And Actually Enjoying It)

Restaurants vary widely in their knowledge and kitchen setup; cross-contact can happen in shared fryers, toasters, or chopping boards. Nevertheless, you can dine out more confidently by calling ahead, asking about separate prep areas, and clarifying sauces, marinades, and dessert toppings.

For discovery, use tools that crowdsource experience and certification. Apps like Find Me Gluten Free are a practical starting point, while the National Celiac Association’s restaurant resources can point you toward vetted venues and programs.


Troubleshooting Symptoms on a Gluten Sensitivity Diet (When You’re Still Not Feeling Great)

Sometimes, even after removing gluten, symptoms linger. In that case, consider a short, structured audit:

  1. Hidden gluten: re-check spice blends, sauces, and “natural flavors.” If in doubt, switch to single-ingredient spices and brands that explicitly label GF.
  2. Cross-contact: scrutinize toasters, fryers, wooden spoons, cutting boards, and baking trays.
  3. Oats tolerance: even certified GF oats can bother a subset of people; remove oats for 2–3 weeks and reassess. For background on why certified oats matter, read the CDF oats explainer above and the FDA labeling resources.
  4. FODMAP overlap: if gas, bloating, or pain are dominant, consider whether fructans and other FODMAPs might be the bigger trigger; Monash’s guidance is especially practical for this. See Monash on wheat/fructans.
  5. Nutrition review: check iron, B12, folate, vitamin D if fatigue persists—speak with your clinician about labs and tailored supplementation.

When in doubt, circle back to your clinician, share your food log, and refine from there.


Weight Loss—or Gain—on a Gluten Sensitivity Diet

Going gluten-free doesn’t automatically cause weight change; energy balance and satiety still rule. However, a gluten sensitivity diet that’s rich in protein, fiber, and minimally processed foods tends to stabilize appetite.

  • If your goal is weight loss: base meals around protein (dal, chickpeas, tofu, fish/chicken) and high-fiber carbs (millets, quinoa), load up on vegetables, and keep sauces simple.
  • If your goal is healthy weight gain: fold in energy-dense but nutrient-rich picks—tahini, nut butters, olive oil, avocado—and, for to find other great options for a weight gain diet, read our post on Best Weight Gain Foods for Fast, Healthy Gains.

Either way, consistency beats perfection; the plan you repeat wins.


Bringing It Together: Your Next Three Steps

  1. Finish testing (if pending), then commit: after proper screening, decide with your clinician whether you need a strict celiac protocol or a flexible gluten sensitivity diet. Start with the ACG’s overview and NIDDK’s testing guidance to feel confident in the process: ACG—Celiac Disease and NIDDK—Diagnosis.
  2. Stock your pantry and prep once: set up two grains, two legumes, and two sauces every weekend. For variety—especially at breakfast—lean on millets as a gluten-free superfood and customize with oats if you tolerate certified GF oats (use our oat primers on rolled vs old-fashioned and quick vs instant).
  3. Batch-cook and repeat favorites: pick two days from the 7-day plan and double them next week. Consequently, you’ll eat well without starting from scratch each evening.

Final Word (and Why This Works)

A gluten sensitivity diet doesn’t have to feel restrictive. Instead, by emphasizing naturally gluten-free foods, verifying labels, and building meals you actually enjoy, you can reduce symptoms while staying satisfied. Furthermore, the framework above keeps decisions simple: protein + fiber-rich carbs + plants + a little fat. Over time, that combination steadies digestion, improves energy, and makes “eating gluten-free” feel like a normal, delicious routine—not a medical chore.

And remember: your best plan is the one you’ll gladly follow. Start small, iterate weekly, and keep it tasty.


⚠️ Disclaimer: This article is for educational purposes only and is not medical advice. It does not diagnose, treat, cure, or prevent any condition. Always consult a qualified healthcare professional for personalized guidance, especially before starting a gluten sensitivity diet, changing medications, or interpreting tests. If you have urgent or severe symptoms, seek medical care immediately.


FAQs

1) What is a gluten sensitivity diet—and who needs it?

A gluten sensitivity diet is an eating pattern that removes gluten (proteins in wheat, barley, and rye) to reduce symptoms like bloating, brain fog, fatigue, and skin issues. It’s used by people with diagnosed celiac disease, suspected non-celiac gluten sensitivity (NCGS), or those advised by a clinician to trial gluten removal. Importantly, test for celiac disease before starting the diet to avoid false negatives.

2) What are the most common signs and symptoms of gluten intolerance?

Typical symptoms include abdominal pain, bloating, gas, diarrhea or constipation, nausea, headaches, brain fog, fatigue, and sometimes skin rashes. Additionally, some notice joint pain or mood changes. However, symptoms alone can’t confirm the cause—proper testing is key.

3) How is gluten intolerance different from celiac disease and wheat allergy?

Celiac disease is an autoimmune condition that damages the small intestine when gluten is eaten. NCGS causes symptoms without that autoimmune damage or IgE allergy markers. Meanwhile, wheat allergy is an IgE-mediated response to wheat proteins (not just gluten) and may involve hives, wheezing, or, rarely, anaphylaxis. Consequently, each requires a different management plan.

4) Which blood tests are used to check for celiac disease?

Common first-line tests include tTG-IgA plus a total IgA check. In certain cases (for example, young children), DGP antibodies may be used. Nevertheless, you must be eating gluten for a period before testing; otherwise, results may be inaccurate.

5) What does a strict gluten-free diet actually include?

Focus on naturally gluten-free foods: rice, millets (jowar, bajra, ragi), quinoa, potatoes, sweet potatoes, legumes, eggs, poultry, fish, meat, fruits, vegetables, and most dairy (if tolerated). Additionally, keep pantry swaps handy—GF pasta, chickpea flour (besan), cornstarch, tapioca, and gluten-free tamari.

6) Are oats gluten free?

Oats are naturally gluten-free; however, they’re often contaminated during farming or processing. Choose certified gluten-free oats and introduce slowly. A small subset of people may still be sensitive to avenin (oat protein), so monitor how you feel.

7) Is sourdough bread gluten free?

Regular wheat sourdough is not gluten-free, even though fermentation reduces some gluten. Only loaves made entirely with gluten-free flours and starters are safe on a gluten sensitivity diet.

8) Is quinoa gluten free—and is it a good substitute?

Yes. Quinoa is naturally gluten-free, high in protein, and versatile. Moreover, it cooks quickly and works in pulao, upma, salads, and warm bowls, making it a smart staple for beginners.

9) What about Ezekiel bread, spaghetti, and coffee?

Traditional Ezekiel bread (sprouted grains) contains wheat and is not gluten-free. Choose GF-labeled breads instead. As for spaghetti, select gluten-free versions made from rice, corn, quinoa, or legumes. Plain coffee is naturally gluten-free; flavored products may vary, so always check labels.

10) Can a gluten sensitivity diet be both gluten-free and dairy-free?

Absolutely. Many people also remove lactose or dairy to troubleshoot symptoms. Consequently, use alternatives like almond or coconut yogurt, lactose-free milk, or tofu/paneer swaps if tolerated. Still, prioritize balanced meals with protein, fiber-rich carbs, healthy fats, and plenty of vegetables.

11) How do I handle eating out or “gluten-free near me” situations?

Call ahead and ask about separate prep areas, dedicated fryers, and ingredient lists. Additionally, explain cross-contact (shared toasters, cutting boards, or oil) and request simple grilled or steamed options with sauces on the side. Ultimately, clear questions lead to safer plates.

12) What is cross-contact—and why does it matter so much?

Cross-contact happens when gluten-containing foods or crumbs touch gluten-free items. Even tiny amounts can trigger symptoms for sensitive individuals. Therefore, at home, keep separate toasters, strainers, cutting boards, and knives for GF foods; in restaurants, ask about shared fryers and prep surfaces.

13) Can a gluten sensitivity diet help with weight loss—or weight gain?

It can support either goal when you structure meals well. For weight loss, anchor plates around protein and high-fiber carbs (millets, quinoa) and keep sauces light. For healthy weight gain, add energy-dense options—nut butters, tahini, olive oil, avocado—while still avoiding gluten. Ultimately, consistency beats perfection.

14) Do I need supplements on a gluten-free plan?

Maybe. Some people benefit from iron, B12, folate, vitamin D, or calcium depending on labs and intake. However, don’t self-supplement blindly. Instead, review symptoms, diet quality, and testing with a healthcare professional for a tailored plan.

15) What are the effects of gluten sensitivity if I don’t change my diet?

You might experience ongoing GI issues, fatigue, headaches, or skin flare-ups. In celiac disease specifically, continued gluten exposure can damage the small intestine and affect absorption. Consequently, accurate testing and an appropriate dietary plan are essential.

16) Can millets and other traditional grains fit into a gluten sensitivity diet?

Yes—beautifully. Millets like jowar, bajra, and ragi are naturally gluten-free and fiber-rich. Additionally, they’re easy to batch-cook and pair well with dals, veggies, and lean proteins, keeping meals satisfying and diverse.

17) How do I start a beginner-friendly gluten-free meal plan?

Begin with a simple 7-day rotation: two grains (say, rice and millet), two legumes (moong/rajma), and two sauces (tahini-lemon and a GF tamari mix). Batch-cook on the weekend. Consequently, weeknights become quick assemblies—grain + protein + veg + sauce—in under 15 minutes.

18) Will going gluten-free help hypothyroidism or Hashimoto’s?

Some individuals report symptom improvements, but evidence is mixed. Nevertheless, if you have Hashimoto’s and persistent symptoms, discuss a supervised trial with your clinician—especially to ensure adequate nutrients (selenium, iodine, iron, vitamin D) and to avoid unnecessary restriction.

19) What’s the best gluten intolerance or sensitivity test I can take at home?

Home kits exist, yet they can’t replace clinical evaluation. Moreover, interpretation is tricky, and some tests aren’t validated for diagnosis. Ideally, coordinate testing with your clinician, remain on gluten beforehand, and follow up with appropriate confirmation if results are positive.

20) What does a “strict gluten-free diet” look like day to day?

It means avoiding wheat, barley, rye, and cross-contact—every day. Additionally, you’ll read labels for hidden gluten in sauces, spice blends, and processed foods; choose clearly GF-labeled items; and set up separate kitchen tools where needed. Ultimately, it becomes routine—and much easier than it sounds.