Posted on Leave a comment

Baked Jalapeño Poppers (Oven) — Time, Temp & Bacon Tips

Hand plating bacon-wrapped baked jalapeno poppers on a tray — oven time and temp guide by MasalaMonk

There’s a particular kind of party food that somehow disappears the moment the tray lands on the table. Baked jalapeno poppers are that food—spicy, creamy, crisp around the edges, and just messy enough to feel celebratory. Instead of deep-frying, we’ll rely on the oven (and, if you like, a quick finish on the grill or under the broiler) for a version that stays crunchy where it should and melty where it counts. Along the way, you’ll get precise time and temperature cues for plain and bacon-wrapped jalapeño poppers in oven, clever variations, and a handful of drink pairings that make every bite pop.

Before we jump in, a quick word on method: because the oven is less aggressive than a fryer, we’ll engineer crispness with smart setup—wire rack, middle rack placement, proper spacing, and (optionally) a light panko top. This combination delivers the sought-after contrast: tender pepper, hot filling, and a lightly golden cap you can tap with a finger.

Also Read: How to Cook Bacon in the Oven (Crispy, No-Mess, Crowd-Ready Recipe)

The Roadmap (What You’ll Do, in Spirit)

First, split the jalapeños lengthwise. Next, scoop out seeds and ribs (leave some ribs if you want a little sting). Then, stir together a balanced filling—cream cheese for structure, sharp cheddar for pull, scallion for freshness, garlic for warmth, a pinch of salt to wake everything up. After that, pipe or spoon the filling into the pepper “boats.” Finally, either bake them as-is or wrap each with thin-cut bacon, setting the halves seam-side down so the wrap tightens as it cooks.

Although that sounds almost too simple, the difference between good and great lives in the details. A wire rack over a sheet pan is essential: rendered fat and vegetable moisture drip away, heat surrounds the peppers, and the bottoms crisp instead of steam. And yes, a quick sprinkle of panko creates a crackly top without cumbersome breading—Serious Eats has long championed oven-crisp poppers and even suggests techniques like a brief chill to keep fillings tidy. See their crispy baked jalapeño poppers method for why this works so well. (Serious Eats: Crispy & Gooey Baked Jalapeño Poppers)

Also Read: French Toast Sticks (Air Fryer + Oven Recipe) — Crispy Outside, Custardy Inside

Here’s the baseline method for baked jalapeño poppers—time, temp, and the rack setup that keeps them crisp.

Hands holding a sheet pan of baked jalapeno poppers with golden panko topping—oven time and temp guide for MasalaMonk
Baked jalapeño poppers with a light panko crust—use a wire rack and bake 400°F for 20–25 min (or 375°F for 25–30) until edges bubble and tops are golden.

Baked Jalapeno Poppers: Oven Time & Temp (Your Baseline)

Because jalapeños vary—some are slender and fiery, others plump and mild—cook times flex. Nevertheless, a reliable pattern emerges:

  • 400°F (204°C): about 20–25 minutes for plain baked poppers.
  • 375°F (190°C): roughly 25–30 minutes, especially for larger peppers that need a more gradual cook.

Importantly, doneness cues beat the clock every time: look for a lightly golden top, bubbling edges where the cheese meets the pepper, and a pepper wall that yields to a fork without collapsing. If you opted for panko, a slightly hotter oven helps the crumbs set fast; if you skipped crumbs, stay anywhere in that 375–400°F lane and track the visual signs. For more on oven-based technique, you can cross-reference this test-driven baked poppers approach. (Serious Eats: Crispy & Gooey Baked Jalapeño Poppers)

Also Read: Air Fryer or Air Fryer Toaster Oven: Making the Right Choice

Why Panko Helps (Without Going Full Breaded)

Now, you could dredge and bread, but that’s overkill for an oven method. Instead, sprinkle a little oiled panko on top; the large, airy flakes brown quickly and stay crisp. Panko’s structure (bigger flakes, more surface area) is the real reason it works so well for light oven crunch. If you’d like a deeper dive into why those crumbs behave differently, skim this primer on what panko does in high-heat applications. (Serious Eats: Everything You Can Do With Panko)

Bacon-Wrapped Jalapeño Poppers in Oven (Time, Temp & Finish)

For bacon-wrapped, use thin-cut slices and the timings below; finish hot for snap.

Hand lifting bacon-wrapped baked jalapeno poppers from a black tray—oven time and temperature guide
Bacon-wrapped jalapeño poppers—bake on a wire rack at 400°F for 25–30 minutes (or 375°F for 30–35), then broil briefly for extra snap.

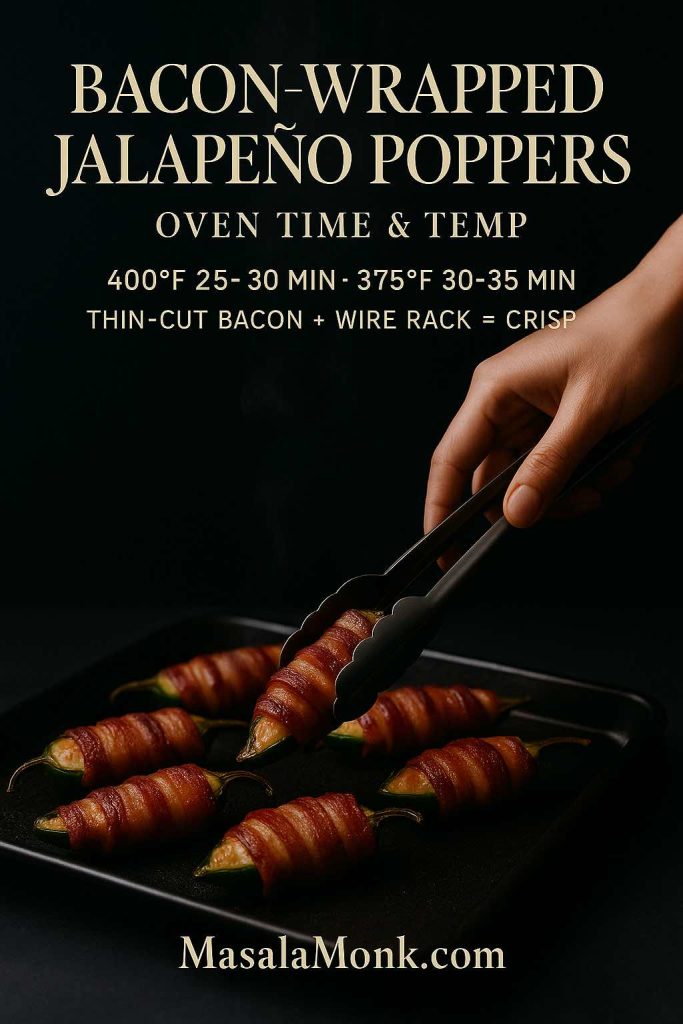
Because bacon needs time to render, bacon-wrapped jalapeño poppers in oven take a touch longer. Furthermore, thin-cut bacon is your friend here: it renders faster, tightens beautifully, and crisps without overcooking the pepper. Consequently, aim for:

  • 400°F (204°C): about 25–30 minutes.
  • 375°F (190°C): approximately 30–35 minutes.

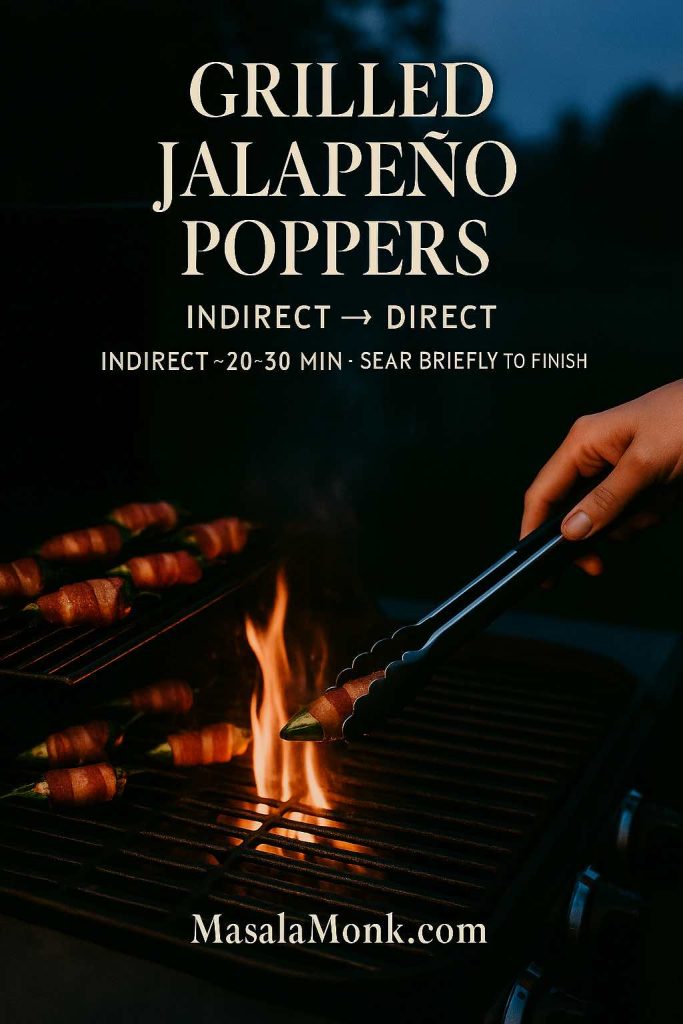
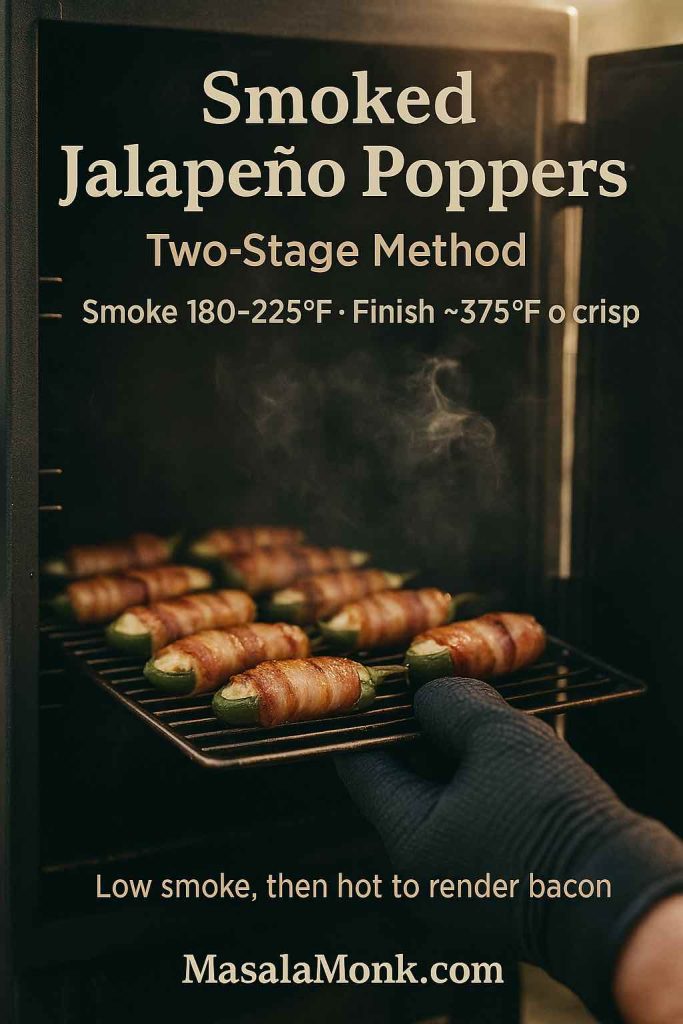
Afterward, if you want a final snap, broil for 60–90 seconds, keeping the tray on the middle rack so the bacon doesn’t leap from crisp to scorched. Prefer smoke instead of broil? As an alternative, a pellet grill or smoker gives you that campfire flavor with very little effort: many cooks smoke at a low setting for about 30 minutes, then raise the heat to around 375°F to finish until the bacon is as crisp as you like. Traeger’s step-by-step method follows that exact logic—low smoke, then hot finish—so you can use it as a cross-check. (Traeger: Smoked Jalapeño Poppers)

If the grill calls your name instead, indirect medium heat (think a covered grill with the poppers off the direct flame) usually lands you in the 20–30 minute window, after which a quick kiss of direct heat crisps the bacon edges. Weber’s popper playbooks outline both grilled and smoked takes, complete with setup notes you can mirror on gas or charcoal. (Weber: Smoked Jalapeño Poppers; Weber: Grilled Jalapeño Poppers)

a quick safety nudge: bacon should be handled cold, cooked once, and cooled promptly. for storage windows (and a handy chart you can cite in your notes), the USDA FSIS has clear guidance on bacon handling and leftovers. (USDA FSIS: Bacon & Food Safety)

The Cleanest Base Recipe of Baked Jalapeño Poppers

You’ll need: fresh jalapeños, cream cheese, shredded sharp cheddar, scallions, garlic, fine salt, optional panko, and thin-cut bacon if you’re wrapping.

  1. Prep the peppers. Halve lengthwise; scrape seeds and ribs with a small spoon. For milder poppers, remove everything; for a gentle tingle, keep a little rib in place.
  2. Mix the filling. Beat the cream cheese until spreadable; fold in cheddar, scallion, and garlic; season lightly.
  3. Fill confidently. Spoon or pipe; keep the filling just proud of the rim (too much will ooze). If you’re wrapping, tuck the bacon seam underneath.
  4. Set the stage. Line a sheet pan with foil for easy cleanup; place a wire rack on top; spray lightly. Arrange peppers with space.
  5. Bake by cues. Use the time/temps above, but trust your eyes: bubbling edges, tender pepper walls, light golden tops.
  6. Finish with intention. Broil briefly for bacon crisp; or, if you’ve got a lit grill, slide the rack on for a minute per side for faint smoke and char.

Because you might be like to try some variations without redundancy, here are a few ideas that change the feel without changing the base.

Variations of Baked Jalapeño Poppers

Panko-Crisp Cap. Toss panko with a touch of oil or melted butter, then sprinkle sparingly before baking. It’s just enough texture to crackle without hiding the pepper. For a rationale rooted in testing, see why panko’s larger shards resist sogginess. (Serious Eats: Panko Guide)

Cheddar-Forward Filling. Increase sharp cheddar for melt and salt; balance with extra scallion. Because cheddar tightens as it melts, leaving a little headspace helps prevent spillover. For ideas on alternative coatings or fillings (including pulled pork for a smoked spin), peek at this pulled-pork poppers riff. (Serious Eats: Pulled-Pork Jalapeño Poppers)

Grilled Finish (No Bacon). Bake until nearly done, then finish on a hot grill grates for 1–2 minutes to add a whisper of smoke. Weber’s jalapeño guides show indirect setups that minimize flare-ups while you get that last bit of char. (Weber: Jalapeño Poppers)

Cook indirect to tender, then kiss with direct heat for the crisp finish.

Tongs moving jalapeño popper on a grill from indirect heat toward flames—grill 20–30 min, then sear briefly to finish
Grilled Jalapeño Poppers: cook over indirect heat for ~20–30 minutes, then flash over direct heat for crisp edges.

Smoked, Then Crisped. If you’re hosting outdoors, smoke the tray for 30 minutes on low, then raise heat to 375°F until the bacon is just right. Traeger’s method lays out that two-stage approach clearly. (Traeger: Smoked Jalapeño Poppers)

Low smoke, then hot finish—use this two-stage rhythm for perfect texture.

Gloved hand sliding bacon-wrapped jalapeño poppers into a smoker—smoke 180–225°F, then finish near 375°F to crisp
Smoked Jalapeño Poppers: go low for flavor at 180–225°F, then finish around 375°F until bacon is rendered and filling bubbles.

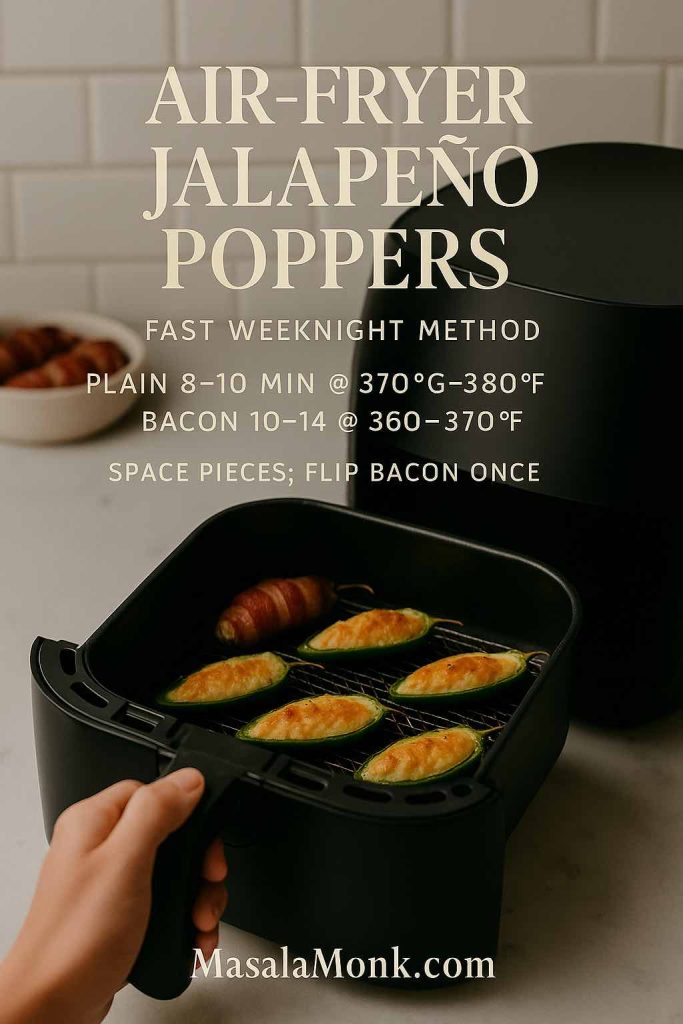
Air-Fryer Shortcut (Small Batches). On weeknights, the basket can be a lifesaver. In that case, preheated around 370–380°F, you’ll usually see 7–10 minutes for plain poppers and about 10–14 minutes for bacon-wrapped, with a flip halfway. For a published reference that mirrors those times and cues, here’s a reliable kitchen resource. (The Kitchn: Air Fryer Jalapeño Poppers)

Weeknight quick? These air-fryer times get you color without crowding the basket.

Hand pulling out an air fryer basket with jalapeno poppers—plain and bacon-wrapped—showing fast weeknight cook times
Air-fryer jalapeño poppers: plain cook in 8–10 minutes at 370–380°F; bacon-wrapped take 10–14 at 360–370°F. Space pieces and flip bacon once for color.

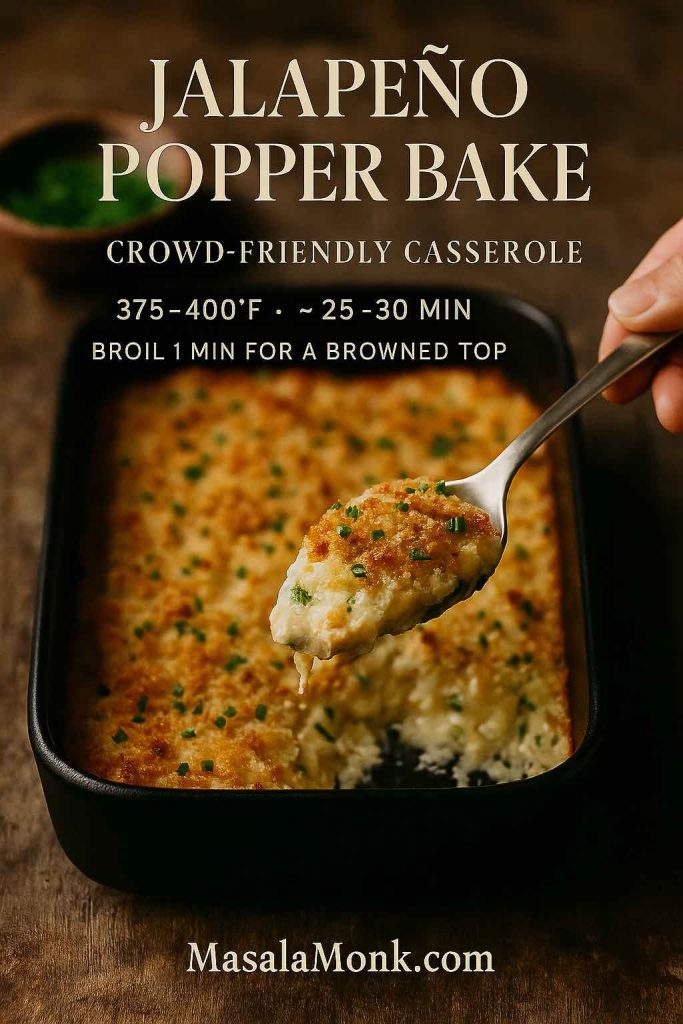
Jalapeño Popper Bake (Casserole). All the popper flavor in a crowd-friendly dish—brown the top under the broiler.

Spoon lifting a square of jalapeño popper bake with browned panko top and chives—375–400°F for about 25–30 minutes
Jalapeño Popper Bake: bake at 375–400°F for ~25–30 minutes until the center bubbles; broil 1 minute for a browned top.

Serving: Contrast, Then More Contrast

Since poppers are rich and salty—and, with bacon, downright luxurious—pair them with drinks and sides that cut through. Naturally, you’ll want variety on the board, but more importantly, you’ll want balance in the glass.

Bright, savory-tangy refreshers. When bacon’s on the tray, the savory sparkle of Jal Jeera (an Indian cumin-mint lemonade) does magical things; it’s zippy, cooling, and distinctly moreish alongside spicy bites.

Tropical, minty coolers. For a crowd pleaser that never fights the food, mix Pineapple Mojito Mocktails; add ginger if you want a light snap that stands up to bacon fat. On a sweeter note—though still bright—Mango Lemonade settles the heat without weighing down the palate.

Creamy, tangy dip to reset the palate. A cool blue cheese dip pairs as naturally with poppers as it does with wings: the funk and acid balance heat, while the thickness reins in drips and crumbs.

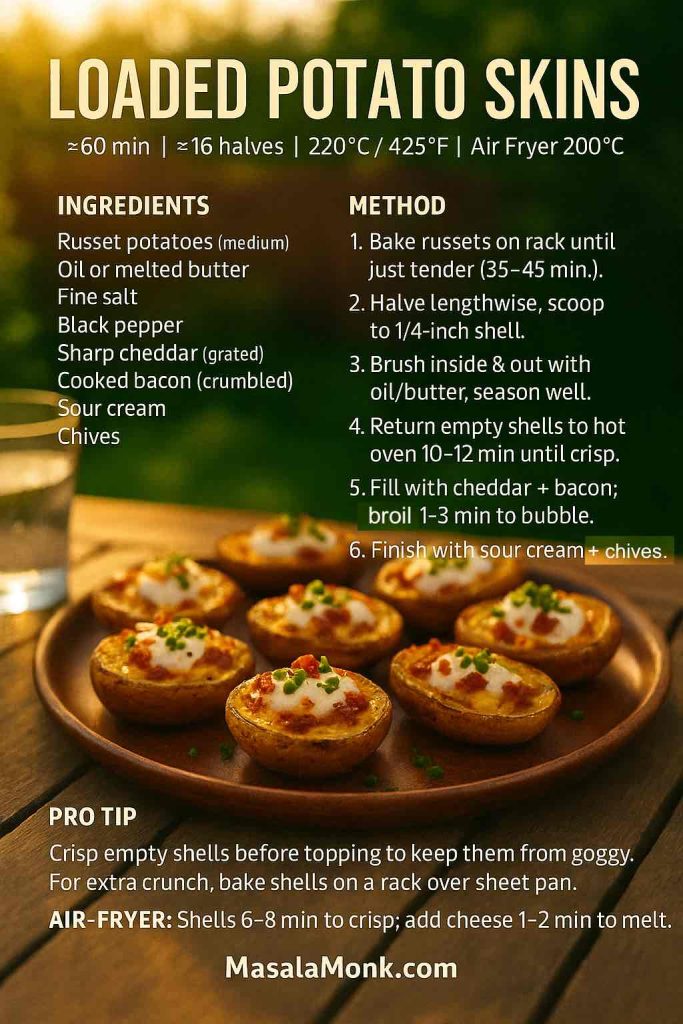
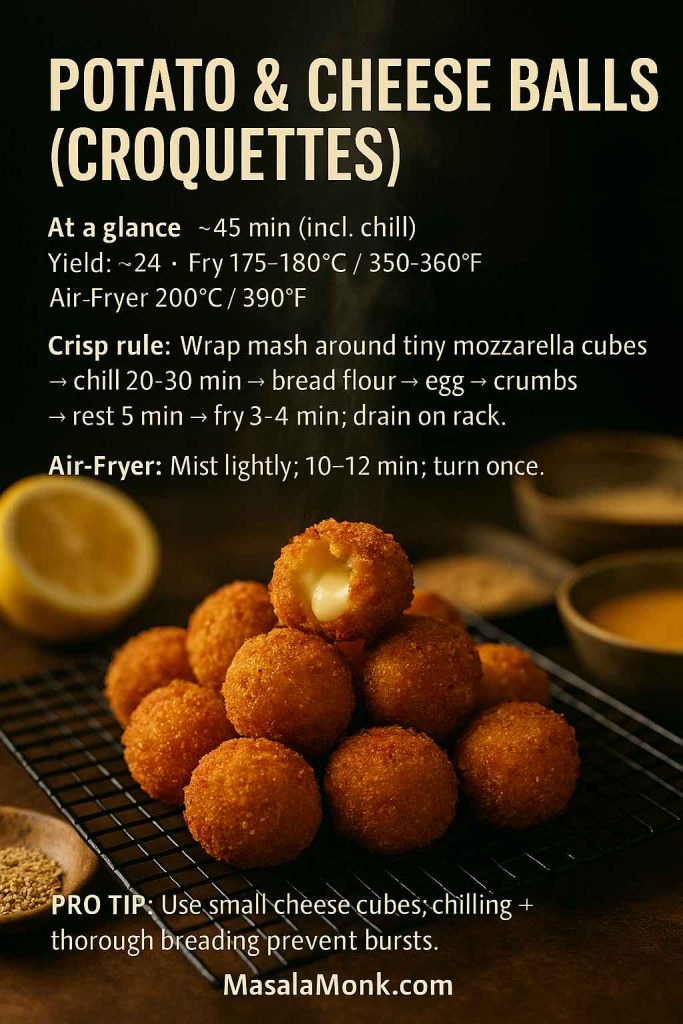
Something hearty on the side. Because the spicy-creamy combo begs for a neutral foil, toss a tray of crisped tubers into the mix; you can swipe them through stray cheese and crumbs between bites. This roundup of potato appetizers is a helpful springboard.

Also Read: Air Fryer Chicken Wings (Super Crispy, No Baking Powder)

Technique Notes You’ll Use For Baked Jalapeño Poppers

Gloves and steam. Always seed jalapeños with gloves if possible; capsaicin sticks to skin. Meanwhile, after baking, let poppers rest 3–5 minutes so steam relaxes into the filling; that short pause prevents molten blowouts.

Rack, not pan. Elevation is everything. A rack allows hot air to circulate and keeps bottoms from stewing in their own juices. If you don’t have one, crumple long coils of foil into “rails” and set peppers on top—janky, yes, but effective.

Thin bacon wins. Because thick slices remain chewy by the time peppers are done, thin-cut bacon is the right call for the oven. If all you have is thick-cut, par-render it briefly on a rack in a hot oven, then wrap and finish on the peppers. For safe handling and storage windows, keep the USDA FSIS bacon guide bookmarked. (USDA FSIS: Bacon & Food Safety)

Breadcrumb restraint. A little panko goes a long way; too much turns the bite into a crust with a pepper attached. Oil the crumbs lightly so they brown instead of drying out. If you’re nerdy about why panko behaves the way it does, this explainer is a quick, satisfying read. (Serious Eats: What to Do With Panko)

Alternate heat sources. If you’re grilling, aim for indirect heat to start; once the pepper softens and the filling bubbles, slide briefly over direct heat to toast the edges. Weber’s popper recipes show timing patterns (often 16–30 minutes total) you can translate to your setup. (Weber: Grilled Jalapeño Poppers; Weber: AU Jalapeño Poppers, 20–30 minutes indirect)

Smoker logic. Smoke likes time, bacon likes heat. Consequently, a two-stage approach—low smoke first, then a hotter finish—gives you both. Traeger’s versions document that climb from 180°F smoke to a 375°F finish until bacon is crisp. (Traeger: Smoked Jalapeño Poppers)

Air-fryer guardrails. Especially on small batches, the basket keeps things weeknight-friendly. Keep space between halves, flip once for bacon, and begin checking early; models run hot or cool by a few degrees. The Kitchn’s recipe lands around 7–10 minutes for plain poppers, and that aligns well with home testing. (The Kitchn: Air Fryer Jalapeño Poppers)

Flavor Tweaks Without Starting Over

Scallion swap. Chives create a softer onion note; minced pickled jalapeños add tang and echo the main pepper without extra heat.

Citrus lift. A micro-grate of lime zest over hot poppers brightens the whole bite; if you’re serving with Jal Jeera or Mango Lemonade, the citrus ties everything together.

Cheese balance. Cream cheese softens heat and prevents greasy leaks; cheddar adds savor and stretch. If you want a stronger punch, swap a little cheddar for smoked gouda or pepper jack, then rein in the salt.

Herb crunch. Minced cilantro and a dusting of toasted panko take the bite from creamy to layered without making it fussy.

Pulled-pork cameo. For a smoker day or a tailgate platter, tuck a teaspoon of pulled pork beneath the cheese; it eats luxurious and leverages leftovers. The inspiration isn’t new, but it’s timeless. (Pulled-Pork Poppers)

Make-Ahead, Leftovers, and Freezer Smarts

Assemble ahead. Filled, unbaked poppers chill beautifully. Cover and refrigerate overnight; bake from cold and add a couple of minutes until the same doneness cues appear. If you sprinkled panko, hold it back until right before baking so it stays perky.

After the party. Cool leftovers, stash airtight, and enjoy within a few days for best quality. When in doubt, reheat on a rack in a hot oven so bottoms crisp again. For freezer logic, the USDA FSIS notes frozen foods remain safe indefinitely, while quality has a practical window; as a reference point, bacon sits comfortably in the 1–2 month range for peak texture. (USDA FSIS: Freezing & Food Safety)

Batch strategy. If you’re cooking multiple trays, rotate pans halfway. Moreover, keep the rack in the middle position to balance top browning with pepper tenderness.

Re-crisp rescue. If bacon lost crunch in the fridge, bring poppers back to life at 425°F for a few minutes on a rack; broil briefly if needed, watching closely.

Also Read: Lemon Drop Martini Recipe (Classic, 3-Ingredient, & More)

When You Want a Show-Stopping Platter

Start with a mountain of baked jalapeño poppers—some plain, some bacon-wrapped. Then, surround them with a few high-contrast sides and sips. Slide in that blue cheese dip for tang, pour a pitcher of Pineapple Mojito Mocktails for brightness, and add a bowl of potato appetizers for an easy, neutral foil. Or, for a more savory-spicy lean, pour tall glasses of Jal Jeera and let the cumin-mint twist do the heavy lifting between bites.

Troubleshooting Baked Jalapeño Poppers

Soggy bacon? Use thinner slices, keep the rack elevated, and finish hot. Alternatively, grill briefly over direct heat right at the end; Weber’s popper recipes show how to move from indirect to direct without flare-ups. (Weber Grilling Inspiration)

Leaky filling? Don’t overfill, and if you’re wrapping, place the seam under the pepper. In addition, a quick 10-minute chill helps the filling set up before baking—a tip baked (pun intended) into many test kitchens’ workflows. (Serious Eats baked poppers)

Too spicy? Remove every last seed and rib; then up the cream cheese and add a drop of honey or a spoon of cooled, mashed potato to the filling—both tame heat without turning the bite into dessert. Finally, pour Mango Lemonade alongside for a sweet-tart buffer.

Not tender yet? Give the peppers 3–5 more minutes; the sweet spot is when the wall yields easily but still holds its shape.

Also Read: 10 Best Chicken Sandwich Recipes (BBQ, Parm, Buffalo & More)


Wrap It Up (and Bake)

Ultimately, baked jalapeño poppers are all about contrasts done right: hot and cool, creamy and crisp, spicy and refreshing. With an oven-first method, a few small tricks (rack, spacing, panko), and dependable timing for both plain and bacon-wrapped jalapeño poppers in oven, you get consistent results without baby-sitting oil. And if you feel like leveling up, you’ve got options: a smoke-then-crisp routine on the pellet grill, a quick detour across hot grates for whisper-char, or an air-fryer sprint for weeknights.

Now, line a tray, grab those peppers, and claim the last popper before someone else does.

FAQs

1) How long to bake jalapeño poppers at 400°F?

At 400°F, baked jalapeno poppers without bacon usually finish in about 20–25 minutes, while bacon-wrapped poppers tend to need 25–30 minutes. Moreover, pull them once the tops are lightly golden, the filling bubbles at the edges, and the peppers feel tender yet hold shape.

2) How long to bake jalapeño poppers at 375°F?

At 375°F, plain poppers generally take 25–30 minutes and bacon-wrapped versions about 30–35 minutes. Additionally, rotate the pan once so color develops evenly across the tray.

3) How long to bake jalapeño poppers at 350°F?

At 350°F, expect a gentler cook: 30–35 minutes for plain and 35–40 minutes for bacon-wrapped. Consequently, if you want extra browning after they’re tender, finish with a brief broil while watching closely.

4) What oven temperature works best for baked jalapeno poppers?

A range of 375–400°F is the sweet spot for consistent results. Notably, 400°F crisps faster, whereas 375°F gives larger peppers and heavy fillings a more even cook.

5) How long to cook jalapeño poppers in the oven overall?

Most trays land between 20 and 35 minutes depending on pepper size, filling volume, and temperature. Ultimately, remove them when the cheese is bubbling and the pepper walls yield to a fork without collapsing.

6) How to keep bacon crisp on bacon-wrapped jalapeño poppers in oven?

Thin-cut bacon and a wire rack make the difference by letting fat render and drip away. Likewise, baking hot on the middle rack and finishing with a short broil locks in snap without overcooking the peppers.

7) How to bake stuffed jalapeños (no bacon) so the filling doesn’t leak?

Keep the filling just proud of the rim rather than mounded, then chill the filled peppers for about ten minutes. Furthermore, a light sprinkle of oiled panko helps the surface set quickly.

8) What’s the best cheese mix for baked jalapeno poppers?

Cream cheese provides body and prevents greasy leaks; sharp cheddar adds savory pull. Conversely, if you want a bolder bite, swap in a little smoked gouda or pepper jack and adjust salt.

9) How long to bake jalapeño poppers with panko on top?

In a 400°F oven, plain poppers with a panko topper usually finish in 20–25 minutes, while bacon-wrapped need roughly 25–30. Additionally, oil the crumbs lightly so they brown instead of drying out.

10) What’s the simplest way to reheat baked jalapeno poppers?

Re-crisp on a rack at 400–425°F for a few minutes until the tops liven up again. Alternatively, avoid microwaving, which softens crust and bacon.

11) How long to bake jalapeño poppers wrapped in bacon at 400°F?

Plan about 25–30 minutes on the middle rack for bacon-wrapped jalapeños. Importantly, thicker bacon may require a minute or two of broil to finish rendering.

12) How long do extra-large jalapeño poppers take?

At 375°F, oversized peppers often need 30–35 minutes; at 400°F, start checking around 25–30. Moreover, test tenderness with a fork and extend time in small increments.

13) What temp to cook bacon-wrapped jalapeños if I want gentle heat?

Choose 375°F for more control over pepper softness and even rendering. Subsequently, if you’d like sharper crisp, raise to 400°F for the final few minutes.

14) How long to cook jalapeño poppers in air fryer (plain and bacon)?

Plain poppers at roughly 370–380°F typically take 8–10 minutes, while bacon-wrapped at about 360–370°F run 10–14 minutes with a flip. Nevertheless, check early because basket crowding and model variance change browning speed.

15) How to cook bacon-wrapped jalapeños in oven without soggy bottoms?

Elevate everything on a wire rack so heat circulates and drips fall away. Similarly, give pieces space; overcrowding traps steam and softens the bacon.

16) How to bake stuffed jalapeños so peppers stay tender, not mushy?

Bake on the middle rack uncovered and stop as soon as a fork slides in with slight resistance. Thereafter, rest a few minutes so steam settles into the filling rather than making the walls limp.

17) How long to bake jalapeño poppers if I’m using thick bacon?

Expect 35 minutes or a touch more at 375°F, depending on thickness. Alternatively, par-render the bacon briefly before wrapping to shorten the final bake.

18) How far ahead can I assemble baked jalapeno poppers?

Assemble up to one day ahead and refrigerate tightly covered. Additionally, bake from cold and add two to three minutes until the same visual cues appear.

19) How long to bake jalapeño popper “casserole” or bake?

In a shallow dish at 375–400°F, estimate about 25–30 minutes until the center bubbles. Afterward, broil briefly for a browned top and rest several minutes so slices hold.

20) What’s the best rack position for even results?

Use the middle rack to balance top browning with pepper tenderness. Similarly, if you’re running multiple trays, rotate positions halfway through.

21) How to cook jalapeños wrapped in bacon on the grill without flare-ups?

Set up indirect heat first and cook until nearly done, then kiss with direct heat to crisp edges. Moreover, keep the seam underneath and use toothpicks sparingly.

22) How long to cook jalapeño poppers in the air fryer when they’re thick and crowded?

Start around 10–14 minutes for bacon-wrapped at 360–370°F but reduce the load for better airflow. Consequently, smaller batches brown more reliably and finish on time.

23) How long to bake jalapeño poppers with bacon bits instead of wrapping?

At 400°F, 20–25 minutes typically does it since there’s no strip to render. Additionally, sprinkle bits over the filling before baking for quick porky flavor.

24) What’s the ideal way to store and re-crisp leftovers?

Cool promptly, refrigerate airtight, and re-crisp on a rack in a hot oven just before serving. Hence, bottoms stay firm and the top regains texture without drying out the pepper.

25) Baked jalapeno poppers: what visual cues mean “done” regardless of time?

Look for bubbling cheese at the edges, lightly golden tops, and pepper walls that are tender but upright. Thus, even if clocks vary, those indicators guarantee the right bite on both plain and bacon-wrapped jalapeño poppers in oven.

Posted on 4 Comments

10 Easy Potato Appetizers: Crispy, Cheesy & Party-Perfect

Cover image for potato appetizers: sweet-potato rounds topped with whipped goat cheese and pecans on a platter, with champagne toasts blurred in the background.

Potatoes are the great equalizer. They delight picky kids and impress seasoned food lovers; they soothe weeknights and energize parties. More importantly, they deliver drama for pennies: shattering edges, buttery interiors, and aromas that make people drift toward the platter. Yet truly memorable potato appetizers don’t happen by accident. Instead, they rely on three repeatable disciplines—dryness, direct heat, and bold finishing—that turn humble spuds into the first tray to disappear.

Why Potato Appetizers Win (Speed, Texture, Crowd-Love)

First, dryness. After boiling or rinsing, water clings to starch. However, a quick steam-dry in a colander (or on a warm sheet pan) drives off surface moisture. Consequently, oil clings, seasoning sticks, and browning starts immediately instead of after a texture-killing wait.

Second, direct heat. A preheated, lightly oiled sheet pan (or a hot grill, or an uncrowded air-fryer basket) mimics restaurant sizzle. Therefore, you get fast contact browning and true crisp edges. Similarly, spacing matters; if pieces touch, they steam. Besides, shaking once mid-cook exposes new sides to hot air and evens color.

Third, bold finishing. Richness loves lift. So, add acid, add herbs, add something cool and bright. A squeeze of lemon on croquettes. A cool dairy dip with bacon-wrapped bites. A tuft of dill on canapés. Moreover, contrast—crisp vs. creamy, hot vs. cool, salty vs. sweet—keeps guests returning to the board of potato appetizers.

Crisp rule (memorize this): Parboil, steam-dry, and cook on a preheated, lightly oiled surface—or air-fry in a single, uncrowded layer. Consequently, edges shatter while centers stay plush.


1) Loaded Potato Skins — The Icon of Potato Appetizers

At a glance — Time: ~60 min • Yield: 16 halves • Oven: 220°C / 425°F • Air fryer: 200°C / 390°F
How to: Bake russets, scoop to a ¼-inch shell, crisp empty shells, then fill and broil.

Intro
Among potato appetizers, loaded skins are nostalgic and—done right—surprisingly elegant. The trick isn’t the topping; it’s the shell. Crisp the empty shell first, then melt the cheese. Consequently, every bite lands hot, crunchy, and creamy at once.

Ingredients
Russet potatoes (medium), butter or neutral oil, fine salt, pepper, sharp cheddar (grated), cooked bacon (crumbled), sour cream, chives.

Loaded potato skins recipe card showing ingredients and 6-step method—crispy shells with cheddar, bacon, sour cream, and chives; oven and air-fryer times.
Crispy Loaded Potato Skins: Game-day friendly—prep and scoop russets ahead, then re-crisp empty shells 10–12 min before guests arrive (or air-fry 6–8 min). Broil to melt cheddar + bacon, and garnish tableside with sour cream and chives for shatter-crisp edges and creamy centers.

Method

  1. Scrub and prick; bake on a rack until just tender (35–45 min).
  2. Halve lengthwise; carefully scoop to a ¼-inch shell.
  3. Brush inside and out with butter/oil; season assertively.
  4. Return empty shells to the oven 10–12 min until glassy-crisp.
  5. Add cheddar and bacon; broil briefly until bubbling.
  6. Finish with sour cream and chives.

Air-Fryer Option
Crisp empty shells 6–8 min; fill; air-fry 1–2 min to melt.

Why This Order Works
Crisping the shell first blocks moisture from seeping back. For bar-style upgrades (including “potato cups”), see Serious Eats’ better potato skins; for smoke, adapt grilled potato skins.

Variations & Swaps
Jalapeño-cheddar; buffalo chicken + blue-cheese drizzle; black beans + corn + scallion + lime.

Make-Ahead & Storage
Bake and scoop shells up to 2 days ahead; keep chilled. Re-crisp, then top. Hold briefly on a low oven rack.

Serve & Pairing
Drizzle or dunk in blue cheese dip; the tang cuts cheddar and bacon without dulling the crunch. If you’re pouring, a bright Lemon Drop Martini resets the palate between bites.


2) Crispy Baby Potato Bites — Crowd-Proof Potato Appetizers

At a glance — Time: 40–50 min • Serves: 6–8 • Oven: 230°C / 450°F • Air fryer: 200°C / 390°F
How to: Parboil → steam-dry → roast on a preheated, oiled tray; add cheese at the end.

Intro
These low-effort, high-glory potato appetizers thrive on dryness and heat. Parboil, steam-dry, and roast on a hot, oiled tray. Then, in the last minutes, shower with parmesan so it fuses into a lacy crust.

Ingredients
Baby potatoes, oil, salt, garlic powder (optional), finely grated parmesan (optional), lemon.

Golden baby potato bites on a dark plate with lemon zest and herbs; minimal recipe card overlay showing time and temps.
Caterer’s trick for even color: after parboil, leave potatoes in the colander 5–10 minutes until the skins look matte; then go onto a preheated, lightly oiled tray. Finish with lemon zest right before plating so the aroma lands at the table.

Method (oven)

  1. Parboil 8–10 min until just tender; drain.
  2. Steam-dry 5 min until surfaces look matte.
  3. Toss with oil, salt, and optional garlic powder.
  4. Preheat an oiled sheet pan; roast 20–25 min, shaking once.
  5. In the final 3–4 min, add parmesan so it melts and crisps.
  6. Finish with lemon zest and a squeeze of juice.

Air-Fryer Option
Single layer; 14–18 min; shake once; cheese in the last 2 min.

Why They Crisp
Dryness + hot contact = fast browning. The same logic powers smashed potatoes—see RecipeTin Eats’ ultra-crispy method.

Variations & Swaps
Lemon-pepper + parsley; Cajun + lime; ranch + chive; peri-peri + a touch of honey.

Make-Ahead & Storage
Parboil ahead; roast to finish just before serving. Re-crisp on a hot tray for 5–7 min if needed.

Serve & Pairing
Keep it simple: lemon wedges at the ready, and a pitcher of watermelon mocktails on ice—clean, cold, and refreshing alongside the crust.


3) Mashed Potato Bites — Mini-Muffin Potato Appetizers

At a glance — Time: 30–35 min • Yield: 24 mini bites • Oven: 200°C / 400°F • Air fryer: 190°C / 375°F
How to: Mix cold mash + egg + cheese, portion into a mini-muffin tin, bake until puffed and bronzed.

Intro
Cold mash is a blank canvas. With egg and cheese, it behaves like soft dough that puffs and bronzes in mini-muffin wells. Consequently, you get crisp rims and creamy centers—without deep-frying. For the base approach, see The Kitchn’s mashed-potato puffs.

Ingredients
Cold mashed potatoes, egg, shredded cheese, chives, black pepper, butter or oil for greasing.

Golden mashed potato bites puffed in a mini-muffin tin with chives; cozy indoor light; minimal recipe card overlay.
Best texture hack: use cold mash, then pack the wells to the rim so the tops dome and the edges crisp. Loosen while warm, rest 2 minutes on a rack, then return to a hot oven for 3–4 minutes to re-crisp before serving.

Method

  1. Mix mash, egg, cheese, chives, and pepper until cohesive.
  2. Grease a mini-muffin tin; pack to the rim.
  3. Bake 18–22 min until bronzed and lightly puffed.
  4. Loosen while warm so rims stay crisp.

Air-Fryer Option
Walnut-sized mounds on a lined basket; 10–12 min, turning once.

Variations & Swaps
Caramelized onions; crisp bacon; roasted corn; finely chopped spinach + nutmeg. Add a spoon of fine breadcrumbs if you want extra structure.

Make-Ahead & Storage
Bake, cool, and refrigerate up to 24 hours; re-crisp 6–8 min in a hot oven.

Serve & Pairing
These are plush, so contrast lightly—chives, lemon, and a grown-up zero-proof lane from lychee mocktails (crisp, floral, not cloying).


4) Smashed Potato Bites — Shatter-Crisp Potato Appetizers

At a glance — Time: ~45 min • Yield: 4–6 servings • Oven: 230°C / 450°F
How to: Boil → steam-drysmash to ½-inch → roast with butter + a little oil.

Intro
When you want “how are these so crispy?” reactions, make smashed bites. Boil; steam-dry; smash thin; roast on a hot, oiled tray. Thus the edges frill like lace while the centers remain plush. For a masterclass, see RecipeTin Eats’ smashed potatoes.

Ingredients
Small waxy potatoes, butter, oil, salt, pepper.

Smashed potato bites with frilly, crisp edges on a hot sheet pan outdoors; lemon wedge and dip in background.
For maximum “lace”: steam-dry until skins wrinkle, then smash to ½-inch on parchment and slide the sheet onto a preheated pan—no sticking, faster browning. Salt as soon as they come out; hold on a wire rack in a low oven so edges stay shattery.

Method

  1. Boil until just tender; drain.
  2. Steam-dry thoroughly so skins wrinkle and surfaces roughen.
  3. Transfer to a hot, oiled tray; smash to ½-inch with a glass.
  4. Brush with butter + oil; season generously.
  5. Roast 20–25 min until undersides are deep gold and edges frill.

Air-Fryer Option
Smash on a board; move carefully to the basket; cook in one layer 12–16 min, turning once.

Variations & Swaps
Luxe: crème fraîche + chive. Bold: chili crisp + scallions. Bright: lemon zest + parsley + olive oil.

Make-Ahead & Storage
Boil and smash earlier; hold covered (not stacked). Roast to finish just before service so edges stay shattery.

Serve & Pairing
Serve while they’re shatter-crisp; a dot of lemon is enough. If you’re pouring, a citrus-forward Lemon Drop Martini works beautifully between bites.


5) Potato-and-Cheese Balls (Croquettes) — Party Croquette Potato Appetizers

At a glance — Time: ~45 min (incl. chill) • Yield: ~24 • Fry: 175–180°C / 350–360°F • Air fryer: 200°C / 390°F
How to: Wrap seasoned mash around tiny mozzarella cubes, chill, bread thoroughly, then fry or air-fry.

Intro
Plush inside, crackly outside, and endlessly adaptable—these croquettes are party catnip. Because the centers turn molten, you need a firm exterior. Therefore, chilling and thorough breading matter most.

Ingredients
Mashed potatoes, salt, pepper, tiny mozzarella cubes (or cheddar), flour, eggs, breadcrumbs, oil.

Golden potato-and-cheese croquettes on a rack, crisp crumb outside and molten cheese center; lemon and herbs nearby.
Burst-proof method: form around tiny cheese cubes, chill 20–30 min, then bread flour → egg → crumbs and rest 5 min so crumbs hydrate. Fry at 175–180°C (oil recovers faster in a Dutch oven). For air-fryer batches, mist lightly and flip once; season while hot. Make-ahead: bread and freeze on a tray; cook from frozen, +1–2 min.

Method

  1. Wrap mash around cheese cubes; roll tight.
  2. Chill 20–30 min so balls set.
  3. Bread: flour → egg → crumbs; rest 5 min to hydrate crumbs.
  4. Fry 3–4 min to deep gold; drain on a rack.

Air-Fryer Option
Mist lightly; cook 10–12 min, turning once.

Variations & Swaps
Cheddar cubes; smoked mozzarella; feta folded into the mash; herbs in the crumb.

Make-Ahead & Storage
Form and bread; freeze on a tray; fry from frozen, adding 1–2 min.

Serve & Pairing
Set croquettes on a warm board and pass lemon wedges; for game-night energy that still reads fresh, shake up watermelon margarita variations.


6) Bacon-Wrapped Potato Bites — Smoky-Savory Potato Appetizers

At a glance — Time: ~40 min • Yield: ~24 pieces • Oven: 220°C / 425°F
How to: Parboil chunks → wrap with ½ slice bacon → bake on a rack over a tray so fat renders.

Intro
Salty-smoky bacon around tender potato is simple, yes, yet irresistible. However, if you bake on a flat tray, bottoms stew. On a rack, fat renders away and edges lacquer instead.

Ingredients
Potato chunks, bacon halves, toothpicks, black pepper, optional maple-chili glaze, lime.

Bacon-wrapped potato bites skewered and sizzling on grill grates with a lime wedge; minimal recipe card overlay.
Render, then lacquer: parboil and pat dry, wrap with ½ slice bacon, and cook elevated (grill grates or a rack over a tray) so fat drains and the bacon crisps. Brush a thin maple-chili glaze in the last 2–3 minutes, rest on a wire rack 3–4 minutes, then finish with cracked pepper and lime.

Method

  1. Parboil chunks; pat completely dry.
  2. Wrap each with half a slice of bacon; secure with a pick.
  3. Arrange on a rack over a tray; roast until mahogany.
  4. Finish with pepper; rest 3–4 min.

Air-Fryer Option
If your basket has a raised grate, cook 12–16 min, turning once.

Variations & Swaps
Brush a thin maple-chili glaze during the last 2–3 min; or keep it simple with pepper + lime.

Make-Ahead & Storage
Parboil and wrap earlier; chill on a rack. Roast just before serving for maximum crisp.

Serve & Pairing
Let the bacon lead, then finish with cracked pepper and lime; for the zero-proof crowd, pour from these low-sugar summer mocktails—cold, bright, and not syrupy.


7) Sweet-Potato Rounds — Color-Forward Potato Appetizers

At a glance — Time: 35–40 min • Yield: ~24 rounds • Oven: 220°C / 425°F
How to: Roast ½-inch rounds → top with whipped goat cheese + pecans + honey → finish with thyme + chili.

Intro
Not every platter should be brown and crunchy. These glossy coins bring color, perfume, and balance. Moreover, their sweet-salty-creamy-crunchy profile resets the palate between heavier potato appetizers. For ratios and presentation cues, see Well Plated’s sweet-potato rounds and Recipe Runner’s goat-cheese bites.

Ingredients
Sweet potatoes, oil, salt, goat cheese, toasted pecans, honey, thyme, chili flakes.

Roasted sweet-potato rounds topped with whipped goat cheese, toasted pecans, thyme and chili, finished with a honey drizzle on a slate platter.
Toast pecans first (5–7 min at 175°C/350°F) so they stay crisp on the creamy topping. For lift, whip the goat cheese with a spoon of yogurt and a pinch of salt, then add a micro-zest of orange right before serving—sweet + acid keeps the bites bright.

Method

  1. Slice into ½-inch rounds; toss with oil and salt.
  2. Roast 18–22 min, flipping once for even caramelization.
  3. Cool briefly; pipe or spoon whipped goat cheese.
  4. Top with pecans; thread on honey; finish with thyme + chili.

Air-Fryer Option
One layer; 12–15 min, turning once.

Variations & Swaps
Whipped feta; walnuts; date syrup; orange zest; microgreens.

Make-Ahead & Storage
Roast rounds; cool and chill. Rewarm briefly; pipe cheese and finish at the last minute.

Serve & Pairing
The goat cheese and honey want something lifted and clean; add a tiny squeeze of orange zest and, if readers ask nutrition questions, point them (once) to sweet-potato benefits & nutrition.


8) Twice-Baked Mini Potatoes — Elegant Potato Appetizers

At a glance — Time: 55–65 min • Yield: ~24 halves • Oven: 200°C / 400°F
How to: Roast → scoop a shallow well → mash centers with sour cream + butter + cheese → rebake.

Intro
These read like tiny jackets with whipped, tangy centers. Because they’re structured, they travel well and hold heat. Additionally, they welcome endless flavor detours and pair seamlessly with other potato appetizers. For a flame-kissed direction (easy to scale to minis), see Serious Eats: grilled, loaded twice-baked potatoes.

Ingredients
Small potatoes, sour cream, butter, sharp cheese, salt, pepper, chives.

For tall, tidy swirls: pass the mash through a ricer, season boldly, then pipe while warm. Brush the peaks with a touch of melted butter before the second bake—faster browning, glossy finish. Hold on a wire rack in a low oven so the bottoms stay dry.

Method

  1. Roast until tender; cool slightly; halve.
  2. Scoop a shallow well; mash centers with sour cream, butter, and cheese; season boldly.
  3. Refill neatly; bake again until peaks brown lightly.
  4. Top with chives.

Air-Fryer Option
If the oven is crowded, set tops in a preheated basket 3–5 min.

Variations & Swaps
Caramelized onions + gruyère; jalapeño + cheddar; harissa + feta + mint. Russets yield fluffier fillings; baby yellows lean creamy.

Make-Ahead & Storage
Assemble to the second bake; chill on a tray; bake to finish right before service.

Serve & Pairing
If dairy comes up in comments, a calm sidebar on sour cream & keto answers it without derailing the recipe.


9) Stuffed Baby Potatoes & Fingerling Canapés — Polished Potato Appetizers

At a glance — Time: ~45 min • Yield: ~30 canapés • Oven: 200°C / 400°F
How to: Roast tiny potatoes → trim a tiny base to stand → scoop a small well → pipe fillings.

Intro
When you want one-bite elegance, make these. They look expensive yet stay simple. Meanwhile, because you control the filling, the flavor can skew Mediterranean, American, or Nordic without changing the base—useful when you’re composing a board of mixed potato appetizers. Prefer a lacy base? Pan-fry bite-size boxty using Serious Eats’ template.

Ingredients
Petite potatoes, oil, salt, dill, lemon zest, sour cream or yogurt, feta, roasted red pepper, olive tapenade, parsley, goat cheese, capers.

Standing baby potatoes and fingerling canapés on a slate platter with three fillings—dill-lemon sour cream, whipped feta with red pepper, and olive tapenade with parsley—minimal recipe card overlay.
For perfect “stand-up” canapés, trim a 2–3 mm base before scooping the well, then pre-crisp empty shells 5–6 min so they don’t weep. Pipe chilled fillings right before serving and finish with a pinch of lemon zest + flaky salt to wake up the potatoes.

Method (shells)

  1. Roast until just tender; cool briefly.
  2. Trim a tiny base so each stands; scoop a small well from the top.
  3. Pipe fillings: dill-sour cream + lemon zest; whipped feta + roasted red pepper; olive tapenade + parsley; herbed goat cheese + capers.

Air-Fryer Option
Crisp the empty shells 5–6 min to “set” them before filling.

Variations & Swaps
For a cold platter, chill shells; spoon in a tangy potato-salad spoonful just before guests arrive.

Make-Ahead & Storage
Prepare shells and fillings separately; keep chilled. Assemble at the last minute so everything looks glossy, not weepy.

Serve & Pairing
Go bright and modern with a mango martini—fruity nose, clean finish, easy to batch for a crowd.


10) Indian Aloo Starters — Aloo Tikki → Chaat (Festival-Style Potato Appetizers)

At a glance — Time: 35–45 min • Yield: 18–24 • Pan or Air fryer: medium-high / 200°C
How to: Mix spiced mash with ginger, chilies, coriander + a bit of cornflour → form patties → pan-fry/air-fry → turn into chaat with chutneys + yogurt + sev.

Intro
This is the show-stopper path: simple spiced patties that transform into chaat with chutneys, yogurt, sev, and onion. Because textures contrast wildly—hot vs. cool, crisp vs. creamy—the plate feels like a mini festival of potato appetizers. For garnish cadence and proportion cues, use Bon Appétit’s aloo tikki as a frame.

Ingredients
Boiled potatoes, grated ginger, chopped green chilies, coriander leaves, garam masala, cumin, chaat masala, salt, cornflour, oil; plus yogurt, tamarind and green chutneys, sev, onion for chaat.

Golden aloo tikki on a brass plate—two plain, two topped as chaat with yogurt, green and tamarind chutneys, sev, onion, and coriander; minimal recipe card overlay.
For chaat that pops: keep yogurt thick (hung or Greek) and layer tamarind → green chutney → yogurt → sev → onion → chaat masala. Salt the tikkis the moment they leave the pan, then plate and finish fast so the sev stays crisp.

Method

  1. Mash potatoes with spices and herbs; season confidently.
  2. Add cornflour; form small patties; chill briefly so edges set.
  3. Pan-fry in shallow oil until deep golden; or brush with oil and air-fry, flipping once.
  4. For chaat, plate hot tikkis; spoon tamarind + green chutneys; add thick yogurt, sev, onion, and a final dusting of chaat masala.

Air-Fryer Option
Lightly oil both sides; cook 10–14 min, turning once; rest 2 min.

Variations & Swaps
Stuff with a pea masala; add beet for color; or swap some potato with sweet potato.

Make-Ahead & Storage
Form patties and chill up to a day. Fry to order. Hold cooked tikki briefly in a low oven.

Serve & Pairing
Because the plate is lively—hot, cool, crisp, creamy—keep drinks crisp and not sweet: digestive-leaning ACV & cranberry mocktails pair surprisingly well.


Smarter Hosting for Potato Appetizers (Make-Ahead, Reheat & Flow)

  • Skins: bake, scoop, and pre-crisp empty shells up to two days ahead; re-crisp 5–7 min, then top and broil.
  • Croquettes: form and bread; freeze on a tray; fry from frozen, adding 1–2 min.
  • Smashed: boil and smash earlier; roast right before serving so edges keep their shatter.
  • Canapés: keep bases and fillings separate; assemble last minute so textures stay lively.
  • Air-fryer juggling: when the oven is full, finish small trays in the air fryer; however, never stack or they’ll steam. Crowding kills crisp; if color stalls, this roundup of common air-fryer mistakes is a fast rescue.

Fast fixes
If skins feel limp, give empty shells more high heat before topping. And if croquettes threaten to burst, chill longer and bread thoroughly. Bites look pale? Raise heat and spread them out. If the air fryer under-browns, add a minute or two and shake once. Therefore, service stays smooth while stress stays low.


Ingredient Notes That Actually Help Potato Appetizers

Potatoes

  • Russet: drier flesh, fluffy interiors—ideal for skins and twice-baked minis.
  • Waxy baby reds or yellows: hold shape—best for bites, smashed, and canapés.
  • Yukon Gold: creamy all-rounder—great for mash-based fillings and croquettes.
    For diet-minded readers, one calm pointer is enough: how potatoes can fit a weight-loss plan—portioning and cooking method matter more than panic.

Cheese
Cheddar for melt and flavor; parmesan for lacy finishes; gruyère for nutty depth; feta or goat cheese for salty brightness; mozzarella for stretch. Additionally, grate fresh—pre-shredded blends often resist quick melt.

Acid & Heat
Balance richness with lemon or lime. Add chili (fresh or flake) or a cool dairy dip for lift. Instead of heavy sauces, offer small bowls so guests tune their own bite of potato appetizers.

Scaling Smart
Double trays; stagger oven times by 10 minutes. As a result, hot food flows without bottlenecks. For board layout sanity, the charcuterie 3-3-3-3 rule keeps things balanced without overbuying.


Conclusion: Small Bites, Big Joy

Ultimately, potato appetizers multiply delight while minimizing effort. Once you lean into dryness and direct heat, the rest becomes play—choose a cheese, pick an herb, add a spark of acid, and finish confidently. Meanwhile, the structure of these recipes lets you prep ahead and still serve crisp food without guarding the oven door. Consequently, the platters return empty, the room gets louder, and you—finally—enjoy your own party.

FAQs

1) What are the best potatoes for potato appetizers (skins, bites, and hors d’oeuvres)?

For crispy shells and fluffy centers, russets win; their drier flesh makes loaded potato skins and twice-baked minis sing. Meanwhile, waxy baby reds or yellows hold shape beautifully for crispy potato bites, smashed bites, and stuffed baby potatoes. Yukon Golds sit happily in the middle—creamy enough for mashed potato bites and croquettes, yet sturdy enough for pan work.

2) How do I keep potato skins extra crisp and not soggy?

First, bake whole potatoes until just tender. Then, scoop to a ¼-inch shell, brush inside and out with oil or butter, and—crucially—re-crisp the empty shells before filling. Consequently, moisture won’t creep back in, and the final broil merely melts cheese instead of steaming the shell.

3) Oven vs. air fryer: which method is best for potato appetizers?

Both shine, but differently. The oven handles big trays and yields even browning; the air fryer delivers fast, concentrated heat for small batches. Therefore, use the oven for parties and the air fryer when you want a quick round of baked potato bites or air-fryer potato appetizers before guests arrive.

4) What temperatures and times should I start with (so I don’t guess)?

As a starting grid:

  • Loaded potato skins: 220°C / 425°F until tender; re-crisp shells 10–12 minutes; broil to finish.
  • Crispy potato bites: 230°C / 450°F for 20–25 minutes; shake once.
  • Smashed potato bites: 230°C / 450°F for 20–25 minutes after smashing thin.
  • Mashed potato bites (mini muffin): 200°C / 400°F for 18–22 minutes.
  • Croquettes: fry at 175–180°C / 350–360°F for 3–4 minutes.
    Adjust by a few minutes for size and spacing; if color stalls, spread pieces out.

5) How do I adapt these potato appetizers for the air fryer?

Go single-layer, preheat if your model suggests it, and avoid crowding. Generally: bites 14–18 minutes at ~200°C / 390°F; smashed 12–16 minutes; mashed-bite mounds 10–12 minutes; skins 6–8 minutes to crisp shells, then 1–2 minutes after topping. Shake once mid-cook and, moreover, add cheese in the final 1–2 minutes so it melts without over-browning.

6) Can I make potato appetizers ahead for a party?

Absolutely. Bake and scoop skins a day or two ahead, then re-crisp just before service. Boil and smash smashed bites in advance; roast to finish right before serving. Form and bread croquettes earlier and freeze; fry from frozen, adding 1–2 minutes. As a result, you get hot platters with almost no last-minute stress.

7) What’s the secret to truly crispy potato bites?

Dryness + direct heat. After parboiling, let potatoes steam-dry until surfaces turn matte. Next, roast on a preheated, lightly oiled tray (or a hot air-fryer basket) with room to breathe. Finally, season assertively; salt draws out a touch of moisture and helps browning, while a last-minute sprinkle of finely grated hard cheese creates a lacy crust.

8) How do I prevent croquettes, cheese balls, or potato and cheese balls from bursting?

Chill the formed balls so they firm up, bread thoroughly (flour → egg → crumbs), and rest 5 minutes so crumbs hydrate. Fry hot enough to set the crust quickly, but not so hot the outside browns before the center warms. Similarly, tiny cheese cubes inside behave better than large ones.

9) What about sweet potato appetizers—any quick rules?

Because sweet potatoes run moister and sweeter, slice thicker (about ½-inch) for rounds and roast hot for caramelized edges. Pair with salty, tangy toppings—goat cheese, feta, herbs, citrus—to balance sweetness. Consequently, sweet potato bites feel bright and modern, not dessert-like.

10) Which cheeses melt best for cheesy potato bites and skins?

Sharp cheddar melts smoothly and tastes assertive. Parmesan turns lacy and crisp in the final minutes. Gruyère adds nutty depth; mozzarella brings stretch but needs salt and acid for balance. For twice-baked minis, a mix (cheddar + a little parmesan) gives both flavor and texture.

11) What are easy vegetarian or gluten-free swaps for potato hors d’oeuvres?

Skip bacon and lean on smoked paprika, roasted peppers, or crisped mushrooms for savory depth. Most recipes are naturally gluten-free if you avoid breadcrumbs; for croquettes, use gluten-free crumbs or a thin rice-flour coating. Likewise, plant-based yogurt or cashew cream can stand in for sour cream on canapés.

12) Can I freeze any of these potato appetizers?

Yes—especially croquettes and mashed potato bites. Freeze in a single layer until firm, then bag. Bake/fry from frozen, adding a minute or two. As for loaded potato skins, freeze the empty, pre-crisped shells; thaw briefly, re-crisp, fill, and broil.

13) How many pieces per person should I plan for party potato appetizers?

For a spread with multiple items, plan 3–4 pieces per person per hour—more at the start, fewer later. For a game-day or all-apps party, scale to 6–8 pieces per person total, mixing rich bites (skins, croquettes) with lighter or zesty options (smashed bites with lemon, sweet-potato rounds).

14) What are smart seasoning lanes that always work?

Go “bright and salty”: lemon zest, parsley, and olive oil. Or “spicy and cool”: chili flakes plus a creamy element on the side. Alternatively, try “herby and nutty”: dill, chive, and a dusting of parmesan. Meanwhile, a squeeze of citrus just before plating wakes up every one of these potato appetizers.

15) My air-fryer potato appetizers aren’t browning—what now?

First, reduce the load and cook in two rounds; crowding traps steam. Next, pat drier and add a teaspoon more oil to help conduction. Finally, raise the temperature slightly or extend 1–3 minutes. Therefore, you’ll get color without overcooking the centers.

16) Which dips pair well (besides the usual suspects) with appetizers made with potatoes?

Think “contrast, not camouflage.” Blue cheese dip adds tangy punch to loaded potato skins and bacon-wrapped bites. A lemony yogurt or thin sour-cream sauce lifts smashed potato bites and twice-baked minis. For sweet potato hors d’oeuvres, go clean—whipped feta or light goat cheese with herbs.

17) Any quick plating tips so my potato party snacks look premium?

Yes—group by texture and temperature. Put hot-and-crisp items together so aromas stack; nearby, set warm-and-creamy bites for contrast. Add a color break with sweet-potato rounds. Garnish sparingly: chives, dill, thin radish slices, and lemon wedges. Consequently, your board looks intentional, not crowded.

18) How do I keep baked potato appetizers hot without losing crunch?

Use a low oven (90–100°C / 200–210°F) and a wire rack so air circulates under the pieces. Instead of holding for long stretches, serve in waves—small trays every 10–15 minutes. As a result, guests always meet crisp edges and creamy centers.

19) What’s the simplest way to turn leftovers into tomorrow’s potato appetizer bites?

Chill leftover mash, fold in an egg and a little grated cheese, then portion into a mini-muffin tin and bake until puffed. Alternatively, form patties and pan-sear for quick mashed potato bites. Meanwhile, leftover skins re-crisp beautifully; refill with whatever cheese or veg you have.

20) Lastly, what are the biggest mistakes to avoid with easy potato appetizer recipes?

Overcrowding trays, skipping the steam-dry step, and adding cheese too early (it over-browns before the potatoes crisp). Also, scooping skins too thick (they eat heavy) or too thin (they collapse). Fix these, and—therefore—your potato appetizers will reliably steal the show.

Posted on 1 Comment

Cheese Balls: 5 Irresistible Indian-Inspired Variations

Indian-Inspired CHEESE BALLS

Cheese balls are the perfect bite-sized indulgence, combining creamy cheese with crispy exteriors and irresistible flavor. While cheese balls are a global favorite, the Indian kitchen brings a flavorful twist to this beloved snack. Whether you’re planning a party, preparing a weekend treat, or looking for a quick yet satisfying appetizer, these Indian-inspired cheese ball recipes have something for everyone.

In this blog, we explore five standout variations that marry the comforting taste of cheese with the bold, diverse flavors of Indian cuisine. Let’s dive right in.


1. Masala Cheese Balls

Flavor Profile:

Spicy, tangy, and aromatic

Why It Works:

These are an elevated version of the classic cheese balls with a desi punch. Think of it as aloo tikki meets molten cheese.

Ingredients:

  • 1 cup grated processed cheese
  • 2 medium boiled potatoes (mashed)
  • 1 tsp red chili powder
  • ½ tsp garam masala
  • ½ tsp chaat masala
  • 1 tbsp chopped coriander
  • 1 chopped green chili
  • Salt to taste
  • Cornflour (for binding)
  • Bread crumbs (for coating)
  • Oil (for deep frying)

Preparation:

  1. In a mixing bowl, combine mashed potatoes, cheese, spices, coriander, and green chili.
  2. Add cornflour to form a soft, pliable dough.
  3. Shape into small balls and roll in breadcrumbs.
  4. Chill for 15 minutes to firm up.
  5. Deep-fry until golden and crispy.

Serving Tip:

Serve hot with green chutney or a tangy tamarind dip.


2. Paneer & Spinach Cheese Balls

Flavor Profile:

Earthy, creamy, and subtly spiced

Why It Works:

This healthier option uses spinach and paneer, making it rich in protein and iron while still being indulgent.

Ingredients:

  • 1 cup grated paneer
  • ½ cup grated cheese
  • 1 cup finely chopped blanched spinach
  • ½ tsp cumin powder
  • 1 tsp ginger-garlic paste
  • Salt and pepper to taste
  • 1 tbsp cornflour
  • Bread crumbs
  • Oil (for shallow frying)

Preparation:

  1. Squeeze out excess water from spinach.
  2. Mix paneer, cheese, spinach, spices, and cornflour.
  3. Shape into small balls and roll in breadcrumbs.
  4. Pan-fry or air-fry until golden.

Serving Tip:

Pair with yogurt-mint dip or serve on a skewer for a canapé-style appetizer.


3. Schezwan Cheese Balls

Flavor Profile:

Spicy, umami, and Indo-Chinese

Why It Works:

If you love spice and fusion, this one’s for you. Schezwan sauce adds a fiery depth that balances the creamy cheese.

Ingredients:

  • ½ cup grated mozzarella
  • ½ cup chopped bell peppers and spring onions
  • 2 tbsp Schezwan sauce
  • 1 tsp soy sauce
  • 2 tbsp cornflour
  • Salt to taste
  • Bread crumbs

Preparation:

  1. Combine all ingredients to form a dough.
  2. Shape into balls, coat in breadcrumbs.
  3. Deep-fry or air-fry for 8–10 minutes.

Serving Tip:

Serve with extra schezwan sauce or chili mayo for dipping.


4. Tandoori Cheese Balls

Flavor Profile:

Smoky, spiced, and bold

Why It Works:

Bringing in the magic of tandoori masala, this version captures that smoky restaurant-style flavor in a compact snack.

Ingredients:

  • ½ cup paneer, crumbled
  • ½ cup grated cheese
  • 2 tbsp thick yogurt (hung curd preferred)
  • 1 tsp tandoori masala
  • ½ tsp kasuri methi
  • ½ tsp chili powder
  • Salt to taste
  • Semolina or bread crumbs

Preparation:

  1. Marinate the paneer and cheese with yogurt and spices.
  2. Shape into balls and coat with semolina or breadcrumbs.
  3. Shallow-fry or bake until golden.

Serving Tip:

Garnish with onion rings, mint chutney, and lemon wedges.


5. Aloo-Makhani Cheese Balls

Flavor Profile:

Rich, buttery, and luxurious

Why It Works:

Inspired by the iconic makhani (butter) sauce, this version is indulgent and flavor-packed.

Ingredients:

  • 1 cup mashed potatoes
  • Cheese cubes (for stuffing)
  • ½ cup makhani gravy (can be store-bought or homemade)
  • Salt, garam masala, and kasuri methi
  • Cornflour for binding
  • Bread crumbs for coating

Preparation:

  1. Mix mashed potatoes with spices and a spoonful of makhani gravy.
  2. Encase cheese cubes within the mixture and shape into balls.
  3. Coat with breadcrumbs and fry until golden.
  4. Warm remaining makhani sauce for serving.

Serving Tip:

Serve on a platter with a spoonful of makhani sauce under each ball. Garnish with coriander and cream.


Final Thoughts

Cheese balls are more than just party snacks—they can be canvases for creativity. These five Indian-inspired variations offer options for every taste and occasion. Whether you’re going for spicy, healthy, indulgent, or fusion, there’s a version here that will wow your guests and satisfy your cravings.

Ready to try these at home? Let us know which one stole your heart. And if you have a twist of your own, share it in the comments—we’d love to feature it in a future post!

FAQs

1. Can I make these cheese balls ahead of time?
Yes, you can shape and coat the cheese balls, then refrigerate them for up to 24 hours. For longer storage, freeze them uncooked and fry directly from frozen when needed.

2. What is the best cheese to use for Indian-style cheese balls?
Processed cheese, mozzarella, or a mix of mozzarella and cheddar works best. Paneer is also ideal when used in combination for Indian flavors.

3. How do I prevent cheese balls from breaking while frying?
Ensure the dough is firm and not too moist. Chill the shaped balls before frying and avoid overcrowding the pan. Double-coating with breadcrumbs helps too.

4. Can I bake or air-fry these instead of deep frying?
Absolutely. Brush with oil and bake at 200°C (392°F) for 15–20 minutes or air-fry at 180°C (356°F) for 10–12 minutes, flipping halfway.

5. Are these cheese balls gluten-free?
Some versions can be made gluten-free by using gram flour (besan) and gluten-free breadcrumbs. Avoid maida (all-purpose flour) if you need a gluten-free recipe.

6. What are good vegetarian substitutes for eggs in the coating?
Use a slurry of cornflour and water or all-purpose flour and water for binding and coating. These help the breadcrumbs stick just like egg wash.

7. Can I make these cheese balls spicy or mild?
Yes, you can adjust the spice level easily. Skip green chilies and reduce chili powder for mild versions, or add chili flakes and spicy sauces for a kick.

8. What sauces or dips go best with these cheese balls?
Indian green chutney, mint yogurt dip, tamarind chutney, schezwan sauce, or even spicy mayo all work well depending on the variation.

9. How can I stuff the cheese balls without the cheese leaking out?
Make sure the outer potato or paneer layer is thick enough to fully seal the cheese cube. Chilling them before frying helps keep the stuffing intact.

10. Can I reuse leftover makhani gravy or sabzis for any variation?
Yes! Leftover makhani gravy is perfect for the Aloo-Makhani balls. Leftover dry sabzis like aloo-matar can also be mashed and repurposed into the mix.