There’s something quietly satisfying about a slow cooker dinner. You season, you layer, you set the lid, and then you go live your life while the kitchen slowly turns itself into the coziest room in the house. Slow cooker pork tenderloin fits that rhythm beautifully—provided you treat it like the lean, quick-cooking cut it is.
That’s the part that surprises people. A tenderloin sounds like it should love long, lazy cooking. However, because it’s so lean, it doesn’t have the same built-in cushion that pork shoulder has. In other words, slow cooking pork tenderloin works best when you’re aiming for a clear endpoint: juicy and sliceable at one temperature, or shreddable at a higher one. Once you cook to that endpoint, the rest becomes wonderfully flexible.
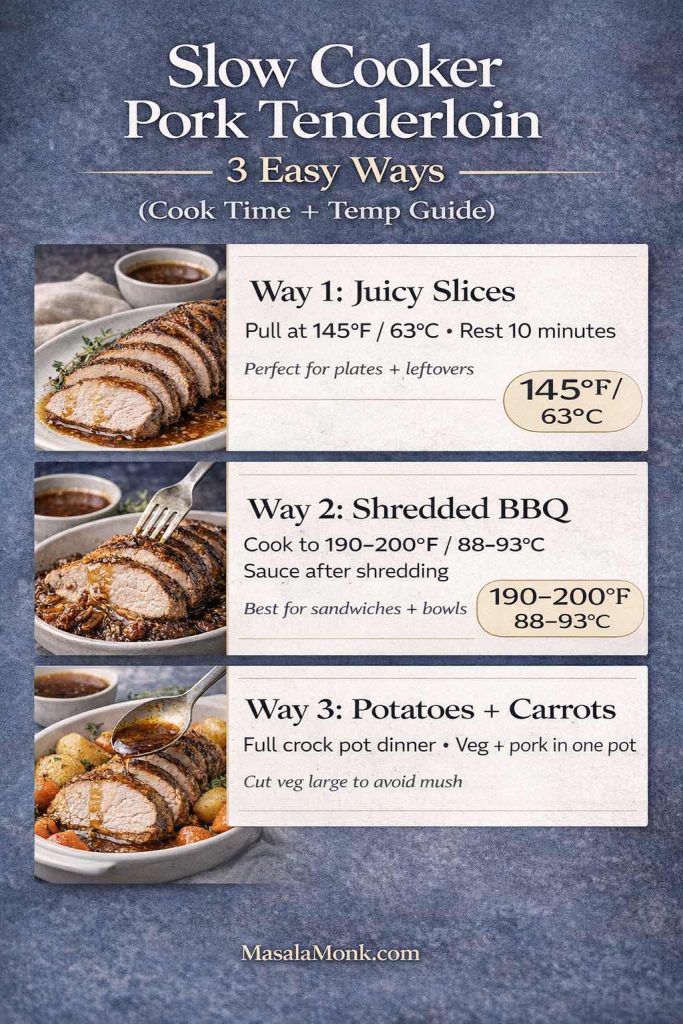
So this is a full guide to slow cooker pork tenderloin with three dependable recipes or “ways”:
- a classic sliceable version with glossy juices you can spoon over every slice
- a shredded, pulled-style BBQ version that turns into sandwiches, bowls, and sliders
- a complete one-pot meal with potatoes and carrots that feels like comfort food without extra pans
Along the way, you’ll also get the cooking time for pork tenderloin in slow cooker on LOW vs HIGH, the temperature targets that keep it juicy, and plenty of flavorful serving variations—because once you nail the method, you’ll want to use it often.
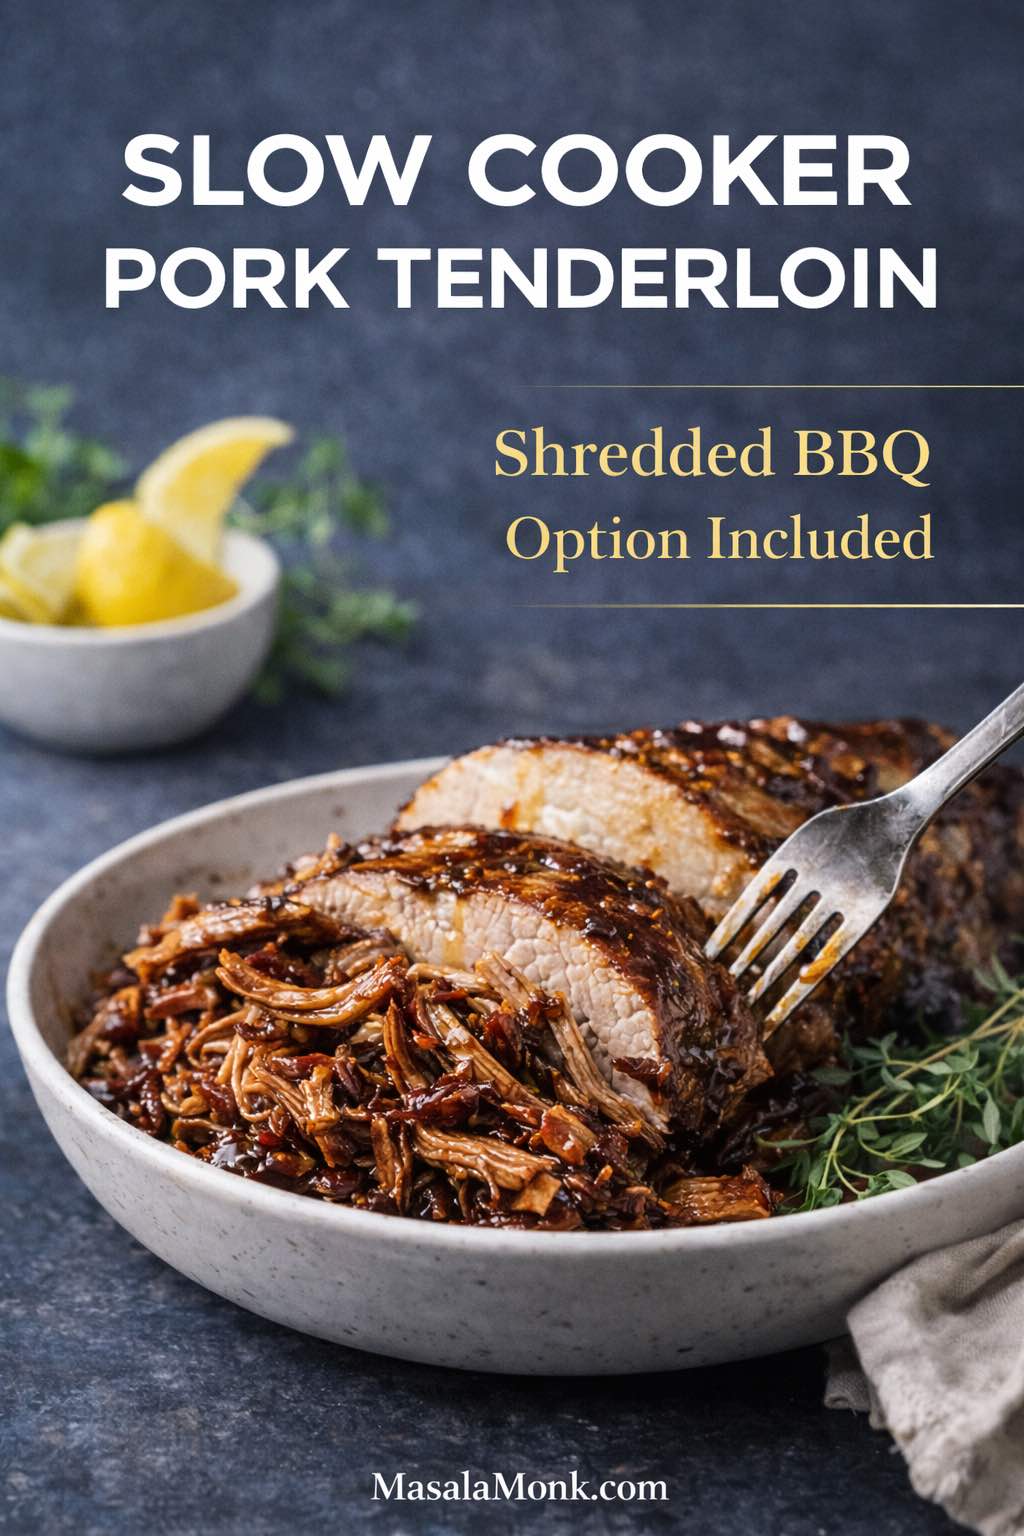
Slow Cooker Pork Tenderloin vs Pork Loin (Don’t Swap Cook Times)
Before you unwrap anything, it helps to confirm what you bought. Pork tenderloin and pork loin get confused constantly, and the slow cooker is where that mix-up can wreck dinner.
Pork tenderloin is long, narrow, and very lean. It cooks quickly and turns tender without needing hours upon hours. Pork loin is wider, often heavier, and typically needs more time to soften—especially if you’re trying to shred it.
Consequently, pork tenderloin in a slow cooker works best when you treat time as a guideline and temperature as your finish line. That shift—temperature over hours—keeps you out of the “dry but tender” zone.
If you cook tenderloin in other ways too and want a helpful comparison for texture and slicing, this guide on pork tenderloin in the oven is a great companion. It helps anchor your instincts: what tenderloin feels like when it’s juicy, how resting changes everything, and why “just a little longer” can be the wrong move.
Also Read: Chicken Pesto Pasta (Easy Base Recipe + Creamy, One-Pot, Baked & More)
Why Slow Cooker Pork Tenderloin Works (And When It Doesn’t)
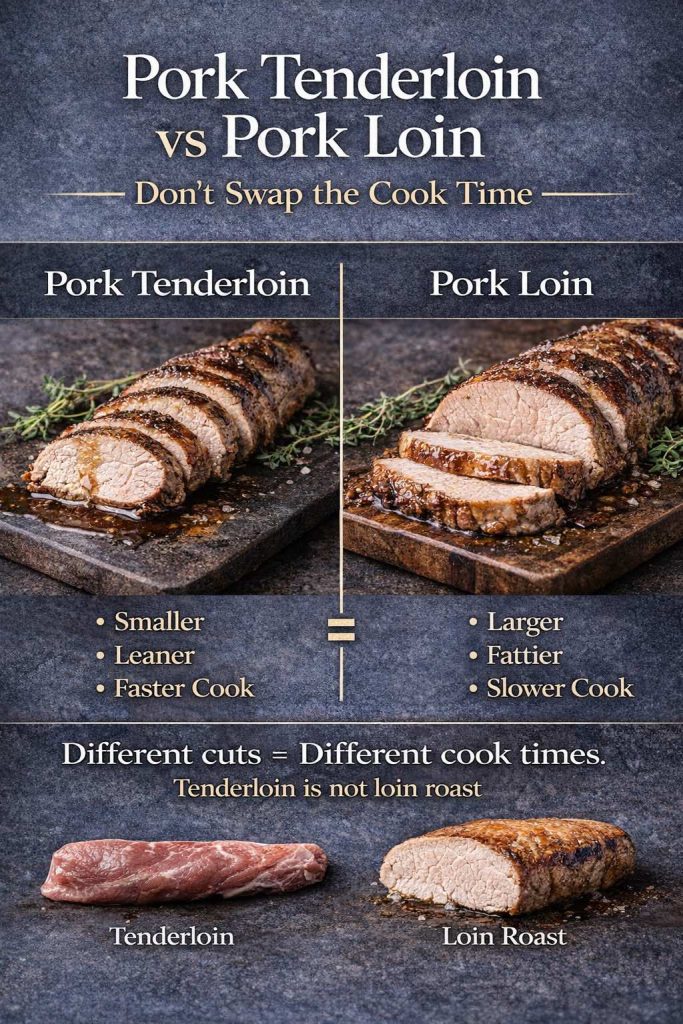
Slow cookers excel at gentle, even heat. That’s why they’re great for soups, stews, and braises. At the same time, their superpower—steady heat over time—can become the very thing that dries out tenderloin if you leave it too long.
Here’s the good news: you don’t need fancy tricks. You simply need a structure.
- For sliceable pork tenderloin crock pot style, you cook to a safe, juicy temperature, then rest and slice.
- For slow cooker pork tenderloin shredded, you keep cooking until it pulls apart, then you sauce it so the meat stays flavorful and lush.
Once you use that structure, this becomes an “I can do this any week” meal. Moreover, it’s incredibly adaptable—BBQ one night, herb-bright the next, potatoes and carrots on a Sunday when you want a full pot of comfort.
Also Read: How to Make a Flax Egg (Recipe & Ratio for Vegan Baking)
Ingredients for Slow Cooker Pork Tenderloin (Crock Pot Base)
This base is designed to taste complete on its own while still leaving you room to pivot into BBQ or a hearty vegetable version.
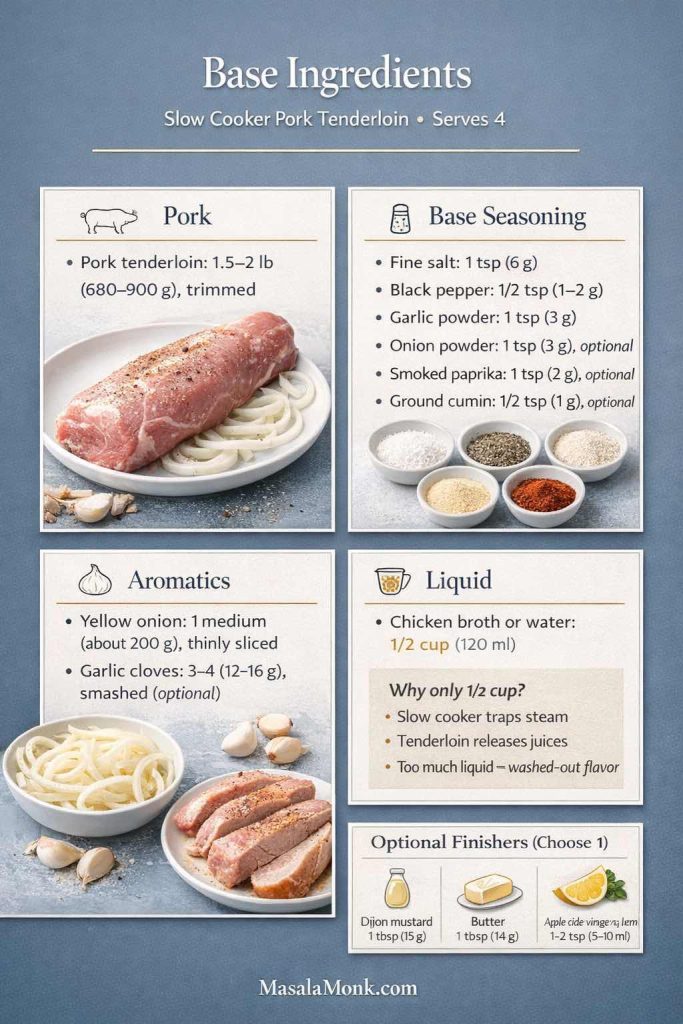
Base ingredients for recipe (serves 4)
- Pork tenderloin: 1.5–2 lb (680–900 g), trimmed
- Fine salt: 1 tsp (6 g)
- Black pepper: 1/2 tsp (1–2 g)
- Garlic powder: 1 tsp (3 g)
- Onion powder: 1 tsp (3 g), optional but excellent
- Smoked paprika: 1 tsp (2 g), optional (especially good for BBQ direction)
- Ground cumin: 1/2 tsp (1 g), optional (adds warmth without taking over)
- Yellow onion: 1 medium (about 200 g), thinly sliced
- Garlic cloves: 3–4 (12–16 g), smashed (optional)
- Liquid: 1/2 cup (120 ml) chicken broth or water
Why the liquid is modest for Slow Cooker Pork Tenderloin
Slow cookers trap steam, so liquid doesn’t reduce the way it would on a stovetop. In addition, pork tenderloin releases its own juices as it cooks. Therefore, a modest amount—about 1/2 cup (120 ml)—creates a flavorful, concentrated pot of juices without washing out the seasoning.
Optional finishers (choose one later)
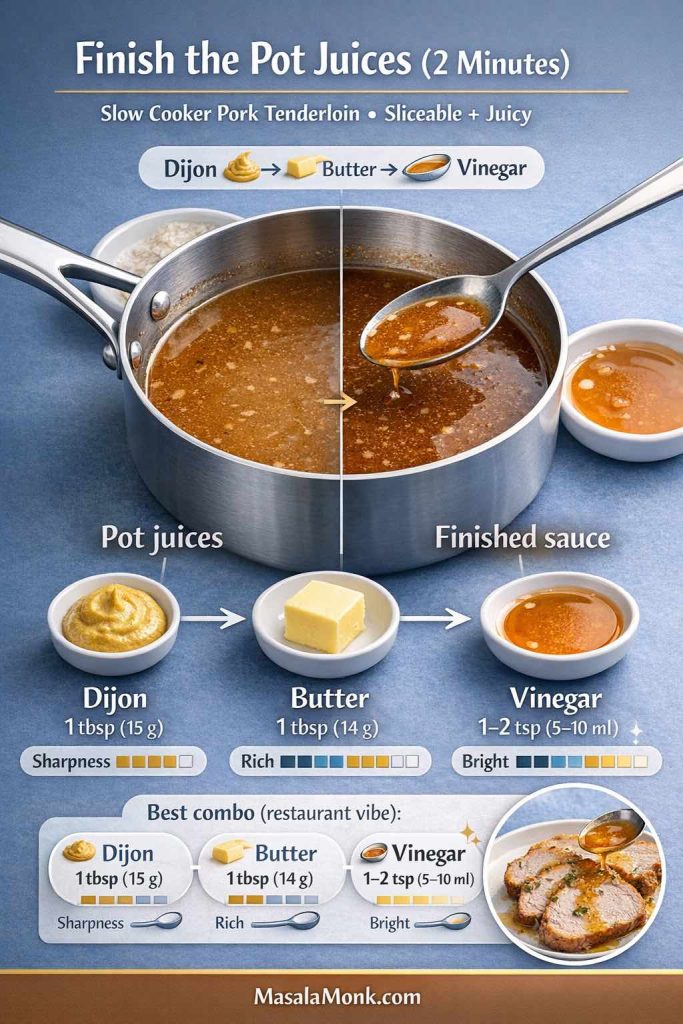
- Dijon mustard: 1 tbsp (15 g)
- Butter: 1 tbsp (14 g)
- Apple cider vinegar or lemon juice: 1–2 tsp (5–10 ml), to taste
Those “small” finishers add up to a bigger, brighter flavor at the end—especially if you’re serving slices.
Also Read: Croquettes Recipe: One Master Method + 10 Popular Variations
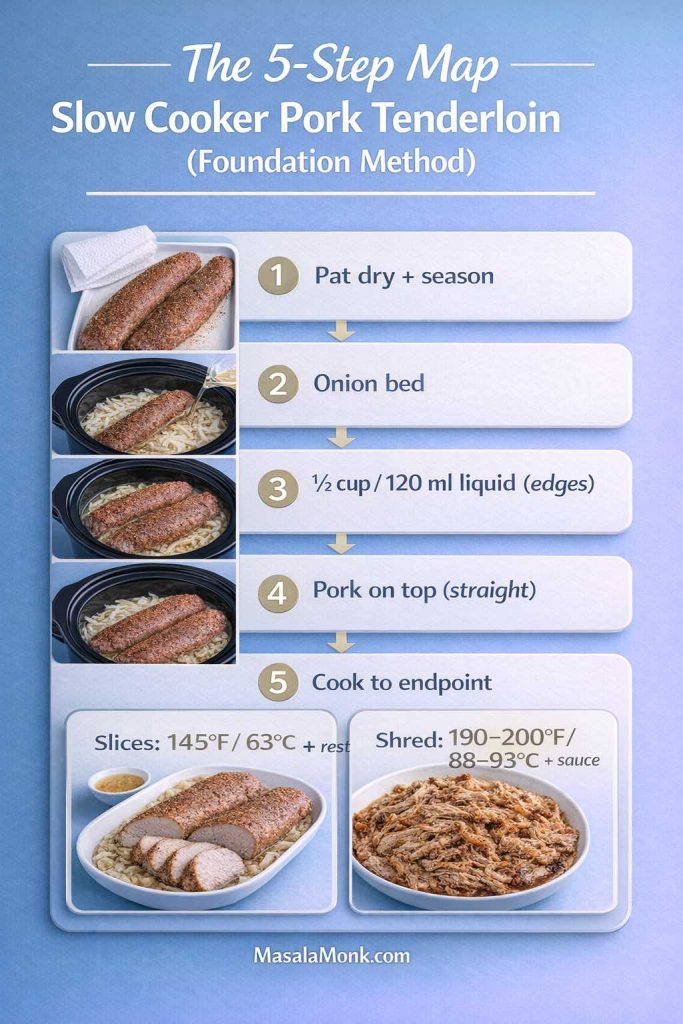
How to Cook Pork Tenderloin in a Slow Cooker (Step-by-Step Recipe)
This method is the foundation for all three ways. It’s also the simplest path to easy pork tenderloin in slow cooker form—juicy, flavorful, and dependable.
1) Season with intention
Pat the tenderloin dry with paper towels, then season evenly with salt, pepper, garlic powder, and any optional spices you’re using. Rub gently so the seasoning adheres.
Drying the surface might seem fussy, yet it helps in two ways: the rub sticks better, and the outer layer doesn’t steam quite as quickly.

2) Build a flavor bed
Lay the sliced onion (and smashed garlic, if using) in the bottom of the crock pot. The onions soften into the cooking liquid and bring a mellow sweetness that makes the pork taste fuller.
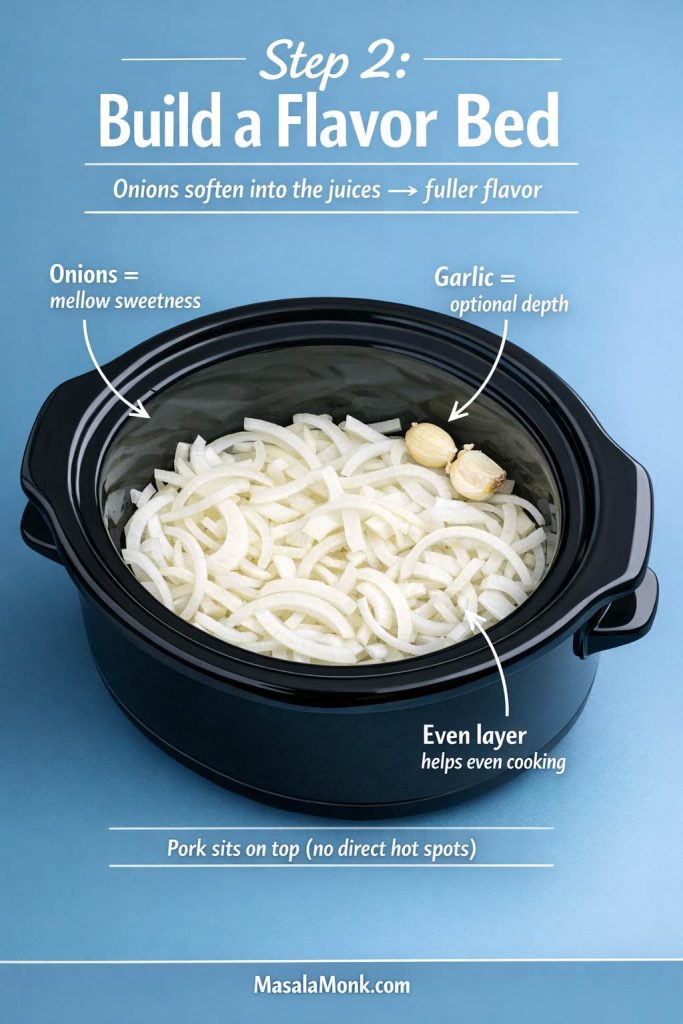
3) Add liquid around the edges
Pour 1/2 cup (120 ml) broth or water into the pot. Try to pour around the onions so you don’t rinse all the seasoning off the pork when you set it in.

4) Place the pork tenderloin on top in a slow cooker
Lay the tenderloin over the onions. Keep it as straight as possible so it cooks evenly.

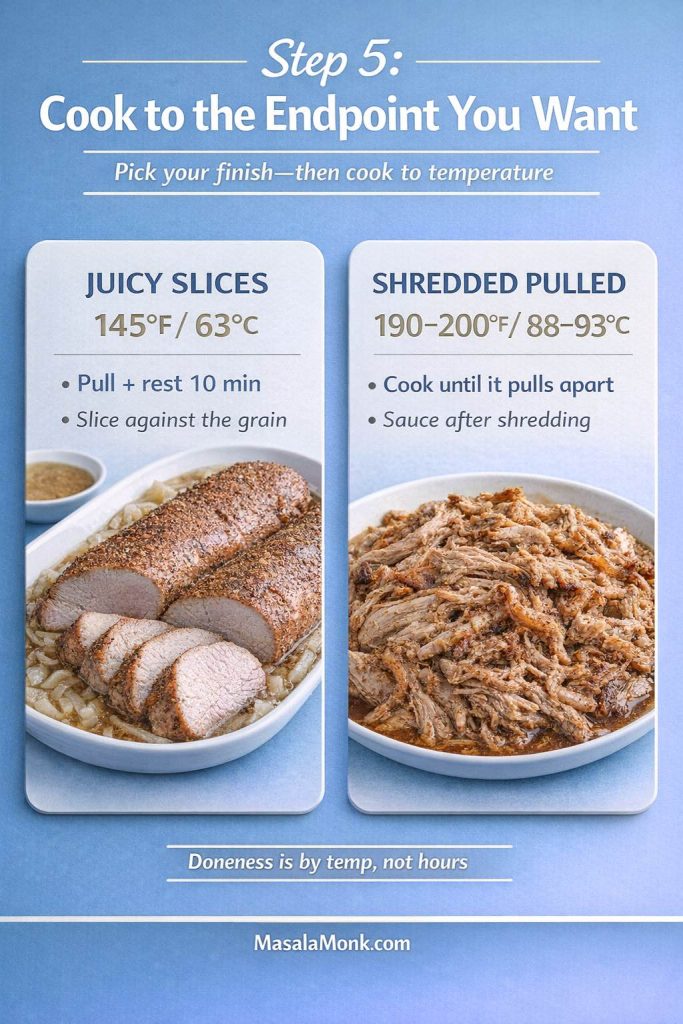
5) Cook to the endpoint you want
Now you choose the track:
- For sliceable slow cooker pork tenderloin, you stop at the juicy temperature and rest.
- For pulled pork from pork tenderloin in crock pot style, you keep cooking until it shreds easily, then you sauce it.
Should you sear pork tenderloin before putting it in slow cooker?
You can, though you don’t have to.
- If you have 5–7 minutes and want extra depth, sear in a hot skillet with a little oil: 60–90 seconds per side.
- If you’re going for “dump and go,” skip it. The seasonings, onions, and finishing steps still deliver.
Either route works. The difference is flavor nuance, not success versus failure.
A quick, trustworthy safety anchor
Slow cookers are safe and practical when used correctly. If you want a clear reference for safe handling and slow cooker practices, the USDA’s guide on slow cookers and food safety is a good citation to keep the method grounded.
Also Read: Ravioli Recipe Reinvented: 5 Indian-Inspired Twists on the Italian Classic
Cooking Time for Pork Tenderloin in Slow Cooker (LOW vs HIGH)
Cook time varies by thickness, slow cooker model, and whether the tenderloin started fridge-cold. Still, these ranges are practical starting points—especially if you pair them with a thermometer.

Temperature targets that keep it juicy
For sliceable tenderloin, the USDA lists 145°F / 63°C as the safe minimum internal temperature for whole cuts of pork, followed by a rest. You can cite their safe temperature chart right where you explain this.
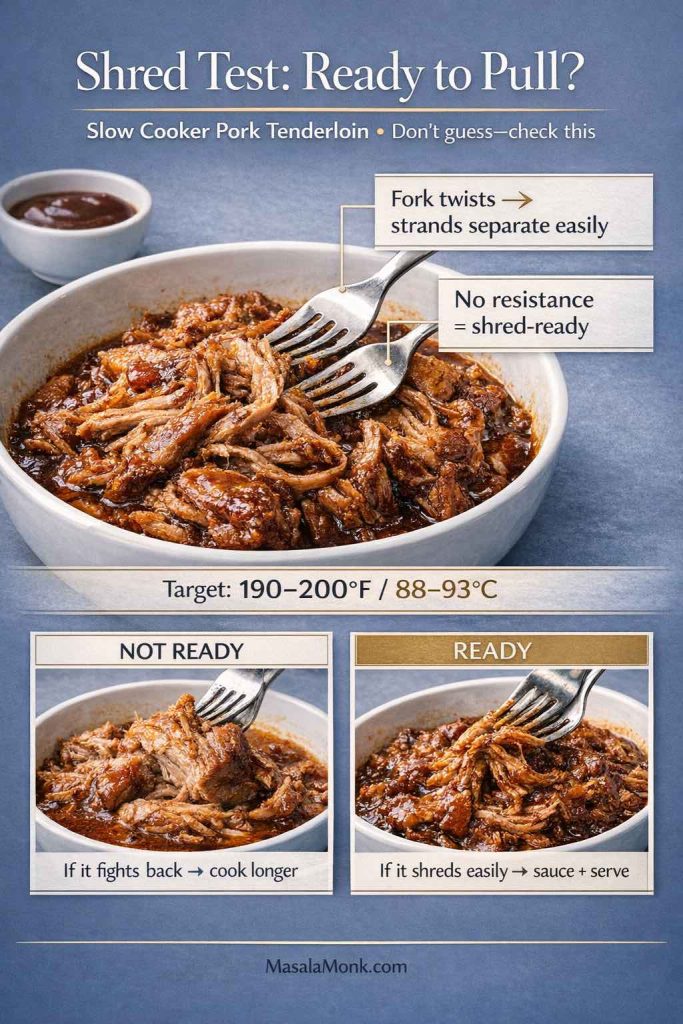
For shreddable tenderloin (pulled-style), you’re aiming for tenderness more than a single number, yet it usually lands around:
- 190–200°F / 88–93°C
Typical timing ranges (1.5–2 lb / 680–900 g tenderloin)
- LOW: 2.5–4 hours
- HIGH: 1.5–2.5 hours
Because models vary, start checking earlier than you think—particularly on HIGH. That early check is what keeps “juicy” from becoming “a little dry.”
Can you overcook pork tenderloin in a crock pot?
Yes, and it happens quietly. Tenderloin doesn’t have the fat cushion of shoulder. Once it sits past the ideal sliceable endpoint, moisture squeezes out. It may still be tender, yet the slices can taste dry.
Fortunately, there’s an easy rescue: if you overshoot the sliceable window, shift gears and shred it into a saucy version. Sauce won’t recreate lost moisture, but it can make the final dish far more enjoyable.
Also Read: Fish and Chips Reimagined: 5 Indian Twists (Recipe + Method)
Way 1: Classic Slow Cooker Pork Tenderloin (Sliceable + Juicy Recipe)
This is the version you make for neat slices, glossy pan juices, and a dinner plate that looks like you tried harder than you did. It also sets you up for easy leftovers—sandwiches, grain bowls, and quick reheats that still taste like dinner.
Ingredients (Way 1)
Base ingredients, plus one optional finisher:
- Dijon mustard: 1 tbsp (15 g)
or - Butter: 1 tbsp (14 g)
optional brightener: apple cider vinegar 1–2 tsp (5–10 ml)
Steps (Way 1)
- Layer onions (and garlic if using) in the crock pot.
- Add 1/2 cup (120 ml) broth or water.
- Place seasoned tenderloin on top.
- Cook on LOW or HIGH until the thickest part hits 145°F / 63°C.
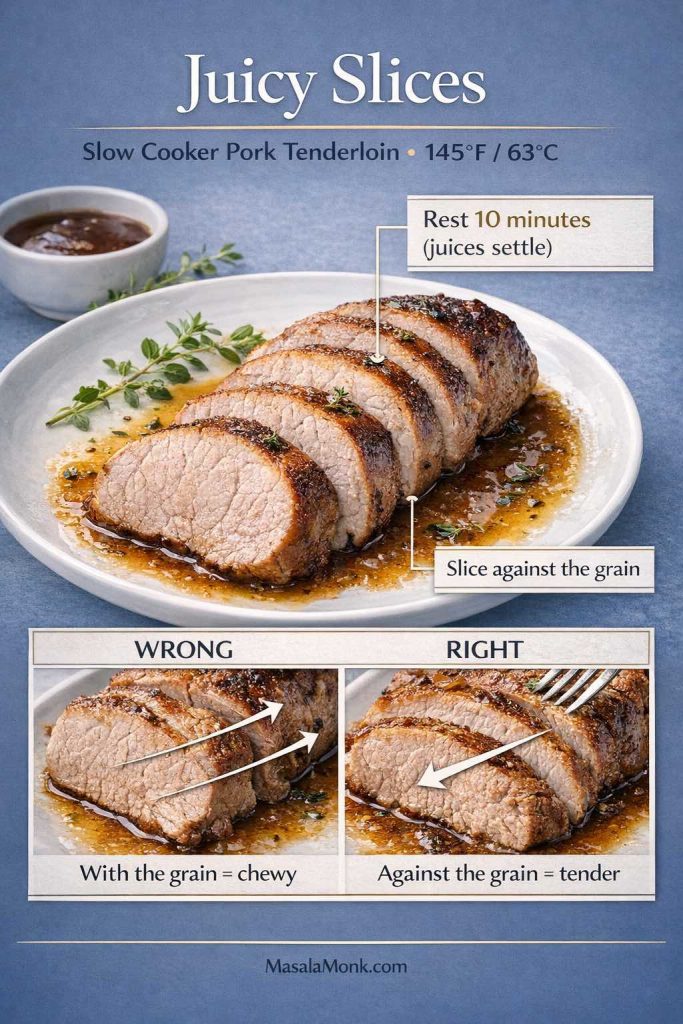
- Transfer to a plate, tent loosely with foil, and rest 10 minutes.
- While it rests, stir the pot juices. Add Dijon or butter for a glossy, flavorful finish.
- Slice against the grain and spoon juices over each serving.
How to slice pork tenderloin after slow cooking
After resting, slice across the grain into 1/2-inch (1–1.5 cm) pieces. Thin slices cool quickly and can feel drier, while thicker slices can feel less tender. Half-inch slices are a sweet spot for both tenderness and juiciness.
Serving ideas for sliceable pork tenderloin in the crock pot or slow cooker
This version is quietly versatile. Depending on what you’re craving, it can go in a few directions:
- Bright and herby: Spoon chimichurri over warm slices for a fresh, restaurant-feeling finish. The acidity and herbs lift the pork beautifully, while the oil adds richness without heaviness.
- Comfort plate: Serve with mashed potatoes, roasted vegetables, or a simple rice pilaf.
- Salad dinner: Add slices to a salad with crunchy cucumber, onion, and a sharp vinaigrette.
- Sandwiches: Slice thinly the next day, add a creamy spread, and layer with crisp vegetables.
If you want a creamy base that behaves like a classic sandwich spread, our eggless mayonnaise works well as a simple read here—especially for readers who like a soft, creamy contrast to lean pork.
Make the pot juices taste “finished”
Slow cooker juices can taste good yet slightly muted, especially if you used water instead of broth. To bring them into focus:
- Add Dijon for sharpness,
- or butter for richness,
- or a small splash of vinegar for brightness.
Even better, you can do two—Dijon plus butter is a classic combination that reads like a quick pan sauce without any extra work.
Leftovers for Way 1 (quick, satisfying reuses)
Sliceable tenderloin leftovers are a gift, especially when you store them with a little liquid.
- Warm bowl: Reheat slices gently with a spoon of juices, then serve over rice with herbs and lemon.
- Wraps: Add sliced pork, crisp vegetables, and a creamy spread.
- Protein snack plate: Cold slices with pickles, a little mustard, and crunchy vegetables are surprisingly good.
Also Read: Dirty Martini Recipe (Classic, Extra Dirty, No Vermouth, Spicy, Blue Cheese, Tequila + Batched)
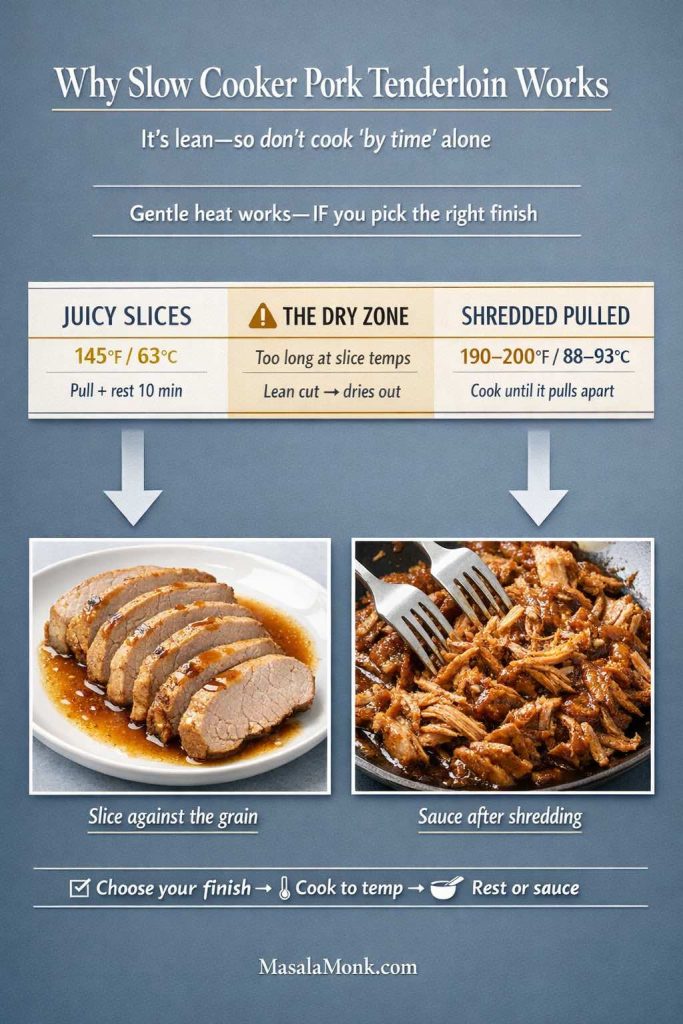
Way 2: Slow Cooker Pork Tenderloin Shredded (Pulled-Style BBQ Recipe)
This version answers a very real craving: the saucy, messy, satisfying joy of pulled pork—without needing pork shoulder. It’s not the same as shoulder, yet it can be wildly delicious when you treat it properly.
Here, you’re using pork tenderloin pulled pork in slow cooker style as a method: cook until it shreds, then sauce it so the flavor stays bold.
Ingredients (Way 2)
Base ingredients, plus:
- BBQ sauce: 1 cup (240 ml), divided
- Apple cider vinegar: 1 tbsp (15 ml)
- Brown sugar or honey: 1 tbsp (12–15 g), optional (adjust to taste)
- Optional heat: a few drops of pepper sauce
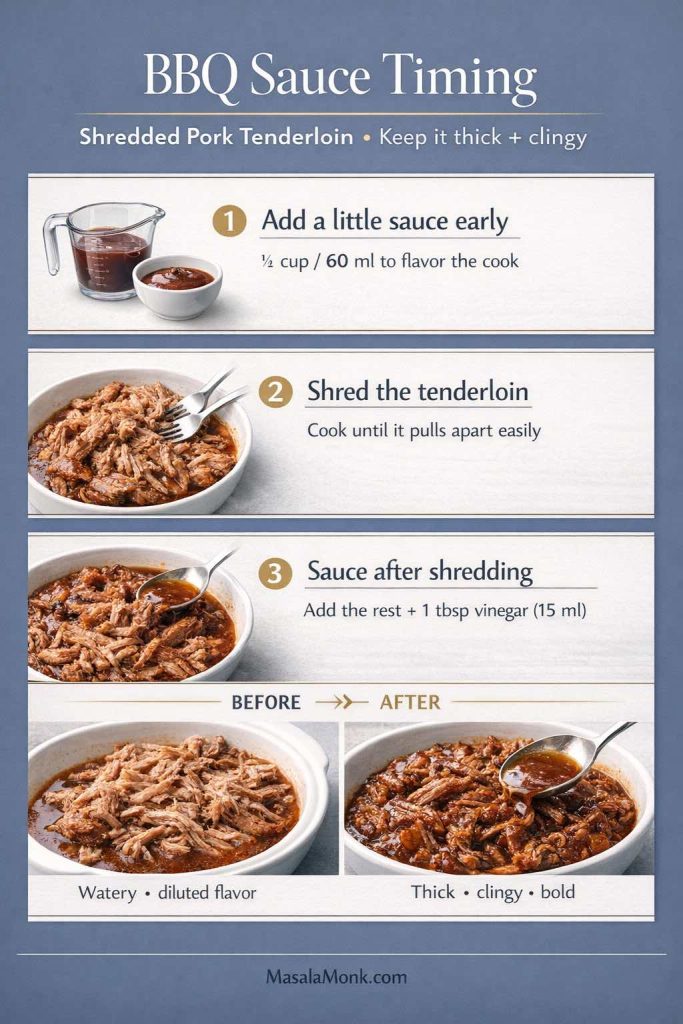
Why sauce timing matters
If you add all the BBQ sauce at the beginning, it tends to thin out and lose its punch. Instead, you want the pork to cook in a lightly seasoned liquid, then get coated in thicker sauce after shredding.
Steps (Way 2)
- Add onions and liquid to the crock pot. Stir in 1/4 cup (60 ml) BBQ sauce.
- Place the seasoned tenderloin on top.
- Cook on LOW until the meat shreds easily. For many slow cookers, that’s around 190–200°F / 88–93°C.
- Move tenderloin to a board and shred with two forks.
- Return shredded pork to the crock pot. Add remaining BBQ sauce, vinegar, and optional sweetener.
- Let it sit on WARM for 10–15 minutes so the sauce clings.
How to keep shredded pork tenderloin from drying out
- Keep some of the cooking juices in the pot when you sauce it—enough to keep it luscious, not so much that it becomes watery.
- Avoid holding it on WARM for a long time. A short rest for sauce absorption is great; extended holding can dry it out.
BBQ pulled pork tenderloin crock pot serving variations
Now the fun part: once you have saucy shredded pork, dinner becomes flexible. Instead of one meal, you suddenly have options.
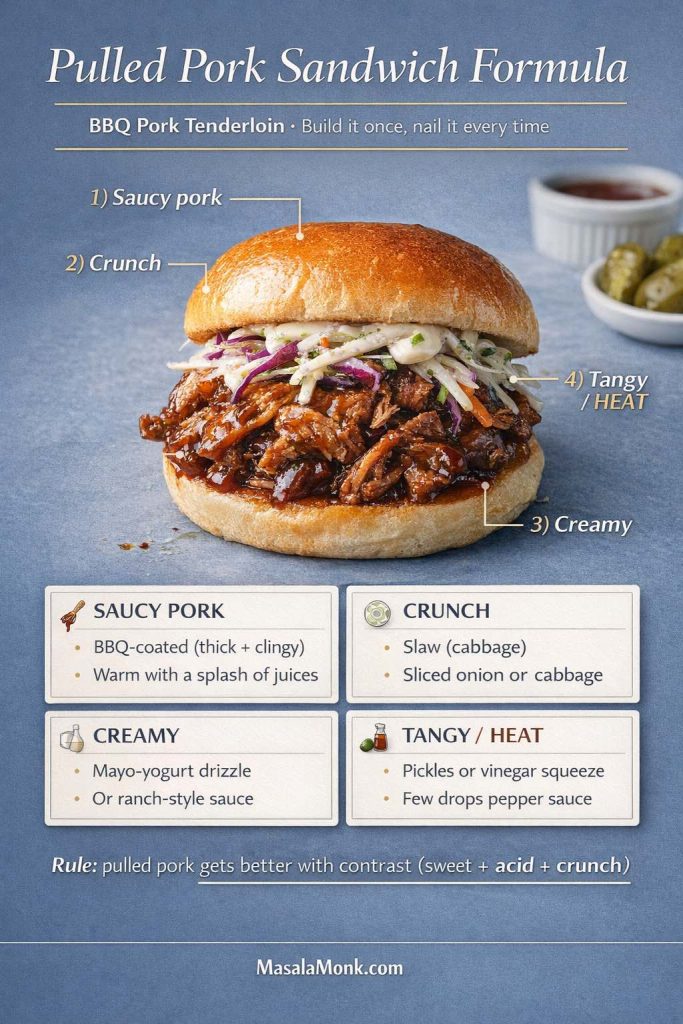
1) Pulled pork sandwiches and sliders
Piles of shredded pork love contrast: creamy, crunchy, tangy, or spicy.
- Creamy drizzle: Mix a spoon of eggless mayonnaise with a splash of vinegar and a pinch of salt for a quick slaw-like drizzle.
- Crunchy topping: Add shredded cabbage or sliced onions for snap.
- Build inspiration: If you like the “how to assemble a great sandwich” logic—creamy + crunchy + acidic—this roundup of chicken sandwich recipes is a natural pathway, because the assembly patterns work across proteins.
2) Bowls (fast, filling, meal-prep friendly)
Serve shredded pork tenderloin over:
- rice,
- quinoa,
- mashed potatoes,
- or roasted sweet potatoes.
Then add something bright (pickles, onions, a squeeze of lime) to keep the bowl from feeling heavy.
If you enjoy batch cooking and turning one protein into multiple meals, our meal prep framework on vegetarian and high-protein meal prep ideas is a natural read here, because the principles—balanced add-ons, smart storage, mix-and-match components—translate perfectly.
3) Potluck plates
BBQ-style shredded pork shines with cold sides. A classic pairing is potato salad, which balances smoky-sweet sauce with tangy creaminess.
4) Spicy BBQ finish
If you want the sauce to taste lively rather than just sweet, a few drops of pepper sauce added at the end can give you clean, controlled heat.
A gentle realism check (and why it still works)
Pulled tenderloin won’t have the same fatty silkiness as shoulder. Nevertheless, it can still be extremely satisfying—especially when you choose bold sauce, add acidity, and serve it with crunchy toppings. In a busy week, that combination hits the “comfort food” note without demanding much from you.
Also Read: Keto Hot Chocolate Recipe (Sugar-Free Hot Cocoa) + Best Homemade Mix
Way 3: Pork Tenderloin with Potatoes and Carrots (Crock Pot Meal Recipe)
This is the one-pot dinner that feels like you planned ahead. The pork cooks over vegetables, the juices drip down into the potatoes and carrots, and the whole thing tastes like it belongs on a cold evening.
It also answers a lot of practical cravings: crock pot pork tenderloin with carrots and potatoes, pork tenderloin in crock pot with potatoes and carrots, and slow cooker pork tenderloin with potatoes and carrots—all without feeling repetitive.
Ingredients (Way 3)
Base ingredients, plus:
- Baby potatoes: 1.5 lb (680 g), halved (quarter if large)
- Carrots: 4 medium (about 300–350 g), cut into thick chunks
- Olive oil: 1 tbsp (15 ml)
- Salt (for vegetables): 3/4 tsp (4–5 g)
- Black pepper: 1/2 tsp (1–2 g)
- Dried thyme or rosemary: 1/2 tsp (1 g), optional
- Optional finisher: butter 1 tbsp (14 g) or Dijon 1 tbsp (15 g)
Steps (Way 3)
- Toss potatoes and carrots with olive oil, salt, pepper, and herbs.
- Spread vegetables in the bottom of the crock pot.
- Layer sliced onion over the vegetables.
- Place the seasoned tenderloin on top.
- Pour 1/2 cup (120 ml) broth or water around the edges.
- Cook on LOW or HIGH until tenderloin reaches 145°F / 63°C.
- Rest pork 10 minutes, then slice.
- Taste pot juices and stir in butter or Dijon for a quick, glossy finish.
- Serve slices over vegetables with spooned juices.
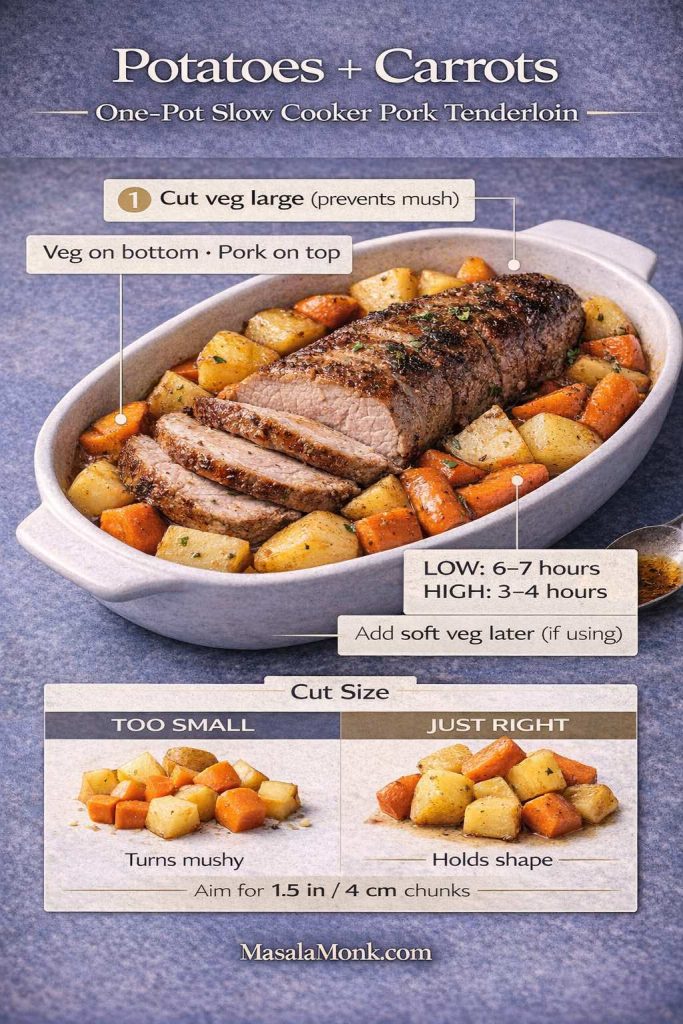
When to add potatoes and carrots so they don’t turn mushy in slow cooker
Most of the time, adding them at the start works well—especially if pieces are large. However, slow cookers vary.
- On LOW: add vegetables at the start; cut them large.
- On HIGH: if your slow cooker runs hot, consider adding carrots and potatoes after the first 45–60 minutes, or keep pieces very large and check earlier.
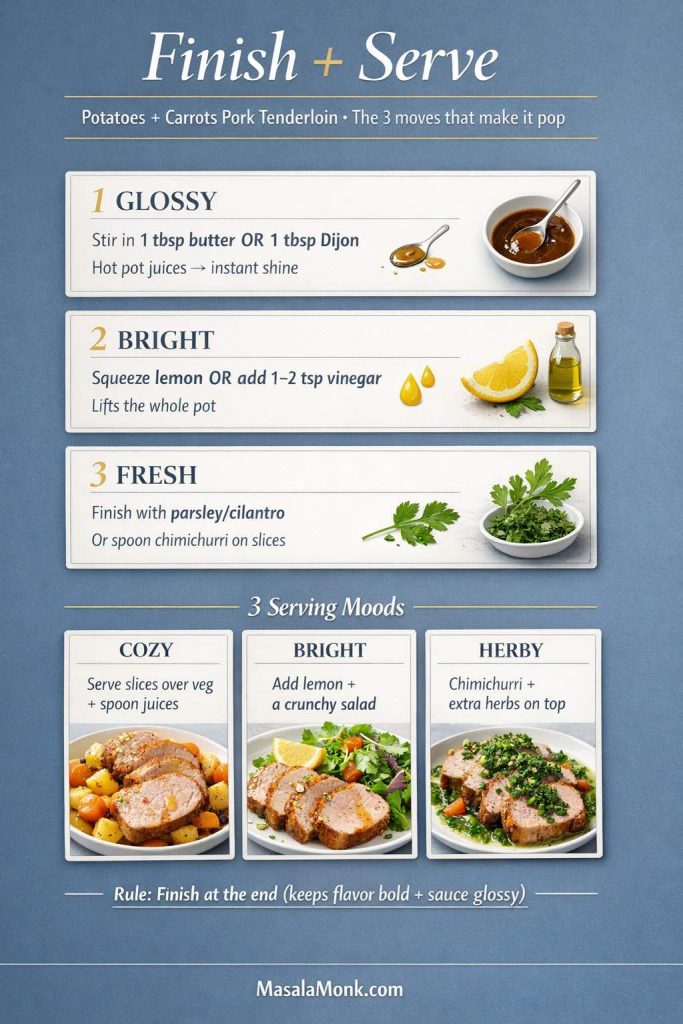
Serving variations for the potatoes-and-carrots version
Because this meal has a hearty base, small finishing touches matter.
- Herb finish: parsley or cilantro adds freshness.
- Bright finish: a squeeze of lemon or a small splash of vinegar lifts the whole pot.
- Sauce finish: a spoon of chimichurri turns this into a more vibrant, “special” dinner.
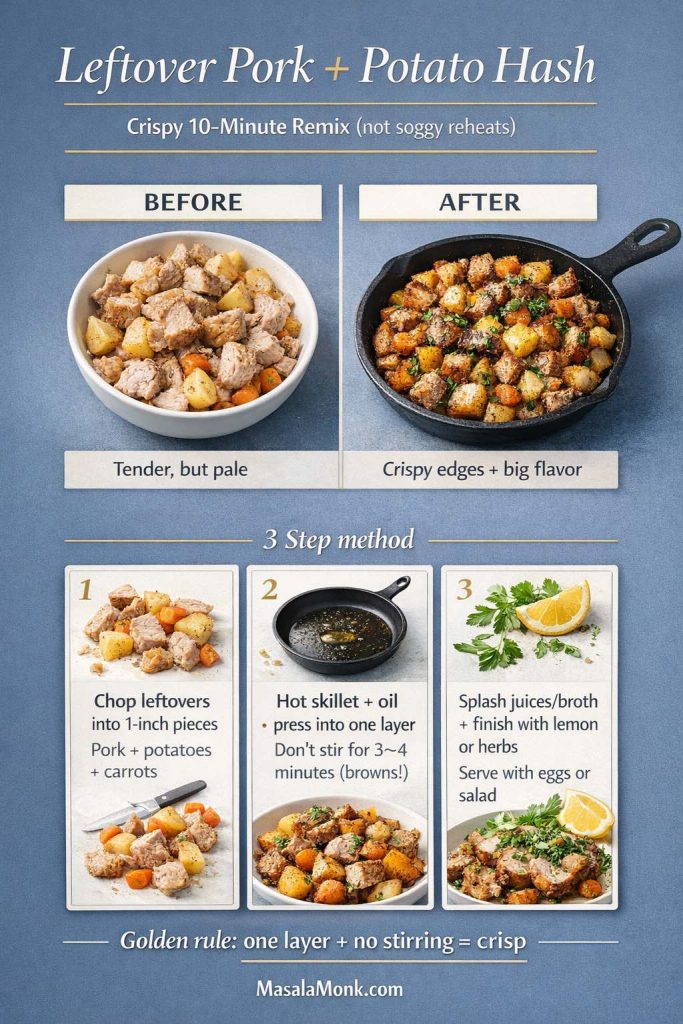
Turning leftovers into a second meal
This version reheats especially well because the vegetables hold moisture.
- Reheat gently with a splash of broth or reserved juices.
- Alternatively, chop leftover pork and vegetables, then crisp them in a skillet for a hash-like dinner.
Also Read: 10 Low Carb Chia Pudding Recipes for Weight Loss (Keto, High-Protein, Dairy-Free)
Pork Tenderloin with Vegetables in the Slow Cooker (Easy Mix-and-Match)
Once you’ve made the base method a couple of times, you start seeing how flexible it is. The vegetables section becomes less of a recipe and more of a rhythm: use what you have, add vegetables according to how quickly they soften, and keep the pork endpoint in mind.
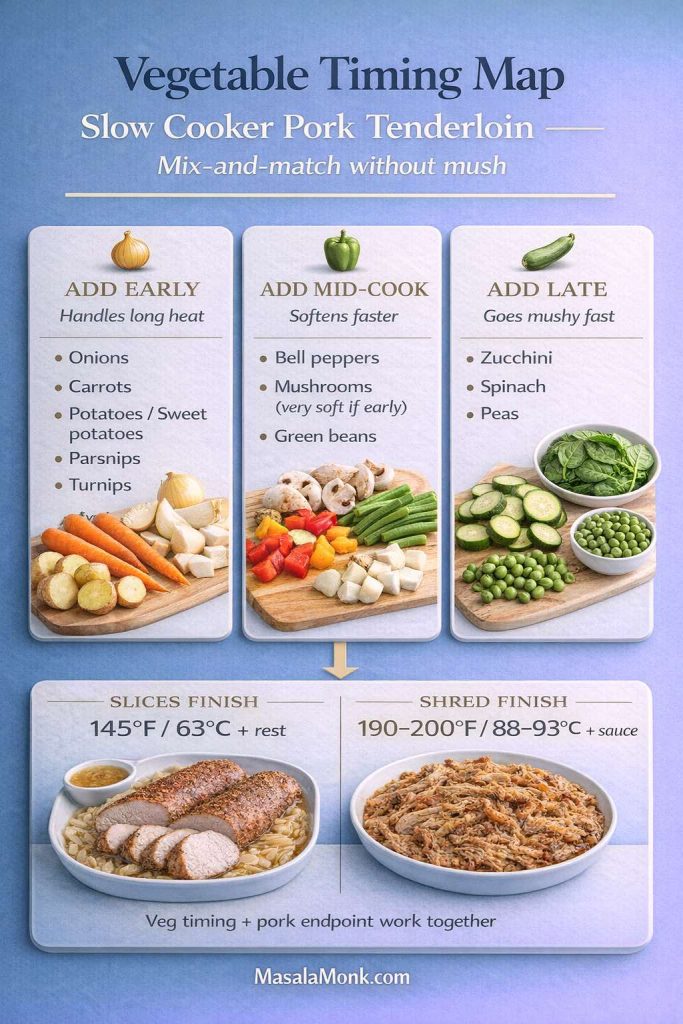
Vegetables to add early (they can handle long heat)
- onions
- carrots
- potatoes and sweet potatoes
- parsnips
- turnips
Vegetables to add mid-cook (they soften faster)
- bell peppers
- mushrooms (they can go early too, but they’ll get very soft)
- green beans
And Vegetables to add late (they go mushy if overcooked)
- zucchini
- spinach
- peas
If you like this hands-off approach and want a similar dinner style with a different protein, this post about crock pot chicken breast recipes is a great read, since the timing logic and “finish with sauce” idea overlaps nicely.
Also Read: Eggless Yorkshire Pudding (No Milk) Recipe
Can You Cook Pork Tenderloin from Frozen in a Crock Pot?
It’s tempting to drop frozen meat into a slow cooker and call it dinner. Still, with a slow cooker, the safety concern is time spent warming through the temperature range where bacteria can grow.
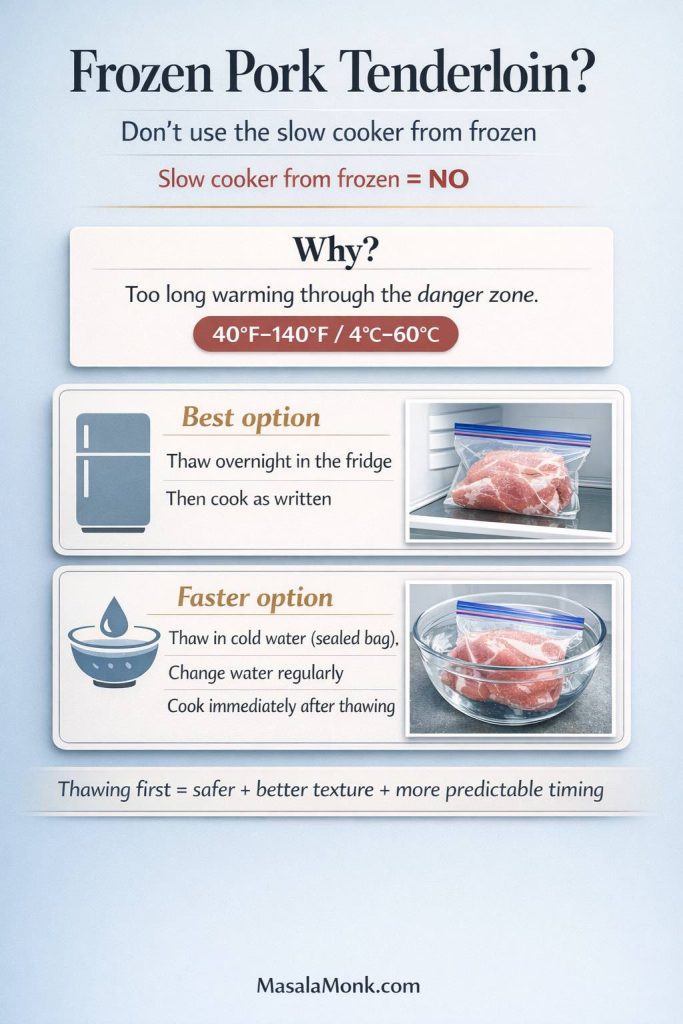
USDA guidance advises against cooking frozen meat directly in a slow cooker. Their direct Q&A on cooking frozen foods in a slow cooker or crock pot is a clear citation for this. If you’d like a simple explanation of why, this USDA page on the 40°F to 140°F danger zone supports the reasoning without getting overly technical.
A safer workaround that still feels easy
- Best option: thaw overnight in the fridge, then cook as written.
- Faster option: thaw in a sealed bag in cold water, changing the water regularly, then cook immediately after thawing.
Besides being safer, thawing first usually gives you better texture and more predictable timing—especially important with a lean cut like tenderloin.
Also Read: Crock Pot Chicken Breast Recipes: 10 Easy Slow Cooker Dinners (Juicy Every Time)
How to Make Slow Cooker Pork Tenderloin Taste Bold (Not “Slow Cooker Plain”)
Sometimes the only downside of slow cooker pork is that it can taste… polite. Not bad, just a little quiet. Fortunately, boldness is simple to build.
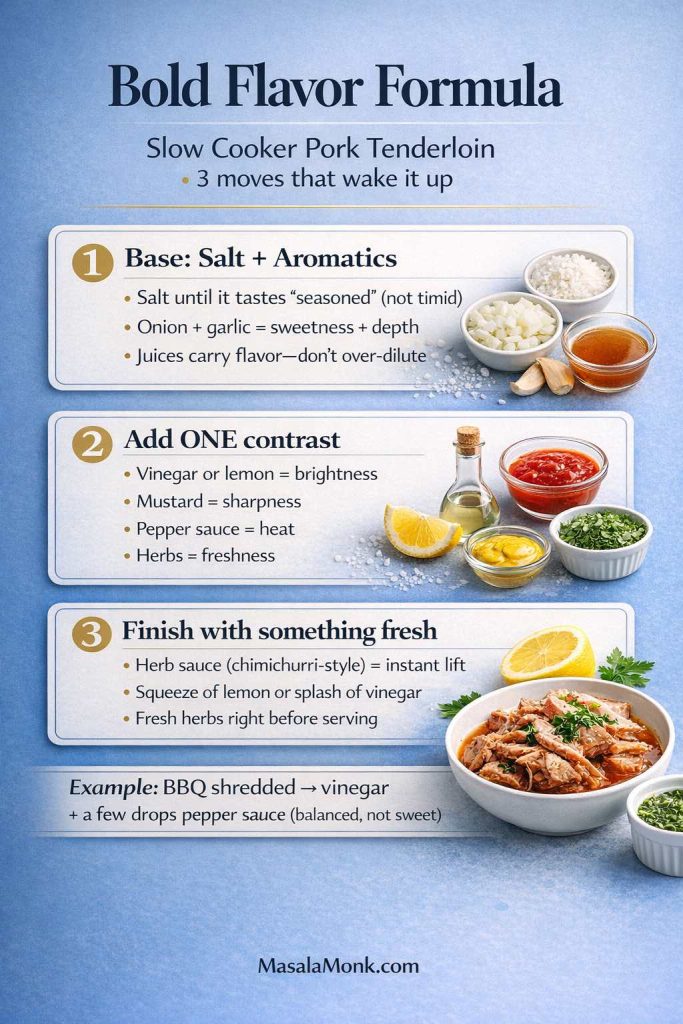
Start with salt and aromatics
If the salt level is timid, the pork tastes muted. Meanwhile, onions and garlic add sweetness and depth without requiring extra work.
Add one contrast element to Slow Cooker Pork Tenderloin
Contrast wakes up the palate. Pick one:
- vinegar or lemon (brightness)
- mustard (sharpness)
- pepper sauce (heat)
- herbs (freshness)
In the BBQ shredded version, for example, vinegar plus a few drops of pepper sauce can make the sauce taste balanced rather than just sweet.
Finish with something fresh
This is where an herb sauce like chimichurri shines. It brings acidity, herbs, and richness in one spoon—exactly what lean pork loves.
Also Read: 10 Vegan Chocolate Cake Recipes (Easy, Moist, & Dairy-Free)
Troubleshooting Slow Cooker Pork Tenderloin (Real Fixes That Work)
Even with a good method, dinner can occasionally go sideways. The good news is most problems have practical solutions.
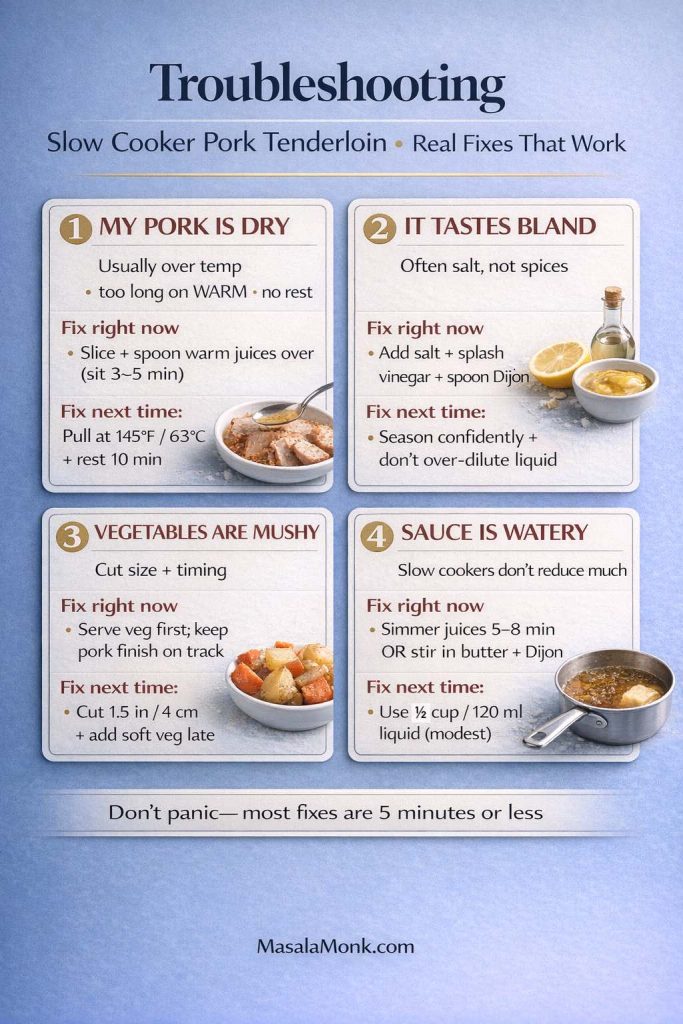
“My pork tenderloin is dry.”
This usually comes from one of three things:
- it cooked past the sliceable endpoint
- it sat on WARM too long
- it was sliced immediately, without resting
Fix right now: slice it, then spoon warm pot juices over the slices and let them sit for a few minutes. If you overshot significantly, pivot to shredded: pull it apart and sauce it BBQ-style so it eats better.
“It tastes bland.”
This is often a salt issue, not a spice issue.
Fix right now: adjust the cooking liquid. Add a pinch of salt, a splash of vinegar, and a spoon of Dijon. Stir well, then spoon over slices.
“The vegetables are mushy.”
This is timing and cut size.
Fix next time: cut vegetables larger, add them later on HIGH, or choose vegetables that tolerate longer cooking.
“The sauce is watery.”
Slow cookers don’t reduce liquids much.
Fix right now: remove pork and simmer the cooking liquid in a small saucepan for 5–8 minutes, or stir in butter and Dijon to give it body and shine.
Also Read: Peanut Butter Fudge: Recipes & Guide (8 Methods + Easy Variations)
Storage, Freezing, and Reheating (So It Stays Juicy)
A slow cooker pork tenderloin often turns into two meals. That’s a win—especially if you store it correctly.
Storage
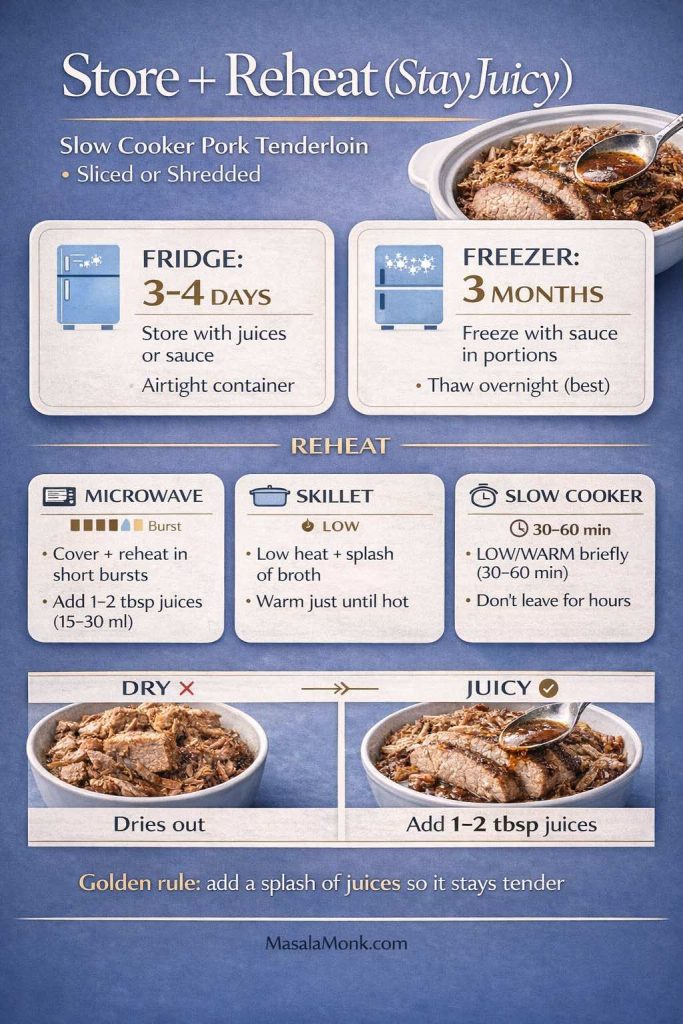
- Refrigerate in an airtight container for 3–4 days.
- Store with a few spoonfuls of cooking liquid whenever possible.
Freezing
- Freeze sliced or shredded pork with a little liquid for 2–3 months.

Reheating Slow Cooker Pork Tenderloin without drying out
- Stovetop: warm gently in a covered pan with a splash of broth or reserved juices.
- Microwave: cover and reheat in short bursts with a spoon of liquid.
The shredded BBQ version is especially forgiving because the sauce protects the meat. Conversely, sliceable tenderloin appreciates gentle heat and a little moisture.
Also Read: Sourdough Recipe: 10 Easy Bread Bakes (Loaves, Rolls & Bagels)
Flavor Variations (Same Method, New Mood)
Once you’ve made pork tenderloin in slow cooker form a few times, it’s fun to keep the method and shift the flavor. These are simple pivots that don’t demand extra effort.
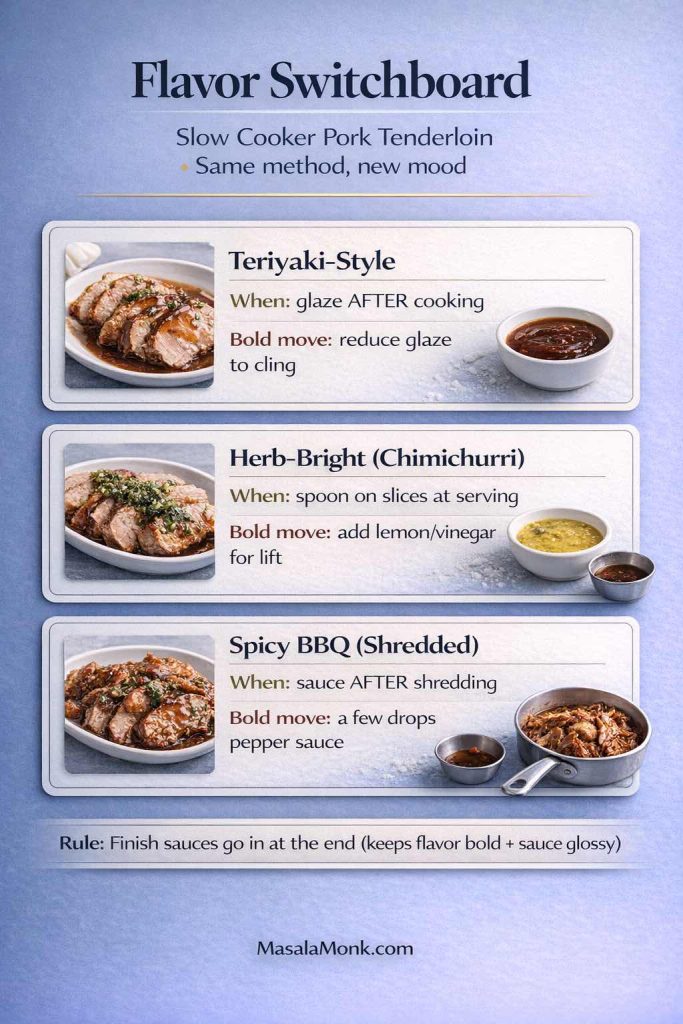
Teriyaki-style finish Slow Cooker Pork Tenderloin
Cook using the base method, then glaze after cooking so the sauce stays glossy. This homemade teriyaki sauce is a natural read here because it’s best added at the end rather than simmered for hours.
Herb-bright finish Slow Cooker Pork Tenderloin
Slice the tenderloin and spoon chimichurri over the top. Add a salad, and the meal feels lighter instantly.
Spicy BBQ finish Slow Cooker Pork Tenderloin
In the shredded version, add a few drops of pepper sauce right before serving. The heat tastes clean and intentional, not random.
Also Read: Chicken Adobo — Step-by-Step Recipe — Classic Filipino Adobong Manok
Closing: The Method That Makes It Repeatable
Slow cooker pork tenderloin becomes easy when you treat it like what it is: a lean cut that rewards you for cooking to the right endpoint. After that, it turns into a repeatable method you can bend toward whatever you want—sliceable plates, saucy pulled-style sandwiches, or a full pot of potatoes and carrots that tastes like comfort.
Slow Cooker Pork Tenderloin FAQs
1) How long does it take to cook slow cooker pork tenderloin?
Most pork tenderloin in a slow cooker is done in 2.5–4 hours on LOW or 1.5–2.5 hours on HIGH, depending on thickness and your crock pot. Even so, the most reliable approach is checking the thickest part for doneness rather than trusting the clock.
2) What is the best internal temperature for slow cooker pork tenderloin?
For a sliceable, juicy result, cook slow cooker pork tenderloin to 145°F / 63°C, then rest it for about 10 minutes. Afterward, the juices settle back into the meat, which keeps the slices noticeably more moist.
3) Is it better to cook pork tenderloin in a crock pot on LOW or HIGH?
LOW is often more forgiving for even cooking, whereas HIGH can work well when you’re watching timing closely. That said, if your goal is the best pork tenderloin crock pot texture, using a thermometer matters more than the setting.
4) Can you overcook pork tenderloin in a slow cooker?
Yes. Because pork tenderloin is lean, it can turn dry if it stays cooking well past the sliceable endpoint. Instead, pull it at the right temperature and rest it; otherwise, consider shifting to a shredded finish where sauce helps the eating experience.
5) How do you keep pork tenderloin in the slow cooker from drying out?
First, avoid extended “keep warm” time. Next, use a modest amount of liquid and cook to the correct internal temperature. Finally, rest before slicing and spoon a little cooking juice over the meat for extra moisture.
6) Do you need to sear pork tenderloin before putting it in the crock pot?
Not necessarily. Searing adds a deeper, roasted flavor, yet slow cooker pork tenderloin can still taste excellent without it. If you’re short on time, seasoning well and finishing with flavorful juices can deliver plenty of richness.
7) Can you make pulled pork with pork tenderloin in a slow cooker?
You can make a pulled-style result, although it won’t be as fatty as classic shoulder. For pork tenderloin pulled pork in slow cooker form, cook until it shreds easily, then mix in sauce afterward so the flavor stays bold.
8) What cooking time works best for shredded pork tenderloin crock pot style?
For slow cooker pork tenderloin shredded, plan on 3–5 hours on LOW in many slow cookers, depending on size and thickness. Still, focus on the texture: if it pulls apart easily with forks, it’s ready to shred.
9) When should you add BBQ sauce for bbq pulled pork tenderloin crock pot recipes?
Rather than adding all the sauce at the beginning, add a small amount early and most of it after shredding. This way, bbq pork tenderloin crock pot results taste more concentrated and less watery.
10) Can you make pork loin pulled pork in a slow cooker the same way?
Pork loin for pulled pork in slow cooker recipes can work, but it behaves differently from tenderloin and often needs longer to become shreddable. Additionally, it can still dry out if cooked too long, so cooking to tenderness and saucing well is important.
11) What’s the difference between pork loin pulled pork and pork tenderloin pulled pork?
Pork loin pulled pork is typically a bit firmer and less delicate, while pulled pork made with pork tenderloin tends to shred into finer, softer strands. Either way, the finish—especially sauce and acidity—makes the biggest difference in how it eats.
12) Can you cook pork tenderloin with potatoes and carrots in the crock pot?
Absolutely. Pork tenderloin in crock pot with potatoes and carrots works best when vegetables are cut into larger chunks so they hold their shape. Meanwhile, placing the tenderloin on top helps it cook evenly without turning the vegetables mushy too soon.
13) When should you add vegetables to pork tenderloin in slow cooker recipes?
Hard vegetables like potatoes and carrots can go in early, particularly on LOW. Conversely, softer vegetables are better added later so they don’t collapse into the cooking liquid.
14) Can you cook pork tenderloin from frozen in a crock pot?
It’s not recommended to cook pork tenderloin from frozen in a slow cooker because it can take too long to heat through safely. Instead, thaw first, then cook normally for more predictable timing and better texture.
15) What’s the best way to reheat slow cooker pork tenderloin?
For the juiciest results, reheat slices gently with a splash of broth or reserved cooking juices. Similarly, shredded pork tenderloin reheats well when warmed in its sauce, which helps prevent dryness.
16) How do you store shredded pork loin crock pot recipes and leftovers safely?
Cool leftovers promptly, store them in airtight containers, and keep some juices or sauce with the meat for moisture. Then, reheat only what you need, warming it until it’s hot throughout.
17) Can you make crock pot pulled pork loin recipe results that stay moist?
Yes, especially if you avoid overcooking and finish with sauce after shredding. Additionally, adding a small splash of broth or cooking liquid while reheating helps maintain a tender, juicy texture.
18) What are the easiest flavor variations for slow cooker pork tenderloin?
For a simple change, swap the finishing sauce: go BBQ for a pulled-style option, add mustard and butter for a savory pan-juice finish, or use herbs and a splash of vinegar for a brighter plate. Either way, the core method for slow cooker pork tenderloin stays the same.