Posted on 6 Comments

Baked Ziti Recipe Collection: 15 Easy Variations

Cover image of 15 baked ziti variations with a cheesy fork-lift, labeled easy, no-boil, and vegetarian.

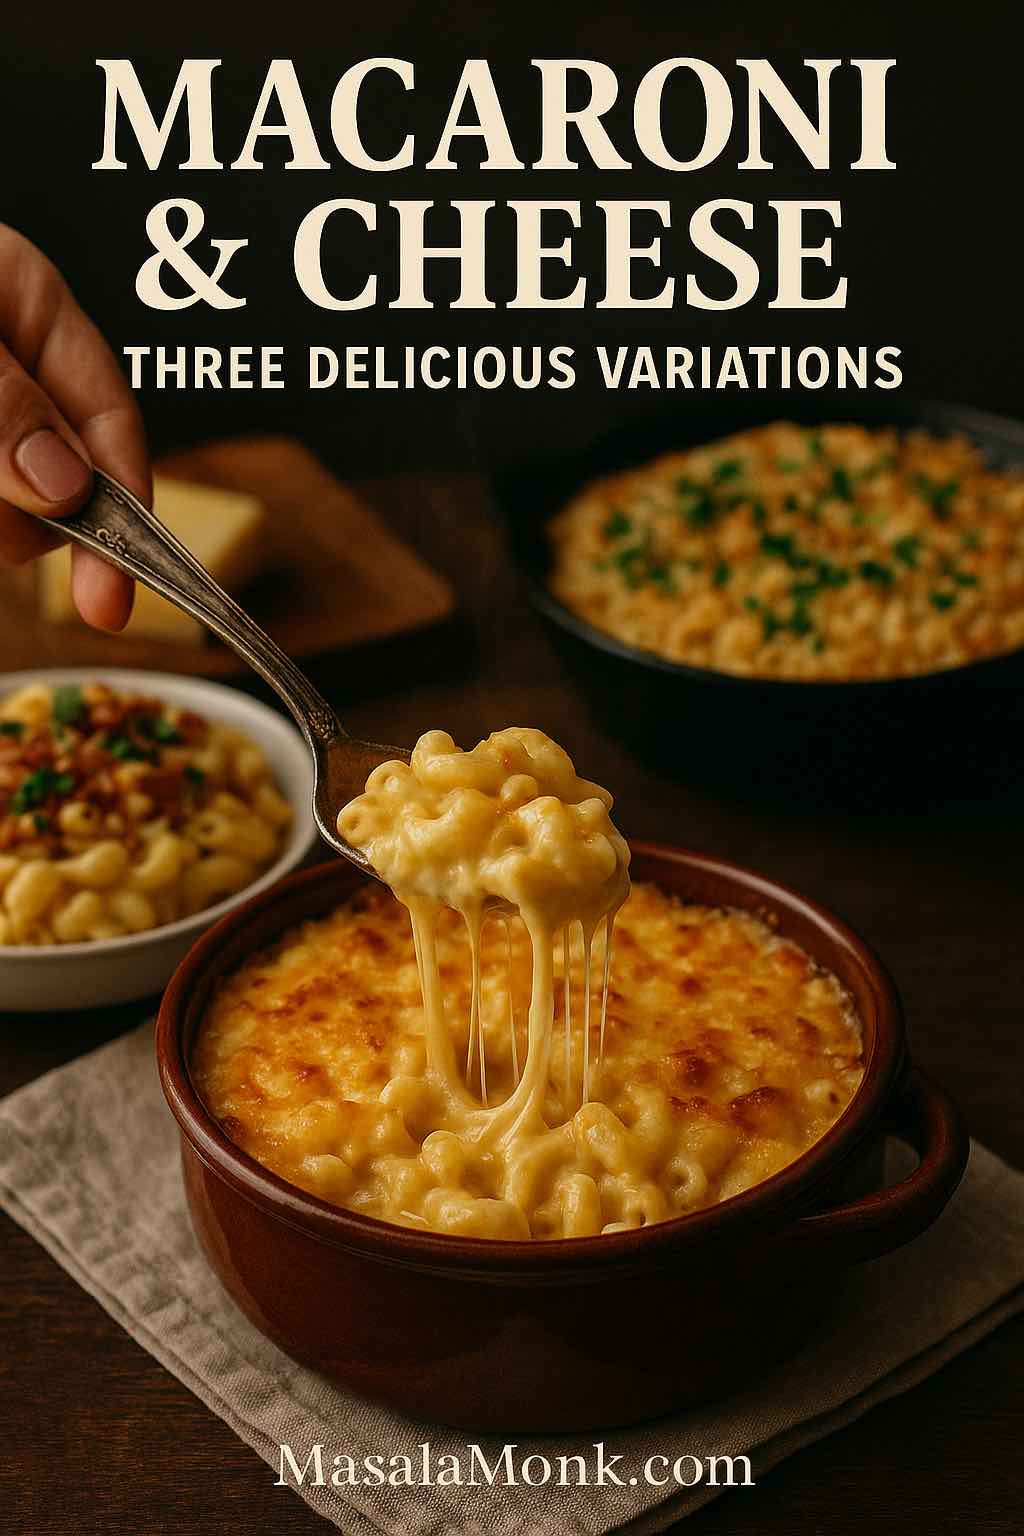
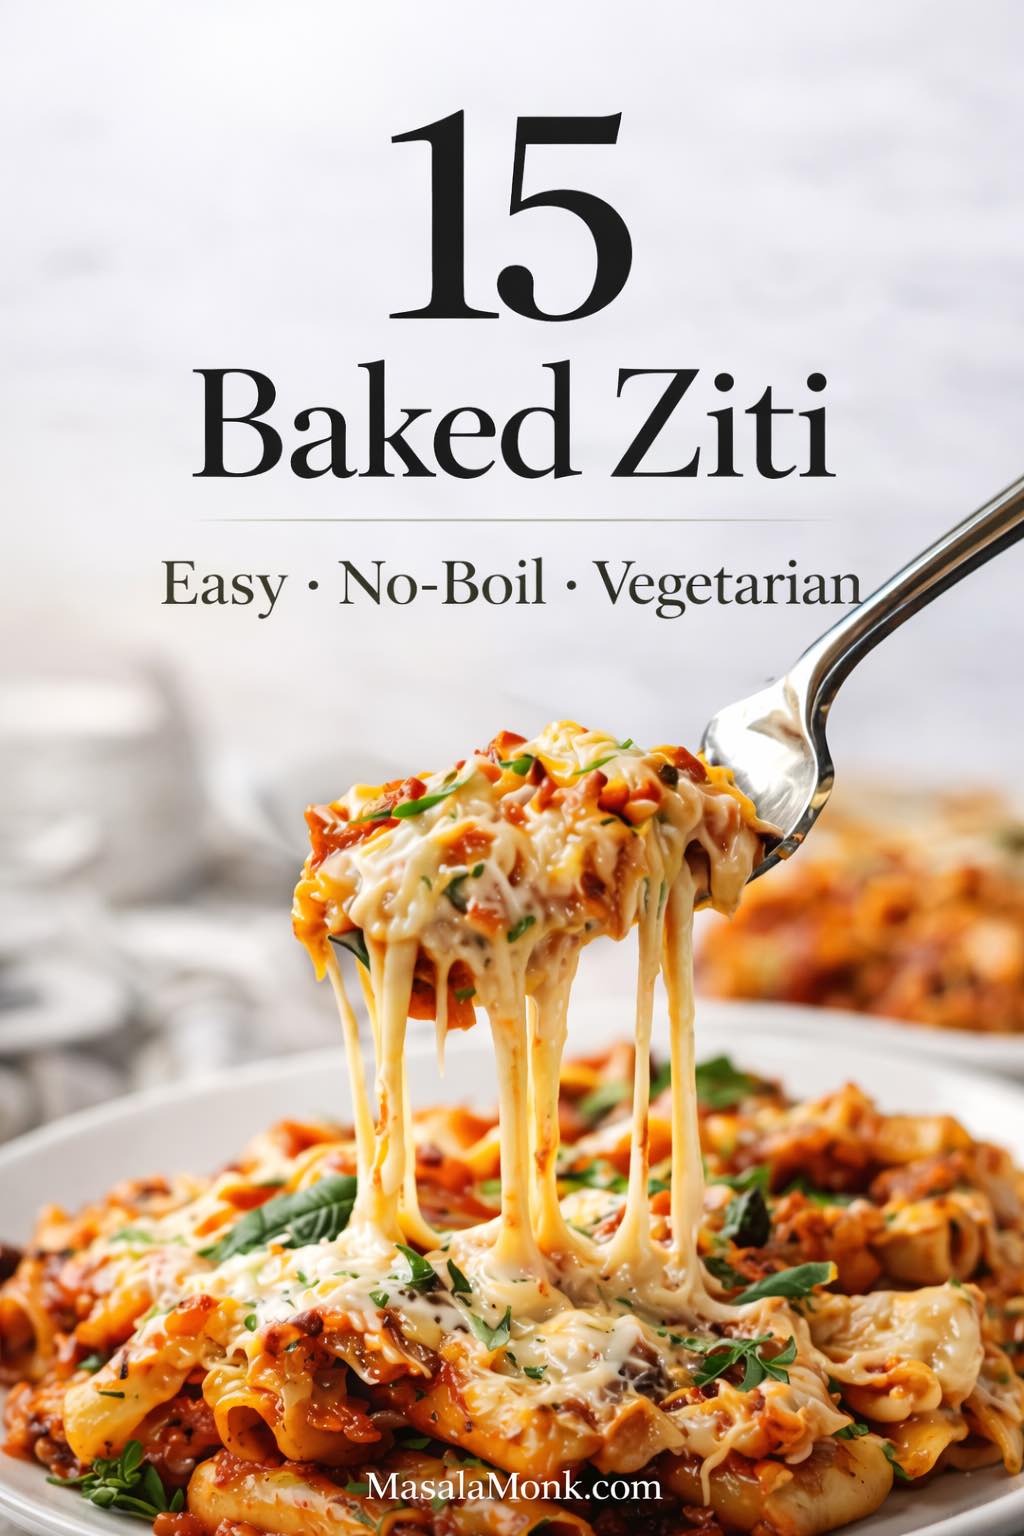
A good baked ziti recipe is one of those rare dinners that feels like it belongs everywhere at once. It can be a relaxed weeknight ziti meal, a “feed the whole table” Sunday ziti dish, or the dependable tray you bring to a potluck when you don’t want to overthink it. Better still, the same basic method can flex in a dozen directions—extra cheesy, no ricotta, vegetarian, sausage-studded, slow cooker, gluten-free—without losing what makes baked pasta so comforting in the first place.

So this is a reader-first collection: one reliable classic baked ziti recipe, followed by clearly labeled recipe cards for versions you might look for on different nights. Along the way, you’ll also see natural pairings (drinks and lighter sides) that make the whole spread feel complete rather than heavy.


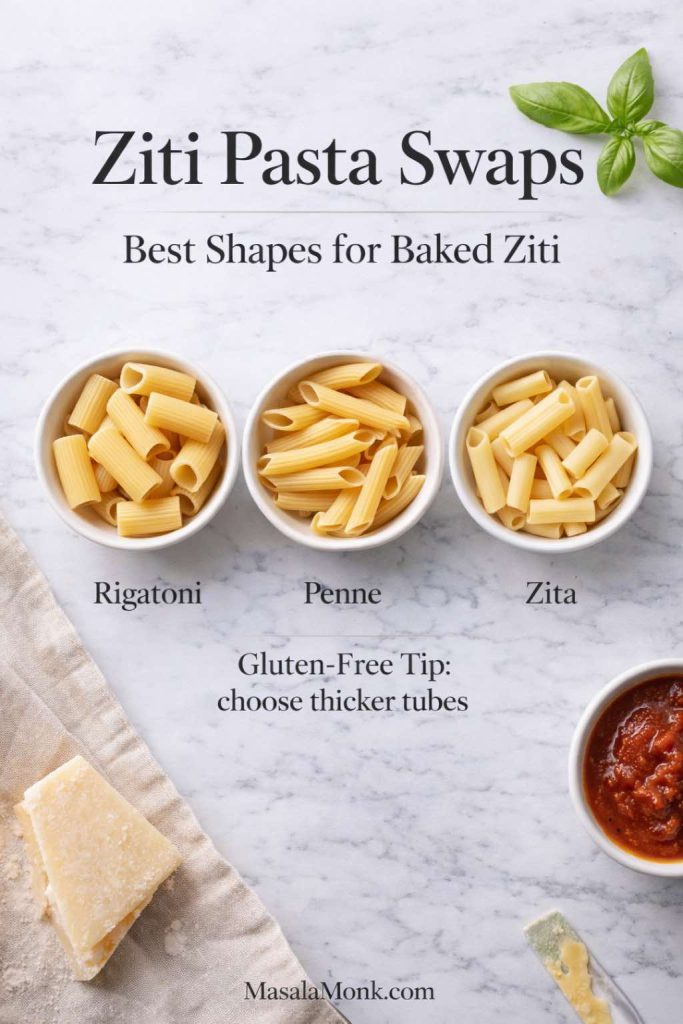
Ziti pasta, explained (and the best swaps)

Ziti pasta is a short, smooth tube—built for sauce, built for cheese, built for baking. It’s often linked to celebrations: Barilla notes that “zita” can mean “bride,” and that ziti has traditionally been served at weddings as “the bride’s pasta.” If you enjoy those little stories that make a dish feel rooted, it’s a lovely detail to know while you cook. You can read that background directly on Barilla’s ziti page: Barilla Ziti.

On the practical side, the best part is this: you don’t need perfect ziti to make baked ziti. In fact, the wider point of a baked pasta is resilience. If the shop only has rigatoni or penne, you can still get that same saucy-cheesy structure.

De Cecco’s pasta notes are helpful for substitution thinking because they describe which shapes suit oven-baked recipes and “dense, colourful sauces.” Their Zita page even calls out baked dishes specifically: De Cecco Zita n° 18. That’s exactly the kind of sauce-and-shape compatibility you want when you’re building a pasta bake that won’t dry out.

Easy swap guide:

  • Best swap for ziti: rigatoni (sturdy, lots of surface)
  • Next best: penne (especially penne rigate)
  • If you want it smoother: zita / mezza zita
  • If you’re using gluten-free pasta: choose a thicker tube shape and undercook slightly before baking (more on that later)
Ziti pasta swaps infographic showing rigatoni, penne, and zita as the best pasta shapes for baked ziti, with a gluten-free tip to choose thicker tubes.
Can’t find ziti pasta? Use rigatoni for the sturdiest baked ziti, penne as the easy everyday swap, or zita for a smooth tube—plus a simple gluten-free baked ziti tip: choose thicker pasta shapes so they stay firm after baking.

Also Read: Manhattan Cocktail Recipe (Classic + 6 Variations)


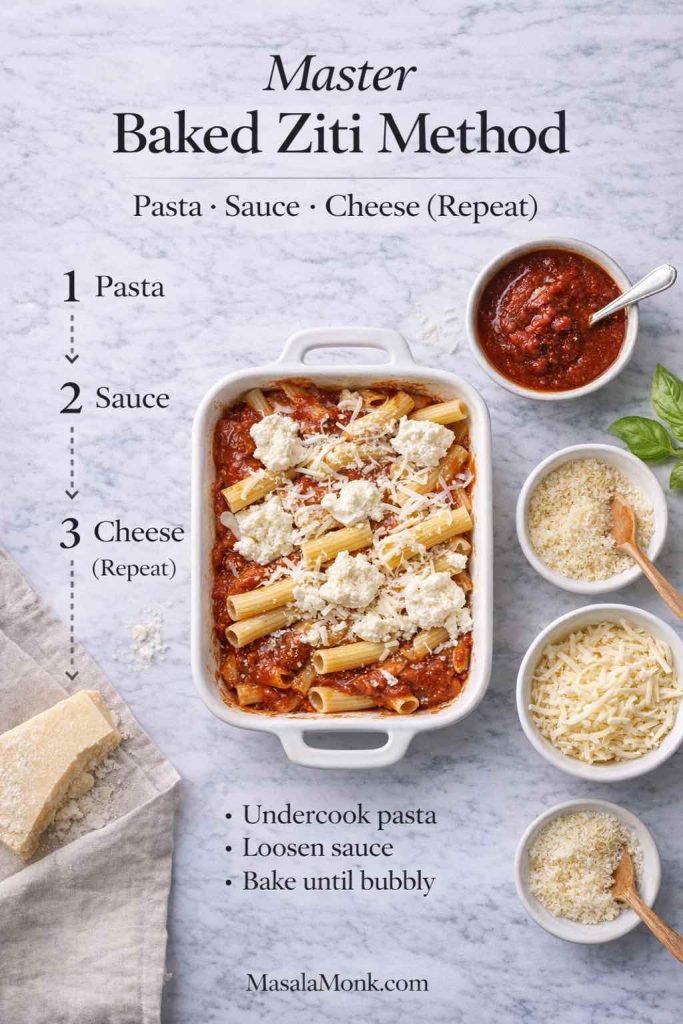
The master baked ziti method (why it works)

Before we jump into all the fun variations, it helps to understand what makes a baked ziti recipe succeed. Baked ziti is basically three things repeated in layers:

  1. Pasta that’s slightly underdone so it finishes in the oven
  2. Sauce that’s a little looser than you’d use for stovetop pasta
  3. Cheese in two roles: creamy “binder” (ricotta, cottage cheese, béchamel, etc.) and melty “top” (mozzarella + parm)

Once you internalize that, you can make almost any baked pasta feel balanced.

Master baked ziti method infographic showing the layering order—pasta, sauce, and cheese (repeat)—with tips to undercook pasta, loosen sauce, and bake until bubbly.
Use this master baked ziti method every time: slightly undercook the pasta, keep the sauce a little looser, then layer pasta + sauce + cheese (repeat) for a baked ziti recipe that stays saucy, creamy, and bubbly—not dry.

If you prefer a brighter, fresher sauce rather than a purely jarred flavor, a homemade base can lift the entire pan. This MasalaMonk guide walks through a food-mill method and a no–food mill option: Tomato Sauce From Fresh Tomatoes. It’s an easy way to make the sauce taste “alive” without turning dinner into a project.

On nights you want a creamier, more lasagna-like vibe, a white sauce layer can do the job too. MasalaMonk’s béchamel guide covers classic and vegan versions (and helps you avoid lumps): Béchamel Sauce for Lasagna.


Classic baked ziti recipe (the base you can build on)

This is the dependable classic baked ziti recipe. Every variation below either uses this exactly or swaps a few ingredients while keeping the same structure.

Classic baked ziti recipe in a casserole dish with marinara, ricotta, and melted mozzarella, labeled serves 6–8 and 45 minutes.
Save this classic baked ziti recipe card as your base method—once you nail this tray, every variation below (easy, no-boil, vegetarian, sausage, slow cooker, gluten-free, and more) becomes a simple swap.

Ingredients (serves 6–8)

  • 450 g (1 lb) ziti pasta (or rigatoni/penne)
  • 2 tbsp olive oil
  • 4–5 cloves garlic, minced
  • 1 small onion, finely chopped (optional)
  • 700–800 g marinara sauce (about 3 cups), plus a splash of water if it’s very thick
  • 250 g ricotta (about 1 cup)
  • 200 g mozzarella, shredded (about 2 cups), divided
  • 50 g parmesan, grated (about 1/2 cup)
  • 1 tsp dried oregano (or Italian seasoning)
  • Salt and black pepper
  • Basil or parsley for serving (optional)

Method

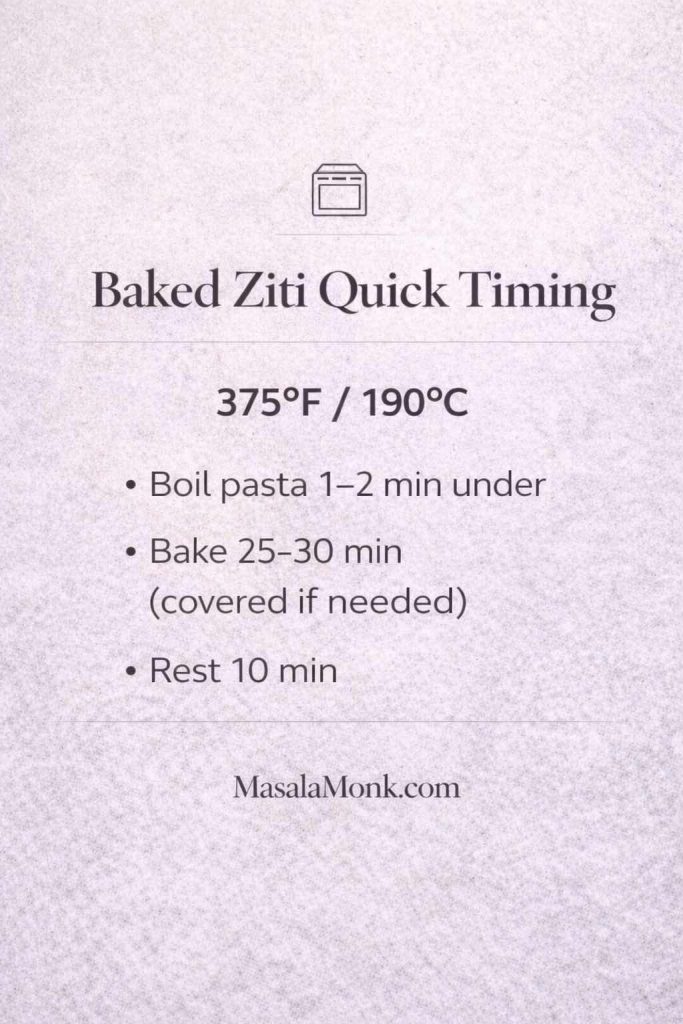
  1. Heat the oven to 190°C / 375°F. Lightly oil a baking dish.
  2. Cook the pasta in well-salted water until just shy of al dente (1–2 minutes less than the package suggests). Drain.
  3. Make the sauce base: warm olive oil, sauté onion until soft (if using), then add garlic for 30–45 seconds. Pour in marinara, add oregano, and let it simmer 5 minutes. If the sauce looks very thick, loosen with a splash of water.
  4. Combine: toss the drained pasta with most of the sauce.
  5. Layer: spread a thin layer of sauce in the dish. Add half the pasta. Dollop ricotta across the surface. Sprinkle with some mozzarella. Add the remaining pasta, spoon the remaining sauce on top, then finish with mozzarella and parmesan.
  6. Bake 25–30 minutes until bubbling at the edges and the top looks glossy. If you want deeper browning, broil 1–2 minutes at the end.
  7. Rest 10 minutes before serving so the ziti dish slices cleanly.
Baked ziti quick timing card showing the standard baked ziti temperature (375°F/190°C), boil pasta 1–2 minutes under, bake 25–30 minutes, and rest 10 minutes.
Use this baked ziti quick timing guide every time: bake at 375°F / 190°C, boil pasta 1–2 minutes under al dente, bake until bubbly (25–30 minutes), then rest 10 minutes for cleaner slices.

From here, you can keep the base exactly as-is—or pivot to the version that matches your night.

Also Read: Double Chocolate Chip Cookies – Easy Recipe with 7 Variations


Recipe cards: 15 baked ziti variations

1) Easy baked ziti recipe (weeknight-friendly)

Sometimes you don’t want a “project,” you just want dinner to happen. This easy baked ziti recipe leans on smart shortcuts while still tasting like a real baked pasta.

Easy baked ziti recipe (weeknight-friendly) shown in a bowl with marinara and ricotta mixed in, labeled 1 bowl and 4 steps.
This easy baked ziti recipe is the weeknight shortcut: mix ricotta directly into sauced pasta, top with mozzarella and parmesan, then bake until bubbly—fewer bowls, same comfort.

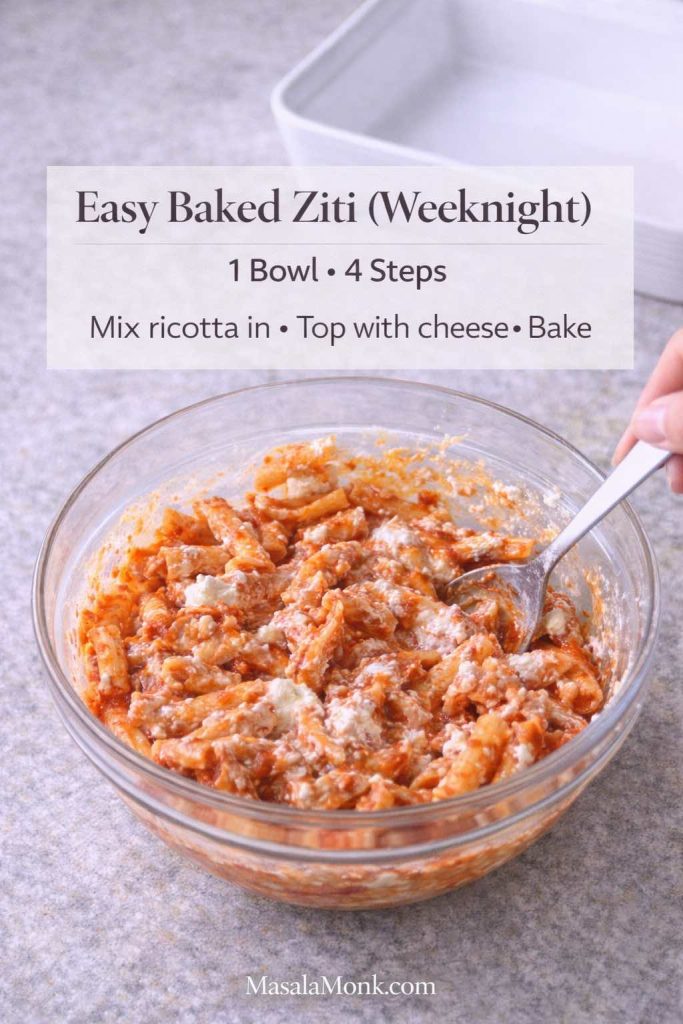
What changes from classic: fewer steps, fewer bowls, more mixing.

Ingredients

  • Use the classic ingredient list, but:
    • Skip the onion
    • Use a good jarred marinara
    • Mix ricotta directly into the pasta-sauce mixture instead of dolloping and layering (faster and still creamy)

Steps

  1. Cook pasta slightly under al dente and drain.
  2. Warm marinara with a little garlic and oregano.
  3. Stir pasta + sauce together, then fold in ricotta, half the mozzarella, and a small handful of parmesan.
  4. Pour into the dish, top with remaining cheese, and bake until bubbling.

Even though it’s a shortcut ziti meal, it still hits the same comfort notes—gooey top, saucy center, that “baked pasta” smell when you pull it from the oven.

Also Read: Paper Plane Cocktail Recipe + Best Amaro Substitutes & Tips


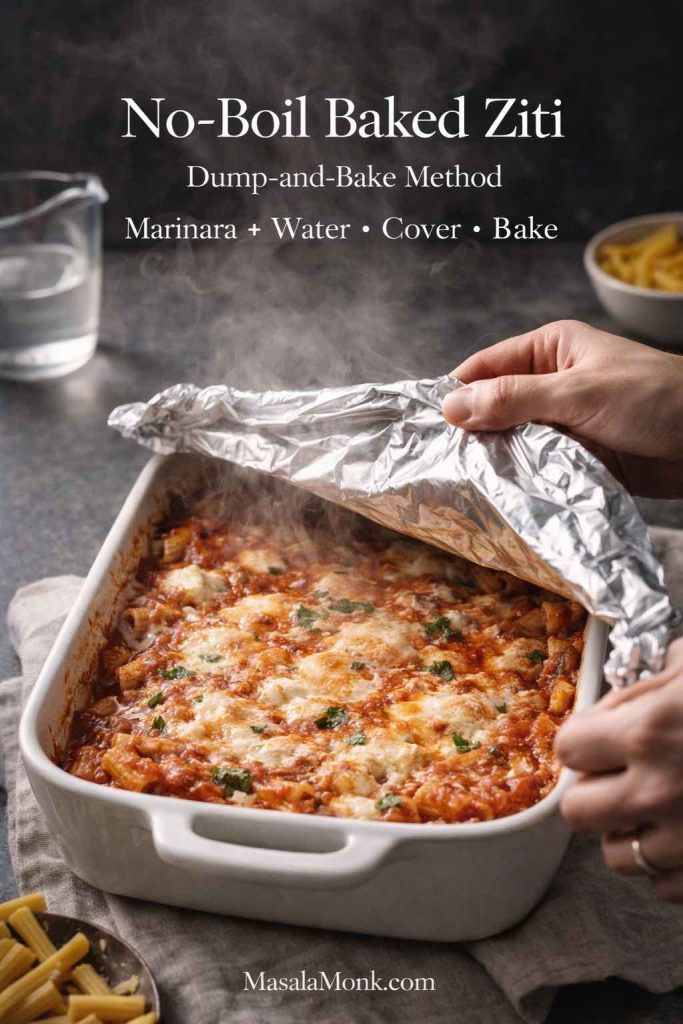
2) No boil baked ziti recipe (dump-and-bake style)

If you’ve ever wanted baked ziti without boiling water at all, this is where the no boil baked ziti approach shines. The trick is hydration: the pasta absorbs liquid in the oven instead of in a pot.

No-boil baked ziti in a baking dish with foil being lifted off, showing the dump-and-bake method using marinara and water.
No-boil baked ziti is the easiest “dump-and-bake” version: coat dry pasta in marinara + water, cover tightly with foil, then bake until the ziti turns tender and the top gets bubbly and cheesy.

Serious Eats explains the logic clearly in their no-boil method, including why soaking can deliver al dente baked pasta without an extra pot: The Food Lab’s No-Boil Baked Ziti.

Ingredients (serves 6–8)

  • 450 g ziti (or penne/rigatoni)
  • 4 cups marinara (slightly more than classic)
  • 1 cup water or light stock
  • 250 g ricotta
  • 200 g mozzarella, divided
  • 50 g parmesan
  • Oregano, salt, pepper

Steps

  1. Heat oven to 190°C / 375°F.
  2. Mix marinara and water/stock in a bowl. Taste and season.
  3. Stir in dry pasta until coated. Let it sit 10 minutes to start hydrating.
  4. Assemble like classic (sauce layer, pasta, ricotta, cheese, repeat).
  5. Cover tightly with foil and bake 40 minutes.
  6. Uncover and bake another 10–15 minutes to brown and reduce excess moisture.
  7. Rest 10 minutes before serving.

Meanwhile, if you want a quicker “less-fuss” take that still feels like baked ziti, Serious Eats also has a skillet baked ziti version: Easy Skillet Baked Ziti with Sausage and Ricotta. Even if you don’t follow it exactly, it’s useful for understanding moisture balance.

Also Read: Green Chutney Recipe (Coriander–Mint / Cilantro Chutney)


3) Baked ziti recipe with ricotta cheese (extra creamy, 3-cheese feel)

A baked ziti with ricotta cheese should feel generous, not dry. Here, the goal is a creamy layer that stays soft after baking, plus enough mozzarella to stretch without turning the whole dish into a cheese brick.

Baked ziti with ricotta cheese showing evenly spaced ricotta dollops in a baking dish, labeled extra creamy (3-cheese feel) with tips to season ricotta and rest 12 minutes.
For extra-creamy baked ziti with ricotta cheese, season the ricotta, dollop it evenly across the pasta, and let the bake rest about 12 minutes—this keeps the ricotta layer soft, creamy, and more sliceable (a true 3-cheese feel).

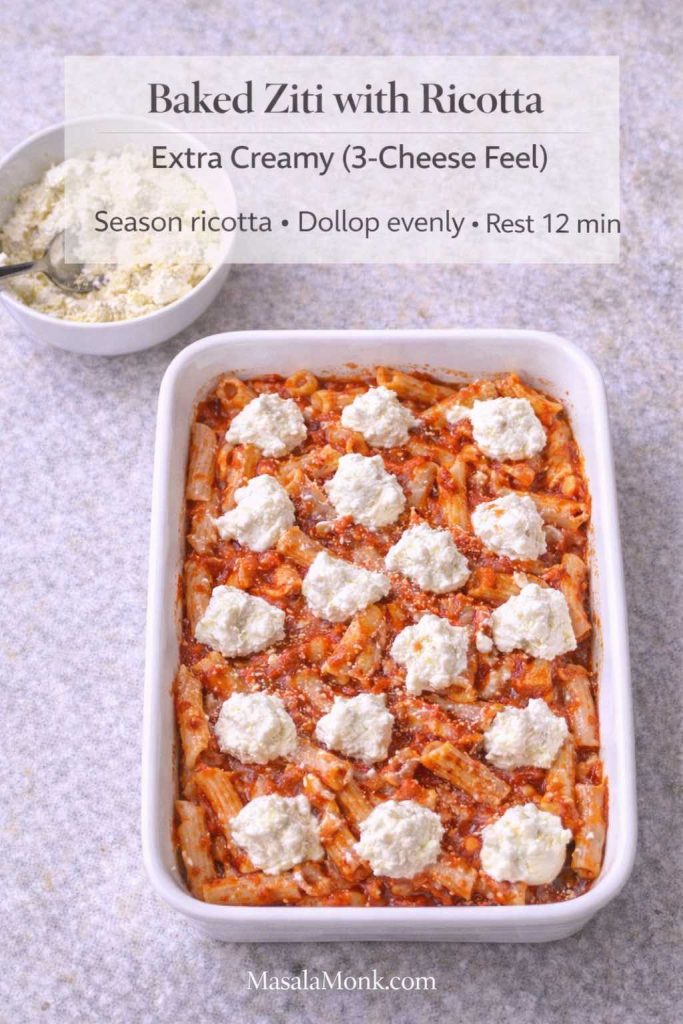
What changes from classic: more ricotta, more parmesan, slightly wetter mix.

Ingredients

  • Use the classic list, plus:
    • +125 g ricotta (an extra 1/2 cup)
    • +25 g parmesan (a few extra spoonfuls)
    • Optional: 1 egg (helps set the ricotta layer into a “lasagna-like” slice)

Steps

  1. Mix ricotta with parmesan, black pepper, and (optionally) an egg.
  2. Layer ricotta more evenly (smaller dollops, closer together).
  3. Add a splash of pasta water or plain water to the sauce so the bake stays moist.
  4. Bake until bubbling, then rest longer—about 12 minutes—so the ricotta settles.

After that, if you’re the kind of cook who enjoys creamy sauce techniques beyond ricotta, the white sauce approach can be a fun detour: Béchamel Sauce for Lasagna.


4) Baked ziti without ricotta (still rich, no compromise recipe)

Baked ziti without ricotta is more common than people think—sometimes it’s a preference, other times it’s just what your fridge looks like. The key is replacing ricotta’s two jobs: creaminess and structure.

Baked ziti without ricotta guide showing the best creamy swaps: cottage cheese, Greek yogurt, and cream cheese mixed with milk.
Making baked ziti without ricotta? These three creamy swaps keep the ziti dish rich and sliceable: cottage cheese (closest match), Greek yogurt (lighter and tangy), or cream cheese + milk (smooth and indulgent).

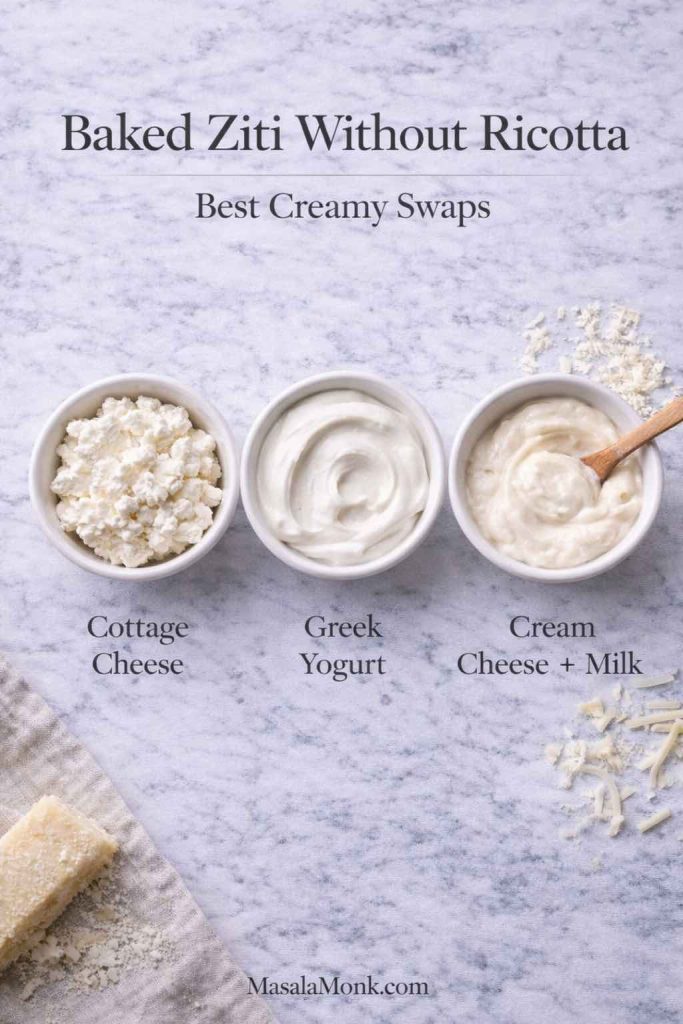
Pick one creamy substitute

  • Cottage cheese (best match; see next recipe card)
  • Cream cheese + milk (for a smooth, indulgent texture)
  • Greek yogurt (tangy and lighter; best with extra mozzarella)

Option A: Cream cheese swap

  • Replace ricotta with 150 g cream cheese + 3–4 tbsp milk, whisked smooth.
  • Add a pinch of garlic powder or oregano.

Option B: Greek yogurt swap

  • Replace ricotta with 250 g thick Greek yogurt.
  • Increase mozzarella slightly, because yogurt doesn’t melt the way cheese does.

In contrast to ricotta, these swaps blend in more smoothly, so you can either layer them or stir them directly into the pasta-sauce mixture. Either route works; your choice depends on whether you want a “layered ziti dish” or a more unified, creamy baked pasta.

Also Read: Rob Roy Drink Recipe: Classic Scotch Cocktail (Perfect + Dry + Sweet Variations)


5) Baked ziti with cottage cheese (creamy recipe + protein-forward)

Baked ziti with cottage cheese is one of those “sounds odd until you try it” upgrades. Cottage cheese bakes into a creamy layer, especially if you blend it briefly.

Baked ziti with cottage cheese recipe card showing a creamy slice with ziti pasta, marinara, melted mozzarella, and a fork, labeled creamy and protein-forward.
Baked ziti with cottage cheese is the easiest ricotta swap—blend it for a smoother “ricotta-style” layer, then bake until bubbly for a creamy, protein-forward ziti dish that tastes even better the next day.

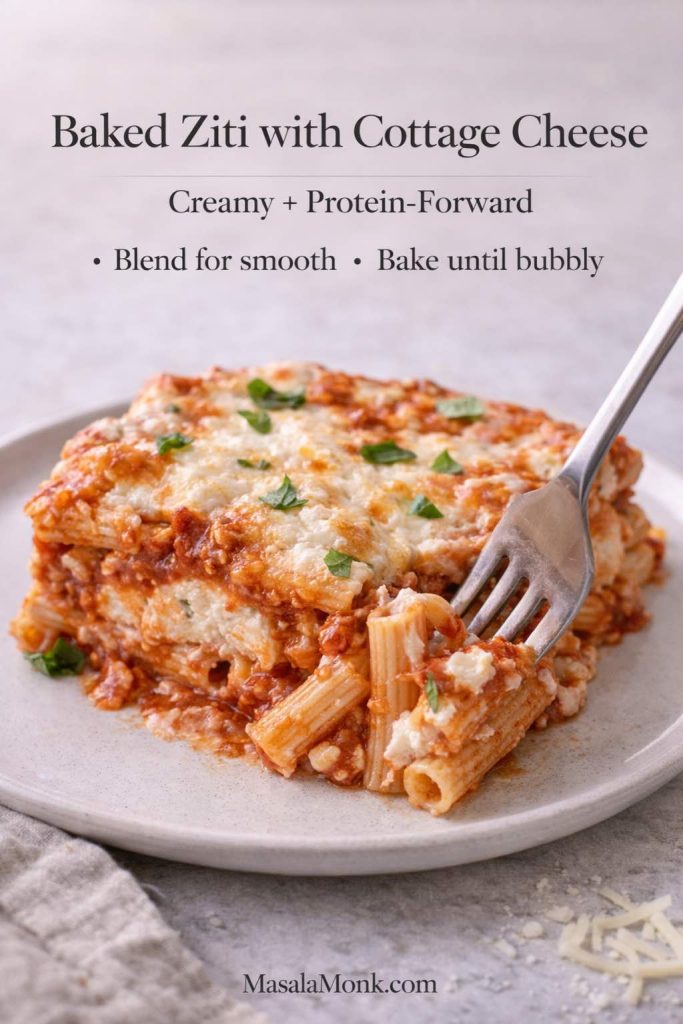
If you want a full casserole-style cousin to this idea, MasalaMonk has a dedicated baked pasta guide that uses cottage cheese in a layered format: Cottage Cheese Lasagna Recipe. It’s a great “next recipe” pathway once you fall in love with cottage cheese in pasta bakes.

Ingredients

  • Use the classic list, but swap:
    • Ricotta → 250 g (1 cup) cottage cheese
  • Optional: blend cottage cheese 20–30 seconds for a smoother texture
  • Optional: add lemon zest + black pepper (surprisingly good)

Steps

  1. Cook pasta slightly under.
  2. Simmer sauce briefly.
  3. Mix cottage cheese with parmesan and pepper.
  4. Layer as in classic, or stir cottage cheese into the pasta for a faster bake.
  5. Bake until bubbly and golden.

Notably, cottage cheese versions often taste even better the next day, once the flavor settles and the cheese layer firms up slightly.

Also Read: Sandwich for Breakfast: Breakfast Sandwich Recipe + 10 Variations


6) Baked ziti recipe with ground beef (classic “family tray”)

Baked ziti with ground beef is the tray that disappears first at a potluck—hearty, familiar, and easy to portion. If you’re looking for baked ziti with hamburger meat, this is the version you want.
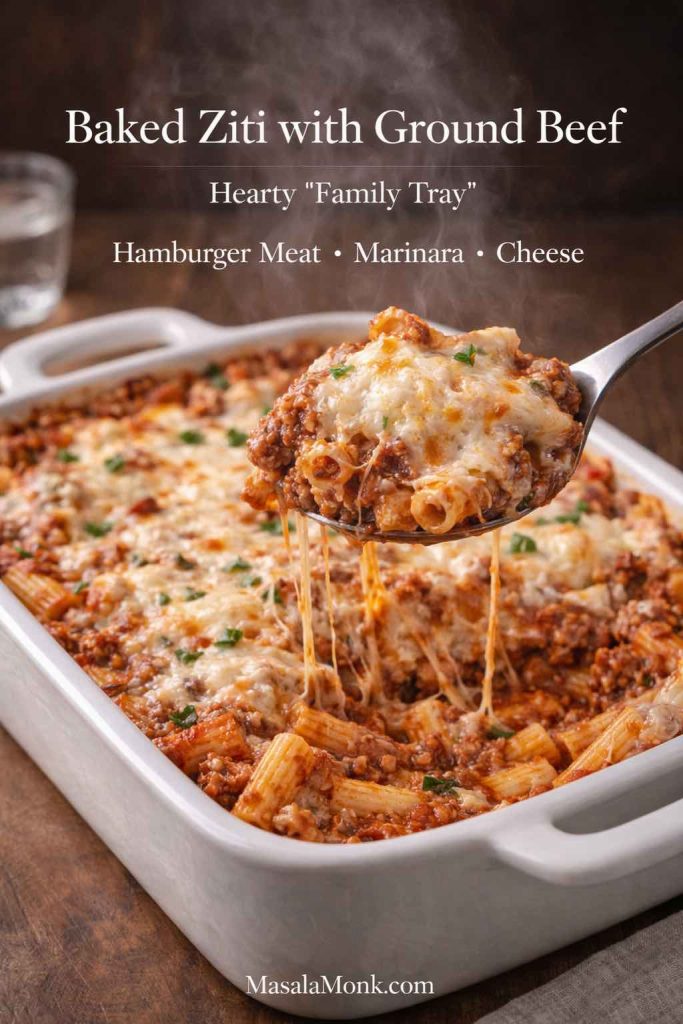
Baked ziti with ground beef (hamburger meat) in a casserole dish with melted mozzarella and marinara, served as a hearty family tray.
This baked ziti with ground beef (aka baked ziti with hamburger meat) is the classic family-tray version—brown the beef, simmer it in marinara, then bake with mozzarella for a hearty, crowd-pleasing ziti dish.

Ingredients

  • Classic ingredients, plus:
    • 450 g ground beef
    • Optional: 1/2 tsp chili flakes
    • Optional: a pinch of smoked paprika (adds depth)

Steps

  1. Brown the ground beef in a pan until fully cooked. Drain excess fat if needed.
  2. Stir beef into the marinara and simmer 5 minutes so the flavors meld.
  3. Combine with pasta and assemble like classic.
  4. Bake until bubbling and browned on top.

Alternatively, if you’re cooking for a crowd that likes a little heat, add a spoon of chili crisp or crushed red pepper between layers—small change, big payoff.

Also Read: Strawberry Smoothie Recipes (12 Easy Blends + Bowls & Protein Shakes)


7) Sausage baked ziti (deep, savory, a little bold recipe)

Sausage baked ziti has a richer, more seasoned backbone than ground beef, which makes it ideal when you want flavor without extra spices.
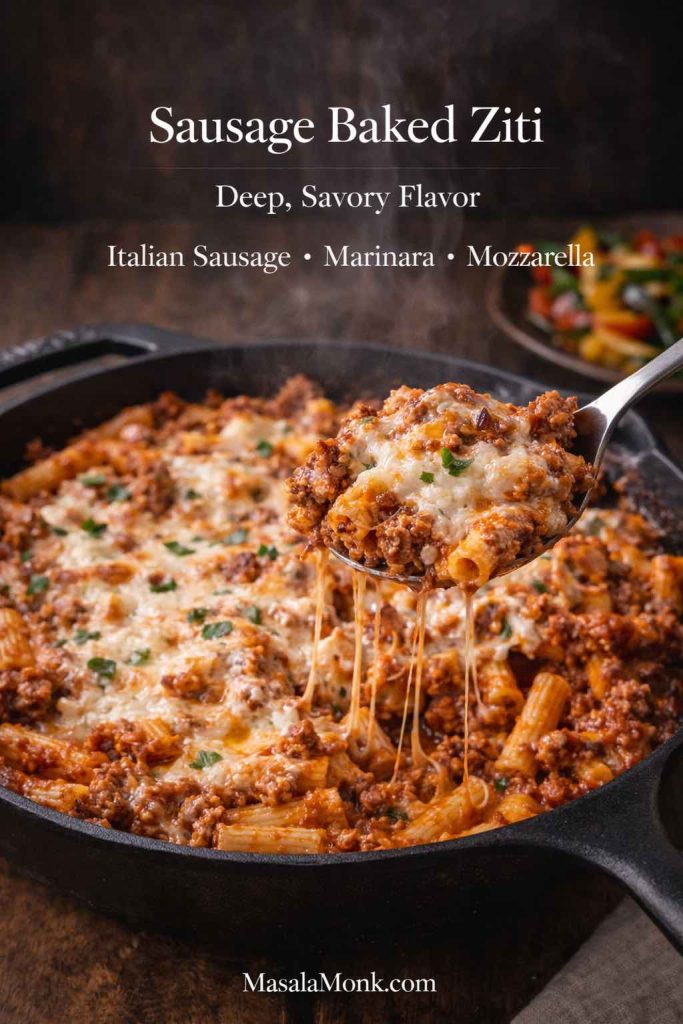
Sausage baked ziti in a cast-iron skillet with Italian sausage, marinara sauce, melted mozzarella, and a cheesy spoon lift.
Sausage baked ziti brings deep, savory flavor with almost no extra effort—brown Italian sausage, simmer it in marinara, then bake with mozzarella until bubbly and scoopable.

Ingredients

  • Classic ingredients, plus:
    • 450 g Italian sausage (casings removed)
    • Optional: fennel seeds if your sausage is mild
    • Optional: sautéed peppers for a sweeter balance

Steps

  1. Brown sausage, breaking it into chunks. Let it get a bit caramelized.
  2. Add marinara to the pan and simmer 5 minutes.
  3. Continue with the classic method.

If you’re already in a sausage mood, you may also enjoy the “cozy slow-cooker” lane of Italian-American comfort—MasalaMonk’s Crock Pot Lasagna Soup has the same spirit, just in bowl form.


8) Meatball baked ziti (sliceable and satisfying)

Meatball baked ziti is the “party version” of the dish: the slices look impressive, and every serving has a clear highlight.
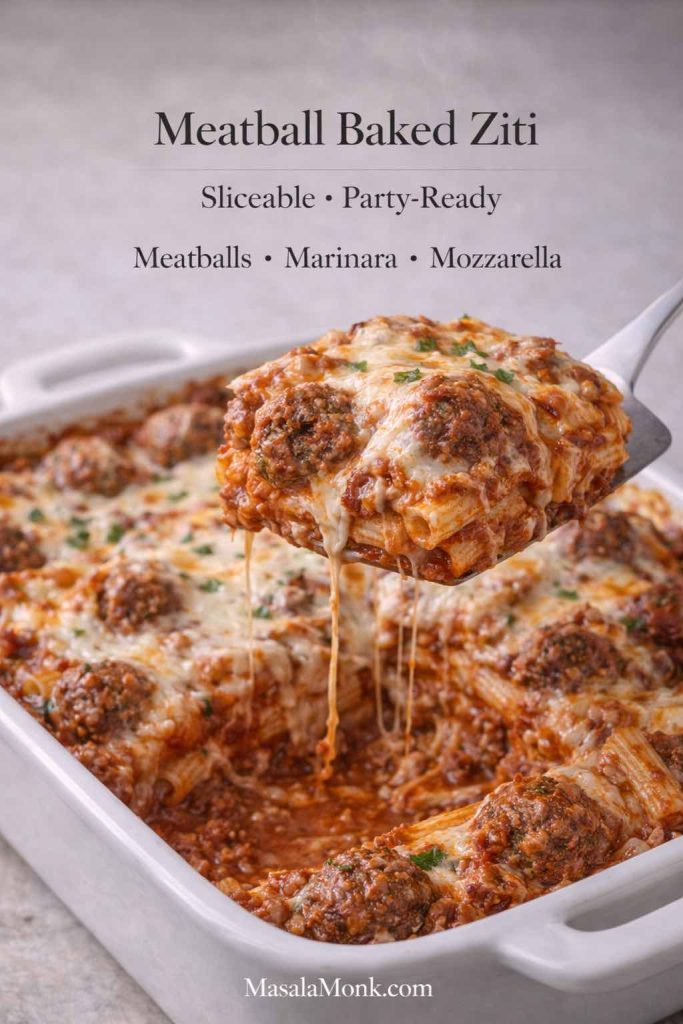
Meatball baked ziti in a casserole dish with a slice lifted on a spatula, showing meatballs, marinara sauce, ziti pasta, and melted mozzarella.
Meatball baked ziti is the “party version” of baked ziti—nestle warmed meatballs into saucy layers, then bake until bubbling so every slice delivers a meatball, plenty of marinara, and a melty mozzarella top.

Ingredients

  • Classic ingredients, plus:
    • 12–16 cooked meatballs (homemade or store-bought)
  • Optional: extra marinara for spooning over servings

Steps

  1. If using store-bought meatballs, warm them in marinara so they’re flavorful and tender.
  2. Assemble the dish: sauce layer → pasta → ricotta/cottage cheese layer → nestle meatballs → cheese → repeat.
  3. Bake until fully hot and bubbling.

Consequently, this version often benefits from an extra 5 minutes of rest time so the meatballs don’t shift when you serve.

Also Read: Classic Rum Punch + 9 Recipes (Pitcher & Party-Friendly)


9) Vegetarian baked ziti recipe (baked ziti without meat, still hearty)

Vegetarian baked ziti should never feel like “the meatless option.” The fix is texture and umami: mushrooms, spinach, roasted veg, or a mix.

Vegetarian baked ziti with mushrooms and spinach in marinara, topped with melted mozzarella and a cheesy spoon lift, labeled hearty and no meat needed.
Vegetarian baked ziti doesn’t have to feel like the “meatless option”—browned mushrooms and wilted spinach add savory depth, while a bubbling mozzarella top keeps this baked ziti without meat just as comforting as the classic.

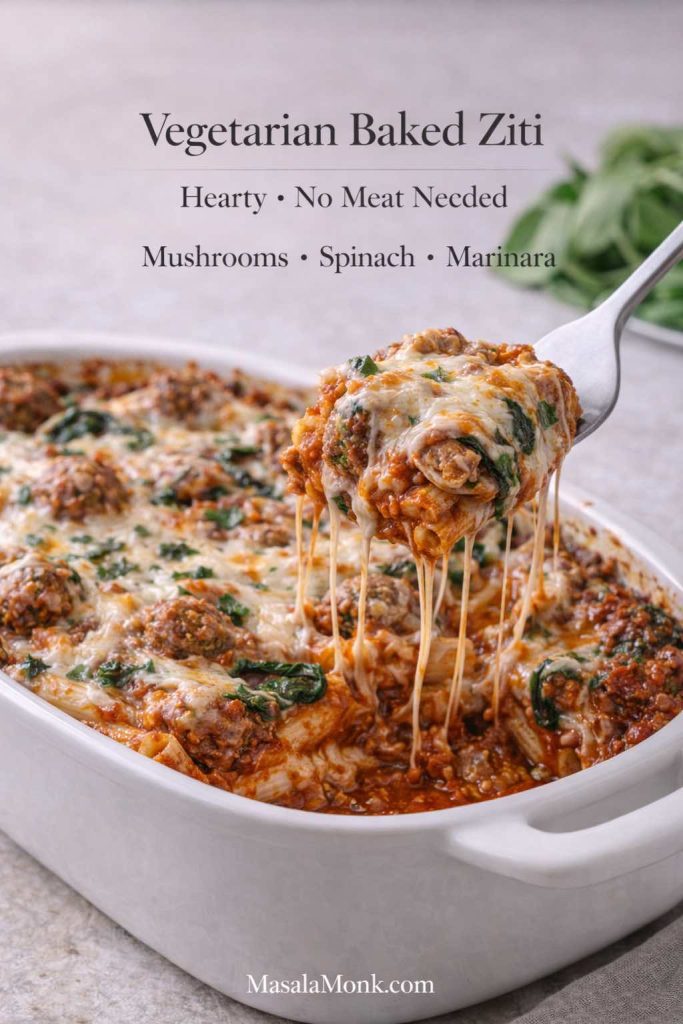
If you’re curious about building meat-like satisfaction from mushrooms in general, MasalaMonk has a useful plant-based guide: “Mushrooms” Instead of “Beef”. It’s not a ziti recipe, yet it’s packed with ideas for getting that savory, filling feel without meat.

Ingredients

  • Classic ingredients, plus:
    • 300–400 g mushrooms, sliced
    • 2 cups spinach
    • Optional: 1 tbsp soy sauce (tiny amount, big umami)

Steps

  1. Sauté mushrooms until they’re browned and you’ve cooked off their moisture.
  2. Stir mushrooms into the sauce and simmer 5 minutes.
  3. Stir spinach into the hot sauce just until it wilts.
  4. Assemble and bake like classic.

At the same time, a fresh, crunchy side makes the whole ziti meal feel lighter. A quick option that pairs beautifully is this garlicky skillet veg: Skillet Mushroom and Zucchini Stir Fry.


10) Veggie baked pasta (roasted vegetables, baked ziti style)

If you want veggie baked pasta, this is the version that hits that exact craving: roasted vegetables folded into marinara, then baked with pasta and cheese.

Roasted veggie add-in guide for veggie baked pasta (ziti style) showing roasted zucchini, bell pepper, and eggplant with marinara and uncooked ziti.
For veggie baked pasta (baked ziti style), roast zucchini, peppers, and eggplant until caramelized, then fold them into marinara before baking—this keeps the vegetables flavorful and prevents a watery pasta bake.

Ingredients

  • Classic ingredients, plus:
    • 1 zucchini, diced
    • 1 bell pepper, diced
    • 1 small eggplant, diced (optional but great)
    • 2 tbsp olive oil
    • Salt + pepper

Steps

  1. Roast the vegetables at 220°C / 425°F for ~20 minutes until browned at the edges.
  2. Stir roasted veg into the sauce and simmer 2–3 minutes.
  3. Assemble and bake like classic.

Because roasted vegetables can release moisture as they sit, this version tends to bake best when you roast until properly caramelized rather than “just soft.”

Also Read: 7 Pizza Sauce Recipes | Marinara, White Garlic, Alfredo, Buffalo, BBQ, Vodka & Ranch


11) Crock pot baked ziti (recipe of slow cooker baked ziti)

Crock pot baked ziti is for days when you want dinner to cook while you do literally anything else. It’s softer than oven-baked ziti and a little less browned, but it’s incredibly convenient.

Crock pot baked ziti in a slow cooker with a ladle lifting a cheesy portion, showing slow cooker baked ziti texture with marinara and melted mozzarella.
Crock pot baked ziti is the hands-off version of a baked ziti recipe—layer pasta, sauce, and cheese in the slow cooker, then scoop up a saucy, melty dinner that’s perfect for busy days.

Two ways to do it

  • Best texture: parboil pasta 4–5 minutes (still very underdone), then slow cook
  • Easiest: use a no-boil style approach with extra liquid, but keep a close eye on softness

Ingredients

  • 450 g ziti
  • 4 cups marinara
  • 1 cup water (only if you’re using the “no-boil” approach)
  • 250 g ricotta or cottage cheese
  • 2 cups mozzarella + parmesan
  • Oregano, salt, pepper

Steps

  1. Lightly oil the slow cooker insert.
  2. Mix sauce (and water if using). Season well.
  3. Layer sauce → pasta → ricotta/cottage cheese → mozzarella. Repeat until used up.
  4. Cook on LOW until pasta is tender and the center is hot (typically 2–3 hours, depending on your cooker).
  5. Let it sit with the lid off for 10 minutes before serving so it thickens slightly.

If you enjoy slow cooker comfort meals in this general lane, Crock Pot Lasagna Soup is another cozy option that uses similar flavors.


12) Vegan baked ziti (plant-based recipe, still comforting)

A vegan baked ziti recipe should feel creamy and cohesive rather than “pasta with tomato sauce.” The secret is a good ricotta-style component and enough seasoning to make it taste finished.
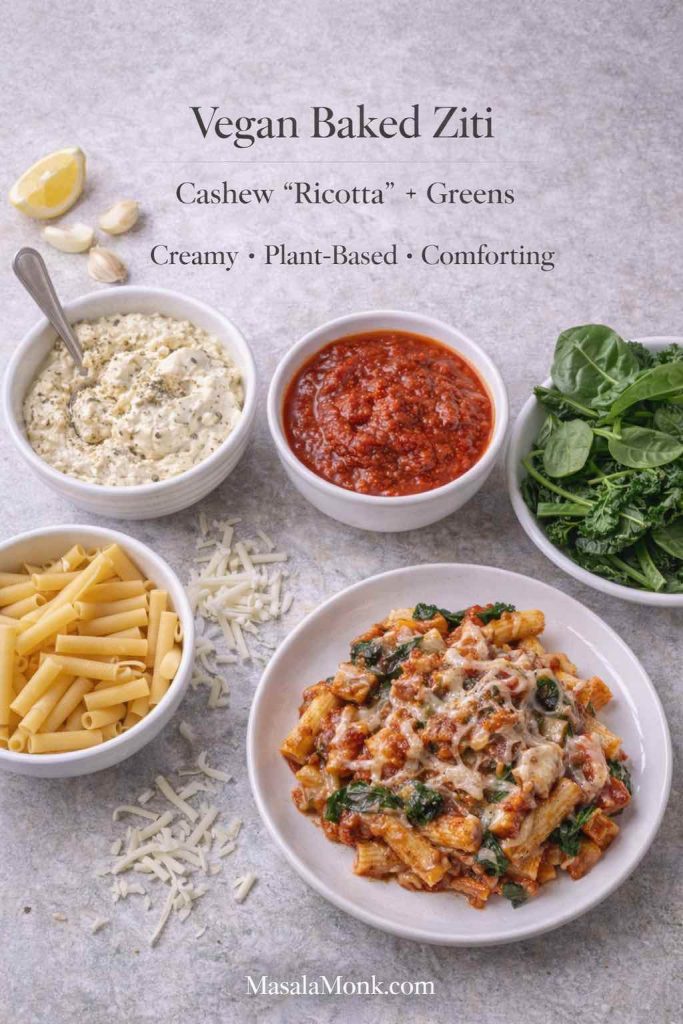
Vegan baked ziti that actually feels creamy: cashew “ricotta” adds richness, greens balance the marinara, and a meltable vegan cheese on top gives you that classic baked-ziti comfort—fully plant-based.

Ingredients

  • 450 g ziti (choose vegan-friendly pasta)
  • 3–4 cups marinara
  • 2–3 cups spinach or kale
  • Vegan mozzarella shreds (or a meltable vegan cheese)
  • Cashew ricotta (quick version):
    • 1 cup cashews (soaked if you can)
    • 2–3 tbsp lemon juice
    • 1 clove garlic
    • Salt + pepper
    • A splash of water to blend

Steps

  1. Blend cashew ricotta until creamy but not soupy.
  2. Cook pasta slightly under, or use a hydrated/no-boil method with extra liquid.
  3. Stir greens into sauce to wilt.
  4. Assemble: sauce → pasta → cashew ricotta → vegan cheese → repeat.
  5. Bake until hot and the top is lightly browned.

Even if you’re not fully vegan, this is a helpful “plant-based dinner” baked pasta to have in rotation—especially when cooking for mixed diets.

Also Read: Vegan Mayo Recipe Guide: 5 Plant-Based Mayonnaise


13) Gluten-free baked ziti (no mush, no sadness)

Gluten-free baked ziti is completely doable, but the timing matters. GF pasta softens faster, and oven heat can push it past “tender” into “too soft” if you’re not careful.
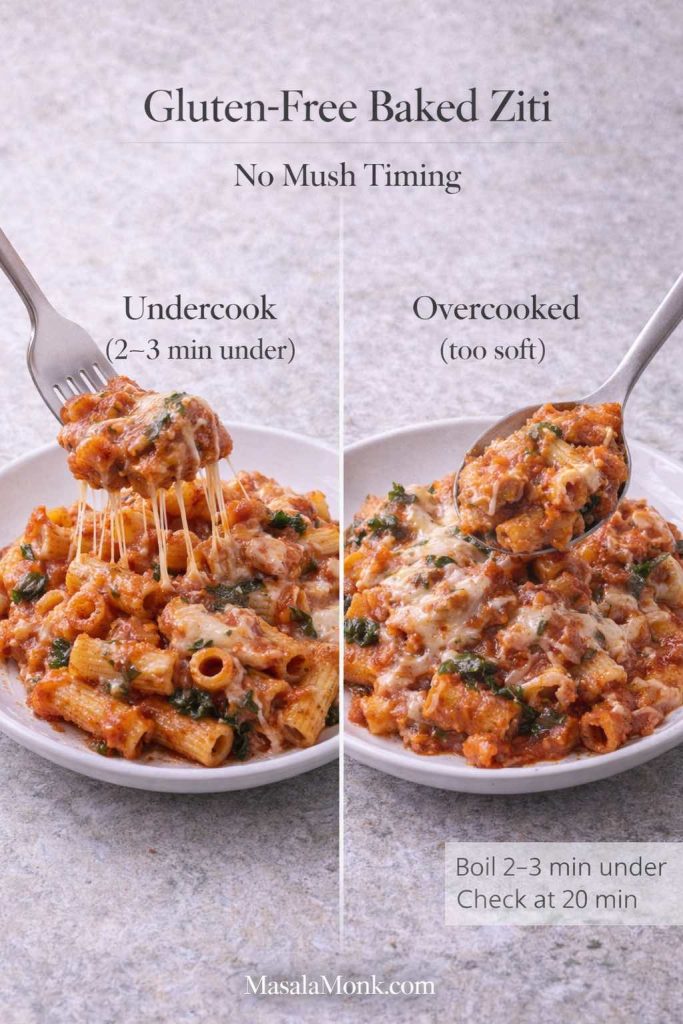
Gluten-free baked ziti timing guide comparing undercooked pasta vs overcooked pasta, showing firmer ziti tubes on the left and softer texture on the right, with tips to boil 2–3 minutes under and check at 20 minutes.
Gluten-free baked ziti is all about timing: boil the pasta 2–3 minutes under, then start checking the bake early (around 20 minutes) so the ziti stays firm instead of turning soft or mushy.

Ingredients

  • Same as classic, but use gluten-free ziti/penne/rigatoni

Steps

  1. Boil GF pasta until it’s more underdone than you think (often 2–3 minutes under the box time).
  2. Keep the sauce slightly looser than usual.
  3. Assemble and bake, but start checking at 20 minutes rather than 30.

If you like the idea of higher-protein pasta alternatives, you might also enjoy reading about legume-based options like lentil pasta—MasalaMonk has a guide that covers brands and recipes: Lentil Pasta for Weight Loss: Nutrition, Brands & 5 Recipes. You don’t have to make it about weight; it’s simply a useful overview of textures and cooking behavior.


14) Pizza baked ziti (pepperoni, oregano, “slice night” energy)

Pizza baked ziti is exactly what it sounds like: a baked ziti dish that leans into pizza flavors—pepperoni, extra oregano, and a cheesier top.
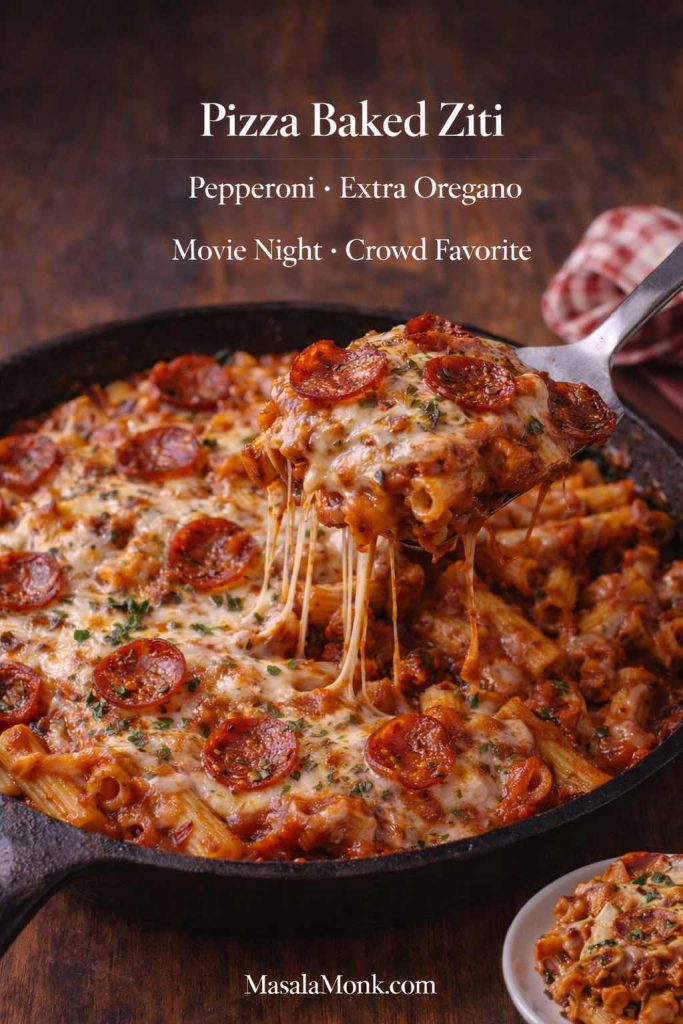
Pizza baked ziti with pepperoni and melted mozzarella in a skillet, showing a cheesy slice being lifted, labeled pepperoni and extra oregano.
Pizza baked ziti is the fun, crowd-pleasing twist—pepperoni, extra oregano, and a bubbly mozzarella top turn baked ziti into “slice night” comfort that’s perfect for movie night.

Ingredients

  • Classic ingredients, plus:
    • 80–120 g pepperoni (or plant-based pepperoni)
    • +1/2 tsp oregano
    • Optional: a few spoonfuls of pizza sauce mixed into the marinara

Steps

  1. Assemble like classic, but add pepperoni near the top layer and between layers for more punch.
  2. Finish with extra mozzarella and a little parmesan.
  3. Bake until the edges bubble and the top browns.

In other words, this is the baked pasta version of movie night: simple, loud flavors, very little fuss.

Also Read: Blueberry Pancakes (6 Recipes) + Homemade Pancake Mix


15) “Fresh sauce” baked ziti (lighter, brighter, still cozy)

Finally, when you want baked ziti that tastes less “heavy winter casserole” and more “fresh tomato pasta baked into comfort,” a homemade sauce base makes a noticeable difference.

Fresh sauce baked ziti card showing a skillet of fresh tomato sauce with basil, tomatoes, garlic, and olive oil, labeled brighter and tomato-forward.
Fresh sauce baked ziti tastes lighter and more tomato-forward—use fresh tomatoes, basil, and olive oil for a brighter baked ziti recipe that still bakes up cozy and bubbly.

Use the classic recipe, but swap jarred marinara for a fresh sauce. This MasalaMonk guide keeps it approachable: Tomato Sauce From Fresh Tomatoes.

To keep the overall pan balanced, pair the fresh sauce with either:

As a result, you get a baked ziti recipe that still feels comforting, but tastes brighter and more “tomato-forward.”

Also Read: Authentic Chimichurri Recipe (Argentine Steak Sauce)


How to store, freeze, and reheat baked ziti safely

Leftovers are part of the baked ziti charm, and it’s worth handling them safely so you can enjoy the second (and third) round with confidence.

For fridge storage, USDA guidance commonly points to using cooked leftovers within about 3–4 days, and reheating to 165°F (74°C). You can reference USDA’s food safety page here: Leftovers and Food Safety (USDA FSIS). Foodsafety.gov also reinforces reheating leftovers to 165°F and offers practical reheating reminders: Leftovers: The Gift that Keeps on Giving. If you like a simple chart format, Foodsafety.gov’s minimum internal temperatures include a leftovers line at 165°F: Safe Minimum Internal Temperatures.

Freeze and reheat baked ziti guide showing a labeled foil pan and storage tips: refrigerate 3–4 days and reheat leftovers to 165°F (74°C).
Freeze and reheat baked ziti the easy way: label your tray, keep leftovers in the fridge for 3–4 days, and reheat baked ziti until it reaches 165°F (74°C)—cover with foil first, then uncover to refresh the cheesy top.

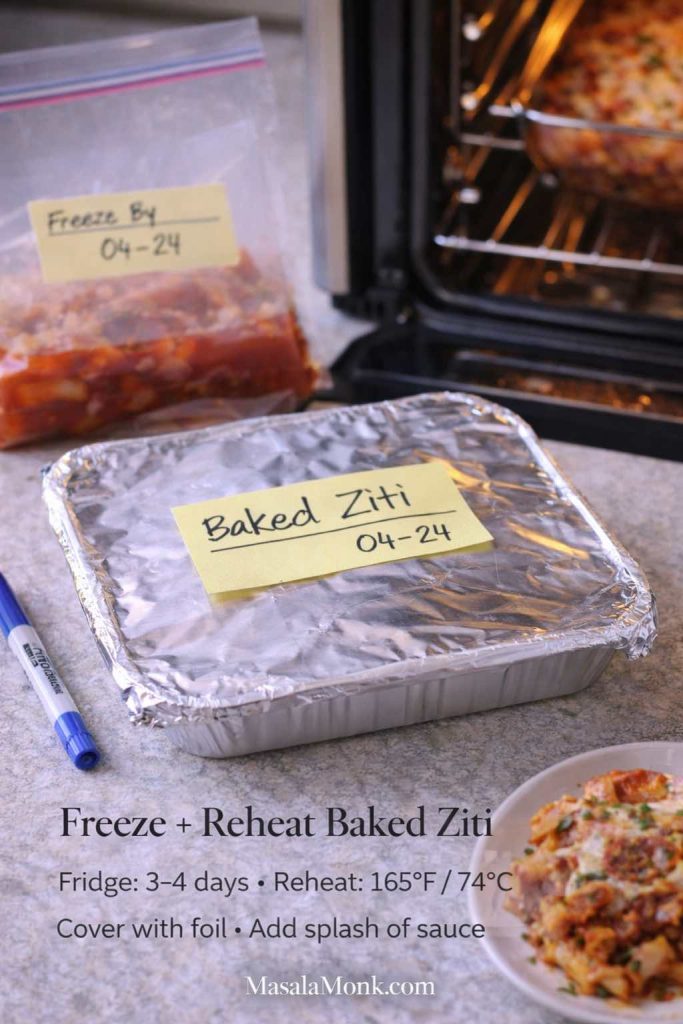
Reheating baked ziti (best texture)

  • Oven method: cover with foil and warm until hot throughout; uncover for the last few minutes to re-crisp the top.
  • Microwave method: add a spoon of water or sauce, cover loosely, and reheat in bursts so it warms evenly.

If you’re freezing a full tray, Allrecipes has a practical guide on what freezes well and how to protect texture: How to Freeze Casseroles. It’s especially helpful for baked pasta because it talks through moisture, dairy, and best practices for baking from frozen.

Freezing baked ziti (simple approach)

  1. Cool fully.
  2. Wrap tightly (plastic wrap + foil, or a tight lid).
  3. Label with date.
  4. Reheat covered first, then uncover to brown.

Also Read: Double Chocolate Chip Cookies – Easy Recipe with 7 Variations


What to serve with baked ziti (drinks + lighter sides that fit naturally)

A baked ziti meal can be rich, so pairing it with something bright—or simply something crunchy—makes the whole dinner feel more complete. Instead of piling on another heavy side, aim for contrast: tang, citrus, herbs, crisp vegetables, or a cooling drink.

Drinks that work especially well

For something creamy and soothing, mango lassi is a classic partner to tomato-rich meals because it softens acidity and heat. MasalaMonk’s version includes five variations, so you can keep it simple or get playful: How to make Mango Lassi (5 versions).

If you’d rather go refreshing and zippy, jal jeera is a punchy cumin-citrus drink that feels tailor-made for richer baked pasta nights: Jal Jeera aka the Indian Lemonade.

And if you’re setting a family-friendly table (or you just want something bubbly that reads “special”), this MasalaMonk roundup has plenty of options: Apple juice mocktails for every occasion.

If you want a more tropical, hydration-forward angle, MasalaMonk also has a collection that includes both cocktails and mocktail-leaning ideas built around coconut water: Coconut water cocktails and refreshing drink ideas. Even if you skip the alcohol, the flavor pairings are useful inspiration.

Wondering what to serve with baked ziti? Pair a rich baked ziti recipe with a crisp salad, a bright green side, and a refreshing drink to balance the richness and make the meal feel lighter.

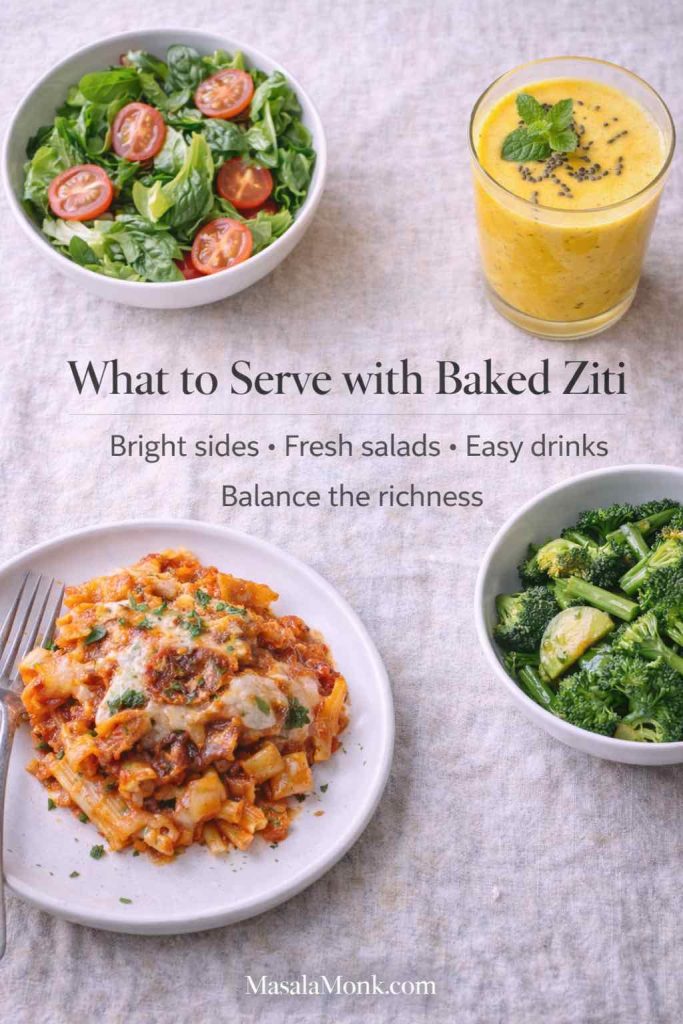
Lighter sides that balance a baked pasta

A quick vegetable side is often enough. This simple garlicky sauté is fast, bright, and surprisingly perfect next to baked ziti: Skillet Mushroom and Zucchini Stir Fry.

For crunch and protein, a peanut salad gives you that fresh bite that baked pasta lacks by design: Crunchy, tangy, spicy peanut salad.

If you want a gentle “balance the plate” mindset without turning dinner into a lecture, Harvard’s Healthy Eating Plate is a simple visual reminder to load up vegetables and choose whole grains when you can: Healthy Eating Plate (Harvard Nutrition Source). Their whole grains overview is also useful if you’re deciding between refined pasta and whole-grain options: Whole Grains (Harvard Nutrition Source).


A final word before you pick your version

The best baked ziti recipe is the one you’ll actually make again. Some nights that’s a classic tray with ricotta and mozzarella; other times it’s baked ziti without ricotta because that’s what you’ve got; and occasionally it’s a slow cooker baked ziti because you want dinner to cook while life happens.

Pick your baked ziti variations guide showing options for weeknight (easy, no-boil), creamy (ricotta, no ricotta, cottage cheese), hearty (ground beef, sausage, meatballs), diet (vegetarian, vegan, gluten-free), and pizza baked ziti.
Not sure which baked ziti recipe to make tonight? Use this quick baked ziti variations guide to choose by mood—easy or no-boil for weeknights, ricotta or cottage cheese for creamy, ground beef/sausage/meatballs for hearty, vegetarian/vegan/gluten-free for dietary needs, or pizza baked ziti for “slice night.”

Start with the classic base once. Then, the next time you’re craving a different vibe, jump straight to the recipe card that matches your pantry and your mood—easy baked ziti, sausage baked ziti, vegetarian baked ziti, veggie baked pasta, no boil baked ziti, gluten-free baked ziti, vegan baked ziti recipe, or pizza baked ziti. That’s the whole point of keeping all the variations together: one method, many dinners, no stress.

Also Read: How to Make Churros (Authentic + Easy Recipe)

FAQs

1) What is the best baked ziti recipe for beginners?

For most beginners, the best baked ziti recipe is the classic version with marinara, ricotta, mozzarella, and parmesan. It’s forgiving, it bakes evenly, and the layers help prevent dryness. If you’re nervous about timing, cook the pasta slightly under al dente so it finishes perfectly in the oven.

2) What makes an easy baked ziti recipe truly “easy”?

An easy baked ziti recipe usually means fewer steps and fewer dishes. Common shortcuts include using jarred marinara, skipping sautéed onion, and mixing the ricotta directly into the pasta and sauce instead of carefully layering. As long as you still bake it until bubbling, it will taste like a proper baked ziti dish.

3) Can I make baked ziti with ricotta cheese and still keep it creamy?

Yes. Baked ziti with ricotta cheese stays creamy when the sauce is not too thick and the pasta is slightly undercooked before baking. Additionally, seasoning the ricotta (salt, pepper, parmesan) improves flavor without changing texture. If you like a softer middle, add a small splash of water to the sauce before assembling.

4) Can you make baked ziti without ricotta?

Absolutely. Baked ziti without ricotta works well with cottage cheese, a cream cheese blend, or thick Greek yogurt. The key is choosing a substitute that adds moisture and helps the layers hold together. In many cases, you’ll want a touch more mozzarella on top since ricotta-free versions rely more on melt for that classic comfort bite.

5) Is baked ziti with cottage cheese a good substitute for ricotta?

Surprisingly, yes. Baked ziti with cottage cheese is one of the closest swaps for ricotta because it bakes into a creamy layer. For a smoother texture, blend the cottage cheese briefly before using it. On the other hand, if you prefer more texture, use it as-is.

6) Can I make baked ziti without meat and still make it filling?

Definitely. Vegetarian baked ziti (or baked ziti without meat) is satisfying when you add ingredients that bring savory depth, such as mushrooms, spinach, roasted vegetables, or a mix of the three. In particular, browning mushrooms well before adding them to sauce makes the whole ziti meal taste richer without needing meat.

7) What’s the difference between vegetarian baked ziti and veggie baked pasta?

Vegetarian baked ziti is usually a baked ziti recipe that skips meat but keeps the classic pasta-bake structure. Veggie baked pasta, meanwhile, often leans more heavily on vegetables—especially roasted vegetables—as the “main event,” with pasta and cheese supporting them. In practice, they overlap a lot; the difference is simply emphasis.

8) Can I make baked ziti with ground beef (hamburger meat)?

Yes. Baked ziti with ground beef—often sought as baked ziti with hamburger meat—starts by browning the beef, draining extra fat, then simmering it briefly in marinara. Afterward, assemble and bake like any other baked ziti recipe. For deeper flavor, let the beef brown a little more before adding sauce.

9) Is sausage baked ziti better than ground beef baked ziti?

It depends on what you want. Sausage baked ziti tends to taste more boldly seasoned because the sausage already contains spices. Ground beef baked ziti, by contrast, is milder and more “classic cafeteria comfort” in the best way. If you’re serving a crowd with mixed tastes, ground beef is often the safer pick.

10) How do I make meatball baked ziti without drying it out?

Use meatballs that are fully cooked but not overbaked, and keep them nestled within saucy layers rather than sitting exposed on top. Also, add enough marinara so the bake stays moist. If the dish looks dry before it goes into the oven, it will only get drier during baking.

11) What pasta can I use if I can’t find ziti pasta?

If ziti pasta is unavailable, use rigatoni, penne, or other short tube shapes. The main idea is choosing a pasta that holds sauce and stands up to baking. Avoid very thin pasta shapes, because they can turn soft more quickly in the oven.

12) How do I keep baked ziti from drying out?

First, don’t overcook the pasta before baking. Next, make sure the sauce is loose enough—thick sauce can bake up too tight and dry. Finally, cover with foil for part of the bake if your oven runs hot, then uncover near the end to brown the cheese.

13) What is no boil baked ziti, and does it really work?

No boil baked ziti is a method where dry pasta hydrates in the oven using extra liquid from sauce and added water or stock. It can work very well, provided the dish is covered tightly for the first stage of baking and you use enough liquid. If you prefer a firmer bite, uncover near the end so excess moisture cooks off.

14) Can I make crock pot baked ziti or baked ziti in a slow cooker?

Yes—crock pot baked ziti is popular because it’s hands-off. For better texture, parboil the pasta briefly before layering. If you use dry pasta, you’ll need extra liquid and careful timing to prevent it from getting too soft.

15) Can I make a vegan baked ziti recipe that still tastes rich?

Yes. Vegan baked ziti is richest when you include a creamy component (like cashew “ricotta”) plus enough seasoning in the sauce. Also, adding greens like spinach helps balance the richness. If you’re aiming for that classic baked ziti feel, a meltable vegan cheese on top helps deliver the familiar finish.

16) How do I make gluten-free baked ziti without mushy pasta?

Gluten-free baked ziti turns out best when the pasta is undercooked before baking and the bake time is watched more closely. In addition, keep the sauce slightly looser so the pasta finishes cooking without drying out. Since different GF pastas behave differently, checking doneness early is the easiest safeguard.

17) Can I assemble baked ziti ahead of time?

Yes. Assemble the baked ziti recipe, cover tightly, and refrigerate. When baking from cold, add extra time so the center heats through. If the top browns too quickly, cover with foil and uncover later to finish.

18) Can I freeze baked ziti, and should I freeze it baked or unbaked?

You can freeze baked ziti either way. Freezing unbaked keeps the cheese layer fresher in texture, while freezing baked is convenient for quick reheating. Either option works; the difference is simply whether you want “ready-to-reheat” convenience or “fresh-baked” texture.

19) How long does baked ziti last in the fridge?

Typically, baked ziti lasts several days in the fridge when stored in an airtight container. For best flavor and texture, eat it sooner rather than later, because baked pasta continues to absorb sauce over time.

20) How do I reheat baked ziti so it stays cheesy and moist?

For the best texture, reheat in the oven covered with foil, then uncover briefly to refresh the top. If using a microwave, add a small spoon of water or extra sauce before reheating so the pasta doesn’t dry out. Either way, heating gently is better than blasting it quickly.

21) What temperature do you bake baked ziti at?

Most baked ziti recipes bake well around 190°C / 375°F. That temperature is hot enough to bubble sauce and melt cheese without scorching the top too fast. If you want more browning, use a short broil at the end rather than raising the oven temperature.

22) What are the most popular baked ziti variations?

The most popular baked ziti variations tend to include easy baked ziti, baked ziti with ricotta, baked ziti without ricotta, baked ziti with cottage cheese, vegetarian baked ziti (baked ziti without meat), baked ziti with ground beef (hamburger meat), sausage baked ziti, crock pot baked ziti, vegan baked ziti, gluten-free baked ziti, and pizza baked ziti.

Posted on 12 Comments

Macaroni & Cheese Recipe: Creamy Stovetop, Baked & Southern

Hand lifting a gooey spoonful from a golden baked macaroni and cheese, with two creamy variations in the background—portrait cover for a macaroni and cheese recipe by MasalaMonk.

When you crave a macaroni and cheese recipe, chances are you’re picturing a bowl of silky noodles wrapped in a molten, savory blanket—nostalgic yet refined, familiar yet endlessly adaptable. In that spirit, what follows is a single, dependable blueprint that branches gracefully into three proven versions: a quick, creamy stovetop you can finish on a weeknight without breaking a sweat; a creamy baked casserole crowned with a bronzed, crunchy top; and a Southern baked, custard-style classic that slices neatly and holds beautifully for gatherings. As we go, you’ll also find natural places to layer in chicken, to lighten or enrich, and to experiment with cheeses—plus a few carefully chosen references for technique, safety, and smart flavor moves.


Creamy Stovetop Macaroni & Cheese Recipe (Ready Fast, Stays Silky)

First, let’s anchor the base. This stovetop method leans on a softly cooked roux, warmed milk, and patient whisking before the cheese ever touches heat. Then, crucially, the melt happens off the burner, which prevents the proteins from tightening and turning grainy. Not only does this approach deliver a glossy sauce, but it also makes the whole process calmer and more forgiving.

Ingredients (serves 4):

  • 225 g (8 oz) elbow macaroni (or cavatappi), cooked very al dente in generously salted water
  • 30 g (2 Tbsp) unsalted butter
  • 20 g (about 2½ Tbsp) all-purpose flour
  • 480 ml (2 cups) whole milk, gently warmed
  • 60 ml (¼ cup) evaporated milk (optional, for sheen and stability)
  • 170 g sharp cheddar, finely grated
  • 70 g Gruyère or Monterey Jack, finely grated
  • 1 thin slice American cheese (optional, for ultra-smooth emulsion)
  • ¾ tsp kosher salt, or to taste
  • ¼ tsp mustard powder
  • Pinch of white pepper and a light dusting of sweet paprika
Hand lifting a spoonful of silky stovetop macaroni and cheese from a cast-iron skillet; cheese strands and warm milk in background.
Creamy stovetop macaroni and cheese—melted off the heat for a glossy sauce in about 15 minutes.

Method:

  1. Boil and time it right. Cook the pasta in well-salted water until one minute shy of al dente; drain but reserve about ½ cup of starchy cooking water. Meanwhile, warm the milk in a small pot or microwave—it shouldn’t be hot, just comfortably warm.
  2. Roux, but gently. In a wide saucepan over medium heat, melt the butter. Sprinkle in the flour and whisk for 60–90 seconds; you’re cooking out the raw edge, not browning.
  3. Build the béchamel. Whisk in the warm milk gradually, stirring constantly to avoid lumps. Bring to a lazy simmer and cook for 3–4 minutes, until the sauce lightly coats the back of a spoon. If using, stir in the evaporated milk.
  4. Take it off the heat. Slide the pan off the burner. Stir in the cheddar and Gruyère in two or three small additions, letting each handful melt before adding the next. If you want a super-glossy, café-style finish, slip in the optional slice of American at the end. Season with salt, mustard powder, white pepper, and paprika.
  5. Finish to gloss. Fold in the pasta. If the sauce tightens, loosen with a tablespoon or two of the reserved pasta water. You’re aiming for a sauce that clings without clumping, shining lightly on every elbow.

Because technique matters, it helps to remember why this works: cheese melts best away from direct heat, and gradual additions prevent seizing. If you’d like a deeper dive into emulsified cheese sauces—including an approachable explanation of why evaporated milk and a touch of starch make them more stable—the step-by-step breakdown by Serious Eats is a clear, practical companion you can consult for extra confidence (ultra-gooey stovetop method and a concise explainer on stabilizers here).


Baked Macaroni & Cheese Recipe (Creamy Center, Crunchy Top)

Sometimes, what you want is a bubbling, cozy casserole that starts with the same silky base and then bakes just long enough to marry flavors and crisp the lid. Rather than reinvent the wheel, we’ll take that stovetop sauce and invite it into the oven for a short visit.

Ingredients & Setup:
Prepare the stovetop version as written. Butter a 9×9-inch (or similar) baking dish. Combine 1 cup panko with 1 Tbsp melted butter and a pinch of salt; set aside 1 cup of grated cheddar.

Hand sprinkling buttery breadcrumbs over a golden baked macaroni and cheese in a black casserole; cheese wedge and grater softly blurred.
Baked mac and cheese with a bronzed breadcrumb lid and a creamy center for the perfect bite.

Bake:

  1. Stir the drained pasta into the finished sauce, then transfer the mixture to the buttered dish.
  2. Scatter the extra cheddar over the top, followed by the buttered panko.
  3. Bake at 190 °C / 375 °F for 15–20 minutes, until the edges barely bubble and the crumb turns golden. For a final flourish, broil for 1–2 minutes, just until the top is audibly crisp when tapped.

For extra insurance against splitting, a splash of evaporated milk in the sauce and finely grated cheese (not thick shreds) make a noticeable difference. If you enjoy exploring why evaporated milk and cornstarch prevent breakage, the technique notes from Serious Eats are well worth a quick read (stable cheese sauce method).


Southern Baked Macaroni & Cheese Recipe (Custard-Style, Sliceable)

On holidays and church tables across the South, you’ll find a different—but equally beloved—style: a custard set with eggs and enriched by evaporated milk. The texture is tender, sliceable, and deeply comforting; moreover, it holds exceptionally well on buffets and travels neatly to potlucks.

Ingredients (serves 6):

  • 225 g elbows, cooked to firm al dente
  • 2 large eggs, beaten
  • 360 ml (1½ cups) evaporated milk
  • 120 ml (½ cup) whole milk
  • 280 g cheese blend (for example, 200 g sharp cheddar + 80 g Colby or Jack), divided
  • 30 g butter, melted
  • ½ tsp kosher salt; ¼ tsp black pepper; pinch paprika
Hand cutting a neat square of Southern baked macaroni and cheese from an oval casserole; custard-like interior visible with vintage spoon and milk props.
Southern baked mac and cheese—egg-set custard texture that slices cleanly and holds beautifully for gatherings.

Method:

  1. Toss the hot pasta with half the cheese and the melted butter; spread it evenly in a buttered 8×8-inch dish.
  2. Whisk together the eggs, evaporated milk, whole milk, salt, and pepper. Pour the custard over the pasta. Top with the remaining cheese and dust lightly with paprika.
  3. Bake at 175 °C / 350 °F for about 30–35 minutes, until the center is just set and the top is gently browned. Let it rest 10 minutes before cutting.

Because this version contains eggs, it’s wise to check that the center reaches 160 °F / 71 °C. A quick-read thermometer makes this easy; for a straightforward reference, the USDA/FSIS safe temperature chart is the standard many pros keep bookmarked (official chart and an egg-dish note for clarity here).


Cheese Choices That Actually Melt (and How to Blend for Balance)

Now, let’s talk flavor and function in one breath. Sharp cheddar brings that quintessential mac-and-cheese profile; however, when used alone, it can turn a little pasty. To counter this, combine it with a young, elastic melter—Monterey Jack, young Gouda, or even a restrained portion of mozzarella—so the sauce stays fluid and supple. Then, to lift the aroma, a small share of Gruyère or Emmentaler adds nuttiness without dominating.

As a practical baseline for 240–250 g total cheese, try 60% sharp cheddar, 25% alpine (Gruyère/Emmentaler), 15% easy-melter (Jack/Gouda). For an elegant salty finish, shave in a spoonful of finely grated Parmesan right at the end—handled thoughtfully, it boosts savoriness without tightening the sauce. If you’d like a refresher on Parmesan varieties and how to use them wisely, the MasalaMonk overview offers a handy primer on style, storage, and serving ideas: browse the concise guide to Parmesan and its varieties for context and quick comparisons (MasalaMonk primer) and, for a side-by-side, this deeper Parmesan vs. Parmigiano Reggiano piece breaks down labeling, flavor, and age cues in plain language (comparison guide).

If you ever want showroom-smooth sauce while using stronger, older cheeses, you can also explore sodium citrate—a simple, safe emulsifying salt that keeps melted cheese from separating. It’s not required, yet it’s fascinating to learn; for an approachable, kitchen-tested walkthrough, the Serious Eats breakdown shows how a pinch turns almost any cheese blend into a glossy, pourable dream (sodium-citrate baked method and the broader mac & cheese overview with variations here).


Variation Pathways (Layer More Flavor Without Losing the Plot)

Because the base is flexible, you can extend this macaroni and cheese recipe in several directions without compromising texture. Rather than sprawl into fully separate recipes, think of these as compact pathways you can fold in as needed.

Chicken Macaroni & Cheese Recipe (Comforting and Hearty)

Warm, gently seasoned chicken plays especially well with creamy sauces. After saucing the pasta, fold in 2 cups of diced roast chicken; the residual heat is enough to warm it through without drying. If you’re hunting for subtle flavor ideas that won’t clash with dairy—think a whisper of garlic, a hint of herbs—our MasalaMonk Chicken Alfredo collection explores creamy, chicken-forward combinations that transfer beautifully into mac and cheese without overshadowing the cheese base (find inspir­ing pairings).

Macaroni & Cheese Recipe with Cream Cheese (Even Silkier)

If you love an extra-lux mouthfeel, whisk in 60–90 g cream cheese off the heat, then reduce the cheddar by about 15% to keep salt in balance. This trick mimics the stability you’d get from processed slices while remaining firmly in “from-scratch” territory. If you’d like the science behind why a little stabilized dairy keeps the emulsion glossy, the practical testing notes by Serious Eats illustrate how evaporated milk and a touch of starch prevent separation without adding gumminess (technique explainer).

Three-Ingredient Macaroni & Cheese Recipe (Minimalist, Weeknight)

For nights when you want dinner with vanishing effort, use pasta, milk, and cheese alone. Simmer the pasta directly in milk with frequent stirring until barely tender, remove from heat, and add finely grated cheese in small handfuls. The result tastes nostalgic and takes scarcely more time than a boxed dinner; if you’d like a tested baseline, Serious Eats has a straightforward version that gets the job done without fuss (three-ingredient approach).

White Cheddar Macaroni & Cheese Recipe

Swap the blend for 100% white cheddar, ideally medium sharp rather than extra-aged. To keep the texture lively, add a whisper of mustard powder and finish with a spoonful of pasta water; this simple tweak maintains flow and prevents the sauce from turning claggy.

Gouda or Jack Accents (Nutty or Mildly Sweet)

When you want mellow sweetness or a nudge of nuttiness, fold young Gouda or Monterey Jack into your cheddar base at a 40:60 ratio. Meanwhile, if you’re tempted by smoked Gouda, keep it to 20–25% of the blend; otherwise, it can dominate.

Holiday & Potluck Strategy (Make-Ahead Without Stress)

Before a gathering, assemble either baked version up to 24 hours in advance. Cover and refrigerate, then bake covered until heated through; uncover toward the end so the top browns. For a whisper of depth that reads “festive” rather than “smoky,” finish with a dusting of sweet paprika. For more gentle paprika routes that respect dairy’s sweetness, the MasalaMonk paprika-in-classics guide offers clever, balanced ideas you can borrow without overpowering the dish (practical paprika tips).

Gluten-Free, Lactose-Conscious, and Low-Carb Considerations

If you’re cooking for gluten-free guests, switch to GF elbows and build the roux with rice flour; the method is identical, though you may find the sauce sets a hair faster. If you’re reducing lactose, opt for lactose-free milk and focus on aged cheeses, which typically contain far less residual lactose than young, fresh styles. And if you’re steering low-carb, try roasted cauliflower florets as the base, then finish with slightly more sauce for coverage. For a helpful sweep of practical swaps and carb-conscious alternatives, our MasalaMonk keto pasta guides lay out approachable options—from zucchini ribbons to spaghetti squash—while explaining how to season them so the dish still tastes indulgent (low-carb pasta options and a broader keto-friendly overview here).


Texture Troubleshooting (Quick Fixes That Respect the Sauce)

Even with a steady hand, sauce can misbehave; fortunately, a few calm adjustments bring it back in line.

If it’s grainy or greasy: You likely melted the cheese over too much heat or added it too fast. Pull the pot off the burner, whisk vigorously, and trickle in a tablespoon or two of warm milk to re-emulsify. Next time, keep the pan off heat during the melt and add cheese in handfuls. If you’re curious about the “why,” the emulsification explanation in the Serious Eats mac series translates kitchen chemistry into everyday steps you can actually use (overview with technique notes).

If it’s too thin: Simmer the béchamel a touch longer before adding cheese; or, whisk 1 tsp cornstarch into 1 Tbsp cold milk, then stir that into the gently simmering sauce for 30–60 seconds. This minor adjustment thickens without chalkiness and, importantly, won’t dull the cheese flavor.

If it’s too thick: Ease in warm milk or a spoon of pasta water until the sauce flows freely again. Because starch can tighten as it cools, it’s normal to need a splash more liquid at the table.

If reheating: Stir low and slow with a splash of milk; avoid high heat. For baked leftovers, cover with foil and warm gently. Softness returns as the sauce relaxes and regains moisture.

Also Read: Lentil Pasta for Weight Loss: Nutrition, Best Brands & 5 Healthy Recipes


Flavor Lifts That Don’t Overpower

Cheese loves restraint. Accordingly, keep boosts small and purposeful so the dairy still sings.

  • Mustard powder: A tiny pinch (⅛–¼ tsp) brightens cheddar and lifts aroma without shouting.
  • White pepper: A whisper adds warmth without speckling the sauce.
  • Onion powder or garlic powder: Go light—⅛ tsp at a time—so you add a hum rather than a headline.
  • Paprika: Sweet for color and softness; smoked only in the smallest quantities, ideally on top rather than in the sauce.
  • Nutmeg: One or two gentle gratings in the béchamel, especially if you’re leaning alpine with Gruyère.

If you’d like to practice restraint with creamy sauces while still layering interest, the balanced approach in our Classic vs. Authentic Alfredo walkthrough shows how to use starchy pasta water, butter, and cheese to create dimension without clutter—ideas that port gracefully into mac and cheese as well (learn the gentle emulsion approach). And for more creative yet dairy-friendly directions, the Indian-inspired Alfredo riffs offer nuanced spice paths that flatter, not fight, a cream-and-cheese base (five subtle twists).


The “Why” Behind Small Habits That Matter

A few small behaviors do the heavy lifting:

  • Warm the milk. Cold milk can seize the roux and create tiny lumps that never fully smooth out.
  • Grate finely. Thin shreds melt evenly and quickly; thick batons resist and clump.
  • Melt off heat. Cheese proteins are delicate; gentle residual heat delivers silk instead of chalk.
  • Season late. Salt levels vary wildly among cheeses. Taste after melting, not before.
  • Hold back pasta water. A tablespoon or two can rescue a sauce that tightened while you grabbed bowls.
  • Rest custards. The Southern baked version continues to set after leaving the oven; give it 10 minutes before cutting.

If your curiosity runs deeper, the modern mac-and-cheese canon collected by Serious Eats stitches together precisely these habits with testing notes you can use immediately, from stovetop to baked—and from classic cheddar blends to sodium-citrate adventures (explore the collection). Meanwhile, when you’re preparing the egg-set Southern style, it never hurts to keep the USDA temperature reference close at hand for that easy 71 °C target (official guidance).


Ingredient Swaps That Preserve Structure

Because life happens, let’s outline safe substitutions that won’t disrupt the balance:

  • Milk: 2% works with a touch of extra butter; half-and-half works if you loosen with pasta water to avoid over-thickening.
  • Flour: Rice flour performs well in the roux for gluten-free guests; whisk diligently and give it an extra 30 seconds on the heat to tame any raw note.
  • Cheddar: Medium sharp melts more kindly than extra-aged; if using very old cheddar, fold in 10–15% Monterey Jack for elasticity.
  • Butter: Neutral oils can stand in for the roux, yet butter’s milk solids add flavor; if substituting, consider finishing with a small pat of butter at the end for aroma.

And if you’re pursuing low-carb or simply variety, moving from pasta to roasted cauliflower florets changes the dish’s feel while keeping the spirit intact. To make that detour more satisfying, skim the MasalaMonk low-carb pasta alternatives; the strategies there translate directly to mac and cheese and help you keep richness without wobbling structure (practical low-carb swaps).


Bringing It All Together

At its heart, a macaroni & cheese recipe should be dependable, comforting, and easy to tailor. The creamy stovetop builds confidence because it behaves; the baked variation adds celebration with texture and aroma; the Southern custard provides nostalgia and crowd-pleasing structure. From there, you can nudge flavor—toward chicken for heartiness, toward white cheddar for clarity, toward alpine notes for depth—while the technique remains steady beneath your hands.

As you cook, let small, careful moves do the work: warm the milk before whisking, melt the cheese off heat, grate finely, season at the end, and keep a little pasta water on standby. If you’re feeding a crowd, assemble ahead and bake gently; if you’re feeding yourself, the stovetop pan will be ready before you’re done setting the table. And should you want to explore richer emulsions, silkier textures, or kitchen-tested tweaks, the thoughtfully written technique pieces from Serious Eats give you both confidence and clarity, while the USDA benchmarks keep holiday casseroles safely on target. Meanwhile, when you’re hungry for friendly flavor expansions—cheese primers, paprika tips, creamy chicken pairings—the linked MasalaMonk guides open the door to variations that respect the dish’s soul rather than drown it out.

In the end, whether you spoon it steaming from the pot, crack through a breadcrumb crust, or slice a custard-set square beside collards and cornbread, you’re returning to the same promise: warm noodles, a gentled emulsion, and the kind of cheesy comfort that meets you exactly where you are tonight.

FAQs

1) What is the best macaroni and cheese recipe for beginners?

For a first timer, a classic stovetop macaroni and cheese recipe is ideal: make a light roux (equal parts butter and flour), whisk in warm milk to form a béchamel, then melt in finely grated cheddar with a secondary melter like Monterey Jack off the heat. This path is quick, forgiving, and produces a glossy sauce without special equipment.

2) Which cheeses melt best for mac and cheese?

Aim for a blend: primarily sharp cheddar for flavor, supported by a young melter (Monterey Jack, young Gouda, or low-moisture mozzarella). Optionally, include a little Gruyère or Emmentaler for nutty depth. This combination delivers flavor, stretch, and smoothness without becoming oily.

3) How can I keep my cheese sauce from turning grainy or greasy?

Remove the pan from direct heat before adding cheese; stir in small handfuls until each addition melts. Furthermore, grate cheese finely, warm the milk beforehand, and avoid pre-shredded bags with anti-caking starch if possible. Gentle handling prevents the proteins from tightening.

4) What pasta shape works best—and why?

Elbows are traditional, yet cavatappi and small shells catch sauce superbly. Because ridges and curves hold more béchamel, these shapes create a creamier bite. Cook them 1–2 minutes shy of al dente so they finish perfectly in the sauce or in the oven.

5) How do I thicken a mac and cheese sauce that’s too loose?

Let the béchamel simmer briefly to reduce; otherwise, whisk 1 teaspoon cornstarch into 1 tablespoon cold milk and stir that into the gently bubbling sauce for 30–60 seconds. Subsequently, add cheese off heat and reassess; the melt will thicken it further.

6) How do I fix a sauce that set up too thick?

Stir in warm milk or a spoon of reserved pasta water a bit at a time until it flows. Additionally, toss the hot pasta in sooner; the starch on its surface will naturally thin the sauce to a glossy consistency.

7) What’s the difference between creamy baked and Southern baked mac and cheese?

Creamy baked begins as stovetop mac and cheese, then bakes briefly under a breadcrumb or extra-cheese topping for a golden crust. By contrast, Southern baked uses a custard base (eggs + evaporated milk), setting into neat slices with a nostalgic, Sunday-table texture.

8) Can I use only cheddar, or should I mix cheeses?

Only cheddar works, but moderate the age: medium sharp melts more kindly than extra-aged. Conversely, a blend (cheddar + Jack/Gouda + a little Gruyère) offers superior silkiness and layered flavor. Balance wins here.

9) Is heavy cream better than milk for a macaroni and cheese recipe?

Heavy cream makes a richer sauce but can turn cloying or overly thick. Whole milk (sometimes with a splash of evaporated milk) keeps things velvety without dulling flavor. If you choose cream, loosen with pasta water so the sauce still drapes rather than sits.

10) How do I make mac and cheese extra creamy without processed cheese?

Melt cheese off heat, use a finely grated blend, and add a few tablespoons of evaporated milk for stability. Moreover, a small spoon of cream cheese can add silkiness while keeping a from-scratch feel. Finish with pasta water for sheen.

11) What are the best breadcrumbs for a crunchy baked topping?

Butter-toasted panko creates an audible crunch. Alternatively, mix half panko and half grated cheddar for flavor plus texture. Spread in an even layer and bake just to golden; then, broil briefly for a shattering crust.

12) How do I make a gluten-free mac and cheese that still tastes great?

Swap in gluten-free elbows and make the roux with rice flour. Whisk attentively and give the sauce an extra 30 seconds of simmer to cook out any raw note. Otherwise, follow the same method; the result remains creamy and familiar.

13) Can I make a lactose-friendly version without losing flavor?

Use lactose-free milk and favor aged cheeses (they naturally contain less residual lactose). In addition, rely on mustard powder, paprika, and a little Parmesan for savory lift so you don’t need to overload dairy to taste rich.

14) What’s the simplest 3-ingredient approach for busy nights?

Cook pasta in milk with frequent stirring until just tender, then take the pot off heat and stir in finely grated cheese. Consequently, you get a nostalgic, minimal macaroni and cheese recipe in minutes—no roux required.

15) How do I add chicken without drying it out?

Fold in bite-size pieces of warm, cooked chicken at the very end so residual heat brings them to temperature. Light seasoning—think a pinch of garlic powder or thyme—enhances the dish without muting the cheese.

16) How do I reheat mac and cheese so it stays creamy?

For stovetop leftovers, add a splash of milk and rewarm on low while stirring. For baked casseroles, cover with foil and heat gently until steamy, then uncover for a few minutes to refresh the top. Avoid high heat, which can split the sauce.

17) Does rinsing pasta help?

Skip rinsing for this dish. The light starch coating on drained pasta helps the sauce cling. Instead, just shake off excess water and move straight to the pot of sauce.

18) How far ahead can I assemble mac and cheese?

Assemble baked versions up to 24 hours in advance. Cover and refrigerate, then bake covered until hot through; uncover to brown at the end. For parties, this make-ahead approach keeps the texture creamy while simplifying timing.

19) Can I freeze mac and cheese?

Yes, although texture softens slightly after thawing. Cool completely, portion tightly, and freeze. Later, reheat covered with a little milk to restore creaminess. Even so, fresh or refrigerated-then-baked versions keep the best bite.

20) What seasonings complement cheese without overpowering it?

Use restraint: a pinch of mustard powder brightens cheddar; white pepper adds warmth without visible specks; sweet paprika lends color and gentle sweetness. Likewise, a whisper of nutmeg in the béchamel harmonizes with alpine cheeses.

21) Why does melting cheese off the heat matter so much?

Direct heat can make proteins contract and separate fat from moisture, causing graininess. Instead, let residual warmth do the melting. In short, slow additions off heat maintain a smooth emulsion and a naturally glossy sauce.

22) How do I scale a macaroni and cheese recipe for a crowd?

Multiply ingredients linearly, then divide into multiple shallow pans so the interior heats evenly and the top browns properly. Additionally, stagger pans on different oven racks and rotate midway for consistent results.

23) What’s the smartest way to lighten the dish without losing comfort?

Opt for 2% milk, keep the roux the same, and finish with a touch more pasta water to maintain flow. Beyond that, consider a sharper cheese for stronger flavor so you can use slightly less overall while the dish still tastes indulgent.

24) Can I make mac and cheese without baking at all?

Absolutely. The stovetop version is designed to be served right away. Meanwhile, if you want a “baked” feel without the oven, sprinkle extra cheese and buttered crumbs over hot mac and cheese and cover for a minute to soften the topping slightly.

25) What’s the ideal salt strategy with multiple cheeses?

Season late and in stages. Since cheeses vary in salinity, taste after the melt, then adjust. Ultimately, a small pinch of salt at the end is often enough once Parmesan or aged cheddar enters the mix.

Posted on Leave a comment

Irresistible Glazed Carrots with Honey: A Sweet and Savory Delight

Glazed Carrots with Honey

Carrots are often unsung heroes on the dinner table, but with the right glaze, they transform into a dish that’s both comforting and elegant. If you’ve never made honey-glazed carrots before, get ready for a side that’s more than just a bit player—these carrots are truly irresistible. This post covers everything you need: recipe, science, feedback from real cooks, time-saving hacks, and creative twists to make it your own.


🥕 Why Glazed Carrots with Honey?

Carrots have a natural sweetness, which is brought to life by roasting or simmering. When you add honey and butter, you get a glossy, caramelized glaze that balances sweet and savory in every bite. The addition of a touch of citrus or warm spice can take the flavor to another level, cutting the richness and creating complexity.

But it’s not just about taste. Glazed carrots are:

  • Quick to prep: Minimal chopping and hands-on time.
  • Budget-friendly: Carrots are inexpensive, and the rest are pantry staples.
  • Visually appealing: Especially with rainbow carrots, they bring color to the plate.
  • Loved by kids and adults alike: Even picky eaters have been known to sneak seconds.

⭐ What Makes a Great Glazed Carrot?

Based on feedback from hundreds of home cooks, here’s what separates a good glazed carrot from a showstopper:

  • Caramelization: Roasting at high heat or finishing under the broiler gives carrots those irresistible golden edges.
  • Balance: The glaze needs both sweetness (honey) and brightness (lemon or orange juice). A little salt and pepper, plus optional spices, round it out.
  • Texture: Tender, not mushy. Uniform slicing helps.
  • Visual pop: Rainbow or heirloom carrots make it special, but classic orange carrots work beautifully too.

📋 The Best Honey-Glazed Carrots Recipe (Oven & Stovetop)

Adapted from Chef Dennis and top-rated home cook tips (2025)

Ingredients

  • 1½ lb (≈ 680 g) carrots (rainbow or classic), peeled and sliced on a bias, ½-inch thick
  • 2 Tbsp unsalted butter (or vegan substitute)
  • 2 Tbsp honey (or maple syrup for vegan)
  • 1 Tbsp fresh lemon juice (or orange juice for more warmth)
  • 1–2 cloves garlic, minced
  • 1 tsp kosher salt
  • ½ tsp black pepper
  • Optional: ¼ tsp ground cinnamon, ½ tsp ground ginger, pinch of chili flakes
  • Fresh parsley, thyme, or chives for garnish

Kitchen Equipment

  • Sheet pan lined with parchment (for oven method)
  • Skillet (for stovetop)
  • Medium saucepan (to make glaze)

Step-by-Step: Oven-Roasted Glazed Carrots

  1. Prep the Carrots:
    Peel and slice carrots to about ½-inch thick, cutting on a diagonal for more surface area. Uniformity = even cooking.
  2. Preheat & Arrange:
    Set oven to 400°F (200°C). Arrange carrots in a single layer on a parchment-lined sheet pan.
  3. Make the Glaze:
    In a small saucepan over medium heat, melt butter. Add honey and garlic; stir until fragrant (about 1 minute). Whisk in lemon juice, salt, pepper, and any spices.
  4. Coat & Roast:
    Pour glaze over carrots, toss well to coat, and spread carrots out again. Roast for 20 minutes. Toss/flip, then roast another 10–15 minutes, until fork-tender and caramelized at edges.
  5. Finish & Garnish:
    For extra caramelization, broil for 2–3 minutes at the end. Transfer to serving dish, top with fresh herbs, and serve immediately.

Quick Stovetop Glazed Carrots (Ready in 15 Minutes)

  1. Simmer:
    Add carrots to a large skillet with ½ cup water. Cover and simmer over medium-high heat until almost tender, about 5–7 minutes. Drain any excess water.
  2. Glaze:
    Add butter, honey, garlic, lemon juice, salt, pepper, and spices. Toss over medium heat until carrots are fully coated and glaze is sticky and reduced (another 3–5 minutes).
  3. Serve:
    Garnish and serve!

🧑‍🍳 Real User Feedback: What Works, What Doesn’t

  • “This is my favorite way to eat carrots now. The glaze is amazing and rainbow carrots make it a showstopper for guests.”
  • “Good basic recipe—needed more flavor. I added ginger and a little cinnamon, and broiled at the end for extra char.”
  • “Steaming then glazing on the stovetop saved time for a weeknight. Kids loved it!”
  • “I tried with maple syrup instead of honey for a vegan friend—delicious!”

🔬 Why Does This Recipe Work?

Carrots’ sugars caramelize at high heat, creating those sweet, nutty flavors and golden color.
Honey and butter help this along by browning and thickening into a glossy, clingy glaze.
Citrus juice (lemon or orange) provides acidity, keeping the dish from tasting cloying.
Salt and a pinch of spice (ginger, cinnamon, chili) balance the sweetness and add subtle warmth.


🛠️ Practical Tips & Variations

  • Uniform slicing: Helps all carrots cook evenly—no raw bits or mushy ends.
  • Double-glazing: Toss carrots halfway through roasting with a little extra glaze for extra stickiness.
  • Make ahead: Glaze can be made in advance. Toss with carrots just before roasting.
  • Vegan? Use olive oil or vegan butter, and swap honey for maple syrup or agave.
  • Extra flavor: Try adding za’atar, cumin, or chopped rosemary for a more complex profile.
  • Add-ins: Top with feta, toasted nuts, or pomegranate seeds for color and crunch.
  • Leftovers: Glazed carrots taste great cold in salads, grain bowls, or as lunchbox snacks.

🍽️ Perfect Pairings

Honey-glazed carrots are as versatile as they are delicious. Try them with:

  • Roast chicken, turkey, or ham
  • Baked salmon or white fish
  • Lentil or grain bowls (for a hearty vegetarian meal)
  • As part of a vibrant holiday spread
  • Chilled, as a colorful addition to salads

🌟 Final Thoughts: Your New Go-To Side Dish

Whether it’s a holiday meal or a weeknight dinner, Irresistible Glazed Carrots with Honey will brighten your table and win over even the vegetable skeptics. They’re quick, adaptable, crowd-pleasing, and just as tasty as they are pretty.


Have you tried this recipe?

Drop your tweaks, tips, or winning pairings in the comments below. Let’s make glazed carrots everyone’s favorite side!

🥕 10 Frequently Asked Questions (FAQs) for Irresistible Glazed Carrots with Honey

1. Can I make glazed carrots ahead of time?
Yes! You can prep and glaze the carrots a day in advance. Store them in an airtight container and reheat in a 350°F (175°C) oven or on the stovetop until warmed through. Add a splash of water or extra glaze if needed to keep them moist.

2. What’s the best way to cut carrots for glazing?
Cut carrots on a diagonal (bias) into ½-inch thick slices for maximum surface area and even cooking. Baby carrots can be left whole or halved lengthwise.

3. Can I use maple syrup instead of honey?
Absolutely! Maple syrup is a great vegan alternative and gives a slightly different, richer flavor.

4. How do I prevent my carrots from becoming mushy?
Avoid overcooking and slice your carrots evenly. Check doneness with a fork at the minimum cooking time and roast in a single layer for even heat.

5. Are glazed carrots gluten-free?
Yes—if you use pure honey or maple syrup and no added sauces with gluten. Always check your ingredient labels if cooking for someone with celiac disease.

6. Can I add other vegetables to this recipe?
Definitely! Parsnips, sweet potatoes, and beets all work well. Cut all vegetables to similar sizes so they cook evenly.

7. What herbs and spices work best with honey-glazed carrots?
Parsley, thyme, rosemary, cinnamon, ginger, or even a little cumin or za’atar add great flavor.

8. Can I use frozen carrots?
Yes, but thaw and dry them first. Frozen carrots may cook faster and can be softer, so watch the roasting time.

9. How do I get extra caramelization?
For deeper caramelization, broil the carrots for 2–3 minutes at the end of roasting. Watch closely to avoid burning.

10. What dishes pair well with honey-glazed carrots?
They’re perfect with roast meats (chicken, turkey, ham), salmon, grain bowls, or as part of a holiday meal.