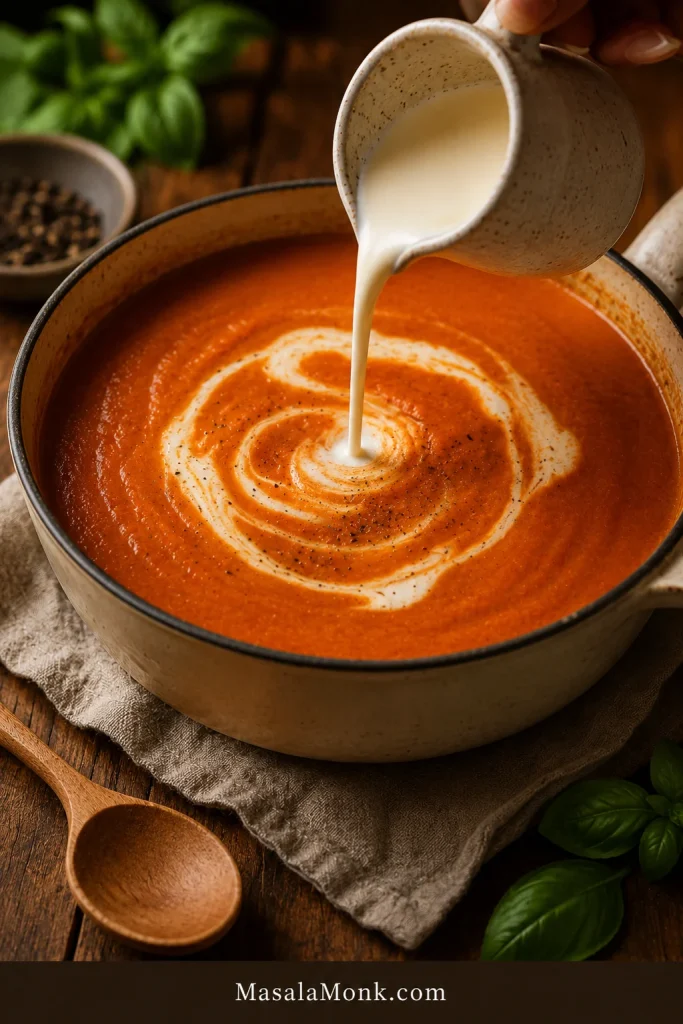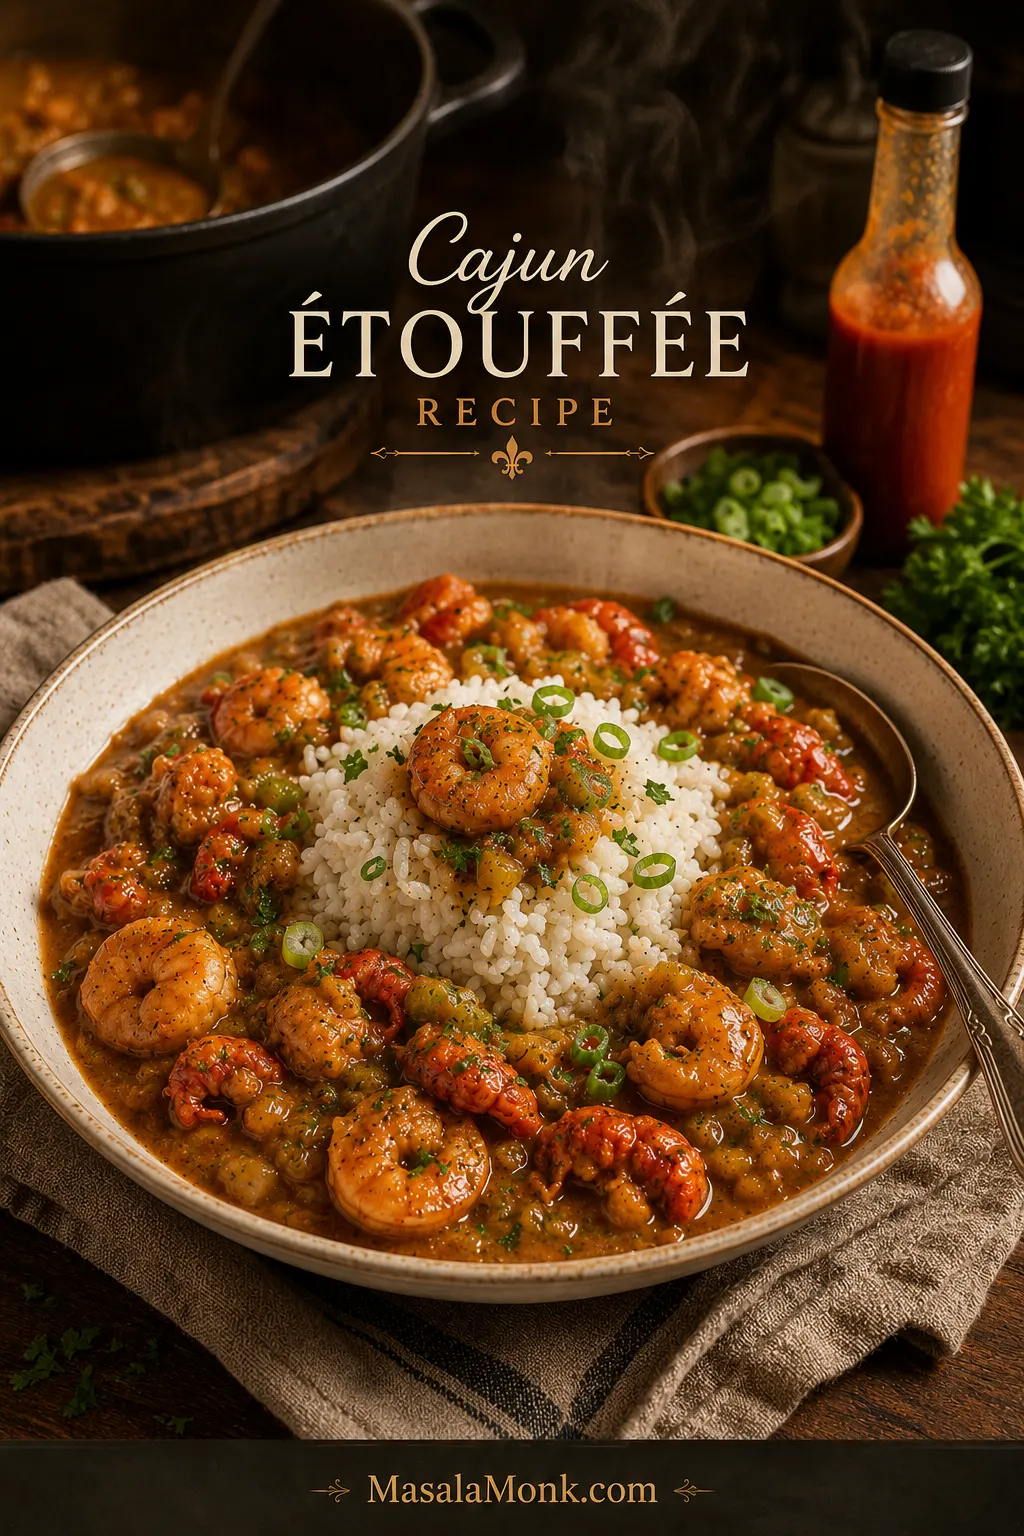
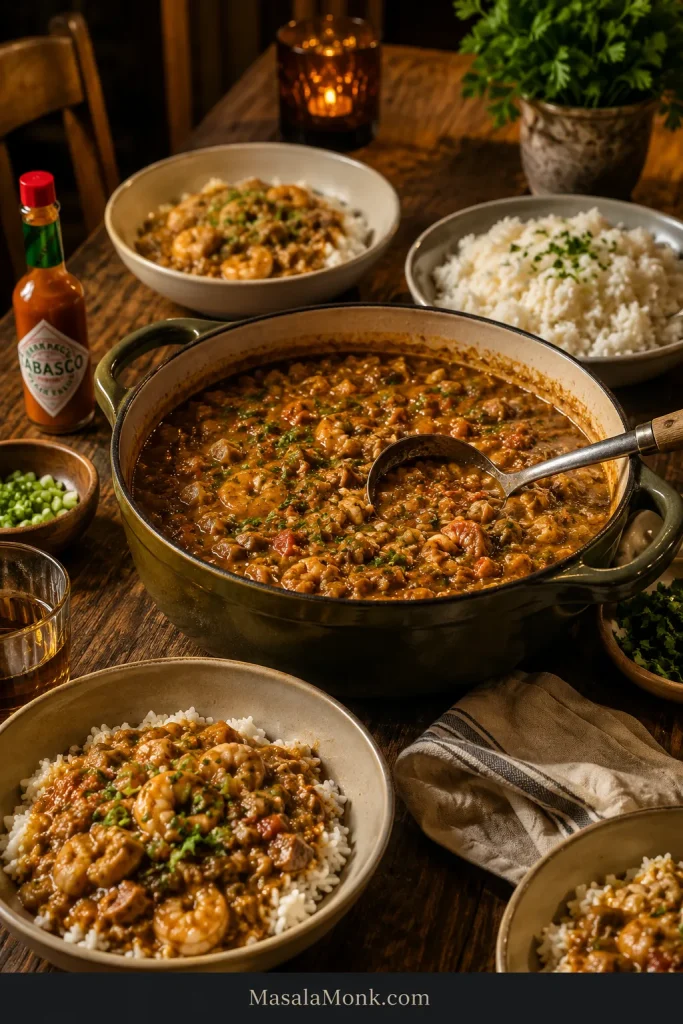
A great Cajun étouffée recipe lands on the table as hot rice, tender shrimp or crawfish, and glossy sauce that settles into every grain. It should smell like toasted roux, sweet bell pepper, garlic, seafood, and a little vinegar heat before the first spoonful even reaches the bowl.
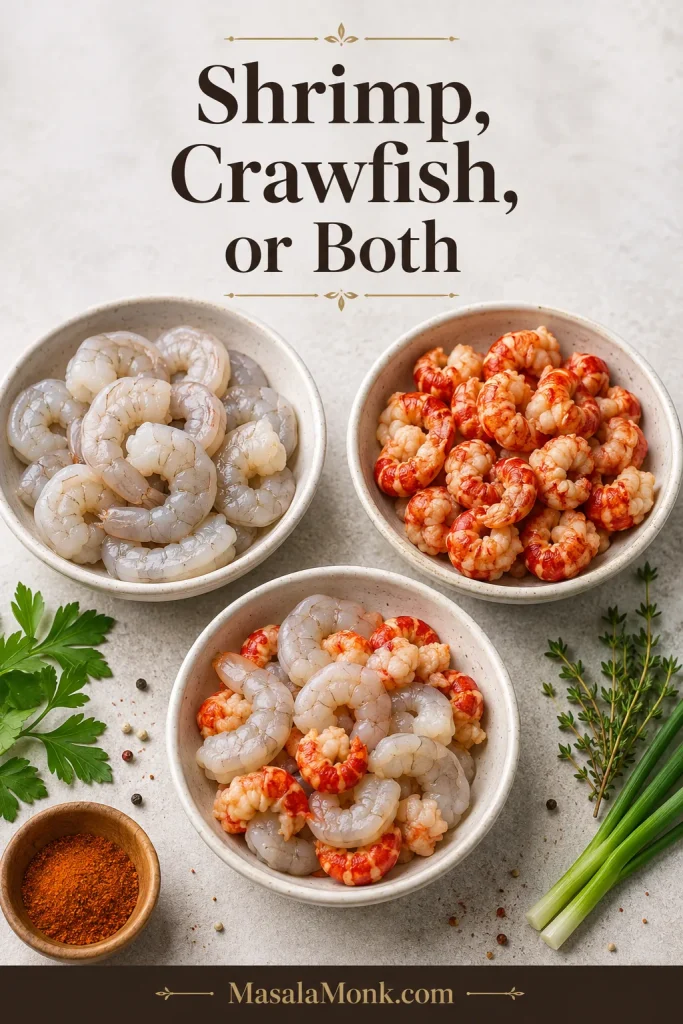
You can make this with shrimp, crawfish, or a mix of both without changing the base method. Once the vegetables are chopped and the rice is started, the rest is one steady stovetop pot: roux, holy trinity, sauce, seafood, herbs, and hot rice waiting.
The rhythm is simple: trust the roux, taste the sauce, then add the seafood. That order gives you deep flavor without rubbery shrimp, tough crawfish, or a thin sauce that disappears into the rice.
You do not need to guess your way through the roux, the sauce texture, or the seafood timing. This guide also covers frozen crawfish tails, salty Cajun seasoning, prepared roux, boxed étouffée base, cream soup shortcuts, tomato options, and the common fixes that save the pot before dinner gets stressful.
Quick Answer: What Is Cajun Étouffée?
Cajun étouffée is a thick, seasoned Louisiana-style dish made with a roux, onion, celery, green bell pepper, stock, Cajun seasoning, and seafood such as crawfish or shrimp. It is served over white rice and eats more like a rich seafood gravy than a soup.
The word étouffée means “smothered,” and that is exactly how the dish should land on the plate: shrimp or crawfish smothered in a savory sauce that clings to every spoonful of rice. This version keeps the main pot roux-forward and no-tomato, with an easy tomato option if you prefer a brighter Creole-style sauce.
The final bowl should look rich and spoonable, with seafood and rice held together by a sauce that is thicker than broth.

Make It Now
Ready to cook? Use this as the quick roadmap, then follow the recipe card for exact amounts. Nothing here needs to be rushed; once your prep is done, the recipe is mostly steady stirring, simmering, tasting, and finishing.
- Chop the onion, celery, bell pepper, garlic, green onions, and parsley.
- Start the rice early so it is hot when the étouffée is ready.
- Warm the stock and cook the roux until it turns copper to peanut-butter brown.
- Stir in the holy trinity, garlic, seasoning, stock, Worcestershire sauce, and a splash of hot sauce.
- Simmer until the base tastes rounded and thick enough to spoon over rice.
- Finish with your chosen seafood, add the final herbs, rest briefly, and serve.
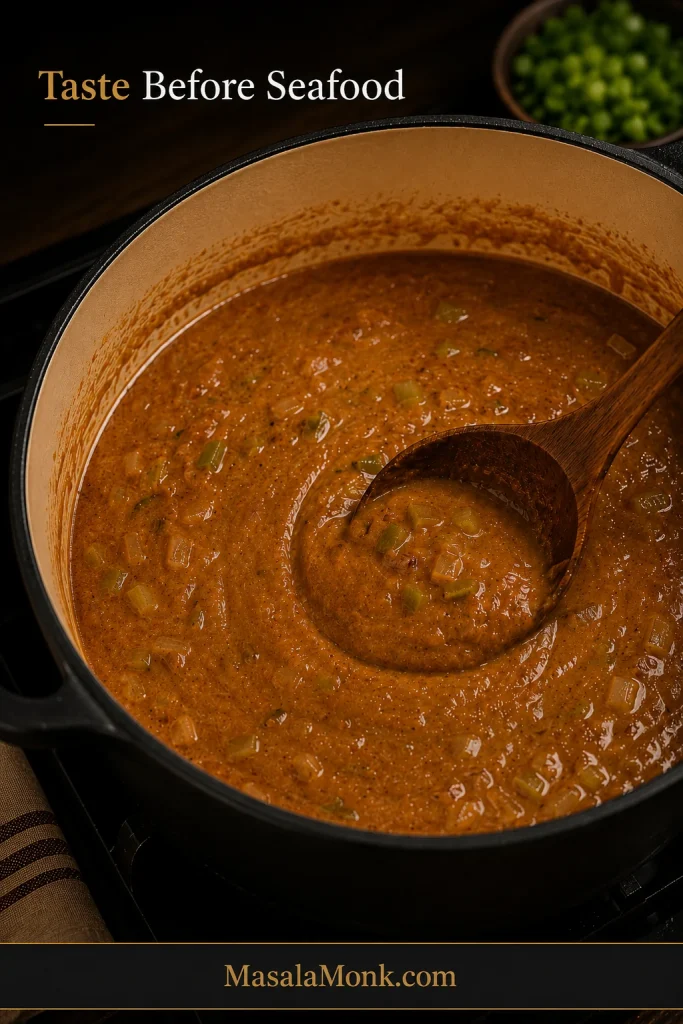
The checkpoint that saves the pot: the sauce should taste good before the seafood goes in.
Use the quick flow to keep the method calm: roux, trinity, sauce, seafood, herbs, and rice.
Cajun Étouffée at a Glance
| Main style | Roux-based Cajun-style étouffée, no tomato by default |
| Best seafood | Shrimp, crawfish tails, or a mix of both |
| Servings | 6 |
| Total time | About 1 hour 5 minutes |
| Roux target | Copper to peanut-butter brown |
| Sauce texture | Glossy, spoonable, thick enough to hug rice |
| Serve with | Long-grain white rice, fresh herbs, and table hot sauce |
| Best quick path | Make a light roux instead of relying only on canned soup or boxed mix |
| Biggest success cue | Let the base taste complete, then finish with seafood |
Cajun Étouffée Recipe Card
This stovetop recipe makes a roux-based Cajun étouffée with shrimp, crawfish tails, or both. The method stays the same; the main change is when each type of seafood goes into the finished sauce.
Keep the rice hot and the seafood cold until the sauce is ready. That little bit of timing is what makes the bowl feel generous instead of rushed.
Recipe Snapshot
| Prep time | 20 minutes |
| Cook time | 45 minutes |
| Total time | 1 hour 5 minutes |
| Servings | 6 |
| Method | Stovetop |
| Cuisine | Cajun / Louisiana-style |
| Main equipment | Dutch oven, heavy-bottomed pot, or deep heavy skillet |
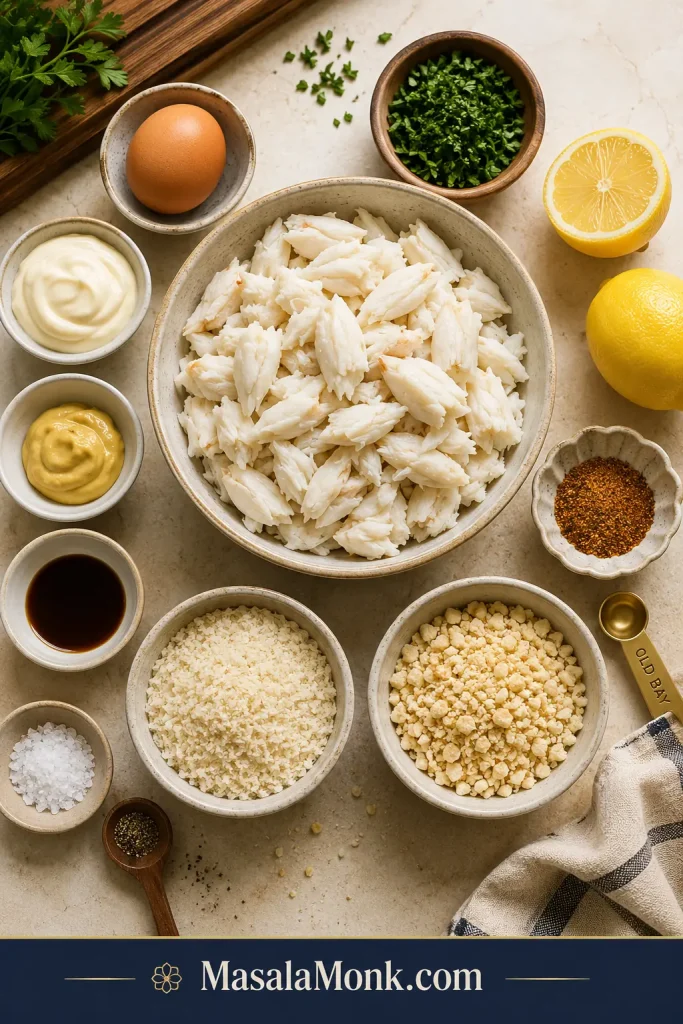
Ingredients
Before cooking, notice how each ingredient has a job: roux for body, trinity for sweetness, stock for sauce, and seafood for the finish.
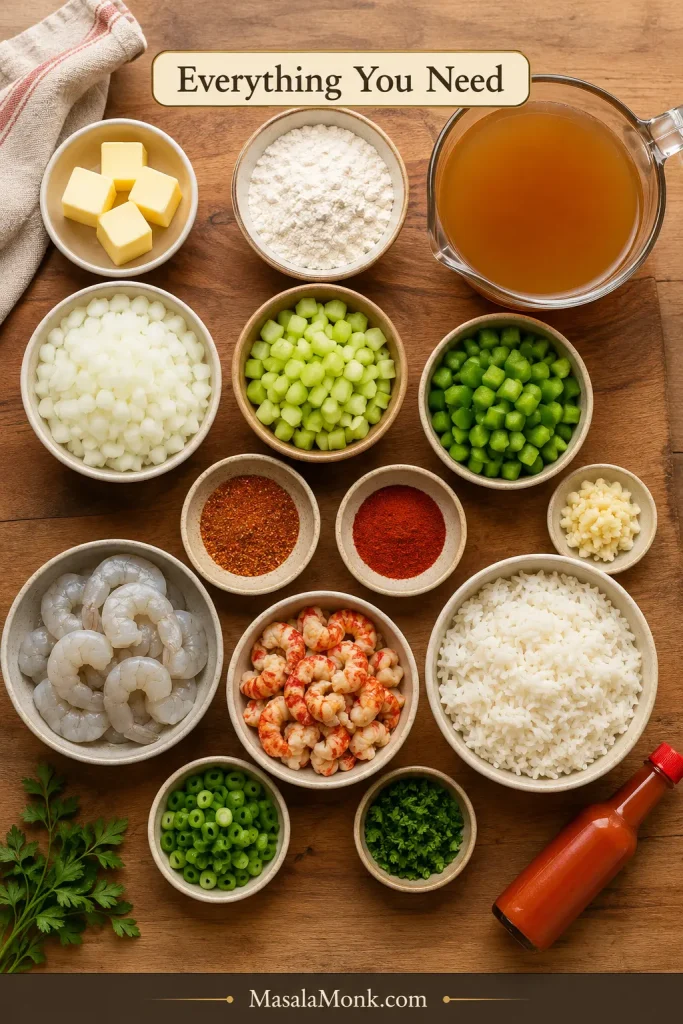
- ½ cup unsalted butter, 113 g, or 120 ml neutral oil
- All-purpose flour, ½ cup, about 60–65 g
- 1½ cups finely chopped yellow onion, about 225 g
- 1 cup finely chopped green bell pepper, about 150 g
- ¾ cup finely chopped celery, about 100 g
- 4–6 garlic cloves, minced, about 15–25 g
- 2½–3 cups warm seafood stock, shrimp stock, crawfish stock, or chicken stock, plus more as needed, 600–720 ml
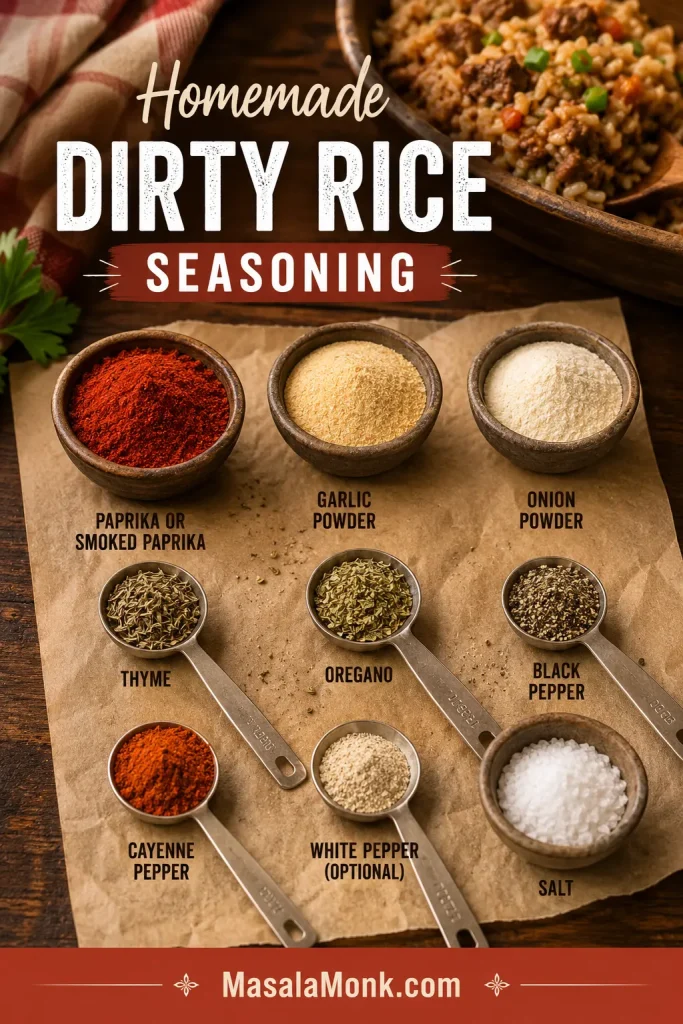
- 2–3 teaspoons salted Cajun seasoning, or 1½–2 tablespoons salt-free Cajun seasoning
- 1 teaspoon paprika or smoked paprika
- ½ teaspoon dried thyme
- 2 bay leaves
- ¼–½ teaspoon cayenne pepper, optional
- 1 tablespoon Worcestershire sauce, 15 ml
- Hot sauce, 1–2 tablespoons, 15–30 ml, plus more for serving
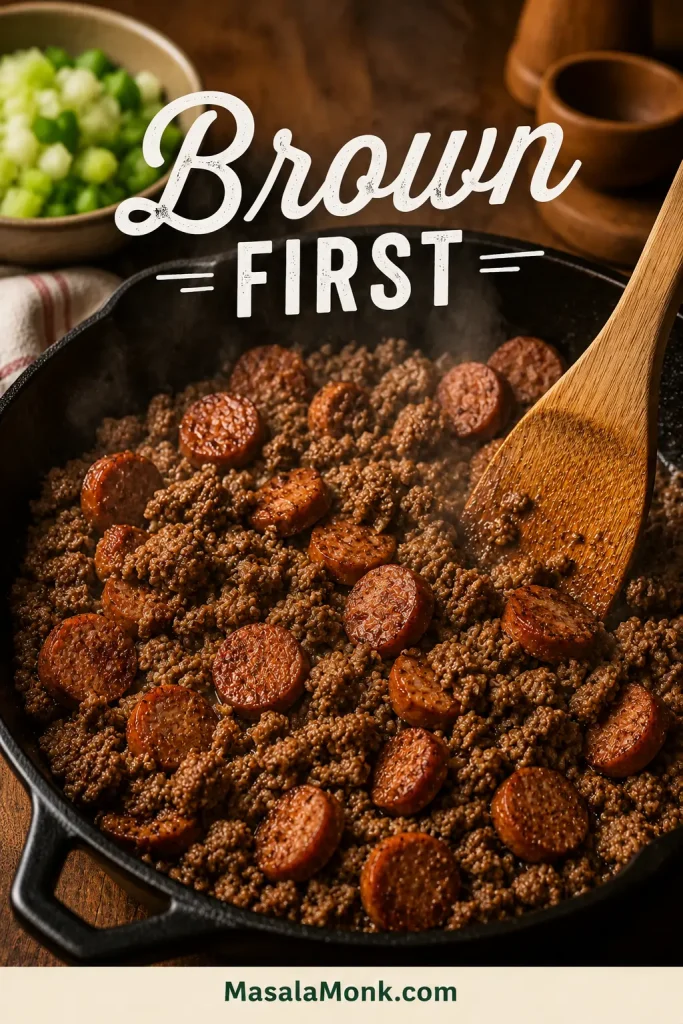
- 2 lb total peeled shrimp, crawfish tails, or a mix, about 900 g
- ½ cup sliced green onions
- ¼ cup chopped parsley
- Salt and black pepper, to taste
- 4–6 cups cooked long-grain white rice, for serving
Ingredient Notes for Salt, Seafood, and Rice
Salt note: If your Cajun seasoning already contains salt, do not add extra salt until the sauce has simmered and you have tasted it. Stock, hot sauce, boxed bases, and cream soup can all add salt too. Salt-free Cajun blends can usually be used more generously because they bring spice without adding as much sodium.
Seafood note: Use 2 lb total seafood, not 2 lb shrimp plus 2 lb crawfish. If using a mix, combine the shrimp and crawfish together to reach about 2 lb / 900 g total.
Pick the seafood before you start, because shrimp and crawfish can share the same sauce but need different finishing care.
Rice note: Use 6 cups cooked rice for generous bowls, or 4 cups for lighter servings. Start the rice before the seafood goes in so everything reaches the table hot.
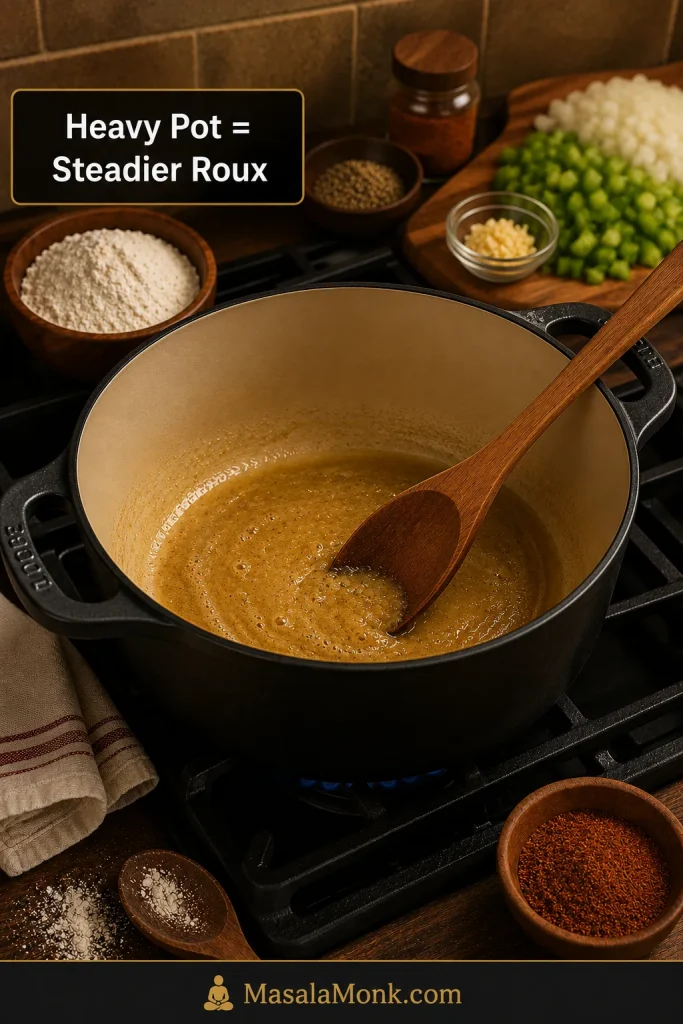
Equipment
- Dutch oven or heavy-bottomed pot, important for steady roux heat
- Deep heavy skillet, if it gives you enough room to stir safely
- Wooden spoon or heat-safe spatula
- Whisk
- Small saucepan for warming stock
- Cutting board and sharp knife
- Measuring cups and spoons
- Rice cooker or rice pot
Roux can scorch quickly in thin cookware. A heavy pot gives you more control as the flour moves from pale to nutty brown. Patience beats speed here; burnt roux is not worth saving.
Steady cookware protects the roux, giving flour time to brown evenly instead of scorching in one hot spot.
Instructions
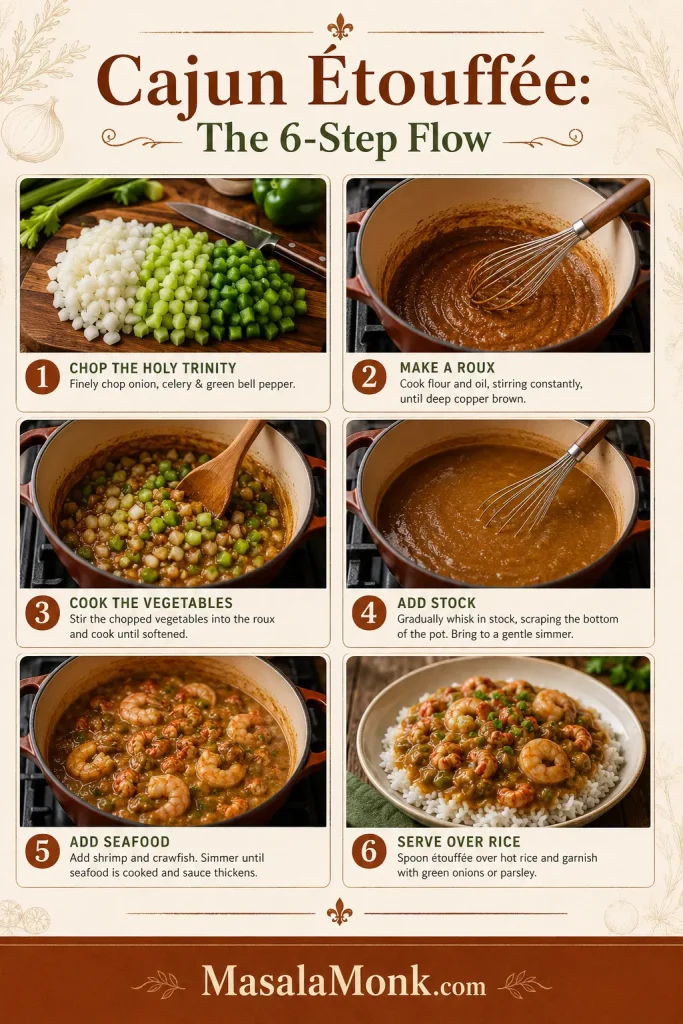
Prep and Roux
- Prep first. Chop the onion, bell pepper, celery, garlic, green onions, and parsley before you start. Cook the rice or set it going. Thaw and drain frozen shrimp or crawfish. Pat shrimp dry if it is very wet.
- Warm the stock. Keep the stock warm in a small saucepan over low heat. It should be warm, not boiling.
- Make the roux. Melt the butter, warm the oil, or heat a butter-oil mix in a Dutch oven or heavy-bottomed pot over medium heat. Add the flour and stir constantly for 8–15 minutes, lowering the heat if needed, until the roux turns copper to peanut-butter brown and smells nutty. If the roux starts darkening faster than you can comfortably stir, lower the heat before you panic; roux forgives patience better than speed.
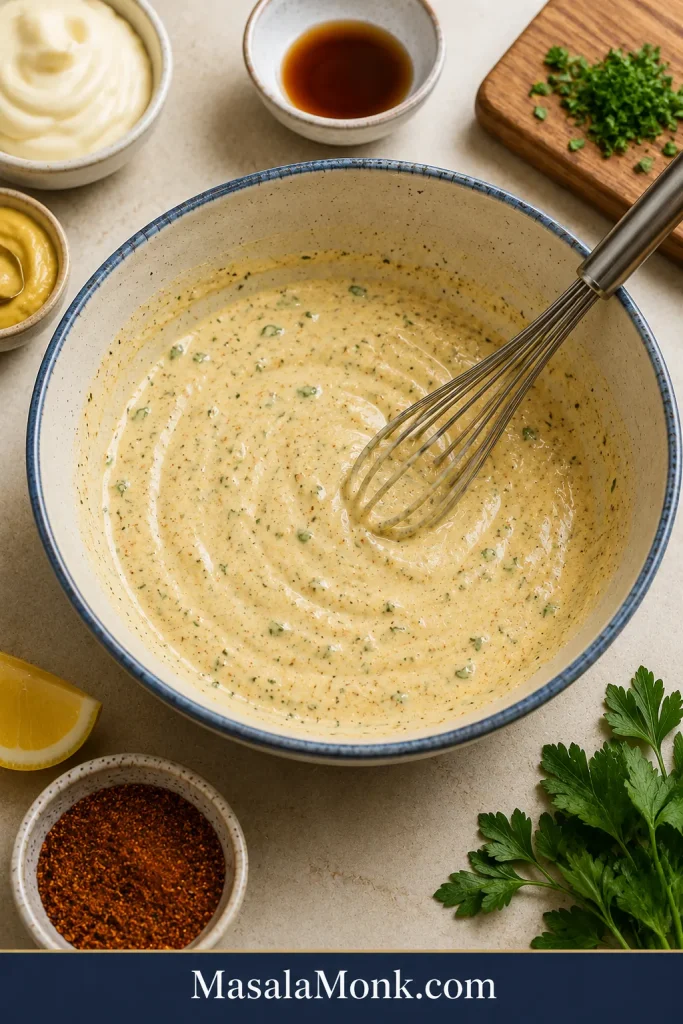
Build the Sauce
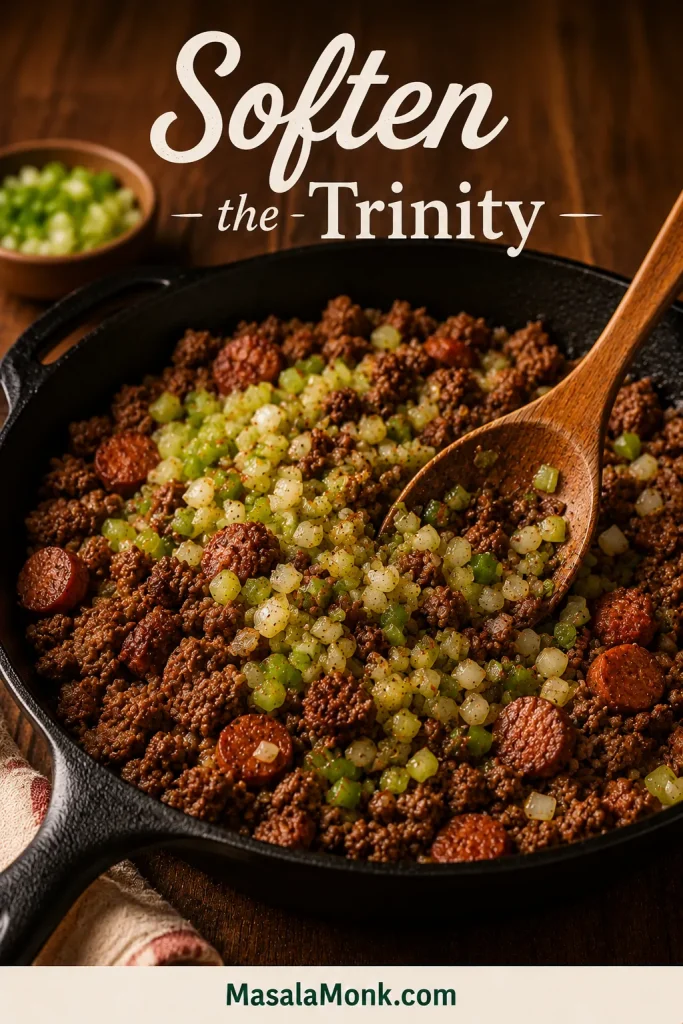
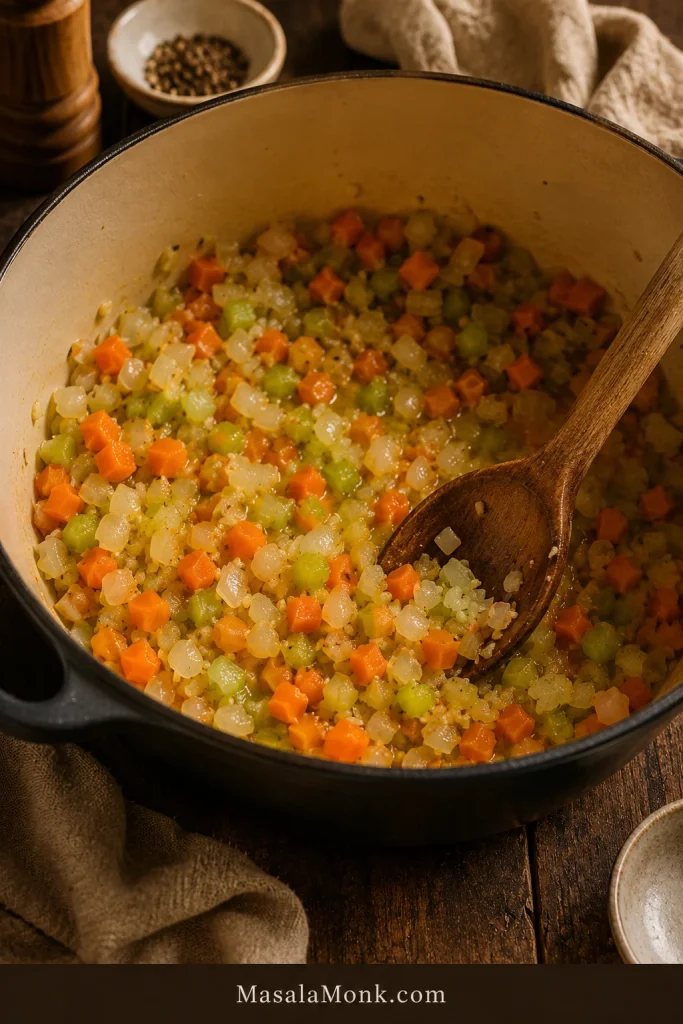
- Add the holy trinity. Stir in the onion, green bell pepper, and celery. Cook for 6–8 minutes, stirring often, until the vegetables soften and the roux clings to them.
- Add garlic and seasoning. Stir in the garlic, Cajun seasoning, paprika, thyme, bay leaves, and cayenne if using. Cook for 30–60 seconds, just until fragrant.
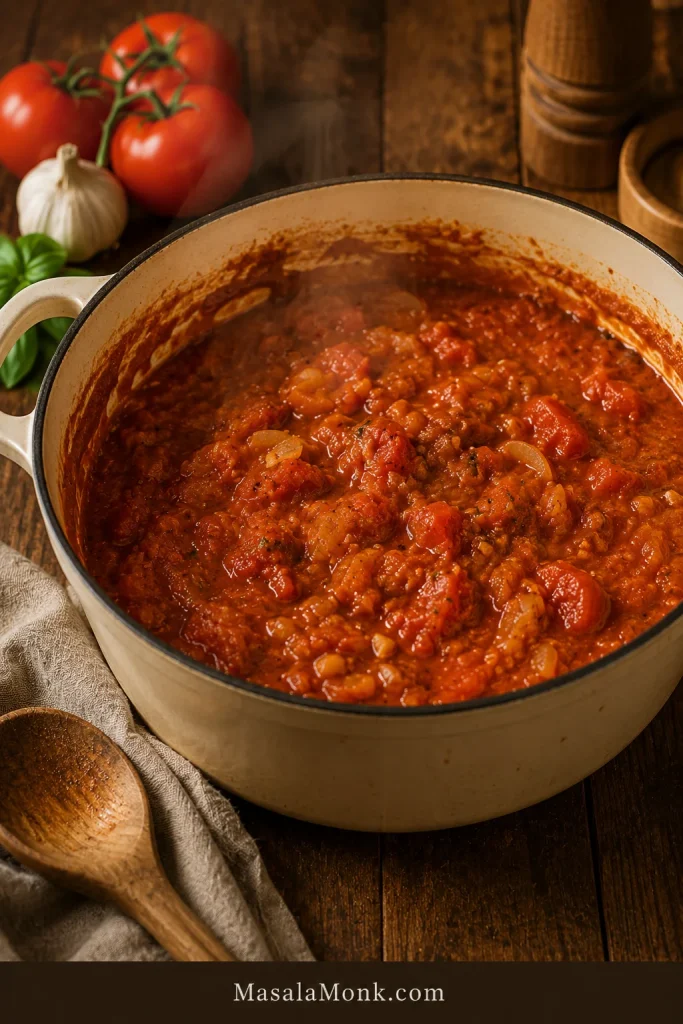
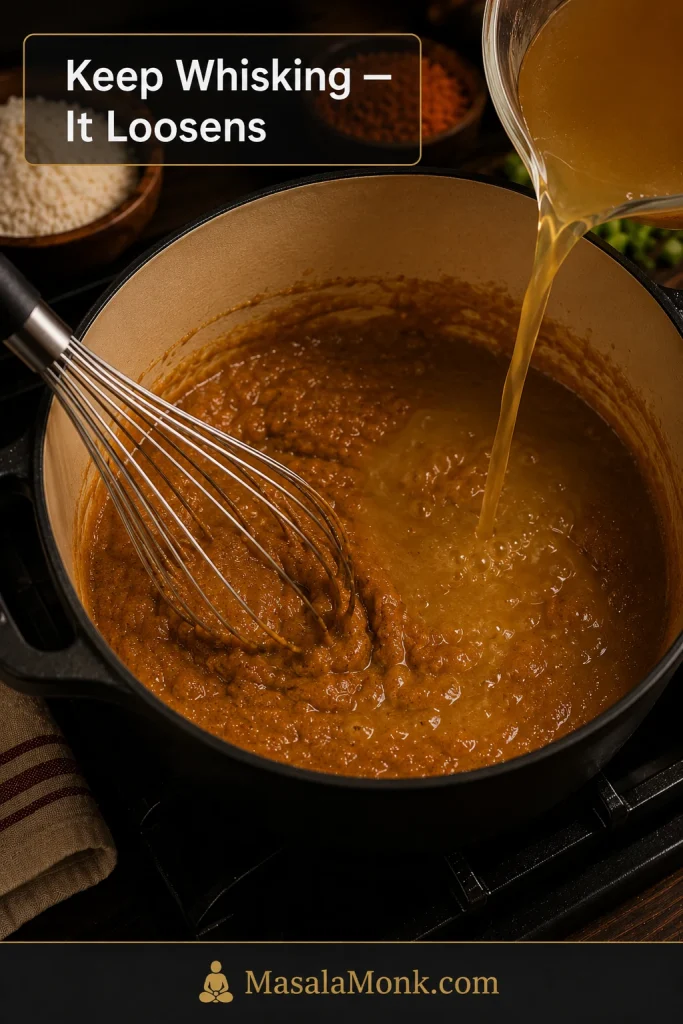
- Build the sauce. Slowly whisk in 2½ cups warm stock, adding it gradually so the sauce stays smooth. The first splash may make the roux seize and thicken; keep whisking and it will loosen as the rest of the stock goes in. Stir in Worcestershire sauce and hot sauce. Bring to a gentle simmer.
- Simmer until rounded. Reduce the heat to medium-low and simmer for 15–20 minutes, stirring occasionally, until the sauce thickens and tastes complete. Add more warm stock if it becomes too thick.
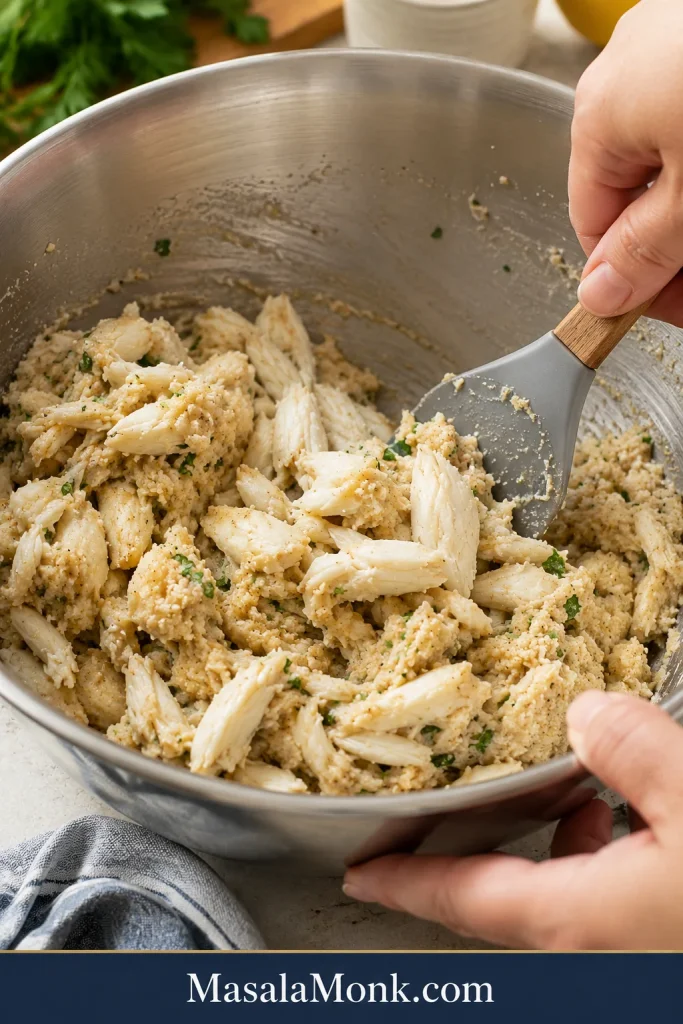
Add Seafood and Serve
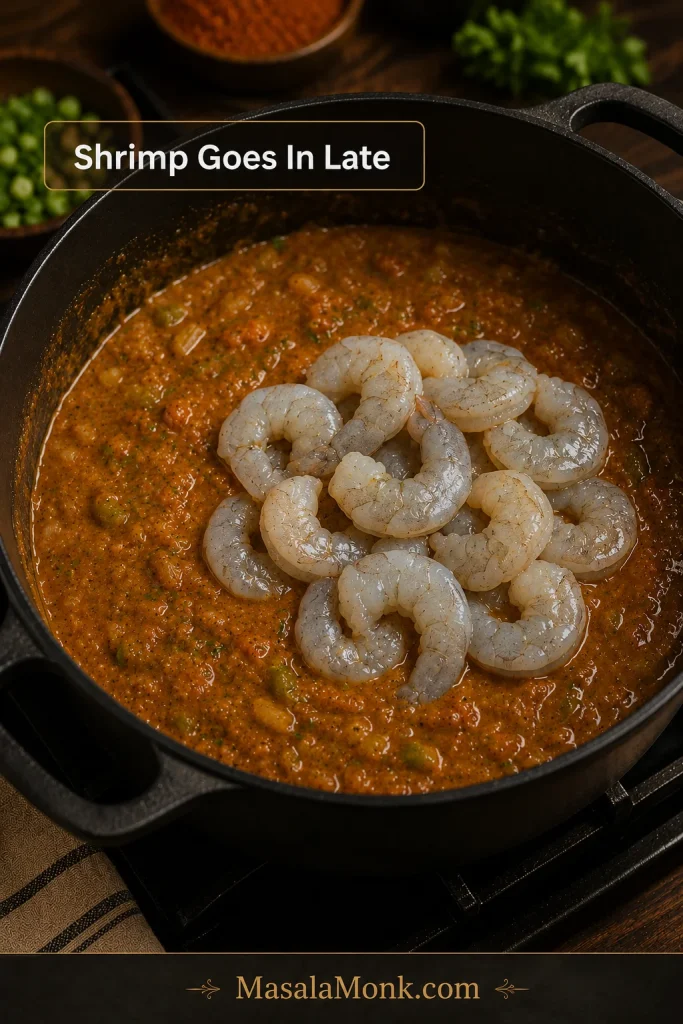
- Finish with seafood. Raw shrimp cooks gently in 3–5 minutes, just until opaque and lightly curled. Cooked crawfish tails should be stirred in and heated gently for 3–5 minutes. If using both, add shrimp first, then stir in crawfish during the final 2–3 minutes. Already-cooked shrimp only needs the final 1–2 minutes to warm through.
- Season and brighten. Remove the bay leaves. Stir in most of the green onions and parsley. Taste and adjust with salt, black pepper, Cajun seasoning, a splash of acidity, or a little more stock.
- Rest and serve. Turn off the heat and let the étouffée rest for 5 minutes. Spoon over hot white rice so the sauce pools around the grains, then finish with fresh herbs and extra hot sauce at the table.
Recipe Notes
Seasoning, Stock, and Roux Notes
- Seasoning: If your Cajun seasoning is salty, start with less and add more only after the sauce has simmered.
- Stock: Low-sodium stock is safest if your Cajun seasoning, hot sauce, or boxed base is already salty. Chicken stock works when seafood stock is unavailable; a small splash of bottled clam juice adds deeper seafood flavor if you like that taste.
- Flour and roux: Spoon and level the flour if measuring by cup; a packed ½ cup can make the sauce thicker. A peanut-butter roux gives the best balance of flavor and thickening for this recipe.
Seafood, Heat, and Make-Ahead Notes
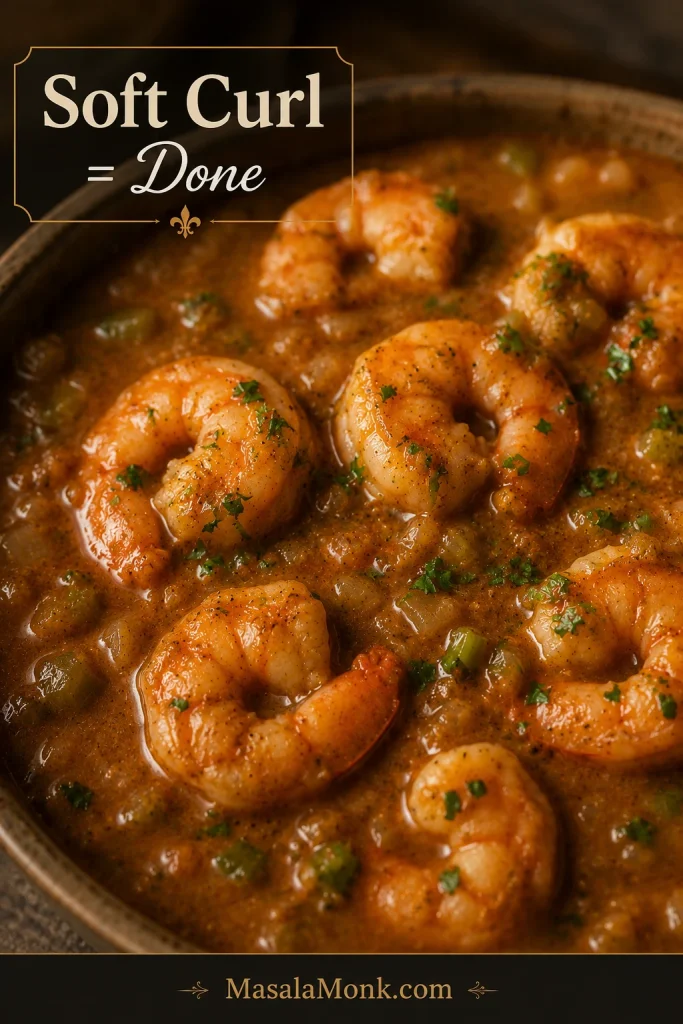
- Shrimp: Medium, large, or medium-large shrimp work best. Peeled shrimp are easiest for spooning over rice. Shrimp is done when opaque and lightly curled, not tightly coiled into hard rings.
- Cooked shrimp: Add cooked shrimp only in the final 1–2 minutes so it warms without turning rubbery.
- Food safety: Shrimp, lobster, crab, and scallops should cook until the flesh is pearly or white and opaque, as noted by FoodSafety.gov.
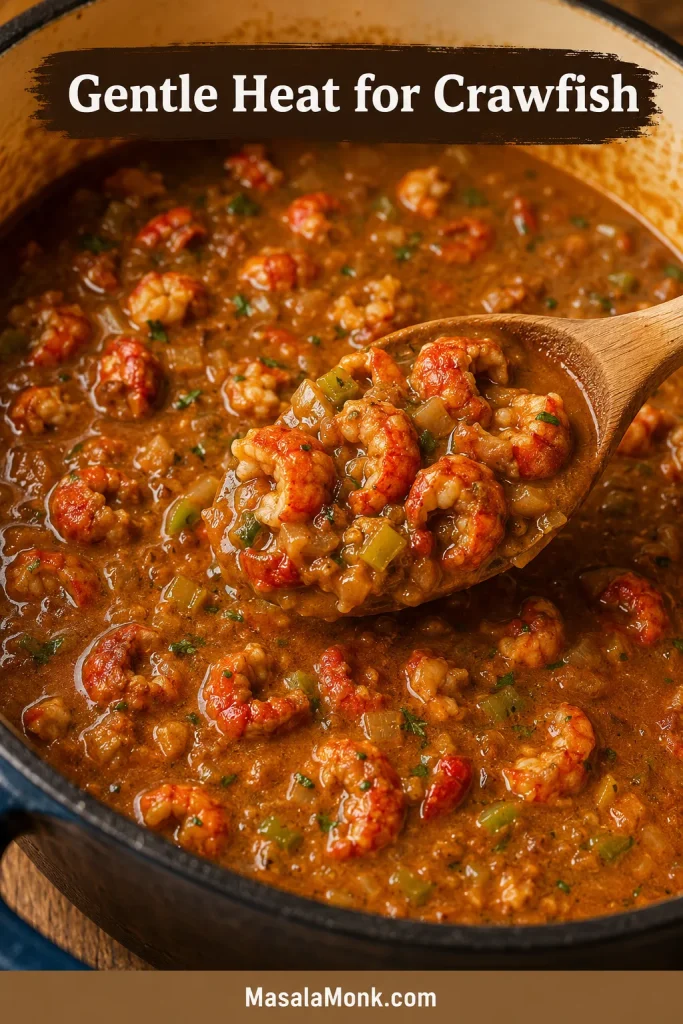
- Crawfish: Crawfish tails are often already cooked, so they only need gentle heating. For frozen crawfish tails, thaw and drain excess liquid. Do not rinse away flavorful crawfish fat or juices unless they smell muddy, overly fishy, or unpleasant.
- Heat: Use a vinegar-forward Louisiana-style hot sauce if you want brightness, or keep the pot mild and let people add heat at the table. For more spice, add cayenne near the end so you can control it.
- Resting and make-ahead: The sauce thickens as it sits. Loosen with warm stock or water if needed. Best make-ahead results come from preparing the sauce first and adding the seafood during reheating.
Half-Batch Note
To make a smaller pot, use 1 lb / 450 g total seafood, ¼ cup butter or oil, ¼ cup flour, and about 1½–2 cups stock. Keep the same method, but start checking the sauce thickness sooner because a smaller batch reduces faster. Begin with the lower amount of Cajun seasoning, especially if your blend contains salt.
Need help while cooking? Jump to Success Cues, Roux Guide, Troubleshooting, or Serving Tips.
Success Cues
The recipe card gives you the steps. These cues help you know when each stage is actually working. Once the pot is on the stove, smell, color, texture, and the way the sauce moves matter more than the exact minute on the clock.
Roux smells nutty, not raw
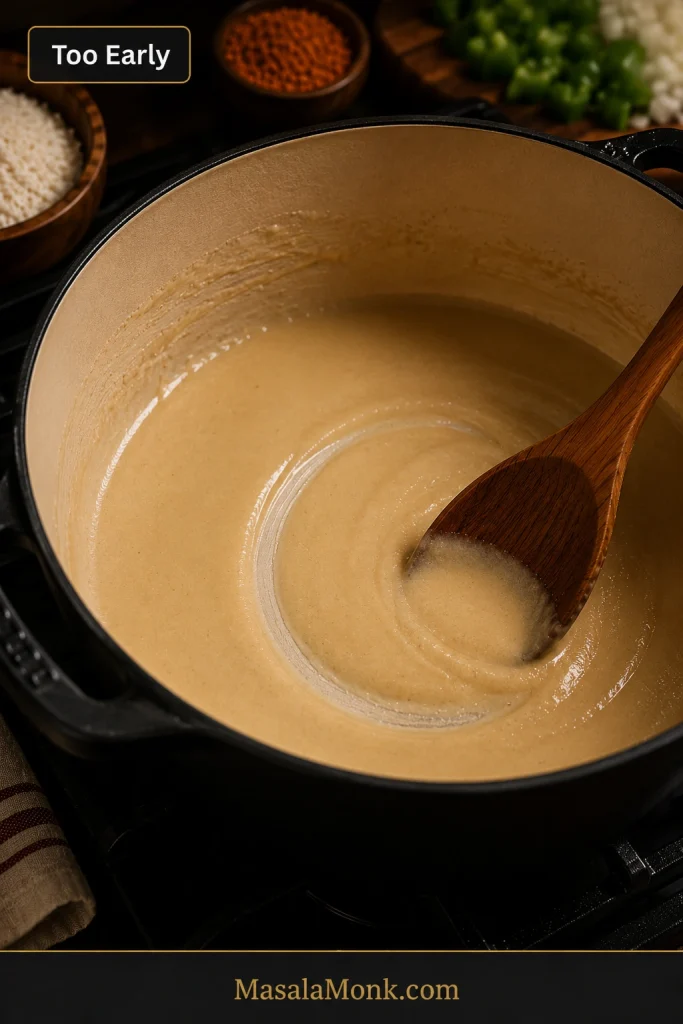
Smell is the first real sign. The roux stops smelling like raw flour and starts smelling warm, buttery, and nutty. Its color should move from pale flour to copper or peanut-butter brown. A sharp, scorched, or bitter smell means it is better to restart before adding the vegetables.
Vegetables soften into the base
When the onion, celery, and bell pepper hit the roux, the pot should start smelling like dinner. The vegetables cool the roux slightly, then soften into it until the base tastes sweet, savory, and rounded instead of sharp or raw.
The base tastes complete
This is the biggest checkpoint. Once the base tastes like dinner, the seafood only has to show up. It should already taste seasoned, rounded, and spoonable before shrimp or crawfish is added.
At this point, the base should carry the flavor on its own; seafood is only the final gentle finish.
Shrimp stays tender, crawfish warms gently
Shrimp should turn opaque and curl softly. Crawfish tails should be warmed through, not boiled hard. The pot should bubble softly after the seafood is added, not roll like a hard boil.
Raw shrimp belongs in the finished sauce, not in a long simmer, so the timing stays short and gentle.
Soft curl is the shrimp signal; take the pot off hard heat before tender shrimp turns into tight rings.
Gentle warming protects crawfish tails, especially when they are already cooked before they reach the sauce.
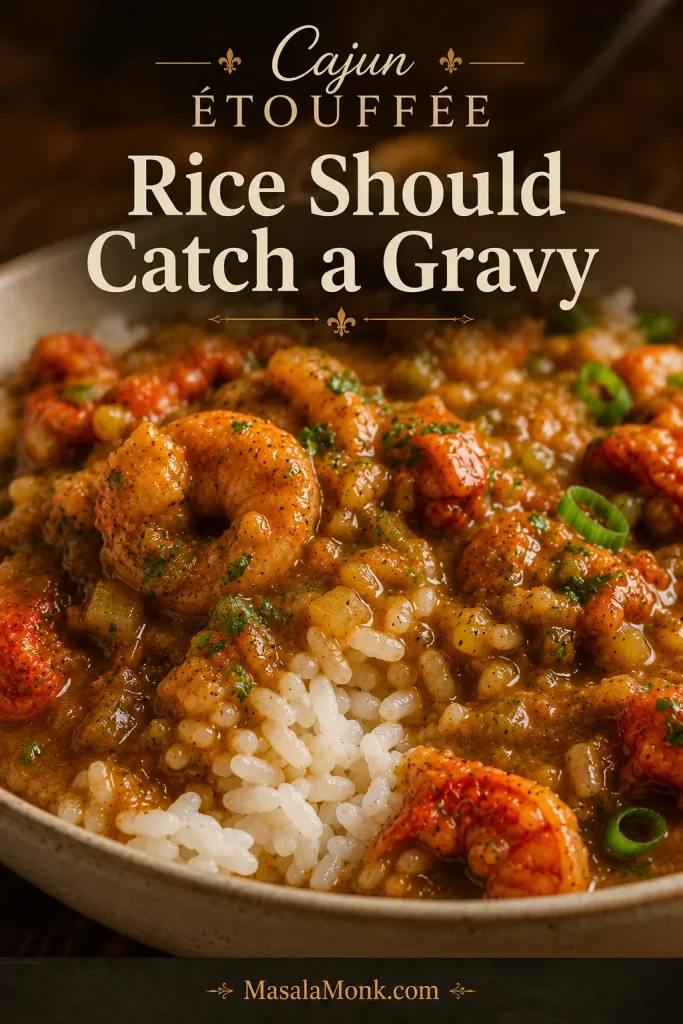
The rice catches a gravy, not a broth
When you spoon étouffée over rice, the sauce should settle into the grains instead of sliding away like broth or sitting on top like paste. The rice should catch a gravy, not chase a broth.
This is the bowl test: rice should hold sauce between the grains, not sit under a watery layer.
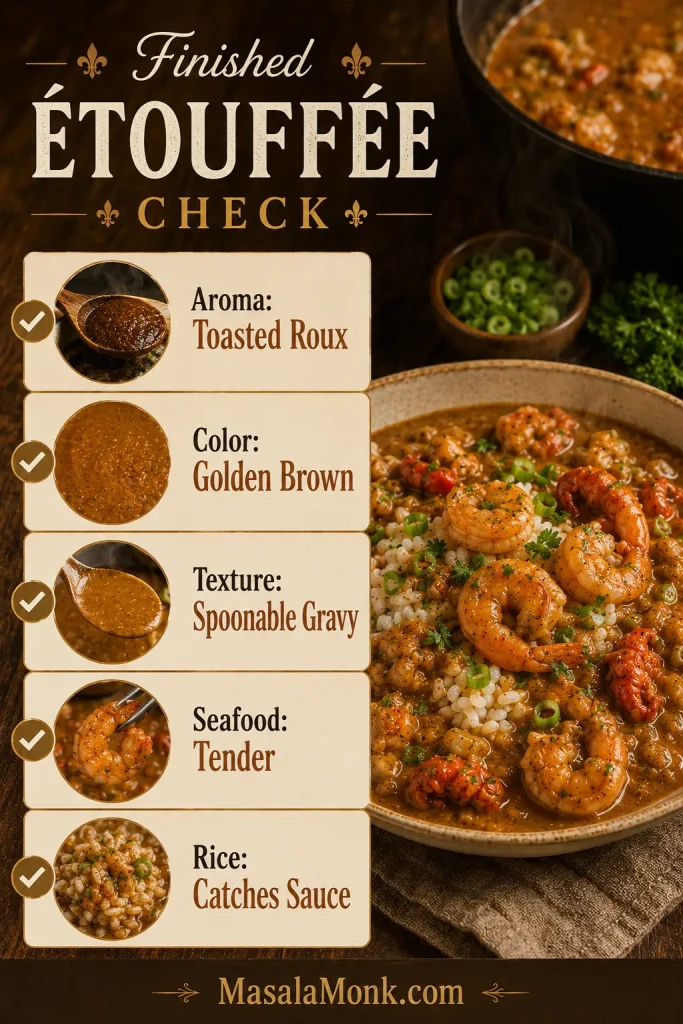
What the Finished Étouffée Should Look Like
| Cue | What to look for |
|---|---|
| Aroma | Toasted roux, softened onion, bell pepper, garlic, seafood, and a little vinegar heat |
| Color | Golden brown to light brown, not pale beige and not burnt dark |
| Texture | Thick gravy that moves slowly from the spoon and spreads gently over rice |
| Seafood | Shrimp softly curled and opaque; crawfish warmed through, not boiled hard |
| Rice | Sauce settling around the grains, not watery puddles at the bottom of the bowl |
Use the checklist as the final pass before serving, especially if the sauce looked uncertain earlier.
Still checking the pot? Use the Roux Guide if the base looks too light or too dark, or go to Troubleshooting if the sauce feels thin, thick, salty, or floury.
Why This Cajun Étouffée Works
This pot works because the flavor is built before the seafood goes in. The roux turns nutty, the trinity softens, the seasoning settles into the stock, and the seafood only needs a short, gentle finish.
- Roux builds body and flavor. It thickens the sauce and gives the dish that warm, toasted smell that makes the whole pot feel deeper.
- The holy trinity makes the base taste complete. Onion, celery, and green bell pepper soften into the roux before the liquid is added.
- Warm stock keeps the sauce smooth. Adding it slowly helps prevent lumps and gives you control over the final texture.
- Seafood is treated gently. Shrimp and crawfish stay tender because they only need a short finish.
- Tomato stays optional. The main recipe stays roux-forward, while a small tomato option gives you a brighter Creole-style variation.
- Shortcuts have a place. Cream soup, boxed mix, prepared roux, and étouffée base can help on busy nights, but the from-scratch roux method gives the best flavor and control.
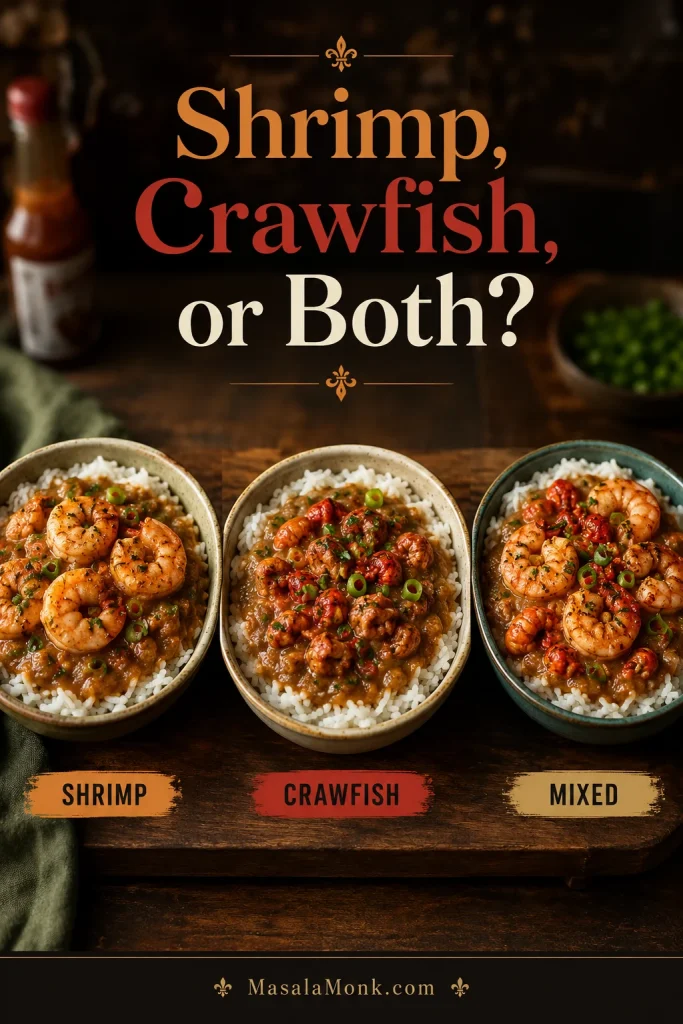
Choose Your Version: Shrimp, Crawfish, or Both
Before you worry about spice level, choose the seafood that makes sense for your kitchen. Crawfish gives étouffée its classic Louisiana feel, shrimp makes the recipe easier to shop for, and using both turns the pot into a fuller seafood dinner.
| Version | Use it when | How to cook it |
|---|---|---|
| Crawfish étouffée | You have crawfish tails and want the most classic seafood flavor | Add thawed crawfish tails at the end and heat gently for 3–5 minutes |
| Shrimp étouffée | You want the easiest seafood version with ingredients that are easier to find | Add raw peeled shrimp at the end and cook 3–5 minutes until opaque |
| Shrimp and crawfish étouffée | You want a bigger seafood dinner with more texture and flavor | Add shrimp first, then stir in crawfish during the final 2–3 minutes |
| Chicken étouffée | You want the same sauce structure without seafood | Use cooked chicken or simmer small pieces until fully cooked and tender |
Compare the versions before cooking so the pot matches your seafood, shopping, and serving plan.
Seafood Timing Notes
Good crawfish tails are worth using when you can get them. Otherwise, shrimp is not a compromise; it is a strong version of the dish on its own. Thaw frozen shrimp fully and pat it dry so extra water does not thin the pot. For another shrimp dinner where timing matters, this shrimp scampi also keeps the shrimp tender by cooking it quickly in a finished sauce.
Chosen your seafood? Return to the Recipe Card, or review Success Cues for shrimp and crawfish timing.
Ingredients You Need for Cajun Étouffée
Once the roux is under control, the rest of the ingredient list is simple. Each piece has a job, and the timing matters more than using a long list of extras.
Roux: butter or oil plus flour
The roux gives the sauce its body and toasted depth. Butter tastes richer; oil is more forgiving. Nervous about scorching? Use half butter and half oil so you get flavor with a little more stability.
The holy trinity
Onion, celery, and green bell pepper form the Cajun holy trinity. Green bell pepper gives the most classic flavor, but red or yellow bell pepper works when that is what you have. Chop the vegetables finely so the finished dish feels smooth and spoonable instead of chunky.
The Cajun holy trinity belongs in the ingredient notes because it shapes the sweetness and depth of the sauce.

Garlic and Cajun seasoning
Garlic adds depth, but it burns quickly, so add it after the onion, celery, and bell pepper have softened. Cajun seasoning varies a lot by brand. Some blends are mostly spice; others are very salty. Start with less if your seasoning contains salt, then adjust after the sauce simmers.
Salted seasoning, salted stock, hot sauce, and boxed bases can stack quickly. Wait until the sauce has simmered, then taste and adjust. Rice will soften saltiness on the plate, but it is much easier to add salt than remove it.
Stock
Seafood stock or shrimp stock gives the deepest flavor, but chicken stock works well for a home version. Choose low-sodium stock when your Cajun seasoning is salted. Warm stock blends into the roux more smoothly. For another seafood recipe where the base makes or breaks the final flavor, this lobster bisque uses the same idea: build the base first so the seafood tastes richer without overcooking.
Shrimp or crawfish
Use peeled raw shrimp, thawed crawfish tails, or a mix. Shrimp cooks quickly, crawfish tails are often already cooked, and both do best with gentle heat.
Green onions, parsley, and hot sauce
Green onions and parsley cut through the richness right at the end, so the bowl tastes bright instead of heavy. Hot sauce brings acidity as well as heat. Add some to the pot, then keep more on the table for anyone who wants a brighter final kick.
What Is Étouffée Sauce Made Of?
Think of étouffée sauce as a roux-thickened seafood gravy: not soup, not paste, and not a loose pan sauce. It should move slowly from the spoon, coat the seafood, and settle into hot rice.
The roux gives body, the trinity gives sweetness and depth, stock loosens everything into a spoonable base, and Cajun seasoning, Worcestershire sauce, hot sauce, green onions, and parsley finish the flavor. Crawfish tail juices, when they smell clean and sweet, can add extra seafood depth near the end.
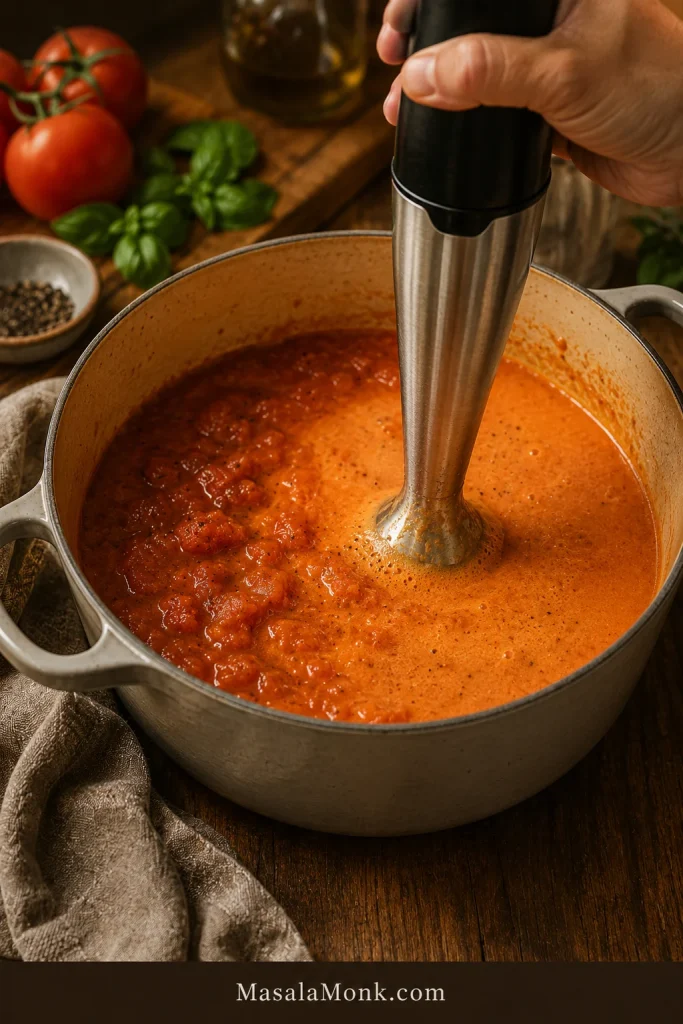
Stiff sauce needs warm stock. Watery sauce needs a few uncovered minutes before the seafood is added. The goal is simple: thick enough to coat the back of a spoon, soft enough to flow around rice.
Texture matters most here: étouffée sauce should behave like seafood gravy, not broth or paste.
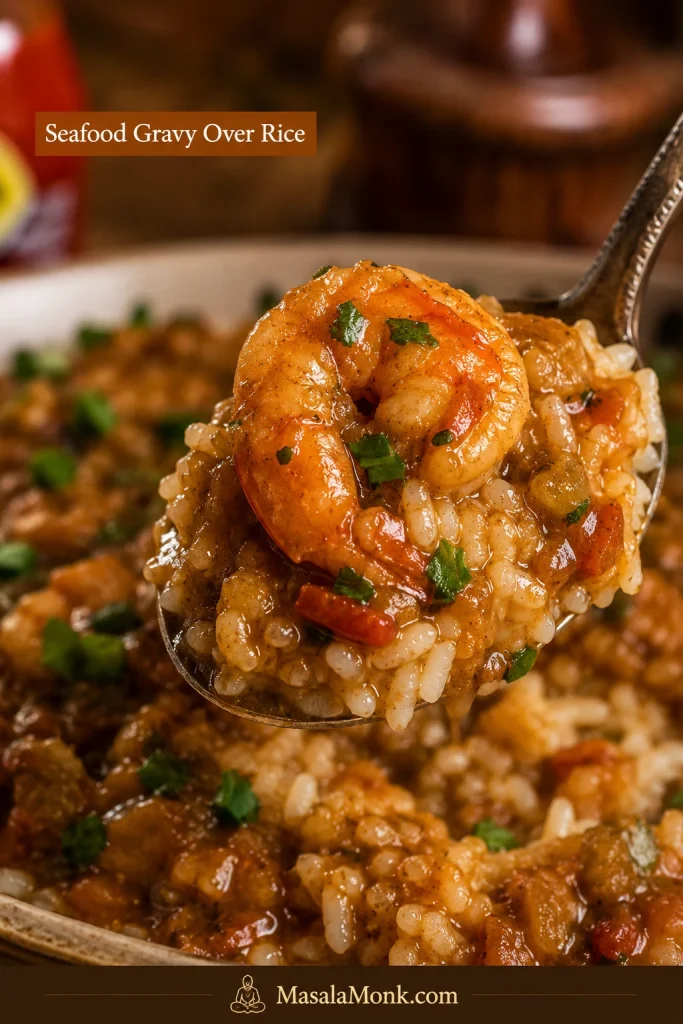
Check the spoon before serving; a slow coating means the sauce has enough body without turning pasty.
If you love Cajun-style seafood sauces in general, this seafood boil sauce is useful for a different kind of seafood dinner. It is more buttery and pourable than étouffée, but it works with many of the same shrimp, crab, crawfish, garlic, and Cajun seasoning flavors.
Roux Color Guide for Étouffée
The roux is the only part of this recipe that asks for your full attention, but it does not ask you to rush. You do not need a restaurant-speed roux here. A steady, slower roux is easier to control and still gives you the nutty flavor this dish needs.
Watch Color Before Time
Stir steadily, control the heat, and watch the color more than the clock. Do not judge the pot too early; the roux changes slowly at first, then deepens faster as it gets darker.
Start the roux guide with color, because the stages tell you more than the clock on the stove.
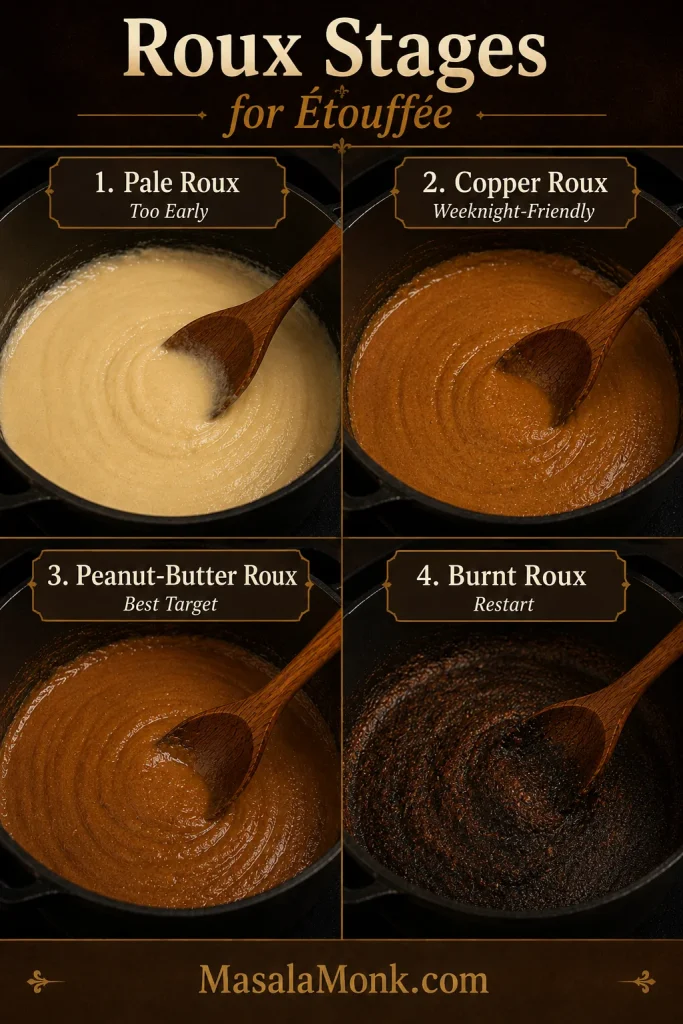
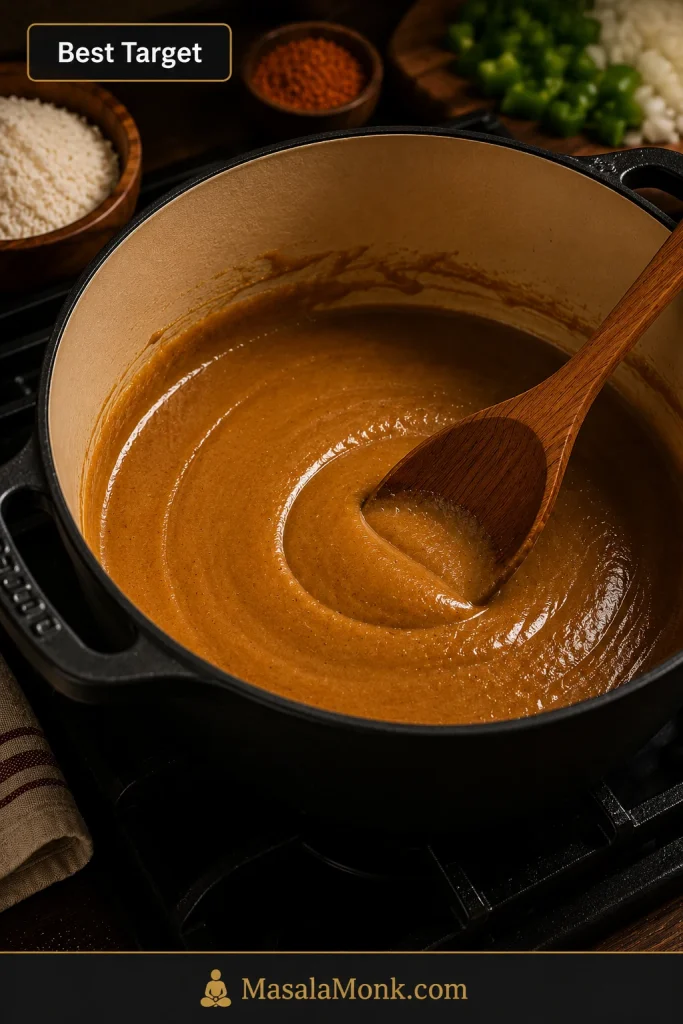
The times below are estimates. Color and smell matter more than minutes, especially if your pot runs hot or your stove is uneven. For this Cajun étouffée recipe, aim for a peanut-butter-colored roux. It gives the sauce a nutty flavor without taking as long as a very dark gumbo-style roux.
Roux Colors at a Glance
| Roux color | Approximate time | Flavor | Best use |
|---|---|---|---|
| Blonde | 3–5 minutes | Mild, buttery, lightly cooked | Fastest version, but less Cajun depth |
| Copper | 6–8 minutes | Lightly nutty and beginner-friendly | Good weeknight étouffée |
| Peanut butter | 8–15 minutes | Nutty, rounded, deeper flavor | Best balance for this recipe |
| Dark brown | 18–25+ minutes | More intense, slightly smoky | Advanced version; thickens less and burns more easily |
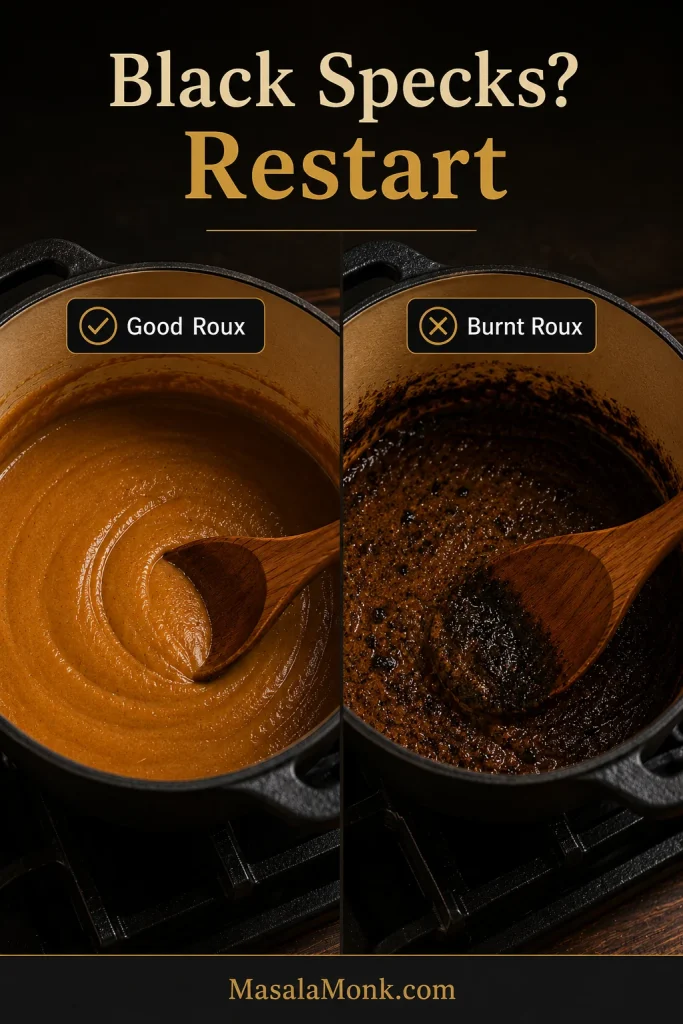
| Burnt with black specks | Any time if heat is too high | Bitter | Discard and restart |
The color guide turns roux judgment into a visual check instead of a guessing game.

This early roux stage explains why color matters before the sauce gets its deeper Cajun flavor.
Aim for this peanut-butter shade when you want toasted flavor without losing too much thickening power.
When to Restart the Roux
As the roux darkens, lower the heat if it starts moving too fast. Black specks or a sharp burnt aroma mean it is time to restart. Burnt roux will make the whole pot taste bitter.
Restarting is better than saving burnt roux, because scorched flavor will travel through the whole sauce.
Roux ready? Continue to How to Make Cajun Étouffée, or use Troubleshooting if the pot smells burnt, tastes floury, or feels too thick.
How to Make Cajun Étouffée
The recipe card gives the exact steps. This walkthrough is here for the cooking cues: what should be ready, what should smell right, and when the pot is safe for seafood.
1. Prep everything before the roux
Once the roux starts cooking, your attention belongs to the pot. Chop the vegetables, mince the garlic, slice the herbs, warm the stock, cook the rice, and thaw the seafood before you turn on the stove.
2. Cook the roux slowly
Melt the butter, warm the oil, or heat a butter-oil mix, then add the flour and stir constantly over medium heat. The roux will move from pale to blonde, then copper, then peanut-butter brown. Darkening too quickly is your cue to lower the heat and keep stirring.
3. Add onion, celery, and bell pepper
When the roux reaches the color you want, stir in the holy trinity. The vegetables cool the roux slightly, then turn sweet and savory as they soften into the base. This is the moment the pot starts smelling like dinner.
Once the trinity hits the roux, the pot shifts from toasted flour to a sweet, savory Cajun base.

4. Build the sauce with warm stock
After the garlic blooms, the first splash of stock will make the roux seize and thicken. Keep whisking. It loosens as the rest of the stock goes in and turns into a smooth, spoonable base.
Warm stock and steady whisking turn the roux from tight and thick into a smooth sauce.
5. Simmer until the base tastes complete
Let the sauce simmer until the floury edge has cooked away and the seasoning tastes balanced. The pot should already taste like dinner before the seafood arrives.
6. Finish with shrimp or crawfish
Raw shrimp only needs a few minutes. Crawfish tails are often already cooked and only need to be heated through. Treat the seafood like the finish, not the simmer.
7. Rest, garnish, and serve
Let the pot rest for a few minutes so the sauce settles and thickens slightly. Spoon it over hot white rice so the gravy pools around the grains, then serve with fresh herbs and extra hot sauce at the table.
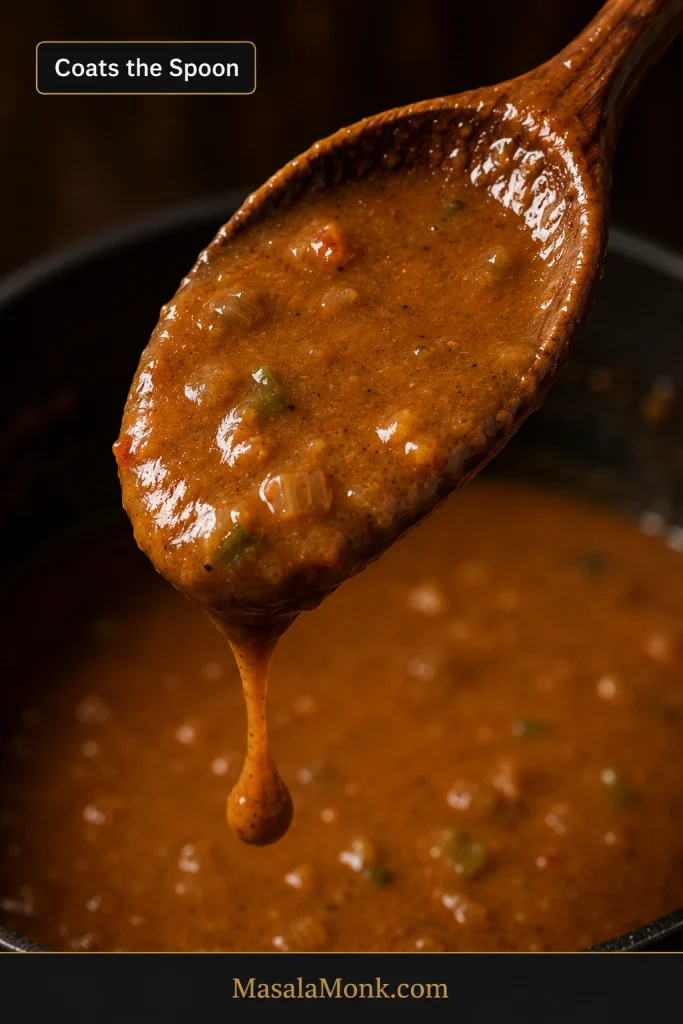
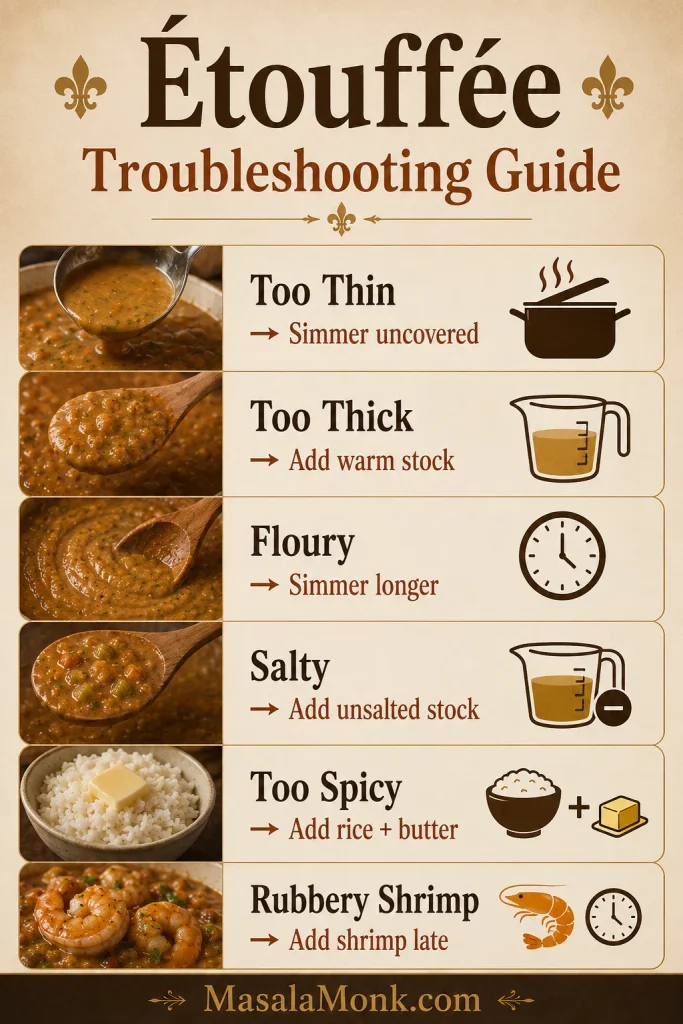
Troubleshooting: Fix Thin, Thick, Salty, Bland, Spicy, or Floury Étouffée
Do not panic if the sauce looks wrong at first. Étouffée can look too thick, too thin, or too dark for a minute before it comes together. Most problems are easier to fix before the seafood goes in, so taste and adjust while the shrimp or crawfish is still safely waiting.
Check Texture Before Seafood
Étouffée should be thicker than soup but softer than paste. It should spoon easily over rice, coat the seafood, and settle into the grains without disappearing completely.
Diagnose the sauce before adding seafood by comparing thin, spoonable, and overly thick textures.
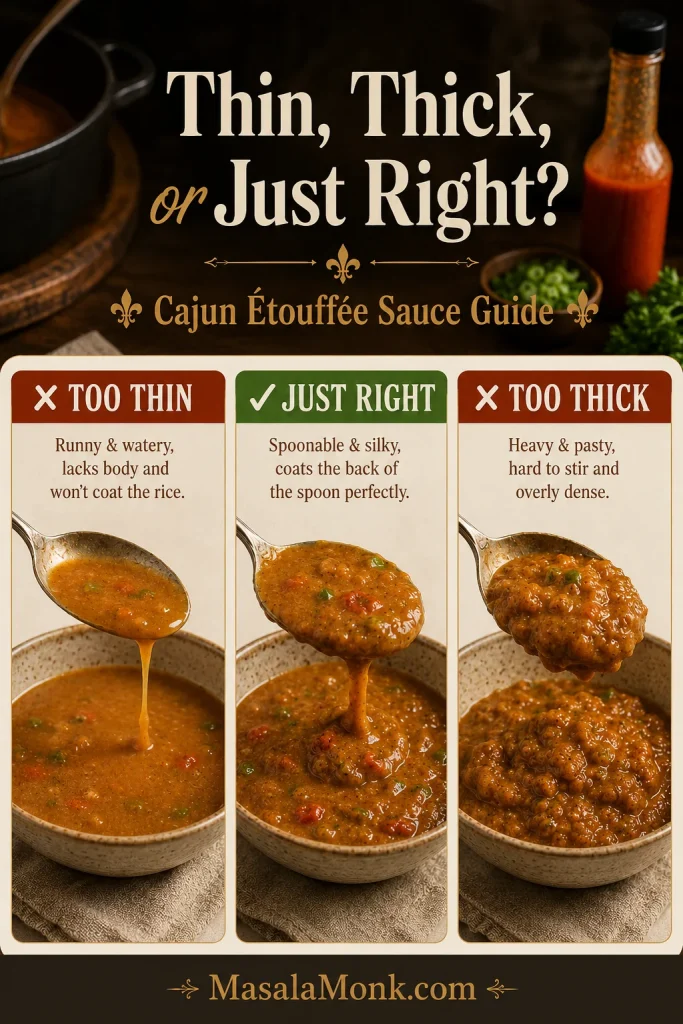
Common Étouffée Fixes
| Problem | What it means | How to fix it |
|---|---|---|
| Too thin | Usually too much liquid or not enough simmering | Simmer uncovered for a few more minutes before adding seafood |
| Too thick | The roux absorbed more liquid than expected | Add warm stock a splash at a time |
| Floury taste | Roux was undercooked or sauce needs more time | Simmer the sauce longer before adding seafood |
| Too salty | Seasoning blend, stock, hot sauce, or boxed base was salty | Add unsalted stock, a little butter, and serve with plain rice |
| Too spicy | Often too much cayenne, hot sauce, or spicy Cajun seasoning | Add unsalted stock, a little butter, and serve with extra plain rice |
| Bland | Needs more spice, acid, or finishing flavor | Add Cajun seasoning, hot sauce, Worcestershire, green onion, or cayenne |
| Burnt roux | Roux scorched before vegetables were added | Restart the roux; burnt flavor will not cook out |
| Rubbery shrimp | Shrimp cooked too long or boiled too hard | Add shrimp only at the end and cook just until opaque |
| Watery seafood flavor | Frozen seafood released too much liquid | Thaw, drain, and pat dry before adding; simmer the sauce first so it has body |
After the detailed fixes, this guide works as a quick save-the-pot reminder for common étouffée problems.
Pot fixed? Return to the Recipe Card, check Serving Ideas, or use Shortcut Options if you are adjusting a faster version.
Cajun vs Creole Étouffée: Tomato or No Tomato?
Tomato is where étouffée opinions can get loud, so this recipe keeps the choice simple. This version keeps tomato out of the main pot for a roux-forward Cajun-style flavor. Some home cooks add tomato, especially in Creole-leaning or family-style versions, so the option is included below.
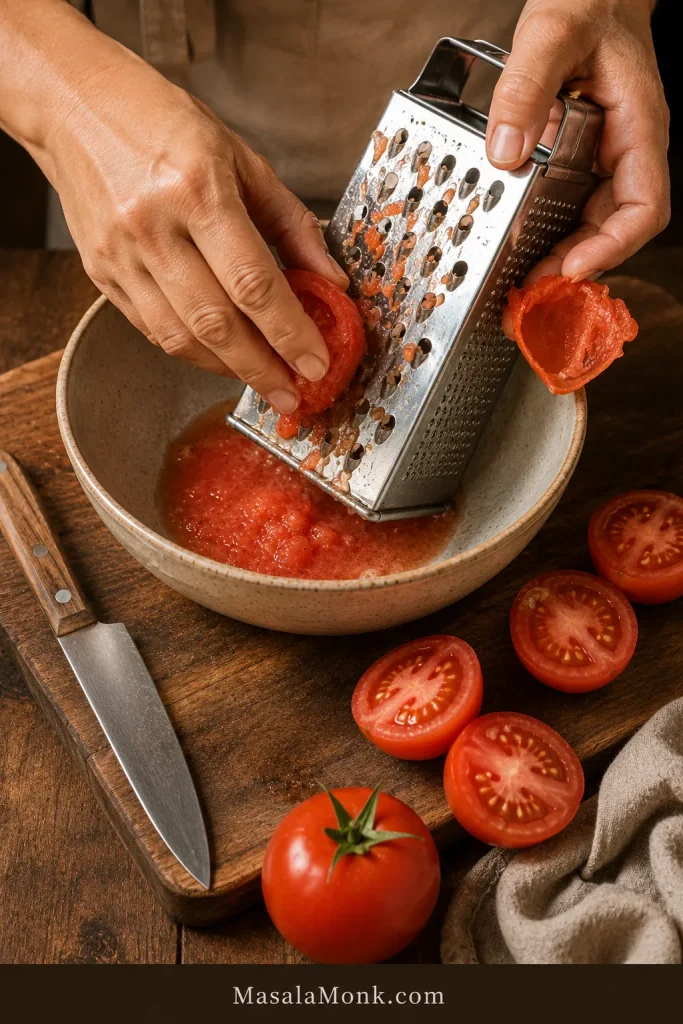
For a brighter sauce, add 1 tablespoon tomato paste with the garlic and spices, or stir in ½ cup diced tomato when you add the stock. Tomato changes the flavor, but it can still make a delicious pot.
The tomato choice belongs here because roux-forward Cajun-style and brighter Creole-leaning bowls can both be delicious.
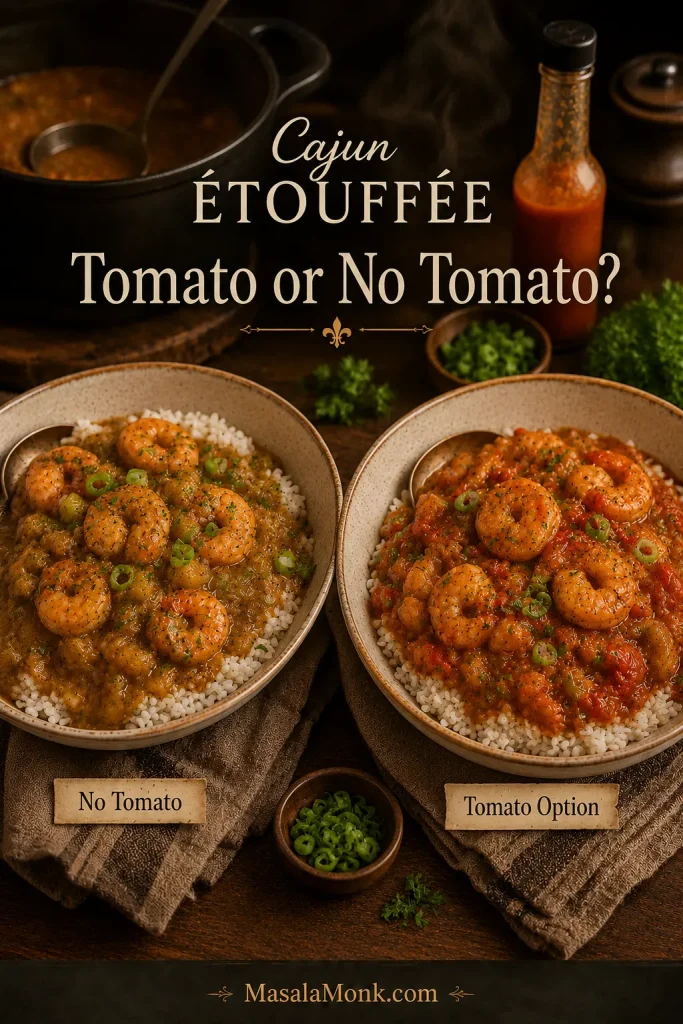
Skip the tomato if you came here for a roux-forward bowl. Add a little if you like a softer, brighter sauce. Like many Louisiana-style dishes, every kitchen has its own opinion.
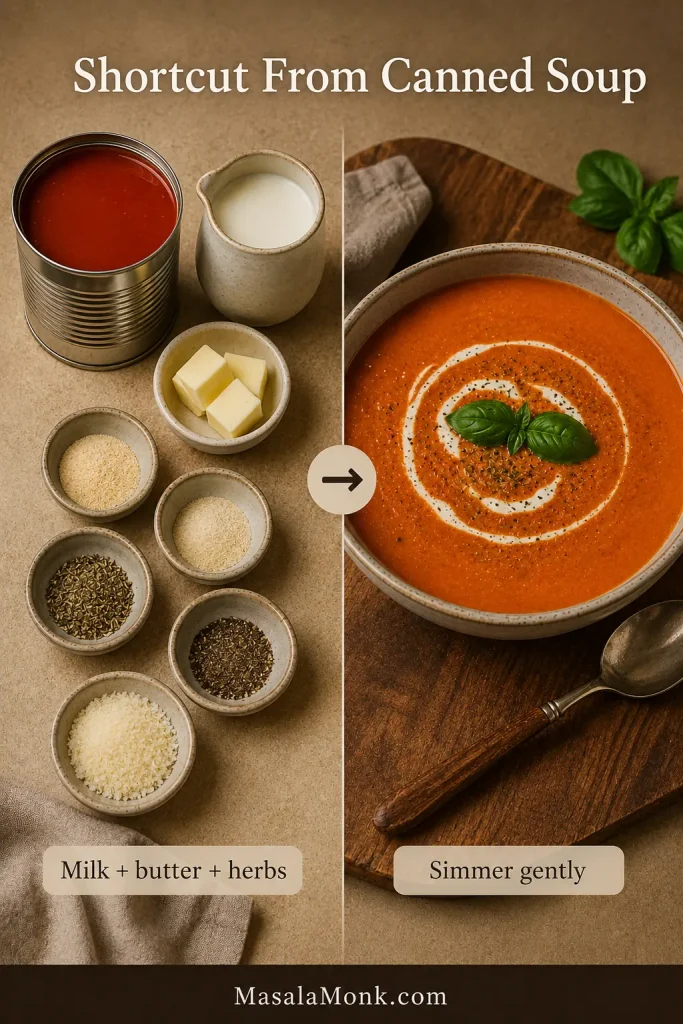
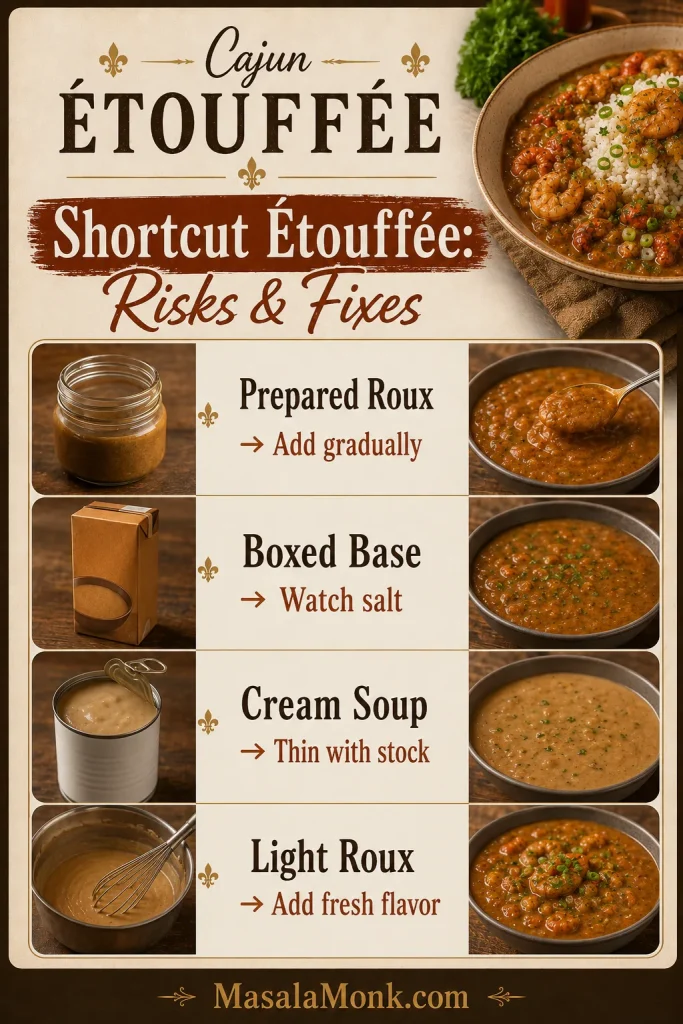
Étouffée Sauce, Base, Mix, and Cream Soup Shortcuts
Some nights, you want the roux. On other nights, you want dinner faster. Both are real kitchens. Shortcut étouffée works best when you add freshness back: sautéed trinity, garlic, herbs, a splash of hot sauce, and gentle seafood timing.
The goal is not to pretend a shortcut tastes exactly the same as a from-scratch roux. Instead, make it balanced, creamy or saucy in the right way, and worth spooning over rice.
| Shortcut | Main risk | Best fix |
|---|---|---|
| Prepared or jarred roux | Too intense or too dark | Add gradually and taste before adding more seasoning |
| Boxed étouffée mix or base | Too salty or flat | Use less seasoning and add sautéed trinity, garlic, herbs, and hot sauce |
| Cream soup | Too heavy, thick, or salty | Thin with stock and finish with fresh herbs and gentle seafood timing |
| Light roux | Less depth | Use good stock, Cajun seasoning, Worcestershire sauce, and a little acidity |
For shortcut methods, keep the focus on salt control, sauce thickness, fresh trinity, and gentle seafood timing.
Using prepared or jarred roux
Prepared roux can save time if you want roux flavor without standing over the pot as long. Follow the jar’s or package’s guidance as your baseline, then add gradually rather than all at once. Build the sauce with sautéed onion, celery, bell pepper, garlic, warm stock, and seasoning. Taste before adding more Cajun seasoning because prepared roux can vary in intensity.
Using étouffée mix or base
Boxed étouffée mix or jarred base can be useful when you want dinner fast. Most mixes already contain seasoning, thickener, and salt, so taste before adding more Cajun seasoning. Add shrimp or crawfish near the end instead of boiling it hard for the whole cooking time.
To make a mix taste more homemade, sauté onion, celery, bell pepper, and garlic in a little butter before adding the mix and liquid. Finish with fresh herbs, a splash of hot sauce, and a small knob of butter.
Using cream of mushroom, cream of shrimp, or cream of celery soup
Many home cooks make a creamy shortcut étouffée with condensed soup. If this is the version you grew up with, it deserves a place too. Cream of mushroom, cream of shrimp, cream of celery, and golden mushroom soup all create an easy, comforting sauce. It will not taste exactly like a roux-based Cajun étouffée, but it can still be a cozy family-style dinner.
Cream soup shortcuts work best when stock loosens the base and seafood stays gently cooked.

Condensed soup needs a lighter hand with salt and seasoning. Start with about ½ can of water or stock per can of condensed soup, then loosen the sauce more only if needed. Cream soup versions can become salty quickly, especially when combined with Cajun seasoning and table hot sauce.
For a full dinner built around the same condensed-soup comfort idea, this cream of mushroom chicken shows how much the soup-to-liquid ratio matters when you want the sauce creamy instead of watery.
The fastest from-scratch shortcut
If you have 5–8 minutes, make a light roux instead of relying only on soup or mix. Even a copper-colored roux gives the sauce more flavor and better texture than a fully instant version.
Using a shortcut tonight? Keep Troubleshooting nearby, then return to the Recipe Card for seafood timing.
What to Serve With Cajun Étouffée
Cajun étouffée is usually served over white rice, and for good reason. The rice catches the sauce, softens the heat, and turns the dish into a full meal. If rice is the part that usually lets you down, this guide on how to cook perfect rice will help you get fluffy grains before the étouffée is ready.
A shallow bowl works best here: rice in the center, sauce ladled around it, herbs on top, and table hot sauce close by. It feels generous without needing many sides.
Serving gets easier when rice is mounded first and the étouffée is ladled around it.
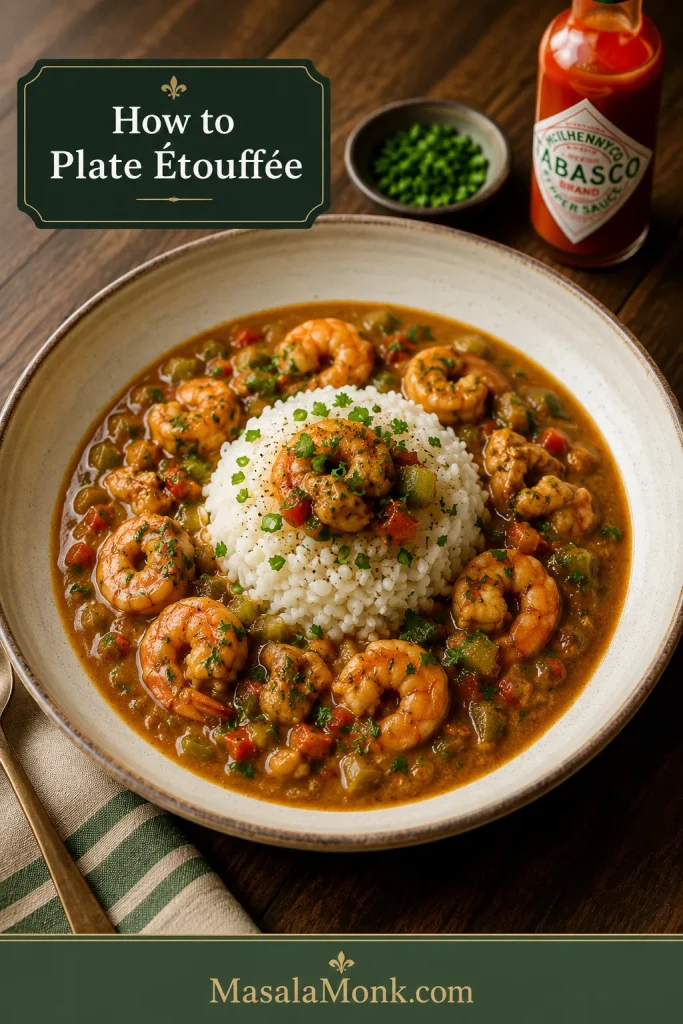
- Long-grain white rice: the classic, clean choice.
- Green onions and parsley: a fresh finish for a rich sauce.
- Hot sauce: serve on the side so everyone controls the heat.
- Cornbread: good for soaking up extra sauce.
- Simple green salad: balances the richness.
- Roasted okra or sautéed greens: adds a Southern-style vegetable side.
- Red beans and rice: better as a separate meal or part of a larger Cajun/Creole spread rather than something you need on the same plate.
- Cajun seafood boil: a natural next recipe if you are building a bigger seafood spread around shrimp, crawfish, crab, or potatoes.
Finish with herbs and a sharp splash of hot sauce.
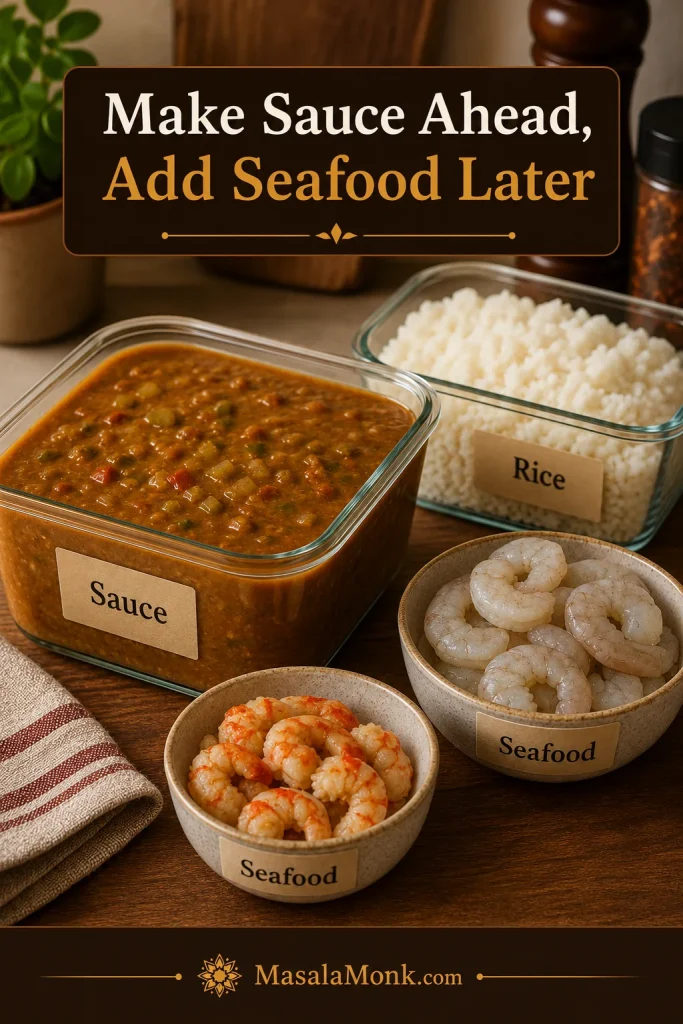
Make-Ahead, Storage, Freezing, and Reheating
Étouffée is a good make-ahead dish when the sauce and seafood are handled separately. Prepare the sauce ahead, then add the seafood when you reheat and serve.
Make ahead
Make the sauce through the simmering step, then cool and refrigerate it. When ready to serve, warm it gently, add a splash of stock if needed, and finish with shrimp, crawfish tails, or both.
Storage works best when the sauce is made ahead and seafood is saved for reheating.
Refrigerating leftovers
Store leftovers in an airtight container in the refrigerator for up to 3 days. Keep rice separate if possible so the sauce does not become too thick and starchy.
If you have extra cooked rice but not enough étouffée for another full bowl, turn the rice into a separate dinner like this shrimp fried rice instead of stretching the sauce too thin.
Freezing
You can freeze étouffée, but seafood texture may change after thawing. The best method is to freeze the sauce without seafood, then add fresh shrimp or crawfish when reheating. Leftovers with seafood already in the sauce should be cooled quickly, frozen in a sealed container, and reheated gently.
Reheating
Reheat on low heat, stirring often. Add a splash of stock or water to loosen the sauce. Avoid boiling leftovers hard because shrimp and crawfish can toughen.
Variations
Shrimp étouffée
Use 2 lb total peeled and deveined raw shrimp. Add it near the end and cook gently until opaque and softly curled.
Crawfish étouffée
Use 2 lb total thawed crawfish tails. Already cooked crawfish should be warmed gently instead of boiled hard.
Seafood étouffée
Use a mix of shrimp and crawfish, or add a little crabmeat at the end. Delicate seafood stays best when it is added late.
Chicken étouffée
Use bite-size cooked chicken or small pieces of boneless chicken thighs. Simmer until the chicken is fully cooked and tender, then finish with fresh herbs.
Gluten-free étouffée
Use a gluten-free all-purpose flour blend or rice flour for the roux. The texture may be slightly different, so add stock gradually and adjust the sauce as it thickens.
Vegetarian mushroom étouffée
Use mushrooms instead of seafood and vegetable stock instead of seafood or chicken stock. Brown the mushrooms first so they bring depth to the sauce instead of watering it down.
Extra spicy Cajun étouffée
Add more cayenne, diced jalapeño, or extra hot sauce at the table. Build spice gradually because Cajun seasoning and hot sauce can also add salt.
Creamy shortcut étouffée
Use condensed cream of mushroom, cream of shrimp, or cream of celery soup as part of the sauce base. Keep the seasoning lighter, thin with stock, and add seafood at the end.
Cajun Étouffée FAQs
How do you pronounce étouffée?
Étouffée is usually pronounced ay-too-FAY or eh-too-FAY. The word comes from French and means “smothered.”
Is shrimp okay instead of crawfish?
Yes. Use raw peeled shrimp and add it during the final 3–5 minutes so it stays tender. Shrimp is easier to find than crawfish and works very well in Cajun étouffée.
Are crawfish tails already cooked?
Many packaged crawfish tails are already cooked. Check the package, but in most cases they only need to be warmed through in the sauce for a few minutes.
How should frozen crawfish tails be handled?
Thaw frozen crawfish tails first, then drain excess liquid. Do not automatically rinse them, especially if the package has flavorful crawfish fat or juices. Muddy or overly fishy liquid should be drained more aggressively, with stock doing more of the flavor work.
What roux color is best for étouffée?
Peanut-butter brown is the best balance for this recipe. It gives the sauce nutty flavor without requiring a very dark roux. A lighter copper roux also works for an easier weeknight version.
Does Cajun étouffée need tomatoes?
No. This version does not use tomato by default. A little tomato paste or diced tomato gives the sauce a brighter Creole-style feel. Tomato changes the flavor, but it can still make a delicious pot.
Should étouffée be thick?
Yes, but not pasty. Étouffée should be thicker than soup and thin enough to spoon over rice. A thick sauce needs warm stock; a thin one needs a few more uncovered minutes.
Why does my étouffée taste floury?
The roux may not have cooked long enough, or the sauce may need more simmering time. Cook the roux until it smells nutty, then simmer the sauce until the floury taste disappears.
How do I keep shrimp from overcooking?
Build and simmer the sauce first, then add shrimp at the end. Shrimp usually needs only 3–5 minutes in a gentle simmer. Remove the pot from heat as soon as the shrimp is opaque and tender.
Cream of mushroom soup in étouffée: yes or no?
Yes, if you want a creamy home-style shortcut. Cream of mushroom soup is not the same as a roux-based Cajun étouffée, but it can be useful for a fast, comforting version. Use less salt because condensed soup and Cajun seasoning can become salty together.
Gumbo vs étouffée: what is the difference?
Gumbo is usually more soup-like and often served as a stew with rice, while étouffée is thicker and more sauce-like. Étouffée should cling to the seafood and rice rather than feel like broth. For a deeper comparison, Southern Living has a helpful étouffée vs gumbo explainer.
Make-ahead étouffée: what works best?
Best texture comes from making the sauce ahead and adding the seafood when reheating. This keeps shrimp and crawfish from becoming tough.
Need the essentials again? Jump back to the Recipe Card, Roux Guide, Troubleshooting, or Top.
Final Spoonful
Once you know what the roux should smell like, how the sauce should move, and when the seafood should go in, Cajun étouffée stops feeling intimidating. It becomes what it should be: glossy, spicy, seafood-rich comfort poured over hot rice, finished with herbs and one more sharp splash of hot sauce.
The finished-pot target is simple: glossy sauce, hot rice, fresh herbs, and enough Cajun étouffée for the table.
Every kitchen has an opinion on tomato, cream soup, crawfish, shrimp, or how dark the roux should be — and that is part of why étouffée is so fun to cook. If your family has a version, it probably has a reason behind it. Learn the base method, adjust the pot to your table, keep the rice hot, and serve it while the sauce is still glossy.