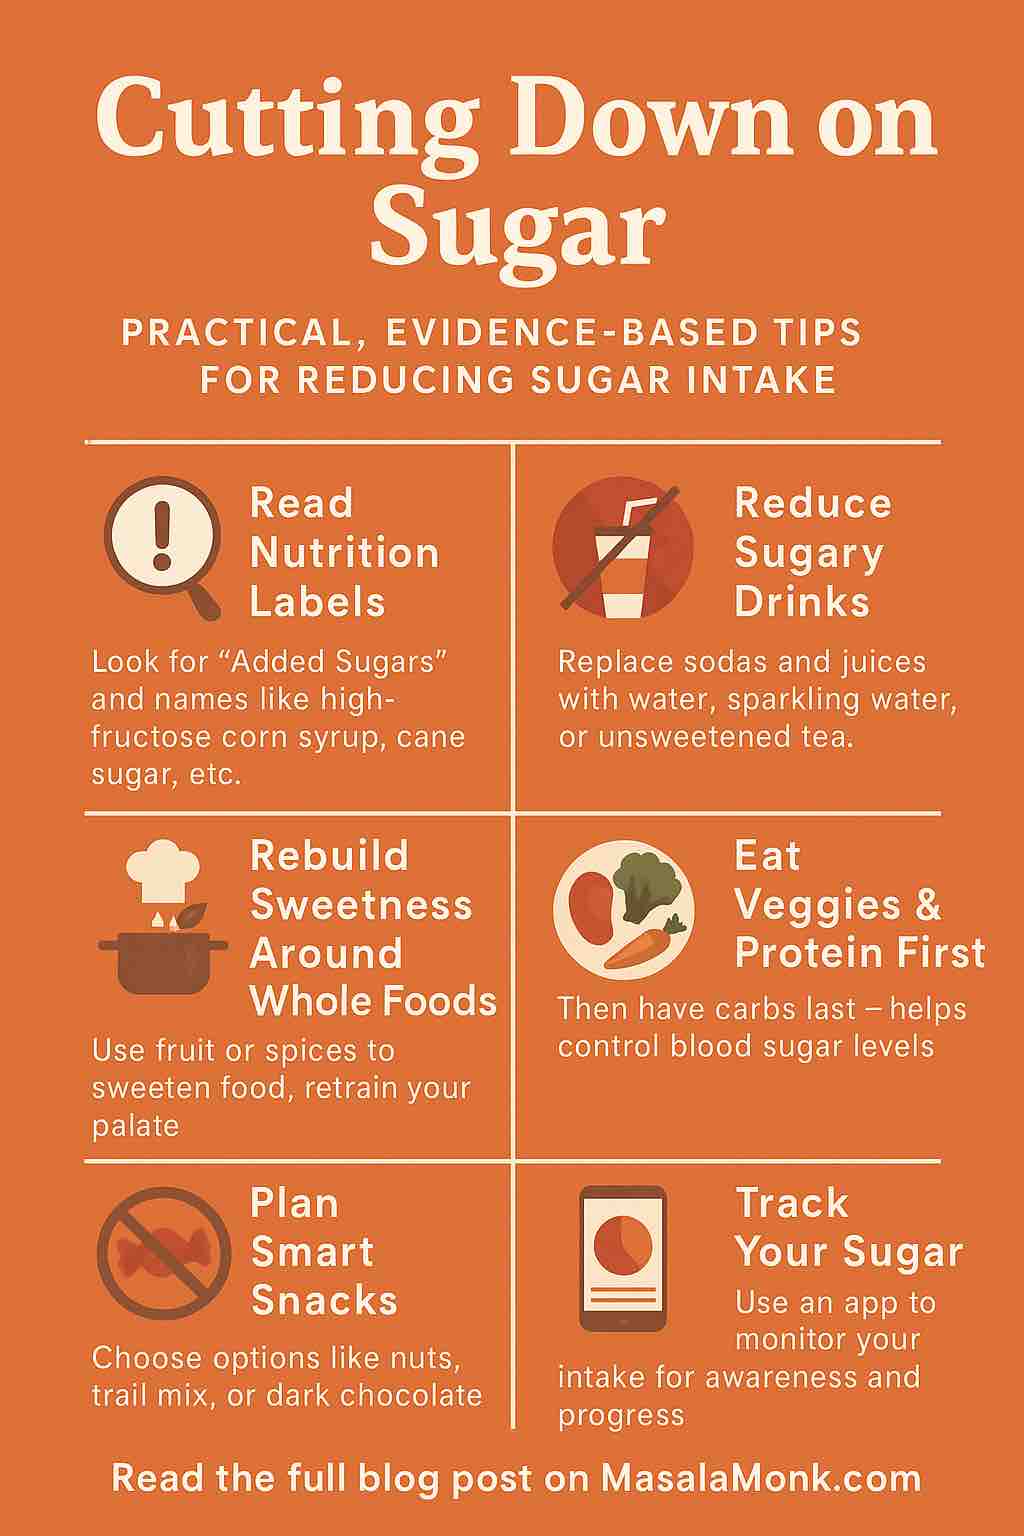
“Sugar is sweet—but too much can sour your health.” In today’s world, reducing sugar isn’t just about willpower—it’s about strategy, awareness, and smarter choices. This isn’t a call to cut sugar cold turkey, but rather a guide to eating less sugar in a realistic, sustainable way, based on the latest research and practical tips.
🍬 Why Cut Down on Sugar?
Added sugars—especially in beverages and ultra-processed foods—are a major driver of preventable disease. They contribute to:
Obesity and weight gain
Type 2 diabetes and insulin resistance
Cardiovascular disease
Liver dysfunction
Mood disorders, anxiety, and fatigue
Dental problems
📊 The Stats Don’t Lie:
Over 2.2 million diabetes cases and 1.2 million cardiovascular disease cases are attributed annually to sugary drinks alone (Tufts University, 2025).
People exposed to sugar restrictions in early childhood develop less hypertension and diabetes and live healthier for longer (Science, 2024).
🧭 Step-by-Step: How to Cut Sugar Practically
✅ 1. Know Where Sugar Hides
The first step to cutting down sugar is knowing where it lives. It’s not just in candy or soda.
🕵️♂️ Hidden Sources of Added Sugar:
Granola, breakfast cereals
Yogurt (especially fruit-flavored)
Sauces and dressings (e.g. ketchup, BBQ sauce)
Bread and crackers
“Healthy” snacks: protein bars, energy bites
🔎 Action Tip: Read nutrition labels carefully. Look for “added sugars” and scan ingredient lists for:
Artificial sweeteners (aspartame, saccharin) may disrupt gut microbiota
Some may maintain sweet cravings even without calories
🏛️ Beyond the Plate: Policies Shaping Sugar Reduction
Public health is catching up.
SNAP program updates (2025): Some states now restrict soda purchases via food assistance.
SSB taxes: Over 40 countries and cities have implemented taxes—consumption falls by 10–20% where enforced.
Food labeling laws: Added sugars now clearly listed in many countries, empowering consumers.
🔚 Final Thoughts: Progress Over Perfection
Cutting sugar isn’t about quitting dessert forever or obsessing over labels. It’s about:
Making smarter swaps
Understanding your triggers
Creating sustainable systems that support your goals
Even small reductions—one less soda per day, half as much sugar in your coffee, or reading one more label—compound over time.
✅ Quick Recap: Sugar Reduction Checklist
✔ Scan ingredient lists for added sugars ✔ Replace sugary drinks with flavored water or tea ✔ Use fruit and spices to naturally sweeten food ✔ Eat veggies/protein before carbs ✔ Prepare healthy snacks ahead of time ✔ Track your sugar intake using an app ✔ Gradually reset your palate
AHA/Health orgs endorse low-cal sweeteners, replacements like applesauce
Gradual taste adaptation, less added sugar
Policy measures
Taxes & campaigns show measurable intake drops
Broad public health benefit
🔍 FAQs on Cutting Down Sugar
1. How much sugar is considered “too much”?
According to the World Health Organization and American Heart Association:
Men: No more than 36g (9 teaspoons) of added sugar per day
Women: No more than 25g (6 teaspoons) That’s about 5–10% of your daily calories from added sugars.
2. Is natural sugar in fruit bad for you?
No. Whole fruits contain fiber, water, vitamins, and antioxidants that slow sugar absorption and provide essential nutrients. Fruit juice, however, should be limited as it removes fiber and concentrates sugar.
3. Do I have to give up desserts completely?
Not at all. You can enjoy desserts in moderation or recreate them using healthier ingredients, like using dates, bananas, or applesauce for sweetness. Portion control and frequency are key.
4. What are the best sugar substitutes?
The most recommended are:
Stevia and monk fruit (plant-based, no calories)
Erythritol and allulose (low-calorie sugar alcohols) Avoid overuse of artificial sweeteners like aspartame or sucralose if you’re sensitive to them.
5. How can I tell if a food has added sugar?
Check the “Added Sugars” line on the Nutrition Facts label. Also scan the ingredient list for words like:
Liquid sugar is absorbed more quickly, leading to rapid blood sugar spikes, insulin surges, and fat storage. It’s also less satiating, so it adds calories without reducing hunger.
7. Will cutting sugar help me lose weight?
Yes—especially if you cut liquid sugar and processed snacks. This reduces empty calorie intake and improves insulin sensitivity, making it easier for your body to burn fat.
8. How long does it take to reduce sugar cravings?
Most people see reduced cravings within 7–14 days. Your taste buds adapt over time, and whole foods begin to taste sweeter naturally.
9. What should I eat when I crave sugar?
Try:
Fruit (like apple slices with peanut butter)
Nuts
Dark chocolate (70%+)
A glass of water and a walk—sometimes cravings stem from boredom or dehydration.
10. Is “zero sugar” the same as healthy?
Not always. “Zero sugar” products can contain artificial sweeteners, additives, or unhealthy fats. Always check the full nutrition label—not just marketing claims.
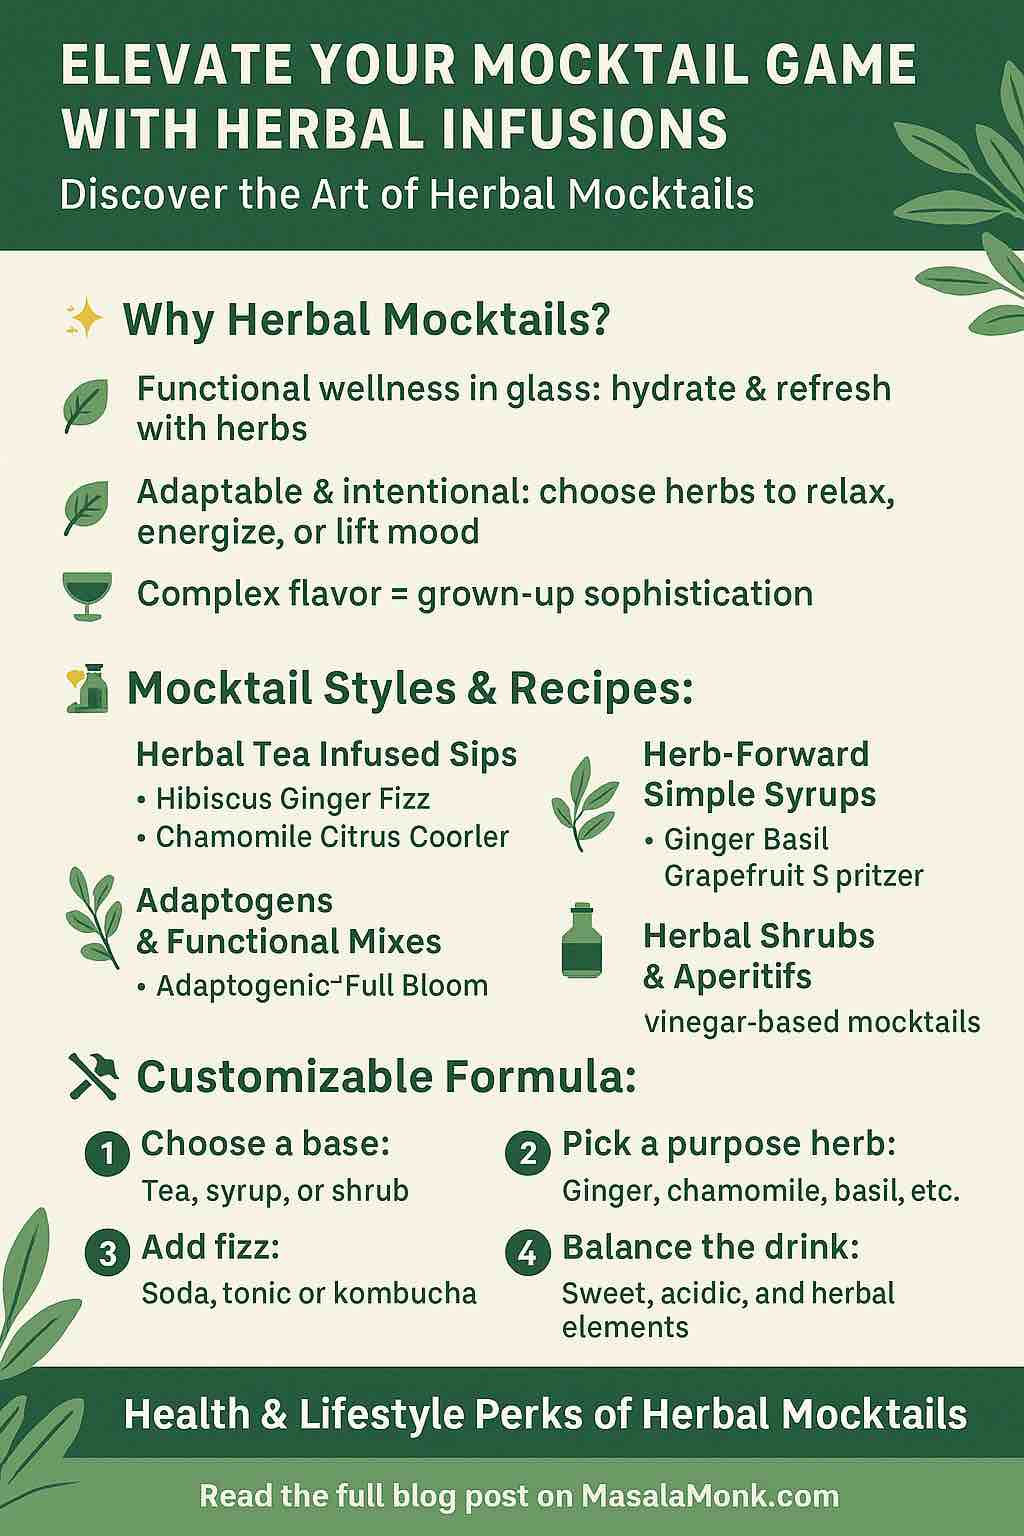
In the era of mindful drinking and wellness-centric lifestyles, herbal mocktails are taking center stage. These alcohol-free elixirs blend botanical ingredients, wellness herbs, and creative mixology to deliver sophistication, flavor, and function. Whether you’re unwinding at home, hosting a summer soirée, or embracing sober living, herbal mocktails are the ultimate beverage upgrade.
Why Herbal Mocktails?
Herbal mocktails go beyond being just a substitute for cocktails. They are:
Wellness-Driven: Ingredients like chamomile, hibiscus, ginger, and adaptogens support digestion, relaxation, mood, and immunity.
Flavor-Rich: Fresh herbs offer a range of complex flavors—from bright and citrusy to earthy and floral.
Socially Sophisticated: They cater to a growing number of adults who seek alcohol-free options without sacrificing the grown-up feel.
Herbal Mocktail Foundations
1. Herbal Teas and Decoctions
Brewed herbal teas serve as flavorful and functional bases.
Hibiscus Ginger Fizz: Hibiscus tea + ginger juice + lemon + soda water.
2. Herbal Simple Syrups
Infuse sugar syrups with herbs to add depth.
Basil Syrup: Pairs wonderfully with strawberry or grapefruit.
Rosemary Syrup: Combines beautifully with lemon and sparkling wine alternatives.
Lavender Honey Syrup: Perfect for calming evening drinks.
3. Functional Additions
Take it a step further with these superfood and adaptogenic extras:
Tart Cherry Juice: Natural melatonin source for better sleep.
Ashwagandha Drops: Stress relief and balance.
Turmeric: Anti-inflammatory and pairs well with citrus.
Trending Herbal Mocktails of 2025
✨ Sleepy Girl Mocktail
Tart cherry juice
Magnesium powder
Sparkling water
Best served before bed to support sleep.
🌿 Ginger Basil Grapefruit Spritzer
Fresh grapefruit juice
Basil-ginger syrup
Sparkling water
Refreshing and energizing.
🌸 Adaptogenic “Full Bloom”
Botanical non-alcoholic spirit (e.g., Three Spirit)
Basil syrup
Lime juice
Tonic water
A mood-lifting aperitif for evenings.
🍵 Rosemary-Lavender Lemon-Lime Sparkler
Homemade rosemary and lavender syrup
Lemon-lime soda
Garnish with fresh herbs and edible flowers
How to Build Your Own Herbal Mocktail
Step-by-Step Formula
Choose a Base: Tea, infused syrup, or a botanical zero-proof spirit.
Add Herbal Functionality: Chamomile, mint, ginger, adaptogens, or tinctures.
Introduce Acidity: Citrus juices or vinegars for complexity.
Sweeten: Use honey, maple syrup, or monk fruit.
Finish with Fizz: Sparkling water, kombucha, or tonic.
Garnish: Fresh herbs, citrus wheels, or edible flowers.
Practical Tips for Home Mixologists
Batch Brew Herbal Teas: Chill and store in the fridge for easy use.
Make Ahead Syrups: Store in sterilized bottles and refrigerate for up to 2 weeks.
Keep a Herb Garden: Fresh mint, basil, thyme, and lavender elevate any drink.
Use a Cocktail Shaker: It helps blend syrups, citrus, and ice smoothly.
Get Creative with Glassware: Presentation enhances the experience.
Mocktail Lifestyle and Wellness
Herbal mocktails are more than beverages—they’re a ritual. Whether it’s a calming lavender tonic before bed or an energizing hibiscus spritzer mid-day, these drinks contribute to your wellness, mood, and hydration.
They’re also inclusive. Hosting a gathering? Offering a crafted herbal mocktail shows thoughtfulness and sophistication, making everyone feel welcome—regardless of their alcohol preferences.
Final Thoughts
As we embrace more intentional lifestyles in 2025 and beyond, herbal mocktails are a delicious intersection of nature, health, and creativity. With a bit of experimentation and the right ingredients, you can turn every sip into an experience.
So next time you’re mixing a drink, skip the booze and reach for basil, hibiscus, or chamomile. Your taste buds—and your body—will thank you.
🔍 FAQs
1. What are herbal mocktails? Herbal mocktails are non-alcoholic drinks that incorporate herbs, botanical ingredients, and natural flavors. They’re designed to offer complexity, health benefits, and an adult drinking experience without alcohol.
2. Are herbal mocktails healthy? Yes. Many herbs like chamomile, ginger, hibiscus, and basil offer functional benefits—such as promoting relaxation, aiding digestion, and supporting immunity—while keeping the drink low in sugar and free of alcohol.
3. Can I make herbal mocktails without special equipment? Absolutely. You can start with basic kitchen tools: a saucepan (for syrups), a strainer (for teas), a citrus juicer, and a jar or shaker for mixing. Glassware and garnish can elevate the experience, but aren’t essential.
4. Which herbs are best for beginners? Start with familiar herbs like mint, basil, chamomile, and ginger. They’re easy to find, forgiving in flavor, and pair well with fruits and sparkling water.
5. How do I make an herbal syrup at home? Simmer 1 cup water + 1 cup sugar (or honey) with 1–2 tbsp of fresh herbs for 10 minutes. Let it cool, strain, and store in the fridge. It keeps for up to 2 weeks.
6. Are there any side effects to using herbs in drinks? Generally, culinary herbs are safe in moderate amounts. However, herbs like St. John’s wort, valerian, or adaptogenic tinctures can interact with medications—so check with a healthcare provider if unsure.
7. Can I serve these drinks at parties or events? Definitely! Herbal mocktails are inclusive, visually stunning, and show attention to guest preferences. Batch-brewing teas or syrups in advance makes event prep simple.
8. What’s the difference between herbal teas and syrups in mocktails? Teas offer a lighter, more diluted base and are often chilled and used like juice. Syrups are concentrated and used in smaller amounts to sweeten and infuse intense flavor.
9. How do I add fizz to my herbal mocktails? Use sparkling water, tonic, seltzer, or even kombucha. Add it last when assembling your drink to maintain bubbles.
10. Where can I buy adaptogens or non-alcoholic spirits? Health food stores, apothecaries, and online retailers carry adaptogens in tincture or powder form. Zero-proof spirits like Three Spirit, Lyre’s, or WhistlePig’s non-alc line are available online and in specialty beverage shops.
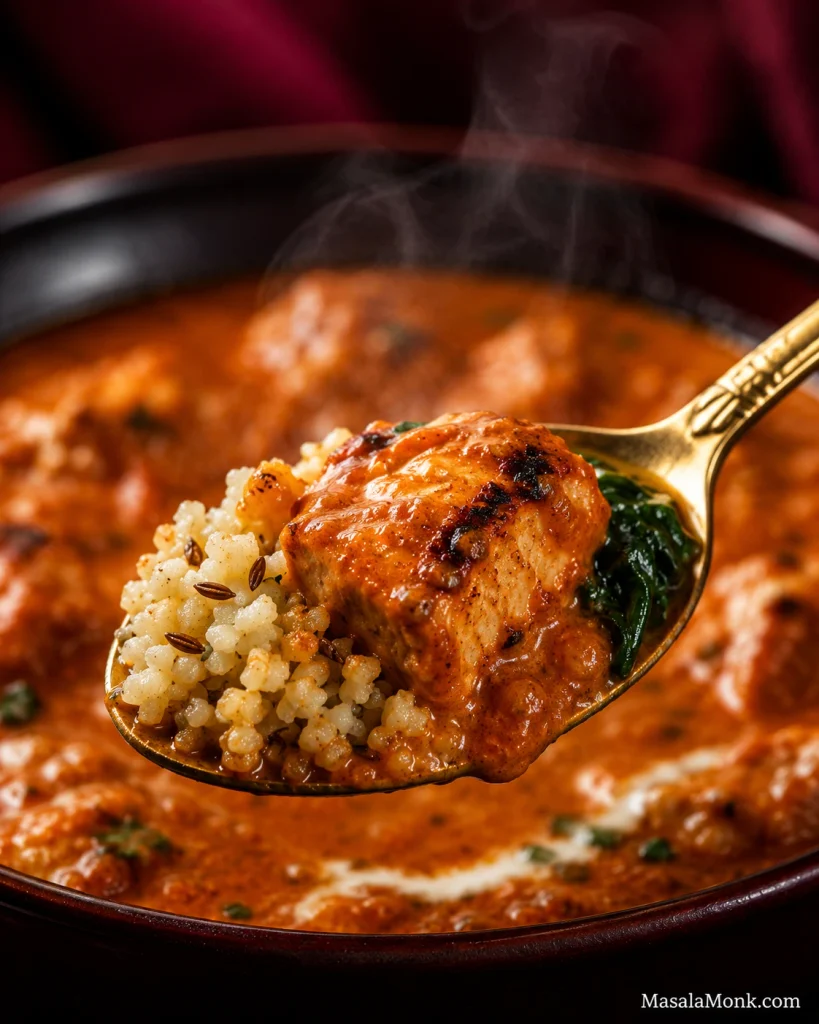
A good butter chicken has contrast, and keto doesn’t change that.
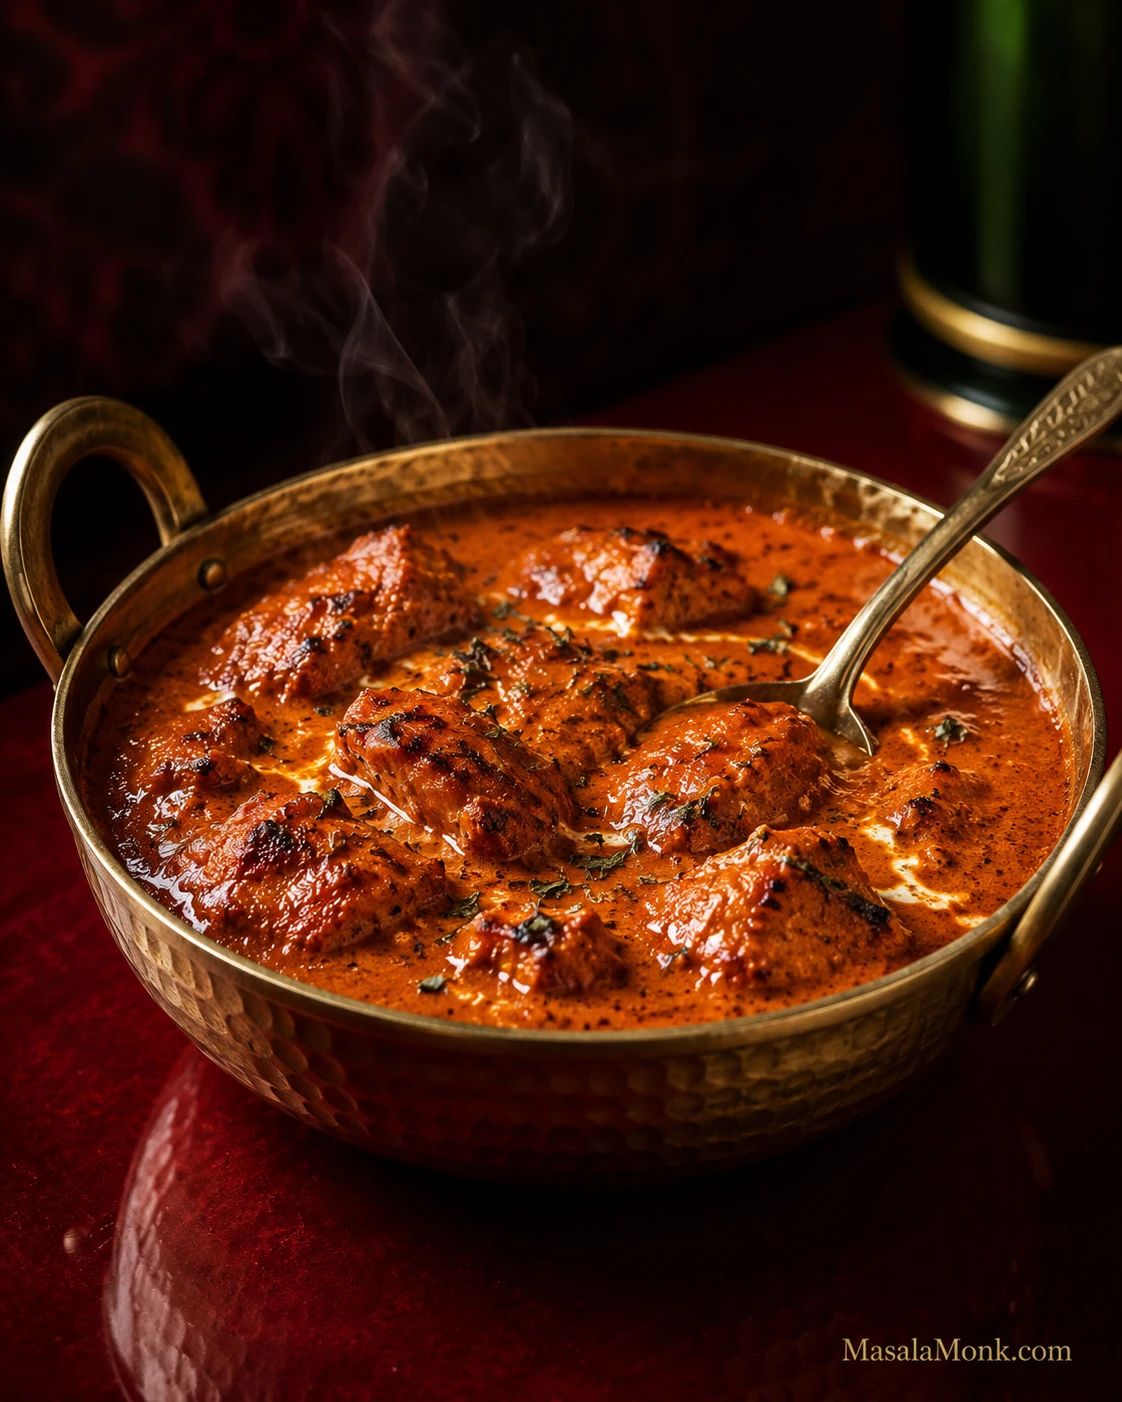
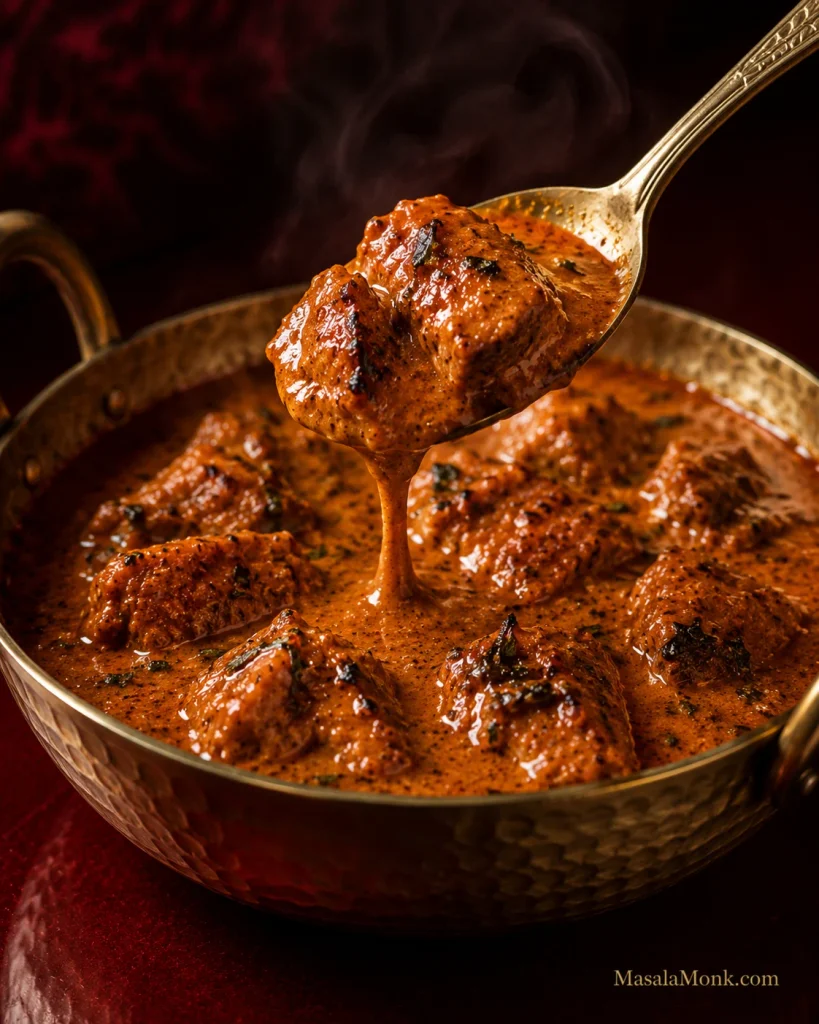
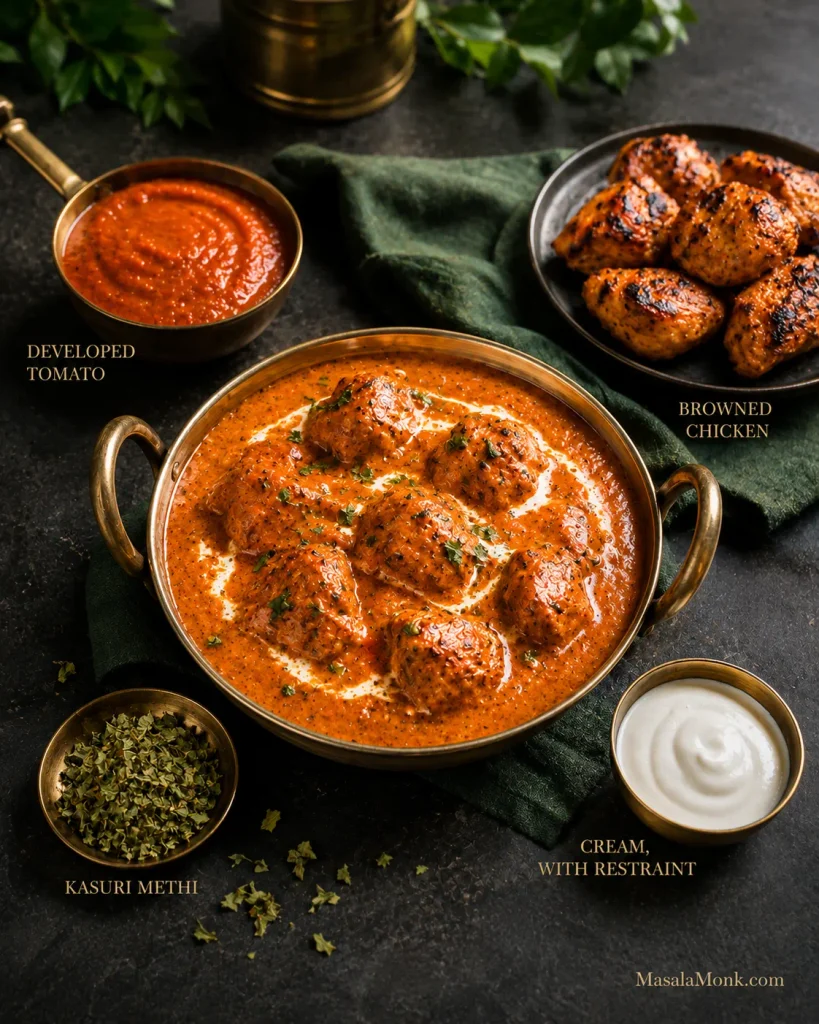
The chicken should have browned, sometimes lightly charred edges. The gravy should cling to those pieces and still move around them, with a soft butter sheen. Tomato gives the sauce its backbone, cream smooths the acidity, and crushed kasuri methi leaves the aroma that makes the finished curry recognizably butter chicken.
If butter chicken is one of the dinners you’ve been missing since cutting back on carbs, most of what makes it worth eating can stay. Or maybe you’ve already tried a low-carb version and ended up with perfectly decent creamy tomato chicken that somehow never quite became butter chicken. This recipe is meant to solve both problems.
This version is savory and tomato-deep, with browned chicken, a smooth orange-red gravy, moderate cream and kasuri methi still noticeable after the bite. A favourite takeaway may be much sweeter or richer. If yours is, this will taste different—and nothing has gone wrong.
Butter chicken—murgh makhani—already starts with plenty of ingredients that fit naturally into a lower-carb meal. Most of the carb difference comes from added sugar, how much tomato and onion go into the gravy, cashews or starches, prepared sauces and, very often, the rice and naan served with it.
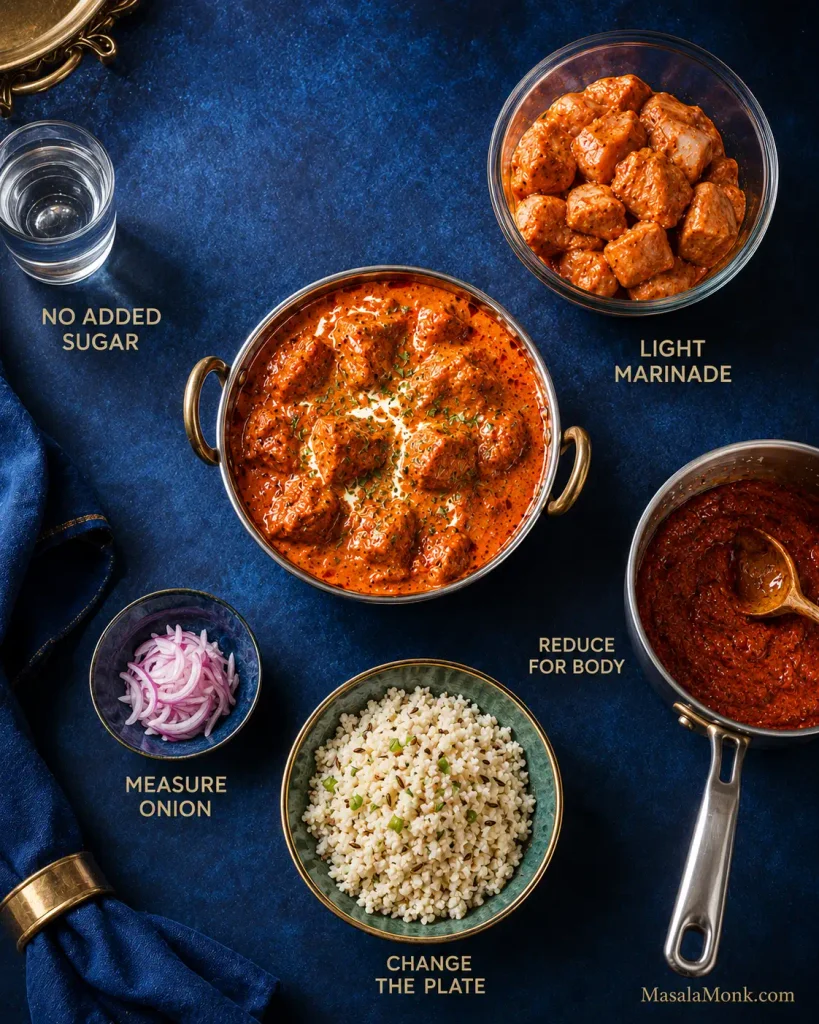
Keep the butter chicken. Change the carbs that matter.
Yes. Homemade butter chicken can be keto-friendly. This version comes to roughly 7g net carbs per serving, with no added sugar, cashews or flour-based thickener.
Chicken, butter, ghee, cream and spices contribute relatively little carbohydrate in the amounts used here. Tomato, onion and plain yogurt contribute some. Restaurant and packaged gravies may add sugar, ketchup, flour, cornstarch, cashews or simply a much larger amount of sauce.
Homemade is easier to calculate because you know what went into the pan. Whether roughly 7g net carbs fits your day depends on the carbohydrate target you’re following.
Skip the added sugar. Give the tomato enough time to lose its raw, sharp edge before deciding the sauce needs sweetness.
Keep the yogurt-and-lemon marinade. Leave only a light coating on the chicken before browning so the spices stay with the meat without flooding the pan.
Let the gravy thicken through cooking. Tomato reduction and blending give this sauce plenty of body. Flour and specialty keto thickeners are unnecessary.
Measure the onion; skip the cashews in this version. A modest amount of onion still gives the gravy body and sweetness, while the tomato, butter and cream supply enough richness.
Look at the whole plate. Jeera cauliflower rice, greens and something crisp can save more carbohydrates than stripping character out of the curry itself.
That’s most of the keto work. From here, cook it like butter chicken.
No specialty keto thickeners are needed here: reduction, measured gravy ingredients and the plate do the work.
Keto Butter Chicken Recipe
The ingredient list looks long, but the cooking itself is straightforward. Most of the work is measuring, browning the chicken and giving the tomato enough time.
If other people at the table aren’t eating low-carb, you do not need a second curry. Put rice or naan on their side of the table and cauliflower rice or vegetables on yours.
At a Glance
Detail
What to expect
Serves
4 generous main-course portions
Chicken
700g / 1½ lb boneless skinless thighs
Prep
About 15 minutes
Marinating
30 minutes minimum; 2–4 hours is better
Cook
About 30–40 minutes
Minimum elapsed time
About 1¼–1½ hours
Pan
11–12in / 28–30cm wide, reasonably deep skillet or sauté pan
Heat level
Mild to medium
Estimated net carbs
About 7g per serving, before sides
Equipment
11–12in / 28–30cm wide, reasonably deep skillet or sauté pan
mixing bowl
knife and cutting board
instant-read thermometer
immersion blender, recommended for a smoother gravy
digital kitchen scale, useful but not essential
A countertop blender works too. If the gravy is too shallow for an immersion blender to stay submerged, transfer it to a tall heatproof jug. Let very hot gravy settle briefly and follow your blender manufacturer’s guidance for hot liquids. A fine-mesh strainer is optional.
For carb tracking, weigh the tomato and onion first; tiny spice differences matter far less.
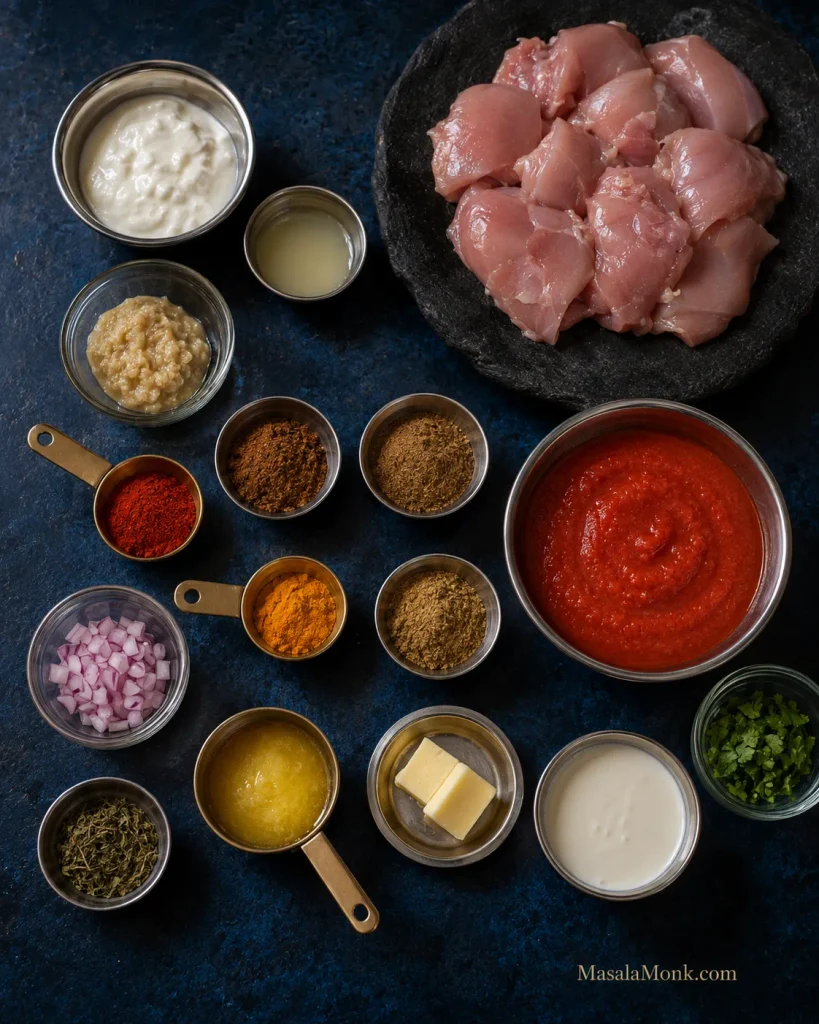
80g / ⅓ cup thick plain full-fat yogurt or dahi; mild full-fat Greek yogurt also works
15ml / 1 tbsp lemon juice
15g / 1 tbsp ginger-garlic paste
1 tsp Kashmiri red chilli powder
1 tsp garam masala
½ tsp ground cumin
4g / about ¾ tsp fine sea salt
Makhani Gravy
14g / 1 tbsp ghee, for browning the chicken
14g / 1 tbsp ghee or butter, for the gravy
50g / roughly ½ small onion, finely chopped
15g / 1 tbsp ginger-garlic paste
1 tsp ground coriander
½ tsp ground cumin
½ tsp garam masala
¼ tsp ground turmeric
¼–½ tsp Kashmiri red chilli powder
225g / 8oz / scant 1 cup plain passata or strained tomatoes, with no added sugar
60ml / ¼ cup hot water or unsalted/lightly salted chicken stock, plus more if needed
3g / about ½ tsp fine sea salt
To Finish
120ml / ½ cup heavy or whipping cream
14g / 1 tbsp butter
1 tsp dried kasuri methi
fresh coriander/cilantro, optional
A fresh cream around 25% milk fat works too. The gravy will be slightly lighter and looser and may need another minute of gentle reduction. The nutrition estimate later in the post assumes heavier cream in roughly the 30–36% range.
Kashmiri chilli is being used mainly for colour and gentle warmth. Add cayenne or a hotter Indian chilli powder separately when you want more heat. For a mixed table, keeping the main pan mild and sharpening individual portions at the end is usually easier.
1. Marinate the Chicken
Mix the yogurt, lemon juice, ginger-garlic paste, Kashmiri chilli, garam masala, cumin and salt. Add the chicken and turn until every piece carries a light coating.
Cover and refrigerate for at least 30 minutes. Two to four hours works particularly well, and overnight is fine when that suits your schedule.
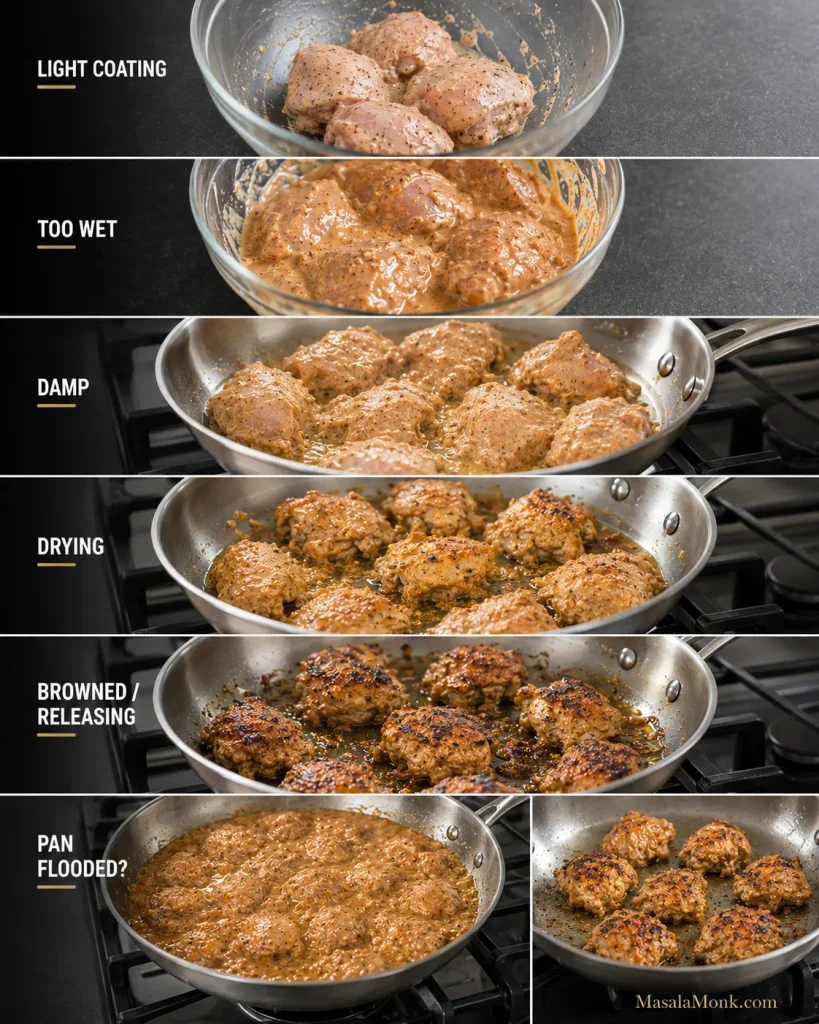
Before cooking, lift the chicken from the bowl and scrape or shake away the heavy excess marinade. Discard what remains after contact with the raw chicken. A little yogurt-spice coating should stay on the meat, but there should not be enough to form a puddle in the pan.
2. Brown the Chicken
Heat the pan over medium-high heat and add the ghee. If you’re cooking in two batches, divide that tablespoon between them. Arrange the chicken in a single layer with some room around the pieces.
At first you’ll hear a damp hiss as moisture leaves the surface. As the pan dries, the sound becomes sharper and the yogurt-spice coating begins catching and darkening around the edges. Give the first side roughly 2–3 minutes before checking it. Chicken that still grips the pan usually needs another few moments; once the surface has browned properly, it releases more easily.
Turn and colour the second side briefly, then transfer the chicken to a plate while the centre is still underdone. A few uneven dark patches are exactly what you want. The pieces do not need to look identical.
Pan filling with water? Stop adding chicken. Remove the pieces if necessary, let the excess liquid evaporate, add a touch of ghee once the pan is dry again and continue in smaller batches.
Between batches, let the pan get hot and dry again before adding more yogurt-marinated chicken. Otherwise, the next batch inherits the moisture from the last one.
For stronger tandoori-style edges, the marinated chicken can go under a very hot broiler/grill until a few spots blister, then finish cooking in the gravy.
3. Build the Makhani Base
Lower the heat to medium and add the second tablespoon of ghee or butter. Add the onion and measured salt and cook for about 4–6 minutes, until the onion softens and loses its sharp raw smell. A little gold around the edges is welcome.
Add the ginger-garlic paste and cook for roughly 30 seconds, until its raw aroma mellows. Stir in the coriander, cumin, garam masala, turmeric and Kashmiri chilli for another 20–30 seconds. Lower the heat if the spices begin sticking or darkening quickly.
4. Give the Tomato Enough Time
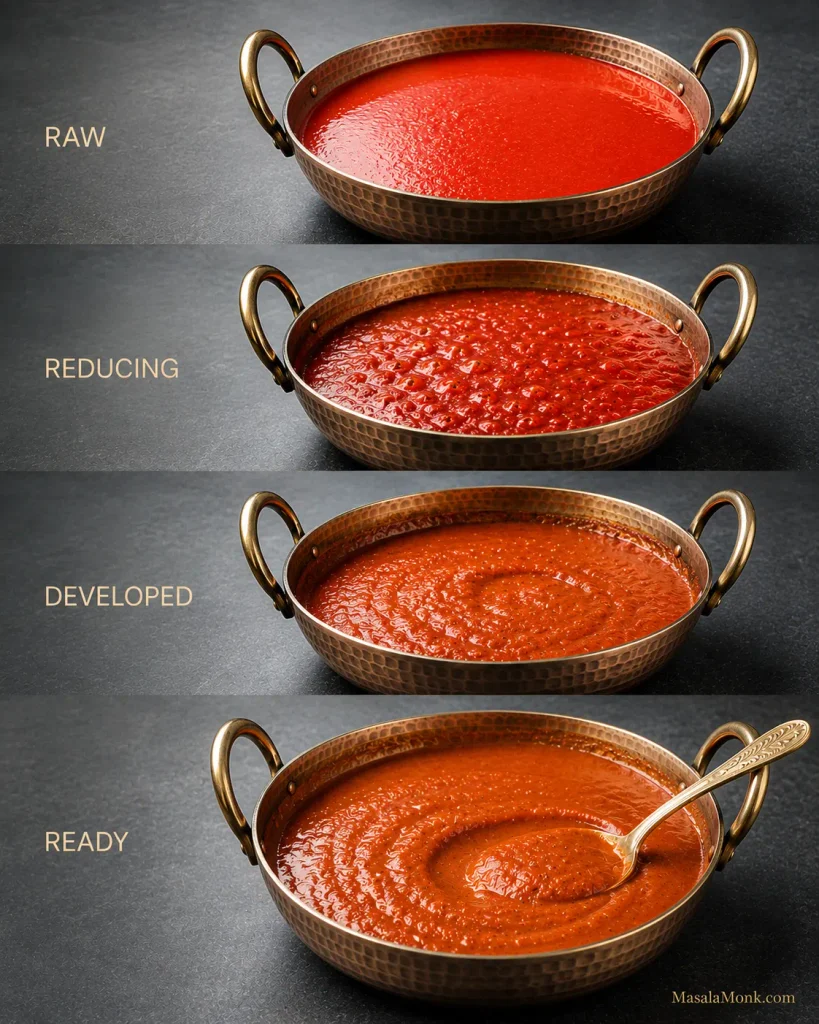
Pour in the passata and scrape the bottom of the pan to release the browned chicken and spice residue. Cook uncovered over medium to medium-low heat, stirring regularly.
Expect roughly 8–15 minutes, sometimes longer. Tomato products vary, and so do burners and pans. If yours needs 18 minutes, nothing has gone wrong.
The sauce starts bright and loose. As water cooks away, the colour deepens, the texture tightens and the obvious bottled-tomato smell fades. Draw a spoon through the pan: the trail should remain visible briefly before the sauce flows back. Small beads or streaks of fat may appear near the edges; you do not need a dramatic oil layer.
Taste a little. A sharp, raw tomato flavour means it needs more cooking. Extra tomato paste makes the colour stronger, but it can push the gravy towards a concentrated pasta-sauce flavour. Use it only when the tomato product itself is unusually pale or weak.
A wide pan speeds evaporation, concentrating passata without flour, cornstarch or another gravy thickener.
5. Blend the Gravy, Then Finish the Chicken
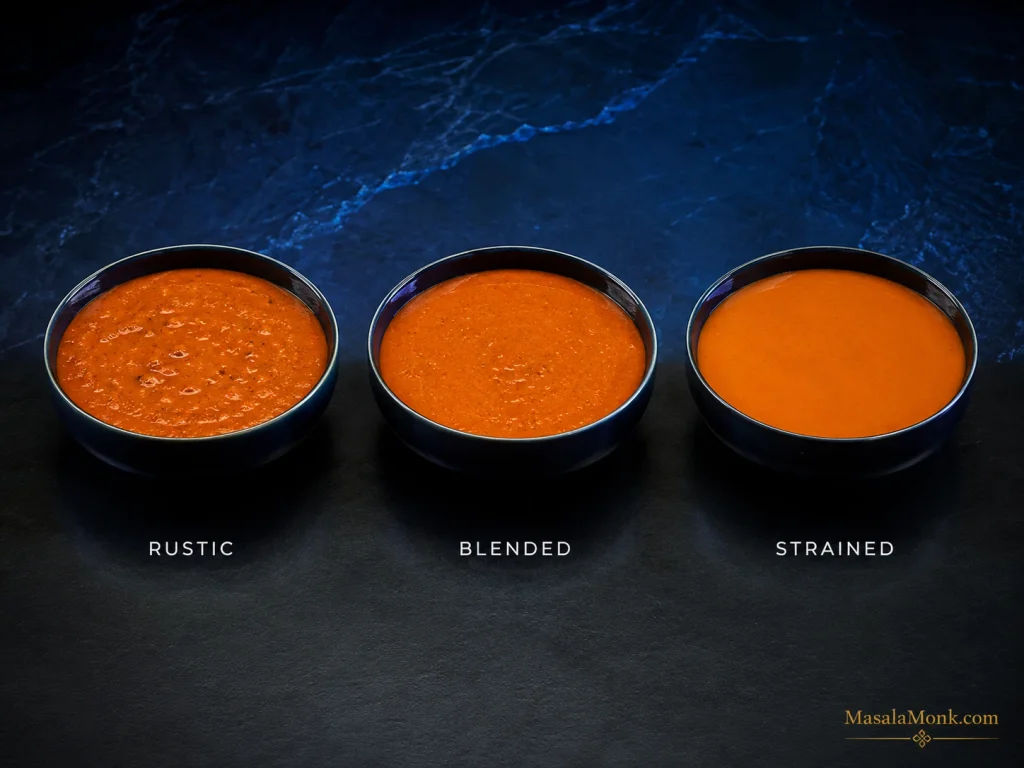
Pour in 60ml / ¼ cup hot water or stock and remove the pan briefly from the heat. Blend until smooth. For an especially silky gravy, strain it before returning it to the pan. Leaving it a little rustic is fine too.
Return the blended gravy to medium-low heat for 2–3 minutes, stirring as it comes back together and thickens slightly. Tiny beads of fat may appear around the edge.
If the gravy tightens before the chicken is ready, add hot water or stock 1 tbsp / 15ml at a time.
6. Finish With Cream, Butter and Kasuri Methi
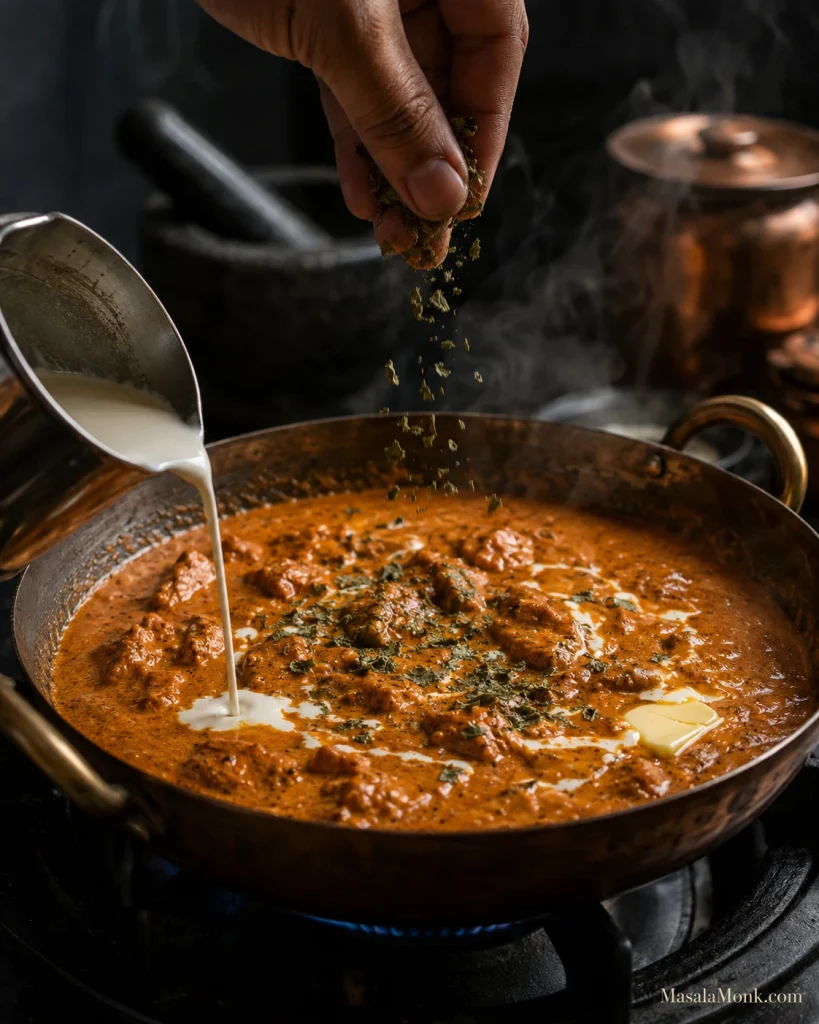
Reduce the heat to low and let hard bubbling settle. Stir in the cream, then crush 1 teaspoon kasuri methi between your palms over the pan and add it with the finishing butter. Warm everything gently for another minute.
Once the cream is in, keep the heat gentle. A hard boil can split the dairy, while prolonged cooking also softens the fresh aroma of butter and kasuri methi.
Taste and check the salt first. After that, make only the adjustment the gravy needs: another ¼ teaspoon methi, a touch more heat, a small finishing pinch of garam masala, a spoonful of water or perhaps one more spoonful of cream.
If the tomato is still sharply acidic after it has cooked fully and the salt, butter and cream are in place, a very small amount of your preferred low-carb sweetener can help. Add it only at the end and only if the sauce genuinely needs it.
Turn off the heat and let the curry rest for about 5 minutes.
The Finished Butter Chicken
Some of the yogurt-spice coating should have darkened around the chicken while the centre stays juicy. The gravy should settle naturally around the pieces, with no watery pool underneath. The raw tomato edge should be gone, but you should still taste tomato, ginger, chilli and spice after the cream goes in.
Kasuri methi should be easy to notice when you lean over the pan. Drag a spoon through the gravy; the line should stay open for a moment and then slowly close. Lift the spoon and the sauce should cling before falling back in a slow ribbon.
Too thick? Stir in 1 tbsp / 15ml hot water. Too loose? Give it another minute or two uncovered.
Perfect texture can still mean too much sauce. Fix the ratio, not the chicken.
Then stop adjusting.
Spoon it over hot jeera cauliflower rice and get some browned chicken and gravy in the first bite. At that point, nobody needs to be thinking about what was removed.
If dinner is already on the table, stop here and eat. Everything below is for the question that comes next: why another recipe claims fewer carbs, why a gravy tastes wrong, what changes at a restaurant or how to make the next batch easier.
What Makes Butter Chicken Taste Like Butter Chicken?
The hardest butter chicken to diagnose is the one that isn’t bad. The chicken is tender, the sauce is creamy and the seasoning seems reasonable, yet the first bite still tastes like generic tomato curry.
Usually there isn’t one secret ingredient missing. Tomato that has cooked far enough, properly browned chicken, enough salt and a sensible amount of cream all matter. Kasuri methi adds one of the most recognizable aromas in the finished gravy, and even a small amount can change the character of the sauce.
If the curry tastes seasoned but still smells anonymous, smell the kasuri methi before reaching for another spoonful of spice.
When butter chicken tastes almost right, change one variable at a time: check salt first, then char and kasuri methi before adding more cream or another spoonful of spice.
Where the Carbs in Butter Chicken Come From
Two bowls of butter chicken can look nearly identical and still produce very different nutrition numbers. Much of that variation comes from the gravy and from what somebody has decided counts as one serving.
Variable
Lower-carb direction
Higher-carb direction
Tomato
Measured tomato base
Large tomato-heavy gravy
Onion
Small measured amount
Onion-heavy base
Added sweetness
None
Sugar, honey or ketchup
Cashews
None or a little
Cashew-rich gravy
Yogurt
Plain and measured
Sweetened or larger amounts
Thickening
Reduction
Flour or cornstarch
Prepared sauce
Plain/no-added-sugar
Sweetened commercial gravy
Serving size
Clearly defined
Tiny or vague
The plate
Vegetables or cauliflower rice
Rice plus naan
For this recipe, one serving means one-quarter of the finished curry.
The 225g / 8oz tomato gives the gravy enough acidity and fruitiness without making tomato the whole story. Once properly cooked, it tastes much less dominant than it does straight from the bottle.
Some butter chicken is sweet and some isn’t. This version starts without added sugar because cooked tomato, salt, butter and cream usually provide enough balance.
The 50g onion contributes body and natural sweetness while keeping the quantity predictable. Cashew paste can make a lovely rich butter chicken gravy, but this sauce does not need it.
Same curry, different plate: hold the portion steady and let the sides change the carb load.
Ingredient Notes That Change the Result
Thick yogurt helps the seasoning cling to the chicken, and lemon adds brightness. Moisture is the part to watch during browning: a heavy yogurt coating cools the pan, releases water and can leave pale coagulated clumps. Plain unsweetened yogurt or dahi works well. A particularly tangy Greek yogurt can make the finished curry noticeably more sour.
Chicken thighs are more forgiving through browning and the final simmer. Breast works too; keep the pieces evenly sized and avoid cooking them through during the first sear. MasalaMonk’s baked chicken breast recipe goes deeper into thickness, temperature and keeping lean breast meat juicy.
For the tomato, smooth plain passata is the easiest choice. Finely crushed tomatoes can be used too and may need more cooking and blending. Sweet pasta sauce, ketchup and seasoned marinara change the flavour substantially. Tomato paste is far more concentrated, so save it for the rare batch where the tomato itself seems unusually pale or weak.
Spices, Kasuri Methi and Cream
Kashmiri chilli gives deep colour with moderate heat. Paprika can provide much of that colour when Kashmiri chilli is unavailable, with stronger chilli added separately. Garam masala varies considerably from brand to brand, so a small finishing pinch can help when its aroma seems muted.
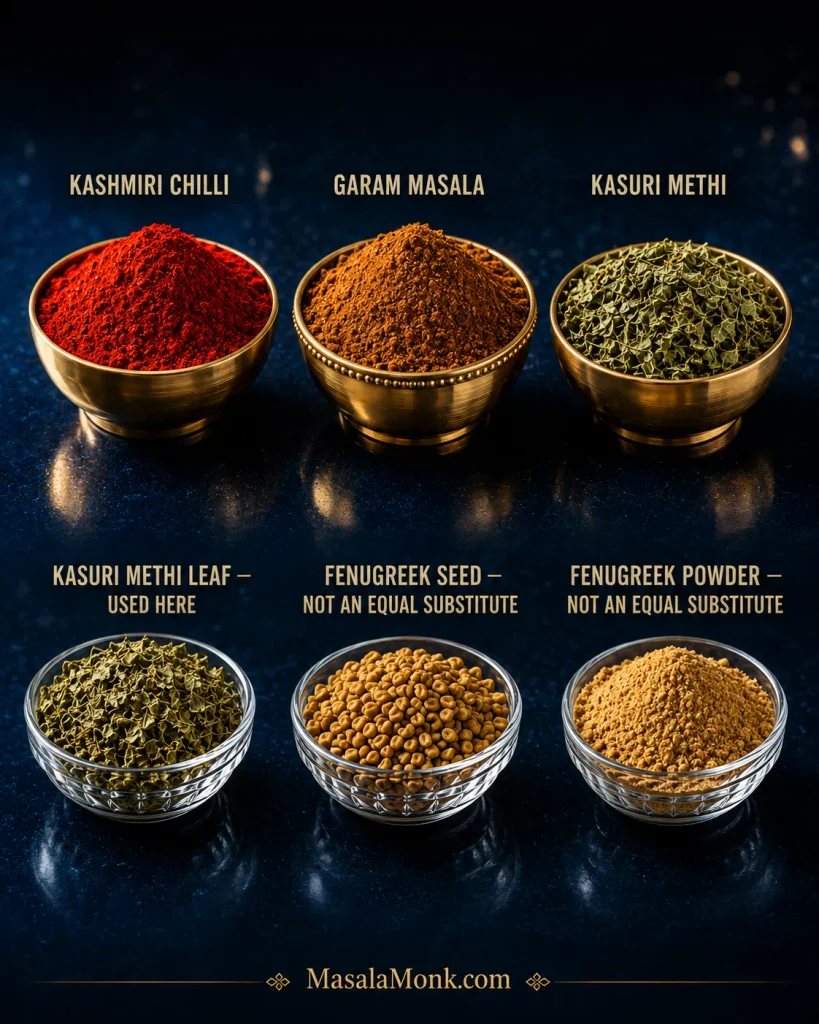
Kasuri methi is dried fenugreek leaf. Fenugreek seed and ground fenugreek are much stronger and should not replace it measure-for-measure. Start with 1 teaspoon of the leaves and increase in ¼-teaspoon steps only after tasting. If you cannot find kasuri methi, leaving it out is safer than substituting the same quantity of seed or powder.
At the shop, look for “kasuri methi” or “dried fenugreek leaves” on the packet. Then crush the leaves just before finishing the gravy to release more of their aroma.
The 120ml / ½ cup cream used here softens the tomato and carries the spices through the gravy. Add much more and the curry can turn pale while the ginger, chilli and methi recede into the background.
Want a Smoother, More Restaurant-Style Finish?
Restaurant butter chicken is not one fixed flavour. Some gravies are sweeter, some tangier and some substantially richer with cream or cashew. You can reproduce much of the char, silkiness and aroma at home, but a particular restaurant may still taste quite different.
A very hot broiler or grill gives the chicken darker blistered edges than most home pans can manage when they are full. A few charred spots are enough.
For the gravy, thorough blending makes the biggest difference. Straining takes the texture one step further when you specifically want the very smooth finish found in many restaurant versions.
Keep the butter and kasuri methi for the end so their aroma stays fresh. A brief dhungar smoke can add another layer when that is a technique you already use comfortably. Good chicken char gets you a long way without it.
Blending gets you most of the silkiness; straining is optional polish.
Fix Your Butter Chicken
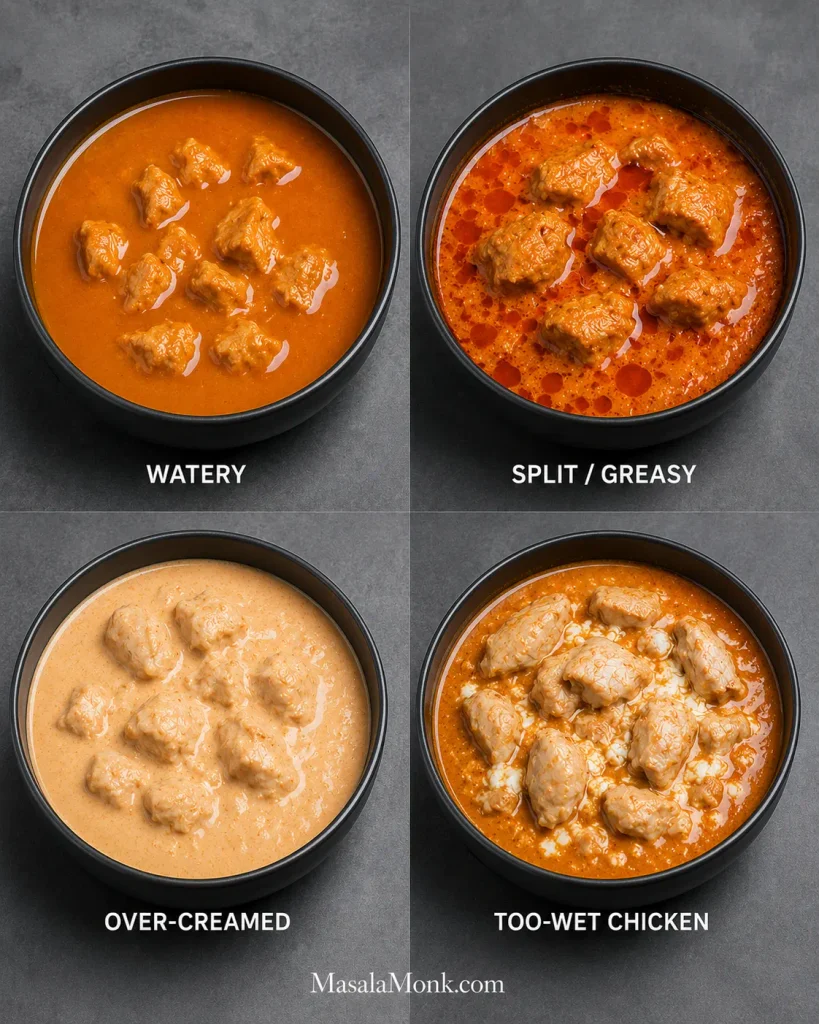
Butter chicken problems often sound alike. “Too tomatoey,” “bland” and “thin” can each describe more than one failure, and throwing more cream or spice at a confused gravy rarely helps. Work out what is actually wrong first.
Problem
Likely cause
First move
Raw or harsh tomato
Tomato base undercooked
Keep reducing
Tastes like pasta sauce
Too much concentrate or underdeveloped gravy
Cook the base further
Bland
Salt, char or finishing aroma lacking
Check salt first
Too sour
Acidic or undercooked tomato
Cook, then balance
Too sweet
Too much sweetener
Restore salt and spice balance
Generic creamy curry
Weak char, little methi or rushed tomato
Correct those elements
Watery
Too much liquid
Remove chicken and reduce
Pasty
Over-reduced
Add hot water 15ml at a time
Too much gravy
Sauce volume drifted upward
Remove some sauce
Chicken released lots of water
Wet coating, cool pan, crowding or high-water chicken
Dry the pan and brown smaller batches
White yogurt clumps
Wet marinade or crowded/cool pan
Less coating, more heat, smaller batches
Greasy or split
Excess fat or hard boiling after dairy
Lower the heat
Dry chicken
Overcooked during both stages
Brown first; finish only to 165°F / 74°C
Bitter methi
Too much kasuri methi
Dilute if possible
Too spicy
Excess hot chilli
Add a little cream
Too pale
Too much cream
Use less next time
Read the pan before changing the seasoning. Pooling liquid, separated fat, pale gravy and yogurt clumps describe four different failures—and therefore four different fixes.
Too Tomatoey or Too Sour
Bright, raw tomato needs more cooking. A heavy concentrated-tomato flavour is different and often comes from too much tomato paste. For sourness, make sure the tomato is fully cooked and then check the salt. Butter or a little more cream can soften what remains; sweetener comes last.
Bland—or Just Not Tasting Like Butter Chicken?
Flat flavour usually calls for salt first. A curry that is already seasoned but still tastes generic needs a different diagnosis: check the chicken browning, tomato development and kasuri methi. Smell the garam masala and methi straight from their containers too. Old spices can be present in the recipe and almost absent in the bowl.
Watery Sauce
Once the chicken reaches temperature, take it out. Reduce the gravy uncovered and return the chicken only long enough to coat and warm through.
Great Sauce, Wrong Ratio?
Sometimes the gravy is perfectly thick and there is simply too much of it. An oversized onion, extra tomato or accidentally scaled-up sauce can do that. Remove some and save it for another meal instead of continuing to cook the chicken.
White Yogurt Clumps
The pan was probably too cool, too crowded or carrying too much wet marinade. The curry is still edible. Next time, leave only a light coating on the chicken and give the pieces more space.
Bitter Kasuri Methi
Once too much methi is in the sauce, there is no clean way to remove it. Extra unsweetened gravy or a little cream can dilute the bitterness. Starting with the first teaspoon and increasing slowly is much easier than rescuing an over-methi’d pan.
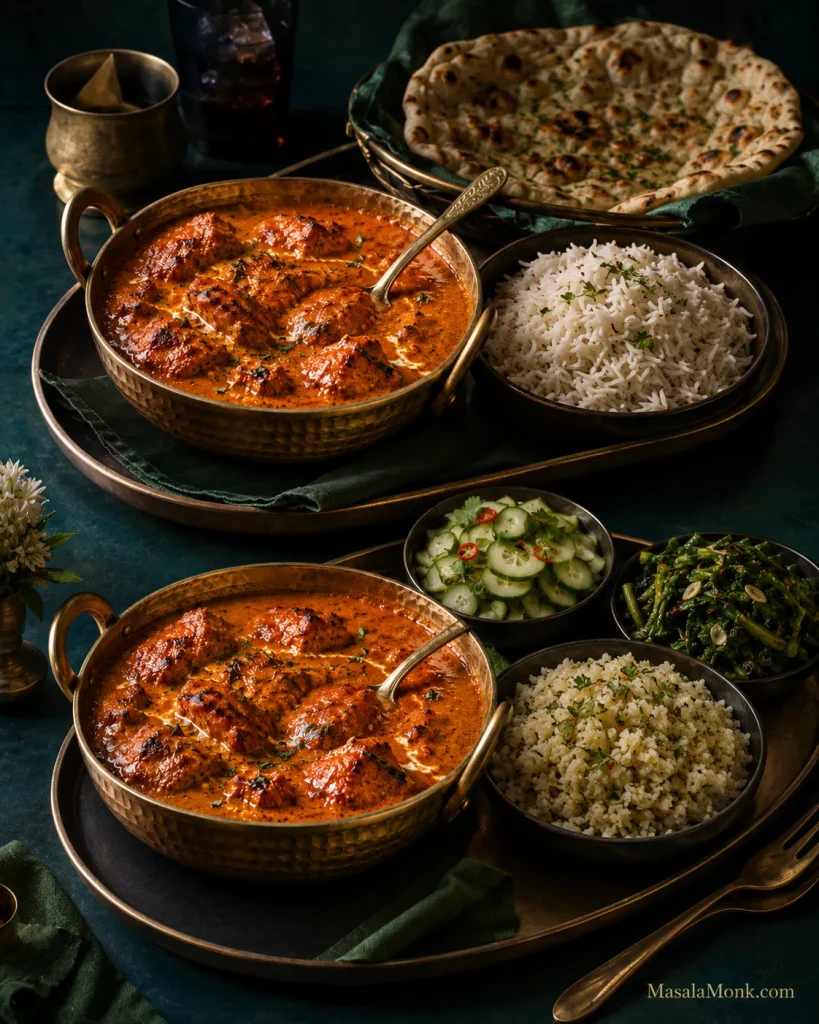
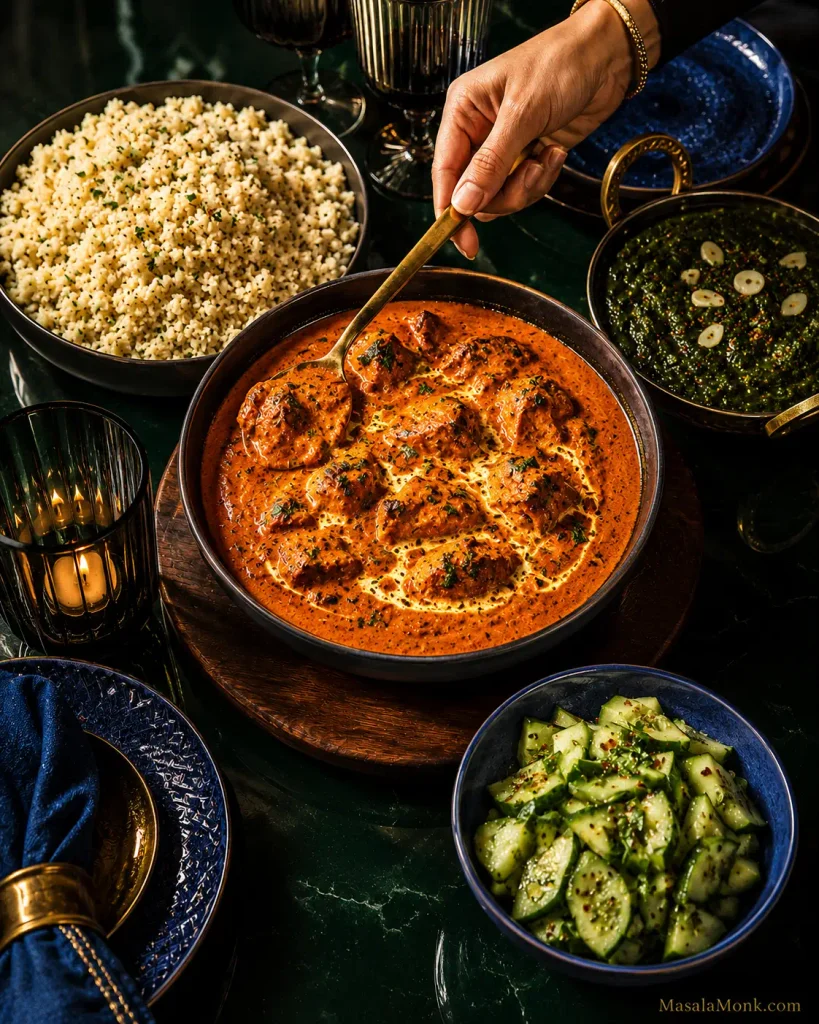
A lower-carb butter chicken dinner does not need to look like curry surrounded by substitutes you’re merely tolerating. Give the gravy something warm to sit on, something green to cut through the richness and something cold and crisp beside it.
Jeera Cauliflower Rice
Cumin makes cauliflower rice feel like part of dinner.
Serves 4
Ingredients: 600g / about 6 cups cauliflower rice, 1 tbsp ghee or butter, 1 tsp cumin seeds, ½–¾ tsp salt, plus coriander and a small squeeze of lemon if you like.
Heat a wide pan over medium heat and add the ghee. Let the cumin seeds sizzle for 20–30 seconds, until fragrant, then add the cauliflower rice and salt. Increase the heat to medium-high and cook uncovered for about 5–7 minutes.
There will be plenty of steam at first. As it eases, the cauliflower should become tender while the small grains remain separate. Stop before it turns soft and wet.
Garlic spinach is especially good here because its slight bitterness cuts through the buttery gravy. Roasted cauliflower, cabbage, broccoli and green beans are easy alternatives.
Something Cold and Crisp
Cucumber, coriander, mint and lemon bring crunch and acidity. MasalaMonk’s cucumber salad recipe gives you several ways to build that fresh side.
If You Miss Naan
A low-carb naan or roti can make the meal feel much closer to the dinner you were craving. With packaged low-carb breads, check the actual carbohydrate amount and serving size on the label.
Cauliflower rice, one green vegetable and something cold already make a generous plate.
Put the hot jeera cauliflower rice under the curry so it catches the makhani gravy; keep cucumber alongside it so the crunch, acidity and temperature contrast stay intact.
Is Restaurant Butter Chicken Keto?
Restaurant butter chicken is harder to calculate because the gravy has usually made most of its decisions before you sit down.
It may contain sugar or honey, ketchup, more onion, cashew paste, flour or cornstarch, sweetened tomato products or a premade curry base. Because that gravy is often prepared in a large batch, asking for “no sugar” may not change what is already in the pot.
The most useful question is simple: Does the butter chicken gravy contain added sugar or flour/cornstarch?
Can’t get a clear answer? Simpler grilled dishes are easier to judge when you’re keeping carbohydrates particularly low: tandoori chicken, chicken tikka, kebabs, grilled fish and some dry-style meat preparations. MasalaMonk’s green chutney recipe is a natural partner for those dishes.
Then look at the rest of the order. Rice, naan and sweet chutneys can change the meal far more than a measured amount of tomato in the curry.
Your favourite takeaway may taste quite different from this recipe even when both are good butter chicken. Some house gravies are much sweeter, saltier or richer. If that is exactly the butter chicken you love, a different result at home does not mean the recipe failed; you’re simply aiming at another style.
Batch gravy may already contain sugar or starch; when it does, a simpler grilled dish is easier to estimate.
A jarred butter chicken sauce can make dinner much faster. Check the total carbohydrates, added sugars, flour or starch, stated serving size and how much sauce you will actually use. A sauce that fits your numbers but tastes flat can often be improved with a little butter, cream and crushed kasuri methi.
The full recipe takes roughly 45–55 minutes of active work plus at least a short marinade. For a quicker weeknight, marinate the chicken first and use those 20–30 minutes to chop and measure everything else. Smooth passata and skipping the optional straining save time without giving up the chicken browning or tomato reduction.
For nights when fifteen minutes really is the limit, MasalaMonk’s 15-minute sesame ground chicken works well over cauliflower rice, sautéed cabbage or lettuce.
Instant Pot
Pressure cooking traps moisture, so the finished gravy tends to be thinner. Use Sauté for the aromatics, deglaze the pot thoroughly and follow the minimum-liquid requirement for your cooker. Once the chicken is cooked, remove it and reduce a loose sauce with Sauté uncovered before adding the chicken back with the cream, butter and kasuri methi.
Slow Cooker
Slow cooking gives tenderness but very little browning, so sear the marinated chicken first when you can. For boneless pieces, 2–3 hours on High or 4–6 hours on Low is a reasonable starting range; the chicken still needs to reach 165°F / 74°C. Add the cream and finishing butter near the end, and reduce a thin gravy separately.
Make Ahead, Store and Reheat
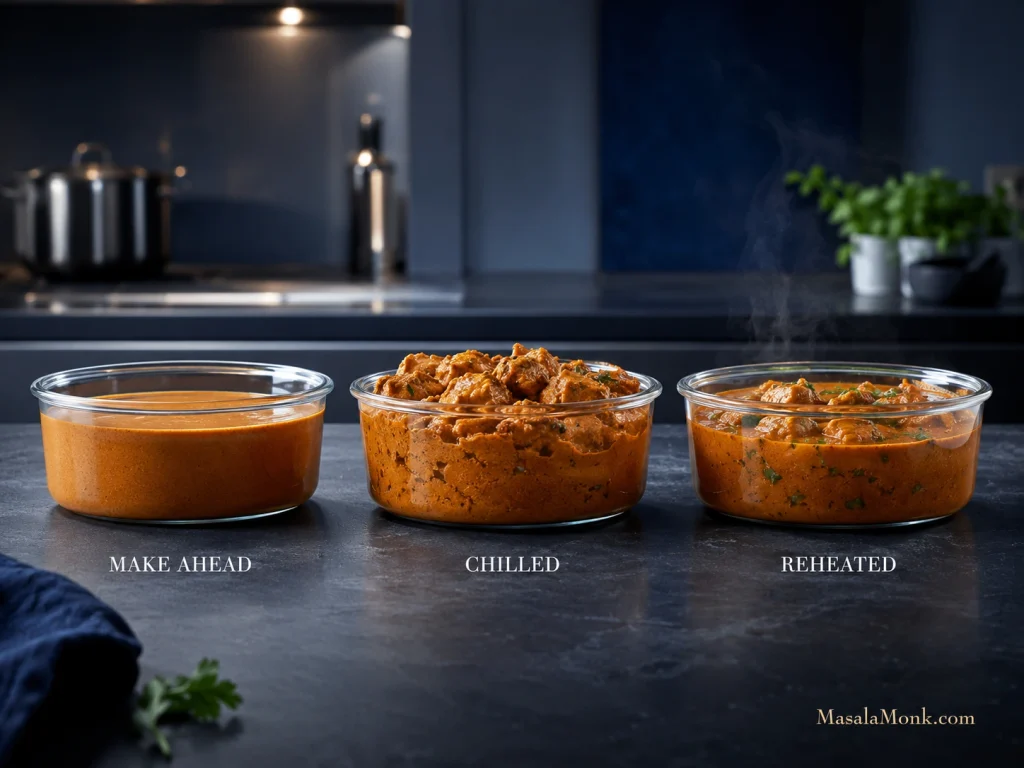
The chicken can be marinated the day before. The blended tomato gravy can also be cooked ahead. If dinner is for tomorrow, refrigerate the gravy before adding the final cream, butter and kasuri methi, then add those as you reheat it.
Cool leftovers promptly and refrigerate them in a covered container. Use them within 3–4 days, in line with USDA leftover-storage guidance.
Cold butter chicken will look much thicker after a night in the refrigerator. That is normal. Warm it gently and add a splash of water or stock as the gravy loosens. Bring reheated leftovers back to 165°F / 74°C.
Butter chicken freezes well too. Portion it before freezing and aim to use it within about 3 months for best quality.
Reheat first, then thin only if needed; melted fats loosen chilled gravy naturally.
Keto Butter Chicken Nutrition
Based on typical nutrition values for the ingredients listed, one-quarter of the finished curry is approximately:
Per serving
Estimated amount
Calories
About 500 kcal
Protein
About 36g
Fat
About 36g
Total carbohydrates
About 9g
Fiber
About 2g
Estimated net carbohydrates
About 7g
Here, net carbs means total carbohydrate minus fiber. The estimate assumes full-fat plain yogurt and heavy/whipping cream in roughly the 30–36% fat range; a lighter fresh cream will lower the fat and calorie numbers somewhat.
The calculation includes the chicken, yogurt, lemon, onion, tomato, ginger, garlic, ghee, butter, cream and measured spices. It does not include cauliflower rice, bread, optional sweetener, extra cream at serving or other sides.
1 serving = ¼ of the finished curry. If you track carbohydrates closely, the labels on the ingredients in your own kitchen are the most relevant numbers.
Frequently Asked Questions
Does Butter Chicken Usually Contain Sugar?
Sometimes. Some home and restaurant versions add sugar or honey to soften tomato acidity; many others don’t. It isn’t required here. Cook the tomato fully and balance the gravy before deciding it needs sweetness.
Do I Really Need Kasuri Methi?
You can make good creamy tomato chicken without it, but kasuri methi contributes an aroma closely associated with butter chicken. Use dried fenugreek leaves, not the same quantity of fenugreek seed or powder. If the leaves are unavailable, omission is safer than an equal substitution.
Can I Make This Dairy-Free?
Yes, although the flavour will shift. Use plain unsweetened dairy-free yogurt in the marinade and full-fat coconut cream in the gravy, along with a suitable non-dairy cooking fat. The finished sauce becomes more coconut-forward and moves away from classic murgh makhani.
If you’re avoiding dairy because of a milk allergy, don’t assume ghee is automatically suitable.
Is This Butter Chicken Gluten-Free?
The recipe itself doesn’t use wheat flour. Stocks, packaged spice blends and prepared sauces can vary, so check labels when avoiding gluten strictly.
Can I Make It Without a Blender?
Absolutely. Use smooth passata, chop the onion finely and leave the gravy a little more rustic. You lose some silkiness, not dinner.
Keep the Butter Chicken
Once the bowl reaches the table, “keto” shouldn’t be the first thing you notice.
There should be a browned edge on the chicken and enough gravy to drag through whatever is underneath it. The tomato should taste deep and fully cooked, the cream should leave the spices easy to taste, and the butter should give the sauce a soft sheen.
The kasuri methi lingers after the bite.
Cauliflower rice does not need to impersonate basmati. Here its job is simpler: catch the silky makhani gravy and bring toasted cumin into the same bite as the charred chicken.
Keep the butter chicken. Change the carbs that matter.
In the age of mindful living and clean eating, it’s no surprise that nature’s original electrolyte drink—coconut water—has captured the world’s attention. From athletes to wellness enthusiasts, everyone seems to be sipping this tropical drink. But is the hype deserved?
In this post, we’ll dive into what makes coconut water unique, its science-backed benefits, real-world applications, and what to watch out for—so you can decide how to make the most of this natural hydrator.
🥥 What Exactly Is Coconut Water?
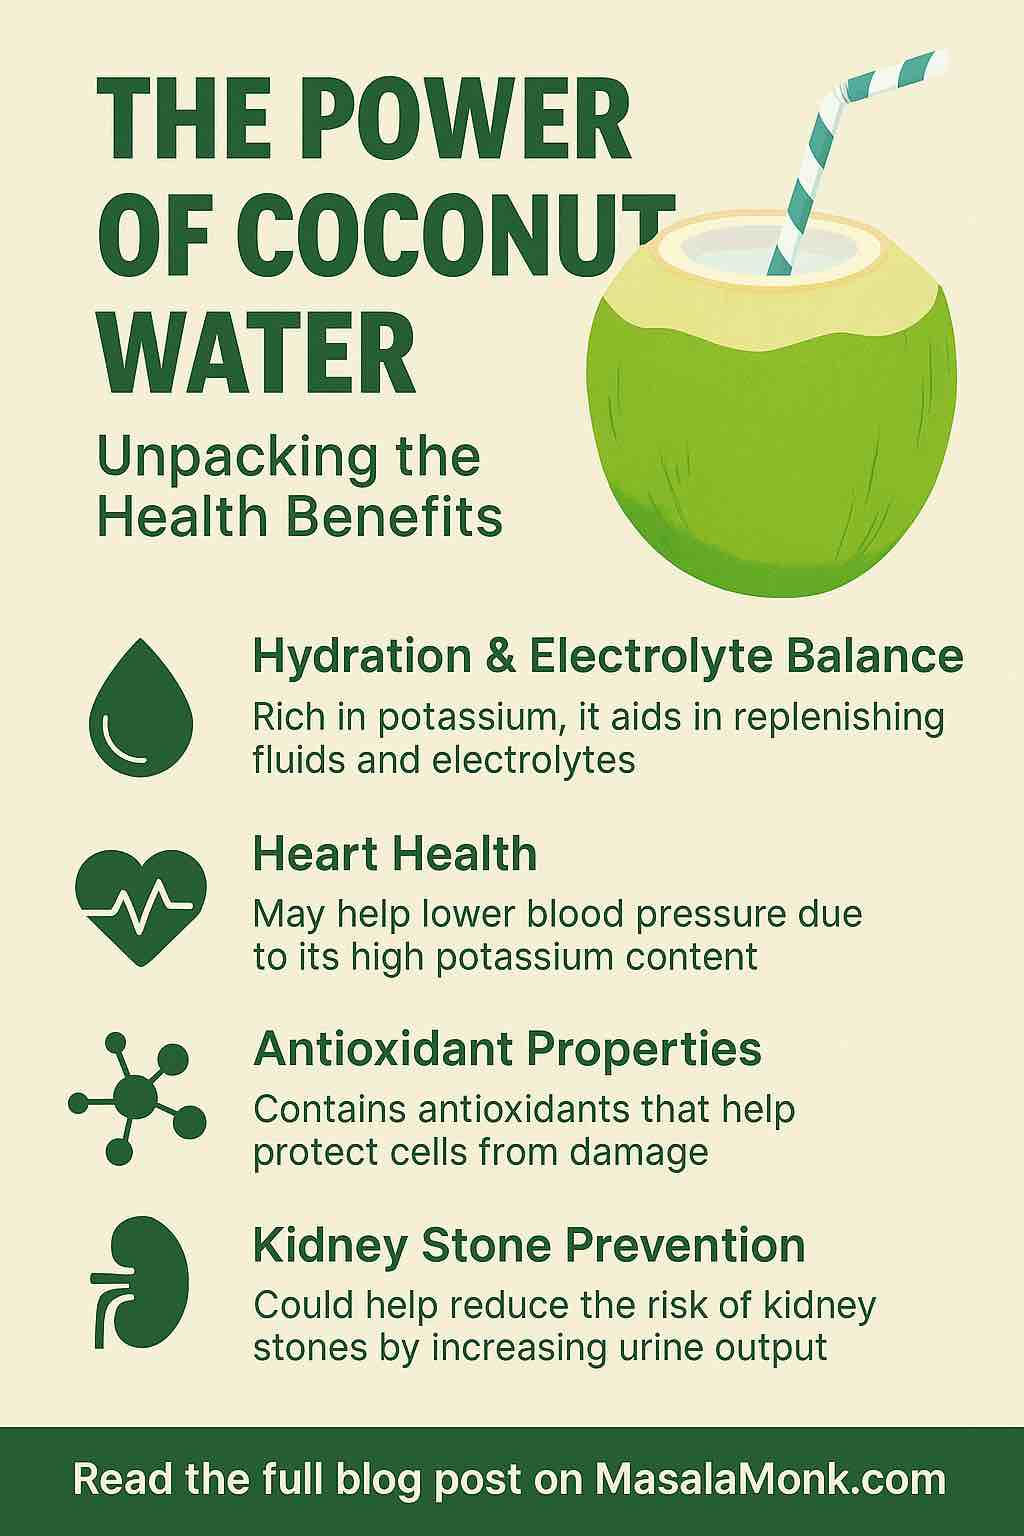
Coconut water is the clear, slightly sweet liquid inside young, green coconuts (around 6–7 months old). Unlike coconut milk, which is extracted from grated coconut flesh and rich in fat, coconut water is low-calorie and fat-free, but rich in electrolytes and phytonutrients.
As coconuts mature, this water gets absorbed into the meat, so younger coconuts yield the most liquid.
📊 Nutritional Snapshot (Per 240 ml / 8 oz)
Nutrient
Approx. Amount
Calories
45–60
Carbohydrates
9g (natural sugars)
Protein
<2g
Fat
<1g
Potassium
~600 mg (13% RDI)
Sodium
~250 mg (10% RDI)
Magnesium
~60 mg (15% RDI)
Calcium
~55 mg (6% RDI)
Antioxidants
Flavonoids, cytokinins, vitamin C
📌 Note: Composition may vary depending on the coconut’s age, origin, and processing method.
💪 Why Coconut Water Is More Than Just a Trend
1. Hydration with a Natural Edge
Thanks to its electrolyte content—especially potassium and sodium—coconut water supports:
Rehydration after workouts or heat exposure
Muscle cramp prevention
Fluid balance during illness or travel
A 2012 study by the Journal of the International Society of Sports Nutrition found that coconut water rehydrated athletes just as effectively as commercial sports drinks—without the added sugar and coloring.
🧴 Practical Tip: Drink fresh coconut water within 30–60 minutes post-exercise for optimal recovery.
2. Supports Heart Health and Blood Pressure
Potassium plays a central role in regulating blood pressure. Most people consume too much sodium and too little potassium—a combination linked to hypertension. Coconut water delivers a significant potassium boost, helping to:
Lower blood pressure (modestly)
Reduce stroke risk
Support heart muscle function
One animal study even showed coconut water reduced blood pressure better than water or potassium chloride alone. Human studies remain limited, but the potential is promising.
❤️ Best For: People with mild hypertension looking for natural support alongside a balanced diet.
3. Antioxidant & Anti-Inflammatory Action
Coconut water contains natural compounds like cytokinins (e.g., kinetin) and flavonoids (e.g., catechin, kaempferol), which:
Fight free radicals
Support cell repair
May delay skin aging and internal inflammation
A 2025 metabolomics study showed that young coconuts (2 months old) had the highest concentration of these protective compounds.
✨ Beauty Insight: Choose younger coconut water for maximum antioxidant punch—fresh is better than bottled.
4. Helps Prevent Kidney Stones
Thanks to its high water content and potassium, coconut water can increase urine volume and reduce crystal-forming substances like calcium and oxalate.
A 2018 study in Evidence-Based Complementary and Alternative Medicine showed coconut water reduced the number of crystals in urine of rats prone to stones.
💧 Pro Tip: Regularly including coconut water in your diet may offer natural protection—especially when paired with good hydration habits.
5. Friendly for Blood Sugar (In Moderation)
Coconut water has a low glycemic load and is mostly composed of simple sugars and fiber. While not carb-free, unsweetened coconut water has been shown in animal studies to:
Improve blood glucose levels
Enhance insulin sensitivity
Recent advice from dietitians (2025, EatingWell) suggests that coconut water, especially unsweetened, is safe and helpful for short-term hydration in people with diabetes.
🍬 Caution: Avoid flavored or sweetened coconut water if managing blood sugar.
⚠️ What to Watch Out For
⚠️ Consideration
Details
Sugar content
Natural sugars are still sugars—avoid brands with added sweeteners.
Sodium inconsistency
Commercial brands often don’t contain enough sodium for athletes.
Potassium overload
Not ideal for people with kidney disease or those on potassium-restricted diets.
Nutrient loss
Pasteurization and long shelf life can reduce antioxidant and vitamin content.
🛒 Choosing the Right Coconut Water
✔️ Look For:
“100% coconut water”
“No added sugar or preservatives”
Cold-pressed or HPP (High Pressure Processing)
Harvested from young green coconuts
❌ Avoid:
“From concentrate” products
Flavored or sweetened options
Shelf-stable versions with a long ingredient list
🧃 When and How to Use Coconut Water
Situation
How to Use It
Post-workout
1 cup to replenish electrolytes
Hot weather or sauna
Sipped cold to cool and hydrate
Travel/jet lag
Drink ½ cup on arrival
Fasting or detoxing
Light hydration without heavy calories
Mild hangovers
Replaces lost fluids and minerals
🥤 Pro Tip: Blend it into smoothies or freeze into cubes for tropical flavor enhancers.
🧬 What’s New in 2025: Cutting-Edge Findings
Flavonoid Mapping (China, 2025): Confirmed antioxidant profiles vary by coconut age and variety. Young coconuts (2 months old) = highest antioxidant activity.
Clinical Endorsements: RDs now recommend coconut water as a go-to option for diabetics and those seeking natural hydration.
Shelf-Life Innovation: New cold-chain preservation methods aim to retain more nutrients in packaged options.
📝 Final Thoughts: Should You Drink It?
Coconut water is more than a fad—it’s a natural, functional beverage with solid nutritional benefits. It may not be a miracle cure, but when used smartly, it supports hydration, heart health, antioxidant defenses, and more.
✔️ Best For:
Active individuals
People in hot/humid climates
Mildly hypertensive or health-conscious consumers
Those wanting a soda alternative
❌ Not Ideal For:
High-intensity athletes needing more sodium
People with advanced kidney disease
Those expecting dramatic medical benefits
🌿 Bottom line: Nature packaged this hydration booster perfectly—just be sure you’re choosing wisely, drinking in moderation, and using it for the right reasons.
👋 Your Turn
Do you drink coconut water regularly? Have you noticed a difference in your energy or hydration? Drop your experiences and favorite brands in the comments below, and share this article with someone who needs a tropical hydration boost.
FAQs
1. Is coconut water better than plain water for hydration?
Answer: Coconut water hydrates well due to its electrolytes like potassium and magnesium. It’s especially beneficial after sweating or mild dehydration, but plain water is still best for everyday hydration unless you’ve lost electrolytes through heat, exercise, or illness.
2. Can I drink coconut water every day?
Answer: Yes, 1 cup (240ml) daily is generally safe for most people. It’s a healthy beverage when unsweetened and consumed in moderation, but overconsumption may lead to excessive potassium intake, especially for those with kidney issues.
3. Is coconut water good for weight loss?
Answer: Coconut water is low in calories and can replace sugary drinks, making it helpful in weight loss strategies. However, it’s not a fat-burning drink—its benefit lies in being a healthier alternative, not a direct weight loss agent.
4. Does coconut water help with hangovers?
Answer: Yes. Its electrolyte and fluid content can ease hangover symptoms by rehydrating the body and replenishing minerals lost through alcohol-induced dehydration.
5. Can people with diabetes drink coconut water?
Answer:Yes, in moderation. Choose unsweetened varieties and limit to small servings (½–1 cup) to avoid blood sugar spikes. It’s generally considered safe and hydrating for people with controlled blood sugar.
6. What’s the difference between coconut water and coconut milk?
Answer: Coconut water is the clear liquid from young coconuts—low in fat and calories. Coconut milk is made from grated mature coconut flesh and is high in fat and calories, used mostly in cooking.
7. Is it safe during pregnancy?
Answer: Yes. Coconut water is safe during pregnancy and may help with hydration, digestion, and mild blood pressure support. However, as with any food or drink, it should be consumed in moderation.
8. Can I drink it before or during a workout?
Answer: Yes. Coconut water is a good pre- or post-workout drink for light to moderate activity. For high-intensity workouts, especially in hot environments, you may need a beverage with more sodium.
9. How do I choose the best coconut water?
Answer: Look for:
100% coconut water
No added sugar or flavors
Cold-pressed or not from concentrate Avoid shelf-stable brands with additives or “from concentrate” labeling.
10. Can coconut water spoil?
Answer: Yes. Fresh coconut water spoils quickly and should be refrigerated and consumed within a day or two. Packaged varieties have longer shelf lives but still expire—always check the date and storage instructions.
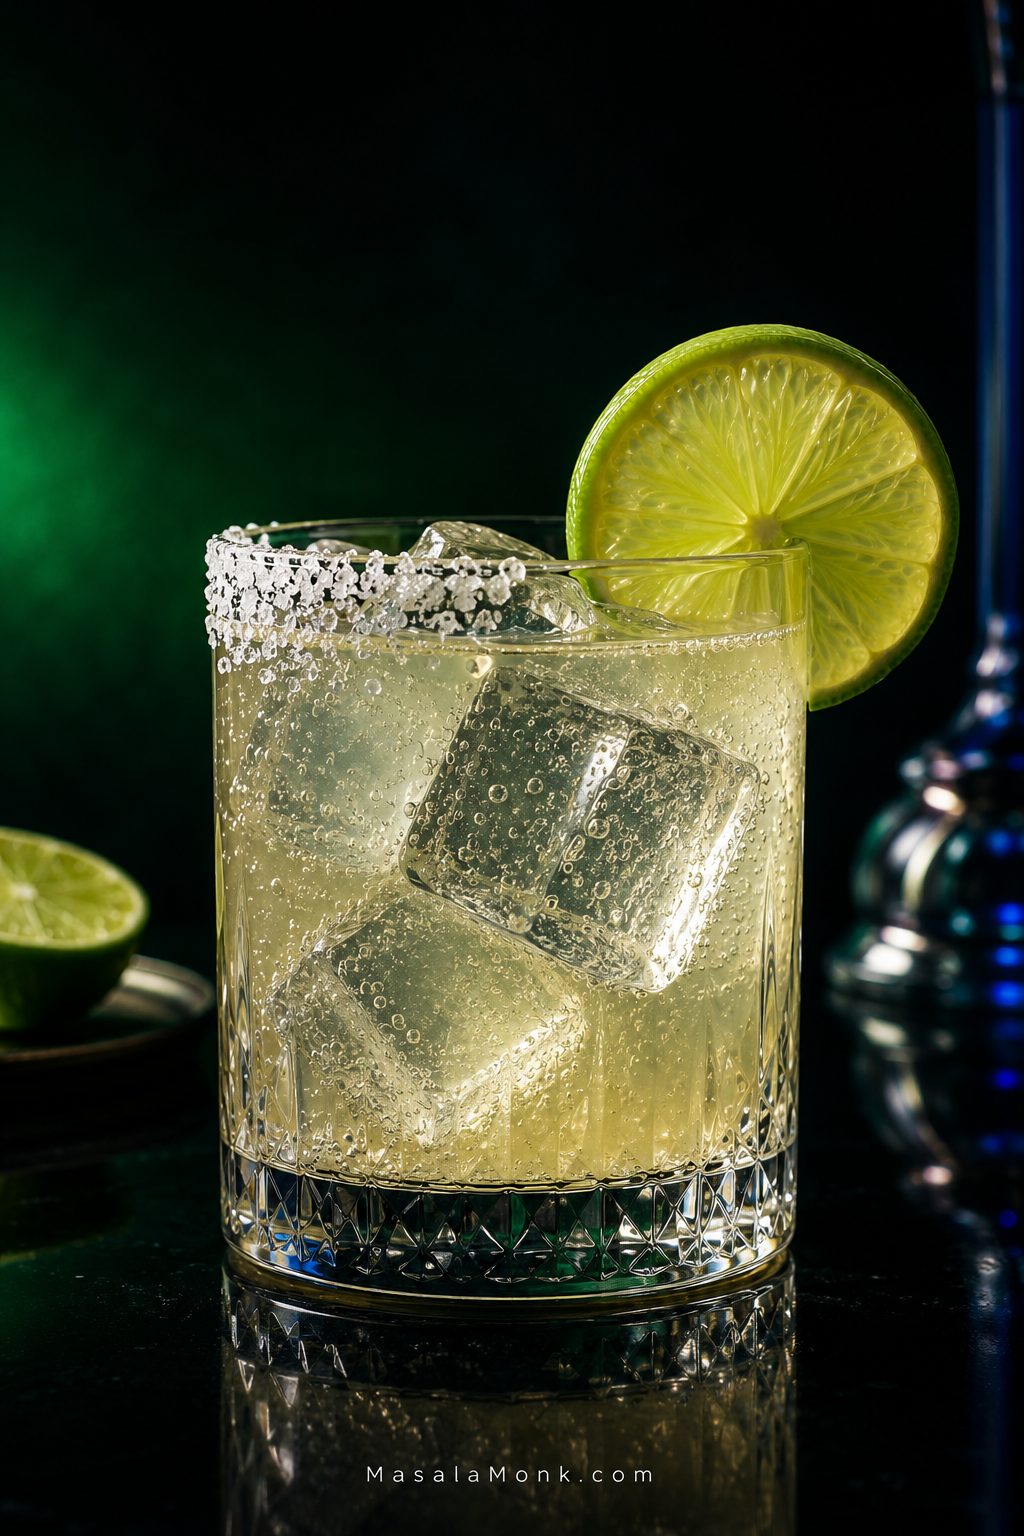
A good margarita mocktail should taste like something you would choose to drink, not limeade wearing a salt rim.
Whatever the reason tequila is out of the glass, the margarita itself should not feel like an afterthought. You still want cold lime first, a salty edge, enough sweetness to soften the acidity, and enough character that the drink is worth lingering over.
That is where many virgin margaritas go wrong. Take tequila and orange liqueur out of a classic margarita and you lose more than alcohol: aroma, body, bitterness and some of the bite disappear with them.
You do not need a shelf full of zero-proof bottles to put those qualities back. Start with the five-minute margarita mocktail recipe below. If you like it exactly that way, you’re done. If you want it drier, spicier, frozen, fruitier or closer to a classic margarita, the rest of the guide shows you what to change and why.
The rule to remember: lime first, sweetness second, complexity third, bubbles last.
Quick Answer: How to Make a Margarita Mocktail
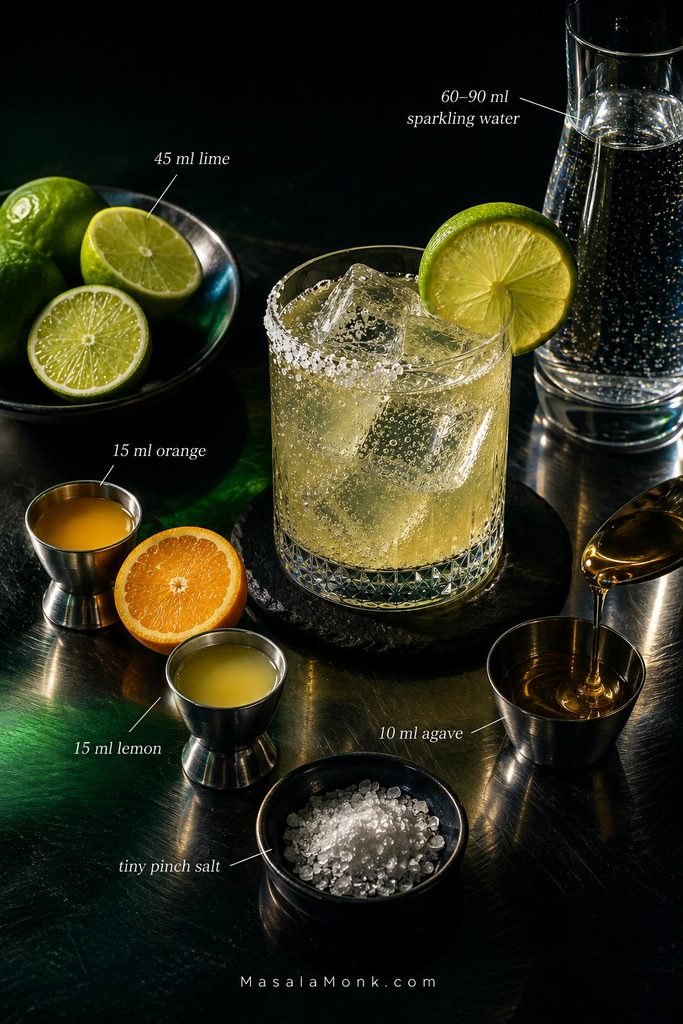
Shake 1½ oz (45 ml) fresh lime juice, ½ oz (15 ml) orange juice, ½ oz (15 ml) lemon juice, 2 teaspoons (10 ml) agave nectar and a tiny pinch of salt with ice for 10–15 seconds. Strain over fresh ice in a half salt-rimmed glass, then add 2 oz (60 ml) sparkling water for a punchier drink or 3 oz (90 ml) for a longer, lighter one. Fresh citrus varies from fruit to fruit, so make small adjustments only after the first sip.
Margarita Mocktail Recipe
Prep time: 5 minutes Total time: 5 minutes Yield: 1 drink Method: Shaken Best glass: 8–10 oz (240–300 ml) rocks glass; a margarita glass of similar capacity also works
Equipment
8–10 oz (240–300 ml) rocks glass or similarly sized margarita glass
cocktail shaker or clean lidded jar
jigger or measuring spoons
small plate for the salt rim
Ingredients
1½ oz (45 ml) fresh lime juice
½ oz (15 ml) fresh orange juice
½ oz (15 ml) fresh lemon juice
2 teaspoons (10 ml) agave nectar, straight from the bottle
tiny pinch fine salt
2–3 oz (60–90 ml) chilled sparkling water or club soda
plenty of ice
coarse salt, kosher salt or margarita salt, for the rim
lime wedge or wheel, for serving
Keep the sparkling water refrigerator-cold. Starting with a cold mixer slows immediate ice melt once the margarita is built.
Method
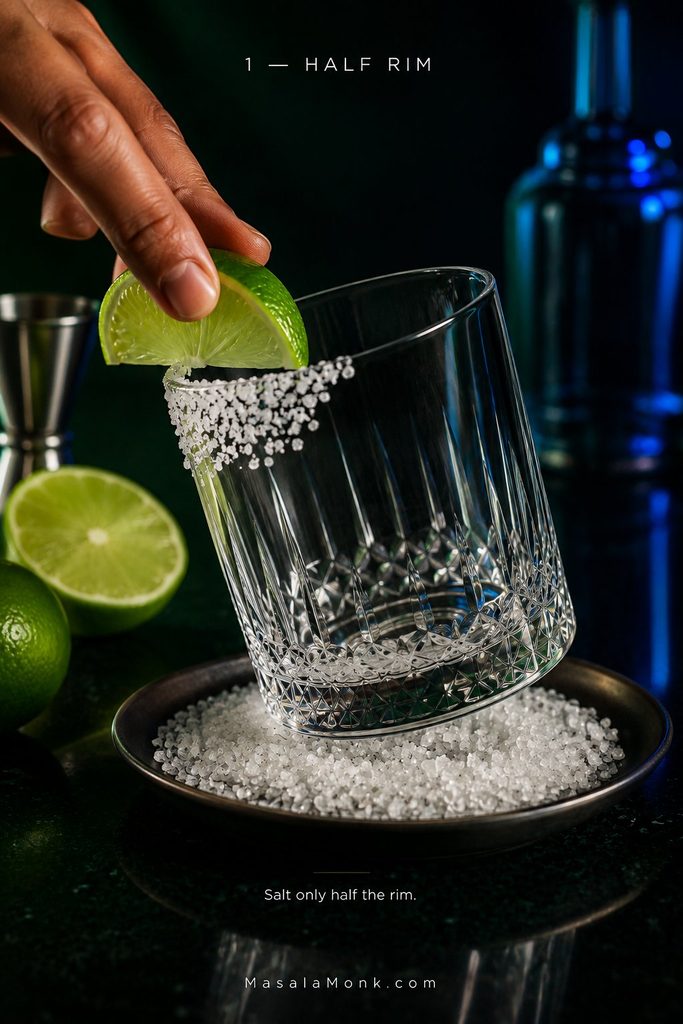
Salt half the rim. Put salt on a small plate. Run a lime wedge around half of the outside edge of the glass and press that section into the salt. Fill the glass generously with fresh ice.
Wet only the outside half of the rim. That keeps loose salt out of the drink while still letting you rotate between salted and unsalted sips.
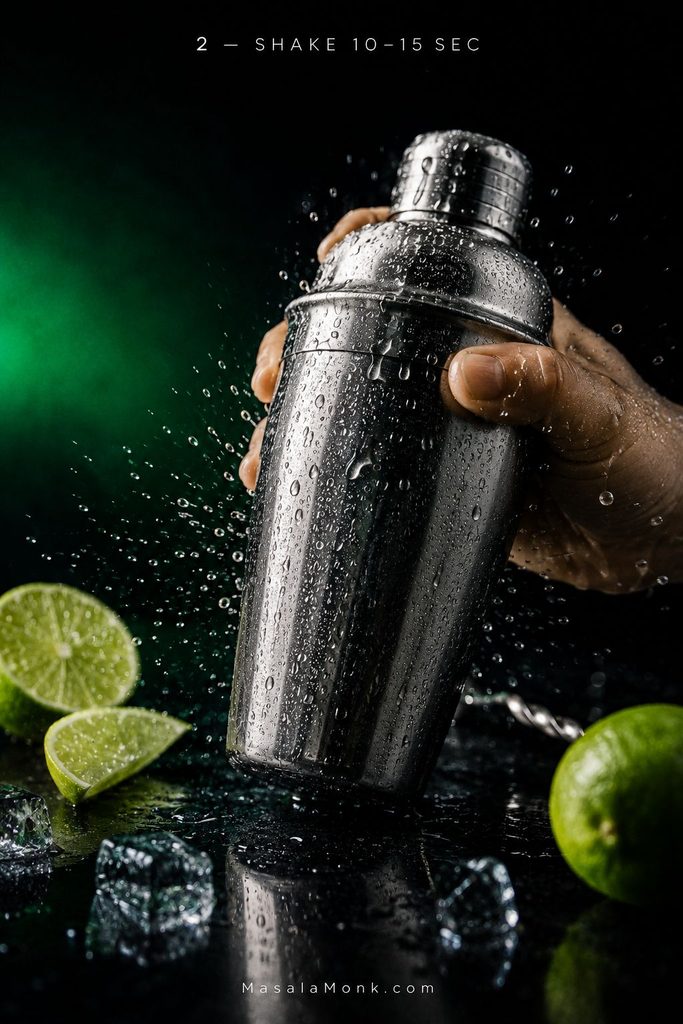
Shake the citrus base. Add the lime juice, orange juice, lemon juice, agave nectar and tiny pinch of salt to a shaker with ice.
Shake for 10–15 seconds. The shaker should feel thoroughly cold. Shaking chills the drink, works the thick agave into the citrus and adds enough dilution to soften the acidity.
If cold agave clings to the jigger or spoon, rinse it into the shaker with a little citrus so the amount you measured actually reaches the drink.
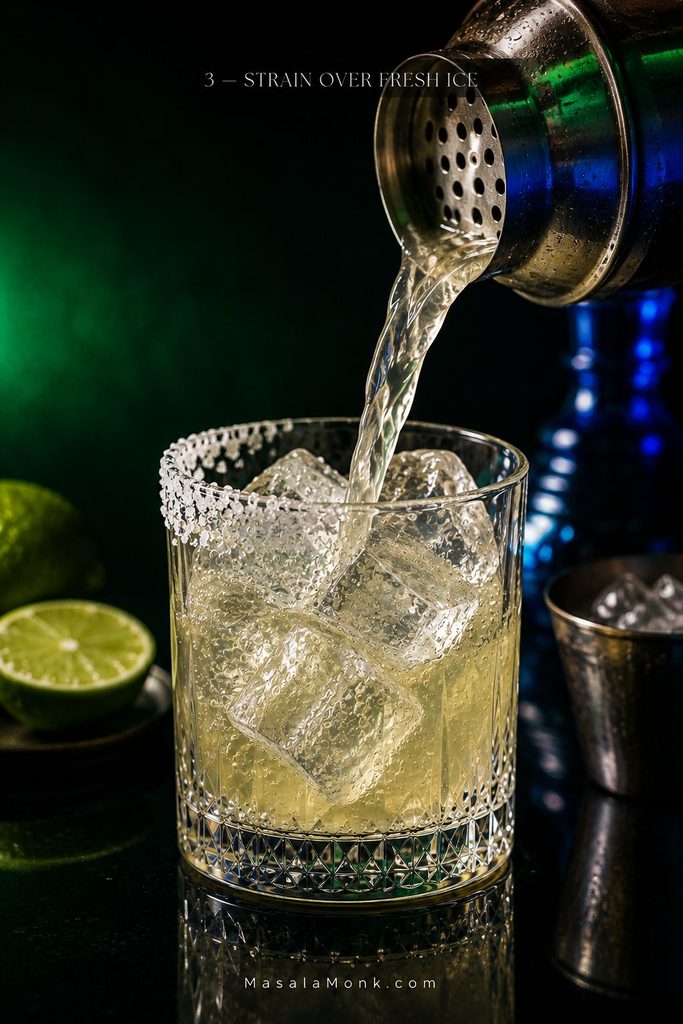
Strain over fresh ice. The shaker ice has already begun melting; fresh serving ice keeps the drink colder and slows further dilution.
Large fresh serving cubes expose less surface area than small broken shaker ice, so they slow further dilution once the virgin margarita reaches the glass.
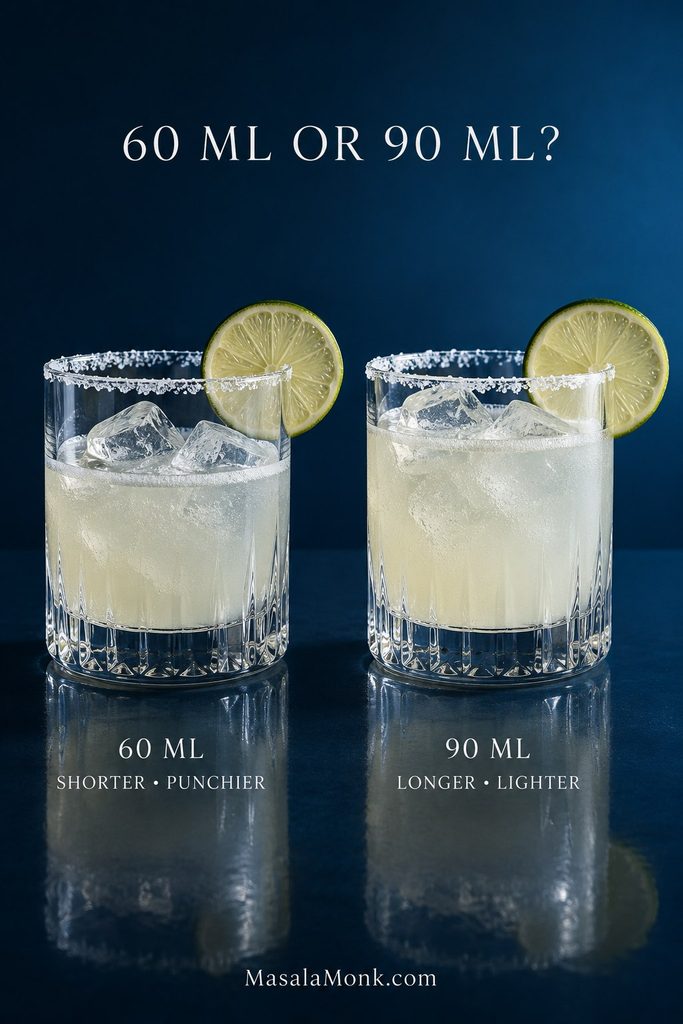
Add the bubbles last. Pour in 2 oz (60 ml) sparkling water for a shorter, punchier drink or 3 oz (90 ml) for a lighter one. Stir gently once or twice.
Take the first sip. If lime overwhelms everything else, add another teaspoon (5 ml) agave. Sweetness getting there first calls for a small squeeze of lime. When sweet and sour already feel right but the drink seems strangely empty, the answer is usually contrast rather than more syrup.
A Few Useful Notes
Add sparkling water only after shaking. Shaking a carbonated mixer makes a mess and wastes the bubbles you want in the finished drink.
Err slightly dry at first. Another teaspoon of agave is easy to add; excess sweetness is harder to undo.
A half rim gives you a choice. Some sips get the salty edge and some do not.
Keep the glass reasonably small. Filling an oversized tumbler with extra soda turns the drink into something much closer to a citrus spritz.
If you’re making one beside traditional margaritas, start with the 60 ml soda pour. It keeps the drink closer to their shorter, more concentrated feel instead of giving the alcohol-free glass twice the volume.
More sparkling water dilutes acidity and sweetness together, so it changes the margarita mocktail’s intensity and length more than its underlying sweet-sour ratio.
What a Good Margarita Mocktail Should Taste Like
The first sip should be properly cold and unmistakably lime-led. Orange and lemon sit underneath rather than announcing themselves as separate juices.
The agave should smooth the sharper edges without making sweetness the main event. A little salt makes the lime seem fuller, while the sparkling water lifts the finish without washing the flavor away.
It should feel crisp rather than thin. The short shake and measured amount of soda matter to that texture just as much as they matter to the flavor.
When the balance lands, you get bright lime, a flicker of salt, rounder citrus through the middle and a clean finish that makes another sip sound good.
Bring the fresh lime garnish close to the rim: its aroma reaches your nose with each sip and makes the citrus seem brighter before you taste it.
There is no single universal margarita target. Some people want a short, sharply lime-forward drink; others are trying to recreate the sweeter, longer margaritas they know from restaurants. Use the margarita you actually enjoy as the reference point. Once you know what each adjustment changes, you can steer the glass in that direction.
Making it right now? You can stop here. The recipe above is complete. If you’re curious about why it works—or why yours didn’t—the rest of the guide is here when you need it.
Why Margarita Mocktails Sometimes Taste Like Limeade
A classic margarita is doing more work than its short ingredient list suggests. Tequila supplies agave aroma, body and a peppery or vegetal edge. Orange liqueur brings concentrated orange aroma, sweetness and some bitterness.
You can see those roles clearly in a richer Cadillac Margarita, where tequila, lime and orange liqueur each have a distinct job.
Remove both alcoholic ingredients, keep the lime and sweetener, then stretch everything with water and the drink can collapse into lime + sugar + bubbles. More lime makes it sharper and more agave makes it sweeter, but neither necessarily makes it more interesting.
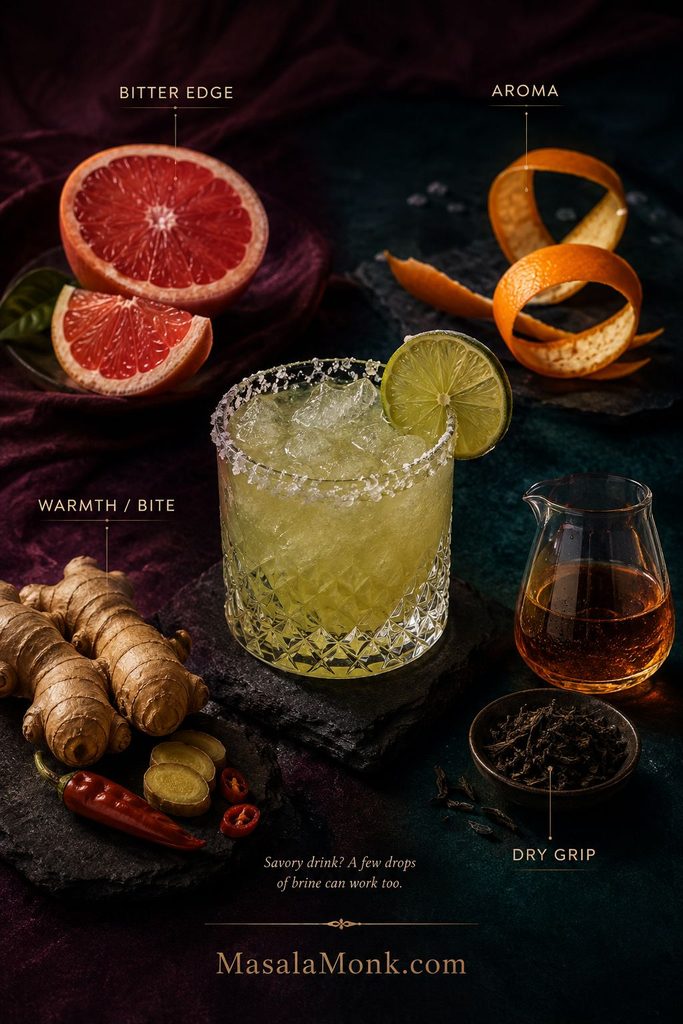
What is usually missing is some kind of contrast: a bitter edge, aromatic peel, a little heat, a faint dry grip, more concentration or simply the savory lift of salt. One well-chosen correction is usually enough.
A hollow drink can be both sweet and sour at once. Adding more of either will not create the aroma, bitterness or dry grip that is actually missing.
How to Balance a Margarita Mocktail
Forget the theory for a moment and pay attention to the sip in front of you.
If it makes you pucker immediately, the acidity is outrunning everything else. A little agave or controlled dilution will usually help more than another juice.
If sweetness arrives before lime, look first at the syrup, fruit or mixer. Tonic, Sprite, ginger beer and ripe fruit all bring sweetness of their own.
If sweet and sour seem balanced but the drink still feels hollow, give the finish something to hold onto. Grapefruit leaves bitterness after the lime; orange peel adds aroma before the sip; ginger or chile gives the finish a little bite.
If the flavor is good but disappears almost immediately, shorten the drink. Sometimes a perfectly good margarita base has simply been stretched too far.
If it tastes right but feels thin, fresh ice, a proper shake and a 60 ml rather than 90 ml soda top-up can make more difference than another ingredient.
Fix the sensation that is actually bothering you instead of changing three ingredients at once.
When diagnosing balance, taste from the unsalted side first; the rim changes how the lime registers and can make the baseline harder to judge.
What the Ingredients Actually Change
Lime Does Most of the Work
The base recipe uses 1½ oz (45 ml) fresh lime juice, enough to keep the drink unmistakably lime-led after ice and sparkling water are added.
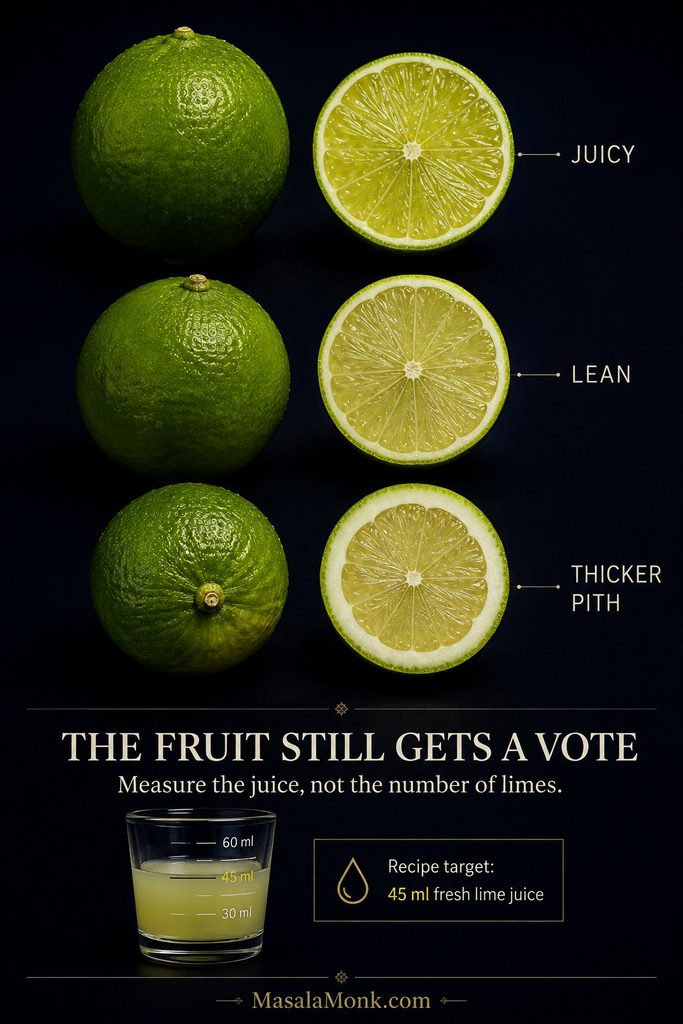
Limes are unpredictable. One can be fragrant and juicy; the next can be lean, bitter or fiercely tart. Measuring gives you a useful starting point, but the fruit still gets a vote.
If one lime falls short of 45 ml, reach for another lime rather than replacing the missing volume with lemon or orange; those juices change the profile.
Fresh lime gives the cleanest flavor, though bottled lime juice can still make a useful drink when that is what you have. Bottled products vary considerably, so start with the recipe rather than trying to compensate in advance.
Orange and Lemon Stay in the Background
The small amount of orange rounds the lime and restores some of the citrus character lost with orange liqueur. Too much turns the drink orange-forward. Lemon broadens the acidity; if your limes are already especially sharp, use less lemon before reaching for more sweetener.
Agave Is Less Standard Than It Looks
The recipe uses 2 teaspoons (10 ml) agave nectar straight from the bottle. Bartender-style agave syrup is sometimes diluted with water, so the same volume may taste less sweet. That is one reason apparently identical margarita recipes can land differently.
Salt is doing something different again. The rim gives individual sips a salty edge; the tiny pinch inside the drink quietly makes the lime seem fuller. Sparkling water is mostly about length: 60 ml keeps the drink tight, 90 ml makes it lighter, and much more begins to move toward spritz territory.
Sparkling Water, Tonic, Sprite or Ginger Beer?
Mixer
What it adds
Best when you want…
Sparkling water
Clean fizz, no added sweetness
The easiest all-purpose version
Club soda
Fizz plus light mineral character
A similarly crisp drink
Sparkling mineral water
Mineral character, often with lively bubbles
A drier-feeling margarita
Tonic water
Bitterness plus sweetness
A finish with more grip
Sprite or 7-Up
Fizz plus substantial sweetness
A softer, sweeter convenience version
Ginger beer
Sweetness plus ginger bite
A warmer, punchier drink
Grapefruit sparkling water
Citrus aroma with little sweetness
A drier, fruitier direction
A classic margarita isn’t carbonated. The International Bartenders Association’s Margarita is built from tequila, triple sec and lime. Bubbles are useful in this pantry version because they replace some of the lost volume and add lift. A margarita built around a full pour of zero-proof agave spirit may need little or none.
Tonic is especially good when the lime already feels bright but the finish disappears too quickly. Its bitterness hangs around after the citrus. Because tonic is also sweet, reduce the agave rather than simply swapping it one-for-one with sparkling water.
Want Your Margarita Mocktail Drier or Less Sweet?
A drier drink is not automatically a better drink. Some margaritas are meant to be sharp and salty; others are softer and a little sweeter. The useful target is the amount of sweetness that still lets you notice lime, salt and the finish instead of tasting syrup first.
If you are using…
Start here
Sparkling water or club soda
2 tsp (10 ml) agave nectar
Tonic water
About 1 tsp (5 ml) agave or less
Sprite or 7-Up
No added agave initially
Sweet mango, pineapple or berries
Add the fruit before deciding whether syrup is needed
Non-alcoholic tequila
Account for any sweetness already in the spirit
Grapefruit, orange peel, chilled tea and unsweetened fizzy mixers are often more useful than piling in extra citrus. They can make the drink feel less sweet without simply making it more sour.
Taste an unfamiliar mixer before adding it. Tonic, ginger beer and lemon-lime soda vary in sweetness and bitterness, which can change how much agave the glass needs.
How to Add More Margarita Character Without Zero-Proof Tequila
The pantry version is complete on its own. The ideas below change the personality of the drink rather than “improve” it. Pick the direction that actually sounds good to you.
When you want more aroma without extra sugar or volume, expressed orange peel is a low-impact adjustment: it changes the nose more than the drink’s balance.
Grapefruit
Add about ½ oz (15 ml) fresh grapefruit juice and reduce the orange or lemon by roughly the same amount. The lime still arrives first, but grapefruit leaves a pleasantly bitter edge behind it.
If that bitter grapefruit finish is exactly what you wanted, a Paloma puts grapefruit, lime, salt and fizz at the center of the drink.
Orange Peel
Express a strip over the finished margarita. You smell orange before the first sip without adding another layer of juice or sugar. It is a small change, but it makes the glass feel noticeably more aromatic.
Ginger or Chile
A tiny amount of fresh ginger juice, ginger syrup or chile gives the finish some warmth. This is the direction to take when you want a margarita that lingers a little instead of finishing clean and disappearing.
Chilled Tea
Replace ½–1 oz (15–30 ml) of the mixer with strong chilled green tea or Earl Grey. At that amount it should not announce itself as a tea drink; it simply leaves a faint dry grip after the citrus.
If you already enjoy savory drinks, a few drops of unsweetened dill-pickle brine or olive brine can work too. Start around ⅛ teaspoon or less. This is a small adjustment, not a new main ingredient.
Margarita Mocktail With Non-Alcoholic Tequila
If what you miss is specifically the agave aroma, body and bite of tequila, a zero-proof agave spirit can be useful. This is also the version that sits most naturally beside traditional margaritas at the same table: same short-drink idea, just built around a different bottle.
If you add soda to a zero-proof agave build, remember the spirit already contributes 60 ml of volume; start shorter and lengthen only after tasting.
For 1 drink
2 oz (60 ml) non-alcoholic agave or tequila-style spirit
1 oz (30 ml) fresh lime juice
½ oz (15 ml) fresh orange juice or non-alcoholic orange liqueur
¼ oz (7.5 ml) agave nectar, then adjust if needed
tiny pinch salt
ice
salt for the rim
Shake with ice for 10–15 seconds and strain over fresh ice. Hold back any extra agave or sparkling water until you know what the spirit has already contributed.
Taste the Bottle You Actually Bought
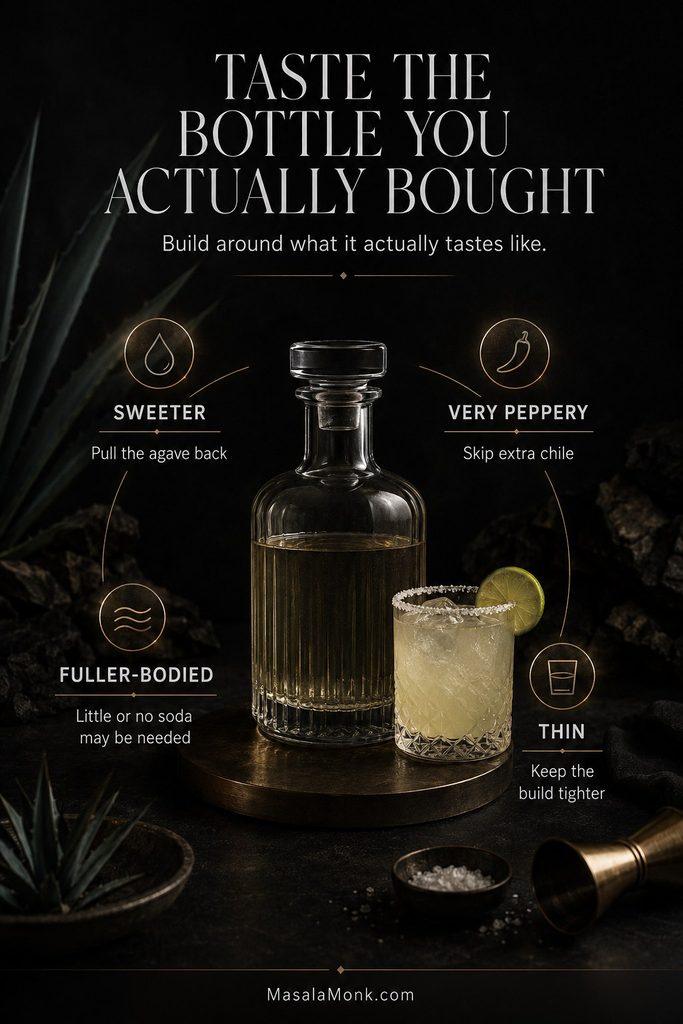
Zero-proof agave spirits vary enormously. Some are sweet, some thin, and some lean heavily on pepper or capsicum to imitate alcoholic burn. Others are grassy, smoky or aromatic.
Some bottles also taste stranger neat than they do in a margarita. Lime, salt and a little sweetness can pull those flavors together, so a spirit you would never sip by itself may still work surprisingly well once mixed.
A sweeter bottle needs less agave. Strong pepper or capsicum probably means you can skip extra chile. Fuller-bodied products may give you enough structure that soda becomes unnecessary. Work around the bottle in front of you rather than assuming every zero-proof tequila behaves the same way.
Opening an unfamiliar zero-proof bottle? Make a half-size trial drink before batching so you can learn whether it pushes sweet, peppery or thin without wasting ingredients.
What Can Replace Orange Liqueur?
The substitutes do not all do the same job. Orange juice brings flavor, sweetness and water. A strip of orange peel gives you mostly aroma. Orange blossom water is intensely floral, so think drops rather than splashes. A non-alcoholic orange liqueur is the closest single replacement, though its sweetness will depend on the bottle.
If you need the finished drink to be strictly 0.0% alcohol, check the stated alcohol content on every specialty spirit, bitters or bottled cocktail ingredient you use. The simple citrus-agave-sparkling-water recipe avoids those products entirely.
Spicy Margarita Mocktail
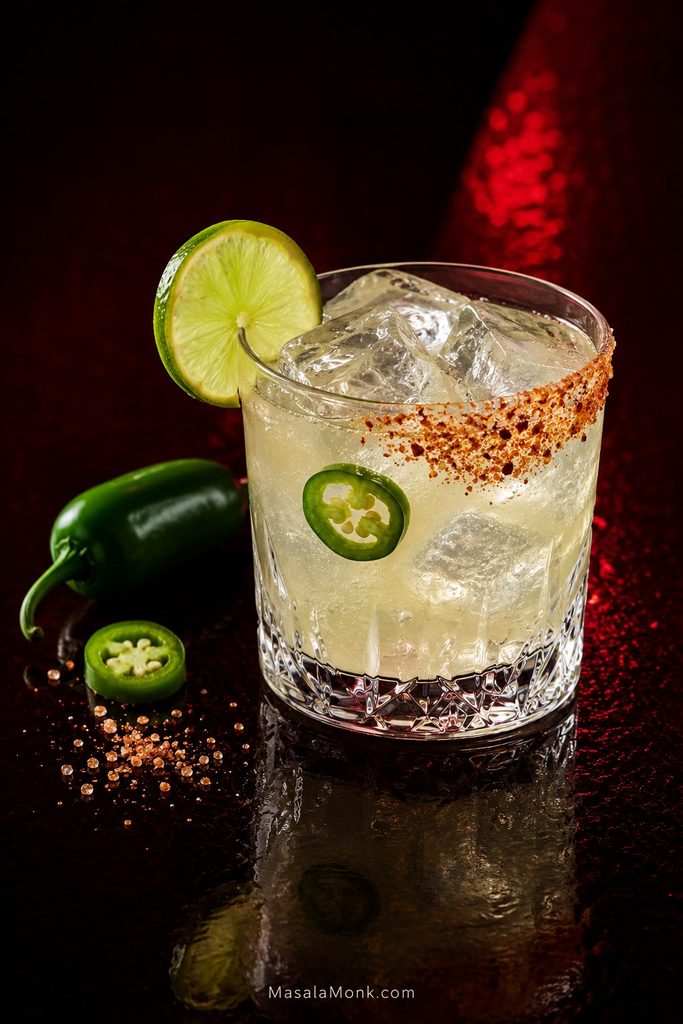
Jalapeño works especially well here because it brings fresh green-pepper flavor as well as heat. The best version gives you cold lime and salt first; the warmth catches up a moment later and lingers through the finish.
A chile-salt rim makes heat optional from sip to sip, whereas jalapeño infused into a spicy margarita mocktail changes the character of the entire glass.
For 1 drink
1½ oz (45 ml) fresh lime juice
½ oz (15 ml) fresh orange juice
½ oz (15 ml) fresh lemon juice
2 tsp (10 ml) agave nectar
1–3 thin jalapeño slices
tiny pinch salt
2–3 oz (60–90 ml) sparkling water
Tajín or chile salt, for the rim
Add the citrus, agave, salt and jalapeño to the shaker.
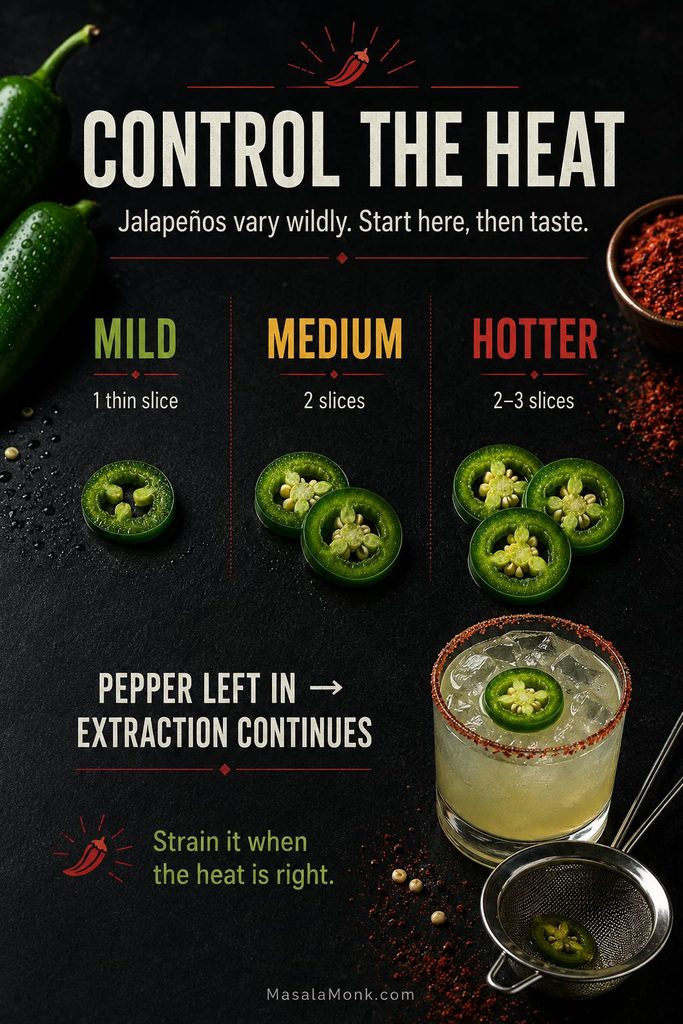
Mild: 1 thin slice, lightly muddled
Medium: 2 slices
Hotter: 2–3 slices with a firmer muddle
Jalapeños vary wildly in heat, so those counts are starting points rather than guarantees. Shake with ice, strain over fresh ice and add the sparkling water last.
Fine-straining also stops pepper pieces from sitting in the drink and continuing to release heat. Leave them in and the last sip can be considerably hotter than the first.
Keep the jalapeño slices similarly thin when comparing heat levels; otherwise, slice thickness becomes another variable alongside the number of pieces.
If chile is the part you want to emphasize, the Spicy Margarita gets much more specific about jalapeño intensity, Tajín and heat control.
Hot Honey Shortcut
Hot honey makes a rounder, warmer spicy margarita than plain agave. Thin it with a little warm water, let the syrup cool, then use it instead of agave. Straight honey is much harder to incorporate evenly into an ice-cold drink.
A frozen margarita needs its own formula because blended ice is a major ingredient, not merely a way to chill the drink. As that ice breaks down, it adds water to every other flavor.
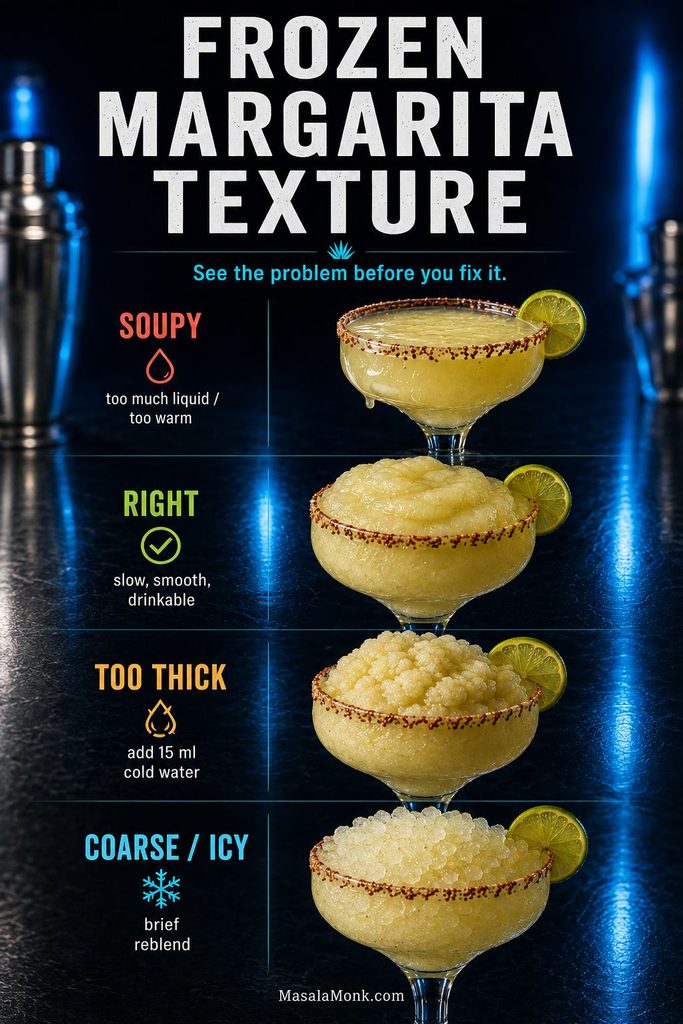
Judge a frozen margarita mocktail by how the slush moves, not by a fixed blender time: machine power and ice size can change how quickly the right texture appears.
For 1 generous frozen margarita
1½ oz (45 ml) fresh lime juice
¾ oz (22 ml) fresh orange juice
½ oz (15 ml) fresh lemon juice
½ oz (15 ml) agave nectar
tiny pinch salt
about 1½ cups standard ice cubes
up to 1 tbsp (15 ml) cold water, only if the blender needs it
Add the liquids and salt first, then the ice. Blend only until smooth and slushy, then stop. Once the texture is right, leaving the blender running only gives the mixture more time to warm and the ice more time to melt.
The right texture should look almost a little too thick when it first leaves the blender, then relax into a smooth slush as you drink it. It should move slowly in the glass without becoming spoonable.
Start Cold
Fridge-cold citrus, cold agave and a chilled glass give you a head start. Warm ingredients force more ice to melt before the margarita is properly cold, making a thin texture more likely.
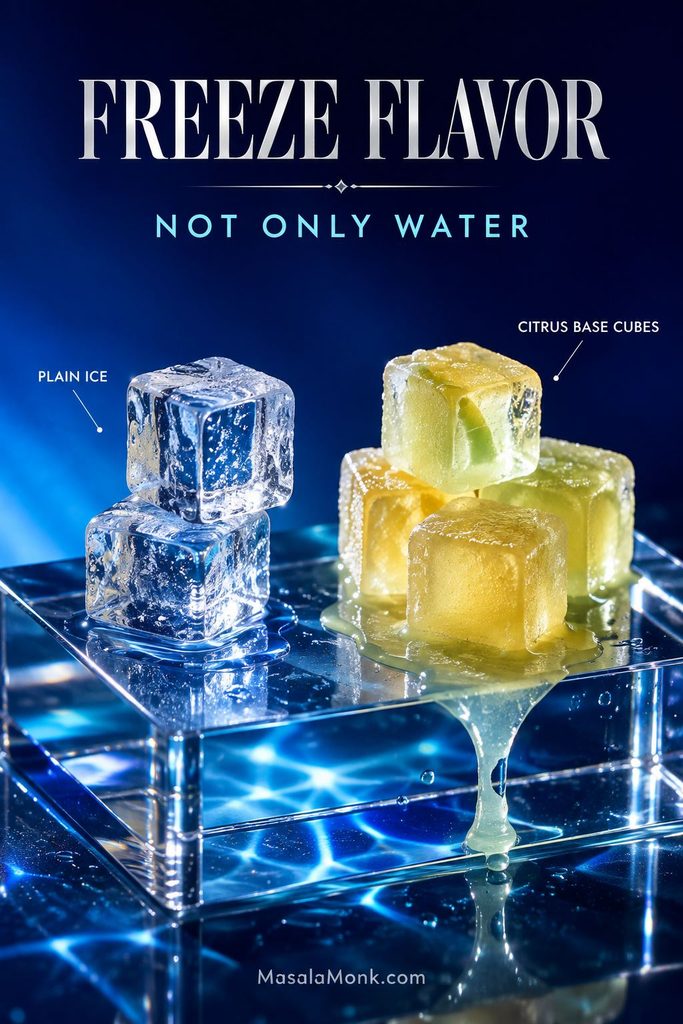
Freeze Flavor, Not Only Water
Freeze some of the citrus base into cubes and replace part of the plain ice with them. As those cubes melt, they add margarita rather than plain water.
Freeze the citrus base in small, repeatable portions; then you can replace plain ice consistently instead of guessing how much concentrated flavor went into the blender.
Frozen mango brings body as well as sweetness; in a Mango Margarita, enough lime keeps that richness lively rather than heavy.
Frozen Margarita Troubleshooting
It is soupy
There is too much liquid for the amount of ice, or everything started too warm. Before blending, the ice should sit substantially above the liquid rather than floating freely in a large pool.
Add a modest amount of ice and pulse briefly. Getting close to the right ratio from the beginning works better than repeatedly feeding fresh ice into a mixture that has already warmed.
It is too thick or the blender will not move
Add 1 tablespoon (15 ml) cold water and blend briefly. Repeat only if the mixture still refuses to move.
It tastes watery
Try a squeeze of lime and a tiny pinch of salt before reaching for more syrup. Next time, make the base stronger or replace some plain ice with frozen citrus or fruit cubes.
It is coarse and icy
The ice may not be breaking down finely enough, or the mixture may need a little more liquid to settle into a smooth slush. Blend again briefly, adding liquid a tablespoon at a time if necessary.
The ice and liquid separate quickly
Frozen margaritas naturally begin separating as they warm. Start colder, use enough ice and serve promptly. Fruit purée can add useful body in fruit versions too.
Fix texture before sweetness. Extra juice or syrup adds more liquid, so adjusting flavor first can make an already loose frozen margarita even looser.
For a party, make the still base ahead with a little cold water to replace some of the dilution you would normally get from shaking eight individual drinks. Keep the sparkling water and serving ice separate until you’re actually pouring glasses.
Chill the empty pitcher before adding the margarita base. That protects serving temperature without quietly adding more water to the batch through extra ice.
Chilled Base for 8 Drinks
12 oz (360 ml) fresh lime juice
4 oz (120 ml) fresh orange juice
4 oz (120 ml) fresh lemon juice
⅓ cup (80 ml) agave nectar
⅓ cup (80 ml) cold water
⅛ teaspoon fine salt to start, with up to ¼ teaspoon total if needed
Whisk thoroughly, cover and refrigerate until very cold. You’ll have about 26 oz (760 ml) of base, enough for eight pours of roughly 3¼ oz (95 ml) each.
The chilled base should taste a little concentrated because every glass still has ice and sparkling water ahead of it. Lime can be assertive without feeling punishing, while the salt should stay in the background.
To Serve Each Glass
Rim the glass close to serving time and fill it with fresh ice.
Pour in about 3¼ oz (95 ml) chilled margarita base.
Add 2–3 oz (60–90 ml) chilled sparkling water.
Stir gently and garnish with lime.
Open the sparkling water near serving time and stir only gently; extra agitation spends carbonation before the margarita mocktail even reaches the table.
Keeping the carbonation separate means the eighth glass can be as lively as the first. That matters even more when some people want the short 60 ml top-up and others prefer the lighter 90 ml version—you do not have to commit the whole table to one margarita.
If getting ahead makes hosting easier, prepare the citrus base up to about 24 hours before serving. Keep it covered and refrigerated; save the ice and bubbles for the glasses.
For a spicy batch, add jalapeño to the still base and monitor the heat. Remove the pepper when it reaches the level you want because it will keep extracting while it sits.
Fruit Margarita Mocktails
Fruit versions change the personality of the drink quickly: strawberry makes it softer, mango fuller, watermelon lighter and grapefruit drier. The method barely changes; the balance does.
Variation
Add
Watch for
Strawberry
2–3 muddled ripe berries
Very ripe berries may make extra agave unnecessary
Mango
1½–2 oz (45–60 ml) mango nectar or purée
Keep enough lime to stop mango overwhelming the citrus
Watermelon
3–4 oz (90–120 ml) fresh watermelon juice
Use less soda because watermelon contributes plenty of water
Pineapple
1–2 oz (30–60 ml) pineapple juice
Extra agave may not be necessary
Blood orange
Replace regular orange with blood orange
Keep lime clearly in front
Grapefruit
½–1 oz (15–30 ml) fresh grapefruit juice
Reduce another citrus component rather than simply adding more juice
Cucumber
3–4 muddled slices
Fine-strain if you want a cleaner texture
Fruit changes texture as well as flavor. Fine-strain fruit margarita mocktails for a cleaner sip, or keep some pulp when extra body is part of the appeal.
Watermelon is particularly easy to wash out because the fruit contributes so much liquid of its own. A Watermelon Margarita works best when the lime stays assertive and the final fizz stays under control.
Margarita Mocktail With Sprite
This is the easy, sweeter version. If that is the margarita you actually want, there is no need to apologize for it—just let the soda supply the sugar instead of adding agave on top.
1½ oz (45 ml) fresh lime juice
½ oz (15 ml) fresh orange juice
tiny pinch salt
3–4 oz (90–120 ml) chilled lemon-lime soda
ice
Shake the lime, orange and salt with ice, strain over fresh ice and add the soda last. Fresh lime matters especially here because it stops the sweet mixer from becoming the whole drink.
Margarita Mocktail Without Orange Juice
If orange is the part you do not want, leave it out rather than trying to hide it under more lime. The result is leaner, sharper and more lime-forward.
1½ oz (45 ml) fresh lime juice
2 teaspoons (10 ml) agave nectar
½ oz (15 ml) grapefruit juice, optional
tiny pinch salt
2 oz (60 ml) sparkling water
Shake the still ingredients with ice, strain over fresh ice and add the sparkling water. A strip of orange peel expressed over the top gives you orange aroma without putting orange juice back into the drink; skip the peel too if you want the cleanest lime-only direction.
Practical Shortcuts & Ingredient Swaps
A margarita is not a test of how well stocked your kitchen is. Fresh citrus and a shaker help, but neither is worth abandoning the drink over.
Using Bottled Margarita Mix
First check the label and make sure you’re holding an alcohol-free margarita mixer rather than a premixed alcoholic margarita. Then see whether it is a concentrate that needs diluting or a ready-to-use mixer that is already quite sweet.
With a concentrate, follow the label’s dilution instructions first, then add fresh lime, ice and a salt rim before deciding it needs anything else.
For a sweet ready-to-use mix, replacing roughly one-third of the pour with unsweetened sparkling water is a useful first move. Fresh lime can sharpen it from there. Brands vary too much for that ratio to be a law.
No Cocktail Shaker?
A clean jar with a secure lid works well: shake the citrus, agave, salt and ice, strain into the glass, then add sparkling water.
You can also build the drink directly in the glass. Stir the citrus, agave and salt together first, add plenty of ice and stir until cold, then finish with sparkling water. You lose a little aeration, not the entire drink.
Swap by Function
Need sweetness? Simple syrup, honey syrup or cooled hot-honey syrup can replace agave.
Need orange aroma? Try orange peel, zest, a few drops of orange blossom water or non-alcoholic orange liqueur.
Need a drier finish? Tonic, grapefruit or strong chilled tea can help.
Need fizz? Club soda, mineral water, tonic, grapefruit sparkling water, ginger beer and lemon-lime soda all work, but they do not contribute the same sweetness.
Need bite? Use a little ginger, jalapeño, hot honey or a peppery zero-proof spirit.
Margarita Mocktail Troubleshooting
Come back here when the drink is close but not quite right. Fix the problem you can actually taste first rather than changing several things at once.
Problem
First fix
Too sour
Add 1 tsp (5 ml) agave
Too sweet
Add a small squeeze of fresh lime
Tastes like limeade
Add contrast with tonic, grapefruit, ginger, a tiny salt adjustment or a zero-proof spirit
Orange dominates
Reduce orange juice and use peel for aroma instead
Mostly tastes like soda
Use less carbonated mixer
Watery
Use less mixer and fresh serving ice
Flat
Use fresh carbonation; a tiny pinch of salt may also help the flavor
Too bitter
Work out whether tonic, grapefruit, lime pith, brine or the zero-proof spirit is responsible before adding sugar
Too salty
Drink from the unsalted side or dilute/rebuild the glass
Non-alcoholic tequila tastes too peppery
Use less, rebalance around it or make the pantry version instead
Not enough bite
Add a very small amount of ginger or chile
Far too spicy
Remove or strain the pepper and dilute the drink
Pitcher has gone flat
Keep carbonation separate and add it per glass
Spicy pitcher keeps getting hotter
Strain the jalapeño once the heat is right
Sour and Bitter Are Not the Same Problem
Sour is mostly acidity. When lime makes your mouth pucker before anything else gets a chance to register, a little sweetness or controlled dilution can bring the glass back into balance.
Bitter can come from tonic, grapefruit, lime pith, a strongly flavored zero-proof spirit or too much brine. Adding syrup to that problem can leave you with a drink that is both sweet and bitter, so find the source first.
Is a virgin margarita the same as a margarita mocktail?
In everyday use, virgin margarita, non-alcoholic margarita and margarita mocktail usually describe the same broad idea: a margarita-style drink made without tequila or orange liqueur. Recipes range from simple citrus-and-soda drinks to versions built with zero-proof agave spirits.
Does this margarita mocktail contain alcohol?
The basic citrus-agave-sparkling-water recipe uses no alcoholic ingredient. Specialty products sold as non-alcoholic spirits, bitters or cocktail substitutes can vary, so check the stated alcohol content on the individual product whenever an exact 0.0% drink matters to you.
Can I leave out the lemon juice?
Yes. Lemon broadens the citrus, but the drink still works without it. Leave it out, make the lime-and-orange base, and change something only if the finished glass actually needs it.
How much juice is in one lime?
It varies considerably. A medium juicy lime may give roughly 1 oz (30 ml), while another may give much less. Measuring the juice is more reliable than building the recipe around a fixed number of limes.
What to Serve With a Margarita Mocktail
Part of the pleasure of a margarita is the table around it: something salty, something spicy, a cold glass that lasts long enough to eat with. Creamy guacamole with tortilla chips is one of the simplest pairings because lime and salt already connect the food and drink.
Quesadillas, grilled corn, nachos, grilled vegetables, spicy chicken, shrimp, bean dips and fruit salsas fit naturally too. A chile-and-Tajín rim is particularly good when the food brings a little sweetness.
For dinner, Fish Tacos are an easy match: flaky fish, cabbage, lime crema and jalapeño give the cold margarita plenty of richness and spice to cut through.
At the table, use the half-salted rim strategically: sip from the unsalted side with salty chips, then rotate toward salt alongside sweeter or richer bites.
A margarita mocktail does not have to convince anyone that tequila is hiding in the glass. It needs to give you the part you came for: bright lime, a salty edge, enough character to slow down and enjoy it, and a second sip that sounds better than the first. Once you know which adjustment changes which part of that experience, you can make the glass your own.
Made it your own? Tell me what made the difference for you—less agave, tonic, extra grapefruit, jalapeño, a frozen version, or something completely different.