Welcome to the Most Accessible (and Enjoyable!) Yoga You’ll Ever Try—Absolutely FREE
Getting older shouldn’t mean giving up movement, joy, or comfort in your own body. But let’s be real:
Aging can bring creaky knees, a stiff back, and worries about falling or “keeping up” with fast-paced fitness classes.
Enter chair yoga—your ticket to a happier, more mobile you, with no floor work, no expensive equipment, and absolutely no experience required.
This guide is your FREE, all-in-one resource for building flexibility, strength, and confidence right where you are—at home, in a community center, or even on your porch with a cup of tea. It’s gentle, senior-approved, and designed to help you thrive.
Why Chair Yoga? (And Why Now?)
Chair yoga takes everything good about classic yoga—mindful breathing, stretching, building muscle, and calming your mind—and adapts it to meet you exactly where you are today.
No need to get up and down from the floor, and no worries if you’re stiff, sore, or haven’t moved much lately. Every pose uses a chair for support, making movement safer and more comfortable than ever.
With this FREE chair yoga guide, you will:
- Discover how simple movement can ease aches and pains, even with arthritis or chronic conditions.
- Feel steadier on your feet—everyday tasks, like standing up or reaching for a shelf, get easier with regular practice.
- Calm your mind and reduce stress or anxiety, using easy breathing and stretching techniques.
- Gain confidence and independence—no matter your age or previous exercise experience.
Who Is This For?
This step-by-step chair yoga sequence is perfect for:
- Seniors and elderly adults looking for safe, effective ways to stay active.
- Anyone with limited mobility, joint pain, or balance issues.
- Caregivers, family, or activity leaders seeking a proven, practical program for their loved ones.
- Beginners, including those who have never tried yoga before.
- Anyone wanting a FREE, printable resource to keep at home or share.
What You’ll Find in This FREE Guide
- Easy-to-understand instructions—no confusing yoga jargon.
- Big, clear visuals for every pose, so you always know what to do.
- Modifications and tips for every body, so you never have to feel left out or behind.
- Science-backed benefits to inspire you and help you track your progress.
- A complete 30-minute flow you can follow at your own pace—pause, repeat, or skip as needed.
Before You Begin: Quick Safety Checklist
- Use a sturdy, armless chair (no wheels or rolling office chairs).
- Wear comfortable clothing that lets you move easily.
- Keep water nearby and move slowly—listen to your body, and stop if you ever feel pain or dizziness.
- If you have a medical condition or recent surgery, check with your doctor before starting any new exercise.
A Message from Masala Monk
At Masala Monk, we believe movement is for everyone. This is a space to rediscover strength, joy, and confidence—at any age, with any ability.
This guide is 100% FREE, because everyone deserves the tools for better health—no barriers, no cost, just pure encouragement and real results.
Let’s Get Moving!
Pull up your chair, take a few deep breaths, and join us as we begin with the foundation of every great chair yoga flow: Seated Mountain Pose.
Scroll down to start your practice, and don’t forget—come back as often as you like. This resource is always FREE for you to use and share!
1. Seated Mountain (Tadasana on Chair)
Benefit:
Builds posture awareness, activates core and legs, and centers your mind.
Setup:
- Use a sturdy, stable chair with no arms or wheels.
- Sit toward the front half of the seat so your feet are flat on the floor and knees are stacked above your ankles.
- Check that your thighs are parallel to the ground and your spine is upright—not leaning back.
Step-by-Step:
- Place your feet hip-width apart, grounding evenly through all parts of each foot.
- Lengthen your spine upward—imagine a gentle tug at the crown of your head.
- Roll your shoulders up, back, and then down so they rest naturally away from your ears.
- Rest your hands comfortably on your thighs, palms down (for grounding) or up (for openness).
- Lightly engage your abdominal muscles by drawing your navel in and up, but don’t tense or hold your breath.
- Relax your face, soften your jaw, and gently close your eyes or maintain a soft gaze forward.
- Begin to notice your breath. Let each inhale expand your chest and lengthen your posture; let each exhale root your feet more firmly.

What to Notice:
- Feel the support of the chair beneath you, the grounding through your feet, and a gentle lift through your crown.
- Notice any areas of tension—let your shoulders, jaw, and fingers relax a bit more with each breath.
Modifications:
- If your feet don’t touch the floor, place a folded blanket or yoga block underneath.
- If sitting tall is difficult, try sliding a small pillow behind your lower back for gentle support.
Make it Your Own:
- Use this pose to check in at any time. Take a few breaths here to reset posture during your day.
Flow Cue:
“Let every inhale make you taller; let every exhale ground you deeper.”
Common Mistakes to Avoid:
- Slouching, rounding the shoulders, or tensing the neck.
- Holding your breath or gripping the chair.
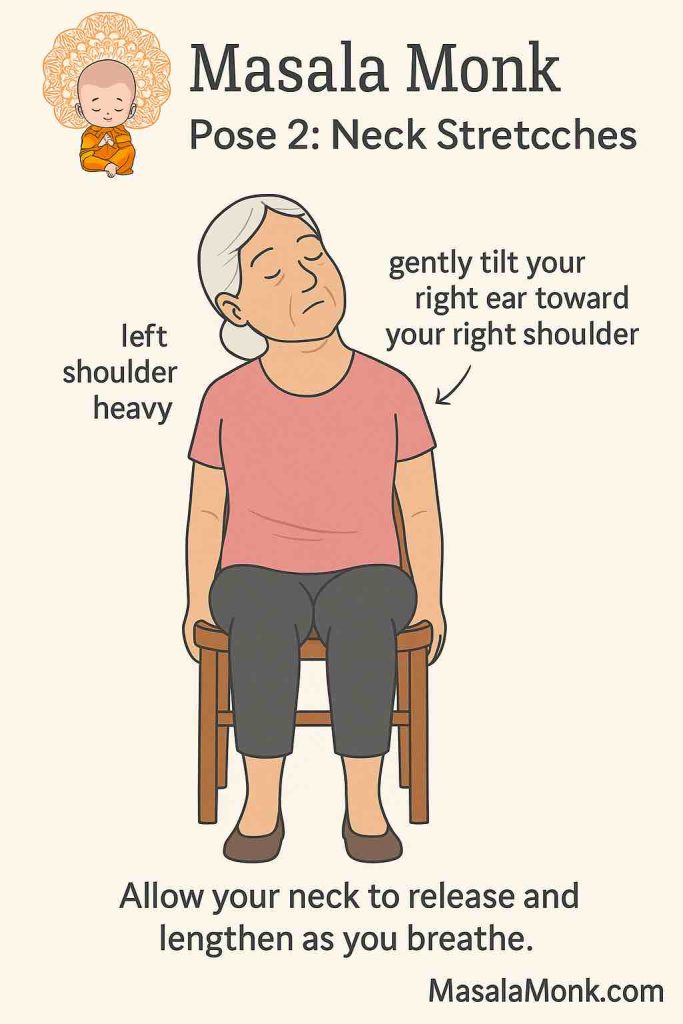
2. Neck Stretches
Benefit:
Releases neck and shoulder tension, increases mobility, and improves posture awareness.
Setup:
- Sit in your Seated Mountain pose, feet flat and spine tall.
- Ensure your shoulders are relaxed and your hands rest comfortably on your thighs or the sides of the chair.
Step-by-Step:
- Take a deep breath in, feeling the crown of your head reach upward and shoulders soften.
- Lateral Stretch:
- Exhale and gently let your right ear drift toward your right shoulder.
- Keep your left shoulder heavy and relaxed.
- Pause and breathe for 3–5 slow breaths, feeling a gentle stretch along the left side of your neck.
- To deepen, you may lightly place your right hand over your left temple (no pulling, just gravity).
- Inhale to return your head to center.
- Exhale and repeat on the left side.
- Chin to Chest:
- Inhale, then as you exhale, drop your chin toward your chest, lengthening the back of your neck.
- Hold and breathe, noticing any stretch or release.
- Return head to center on an inhale.
- Gentle Rotation:
- Look gently to the right, keeping chin parallel to the floor.
- Inhale back to center, exhale and look gently to the left.
What to Notice:
- You should feel a soft stretch, not pain or pinching.
- Shoulders remain relaxed and level, not lifting as you stretch.
Modifications:
- If you have neck injury or severe stiffness, do only very small movements—just enough to feel gentle sensation.
- Skip any motion that causes discomfort.
Make it Your Own:
- Repeat the stretches throughout the day when feeling stiff from reading, using devices, or watching TV.
Flow Cue:
“With every breath out, let your neck lengthen and your shoulders melt away from your ears.”
Common Mistakes to Avoid:
- Hunching shoulders up toward ears or tilting the entire torso instead of just the head.
- Forcing the stretch; always keep it gentle.
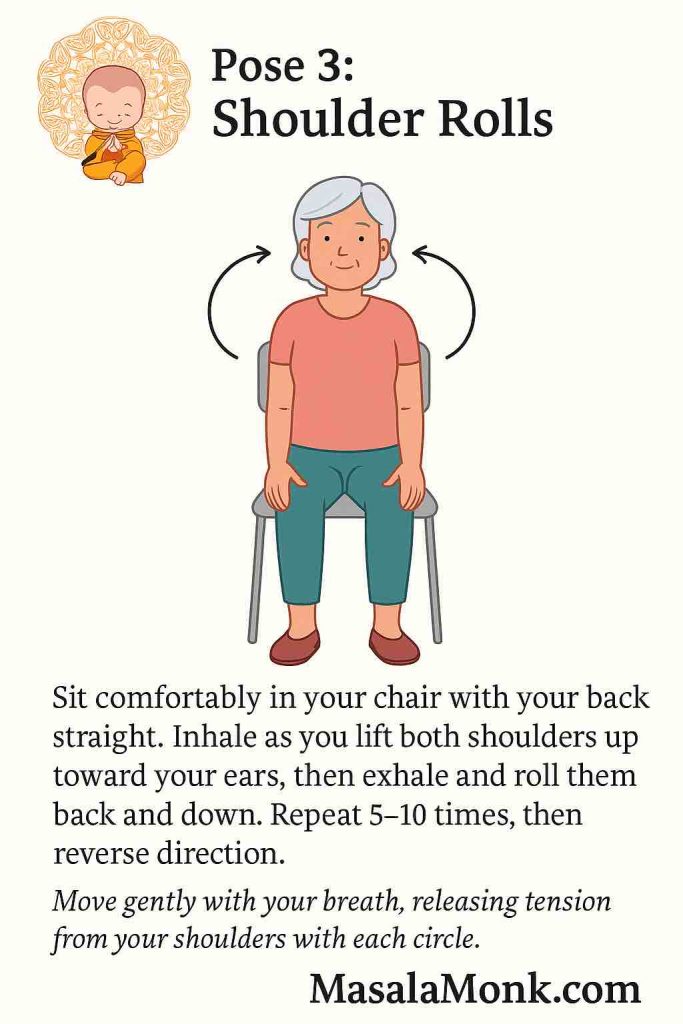
3. Shoulder Rolls
Benefit:
Loosens the muscles around the shoulders and upper back, reduces stiffness, and encourages deeper breathing.
Setup:
- Remain in Seated Mountain or relax slightly, hands resting on thighs.
Step-by-Step:
- Take a slow breath in, sitting tall.
- As you inhale, lift both shoulders up toward your ears in a smooth motion.
- As you exhale, roll the shoulders back, squeeze the shoulder blades gently together, and then drop the shoulders down and away from your ears.
- Continue the circular motion:
- Inhale as you lift up
- Exhale as you roll back and down
- Repeat for 5–10 circles, then reverse direction—forward circles (inhale up and forward, exhale down and back).
What to Notice:
- A sense of warmth or release in the shoulders and upper back.
- Your breath naturally deepens as your chest opens on the backward motion.
Modifications:
- If you have a shoulder injury, make the circles very small.
- One shoulder at a time can be easier for those with limited mobility.
Make it Your Own:
- Add wrist or finger shakes at the bottom of each roll to relax hands too.
Flow Cue:
“Circle slowly and smoothly—let tension melt from your shoulders with every breath.”
Common Mistakes to Avoid:
- Moving too quickly or with jerky motions.
- Shrugging shoulders up and holding tension.
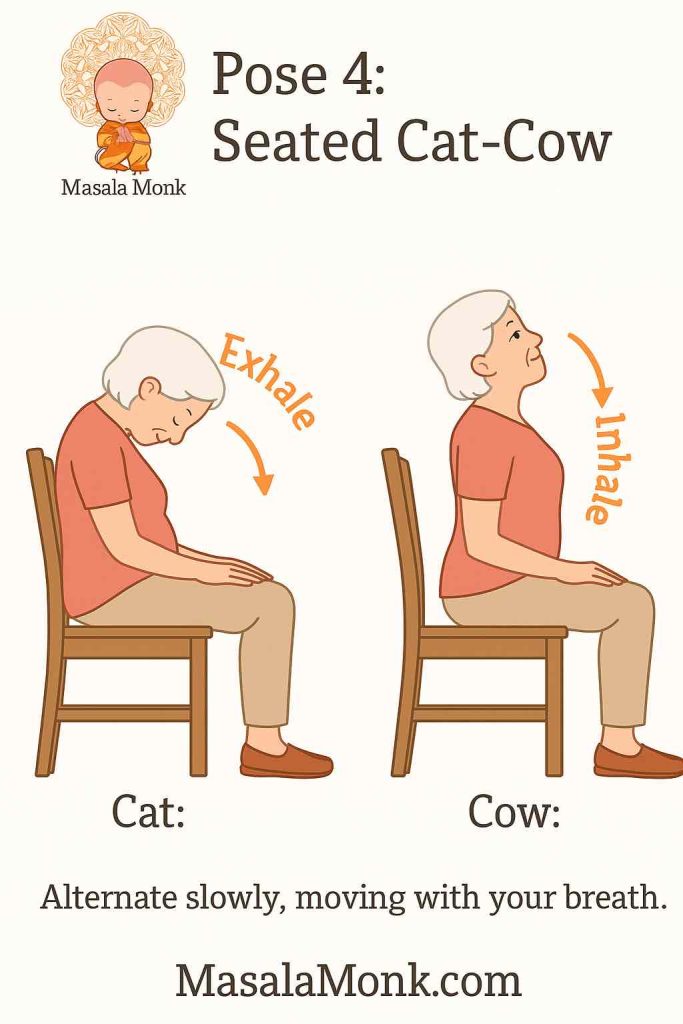
4. Seated Cat–Cow
Benefit:
Mobilizes the entire spine, helps relieve back pain, and improves awareness of breath and posture.
Setup:
- Sit in the middle of your chair, feet grounded, hands on knees or thighs.
Step-by-Step:
- Cow Pose:
- Inhale, tilt your pelvis forward, arch your back gently, lift your chest and chin, and draw your shoulders slightly back.
- Feel your belly expand and your spine curve naturally.
- Cat Pose:
- Exhale, tilt your pelvis back, round your back, tuck your chin toward your chest, and let your shoulders roll forward.
- Pull your navel gently toward your spine, feeling your back stretch.
- Move slowly between Cow (inhaling, opening the front body) and Cat (exhaling, rounding and stretching the back), 5–10 rounds.
What to Notice:
- A flowing wave through your spine, warmth or release in your back.
- Breaths should sync with movement—inhale for arching, exhale for rounding.
Modifications:
- Make the motion smaller if you have back or neck issues—focus on just the pelvis and mid-back.
- Keep hands closer to hips for extra support if needed.
Make it Your Own:
- Move as slowly or quickly as feels good, matching your breath.
Flow Cue:
“Let your breath guide the wave of movement from your tailbone to your head.”
Common Mistakes to Avoid:
- Hunching shoulders up to ears or letting movement come from just the neck.
- Moving too quickly and missing the breath connection.
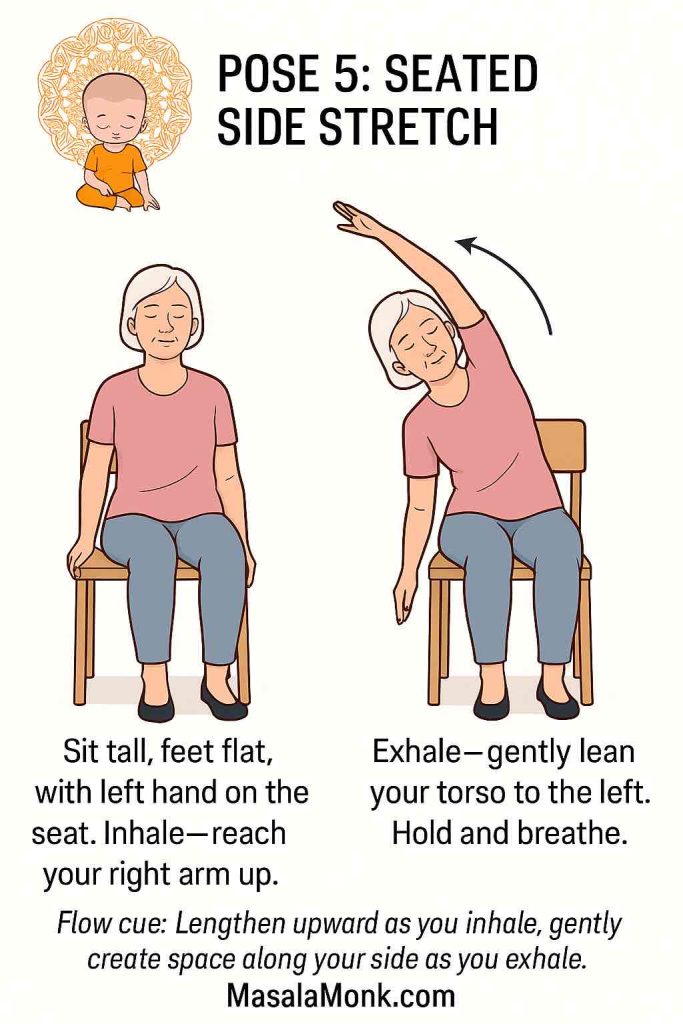
5. Seated Side Stretch
Benefit:
Opens the sides of the body, improves ribcage and lung expansion, and reduces waist and lower back tightness.
Setup:
- Sit tall, feet wide enough for balance, spine long.
Step-by-Step:
- Place your left hand or fingertips on the seat or just beside your left hip for support.
- Inhale, sweep your right arm up alongside your ear, reaching toward the ceiling.
- Exhale and gently lean your torso to the left, keeping both sit bones firmly on the chair.
- Reach out through your right fingertips, feeling a long line from hip to hand.
- Breathe deeply for 3–5 breaths, feeling your right ribs expand and stretch.
- Inhale, return to center; exhale and repeat on the other side.
What to Notice:
- A gentle stretch through the side of your body, especially the ribs and low back.
- Your breath might feel easier or deeper as you open the side body.
Modifications:
- Keep the lifted arm lower or bend the elbow if your shoulder is stiff.
- If you have balance concerns, do a smaller lean or skip the arm reach.
Make it Your Own:
- Imagine reaching for a sunbeam or painting a rainbow above you—make it playful!
Flow Cue:
“Lengthen tall as you inhale, create space along your side as you exhale.”
Common Mistakes to Avoid:
- Twisting forward or collapsing the chest.
- Lifting hips off the chair for a deeper stretch—keep both grounded.
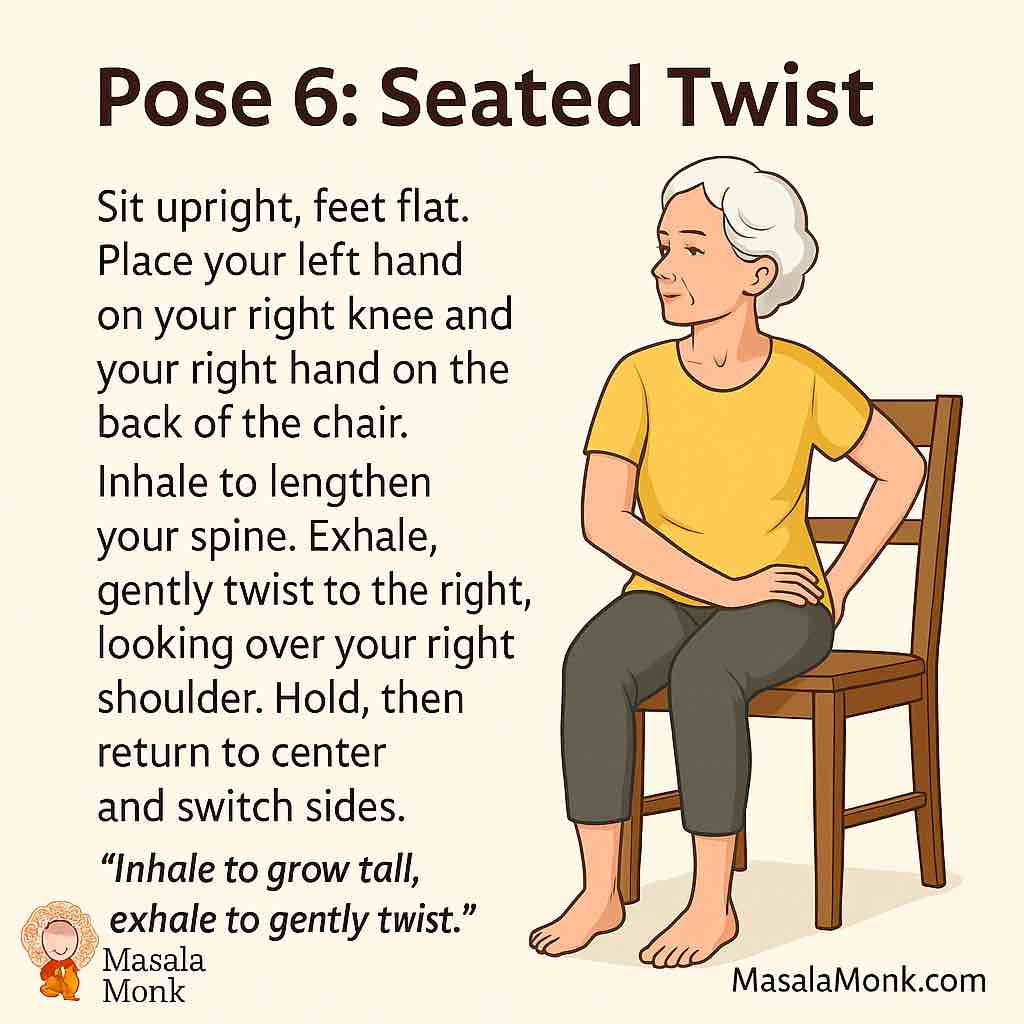
6. Seated Twist
Benefit:
Increases spinal flexibility, aids digestion, and helps release tension in the back and waist.
Setup:
- Sit upright near the middle or front edge of your chair, feet flat and hip-width apart.
- Lengthen your spine so you’re sitting tall.
Step-by-Step:
- Place your left hand on your right knee or thigh.
- Place your right hand behind you, resting it on the seat or the chair’s backrest for support.
- Inhale, lengthening your spine upwards.
- Exhale and gently twist your torso to the right, using your hands for gentle leverage (not to force).
- Keep your hips and knees facing forward—the movement comes from your upper body.
- Look over your right shoulder, or, if that’s uncomfortable, simply keep your gaze to the side.
- Hold for 3–5 slow breaths, growing taller on every inhale and relaxing shoulders down on every exhale.
- Inhale to return to center. Repeat the sequence on the other side.
What to Notice:
- A gentle, wringing-out sensation in the spine—not pain.
- Shoulders stay level and relaxed; chest open.
- The twist deepens naturally as you exhale.
Modifications:
- Keep the twist smaller if you have spinal conditions or osteoporosis.
- If reaching the back of the chair is difficult, simply rest your hand on your hip.
Make it Your Own:
- Imagine you’re turning to see an old friend arriving behind you—keep the motion friendly, never forced.
Flow Cue:
“Inhale to grow tall, exhale to gently spiral into your twist.”
Common Mistakes to Avoid:
- Twisting from the hips instead of the waist and ribs.
- Letting shoulders hunch up or over-twisting into discomfort.
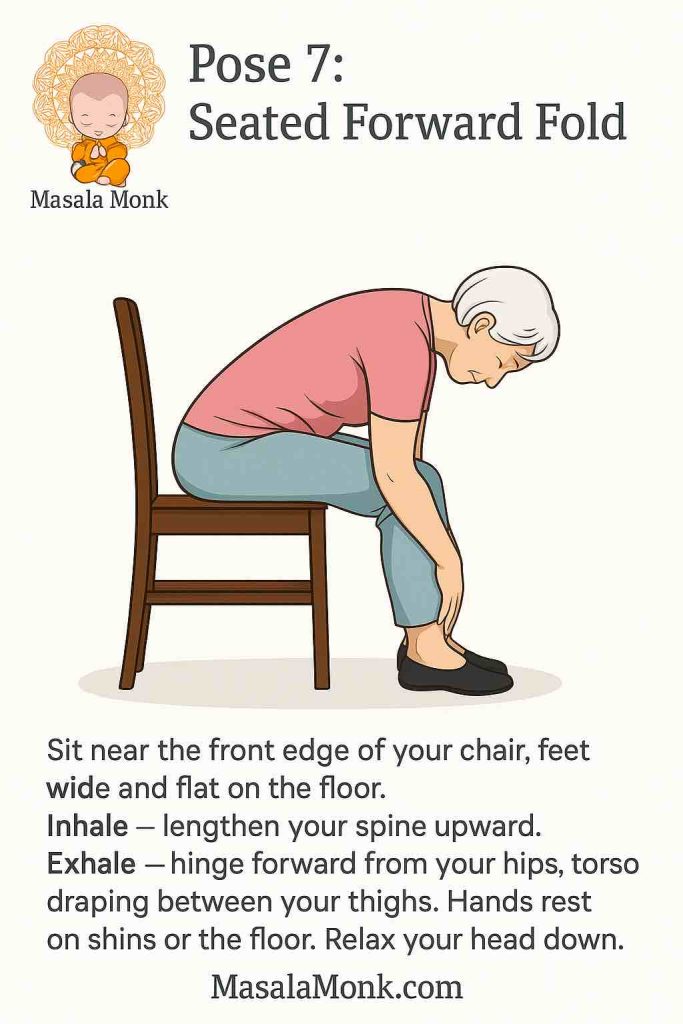
7. Seated Forward Fold
Benefit:
Gently stretches the back, hips, and hamstrings; soothes the nervous system; relieves fatigue.
Setup:
- Sit near the front edge of your chair, feet wider than hip-width for stability.
Step-by-Step:
- Inhale, sit tall and lengthen your spine.
- Exhale and slowly hinge forward from your hips, bringing your torso toward your thighs.
- Let your arms hang down between your legs, or rest hands on shins, ankles, or the floor—whatever is comfortable.
- Allow your head and neck to relax, chin softly toward chest.
- Stay here for 3–5 breaths, letting gravity gently stretch your spine.
- Inhale and slowly roll up, one vertebra at a time, letting your head come up last.
What to Notice:
- A gentle stretch in your lower back and backs of your legs.
- Soothing release with each breath out.
Modifications:
- If you have high blood pressure, keep your head above your heart.
- Use a yoga block, stack of books, or a cushion to rest your hands if you can’t comfortably reach the floor.
Make it Your Own:
- Gently sway side-to-side or nod your head “yes/no” to release more tension.
Flow Cue:
“Let gravity melt tension from your spine with every exhale.”
Common Mistakes to Avoid:
- Rounding or collapsing shoulders—keep chest broad as you fold.
- Forcing the fold—go only as far as feels good.
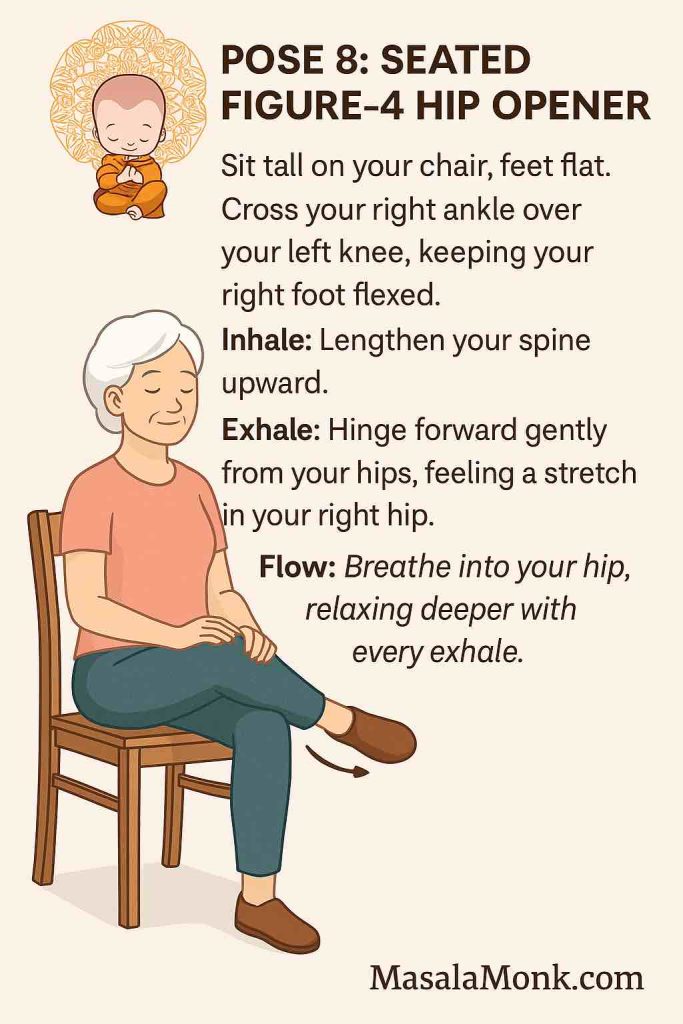
8. Seated Figure-4 Hip Opener
Benefit:
Opens the hips, stretches glutes, eases lower back discomfort, and improves hip flexibility.
Setup:
- Sit tall, feet flat, and knees bent at 90 degrees.
Step-by-Step:
- Cross your right ankle over your left knee, creating a “figure-4” shape with your legs.
- Keep your right foot flexed (to protect your knee).
- Sit up tall, feeling length through your spine.
- If you feel a stretch already, stay here and breathe.
- To deepen, inhale and as you exhale, hinge gently forward from your hips—keep your back straight.
- Hold for 3–5 breaths, feeling the stretch in your right hip and glutes.
- Inhale, return to upright, uncross your legs and switch sides.
What to Notice:
- A stretch (not pain) deep in the hip and outer thigh.
- Breath flowing into your belly and lower back.
Modifications:
- If crossing the ankle over the knee is too intense, rest the ankle lower on the shin.
- Skip the forward fold if you have hip or knee issues—just sitting with the ankle crossed is effective.
Make it Your Own:
- Imagine sending your breath into the tight places; relax jaw and shoulders.
Flow Cue:
“Breathe into your hip, softening more with every exhale.”
Common Mistakes to Avoid:
- Letting your lifted knee drop forcefully—keep control.
- Rounding the back; keep spine long even as you lean.
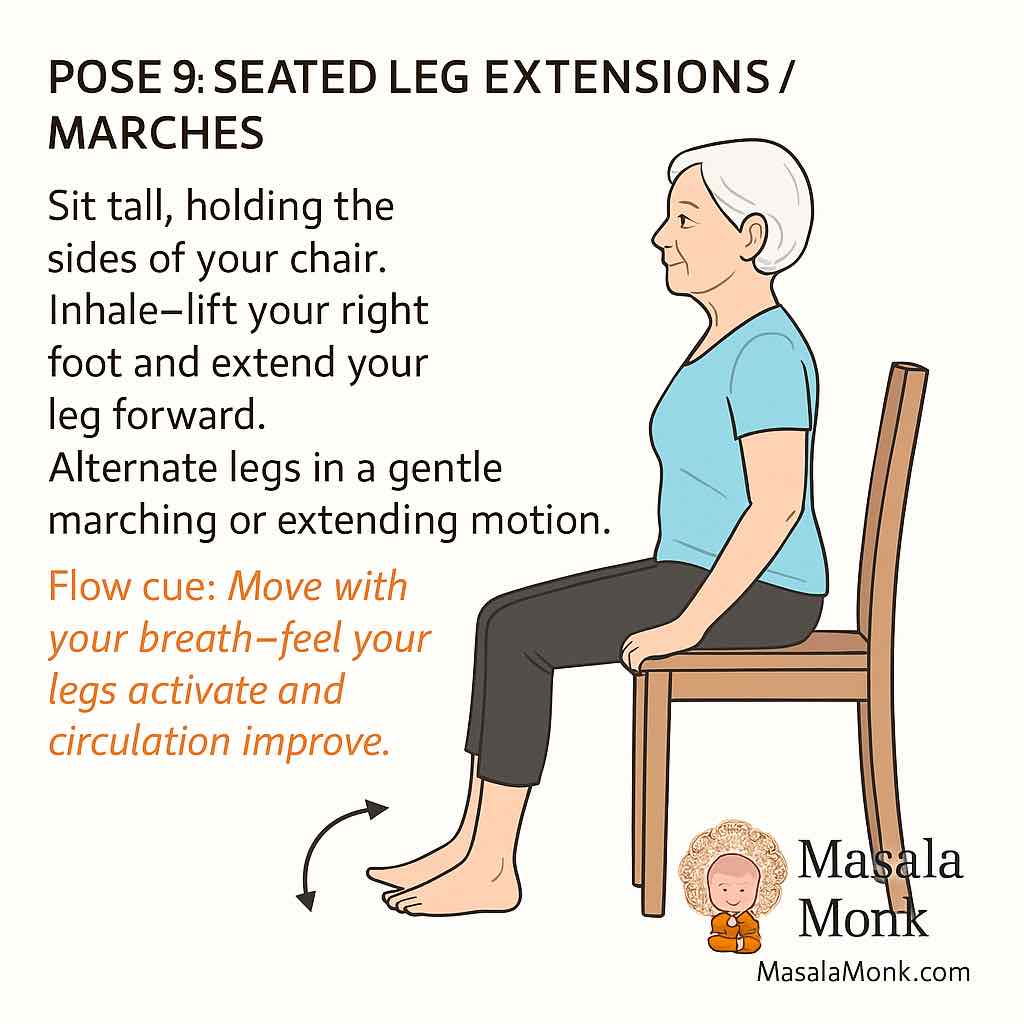
9. Seated Leg Extensions / Marches
Benefit:
Strengthens thigh and hip muscles, boosts knee mobility, and enhances blood flow to the legs.
Setup:
- Sit upright, holding the sides of your chair for balance.
Step-by-Step:
- Ground your left foot as you slowly lift your right foot off the floor, straightening your right knee so your leg extends forward.
- Hold for 1–2 breaths, keeping your toes flexed toward your face (dorsiflexed).
- Lower your foot slowly back to the ground.
- Repeat with the left leg.
- Alternate, performing 8–10 slow leg extensions per side.
- For “marches,” simply lift one knee at a time toward your chest, alternating rhythmically.
What to Notice:
- The muscles in your thighs and hips working as you lift and hold.
- Increased warmth or gentle fatigue after several repetitions.
Modifications:
- Only lift your leg as far as comfortable—smaller movements are still beneficial.
- Use a folded blanket behind your back for added support if needed.
Make it Your Own:
- Try pointing and flexing your toes at the top of each extension for extra ankle mobility.
Flow Cue:
“Move with control, feeling strength grow in your legs with every lift.”
Common Mistakes to Avoid:
- Swinging or using momentum—move slowly and steadily.
- Slouching or leaning backward—keep your spine long.
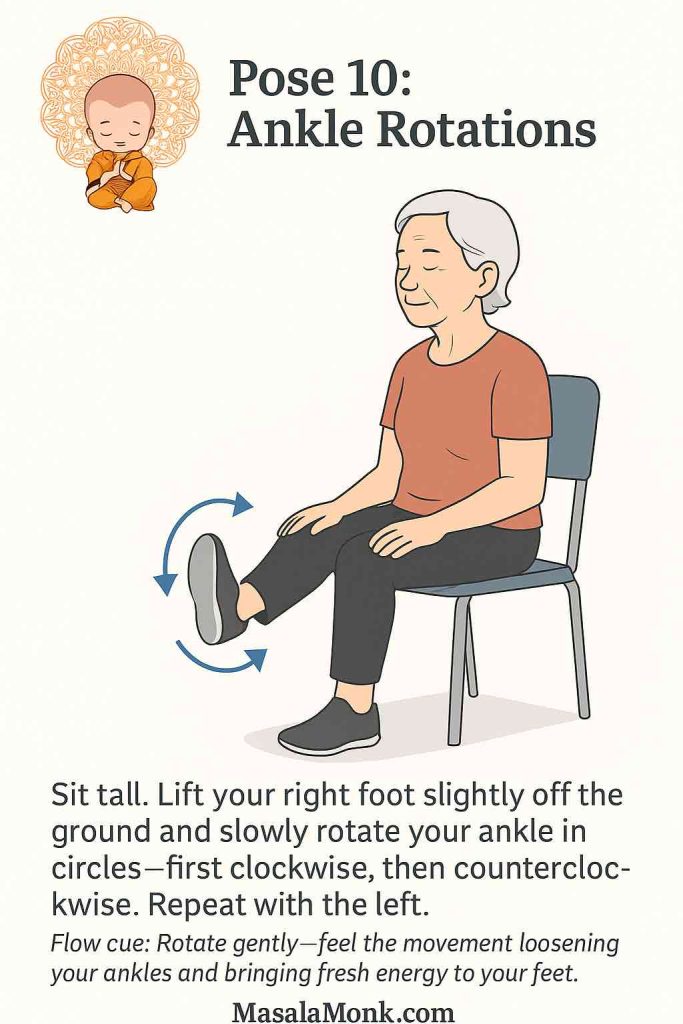
10. Ankle Rotations
Benefit:
Improves ankle mobility and flexibility, boosts circulation in the lower legs and feet, and helps with balance.
Setup:
- Sit tall with your back straight, both feet flat on the floor.
- Hold the sides of the chair for support if needed.
Step-by-Step:
- Lift your right foot a few inches off the floor, keeping the knee bent and the rest of your body stable.
- Begin making slow, controlled circles with your right ankle—move as if you’re drawing a circle with your big toe.
- Complete 8–10 circles clockwise, then 8–10 circles counterclockwise.
- Lower your right foot, then repeat the same process with your left ankle.
- For an extra stretch, try flexing (pointing toes up) and pointing (toes down) after the circles.
What to Notice:
- Any popping, stiffness, or looseness—move within a comfortable, pain-free range.
- A gentle warming sensation in the foot and lower leg.
Modifications:
- If you have trouble lifting your foot, you can still do ankle circles with your toes touching the ground—just slide your foot in a circular pattern.
- Hold the chair for extra stability or lean back slightly if balance is an issue.
Make it Your Own:
- Do ankle circles while waiting in line or sitting at the doctor’s office!
Flow Cue:
“Move gently and smoothly, feeling energy and circulation return to your feet.”
Common Mistakes to Avoid:
- Letting the whole leg move instead of isolating the ankle.
- Rushing the circles—slow, mindful movements are best.
11. Seated Warrior I (Arms Overhead)
Benefit:
Stretches the hips and thighs, opens the chest and shoulders, and improves posture and breath capacity.
Setup:
- Sit tall, feet flat and spaced hip-width apart.
- Scoot slightly forward if needed for stability.
Step-by-Step:
- Step your right foot slightly back, keeping the toes on the floor (your left foot stays planted).
- Face your torso forward—both hips square toward the front.
- Inhale and reach both arms overhead, palms facing each other or together (if comfortable).
- Draw your shoulder blades gently down your back as you lift your heart.
- Hold for 3–5 breaths, reaching up with your fingertips and rooting down with your sit bones.
- Exhale, release arms and step your right foot forward to meet your left.
- Repeat the same on the other side.

What to Notice:
- A gentle stretch through the front of your back leg and the lengthening of your whole torso.
- Your breath expanding your chest and ribs.
Modifications:
- If lifting arms overhead is difficult, reach forward or keep hands on your hips.
- Move the back foot just slightly—no big step needed.
Make it Your Own:
- Imagine you’re reaching for the sky or greeting a new day!
Flow Cue:
“Root down through your chair as you reach up—grow tall and proud.”
Common Mistakes to Avoid:
- Lifting shoulders up toward ears—keep them relaxed.
- Overarching the lower back—tuck your tailbone gently.
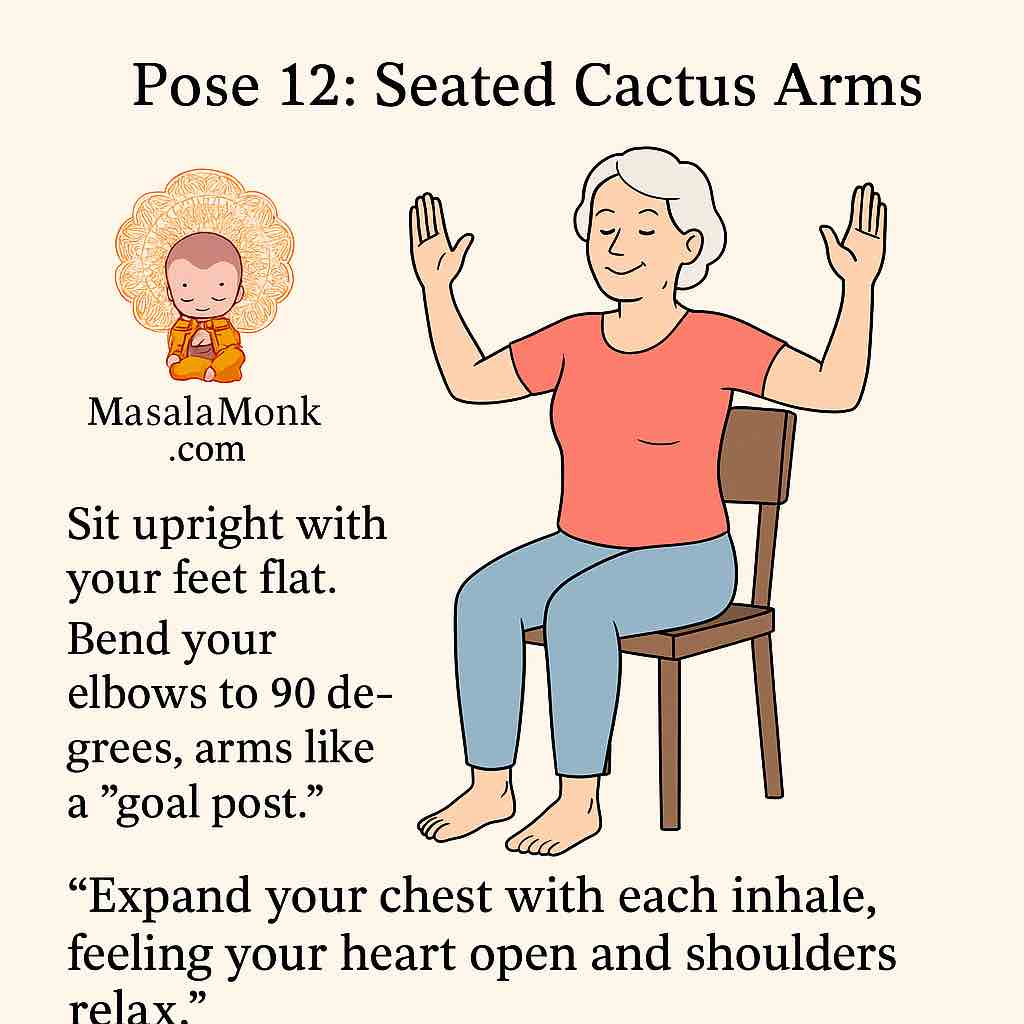
12. Seated Cactus Arms (Goal Post Arms)
Benefit:
Strengthens the upper back, opens the chest, improves posture, and counteracts slouching.
Setup:
- Sit upright, feet grounded and spine long.
Step-by-Step:
- Raise both arms out to the sides at shoulder height, elbows bent to 90 degrees, palms facing forward—like a football goal post.
- Inhale, gently squeeze your shoulder blades together and lift your chest, feeling your heart “shine” forward.
- Exhale, relax your arms slightly but keep the elbows lifted.
- Repeat for 5–8 slow breaths, feeling the chest expand and the upper back work.
- Optionally, as you exhale, gently bring elbows and forearms toward each other, then inhale and open wide again.
What to Notice:
- The space across your chest opening up, a gentle activation in your upper back.
- Shoulders relaxing down from your ears.
Modifications:
- Keep arms lower if your shoulders are stiff.
- Do one arm at a time for extra support.
Make it Your Own:
- Smile as you breathe—imagine giving yourself a “heart-opening” boost.
Flow Cue:
“Expand through your chest—breathe wide, not just tall.”
Common Mistakes to Avoid:
- Lifting shoulders toward ears or collapsing elbows down.
- Arching the low back—keep core lightly engaged.
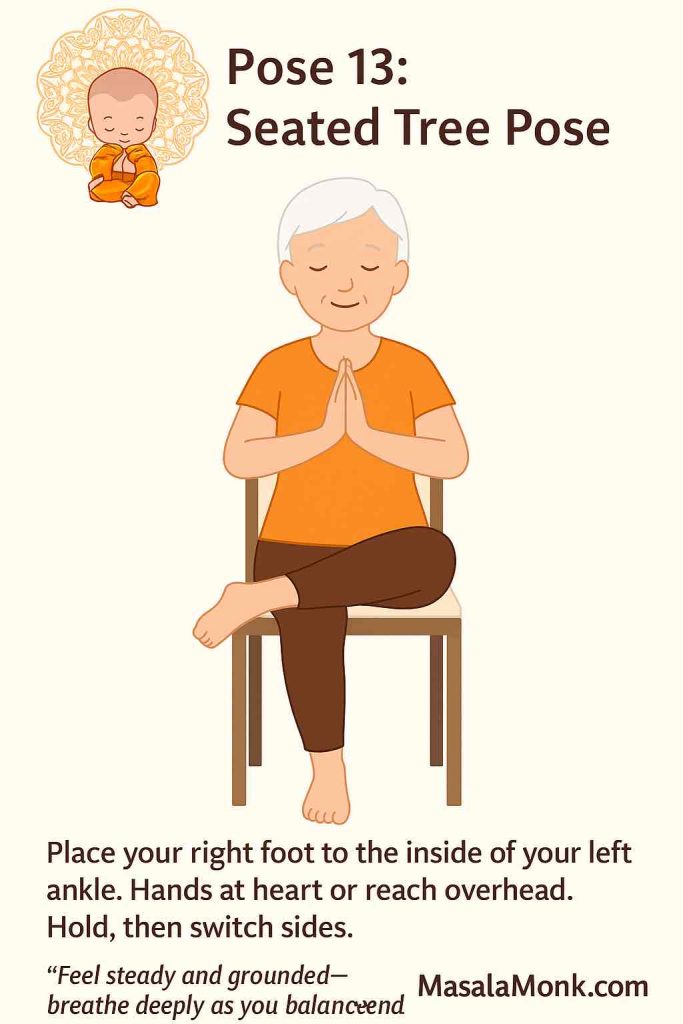
13. Seated Tree Pose (Foot to Ankle/Knee)
Benefit:
Gently improves hip mobility and balance, builds focus, and strengthens inner thigh and core muscles.
Setup:
- Sit up tall, feet flat and knees aligned with ankles.
Step-by-Step:
- Place your right foot to the inside of your left ankle, or (if you feel stable) slide it up to your calf—avoid the knee.
- Let your right knee gently open to the side, keeping your hips facing forward.
- Press your left foot into the ground and sit tall, engaging your belly muscles.
- Bring your hands together at your heart (Anjali Mudra) or raise arms overhead if comfortable.
- Breathe and balance here for 3–5 slow breaths.
- Lower your leg, return to center, and switch sides.
What to Notice:
- Gentle opening in your hip and inner thigh, steadiness in your seated base.
- Your breath helping you find balance.
Modifications:
- Keep your toes touching the floor for added support.
- Hold the chair with one hand for extra stability.
Make it Your Own:
- Imagine you’re a tree—strong roots (your chair and feet), growing tall and steady with each breath.
Flow Cue:
“Find your roots, then grow your branches tall.”
Common Mistakes to Avoid:
- Forcing the knee out or straining to lift the leg too high.
- Letting your torso lean—stay centered and upright.
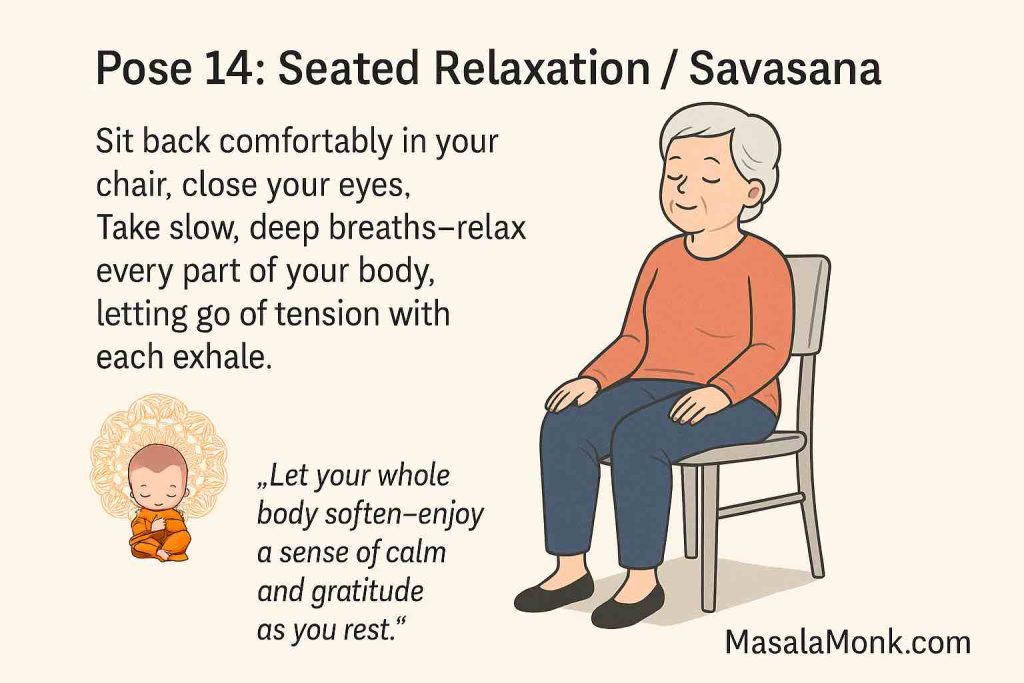
14. Seated Relaxation / Savasana
Benefit:
Promotes deep relaxation, reduces stress, allows the body to absorb benefits, and improves mental calmness.
Setup:
- Sit comfortably in your chair, back supported, feet flat.
Step-by-Step:
- Rest your hands in your lap, palms up or down.
- Allow your shoulders to soften and your face to relax.
- Close your eyes or lower your gaze.
- Breathe deeply and slowly, feeling the air fill your lungs and your body relax more with every exhale.
- Notice the weight of your body supported by the chair and the calm in your mind.
- Stay here for 2–5 minutes, or as long as you like.
- When ready, gently open your eyes, wiggle your fingers and toes, and return to your day refreshed.
What to Notice:
- The gentle rhythm of your breath, the release of muscle tension.
- A sense of gratitude for your practice and for your body.
Modifications:
- If it’s uncomfortable to close your eyes, keep them open and focus on an object in the room.
- Place a small pillow or rolled towel behind your lower back for added support.
Make it Your Own:
- Try a gratitude reflection or simply repeat a calming word (“peace,” “ease”) in your mind as you rest.
Flow Cue:
“Let each breath bring calm, each exhale release tension. You’ve earned this rest.”
Common Mistakes to Avoid:
- Fidgeting or rushing—let your body settle fully.
- Judging thoughts or sensations—allow everything to just be.
Chair Yoga: The Start of Your Healthier, Happier Tomorrow
Congratulations—you’ve just taken your body and mind on a gentle, nourishing journey! Whether you followed every pose or just a few, every bit of mindful movement counts. The best part about chair yoga is how adaptable it is: you can do it anytime, anywhere, with whatever energy you have that day.
What Happens If You Practice Chair Yoga Regularly?
- You’ll notice less stiffness and more flexibility—little things, like getting up from a chair or turning to reach something, will feel easier.
- Your confidence will grow as your balance, posture, and strength improve, making falls less likely.
- You’ll find new calm and clarity, both in your body and your thoughts.
- Even your mood may lift, thanks to the combination of movement, breath, and the feeling of accomplishment.
Tips to Make Chair Yoga a Habit
- Pick a time: Morning to loosen up, after lunch to refresh, or evening to unwind.
- Keep your chair yoga spot inviting—place your favorite sturdy chair by a sunny window or where you can see a calming view.
- Start small: Even 10 minutes a day is powerful. Consistency matters more than duration.
- Invite a friend or loved one to join you! Community and connection make movement more joyful.
Remember:
There’s no need to force or strain—listen to your body, and make each pose your own.
Chair yoga is about progress, not perfection.
The Masala Monk Promise
At Masala Monk, we believe everyone deserves to move, laugh, and enjoy life—no matter your age or ability. Chair yoga is one of the best gifts you can give yourself (or someone you love): gentle, proven, and full of heart.
If you enjoyed this guide, save it, share it, or come back any time you need a reset.
Keep moving. Keep smiling. You’ve got this!
Have questions, want more tips, or need new routines? Leave a comment below or explore the rest of MasalaMonk.com for more practical wellness wisdom.
Frequently Asked Questions (FAQs) About Chair Yoga for Seniors
1. Do I need any special equipment to start chair yoga?
No special gear is needed—just a sturdy, armless chair (no wheels), comfortable clothes, and perhaps a small cushion or folded towel for added support. Optional: yoga blocks or a strap, but they aren’t required for most routines.
2. Is chair yoga safe for seniors with arthritis or joint pain?
Yes! Chair yoga is specifically designed to reduce pressure on joints. Always move within your pain-free range, skip anything that hurts, and consult your doctor if you have concerns about new exercises.
3. How often should I practice chair yoga to see results?
Even 2–3 sessions per week can improve flexibility, strength, and mood. Daily practice, even for 10–15 minutes, brings the best long-term benefits.
4. Can chair yoga help with balance and fall prevention?
Absolutely. Many poses strengthen the legs, core, and muscles that support posture and balance. Studies show chair yoga reduces fall risk for seniors.
5. What if I can’t do all the poses or get tired easily?
That’s completely normal! Start with a few poses at a time, rest as needed, and build up gradually. Every bit of movement counts.
6. Do I need prior yoga experience?
Not at all. Chair yoga is ideal for beginners and requires no previous yoga background. Each pose comes with clear instructions and can be modified for your comfort.
7. Is it okay to do chair yoga after surgery or injury?
Many rehab programs use chair yoga for gentle recovery, but always check with your healthcare provider or physical therapist to ensure safety for your specific condition.
8. Can I do chair yoga if I use a walker or have trouble standing?
Yes! Most routines can be done entirely seated. Only add standing or balance poses if and when you feel safe and stable.
9. Will chair yoga help with anxiety or trouble sleeping?
Yes. Deep breathing, gentle movement, and mindful focus in chair yoga have been shown to reduce anxiety and improve sleep quality.
10. Can chair yoga be done in a group or online?
Definitely. Chair yoga is great for solo practice, but joining a group—either in person or online—can boost motivation, provide social connection, and add fun to your routine.