Posted on Leave a comment

No-Bake Lemon Bars Recipe

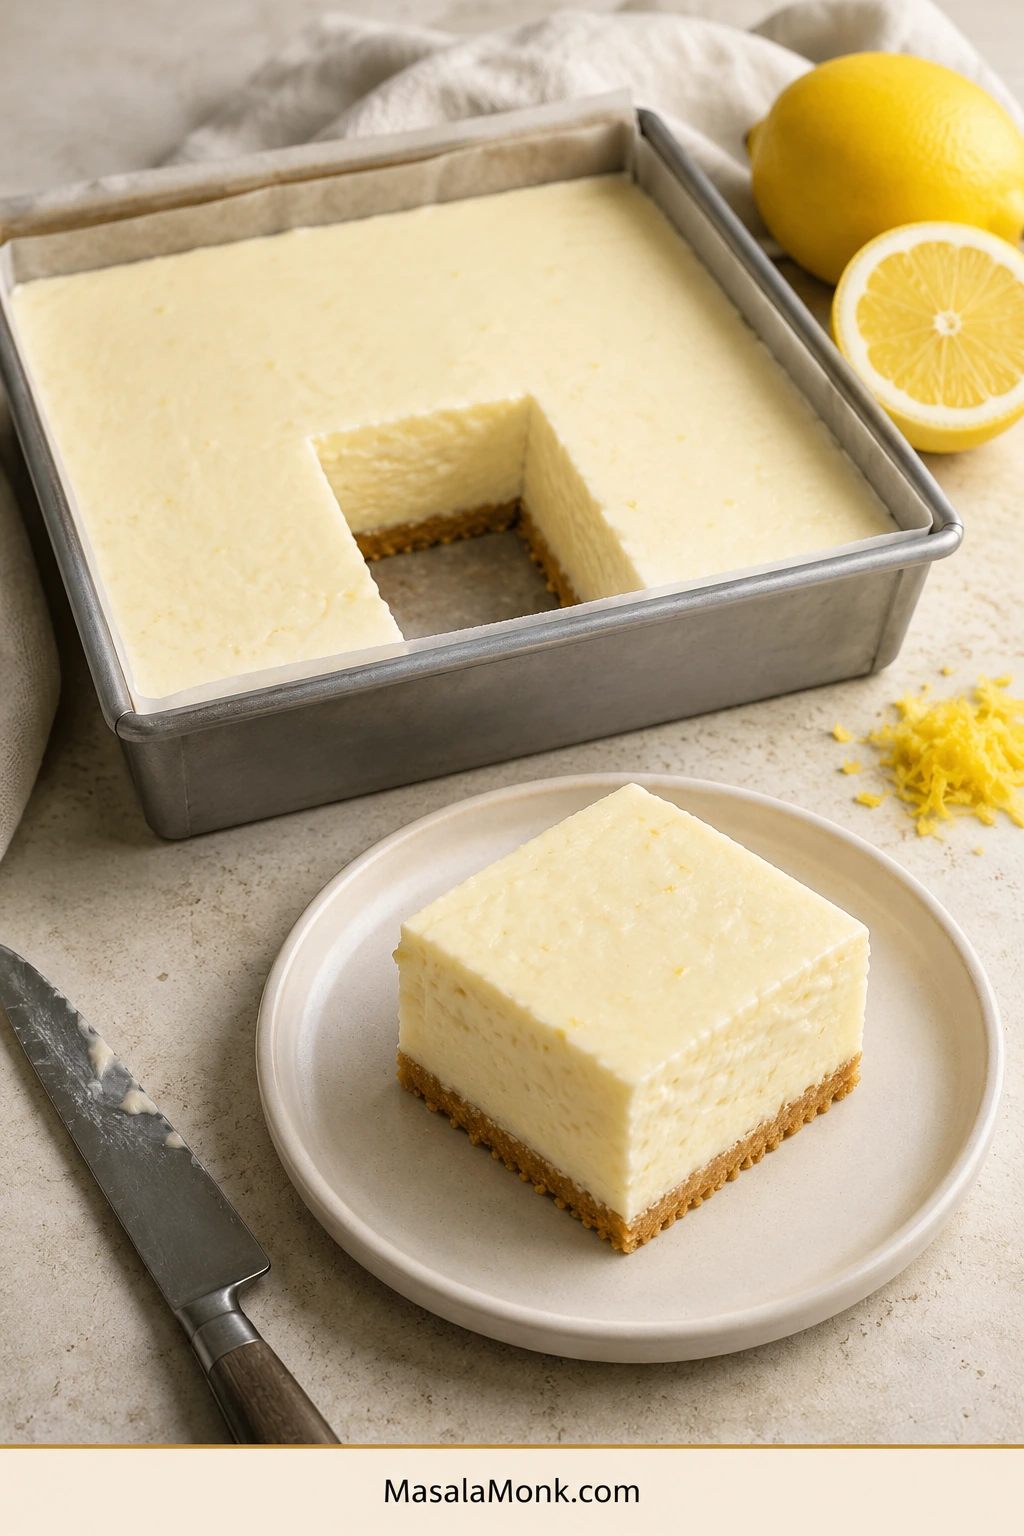
One square lifted from the centre of a pan reveals thick pale lemon filling standing above a thin golden biscuit crust.

The first centre cut tells the truth. A no-bake lemon filling can taste bright and creamy in the bowl, yet still slump when the parchment lifts and the knife reaches the middle.

These easy no-bake lemon bars stay creamy while holding their shape. Cold and silky, the filling carries the fragrance of fresh zest and melts into the buttery crumbs underneath. Fresh lemon arrives first, so the condensed milk never tastes as heavy as it might sound.

Classic lemon bars can mean baking a shortbread crust, whisking an egg-based filling and waiting for a hot pan to cool. Here, six main ingredients plus salt come together in about 25 minutes of hands-on work. The bars set fully in the refrigerator without cream cheese or gelatin. A brief freezer chill is only an optional aid when extra-sharp edges matter.

The Masala Monk rule is simple: let the lemon thicken the condensed milk; let the refrigerator finish the set.

Quick answer

How to make no-bake lemon bars that hold their shape

Press the crumb mixture firmly into an 8-inch square pan and chill it. Whisk one standard can of sweetened condensed milk with ½ cup fresh lemon juice, finely grated zest and a little salt until the mixture falls from the whisk in a heavier ribbon.

Whip the cream until the peaks stand firmly and the surface still looks glossy. Fold it into the lemon mixture, spread the filling over the chilled crust and refrigerate for about 6 hours. A longer chill makes lifting and cutting even easier.

The finished bars are lighter than no-bake cheesecake, firmer than spoonable lemon mousse and softer than traditional baked lemon bars. Serve them straight from the refrigerator, while the filling still holds a clean edge.

Choose this version when you want the lightness of lemon mousse with enough structure for proper bars—without cream cheese, gelatin or a frozen filling.

Make it now

No-bake lemon bars recipe

A buttery graham-cracker crust topped with a fresh lemon filling made from condensed milk and whipped cream. The only stage that asks for close attention is whipping the cream; everything else can be done at an unhurried pace.
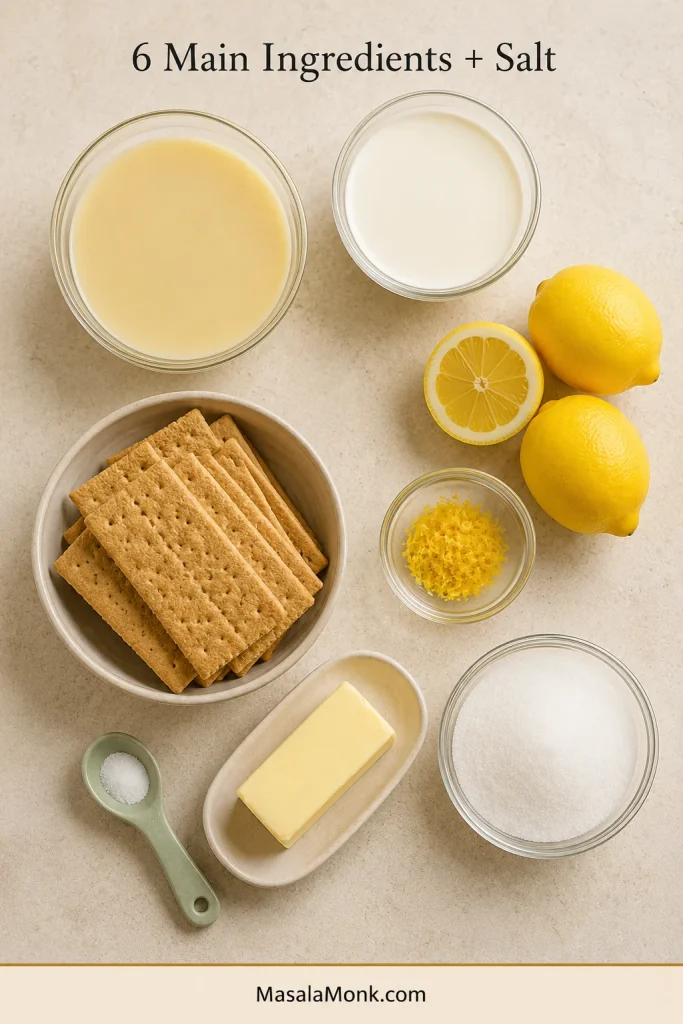
Condensed milk, whipping cream, lemons, graham crackers, butter, sugar and salt arranged separately on a pale work surface.
Condensed milk gives body, lemon brings acidity and aroma, cream adds air, and crumbs support the filling.
Pan and yield8 × 8-inch / 20 × 20 cm square pan; 16 regular bars or 12 generous bars
Prep timeAbout 25 minutes
Earliest check4 hours
Recommended chillAbout 6 hours
Best for clean cutsOvernight
Total timeAbout 6 hours 25 minutes
Texture and dietary noteCold, creamy and sliceable; the filling is egg-free and gelatin-free

What you need

  • 8 × 8-inch / 20 × 20 cm square pan and parchment paper
  • Food processor, or a rolling pin and sturdy food bag
  • Electric hand mixer or stand mixer
  • Fine zester and flexible spatula
  • Large straight-edged knife

Ingredients

For the no-bake graham-cracker crust

  • About 1½ cups graham-cracker crumbs (180 g / 6.3 oz); the number of sheets varies by brand
  • 6 tablespoons unsalted butter (85 g / 3 oz)
  • 1 tablespoon granulated sugar (13 g / about ½ oz)
  • ¼ teaspoon fine salt

For the lemon filling

  • One 14-ounce / 397 g can full-fat sweetened condensed milk, or one 400 g can
  • ½ cup fresh lemon juice (120 ml / 4 fl oz)
  • 2 tablespoons finely grated lemon zest, loosely packed
  • ¼ teaspoon fine salt
  • 1½ cups cold whipping cream (355 ml / 12 fl oz), ideally 35% milk fat or higher

Optional finish

  • Fresh lemon zest
  • A few reserved biscuit crumbs
  • Fresh blueberries or raspberries, added shortly before serving
  • Up to 2 tablespoons homemade lemon curd for a light surface swirl, or about ½ teaspoon per bar

Buying lemons: four or five medium lemons should provide enough measured juice and zest. Lemon yield varies considerably, so measure the juice rather than relying on fruit count alone.
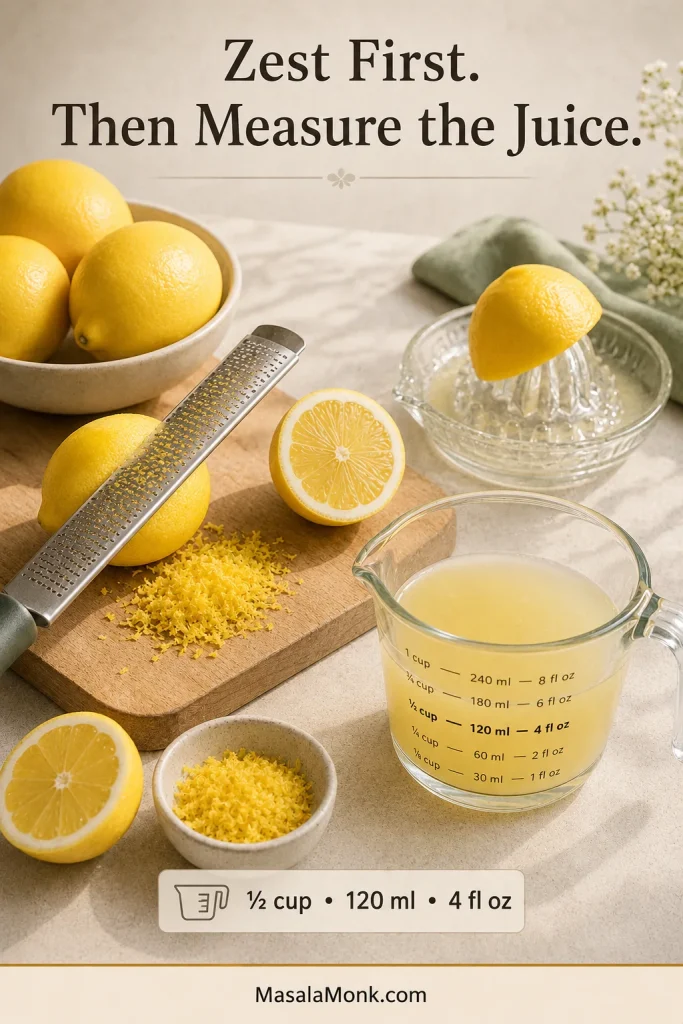
Whole lemons, a fine zester, fresh yellow zest and a measuring jug containing half a cup of lemon juice sit on a work surface.
Zest only the yellow skin, then measure the juice so flavour and thickening stay consistent.

Cream note: use a product specifically labelled for whipping. Some regular fresh or table creams sold in India and elsewhere contain too little fat to whip properly. British double cream works well but thickens quickly, so reduce the mixer speed early.

Instructions

Prepare the pan and crust

  1. Line the pan. Lay two strips of parchment across the pan in opposite directions, leaving enough overhang to lift the chilled slab later.
  2. Make the crust. Process the graham crackers until evenly fine. Melt the butter briefly in the microwave or in a small pan, then mix it with the crumbs, sugar and salt. A firmly squeezed handful should hold together without releasing visible butter.
  3. Press and chill. Spread the crumbs evenly, compact them with the flat bottom of a cup and finish the corners with the back of a spoon. Freeze for 15 minutes or refrigerate for about 30 minutes.

Build the lemon filling

  1. Make the lemon base. Zest the lemons before cutting and juicing them. In a glass or stainless-steel bowl, whisk the condensed milk, measured lemon juice, zest and salt for 1–2 minutes. The mixture is ready when it falls from the whisk in a heavier ribbon. Set it aside while you whip the cream.

Visual cue

Watch the lemon base change: after a minute or two with the juice, it should feel more resistant and fall from the whisk in a brief, heavier ribbon. It will still look softer than the finished filling.
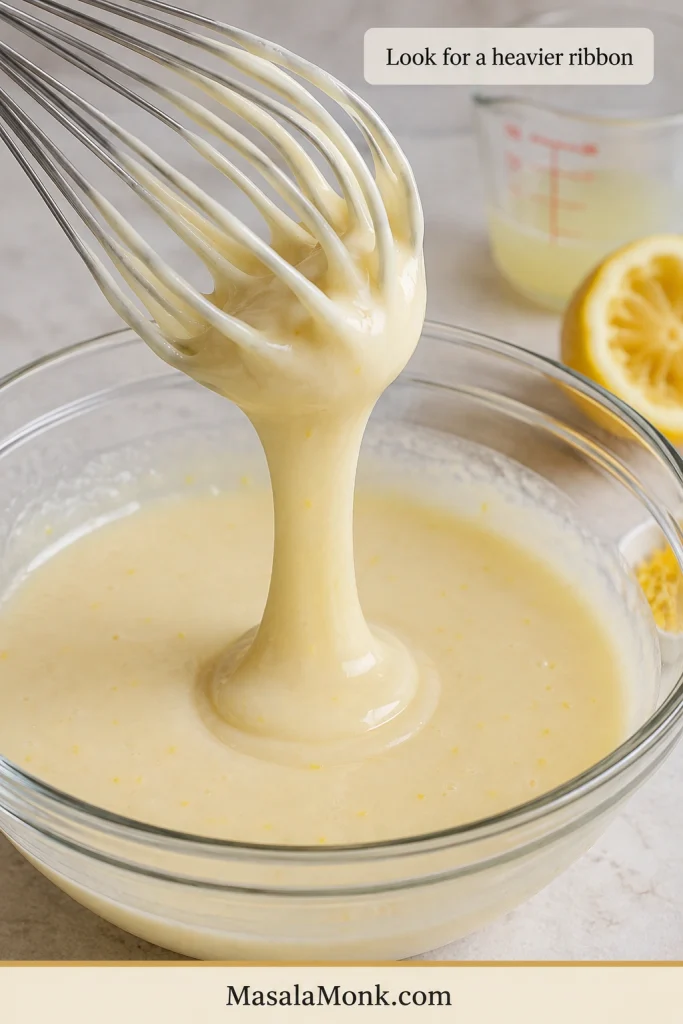
A whisk lifts a smooth pale lemon and condensed-milk mixture that falls back into a glass bowl in a slow, thick ribbon.
Look for a brief, heavier ribbon—not peaks. Whipped cream and chilling create the final structure.
  1. Whip the cream. Beat to firm-to-stiff peaks; the tip may bend slightly, but the peak should not collapse.

Visual cue

Stop at a firm, glossy peak: once the whisk leaves deep tracks, reduce the speed. The peak may bend slightly at the tip, but it should not collapse or look rough and grainy. For every stage, see the whipped cream peak guide.
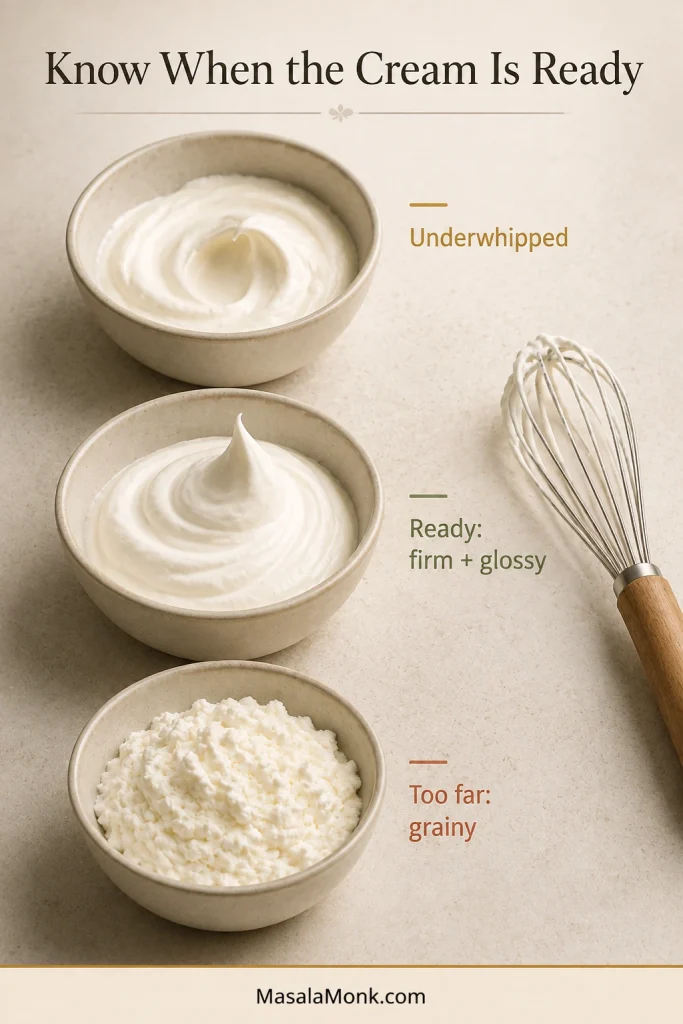
Three bowls compare cream with a collapsing peak, cream with a firm glossy peak and overwhipped cream with a rough grainy texture.
Stop while the peak stands and the surface stays glossy; rough, grainy cream has gone too far.
  1. Fold the filling. Start by folding about one-third of the cream into the lemon base to loosen it. Add the rest in two portions, using broad movements only until no large white streaks remain.
  2. Fill the pan. Spoon the filling across the chilled crust in several mounds, ease it into the corners and level the top. Once the corners are filled, stop smoothing. A few gentle ripples will not affect the set.

Chill, check and serve

  1. Cover and chill. Tent foil or plastic wrap loosely over the pan. A fitted lid works too, provided it does not touch the filling. Refrigerate for about 6 hours, or until the middle moves with the pan rather than rippling on its own.
  2. Check the middle. The surface should look set rather than wet. For especially neat cuts, give the fully chilled slab a 20–30-minute freezer chill.
  3. Lift, cut and serve. Use the parchment to lift the slab. Heat a large straight-edged knife in hot water, dry it completely and press straight down. Clean and reheat the blade between cuts. Serve straight from the refrigerator.

Recipe notes

  • No oven is needed. The only heat required is enough to melt the butter.
  • Salted butter works. Omit the added salt from the crust or reduce it to a small pinch.
  • Use sweetened condensed milk, not evaporated milk. Condensed milk provides both sweetness and body.
  • A metal pan chills fastest. Glass or ceramic works, but the filling may need additional time.
  • A 9-inch square pan makes slightly thinner bars. Double the recipe for a 9 × 13-inch pan when you want a similar filling depth.
  • The filling is egg-free. Check the biscuit label and omit egg-based lemon curd if the entire dessert must be egg-free.

Pan-size guide

Choose the pan before scaling: changing the surface area alters filling depth, chilling speed and the crust-to-cream balance.
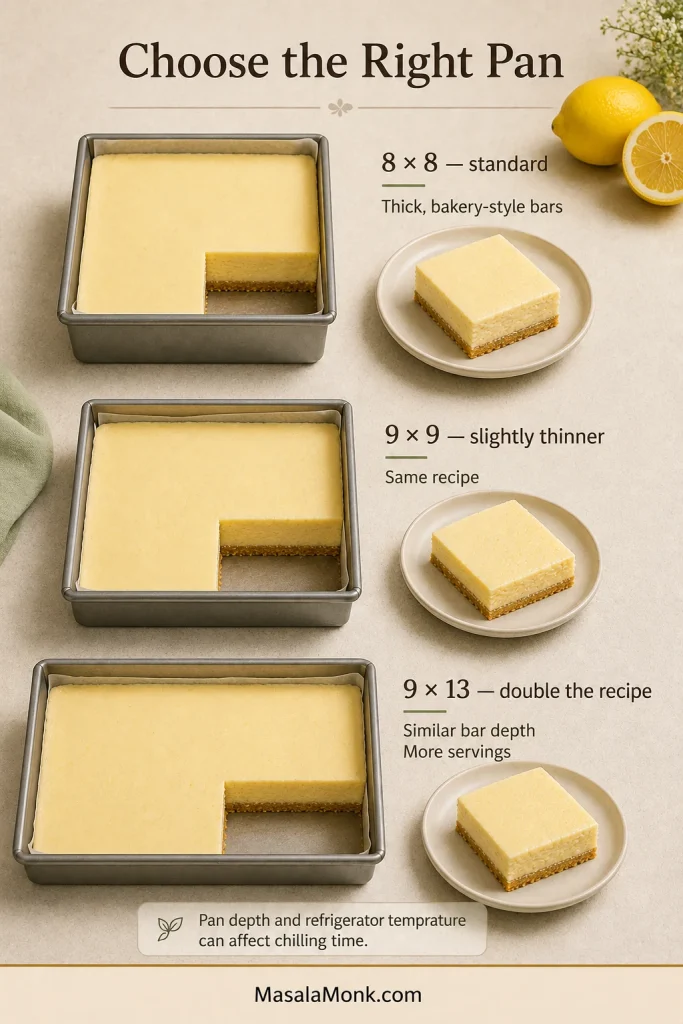
An eight-inch square pan, a nine-inch square pan and a nine-by-thirteen-inch pan compare standard, thinner and doubled batches.
A larger pan makes thinner bars that warm and soften faster; scale both layers to preserve the intended balance.

Need help before starting? Set and cut cleanlyChoose your crustFix a problem

You can stop at the recipe and start making the bars. Still deciding whether this is the style you want? The comparison below separates it from cheesecake bars, icebox squares, frozen bars and Australian-style lemon slice.

Visual comparison

How this version differs from other no-bake lemon bars

Start with the texture you want. The visual gives the quick distinction; the table beneath explains how each style is built.
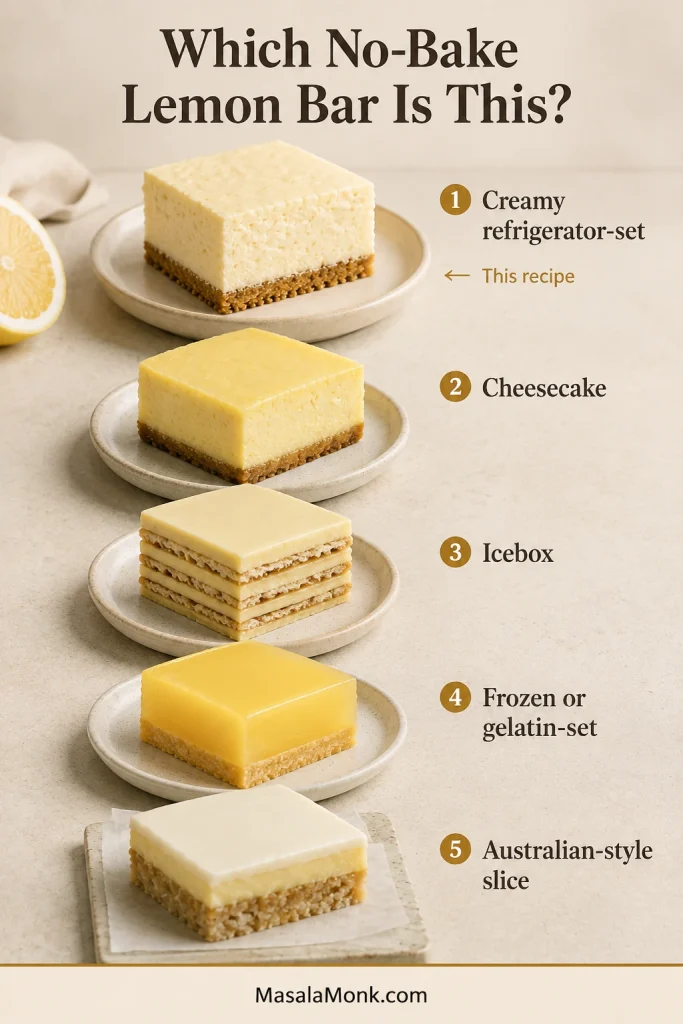
Five lemon desserts are compared: refrigerator-set bars, cheesecake bars, layered icebox squares, frozen bars and Australian-style lemon slice.
Choose by texture first: creamy refrigerator bars, denser cheesecake, softened layers, frozen bars or a firm lemon slice.
StyleHow it is madeResult
Creamy lemon barsCondensed milk, fresh lemon and whipped cream over a pressed crumb crustLight, creamy and softly sliceable when cold
Lemon cheesecake barsUse a cream-cheese-based no-bake cheesecake fillingRicher, tangier and substantially denser
Icebox lemon squaresLayer lemon filling with whole crackers, much like the softened cookie layers in no-bake banana puddingSoft and cake-like after resting
Frozen or gelatin-set barsUse a frozen cream filling or lemon gelatinFirmer, colder or more elastic
Australian-style lemon sliceMake a biscuit-and-coconut base topped with lemon icingDense and chewy rather than creamy

This is the sort of dessert that earns its place on a hot afternoon: make it before anyone arrives, leave it in the refrigerator and bring it out only when the table is ready.
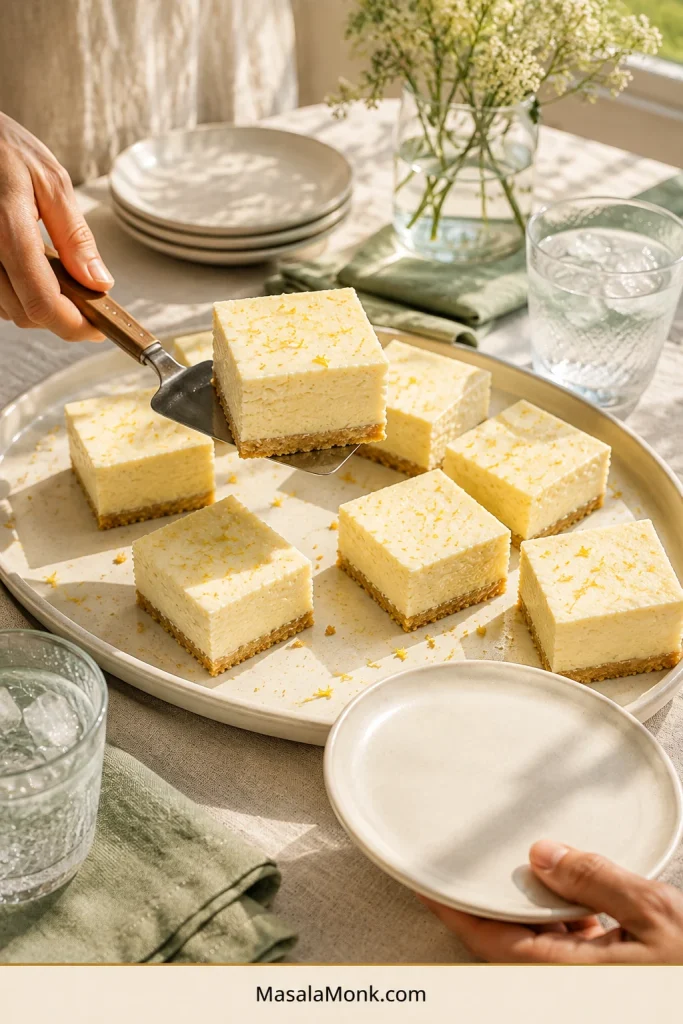
Hands serve creamy lemon bars from a white platter at a bright table with small plates, glasses and pale-green napkins.
Serve a few bars at a time so the remaining slab stays cold, firm and neatly sliceable.

What success tastes like

Cold lemon cream over tender buttery crumbs

Cold from the refrigerator, the filling feels airy at first and then melts into smooth lemon cream. Fresh zest gives it a fragrant lift, while the buttery, lightly salted crumbs keep the sweetness grounded.

Each square is soft enough for a fork to pass through easily, but substantial enough to lift and serve neatly.
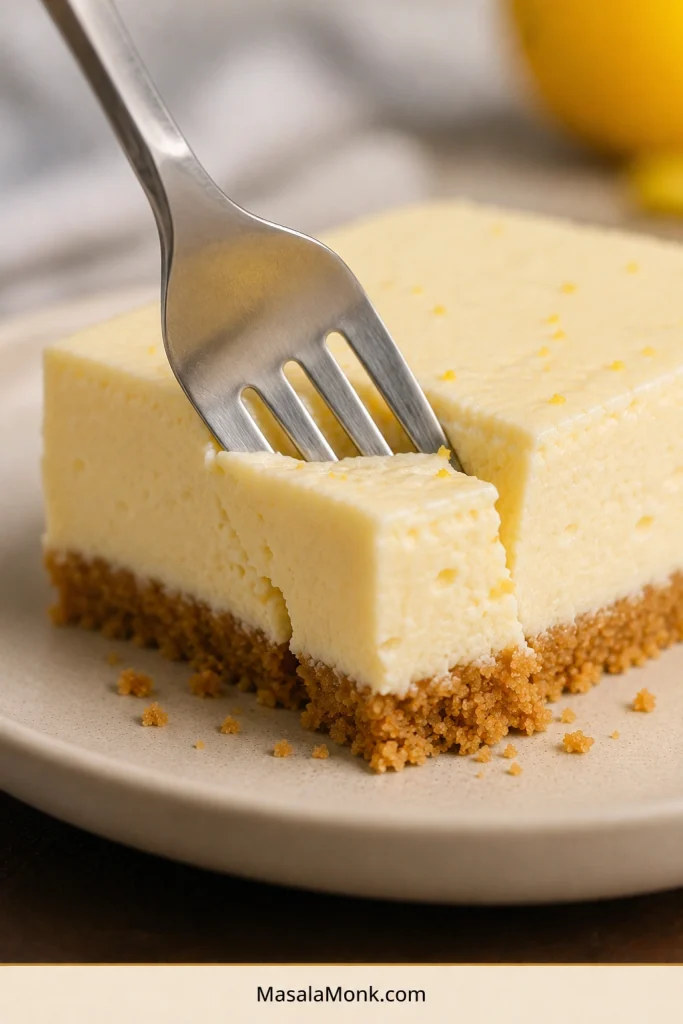
A dessert fork cuts through thick pale lemon filling and a thin golden crumb crust, lifting a small creamy bite.
The fork should compress the cream before meeting gentle resistance from a thin, compact crust.

Visual timing guide

How long to chill—and how to cut clean squares

Allow about 6 hours for dependable slices. For the most even set and easiest cuts, chill the pan overnight.

Four hours may be enough in a very cold refrigerator, especially with a metal pan. Six hours gives more margin for warmer refrigerators, glass or ceramic pans and a centre that chills slowly.
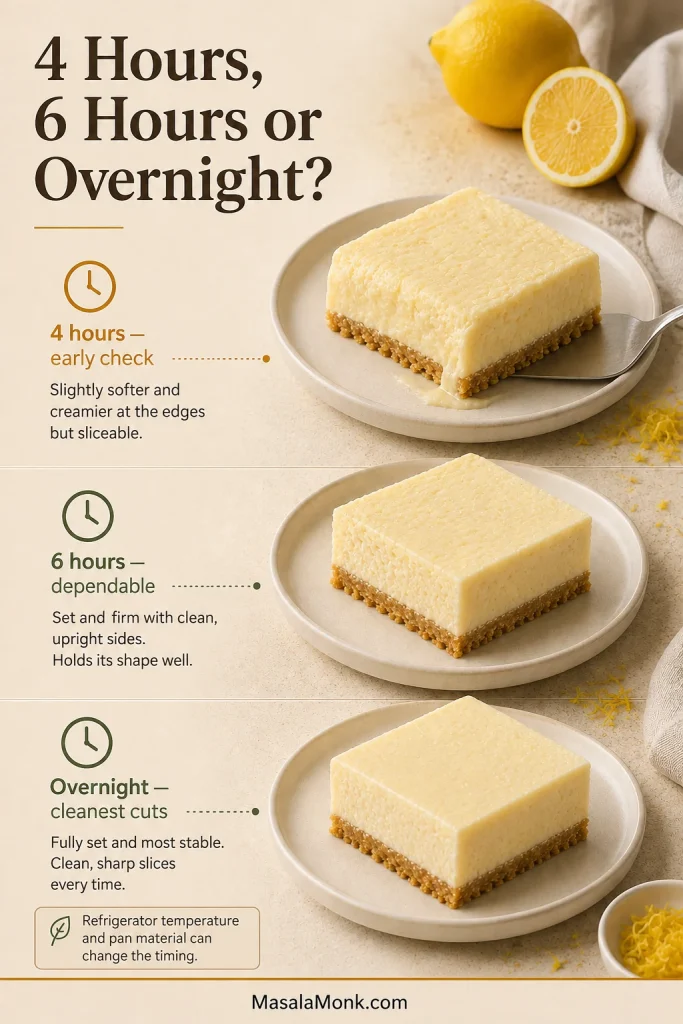
Three lemon bars show a softer early set after four hours, a dependable slice after six hours and cleaner edges after overnight chilling.
Corners set first; judge the centre before lifting or cutting the slab.
Chilling timeWhat to expect
4 hoursAn early checkpoint when the bars are needed urgently; the middle may still be delicate
About 6 hoursA dependable point for lifting and cutting in a properly cold refrigerator
OvernightThe most even set and easiest cuts
Plus 20–30 minutes in the freezerSharper edges for photographs, parties or warm-weather transport

A crowded refrigerator or a door that keeps opening can slow the middle down. If it still looks soft, more refrigerator time is usually the best fix.

Before lifting or cutting

  • Surface looks set rather than wet
  • Centre moves with the pan instead of rippling on its own

After the first cut

  • Cut stays open instead of closing behind the knife
  • Exposed sides hold their shape instead of slowly spreading
  • A light, creamy trace on the blade is normal

The first square does not have to be the prettiest. Use it to judge the set, then clean the blade and continue.
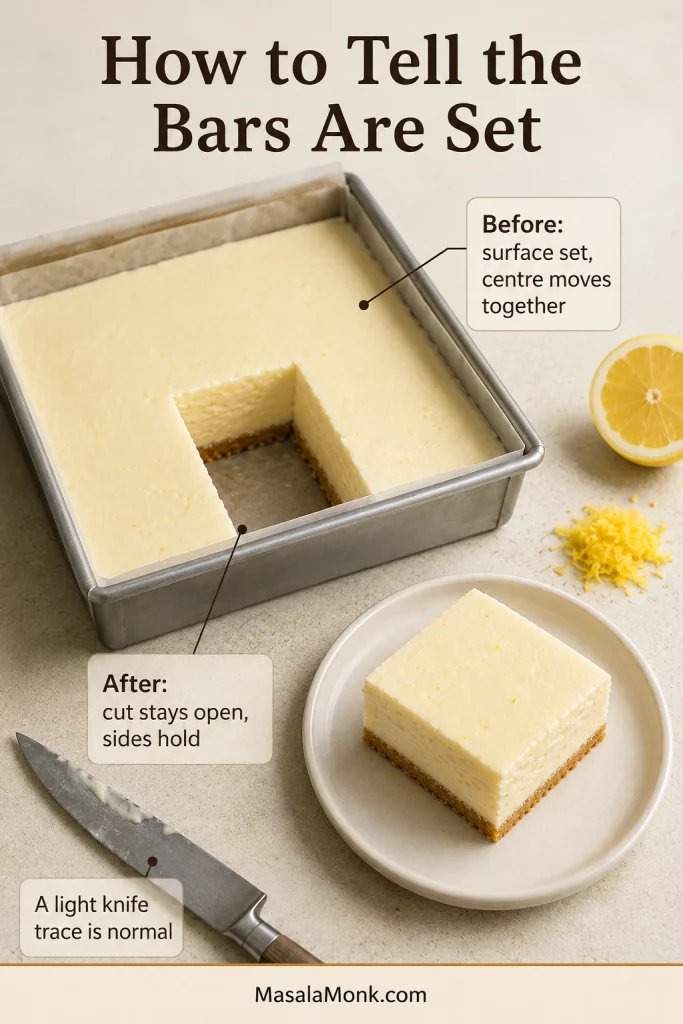
A chilled lemon-bar slab with one centre square removed shows a matte top, upright sides, a defined opening and a light trace on the knife.
A light knife trace is normal; sides that spread slowly need more refrigerator time.

How to get clean lemon-bar squares

  1. Chill the slab fully and give it the optional freezer chill when especially neat edges matter.
  2. Lift the slab onto a stable board with the parchment.
  3. Heat a large straight-edged knife in hot water and dry it completely.
  4. Press straight down without sawing.
  5. Wipe, reheat and dry the blade between cuts.
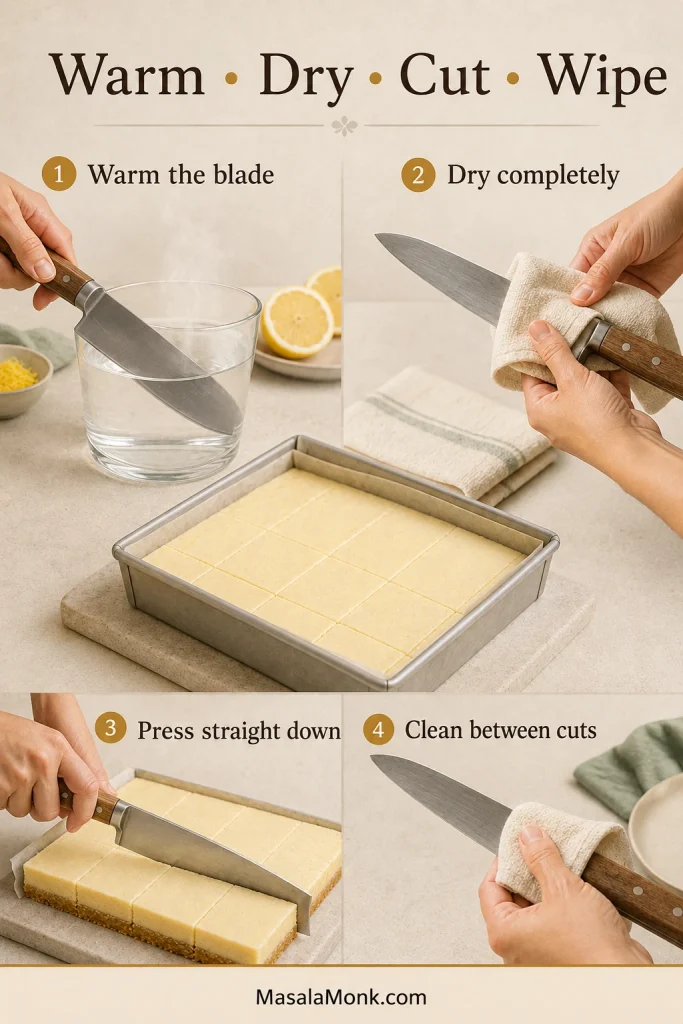
Four steps show a straight knife warmed in hot water, dried with a towel, pressed through lemon bars and wiped clean.
Dry the warmed blade, then press straight down; moisture and sawing both roughen the cut edges.

Cut the slab 4 × 4 for 16 regular bars or 3 × 4 for 12 generous portions. For a dessert tray, a 5 × 5 grid makes 25 small bites.
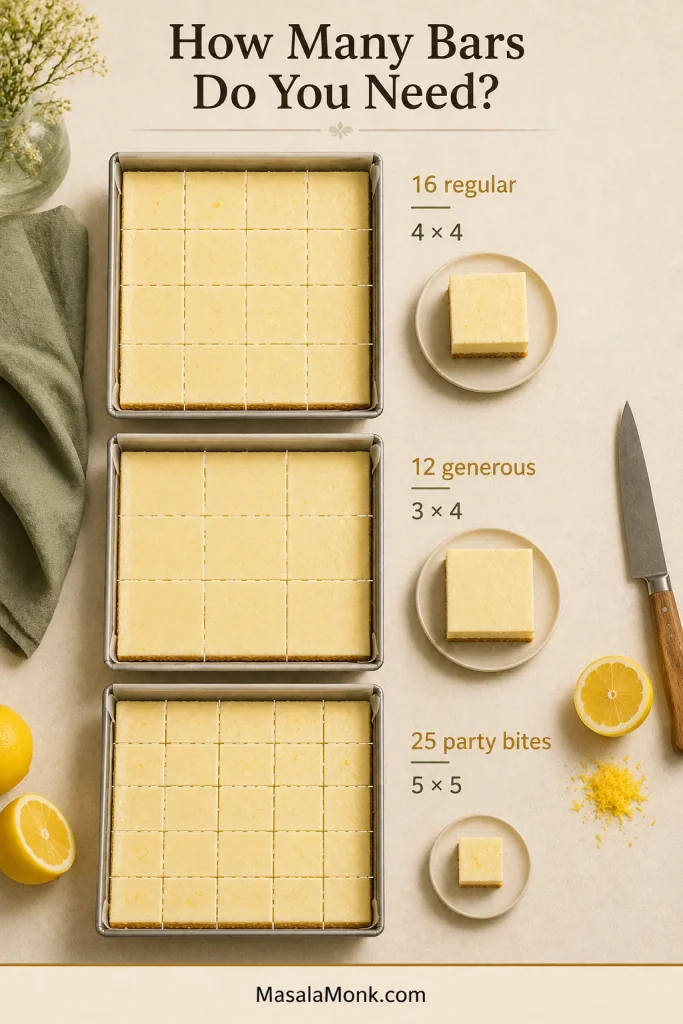
Three square slabs show cutting grids for 16 regular bars, 12 larger portions and 25 small party bites.
Mark equal intervals on two edges before cutting so every row finishes at the same size.

Remove the bars only when you are ready to serve them. In a warm room, return the remaining slab to the refrigerator between servings. Trimming the edges is optional; for everyday serving, keep them.

Back to recipeChoose your crustBack to top ↑

Graham crackers, digestives, Marie biscuits or shortbread?

Crumb crusts can feel annoyingly vague because every biscuit absorbs butter differently. The figures below are practical starting ranges, not universal ratios. Biscuit fat, sugar and dryness vary by brand, so reserve a little butter and let the squeeze test make the final decision.

The same principle keeps the biscuit base in Banoffee Pie from becoming either sandy or greasy.
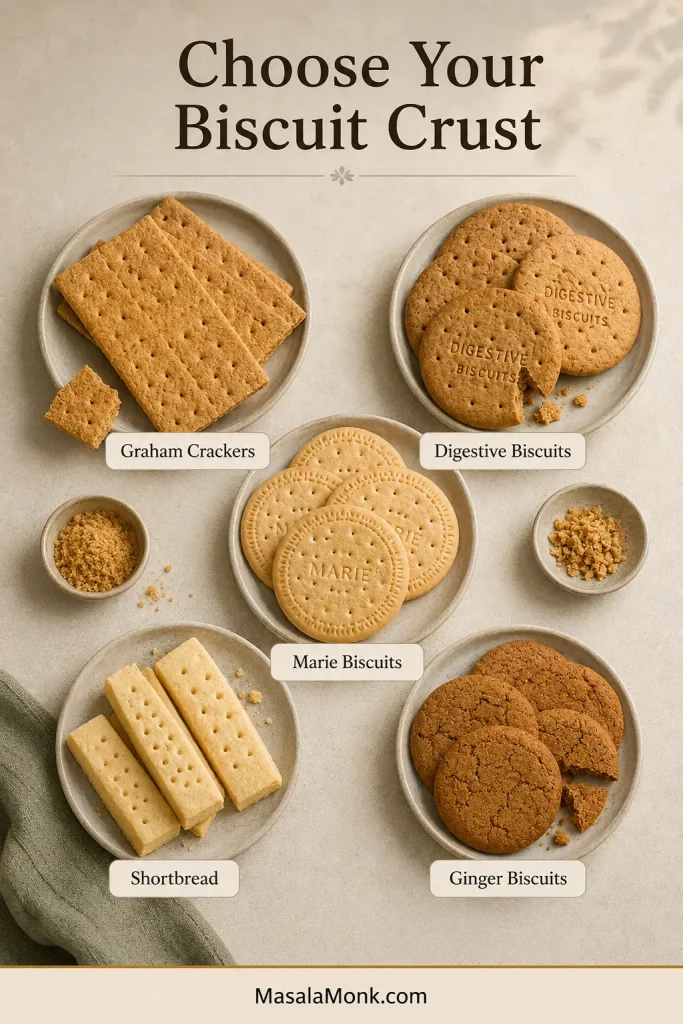
Five labelled biscuit types are shown whole, broken and as crumbs: graham crackers, digestives, Marie biscuits, shortbread and ginger biscuits.
Biscuit richness and dryness predict butter needs more reliably than the name printed on the packet.

Starting-point guide

Starting butter ratios by biscuit

Biscuit richness changes how much butter the crumbs need. Begin conservatively, then confirm the mixture with the squeeze test.
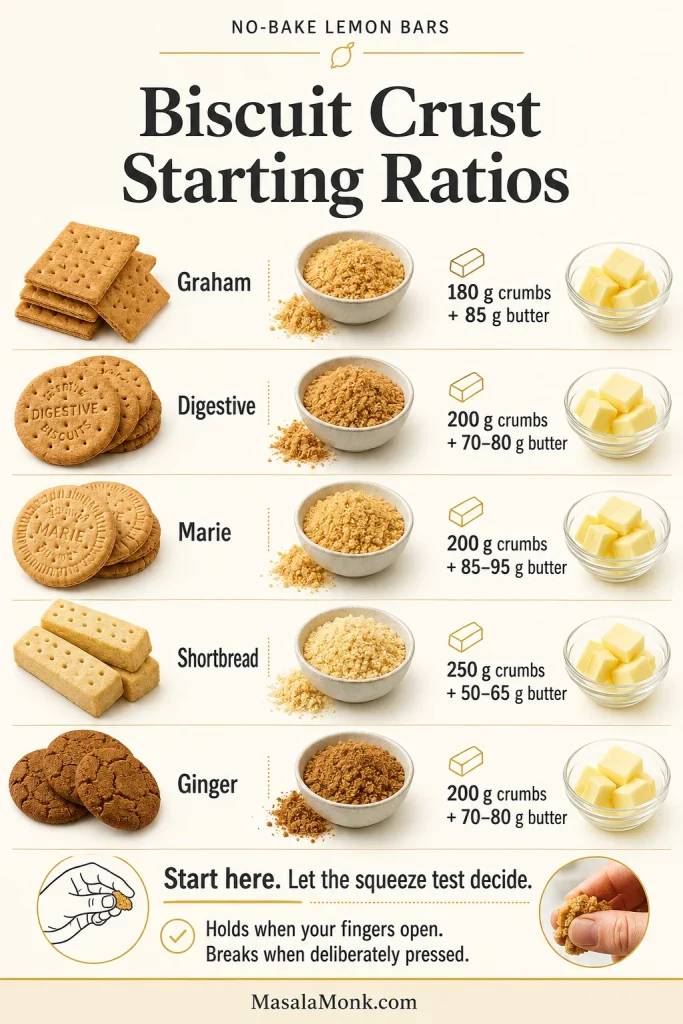
A guide pairs five biscuit types with starting crumb weights and melted-butter quantities for a no-bake crust.
Start low with rich biscuits, then let the squeeze test decide whether more butter is needed.
BiscuitStart withResultWhat to watch
Graham crackers180 g crumbs + 85 g butter + 13 g sugarLight, mildly sweet and easy to cut when coldA very lean brand may need another teaspoon or two of butter
Digestive biscuits200 g crumbs + 70–80 g butterDeeper, toastier and less sweetUsually omit added sugar
Marie biscuits200 g crumbs + 85–95 g butterMild and relatively leanAdd the final butter gradually
Shortbread cookies250 g crumbs + 50–65 g butterRich and closest to classic lemon-bar flavourToo much butter quickly makes it greasy or hard
Ginger biscuits200 g crumbs + 70–80 g butterWarm, spiced and excellent with lemonUsually needs no added sugar
Gluten-free biscuitsBegin with the closest matching biscuit aboveDepends strongly on the brandLet the squeeze test decide the final butter amount

Let the squeeze test decide

The crumb mixture is ready when every crumb looks moistened and a firmly squeezed handful holds together. It should hold when your fingers open, then break apart when you press it deliberately.

  • Loose and sandy: add melted butter one teaspoon at a time.
  • Wet or butter-releasing: add more crumbs one tablespoon at a time.
  • Using shortbread: stop earlier because the cookie already carries plenty of fat.

Because this base is chilled rather than baked, it will be firm enough to lift but slightly softer than an oven-baked crust—especially on the second or third day.
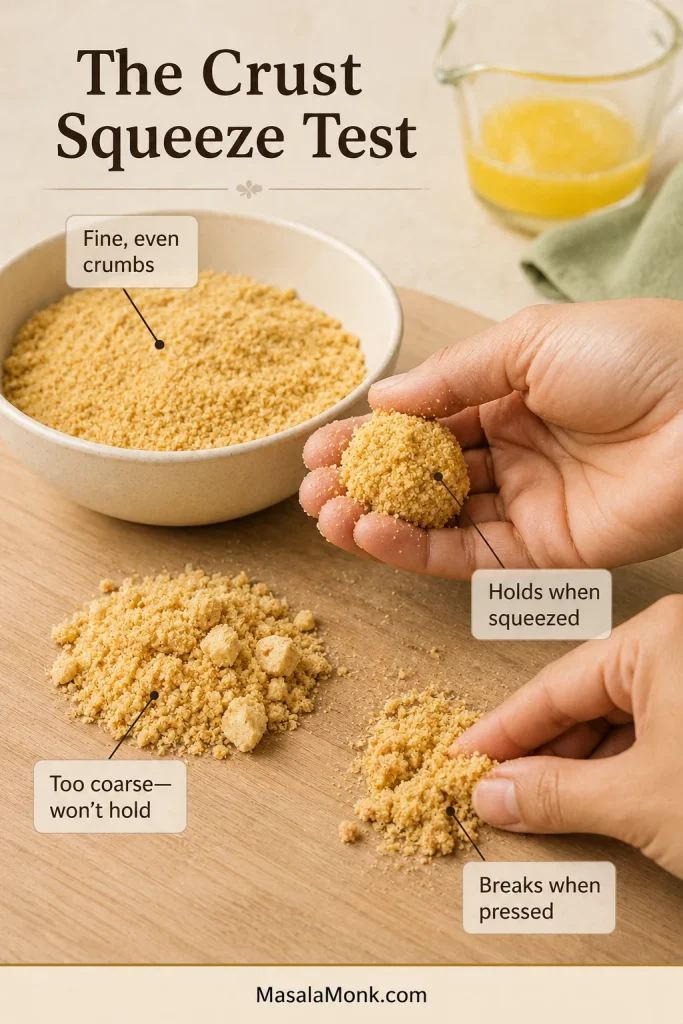
Fine buttered crumbs form a clump that holds in one hand, with loose coarse crumbs and a deliberately broken clump shown nearby.
The crumbs should clump firmly without leaving oily shine on the hand or bowl.

Graham crackers keep the lemon in front. Digestives bring a deeper, toastier base. Shortbread makes each square richer, while ginger biscuits leave a warm finish after the lemon fades.

Small details that make the bars reliable

Press through the whole crust

A crust can look smooth on top while remaining loose underneath. Press in overlapping passes across the whole base rather than polishing only the surface. Crumbs may resist the corners at first; the back of a spoon usually reaches them more easily than a round cup.
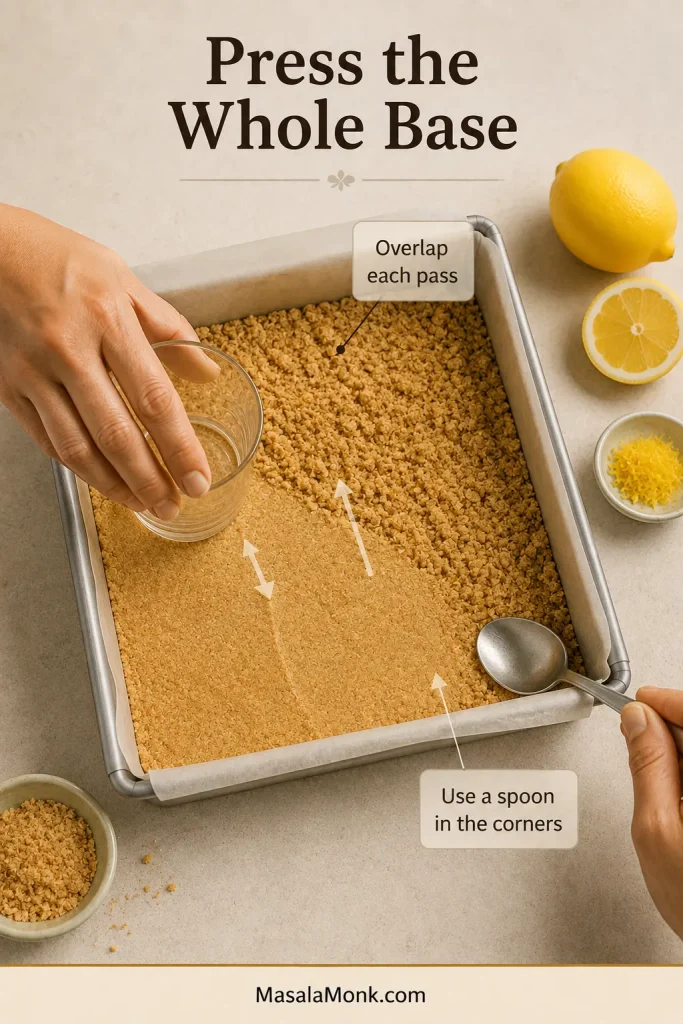
A flat-bottomed glass compacts biscuit crumbs across a lined pan while a spoon presses firmly into the corners.
Lift and reposition the glass instead of sliding it continuously, which pushes compacted crumbs into ridges.

Hot-kitchen note: refrigerate the bowl and beaters for 10–15 minutes, keep the cream cold until the last moment and set the mixing bowl over a larger bowl of ice when necessary. An electric mixer makes it much easier to stop at the right stage.
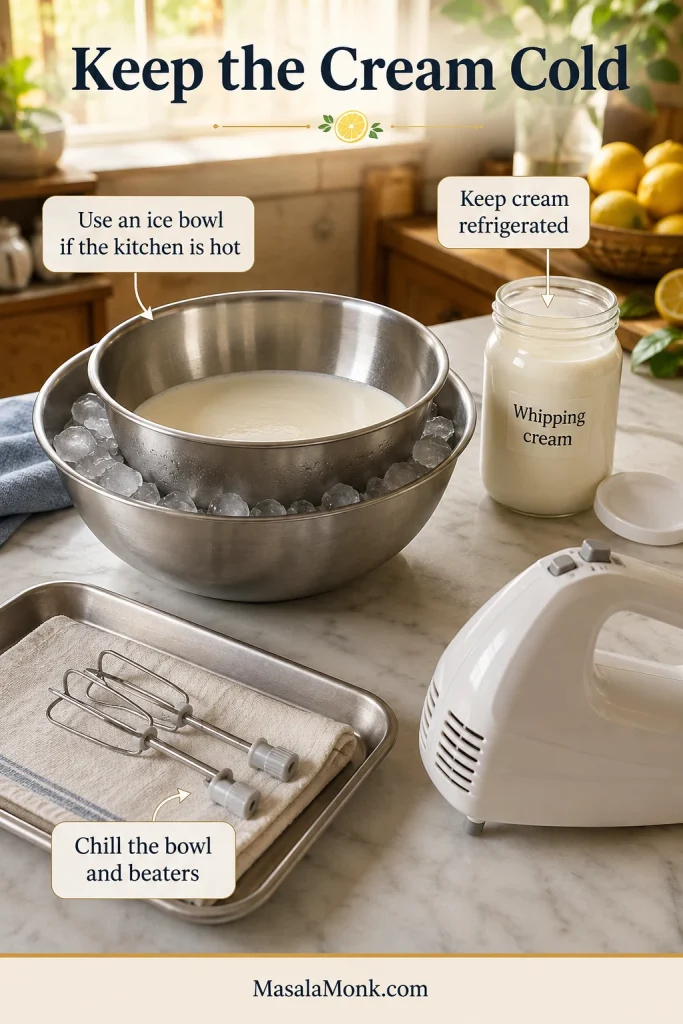
A metal bowl rests over ice beside cold whipping cream, chilled beaters on a dry towel and an electric hand mixer.
Keep the bowl cold and dry; the ice bath should chill the cream, never dilute it.

Fold and finish without overworking

Fold the first third of the cream more confidently to loosen the lemon base. Once the mixture feels lighter, use slower, broader movements for the remaining cream.
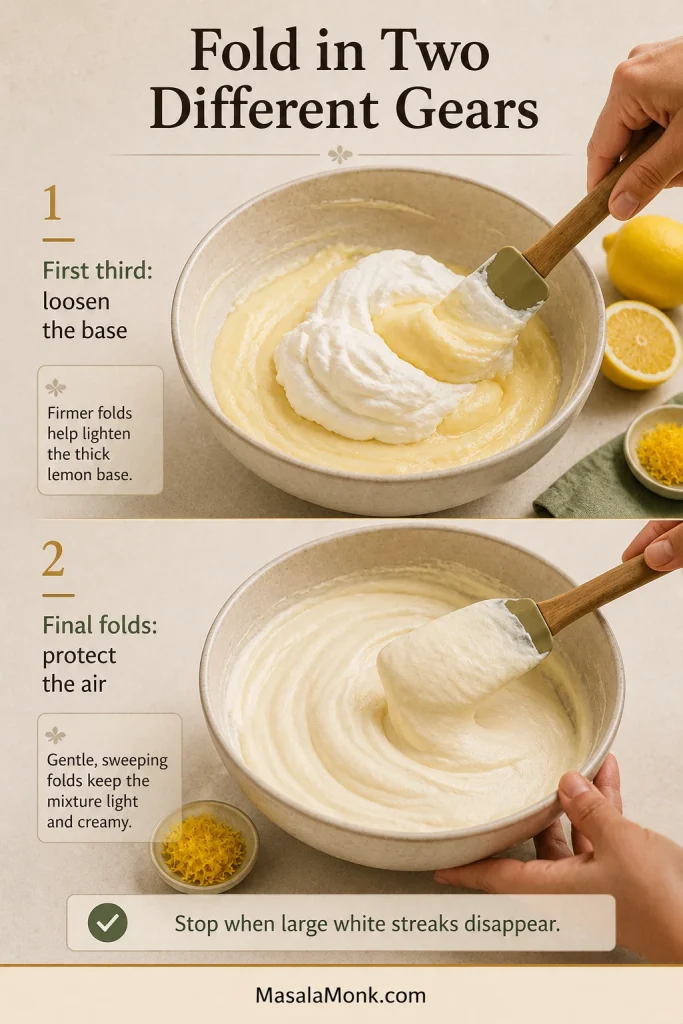
Two stages show whipped cream loosening a thick lemon base and then being folded into a smooth, airy filling.
The folded filling should mound softly rather than pour, showing that enough air remains.

Everything else in the bowl is sturdy; the air in the cream is not. Stop once no large white streaks remain, spread the filling gently and leave a few harmless ripples on top.
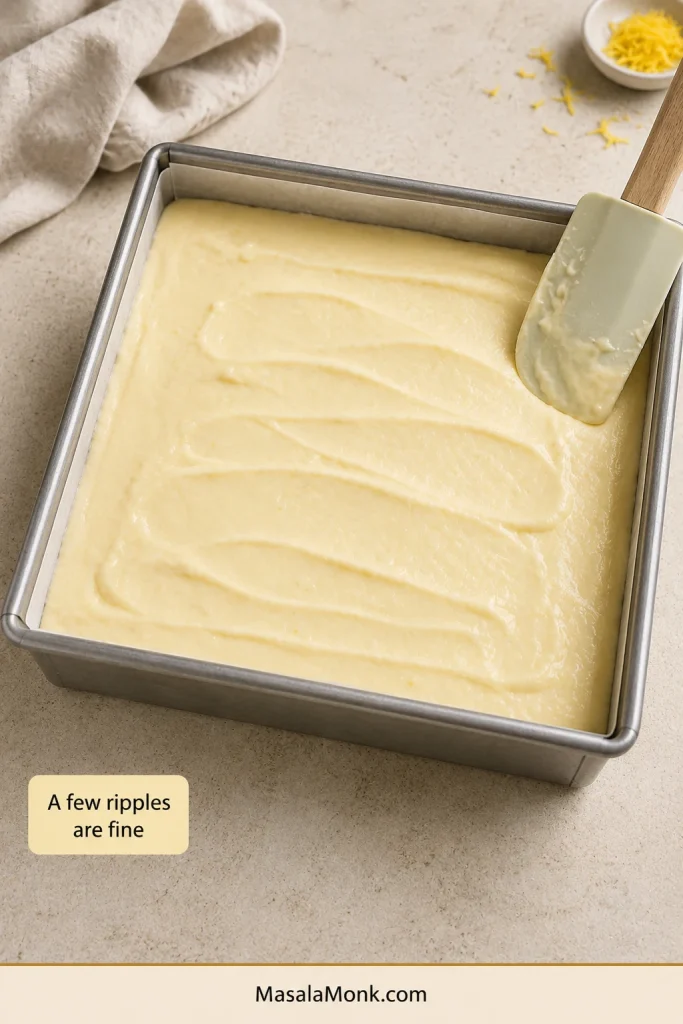
Creamy lemon filling reaches the corners of a lined square pan, with soft spatula ripples visible across the top.
Soft ripples are harmless; filling that runs flat immediately needs more structure.

Illustrated structure guide

Why this filling firms up in the refrigerator

Lemon thickens the condensed milk, whipped cream carries air through the mixture, and refrigeration firms the dairy. Together, they give the filling enough body to slice without making it dense.

Lemon works on condensed milk in much the same way lime juice does in key lime pie. Here, the whipped cream keeps the texture lighter, while the refrigerator completes the set.
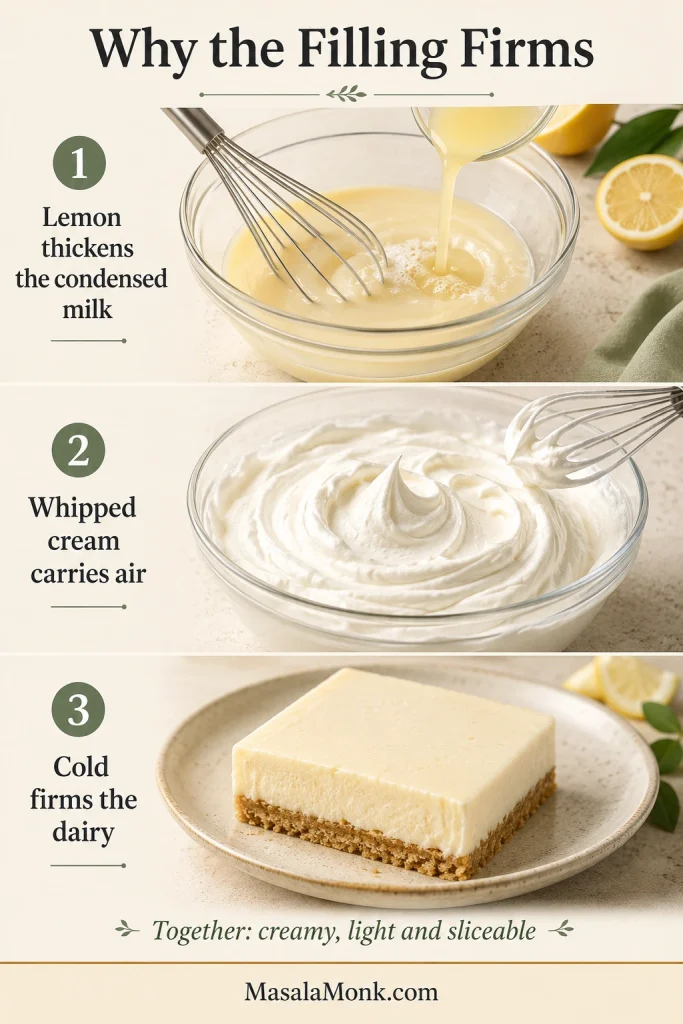
Three stages show lemon thickening condensed milk, whipped cream holding air and a chilled lemon bar retaining a square shape.
All three stages matter; extra chilling cannot repair weakly whipped cream or an improperly mixed lemon base.

What each ingredient contributes

Condensed milk supplies sweetness, concentrated dairy flavour and most of the filling’s body. Either a 397 g or 400 g can works.

Lemon juice balances the condensed milk and helps thicken it. Measure ½ cup / 120 ml / 4 fl oz after squeezing rather than relying on a fruit count.

Lemon zest carries the fragrant oils that make the bars smell unmistakably citrusy without loosening the filling. Grate only the yellow skin; white pith can taste bitter.

Whipping cream introduces the air that keeps the filling light, while its fat firms as it chills.

Salt makes the lemon taste brighter and keeps the second bite as appealing as the first.

Evaporated milk, regular milk and ordinary pouring cream are much thinner. None will thicken and set the filling in the same way as condensed milk.

No-bake lemon bar troubleshooting

Visual troubleshooting guide

Use the symptom to choose the fix: soft filling, cream that will not whip, a crumbly crust and a greasy or hard crust each need a different response.
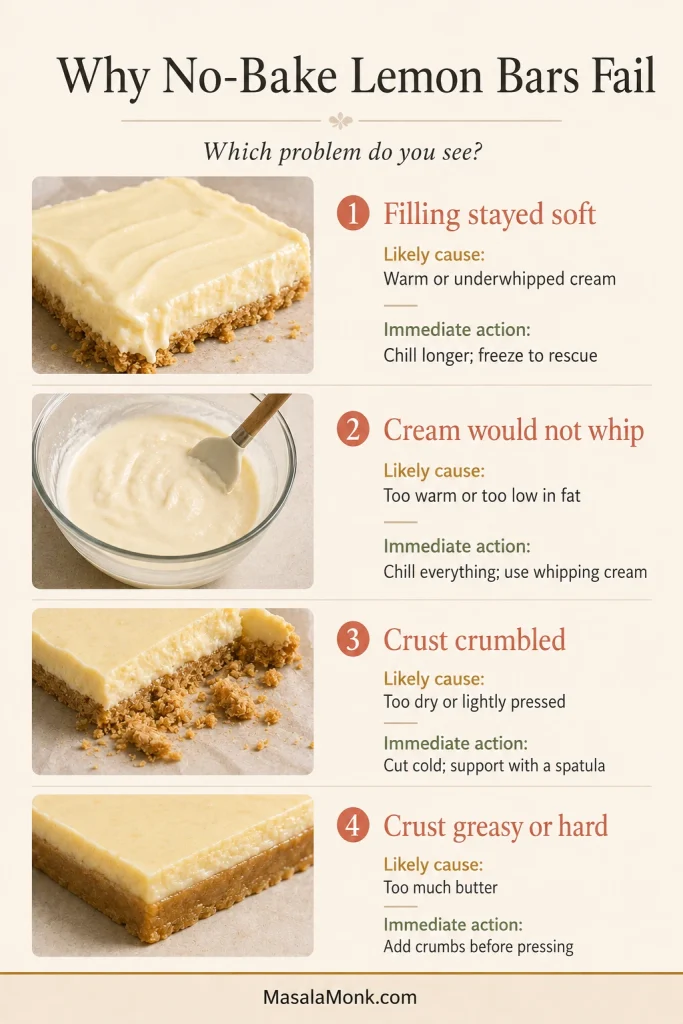
A troubleshooting guide compares soft filling, cream that did not whip, a crumbling crust and an overly dense greasy crust.
Match the visible symptom to its cause before choosing a rescue; different failures need different fixes.

Filling and cream problems

ProblemWhy it happened and what to do
Filling looks loose before chillingThe cream may be warm or underwhipped, or too much air was lost during folding. Refrigerate the pan promptly; the filling should mound softly rather than pour.
Bars remain soft after 6 hoursThe refrigerator may be warmer or busier than expected. Leave the pan overnight and use a brief freezer chill before cutting when needed.
Bars remain spoon-soft after chilling overnightThe cream may have been too low in fat, underwhipped or deflated during folding. Freeze the pan and serve the bars as frozen lemon cream squares.
Cream will not whipThe cream may be too warm, too low in fat or intended only for pouring. Chill the cream, bowl and beaters before starting.
Cream became grainyWhen it is only slightly rough, fold in 1–2 tablespoons fresh cold cream. Once liquid begins separating, start again; the cream will not fold back into a smooth filling.

Crust and flavour problems

ProblemWhy it happened and what to do
Crust falls apartThe crumbs may have been coarse, under-buttered, lightly pressed or insufficiently chilled. Cut very cold and support each piece with a wide spatula. Next time, press the crumb mixture more evenly.
Crust is greasy or hardMix in more crumbs when the mixture looks greasy before pressing. When the finished crust is hard, let the slab stand at cool room temperature for about 5 minutes. Next time, use less butter with rich cookies.
Filling tastes too sweetFor the current batch, add fresh zest and serve the bars with tart raspberries. Next time, keep the salt and choose digestives or another less-sweet biscuit.
Lemon flavour is weak or bitterAdd fresh yellow zest at serving time when the flavour is weak. Bitterness usually means pith or crushed seeds entered the filling; avoid both in the next batch.

When the filling stays soft: if the flavour is good, the pan is not lost. Freeze it, cut it cold and serve it as frozen lemon cream bars. The texture changes, but dessert survives.
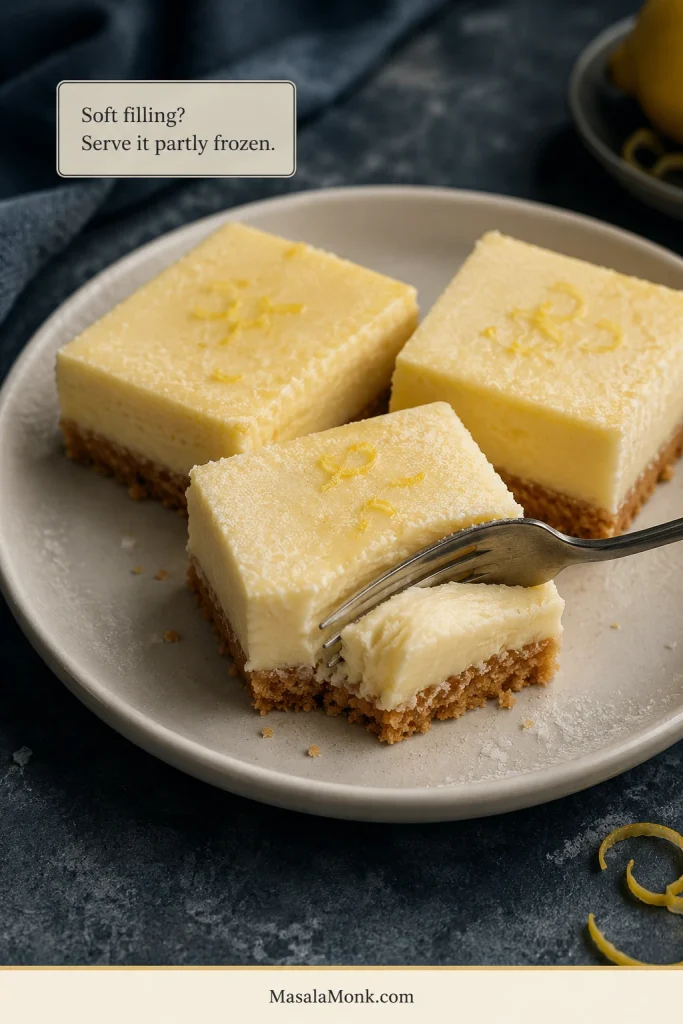
Very cold lemon bars with firm creamy centres and golden crumb crusts sit on a dark plate as a fork removes a bite.
Cut the slab while firm, then soften each frozen bar for 5–10 minutes before serving.

Back to recipeTry a variationStorage and freezingBack to top ↑

Ways to change the flavour without softening the filling

Choose berries for tartness, ginger or coconut for a more distinctive crust, lemon curd for stronger citrus, or serve the bars partly frozen when the weather is especially hot.

Berry swirls

Blueberry: simmer ½ cup blueberries (70 g / 2½ oz) with 1 teaspoon sugar until thick and jammy. Cool completely, then dot 2–3 tablespoons over the filling and make a few shallow swirls.

Raspberry: simmer ½ cup raspberries (65–70 g / about 2½ oz) with 1 teaspoon sugar until thick. Strain if desired, cool completely and use 2–3 tablespoons.

For any fruit swirl: reduce the fruit until thick and cool it completely. Raw purée can loosen a chilled filling; the no-bake mango cheesecake guide explains why thicker fruit preparations behave better.
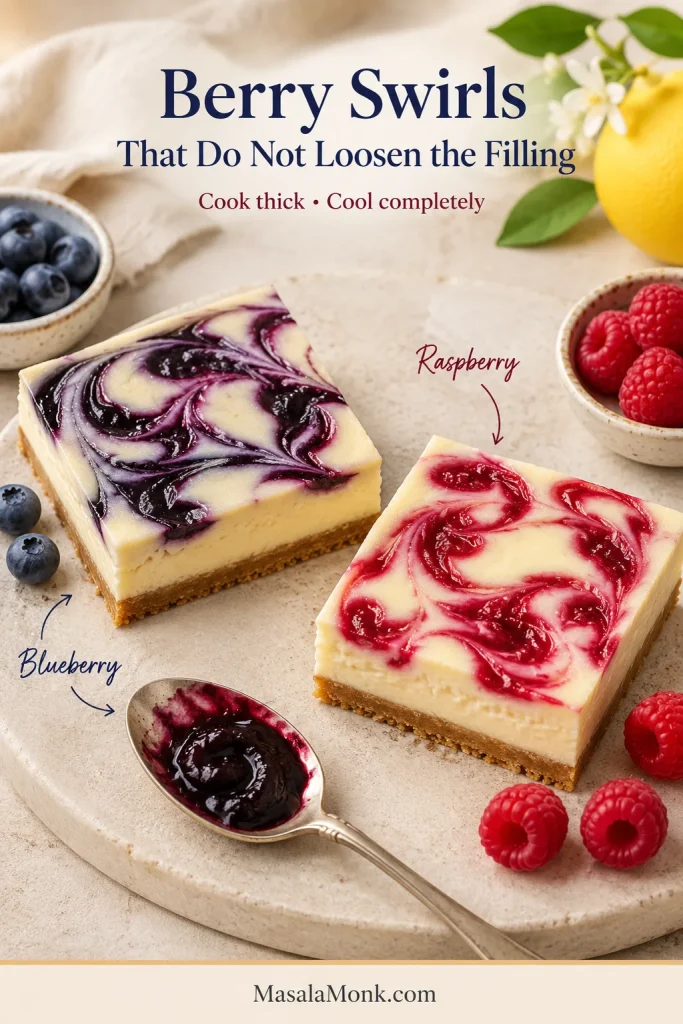
Two creamy lemon bars contain thick blueberry-purple and raspberry-red swirls, with berries and reduced fruit mixture nearby.
Keep fruit swirls shallow so extra moisture stays near the surface, not through the filling’s centre.

Crust variations

Ginger biscuits: replace the graham crackers with crisp ginger biscuits. Omit the sugar and begin with less butter because many brands are already rich.

Coconut: replace ¾–1 oz / 20–30 g of biscuit crumbs with fine desiccated coconut. Keep the quantity modest so the crust still packs tightly.
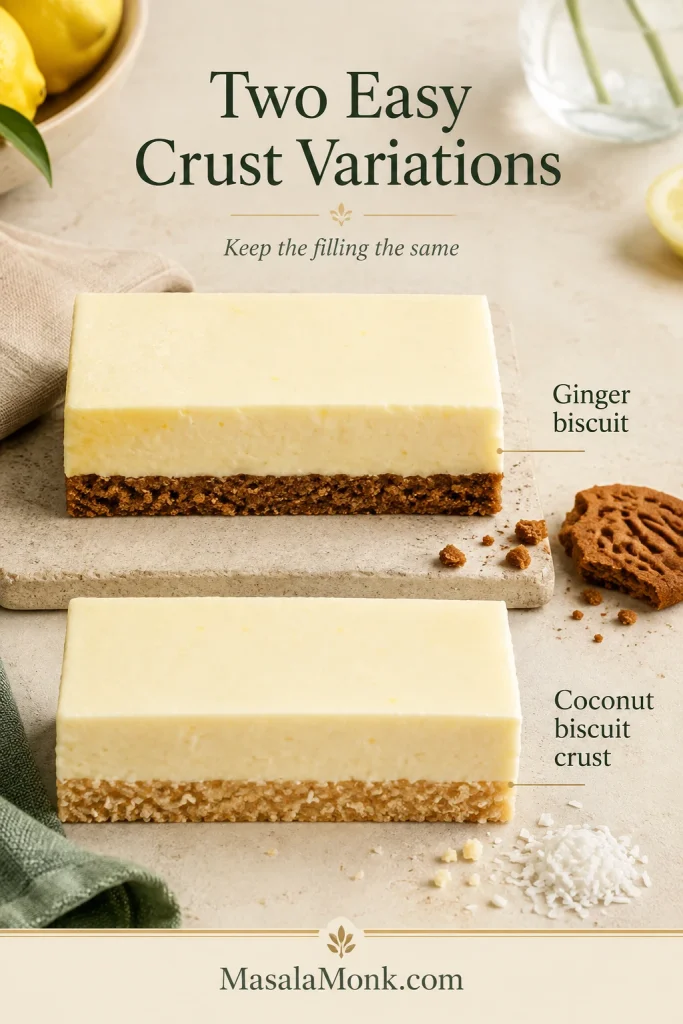
Two lemon bars with identical pale filling show a darker ginger-biscuit crust and a lighter crust containing fine coconut.
Use coconut sparingly to preserve cohesion; ginger biscuits change flavour without weakening the crust.

Extra lemon or a frozen finish

Lemon curd: swirl up to 2 tablespoons lightly over the surface, or add about ½ teaspoon to each bar just before serving.

Meyer lemon: use half Meyer lemon juice and half regular lemon juice, then use Meyer zest for the aroma. The Masala Monk guide to lemon varieties explains how their flavours differ.
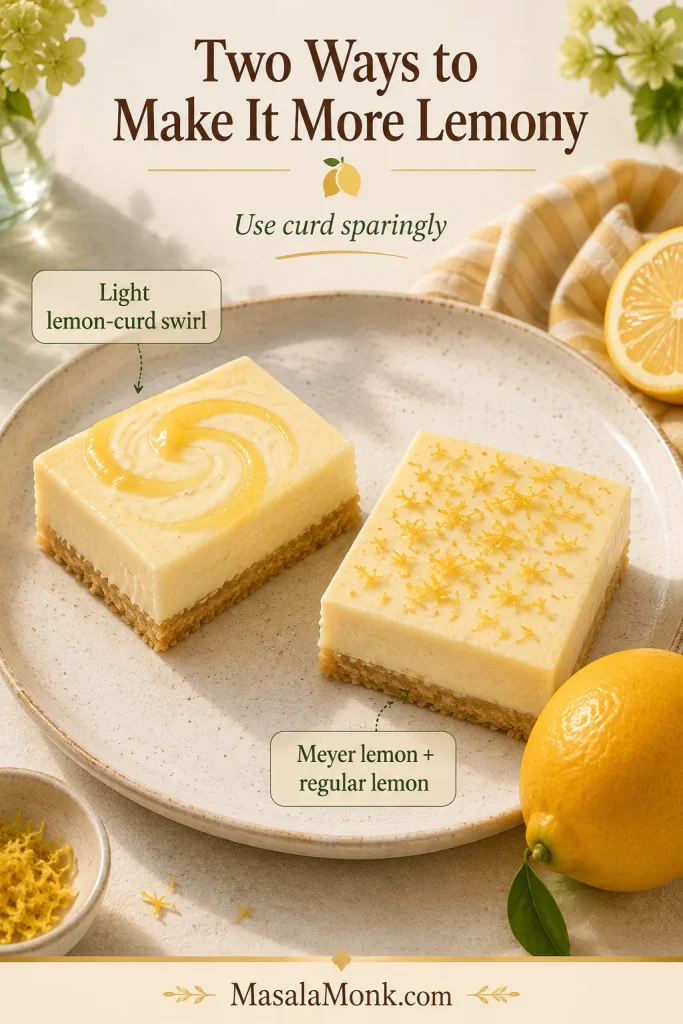
Two no-bake lemon bars are finished with a thin lemon-curd swirl and fine zest beside regular and Meyer-style lemons.
Keep curd near the surface and preserve the liquid balance the filling needs to set cleanly.

Partly frozen: freeze the completed slab until firm, then let each bar soften for 5–10 minutes before eating. The bars eat more like lemon ice cream and are especially welcome in very hot weather.

Easy swaps—and changes that need another recipe

Easy swaps

  • Digestives for graham crackers: use the starting range in the crust table and omit the sugar.
  • Shortbread for graham crackers: reduce the added butter substantially.
  • Gluten-free biscuits: use a crisp biscuit and let the squeeze test determine the final butter quantity.
  • Lime for lemon: replace the juice and zest measure for measure for a no-bake lime version.
  • Prepared whipped topping: replace the whipped cream with about 3 cups thawed whipped topping (225 g / 8 oz). The bars will be sweeter and less fresh-tasting.

Changes that need another recipe

Evaporated milk, regular milk, low-fat pouring cream, yoghurt and liquid sweeteners cannot replace condensed milk or whipping cream in equal quantities. They change both the water content and the way the filling sets.

Coconut milk, cashews and agar need a separate recipe designed around those ingredients.

A low-carb version also needs a different filling and crust because condensed milk supplies both sweetness and body. Use the keto cheesecake recipe as a starting formula rather than swapping in a low-carb sweetener alone.

Make-ahead, storage and freezing

Make them one day ahead

Make the pan the day before and dessert is already handled. It can stay cold while dinner happens, guests arrive and everything else asks for your attention.

Add fresh fruit, extra zest or delicate toppings shortly before serving so they remain bright and do not release moisture onto the surface.
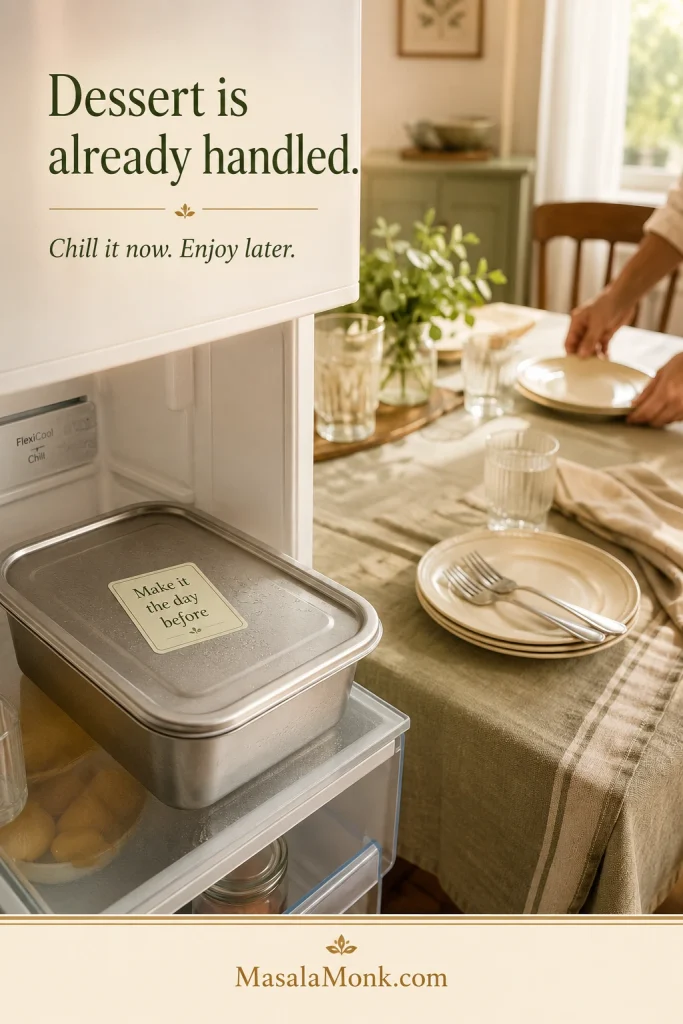
A covered pan of lemon bars rests inside an open refrigerator while hands arrange dessert plates and forks nearby.
Chill the slab uncut overnight, then add fresh garnish shortly before serving for cleaner edges.

Refrigerator storage

For the best texture, eat the bars within about three days. Keep any remaining bars continuously refrigerated at or below 40°F / 4°C and use them promptly.

A single layer is preferable. When stacking cannot be avoided, place parchment between layers and keep the container very cold.

Freezing

Freeze only for short-term storage; the texture is best when the bars are used within roughly one week. Store the uncut slab or individual bars in an airtight container and protect them from freezer odours and surface ice.

Thaw in the refrigerator. The filling may feel slightly denser after freezing, but it should remain creamy. Add berries and fresh zest after thawing.
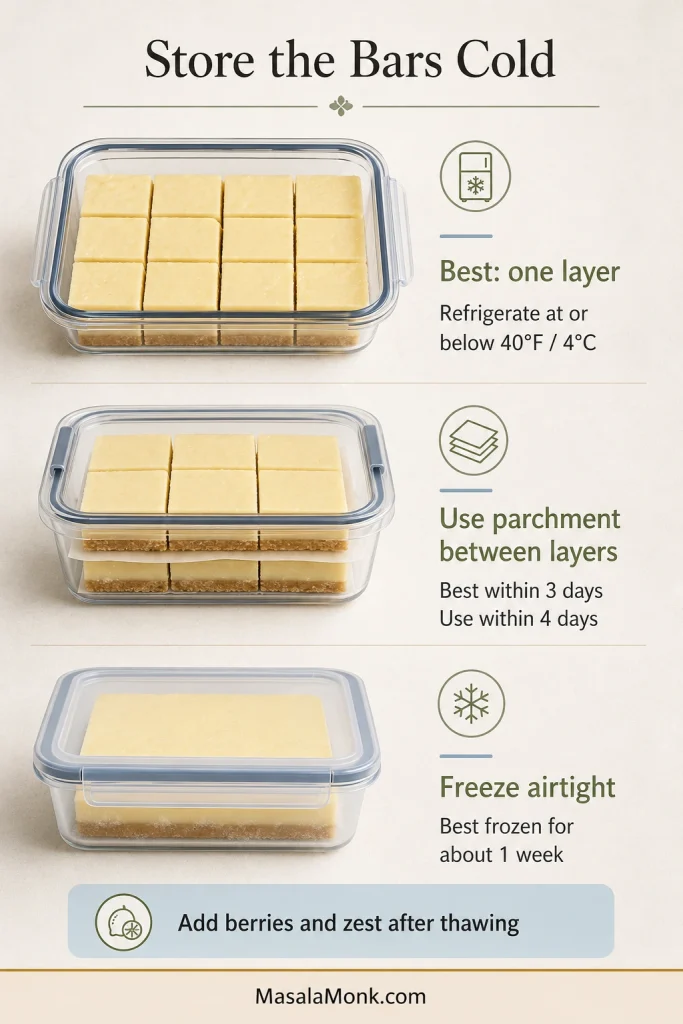
Lemon bars are stored in one refrigerated layer, stacked with parchment between layers and sealed as a slab in an airtight freezer container.
Store in one layer when possible; parchment protects stacked bars from marks and surface damage.

Taking the bars elsewhere? Continue to the hot-weather transport setup so the slab stays cold and level.

Transporting no-bake lemon bars in hot weather

  • Chill the pan fully before travelling.
  • Give it a 20–30-minute freezer chill before departure.
  • Transport the bars in the original pan or a rigid single-layer container.
  • Keep the container level inside an insulated cooler with frozen ice packs.
  • Refrigerate immediately on arrival.
  • Add fruit garnish after transport.
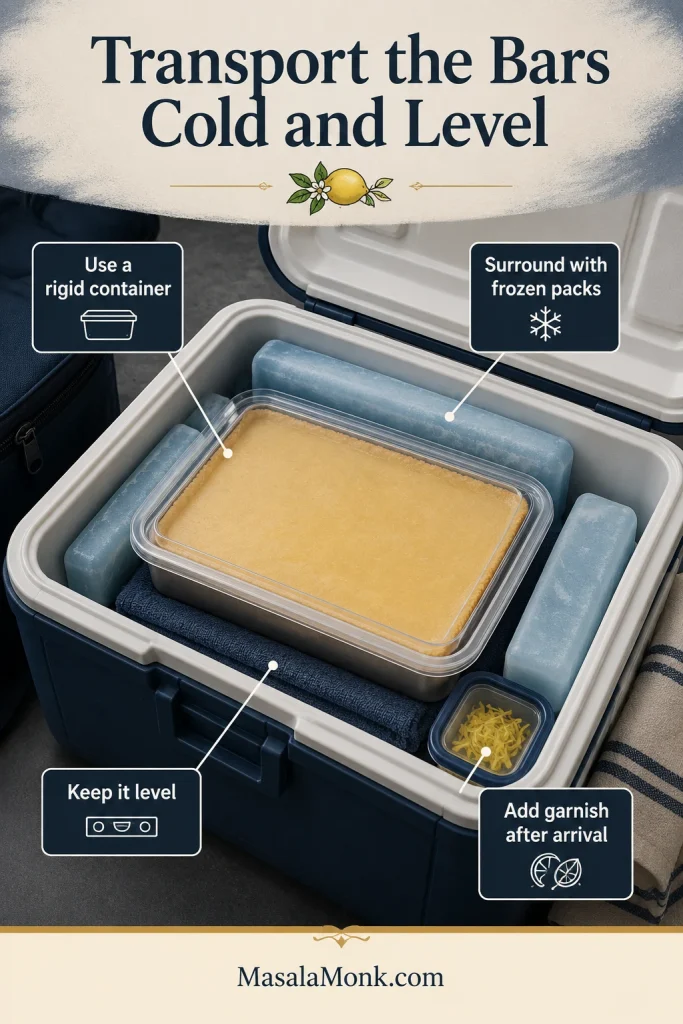
A rigid covered container of lemon bars sits level inside an insulated cooler with frozen packs, a stabilising towel and garnish packed separately.
Pre-chill the cooler, keep the container level and arrange ice packs around rather than above it.

Keep these chilled dairy bars at or below 40°F / 4°C. Do not leave them unrefrigerated for more than two hours—or more than one hour when the surrounding temperature is above 90°F / 32°C. The USDA cold-food safety guidance explains the same limits in more detail.

Frequently asked questions

Do no-bake lemon bars need gelatin or cream cheese?

No. Lemon-thickened condensed milk, whipped cream and refrigeration provide the structure. Cream cheese makes a denser dessert, closer to a no-bake cream cheese pie, while gelatin creates a firmer, more elastic set.

Can I make them without condensed milk?

Not with this formula. Condensed milk supplies sweetness, dairy solids and much of the filling’s body. A version without it needs a separate base built around ingredients such as cream cheese, gelatin, agar, coconut cream or cashews.

Can I use bottled lemon juice?

It may provide enough acidity, but fresh juice tastes cleaner. When bottled juice is the only option, use the same ½ cup / 120 ml / 4 fl oz measure and include fresh zest for aroma.

Why have my lemon bars not set?

They may simply need longer. Leave the pan overnight before assuming the filling has failed. If it remains spoon-soft, the cream was probably too warm, too low in fat, underwhipped or deflated during folding; the troubleshooting guide above shows how to rescue it.

Do these bars taste strongly of condensed milk?

Fresh juice, zest and salt keep the flavour from tasting flat or purely milky. Serve the bars cold, when the citrus tastes brightest and the sweetness feels more restrained.


Final texture
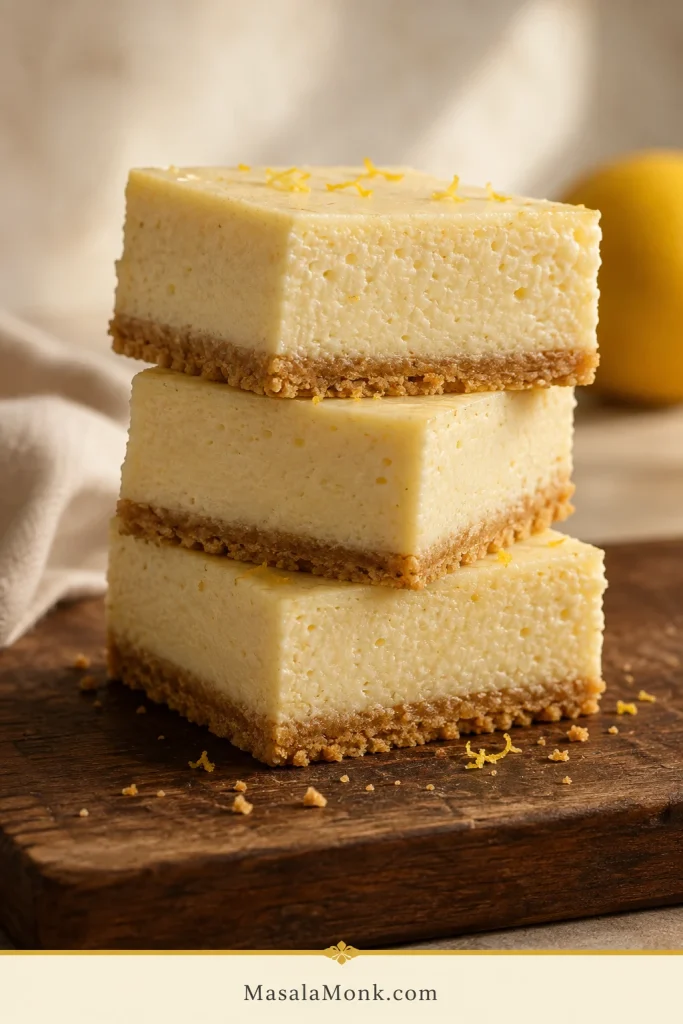
Three thick lemon bars are stacked slightly apart, revealing airy pale filling above thin, compact golden biscuit crusts.
A thin, compact crust supports the filling without competing with its cold, airy texture.

The centre cut is worth the wait

The hands-on work ends quickly: press the crust, whisk the lemon base, fold in the cream and level the pan. Then comes the quiet part, when the refrigerator turns a soft filling into a dessert you can lift.

Give the refrigerator its time. Heat and dry the knife. Make one clean downward cut.

Under the fork, the crust gives gently. The filling stays cold and creamy. Then the lemon arrives before the sweetness has a chance to feel heavy.
Return to the recipeBack to top ↑

Posted on 15 Comments

How to make No-Bake Banana Pudding: No Oven Required Recipe

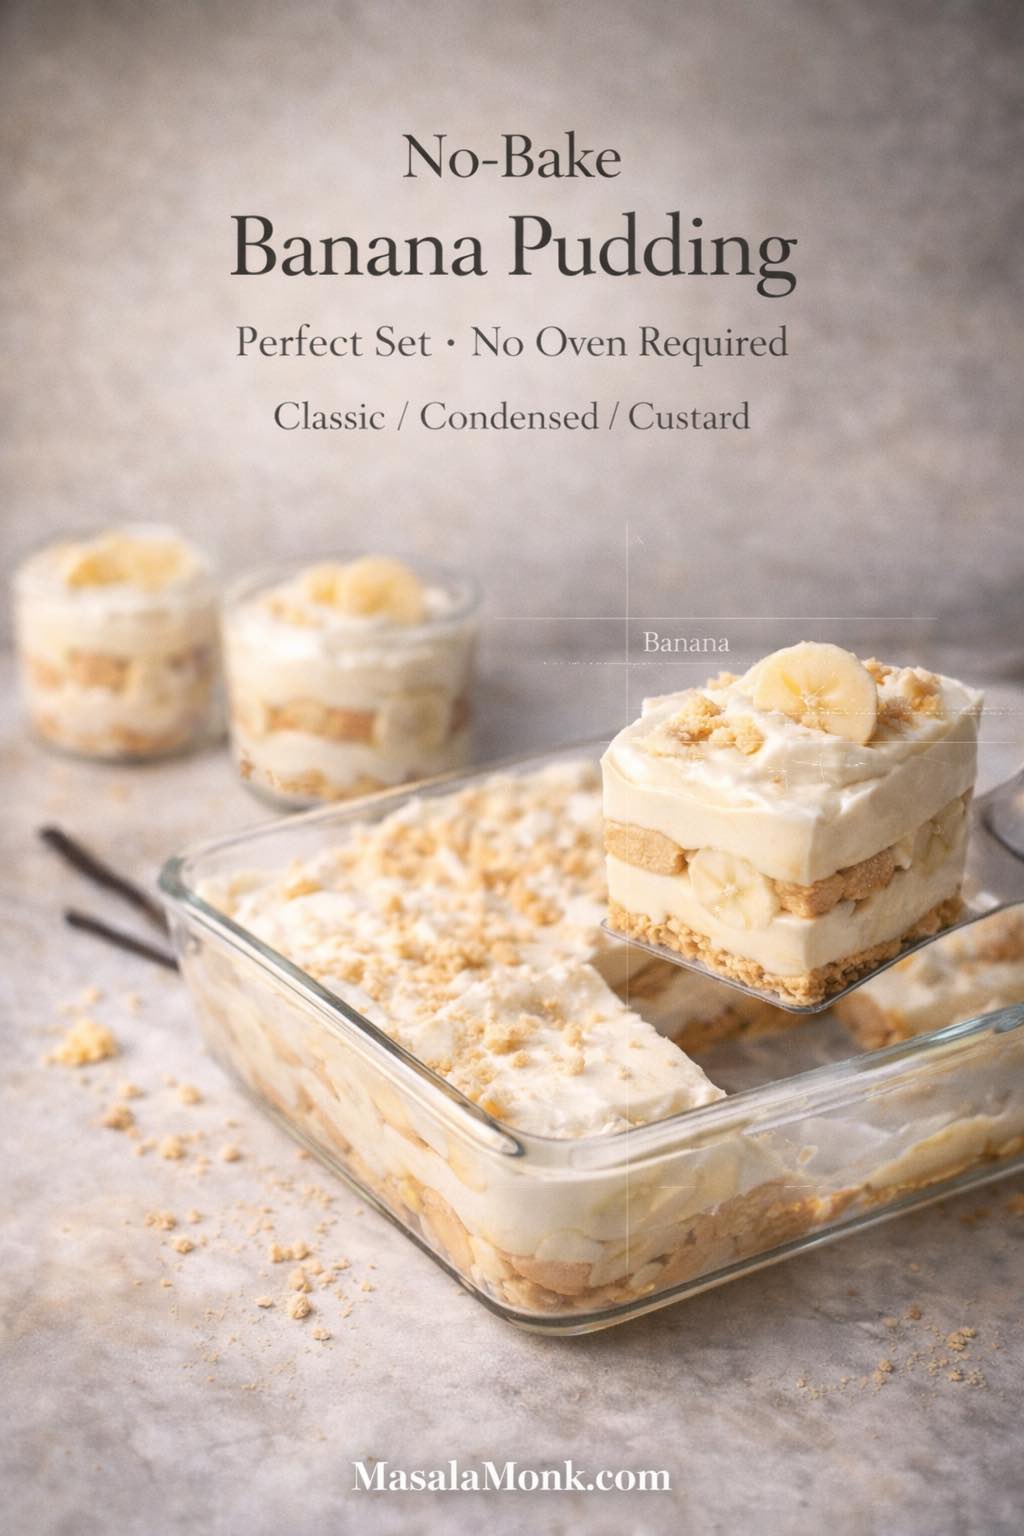
A square slice of no-bake banana pudding is lifted from a glass baking dish, showing neat layers of creamy vanilla pudding, banana slices, and vanilla wafers with cookie crumble on top. Text overlay reads “No-Bake Banana Pudding,” “Perfect Set • No Oven Required,” and “Classic / Condensed / Custard,” with MasalaMonk.com in the footer.

Some desserts ask you to measure, mix, bake, cool, frost, and pray nothing cracks. Banana pudding doesn’t demand that kind of ceremony. Instead, it leans into a simpler rhythm: slice bananas, whip something creamy, stack it with cookies, and let the fridge do the patient work. By the time you come back, the layers have transformed—cookies soften into cake-like sheets, bananas mellow into perfume, and the pudding turns thicker, silkier, and somehow more “finished” than it had any right to be.

That’s the heart of banana pudding (no bake). It’s comforting without being fussy, familiar without feeling boring, and flexible enough to match whatever your pantry—and mood—happen to be today. You can keep it classic with vanilla wafers and pudding mix, push it richer with sweetened condensed milk, go fully homemade with a stovetop custard (still no oven required), or make a dairy-free version that doesn’t taste like a compromise.

If you’re building a no-oven dessert lineup, you can round out the table with something bright and tangy like this no-bake blueberry cheesecake or something spiced and crunchy like these Lotus Biscoff dessert cups. Still, banana pudding is the one that disappears first—because it feels like home in a bowl.


No-bake banana pudding, five recipes (pick the vibe before you start)

Before you pull out a dish, decide what you want your banana pudding to be: airy and light, thick and tangy, extra creamy, old-fashioned, or plant-based. Once you choose, everything else—milk amount, cookie choice, chill time—falls neatly into place.

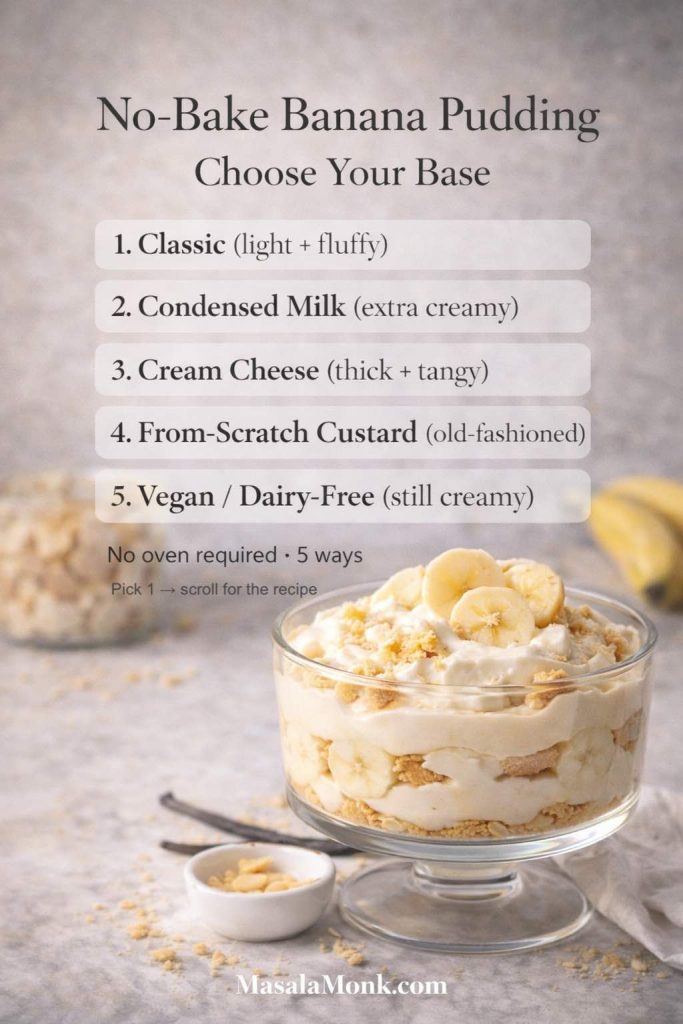
No-bake banana pudding in a glass dessert dish with layered bananas, vanilla wafers, and creamy pudding. Text overlay reads “No-Bake Banana Pudding – Choose Your Base” with five options: classic, condensed milk, cream cheese, from-scratch custard, and vegan/dairy-free. No oven required.
Not sure which no-bake banana pudding to make? Start here—pick your base (classic, condensed milk, cream cheese, custard, or vegan) and the rest falls into place. Scroll down & get the full step-by-step options in this blog post.

The classic (light, fluffy banana pudding, reliably set)

This is the “banana pudding recipe” most people picture: instant vanilla pudding, whipped cream, bananas, and vanilla wafers. It’s easy, and it still tastes like a celebration.

The condensed milk version (extra creamy banana pudding, no-cook)

If you love a richer spoon and a dessert that holds up longer at gatherings, banana pudding with sweetened condensed milk is the move. It’s no-bake, no oven, and still feels indulgent.

The cream cheese banana pudding recipe (thick, tangy, cheesecake-style)

Cream cheese makes the layers sturdier and adds a gentle tang that keeps the sweetness from feeling heavy. It also nods toward a banana pudding cheesecake no bake style without turning the whole thing into a separate dessert.

The from-scratch custard (homemade, old-fashioned, no oven required)

This one tastes the most “made.” You’ll cook a simple stovetop custard, chill it, then layer as usual. The payoff is deeper vanilla flavor and a silkier texture that feels unmistakably homemade.

The vegan/dairy-free banana pudding (still creamy, still classic recipe)

A well-made vegan banana pudding can be every bit as satisfying. The secret is a pudding base that sets firmly, plus a chill long enough to knit the layers together.

Also Read: Sweetened Condensed Milk Fudge: 10 Easy Recipes


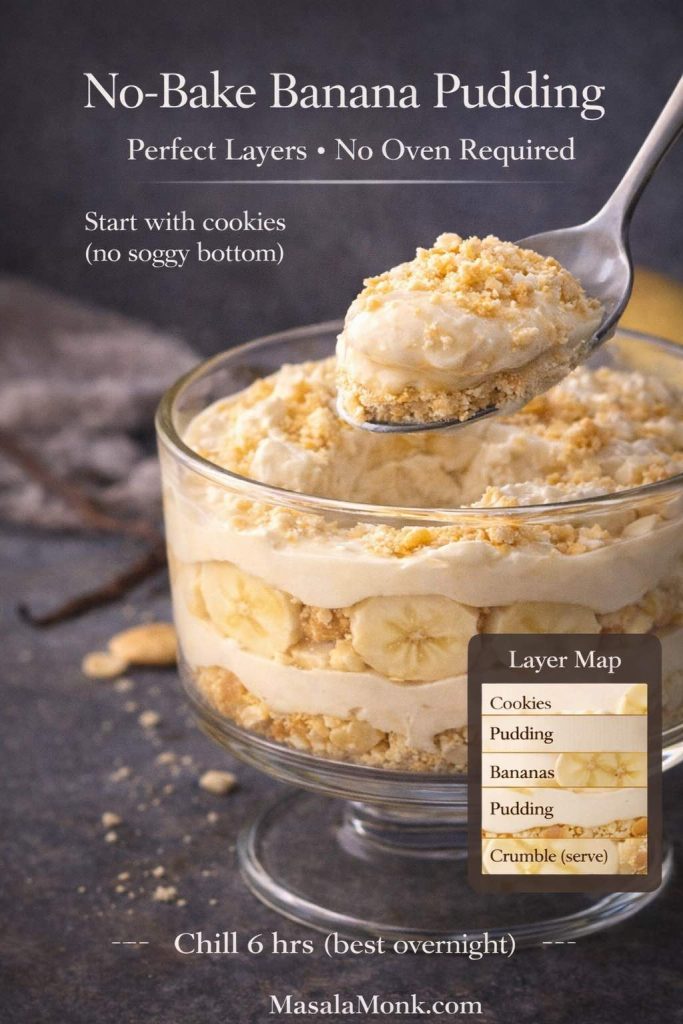
Close-up of a spoon lifting a creamy bite of no-bake banana pudding from a glass dessert bowl. The pudding shows layers of vanilla pudding, banana slices, and crushed cookie crumbs. Text overlay reads “No-Bake Banana Pudding,” “Perfect Layers • No Oven Required,” and “Start with cookies (no soggy bottom),” plus a small “Layer Map” inset listing cookies, pudding, bananas, pudding, and crumble (serve). Bottom text says “Chill 6 hrs (best overnight)” and “MasalaMonk.com.”
If your no-bake banana pudding ever turns watery at the bottom, this is the fix: start with a cookie layer, then build upward so the crumbs absorb slowly instead of collapsing fast. Keep bananas tucked under pudding, chill long enough for everything to set, and you’ll get thick, scoopable layers that taste richer and look far more “finished” when you serve.

The ingredients that matter (and why each one changes the texture)

Banana pudding can look like a simple list on paper, yet a few small choices decide whether you end up with clean, scoopable layers or a soft, slumped bowl of sweetness. Luckily, the fixes are straightforward.

Bananas: ripe, but not collapsing

Aim for bananas that are yellow with light freckles—fragrant, sweet, and tender without being watery. If they’re very ripe (lots of brown), they’ll still taste great; however, they can release more moisture as they sit. In that case, you’ll want a thicker pudding base and a little more chill time.

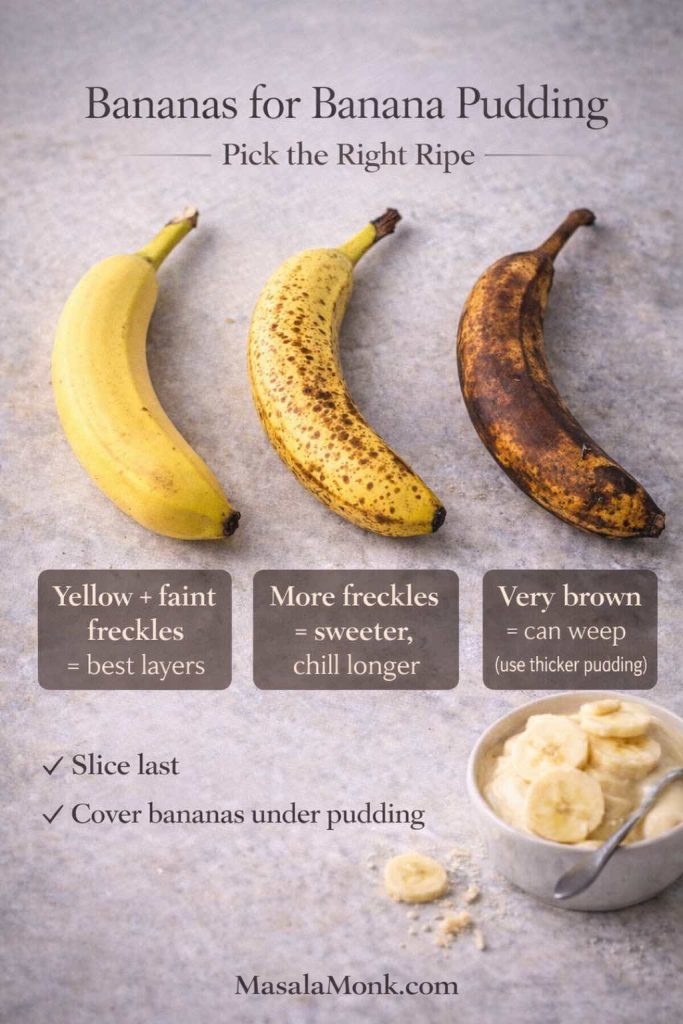
Three bananas in different ripeness stages on a light gray surface with labels for banana pudding: yellow with faint freckles for best layers, more freckles for sweeter flavor, and very brown bananas that can weep (use thicker pudding). Includes tips to slice bananas last and keep slices covered under pudding. MasalaMonk.com footer.
The easiest way to keep no-bake banana pudding thick (not watery) is choosing the right banana. Yellow with light freckles gives the cleanest layers, while extra-freckled bananas taste sweeter but benefit from a longer chill. Very brown bananas can release more moisture—so if you use them, keep your pudding base thicker and don’t rush the fridge time. Slice bananas last, then cover the layer fully with pudding to slow browning and keep the bottom from “swimming.”

Creamy base: pudding mix, custard, or condensed milk

  • Instant pudding mix gives a consistent set and keeps the method truly no-cook.
  • Stovetop custard brings the “homemade banana pudding” depth, and it still stays no oven required.
  • Condensed milk adds body and richness, which helps the pudding stay thick even after hours in the fridge.

Cream: optional, but it changes everything

Whipped cream folded into the pudding base makes the texture lighter, almost mousse-like. It also softens the sweetness so each bite feels more balanced. If you’ve ever wondered about the difference between heavy cream and whipping cream for desserts, this quick explainer on heavy cream is a helpful reference—especially when you’re deciding what will whip most reliably.

Cookies: the quiet backbone of the whole dessert

Cookies aren’t just garnish here. They’re structure. They’re sponge. And then they’re the reason banana pudding becomes cohesive instead of just “bananas with pudding.”

Also Read: Kahlua Drinks: 10 Easy Cocktail Recipes (Milk, Vodka, Coffee)


Cookies for banana pudding (vanilla wafers, plus the best swaps)

If you want the most classic finish, vanilla wafers are hard to beat. They soften into tidy layers rather than dissolving instantly, and their gentle vanilla flavor keeps the dessert focused on bananas and cream.

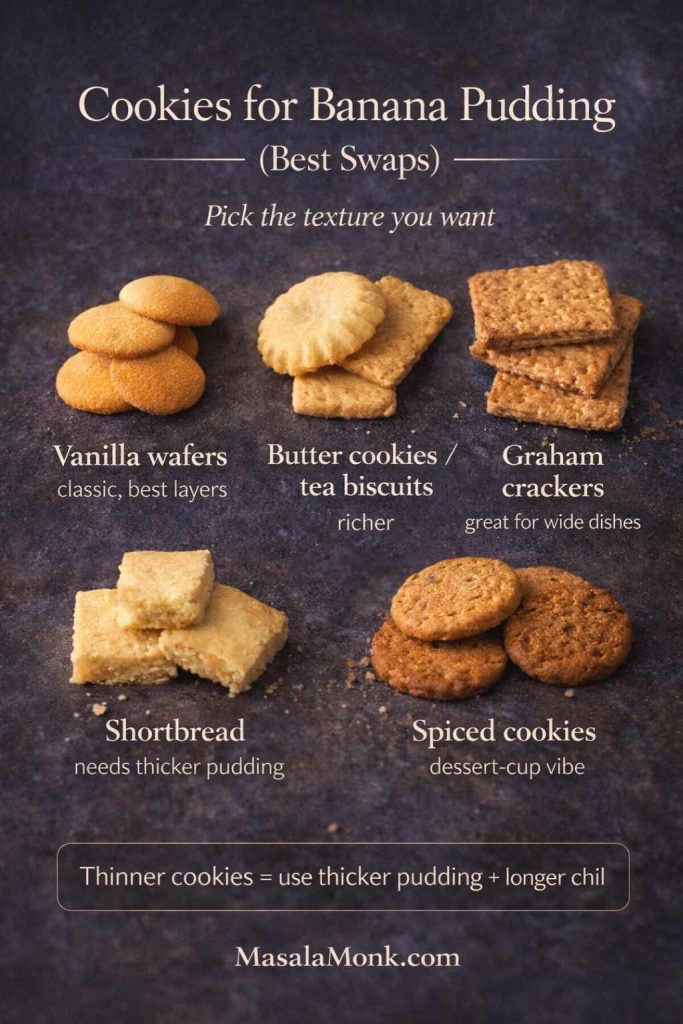
Cookie guide for no-bake banana pudding showing five options: vanilla wafers (classic), butter cookies/tea biscuits (richer), graham crackers (great for wide dishes), shortbread (needs thicker pudding), and spiced cookies (dessert-cup vibe). Note at bottom: thinner cookies need thicker pudding and a longer chill. MasalaMonk.com footer.
Cookies are the backbone of banana pudding. Vanilla wafers give the most classic, tidy layers, while butter cookies make it taste more bakery-rich. Graham crackers are great in wider dishes, shortbread holds up best with a thicker pudding base, and spiced cookies turn jars into cozy dessert cups. If your layers ever go too soft, it’s usually not “your fault”—it’s a cookie thickness + chill-time mismatch.

Banana pudding with vanilla wafers (the classic layering cookie)

Vanilla wafers create that signature texture: soft, cake-like, and spoonable, yet still layered. They also look beautiful through glass if you serve banana pudding in jars.

Vanilla wafer alternatives that still behave well in banana pudding

Sometimes you want a different cookie, either for flavor or because you’re working with what you have.

  • Butter cookies or tea biscuits: richer, more “bakery” tasting
  • Graham crackers: slightly honeyed; great for wide dishes and jars
  • Shortbread: dense and buttery; best paired with a thicker pudding base
  • Spiced cookies: cozy, dramatic, and excellent in dessert cups

If you lean toward delicate cookies, keep your pudding thicker and don’t rush the chill. Otherwise, the layers can turn too soft before serving.

Also Read: Sourdough Recipe: 10 Easy Bread Bakes (Loaves, Rolls & Bagels)


No-bake banana pudding: the classic recipe (vanilla wafers + whipped pudding)

This is the version to make when you want the most reliable outcome with the least effort. It also gives you the cleanest foundation for variations later.

Ingredients (serves 8–10)

  • 3–4 medium ripe bananas
  • 1 box instant vanilla pudding mix (about 90–100 g)
  • Cold milk (use the amount on the box as your starting point)
  • 250–350 ml whipping cream, chilled
  • 1–2 teaspoons vanilla extract (optional)
  • Vanilla wafers (or your cookie choice)
  • A small pinch of salt (optional, but surprisingly important)
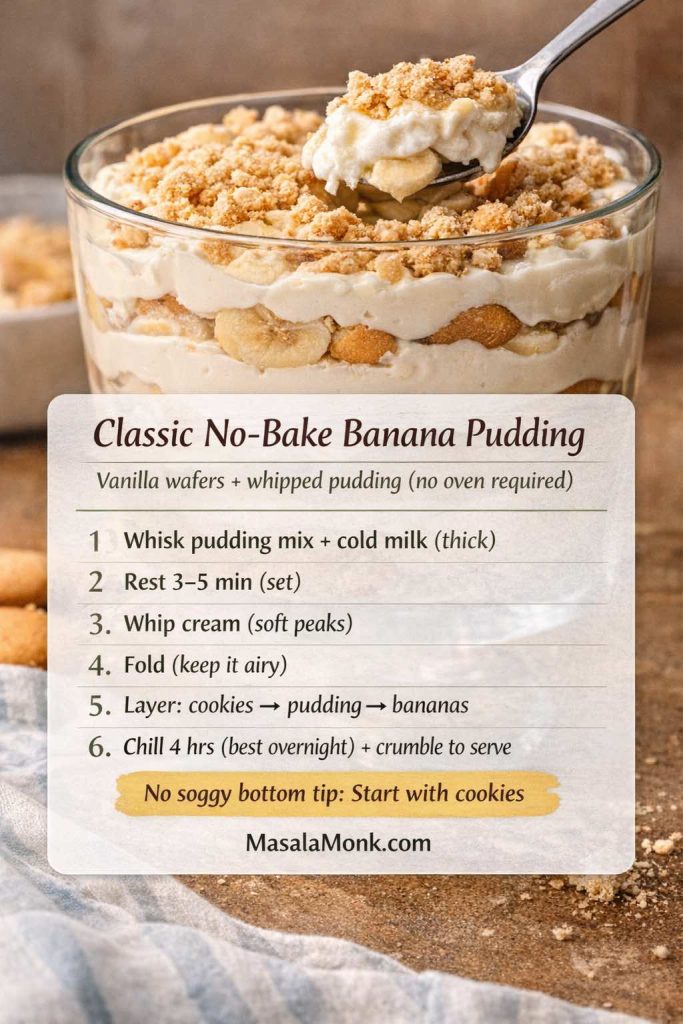
Classic no-bake banana pudding in a glass dish with visible layers of vanilla wafers, banana slices, and creamy pudding, topped with cookie crumble and a spoon lifting a bite. Text overlay shows a 6-step recipe: whisk pudding mix with cold milk, rest 3–5 minutes, whip cream, fold, layer cookies–pudding–bananas, then chill 4 hours (best overnight). Tip: start with cookies.
This is the most reliable no-bake banana pudding—classic vanilla wafers, fluffy whipped pudding, and clean layers that hold. The quick 6-step card makes it easy to build: whisk, fold, layer, then let the fridge do the magic (overnight = bakery-level texture). If you’ve ever had a soggy bottom, the one change that fixes it is right here: start with cookies.

Method

  1. Make the pudding base. Whisk pudding mix with cold milk until it thickens, then let it stand for a few minutes so it sets properly.
  2. Whip the cream. Beat chilled cream until soft peaks. Add vanilla if you want a warmer, dessert-shop aroma.
  3. Fold gently. Fold whipped cream into the pudding base until it looks airy and uniform. Don’t stir aggressively; instead, turn the mixture over itself so you keep the lift.
  4. Slice bananas at the last moment. This keeps them fresher and helps reduce browning.
  5. Layer. In a dish: cookies → pudding → bananas. Repeat until you run out, finishing with pudding on top.
  6. Chill. Refrigerate for at least 4 hours. Overnight is even better because the cookies soften evenly and the pudding tightens into a more cohesive slice-and-scoop texture.

A small finishing move that changes the whole dessert

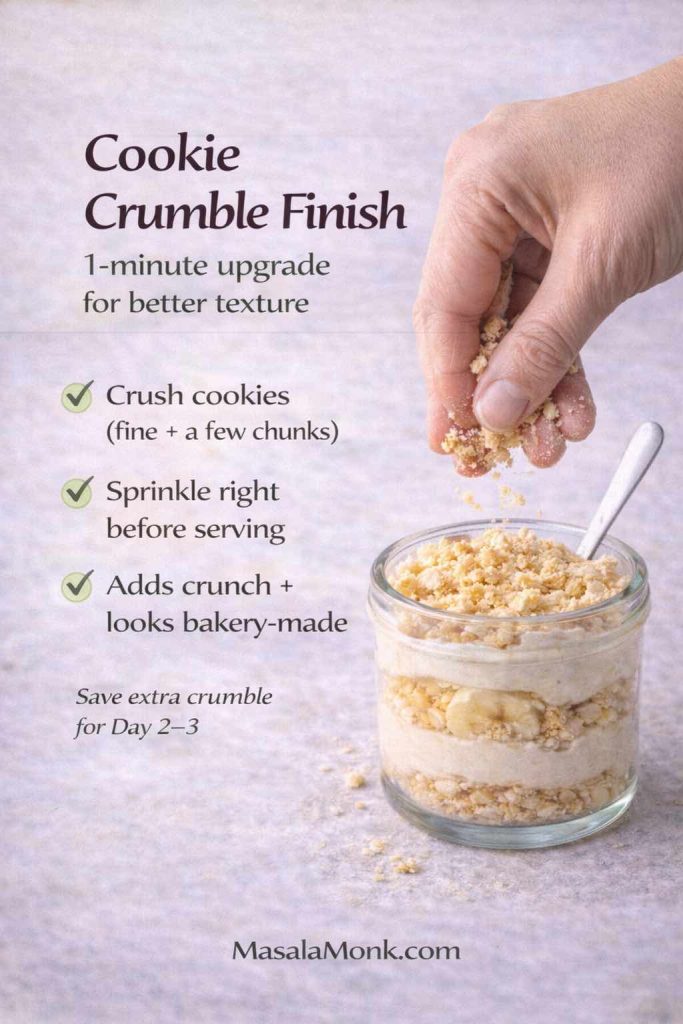
Right before serving, crumble a handful of cookies over the top. The contrast—soft layers underneath, crunchy crumb on top—makes each bite feel more alive.

Instructional graphic titled “Cookie Crumble Finish” showing a hand sprinkling crushed vanilla wafer crumbs over a jar of no-bake banana pudding with visible layers. Text overlay says it’s a 1-minute upgrade for better texture: crush cookies (fine plus a few chunks), sprinkle right before serving, and it adds crunch and looks bakery-made. It also notes to save extra crumble for Day 2–3. Footer reads MasalaMonk.com.
If you want banana pudding to feel more “finished” without adding new ingredients, this is the move: a fresh cookie crumble right before serving. Crushing wafers into a mix of fine crumbs and a few bigger chunks gives you contrast—soft cake-y layers underneath, crisp texture on top. It also makes the dessert look bakery-made in seconds. If you’re storing leftovers, keep a small bowl of crumble aside and add it at serving time; it brings Day 2 (and even Day 3) right back to life.

If you enjoy layered puddings and want another “simple but elegant” idea, this savoiardi chocolate vanilla pudding has a similarly satisfying spoon texture, just with a more dramatic chocolate-and-cream vibe.

Also Read: Cold Brew Espresso Martini: How to Make It (Step-by-Step Recipe)


No-cook banana pudding with sweetened condensed milk (extra creamy, no oven required)

When you want banana pudding that tastes richer and holds up longer—especially if it’s sitting out for a while at a gathering—condensed milk is the shortcut that feels like a secret.

This variation also makes it easier to keep the pudding thick even after chilling, which is helpful if you’re using cookies that soften quickly.

Ingredients

  • 1 can sweetened condensed milk (about 395–400 g)
  • 1 box instant vanilla pudding mix (about 90–100 g)
  • Cold milk (start with slightly less than the box suggests)
  • Whipped cream (optional but recommended)
  • Bananas
  • Vanilla wafers or other cookies
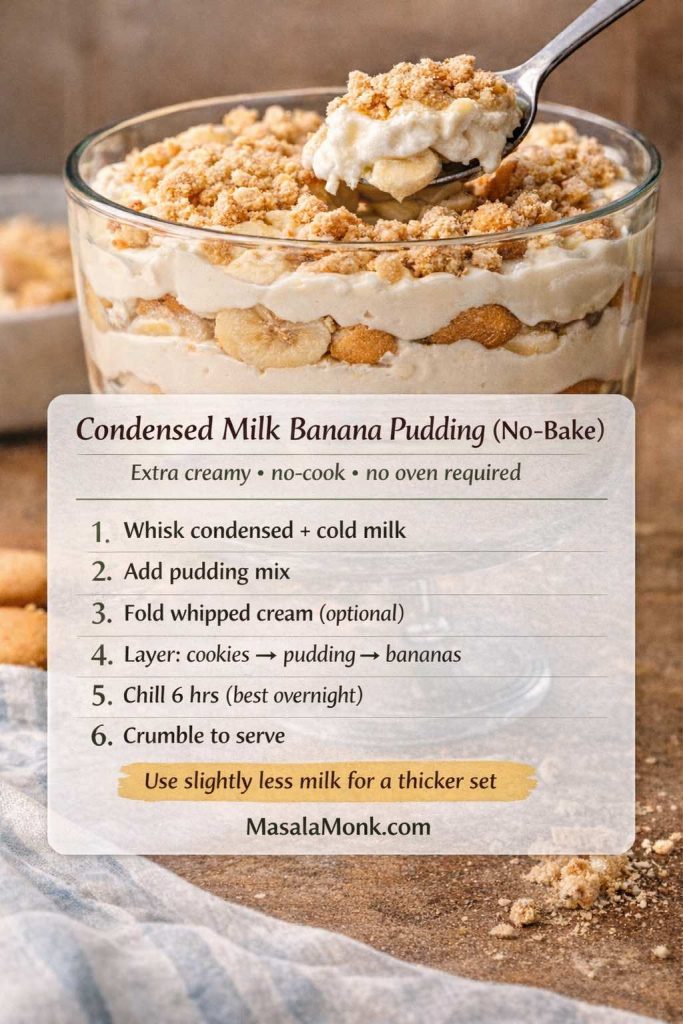
Condensed milk banana pudding (no-bake) in a glass dish with visible layers of bananas, vanilla wafers, and creamy pudding, topped with cookie crumble and a spoon lifting a bite. Text overlay shows a simple 6-step method: whisk sweetened condensed milk with cold milk, add pudding mix, fold in whipped cream (optional), layer cookies–pudding–bananas, chill 6 hours (best overnight), then crumble to serve. Tip: use slightly less milk for a thicker set.
If you want banana pudding that tastes richer and holds its shape longer, this sweetened condensed milk version is the upgrade. The condensed milk adds body, which helps the layers stay thick after chilling—especially useful if your cookies soften quickly. One small move makes it even more reliable: start with slightly less milk than your pudding box suggests, then let it rest overnight so the wafers turn cake-y without the bottom getting watery.

Method

  1. Whisk condensed milk and cold milk until smooth and glossy.
  2. Add the pudding mix and whisk until thickened.
  3. Fold in whipped cream if you want a lighter finish.
  4. Layer cookies, bananas, pudding, repeating until the dish is full.
  5. Chill longer than the classic—aim for 6 hours or overnight—so the layers become neatly sliceable.

If you’re the type who loves make-ahead fridge sweets, you might also enjoy peanut butter fudge. It’s a different texture entirely, yet it hits that same “chill, slice, share” convenience.

Also Read: 10 Vegan Chocolate Cake Recipes (Easy, Moist, & Dairy-Free)


Cream cheese no-bake banana pudding (thick, tangy, cheesecake-style recipe)

Cream cheese changes the personality of banana pudding. The dessert becomes thicker and slightly tangy, with a richer mouthfeel that feels closer to a cheesecake filling. It’s a wonderful choice if you like desserts that scoop cleanly and don’t slump.

Ingredients (serves 8–10)

  • 225 g cream cheese, softened
  • 1 box instant vanilla pudding mix
  • Cold milk (use a little less to keep it thick)
  • 250–350 ml whipping cream, whipped to soft peaks
  • Optional: 1 can sweetened condensed milk for extra richness
  • Bananas
  • Cookies (vanilla wafers are perfect here)
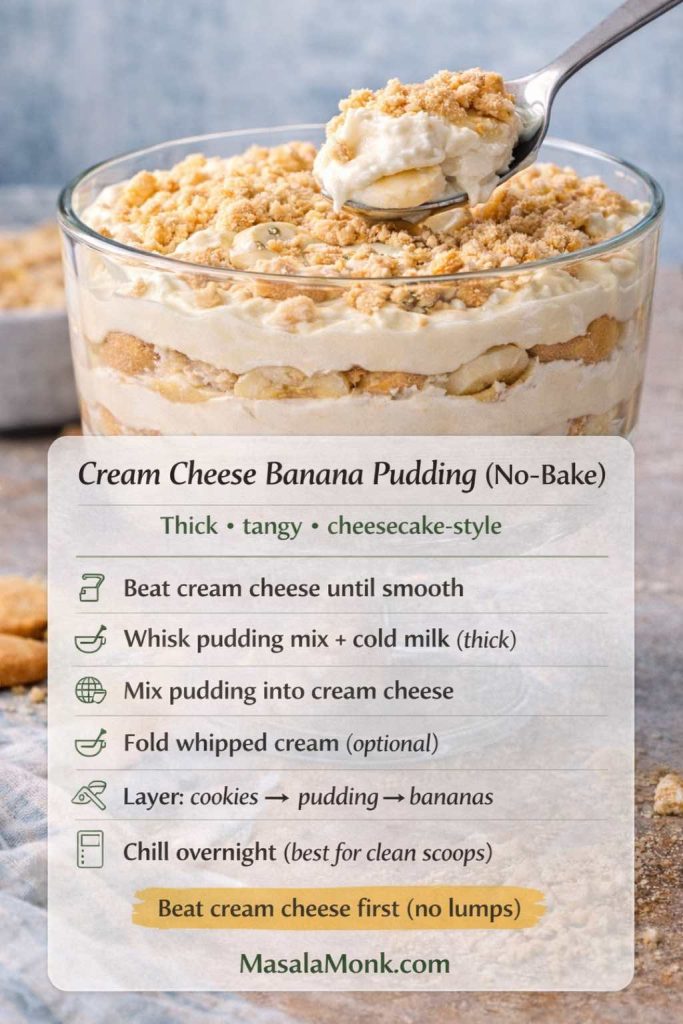
Cream cheese banana pudding (no-bake) in a glass dish with layered bananas, vanilla wafers, and thick creamy pudding, topped with cookie crumble and a spoon lifting a bite. Text overlay lists steps: beat cream cheese until smooth, whisk pudding mix with cold milk until thick, mix pudding into cream cheese, fold in whipped cream (optional), layer cookies–pudding–bananas, then chill overnight for clean scoops. Tip: beat cream cheese first to avoid lumps.
This is the banana pudding to make when you want thick, scoop-clean layers with a gentle cheesecake tang. Cream cheese adds structure, so the dessert slumps less and holds up better on a table. The only non-negotiable is texture: beat the cream cheese until completely smooth before anything else goes in—once lumps hide in the base, they’re hard to fix. After an overnight chill, the layers tighten, the wafers turn cake-y, and every spoonful stays creamy instead of runny.

Method

  1. Beat the cream cheese until completely smooth. Take your time—lumps are stubborn once you add everything else.
  2. Blend in condensed milk if using, until creamy and glossy.
  3. Whisk pudding mix with cold milk separately until thick, then fold or beat it into the cream cheese mixture.
  4. Fold in whipped cream to lighten the base.
  5. Layer with bananas and cookies, then chill overnight for the best structure.

If you want to lean into the cheesecake mood, serve this version alongside no-bake blueberry cheesecake for a dessert table that feels intentional rather than accidental.

Also Read: Cranberry Moscow Mule Recipe: A Festive Holiday Cocktail With Easy Variations


Homemade banana pudding from scratch (stovetop custard, still no oven needed)

This is the method that turns banana pudding into something you might proudly bring to a holiday dinner. It tastes deeper, it feels silkier, and it carries a quiet confidence that instant mix can’t quite replicate.

Even so, it’s still simple. You’re making a vanilla custard thickened with egg yolks and cornstarch, then chilling it until cold and spoonable. After that, you layer it exactly the same way.

For a dependable reference on how stovetop pudding thickens, King Arthur’s simple stovetop vanilla pudding is a useful baseline. If you enjoy understanding the “why” behind the method, Serious Eats has a clear explanation in their guide to vanilla pastry cream, which shares many of the same principles.

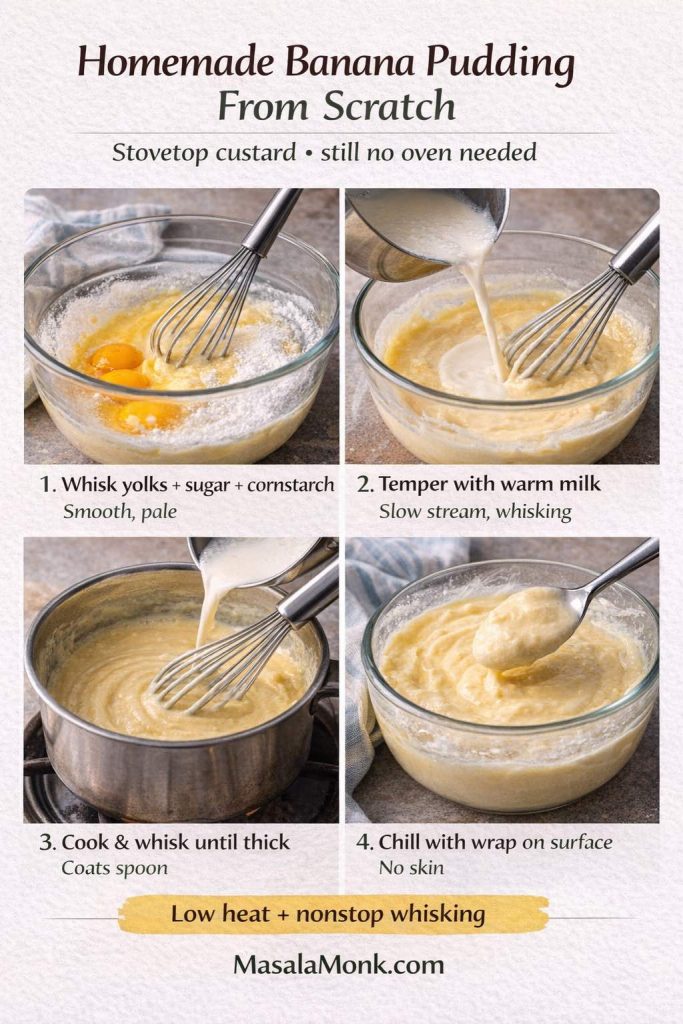
Step-by-step infographic titled “Homemade Banana Pudding From Scratch” showing a 2x2 grid of stovetop custard steps: whisk egg yolks with sugar and cornstarch until smooth, temper with warm milk while whisking, cook and whisk on low heat until thick and coating a spoon, then chill with plastic wrap pressed on the surface to prevent a skin. Note reads “Low heat + nonstop whisking.” MasalaMonk.com appears in the footer.
If you want banana pudding that tastes unmistakably homemade, the stovetop custard is the difference—and it’s easier than it sounds once you see the rhythm. This quick guide covers the two make-or-break moments: tempering (so yolks don’t scramble) and steady whisking on low heat (so the custard thickens smoothly instead of turning lumpy). Finish by chilling with wrap pressed directly on the surface to prevent a skin, then layer with bananas and wafers once it’s fully cold for the cleanest, most “old-fashioned” texture.

Ingredients (serves 8–10)

  • 500 ml milk (2 cups)
  • 90–120 g sugar (adjust to taste)
  • 3 egg yolks
  • 20–25 g cornstarch (about 3 tablespoons)
  • Pinch of salt
  • 2 teaspoons vanilla extract
  • 25–30 g butter (optional, for extra silkiness)
  • Bananas
  • Vanilla wafers (or cookie of choice)

Method

  1. Whisk the yolks, sugar, cornstarch, and salt until smooth and slightly thickened. This mixture should look pale and glossy.
  2. Warm the milk in a saucepan until steaming. Do not boil—you want it hot enough to temper the eggs, not hot enough to scramble them.
  3. Temper slowly. Whisk a little warm milk into the yolk mixture, then a little more, building the temperature gradually.
  4. Return to the pan and cook. Pour the tempered mixture back into the saucepan and cook on medium heat, whisking constantly. In a few minutes, it will shift from thin to thick. Keep whisking until it’s pudding-like and coats the back of a spoon.
  5. Finish off the heat. Remove the pan from the heat and stir in butter (if using) and vanilla.
  6. Cool correctly. Press a sheet of plastic wrap directly onto the surface so a skin doesn’t form. Let it cool to room temperature, then refrigerate until fully cold.
  7. Layer and chill again. Once the custard is cold and thick, layer cookies, bananas, and custard. Chill at least 4–6 hours, ideally overnight.

To make it “old fashioned” banana pudding without an oven

Keep the custard thicker and skip folding in whipped cream. The result is dense, silky, and unmistakably homemade—very much the old-fashioned homemade banana pudding feeling, while still staying no oven required.

Also Read: Baked Ziti Recipe Collection: 15 Easy Variations


Vegan and dairy-free banana pudding (no-bake, no oven, still satisfying)

A dairy-free banana pudding shouldn’t feel like a side quest. It should taste like banana pudding—fragrant bananas, vanilla warmth, and a creamy base that sets properly.

The key is choosing a plant milk that thickens well (oat and soy are excellent), then cooking a quick pudding base with cornstarch. After that, you chill it fully before layering.

If you like fridge-set desserts, you might also enjoy the textures in this collection of chia pudding recipes. The flavors differ, yet the “make it, chill it, enjoy it” rhythm is beautifully similar.

Ingredients (serves 6–8)

  • 500 ml plant milk (oat or soy recommended)
  • 50–70 g sugar (adjust to taste)
  • 20–25 g cornstarch (about 3 tablespoons)
  • Pinch of salt
  • 2 teaspoons vanilla extract
  • 1–2 tablespoons vegan butter (optional)
  • Bananas
  • Vegan-friendly cookies (vanilla-style if possible)
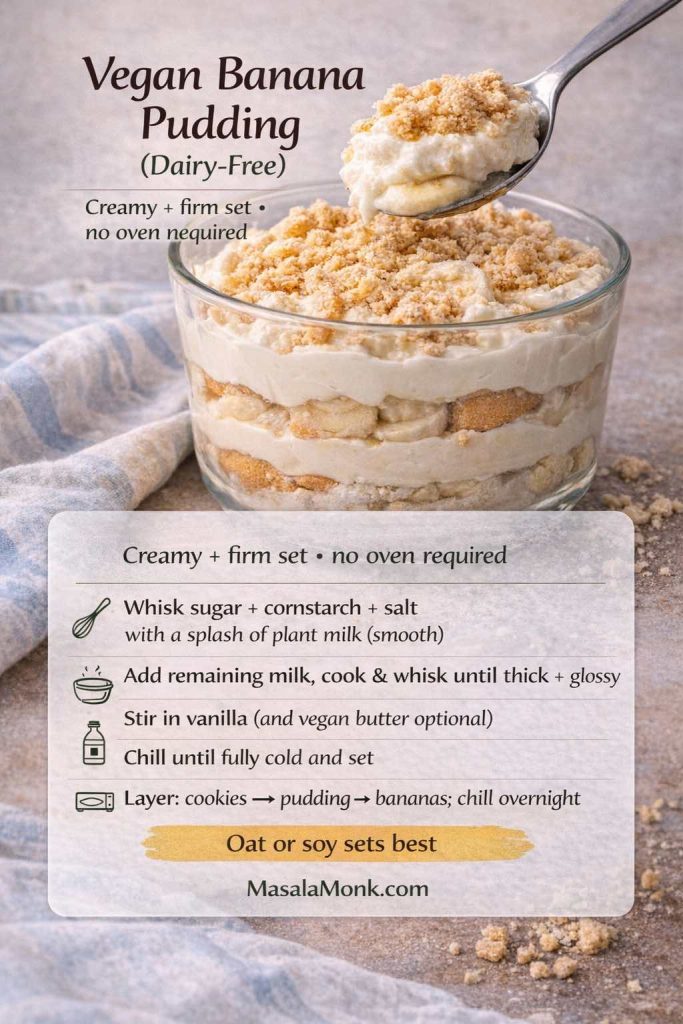
Vegan banana pudding (dairy-free) in a clear glass bowl with layered bananas, cookies, and creamy plant-based pudding, topped with cookie crumble and a spoon lifting a bite. Text overlay shows steps: whisk sugar, cornstarch, and salt with a splash of plant milk, add remaining milk and cook while whisking until thick and glossy, stir in vanilla (and vegan butter optional), chill until fully cold and set, then layer cookies–pudding–bananas and chill overnight. Tip: oat or soy sets best. MasalaMonk.com footer.
A dairy-free banana pudding only feels “compromised” when the base doesn’t set. This version fixes that by cooking a quick cornstarch pudding until it turns thick and glossy, then chilling it fully before you build the layers. Oat or soy milk tends to set more reliably than thinner plant milks, and the overnight rest does double duty: it firms the pudding and softens the cookies into that classic cake-y texture. Assemble once, chill, and you’ll get clean scoops that still taste like real banana pudding.

Method

  1. Make a slurry. Whisk cornstarch, sugar, and salt with a splash of the plant milk until smooth.
  2. Add the remaining milk and cook in a saucepan on medium heat, whisking constantly.
  3. Cook until thick. Once it turns glossy and pudding-like, remove from the heat.
  4. Stir in vanilla and vegan butter if using.
  5. Cool with wrap on the surface, then refrigerate until cold and set.
  6. Layer with bananas and cookies, then chill overnight so the cookie layers soften and the pudding becomes cohesive.

Also Read: Rob Roy Drink Recipe: Classic Scotch Cocktail (Perfect + Dry + Sweet Variations)


Banana pudding cheesecake no-bake style (a variation without changing the whole plan)

If you love cheesecake desserts but still want the nostalgic banana pudding texture, you can build a banana pudding cheesecake no bake variation by combining the cream cheese base with a crumb layer.

  • Crush cookies and press them into the bottom of your dish (a little melted butter helps, though it’s optional if your cookie crumbs are already buttery).
  • Add a thick cream cheese pudding layer, then bananas, then more pudding, then cookies.
  • Chill overnight so it slices cleanly.

For another easy, fruit-forward no-bake dessert that feels “party ready,” keep no-bake blueberry cheesecake in your back pocket—it complements banana pudding beautifully without competing for the same flavor space.

Also Read: Green Chutney Recipe (Coriander–Mint / Cilantro Chutney)


How to layer no-bake banana pudding so it turns cake-y, not soggy

Layering seems obvious until you scoop and realize the cookies dissolved too fast or the bananas slid around like they were on ice. A few simple habits fix that.

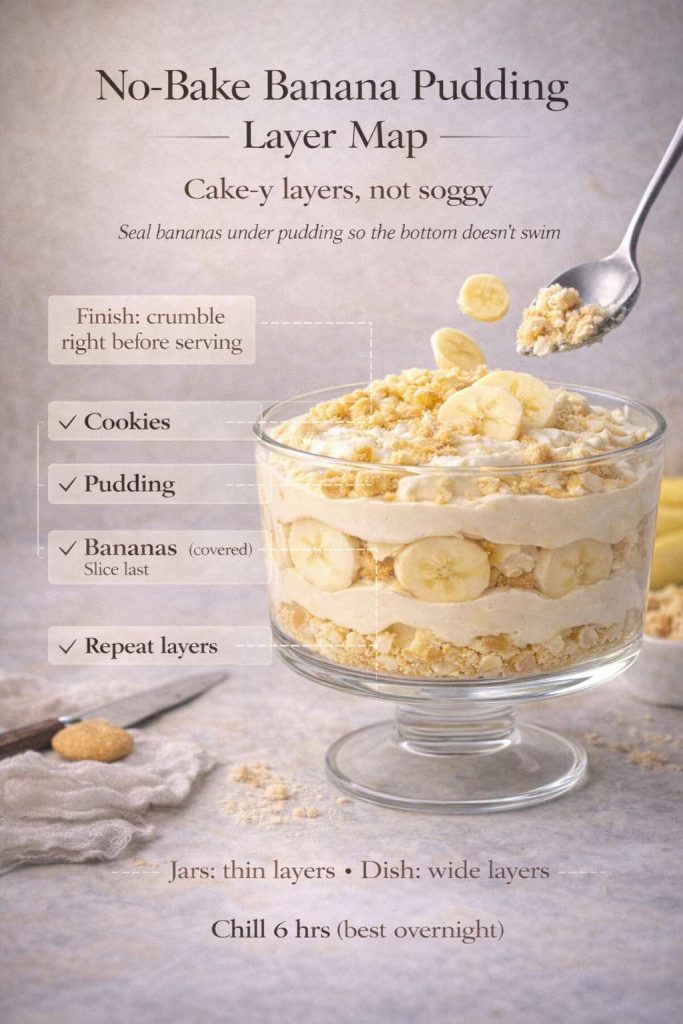
No-bake banana pudding in a clear glass trifle bowl with visible layers of cookies, creamy vanilla pudding, and banana slices. Text overlay reads “No-Bake Banana Pudding Layer Map” and “Cake-y layers, not soggy,” with callouts showing the order: cookies, pudding, bananas (covered—slice last), repeat layers, and finish with cookie crumble right before serving. Bottom note says “Chill 6 hrs (best overnight)” and “MasalaMonk.com.”
This quick no-bake banana pudding layer map is the difference between neat, cake-y layers and a soggy bottom. Start with cookies, seal the bananas under pudding (slice them last), then repeat until the dish is full. Finish with a fresh cookie crumble right before serving, and give it a long chill (overnight is the real upgrade) so every scoop stays thick, creamy, and clean.

Start with cookies, not pudding

Cookies at the base give the dessert structure. They also absorb moisture from the pudding gradually, which helps the bottom layer set rather than swim.

Keep banana slices medium-thick

Thin slices vanish into the pudding; thick slices can feel slippery. Aim for coins that hold their identity without taking over.

Seal bananas under pudding

Bananas brown when exposed to air. Covering them with pudding slows that down while keeping the layers tidy.

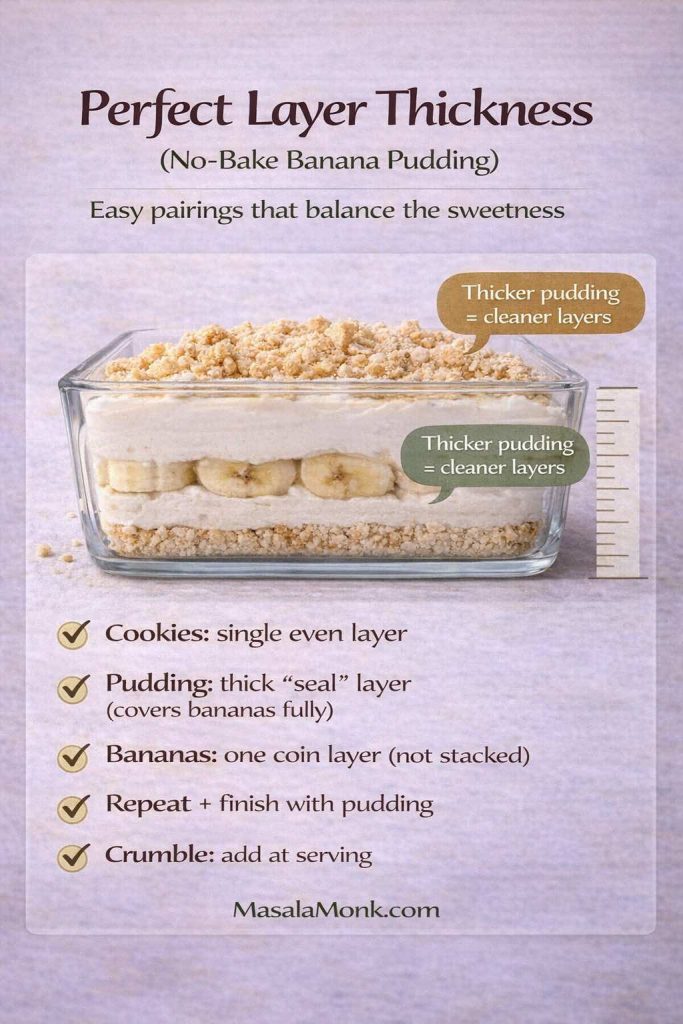
Instructional graphic titled “Perfect Layer Thickness (No-Bake Banana Pudding)” showing a glass dish with visible cookie, pudding, and banana layers plus a ruler-style guide. Text explains: cookies should be a single even layer; pudding should be a thick “seal” layer that fully covers bananas; bananas should be one coin layer, not stacked; repeat layers and finish with pudding; add crumble at serving. Notes say thicker pudding gives cleaner layers. Footer: MasalaMonk.com.
Layer order matters, but layer thickness is what keeps banana pudding from turning soft and messy. Think of pudding as a “seal”: it should be thick enough to fully cover the bananas so they don’t brown quickly or leak moisture into the cookie base. Keep banana slices to a single coin layer (no stacking), then repeat and finish with pudding so the top stays smooth. Save the cookie crumble for serving time—this one step gives you that perfect contrast between cake-y layers underneath and a crisp finish on top.

Chill longer than you think you need

Four hours works. Overnight is better. The difference isn’t subtle: cookies soften evenly, the pudding firms, and the flavors knit into a single, harmonious spoonful.

If you’re serving in jars, build thinner layers. That way, every bite picks up banana, cookie, and pudding together.

Also Read: Paper Plane Cocktail Recipe + Best Amaro Substitutes & Tips


No-bake banana pudding in jars (dessert cups that look as good as they taste)

Banana pudding served in a dish feels nostalgic. Banana pudding served in jars feels modern and intentional—especially if you’re bringing dessert to a gathering or setting up a dessert table.

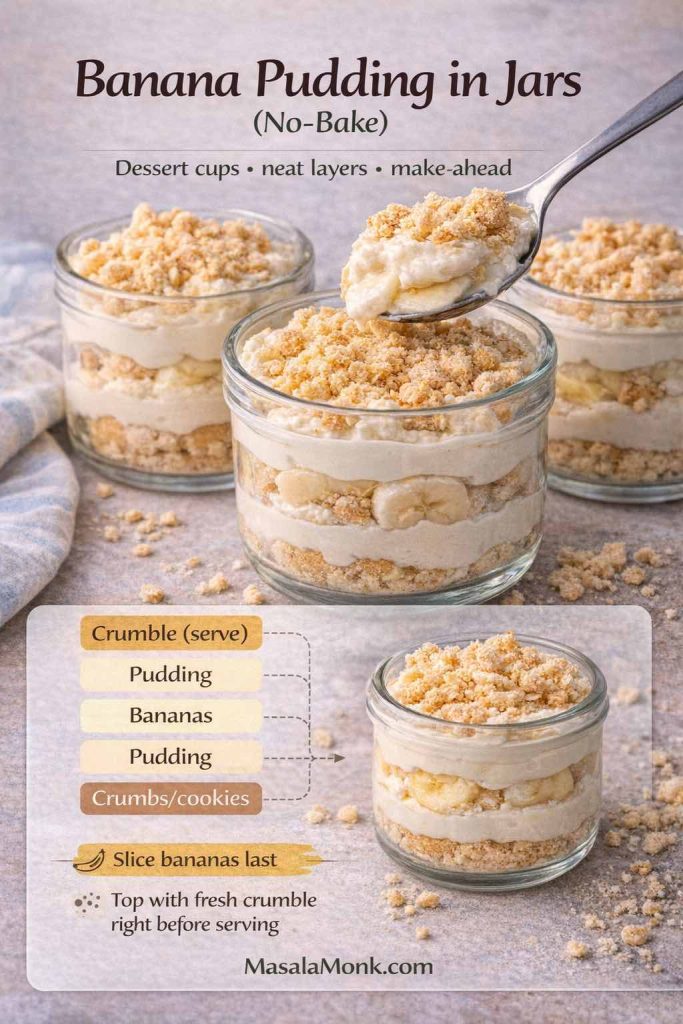
Infographic titled “Banana Pudding in Jars (No-Bake)” showing three glass dessert jars filled with layered banana pudding and cookie crumbs, plus a spoon lifting a bite. A layering guide lists: crumbs/cookies, pudding, bananas, pudding, and crumble to serve. Tips say “Slice bananas last” and “Top with fresh crumble right before serving.” Footer reads MasalaMonk.com.
Jars make banana pudding feel instantly more “party-ready,” and they also protect the layers so each serving stays neat. Use this simple jar layer order—crumbs/cookies → pudding → bananas → pudding → crumble (serve)—and you’ll get the best texture in every bite. Two small details matter most: slice bananas right before assembling (so they stay fresher) and save the final crumble for the last minute so the top stays crisp instead of turning soft in the fridge.

Why jars work so well

  • They protect the layers so the pudding stays neat
  • They’re easy to portion and transport
  • They look beautiful through the glass

If you love the “dessert cup” presentation, you’ll also like the vibe of these Lotus Biscoff dessert cups. They’re different in flavor, yet they share the same layered, chilled charm.

Jar layering rhythm

Cookies (or crumbs) → pudding → bananas → pudding → cookie crumble on top.
Then chill.
Just before serving, add fresh crumble again so the top stays crisp.

Also Read: Sandwich for Breakfast: Breakfast Sandwich Recipe + 10 Variations


Make-ahead timing (how to plan banana pudding without stress)

Banana pudding is at its best when it has time to rest, which makes it a natural make-ahead dessert. Still, timing matters—especially if you want bananas to look good and layers to hold.

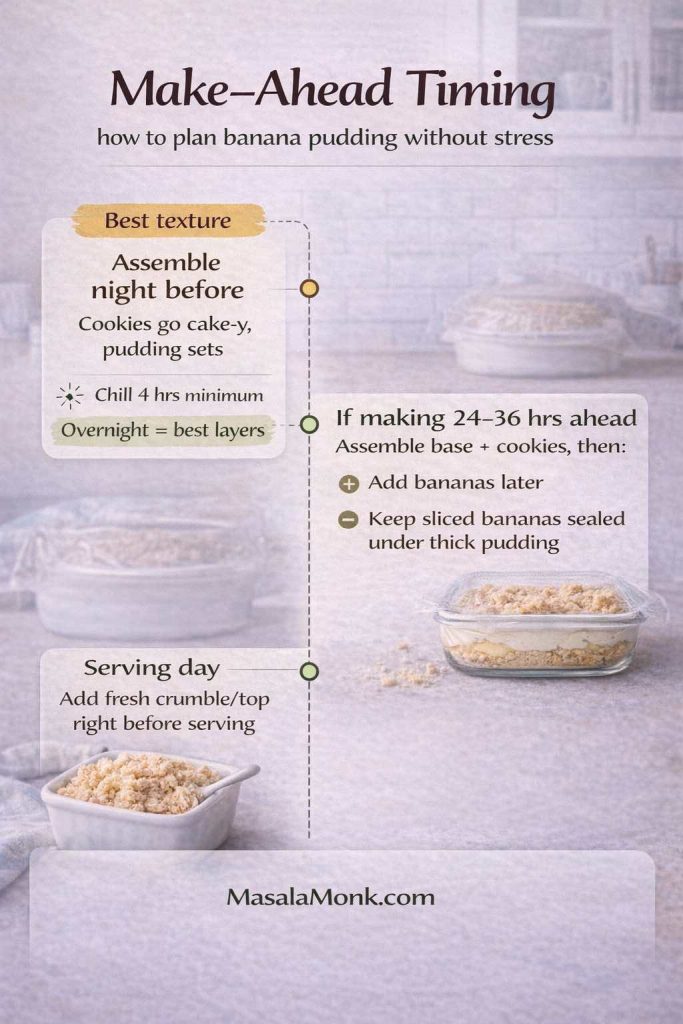
Vertical infographic titled “Make-Ahead Timing: how to plan banana pudding without stress” with a timeline. It recommends assembling banana pudding the night before for best texture, chilling at least 4 hours (overnight best) so cookies turn cake-y and pudding sets. If making 24–36 hours ahead, assemble base and cookies, then add bananas later or keep bananas sealed under thick pudding. On serving day, add fresh crumble/topping right before serving. Footer: MasalaMonk.com.
Banana pudding is one of those desserts that actually improves with a little planning. The simplest win is assembling it the night before: the pudding firms, the cookies soften into that cake-y layer, and the whole dish scoops more cleanly. If you need to make it farther ahead, treat bananas as the variable—either add them closer to serving or keep them fully covered under a thicker pudding layer to reduce browning and excess moisture. Right before serving, add a fresh crumble on top so the finish stays crisp.

The sweet spot: assemble the night before

When you assemble banana pudding the evening before, you get the best of everything: the cookies soften, the pudding sets, and the bananas mellow without turning watery.

If you need to assemble earlier

If you’re making it more than a day in advance, consider one small adjustment: assemble the pudding and cookies first, then add bananas closer to serving time. Alternatively, you can keep bananas protected under thicker pudding layers so air exposure stays minimal.

Food safety basics for fridge desserts

Since banana pudding contains dairy—and sometimes eggs, if you make custard—good refrigeration habits matter. The general guidance on keeping perishable foods safe (including cooling and refrigeration) from FoodSafety.gov is a solid reference to follow. For egg-based custards in particular, the FDA’s overview of egg safety is worth a quick read if you want extra peace of mind.

For leftovers, the USDA’s advice on leftovers and food safety is a reliable guide for how long chilled desserts typically stay safe in the fridge.

Also Read: Classic Rum Punch + 9 Recipes (Pitcher & Party-Friendly)


Storage (how to keep banana pudding tasting fresh)

Cover it tightly

Banana pudding absorbs fridge odors easily. A tight lid or well-sealed wrap keeps the flavor clean and keeps the top from drying out.

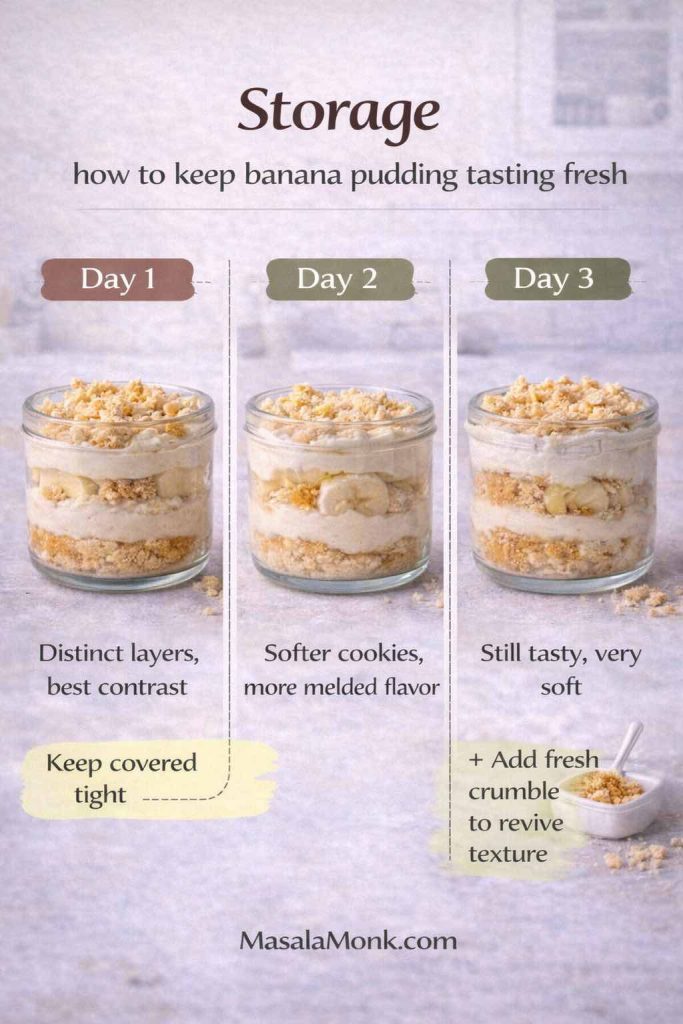
Triptych infographic titled “Storage: how to keep banana pudding tasting fresh” showing banana pudding in a jar over three days. Day 1 notes distinct layers and best contrast; Day 2 notes softer cookies and more melded flavor; Day 3 notes still tasty but very soft, with a tip to add fresh crumble to revive texture. Another tip says “Keep covered tight.” Footer reads MasalaMonk.com.
Banana pudding changes as it sits, and that’s normal—not a mistake. On day one, the layers are the most distinct and the contrast is strongest. By day two, the cookies soften further and everything tastes more blended (often the sweet spot). By day three, it’s still delicious, just much softer overall. The easiest way to keep it tasting “fresh” is sealing it tightly so it doesn’t pick up fridge odors—and saving a little cookie crumble to sprinkle right before serving for a crisp finish.

Keep it cold, consistently

Avoid leaving the pudding out for long stretches, especially in warm rooms. Serve what you need, then return the dish to the fridge.

Expect the texture to evolve

On day one, layers are distinct. By day two, the cookies soften further. By day three, it’s still delicious—just more uniformly soft. If you like a bit of crunch, save extra cookie crumble to add at the end.


Serving ideas that make banana pudding feel “new” again

Banana pudding is classic for a reason, yet it also welcomes a few thoughtful finishing touches.

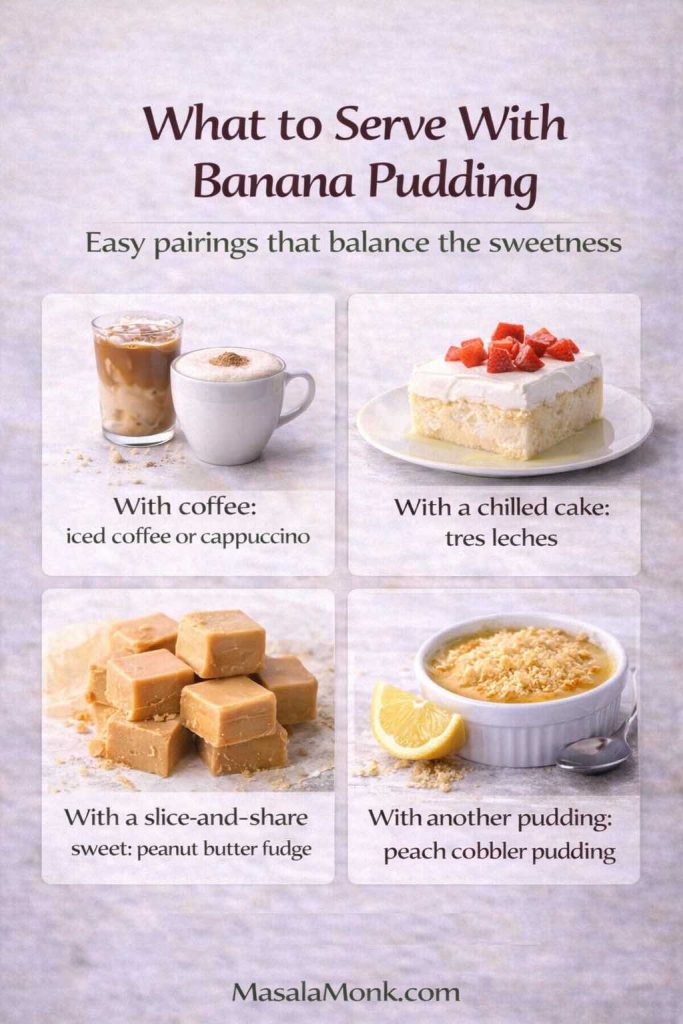
Infographic titled “What to Serve With Banana Pudding” with the subtitle “Easy pairings that balance the sweetness.” A four-tile grid shows: iced coffee or cappuccino, tres leches (chilled cake), peanut butter fudge (slice-and-share sweet), and peach cobbler pudding (another pudding dessert). Each tile includes a photo and a short label. Footer reads MasalaMonk.com.
Banana pudding is rich and soft, so it shines brightest next to something that adds contrast—either bitterness, chill, or a different texture. Coffee (iced coffee or cappuccino) cuts the sweetness and makes dessert feel café-like. A chilled cake such as tres leches turns the table into a “real dessert spread” without extra work. If you want something sliceable and giftable, peanut butter fudge is a great partner. And if you’re keeping the theme cozy, peach cobbler pudding gives a warm-spiced counterpoint while staying in the same spoon-dessert lane.

A light drizzle (without turning it into a chocolate dessert)

A small drizzle can make the surface look glossy and special, particularly when you’re serving guests. This 3-minute chocolate syrup works beautifully if you keep it subtle—just enough to accent the bananas and vanilla, not drown them.

A cookie “snow” finish

Crumble cookies over the top right before serving. It’s simple, yet it adds crunch and makes the presentation more inviting.

A dessert table that feels balanced

If you’re putting together multiple sweets, pair banana pudding with something that contrasts its creamy softness:

For even more ideas in the same cozy category, this Pudding Palooza dessert roundup is a fun way to keep the theme going without repeating the same flavors.

Pair it with coffee (cold or foamy)

Banana pudding loves coffee. The sweetness and vanilla play nicely against roasted notes, especially after a meal.

  • If you want something refreshing, browse these iced coffee recipes and pick a cold brew or latte-style option.
  • If you’d rather keep it warm and classic, a homemade cappuccino makes the whole dessert moment feel café-like.

Strawberry Smoothie Recipes (12 Easy Blends + Bowls & Protein Shakes)Also Read:


Troubleshooting (so your banana pudding turns out thick, creamy, and layered)

Even a simple dessert can misbehave. Fortunately, banana pudding is forgiving, and the fixes are usually quick.

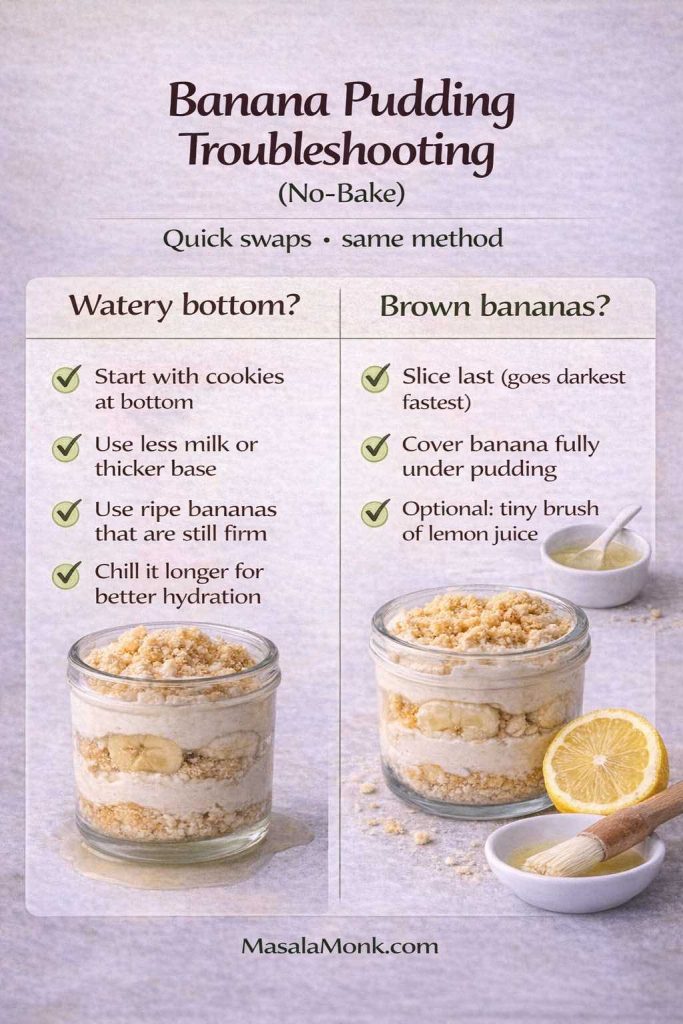
Infographic titled “Banana Pudding Troubleshooting (No-Bake)” with two columns: “Watery bottom?” and “Brown bananas?” The watery-bottom tips say to start with cookies, use less milk or a thicker base, choose ripe bananas that are still firm, and chill longer. The browning tips say to slice bananas last, cover them fully under pudding, and optionally brush lightly with lemon juice. Two jar photos illustrate the layers. Footer reads MasalaMonk.com.
Most banana pudding “problems” come down to two things: moisture and air. If you see liquid pooling at the bottom, it usually means the bananas were very ripe or the pudding base was a bit thin—starting with a cookie layer and using a thicker base (often just slightly less milk) helps the dessert set into clean, scoopable layers. If bananas turn brown, it’s simply exposure: slice them right before layering and keep them fully covered under pudding so air can’t reach the fruit. A tiny brush of lemon juice is optional, but keep it subtle so the pudding still tastes purely vanilla-banana.

If the pudding feels runny

Most often, it’s too much milk or not enough time in the fridge. Next time, reduce the milk slightly. For now, chill it longer—covered—so it can finish setting properly.

If a watery layer appears at the bottom

Overripe bananas can release moisture, and thin pudding can’t hold it. Use slightly firmer ripe bananas and make a thicker pudding base, especially if you’re layering with delicate cookies.

If the cookies dissolved into mush

That’s usually a thickness issue. Thicker pudding slows down cookie breakdown. Vanilla wafers, butter cookies, and shortbread also hold up better than delicate biscuits.

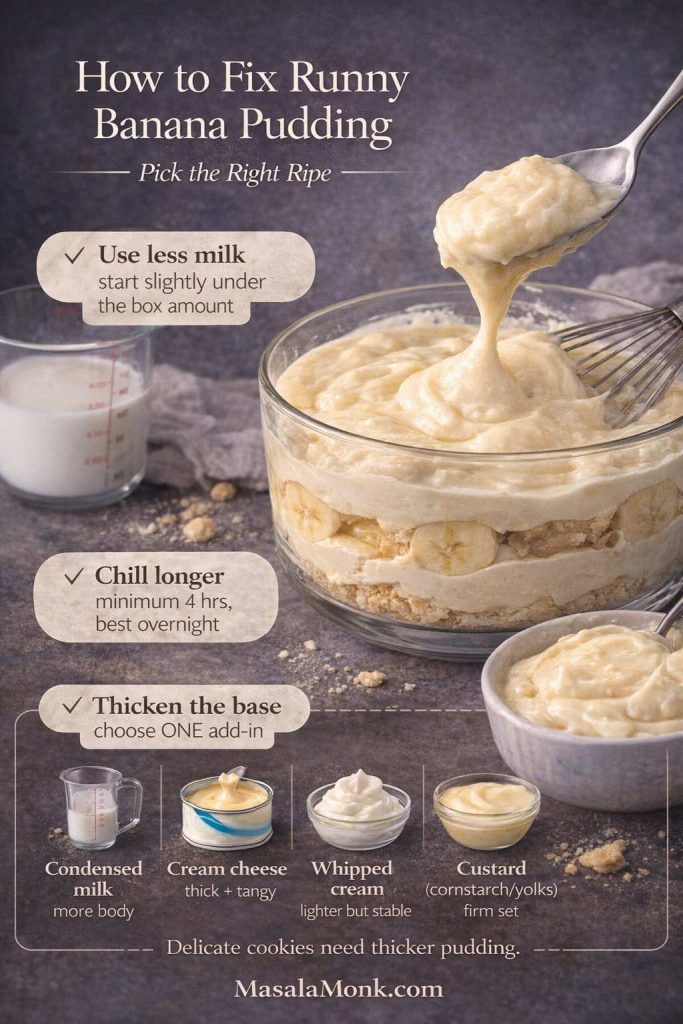
Infographic titled ‘How to Fix Runny Banana Pudding’ showing a spoon lifting loose banana pudding over a bowl. It lists three fixes: use slightly less milk than the pudding box amount, chill longer (minimum 4 hours, best overnight), and thicken the base by choosing one add-in—sweetened condensed milk, cream cheese, whipped cream, or a cooked custard with cornstarch/yolks. Note says delicate cookies need thicker pudding. MasalaMonk.com at bottom.
Runny banana pudding is almost always a ratio + chill-time problem—not a failure. Start with slightly less milk, then give it a proper fridge rest (overnight is the real glow-up). If you want a thicker, cleaner scoop, pick one base booster: condensed milk for body, cream cheese for thick + tangy, whipped cream for lighter stability, or a simple custard for the firmest set. (Perfect for the Troubleshooting section when your layers feel too soft.)

If the bananas browned

Slice bananas right before layering, then cover them with pudding so air can’t reach them. If you need extra protection, a very light brush of lemon juice can help; keep it subtle so the pudding doesn’t taste citrusy.

If your from-scratch custard turned lumpy

Heat was likely too high, or whisking paused. You can strain the custard through a fine sieve, then return it to gentle heat briefly while whisking to smooth it out. After that, chill as usual.

Also Read: Daiquiri Recipe (Classic, Strawberry & Frozen Cocktails)


A few variations that keep the banana pudding recipe feeling fresh

Once you’ve made banana pudding once, it becomes dangerously easy to make it again—so it helps to rotate small changes that make it feel new.

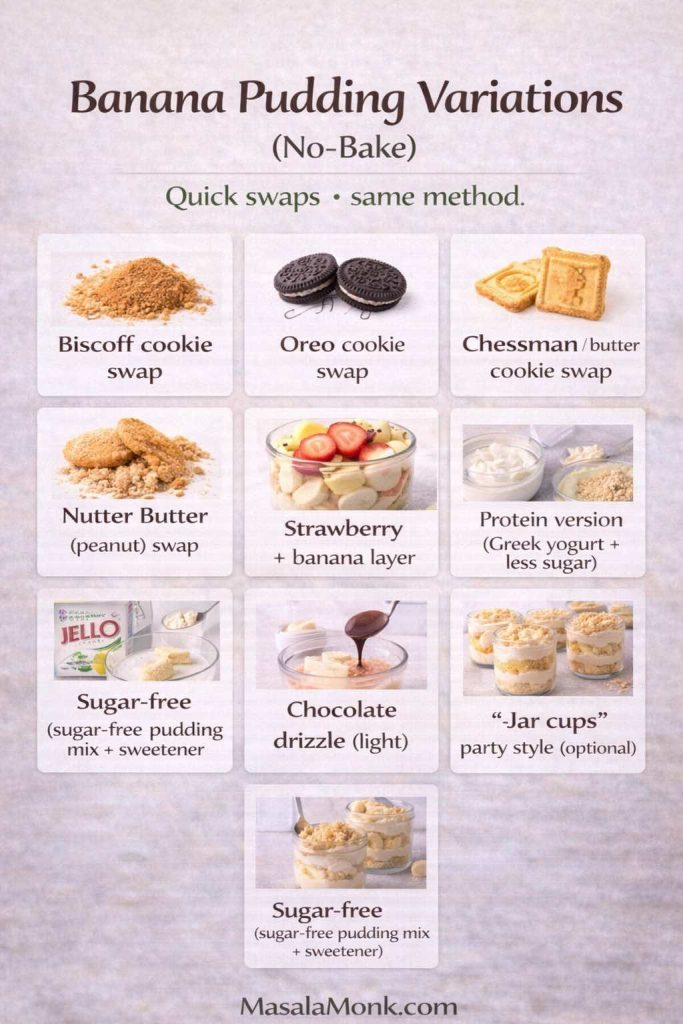
Infographic titled “Banana Pudding Variations (No-Bake)” with the subtitle “Quick swaps • same method.” A grid lists easy add-ins and swaps for no-bake banana pudding: Biscoff cookie swap, Oreo cookie swap, Chessman or butter cookie swap, Nutter Butter (peanut) swap, strawberry + banana layer, protein version (Greek yogurt + less sugar), sugar-free option (sugar-free pudding mix + sweetener), a light chocolate drizzle, and optional jar cups party style. Footer reads MasalaMonk.com.
Once you know the basic layering rhythm, banana pudding becomes a template you can remix. This quick variation board helps you choose a direction without rewriting the whole recipe: swap cookies for Biscoff, Oreo, Chessman, or Nutter Butter; add a strawberry layer for a fruitier twist; or go lighter with a protein-friendly version using Greek yogurt and less sugar. If you’re serving guests, a small chocolate drizzle or jar-cup presentation makes the same pudding feel brand new—without changing the method that keeps it thick and reliable.

Make it more “vanilla-forward”

Use a little extra vanilla extract, and add a pinch of salt to sharpen the flavor. It’s still banana pudding, just brighter and more aromatic.

Make it more “cookie-forward”

Double down on the cookie layers and finish with a generous crumble on top. You’ll get more contrast between soft and crisp.

Make it richer without adding fuss

Use sweetened condensed milk in the base. It adds richness and a thicker finish without requiring custard-making.

Make it more homemade (without using an oven)

Go the stovetop custard route. It takes a little longer, yet the flavor payoff is worth it—especially when you want a truly homemade banana pudding from scratch feeling.

Make it plant-based

Use a thick dairy-free pudding base and vegan-friendly cookies. Given enough chill time, the dessert becomes cohesive and satisfying.

Also Read: Oat Pancakes Recipe (Healthy Oatmeal Pancakes)


Bringing it all together (the no-oven dessert you’ll make again and again)

No-bake banana pudding is one of those desserts that meets you where you are. It can be a quick weeknight treat made from a banana pudding mix and a box of wafers. Then can be a party-ready dish made with sweetened condensed milk for extra creaminess. And it can even be an old-fashioned, homemade banana pudding from scratch with stovetop custard—still no oven required, still wonderfully simple once you learn the rhythm.

Most importantly, it’s the kind of dessert that invites seconds without demanding perfection. So make it classic, make it creamy, make it tangy, or make it dairy-free. Either way, give it time in the fridge, spoon it generously, and let the layers do what they do best: turn a few humble ingredients into something that feels like comfort you can share.

Also Read: What to Mix with Jim Beam: Best Mixers & Easy Cocktails


FAQs

1) Can I make banana pudding with no oven required?

Yes. Banana pudding is naturally a no-oven dessert because the pudding sets in the fridge. Whether you use instant pudding mix, a no-cook condensed milk base, or a stovetop custard, you can still finish the entire dish without turning on the oven.

2) What’s the difference between no-bake banana pudding and no-cook banana pudding?

No-bake banana pudding simply means you don’t bake it. Meanwhile, no-cook banana pudding usually means you also skip stovetop cooking—so you rely on instant pudding mix (and sometimes sweetened condensed milk) to thicken everything.

3) How long does banana pudding need to chill to set properly?

In most cases, banana pudding needs at least 4 hours to set; however, overnight chilling gives the best texture. As it rests, the pudding firms up and the cookies soften into a cake-like layer.

4) How do I keep bananas from turning brown in banana pudding?

First, slice bananas right before layering. Next, cover the banana layer completely with pudding so less air reaches the fruit. If you want extra protection, lightly brushing banana slices with a tiny amount of lemon juice can help—just use it sparingly so the pudding doesn’t taste citrusy.

5) What are the best bananas for banana pudding?

Choose bananas that are yellow with a few brown freckles. They’re sweet and aromatic, yet still firm enough to hold their shape. On the other hand, bananas that are very brown can release more moisture, which may thin the layers.

6) What are the best cookies for banana pudding?

Vanilla wafers are the classic choice because they soften evenly and keep the layers structured. That said, butter cookies, graham crackers, and shortbread also work well—especially if you prefer a richer, more buttery base.

7) Can I make banana pudding with vanilla wafers and still keep it from getting soggy?

Absolutely. Use a thicker pudding base, layer cookies evenly, and chill long enough so the moisture absorbs gradually rather than flooding the cookies. Additionally, adding a fresh cookie crumble on top right before serving brings back a crisp contrast.

8) Can I make banana pudding with sweetened condensed milk?

Yes, and it’s one of the creamiest no-oven options. Sweetened condensed milk adds richness and body, so the pudding holds its shape more reliably. Even so, it’s best to chill it longer—ideally 6 hours or overnight—for the cleanest scoops.

9) Can I make banana pudding from scratch without baking?

You can. Instead of baking, you cook a quick stovetop custard (milk, sugar, egg yolks, and cornstarch), then chill it until thick. After that, you layer it with bananas and cookies just like any banana pudding (no bake) version.

10) Why is my banana pudding runny?

Usually, it comes down to one of three things: too much milk, not enough chill time, or a pudding base that didn’t fully thicken before layering. To fix it next time, reduce the milk slightly and let the pudding stand a few minutes before assembling.

11) Why does banana pudding get watery at the bottom?

Most often, very ripe bananas release liquid as they sit. Similarly, a thinner pudding base can’t “hold” that moisture. Therefore, using slightly firmer ripe bananas and a thicker pudding base helps keep the layers stable.

12) Can I make banana pudding ahead of time?

Yes—banana pudding is one of the best make-ahead desserts. In fact, making it the night before usually improves the texture because the cookies soften evenly and the flavors meld.

13) How long does banana pudding last in the fridge?

Typically, banana pudding tastes best within 24–48 hours. After that, it’s still enjoyable, though the cookies can become very soft and the bananas may darken slightly. Keep it tightly covered to maintain freshness.

14) Can I freeze banana pudding?

Freezing isn’t ideal. Although it may be safe, the texture often suffers because pudding can separate when thawed, and bananas can become mushy. Instead, it’s better to refrigerate and enjoy within a couple of days.

15) How do I make banana pudding thicker without changing the flavor?

Start by using a little less milk, then chill longer. Moreover, folding in whipped cream after the pudding thickens can help the dessert feel thicker and more stable. For an even denser option, try the cream cheese variation.

16) Can I make banana pudding with cream cheese?

Yes. Cream cheese makes banana pudding thicker, slightly tangy, and more “cheesecake-like.” As a result, it holds its shape well and scoops cleanly, especially after an overnight chill.

17) What’s the easiest banana pudding recipe for beginners?

A classic no-bake banana pudding using instant vanilla pudding mix, milk, whipped cream, bananas, and vanilla wafers is the easiest. Since it’s no-cook and no oven required, it’s also the most forgiving.

18) Can I make vegan banana pudding that still tastes creamy?

Yes. A dairy-free banana pudding can be creamy if the pudding base is thickened properly (often with cornstarch) and chilled until fully set. Also, choosing a vanilla-style vegan cookie keeps the flavor closer to traditional banana pudding.

19) Can I make banana pudding without vanilla wafers?

Definitely. You can use butter cookies, graham crackers, shortbread, or similar crisp cookies. Just keep in mind that thinner cookies soften faster, so a thicker pudding base and a longer chill can make a big difference.

20) How do I layer banana pudding so every scoop has all the layers?

Use evenly spaced cookie layers, slice bananas to a similar thickness, and spread pudding all the way to the edges each time. Finally, let it chill long enough so the layers settle—then scoop straight down to capture cookie, banana, and pudding in one bite.