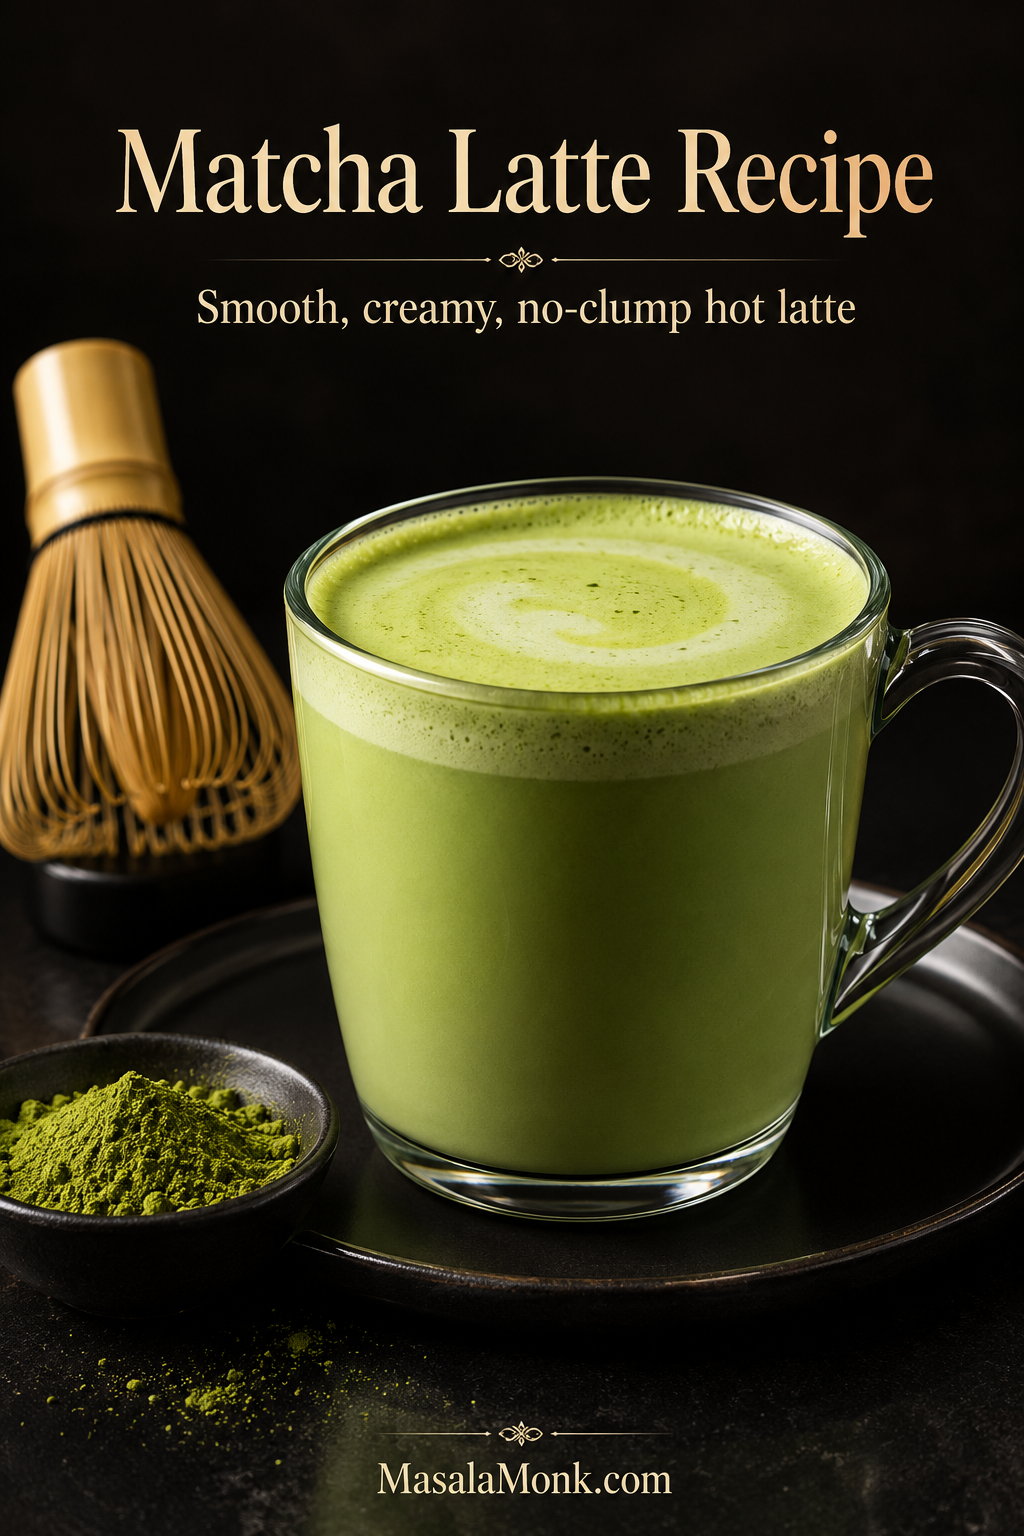
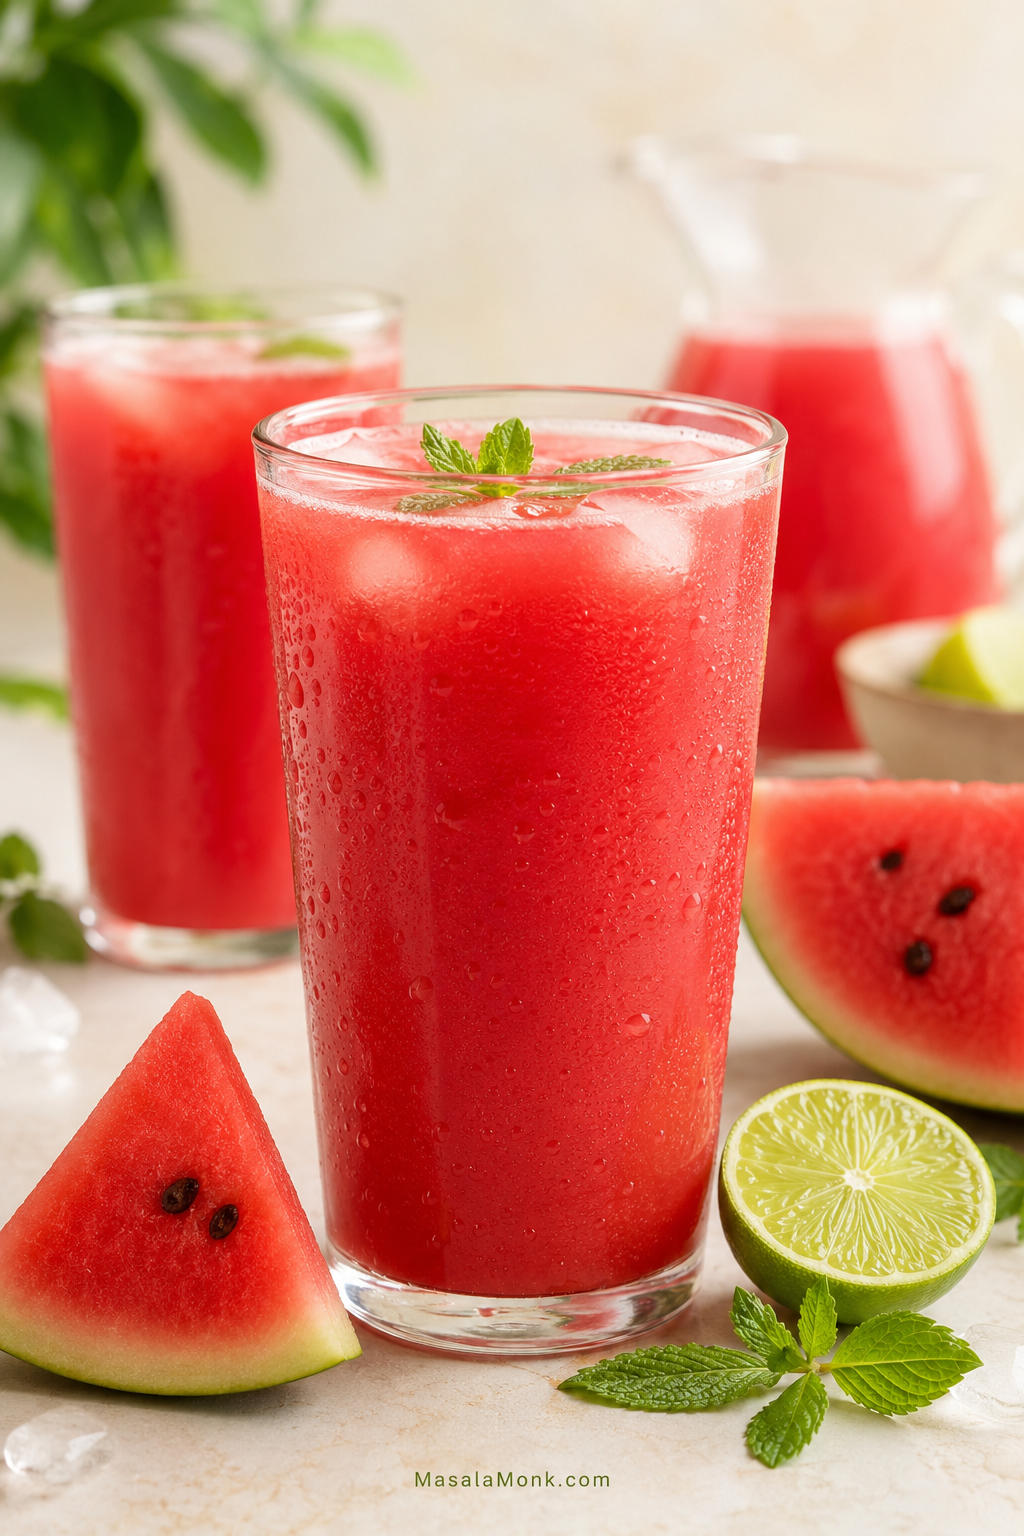
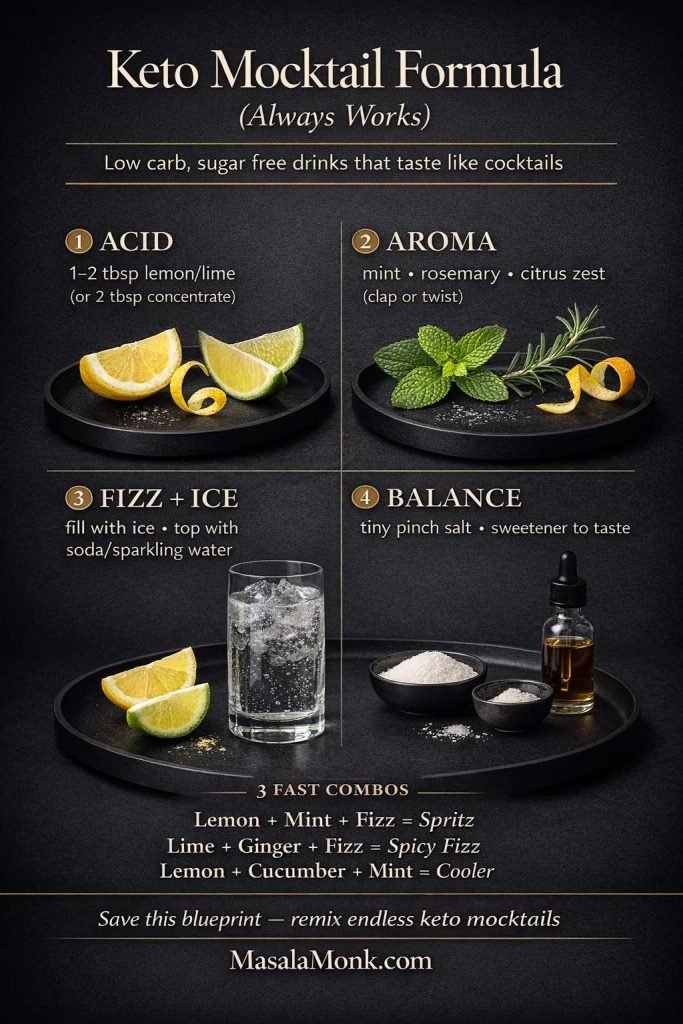
A good matcha latte recipe should give you a cup that tastes smooth, creamy, and gently earthy — not bitter, chalky, or full of green clumps. If your first homemade version tasted like warm milk with powder at the bottom, the problem probably was not you. Matcha simply needs a little help before the milk goes in.
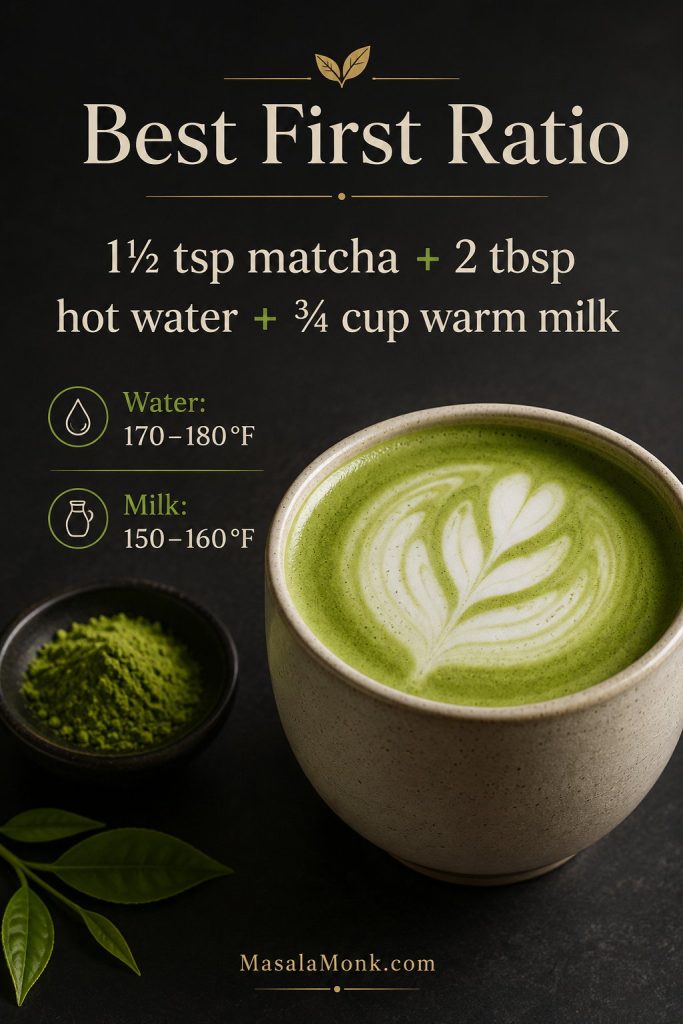
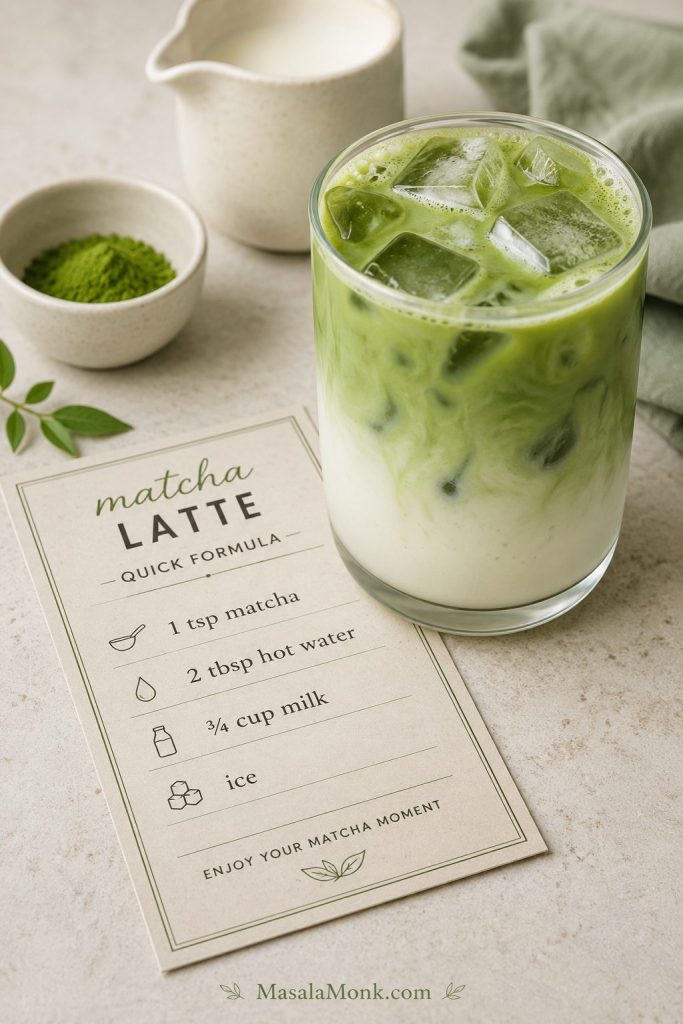
This is a no-clump, no-bitter, ratio-first hot matcha latte for the problems most homemade cups run into: weak flavor, harsh bitterness, and powder settling at the bottom. Start with 1½ teaspoons matcha, 2 tablespoons hot water, and ¾ cup warm milk, then adjust from a clear baseline instead of guessing.
The finished cup should taste creamy enough to feel like a treat, but green enough that the tea still shows up. The trick is simple: sift the matcha, whisk it with a small amount of hot water, and only then add the milk.
This guide focuses on the hot, creamy homemade version. For the full cold version, use our iced matcha latte recipe.
Why this method works: sifting breaks up dry clumps, the concentrated hot-water paste hydrates the tea before milk dilutes it, and the final taste adjustment keeps the latte balanced instead of watery, bitter, or overly sweet.
Once matcha turns glossy instead of sandy, the milk blends in more evenly and the drink is far less likely to taste chalky.
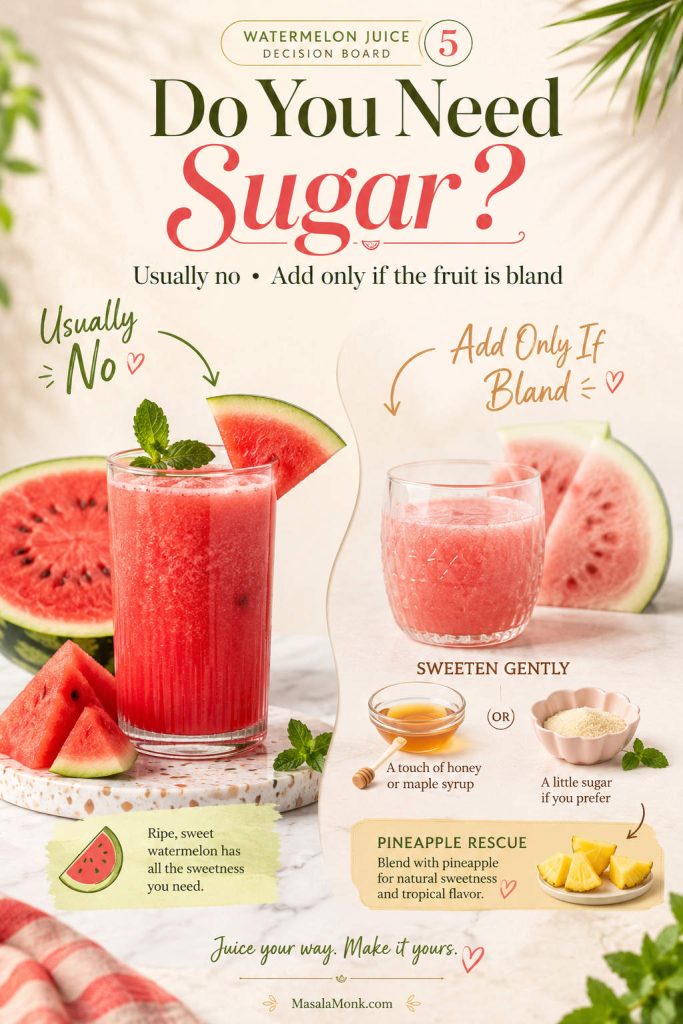
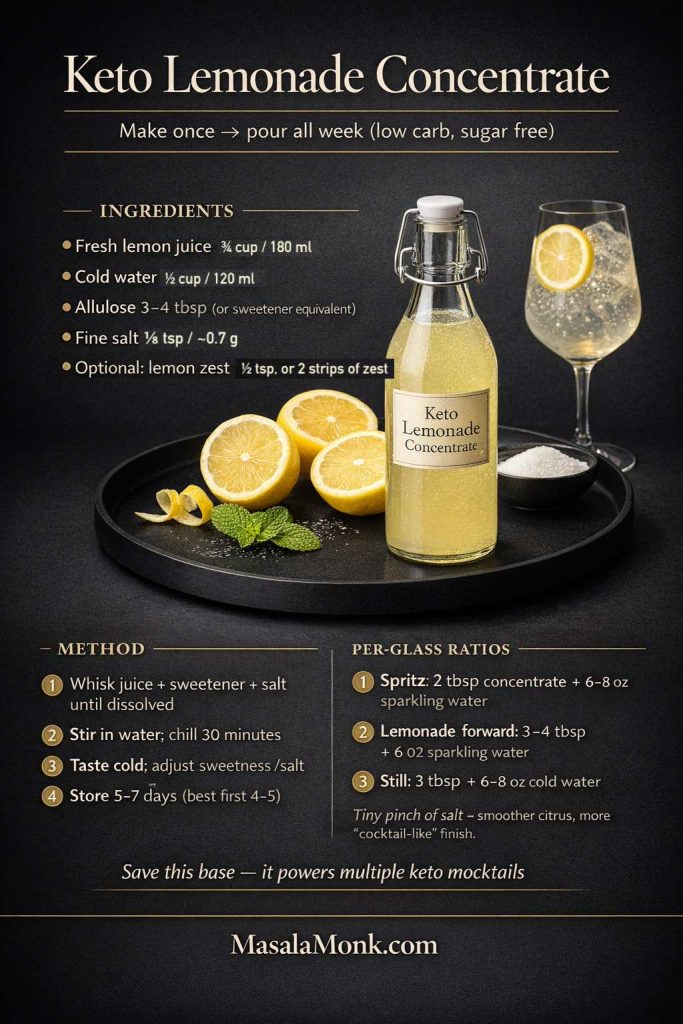
For one balanced hot matcha latte, whisk 1½ teaspoons / about 3 grams matcha with 2 tablespoons / 30 ml hot water, then add ¾ cup / 170–180 ml warm milk. Sweeten with 1 teaspoon sugar, honey, maple syrup, or simple syrup if you like a lightly sweet cup.
Best first ratio: 1½ tsp / about 3 g matcha + 2 tbsp / 30 ml hot water + ¾ cup / 170–180 ml milk. Use water around 170–180°F / 76–82°C and milk around 150–160°F / 65–71°C.
This baseline matcha latte ratio gives you a balanced first cup; after that, adjust matcha, milk, or sweetness one change at a time.
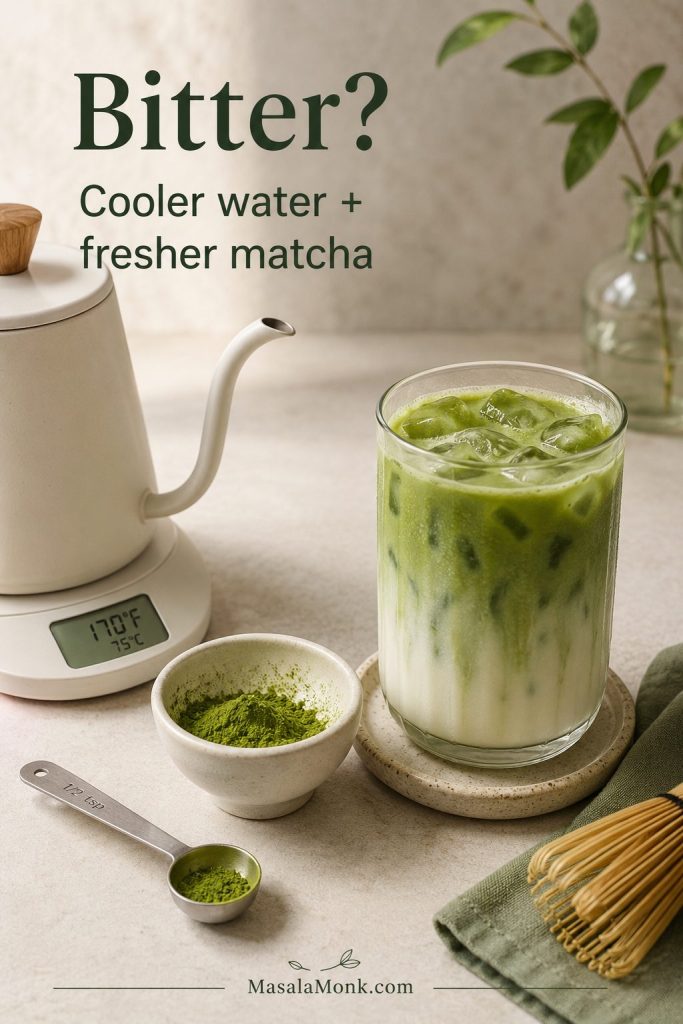
Too mild usually means the tea is being drowned by milk. A harsh or bitter first sip usually points to water that was too hot, matcha that was old, or a ratio that needs a little more milk before it needs more sugar.
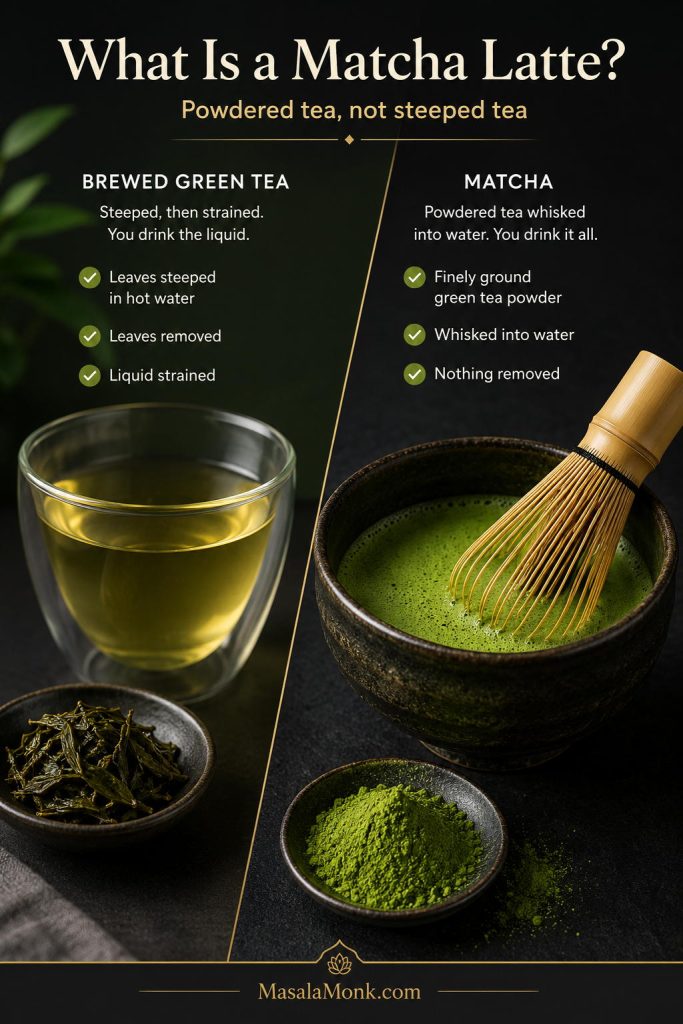
A matcha latte is made by whisking powdered green tea with water, then adding milk. Unlike regular green tea, matcha is not steeped and removed. The whole powdered tea stays in the cup, which is why the texture depends so much on how you mix it.
Because you are drinking the whole powdered tea, a good matcha latte feels fuller than brewed green tea with milk — richer, greener, and more textured. That is also why the drink can taste creamy and smooth one day, then grainy and bitter the next if the powder is rushed.
Matcha is powdered tea that stays in the drink, which is why whisking it smoothly matters before it becomes a latte.
For a more traditional reference point, Ippodo also whisks matcha with warm water before adding milk. Their matcha latte method starts with 3 grams matcha and warm 80°C / 176°F water; this recipe uses less water for a thicker latte paste before the milk goes in. You can read their guide here: Ippodo matcha latte recipe.
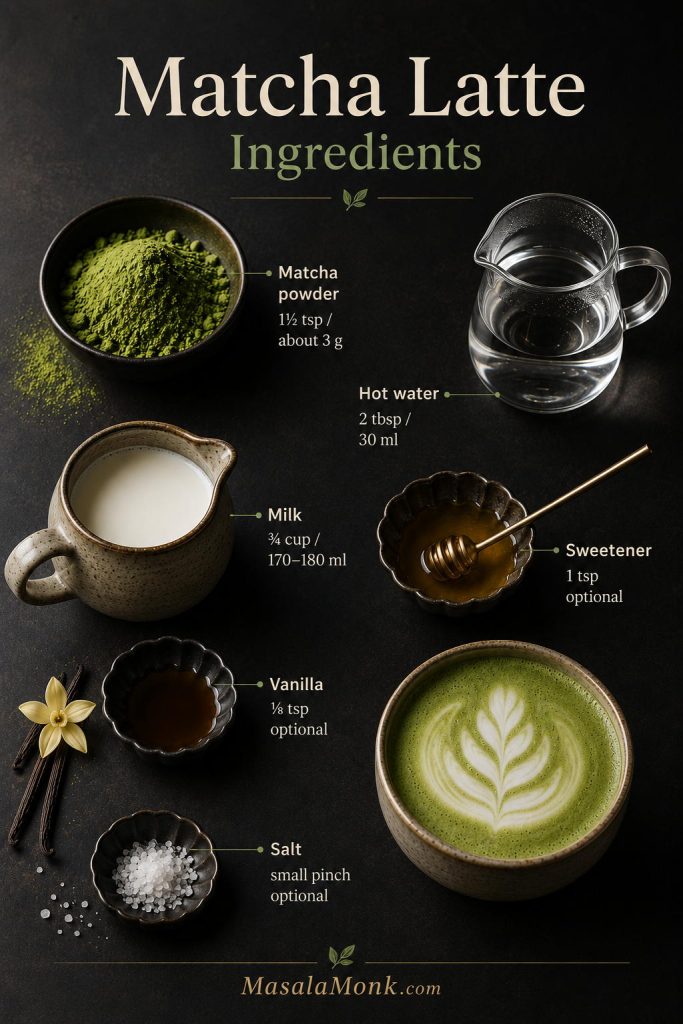
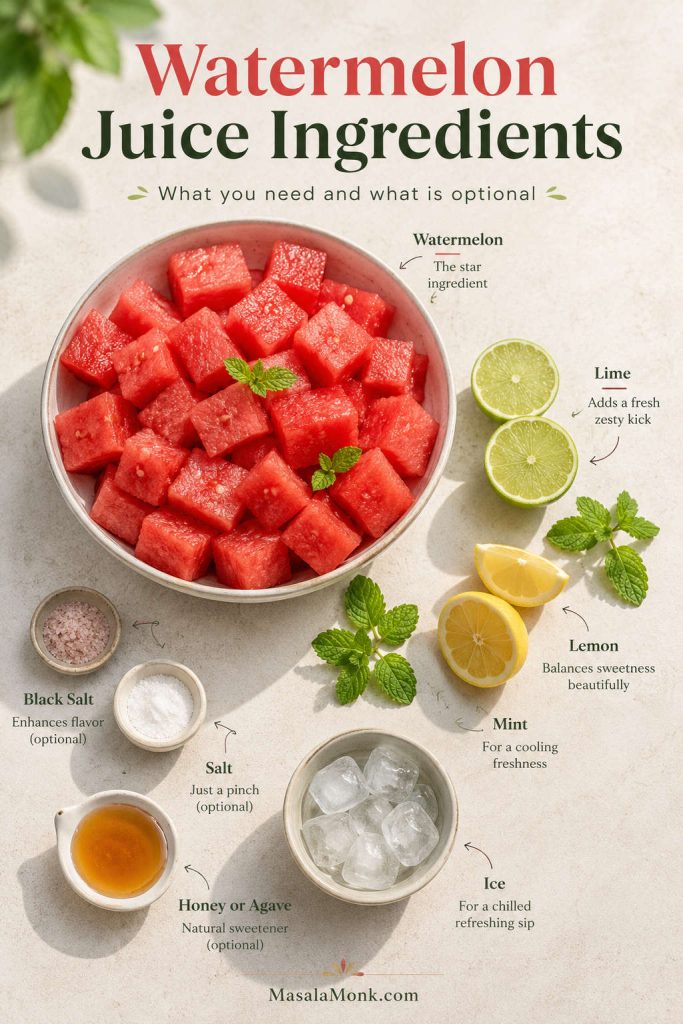
Ingredients You Need
The ingredients are simple, but each one has a job: water opens the matcha, milk adds body, and sweetener rounds the edge.
Matcha powder
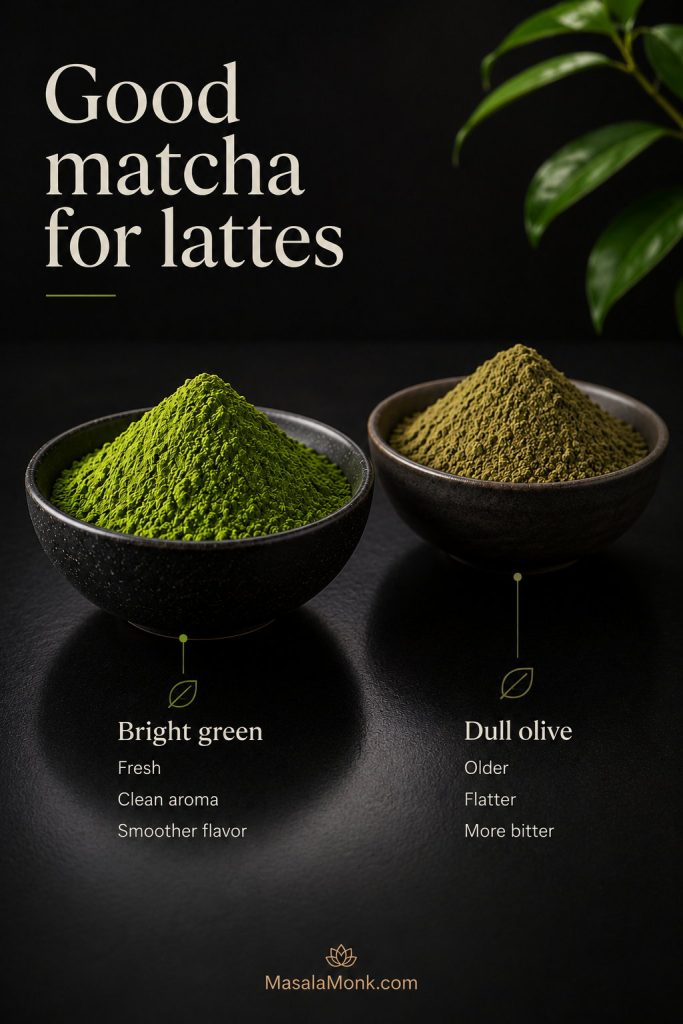
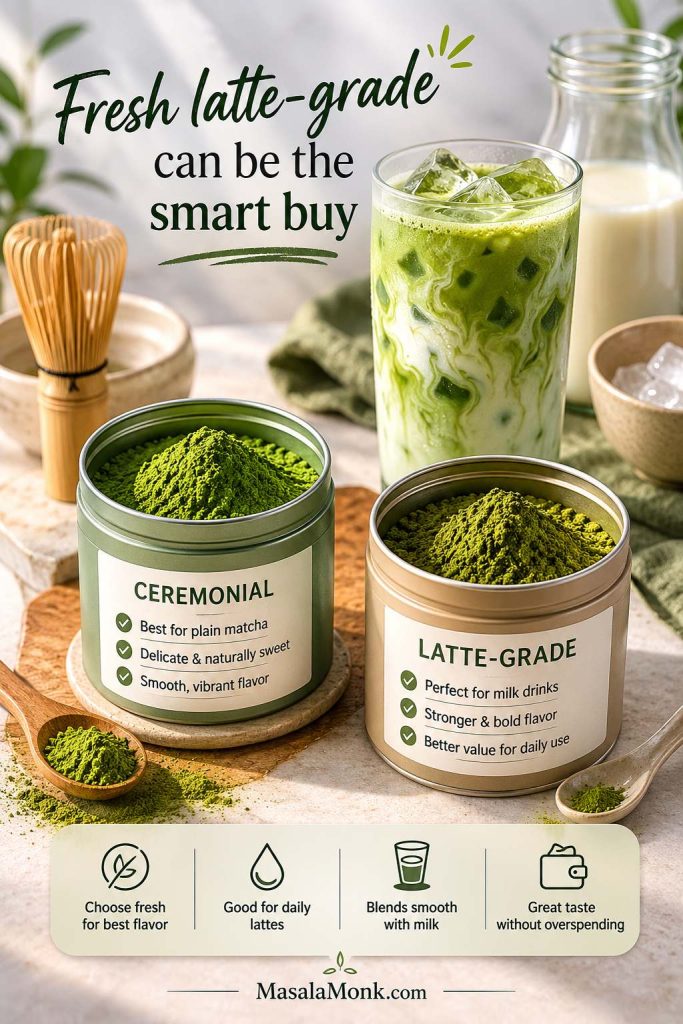
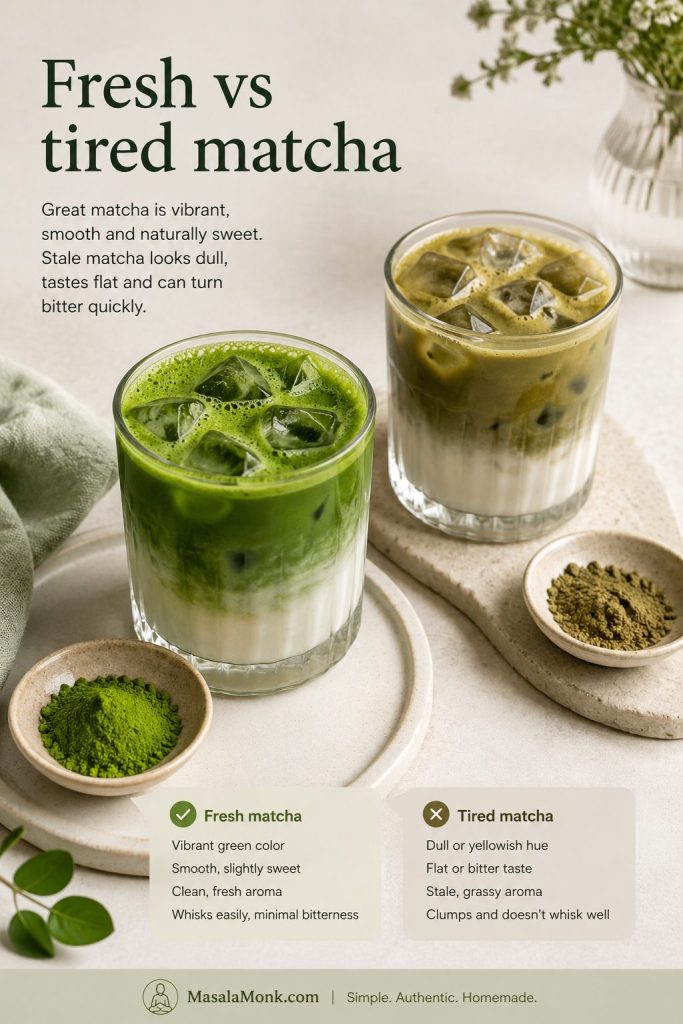
Fresh matcha gives the best color and flavor. For lattes, use ceremonial, premium culinary, or latte-grade matcha that looks bright green and smells clean. Very dull olive powder often tastes flatter and more bitter, even with milk.
You do not need the most expensive ceremonial tin for a milk drink. However, very cheap or stale powder can make the cup taste harsh. Old matcha can smell flat, dusty, or hay-like. If that is the tin you have, use the balanced latte ratio, add a little vanilla or sweetener, and do not judge all matcha by that one cup.
Bright matcha usually gives a cleaner latte; however, dull olive powder often tastes flatter, sharper, and harder to balance.
Hot water
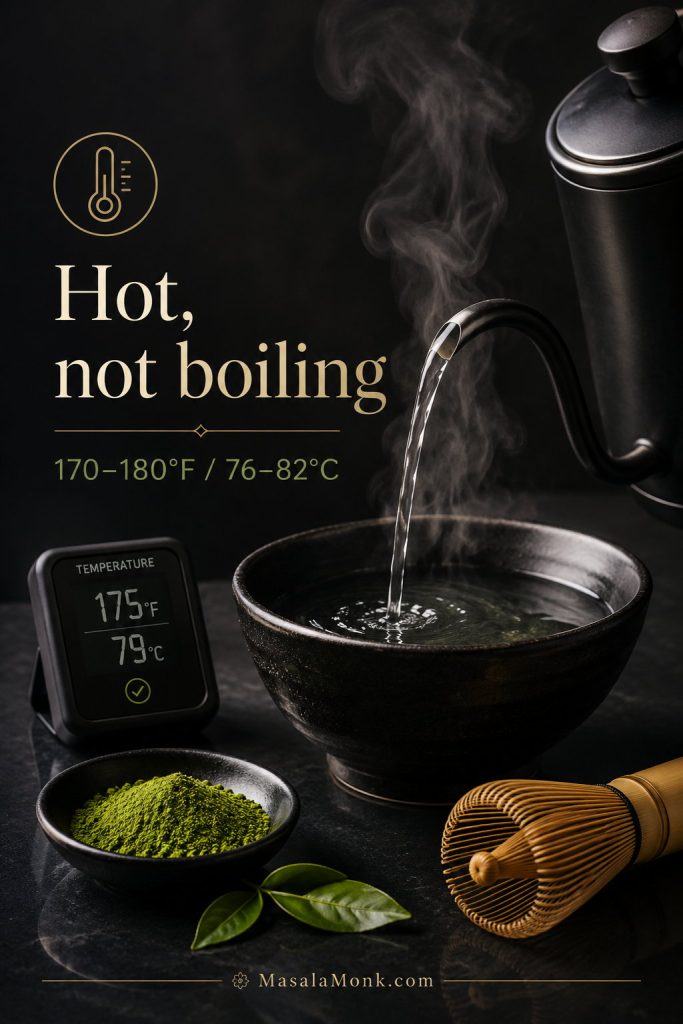
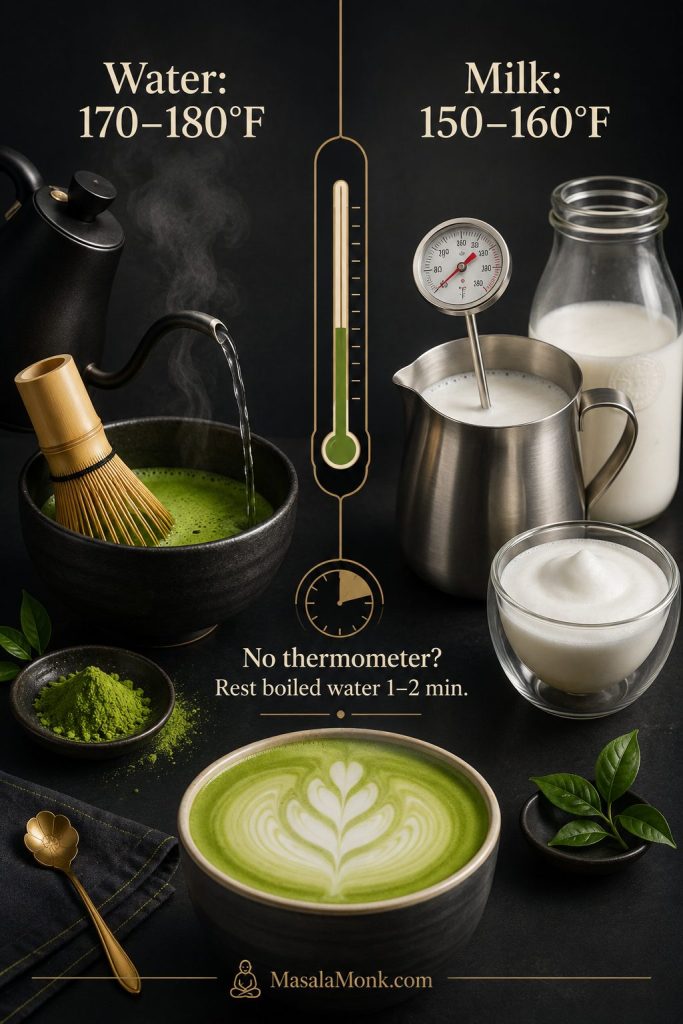
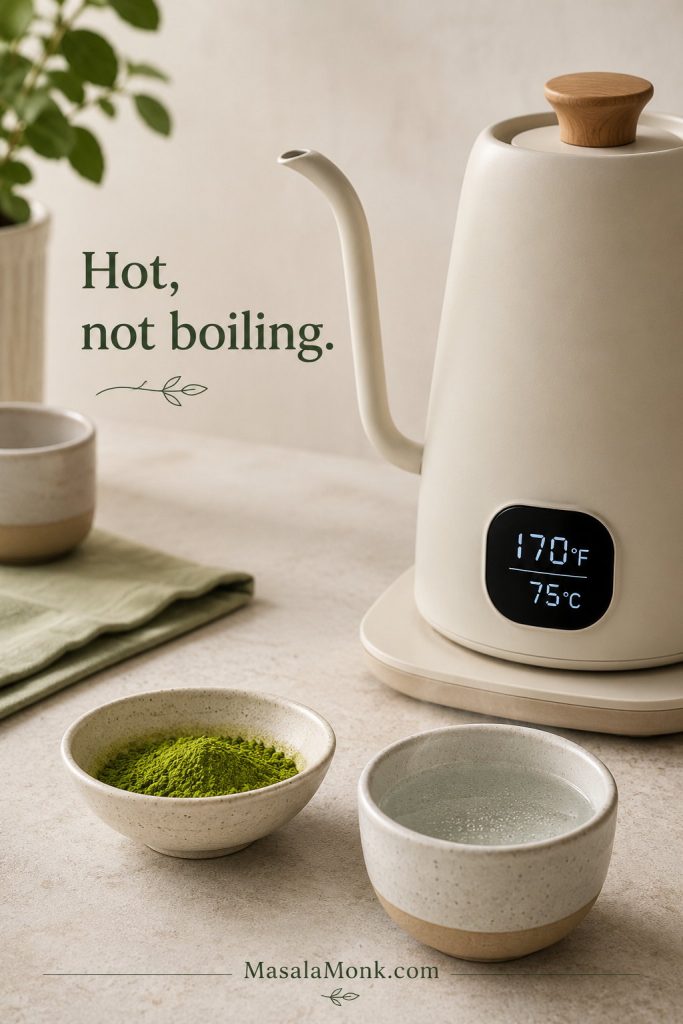
Use hot water around 170–180°F / 76–82°C. It should be hot and steaming, not boiling. Without a thermometer, boil the water, let it stop bubbling, then rest it for about 1–2 minutes before using it.
Boiling water can make matcha taste sharp, so a brief rest after boiling helps protect the tea’s softer green flavor.
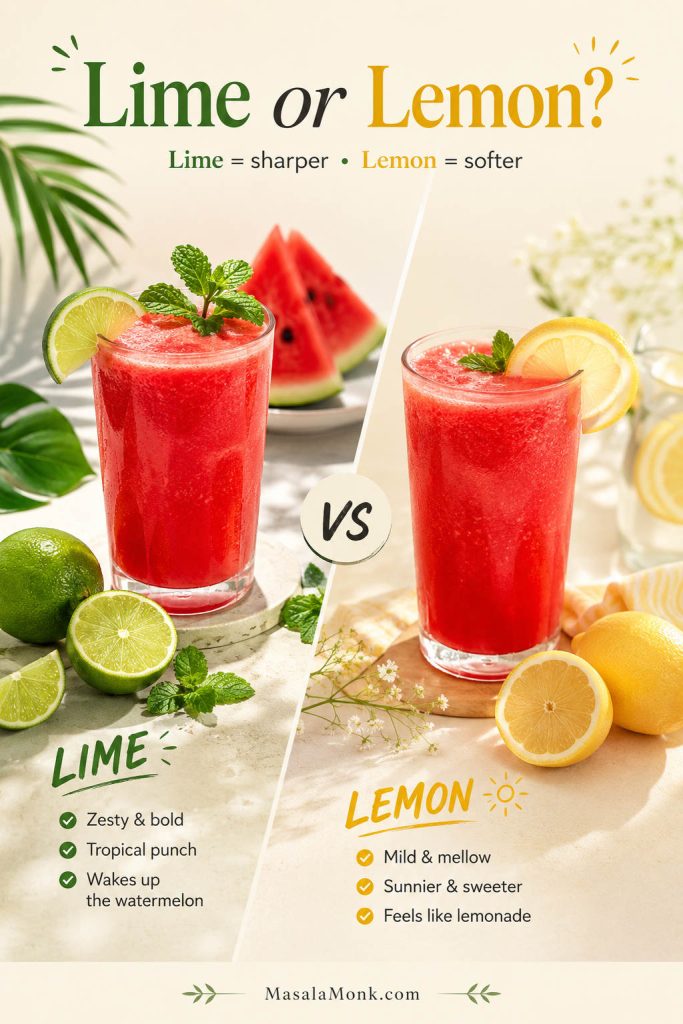
Milk changes the latte as much as the tea does. Whole milk gives the richest body, oat milk is the easiest creamy dairy-free choice, almond milk makes a lighter cup, coconut milk tastes richer but can take over, and soy milk gives a stable coffee-shop texture.
Sweetener
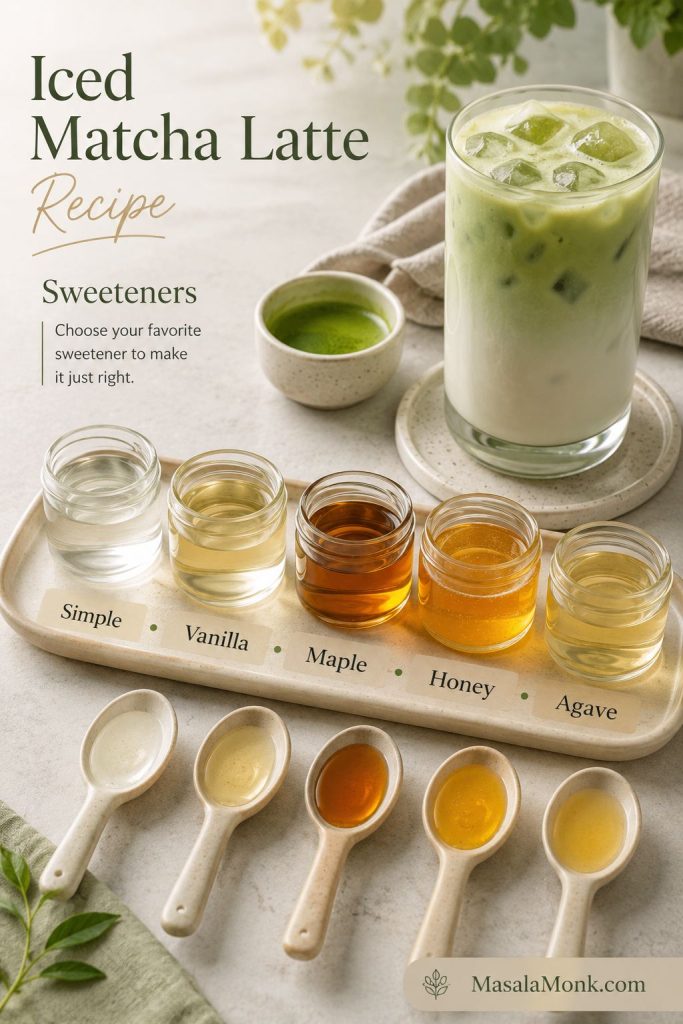
Sweetener is optional. Sugar, honey, maple syrup, simple syrup, vanilla syrup, monk fruit, and stevia can all work. For a hot drink, granulated sugar can dissolve in the paste. For an iced version, syrup blends more smoothly than sugar crystals.
Optional vanilla or salt
A tiny splash of vanilla gives the drink a softer coffee-shop finish. A small pinch of salt can also round out bitterness, especially if your matcha is strong or your milk is unsweetened.
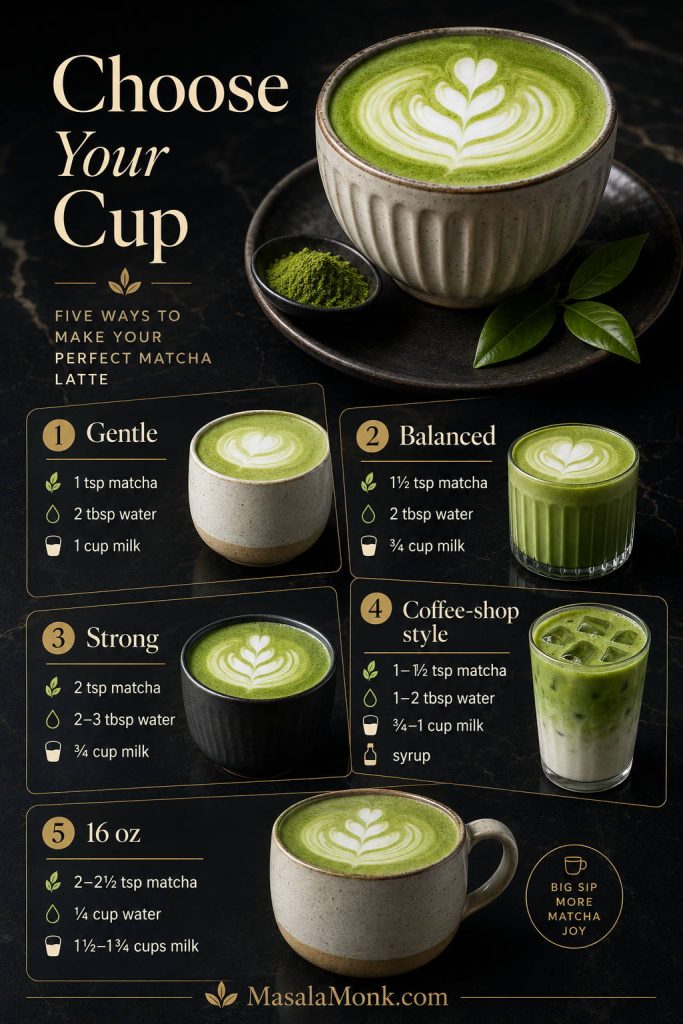
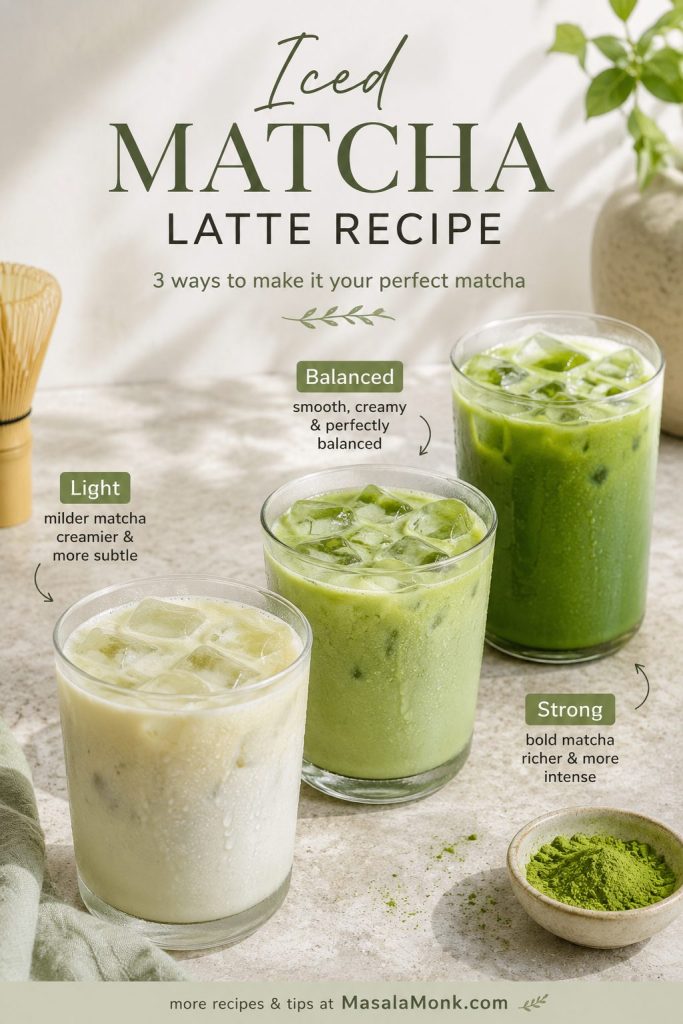
Best Ratio for a Creamy Cup
The best ratio depends on whether you want a mild beginner cup, a balanced café-style drink, or a stronger green tea flavor. Choose the gentle version if you are new to matcha, the balanced version if you want the best first cup, and the strong version if you want the tea to stay bold through the milk.
Choose the cup you actually want: gentle and milky, balanced café-style, stronger green tea flavor, sweeter, or 16 oz.
Style
Matcha
Water
Milk
Sweetener
Best For
Gentle beginner
1 tsp / about 2 g
2 tbsp / 30 ml
1 cup / 240 ml
Optional
Mild, creamy, less grassy
Balanced café-style
1½ tsp / about 3 g
2 tbsp / 30 ml
¾ cup / 170–180 ml
1 tsp
Best first version
Strong matcha
2 tsp / about 4 g
2–3 tbsp / 30–45 ml
¾ cup / 180 ml
1–2 tsp
Bold, less milky
Starbucks-style sweet
1–1½ tsp / about 2–3 g
1–2 tbsp / 15–30 ml
¾–1 cup / 180–240 ml
1 tbsp syrup
Sweeter café feel
16 oz café-style
2–2½ tsp / about 4–5 g
¼ cup / 60 ml
1½–1¾ cups / 360–420 ml
1 tbsp syrup
Large drink
If the paste feels too thick to whisk, add 1 extra tablespoon of water. Try not to turn the paste into a thin tea before the milk goes in, or the finished latte can taste watery.
Start with the balanced ratio, then adjust one variable at a time: more matcha for stronger flavor, less milk for a bolder cup, or a little syrup if the tea tastes sharp.
If your latte tastes like warm milk: you probably need more matcha, not more syrup. Increase the matcha to 1½–2 teaspoons or reduce the milk slightly.
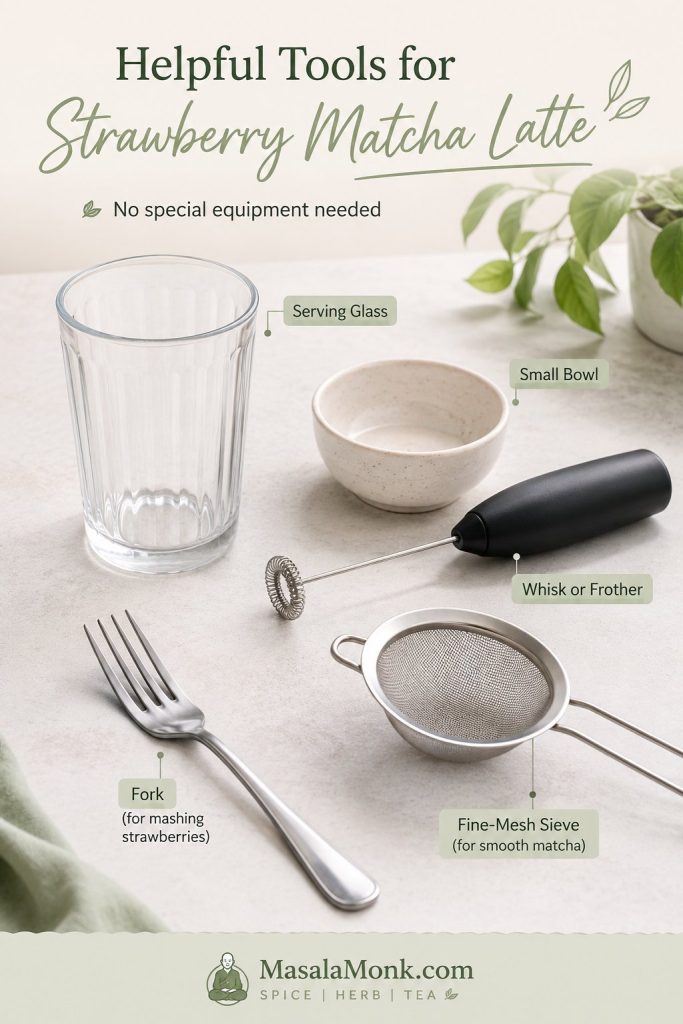
Equipment You Need
You do not need a full tea setup. A strainer helps prevent clumps, a wide mug gives you room to whisk, and a bamboo whisk or handheld frother makes the paste smoother.
You do not need every tool; the strainer handles clumps, the whisk builds texture, and the frother helps with milk.
Easiest daily method if you do not have a bamboo whisk.
Milk frother
Heats and froths milk for a café-style finish.
Small saucepan
Good for heating milk on the stovetop.
Blender
Useful no-whisk option for a very smooth cup.
Jar with lid
Best for iced matcha or quick shaking.
If the milk-frothing part is what you want to improve most, MasalaMonk’s cappuccino recipe breaks down café-style foam with and without a machine.
How to Make a Hot Matcha Latte
This method gives you the silkiest result because the matcha is fully hydrated before milk is added. The key order is simple: make the paste, add the milk, then adjust sweetness at the end.
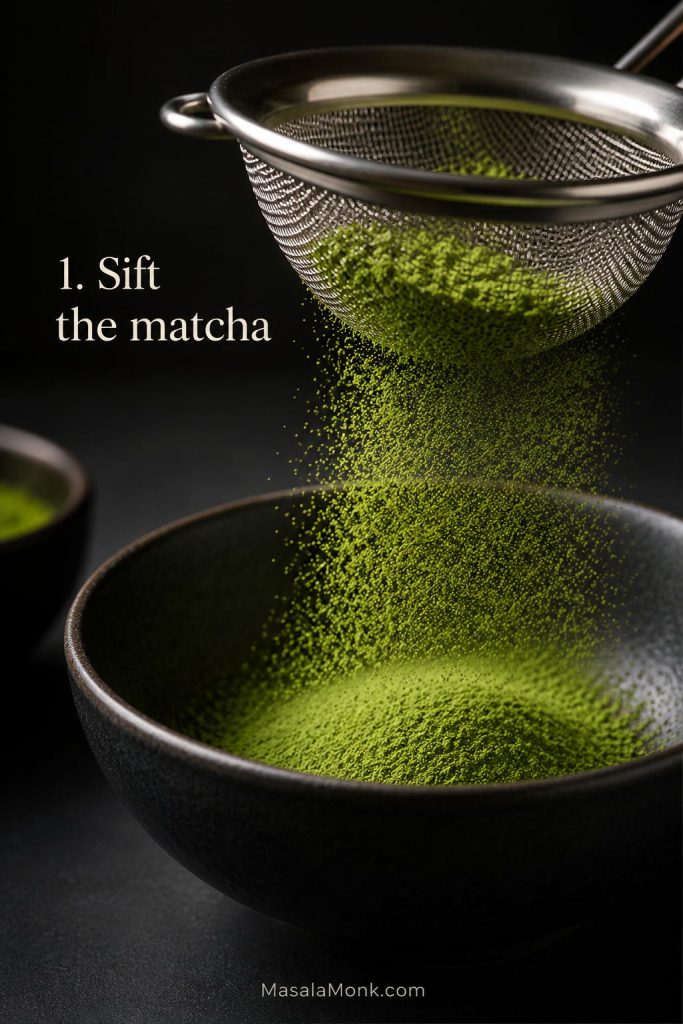
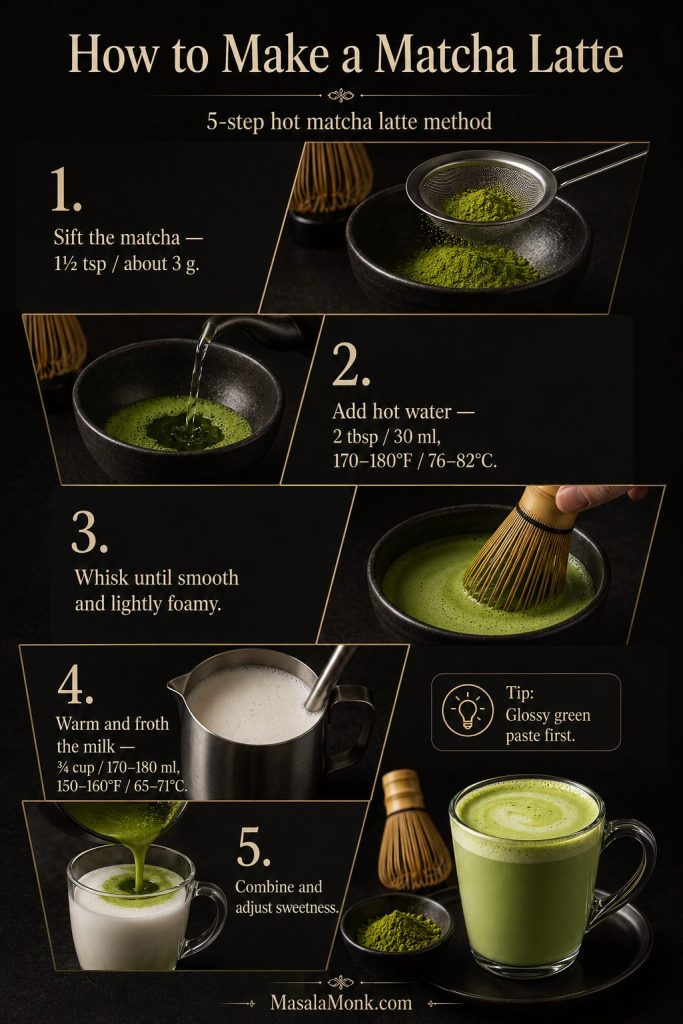
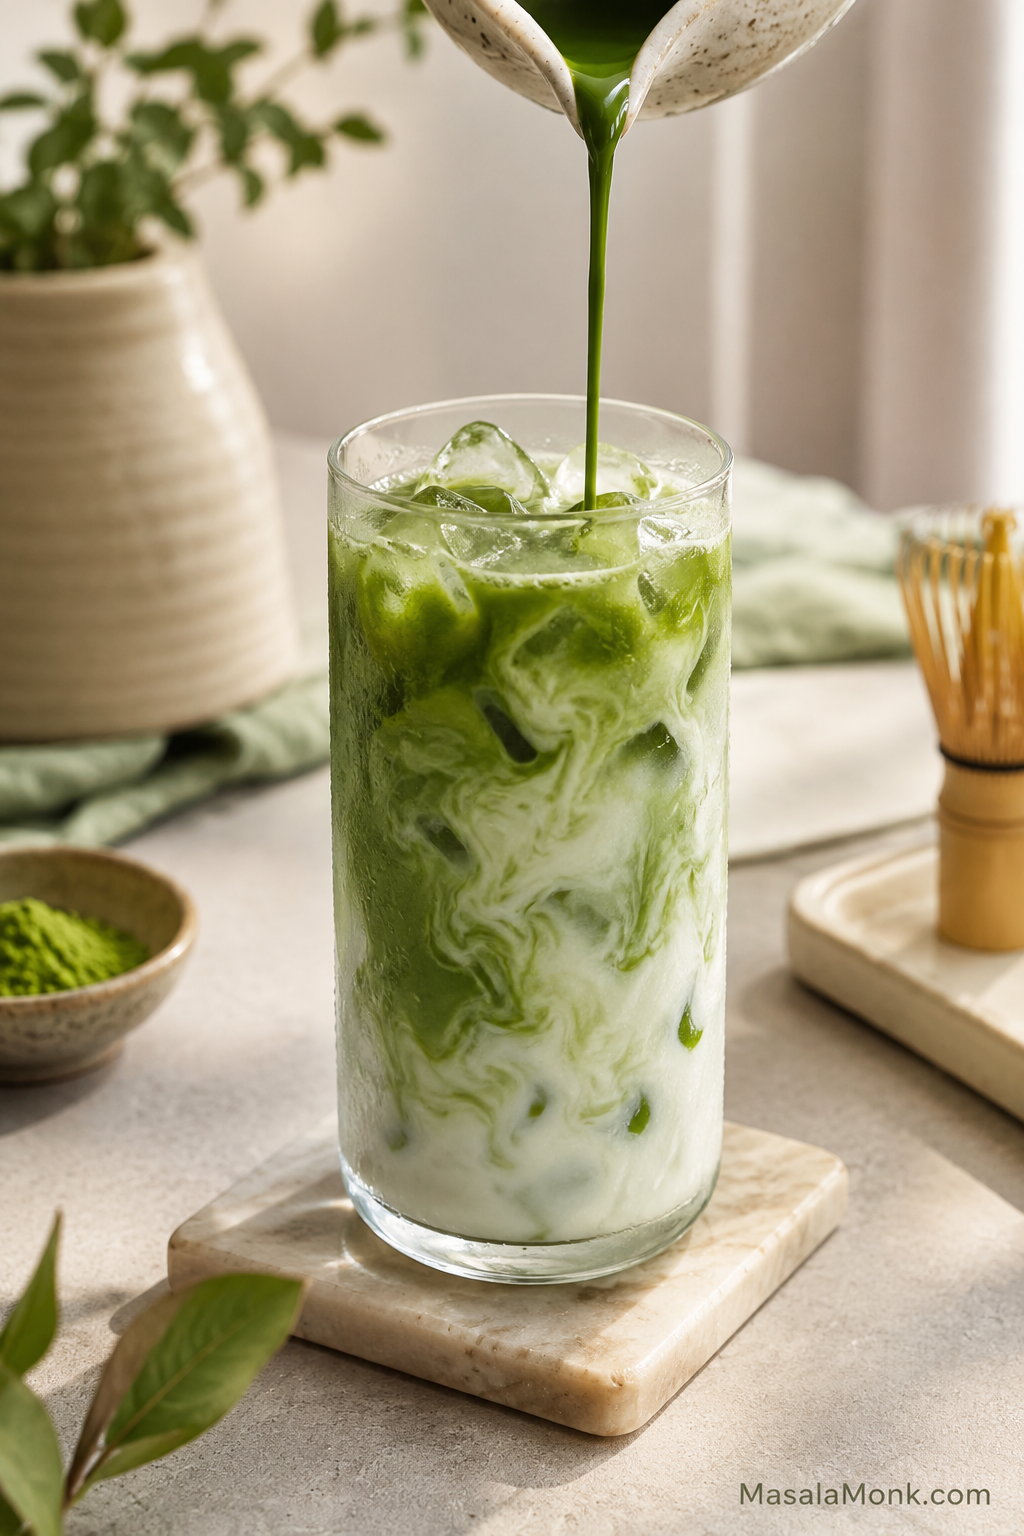
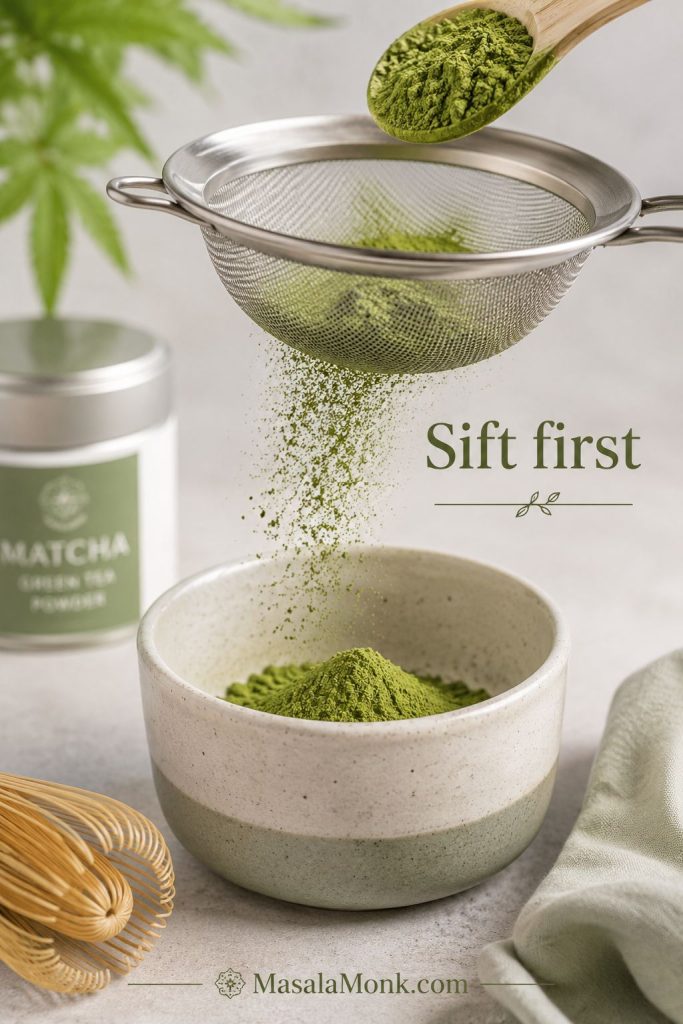
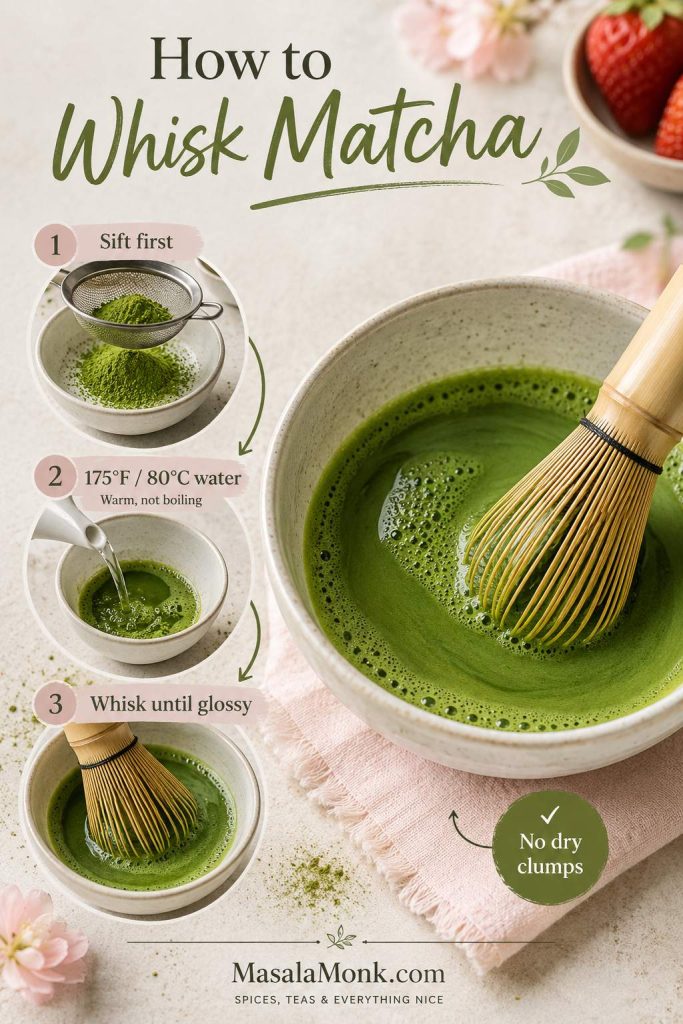
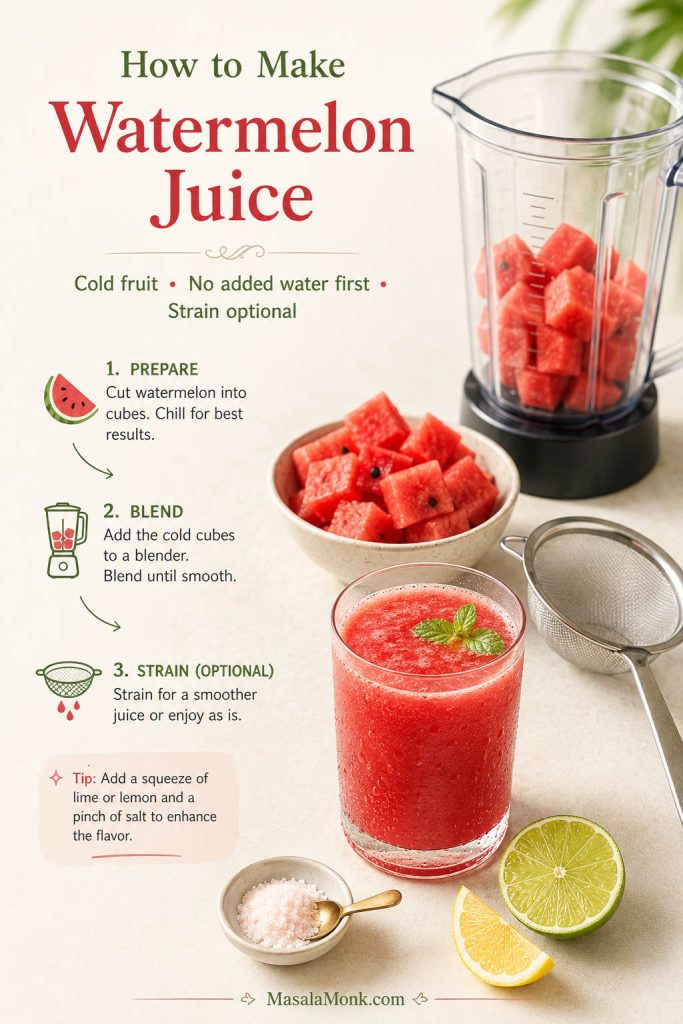
1. Sift the matcha
Add 1½ teaspoons / about 3 grams matcha to a fine-mesh strainer and sift it into a wide mug or small bowl. Matcha naturally forms tiny clumps in the tin, so this quick step is the easiest way to avoid a grainy texture.
If your matcha is very fresh and you are using a strong frother or blender, you may get away without sifting, but sifting is still the safest route for a clump-free cup.
Sifting takes only a few seconds, yet it removes the tiny dry lumps that can make a latte taste grainy.
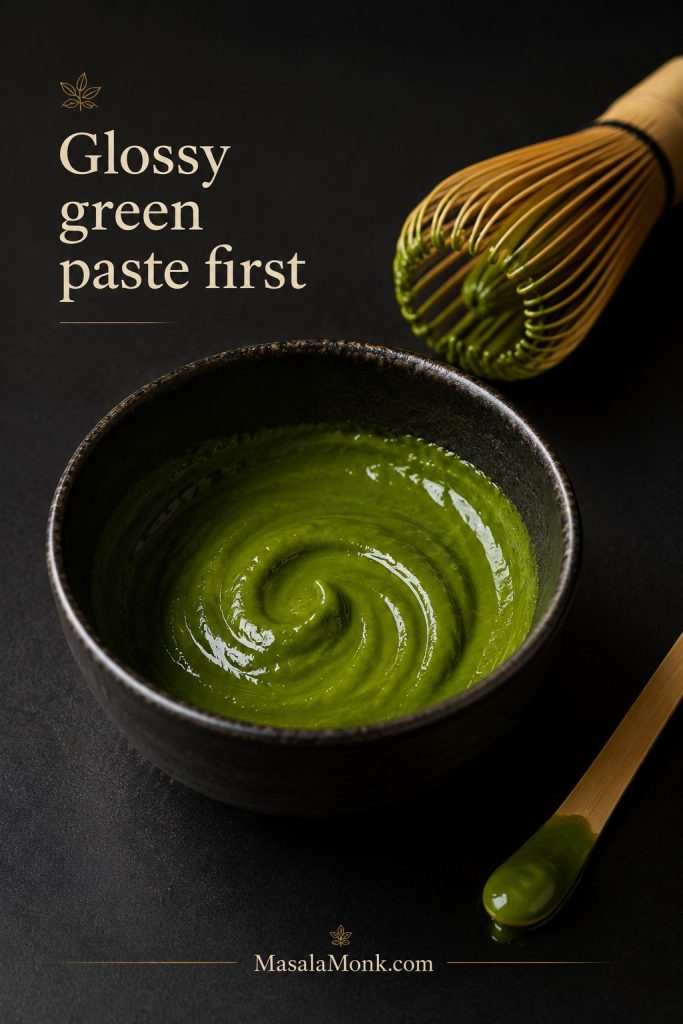
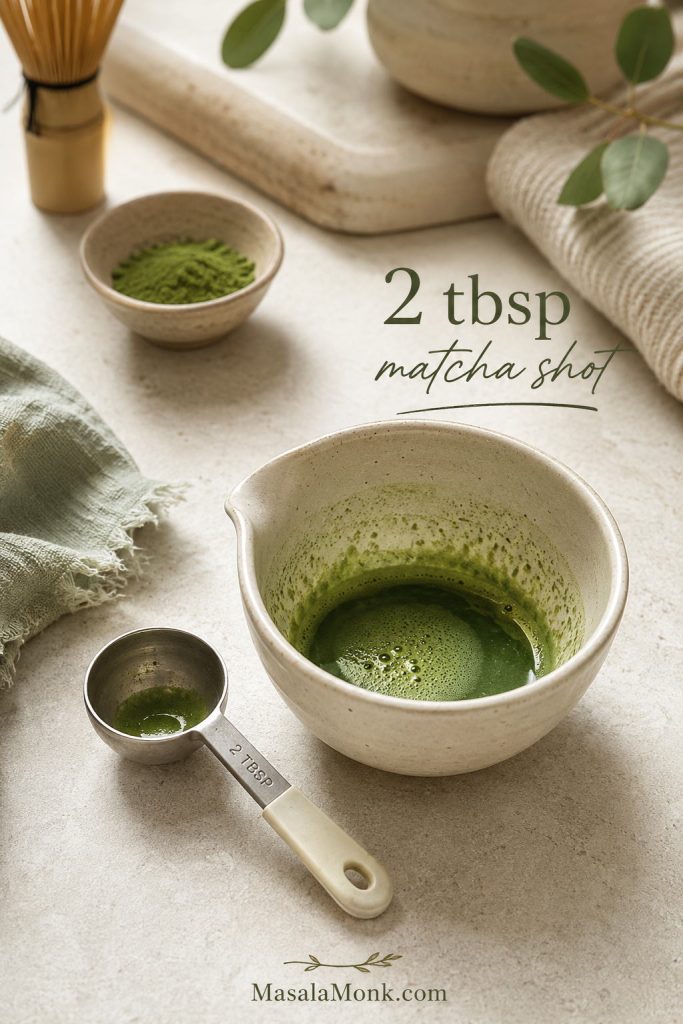
2. Add hot water and make a paste
Add 2 tablespoons / 30 ml hot water. The water should be around 170–180°F / 76–82°C, hot but not boiling. Stir or whisk until the mixture looks like a glossy green paste with no dry pockets.
Think glossy green paste, not sandy sludge. If it looks dry or grainy, keep whisking before the milk goes in.
Look for a shiny, hydrated paste before adding milk; a sandy texture usually means the powder needs more whisking.
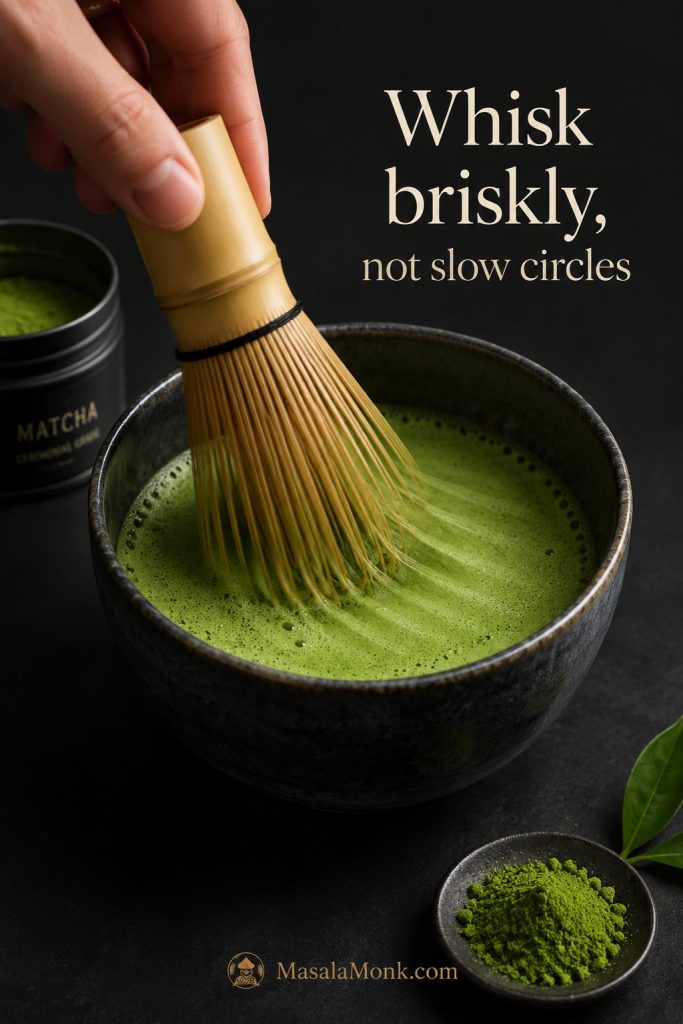
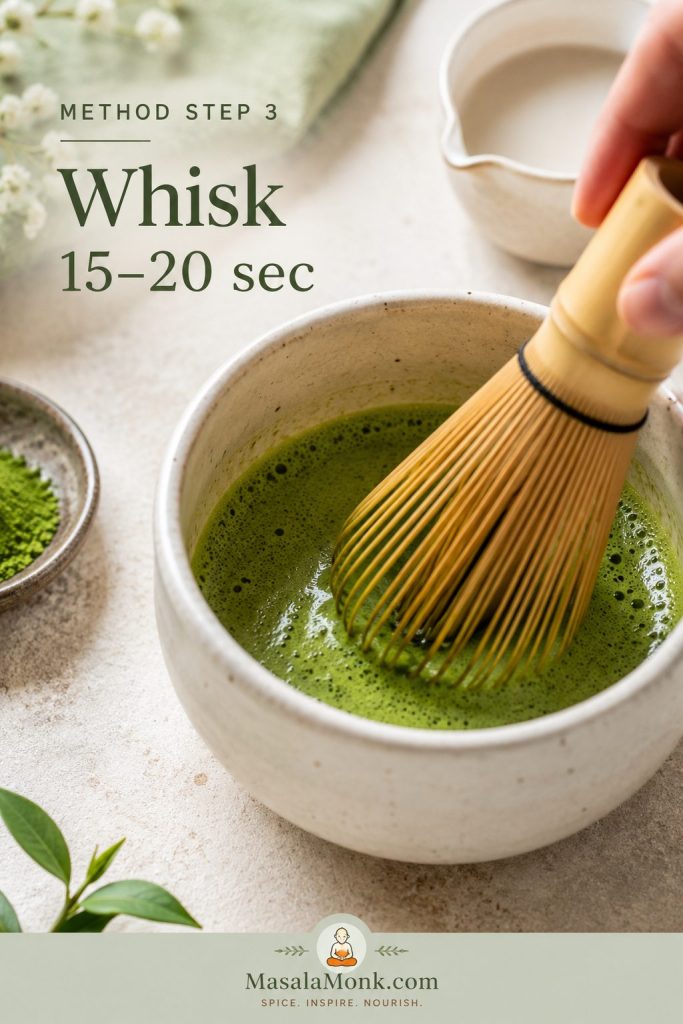
3. Whisk until smooth and lightly foamy
Whisk briskly in a W, M, or zig-zag motion for 20–45 seconds. Avoid slow circles, which tend to push the tea around instead of suspending it evenly. The paste should look even and lightly foamy.
Brisk back-and-forth whisking suspends matcha better than slow circles, especially when you want a fine, even foam.
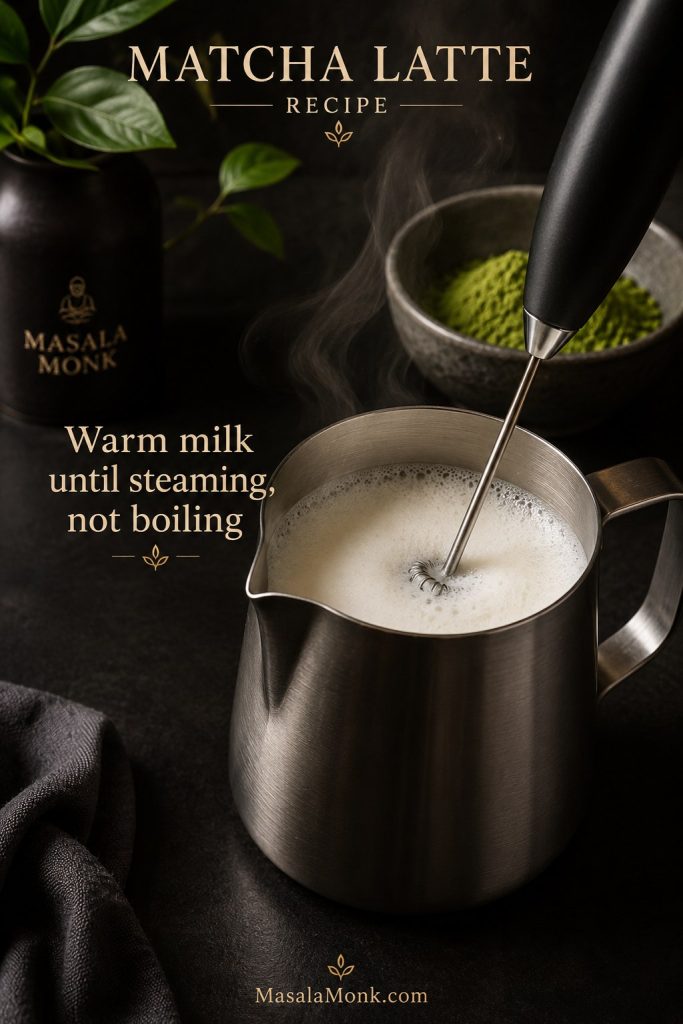
4. Heat and froth the milk
Warm ¾ cup / 170–180 ml milk until steaming, ideally around 150–160°F / 65–71°C. Froth it with a milk frother, handheld frother, whisk, or blender. If you are heating milk in a saucepan, keep the heat gentle and do not let it boil.
A microwave also works. Heat the milk in short bursts until steaming, then froth or whisk it before adding it to the matcha.
Warm the milk until it steams gently, then froth lightly; boiling milk can make the latte taste flat and heavy.
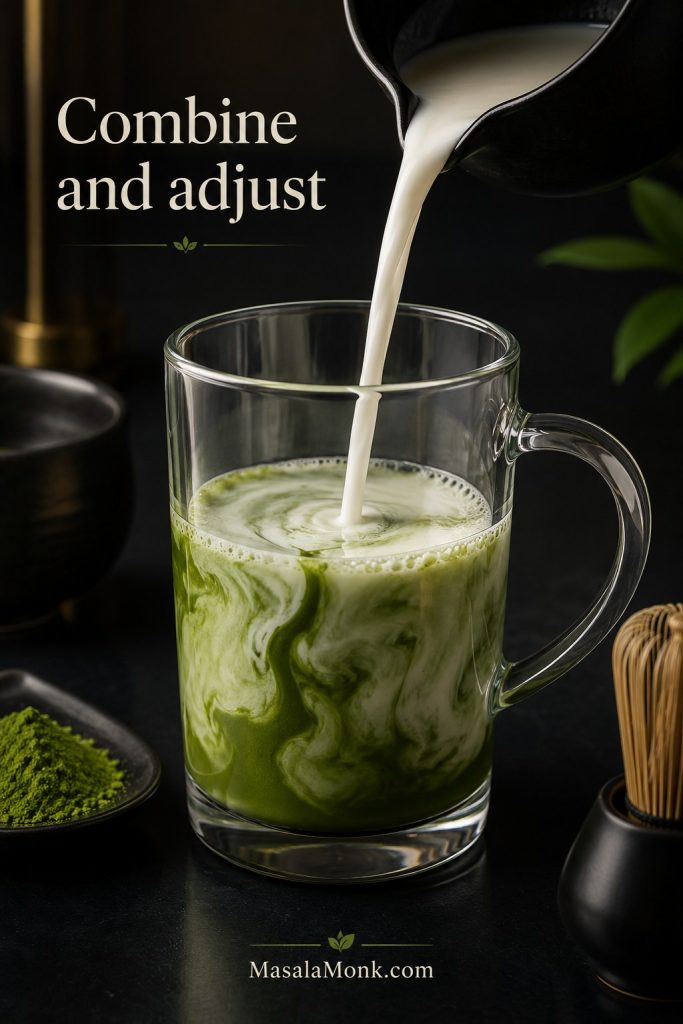
5. Combine and adjust
Pour the warm milk into the matcha paste. Stir gently, then taste. Add 1 teaspoon sweetener if you want it lightly sweet, or use vanilla syrup for a more coffee-shop finish.
At this point, the latte should look creamy and softly green, with no dry specks riding on top.
When the matcha is already hydrated, the milk creates a creamy swirl instead of dragging dry powder through the cup.
Think of the method as a texture path: remove lumps, hydrate the tea, build light foam, warm the milk, and combine.
Water and Milk Temperature
Temperature is where a good cup can quietly go wrong. Water that is too hot can make matcha harsh; milk that is overheated can taste flat or slightly scorched.
For the paste, aim for water around 170–180°F / 76–82°C. For the milk, aim for 150–160°F / 65–71°C, or heat it just until steaming.
No thermometer? Boil the water, let it stop bubbling, then rest it for about 1–2 minutes before using it. For milk, stop heating when it is steaming but not simmering.
The right temperatures protect both sides of the drink: gentler water keeps the tea clean, while warm milk keeps the body soft.
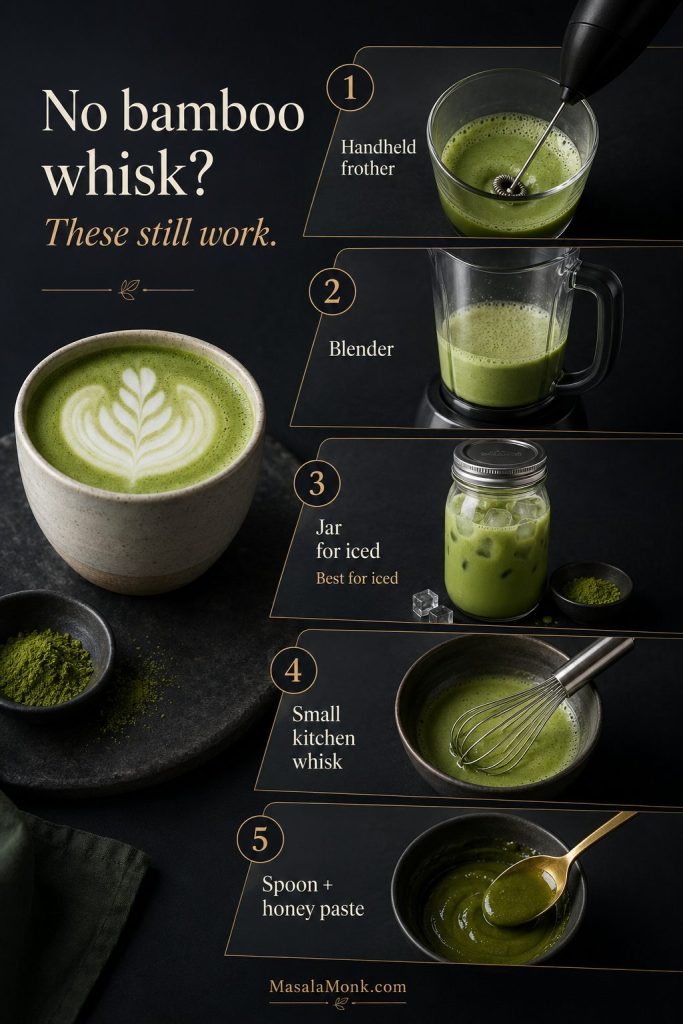
No Bamboo Whisk? Use These Methods
A bamboo whisk gives the cleanest foam, but it is not required for a smooth cup. You just need another way to help the powder and water meet properly before the milk goes in.
A bamboo whisk is helpful, but not required; use a frother for daily hot lattes and a jar for iced matcha.
Handheld frother method
Sift the matcha into a mug, add hot water, then use a handheld frother to blend the paste until smooth. Add warm milk and froth again briefly. This is the easiest everyday method for most home kitchens.
Blender method
Add warm milk, sweetener, and the matcha paste to a blender. Blend briefly until smooth and foamy. This is a good choice if clumps are your main issue, but do not overblend hot liquid in a sealed blender.
Jar method
The jar method works best for iced matcha. Shake the powder with a small amount of water first, then add milk and shake again. For hot drinks, use only a heat-safe jar and be careful with steam pressure.
If you are making it cold, the quick iced version is the best place to use the jar method.
Small kitchen whisk method
A regular mini whisk can work if you use a wide bowl or mug. Whisk quickly back and forth rather than stirring in circles.
Spoon + honey paste method
In a pinch, mix matcha with honey or maple syrup first, then add a little hot water and stir until smooth. It will not foam like a whisked latte, but the sticky sweetener helps loosen small clumps.
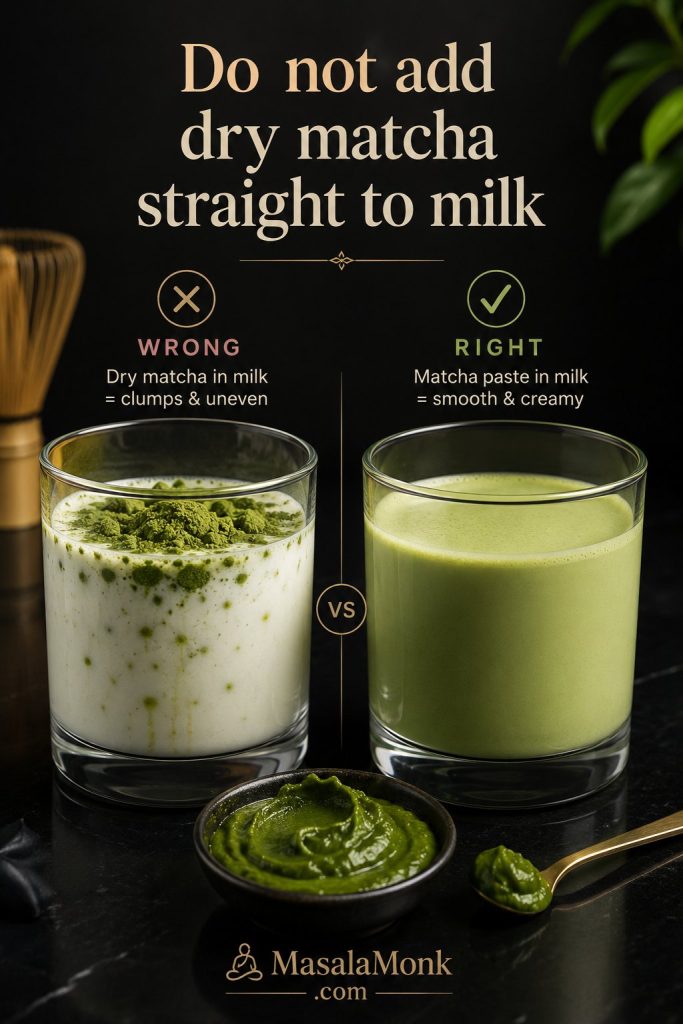
Avoid this mistake: do not add dry matcha straight into a full mug of milk. It usually floats, clumps, and leaves powder at the bottom.
Dry matcha tends to float and clump in milk, so make a paste first if you want the drink even from top to bottom.
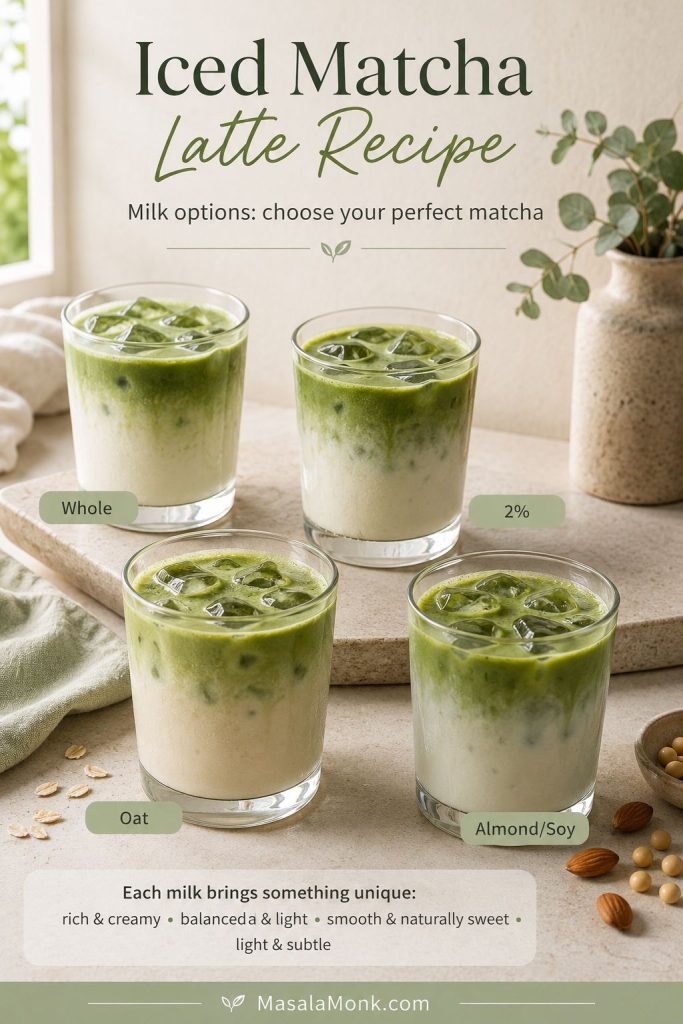
Best Milk to Use
Milk decides whether the cup tastes plush, light, sharp, or sweet. Whole milk gives the roundest body, oat milk is the easiest creamy dairy-free choice, almond milk keeps things lighter, coconut milk tastes richer but can dominate, and soy milk gives a stable coffee-shop texture.
If oat milk is your favorite matcha base, MasalaMonk’s homemade oat milk guide is useful when you want a simple DIY version that does not turn slimy.
Milk
Best Use
Notes
Whole milk
Classic café texture
Foams well and gives a round, creamy body.
2% milk
Everyday latte
Lighter than whole milk but still balanced.
Oat milk
Best dairy-free default
Creamy, slightly sweet, and good at softening bitterness. Barista-style oat milk usually froths better.
Almond milk
Lighter cup
Can make matcha taste sharper, especially if unsweetened.
Coconut milk
Rich variation
Sweet and full-bodied, but it can dominate the tea.
Soy milk
Stable café-style plant milk
Creamy, reliable, and usually froths better than many nut milks.
Cashew or macadamia milk
Premium creamy variation
Soft, rich, and smooth, but less common.
There is no single correct milk here. The best choice is the one that lets the tea taste balanced instead of hidden.
Milk changes the whole cup: whole milk tastes richest, oat milk is the creamiest dairy-free default, and almond milk keeps it lighter.
Once you choose your milk, the variation ideas show how to take the same base sweeter, colder, fruitier, or bolder.
Popular Matcha Latte Variations
Once the base is smooth, choose the version by what you want from the cup: sweeter, stronger, colder, fruitier, or bolder with espresso.
Starbucks-style at home
On Starbucks’ official menu, the hot Matcha Latte is described with matcha, milk, and classic syrup; the iced version adds ice. You can see the official Starbucks menu listing here: Starbucks Matcha Latte.
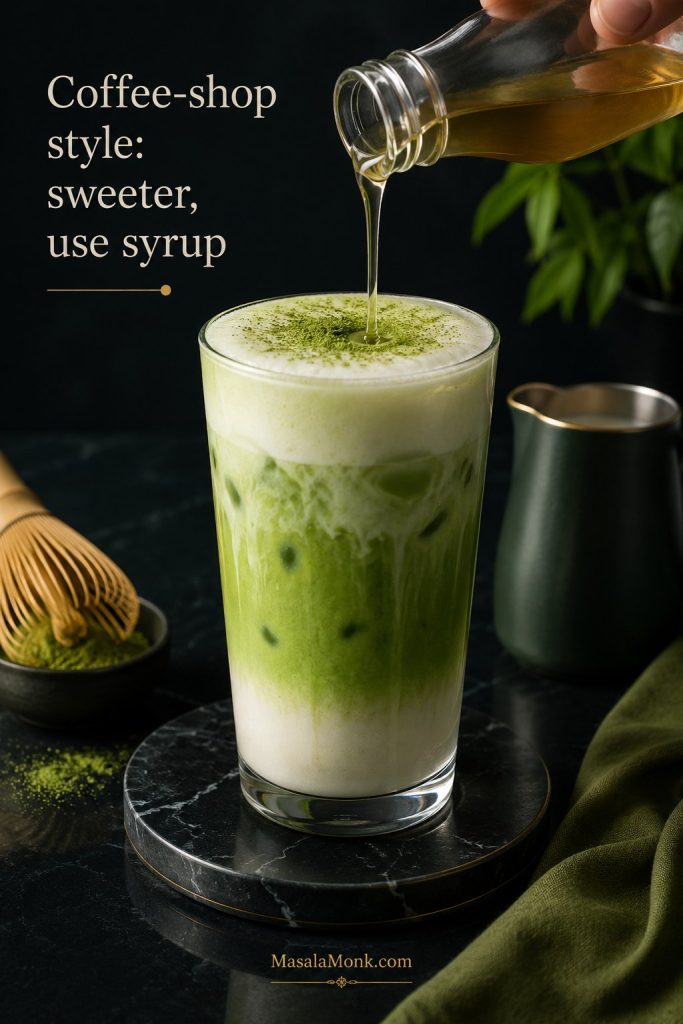
For a Starbucks-style cup at home, the main difference is sweetness. Use simple syrup or vanilla syrup instead of granulated sugar, because syrup blends smoothly into both hot and iced drinks.
For a homemade Starbucks-style hot drink, use 1–1½ teaspoons matcha, 1–2 tablespoons hot water, ¾–1 cup milk, and 1 tablespoon simple syrup or vanilla syrup. Keep the matcha paste slightly concentrated so the tea does not disappear under the milk.
For a sweeter coffee-shop style matcha latte, syrup works better than granulated sugar because it blends smoothly.
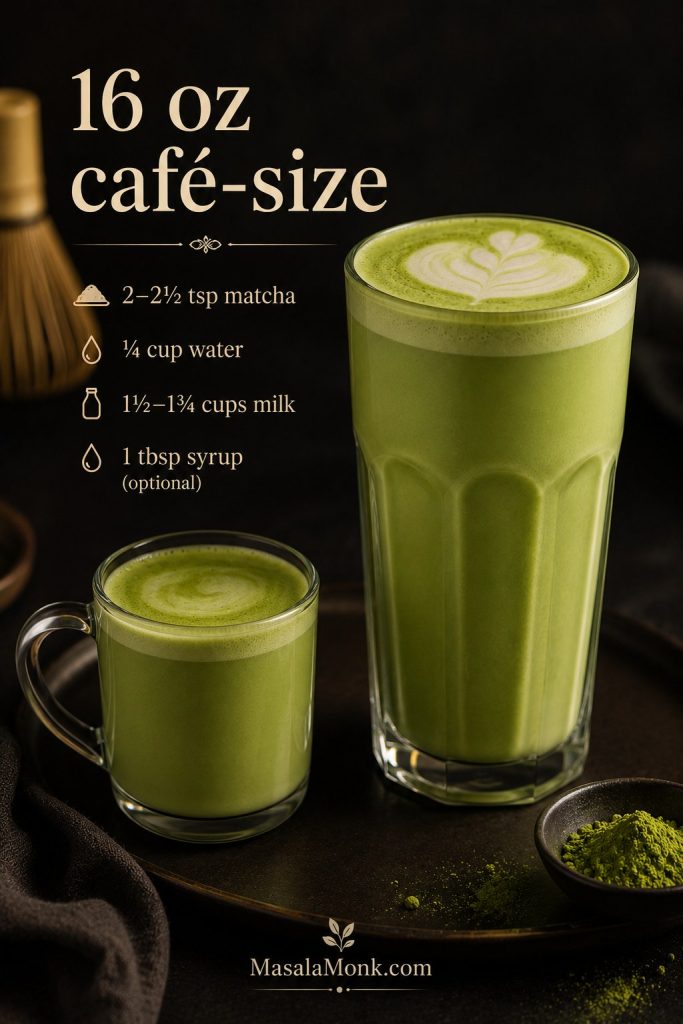
16 oz café-size version
A 16 oz café cup needs more matcha than a small mug. Use the lower milk amount if you want room for foam, or the higher amount if you want a fuller 16 fl oz drink.
Ingredient
16 oz Café-Style Hot Amount
Matcha
2–2½ tsp / about 4–5 g
Hot water
¼ cup / 60 ml
Milk
1½–1¾ cups / 360–420 ml
Sweetener
1 tbsp syrup, or to taste
A larger matcha latte needs more powder, not just more milk; otherwise, the green tea flavor disappears in the cup.
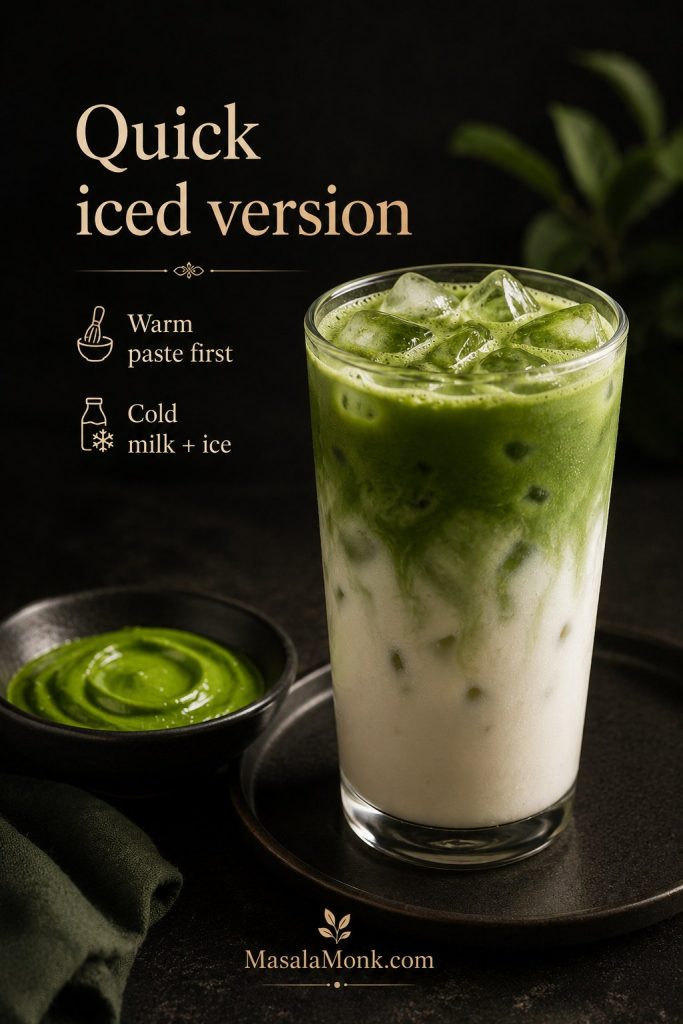
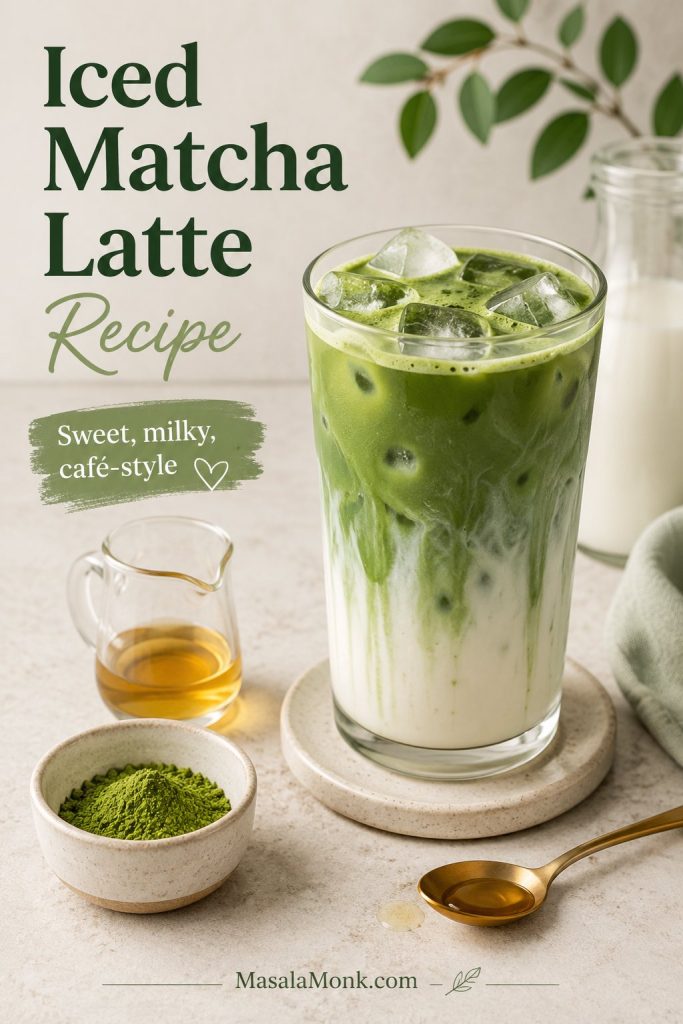
Quick iced version
To make a quick iced version, whisk 1–1½ teaspoons matcha with 2 tablespoons warm water, then pour it over ice with ¾–1 cup cold milk and syrup to taste.
This is only the shortcut. For the full cold method, Starbucks-style iced version, no-clump tips, and watery-fix notes, use the full iced matcha latte recipe.
For a quick iced version, make the warm paste first, then pour it over cold milk and ice to keep the texture clean.
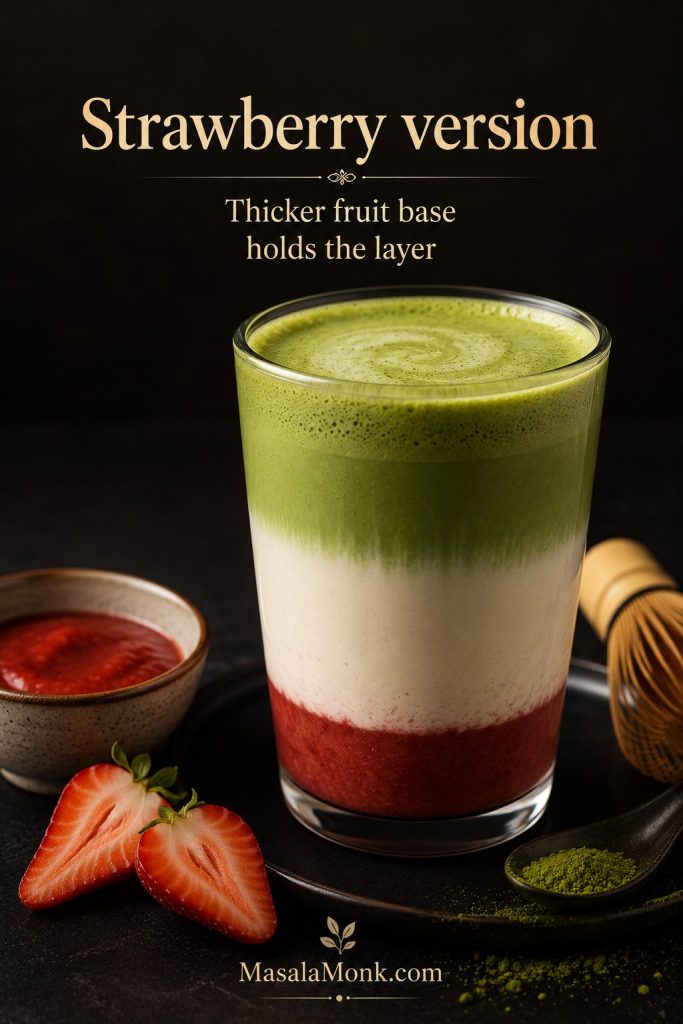
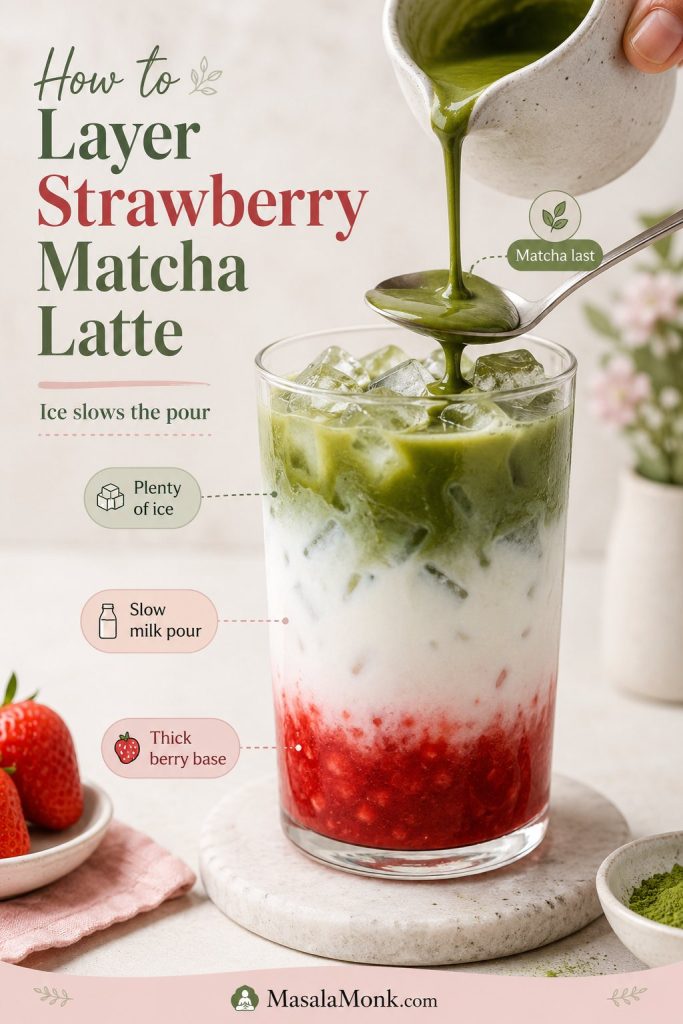
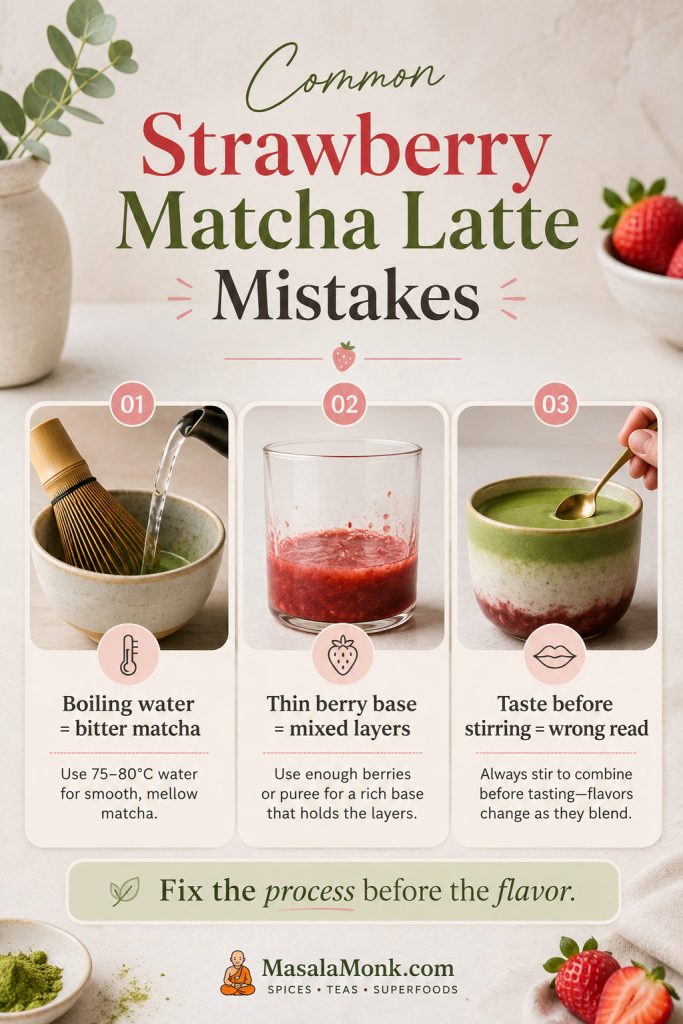
Strawberry version
For a strawberry version, spoon strawberry puree, strawberry syrup, or a quick strawberry jam base into the bottom of the glass, add milk, then pour matcha over the top. The layered look works best when the strawberry base is thicker than the milk.
A thicker strawberry base helps the layers stay visible, while the milk keeps the fruit and matcha from blending too fast.
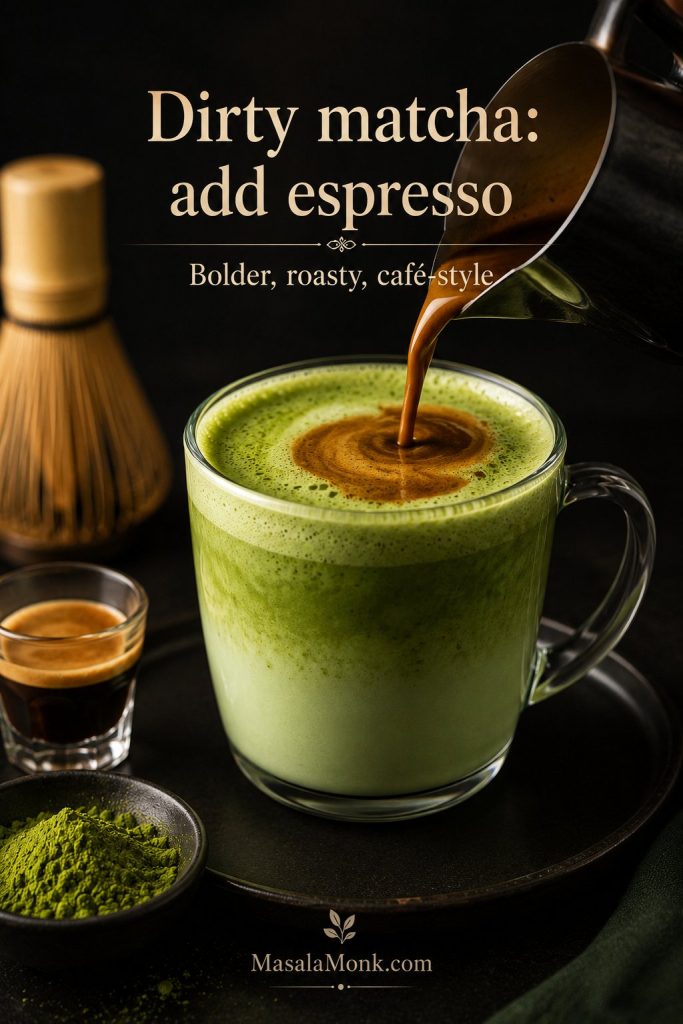
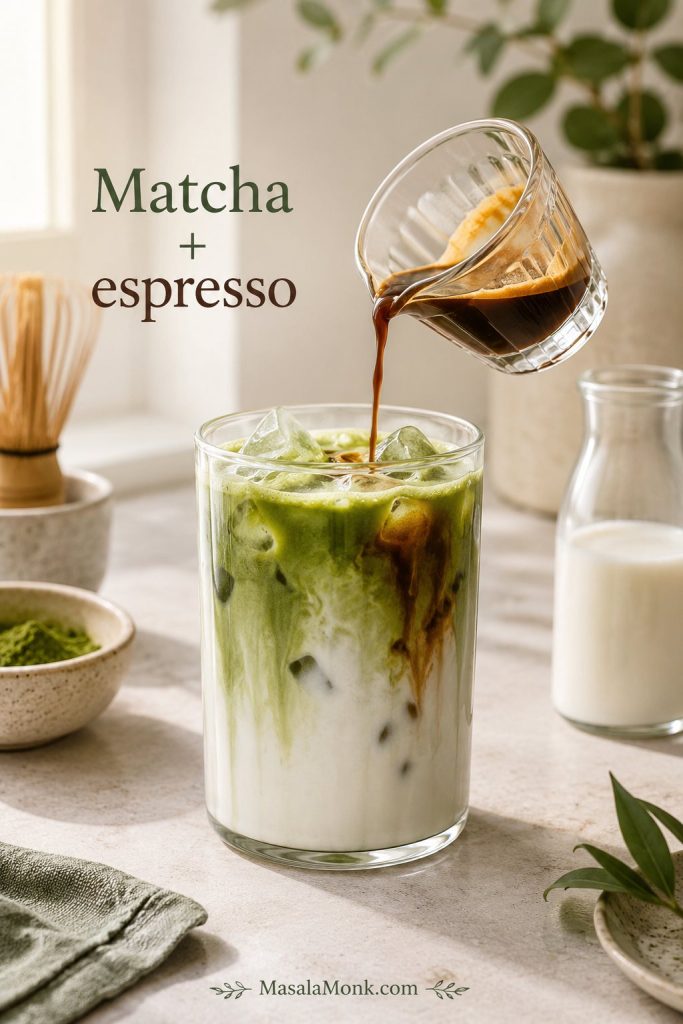
Dirty matcha / matcha with espresso
A dirty matcha adds espresso or strong coffee to the matcha-milk base. It tastes bolder, slightly roasty, and more like a coffee-shop drink than a pure green tea latte.
Use 1 teaspoon matcha, 2 tablespoons / 30 ml hot water, ¾ cup / 180 ml milk, 1 shot espresso or 2 oz strong coffee, and 1–2 teaspoons sweetener. For a hot dirty matcha, add the espresso after combining the matcha and milk. For an iced dirty matcha, pour the espresso over ice and milk, then add the green tea layer.
If you are still figuring out espresso strength, MasalaMonk’s quick espresso guide can help you choose coffee that stands up to the green tea flavor instead of disappearing into the milk.
Espresso makes the drink bolder and more roasty, but the matcha still needs enough strength to show through the coffee.
More flavor ideas
Vanilla: add 1–2 teaspoons vanilla syrup when you want the soft coffee-shop version.
Honey: sweeten the paste with honey before adding milk for a rounder, floral sweetness.
Maple: use maple syrup when you want a warmer, deeper sweetness.
Oat milk: use barista-style oat milk for the creamiest dairy-free version.
Almond milk: use almond milk for a lighter drink; add vanilla if it tastes sharp.
Coconut: use light coconut milk or coconut beverage for a richer, slightly tropical version.
Protein: blend the finished latte with vanilla protein powder, or use a protein milk.
Unsweetened: skip the sweetener, but use a creamy milk so the cup still tastes round rather than sharp.
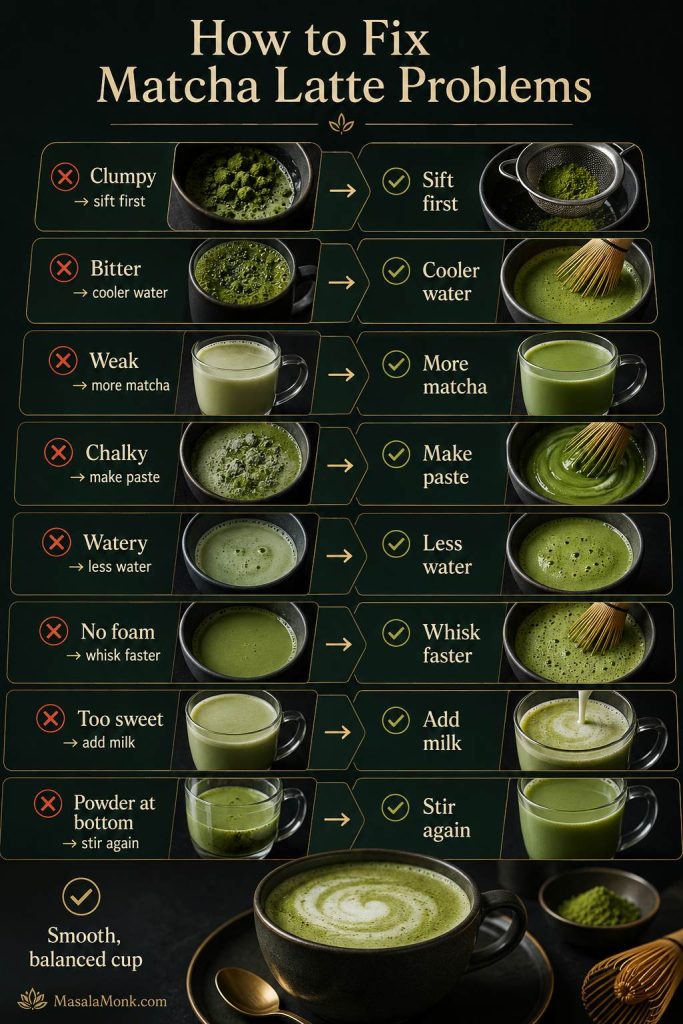
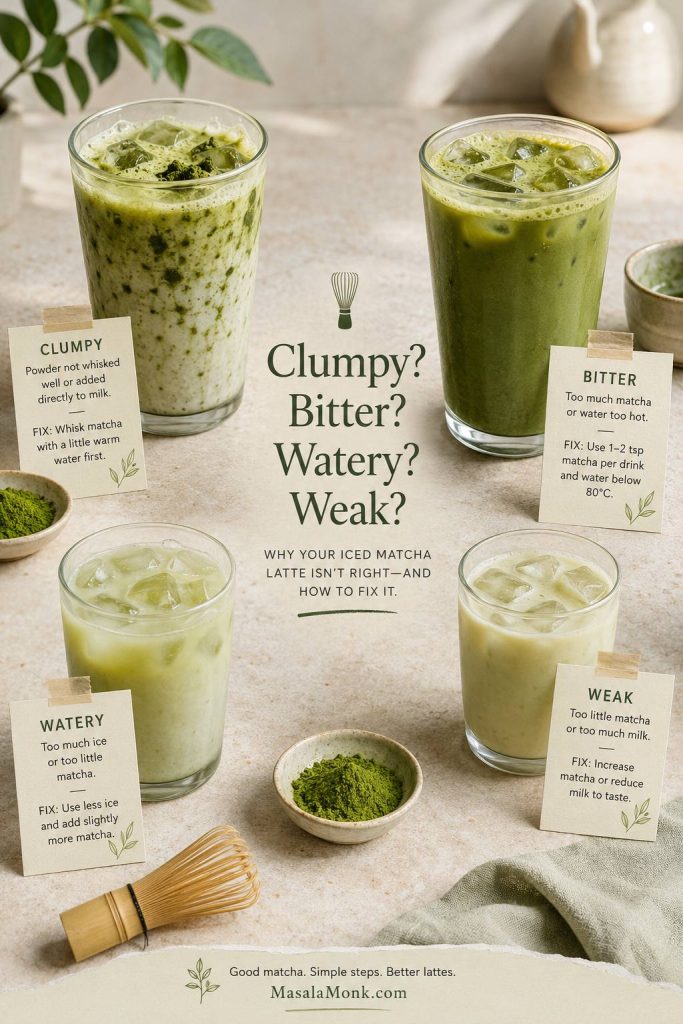
Fixes for Clumps, Bitterness, and Weak Flavor
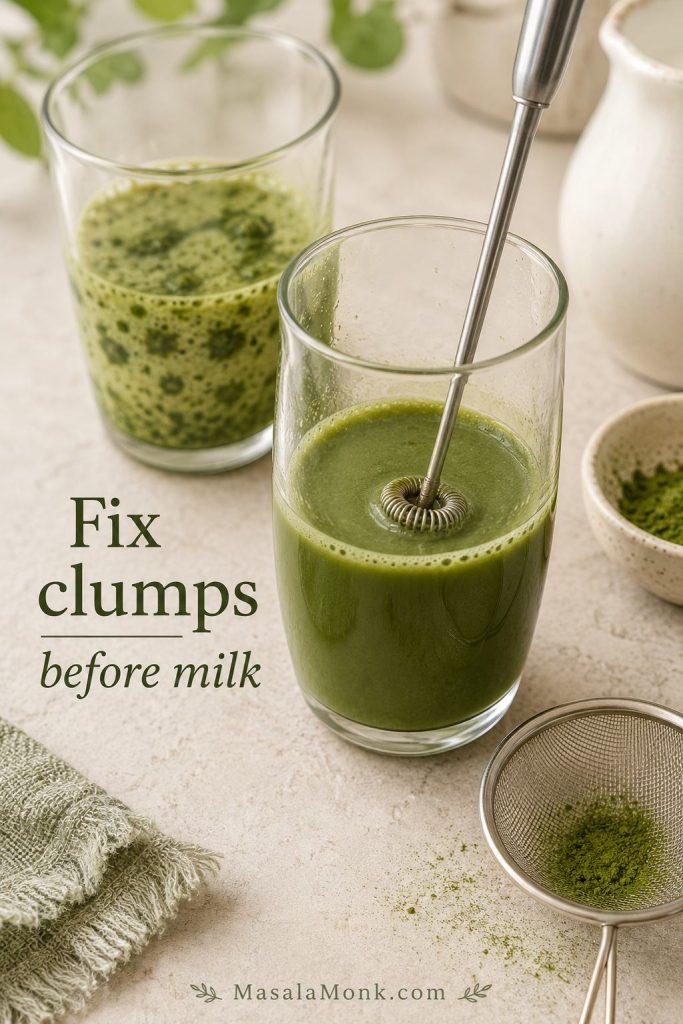
A bad matcha latte usually announces the problem quickly: clumps on top, bitterness on the first sip, weak milkiness, or powder at the bottom. Use the symptom first, then fix the cause.
Fix the symptom instead of guessing: clumps need sifting, bitterness needs gentler water, and weak flavor needs more matcha.
Matcha was not sifted or was added straight to milk.
Sift first, then make a paste with hot water.
Bitter
Water was too hot, matcha was old, or too much powder was used.
Use 170–180°F water, reduce matcha slightly, or add milk/sweetener.
Weak / too milky
Too much milk or not enough matcha.
Use 1½ tsp / about 3 g matcha per ¾ cup milk.
Chalky
Matcha was not hydrated before milk was added.
Whisk with 2 tbsp hot water first.
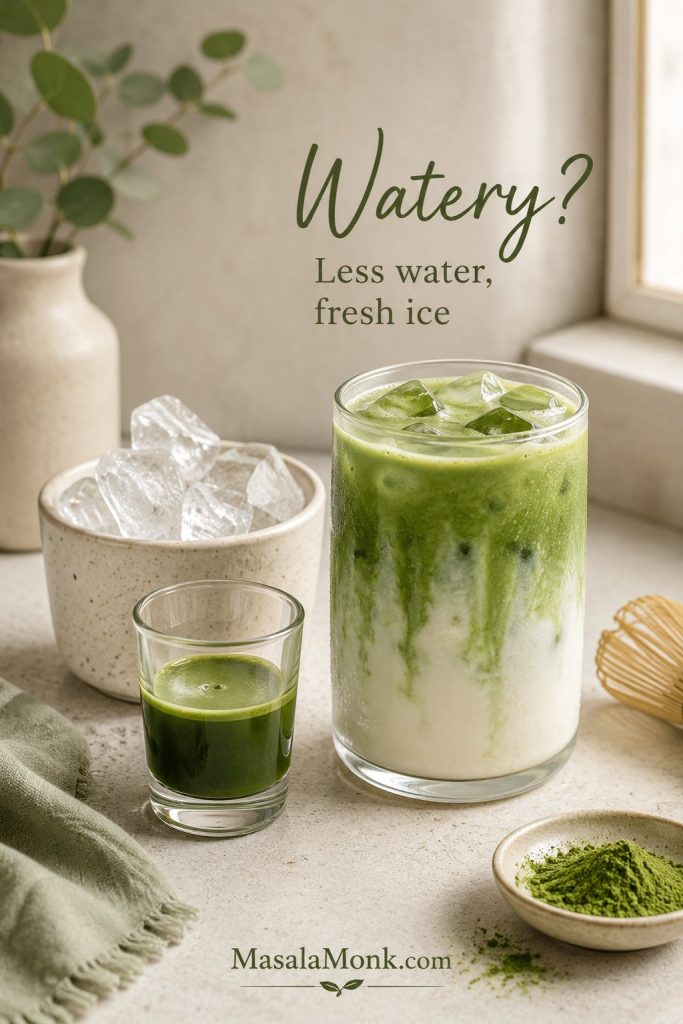
Watery
Too much water or melted ice.
Use a concentrated paste and reduce extra water.
Not foamy
Slow stirring or unfrothed milk.
Use a W/M whisking motion and froth the milk separately.
Too sweet
Too much syrup was added at the start.
Start with 1 tsp sweetener, then add more after tasting.
Powder at bottom
Matcha settled as the drink sat.
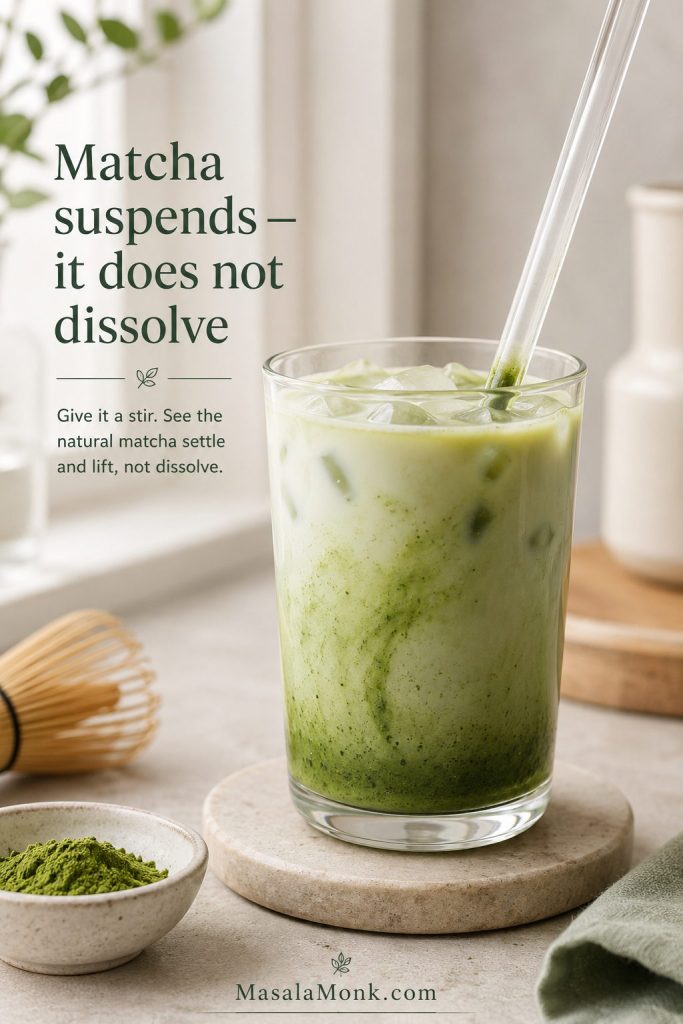
Stir again before drinking. Matcha is a suspended powder, so some settling is normal.
A bitter cup, a weak cup, and a clumpy cup do not need the same solution. That is why fixing the symptom works better than hiding everything with extra syrup.
Recipe Card
Matcha Latte Recipe
This hot matcha latte is creamy, lightly grassy, and built around a no-clump paste method. Sift the matcha, whisk it with hot water, then add warm milk and sweeten to taste.
Yield1 latte
Prep Time5 minutes
Total Time5–7 minutes
CategoryBeverage
Equipment
Fine-mesh strainer
Bamboo whisk, handheld frother, or small whisk
Wide mug or small bowl
Milk frother, microwave-safe cup, or small saucepan
Ingredients
1½ tsp / about 3 g matcha powder
2 tbsp / 30 ml hot water, around 170–180°F / 76–82°C
¾ cup / 170–180 ml milk of choice
1 tsp sugar, honey, maple syrup, or simple syrup, optional
⅛ tsp vanilla extract or a tiny splash of vanilla syrup, optional
Small pinch of salt, optional
Instructions
Sift the matcha. Sift 1½ tsp / about 3 g matcha into a wide mug or small bowl.
Make the paste. Add 2 tbsp / 30 ml hot water and whisk until smooth.
Combine and adjust. Pour the milk into the matcha paste, stir gently, taste, and sweeten if needed.
Notes
For a milder drink, use 1 tsp / about 2 g matcha and 1 cup / 240 ml milk.
For a stronger drink, use 2 tsp / about 4 g matcha and keep the milk around ¾ cup / 180 ml.
A microwave works for warming milk; heat in short bursts until steaming, then froth or whisk before combining.
For a Starbucks-style version, use simple syrup or vanilla syrup and make it sweeter.
For an iced version, use the dedicated iced matcha latte recipe for the full method.
Storage and Make-Ahead Tips
A hot matcha latte is best when the milk is freshly warmed and the foam is still light. Think of make-ahead here as prep, not storage: measure the matcha, keep the sweetener ready, and warm the milk fresh.
If you make the paste ahead, stir or froth it again before adding milk because the tea can settle. Do not store hot frothed milk for long; the foam collapses, and reheated milk can taste flat.
FAQs
How much matcha do you use for one latte?
For a balanced café-style latte, start with 1½ teaspoons / about 3 grams matcha. Use 1 teaspoon for a milder beginner drink or 2 teaspoons for a stronger green tea flavor.
What temperature should water be for matcha?
Aim for 170–180°F / 76–82°C. Boiling water can make matcha taste more bitter, so let freshly boiled water cool slightly before using it.
Why does it taste bitter?
Bitter matcha usually means the water was too hot, the powder was old, or the ratio was too strong. Lower the water temperature before adding extra sugar.
Why are there clumps?
Clumps usually mean the matcha met too much milk too soon. Sift it first, then whisk it with a small amount of hot water before adding milk.
What milk tastes best?
Whole milk is best for classic richness. Oat milk is the best dairy-free default. Almond milk is lighter, soy is stable, and coconut milk is rich but more noticeable.
Is it better hot or iced?
The hot version tastes warmer, creamier, and more soothing. Iced matcha tastes brighter and more refreshing. The best version depends on whether you want a cozy drink or a cold café-style one.
Does matcha latte have caffeine?
Yes. Matcha is powdered green tea, so it contains caffeine. The amount varies by brand and serving size; check your matcha package if caffeine is a concern.
Do I need a bamboo whisk?
Not necessarily. A bamboo whisk gives the best traditional texture, but a handheld frother, blender, jar, or small kitchen whisk can also work if you make a paste first.
How do I make a 16 oz version?
For a 16 oz drink, start with 2–2½ teaspoons / about 4–5 grams matcha, ¼ cup / 60 ml water, 1½–1¾ cups / 360–420 ml milk, and about 1 tablespoon syrup if you want it sweet.
Should I use ceremonial or culinary matcha?
Ceremonial or latte-grade matcha usually tastes smoother in drinks. Culinary matcha can work if you are adding milk and sweetener, but it is usually better for baking, smoothies, or recipes where matcha is not the only main flavor.
How do I make it Starbucks-style?
Use matcha, milk, and simple syrup or vanilla syrup. Make it sweeter than the basic recipe, then adjust the syrup to taste. For an iced version, syrup works better than granulated sugar because it blends smoothly.
Why does powder settle at the bottom?
Matcha is a powdered tea suspended in liquid, not a brewed tea that fully dissolves. Some settling is normal if the cup sits for a while. Stir or froth it again before drinking.
Final Tips
The whole method comes back to one order: make a smooth paste, add milk, then adjust sweetness. If the drink tastes weak, use a little more matcha or a little less milk next time. If it tastes bitter, lower the water temperature before reaching for extra sugar.
From there, every version gets easier: stronger, sweeter, oat milk, iced, dirty, or strawberry — all built from the same glossy paste and balanced milk base.
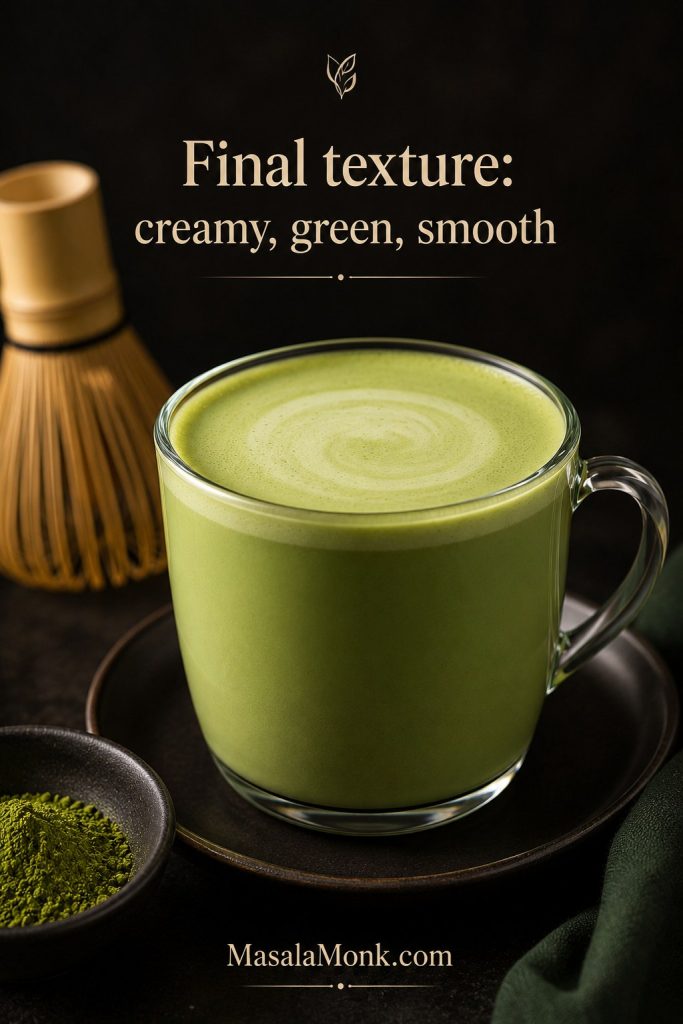
What the final texture should look like
The final cup should look softly green, lightly foamed, and fully blended, with no dry specks floating through the drink and no powder layer sitting at the bottom.
Before building variations, check the finish: the latte should be fully blended, lightly foamed, and free of dry green powder at the bottom.
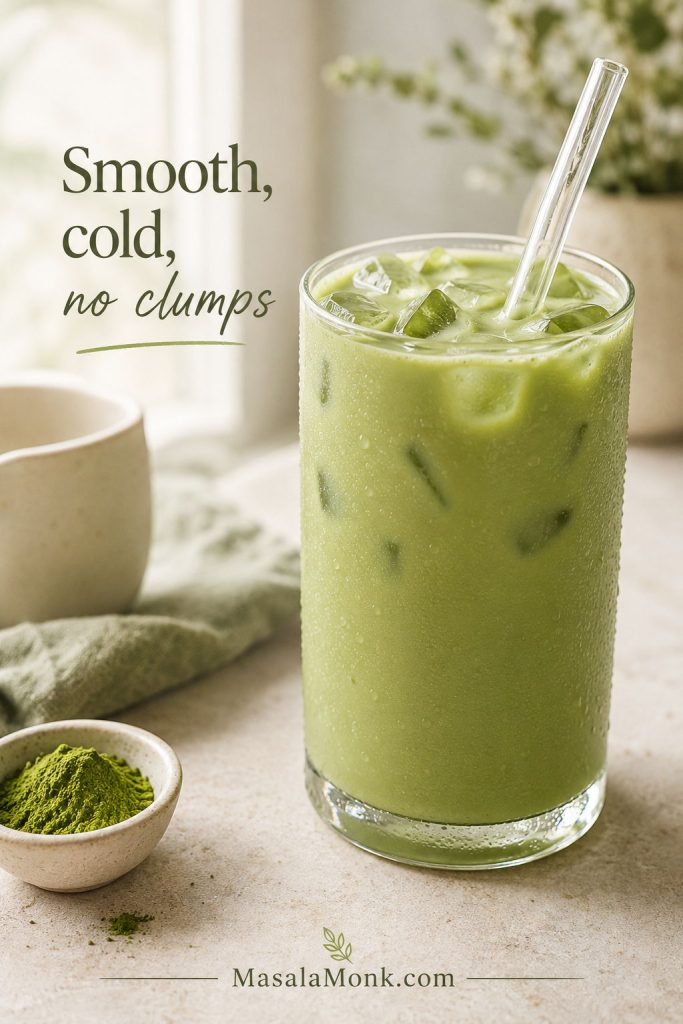
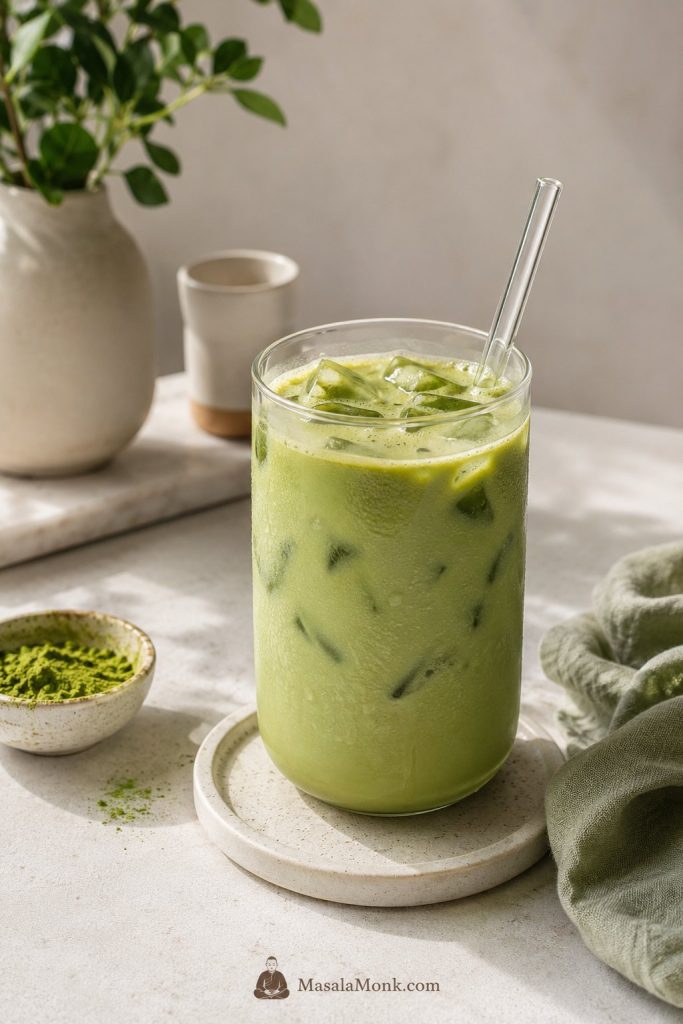
A homemade iced matcha latte should not taste like cold milk with dry green specks drifting through it. The best version is cold, creamy, bright green, and smooth from the first sip to the last. The trick is simple: sift the matcha, whisk it with a small amount of hot water, then pour it over cold milk and ice.
This recipe gives you the everyday version first, then shows you how to adjust it: stronger, less sweet, Starbucks-style, vanilla, oat milk, cold foam, or strawberry. The goal is a chilled, milky green tea drink that tastes clean from the first sip — not powdery, bitter, or watered down.
Blending the matcha before adding milk keeps the texture silky, so you do not get dry green specks floating through the drink.
To make an iced matcha latte, sift 1 teaspoon matcha powder into a small bowl or cup, whisk it with 2 tablespoons hot water until smooth, then pour it over a glass filled with ice, cold milk, and a little simple syrup or vanilla syrup if you like it sweet.
Matcha: 1 teaspoon / about 2 grams
Water: 2 tablespoons / 30 ml hot water, not boiling
Milk: ¾ to 1 cup / 180 to 240 ml cold milk
Sweetener: 1 to 2 teaspoons simple syrup, maple syrup, or vanilla syrup
Ice: about 1 cup, enough to fill a 12 to 16 oz glass
Use the visual formula below as a quick scan of the base iced matcha latte before you adjust sweetness or milk.
Begin with the base formula, then change only one thing at a time so you know whether matcha, milk, or syrup made the difference.
Start here: Choose 1 teaspoon matcha, 2 tablespoons hot water, ¾ cup cold milk, 1 teaspoon syrup, and a full glass of ice the first time.
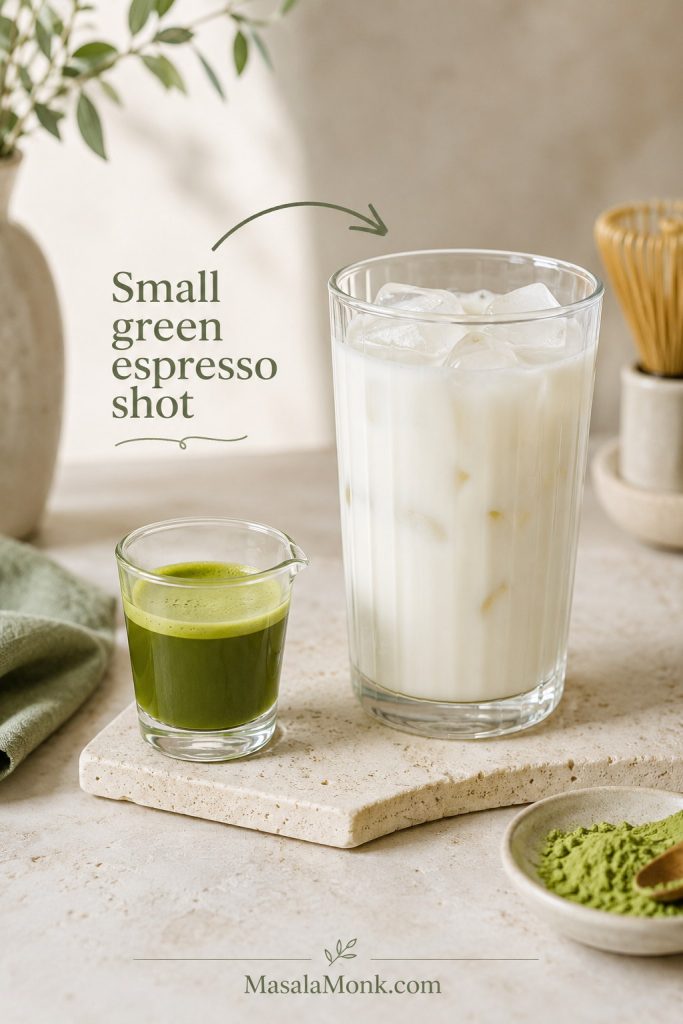
The small 2-tablespoon matcha shot is the key: enough water to smooth the powder, not so much that it thins the latte. Starting with ¾ cup milk also leaves room to soften the drink after tasting instead of making it too pale from the beginning.
Keep this 2-tablespoon hot-water shot in mind: it is the difference between a creamy latte and a watered-down glass.
This small hot-water shot gives the powder enough room to smooth out while keeping the finished latte creamy instead of thin.
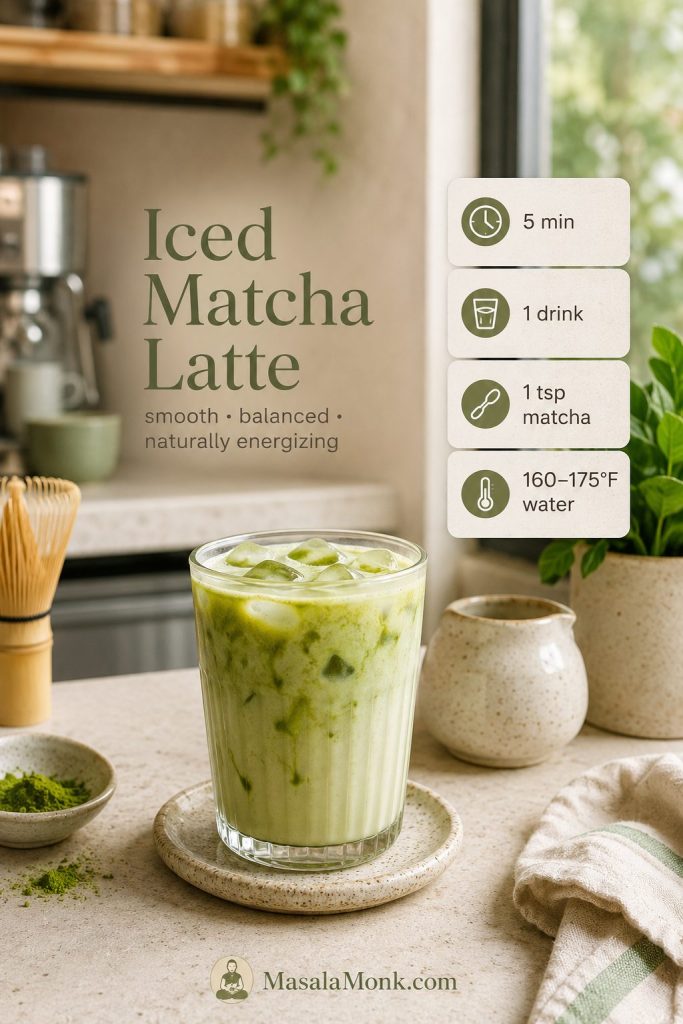
Iced Matcha Latte at a Glance
Yield
1 drink, about 12 to 16 oz depending on milk and ice
Total time
5 minutes
Matcha amount
1 teaspoon / about 2 grams
Water temperature
160 to 175°F / 70 to 80°C
Milk amount
Start with ¾ cup / 180 ml, then add more if needed
Tools
Bamboo whisk, handheld frother, shaker jar, or blender
Main fix
Sift first, then whisk matcha with water before adding milk
Use this quick reference to check the timing, water temperature, and base ratio before you start whisking.
A clear starting point saves guesswork: the right powder amount, warm water, cold milk, and ice make the first glass much easier.
After a couple of tries, the order becomes easy: sift, whisk, ice, milk, pour. Matcha does not dissolve like instant coffee; it stays suspended in the drink. That is why it can settle as it sits, why the last few sips may taste stronger, and why stirring before drinking helps.
Since matcha is finely ground tea leaf, stirring before drinking helps redistribute the green tea flavor through the milk.
Why This Method Works
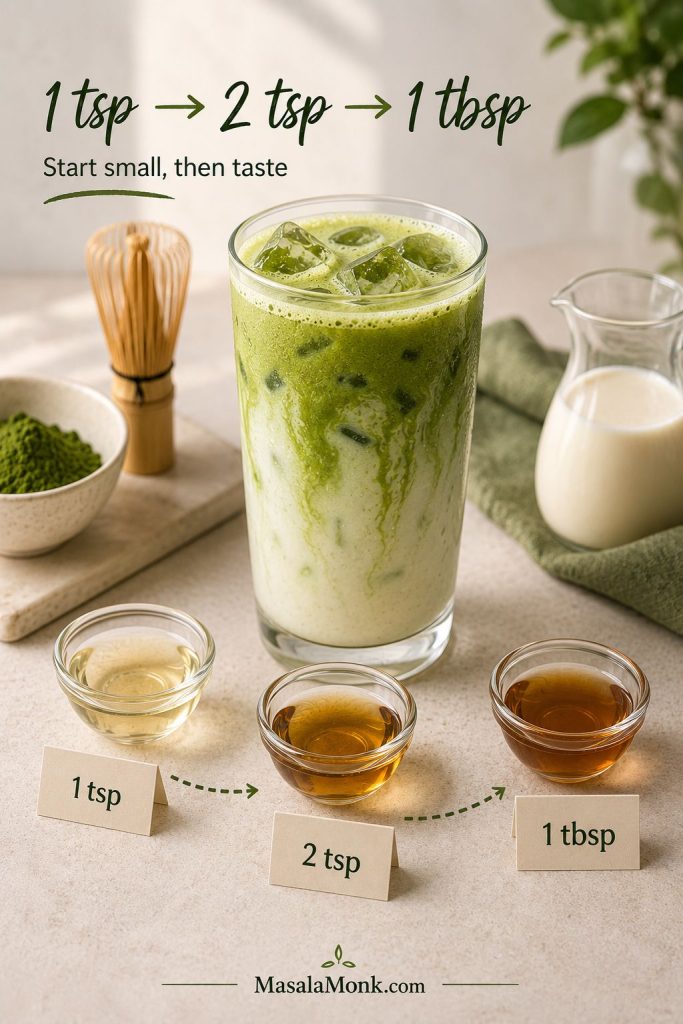
The key move is the concentrated matcha shot: just 2 tablespoons hot water, enough to blend the powder without watering down the glass. Think of it like a small green espresso shot: smooth, concentrated, and strong enough to flavor the milk without turning the latte thin.
You want a smooth matcha base, not a diluted cup of tea. Cold milk keeps the drink soft and refreshing, while a little syrup rounds off the earthy edge without covering the green tea flavor.
Treat the prepared matcha like a concentrated base: strong enough to carry the milk, but small enough to keep the drink refreshing.
Iced Matcha Latte Ingredients
Before you start, set up the matcha, hot water, milk, ice, and syrup in the same order the drink comes together.
A short ingredient list still needs the right sequence: loosen the powder first, then build the cold milk drink around it.
Matcha powder
Plain, unsweetened matcha powder gives you the most control. One teaspoon / about 2 grams makes a balanced drink. If you have a small kitchen scale, 2 grams is more reliable than a packed teaspoon. For a stronger version, increase the matcha to 1½ teaspoons. If you are new to matcha or your powder tastes intense, start with ½ to ¾ teaspoon and increase next time.
Some matcha blends already contain sugar. If yours is sweetened, reduce or skip the syrup so the finished latte does not taste too sweet.
Hot water
A small amount of hot water turns the powder into a smooth matcha shot before it touches the cold milk. The water should be hot but not boiling, which keeps the flavor smoother and less harsh. If you do not have a thermometer, boil the water, turn off the heat, and wait about 1 to 2 minutes before using it.
Warm water helps the powder blend quickly; however, boiling water can push matcha toward a sharper, more bitter finish.
Milk
Dairy milk, oat milk, almond milk, coconut milk, and soy milk all work. Whole milk gives the richest texture, 2% milk feels balanced and familiar, and barista oat milk is usually the creamiest dairy-free choice.
Ice
About 1 cup ice is enough for a 12 to 16 oz glass. A full glass keeps the milk cold and helps the matcha pour slowly over the top. Large cubes melt more slowly, while crushed ice feels extra refreshing but waters the drink down faster.
Sweetener
Simple syrup, vanilla syrup, maple syrup, honey, or agave all work. Liquid sweeteners are easier to mix into cold drinks than granulated sugar. If you choose honey, whisk it into the warm matcha shot first so it blends evenly.
If your first sip tastes too grassy, that does not mean you did anything wrong. A little more milk, a touch of vanilla syrup, or fresher matcha can make the drink softer and more rounded.
How to Make an Iced Matcha Latte
The whole drink depends on the matcha shot. When that little green base is smooth, the milk and ice have an easy job.
1. Sift the matcha
Sift 1 teaspoon matcha powder into a small bowl, cup, or measuring jug. This step takes only a few seconds, but it prevents the powdery clumps that often float through homemade matcha drinks.
Sifting breaks up compacted powder before whisking, which is why this tiny step makes such a big difference in clump control.
2. Add hot water
Add 2 tablespoons / 30 ml hot water. If you have a temperature-controlled kettle, aim for 160 to 175°F / 70 to 80°C. If not, boil the water, turn off the heat, and let it sit for about 1 to 2 minutes.
3. Whisk until smooth
Whisk for 15 to 20 seconds, using a quick W or M motion if you have a bamboo matcha whisk. A handheld milk frother also works well. The matcha should look blended and lightly foamy, with no dry powder stuck to the sides.
Look for a glossy, lightly foamy surface before adding milk; that tells you the matcha is hydrated and ready to pour.
4. Add ice and milk
Fill a tall glass with ice, then pour in ¾ cup cold milk. Taste after the matcha is added, then add up to ¼ cup more milk if you want the drink softer and creamier. This is easier than trying to rescue a latte that started too milky.
5. Sweeten
Add 1 to 2 teaspoons simple syrup, maple syrup, or vanilla syrup. You can stir it into the milk or whisk it into the warm matcha shot. For a sweeter drink, start with 1 tablespoon syrup and adjust from there.
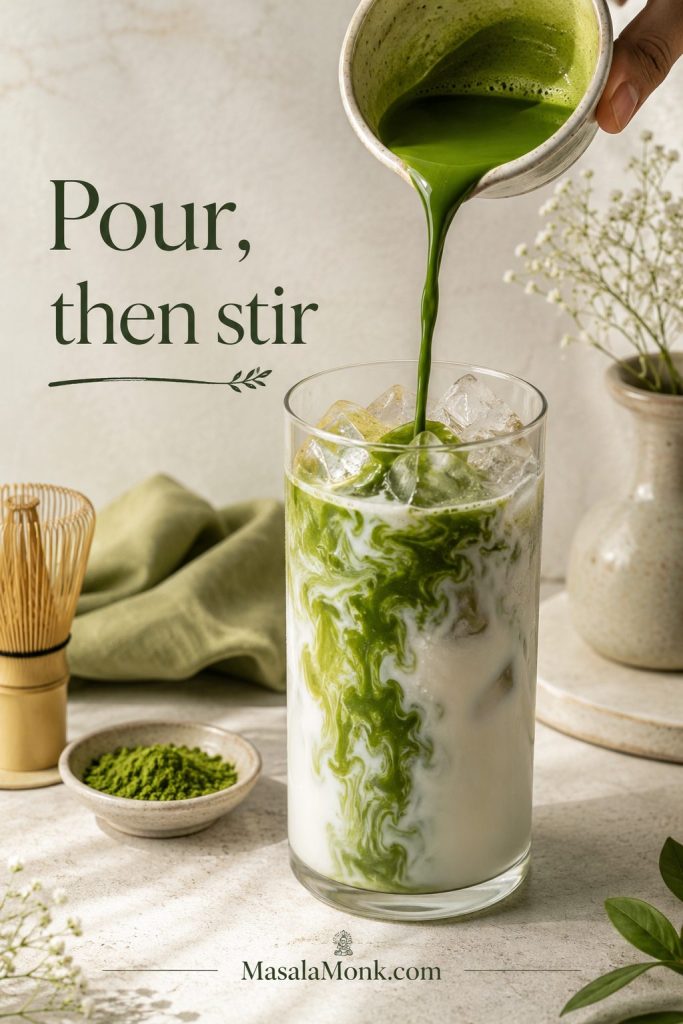
6. Pour and stir
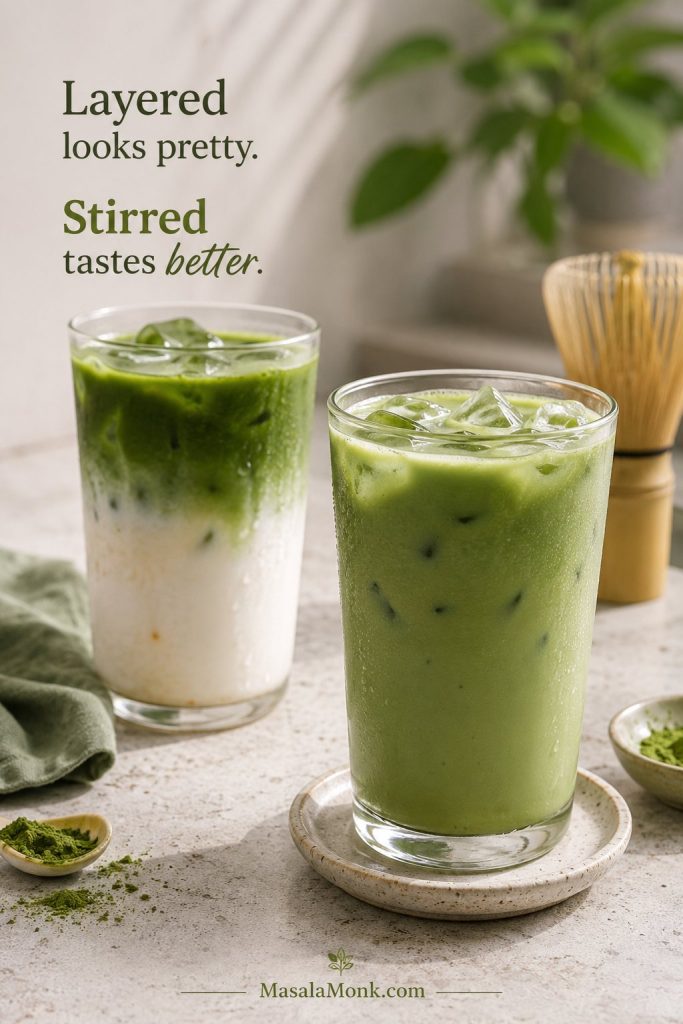
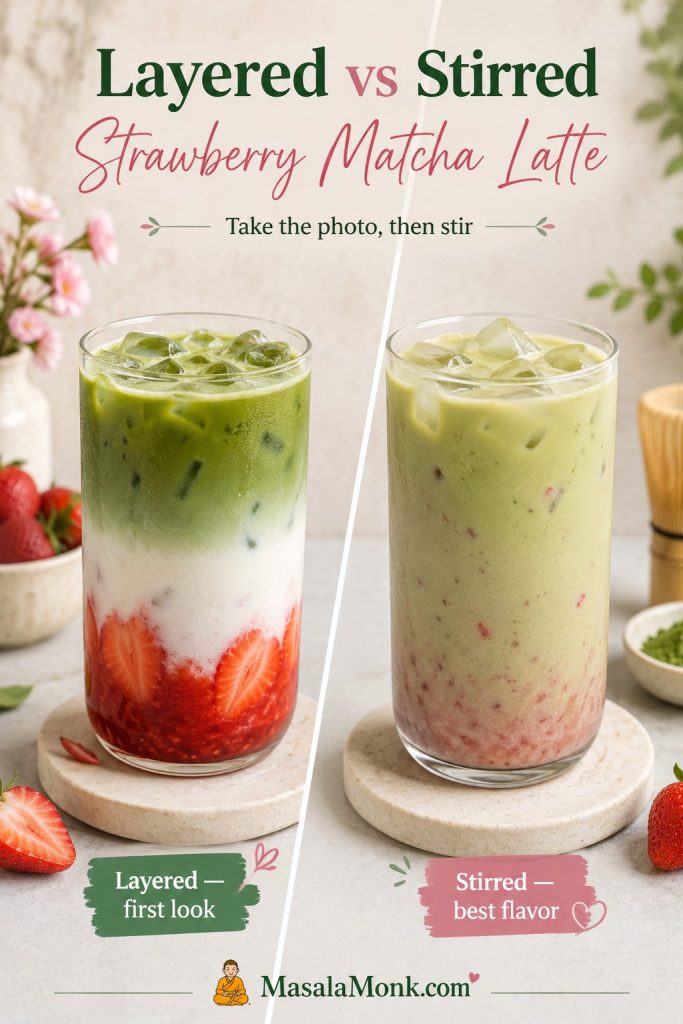
Slowly pour the matcha shot over the milk and ice. At first, the pour gives you the pretty green layer; after that, stirring gives you the best flavor. The layered glass is pretty for a minute, but the stirred glass is better: cold milk, soft sweetness, and a clean green tea finish without powder at the bottom of the glass.
A green ribbon gives the glass its café look, but the real test comes after stirring, when the flavor should taste even.
This comparison shows why the layered look is only the starting point and the stirred glass gives the better sip.
Layers are beautiful for serving photos, while the stirred glass is usually the one that tastes balanced all the way down.
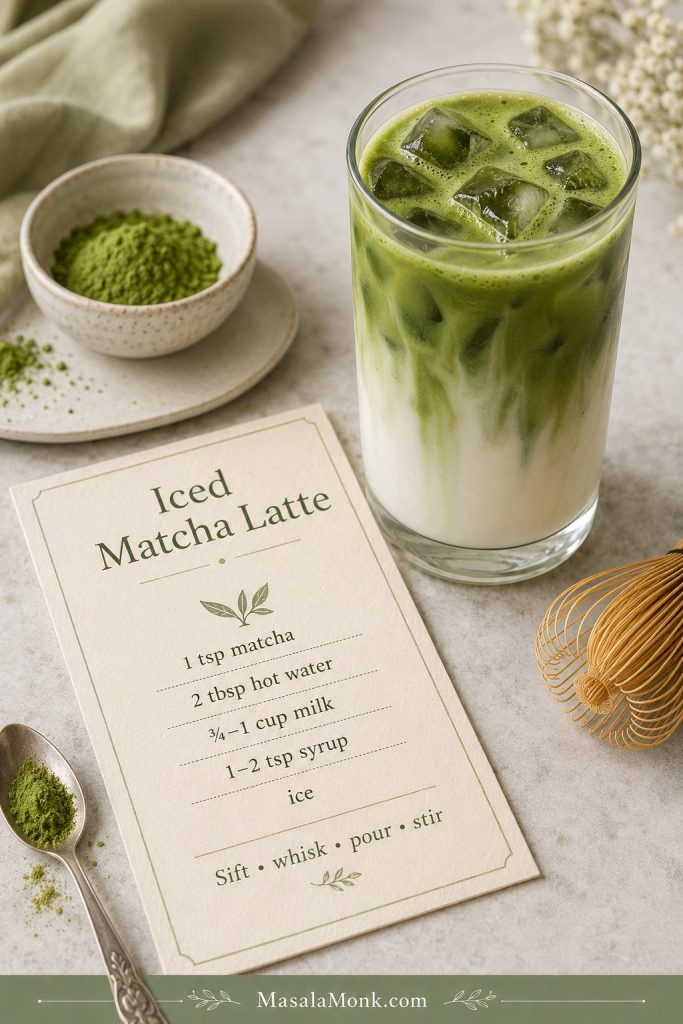
Iced Matcha Latte Recipe
This iced matcha latte is cold, milky, lightly earthy, and easy to adjust. Start with 1 teaspoon matcha for a balanced drink or 1½ teaspoons for a stronger version.
Yield 1 drink
Prep Time 5 minutes
Total Time 5 minutes
Skill Level Easy
Ingredients
1 teaspoon matcha powder / about 2 grams
2 tablespoons hot water / 30 ml, 160 to 175°F / 70 to 80°C
¾ to 1 cup cold milk / 180 to 240 ml
1 to 2 teaspoons simple syrup, maple syrup, or vanilla syrup
About 1 cup ice, enough to fill a 12 to 16 oz glass
Instructions
Sift the matcha powder into a small bowl, cup, or measuring jug.
Add the hot water and whisk for 15 to 20 seconds, until blended and lightly foamy.
Fill a tall 12 to 16 oz glass with ice.
Pour in ¾ cup cold milk.
Add the sweetener to the milk or whisk it into the warm matcha shot.
Pour the matcha over the milk and ice.
Stir, taste, and add up to ¼ cup more milk if you want a softer drink.
Notes
The 2-tablespoon hot-water shot keeps the drink smooth without making it watery.
A stronger glass starts with 1½ teaspoons matcha.
For a sweeter coffee-shop style drink, use about 1 tablespoon simple syrup or vanilla syrup.
Clumps are easiest to prevent before they start: sift first, then whisk.
If your matcha is already sweetened, reduce or skip the syrup.
Use the saveable recipe-card visual below when you want the base method without rereading the full guide.
Keep the base recipe handy; once this version works, every variation becomes an adjustment instead of a new drink to relearn.
That is the whole base drink. When the matcha shot is right, the glass looks café-pretty, but more importantly, it tastes smooth all the way down. After you have made it this way once or twice, it stops feeling like a café trick: you know how strong you like the matcha, how much milk softens it, and exactly when to stir. From here, use the ratio guide if you want to adjust strength, the no-whisk tools if you want an easier method, and the matcha powder guide if your drink tastes flat or bitter.
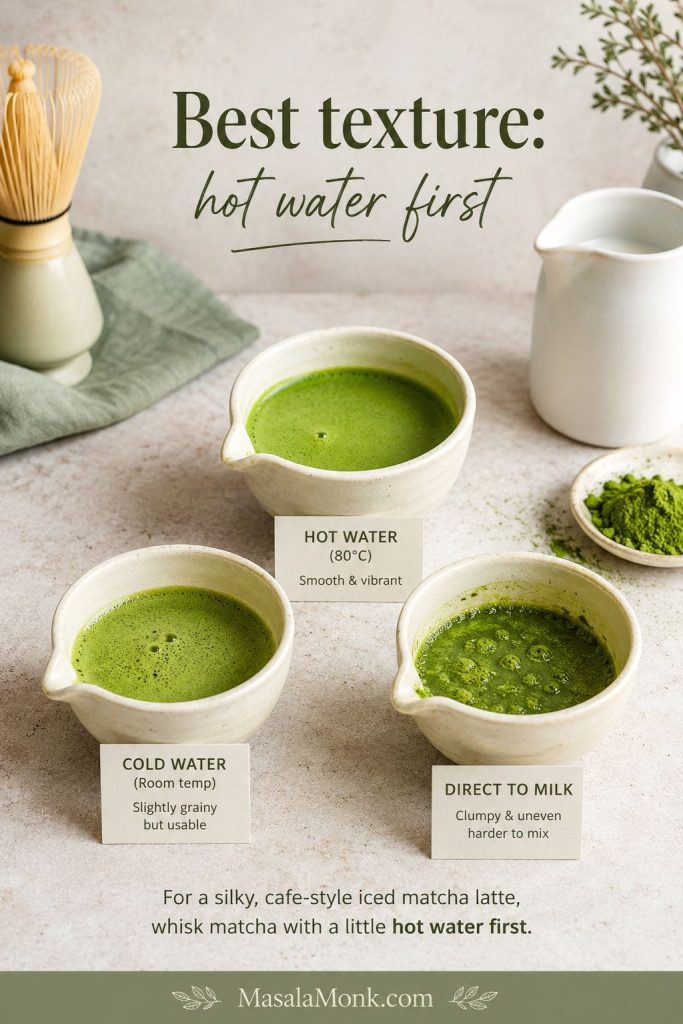
Hot Water vs Cold Water for Iced Matcha
The main texture question is whether the matcha gets mixed with hot water, cold water, or milk. For the most reliable result, whisk the powder with a small amount of hot water first, then pour it over cold milk and ice.
This same sequence — sift, whisk with warm water, then combine with cold milk and ice — also appears in Ippodo’s iced matcha latte method. See Ippodo’s iced matcha latte method here.
Method
Best for
Downside
Hot water first
Silky texture, fewer clumps, balanced flavor
Needs hot water
Cold water first
Fast shaker or bottle method
Can clump if the matcha is not sifted well
Directly into milk
Fastest method
Highest chance of clumps
Blender method
Foamy, lump-free, no-whisk version
Extra cleanup
Water amount matters: Two tablespoons hot water makes a stronger, creamier latte. Up to ¼ cup / 60 ml is easier to whisk, but the drink will taste lighter and more tea-forward.
This method comparison shows why warm water is more reliable than adding dry matcha straight to cold milk.
Cold water can work with enough shaking, but warm water gives the powder a better start before it meets cold milk.
How to Make an Iced Matcha Latte Without a Whisk
You do not need a full matcha setup. The only real mistake is expecting dry matcha and cold milk to become silky on their own.
A bamboo matcha whisk is lovely, but it is not required. You can also make a lump-free drink with a frother, shaker jar, or blender if the powder is sifted first.
Traditional bamboo whisking is helpful, yet a frother, shaker jar, or blender can still make a smooth matcha latte when used in the right order.
Tool
Best use
How to use it
Bamboo matcha whisk
Best traditional texture
Sift matcha, add hot water, then whisk quickly in a W or M motion.
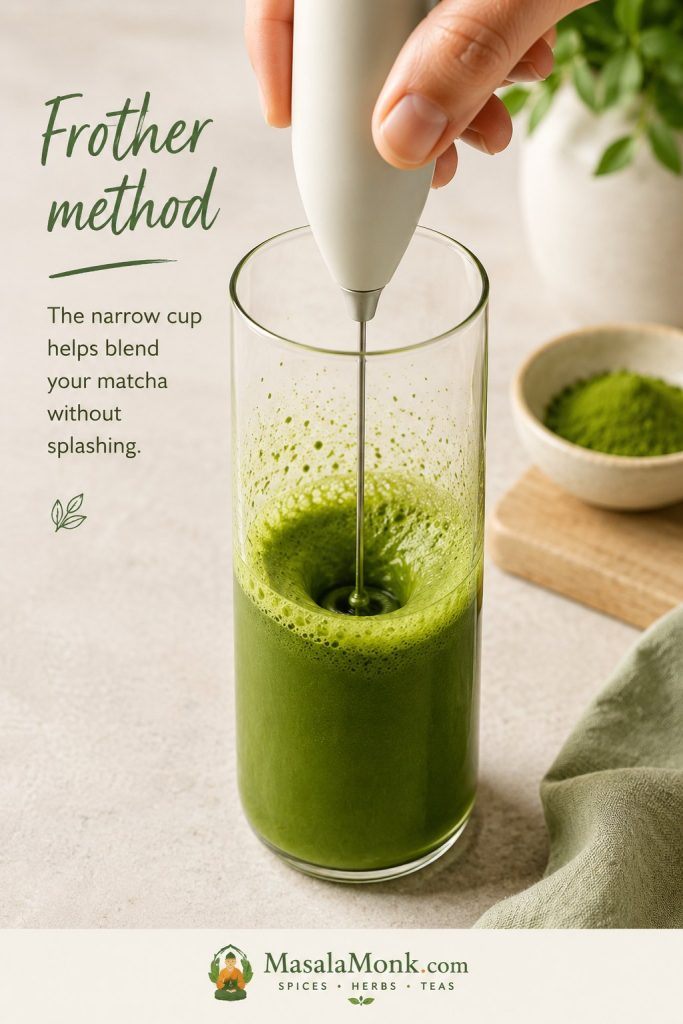
Handheld milk frother
Fast everyday method
Froth the matcha shot in a tall cup for 15 to 20 seconds.
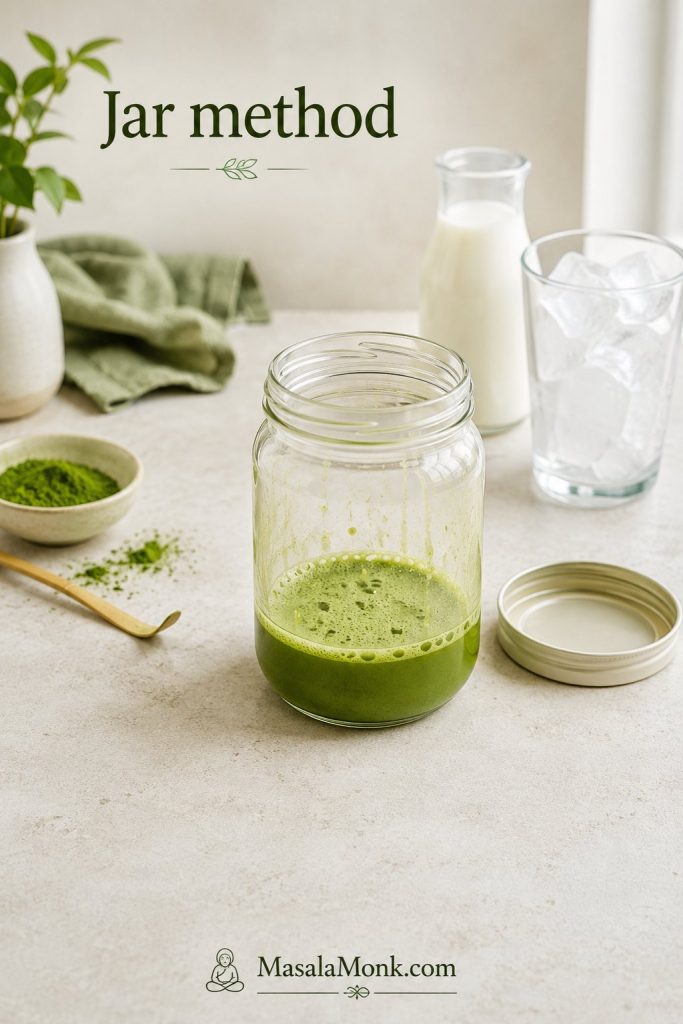
Shaker jar
No-whisk iced matcha
Shake sifted matcha with water first, then add milk and ice.
Blender
Smoothest, foamiest version
Blend the matcha shot or the full latte briefly.
Spoon or fork
Last resort
Make a paste first, then slowly loosen it with more water.
A narrow cup gives the frother less room to splash and more control over the small matcha base.
A tall narrow cup keeps the frother’s motion focused, so the matcha blends faster and splashes less.
With the jar method, the order still matters: shake the matcha with water first, then add milk and ice.
Shake the matcha with water first; after that, milk and ice can chill the drink without trapping dry powder.
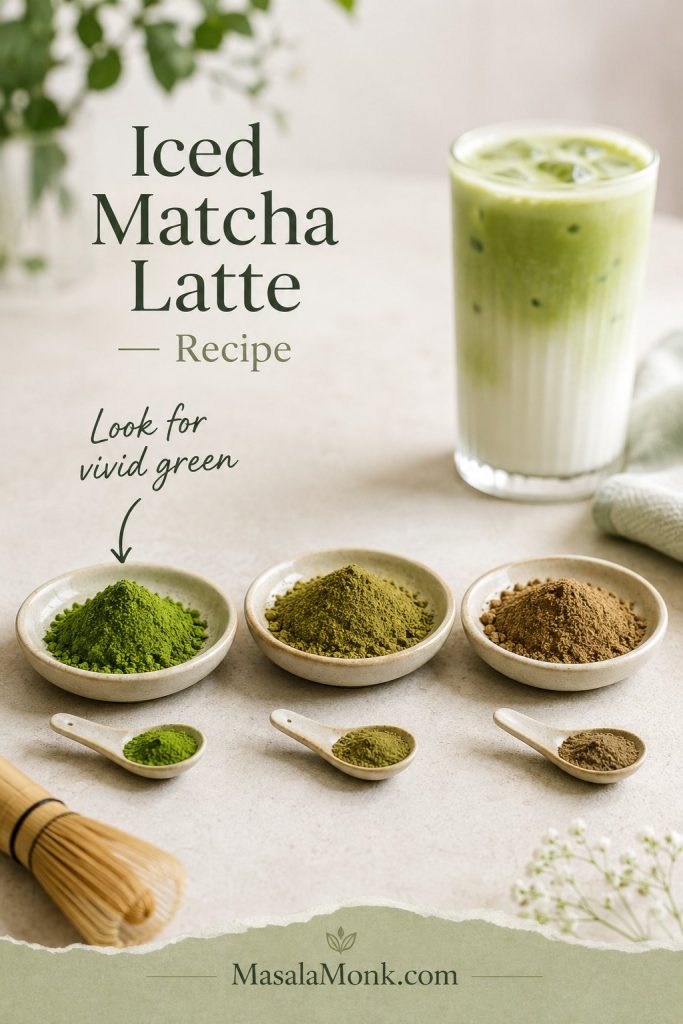
Best Matcha Powder for This Latte
What to look for in the powder
Technique matters most, but the powder still matters. A good method can smooth out matcha, but it cannot completely hide powder that tastes stale before it reaches the glass.
For this recipe, the best buy is usually a fresh, vivid green latte-grade matcha from a seller with good turnover. Save the expensive ceremonial tin for plain matcha if you drink it that way. Good matcha makes the drink feel clean and fresh; tired matcha often makes you keep adding syrup and milk, trying to soften a flavor that has already lost its brightness.
Do not judge matcha only by the word “ceremonial” on the label. Color, aroma, freshness, and taste matter more than marketing language. Vivid green matcha usually gives a cleaner drink, while dull olive, yellow-green, or brownish matcha is more likely to taste flat or muddy.
Color is not everything, but vivid green powder is often a good sign that your latte will taste cleaner and fresher.
Ceremonial vs latte-grade matcha
Matcha type
Best use
What to know
Ceremonial matcha
Best for drinking
Smooth, bright, and usually less bitter. Good if you drink matcha often.
Latte-grade matcha
Best everyday value
Often the smartest choice for milk drinks if it is fresh and vivid green.
Culinary matcha
Baking, smoothies, stronger milk drinks
Not automatically bad, but it should not taste muddy, stale, or overly bitter.
For milk drinks, this comparison helps separate everyday latte value from labels that only sound more expensive.
For milk drinks, freshness matters more than prestige, so a bright latte-grade matcha can be the better everyday buy.
Keep matcha fresh after opening
If you only make matcha occasionally, buy a smaller tin so it stays fresh. Store it airtight, cool, dark, and dry. Matcha loses its color and aroma when it sits too long near heat, light, or moisture.
If your matcha tastes strong but not stale, use the ratio guide to soften the drink with milk or reduce the powder before adding extra syrup.
If the drink tastes flat even after adjusting milk and syrup, the problem may be tired matcha rather than your method.
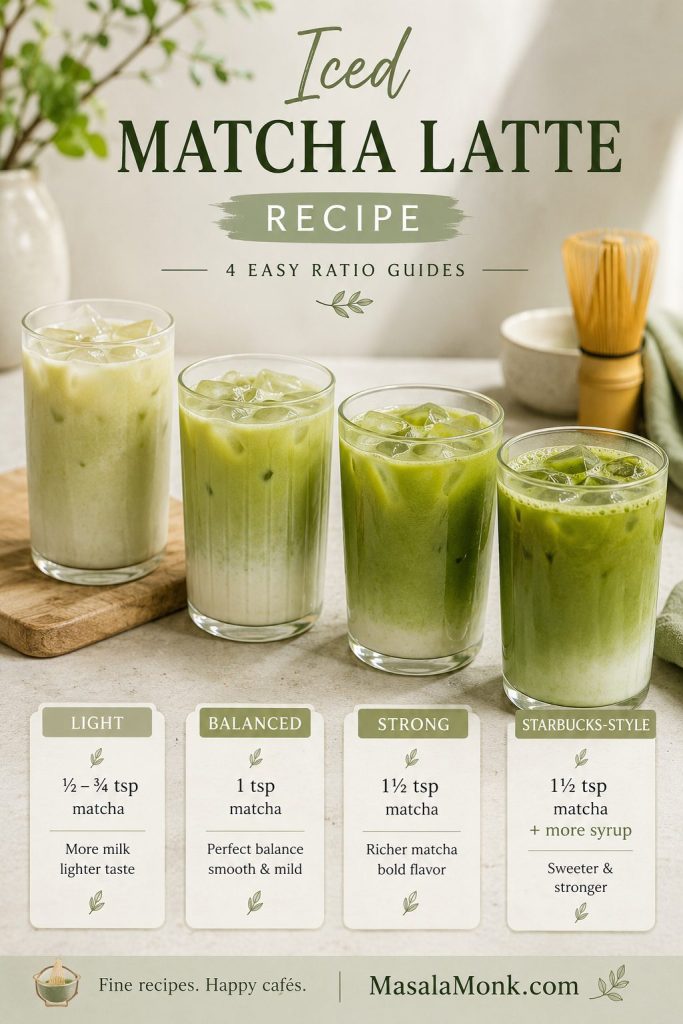
Iced Matcha Latte Ratio Guide
Use the table below to adjust after your first glass. For most people, the balanced version is the best starting point.
If you are still finding your ideal glass, adjust only one thing at a time. More matcha makes it greener and stronger, more milk makes it softer, and more syrup makes it rounder.
Strength is not only about color; a stronger version should taste more tea-forward without needing to become overly sweet.
Style
Matcha
Water
Milk
Sweetener
Light
½ to ¾ tsp
2 tbsp / 30 ml
1 cup / 240 ml
1 tsp
Balanced
1 tsp / about 2 g
2 tbsp / 30 ml
¾ to 1 cup / 180 to 240 ml
1 to 2 tsp
Strong
1½ tsp / about 3 g
2 to 3 tbsp / 30 to 45 ml
¾ cup / 180 ml
1 to 2 tsp, then add more only if it tastes too sharp
Less sweet
1 tsp
2 tbsp / 30 ml
¾ to 1 cup / 180 to 240 ml
0 to 1 tsp
Starbucks-style
1½ tsp
1 to 2 tbsp hot water if whisking first
1 cup / 240 ml
1 to 2 tbsp syrup
Use the ratio board as a saveable shortcut for light, balanced, strong, and coffee-shop style drinks.
The ratio guide helps you steer the drink: more powder for a greener taste, more milk for softness, and more syrup for a café-style finish.
Still unsure where to start? The which version guide turns these ratios into quick choices for gentle, strong, café-style, or dairy-free drinks.
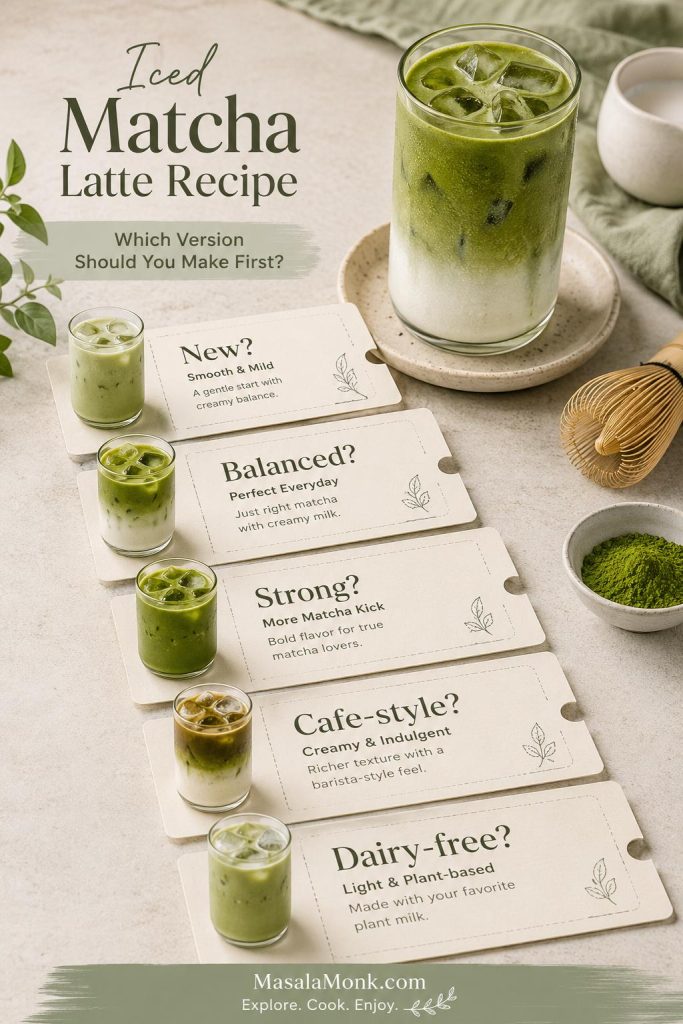
Which Version Should You Make First?
Once you know your ratio, the rest is personal. Make the balanced version once, then use this table to move the drink toward your own taste. Some days you want the cleaner green tea version; other days you want the sweeter café-style glass with more milk, more ice, and vanilla syrup. The method stays the same — only the mood changes.
If you want…
Start with…
A gentle first matcha latte
½ to ¾ teaspoon matcha, 1 cup milk, and 1 teaspoon syrup
The best balanced everyday version
1 teaspoon matcha, ¾ cup milk, and 1 to 2 teaspoons syrup
A stronger green tea flavor
1½ teaspoons matcha, ¾ cup milk, and 1 to 2 teaspoons syrup; add more only if it tastes too sharp
A sweeter coffee-shop drink
1½ teaspoons matcha, 1 cup milk, and 1 tablespoon vanilla syrup
The creamiest dairy-free version
1 teaspoon matcha, barista oat milk, and 1 teaspoon syrup
The least clumpy method
Sift first, then use the hot-water shot with a frother, whisk, shaker, or blender
This chooser helps you pick a first version before you start changing matcha, milk, or syrup.
Pick the version that matches your mood first, then use the same method to move the drink lighter, stronger, sweeter, or creamier.
Starbucks-Style Iced Matcha Latte
Copy the profile, not the exact sweetness
For a Starbucks-style iced matcha latte at home, the main thing to copy is the sweet, milky profile — not the exact sweetness level. Starbucks’ U.S. iced matcha latte listing includes milk, ice, matcha, and classic syrup, so syrup is what gives the homemade version that sweeter coffee-shop profile. You can see the official Starbucks iced matcha latte page here.
This is where homemade is nicer: you can keep the café feel while choosing exactly how sweet you want the glass.
A coffee-shop style glass is mainly about a sweeter milk profile, so start with less syrup and build up only if needed.
Adjust sweetness and texture
Goal
What to do
Sweeter Starbucks-style flavor
Add 1 to 2 tablespoons simple syrup or vanilla syrup.
Stronger matcha flavor
Increase the matcha to 1½ teaspoons.
Creamier texture
Choose whole milk, 2% milk, or barista oat milk.
Less sweetness
Start with 1 teaspoon syrup and add more only after tasting.
Fewer clumps
Whisk matcha with hot water before adding milk and ice.
Add syrup in stages so you can stop when the latte tastes rounded instead of overly sweet.
Sweetness is easiest to control in stages; once the drink is too sweet, the only real fix is more unsweetened milk.
A 16-ounce-style drink works well with 1½ teaspoons matcha, 1 cup milk, 1 cup ice, and 1 to 2 tablespoons simple syrup or vanilla syrup. For the most even texture, whisk the matcha with 1 to 2 tablespoons hot water first instead of shaking dry powder directly into cold milk.
Once the method is smooth, the rest of the drink becomes personal. At this point, milk changes the body, sweetener changes the finish, and small adjustments can make the same matcha taste clean, cozy, café-style, or dessert-like.
Milk and Sweetener Choices
After the matcha shot, milk and sweetener decide the mood of the drink: clean and tea-forward, soft and milky, or sweet like a coffee-shop treat.
Choose your milk
Milk
Result
Best for
Whole milk
Rich, creamy, rounded
Classic creamy version
2% milk
Lighter but still rounded
Balanced everyday version
Barista oat milk
Creamy, slightly sweet, full-bodied
Best dairy-free option
Almond milk
Lighter, thinner, nutty
Lower-calorie or lighter version
Coconut milk
Rich, tropical, more noticeable flavor
Coconut variation
Soy milk
Creamy and neutral if unsweetened
Balanced dairy-free option
Compare the milks by body as much as flavor: some soften matcha, while others keep it sharper and more tea-forward.
This comparison shows more than color: richer milks soften green tea flavor, while lighter milks keep the drink sharper.
For the creamiest dairy-free drink, barista oat milk is the easiest choice. For a cleaner, less sweet finish, go with unsweetened dairy milk or unsweetened soy milk.
Sweeteners that mix well
Liquid sweeteners work best here because cold milk will not dissolve granulated sugar evenly. Simple syrup keeps the flavor clean; vanilla syrup makes the drink softer and more dessert-like.
Sweetener
Flavor
Amount
Simple syrup
Clean, neutral sweetness
1 to 2 tsp, or 1 tbsp for sweeter
Vanilla syrup
Soft, sweet, rounded
1 to 2 tsp
Maple syrup
Warm and rounded
1 to 2 tsp
Honey
Floral and stronger
1 tsp, whisked into warm matcha first
Agave
Mild and smooth
1 to 2 tsp
Sugar-free syrup
Depends on brand
To taste
Choose a liquid sweetener when possible, since it blends into cold matcha more evenly than dry sugar.
Liquid sweeteners mix into cold drinks more evenly, whereas dry sugar can settle before it has a chance to dissolve.
Quick simple syrup: Stir equal parts sugar and hot water until dissolved, then cool before using. Keep it in the fridge for quick iced matcha, iced coffee, lemonade, and other cold drinks.
Variations
This is where the drink starts feeling less like a formula and more like your own café order: the same smooth matcha base, shifted with vanilla, oat milk, fruit, foam, coffee, or coconut.
If a variation tastes too strong, too sweet, or too thin, use the quick fixes instead of starting over.
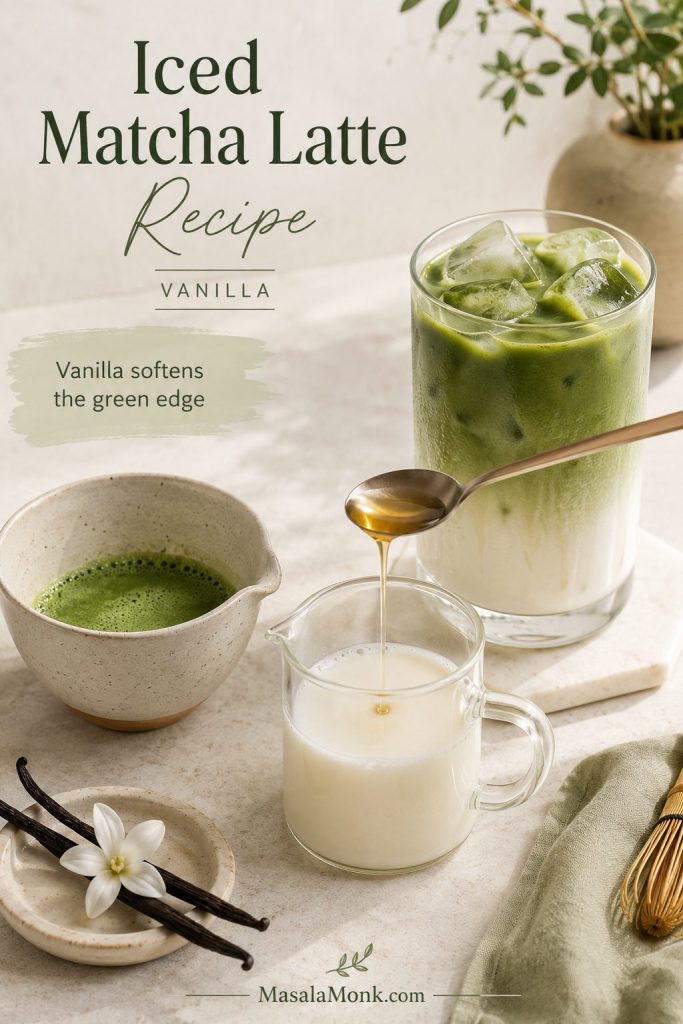
Vanilla iced matcha latte
Vanilla is the easiest coffee-shop adjustment. Add 1 to 2 teaspoons vanilla syrup to the milk or warm matcha shot; it rounds off the grassy edge without making the drink taste like dessert. It is the best first variation if plain matcha tastes a little too green but you do not want the drink to become sugary.
Vanilla rounds the edges of grassy matcha, making it a smart first variation when plain green tea flavor feels too strong.
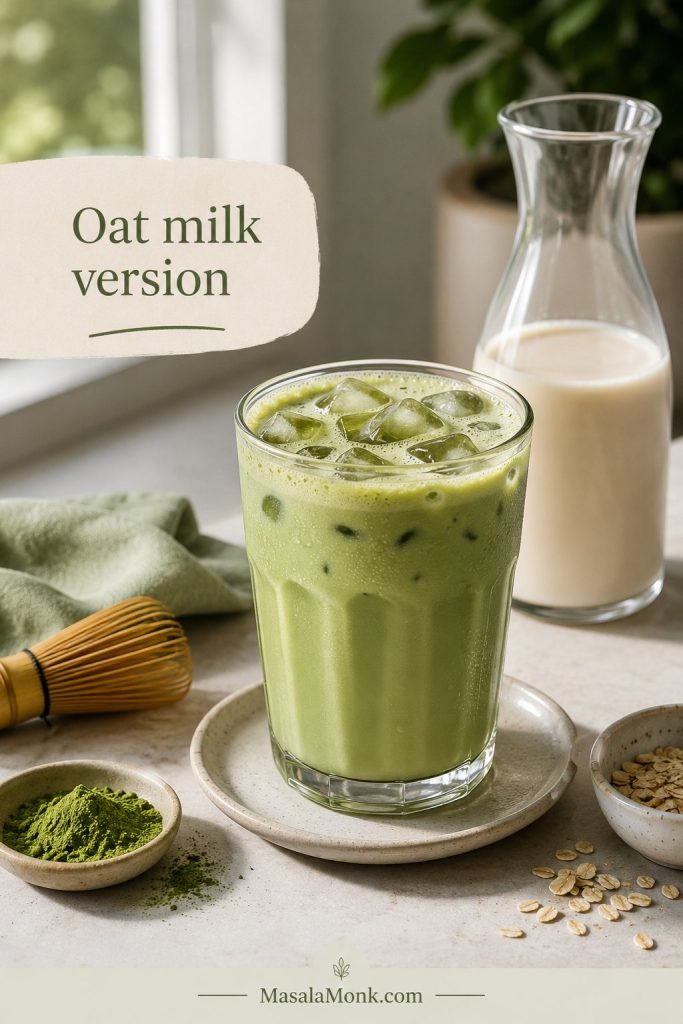
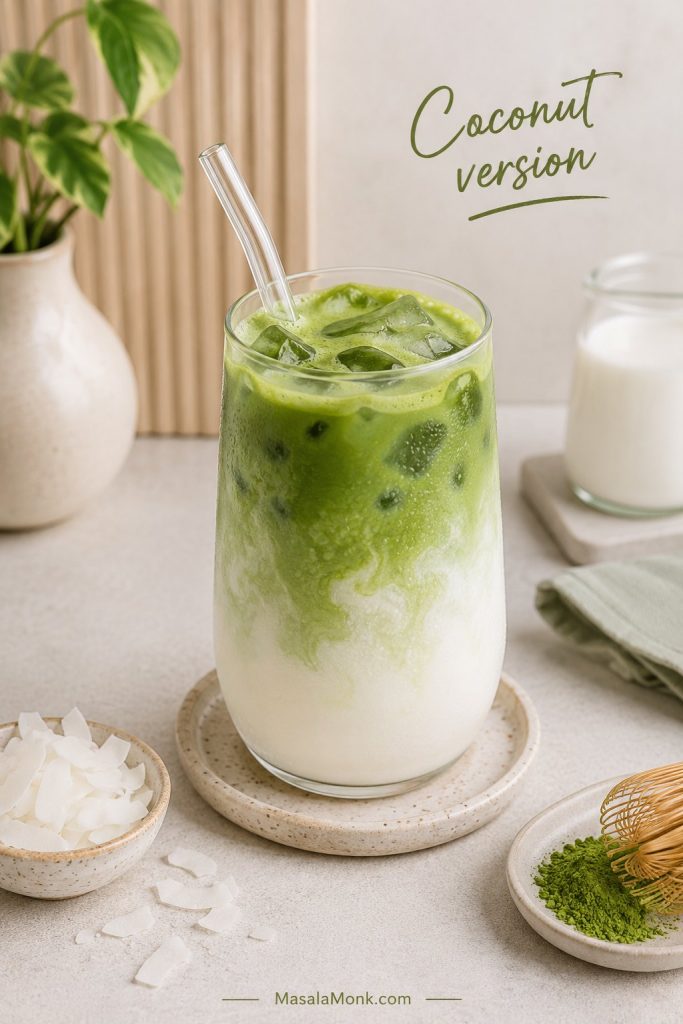
Oat milk iced matcha latte
Barista oat milk makes the latte rounder and fuller, especially if almond milk makes your matcha taste a little sharp. Because oat milk has natural sweetness, start with less syrup and add more only after tasting. It also helps the drink feel fuller without needing as much syrup.
Oat milk is especially useful when you want a dairy-free matcha latte that still feels full, creamy, and lightly sweet.
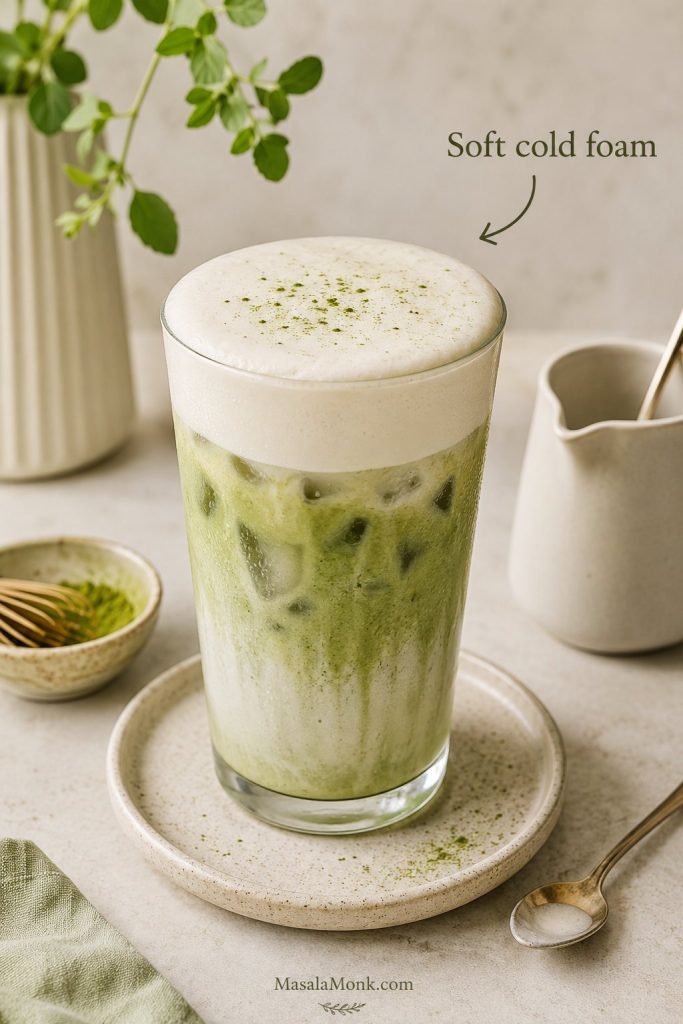
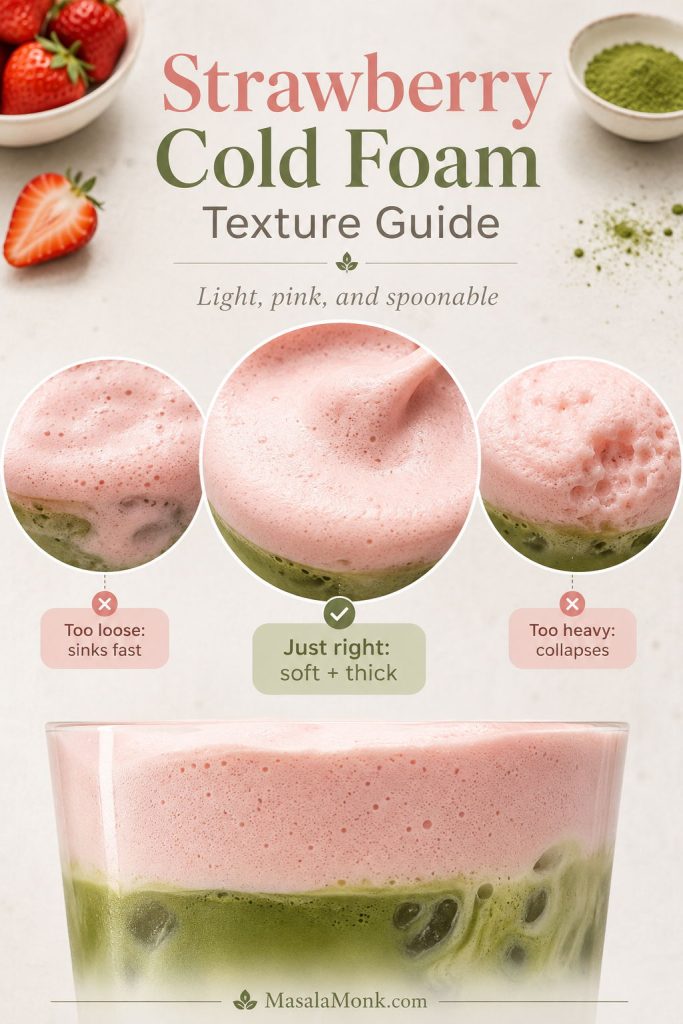
Iced matcha latte with cold foam
Cold foam turns this into a slower, dessert-leaning drink. Make the base latte, then top it with 2 to 3 tablespoons vanilla cold foam. Keep the foam soft and pourable rather than piling it on like whipped cream.
Cold foam adds a café-style finish, but it should stay soft enough to blend into the latte rather than sit like whipped cream.
Strawberry iced matcha latte
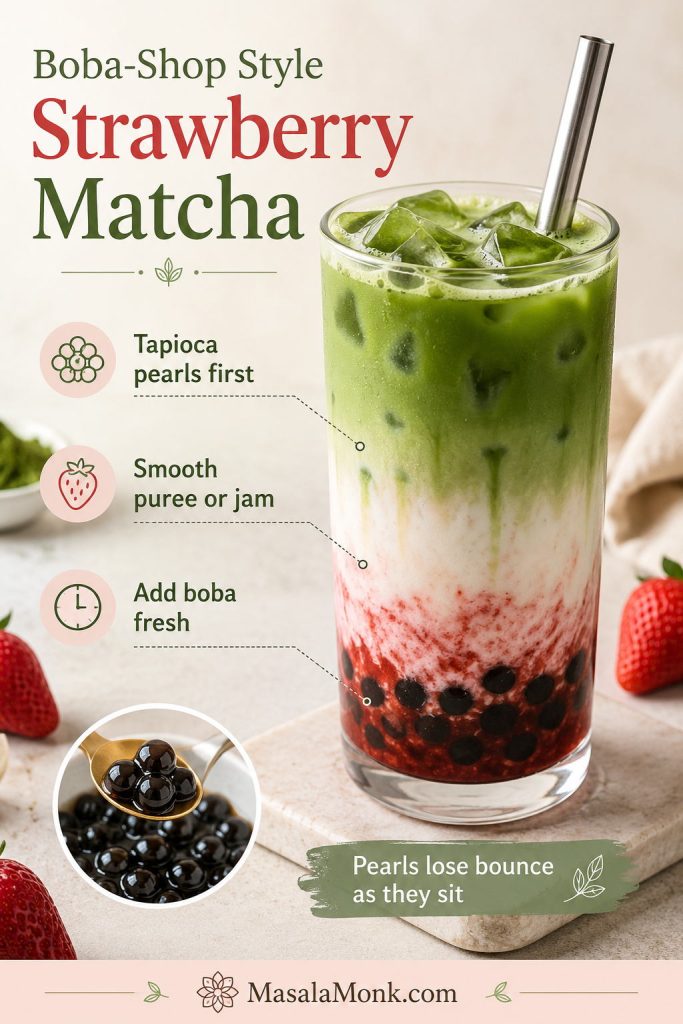
Spoon strawberry puree or strawberry syrup into the glass first, add ice and milk, then pour the matcha shot over the top. A thicker fruit layer gives you the café look; stirring gives you the better sip. For the full layered version with strawberry base options, ratios, and fixes, see MasalaMonk’s strawberry matcha latte recipe.
The thicker the strawberry layer, the cleaner the visual contrast; after stirring, the fruit should support the matcha instead of hiding it.
Dirty iced matcha latte
Add one shot of espresso to the milk before pouring over the matcha. This version is stronger, slightly bitter, and more coffee-forward. Vanilla syrup or oat milk helps soften the edges.
Espresso adds a stronger coffee note, so a creamy milk or a little vanilla helps keep the dirty matcha from tasting harsh.
Coconut iced matcha latte
Use coconut milk with a small amount of maple syrup or vanilla syrup. Because coconut milk is richer and more noticeable, it works best if you enjoy a clear tropical flavor.
This version brings a richer body and a clear tropical note, which makes it best when you want coconut flavor to show.
When you want another chilled café-style drink, MasalaMonk’s iced coffee recipes guide has ideas for iced lattes, cold brew, frappes, syrups, and cold foam.
How to Fix an Iced Matcha Latte
The drink is rarely ruined. Most problems are one small adjustment away from working.
If your first glass is not perfect, do not throw it out. Matcha lattes are unusually easy to correct once you know what went wrong.
Troubleshooting gets easier when you identify the issue first: texture, bitterness, dilution, and weak flavor each need a different fix.
Quick fixes by problem
Most issues come from the same few places: dry matcha hitting cold milk, water that is too hot, too much melted ice, or a ratio that does not match your taste.
Texture and dilution fixes
Problem
Likely cause
Fix
Clumpy matcha
Matcha was not sifted or was added directly to cold milk
Sift first, then whisk with hot water before adding milk.
Watery latte
Too much water or melted ice
Use 2 tablespoons water, cold milk, and fresh ice.
Layers disappear
Matcha was poured too fast or the glass had too little ice
Fill the glass with ice and pour matcha slowly over the top.
Flavor balance fixes
Problem
Likely cause
Fix
Bitter taste
Water was too hot, matcha is old, or too much powder was used
Cooler water and fresher matcha usually fix the harsh edge; if it still tastes strong, reduce the powder to ¾ teaspoon.
Weak matcha flavor
Too much milk or too little matcha
Increase the matcha to 1½ teaspoons or reduce milk to ¾ cup.
Too grassy
Strong matcha, stale matcha, or not enough milk/sweetness
Add vanilla syrup, use oat milk, start with less matcha, or switch to fresher matcha if the flavor tastes harsh rather than pleasantly earthy.
Too sweet
Too much syrup or sweetened matcha/milk
Add more unsweetened milk and stir well. Next time, start with 1 teaspoon syrup and taste before adding more.
Bitter and watery examples
When bitterness shows up, check water temperature, powder freshness, and matcha amount before adding more syrup.
If the latte tastes bitter, try cooler water or less powder before adding more sweetener; syrup can cover bitterness, but it rarely solves it.
When the latte tastes thin, look at dilution first: too much water or melted ice can flatten even good matcha.
Watery matcha usually comes from too much dilution, so fresh ice and a smaller water amount keep the green tea flavor clearer.
Still clumpy after whisking?
If the drink is still clumpy even after whisking, check the details: the powder may not have been sifted, the cup may be too wide for a frother, the matcha may have stuck to wet sides before whisking, or the milk may have been added before the powder had a chance to fully blend with water.
Fix clumps at the source: sift dry powder, hydrate it with water, then add milk only after the matcha looks smooth.
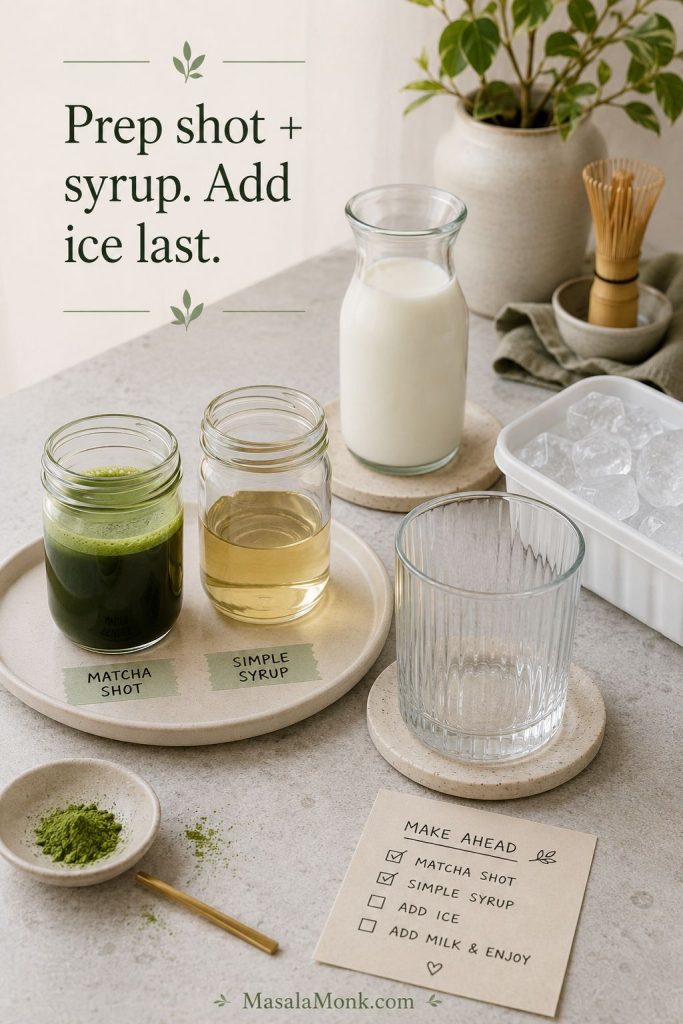
Can You Make It Ahead?
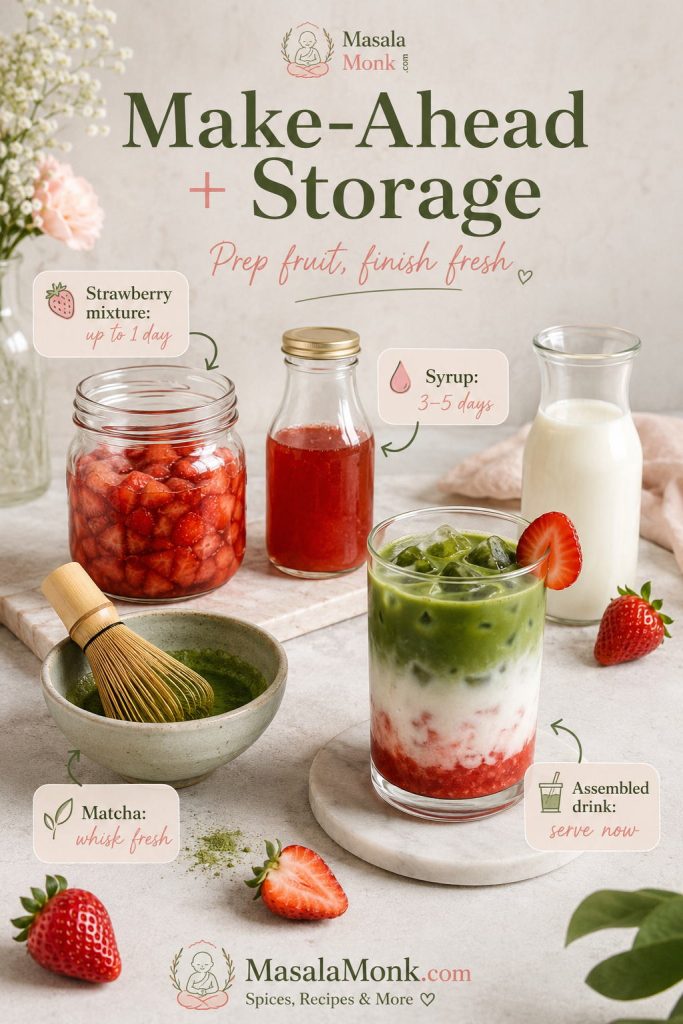
This drink tastes best right after you make it. Once the ice sits in the milk, the latte slowly becomes watery. However, a few parts can be prepped ahead.
Simple syrup: Make it ahead and keep it in the fridge.
Matcha shot: Whisk matcha with water and chill it for a few hours if needed.
Milk: Keep it cold until serving.
Finished drink: Assemble with ice right before drinking.
For make-ahead success, prep the stable parts early and save the ice for the moment you serve.
Make ahead the parts that hold well, such as syrup and the matcha base; however, add ice only when you are ready to drink.
If a chilled matcha shot settles in the fridge, shake or whisk it again before using. Since matcha stays suspended in liquid, a little settling is normal.
FAQs
No whisk? Use a frother, jar, or blender
A handheld frother is the easiest swap, but a shaker jar or blender also works. Sift the matcha first, mix it with water, then add milk and ice.
Hot water or cold water — which is better?
Hot water usually makes a smoother matcha shot. Cold water can work if you sift well and shake or froth strongly, but it is less forgiving if your matcha is compacted or slightly clumpy.
Why the drink gets clumpy
It usually happens when dry matcha is added directly to cold milk, when the powder is not sifted, or when the matcha sticks to the sides of the cup before whisking. Sift the powder, whisk it with hot water first, then pour it over milk and ice.
Does matcha dissolve in milk?
Not exactly. Matcha is finely ground tea leaf, so it suspends in liquid rather than dissolving like sugar or instant coffee. That is why a whisk, frother, shaker, or blender helps — and why stirring before drinking keeps the flavor even.
How much matcha goes in one iced latte?
One teaspoon / about 2 grams gives a balanced drink. For a stronger version, increase the matcha to 1½ teaspoons. If you are new to matcha, start with ½ to ¾ teaspoon and build up from there.
Best milk for a creamy iced matcha latte
Whole milk is richest, 2% milk tastes balanced, and barista oat milk is the best dairy-free option for a full-bodied texture. Unsweetened soy milk is another good choice if you want a dairy-free drink with less natural sweetness than oat milk.
How to make it taste more like Starbucks
Use 1½ teaspoons matcha, 1 cup milk, 1 cup ice, and 1 tablespoon simple syrup or vanilla syrup. Add more syrup only after tasting. The syrup gives the drink its sweeter coffee-shop profile.
How to make a sugar-free iced matcha latte
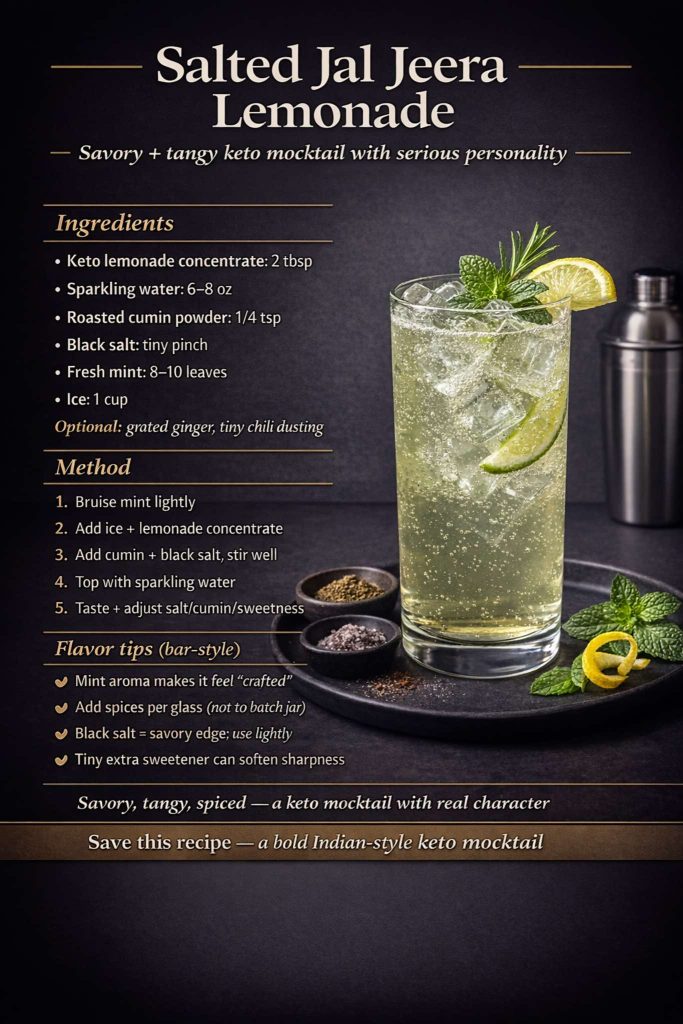
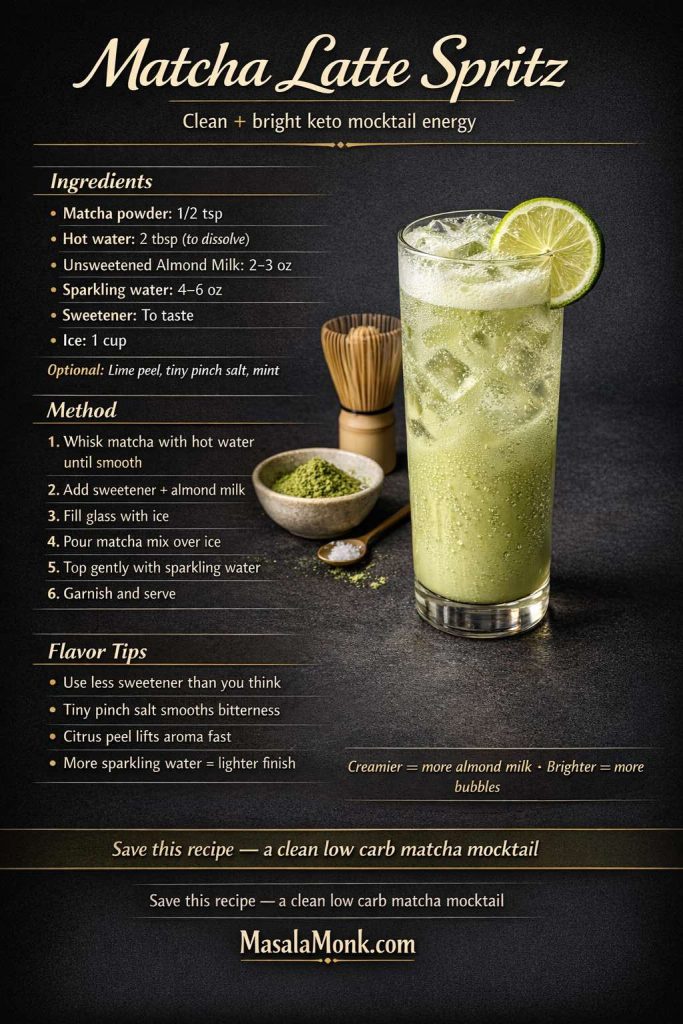
Skip the syrup or use a sugar-free liquid sweetener, and check that both your matcha powder and milk are unsweetened. Vanilla extract plus unsweetened oat milk or soy milk can make the drink taste softer without adding much sweetness. MasalaMonk’s keto mocktails guide also has a matcha latte spritz for another low-carb matcha drink idea.
For a sugar-free version, check both the matcha and milk first, then use vanilla to soften the flavor without adding regular syrup.
Caffeine in matcha lattes
Matcha naturally contains caffeine because it is made from finely ground green tea leaves. A latte made with 1 teaspoon matcha usually feels like a moderate-caffeine drink, while 1½ teaspoons will taste and feel stronger. If you are sensitive to caffeine, use ½ to ¾ teaspoon matcha or drink it earlier in the day.
Adjusting the powder amount is the simplest way to make the drink gentler or stronger without changing the whole recipe.
Strawberry version
Add strawberry puree or syrup to the bottom of the glass, then add ice, milk, and the matcha shot. Stir before drinking, or leave it layered for a pretty green-and-pink drink. A thicker puree gives cleaner layers, while a thinner syrup blends faster. For exact strawberry amounts and step-by-step layering, use the full strawberry matcha latte recipe.
Final Thoughts
Once the matcha shot is smooth, the rest is easy. Pour it over cold milk and ice, sweeten only as much as you like, and you have the kind of iced matcha latte that feels calm, creamy, and worth making again tomorrow.
The small details matter most: sift the matcha, whisk it before adding milk, and avoid boiling water. Those three steps turn a clumpy green drink into something cold, balanced, and genuinely satisfying — the kind of iced matcha latte that tastes like you finally figured out the café version at home.
Once you understand the matcha base, the final glass becomes repeatable: cold, creamy, balanced, and easy to make again.
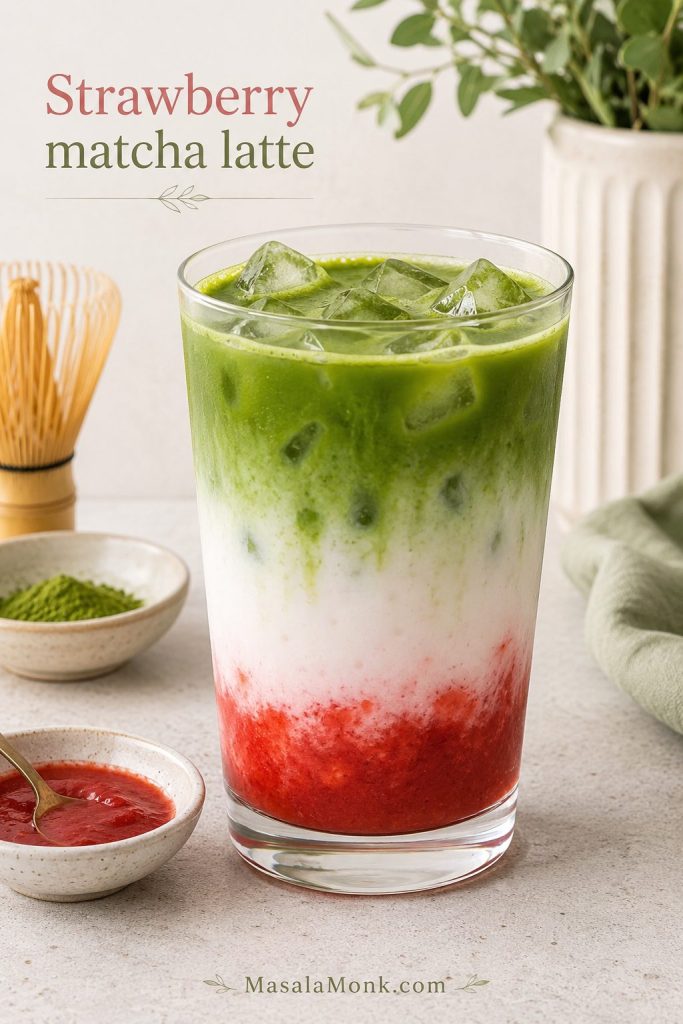
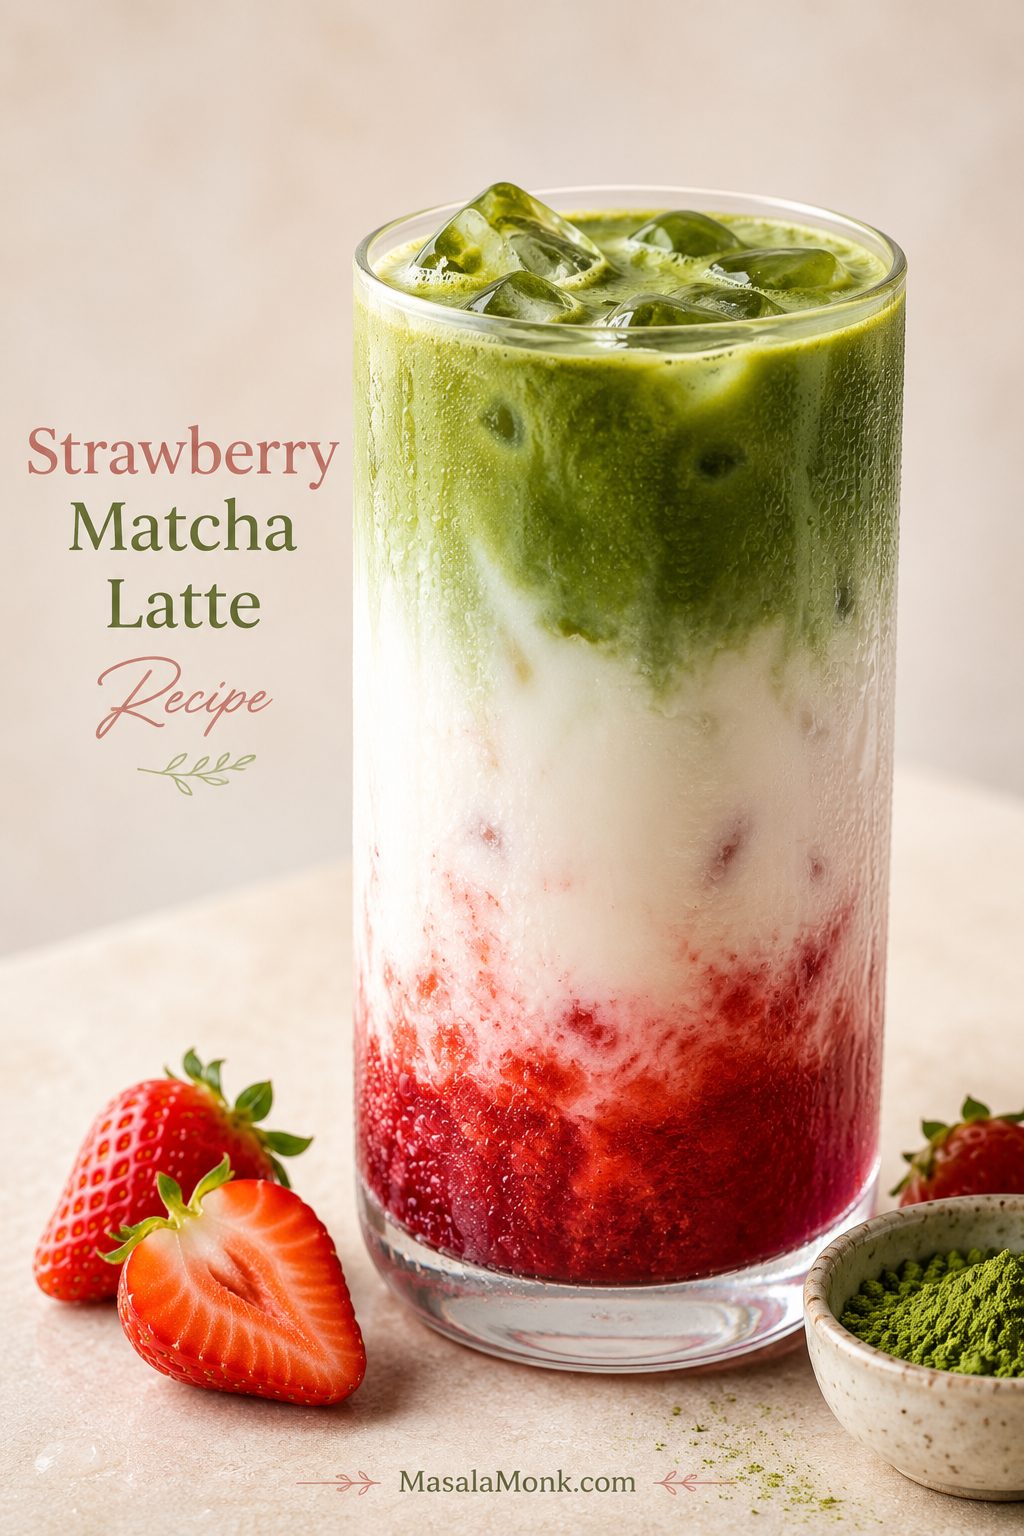
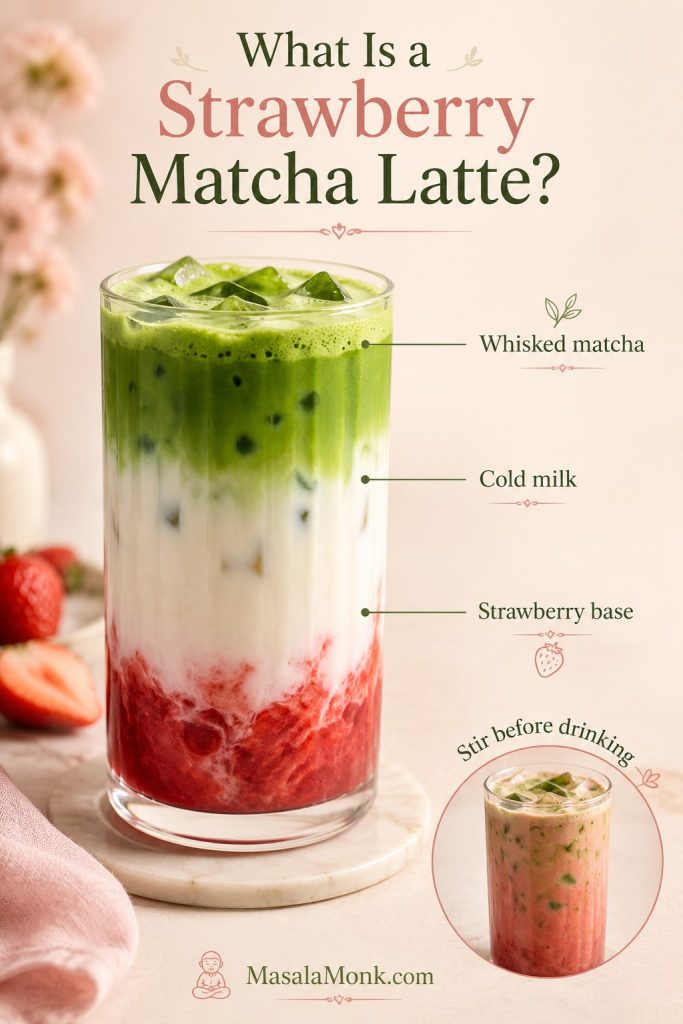
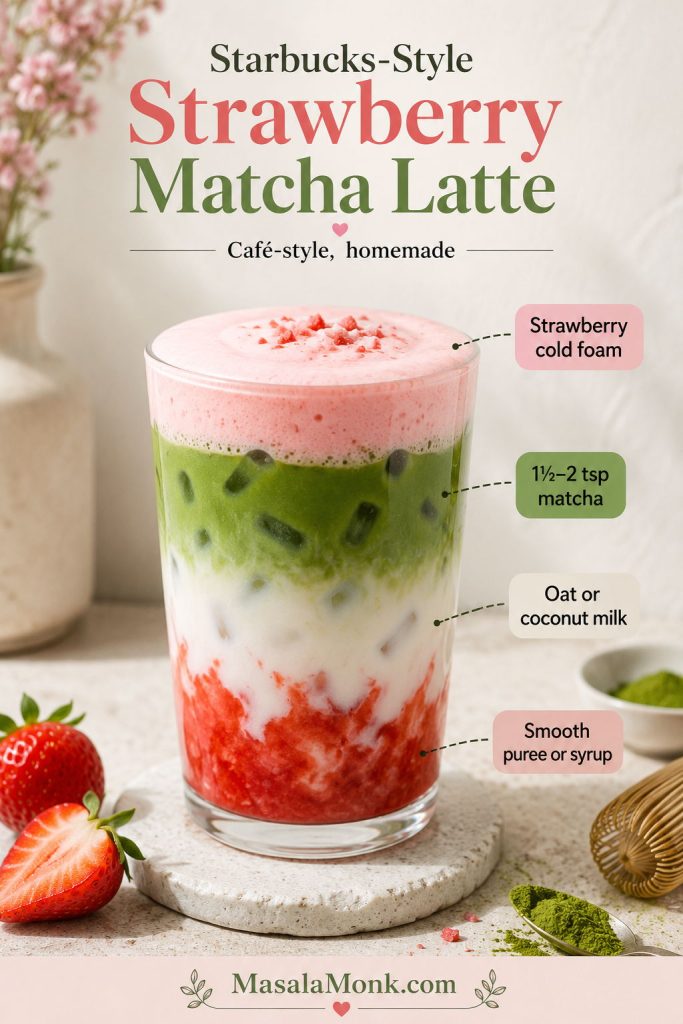
The first thing you notice is the color: juicy red strawberry at the bottom, cold milk turning pale and creamy in the middle, and a glossy green matcha pour floating over the top. Then you stir it, take a sip, and the drink finally makes sense: fresh strawberry, smooth milk, and earthy green tea all in one cold glass.
It is the kind of iced drink that feels like a small afternoon reset: pretty enough to slow down for, but simple enough to make before the ice in your glass even thinks about melting.
This strawberry matcha latte recipe is for the drink you want when a plain iced matcha feels a little too serious and strawberry milk feels a little too sweet. It gives you the pretty layered look, but more importantly, it gives you a balanced glass that tastes creamy, fruity, refreshing, and smooth.
It takes about 10 minutes, needs no cooking for the main version, and feels much more special than the effort suggests. Make the strawberry base, whisk the matcha separately, build the glass over ice, and pour slowly. Warm—not boiling—water keeps the matcha gentler, a thicker berry mixture helps the colors stay separated, and enough ice slows the pour.
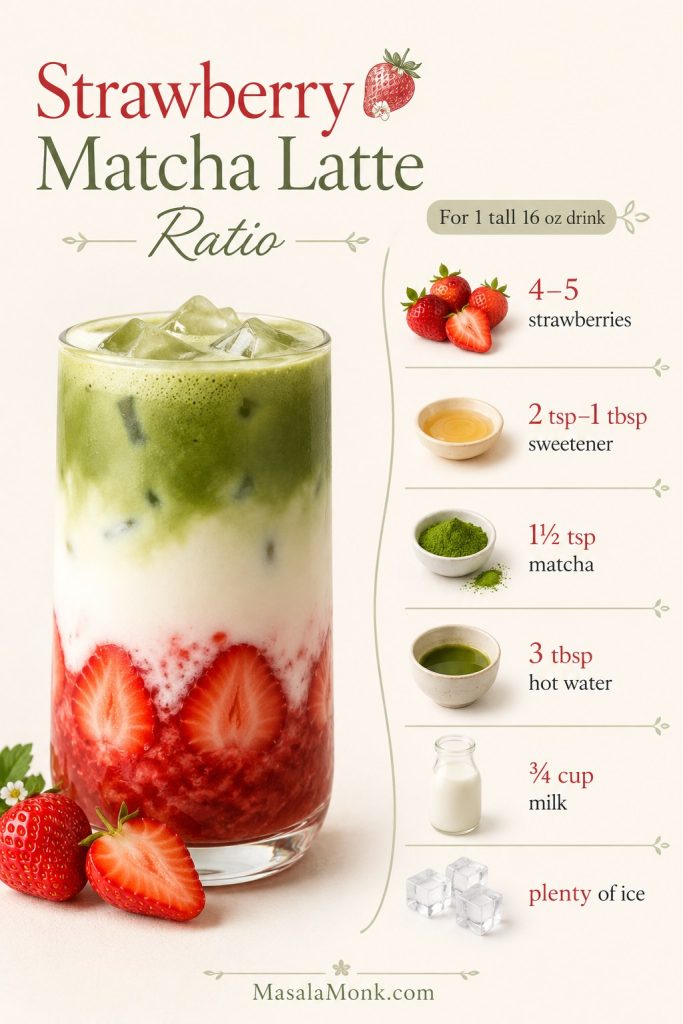
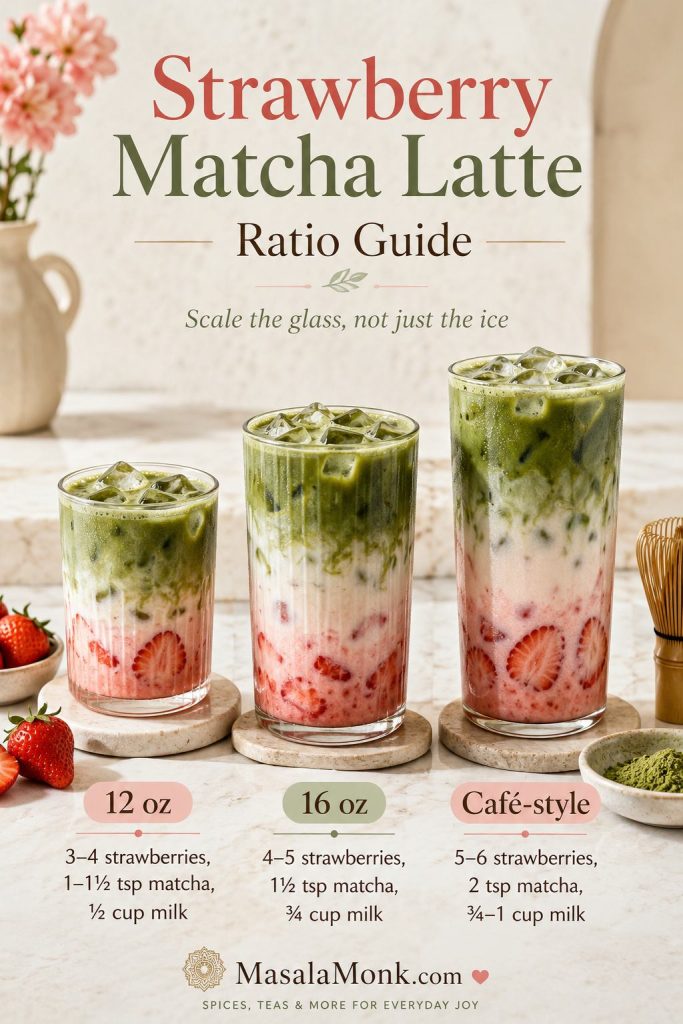
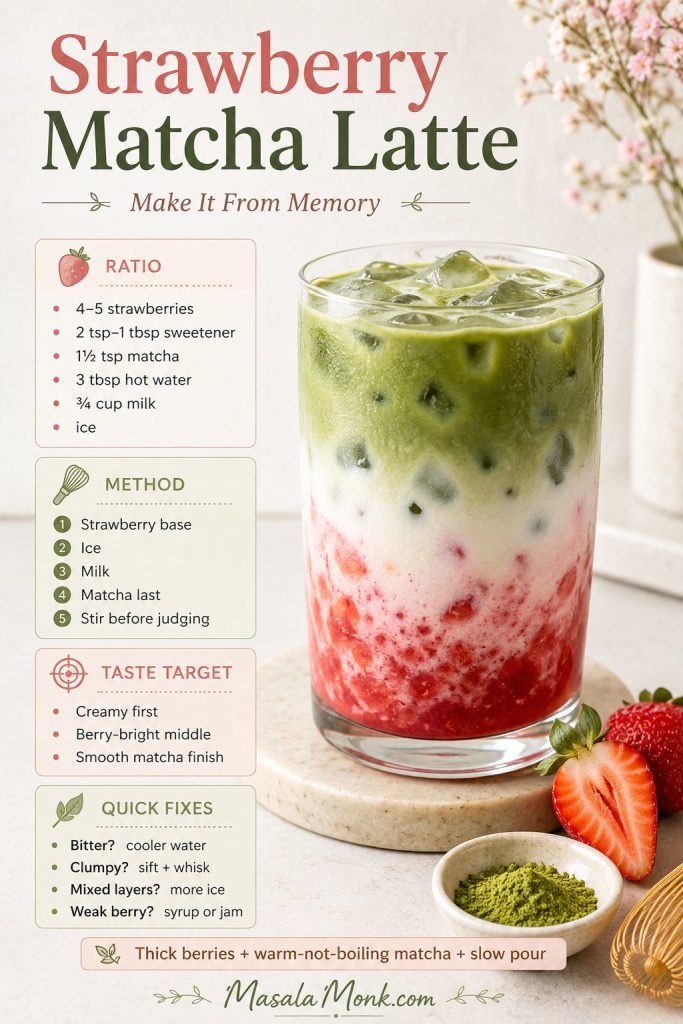
For one tall iced strawberry matcha latte, use 4–5 strawberries, 2 teaspoons to 1 tablespoon sweetener, 1½ teaspoons matcha, 3 tablespoons hot water, ¾ cup milk, and plenty of ice.
At a glance: 10 minutes, no cooking for the main version, 1 tall glass, fresh or frozen strawberries, dairy or non-dairy milk.
Quick method
Muddle or blend the strawberries with sweetener, spoon them into the bottom of a clear glass, add ice, pour in the milk, then slowly pour whisked matcha over the top. The gentlest flavor comes from whisking the matcha with hot water around 175°F / 80°C, not boiling water.
Matcha strength
A milder drink works best with 1 teaspoon matcha. For a stronger, more matcha-forward latte, use 2 teaspoons. Serve it layered if you want the dramatic red-white-green look, then stir before drinking so the strawberry, milk, and matcha taste balanced in every sip.
16 oz ratio
For 1 tall 16 oz drink
Use this amount
Why it works
Strawberries
4–5 medium / 70–90 g
Enough fruit for a visible base and real strawberry flavor.
Sweetener
2 tsp to 1 tbsp
Start lower. Add more only if the berries are tart.
Matcha
1½ tsp / about 3 g
Balanced strength for milk and strawberry.
Hot water
3 tbsp / 45 ml
Makes a concentrated matcha pour without thinning the latte.
Milk
¾ cup / 180 ml
Creamy enough for a tall iced latte.
Ice
1 cup, or enough to fill the glass halfway to three-quarters full
Helps keep the strawberry, milk, and matcha separated.
Keep the simple rule in mind: thick berries, warm-not-boiling matcha, plenty of ice, a slow pour, and one good stir before judging the flavor.
After one round, you will know exactly where your taste sits: more strawberry if you want it fruitier, more milk if you want it softer, or a little more matcha if you want that green tea finish to lead.
Start with this 16-ounce strawberry matcha latte ratio, then adjust sweetness, berry flavor, or matcha strength after tasting the drink stirred.
Strawberry Matcha Latte Recipe
Creamy Iced Strawberry Matcha Latte
A layered café-style latte with a bright berry base, cold milk, and glossy whisked matcha — pretty enough for a café moment, easy enough for home.
Yield1 tall drink
Prep Time10 minutes
Cook Time0 minutes
Total Time10 minutes
Ingredients
4–5 medium strawberries, hulled and chopped, about 70–90 g
2 teaspoons sweetener, plus up to 1 tablespoon total if the berries are tart
1½ teaspoons matcha powder, about 3 g
3 tablespoons / 45 ml hot water, about 175°F / 80°C
¾ cup / 180 ml cold milk, dairy or non-dairy
1 cup ice, or enough to fill the glass halfway to three-quarters full
Instructions
Make the strawberry base. Add chopped strawberries and sweetener to a small bowl or glass. Muddle until juicy, or blend for a smoother base.
Prepare the matcha. Sift matcha into a small bowl. Add hot water and whisk until glossy and lightly frothy.
Build the drink. Spoon the strawberry mixture into a tall clear glass. Add ice. Pour milk slowly over the ice.
Pour the matcha. Slowly pour the whisked matcha over the back of a spoon or directly over the ice so it settles on top.
Serve and stir. Serve layered, then stir before drinking so the strawberry, milk, and matcha taste balanced.
Notes
Use 1 teaspoon matcha for mild, 1½ teaspoons for balanced, or 2 teaspoons for strong.
For clear layers, keep the berry base thick and pour over plenty of ice.
If using jam, start with 1 tablespoon and reduce the added sweetener.
The matcha is concentrated on purpose; more water makes the latte thinner.
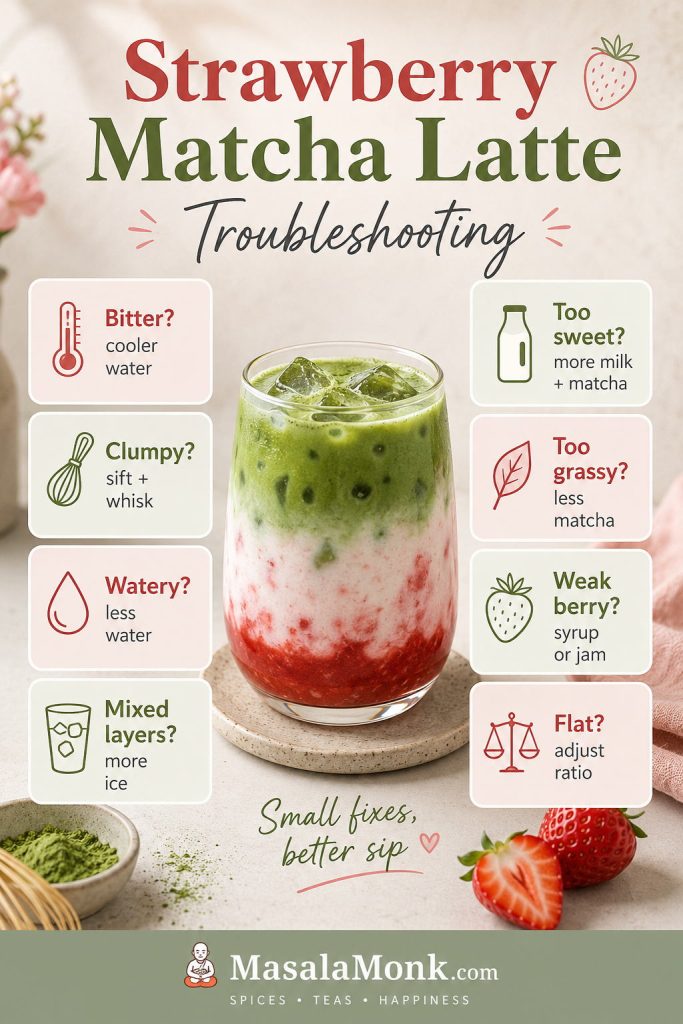
If the matcha turns clumpy, bitter, watery, or the layers mix too fast, use the troubleshooting guide.
What Is a Strawberry Matcha Latte?
A strawberry matcha latte is an iced matcha drink made with a strawberry base, milk, ice, and whisked matcha. The popular version is layered: red strawberry at the bottom, white milk in the middle, and green matcha on top.
Think of the layers as a map: fruit gives the base, milk softens the middle, and matcha brings the green tea finish.
It is not just strawberry milk with matcha poured over it, and it is not only a plain iced matcha with syrup. The best version keeps each part doing a job: strawberry brings fruit and color, milk softens the sip, and matcha gives the clean green tea finish.
The layered look is mostly for the first impression; the real flavor happens after stirring.
Homemade also gives you control. You can keep the strawberry base fresh instead of candy-sweet, make the matcha stronger or softer, and choose a milk that makes the whole glass taste the way you like it.
Why This Latte Works
This latte works because it is pretty without being fussy, sweet without becoming syrupy, and creamy without hiding the matcha. You get the pretty layered look, but the real win is the way the flavors come together after stirring.
The fruit base is thick enough to stay visible. It gives the drink real strawberry flavor instead of a candy-syrup taste.
The sweetness starts low. You can adjust based on your berries instead of making the latte syrupy from the start.
The matcha is whisked separately. That keeps dry green clumps out of the milk.
The water is warm, not boiling. This helps the matcha taste smoother and less harsh.
The ice does real work. It slows the milk and matcha as they pour, which helps the colors stay separated.
The best part of making it at home is control: the strawberry can taste like real fruit, the matcha can stay smooth instead of harsh, and the sweetness does not have to hit like a syrup pump.
That balance is the goal; here is what to taste for once the drink is stirred.
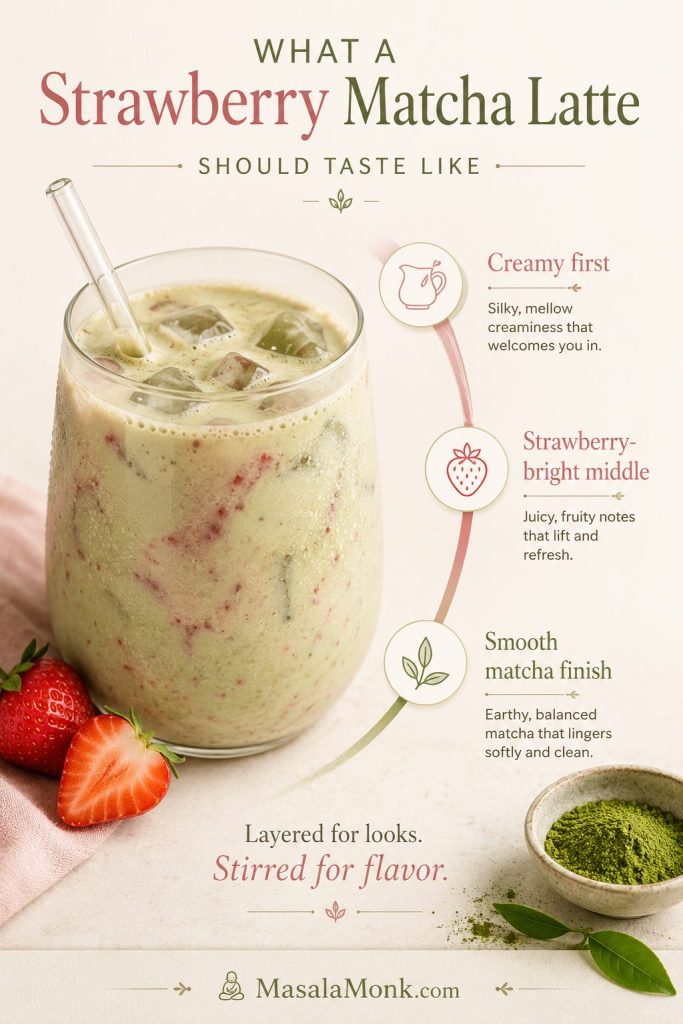
What It Should Taste Like
Once stirred, the latte should taste cold and creamy first, then bright with strawberry, with matcha finishing gently instead of taking over. It should not taste like strawberry syrup with green tea on top, or like bitter matcha hiding behind milk. The sweet spot is fruit, creaminess, and a smooth green-tea finish in the same sip.
A balanced strawberry matcha latte should taste like one drink after stirring, not three separate layers competing in the glass.
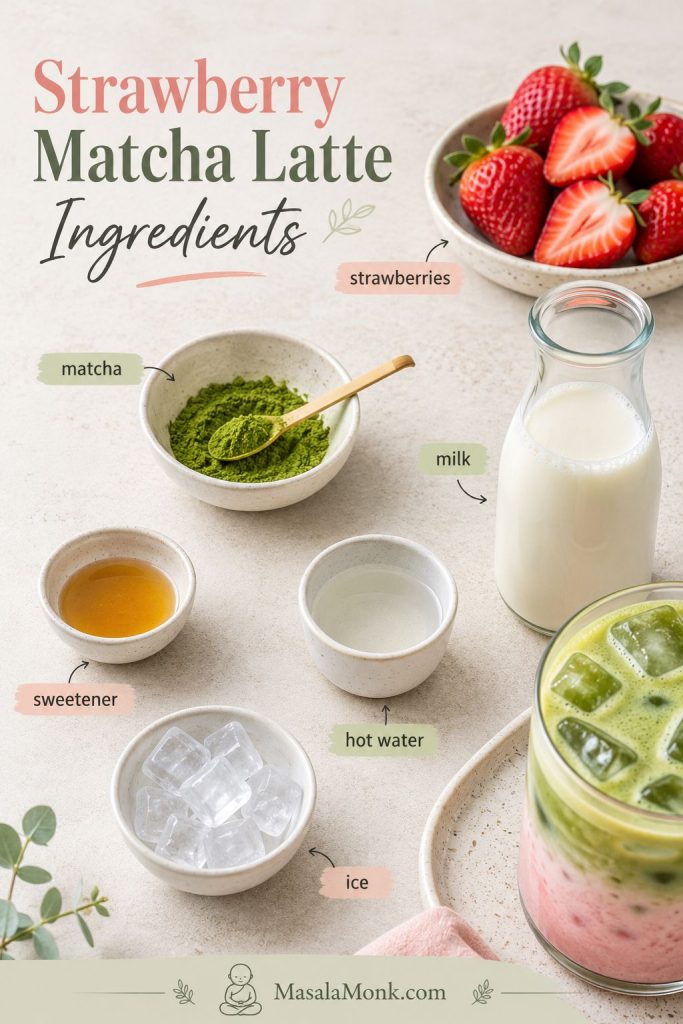
Ingredients You Need
You only need a few ingredients, but each one changes the final latte. Choose the strawberries, matcha, milk, and sweetener with the kind of sip you want in mind.
Because the ingredient list is short, each choice matters: ripe berries, fresh matcha, cold milk, and restrained sweetness shape the final sip.
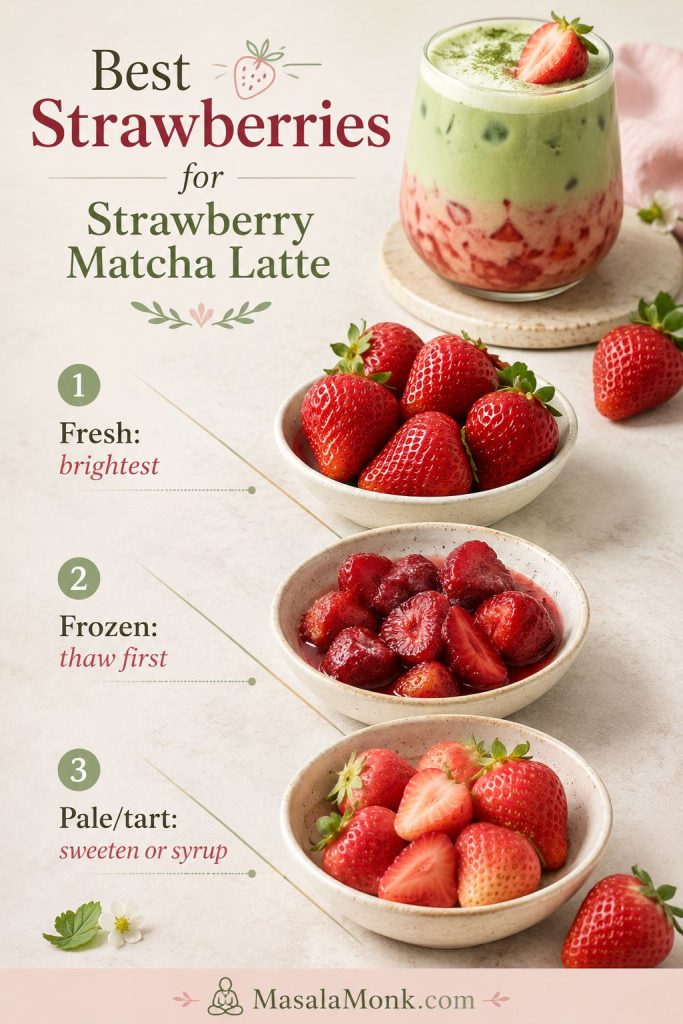
Strawberries
Fresh strawberries give this latte the brightest flavor and color. If the berries smell sweet before you cut them, the drink will taste fresher and need less sugar. Pale, watery, or tart berries can still work, but they usually need a little more sweetener or a quick syrup treatment.
Frozen strawberries are useful when fresh berries are out of season. Thaw them first, then blend or mash them with sweetener. For the silkiest red base, strain the puree so it sits evenly at the bottom of the cup.
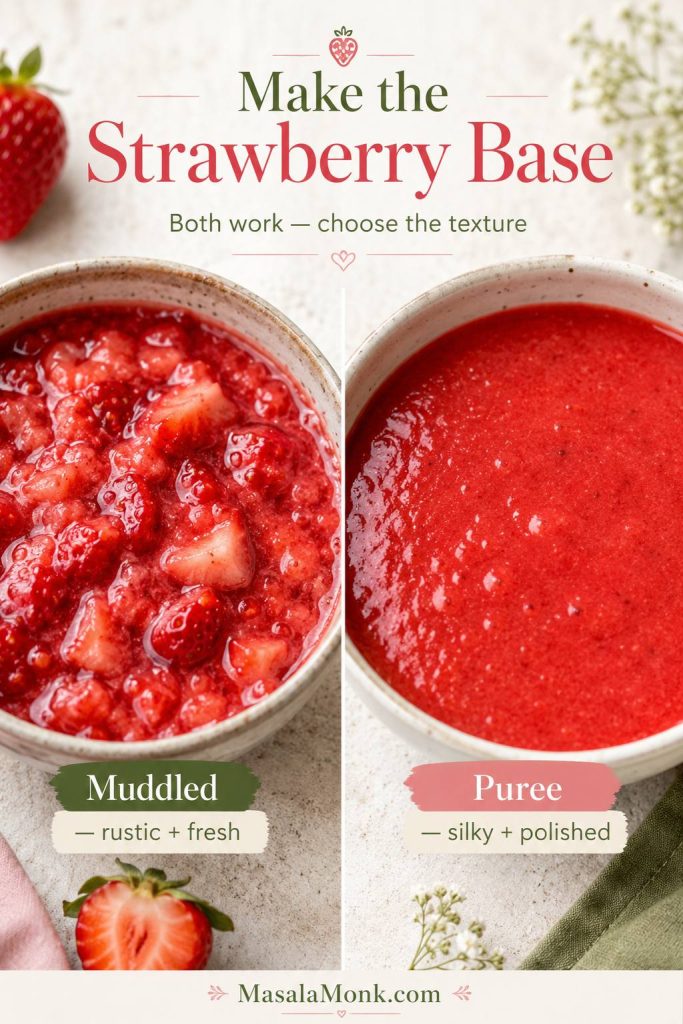
For a deeper comparison of muddled berries, puree, syrup, and jam, see the strawberry base options.
Ripe fresh strawberries give the brightest flavor, while frozen berries need thawing and pale berries usually need extra sweetness or syrup.
If your strawberries are especially ripe and you have extra, this strawberry shortcake recipe is another simple way to use them while they are still fresh and juicy.
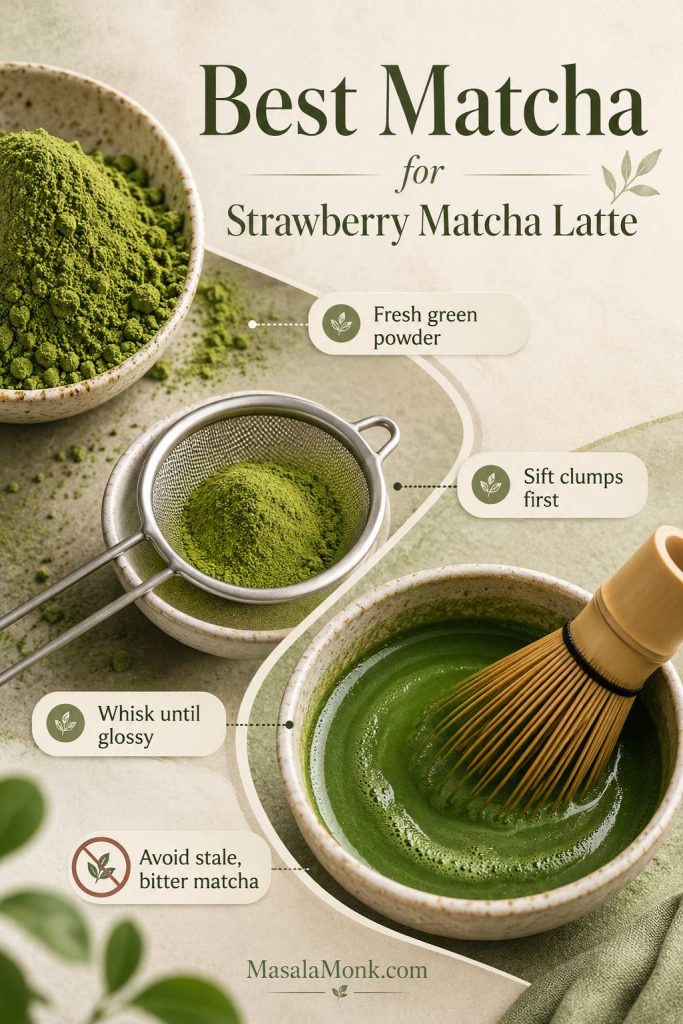
Matcha powder
Choose a matcha powder you enjoy drinking, not the stale green powder hiding at the back of the pantry. Ceremonial-style matcha gives the smoothest flavor, but a good latte-grade matcha is usually enough for an iced drink with milk and strawberry.
Sift the matcha before whisking if it looks clumpy. Matcha does not dissolve like instant coffee; it suspends in water, so whisking matters. The goal is a smooth, balanced sip, not a bitter powdery one.
Fresh matcha and proper whisking matter because milk can soften bitterness, but it cannot fully hide stale powder or dry green clumps.
Matcha temperature tip: Use hot water around 175°F / 80°C, not boiling water. This keeps the matcha smoother and less sharp; Ippodo’s matcha latte guide uses the same 80°C / 176°F benchmark.
If matcha usually tastes harsh to you, this one change helps most: let boiling water cool for a minute before whisking. The finished latte should taste fresh instead of flat or sharp.
Why the main recipe uses only 3 tablespoons water: This is a concentrated matcha pour for one 16 oz iced strawberry latte, not a full plain matcha tea. The drink already has strawberry, milk, and ice, so less water keeps the final glass creamy instead of thin. If you use 2 teaspoons matcha for a larger glass, you can increase the water to ¼ cup / 60 ml.
If clumps are your main problem, the step-by-step matcha whisking section is the fastest fix.
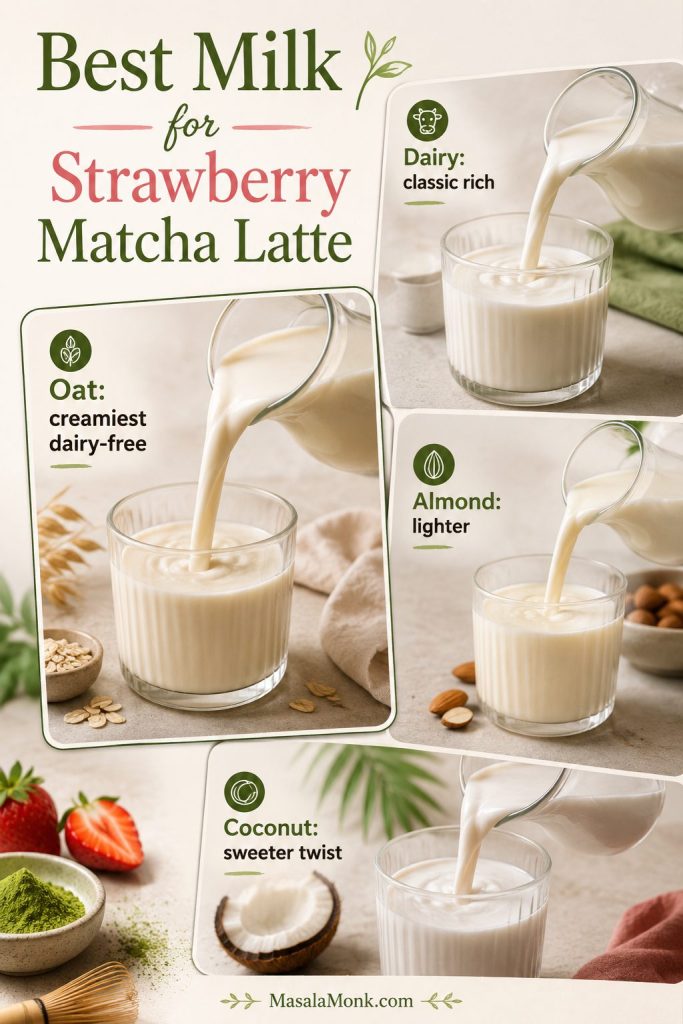
Milk
Oat milk gives the creamiest dairy-free version. Dairy milk tastes clean and rich. Almond milk makes a lighter drink, while coconut milk gives a sweeter, more tropical flavor that works well with strawberry.
Think of the milk as the soft middle. It should round out the fruit and matcha without making the latte taste flat. Cold milk and plenty of ice also help the colors stay separated.
Milk changes the body of the latte: oat milk tastes creamiest, dairy feels classic, almond keeps it lighter, and coconut adds a sweeter twist.
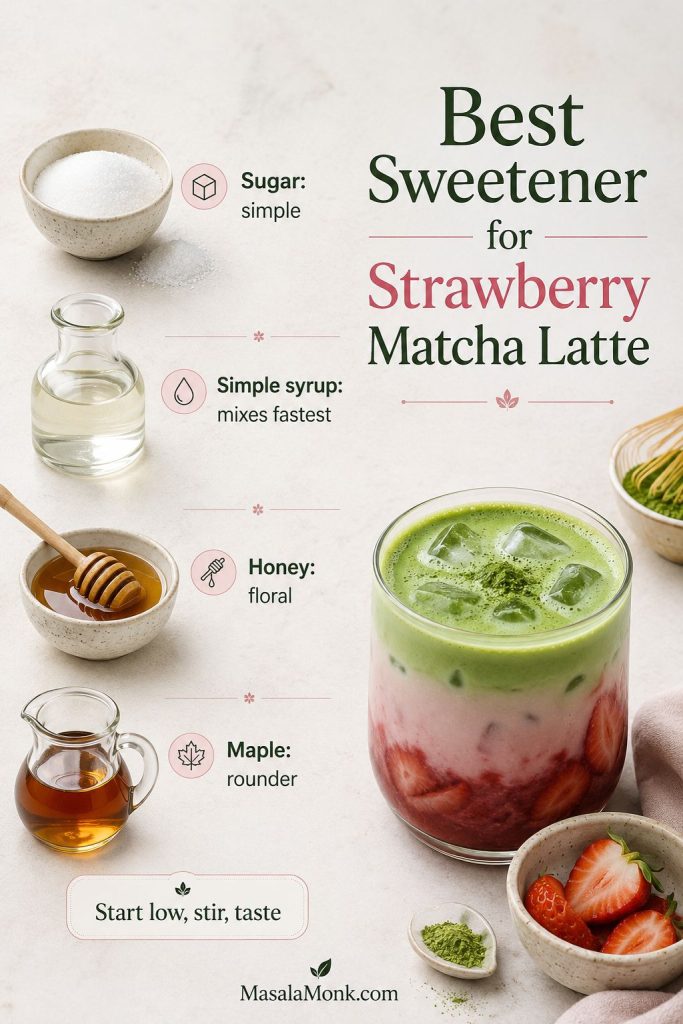
Sweetener
Sugar, honey, maple syrup, or simple syrup all work. Granulated sugar is fine if you muddle it into juicy strawberries. Simple syrup mixes fastest. Honey and maple syrup add their own flavor, so they are better when you want a softer, rounder sweetness.
Start with 2 teaspoons for one drink. Add more only after tasting the fruit. Many café-style versions are very sweet, but this homemade latte tastes better when the berries, milk, and matcha stay in balance.
Before adding more sweetener, stir and taste once. The strawberry tastes sweetest at the bottom, the matcha tastes strongest at the top, and the final flavor only makes sense after everything is mixed.
Start with less sweetener than you think, because the strawberry base tastes stronger once the latte is fully stirred.
If the latte still tastes too sweet, weak, or flat after stirring, check the troubleshooting table before changing the whole recipe.
Helpful Tools
You do not need special equipment for this drink. A clear glass, small bowl, and whisk or frother are enough; a sieve, blender, thermometer, and long spoon simply make the finish smoother and neater.
Clear glass: Shows the layers and gives you room for ice.
Small bowl: Makes it easier to whisk matcha before pouring.
Whisk or frother: Helps prevent dry green clumps.
Muddler, fork, or blender: Use whichever fits the strawberry texture you want.
Fine-mesh sieve: Optional, but useful for sifted matcha or smoother puree.
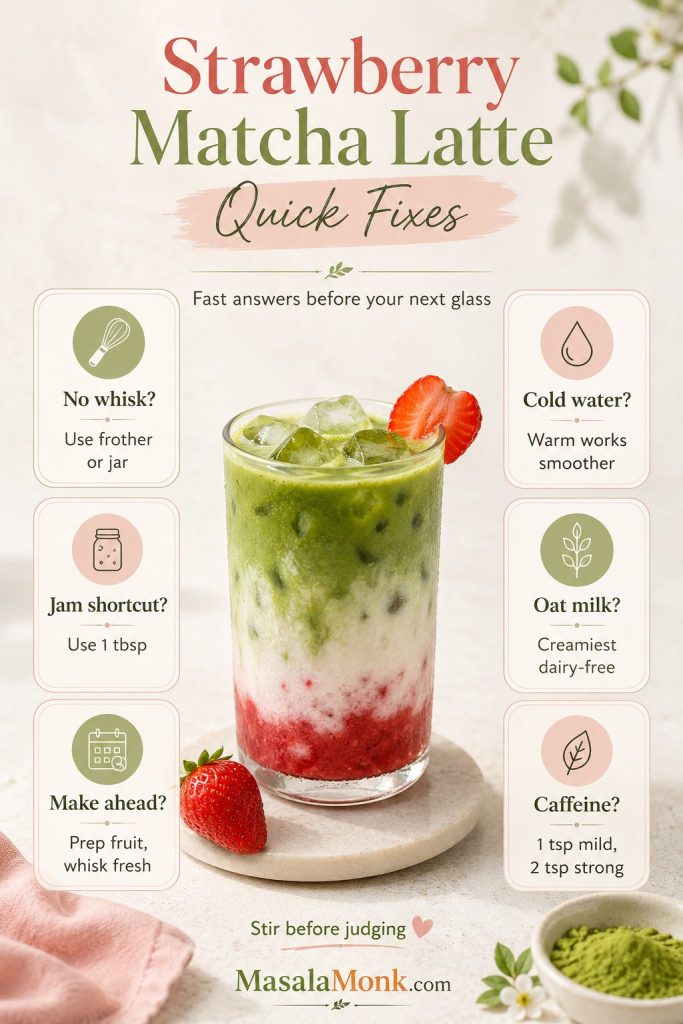
No matcha whisk? Use a handheld frother or shake the sifted matcha with hot water in a small jar. The goal is a glossy matcha pour with no dry green clumps.
You do not need café equipment; a clear glass, small bowl, and whisk or frother are enough to build clean layers.
Ratio Guide for 12 oz, 16 oz, and Café-Style Drinks
The right ratio depends on your cup size and how strong you like matcha. A 12 oz serving needs less milk and ice. A 16 oz serving gives you more room for dramatic colors and a creamier drink.
Glass size
Strawberry base
Matcha
Hot water
Milk
Ice
12 oz
3–4 strawberries + 1½–2 tsp sweetener
1–1½ tsp
2½–3 tbsp / 37–45 ml
½ cup / 120 ml
About ¾ cup
16 oz
4–5 strawberries + 2 tsp–1 tbsp sweetener
1½ tsp
3 tbsp / 45 ml
¾ cup / 180 ml
About 1 cup
Large café-style
5–6 strawberries + 1 tbsp sweetener
2 tsp
¼ cup / 60 ml
¾–1 cup / 180–240 ml
Enough to fill the glass
Once the 16-ounce strawberry matcha latte tastes right, scaling up or down is easier than guessing with extra ice.
Do not treat the numbers like a test. The 16 oz version is your baseline; the next glass is where you make it yours.
To make two drinks, double the strawberries, milk, matcha, and sweetener, but whisk the matcha in one slightly larger bowl so it stays even. Build each serving separately if you want the colors to stay clear.
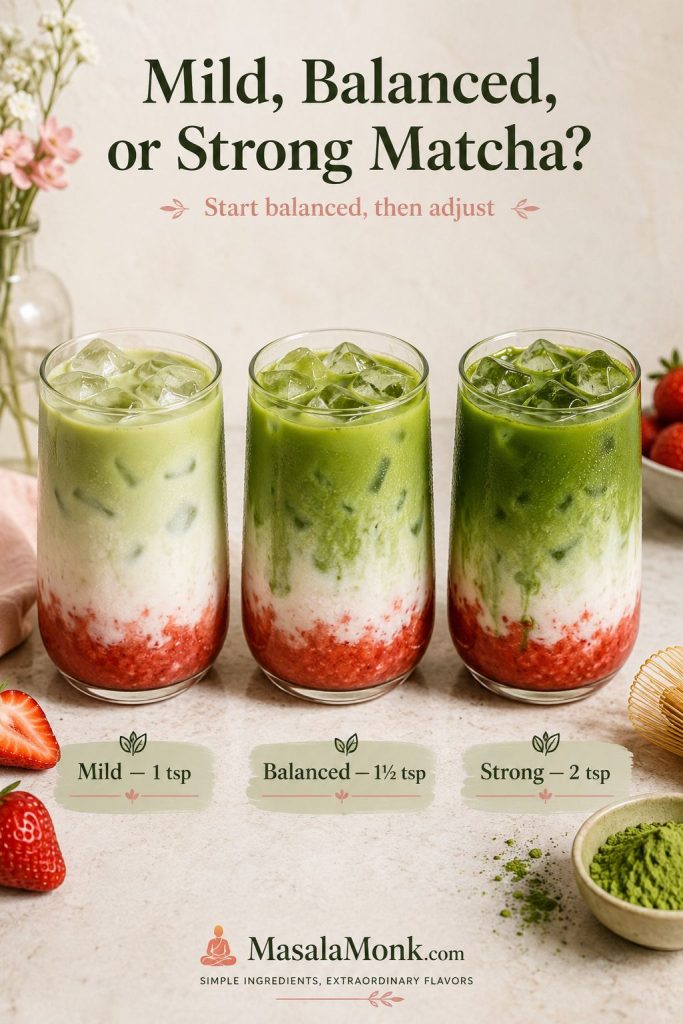
Mild, Balanced, or Strong Matcha?
New to matcha? Start mild. Already love iced matcha? Use the balanced amount. Want the green tea flavor to lead even after milk and strawberry are added? Go stronger.
Oat milk drinks, extra ice, and stronger matcha flavor.
Start with the balanced 16 oz version once, then adjust by taste: more berries for a fruitier sip, more milk for a softer sip, or more matcha when you want the green tea flavor to lead.
Matcha strength changes the whole drink, so begin balanced and move stronger only when you want the green tea flavor to lead.
How to Make an Iced Strawberry Matcha Latte
The order matters. If everything goes in at once, the drink will taste fine but look muddy. For clear separation, build from heaviest to lightest: strawberry, ice, milk, then matcha.
There is also a small pleasure in the pour: the milk softens the red strawberry base, then the matcha slides over the ice and settles into green. It looks fancy, but it is really just a few careful steps.
Build it like a little stack: fruit first, ice next, milk slowly, matcha last.
Build from heavy to light so the strawberry stays low, the milk cushions the middle, and the matcha finishes on top.
Step 1: Make the strawberry base
Hull and chop 4–5 medium strawberries. Add them to a small bowl or directly to the bottom of a sturdy glass with 2 teaspoons sweetener. Muddle until the berries release their juice and look saucy.
For a smoother base, blend the strawberries with the sweetener, then spoon the puree into the cup. Strain it if you want the neatest red stripe at the bottom.
Muddled berries taste fresh and rustic, while puree gives a smoother strawberry base for cleaner layers and a more polished finish.
Step 2: Whisk the matcha
Sift 1½ teaspoons matcha into a small bowl. Add 3 tablespoons hot water around 175°F / 80°C. Whisk until the matcha is glossy and lightly frothy. There should be no dry clumps left at the bottom of the bowl.
A bamboo whisk works beautifully, but a small whisk, handheld frother, or shaker jar can also do the job. With a frother, keep the head fully submerged at first so the matcha does not splash.
Sift first and use warm-not-boiling water, because smooth matcha before pouring means a better latte after stirring.
Step 3: Build the drink
Spoon the strawberry mixture into the bottom of a tall clear glass. Add ice until the glass is at least halfway full. Pour the milk slowly over the ice, not directly into the fruit.
Finally, pour the whisked matcha over the ice or over the back of a spoon. This slows the pour and helps the green matcha sit above the milk for that red-white-green look.
Plenty of ice slows the pour, which helps the milk and matcha settle into layers instead of turning muddy immediately.
Step 4: Serve, then stir
Serve it layered for the first beautiful moment, then stir before drinking. The sip gets better once the berry, milk, and matcha stop sitting in separate lanes.
If you do not care about visible colors, simply stir the strawberry, milk, and matcha together after building the drink. The flavor will be just as good, and the drink is easier to sip evenly from the start.
Do not worry if the first pour is not perfect. The colors are fun, but this latte is forgiving; once you stir it, the flavor matters much more than the stripes.
The layered version wins the first look, while the stirred version gives you strawberry, milk, and matcha in one balanced sip.
If the layers disappear too quickly, the fixes section covers ice, pouring speed, and berry thickness.
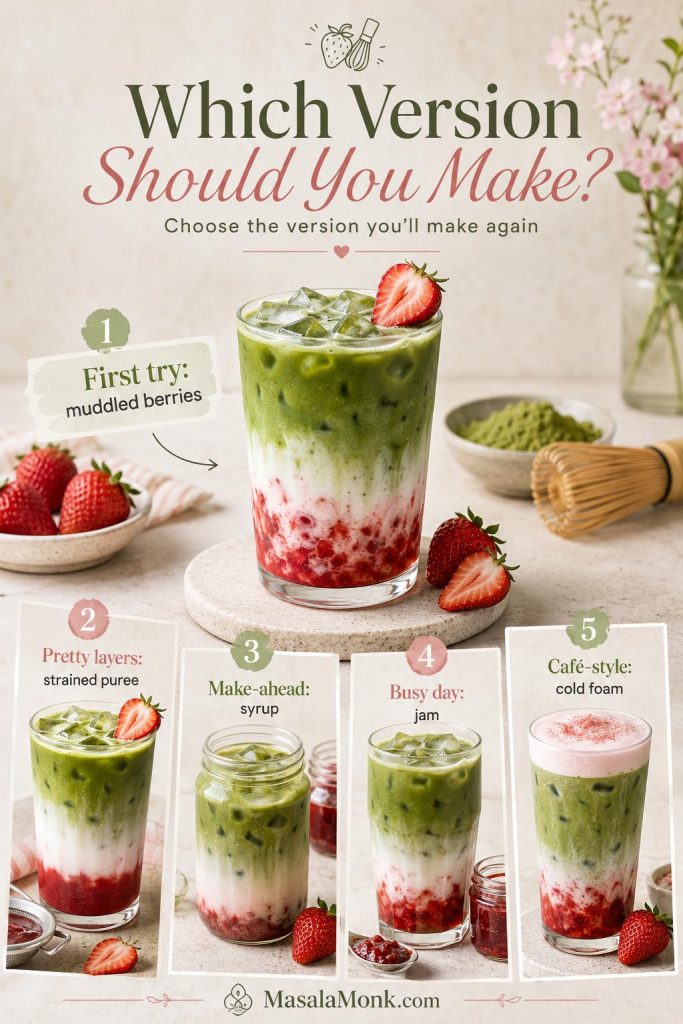
Which Version Should You Make?
For your first try, start with muddled berries. For the cleanest layers, strain the puree. On a busy day, jam is completely fine; the point is a balanced latte you would actually make again.
Best everyday version: fresh muddled berries for the brightest, quickest flavor.
Best pretty layered version: strained strawberry puree for a cleaner red base.
Best make-ahead version: cooked strawberry syrup chilled in a jar.
Best busy-day shortcut: 1–2 tablespoons strawberry jam with less extra sweetener.
Best café-style version: smooth puree or syrup with oat milk, stronger matcha, and optional cold foam.
Choose the version that fits the moment: fresh berries for everyday, puree for layers, syrup for prep, jam for speed, or cold foam for café style.
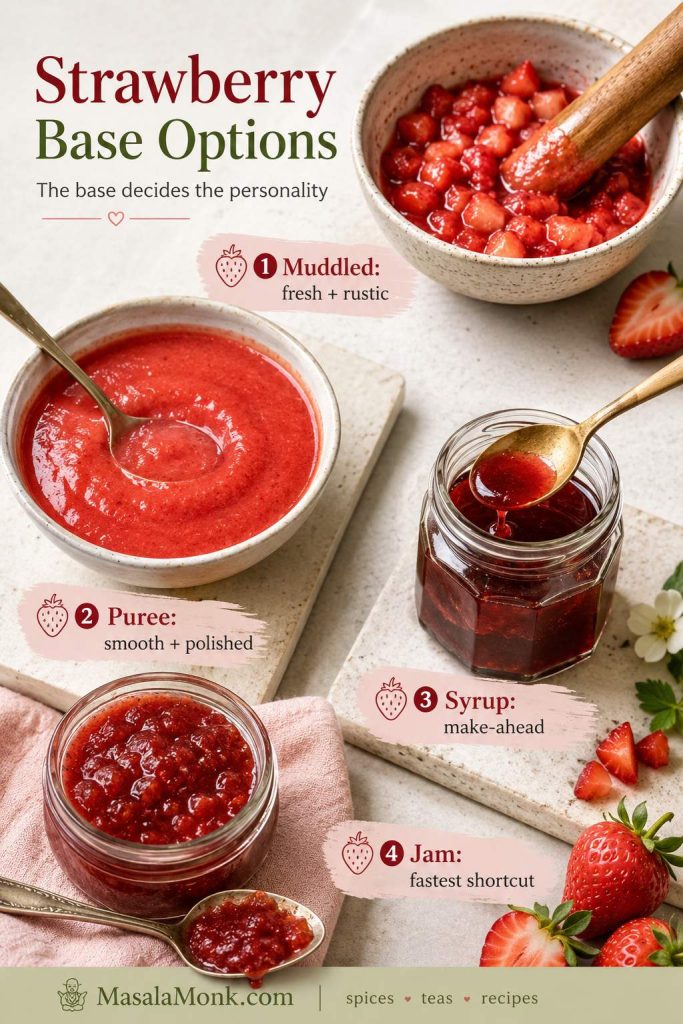
Strawberry Base Options
Once you know which direction you want, the strawberry base is where the latte gets its personality: rustic and fresh, smooth and polished, syrupy and make-ahead, or fast and jammy.
The strawberry base decides the personality of the drink, from fresh and rustic to silky, syrupy, or fast and jammy.
Fresh muddled strawberries
Ripe strawberries are where this version shines. It tastes fresh, takes only a few minutes, and keeps the drink from feeling too syrupy. The texture is slightly rustic, which can be lovely if you enjoy real fruit in the glass.
Smooth strawberry puree
Blend strawberries with sweetener for a silkier fruit base. This gives the latte a more polished look and makes the strawberry flavor spread more evenly once stirred. If seeds bother you, strain the puree before adding it to the glass.
Make-ahead strawberry syrup
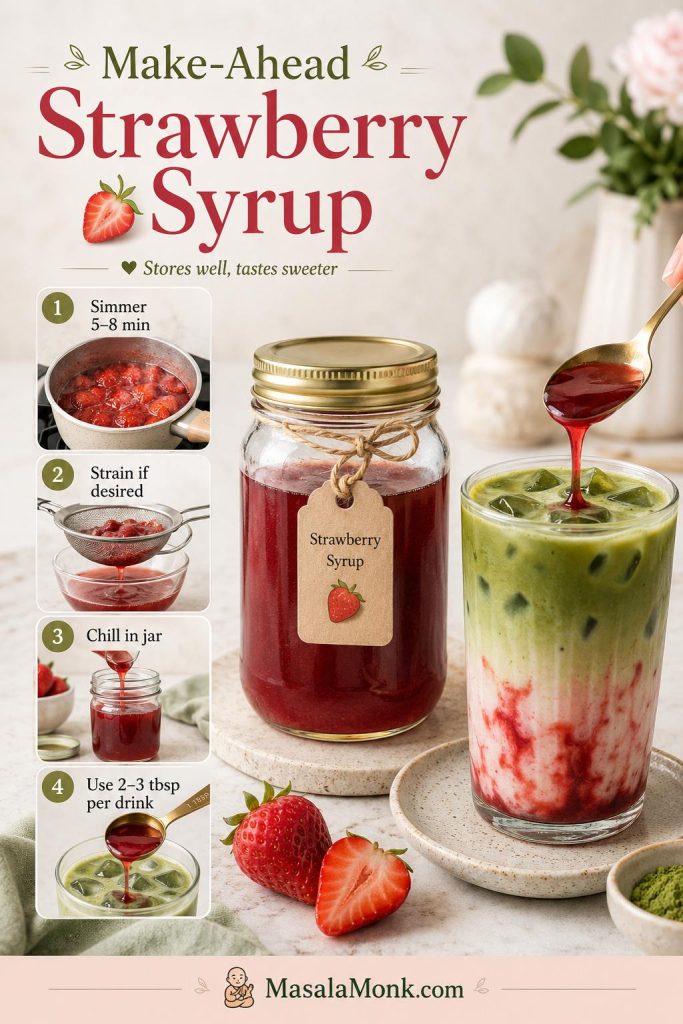
To make syrup ahead, simmer 1 cup chopped strawberries, about 140–160 g, with ¼ cup sugar and ¼ cup water for 5–8 minutes, until the fruit softens and the liquid turns red. Mash, strain if desired, cool, and refrigerate. Use 2–3 tablespoons syrup per drink.
This makes roughly enough syrup for 3–4 drinks, depending on how much you reduce it. Syrup stores well and gives stronger strawberry flavor, but it tastes sweeter and less fresh than muddled berries. Store-bought syrup can work in a pinch; start with less than you think you need.
That jammy berry flavor also works beautifully in desserts; this strawberry ice cream recipe uses the same idea of concentrating juicy strawberries before they water things down.
Use strawberry syrup when convenience matters more than fresh berry texture, especially for repeat lattes during the week.
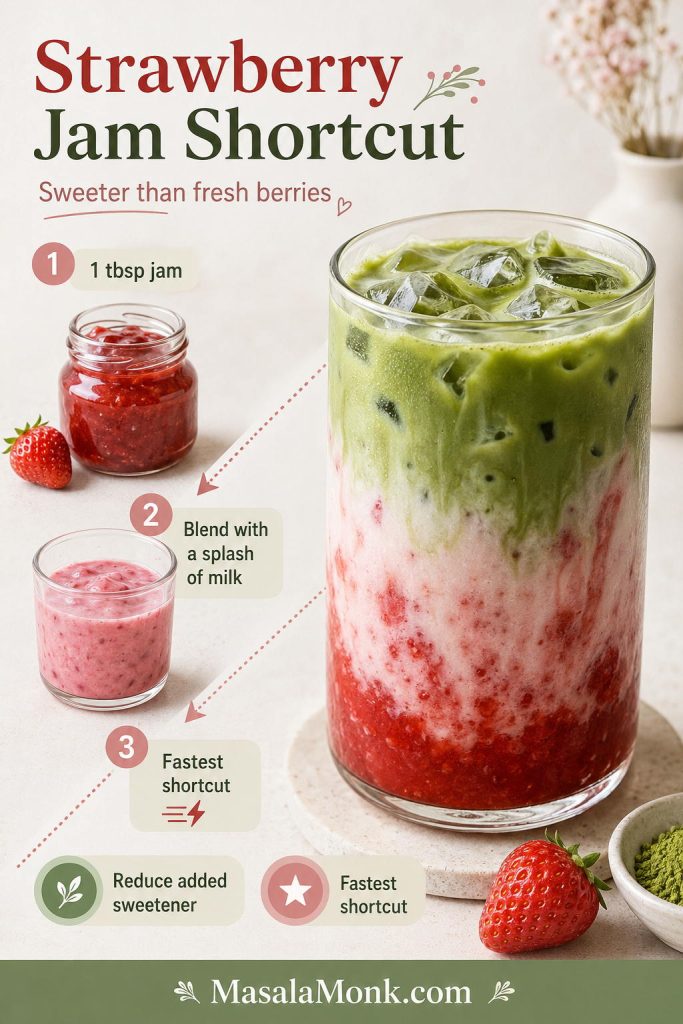
Strawberry jam shortcut
Jam works when speed matters, but it gives the drink more candy-shop sweetness than fresh berry lift. Start with 1 tablespoon, stir or blend it with a spoonful of milk, then add the rest of the milk and matcha.
Jam is the fastest shortcut when fresh berries are not available, but reduce added sweetener because the base is already sweet.
Starbucks-Style Notes
For a Starbucks-style strawberry matcha latte, use smooth strawberry puree or syrup, oat milk or coconut milk, 1½–2 teaspoons matcha, and strawberry cold foam if you want the café-style finish.
Puree or syrup gives you more café polish; muddled berries give you the fresher homemade sip.
The exact Starbucks version can vary by country, season, and custom order. Starbucks EMEA announced an Iced Strawberry Matcha Tea Latte with strawberry cream cold foam, while in other places people often recreate the flavor through custom orders or homemade copycat versions.
For a Starbucks-style direction, use a smoother strawberry base, slightly stronger matcha, creamy milk, and strawberry cold foam on top.
Variations
Once you know the base ratio, this iced matcha drink is easy to adapt. Keep the same building order, then change the milk, fruit base, or topping.
For the basic build before changing the milk, foam, or fruit base, start with the main method.
Strawberry Milk Matcha
Blend strawberries or strawberry jam directly into the milk, then pour whisked matcha over the top. Choose this when you care more about a creamy, evenly fruity latte than the dramatic red-white-green layers.
Creamiest Dairy-Free Version
Oat milk gives you the creamiest dairy-free glass. Because it is naturally a little sweet and rich, it works especially well with 1½–2 teaspoons matcha and a lightly sweetened strawberry base.
Oat milk is usually the easiest dairy-free choice because it softens matcha while keeping the strawberry layer creamy and full.
Strawberry Cold Foam Matcha
For a creamier cold foam variation, froth 3 tablespoons heavy cream or barista-style milk with 1 tablespoon strawberry puree or jam and ½ teaspoon vanilla. Spoon it over an iced matcha latte, or use it on top of the layered strawberry-matcha drink.
If fresh strawberry puree makes the foam too loose, use freeze-dried strawberry powder or a small amount of thick strawberry jam instead. The goal is a pink, lightly sweet foam that tastes like strawberry without sinking straight into the glass.
For a thicker topping, the same timing cues from this whipped cream recipe can help you stop before the foam turns heavy.
Good strawberry cold foam should be light and spoonable, not runny enough to sink or heavy enough to feel like frosting.
Boba-Shop Style Strawberry Matcha
Add cooked tapioca pearls to the bottom before the strawberry base, then build with ice, milk, and matcha. Use a smooth puree or jam so the cup does not feel too busy, and add boba fresh because cooked tapioca pearls lose their bounce as they sit.
Add tapioca pearls fresh and keep the strawberry base smooth, because boba already brings plenty of texture to the glass.
Strawberry Matcha Lemonade, Not a Latte
For a brighter refresher-style variation, replace the milk with cold lemonade and keep the strawberry base at the bottom. This is a separate summer drink, not a creamy latte. Use 1 teaspoon matcha because the acidity makes the green tea taste stronger.
This variation leaves latte territory; instead of creamy milk, lemonade makes the drink brighter, sharper, and more refreshing.
More Filling Protein Version
Use vanilla protein milk or a vanilla protein shake for part of the milk. This is the version to make when you want the drink to act more like a light breakfast than a pretty afternoon sip. For a more fruit-forward breakfast drink, this berry smoothie recipe is a better direction.
Vanilla protein milk turns the drink into a more filling option, while the strawberry and matcha keep it tasting fresh rather than heavy.
Make-Ahead and Storage
This drink tastes best right after it is assembled, but you can prepare the parts ahead. Keep the strawberry mixture and matcha separate until you are ready to build the glass.
The best make-ahead plan is simple: prep the strawberry part, chill the milk, and leave the matcha for the last minute. The matcha is the part worth making fresh; whisk it at the end so the top tastes bright instead of dull.
Component
Make-ahead timing
Storage tip
Fresh strawberry mixture
Up to 1 day
Refrigerate in a covered jar. Stir before using.
Cooked strawberry syrup
3–5 days
Refrigerate in a clean jar and use a clean spoon each time.
Whisked matcha
Best fresh
Whisk right before serving for the smoothest texture.
Fully assembled drink
Serve immediately
The colors fade and the ice waters it down over time.
If you want to make several drinks for guests, prepare the strawberry base ahead and chill the milk. Whisk the matcha fresh, then assemble each serving just before serving.
Make-ahead works best when the fruit is ready and the matcha is fresh, so the drink still tastes bright when assembled.
Avoid the three easiest mistakes: do not use boiling water for matcha, do not pour milk directly into a thin strawberry mixture if you want visible separation, and do not judge the sweetness until the drink has been stirred.
Most mistakes happen before the first sip, so fix the process: avoid boiling water, thicken the berry base, and stir before judging.
Troubleshooting: Bitter, Clumpy, Watery, or Mixed Layers
Even if the glass does not look perfect, it is usually easy to fix the flavor. Most problems come down to heat, sweetness, ice, or how fast everything was poured.
A messy glass is not a failed latte. If the flavor is balanced, you are already close.
Fix matcha problems first
When a strawberry matcha latte tastes bitter, clumpy, or watery, start with the matcha. The water temperature, whisking, and dilution usually explain the problem.
Problem
Likely cause
How to fix it
Matcha tastes bitter
Water was too hot, matcha was low quality, or too much matcha was used.
Use water around 175°F / 80°C, start with 1 tsp matcha, and add more milk if needed.
Matcha is clumpy
Powder was not sifted or whisked enough.
Sift first, add hot water gradually, and whisk until glossy before pouring.
Drink tastes watery
Too much water in the matcha or too much melted ice.
Use 3 tbsp water for the matcha and serve immediately after building.
Fix layers, sweetness, and berry flavor
If the matcha is smooth but the latte still feels off, check the strawberry base, ice, sweetness, and milk balance next.
Problem
Likely cause
How to fix it
Colors disappeared
Not enough ice, thin strawberry mixture, or pouring too fast.
Use more ice, make the fruit base thicker, and pour milk and matcha slowly over the ice.
Too sweet
Too much syrup, jam, or sweetened milk.
Use fresh strawberries next time. For this glass, add more milk and a little extra matcha.
Too grassy
Matcha is too strong for your taste.
Use 1 tsp matcha, add more milk, or sweeten the fruit base slightly.
Not enough strawberry flavor
Berries were pale or watery.
Use a cooked syrup, add 1 extra strawberry, or mix in 1 tsp strawberry jam.
Drink tastes flat
Not enough strawberry, weak matcha, or too much milk.
Add a spoonful of strawberry mixture, use 1½–2 tsp matcha, or reduce the milk slightly next time.
If the latte tastes off, the fix is usually small: cooler water, more ice, better whisking, or a quick adjustment to sweetness and matcha.
When it is right, the first sip is creamy and cool, then berry-bright, with just enough matcha to keep the sweetness in check.
Make it from memory
After the troubleshooting guide, this saveable card brings the core ratio, build order, taste target, and quick fixes into one easy reference.
This card turns the full recipe into a memory system: ratio, build order, flavor target, and the fixes that matter most.
FAQs
These quick answers cover the practical questions readers usually have once they start making the drink, from whisking matcha to using jam, oat milk, and make-ahead parts.
These quick answers help the next glass taste better, especially if you need a no-whisk method, jam shortcut, oat milk option, or caffeine adjustment.
Does strawberry taste good with matcha?
Strawberry works well with matcha because its sweet-tart flavor softens matcha’s grassy edge. Milk brings the two together, so the drink tastes fruity, creamy, and lightly earthy instead of sharp.
No bamboo whisk?
A bamboo whisk gives the best traditional texture, but a small whisk, handheld milk frother, blender, or shaker jar can also make glossy matcha. Sifting the powder first helps no matter which tool you use.
Cold water or warm water for matcha?
Cold water can work with a shaker or handheld frother, but warm water usually makes matcha easier to whisk smooth. For this recipe, a small amount of hot water gives the matcha a smoother texture before it hits the ice.
Fresh strawberries or jam?
Fresh berries or puree usually taste brighter and less sugary. Strawberry jam is the fastest shortcut. Use 1–2 tablespoons and blend or stir it with a little milk before adding the rest.
Why is my latte bitter?
The matcha may have been whisked with water that was too hot, or you may have used too much matcha for your taste. Use hot water around 175°F / 80°C, avoid boiling water, and start with 1 teaspoon matcha if you are new to the flavor.
Why did the colors mix together?
The glass probably needed more ice, a thicker strawberry mixture, or a slower pour. Add the strawberries first, fill the glass with ice, pour milk slowly over the ice, then pour matcha gently over the top.
Do I have to layer the drink?
No. The layered look is pretty, but the best flavor comes after stirring. Take the beautiful first look, then mix it so the strawberry, milk, and matcha land in the same sip.
If you want a fully blended matcha drink instead of an iced latte, these matcha smoothie recipes are a better fit.
Oat milk and vegan options
Oat milk works especially well because it is creamy enough to soften the matcha and naturally sweet enough to pair with strawberries. For a vegan version, use oat milk, almond milk, coconut milk, or another non-dairy milk, and sweeten the strawberries with sugar, maple syrup, or simple syrup instead of honey.
Is this the same as strawberry milk matcha?
Not exactly. A layered version keeps the strawberry at the bottom, milk in the middle, and matcha on top. Strawberry milk matcha blends the strawberry into the milk first, so the drink tastes creamier and more evenly fruity but looks less dramatic.
How strong is the caffeine?
The caffeine depends on the matcha powder and how much you use, but this is definitely a caffeinated latte. A 1-teaspoon version is gentler; a 2-teaspoon version tastes closer to the stronger café-style matcha people expect when they want the green tea to show up.
Make-ahead plan
Prepare the strawberry mixture or syrup ahead, but whisk the matcha and assemble the latte fresh. Once ice, milk, fruit, and matcha sit together, the colors fade and the texture turns watery.
How to double it
Double the strawberry mixture, milk, matcha, and sweetener, then build two glasses separately. If everything goes into one pitcher, the flavor will still be good, but the layered look will disappear.
Start with the fresh strawberry version first. Stir before judging, then adjust only one thing in the next glass: more berry, stronger matcha, oat milk, cold foam, or the jam shortcut on a busy day. Once the balance clicks, this becomes the kind of small café drink you can make from memory.
There are days when a cold glass of watermelon juice feels better than dessert: icy, ruby-red, naturally sweet, and bright enough to wake you up in a few sips. The only catch is that it can turn flat or watery if you blend it the wrong way.
This watermelon juice recipe keeps the flavor bold by blending cold watermelon without added water, then balancing it with lime or lemon and a small pinch of salt. You do not need a juicer, and you can leave it pulpy, strain it smooth, or turn the same base into watermelon cucumber juice, watermelon pineapple juice, mint watermelon juice, or Indian-style tarbooz juice with black salt.
The best glass should taste like biting into cold watermelon, not like watermelon-flavored water. That is why this method starts with chilled fruit, skips added water, and adjusts only after you taste: citrus for lift, a tiny pinch of salt for brightness, and more cold fruit for body.
Blend 4 cups cold seedless watermelon cubes with 1 tablespoon fresh lime or lemon juice and a small pinch of salt. Do not add water at first. Strain the juice if you want it smooth, or leave it unstrained for a thicker, pulpy, fresh-fruit texture. Serve it over ice right away, or chill it briefly and stir before pouring.
Sweet watermelon needs very little help. Bland fruit is where the lime-and-salt trick matters most. That small adjustment is what turns watery blended fruit into a bright, cold glass that actually tastes alive.
Blend cold watermelon first, then taste before adding anything else. That small pause helps you fix the fruit you actually have instead of diluting the glass too early.
If your juice tastes flat, thin, or pulpy after blending, use the flavor fixes before adding more ice or sugar.
Why This Watermelon Juice Works
The best version should taste like cold, ripe watermelon first: clean, juicy, and bright. Everything else in this recipe is there to protect that flavor, not cover it up.
No juicer needed: Watermelon blends easily because it is naturally full of juice.
No added water: The drink stays sweet, fresh, and concentrated instead of diluted.
Lime or lemon wakes it up: A little acidity lifts even average watermelon.
A small pinch of salt helps: Regular salt sharpens the sweetness; black salt gives an Indian-style summer cooler flavor.
Straining is optional: Keep the pulp for body, or strain the juice for a cleaner pitcher-style drink.
Because the base is so clean, you can use it for everyday drinking, mocktails, brunch drinks, popsicles, or cocktails like a watermelon margarita.
Ingredients for Watermelon Juice
You only need watermelon for the simplest version, but lime or lemon and a little salt make the drink taste much more alive.
Watermelon does most of the work, while the small additions shape the flavor. Lime or lemon adds lift, salt sharpens sweetness, and mint or black salt changes the mood.
Ingredient
US Measure
Metric
Why It Matters
Cold seedless watermelon cubes
4 cups
About 600 g
The main body, sweetness, and color of the drink.
Fresh lime or lemon juice
1 tablespoon
15 ml
Lifts the flavor and fixes flat-tasting fruit.
Fine salt or black salt
Small pinch, up to 1/8 teaspoon
About 0.5 g
Makes the fruit taste sweeter and more refreshing.
Fresh mint leaves
6–10 leaves
Optional
Adds a cooling summer flavor.
Honey, sugar, or agave
1–2 teaspoons
Optional
Use only if the watermelon is not sweet enough.
Ice
As needed
Optional
Serve over ice, but avoid blending in too much ice because it waters down the flavor.
Seedless vs Seeded Watermelon
Seedless watermelon is easiest because you can cube and blend it quickly. If you have seeded watermelon, remove as many black seeds as possible before blending. A few small white seeds are usually fine in a blender, especially if you plan to strain the juice.
Lime or Lemon?
Lime gives the drink a sharper, more tropical edge. Lemon tastes softer and more familiar, especially if you are making watermelon lemonade or Indian-style tarbooz juice. Either works, so use what you have.
Lime gives the glass a sharper, cleaner edge, while lemon makes it softer and more lemonade-like. Choose lime for crispness and lemon for a gentler summer drink.
Do You Need Sugar?
Usually, no. A ripe watermelon should be sweet enough. However, if the fruit is pale, bland, or not fully ripe, add 1–2 teaspoons of honey, sugar, simple syrup, or agave. Start small because the drink should still taste fresh, not syrupy.
Ripe watermelon usually needs no sugar. When the fruit tastes pale or flat, pineapple or a tiny amount of sweetener can rescue the juice without making it syrupy.
If your watermelon needs help but you do not want to lean on sugar, pineapple is one of the easiest fruit fixes. For another naturally sweet tropical drink, this pineapple mango juice follows the same fruit-forward idea.
How to Pick a Sweet Watermelon
The best juice starts before the blender. If the melon is sweet and ripe, the recipe needs almost no help. If you only check two things, choose one that feels heavy for its size and has a creamy yellow field spot.
Better juice starts with better fruit. Choose a watermelon that feels heavy for its size and has a creamy yellow field spot for the best chance at sweetness.
Heavy for its size: A juicy watermelon should feel heavier than it looks.
Dull rind: A shiny rind can mean the fruit is underripe.
Creamy yellow field spot: This is where the melon rested on the ground. A deeper yellow spot usually suggests better ripeness.
Symmetrical shape: Avoid oddly dented or misshapen fruit when possible.
No soft spots or sour smell: Once cut, the flesh should smell fresh and sweet, not fermented.
How to Make Watermelon Juice in a Blender Without a Juicer
This is the easiest clean method because it is fast, low-effort, and does not require special equipment. You do not need a perfect watermelon for it to work. A great melon needs almost nothing; an average one can still become a good drink with citrus, salt, cold temperature, or a little pineapple.
The method is simple, but the order matters. Chill and blend the fruit first, then adjust the flavor before deciding whether to strain or serve.
Wash the Watermelon Before Cutting
Rinse the outside before cutting, and scrub the rind under running water if it feels dusty or dirty. You do not eat the rind, but the knife passes through it into the fruit, so a clean outside matters. Food-safety guidance also recommends washing produce before cutting, even when you do not eat the skin.
Wash the rind before cutting, even though you will not eat it. As the knife passes through the outside into the flesh, a clean rind helps keep juice prep cleaner.
Chill the Watermelon
Cold fruit makes better juice. If the watermelon is already cold, you can serve the drink right away without blending in extra ice. If it is room temperature, cube it and chill the pieces for 30 minutes before blending, or chill the finished pitcher briefly before serving.
Cold fruit gives the drink better body and a cleaner first sip. It also reduces the need for blended ice, which can make the juice taste watery.
Cut Away the Rind
Slice off the green rind and the pale white part underneath it. A little pale edge will not ruin the drink, but too much white rind can make it taste grassy or thin.
Use mostly the red flesh for the cleanest flavor. Too much pale rind can make fresh watermelon juice taste grassy, thin, or less naturally sweet.
Blend Without Water
Add the watermelon cubes to a blender and blend for 30–60 seconds, until smooth. Do not add water at first. The fruit releases plenty of liquid as it blends.
The No-Water Rule
Blend the watermelon by itself first. Extra water makes the drink thinner before you know whether it needs help. If the blender struggles, pulse a few times, press the fruit down with a tamper if your blender has one, or add only 1–2 tablespoons cold water to get the blades moving.
Watermelon releases plenty of liquid once the blades catch. Start without water and use only the smallest splash of cold water if your blender refuses to move.
If the first blend tastes weak or watery, taste and adjust before adding ice or extra water.
Taste, Then Adjust
Taste before adding anything else. Sweet but flat? Add lime or lemon. Dull? Try a tiny pinch of salt or black salt. Not sweet enough? Add a teaspoon or two of honey, sugar, agave, or a little pineapple.
A quick taste tells you what the glass needs. Citrus brightens, salt sharpens, and pineapple adds sweetness plus acidity when the melon tastes weak.
Strain If You Want It Smooth
Pour the juice through a fine-mesh strainer for a clean, smooth glass. Leave it unstrained if you like a thicker, pulpy, fresh-fruit texture.
Serve Cold
Pour into glasses over ice and enjoy soon after blending. Garnish with mint, lime, lemon, or small watermelon wedges if you want it to look more polished.
Should You Strain Watermelon Juice?
Straining is optional. The right choice depends on the texture you want and how you plan to serve the drink.
If you want a juice-bar-style glass, strain it. If you want more body and less waste, leave it pulpy.
For a pitcher or mocktail, strained juice looks cleaner. When you are drinking it right away, the pulp adds body and keeps more of the fruit in the glass.
Style
Texture
Best For
Unstrained
Thicker, pulpy, more body
Everyday drinking, less waste, a fuller fruit texture
Fine-mesh strained
Smooth but still fresh
Pitchers, guests, cleaner glasses
Cheesecloth or nut milk bag
Very smooth and polished
Mocktails, cocktails, party drinks, or extra-smooth juice
For a quick glass at home, unstrained is perfectly fine. For a pitcher, mocktail, or cocktail, straining gives a cleaner finish.
Still not sure about texture? See the texture guide for thin, just-right, and pulpy juice.
How to Fix Bland, Watery, or Pulpy Watermelon Juice
This is where homemade watermelon juice either becomes excellent or stays forgettable. Watermelon changes from fruit to fruit, so taste the blended juice before adding anything. Then fix the exact problem instead of dumping in ice, sugar, or water.
If the first sip is not right, do not panic and do not add more ice. Flat juice needs citrus and salt, thin juice needs more cold fruit, and pulpy juice needs straining.
Do not rescue a dull batch with more ice. Instead, fix the actual problem: brighten the flavor, rebuild the body, or strain the texture until the glass tastes balanced.
Problem
Best Fix
Tastes flat
Add 1 tablespoon lime or lemon juice and a small pinch of salt.
Not sweet enough
Add 1–2 teaspoons honey, sugar, or agave. Pineapple also helps.
Too sweet
Add lime, lemon, cucumber, or sparkling water.
Too watery
Chill it, stir it, and serve over ice instead of blending ice into it. For more body, blend in extra cold watermelon.
Too pulpy
Strain through a fine-mesh sieve, cheesecloth, or nut milk bag.
Too thin after straining
Blend in more cold watermelon, not more ice.
Separated in the fridge
Stir or shake before serving. Separation is normal.
Slightly grassy
Use less of the pale white part near the rind next time.
What not to do: Do not fix thin, bland juice by blending in a lot of ice or water. That makes the flavor even weaker. Use lime or lemon for brightness, a small pinch of salt for lift, pineapple for sweetness, or more cold watermelon for body.
What the Right Texture Looks Like
The ideal texture is bright and full without becoming thick. Use this guide after blending or straining, especially if the juice tastes thin or feels too pulpy.
The best texture is bright and full without feeling thick. If the juice is too thin, blend in more cold watermelon; if it is too pulpy, strain it.
Watermelon Juice Variations
Once the basic glass tastes bright, choose the variation by mood: cucumber for cooler and lighter, pineapple for sweeter and fuller, ginger for bite, sparkling water for a mocktail feel, and black salt for Indian-style tarbooz juice.
Once the basic glass tastes balanced, choose the variation by mood. Cucumber cools it down, pineapple adds sweetness, ginger gives bite, and black salt makes it tarbooz-style.
What You Want
Make This Version
Bright, crisp, and classic
Watermelon lime juice
Cooler and less sweet
Watermelon cucumber juice
Sweet-tart and tropical
Watermelon pineapple juice
A little bite
Watermelon ginger juice
Light, fizzy, and mocktail-like
Sparkling watermelon juice
Tangy Indian summer-cooler flavor
Tarbooz juice with black salt, mint, and lemon
If you are making a pitcher or party batch, check the yield guide before scaling any variation.
Watermelon Lime Juice
Choose this when you want the cleanest, brightest glass. Blend 4 cups watermelon with 1 tablespoon lime juice and a small pinch of salt. It tastes crisp, cold, and not too sweet.
Choose watermelon lime juice when you want the crispest version. Lime cuts through the sweetness quickly, so the glass tastes clean, bright, and not too heavy.
Watermelon Lemon Juice
Lemon gives the base a softer, lemonade-like brightness. Use 1 tablespoon lemon juice instead of lime. This is the simplest version of watermelon and lemon juice, and it works especially well with mint or black salt.
Lemon gives the drink a softer kind of brightness. Because it tastes gentler than lime, this version works well when you want a watermelon lemonade feel.
Watermelon Mint Juice
Mint makes the drink taste colder and more refreshing, especially on very hot days. Blend 4 cups watermelon with 6–10 fresh mint leaves and 1 tablespoon lime juice. Start with fewer leaves if your mint is strong, because too much can turn the flavor herbal instead of fresh.
Mint makes the drink feel cooler without adding sweetness. Start with a few leaves first, then add more only if you want a stronger herbal finish.
If mint and lime are your favorite part of the glass, you may also like this mojito recipe for the same cooling, citrusy direction.
Watermelon Cucumber Juice
When you want something cooler and less sweet, add cucumber. Blend 4 cups watermelon with 1/2 to 1 cup peeled cucumber, 1 tablespoon lime or lemon juice, and a small pinch of salt. This also covers the same idea people search for as watermelon and cucumber juice.
Cucumber makes the juice lighter and less sweet, which helps when the watermelon is very ripe. It also gives the glass a cleaner, spa-water-style finish.
Watermelon Pineapple Juice
For bland watermelon, pineapple is the easiest rescue. It brings both sweetness and acidity, so the blend tastes fuller without needing much added sugar. Use 2 cups watermelon with 1 cup pineapple, then add lime if you want more sharpness. If you are looking for watermelon and pineapple juice, this 2:1 fruit ratio is the easiest place to start.
Pineapple is the easiest fruit fix when watermelon tastes bland. It adds both sweetness and acidity, so the juice tastes fuller without needing much added sugar.
Watermelon Ginger Juice
For a sharper, more grown-up glass, add fresh ginger. It cuts through the sweetness and gives the juice a warm little kick. Blend 4 cups watermelon with 1 to 2 teaspoons fresh grated ginger and 1 tablespoon lemon or lime juice.
Fresh ginger gives the drink a sharper, more grown-up finish. Start small because ginger can quickly overpower watermelon’s clean sweetness.
Watermelon Coconut Water
For a softer, slightly tropical version, blend 3 cups watermelon with 1/2 cup coconut water, lime, and mint. Use less coconut water at first because it thins the drink quickly.
Sparkling Watermelon Juice
For a mocktail-style glass, fill a cup about two-thirds full with cold watermelon juice, then top with chilled sparkling water. Add lime and mint for a cleaner finish.
Add sparkling water right before serving so the bubbles stay lively. This turns fresh watermelon juice into an easy mocktail-style summer drink.
For more non-alcoholic summer drink ideas, use this juice as a base for watermelon mocktails, especially versions with lime, mint, coconut water, or bubbles.
Indian-Style Tarbooz Juice
For an Indian summer-cooler flavor, blend watermelon with lemon or lime, mint, and a small pinch of black salt. Add only a tiny pinch of roasted cumin, black pepper, or chaat masala if you want that street-style edge. Keep the seasoning light so the fruit tastes cooler and brighter, not salty.
Black salt gives tarbooz juice its tangy Indian summer-cooler edge. Keep the seasoning light, though, so the drink still tastes like cold watermelon first.
Juicing Watermelon: Blender vs Juicer Method
For watermelon, a blender is usually the better first choice because the fruit is already soft, juicy, and easy to break down. A juicer can work, but it often gives you a thinner, cleaner drink rather than the cold, full-bodied glass most people want at home.
A blender gives watermelon juice more body, while a juicer makes it thinner and cleaner. For most home batches, blending first is easier and more satisfying.
Method
Result
Best For
Blender, unstrained
Thicker juice with more body
Everyday drinking and less waste
Blender, strained
Smooth, clean juice
Pitchers, guests, mocktails, cocktails
Juicer
Thinner, clearer juice
People who already own a juicer and prefer a lighter drink
If you use a juicer, remove the rind and feed the pieces through slowly. If you use a blender, you can decide after blending whether you want to strain the juice or keep the pulp.
For a more filling drink, unstrained blended juice has an advantage because it keeps more of the fruit’s body. Mayo Clinic notes that juicing is not healthier than eating whole fruits and vegetables, and that blending edible parts can retain more fiber and plant compounds than extracting juice alone. You can read their general juicing guidance for more context.
How Much Juice Does One Watermelon Make?
The exact yield depends on ripeness, juiciness, and whether you strain. These estimates will help you plan.
Watermelon yield changes with ripeness and juiciness, but 4 cups of cubes usually gives about 2 to 2½ cups of juice. Use this guide when scaling for a pitcher.
Watermelon Amount
Approximate Juice Yield
4 cups cubed watermelon / about 600 g
About 2–2½ cups / 480–600 ml
8 cups cubed watermelon / about 1.2 kg
About 4–5 cups / 950 ml–1.2 L
1 small watermelon, about 6–6.5 lb
About 5 cups, depending on juiciness
If you are making a pitcher for a group, start with 8 cups of cold cubed watermelon. That usually gives enough for about 4 glasses, especially if you serve it over ice or top some glasses with sparkling water.
How to Store Watermelon Juice
This drink tastes best right after blending. The flavor is brightest, the color is freshest, and the texture has not had time to settle.
Fresh is the peak, but a short fridge rest can still work. Keep the jar covered, serve it cold, and stir well before pouring because the pulp naturally settles.
Storage Rule
For the best make-ahead flavor, refrigerate watermelon juice in a clean covered jar for up to 24 hours. It can keep for 2–3 days if properly chilled, but the flavor fades and the juice naturally separates. Stir or shake before serving.
If you are serving guests, blend it the same day if possible. If you make it ahead, keep it covered and cold, then stir well and taste again before pouring.
Best: drink it right away.
Best make-ahead window: up to 24 hours in the fridge.
Possible: 2–3 days in a clean airtight jar, if kept cold.
Freeze: pour into ice cube trays for smoothies, mocktails, lemonade, or slushies.
Do not leave it out: fresh fruit juice should not sit at room temperature for long.
Separation is normal. It does not mean the juice has gone bad unless it smells sour, tastes fizzy, looks spoiled, or has been stored too long.
Freeze Extra Juice Into Cubes
Freezing is the best option when you have extra juice but do not want to drink it plain later. The cubes work better as a mixer than as thawed juice.
Freeze extra juice into cubes instead of wasting it. Later, use the cubes in lemonade, sparkling water, smoothies, slushies, or mocktails.
Think of watermelon juice as a fresh summer drink, not a health shortcut. You do not have to turn it into a wellness claim for it to be worth making; a cold, unsweetened glass can simply taste like real fruit and feel better than soda.
Unsweetened watermelon juice can be a refreshing fruit drink, but whole watermelon is usually more filling. So, enjoy the juice, but keep portions in mind.
It is naturally sweet, colorful, and hydrating. However, it is still fruit juice, so whole watermelon is usually more filling because you chew it and keep more of the fruit’s natural structure. Unstrained blended juice keeps more body than fully strained juice, but it is still easier to drink quickly than eating watermelon pieces.
A modest glass of unsweetened watermelon juice is mostly blended fruit, so the calories and natural sugars depend on how much watermelon you drink. The main practical point is portion size: it is easier to drink several cups of juice than to slowly eat the same amount of fruit.
If you want a lighter drink, keep it unsweetened and add lime, mint, cucumber, or sparkling water instead of extra sugar. For a deeper nutrition-focused read, see our guide to watermelon juice benefits.
It can fit into a balanced diet, especially if it replaces soda or heavily sweetened drinks. However, it does not cause weight loss by itself. For fullness, whole watermelon is usually better because it contains more intact fiber and takes longer to eat.
If weight management is your goal, keep the drink unsweetened, avoid oversized portions, and treat it as one refreshing glass within the rest of your day.
Ways to Use Watermelon Juice
Once there is a cold pitcher in the fridge, it disappears quickly. Drink it plain, stretch it with bubbles, freeze it into cubes, or use it as the base for summer drinks.
A pitcher can do more than fill one glass. Use it for everyday drinks, sparkling mocktails, watermelon lemonade, frozen cubes, or summer cocktails.
Everyday drink: serve cold over ice with lime.
Mocktail base: top with sparkling water, mint, cucumber, or coconut water.
Watermelon lemonade: mix with lemon juice and a little sweetener if needed.
Frozen cubes: use in lemonade, slushies, smoothies, and summer pitchers.
Cocktails: strain first for cleaner margaritas, mojitos, and daiquiris.
If you are making cocktails, strained juice usually works better because it gives a cleaner texture. For a frozen cocktail direction, strained watermelon juice also works well in a watermelon daiquiri.
Make the simple version once: cold watermelon, lime or lemon, and a pinch of salt. After that first bright, icy glass, you will know exactly how to adjust the cucumber, pineapple, mint, ginger, and black salt versions by taste.
Watermelon Juice Recipe Card
Here is the quick-reference version of the recipe, with the no-water rule and taste-before-adjusting step built in.
This is the formula to remember: cold fruit first, no added water first, citrus for lift, and a tiny pinch of salt only after you taste the blended juice.
Watermelon Juice Recipe
Fresh watermelon juice made in a blender with cold fruit, no added water, lime or lemon, and a small pinch of salt for a bright, not-watery glass.
Prep Time5 minutes
Cook Time0 minutes
Total Time5 minutes
Yield2–2½ cups / 480–600 ml
Equipment
Blender
Knife and cutting board
Measuring cup
Fine-mesh strainer, optional
Pitcher or jar
Ingredients
4 cups cold seedless watermelon cubes, about 600 g
1 tablespoon fresh lime or lemon juice, 15 ml
Small pinch fine salt or black salt, up to 1/8 teaspoon
6–10 fresh mint leaves, optional
1–2 teaspoons honey, sugar, or agave, only if needed
Ice, for serving
Instructions
Rinse the outside of the watermelon before cutting.
Chill the watermelon if possible. Cold fruit makes better juice and reduces the need for extra ice.
Cut away the rind and pale white part, then cube the red flesh.
Add the cubes to a blender. Blend for 30–60 seconds, until smooth. Do not add water at first.
Taste the juice. Add lime or lemon juice and a small pinch of salt or black salt. Add mint if using.
Blend briefly again. If the fruit is not sweet enough, add 1–2 teaspoons honey, sugar, or agave.
Strain through a fine-mesh sieve if you want smooth juice, or leave it unstrained for a thicker texture.
Serve immediately over ice, or chill for 30 minutes and stir before serving.
Notes
Do not add water unless your blender truly cannot move. Add only 1–2 tablespoons if needed.
For watermelon cucumber juice, add 1/2 to 1 cup peeled cucumber.
For watermelon pineapple juice, use 2 cups watermelon and 1 cup pineapple.
For watermelon ginger juice, add 1–2 teaspoons fresh grated ginger.
For Indian-style tarbooz juice, use lemon or lime, mint, black salt, and a tiny pinch of roasted cumin or chaat masala.
The juice naturally separates. Stir or shake before serving.
Storage
Watermelon juice is best fresh. Refrigerate it in a clean covered jar for up to 24 hours for best flavor, or up to 2–3 days if properly chilled. Stir before serving.
No. A blender is enough because watermelon is soft and naturally juicy. Blend the cubes until smooth, then strain only if you want a cleaner texture.
Should watermelon juice be strained?
Only if you want a smoother glass. Unstrained juice has more body; strained juice looks cleaner in pitchers, mocktails, and cocktails.
Can I make watermelon juice without sugar?
Usually, yes. Ripe watermelon is sweet enough on its own, especially when lime or lemon and a tiny pinch of salt brighten the flavor.
Why does watermelon juice separate?
Fresh blended fruit naturally separates as it sits because the pulp and liquid settle at different rates. Stir or shake before serving. Separation alone does not mean the juice has spoiled.
How long does fresh watermelon juice last?
It tastes best immediately. For the best make-ahead flavor, refrigerate it in a clean covered jar for up to 24 hours. It may keep for 2–3 days if properly chilled, but the flavor fades and separation increases.
Can I freeze watermelon juice?
Yes. Freeze it in ice cube trays, then use the cubes in lemonade, sparkling water, smoothies, mocktails, or slushies. The texture changes after thawing, so frozen cubes are better for mixing than drinking plain.
Can I use lemon instead of lime?
Yes. Lime tastes sharper and more tropical, while lemon gives a softer lemonade-style brightness. Use 1 tablespoon lemon or lime juice for every 4 cups of watermelon.
Can I make watermelon juice with seeds?
You can use seeded watermelon, but remove as many black seeds as possible before blending. A few small white seeds are usually fine, especially if you plan to strain.
What can I mix with watermelon juice?
The easiest mixers are lime, lemon, mint, cucumber, pineapple, ginger, coconut water, sparkling water, black salt, and a little roasted cumin. For mocktails and cocktails, strain it first so the drink tastes cleaner.
Is watermelon juice the same as watermelon agua fresca?
Not exactly. Watermelon juice is usually mostly blended watermelon, sometimes with citrus or salt. Watermelon agua fresca is usually lighter because it is diluted with water and often sweetened. For stronger fruit flavor, use this recipe without added water; for a lighter Mexican-style agua fresca, dilute and sweeten to taste.
Choose undiluted juice when you want stronger watermelon flavor. Choose agua fresca when you want a lighter, softer drink that is usually diluted and gently sweetened.
Happy hour isn’t only about alcohol. It’s about the pause—the glass that feels special, the first cold sip, the tiny ritual that tells your brain the day is shifting gears. That’s exactly why keto mocktails hit differently than “just water.” They have a point of view. They’re bright without being sharp, sweet without tasting fake, and fizzy in a way that makes you reach for another sip before you even realize you’re doing it.
Better still, once you know how to build keto mocktails the right way, you stop feeling like you’re missing out. Instead, you end up with a lineup of low carb, no sugar drinks you genuinely crave—whether you’re cooking dinner, hosting friends, or simply wanting something cold and satisfying around 4 pm.
This guide is built around simple, repeatable formulas. You’ll get ten keto mocktails that taste like real cocktails, plus the foundations that let you remix them endlessly: a lemonade base that becomes five different drinks, fizz tricks that mimic soda, tea and coffee options that feel cozy yet grown-up, and a hydration lane that’s surprisingly useful if you’ve ever felt a little “flat” on low carb.
Save this “Keto Mocktails Menu” as your quick pick list: 10 low carb, sugar free drinks—fizzy, fresh, spicy, creamy, and party-ready—so you can choose a mocktail in seconds and jump to the recipe below.
Throughout, we’ll keep it practical. No weird gear. No fussy syrups you’ll use once and forget. Just smart ingredients and a few small techniques that add up fast.
What makes keto mocktails taste like the real thing
The difference between a forgettable sugar free drink and a memorable keto mocktail is rarely the sweetener. Most of the time, it’s structure. Cocktails taste good because they’re balanced—acid, aroma, bitterness, sweetness, and texture all working together. Once you borrow that logic, non alcoholic keto drinks stop feeling like substitutes and start feeling like choices.
Save this keto mocktail formula: build low carb, sugar free drinks that taste like cocktails by layering acid + aroma + fizz + balance—then remix the quick combos (spritz, spicy fizz, cooler) anytime happy hour cravings hit.
Start with a base that’s naturally low carb & suits keto mocktails
Your base decides whether the drink feels crisp, creamy, punchy, or soothing. Fortunately, most of the best options are already friendly to a low carb lifestyle.
For bright drinks, sparkling water, soda water, and club soda do most of the work. For softer drinks, chilled tea, iced coffee, or diluted lemonade concentrate gives you body without relying on sugar. Meanwhile, a creamy base—unsweetened almond milk, coconut cream used lightly, or a small splash of cream—creates dessert-style mocktails that feel like treats without a sugar crash.
If you’re building a tea or coffee lane, it helps to understand how these drinks fit into your day, especially if you fast. This guide to coffee timing and fasting is a useful companion when you’re deciding whether a chilled latte-style mocktail belongs in your afternoon or evening routine: coffee and fasting basics.
Want keto mocktails that feel like cocktails instead of “diet drinks”? Save this keto mocktail build formula and you can make low carb, no sugar drinks on repeat—without hunting for fancy mixers. Start with 8 oz fizz + 1–2 tbsp lemon base + a pinch of salt, then choose your lane: citrusy, herbal, spicy, or creamy. It’s the simplest way to nail that crisp, bar-style finish while keeping it keto-friendly.
Then add acid and aroma, not just sweetness to mocktails that are keto
A good keto drink doesn’t need to be sweet to be delicious. Acid creates lift and clarity. Aroma makes the drink feel complex even when the ingredient list is short.
Think beyond “lemon and sweetener.” Lime zest makes a drink smell like a cocktail bar. A bruised mint sprig adds freshness before the first sip. Ginger brings heat and depth. A pinch of salt makes citrus taste rounder and less harsh. Bitters—used carefully, and chosen thoughtfully—can bring that adult, cocktail-like edge.
This is why certain flavors translate so beautifully. A mojito works because of mint and lime. A spritz works because of bitterness and bubbles. A margarita works because of salt, citrus, and a clean finish. Once you build with those ideas, you don’t need sugar to fake flavor.
Finally, choose a sweetener strategy that stays clean in keto mocktails
Sweeteners matter, but they’re not the headline. They’re the balancing tool. Used well, they disappear into the drink and make everything else taste better.
Allulose often tastes the most “sugar-like” in cold drinks. Monk fruit blends are convenient, but quality varies. Stevia is powerful and works best with citrus and salt. Erythritol can be fine, yet it sometimes feels “cooling” and may not dissolve well unless you make a simple syrup first.
If you ever feel uncertain about what “added sugar” actually means on labels—especially when you’re buying mixers—this FDA explainer is one of the clearest references: how added sugars are defined on the Nutrition Facts label. It’s not glamorous reading, yet it makes choosing bottles dramatically easier.
Sweeteners for keto mocktails that don’t taste like “diet”
Let’s make this easy: the goal isn’t to build a drink that tastes like candy. The goal is to build a drink that tastes balanced—like a cocktail, not a soda.
That’s why “less sweet, more aromatic” is usually the best starting point. Instead of chasing a sweet hit, you create satisfaction through freshness, bite, and finish. Then you add just enough sweetener to soften the sharp edges.
Save this sweetener guide for keto mocktails: match your drink style (spritz, citrus, botanical, or creamy) with the best sweetener—plus quick fixes for aftertaste, “cooling” feel, and balance so your low carb drinks taste smooth and cocktail-like.
Allulose: the smoothest in cold drinks
Allulose tends to dissolve well and tastes natural in lemonade, citrus spritzers, and berry drinks. It’s especially helpful when you’re aiming for “zero sugar zero carb drinks” vibes without tasting artificial. In practice, your exact carb impact depends on serving size and your chosen sweetener, so treat it as a flexible tool rather than a promise.
Monk fruit blends: convenient for keto mocktails, but choose carefully
Monk fruit can be great. However, many blends include extra ingredients that change the flavor or the way it behaves in drinks. If the aftertaste bothers you, reduce the amount and increase aroma instead—more zest, more mint, more ginger, or a pinch of salt.
Stevia: small doses, big payoff
Stevia can be brilliant when used lightly. If your drink suddenly tastes “sharp” or “thin,” it often means the stevia is too intense relative to the acid. Pull back, then add a tiny pinch of salt and a bit more citrus zest. Surprisingly, that fixes the problem more often than adding more sweetener.
Erythritol: best as a syrup in keto friendly mocktails
Erythritol can crystalize in cold drinks. If you like it, dissolve it into a syrup first. A small jar of syrup in the fridge makes your low carb mocktails far more consistent.
Keto mocktail mixers that stay low carb and still feel festive
Mixers are where most drinks either shine or quietly fail. Fortunately, the rules are simple.
Save this keto mocktail mixer guide before your next grocery run: these 5 avoid-vs-swap fixes help you skip hidden sugar and build low carb, sugar free drinks that still taste crisp, flavorful, and cocktail-worthy.
Choose fizz wisely
Sparkling water and soda water are the cleanest foundation for keto fizzy drinks. They deliver the party feeling—bubbles, lift, cold refreshment—without turning your drink into a sugar trap.
If you want a more “soda” experience, a low carb soda or zero carb soda can work well. Just keep the rest of the drink simple so it doesn’t become overly sweet or chemically tasting. When in doubt, treat flavored soda like a garnish, not the entire personality of the drink.
Build flavor with real ingredients, not sugary syrups
Instead of syrups, build with:
citrus juice and zest
herbs (mint, basil, rosemary)
spices (cinnamon, cardamom, roasted cumin)
ginger in a homemade concentrate
salt and chili for contrast
extracts used sparingly (vanilla, coconut, almond)
If you want an Indian-inspired direction, jal jeera is an underrated flavor blueprint. It’s tangy, savory, and intensely refreshing—exactly the kind of profile that makes sugar feel unnecessary. Traditional recipes may include sweetener, yet the spice architecture is the real star: jal jeera (Indian lemonade) flavor inspiration.
Keep a hydration lane in your rotation
Sometimes you don’t want a “dessert drink.” You want something that makes you feel better after a long day—especially if you’re eating lower carb and notice cramps, headaches, or that heavy tired feeling.
That’s where electrolyte-style mocktails come in. A salted citrus spritz, a cucumber mint cooler, or a lightly spiced lemonade can feel like a reset. If you want more ideas in that lane, these DIY recipes are handy to keep around: keto electrolyte drinks you can make at home.
Keto lemonade: the “zero carb lemonade” vibe base that unlocks dozens of mocktails
If you make one thing from this post, make a lemonade base. It turns keto mocktails from “special occasion effort” into “I can do this anytime.”
Instead of mixing lemonade from scratch every time, you make a concentrate. That way you can build drinks quickly, keep the taste consistent, and adjust sweetness per glass. Moreover, you’ll avoid the classic mistake of over-sweetening early, then trying to fix it with more lemon, then ending up with something harsh and watery.
This keto lemonade concentrate is the “make once, pour all week” base: use it for a zero-carb-style lemonade spritz, quick citrus coolers, and party sparklers—just mix the per-glass ratios below and build any keto mocktail in minutes.
Keto lemonade concentrate (fridge base for mocktails)
This is the “make once, pour all week” foundation that turns your fridge into a mocktail bar. Because it’s a concentrate, you can keep it punchy and bright, then dilute per glass—so every drink stays crisp instead of watery.
Makes: about 1¼ cups / ~300 ml (enough for ~6–10 drinks, depending on how strong you like it) Fridge life: 5–7 days, best flavor in the first 4–5 days
You’ll use it for: spritzers, coolers, mockaritas, and spiced lemonades Texture goal: bright, clean, slightly rounded
Fresh lemon juice (start with enough for a small jar)
Cold water (a little, to soften the sharpness)
Your sweetener of choice (allulose is often the smoothest here)
A pinch of salt
Stir until dissolved and chill. Once it’s cold, taste again. The flavor shifts after chilling; it usually tastes sharper at first, then smoother later. Below is a precise recipe, tips, & upgrades to help you along the way.
Ingredients
Fresh lemon juice: ¾ cup / 180 ml (from about 4–6 lemons)
Cold water: ½ cup / 120 ml
Allulose (recommended): 3–4 tbsp / 36–48 g
or monk fruit blend / stevia blend: use the equivalent sweetness for 3–4 tbsp sugar (start low, then adjust)
Fine salt: ⅛ tsp / ~0.7 g
Optional (for extra “cocktail” depth): lemon zest ½ tsp, or 2 strips of zest (no white pith)
Method
Juice the lemons into a bowl or measuring jug. If you’re adding zest, do it now so the oils perfume the base.
Add sweetener + salt, then whisk until fully dissolved.
Stir in the cold water and taste. At this stage it should be bold—slightly too intense to drink straight—because it will be diluted in the glass.
Chill completely (at least 30 minutes). Then taste again. Cold changes the balance; you may want a touch more sweetener or a pinch more salt.
How to use it in Keto Mocktails (per drink)
Classic “lemonade spritz” strength:2 tbsp / 30 ml concentrate + 6–8 fl oz / 180–240 ml sparkling water
More lemonade-forward:3–4 tbsp / 45–60 ml concentrate + 6 fl oz / 180 ml sparkling water
Still lemonade (no bubbles):3 tbsp / 45 ml concentrate + 6–8 fl oz / 180–240 ml cold water
Easy flavor upgrades (add to the jar)
These upgrades let you create “variants” without re-making the base:
Ginger-lime lane: add 1–2 tbsp / 15–30 ml ginger concentrate (recipe in the Ginger Lime Fizz)
Mint lane: add 8–10 mint leaves, bruise lightly, steep 15 minutes, then strain
Spiced jal jeera lane: don’t add spices to the jar—add them per glass so they don’t settle and intensify too much
Quick balance fixes (so it never tastes “off”)
Too sharp / too sour: add ½–1 tbsp / 6–12 g allulose (or sweetener equivalent), stir, chill 10 minutes, re-taste.
Too sweet: add 1 tbsp / 15 ml lemon juice + a pinch more salt.
Tastes flat or “thin”: add a tiny pinch of salt (yes, again). It’s the easiest way to make citrus taste rounded.
At this point, you’ve basically created a keto-friendly lemonade base. It can feel like “no carb lemonade” in practice, depending on how you portion it and which sweetener you use. Either way, it’s the backbone for many low carb, sugar free drinks.
If you’re the kind of person who likes a simpler morning ritual—less sweet, more gentle—warm lemon water is a separate lane that pairs nicely with the citrus theme. This piece covers that habit in a calm, practical way: the warm lemon water morning ritual.
A quick label note when you buy mixers
If you’re using bottled lemon juice or “lemonade flavor” products, it helps to understand how labels handle sugars and serving sizes. The FDA guides here are genuinely useful when you want clarity:
Now you can plug this concentrate directly into every drink in the mocktails section—especially the spritz, cucumber cooler, berry sparkler, and jal jeera lemonade—without re-measuring lemons every time.
10 keto mocktails that feel like cocktails (low carb, no sugar drinks you’ll repeat)
Each recipe below is built to be practical, not precious. In other words, you won’t need obscure ingredients, and you won’t need a blender unless you genuinely want one. Even so, every drink still has a clear “job”: crisp refreshment, spicy bite, creamy comfort, or party-ready fizz.
Meanwhile, you’ll notice the same foundations coming back—citrus + salt, herb + bubbles, tea + spice, ginger + lime, creamy + vanilla. Rather than feeling repetitive, that’s exactly what makes the set useful: once you master a few bases, you can improvise confidently.
1) Zero-carb lemonade spritz (a bright keto mocktail staple)
This is the fastest path to a satisfying fizzy drink that still feels intentional. Even better, it tastes like lemonade soda—only cleaner, sharper, and less cloying—so it works as a weeknight “reset” as well as a party pour.
Makes: 1 drink Glass: tall glass (highball)
Ingredients
Ice: 1 cup / ~140 g
Keto lemonade concentrate: 2–4 tbsp / 30–60 ml
Sparkling water (plain): 6–8 fl oz / 180–240 ml
Lemon wheel or lemon zest: 1 wheel or a few strips
Save this Zero-Carb Lemonade Spritz recipe card for the easiest keto mocktail: fizzy, bright, and sugar free, with a simple lemonade concentrate + sparkling water formula and quick flavor tips to make it taste crisp and cocktail-like.
Method
First, fill a tall glass with ice so everything stays aggressively cold.
Next, pour in the lemonade concentrate. If you’re unsure where to start, use 2 tbsp (30 ml) for a crisp drink or 4 tbsp (60 ml) for a more lemonade-forward sip.
Then top with sparkling water slowly; this keeps the carbonation lively instead of foamy.
After that, stir once—just one gentle turn is enough.
Finally, garnish with lemon wheel or zest. If you’re using mint, clap it once between your palms before adding; that quick move releases aroma immediately.
Make it taste more “cocktail-ish”
Add the tiny pinch of salt. Surprisingly, it doesn’t make the drink salty; instead, it makes the lemon taste rounder and more “complete.”
Alternatively, add ginger slices and keep the sweetener minimal—ginger brings a natural sense of richness without extra sweetness.
2) Cucumber mint cooler (cool, crisp keto mocktail energy)
When your brain wants “fresh and hydrating” rather than “sweet,” this is the one to reach for. Moreover, it’s almost impossible to mess up, which makes it ideal for busy evenings. The cucumber brings clean, watery crunch; the mint brings lift; the lemon ties it all together.
Makes: 1 drink Glass: tall glass
Ingredients
Cucumber: 6–8 thin slices / 40–60 g
Fresh mint: 8–10 leaves
Keto lemonade concentrate: 1–2 tbsp / 15–30 ml
Sparkling water: 6–8 fl oz / 180–240 ml
Ice: 1 cup / ~140 g
Fine salt: tiny pinch (about 1/16 tsp)
Save this Cucumber Mint Cooler recipe card for a fresh, fizzy keto mocktail that actually feels satisfying. It’s a low carb, sugar free drink made with cucumber, mint, sparkling water, and keto lemonade concentrate—plus quick balance tips so it tastes crisp, refreshing, and not overly sweet.
Method
Start by adding cucumber and mint to the bottom of the glass.
Then muddle gently—6 to 8 presses is plenty. You’re aiming to bruise the mint and lightly crush the cucumber, not turn everything into pulp.
Add ice, pour in the lemonade concentrate, and top with sparkling water.
Stir once, and only once.
Lastly, add the tiny pinch of salt and taste. If the drink feels too sharp, add another teaspoon (5 ml) of lemonade concentrate; if it feels too soft, add an extra squeeze of lemon or more mint.
If you like this “hydration lane” You’ll probably enjoy keeping electrolyte-style sips in rotation, especially on hot days or after workouts. For more DIY ideas you can adapt, see homemade electrolytes for fasting with zero-cal DIY options.
3) Ginger lime fizz (keto mocktail that scratches the ginger beer itch)
This is spicy, sharp, and unmistakably bar-like. Instead of relying on bottled “ginger beer” (often a sugar trap), you make a quick ginger concentrate that lasts several drinks. As a result, this becomes one of those recipes you repeat constantly because it tastes far more impressive than the effort involved.
Makes: 1 drink Glass: tall glass
Quick ginger concentrate (makes 6–8 drinks)
Ingredients
Fresh ginger, grated: 2 oz / 60 g
Hot water: 1 cup / 240 ml
Save this Ginger Lime Fizz recipe card for a spicy, sharp keto mocktail that gives ginger beer vibes without the sugar. It includes a quick ginger concentrate, lime, sparkling water, and easy bar-style tips (like lime zest and chili salt) so your low carb drink tastes bright, fizzy, and cocktail-like.
Method
Pour hot water over the grated ginger and steep 10–15 minutes.
Strain well, then chill. The flavor intensifies once cold, so it’s worth tasting again after refrigeration.
Drink ingredients
Lime juice: 1–1½ tbsp / 15–22 ml
Ginger concentrate: 1–2 tbsp / 15–30 ml
Sweetener: to taste (start small)
Sparkling water: 6–8 fl oz / 180–240 ml
Ice: 1 cup / ~140 g
Lime zest: pinch or 1 strip
Optional
Chili salt: tiny pinch
Fresh ginger slice: 1 for garnish
Method
Fill the glass with ice.
Add lime juice, ginger concentrate, and sweetener; then stir until the sweetener dissolves.
Top with sparkling water and give a single gentle stir.
Finish with lime zest. That aroma is what makes the drink feel like a cocktail instead of “lime water.”
If you want extra heat, add a tiny pinch of chili salt and let the drink sit 30 seconds before your first sip.
4) “Mock G&T” without the tonic trap (a crisp botanical keto mocktail)
Tonic water is the classic troublemaker—sweet, sneaky, and rarely as “light” as it tastes. Instead, this version recreates the crisp botanical vibe with aromatics and clean fizz. Even better, it’s adaptable: cucumber for spa freshness, rosemary for piney elegance, or citrus zest for pure lift.
Makes: 1 drink Glass: rocks glass or tall glass
Ingredients
Soda water: 6–8 fl oz / 180–240 ml
Lime or lemon juice: 1 tbsp / 15 ml
Cucumber slices: 4–6 slices / 30–40 g or rosemary: 1 small sprig
Ice: 1 cup / ~140 g
Optional (for bite)
Apple cider vinegar: ½ tsp / 2.5 ml
Lemon zest: 1 strip
Fine salt: tiny pinch
Save this Mock G&T (No Tonic) recipe card for a crisp, botanical keto mocktail that skips the sugar-heavy tonic water. This low carb, sugar free drink uses soda water, citrus, cucumber or rosemary, and optional apple cider vinegar for that grown-up bitter bite—clean, elegant, and perfect for keto happy hour.
Method
Add ice to the glass.
Pour in citrus juice (and vinegar, if using).
Add cucumber or rosemary.
Top with soda water and stir once.
Finish with zest so it smells “grown-up” before it tastes “grown-up.”
When you want it extra “cocktail-like” Use rosemary + lemon zest + that tiny pinch of salt. The combination reads herbal, sharp, and sophisticated rather than sweet.
5) Berry-lemon sparkler (a bright keto mocktail that stays light, not juicy)
This is a party-friendly “pink drink” that doesn’t become fruit juice. The secret is using berries for fragrance and color, then letting bubbles do the heavy lifting. Consequently, you get something festive and pretty without the sugar baggage.
Makes: 1 drink Glass: tall glass
Ingredients
Keto lemonade concentrate: 2 tbsp / 30 ml
Berries (raspberries or strawberries): 3–5 berries / 25–40 g
Ice: 1 cup / ~140 g
Sparkling water: 6–8 fl oz / 180–240 ml
Lemon zest: pinch or strip
Save this Berry Lemon Sparkler recipe card for a pretty, party-ready keto mocktail that stays light—not juice-heavy. This low carb, sugar free drink uses keto lemonade concentrate, a few berries for color and aroma, sparkling water for fizz, and lemon zest for a clean cocktail-style finish. Perfect for keto happy hour, guests, or summer gatherings.
Method
Add berries and lemonade concentrate to a jar or shaker.
Add ice and shake hard for 10 seconds. This step matters because it pulls aroma and color quickly without needing a blender.
Strain into a fresh glass filled with ice.
Top with sparkling water and stir gently.
Finish with lemon zest. If you want it more “cocktail bar,” rub the zest around the rim first, then drop it in.
If you ever want to sanity-check carbs for a specific berry portion, USDA FoodData Central is the most straightforward nutrition lookup.
This is where things get genuinely memorable: savory, tangy, and shockingly refreshing. It’s not trying to taste like soda; instead, it tastes like a crafted bar drink—sharp, aromatic, and layered. If you’ve never tried jal jeera flavors, this is a wildly satisfying place to start.
Makes: 1 drink Glass: tall glass
Ingredients
Keto lemonade concentrate: 2 tbsp / 30 ml
Sparkling water: 6–8 fl oz / 180–240 ml
Roasted cumin powder: ¼ tsp / ~0.5 g
Black salt: tiny pinch (start with less than 1/16 tsp)
Fresh mint: 8–10 leaves
Ice: 1 cup / ~140 g
Optional
Fresh ginger, grated: ¼ tsp / ~1 g
Chili powder: tiny dusting
Save this Salted Jal Jeera Lemonade recipe card for a bold Indian-style keto mocktail that’s savory, tangy, fizzy, and seriously refreshing. This low carb, sugar free drink uses keto lemonade concentrate, sparkling water, mint, roasted cumin, and black salt for a cocktail-like finish without syrupy mixers. A great keto happy-hour drink when you want something more interesting than sweet.
Method
Bruise the mint first (clap it once or press gently in the glass). That step changes the aroma immediately.
Add ice, then pour in the lemonade concentrate.
Sprinkle cumin and black salt, then stir well so the spices don’t float on top.
Top with sparkling water and stir once more.
Taste and adjust: if it’s too sharp, add a touch more sweetener; if it’s too flat, add a hair more black salt or cumin.
This one feels cozy without being heavy, which makes it perfect for evenings when you want something “dessert-adjacent” but still clean. Furthermore, it’s flexible: keep it still for calm comfort, or add a little soda water for a surprisingly elegant lift.
Makes: 1 drink Glass: tall glass
Chai concentrate (makes 2–3 drinks)
Ingredients
Water: 1 cup / 240 ml
Black tea: 2 tea bags (or 2 tsp / ~4 g loose leaf)
Cardamom pods: 4, lightly crushed
Cinnamon stick: 1 small
Fresh ginger: 4–5 thin slices (or ½ tsp / ~2 g grated)
Cloves: 2–3
Sweetener: to taste
Save this Iced Chai Latte keto mocktail recipe card for a creamy, spiced, low carb drink that feels cozy but still refreshing. This sugar free mocktail uses chai concentrate, unsweetened almond milk, ice, and a tiny cinnamon finish for a clean keto happy-hour option. Great when you want a rich, café-style keto drink without syrupy mixers. Pin it now and visit MasalaMonk.com for the full keto mocktails guide, sweetener tips, and more easy drink ideas.
Method
Simmer the water and spices for 5 minutes so the flavors actually bloom.
Remove from heat, add tea, and steep 3–4 minutes.
Strain, sweeten lightly, then chill completely.
Drink ingredients
Chai concentrate: 4–5 fl oz / 120–150 ml
Unsweetened almond milk (or a small splash of cream): 2–3 fl oz / 60–90 ml
Ice: 1 cup / ~140 g
Optional
Soda water: 2–3 fl oz / 60–90 ml (for lift)
Ground cinnamon: tiny pinch
Method
Fill a tall glass with ice.
Pour in chai concentrate and almond milk; stir.
If using soda water, add it last and stir very gently.
Finish with a tiny pinch of cinnamon on top.
If you want to level up your chai base—spice balance, brewing technique, and depth—this guide is excellent: how to make the perfect masala chai.
This drink scratches the “energy drink” itch in a calmer way. It’s bright, earthy, and refreshing; meanwhile, the bubbles make it feel celebratory rather than functional. If you want it creamy, add a small splash of milk; if you want it sharper, add lemon zest. Either way, it feels deliberate.
Makes: 1 drink Glass: tall glass
Ingredients
Matcha: ½ tsp / 1–1.5 g
Cold water: 2 fl oz / 60 ml
Sweetener: to taste (start tiny)
Ice: 1 cup / ~140 g
Sparkling water: 6 fl oz / 180 ml
Optional unsweetened milk: 1–2 fl oz / 30–60 ml
Optional lemon zest: pinch
Save this Matcha Latte Spritz keto mocktail recipe card for a clean, bright, low carb drink with a fresh matcha twist. This sugar free mocktail combines matcha, unsweetened almond milk, sparkling water, and ice for a lighter “happy hour” sip that feels energizing without sugary mixers. Great for warm days when you want something refreshing but not overly sweet. Pin it now and visit MasalaMonk.com for the full keto mocktails guide, sweetener tips, and more easy low carb drink recipes.
Method
Shake matcha + cold water + sweetener in a jar for 10–15 seconds (or whisk until smooth).
Fill a tall glass with ice.
Pour in the matcha mixture.
Top with sparkling water and stir once—very gently.
Add milk if desired, then finish with lemon zest for a brighter aroma.
If tea-based rituals are your thing, you may enjoy this deeper read: tea and cortisol.
This doesn’t pretend to be tapioca boba. Instead, it gives you the creamy tea satisfaction plus a fun texture—without the sugar-heavy bubble tea base. The result feels playful and comforting, especially when you want something different from endless fizz.
Makes: 1 drink Glass: tall glass
Ingredients
Strong black tea, chilled: 6 fl oz / 180 ml
Unsweetened milk alternative: 2–3 fl oz / 60–90 ml
Sweetener: to taste
Ice: ½–1 cup / 70–140 g
“Boba-style” texture
Chia seeds: 1 tbsp / 12 g
Water (to soak): 3 tbsp / 45 ml
Save this Keto Bubble Tea Vibes recipe card for a fun, creamy, sugar free mocktail with chia “boba” texture. This low carb keto mocktail uses tea or chai concentrate, unsweetened almond milk, ice, and hydrated chia seeds for a bubble tea-inspired drink without sugary syrups. The card also includes quick chia prep, mixing steps, and texture tips so it turns out smooth and balanced. Pin it now and visit MasalaMonk.com for the full keto mocktails guide, sweetener swaps, and more easy low carb drink recipes.
Method
Soak chia seeds in water for 10–15 minutes until gel-like; stir once halfway so it doesn’t clump.
Spoon the chia gel into the bottom of a tall glass.
Add ice, then pour in chilled tea and milk alternative.
Sweeten, then stir well so the sweetness distributes evenly.
Sip with a wide straw if you have one; otherwise, use a spoon-sip approach and enjoy the texture.
Variations that actually work
For dessert vibes, add 2 drops vanilla extract.
For a sharper finish, add a tiny pinch of salt and keep the sweetness lighter.
10) Cream soda float (dessert-style keto mocktail fun)
This is the “I want something fun” drink—nostalgic, creamy, and oddly satisfying. It’s not an everyday sip for most people; nevertheless, it’s perfect when you want a treat without turning the evening into a sugar spiral.
Makes: 1 drink Glass: tall glass
Ingredients
Ice: 1 cup / ~140 g
Soda water: 6–8 fl oz / 180–240 ml
Vanilla extract: ¼ tsp / 1.25 ml (start with less if you prefer subtle vanilla)
Sweetener: to taste
Optional cream (or coconut cream): 1–2 tbsp / 15–30 ml
Optional lemon zest: tiny pinch (adds brightness)
Save this Cream Soda Float keto mocktail recipe card for a fun weekend treat that tastes creamy and fizzy without the sugar. This low carb mocktail uses sparkling water, keto vanilla simple syrup, and a little almond milk or cream for a smooth “float” vibe, plus quick tips to balance sweetness, boost bubbles, and get better foam. It’s a great dessert-style drink when you want something indulgent but still keto-friendly. Pin it now and visit MasalaMonk.com for the full keto mocktails guide, sweetener swaps, and more sugar free drink recipes.
Method
Fill a tall glass with ice.
Add vanilla extract and sweetener, then pour in soda water slowly.
Stir gently to dissolve the sweetener without killing the fizz.
Add cream last and give it one slow swirl so it stays “floaty” instead of fully mixing.
How to keep keto mocktails from becoming “hidden carb drinks”
Here’s the frustrating truth: most people do everything right at home, then one “healthy” bottle ruins it. The label looks innocent. The marketing sounds clean. Then you pour it into your drink and wonder why it tastes like candy.
The problem is usually one of these:
juice concentrates hiding in “mocktail mixers”
sweetened tonic water
syrups dressed up as wellness
serving sizes that quietly double the carbs
“no sugar added” that still contains plenty of sugar naturally
Trying to keep your keto mocktails truly low carb? This quick visual guide helps you spot the hidden carb traps that sneak into “healthy-looking” mixers—like juice concentrates, sweetened tonic water, wellness syrups, and misleading serving sizes. It also gives you a 30-second label check so you can read Nutrition Facts fast before you pour. Save this for your next grocery run, and use it every time you shop for mocktail mixers, tonic, syrups, and flavored drink bases. For the full keto mocktail system, recipes, and flavor-building tips, visit MasalaMonk.com. Save, pin, and share if you want more practical low-carb drink guides like this.
If you want to keep your low carb, no sugar drinks truly low carb, use the label like a tool. The FDA’s guide makes the basics clear without drama: how to use the Nutrition Facts label. It’s especially useful for catching serving-size tricks and spotting added sugars fast.
For anything that still feels ambiguous—fruit portions, juices, or even some “natural” drinks—checking the nutrition data directly can save you time: USDA FoodData Central.
A mocktail becomes a habit when it’s easy. That’s why the smartest setup isn’t a long ingredient list. It’s a small “bar” of repeatable building blocks.
Turn keto mocktails into a real habit with this simple weekly setup: prep 1–2 bases (like keto lemonade concentrate or ginger concentrate), keep sparkling water + mint + citrus ready, and rotate drink styles through the week so you never get bored. This “build once, pour all week” system makes low carb mocktails fast, repeatable, and way more realistic for busy days. Save this guide for your weekly drink routine, and visit MasalaMonk.com for the full keto mocktail recipes, concentrate cards, and flavor tips. Pin, save, and share with someone building a sugar-free happy-hour ritual.
Keep one concentrate in the fridge
Your keto lemonade base is the obvious choice, but you can also keep:
a ginger concentrate
a chai concentrate
a simple syrup made with your preferred sweetener
Then, when you want a drink, you’re assembling rather than cooking.
Keep garnishes simple, but intentional
A garnish isn’t decoration. It’s aroma. That’s why mint, citrus zest, and ginger matter more than complicated fruit carvings. Even a small twist of lemon peel changes how the drink smells, which changes how it tastes.
Rotate styles so you don’t get bored
A good weekly rhythm might look like this:
two fizzy citrus drinks
one tea-based mocktail
one hydration-style cooler
one dessert-style drink on the weekend
That rotation covers cravings without turning your kitchen into a beverage lab.
A gentle note on “salty rims” and electrolyte-style drinks
Salt makes citrus taste better. It also makes certain low carb drinks feel oddly satisfying, especially if you’ve ever felt sluggish on keto or after a long day in the heat.
A tiny pinch of salt can completely change a keto mocktail. This guide shows how to use salt as a flavor tool (not a rule) to make citrus drinks taste more balanced, crisp, and “finished” without adding extra sweetener. Save this for your next keto happy-hour drink, especially if your lemonade spritz or ginger lime fizz tastes flat. Full keto mocktail recipes, concentrates, and low-carb drink ideas on MasalaMonk.com — pin it, save it, and share it with someone building a better sugar-free drink routine.
Still, salt is personal. Some people feel amazing with a salted lemonade spritz. Others prefer to keep it minimal. If you’d like a general reference point for daily sodium considerations, the American Heart Association’s overview is straightforward: how much sodium per day. It’s a useful compass while you experiment with salty rims and hydration-style mocktails.
Similarly, when people talk about electrolytes, potassium is part of the conversation. If you’re curious about potassium as an electrolyte in general nutrition terms, the NIH Office of Dietary Supplements has a detailed fact sheet: potassium overview.
Beyond mocktails: when fizzy drinks, kombucha, and “gut-friendly” fizz fit in
Sometimes you want bubbles but don’t want sweetener at all. Other times, you want something that feels like a soda replacement without being just flavored water. That’s where kombucha enters the conversation.
Kombucha isn’t automatically keto-friendly, because sugar and fermentation vary wildly. Still, small portions of lower-sugar kombucha can work for some people, and it’s often used as a “bridge drink” away from soda habits.
Trying to choose between a keto mocktail, kombucha, or a simple gut-friendly fizzy drink? This quick comparison guide makes it easy. It breaks down sweetness control, carb risk, label-check priorities, and when each option fits best—so you can enjoy bubbles without accidentally turning your drink into a hidden carb trap. If you’re keeping drinks low carb, this is the kind of saveable reference you’ll actually reuse. Save this pin, share it with someone building better soda swaps, and bookmark this guide for recipes, keto mixer swaps, and label-check tips.
If you want a thoughtful breakdown, these reads help you understand the landscape and decide how it fits your routine:
Even if you decide kombucha isn’t for you, the idea is useful: you can build gut-friendly fizz vibes through herbs, ginger, citrus, and sparkling water without needing sugar at all.
Making your keto mocktails feel like happy hour, not “health drinks”
If there’s one mindset shift that improves everything, it’s this: stop trying to make drinks “healthy.” Start trying to make them enjoyable.
Keto mocktails taste better when you build for flavor, not sweetness. This saveable guide shows how to create a true happy-hour feel with contrast, aroma, and finish—using bright citrus, ginger spice, minty coolness, creamy chai/vanilla notes, and botanical herbs instead of chasing sugar. Use it as your flavor map for low carb, sugar-free mocktails that actually feel satisfying. Save this for your next keto drink night, and save this post for the full mocktail recipes, sweetener tips, and weekly ritual ideas.
Enjoyable drinks have contrast. They have aroma. They have a beginning and a finish.
That’s why a salted rim matters. That’s why ginger matters. And that’s why mint matters. Those are cocktail ideas, not diet ideas. You’re borrowing the logic of the bar and applying it to low carb non alcoholic drinks.
Once you do that, you’ll notice something else: your cravings change. You stop wanting a sugar hit and start wanting a flavor hit. Instead of chasing “sweet,” you chase “bright,” “spicy,” “cool,” “creamy,” or “bitter.” That’s a better place to be—not because it’s virtuous, but because it’s sustainable.
A few more drink directions you can keep in your back pocket
Sometimes the best keto mocktails are the ones you can customize to your day.
Not sure what to make tonight? This Keto Mocktail By Mood guide helps you choose fast: go Hydration (salted lemonade spritz / cucumber mint cooler), Dessert (cream soda float / iced chai latte), or Coffeehouse (iced coffee + cream / cold brew style). It’s a simple way to keep your keto mocktails fun, flavorful, and low sugar without overthinking ingredients. Save this guide for your weekly drink rotation, and use it anytime you want a happy-hour vibe without hidden carbs. Explore the full post on MasalaMonk.com for recipes, concentrates, flavor tips, and more keto mocktail ideas.
When you want a post-work vibe without the sugar
A lot of “sports drinks” and powdered mixes rely on sweeteners and flavors that feel heavy. Instead, try:
salted lemonade spritz
cucumber mint cooler
ginger lime fizz with extra salt (lightly)
If you want more hydration drink ideas that fit fasting and low carb days, this DIY collection is an easy reference: zero-cal electrolyte drink recipes.
When you want a dessert drink without turning it into a meal replacement
If you’re craving a creamy drink, keep it simple:
cream soda float mocktail
iced chai latte mocktail
a small mug of sugar-free hot cocoa on colder nights
When you want a coffeehouse vibe without the sugar trap
Cold coffee mocktails can be incredible. A simple iced coffee with a splash of cream and a touch of sweetener is often enough. If fasting is part of your routine, it’s useful to understand how coffee fits into that pattern: coffee and fasting guidance.
Closing thought: keep the ritual, lose the sugar
Keto mocktails work because they respect the moment. They don’t ask you to give up the “special drink” habit. Instead, they upgrade it.
With a lemonade base in your fridge, a jar of ginger concentrate ready to go, and a small set of garnishes, you can make low carb mocktails that feel like happy hour—bright citrus spritzers, savory jal jeera lemonade, spicy ginger fizz, creamy dessert sips, and tea-based drinks that feel like a treat.
Keep the ritual, lose the sugar 🍋✨ This closing keto mocktail guide brings the whole idea together: build drinks around flavor, aroma, bubbles, and finish instead of chasing sweetness. It maps out 5 easy directions—bright citrus, spicy ginger, savory jal jeera, creamy dessert-style, and coffeehouse vibes—plus the simple “keep-ready” staples that make low-carb mocktails feel effortless all week. Perfect if you want keto mocktails that feel like happy hour, not health drinks. Save this for your weekly drink rotation, and click through for the full MasalaMonk guide with recipes, concentrates, and flavor tricks. Pin, save, and share if you’re building a sugar-free mocktail ritual. 🍸💛
Then, over time, you’ll notice your default changes. You won’t reach for sugary mixers because your drinks already taste good. You won’t miss the syrup because aroma does the heavy lifting. And you won’t feel stuck, because you’ll have more options than you did before—options that keep your day on track while still feeling indulgent.
If you’re in the mood to keep experimenting, try building a “two-lane” rotation: one lane for fizzy citrus and party drinks, another lane for warm or creamy comfort drinks. Between those two, you can cover almost any craving without leaving the world of keto-friendly, sugar free mocktails behind.
Keto mocktails are non-alcoholic drinks made to stay low in carbs and sugar while still tasting like a “real” cocktail. Instead of juice-heavy mixers and syrups, they lean on sparkling water, citrus, herbs, spices, and keto-friendly sweeteners to create balance and flavor.
2) Are keto mocktails really sugar free?
They can be. Many keto mocktails are built as sugar free mocktails by using zero-sugar sweeteners and avoiding juice concentrates, tonic water, and premade mixers. However, “sugar free” depends on what you pour in—so the ingredients matter more than the name.
3) Are there truly zero carb keto mocktails?
Sometimes, yes—especially when you use plain sparkling water, citrus zest, herbs, and very small amounts of lemon or lime juice. That said, many “zero carb” style drinks are best thought of as near-zero, because even citrus juice can add trace carbs depending on portion size.
4) What are the best low carb non alcoholic drinks for a party?
If you want crowd-friendly options, choose keto fizzy drinks that are easy to batch: lemonade spritzers, cucumber-mint coolers, ginger-lime fizz, or berry-lemon sparklers with a light fruit touch. In addition, tea-based mocktails (like iced chai) can be made ahead and served over ice.
5) What’s the easiest keto mocktail to start with?
A keto lemonade spritz is usually the simplest: lemonade concentrate plus sparkling water over ice. From there, you can branch into mint, ginger, cucumber, or spice variations without changing the base.
6) How do I make keto friendly lemonade without it tasting “diet”?
Instead of pushing sweetness, aim for balance. A small pinch of salt smooths sharp lemon. Zest adds aroma. Ginger adds depth. Also, sweeten lightly, then chill and re-taste—cold temperatures change how sweetness reads.
7) Which sweeteners work best in sugar free keto drinks?
Allulose tends to taste the most “clean” in cold lemonade-style drinks. Monk fruit blends are convenient, although different brands vary in aftertaste. Stevia works well in tiny amounts, particularly with citrus. Erythritol can be fine too, yet it often dissolves best when used as a syrup.
8) What should I avoid if I’m trying to keep drinks low carb and no sugar?
Avoid tonic water, regular soda, cocktail syrups, juice blends, and “mocktail mixers” that rely on fruit concentrates. Likewise, watch for sweetened flavored waters that appear light but still contain sugars or high-carb ingredients.
9) Can keto mocktails help with cravings for soda?
Often, yes. Because keto mocktails can mimic the fizz, the cold bite, and the flavor complexity of soda, they can be a smoother replacement than plain sparkling water. Additionally, citrus zest and ginger can add that “satisfying hit” soda drinkers miss.
10) What are the best keto fizzy drinks when I want something bubbly?
Sparkling water with lemon or lime is the simplest. Beyond that, lemonade spritzers, ginger-lime fizz, mint coolers, and “mock G&T” style drinks are strong go-to choices. If you like a sweeter profile, a light cream-soda style mocktail can work as well.
11) Is kombucha keto friendly?
It depends. Some kombuchas are lower sugar than others, and portion size changes everything. Therefore, if you include kombucha, treat it as an occasional small pour rather than a default base for keto mocktails—unless you’ve checked its sugar content and it fits your carb limits.
12) Can I drink keto mocktails while fasting?
It depends on what you mean by fasting. Plain sparkling water, herbs, and citrus zest are more likely to fit a “clean” approach. In contrast, sweeteners, cream, and juice—even if low carb—may not fit stricter fasts. Consequently, if fasting is a priority, keep mocktails simpler and more mineral-forward.
13) What are keto hydration drinks, and how are they different from keto mocktails?
Keto hydration drinks focus on fluids plus minerals like sodium and potassium, rather than “cocktail-style” flavor. Nevertheless, many keto mocktails can double as hydration drinks when you use citrus, salt, and plenty of water or sparkling water—especially in hot weather or after a workout.
14) What’s a good keto post workout drink if I don’t want a shake?
A salted lemonade spritz, cucumber-mint cooler with a pinch of salt, or a ginger-lime fizz with extra water can be a refreshing alternative. Also, keeping sweetness light may feel better after training, particularly if you’re aiming for low carb, low sugar recovery.
15) Can I make low carb mocktails creamy without making them heavy?
Yes. Use small amounts of cream or unsweetened milk alternatives, then balance with vanilla, spice, or tea. Moreover, keeping the base cold and the sweetener minimal helps it taste like a “treat” rather than a thick dessert drink.
16) How do I make keto bubble tea or keto boba tea at home?
Use chilled black tea (or jasmine tea), a low-carb milk option, and sweetener to taste. For a boba-style texture, chia seeds soaked into a gel can mimic that fun chew. Then adjust sweetness gradually so it stays balanced rather than overly sweet.
17) What’s the best way to batch keto mocktails for guests?
Make concentrates ahead—lemonade, chai, ginger—and chill them. When serving, build each drink over ice, then top with sparkling water at the last moment. That way, every glass stays fizzy and fresh instead of flat.
18) Can I turn these into low carb drinks that feel like cocktails without alcohol?
Absolutely. Focus on cocktail cues: aroma (zest, herbs), bite (ginger, acid), contrast (salt, spice), and texture (bubbles, a small creamy swirl). As a result, your keto mocktails will taste intentional—like happy hour—rather than like a substitute.